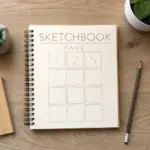
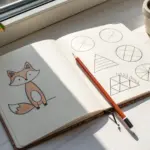
Dragons look complicated, but with a few easy painting ideas, you can get something magical on paper fast. I love using simple shapes and dramatic backgrounds so your dragon reads clearly without stressing over tiny details.
Moonlit Dragon Silhouette
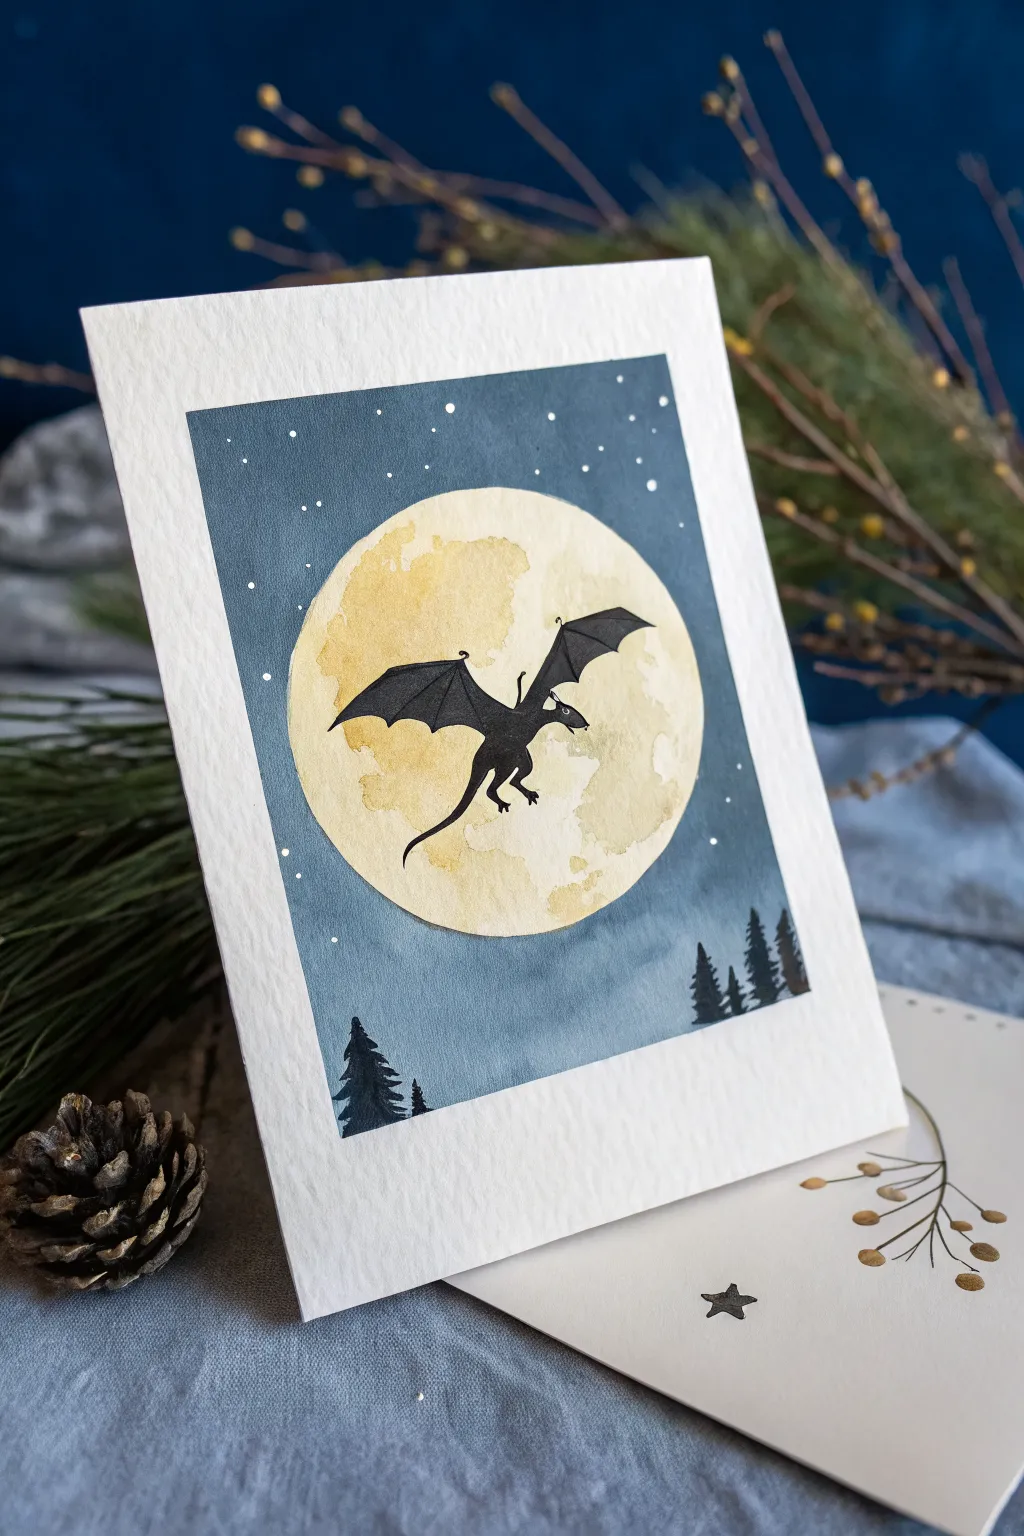
Capture the magic of a dragon taking flight against a glowing full moon with this striking watercolor silhouette project. The contrast between the soft, textured moon and the sharp, crisp black ink creates a dramatic scene that looks impressive but relies on simple masking techniques.
Step-by-Step Tutorial
Materials
- Cold press watercolor paper (cut to card size)
- Blue painters tape or masking tape
- Watercolor paints (Indigo, Payne’s Gray, Yellow Ochre, Cadmium Yellow)
- Black waterproof fine liner pen (0.3mm or 0.5mm)
- Black gouache or acrylic paint (optional for opacity)
- Round watercolor brushes (size 6 and size 2)
- Circle cutter, compass, or a circle object to trace
- Masking fluid (drawing gum)
- Old paintbrush or silicone applicator for masking fluid
- pencil and eraser
- Rubber cement pick-up tool (optional)
Step 1: Preparing the Moon & Sky
-
Tape the borders:
Begin by taping down your watercolor paper to a hard board. Leave about a half-inch border on all sides to create that crisp white frame seen in the original card. -
Define the moon:
Use a compass or trace a circular object (like a jar lid) lightly with a pencil in the center of your paper. This will be your glowing moon. -
Protect the moon shape:
Using an old brush or a silicone tool, fill the entire circle with masking fluid. Be very careful to stay exactly on your pencil line to keep the moon perfectly round. -
Let the mask dry:
Allow the masking fluid to dry completely until it is tacky and clear. If you paint too soon, you’ll ruin the crisp edge. -
Paint the night sky:
Mix a watery wash of Indigo or a deep slate blue. Start painting at the top of the paper, creating a flat, consistent wash over the background area, right over the masked moon. -
Deepen the color:
While the first layer is still wet, drop in a slightly more concentrated blue-grey near the top corners to create a subtle vignette effect. -
Add the stars:
For the stars, load a small brush with white gouache or opaque white watercolor. Gently tap the brush handle against your finger to splatter tiny droplets over the wet blue sky. Some will spread for a distant glow. -
Dry and reveal:
Wait until the blue sky is bone dry. Then, gently rub away the masking fluid with your finger or a rubber pick-up tool to reveal the clean white circle underneath.
Bleeding Edges?
If paint bleeds under your tape, use a slightly damp, clean brush to gently scrub the unwanted paint, then blot with a paper towel. For sharper lines next time, press tape edges firmly with a bone folder.
Step 2: Texturing the Moon
-
Initial yellow wash:
Wet the white circle slightly with clean water. Drop in a very pale wash of Cadmium Yellow mixed with plenty of water, letting it bloom unevenly. -
Add craters and texture:
While the yellow is damp, dab in touches of Yellow Ochre or a diluted light brown. Focus these darker spots near the edges of the moon to make it look spherical and textured. -
Create blooms:
I like to drop tiny dots of clean water into the drying pigment here; this pushes the pigment away and creates those natural, crater-like textures visible in the reference. -
Final drying time:
Let the moon dry completely. It needs to be flat and moisture-free before you add the ink details.
Starry Night Pro Tip
Don’t just splatter randomly! Use a white gel pen after the sky is dry to add a few larger, brighter stars exactly where you want them to balance the composition.
Step 3: The Dragon Silhouette
-
Sketch the dragon:
Lightly sketch the outline of your dragon with a pencil. Place the body centrally over the moon for maximum contrast, with the wings extending slightly outward. -
Outline with ink:
Using your waterproof fine liner pen, carefully trace the outline of the dragon’s head, neck, and jagged wings. Make sure the lines are sharp. -
Fill the silhouette:
Fill in the dragon shape. You can use the pen for precise areas like the tail tip, but switching to black gouache or acrylic creates a more solid, opaque black for the main body. -
Refine wing details:
Add the tiny hook details on the wing joints and ensure the tail has a fluid, curved motion. -
Paint the treeline:
At the bottom of the blue sky area (referencing the photo), paint small, jagged triangle shapes to represent pine trees. Use your black gouache or a very concentrated dark blue-black mix. -
Vary tree heights:
Ensure the trees are different heights for a natural look—some tall ones peaking up on the right, and smaller ones on the left. -
Peel the tape:
Once all ink and paint is absolutely dry, slowly peel off the painter’s tape at a 45-degree angle to reveal your clean white border.
Step back and admire how your fierce little dragon contrasts perfectly against the glowing moon


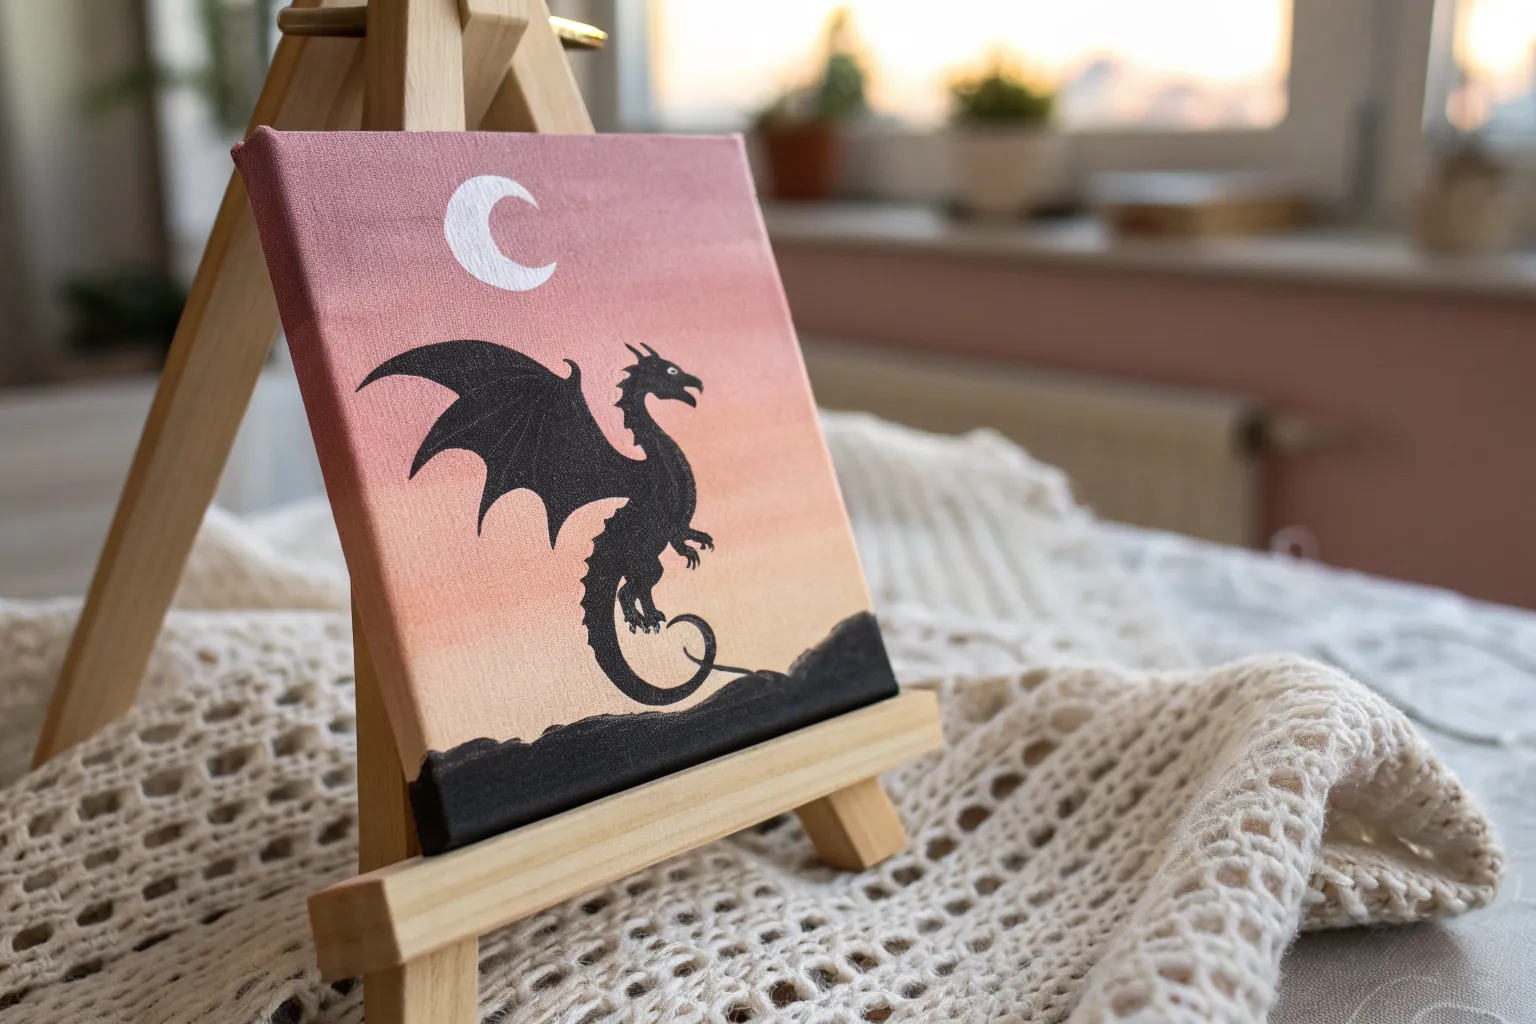
Sunset Gradient Sky Dragon
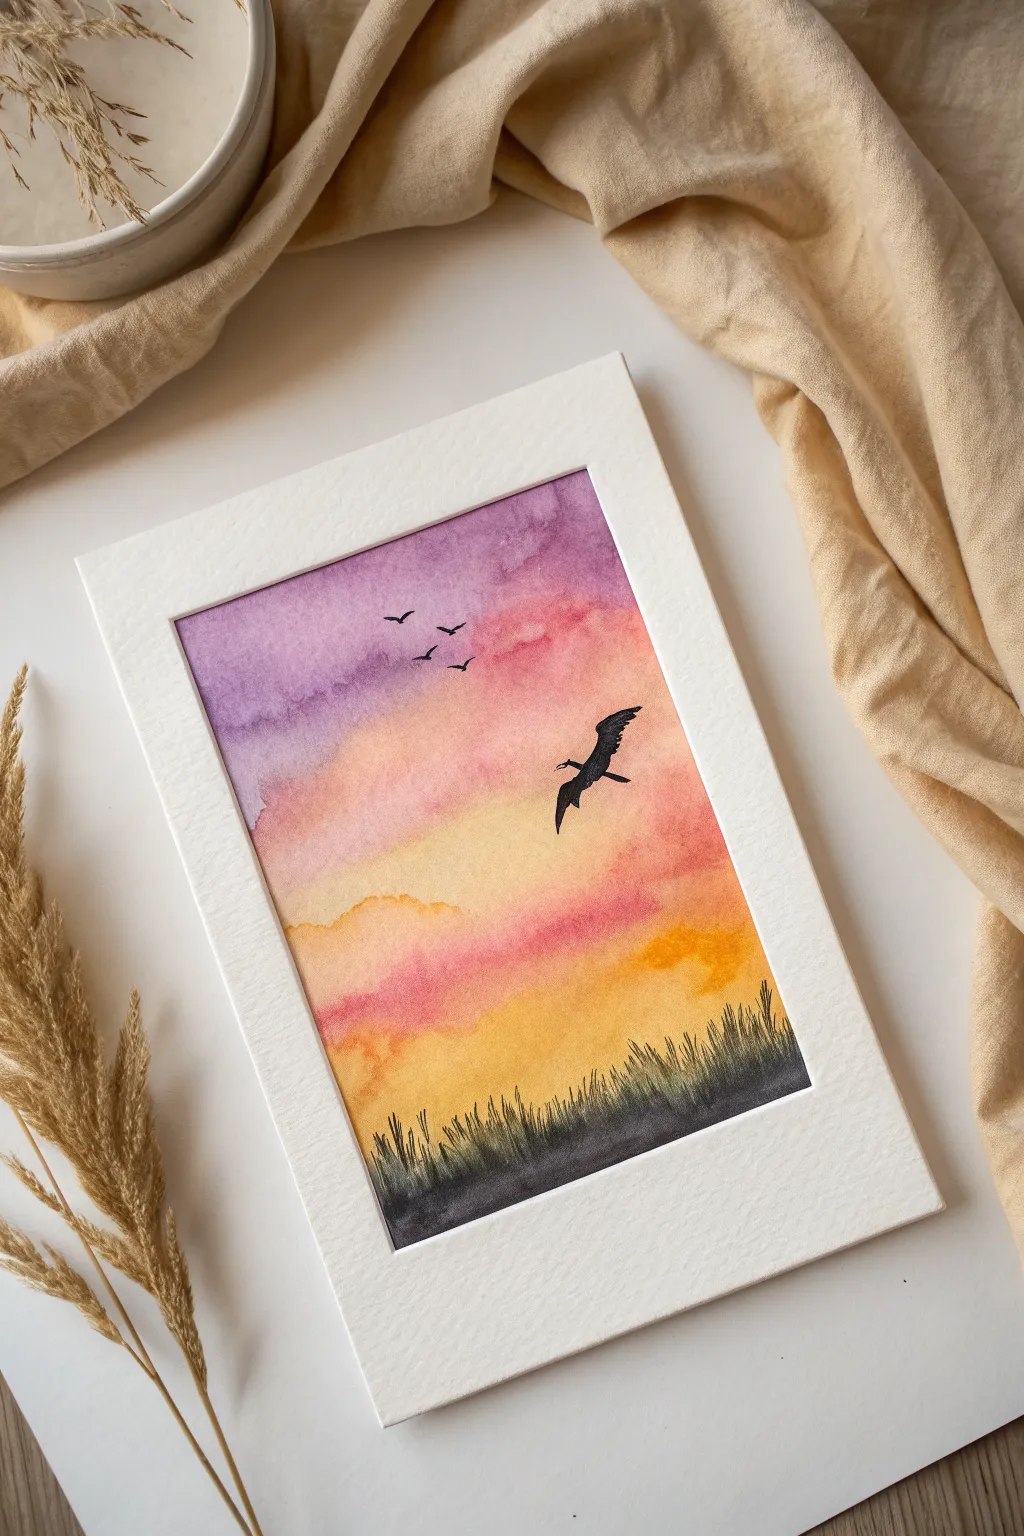
Capture the magic of twilight with this serene watercolor piece featuring a dragon gliding through a vibrant gradient sky. The soft blend of purple, pink, and gold creates a dreamy backdrop for stark, elegant silhouettes.
Step-by-Step
Materials
- Cold press watercolor paper (A5 or 5×7 inch)
- Watercolor paints (Purple, magenta/rose, cadmium yellow, black)
- Flat wash brush (3/4 inch or similar)
- Round brush (size 4 or 6)
- Fine liner brush (size 0 or 00) or a black pigment liner pen
- Painter’s tape or masking tape
- Jar of clean water
- Paper towels
- Painting board or clipboard
Step 1: Preparing the Canvas
-
Secure the paper:
Tape your watercolor paper down to your board using painter’s tape on all four sides. This creates that crisp white border you see in the final piece and prevents the paper from buckling when wet. -
Pre-wet the sky area:
Using your flat wash brush and clean water, gently wet the paper starting from the top and stopping about one inch from the bottom edge. The paper should be glistening but not forming puddles.
Step 2: Painting the Gradient Sky
-
Apply the purple:
Load your brush with a diluted purple. Start at the very top of the paper and paint horizontal strokes, letting the color naturally diffuse downwards into the wet paper. -
Introduce pink tones:
Clean your brush slightly and pick up a rose or magenta shade. Apply this directly below the purple, allowing the two colors to touch and bleed together where they meet for a seamless transition. -
Add the golden light:
Rinse your brush thoroughly. Load it with yellow paint and apply it beneath the pink section. Paint downwards into the area that will become the horizon. -
Create cloud textures:
While the paint is still damp, you can gently dab a thirsty brush (a damp brush with excess water removed) into the yellow and pink areas to lift slight pigment, creating soft, fluffy cloud shapes. -
Intensify the horizon:
While the yellow area is still wet, drop in a slightly more concentrated orange or deep yellow near the bottom right to suggest the last intense light of the setting sun. -
Painting the ground wash:
At the very bottom strip of the paper, apply a very faint, watery wash of grey or diluted black to establish the ground level, letting it blend slightly upward into the yellow. -
Let it dry completely:
Before moving to silhouettes, the paper must be bone dry. If it’s cool to the touch, it’s still wet. Patience here prevents the sharp black lines from bleeding into the sky.
Smooth Gradients
Work quickly while the paper is wet. Tilt your board slightly so gravity helps pull the paint downward, blending colors naturally without harsh lines.
Step 3: Adding Silhouettes
-
Paint the distant grass:
Using a small round brush loaded with black watercolor (a creamy consistency works best), paint short, vertical strokes along the bottom edge for the grassy field. -
Vary the grass height:
I like to flick the brush upward quickly at the end of each stroke to create tapering points. Make some blades tall and others short to keep it looking natural. -
Draft the dragon shape:
If you are nervous, lightly sketch the dragon’s outline with a pencil. Position it in the mid-right section of the sky, angled diagonally upwards. -
Paint the dragon body:
Using your fine liner brush and concentrated black paint (or a black pen), fill in the dragon’s body. Focus on the elongated neck and the sharp angles of the wings. -
Refine the wings:
Add jagged edges to the bottom of the wings to mimic the bat-like structure typical of dragons. Ensure the tail trails behind elegantly. -
Add distant birds:
Using the very tip of your fine brush, paint three small ‘V’ shapes in the upper left purple area to represent distant birds or smaller dragons flying in formation.
Add Magic Sparkles
Once fully dry, flick a tiny bit of white gouache or acrylic onto the purple sky area to create distant stars or magical dragon dust.
Step 4: Finishing Touches
-
Check opacity:
Once the black paint dries, it may lighten. Go over the dragon or grass again if needed to ensure the silhouette is a sold, opaque black. -
Review edges:
Clean up any edges on the dragon’s wings with the fine liner to make them sharp and distinct against the soft background. -
Reveal the border:
Carefully peel away the painter’s tape. Pull it away from the painting at a 45-degree angle to ensure a clean, crisp edge without tearing the paper.
Framing this piece with a white mat really makes those sunset colors pop against the dramatic silhouettes


Simple S-Curve Flying Dragon
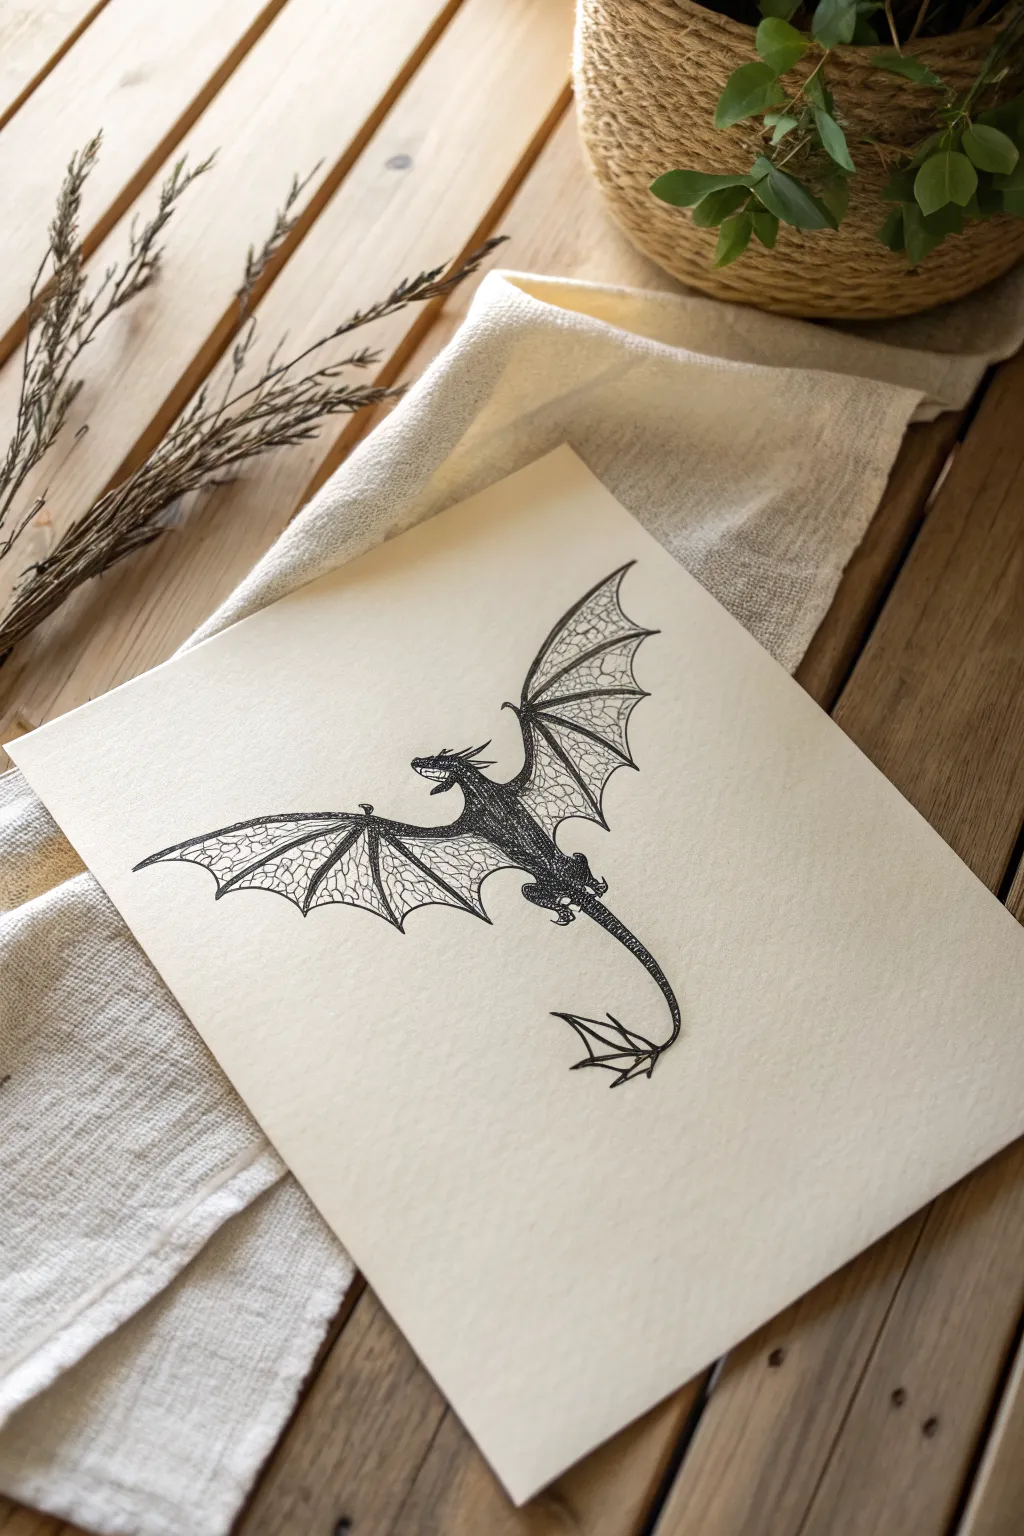
Capture the grace of flight with this elegant dragon illustration that relies on clean lines and intricate texture. Using simple black ink on textured paper, you’ll build contrast through stippling to create a timeless, classic look.
Step-by-Step Tutorial
Materials
- Heavyweight textured drawing paper (cream or off-white)
- HB graphite pencil
- Kneaded eraser
- Fine liner pens (sizes 0.1, 0.3, and 0.5)
- Ruler (optional for alignment)
- Reference image of dragon anatomy (optional)
Step 1: Sketching the Framework
-
Draw the spine curve:
Begin with your pencil by drawing a gentle, sweeping ‘S’ curve. This will serve as the spine of the dragon, determining the flow from the head down to the tail tip. -
Map the body masses:
Lightly sketch an oval for the chest area near the top third of your curve, and a smaller circle for the hip area lower down. Connect these roughly to form the torso thickness. -
Position the wings:
Draw long diagonal lines extending outward from the shoulder area. The right wing (viewer’s right) should point up and back, while the left wing extends outward to the side, creating a dynamic flying pose. -
Sketch the head and tail:
Add a small, elongated triangle shape for the head at the top of the curve. At the bottom, extend the tail into a long, thin whip shape, adding a small spade or fin shape at the very end.
Step 2: Defining the Outline
-
Refine the wing structure:
Flesh out the wings by drawing the ‘fingers’ or batting. These should curve downwards from the main wing arm, like the ribs of an umbrella. -
Scallop the wing edges:
Connect the tips of the wing fingers with concave, scalloped lines to create the membrane edge. Keep these lines loose and organic. -
Detail the head and limbs:
Refine the head shape, adding a small open mouth and a horn sweeping back. Sketch small, gripping claws for the legs tucked against the body. -
Ink the primary outlines:
Switch to your 0.3 pen. Carefully trace your final pencil lines, focusing on the outer silhouette of the dragon’s body and the main bones of the wings. -
Erase pencil guides:
Once the ink is completely dry—I usually give it a full five minutes to be safe—gently erase all graphite marks with your kneaded eraser.
Ink Smudge Savior
If you accidentally smudge wet ink, don’t panic. Turn the smudge into a shadow, a passing cloud, or add extra texture to the background to camouflage it.
Step 3: Texture and Shading
-
Fill the body solid:
Use a 0.5 pen to color in the main body, neck, and tail. Instead of solid block black, use dense hatching or tight scribbles to give it a slightly rough, scaled texture. -
Add wing membrane veins:
With your finest 0.1 pen, draw delicate, cracking patterns inside the wing panels. These should look like lightning bolts or dry earth, branching out randomly. -
Stipple the wings:
This is the most time-consuming but rewarding part. Using the 0.1 pen, adding thousands of tiny dots (stippling) inside the wing membranes. Concentrate the dots near the ‘bones’ and fade them out toward the center of each panel. -
Texture the tail fin:
Apply the same stippling technique to the tail spade, keeping the edges darker and the center lighter to suggest volume. -
Add spinal spikes:
Using the 0.3 pen, draw tiny, sharp triangles running all the way down the back of the neck and along the tail for a jagged silhouette. -
Final contrast check:
Look at the junction where the wings meet the body. Darken this area with more stippling or cross-hatching to ensure the wings look like they are attached securely.
Metallic Accent
Once the black ink is dry, use a gold or silver gel pen to trace just the spine spikes or the wing veins for a magical, shimmering effect.
Frame your new mythical creature or gift it to a fantasy-loving friend


Dragon and Castle Silhouettes
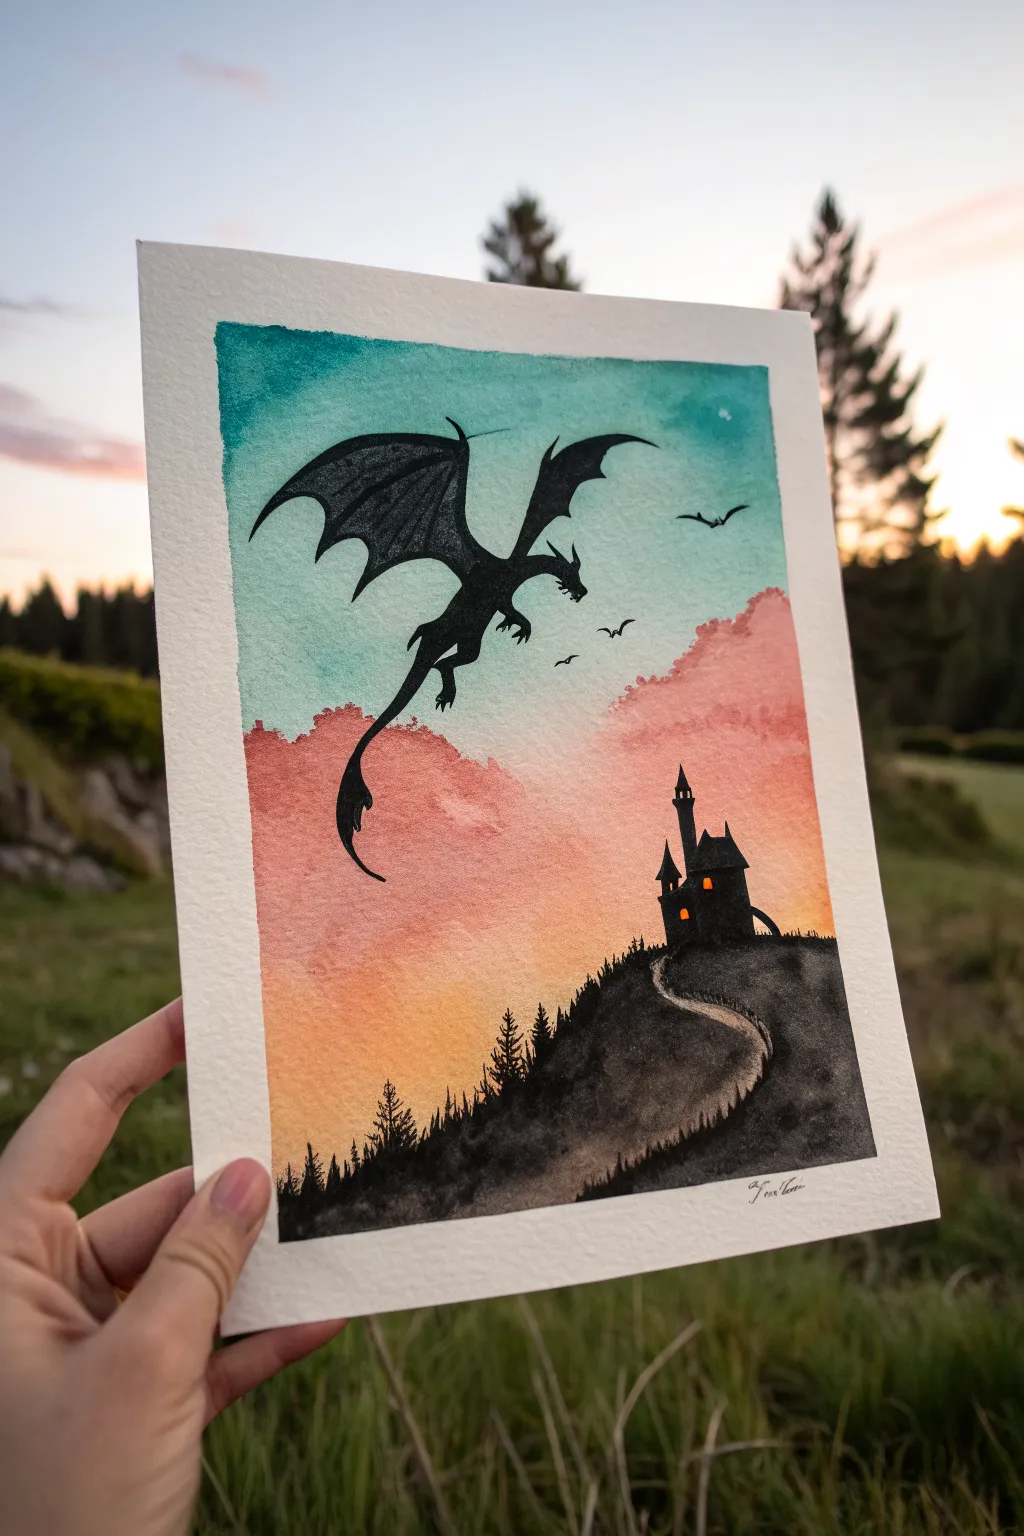
Capture the magic of fantasy with this dramatic silhouette painting featuring a soaring dragon and a distant castle. You’ll layer rich watercolors to create a sunset gradient before adding crisp black details for a striking contrast.
Step-by-Step
Materials
- Watercolor paper (cold press, roughly 140lb/300gsm)
- Watercolor paints (teal/turquoise, light pink, orange, yellow)
- Masking tape or artist tape
- Wide flat brush and medium round brush
- Small liner brush or fine pigment liner pen (black)
- Black gouache or acrylic paint
- Pencil and eraser
- Water cups and paper towels
- Hardboard or table surface
Step 1: Preparing the Gradient Sky
-
Tape the Edges:
Start by taping down your watercolor paper to a hardboard or your work surface. Ensure the tape is straight and pressed down firmly; this creates that clean, professional white border you see in the final piece. -
Wet on Wet:
Using your large clean brush, apply a generous layer of clean water over the entire area inside the tape. The paper should glisten but not have standing puddles. -
Painting the Teal:
Load your brush with a vibrant teal or turquoise watercolor. Paint the upper third of the sky, letting the color be most intense at the top edge and fading it downward. -
Adding the Sunset Pink:
Clean your brush and pick up a soft pink. Apply this band just below the teal, allowing them to touch and blend slightly on the wet paper to create a soft transition. -
Warming the Horizon:
Transition into a warm orange and finally a touch of yellow near the bottom third of the paper. This represents the last light of the sunset where the hill will eventually be. -
Creating Cloud Texture:
While the paint is still damp but not soaking, I like to dab a crumpled paper towel gently into the transition between the teal and pink to lift a little color, hinting at soft cloud shapes. -
Drying Time:
Step away and let this layer dry completely. The paper must be bone-dry and flat before you add the black silhouettes, or the ink will bleed into the sky.
Opacity is Key
For true silhouettes, watercolor often isn’t dark enough. Use black Gouache or India Ink for the foreground to get that deep, matte black finish.
Step 2: Sketching the Elements
-
Outline the Hill:
With a pencil, lightly sketch a sloping hill rising from the bottom left to the right side of the page. Add a winding path leading up the hill. -
Plotting the Castle:
Draw the outline of a small castle at the peak of the hill on the right. Focus on the towers and pointed roofs. -
Dragon Sketch:
Roughly place your dragon in the upper left sky. It doesn’t need to be perfect yet, just get the span of the wings and the curve of the tail right.
Blooms in the Sky?
If cauliflower-like blooms appear in your sky, you added water when the paper was drying. Let it dry fully, then embrace the texture as ‘clouds’ or mist.
Step 3: Painting the Silhouettes
-
Filling the Ground:
Switch to black gouache or very opaque acrylic. Using a medium brush, paint the main mass of the hill solid black, leaving the winding path unpainted for now to define its edges. -
Detailing the Trees:
Use a smaller brush to stipple jagged, vertical shapes along the ridge of the hill. These represent the tops of pine trees silhouetted against the light. -
The Winding Path:
Carefully paint the edges of the path. You can add very thin, watered-down black, or just stipple texture along the sides to suggest grass growing over the trail. -
Castle Architecture:
Fill in the castle shape with solid black. Leave tiny squares unpainted for windows, or paint over them and add yellow later. -
Dragon Body:
Using your finest brush or a black liner pen, fill in the dragon’s body. Pay attention to the sharp angles of the wings and the sleek curve of the tail. -
Fine Details:
Add the tiny claws, the horns on the dragon’s head, and the distant birds in the background. Subtle details like the tattered edges of the wings make a big difference. -
Window Lights:
Once the black paint is dry, take a tiny bit of orange or yellow paint and fill in the castle windows to make them look illuminated. -
The Reveal:
Gently peel away the masking tape at a 45-degree angle away from the painting to reveal your crisp white borders.
Now you have a mythical scene ready to be framed or gifted to a fantasy lover
BRUSH GUIDE
The Right Brush for Every Stroke
From clean lines to bold texture — master brush choice, stroke control, and essential techniques.
Explore the Full Guide
Cute Chubby Cartoon Dragon
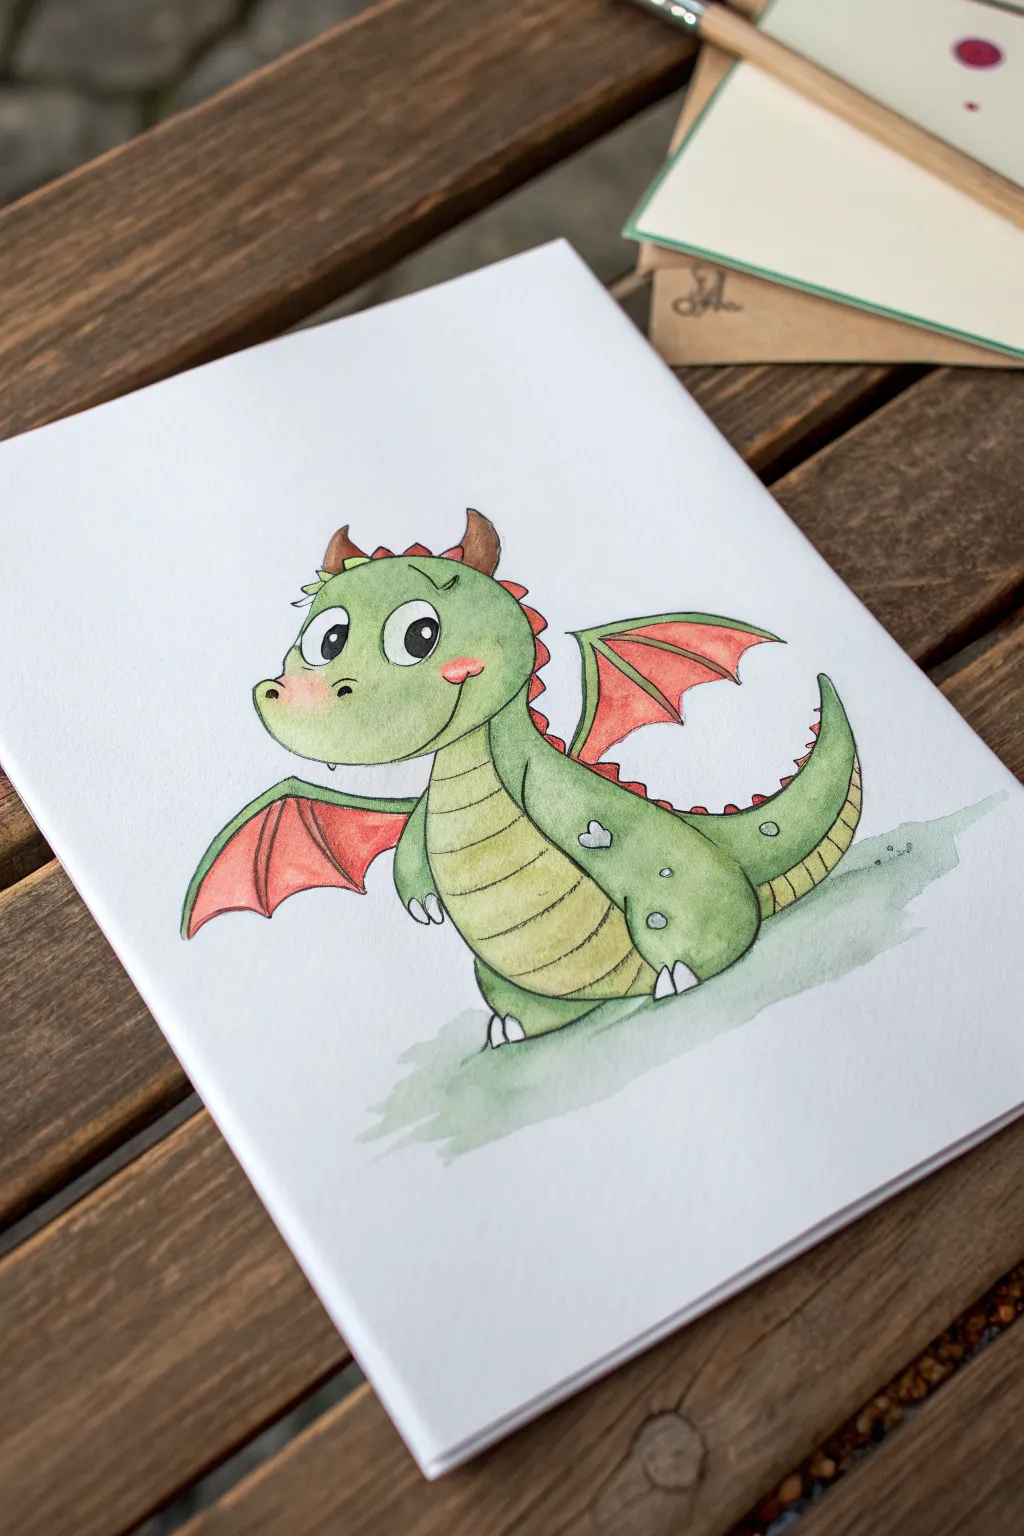
This adorable dragon painting features soft watercolor washes and crisp ink outlines to create a friendly, chubby character. The gentle green body contrasts delightfully with the coral-red wings, making for a perfect beginner-friendly watercolor project.
Step-by-Step
Materials
- Watercolor paper (cold press recommended)
- Pencil and eraser
- Waterproof fine liner pen (black)
- Watercolor paints (Sap Green, Yellow Ochre, Coral Red, Burnt Sienna)
- Round watercolor brushes (size 4, size 8)
- Two cups of water
- Paper towel
Step 1: Sketching the Outline
-
Draw the head shape:
Start with a soft, rounded oval for the head. Add a smaller bump on the left side for the snout, making sure it looks slightly upturned for a cute expression. -
Add the body:
Below the head, draw a large, pear-shaped body. The bottom should be wide and flat to make the dragon look like it’s sitting comfortably on the ground. -
Define the face:
Draw two large oval eyes inside the head. Add a small smile line curving up towards the cheek and sketch two tiny nostrils on the snout. -
Sketch the limbs and tail:
Add stubby arms resting against the side of the body. Draw small, rounded feet at the base. Curve a thick tail wrapping around the right side of the body, tapering to a point. -
Add wings and details:
Sketch bat-like wings extending from the back. Add small triangular horns on the head and a row of tiny spikes running down the back and tail. Draw a curved line across the belly to mark the stomach area.
Step 2: Inking the Drawing
-
Outline the main shapes:
Using a waterproof fine liner, carefully trace your pencil lines. Keep the lines smooth and continuous. -
Fill in the eyes:
Draw distinct pupils inside the eyes, leaving small white circles for highlights to bring the character to life. -
Refine the details:
Ink the belly stripes, the tiny claws on the toes, and the individual segments of the wings. Add a tiny heart shape on the hip for extra charm. -
Erase pencil marks:
Wait until the ink is completely dry—I usually give it a full minute—then gently erase all the underlying pencil sketches to leave a clean black outline.
Smooth Washing
To avoid harsh lines inside the dragon’s body, keep your paint edge wet as you move across the shape. If an edge dries mid-stroke, it creates a hard line.
Step 3: Applying Watercolor
-
Paint the body base:
Mix a watery Sap Green. Paint the head, arms, and outer body, leaving the belly, horns, and wings unpainted. Keep the wash light and even. -
Add shadows to the green:
While the green is still slightly damp, drop a slightly darker green mix into the bottom of the body, under the chin, and along the tail’s curve to create rounded volume. -
Paint the belly:
Mix a pale Yellow Ochre with plenty of water. Fill in the segmented belly area. Once dry, add a second layer of the same color just at the bottom of each segment to show curvature. -
Color the wings and accents:
Use a diluted Coral Red to fill in the webbing of the wings. Paint the tiny spikes along the back with this same red hue for a nice pop of contrast. -
Paint horns and claws:
Use Burnt Sienna for the small horns on the head. Leave the claws white or use a very faint grey wash if you want them to have a bit of dimension. -
Add the blush:
With a very washed-out pink or red, dab a small cheeky spot right under the eye. Soften the edges with a clean, damp brush so it blends naturally. -
Ground the figure:
Mix a very watery grey-green. Paint a loose, uneven puddle underneath the dragon to create a shadow and ground, so the character isn’t floating in space. -
Final touches:
Add tiny decorative dots using white gouache or a gel pen on the dragon’s green skin if you want texture, or define the knee with a small darker green stroke.
Bleeding Colors?
If the red wing color bleeds into the green body, your green layer wasn’t dry enough. Dab the leak with a clean tissue immediately and let it fully dry before fixing.
Let your little dragon dry completely before displaying this cheerful companion
Baby Dragon in a Teacup
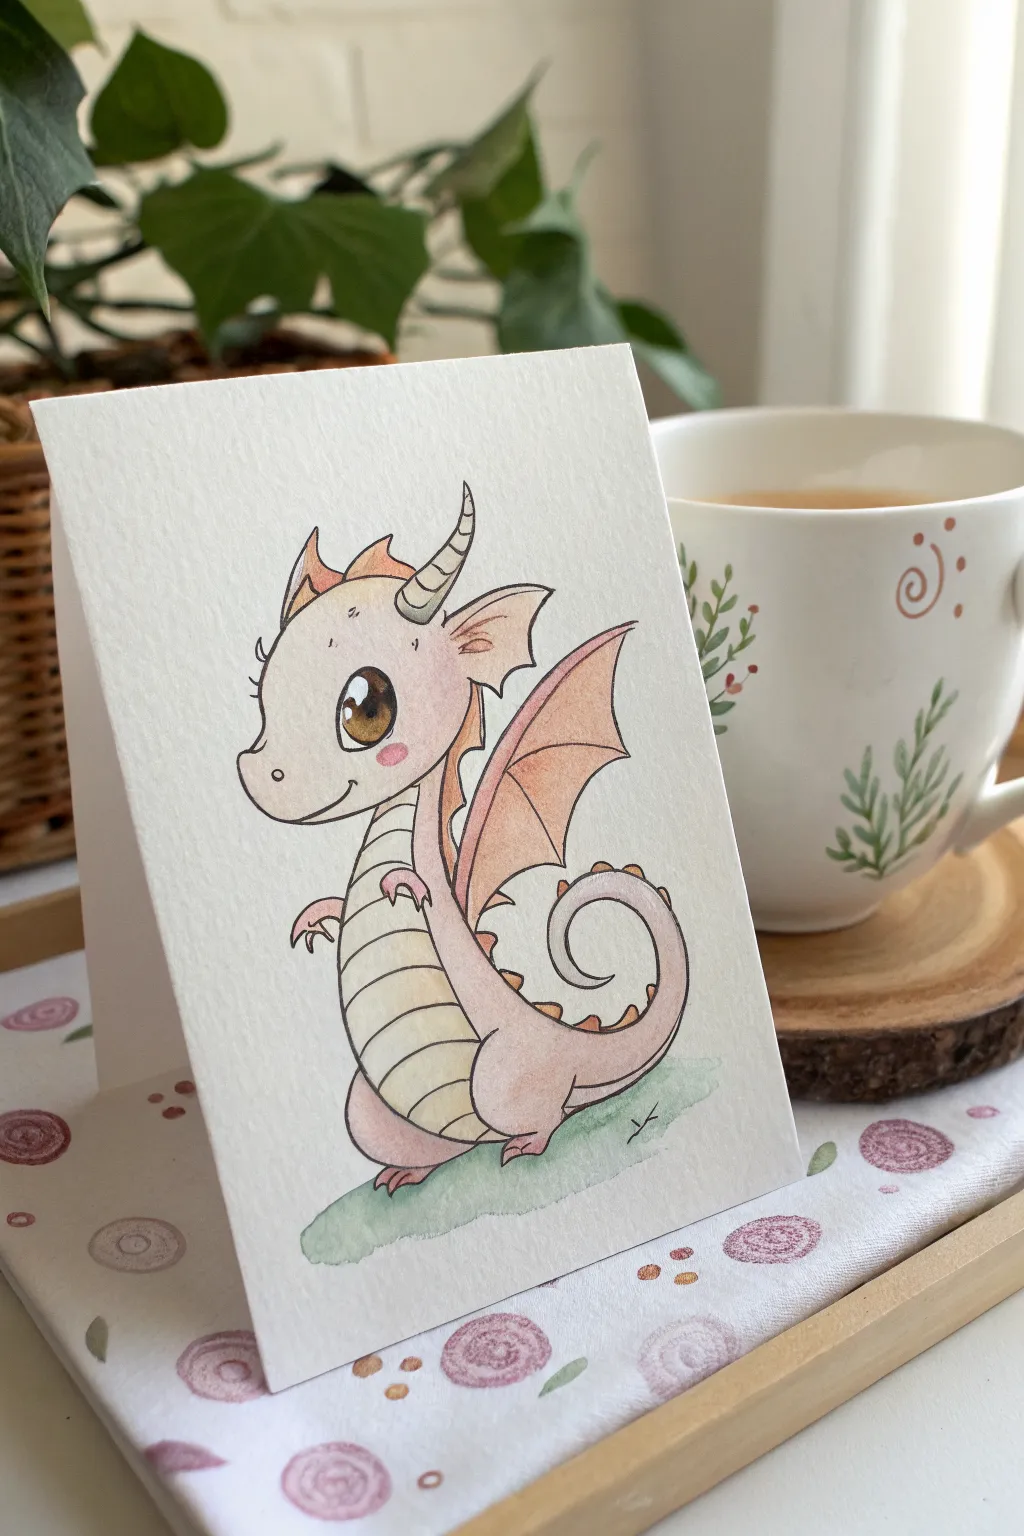
Create this heartwarming greeting card featuring a soft, pastel-toned baby dragon with expressive eyes and pearlescent details. The gentle watercolor wash and clean ink lines make for a professional-looking illustration that captures a sense of innocence and charm.
Step-by-Step Tutorial
Materials
- Cold press watercolor paper (folded into a card)
- Black fineliner pens (0.1mm and 0.3mm, waterproof)
- Watercolor paints (Alizarin Crimson, Yellow Ochre, Burnt Sienna, Hooker’s Green)
- Small round watercolor brush (size 2 or 4)
- HB pencil and eraser
- White gel pen
- Cup of water and paper towels
Step 1: Sketching the Outline
-
Basic shapes:
Begin lightly with your pencil. Draw a large oval for the head and a smaller bean shape below it for the body, connecting them with a short neck. -
Adding features:
Sketch a small snout protruding from the left side of the face. Add a large, teardrop shape for the eye and a curved line for the smiling mouth. -
Tail and limbs:
Extend a thick, curling tail from the base of the body. Sketch small, simple arms with tiny claws and rounded feet firmly planted on the ground. -
Wings and spikes:
Draw one dragon wing extending from the back, using jagged lines for the webbing. Add a single horn on the head and a row of small triangular spikes running down the spine and tail. -
Refining lines:
Add the belly plating by drawing horizontal curved lines across the stomach. Sketch a small tuft of jagged ground beneath the feet.
Smudge Prevention
If your fineliner isn’t perfectly waterproof, lay a scrap piece of paper under your hand while coloring to prevent dragging ink across the wet paper.
Step 2: Inking the Drawing
-
Main outlines:
Using the 0.3mm waterproof fineliner, carefully trace over your pencil lines. Keep your hand steady but allow for slight variations in line weight to give it character. -
Fine details:
Switch to the 0.1mm pen to add delicate details like the eyelashes, the nostril dot, and the texture lines inside the horn. -
Clean up:
Wait for the ink to dry completely to avoid smudging, then gently erase all visible pencil marks.
Step 3: Applying Watercolor
-
Base skin tone:
Mix a very watery wash of Alizarin Crimson with a tiny touch of Yellow Ochre to create a pale peach-pink. Paint the entire head, body, and tail, avoiding the belly, eye, horn, and wing. -
Wing color:
Use a slightly more concentrated mix of the same pink-orange hue to paint the wing webbing, making it appear distinct from the body. -
Belly and horn:
Dilute Yellow Ochre until it is a pale cream color. Paint the belly stripes and the horn on the head. -
The eye:
Paint the iris with Burnt Sienna. While wet, drop a tiny bit of darker brown at the top of the iris to create a gradient. -
Spikes:
Using a small brush, carefully dab an orange-brown mix onto the tiny triangular spikes along the back. -
Grounding wash:
Mix a pale, watery Hooker’s Green. Paint a loose, jagged shape under the dragon’s feet to represent grass, letting the edges fade out softly.
Level Up: Sparkles
Mix a tiny amount of iridescent medium or gold watercolor paint into the wing color to make the dragon shimmer when the card is tilted in the light.
Step 4: Finishing Touches
-
Adding blush:
Once the face is dry, mix a slightly stronger pink and dab a small oval cheek blush right under the eye. I like to soften the edges with a clean, damp brush. -
Shadows:
Mix a very pale purple-grey. Glaze this lightly under the chin, under the arm, and at the bottom curve of the belly to give the dragon volume. -
Highlights:
Use a white gel pen to add a crisp reflection dot in the eye and a tiny highlight on the tip of the nose.
Now you have an adorable hand-painted card ready to gift to a fantasy-loving friend

PENCIL GUIDE
Understanding Pencil Grades from H to B
From first sketch to finished drawing — learn pencil grades, line control, and shading techniques.
Explore the Full Guide
Blue-and-White Dragon Look
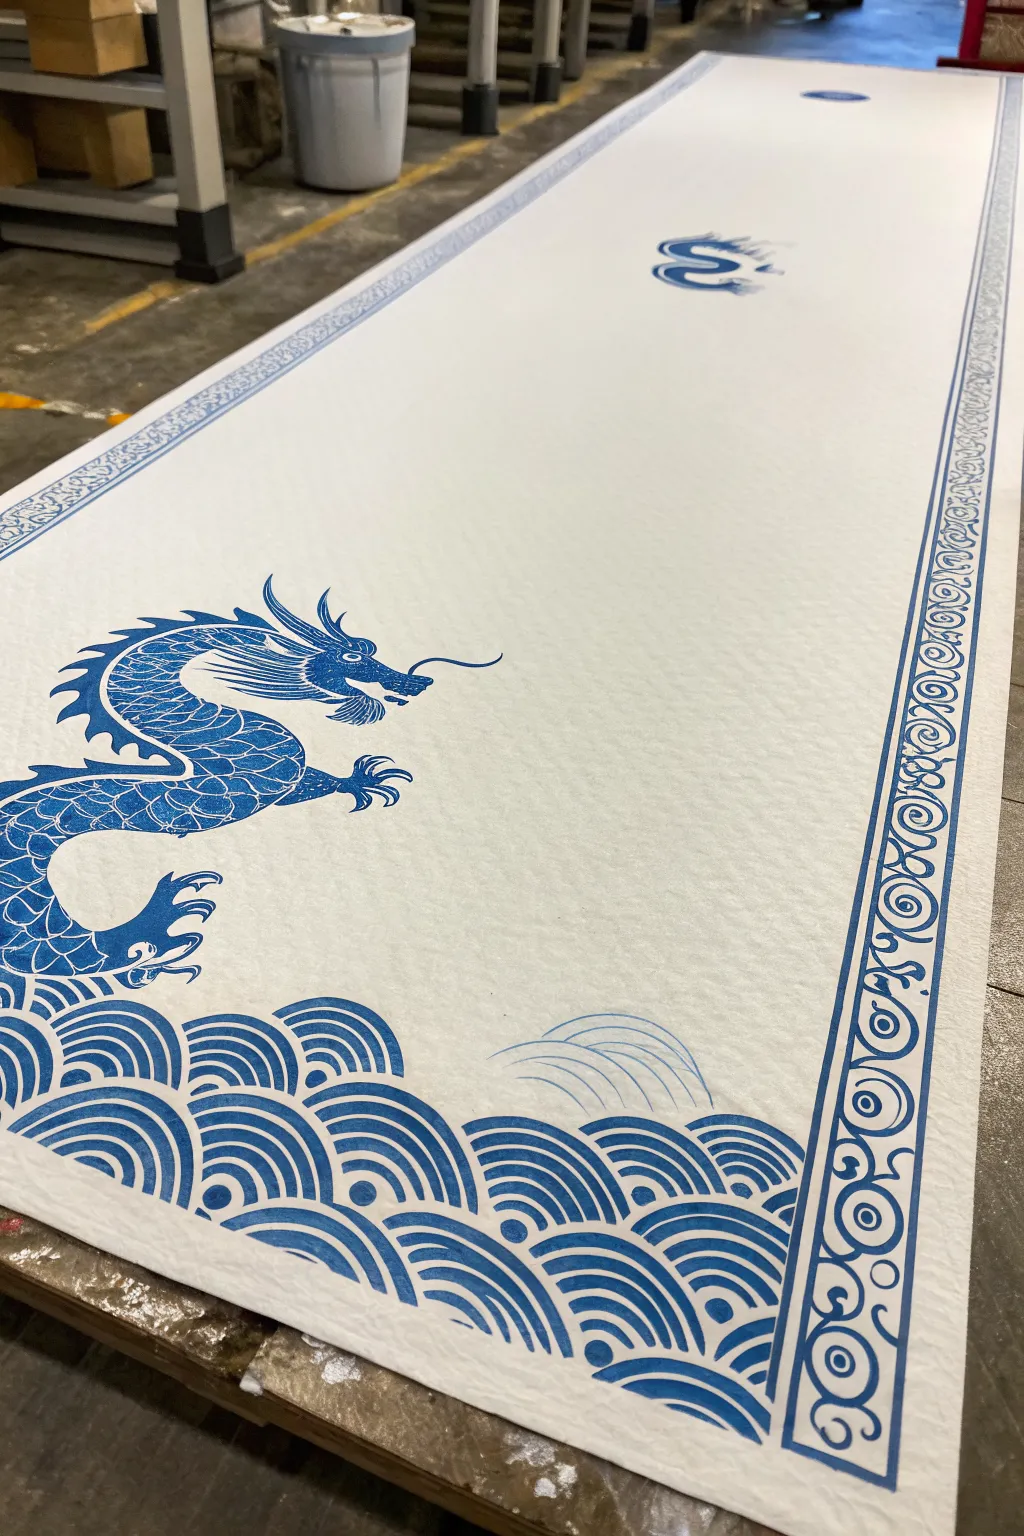
Capture the timeless elegance of blue-and-white ceramics with this stunning paper runner project. Using stenciling techniques and crisp cobalt blue paint, you’ll create a long, scroll-like artwork featuring a majestic dragon rising from crashing waves.
Step-by-Step Guide
Materials
- Long roll of heavy-weight white paper (sold as runner paper or easel paper)
- Cobalt blue acrylic paint (matte finish)
- High-density foam roller and tray
- Stencil brushes (various sizes)
- Fine detail paintbrush (size 0 or 1)
- Mylar stencil sheets or pre-cut dragon/wave stencils
- Painter’s tape or stencil adhesive spray
- X-acto knife and cutting mat (if making custom stencils)
- Ruler or straight edge
- Pencil
Step 1: Planning and Border Layout
-
Prepare the workspace:
Clear a very long table or clean section of floor. Unroll your paper to the desired length—this project works beautifully as a 6-foot or longer runner. Secure the ends with painter’s tape to keep it flat. -
Mark the borders:
Using a long ruler and a light pencil touch, mark a straight line about 2 inches in from the long edges of the paper. This will serve as the guideline for your decorative border strip. -
Position the border stencil:
Align a narrow, repetitive border stencil (like a Greek key or floral scroll pattern) along your pencil guideline. Secure it firmly with painter’s tape to prevent slipping. -
Paint the first border section:
Load your stencil brush with a small amount of cobalt blue paint—offload excess onto a paper towel until the brush is almost dry. Dab vertically onto the stencil to create a crisp impression. -
Complete the frame:
Carefully lift and reposition the stencil down the length of the paper, matching up the pattern registration marks. Repeat this process for both long sides to frame your composition.
Step 2: Creating the Wave Foundation
-
Stencil the wave base:
Place a wave pattern stencil at the bottom edge of the paper. This design uses concentric semi-circles to mimic traditional Seigaiha waves. Start at the bottom left corner. -
Build the wave density:
Apply the blue paint with a foam roller or large stencil brush for these larger areas. Ensure the coverage is solid and opaque to anchor the bottom of the design visually. -
Layer the pattern:
Move the stencil to the right, connecting the wave patterns seamlessly across the entire bottom width. I like to let the waves vary slightly in height, stacking stencils to create a surging effect on the left side where the dragon will emerge.
Bleeding Lines?
If paint bleeds under the stencil, your brush is too wet. Wait for the mistake to dry, paint over it with white acrylic, and re-stencil. Always offload paint on a paper towel first.
Step 3: The Dragon and Details
-
Position the dragon:
Place your main dragon stencil on the left side, hovering just above the wave line. The dragon should be looking upward toward the empty space at the top of the runner. -
Apply the dragon body:
Using a smaller stencil brush, apply paint to the dragon’s body. Use a stippling motion to get paint into the detailed scales without forcing paint under the stencil edges. -
Add distant elements:
About three-quarters of the way up the runner, position a smaller cloud or pearl stencil. Paint this with a slightly lighter touch or less paint to simulate atmospheric distance. -
Freehand details:
Once the stenciled areas are dry to the touch, use a fine detail brush to connect any stencil bridges (the small gaps in the lines) for a hand-painted look. Extend the dragon’s whiskers with fluid, sweeping strokes. -
Refine the waves:
Use the fine brush to add delicate arching lines above the main wave mass, suggesting spray or movement in the water that connects the sea to the dragon. -
Check for consistency:
Scan the entire length of the piece. If some blue areas look patchy, carefully dab a second layer of paint to ensure that deep, rich porcelain blue color. -
Dry and trim:
Allow the entire runner to cure for at least 2 hours. Once fully dry, you can trim the excess white paper from the top and bottom edges for a clean finish.
Pro Tip: Vintage Look
For an aged, authentic look, lightly sponge a very diluted tea stain or watered-down gray paint over the stark white paper before you begin stenciling.
Roll out your finished masterpiece to transform a hallway or table with elegant mythical energy
Glowing Edge Highlights on a Dark Dragon
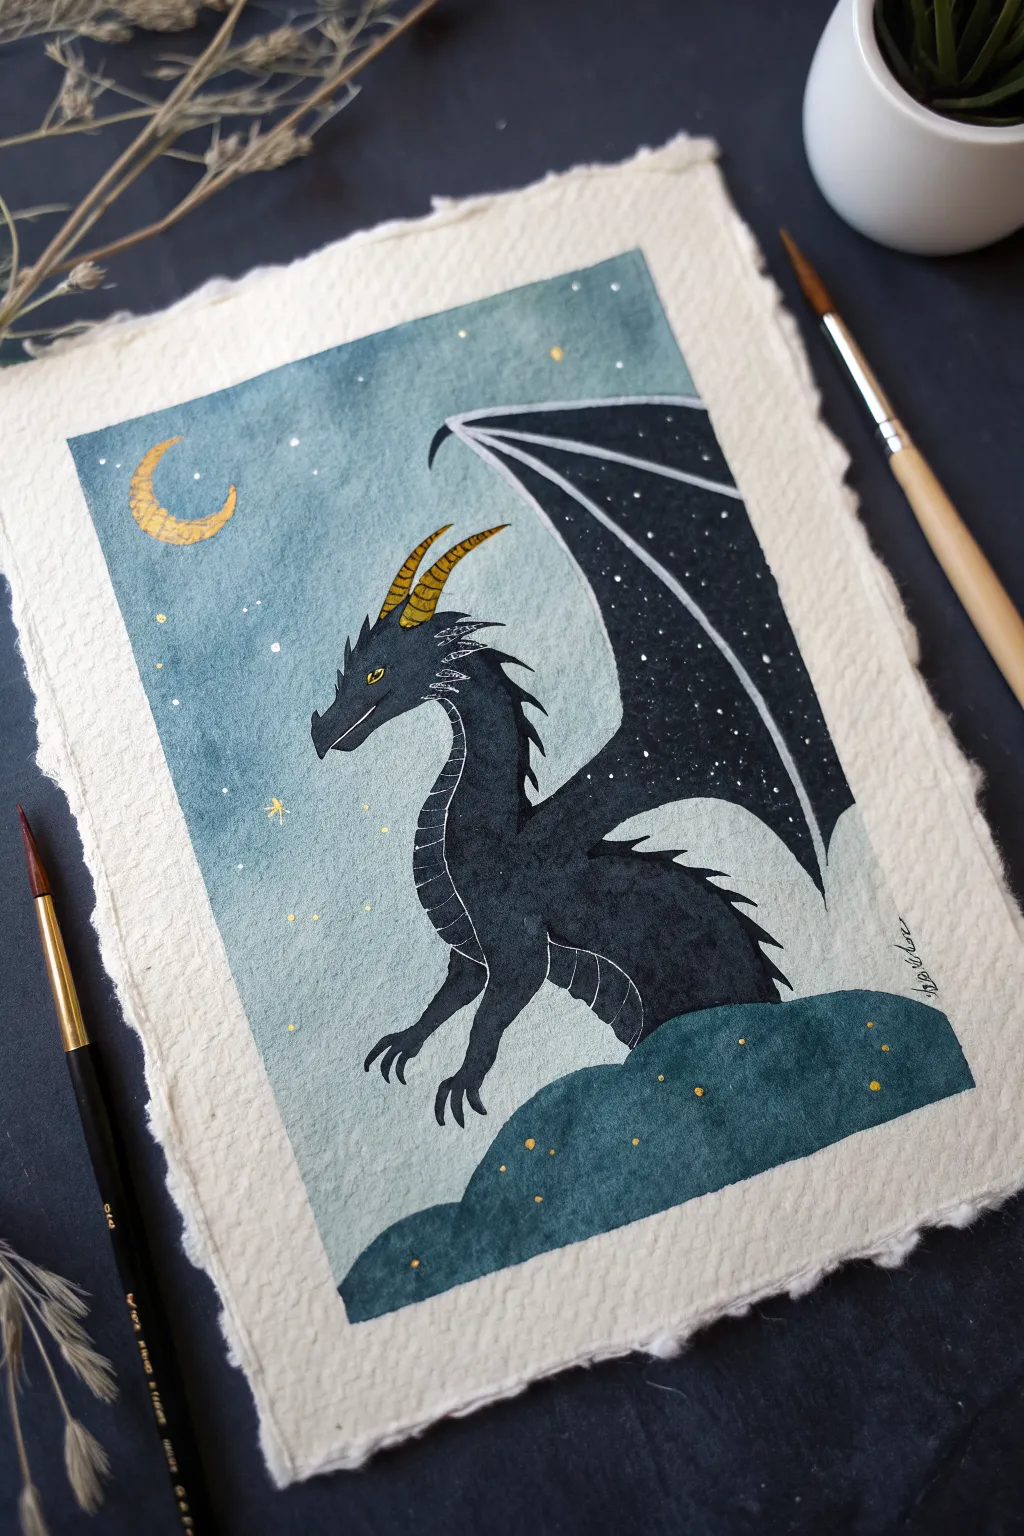
Capture the magic of a starry night with this elegant dragon silhouette painting. Using deep gouache or ink on textured paper allows you to create a striking contrast between the dark, mystical creature and the soft moonlit sky.
How-To Guide
Materials
- Cold press watercolor paper (deckled edge for style)
- Pencil (HB or H)
- Kneaded eraser
- Gouache paint (Black, Deep Teal/Cyan, White, Gold)
- OR High-pigment watercolor/Ink
- Flat brush (medium)
- Round brush (size 2 or 4)
- Fine liner brush (size 00 or 000)
- White gel pen (optional)
- Mixing palette
- Water jar
Step 1: Planning the Composition
-
Prepare the Paper:
If your paper doesn’t have a natural deckled edge, you can gently tear the edges of a standard watercolor sheet against a ruler to create that organic, rustic look. Secure the paper to your surface with masking tape if you want a clean border, or leave it free for the floating wash effect seen here. -
Sketch the Frame:
Lightly draw a rectangular border with a pencil. This won’t be a hard line, but a guide for where your background wash will stop, leaving a nice uneven painted edge. -
Outline the Dragon:
Sketch the dragon’s main shapes lightly. Focus on the S-curve of the neck and the triangular wing. Don’t worry about tiny scales yet; just get the silhouette and the horned head shape right. Place him sitting on a rounded hill shape at the bottom. -
Refine the Sketch:
Add the details of the horns, the spiky spine ridges, and the crescent moon in the upper left corner. Keep your pencil pressure very light so it doesn’t show through the lighter background paint later.
Clean Lines
If your white gel pen skips over the textured paper or painted surface, warm it up on a scrap piece first, or switch to thinned white acrylic ink on a liner brush for smoother flow.
Step 2: Painting the Background
-
Mix the Sky Color:
Create a watery wash of teal or muted cyan. If using gouache, dilute it significantly with water to make it semi-transparent like watercolor. -
Wash the Sky:
Paint around your dragon sketch, filling the rectangular area. Let the edges be a little uneven and organic. Be careful near the moon shape—paint around it or leave it blank. -
Paint the Foreground Hill:
Mix a darker, more opaque teal or slate blue for the hill the dragon sits upon. Paint this area solid, slightly overlapping the sky wash to create depth. -
Let it Dry:
I always insist on full drying here. If the background is damp, the black dragon paint will bleed into the sky.
Step 3: The Dark Dragon
-
Fill the Silhouette:
Using opaque black gouache or ink, carefully carefully fill in the dragon’s body. Use a round brush for the larger areas of the torso and wing. -
Refine the Edges:
Switch to a smaller brush to paint the sharp spikes along the neck and back. Crisp points are essential for that fierce silhouette look. -
Detail the Wing:
Paint the wing structure. Notice the wing membrane has white speckles—you can paint the wing solid black first and add stars later, or leave tiny negative spaces if you have steady hands. -
Paint the Horns:
Use a metallic gold paint or a yellow ochre mixed with a touch of brown to fill in the spiral horns. This pop of warmth contrasts beautifully with the cool background.
Galaxy Wing
Instead of solid black for the wing, try blending deep purple and navy blue before adding the stars to create a true nebula effect inside the dragon’s wing.
Step 4: Starlight and Highlights
-
Add White Linework:
Once the black paint is bone dry, use a fine liner brush with white gouache (or a white gel pen) to outline the top edge of the wing and the dragon’s jawline. This ‘rim lighting’ separates the dark subject from the background. -
Detail the Scales:
Add thin, curved white lines along the dragon’s underbelly to suggest segmental scales. Keep these lines very delicate. -
Paint the Stars:
Using white paint, dot tiny stars throughout the deep black wing membrane. This makes the wing look like a piece of the night sky. -
Moon and Sky Stars:
Paint the crescent moon gold to match the horns. Then, scatter small white and gold dots across the teal sky background for a magical atmosphere. -
Final Touches:
Add a tiny yellow dot for the dragon’s eye with a vertical black slit in the center. Add a few gold specks on the dark hill to tie the colors together.
Sign your name in the corner and enjoy your mystical creature


Galaxy Sky Dragon With Splatter Stars
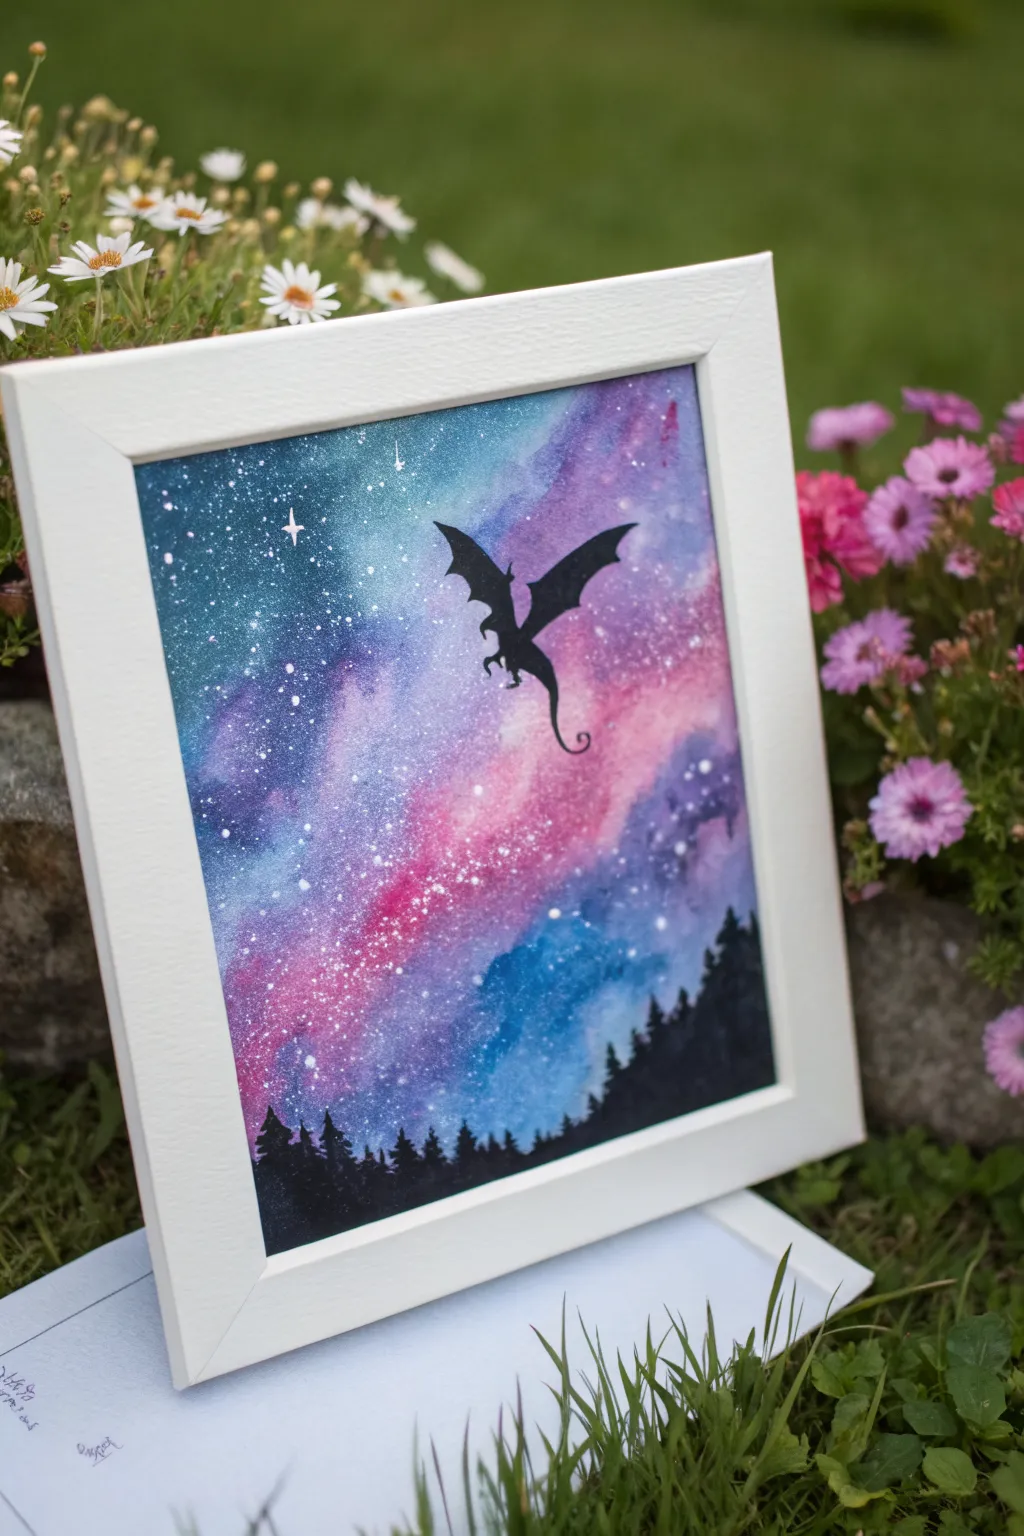
Capture the magic of a starry night with this dreamy watercolor galaxy painting featuring a striking dragon silhouette. The vibrant blend of blues, purples, and pinks creates a stunning backdrop for the mystical creature soaring above the treetops.
Step-by-Step Tutorial
Materials
- Watercolor paper (cold press, 300gsm recommended)
- Watercolor paints (Indigo, Turquoise, Purple, Magenta/Pink)
- Black acrylic paint or black gouache
- White acrylic paint or white gouache
- White gel pen (optional)
- Big flat wash brush
- Medium round brush
- Small liner brush or fine detail brush
- Masking tape
- Jar of water
- Palette
- Old toothbrush or stiff brush for splattering
- Pencil and eraser
Step 1: Preparing the Canvas
-
Secure the paper:
Tape down all four edges of your watercolor paper to a board or table using masking tape. This creates a crisp white border and prevents the paper from buckling when it gets wet. -
Sketch lightly:
Using a pencil, very lightly sketch the placement for your dragon in the upper center and the tree line along the bottom. Keep the lines faint so they don’t show through the lighter galaxy colors later.
Starry precision
Cover the bottom area (where trees will be) with a scrap piece of paper while splattering stars. This prevents white speckles from appearing in your dark forest silhouette.
Step 2: Creating the Galaxy Background
-
Wet the paper:
Using your large flat brush, apply a layer of clean water across the entire sky area, stopping just above where your tree line begins. The paper should be glistening but not forming puddles. -
Apply the first wash:
While the paper is wet, drop in patches of turquoise and bright blue. Let the colors bloom and flow naturally on the wet surface. -
Add warmth:
Introduce magenta or pink into the middle area of the sky, allowing it to blend softly with the blue edges to create purple transitions. Avoid over-mixing, or the colors might turn muddy. -
Deepen the cosmos:
While the paint is still damp, dab rich purple and indigo into the corners and upper edges to create depth and a ‘night sky’ vignette effect. -
Enhance texturing:
I like to tilt the board slightly to encourage pigments to bleed into one another organically. If you want lighter patches for ‘nebula’ clouds, dab a clean paper towel gently on wet areas to lift some pigment. -
Let it dry completely:
Allow the background layer to dry fully. The paper should feel room temperature to the touch, not cool.
Bleeding colors?
If your galaxy colors are merging into one big grey blob, your paper is likely too wet or you are overworking the brush. Let the water do the work and stop manipulating the paint sooner.
Step 3: Adding Stars
-
Prepare the splatter:
Mix a small amount of white acrylic paint or gouache with a tiny bit of water until it has a milky consistency. -
Create the starfield:
Dip an old toothbrush or stiff brush into the white mixture. Run your thumb across the bristles to flick fine specks of paint over the galaxy sky. -
Add main stars:
Use a small detail brush or a white gel pen to place a few larger, specific stars. You can add a simple four-point cross shape to one or two of them to make them twinkle.
Step 4: Painting Silhouettes
-
Mix the black:
Load your brush with opaque black acrylic paint or gouache. These mediums work better than black watercolor for silhouettes because they provide solid, crisp coverage. -
Outline the dragon:
Using your finest liner brush, carefully trace the outline of your dragon’s wings, body, and tail based on your initial sketch. -
Fill the dragon:
Fill in the dragon shape with solid black. Ensure the wing edges are sharp and the tail has a nice curve. -
Start the tree line:
Switch to a medium round brush. Paint a solid black undulating line at the bottom of the paper for the ground. -
Detail the trees:
Use the tip of a smaller brush to dab upward vertical strokes along the horizon line, shaping them into jagged evergreen tree peaks. Vary their heights to make the forest look natural. -
Final touches:
Check for any gaps in the black silhouettes and fill them in. Let everything dry completely. -
Reveal the border:
Slowly and carefully peel off the masking tape at a 45-degree angle away from the painting to reveal your clean white edges.
Frame your masterpiece in a simple white frame to really make those galaxy colors pop
Leafy Nature-Dragon Hybrid
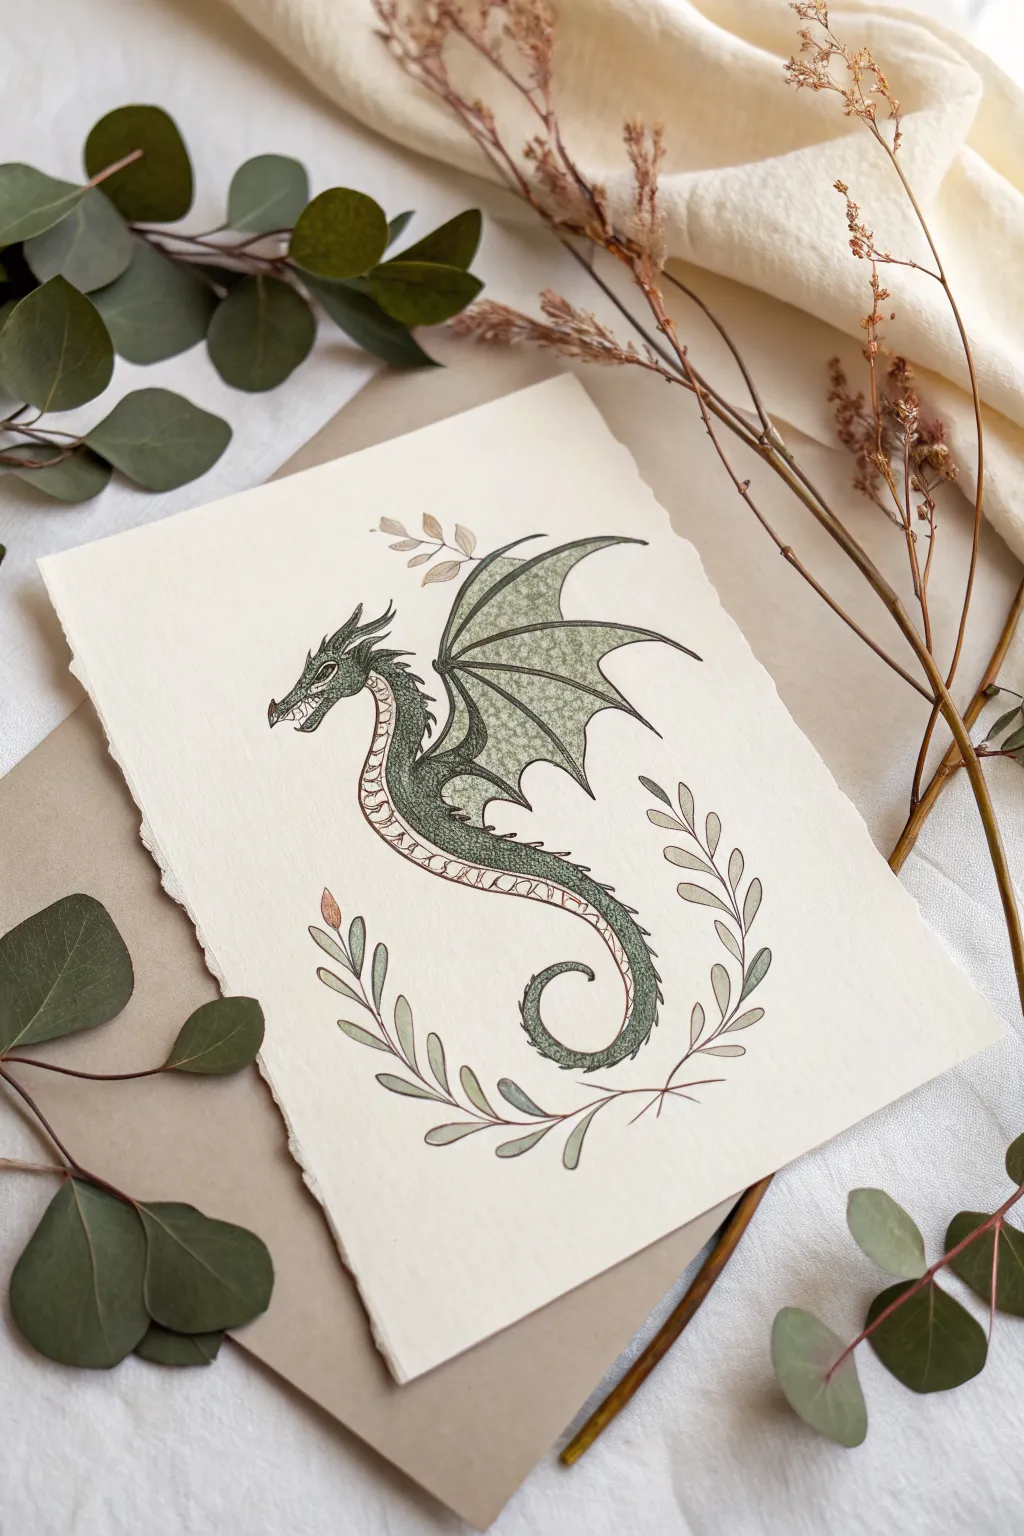
Merge fantasy with flora in this charming watercolor and ink project featuring a stylized green dragon framed by delicate greenery. The illustration uses a limited earthy palette and clean linework to create an elegant, nature-inspired creature perfect for greeting cards or wall art.
Step-by-Step Guide
Materials
- Cold-press decorative paper (with deckled edge)
- Pencil (HB or H)
- Kneaded eraser
- Fine liner pens (black, waterproof, sizes 01 and 05)
- Watercolor paints (Sap Green, Olive Green, Burnt Sienna, Sepia)
- Small round brushes (size 2 and 4)
- Palette covering
- Water cups
- Paper towels
Step 1: Sketching the Form
-
Outline the body curve:
Start with your pencil, drawing a gentle ‘S’ curve. This will form the spine of the dragon, starting from the head area, curving down for the neck, and hooking back up for the tail. -
Define the head and snout:
At the top of your ‘S’, sketch an elongated triangular shape for the head. Add a small beak-like hook at the nose and sketch the jawline slightly open. -
Flesh out the body:
Draw the underside of the neck and body parallel to your spine line, tapering it gradually until it meets the tip of the curved tail. -
Sketch the leaf-wings:
Extend a long, curved line out from the shoulder area for the top of the wing. Instead of traditional bat wings, sketch scalloped, leaf-like edges for the webbing. -
Add nature details:
Lightly sketch leafy sprigs curving upwards from below the dragon’s tail, framing the bottom half of the creature like a botanical wreath.
Ink Confidence
Don’t stress over perfect lines. Slightly broken or wobbly ink lines actually enhance the vintage, hand-drawn botanical style of this artwork.
Step 2: Inking the Design
-
Line the main body:
Using your 05 fineliner, carefully trace the outline of the dragon’s head, back, and tail. Use confident, smooth strokes to avoid jittery lines. -
Detail the scales and wings:
Switch to a finer 01 pen. Draw the segments of the underbelly scales and add the internal veins of the leaf-wings. I like to keep these lines very thin to contrast with the bold outer shape. -
Texture the skin:
Use stippling (tiny dots) or small hatching marks along the spine and shadowed areas of the neck to suggest rough dragon skin without drawing individual scales. -
Ink the botanical frame:
Outline the leaves at the bottom and the small sprig above the dragon’s head. Keep these lines floaty and organic. -
Clean up:
Once the ink is completely dry—give it a few minutes—gently erase all visible pencil marks with the kneaded eraser.
Tea Staining
For an antique look, lightly brush strong black tea over the background paper (avoiding the dragon) before you start sketching.
Step 3: Watercolor Application
-
Base wash for the body:
Mix a watery Sap Green. Paint the main body of the dragon, leaving the underbelly unpainted for now. The texture of the paper should show through slightly. -
Wing gradients:
Paint the wings with a mix of Olive Green. While the paint is wet, drop a tiny bit of darker green near the ‘bones’ of the wing to create instant depth. -
Warm up the belly:
Mix a very pale wash of Burnt Sienna or a soft brown. Carefully paint the segmented underbelly scales. -
Botanical accents:
Paint the surrounding leaves using varied saturations of green. Some leaves can be darker, while others should remain very pale for a faded look. -
Enhancing the texture:
Once the base green layer is dry, use a slightly drier brush with darker green to dab focusing on the neck joints and tail curve. This mimics a scaly texture. -
Final drying time:
Allow the entire piece to dry completely before touching or framing.
Display your mythical botanical study on a clipboard or nestled in a frame
Dragon Breaking Out of a Frame
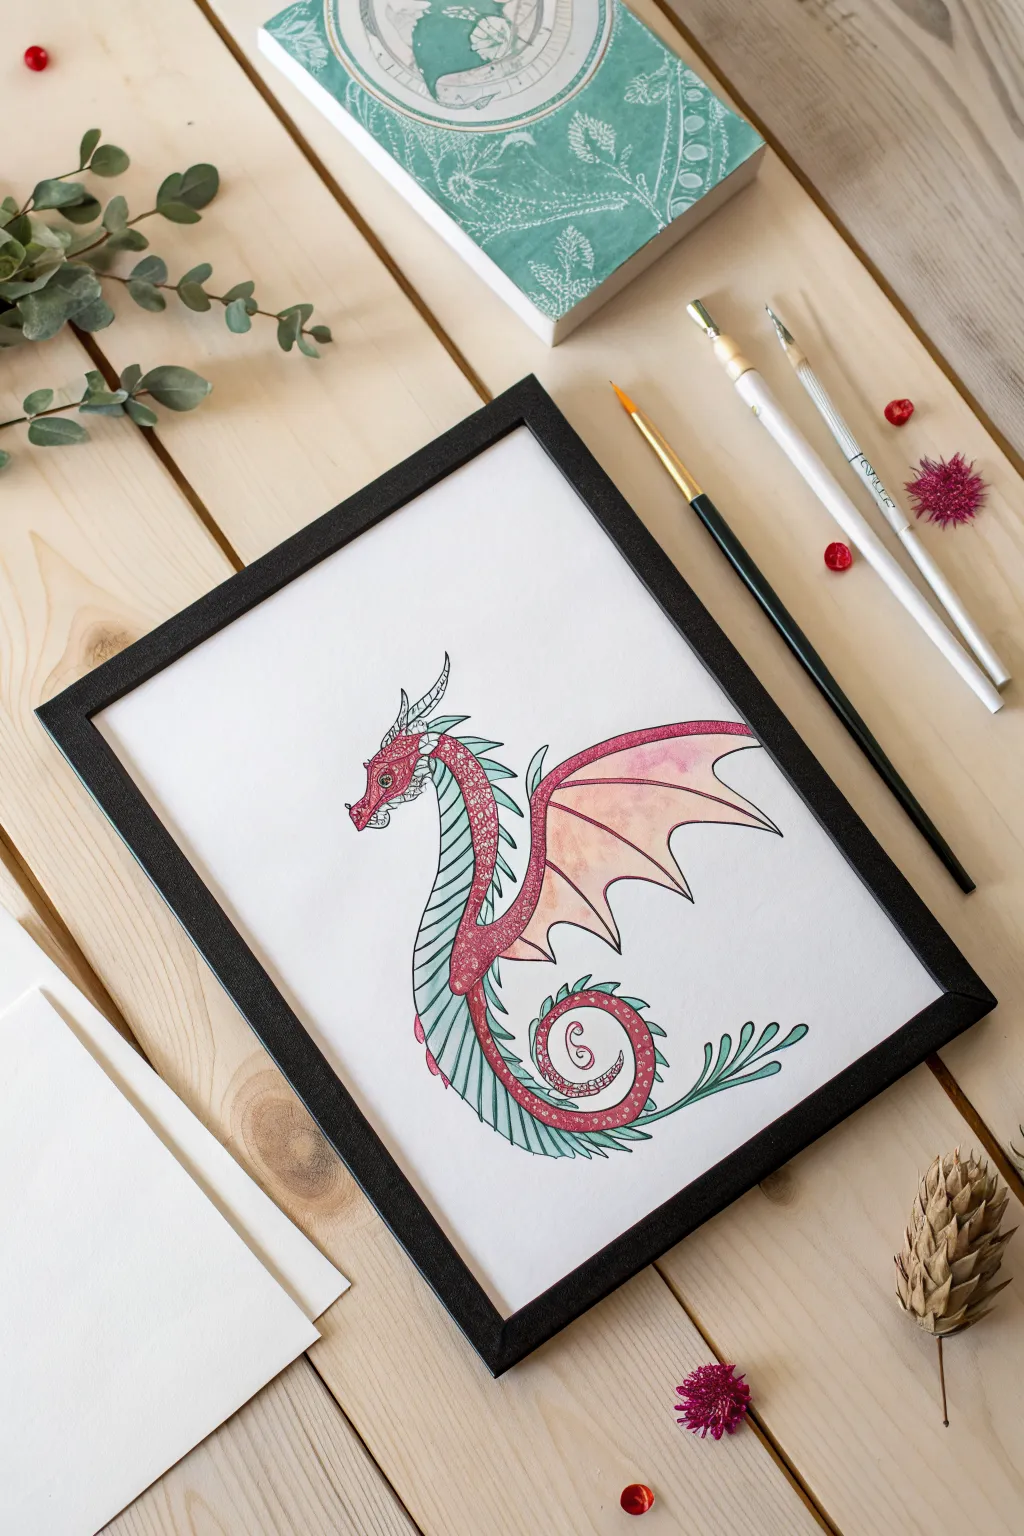
Capture the magic of fantasy with this elegant dragon illustration, featuring intricate line work and soft watercolor washes. The whimsical creature feels both vintage and modern, with its gentle curves and striking contrast between warm reds and cool teals.
Step-by-Step
Materials
- White mixed media or hot press watercolor paper (A4 size)
- Black fine liner pens (0.1mm, 0.3mm, and 0.5mm)
- Watercolor paints (Alizarin Crimson, Sap Green, Pthalo Blue)
- Small round watercolor brush (size 2 or 4)
- Pencil (HB) and eraser
- Ruler
- Simple black photo frame (8×10 or A4)
Step 1: Sketching the Foundations
-
Draft the S-curve composition:
Begin by lightly sketching a large ‘S’ shape on your paper. This will be the spine of the dragon, guiding its elegant posture from the head down to the curled tail. -
Define body thickness:
Add thickness to the spine line you just drew. Make the chest area slightly broader and taper the form gradually as you move toward the tail tip. -
Sketch the head and neck:
At the top of the S-curve, draw a sleek, elongated head shape with a small snout. Add a curved neck line that connects smoothly to the body. -
Add the wing structure:
Extend a large, bat-like wing from the upper back. Draw the main arm of the wing first, pointing diagonally upward, and then sketch the scalloped bottom edge. -
Detail the belly scales:
Sketch horizontal lines along the dragon’s underside (the belly) to create segments. These should follow the curve of the body.
Ink Smearing?
If your black outline bleeds when you apply watercolor, your pen isn’t waterproof. Use pigment liners (like Micron or pigment ink) or paint first, then outline.
Step 2: Inking the Outline
-
Outline the main form:
Using a 0.5mm fine liner, carefully trace over your pencil lines for the dragon’s main body and wing outline. Keep your hand steady for smooth, confident curves. -
Draw the facial features:
Switch to a 0.3mm pen for the face. Draw the eye, the small horn on the nose, and the delicate frills or ears behind the head. -
Add the decorative spikes:
Along the back of the neck and spine, draw small, triangular spikes. As you reach the tail, transform these into longer, leaf-like tendrils for a fantastical look. -
Detail the wing webbing:
Draw the internal lines of the wing, extending from the wing arm down to the points of the scalloped edge. These represent the bones supporting the wing membrane. -
Erase pencil marks:
Wait until the ink is completely dry to prevent smudging. I usually give it an extra minute just to be safe, then gently erase all visible graphite lines.
Metallic Magic
Use metallic gold watercolor or a gold gel pen for the belly scales or the wing tips. It adds a shimmering, royal effect perfect for dragons.
Step 3: Adding Color and Texture
-
Mix your colors:
Prepare two main watercolor pools: a watery mix of Alizarin Crimson for a soft pinkish-red, and a blend of Sap Green with a touch of Pthalo Blue for a muted teal. -
Paint the red sections:
Apply the red wash to the dragon’s main body scales, the face, and the outer arm of the wing. Keep the paint somewhat translucent to let the paper texture show through. -
Fill the wing membrane:
Dilute the red paint further with water for a very pale wash. Fill the large webbing areas of the wing, creating a gradient that fades slightly toward the edges. -
Paint the belly and accents:
Using the teal mixture, carefully paint the segmented belly scales. Use the tip of your brush to stay strictly within the lines. -
Color the decorative tendrils:
Apply the same teal color to the leaf-like tendrils at the end of the tail and the spikes along the back, creating a nice contrast against the red body.
Step 4: Finishing Touches
-
Add pattern details:
Once the red paint is fully dry, use the 0.1mm fine liner to doodle tiny circles or a scale pattern over the red body sections. This adds a texture that mimics intricate embroidery. -
Enhance the eye:
Add a tiny dot of green or yellow to the eye, leaving a speck of white for a highlight to bring the creature to life. -
Frame your work:
Trim the paper if necessary to fit your frame. Place the finished artwork behind the glass and secure the backing.
Hang your new mythical companion on the wall and enjoy the touch of fantasy it brings to your room.


Have a question or want to share your own experience? I'd love to hear from you in the comments below!