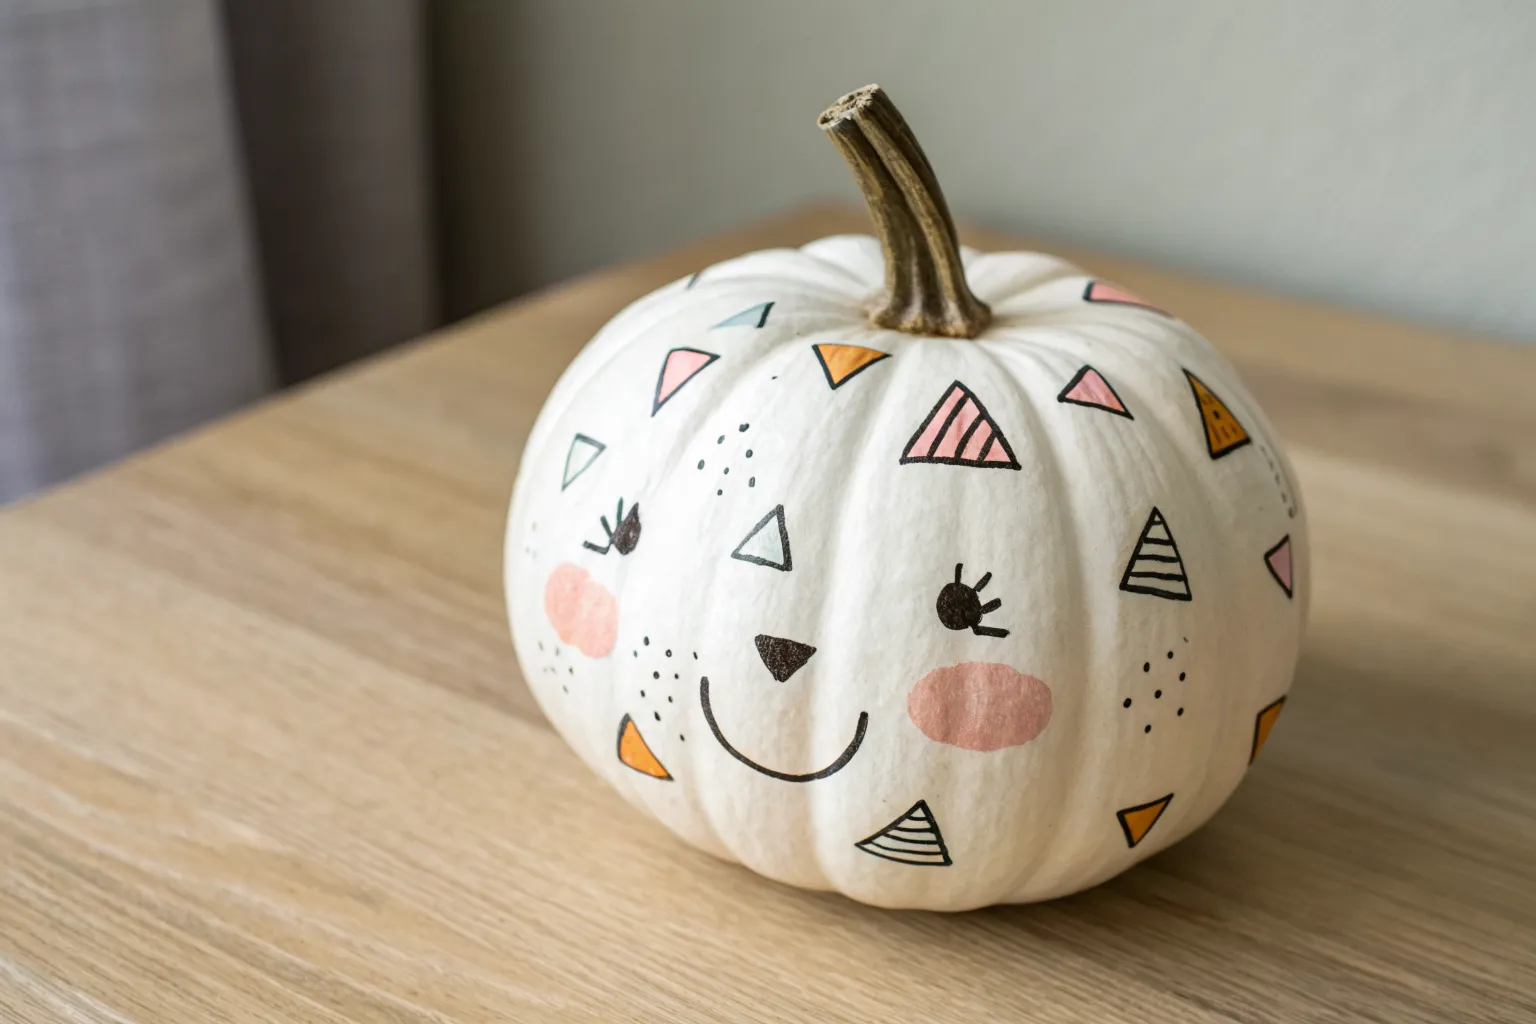
If you love the look of decorated pumpkins but don’t feel like carving, pumpkin marker designs are the sweetest shortcut. I’m sharing easy, no-fuss ideas that look bold and intentional even if you’re brand-new to drawing on a curved surface.
Cute Wide-Eyed Pumpkin Face
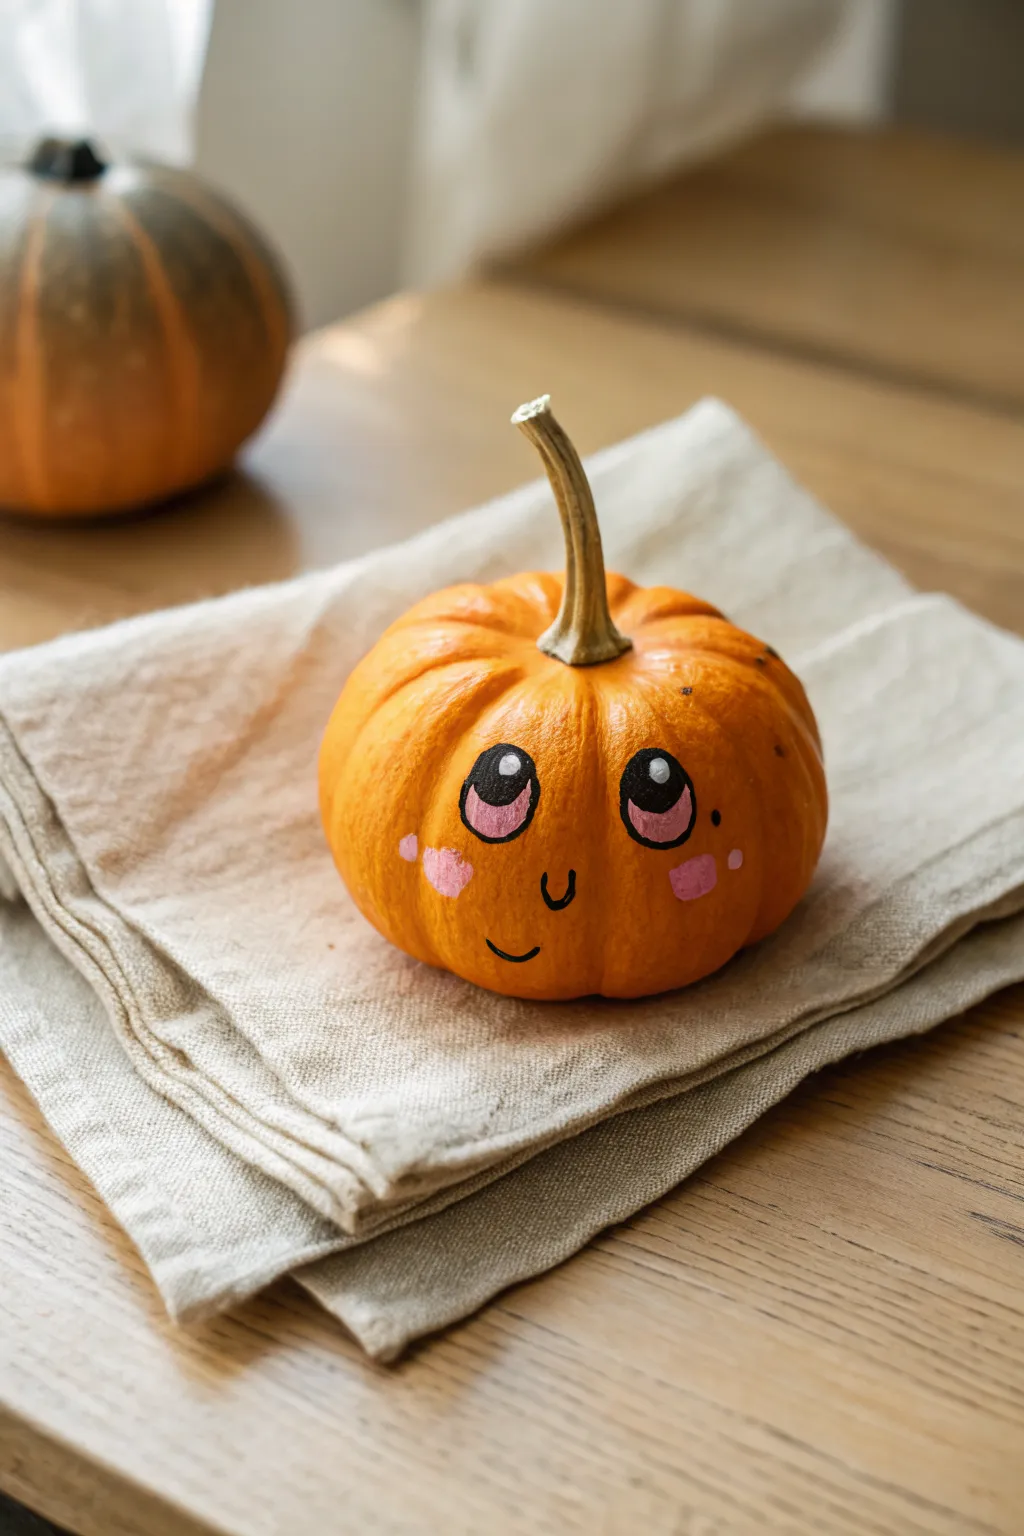
Transform a mini pumpkin into an adorable little character with this simple kawaii-inspired design. Featuring oversized sparkling eyes and sweet rosy cheeks, this quick project uses basic markers to create an irresistibly charming fall decoration.
Step-by-Step Tutorial
Materials
- Small orange pumpkin (real or faux)
- Black permanent marker (fine tip)
- Black acrylic paint marker (medium tip)
- White acrylic paint marker (fine tip)
- Pink acrylic paint marker (medium tip)
- Pale pink acrylic paint marker (bullet tip)
- Damp cloth or paper towel
- Pencil (optional)
Step 1: Preparation and Planning
-
Clean the surface:
Begin by gently wiping down your pumpkin with a damp cloth to remove any dirt or waxy residue. This ensures your markers will adhere smoothly to the skin. -
Dry thoroughly:
Let the pumpkin air dry completely before starting. If the surface is damp, the markers might bleed or refuse to stick. -
Map out the face:
Find the smoothest side regarding bumps and ridges, as this will be your canvas. Visualize where the eyes and mouth will go to ensure they are centered and symmetrical. -
Sketch lightly (optional):
If you are nervous about freehanding, use a pencil to very lightly sketch the circles for the eyes and the curve of the mouth. Don’t press hard, just leave a faint guide.
Step 2: Drawing the Main Features
-
Outline the eyes:
Using your medium-tip black paint marker, draw two large, tall ovals for the eyes. Space them wide apart to enhance the cute, innocent look. -
Add the smile:
With the fine-tip permanent marker, draw a small, simple curved line for the mouth, placing it low between the eyes. -
Draw the nose:
Just above the center of the mouth, make a tiny ‘u’ shape for the nose using the fine permanent marker. -
Thicken the eye outlines:
Go back over the oval eye shapes with the black paint marker to make the lines bold and crisp. A uneven line here adds to the hand-drawn charm.
Smooth Operator
Pumpkins have ridges! When drawing horizontal lines (like the mouth), go slowly over the bumps. Dotting the line instead of dragging it can help prevent skips.
Step 3: Adding the Sparkle and Color
-
Fill the upper iris:
Inside the top half of each eye oval, draw a smaller, black filled-in area. This acts as the pupil. Leave the bottom half empty for now. -
Color the irises pink:
Take your pink acrylic paint marker and fill in the bottom half of the eye ovals. Blend it slightly where it meets the black pupil so there isn’t a harsh gap. -
Let the eyes dry:
Pause for a few minutes. It is crucial that the black and pink layers are completely dry before you add the white highlights, or the colors will smear. -
Add the main highlight:
Using the white paint marker, add a large white dot in the upper left corner of the black pupil area on both eyes. -
Add the secondary sparkle:
Place a smaller white dot diagonally opposite the first one, sitting within the pink area or right on the border. This brings the character to life. -
Create the blush cheeks:
Using a pale pink marker (or the previous pink if you don’t have two shades), dab two small, rough oval patches on the cheeks right next to the eyes. -
Add blush details:
I like to add a tiny extra dot of blush floating near the main cheek patch for a bit of whimsical texture. -
Refine the lines:
Check your black outlines again. If any pink paint overlapped the black borders, carefully re-trace the outer edge of the eye with the fine-tip black marker. -
Add freckles (optional):
For extra character, add one or two tiny black dots near the cheeks using your finest marker tip.
Oops! Paint Smudge?
If you make a mistake with acrylic marker on a real pumpkin skin, wipe it away immediately with a damp Q-tip before it dries. It lifts off surprisingly well.
Place your little pumpkin friend on a napkin or shelf to brighten up your autumn decor


Easy Polka Dot Pumpkin
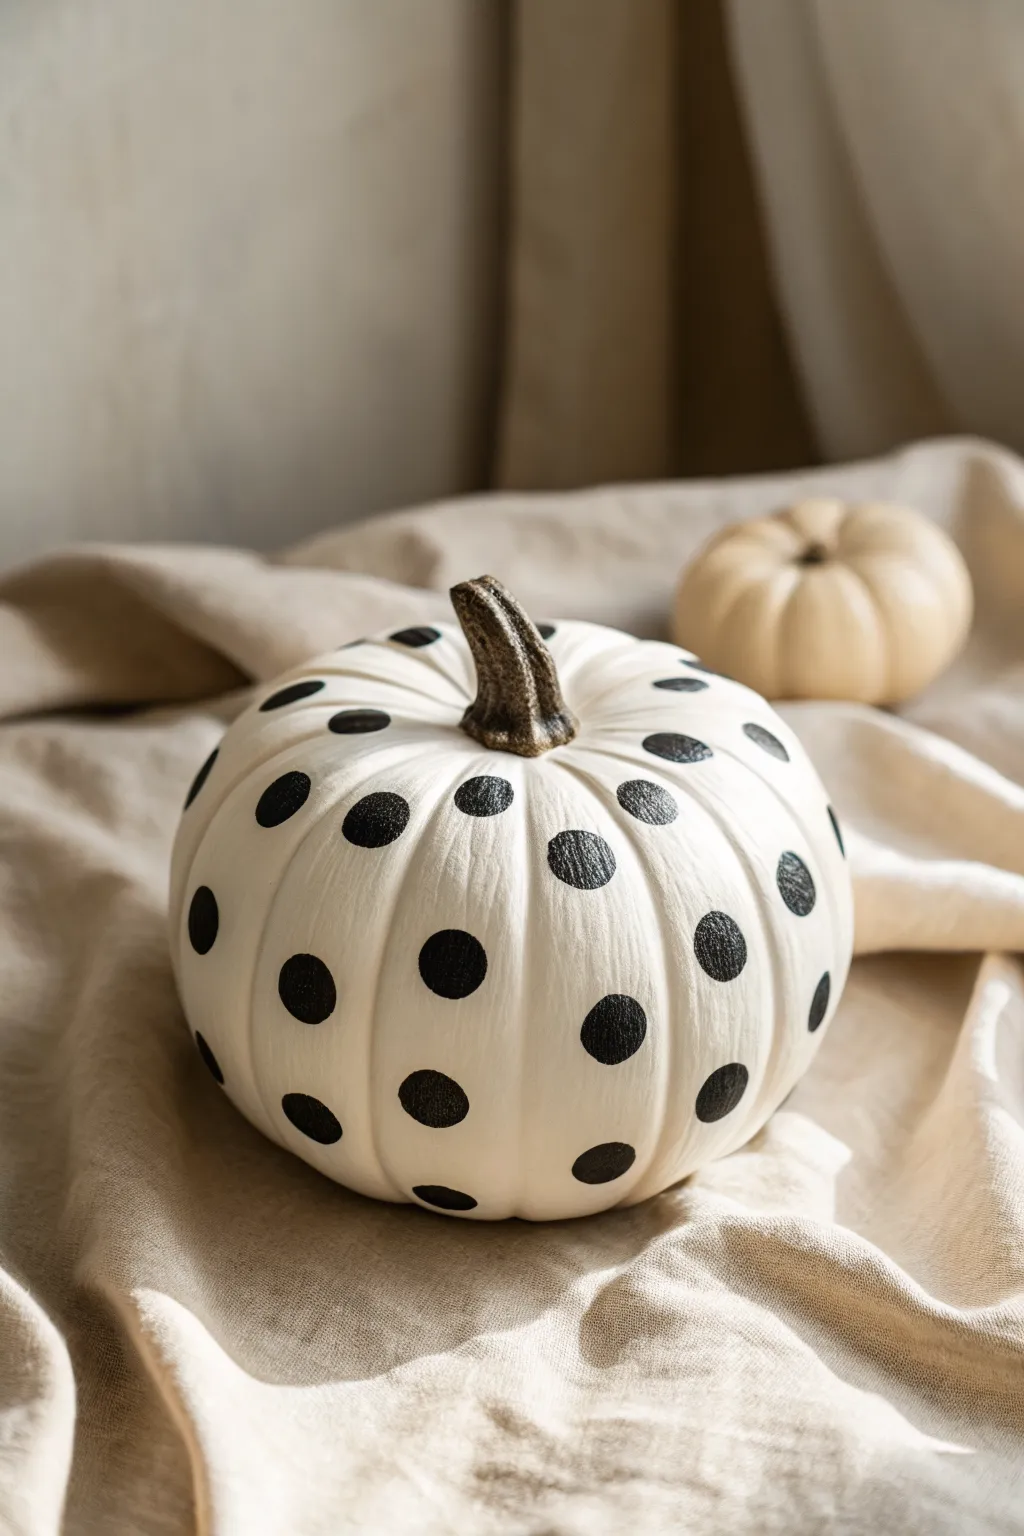
Transform a simple white pumpkin into a chic, modern decor piece with nothing more than a steady hand and a black marker. This high-contrast design adds a playful yet sophisticated touch to your fall display without the mess of carving.
How-To Guide
Materials
- Faux white pumpkin (or a real one wiped clean)
- Black oil-based paint marker (medium tip)
- Pencil (optional)
- Rubbing alcohol
- Cotton rounds
- Matte spray sealer (optional)
Step 1: Cleaning and Prep
-
Clean the surface:
Before you begin, wipe down your pumpkin with rubbing alcohol on a cotton round to remove any oils, dust, or sticker residue. -
Dry thoroughly:
Allow the pumpkin to air dry completely for a few minutes; marker ink adheres much better to a bone-dry surface. -
Plan your spacing:
Visualize the pumpkin’s ribs (the vertical indentations). You will be placing dots in the varying widths between these ribs.
Oops! Smudged Ink?
If you smudge wet ink, don’t wipe it! Let it dry completely, then paint over the mistake with white acrylic paint. Once the white is dry, redraw your black dot over the fix.
Step 2: Drawing the Base Pattern
-
Start at the top:
Begin near the stem. Choose a ‘valley’ between two ribs and lightly mark your first circle position with a pencil if you feel nervous about freehanding. -
Draw the first outline:
Using your medium-tip black paint marker, draw the outline of your first circle. Aim for a size about the width of a nickel or quarter. -
Fill it in:
Color inside the circle outline. Use smooth, consistent strokes to get solid black coverage without streak marks. -
Create a vertical column:
Move straight down from your first dot and create a second dot about two inches below it. -
Continue the column:
Add a third dot near the bottom of that same section, maintaining that roughly two-inch gap between them.
Make It Metallic
Swap the black marker for a gold or copper paint pen for a glamorous twist. Paint the pumpkin stem in a matching metallic shade to tie the whole elegant look together.
Step 3: Creating the Offset Grid
-
Move to the next section:
Rotate the pumpkin slightly to work on the panel to the right of your first column. -
Offset the pattern:
Instead of aligning the new dots horizontally with the first set, position this new dot so it aligns with the empty space between the previous column’s dots. This creates a brick-lay or staggered pattern. -
Fill and repeat:
Draw the outline and fill in this offset dot carefully. -
Work your way down:
Continue down this second column, placing dots so they sit diagonally from the ones in the first column. -
Check the perspective:
Occasionally step back to look at the pumpkin from a distance to ensure your spacing looks balanced overall.
Step 4: Finishing Touches
-
Handle the curves:
As you work around the entire pumpkin, you may find some sections are wider or narrower. I like to cheat the spacing slightly here rather than changing dot size. -
Review edges:
Go back over any dots that look patchy or where the black ink looks slightly translucent, applying a second coat if needed. -
Clean up borders:
If any circles look a bit wobbly, carefully thicken the outline on the uneven side to smooth out the curve. -
Let it cure:
Let the pumpkin sit untouched for at least an hour to ensure the paint marker is fully cured and won’t smudge. -
Seal the design:
If you plan to place this pumpkin on a porch, spray it lightly with a matte clear sealer to protect your artwork from moisture.
Now you have a stylish, high-contrast decoration perfect for a modern autumn vignette


Spiderweb Corner Detail
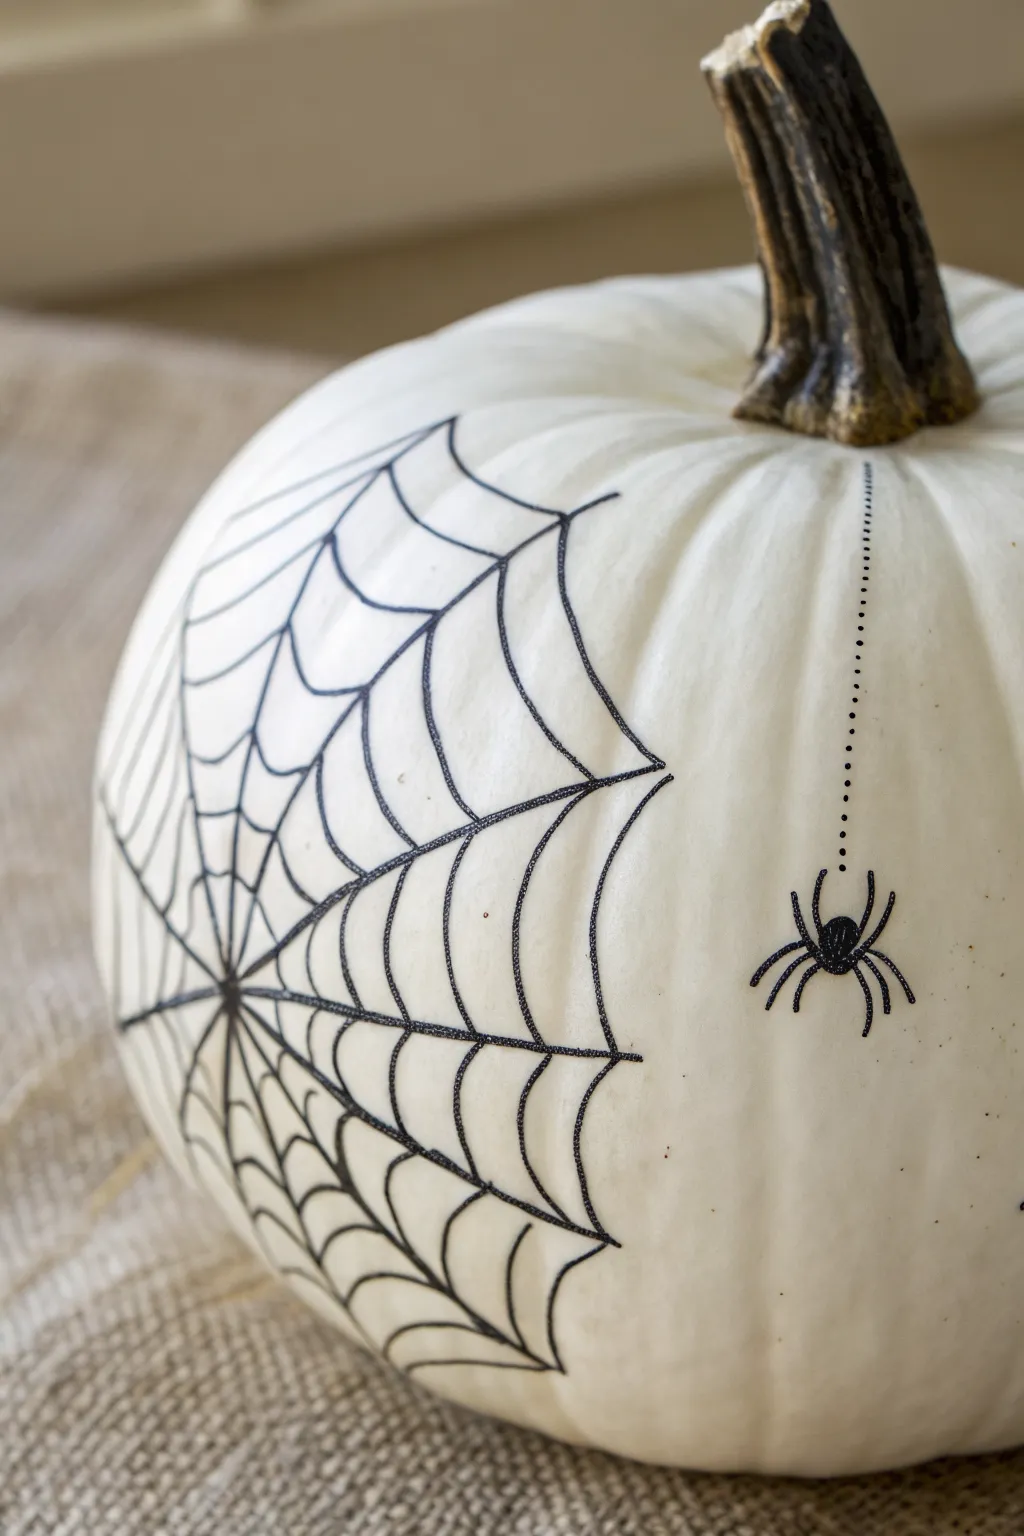
Transform a plain white pumpkin into a creepy-crawly masterpiece with just a few simple lines. This design features a sprawling corner web and a little arachnid friend dropping in for a visit, creating a perfect balance of minimal and spooky.
Step-by-Step Guide
Materials
- Small to medium white pumpkin (real or faux)
- Black permanent marker (fine tip)
- Black permanent marker (ultra-fine tip)
- Pencil (optional, for sketching)
- Eraser
- Damp cloth or paper towel
Step 1: Prepping the Canvas
-
Clean surface:
Before uncapping any markers, give your white pumpkin a thorough wipe down with a damp cloth to remove any dust or waxy residue. A clean surface ensures your marker ink adheres smoothly and stays crisp. -
Dry completely:
Let the pumpkin air dry fully or wipe it dry with a paper towel. Drawing on a damp surface can cause permanent markers to bleed or fade instantly. -
Plan position:
Rotate the pumpkin to find its ‘best’ side. You want a relatively smooth area without deep blemishes for the main web. Visualize the web anchored on the lower left side and the spider on the right.
Oops! Smudged Ink?
If you accidentally smear wet ink, dampen a cotton swab with rubbing alcohol and gently dab the mistake. It erases permanent marker from smooth pumpkin skin magic
Step 2: Weaving the Web
-
Establish the center:
Pick a point on the lower left curve of the pumpkin where all your web lines will originate. It doesn’t need to be perfectly centered; an off-center origin looks more organic. -
Draw radial lines:
Using the fine tip marker, draw 5 to 7 straight lines radiating outward from your origin point. Fan them out across the curve of the pumpkin like sun rays. -
Extend the reach:
Make the outer lines longer than the inner ones to create a dynamic fan shape that stretches across the pumpkin’s surface. -
Start the inner c-curves:
Starting near the center point, draw small, scalloped lines connecting the radial spokes. Think of these as little ‘U’ shapes or inverted bridges connecting one straight line to the next. -
Expand outward:
Move about an inch further out and draw the next row of connective scallops. I find it easiest to work in full rings, completing one circuit before moving to the next layer. -
Vary the spacing:
As you move toward the outer edge of the web, make the gap between your scalloped rows slightly wider. This perspective trick adds depth to the drawing. -
Connect the edges:
For the final outer layer, ensure your scalloped lines connect the very tips of your radial spokes, closing off the web shape cleanly.
Add Some Glam
Trace over the black web lines with a thin line of glitter glue or metallic silver paint pen. It makes the web catch the light like morning dew
Step 3: Adding the Arachnid
-
Choose the drop point:
Look to the right side of your web, closer to the stem but still on the body of the pumpkin. This negative space is perfect for the spider. -
Draw the thread:
Switch to your ultra-fine tip marker. Starting near the top stem area, create a vertical line composed of tiny dots going straight down. Stop where you want the spider to hang. -
Create the body:
At the end of your dotted line, switch back to the regular fine tip marker. Draw a small oval for the spider’s abdomen and a smaller circle attached to the top for the head. -
Fill it in:
Color in the body shape completely so it is solid black and stands out against the white rind. -
Add upper legs:
Draw four legs on each side. Start with the top two on each side reaching upwards and slightly bent, as if they are gripping the air. -
Add lower legs:
Draw the remaining legs curving downwards. Keep the strokes light and tapered at the ends for a creepy, spindly look. -
Review and refine:
Step back and look at the design. If any web lines look too thin or faint, trace over them once more to ensure the black is bold and consistent.
Place your decorated pumpkin on a porch or mantle to show off your spooky handiwork


Simple Ghost Outline Parade
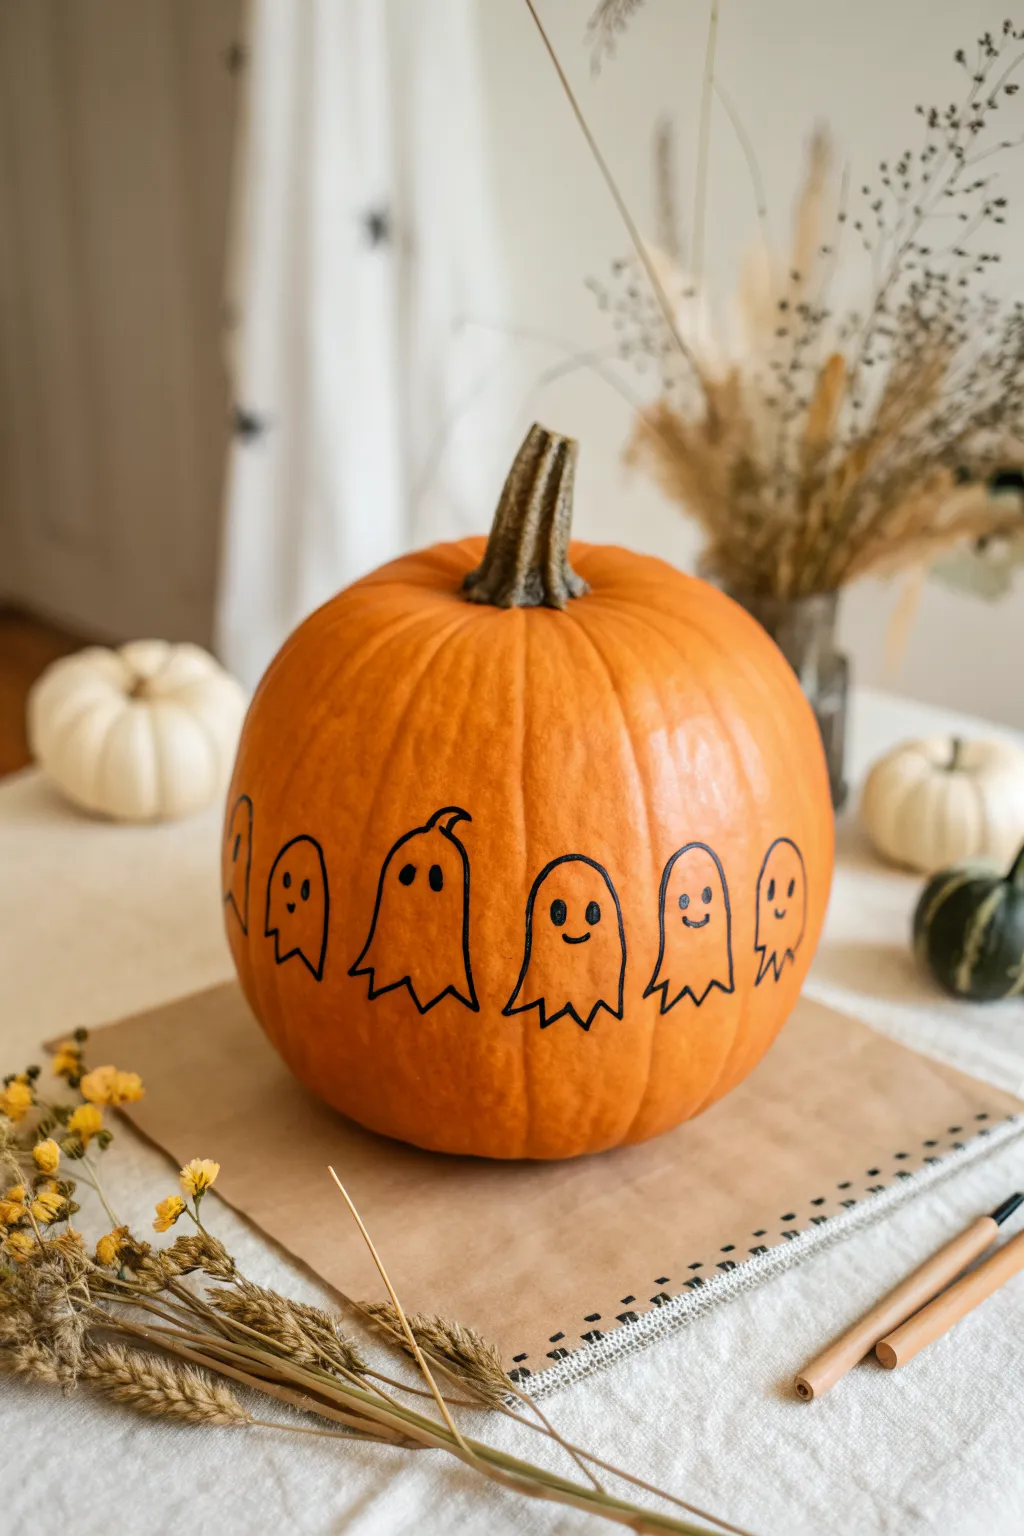
Skip the messy carving this year and opt for this charming, minimalist design featuring a conga line of friendly ghosts. Using just a simple black marker, you can transform a classic orange pumpkin into a festive centerpiece that feels both modern and playful.
How-To Guide
Materials
- Medium-sized orange pumpkin (real or faux)
- Black permanent marker (medium tip)
- Black permanent marker (fine tip)
- Pencil (optional)
- Eraser (optional)
- Damp cloth or baby wipe
- Dry paper towel
Step 1: Preparation & Planning
-
Clean surface:
Begin by wiping down the surface of your pumpkin with a damp cloth to remove any dirt or oils that might repel the marker ink. -
Dry thoroughly:
Use a paper towel to ensure the pumpkin skin is completely dry; moisture is the enemy of crisp marker lines. -
Visualize the line:
Decide where you want your ghost parade to sit. The middle ‘equator’ of the pumpkin offers the best visibility and smoothest drawing surface.
Oops! Smudged Ink?
If you accidentally smudge the permanent marker while it’s wet, quickly use a cotton swab dipped in rubbing alcohol to lift the stain before redrawing the line.
Step 2: Drawing the Ghosts
-
Outline the central figure:
Start with a central ghost. Draw a tall, rounded arch shape for the head and body, keeping the bottom open. -
Add the playful skirt:
Close the bottom of the shape with a jagged, zigzag line to create the classic sheet-ghost hem. -
Create the arm connection:
Extend a small curved line from the side of the ghost’s body to suggest where it will touch or hold hands with its neighbor. -
Draw the neighbor ghost:
Draw the next arch shape right next to the first one, allowing their lower sides to touch or slightly overlap to create a connected chain. -
Close the second shape:
Add the zigzag hem to this second ghost, varying the height of the zigzags slightly for a hand-drawn feel. -
Repeat the pattern:
Continue adding arched ghost shapes around the circumference of the pumpkin until the chain is complete or fills the desired front face.
Make It Glow
Use white acrylic paint pens to fill in the ghost bodies completely. Once dry, redraw the faces on top for a high-contrast look that pops even more.
Step 3: Adding Details & Expressions
-
Thicken the outlines:
Go back over your initial outlines with the medium-tip marker. I like to retrace slowly to ensure the black line is bold and solid against the orange skin. -
Add simple eyes:
For the majority of the ghosts, draw two small vertical ovals for eyes, filling them in completely black. -
Draw simple smiles:
Give several ghosts a simple, U-shaped curved line for a happy smile. -
Create a ‘surprised’ face:
Pick one ghost to be the standout character (like the third one from the left). Draw two larger, wider oval eyes. -
Add the surprised mouth:
For that same ghost, draw a small, filled-in oval for an ‘O’ shaped mouth. -
Add a quirky detail:
On the surprised ghost, add a tiny curved line at the very top of its head to suggest a little cowlick or the top of the sheet fabric. -
Refine the edges:
Inspect your lines closely. Use the fine-tip marker to sharpen the points of the zigzag hems or fix any uneven edges on the eyes. -
Clean up:
If you used any pencil guidelines earlier, verify the ink is fully dry before gently erasing stray graphite marks.
Place your pumpkin on a sketchbook or rustic cloth to enjoy your hand-drawn spirited display

PENCIL GUIDE
Understanding Pencil Grades from H to B
From first sketch to finished drawing — learn pencil grades, line control, and shading techniques.
Explore the Full Guide
Easy Cat Silhouette Pumpkin
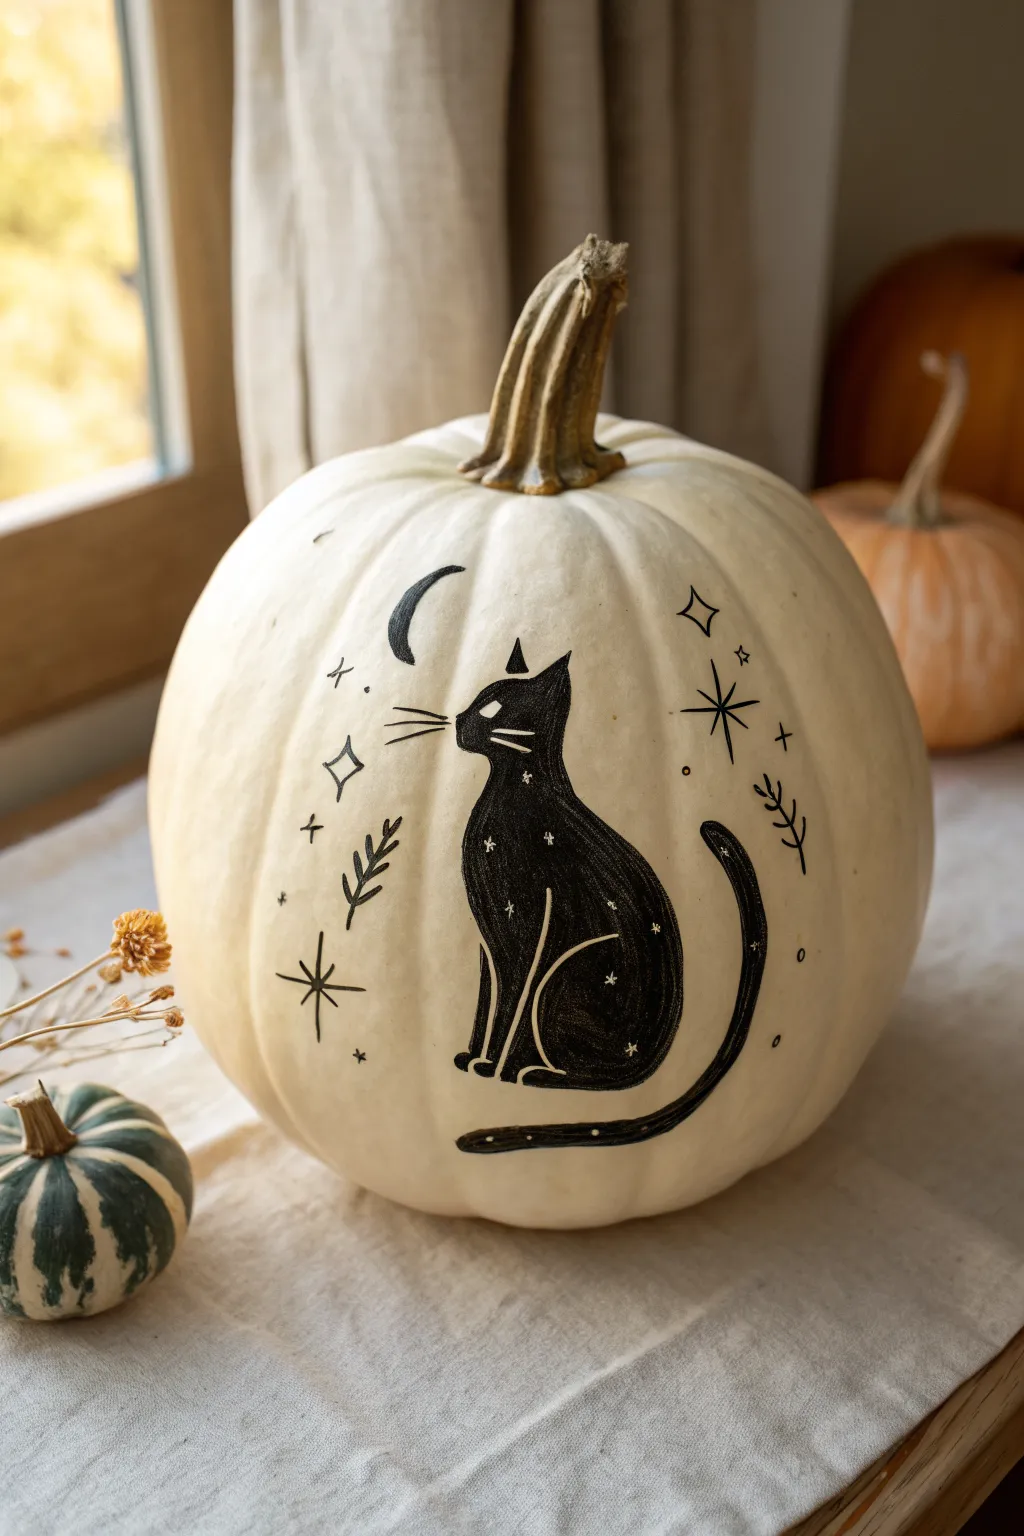
Transform a simple white pumpkin into a mystical Halloween decoration with this elegant black cat design. The contrast of bold ink against the pale rind creates a striking celestial centerpiece perfect for the spooky season.
Step-by-Step
Materials
- White craft pumpkin (synthetic) or real white pumpkin (cleaned and dried)
- Black Posca paint pen (medium tip)
- Black Posca paint pen (fine tip for details)
- Black fine-liner drawing pen (optional, for very sharp points)
- Pencil (HB or lighter)
- Eraser
- Paper towels or cotton swabs (for cleanup)
Step 1: Sketching the Composition
-
Clean surface:
Begin by wiping down your pumpkin with a damp cloth to remove any dust or oils. Dry it thoroughly, as markers adhere best to a completely clean surface. -
Outline the cat body:
Using a light pencil, gently sketch the main teardrop shape of the cat’s body in the center of the pumpkin. Keep the lines faint so they don’t show through later. -
Add the head:
Draw an oval for the head slightly overlapping the top of the body shape. Add two pointed, triangular ears on top. -
Sketch the tail:
Curve a long, sleek tail starting from the base of the cat, wrapping around towards the right side and curving upward. -
Celestial elements:
pencil in a crescent moon near the cat’s head. Scattered around the cat, sketch four-pointed stars, diamond shapes, and a few botanical sprigs.
Clean Lines Secret
Work from the top of the pumpkin down to the bottom. This prevents your hand from excessive smudging on wet ink as you draw the lower details.
Step 2: Inking the Silhouette
-
Trace the outline:
Take your medium-tip black paint pen and carefully trace over your pencil lines for the cat’s entire outer silhouette. -
Define interior lines:
Before filling it in, draw the internal ‘negative space’ lines that define the legs. You want to leave these white. Outline the front legs and the curve of the hind leg. -
Fill the body:
Use the medium marker to color in the solid black areas of the cat. Work in sections to ensure even coverage. -
Fill the head:
Color in the head, being careful to leave a small almond shape uncolored for the eye. -
Second coat:
Let the first layer of ink dry completely. I often apply a second coat here to make the black truly opaque and eliminate streakiness.
Make It Glow
Use gold or silver metallic paint pens for the moon, stars, and the cat’s eye to add a magical shimmer that catches candlelight.
Step 3: Details & Atmosphere
-
Draw the moon:
Fill in the crescent moon shape using the medium marker. Keep the inner curve sharp. -
Draw large stars:
Switch to your fine-tip marker. Draw the larger distinct stars: a vertical line crossed by a horizontal line, then an ‘X’ through the center for a sparkle effect. -
Add floating diamonds:
Draw several four-pointed diamond shapes using the fine tip. Keep the points sharp and crisp. -
Botanical accents:
Draw the simple leaf sprigs on either side of the cat. A single stem with short, angled lines coming off it works perfectly. -
Cat details:
Use the fine tip to add three whiskers coming from the cat’s cheek. Be quick with your stroke to keep them tapered. -
Tiny stars:
Add tiny dots, crosses, and small circles inside the black body of the cat to make it look like a starry night sky. -
Final touches:
Scatter a few more tiny dots and small crosses around the outside background to balance the composition. -
Cleanup:
Once the ink is 100% dry, gently erase any visible pencil sketch lines.
Display your celestial kitty on a mantle or table for a sophisticated touch of seasonal magic
Leafy Vine Pumpkin Linework
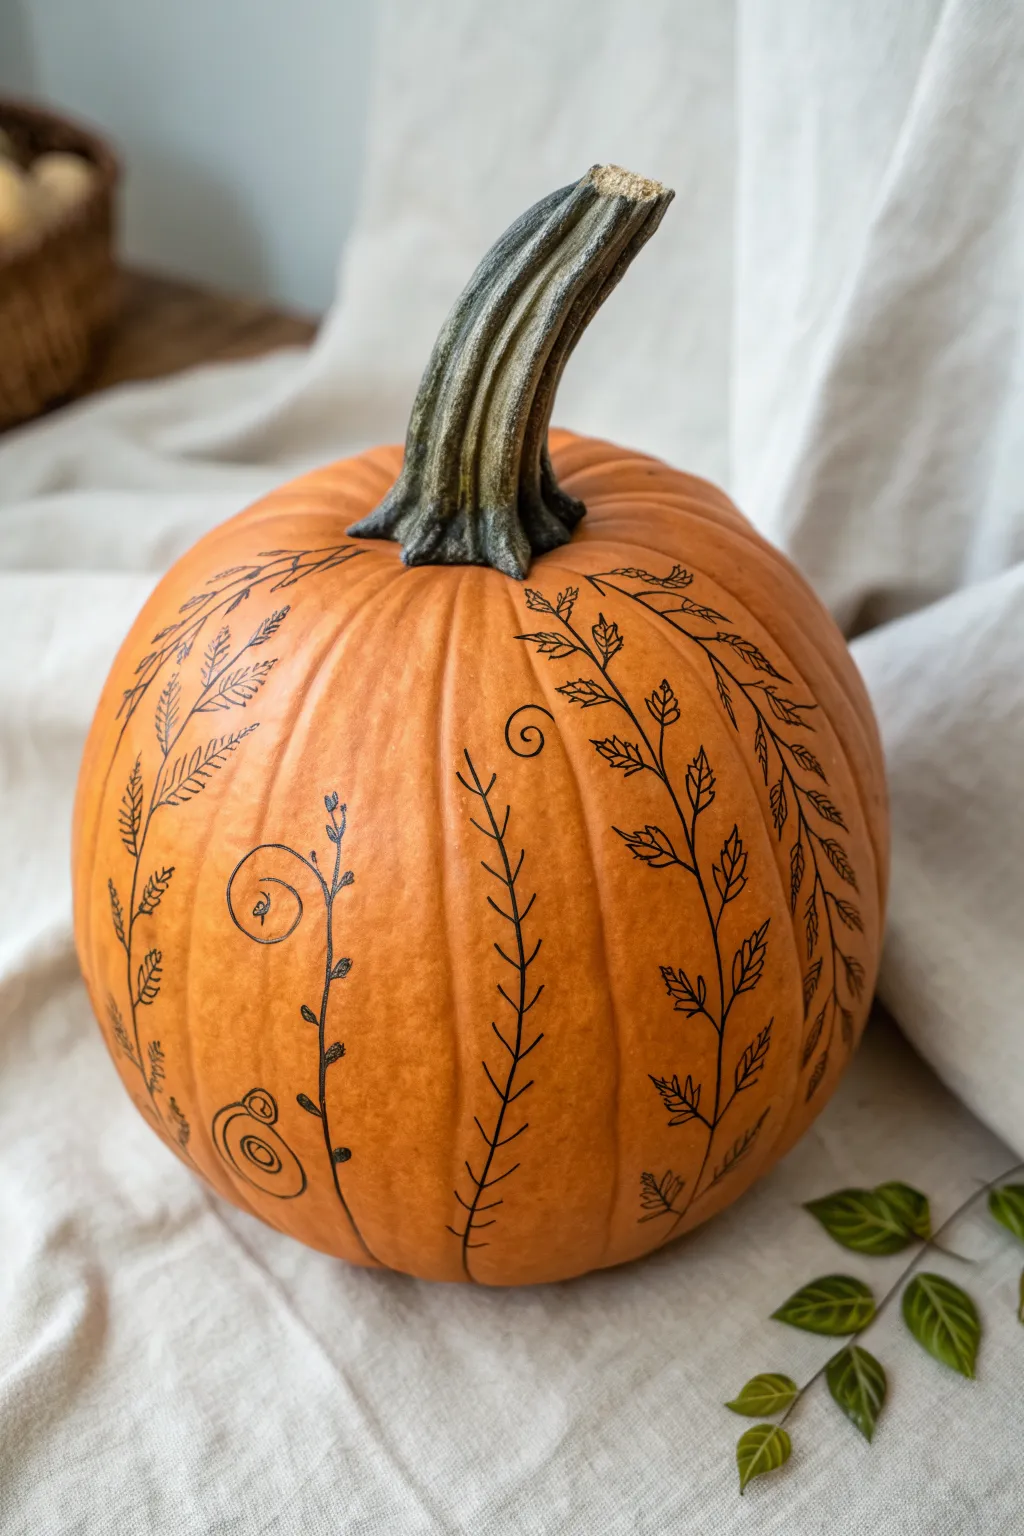
Transform a simple orange pumpkin into a sophisticated piece of autumn decor with this delicate linework design. Using fine-point markers, you’ll create vertical climbing vines that mimic ferns and leaves, flowing naturally with the pumpkin’s ribs.
Step-by-Step Tutorial
Materials
- Medium-sized orange pumpkin (real or faux)
- Black permanent marker (fine point)
- Black permanent marker (ultra-fine point)
- Pencil (optional, for drafting)
- Eraser
- Paper towel or rag
- Rubbing alcohol (for cleaning)
Step 1: Preparation & Planning
-
Clean surface:
Begin by wiping down your pumpkin with a paper towel dampened with rubbing alcohol. This removes surface oils or dirt that might clog your marker tips. -
Dry completely:
Let the surface air dry for a few minutes. If the pumpkin is damp at all, the ink will bleed and feather. -
Identify sections:
Look at the natural vertical ribs of your pumpkin. You will be drawing one vine design in the center of every other ‘panel’ or valley between the ribs to keep the spacing even. -
Light sketch:
If you are nervous about freehanding, use a pencil to lightly trace the main vertical S-curve for each vine. Keep these lines faint so they don’t show later.
Step 2: Drawing the Primary Vines
-
Draw the central stem:
Starting near the bottom curve of the pumpkin, draw a single, unbroken line curving gently upward toward the stem using your fine-point marker. Let the line follow the natural bulge of the pumpkin. -
Vary direction:
For the next panel, draw a similar stem but perhaps curve it slightly differently or have it lean the opposite way to create organic variety. -
Repeat around the perimeter:
Continue adding these primary vertical stems around the entire pumpkin, spacing them out comfortably. -
Add curly cues:
At the top or near the branching points of some vines, draw small, tight spirals (like fiddleheads). These add whimsy and fill negative space effectively.
Marker Mastery
Work from the top of the pumpkin downward if you are right-handed (or vice versa) to prevent your hand from smudging fresh ink while you draw.
Step 3: Adding Foliage Details
-
Fern style leaves:
choose one of your vertical stems to be a ‘fern’. Switch to the ultra-fine point marker. Draw short, curved dashes extending outward from both sides of the stem, getting smaller as they reach the top tip. -
Leafy vine style:
On the next stem, draw small, simple leaf shapes. These should be paired or alternated along the stem. Keep the outlines crisp and open. -
Chevron vine style:
Create a more geometric look on a third stem by drawing upside-down ‘V’ shapes or chevrons along the line. This mimics a different type of plant texture. -
Mix and match:
Rotate through these three leaf styles—fern dashes, open leaves, and geometric chevrons—as you work your way around the pumpkin so no two identical vines are right next to each other. -
Add smaller tendrils:
Draw very thin, secondary vines branching off the main stems near the bottom. I like to add tiny spirals at the ends of these to mimic climbing pea shoots.
Gold Highlights
Trace just the outer edge of one side of your vines with a gold metallic paint pen. It adds a subtle shimmer that catches the light beautifully.
Step 4: Refining the Design
-
Thicken main lines:
Go back over the very bottom inch of your main stems with the thicker fine-point marker to give the plants a sense of weight and grounding. -
Detail the open leaves:
Inside the larger open leaf shapes, add a tiny central vein line using the ultra-fine tip. Don’t let it touch the edges; just a floating line adds dimension. -
Check balance:
Step back and look at the pumpkin from a distance. If a spot looks too empty, add a small floating spiral or a detached leaf. -
Clean up sketch lines:
Once the ink is 100% dry (give it at least 20 minutes), gently erase any visible pencil marks. Be careful not to smudge the marker. -
Seal (optional):
If you plan to keep this pumpkin outside, spray it with a clear acrylic matte sealer to prevent the rain from washing away your art.
Your pumpkin now features a botanical garden style that looks elegant on any porch or dining table
BRUSH GUIDE
The Right Brush for Every Stroke
From clean lines to bold texture — master brush choice, stroke control, and essential techniques.
Explore the Full Guide
Boho Sunburst Pumpkin Details
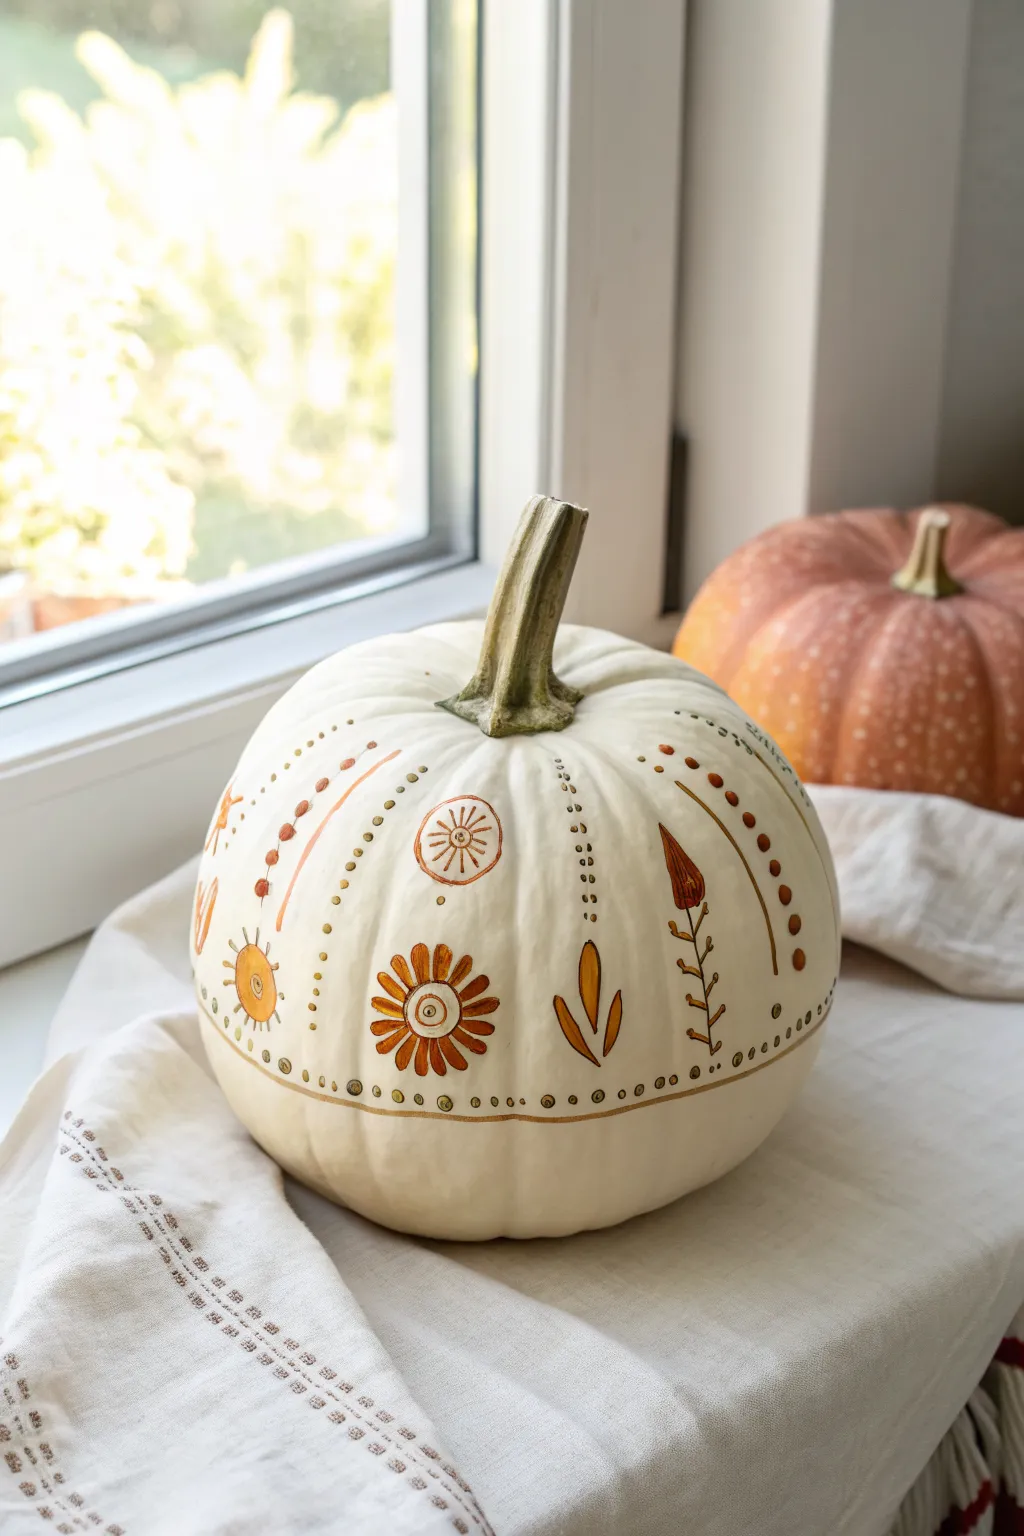
Capture the warmth of autumn sunshine with this minimalist yet striking boho design. Using simple earth tones on a creamy white pumpkin, you’ll create a repeating pattern of stylized sunbursts, botanical stems, and delicate dots that feels organic and handcrafted.
Step-by-Step Guide
Materials
- Medium-sized white pumpkin (real or faux)
- Oil-based paint pens (fine and medium tip) in burnt orange
- Oil-based paint pens (fine and medium tip) in metallic gold or bronze
- Oil-based paint pens (fine point) in olive green
- Rubbing alcohol
- Cotton pads or paper towel
- Pencil (optional)
Step 1: Preparation & Base Layout
-
Clean the surface:
Before uncapping any markers, wipe down your entire pumpkin with rubbing alcohol and a cotton pad. This removes natural oils or manufacturing residues that could prevent the paint from sticking properly. -
Visualize the segments:
Note the natural vertical ribs of the pumpkin. You will be using the recessed grooves as dividers and the raised sections as your canvas panels for the main designs. -
Draft the horizon line:
If you’re nervous about freehanding, use a pencil to lightly sketch a horizontal line circling the lower third of the pumpkin. This will act as the baseline for your pattern.
Uneven Ink Flow?
If the marker streaks or skips, press the nib on a scrap paper to pump more ink. Do not shake the pen directly over the pumpkin or it might splatter.
Step 2: Drawing the Primary Motifs
-
Create the central flower:
Choose a prominent raised section. Near the bottom third, draw a small circle in burnt orange. Add a dot in the center, then draw elongated teardrop petals radiating outward to create a daisy-like sunburst. -
Add the upper medallion:
Directly above your flower, higher up on the pumpkin’s shoulder, draw a circle with your bronze or gold pen. Decorate the inside with four radiating spokes and add small dashes around the exterior perimeter. -
Draw the simple leaf sprig:
Move one section to the right. Using the burnt orange marker again, draw two simple, curved, leaf-like shapes rising from the bottom third, resembling a tulip sprouting. -
Create the tall botanical stem:
In the next section to the right, draw a long, thin vertical line in bronze/gold. Add small, angled dashes on either side to resemble leaves or thorns, and top it with a filled, teardrop-shaped bud in burnt orange. -
Sketch the radiating sun:
Moving left from your original flower, draw a half-circle or full circle sun shape in gold. Add definitive, straight rays extending outward, alternating lengths for visual interest. -
Repeat the pattern:
Continue rotating the pumpkin, alternating these motifs—sunburst flower, simple leaves, tall stem, radiating sun—until you have circled the entire gourd.
Step 3: Adding Decorative Accents
-
Draw the swooping arches:
Above your tall botanical stems, use the burnt orange marker to draw long, curved lines that arch toward the stem from the top of the pumpkin. I find it easiest to pull the pen toward me for smoother curves. -
Dot the arches:
Along the curved line you just drew, add a series of solid dots. Make the dots slightly larger near the top and smaller as they descend. -
Add vertical dotted lines:
In the vertical grooves between your main design panels, add strictly vertical lines of small dots using your olive green or bronze fine-tip marker to define the segments. -
Embellish the spaces:
Look for empty white space between your main drawings. Fill these gaps with tiny singular dots or very small circles in gold to create a ‘sparkle’ effect without cluttering the design.
Mistakes Happen
Slipped up? Dip a Q-tip in rubbing alcohol and gently erase the wet ink. For dried ink, you can gently scratch it off with a fingernail or craft knife.
Step 4: The Anchoring Border
-
Draw the base line:
Create a solid horizontal line that runs underneath all your designs, circling the entire pumpkin. This grounds the artwork so the flowers don’t look like they are floating aimlessly. -
Add the secondary line:
Draw a second, thinner line about a quarter-inch below the first foundation line. -
Fill the border with dots:
In the space between your two horizontal lines, add a consistent row of small dots, spacing them evenly all the way around. -
Final drying time:
Let the pumpkin sit untouched for at least 30 minutes. Oil-based markers can stay tacky longer than you expect, and smudging it now would be heartbreaking.
Place your finished pumpkin near a window to let the metallic gold ink catch the natural light
Zentangle Panel-by-Panel Pumpkin
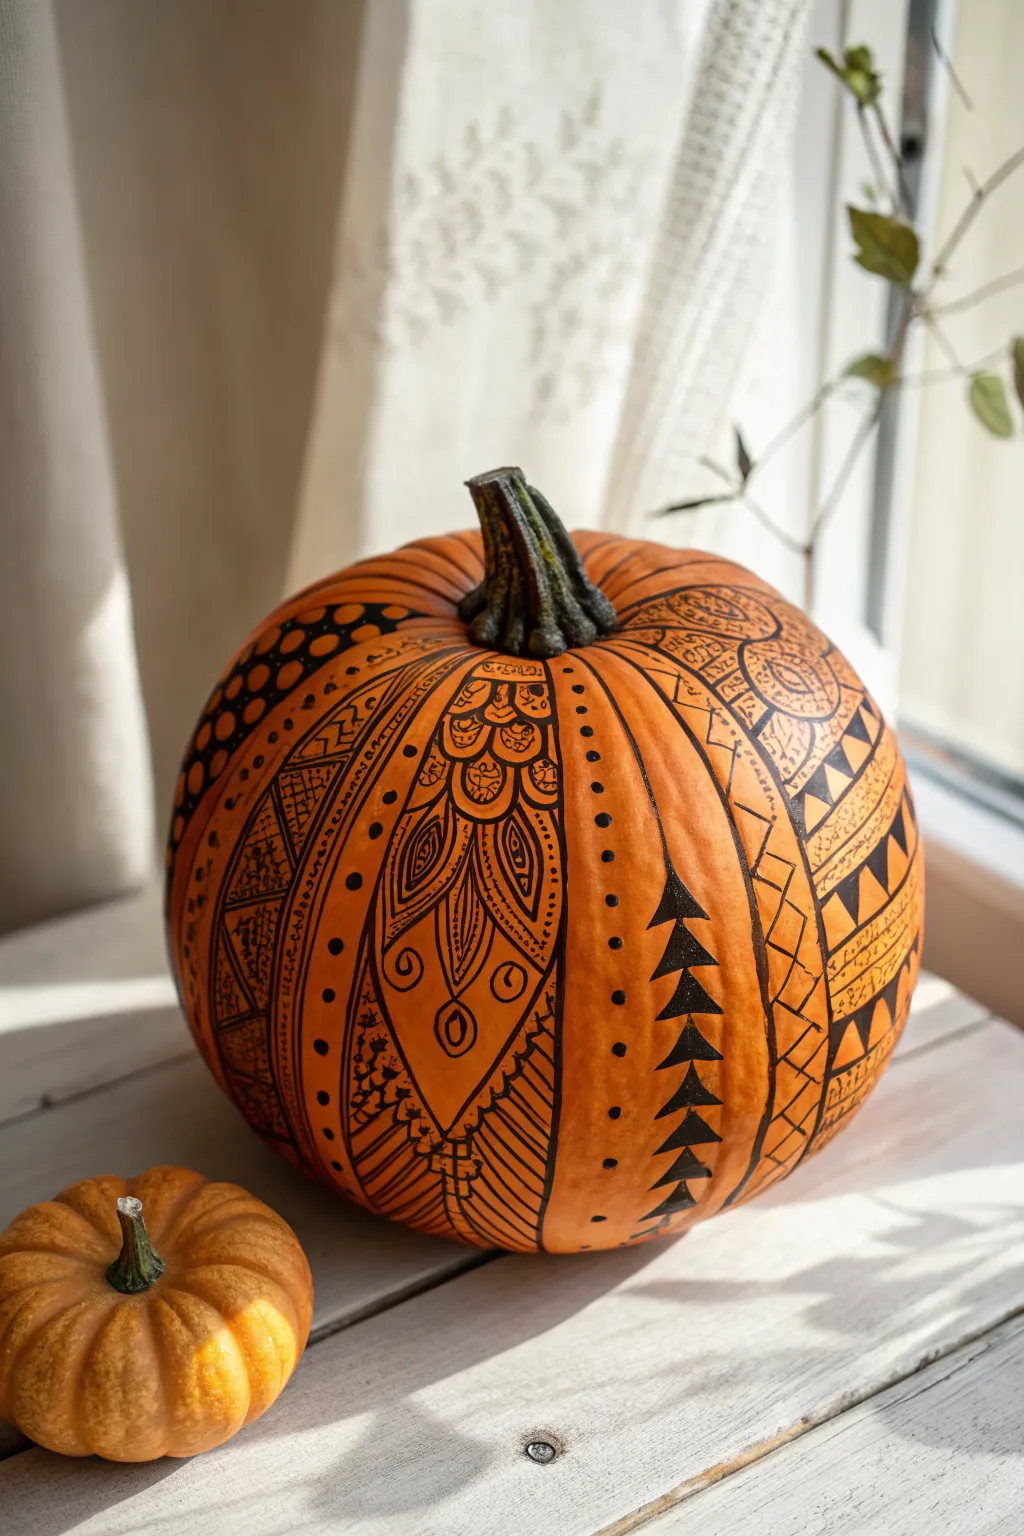
Transform a smooth-skinned pumpkin into a striking piece of seasonal decor by treating its natural ribs as individual canvases for detailed line work. This Zentangle-inspired approach uses high-contrast black ink to create alternating panels of geometric triangles, organic paisley shapes, and intricate stippling.
Step-by-Step
Materials
- Medium-sized pumpkin (smooth surface, distinct ribs)
- Permanent marker (black, chisel tip)
- Permanent marker (black, fine point)
- Permanent marker (black, ultra-fine point)
- Rubbing alcohol
- Cotton pads or paper towel
- Pencil (optional for drafting)
Step 1: Preparation and Partitioning
-
Surface Prep:
Begin by wiping the entire surface of your pumpkin with rubbing alcohol on a cotton pad. This removes natural oils and dirt, ensuring your ink adheres crisply without smudging. -
Analyze the Ribs:
Examine the natural vertical indentations (ribs) of your pumpkin. These will serve as boundaries for your designs. You don’t need to draw lines to separate them; the pumpkin’s own geography does the work for you. -
Panel Planning:
Mentally assign alternating designs to the segments. I find it helpful to plan for a mix of heavy black-fill designs and lighter, line-based designs to keep the overall look balanced.
Ink Smudging?
If you smudge wet ink, don’t panic. Dip a Q-tip in rubbing alcohol and carefully erase the mistake. Let the spot dry completely before redrawing over it.
Step 2: Drawing the Geometric Panels
-
Triangle Towers:
Select a panel for geometric focus. Using the fine-point marker, draw a vertical zigzag line running from the stem down to the base to create a column of stacked triangles. -
Filling the Triangles:
Switch to your chisel tip or standard fine marker for filling. Color in every other triangle completely black to create a bold, high-contrast column. -
Adding Texture:
In the remaining empty triangles, use the ultra-fine pen to add small details like parallel hatching lines or tiny dots to add depth without darkening the space too much. -
Adjacent Zigzags:
Move to a neighboring panel or section. Draw a simpler zigzag line or a stack of chevrons. Instead of filling these solid, try outlining them with double lines to create a ribbon effect.
Step 3: Creating Organic & Flowing Panels
-
Paisley Shapes:
On a wider panel, sketch large, teardrop paisley shapes using the fine-point marker. Orient them vertically, perhaps stacking two large ones with the pointed ends facing up. -
Internal Details:
Inside the paisley teardrops, draw concentric shapes—smaller teardrops, circles, or petal-like curves. Use the ultra-fine pen here to keep the lines crisp and delicate. -
Connecting Lines:
Connect the large paisley shapes with flowing, curved lines that mimic vines or feathers. Allow these lines to follow the curve of the pumpkin’s surface. -
Stippling Decoration:
Use the stippling technique (creating patterns with dots) to shade the tips of petals or fill negative space inside the paisley forms.
Add Metallic Flair
Trace inside the empty spaces of your black designs with a gold or copper metallic paint pen. The shimmer looks incredible against the matte pumpkin skin.
Step 4: dividers and Final Touches
-
Defining Boundaries:
Once your main panels are filled, use the fine-point marker to draw solid vertical lines separating the distinct design sections. This acts like a frame for each panel. -
Dotted Borders:
Enhance these vertical dividers by adding a row of evenly spaced dots running parallel to the solid line. This adds visual interest to the ‘gutter’ spaces. -
Circle Motifs:
If you have a narrow panel left over, fill it with a simple stack of circles. Fill the negative space around the circles with solid black ink to make the orange circles pop. -
Stem Work:
Don’t ignore the stem. You can leave it natural for contrast, or add very subtle shading lines at the base where it meets the pumpkin. -
Clean Up:
Check for any light pencil marks if you used them and gently erase. Touch up any black areas that look uneven with a second coat of marker.
Place your patterned masterpiece on a sunny windowsill where the light can highlight the intricate ink work


Stitched Frankenstein Patch Pumpkin
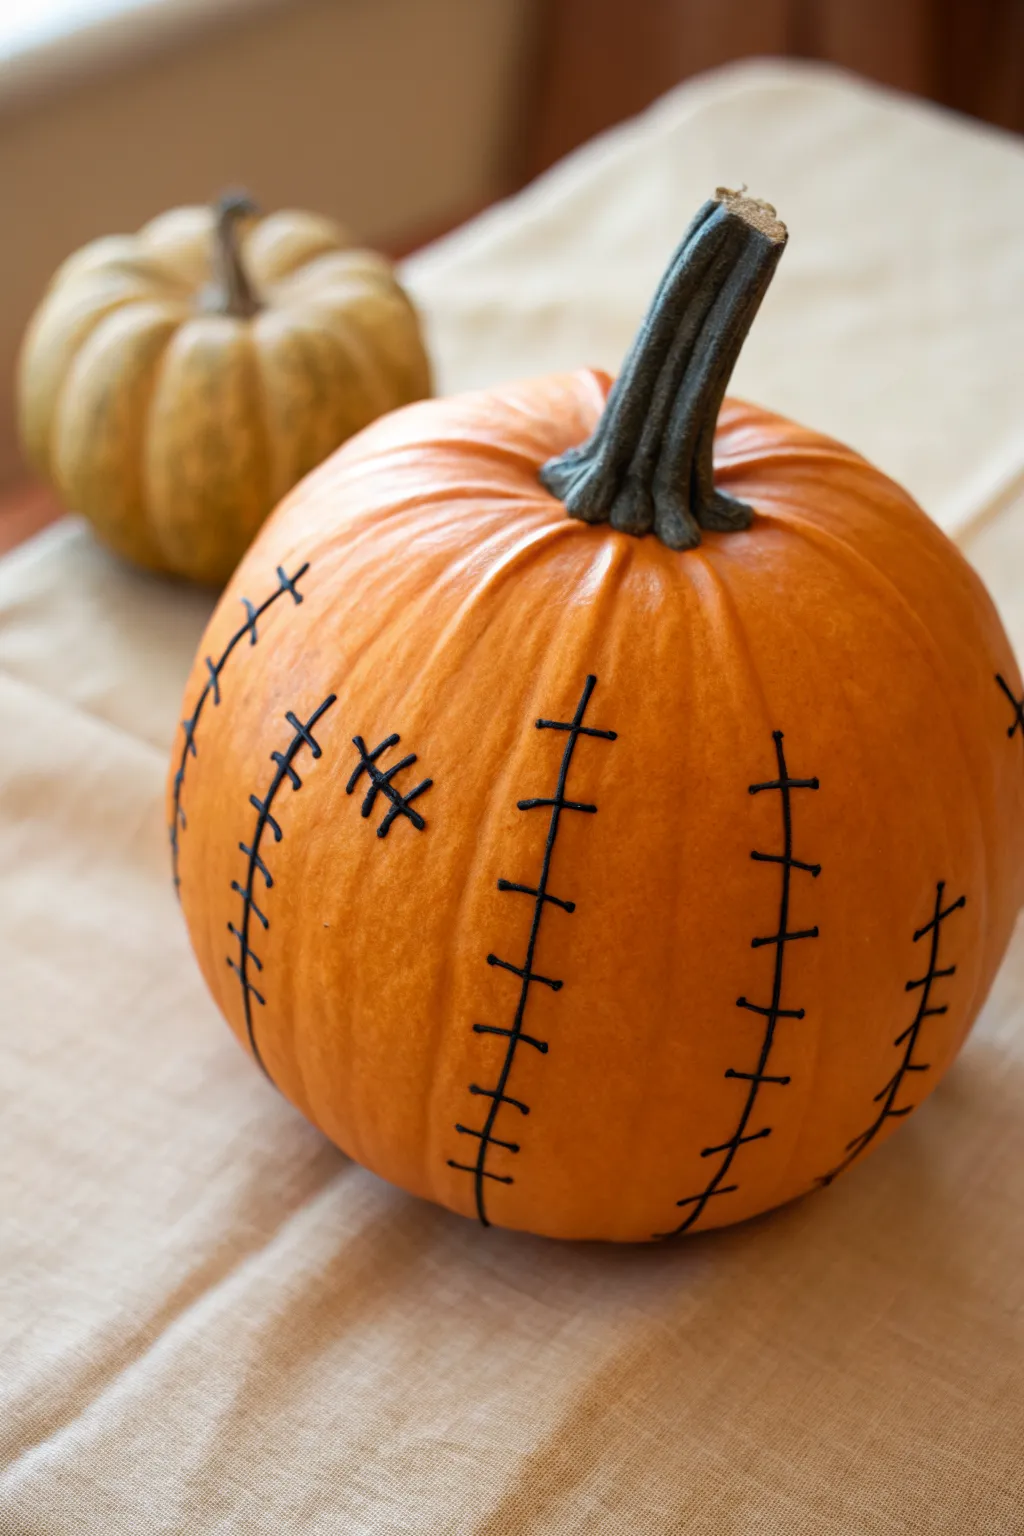
Transform a classic orange gourd into a playfully spooky creation with nothing but a steady hand and a marker. This minimalist, no-carve design uses varied stitch patterns to evoke the look of a pieced-together monster.
Detailed Instructions
Materials
- Medium-sized orange pumpkin (real or faux)
- Black permanent marker (chisel tip advised)
- Black permanent marker (fine tip)
- Rubbing alcohol
- Cotton balls or paper towel
- Pencil (optional)
Step 1: Preparation
-
Clean surface:
Begin by wiping down your pumpkin with a damp cloth to remove any field dirt or dust that might clog your markers. -
Degrease skin:
Using a cotton ball soaked in rubbing alcohol, thoroughly wipe the entire surface of the pumpkin skin. This removes natural oils and ensures the permanent ink adheres crisply without beading up. -
Dry completely:
Allow the pumpkin to air dry for several minutes until the surface feels completely matte and dry to the touch.
Ink Not Stick?
If the marker ink beads up or separates, the pumpkin skin is likely too oily. Re-clean the specific area vigorously with rubbing alcohol and let dry completely.
Step 2: Drafting Part Lines
-
Plan vertical seams:
Visualize three to five vertical lines running down the pumpkin’s ribs. You don’t need to follow every rib groove; spacing them out creates a bolder effect. -
Sketch guides:
Lightly sketch these vertical lines with a pencil if you feel unsure, or prepare to freehand them. I usually find following the natural indentation of the pumpkin ribs helps keep things straight. -
Draw main vertical lines:
Using the chisel-tip permanent marker, draw long, continuous vertical lines from the top shoulder of the pumpkin down to the base. -
Vary lengths:
Make some lines run almost the full height of the pumpkin, while others can be shorter segments to look like smaller patches. -
Add horizontal scars:
Draw one or two smaller, horizontal or diagonal lines between the vertical ones to create the look of cross-directional patches.
Step 3: Stitching Detail
-
Cross the lines:
Switch to your fine-tip marker for better control over the smaller details. -
Draw standard stitches:
Along your first vertical line, draw short horizontal hash marks intersecting the main line. Space them about half an inch apart. -
Add ‘X’ stitches:
On a different vertical line, vary the pattern by drawing small distinct ‘X’ shapes over the line instead of straight dashes. -
Create angled stitches:
For a third variation, draw diagonal slashes across a line. This variety makes the ‘surgery’ look more chaotic and authentic. -
Detail the patch mark:
Locate a small open area and draw a standalone hashtag or tic-tac-toe board shape to represent a heavy reinforcement stitch. -
Thicken intersections:
Go back over the points where your stitches cross the main line. Adding a tiny bit of extra weight at these intersections mimics the tension of thread pulling on skin. -
Clean up edges:
If any lines look too feathery or light, carefully retrace them with the chisel tip to ensure they are solid black.
Pro Tip: Matte Finish
After the marker is fully dry, spray the pumpkin with a clear matte sealant. This reduces the pumpkin’s natural shine and makes the black ink look darker and deeper.
Step 4: Finishing Touches
-
Check perspective:
Step back and view the pumpkin from a few feet away. Add more stitches if any areas look too empty. -
Set the ink:
Let the marker ink dry undisturbed for at least 15 minutes to prevent accidental smearing. -
Erase pencil marks:
If you used pencil guidelines earlier, gently erase any visible graphite marks, being careful not to rub off the marker ink.
Now you have a wonderfully stitched centerpiece that captures the spirit of the season without any of the messy pumpkin guts
Bold Stained-Glass Mosaic Pumpkin
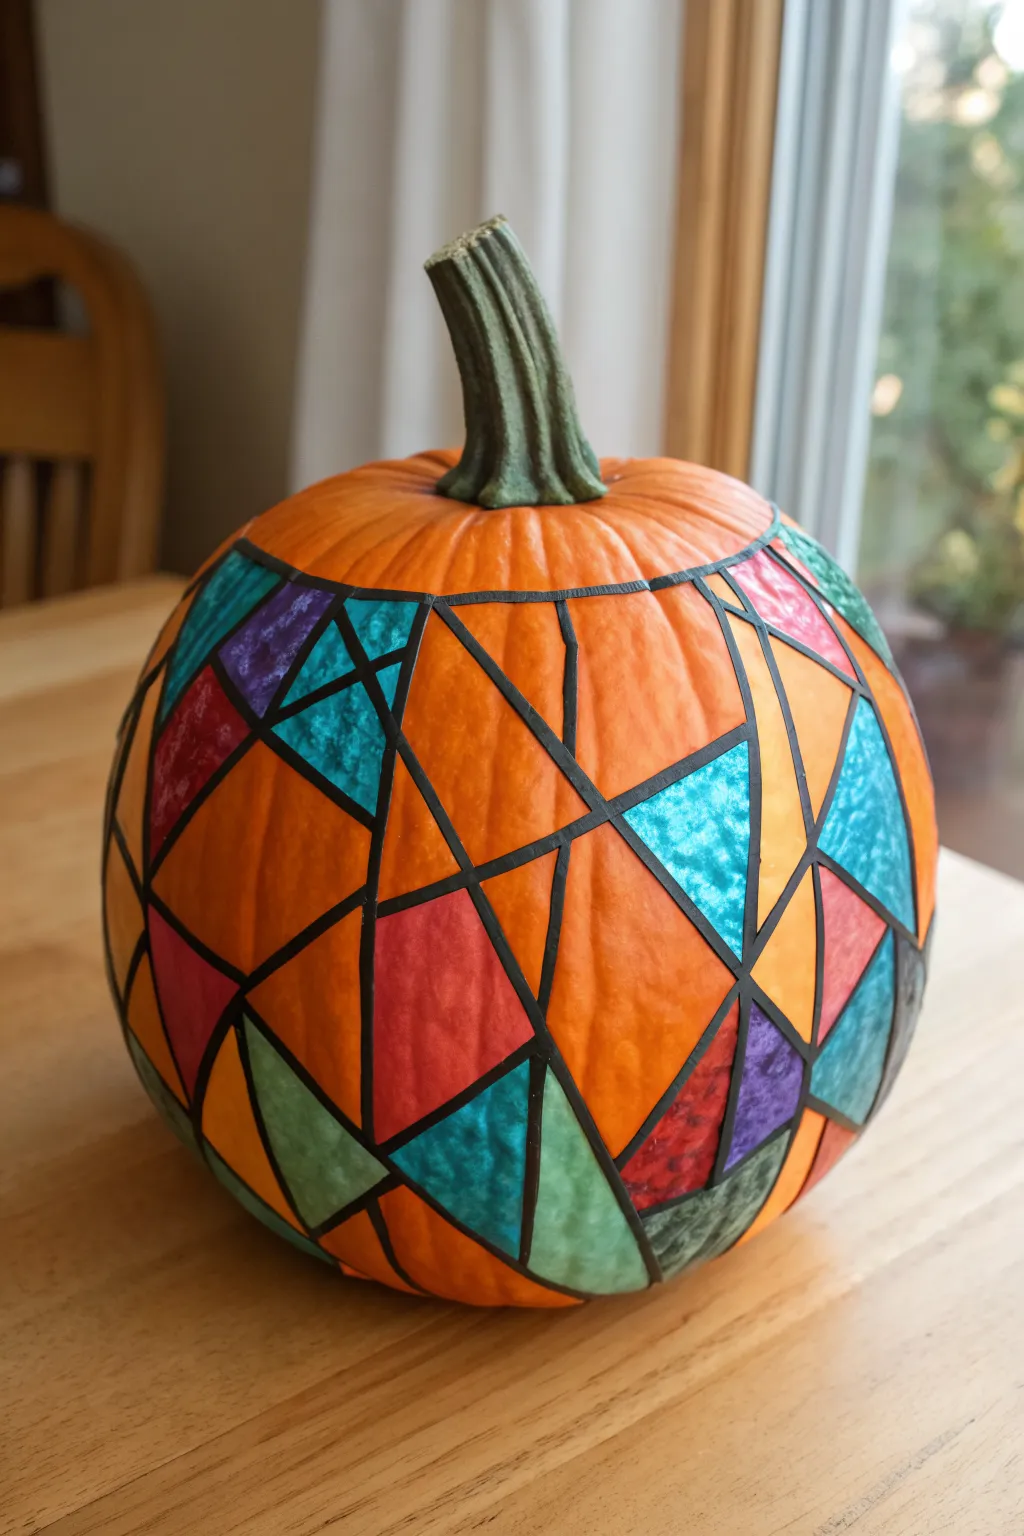
Transform a simple orange pumpkin into a vibrant work of art that mimics the glowing beauty of a stained-glass window. This project uses bold geometric lines and bright marker ink to create a stunning mosaic effect without any carving required.
Step-by-Step
Materials
- Medium-sized orange pumpkin (real or faux)
- Black paint pen or permanent marker (medium or bold tip)
- Set of alcohol-based markers or permanent markers (jewel tones like teal, purple, red, green)
- Rubbing alcohol
- Cotton balls or paper towels
- Clear acrylic sealant spray (glossy finish)
Step 1: Preparation and Planning
-
Clean the Surface:
Begin by wiping the entire surface of your pumpkin with a paper towel dampened with rubbing alcohol. This removes natural oils or wax that might repel the marker ink. -
Dry Completely:
Allow the pumpkin to air dry for a few minutes. The surface must be bone-dry so your marker lines don’t bleed or smudge immediately. -
Define the First Lines:
Using your black paint pen or bold marker, draw a few long, straight lines across the pumpkin’s surface in a diagonal direction. Don’t overthink placement; randomness helps the mosaic look. -
Cross the Lines:
Add a second set of long lines crossing the first set at contrasting angles. You are aiming to create large shapes, primarily triangles and quadrilaterals.
Clean Lines Pro Tip
For ultra-crisp geometric lines, stick strips of painters tape or washi tape on the pumpkin to guide your black marker. Peel them off once the black ink is dry to reveal perfect straight edges.
Step 2: Creating the Mosaic Grid
-
Subdivide Large Areas:
Look for the largest open orange spaces on your pumpkin. Draw shorter straight lines within these areas to break them down into smaller, more manageable geometric shapes. -
Connect the Corners:
Ensure every line connects fully to another line or travels all the way to the stem or base. Floating lines will disrupt the leaded glass illusion. -
Thicken the Outline:
Go back over your initial black grid. I find that tracing over the lines a second time to make them slightly thicker mimics the look of lead soldering used in real stained glass. -
Check for Gaps:
Inspect your intersections carefully. Fill in any tiny gaps where lines meet so each geometric ‘pane’ is completely enclosed by a solid black border. -
Let the Outline Set:
Wait about 10–15 minutes for the heavy black ink to cure completely before introducing color to prevent muddying your brights.
Step 3: Adding the Color
-
Plan Your Palette:
Select 4–5 jewel-toned colors for your ‘glass’ panes. Leaving some sections the original orange color of the pumpkin adds a nice warmth to the design. -
Start with Teal:
Pick your first color, like a bright teal, and color in random shapes scattered across the pumpkin. Try not to color two adjacent shapes with the same hue. -
Add Purple Accents:
Switch to a deep purple marker. Fill in shapes that neighbor the teal ones, being careful to stay inside your thick black lines. -
Incorporate Red and Green:
Continue the process with red and green markers, scattering them evenly around the pumpkin to balance the composition. -
Saturate the Color:
If the marker looks streaky, let the first layer dry and apply a second coat of the same color to increase the opacity and richness. -
Leave Orange Spaces:
Resist the urge to color every single shape. The natural orange skin acts as an amber glass tone and saves you time while adding to the autumn vibe.
Level Up: Metallic
Swap out one of your colors for a gold or silver metallic marker. Scattering a few metallic ‘panes’ throughout the design will catch the light and make the pumpkin look truly magical.
Step 4: Finishing Touches
-
Touch Up Borders:
If you accidentally colored over any black lines, use your black marker to re-trace that specific section and crisp up the edges. -
Seal the Design:
Take the pumpkin to a well-ventilated area and spray it lightly with a glossy clear acrylic sealant. This protects the marker from fading and gives it a shiny, glass-like finish. -
Final Dry:
Allow the sealant to dry untouched for at least an hour before displaying your masterpiece.
Place your colorful creation in a sunny window or on the porch to welcome the season with style


Have a question or want to share your own experience? I'd love to hear from you in the comments below!