If you’ve got three blank canvases and a little curiosity, you can make a 3-canvas set that looks way more advanced than it is. These easy triptych ideas are my go-tos for beginners because simple gradients, bold silhouettes, and a few clean lines do most of the heavy lifting.
Sunset Ocean Horizon Triptych
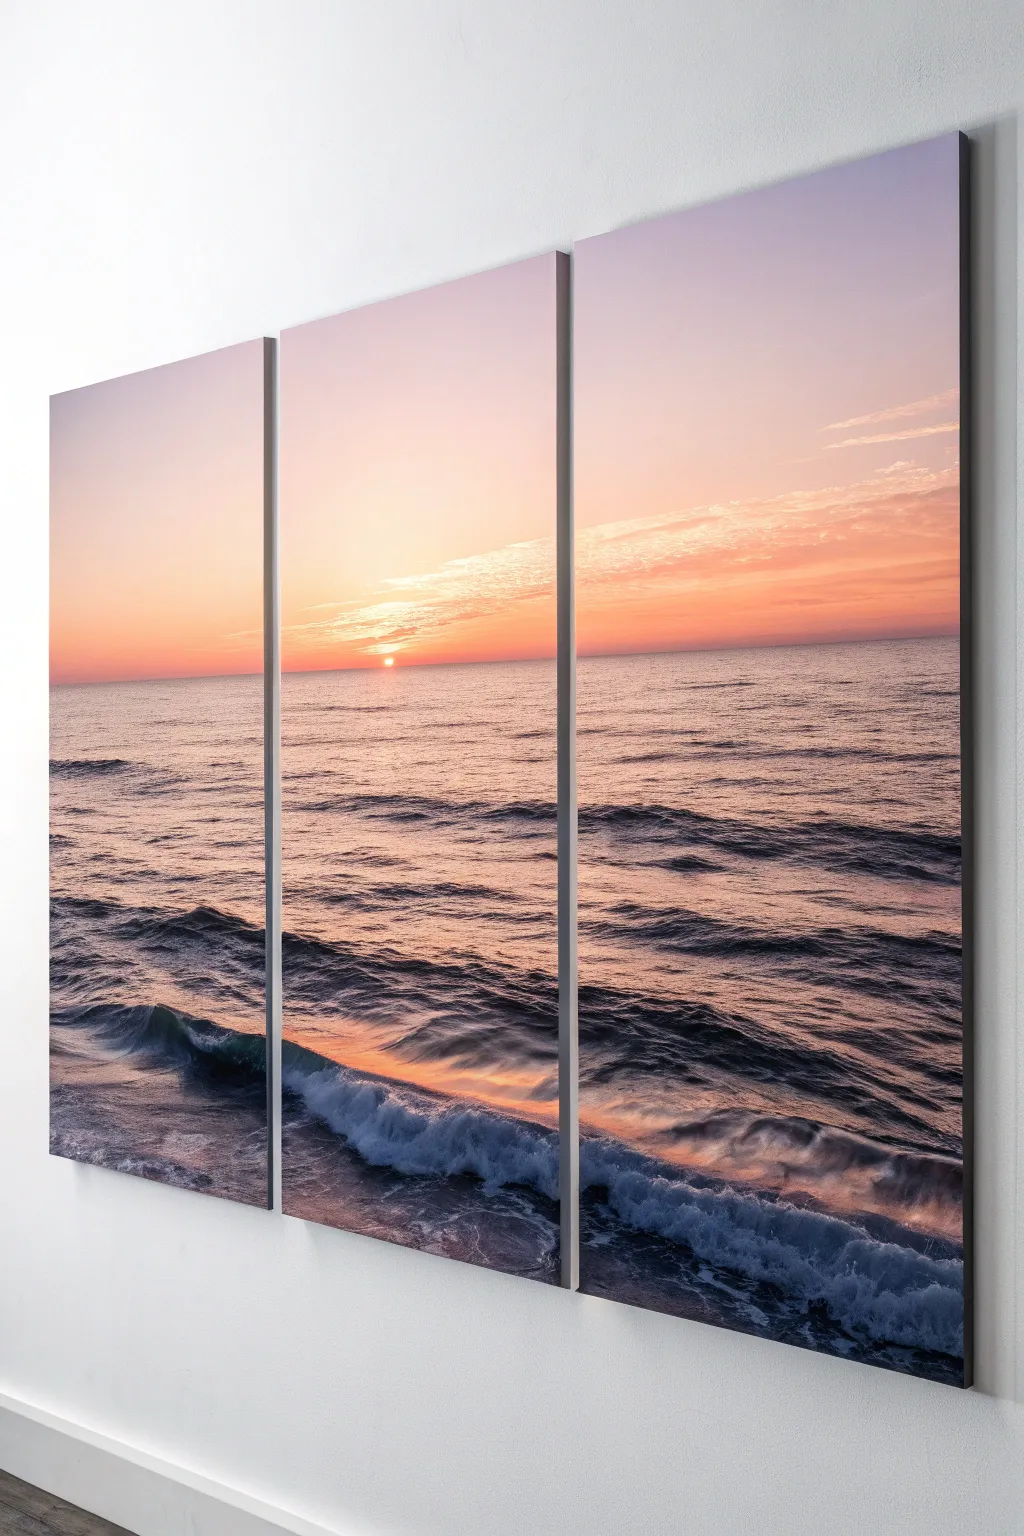
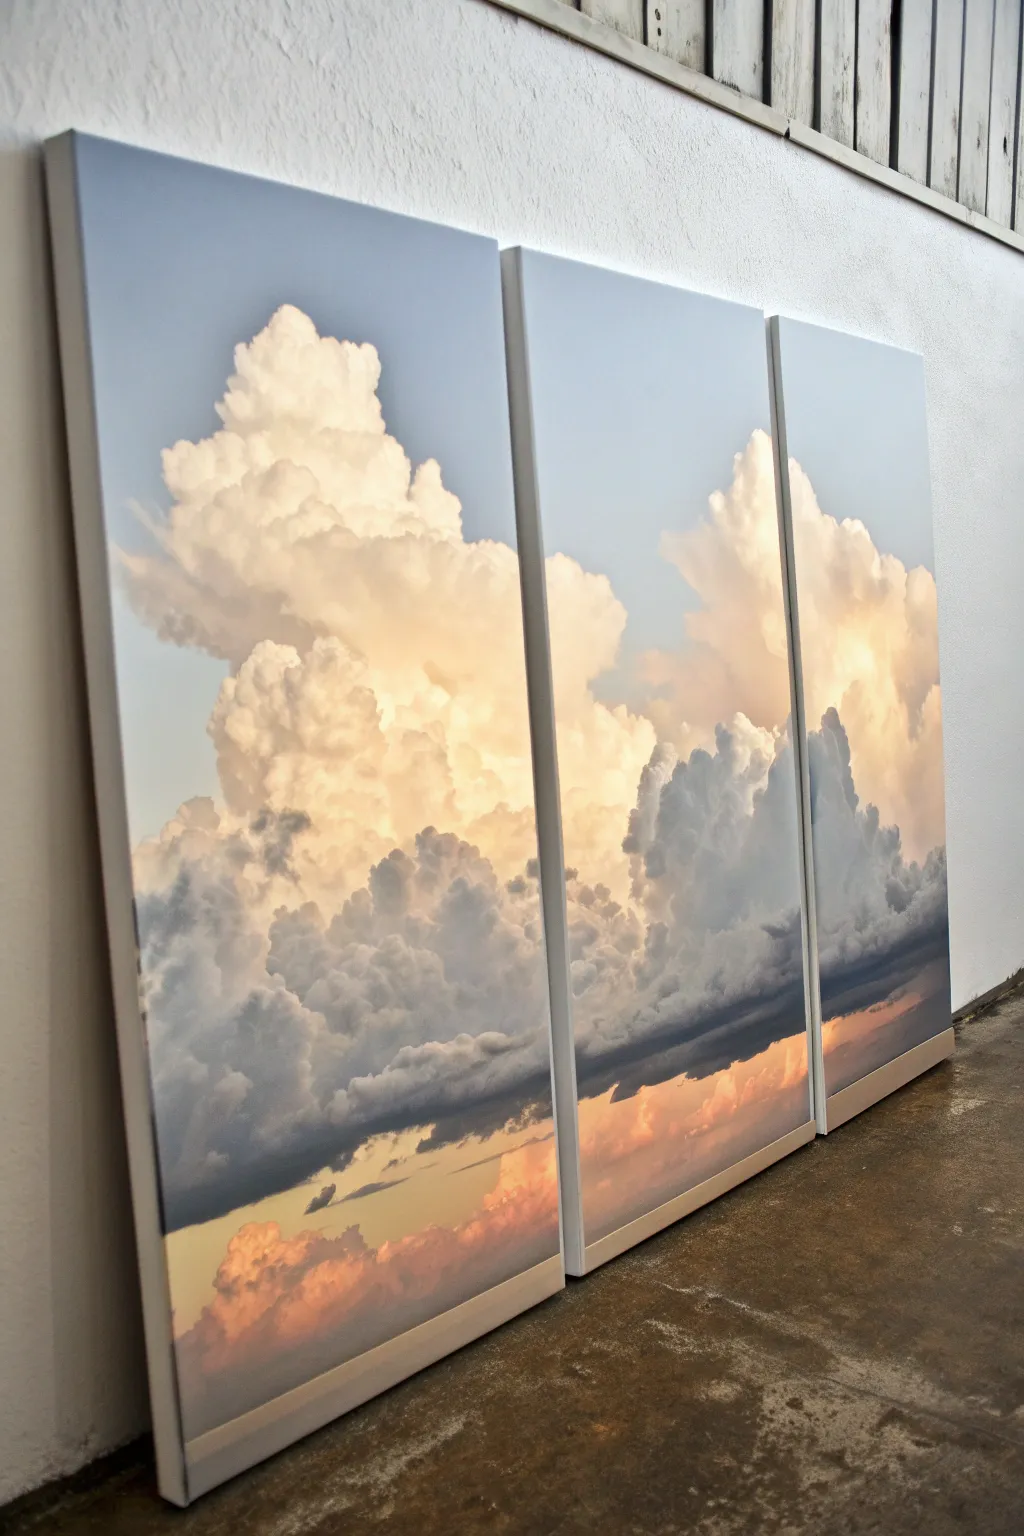
Capture the peaceful transition of day into night with this stunning three-panel ocean sunset. This beginner-friendly project uses smooth blending techniques to create a continuous, realistic horizon that stretches across your wall.
Step-by-Step Guide
Materials
- Three tall, rectangular canvases (same size, e.g., 12×24 inches)
- Acrylic paints: Titanium White, Cadmium Yellow, Orange, Alizarin Crimson, Dioxazine Purple, Phthalo Blue, Burnt Umber
- Large flat wash brush (2 inch)
- Medium flat brush (1 inch)
- Small round brush for details
- Fan brush (optional, for foam)
- Palette knife
- Water cup and paper towels
- Easels or flat working surface
- Masking tape (low tack)
Step 1: Preparation and Sky Gradient
-
Align the canvases:
Place all three canvases side-by-side on your workspace. Leave a tiny gap (about 1/4 inch) between them to mimic how they will hang on the wall, but close enough to visualize continuous lines. Using masking tape on the back to temporarily hold them together can help keep the horizon straight. -
Mark the horizon:
Use a pencil or a piece of tape to mark your horizon line straight across all three panels. Position it just below the halfway point of the canvas height to give more space to the dramatic sky. -
Mix sky colors:
Prepare three piles of paint for the sky: a pale lavender (White + tiny touch of Purple + Blue), a soft peach (White + Orange + tiny touch of Pink), and a vibrant yellow-orange for the horizon. -
Paint the upper sky:
Starting at the very top of all three canvases, use your large wash brush to apply the pale lavender mix. Brush horizontally from the left edge of the first canvas to the right edge of the third to ensure color consistency. -
Blend downward:
While the lavender is still wet, pick up your peach mixture without fully cleaning the brush. Apply this below the lavender, blending the two zones together with long, sweeping horizontal strokes. -
Brighten the horizon:
Right above your pencil line, apply the yellow-orange mixture. Blend this upward into the peach section. I find that using a clean, dry brush to lightly ‘tickle’ the border between colors creates the softest gradient.
Pro Tip: The Gap Trick
When painting across panels, paint the sides (edges) of the canvas with the image continuation. It makes the triptych look cohesive from any angle in the room.
Step 2: Ocean Depth and Sun
-
Base coat the water:
Mix a dark, muted purple-blue color (Purple + Blue + Burnt Umber). Apply this from the bottom of the canvas up to the horizon line, making it slightly lighter as you approach the horizon by adding a touch of the sky color. -
Create the sun:
On the center canvas, just above the horizon line, dab a small circle of pure White mixed with a tiny bit of Yellow. Soften the edges slightly so it glows rather than looking like a sticker. -
Add clear sky clouds:
High in the sky, especially on the right panel, scrub in very faint, thin streaks of a slightly lighter peach color to suggest distant cirrus clouds catching the light. -
Paint horizon clouds:
Just above the sun, use a smaller flat brush to create a band of low, illuminated clouds. Use bright orange and yellow on the bottom edges (lit by the sun) and a darker mauve on their tops.
Troubleshooting: Chunky Blends
If your sky gradient dries too fast and looks striped, use a misting spray bottle to lightly dampen the canvas. Acrylic glazing medium also keeps paint wet longer for smoother blends.
Step 3: Waves and Reflection
-
Establish the reflection:
Directly under the sun on the middle canvas, use horizontal dashes of yellow and orange to create the sun’s reflection on the water. Make the dashes smaller and closer together near the horizon, and wider as they move down. -
Form the wave structure:
Mix a dark navy (Blue + Burnt Umber). Identify where your main crashing wave will be—roughly in the lower third across the canvases. Paint the shadow underneath the wave’s crest with this dark tone. -
Highlight the water surface:
Using a light purple-grey, paint thin, horizontal lines across the water surface to represent gentle ripples. Ensure these lines continue logically from one panel to the next. -
Paint the crashing foam:
Load a fan brush or an old, splayed flat brush with watered-down Titanium White mixed with a hint of blue. Stipple (tap repeatedly) along the crest of your wave to create sea foam. -
Detail the shore wash:
At the very bottom, paint the ‘wash’ where the water meets the sand. Use a translucent white glaze to create a milky look over the dark sand color, making it look wet and reflective. -
Refine the wave motion:
Drag some of the white foam backwards (up into the wave) to show movement. The foam isn’t a solid line; break it up to look organic. -
Final continuity check:
Step back and look at the triptych as a whole. Ensure the horizon line is perfectly straight across the gaps and that the major wave lines connect visually from panel to panel. -
Varnish:
Once completely dry (give it at least 24 hours), apply a gloss varnish to make the water look wet and protect the colors.
Hang your new masterpiece with a small gap between panels to complete the modern gallery look


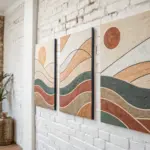
Layered Mountains Across Three Canvases
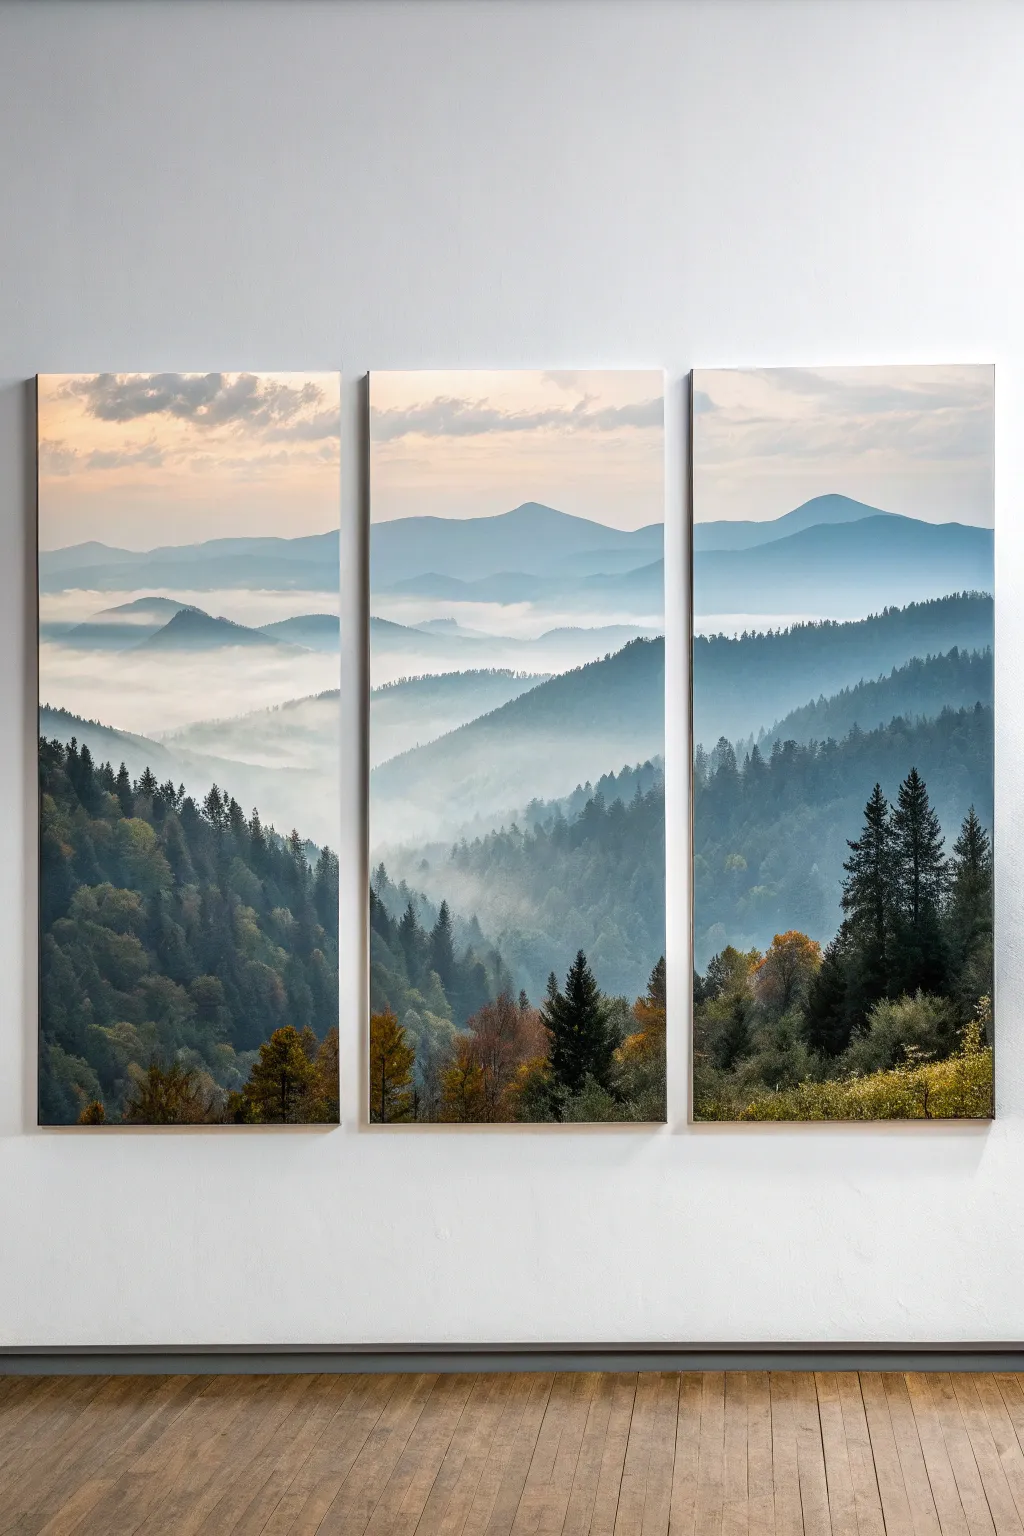
Capture the serene beauty of a sunrise over layered mountain peaks with this gorgeous three-piece wall art. The subtle gradients and layers of mist create a stunning depth that looks continuous across all three canvases.
Step-by-Step
Materials
- 3 large stretched canvases (same size)
- Acrylic paints (Titanium White, Phthalo Blue, Mars Black, Burnt Sienna, Yellow Ochre, Cadmium Orange)
- Large flat brush (2-inch)
- Medium filbert brush
- Small round brush for details
- Easel or flat surface large enough for 3 canvases
- Palette
- Water cups
- Paper towels
- Blending medium or slow-drying medium (optional)
Step 1: Setting the Sky
-
Arrange your canvas:
Place your three canvases side-by-side with a small gap (about an inch) between them. Treat them as one giant surface while painting to ensure the horizon lines match perfectly. -
Mix the sky colors:
Prepare a very pale, warm mix using Titanium White with a tiny touch of Yellow Ochre and Cadmium Orange. Also, mix a soft, pale blue using White and a dot of Phthalo Blue. -
Paint the upper sky:
Using your large flat brush, apply the pale blue mixture to the top third of all three canvases, brushing horizontally across the gaps. -
Blend the sunrise glow:
While the blue is still wet, introduce the warm peach mixture below it. Use long, horizontal strokes to blend the two colors where they meet, creating a soft, hazy transition. -
Add soft clouds:
With a clean brush and slightly thicker White paint mixed with a hint of grey, dab in soft cloud shapes near the top left and center. Keep the edges fluffy and indistinct to mimic morning mist.
Mist Mastery
Use a ‘scumbling’ technique for fog: load a dry brush with very little white paint and scrub it in circular motions at the base of mountains.
Step 2: Layering the Mountains
-
Mix the distant mountain color:
Create a very light, hazy blue-grey by mixing Phthalo Blue, White, and a tiny speck of Black. The color should be just slightly darker than the sky. -
Paint the furthest peaks:
Paint the silhouette of the most distant mountains across the middle of the triptych. I like to keep these edges soft to suggest atmospheric distance. -
Create the heavy mist:
Wash out your brush significantly so it holds mostly water and a little white paint. Glaze over the base of the distant mountains to create a ‘fog’ effect that obscures the bottom of the peaks. -
Mix the mid-ground color:
Darken your blue-grey mix by adding a little more Blue and a touch of Burnt Sienna to desaturate it. This layer should be visibly closer than the first. -
Paint the middle ridges:
Block in the middle mountain ranges, ensuring the lines flow naturally from one canvas to the next. Let the paint fade into white at the bottom of these shapes to enhance the misty look. -
Add ridge details:
Using a smaller brush, add subtle variations to the ridge lines, implying the texture of distant trees without painting individual ones.
Step 3: Foreground and Details
-
Prepare dark forest colors:
Mix a deep, rich dark green using Phthalo Blue, Mars Black, and Yellow Ochre. You want a range of tones, so keep some lighter greens available too. -
Block in the foreground slopes:
Paint the large, sweeping slopes in the immediate foreground on the bottom third of the canvases. These should be the darkest and most contrasted shapes. -
Stipple the tree textures:
Switch to your medium filbert brush or an old, splayed brush. Dip it in the dark mix and stipple (dab repeatedly) along the tops of the foreground ridges to create the look of jagged pine tree tops. -
Highlight the trees:
Mix a lighter olive green and gently dab it on the ‘sun-facing’ sides of the foreground trees to give them dimension. -
Add autumn accents:
Using a small round brush, dot in some touches of burnt orange and yellow ochre in the lower corners to suggest changing leaves. -
Refine the mist gaps:
If the mist between layers feels too sharp, take a dry, soft brush and very gently buff the transition lines to blur them further. -
Final separation check:
Separate the canvases to ensure the edges are painted cleanly (wrap the image around the sides if desired) and let the entire piece dry completely.
Wrap It Around
Don’t stop painting at the front edge! Continue your mountain lines and colors onto the sides of the canvas for a polished, frameless look.
Hang your triptych with evenly spaced gaps to reveal the full majesty of your mountains
Big Tree Silhouette Spanning All Three
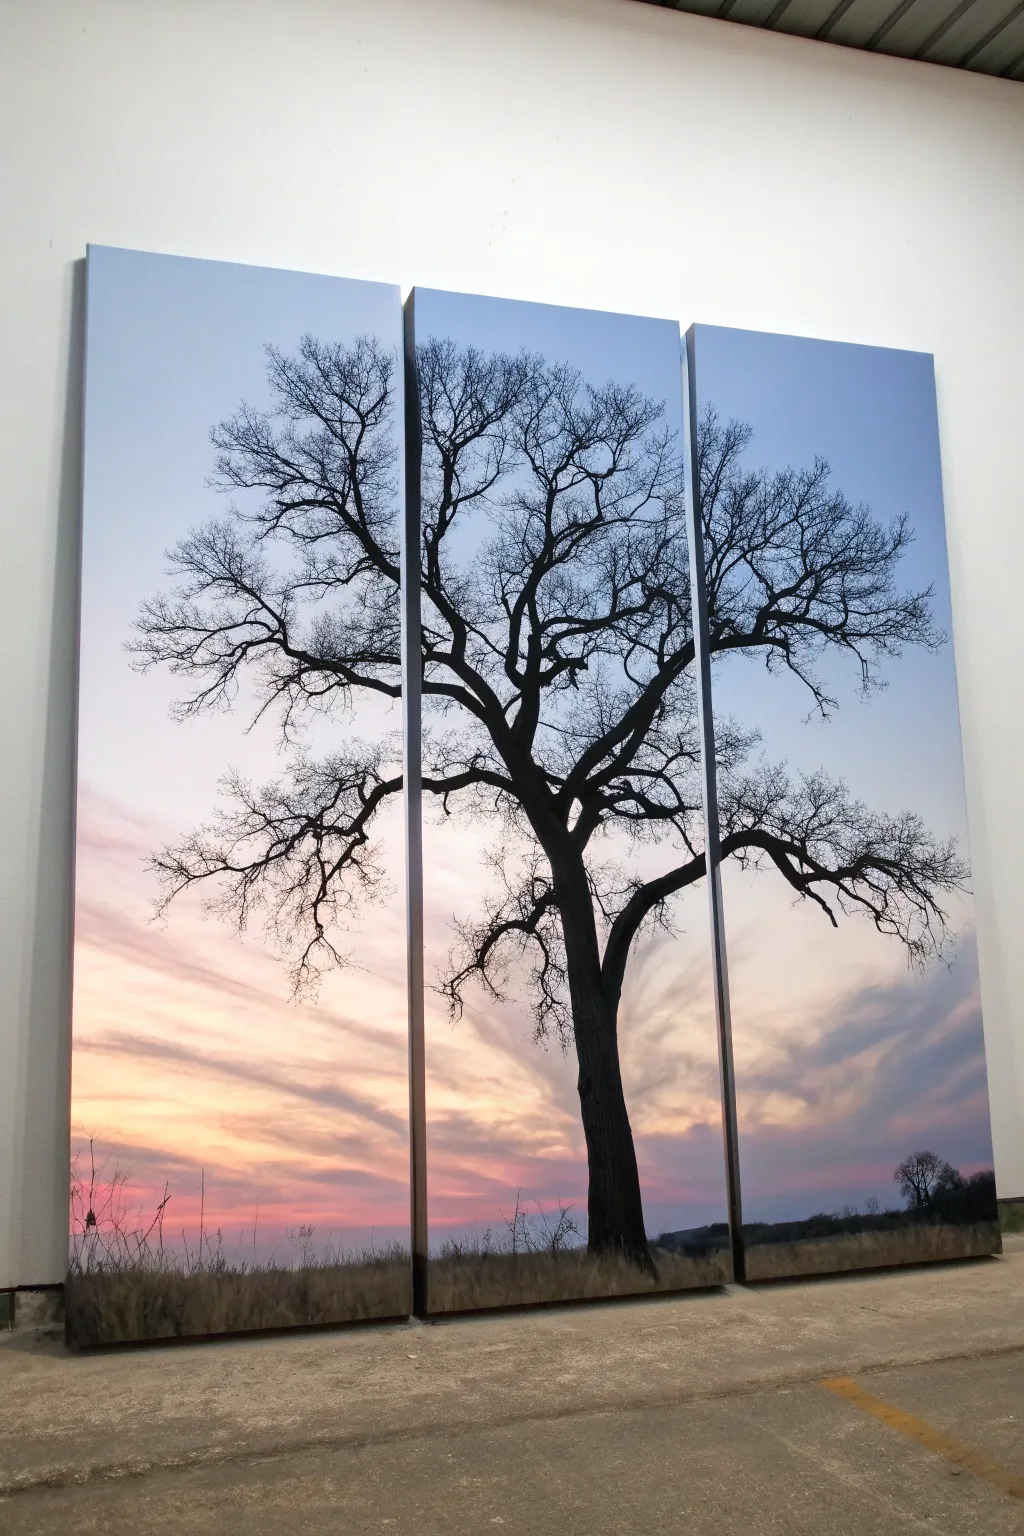
Transform three blank canvases into a stunning panoramic view featuring a majestic tree silhouette against a soft, gradient sunset. This project uses blending techniques to capture the warmth of the sky before adding the bold, dark contrast of the tree branches spanning across all panels.
Step-by-Step Guide
Materials
- 3 tall rectangular canvases (e.g., 12×24 or 16×30 inches)
- Acrylic paints: Titanium White, Baby Blue, Lavender, Peach/Light Orange, Pink, and Mars Black
- Large flat brush (2-3 inch) for background
- Medium flat brush
- Round detail brushes (sizes 2 and 0)
- Palette or large plate
- Water cup and paper towels
- Pencil (optional)
- Easel or flat work surface
Step 1: Setting the Scene
-
Arrange the canvases:
Place your three canvases side-by-side on your workspace or easel, leaving a small gap (about 1 inch) between them. This helps you visualize the continuous image as you paint. -
Mix the sky gradient colors:
Prepare your palette with generous amounts of white, blue, and light purple for the upper sky. For the lower sky, mix peach, pink, and a touch of the purple to create a warm sunset transition. -
Paint the upper sky first:
Using your large flat brush, apply the blue and lavender mix to the top third of all three canvases. Use long, horizontal strokes that span across the panels to ensure the color flow is consistent. -
Blend downwards:
While the top paint is still wet, introduce white to your brush and blend downwards into the middle section, lightening the blue as you go. I prefer to work quickly here to keep the blend smooth. -
Create the sunset horizon:
On the bottom third, apply your peach and pink mixture. Start from the very bottom and work upwards, blending into the lighter middle section where the sky meets the sunset. -
Add soft clouds:
Wipe your brush clean. Pick up a small amount of white mixed with a tiny drop of pink or purple. Gently streak in diagonal cloud formations across the lower sky, softening the edges with a dry brush to make them look wispy. -
Let the background dry:
Allow the sky layer to dry completely. This is crucial so your black silhouette doesn’t smudge or turn muddy when applied over the colorful background.
Step 2: The Majestic Tree
-
Plan the composition:
Visualise where the main trunk will go. In the image, the trunk sits primarily in the center and right panels. You can lightly sketch the main lines with a pencil if you want a guide. -
Paint the trunk base:
Using black paint and a medium flat brush, block in the thick trunk starting at the bottom of the center and right canvases. Make the base wider and taper it slightly as it goes up. -
Extend the main branches:
Switch to a smaller round brush. Paint the thick primary branches extending outward from the trunk, crossing over the gaps between canvases to connect the visual flow. -
Create the branch network:
Continue splitting the main branches into smaller secondary branches. Remember that tree limbs generally get thinner the further they grow from the trunk. -
Work on the fine details:
Using your smallest detail brush (size 0) and slightly watered-down black paint, add the tiny, twig-like ends to the branches. These delicate lines give the tree its realistic, wintery look. -
Check the connections:
Step back and look at the gaps between canvases. Ensure that a branch leaving the left side of the right canvas picks up at the correct height on the right side of the center canvas. -
Add the ground line:
Paint a low, uneven horizon line of grass or brush at the very bottom of the canvases using black. Use upward flicking motions to simulate wild grass textures. -
Paint background foliage:
If you want the distant tree line shown in the reference, paint very small, low bumps and tiny tree shapes on the far right horizon line to add depth. -
Paint the canvas edges:
Don’t forget the sides! Wrap your sky colors and black branch lines around the thick edges of the canvas for a polished, gallery-ready finish.
Flowing Lines
Add a drop of water to your black paint for the branches. Inky consistency helps the brush glide smoothly for long, thin twigs.
Golden Hour Glow
Glaze a transparent layer of yellow or gold over the lower clouds once dry to intensify the sunset warmth and vibrancy.
Hang your new masterpiece with slight spacing to enjoy the panoramic effect of your beautiful sunset tree

Birds on a Wire Silhouette Set
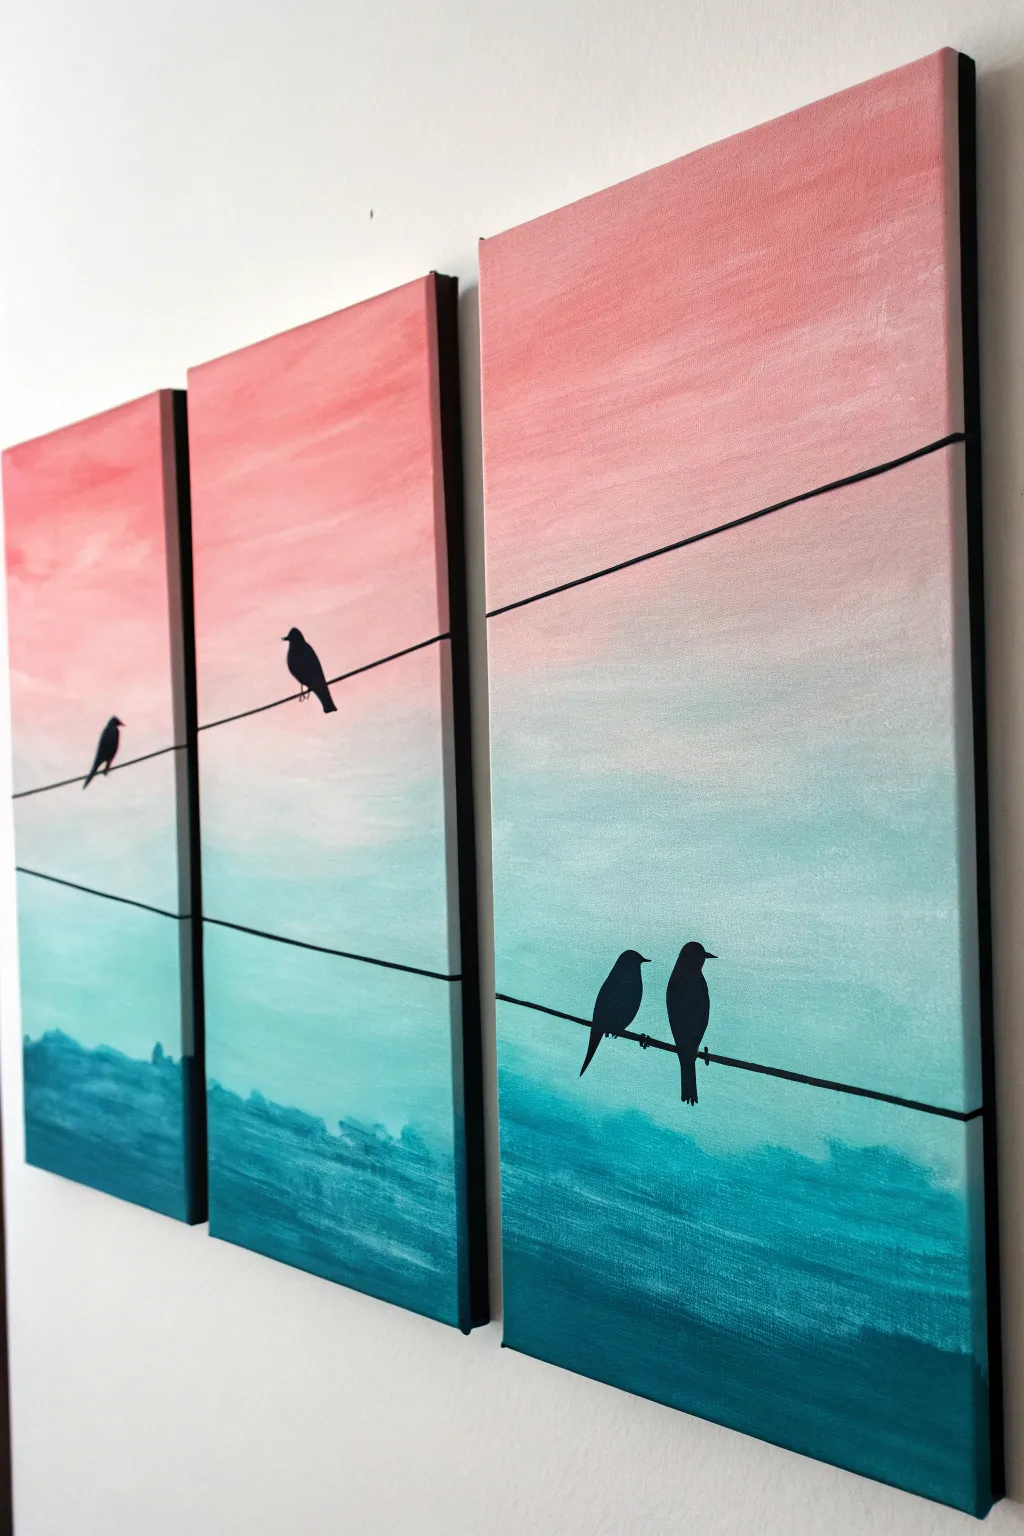
Master the art of the gradient with this stunning three-piece canvas set featuring a serene sunset transitioning into deep teal waters. The bold silhouettes of birds on a wire create a graphic focal point that connects all three canvases into one cohesive story.
How-To Guide
Materials
- 3 Rectangular stretched canvases (e.g., 8×12 or 10×20 inches)
- Acrylic paints: Titanium White, Salmon Pink (or Light Red), Teal, Phthalo Turquoise
- Black acrylic paint or a black Posca paint pen
- Large flat brush (1-2 inch) for blending
- Medium round brush
- Fine liner brush
- Ruler or straight edge
- Pencil
- Palette or paper plate
- Cup of water and paper towels
Step 1: Creating the Ombré Background
-
Arrange your workspace:
Lay your three canvases side-by-side on your table, touching each other. You want to paint across all three simultaneously to ensure the horizon lines and color transitions match perfectly. -
Mix your base colors:
Prepare plenty of paint on your palette. You’ll need a pure Salmon Pink, a mixture of White and a tiny drop of Pink for the ‘light’ zone, and a deep Teal for the bottom. -
Paint the top section:
Using your large flat brush, apply the Salmon Pink to the top third of all three canvases. Use long, horizontal strokes that span across the gaps between the canvases. -
Add the middle transition:
Clean your brush slightly, then pick up your White/Pink mixture. Paint the middle section, slightly overlapping the bottom of the pink layer above. -
Blend the sky:
While both paints are still wet, gently stroke the brush back and forth where the pink and white meet to create a soft, seamless fade. -
Apply the water base:
Rinse your brush thoroughly. Load it with the Teal paint and fill the bottom third of the canvases. -
Create the horizon haze:
Pick up a little white on your dirty teal brush to make a lighter aquamarine. Blend this where the teal meets the white middle section to create a hazy horizon line. -
Darken the depths:
Mix Phthalo Turquoise with a touch of Teal to create a darker ocean shade. Apply this to the very bottom edge of the canvases and blend upward into the teal for depth. -
Add texture to the water:
Using a slightly dry brush with the darker turquoise, add short, choppy horizontal strokes in the water section to mimic small waves or ripples. Let the canvases dry completely.
Step 2: Planning and Silhouettes
-
Draw the wire guidelines:
Once the paint is fully dry, place a ruler across the canvases to map out your wires. Draw two diagonal lines with a pencil: one higher on the left canvas sloping down, and another lower line extending across the middle and right canvases. -
Sketch the birds:
Lightly pencil in the oval shapes of the birds’ bodies. Place one bird on the left canvas, one on the center, and a pair sitting closely together on the right canvas. -
Paint the wires:
Using black paint and a fine liner brush (or a black paint pen for steadier lines), carefully trace over your pencil lines to create the wires. I find resting my hand on a dry part of the canvas helps keep the line straight. -
Fill the bird bodies:
Switch to a medium round brush loaded with black paint. Fill in the main oval shapes of the birds, ensuring the edges are opaque and smooth. -
Detail the heads and beaks:
Using the fine liner brush again, carefully add small circles for the heads and tiny triangles for the beaks. Make sure the beaks point in different directions for variety. -
Add tails and legs:
Paint the tail feathers extending below the wire. For the legs, paint tiny lines connecting the bird’s body to the wire only if the body is hovering slightly above it; otherwise, let the body sit directly on the line. -
Paint the canvas edges:
Don’t forget the sides! Paint the edges of the canvas (the depth) black to give the artwork a framed, professional finish. -
Final touches:
Check for any see-through spots in your black silhouettes. Apply a second coat of black if needed to make them solid and bold against the colorful background.
Blending Trouble?
If acrylics dry too fast while blending the sky, mist the canvas lightly with water or mix a slowing medium into your paint to keep it workable longer.
Sharper Silhouettes
For the crispest black lines on the wires and birds, use a black acrylic paint marker instead of a brush. It offers much better control for beginners.
Hang your triptych with about an inch of space between each canvas to let the scene flow naturally across the wall
BRUSH GUIDE
The Right Brush for Every Stroke
From clean lines to bold texture — master brush choice, stroke control, and essential techniques.
Explore the Full Guide
Northern Lights Forest Triptych
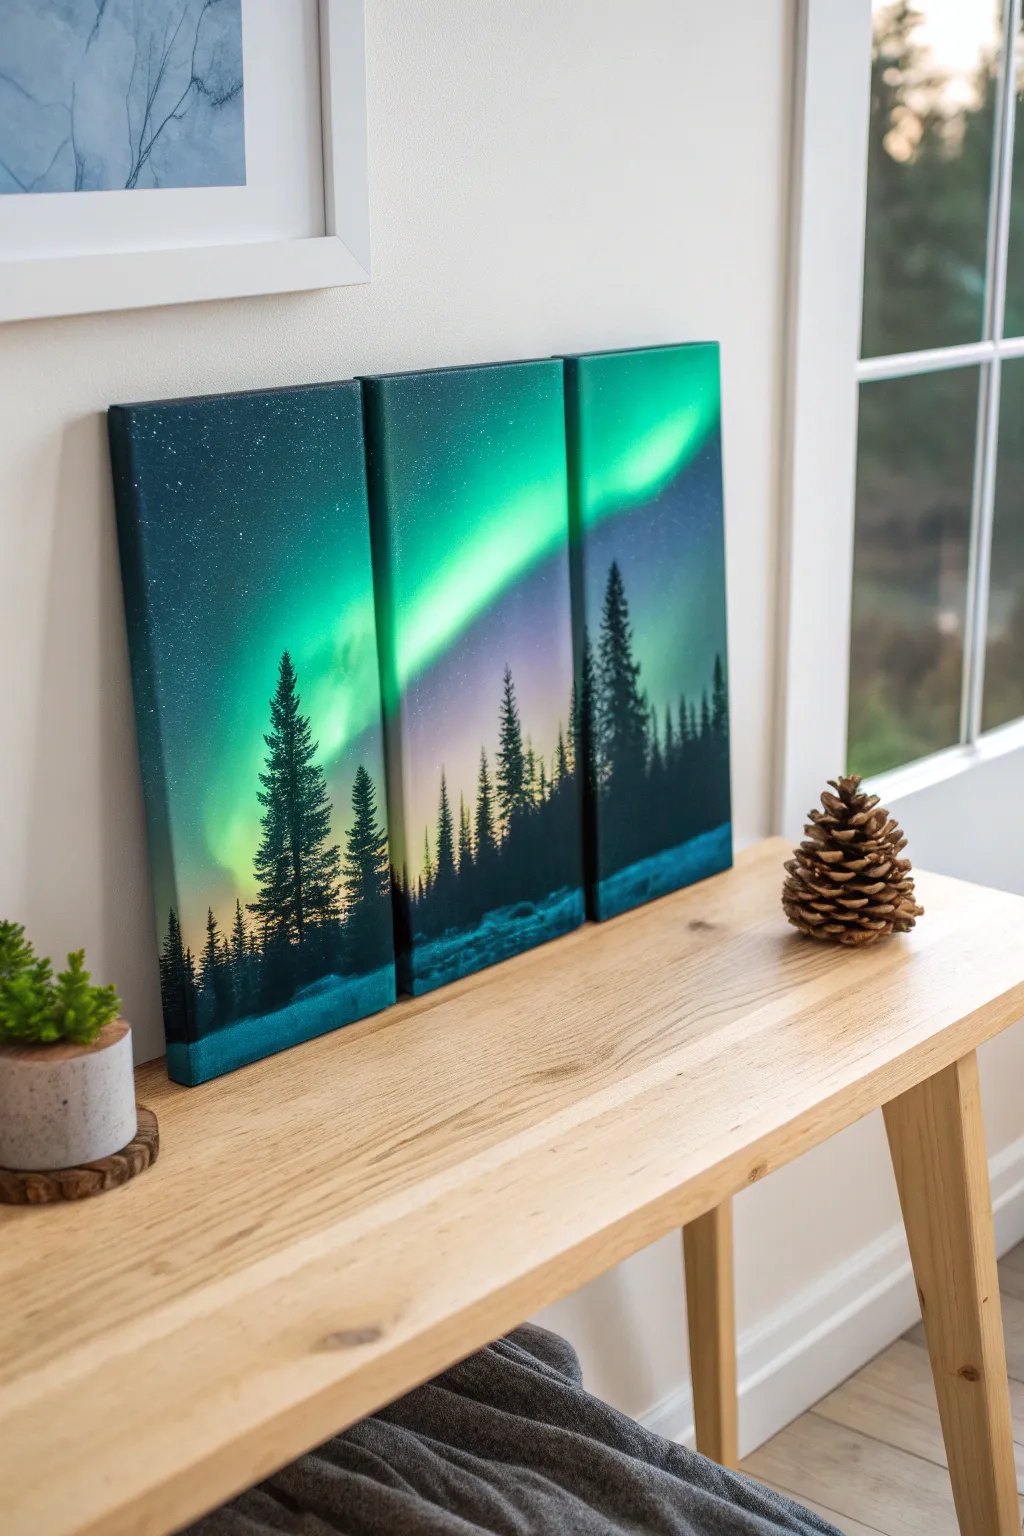
Capture the ethereal glow of the aurora borealis across three canvases with this beginner-friendly project. By blending cool jewel tones and adding striking silhouette trees, you’ll create a seamless, expansive landscape that looks stunning on any wall.
Detailed Instructions
Materials
- 3 small rectangular canvases (approx. 8×16 or 10×20 inches each)
- Acrylic paints: Phthalo Blue, Prussian Blue, Teal, Emerald Green, Neon/Light Green, Purple, Black, Titanium White
- Large flat brush or sponge applicator
- Medium round brush
- Fan brush (optional but recommended for trees)
- Old toothbrush
- Palette
- Water cup and paper towels
- Masking tape (for securing canvases together)
Step 1: Setting the Stage
-
Unify the Canvases:
Place your three canvases side-by-side on a flat covered surface. To ensure the image flows perfectly, use masking tape on the back to hold them temporarily together as one large unit while you paint the background. -
Base Background:
Mix Prussian Blue with a touch of Black to create a very dark midnight blue. Use your large flat brush to paint the upper third of the canvases, especially top corners, creating the night sky’s outer darkness. -
Gradient Glow:
While the dark blue is still wet, introduce Phthalo Blue and Purple as you work downwards. Blend these colors horizontally, allowing them to mix with the dark upper layer. -
Green Transition:
Transition into Teal and Emerald Green near the bottom third. The paint should stay wet enough to blend effortlessly, so work somewhat quickly or use a slow-drying medium if available.
Muddy colors?
If your green aurora turns brown against the purple sky, let the purple layer dry completely first. Then apply a thin glaze of white, let that dry, and paint the neon green over the white.
Step 2: Painting the Aurora
-
Map the Light Path:
Visualize a diagonal swoosh of light starting from the top right and curving down toward the bottom left. Load a clean brush with Teal and Titanium White. -
Create the Glow:
Roughly paint this diagonal path. Don’t worry about neatness; you want soft, diffuse edges. I like to wipe my brush often to keep the colors from getting muddy. -
Intensify the Aurora:
Mix Neon or Light Green with White. Paint a narrower, brighter streak directly in the center of your previous Teal swoosh. -
Vertical Streaking:
With a dry brush (remove most paint onto a paper towel), gently pull the wet green paint upward in quick, short vertical strokes. This mimics the ‘curtain’ effect of the Northern Lights. -
Soften the Edges:
Use a soft, clean dry brush to very lightly feather the edges of your light streak into the dark background, ensuring the transition looks like glowing gas rather than a solid stripe. -
Starry Night:
Dilute a small amount of White paint with water until it is inky. Dip an old toothbrush into it and flick the bristles with your thumb to spray tiny stars across the top two-thirds of the dried sky.
Make it shimmer
Once the painting is fully dry, mix iridescent medium or holographic glitter paint into a gloss varnish and coat the aurora section for a truly magical, shifting glow.
Step 3: The Forest Silhouette
-
Separate Canvases:
Once the background is completely dry, remove the tape from the back and separate the canvases slightly (about an inch apart) to paint the wrapped edges if desired. -
Horizon Line:
Mix pure Black with a tiny drop of Blue. Paint an uneven, low horizon line across the bottom of all three canvases, creating small bumps for distant hills. -
Start the Trees:
Using a fan brush or a medium round brush, tap a vertical line for a tree trunk. Start at the top of the tree and work down. -
Adding Branches:
Tap the brush side-to-side, getting wider as you move down the trunk to create the conical fir tree shape. Keep the texture rough and organic. -
Composition Balance:
Place your tallest trees in the foreground (closest to the bottom edge). Group a few large trees on one canvas and balance it with medium trees on the others. -
Middle Ground Landscape:
Fill the space between the large foreground trees with smaller, faint tree silhouettes in the background. You can mix a little dark blue into your black for these to make them recede. -
Snowy Highlights:
Mix a light blue-grey color (White with a speck of Phthalo Blue). Lightly dry-brush the very tops of the dark ground and the tips of a few branches to suggest moonlight on snow.
Hang your trio of canvases with slight spacing between them to complete this majestic window into the arctic night.
Desert Dunes With Cactus Silhouettes
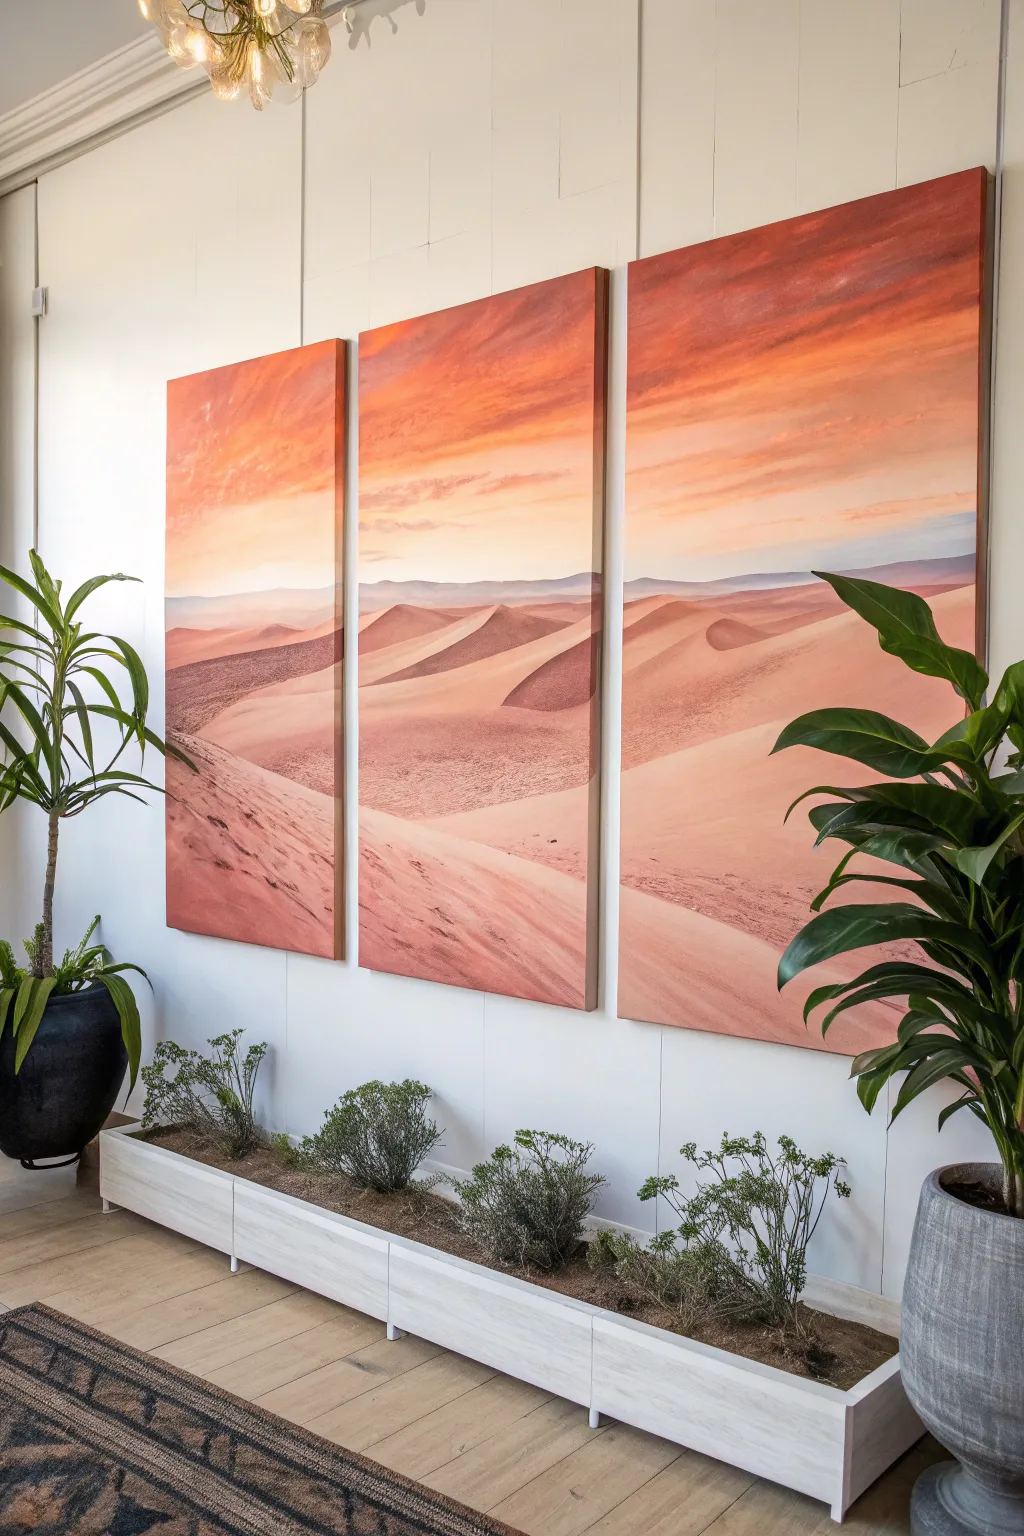
Bring the warmth of a desert sunset into your home with this stunning three-panel landscape painting. Using smooth gradients and warm earth tones, you will create a seamless view of rolling dunes and vast skies across multiple canvases.
Step-by-Step
Materials
- 3 large vertical canvases (same size)
- Acrylic paints: Titanium White, Burnt Sienna, Yellow Ochre, Cadmium Red or Orange, Ultramarine Blue, Burnt Umber
- Large flat brush (2-3 inch) for sky blending
- Medium filbert brush for dunes
- Small round brush for details
- Palette knife (optional for mixing)
- Water cup and paper towels
- Easels or wall space to hang canvases side-by-side
Step 1: Preparation and Sky Layer
-
Set up the triptych:
Arrange your three canvases side-by-side with a small gap between them, exactly as they will hang on the wall. This ensures your horizon lines and cloud patterns flow seamlessly from one panel to the next. -
Mix sky colors:
Prepare a gradient palette for the sky. Mix a pale blue-grey using White with a touch of Ultramarine Blue and Burnt Sienna. Then, mix a warm sunset orange using Cadmium Red, Yellow Ochre, and plenty of White. -
Paint the upper sky:
Start at the very top of all three canvases. Use your large flat brush to apply the orange-red mixture, brushing horizontally across all three panels. Keep strokes long and smooth. -
Blend the transition:
While the top paint is still wet, introduce the pale blue-grey mixture below it. Clean your brush slightly and blend the two colors where they meet to create a soft, hazy transition typical of a desert evening. -
Add cloud wisps:
Dip a smaller brush into a slightly darker orange mix. Lightly streak in horizontal cloud formations across the upper orange section. Soften the edges with a dry brush so they look distant and windswept. -
Create the horizon haze:
Near the horizon line (about 1/3 down from the top), mix a very pale, misty purple-grey. Paint this band horizontally across all three canvases to represent the distant atmosphere where the sky meets the earth.
Keep It Continuous
Work on all three canvases simultaneously rather than finishing one at a time. This ensures your color mixes match perfectly across the entire triptych.
Step 2: Distant Mountains and Base Layers
-
Sketch the layout:
Using a diluted Burnt Sienna and a small round brush, lightly sketch the outlines of the distant mountains and the major dune shapes. Draw these lines continuously across the gaps between canvases to maintain perspective. -
Paint distant mountains:
Mix a muted purple using Ultramarine Blue, Alizarin Crimson, and White. Fill in the distant mountain range shapes. Keep the edges soft and the color low-contrast to push them into the background. -
Block in dune shadows:
For the shadow sides of the dunes, mix Burnt Sienna with a touch of Ultramarine Blue and White to create a cool, dusty pink-brown. Apply this to the shadowed faces of the dunes. -
Block in dune highlights:
Mix a light peach color using White, Yellow Ochre, and a tiny dot of Red. Paint the sunlit tops and faces of the dunes. Don’t worry about perfect blending yet; just get the colors in the right zones.
Step 3: Refining the Dunes
-
Smooth the gradients:
Use a clean, dry filbert brush to blend the boundary between the light and shadow areas on the dunes. The curve should be soft but distinct to show the rolling shape of the sand. -
Deepen the foreground:
The dunes closest to the viewer (bottom of the canvas) should be darker and more textured. Mix Burnt Sienna and a little Burnt Umber to deepen the shadows in the foreground areas. -
Add sand texture:
I find that dry-brushing works best here. Take a brush with very little paint (a mix of shadow and highlight colors) and lightly drag it differently across the dune slopes to simulate ripples in the sand. -
Highlight the ridges:
Using your lightest peach-white mix and a small brush, carefully paint the sharp crests of the dunes. This sharp line defines the shape and makes the dunes pop against the shadows. -
Check continuity:
Step back and look at the painting as a whole. Ensure the dune ridges on the left panel connect logically to the shapes in the center and right panels. Adjust lines if necessary. -
Final atmosphere check:
If the distant mountains look too sharp, glaze over them with a very thin wash of the sky color to push them further back into the distance.
Golden Hour Glow
Add a thin glaze of transparent yellow or gold paint over the sunlit sides of the dunes after they dry to enhance the warm sunset effect.
Hang your masterpiece with even spacing and enjoy the endless horizon you have created.

PENCIL GUIDE
Understanding Pencil Grades from H to B
From first sketch to finished drawing — learn pencil grades, line control, and shading techniques.
Explore the Full Guide
Soft Cloudscape in Three Parts
Capture the breathtaking scale of a sunset sky with this soft, atmospheric triptych that spans three canvases. By breaking a complex cloud formation into three panels, you create an impressive, modern statement piece that feels much easier to tackle than a single large painting.
Step-by-Step Guide
Materials
- 3 tall rectangular canvases (e.g., 12×24 or 16×30 inches)
- Acrylic paints: Titanium White, Ultramarine Blue, Cerulean Blue, Cadmium Yellow Medium, Cadmium Orange, Burnt Umber, Payne’s Grey, Alizarin Crimson
- Large flat brush (2-inch width)
- Medium filbert brush
- Small round brush for details
- Sea sponge or crumpled paper towel (optional)
- Acrylic glazing medium or slow-drying medium
- Palette and water container
- Easel or flat surface large enough for all three canvases
Step 1: Preparation and Base Layer
-
Arrange the canvases:
Place your three canvases side-by-side with a small gap (about an inch) between them. Treat them as one single surface while you sketch and paint the initial laters to ensure the image flows continuously. -
Sketch the composition:
Using a diluted mixture of Burnt Umber and water, lightly sketch the main cloud shapes. Draw a large, billowing cumulus formation dominating the center and top, and a flat horizon line near the bottom third. -
Mix the sky gradient:
Prepare a pale blue gradient mixture. Start with Titanium White and a touch of Cerulean Blue for the very top. Gradually add a tiny bit of Ultramarine as you move down, but keep it very pale and airy. -
Paint the background sky:
Use your large flat brush to paint the sky area behind the clouds. Start at the top of all three canvases and work your way down to the cloud line. Smooth out brushstrokes to keep it soft.
Fixing “Heavy” Clouds
If your clouds look like solid rocks, wet a clean brush and gently blur the internal edges. Clouds are rarely hard-edged everywhere; keep the sharpest lines only on the sunlit top curves.
Step 2: Building the Clouds
-
Block in shadow tones:
Mix a cloud shadow color using Payne’s Grey, a touch of Ultramarine, and White. Paint the lower sections of the large cloud mass, focusing on the bottom-heavy areas where rain might be gathering. -
Establish the light source:
Mix Titanium White with a small amount of Cadmium Yellow and a speck of Orange. Identify where the sun hits the clouds—mostly on the upper left and center bulges—and block in these high-value areas. -
Blend the mid-tones:
Create a transition color by mixing your shadow grey with the warm highlight mix. Use a filbert brush to bridge the gap between the dark bottoms and bright tops of the clouds. -
Softening edges:
While the paint is still slightly tacky, use a clean, dry brush or a sea sponge to gently dab the edges of the clouds. This ‘scumbling’ technique creates that fluffy, vaporous look. -
Add the sunset band:
At the very bottom of the canvases (the horizon area), paint a horizontal strip of warm sunset colors. Mix Cadmium Orange, Alizarin Crimson, and White to create a glowing peach/pink hue beneath the dark cloud line.
Go Metallic
Mix a small amount of iridescent medium or pearl white into your highlight colors. This gives the sun-drenched parts of the cloud a literal glow when the light hits the canvas.
Step 3: Refining and Atmospheric Effects
-
Deepen the contrast:
Mix a darker grey-blue using Payne’s Grey and Burnt Umber. Glaze this over the darkest bottom edge of the clouds to give them weight and volume, making the sunset strip below pop. -
Highlight the peaks:
Take pure Titanium White with just a hint of Yellow. Use your filbert brush to add thick, impasto strokes to the very tips of the cloud billows to simulate bright sunlight catching the edges. -
Connect the panels:
Stand back and check the flow across the gaps. Ensure that a cloud shape ending on the left canvas picks up logically on the middle canvas. Paint the sides of the canvases to match the image if you aren’t framing them. -
Add lower cloud fragments:
Using the sunset colors mixed with a little grey, paint small, horizontal wisps of clouds in the bottom orange section to create depth and perspective. -
Final glazing:
I like to apply a very thin wash (glaze) of Zinc White or clear medium over the distant parts of the clouds to push them back visually, making the foreground clouds appear closer. -
Varnish and seal:
Once the painting is completely dry (wait at least 24 hours), apply a satin or gloss varnish to unify the sheen and protect the colors.
Hang your new masterpiece with about 1-2 inches of space between each panel to let the scene breathe on your wall
Ombre Background With Paint Splatter Accent

Bring the serene energy of the shoreline into your home with this stunning triptych that captures waves crashing onto sand. This project relies on smooth blending for the ombre effect and a playful splatter technique to mimic the organic texture of sea foam.
Step-by-Step Guide
Materials
- 3 tall rectangular canvases (e.g., 12×36 inches)
- Acrylic paints: Deep teal, pthalo blue, turquoise
- Acrylic paints: Titanium white
- Acrylic paints: Burnt sienna, ochre yellow, terra cotta or coral
- Large flat paintbrushes (2-3 inches wide)
- Sea sponge or clean kitchen sponge
- Old toothbrush or stiff bristle brush
- Water cups and paper towels
- Drop cloth or newspapers (essential for splatter)
Step 1: Setting the Scene
-
Prepare the workspace:
Since we are working across three canvases simultaneously to ensure the horizon lines match, lay them flat on a protected floor or table side-by-side with about an inch of space between them. -
Mix your ocean colors:
Create a gradient palette for the water. Pour out a deep teal, a medium turquoise, and a lighter mix of turquoise with a touch of white. -
Mix your sand colors:
Prepare the beach tones. You’ll need a deep reddish-brown (terra cotta mixed with burnt sienna), a medium coral-orange, and a light sandy beige (ochre mixed with plenty of white).
Step 2: Painting the Base Gradient
-
Start with the deep ocean:
Using a large flat brush, paint the top third of all three canvases with your darkest teal color. Use long horizontal strokes that span across the breaks between canvases to keep the flow consistent. -
Transition to lighter water:
While the top is still wet, blend the medium turquoise into the bottom edge of the teal, working your way down to the middle area. Keep the strokes loose and organic. -
Paint the deep sand:
Switch to a clean large brush. Paint the bottom 20% of the canvases with your darkest reddish-brown sand color. -
Blend the beach upward:
Work upwards from the dark sand, blending in the coral-orange tone, and finally the light beige as you approach the middle section where the water meets the land. -
Create the meeting point:
Leave a messy, irregular gap in the center where the light blue water and beige sand meet. Don’t worry about a perfect line; this area will be covered in foam. -
Let the base dry:
Allow this base layer to dry completely. If the colors look transparent, apply a second coat to deepen the saturation.
Blob Control
If your splatters are landing as giant globs, your paint is likely too watery or your brush is overloaded. Shake excess paint off the brush before flicking.
Step 3: Creating the Waves
-
Draft the wave line:
Load a medium brush with pure Titanium White. Paint a thick, jagged line diagonally across the center where the blue and sand meet, varying the width to look like rolling water. -
Build the foam body:
Using a dampened sea sponge dipped in white paint, dab texture along the white wave line, pulling the white slightly upwards into the blue and downwards onto the sand to create a misty transition. -
Add secondary waves:
Paint thinner, smaller white lines further down in the sand area to mimic receding tide lines. Sponge these lightly so they look translucent and fading.
Pro Tip: Depth of Foam
For realistic 3D foam, layer your white. Let the first sponge layer dry, then add a brighter, thicker layer of white just on the ‘crest’ of the wave.
Step 4: The Splatter Technique
-
Prepare the splatter paint:
Mix a small amount of white paint with water until it reaches the consistency of heavy cream or diverse milk. It needs to be fluid enough to fly off bristles but thick enough to stay opaque. -
Test your splatter:
I always recommend testing on a piece of scrap paper first. Dip a toothbrush or stiff brush into the thinned paint and run your thumb across the bristles to flick the paint. -
Apply the sea spray:
Hold the brush near the canvas and flick the white paint generously over the main wave crash zone. Focus the densest splatter where the wave is ‘breaking’ highest. -
Extend the mist:
Add lighter, more scattered splatters extending upward into the teal water and downward over the wet sand areas to simulate wind-blown spray. -
Refine with details:
If any large blobs land where you don’t want them, quickly dab them with a paper towel to turn them into soft foam bubbles. -
Final dry:
Let the thick white textures and splatters dry fully overnight before hanging your artwork.
Step back and admire your custom coastal landscape that brings a permanent vacation vibe to your walls


String Lights Over a Twilight Gradient
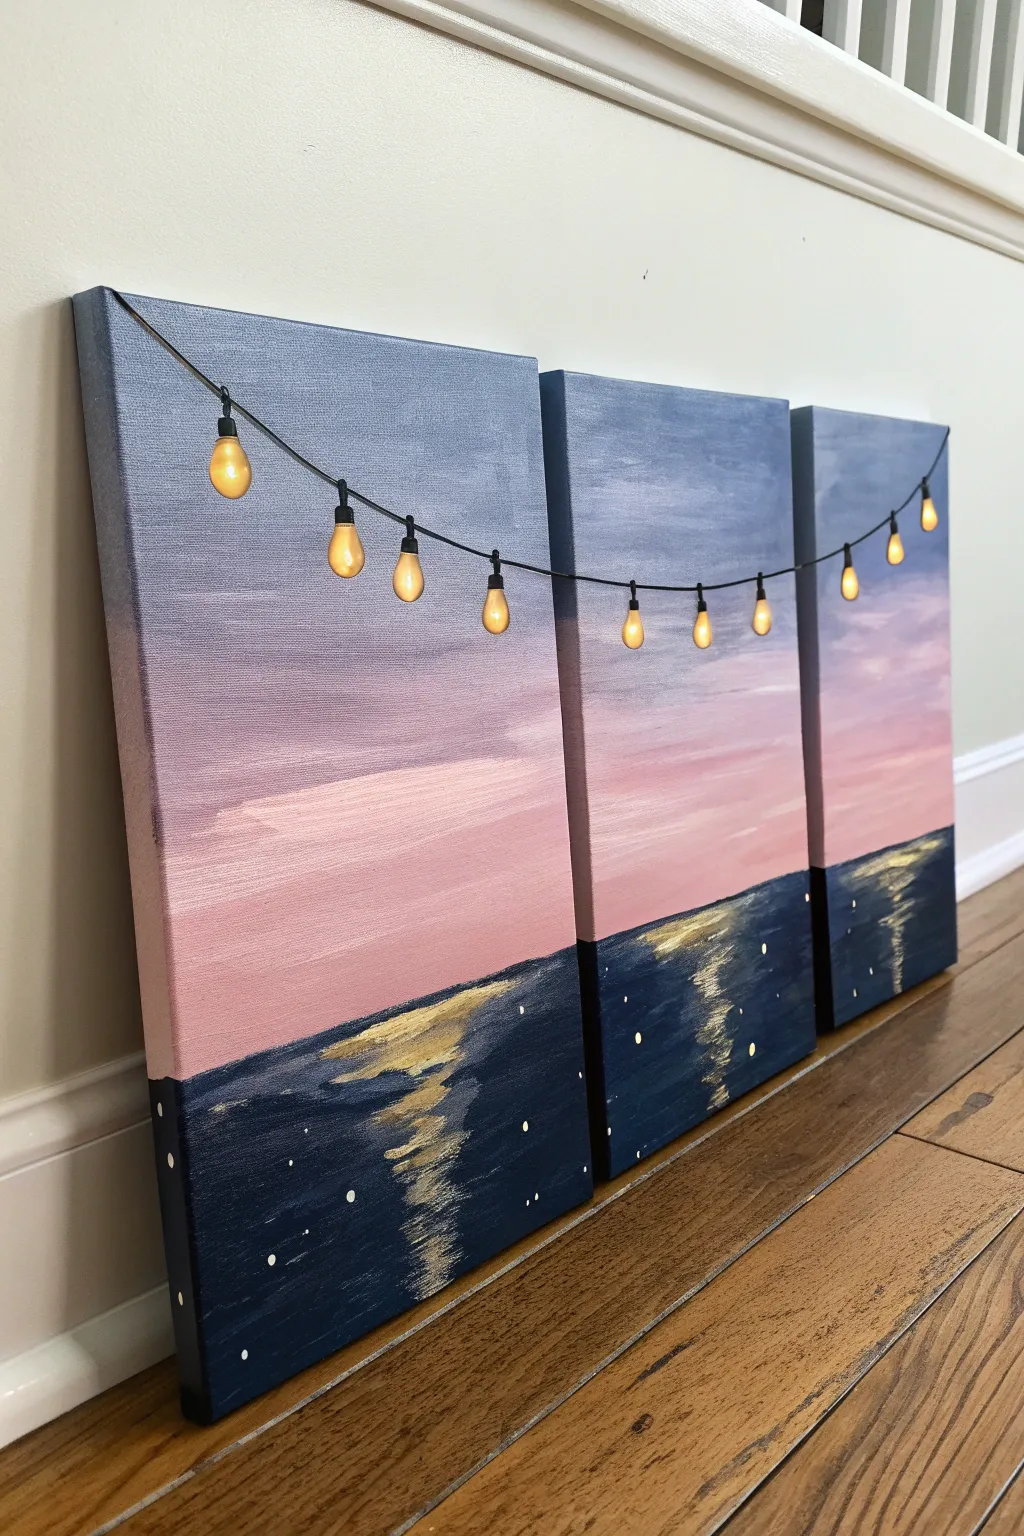
This charming three-piece canvas set captures the magic of dusk with a soft gradient sky and shimmering water. The warm glow of painted string lights adds a cozy, dimensional feel that ties the separate panels together into one cohesive scene.
Detailed Instructions
Materials
- 3 stretched canvases (ideally 8×10 or similar size)
- Acrylic paints: Ultramarine Blue, Royal Blue, Lavender/Light Purple, Light Pink, Titanium White, Black, Yellow Ochre, Bright Yellow
- Wide flat brush (1 inch or larger)
- Medium flat brush
- Small round detail brush (size 0 or 1)
- Black Sharpie or thin paint marker (optional)
- Palette or paper plate
- Cup of water and paper towels
Step 1: Creating the Background Gradient
-
Prepare the workspace:
Lay out all three canvases side-by-side on your work surface, leaving just a tiny gap between them. You want to paint across all three simultaneously to ensure the horizon line and colors match perfectly. -
Paint the top sky:
Load your wide flat brush with a mix of Ultramarine Blue and a touch of White. Paint the top third of all three canvases using long, horizontal strokes, ensuring good coverage on the top edges as well. -
Blend in the middle sky:
Without cleaning your brush thoroughly, pick up some Lavender paint. Blend this into the wet blue section, moving downward. Allow the colors to mix on the canvas to create a soft transition. -
Finish the sky gradient:
Wipe your brush on a paper towel, then load it with Light Pink and a little White. Paint the area just above where your horizon line will be, blending upwards into the purple. The goal is a smooth fade from blue to purple to pink. -
Paint the ocean base:
Rinse your brush well. Mix a dark navy color using Royal Blue and a small dot of Black. Paint the bottom third of the canvases to create the water, ensuring a straight horizontal line where it meets the pink sky. -
Add water motion:
While the navy paint is still slightly wet, take a clean medium brush with a tiny bit of Royal Blue or White. Add subtle horizontal streaks in the water area to suggest gentle waves, but keep it dark overall.
Uneven Horizon?
If your hand isn’t steady, place a strip of painter’s tape across the canvases where you want the horizon line to be. Paint the sky first, peel the tape, then paint the water.
Step 2: Adding Reflections & Details
-
Create the gold reflection:
Load a medium flat brush with Gold or Yellow Ochre mixed with a tiny bit of White. Starting at the horizon line in the center canvas (and slightly onto the side canvases), paint horizontal zigzag strokes moving downward to mimic light reflecting on water. -
Intensify the shine:
Add a few streaks of straight White or Bright Yellow in the center of your gold path to make the reflection look brightest in the middle. Let the background dry completely before moving to the next phase. -
Add distant stars:
Using the handle end of a small brush or a toothpick, dip it into White paint. Dot a few tiny stars into the dark water area or the upper sky for a magical effect.
Step 3: Stringing the Lights
-
Draw the wire:
Using a thin detail brush with Black paint (or a black paint marker), draw a single swooping line that starts high on the left canvas, dips down through the middle, and goes back up on the right canvas. It should look like a slack wire. -
Paint the bulb sockets:
Along the black wire, paint small black rectangles or cylinders spaced evenly apart. These will be the bases for your light bulbs. -
Shape the bulbs:
Mix a warm light yellow color (White + Yellow). Using a small round brush, paint a teardrop shape coming down from each black socket. Make them large enough to be visible but proportional to the canvas. -
Add the glowing center:
Once the yellow teardrops are dry, mix an even lighter yellow (mostly White). Paint a smaller teardrop or oval inside the yellow bulb to make it look like the filament is glowing brightly. -
Final highlights:
Add a tiny dot of pure White to the side of each bulb to simulate the glass reflection. This small detail instantly makes the bulbs look like 3D glass.
Level Up: Real Glow
Instead of painting the bulbs, poke small holes through the canvas where the sockets are and push actual battery-operated fairy lights through from the back.
Hang your new triptych with about an inch of space between the panels to complete the modern look
Abstract Coral Branches in Three Panels

Bring the serene beauty of the ocean into your home with this striking three-panel canvas set featuring intricate coral silhouettes. The contrasting color palettes between the panels create a modern, cohesive look that is surprisingly simple to achieve with steady handwork.
How-To Guide
Materials
- 3 square stretched canvases (10×10 or 12×12 inches)
- Acrylic paints: Cream/Off-white, Teal Blue, Burnt Orange/Terracotta, Deep Red, Dark Brown, White
- Gesso (optional but recommended for smoother texture)
- Wide flat brush (for background)
- Round liner brushes (sizes 0 and 2)
- Pencil
- Carbon transfer paper (optional)
- Coral branch reference images or stencils
- Palette or paper plate
- Water cup and paper towels
Step 1: Preparing the Base
-
Prime the canvases:
If your canvases are raw or rough, apply a coat of gesso to smooth out the texture. This helps the fine lines of the coral glide on more easily later. -
Paint the first background:
For the left panel, mix a warm cream color using white with a tiny drop of brown or yellow ochre. Using a wide flat brush, paint the entire surface of the first canvas, including the sides for a finished look. -
Paint the middle background:
On the second canvas, apply a solid coat of teal blue. Ensure the coverage is opaque; you may need a second coat after the first one dries completely. -
Paint the third background:
Cover the final canvas with a rich terracotta or burnt orange shade. Allow all three canvases to dry for at least an hour until they are cool to the touch.
Step 2: Sketching the Structure
-
Establish the trunk placement:
Lightly sketch a central trunk line starting at the bottom center of each canvas. Vary the curves slightly so each coral looks unique—one might lean left, another right. -
Draft the main branches:
From the main trunk, draw three to five major branches extending upward and outward. Keep these lines relatively thick near the base and taper them as they go up. -
Add secondary twigs:
Sketch smaller offshoot branches coming from your main lines. These should be more erratic and numerous, imitating the organic, fractal growth of real sea fans. -
Refine the tips:
Add tiny Y-shapes at the very ends of the branches to create that delicate, feathery coral texture. I find that keeping your pencil loose here helps avoid stiff, unnatural lines.
Clean Lines Hack
If your hand is shaky, rest your pinky finger on a dry part of the canvas while painting. This anchors your hand and gives you much more control over fine detail work.
Step 3: Painting the Coral
-
Mix the red coral color:
For the cream canvas, mix a deep red with a touch of brown to create a dried coral hue. Thin the paint slightly with a drop of water to help it flow. -
Outline the red trunk:
Using a size 2 round brush, paint the main trunk and thickest branches of the first canvas. Use smooth, confident strokes to establish the structure. -
Detail the red tips:
Switch to your size 0 liner brush. Carefully paint the finer twigs and tips on the cream canvas, lifting your brush pressure at the end of each stroke to create sharp points. -
Create the white coral:
For the teal canvas, load your brush with pure white paint (or white with a tiny drop of cream). Paint the trunk and branches just as before, ensuring the white stands out brightly against the dark blue. -
Paint the dark coral:
On the terracotta canvas, use a dark brownish-red or maroon. Paint the final coral structure, letting the dark silhouette contrast against the warm orange background. -
Touch up edges:
Inspect all three paintings for any wobble in your lines. Use the original background colors to carefully cut in and clean up any thick branches or accidental drips. -
Seal the work:
Once fully dry (give it 24 hours), apply a satin varnish to protect the paint and unify the sheen across all three panels.
Paint Viscosity
If the paint drags or skips on the canvas weave, add a tiny drop of water or flow medium. It should be the consistency of heavy cream for smooth lining.
Hang your new triptych with a small gap between each canvas to let the colors interact and pop
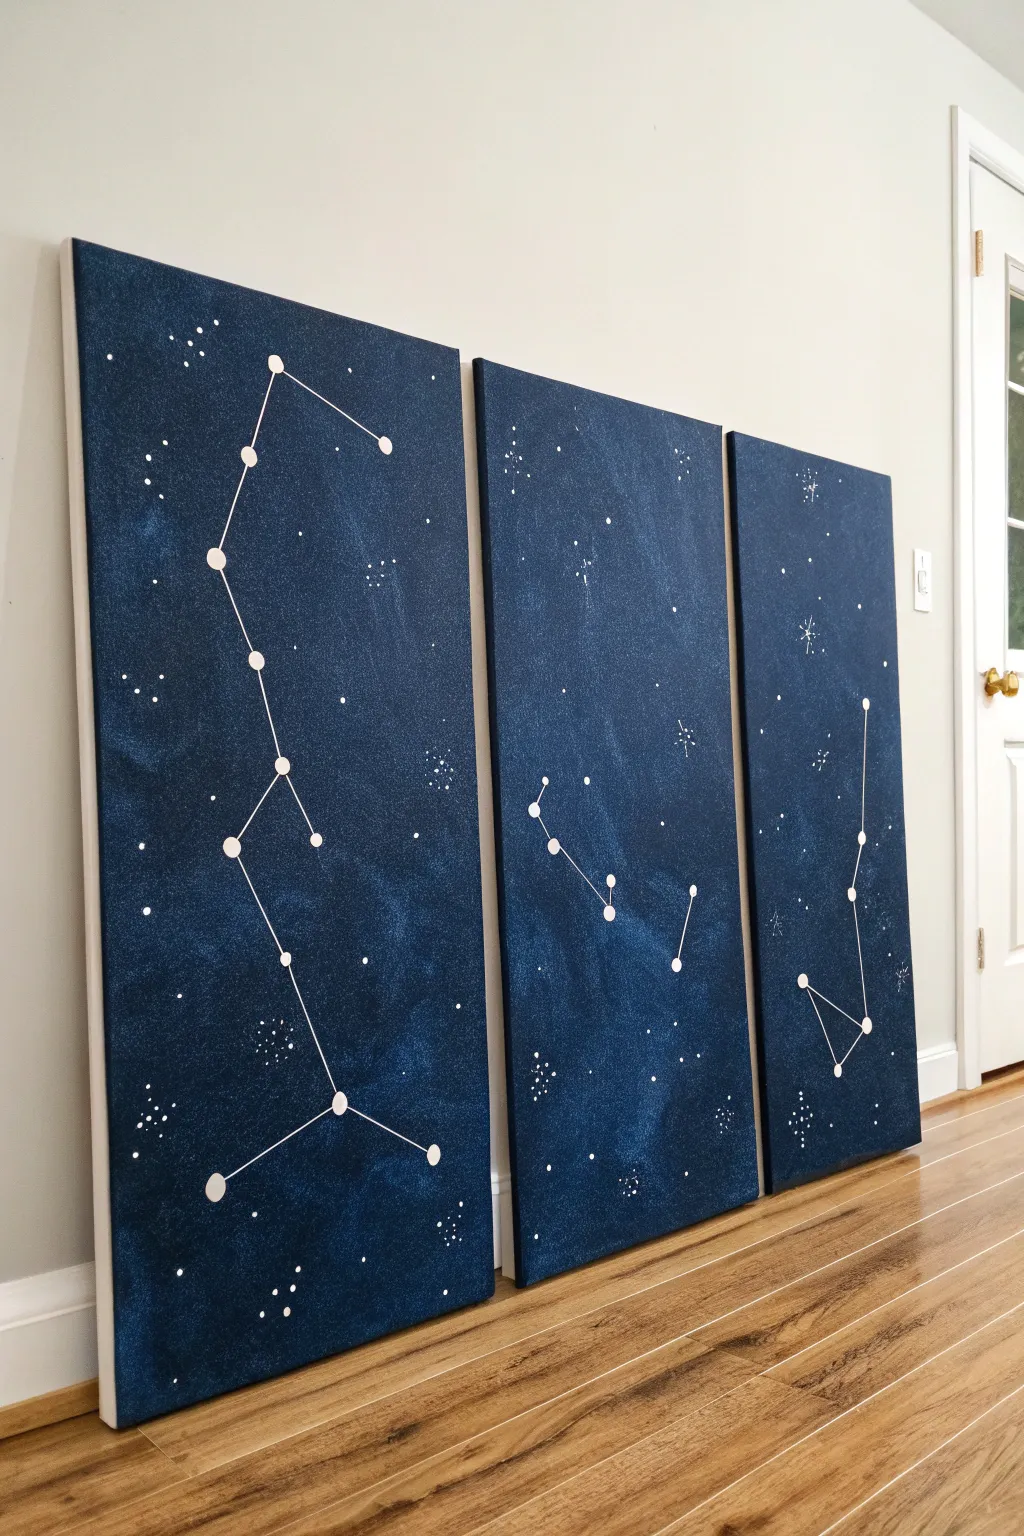
Easy Constellation Night Sky Triptych

Transform three simple canvases into a stunning, unified night sky display that brings the cosmos into your home. This beginner-friendly project uses basic techniques to achieve a deep, textured galaxy effect, punctuated by your favorite constellations.
Step-by-Step Guide
Materials
- 3 Stretched canvases (long rectangular size, e.g., 10×24 or 12×36)
- Dark blue acrylic paint (Navy or Prussian Blue)
- Black acrylic paint
- White acrylic paint
- Sponge or sea sponge
- Flat paintbrush (1-inch width)
- Fine detail paintbrush (round size 0 or 1)
- Ruler or straight edge
- White charcoal pencil or chalk
- Palette or paper plate
- Cup of water and paper towels
Step 1: Creating the Night Sky Base
-
Prepare your workspace:
Lay out all three canvases side-by-side on a flat, protected surface. Leaving a small gap between them helps prevent paint from bridging the gap, but keep them close enough to visualize the continuous image. -
Apply the base coat:
Mix your dark blue paint with a tiny drop of black to deepen it. Using the flat brush, cover the entire surface of all three canvases. Don’t forget to paint the sides for a finished gallery look. -
Add texture with a sponge:
While the base coat is still slightly tacky, dab a sea sponge lightly into pure dark blue paint. Blot it on a paper towel to remove excess, then gently press it onto the canvas in random clusters to create cloudy, nebular texture. -
Layering depth:
Repeat the sponge technique, this time mixing a very small amount of white into your blue to create a lighter denim shade. Sponge this sparingly over the darker areas to suggest distant galactic light. -
Let it cure:
Allow the background to dry completely. This is crucial because you want a solid surface for drawing your precise constellation lines later.
Star-Maker Tip
Use different sized tools for stars! A toothpick makes tiny points, a Q-tip makes medium stars, and a brush handle makes large planets.
Step 2: Mapping the Stars
-
Select your constellations:
Choose three distinct constellation patterns. The example uses Cassiopeia and others; you can pick simple zig-zag patterns or map out your own zodiac signs. -
Draft the layout:
Using a white charcoal pencil or chalk, lightly sketch the positions of your main stars. I find it helpful to mark the ‘major’ stars first before worrying about the connections. -
Draw the connecting lines:
Use a ruler and your chalk to connect the dots. Don’t press too hard; you just need a faint guide for the paint. -
Paint the star points:
Dip the handle end of a paintbrush into white paint to create perfect circles. Dot paint onto your marked star locations. Use larger dots for brighter stars and smaller dots for fainter ones. -
Connect with precision:
Switch to your fine detail brush. Lightly thin your white paint with a drop of water so it flows smoothly. Paint over your chalk lines, connecting the white star dots.
Glow Up
Mix glow-in-the-dark medium into your white paint for the stars. The art will look classic by day but illuminate your room at night.
Step 3: Final Galactic Details
-
Add background stars:
Dip an old toothbrush or a stiff brush into watered-down white paint. Run your thumb over the bristles to flick tiny specks of ‘stardust’ across the canvases. Focus on the empty spaces away from the main lines. -
Create star clusters:
Use the tip of your detail brush to manually add small clusters of dots in empty corners. Grouping 5-10 tiny dots together mimics distant star clusters. -
Add distinct flair:
Paint a few small ‘starburst’ shapes (a cross with an ‘X’ over it) randomly in the background to add variety among the simple dots. -
Clean up:
Once the white paint is fully dry, use a slightly damp cloth to gently wipe away any visible chalk or charcoal guidelines. -
Seal the artwork:
Optionally, apply a coat of clear varnish spray to protect the dark paint from dust and give the stars a uniform sheen.
Hang your triptych with about an inch of space between each canvas to create a sophisticated window into space


Have a question or want to share your own experience? I'd love to hear from you in the comments below!