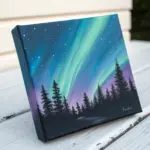
If you’ve ever tried a mirror drawing, you already know the magic: it’s just a frame and a flat plane until you add the right reflection cues. Here are some of my favorite mirror-focused ideas—starting with the classics and drifting into the weirder, moodier, more imaginative stuff.
Ornate Vintage Hand Mirror
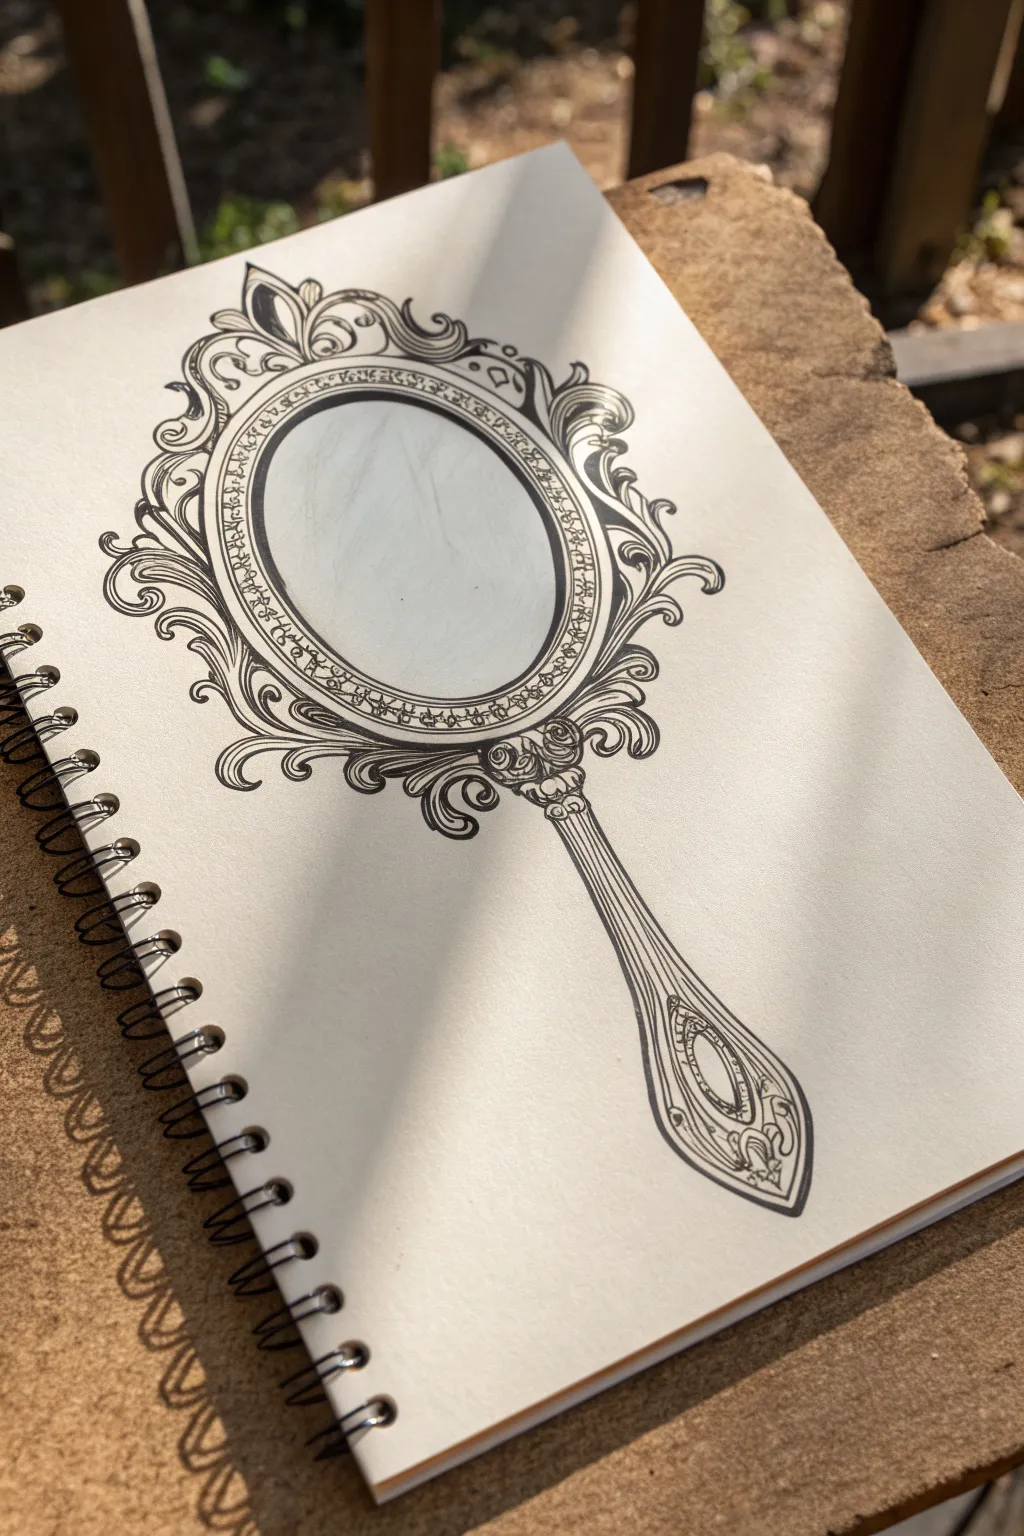
Capture the elegance of a bygone era with this intricate line art drawing of a vintage hand mirror. You’ll work with fine liners to build up elaborate scrollwork frames and delicate handle details that look sophisticated but are surprisingly meditative to create.
Step-by-Step Guide
Materials
- Smooth bristol paper or sketchbook
- HB graphite pencil
- Kneaded eraser
- Fine liner pens (0.05mm, 0.1mm, and 0.3mm)
- Ruler (optional)
- Circle template or compass (optional)
Step 1: Structural Sketching
-
Establish the centerline:
Begin by lightly drawing a vertical centerline down your page with your HB pencil. This is crucial for keeping the mirror symmetrical. Mark the top and bottom points of the entire object to sets its height. -
Define the mirror oval:
Sketch a large oval shape for the glass part of the mirror, centering it on your vertical line. If you struggle with ovals, lightly box it in first or use a template, but a loose, hand-drawn feel works well for vintage items. -
Outline the frame thickness:
Draw a second, slightly larger oval around the first one to create the rim of the frame. Keep the spacing consistent all the way around. -
Block in the handle:
Extending from the bottom of the frame, sketch the handle shape. It should taper in slightly at the neck, widen into a long stem, and flare out into a teardrop or diamond shape at the very bottom pommel. -
Map the ornate zones:
Lightly sketch the boundary shapes for the scrollwork. Instead of drawing details yet, just draw ‘clouds’ or rough shapes at the top, sides, and neck where the heavy ornamentation will go.
Symmetry Hack
Draw one half of the ornate scrollwork on tracing paper, flip it over, and trace it onto the other side to ensure perfect symmetry without measuring.
Step 2: Detailed Graphite Work
-
Draft the inner rim details:
Inside the frame rim you drew earlier, sketch small, repeating decorative elements. A simple pattern of small circles or ‘beads’ works beautifully here. -
Create the top crest:
At the very top, sketch a central fleur-de-lis or leaf shape. From this center point, draw curling S-curves that flow outward and down the sides of the frame. -
Develop side flourishes:
Continue the scrollwork down the sides. Think of these as acanthus leaves or vines; they should curve outward and then tuck back in towards the frame. -
Detailing the neck:
Where the handle meets the mirror, draw a cluster of ornate curves that wrap around the connection point, almost like a collar. This adds visual strength to the structure. -
Refining the handle:
Add vertical fluting lines down the length of the handle. At the bottom pommel, sketch a small oval inset surrounded by tiny flourishes to match the top crest.
Metallic Illusion
Use a light gray marker or very diluted ink wash inside the ‘glass’ oval, leaving a diagonal white streak to simulate a reflective surface.
Step 3: Inking and Definition
-
Outline the main oval:
Switch to a 0.3mm pen. Carefully trace the two main oval lines of the mirror glass and the inner frame edge. Use a steady hand, or move your whole arm to get a clean curve. -
Ink the structural scrolls:
Still using the 0.3mm pen, ink the main outlines of the largest scroll shapes and the outer contour of the handle. These are your ‘weight-bearing’ lines. -
Add delicate details:
Switch to a 0.1mm pen. Ink the intricate beadwork inside the rim and the smaller interior lines of the leaves and scrolls. This thinner line weight creates depth. -
Texture the handle:
Use the 0.1mm pen to draw the vertical lines down the handle. I like to break these lines slightly rather than making them perfect ruler-straight strokes to look more aged. -
Micro-detailing:
With your finest 0.05mm pen, add tiny hatching lines inside the thickest parts of the scrolls to suggest shadow and volume. Add tiny dots or stippling in the tight corners of the metalwork. -
Erase and Assess:
Wait at least five minutes for the ink to fully cure. Gently erase all your graphite guidelines with the kneaded eraser. Check for any broken lines that need reconnecting. -
Final shadow accents:
To make the drawing pop, take the 0.3mm pen again and thicken the lines on the underside of the scrolls (the bottom right edges), mimicking a cast shadow.
Now you have a stunning piece of vintage line art ready to be framed or colored


Diagonal Hatching Glass Effect
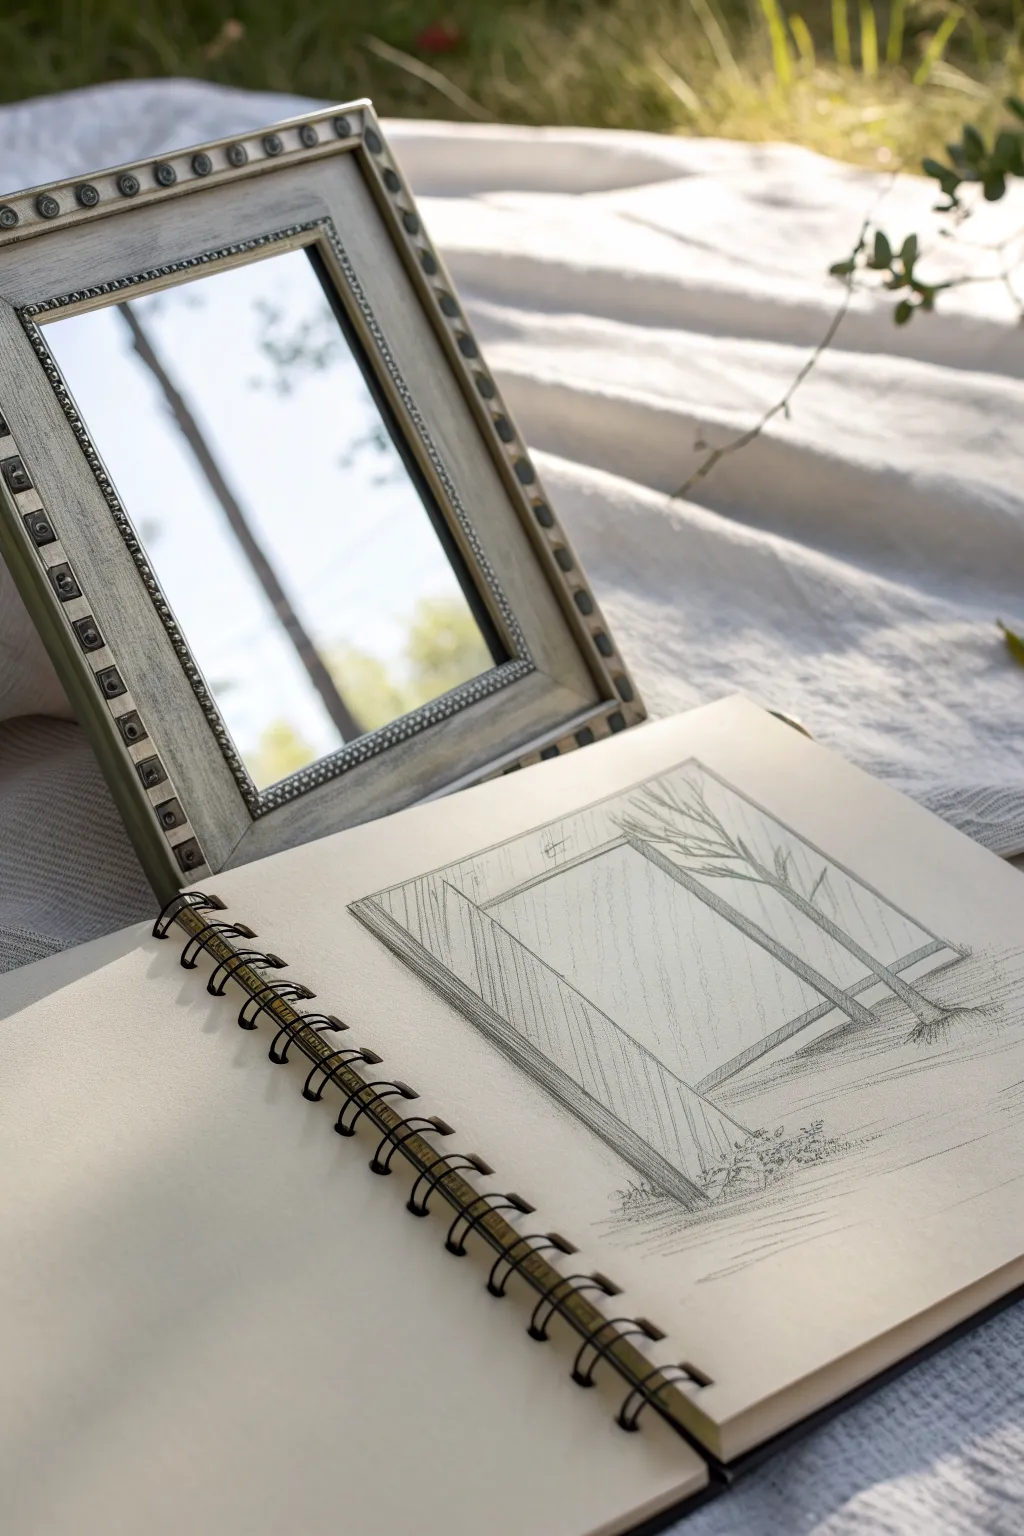
Capture the quiet elegance of a framed mirror resting outdoors with this detailed pencil study. You’ll learn how to build structure with clean lines and use diagonal hatching to suggest the sleek, reflective surface of glass.
Step-by-Step Tutorial
Materials
- Spiral-bound sketchbook (medium tooth paper)
- H graphite pencil (for initial layout)
- 2B graphite pencil (for shading and details)
- Ruler or straight edge
- Kneaded eraser
- Pencil sharpener
Step 1: Structuring the Frame
-
Establish the horizon:
Begin by lightly drawing a horizontal line across the lower third of your page to represent the ground where the mirror sits. Keep this line faint, as it will be partially obscured later. -
Block in the outer rectangle:
Using your ruler and the H pencil, draw a large tilted rectangle to form the outer edge of the mirror frame. Angle it slightly backward to mimic the perspective of the mirror leaning against something. -
Define the frame thickness:
Draw a second, smaller rectangle inside the first one. Maintain an even distance from the outer edge to create the width of the wooden frame. This creates the ‘window’ where the glass will be. -
Add depth lines:
Connect the corners of your inner and outer rectangles with short diagonal lines to give the frame three-dimensional depth, showing that it has thickness and isn’t just a flat shape.
Step 2: Developing the Reflection
-
Sketch the reflection basics:
Inside the inner rectangle (the glass area), lightly sketch the main elements reflecting in the mirror. In this study, we are capturing a simplified tree trunk and a few branches reaching upward. -
Extend the environment:
Allow the lines of the tree trunk to continue visually from the reflection down to the ground outside the frame, grounding the mirror in its setting. -
Apply diagonal hatching:
This is the crucial step for the ‘glass effect.’ Take your 2B pencil and draw consistent, evenly spaced diagonal lines across the entire glass surface. Press lightly. I find this uniform texture immediately tells the eye ‘this is a flat, reflective surface.’ -
Refine the reflection contrast:
Go back over your tree branches inside the reflection. Press slightly harder here so the reflection stands out against the diagonal hatching, but keep the lines somewhat airy.
Hatching Troubleshooting
If your hatching looks messy, use a ruler for the first few lines to set the angle. Keep your wrist stiff and move your whole arm to keep parallel spacing consistent.
Step 3: Texturing and Finishing
-
Shade the frame:
Use the side of your 2B pencil to add shading to the frame itself. Use vertical strokes for the side panels and horizontal strokes for the top and bottom to follow the wood grain direction. -
Detail the corners:
Darken the mitered corners of the frame with a few distinct lines. This emphasizes the construction of the frame and adds a touch of realism. -
Add ground cover:
At the base of the mirror, sketch loose, scribbly clumps of grass and dirt. Let these marks overlap the bottom edge of the frame slightly to show it is resting ‘in’ the grass, not hovering above it. -
Cast a shadow:
Draw a small, dark shadow directly underneath the bottom right corner of the frame. This anchors the object and confirms the light source. -
Final line weights:
Review your drawing. Darken the outer perimeter of the frame with a sharp 2B pencil to make the object pop off the page, leaving the hatching inside delicate and light.
Level Up: Sky Gradient
To imply a bright sky reflection, make your diagonal hatching denser at the top of the mirror and gradually fade it out as you move down toward the bottom.
With your sketch complete, you have a lovely study of perspective and transparency captured on paper
Self-Portrait in a Mirror
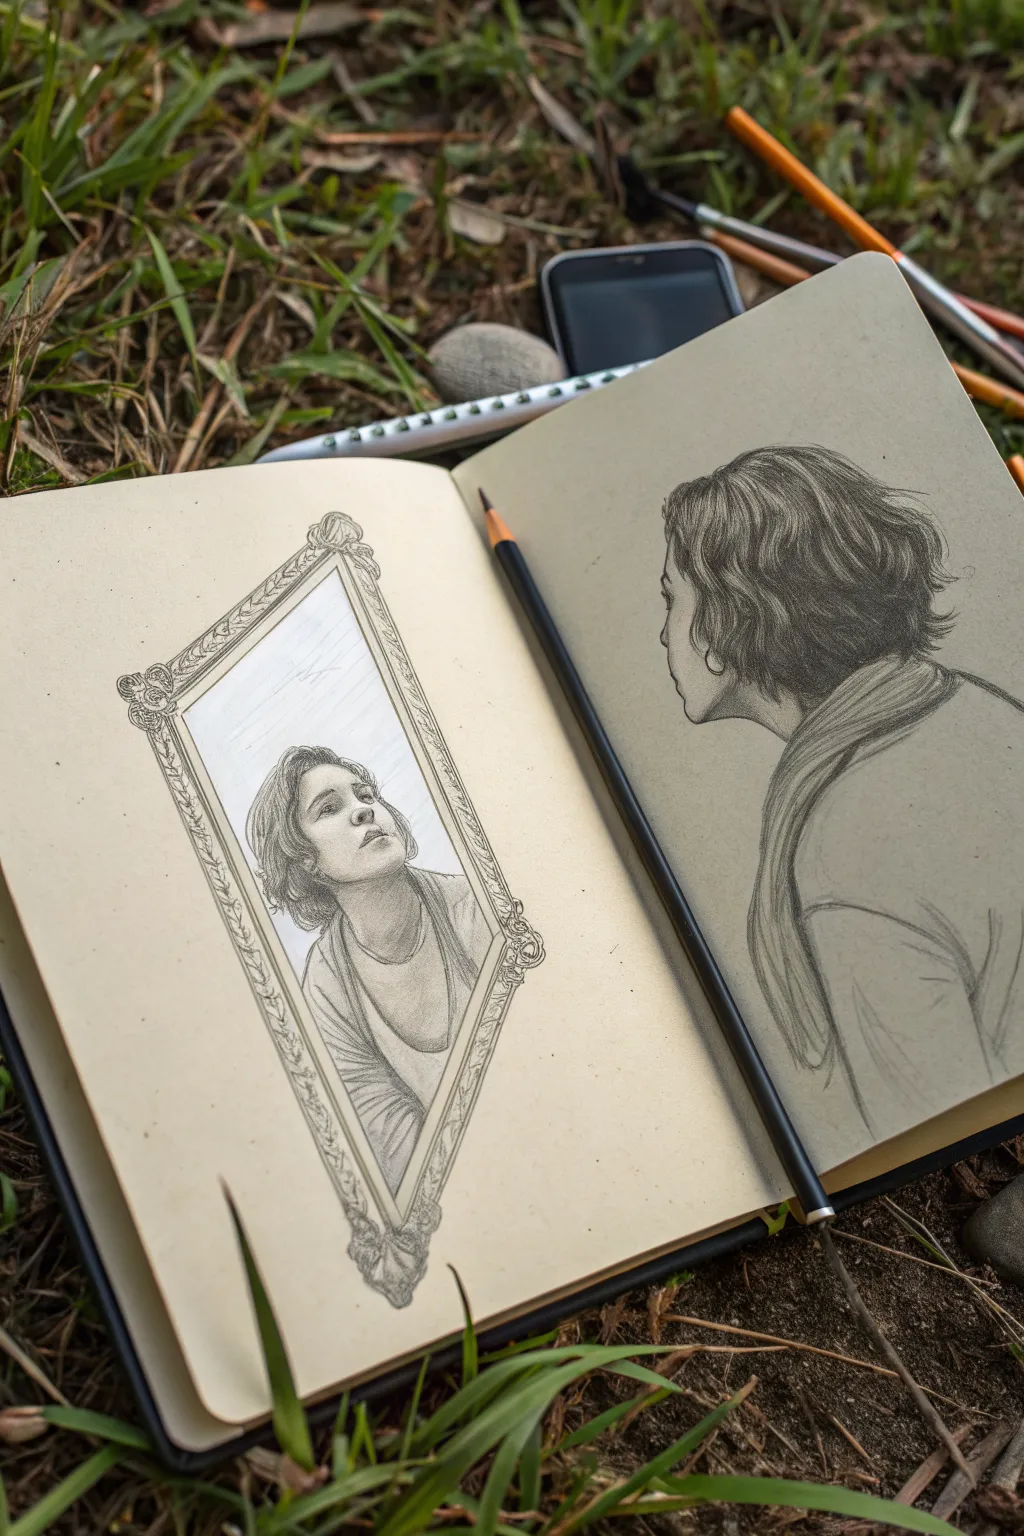
This evocative sketchbook spread captures a thoughtful narrative by juxtaposing a reflected face with the back of the viewer’s head. The interplay between the ornate mirror frame on the left and the simplistic profile on the right creates a compelling visual conversation about self-perception.
Step-by-Step
Materials
- Sketchbook with cream or toned paper (heavyweight)
- Graphite pencils (HB, 2B, 4B)
- Mechanical pencil for fine details
- Kneaded eraser
- Blending stump (tortillon)
- Ruler
Step 1: Conceptual Layout
-
Establish the composition:
Open your sketchbook to a fresh spread. Lightly mark the center of the left page for the mirror and the center-right of the right page for the observer’s head. The goal is to have the observer looking diagonally across the spine. -
Draft the mirror shape:
On the left page, use your ruler to lightly sketch a tall, diamond-shaped rhombus. Ensure the perspective tilts slightly, as if the mirror is hanging on a wall and angling downward. -
Place the head shapes:
Sketch a simple oval inside the mirror frame for the reflection. On the right page, sketch a larger, rough circle for the back of the head, ensuring the chin line suggests an upward gaze towards the mirror.
Perspective Match
To sell the illusion, ensure the tilt of the head in the reflection matches the angle of the head on the right. If the observer tilts left, the reflection tilts right.
Step 2: The Mirror Frame
-
Detail the frame structure:
Draw a secondary line inside your initial diamond shape to create the width of the frame. Sketch small ornate corners—think baroque swirls or floral motifs—at the four points. -
Add pattern and texture:
Fill the space between the inner and outer frame lines with a repetitive pattern, such as small leaves or a braided design. Keep your pencil strokes light so you can refine them later. -
Define the frame edges:
Go over the frame’s outline with a sharper HB pencil to solidify the structure. Darken the ornate corners to give them weight and make them feel like carved wood or metal.
Smudge Prevention
Graphite loves to smear across pages. Place a sheet of tracing paper or scrap paper under your drawing hand to keep the pristine cream paper clean while you work.
Step 3: The Reflection (Left Page)
-
Map facial features:
Inside the mirror oval, sketch horizontal guidelines for the eyes, nose, and mouth. The face should be tilted upward, so curve these lines slightly towards the top of the frame. -
Draw the eyes and nose:
Sketch the eyes looking upward. Since the head is tilted back, the nostrils will be more visible. Keep the lines soft; I prefer using a 2B pencil here for easier shading later. -
Refine the jaw and neck:
Draw the jawline connecting to an elongated neck. The neck muscles should show tension as the head tilts back. Add the collar of the shirt, curving it around the neck. -
Shade the reflection:
Using a 2B or 4B pencil, add shadows under the chin, in the eye sockets, and along the side of the face. Use your blending stump to smooth the graphite, creating a soft, dreamlike quality distinct from the frame.
Step 4: The Observer (Right Page)
-
Outline the profile:
Focus on the right page now. Draw the profile of the face—forehead, nose tip, lips, and chin—facing left. This figure is closer to the viewer, so the scale should be slightly larger than the reflection. -
Texture the hair:
Start drawing the hair in clumps rather than individual strands. Use wavy strokes that follow the curvature of the skull, darkening the roots and underneath the layers for volume. -
Draft the clothing:
Sketch the shoulder and back. Keep the clothing simple—just a few crucial fold lines to suggest a shirt or jacket—so it doesn’t distract from the hair texture. -
Deepen the contrast:
Use a 4B pencil to darken the hair significantly, especially near the nape of the neck and behind the ear. This high contrast anchors the drawing and balances the detailed frame on the opposite page.
Step 5: Final Touches
-
Connect the narrative:
Check the eye line. Does the brooding figure on the right look like they are staring directly into the eyes of the reflection? If not, adjust the pupil placement in the mirror slightly. -
Clean up highlights:
Use a kneaded eraser to lift pigment from the hair for highlights and to clean up the white space inside the mirror frame, ensuring the background behind the reflection looks airy. -
Sharpen details:
Take a sharp mechanical pencil and refine the intricate details of the mirror frame one last time, adding tiny hatching lines to suggest depth and craftsmanship.
Close your sketchbook gently after applying a fixative spray to preserve your dual-perspective masterpiece


Two Mirrors Creating Infinite Depth
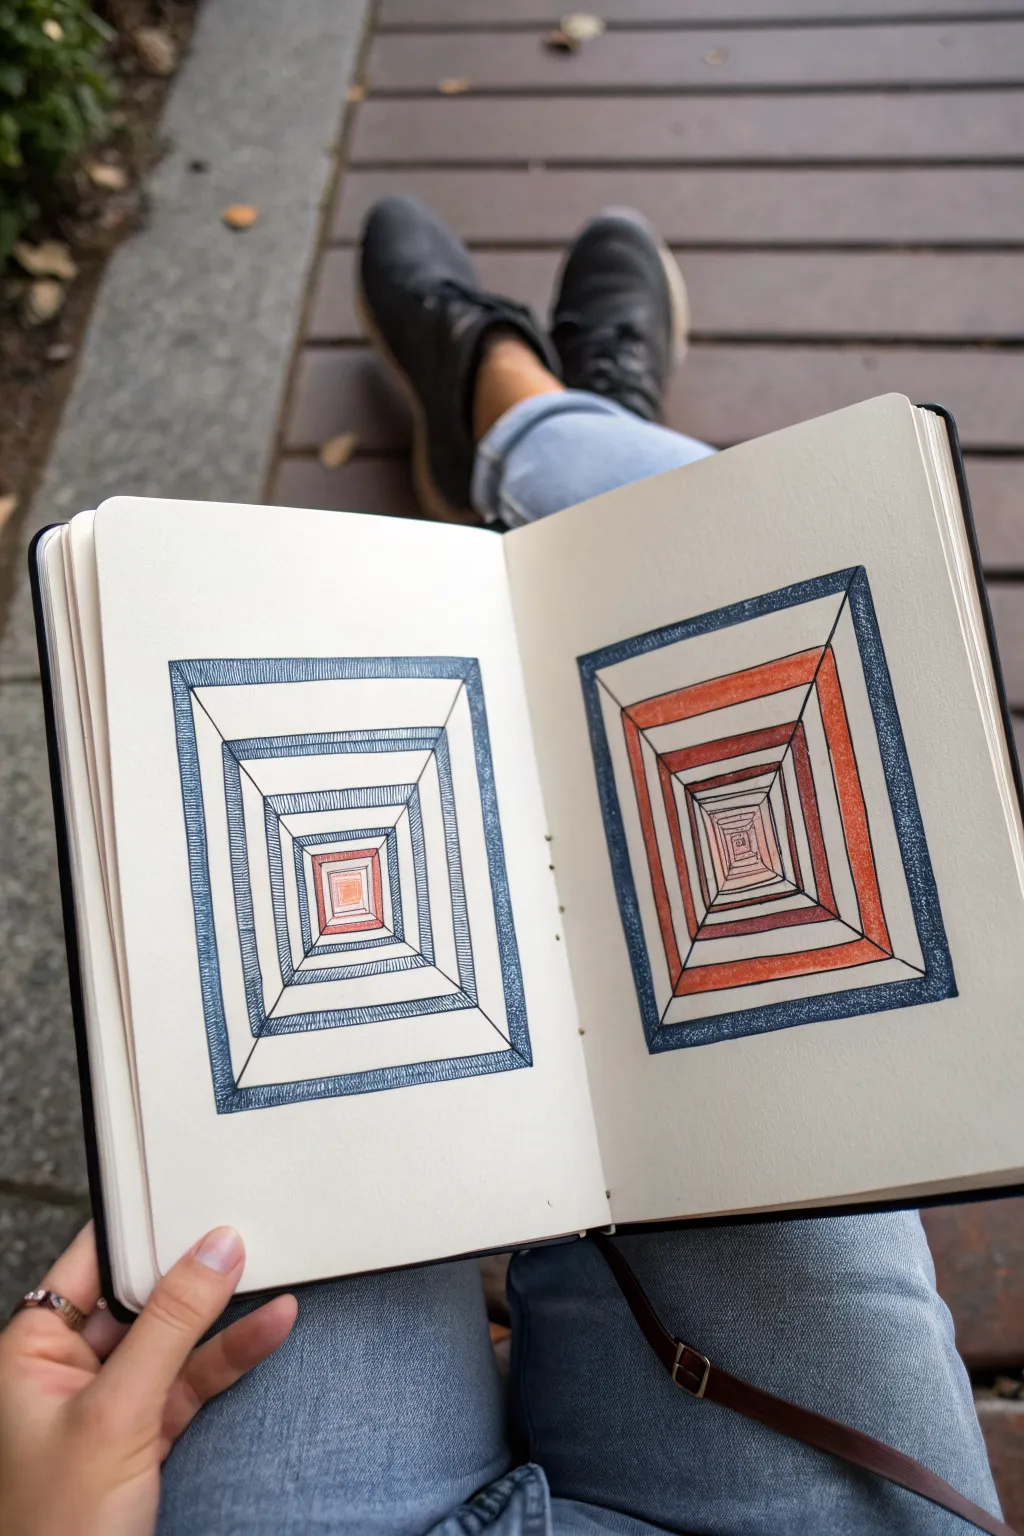
Create a mesmerizing optical illusion of infinite hallways using simple geometric perspective and contrasting color palettes. This sketchbook project relies on careful ruler work and hatched textures to mimic the look of endless mirrors reflecting into the distance.
Step-by-Step Guide
Materials
- Fine liner pen (0.5mm or 0.8mm, black or dark blue)
- Ruler
- Pencil (HB or 2B)
- High-quality sketchbook paper
- Colored pencils or fine markers (shades of blue)
- Colored pencils or fine markers (shades of orange/rust/red)
- Eraser
Step 1: Drafting the Structure
-
Establish the Outer Bounds:
Begin by drawing two large, identical rectangles on facing pages of your sketchbook using a pencil and ruler. Leave a generous margin of white space around each rectangle to frame the artwork. -
Define the Diagonal Guide Lines:
Lightly draw diagonal lines connecting the opposite corners of each rectangle (top-left to bottom-right, and top-right to bottom-left). These ‘X’ marks will serve as your perspective guides for every subsequent layer. -
Draw Nested Rectangles:
Starting from the outside and working inward, draw a series of progressively smaller rectangles. Use the diagonal guide lines to ensure the corners of every inner rectangle align perfectly. I like to space them somewhat evenly, though getting slightly closer together near the center enhances the depth effect. -
Add Frame Thickness:
Give thickness to your ‘frames’ by drawing a second, slightly smaller rectangle immediately inside each main rectangle you just drew. This creates the illusion of a visible edge or molding on each mirror frame. -
Ink the Foundations:
Once satisfied with the pencil draft, trace over your concentric rectangles with a fine liner pen. Keep your ruler firmly in place to ensure crisp, unwavering lines. Do not ink the diagonal guide lines; those will be erased later. -
Clean Up:
Wait a few minutes for the ink to dry completely to avoid smudging, then gently erase all pencil marks, including the diagonal guides.
Wonky Perspective?
If your tunnel looks twisted, verify your diagonal guide lines. Every single corner of every nested rectangle must touch that initial X. If one corner misses, the illusion breaks.
Step 2: Texturing the Frames
-
Primary Blue Hatching:
On the left page (the ‘cool’ mirror), focus on the outermost frame first. Use your fine liner to fill the frame’s thickness with tightly packed vertical or horizontal hatching lines. This creates a darker value than simple coloring. -
Alternating Textures:
For the next frame inward, switch the direction of your hatching or reduce the density to create a lighter grey-blue tone. Alternating heavy textures with lighter ones helps separate the layers visually. -
Orange Warmth:
Move to the right page (the ‘warm’ mirror). Replicate the hatching technique on the frames, but consider using a brownish or rust-colored fine liner if you have one, or stick to black ink and rely on the colored pencil for the hue later. -
The Deep Center:
As you reach the smallest, central-most rectangle (the ‘vanishing point’), make your hatching lines incredibly dense. This dark center simulates the loss of light deep within the infinite reflection.
Step 3: Adding Color and Depth
-
Layering Cool Zones:
Select a medium blue colored pencil. Shade the expansive, flat surfaces between the frames on the left page. Apply the color lightly at first. -
Gradient Shading:
To enhance the 3D effect, press harder with your blue pencil near the corners of each section and fade out toward the center of the lines. This simple gradient simulates shadow and light hitting the angled walls. -
Applying Warm Tones:
On the right page, use orange and terracotta colored pencils. Fill the spaces between the frames, again using gradients to suggest depth. The contrast between this bright orange page and the cool blue page makes the spread pop. -
Highlighting the Rims:
Go back to the thin edges of the frames where you added ink hatching. Lightly glaze over these with your colored pencils—blue on the left, orange on the right—to tint the ink without obscuring the texture. -
Final Contrast Check:
Assess the very center of both tunnels. If they don’t look deep enough, take a black pencil or pen and darken the innermost square significantly. -
Connection Lines (Optional):
If you want to emphasize the perspective, you can use a ruler to redraw the four main diagonal lines in ink, connecting the corners of the frames to accentuate the tunnel shape.
Pro Tip: Paper Shield
Place a scrap piece of paper under your drawing hand while adding color. This prevents oils from your skin transferring to the page and stops you from smearing the pencil shading.
Close your sketchbook knowing you’ve created a pocket-sized optical illusion.
BRUSH GUIDE
The Right Brush for Every Stroke
From clean lines to bold texture — master brush choice, stroke control, and essential techniques.
Explore the Full Guide
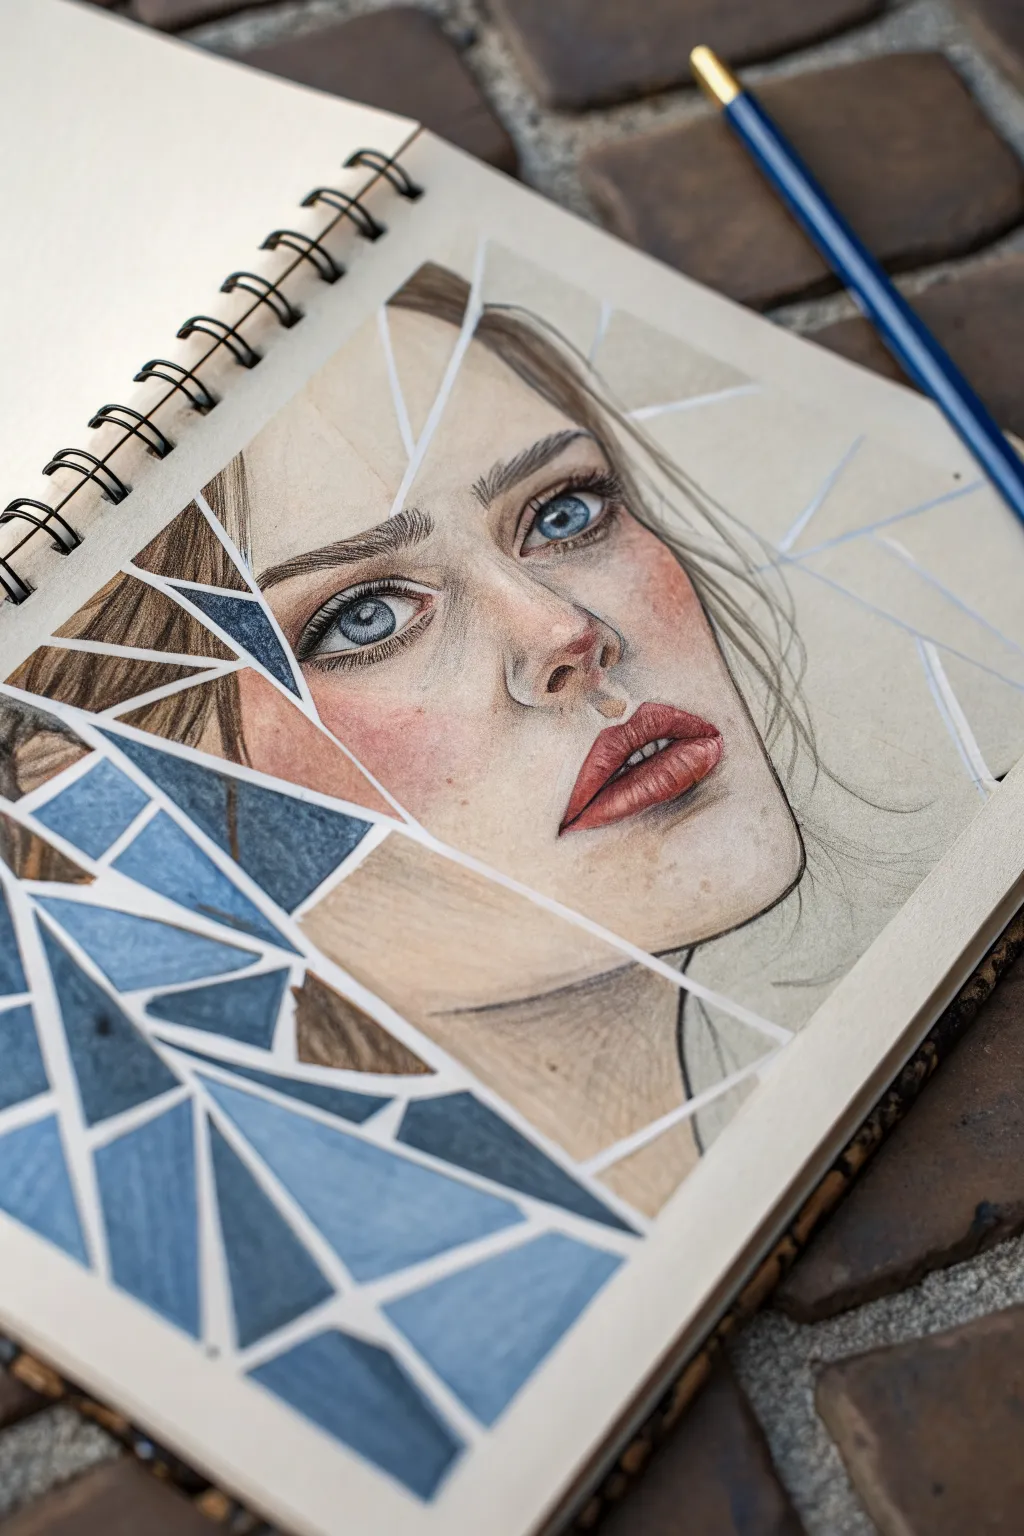
Shattered Reflection Portrait in Shards

This captivating mixed-media drawing creates the illusion of a portrait viewed through broken glass, blending realistic facial features with bold, abstract geometric forms. By using negative space as the fracture lines, you’ll achieve a striking contrast between the soft rendering of the face and the sharp, jagged edges of the shards.
Detailed Instructions
Materials
- High-quality sketchbook paper (smooth or vellum finish)
- HB graphite pencil
- Kneaded eraser
- Fine-liner pen (optional for initial layout, but pencil is preferred)
- Colored pencils (prismacolor or similar soft-core wax based)
- Flesh tone markers (alcohol-based for base layer)
- White gel pen or gouache (for highlights)
- Ruler or straight edge
- Blending stump or cotton swab
Step 1: Planning the Fracture
-
Sketch the Face Geometry:
Begin with a light graphite sketch of the woman’s face. Focus on the placement of eyes, nose, and mouth, ensuring the proportions are correct before adding any ‘broken’ effects. Don’t press too hard, as you will need to erase parts later. -
Map Out the Shards:
Using a ruler, draw straight, intersecting lines across the entire page to create the ‘shattered’ effect. Radiate these lines outward or create random geometric overlaps. Be strategic—ensure lines don’t cut awkwardly through critical features like the pupils unless intended. -
Define the Separation:
Thicken these fracture lines slightly to create double lines about 2-3mm apart. This empty channel between the shapes will remain the white of the paper, acting as the ‘grouts’ that separate the glass shards. -
Designate the Blue Zone:
Decide which area will be the abstract ‘missing’ reflection. In the reference, the bottom-left corner is replaced by blue geometric shapes. Mark these shards lightly with a ‘B’ so you don’t accidentally draw facial features there.
Step 2: Rendering the Portrait
-
Base Layer Skin Tones:
Start applying color to the skin sections. I find using alcohol markets for a base layer creates a smooth foundation, but light washes of colored pencil work too. Stay strictly inside your shard boundaries. -
Deepen Shadows:
Switch to colored pencils for detailing. Add darker flesh tones around the nose, under the lip, and in the eye sockets. Use small circular motions to build up pigment without damaging the paper tooth. -
Detailing the Eyes:
The eyes are the focal point. Use a sharp blue pencil for the irises, adding a dark navy ring around the outside. Leave small white highlights in the pupil for life-like wetness. -
Blush and Warmth:
Dust a soft pink or coral colored pencil high on the cheeks and across the nose bridge. This warmth contrasts beautifully with the cold blue shards we will add later. -
Realistic Lips:
Fill the lips with a terracotta or muted red. Pay attention to the vertical texture lines of the lips. If a fracture line cuts through the lip, ensure the color stops abruptly at the white gap. -
Hair Strands:
Draw the hair using long, sweeping strokes in browns and ochres. Treat each shard as its own window; if a hair strand enters one shard, make sure it exits at a slightly misaligned angle in the next shard to enhance the broken glass illusion.
Displacement Trick
To make the ‘broken’ effect realistic, slightly misalign the face drawing inside each shard. Shift the nose or lip line just a millimeter up or down in adjacent shards to simulate refraction.
Step 3: The Abstract Shards
-
Gradient Blue Fill:
Move to the bottom-left section you marked earlier. Fill these geometric shapes with shades of slate blue and denim. Unlike the face, these don’t need texture—make them flat and graphical. -
Varying Values:
To avoid a flat look, color some blue shards darker and others lighter. This simulates light reflecting off different angles of broken mirror pieces. -
Cleaning the Gaps:
Take your eraser and meticulously clean up the white channels between all your shards. These lines must lead stark white to sell the effect. -
High Contrast Edges:
Sharpen your pencils and refine the edges where the colored drawing meets the white gaps. The sharper this boundary, the more it looks like cut glass.
Smudge Patrol
Working on a segmented drawing makes smudging easy. Place a scrap sheet of paper under your drawing hand to protect the stark white ‘fracture’ lines from graphite or pigment transfer.
Step back and admire how distinct fragments come together to form a cohesive, yet beautifully broken image


Have a question or want to share your own experience? I'd love to hear from you in the comments below!