
If you’re craving calm, meaningful art that’s also beginner-friendly, Islamic painting ideas are such a beautiful place to start. I love how a few simple shapes, a soft gradient, and a touch of calligraphy can turn into something that feels genuinely special.
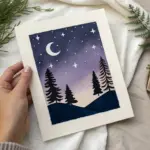
Mosque Silhouette at Sunset
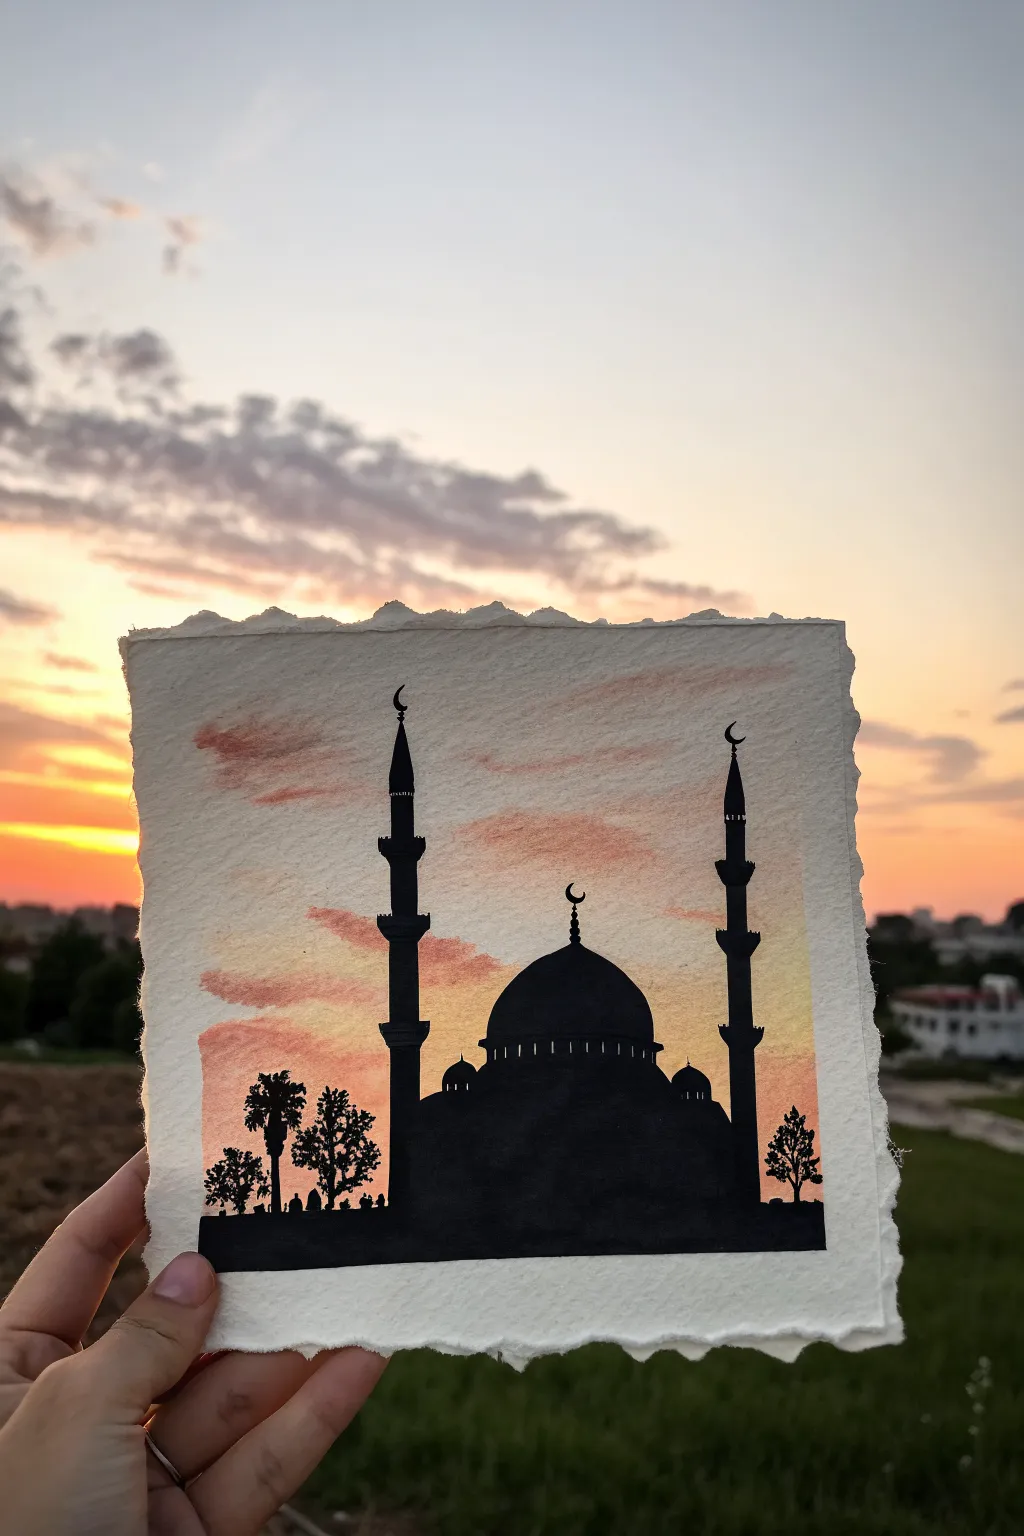
Capture the serenity of twilight with this beautiful watercolor project featuring a mosque silhouette against a vibrant sunset sky. The contrast between the warm, blended background and the crisp, black foreground creates a striking piece of art that fits perfectly in the palm of your hand.
How-To Guide
Materials
- Heavyweight watercolor paper (300gsm, cold press recommended)
- Watercolor paints (Yellow, Orange, Pink, Light Purple)
- Black waterproof fine liner pen (0.3mm or 0.5mm)
- Black ink or gouache paint
- Small round brushes (size 2 and size 0 for details)
- Flat shader brush (size 6 or 8 for the sky)
- Pencil and eraser
- Masking tape
- Ruler
- Water cups and paper towels
Step 1: Preparing the Canvas
-
Paper Prep:
Begin by tearing your watercolor paper into a small square, roughly 4×4 or 5×5 inches. Tearing the edges against a ruler rather than cutting them with scissors gives that lovely, rustic deckled edge look seen in the example. -
Secure the Paper:
Tape the paper down to a hard board or your table using masking tape on the back or just at the very corners if you want the paint to reach the rough edges. This prevents buckling when the paper gets wet. -
Sketch the Horizon:
Lightly draw a straight horizontal line across the lower third of the paper with a pencil. This will mark the ground level where the silhouette begins.
Step 2: Painting the Sunset Sky
-
Wet on Dry:
Load your flat brush with clean water and lightly dampen the sky area, stopping just above your pencil horizon line. Be careful not to make it soaking wet; just a nice sheen is perfect. -
Golden Hour Base:
Starting just above the horizon line, brush in a layer of warm yellow paint. Keep this color intense near the bottom and let it fade slightly as you move upward. -
Adding Warmth:
While the yellow is still damp, introduce an orange hue directly above it. Gently blend the meeting point of the two colors using horizontal strokes so there are no harsh lines. -
Twilight Clouds:
Mix a soft pinkish-purple shade. Use the tip of your round brush to dab in horizontal, cloud-like streaks across the upper half of the sky. -
Creating Texture:
I like to lift a tiny bit of pigment out with a thirsty (clean, damp) brush while the sky is drying to create soft white highlights in the clouds. -
Dry Completely:
This is crucial: allow the background to dry fully before moving on. The paper should be warm to the touch and flat. If you rush this, the black silhouette will bleed.
Deckled Edge Tip
To get perfectly soft torn edges, paint a line of water where you want to tear, wait 30 seconds, then pull the paper apart gently.
Step 3: Designing the Mosque Silhouette
-
Drafting the Dome:
Using a pencil very lightly, sketch a large central dome sitting on the horizon line. Add a smaller half-dome or block shape on the left and right sides to balance the structure. -
Placing Minarets:
Sketch two tall, slender towers (minarets) on either side of the dome. Use a ruler to ensure they are perfectly vertical. -
Refining Details:
Add the small details in pencil: the crescent moons on top of the dome and minarets, and the balconies on the towers. Keep these sketches faint so they don’t show through later. -
Adding Nature:
Sketch the outlines of a few trees—perhaps a palm tree and some leafy bushes—on the far left and right edges for framing.
Add Some sparkle
Once the painting is dry, use a metallic gold gel pen to outline just the crescent moons or add tiny stars in the upper sky for a magical effect.
Step 4: Inking the Silhouette
-
Outline First:
Switch to your black waterproof fine liner. Carefully trace the outline of the dome, the minarets, and the crescent moons. The pen gives you more control over the sharp geometry than a brush would. -
Filling Large Areas:
Use a small round brush dipped in black ink or opaque black gouache to fill in the main body of the dome and the ground area. Ensure the black is solid and opaque. -
Windows and Balconies:
Use the fine liner again to add tiny vertical lines just below the dome to suggest windows or architectural details. -
Drawing Trees:
For the trees, use stippling (tiny dots) or rough scribbles with the pen to mimic the texture of leaves against the light. Don’t make these shapes too solid; let a little light breaks through the foliage. -
Tiny Figures:
If you are feeling confident, add tiny bumps along the horizon line to represent people gathering or small tombstones, adding scale to the building. -
Final Touches:
Check the opacity of your black paint. If it looks greyish once dry, add a second coat to the largest dark areas to ensure a deep, rich silhouette.
Now you have a peaceful sunset scene that captures a moment of spiritual reflection


Crescent Moon Over a Mosque Skyline
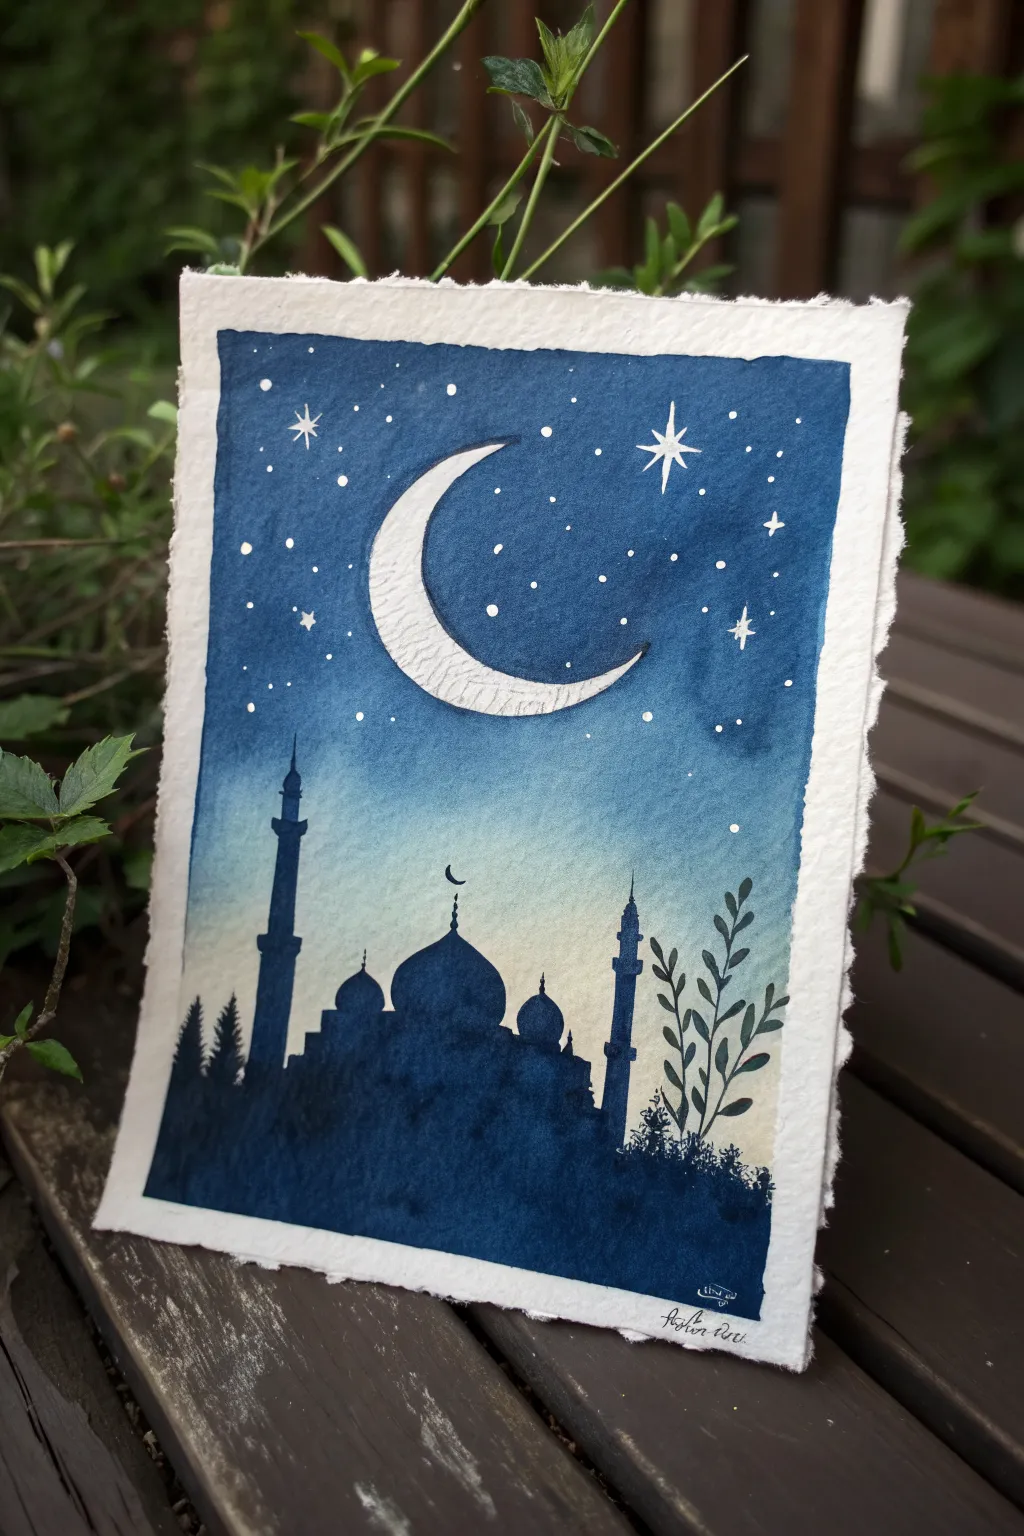
This serene painting captures the peaceful essence of a night prayer with a glowing crescent moon watching over a silhouetted mosque. The gradient sky transitions from deep indigo to a soft twilight haze, creating a perfect backdrop for the architectural details.
Step-by-Step Tutorial
Materials
- Cold press watercolor paper (deckled edge optional)
- Masking tape or painter’s tape
- Pencil (HB or lighter)
- Masking fluid
- Watercolor paints (Indigo, Prussian Blue, Payne’s Grey, Yellow Ochre or Unbleached Titanium)
- Round watercolor brushes (size 8 for washes, size 2 or 0 for details)
- Opaque white gouache or white gel pen
- Clean water and paper towels
Step 1: Preparation and Sketching
-
Tape the edges:
Begin by taping down all four edges of your watercolor paper to a board. For this specific look, leave about a half-inch border between the tape and the edge of your painting area to create a clean frame. -
Draft the moon:
Lightly sketch a large crescent moon in the upper center of the paper. Keep the lines faint so they don’t show through later. -
Protect the moon:
Before painting, carefully fill in the crescent moon shape with masking fluid. This preserves the white of the paper so the moon stays bright against the dark sky. -
Let it dry completely:
Wait until the masking fluid is fully rubbery and dry to the touch. Painting over wet fluid will ruin your brushes and smear the shape.
Step 2: Painting the Sky Gradient
-
Prepare your colors:
Mix a large amount of a deep indigo blue. You’ll also need a watered-down version of this blue and a touch of yellow ochre or unbleached titanium for the horizon. -
Wet the paper:
Using a clean, large brush, wet the entire sky area with clear water, stopping just above where you want the mosque silhouette to be. -
Start at the top:
Load your brush with the concentrated indigo pigment. Apply it boldly to the top of the paper, letting the color flow into the wet surface. -
Create the gradient:
As you move down the paper, dip your brush in water to dilute the paint. The color should naturally fade from deep blue to a lighter, washed-out blue. -
Add the horizon glow:
Near the bottom of the sky (while the paper is still damp), introduce a very faint wash of yellow ochre or warm cream. Blend this gently into the fading blue to distinct morning or twilight glow. -
Dry partially:
Let this layer dry until it is no longer distinctively shiny but feels cool to the touch.
Uneven Gradient?
If your sky dries with hard lines or ‘cauliflowers,’ re-wet the entire sky area gently with a clean, damp brush and smooth it out, or embrace the texture as clouds.
Step 3: The Silhouette Layer
-
Draft the mosque:
Once the sky is fully dry, lightly sketch the outline of the domes and minarets. Don’t press too hard; you just need a guide. -
Mix the silhouette color:
Combine Indigo and Payne’s Grey to create a very dark, near-black blue. It should be creamy in consistency, not watery. -
Paint the domes and minarets:
Carefully fill in your sketched mosque shapes. Use the fine tip of your brush to get crisp points on the minarets and the small crescendo on the central dome. -
Fill the foreground:
Use a larger brush to fill in the solid dark mass at the bottom of the page beneath the domes. Dab the brush to create a slightly uneven texture, implying foliage or distant trees. -
Add nature elements:
With a thin liner brush (size 0), paint delicate vertical stems on the right side. Add small, leaf-shaped dabs along the stems to create the silhouetted plant life. -
Paint the pine trees:
On the left side, use small stippling motions to create jagged, triangular pine tree shapes rising from the dark foreground.
Metallic Magic
Once the painting is dry, trace the crescent moon or the tips of the minarets with visible gold watercolor paint for a luxurious, illuminated manuscript feel.
Step 4: Stars and Details
-
Remove the mask:
Gently rub away the masking fluid from the moon using your finger or a rubber cement eraser to reveal the crisp white paper underneath. -
Texture the moon:
Mix a very watery grey wash. Gently dab a little texture onto the inner curve of the moon to give it dimension, leaving the outer edge bright white. -
Scatter the stars:
Dip a brush or toothbrush into white gouache. Flick the bristles to spatter tiny stars across the dark upper section of the sky. -
Draw larger stars:
Use a white gel pen or a fine brush with white gouache to manually draw a few prominent four-pointed stars and distinct dots for constellations. -
Remove tape:
Peel the tape away slowly at a 45-degree angle to reveal your clean edges and frame the night scene.
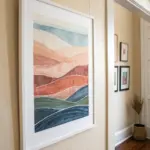
Display your beautiful nightscape in a simple frame or gift it as a thoughtful greeting card


Lanterns and Crescent for Ramadan Nights
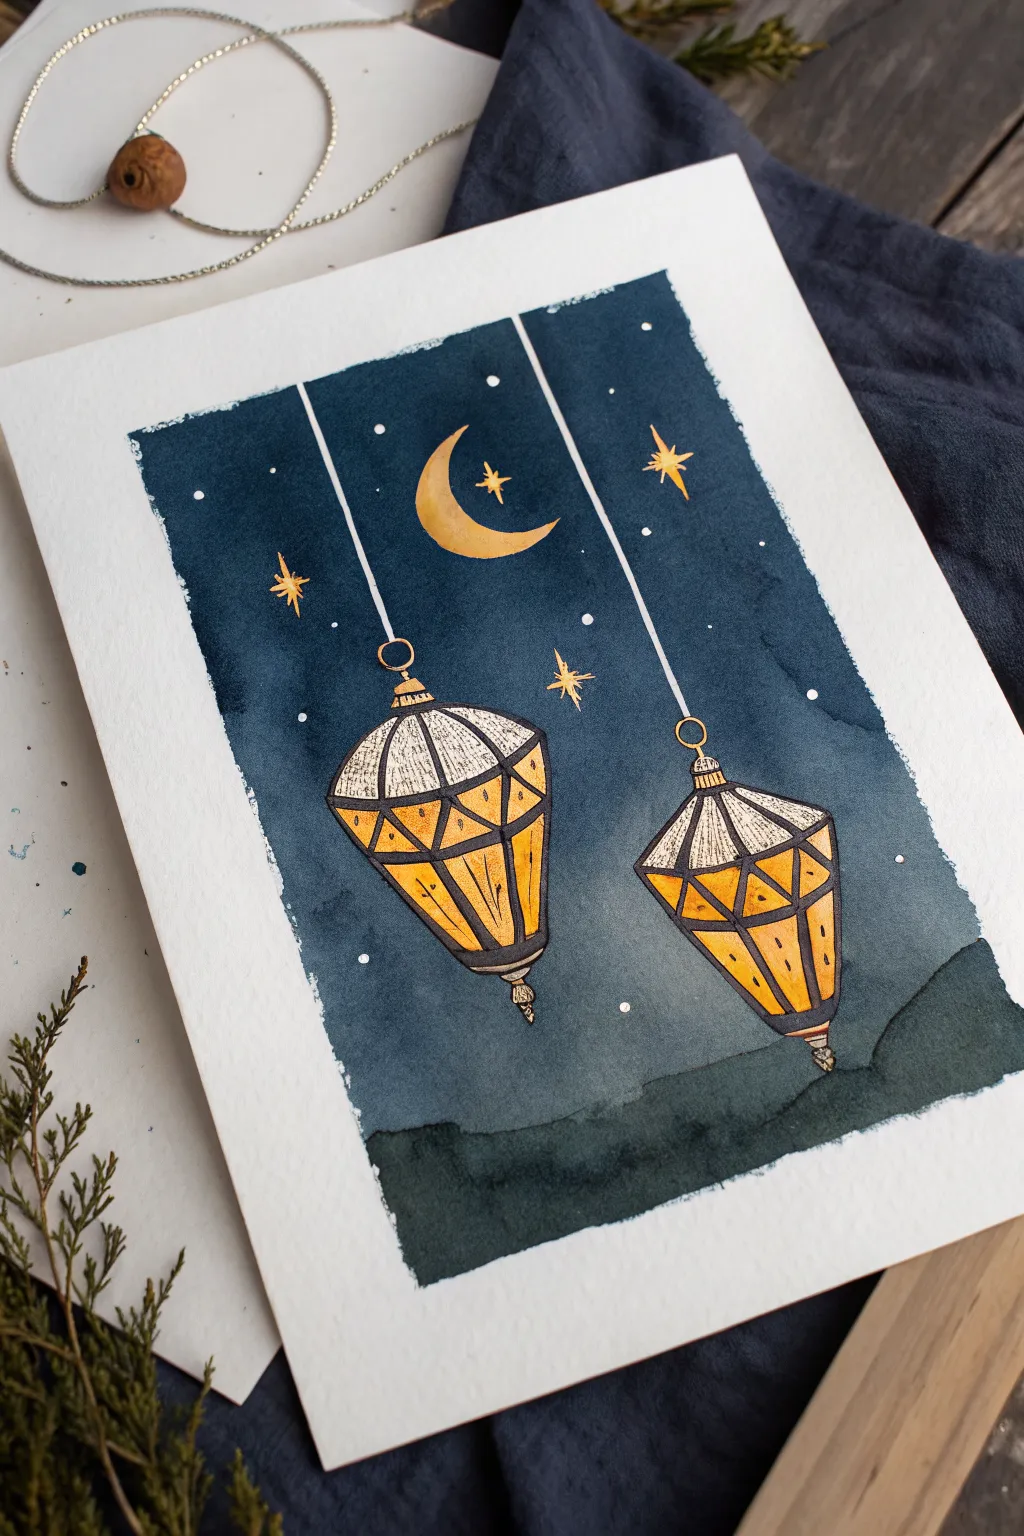
Capture the serene magic of a Ramadan evening with this watercolor and ink illustration featuring two hanging fanoos lanterns against a deep indigo sky. The contrast between the dark, moody wash and the warm, golden lanterns makes for a striking yet achievable piece for beginners.
Step-by-Step
Materials
- Cold-pressed watercolor paper (300 gsm)
- Masking tape (washi or painter’s tape)
- Watercolor paints (Indigo, Lamp Black, Yellow Ochre, Burnt Sienna)
- Fine liner pens (Black, 0.3mm and 0.5mm)
- White gel pen or white gouache
- Gold metallic paint or gold gel pen
- Round watercolor brushes (Size 8 for washes, Size 2 for details)
- Pencil and eraser
- Ruler
Step 1: Preparation and Sketching
-
Tape the borders:
Begin by taping down all four edges of your watercolor paper to a board. To achieve the crisp, clean borders seen in the photo, run two vertical strips of tape down the paper to create a rectangular painting area in the center. Press the edges firmly to prevent paint bleeding. -
Sketch the composition:
Lightly sketch the outlines of two lanterns hanging at different heights. Start with the strings coming from the top, then draw the diamond-shaped bodies of the lanterns. Add a crescent moon near the top center and mark small spots for stars. -
Draft the moon and ground:
Drawing lightly, outline the crescent moon shape. At the bottom of your taped rectangle, sketch an uneven, rolling horizon line for the dark silhouette of the ground.
Bleed-Proof Borders
To get razor-sharp edges like the photo, run a fingernail or bone folder firmly over the edge of the tape before painting. This seals the gap and stops blue paint from creeping underneath.
Step 2: Painting the Sky
-
Mix the night sky color:
Create a deep, moody blue by mixing Indigo with a touch of Lamp Black. You want a saturated, dark value that suggests late night. -
Apply the wash:
Using your size 8 round brush, apply the paint to the sky area. Work carefully around your pencil sketches of the lanterns and the moon—this is a ‘negative painting’ technique where you leave the subject white for now. -
Create the ground silhouette:
While the sky is drying, mix a more concentrated version of your indigo/black mixture (less water). Paint the bottom section below your horizon line to create a dark, solid ground area that contrasts slightly with the sky. -
Dry completely:
Wait for the paint to dry fully. The paper should be flat and cool to the touch before you proceed to the next steps.
Make it dimensional
Use a white gel pen to add tiny highlights on the metal parts of the lanterns (the top cap and bottom tassel) to make them look shiny and three-dimensional against the dark background.
Step 3: Coloring the Lanterns
-
Base layer for lanterns:
Mix a watery wash of Yellow Ochre. Paint the segments of the lanterns, leaving the very top ‘caps’ unpainted or extremely pale. I aim for slightly uneven coverage here to suggest flickering light. -
Add warmth and depth:
While the yellow is still slightly damp, drop in touches of Burnt Sienna or orange near the edges and bottom of the lantern segments to create a warm glow effect. -
Paint the moon:
Use the same Yellow Ochre and Burnt Sienna mix to paint the crescent moon. Concentrate the darker orange tone on the inner curve of the crescent for shadow.
Step 4: Inking and Details
-
Outline the lanterns:
Once the paint is bone dry, use a black fine liner (0.5mm) to trace the pencil outlines of the lanterns. Draw the vertical strings, the hanging loops, and the geometric frames of the lantern bodies. -
Add pattern details:
Switch to a finer 0.3mm pen to add delicate hatching or small dots inside the lantern panels for texture. Don’t forget the decorative tassels at the very bottom. -
Draw the stars:
Use a gold gel pen or gold metallic paint to draw several four-pointed stars scattered across the dark sky. Make the star nearest the moon slightly larger for balance. -
Add distant stars:
Using a white gel pen or a small dot of white gouache, add tiny specks around the sky to represent distant stars. -
Highlight the moon:
Add a small gold star right next to the moon’s curve to emphasize the celestial theme.
Step 5: Finishing Touches
-
Remove the tape:
Peel the masking tape away slowly and at a sharp angle to the paper. This reveals those satisfying crisp white edges that frame your night scene perfectly. -
Final assessment:
Check your illustration for any needed touch-ups. If the strings look too faint, retrace them carefully with your black pen to ensure they look strong enough to hold the lanterns.
Display your beautiful lantern painting in a simple frame or gift it as a handmade Ramadan greeting card
Eid Greeting With Simple Lettering and Stars
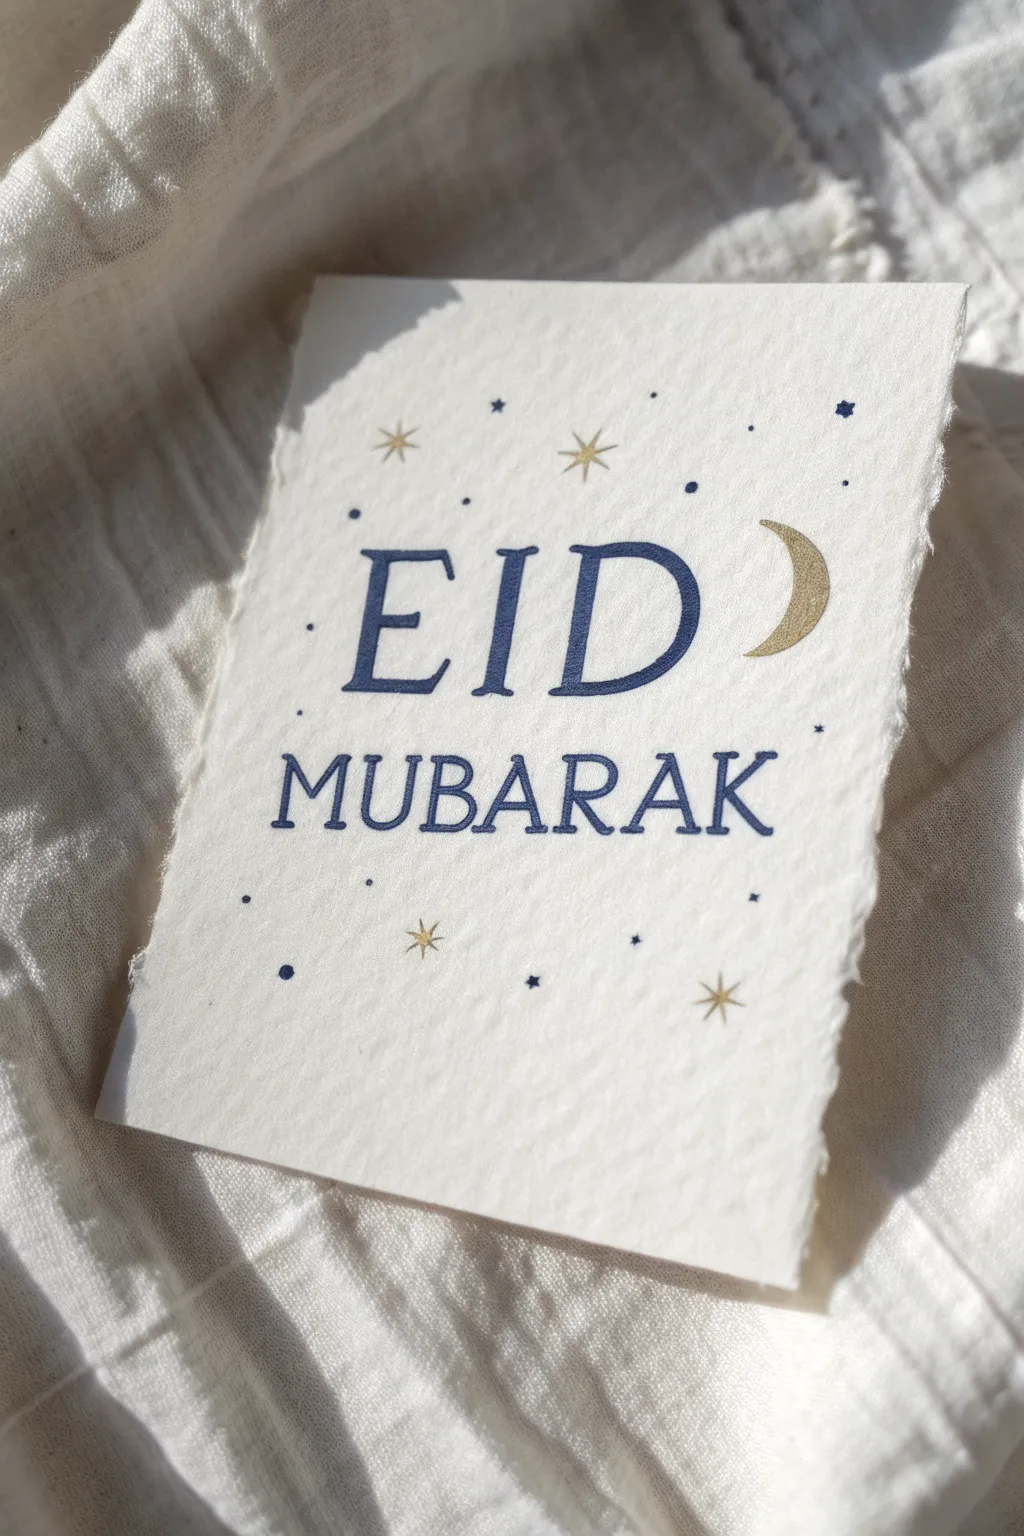
Celebrate the occasion with this elegant, minimalist greeting card featuring crisp navy lettering and shimmering gold accents. The textured, deckled-edge paper adds a beautiful handmade quality that elevates the simple celestial design.
Step-by-Step Guide
Materials
- Heavyweight textured watercolor paper or handmade cotton paper (300gsm+)
- Navy blue watercolor paint or calligraphy ink
- Metallic gold watercolor paint or gold ink
- Pointed round brush (size 2 or 4)
- Fine liner brush (size 0 or 00) for details
- Ruler
- Pencil
- Eraser
- Palette for mixing
- Water cup and paper towels
Step 1: Preparing the Paper
-
Size the paper:
Cut your watercolor paper to a standard postcard size, roughly 5×7 inches. If you are starting with a larger sheet, you can tear it against a ruler to create soft, deckled edges. -
Create deckled edges:
If your paper has straight machine-cut edges, wet the edge with a clean brush and water, wait a moment for it to soften, and then gently tear away a thin strip to mimic the handmade look seen in the photo. -
Find guidelines:
Using a ruler and a very light pencil touch, draw two horizontal baselines near the center of the paper. Leave a larger gap for the top word ‘EID’ and a smaller gap below it for ‘MUBARAK’.
Step 2: Drafting the Design
-
Sketch lettering:
Lightly sketch the word ‘EID’ in a serif style on the top line. The letters should be tall and evenly spaced. I like to make the serifs slightly prominent to match the classic style. -
Add the second line:
Below ‘EID’, sketch ‘MUBARAK’ in smaller, capital serif letters. Center this word relative to the text above it to maintain balance. -
Position celestial elements:
Draw faint outlines for a crescent moon on the right side of ‘EID’. Then, mark small dots or ‘x’ shapes where you want your scattered stars and speckles to go.
Deckle Edge Trick
To get that soft torn look easily, paint a line of water where you want to tear the paper. Let it soak for a minute, then pull the paper apart gently.
Step 3: Painting the Lettering
-
Mix the navy:
On your palette, mix a deep navy blue watercolor. You want a high pigment-to-water ratio so the color is opaque and bold, not washed out. -
Paint ‘EID’:
Using your size 2 or 4 pointed round brush, carefully follow your pencil lines to paint the letters E, I, and D. Keep your vertical strokes thick and your horizontal serifs thinner. -
Sharpen edges:
While the paint is wet, refine any uneven edges with the tip of your brush. If you need sharper corners on the serifs, switch to the fine liner brush. -
Paint ‘MUBARAK’:
Switch to a smaller brush if needed for better control. Paint the word ‘MUBARAK’ with equal care, ensuring the blue tone matches the intensity of the first word. -
Let it dry:
Allow the navy lettering to dry completely. This is crucial—if it’s damp, your hand might smudge it while adding the gold details.
Make It Shine
Once the gold paint is dry, gently buff it with a clean, dry soft cloth or tissue. This polishes the metallic pigments and makes the gold reflect more light.
Step 4: Adding Celestial Details
-
Prepare the gold:
Activate your metallic gold paint with a few drops of water. It should be creamy, like melted butter, to ensure it shines brightly on the textured paper. -
Paint the crescent:
Fill in the crescent moon shape next to ‘EID’. Use steady, sweeping strokes to keep the curve smooth and seamless. -
Add large stars:
Paint a few larger, four-pointed or eight-pointed stars using the fine liner brush. Start from the center and flick outward to create sharp points. -
Scatter small details:
Dip the very tip of your fine brush into the gold and add tiny dots and smaller star shapes randomly around the text to fill the empty space. -
Add blue accents:
Clean your brush and pick up a little more navy paint. Add a few tiny blue dots interspersed among the gold stars to tie the color palette together.
Step 5: Finishing Touches
-
Erase guidelines:
Once you are absolutely certain all paint is bone dry, gently erase any visible pencil lines. Be very careful not to rub over the gold paint too vigorously, as it can smear. -
Flatten the card:
If the watercolor has caused the paper to buckle slightly, place the dry card under a heavy book overnight to flatten it out seamlessly.
Your beautiful, handmade card is now ready to share warm wishes for the holiday
BRUSH GUIDE
The Right Brush for Every Stroke
From clean lines to bold texture — master brush choice, stroke control, and essential techniques.
Explore the Full Guide
Prayer Rug Pattern Block Painting
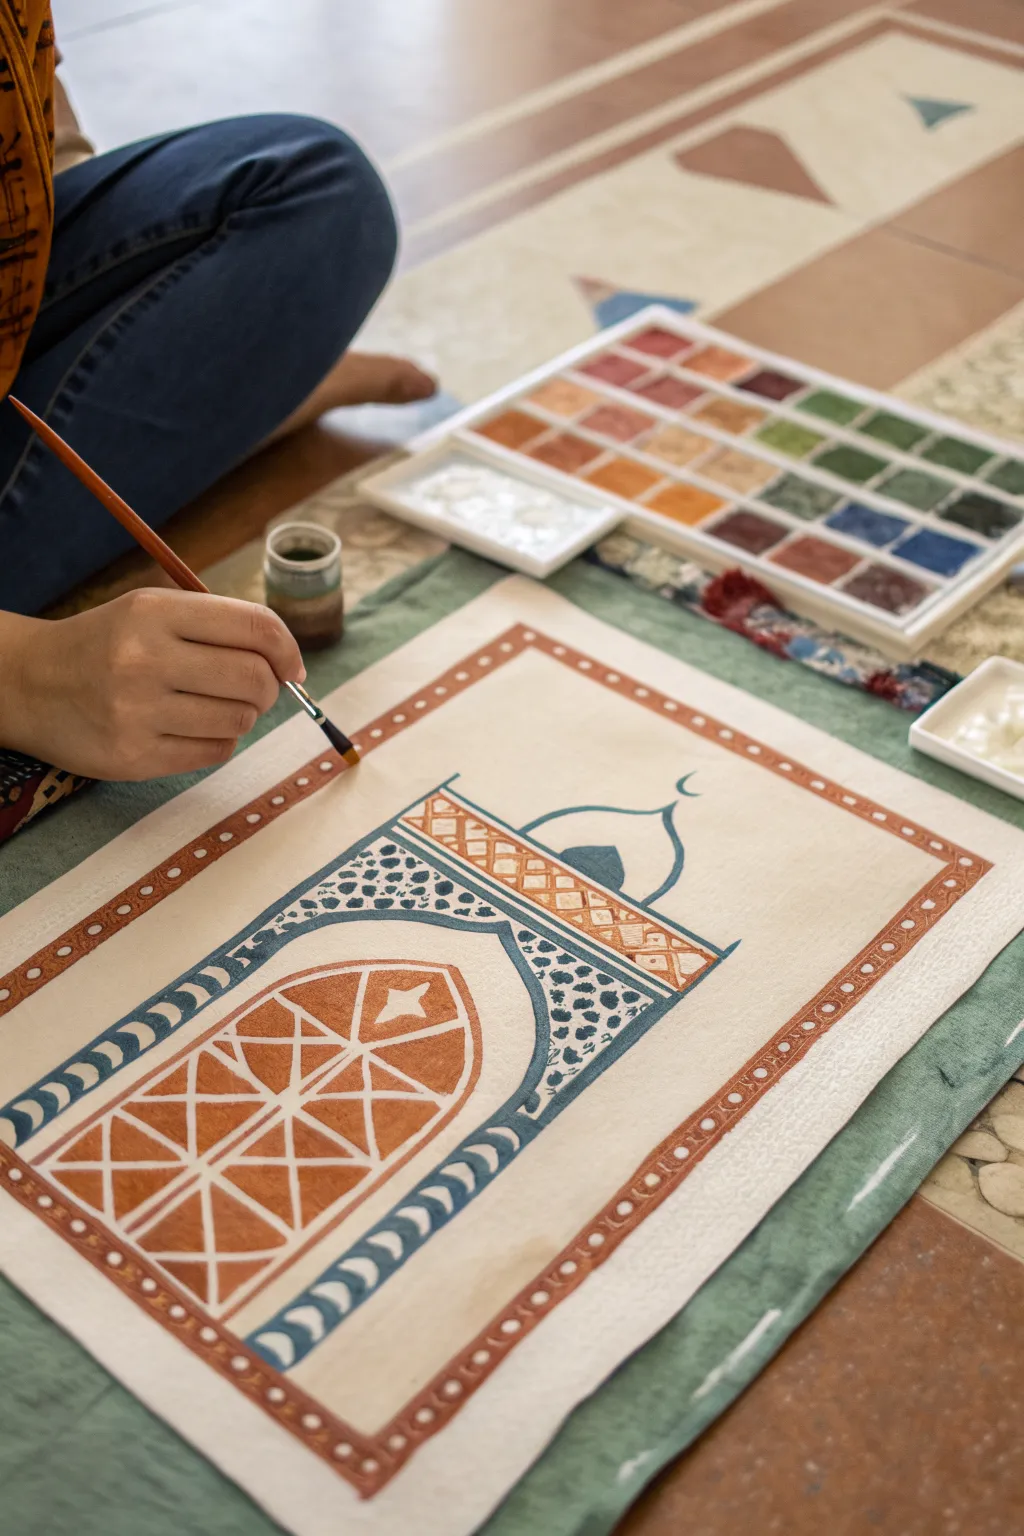
Capture the serenity of traditional Islamic art with this gouache or watercolor painting of a stylized prayer rug. Featuring a classic Mihrab archway and warm geometric motifs, this project balances precise linework with soft, earthy block colors.
Detailed Instructions
Materials
- Heavyweight watercolor paper or cotton rag paper (min 300gsm)
- Gouache paints (Terracotta, Prussian Blue, Teal, White, Yellow Ochre, Burnt Sienna)
- Pencil and eraser
- Ruler
- Detail brushes (Size 0 and Size 2 round)
- Small flat brush (Size 4 or 6)
- Painting palette
- Cup of water
- Paper towels
Step 1: Planning the Architecture
-
Establish the border:
Begin by lightly penciling a large rectangle on your paper, leaving a generous margin of white space around the edges. Inside this, draw a second rectangle about an inch inward to create a thick border frame. -
Draft the central arch:
Find the vertical center of your inner rectangle. Sketch the sides of the central archway, curving them inward at the top to meet at a gentle point, forming the classic Mihrab shape. -
Add the dome detail:
Above the main arch frame, lightly sketch a smaller dome shape or cupola finial resting on top, and include the small crescent moon symbol floating just above it. -
Sketch the inner window:
Inside the main archway, draw a smaller, arched window shape. This will be the focal point for the geometric lattice pattern later. -
Grid the geometric pattern:
Using your ruler, lightly cross-hatch the interior of the smallest window arch to create the diamond and triangular segments that will be filled with color.
Wobbly Lines?
If painting long straight lines is difficult, use painter’s tape (low tack) to mask off the borders. Ensure the paper is dry before applying tape to avoid tearing.
Step 2: Painting the Borders and Structure
-
Mix the terracotta hue:
On your palette, mix a warm, earthy rust color using Burnt Sienna with a touch of Red or Orange. Dilute it slightly so it flows smoothly but remains opaque. -
Paint the outer border:
Using a steady hand and a medium round brush, paint the two parallel lines that define the outermost rectangular border. -
Add border details:
While you have the rust color on your brush, add the small decorative dots or circles inside the border stripes. -
Outline the blue arch:
Switch to a mix of Prussian Blue and Teal to create a slate blue shade. Carefully paint the thick band that forms the main archway, outlining your pencil sketch. -
Paint the crescent detail:
Using the very tip of a Size 0 brush and the same blue mix, delicately paint the outline of the top dome and the crescent moon.
Step 3: Filling the Geometric Motifs
-
Block in the lattice:
Return to your terracotta mix. Fill in the specific diamond and triangle shapes within the central window grille, leaving thick white lines between them to represent the stone tracery. -
Create the half-moon border:
Along the blue archway band you painted earlier, use white paint (or leave the paper white if you are very precise) to create the row of repeating crescent shapes running up the sides. -
Paint the patterned inset:
Mix a lighter blue-grey. In the spandrels (the triangular spaces between the arch curve and the rectangular corners), dab small, irregular spots to create a textured, mosaic-like appearance. -
Detail the upper frieze:
Above the main arch, paint the horizontal rectangular panel with a warm ochre or diluted sienna, adding a crisscross lattice pattern over top in a darker brown once the base layer is dry. -
Refine the white lines:
If your white gaps between the geometric shapes got messy, use opaque white gouache and a fine brush to tidy up the lattice lines, making them crisp and uniform.
Add Gold Accents
Once the matte paint is fully dry, trace over the white lattice lines or the crescent moon with metallic gold paint or a gold pen to give the rug a rich, illuminated look.
Step 4: Final Touches
-
Add floating accents:
Dip a small brush into the slate blue mix and add tiny organic leaf or floral motifs inside the blue border or around the detailed areas for extra texture. -
Inspect and clean:
Check the painting for any pencil lines that might still be visible in the unpainted white areas. Wait until the paint is bone dry before gently erasing them.
Step back and admire the calm symmetry of your painted prayer rug design.
Geometric Islamic Star Pattern, Easy Grid Style
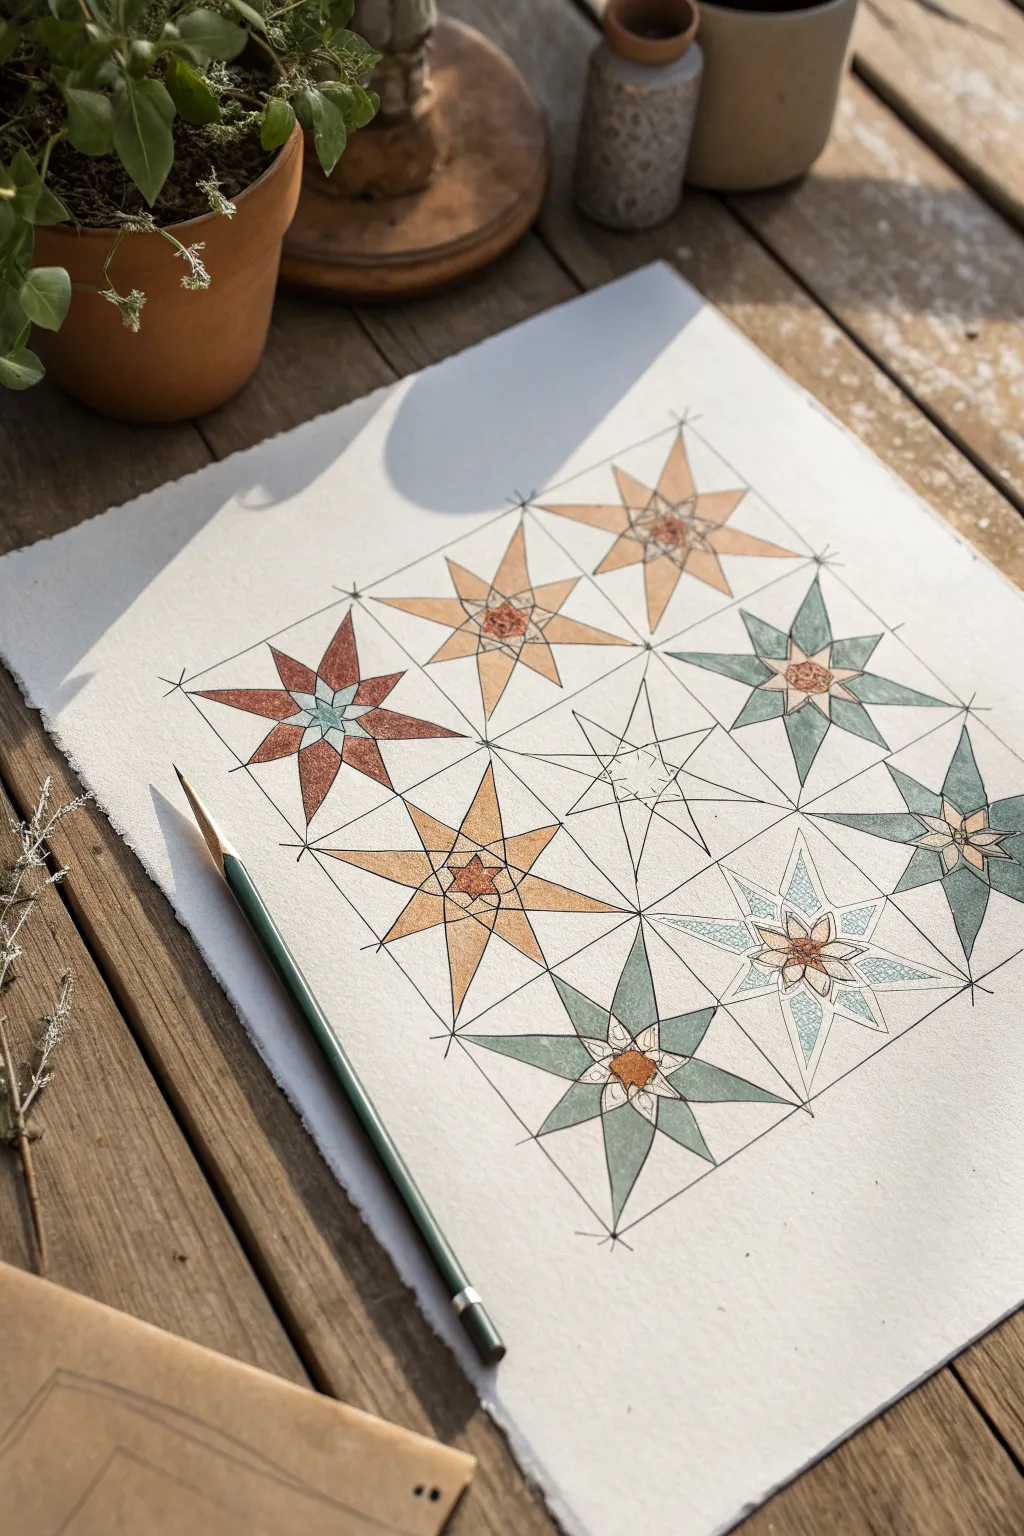
This elegant project introduces you to the calming precision of Islamic geometry, creating a repetitive pattern of eight-pointed stars connected by a structured grid. The earthy watercolor palette and crisp pencil lines give it a warm, classical feel perfect for beginners.
Step-by-Step Tutorial
Materials
- High-quality watercolor paper (cold press, roughly 9×12 inches)
- Pencil (HB or H for light lines)
- Ruler or straightedge
- Compass
- Fine liner pen (optional, for final outlines)
- Watercolors or watercolor pencils (terracotta, sage green, turquoise, ochre, gold)
- Fine round paintbrush (size 0 or 2)
- Eraser
Step 1: Constructing the Grid
-
Establish the Border:
Begin by lightly drawing a large square in the center of your paper. This will act as the boundary for your pattern. -
Create a 3×3 Matrix:
Divide your large square into nine smaller, equal squares (a 3-by-3 grid). Use your ruler to measure carefully to ensure each square is identical. -
Find the Centers:
Lightly draw diagonal lines corner-to-corner within each of the nine small squares. Where these ‘X’ lines cross is the exact center of each square. -
Draw Inner Circles:
Place your compass point on the center of a small square and draw a circle that fits comfortably within it, leaving a little breathing room from the edges. Repeat this for all nine squares.
Grid Precision Tip
Use a divider tool (a compass with two metal points) to transfer measurements. It is more accurate than reading a ruler repeatedly.
Step 2: Drawing the Star Pattern
-
Mark Vertex Points:
On each circle, you need to mark eight points. Do this by extending the horizontal, vertical, and diagonal lines from the center of the square out to the circle’s edge. -
Form the First Square:
Connect the top, bottom, left, standard, and right points on the circle to form a square that stands on its corners (a diamond shape). -
Form the Second Square:
Now connect the four diagonal points on the circle to form a standard square. Overlapping these two shapes creates the classic eight-pointed star. -
Extend the Rays:
Draw straight lines extending from the tips of the stars to connect with the tips of adjacent stars, creating a continuous lattice effect. -
Repeat the Process:
Continue this star formation for all nine sections of your grid. Take your time here; precision makes the final result shine. -
Clean and Refine:
Once your stars are drawn, gently erase the initial construction lines (the circles and the base grid lines), leaving only the star shapes and connecting rays.
Metallic Accent Level Up
Use gold metallic watercolor or a gold leaf pen for the central hexagon of each star to make the pattern shimmer in the light.
Step 3: Adding Color and Detail
-
Select Your Palette:
Choose an earthy, harmonious color scheme. I prefer mixing a dusty terracotta, a muted sage green, and a sandy gold to mimic traditional tile work. -
Paint the Star Points:
Start painting the triangular ‘rays’ of the stars. Alternate colors for visual interest—perhaps make the cardinal points one color and diagonal points another. -
Add Texture:
For a rustic look, don’t fill the color in completely solid. Use a ‘dry brush’ technique or dab the paint to create a stippled, stone-like texture. -
Detail the Centers:
Paint a small geometric flower or hexagon shape in the very center of each star. Use a darker or contrasting tone like deep rust or gold to draw the eye. -
Leave Whitespace:
Leave one or two stars unpainted or merely outlined. This ‘unfinished’ look adds an artistic, sketchbook quality to the piece. -
Final Definition:
Once the paint is fully dry, you can re-trace the main structural lines with a sharpened pencil or a very fine dark pen to make the geometry pop.
Step back and admire the rhythm and balance of your handmade geometric lattice

PENCIL GUIDE
Understanding Pencil Grades from H to B
From first sketch to finished drawing — learn pencil grades, line control, and shading techniques.
Explore the Full Guide
Moroccan-Style Arch With a Simple Gradient
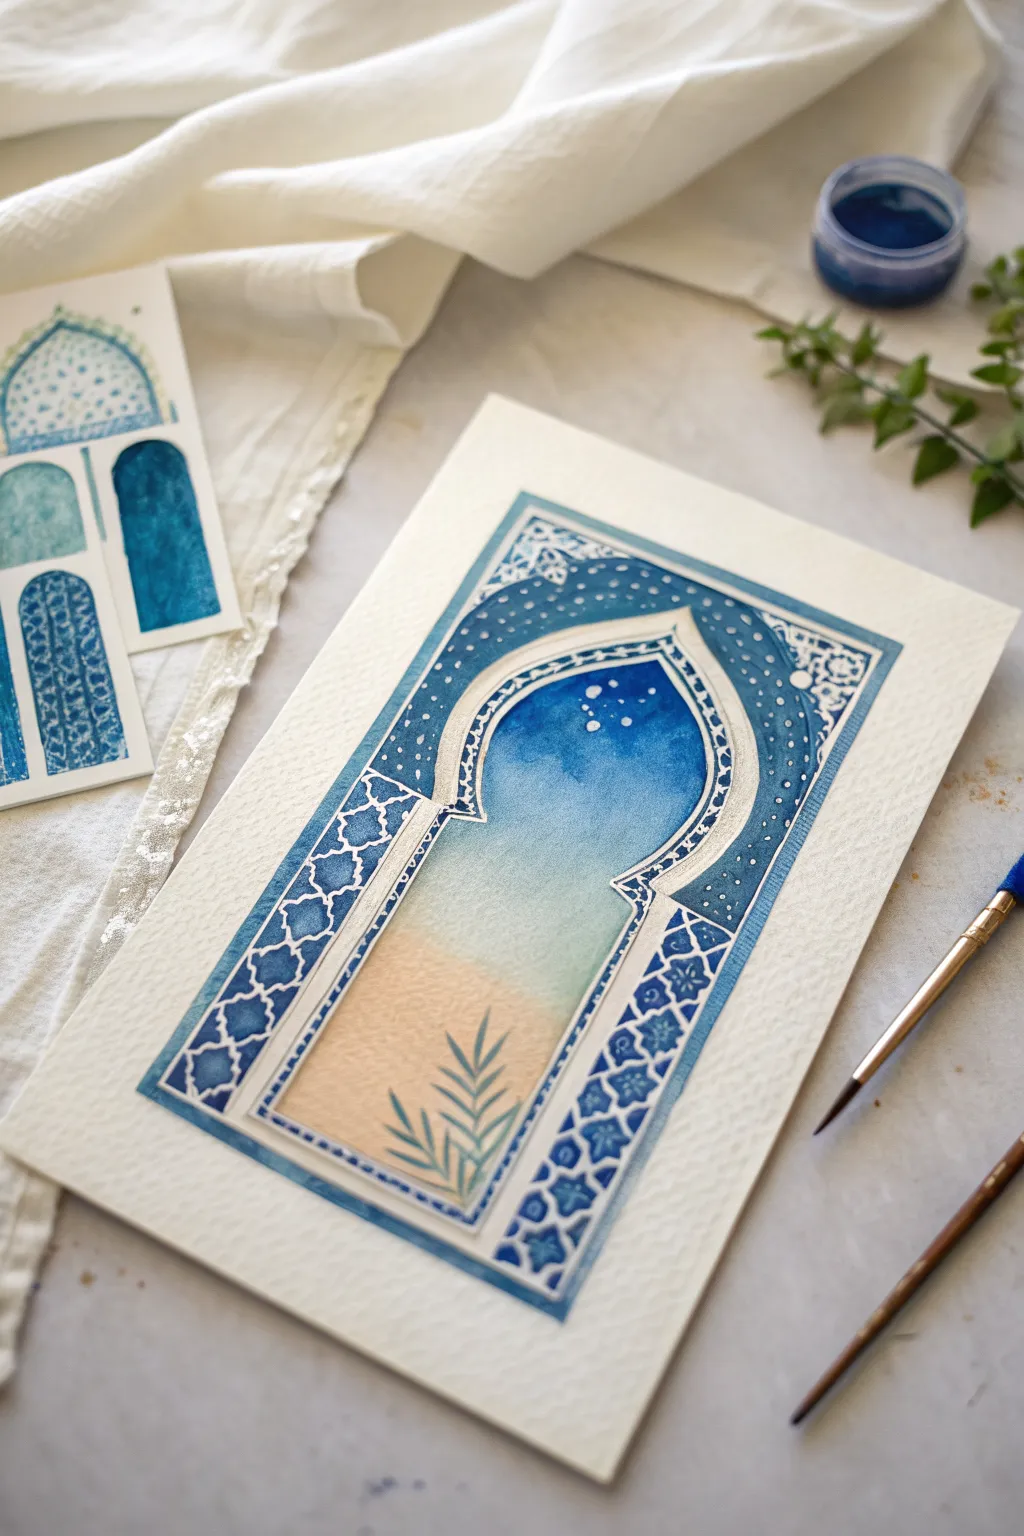
Capture the serene beauty of Islamic architecture with this watercolor painting featuring a classic Moroccan arch. The piece combines intricate geometric borders with a soft, peaceful gradient sky, creating a window into a tranquil world.
Step-by-Step Guide
Materials
- Cold press watercolor paper (A4 or similar)
- Watercolor paints (Indigo, Prussian Blue, Cobalt Blue, Peach/Light Ochre)
- Masking fluid (drawing gum) and old brush
- Pencil and ruler
- Round brushes (sizes 2 and 6)
- Detail brush (size 0 or 00)
- White gel pen or white gouache
- Clean water and palette
Step 1: Drafting the Design
-
Sketch the frame:
Start by lightly drawing a large rectangle in the center of your paper. Leave a generous margin of white paper around the edges for a clean look. -
Draw the arch shape:
Inside the top half of your rectangle, sketch the Moroccan arch. This specific shape is called a multifoil or cusped arch; draw a smooth curve that dips inward slightly near the top to form a pointed peak. -
Create the borders:
Draw parallel lines around your arch shape to create the border zones. You need a thick outer band for the geometric pattern and a thinner inner band that frames the central window. -
Sketch the pattern grid:
Lightly sketch a geometric pattern inside the thick outer border. Simple interconnected stars or diamond shapes work well here. Don’t worry about perfection; faint guide lines are enough.
Keep it Crisp
To ensure your masking fluid peels away cleanly without tearing the paper, remove it as soon as the paint is fully dry—don’t leave it on for days.
Step 2: Painting the Gradient
-
Mask the borders:
Apply masking fluid carefully over the lines of your archway border and the geometric pattern grid you just drew. This protects the white paper so you can paint freely. Let it dry completely. -
Wet the center:
Using a clean brush, wet the paper inside the archway with clean water. The paper should be glistening but not forming puddles. -
Apply the sky blue:
Load your brush with a deep blue like Indigo or Prussian Blue. Touch it to the very top of the arch interior and let the color flow downward into the wet paper. -
Blend the gradient:
Clean your brush and switch to a lighter blue while the paper is still wet. Blend this down from the dark top area towards the middle, fading it out as you go lower. -
Add the sandy base:
While the middle area is still slightly damp, introduce a very watery wash of peach or light ochre at the bottom. Encourage the pale blue and peach to meet softly in the middle without creating a hard line. -
Add texture:
While the top blue section is still wet, you can tap in a few drops of clean water or sprinkle a tiny bit of salt to create subtle starry textures in the ‘sky.’
Metallic Accent
Swap the white gel pen for a gold or silver metallic marker when adding the final dots and line corrections to give the arch a royal, illuminated manuscript feel.
Step 3: Pattern and Details
-
Paint the borders:
Once the center is totally dry, paint the outer rectangular border and the arch frame with a solid coat of medium-dark blue. Paint right over your masking fluid design. -
Remove the mask:
Wait until the blue border paint is bone dry. Gently rub off the masking fluid with your finger or a rubber cement pickup to reveal the crisp white lines underneath. -
Fill the geometric shapes:
Using your smallest brush, paint inside the negative spaces of your geometric border. Use a mix of dark and medium blues to create depth, leaving the white web-like structure visible. -
Refine the lines:
If any lines look messy after removing the mask, tidy them up with a white gel pen or a fine brush dipped in white gouache. -
Add dots and accents:
Use your white gel pen to add tiny dots along the inner curve of the arch and in the corners of the border patterns for extra intricacy. -
Paint the botanical silhouette:
Mix a muted grey-blue or transparent green. At the bottom of the arch window, paint a simple fern or palm frond silhouette rising from the bottom edge. -
Layer the leaves:
I like to painting one stem first, letting it dry, and then overlapping a second, slightly darker stem to create a sense of dimension within the silhouette.
Step back and admire how the deep blues contest with the white paper to create a strikingly peaceful architectural scene
Dome and Minaret Line Art With Watercolor Fill
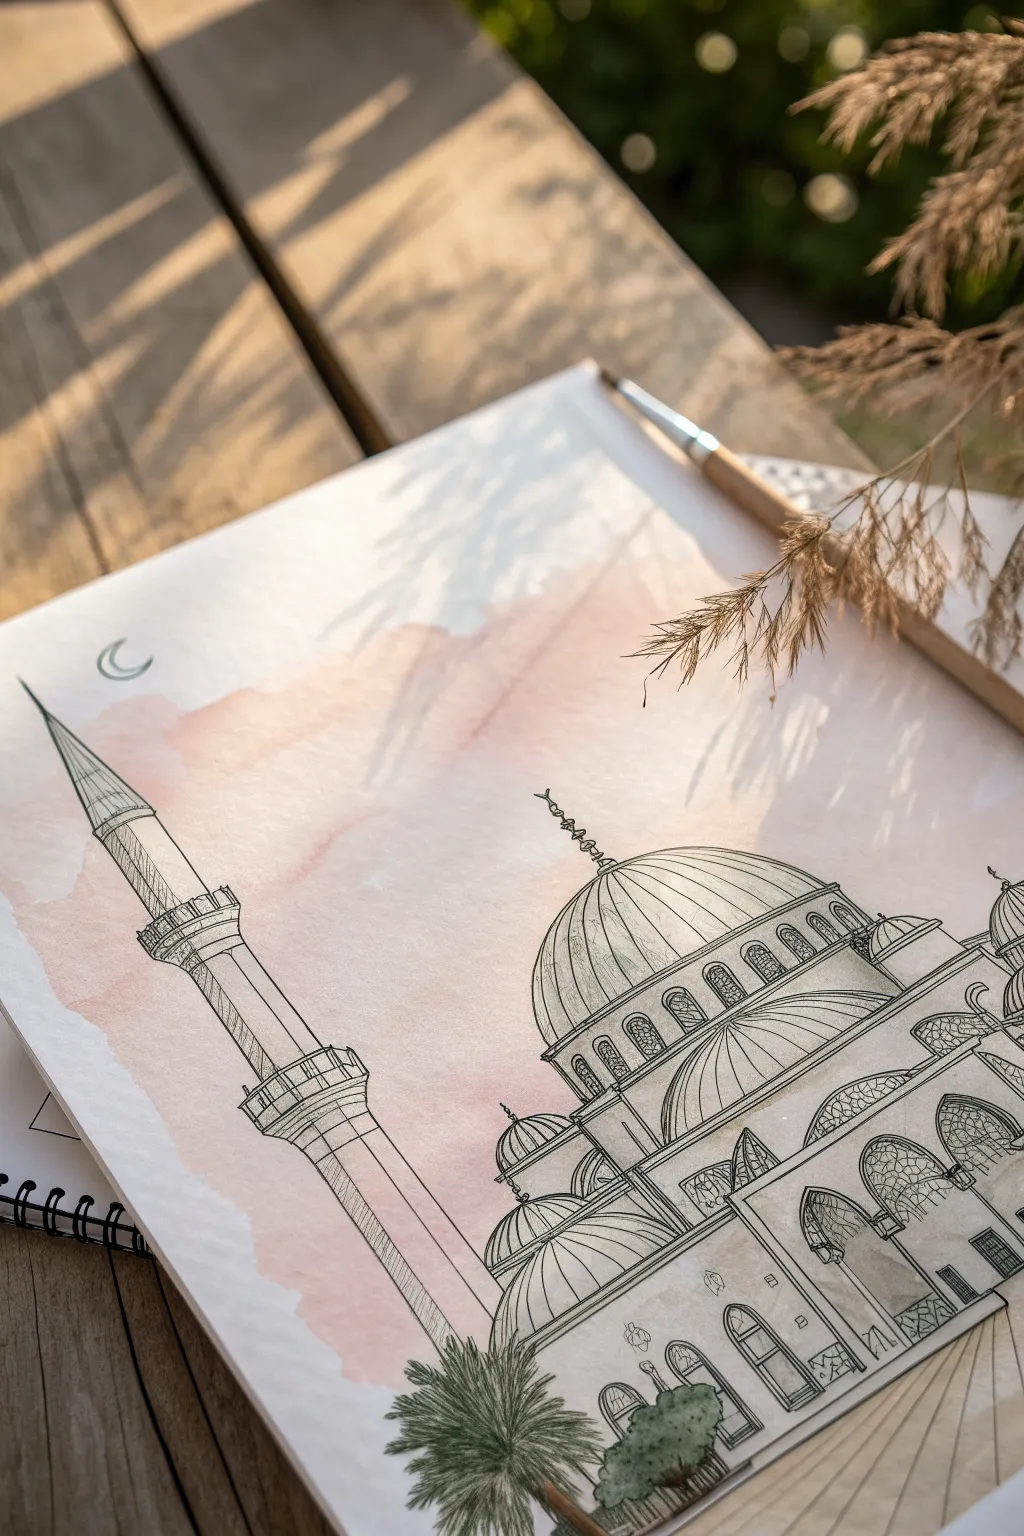
This project combines the loose, organic flow of a watercolor background with the crisp precision of architectural line art. It captures the elegance of a mosque’s silhouette against a soft, sunset-inspired sky, perfect for creating peaceful Islamic art.
Detailed Instructions
Materials
- Cold press watercolor paper (A4 or A5)
- Watercolor paints (Alizarin Crimson, Burnt Sienna, or soft pinks/oranges)
- Large round watercolor brush (size 10 or 12)
- Fine liner pens (black, sizes 0.1, 0.3, and 0.5)
- Pencil (HB or H)
- Eraser
- Ruler
- Jar of clean water
- Paper towels
Step 1: Creating the Atmosphere
-
Prepare the wash:
Mix a watery solution of soft pink, peach, or light terra cotta on your palette. You want a very diluted consistency, almost like tea, to keep the background subtle. -
Apply the background:
Using your large round brush, swipe a broad, diagonal wash across the center of the paper. Don’t worry about filling the whole page; leave plenty of white space at the top and bottom for an airy feel. -
Soften the edges:
While the paint is still wet, dip your brush in clean water and gently feather out the edges of your painted shape so it fades naturally into the white paper rather than ending in a hard line. -
Let it dry completely:
This is crucial. The paper must be bone dry before you start drawing, or your ink pens will bleed into the paper fibers. I usually wait at least 20-30 minutes or use a hairdryer on a low setting.
Use Waterproof Ink
Make sure your fine liner pens are waterproof or archival ink. If you need to touch up the watercolor later, non-waterproof ink will smear instantly.
Step 2: Sketching the Structure
-
Position the horizon:
With a pencil, lightly mark the base of the mosque near the bottom right of the page. The composition works best if the minaret rises on the left and the main dome sits heavily on the right. -
Draft the minaret:
Use a ruler to lightly sketch the tall, slender vertical lines of the minaret on the left. Divide it into sections for the balcony (sherefe) and the pointed spire cap. -
Outline the domes:
Sketch the large central dome on the right side. Add the semi-domes stepping down from the main structure. Don’t press too hard with the pencil; these are just guides. -
Add structural details:
Lightly draw in the arched windows, doorways, and the cylindrical drum beneath the main dome. Keep everything geometric and balanced.
Uneven Watercolor Edges?
If your wash dries with hard, unwanted ‘cauliflower’ edges, lightly dampen a clean brush and gently scrub the edge to soften it into the paper.
Step 3: Inking the Details
-
Ink the main outlines:
Switch to your 0.5 fine liner. Trace over the main structural lines of the domes and the minaret. Use confident, steady strokes. -
Texture the dome:
Using a 0.1 or 0.3 pen, draw vertical curved lines contouring the main dome to show its roundness. These lines should curve with the shape of the dome, not go straight down. -
Detail the minaret:
Use the 0.1 pen to add hatching on the shadowed side of the minaret (usually the left/bottom side) to give it cylindrical volume. Draw the tiny railing details on the balcony. -
Draw the windows:
Fill in the arched windows. You can cross-hatch the inside of the windows to make them look recessed and darker. -
Add ornamentation:
Using your finest pen, add the crescent moon finials (alem) on top of the main dome and the minaret spire. -
Refine the foreground:
Draw the lower courtyard arches and steps. Add small geometric patterns or brickwork indications on the walls for architectural interest.
Step 4: Final Touches
-
Erase pencil marks:
Once you are absolutely certain the ink is dry, gently run your eraser over the entire drawing to remove the graphite guidelines. -
Add the crescent moon:
In the sky area on the upper left, draw a simple, small crescent moon with your pen. -
Sketch greenery:
At the very bottom, use short, flicking pen strokes to draw palm fronds or bushes. You can add a tiny wash of muted green watercolor over these if you like, or keep them black and white. -
Review contrast:
Step back and look at your drawing. If the building looks too flat, go back in with the 0.5 pen and thicken the outline on the shadowed side (right or bottom edges) to make it pop.
Enjoy the calm process of building your architectural scene line by line.


Mihrab-Inspired Niche With Floral Border

This elegant painting features a classic Islamic pointed arch shape, known as a mihrab, framed by a soft, trailing vine border. The texture of the handmade paper combined with the muted olive greens and dusty pinks creates a timeless, antique feel perfect for wall art or a thoughtful greeting card.
Step-by-Step Guide
Materials
- Heavyweight handmade cotton rag paper (deckle edge)
- Pencil (HB or H)
- Ruler
- Fine liner pen (brown or sepia, 0.1 or 0.3mm)
- Watercolor paints (Olive Green, Sap Green, Dusty Rose, Burnt Sienna)
- Round watercolor brushes (size 0 and size 2)
- Eraser (kneaded preferred)
- Palette for mixing
- Water jar and paper towels
Step 1: Planning the Layout
-
Prepare the paper:
Start with your piece of handmade cotton rag paper. This paper has a beautiful, rough texture, so tape the corners down lightly to your work surface to prevent it from shifting while you sketch. -
Mark the center:
Use a ruler to find the vertical center of your paper. Make a very faint mark at the top and bottom to guide your symmetry. -
Sketch the arch frame:
Lightly sketch a rectangle in the center of the page, leaving about 1.5 inches of margin on all sides. This will form the base of your niche. -
Construct the arch top:
At the top of your rectangle, sketch the pointed arch shape. The peak should align with your center mark. You want a gentle ‘keel’ shape, curving inward slightly before meeting at the point. -
Create the inner border:
Carefully draw a second line just inside your first arch shape, approximately 3-4mm inward. This creates the double-line border where we will add texture later. -
Sketch the vine guidelines:
Lightly draw a flowing line around the outer perimeter of the paper, framing the arch. Keep the lines loose and wavy to act as the stem for your floral border.
Working with Rag Paper
Handmade paper is very absorbent. Use less water than usual to prevent paint from bleeding, and test your colors on a scrap piece first.
Step 2: Painting the Design
-
Mix the green hues:
On your palette, mix Olive Green with a touch of Burnt Sienna to get a muted, earthy vine color. Add plenty of water to keep the pigment translucent. -
Paint the main stems:
Using your size 0 brush, carefully trace over your pencil vine guidelines. Use a light hand; the natural texture of the paper might break the line slightly, which adds to the charm. -
Add the leaves:
Switch to the size 2 brush. Along the vine stem, press and lift your brush to create small, simple leaf shapes. Alternate the leaves on either side of the stem, keeping them pointing in the direction of growth. -
Paint the floral accents:
Mix a watery Dusty Rose color. At the corners and center points of your vine border, paint small, three-petaled flowers or buds. Keep them simple and unrefined. -
Outline the arch:
Using a very fine brown liner pen or a size 0 brush with concentrated Burnt Sienna, trace the double lines of the central arch. Try to keep a steady hand, but don’t worry about perfection. -
Fill the arch texture:
Inside the double lines of the arch border, use your fine liner or smallest brush to stipple tiny dots or small dashes. This creates a textured ‘stone’ or mosaic look within the frame.
Step 3: Finishing Touches
-
Tint the arch border:
Take a very diluted wash of the Dusty Rose paint. Carefully glaze over the stippled area between the two arch lines to give the frame a soft, warm glow. -
Add leaf veins:
Once the green leaves are fully dry, use your fine liner pen or a dry brush with darker green paint to draw a single central vein line on the larger leaves for definition. -
Erase guidelines:
Wait until the painting is completely bone dry. Gently dab your kneaded eraser over the page to lift any visible pencil marks without damaging the paper surface. -
Final assessment:
Step back and look at the composition. If any areas look too empty, add a tiny extra leaf or a small dot of pink to balance the floral border.
Add Gold Accents
For a regal touch, trace the inner line of the arch or the center of the flowers with metallic gold watercolor or ink after the base layers dry.
Now you have a serene piece of art that beautifully combines minimalist botanical elements with traditional architectural forms
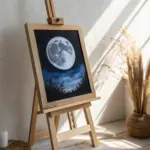
Night Sky Duotone With Mosque Cutout Effect
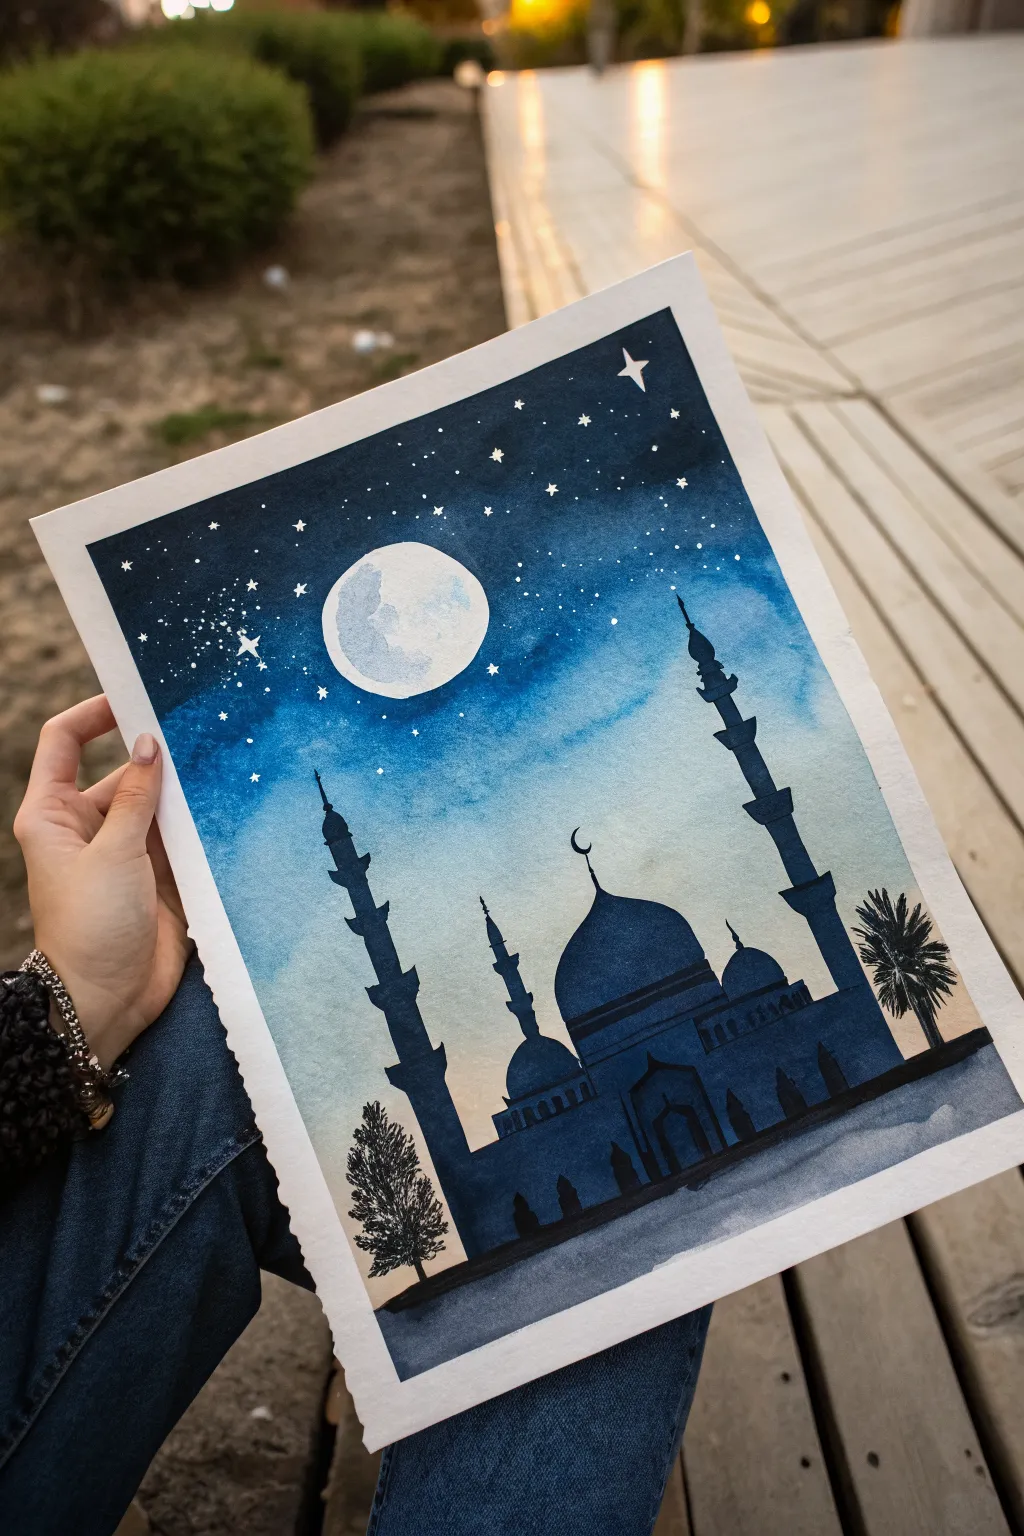
This stunning watercolor piece captures the serene beauty of a mosque under a luminous, star-filled night sky. By layering deep indigo washes over bright paper, you’ll create a striking duotone effect that makes the silhouette pop.
How-To Guide
Materials
- High-quality watercolor paper (cold press, 300gsm)
- Masking tape
- Pencil and eraser
- Watercolor paints (Indigo, Prussian Blue, Turquoise, Black)
- White gouache or white gel pen
- Round watercolor brushes (size 8 and 2)
- Flat wash brush
- Palette
- Water jar
- Paper towels
Step 1: Preparation and Sketching
-
Prepare the canvas:
Begin by taping down all four edges of your watercolor paper to a board or table using masking tape. This creates that crisp white border seen in the final piece and prevents the paper from buckling when wet. -
Outline the moon:
Near the upper left quadrant, lightly sketch a perfect circle for the moon. Use a compass or trace a small lid to keep it precise, as this area will remain largely unpainted initially. -
Sketch the silhouette:
Lightly draw the horizon line near the bottom third of the paper. Sketch the outline of the mosque, including the central dome, smaller domes, and two tall minarets on either side. Keep the pencil lines faint so they don’t show through later.
Step 2: Painting the Sky
-
Wet-on-wet technique:
Using your flat brush, apply a clean layer of water across the entire sky area, stopping right at the edge of the mosque silhouette and the moon circle. The paper should be glisten, but not hold puddles. -
Apply the lightest blue:
Load your brush with a diluted turquoise or light blue. Paint the area immediately surrounding the moon and the horizon line just above the mosque. This creates the glowing, atmospheric effect. -
Deepen the sky:
While the paper is still damp, switch to a mix of Prussian Blue and Indigo. Start painting from the top corners of the paper, pulling the dark color downwards. Let the paint fade naturally into the lighter turquoise areas. -
Intensify the darkness:
For that deep galaxy look, add concentrated Indigo or a touch of Payne’s Grey to the very top edge and corners. Allow the colors to bleed together, creating a gradient from dark night to the glowing horizon. -
Shape the moon:
Once the sky is tacky but not fully dry, use a clean, slightly damp brush to gently lift a bit of pigment right inside the edge of the moon circle, softening the transition. Then let the whole sky layer dry completely.
Moon Glow Secret
Before the sky dries, lift extended pigment around the moon with a clean, damp brush. This creates a soft halo effect that makes the moon look like it’s truly glowing.
Step 3: Painting the Details
-
Fill the silhouette:
Mix a very dark, saturated color using Indigo and a touch of Black. Using a size 8 round brush, carefully fill in the mosque sketch. Ensure the edges of the dome and minarets are sharp and crisp. -
Add architectural details:
While painting the main structure, look for opportunities to leave tiny slivers of negative space or add slight variations in tone to suggest windows or arches, though keeping it a flat silhouette works beautifully too. -
Paint the vegetation:
Switch to a smaller brush (size 2). On the right side, paint a palm tree silhouette with spiky fronds. On the left, dab the brush tip repeatedly to create the texture of a bushy tree or shrub. -
Ground the scene:
Paint a solid dark strip at the very bottom beneath the mosque to anchor the building. You can use a slightly lighter, watered-down wash of indigo for the ground immediately in front of the building to create depth. -
Texture the moon:
Mix a very watery, pale grey-blue. Dab it gently into parts of the white moon circle to create craters and shadows, leaving some areas pure white for brightness.
Metallic Magic
Use gold watercolor or metallic ink for the crescent atop the dome and the larger stars. It adds a luxurious, shimmering touch when the light hits the painting.
Step 4: Starry Finish
-
Splatter stars:
Cover the mosque area with a scrap piece of paper to protect it. dilute white gouache with a little water. Load a brush or toothbrush and flick the bristles to spray fine white specks across the dark blue sky. -
Hand-paint larger stars:
Using a white gel pen or a fine detail brush with gouache, manually draw a few four-pointed stars and slightly larger dots to create focal points in the constellation. -
Reveal the border:
Ensure the artwork is 100% dry. Slowly peel away the masking tape at a 45-degree angle, pulling away from the image to reveal clean, sharp white edges.
Frame your serene nightscape and enjoy the peaceful atmosphere it brings to your space
Abstract Color Fields Behind Arabic Calligraphy
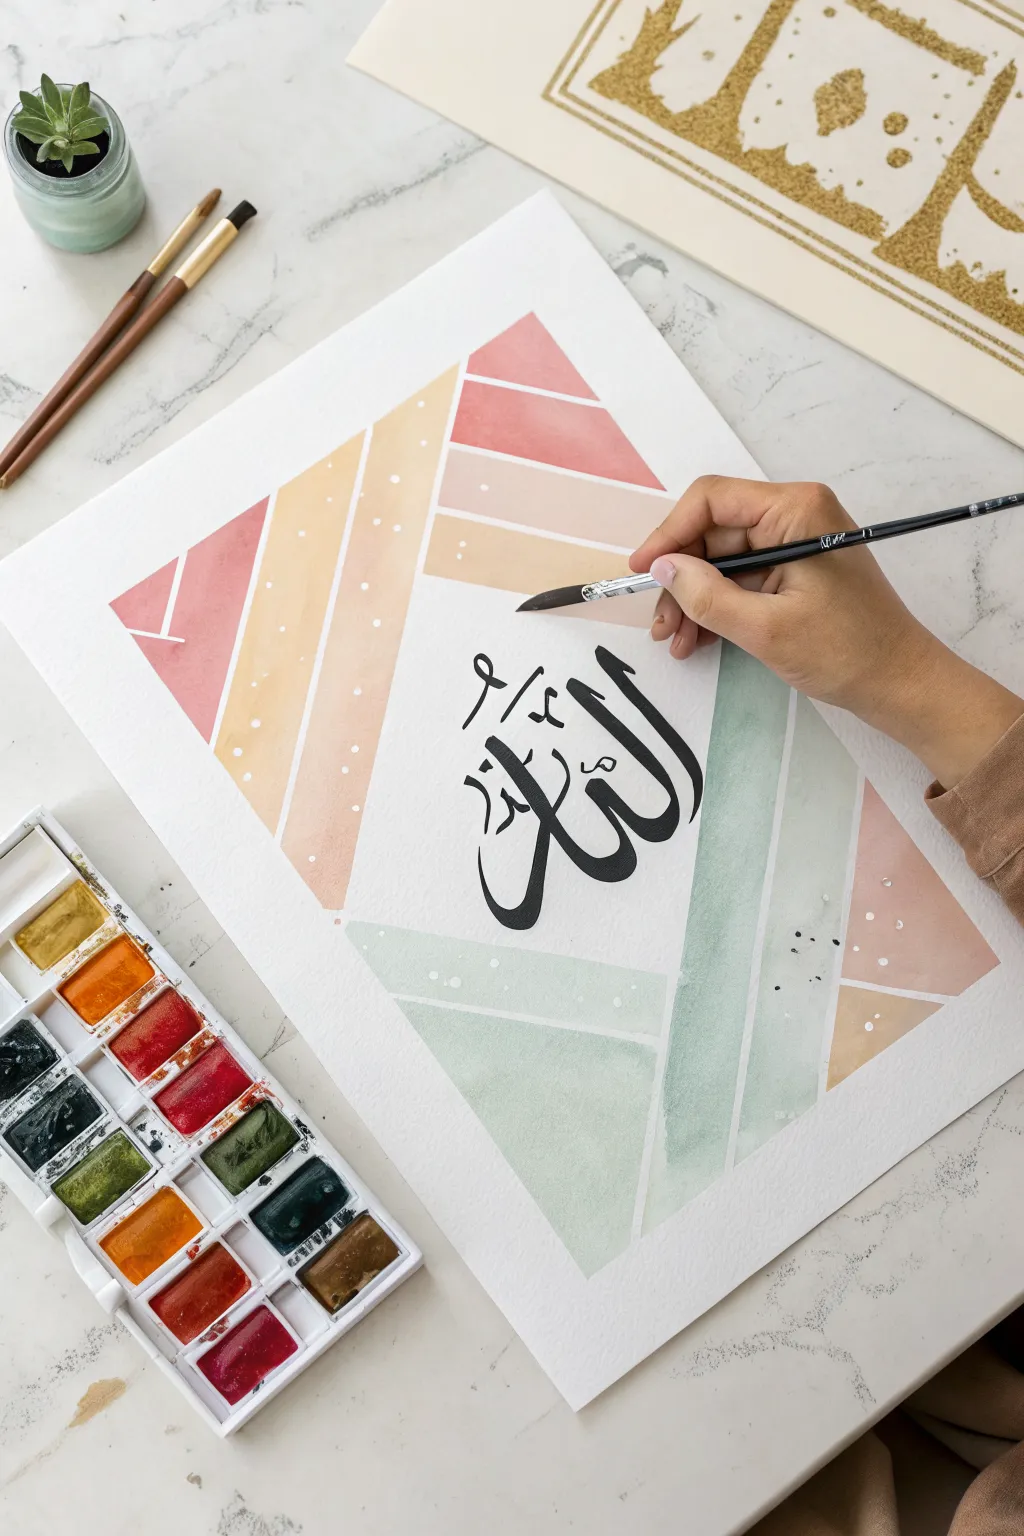
Beautifully merge traditional Islamic lettering with modern abstract art in this vibrant watercolor piece. By using masking tape to create crisp, geometric color fields, you frame the central calligraphy with a soft, warm palette that feels both contemporary and timeless.
Step-by-Step Guide
Materials
- Cold-press watercolor paper (300 gsm recommended)
- Painter’s tape or masking tape (approx. 1/2 inch width)
- Watercolor paint set (warm yellows, oranges, reds, and muted greens)
- Round watercolor brush (size 6 or 8)
- Fine liner brush or calligraphy pen (black ink)
- Black ink or gouache
- Pencil and eraser
- Palette for mixing
- Paper towels
- Water cups
Step 1: Creating the Geometric Framework
-
Prepare your paper:
Start by taping down the edges of your watercolor paper to a hard surface. This prevents buckling and creates a clean white border when you’re finished. -
Map out the center:
Using a pencil, very lightly mark a large diamond shape or central rectangle where the calligraphy will eventually go. This area needs to stay white. -
Apply the tape design:
Place strips of masking tape across the paper to create geometric sections. Angle them diagonally to create dynamic movement, ensuring they intersect and overlap. -
Create the negative space:
Use the tape to specifically block off the central area you marked earlier. You want the color fields to radiate outward, leaving a clean, unpainted geometric window in the middle. -
Seal the edges:
Run your fingernail or a bone folder firmly along the edges of every piece of tape. This is crucial to stop paint from bleeding underneath and ensures those crisp white lines later.
Tape Removal Tip
If your tape feels too sticky, press it against your clothes a few times before applying it to the paper. This reduces tackiness and saves your paper from tearing.
Step 2: Painting the Color Fields
-
Mix your palette:
Prepare watery pools of color on your palette. Aim for a sunset-inspired scheme: dusty rose, peach, ochre yellow, and a soft sage green. -
First wash:
Start painting inside the taped geometric shapes. I like to work one section at a time, loading the brush with plenty of water for a translucent look. -
Vary the saturation:
As you move between sections, slightly alter the intensity of your paint. Let some triangles be a deep, saturated coral while neighbors are a pale, watery yellow. -
Add subtle texture:
While the paint is still wet in a few sections, dab in a tiny drop of clean water or a slightly different hue to create a ‘bloom’ effect for visual interest. -
Splatter effect:
Load a small brush with white gouache or very watered-down white acrylic. Tap the handle to flick tiny speckles over the colored sections for a starry, textured look. -
Let it dry completely:
Wait until the paper is bone dry. If it’s cool to the touch, it’s still wet. Patience here prevents the tape from ripping the paper.
Gilded Touches
Make the artwork pop by painting over the thin white lines (left by the tape) with gold watercolor or a metallic gold pen for a luxurious finish.
Step 3: The Reveal and Calligraphy
-
Remove the tape:
Peel the tape away slowly at a 45-degree angle. This is the most satisfying part, revealing the crisp white channels between your colorful shapes. -
Sketch the calligraphy:
Lightly sketch the word ‘Allah’ (or your chosen script) in the central white window. Ensure it is centered and balanced within the negative space. -
Ink the main strokes:
Using a fine liner brush dipped in black ink or gouache, carefully trace your pencil lines. Apply more pressure on the downstrokes to thicken them. -
Refine the edges:
Go back over the calligraphy with a very fine tip to sharpen the ends of the strokes and smooth out any curves. -
Final clean up:
Once the black ink is fully dry, gently erase any visible pencil marks from your initial sketch.
Display your artwork in a simple frame to let the bold geometry and elegant script take center stage


Have a question or want to share your own experience? I'd love to hear from you in the comments below!