When you’re hunting for face painting designs ideas, it helps to see a mix of quick wins and a few “wow” looks you can grow into. Here are my go-to transformations—everything from tiny cheek art to bold full-face masks—so you can pick what fits your time and vibe.
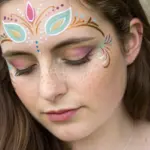
Butterfly Eye Mask
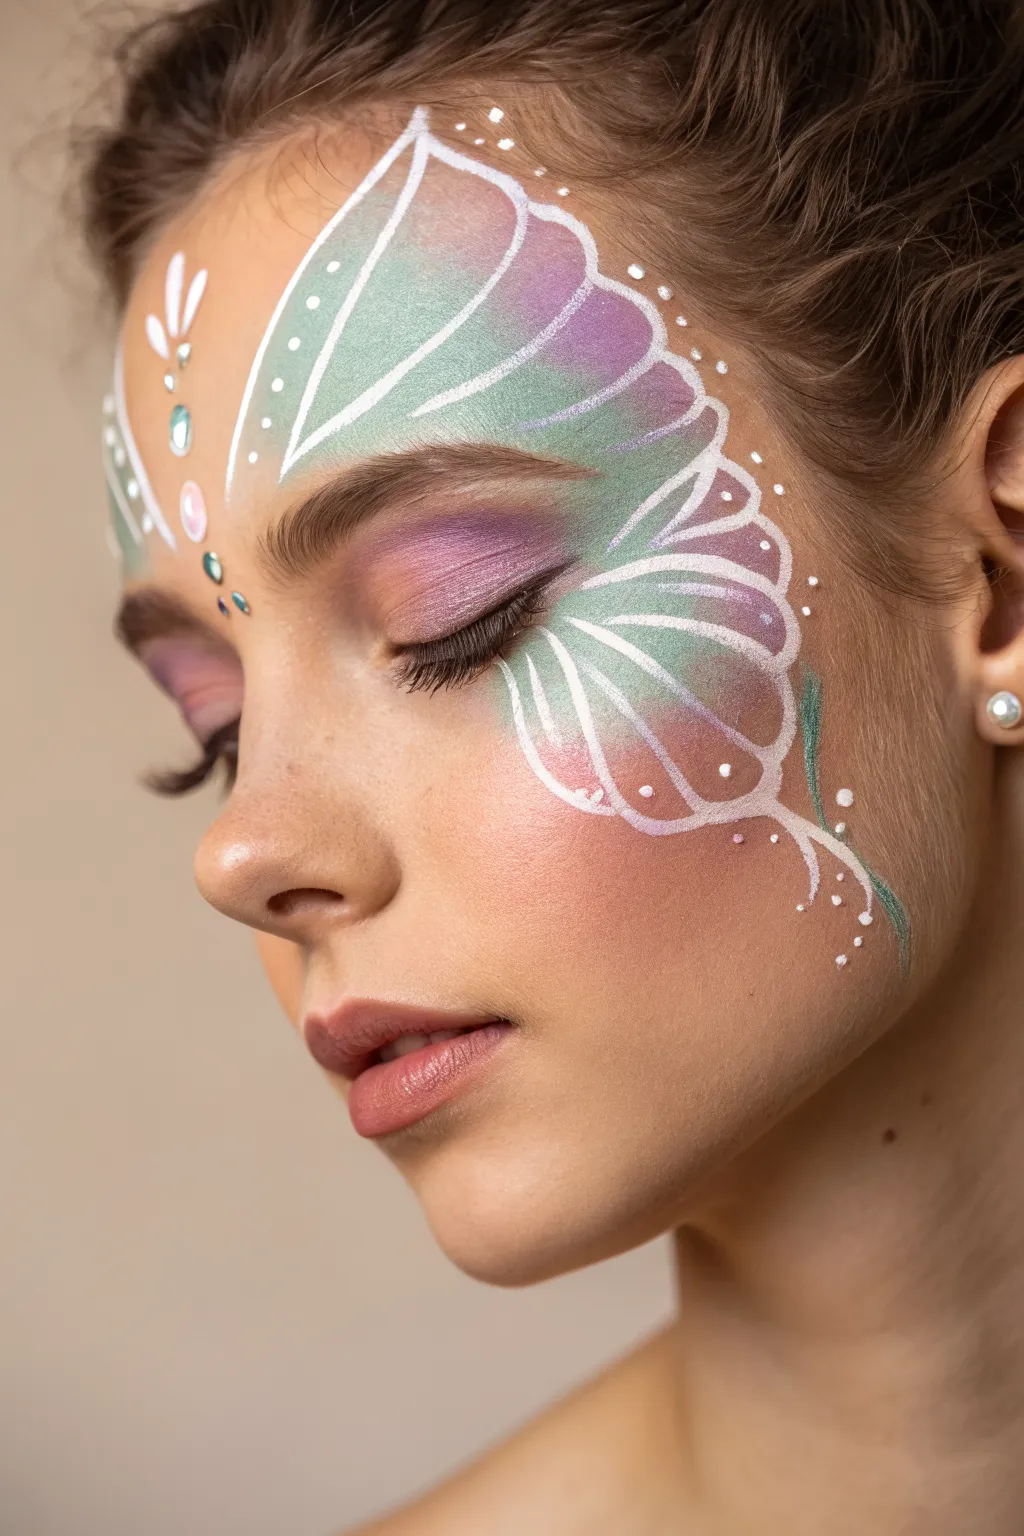
This delicate face paint design transforms the eye area into a soft, ethereal butterfly wing using blends of mint and lavender. The look is finished with crisp white linework and tiny gems for a magical, shimmering effect.
Step-by-Step Tutorial
Materials
- Water-activated face paints (white, mint green, lavender/lilac, soft purple)
- High-density face painting sponge (petal shaped or half-circle)
- Round brushes (size 2 and size 4)
- Small flat or filbert brush
- Self-adhesive face gems (clear and iridescent)
- Cosmetic glitter gel or fine loose glitter (optional)
- Cup of water
- Spray bottle with water
Step 1: Creating the Base Gradient
-
Prepare the Sponge:
Start by misting your face paint cakes with water to activate them. Load a petal-shaped sponge by swiping it back and forth across a split-cake containing mint green and lavender, or load one half of a sponge with mint and the other with lavender. -
Place the Upper Wing:
Position the sponge above the eyebrow, angling it outward toward the temple. Press down gently to stamp the color, ensuring the darker purple tone is near the hairline and the lighter mint tone is closer to the center of the forehead. -
Form the Lower Wing:
Reload the sponge if necessary. Place it just below the outer corner of the eye, angling it down towards the cheekbone. Press to create a smaller, rounded shape that complements the top wing. -
Blend the Eye:
Using a soft brush or the edge of your sponge with lavender paint, gently pat color onto the eyelid, blending it outward to meet the wing shapes you just created. This connects the design seamlessly.
Clean Lines
If your white lines look transparent or streak, your paint is too watery. Mix more pigment until the consistency resembles melted white chocolate for opaque strokes.
Step 2: Detailing the Structure
-
Load the Liner Brush:
Activate your white face paint until it has an inky, creamy consistency. Fully load a size 2 round brush, twisting the tip to keep it sharp. -
Outline the Upper Wing:
Starting from the inner corner above the eyebrow, paint a scalloped line that follows the outer edge of your gradient. Use variable pressure: press harder for thick lines and lift up for thin, tapering ends. -
Add Internal Veins:
From the white outline, draw thin, curved lines inward toward the eye. These should mimic the veins of a butterfly wing, curving gently with the contours of the face. -
Outline the Lower Wing:
Repeat the scalloped white outline on the bottom painted section on the cheek. Make sure the curves are soft and organic rather than rigid. -
Connect the Wings:
Draw delicate lines connecting the top and bottom wing sections near the temple, ensuring the design flows as one cohesive piece.
Fairy Dust
Use a toothbrush dipped in watered-down white paint to flick tiny speckles over the finished design. This creates a magical, starry texture instantly.
Step 3: Decorative Accents
-
Add Polka Dots:
Using the very tip of your round brush or a dotting tool, place small white dots along the spine of the wing veins and scattered near the outer edges for texture. -
Creating the Body:
With a hint of green paint on a small brush, draw a faint, curved line extending from the bottom wing down the cheek to suggest a stem or body, giving the butterfly movement. -
Forehead Details:
In the center of the forehead, paint small teardrop shapes and dots in white to create a centerpiece that balances the asymmetry of the side eye design. -
Apply Gems:
Select a few small, iridescent adhesive gems. Place them carefully along the forehead design or near the corner of the eye to catch the light. -
Final Sparkle:
If desired, tap a tiny amount of glitter gel over the wettest parts of the gradient paint before it dries completely, or dusting fine cosmetic glitter over the eyelids.
Step back and admire the soft flutter of your beautiful new accessory


Classic Tiger Face
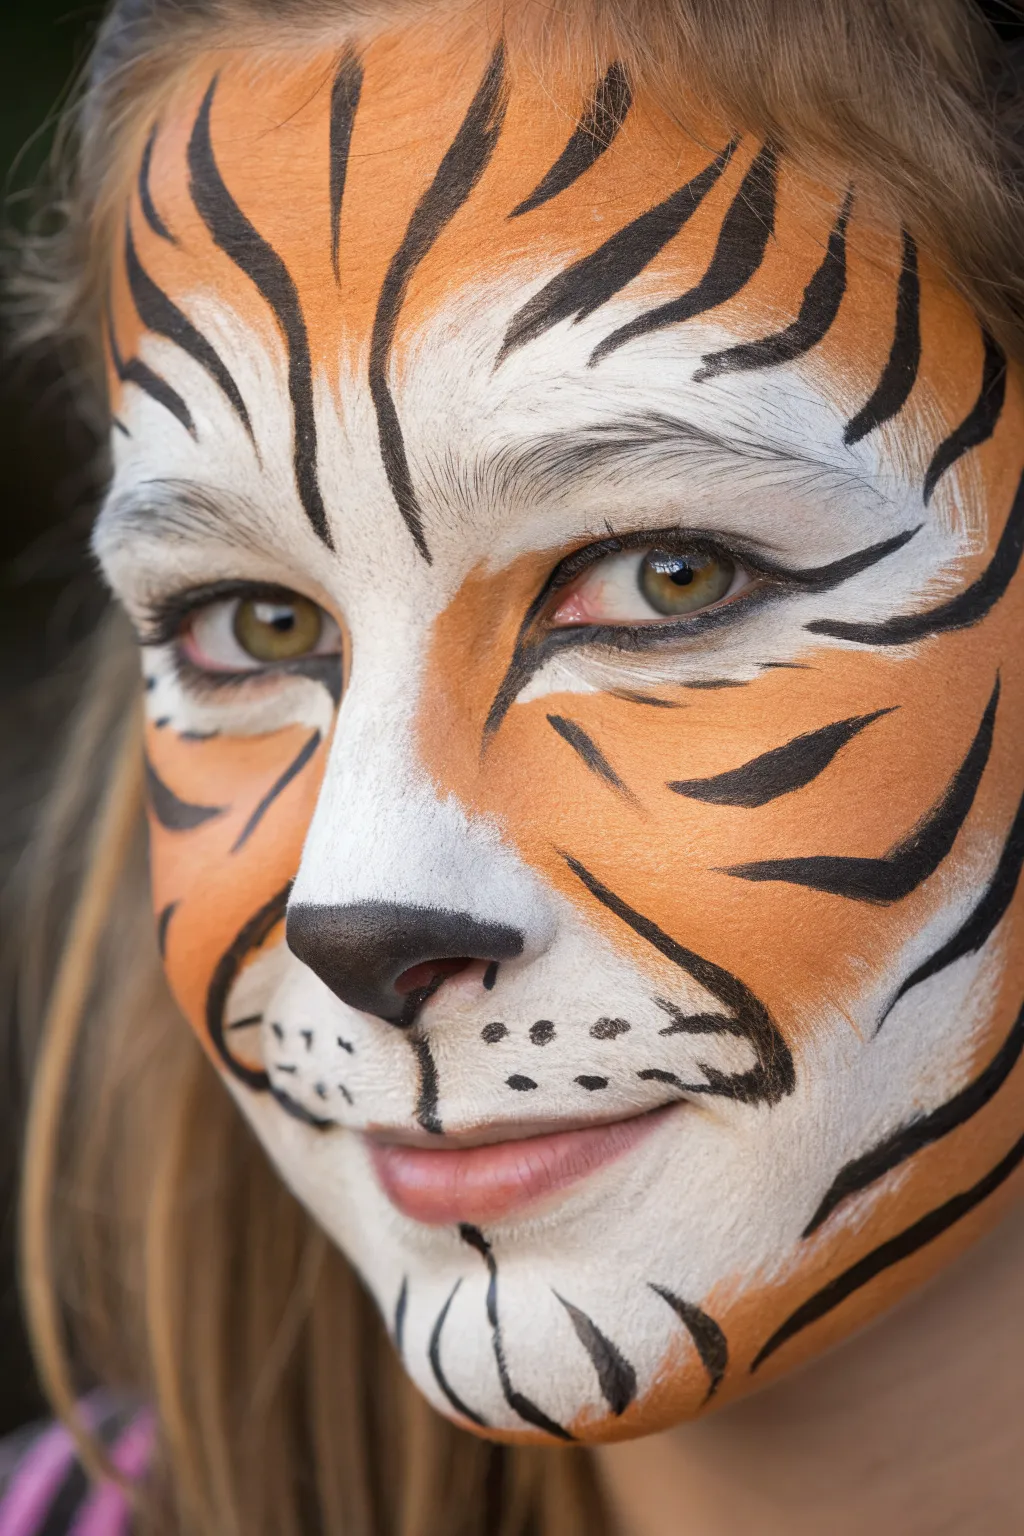
Transform into a fierce jungle cat with this striking tiger design featuring bold stripes and a classic orange-and-white color scheme. The look relies on clean, sweeping lines and careful blending to create a soft, furry texture around the eyes and muzzle.
How-To Guide
Materials
- Face paint (bright orange, white, black)
- High-density sponge
- Medium round brush (size 4 or 6)
- Fine liner brush (size 1 or 2)
- Cup of water
- Paper towels or cloth
Step 1: Laying the Base
-
Sponge the white areas:
Start by dampening your sponge and loading it with white paint. Dab it firmly over both eyelids, extending up above the eyebrows in a triangular shape. -
Create the muzzle:
Continue with the white sponge down the bridge of the nose and fan it out over the upper lip and chin area to create a wide muzzle base. -
Apply the orange base:
Rinse your sponge or switch to a clean side. Load it with bright orange paint and fill in the forehead, blending slightly into the white edges above the brows. -
Fill the cheeks:
Sponge orange on the cheeks and temples, bringing the color down along the jawline but leaving the white muzzle distinct. -
Blend the transition:
While the paint is still slightly tacky, gently dab the area where the orange meets the white to create a soft, gradient blend rather than a harsh line.
Step 2: Defining Features
-
Paint the nose:
Using a medium round brush and black paint, color the tip of the nose completely black. Add a straight vertical line connecting the nose to the mental crease of the upper lip. -
Outline the muzzle:
With the same brush, draw a curved line along the outer edge of the white muzzle area on the cheeks to separate the snout from the orange fur. -
Define the eyes:
Switch to a finer brush if needed. Paint a thin black line underneath the lower lash line, extending slightly outward at the corners to elongate the eyes. -
Add muzzle details:
On the white upper lip area, paint two horizontal rows of three small black dots on either side to suggest whisker spots.
Paint looking streaky?
Streaky paint usually means too much water. Blot your sponge on a paper towel before loading color, or work the paint until it has a creamy, opaque consistency.
Step 3: Stripes and Fur
-
Forehead stripes:
Using a round brush loaded with creamy black paint, create the central forehead stripes. Press down to start thick, then lift the brush as you pull upward to create a sharp, tapered point. -
Side forehead markings:
Paint curved stripes framing the eyebrows, starting from the center and curving outward toward the temples. Keep the lines fluid and organic. -
Cheek stripes:
Paint three distinct stripes on each cheek, angling them inward toward the nose. I find it helps to vary the thickness here to make the pattern look more natural. -
Temple details:
Add smaller, shorter strokes near the outer corners of the eyes and temples to fill in any empty orange space without overcrowding the design. -
Chin accents:
Paint two or three thin, curved lines on the white chin area, mimicking the texture of a hairy chin. -
Add texture strokes:
Using a very fine liner brush and white paint, add tiny, quick flicking strokes over the black stripes on the forehead and cheeks to simulate real fur texture overlapping the markings. -
Final highlights:
Add a few white flicks to the inner corners of the eyes and the tip of the black nose to give the face a wet, shiny look.
Flick of the wrist
For perfect tiger stripes, press the brush down firmly to start the line thick, then lift completely off the skin as you drag it to create a razor-sharp, tapered tail.
Now you have a fierce feline look ready for any costume party or event


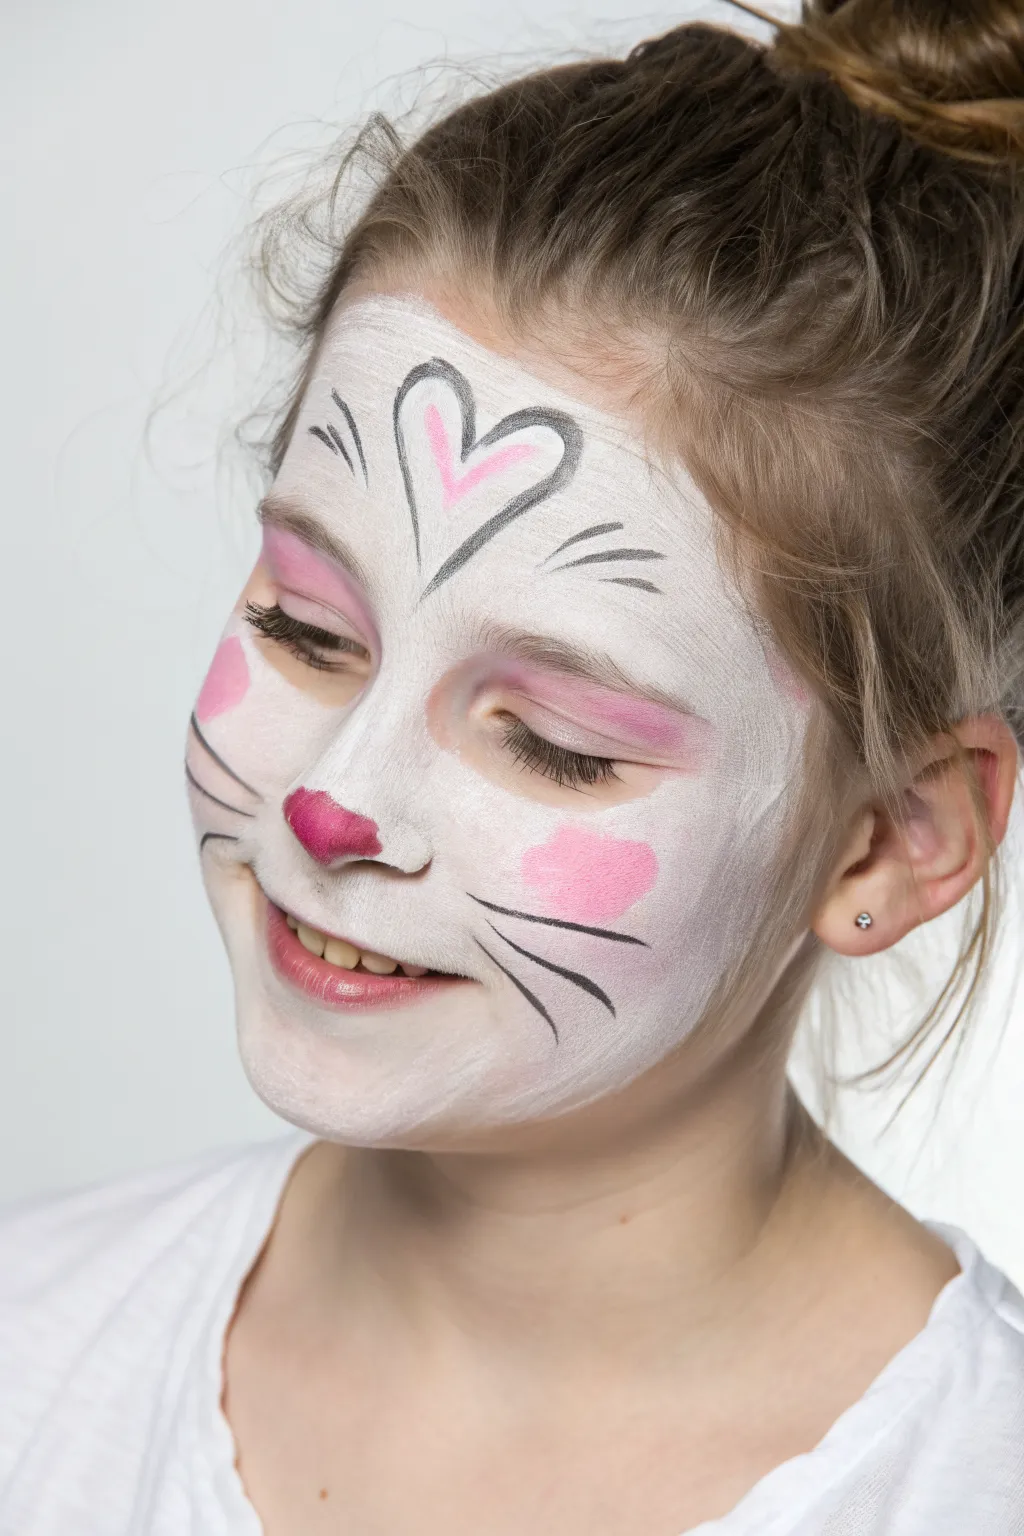
Sweet Kitty Nose and Whiskers
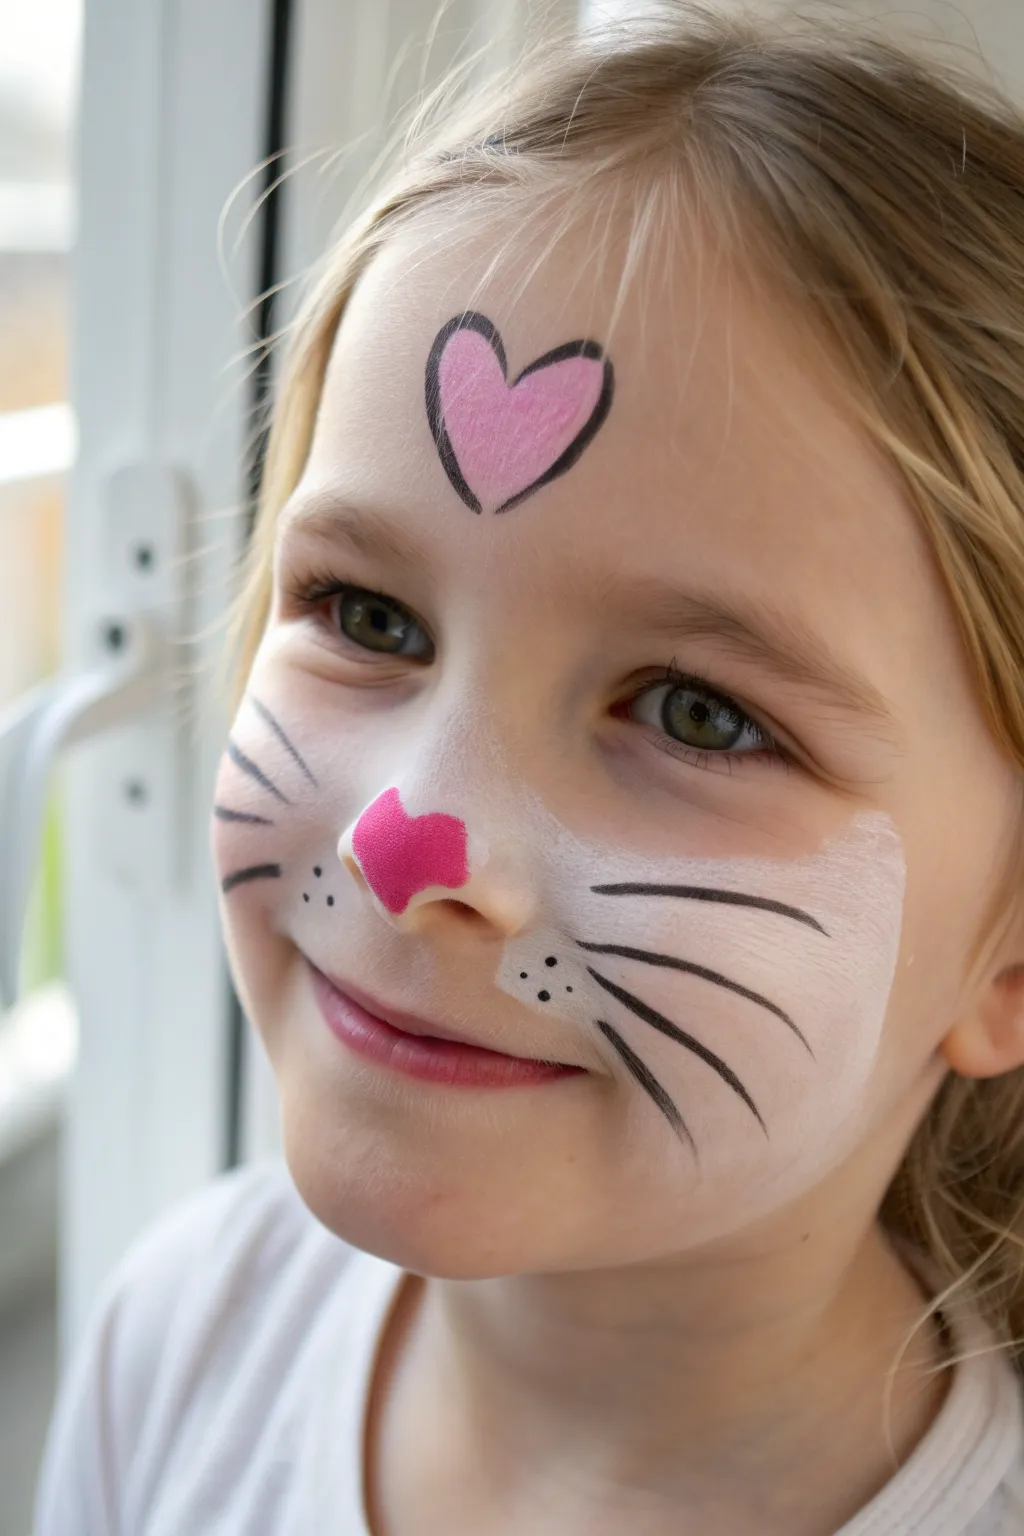
This adorable face painting design transforms little ones into cute kittens with simple, delicate details. Featuring a sweet heart on the forehead and classic whiskers, it’s a quick crowd-pleaser perfect for parties or playtime.
Step-by-Step Guide
Materials
- White face paint
- Light pink face paint
- Bright magenta or hot pink face paint
- Black face paint
- High-density face painting sponge
- Round brush (size 2 or 3)
- Small filbert brush or flat brush
- Cup of water
- Towel or paper towel
Step 1: Creating the Base
-
Load the sponge:
Dampen your high-density sponge slightly and load it generously with white face paint. You want a creamy consistency that isn’t too drippy. -
Define the muzzle area:
Gently stipple the white paint onto the upper lip area, covering the space between the nose and mouth. Extend this white patch outwards onto the cheeks in a rounded shape to create the kitty’s muzzle. -
Clean the edges:
Use the clean edge of your sponge to feather the outer edges of the white paint slightly so it blends softly into the natural skin tone rather than having a harsh line. -
Paint the nose heart:
Using a small filbert brush or a round brush loaded with bright magenta paint, paint a small, inverted triangle or heart shape directly onto the tip of the nose. -
Refine the nose shape:
Ensure the bottom point of the nose heart extends slightly down the center of the philtrum to connect visually with the muzzle area.
Smudged Lines?
If a black line smears, wait for it to dry completely. Then, use a damp cotton swab to wipe away the mistake before reapplying paint.
Step 2: Forehead Detail
-
Position the forehead heart:
Find the center of the forehead, just above the eyebrows. Load a clean brush or small sponge edge with light pink paint. -
Fill the heart shape:
Paint a simple, solid heart shape in the center of the forehead. It doesn’t need to be perfect at the edges yet, as you will outline it later. -
Let it set:
Allow the pink paint to dry for a few moments so the black outline doesn’t bleed into it.
Sharper Whiskers
For pointed whiskers, press the brush down at the start of the line and lift it quickly off the skin as you flick outward.
Step 3: Line Work and Whiskers
-
Load the liner brush:
Wet a size 2 or 3 round brush and load it with black face paint. Roll the brush tip in the paint to create a sharp, fine point. -
Outline the forehead heart:
carefully outline the light pink heart on the forehead. I find it helps to start from the top center dip and pull the brush down one side, then repeat for the other side. -
Add first whiskers:
Starting on the white muzzle area on one cheek, paint three long, sweeping lines extending outward towards the ear. Press down firmly at the start and lift the brush as you flick outward to get a tapered end. -
Complete the whiskers:
Repeat the whisker process on the other cheek, trying to keep them symmetrical in length and angle. -
Paint muzzle dots:
Using the very tip of your round brush, add three small dots on the white muzzle area on each side, just below the nose and before the whiskers start. -
Add upper cheek details:
Paint two small, curved lines or extra partial whiskers on the upper cheekbone area, outside the white muzzle zone, to frame the face. -
Final check:
Look over the design for any thin spots in the black lines and touch them up gently if needed.
Step back and admire your purr-fectly cute creation, ready for a day of fun


Puppy Dog Snout and Tongue
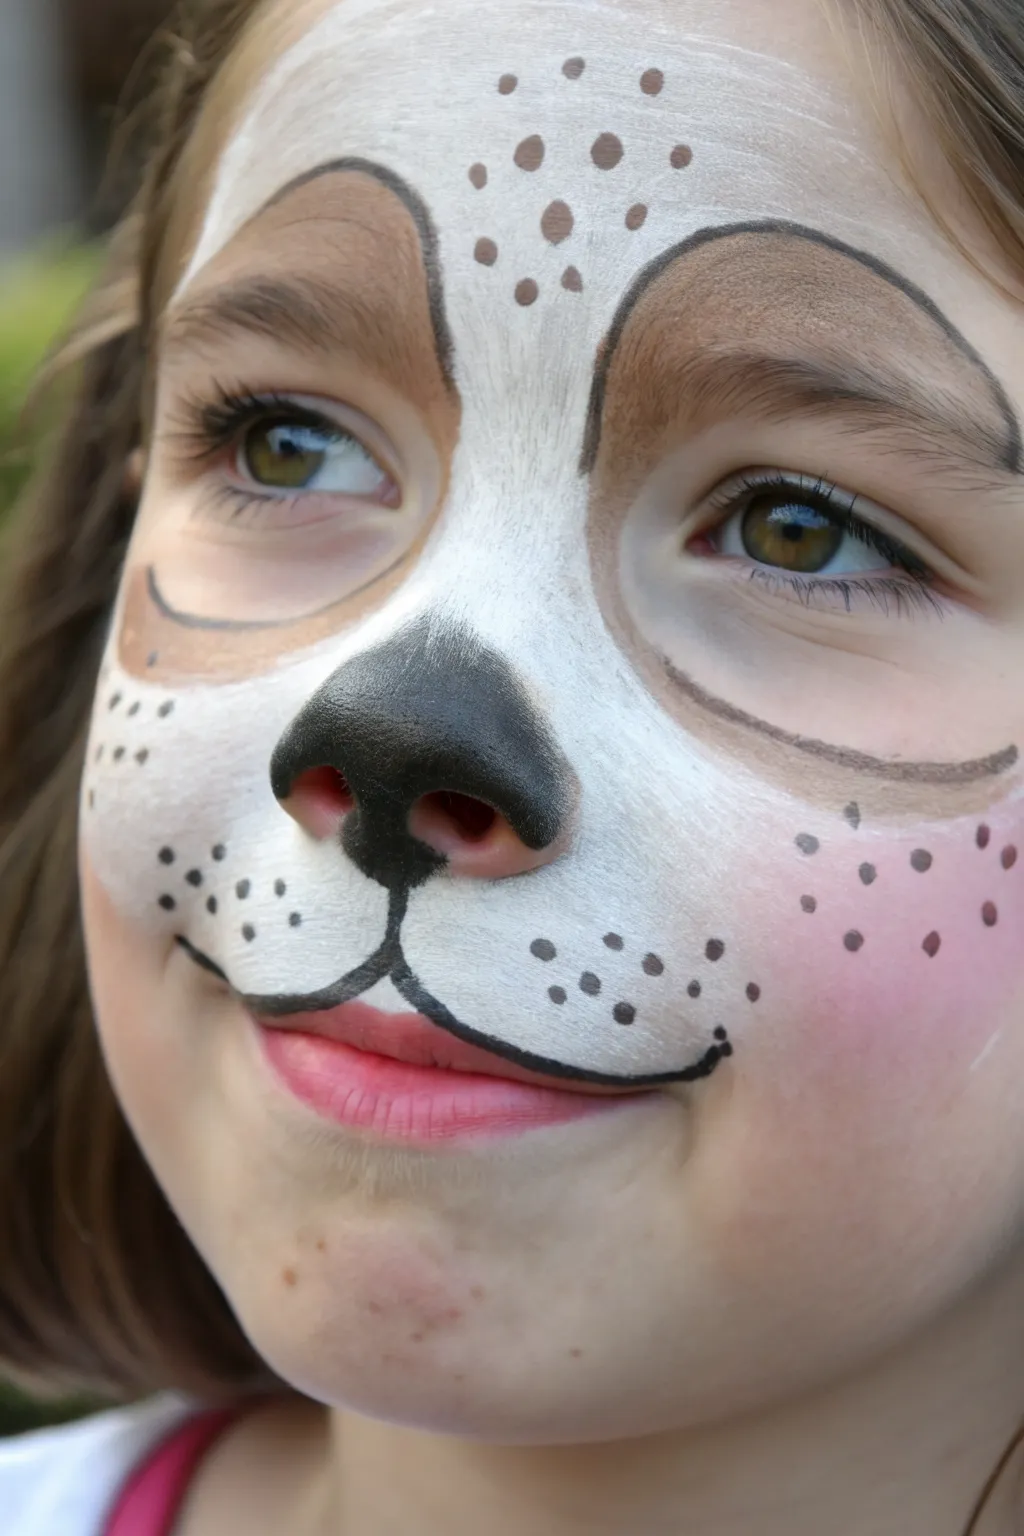
Transform a little face into an adorable pup with this classic, clean design featuring a smooth white muzzle and sweet brown spots. This look strikes the perfect balance between high-contrast details and softer, blended areas for a realistic yet cute effect.
How-To Guide
Materials
- High-density face paint sponge
- Water-activated face paint (White)
- Water-activated face paint (Light Brown/Tan)
- Water-activated face paint (Black)
- Water-activated face paint (Soft Pink)
- Round brush (size 4 or 6)
- Fine detail brush (size 1 or 2)
- Small filbert brush (optional, for blending)
- Spray bottle with water
- Soft towel or wipes
Step 1: Setting the White Base
-
Prep the sponge:
Begin by dampening your high-density sponge with a mist of water. Rub it circularly into the white face paint until you have a creamy implementation that isn’t too runny. -
Map the muzzle area:
Dab the white paint onto the upper lip, extending up over the nose bridge and fanning out slightly onto the cheeks. Keep the shape rounded and soft. -
Reach the forehead:
Continuing with the sponge, create a central patch of white on the forehead, starting between the eyebrows and fanning upward toward the hairline. -
Smooth the texture:
Use the clean side of the sponge or gently tap over the applied paint to ensure an even, opaque coverage without streak marks.
Step 2: Adding the Puppy Patches
-
Mix the brown tone:
Load a clean corner of your sponge or a filbert brush with a soft light brown or tan color. You want a semi-sheer application here rather than a solid block of color. -
Create the left eye patch:
Gently stipple the brown paint over the left eyelid and eyebrow area, extending it up towards the forehead in a large, rounded shape. -
Define the right eye patch:
Mirror the shape on the right eye. I find it helpful to have the child close their eyes gently so you can cover the eyelid completely without irritation. -
Blend the edges:
Where the brown patches meet the white central area, use a slightly damp, clean brush or sponge edge to soften the transition so it looks like fur blending together. -
Add rosy cheeks:
Pick up a very small amount of soft pink on a sponge. Lightly dab this onto the apple of the cheeks, overlapping the outer edges of the white muzzle area to give a warm glow.
Sponge Savvy
Cut a round sponge in half to get a sharp edge. This helps when painting around the eyes and nose without smudging the work you’ve already done.
Step 3: Defining the Doggy Details
-
Paint the nose black:
Load a medium round brush with black paint. Carefully fill in the tip of the nose, covering the nostrils completely and rounding off the top. -
Draw the split lip:
Using the very tip of your round brush, draw a vertical line straight down from the center of the nose to the top lip. -
Create the smile:
From the bottom of that vertical line, sweep a curved line outward to the left and right along the upper lip line, curling up slightly at the corners for a happy expression. -
Outline the eye patches:
Switch to your fine detail brush loaded with thin black paint. Outline the brown eye patches with a smooth line, but stop halfway down the cheek so the bottom edge stays soft. -
Add forehead spots:
Load a round brush with the brown paint again. Press the brush down firmly and lift straight up to create perfect round dots on the white forehead area. -
Stipple the cheek spots:
Using the same brown paint, add a cluster of smaller dots on the pink cheek areas. Vary the pressure to make some dots larger and some tiny. -
Create muzzle freckles:
With the fine detail brush and black paint, add three rows of tiny dots on the white muzzle area on either side of the nose.
Level Up: Fur Texture
Use a dry fan brush with white paint to flick wispy lines over the edges of the brown spots. This creates a realistic fuzzy fur texture instantly.
Now you have a perfect little pup ready for a day of play
BRUSH GUIDE
The Right Brush for Every Stroke
From clean lines to bold texture — master brush choice, stroke control, and essential techniques.
Explore the Full Guide
Rainbow Cheek Swirl
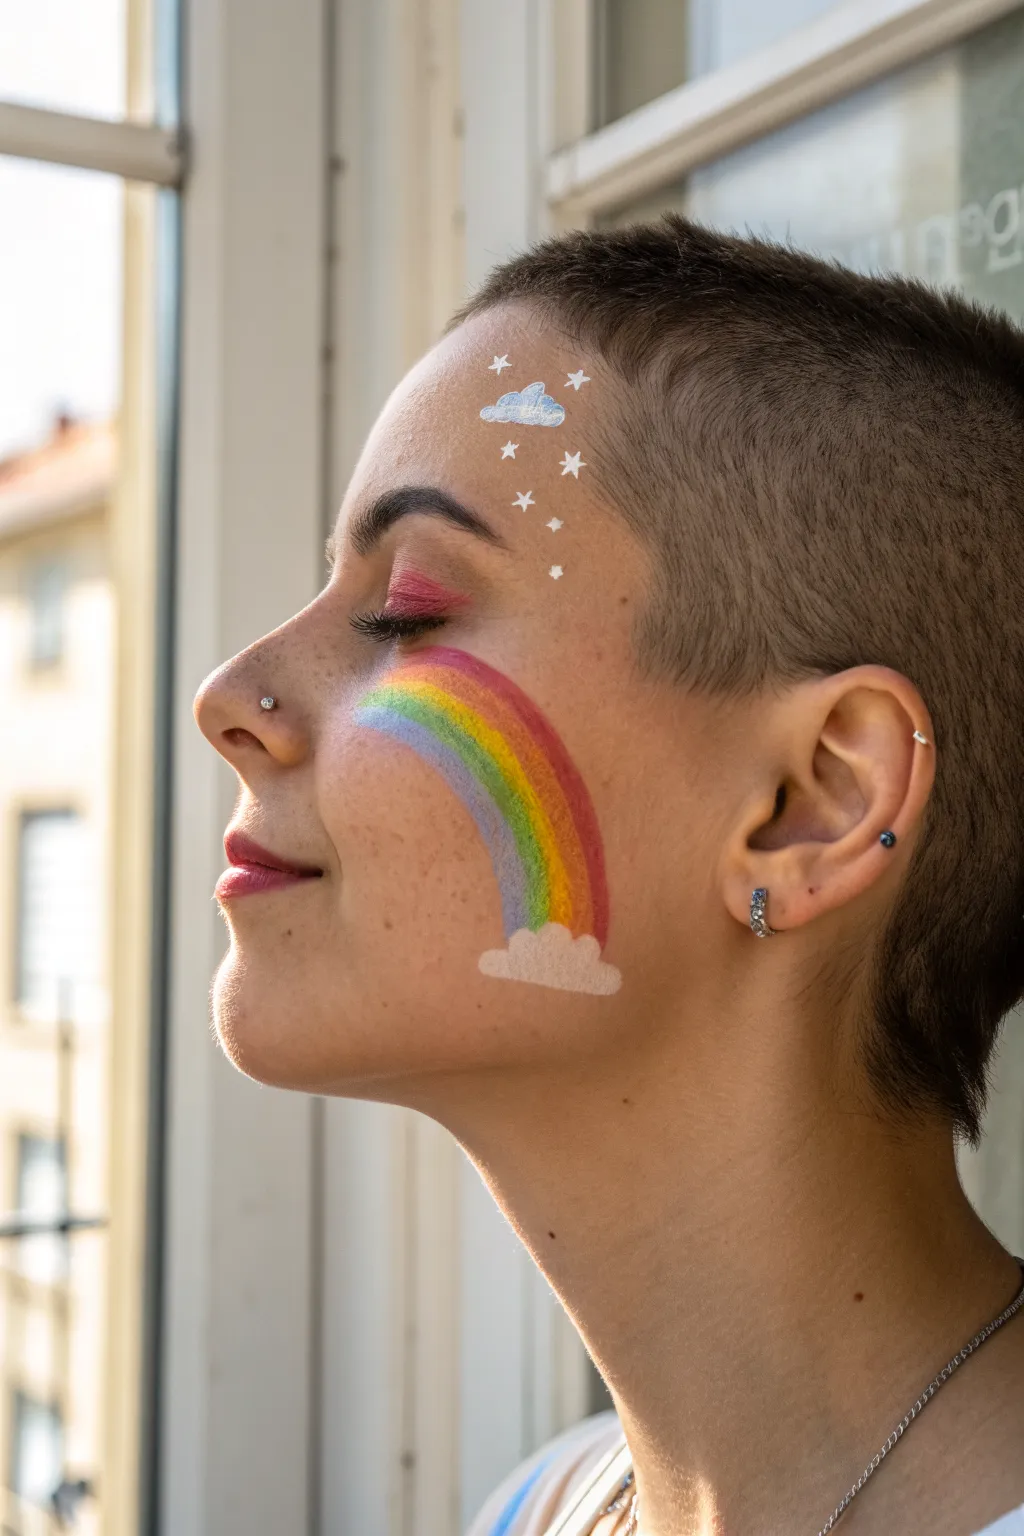
Brighten up any day with this cheerful, weather-inspired face paint design featuring a vibrant rainbow arch and celestial accents. The look combines a classic sweep of colors on the cheek with delicate, starry details on the forehead for a dreamy, joyous finish.
Detailed Instructions
Materials
- Face paint palette (Red, Orange, Yellow, Green, Blue, Purple)
- White face paint (highly opaque)
- Silver face paint or metallic liquid liner
- Flat brush (medium width, approx ½ inch)
- Round detail brush (size 1 or 2)
- Small blending sponge
- Pink eyeshadow
- Mascara
- Setting spray (optional)
Step 1: Eye Base
-
Apply eyeshadow:
Before starting the face paint, apply a wash of deep pink eyeshadow across the entire eyelid, blending it slightly upward into the crease for a soft, warm gaze. -
Define lashes:
Add a coat or two of black mascara to the upper and lower lashes to define the eyes without overpowering the colorful paint.
Use a Split Cake
For the rainbow, use a ‘split cake’ (a container with pre-striped rainbow colors). It lets you paint the full spectrum in one single swipe rather than painting individual lines.
Step 2: Painting the Rainbow
-
Load the brush:
Take a flat brush and dampen it slightly. Load it with your rainbow split-cake if available, or carefully stripe your brush with red, orange, yellow, green, blue, and purple paints side-by-side. -
Position the start:
Place the brush horizontally just under the outer corner of the eye, ensuring the red pigment is at the top and purple is at the bottom. -
Execute the sweep:
In one smooth, confident motion, drag the brush downward and curve it slightly inward toward the jawline, mimicking the natural contour of the cheek. -
Clean the edges:
If the ends of your rainbow look a bit ragged, use a slightly damp cotton swab or a clean brush to wipe away excess paint, squaring off the bottom edge where the cloud will go.
Step 3: Cloud Creation
-
Mix the cloud color:
Load a small round brush or a very small sponge with opaque white face paint. I sometimes mix a tiny dot of blue in to give the cloud dimension, but pure white works perfectly. -
Paint bottom cloud:
At the bottom end of the rainbow arch near the jaw, dab the white paint in rounded, fluffy distinct bumps to create a soft cloud shape that covers the end of the colorful streaks. -
Paint forehead cloud:
Move to the upper forehead and paint a second, smaller floating cloud shape using the same scalloped, dabbing technique. -
Add texture:
While the white is still slightly tacky, dab it gently with a dry finger or sponge to remove brush strokes and create a softer, more misty texture.
Muddy Colors?
If your rainbow colors are blending together into brown, your brush is too wet. Clean it, dry it thoroughly on a towel, and reload with a creamier, drier paint consistency.
Step 4: Celestial Details
-
Outline the top cloud:
Using a very fine liner brush and silver paint (or white if you prefer high contrast), create a delicate outline on the top edge of the forehead cloud. -
Draw star clusters:
With the silver paint and fine brush, carefully draw small five-pointed stars scattered above and below the forehead cloud. -
Add simple dots:
Intersperse the stars with tiny silver dots to look like distant starlight. -
Final highlight:
Add one small silver highlight or star shape near the top curve of the rainbow on the cheekbone to tie the two zones together.
Now you are ready to wear your personalized sky art with pride
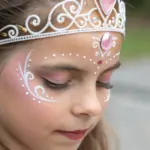
Princess Tiara With Swirls
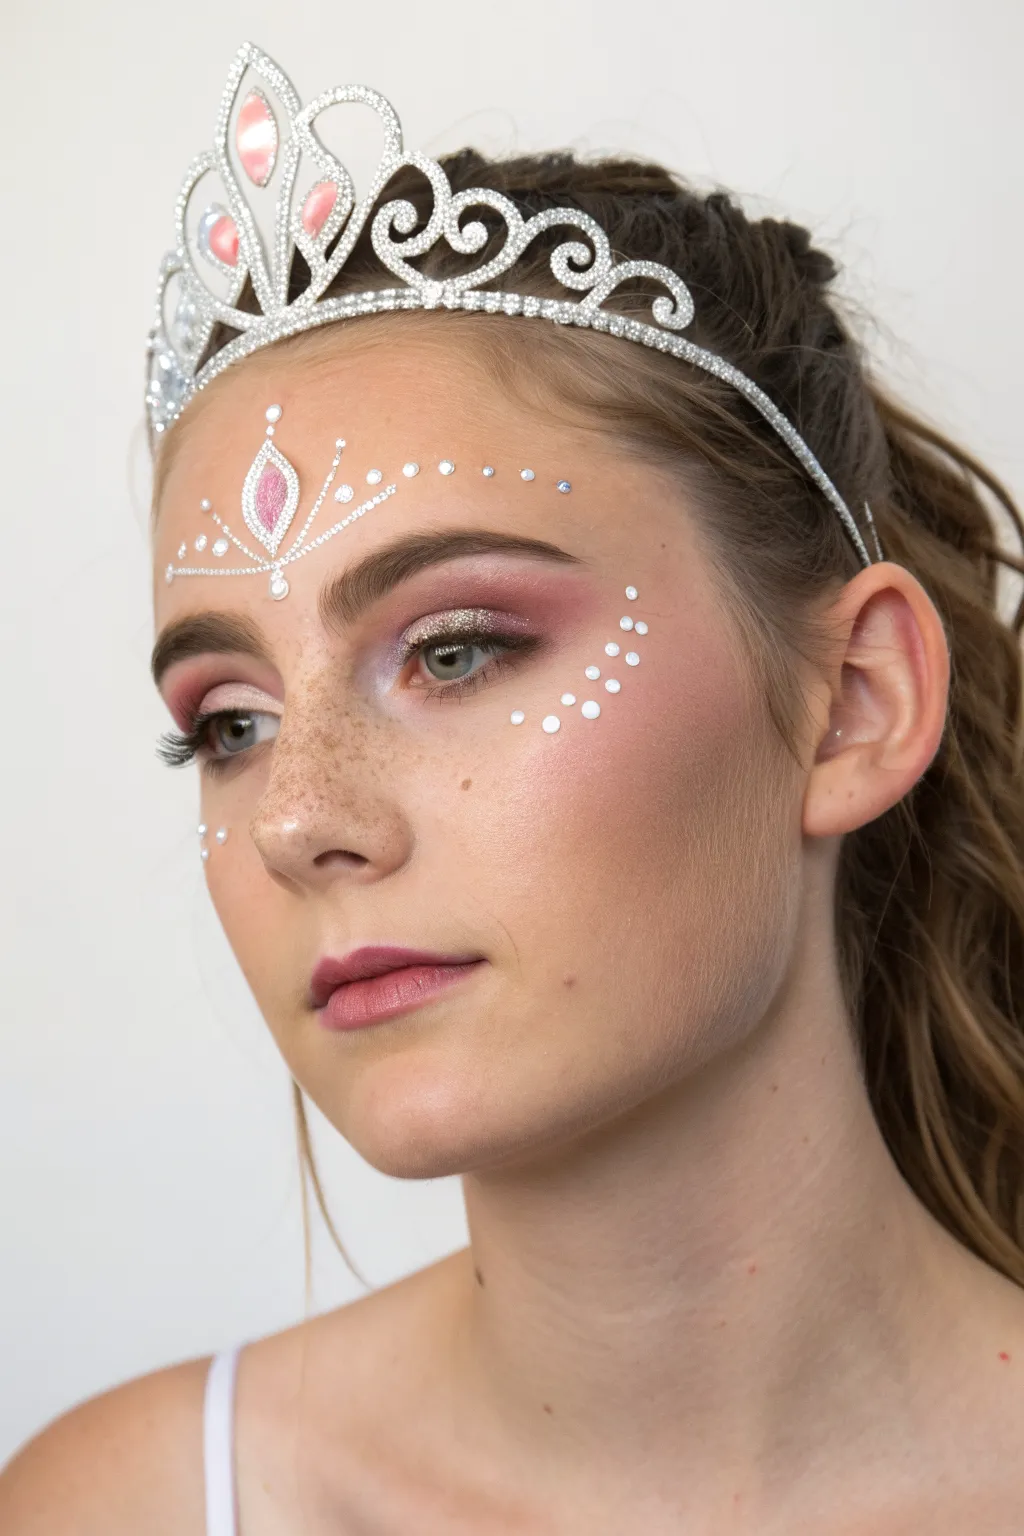
Transform into royalty with this elegant look that combines soft, rosy makeup with intricate face painting and gem accents. This design mimics the sparkle of a real tiara directly on the skin, perfect for parties or costumes.
Step-by-Step
Materials
- Matte foundation (skin tone matching)
- Pink blush or face paint
- Purple/Mauve eyeshadow
- Pink shimmer eyeshadow
- Champagne or gold glitter pigment
- White liquid eyeliner or fine tip face paint
- Small rhinestones or face gems
- Large tear-drop gem sticker (pink center)
- Eyelash glue (latex-free)
- Mascara
- Fluffy blending brush
- Fine detail brush
- Setting spray
Step 1: Base & Contouring
-
Prep the canvas:
Begin with a clean, moisturized face. Apply a light layer of foundation to even out the skin tone, focusing on the center of the face and blending outward for a natural finish. -
Rosy contour:
Instead of traditional brown bronzer, use a matte pink blush or soft pink face paint. Sweep this generously across the temples, hitting the tops of the cheekbones and blending upwards toward the hairline to create a flushed, ethereal base. -
Deepen the cheeks:
Add a slightly deeper mauve tone just under the cheekbones to define the face shape while keeping the overall color palette romantic and soft.
Stay Steady
Rest your pinky finger on the cheek or chin while painting the fine white lines. This anchors your hand and prevents shaky lines.
Step 2: Eye Makeup Magic
-
Base shadow application:
Apply a matte mauve or dusty rose eyeshadow across the entire eyelid, blending it well into the crease. -
Add shimmer:
Press a metallic pink or champagne shimmer shadow onto the center of the lid to catch the light. -
Glitter accent:
For extra sparkle, pat a small amount of gold or champagne glitter pigment onto the very center of the eyelid, directly over the pupil. -
Lower lash line:
Smudge a little of the matte mauve shadow under the lower lash line to balance the eye look. -
Define the lashes:
Apply two coats of black mascara to top and bottom lashes. If you want more drama, you can add false lashes at this stage.
Step 3: The Painted Tiara
-
Centerpiece placement:
Place a large pink tear-drop gem sticker in the center of the forehead, just above the eyebrows. -
Outline the center gem:
Using white liquid eyeliner or white face paint on a fine brush, carefully outline the tear-drop gem. I find it easiest to start at the top point and work down. -
Create the side swoops:
Draw delicate white curved lines extending from the base of the center gem outward toward the temples, creating a ‘wings’ shape. -
Dotted details:
Along these white curved lines, apply tiny dots of white paint to give the impression of pearls or small diamonds set in the design. -
Forehead arches:
Add a series of small white dots in an arch shape above the eyebrows, connecting the center design toward the hairline.
Add Real Sparkle
Swap the white painted dots for real adhesive pearls or tiny flat-back crystals for a 3D effect that catches the light beautifully.
Step 4: Gemstones & Finishing Touches
-
Cheek accents:
On the high points of the cheekbones, apply small dots of white paint in a curved cluster pattern. -
Apply face gems:
Using a tiny dot of eyelash glue, adhere small scattered rhinestones or pearls around the painted white dots on the forehead for dimension. -
Temple sparkle:
Add a few more scattered gems or white paint dots near the temples to frame the eyes. -
Lip color:
Finish with a soft rose or berry-colored lipstick, blotting it for a stained, natural effect. -
Set the look:
Mist the face lightly with setting spray to keep the makeup and face paint fresh for hours.
Enjoy your royal transformation and the dazzling sparkle of your new crown design

PENCIL GUIDE
Understanding Pencil Grades from H to B
From first sketch to finished drawing — learn pencil grades, line control, and shading techniques.
Explore the Full Guide
Superhero-Style Eye Mask
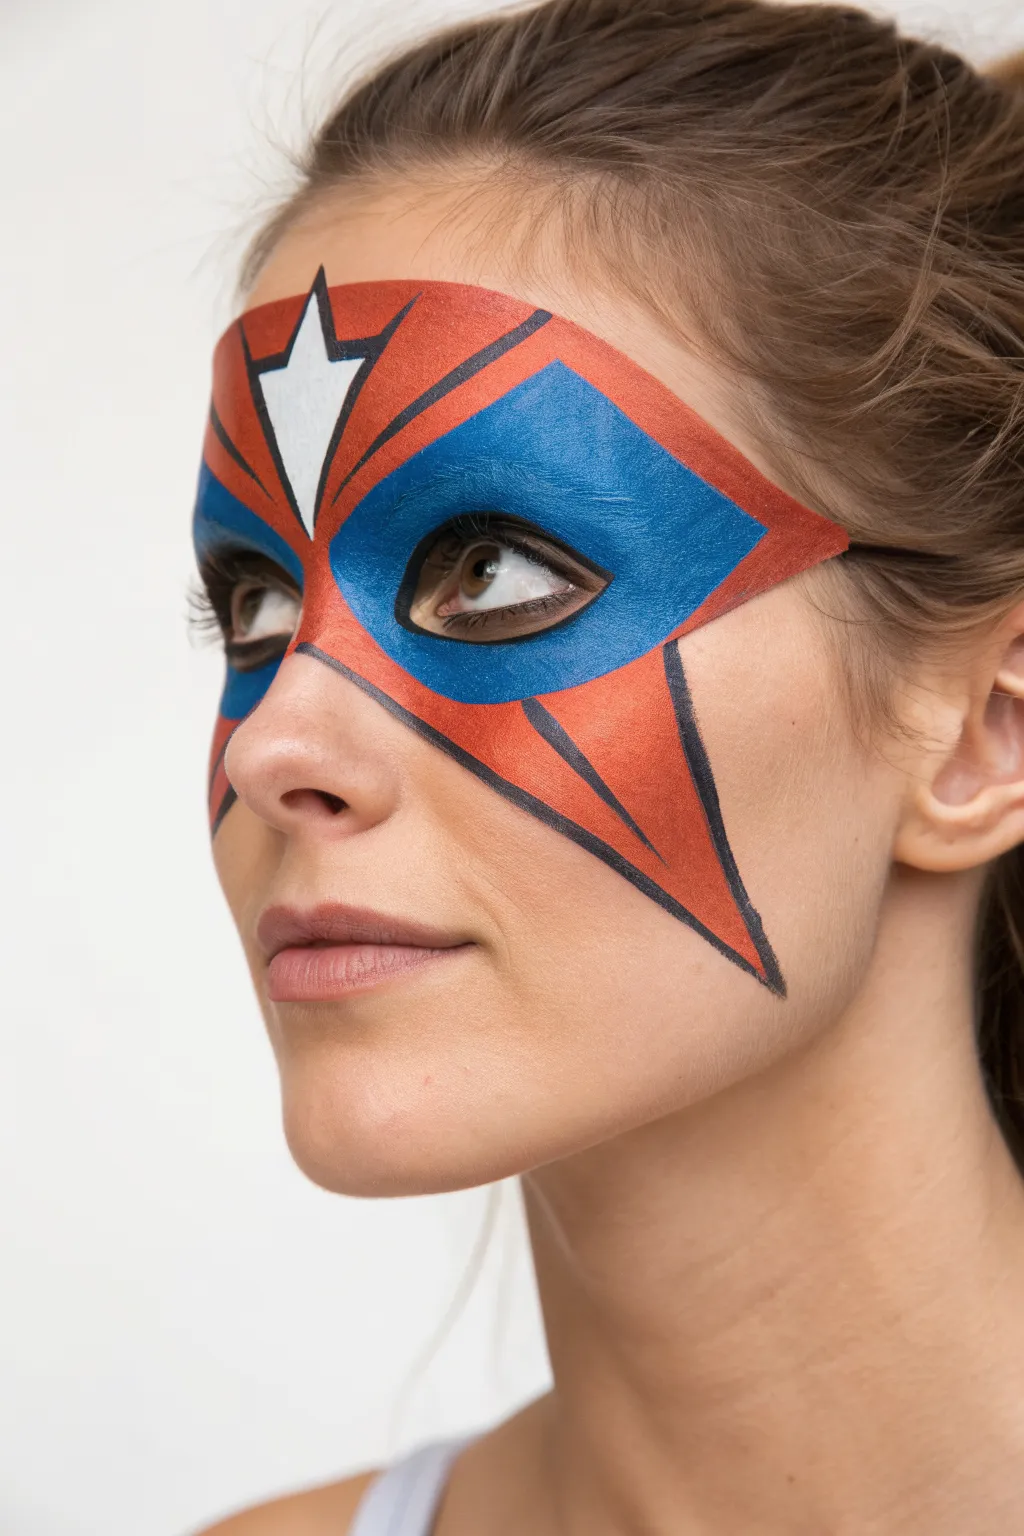
Transform into a soaring superhero with this bold face paint design that combines dynamic angles and classic primary colors. Featuring a striking red star motif overlaid with blue eye masks and a bright white crest, this look is perfect for comic book fans.
Detailed Instructions
Materials
- Red face paint (high opacity)
- Blue face paint (royal or metallic)
- White face paint
- Black face paint (for outlining)
- Flat brush (medium width)
- Round brush (fine tip for details)
- Spray bottle with water
- Cosmetic sponge (optional)
Step 1: Mapping the Base Shapes
-
Center the design:
Visualize a central point between the eyebrows. This will be the anchor for your star shape and the focal point of the mask. -
Outline the forehead crest:
Using a thin brush and white paint, draw an upside-down kite or diamond shape in the center of the forehead. The bottom point should land right between the eyebrows giving you a clear center line. -
Fill the crest:
Fill in this central diamond shape completely with white paint. Ensure the coverage is solid, as this bright spot needs to pop against the darker colors later. -
Sketch the upper wings:
Switch to red paint on a flat brush. Starting from the edges of your white diamond, paint two large triangular shapes that extend upwards and outwards toward the hairline, forming the top points of the star. -
Create the cheek points:
Continue with the red paint to create the bottom points of the star. Draw lines extending from the outer corner of the eye area down onto the cheekbones, angling them sharply back up towards the nose to create a dynamic ‘V’ shape on each cheek. -
Connect the red areas:
Fill in these red sections completely, ensuring you leave empty space around the eyes for the blue sections. The red should frame the eye area like a traditional domino mask but with sharper edges.
Clean Lines Pro Tip
For the straightest lines, lock your pinky finger against the model’s cheek or chin to stabilize your hand while painting the black outlines.
Step 2: Adding the Blue Field
-
outline the eye patches:
Load a medium brush with blue paint. Outline a diamond-like shape around each eye. The top edge should run parallel to the red forehead section, and the bottom edge should slope upwards. -
Fill in the blue:
Carefully fill in the area around the eyes with the blue paint. Be gentle around the delicate eyelid skin and get as close to the lash line as comfortable without causing irritation. -
Refine the edges:
Check the boundaries where the blue reads meet the red. You want these to be crisp, distinct blocks of color rather than blended gradients.
Level Up: Metallic Sheen
Swap the standard blue for a metallic sapphire paint or dust a little cosmetic glitter over the red sections while damp for a shimmering, powerful finish.
Step 3: Defining with Linework
-
Load the liner brush:
Get your fine round brush wet and load it with black paint until it has an inky, smooth consistency perfect for long lines. -
Outline the center crest:
Draw a confident black outline around the white diamond in the center of the forehead. This helps separate it cleanly from the red and blue sections. -
Separate the colors:
Draw black lines along the borders where the red and blue paints meet above the eyes. This separation adds that illustrative, comic-book style. -
Define the eyes:
Create a bold outline around the blue eye creates. I prefer to thicken the line slightly around the outer corners to emphasize the cat-eye shape. -
Outline the outer edges:
Trace the entire outer perimeter of the red star shape with black. Keep your hand steady to maintain straight, sharp lines for that geometric look. -
Add detail lines:
Paint the final structural lines, specifically the vertical lines that separate the red cheek flare from the main mask area, reinforcing the segmented armor look.
Now you are ready to save the day with a heroic look that commands attention
Bunny Nose and Fluffy Cheeks
Transform little faces into adorable cottontails with this charming bunny design. Featuring soft white fur, sweet pink accents, and a distinctive forehead heart, this look is perfect for Easter celebrations or everyday dress-up fun.
How-To Guide
Materials
- High-quality white face paint (water-activated cake)
- Light pink face paint
- Deep pink or magenta face paint
- Black face paint (liner consistency)
- High-density face painting sponge (petal or round)
- Small round brush (size 2 or 3)
- Medium round brush (size 4 or 6)
- Fine liner brush (size 0 or 1)
- Cup of clean water
- Spray bottle with water
Step 1: Creating the Fluffy Base
-
Activate the white:
Start by lightly misting your white face paint cake with water until it forms a creamy consistency. Rub a damp sponge over the paint until it’s fully loaded but not dripping. -
Map out the shape:
Begin dabbing the sponge on the forehead area to create the wide top of the bunny face, keeping the edges soft and feathery rather than creating a hard line. -
Fill the cheeks:
Continue sponging white paint down the center of the nose and across both cheeks, extending out towards the ears. Leave the tip of the nose bare for now. -
Cover the chin:
Bring the white paint down to cover the upper lip and chin area, connecting everything into one cohesive mask-like shape. -
Refine the edges:
Use the edge of your sponge to tap lightly around the perimeter, creating a textured look that mimics soft fur.
Sponge Savvy
For the fluffiest texture, keep your sponge relatively dry. If it’s too wet, the white paint will streak instead of looking like soft fur.
Step 2: Adding Rosy Details
-
Paint the eyelids:
Load a medium round brush with light pink paint. Ask your model to close their eyes gently and sweep the color across the eyelids, extending slightly upward into the eyebrow area. -
Create blushing cheeks:
Using a clean section of your sponge or a fresh blush brush, dab a soft circle of light pink onto the apples of the cheeks, overlapping the white base slightly for a blended effect. -
Paint the nose:
Switch to a smaller round brush loaded with the deeper magenta pink. Paint a cute, rounded triangle on the tip of the nose. -
Draw the forehead heart:
With the same deep pink brush, draw a small heart shape in the center of the forehead, resting on the white base.
Sparkle Upgrade
While the paint is still slightly damp, poof cosmetic-grade iridescent glitter over the white areas for a magical, shimmering bunny effect.
Step 3: Defining the Features
-
Outline the heart:
Load a thin liner brush with inky black paint. Carefully outline the pink heart on the forehead, using varying pressure to make the line dynamic. -
Add forehead fluff:
On either side of the heart, flick two or three thin, curved black lines outward to suggest tufts of fur or large whiskers. -
Line the nose:
Underneath the pink nose, draw a small vertical black line connecting to the upper lip to create the bunny’s muzzle split. -
Add the main whiskers:
Starting from the white muzzle area, use confident, quick flicks to paint three long black whiskers on each cheek. I try to flick my wrist quickly at the end of the stroke so the line tapers off naturally.
Now you have a bouncy bunny ready to hop into the day


Mermaid Scales and Sea Shimmer
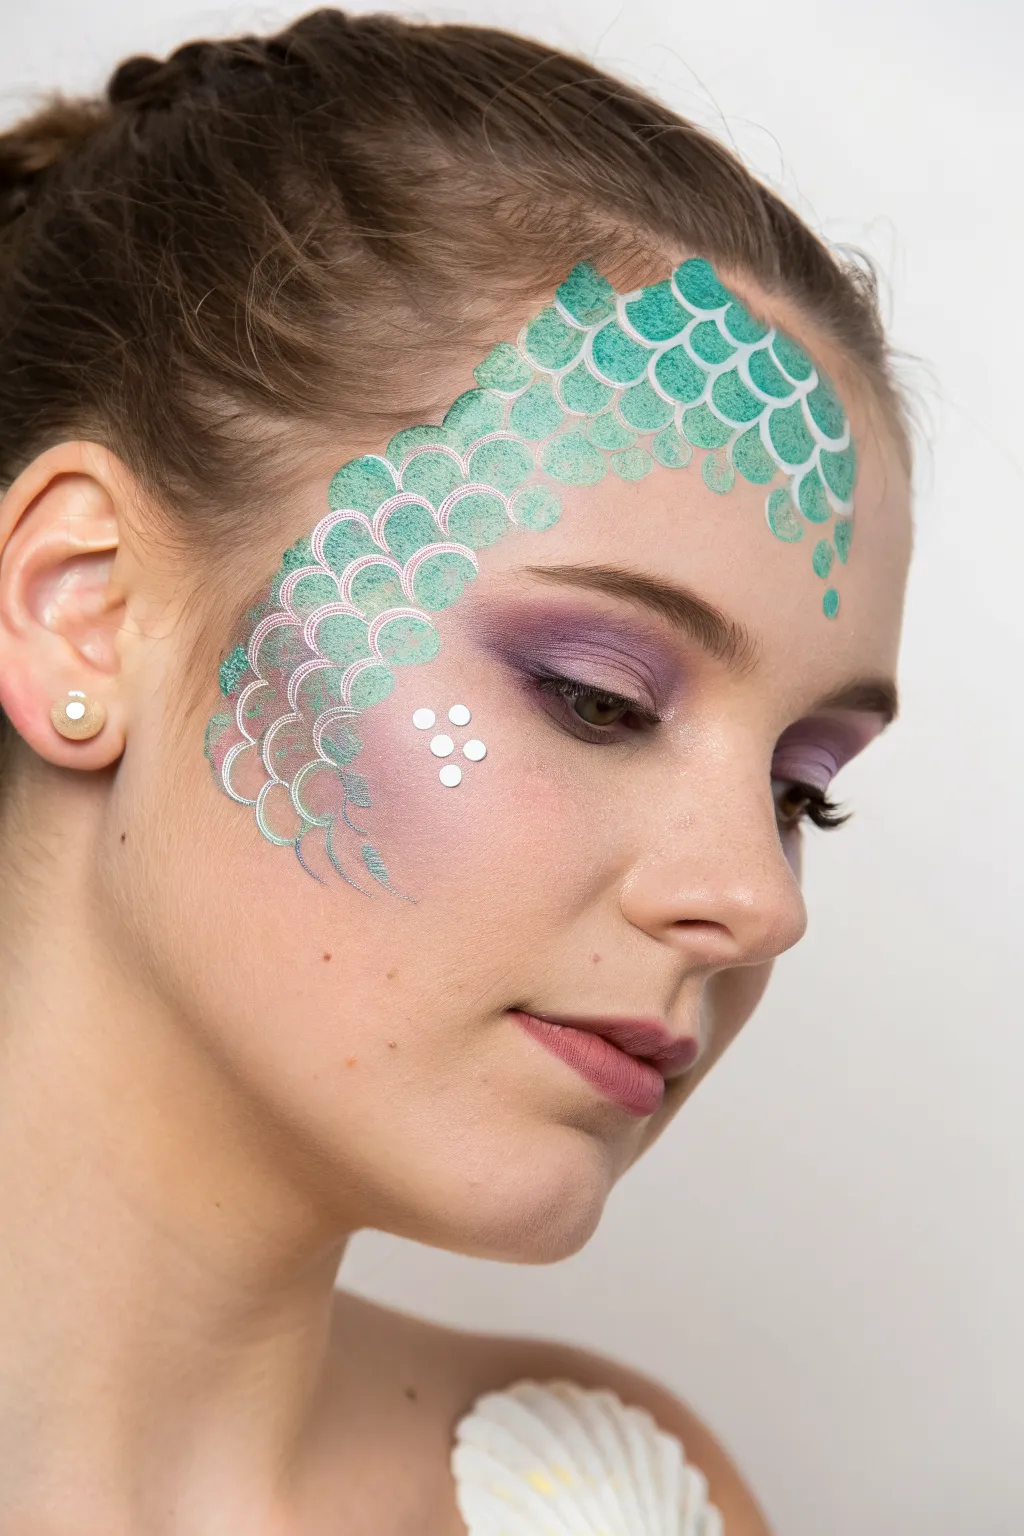
Transform into a deep-sea siren with this ethereal mermaid design that combines soft, blended eyeshadows with crisp, scale-like stenciling. The look features a gradient of teal and purple hues accented by delicate white dots for a magical, underwater finish.
Step-by-Step
Materials
- Teal face paint (water-activated or cream)
- White face paint
- Purple eyeshadow (matte and shimmer)
- Small round makeup sponge (dauber)
- Fish scale stencil
- Fluffy eyeshadow blending brush
- Small flat brush (for detail work)
- Makeup setting spray
- Cotton swabs
- Water cup
Step 1: Base Shadow & Contour
-
Prime the Eyelid:
Begin with a clean, dry face. Apply a subtle eyeshadow primer to the eyelids to ensure the purple pigment pops and stays vibrant throughout the day. -
Apply Purple Shadow:
Using a fluffy blending brush, sweep a matte purple eyeshadow across the entire eyelid, extending it slightly above the crease and outward toward the temple. Keep the edges soft and diffused. -
Deepen the Crease:
Dip a smaller brush into a darker plum or violet shade. Work this into the outer corner of the eye and the crease to add dimension, blending well so there are no harsh lines. -
Add Cheek Contour:
Take the same purple eyeshadow onto a blush brush or contour brush. Lightly dust it onto the upper cheekbone, right where the scales will eventually fade out. This creates a cohesive color story between the eye and the face art.
Step 2: Creating the Scales
-
Position the Stencil:
Place your fish scale stencil against the forehead. Start high, near the hairline, angling it down diagonally across the temple and onto the upper cheekbone. Hold it firmly against the skin to prevent slipping. -
Load the Sponge:
Dampen your sponge dauber slightly and load it with teal face paint. The sponge should be tacky, not dripping wet, to ensure crisp lines. -
Stipple the Forehead:
Gently tap the sponge over the top portion of the stencil near the hairline. Use a straight up-and-down motion specifically to avoid pushing paint under the stencil edges. -
Create a Gradient:
As you move down the stencil toward the cheek, lighten your pressure significantly. You want the teal scales to fade out, becoming more transparent and delicate as they reach the purple contoured area. -
Remove the Stencil:
Carefully lift the stencil straight away from the face. Allow the paint to dry completely for a minute before touching up any areas. -
Add White Highlights:
I like to take a very fine brush with white face paint to accent specific scales. Outline the just bottom curves of the teal scales on the cheek area to make them look three-dimensional and shimmery. -
Extend the Pattern:
Use the white paint to freehand a few delicate, open scales at the very bottom of the design on the cheek. This helps the pattern blend organically into the skin rather than stopping abruptly.
Smudged Edges?
If paint bleeds under the stencil, wait for it to dry fully. Then, take a wet cotton swab with a tiny bit of makeup remover and gently erase the smudge before re-applying.
Step 3: Final Details
-
Dot Accents:
Dip the handle end of a small brush or a dotting tool into white face paint. Place a small cluster of four or five dots on the apple of the cheek, just below the scale pattern. -
Floating Bubbles:
Add a few stray teal dots or small circles near the hairline and outer eye area to mimic rising bubbles, tying the whole aquatic theme together. -
Mascara:
Apply a coat of black mascara to top and bottom lashes to frame the eyes and balance the bold artwork. -
Set the Look:
Close your eyes and mist the entire face with a setting spray to lock the eyeshadow and face paint in place.
Add Extra Sparkle
While the face paint is still slightly damp, gently press cosmetic-grade iridescent glitter onto the center of the scales for a mesmerizing, light-catching effect.
Enjoy wearing this mystical look that brings the ocean’s beauty to the surface
Dragon Split-Face Transformation
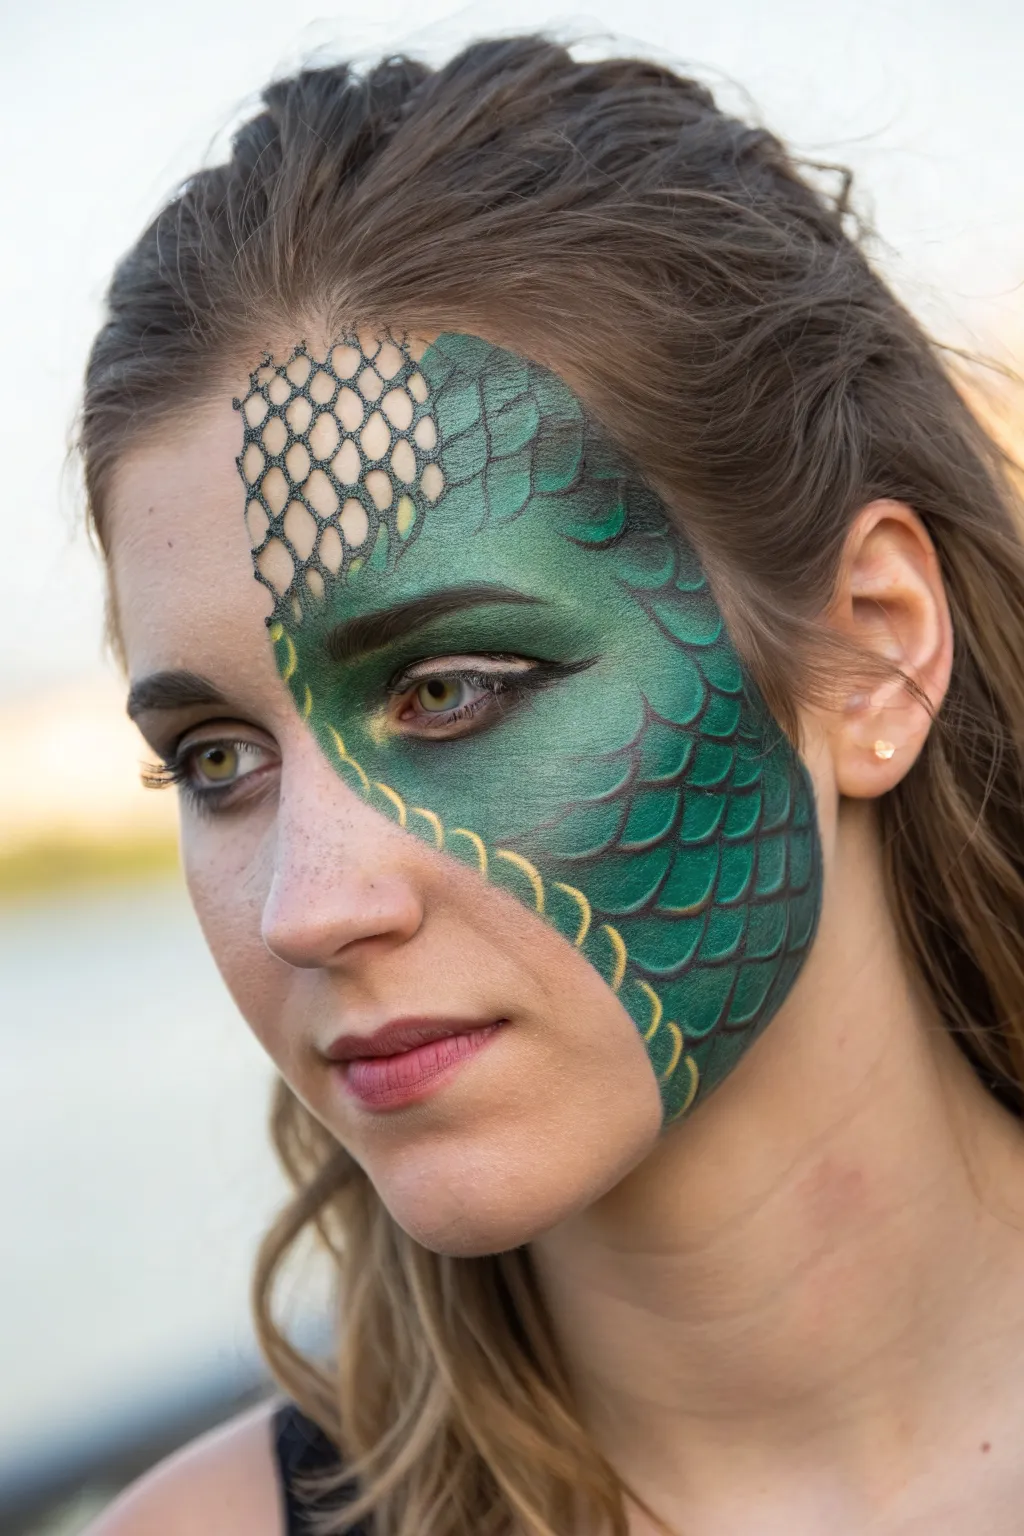
Transform half of your face into a mystical creature with this striking dragon design. Featuring realistic green scales, a honey-comb fishnet technique, and golden accents, this look balances sharp definition with smooth blending for a captivating fantasy effect.
How-To Guide
Materials
- High-density face paint sponges (triangle wedges)
- Water-activated face paints (Dark leaf green, medium emerald green, light lime green, gold, black, teal)
- Fishnet stencil or a piece of actual fishnet stockings
- Round brushes (sizes #2 and #4)
- Fine liner brush (size #0 or #1)
- Petal or filbert brush
- Black eyeshadow or setting powder
- Small cup of water
- Setting spray (optional)
Step 1: Base Gradient
-
Outline the Shape:
Visualize a diagonal line cutting across the face, starting from the center of the forehead, coming down past the nose bridge, and curving under the cheekbone. Use a pale green paint on a small brush to lightly sketch this boundary so you know where your design stops. -
Load the Sponge:
Take a damp sponge and load it with a gradient of greens. Dip one corner in dark leaf green and the rest in emerald. If you are using a split-cake palette, simply swipe your sponge back and forth to pick up the multi-colored strip. -
Initial Application:
Press the sponge onto the skin, keeping the darker green on the outer edges (by the hairline and ear) and the lighter green toward the center of the face. Use a patting motion to build opaque coverage. -
Contour the Eye:
While the paint is moist, gently press a darker teal or forest green into the eyelid crease and the outer corner of the eye to create depth. This sets the stage for a piercing dragon gaze. -
Blend the Edge:
Along the diagonal boundary line we sketched earlier, soften the paint edge just slightly so it isn’t too harsh, but keep the overall shape distinct.
Step 2: Creating Texture
-
The Fishnet Trick:
For the forehead area, stretch a piece of fishnet (or hold a stencil) firmly against the skin where the base green is located. Make sure the paint underneath is dry first so it doesn’t smudge. -
Stippling Shadows:
Load a sponge lightly with black or very dark green paint—it should be almost dry. Dab it gently over the fishnet mesh on the forehead area to create a honeycomb pattern. -
Lift and Reveal:
Carefully lift the netting straight up without dragging it across the skin. This reveals a crisp, darker grid pattern over your green base, mimicking tiny scales. -
Manual Scale Painting:
Moving down the cheek and temple where the scales are larger, use a round #4 brush with dark green or teal paint. Paint ‘U’ shaped curves in overlapping rows, similar to roof shingles, getting larger as you move away from the eye.
Smudged Netting?
If paint bleeds under the fishnet, your sponge was too wet. Let the base layer dry completely, squeeze the sponge thoroughly, and test on your hand before touching the face.
Step 3: Defining Details
-
Shadowing the Scales:
To make the cheek scales look 3D, blend a tiny amount of black eyeshadow or thinned black paint at the top curve of each individual painted scale. -
Highlighting Edges:
Using a fine liner brush and light lime or mixed white-green paint, outline the bottom edge of the larger scales on the cheek. This highlight makes them pop forward visually. -
The Golden Border:
Load a #2 round brush with metallic gold face paint. Carefully trace the main diagonal border that divides the dragon skin from the natural skin. -
Scalloped Edging:
Instead of a straight line, paint small, connected semi-circles (scallops) with the gold paint along that dividing line. This creates a decorative, armored rim effect. -
Enhancing the Eye:
Use a black liner brush to paint a winged eyeliner style on the upper lid. Extend the inner corner slightly downwards to mimic a reptilian eye shape. -
Final Touches:
Add a few tiny dots of gold or white near the tear duct and on the highest point of the large scales for a wet, gleaming look. -
Contrast Check:
Step back and check the honeycomb area on the forehead. If the mesh pattern looks too flat, I sometimes lightly outline a few of the hexagonal cells with the fine liner brush to connect it visually to the cheek area.
Pro Tip: Custom Shift
Mix a tiny bit of metallic gold powder into your green face paint before applying the base layer. It gives the dragon skin an iridescent shimmer that changes in the light.
With your fierce new scales complete, all that remains is to master your best dragon roar
Shark Mouth Over the Lips
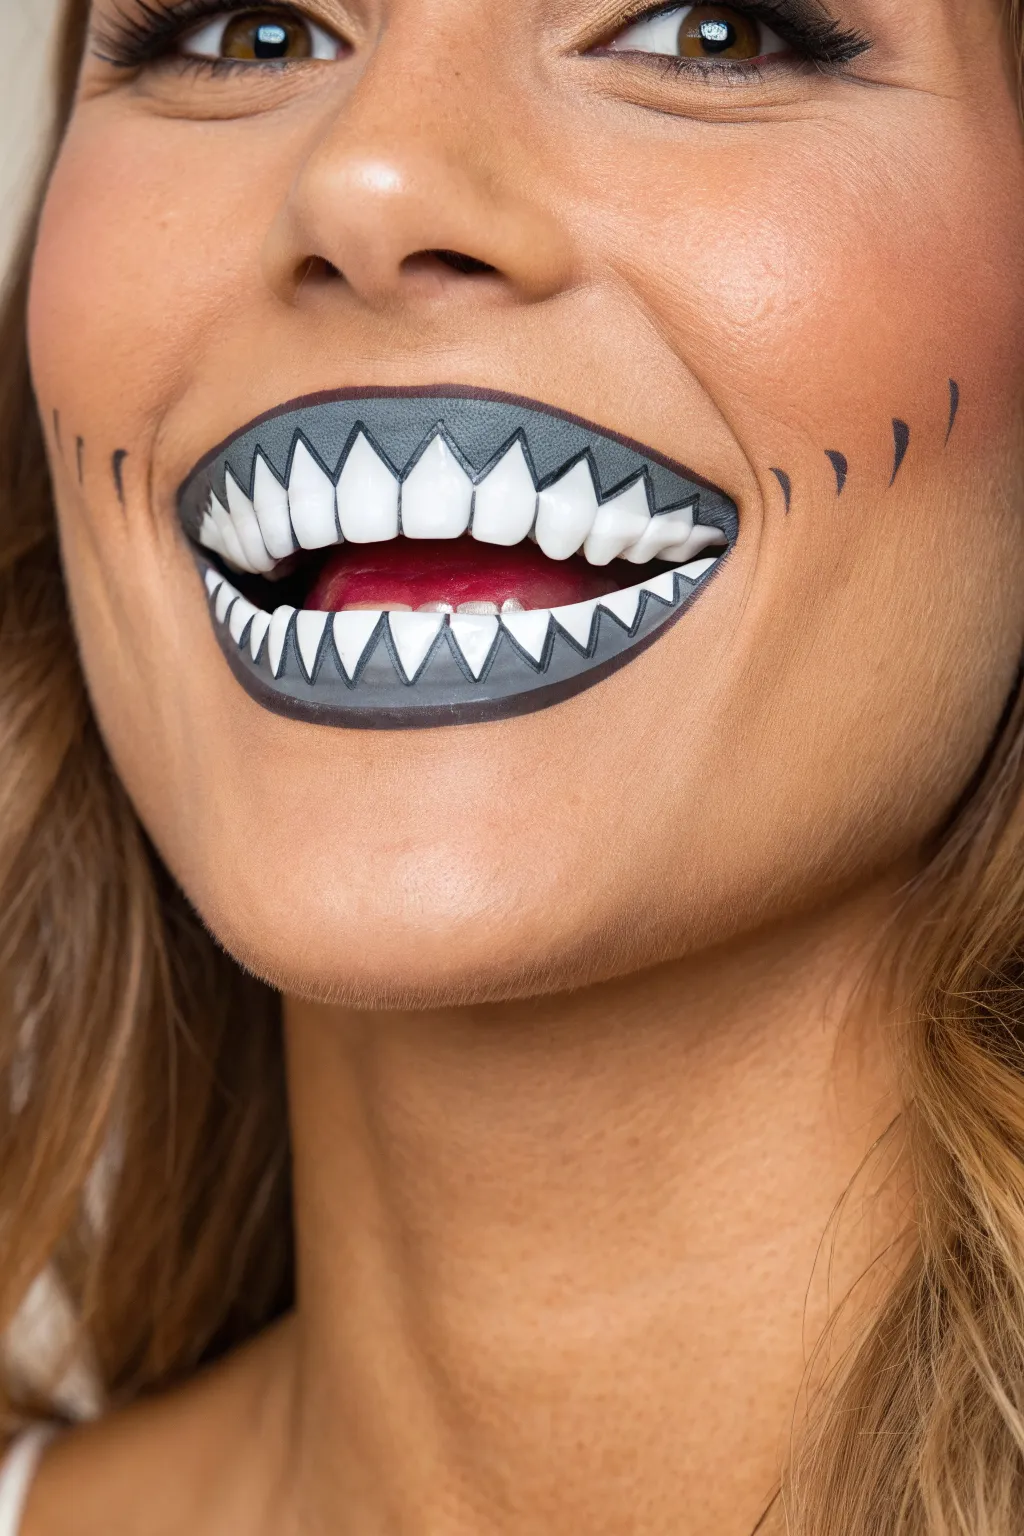
Transform your smile into a fearsome predator with this clever shark mouth face painting design. By painting directly over the lips, you create a striking illusion of rows of jagged teeth that move when you talk.
Detailed Instructions
Materials
- Grey face paint (water-activated)
- White face paint
- Black face paint or fine brush-tip eyeliner
- Flat brush (approx. 1/2 inch)
- Fine detail brush (round #1 or #2)
- Small tapered brush
- Setting spray (optional)
- Makeup sponge
Step 1: Creating the Base Shape
-
Clean and prep:
Start with clean, dry lips free of any balm or gloss, as face paint adheres best to bare skin. -
Outline the upper jaw:
Using a fine detail brush and grey paint, trace an arc starting at one corner of your mouth, curving up over your cupid’s bow onto the skin above the lip, and down to the other corner. -
Outline the lower jaw:
Mirror the top arc by drawing a similar curve below your bottom lip, connecting the corners to form a wide, open football shape around your mouth. -
Fill the grey base:
With a flat brush or sponge, fill inside these outlines with the grey paint, covering your actual lips completely. -
Define the outer edge:
Switch to your black paint and a fine brush to outline the entire grey shape, giving it a crisp, defined border.
Lip Prep Secret
Apply a thin layer of primer specifically for lips before painting. This stops the color from bleeding into fine lip lines.
Step 2: Designing the Teeth
-
Map the gum line:
Inside the grey area, use the black liner brush to draw a second, smaller outline closer to the center of the mouth; this gap between the outlines will be the gums. -
Draw the zig-zags:
Using the fine black brush, carefully draw a continuous zig-zag line along the inner curve of both the top and bottom painted areas. -
Size the teeth:
Make the triangles larger in the center of the mouth and gradually smaller as you move toward the corners to mimic perspective. -
Initial white fill:
Load a small tapered brush with white face paint and fill in each triangle shape. -
Second coat:
I find that waiting a minute for the first layer to dry before adding a second coat of white ensures the teeth look solid and opaque. -
Clean up edges:
If any white paint spilled over the lines, touch up the black zig-zag outlines with your detail brush for sharpness.
Step 3: Adding Details and Gills
-
Inner shading:
To separate the teeth visually, extend the black line from the tip of the triangle slightly inward toward the center of the mouth. -
Paint the gums:
Optionally, you can lightly stipple the grey area above the teeth to add texture, or leave it solid grey for a cartoon look. -
Mark the gill positions:
Looking at the cheeks, visualize three curved lines on each side starting about an inch away from the mouth corners. -
Paint the gills:
Using your fine brush and black paint, create three comma-shaped strokes on each cheek, graduating in size from large to small. -
Sharpen the gill trails:
Flick the end of each gill stroke slightly to create a tapered point. -
Final check:
Examine the symmetry of the design and spot-correct any uneven lines with a tiny bit of makeup remover on a cotton bud if needed. -
Set the look:
Mist lightly with a setting spray to keep the paint from cracking when you smile or talk.
Make It Scary
Add tiny dots of red gloss to the tips of the white teeth for a ‘fresh feeding’ effect that looks glossy and wet.
Now you are ready to surprise everyone with your fearsome aquatic grin
Floral Sugar Skull Glam
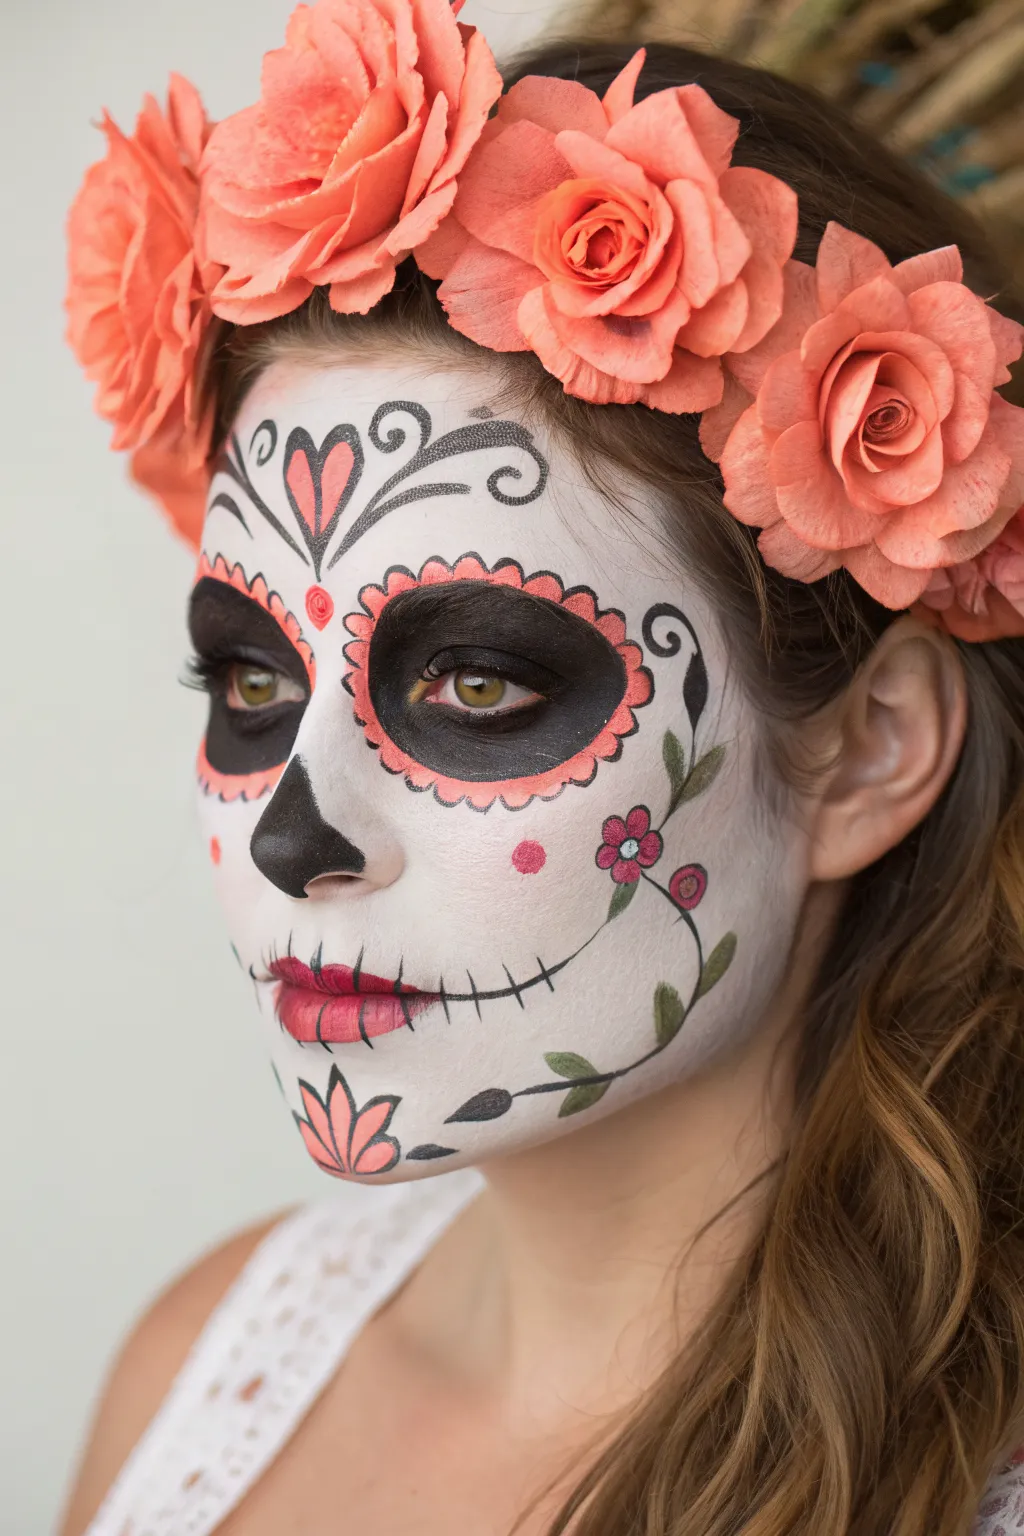
Embrace the elegance of Dia de los Muertos with this sophisticated sugar skull design that pairs classic skeleton motifs with soft floral details. The look balances stark black outlines with warm coral tones, creating a hauntingly beautiful style perfect for Halloween or costume parties.
How-To Guide
Materials
- White cream face paint (water-activated or grease)
- Black face paint (detail line quality)
- Coral or peach colored face paint
- Red lipstick or liner
- Makeup sponge
- Round brushes (sizes #2 and #4)
- Fine liner brush
- Translucent setting powder
- Faux floral crown (coral/peach roses)
Step 1: Base & Eyes
-
Prep and base:
Start with a clean, dry face. Using a slightly damp makeup sponge, sponge white face paint all over the face, stopping at the jawline. Build coverage slowly; you want a porcelain look rather than a thick, cakey mask, so keep the layer somewhat translucent. -
Set the base:
Lightly dust translucent setting powder over the white paint to prevent creasing and create a smooth surface for the detailed line work. -
Outline eye sockets:
Using a #4 round brush loaded with black face paint, outline large circles around the eyes, covering the eyebrows and extending down to the top of the cheekbones. -
Fill the eyes:
Fill in the entire circle with black paint. Take care around the waterline and inner corners. I find it helpful to have the model look up while painting the under-eye area. -
Create the scallops:
Switch to your coral or peach paint and a clean #4 round brush. Paint small semi-circles (scallops) all around the outer edge of the black eye sockets, creating a flower petal effect. -
Detail the nose:
Paint the tip of the nose black in an upside-down spade or heart shape. Extend the black slightly up the bridge of the nose to mimic a hollow nasal cavity.
Step 2: Forehead & Mouth
-
Forehead centerpiece:
Using a fine liner brush and black paint, draw a small heart in the center of the forehead, just above the brow line. Fill the inside with coral paint. -
Forehead flourishes:
From the bottom tip of the heart, draw symmetrical black swirls extending outward and upward toward the temples. Add smaller teardrop shapes and dots to accentuate the swirls. -
Paint the lips:
Apply red lipstick or red face paint to the lips. Blot gently to ensure the color stays within the lip line. -
Stitch the smile:
With the liner brush and black paint, draw a thin line extending from the corners of the mouth outward toward the jaw. Add vertical hash marks (stitches) across this line and vertically across the lips themselves.
Smudge Control
If black paint smudges onto the white base, don’t wipe it! Let it dry completely, then gently dab a bit of white paint over the mistake to conceal it.
Step 3: Floral Details & Finishing
-
Cheek floral vines:
Starting near the ear, paint a curving black vine that sweeps down onto the cheek. Add small leaves branching off the vine using firm pressure at the base of the leaf and lifting for a point. -
Add floral blooms:
Along the vine, paint small five-petal flowers using the coral paint. Center each flower with a tiny dot of white or yellow if available. -
Chin embellishment:
On the chin, paint a stylized lotus or flower shape using coral for the petals and outlining them with fine black lines. -
Dot details:
Add tiny decorative dots using the coral paint: place one between the eyebrows and a few inside the scallops around the eyes for extra dimension. -
Final touches:
Review your symmetry. Crisp up any black contour lines that may have faded. Add the floral crown to complete the transformation.
Add Sparkle
Adhere small self-adhesive rhinestones to the center of the scalloped petals around the eyes or in the middle of the forehead swirls for a glamorous touch.
Now you are ready to celebrate with this stunning, handcrafted floral look
Galaxy Nebula Face Wash
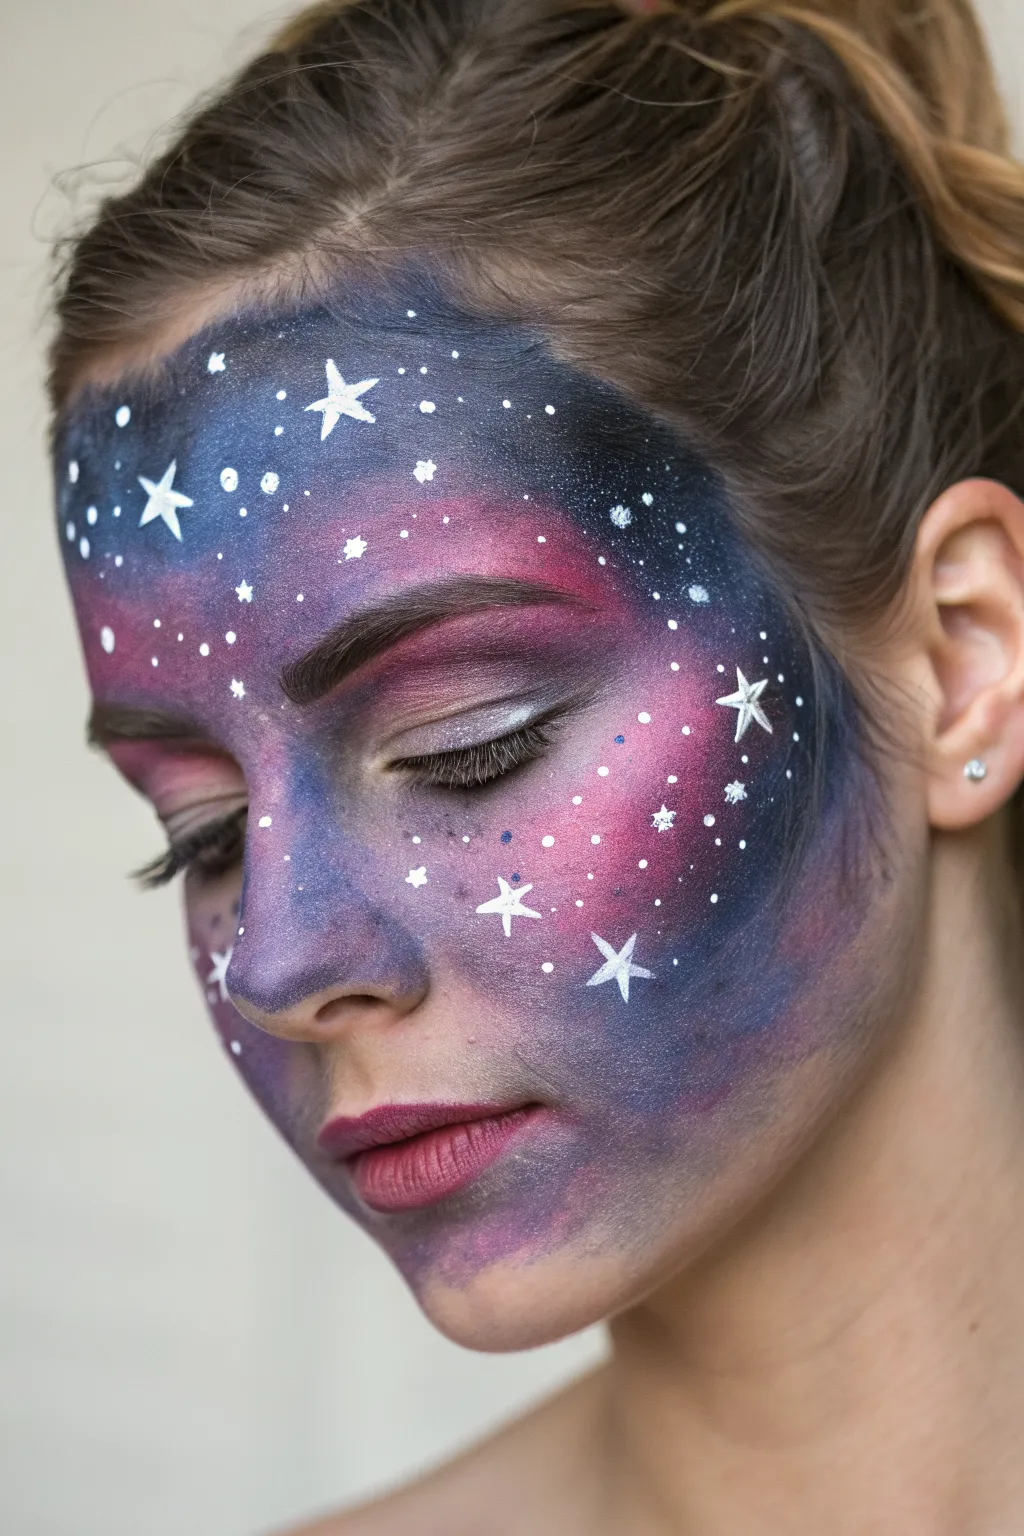
Transform your face into a stunning celestial landscape with this galaxy-inspired makeup look. Featuring deep indigos, vibrant magentas, and crisp white stars, this design captures the ethereal beauty of a nebula right on your skin.
Step-by-Step Tutorial
Materials
- Face paint or cream makeup (Dark Blue, Purple, Magenta/Pink, White)
- Makeup sponges (wedges or rounds)
- Small round detail brush (size 1 or 2)
- Fine liner brush (size 0 or 00)
- Setting spray (optional)
- Water cup and paper towels
- Stiff bristle toothbrush (for spatter texture)
Step 1: Laying the Cosmic Base
-
Prep the canvas:
Start with a clean, dry face. Tie back any hair to keep the forehead and temples clear for painting. -
Sponge selection:
Moisten a makeup sponge slightly and load it with a dark blue or indigo face paint. You want a creamy consistency, not too watery. -
Apply the dark perimeter:
Dab the dark blue paint along the hairline on the forehead, sweeping down the temples to just below the cheekbones. Frame the face but leave the center open. -
Introduce purple tones:
Using a clean side of the sponge or a fresh one, pick up a rich purple shade. Dab this color right next to the blue, blending the edges where they meet while the paint is still slightly damp. -
Blend downward:
Continue the purple down the nose bridge and onto the chin, creating an organic, cloud-like shape rather than harsh lines. -
Add the nebula heart:
Load a sponge with bright magenta or hot pink. Apply this to the center of the forehead, eyelids, and the apples of the cheeks. -
Create seamless transitions:
Use a clean, slightly damp sponge to tap over the borders between the pink, purple, and blue areas. Soften everything so the colors look like drifting gases. -
Deepen the shadows:
I like to go back in with a touch of black or very dark blue on the outer temples and jawline to add depth and make the bright colors pop more.
Nebula Nuances
Don’t over-blend! Leaving distinct patches of pink and blue visible next to each other creates more depth than mixing them all into a single purple mud.
Step 2: Eye Integration
-
Define the crease:
Using a smaller brush or the edge of a sponge, intensify the purple in the crease of the eyelid to give the eyes dimension within the galaxy mask. -
Highlight the lid:
Pat a shimmery white or pale silver powder (or paint) onto the center of the eyelid and the inner corner of the eye. -
Soften the under-eye:
Gently blend the pink and purple mixture under the lower lash line, connecting it to the cheek color for a unified look.
Muddy colors?
If your colors are turning grey or brown, let the first layer dry completely before dabbing a new color on top, rather than wet-blending everything.
Step 3: Starlight and Details
-
Mix white paint:
Activate your white face paint with water until it reaches an ink-like consistency that flows easily off a brush. -
Paint primary stars:
Using a fine liner brush, paint a few large, five-pointed stars. Place one prominently on the forehead and a few on the cheeks. -
Add distant stars:
Switch to a small round brush. Dip the very tip in white and press gently to create various sized dots scattered randomly across the colored areas. -
Create star clusters:
Group tiny white dots together in certain areas, like the temple or cheekbone, to mimic star clusters. -
The spatter technique:
Dip an old toothbrush into wet white paint. Hold it a few inches from the face and run your thumb across the bristles to spray a fine mist of ‘distant stars’ over the design. -
Refine the lips:
Apply a berry or dark pink shade to the lips that complements the magenta in the nebula design. -
Final touches:
Check for any gaps in the base color and touch up if needed. A quick spritz of setting spray will help the galaxy stay in place.
Now you are ready to shine with the brilliance of a thousand stars


Have a question or want to share your own experience? I'd love to hear from you in the comments below!