
There is something deeply grounding about gathering everyone around the kitchen table to capture your unique bond on canvas, even if you have never picked up a brush before. The best part is that you don’t need to be a master of portraiture to create a heartwarming piece that celebrates your family unity and captures a special moment in time.
The Sunset Silhouette Portrait
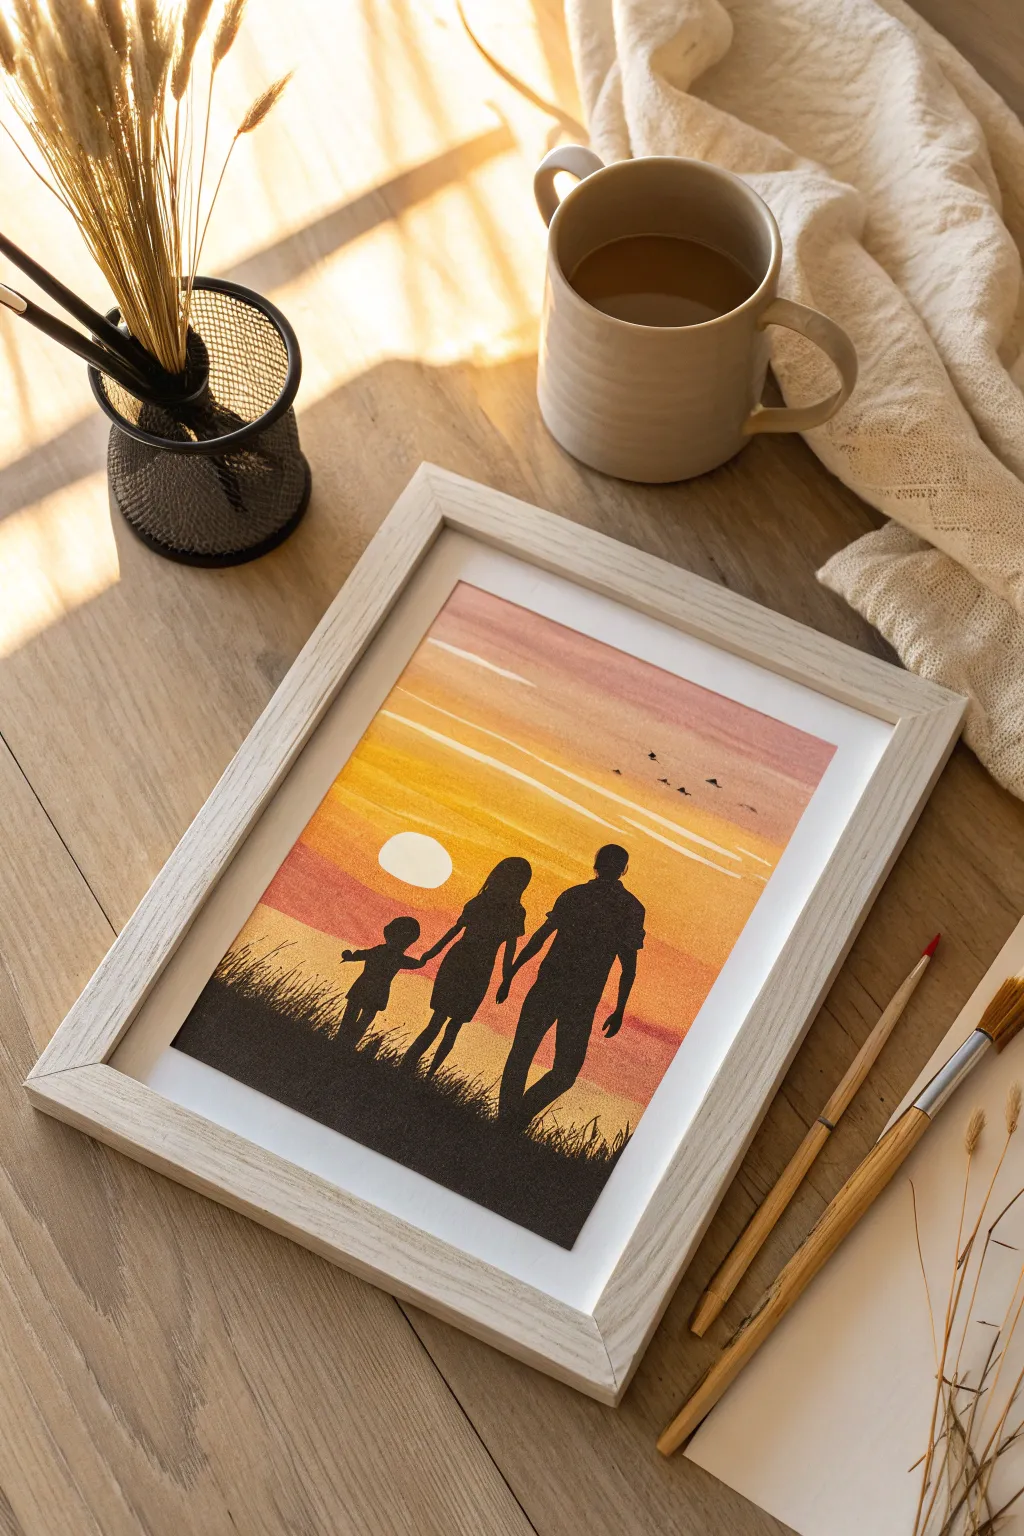
This heartwarming project captures the serene beauty of a family sunset using a vibrant watercolor gradient as the backdrop. The high-contrast black composition makes this style incredibly forgiving, as you focus only on shapes rather than facial details.
Detailed Instructions
Materials
- Watercolor paper (cold press, 300gsm)
- Watercolor paints (Deep Yellow, Orange, Dusty Rose/Pink)
- Black Gouache or Acrylic paint (for opacity)
- Flat shader brush (size 10-12)
- Round detail brush (size 0 or 1)
- Pencil and eraser
- Masking tape
- Clean water
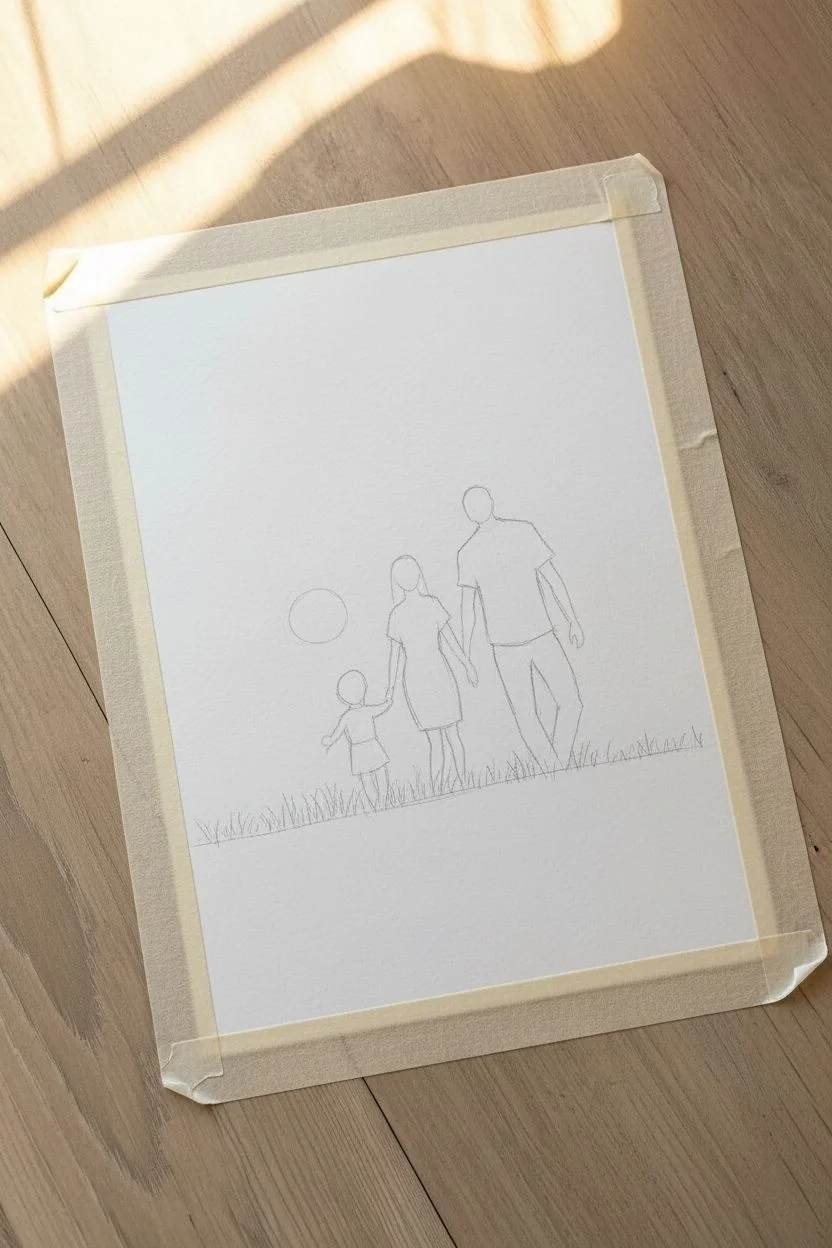
Step 1: Drafting the Composition
-
Secure the paper:
Tape your watercolor paper down to a flat surface using masking tape. This creates a clean white border and prevents the paper from buckling when wet. -
Sketch the horizon:
Lightly draw a curved line across the lower third of the paper to establish where the grassy hill will be. -
Place the sun:
Draw a small circle just above the horizon line on the left side. You can trace a coin or glue stick cap to get a perfect circle. -
Outline the figures:
Sketch the outline of your family members standing on the hill. Keep the shapes simple since we will fill them in solidly later; focus on the pose and holding hands.
Pro Tip: Perfect Sun
Painting around a circle can be tricky. Apply liquid masking fluid over the sun circle before painting the sky, then rub it off once the painting is dry for a crisp white edge.
Step 2: Creating the Sunset Gradient
-
Paint the top band:
Load your flat brush with a watery mix of dusty rose or soft pink. Paint a horizontal strip across the very top of the sky. -
Transition to orange:
Rinse your brush slightly and pick up orange paint. Apply this directly below the pink, overlapping slightly so the colors bleed together softly. -
Add the yellow glow:
Switch to a vibrant deep yellow. Paint the area below the orange, moving down toward the horizon line. -
Preserve the sun:
Carefully paint around your pencil circle with the yellow paint, leaving the paper inside the circle completely white. -
Finish the horizon background:
I like to use a slightly more watered-down yellow right at the horizon line to make it look like glowing light. Don’t worry if you paint over the hill area sketch. -
let it dry:
Allow the sky to dry completely. The paper must be bone-dry before the next step, or the black paint will feather into the sky.
Troubleshooting: Streaky Black
If your black silhouette looks patchy or brush strokes are visible after drying, apply a second coat of paint. Gouache dries matte and flat, making it ideal for fixing streaks.
Step 3: Painting the Silhouettes
-
Prepare opaque black:
Switch to black gouache or acrylic paint. Watercolors can be too transparent for silhouettes, so an opaque medium works best here. -
Outline the figures:
Using your smallest detail brush, carefully paint over the pencil outlines of your family figures. -
Fill the center:
Once outlined, fill in the bodies with solid black paint. Ensure there are no streaks or see-through patches. -
Paint the ground:
Fill in the entire hill area below the figures with solid black paint. -
Add grassy texture:
Using the tip of your detail brush, use quick, upward flicking motions along the top edge of the black hill to create the look of wild grass. -
Add distant birds:
Paint a few tiny ‘V’ shapes in the distance on the right side of the sky to balance the composition. -
Reveal the frame:
Once the black paint is fully dry, slowly peel off the masking tape at a 45-degree angle to reveal your crisp white borders.
Place your finished piece in a light wood frame to enhance those warm sunset tones.


Stargazing Together: The Back-View Technique
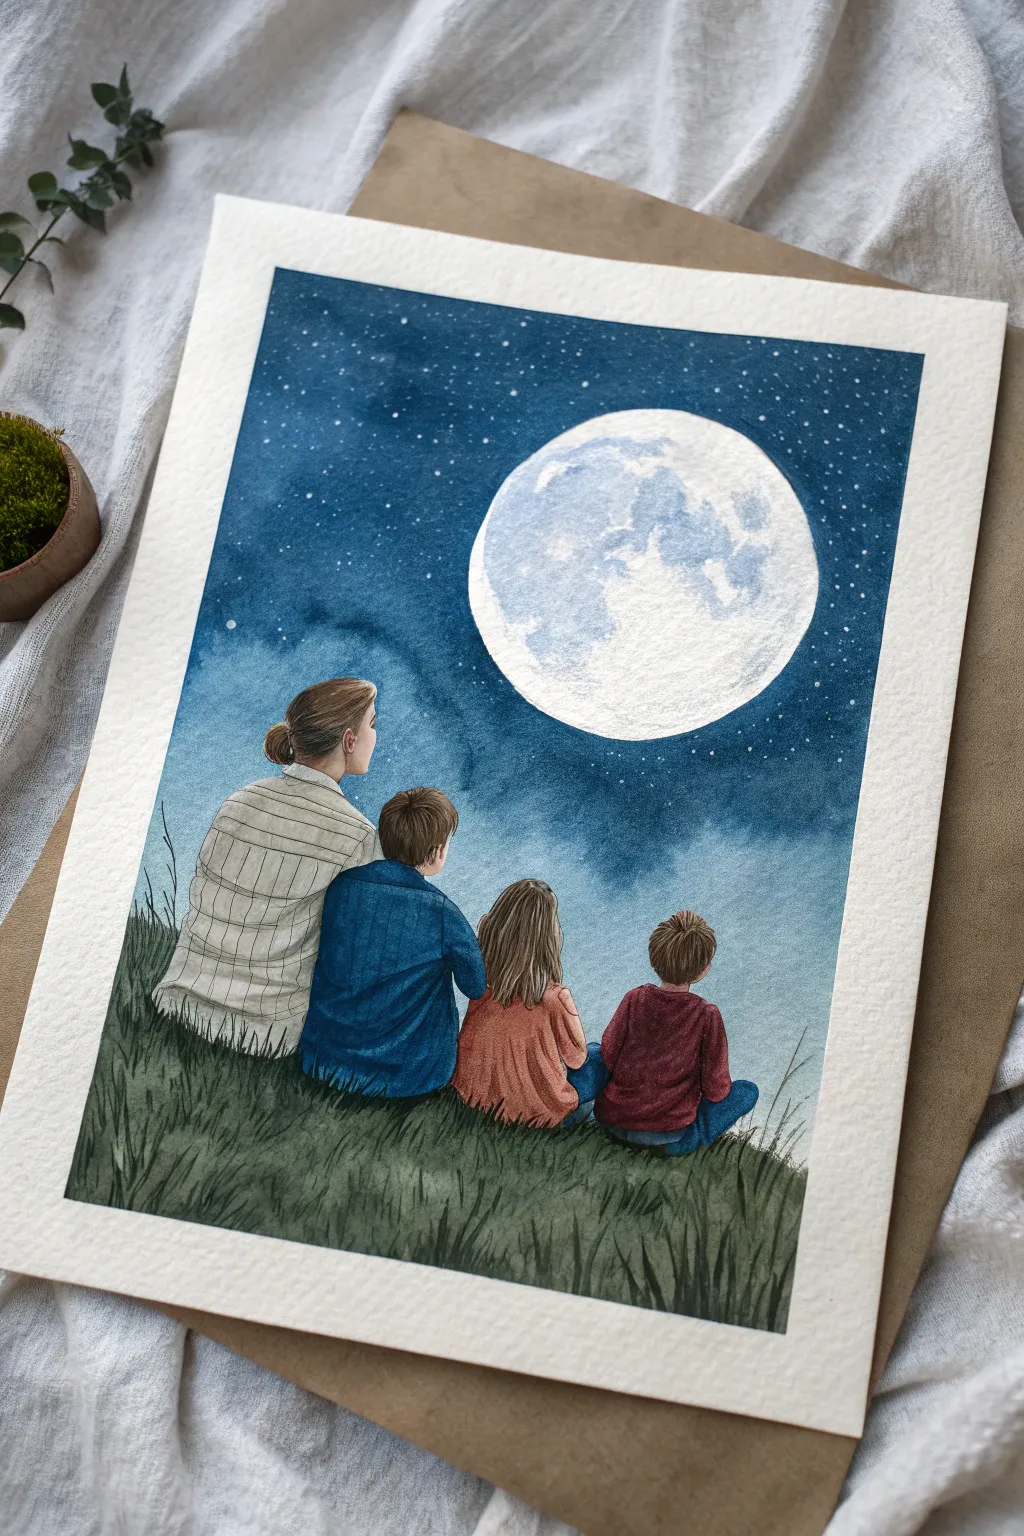
Capture the quiet magic of a night under the stars with this atmospheric watercolor project. By painting the figures from behind, you avoid the challenge of facial features while creating a heartwarming scene that emphasizes togetherness.
Step-by-Step Tutorial
Materials
- Cold press watercolor paper (140lb/300gsm)
- Watercolor paints (Indigo, Prussian Blue, Payne’s Grey, Sap Green, Burnt Sienna, clothing colors)
- Round brushes (size 8 for washes, size 2 or 4 for details)
- Masking tape and a drawing board
- Liquid masking fluid (optional) or white wax crayon
- White gouache or white gel pen
- Pencil and eraser
- Jar or compass for tracing
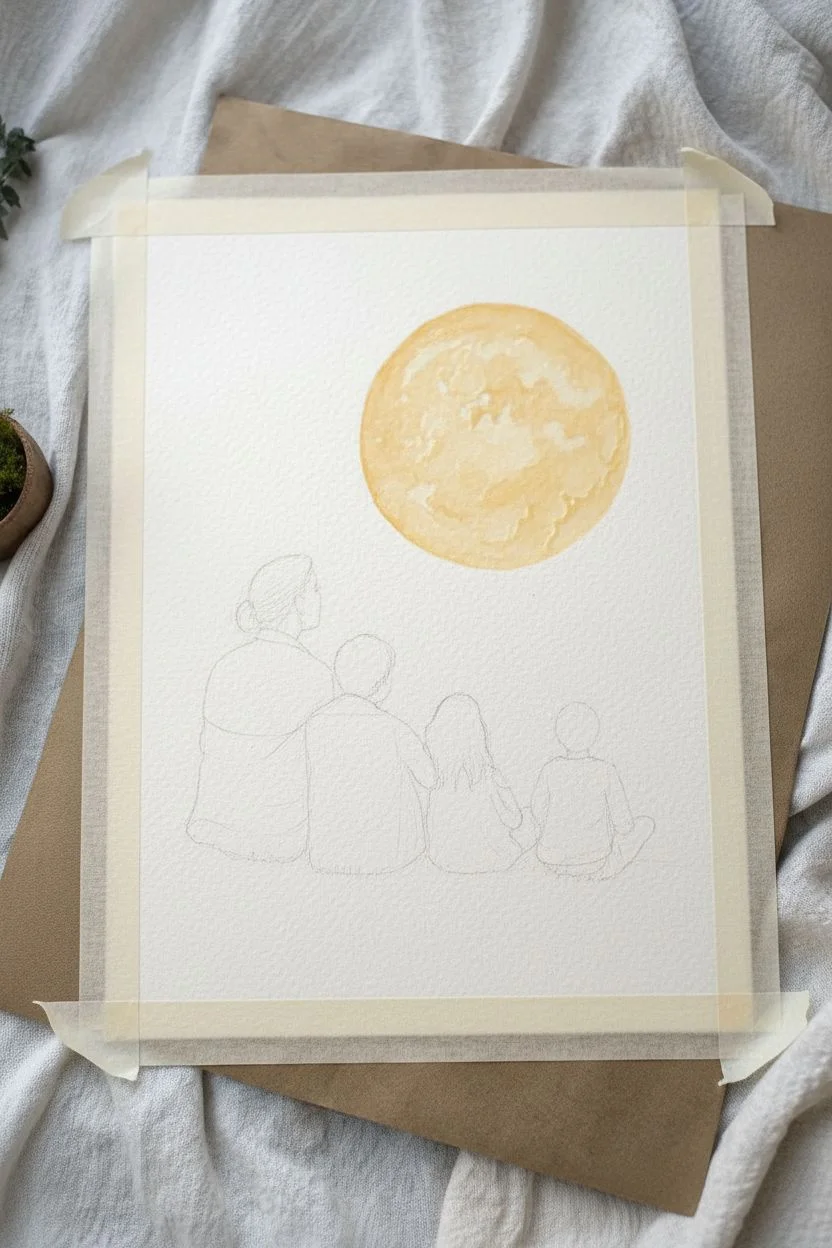
Step 1: Sketching and Preparation
-
Secure the paper:
Tape your watercolor paper down to a board on all four sides. This creates a clean border and prevents the paper from buckling when we add water. -
Trace the moon:
Place a jar lid or roll of tape in the upper center of the paper and trace a circle lightly with a pencil to define your moon. -
Sketch the figures:
Lightly sketch the outlines of the family members sitting at the bottom third of the page. Don’t worry about details; just focus on the shapes of heads and torsos overlapping slightly. -
Protect the moon:
Apply masking fluid carefully inside the moon circle to preserve the white paper. If you don’t have masking fluid, you can carefully paint around it later.
Pro Tip: Crisp Edges
If you struggle to paint a perfect circle for the moon, trace a coin or lid with a white wax crayon before painting. The wax repels the watercolor, keeping your moon shape perfectly round automatically.
Step 2: The Night Sky
-
Wet the sky area:
Using your large brush, apply clean water to the entire sky area, stopping right at the edge of the figures and the grass line. -
Apply the darks:
Load your brush with a deep Indigo or mixture of blue and black. Start painting at the very top of the paper, allowing the color to be richest and darkest at the upper edge. -
Create the gradient:
As you move down toward the figures, dilute the paint slightly with water or switch to a lighter Prussian Blue. Usually, I like to let the water do the work here to create soft, cloudy transitions. -
Add texture:
While the sky is still damp, dab in a few darker spots of paint to create depth and cloud-like shadows, keeping the area directly around the moon slightly lighter.
Step 3: Stars and Moon
-
Dry and reveal:
Allow the sky to dry completely. If you used masking fluid, gently rub it off with your finger or an eraser to reveal the stark white circle. -
Paint the moon:
Mix a very watery pale blue-grey. Paint subtle, blotchy textures onto the white moon to represent craters, leaving plenty of white paper showing for brightness. -
Splatter stars:
Cover the bottom family sketch with a scrap piece of paper. Loaded a toothbrush or stiff brush with white gouache and flick it to create a spray of stars across the sky. -
Highlight stars:
Use a white gel pen to add a few larger, more distinct stars or constellations manually after the splatter dries.
Level Up: Personalize It
Make this artwork a keepsake by matching the hair colors and clothing styles to your real family members. You can even add a small silhouette of a family dog or cat sitting beside the children.
Step 4: The Family
-
Paint the skin:
Mix a watery skin tone (Burnt Sienna with plenty of water) and paint the small areas of necks and ears visible on the figures. -
Fill in the hair:
Using a smaller brush, paint the hair using earth tones. Use directional strokes that mimic the way hair falls—downward for straight hair or curved for waves. -
Clothing base layers:
Paint the shirts and sweaters with your chosen colors. For the striped shirt, paint the base cream color first and let it dry before adding thin grey lines. -
Add clothing depth:
Once the base clothing layers are dry, mix slightly darker versions of those same colors and paint shadows along the sides and creases to give the figures volume.
Step 5: Grassy Foreground
-
Base grass wash:
Mix a dark Sap Green with a touch of Indigo. Paint the ground area, ensuring the paint touches the bottom of the clothing to ‘seat’ the figures. -
Grass blade details:
While the base is damp but not soaking, use a small brush to flick upward strokes of concentrated dark green to create individual blades of grass. -
Final touches:
Add a few dry-brush grass strokes that slightly overlap the bottom of the clothes to make the family look like they are truly sitting in the meadow.
Peel off your artistic tape to reveal crisp white borders and enjoy your peaceful night scene.


Birds on a Branch: A Symbolic Family Lineup
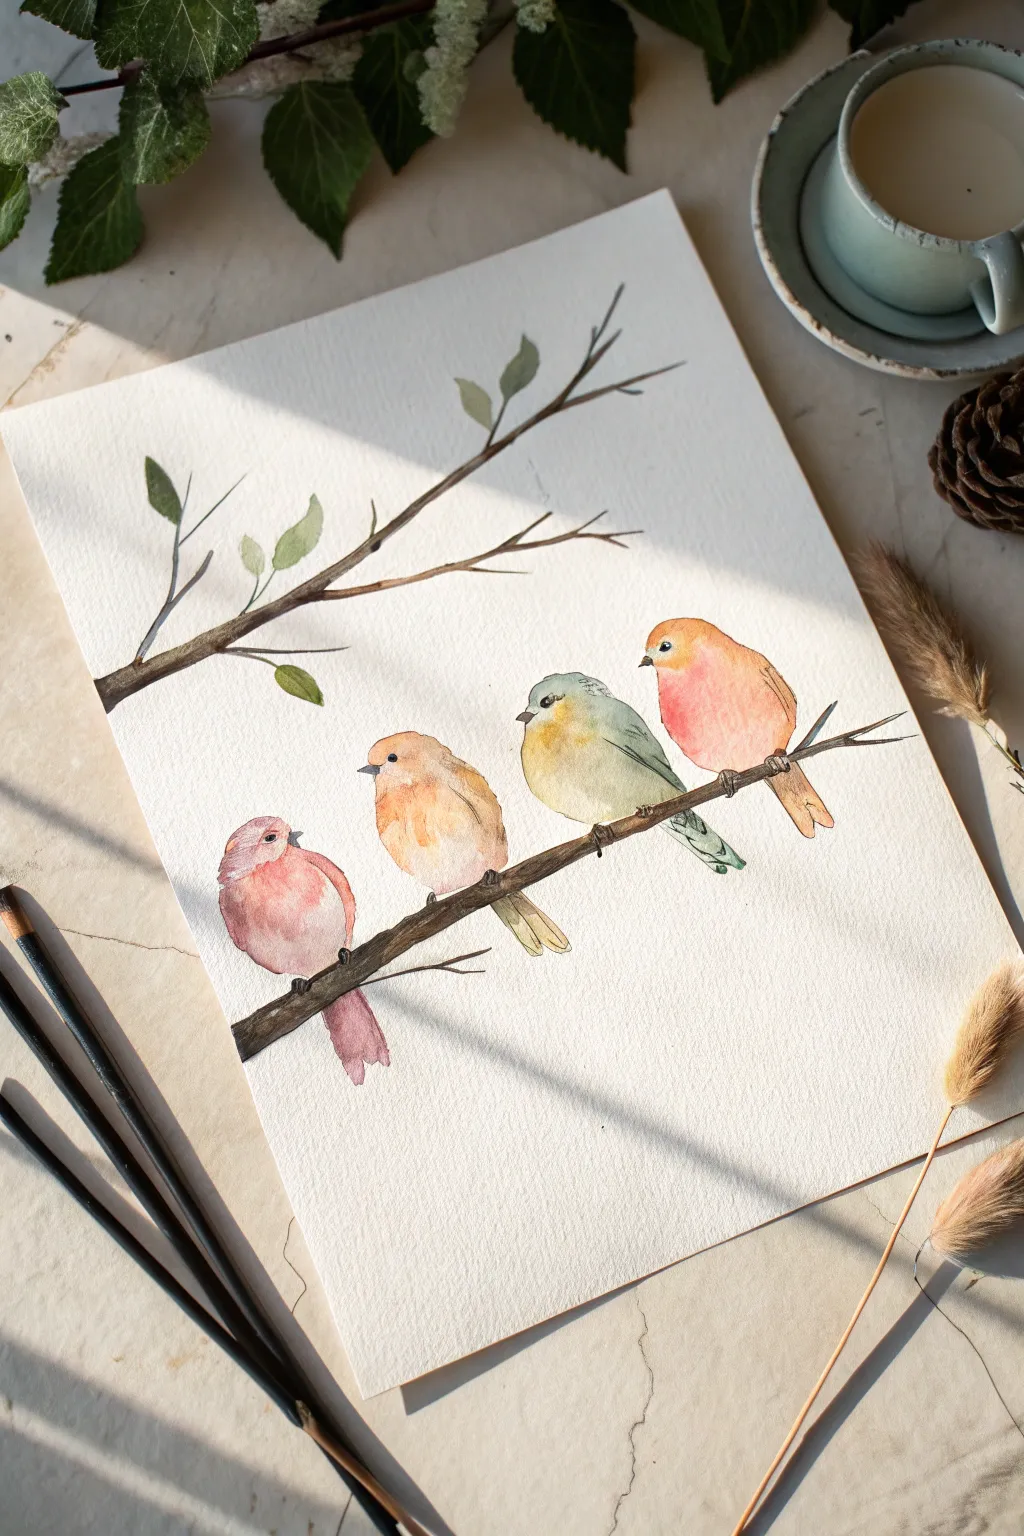
Capture the distinct personalities of your family members using soft watercolors and simple bird shapes. This project focuses on wet-on-wet blending to create round, fluffy textures, resulting in a charming and symbolic piece of wall art.
Step-by-Step
Materials
- Cold-press watercolor paper (300 gsm)
- Watercolor paints (pans or tubes)
- Round brushes (size 6 for bodies, size 0 or 1 for details)
- HB pencil and kneaded eraser
- Two jars of water
- Paper towels
- White gel pen (optional)
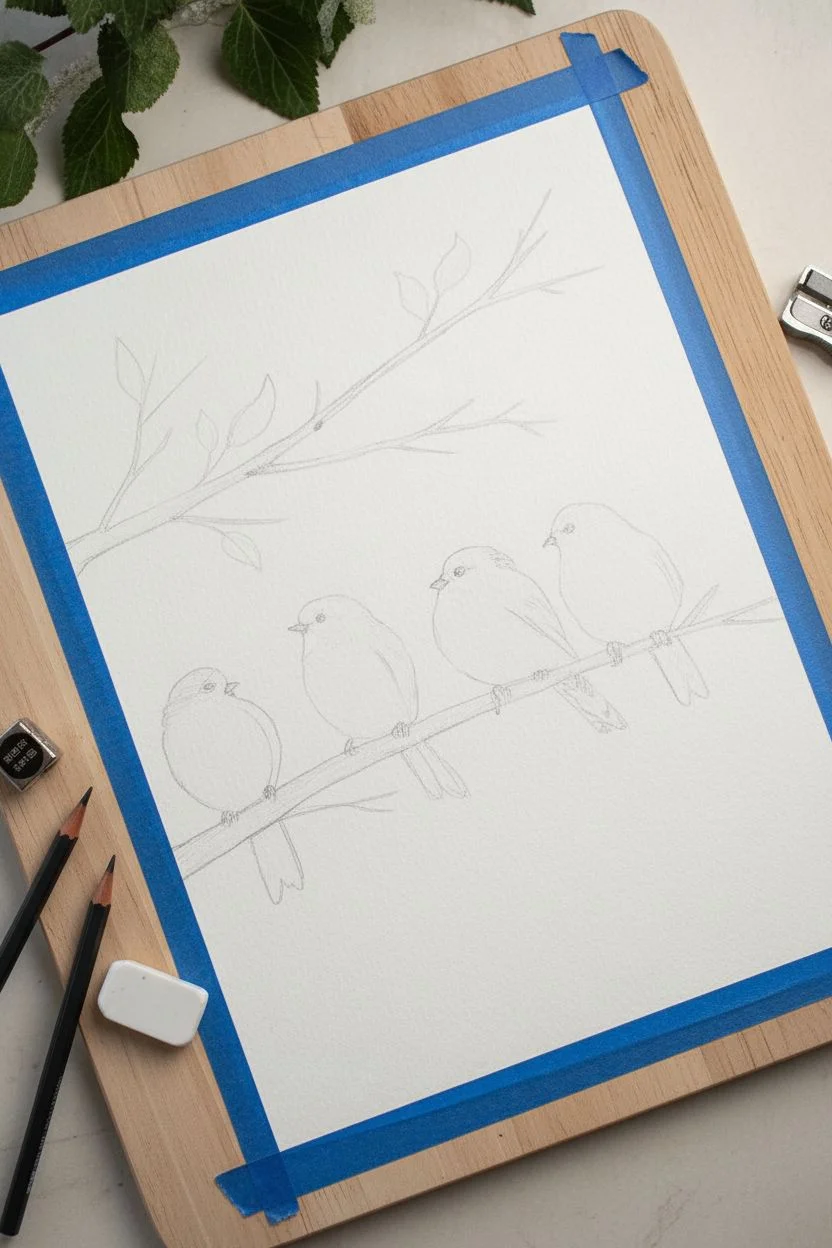
Step 1: Sketching the Composition
-
Prepare the workspace:
Tape your watercolor paper down to a flat board or table essential to prevent buckling when we add water later. -
Draft the main branch:
Using an HB pencil, lightly sketch a diagonal line rising from the bottom left to the middle right. Keep the line slightly jagged to mimic natural wood. -
Outline the birds:
Draw four oval shapes sitting on the branch. Vary their sizes slightly to represent different family members, making sure they are spaced evenly but close enough to look cozy. -
Add upper features:
Sketch a separate branch arching into the frame from the top left corner, adding small teardrop shapes for the leaves.
Muddy colors?
If your colors are bleeding into a brown mess, you aren’t waiting long enough between steps. Ensure adjacent wet areas are bone-dry before painting next to them.
Step 2: Painting the Birds
-
Base layer for Bird 1:
Starting with the left bird, dampen the oval shape with clean water until it glistens. Drop in a pale dusty pink on the belly and let it bloom outward. -
Adding depth:
While the pink is still damp, touch a darker mauve or purple to the wing area and tail, allowing it to bleed slightly into the body for a soft transition. -
Bird 2 and 3:
Repeat the wet-on-wet process for the next two birds. For the second, use warm ochre fading into peach; for the third, blend olive green into a soft yellow belly. -
Bird 4:
For the final bird on the right, use a vibrant orange-red for the chest and a warm brown for the wing, creating that classic robin look. -
Dry completely:
Let the bird shapes dry fully. If the paper is cool to the touch, it’s still wet; wait until it’s room temperature before proceeding.
Step 3: Branches and Foliage
-
Mix the branch color:
Create a dark brown by mixing burnt umber with a tiny touch of dark blue to cool it down. -
Paint the perch:
Using your size 6 brush, paint the main branch under the birds. When you reach a bird, lift the brush and continue on the other side so it looks like they are sitting on it. -
Upper branches:
Switch to a thinner brush to paint the delicate twigs coming from the top left, tapering the lines as they extend outward. -
Adding leaves:
Mix a muted sage green. Paint the leaves on the upper branch using a single press-and-lift motion with the belly of your round brush.
Sparkle in the Eye
If you accidentally painted over the white highlight in the bird’s eye, simply use a white gel pen to add a tiny dot once the paint is dry. It brings them to life!
Step 4: Fine Details
-
Facial features:
With your smallest brush (size 0) and dark grey paint, add tiny triangular beaks and small dot eyes. I usually leave a tiny speck of white paper in the eye for a highlight. -
Feet and claws:
Using the same dark grey or brown, paint thin lines for the feet wrapping around the branch underneath each bird. -
Wing definition:
Add subtle, thin lines over the dried wing areas to suggest feathers and folded wings without outlining the whole shape. -
Final clean up:
Once clearly dry, gently erase any visible pencil lines that weren’t covered by paint to give the artwork a crisp, professional finish.
Frame this sweet flock in a simple wood frame to add a touch of nature and family warmth to your hallway


Have a question or want to share your own experience? I'd love to hear from you in the comments below!