Painting hearts offers an incredible opportunity to experiment with texture and color without worrying about complex drawing skills. Whether you are looking for a romantic gift or a bold statement piece for your studio wall, these ideas will spark your imagination.
Mastering the Classic Tape Resist Technique
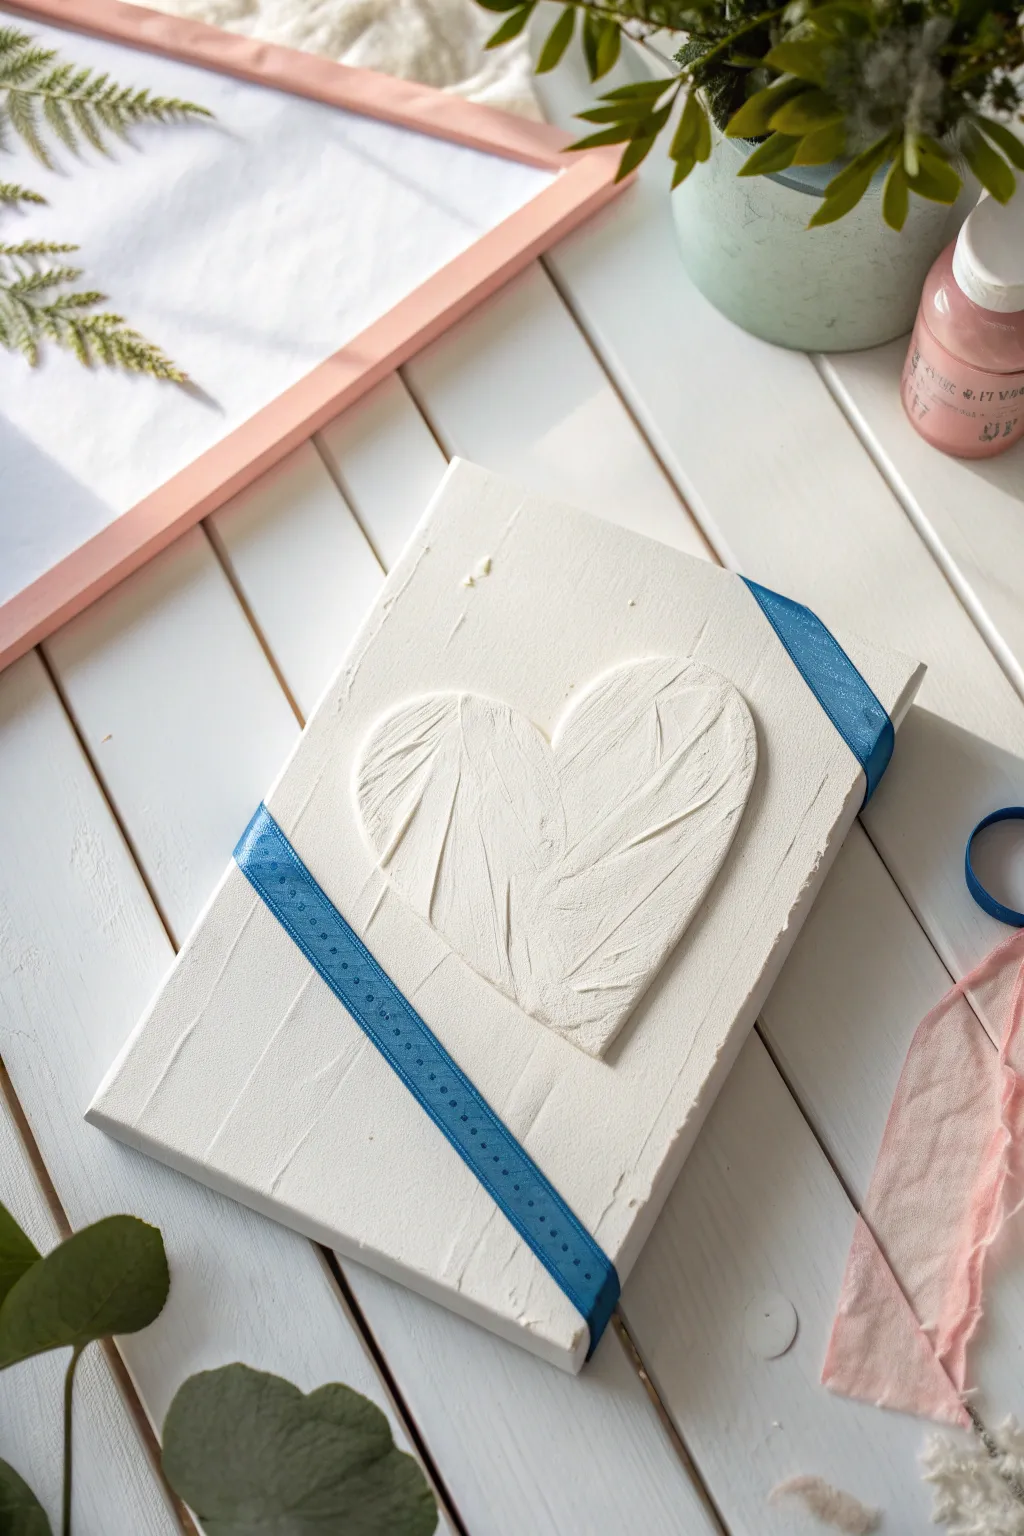
Create a stunning minimalist piece that relies on shadow and depth rather than bold color. This project uses modeling paste and the tape resist technique to craft a raised heart set against a contrasting textured background.
Step-by-Step
Materials
- Stretched canvas (rectangular)
- White modeling paste (or heavy body acrylic gel)
- Blue painter’s tape (approx. 0.5 inch width)
- Cardstock or thin plastic sheet
- Palette knife
- Pencil
- Scissors
Step 1: Preparing the Resist Layers
-
Create the heart stencil:
Cut a sheet of cardstock to the same size as your canvas. Draw a large heart in the center and cut it out carefully. You will use the negative space (the hole), not the cutout heart. -
Secure the stencil:
Place the cardstock frame over your canvas. Tape the outer edges down lightly so it doesn’t shift while you work. -
Apply tape strips:
Take your blue painter’s tape and apply two diagonal strips across the canvas—one across the lower left corner and one across the upper right. -
Seal the edges:
Run your finger or a clean palette knife firmly along the edges of the blue tape to prevent the paste from bleeding underneath later.
Clean Lines Troubleshooting
If your paint bleeds under the tape, it wasn’t pressed down enough. For next time, seal the tape edge with a thin layer of matte medium before applying the heavy paste.
Step 2: Sculpting the Design
-
Scoop the paste:
Load a generous amount of white modeling paste onto the back of your palette knife. -
Fill the heart:
Spread the paste thickly inside the heart cutout area. Don’t worry about smoothing it out perfectly yet; volume is key here. -
Texturize the heart:
Use the edge of your knife to create sweeping, curved ridges inside the heart shape. I like to mimic the shape of the lobes for a natural flow. -
Remove the stencil:
While the paste is still wet, carefully lift the cardstock stencil straight up to reveal the clean, raised heart shape. -
Refine the edges:
If the stencil pulled up any jagged peaks on the heart’s edge, gently tap them down with a damp finger. -
Apply background texture:
Apply a thinner layer of paste to the visible canvas areas around the heart and over the blue tape. -
Create contrast:
Scrape the background paste in a linear, horizontal direction. This directional contrast helps the curved texture of the heart pop.
Level Up: Gilded Edges
Once the textured heart is fully dry, run a metallic gold paint marker along the very edges of the relief to make the shape catch the light beautifully.
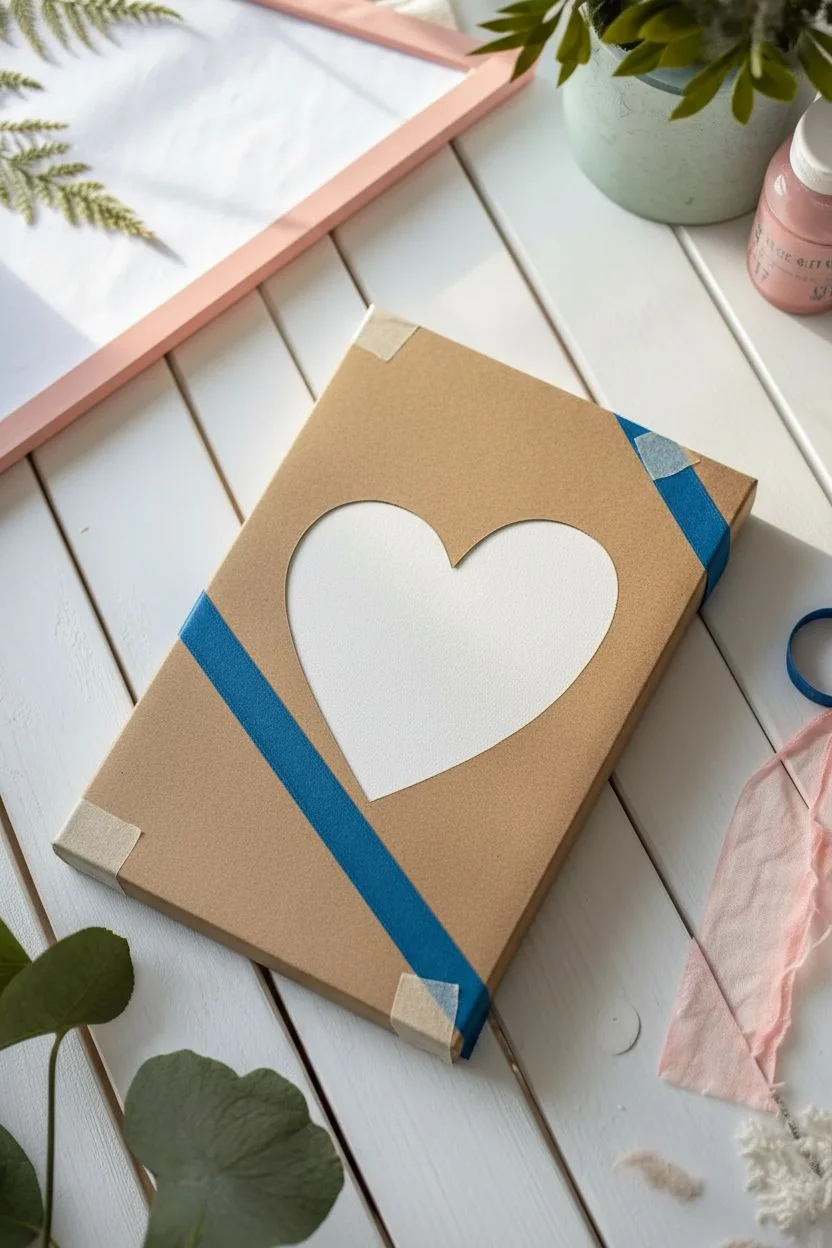
Step 3: The Resist Reveal
-
Initial set time:
Let the artwork sit for about 10 to 15 minutes. The paste should be firming up but not hard. -
Locate tape tabs:
Find the ends of your blue painter’s tape which should be slightly visible under the background texture. -
Peel the tape:
Slowly pull the tape up and away at a 45-degree angle. This removes the texture in those strips, revealing the smooth canvas underneath. -
Clean the channels:
If any paste bridged the gap, use a toothpick to gently clear the straight lines where the tape used to be. -
Final dry:
Allow the canvas to dry flat for at least 24 hours, as thick modeling paste takes time to cure completely.
Now you have a sophisticated, tactile art piece that looks gallery-ready.


Creating Texture With Kitchen Cling Wrap
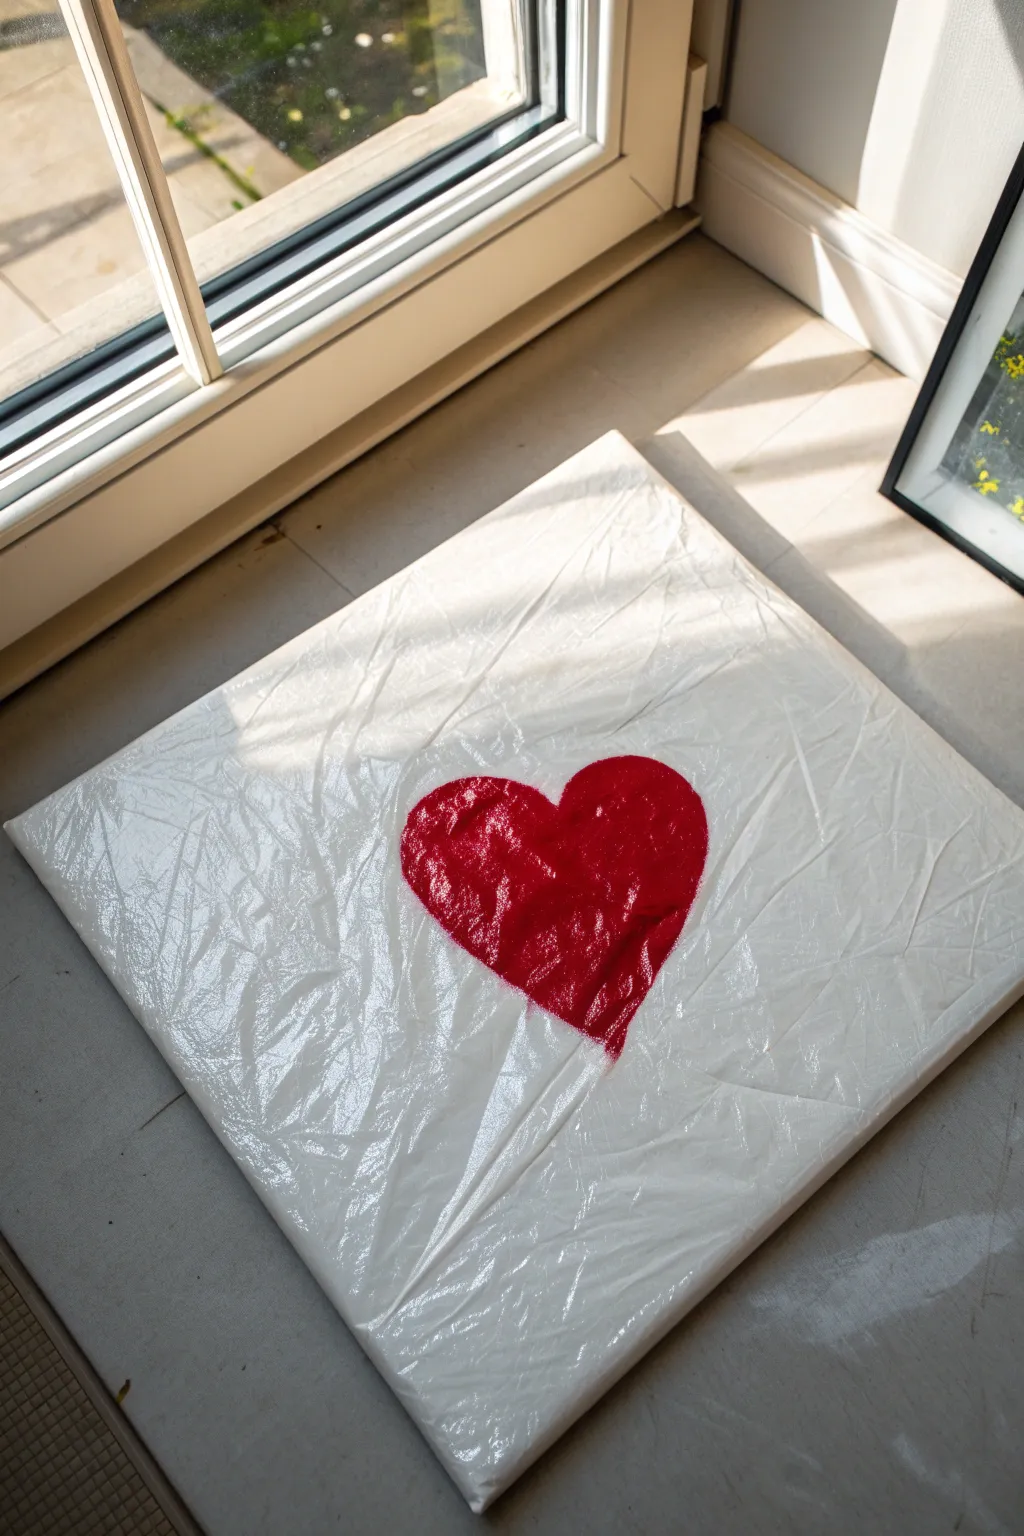
Transform ordinary acrylic paint into a surface that looks like crushed velvet or wrinkled fabric using a simple kitchen staple. This project relies on the wet-on-wet technique combined with cling wrap to create a unique, tactile heart centerpiece.
Step-by-Step Guide
Materials
- Square stretched canvas (e.g., 12×12 inches)
- Heavy body acrylic paint (Titanium White)
- Heavy body acrylic paint (Bright Red)
- Large flat paintbrush (1-2 inch)
- Medium round paintbrush
- Kitchen cling wrap (plastic wrap)
- Palette or paper plate
Step 1: Setting the Stage
-
Prepare your workspace:
Lay down a protective covering on your table or floor, as you will need flat support for the cling wrap step. -
Load the white paint:
Squeeze a generous amount of Titanium White acrylic onto your palette. You need more paint than usual for this technique. -
Apply the base coat:
Using the large flat paintbrush, cover the entire canvas with the white paint. -
ensure thickness:
Apply the paint thickly; it should feel juicy and wet. A thin layer won’t hold the texture we are about to create. -
Smooth the edges:
Don’t forget to paint the sides of the canvas for a finished, professional look.
Step 2: Adding the Heart
-
Switch brushes:
While the white base is still very wet, pick up your medium round brush and load it with Bright Red paint. -
Outline the shape:
Paint the outline of a simple heart in the center of the canvas, painting directly into the wet white layer. -
Fill it in:
Fill the inside of the heart with red paint. Apply it thickly so it matches the volume of the white background. -
Blend slightly:
It is okay if the red and white mix slightly at the edges; this adds to the organic feel.
Paint drying too fast?
If the paint starts drying before you apply the wrap, the texture won’t hold. Mix a slower-drying medium into your acrylics or turn off fans in the room.
Step 3: Creating Texture
-
Cut the wrap:
Tear off a sheet of kitchen cling wrap that is slightly larger than your canvas dimensions. -
Apply the wrap:
Gently lay the cling wrap directly onto the wet paint, covering the entire surface. -
Initiate contact:
Lightly pat the plastic down so it makes contact with the wet paint everywhere. -
Scrunch and wrinkle:
Using your fingertips, pinch and twist the plastic to create wrinkles and ridges. I like to bunch the plastic slightly inward toward the heart to create flow lines. -
Check the heart:
Ensure there are plenty of small wrinkles specifically over the red heart area to break up the flat color. -
Leave to dry:
Do not remove the plastic yet. Leave the canvas horizontally in a safe place to dry completely.
Glitter Upgrade
Before laying down the cling wrap, sprinkle a pinch of fine red or iridescent glitter over the wet heart. The plastic will press it into the paint for a permanent sparkle.
Step 4: The Reveal
-
Testing dryness:
Wait at least 12 to 24 hours. The paint must be fully hardened to hold the sharp ridges shown in the image. -
Peel the plastic:
Once you are sure the paint is dry, locate a corner of the cling wrap and slowly peel it back. -
Remove completely:
Pull the entire sheet off to reveal the textured, marble-like surface underneath. -
Final cure:
Allow the canvas to air out for another hour to ensure any moisture trapped under the plastic evaporates.
Place your textured masterpiece near a window where the light can catch all those beautiful ridges you created.


Dabbling in Pointillism With Cotton Swabs

Master the art of pointillism with this deceptively simple heart project that uses negative space and vibrant red dots to create a romantic visual. By using everyday household items, you can achieve perfect, uniform circles that give this canvas a clean and professional finish.
Step-by-Step Tutorial
Materials
- Square artist canvas (8×8 or 10×10 inches)
- Red acrylic paint (heavy body preferred)
- Cotton swabs (Q-tips)
- Pencil
- Scrap paper
- Scissors
- Palette or paper plate
- White eraser
Step 1: Creating the Template
-
Make a paper guide:
Fold a piece of scrap paper in half and cut out a half-heart shape along the fold to create a perfectly symmetrical paper heart. -
Check the size:
Place your paper heart on the canvas to ensure it is sized correctly; leave at least an inch or two of white space around the edges. -
Center the design:
Position the template in the exact center of your square canvas. -
Trace the shape:
Very lightly trace around the paper heart using a pencil; keep the line faint so it is easier to erase later. -
Remove template:
Lift the paper away to reveal your faint pencil guide on the canvas.
Fuzzy Dot Troubleshooting
If your dots start looking textured or fuzzy, the cotton swab is saturated. Use a new swab every 10-12 dots to maintain sharp, clean edges.
Step 2: Applying the Dots
-
Prepare the paint:
Squeeze a generous amount of bright red acrylic paint onto your palette. -
Load the tool:
Dip one end of a cotton swab vertically into the paint, coating the tip evenly without creating a large drip. -
Test your pressure:
I like to press the swab onto a piece of scrap paper first to get a feel for how hard to push to create a perfect circle. -
Start at the top:
Place your first dot directly on the pencil line at the top center ‘dip’ of the heart. -
Dot the outline:
Continue placing dots along the pencil line down the left curve, spacing them about 3 millimeters apart. -
Maintain consistency:
Reload your cotton swab with fresh paint every 3 to 4 dots to keep the color opacity and size uniform. -
Complete the perimeter:
Finish the right side of the heart until you have a complete dotted outline of your shape.
Pro Tip: Ombré Effect
Mix a little white into your red paint for the inner row. This creates a subtle gradient effect that adds 3D depth to the final heart shape.
Step 3: Adding Depth and Finishing
-
Start the inner row:
Begin a second row of dots just inside the first row, starting again at the top center. -
Align the rows:
Try to place each inner dot next to the gaps between the outer dots, or directly adjacent to them depending on your preference. -
Monitor your tool:
If the cotton begins to fray or get fuzzy, swap to a fresh cotton swab immediately to keep edges crisp. -
Finish the inner heart:
Complete the full inner loop, ensuring the spacing remains consistent with the outer row. -
Dry completely:
Allow the canvas to sit undisturbed for at least 30 minutes to ensure the thick paint dots are dry. -
Erase guidelines:
Once the paint is rock hard, gently use a white eraser to remove any visible pencil marks between the dots.
Display your charming canvas on a shelf or gift it to someone special to spread the love.


Abstract Scrapes Using an Old Credit Card

Transform a blank canvas into a bold statement piece using nothing but acrylics and a repurposed plastic card. The result is a vibrant, textured heart with a rustic, painterly feel that looks professionally done.
Step-by-Step
Materials
- Large stretched white canvas
- Heavy body acrylic paint (Deep Purple)
- Heavy body acrylic paint (Turquoise/Teal)
- Old plastic card (credit card, gift card, or hotel key)
- Palette or paper plate
- Drop cloth or old sheet
- Paper towels
Step 1: Setting the Stage
-
Prepare the workspace:
Lay down a drop cloth or an old sheet to protect your floor, as the scraping technique can sometimes push paint off the edges. -
Position the canvas:
Place your large stretched canvas flat on the floor; working horizontally is crucial so the heavy paint does not drip. -
Prepare the outline color:
Squeeze a generous amount of deep purple acrylic paint onto your palette or plate, keeping it in a thick pile rather than spreading it thin.
Step 2: Creating the Border
-
Load the tool:
Dip the long edge of your plastic card into the purple paint, ensuring the entire edge is coated evenly. -
Start the curve:
Starting near the top center of the canvas, firmly press the card down and drag it in a wide arc to the left to form the first lobe of the heart. -
Complete the outline:
Reload your card as needed and continue the line down to a point, then repeat the process on the right side to close the heart shape. -
Thicken the band:
Go over the purple outline again, widening the stroke to about two or three inches to create a bold frame. -
Texture the edge:
Don’t worry about perfect lines; allow the outer edges to look rough and scraped for an organic, artistic feel. -
Brief drying time:
I prefer to let this outline sit for about 10 to 15 minutes so the purple forms a skin and doesn’t immediately mix with the teal.
Muddy Colors?
If the purple smears into the teal and turns grey, stop immediately. Let the purple border dry completely to the touch before continuing to apply the wet teal center.
Step 3: Filling the Heart
-
Apply the center color:
Dollop a substantial amount of turquoise paint directly onto the center of the white canvas, inside your purple heart. -
Begin scraping:
Using a clean edge of your plastic card, press into the turquoise paint and drag it outward toward the purple border. -
Follow the form:
Use sweeping curved motions that mimic the shape of the heart to spread the paint evenly. -
Blend the intersection:
Gently scrape the teal paint so it just barely oversteps onto the inner edge of the purple, creating a slight blend without muddying the colors. -
Create variation:
Apply different amounts of pressure with the card; light pressure leaves a thick layer of paint, while heavy pressure reveals the canvas grain. -
Add dimension:
If the center looks too flat, add a small touch of white paint to the wet teal and scrape it through for a highlighted marble effect.
Add Some Shimmer
Mix a small drop of iridescent pouring medium or gold mica powder into your teal paint before scraping. It adds a beautiful, subtle glow that catches the light once dried.
Step 4: Final Details
-
Refine the shape:
Use the corner of the card to sharpen the bottom point of the heart or the inner ‘V’ at the top if the paint has spread too much. -
Check for globs:
Inspect the painting for overly thick ridges of paint that might crack when drying and gently flatten them with a light swipe of the card. -
Clean edges:
Use a damp paper towel to wipe away any accidental smudges on the white background outside the heart. -
Allow to dry:
Leave the canvas flat to dry completely, which may take up to 24 hours depending on the thickness of your paint application.
Once dry, hang your textured artwork in a well-lit area to highlight the unique motion lines created by the scraping technique
BRUSH GUIDE
The Right Brush for Every Stroke
From clean lines to bold texture — master brush choice, stroke control, and essential techniques.
Explore the Full Guide
Blending a Soft Ombre Gradient Background

This project features a warm, glowing background that transitions seamlessly from pale peach to deep crimson, framing a bold black heart silhouette. It is a fantastic exercise in wet-on-wet blending to create a smooth, calming ombre effect.
How-To Guide
Materials
- Stretched canvas (16×20 or similar)
- Acrylic paints: Titanium White, Pale Pink, Coral Orange, Deep Red, Mars Black
- Large flat brush (2-inch)
- Medium flat brush (1-inch)
- Small round detail brush
- Pencil
- Paper for stencil (optional)
- Palette
- Water cup and paper towels
Step 1: Creating the Ombre Background
-
Prepare the palette:
Squeeze out generous amounts of white, pink, orange, and red paint onto your palette so they are ready for rapid blending. -
Start the top layer:
Using the large flat brush, mix a large amount of white with a tiny dot of pale pink to create a very light blush tone. -
Paint the upper section:
Apply this blush mixture to the top quarter of the canvas using long, horizontal strokes. -
Introduce the second color:
Load your brush with the pale pink paint—don’t rinse it first, as the residue helps blending. -
Blend the upper transition:
Paint just below the blush section, working the wet paint upward slightly to merge the pink into the lighter top layer. -
Add the middle tone:
Wipe your brush on a paper towel, then pick up the coral orange paint. -
Blend the middle section:
Apply the orange to the center of the canvas, brushing back and forth where it meets the pink to create a soft, fuzzy transition. -
Apply the base color:
Rinse your brush thoroughly, then load it with the deep red paint. -
Finish the gradient:
Paint the bottom quarter of the canvas with red, blending it upwards into the orange section until the gradient looks smooth. -
Final smooth out:
I like to run a clean, slightly damp large brush gently across the entire canvas from top to bottom one last time to soften any harsh ridges. -
Dry tie:
Allow the background to dry completely, which typically takes about 20 to 30 minutes.
Step 2: Painting the Silhouette
-
Sketch the heart:
Lightly draw a large heart shape in the center of the canvas using a pencil. -
Trace for symmetry:
If you struggle with symmetry, cut a heart out of paper first and trace around it to ensure a balanced shape. -
Outline the shape:
Load a medium flat brush or round brush with black acrylic paint mixed with a tiny drop of water for better flow. -
Define the edges:
Carefully paint along your pencil marks to create a sharp, clean outline for the heart. -
Fill the center:
Use the larger brush to fill in the rest of the heart with solid black paint. -
Second coat:
Let the black paint dry to the touch, then apply a second coat if needed to ensure the background colors don’t show through. -
Final touches:
Inspect the edges for any roughness and smooth them out with the small detail brush for a crisp finish.
Sticky Blending?
If the acrylics are drying too fast to blend, keep a spray bottle handy to mist the canvas lightly. This keeps the paint wet and workable for longer, ensuring a seamless fade.
Crisp Lines
For the sharpest heart edges, use an angled shader brush for the outline. The shape of the bristles allows for better control around the curves than a standard round brush.
Display your warm, gradient masterpiece on an easel or shelf to add a loving glow to your room
Expressive Splatter Art Silhouette
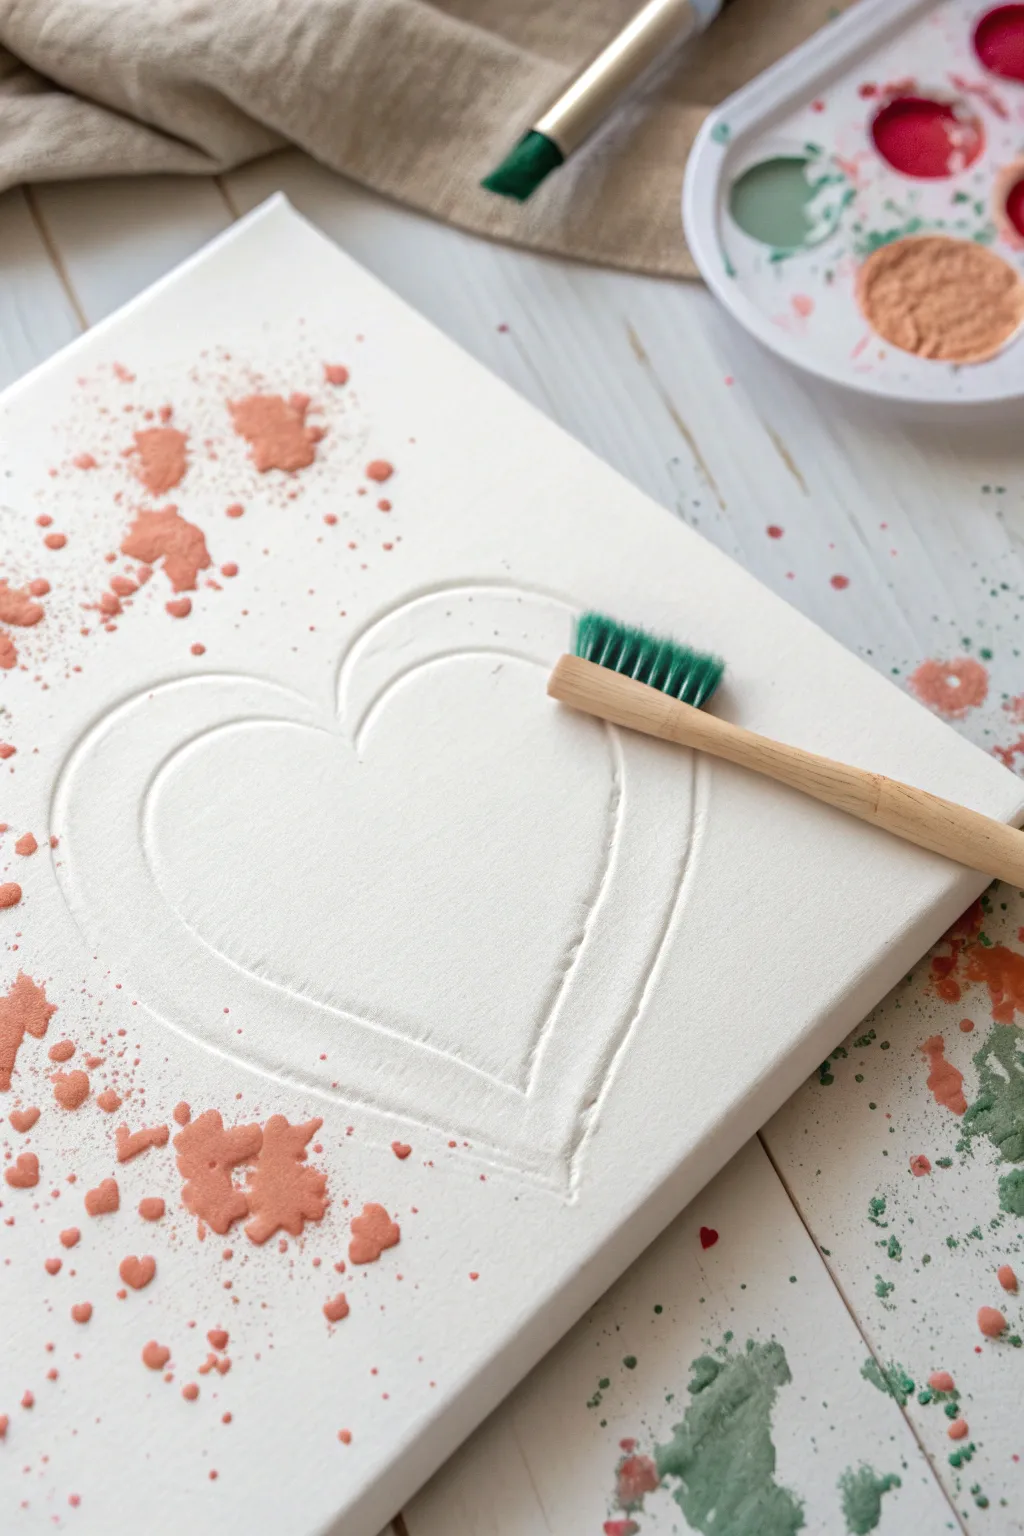
Combine the stark elegance of white-on-white texture with the playful chaos of splatter art in this unique canvas project. The raised ridges create a beautiful dimensional silhouette that pops against the speckled coral and green background.
Step-by-Step Guide
Materials
- Stretched white canvas (8×10 or similar)
- Modeling paste or heavy body white acrylic paint
- Piping bag or small Ziplock bag
- Pencil
- Acrylic paints (Coral/Peach and Sage Green)
- Clean toothbrush (bamboo preferred for stiff bristles)
- Palette with water
- Paper towels
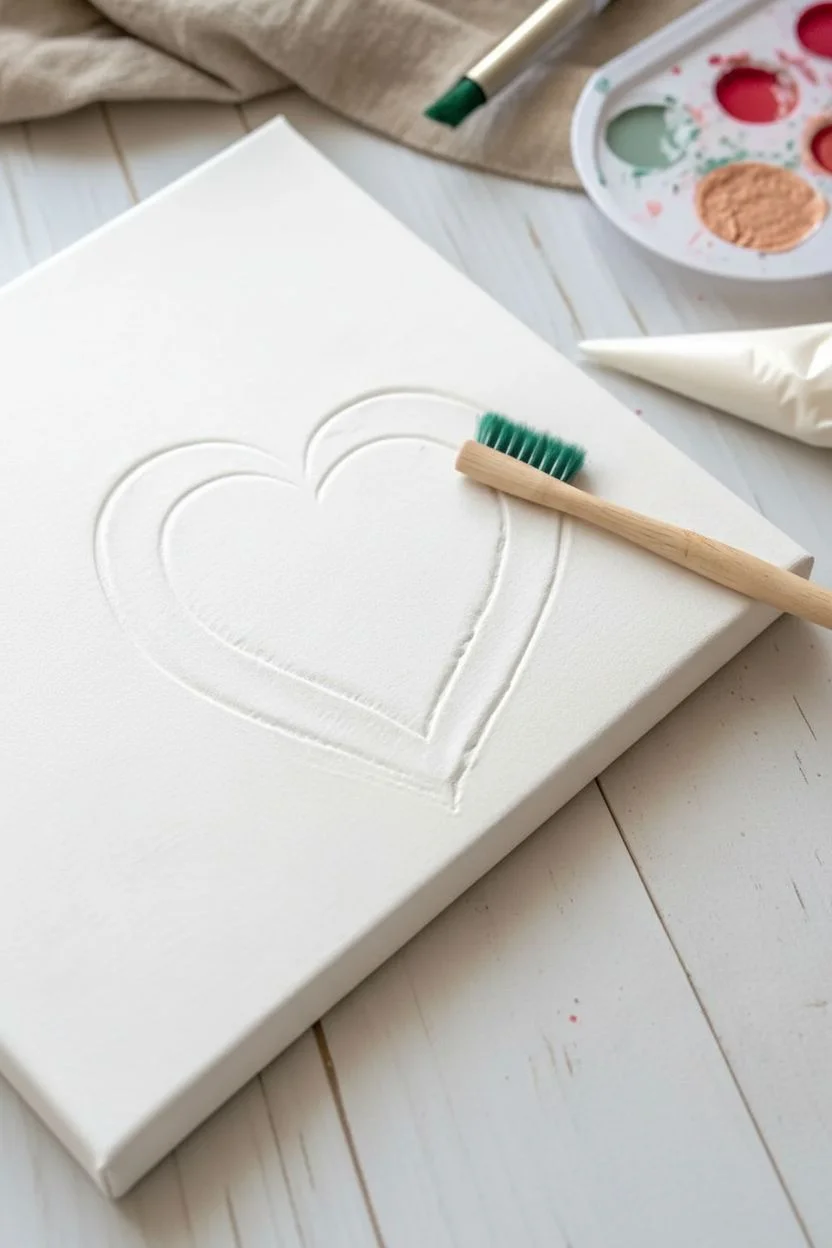
Step 1: Creating the Relief Heart
-
Prepare the canvas:
Ensure your canvas is clean and free of dust. I like to lay it flat on a covered surface since this project can get messy. -
Sketch the heart:
Lightly draw a heart shape in the center of the canvas using a pencil. Keep the lines faint so they are easy to cover. -
Draw the inner border:
Sketch a second, smaller heart inside the first one, leaving about a half-inch gap between the two lines to create the double-border effect. -
Prepare the paste:
Scoop your modeling paste or heavy body acrylic paint into a piping bag. Push the medium down toward the tip. -
Snip the tip:
Cut a very small corner off the bag. You want a hole about the size of a spaghetti noodle for precision. -
Pipe the outline:
Squeeze the bag gently and trace over your pencil lines with the paste, creating a raised spectacular ridge. -
Refine the shape:
If the flow breaks or creates a peak, gently tap it down with a damp finger or a toothpick to smooth it out. -
Allow to cure:
This is crucial: let the white raised heart dry completely. Depending on the thickness, this may take 2-4 hours or overnight.
Splatter Control
Large, unwanted blobs landing on your art? The paint is likely too watery or the brush is overloaded. Blot the bristles on a paper towel before flicking to get a fine mist.
Step 2: Adding the Splatter
-
Mix the base color:
On your palette, mix a small amount of Coral or Peach paint with drops of water until it reaches an ink-like consistency. -
Load the tool:
Dip the tips of the toothbrush bristles into the thinned paint. Gently tap off any excess against the palette edge. -
Test your technique:
Practice flicking the bristles with your thumb over a piece of scrap paper to gauge the spray pattern. -
Apply the first layer:
Hold the brush near the corners of the canvas and flick the bristles to send a fine mist of coral paint across the surface. -
Frame the heart:
Direct some splatter closer to the heart outline, but try to keep the actual raised ridges relatively white for contrast. -
Create variation:
Vary the distance of the brush from the canvas; closer flicking creates dense spots, while distance creates a fine mist. -
Mix the accent color:
Rinse your brush thoroughly and mix the Sage Green paint with water to the same fluid consistency. -
Add accent speckles:
Sparingly flick the green paint around the white space to add depth and visual interest to the composition. -
Clean white areas:
If a large drop lands on your white 3D heart, quickly and carefully dab it away with a damp cotton swab. -
Final dry:
Allow the splatter paint to dry completely before displaying your artwork.
Pro Tip
To keep the interior of the heart purely white, cut a paper heart template and loosely rest it inside the raised ridges to act as a shield while you splatter.
Once dry, you have a modern, textured piece that balances simplicity with vibrant artistic expression

PENCIL GUIDE
Understanding Pencil Grades from H to B
From first sketch to finished drawing — learn pencil grades, line control, and shading techniques.
Explore the Full Guide
Blooming Botanical Wreath Hearts
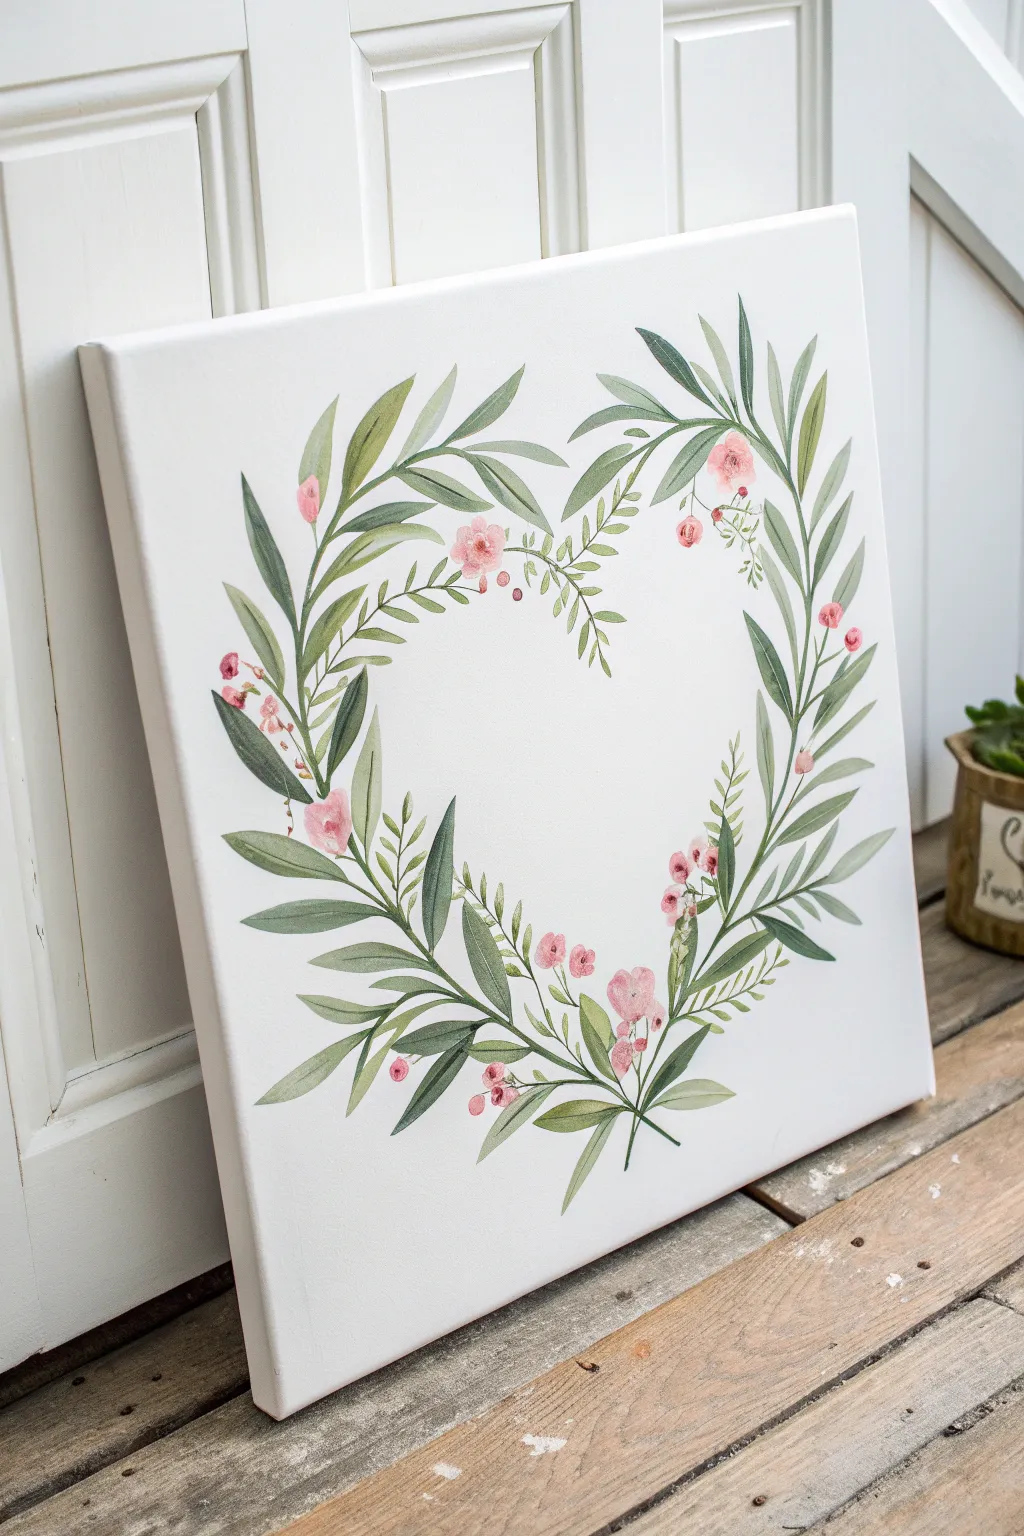
Capture the romance of a wildflower meadow arranged in a loving silhouette with this delicate canvas project. By thinking acrylic paints with water or medium, you will mimic the soft, translucent look of watercolors while enjoying the durability of canvas.
How-To Guide
Materials
- Square canvas (12×12 or similar)
- Acrylic paints (Sap Green, Olive Green, White, Alizarin Crimson, Yellow Ochre)
- Glazing medium or water
- Synthetic round brushes (sizes 2, 4, and 6)
- Detail liner brush
- Pencil and soft eraser
- Palette and paper towels
Step 1: Sketching the Framework
-
Outline the shape:
Lightly draw a large heart in the center of your canvas using a pencil. This will serve as your boundary guide, not a permanent line. -
Draw the main stems:
Sketch two main curved lines starting from the bottom point of the heart, curving upwards along the left and right sides, meeting near the top dip. -
Add branch details:
Lightly mark where small offshoot branches will go, ensuring they point outward and inward without filling the empty center completely. -
Soften the guides:
Take your eraser and gently blot the pencil lines until they are barely visible, preventing graphite from smudging into your paint.
Step 2: Layering the Greenery
-
Prepare the wash:
Mix Sap Green with a drop of Yellow Ochre and a generous amount of glazing medium (or water) to create a transparent, tea-like consistency. -
Paint the stems:
Using the liner brush, carefully trace the main stem lines with your fluid green mix, keeping the touch light and elegant. -
Create main leaves:
Load a size 4 round brush with the green mix. Use a ‘press and lift’ motion: touch the tip to the canvas, press down to widen the belly, and lift while dragging to create a tapered point. -
Vary the tones:
I like to add a touch of white to the green mix for some leaves and a bit of pure Olive Green for others to create natural depth and variety. -
Paint the ferns:
Switch to a size 2 brush and paint delicate, comb-like fern sprigs in the gaps between the larger leaves. -
Check the shape:
Step back to ensure your leaves are defining a clear heart shape. Add small extra leaves at the top curves if the silhouette needs reinforcing.
Troubleshooting
If your acrylics are drying too fast to blend, mix in a slow-drying medium. This extends working time and mimics the behavior of watercolor.
Step 3: Blooming Details
-
Mix the pinks:
Combine Alizarin Crimson with plenty of White to make a soft blush pink. Keep the consistency fluid but slightly more opaque than the leaves. -
Paint the blossoms:
Dab small, organic clusters of irregular circles near the leaf joints to resemble wild roses or apple blossoms. -
Add flower dimension:
While the pink is still damp, dot a slightly darker crimson mix into the center of each flower and let it bleed slightly for a soft gradient. -
Create berry stems:
Use your finest liner brush with a brownish-green mix to draw tiny, thread-thin lines growing out from the main stems. -
Dot the berries:
Dip the tip of a brush handle or a small round brush into a reddish-pink mix and dot small berries at the ends of the thin lines. -
Highlighting:
Add tiny specks of white to the tops of the berries and the centers of the flowers to make them look glossy and fresh. -
Final clean up:
Once fully dry, use a clean eraser to remove any remaining stubborn pencil marks that show through the negative space.
Level Up
Add a personal touch by painting delicate initials or a significant date in the negative white space in the center using a fine grey wash.
Hang your blooming heart masterpiece on a wall that needs a touch of softness and organic beauty
Adding Glamour With Gold Leaf Accents

Create a romantic, textured art piece that combines soft acrylic blending with the luxurious shine of gold leaf. This project focuses on swirling brushstrokes and precise gilding techniques to make the metallic accents truly pop against the pastel background.
Step-by-Step Guide
Materials
- Square stretched canvas (e.g., 12×12 inches)
- Acrylic paints: Baby Pink, Deep Rose, Titanium White
- Wide flat brush (1 inch)
- Medium filbert brush (rounded tip)
- Small round detail brush
- Metal leaf adhesive (sizing)
- Gold leaf sheets or flakes
- Soft, fluffy brush (like a makeup brush) for dusting
- Palette for mixing
- Paper towels
Step 1: Setting the Background
-
Prepare the canvas:
Start by wiping your canvas with a dry cloth to remove any dust that might interfere with paint adhesion. -
Apply the base coat:
Squeeze out a generous amount of Baby Pink acrylic paint. Using your wide flat brush, cover the entire front surface of the canvas in long, even strokes. -
Paint the edges:
Don’t forget to paint the sides of the canvas canvas with the same Baby Pink to ensure the artwork looks finished from every angle. -
Let it dry:
Allow this base layer to dry completely. If the coverage looks streaky, add a second coat and let it dry again before proceeding.
Sticky Situation?
If the gold leaf tears off the canvas completely, the adhesive was likely too wet. Wait until the glue is completely clear and tacky—like the back of a sticker—before applying leaf.
Step 2: Painting the Swirled Heart
-
Mix your colors:
On your palette, place a dollop of Deep Rose and Titanium White next to each other, but don’t fully mix them. You want distinct streaks of color. -
Outline the shape:
Using the filbert brush loaded with Deep Rose, lightly paint a large, loose heart shape in the center of the canvas. It doesn’t need to be perfect; a rugged outline adds charm. -
Fill with texture:
Dip your brush into both the Rose and White simultaneously. Fill in the heart shape using curved, sweeping strokes that follow the contour of the heart. -
Create the swirl effect:
I like to work wet-on-wet here, swirling the white into the pink directly on the canvas to create a marbled, milky texture. -
Thicken the paint:
Leave the paint slightly thicker in the center of the heart to build up a subtle impasto texture, which adds visual interest. -
Dry completely:
This is crucial: allow the heart painting to dry 100% (likely 1-2 hours) before starting the gilding process, otherwise the gold will stick to the wet paint everywhere.
Add Dimension
Mix a gel medium or modeling paste into your pink and white paints for the center heart. This will create raised, sculptural ridges that catch the light alongside the gold.
Step 3: Applying Gold Leaf Accents
-
Map out the gold:
Plan where you want your gold hearts. Visualize a scattering effect, with some inside the main pink heart and some floating in the background. -
Apply adhesive:
Dip your small detail brush into the metal leaf adhesive. Carefully paint small heart shapes onto the dry canvas in your chosen spots. -
Add random accents:
Add a few random dots or dashes of adhesive near the edges to mimic falling gold confetti. -
Wait for the tack:
Let the adhesive sit for about 15-20 minutes (check your bottle’s instructions). The glue must turn from milky to clear and feel sticky (tacky) to the touch, not wet. -
Apply the leaf:
Gently press a sheet of gold leaf over the tacky areas. Use your fingers to smooth the sheet down firmly so it adheres to the glue shapes. -
Burnish the gold:
Use the soft, dry brush to rub over the gold leaf in circular motions. This ‘burnishing’ pushes the gold into the adhesive. -
Dust off excess:
Continue brushing briskly to break away the unglued gold leaf. You will see your crisp gold hearts emerge as the excess flakes away. -
Seal the work:
To prevent the metal leaf from tarnishing over time, gently apply a clear gloss sealant over just the gold areas once fully intricate.
Hang your shimmering masterpiece in a spot that catches the afternoon sun to see those golden hearts truly sparkle.


Capturing a Galaxy Night Sky Inside
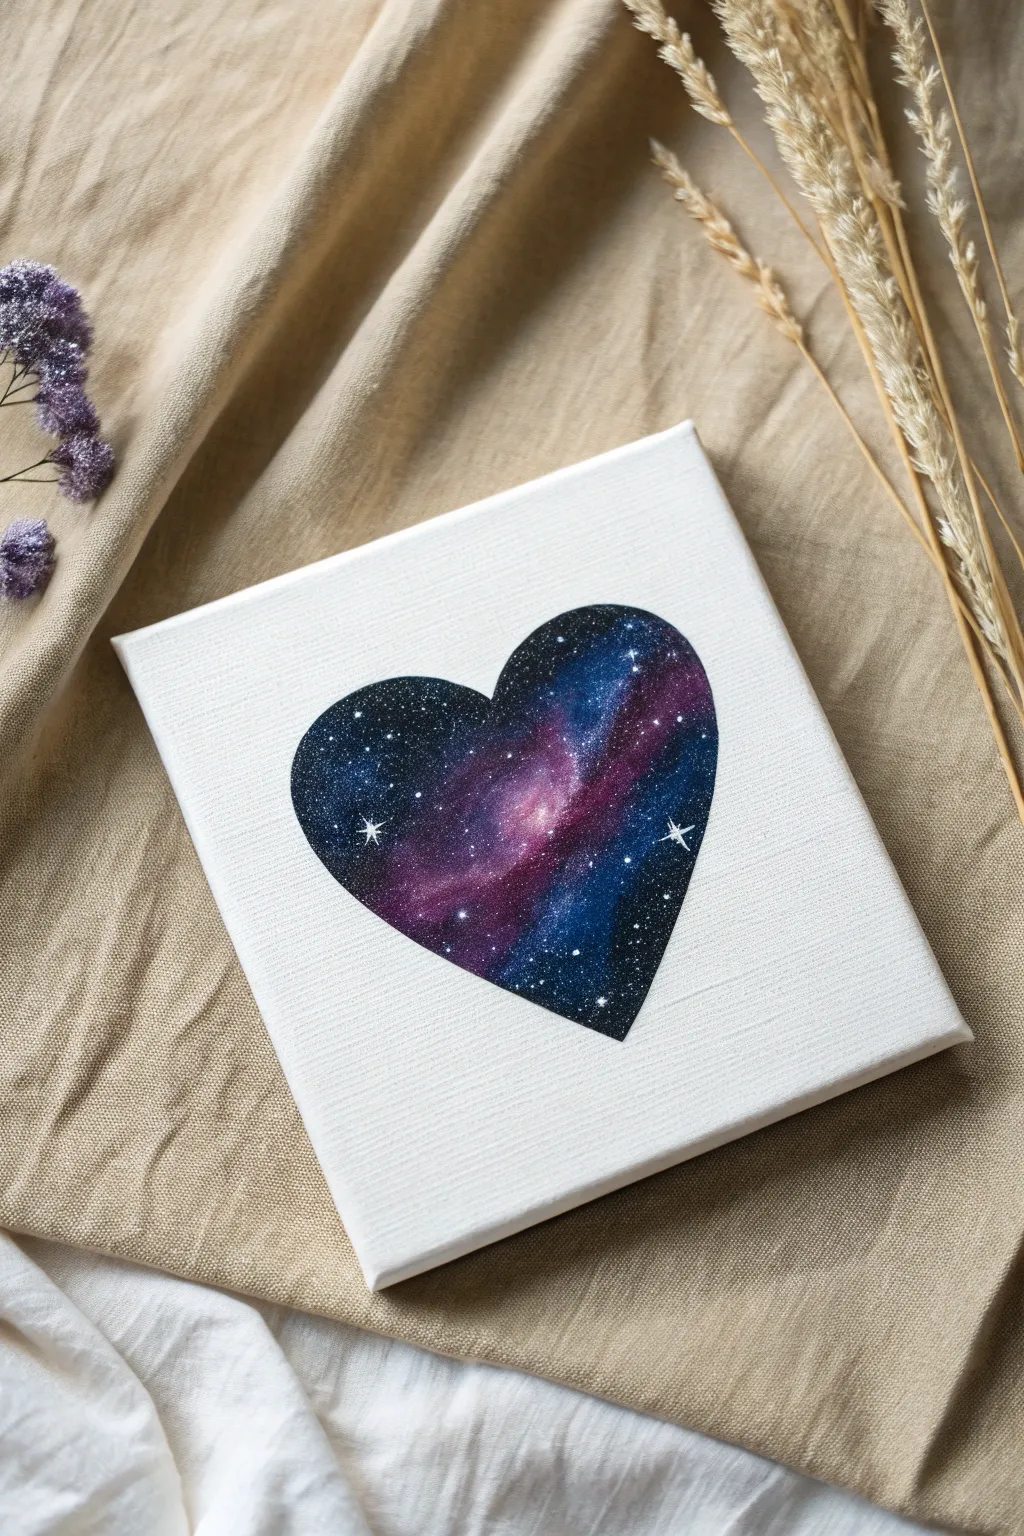

This stunning piece juxtaposes the clean, minimal sharp edges of a simple heart with the chaotic, vibrant beauty of deep space. It creates a window into a tiny universe using simple blending techniques and crisp masking.
How-To Guide
Materials
- Small square canvas (6×6 or 8×8 inches)
- Adhesive contact paper or masking film
- Acrylic paints: Mars Black, Phthalo Blue (or Navy), Dioxazine Purple, Magenta, Titanium White
- Small makeup sponges or sponge brushes
- Fine detail brush (size 0 or 00)
- Old toothbrush (for splattering)
- Scissors and pencil
- Paper plate or palette
Step 1: Creating the Stencil
-
Outline the shape:
Cut a piece of contact paper or masking film slightly larger than your canvas size. On the backing side, draw a symmetrical heart shape in the center using a pencil. -
Cut the negative space:
Carefully cut out the heart shape from the center. You will be using the surrounding ‘frame’ piece, not the heart cutout itself, to create a negative stencil. -
Apply the mask:
Peel the backing off the contact paper and adhere it to your canvas. Center the heart shaped hole. -
Seal the edges:
Run your fingernail or a credit card firmly along the cut edge of the heart to ensure a tight seal. This prevents paint from bleeding under the mask.
Bleeding Edges?
If paint seeped under the mask, wait for it to be 100% dry. Then, take a flat brush with pure Titanium White paint and carefully trace the outside of the heart to cover the imperfections.
Step 2: Painting the Nebula
-
Prepare the palette:
Squeeze out small amounts of black, blue, purple, magenta, and white paints onto your palette. Keep them slightly separated for now. -
Sponge the darkness:
Dampen a makeup sponge slightly and squeeze out excess water. Dip it into the Mars Black mixed with a little Phthalo Blue. -
Depict deep space:
Dab the dark mixture along the inner edges of the stencil, creating a vignette effect. Let the center remain white for now. -
Add mid-tones:
Using a clean side of the sponge (or a new one), pick up the purple paint. Dab this next to the black/blue areas, blending them where they meet by tapping gently. -
Create the nebula core:
Load a sponge with magenta and tap it into the remaining central space. I find that overlapping the magenta slightly over the purple creates a seamless transition. -
Highlight the center:
Mix a tiny dot of white into the magenta to create a bright pink light. Dab this right in the center or diagonally across the heart to mimic a glowing gas cloud. -
Deepen the contrast:
If the colors look too washed out, go back with the black-dipped sponge and re-darken the very edges of the heart shape to make the center pop.
Level Up: Glow Effect
Paint over the white, cross-shaped stars with a layer of glow-in-the-dark acrylic paint. In daylight, it looks standard, but at night, your galaxy heart will faintly illuminate.
Step 3: Stars and Details
-
Mix star paint:
Mix a small amount of Titanium White with a few drops of water until it reaches the consistency of ink or heavy cream. -
Create the starfield:
Dip the bristles of an old toothbrush into the watered-down white paint. Aim it at the canvas and run your thumb across the bristles to spray fine mist. -
Paint hero stars:
Using your finest detail brush and pure white paint (undiluted), paint 2-3 larger distinct stars. Start with a dot, then pull four very thin lines outward to create a cross shape. -
Add bright specks:
Use the tip of the brush or a toothpick to add a few concentrated distinct dots of white in the darker areas for variety. -
Let it dry completely:
Allow the paint to fully dry. This is crucial—if the paint is wet when you remove the stencil, it might smear. -
The reveal:
Gently peel away the contact paper stencil. Start from one corner and pull slowly at a 45-degree angle to reveal the crisp white canvas border.
Hang your cosmic masterpiece on a wall or prop it on a shelf to add a touch of stardust to your room.
Framing a Sunset Landscape Within a Heart

Capture the warmth of a setting sun through a romantic, heart-shaped viewport. Using a masking technique, you will create a crisp, clean border that makes the vibrant gradient sky and silhouette tree pop with professional-looking contrast.
Step-by-Step Tutorial
Materials
- Square deep-edge canvas (approx. 12×12 inch)
- Adhesive shelf liner or contact paper
- Acrylic paints: Titanium White, Cadmium Yellow, Bright Orange, Crimson Red, Carbon Black
- 1-inch flat synthetic brush
- Small round brush (size 4)
- Fine liner brush (size 0 or 00)
- Scissors
- Pencil
- Ruler
Step 1: Preparing the Mask
-
Sketch the heart:
Cut a piece of adhesive contact paper distinctively larger than your canvas. Draw a large, symmetrical heart in the center of the paper backing. -
Create the aperture:
Carefully cut out the heart shape from the contact paper. For this project, you need the outer piece (the negative space), not the heart cutout itself. -
Apply the mask:
Peel the backing off your contact paper stencil and adhere it to the canvas. Center the heart opening perfectly. -
Seal the edges:
Press down firmly along the inner rim of the heart to remove air bubbles. I find running a credit card edge along the outline ensures a really tight seal.
Step 2: Painting the Sunset
-
Paint the sun:
Using your round brush, paint a semi-circle of Titanium White mixed with a tiny drop of yellow at the bottom center of the heart. -
Start the glow:
Surround the sun with pure Cadmium Yellow, blending it slightly into the white edges while the paint is still wet to create a soft halo. -
Add the middle sky:
Switch to your flat brush. Apply Bright Orange in horizontal strokes above the yellow, overlapping the two colors to create a smooth transition. -
Deepen the sky:
Paint the top section of the heart with Crimson Red. Blend it downward into the orange so distinct stripes disappear into a seamless gradient. -
Let it dry:
Allow the sky layer to dry completely to the touch. This ensures your black silhouettes won’t turn muddy when applied.
Clean Edge Secret
Before painting colors, paint a layer of Titanim White *over* the stencil edge. This seals the tape gaps so any bleed-under is white and invisible!
Step 3: Silhouettes & Details
-
Ground the scene:
Using Carbon Black, paint a solid, slightly uneven mound at the very bottom of the heart to represent the grassy earth covering the bottom of the sun. -
Grow the trunk:
With the small round brush, paint a slightly thick tree trunk rising from the center of the hill, tapering as gets higher. -
Branch out:
Extend main branches outward from the trunk into the red and orange sections of the sky. Keep them flowing naturally upward. -
Add fine twigs:
Switch to your fine liner brush to add delicate, wispy twigs to the ends of the branches. This adds realism to the silhouette. -
Add textures:
Dab a little black paint along the top of the hill using the tip of an old brush to simulate grass blades.
Tearing Tape?
If the paint formed a thick skin over the tape, lightly score the edge with a craft knife before peeling to prevent ripping your masterpiece.
Step 4: The Window Effect
-
Draft the grid:
Use a ruler and pencil to very lightly mark a vertical center line and a horizontal line across the dried painting to form a cross. -
Paint vertical bars:
Use the liner brush and black paint to trace over your vertical pencil line. Keep the hand steady to simulate a window pane. -
Paint horizontal bars:
Paint the horizontal black line, crossing the vertical one. Ensure the lines go all the way to the tape edge. -
The reveal:
Once absolutely everything is dry, slowly peel off the contact paper mask to reveal the crisp white borders. -
Final polish:
If there are any smudges on the white canvas area, cover them with a fresh coat of Titanium White for a pristine frame look.
Hang your new window to the soul on a wall that needs a splash of warmth and color
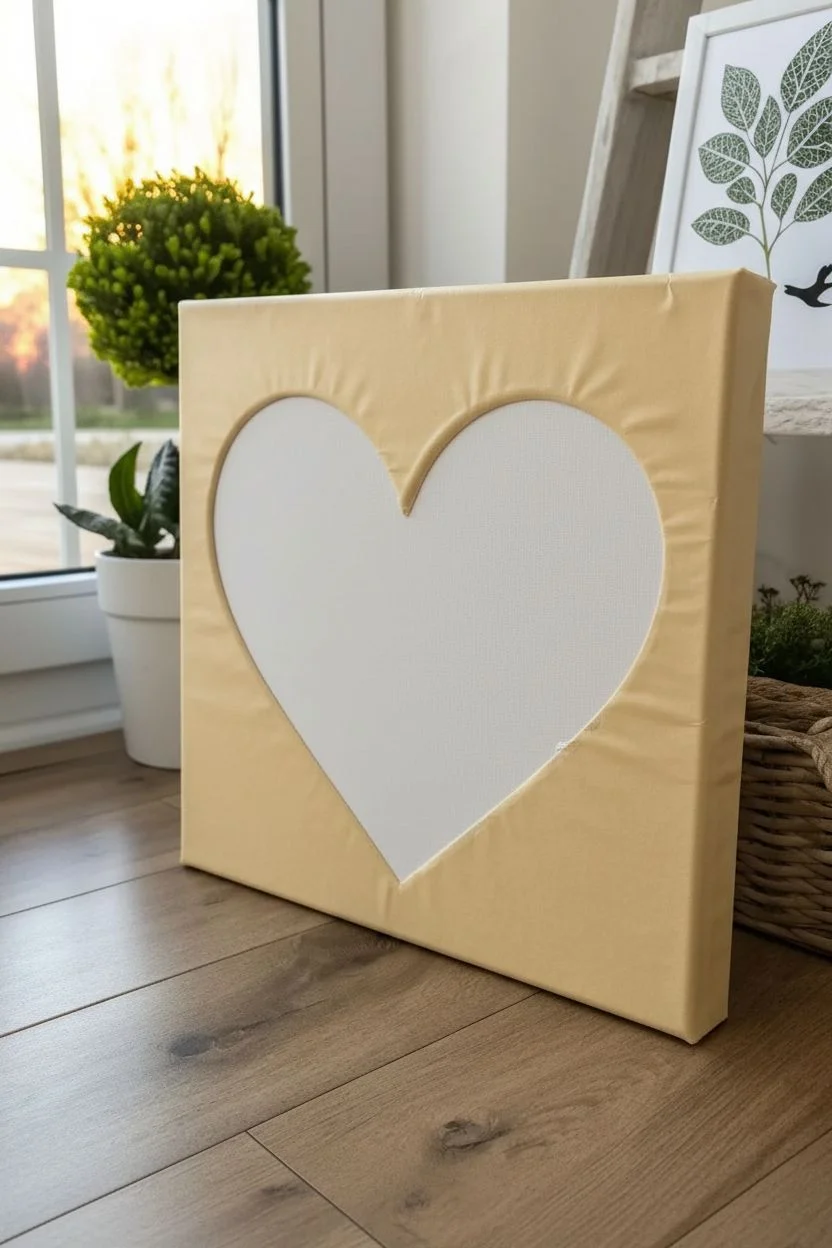
Personalized Fingerprint Family Art
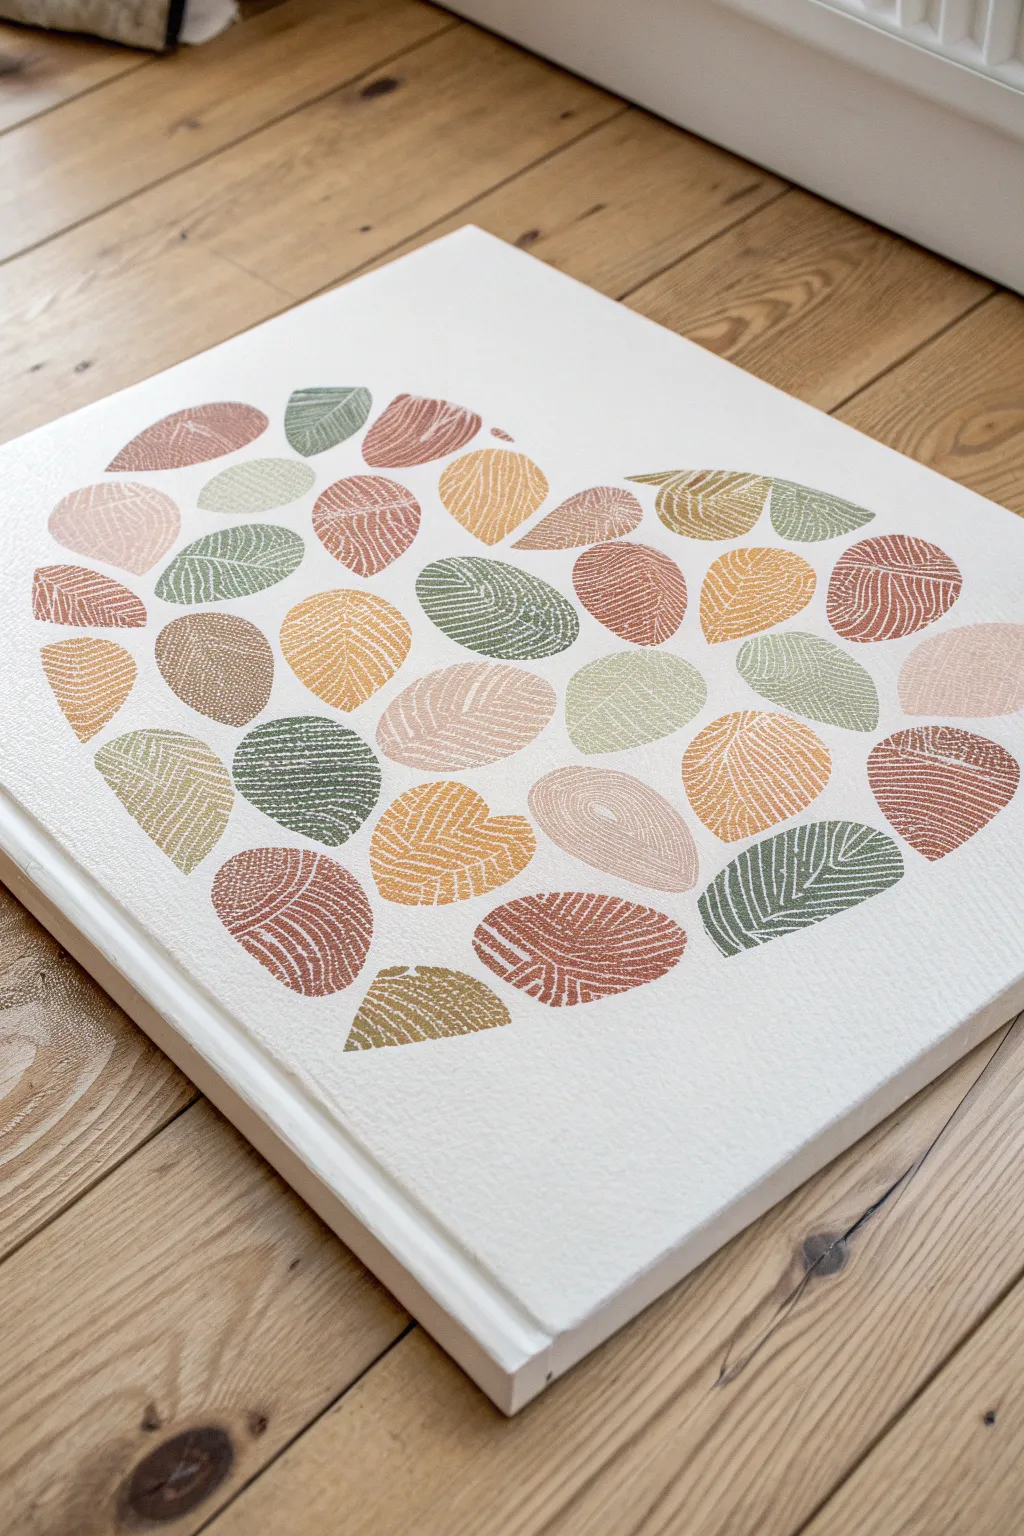
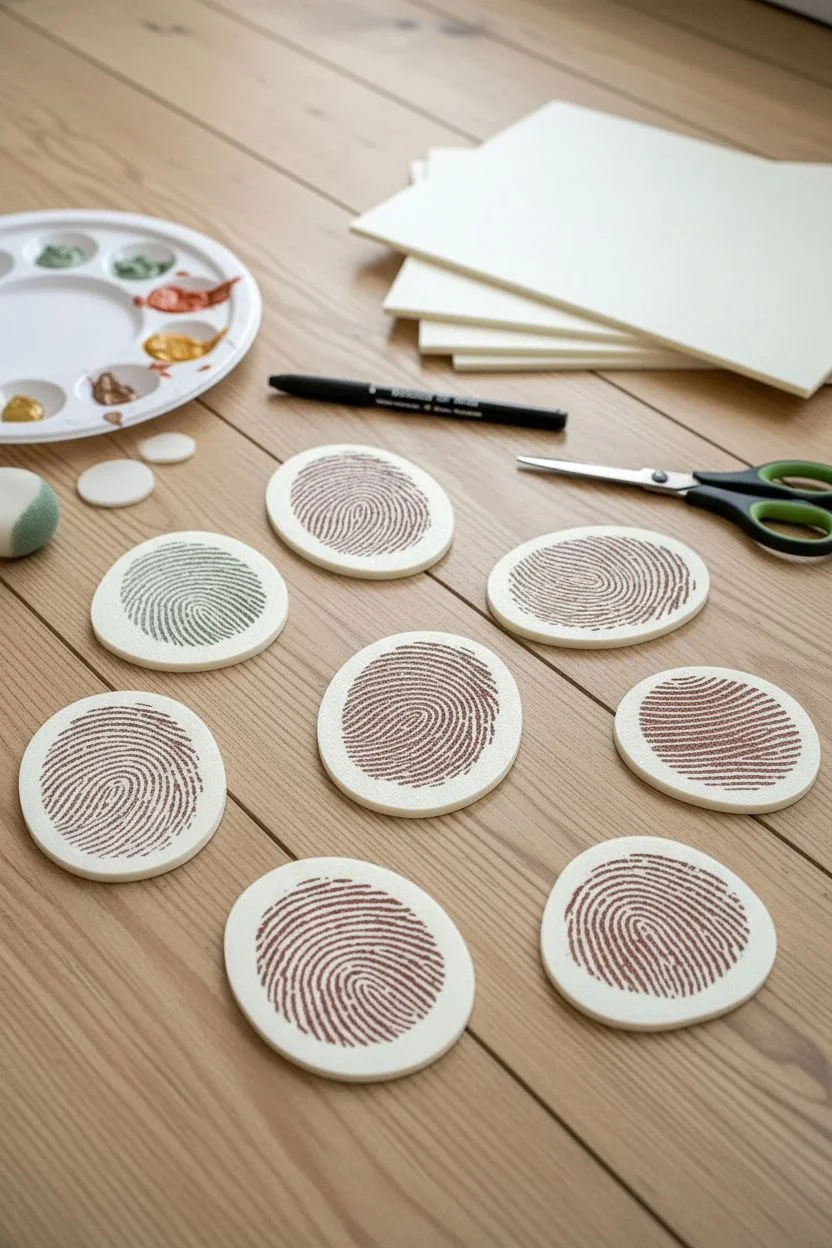
This striking artwork uses a relief-printing technique to create large, stylized “fingerprints” that come together to form a cohesive heart. By using scratch foam to mimic magnified epidermal ridges, you can create a personalized family masterpiece in a warm, modern palette.
Detailed Instructions
Materials
- Square stretched canvas (approx. 20×20 inches)
- Acrylic paints (sage green, terracotta, mustard ochre, dusty pink, rust)
- Scratch foam sheets or clean Styrofoam produce trays
- Ballpoint pen or dull pencil
- Scissors
- Foam contours or sponge pouncers
- Pencil and eraser
- Palette or paper plate
Step 1: Designing the Stamps
-
Cut shape templates:
Cut your scratch foam into varying oval and teardrop shapes found in nature. You want them large enough to be visible from a distance, roughly 1.5 to 3 inches long. -
Draw the ridges:
Using a ballpoint pen or a dull pencil, draw distinctive fingerprint patterns into the foam pieces. Press down firmly to indent the foam without tearing it. -
Vary the patterns:
Create different ridge designs for contrast—some with concentric circles (whorls), some with arches, and others with loops to simulate real fingerprint variety. -
Prepare the printing station:
Set out your acrylic colors on a palette. I find it helpful to mix a tiny bit of white into the earth tones to ensure they show up opaque against the canvas.
Step 2: Planning the Composition
-
Outline the heart:
Lightly sketch a large heart shape on your canvas using a pencil. This will serve as the boundary guide for your stamping. -
Dry run arrangement:
Place your unpainted foam cutouts onto the canvas within the heart outline to get a feel for spacing and how many prints you will need to fill the space.
Pro Tip: Crisp Lines
Use a brayer (rubber roller) to apply paint to your foam stamps instead of a brush or sponge. This applies paint only to the surface and keeps your indented ridge lines perfectly clean.
Step 3: Stamping the Art
-
Load the first color:
Start with your sage green shapes. Use a foam pouncer to dab a thin, even layer of paint onto the raised surface of the foam stamp. -
Check the grooves:
Inspect the stamp close-up before printing; ensure no paint has flooded into the indented lines, as these need to remain white. -
Print the greens:
Press the stamp firmly onto the canvas in scattered spots within your heart outline. Apply even pressure over the whole shape, then lift straight up. -
Switch to Terracotta:
Clean off your stamp or grab a fresh one. Apply the terracotta/rust paint and stamp several prints, focusing on balancing them against the green ones. -
Add Mustard accents:
Introduce the mustard yellow shapes. Place these strategically to brighten up areas that look too dark. -
Fill with blush tones:
Use the dusty pink and lighter beige colors to fill in the remaining larger gaps. These softer colors add depth and dimension to the arrangement. -
Address the edges:
Pay distinct attention to the pencil outline. Rotate your teardrop shapes so the pointed or curved edges align nicely with the imaginary border of the heart. -
Fill small gaps:
If there are awkward empty white spaces between the large prints, you can cut a smaller foam circle, add a simple ridge pattern, and stamp it to fill the void.
Level Up: True Identity
Scan actual family fingerprints, enlarge them on a computer, and trace those specific biological patterns onto your foam for a truly accurate family portrait.
Step 4: Finishing Touches
-
Touch up ridges:
If some lines didn’t come out crisp white, wait for the paint to dry, then carefully re-define them with a very fine white paint pen or a small brush. -
Erase guidelines:
Once the paint is completely dry to the touch (give it at least an hour), gently erase the pencil heart outline. -
Seal the canvas:
Apply a coat of clear matte spray varnish to protect the acrylics and unify the sheen of the different paint colors.
Now you have a sophisticated, gallery-worthy representation of family unity hanging on your wall
Painting the Viral 3D Bubble Heart
Capture the essence of love with this expressive, textured heart painting that pops off the canvas. Using directional brushstrokes and layered highlights, you will create a vibrant piece that feels both rustic and modern.
Step-by-Step
Materials
- Stretched canvas (8×10 or similar)
- Acrylic paints (Magenta, Crimson Red, Titanium White)
- Glitter medium or iridescent mixing medium
- Flat shader brush (size 8 or 10)
- Small round brush (size 2 or 4)
- Pencil
- Palette or heart-shaped dish
- Water cup and paper towels
Step 1: Sketching the Shape
-
Prepare the canvas:
Set your stretched canvas on an easel or a flat, protected surface to ensure stability while painting. -
Mark the center:
Using a pencil, make a tiny dot in the center of the canvas to guide the placement of your heart. -
Draw the curves:
Lightly sketch the two upper arches of the heart, ensuring they reach equal heights on the canvas. -
Connect the point:
Draw sloping lines connecting the outer edges of the arches down to a sharp point near the bottom center.
Curve Your Strokes
To get that dimensional look, imagine the heart is an inflated balloon. Always paint in curves that hug the shape, rather than flat horizontal lines.
Step 2: Flling with Color
-
Mix the base color:
Squeeze Magenta and a touch of Crimson Red onto your palette to create a deep, rich berry pink. -
Outline heavily:
Load a flat shader brush with the paint mixture and trace over your pencil outline with a confident, thick stroke. -
Fill directionally:
Start painting the interior of the heart. Instead of painting side-to-side, follow the curve of the heart shape with vertical, sweeping strokes. -
Vary the pressure:
Allow your brush to lift slightly at the end of strokes to create texture and let some canvas grain show through. -
Create the V:
Ensure the brushstrokes converge neatly at the bottom tip of the heart for a sharp, defined point.
Uneven Shape?
If one side of the heart looks larger, don’t erase. simply broaden the outline of the smaller side with the dark base color until they match.
Step 3: Adding Dimension & Shimmer
-
Mix a highlight shade:
Without cleaning your brush fully, pick up a small amount of Titanium White to create a streaky, lighter pink. -
Apply highlights:
Paint curved ‘comma’ shapes on the upper left lobe and right side of the heart to mimic light hitting a curved surface. -
Blend naturally:
I like to use a dry brush here to gently feather the white streaks into the red base, keeping the texture visible. -
Prepare the shimmer:
In a small dish (like the heart-shaped one shown), mix a dab of Magenta with your glitter or iridescent medium. -
Glaze the center:
Apply this shimmering mixture over the central and darker areas of the heart to add depth and sparkle. -
Refine the edges:
Switch to a small round brush loaded with the original dark pink to tidy up any rough spots on the outer rim. -
Final white accents:
Add one or two final, pure white dots or thin lines on the highest curve to exaggerate the glossy ‘bubble’ effect.
Let your masterpiece dry completely before displaying it on a shelf or hanging it up to spread some love
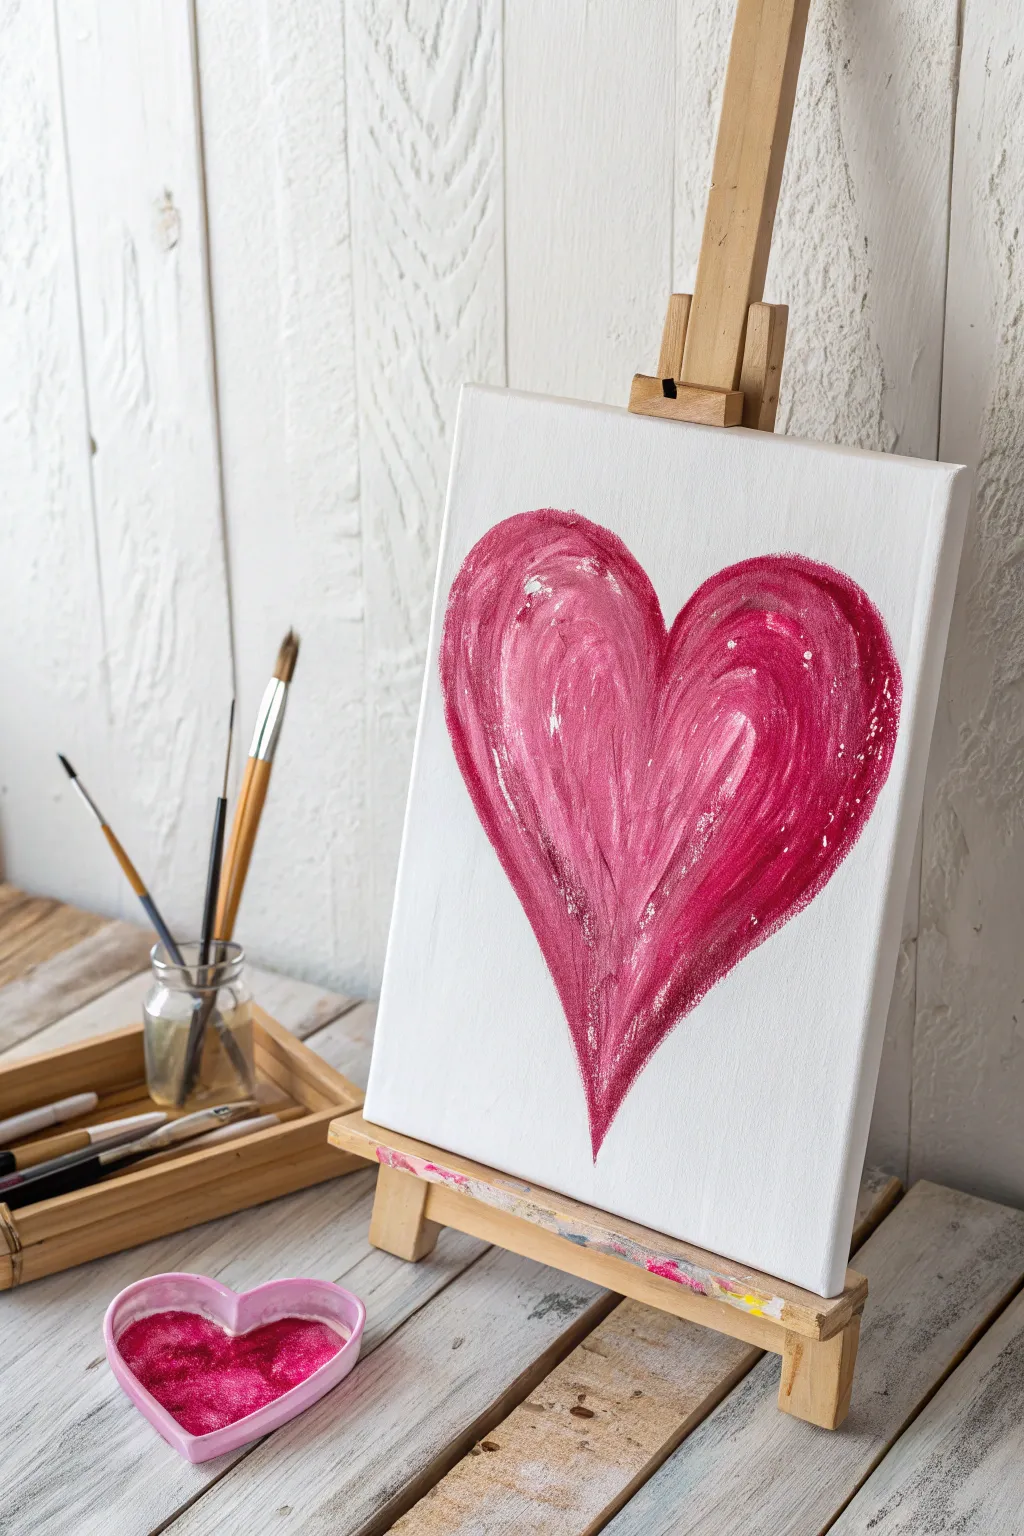
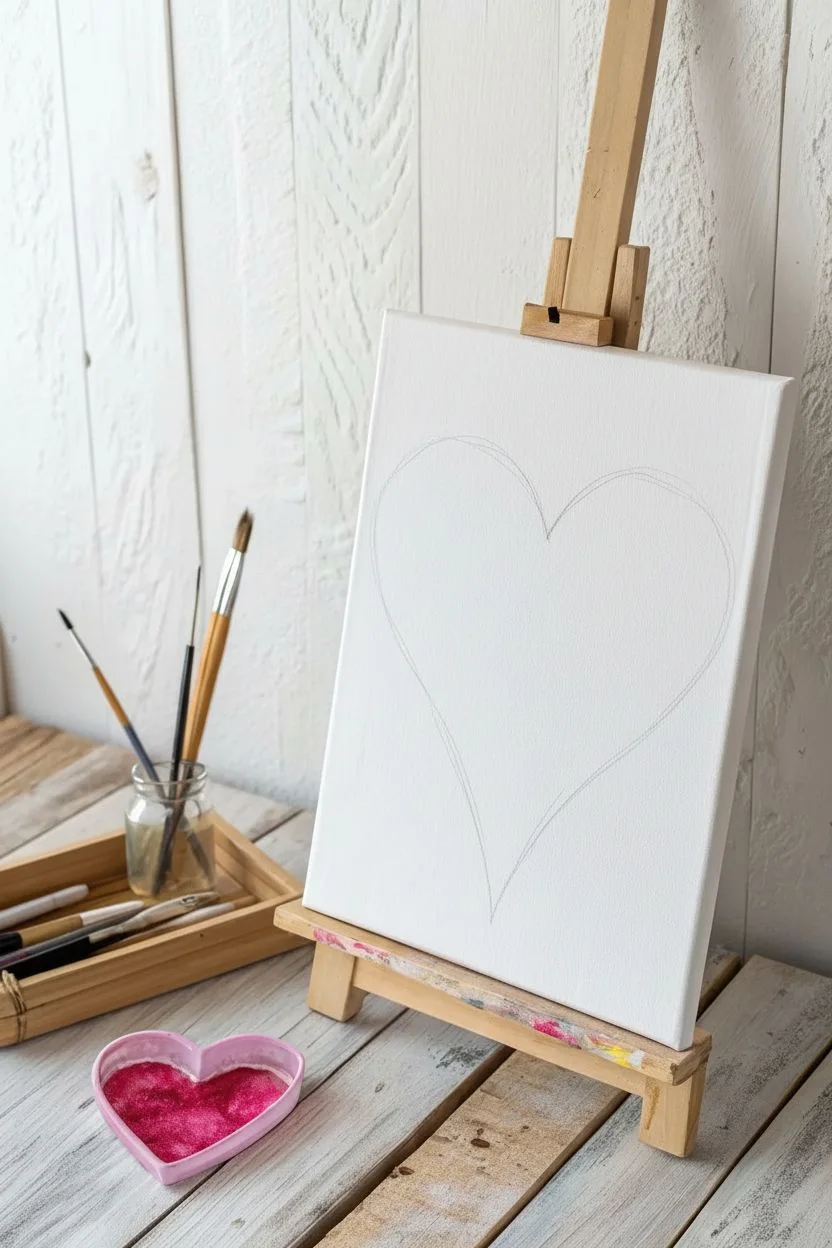
Thick Impasto Texture With a Palette Knife
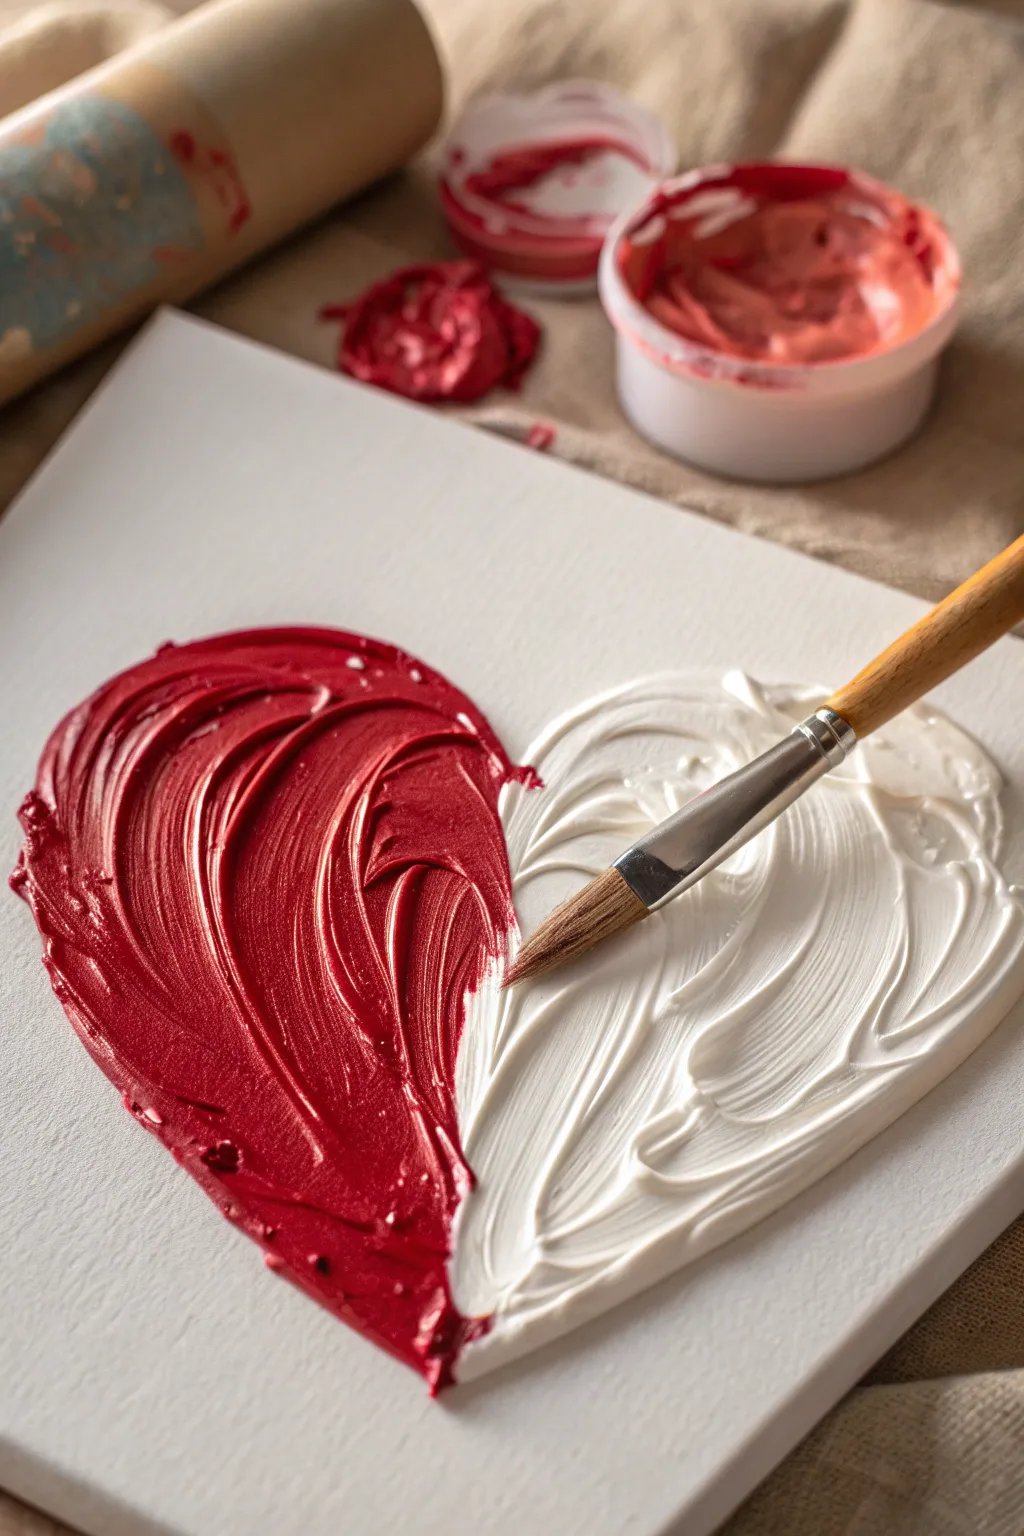
Capture the romance of texture with this striking split-heart design that leaps off the canvas. Using an impasto technique with heavy body acrylics, you will sculpt ridges that look like lustrous frosting.
Step-by-Step Guide
Materials
- Small square canvas (e.g., 8×8 inches)
- Heavy body acrylic paint (Cadmium Red, Titanium White)
- Clear gloss gel medium or modeling paste
- Stiff round bristle brush (Size 8 or 10)
- Pencil
- Palette or paper plate
- Paper towels and water cup
Step 1: Preparation and Outline
-
Prepare your surface:
Ensure your canvas is clean and dry to allow the heavy paint to adhere properly. -
Sketch the heart:
Lightly draw a large, symmetrical heart shape that fills most of the canvas using your pencil. -
Divide the heart:
Draw a gentle, vertical S-curve down the center of the heart to separate the red side from the white side.
Hold the Peak
Using a ‘Heavy Gel’ or ‘Modeling Paste’ is crucial here. Standard craft acrylics will flatten as they dry; the gel ensures those luscious brush ridges stay standing tall.
Step 2: Sculpting the Red Section
-
Mix the red medium:
On your palette, mix a generous dollop of red paint with an equal amount of gloss gel medium or modeling paste to create a thick, frosting-like consistency. -
Load the brush:
Scoop up a large amount of the red mixture onto your stiff bristle brush; do not be shy with the volume. -
Apply the top arch:
Place the brush at the top curve of the left heart lobe and press down, pulling the paint downwards in a sweeping motion following the outer curve. -
Fill the bottom tip:
Reload your brush and apply paint to the bottom tip of the left side, pulling upwards to meet your previous strokes. -
Create the ridges:
Without adding new paint, drag your brush bristles through the wet pile in a continuous curved motion to create deep, textural grooves. -
Define the center line:
Carefully run the edge of your brush along the pencil divider line to create a sharp, distinct edge for the red section.
High Gloss Finish
Since impasto takes a long time to dry (often 24+ hours), wait until it is fully cured and then apply a high-gloss varnish to give it that wet, candy-coated look.
Step 3: Sculpting the White Section
-
Clean your tools:
Thoroughly wash and dry your brush, or switch to a fresh one, to ensure the white paint stays pristine. -
Mix the white medium:
Combine your white heavy body acrylic with the thickening gel medium on a clean spot of your palette. -
Apply the right lobe:
Blob a heavy amount of white paint onto the top right arch of the heart. -
Mirror the motion:
Sweep the white paint downwards following the curve of the heart, mirroring the direction of the red strokes. -
Fill the lower right:
Complete the white shape by filling in the bottom section, ensuring the paint connects seamlessly to the top arch. -
Texture the white:
Use the stiff bristles to carve swirled ridges into the white paint, matching the visual weight of the red side. -
Meet in the middle:
Very carefully push the wet white paint up against the red center edge so they touch but do not blend together.
Step 4: Finishing Touches
-
Check the profile:
Look at the canvas from the side to ensure both halves have equal height and volume. -
Enhance the swirls:
I like to take one final pass with a clean brush to deepen any ridges that may have settled. -
Dry flat:
Lay the canvas absolutely flat in a dust-free area to dry, as gravity can cause the thick paint to slide if hung up while wet.
Once fully dry, this textured heart serves as a bold, modern declaration of love perfect for any wall.
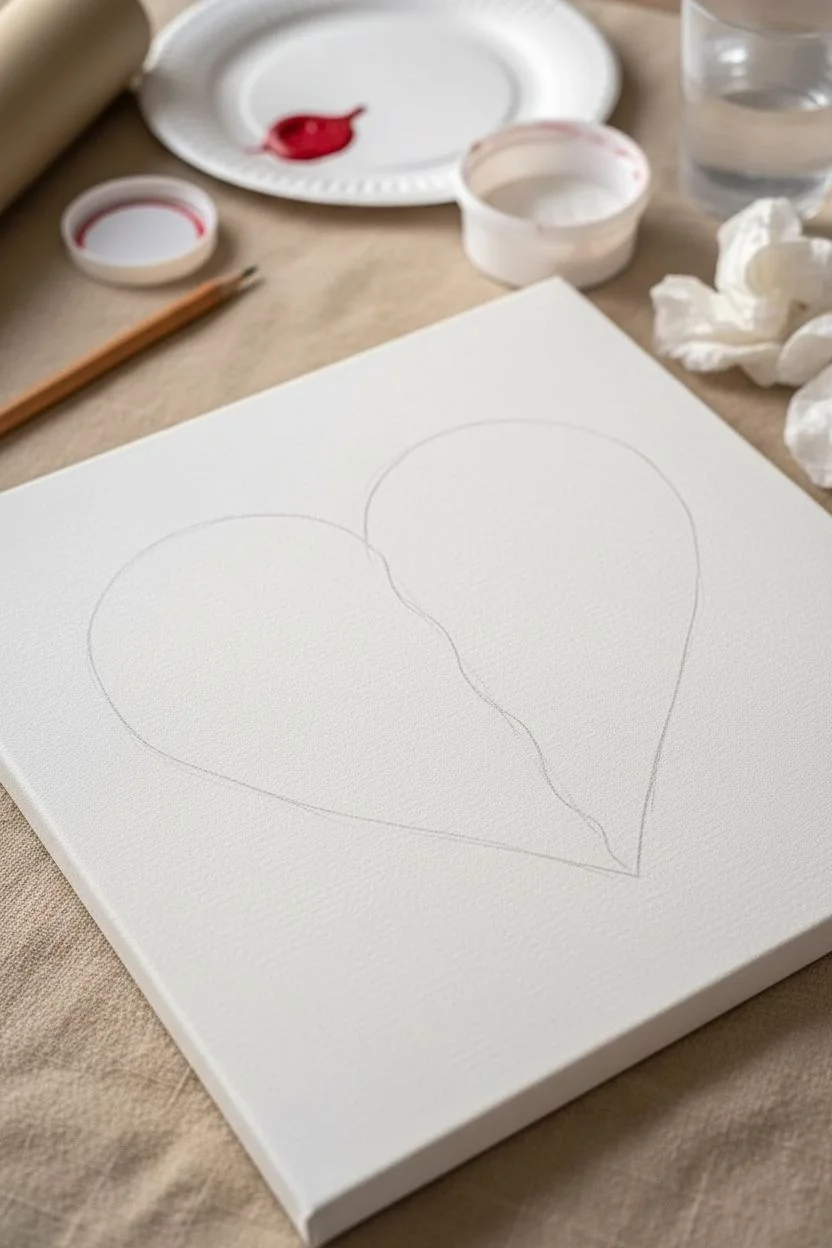
A Split-Canvas Duo for Partners
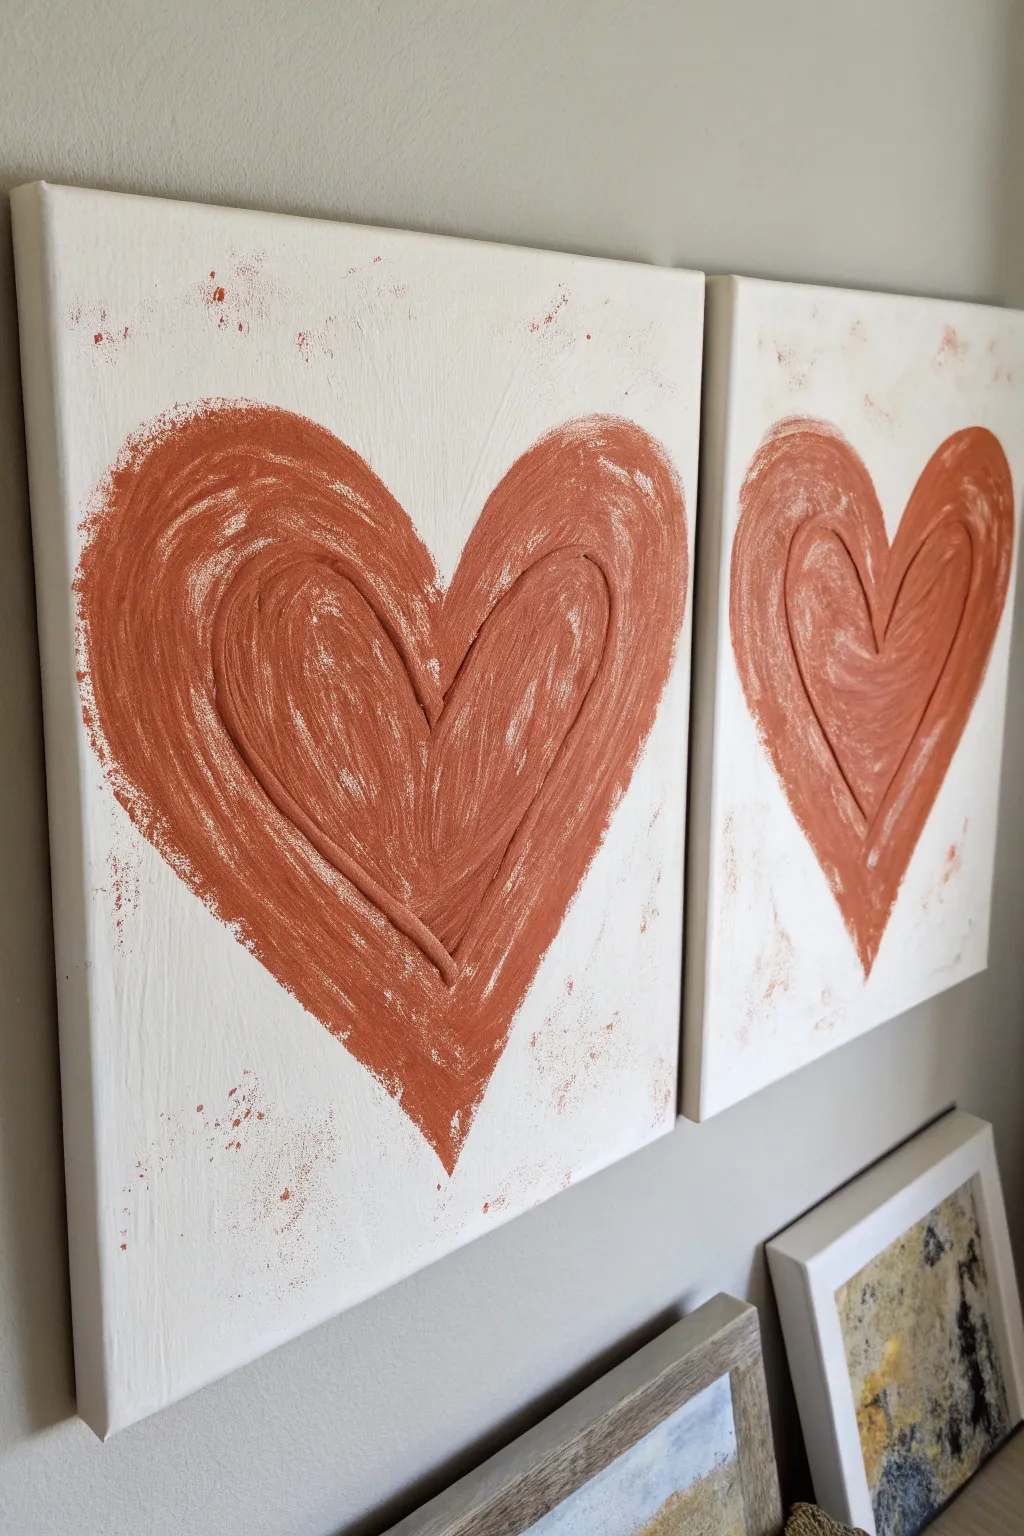
Create a coordinated set of dimensional wall art featuring warm terracotta tones and tactile relief details. Using modeling paste and a dry-brush technique, this project results in a weathered, vintage aesthetic that pops against a white background.
How-To Guide
Materials
- Two square stretched canvases (12×12 or 16×16)
- Modeling paste or heavy structure gel
- Piping bag (or plastic zip-bag)
- Acrylic paint (Terracotta or Burnt Sienna)
- White acrylic paint (for blending)
- Stiff flat bristle brush (hog hair works best)
- Pencil
- Palette or paper plate
- Old toothbrush (optional)
Step 1: Sculpting the Ridge
-
Prepare the layout:
Place both canvases side-by-side on your workspace to ensure your designs will be roughly symmetrical in size and placement. -
Sketch the outline:
Lightly draw a large heart shape on each canvas using a pencil. Keep the lines faint so they are easily covered later. -
Mark the relief line:
Draw a slightly smaller heart inside the first one, leaving about an inch or two of space between the outlines. This inner line will become the raised 3D ridge. -
Prepare the paste:
Scoop your modeling paste into a piping bag. If you don’t have one, a sturdy plastic zipper bag with a corner snipped off works perfectly. -
Pipe the texture:
Squeeze the paste steadily along that inner pencil line, creating a raised cord or ridge. It doesn’t need to be perfectly smooth; bumps prevent it from looking manufactured. -
Allow to cure:
Let the canvases sit flat until the paste is completely hard. Depending on the thickness and humidity, I usually let this dry overnight to be safe.
Use Stiff Bristles
Use a cheap hog-hair brush or utility brush rather than a soft synthetic one. The stiff bristles are essential for creating those rustic, scratchy streaks.
Step 2: Dry Brushing Color
-
Load the brush:
Squeeze a dollop of terracotta paint onto your palette. Dip just the tip of your stiff brush into the paint, keeping the brush mostly dry. -
Offload excess paint:
Dab the brush repeatedly on a paper towel or clean part of the palette until very little pigment comes off. This is crucial for the distressed look. -
Highlight the ridge:
Run your brush along the raised modeling paste ridge first. The texture will grab the paint, defining the darker core of the heart. -
Fill the form:
Using quick, sweeping strokes, paint the rest of the heart shape. Start from the center and flick outward, then paint the outer edges and flick inward. -
Create texture:
Apply varying pressure as you brush. Press lighter in some areas to let the white canvas show through, keeping the coverage scratchy and uneven. -
Build saturation:
Go back over the heart with a second layer of dry-brushing if certain areas look too pale, focusing on deepening the color around the raised ridge.
Metallic Pop
Mix a tiny drop of gold metallic paint into your terracotta shade. It adds a warm, subtle shimmer that catches the light on the raised textures.
Step 3: Finishing Touches
-
Mix a wash:
Dilute a pea-sized amount of the terracotta paint with water until it is distinctively runny. -
Apply splatter:
Load an old toothbrush or a stiff brush with the watery paint. Use your thumb to flick the bristles, spraying fine speckles around the edges of the heart. -
Soften edges:
If a splatter lands somewhere you don’t like, quickly dab it with a clean, damp paper towel to mute it. -
Final dry:
Allow the paint to fully set for at least an hour before hanging your new art duo.
Hang these canvases side-by-side to enjoy the warm, rustic charm they bring to your space.
Modern Geometric Facets and Polygons
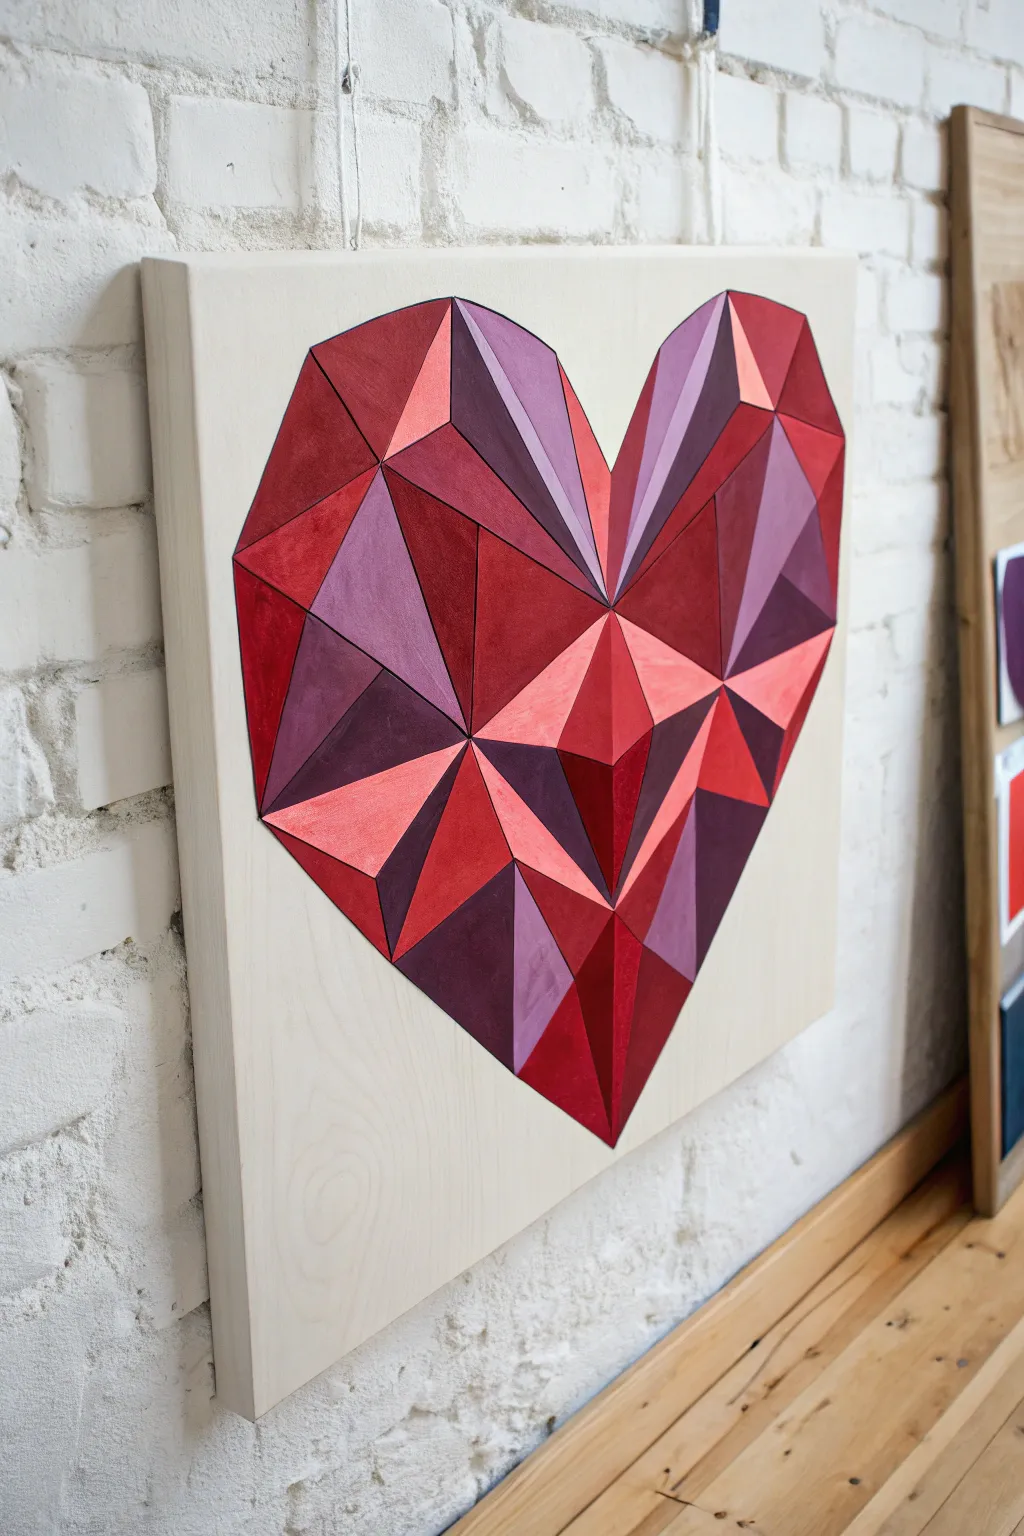
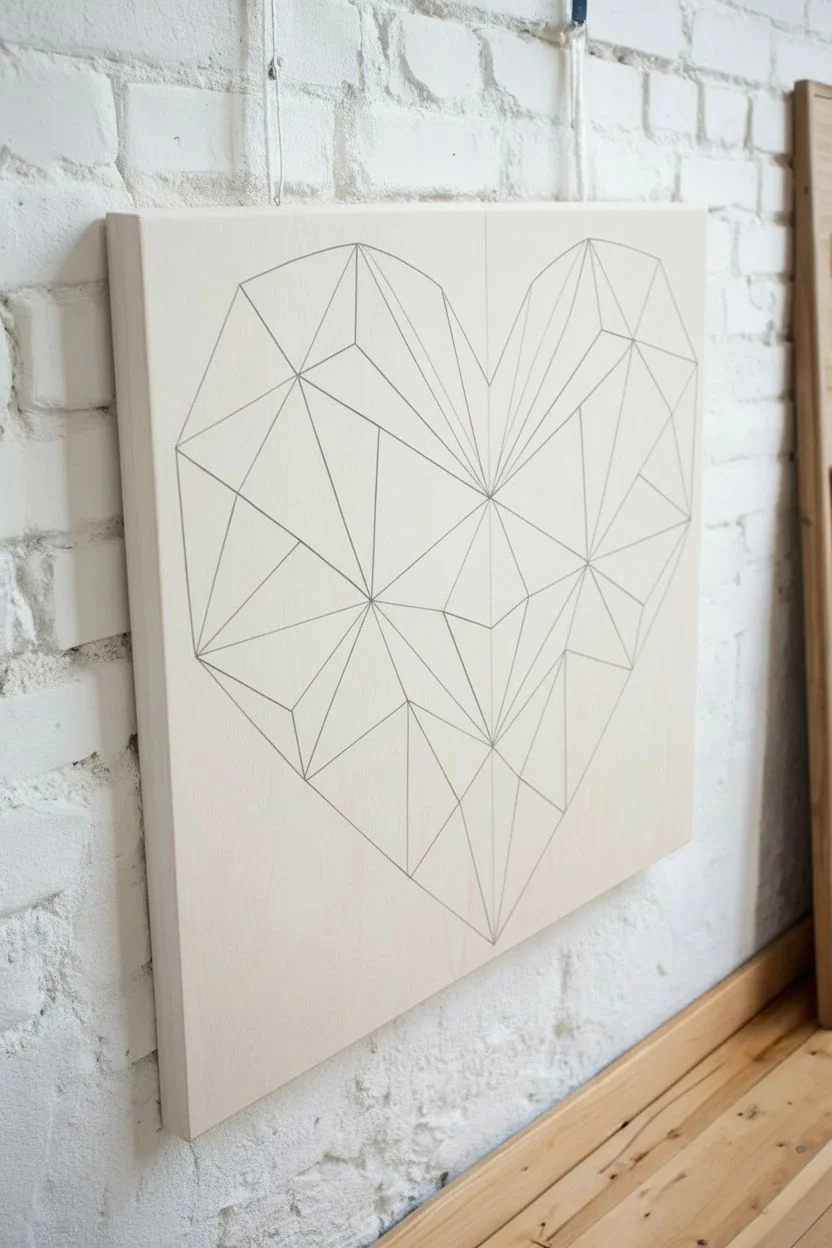
This striking project combines the natural warmth of birch wood with the sharp, modern aesthetic of low-poly art. By using shading and precise angles, you’ll manipulate acrylics to create a 3D faceted heart that looks like it’s popping right off the panel.
Step-by-Step
Materials
- Unfinished wooden cradle board or birch panel
- Acrylic paints (Crimson, Deep Violet, Maroon, Coral, Titanium White)
- Flat synthetic brushes (various sizes)
- Low-tack painter’s tape (0.5 inch width)
- Clear matte medium or clear gesso
- Ruler and HB pencil
- Fine-grit sandpaper
- White eraser
Step 1: Preparation and Drafting
-
Surface Prep:
Begin by lightly sanding your wooden panel with fine-grit sandpaper to remove any splinters or rough patches. Wipe away the dust with a clean, dry cloth. -
Sealing the Wood:
Apply a thin layer of clear gesso or matte medium over the entire face of the panel. This seals the wood grain so your paint sits on top vibrantly without soaking in, while keeping the natural wood look for the background. -
Establishing the Center:
Using your ruler, lightly mark a vertical line down the exact center of the board. This will serve as the anchor for your heart’s symmetry. -
Drawing the Outline:
Sketch the main outline of the heart shape. Keep the lines straight and angular rather than curved; think of a diamond or jewel shape. -
Mapping the Facets:
Mark a focal point near the center of the heart where multiple facets will converge. From this point, use your ruler to draw straight lines radiating outward to the edges of the heart outline, creating various triangles and quadrilaterals.
Step 2: Color Strategy
-
Mixing the Palette:
Prepare your palette by creating three distinct tonal groups: highlights (pinks mixed with white and coral), mid-tones (crimson and standard red), and shadows (maroon mixed with violet). -
Planning the Light Source:
Decide where your imaginary light is coming from—usually the top right. Lightly mark an ‘L’ (light), ‘M’ (mid), or ‘D’ (dark) inside each geometric shape on your wood panel to guide your painting process.
Clean Lines Pro-Tip
Can’t wait for tape? You can paint adjacent shapes freehand if you leave a hairline gap of exposed wood between them. This creates a ‘stained glass’ lead-line effect that looks intentional and stylish.
Step 3: Painting the Polygons
-
Taping the First Group:
Select a few non-adjacent shapes to start with—shapes that do not share a common side. Apply painter’s tape along the outside edges of these shapes to ensure razor-sharp lines. -
Sealing the Tape Edge:
Here I prefer to brush a tiny amount of clear matte medium along the edge of the tape before applying color. This creates a barrier preventing the red paint from bleeding under the tape into the wood grain. -
Applying Paint:
Fill in the taped shapes with their designated color (shadow, mid-tone, or highlight). Use flat brushes to get smooth, even coverage, brushing in the direction of the facet’s longest side. -
Immediate Peel:
Carefully peel back the painter’s tape while the paint is still slightly wet. Pulling away at a 45-degree angle usually gives the cleanest edge. -
Drying Time:
Allow these sections to dry completely. Acrylics dry fast, but since we are taping over painted areas next, they must be fully cured (cool to the touch). -
Taping the Second Group:
Once the first batch is dry, tape off a second set of shapes. It is safe to place tape gently over the dry painted sections to define the edges of the new neighbors. -
Creating Contrast:
As you paint this next set, pay attention to contrast. If a neighbor is dark red, paint the new shape a lighter pink or coral to emphasize the ‘faceted’ 3D effect. -
Repeating the Process:
Continue the cycle of taping, sealing, painting, peeling, and drying until every geometric shape is filled. Be patient; doing this in rounds ensures perfect intersections.
Level Up: Metallic Pop
Choose one or two small facets—ideally where the light would hit hardest—and paint them with metallic gold or rose gold acrylic. It adds a sophisticated shimmer that changes as you walk by the art.
Step 4: Finishing Touches
-
Touch Ups:
Inspect the panel for any paint ridges or small gaps between shapes. Use a very fine liner brush and your mixed colors to carefully correct any imperfections freehand. -
Clean Up:
Once the paint is fully cured (give it overnight if possible), use a white eraser to gently remove any visible graphite pencil lines from the unpainted wood background. -
Final Varnish:
Apply a final coat of satin or matte varnish over the entire board. This unifies the sheen of the paint and protects the exposed wood from yellowing over time.
Hang your geometric heart proudly on the wall and enjoy the modern warmth it brings to your space
Mixed Media Collage Backgrounds
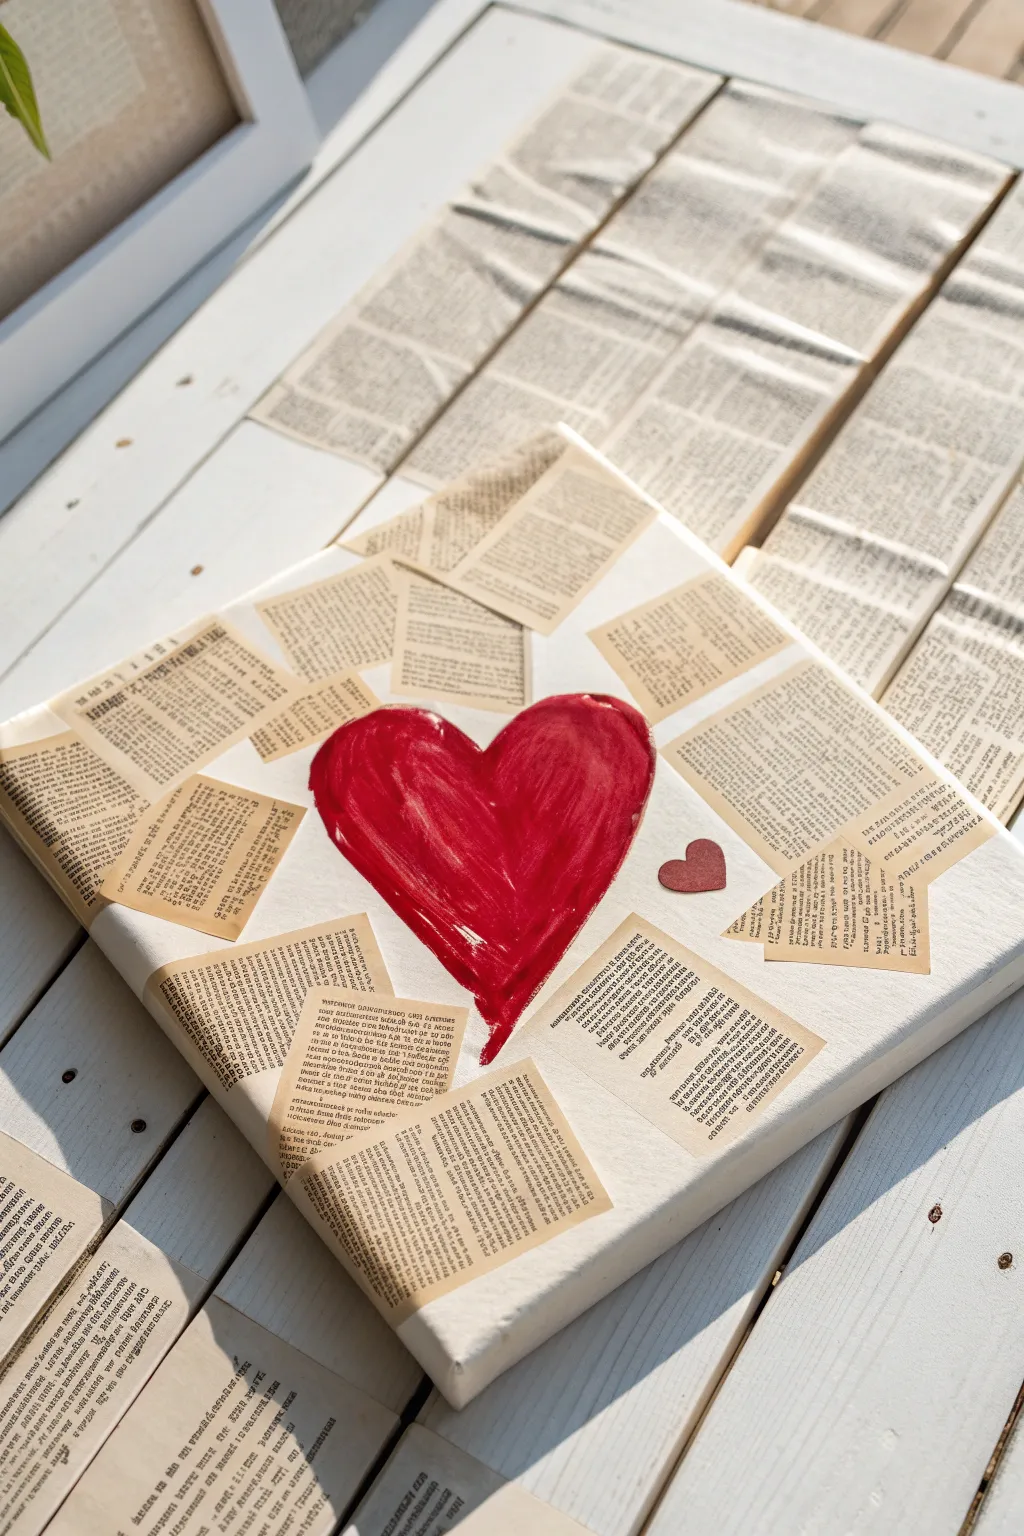

Blend the nostalgia of aged text with bold, expressive color in this romantic mixed media piece. This project uses simple layering techniques to create a sophisticated, textured border that perfectly frames a hand-painted centerpiece.
Detailed Instructions
Materials
- Square stretched canvas (12×12 inches suggested)
- Red acrylic paint (bright red and crimson)
- Old book pages or text printed on cream paper
- Decoupage glue (like Mod Podge) or matte medium
- Scissors
- Flat paintbrush (size 8 or 10)
- Small foam brush
- Pencil
- Red cardstock scrap
Step 1: Creating the Collage Border
-
Select your text:
Find old book pages that have slightly yellowed with age for the best vintage aesthetic. Alternatively, print text blocks on cream-colored paper. -
Cut paper rectangles:
Cut the text pages into small rectangular scraps, approximately 2 by 3 inches. Keep the edges straight and crisp rather than tearing them. -
Plan the layout:
Lay your plain white canvas on a flat surface. Begin arranging the paper rectangles around the perimeter without gluing yet. -
Scatter and angle:
Position the papers at various random angles. Let them overlap each other slightly to create a layered, informal look. -
Define the negative space:
Arrange the border so that the paper creeps inward but leaves a large, roughly heart-shaped or circular open white space in the center. -
Glue the first layer:
Lift one piece of paper, apply a thin layer of decoupage glue to the back using a foam brush, and press it firmly onto the canvas. -
Build the texture:
Continue gluing each piece down. I like to smooth each one immediately with a finger to ensure flat adhesion and prevent air bubbles. -
Dry the background:
Once the border is secured, let the glue dry completely. The paper needs to be stable before you begin painting near it.
Step 2: Painting the Heart
-
Sketch the shape:
Use a pencil to lightly draw a large heart in the center white space. Allow the lobes of the heart to slightly overlap the inner edges of your text collage. -
Prepare the paint:
Load a flat paintbrush with bright red acrylic paint. You don’t need to thin the paint; a thicker consistency adds nice texture. -
Outline the form:
Carefully paint along your pencil line first to define the heart’s shape, covering any pencil marks as you go. -
Fill with texture:
Fill in the rest of the heart using long, vertical brushstrokes. Don’t aim for perfectly smooth coverage; visible brush marks add to the artistic, hand-painted charm. -
Add depth:
While the paint is still wet, dip your brush into a tiny bit of darker crimson (or layer more red) to add subtle dimension to the center strokes. -
Refine the edges:
Step back and look at the heart’s symmetry. Use the tip of your brush to smooth out any curves that look uneven.
Wrinkled Paper?
If the book pages ripple heavily when wet, wait a few minutes for the glue to tack up, then smooth them firmly from the center outward with an old credit card.
Step 3: Final Details
-
Create the mini heart:
Cut a very small heart shape, about the size of a coin, out of red cardstock or a scrap of paper painted red. -
Attach the accent:
Glue this small heart onto the canvas, positioning it to the right of the main heart, resting partially on the text background. -
Seal the artwork:
Allow the red paint to fully cure. Finally, gently brush a coat of matte medium over the entire canvas to seal the papers and protect the painting.
Level Up: Personalize It
Instead of random book pages, use photocopies of love letters, favorite poems, or song lyrics to give the background text a hidden personal meaning.
Hang your finished canvas on the wall or prop it on a shelf to add a lovely handmade touch to your décor.
The Mini Motif Grid Sampler
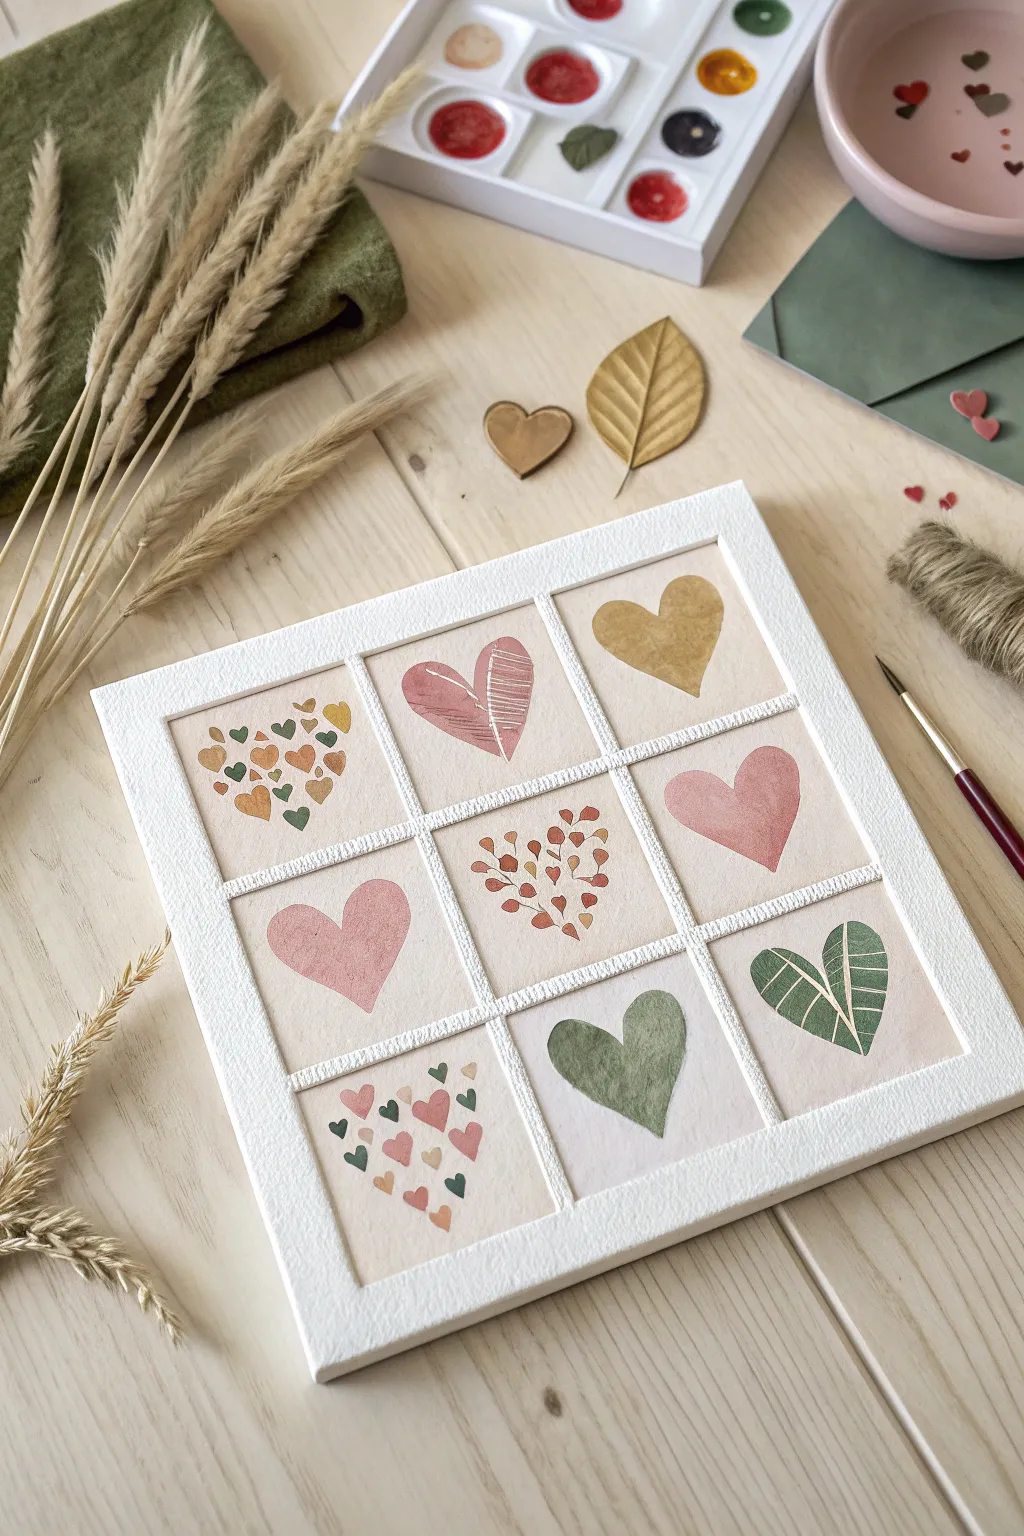
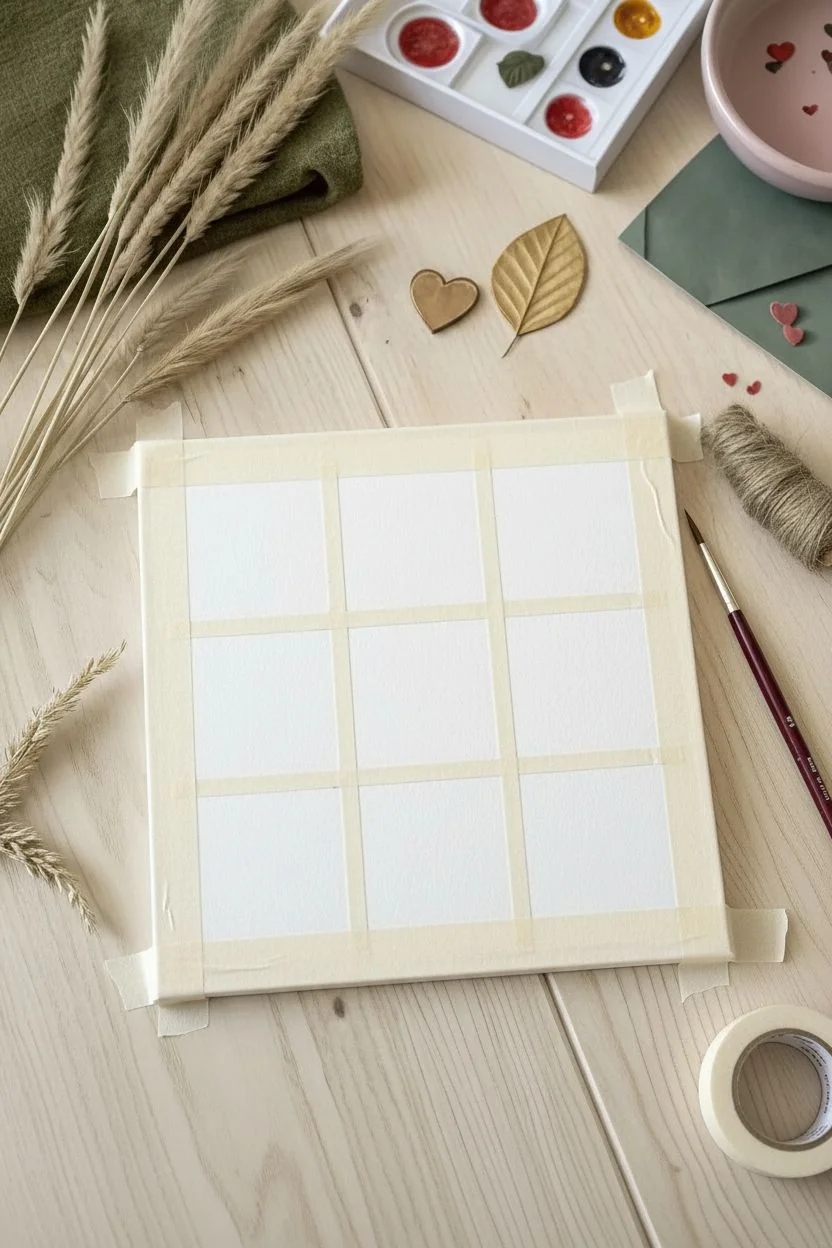
Create a charming miniature gallery wall on a single surface with this nine-panel heart sampler. Using a muted, bohemian palette of sage, dusty rose, and ochre, you will explore different simple patterns to create a cohesive and heartwarming piece of art.
Step-by-Step
Materials
- Square watercolor paper or canvas board (approx. 8×8 or 10×10 inches)
- Artist masking tape or washi tape (1/4 inch width is ideal)
- Watercolors or acrylic gouache paints
- Brushes: Small round brush (size 2) and medium round brush (size 6)
- White gel pen or fine white paint marker
- Pencil and ruler
- Palette for mixing muted tones
- Paper towels
Step 1: Preparation & Grid
-
Surface setup:
Begin with your square paper or canvas. Using your ruler, lightly mark the surface into a 3×3 grid of equal squares. -
Taping the borders:
Apply masking tape around the entire outer perimeter of your artwork to create a crisp, clean border. -
Creating the lattice:
Place strips of masking tape over your pencil lines to separate the nine sections. Press the edges of the tape down firmly with your fingernail or a spoon to prevent paint from bleeding underneath.
Bleeding Lines?
If paint seeped under the tape, wait for it to dry fully. Then, use a small flat brush with white acrylic or gouache to paint over the mistake and tidy up the grid lines.
Step 2: Mixing the Palette
-
Creating Sage Green:
Mix green with a touch of red and plenty of white (or water) to get a soft, desaturated sage color. Test it on a scrap paper to ensure it feels earthy, not bright. -
Mixing Dusty Rose:
Combine red with a tiny dot of green or brown to dull it down, then dilute it for a soft pink that matches the warmth of the wood surroundings. -
Blending Ochre Gold:
Prepare a mustard yellow or ochre shade. If using watercolors, keep the pigment fairly concentrated so it stands out against the white paper.
Level Up: Metallic Pop
Swap the ochre paint for metallic gold watercolor or gold leaf. This adds a subtle shimmer that catches the light and makes the artwork look more expensive.
Step 3: Painting the Solids
-
The Gold Heart:
In the top-right square, paint a simple, solid heart using your ochre mix. Keep the shape plump and centered. -
The Pink Solids:
Paint solid dusty rose hearts in the middle-left and middle-right squares. I like to vary the tilt slightly to give the grid movement. -
The Sage Solid:
Fill the bottom-middle square with a solid sage green heart. Ensure the paint is applied evenly. -
Base Layers for Patterns:
Paint a solid pink heart in the top-middle square and a solid green heart in the bottom-right square. Let these dry completely—we will add details on top of them later.
Step 4: Detailing the Motifs
-
Confetti Hearts (Top-Left):
Using your smallest brush, dab tiny hearts in all three colors (sage, pink, ochre) into the top-left square. Scatter them randomly, rotating them in different directions like falling confetti. -
The Heart Tree (Center):
In the very center square, paint a delicate ‘tree’ shape. Use the ochre and pink to paint tiny hearts arranged like leaves on imaginary branches growing outward. -
Rising Hearts (Bottom-Left):
For the bottom-left square, paint a cluster of small multi-colored hearts starting heavily at the bottom corner and spacing them out as they float upward. -
White Texture (Top-Middle):
Once the pink base is 100% dry, use your white gel pen or fine brush to draw scratchy, horizontal texture lines on the right half of the heart. -
Leaf Veins (Bottom-Right):
On the dried green heart in the bottom-right, draw a vertical center line and V-shaped veins with white ink to turn the heart into a stylized leaf.
Step 5: Finishing Touches
-
Dry check:
Wait until every square is completely dry to the touch. If the paint is cool, it likely still holds moisture. -
The reveal:
Slowly peel away the masking tape grid. Pull the tape away from the painted areas at a 45-degree angle to ensure sharp, crisp lines. -
Grid enhancement (Optional):
If you want the raised look shown in the photo, you can glue thin strips of white cardstock or mat board over your white grid lines to add dimension.
Frame your new sampler in a square wooden frame to complete that cozy, natural aesthetic.
Rainbow Rain Melted Crayon Resist
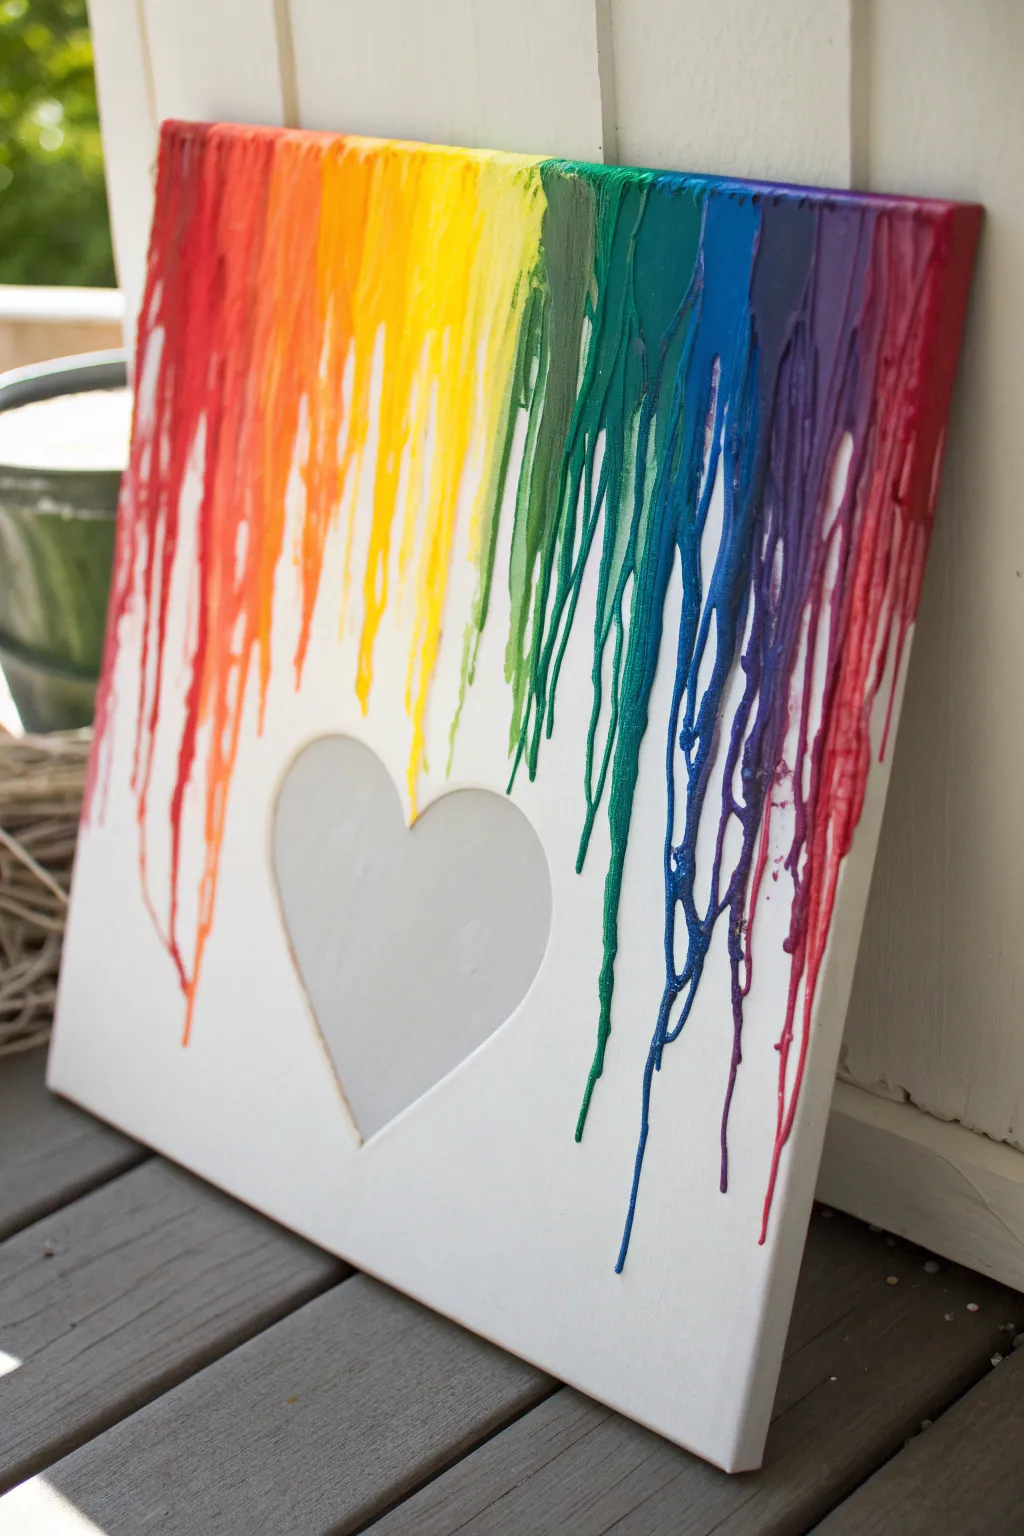
Transform a simple box of crayons into a vibrant cascade of color that pops against clean white space. This project uses a resist technique to keep a perfect heart shape amidst the colorful texture of melted wax.
Detailed Instructions
Materials
- Stretched white canvas (ex. 16×20 inches)
- Box of wax crayons (64 count for variety)
- Adhesive shelf liner or wide painter’s tape
- Hot glue gun and glue sticks
- Hair dryer or heat gun
- Scissors
- Trash bags or newsprint (for protection)
Step 1: Preparing the Mask
-
Protect your workspace:
Lay down trash bags or heavy newsprint on the floor and against the wall where you will work. Melted wax can splatter, so cover a wider area than you think you need. -
Create the heart shape:
Draw a large heart on the backing of your adhesive shelf liner or a strip of wide painter’s tape. -
Cut out the mask:
Carefully cut out the heart shape with scissors. Try to keep the edges as smooth as possible for a crisp final outline. -
Position the heart:
Place the adhesive heart onto the lower center of the canvas. You can center it perfectly or offset it slightly depending on your preference. -
Seal the edges:
Rub your fingernail or a credit card firmly along the edges of the heart sticker. This burnishing step prevents liquid wax from seeping underneath later.
Wax Splatter Fix
If wax splatters sideways where you don’t want it, let it cool completely, then gently scrape the rogue drop off with a dull knife. Don’t wipe it while hot or it will smear!
Step 2: Arranging the Crayons
-
Sort your colors:
Select your crayons and arrange them in a rainbow gradient: red, orange, yellow, green, blue, indigo, and violet. Mixing in a few different shades of each color adds depth. -
Remove the wrappers:
Peel the paper wrappers off all the selected crayons. While you can melt them with wrappers on, removing them creates a cleaner melt and prevents paper debris in your art. -
Glue the crayons:
Apply a line of hot glue along the very top edge of the canvas. Press the naked crayons into the glue line, standing them upright or laying them flat along the rim so they point downward. -
Secure the row:
Ensure the crayons are packed tightly together with no large gaps between them to ensure a solid curtain of color.
Sparkle Finish
Before the wax cools completely, lightly sprinkle fine iridescent glitter over the wet drips. It adds a magical shimmer that catches the light without overpowering the colors.
Step 3: Melting and Revealing
-
Prop the canvas:
Lean the canvas slightly upright against a covered wall or support. A slight angle helps the wax flow down slowly rather than free-falling. -
Begin heating:
Turn your hair dryer to the high heat setting but low air speed. Aim it at the center of the crayon row to start. -
Control the airflow:
Hold the dryer nozzle about 2-3 inches away from the wax. If the air is too strong, the wax will splatter sideways; if so, back away slightly. -
Guide the drips:
As the wax begins to liquefy and run, move the dryer slowly back and forth along the top row. I like to focus on one color section at a time to get an even melt. -
Cover the heart:
Allow the wax streams to flow all the way down and over your heart sticker. Don’t worry about covering the sticker; that is exactly what you want to do. -
Add layers:
Go back over areas that look thin. You can direct the heat on specific streams to push them further down the canvas. -
Check the texture:
Once you are happy with the length and thickness of the drips, turn off the hair dryer. -
Let it cool:
Allow the canvas to sit undisturbed for about 15 to 20 minutes until the wax is completely cool and hard to the touch. -
Remove the mask:
Use a craft knife or your fingernail to gently lift the edge of the heart sticker. Pull it away slowly to reveal the clean white canvas underneath. -
Clean up edges:
If any tiny flakes of wax intruded into the heart area, gently scrape them away with a fingernail for a perfect finish.
Now you have a stunning, colorful art piece that brightens up any room.
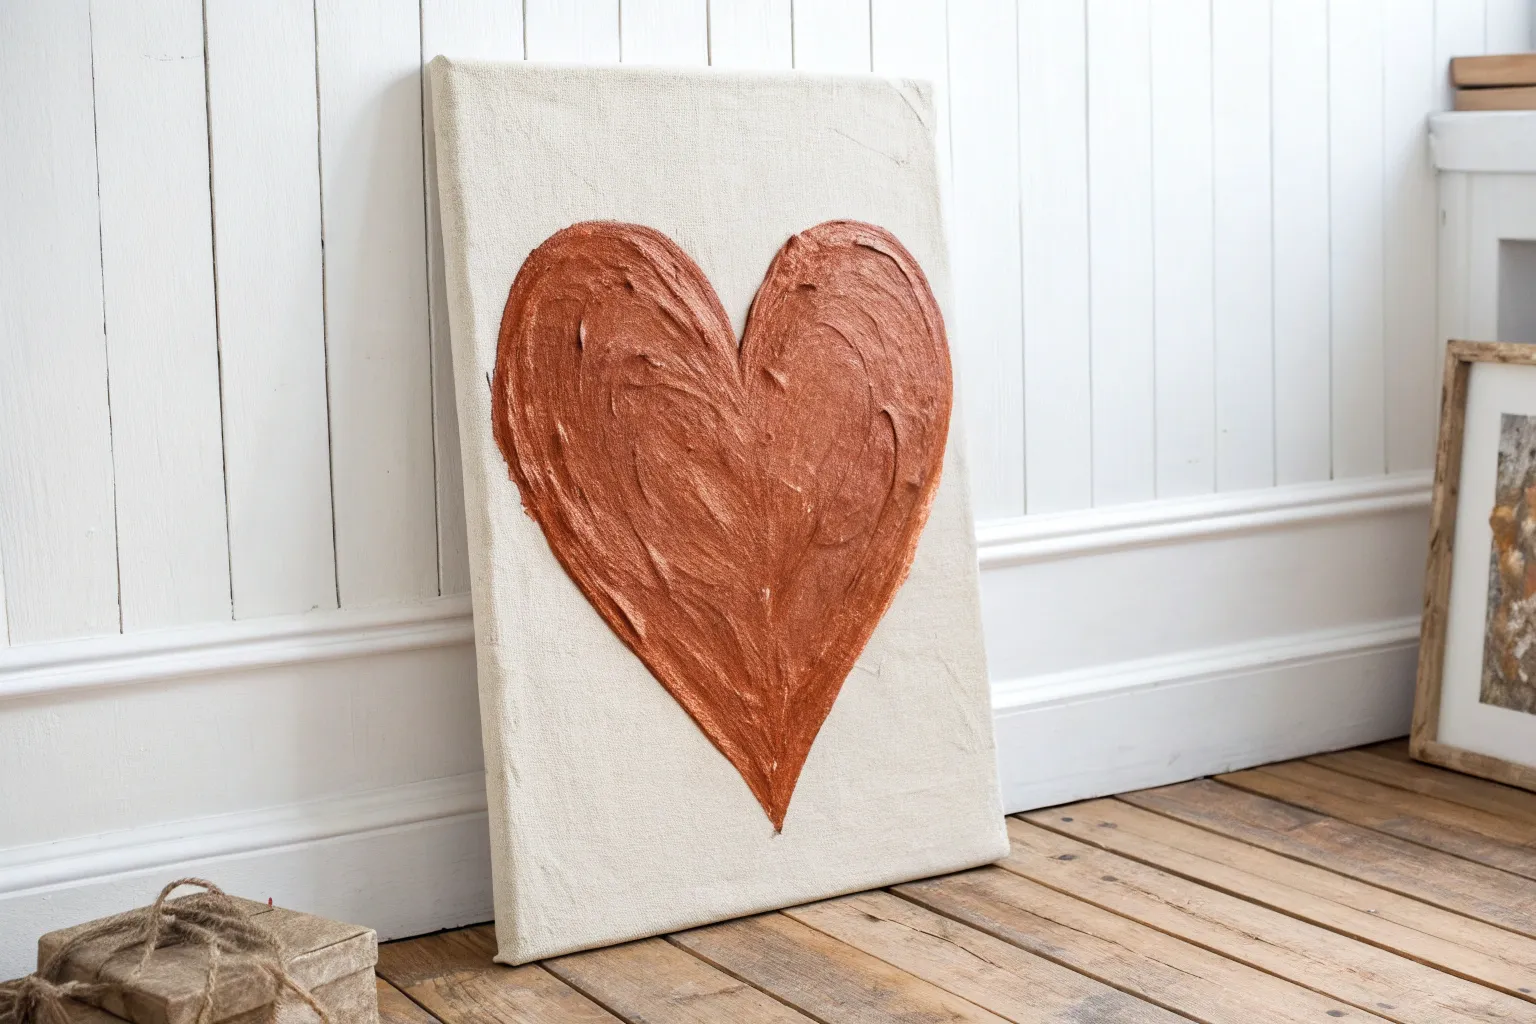
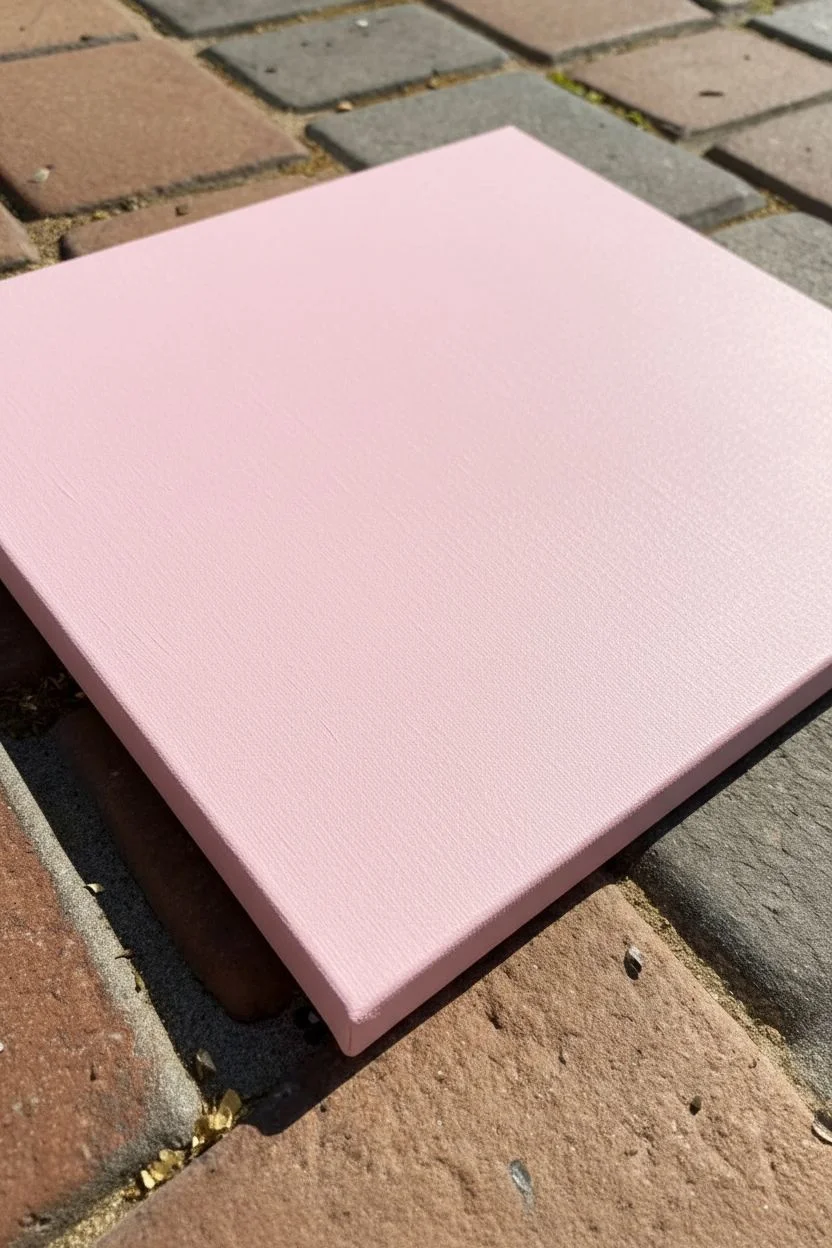
Elegant Minimalist Texture Paste Relief
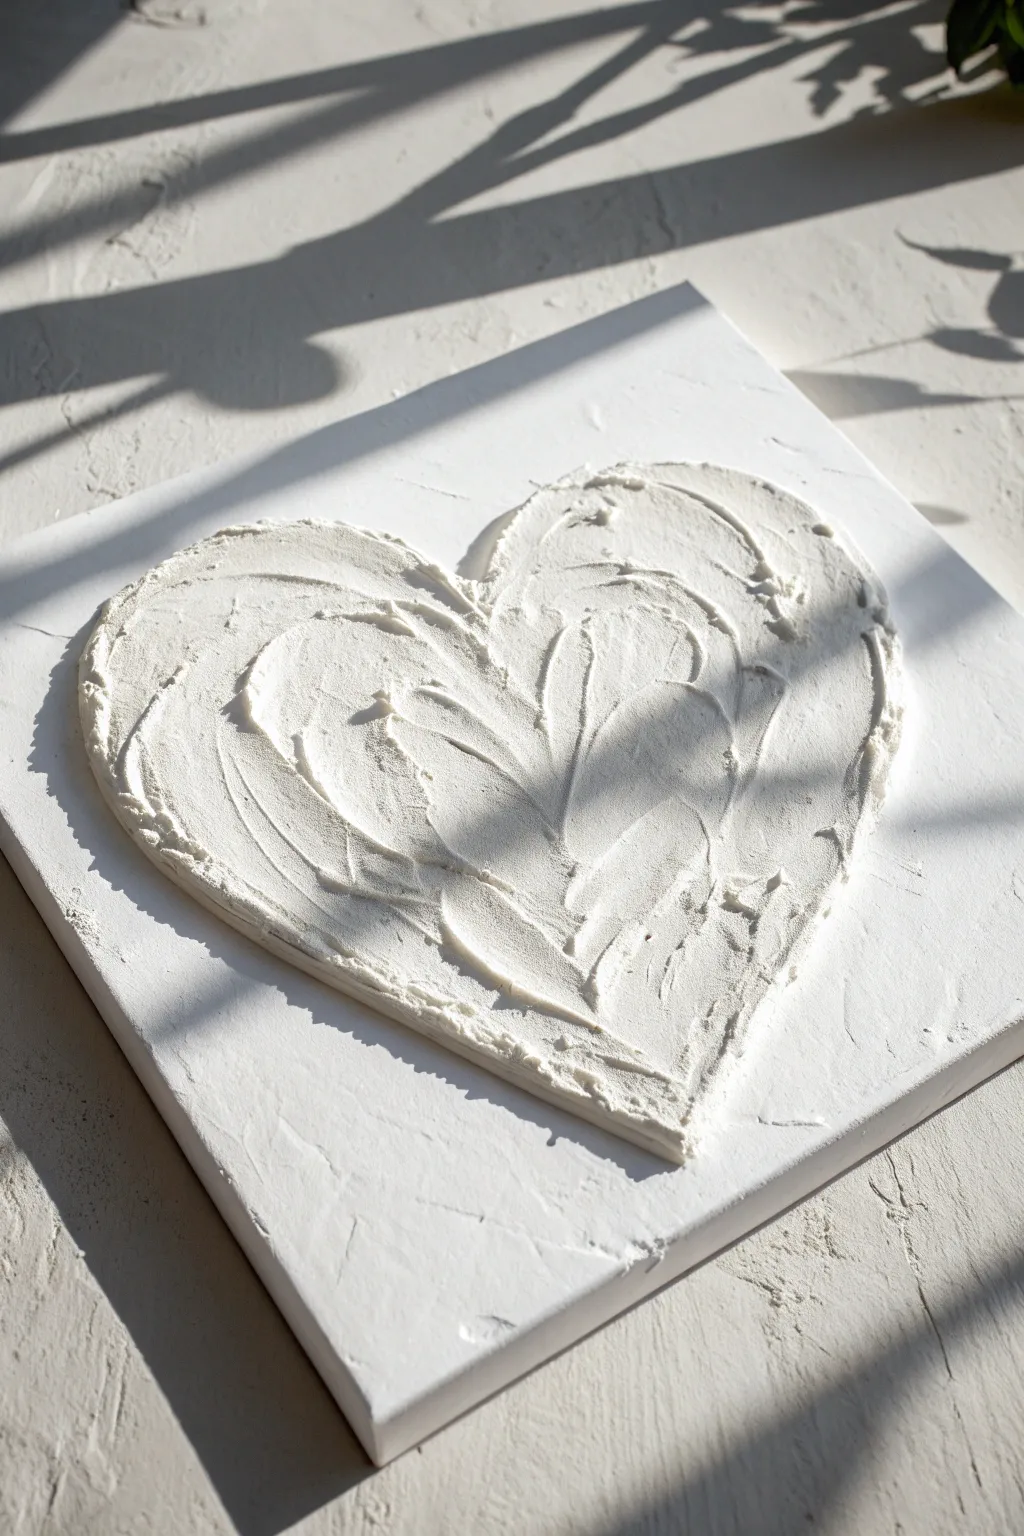
Capture the beauty of light and shadow with this elegant white-on-white relief art. Using texture paste to create a raised, three-dimensional heart allows you to play with depth and sculptural elements on a simple canvas.
Step-by-Step Tutorial
Materials
- Small square stretched canvas (e.g., 8×8 or 10×10 inches)
- White modeling paste or heavy texture gel
- Metal palette knife (trowel style works best)
- HB pencil
- White acrylic paint (optional)
- Soft flat brush (optional)
- Paper towels
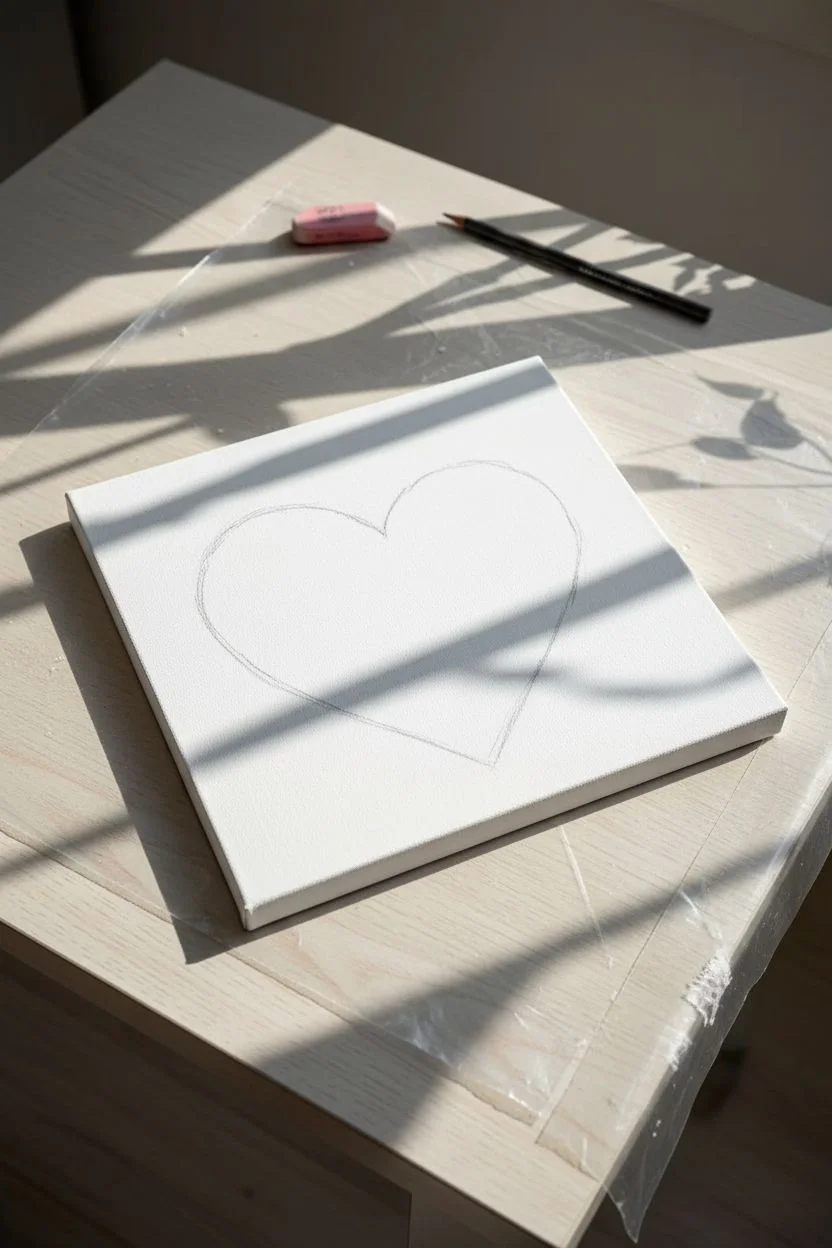
Step 1: Preparation
-
Prepare the workspace:
Lay down a protective covering on your table, as texture paste can be messy and difficult to remove once dried. -
Position the canvas:
Place your stretched canvas on a flat, stable surface. Ensure the canvas is tight and free of dust. -
Sketch the outline:
Using an HB pencil, very lightly draw a heart shape in the center of the canvas. Keep the lines faint so they don’t show through the edges later. -
Check symmetry:
Take a moment to step back and ensure your sketched heart is centered and relatively symmetrical, though a slightly organic look is desirable here.
Clean Blades Matter
Wipe your palette knife with a damp paper towel frequently. Dried bits of paste on the blade will drag through your wet design and ruin the smooth ridges.
Step 2: Applying Texture
-
Load the knife:
Scoop a generous amount of modeling paste onto the back of your palette knife. You want a substantial amount to build height immediately. -
Apply the base layer:
Apply the paste within the pencil outline, spreading it roughly to fill the shape. Avoid going too thin; you need a thick bed of paste to carve into. -
Build the volume:
Add more paste to the center of each heart lobe. The layer should be about 1/4 inch thick to achieve the raised relief effect shown in the example. -
Sculpt the left lobe:
Starting from the bottom point of the heart, drag your palette knife upward along the left curve, following the rounded shape of the lobe. -
Create directional ridges:
Lift the knife slightly as you sweep to create raised ridges. This is what captures the light and creates those dramatic shadows. -
Sculpt the right lobe:
Repeat the motion on the right side, sweeping up and around the curve to mirror the texture of the first side. -
Refine the center:
Where the two lobes meet in the center dip, use the tip of the knife to sharply define the indentation, pulling the paste slightly outward. -
Define the tip:
Work the paste down towards the bottom point of the heart, tapering the thickness slightly but maintaining a defined, sharp edge. -
Roughen the edges:
I prefer to use the side of the knife to tap or scrape the outer edges of the heart gently, giving it that raw, unfinished texture rather than a perfect line. -
Adding surface details:
Use the very tip of your knife to etch shallow curves or ‘C’ shapes into the wet paste inside the heart to enhance the flow of the design.
Step 3: Finishing Touches
-
Clean up stray marks:
Check the surrounding negative space on the canvas. If any stray paste landed there, scrape it off cleanly with a damp paper towel or clean knife. -
Initial drying phase:
Let the artwork sit undisturbed in a dust-free area. Thick paste takes a long time to dry; do not touch it even if the surface looks matte. -
Wait for full cure:
Allow the piece to dry for at least 24 hours. If applied very thickly, it may need up to 48 hours to fully harden all the way through. -
Inspect for cracks:
Once dry, check for any unwanted hairline cracks. If found, you can fill them with a tiny amount of fresh paste and let dry again. -
Optional painting:
If the dried paste looks slightly different in color than your canvas, paint the entire heart (or whole canvas) with white acrylic for a unified sheen.
Golden Hour Glow
Once the white paste is fully dry, gently rub a tiny amount of metallic gold wax over the highest ridges to highlight the texture and add luxury.
Hang your new textured masterpiece near a window where natural light can bring the relief details to life


Have a question or want to share your own experience? I'd love to hear from you in the comments below!