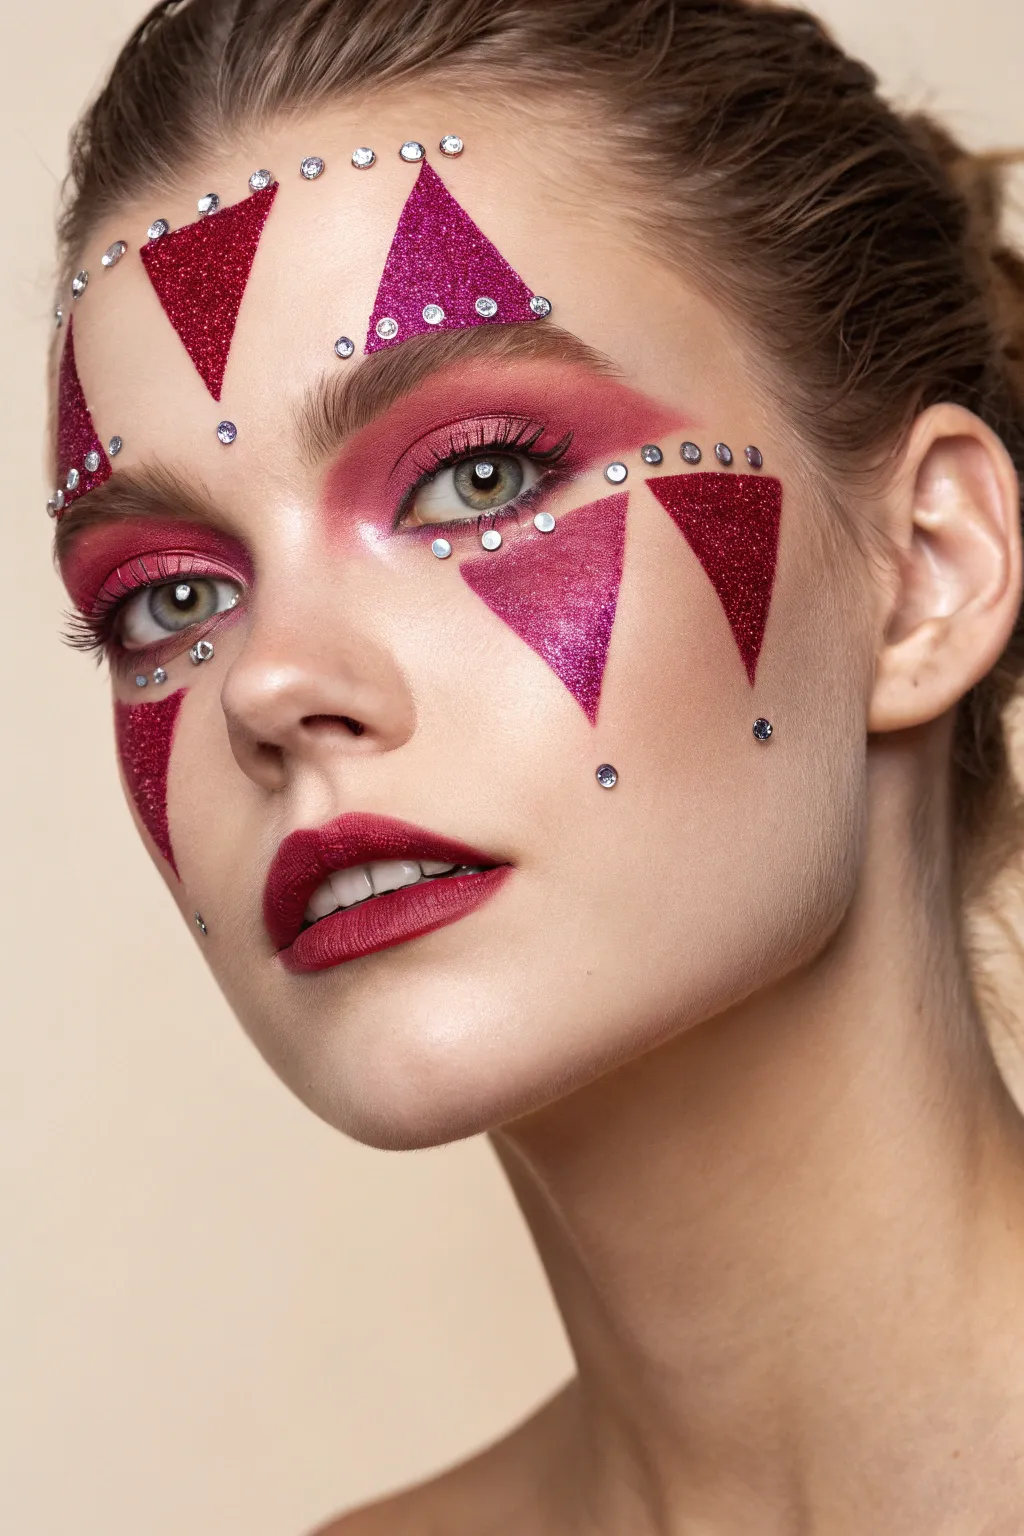
Transforming your look with face paint offers endless possibilities, ranging from whimsical circus characters to hauntingly beautiful artistic interpretations. Whether you are preparing for a costume party or simply exploring new makeup techniques, these concepts will help you master the balance between bold geometry and expressive color.
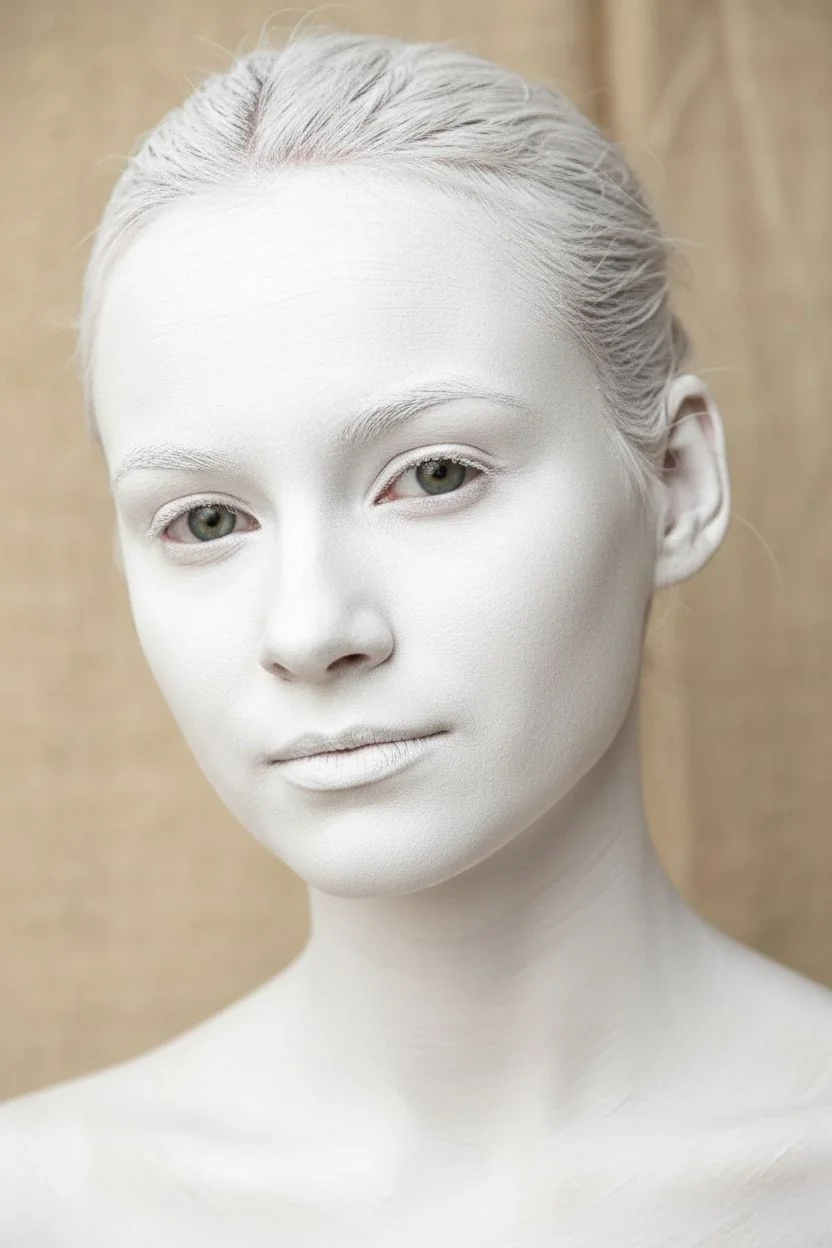
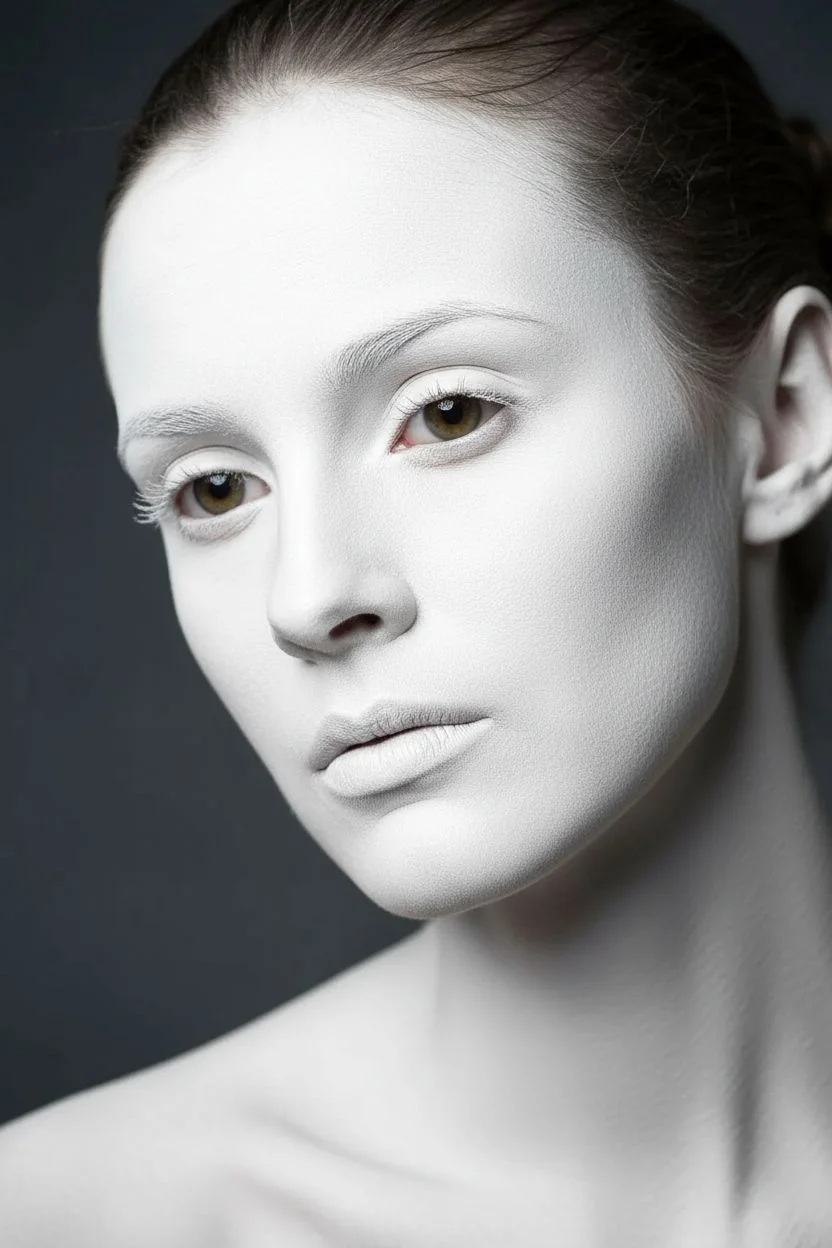
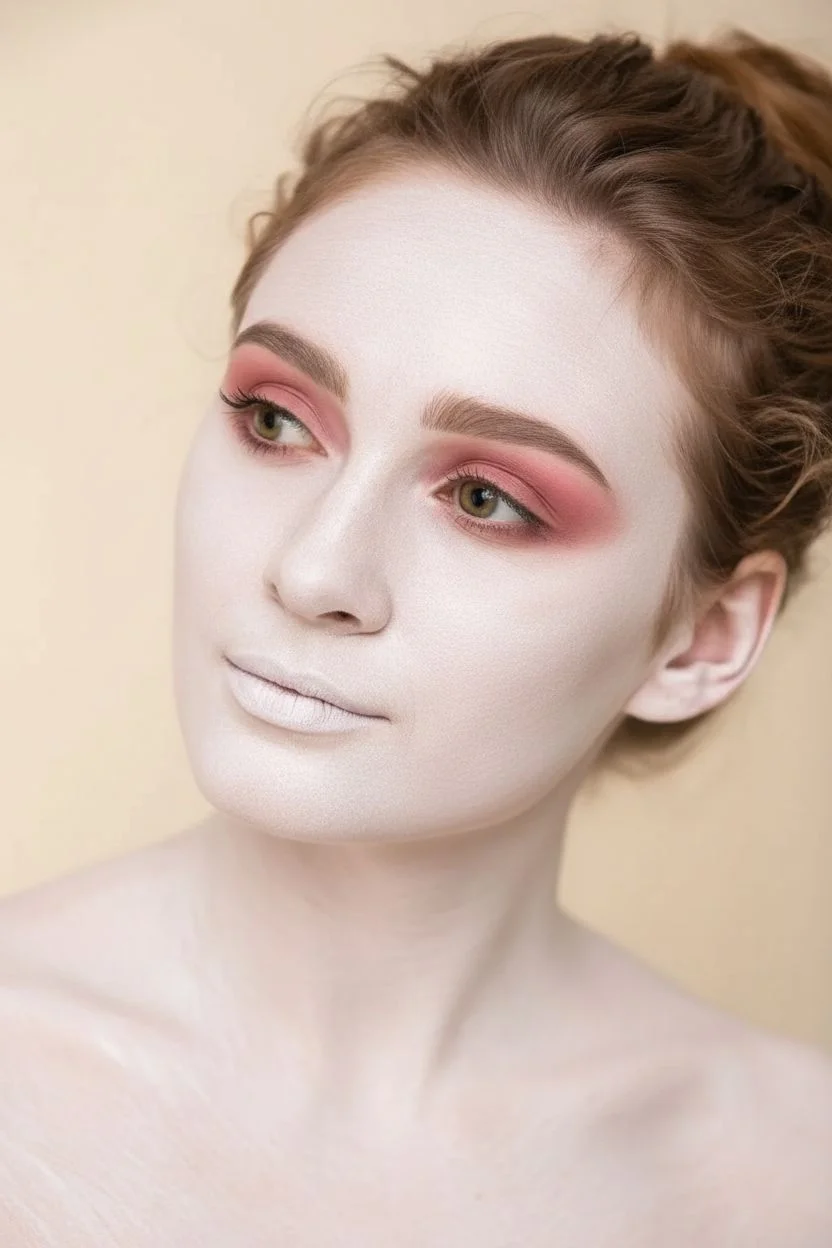
The Classic White Face Base
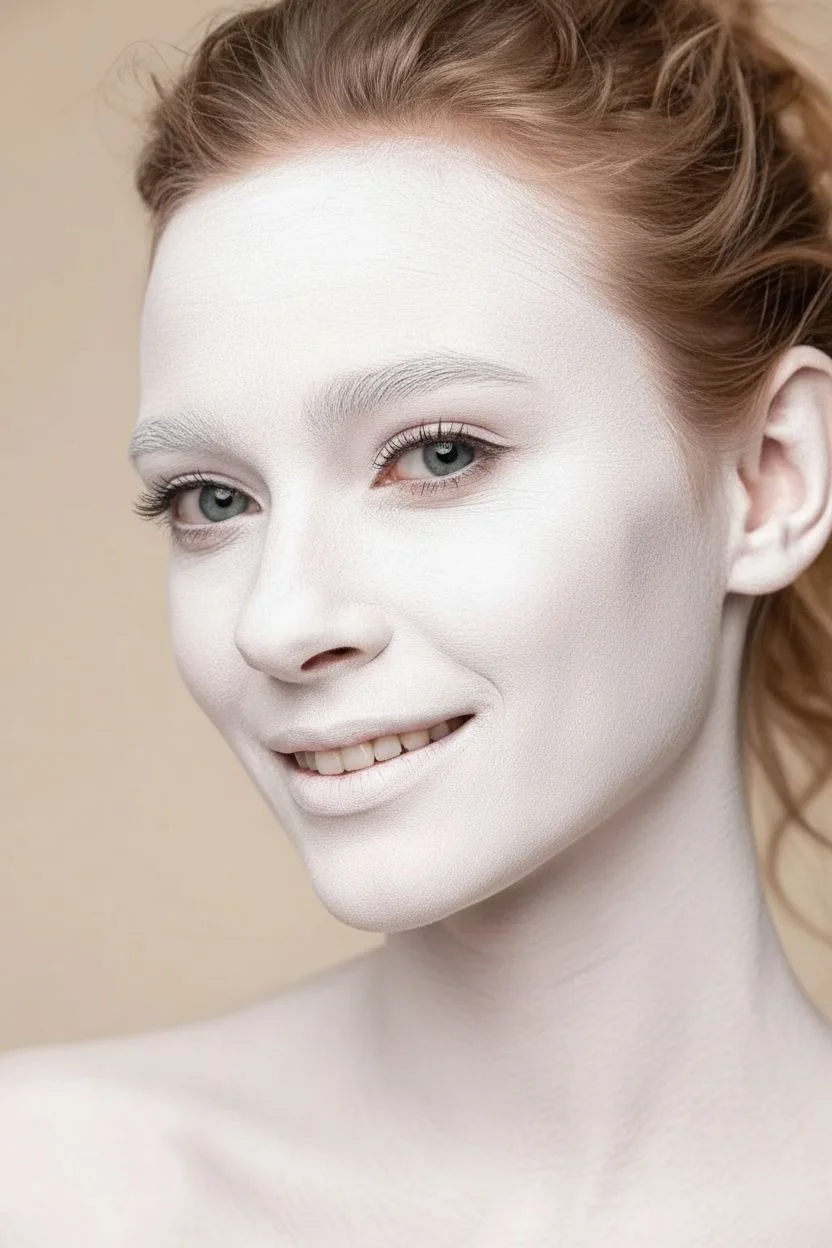
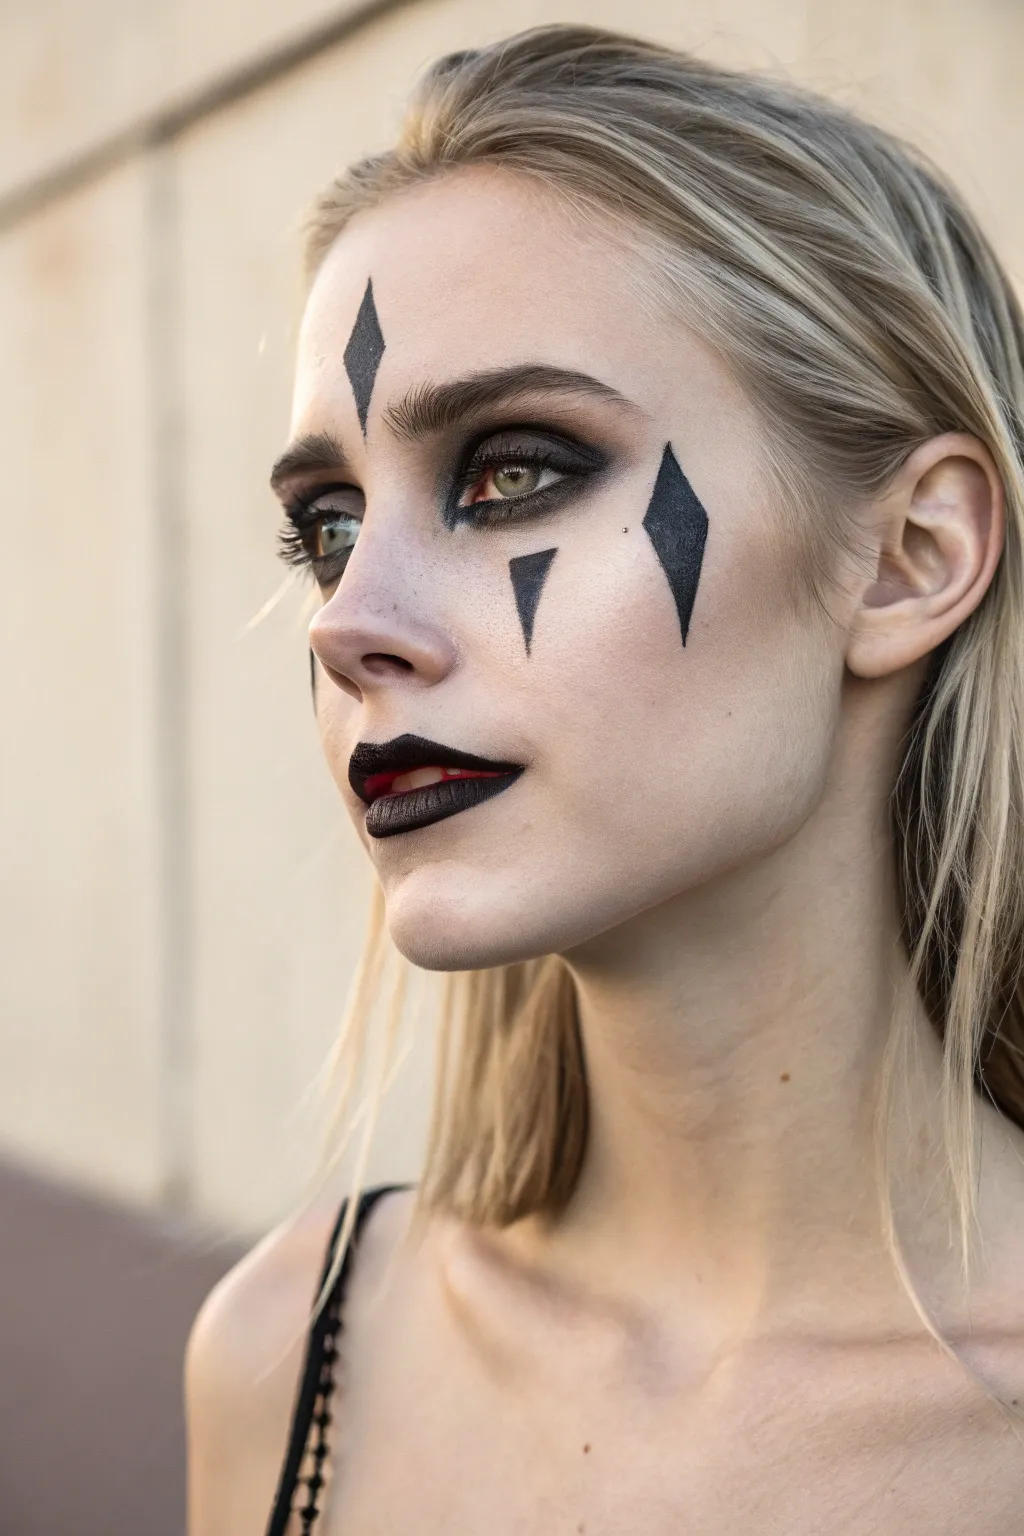
This striking look updates the classic clown aesthetic with high-contrast geometric shapes and a flawless porcelain finish. The key to this hauntingly beautiful style is achieving an opaque, matte white base that makes the sharp black details pop.
Step-by-Step Tutorial
Materials
- White water-activated face paint (cake makeup)
- High-density makeup sponge
- Translucent setting powder
- Velour powder puff
- Black gel liner or liquid eyeliner
- Fine detail brush (0 or 00 size)
- Matte red lipstick
- Red lip liner
- Black mascara
- Flat angled brush (for cleanup)
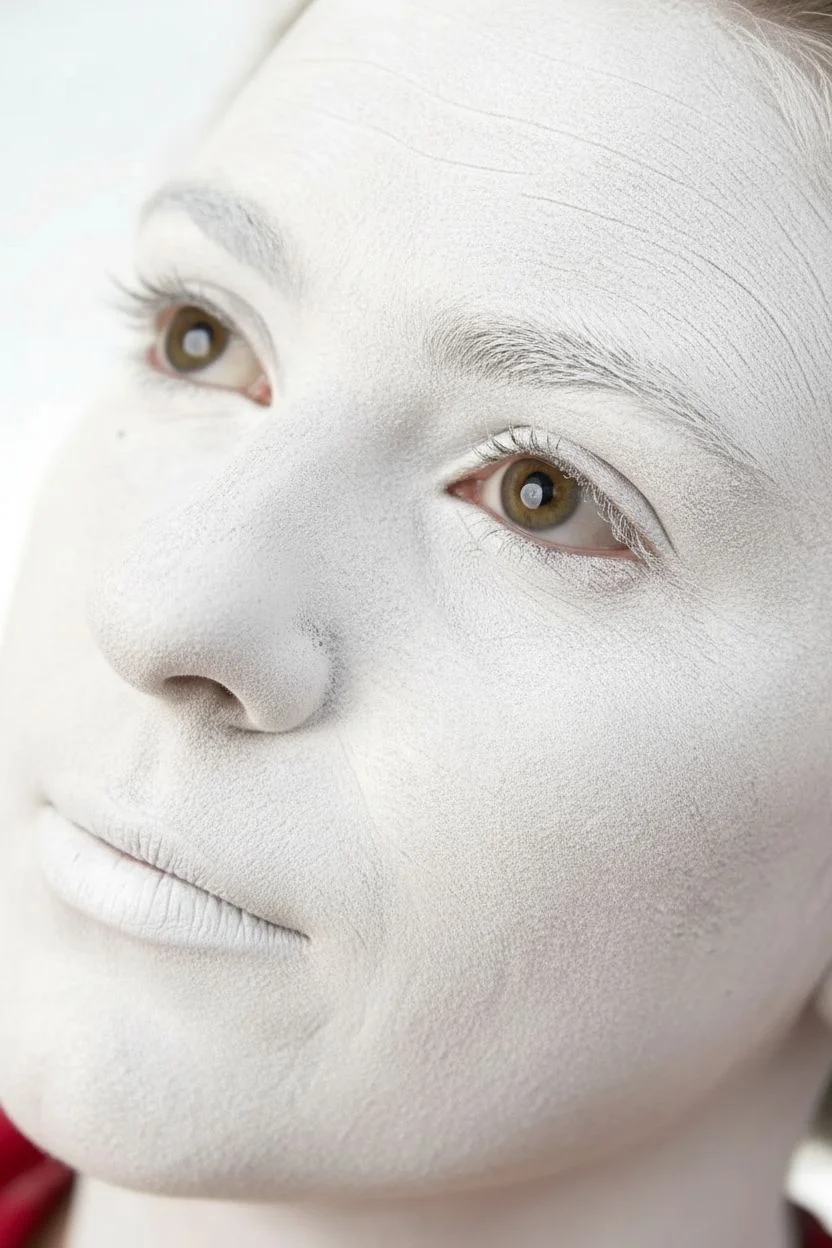
Step 1: Creating the Porcelain Canvas
-
Prep the skin:
Start with a freshly cleansed and moisturized face, allowing the moisturizer to fully absorb so the paint doesn’t slide. -
Load the sponge:
Dampen your high-density sponge with water and swirl it firmly into the white cake makeup until you create a creamy, yogurt-like consistency. -
Apply the first layer:
Begin at the nose and work outward, applying the paint with a stippling or patting motion rather than dragging strokes. -
Focus on ears and neck:
Extend the paint thoroughly over your ears and down onto your neck to match the reference photo’s seamless coverage. -
Build opacity:
Let the first layer dry for about thirty seconds, then pat on a second layer over any areas where natural skin tone is still peeking through. -
Smooth the texture:
Check for any sponge marks and lightly pat over them with a barely-damp side of the sponge to smooth the surface. -
Set the base:
Load a velour puff generously with translucent setting powder. -
Press the powder:
Use a rolling motion to press the powder firmly into the white paint; I prefer this over brushing, which canstreak the makeup. -
Dust off excess:
Gently sweep away any loose powder with a large, fluffy brush to reveal a matte, durable finish.
Step 2: Geometric Definitions
-
Map the brows:
Using a fine detail brush and black gel liner, visualize where the peak of the geometric brow should sit high on the forehead. -
Draw the chevrons:
Paint a sharp inverted ‘V’ shape above each eye, keeping the lines crisp and floating well above your natural brow bone. -
Create under-eye triangles:
Directly below the pupil, paint a small, solid black triangle pointing downward toward the cheek. -
Detail the inner corner:
Add a thin, vertical line or ‘tick’ mark at the inner corner of the eye, extending slightly down the side of the nose. -
Line the upper lid:
Apply a very thin line of black along the upper lashes to define the eye shape without overpowering the geometric art. -
Enhance the lashes:
Apply a coat of black mascara to the top lashes only, leaving the bottom lashes bare for a starker contrast.
Patchy Paint?
If the white looks streaky, you likely dragged the sponge. Use a rapid up-and-down “pouncing” motion to deposit pigment without lifting the layer underneath.
Step 3: The Crimson Finish
-
Outline the lips:
Trace your natural lip shape with a red lip liner, emphasizing the cupid’s bow for a sharp look. -
Fill with color:
Fill in the lips with a matte red lipstick, being careful not to smudge onto the white base. -
Clean the edges:
Use a flat angled brush with a tiny amount of white paint to clean up the perimeter of the lips if the red bled at all.
Pro Tip: Sharp Points
To get razor-sharp points on the triangles, map the shape with tiny dots first, then connect them using a liquid liner pen for maximum precision.
Now you have a striking, high-art clown visage that is ready for the spotlight.


The Joyful Auguste Style
Bring the circus to life with this clean and cheerful take on the classic Auguste clown style. This look relies on a crisp white base and vibrant primary colors to create an expression of pure delight.
Step-by-Step Tutorial
Materials
- High-quality white face paint (water-activated or cream)
- Red face paint
- Blue face paint
- High-density makeup sponges
- Translucent setting powder
- Powder puff or large fluffy brush
- Flat angled brush (small)
- Fine liner brush
- Cup of water
- Makeup remover wipes (for cleanup)
Step 1: Creating the Porcelain Base
-
Prep the skin:
Start with a clean, dry face. If you have sensitive skin, apply a very thin layer of barrier cream or light moisturizer first to make removal easier later. -
Load the sponge:
Dampen your high-density sponge with water and swirl it into the white face paint. You want a creamy consistency, not a dripping wash. -
Apply the first layer:
Begin dabbing the white paint onto the forehead and cheeks. Use a stippling motion (patting up and down) rather than swiping to avoid streaks. -
Cover the features:
Gently pat the paint over the eyelids and eyebrows. I find it helpful to look up towards the ceiling when working under the eyes to smooth out any creases. -
Refine the edges:
Fade the white paint out naturally as you reach the jawline and hairline, rather than creating a harsh, mask-like line. -
Set the base:
Once the white paint loses its wet sheen, generously press translucent setting powder over the entire face with a puff. This prevents your colors from smearing into the white.
Pink Smudge Problems?
If your red paint turns the white base pink, the base was too wet. Ensure the white layer is bone-dry and well-powdered before applying colored details on top.
Step 2: Painting the Expressive Eyes
-
Mix the blue:
Load a small flat angled brush with blue face paint. Ensure the consistency is well-pigmented but not too watery. -
Mark the top points:
Visualize a vertical line running through the pupil. Place a dot on the forehead about an inch above the eyebrow to mark the tip of your upper diamond. -
Draw the upper triangles:
Connect that top dot down to the natural brow line, creating a tall, slender triangle shape centered over the eye. -
Fill gently:
Fill in the triangle with blue. For the look in the photo, you don’t need solid opacity—a slightly textured, painterly fill adds character. -
Paint the lower spike:
Using the same brush, draw a narrower, inverted triangle starting from the lower lash line pointing down towards the cheekbone. -
Add the brows:
Clean your brush thoroughly or switch to a liner brush loaded with red paint. Paint a high, curved arch well above your natural eyebrow for a surprised, happy look.
Step 3: The Smile and Nose
-
Place the nose:
Load a medium round brush with red paint. Paint a circle on the tip of the nose, extending slightly onto the nostrils but keeping the shape round. -
Outline the smile:
With a fine liner brush and red paint, start at the center of the lip and draw a line outwards, flicking the corners upward aggressively towards the cheeks. -
Define the shape:
Draw the bottom line of the lip, following your natural curve but slightly exaggerated, meeting the upper corners you just drew. -
Fill the lips:
Fill in the entire lip shape with vivid red paint. Be careful to stay inside your outlines to keep the edges crisp against the white base. -
Final touches:
Check for symmetry. If one side of the smile is lower, carefully extend the paint upward to match the higher side. -
Removing fallout:
If any colorful dust or paint speckles landed on the white cheeks during the process, gently brush them away with a clean, dry fan brush.
Add High-Contrast Depth
To make the features pop in photos, use a very fine brush with black paint to thinly outline the blue diamonds and the red smile, giving it a cartoonish finish.
You have crafted a timeless, joyful visage ready to entertain at any carnival or party.


Glamorous Beauty Clown Fusion
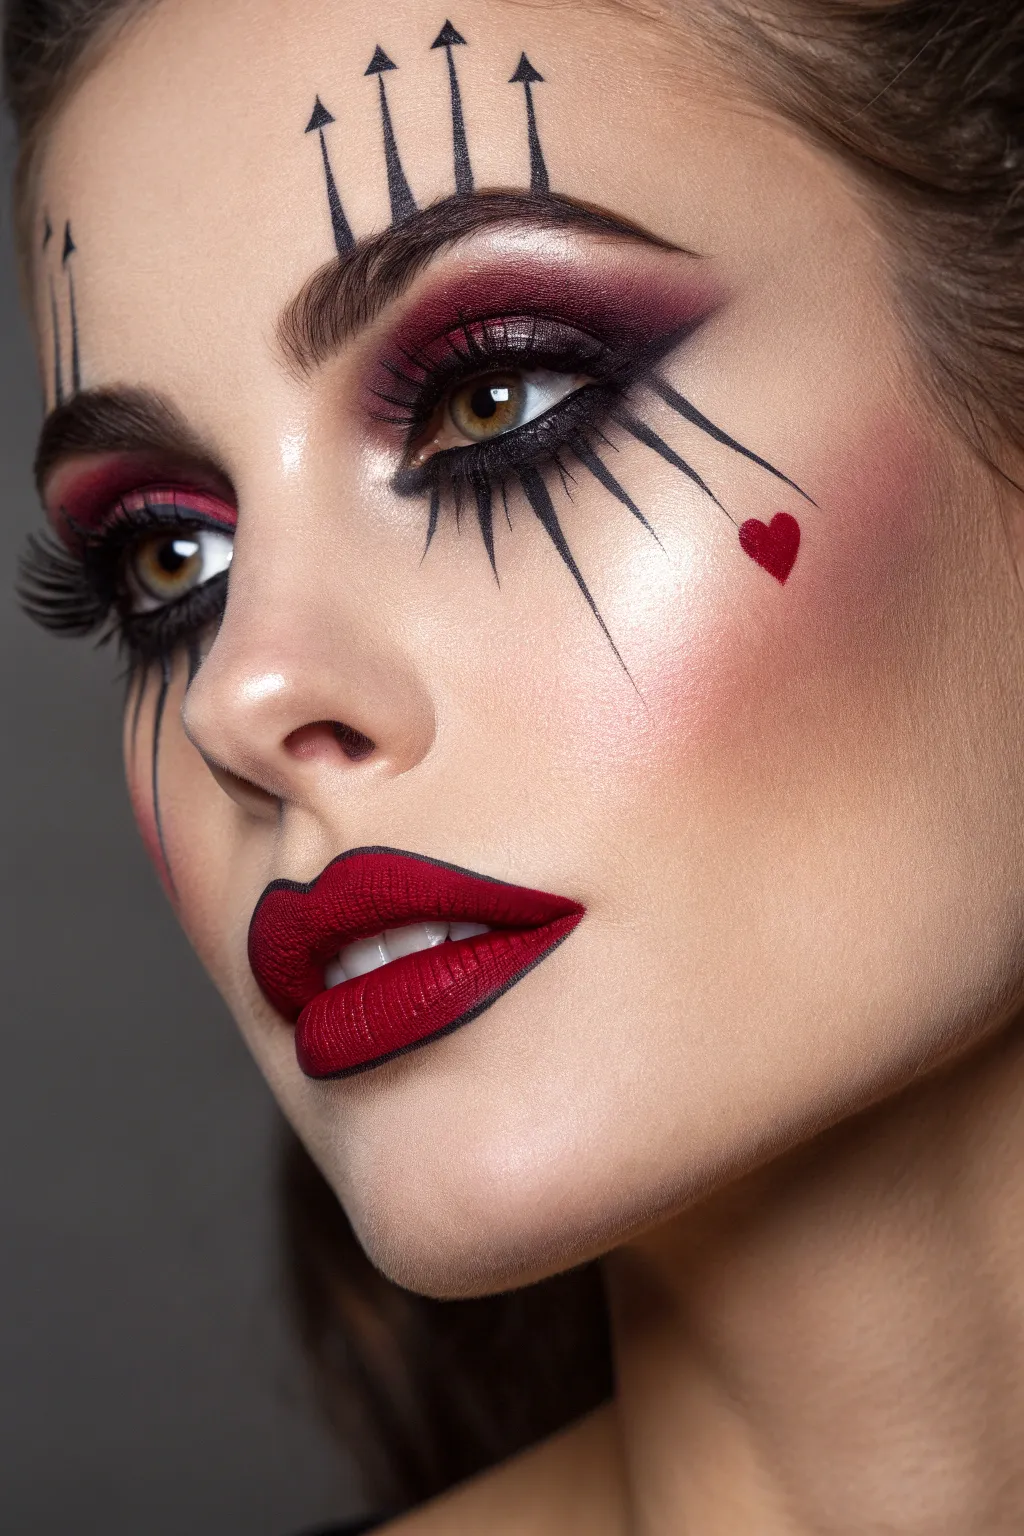
Merge high-fashion editorial techniques with whimsical circus geometry in this striking makeup transformation. The focus lies in the precision of the black linework against a dramatically highlighted complexion and a vampy, two-toned lip.
Step-by-Step
Materials
- High-coverage matte foundation
- Deep contour stick or powder
- Berry-toned blush
- Liquid illuminator
- Burgundy and black matte eyeshadows
- Waterproof black liquid eyeliner
- Fine detail liner brush (000 size)
- Black kohl or gel liner
- Matte crimson red liquid lipstick
- Voluminous false lashes
Step 1: Base and Sculpting
-
Establish the canvas:
Apply a high-coverage foundation to create a flawless, even skin tone, then set the T-zone lightly with translucent powder while keeping the cheeks radiant. -
Carve the features:
Using a contour stick, draw sharp lines under the cheekbones and along the jawline, blending upwards to create a chiseled, angular face shape. -
Apply blush:
Sweep a berry-toned blush high onto the temples and distinctively across the apples of the cheeks to warm up the mid-face. -
Intensify the glow:
Dab liquid illuminator generously on the high points of the cheekbones, the bridge of the nose, and the cupid’s bow for a wet-look shine.
Rest Your Pinky
If your hand shakes while drawing the long graphic lines, rest your pinky finger on the cheekbone (use a powder puff to avoid smudging base) to stabilize your hand.
Step 2: The Smoky Eye
-
Pack on color:
Press matte burgundy eyeshadow over the entire mobile lid, blending it smoothly up into the crease for a blown-out effect. -
Deepen the outer corner:
Layer black eyeshadow into the outer V of the eye to add dramatic depth, buffing it into the burgundy so there are no harsh edges. -
Smoke the lower lash line:
Run the burgundy shadow along the lower lash line, keeping it quite thick and smoky to balance the graphic art coming later. -
Tightline:
Apply black kohl liner to the upper and lower waterlines to frame the eyes intensely.
Step 3: Graphic Linework
-
Draft the brow arrows:
Using liquid liner, draw four vertical lines rising from each eyebrow, varying their heights slightly to follow the arch of the brow. -
Refine the arrowheads:
Carefully draw small, filled-in triangles at the top of each vertical line to turn them into sharp arrows pointing toward the hairline. -
Create lower spikes:
Starting from the lower lash line, draw three to four elongated triangular spikes dragging downward onto the cheek. -
Detail the points:
I like to use a super fine detail brush here to ensure the tips of the lower spikes are needle-sharp and taper off perfectly. -
Paint the heart:
Using your red liquid lipstick on a small brush, paint a precise heart shape high on one cheekbone, positioned between the liner spikes.
Midnight Sparkle
For an extra touch of glamour, adhere tiny black or red rhinestones to the very tips of the arrowheads above the brows or at the point of the heart.
Step 4: Lips and Lashes
-
Outline the lips:
Line your lips boldly with a black gel liner or lip pencil, intentionally making the line thick and graphic like a comic book drawing. -
Fill with red:
Apply the matte crimson lipstick to the center of the lips, carefully meeting the black outline. -
Blend the ombré:
Use a lip brush to gently smudge the black liner into the red lipstick, creating a dark, vampy gradient effect. -
Apply top lashes:
Glue on a pair of thick, voluminous false lashes to the upper lash line to add heaviness and drama. -
Finish with mascara:
Coat the bottom lashes with mascara, allowing them to mingle with the painted spikes for a seamless finish.
Step back and admire your fiercely elegant creation that balances beauty with a touch of darkness


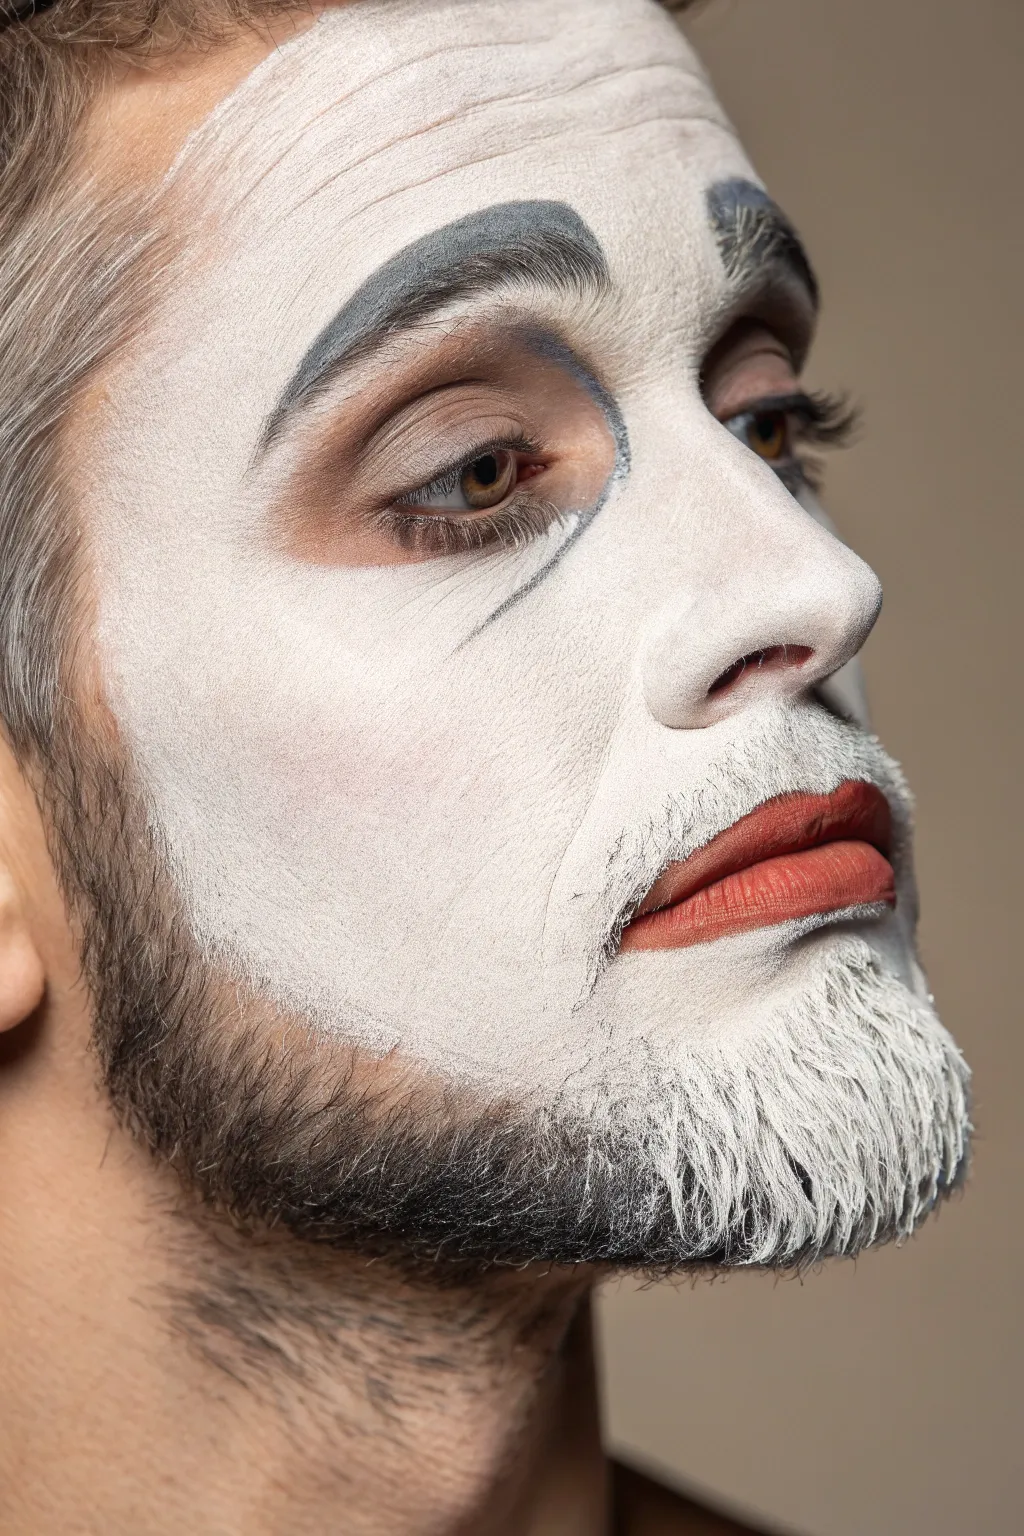
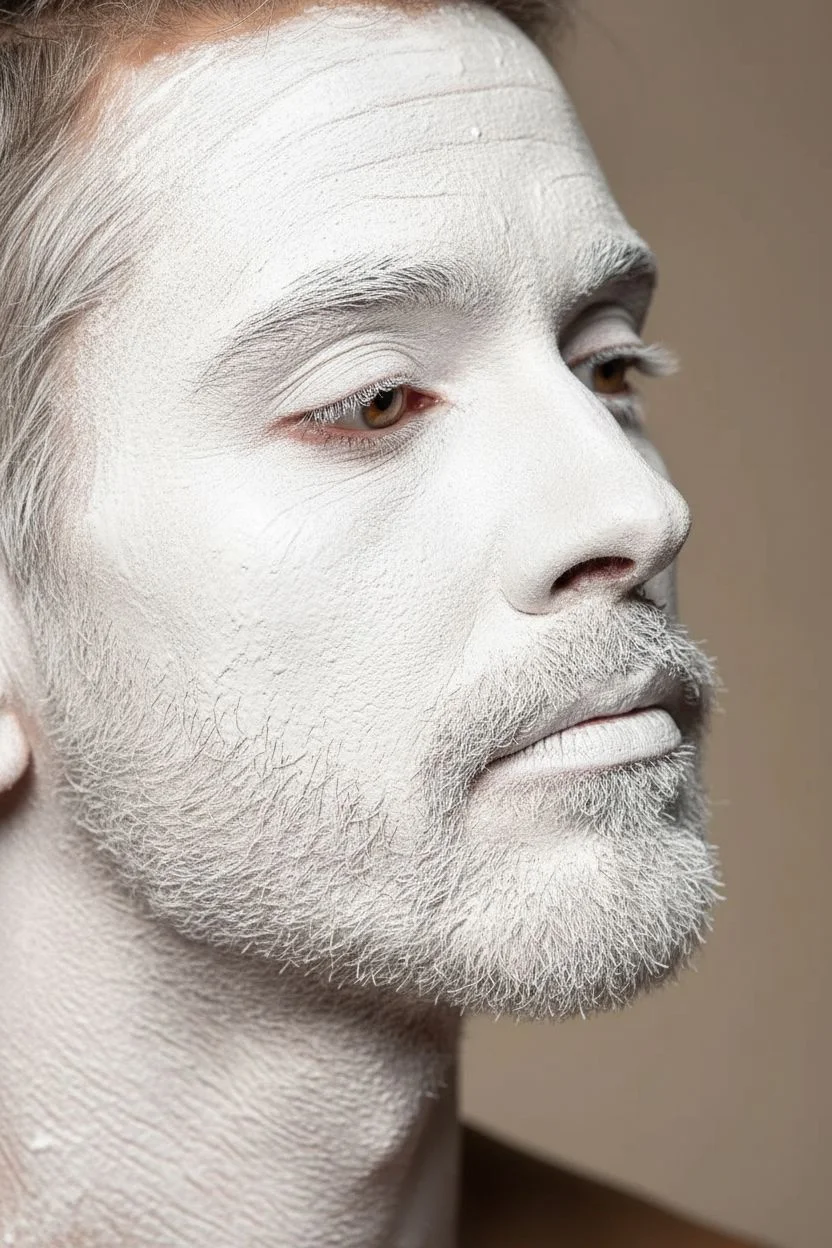
The 3D Painted Red Nose
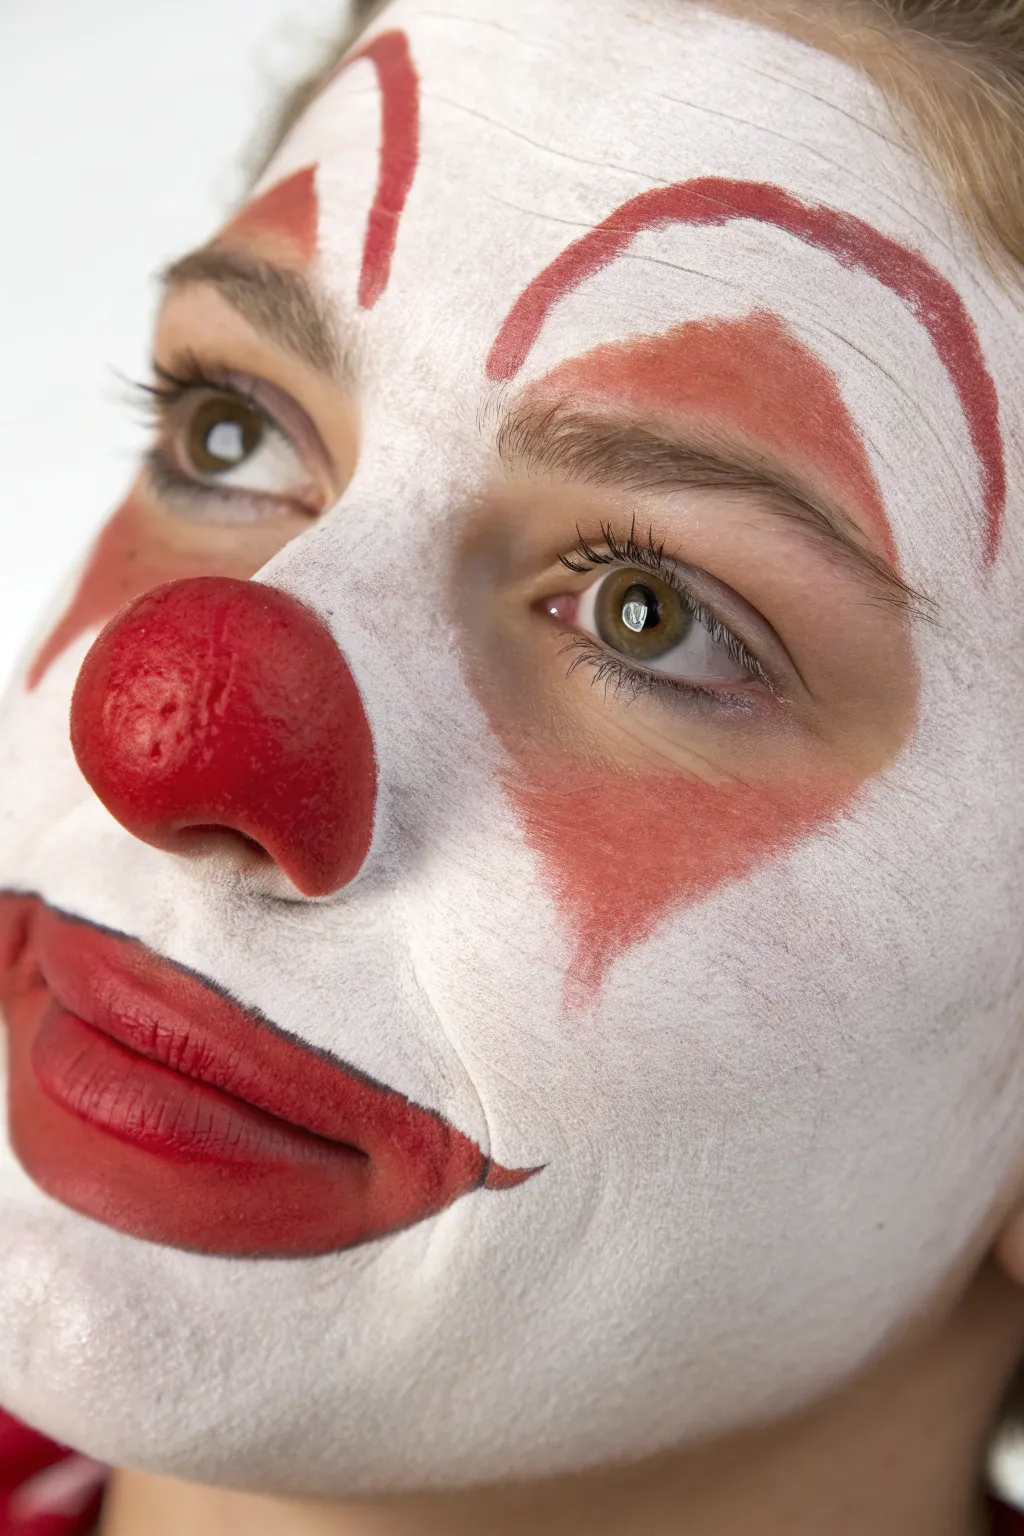
Skip the uncomfortable foam props and create a convincing illusion with this classic clown makeup tutorial. By focusing on paint texture and strategic highlights, you can sculpt a nose that looks dimensional and pops vividly against a traditional white greasepaint base.
Step-by-Step Tutorial
Materials
- Clown White cream makeup or greasepaint
- Bright red face paint (grease based recommended)
- Translucent setting powder
- High-density makeup sponges
- Round brush (size 6)
- Fine liner brush
- Powder puff
- Black or maroon eyeliner pencil (optional)
Step 1: Setting the Canvas
-
Prepare the skin:
Start with a clean, dry face. Pin back any hair to ensure you have full access to the forehead and temples. -
Load the white:
Take a high-density sponge and load it generously with Clown White cream makeup. -
Stipple the base:
Apply the white makeup over your entire face using a patting or ‘stippling’ motion. Avoid dragging the sponge, as this causes streaking. -
Cover the details:
Work the paint thoroughly over your eyebrows and eyelids, ensuring the natural hair color is masked. -
Refine the coverage:
Dab firmly into the crevices around the nose and eyes to ensure no skin tone peeks through. -
Set the base:
Load a powder puff with translucent setting powder. Press—don’t wipe—the powder firmly into the white makeup. -
Dust off:
Once the base feels dry to the touch and not tacky, gently brush away any excess loose powder.
Pro Tip: Texture is Key
To mimic the realistic look seen in the photo, don’t smooth the red nose paint out perfectly. Patting it on creates a slight texture that reflects light similarly to a sponge prop.
Step 2: Sculpting the Features
-
Start the brows:
Load a medium round brush with bright red paint. Locate the inner corner of your natural eyebrow. -
Create the arch:
Paint a high, exaggerated arch that starts at the inner brow and curves upward onto the forehead, framing the eye socket. -
Thicken the shape:
Go back over the line to thicken it, tapering slightly as you curve down around the outer corner of the eye. -
Add the cheeks:
Using a sponge or a large brush, apply a patch of red to the apple of the cheek. -
Blend the blush:
Soften the edges of the cheek paint into a triangular shape that points roughly toward the tail of your brow arch.
Step 3: The 3D Nose & Mouth
-
Paint the nose bulb:
Using a sponge tip or round brush, paint a solid red circle directly onto the tip of your nose. -
Build texture:
I like to stipple this layer on thickly to mimic the porous texture of a real foam nose. -
Add the highlight:
Place a tiny, crisp dot of white paint on the upper side of the red circle to create a fake reflection, instantly making it look 3D. -
Outline the lips:
Use a fine liner brush with red paint to trace the lip line, overlining the top lip slightly for fullness. -
Create the smile:
Extend the lip corners upwards into sharp little points to create a permanent smile effect. -
Fill the color:
Fill in the rest of the lips with your bright red paint. -
Define the edge:
Ideally, run a very thin black or dark maroon line along the bottom lip edge to separate it visually from the chin.
Troubleshooting: Turning Pink?
If your red paint turns pink upon application, it’s mixing with the white base. Ensure you have used enough setting powder to create a dry barrier before painting red details.
With your painted nose perfectly placed, you are ready to entertain without worrying about anything falling off your face.
BRUSH GUIDE
The Right Brush for Every Stroke
From clean lines to bold texture — master brush choice, stroke control, and essential techniques.
Explore the Full Guide
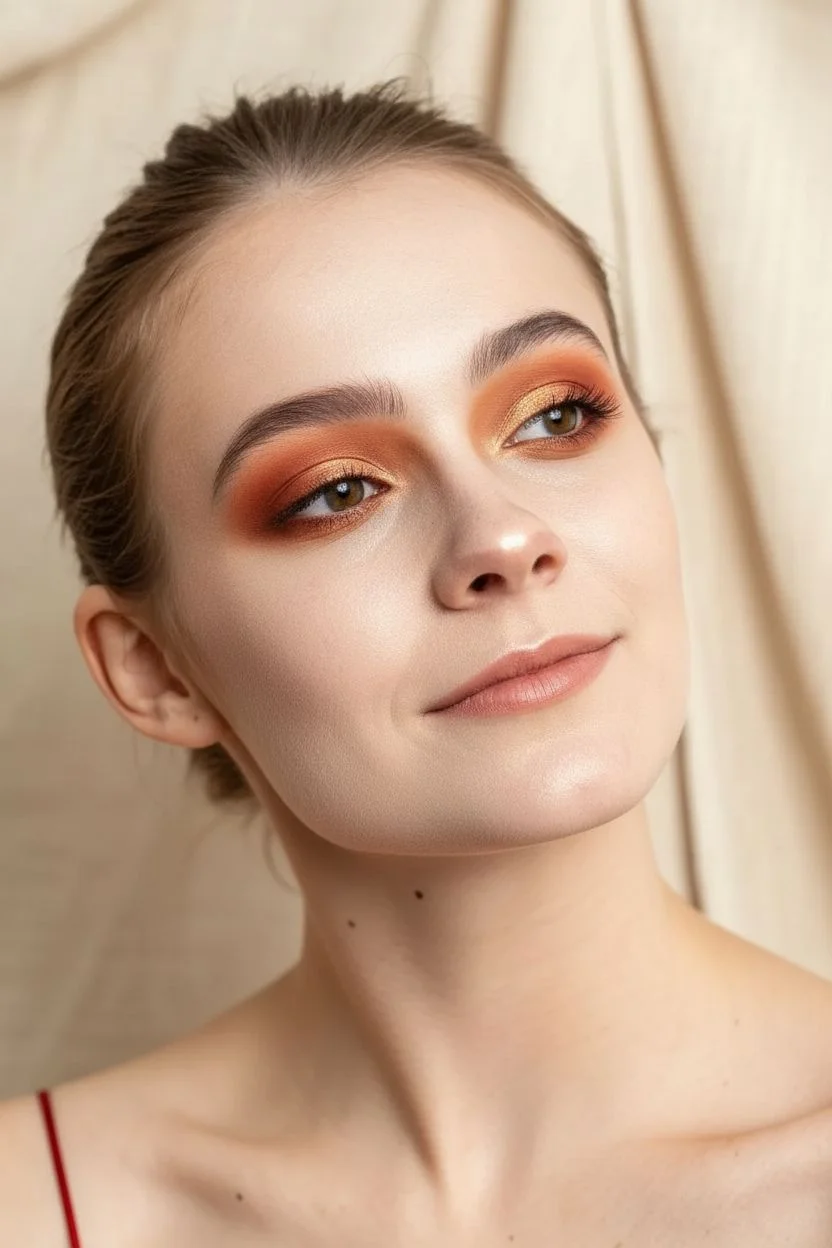
Vertical “It” Inspired Lines
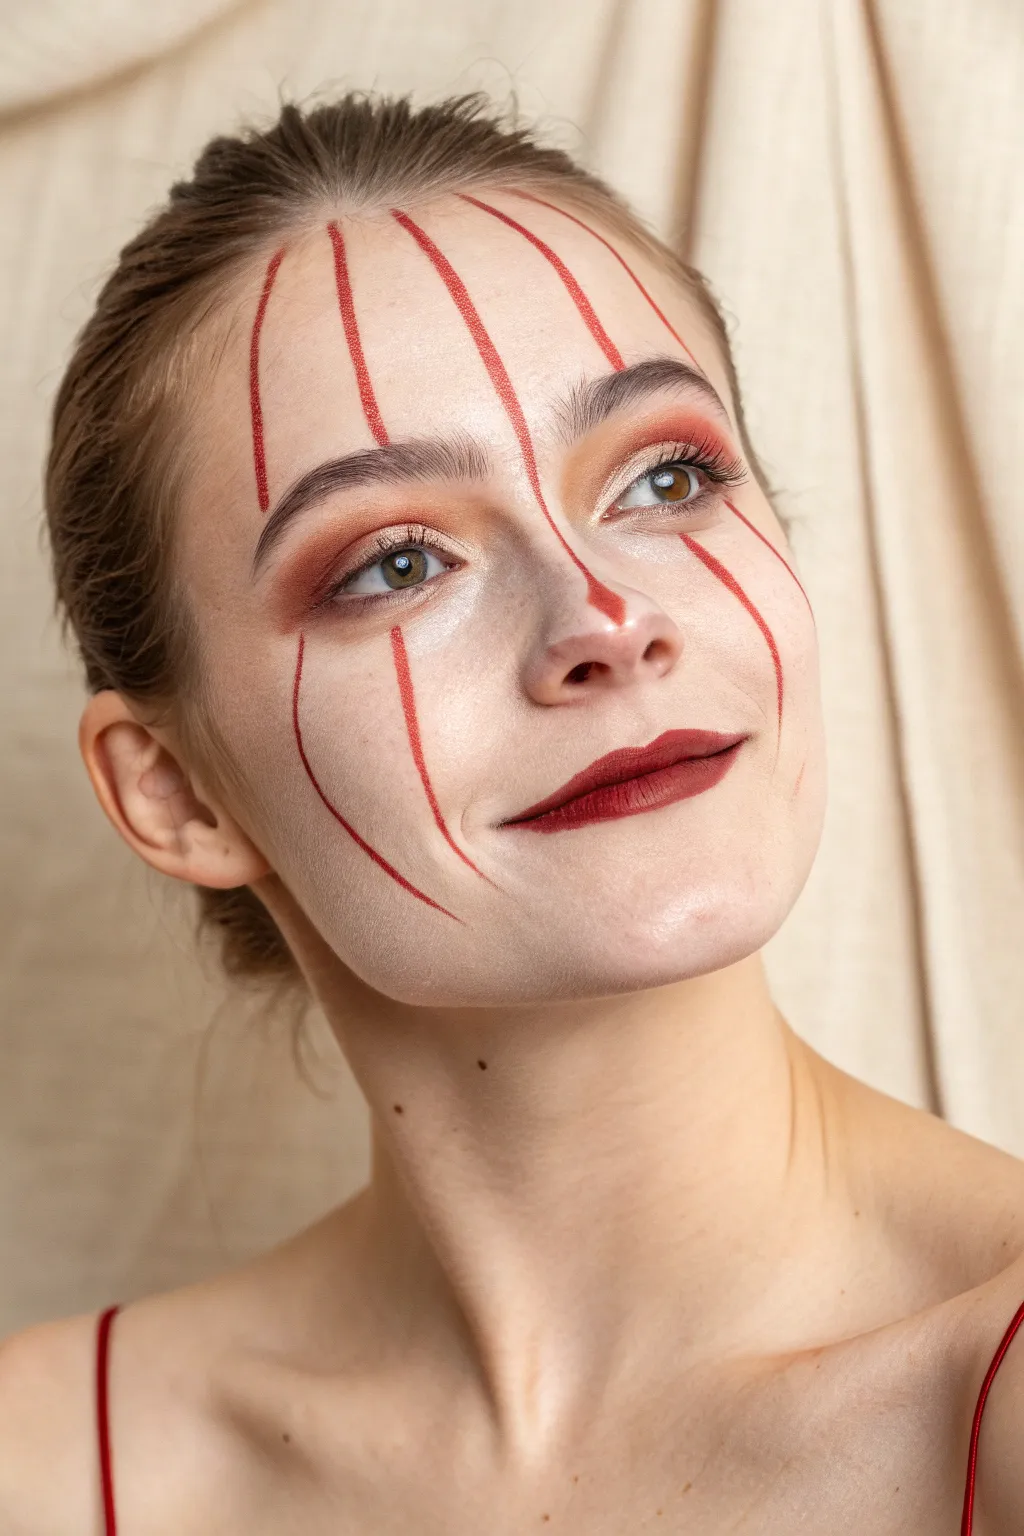
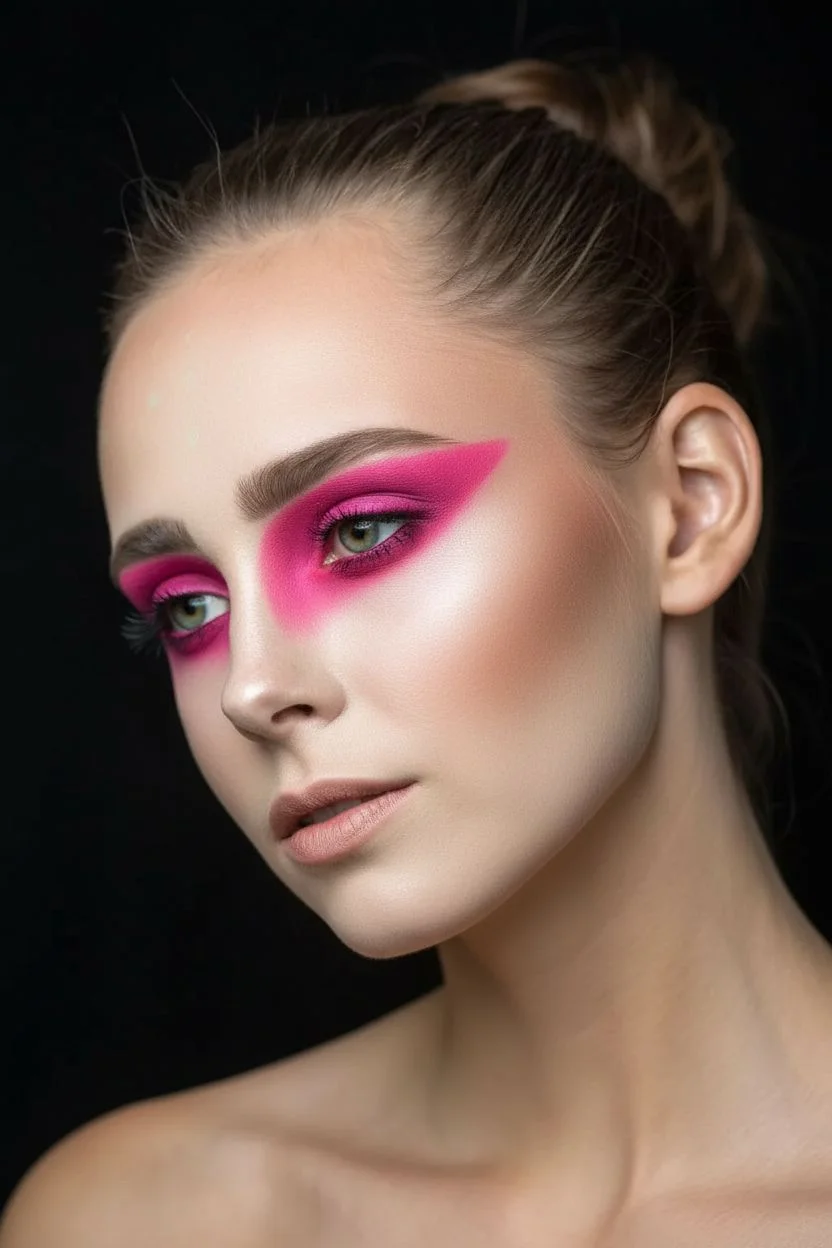
This look blends high-fashion glamour with a spooky edge, featuring warm sunset eye makeup and distinct vertical red linework. It is a sophisticated, artistic take on classic clown makeup that focuses on precision.
Step-by-Step Guide
Materials
- Luminous finish foundation
- Clear brow gel
- Warm-toned eyeshadow palette (rust, burnt orange, gold)
- Matte red liquid lipstick or face paint
- Fine liner brush
- Deep red lip liner
- Setting spray
Step 1: Warm Eye Base
-
Prep the canvas:
Apply a light layer of luminous foundation to even out the skin while keeping a natural texture. -
Feather the brows:
Brush your eyebrows upward using a clear brow gel to create a fluffy, unpolished look. -
Define the crease:
Sweep a matte burnt orange eyeshadow through the crease using a fluffy blending brush. -
Deepen the outer corner:
Pack a darker rust or brick-red shade onto the outer corner of the eyelid to add depth. -
Add inner glow:
Press a shimmery gold or champagne eyeshadow onto the center of the lid and into the inner corners. -
Smoke the lower lash line:
Smudge the rust eyeshadow under the lower lashes for a soft, blown-out effect. -
Apply mascara:
Finish the eyes with a coat of mascara on top and bottom lashes, keeping it relatively natural.
Wobbly Lines?
Make a mistake? Don’t wipe it! Let it dry completely, then use a flat brush with concealer to crisp up the edges and hide any errors.
Step 2: The Red Geometry
-
Prepare the red pigment:
Load a fine liner brush with matte red liquid lipstick; I prefer this over face paint for longevity. -
Draw center forehead lines:
Start at the hairline directly above the inner brows and pull two lines down toward the nose bridge. -
Create the nose point:
Converge the two center lines as they travel down the nose, meeting at a sharp arrow-point just above the tip. -
Add outer forehead detailing:
Draw two shorter vertical lines starting from the hairline down toward the arch of the eyebrows. -
Start the cheek lines:
Begin a line just under the pupil or outer third of the eye, separate from the lower lash line. -
Curve the cheek contour:
Sweep the line downwards in a gentle curve that follows the cheekbone, mimicking a stylized tear track. -
Refine opacity:
Go over the lines a second time to ensure the red color is bold and opaque.
Glitter Upgrade
While the red paint is still tacky, tap a little fine red or gold glitter over the lines for a sparkling, textured finish.
Step 3: Lips and Finish
-
Line the lips:
Outline your lips with a deep red lip liner to define the shape. -
Fill with color:
Apply the same matte red liquid lipstick used for the face lines to fill in the lips fully. -
Clean edges:
Use a flat brush with a tiny amount of concealer to sharpen the edges of the red lines and lips. -
Set the look:
Mist purely with a setting spray to lock the pigment in place without smudging.
Now you have a striking, elegant clown look perfect for a standout costume.
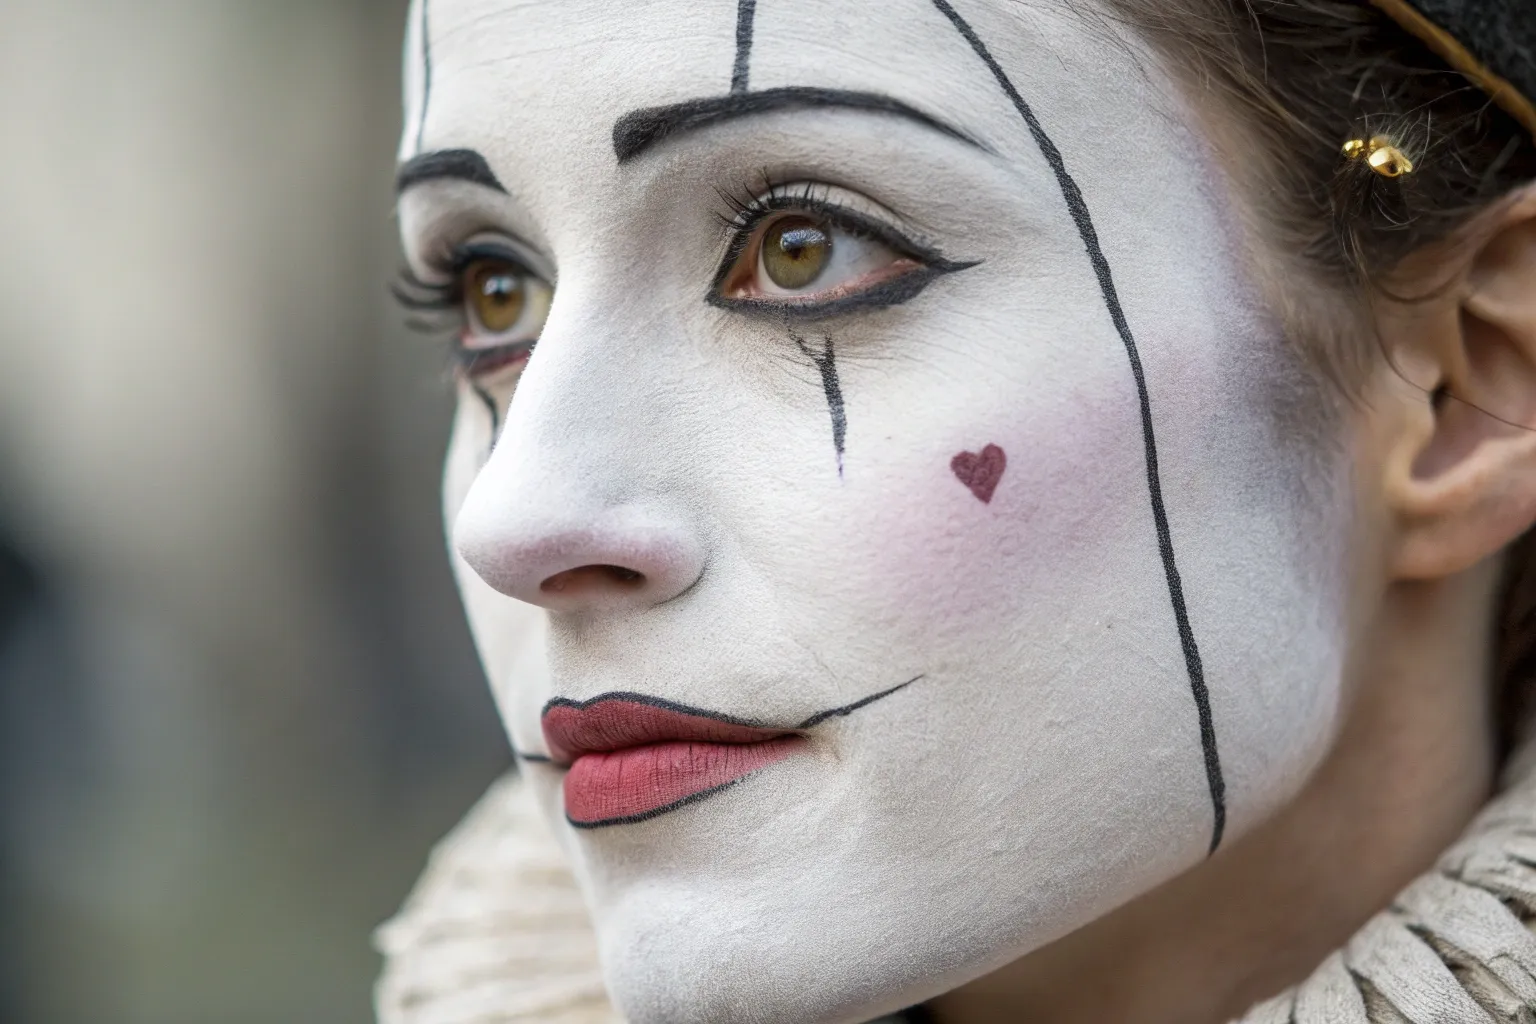
Sad Pierrot Aesthetics
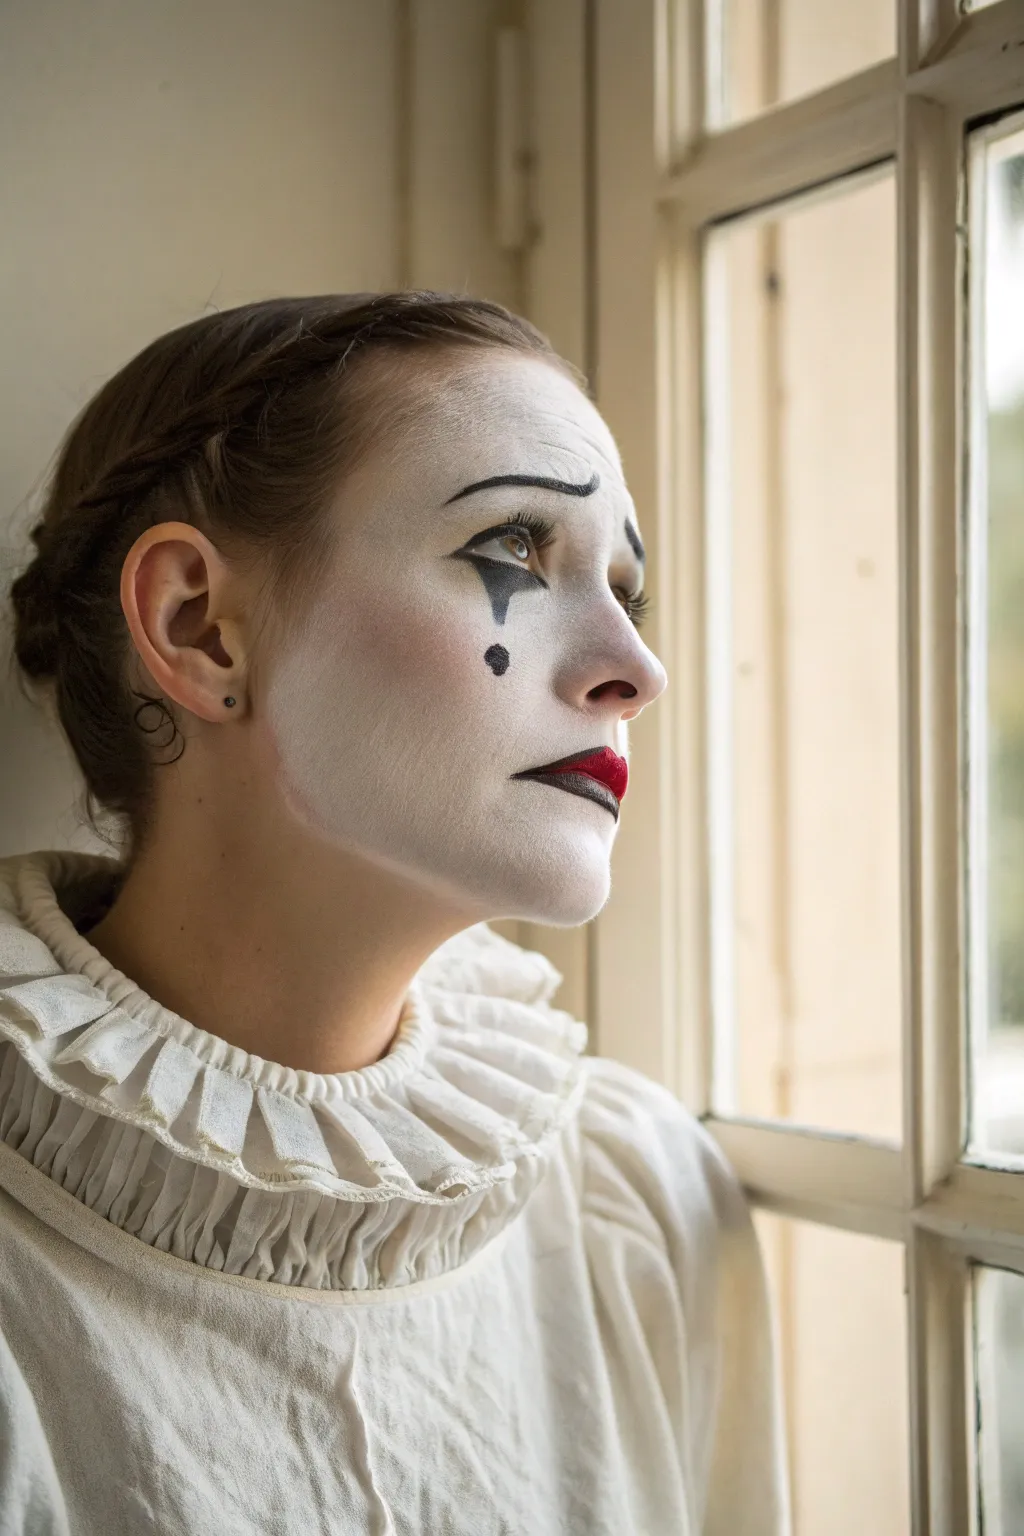

Capture the classic tragedy of the French pantomime with this delicate Pierrot face paint design. This tutorial focuses on creating a flawless porcelain base and using sharp contrasts to sculpt a look of heavy-hearted elegance.
Step-by-Step
Materials
- White cream makeup or very pale foundation
- Translucent setting powder
- Black gel eyeliner or face paint
- Deep red matte lipstick
- Fine detail brush (size 0 or 00)
- Makeup sponge or beauty blender
- Black mascara
- Grey matte eyeshadow (for contour)
- White ruffled collar
Step 1: The Porcelain Canvas
-
Cleanse and Prime:
Start with a freshly washed and moisturized face to ensure the makeup sits smoothly without clinging to dry patches. -
Hair Preparation:
Pull your hair back tightly away from your face. A braided updo or pinning it flat works best so your hairline is visible and clean. -
Apply Base Color:
Using a damp sponge, stipple the white cream makeup all over your face. You want a semi-opaque wash rather than a thick mask, so your real skin texture still shows slightly. -
Blend the Edges:
Fade the white makeup down past your jawline onto your neck. I prefer to blend this quite far down so there is no harsh line visible above the collar. -
Set the Base:
Generously press translucent powder over the white base using a puff or large brush to lock it in and remove any shine.
Step 2: Expressive Eyes
-
Map the Brows:
Visualize where your new eyebrows will go. They should sit significantly higher than your natural brow bone to create a look of surprise and sorrow. -
Draw the Arch:
Using a fine detail brush and black paint, draw a thin, curved line starting near the center of the forehead and arching high before dipping down toward the temple. -
Detail the Curve:
Thicken the front inner corner of the brow ever so slightly, creating a ‘comma’ shape to emphasize the worried expression. -
Create the Tear:
Directly under the center of your eye, outline a diamond or teardrop shape. The top point should almost touch your lower lash line. -
Fill the Tear:
Carefully fill in the diamond shape with solid black paint. Keep the edges crisp and sharp. -
Add the Beauty Mark:
Place a small, solid black dot on your cheekbone, roughly aligned with the outer corner of your eye. -
Lash Definition:
Apply a coat of black mascara to your upper lashes to open up the eyes against the white background.
Long-Lasting Lines
For the eyebrows and teardrops, use a waterproof gel eyeliner pot instead of water-activated face paint. It creates sharper edges and won’t smudge if your eyes naturally water.
Step 3: The Tragic Pout
-
Apply Lipstick:
Paint your lips with deep red lipstick. Focus heavily on the Cupid’s bow to create a heart-shaped appearance. -
Avoid the Corners:
Stop the red color slightly before reaching the actual corners of your mouth to shrink the perceived width of the lips. -
Draw the Frown:
Take your fine liner brush with black paint again. Start at the outer corner of your red lip application. -
Extend the Line:
Draw a thin, sharp black line extending outward and curving slightly downward toward the chin to freeze a permanent frown in place. -
Hollow the Cheeks:
Lightly dust grey eyeshadow under the cheekbones and at the temples to create a subtle, gaunt contour that adds depth to the face. -
Final Setting:
Give the face one last light dusting of powder or a mist of setting spray. -
Don the Ruff:
Fasten your white ruffled collar around your neck to complete the framing of the face.
Wet Look Effect
Make the look more visceral by dabbing a tiny amount of clear lip gloss over the black under-eye diamond. It will catch the light and mimic the texture of a fresh, wet tear.
Now you are ready to gaze out the window and embody the silent, beautiful sorrow of the Pierrot

PENCIL GUIDE
Understanding Pencil Grades from H to B
From first sketch to finished drawing — learn pencil grades, line control, and shading techniques.
Explore the Full Guide
Glitter and Gem Accents
Elevate traditional clown makeup into high-fashion art with this glittering, geometric design. This look combines sultry cranberry eyeshadow with sharp, glitter-filled shapes and rhinestone detailing for a sophisticated finish.
How-To Guide
Materials
- Matte foundation and concealer
- Cranberry or deep red eyeshadow
- Red grease paint or face paint
- Fine red cosmetic glitter
- Glitter glue or mixing medium
- Flat angled brush
- Fluffy blending brush
- Small silver rhinestones (3mm and 4mm)
- Eyelash glue (clear drying)
- Deep red matte lipstick
- Gem picker or tweezers
- Black mascara
Step 1: Setting the Stage
-
Base application:
Apply your regular foundation and concealer to create a flawless, even canvas, ensuring you powder your T-zone to prevent shine. -
Brows:
Brush your eyebrows upward with a clear gel to keep them groomed but natural looking, as they will frame the forehead art. -
Eyeshadow wash:
Using a fluffy blending brush, sweep a cranberry red eyeshadow across the entire eyelid. -
Diffusing edges:
Blend the eyeshadow upward toward the brow bone and outward toward the temple, ensuring there are no harsh lines. -
Lower lash line:
Smudge the same red eyeshadow underneath the lower lashes to encircle the eye in a soft, hazy redness. -
Mascara:
Apply two coats of black mascara to top and bottom lashes to define the eyes against the red pigment.
Glitter Fallout?
If glitter falls on your cheeks, don’t wipe it! Wrap a piece of sticky tape around your finger and gently dab to lift stray sparkles without ruining your base.
Step 2: The Glitter Triangles
-
Mapping the shapes:
I prefer to lightly sketch the triangle outlines with a nude lip liner first to ensure symmetry before committing with paint. -
Forehead outlines:
Draw two tall, inverted triangles explicitly above the eyebrows, extending upward toward the hairline. -
Cheek outlines:
Map out two triangles on the cheeks—one pointing down, and a larger one angled outward toward the ear. -
Filling the base:
Use a flat angled brush and red face paint to fill in your traced triangles, keeping the edges razor-sharp. -
Applying adhesive:
Tap a thin layer of glitter glue directly over the red paint on one triangle at a time. -
Glitter packing:
While the glue is tacky, press specific red cosmetic glitter onto the shape using a flat synthetic brush until fully opaque. -
Repeat process:
Continue the glue and glitter process for the remaining three triangles.
Level Up
Mix fine and chunky glitters together before applying them to the triangles. This creates a textured, 3D effect that catches stage lights beautifully.
Step 3: Gems and Lips
-
Placement planning:
Plan your rhinestone placement along the top straight edge of the forehead triangles and the upper edges of the cheek shapes. -
Adhesive dots:
Using the tip of a brush handle or a toothpick, apply tiny dots of eyelash glue where you want each gem to sit. -
Setting gems:
Use a wax pencil or tweezers to pick up the silver rhinestones and press them firmly onto the glue dots. -
Bridge accents:
Adhere three or four small gems loosely across the bridge of the nose and inner corner area for extra sparkle. -
Lip Definition:
Line your lips with a deep burgundy shade, slightly overlining the cupid’s bow for fullness. -
Lip color:
Fill the lips with a matte red lipstick, blending it into the liner for a seamless, velvety pout.
Now you have a striking, jewel-encrusted look perfect for a refined masquerade or artistic performance.
The Tramp and Hobo Texture
This look captures the soulful essence of the classic tramp clown with a sophisticated, textured finish suitable for theater or costume parties. It features a stark white base that interacts beautifully with facial hair, complemented by melancholic eyes and vivid red lips.
Step-by-Step
Materials
- White cream face paint
- Translucent setting powder
- Black face paint or eyeliner
- Matte red lipstick
- Grey and brown eyeshadows
- Makeup sponges
- Fine detail brushes
- Spoolie brush or clean mascara wand
Step 1: The White Canvas
-
Prep the skin:
Start with a clean, dry face to ensure the makeup adheres well to both the skin and facial hair. -
Apply forehead base:
Load a makeup sponge with white cream paint and dab it onto the forehead, using a stippling motion to create a slightly uneven, skin-like texture. -
Cover the nose:
Coat the nose thoroughly with the white paint, ensuring the sides and tip are fully opaque. -
Coat the beard:
Press the sponge firmly into the beard and mustache area, pushing the paint against the grain to coat the hairs completely down to the root. -
Define the jawline:
Apply the white paint along the jawline, allowing it to fade naturally into the neck rather than creating a harsh, straight line. -
Set the base:
Gently pat translucent setting powder over the smooth white areas, especially the forehead and nose, to lock the base in place.
Step 2: Expressive Eyes
-
Outline brows:
Using a fine brush and black paint, outline exaggerated, high-arching eyebrows well above your natural brow line. -
Fill brows:
Fill in the painted brows with shorter, feathered strokes to mimic the appearance of coarse, expressive hair. -
Shadow eyelids:
Apply a matte brown or grey eyeshadow across the entire eyelid to create a shadowed, weary appearance. -
Deepen the crease:
Concentrate a darker charcoal shadow into the crease of the eye socket to enhance the skeletal, sunken effect. -
Draw contour line:
Using a fine detail brush, draw a sharp, thin black line extending from the inner corner of the eye diagonally down across the cheekbone. -
Soften the line:
Lightly smudge the bottom edge of this cheek line with a clean dry brush to give it a shadowed dimension.
Stubble Strategy
Rub the white paint against the grain of your beard growth first to coat all sides of the hair, then smooth it down for maximum coverage.
Step 3: Lips and Beard Texture
-
Outline lips:
Outline the lips with a red lip pencil, extending the corners slightly to widen the mouth shape. -
Fill the mouth:
Fill in the lips with a matte red lipstick, blotting carefully to remove any excess shine. -
Detail the beard:
Take a clean spoolie brush or disposable mascara wand and comb through the white-painted beard hairs. -
Create frost effect:
I like to comb the beard downwards and outwards to separate the clumps, creating a stiff, frosted texture that photographs beautifully. -
Touch up natural brows:
If your natural eyebrows are very light, darken them slightly with brown shadow so they don’t disappear against the white skin. -
Final inspection:
Inspect the coverage on the mustache area and touch up with a small brush if any skin is showing through the white paint.
Depth & Grime
Lightly dust grey eyeshadow under the cheekbones and temples to age the face and add a dusty, travel-worn dimension to the character.
Now you have a wonderfully expressive and textured character face ready for the spotlight.


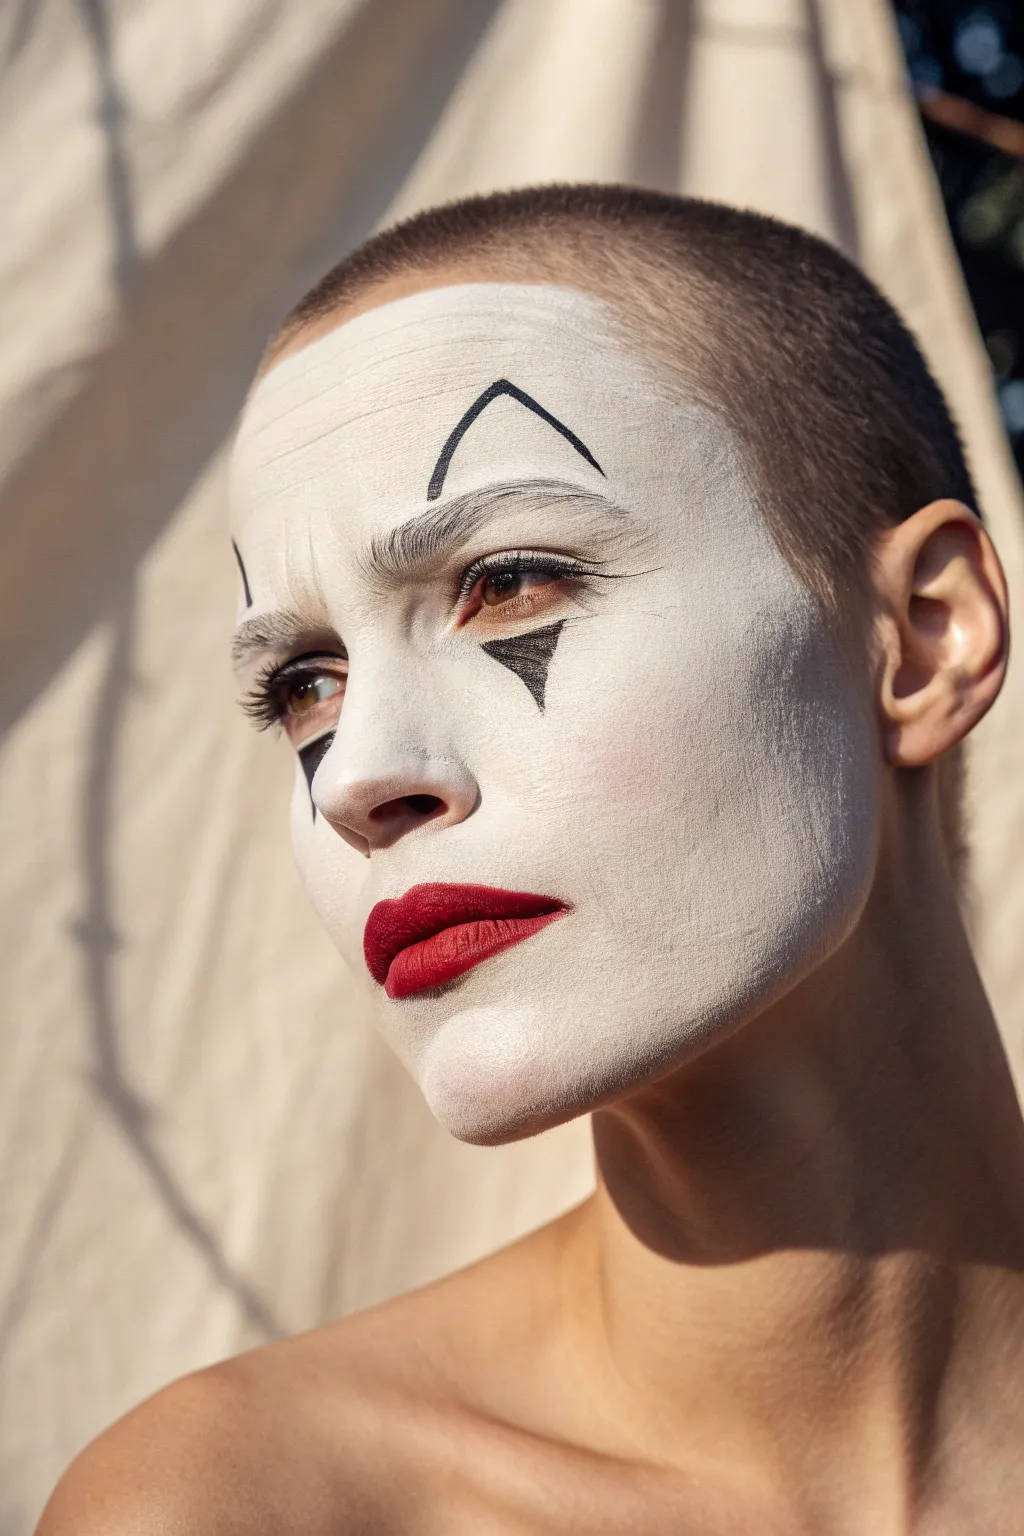
Gothic Jester Vibes
Get ready to channel a moody, elegant circus aesthetic with this high-contrast look. By combining a flawless porcelain base with sharp geometric diamonds and a vampy ombre lip, you’ll create a style that balances eerie theatricality with high-fashion gothic energy.
How-To Guide
Materials
- Pale matte foundation
- Translucent setting powder
- Black gel eyeliner or cream base
- Matte black eyeshadow
- Deep red or burgundy lipstick
- Black lipstick
- Fine-tip liquid eyeliner (black)
- Fluffy blending brush
- Small angled brush
- Mascara
Step 1: Setting the Stage
-
Create a pale base:
Apply a full-coverage foundation that is one or two shades lighter than your natural skin tone. Use a beauty sponge to buff it in for a flawless, airbrushed finish. -
Lock it in:
Press a generous amount of translucent powder over your entire face to create a matte, porcelain-like canvas. This step is crucial so the black face paint doesn’t migrate. -
Subtle cool contour:
Using a cool-toned contour powder (or gray eyeshadow), lightly sweep under the cheekbones to carve out a hollow appearance without adding warmth.
Step 2: Smoked-Out Eyes
-
Apply the dark base:
Scribble black gel eyeliner across your mobile eyelid, staying below the crease. It doesn’t need to be neat, as we will blend it. -
Blend the edges:
Before the liner sets, take a dense brush and smudge the edges upward toward the brow bone to create a soft gradient. -
Pack the shadow:
Press matte black eyeshadow directly over the gel base. This locks the color in place and creates that intense, pitch-black density. -
Definite definition:
Run the black liner along your lower lash line and water line, then smudge it out with a small pencil brush and a touch of black shadow. -
Final eye touches:
Apply two coats of mascara to top and bottom lashes. Brush your eyebrows upward and fill them in lightly with a dark powder to frame the eyes.
Fallout Fixer
Working with heavy black eyeshadow can be messy. Hold a tissue under your eye while packing on the shadow to catch any loose powder and keep your base clean.
Step 3: Geometric Jester Details
-
Map the points:
Using a nude eyeliner pencil, make tiny dots to mark the top, bottom, and side points of where your diamond shapes will go. This ensures symmetry before committing with black ink. -
The forehead piece:
Using a precision liquid eyeliner, draw a tall, slender diamond shape in the center of your forehead, filling it in completely. -
Detailed cheek shapes:
Draw a large diamond on the center of the left cheek. On the right cheek, draw a similar diamond, but add a smaller inverted triangle directly under the eye. -
Sharpen the edges:
I like to go back with a little concealer on a flat brush to clean up the perimeter of the diamonds, making the points look razor-sharp.
Precision Pro-Tip
If you struggle drawing freehand diamonds, cut the shape out of a piece of paper or sticky note to use as a stencil. Sponge the black paint lightly over the hole.
Step 4: The Vampy Lip
-
Outline and corners:
Line your lips with black eyeliner or black lipstick. Fill in the outer corners heavily, leaving the center of the lips bare. -
Create the ombre:
Apply the deep red lipstick to the center of the mouth. -
Blend the transition:
Use a clean lip brush or your finger to tap where the black and red meet, creating a seamless, blood-red fade.
Mist your face with a setting spray to ensure your hauntingly beautiful jester look lasts all night
Stitched and Stapled Horror
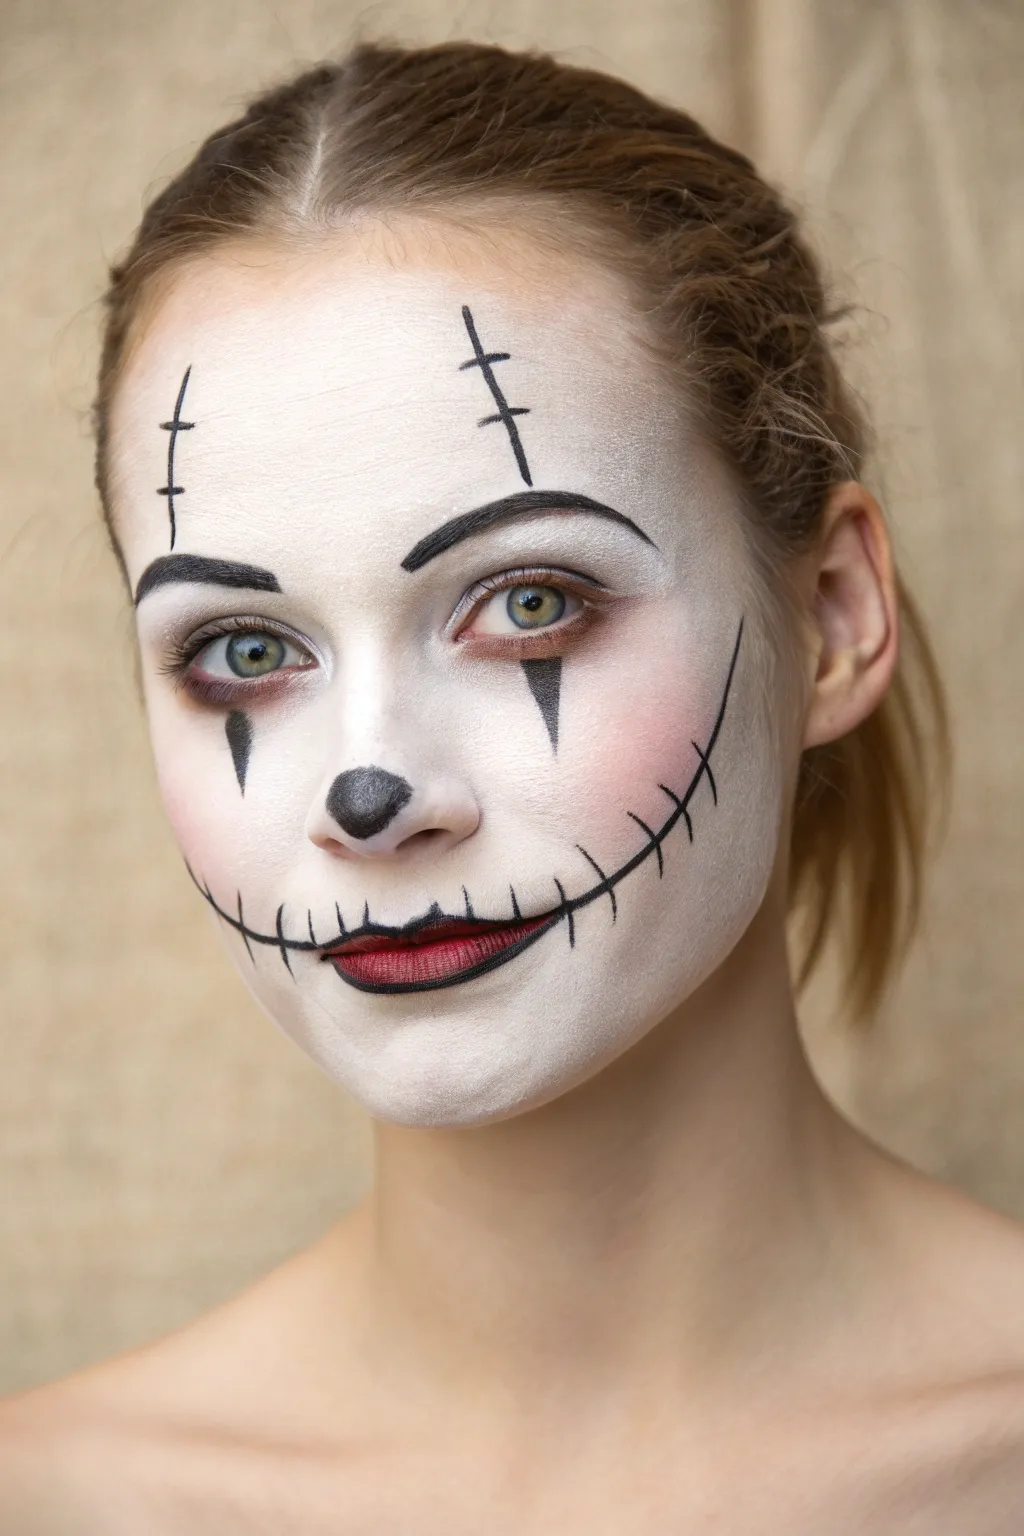
This eerie look balances the innocence of a porcelain doll with a sinister, stitched-up twist. It focuses on a pale, matte complexion accented by exaggerated sewing marks and a hauntingly wide grin.
Detailed Instructions
Materials
- White cream face paint or greasepaint
- Translucent setting powder
- Black gel eyeliner or fluid water-activated paint
- Red satin lipstick
- Matte reddish-brown eyeshadow
- Soft pink blush
- Makeup sponges
- Fine detail brush (size 0 or 1)
- Small fluffy blending brush
Step 1: The Porcelain Canvas
-
Prep and prime:
Start with a clean, dry face to ensure your face paint adheres smoothly without separating. -
Apply the white base:
Dampen a makeup sponge and load it with white cream paint. Stipple the paint over your entire face, covering the eyebrows slightly but avoiding the immediate eye waterline. -
Even out the coverage:
Go back over any streaky areas with a patting motion to create a solid, opaque finish that mimics porcelain. -
Set the base:
Generously press translucent setting powder over the white paint using a powder puff or large brush to lock it in and remove any shine.
Linework Pro Tip
For the sharpest “stitch” lines, thin your black paint with a tiny drop of water or mixing medium. The ink-like consistency will glide over the white base without dragging.
Step 2: Eyes and Cheeks
-
Define the brows:
Using a fine brush and black paint, draw thin, high-arched eyebrows just above your natural brow line to create an expressive look. -
Shadow the under-eyes:
Take a small fluffy brush and gently buff matte reddish-brown eyeshadow along the lower lash line. I like to drag this slightly downward to simulate a tired, bruised effect. -
Paint the triangles:
With black liner and a detail brush, paint a sharp, elongated triangle pointing downwards from the center of each lower eyelid. -
Add the nose:
Paint a small, rounded black shape on the very tip of your nose, keeping the edges soft but distinct. -
Apply blush:
Dust a soft pink blush onto the apples of your cheeks to add a confusingly sweet ‘doll’ quality to the horror.
Step 3: The Stitched Grin
-
Color the lips:
Apply red satin lipstick to your natural lips, blotting once to prevent smearing. -
Extend the smile:
Using your fine detail brush and black paint, draw a thin, curved line extending from the corners of your mouth toward your jawline. -
Blend the corners:
Use the black paint to outline your actual lips, blending the black slightly inward over the red at the corners to create a dark, ombre depth. -
Stitch the mouth:
Paint short, vertical hatch marks all along the extended black smile line and over the lips themselves to look like stitches.
Fixing Mistakes
If you accidentally smudge black onto the white base, don’t wipe it! Let it dry completely, then dab a tiny amount of white paint over the mistake like concealer.
Step 4: Final Details
-
Draw forehead scars:
Create two vertical lines on the forehead, positioned roughly above the inner corners of your eyebrows. -
Stitch the forehead:
Cross these vertical lines with two or three horizontal hatch marks each. -
Final check:
Step back and assess symmetry, sharpening any black lines that may have faded during the process.
You now have a hauntingly beautiful visage ready to unsettle anyone you smile at.
Neon and UV Reactive Designs
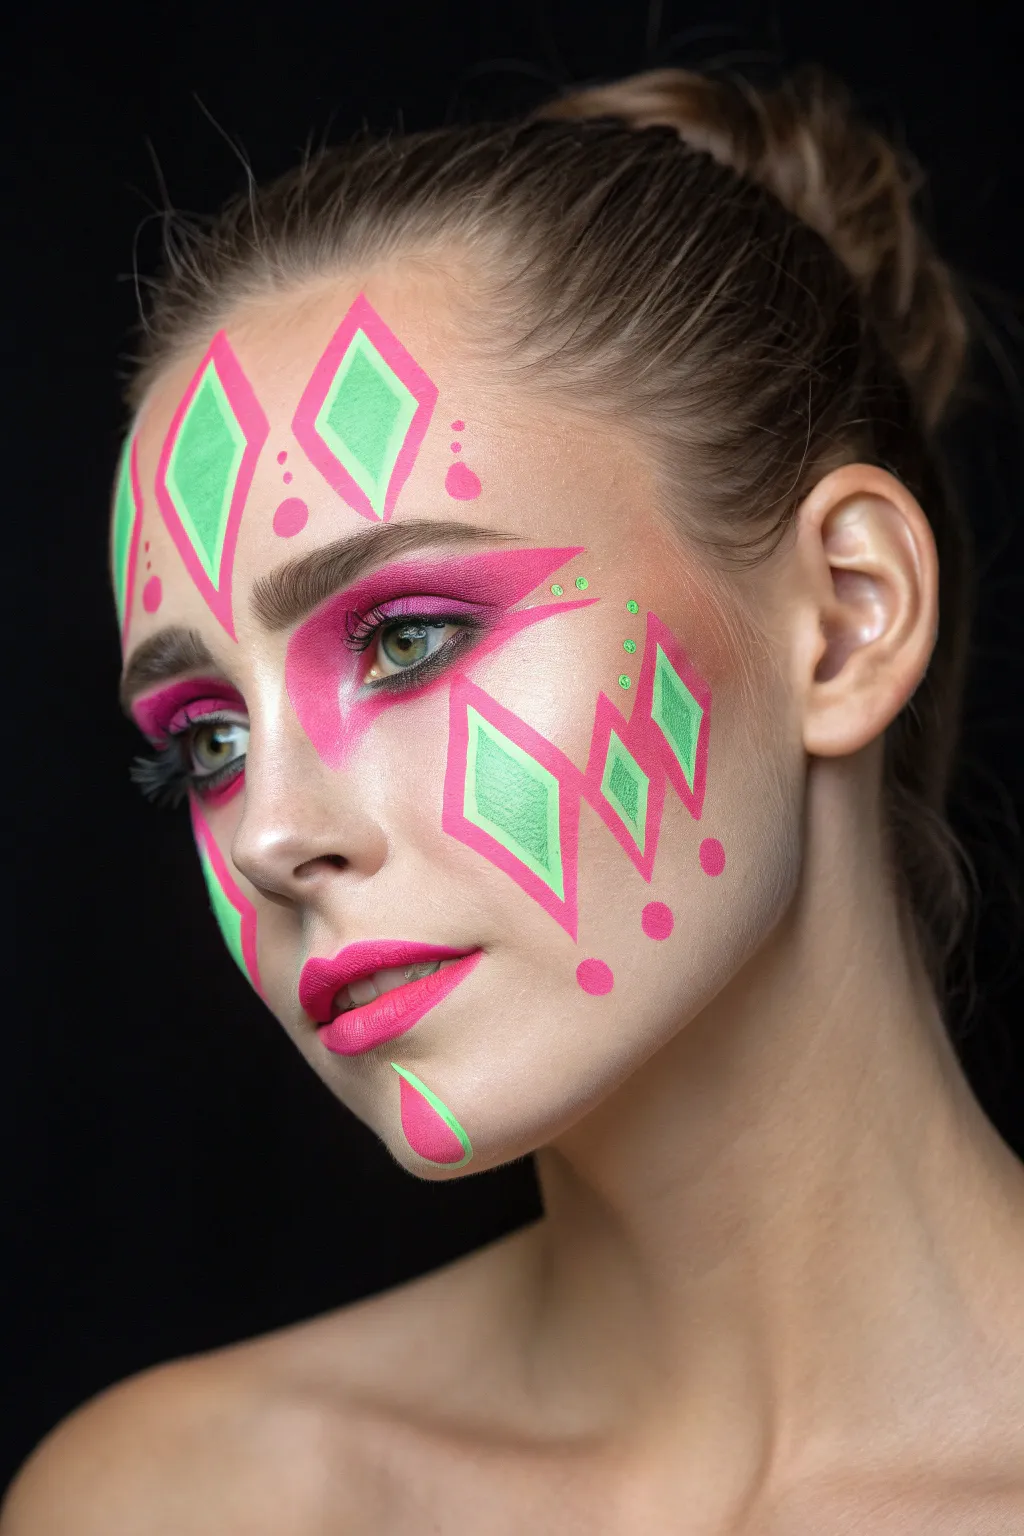
This striking design merges classic court jester geometry with a modern, fluorescent twist perfect for blacklight events. The combination of sharp diamond shapes and soft smoky eyes creates a sophisticated yet playful clown aesthetic that demands attention.
How-To Guide
Materials
- Neon pink water-activated face paint
- Neon mint green water-activated face paint
- Fine detail brushes (size 0 or 1)
- Flat angled brush
- Vibrant pink eyeshadow
- Matte long-wear foundation
- Contour powder
- Black liquid eyeliner
- False eyelashes (wispy style)
- White kohl pencil
Step 1: Base and Eye Makeup
-
Prep and prime:
Start with clean skin and apply a full-coverage matte foundation to create a blank canvas that will make the neon colors pop. -
Contour the face:
Sweep a warm contour powder deeply under the cheekbones and along the temples to restructure the face shape. -
Apply base eyeshadow:
Pack a vibrant pink eyeshadow densely onto the eyelid, blending it smoothly into the crease. -
Create the pink wing:
Extend the pink shadow outwards toward the temple in a sharp, dramatic wing shape, fading it slightly as it moves upward. -
Define the lash line:
Apply a thin line of black liquid liner along the upper lashes and smudge pink shadow along the lower lash line for balance. -
Add lashes:
Apply black mascara and attach a pair of wispy false lashes to open up the eyes.
Steady Hand Trick
Rest your pinky finger on the model’s face (use a powder puff to avoid smudging the base) to anchor your hand while painting the sharp geometric lines.
Step 2: Forehead Geometry
-
Map the shapes:
I like to use a sharp white kohl pencil to faintly sketch the outline of the three diamonds on the forehead to ensure symmetry before painting. -
Fill the centers:
Using a flat brush and neon mint green paint, fill in the inner diamond shapes on the forehead. -
Outline in pink:
Load a detail brush with neon pink paint and create a thick, geometric border around each green diamond. -
Sharpen the points:
Use the very tip of your fine brush to drag the paint outward at the top and bottom of each diamond, creating razor-sharp points. -
Add decorative dots:
Dip the handle end of a brush into the pink paint and stamp round dots between the diamond shapes for consistent sizing.
Step 3: Cheek and Chin Details
-
Outline cheek diamonds:
On the cheekbones, sketch a series of three connected, floating diamonds in varying sizes. -
Paint cheek details:
Repeat the previous coloring process: fill the centers with mint green and outline them boldly with neon pink. -
Add micro-dots:
Using your smallest detail brush and the green paint, carefully stipple tiny dots in a curve from the temple down toward the cheekbone. -
Create the chin accent:
Paint a stylized teardrop shape on the side of the chin using pink paint. -
Detail the chin:
Add a crisp line of neon green along one edge of the pink teardrop to tie the color scheme together. -
Paint the lips:
Finish the look by applying the neon pink paint or a matching matte liquid lipstick to the lips for a cohesive pout.
Patchy Neons?
Neon paints can sometimes be sheer. If the green looks streaky, let the first layer dry completely, then stipple (dab) a second layer on top rather than brushing it.
Step back and admire your glowing, geometric masterpiece.
Porcelain Doll Cracks
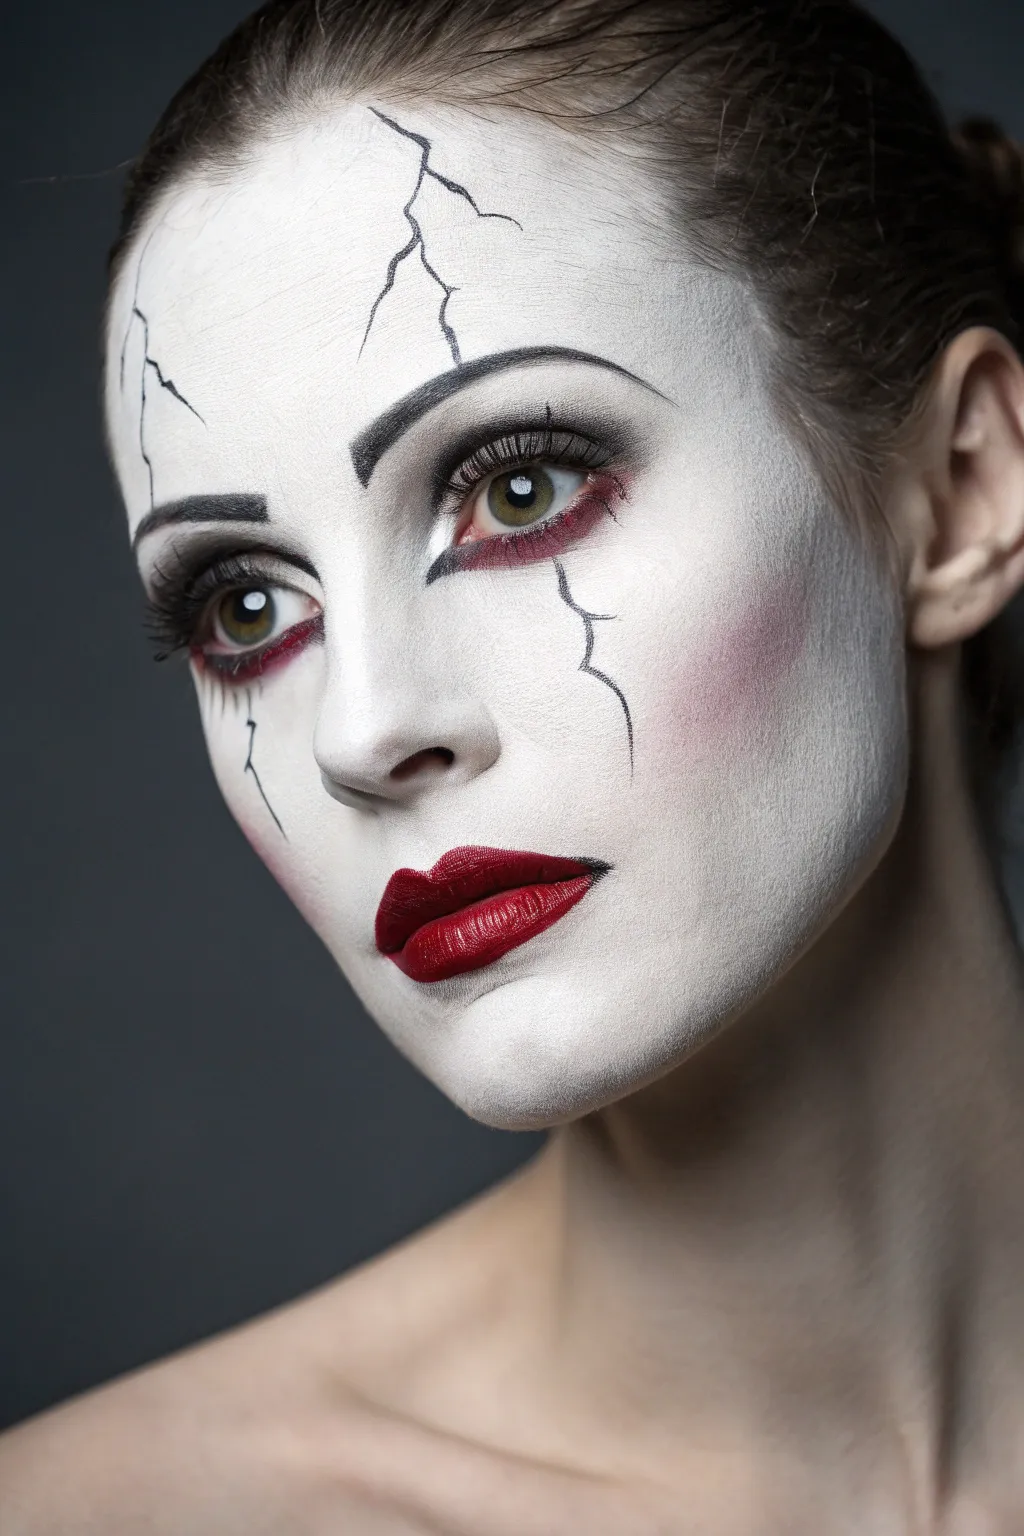
Transform your face into a beautiful but broken antique toy with this haunting makeup look. Using a stark white base and precise lining, you will create the illusion of cracked ceramic skin that is both eerie and elegant.
Step-by-Step Guide
Materials
- White cream face paint or full-coverage pale foundation
- Translucent or white setting powder
- Makeup sponge and powder puff
- Black liquid eyeliner or gel liner
- Red matte eyeshadow
- White eyeliner pencil
- Black brow pomade or pencil
- Pink powder blush
- Red lipstick (matte)
- Fine detail brush
Step 1: Creating the Porcelain Base
-
Prep the skin:
Start with a clean, moisturized face to ensure the heavy makeup sits comfortably on your skin without cracking prematurely. -
Apply the white base:
Using a damp makeup sponge, stipple white cream face paint or the palest foundation you can find all over your face, blending down to the neck. -
Build opaque coverage:
Allow the first layer to dry slightly, then apply a second layer to ensure your natural skin tone is completely hidden. -
Set for a matte finish:
Generously press translucent or white setting powder into the base using a powder puff; this is crucial for achieving that dry, ceramic texture. -
Dust off excess:
Use a large fluffy brush to sweep away any loose powder so the surface is smooth and ready for detail work.
Depth Perception Trick
To make cracks look 3D, trace a very thin line of white paint alongside the black cracks. This creates a highlight on the ‘broken’ edge.
Step 2: Painting the Doll Features
-
Define the brows:
Fill in your eyebrows with a black pencil or pomade, creating a defined, slightly high arch to mimic a painted doll’s expression. -
Shadow the lower decorative line:
Apply a matte red eyeshadow along the lower lash line with a small angled brush, blending it slightly downward for a weary, decorative effect. -
Open up the eyes:
Run a white eyeliner pencil along your lower waterline; this helps the eyes appear wider and more artificial. -
Line the upper lid:
Draw a sharp, consistent line along the upper lash line using black liquid eyeliner, adding a small wing at the outer corner. -
Apply mascara:
Finish the eyes with a coat of black mascara on the top lashes to define them against the white skin. -
Add the flush:
Swirl a soft pink blush onto the apples of your cheeks using a circular motion to create a contained, doll-like rosy spot. -
Shape the lips:
Outline your lips with a deep red lip liner, emphasizing the cupid’s bow for a distinct, sharp shape. -
Fill in the color:
Fill the lips with a matching red lipstick, preferably a matte formula to create a seamless, non-glossy finish.
Smudge Control
If your black liner bleeds into the white base, your base layers may be too oily. Press more powder onto the specific area before re-drawing the line.
Step 3: Adding the Cracks
-
Select the right tool:
Dip a very fine detail brush into black gel liner or face paint, or use a precision liquid liner pen with a flexible tip. -
Start the forehead fracture:
Begin a crack at the hairline on one side of the forehead, dragging the line downward in a jagged, random path. -
Vary line weight:
I like to vary the pressure here, pressing harder at the origin of the crack and lifting off gently for a tapered, sharp end. -
Create branching splits:
Add smaller, lightning-bolt style fissures splitting off from the main crack to resemble shattered glaze. -
Crack the cheek:
Draw a second distinct crack emerging from the outer corner of the eye or below it, trailing down across the cheekbone. -
Final details:
Add a small, isolated fracture on the chin or jawline to balance the composition without overcrowding the face.
Now you have a strikingly spooky look that perfectly balances beauty with decay.
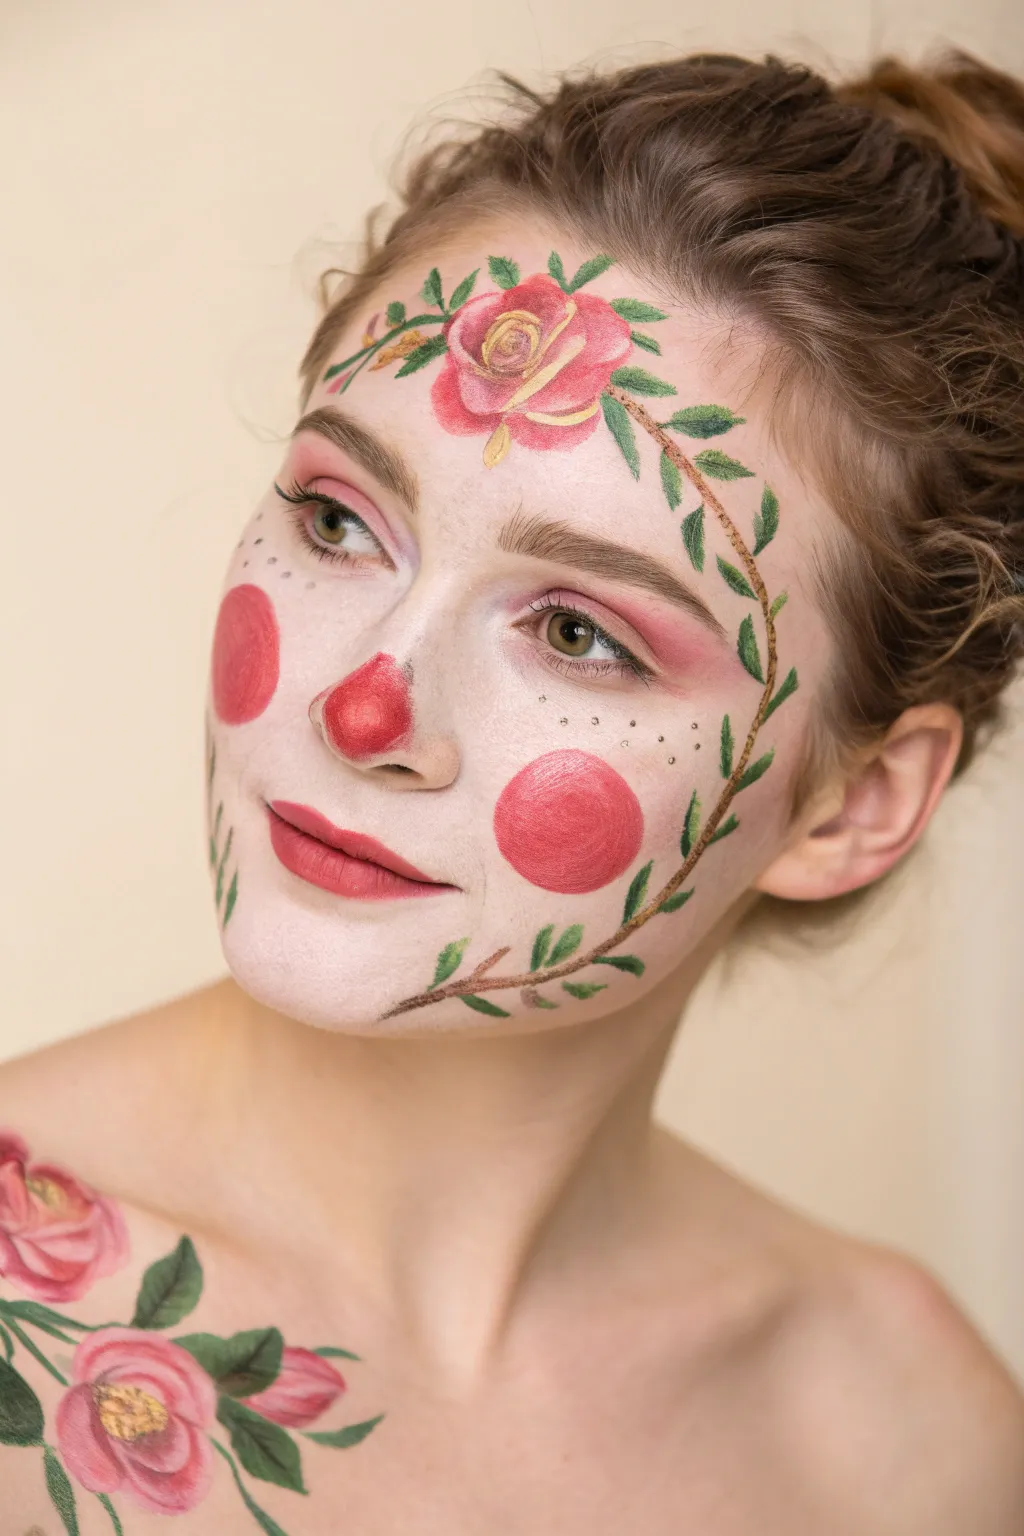
Floral and Nature Motifs
This look marries the whimsy of traditional clowning with the elegance of a botanical illustration. You will transform your face into a living canvas featuring soft roses and delicate vines framing your features.
Step-by-Step Tutorial
Materials
- Water-activated face paints (White, Pink, Red, Green, Brown, Gold)
- Pink and mauve eyeshadows
- Makeup sponges (high-density)
- Round brushes (sizes #2 and #4)
- Fine liner brush
- Setting spray
- Rosy lipstick
Step 1: Setting the Canvas
-
Prepare the base:
Start with clean, moisturized skin to ensure the paint glides on smoothly without cracking. -
Apply the white base:
Dampen a makeup sponge and load it with white face paint. Stipple it over your entire face and neck. I like to keep this layer slightly sheer and blended rather than opaque for a softer, porcelain effect. -
Shadow the eyes:
Sweep a dusty rose or mauve eyeshadow across the entire eyelid, blending it upwards toward the eyebrow to create a romantic haze. -
Define the brows:
Fill in your eyebrows naturally using a brow pencil or powder that matches your hair color, keeping the arch soft.
Pro Tip: Leaf Technique
To paint leaves quickly, press the belly of the round brush down firmly to create the wide base, then lift progressively as you drag the brush to create a sharp, tapered tip.
Step 2: Clown Features
-
Paint the nose:
Load a round brush with a shimmery red or berry-colored paint. Paint the tip of your nose, extending slightly up the bridge, and soften the edges. -
Create cheek circles:
Load a round sponge or a large brush with pink face paint. Press and twist gently on the apples of your cheeks to create two large, symmetrical blush circles. -
Add freckles:
Using a fine liner brush and watered-down brown or grey paint, dot tiny faux freckles across the nose bridge and under the eyes.
Level Up: Morning Dew
Apply tiny self-adhesive rhinestones or dots of clear glitter gel on the rose petals and leaves to mimic the look of fresh morning dew drops catching the light.
Step 3: Floral Framework
-
Position the main rose:
Using a medium round brush and pink paint, create a rough circular shape in the center of your forehead. -
Detail the petals:
Switch to a smaller brush with a darker pink or red. Paint overlapping ‘C’ shaped swirls inside the pink circle to define the rose petals. -
Highlight the center:
Dab a tiny amount of gold or yellow paint in the very center of the rose for dimension. -
Draw the vines:
Mix brown and green paint to curve a thin vine stem extending from the rose, down the temples, and curving in along the jawline on both sides. -
Add leaves:
Along the vine stems, paint small almond-shaped leaves. Use a lighter green for the top of the leaf and a darker green near the stem for depth. -
Refine the vines:
Use your finest liner brush to add tiny, curling tendrils branching off the main vines for a delicate, realistic look.
Step 4: Body Art & Finishing
-
Extend to the shoulder:
Repeat the rose painting technique on your shoulder or collarbone area. Paint one large bloom and perhaps a smaller bud nearby. -
Connect the body art:
Paint long, sweeping vines with large leaves connecting the shoulder flowers, allowing them to trail naturally across your skin. -
Paint the lips:
Apply a berry or rose-colored lipstick. You can smudge the edges slightly with a finger for a stained, vintage appearance. -
Add highlights:
Place a tiny dot of white paint on the tip of the nose and on the upper curve of the cheek circles to simulate shine. -
Set the look:
Close your eyes and mist your face with a setting spray to lock the details in place.
Enjoy wearing this blooming masterpiece that perfectly balances elegance with playfulness.


Have a question or want to share your own experience? I'd love to hear from you in the comments below!