Walking into my studio and seeing a fresh batch of unfinished wood nutcrackers on the worktable always sparks so much holiday joy. You do not need fancy supplies or years of experience to turn these blank figures into stunning DIY Christmas decor that looks professionally made.
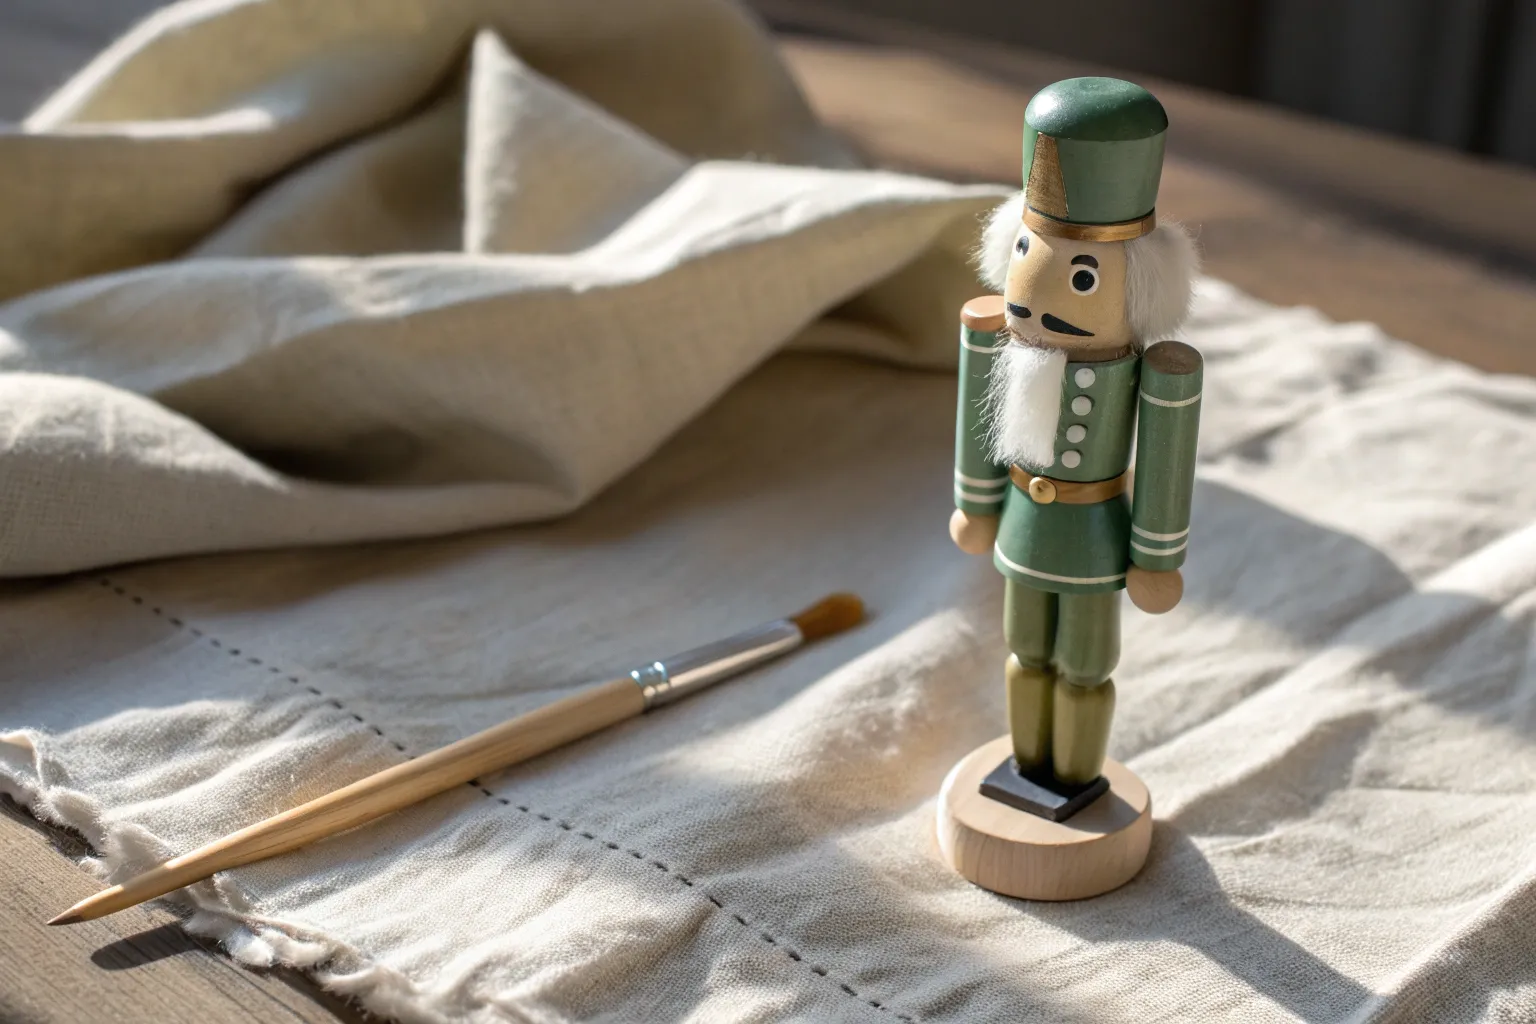
Start with the Classic Red and Green Guardian
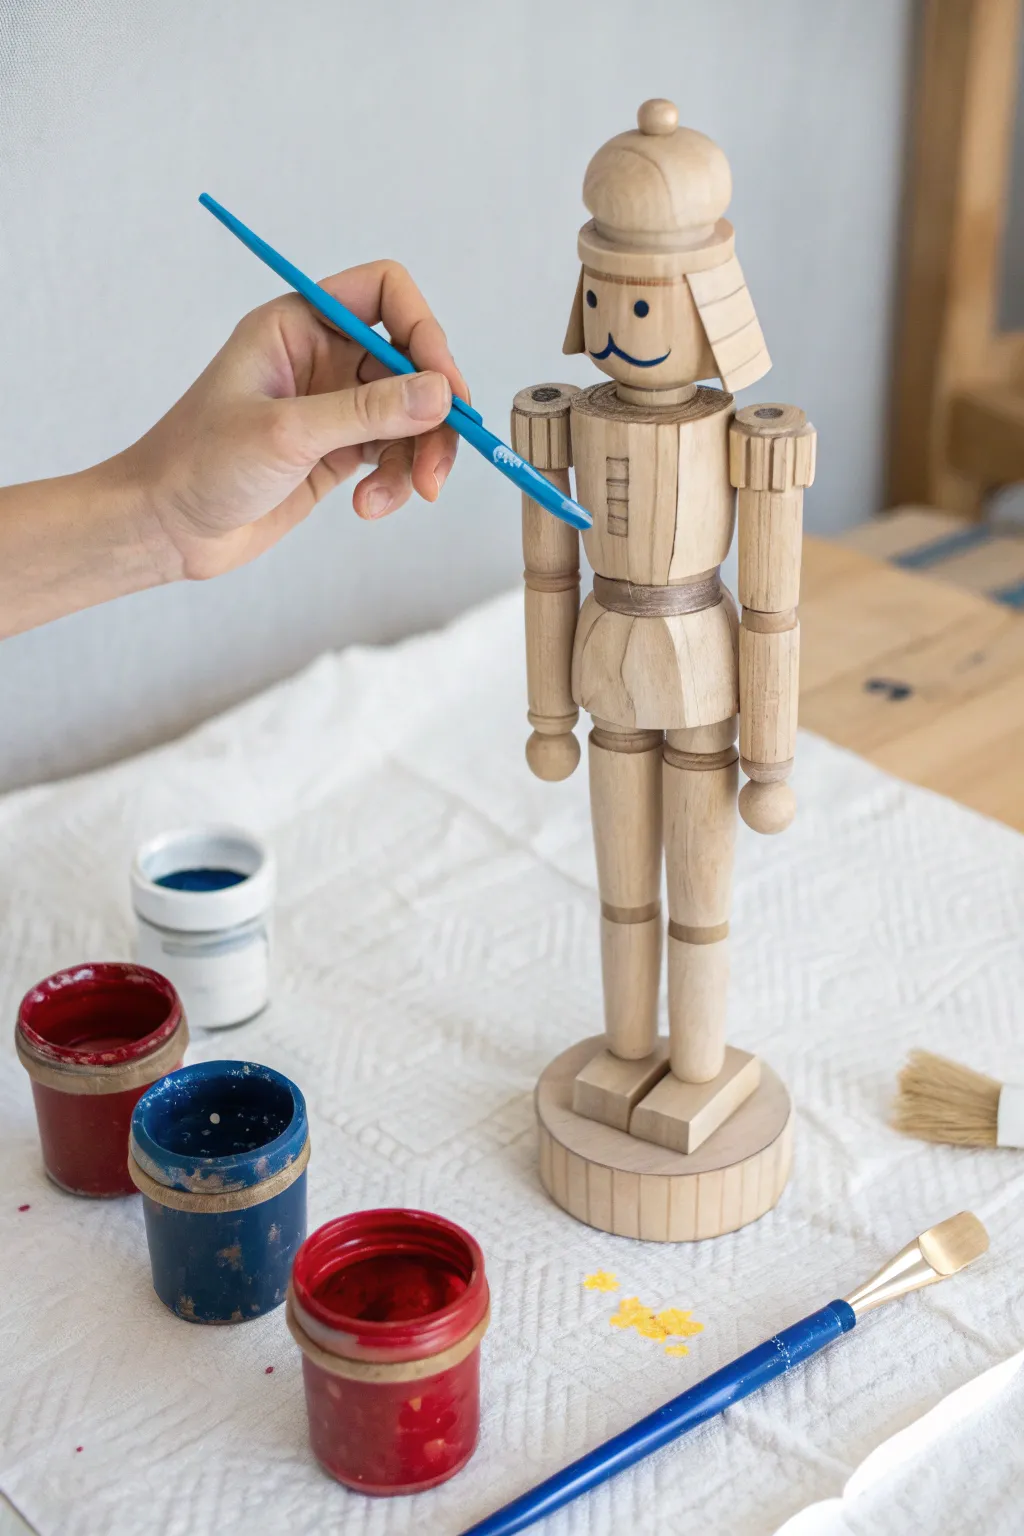
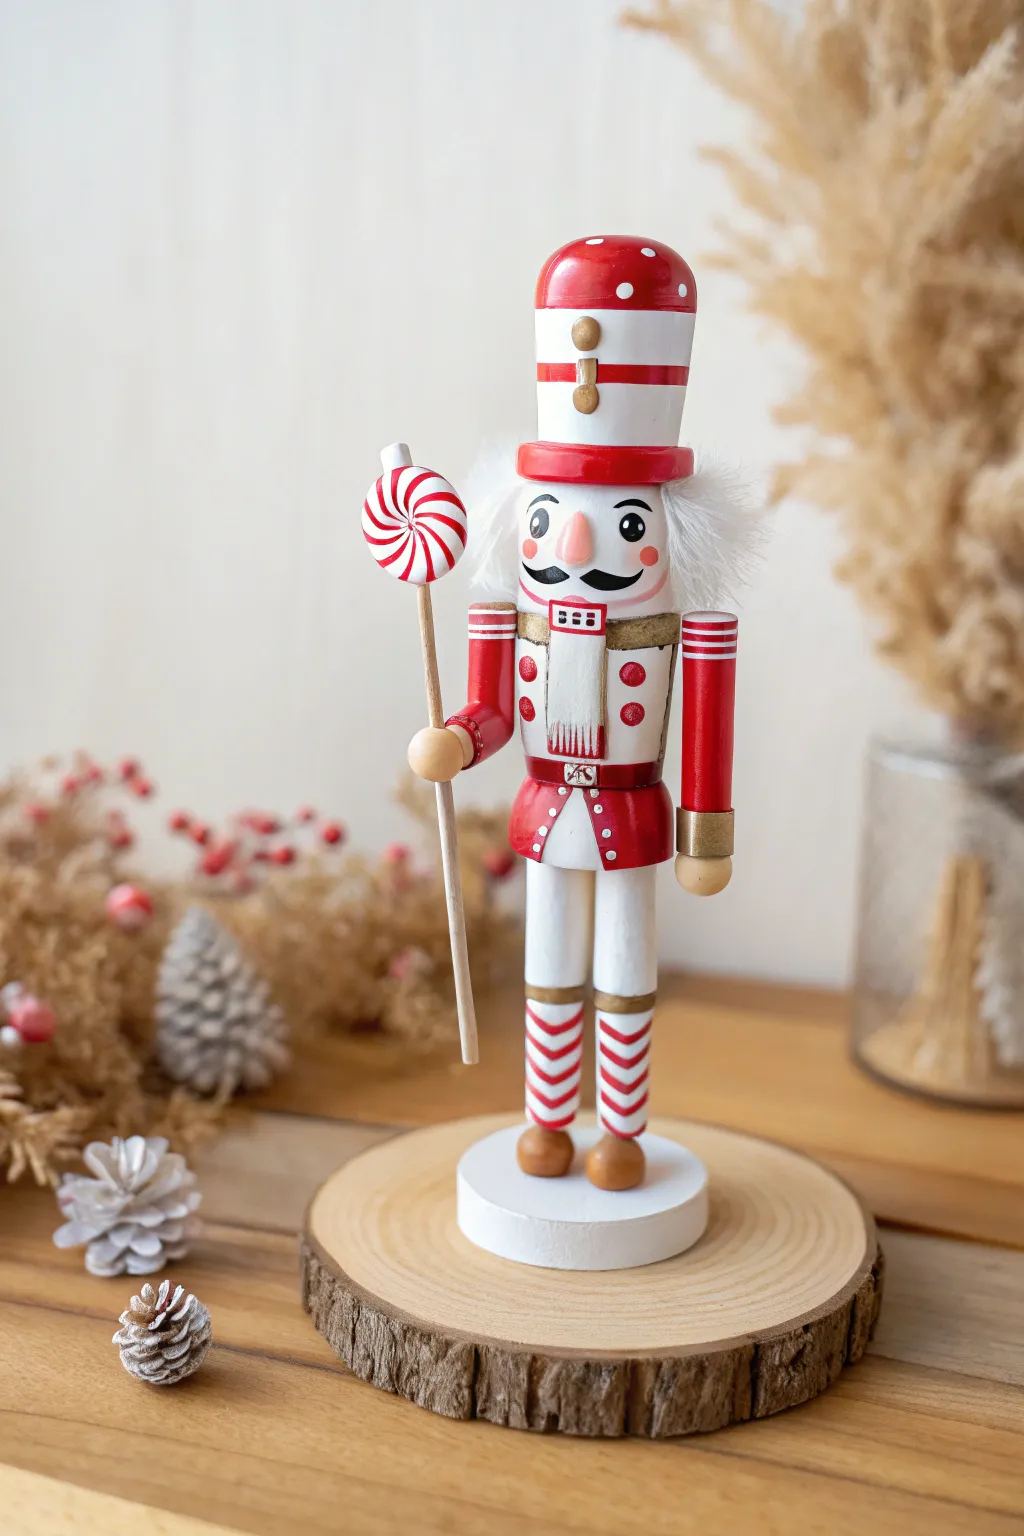
Capture the nostalgia of the holiday season by transforming a plain wooden blank into a stately guardian. This project relies on a timeless palette of crimson, forest green, and metallic gold to create a classic look that fits any mantelpiece.
Step-by-Step
Materials
- Unfinished wooden nutcracker
- Acrylic paints (Cadmium Red, Forest Green, Lamp Black, Titanium White, Flesh Tone)
- Metallic Gold acrylic paint
- Flat synthetic brushes (Size 4 and 8)
- Fine liner brush (Size 00 or 0)
- Pencil
- Craft glue
- Faux fur (White and Black)
Step 1: Preparation & Base Blocking
-
Smooth the surface:
Begin by lightly sanding the wooden figure with fine-grit sandpaper to remove any splinters, then wipe away the dust with a barely damp cloth. -
Sketch the uniform:
Using a pencil, lightly draw horizontal lines to define where the belt, boot tops, and shirt cuffs will sit. -
Paint the skin:
Apply a flesh-toned paint to the face area and the hands; I usually apply two thin coats here to ensure the wood grain doesn’t show through. -
Apply the trousers color:
Paint the legs with Forest Green, being careful to stop neatly at the line you drew for the boots. -
Paint the tunic:
Fill in the torso and arms with Cadmium Red, leaving the hand area exposed. -
Color the hat and base:
Use the same Cadmium Red to paint the tall cylinder of the hat and the top of the circular wooden stand. -
Block in the black:
Paint the boots and the wide belt strip in Lamp Black, using the edge of a flat brush to keep the lines against the red and green crisp.
Steady Hand Pro-Tip
When painting the gold boot details, rest your pinky finger on the wooden base. It creates a stable anchor, stopping your hand from shaking for fine lines.
Step 2: Gold Details & Face
-
Gild the hat:
Using Metallic Gold, paint the brim of the hat and the band wrapping around the top edge. -
Add the crest:
Freehand a small leaf or diamond shape in the center of the hat’s front using gold paint to act as a decorative crest. -
Detail the uniform:
Paint gold cuffs on the sleeves, epaulets on the shoulders, and a square buckle over the black belt. -
Add buttons:
Dip the handle end of a small brush into gold paint and dot it down the center of the red tunic to create perfect circle buttons. -
Decorate the boots:
Use your finest liner brush to paint small gold star or vine patterns on the front shin area of the black boots. -
Paint the facial features:
Paint two white ovals for eyes and a white rectangle for the teeth area. Let them dry completely. -
Define the face:
Use the fine liner with black paint to add a curled moustache, thick eyebrows, and the pupils of the eyes.
Step 3: Finishing Touches
-
Attach the hair:
Apply a small bead of craft glue to the sides of the head and press on strips of black faux fur for the hair. -
Attach the beard:
Glue a triangular piece of white faux fur or a white beard piece under the painted mouth area. -
Seal the work:
Once fully dry, apply a coat of satin varnish to protect the paint and give the soldier a slight wooden-toy sheen.
Wobbly Lines?
If your red paint overlaps the green, don’t wipe it! Let it dry completely, then paint over the mistake with the correct color. Wet-on-wet smudging makes it worse.
Now your nutcracker is ready to stand guard over your holiday festivities with pride and classic style.


Try the Trendy Monochromatic Look
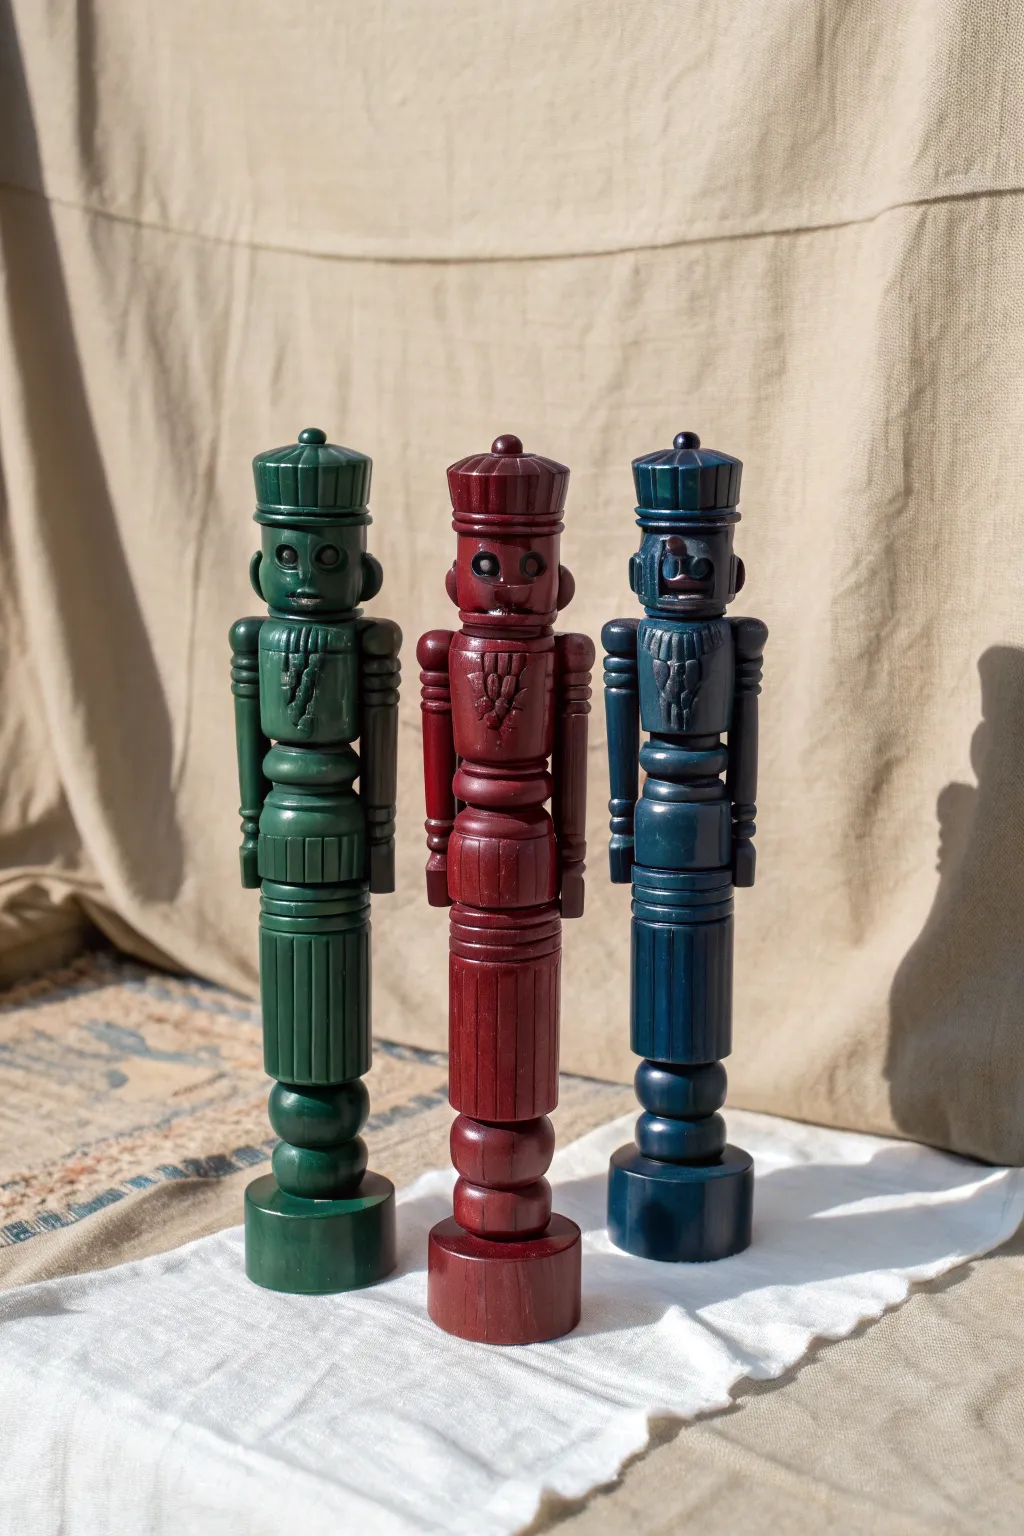
Transform ordinary wooden nutcrackers into sophisticated décor pieces with this modern monochromatic technique. By flooding the intricate carvings with deep jewel tones and a high-gloss finish, you create a unified, sculptural look that fits perfectly in contemporary holiday homes.
How-To Guide
Materials
- Unfinished wooden nutcrackers
- Fine-grit sandpaper (220 grit)
- Tack cloth or lint-free rag
- White or grey acrylic primer (gesso)
- High-quality acrylic paints (Deep Forest Green, Burgundy, Navy Blue)
- Soft synthetic flat brush
- Small round detail brush
- Clear gloss varnish or sealer
- Paper plate or palette
Step 1: Preparation
-
Inspect the Wood:
Examine your unfinished nutcrackers for any rough patches, splinters, or excess glue residue that might affect the finish. -
Smooth the Surface:
Lightly sand the entire surface using fine-grit sandpaper, paying special attention to the rounded areas of the face and legs. -
Clean the Dust:
Detailed carvings trap dust easily, so wipe the figure thoroughly with a tack cloth or a slightly damp rag to ensure a clean base. -
Prime the Figure:
Apply a thin, even coat of primer over the entire nutcracker. This prevents the raw wood from soaking up your colored paint and ensures a vibrant final hue. -
Maintain Movement:
While priming, gently move the jaw lever back and forth to prevent paint closer to the mechanism from gluing the mouth shut as it dries. -
Let it Dry:
Allow the primer to dry completely according to the bottle instructions before moving on to color.
Sticky Jaw Syndrome?
If paint dries and seals the jaw shut, carefully run a craft knife along the seam of the moving part to break the paint seal, then wiggle the lever gently to free it.
Step 2: Painting Application
-
Select Your Palette:
Choose deep, rich colors for that trendy look. Darker shades often require fewer coats to look opaque compared to lighter ones. -
Start from the Top:
Dip your flat brush into the paint and begin coating the hat and crown area first. -
Switch Brushes for Details:
Use the small round detail brush to work paint into the deep crevices of the hair texture and the facial features. -
Watch for Pooling:
Be careful not to overload your brush. I usually dab excess paint onto a paper towel so it doesn’t puddle in the eyes or teeth, which would obscure the carving. -
Paint the Torso and Arms:
Continue painting downwards, covering the jacket, arms, and hands. Use long, smooth strokes on the smoother cylinder shapes. -
Cover the Legs and Base:
Finish the first layer by painting the legs, boots, and the circular stand base. -
Check Hidden Angles:
Flip the nutcracker upside down briefly to check for missed spots under the chin, arms, or the rim of the hat. -
Inside the Mouth:
Open the mouth using the lever and carefully paint the inside area with your small brush so no bare wood shows when it opens. -
Allow to Cure:
Let this first coat dry fully. The wood may have absorbed some pigment, making it look uneven, but that is normal. -
Apply Second Coat:
Apply a second full coat of paint to deepen the color and achieve full opacity.
Level Up: Velvet Texture
For a unique twist on the matte look, use intricate texture paste on the jacket parts before painting to create a raised, embroidered effect under the solid color.
Step 3: Finishing Touches
-
Final Inspection:
Once dry, inspect the figure under bright light to ensure every nook is covered and the color is solid and uniform. -
Apply Varnish:
Brush on a coat of clear gloss varnish to give the nutcracker that shiny, porcelain-like quality shown in the photo. -
Final Cure:
Set the figures aside in a dust-free area to cure completely for at least 24 hours before displaying them.
Group your trio of colorful soldiers together on a mantel or shelf for a bold, modern holiday statement.


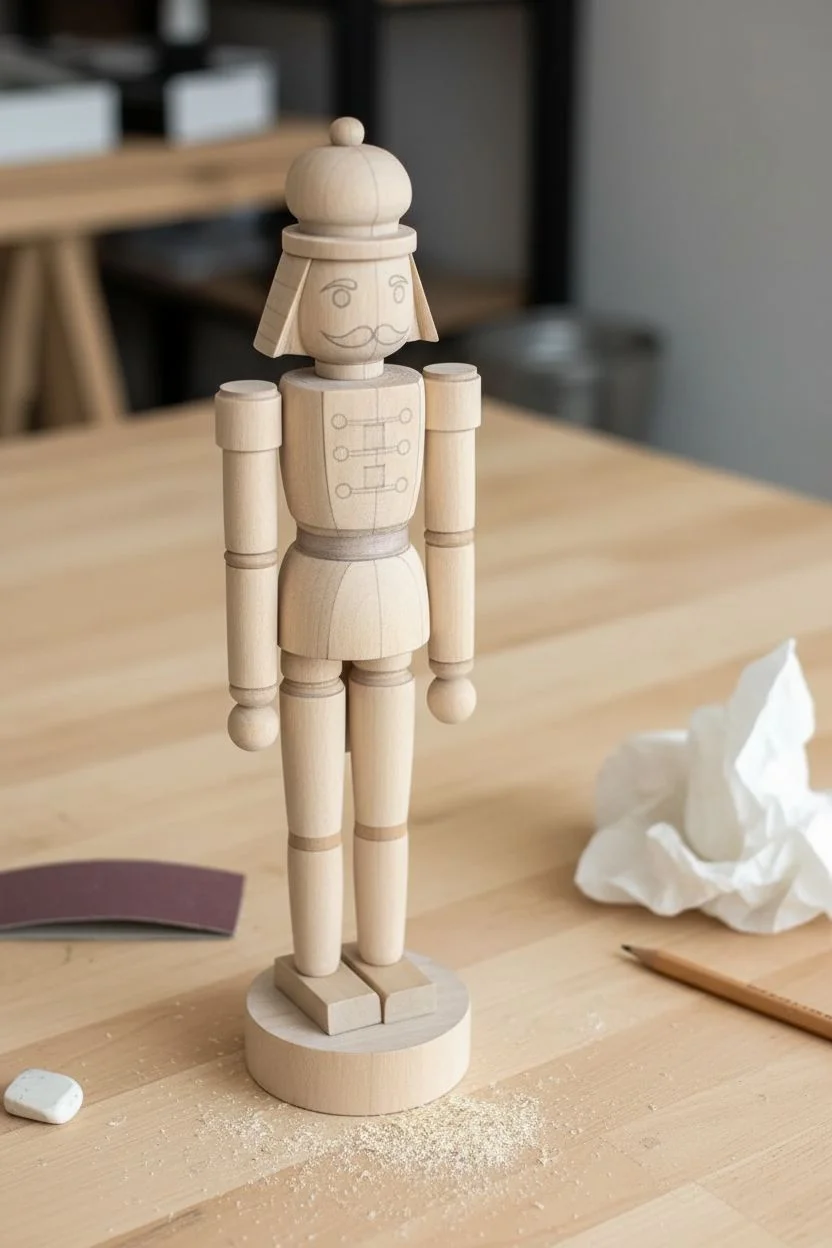
Set Up a Batch Painting Assembly Line
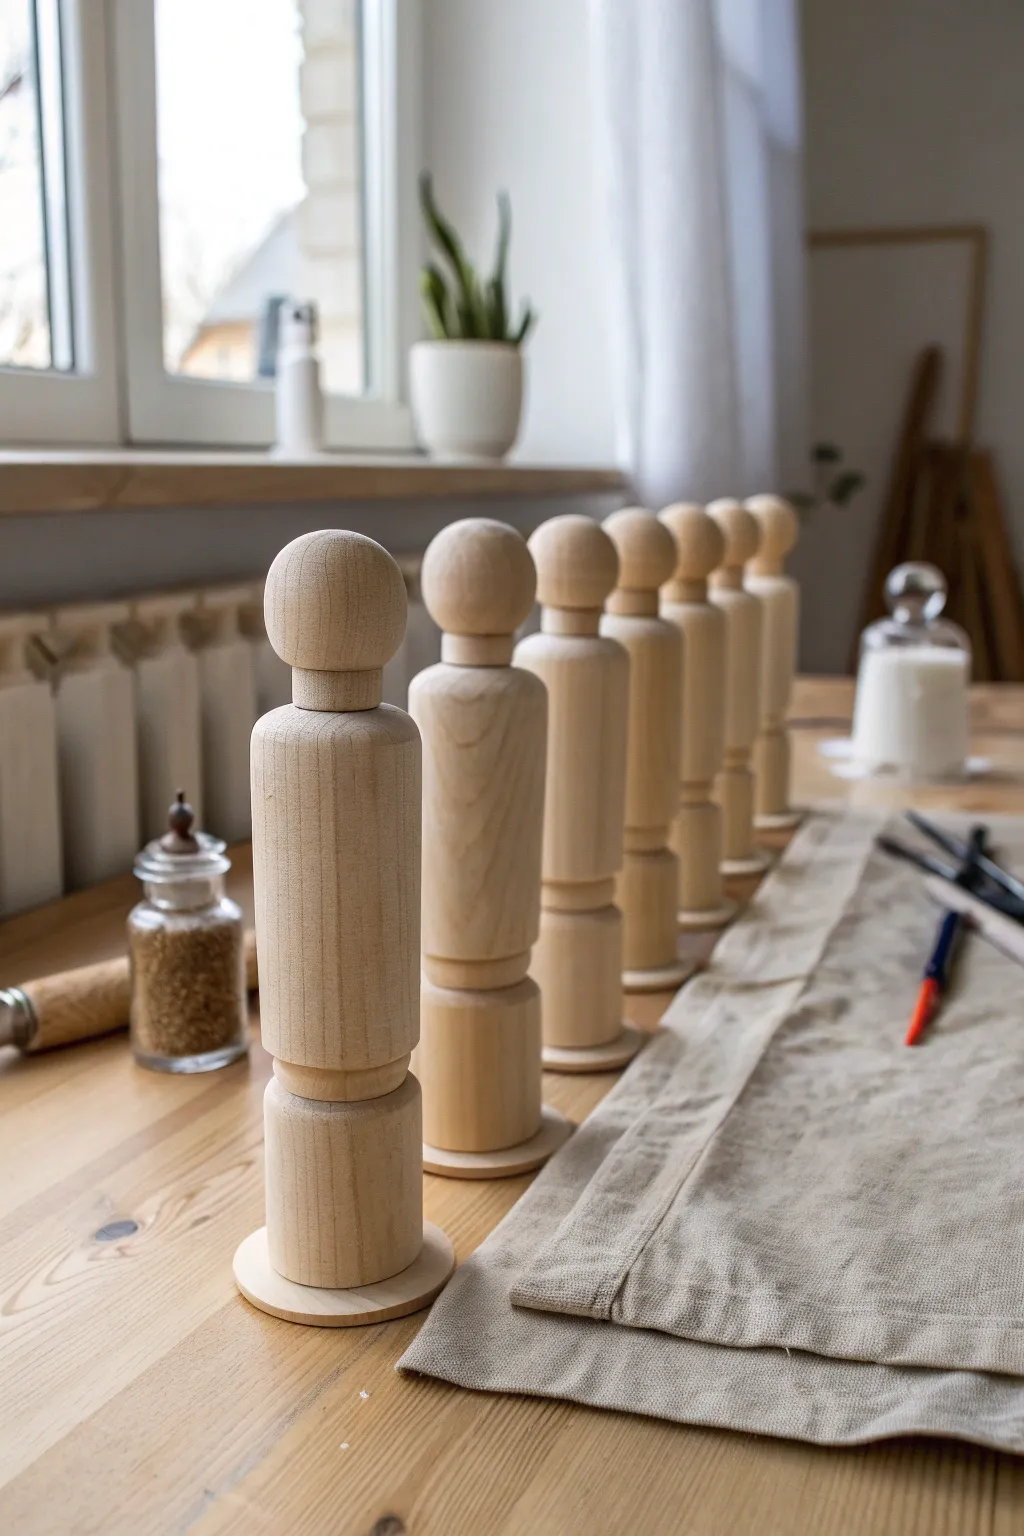
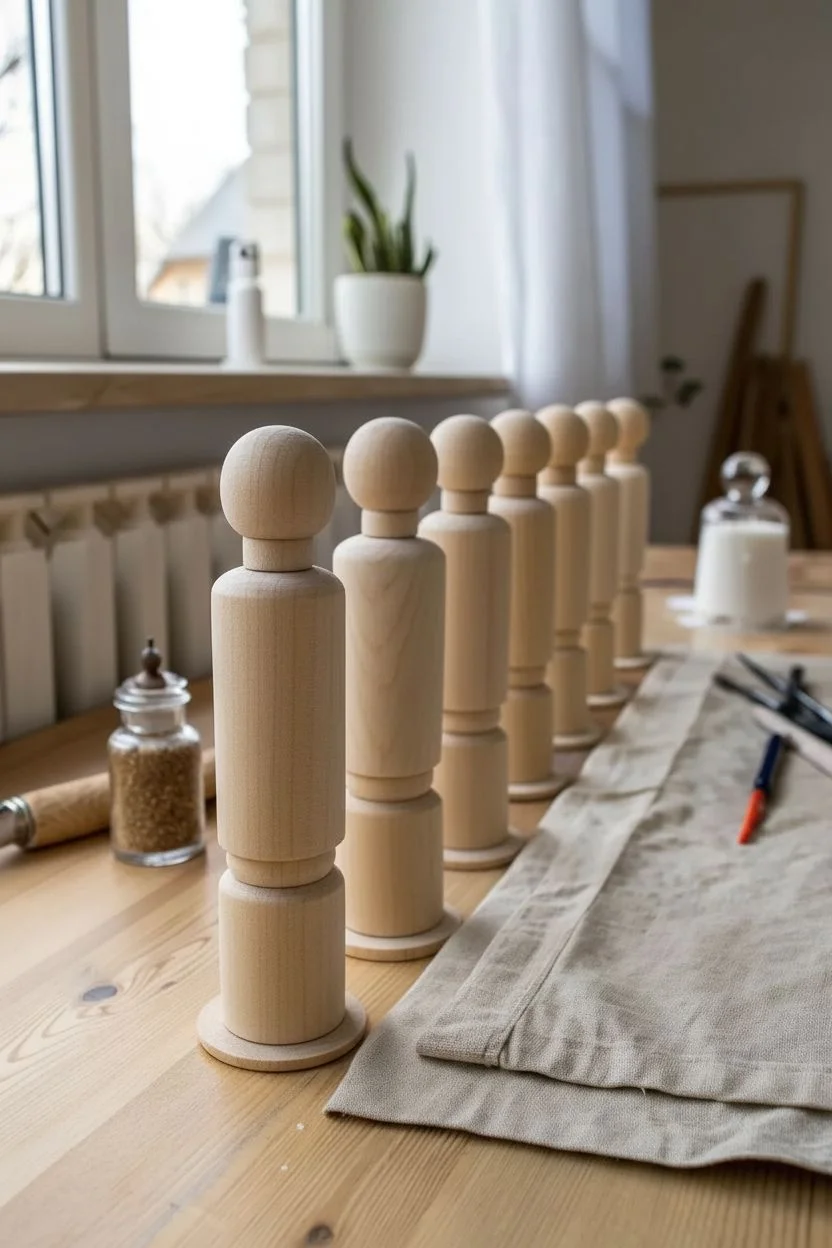
Before a single drop of color touches the wood, the secret to a successful batch project lies in the preparation and organization of your assembly line. This tutorial walks you through conditioning your wooden blanks to a velvet-smooth finish and staging your workspace to look just like the serene, efficient setup in the photo.
Step-by-Step
Materials
- Unfinished wooden nutcracker blanks
- Sandpaper (150 grit for shaping)
- Sandpaper (220 grit for smoothing)
- Tack cloth or lint-free rag
- Natural linen or canvas drop cloth
- Glass mixture jar
- Assorted synthetic paintbrushes (rounds and flats)
- Sturdy work table
Step 1: Preparing the Wood Surface
-
Initial inspection:
Examine each wooden blank for rough patches, splinters, or factory seams that need attention before you begin. -
Coarse sanding:
Use the 150-grit sandpaper to remove any prominent seams running down the sides of the figures. -
Detailing the neck:
Fold a small piece of sandpaper to get into the crevices of the neck and distinctive grooves without flattening the details. -
Smoothing the head:
Cup the sandpaper in your palm and rotate the figure’s head against it to maintain the roundness while smoothing the grain. -
Checking stability:
Stand each figure on a flat surface to see if it wobbles; stability is crucial for the assembly line method. -
Leveling the base:
If a figure wobbles, place a sheet of sandpaper flat on the table and rub the base of the figure against it in a figure-eight motion until flat. -
Final polish:
Switch to the extra-fine 220-grit sandpaper and give every inch of the wood a final buffing until it feels velvety to the touch. -
Dust removal:
I usually take a tack cloth or a slightly damp rag to wipe away all saw dust, ensuring the wood is perfectly clean for the eventual priming.
Wobbly Figures?
If a figure won’t stand straight even after sanding, glue a small metal washer to the bottom. This adds weight for stability and creates a perfectly flat base instantly.
Step 2: Staging the Assembly Line
-
Preparing the surface:
Clear a large section of your work table, ideally near a natural light source like a window for accurate color rendering later. -
Laying the foundation:
Spread out a natural linen or canvas drop cloth; the texture prevents the round figures from sliding around too easily. -
Sorting the batch:
Group your wooden figures by size or shape to streamline the painting process. -
Establishing the queue:
Place your figures in a diagonal row extending away from your dominant hand; this creates an ergonomic workflow. -
Spacing the figures:
Leave about two inches of space between each figure so you can grab one without knocking over its neighbors like dominoes. -
Aligning faces:
Orient all figures to face the same direction, which helps visualize the final uniformity of the batch. -
Setting up the rinse station:
Place your glass jar for water or medium slightly behind the line, within easy reach but out of the splash zone. -
Organizing tools:
Lay your brushes flat on the cloth next to the line, grouping them by size so you can grab the right tool instantly. -
Final check:
Sit at the station and do a ‘dry run’ motion to ensure your hand travels smoothly from the line to the palette area without obstruction.
Production Tracker
Lightly number the bottom of each figure with a pencil (1, 2, 3…). This helps you keep track of which layer of paint corresponds to which figure during a complex multi-step batch process.
With your surfaces perfectly prepped and your station organized, you are now ready to breeze through the painting phase efficiently.


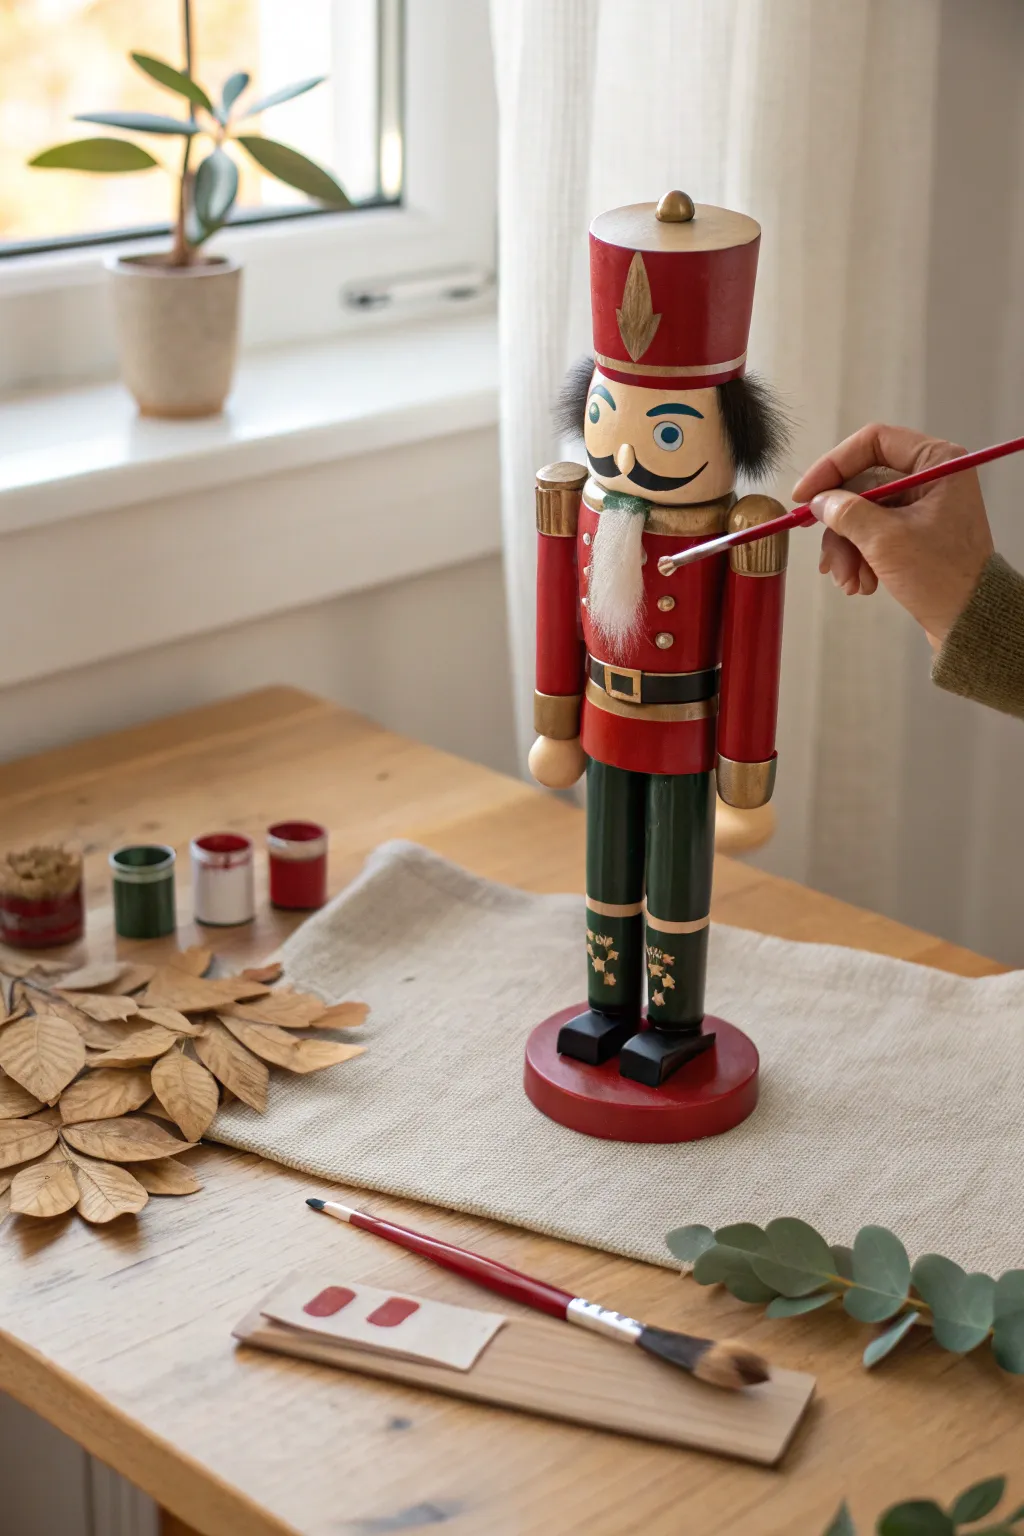
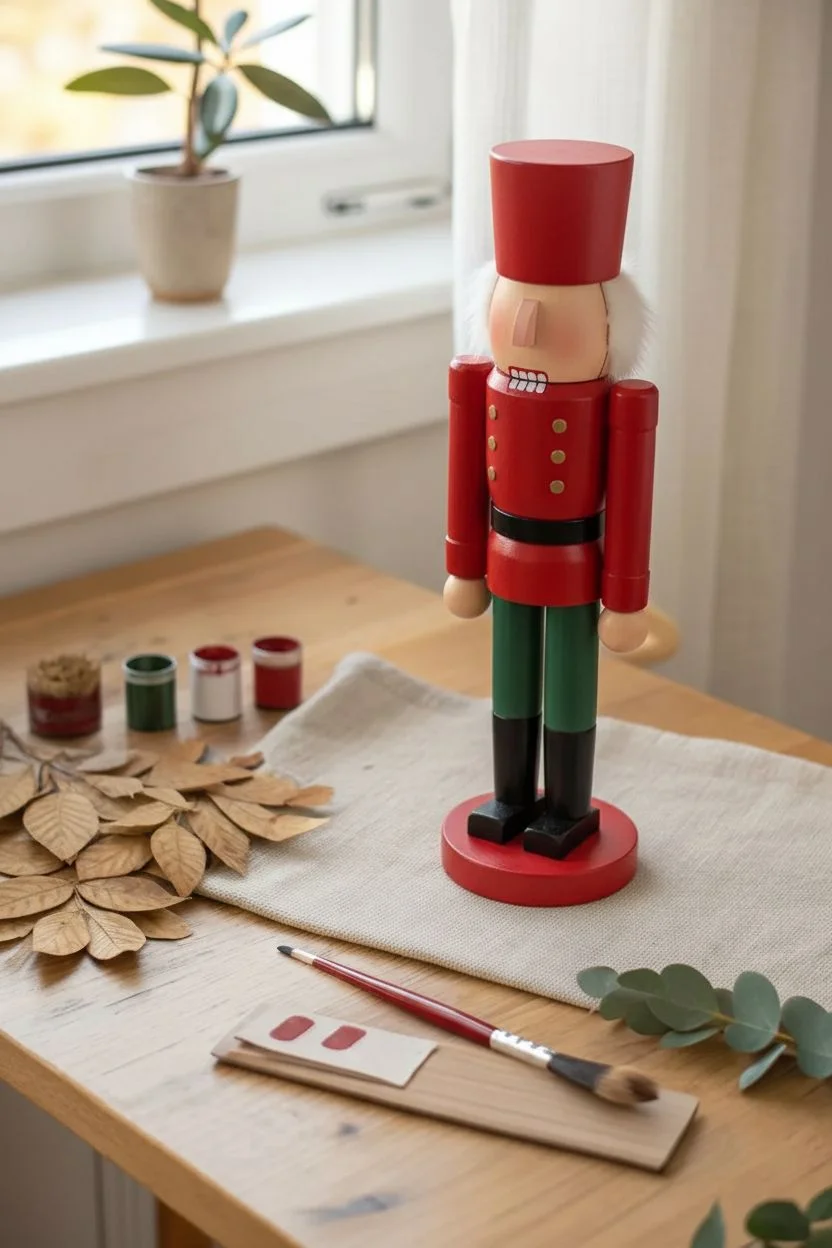
Use Tape for Crisp Soldier Uniform Lines
Transform a simple unfinished wood figure into a traditional holiday guardian using crisp lines and bold colors. This project specifically focuses on achieving that sharp, professional uniform look using smart masking techniques.
Detailed Instructions
Materials
- Unfinished wooden nutcracker doll
- Acrylic paints (Deep Red, Navy Blue, Black, White, Gold)
- Low-tack painter’s tape (narrow width is best)
- Pencil and eraser
- Flat shader brush (size 4 or 6)
- Fine detail round brush (size 0 or 1)
- Water cup and paper towels
- Sandpaper (fine grit)
Step 1: Preparation & Sketching
-
Smooth the surface:
Before painting, lightly sand the entire wooden figure with fine-grit sandpaper to remove any splinters or rough patches that could snag your brush. -
Dust off:
Wipe the nutcracker down with a slightly damp paper towel to remove all sanding dust so the paint adheres properly. -
Map out the face:
Using a pencil, lightly sketch the facial features directly onto the raw wood, drawing two circles for eyes and a wide, curled mustache handle-bar style. -
Define the uniform:
Sketch the clothing lines, marking where the belt will sit, the vertical line for the pants, and rectangular blocks on the chest for the jacket toggles.
Step 2: Blocking Colors & Taping
-
Mask the belt line:
Tear off a strip of painter’s tape and apply it horizontally around the waist area to separate the jacket from the trousers. -
Seal the tape edges:
Run your fingernail firmly along the edge of the tape to ensure a tight seal, which prevents the paint from bleeding underneath. -
Paint the trousers:
Using your flat brush, paint the legs (below the tape) in Navy Blue, applying long, vertical strokes for a smooth finish. -
Lift and dry:
Carefully peel back the tape while the paint is still slightly wet to keep the line crisp, then let the blue paint dry completely. -
Mask the jacket:
Once the blue legs are dry, apply a new line of tape over the top edge of the blue paint to protect it while you work on the torso. -
Paint the jacket:
Fill in the torso area with Deep Red paint, working carefully around the arm joints so they don’t get stuck together with thick paint.
Bleeding Lines?
If paint seeps under the tape, wait for it to dry completely. Then, use a damp stiff brush or a craft knife to gently scrape away the excess wander lines for a clean edge.
Step 3: Face & Details
-
Paint the hat and boots:
While the body dries, use black paint for the boots and the main body of the hat, keeping your hand steady near the rim. -
Fill the mustache:
Switch to your fine detail brush and carefully fill in the sketched mustache shape with black or dark blue paint. -
Add the eyes:
Dip the back end of your paintbrush in paint and stamp it gently onto the eye sketches to create perfect, even dots. -
Create the toggles:
Using the Gold paint and a detail brush, paint small horizontal rectangles across the red jacket chest area to mimic military embroidery. -
Highlight the form:
I prefer to add a thin line of white or gold along the rim of the hat and the top of the boots to make the different sections pop. -
Final dry:
Allow the entire figure to sit undisturbed for at least an hour to ensure all layers, especially around the joints, are fully hardened.
Golden Touch
Instead of plain gold paint for the buttons and epaulettes, use a metallic paint marker. It allows for much greater control and shine on strictly linear details than a brush does.
Display your handsome soldier on the mantel and enjoy the classic charm he adds to your decor.
BRUSH GUIDE
The Right Brush for Every Stroke
From clean lines to bold texture — master brush choice, stroke control, and essential techniques.
Explore the Full Guide
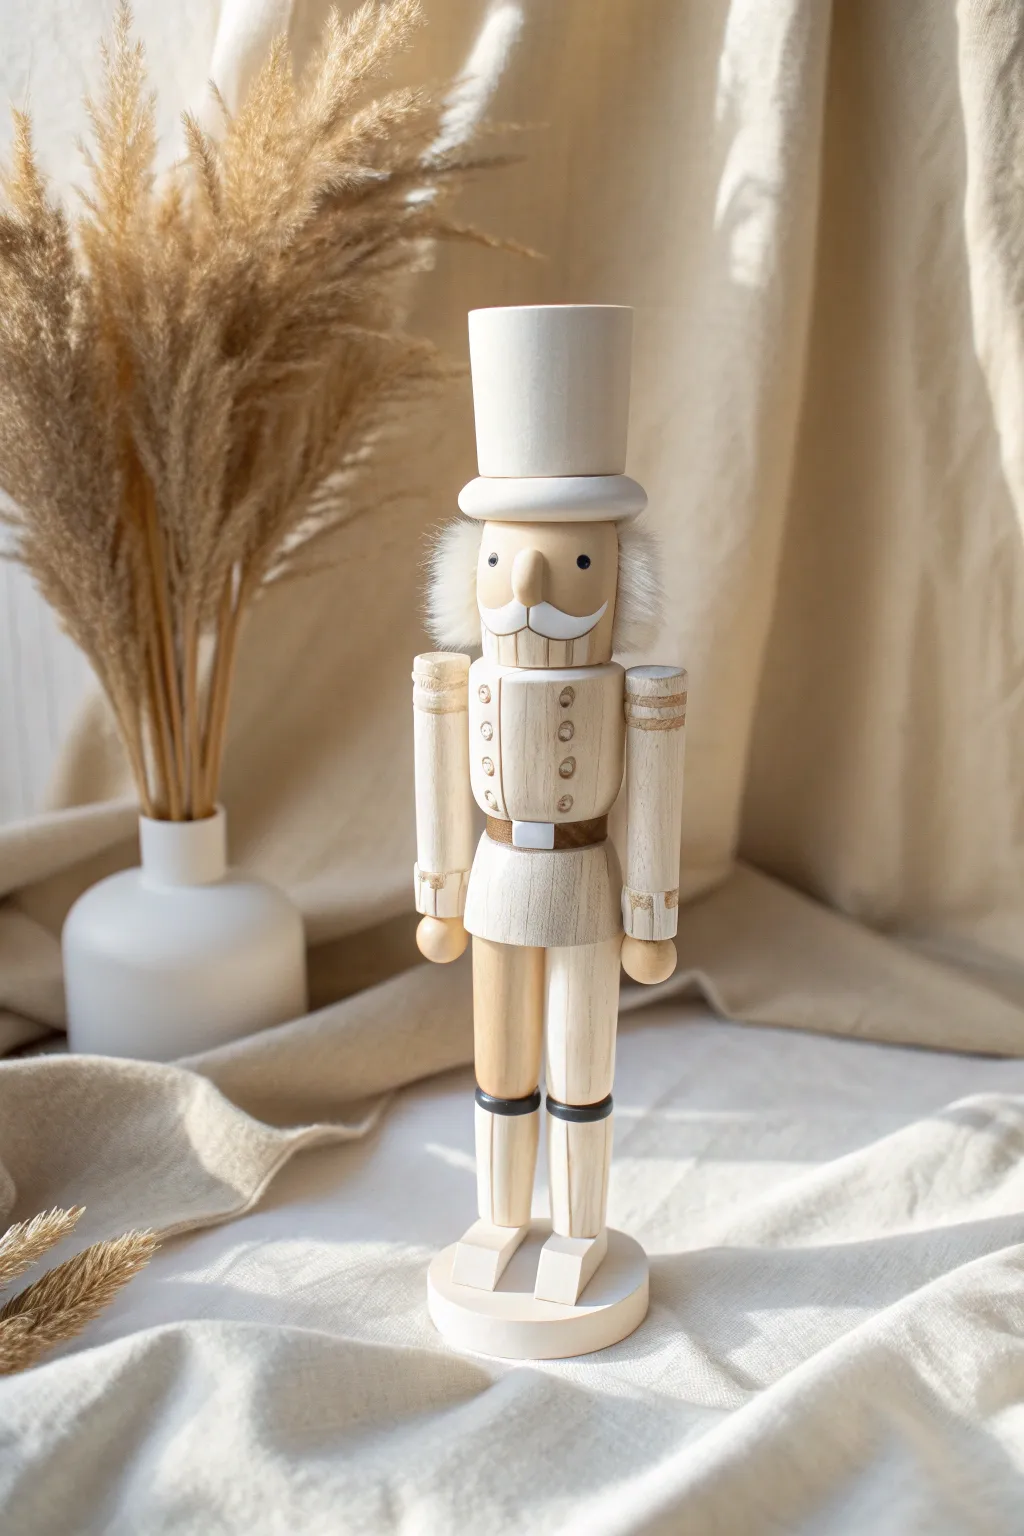
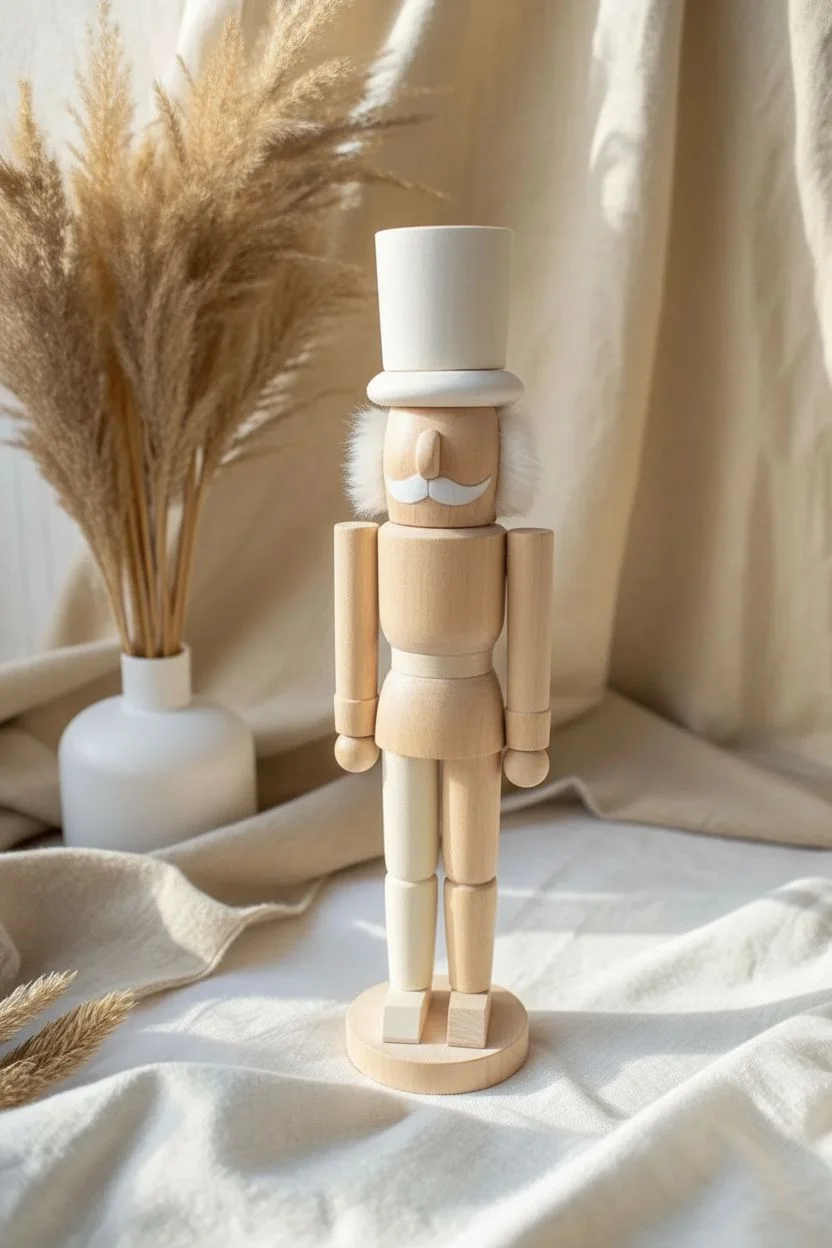
Add Gold Leaf or Metallic Paint for Glamour

This elegant project combines natural wood grain with chic gold accents for a modern, Scandinavian-inspired look. It is perfect for beginners who want high-impact style without the pressure of painting every single inch.
Step-by-Step Tutorial
Materials
- Unfinished wooden nutcracker
- High-gloss metallic gold acrylic paint
- Cream or off-white matte acrylic paint
- Black acrylic paint or Posca marker
- Small flat shader brush (size 4)
- Fine detail liner brush (size 0 or 00)
- Fine-grit sandpaper
- Pencil and white eraser
- Paint palette and water cup
Step 1: Preparation & Mapping
-
Smooth the surface:
Begin by lightly sanding the wooden nutcracker with fine-grit sandpaper to remove any splinters or rough patches, focusing on the round areas like the head and arms. -
Clean dust:
Wipe the figure down with a dry cloth or tack cloth to ensure no sawdust remains, which creates a smooth foundation for the paint. -
Sketch guidelines:
Use a pencil to lightly mark where the hair ends and the face begins, as well as the lines for the belt and the cuffs on the arms.
Pro Tip: Liquid Gold
For the metallic sections, try using a liquid gilding paint rather than standard acrylic. It flows smoother and offers a much brighter, mirror-like finish that catches the light beautifully.
Step 2: Applying Cream Blocks
-
Paint the hair:
Using a flat shader brush, apply the cream paint to the hair block, keeping your brush strokes vertical to mimic hair strands. -
Define the beard:
Carefully paint the beard area under the mouth with the cream color, rounding off the bottom edge for a neat finish. -
Paint the trousers:
Apply the same cream shade to the lower waist and shorts area, creating a crisp line where the legs begin to leave the natural wood exposed. -
Add shoulder details:
Dab a small circle of cream paint on the shoulder joints to create the look of epaulets. -
Apply second coat:
Once the first layer is dry to the touch, apply a second coat of cream to ensure the wood grain doesn’t show through too heavily.
Step 3: Adding the Gold Accents
-
Start the crown:
Load a clean flat brush with metallic gold paint and carefully paint the tips of the crown first to establish a clean edge. -
Fill the crown:
Work your way down the crown, coating the entire headpiece in solid gold. I usually let this dry and do a second coat for maximum shine. -
Paint the belt:
Rotate the nutcracker as you paint a thick gold band around the waist, following the groove usually carved into the wood. -
Detail the cuffs:
Switch to a smaller brush to add thin gold bands around the wrists and the upper arm joints. -
Create buttons:
Dip the handle end of a paintbrush into the gold paint and stamp three vertical dots down the chest to create perfect, uniform buttons. -
Gild the nose:
Use your smallest brush to paint the triangular nose shape in gold, making it the focal point of the face.
Level Up: Texture
While the gold paint on the crown is still wet, sprinkle a tiny pinch of extra-fine gold glitter over it. This adds magical texture without overpowering the clean, modern aesthetic.
Step 4: Face & Finishing
-
Draft facial features:
Verify your pencil sketch for the eyes and mustache is symmetrical before applying permanent dark paint. -
Paint the eyes:
Using black paint and a fine liner brush (or a paint pen for easier control), fill in two simple round ovals for the eyes. -
Add the mustache:
Paint a sleek, handlebar mustache in black directly under the gold nose, tapering the ends to sharp points. -
Optional eyebrows:
Add two very thin, subtle arches above the eyes for eyebrows, or leave them off for a more minimalist look. -
Clean up:
Once all paint is completely dry, gently erase any visible pencil guidelines with a white eraser.
Display your chic new nutcracker on a mantel or shelf to add a touch of handmade sophistication to your holiday decor
Create a Soft Pastel Winter Wonderland Theme
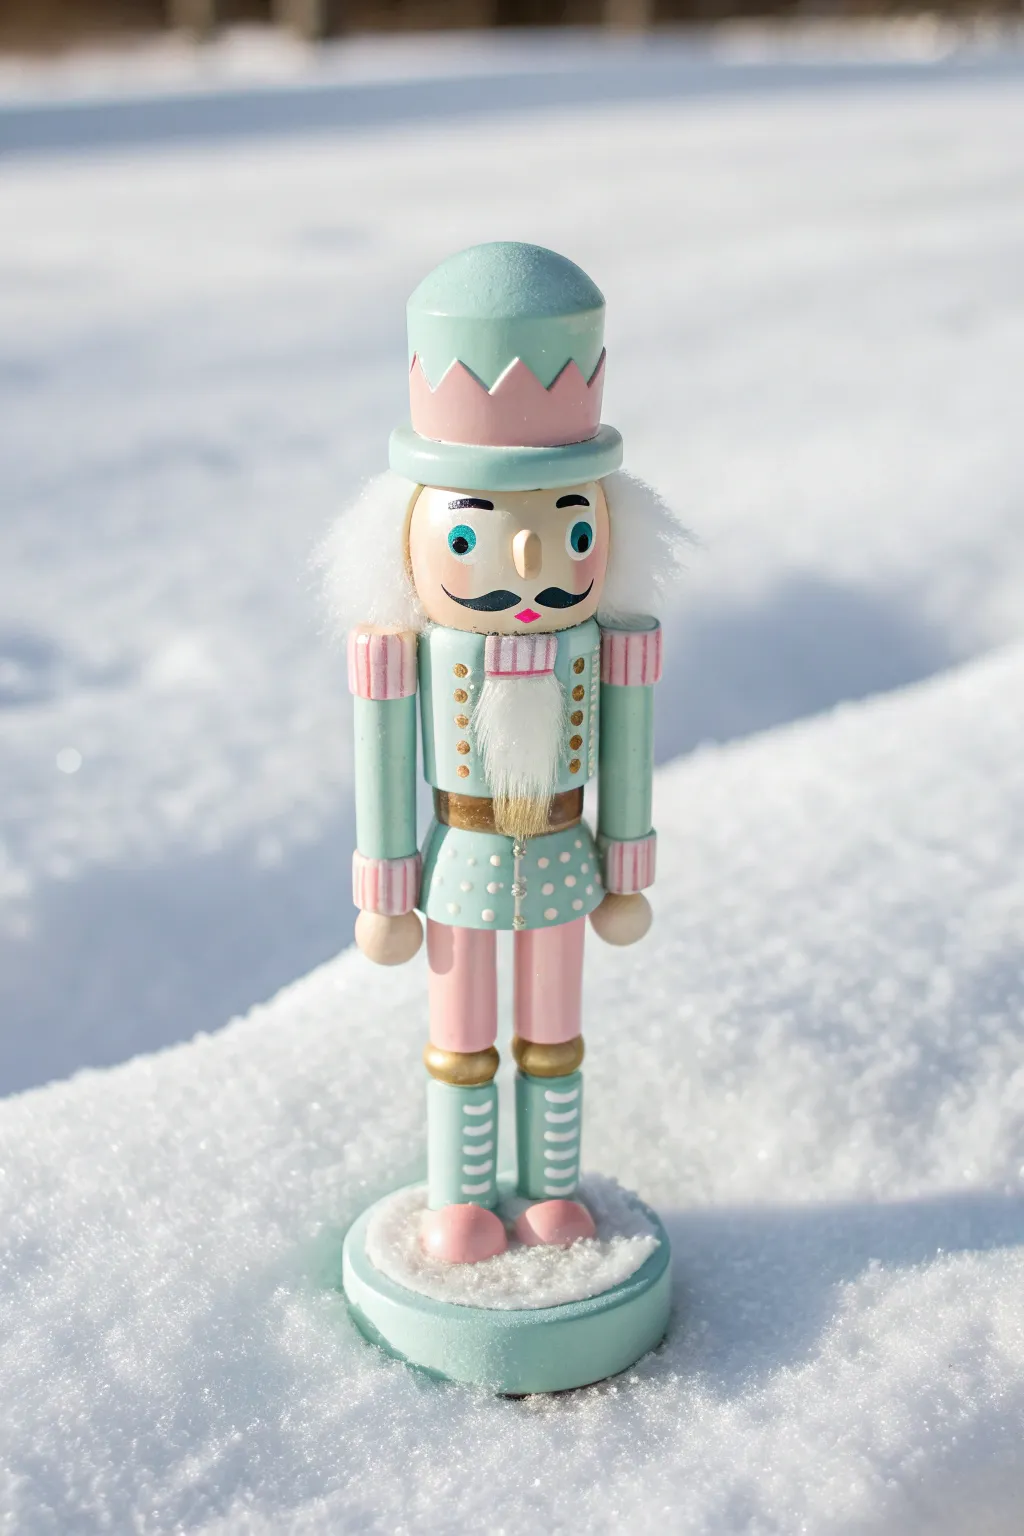
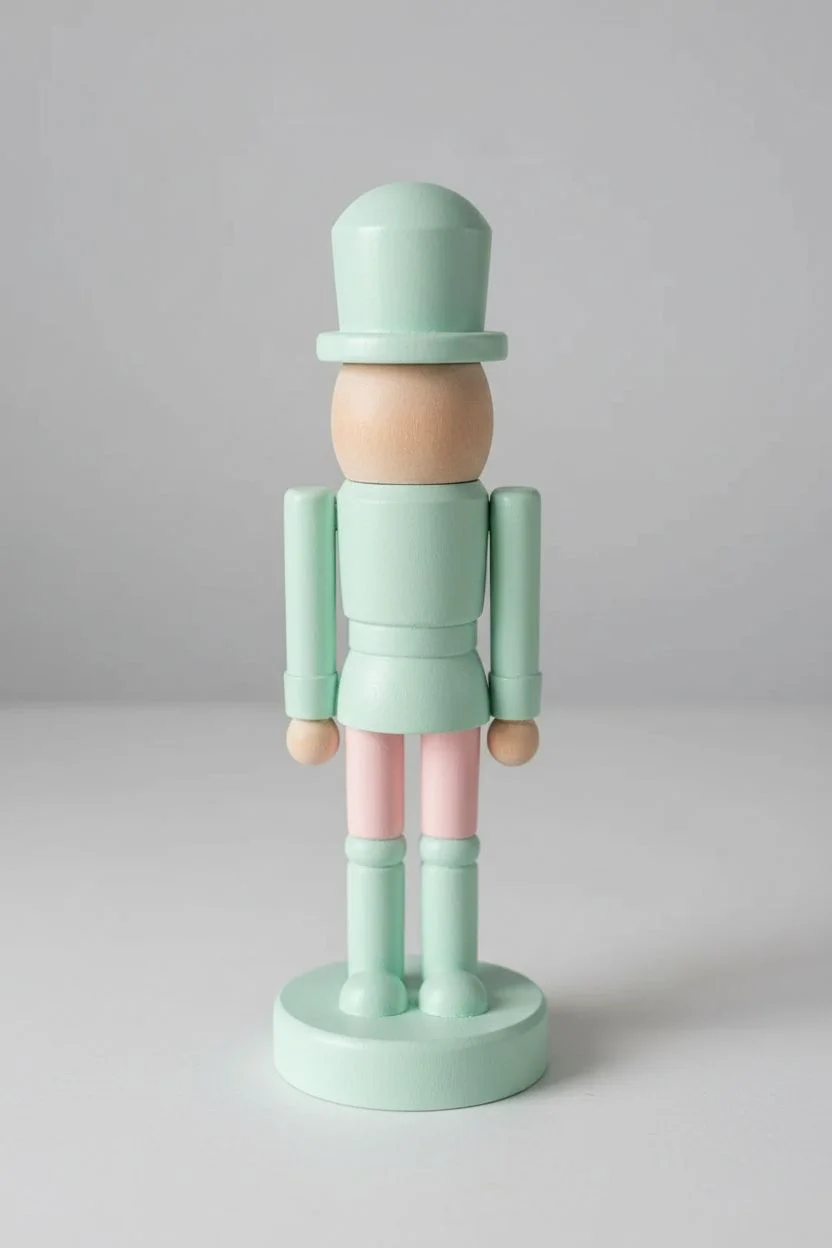
Move away from traditional reds and greens with this refreshing, confection-colored take on a holiday classic. This project combines soft mints, sweet pinks, and touchable textures to create a nutcracker that looks like a frosted sugar cookie come to life.
Step-by-Step Guide
Materials
- Unfinished wooden nutcracker
- Acrylic paints: mint green, pastel pink, skin tone, metallic gold, white, black
- Paintbrushes: flat shader, detail liner
- White faux fur fabric or trim
- Craft glue or hot glue gun
- Faux snow or coarse white glitter
- Fine-grit sandpaper
Step 1: Preparation & Base Coats
-
Smooth the Surface:
Gently sand the unfinished wood with fine-grit sandpaper to remove any rough patches or splinters, then wipe away the dust with a damp cloth. -
Paint the Skin:
Apply a skin-tone acrylic paint to the face area and the hands, applying two coats if necessary for opaque coverage. -
Apply Pink Base:
Paint the legs (pants) with a soft pastel pink using a flat brush. -
Apply Mint Base:
Paint the torso jacket, the arms, the boots, and the dome of the hat with a fresh mint green or light teal shade. -
Paint the Base:
Coat the round wooden stand in the same mint green color to match the uniform.
Perfect Circles
To get perfectly round decorative dots on the jacket without a special tool, dip the wrong end (the handle) of your paintbrush into the paint and stamp it straight down.
Step 2: Uniform Details
-
Crown Detail:
Using the pink paint, carefully draw a zig-zag ‘crown’ pattern around the mint hat dome and fill it in. -
Shoulders and Cuffs:
Paint the shoulder pads and the wrist cuffs in pink to coordinate with the pants and hat. -
Add Stripes:
Once the pink is dry, use a fine liner brush to paint thin, vertical white stripes onto the shoulder pads and cuffs. -
Gold Accents:
Paint the belt around the waist and the top rim of the boots with metallic gold paint for a touch of elegance. -
Jacket Buttons:
Create columns of small gold dots down the center of the chest to represent brass buttons. -
Polka Dots:
I like to use the handle end of a paintbrush dipped in white paint to stamp perfect polka dots onto the lower ‘skirt’ portion of the jacket. -
Boot Lacing:
Paint delicate horizontal white lines across the front of the teal boots to simulate laces.
Step 3: Face & Finishing Touches
-
Paint the Eyes:
Paint two small white ovals for the eyes, then add blue irises and small black pupils once the white is dry. -
Facial Features:
Use your finest detail brush to paint a curly black handlebar mustache, eyebrows, and a tiny nose outline. -
Rosy Cheeks:
Dilute a tiny drop of pink paint with water and gently dab it onto the cheeks for a soft blush effect. -
Cut the Fur:
Cut a triangular piece of white faux fur for the beard and a U-shaped strip for the hair. -
Attach Hair:
Glue the U-shaped fur strip around the back of the head, ensuring it tucks neatly under the hat brim. -
Attach Beard:
Glue the triangular fur piece to the chin, directly under the painted mouth area. -
Create the Snow Base:
Apply a thick layer of craft glue to the top of the mint green base. -
Add Sparkle:
While the glue is wet, generously sprinkle faux snow or coarse glitter over the base to create a winter wonderland effect.
Texture Level Up
For a dimensional look, replace the painted gold belt with a thin strip of metallic gold ribbon or velvet glued around the waist. It adds a lovely mixed-media element.
Display your frosty creation on a mantle or tablescape to add a whimsical pop of pastel winter magic.

PENCIL GUIDE
Understanding Pencil Grades from H to B
From first sketch to finished drawing — learn pencil grades, line control, and shading techniques.
Explore the Full Guide
Keep the Facial Features Simple and Stylized
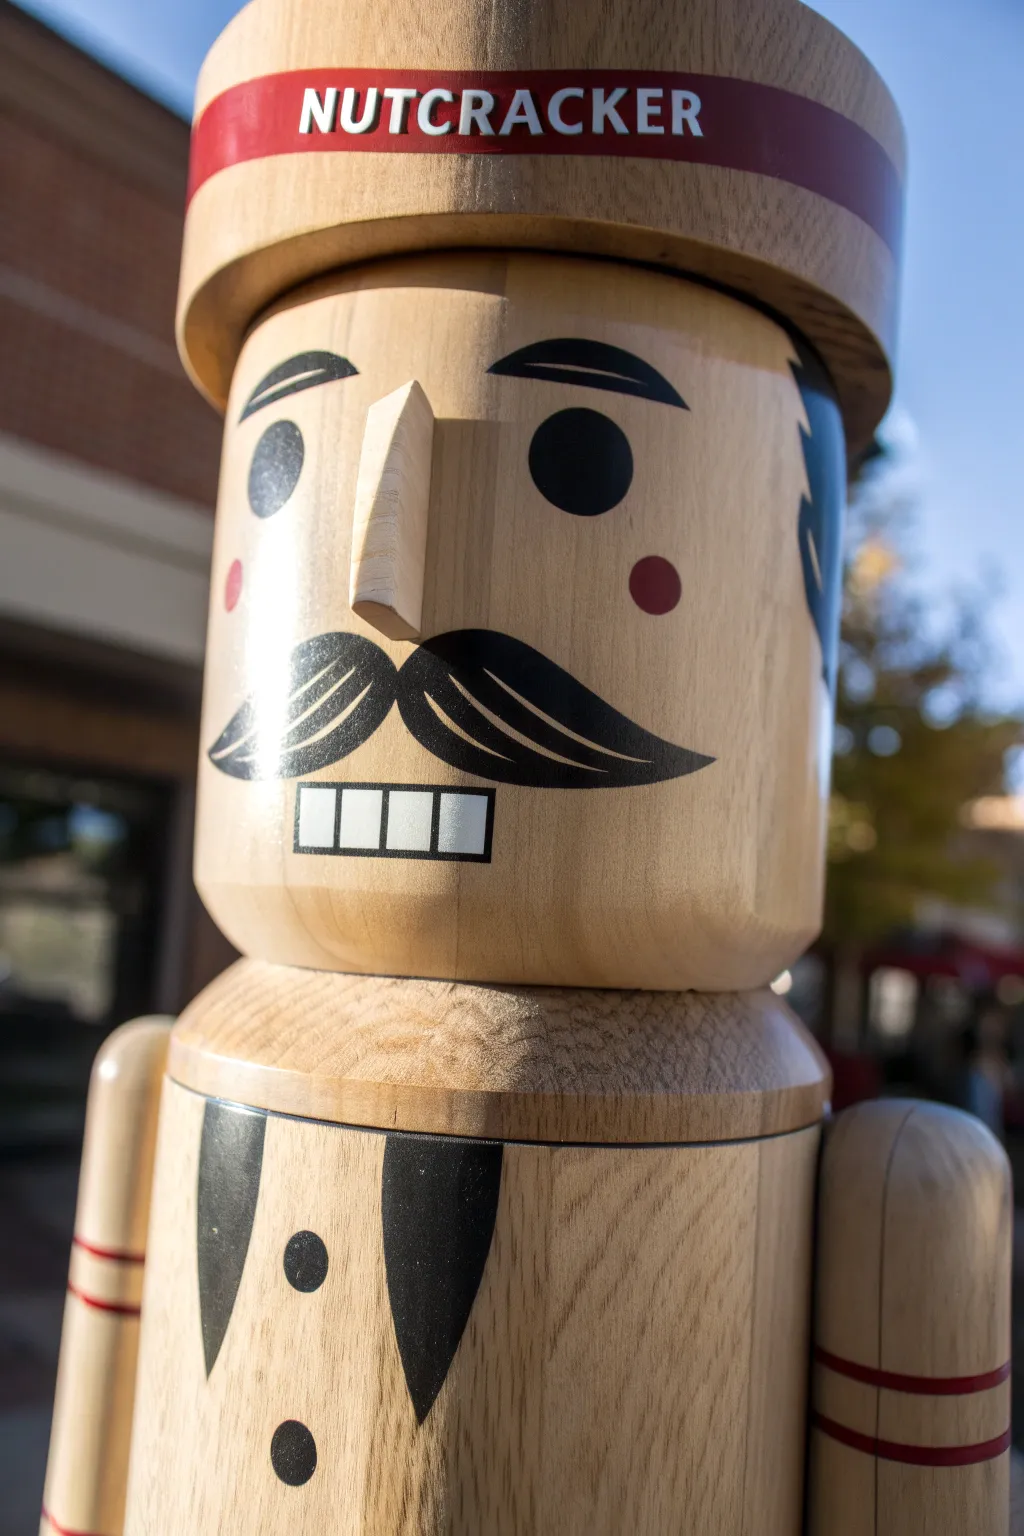
Embrace the beauty of raw wood with this modern, minimalist take on a holiday classic. Instead of covering the entire figure in paint, you will focus on crisp, graphic facial features and bold accents to create a sophisticated character.
How-To Guide
Materials
- Unfinished wooden nutcracker
- Acrylic craft paint (Black, Deep Red, White)
- Fine grit sandpaper
- Painter’s tape
- Small flat brush
- Fine liner brush
- Pencil and eraser
- Letter stencils (small)
- Clear matte varnish or sealant
Step 1: Preparation & Hat
-
Smooth the surface:
Begin by sanding the entire wooden nutcracker with fine-grit sandpaper to remove any rough patches, ensuring a smooth canvas for your detailed painting. -
Clean the dust:
Wipe the figure down thoroughly with a dry tack cloth or microfiber towel to remove all sawdust. -
Seal the wood:
Apply a thin layer of clear matte varnish over the face and body areas where you plan to paint; this prevents the pigment from bleeding into the wood grain later. -
Tape the hat band:
Use painter’s tape to mask off the top and bottom edges of the horizontal band running around the hat. -
Paint the band:
Fill in the taped area with deep red acrylic paint, using a flat brush to ensure even coverage. -
Add lettering:
Once the red paint is fully dry, position your letter stencils to spell ‘NUTCRACKER’ across the front and stipple white paint gently over them.
Bleed Prevention
Painting on raw wood can cause ‘spiderwebbing’ where paint soaks into the grain. Always apply a clear acrylic medium to the raw wood and let it dry before painting your colored designs.
Step 2: Designing the Face
-
Map out features:
Lightly sketch the position of the eyes, eyebrows, mustache, and mouth grid using a pencil to ensure symmetry. -
Paint the eyes:
Using black paint, fill in the two large circles for the eyes; I like to use the handle end of a large paintbrush dipped in paint to stamp perfect circles here. -
Add eyebrows:
With a fine liner brush, paint the arched eyebrows in black, tapering the ends slightly. -
Create the cheeks:
Dip a small round sponge applicator or a q-tip into the red paint and dab two small dots onto the cheeks for a subtle flush. -
Outline the mustache:
Use your liner brush to carefully trace the outline of the sweeping handlebar mustache shape. -
Fill the mustache:
Fill in the rest of the mustache shape with solid black paint, keeping the edges as sharp as possible. -
Paint the teeth base:
Paint a small, horizontal rectangle in white just below the mustache to represent the mouth area. -
Detail the teeth:
Once the white is dry, use the very tip of your liner brush to paint a black border around the rectangle and vertical lines to divide the teeth.
Step 3: Uniform Details
-
Sketch the uniform:
Draw two teardrop shapes for lapels and three circles for buttons on the chest area. -
Paint lapels and buttons:
Fill in the lapel shapes and button circles with black paint, maintaining the clean aesthetic against the natural wood. -
Tape the arms:
Wrap thin strips of painter’s tape around the forearms to mark out the cuff stripes. -
Paint arm stripes:
Apply the deep red paint between the tape strips to create the uniform cuffs. -
Final touches:
Erase any visible pencil marks and apply a final coat of clear matte varnish to protect your handiwork.
Uneven Stenciling
If paint bleeds under your letter stencils, wait for it to dry completely, then gently scrape the excess off with an X-Acto knife or scratch it away with a toothpick to clean up the edges.
Place your finished minimalist nutcracker on a mantle or shelf to add a touch of handcrafted modern charm to your holiday decor.
Glue on Faux Fur for Texture/Hair
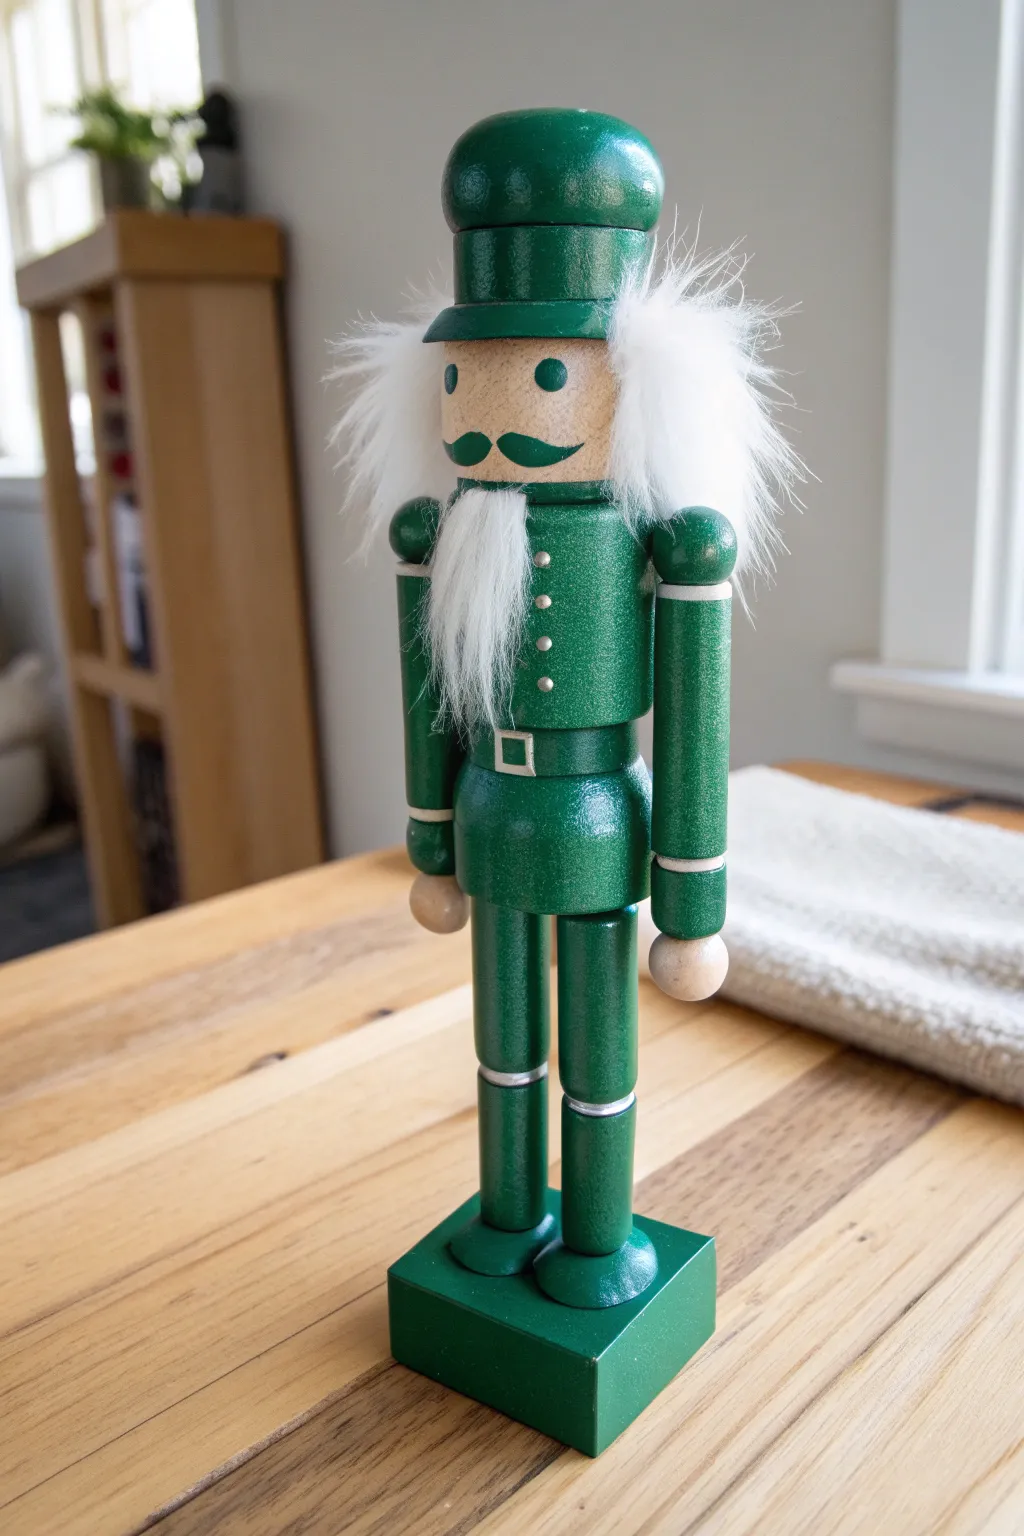
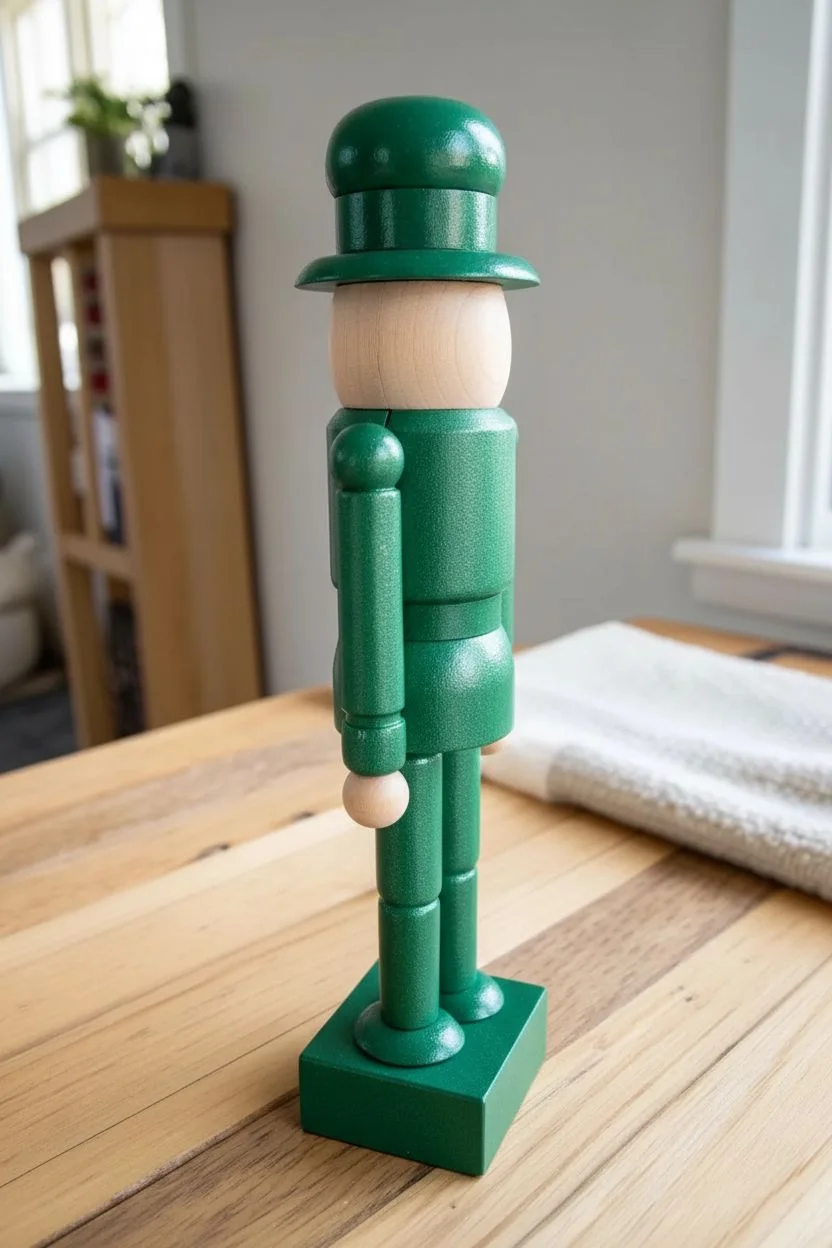
Transform a plain wooden nutcracker into a modern, monochromatic festive decoration using metallic green paint and luxurious white faux fur. This sleek, woodland-inspired design skips the traditional bright reds for a sophisticated look that highlights the natural wood grain.
Step-by-Step Tutorial
Materials
- Unfinished wooden nutcracker
- Metallic or glitter emerald green acrylic paint
- Silver metallic paint pen or fine brush
- White acrylic paint or paint pen
- White faux fur fabric (long pile)
- Small flat paintbrush
- Fine detail paintbrush
- Fabric scissors
- Hot glue gun and glue sticks
- Pencil
- Painter’s tape (optional)
Step 1: Painting the Uniform
-
Prep the surface:
Begin by wiping down your wooden nutcracker with a dry cloth to remove any dust. If there are rough spots, give them a quick sanding with fine-grit sandpaper. -
Mark the natural areas:
Before painting, decide which areas will remain natural wood. For this look, keep the face, hands, and the round ‘ball’ joints at the shoulders and hips unpainted. You can lightly mark these boundaries with a pencil or use painter’s tape to protect them. -
Paint the hat:
Dip your flat brush into the metallic emerald green paint. Coat the entire helmet or hat section, working carefully around the rim where it meets the forehead. -
Coat the jacket:
Continue painting the torso area green, ensuring you paint around the collar area to leave the neck wood exposed. I prefer to do long vertical strokes here for a smooth finish. -
Paint the limbs:
Paint the arms green, stopping at the wrists to leave the hands natural. Paint the legs green as well, stopping at the ankle area if you want boots, or painting all the way down to the base for a uniform look. -
Cover the base:
Finish the base coat by painting the square wooden stand completely green to match the uniform. -
Apply a second coat:
Metallic paints can sometimes be semi-transparent. Once the first layer is dry to the touch, apply a second coat to achieve that deep, rich emerald shimmer.
Fur Cutting Trick
When cutting faux fur, slip your scissors under the pile and snip ONLY the fabric backing. This prevents you from giving the fur a ‘haircut’ and keeps the long, fluffy strands intact for a natural look.
Step 2: Adding Fine Details
-
Paint the face details:
Using a very fine detail brush and the same green paint, carefully paint a handlebar moustache shape on the natural wood face. -
Add the eyes:
Dip the handle end of a paintbrush into the green paint and dot two simple circles onto the face for the eyes. -
Create the belt:
Using the green paint, ensure there is a defined belt strip around the waist. Once dry, use a silver paint pen to draw a small square buckle in the center. -
Add silver buttons:
Use the handle end of a brush or a silver paint pen to create three small vertical dots down the center of the chest for jacket buttons. -
Detail the joints:
With a steady hand or a white paint pen, draw thin horizontal rings around the wrists and the knee joints to mimic separation lines.
Step 3: Applying the Faux Fur
-
Measure the beard:
Hold a piece of faux fur against the chin area to estimate the size. You want a triangular shape that fits under the mouth and extends down the chest. -
Cut the beard:
Flip the fur over and trace the triangle on the backing. Carefully cut along your lines using sharp fabric scissors. -
Measure the hair:
Measure two strips of fur for the hair that will go on either side of the head, starting from under the hat rim and flowing down past the shoulders. -
Cut the hair strips:
Cut the two hair strips from the backing side just like you did with the beard, ensuring you don’t chop the long fibers short. -
Glue the beard:
Apply a small dab of hot glue to the chin area of the nutcracker and press the backing of the fur triangle firmly in place. -
Attach the hair:
Apply a line of hot glue along the side of the head, just under the hat’s rim. Press the hair strips in place one at a time. -
Style and fluff:
Gently fluff the fur with your fingers to blend the hair and beard, covering any cut edges and giving him a wild, textured appearance.
Level Up: Texture
For extra dimension, swap the painted belt buckle for a tiny metal jewelry finding or a square of silver glitter foam sheet glue-gunned onto the waist for a 3D effect.
Now your custom monochrome nutcracker is ready to stand guard comfortably on your mantle or holiday table.


Transform the Base with Glitter
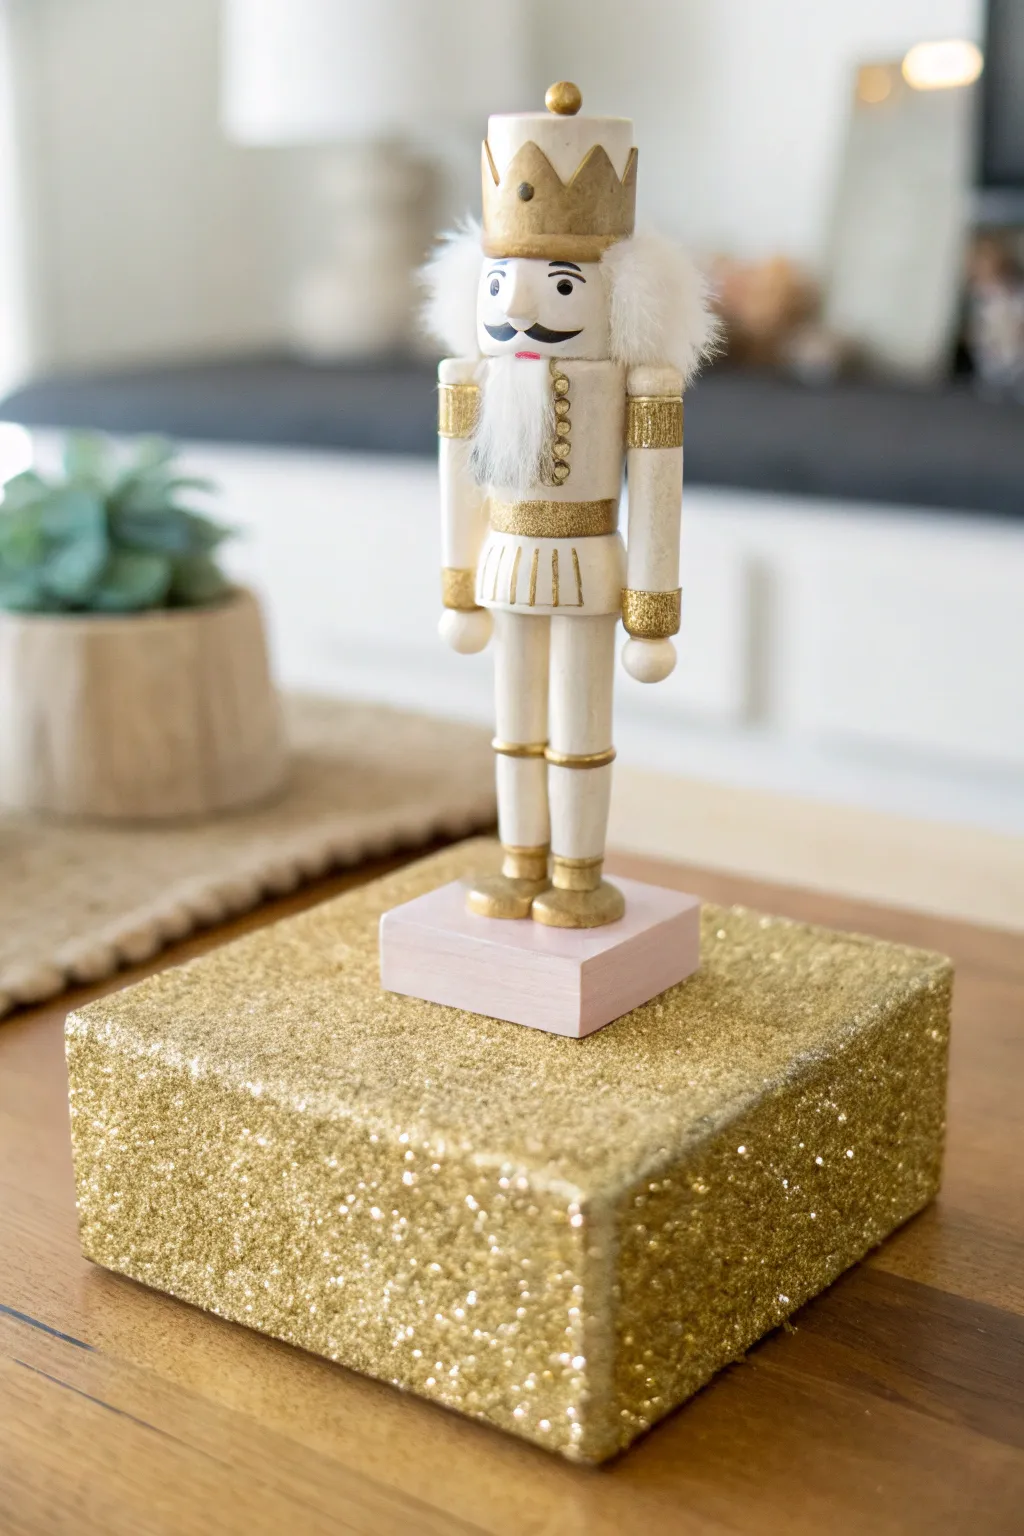

Elevate a simple unfinished nutcracker into a chic holiday statement piece with a monochromatic palette and a show-stopping sparkle base. This project combines creamy neutrals with metallic accents for a sophisticated look that fits perfectly in modern decor.
How-To Guide
Materials
- Unfinished wooden nutcracker
- Square wooden block (slightly larger than nutcracker base)
- Creamy white acrylic paint
- Metallic gold acrylic paint
- Pale blush pink acrylic paint
- Fine loose gold glitter
- Mod Podge or craft glue
- Foam brushes & fine detail brushes
- Hot glue gun
- Sandpaper (fine grit)
Step 1: Painting the Nutcracker
-
Smooth the surface:
Lightly sand the entire wooden nutcracker to remove any rough splinters. Wipe it down with a damp cloth or tack cloth to ensure it is dust-free. -
Base coat the body:
Using a flat brush, paint the hat, jacket, pants, and boots with the creamy white acrylic paint. You will likely need two coats for full, opaque coverage. -
Paint the attached stand:
Carefully paint the small square wooden base attached to the nutcracker’s feet with the pale blush pink paint. I like to use an angled brush here to keep the lines clean near the boots. -
Add gold crown details:
Dip a small detail brush into metallic gold paint and fill in the crown. You can paint the whole crown gold or just highlight the rim and points depending on your preference. -
Accent the uniform:
Paint the small details on the jacket, such as the shoulder epaulets, the belt, and the cuffs on the wrists, using the metallic gold. -
Define the legs:
Add thin gold bands around the knees and the tops of the boots to define the separation between the pants and the footwear. -
Detail the face:
Use a very fine liner brush or a paint pen to draw simple black oval eyes and a curved handlebar mustache. Keep the expression minimal for a modern look. -
Attach the fur:
If your nutcracker came with faux fur separate, glue the white beard and hair pieces in place now that the face paint is dry.
Step 2: Creating the Glitter Block
-
Prep the block:
Take your separate square wooden block and sand down any sharp edges. -
Base coat the block:
Paint the entire wooden block with a layer of the metallic gold paint. This ensures that no raw wood shows through if there are tiny gaps in your glitter. -
Apply adhesive:
Once the gold paint is dry, coat the top and sides of the block with a thick, even layer of Mod Podge using a foam brush. -
Pour the glitter:
Holding the block over a paper plate or tray to catch spills, generously pour the gold glitter over the wet glue until the wood is completely obscured. -
Shake and dry:
Gently tap the block to shake off excess glitter onto your tray. Allow this to dry completely for at least an hour. -
Seal the sparkle:
To prevent shedding, you can gently dab a second coat of Mod Podge over the dry glitter, or mist it with a clear acrylic spray sealer.
Glitter Everywhere?
If glitter keeps falling off after drying, apply a top coat of watered-down PVA glue (50/50 mix). It dries clear and acts as a strong sealant without dulling the shine.
Step 3: Final Assembly
-
Apply strong glue:
Apply a generous amount of hot glue or strong craft adhesive to the bottom of the nutcracker’s pink base. -
Mount the figure:
Press the nutcracker firmly onto the center of the glittered block. Hold it in place for a minute until the glue sets securely to complete your artwork.
Level Up: Velvet Bottom
Cut a square of heavy felt or velvet and glue it to the underside of the gold glitter block. This adds a luxurious feel and protects your tabletop from scratches.
Place your sparkling creation on a mantle or coffee table to enjoy a touch of handmade holiday magic
Go Rustic with a White-Washed Finish
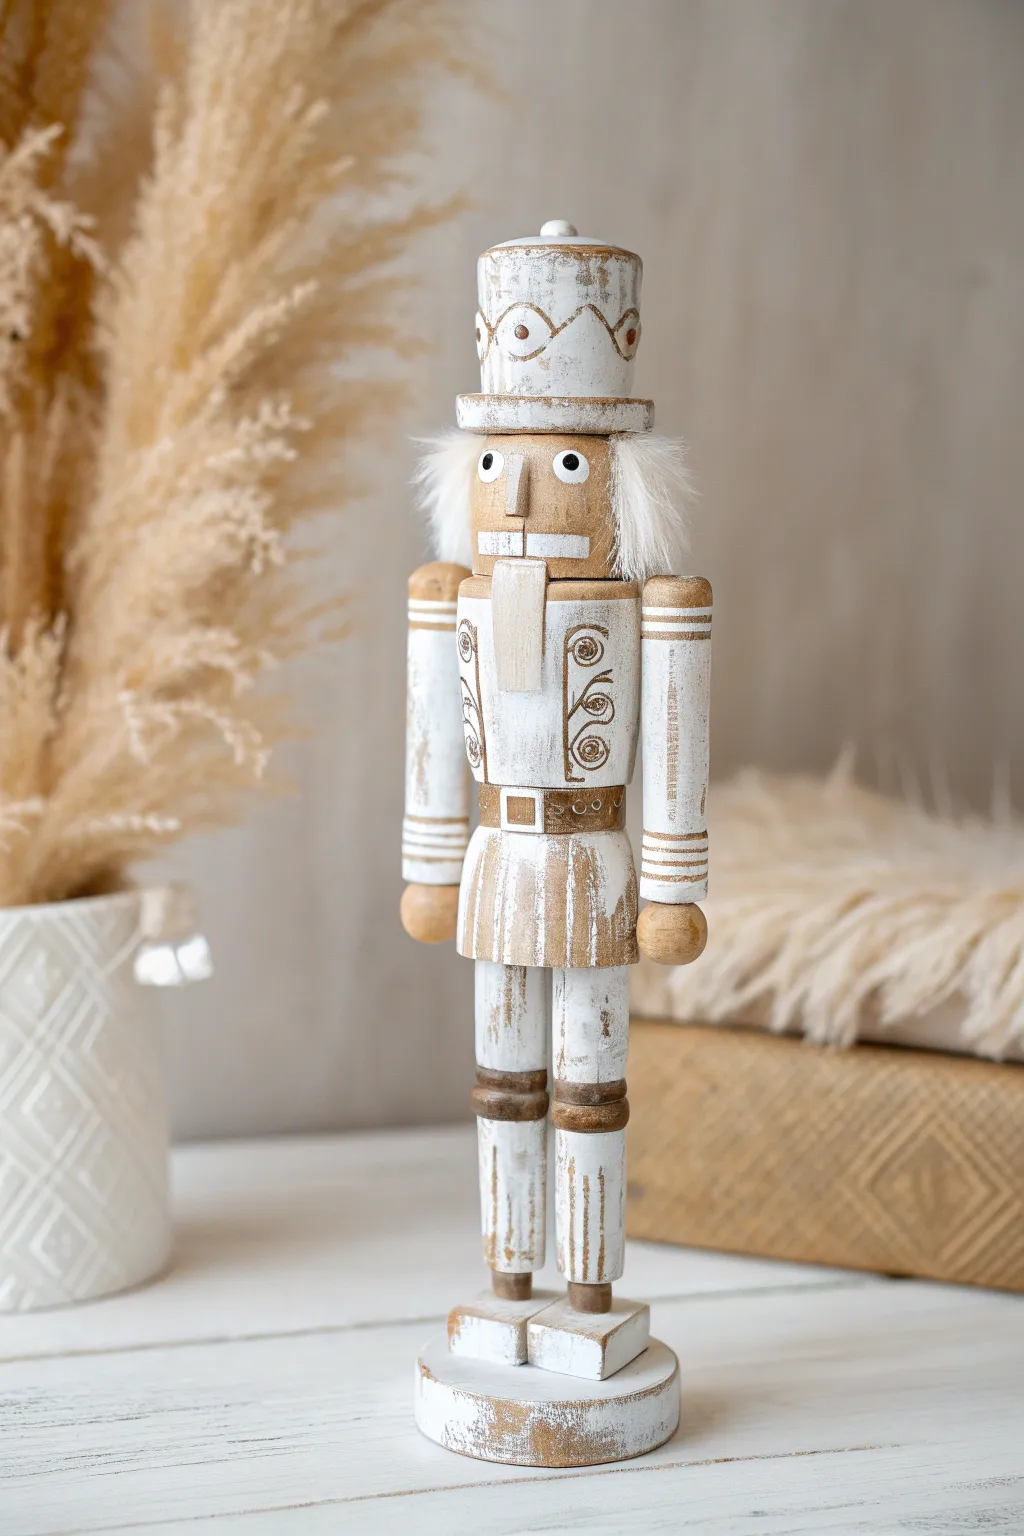
Transform a plain craft store find into a stunning piece of farmhouse decor using simple distressing techniques. This project relies on transparency and texture to create a weathered, vintage aesthetic that looks like it has been in the family for generations.
Step-by-Step Guide
Materials
- Unfinished wooden nutcracker
- Medium and fine-grit sandpaper
- White chalk paint or matte acrylic paint
- Metallic bronze or antique gold acrylic paint
- Faux fur scraps (white)
- Small flat brush
- Detail liner brush
- Stiff bristle dry brush
- Paper towels
- Hot glue gun
Step 1: Preparing the Surface
-
Smooth the wood:
Begin by lightly sanding the entire nutcracker with fine-grit sandpaper to remove any splinters or rough patches from the manufacturing process. -
Clean the dust:
Wipe the figure down with a slightly damp paper towel or tack cloth to ensure no sawdust remains, which creates a cleaner base for the wash. -
Remove hair (optional):
If your unfinished nutcracker came with generic synthetic hair already attached, peel it off now so we can replace it with high-quality faux fur later.
Dry Brush Secret
When dry brushing the white details, offload almost all the paint onto a paper towel first. You want a ‘scratchy’ application, not a solid coat.
Step 2: Creating the Whitewash
-
Mix the wash:
On your palette, mix your white paint with water in a 1:1 ratio until it has the consistency of thin milk. -
Apply the first coat:
Using the flat brush, paint the wash over the hat, coat, pants, and boots. Work in small sections. -
Wipe back:
Immediately after painting a section, gently wipe it with a dry paper towel. I like to leave more paint in the crevices and remove it from the high points to accentuate the wood grain. -
Build opacity:
For areas that need to look whiter—like the hat brim, cuffs, and the skirt of the coat—dip your brush in undiluted white paint and dry-brush a thin layer over the wash. -
Distress the edges:
Once the paint is fully dry, take a piece of medium-grit sandpaper and scuff the edges of the boots, the knees, and the hat rim to simulate years of wear.
Step 3: Adding Metallic Accents
-
Paint the hardware:
Use your antique gold or bronze paint to fill in the belt buckle, the decorative bands on the hat, and the tops of the boots. -
Detail the coat:
With the detail liner brush, carefully paint the belt strap completely gold/bronze. Add two small horizontal stripes on the lower arms to mimic cuffs. -
Add decorative swirls:
Using the very tip of your liner brush and the metallic paint, draw vertical spiral embellishments on the front of the jacket, mirroring the design on both the left and right sides. -
Create the crown motif:
Paint a jagged, crown-like line around the center of the hat cylinder using the metallic shade. Add a small dot in the center of each triangular peak. -
Define the legs:
Paint thin metallic rings around the knees and the ankles to separate the boots from the pants.
Level Up: Texture
Mix a pinch of baking soda into your white paint for the hat and boots. This creates a gritty, stone-like texture that enhances the antique feel.
Step 4: Finishing Touches
-
Paint the face:
Keep the face simple to match the rustic style. Use a small dot of white for the eyes, followed by a tiny black pupil. Paint a simple rectangular brown or white nose. -
Cut the fur:
Cut your faux fur into a rectangular strip for the beard and two semi-circles for the hair. Cut from the back of the fabric to avoid trimming the actual hair strands. -
Attach the hair:
Hot glue the hair pieces to the sides of the head area, tucking the top edge slightly under the hat brim if possible. -
Attach the beard:
Glue the beard strip directly to the chin. For this specific look, aim for a straight, rectangular beard shape rather than a fluffy cloud. -
Final weathering:
If the gold looks too shiny, lightly run your sandpaper over the painted metallic areas to dull them down and blend them into the rustic theme.
Place your weathered nutcracker on a mantle or shelf to add a touch of quiet, nostalgic elegance to your holiday display.
Paint a Flat 2D Porch Sign Instead
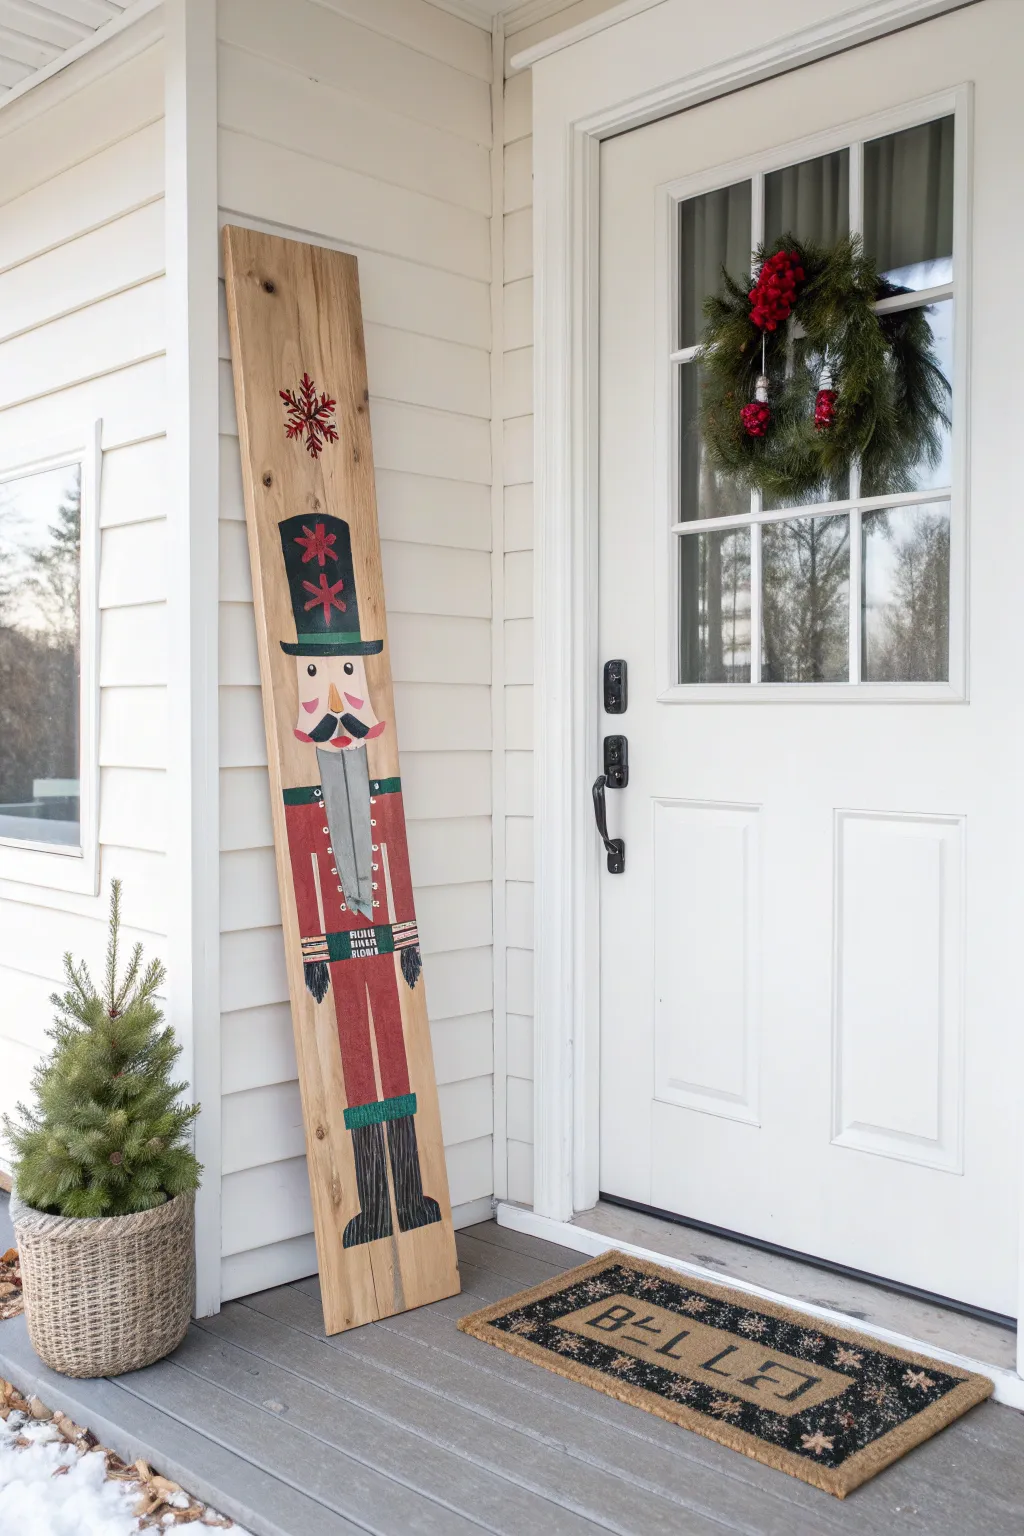
Transform a simple wood board into a festive sentry for your front porch with this charming flat-style painting project. Using the natural wood grain as a backdrop gives this nutcracker a warm, rustic appeal that requires no complex shading.
Step-by-Step Tutorial
Materials
- 6-foot wooden plank (1×10 or 1×12 pine)
- Sandpaper (120 and 220 grit)
- Pencil and eraser
- Painter’s tape
- Acrylic craft paints (Black, Red, Skin Tone, Forest Green, Grey, White)
- 1-inch flat brush
- Small square brush
- Fine liner brush
- Outdoor clear spray sealer (matte or satin)
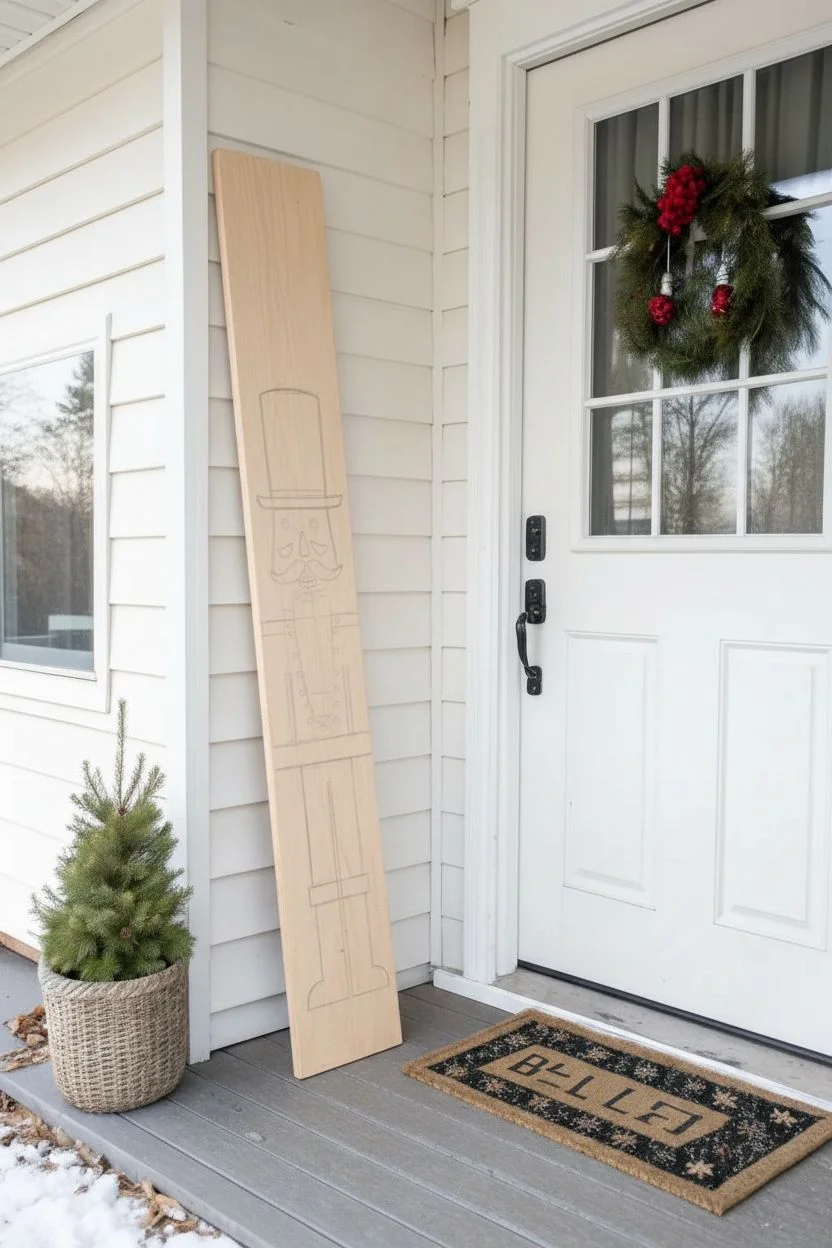
Step 1: Preparation and Sketching
-
Sand the surface:
Start by sanding your wooden plank until it is smooth to the touch, wiping away any sawdust with a tack cloth or damp rag. -
Map out the height:
Using a pencil, lightly mark the vertical sections: the top 20% for the hat, the next 10% for the face, 40% for the torso/jacket, and the remaining 30% for the legs and boots. -
Sketch the hat and head:
Draw a tall rectangle for the hat and a slightly rounded square shape immediately below it for the face. -
Outline the body:
Sketch the shoulders and torso, keeping the lines straight and boxy to maintain that classic toy soldier look. -
Draw the legs and boots:
Draw two long rectangles for legs and finish them with boot shapes at the bottom, ensuring the feet point outward slightly.
Step 2: Base Colors
-
Paint the hat:
Use your 1-inch flat brush to fill in the hat shape with black acrylic paint, keeping the edges crisp. -
Applied the skin tone:
Fill in the face area with a flesh-colored paint that suits your preference, applying two coats if the wood grain shows through too much. -
Color the uniform:
Paint the main jacket area and the pants with a bright, festive red. -
Fill the boots:
Paint the boot shapes black, being careful where they meet the red pant legs. -
Add the central grey strip:
Paint a long, thick grey vertical stripe starting from the chin area down to the waist; this serves as the beard and sword area.
Clean Lines Hack
Use painter’s tape to mask off the boundaries between the hat, face, and uniform before painting. This ensures perfectly straight, crisp lines.
Step 3: Details and Definition
-
Add green accents:
Use a medium flat brush to paint a horizontal green strip for the hat’s brim, a belt across the waist, and cuffs at the top of the boots. -
Paint facial features:
With a small brush, add two black dots for eyes, a small orange triangle for the nose, and rosy pink circles for cheeks. -
The mustache:
Paint a exaggerated, curving black handlebar mustache directly under the nose, overlapping the top of the grey beard area. -
Create the jacket details:
I like to use a fine liner brush here to add thin white or gold vertical lines on the jacket to represent creases or piping. -
Add the belt buckle:
Paint a small square or rectangle in the center of the green belt using white or silver paint to create a buckle.
Rustic Texture
Mix a tiny amount of water into your acrylics to create a ‘wash’ rather than a solid coat; this lets the natural wood knots show through even more.
Step 4: Festive Flair
-
Decorate the hat:
Paint two large, festive red asterisks or simple star shapes stacked vertically on the black hat. -
Add the floating snowflake:
In the empty wood space above the hat, paint a large red snowflake to fill the negative space. -
Distress the paint:
Once completely dry, lightly run sandpaper over the painted areas—especially the edges—to bring back some wood grain for a vintage look. -
Seal the project:
Apply two coats of clear outdoor sealer to protect your hard work from the winter elements.
Prop your new soldier by the door to stand guard over your holiday festivities
Host a Paint-and-Sip Style Canvas Night
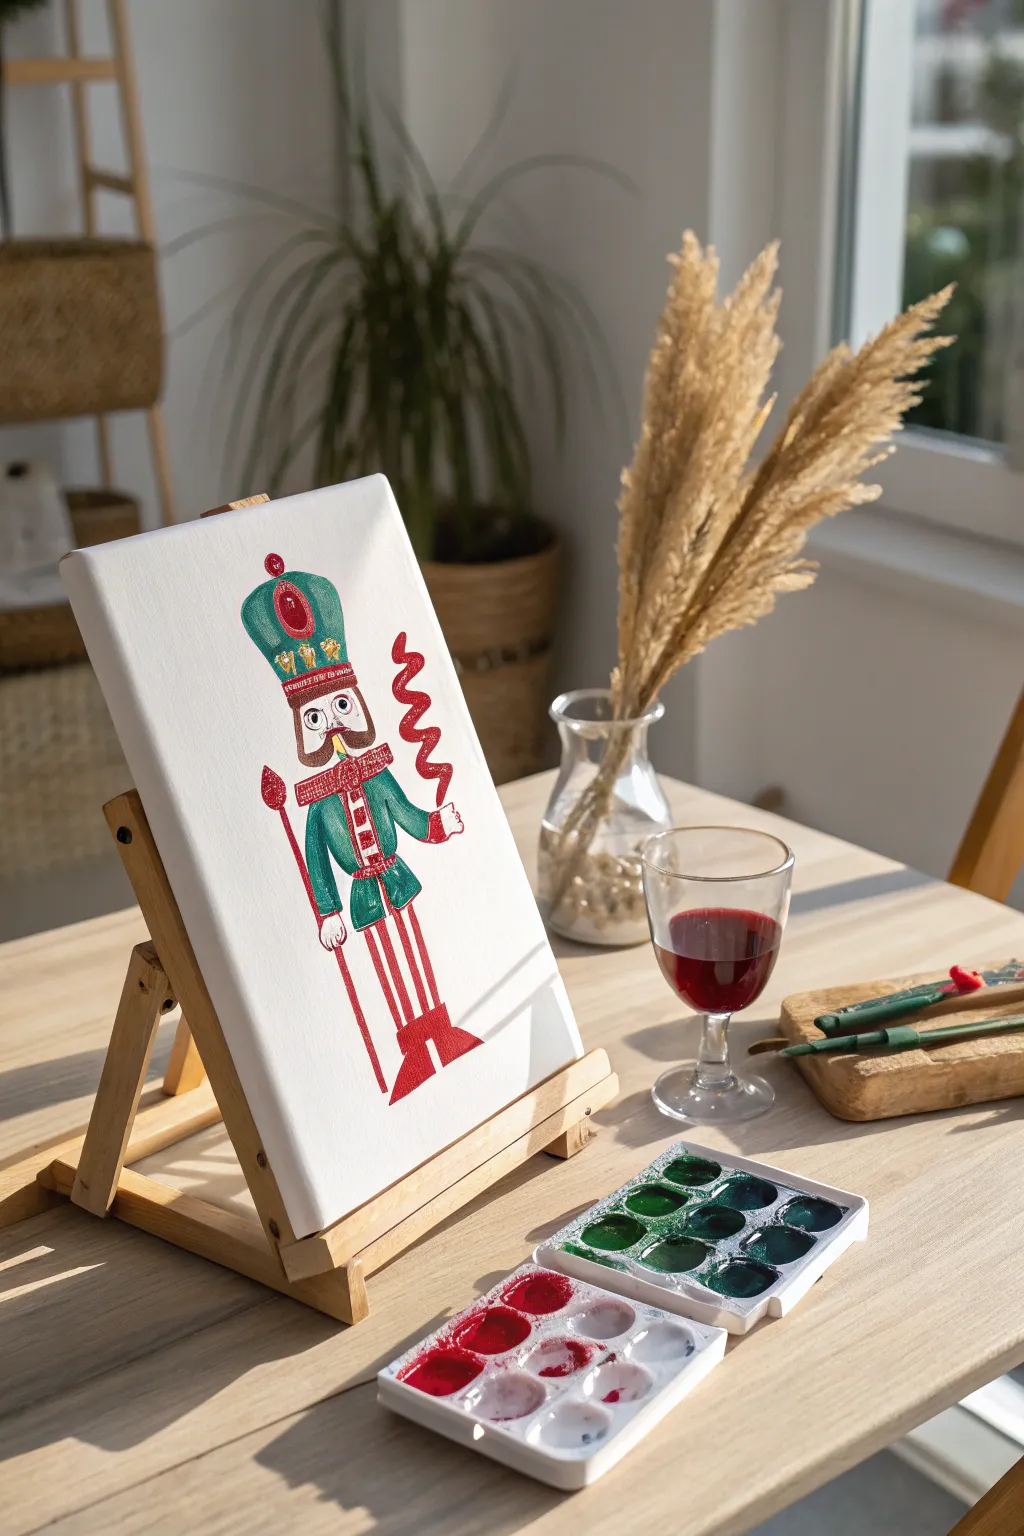
Capture the holiday spirit with this charming, slightly abstract Nutcracker painting that features bold colors and clean lines. The simplified, illustrative style makes it perfect for a relaxing paint-and-sip evening, as the shapes are geometric and forgiving to paint.
Detailed Instructions
Materials
- Small stretched canvas (approx. 8×10 or 9×12)
- Watercolor paints or fluid acrylics (Red, Emerald Green, Yellow Ochre/Gold, Black, Peach)
- Synthetic round brushes (sizes #2 for details and #6 for filling)
- HB Pencil and eraser
- Watercolor ground (optional, enhances absorbency on canvas)
- Water cup and paper palette
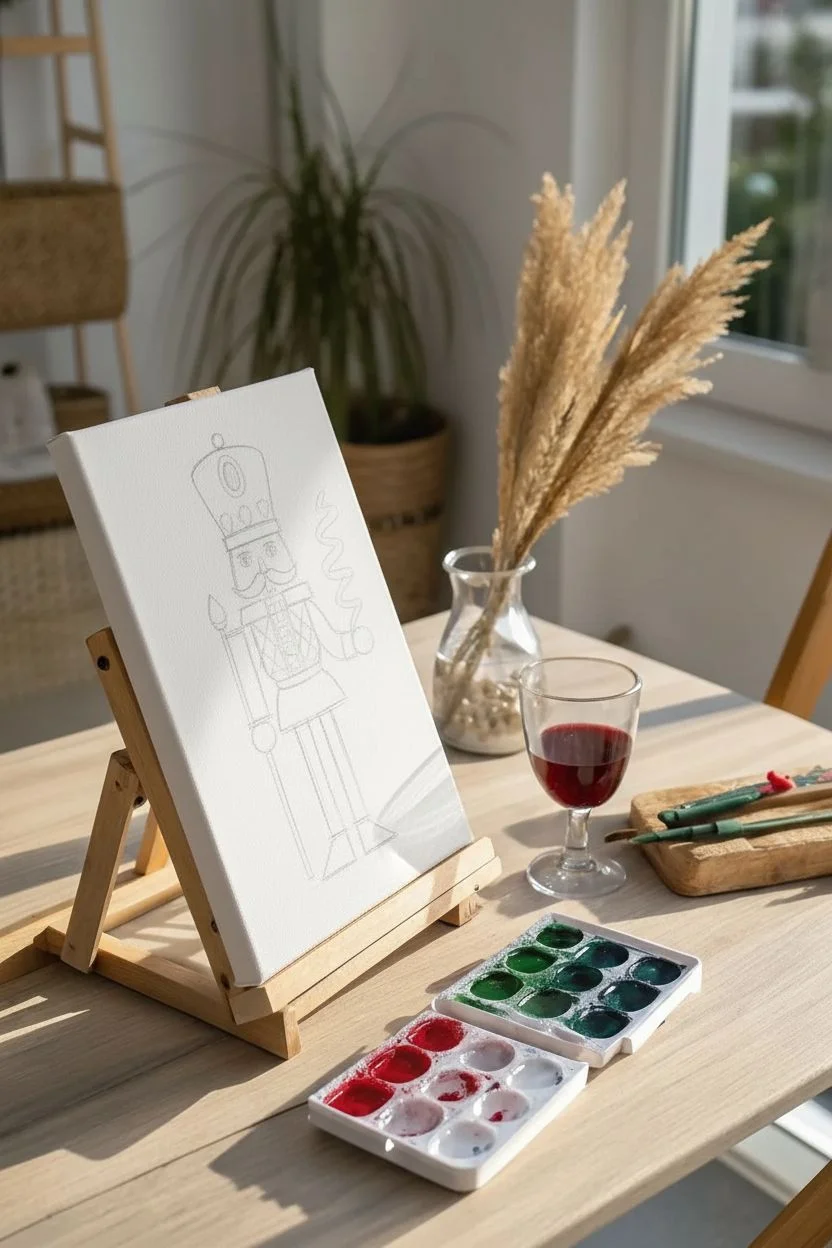
Step 1: Sketching the Character
-
Outline the head and hat:
Start near the top third of your canvas. Lightly draw a tall, rounded rectangle for the hat (shako) and a smaller square shape directly underneath for the face. -
Draw the torso:
Sketch the body as a rectangular tunic that flares out slightly at the hips to create the coat’s skirt. Add simple rectangular shapes for the sleeves extending outward. -
Add legs and boots:
Draw two long, thin vertical lines for the legs to give him a stylized, tall appearance. Cap them off with simple triangular shapes for the boots. -
Sketch the accessories:
On the left hand, draw a long straight line for his staff. In the right hand, sketch a loose, squiggly spiral shape floating upward. -
Detail the face and uniform:
Lightly mark an oval jewel on the hat, a crisscross pattern on the chest for the bandolier, and a wide handlebar mustache on the face.
Canvas Prep
Painting watercolor on canvas can bead up. Coat your canvas with ‘Watercolor Ground’ first, or start with a slightly thicker consistency of paint.
Step 2: Blocking in Color
-
Paint the green elements:
Load your larger brush with emerald green. Fill in the main body of the hat and the tunic jacket, carefully painting around the sash and arm details. -
Add red accents:
Using a bright red, fill in the jewel on the hat, the cuffs on the sleeves, and the distinct V-shapes on the boots. -
Paint the whimsical squiggle:
Use the same bright red to paint the wavy, ribbon-like line held in the right hand. I find using a fully loaded brush helps make this stroke smooth and continuous. -
Color the legs:
Paint the thin stick legs with vertical red stripes. You can alternate with white or skin tone, or keep them solid red for a simpler graphic look. -
Fill in the face:
Mix a small amount of peach or beige and paint the square face area. Apply a wash of this color to the hands as well.
Make it Sparkle
Use actual metallic gold paint or a glitter pen for the bandolier and hat trim to make your Nutcracker catch the holiday lights.
Step 3: Fine Details
-
Paint the gold trim:
Using yellow ochre or gold paint, fill in the horizontal bands on the hat, the shoulder epaulets, and the sash crossing the chest. -
Add the staff:
Paint the staff handle in red or brown, adding a small diamond or oval shape at the top in red. -
Dry the base layers:
Pause here to let your main colors dry completely. This prevents the darker detail lines from bleeding into the wet paint. -
Define the facial features:
Switch to your smallest brush (size #2). With black paint, carefully draw two dots for eyes, curved eyebrows, and fill in the handlebar mustache. -
Outline the beard:
Paint a small, rectangular patch of black or dark brown on the chin to represent the signature nutcracker beard. -
Add uniform details:
Use the fine brush to add vertical lines of buttons or stitching down the center of the green tunic using white or gold. -
Final outlines:
For a crisp illustrative look, you can loosely outline the hat and shoulders with a very thin black line, or leave it lineless for a softer painted effect.
Set your festive masterpiece on a mini easel and enjoy the holiday cheer it brings to the room.
Design a Whimsical Candyland Theme
Transform a plain wooden figure into a sugary delight with this Candyland-inspired design. Featuring crisp peppermint stripes, a lollipop staff, and bright red accents, this nutcracker brings a taste of whimsy to your holiday decor.
Step-by-Step Guide
Materials
- Unfinished wooden nutcracker
- Acrylic paints: Bright red, titanium white, metallic gold, black, pale pink, tan
- Fine detail brush (size 0 or 00)
- Small flat brush
- Wooden lollipop cut-out or round wooden disc
- Small dowel (for lollipop stick)
- White faux fur trim
- Hot glue gun
- Pencil
- Gloss varnish (optional)
Step 1: Base Coating & Blocking
-
Prime the Surface:
Start by painting the entire nutcracker with two coats of bright white acrylic paint. This ensures your red colors pop and provides a clean background for the candy themes. -
Sketch Guidelines:
Once the white is fully dry, use a pencil to lightly mark the waistline, the bands on the hat, the boot tops, and the spiral guides on the lower legs. -
Paint the Jacket:
Paint the jacket area bright red, leaving a rectangular panel in the center of the chest white. I prefer using a small flat brush here to keep the edges sharp against the white pants. -
Hat Basics:
Paint the very top rounded section of the hat and the brim in bright red, leaving the middle section white for now. -
Boots and Hands:
Paint the feet and the circular base in a warm tan or light brown shade. Leave the hands neutral or paint them a pale flesh tone.
Troubleshooting
Struggling with straight stripes on round legs? Use thin flexible masking tape or washi tape to mask off the spirals before painting the red.
Step 2: Candy Details & Stripes
-
Leg Spirals:
Using a fine liner brush and red paint, carefully create the candy cane effect on the lower legs. Follow your pencil guides to paint diagonal stripes that wrap around the calves. -
Arm Details:
Paint thin horizontal red stripes on the upper arms to mimic sleeves, and add solid red cuffs at the wrists. -
Hat Decoration:
Add small white polka dots to the red top of the hat using the back of a paintbrush handle dipped in paint. Paint a thin red line highlighting the middle of the white hat section. -
Gold Accents:
Apply metallic gold paint to the bands separating the hat sections, the belt at the waist, and the cuffs of the boots. Add three small gold dots on the white chest panel for buttons.
Level Up
Add a coat of clear glitter paint over the white parts of the legs and hat to mimic the sparkle of granulated sugar.
Step 3: face & Features
-
Rosy Cheeks:
Mix a tiny drop of red with plenty of white to make a soft pink. Lightly dry-brush circles on the cheeks to give him a fresh, frosty glow. -
The Nose:
Paint the carved nose a slightly darker pink or keep it flesh-toned, depending on your preference. -
Eyes and Brows:
Using your finest brush, paint two black arches for eyebrows. Paint the eyes as black ovals with tiny white reflection dots near the top to bring him to life. -
The Mustache:
Paint a wide, curling black mustache that extends out toward the rosy cheeks. The curled tips give him a friendly, rather than stern, expression.
Step 4: Accessories & Assembly
-
Create the Lollipop:
Paint your round wooden disc white. Starting from the center, paint a red spiral widening outward to the edge. Paint the dowel light tan. -
Assemble the Lollipop:
Glue the painted disc to the top of the dowel. Once dry, glue the stick into the nutcracker’s hand so it rests vertically. -
Attached the Haire:
Cut small strips of white faux fur. Glue one strip around the back of the head (hair) and a smaller piece under the chin (beard). -
Final Seal:
If desired, coat the red candy sections with a gloss varnish to make them look like shiny hard candy.
Display your sweet soldier on a mantle or shelf to add a pop of peppermint cheer to your holiday setup
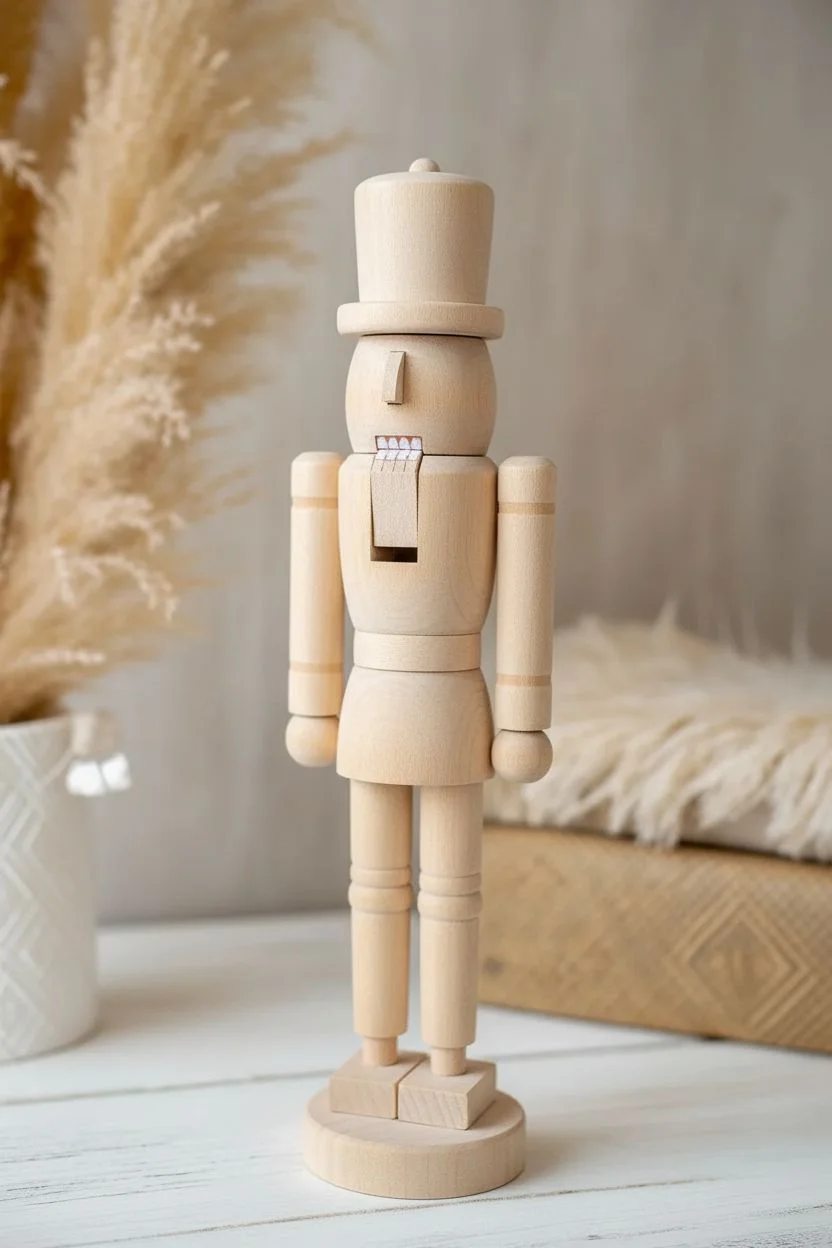
Use Spray Paint for a Flawless Foundation
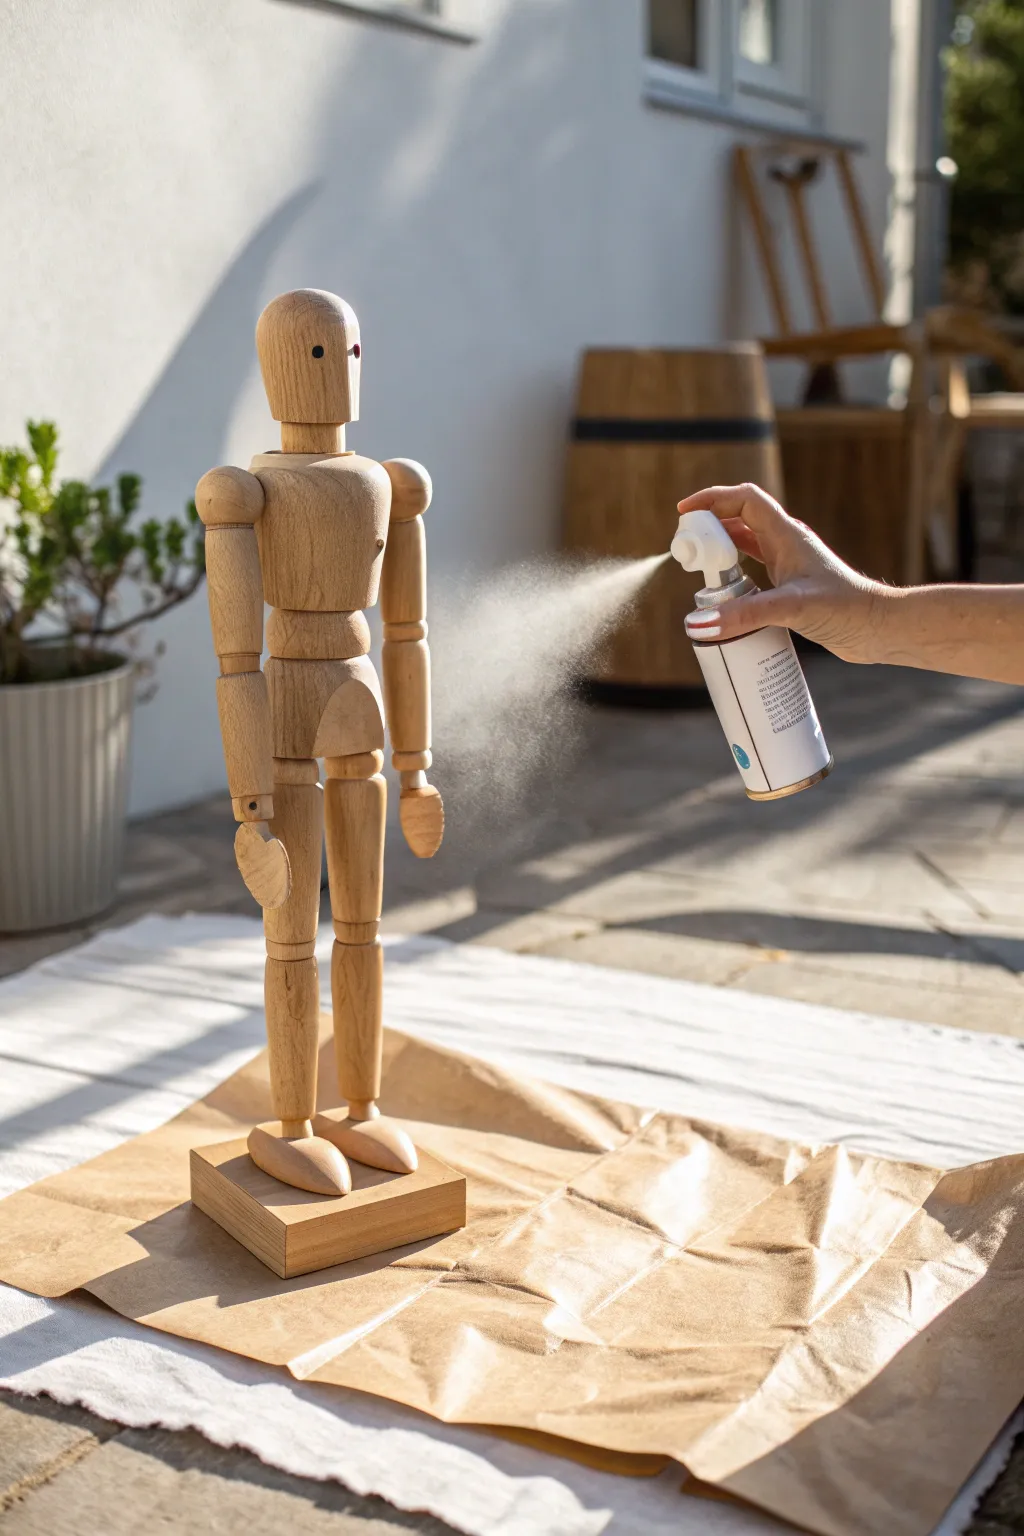
Before adding intricate details to your wooden figure, a smooth base coat is essential for a professional finish. This guide walks you through applying a flawless spray paint foundation, ensuring your final colors will stand out beautifully on the wood.
Step-by-Step Tutorial
Materials
- Unfinished wooden figure (mannequin or nutcracker)
- Spray primer or base paint
- Brown kraft paper
- Drop cloth or old sheet
- Fine-grit sandpaper
- Tack cloth
- Protective mask
Step 1: Workspace Prep
-
Choose your location:
Select a well-ventilated workspace, preferably outdoors on a flat patio or driveway surface. -
Protect the area:
Lay down a drop cloth or old sheet to catch any drifting overspray. -
Create a spray zone:
Place a sheet of brown kraft paper on top of your drop cloth to provide a clean, immediate surface for the figure. -
Inspect the wood:
Check your wooden figure for any splinters or rough patches that might affect the finish. -
Sand gently:
Briefly buff any rough spots with fine-grit sandpaper to ensure a smooth texture. -
Remove dust:
Wipe the entire figure down with a tack cloth to remove every speck of sanding dust. -
Position the figure:
Stand the figure centrally on the paper, separating the legs slightly to expose inner surfaced.
Spin It Around
Place your figure on a cheap lazy susan or a scrap board you can turn. This lets you reach all angles without touching the wet paint.
Step 2: Application
-
Mix the paint:
Shake your spray can vigorously for at least one minute to thoroughly mix the primer. -
Test the flow:
Spray a quick burst onto a scrap corner of the paper to ensure the nozzle is clear. -
Check distance:
Hold the can approximately 8 to 12 inches away from the wooden surface. -
Start the stream:
Depress the nozzle while pointing slightly away from the figure, then sweep the spray across it. -
Apply light coats:
Mist the paint on in thin layers rather than one heavy coat to prevent drips running down the wood. -
Target the joints:
I find it helpful to spray the tricky joint areas and underarms early on to ensure they get covered. -
Rotate for coverage:
Move around the figure or carefully rotate the paper to coat the back and sides evenly.
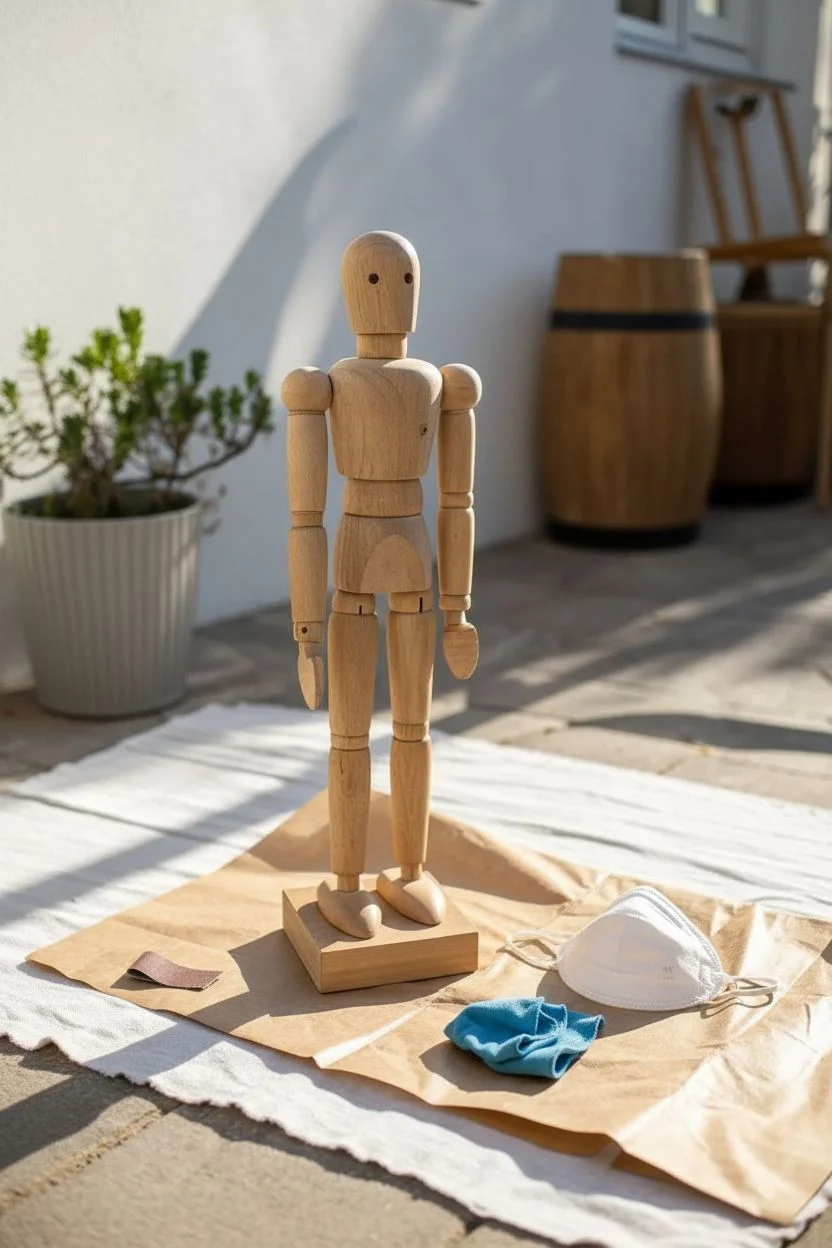
Step 3: Curing & Review
-
Initial dry time:
Allow the first coat to dry for about 15 to 20 minutes before touching. -
Check for gaps:
Inspect the figure closely for any missed spots or uneven wood grain showing through. -
Second coat:
Apply a second light layer using the same sweeping motion if full coverage is needed. -
Final cure:
Let the figure dry completely, ideally overnight, before starting your detailed brushwork.
Drip Disaster?
If you spray too heavy and get a drip, don’t wipe it wet! Let it dry fully, sand it smooth with fine sandpaper, then respray that spot.
You now have a perfectly primed canvas ready for your creative designs
Try a Modern Navy and Silver Palette
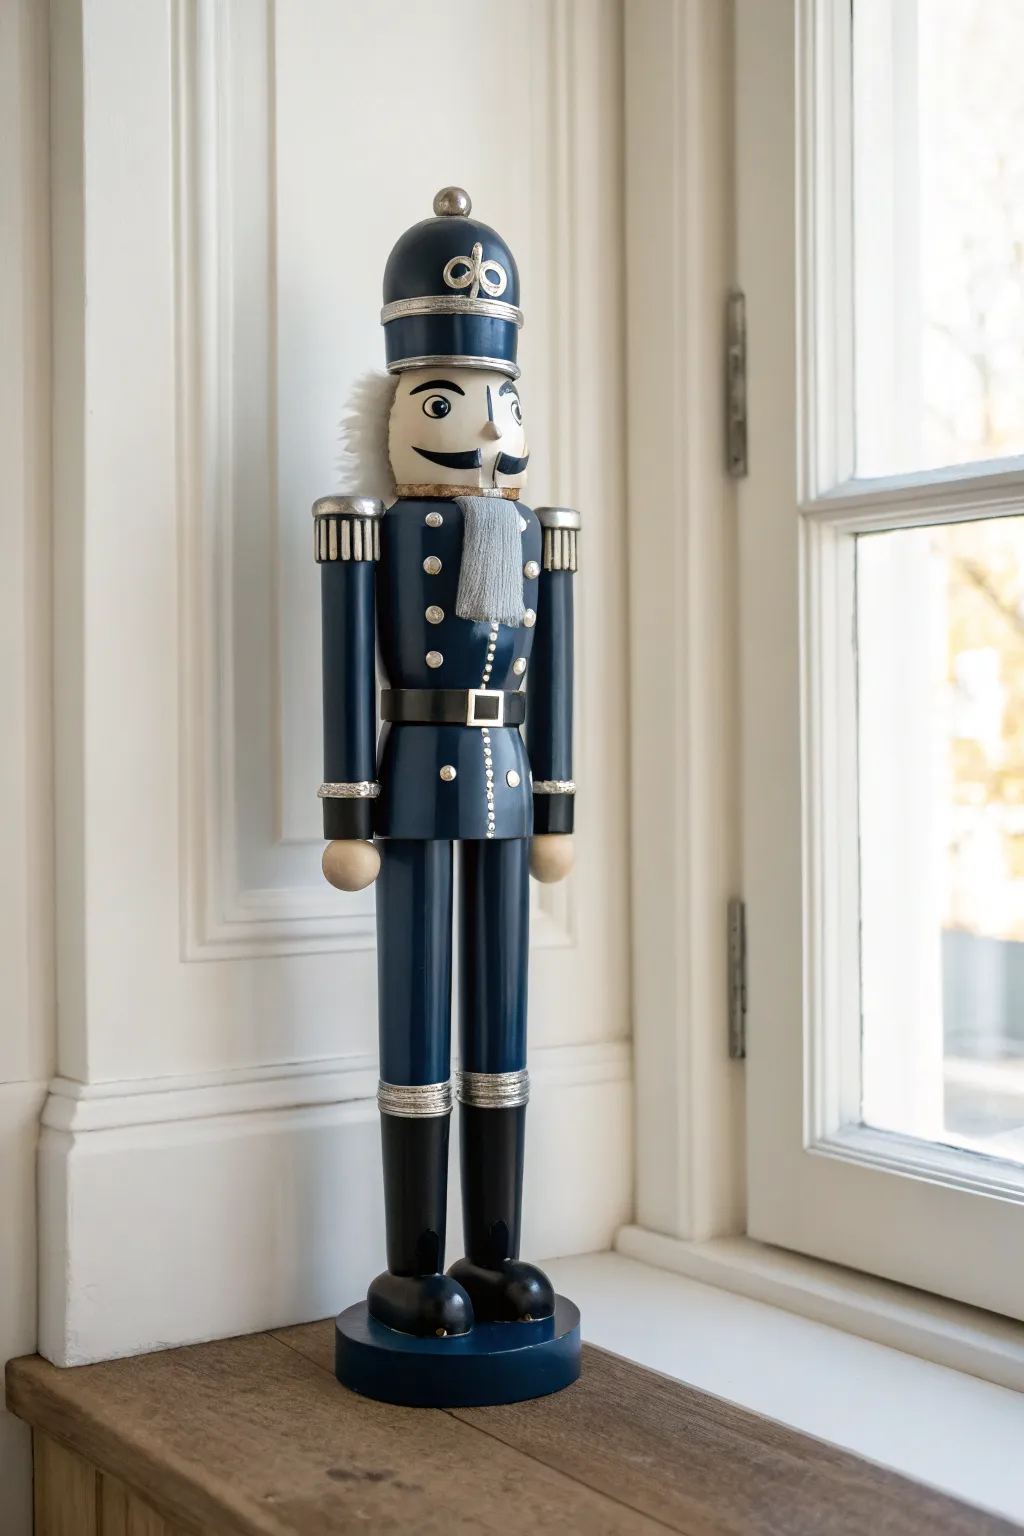
Transform a standard wooden nutcracker into a sophisticated piece of holiday decor by swapping traditional red and green for deep navy and metallic silver. This modern color scheme creates a polished, high-end look that fits beautifully with contemporary interior styles.
Detailed Instructions
Materials
- Unfinished wooden nutcracker
- Acrylic paint: Navy Blue, Metallic Silver, Black, Skin Tone, White
- Flat shader brushes (medium and small)
- Fine detail liner brush
- Dotting tool or toothpick
- Faux fur strip (grey or white) for beard/hair
- Craft glue
- Glossy clear varnish
- Fine-grit sandpaper
- Painter’s tape (optional)
Step 1: Prep and Base Colors
-
Smooth the surface:
Lightly sand the entire wooden figure with fine-grit sandpaper to remove any rough splinters, focusing on the torso and legs. Wipe away dust with a damp cloth. -
Paint skin areas:
Using a small flat brush, apple the skin tone paint to the face and hand areas. I find it easier to do this first so the darker colors can cut in cleanly around these edges later. -
Apply the navy coat:
Paint the jacket, arms, and pants with the navy blue acrylic. Be careful around the hands and face, using a smaller brush for control near those borders. -
Paint the helmet base:
Coat the dome of the hat in the same navy blue. Leave the brim or visor area wood-colored for now if you plan to paint it silver or black, or paint it navy if you want a monochromatic base. -
Add a second coat:
Navy blue can sometimes streak on bare wood. Once the first layer is dry, apply a second coat to ensure a rich, opaque finish.
Step 2: Black Accents
-
Paint the boots:
Use black acrylic to paint the boots. Create a clean horizontal line where the top of the boot meets the navy pants. -
Define the belt:
Paint a black strip around the waist for the belt. You can use a strip of painter’s tape to ensure the top and bottom lines are perfectly straight. -
Paint the mustache base:
Using a fine liner brush and black paint, sketch the shape of the exaggerated curled mustache on the face. Fill it in carefully.
Pro Tip: Perfect Circles
For the silver buttons, don’t use a brush! The handle end of a paintbrush acts as a stamp. Dip it in paint and press straight down for a perfect, raised circle.
Step 3: Metallic Detailing
-
Add hat details:
Using metallic silver paint, add a horizontal band across the lower part of the hat. You can also freehand a decorative symbol or loop design on the front of the helmet. -
Create epaulets and cuffs:
Paint silver rectangles on the shoulders for epaulets and thick silver bands around the wrists to create cuffs. -
Detail the belt and boots:
Paint a square silver buckle on the center of the black belt. Add a thin silver line around the very top edge of the black boots to define them. -
Add uniform buttons:
Dip a dotting tool or the non-brush end of a paintbrush into the silver paint. Stamp two vertical rows of dots down the front of the navy jacket to resemble buttons. -
Add vertical trim:
Paint a very thin vertical dotted line or solid stripe down the center of the jacket between the buttons using your liner brush.
Troubleshooting: Sheer Silver
Metallic paints often require multiple coats to look solid. If your silver looks transparent, let it dry fully before adding a second layer rather than overworking wet paint.
Step 4: Face and Finish
-
Paint the eyes:
Paint two white ovals for the eyes. Once dry, add large black circles for the irises, leaving a tiny white speck in each for reflection. -
Add eyebrows:
Paint thick, angled black eyebrows above the eyes to give the nutcracker his classic stern expression. -
Attach the hair:
Cut a small rectangle of faux fur for the beard and a larger strip for the back of the hair. Glue the beard under the painted mouth area and the hair strip around the back of the head. -
Seal the project:
Apply a coat of glossy varnish over the painted areas (avoiding the faux fur). This gives the navy paint a ceramic-like shine and protects the silver from tarnishing.
Display your handsome soldier on a mantle or shelf where his silver accents can catch the holiday lights.
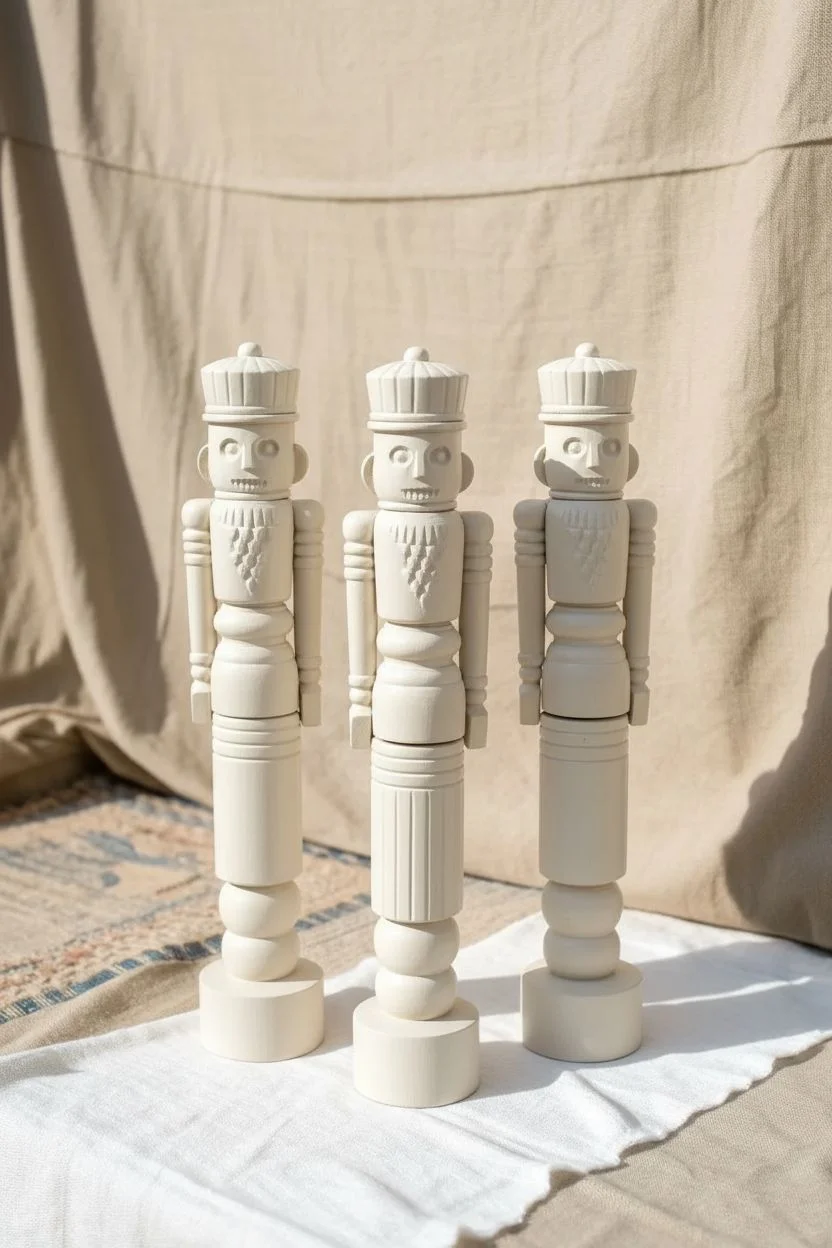
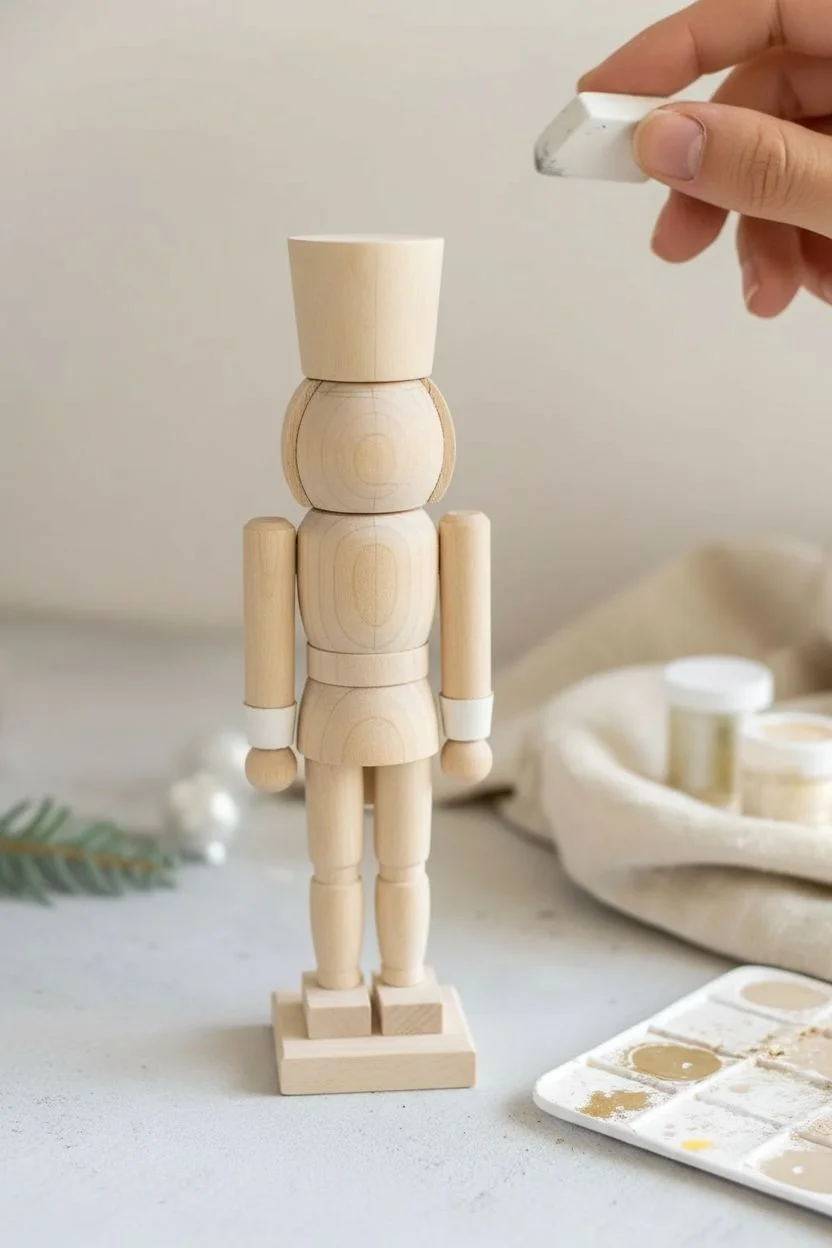
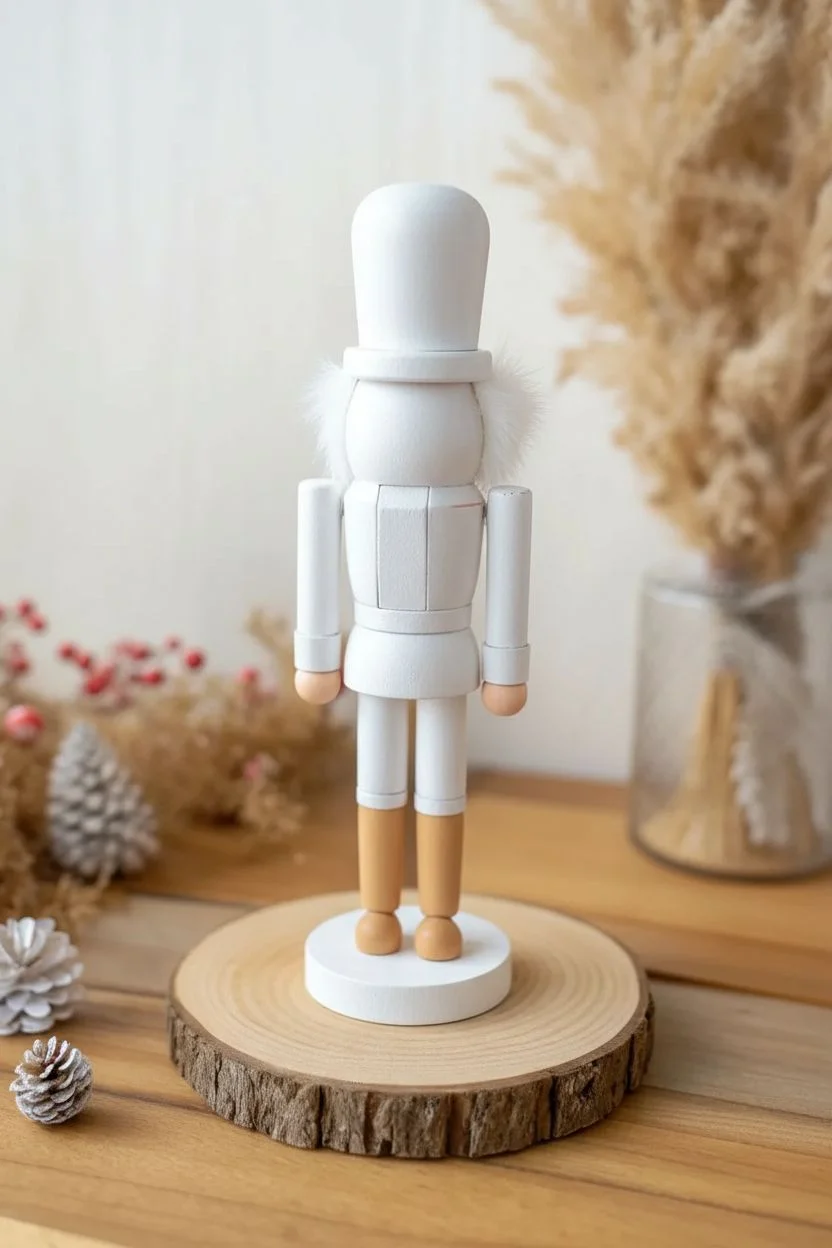
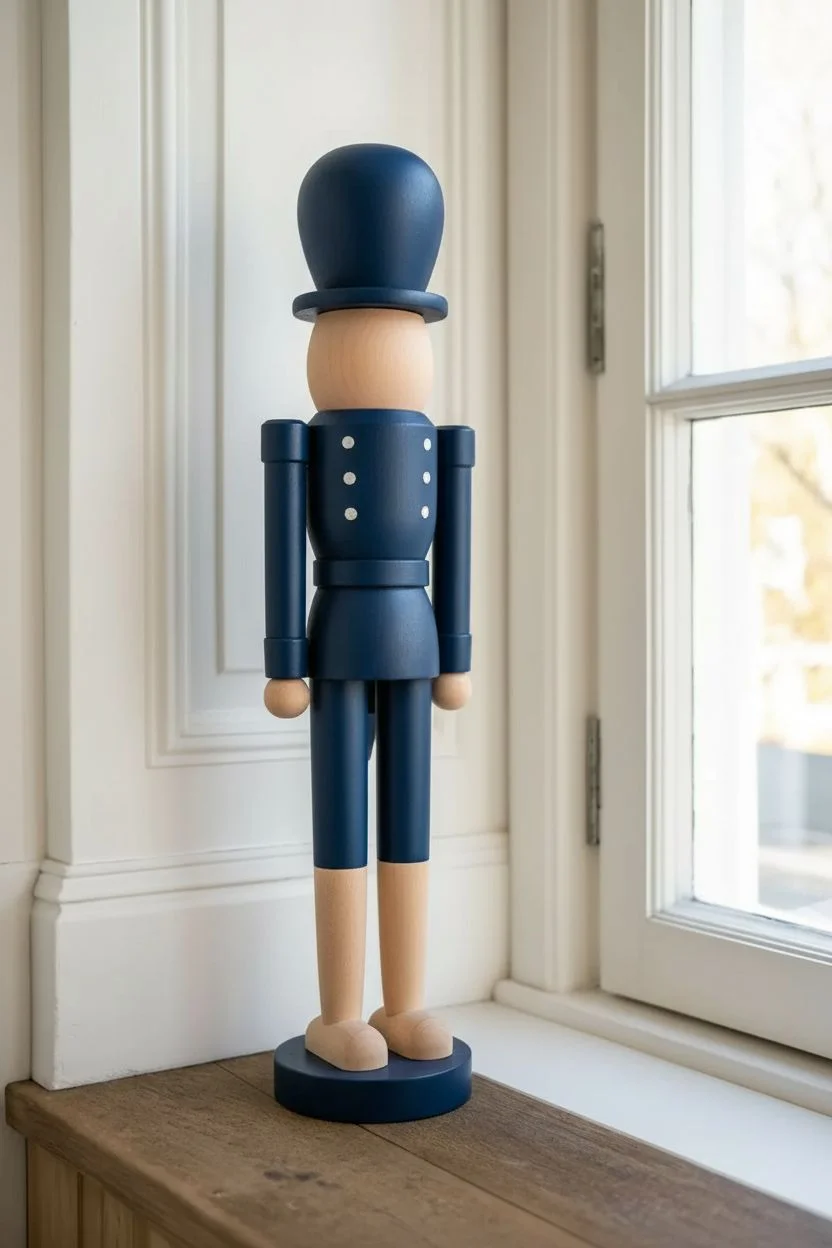
Leave Some Natural Wood Exposed
This project embraces the beauty of unfinished wood by balancing it with crisp, clean blocks of creamy white paint. The result is a modern, monochromatic decoration that fits perfectly into a Scandinavian or Boho holiday theme.
Detailed Instructions
Materials
- Unfinished wooden nutcracker
- Matte acrylic paint (Creamy White)
- Matte acrylic paint (Jet Black)
- Metallic acrylic paint (Champagne or Light Bronze)
- Painter’s tape or Washi tape
- Fine grit sandpaper (220 grit)
- Small flat brush (size 4 or 6)
- Fine detail brush (size 0 or 00)
- Toothpick
- Clear matte varnish spray (optional)
Step 1: Preparation & Blocking
-
Smooth the Surface:
Since much of the wood will remain exposed, give the entire nutcracker a gentle sanding with fine-grit sandpaper to remove any splinters or rough patches. -
Dust Off:
Wipe the figure down with a dry cloth or tack cloth to ensure no sawdust gets trapped in your paint later. -
Paint the Hat:
Using your flat brush, paint the tall cylinder of the hat and the brim with creamy white paint. You may need two thin coats for full coverage. -
Define the Hair:
Paint the hair area (the back of the head and sideburns) white. I find it helpful to follow the carved texture of the ‘hair’ as a guide for where to stop painting. -
Create the Skirt:
Apply painter’s tape just above the waistline to protect the chest area. Paint the ‘skirt’ or bottom of the tunic white. -
The Asymmetrical Legs:
To achieve the classic modern look, paint the left leg completely white while leaving the right leg unpainted (natural wood). -
Base the Boots:
Paint both boot bases white, being careful where they meet the stand. Let all the white base coats dry completely.
Bleeding Paint?
If paint bleeds under your tape onto the raw wood, don’t wipe it! Let it dry slightly, then gently scrape it off with an X-Acto knife or the edge of a credit card.
Step 2: Fine Details
-
Detail the Jacket:
Remove the waist tape. Using your fine detail brush and white paint, draw a thin vertical line down the center of the unpainted chest area to represent the jacket opening. -
Add Buttons:
Dip the handle end of a small paintbrush or a toothpick into white paint and dot four ‘buttons’ evenly on either side of the center line you just painted. -
Stripe the Sleeves:
Paint two thin horizontal bands on the forearms using white paint to create cuff details over the natural wood. -
Paint the Belt:
Use the metallic champagne or bronze paint to carefully fill in the belt area around the waist. This adds a subtle shimmer without breaking the neutral palette. -
Add Boot Accents:
Switch to jet black paint. Using a very steady hand or your smallest brush, paint a thin ring around the top of each boot cuff.
Step 3: Face & Finish
-
Paint the Mustache:
Using the detail brush and white paint, fill in the carved mustache shape. Keep the edges crisp. -
Dot the Eyes:
Dip a fresh toothpick into the black paint and gently stamp two dots for the eyes. Practice on a scrap paper first to get the size right. -
Cleanup Edges:
If any paint bled onto the natural wood areas, gently scrape it away with a craft knife or a toothpick before the paint fully cures. -
Seal the Project:
Once fully dry, lightly mist the entire figure with a clear matte varnish to protect the raw wood from discoloring over time.
Wood Tone Tip
If your raw wood looks too pale or dull, rub a tiny amount of cutting board oil or beeswax onto the unpainted sections to bring out the golden grain.
Place your finished nutcracker near some evergreen branches or pampas grass for a stylish, organic holiday display


Have a question or want to share your own experience? I'd love to hear from you in the comments below!