There is nothing quite like the rush of potential when you look at a tired, dusty dresser and imagine the colorful masterpiece it could become. Whether you are aiming for a sleek modern finish or a cozy rustic charm, grabbing a brush is the quickest way to breathe new soul into your home decor.
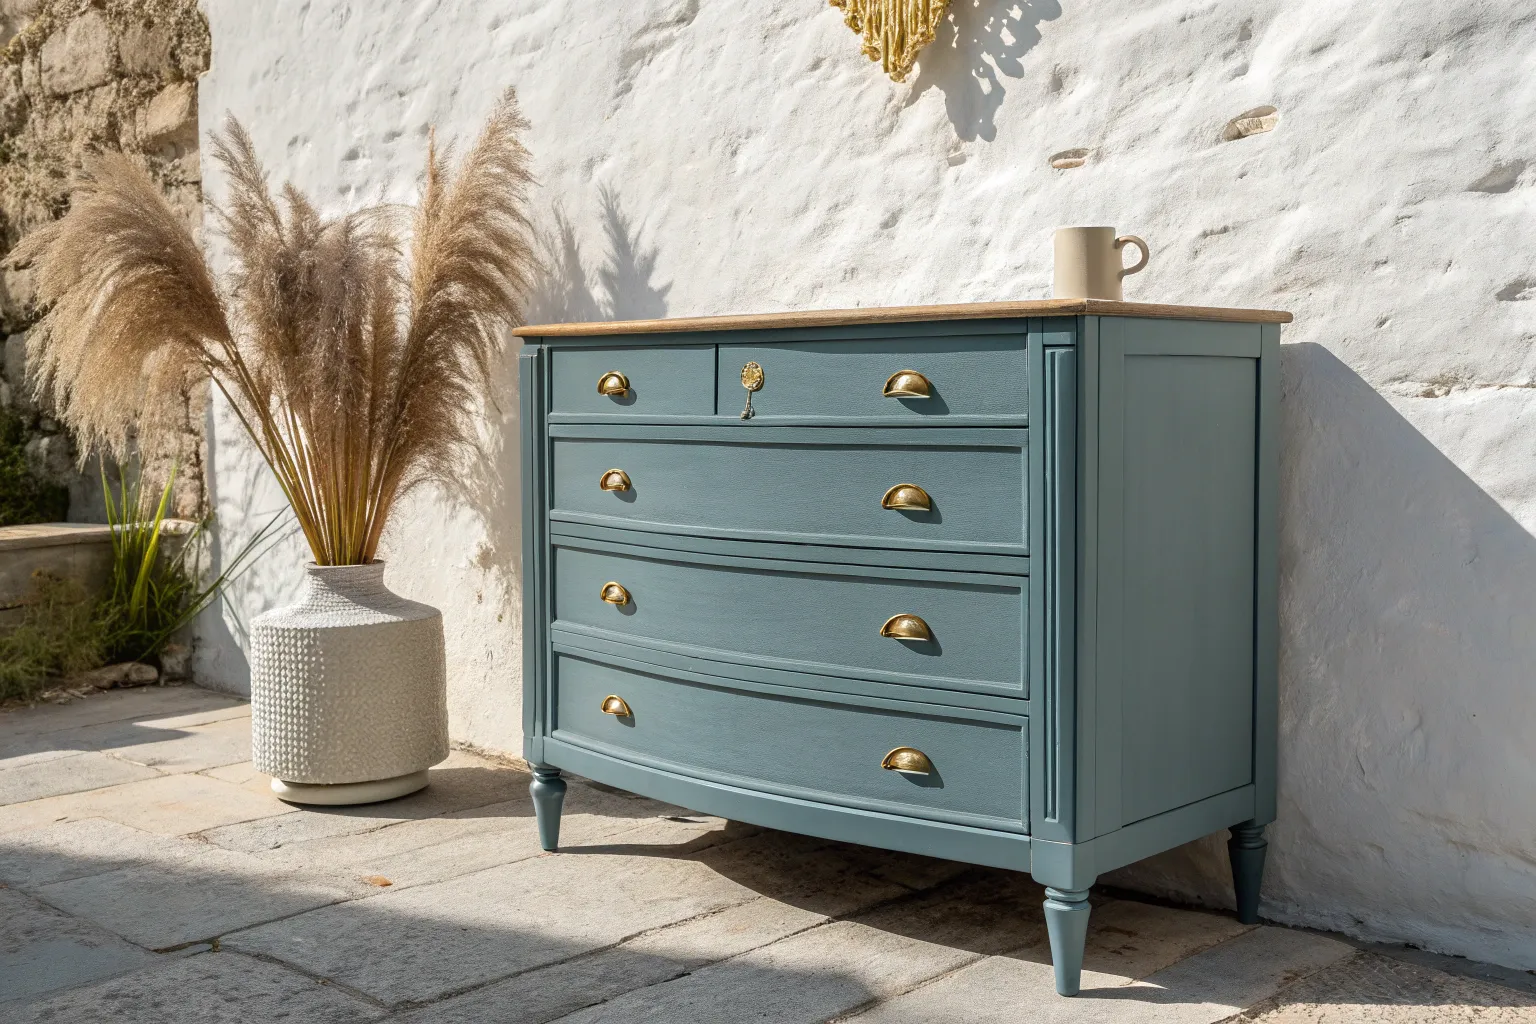
Moody navy blue statement pieces
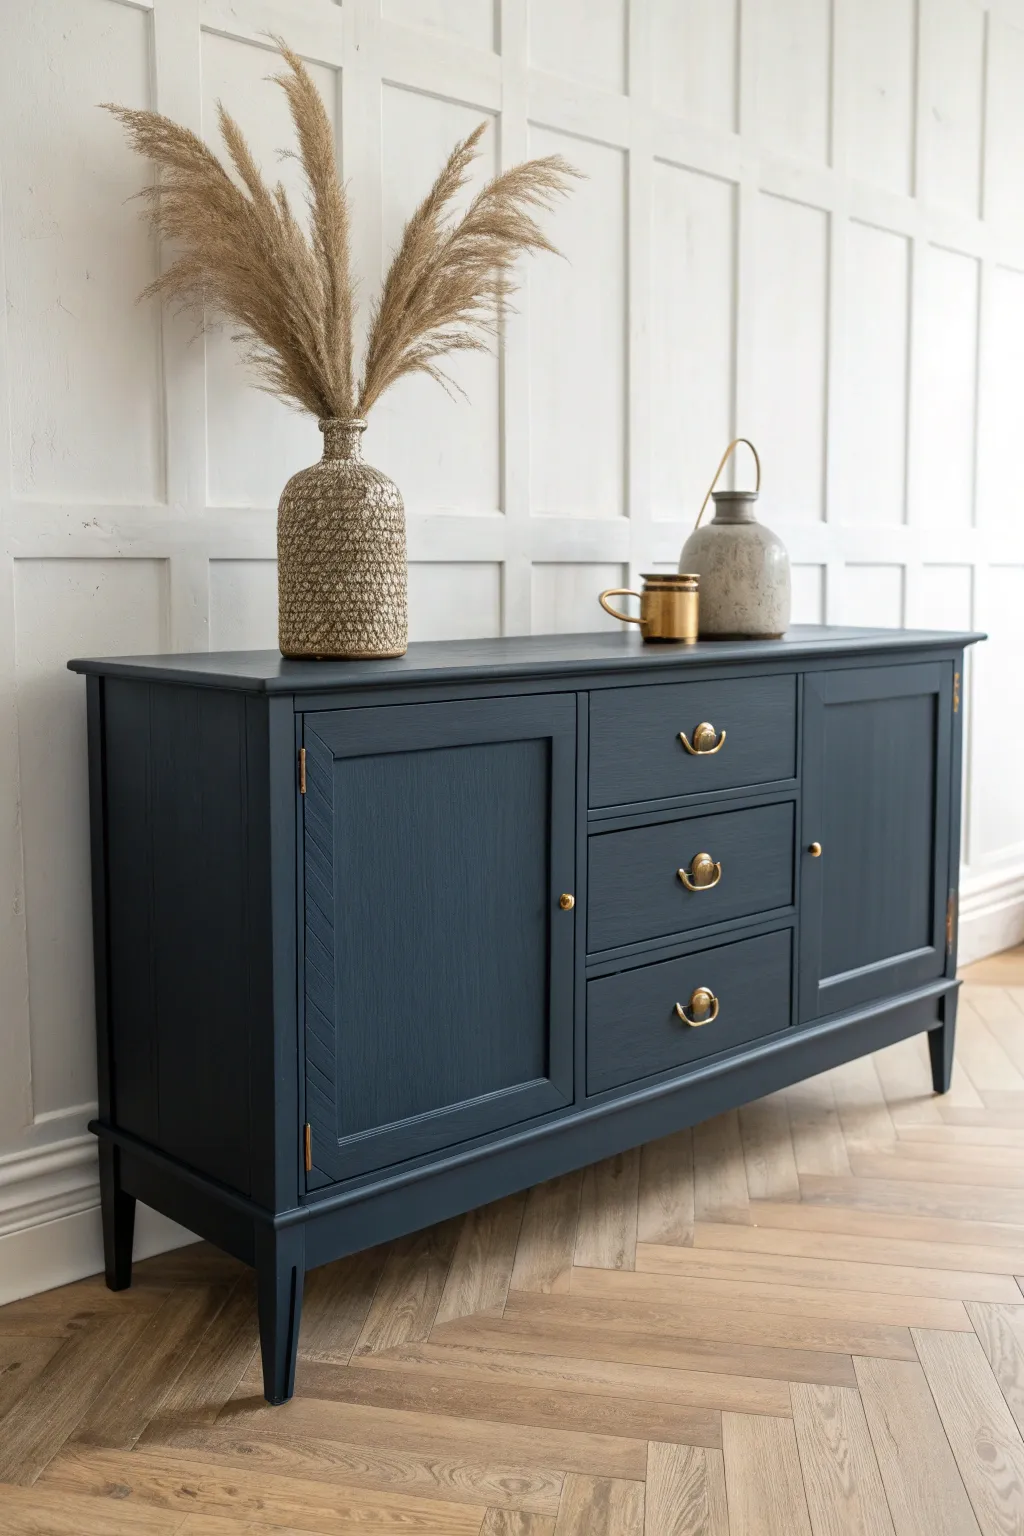
Transform a tired second-hand buffet into a sophisticated focal point with this moody navy blue makeover. The deep, matte finish paired with gleaming brass hardware creates a modern classic that commands attention in any dining room or hallway.
Step-by-Step
Materials
- Solid wood sideboard or buffet
- TSP cleaner or degreaser
- Wood filler (if changing hardware)
- Sandpaper (120 and 320 grit)
- Grey-tinted primer
- Navy blue furniture paint (matte or eggshell finish)
- Synthetic oval brush (2-inch)
- High-density foam roller and tray
- Tack cloths
- Gold cup pulls and knobs
- Water-based polyurethane topcoat (matte)
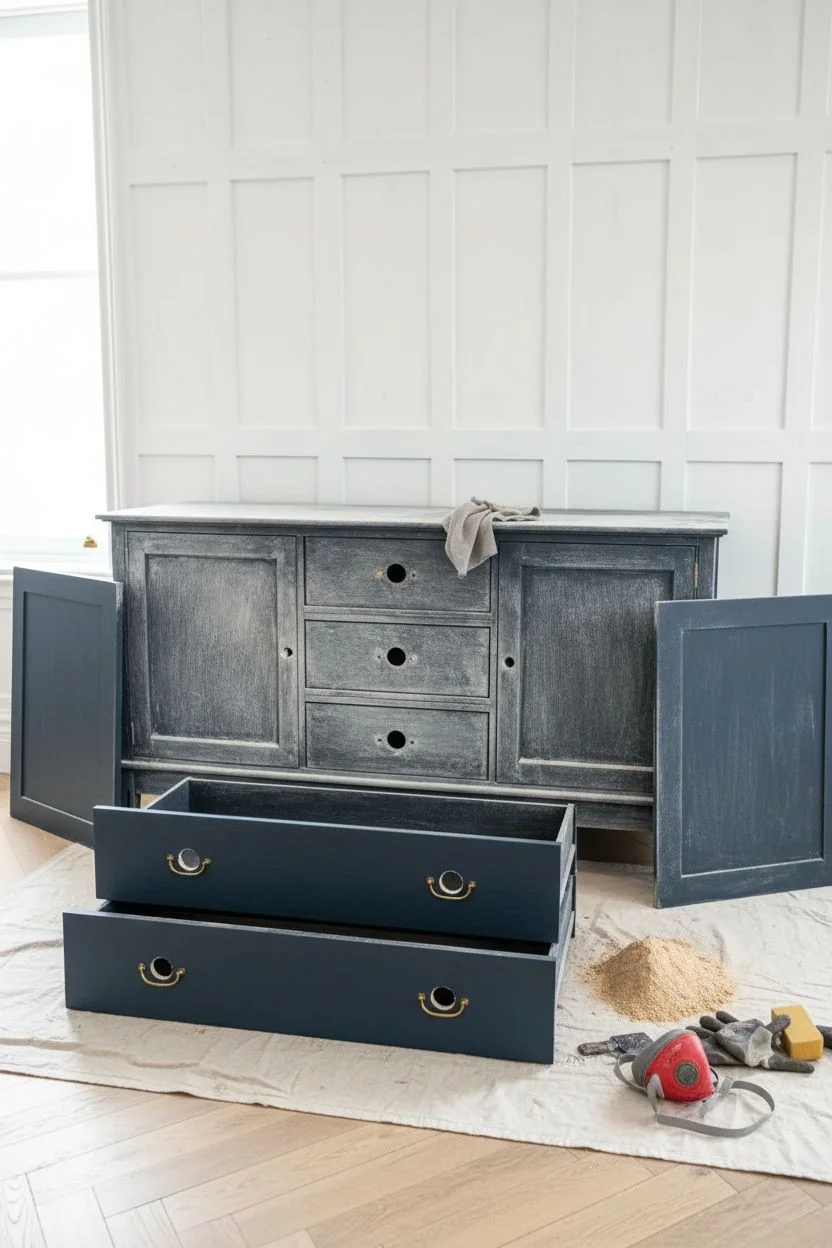
Step 1: Preparation and Repairs
-
Disassemble the piece:
Begin by removing all drawers and unscrewing the doors from the cabinet body. Remove the old hardware; if you plan to switch from knobs to handles, specific measurements are key here. -
Deep clean:
Scrub the entire piece down with TSP or a strong degreaser to remove years of furniture wax, oil, and dust. This ensures your paint adheres properly. -
Fill imperfections:
If your new hardware has different hole spacing than the old set, fill the old holes with wood filler. smooth it out with a putty knife and let it dry completely. -
Scuff sanding:
Sand the entire exterior with 120-grit sandpaper. You aren’t trying to strip it to bare wood, just scratching the surface to give the primer something to grip. -
Remove dust:
Vacuum up the sanding debris and run a tack cloth over every surface to ensure it is perfectly lint-free before painting.
Step 2: Priming and Painting
-
Tape off edges:
Use painter’s tape to protect the inside of the drawer tracks and the inner cabinet edges if you want to keep the interior wood natural. -
Apply tinted primer:
Apply a coat of grey-tinted primer. Using grey instead of white helps deep navy paint achieve true opacity with fewer coats. -
Sand the primer:
Once dry, lightly glide 320-grit sandpaper over the primer to knock down any brush strokes or raised grain adjacent to the edges. -
Cut in the color:
Dip your synthetic oval brush into the navy paint and ‘cut in’ the corners, recessed panels, and detailed edges where a roller won’t reach. -
Roll the flat surfaces:
Immediately after cutting in, use a high-density foam roller to paint the flat sides and tops. This mimics a sprayed factory finish. -
Dry and repeat:
Allow the first coat to dry according to the can’s instructions (usually 4–6 hours). I like to lightly sand with fine grit between coats for an ultra-smooth feel. -
Second coat:
Apply a second coat using the same brush-then-roll technique. Deep blues often need two solid coats, sometimes three, for full richness.
Deep Base Secret
Ask the paint store to tint your primer dark grey. This prevents white specks from showing through if the furniture gets scratched later and deepens the final navy hue.
Step 3: Finishing and Assembly
-
Sealing the paint:
If your paint isn’t an ‘all-in-one’ enamel, apply two thin coats of matte water-based polyurethane to protect the surface from scuffs and fingerprints. -
Hardware preparation:
While the cabinet cures, prepare your hardware. If reusing old metal handles, you can clean them with Brasso or spray paint them metallic gold to match the new look. -
Reattach doors:
Carefully screw the doors back onto the hinges. Having a helper hold the door in place makes this step much less frustrating. -
Drill for new hardware:
If you filled old holes, measure and mark the new locations for your gold cup pulls and knobs. Drill carefully from the front to the back. -
Final installation:
Screw in the brass cup pulls on the drawers and knobs on the doors to complete the elegant transformation.
Hidden Treasure
Line the inner drawers with a botanical or geometric peel-and-stick wallpaper. It adds a pop of surprise pattern and luxury every time you reach for linens or cutlery.
Step back and admire how this striking dark finish completely reinvents the character of your room.


Sleek matte black finishes
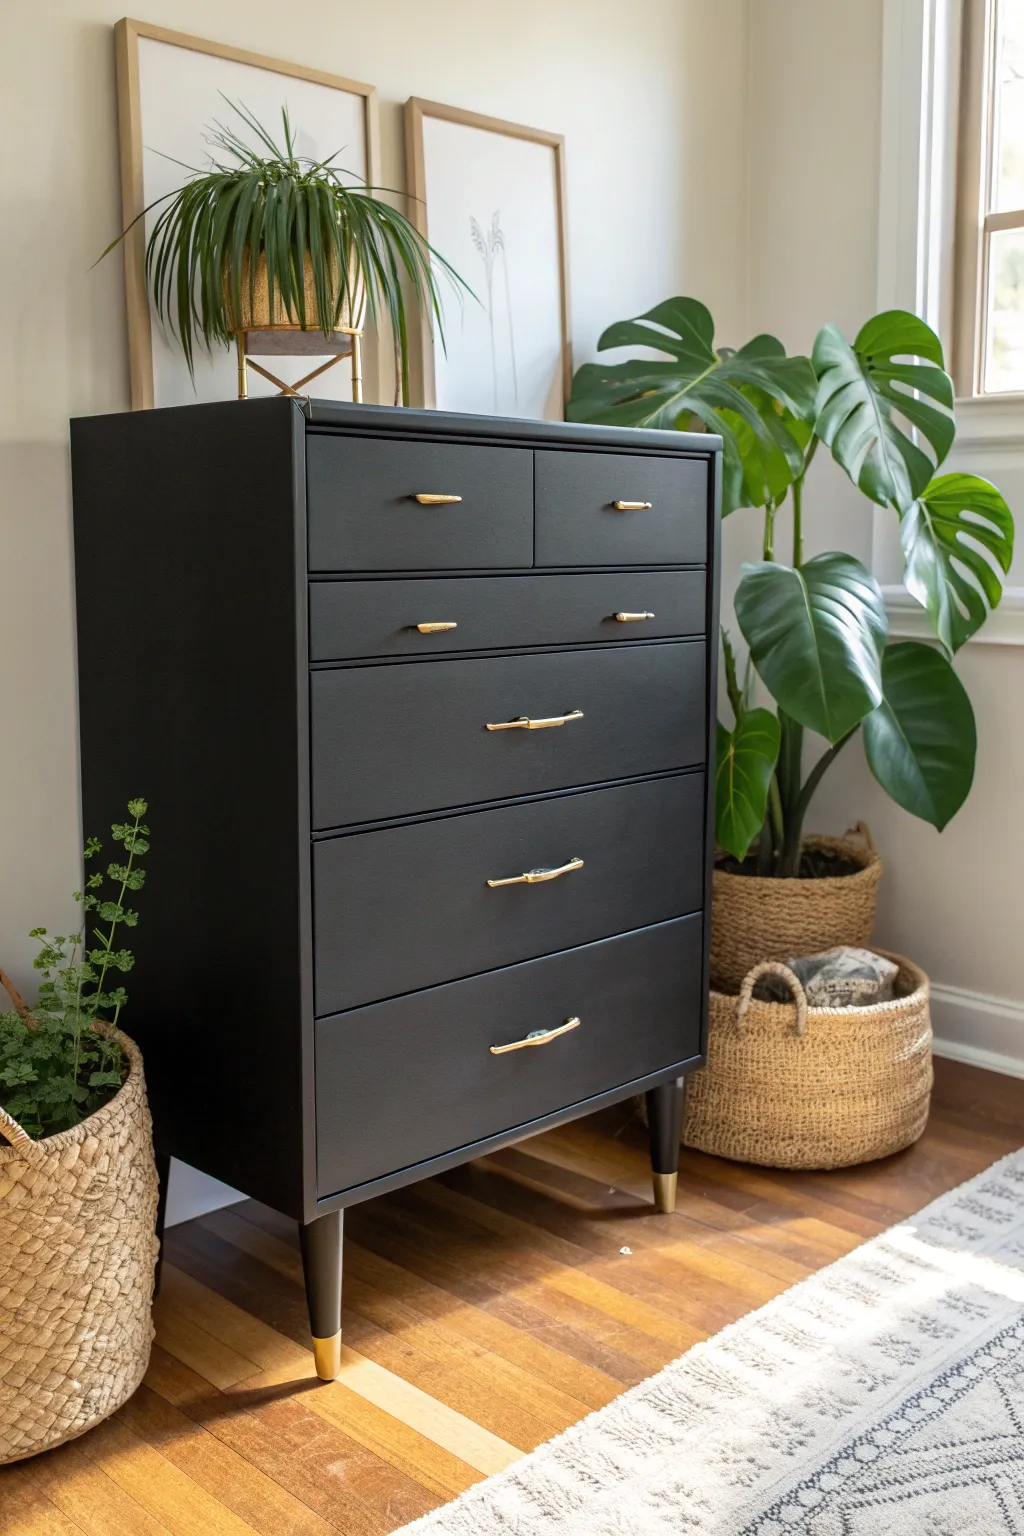

Transform a dated wooden dresser into a moody, sophisticated statement piece with this ultra-sleek matte black finish. The contrast between the deep, velvety charcoal surfaces and the bright crushed-gold accents creates a high-end look suitable for any contemporary space.
Step-by-Step Tutorial
Materials
- Tall wooden dresser
- TSP substitute or heavy-duty degreaser
- Sandpaper (120, 220, and 400 grit)
- Wood filler
- Grey stain-blocking primer
- High-quality matte black furniture paint
- Water-based matte polycrylic topcoat
- Liquid gold leaf or metabolic gold paint
- Painter’s tape
- High-density foam rollers
- Synthetic angled sash brush
- Modern gold hardware (knobs and pulls)
Step 1: Preparation & Priming
-
Dissassemble:
Remove all drawers from the dresser body and unscrew the old hardware; keep the screws if you plan to reuse the mounting holes. -
Deep clean:
Scrub the entire piece, including drawer fronts, with TSP substitute to remove decades of furniture wax and oils. -
Fill imperfections:
Use wood filler to repair deep scratches or old hardware holes if you are changing the pull size. -
Scuff sand:
Sand the entire surface with 120-grit sandpaper to break the existing finish; you don’t need to strip it to bare wood, just create a scratchy ‘tooth’. -
Dust removal:
Wipe away every speck of sanding dust with a tacky cloth or damp rag, as dust is the enemy of a smooth black finish. -
Prime the surface:
Apply a coat of grey primer; grey provides a much better base for black paint than white primer does, requiring fewer topcoats. -
Smooth the base:
Once the primer is fully dry, lightly sand it with 220-grit paper to create a glass-smooth foundation.
Step 2: Painting & Dipping
-
First charcoal coat:
Stir your matte black paint thoroughly, then apply the first coat using a high-density foam roller for large flat areas to minimize texture. -
Detailed brushwork:
Use a synthetic angled sash brush to cut in around corners, lips, and legs, feathering out the edges to blend with the rolled areas. -
Sanding between coats:
Allow the paint to dry completely, then sand very lightly with 400-grit sandpaper to knock down any dust nibs. -
Second coat:
Apply a second coat of black paint; I always find two thin coats cure harder and look better than one thick, heavy coat. -
Tape the legs:
Measure about 3 to 4 inches up from the bottom of each leg and wrap painter’s tape tightly around the circumference to create a crisp line. -
Gold dipping:
Paint the bottom section of the legs with liquid gold leaf or opaque metallic gold paint. -
Tape removal:
While the gold paint is still slightly tacky, carefully peel back the tape at a sharp angle to ensure a razor-sharp transition line.
Smudge Prevention
Matte black shows oily fingerprints instantly. Never skip the topcoat! A dedicated matte polycrylic or furniture wax is essential to make the surface wipeable and durable against daily use.
Step 3: Protection & Assembly
-
Seal the matte:
Apply two coats of matte water-based polycrylic to the black surfaces to protect against oily fingerprints without adding unwanted shine. -
Install hardware:
Attach your new gold knobs and pulls, ensuring they are tight and level. -
Final styling:
Slide the drawers back into their tracks and style the piece with fresh greenery to pop against the dark finish.
Primer Pro-Tip
Request that your paint store tints your primer to a dark grey. This helps you achieve full opacity with the black paint faster and hides chips better than white primer if the piece gets scratched later.
Step back and admire the dramatic, modern elegance of your newly transformed furniture piece.

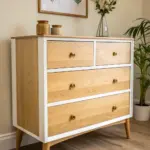


The two-tone wood and paint combination
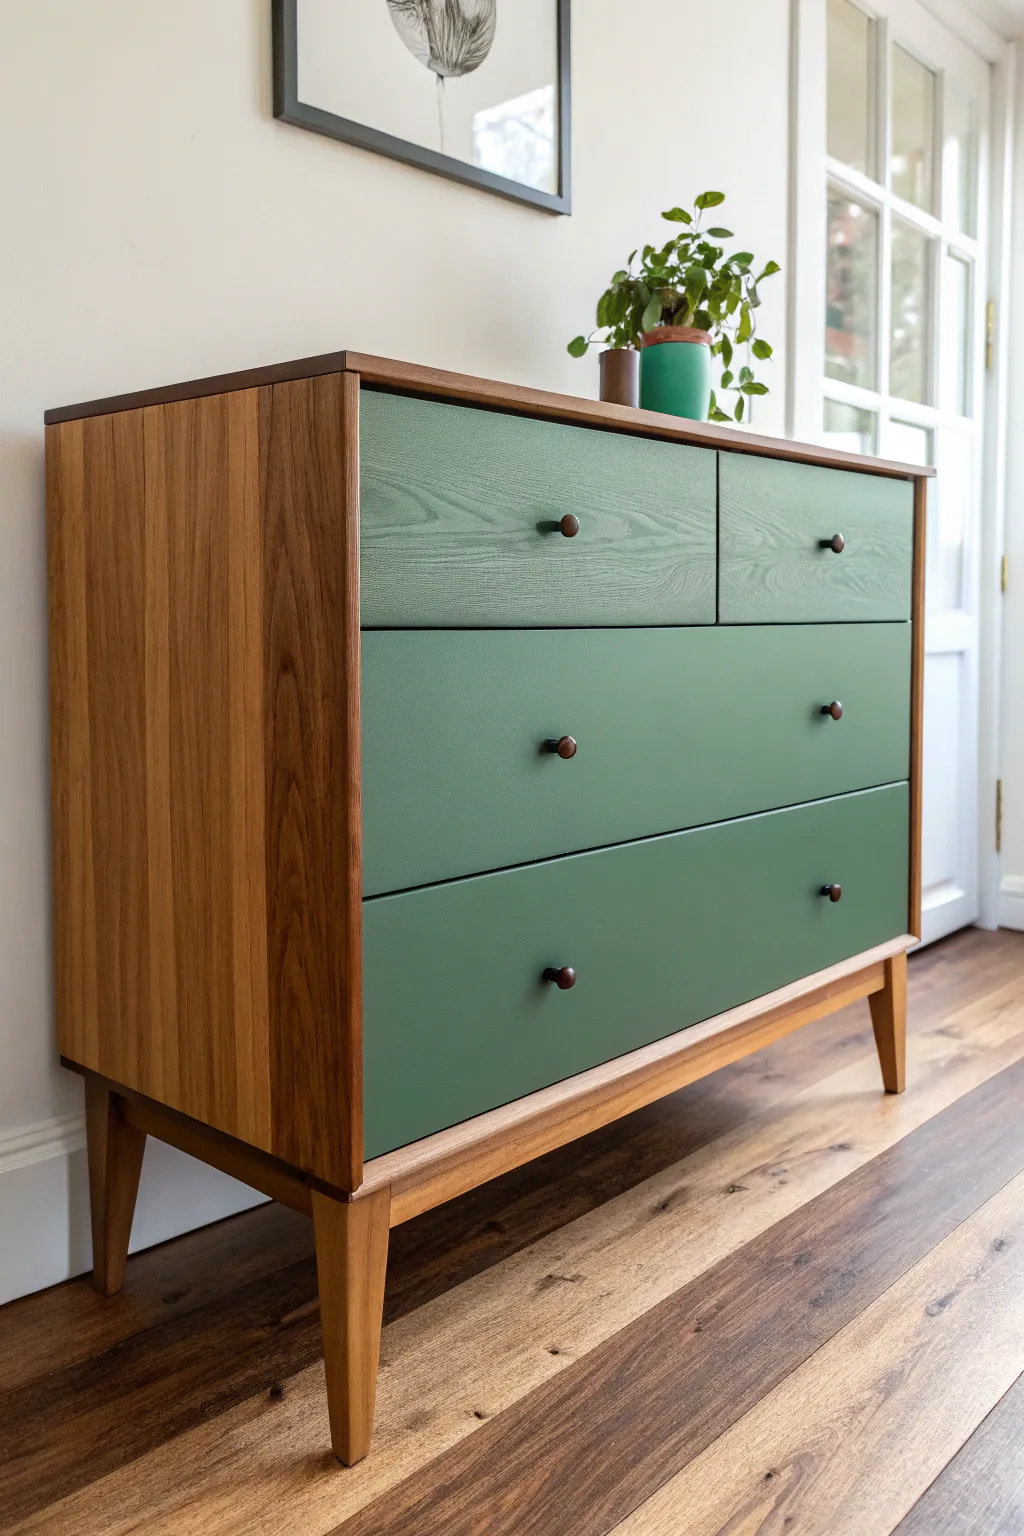
Balance the warmth of natural wood with the cool sophistication of matte green in this striking two-tone dresser makeover. This project celebrates the wood grain texture while updating a mid-century piece with a modern, earthy color palette.
Detailed Instructions
Materials
- Wooden dresser (mid-century style preferred)
- Sander and sandpaper (120, 180, 220 grit)
- TSP or degreasing cleaner
- Painter’s tape
- Wood stain (Walnut or Teak shade)
- Wipe-on Polyurethane (Satin)
- Stain-blocking primer
- Matte finish furniture paint (Sage Green)
- Synthetic bristle brush and foam roller
- Small round cabinet knobs (Oil-rubbed bronze)
Step 1: Preparation and Disassembly
-
Remove moving parts:
Pull out all drawers and remove the old hardware. Place the hardware in a baggie if you plan to reuse it, though we will likely upgrade it. -
Label everything:
Using a piece of tape on the bottom of each drawer and inside each slot, number them so you know exactly which drawer goes back into which specific opening later. -
Deep clean:
Scrub the entire piece, especially the drawer fronts and areas you plan to stain, using a degreaser or TSP alternative to remove decades of furniture polish and oils. -
Tape for protection:
Use painter’s tape to carefully mask off the drawer sides (where the wood meets the face) so your beautiful green paint lines remain crisp and don’t bleed onto the sliding mechanism.
Step 2: Refinishing the Wood Case
-
Sand the body:
On the top, sides, and legs of the dresser, sand down the existing finish using 120-grit paper until you reach bare wood. -
Refine the surface:
Switch to 180-grit and then 220-grit sandpaper to smooth out the wood grain and remove any swirl marks from the coarser sanding. -
Remove dust:
Vacuum the wood thoroughly and wipe it down with a tack cloth or a rag dampened with mineral spirits to remove every speck of dust. -
Apply stain:
If your natural wood is too pale, apply a walnut-tone stain with a lint-free cloth, wiping off the excess quickly to ensure an even tone. -
Seal the wood:
Apply a coat of satin wipe-on polyurethane to the wood case and legs. I like to keep a wet edge to avoid lap marks during this step. -
Sand and recoat:
Once the first coat is dry, lightly hand-sand with 320-grit paper, wipe clean, and apply a second coat for durability and a professional sheen.
Grain Texture Tip
To keep the visible wood grain texture on the painted drawers (as shown in the photo), avoid thick ‘chalk’ paints. Use a thinner enamel or milk paint that sinks into the wood pores rather than floating on top.
Step 3: Painting the Drawer Fronts
-
Scuff sand drawers:
Lightly sand the drawer fronts with 180-grit paper. You don’t need to strip them to bare wood, but you do need to rough up the old glossy finish so the paint adheres. -
Prime the surface:
Apply a thin coat of stain-blocking primer. This prevents tannins from the old wood from bleeding through your green paint later. -
Apply first paint coat:
Using a high-quality sage green matte paint, apply your first coat. Use a roller for the bulk and a brush to feather it out if you want to highlight the wood grain texture beneath. -
Check for imperfections:
Let the paint dry completely. If you find any drips or rough spots, smooth them out gently with fine sandpaper. -
Apply second coat:
Apply the second coat of green. This usually provides full coverage and that deep, saturated color seen in the example. -
Seal the paint:
If your paint isn’t self-sealing, apply a clear matte polycrylic topcoat to protect the drawers from fingerprints and daily wear.
Level Up: Drawer Liners
Add a hidden pop of joy by lining the interior bottom of the drawers with a patterned wallpaper or contact paper that complements the sage green exterior.
Step 4: Finishing Touches
-
Install hardware:
Once the paint is fully cured (give it at least 24 hours), attach the small dark bronze knobs to the center holes. -
Reassemble:
Remove the painter’s tape from the drawer sides and slide the drawers onto their corresponding tracks.
Enjoy your beautifully restored piece that perfectly blends vintage charm with contemporary color.


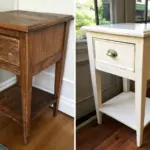
Brightening small spaces with colorful nightstands


Bring a burst of energy into your bedroom by transforming a dated wooden nightstand with a coat of vibrant yellow paint. This project focuses on highlighting vintage details like fluted legs and carved appliqués with a smooth, matte finish that feels sunny and sophisticated.
Step-by-Step Tutorial
Materials
- Vintage wooden nightstand
- TSP substitute or heavy-duty degreaser
- Sandpaper (120 and 220 grit)
- Wood filler
- Tack cloth
- Painter’s tape
- Stain-blocking primer (White)
- Chalk or Mineral paint (Sunshine Yellow)
- Synthetic oval brush (2-inch)
- Small round detail brush
- Clear finishing wax
- Lint-free rags
- Antique bronze round knobs
- Screwdriver
Step 1: Preparation
-
Remove Hardware:
Begin by removing all drawers from the unit. Unscrew the old knobs or handles and set them aside in a baggie if you plan to reuse them. -
Deep Cleaning:
Scrub the entire piece with a TSP substitute and a sponge. Vintage furniture often has years of wax and oils that will repel new paint. -
Surface Repair:
Inspect the surfaces for deep scratches or dents. Fill these imperfections with wood filler, leaving it slightly mounded as it shrinks when drying. -
Sanding:
Once the filler is dry, sand the entire piece with 120-grit sandpaper to scuff the old finish. This creates ‘tooth’ for the primer to grip. -
Fine Sanding:
Switch to 220-grit sandpaper to smooth out the wood filler and ensure the carved details on the legs and sides are free of loose debris. -
Dust Removal:
Vacuum the sanding dust, then wipe every inch with a tacky cloth to ensure a perfectly clean surface.
Yellow Coverage Issues
Yellow paint often has less hiding power than other colors. If you see streaks after two coats, don’t worry. It is better to do three thin, even coats than to apply one thick, gloopy layer to try and force coverage.
Step 2: Priming and Base
-
Masking:
Use painter’s tape to cover the drawer glides or the sides of the drawers if you want them to remain unpainted. -
Apply Primer:
Brush on a coat of white stain-blocking primer. Yellow paint is naturally translucent, so starting with a white base is crucial for true color saturation. -
Smooth the Base:
After the primer is fully dry, run a piece of ultra-fine sandpaper over the flat surfaces to knock down any brush strokes.
Step 3: Painting
-
First Coat:
Stir your yellow chalk or mineral paint thoroughly. Apply a thin, even coat using the oval brush, following the direction of the wood grain. -
Detail Work:
I prefer using a small round artist’s brush here to push paint into the deep floral carvings and the fluting on the legs, ensuring no drips form in the crevices. -
Drying Time:
Let this coat dry according to the manufacturer’s instructions. Do not rush this, or the paint may lift. -
Second Coat:
Apply a second coat to build opacity. Yellow pigments can be tricky, so watch for streaks and keep a light hand. -
Assessment:
Check the coverage once dry. If the white primer is still shadowing through, apply a third thin coat for that solid, saturated look.
Secret Drawer Pattern
To elevate the project, line the interior sides or bottom of the drawers with a patterned wallpaper or contact paper. A soft floral or geometric print adds a delightful surprise every time you open it.
Step 4: Finishing
-
Sealing:
Once the paint has cured overnight, apply a layer of clear furniture wax using a wax brush or lint-free rag to protect the finish. -
Buffing:
Wait for the wax to haze over, then buff it vigorously with a clean cloth. This creates a soft, purposeful sheen that highlights the curves. -
Hardware Update:
Clean the original antique bronze knobs to remove grime, or purchase new vintage-style hardware that contrasts well with the yellow. -
Reassembly:
Screw the knobs back onto the drawer fronts and slide the drawers back into the nightstand.
Style your refreshed piece with a simple glass vase and dried wheat stems to capture that warm, welcoming countryside aesthetic
BRUSH GUIDE
The Right Brush for Every Stroke
From clean lines to bold texture — master brush choice, stroke control, and essential techniques.
Explore the Full Guide
Contrasting interior hutch colors


Transform a standard china cabinet into a stunning focal point by contrasting a creamy white exterior with a vibrant teal interior. This pop of color behind the shelves creates depth and makes white ironstone or dishware stand out beautifully.
Detailed Instructions
Materials
- Hutch or china cabinet
- TSP or degreasing cleaner
- 220-grit sandpaper & tack cloth
- High-quality painter’s tape
- Bonding primer (stain-blocking)
- Creamy white furniture paint (Satin finish)
- Teal or Turquoise furniture paint (Satin finish)
- 1.5-inch angled sash brush
- 4-inch foam roller and tray
- Small artist brush
- Drop cloth
- Screwdriver
Step 1: Preparation
-
Disassemble the unit:
Start by removing all drawers, doors, and adjustable shelves. Unscrew all hinges and knobs, placing the hardware in labeled bags so nothing gets lost. -
Deep clean surfaces:
Scrub the entire piece with TSP or a degreasing cleaner to remove years of furniture wax, oils, and dust. This step is vital for paint adhesion. -
Scuff sand:
Lightly sand all surfaces with 220-grit sandpaper. You don’t need to strip the old finish completely, just dull the shine to give the new paint some ‘tooth’. -
Remove dust:
Vacuum up the sanding dust and wipe everything down with a tacky cloth to ensure a perfectly smooth base. -
Protect the glass:
Carefully apply painter’s tape to the glass panes on the doors. Press the edges down firmly with a credit card to prevent paint seepage.
Pro Tip: Crisp Lines
After taping off the white shelves, brush a thin layer of white paint over the tape edge first. This seals the gap, ensuring no teal paint bleeds underneath.
Step 2: Priming and Base Coat
-
Apply primer:
Coat the entire piece, including the interior back panel, with a bonding primer. This prevents bleed-through and ensures durability. -
Smooth the primer:
Once dry, run your hand over the surface. If it feels rough, give it a quick pass with fine sandpaper and wipe clean. -
Paint the exterior white:
Using your angled brush for corners and the foam roller for flat areas, apply the creamy white paint to the exterior frame, doors, and drawers. -
Paint the shelves:
Paint the shelves and the interior side walls white as well. Apply 2-3 thin coats for best coverage, allowing proper drying time between each. -
Cure time:
Let the white paint dry for at least 24 hours. The paint needs to be hard enough to withstand tape in the next phase.
Troubleshooting: Sticky Drawers
If drawers feel tight after painting, sand the runners down to bare wood. Apply a little candle wax or beeswax to the tracks to help them glide smoothly.
Step 3: The Teal Accent
-
Tape interior lines:
Tape off the edges of the white shelves and side walls where they meet the back panel to ensure a crisp line. -
Cut in the corners:
Dip your angled brush into the teal paint and carefully ‘cut in’ around the perimeter of the back panel and into the grooves if you have beadboard backing. -
Roll the back panel:
Use the foam roller to fill in the rest of the back panel with teal paint. I like to work in small sections to keep a wet edge. -
Apply second coat:
Once the first coat is dry to the touch, apply a second coat of teal to ensure a rich, opaque color. -
Remove tape:
Peel off the painter’s tape while the final coat is still slightly wet. Pull slowly at a 45-degree angle to avoid lifting any paint. -
Touch ups:
Inspect your lines. Use a small artist brush to fix any tiny spots where the white or teal might have crossed over.
Step 4: Finishing Touches
-
Reassemble:
Once everything has cured for a few days, reattach the hinges, hang the doors, and slide the drawers back into place. -
Install hardware:
Screw the knobs and pulls back on. If desired, this is a great time to swap old hardware for something newer to match the fresh look. -
Clean glass:
Remove the tape from the glass and clean any residue with vinegar and water for a streak-free shine.
Fill your refreshed hutch with your favorite linens and dishes to enjoy the stunning contrast every day.
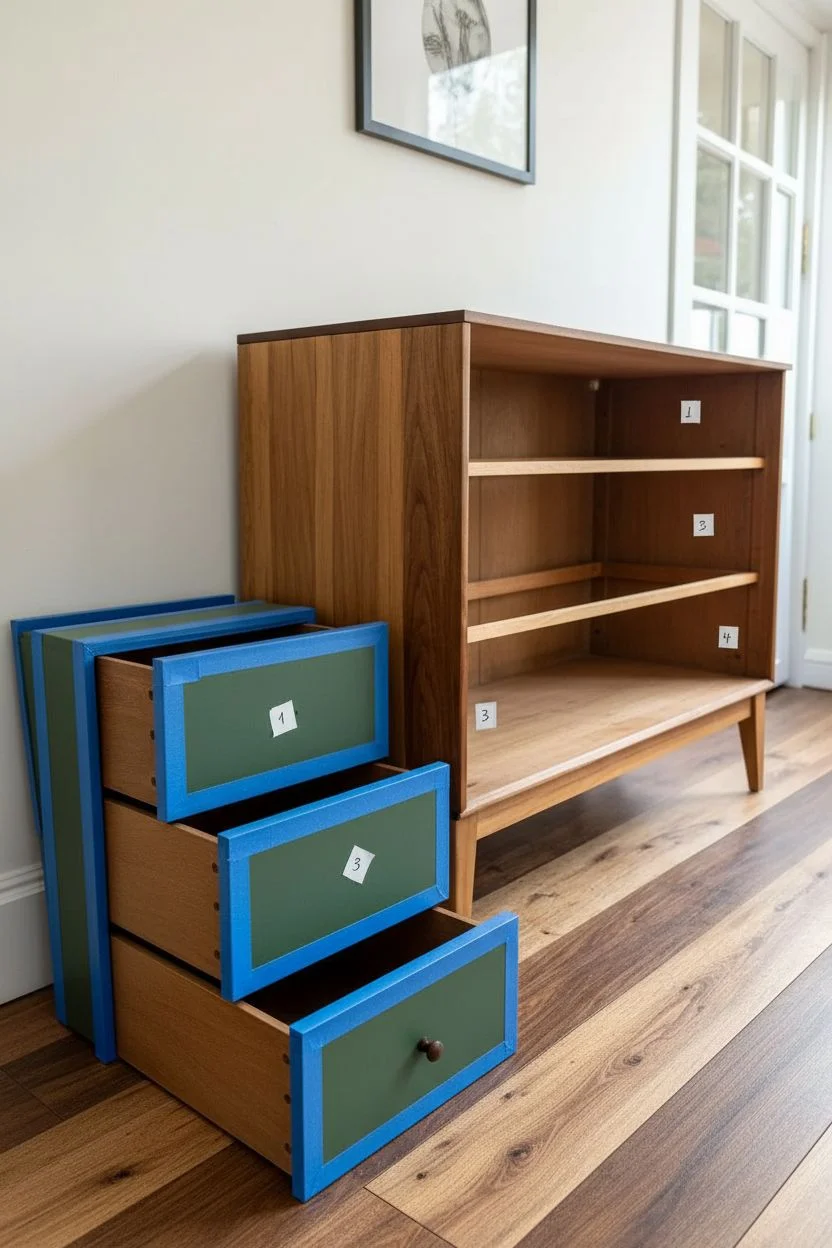
Soft pastel blends for a dreamy look
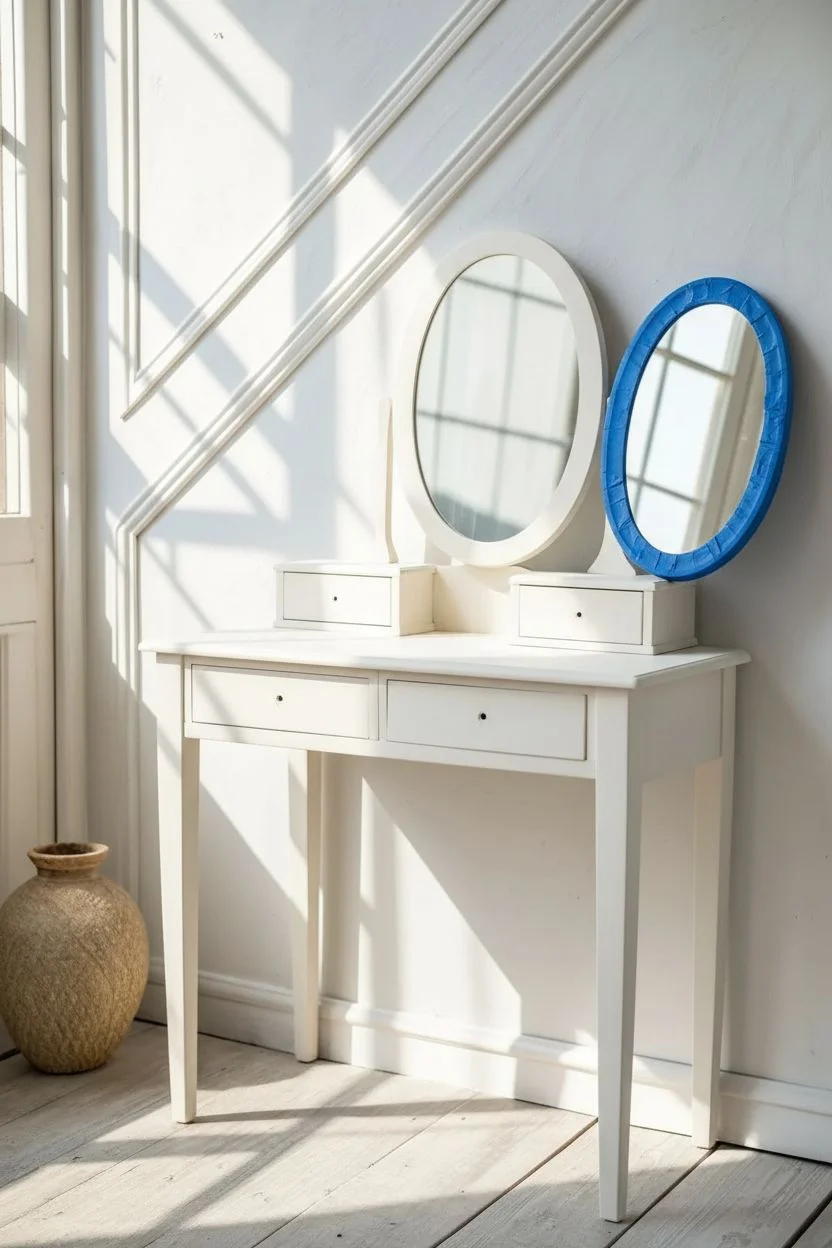
Transform a vintage vanity into a romantic, dreamy focal point using a soft blending technique that mimics the colors of a morning sky. This project uses a wash of pastels and subtle gold accents to create a finish that feels both aged and refreshingly airy.
How-To Guide
Materials
- Vintage wooden vanity with mirror
- Chalk mineral paint (Cream base, Soft Lilac, Dusty Rose)
- Stain-blocking primer
- TSP or degreasing cleaner
- Sandpaper (120 and 220 grit)
- Oval painting brush (synthetic blend)
- Small artist brush
- Gold gilding wax
- Clear furniture wax
- Water mister bottle
- Lint-free rags
Step 1: Preparation & Priming
-
Remove hardware:
Begin by unscrewing any knobs, pulls, and the mirror assembly from the vanity base. Store these screws in a labeled bag so they don’t get lost during the painting process. -
Clean deeply:
Scrub the entire piece with a TSP-alternative cleaner to remove years of oils, wax, and dust. This step is crucial because paint won’t adhere to oily vintage finishes. -
Scuff sand:
Once dry, lightly sand the existing finish with 120-grit sandpaper. You don’t need to strip it to bare wood, just create enough ‘tooth’ for the primer to grip. -
Protect the glass:
If the mirror cannot be easily removed from its frame, carefully apply painter’s tape around the edges of the glass to protect it from stray brushstrokes. -
Apply primer:
Paint the entire piece with a stain-blocking primer. This prevents old tannins in the wood from bleeding through and discoloring your soft pastel shades later.
Step 2: Creating the Pastel Cloud Effect
-
Apply base color:
Paint a coat of your cream or off-white chalk paint over the entire vanity. This neutral canvas will help the translucent pastel layers appear bright and airy rather than muddy. -
Prepare your palette:
Pour small amounts of your Soft Lilac and Dusty Rose paints onto a plate. Keep your water mister bottle nearby; I find this is the secret weapon for effortless blending. -
Paint naturally:
Dip your damp brush into the Lilac paint and apply it to the drawer fronts and legs in random, organic patches. Don’t aim for straight lines; think of drifting clouds. -
Add the second tone:
While the purple is still slightly wet, apply the Dusty Rose to the empty spaces on the wood. Overlap the edges of the pink and purple slightly. -
Blend the transition:
Mist the surface lightly with water. Use a clean, dry brush to feather the area where the two colors meet, using light, cross-hatching strokes to blur the lines. -
Build depth:
Once the first blended layer is dry, you might want to add a second, very watered-down wash of purple in specific areas to deepen the color variation without covering the texture. -
Distress the edges:
Take 220-grit sandpaper and gently sand the raised edges, corners, and details of the legs. This reveals a bit of the cream base or wood underneath, adding to the shabby chic aesthetic.
Wet Distressing Tip
For a smoother distressed look, use a damp kitchen sponge instead of sandpaper to wipe away paint from the edges before it fully cures. This creates a soft wear pattern without scratch marks.
Step 3: Gilding & Finishing
-
Highlight with gold:
Using your fingertip or a small cloth, rub a small amount of gold gilding wax onto the decorative finials of the mirror stand and the hardware pulls. -
Seal with wax:
Brush on a layer of clear furniture wax over the painted surfaces. Work in sections, massaging the wax into the paint to seal and protect your work. -
Buff to a sheen:
Let the wax cure for about 20 minutes, then buff vigorously with a lint-free cloth. This hardens the finish and gives the piece a soft, professional satin glow. -
Reassemble:
Reattach your gilded hardware and mount the mirror back onto the vanity base to complete the transformation.
Muddy Colors?
If your pink and purple blend turns brown or grey, stop blending immediately. Let it dry completely, then simply dry-brush a fresh layer of the pure colors on top to restore vibrancy.
Enjoy your beautiful new vanity, where the soft hues invite a sense of calm into your daily routine.

PENCIL GUIDE
Understanding Pencil Grades from H to B
From first sketch to finished drawing — learn pencil grades, line control, and shading techniques.
Explore the Full Guide
Using geometric masking for modern flair
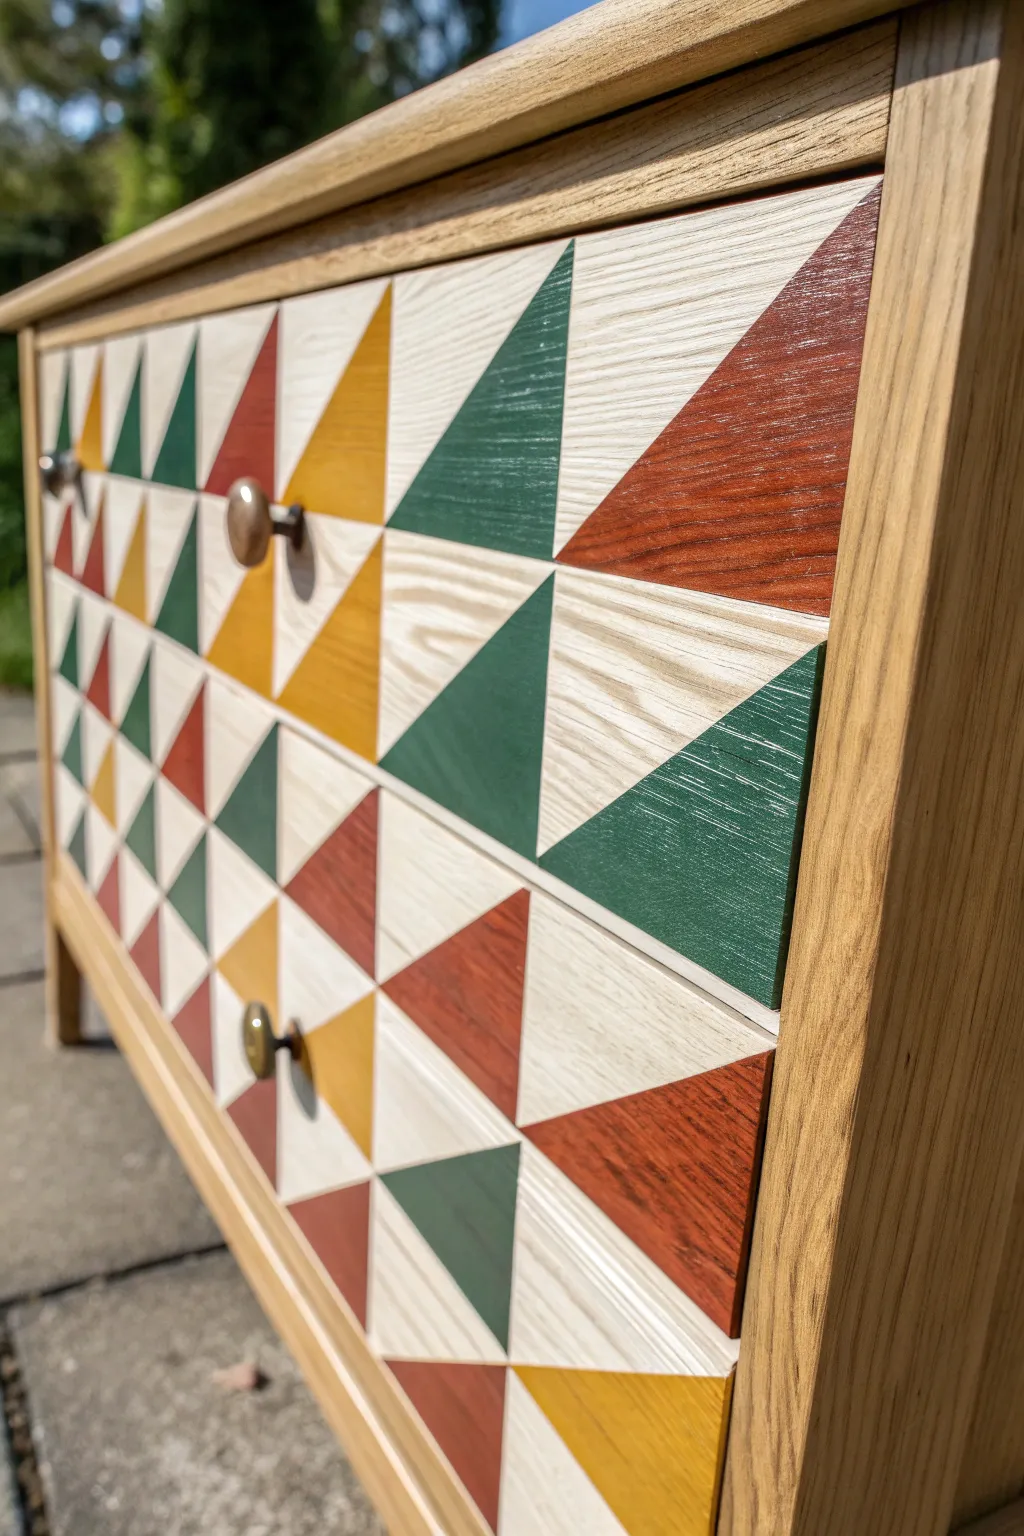
Transform a plain wooden dresser into a stunning modern statement piece using a geometric ‘quilt’ layout. By using semi-transparent stains instead of opaque paint, you preserve the beautiful wood grain while adding bold pops of mustard, rust, and forest green.
Step-by-Step Guide
Materials
- Solid wood dresser (oak or ash works best)
- Orbital sander with 80, 120, and 220-grit discs
- High-quality painter’s tape (sharp lines)
- Water-based wood stains: Forest Green, Terracotta, Mustard Yellow
- White liming wax or whitewash stain
- Pencil and long ruler (or T-square)
- Lint-free rags
- Small foam brushes or artist brushes
- Water-based Polycrylic topcoat (matte or satin)
- Cabinet hardware
Step 1: Preparation and Mapping
-
Remove hardware:
Begin by unscrewing all knobs and pulls from the drawers. Store them safely in a bag if you plan to reuse them. -
Strip to bare wood:
Since we are using stains, the surface must be raw wood. Sand the drawer fronts thoroughly, starting with 80 grit to remove old varnish, moving to 120, and finishing with 220 for a smooth surface. -
Clean the surface:
Vacuum away all sawdust and wipe the wood down with a tack cloth or a rag dampened with mineral spirits to ensure no dust remains in the grain. -
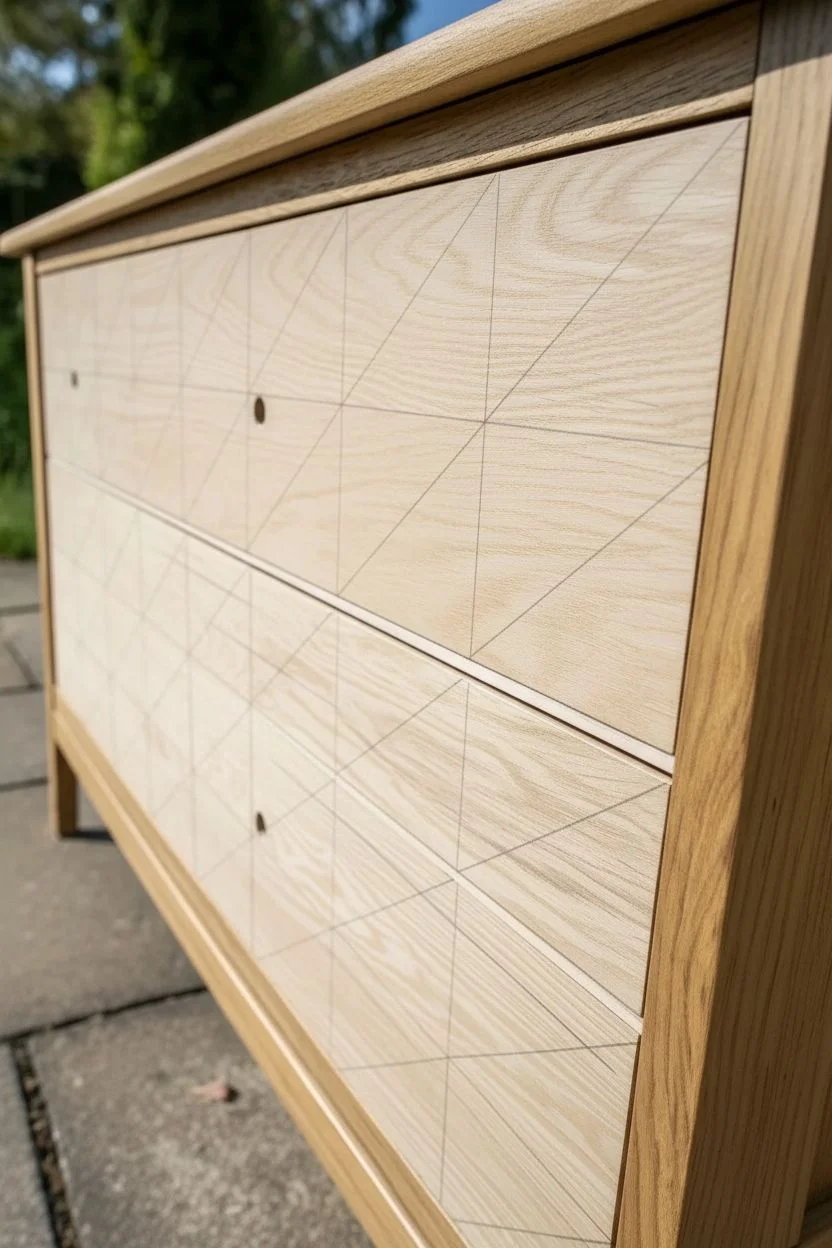
Calculate your grid:
Measure the height and width of your drawer faces. Determine a square size that fits evenly across the front (e.g., 4×4 inch squares) and mark this grid lightly with a pencil. -
Draw the diagonals:
Using a straight edge, draw a diagonal line through each square box to create two triangles. Alternate the direction of the diagonal lines according to the pattern shown in the reference image to create the ‘flying geese’ effect.
Bleed-Proof Lines
Before applying your colored stain, brush a tiny amount of clear matte medium over the tape edge. This seals the gap, ensuring that any seepage is clear, keeping your color lines razor-sharp.
Step 2: Staining – Round One
-
Tape the first batch:
You cannot stain touching triangles simultaneously. Tape off a set of non-adjacent triangles (e.g., all the ones intended for the green stain plus scattered others). -
Seal the tape edges:
Press the tape down firmly with a credit card. For extra crisp lines, I like to lightly brush a tiny amount of clear matte medium along the tape edge to prevent the stain from bleeding under. -
Apply the first colors:
Using a small foam brush, apply the forest green stain to your designated green triangles. Work in small sections so the stain doesn’t dry too fast. -
Wipe back the excess:
After letting the stain sit for 1-2 minutes, use a clean lint-free rag to wipe off the excess. This reveals the wood grain texture through the color. -
Apply secondary colors:
While the first batch of tape is down, apply your Terracotta and Mustard stains to their specific non-touching triangles, wiping them back just as you did with the green. -
Remove tape and dry:
Carefully peel back the painter’s tape while the stain is still slightly damp to avoid bridging. Allow these sections to dry completely (usually 2-4 hours) before touching them.
Level Up: Grain Direction
If using wood veneer sheets instead of solid wood, try rotating the grain direction for each triangle. The light will catch the grain differently, adding a holographic 3D effect.
Step 3: Staining – Round Two
-
Tape the remaining shapes:
Once the first round is fully dry, apply tape over the stained borders to protect them, exposing the remaining raw wood triangles. -
Apply the whitewash background:
For the light-colored triangles, apply a white wood stain or liming wax. This brightens the wood without covering the grain, providing high contrast against the darker colors. -
Wipe and reveal:
Wipe away the excess white stain immediately. Carefully peel off all remaining tape to reveal your complete geometric pattern. -
Touch up lines:
Inspect your geometric grid. If there was any minor bleed, use a detail brush with the appropriate color or a small piece of sandpaper to correct carefully.
Step 4: Finishing
-
Apply topcoat:
Stir your Polycrylic clear coat gently (do not shake, to avoid bubbles). Apply a thin, even layer over the entire drawer front to seal the colors. -
Sand between coats:
Once dry, lightly sand with ultra-fine sandpaper (320 grit) to smooth out any raised grain, then wipe away the dust. -
Final coat:
Apply a second and third coat of Polycrylic for durability. -
Re-install hardware:
Poke your mounting screws through the existing holes (or drill new ones if you filled them) and attach your knobs to complete the look.
Enjoy the interplay of color and natural texture on your newly modernized furniture piece.
Adding detailed stenciled patterns
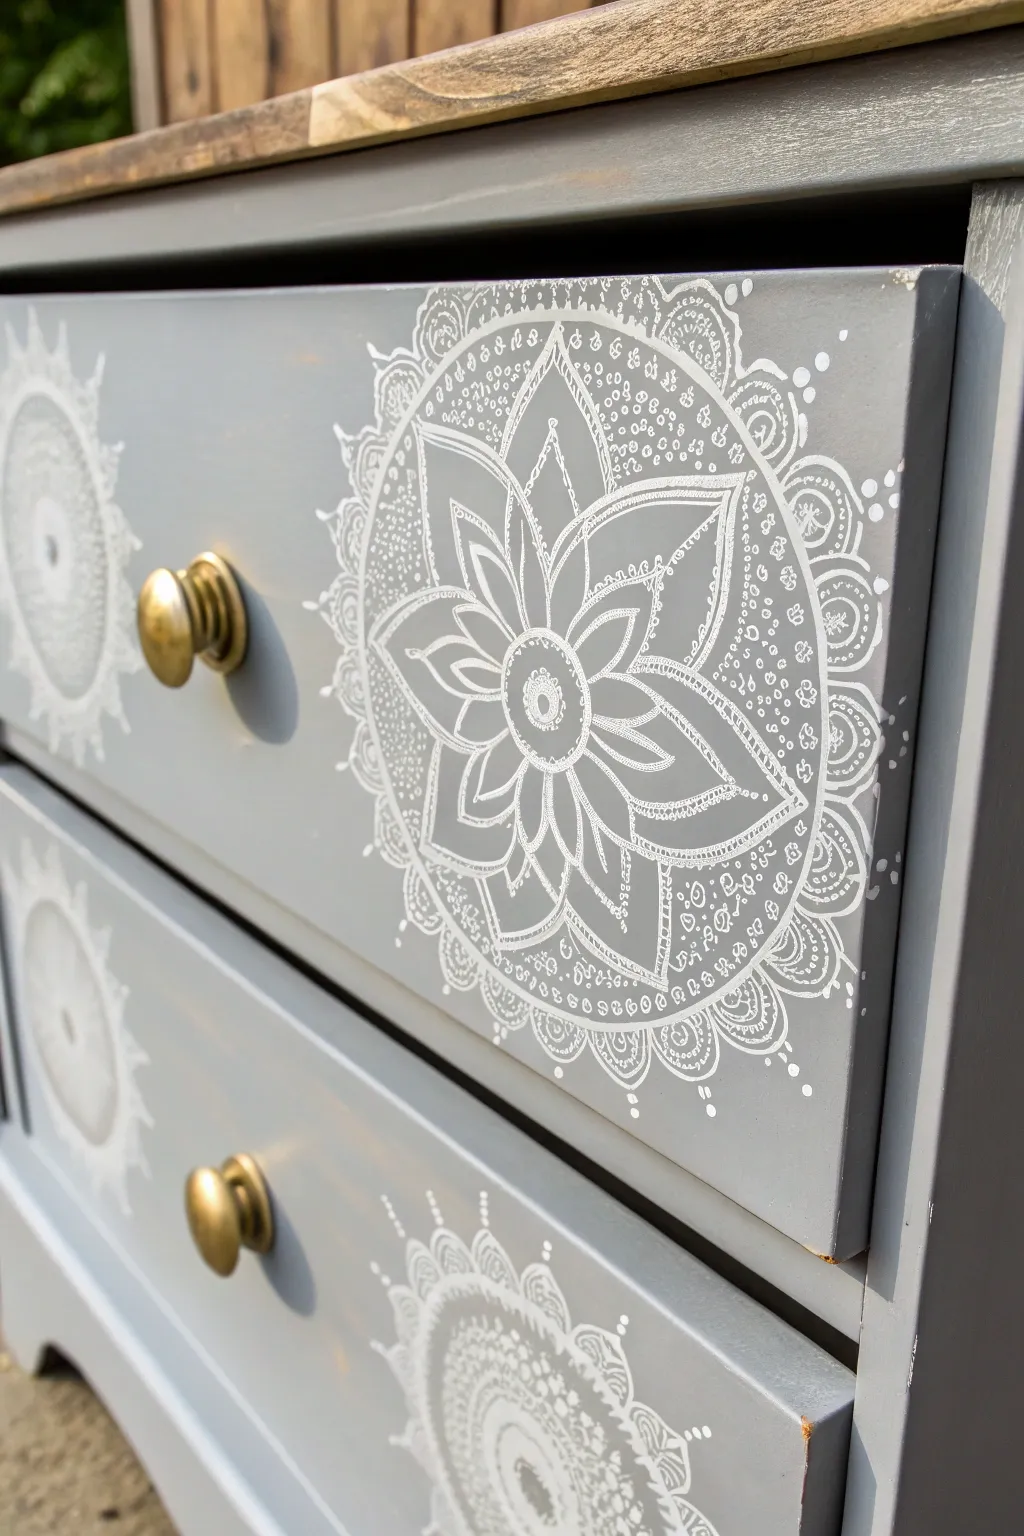
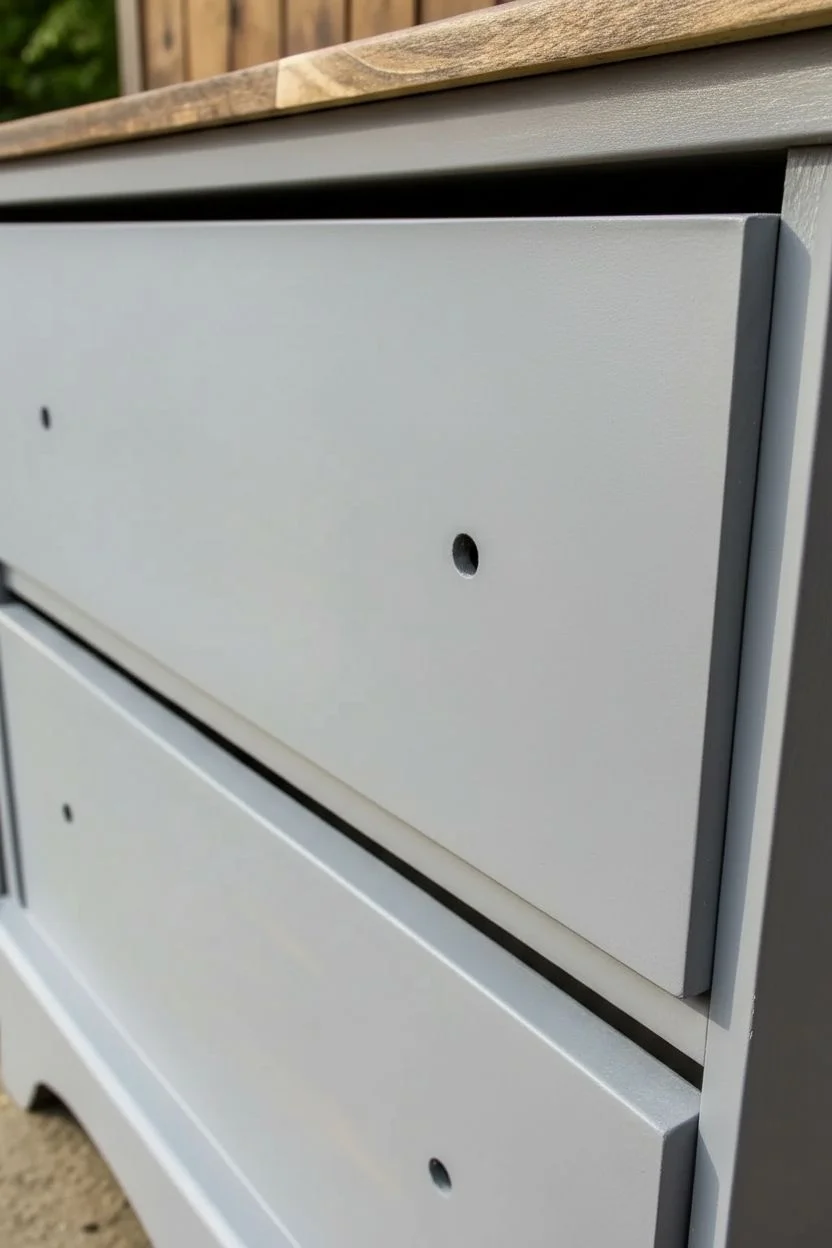
Transform a plain chest of drawers into a serene statement piece with a matte grey finish and intricate white detailing. This project uses stenciling techniques to create a hand-painted look that adds character without requiring advanced artistic skills.
Step-by-Step
Materials
- Wooden dresser or nightstand
- Chalk mineral paint (Medium Grey)
- Chalk mineral paint (Bright White)
- Large mandala stencil
- Stencil brush (flat-tipped)
- Small foam roller and tray
- Sandpaper (120 and 220 grit)
- Painter’s tape
- TSP cleaner or degreaser
- Clear furniture wax or matte topcoat
- Lint-free cloths
- Gold or brass knobs
Step 1: Prep and Base Coat
-
Hardware removal:
Unscrew and remove all existing knobs or handles from the drawers. Store the screws in a labeled bag so they don’t get lost during the makeover. -
Deep clean:
Wipe down the entire piece with a TSP cleaner or degreaser to remove oils, old polish, and dust. This ensures the paint adheres properly. -
Scuff sanding:
Using 120-grit sandpaper, lightly scuff the entire surface of the drawers and frame. You don’t need to strip it to bare wood, just create a ‘keyed’ surface for the paint to grip. -
Dust removal:
Wipe away all sanding dust with a damp lint-free cloth or a tack cloth. A clean surface is crucial for a smooth finish. -
First coat application:
Stir your grey chalk paint thoroughly. Using a small foam roller for flat surfaces and a brush for corners, apply a thin, even coat of grey paint. Don’t worry if coverage isn’t perfect yet. -
Drying time:
Allow the first coat to dry according to the manufacturer’s instructions, typically about 1-2 hours for chalk paint. -
Second coat application:
Apply a second coat of grey paint to achieve full, opaque coverage. I prefer to lightly sand with high-grit sandpaper between coats for an ultra-smooth feel. -
Curing:
Let the base coats dry completely, preferably overnight, before starting the stencil work. If the paint is soft, the stencil adhesive might pull it up.
Step 2: Stenciling the Design
-
Plan layout:
Hold your mandala stencil up to the drawer fronts to decide on placement. Alternating between full circles on one side and half-circles on the edges creates a dynamic, organic look. -
Secure the stencil:
Once positioned, use painter’s tape to firmly secure the stencil to the drawer front. Ensure the stencil lies perfectly flat against the wood. -
Load the brush:
Dip just the tip of your stencil brush into the white paint. Do not overload the bristles; less is definitely more here. -
Offload the paint:
Rub the brush vigorously onto a paper towel until it seems almost dry. This ‘dry brush’ technique is the secret to crisp lines without paint bleeding under the plastic. -
Apply the pattern:
Using a vertical dabbing or gentle swirling motion, apply the white paint over the stencil design. Build up opacity slowly with multiple light layers rather than one thick glob. -
Check progress:
Carefully lift one corner of the stencil to check your coverage. If it looks good, peel the stencil away slowly to reveal the design. -
Handle edges:
For designs that go off the edge of the drawer (like the partial suns on the left), tape off the drawer side to protect it, or let the stencil wraparound if you want the pattern to continue. -
Clean connection points:
If the design crosses over the gap between drawers, place the drawers back in the unit to align the stencil, then paint across the gap carefully.
Clean Stencil Secret
Paint buildup on the stencil causes blurry edges. Wash your stencil with warm water and a scrub brush after every 2-3 applications to keep lines crisp and sharp.
Step 3: Finishing Touches
-
Distress (Optional):
Once the white paint is fully dry, you can very lightly sand over the stencil with 220-grit paper if you want a weathered, vintage look. -
Seal the piece:
Apply a clear furniture wax or a matte polyacrylic topcoat over the entire piece to protect the paint and stencil work from wear and tear. -
Buffing:
If using wax, let it set for about 15 minutes, then buff it with a clean cloth to create a soft, durable sheen. -
Reinstall knobs:
Attach your brass knobs. If the original hardware was old, a quick polish with brass cleaner will make them pop against the matte grey.
Level Up: Shadowing
Shift the stencil 2mm to the right and up, then stencil lightly with a dark grey before doing the white layer. This creates a subtle 3D drop-shadow effect.
Step back and admire how a simple pattern completely reinvented your furniture into a custom work of art.


Romantic floral image transfers
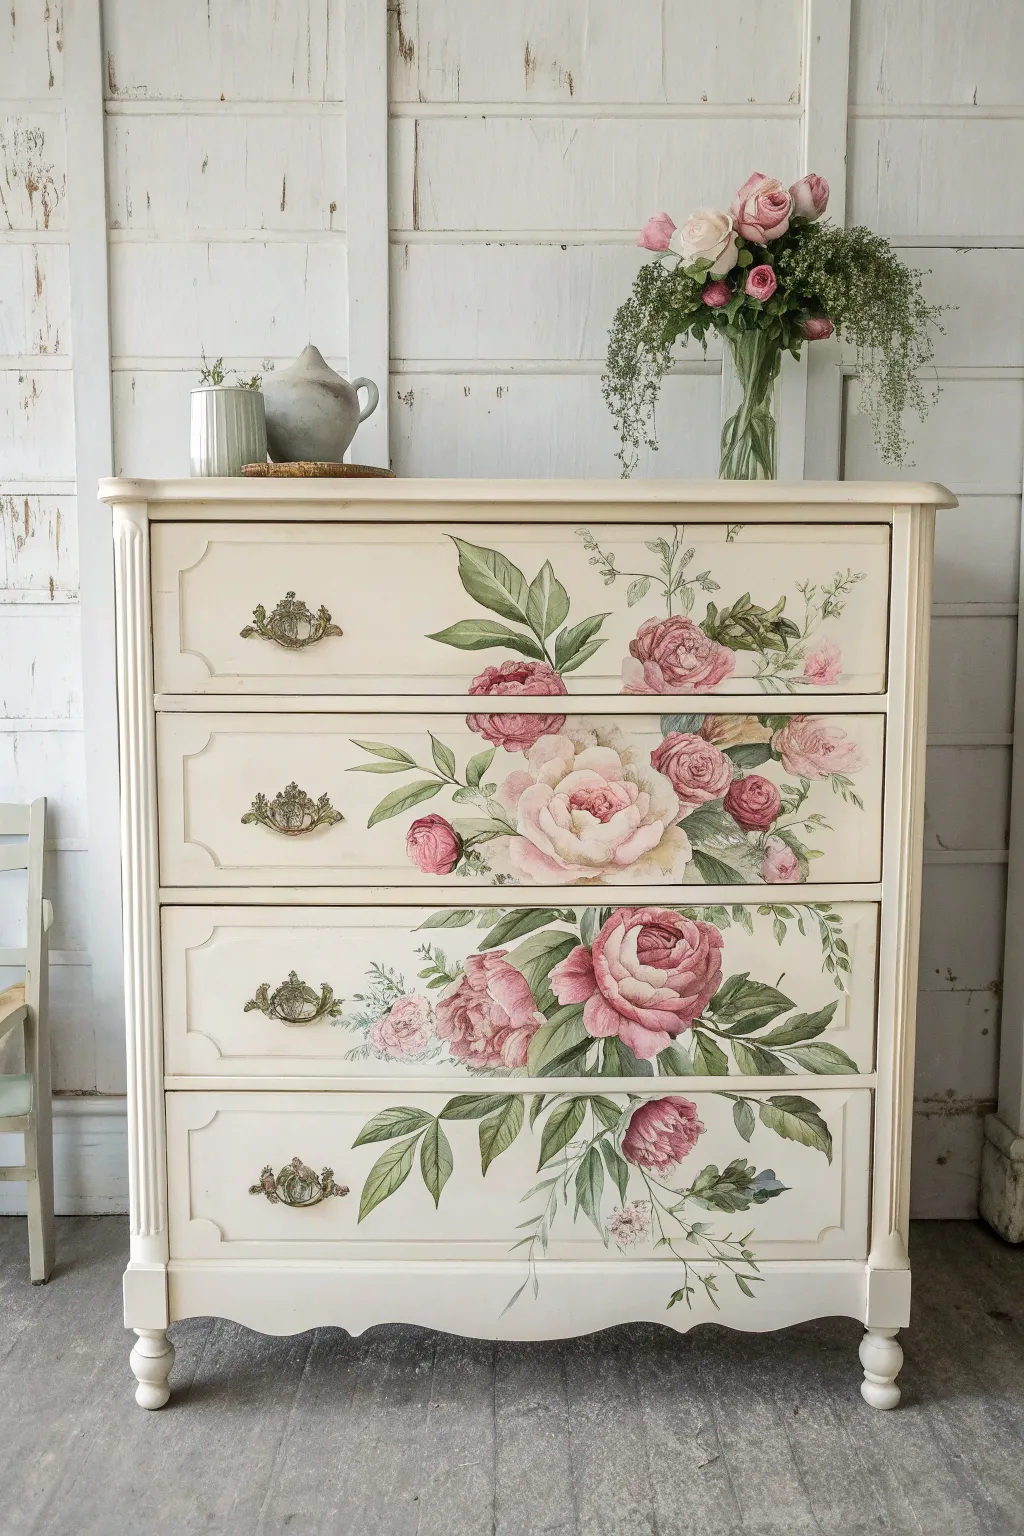
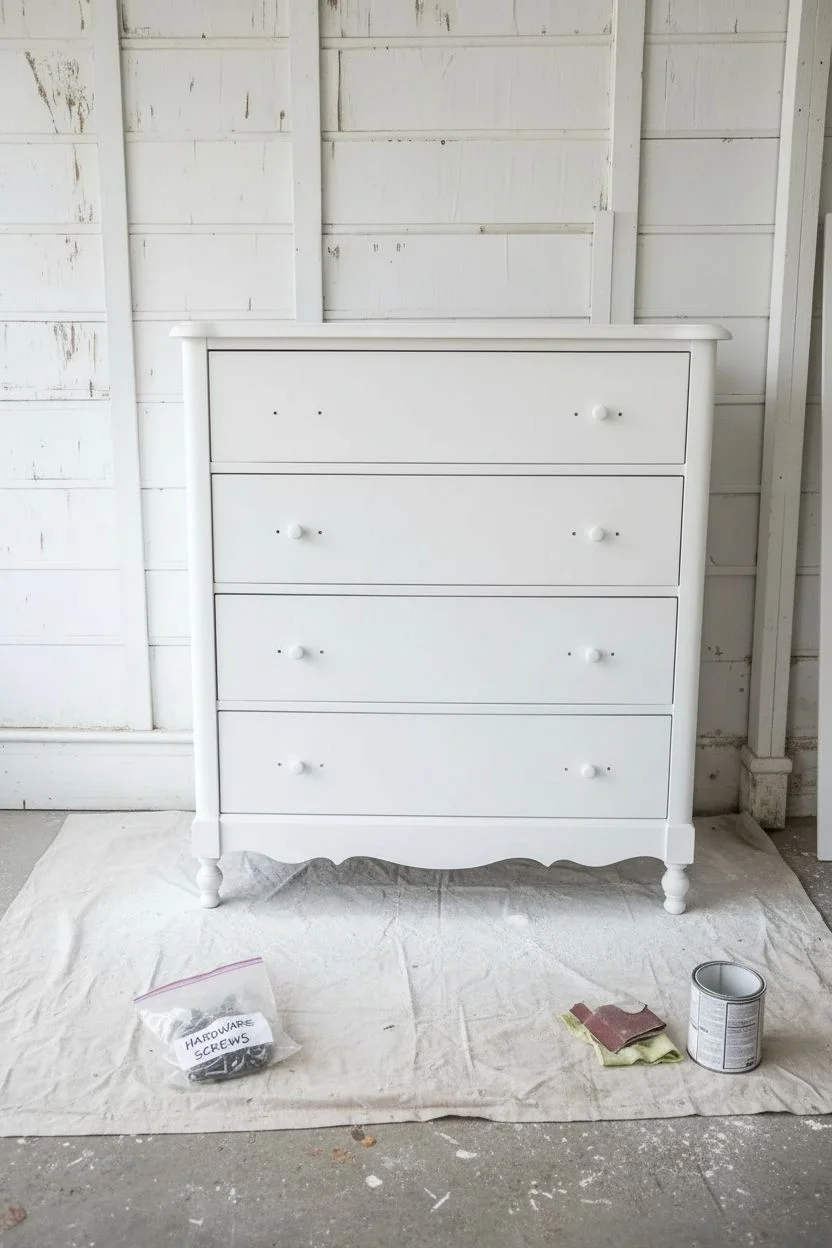
Transform a plain chest of drawers into a romantic statement piece using large-scale image transfers. This technique creates a sophisticated hand-painted look without requiring a fine art degree, perfect for achieving that dreamy cottagecore aesthetic.
Detailed Instructions
Materials
- Wooden tallboy dresser
- TSP substitute or degreaser
- Wood filler
- Sandpaper (180 and 220 grit)
- Stain-blocking primer
- Cream chalk mineral paint
- High-quality synthetic paintbrush
- Large floral furniture transfer (rub-on)
- Painter’s tape
- Sharp craft knife or razor blade
- Clear furniture wax
- Wax brush
- Lint-free polishing cloths
Step 1: Preparation & Priming
-
disassembly:
Remove all drawers from the dresser frame and unscrew the original hardware. Store the screws in a labeled bag so they don’t get lost. -
Deep clean:
Scrub the entire piece, including drawer fronts, with a TSP substitute to remove years of oils and furniture polish. -
Surface repair:
Fill any deep scratches or old hardware holes (if you plan to change the sizing) with wood filler. Let it dry completely. -
Scuff sanding:
Lightly sand the entire surface with 180-grit sandpaper to give the primer something to grip. Wipe away all dust with a tack cloth. -
Prime the surface:
Apply a coat of stain-blocking primer. This is crucial when painting light colors over old wood to prevent tannins from bleeding through and staining your cream finish.
Peeling Panic?
If the design lifts up with the clear sheet, stop peeling immediately! Lay the plastic film back down and burnish that specific spot vigorously again before trying to lift the sheet.
Step 2: The Cream Canvas
-
First coat:
Apply the first layer of cream chalk mineral paint. Use long, smooth strokes in the direction of the wood grain. -
Check for drips:
Inspect the drawer edges and trim details for drips before the paint dries, smoothing them out with your brush. -
Smooth it out:
Once the first coat is dry, I like to run a fine 220-grit sanding sponge over the flat surfaces to ensure a buttery smooth base. -
Second coat:
Apply a second coat of cream paint for full, opaque coverage. Let this layer dry for at least 24 hours before applying transfers to ensure the paint is hard enough.
Step 3: Applying the Floral Art
-
Reassemble temporarily:
Place the painted drawers back into the dresser frame. This is essential for visualizing the continuous flow of the floral design across the gaps. -
Plan the layout:
Hold the transfer sheet up to the dresser. Position the flowers so they cascade naturally from the top right to the bottom left or center, creating movement. -
Secure the design:
Tape the transfer sheet firmly in place using painter’s tape at the top and sides so it doesn’t shift. -
Slice the seams:
Using a sharp craft knife, carefully slice through the transfer paper horizontally along the gaps between the drawers. -
Apply top drawer:
Remove the drawer. Peel the white backing paper off the transfer piece for that drawer. Hover it carefully, then press it onto the drawer front. -
Burnish the image:
Use the transfer tool (usually a wooden or plastic stick included with the kit) to rub the image firmly. This pressure releases the pigment from the clear top sheet onto the furniture. -
Peel and reveal:
Slowly peel back the clear plastic top sheet. If a piece of the flower hasn’t transferred, lay the plastic back down and rub that spot again. -
Repeat the process:
Continue this application process for each drawer, ensuring the cut stems and petals align visually where the drawers meet. -
Smooth adhesion:
Once the plastic is removed, gently rub the transferred image with a soft, dry cloth to ensure all edges are fully adhered to the paint.
Age It Up
To add vintage depth, lightly brush dark antique wax into the recessed corners of the drawer trim and around the hardware, then wipe back the excess.
Step 4: Protection & Hardware
-
Wax application:
Dip a wax brush into clear furniture wax. Apply a thin layer over the entire piece, including directly over the floral transfer. -
Buff to a sheen:
Wait about 15 minutes for the wax to absorb, then buff vigorously with a lint-free cloth to create a soft, protective satin sheen. -
Hardware update:
Clean the original brass hardware or apply a little gold gilding wax to highlight the details, then reattach the pulls to the drawers.
Step back and admire how you’ve brought a timeless garden into your home with this elegant transformation.
Creating an ombré gradient effect
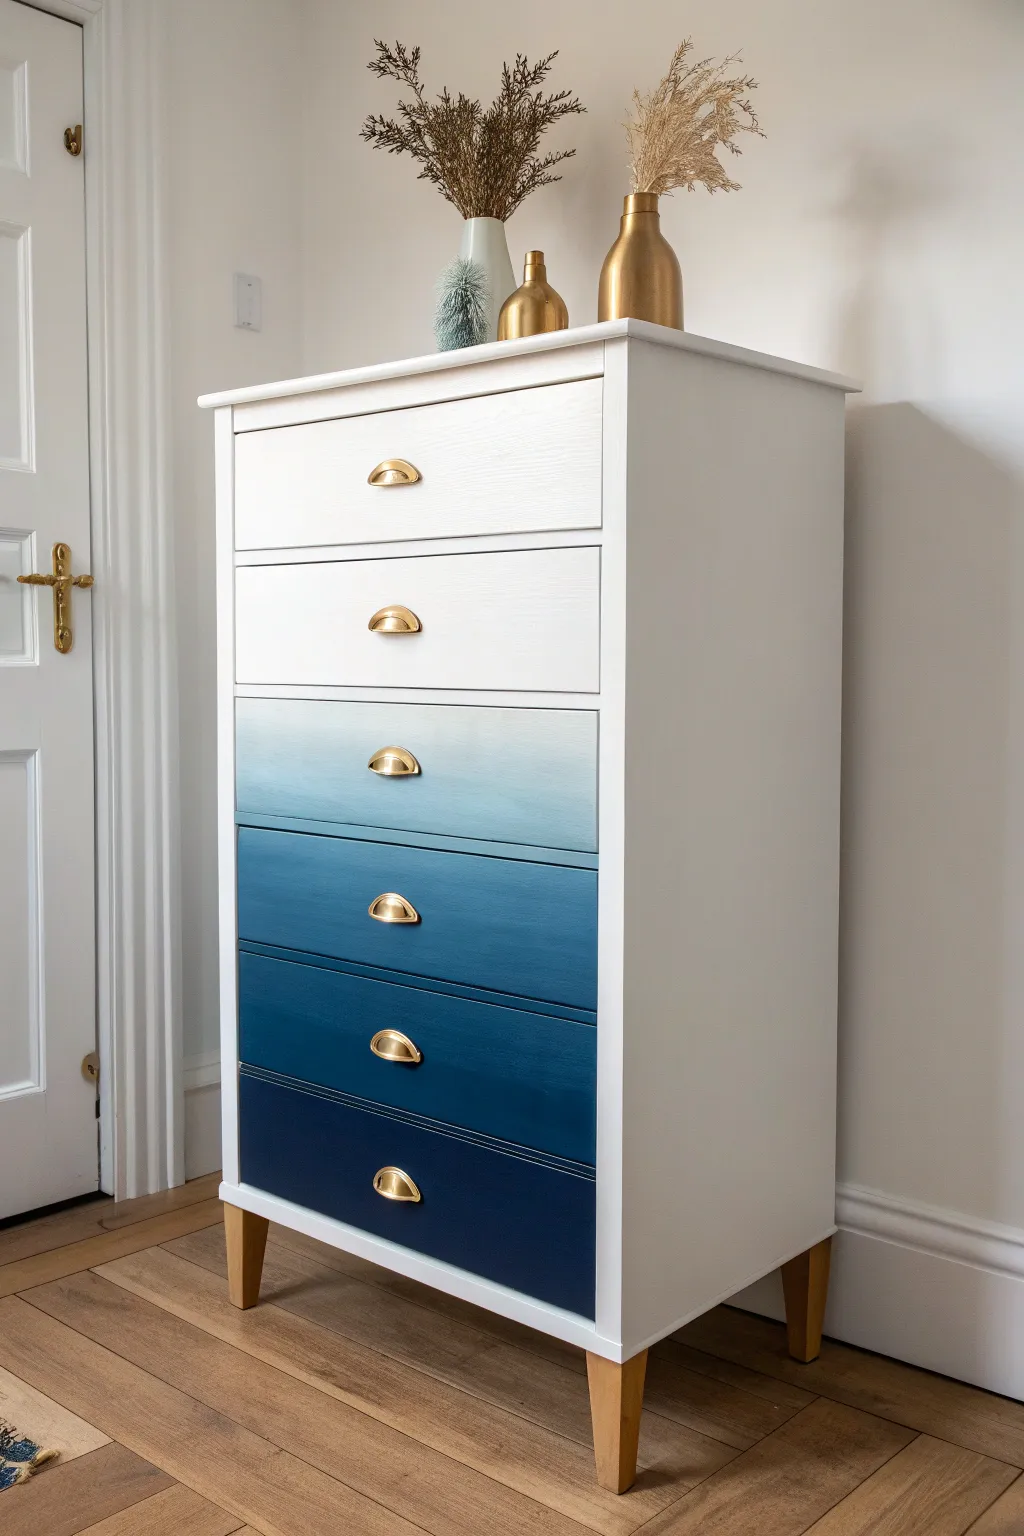
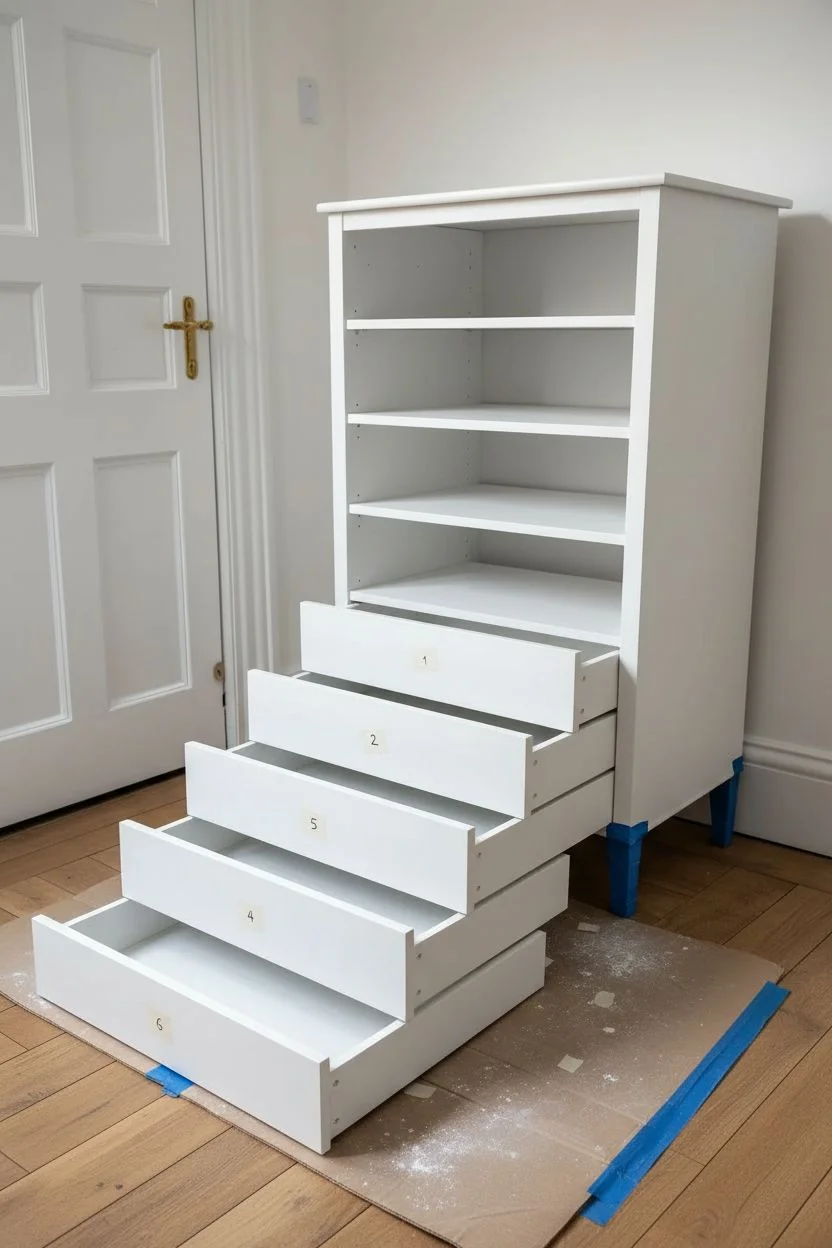
Transform a standard tallboy dresser into a calming statement piece using a stepped gradient technique. By carefully mixing white and navy paint, you’ll create a seamless waterfall of color that mimics the depth of the ocean, finished with elegant gold hardware.
Step-by-Step Guide
Materials
- Tall wooden chest of drawers (6 drawers ideal)
- Satin finish furniture paint (Pure White)
- Satin finish furniture paint (Navy Blue)
- Stain-blocking primer
- Sandpaper (120 and 220 grit)
- De-glosser or TSP cleaner
- 4-inch foam rollers and handle
- Angled synthetic paintbrush (2 inch)
- 6 sealable mixing containers
- Gold cup pull hardware
- Painter’s tape
- Polycrylic topcoat (Satin or Matte)
Step 1: Prep and Prime
-
Disassemble the dresser:
Remove all drawers from the frame. Unscrew and remove the old hardware. If you plan to keep the original legs natural like in the photo, wrap them securely in painter’s tape now. -
Number the drawers:
Before moving the drawers, use a piece of tape or a marker to label the bottom or back of each drawer (1 for top, 6 for bottom). This is crucial for maintaining the correct order for the gradient later. -
Clean deeply:
Wipe down the entire frame and drawer fronts with TSP cleaner or a strong de-glosser to remove years of oils and furniture wax. Let it dry completely. -
Scuff sand:
Using 120-grit sandpaper, sand the frame and drawer fronts to scuff up the shiny surface. You don’t need to strip it to bare wood, just create a rough ‘tooth’ for the paint to grip. -
Apply primer:
Roll a smooth coat of stain-blocking primer onto the frame and all drawer fronts. I like to use a foam roller here to avoid brush strokes. Let it dry according to the can instructions. -
Smooth the base:
Once the primer is dry, lightly sand everything with 220-grit sandpaper to knock down any bumps. Wipe away the dust with a tack cloth.
Gradation Pro Tip
Use a cheap plastic syringe (without the needle) to measure your paint ratios. For example, Drawer 2 might be 50ml White + 2ml Navy, while Drawer 3 is 40ml White + 10ml Navy. This guarantees precision.
Step 2: Creating the Color Gradient
-
Paint the frame:
While the drawers are aside, paint the main cabinet frame pure white. Apply 2-3 thin, even coats, lightly sanding between each one for a factory-like finish. -
Establish the anchors:
Paint the top drawer (Drawer 1) with your Pure White paint. Paint the bottom drawer (Drawer 6) with the Pure Navy paint. These serve as your reference points. -
Mix the intermediate shades:
Set out your four mixing containers. You will need to create a gradual transition. In the first cup (Drawer 2), pour mostly white with a tiny drop of navy. For each subsequent cup, gradually increase the ratio of blue paint. -
Test the flow:
Dip a stir stick into each mixture and dab a sample on a piece of scrap cardboard. Line them up next to your white and navy drawers to ensure the transition looks smooth and stepped evenly before committing to the furniture. -
Adjust the mixes:
If a step looks too drastic, add small amounts of white or blue to adjust. The mix for Drawer 2 should be a barely-there icy blue, while Drawer 5 should be a rich, deep blue just lighter than the navy.
Troubleshooting Color Jumps
If two drawers look too similar once dried, don’t panic. Just take the darker of the two mixes, add a teaspoon of Navy, mix well, and apply a fresh top layer to separate the shades visually.
Step 3: Painting and Finishing
-
Apply the first coat:
Using a clean foam roller for each color (or washing thoroughly between shades), paint the drawer fronts with their assigned custom mix. Work from light to dark to avoid contaminating light colors with dark residue. -
Sand and recoat:
Allow the first coat to dry fully. Lightly sand with 220-grit paper, wipe clean, and apply a second coat. This ensures the color is opaque and the finish is durable. -
Seal the work:
Once the paint is cured (usually 24 hours), apply two coats of water-based Polycrylic sealer over the drawers and frame. This prevents the white from yellowing and protects your custom gradient from scratches. -
Address the legs:
Remove the tape from the legs. If the wood looks dry, revitalize it with a little furniture oil or hemp oil to bring back the natural grain and warmth. -
Install hardware:
Attach the new gold cup pulls. The metallic gold creates a beautiful, warm contrast against the cool blue tones.
Reassemble your drawers and enjoy the serene, coastal energy your new masterpiece brings to the room.
Decoupage accents on drawer sides
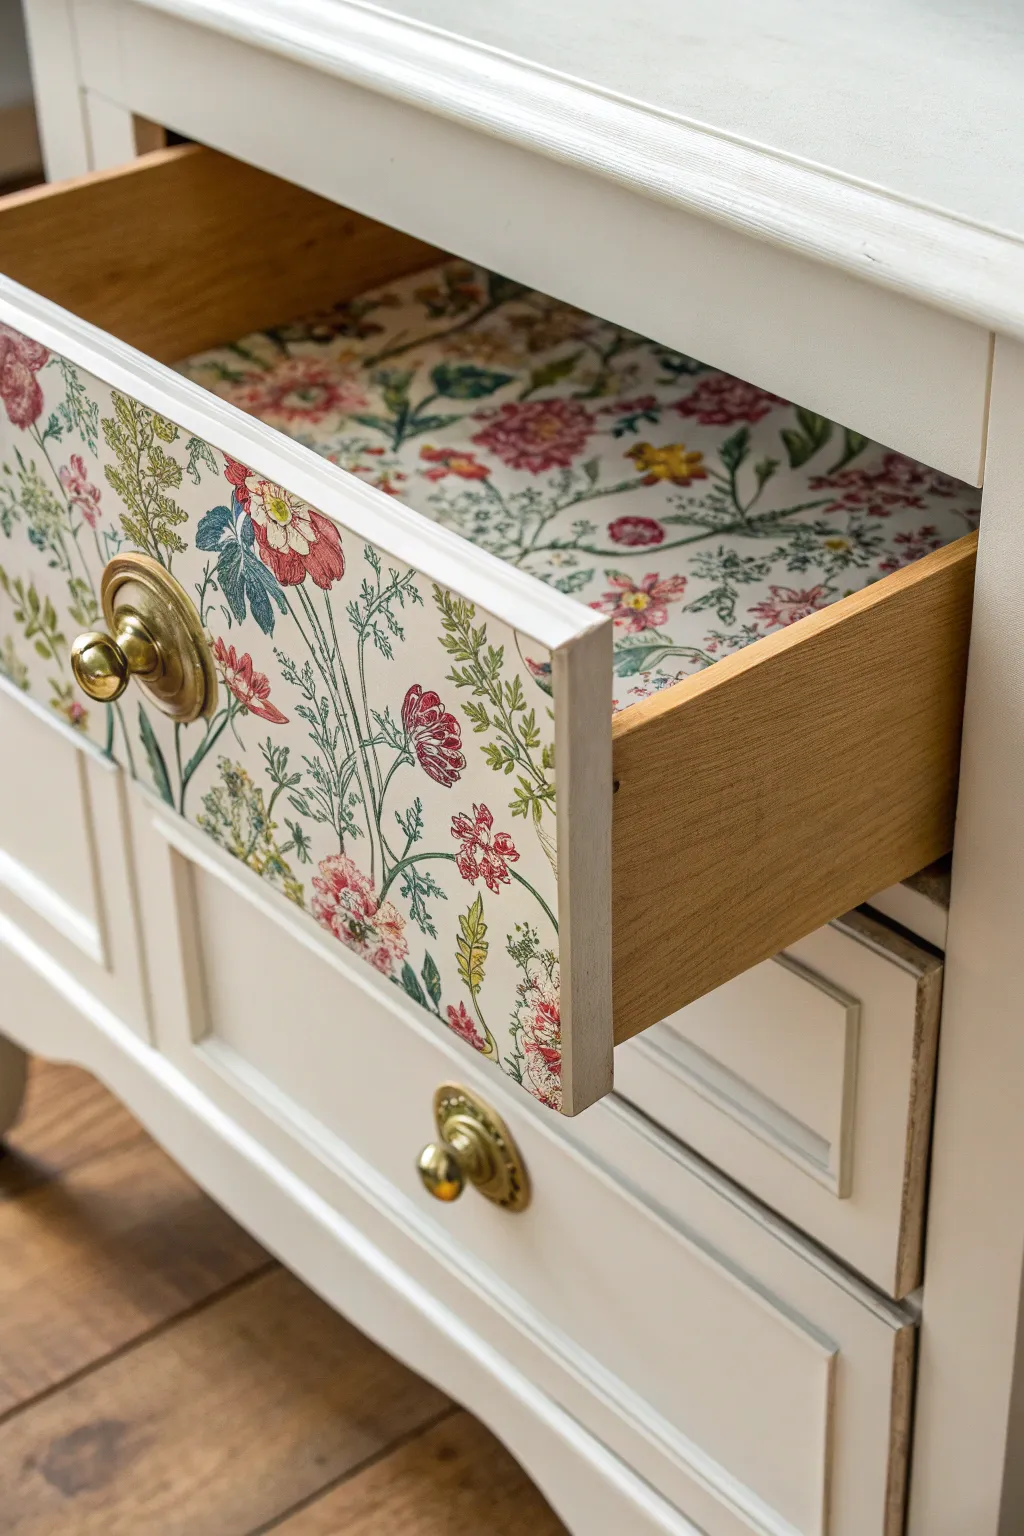

Transform a plain dresser into a delightful surprise by adding floral accents to the drawer sides and interior. This hidden pop of pattern adds a boutique feel to your furniture that reveals itself only when the drawer is opened.
How-To Guide
Materials
- Creamy white mineral or chalk paint
- Floral pattern decorative paper or wallpaper
- Matte decoupage medium (like Mod Podge)
- Small foam roller or synthetic paint brush
- Foam sponge brush
- Craft knife with fresh blades
- Smoothing tool or brayer
- 220-grit sanding block
- Measuring tape and pencil
- Brass drawer pulls
- Clear furniture wax (optional)
Step 1: Preparation & Base Painting
-
Dissasemble the drawer:
Pull the drawer completely out of the furniture casing and place it on a stable work surface. -
Remove hardware:
Using a screwdriver, carefully remove the existing knob or handle and set the screw aside safely. -
Clean surface:
Wipe down the entire drawer front and sides with a degreasing cleaner to ensure proper adhesion. -
Light sanding:
Scuff sand the drawer front and the wooden sides with a 220-grit sanding block to create a ‘tooth’ for the paint and glue. -
Paint the front:
Apply a coat of creamy white mineral paint to the drawer front using a synthetic brush. -
Second coat:
Allow the first coat to dry to the touch (usually 30-60 minutes), then apply a second coat for full opacity.
Step 2: Applying the Design
-
Measure the area:
Measure the height and width of the drawer side exterior, as well as the interior bottom panel. -
Cut the paper:
Cut your floral paper to size, leaving about a half-inch of excess on all sides to allow for wiggle room. -
Apply medium to wood:
Using a foam sponge brush, apply a moderate, even layer of decoupage medium directly onto the side of the drawer. -
Position the paper:
Lay the paper onto the wet medium, aligning the pattern so it looks straight relative to the top edge. -
Smooth it out:
Immediately use a brayer or a flat plastic smoothing tool to push out any air bubbles, working from the center outward. -
Repeat for interior:
Apply medium to the bottom interior of the drawer and smooth the second sheet of paper into place inside. -
Initial dry time:
Allow the paper to dry completely for at least 45 minutes to prevent tearing during the trimming phase.
Wrinkle Rescue
If you notice stubborn bubbles after the paper dries, don’t peel it off. Prick the bubble center with a fine sewing needle, then press the air out to flatten it.
Step 3: Trimming & Finishing
-
Crease the edges:
Use your fingernail or a hard tool to firmly crease the paper along the sharp edges of the drawer. -
Sand to trim:
I prefer to use a sanding block here; rub it in a downward motion only along the edge of the drawer to shear off the excess paper cleanly. -
Seal the paper:
Brush a thin top coat of decoupage medium over the paper on the side and interior to protect it from wear and tear. -
Seal the paint:
If your paint requires it, apply a thin layer of clear wax over the painted drawer front and buff it gently with a lint-free cloth. -
Reinstall hardware:
Once everything is fully cured, screw the brass knob back onto the drawer front. -
Reassemble:
Slide the finished drawer back into the furniture piece to complete the transformation.
Pro Tip: Crisp Edges
When using the sanding method to trim excess paper, never sand upward. Only sand in a downward motion to cut the paper fibers against the wood edge for a perfect line.
Enjoy the little spark of joy you’ll feel every time you slide this drawer open to find that lovely floral pattern
Abstract pour paint makeover
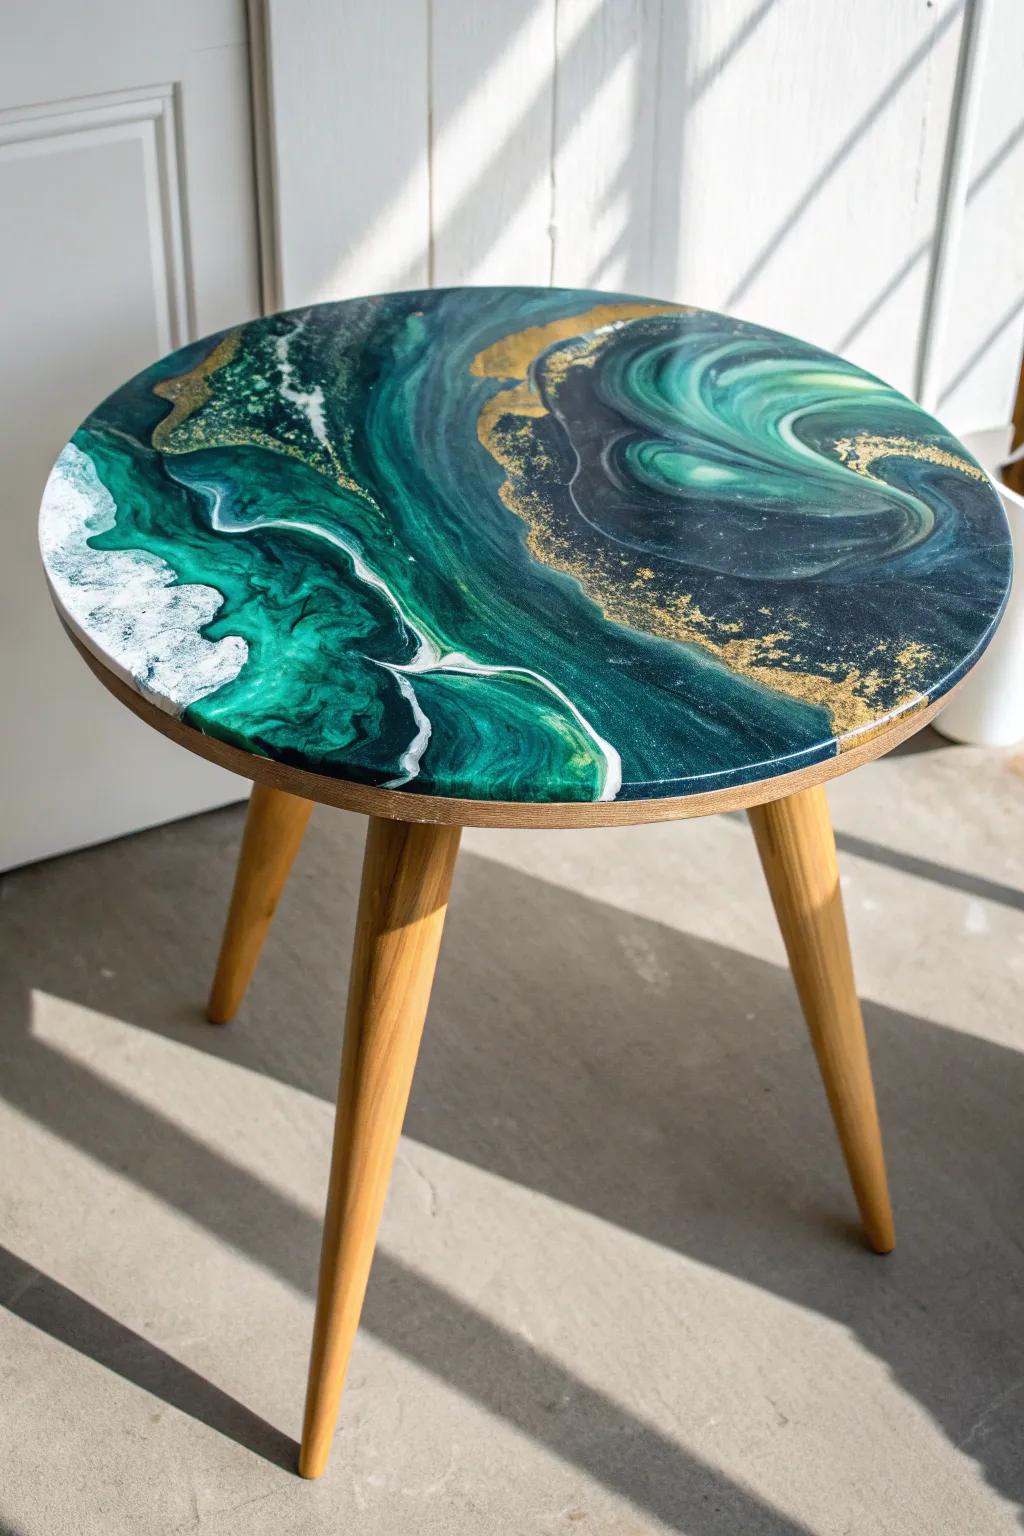
Transform a plain wooden side table into a mesmerizing statement piece using the fluid art technique. This project mimics the depth of a geode or a swirling ocean surface, combining rich emeralds and teals with striking gold accents.
Detailed Instructions
Materials
- Round wooden side table
- Acrylic paints: Emerald Green, Phthalo Green, Black, Titanium White
- Metallic Gold acrylic paint or mica powder
- Pouring medium (like Floetrol or Liquitex)
- Painter’s tape
- Plastic drop cloth
- 4-5 Disposable cups and stir sticks
- Hairdryer with concentrator nozzle
- High-gloss spray varnish or epoxy resin kit
- Sandpaper (220 grit)
Step 1: Preparation
-
Prepare the workspace:
Fluid art is messy, so cover your entire floor area with a plastic drop cloth. Establish a raised platform for the table to sit on, like putting the legs on soup cans or blocks, to ensure you can reach the edges easily. -
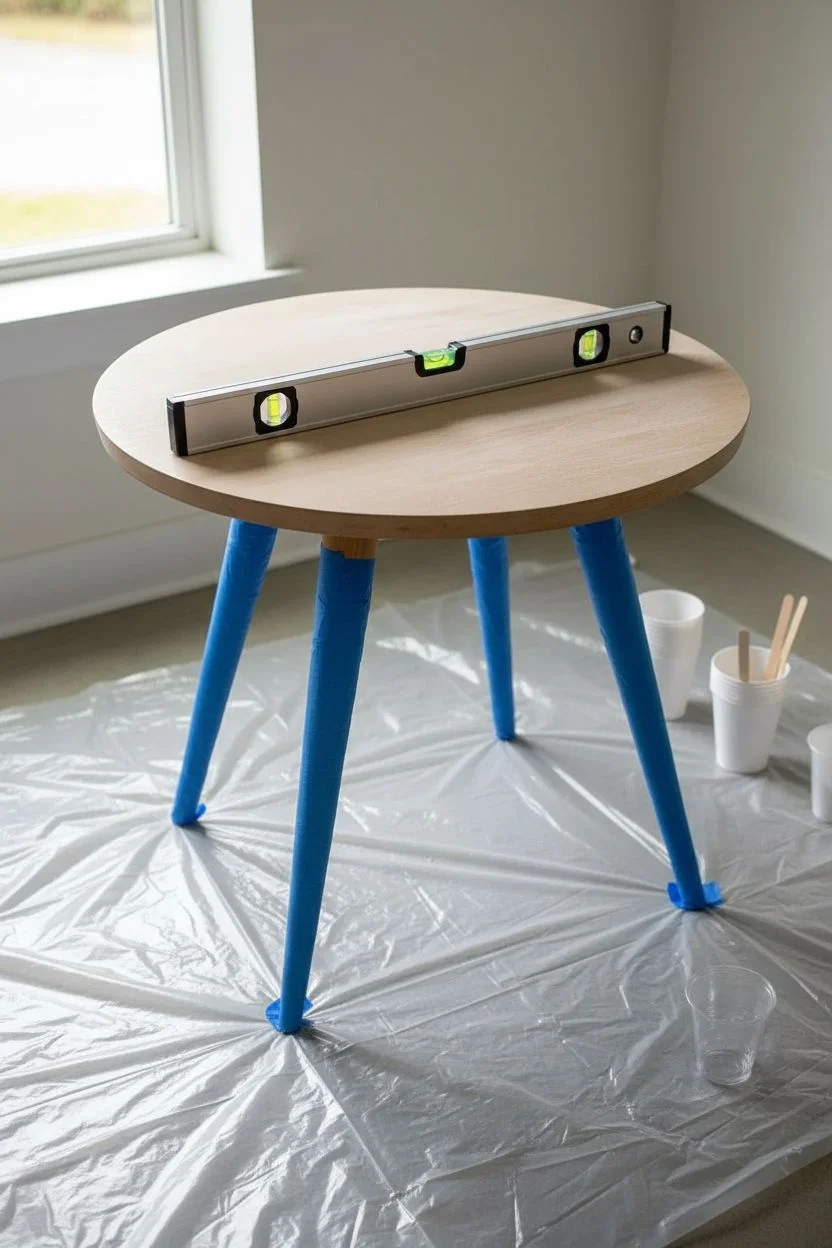
Protect the legs:
Since we want to preserve the natural wood look of the legs shown in the photo, wrap them completely in painter’s tape right up to the underside of the tabletop. -
Sand and clean:
Lightly sand the tabletop surface with 220-grit sandpaper to remove any existing sheen, then wipe it clean with a damp cloth to ensure the paint adheres properly. -
Check for level:
This is crucial: verify your table is perfectly level using a spirit level. If it tilts, your paint design will slide right off while drying.
Muddy Colors?
If your colors are turning grey or brown, you likely over-manipulated the paint. Stop tiling or blowing as soon as you like the pattern. Less is more!
Step 2: Mixing the Paints
-
Create the pouring mixture:
In separate cups, mix one part acrylic paint with two parts pouring medium. You want a consistency similar to warm honey—it should flow off the stick in a continuous stream but maintain a slight mound before settling. -
Mix the colors:
Prepare cups for Emerald Green, Phthalo Green (for that deep teal), Black, and White. I prefer to mix a slightly larger amount of the green shades as they act as our main base. -
Prepare the gold:
Mix the metallic gold paint or mica powder with the pouring medium. Gold tends to be heavier, so ensure it isn’t too thin, or it will sink to the bottom of the design.
Step 3: The Pour Plan
-
Pour the base puddles:
Start by pouring large puddles of Emerald Green and Phthalo Green in the center and working outward in abstract shapes. Don’t worry about covering the whole surface yet. -
Add depth and contrast:
Pour ribbons of Black alongside the greens to create shadow areas, mimicking the dark depths seen in the reference image. -
Pour the highlights:
Drizzle the White paint along the boundaries where the green meets the black. This white will eventually become the foam-like cells and lacing effects. -
Apply gold accents:
Add thin veins of the Gold mixture through the dark areas and near the white lines. Less is more here; you want it to look like mineral veins in stone.
Glass Finish
To get the exact look in the photo, skip the spray varnish and do a clear epoxy resin topcoat. Use a culinary torch to pop bubbles for a mirror-smooth finish.
Step 4: Creating the Movement
-
Tilt the table:
Gently lift the table legs (or the box it’s resting on) to tilt the surface, encouraging the paint to flow over the edges. Rotate the direction to cover the entire top. -
Use air for effects:
Plug in your hairdryer and switch it to the lowest/coolest setting. Gently blow the white paint over the darker colors to create wispy, sea-foam effects and cells. -
Define the composition:
Use a stir stick or a straw to manually blow specific small areas, refining distinct swirls effectively. I find a straw gives me better control for the delicate gold veins. -
Clean the drips:
Run a gloved finger or specific tool along the underside edge of the table to remove dripping paint. Repeat this every 20 minutes for the first hour.
Step 5: Finishing
-
Let it cure:
Allow the table to dry completely undisturbed for at least 24 to 48 hours. The surface must be bone dry before sealing. -
Seal the surface:
To achieve the glass-like finish in the photo, apply a flood coat of clear epoxy resin or several coats of high-gloss spray varnish. -
Remove protection:
Once the topcoat is fully cured, carefully peel away the painter’s tape from the legs to reveal the crisp line between the painted art and the natural wood.
Now you have a unique, gem-like piece of furniture that brings an artistic flair to any room.


Have a question or want to share your own experience? I'd love to hear from you in the comments below!