Transforming a blank vertical space into a personal masterpiece changes the entire energy of your studio or living area. Here is a curated collection of wall paint art ideas that blend professional mural techniques with accessible DIY methods to inspire your next creative project.
The Classic Mountain Layer Mural
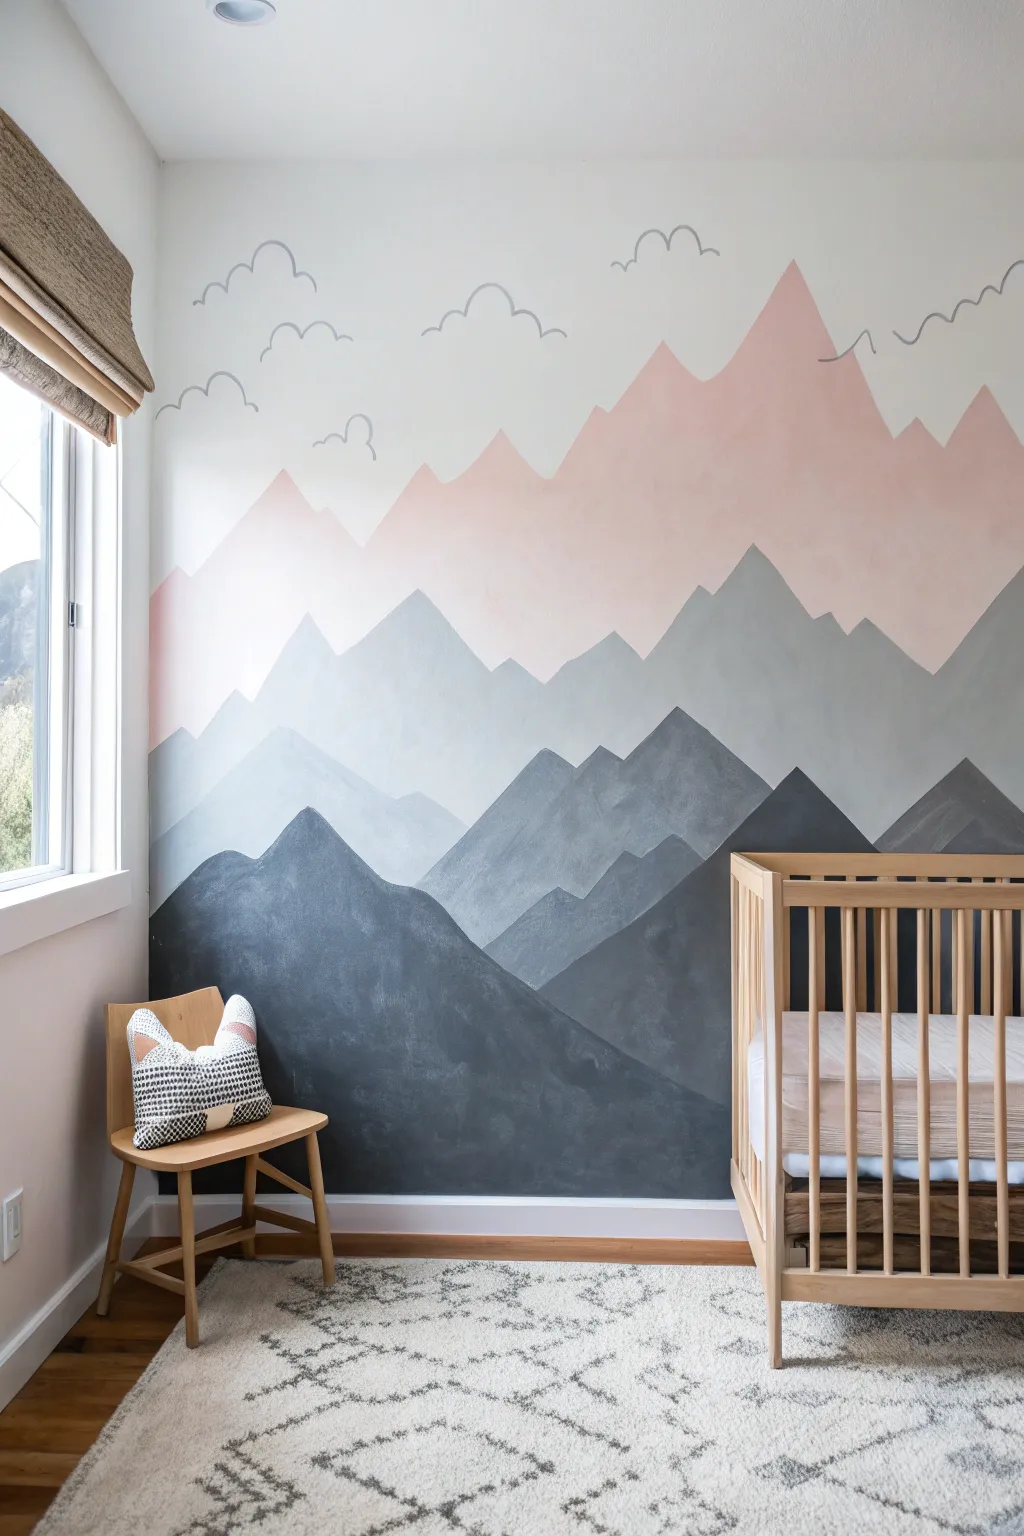
Transform a plain nursery wall into a calming landscape using atmospheric perspective and soft color blocking. This project creates depth by layering mountain ranges from light to dark, topped with whimsical, hand-drawn clouds.
Step-by-Step Tutorial
Materials
- Interior latex paint (White, Blush Pink, Light Gray, Steel Gray, Charcoal)
- 2-inch angled sash brush
- 4-inch foam rollers and paint tray
- Painter’s tape
- Drop cloth
- Pencil and white eraser
- Grey acrylic paint marker (broad tip) or fine liner brush
- Step ladder
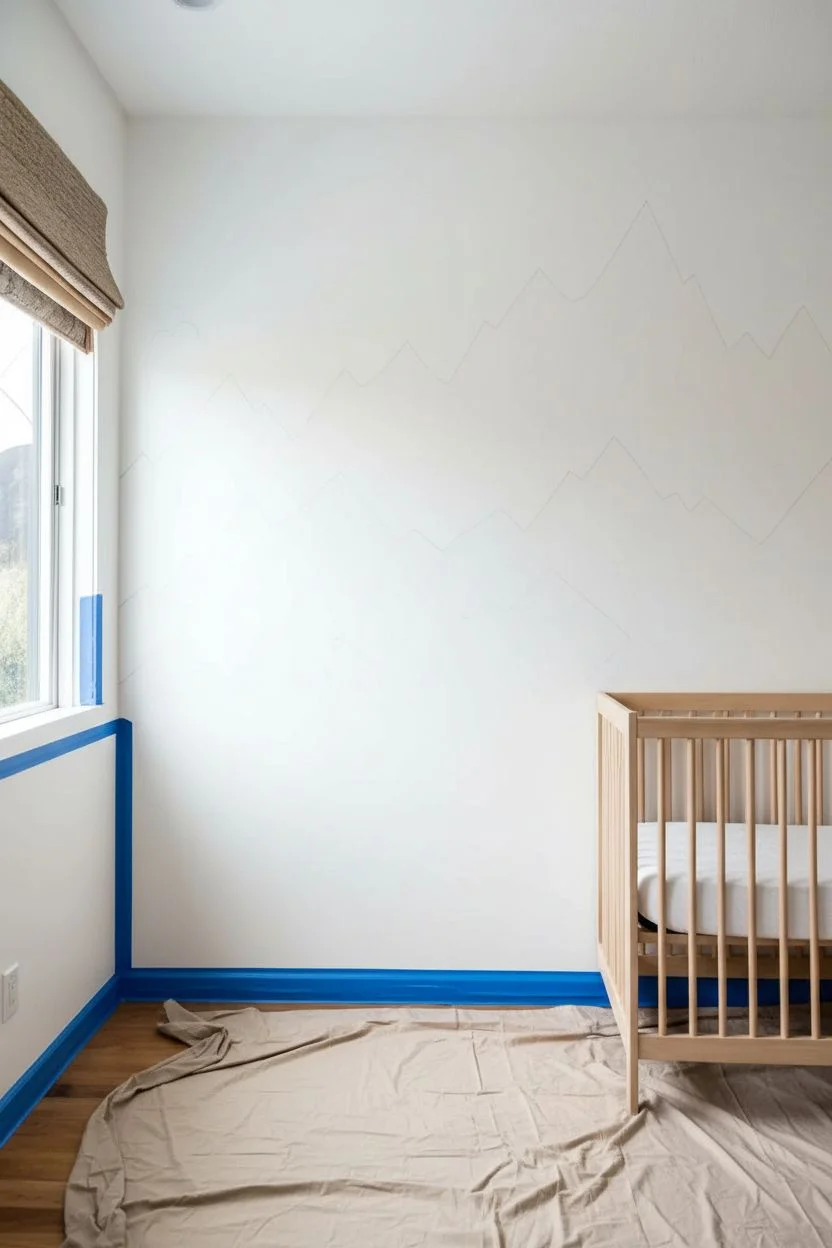
Step 1: Preparation & Mapping
-
Clear the workspace:
Move the crib and any furniture to the center of the room and cover the flooring completely with a drop cloth to protect against splatters. -
Tape boundaries:
Apply painter’s tape along the baseboards, window trim, and the corners of adjacent walls to ensure crisp termination points for your mural. -
Establish the sky:
If your wall isn’t already white, paint the entire surface with your base white color and allow it to dry completely before starting the mountain layers. -
Sketch the ranges:
Using a pencil, lightly draw the outline of your mountain ranges. Start with the highest pink peaks, then the light gray, followed by medium, and finally the bottom dark layer. Vary the heights and slopes to keep it organic. -
Visualize the overflow:
When sketching, remember that you don’t need to draw the bottom of the mountains; you only need to define the top ‘ridgeline’ for each color layer.
Steady Hand Trick
If your hand shakes while cutting in the mountain peaks, extend your pinky finger to rest on a dry styling of the wall to stabilize your brush stroke.
Step 2: Painting the Layers
-
Start at the top:
Open your Blush Pink paint. Using the angled sash brush, carefully ‘cut in’ along the pencil line of your highest mountain range. -
Fill the pink layer:
Use a 4-inch roller to fill in the body of the pink mountains. Extend the paint several inches below where the next gray layer will start to ensure no white gaps appear later. -
Dry time is key:
Allow the pink layer to dry solidly to the touch. This prevents the next color from dragging or mixing. -
Begin the gray gradient:
Switch to your Light Gray paint. Hand-paint the jagged peaks of this second layer, painting right over the bottom section of the dried pink paint. -
Roll the light gray:
Fill the rest of this section with your roller, again extending the paint lower than the next sketched line. -
Apply the steel gray:
Repeat the process with the Steel Gray (medium) paint. I find it helps to step back occasionally to make sure the balance of color feels right before filling in the whole section. -
Complete the middle section:
Roll out the body of the steel gray layer, blending smooth strokes to avoid heavy texture build-up. -
Paint the foreground:
Open your darkest Charcoal paint for the bottom-most layer. Cut in the final ridgeline with your angled brush. -
Anchor the mural:
Roll the charcoal paint all the way down to the taped baseboards, ensuring solid, opaque coverage as this is the visual anchor of the wall.
Level Up: Texture
For a softer look, use a dry brush to feather the paint slightly downwards from the peaks before rolling the solid color, creating a subtle misty effect.
Step 3: Cloud Details & Finishing
-
Remove tape:
While the bottom layer is slightly tacky (but not wet), carefully peel off the baseboard and side tape at a 45-degree angle. -
Sketch the clouds:
Once the wall is fully dry, lightly sketch loose, loopy cloud shapes in the white sky area with a pencil. -
Trace with marker:
Use a grey acrylic paint marker to trace over your pencil lines. This gives the distinct, illustrative look seen in the project photo more easily than a brush. -
Connect the lines:
Ensure your cloud loops are continuous and fluid; shake the marker well to keep the flow consistent. -
Final clean up:
Wait for the marker paint to dry completely, then gently use a white eraser to remove any visible pencil marks from the sketch phase.
Step back and enjoy the peaceful, atmospheric depth you’ve brought to the room.


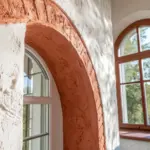
Minimalist Boho Arches
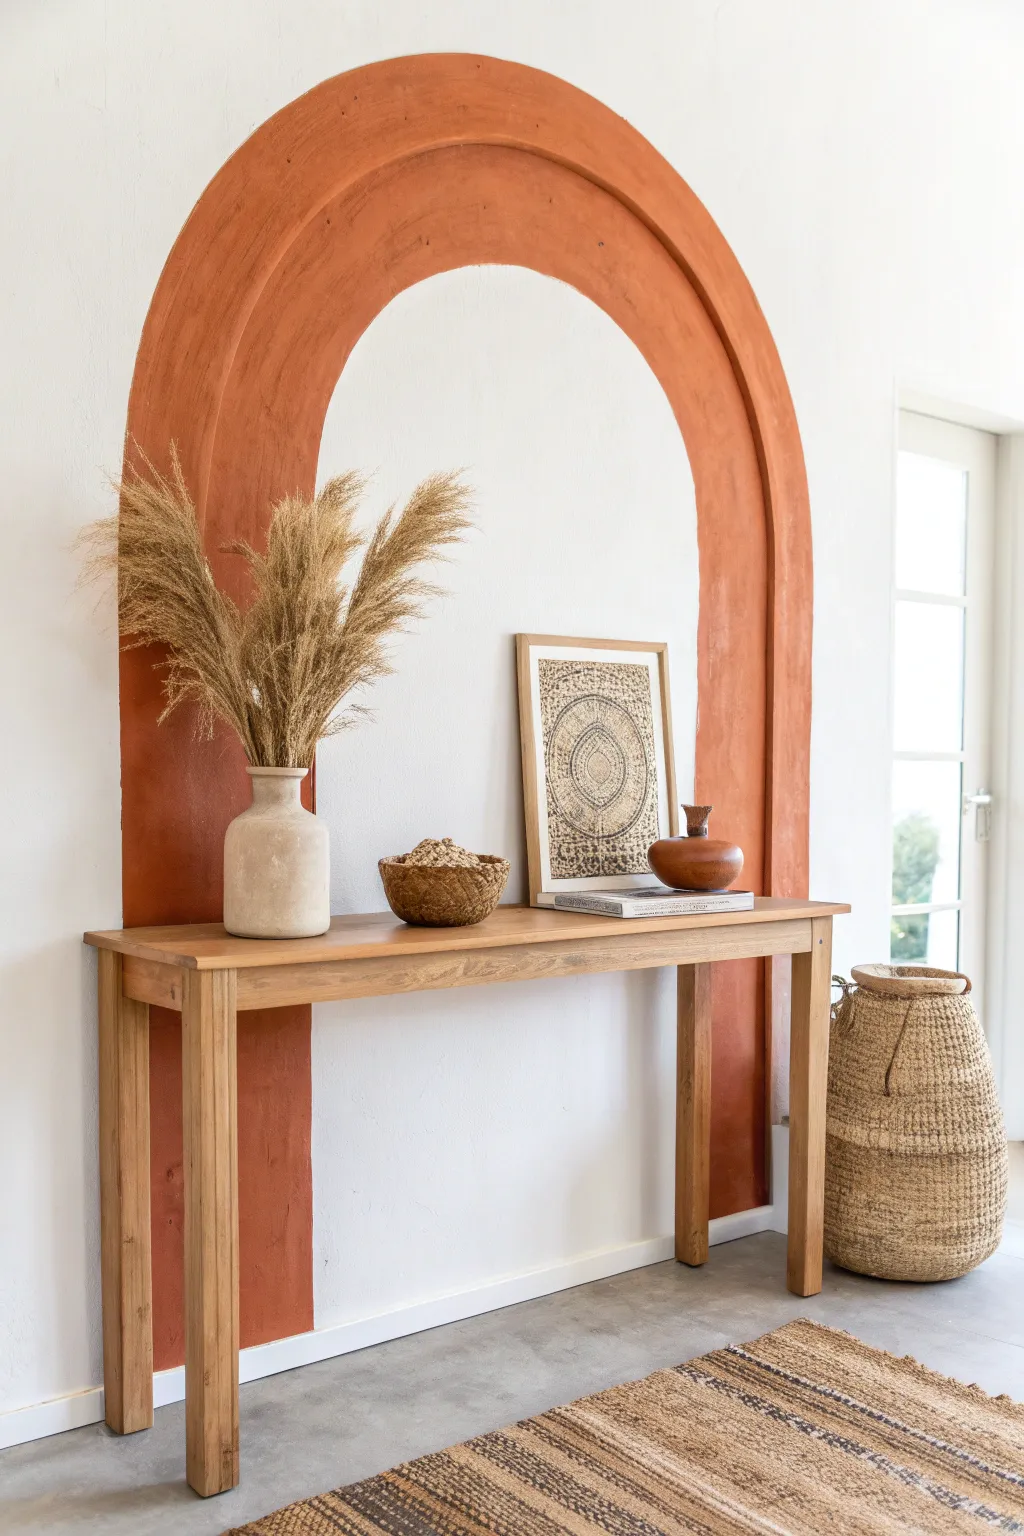
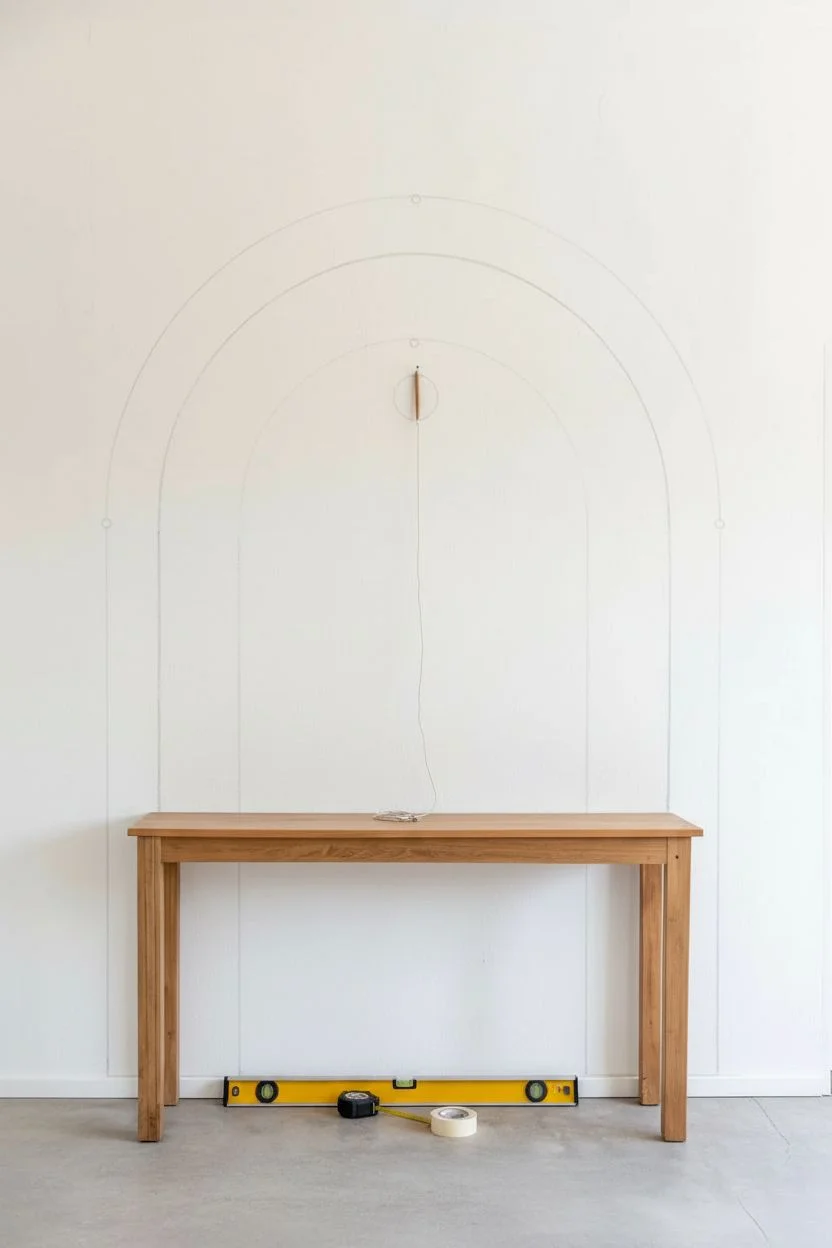
This project adds instant architectural character to a plain room by creating a grand, faux-plaster archway. The warm terracotta tone frames your furniture beautifully while the negative space keeps the room feeling airy and minimalist.
Step-by-Step
Materials
- Matte latex paint (terracotta/rust color) or Limewash paint
- Baking soda (optional for texture)
- Pencil
- Non-stretchy twine or string
- Thumbtack or small nail
- Tape measure
- 4-foot spirit level
- Painter’s tape
- 2-inch angled sash brush
- 4-inch flat wide brush
Step 1: Mapping the Geometry
-
Determine placement:
Position your console table against the wall to visualize the scale. Mark the center point of the furniture on the wall with a pencil, then move the table aside to give yourself workspace. -
Set the height:
Decide how high you want the arch peak to be. Measure up from the floor to your desired height and make a light mark at the center vertical line. -
Create the compass anchor:
Measure down from your peak mark by exactly half the desired width of your arch. Place a thumbtack or small nail securely into the wall at this specific center point. -
Draft the outer curve:
Tie your string to the pencil. Loop the other end around the tack so the pencil tip touches your peak mark. Keeping the string taut, draw a large semi-circle. -
Draft the inner curve:
To create the thick frame effect, shorten the string by about 10 to 12 inches. Drawing from the same center tack, sketch a smaller, concentric semi-circle inside the first one. -
Mark vertical guides:
Use your tape measure to find the widest points of both arches where the curves end. Mark these spots clearly. -
Draw the legs:
Using the 4-foot level, draw straight vertical lines extending from the ends of your semi-circles all the way down to the baseboard. You should now have a ‘rainbow’ outline with long legs.
Wobbly Arches?
Use a non-stretchy string (like kitchen twine or wire) for your compass. Elastic strings or yarn can stretch inconsistently, resulting in an egg-shape rather than a perfect circle.
Step 2: Refining Edges
-
Tape the straight lines:
Apply painter’s tape along the outside of the vertical pencil lines. Press the edges down firmly with a credit card or fingernail to prevent bleed-through. -
Tape the baseboard:
Run a strip of tape along the top of the baseboard where the arch legs will meet the floor. -
Review the curves:
Step back and check your pencil curves. Since taping curves is difficult and often creates jagged edges, I prefer to leave the curved top portions untaped for hand-painting.
Step 3: Painting the Texture
-
Cut in the curves:
Load your angled sash brush with paint. Carefully paint along the pencil lines of the inner and outer curves. Use a confident, steady gliding motion rather than short dashes. -
Fill the boundaries:
Paint the straight vertical edges adjacent to your tape, ensuring you don’t push too much paint under the tape line. -
Create the texture:
Switch to your wide flat brush. Instead of rolling, use cross-hatch strokes (X-patterns) to fill in the main body of the arch. This mimics the mottled look of plaster or limewash seen in the photo. -
Apply second coat:
Allow the first layer to dry until it feels cool but not tacky. Apply a second coat using the same cross-hatch technique to build color depth. -
Remove tape:
While the paint is still slightly damp, slowly peel off the painter’s tape at a 45-degree angle to ensure crisp, clean edges on the vertical sections. -
Final touch-ups:
Use a small artist’s brush to fix any tiny imperfections where the straight lines meet the curved top sections.
Faux Plaster Hack
If not using limewash, mix baking soda into your matte latex paint (start with a 1:4 ratio) to recreate that gritty, old-world earthen texture.
Once the wall is fully cured, move your console back into place and enjoy the warmth of your new focal point


Sharp Geometric Tape Designs
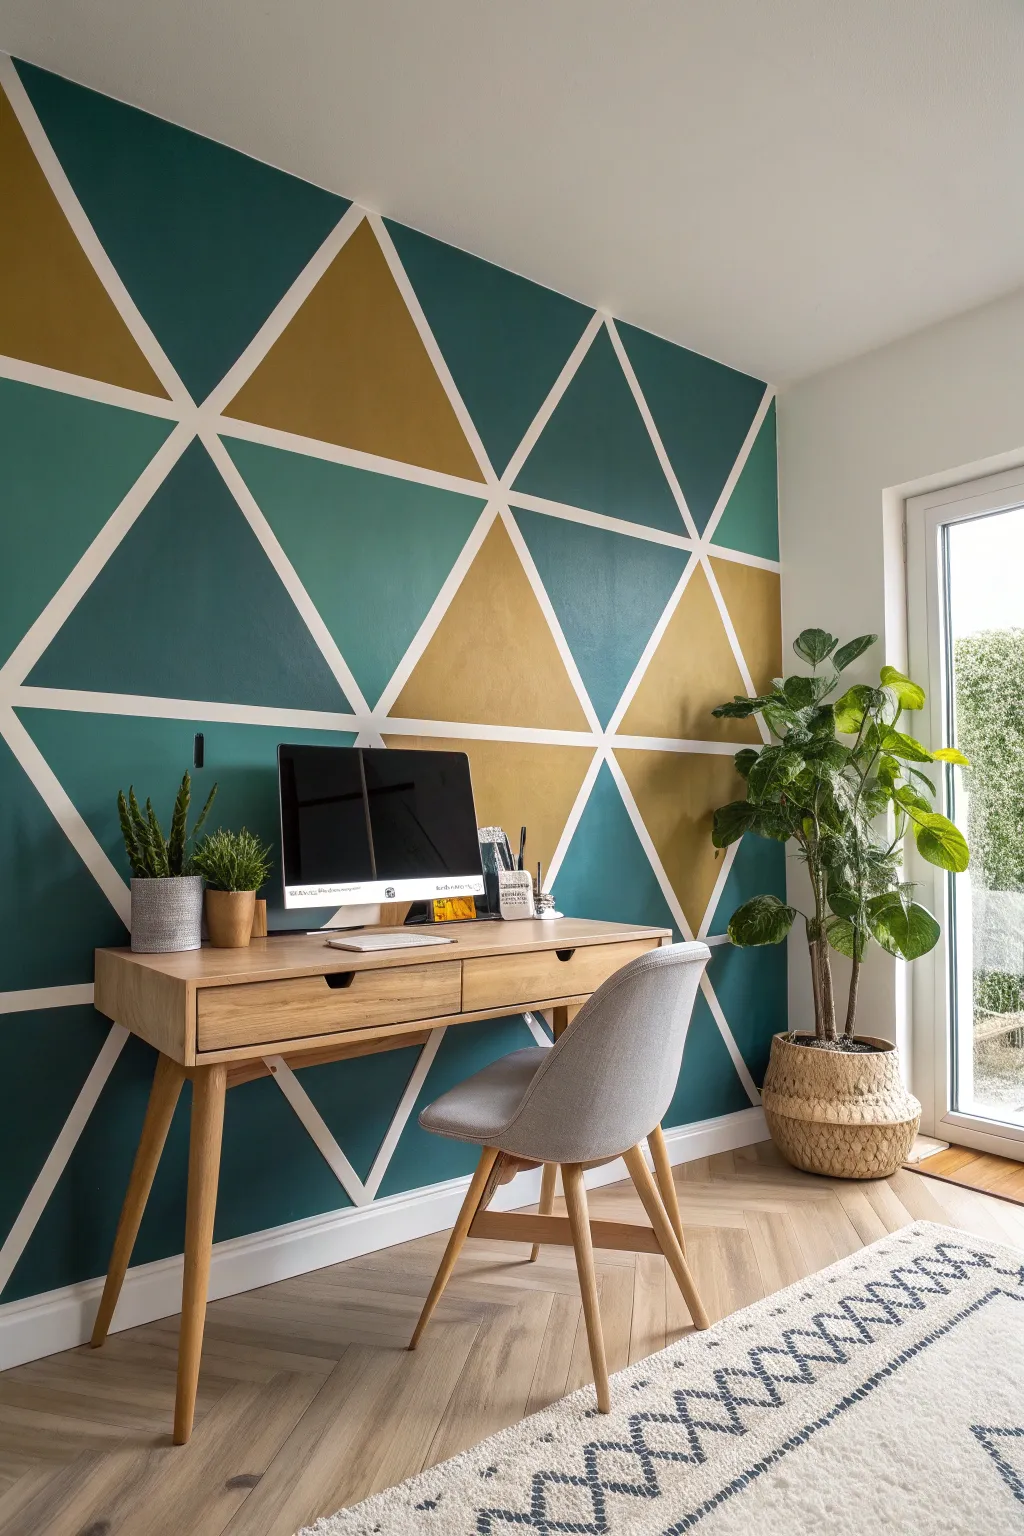
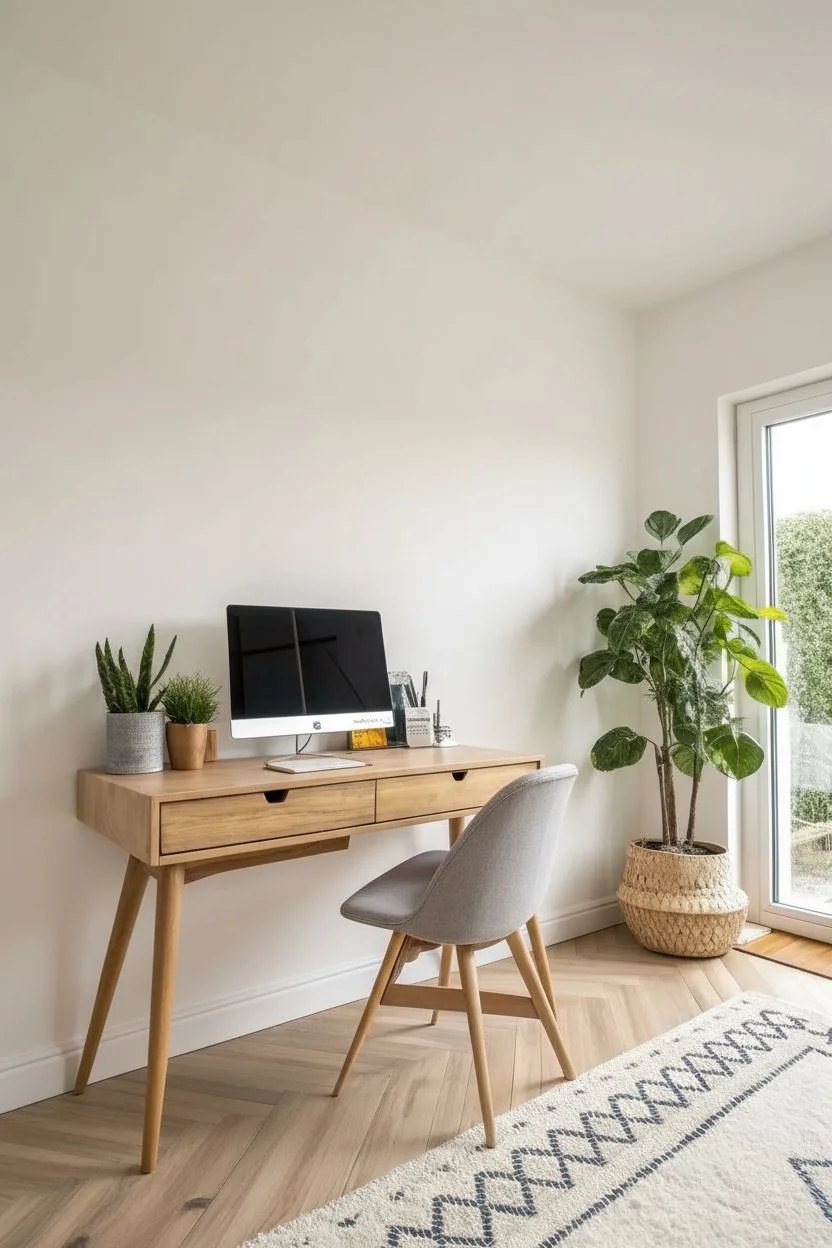
This project transforms a plain white wall into a modern masterpiece using a striking palette of deep teal, muted cyan, and mustard gold. By utilizing the wall’s base color for the geometric lines, you achieve a professional, seamless finish that adds incredible depth to any office or creative space.
How-To Guide
Materials
- High-quality painter’s tape (1-inch width)
- Interior semi-gloss or satin paint (White for base)
- Interior paint (Deep Teal, Muted Teal, Mustard Gold)
- Paint rollers and tray liners
- Angled sash brush (2-inch)
- Putty knife or credit card
- Drop cloths
- Small artist brush
Step 1: Preparation and Base Layer
-
Clear and cover:
Move furniture away from the wall and lay down drop cloths to protect your flooring from drips. -
Establish the white lines:
If your wall isn’t already white, paint the entire surface with your chosen white base paint. This layer is crucial because it will eventually become the crisp lines separating the triangles. -
Allow deep drying:
Let the white base coat cure completely for at least 24 hours. If the paint is even slightly fresh, the tape might peel it off later, so patience is key here.
Clean Line Secret
Don’t skip painting the base color over the tape edges! This ‘sealing’ step creates an invisible barrier that guarantees razor-sharp geometric lines every time.
Step 2: Geometric Taping
-
Create long diagonals:
Start by running long strips of painter’s tape diagonally across the wall from floor to ceiling. I like to vary the angles slightly to avoid a rigid pattern. -
Form the triangles:
Apply shorter strips of tape connecting the long diagonals to create a network of triangles in varying sizes. -
Secure the edges:
Run a putty knife or a plastic credit card firmly along every strip of tape. This ensures a tight bond with the wall and is essential for sharp lines. -
The anti-bleed trick:
Paint a thin layer of your *white base paint* over the edges of the tape. This seals the tape; if any paint bleeds under, it will be white-on-white and invisible, creating a perfect barrier for the colors later.
Level Up: Texture
For a glamorous twist, swap the flat mustard paint for a metallic gold paint. It catches the natural light and adds a dynamic, shifting sheen to the wall.
Step 3: Color Application
-
Map your pattern:
Before opening the colored cans, stick small pieces of masking tape onto the triangles to mark which color goes where. This ensures you balance the teals and golds evenly without two of the same color touching. -
Cut in the corners:
Start with the Deep Teal. Use your angled sash brush to carefully paint the corners and edges of the triangles designated for this color. -
Fill the centers:
Use a small roller to fill in the rest of the Deep Teal triangles, blending into the brushwork for a smooth finish. -
Apply remaining colors:
Repeat the cutting-in and rolling process for the Muted Teal and Mustard Gold sections, cleaning your brushes thoroughly between colors or using fresh liners. -
Second coat:
apply a second coat to all colored sections if necessary to ensure rich, opaque coverage.
Step 4: The Reveal
-
Timing the removal:
Wait until the paint is dry to the touch but not fully cured—usually about an hour after the last coat. -
Peel carefully:
Slowly pull the tape off at a 45-degree angle alongside the wall. This motion helps slice through the paint film cleanly. -
Final touches:
Inspect your white lines. If faint bleeding occurred, use a tiny artist brush and a dab of white paint to clean up the edges.
Step back and admire how this crisp geometric design completely revitalizes the energy of your room


Retro Fluid Waves
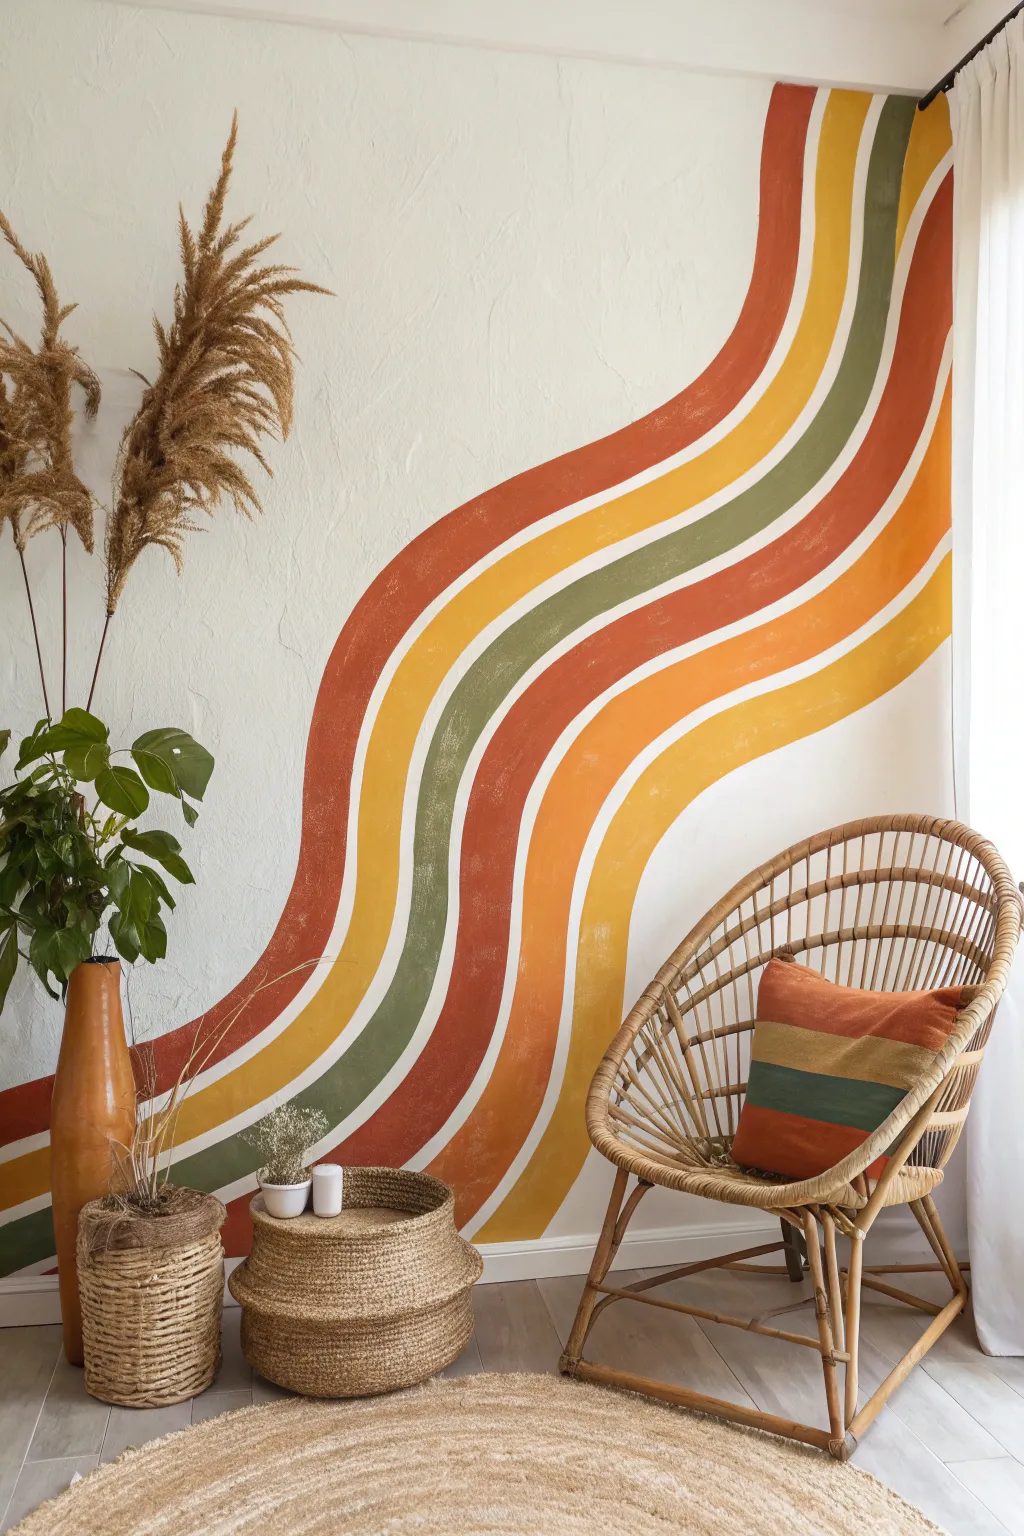
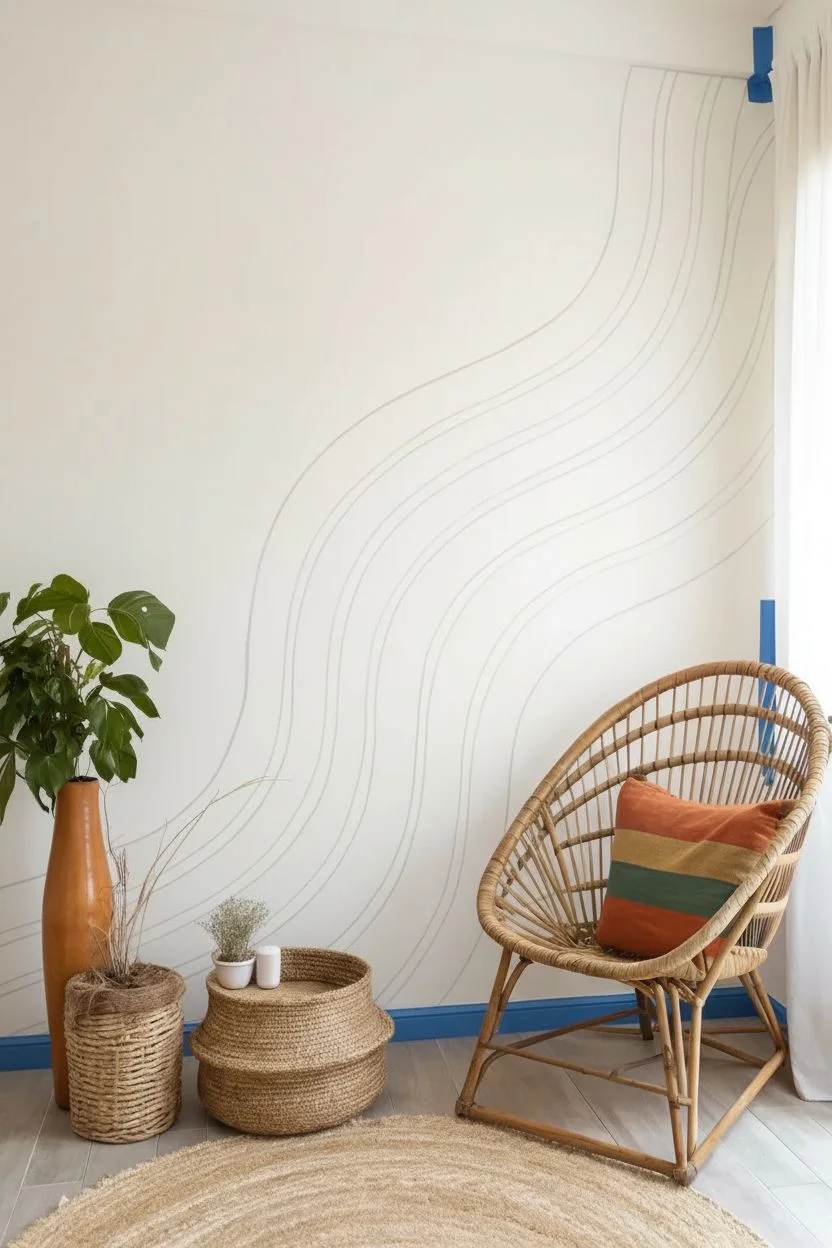
Embrace the retro revival with this earthy, fluid wave mural that instantly warms up any room. The organic curves and vintage color palette create a stunning focal point that feels both nostalgic and modern.
Step-by-Step
Materials
- Interior latex paint (Rust, Mustard Yellow, Sage Green, Orange)
- Base wall color paint (for touch-ups)
- 2-inch angled sash brush
- Small flat artist brush (1/2 inch)
- White stick chalk or light pencil
- Lint-free rag
- Drop cloth
- Painter’s tape
Step 1: Planning the Flow
-
Prepare the canvas:
Begin by cleaning your wall surface thoroughly with a damp cloth to remove dust and oils. If your wall isn’t already white or cream, apply a fresh base coat now and let it dry completely. -
Protect the perimeter:
Apply painter’s tape along the baseboards, ceiling line, and adjoining walls where the mural will end to ensure crisp boundaries. -
Sketch the primary curve:
Using a stick of white chalk, lightly sketch the highest, outermost wave. Start high on the right side and swoop down towards the left floor, creating a deep, lazy ‘S’ curve. -
Draft parallel lines:
Sketch the subsequent lines below the first one, maintaining a consistent distance of about 3-4 inches between them. I like to step back frequently to ensure the flow looks natural. -
Define the spacing:
Remember, this design relies on negative space. Draw double lines for each colored stripe to indicate exactly where the paint goes and where the white wall will show through. -
Clean up the sketch:
Use a damp lint-free rag to wipe away any frantic sketch marks, leaving only the definitive guide lines for your painting.
Smooth Moves Only
For the smoothest curves, lock your wrist and move your entire arm from the shoulder. This prevents the shaky, jagged lines that often happen when you only pivot from the wrist.
Step 2: Painting the Waves
-
Start with the top color:
Dip your 2-inch angled sash brush into the rust/terracotta paint. Load the brush moderately—too much paint leads to drips on vertical surfaces. -
Outline the first stripe:
Carefully paint along the chalk guidelines of the top wave. Focus on creating a smooth, continuous edge rather than short, choppy strokes. -
Fill the form:
Once the edges are defined, fill in the center of the stripe. Use long, sweeping strokes that follow the direction of the curve to minimize visible texture. -
Move to the second color:
Switch to a clean brush and pick up the mustard yellow paint. Repeat the outlining process on the second wave, being careful to preserve the white gap between colors. -
Apply the green tones:
Continue downward with the sage green paint. This middle stripe anchors the design, so take your time to ensure the curve parallels the yellow stripe perfectly. -
Add the bright accents:
Paint the orange stripe next, followed by the lower repeating colors. Maintain that consistent negative space; it acts as a visual breather between the bold hues.
Step 3: Refining details
-
Apply second coats:
Allow the first layer to dry for at least 2 hours. Once dry to the touch, apply a second coat to each stripe to achieve rich, opaque color saturation. -
Clean the edges:
Use the small flat artist brush dipped in your base wall color (white/cream) to tidy up any wobbly edges or paint that strayed into the negative space. -
Remove chalk marks:
Once the paint is fully cured (give it 24 hours just to be safe), gently wipe away any remaining visible chalk lines with a damp cloth. -
Peel the tape:
Remove the painter’s tape from the baseboards and corners at a 45-degree angle while the final touch-ups are still slightly tacky only if you painted near the edges.
Fixing Wobbly Lines
Don’t stress if your painting hand shakes! Use a small artist brush and your white base color to ‘erase’ mistakes by cutting back into the colored stripe from the outside.
Step back and admire how these flowing lines bring a relaxed, artistic energy to your space
BRUSH GUIDE
The Right Brush for Every Stroke
From clean lines to bold texture — master brush choice, stroke control, and essential techniques.
Explore the Full Guide
Abstract Blobs with Botanical Line Art
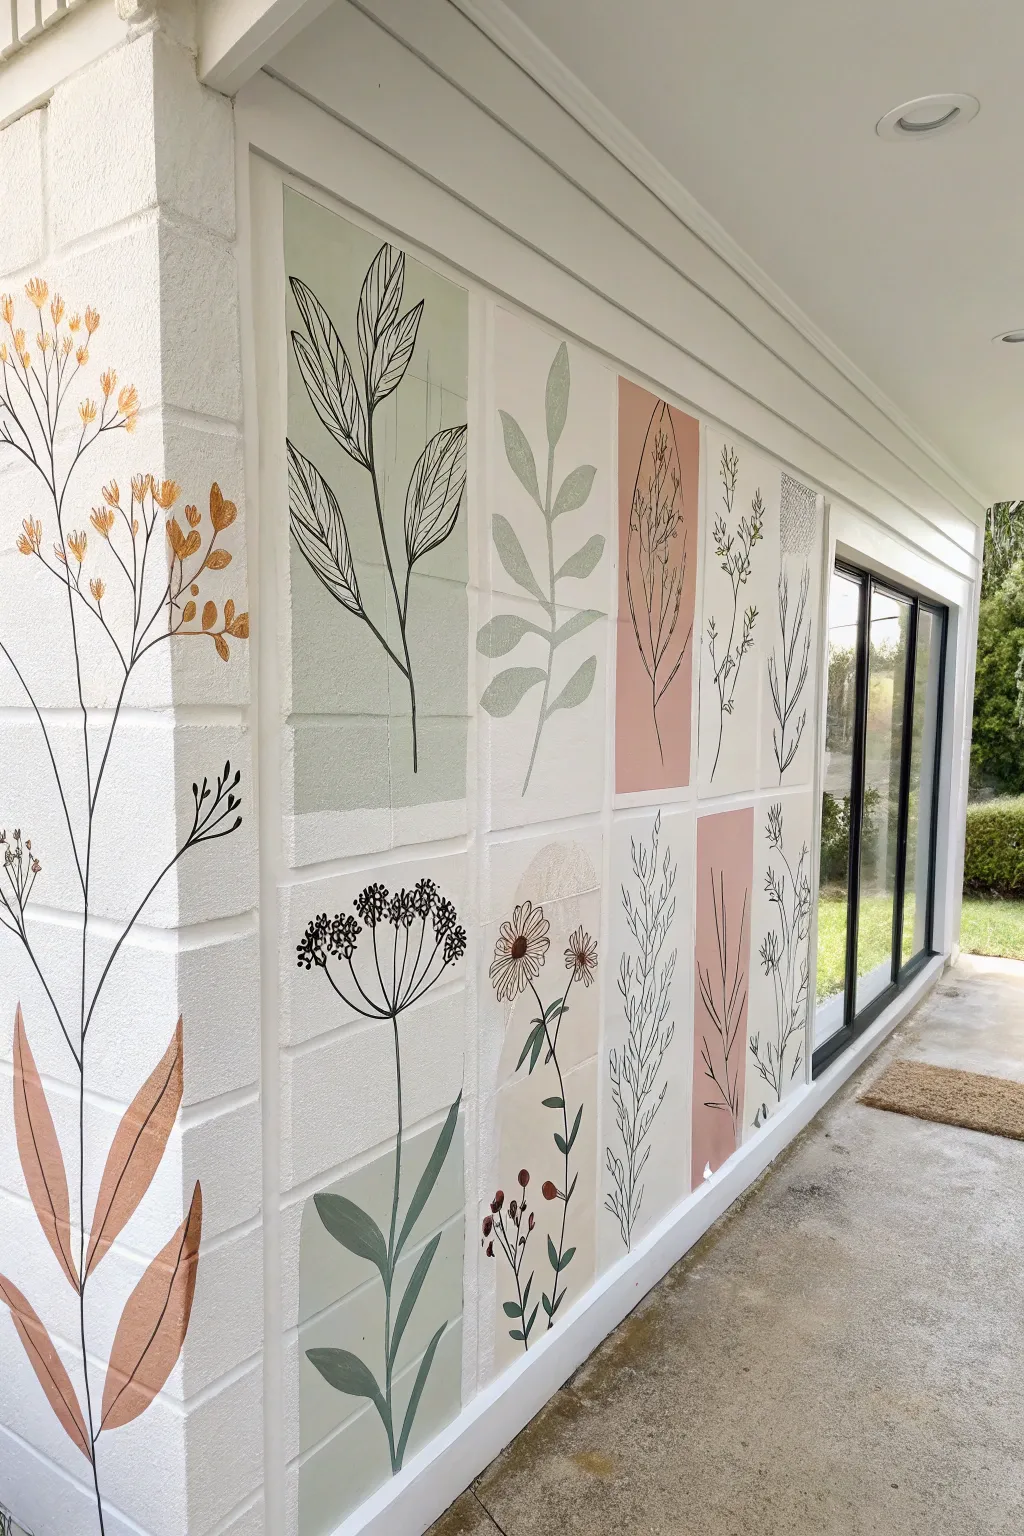
Transform a plain textured wall into an elegant outdoor gallery with this airy, dual-technique mural. By combining soft, pastel color blocks with crisp, illustrative line art, you create a sophisticated grid design that feels both structured and organic.
Step-by-Step Tutorial
Materials
- Exterior masonry primer
- White exterior latex paint (base)
- Exterior paint sample pots (sage green, dusty rose, beige, charcoal black)
- Paint roller and tray
- 2-inch angled distinct sash brush
- Set of fine lyric or liner brushes (sizes 0, 1, and 2)
- White or light grey sidewalk chalk
- Exterior clear matte sealant
- Stiff cleaning brush
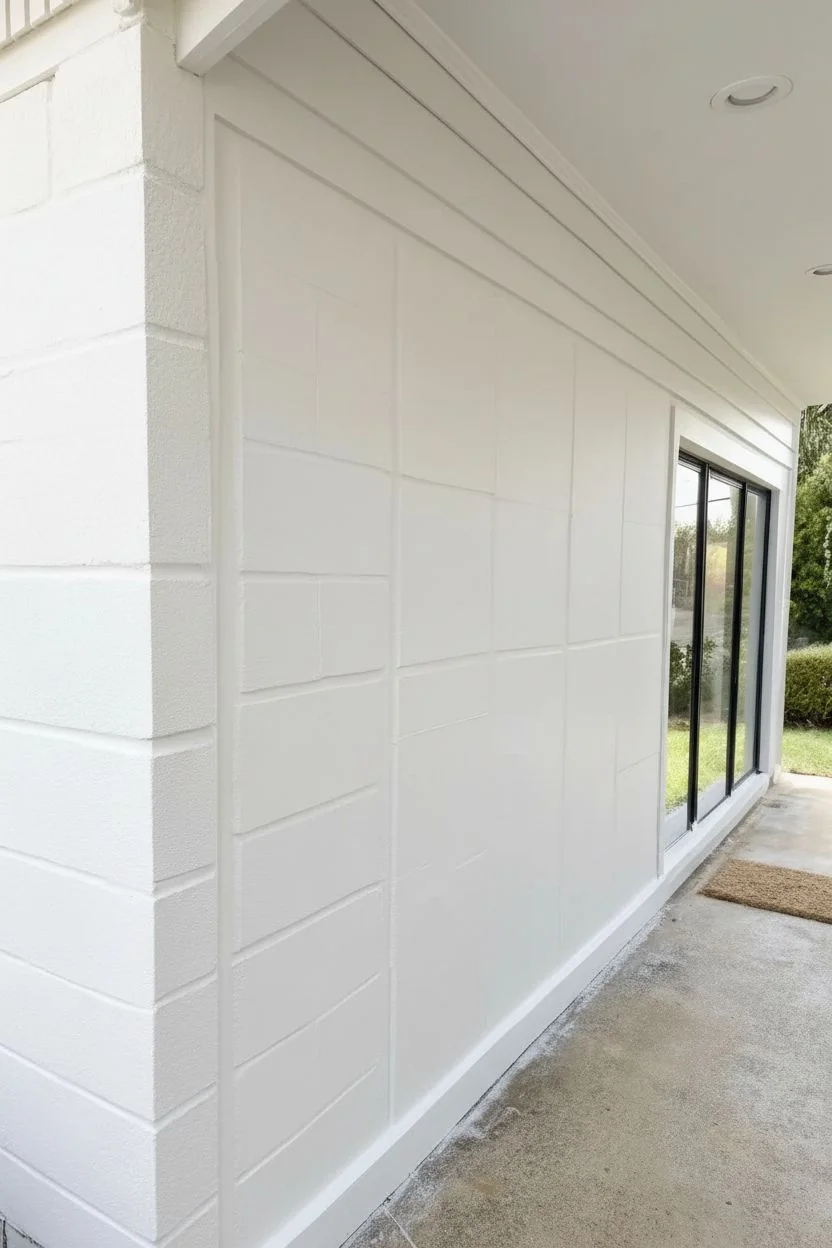
Step 1: Preparation and Base
-
Clean the surface:
Scrub the brick or block wall thoroughly with a stiff brush and soapy water to remove dust and debris. Rinse and let it dry completely. -
Prime the wall:
Apply a coat of masonry primer using a thick-nap roller to ensure it gets into the grout lines and pores of the block. -
Apply the background:
Roll on two coats of bright white exterior latex paint. Use an angled brush to dab paint into deep mortar joints so the white backdrop is solid and opaque.
Troubleshooting: Bumpy Lines
If the wall texture is causing your lines to look jagged, switch to a soft round brush instead of a flat one. The round bristles adapt better to pits and bumps in masonry.
Step 2: Creating the Color Grid
-
Sketch the layout:
Using light chalk, draw a grid of large vertical rectangles on the wall. Leave about 2-3 inches of white space between each shape to mimic a gallery spacing. -
Paint green panels:
Dip your 2-inch angled brush into the sage green paint. Fill in selected chalk rectangles, keeping the edges crisp but freehand painted rather than taped for a softer look. -
Add pink panels:
Rinse your brush and fill in alternating rectangles with the dusty rose color, ensuring consistent coverage over the textured blocks. -
Add neutral accents:
Paint the remaining shapes or lower blocks with the beige tone to balance the palette. I find adding one rounded arch shape on the bottom row adds nice variety. -
Dry time:
Allow these color blocks to dry for at least 4-6 hours, or overnight, so your line work won’t bleed into them.
Step 3: Botanical Line Work
-
Draft the stems:
Lightly sketch your botanical designs over the dry color blocks using chalk. Plan for tall, reaching stems that utilize the full height of the color panels. -
Prepare liner paint:
Pour a small amount of charcoal black paint onto a palette. add a few drops of water to improve flow so the brush glides over the rough texture. -
Outline main stems:
Using a size 2 liner brush, paint the main vertical stems of your plants, starting from the bottom of the color block and pulling upward. -
Paint leaf outlines:
Switch to a size 1 brush to add leaves. For the green blocks, paint large, ovate leaves that fill the space but stay strictly within the color block. -
Detail the florals:
On the pink and beige blocks, paint more delicate, wildflower-style illustrations with thinner stems and smaller petals. -
Corner feature:
Paint a large, free-standing botanical element on the left corner or outer edge of the mural that isn’t contained in a color block. This anchors the design to the architecture. -
Add floating leaves:
Paint a few free-floating leaves or stems in the white negative space to connect the blocks visually. -
Refine details:
Use your smallest size 0 brush to add fine veins inside the leaves and tiny stamen details on the flowers. -
Clean up:
Once the black paint is fully dry, use a damp cloth to gently wipe away any visible chalk lines. -
Seal the work:
Apply a clear, matte exterior sealer over the entire area to protect your artwork from weather and UV fading.
Pro Tip: visual Variety
Don’t use the same flower species twice! Mix ferns, broad leaves, and wildflowers across the different blocks to keep the mural feeling like a curated collection.
Step back and admire how this elegant grid turns a blank exterior wall into a stunning focal point for your outdoor living space.
The Two-tone Half Wall

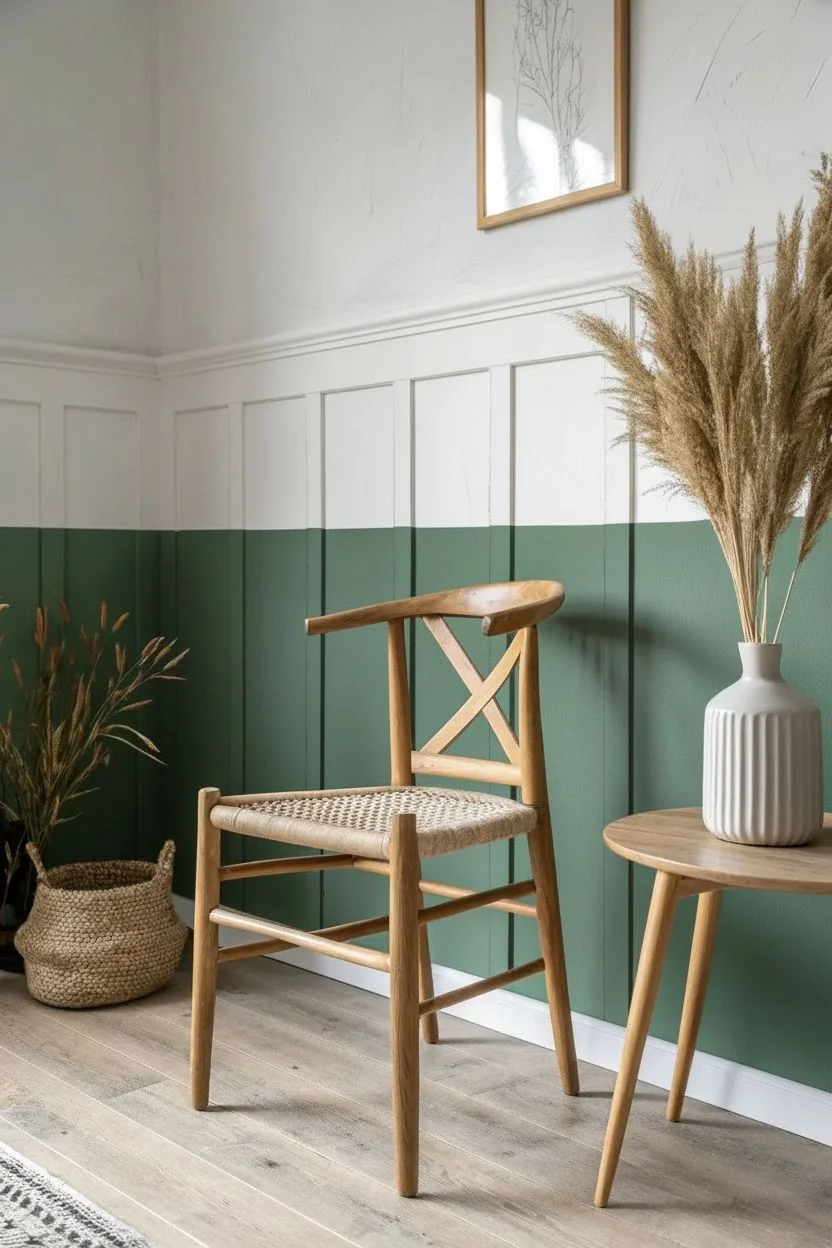
This project transforms a flat wall into an architectural feature by combining classic textural wainscoting with a modern color-block technique. You will create a grounding effect with deep sage green on the lower woodwork while keeping the upper wall bright and airy.
Step-by-Step Guide
Materials
- 1×3 inch MDF strips or pine boards
- Construction adhesive (e.g., Liquid Nails)
- Brad nailer with 1.5-inch nails
- Bubble level or laser level
- Paintable caulk and caulk gun
- Wood filler and sandpaper
- Deep green interior paint (Satin finish)
- White interior paint (Eggshell or Matte)
- Painter’s tape
- Paint roller (microfiber) and angled sash brush
Step 1: Planning and Layout
-
Determine the height:
Decide how high you want your paneled section to be. A good rule of thumb is roughly one-third or two-thirds of the wall height; for this look, measure 40-48 inches up from the floor. -
Mark the horizontal rail:
Use a level to draw a straight horizontal line across the entire wall at your chosen height. This will serve as the guide for your top rail. -
Calculate batten spacing:
Measure the total width of the wall. Divide this number to find a pleasing interval for the vertical boards (battens), typically between 12 and 16 inches apart. Adjust the spacing so you avoid awkward slivers at the corners. -
Mark vertical positions:
Mark the center point for each vertical batten along the wall to visualize the grid before cutting any wood.
Step 2: Installation
-
Install the top rail:
Cut your 1×3 trim to the length of the wall. Apply construction adhesive to the back, place it along your level line, and secure it with brad nails into the studs where possible. -
Cut vertical battens:
Measure the distance from the top of your baseboard to the bottom of the top rail. Cut your vertical strips to this exact length. -
Create a spacer block:
I like to cut a piece of scrap wood to the exact width of my spacing calculation. You can use this block to quickly position each board without constantly measuring. -
Attach vertical battens:
Apply adhesive to the back of a batten, press it against the wall using your spacer block or marks for placement, ensure it is plumb with a level, and nail it into place.
Pro Tip: Seamless Joints
If your wall is longer than your boards, cut the joining ends at a 45-degree angle (a scarf joint) rather than a blunt butt joint. This makes the seam almost invisible once sanded and painted.
Step 3: The Seamless Finish
-
Fill the holes:
Dab a small amount of wood filler into every nail hole and over any seams where board lengths meet. Let this dry completely. -
Sand smooth:
Once the filler is dry, sand the patched areas flush with the wood surface. Wipe away all dust with a tack cloth or damp rag. -
Caulk the seams:
Run a bead of paintable caulk along every edge where the wood meets the wall and where the boards meet each other. Smooth it with a wet finger for a seamless, built-in look.
Level Up: Picture Ledge
Add a 1×2 inch board laid flat on top of the upper horizontal rail. This creates a small projecting shelf perfect for leaning framed art or small photos.
Step 4: Painting
-
Prime the woodwork:
Apply a coat of primer to the MDF or raw wood and the main wall, paying special attention to the sides of the battens. -
Paint the upper wall:
Paint the wall section above the rail with your chosen white paint. You don’t need to be perfectly neat at the bottom, as the rail will be painted over later. -
Protect the white line:
Once the white paint is fully cured, apply painter’s tape to the wall right above of the top rail to protect your fresh work. -
Cut in the edges:
Using an angled sash brush, carefully paint the corners, the edges of the battens, and the detailed areas of the molding with your deep green paint. -
Roll the green:
Use a small roller to apply the green paint to the flat surfaces of the boards and the wall sections between them. This helps avoid brush strokes. -
Peel and reveal:
Apply a second coat of green if necessary for full coverage. Remove the painter’s tape while the final coat is still slightly wet to ensure a crisp, sharp line.
Step back and admire how this simple structural addition completely changes the depth and character of your room.

PENCIL GUIDE
Understanding Pencil Grades from H to B
From first sketch to finished drawing — learn pencil grades, line control, and shading techniques.
Explore the Full Guide
Freehand Polka Dot Pattern
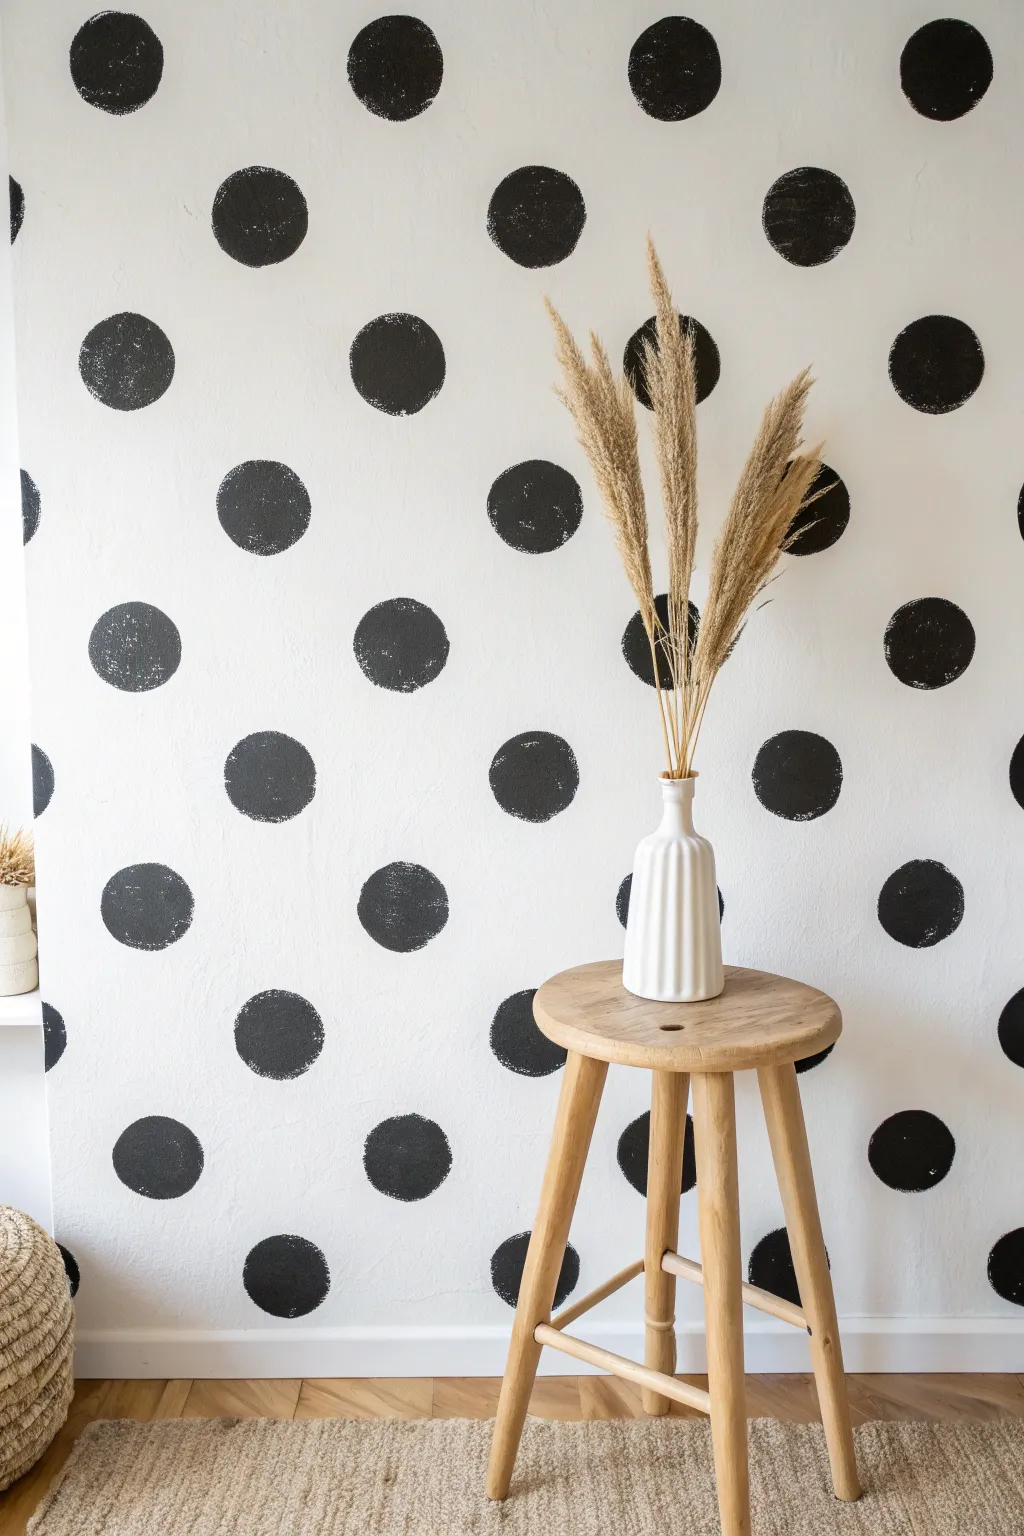
Transform a plain white wall into a playful statement piece with this high-contrast polka dot pattern. The beauty of this project lies in the hand-painted, slightly sketchy quality of the circles, which gives the finished surface an organic, wallpaper-like appearance without the hassle of hanging paper.
Step-by-Step Tutorial
Materials
- Interior latex wall paint (white or off-white base)
- Matte black latex paint or acrylic craft paint (8 oz is plenty)
- 2-inch round sash brush or large stencil brush
- Pencil
- Tape measure
- Bubble level
- Painter’s tape
- Drop cloth
- Scrap cardboard or paper plate
Step 1: Wall Preparation
-
Clear the area:
Move furniture away from the wall to give yourself ample working space and cover the floor with a drop cloth to catch any potential drips. -
Clean the surface:
Wipe down the wall with a damp cloth or a mild TSP substitute to remove dust and oils, ensuring the paint adheres properly. -
Tape the edges:
Apply painter’s tape along the baseboards, ceiling line, and any adjacent walls to keep your edges crisp and clean.
Step 2: Mapping the Grid
-
Determine spacing:
Decide on the density of your dots. A spacing of about 12 to 14 inches usually offers a balanced, open look similar to the example image. -
Mark vertical rows:
Using your tape measure, lightly mark vertical intervals along the top of the wall where each column of dots will begin. -
Create horizontal guides:
Use a level and a pencil to make faint, tiny tick marks down the wall at your chosen vertical intervals. -
Stagger the pattern:
For the second column (and every alternate column thereafter), shift your starting mark down by half the vertical spacing measurement. This creates the classic offset or ‘quincunx’ polka dot arrangement. -
Double-check the layout:
Stand back and look at your pencil marks to ensure the grid looks uniform before you open the paint.
Dry Brush Charm
Don’t aim for solid black opacity. Let the white wall peek through the brushstrokes slightly to enhance the artistic, freehand vibe.
Step 3: Painting the Dots
-
Load the brush:
Pour a small amount of black paint onto a paper plate or tray and dip the tip of your round sash brush into it. -
Offload excess paint:
Dab the brush on a piece of scrap cardboard to remove globs; you want the bristles coated but not dripping. -
Test your technique:
Practice on the cardboard first by placing the brush flat and twisting your wrist in a circular motion to create a rough circle. -
Paint the first dot:
Place your brush directly over a top pencil mark on the wall. -
Create the shape:
Press down firmly and swirl the brush in a circular motion, expanding outward slightly until the dot reaches your desired size (around 2-3 inches). -
Embrace the texture:
Allow the bristles to leave a slightly rough edge or ‘dry brush’ look on the perimeter, as this adds to the hand-drawn charm. -
Continue the column:
Work your way down the first vertical column of marks, reloading your brush every one or two dots. -
Move to the staggered column:
Proceed to the next column, placing these dots halfway between the vertical positions of the first row. -
Assess from distance:
I like to step back frequently to ensure the visual weight of the dots remains consistent across the wall. -
Handle the edges:
Where the pattern meets the ceiling, floor, or corners, paint only a partial semi-circle to create the illusion that the pattern continues beyond the wall. -
Final touch-ups:
Once dry, gently erase any visible pencil marks (though the paint usually covers them) and remove the painter’s tape.
Level Up: Metallic Pop
Swap the black paint for metallic gold or copper for a glam version, or use a high-gloss black on a matte wall for subtle texture.
Now you have a dynamic, custom feature wall that adds movement and personality to your space.
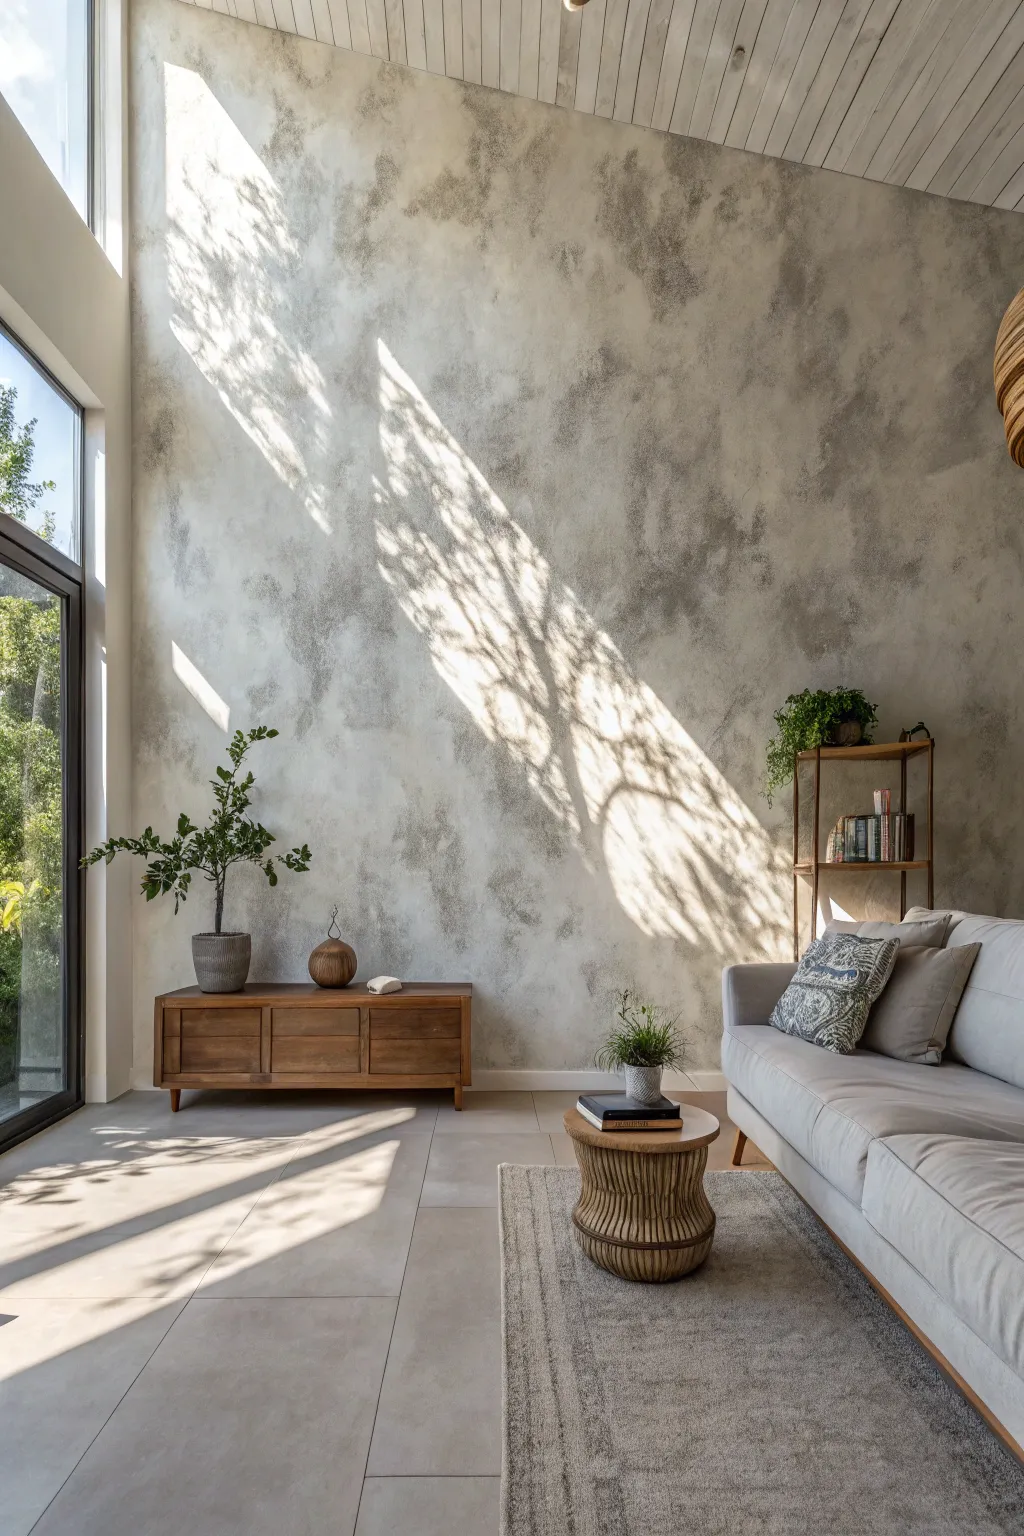
Soft Structural Zoning
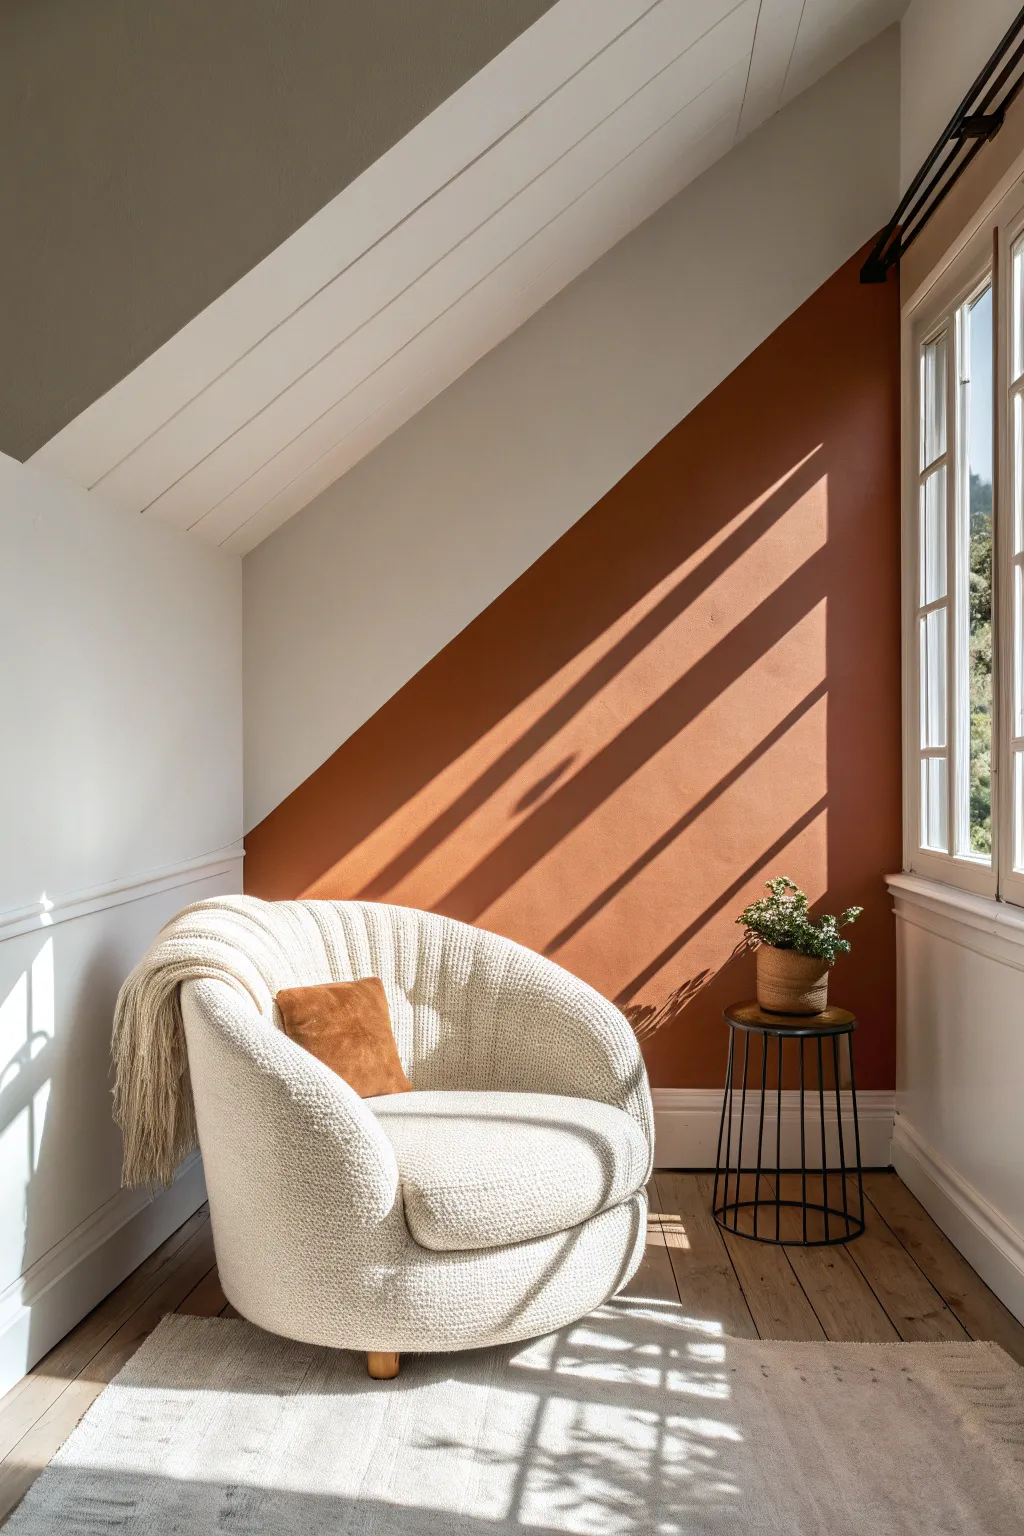
Transform a standard room contour into an architectural feature with this high-contrast color blocking technique. This project uses a deep earthy tone to create a cozy ‘zone’ within an open space, mimicking the effect of structural shadows.
Step-by-Step
Materials
- Matte interior latex paint (Terracotta/Burnt Orange)
- Existing wall base color (for sealing tape)
- High-quality painter’s tape (1.5 inch width)
- Chalk line or long straight edge
- Bubble level or laser level
- Angled sash brush (2-inch)
- Paint roller (9-inch) with nap suitable for your wall texture
- Paint try and liners
- Drop cloths
- Pencil and eraser
- Putty knife or credit card
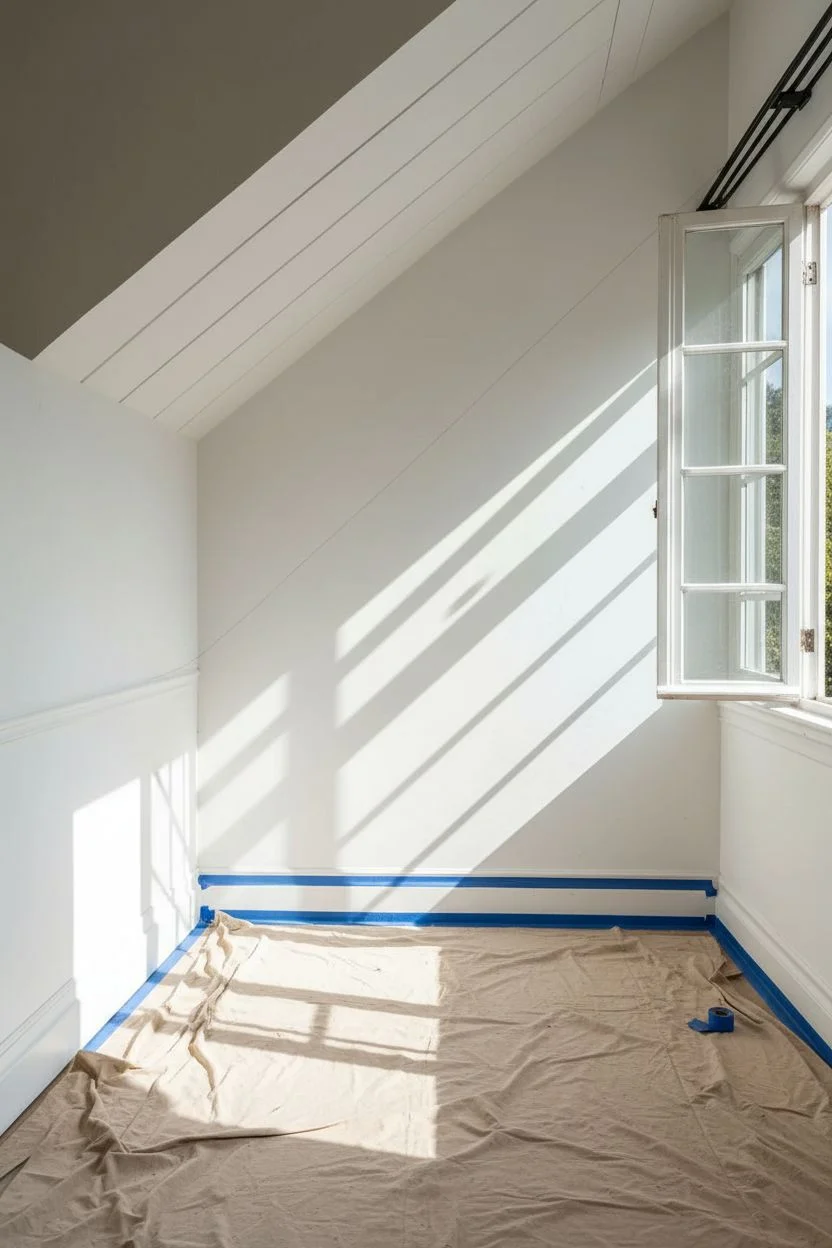
Step 1: Preparation & Mapping
-
Clear the zone:
Begin by removing all furniture, including the armchair and side tables, to give yourself ample working room. -
Protect surfaces:
Lay down drop cloths to protect your wood flooring and apply tape to the top edge of the baseboards within the painting zone. -
Clean the wall:
Wipe down the wall surface with a damp cloth or a mild TSP substitute to remove dust, ensuring the tape adheres perfectly. -
Determine the diagonal:
Decide on your start and end points. In this design, the line starts high near the window corner and slopes down to the opposing wall intersection. -
Mark the line:
Have a friend help you snap a chalk line between your two points, or carefully trace a line using a long straight edge and a pencil.
Step 2: Perfecting the Edge
-
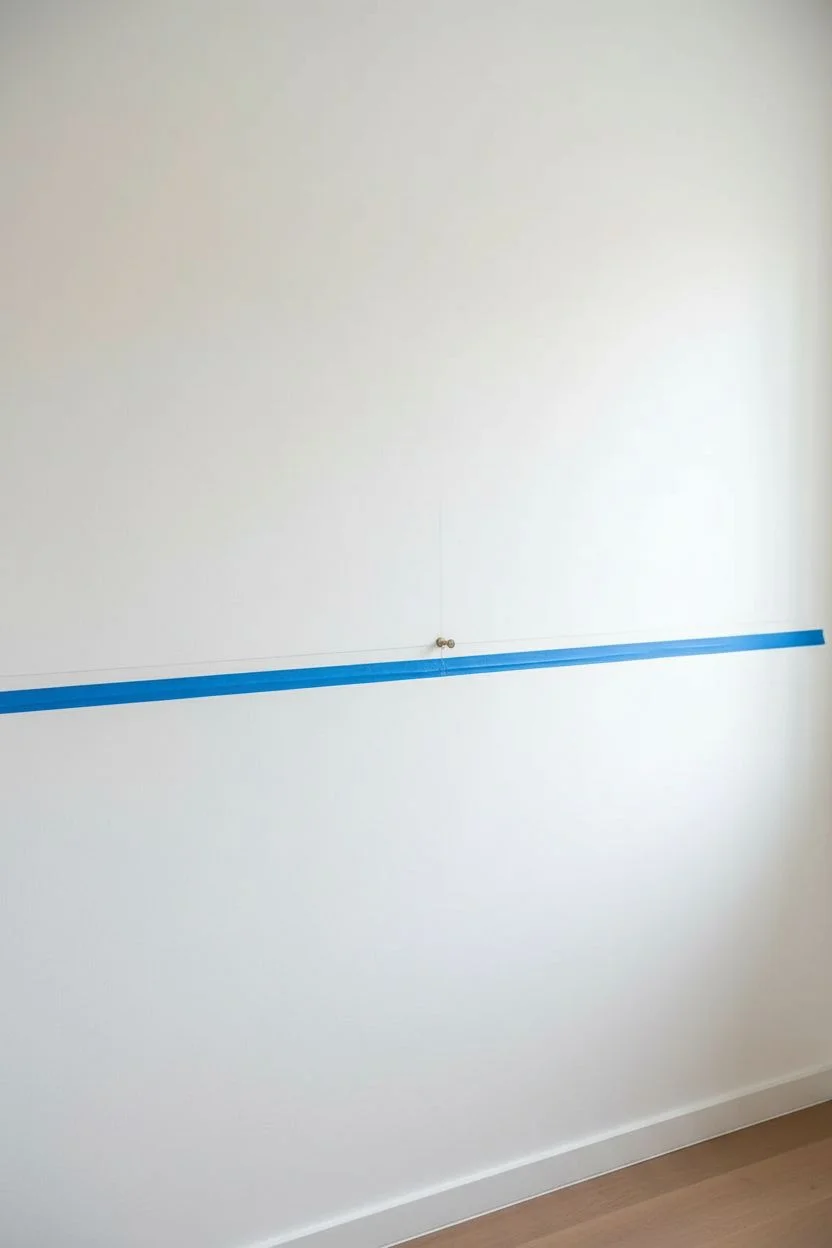
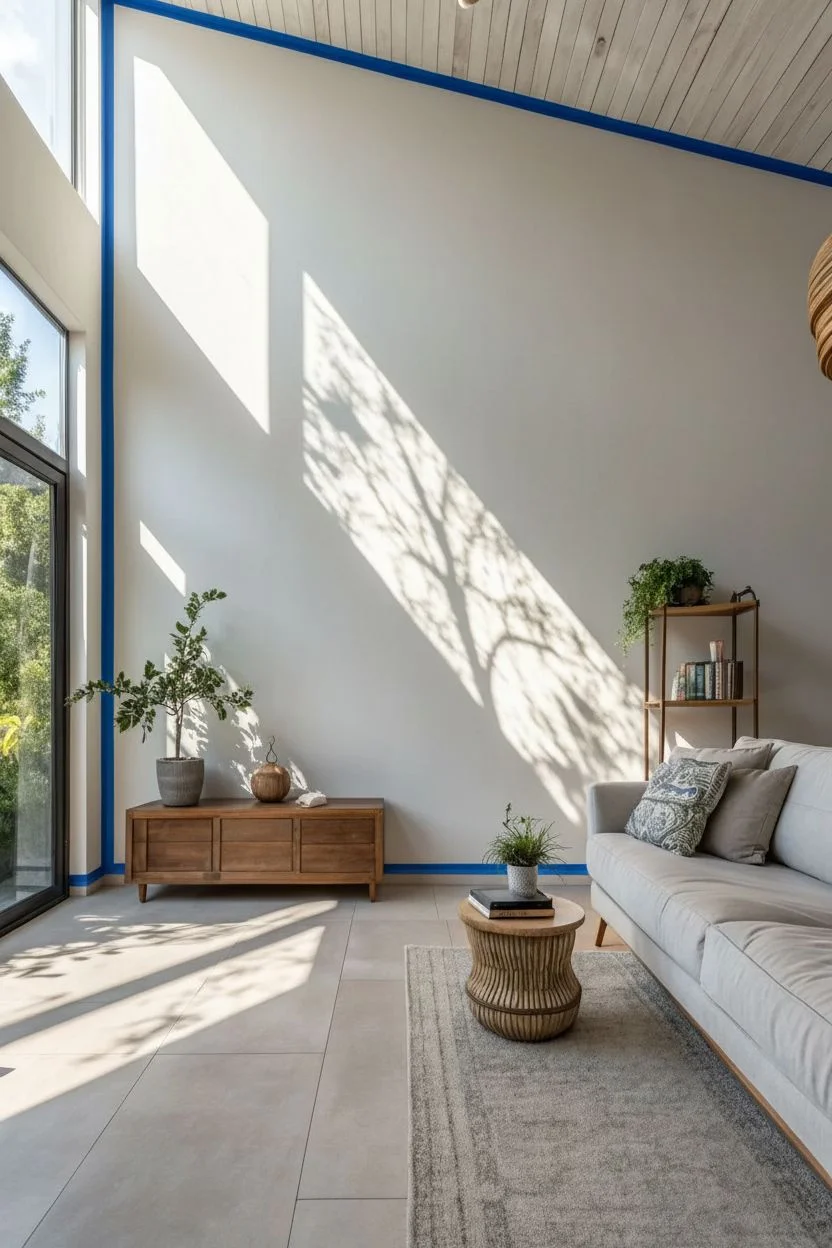
Apply the tape:
Run your painter’s tape along the pencil line. Important: Place the tape on the upper (white) side of the line so that you paint over your pencil mark. -
Secure the bond:
Run a putty knife or the edge of a credit card firmly along the tape edge to press out any air bubbles and ensure a tight seal. -
The sealing secret:
Using a small brush, paint a thin layer of the *existing wall color* (white) over the edge of the tape that will face the new color. -
Let it set:
Allow this sealing layer to dry completely. This creates a barrier so that if any paint bleeds under the tape, it matches the wall and remains invisible.
Bleed Breakthrough?
If a little color slept under the tape, wait for it to cure fully (24hrs). Then, re-tape slightly over the color and lightly brush white paint over the mistake to erase it.
Step 3: Applying Color
-
Cut in the perimeter:
Dip your angled sash brush into the terracotta paint and carefully cut in along the baseboards, window trim, and corners. -
Cut in the diagonal:
Brush the terracotta paint along the sealed tape line, ensuring you don’t build up too much thick paint against the tape ridge. -
Roll the first coat:
Load your roller and cover the triangular area. I like to use a ‘W’ motion to distribute paint evenly before smoothing it out with vertical strokes. -
Dry and repeat:
Wait the recommended time on your paint can (usually 2-4 hours), then apply a second coat for that rich, opaque depth seen in the photo.
Texture Match
To exactly replicate the photo’s soft, velvety finish, swap standard latex paint for a ‘Limewash’ or paint with a ‘Chalk’ finish. This adds subtle movement and depth to the wall.
Step 4: The Big Reveal
-
Peel the tape:
The moment of truth: While the second coat is still slightly tacky (not fully dry), slowly peel the tape back at a 45-degree angle. -
Remove baseboard tape:
Carefully remove the tape protecting the baseboards and window trim. -
Touch ups:
Inspect your crisp line. If any tiny imperfections occurred, use a small artist’s brush to tidy them up once the wall is fully dry. -
Style the corner:
Bring your boucle chair and side table back in, placing them so the furniture interacts with the new diagonal backdrop.
Enjoy the dramatic, cozy new corner you’ve sculpted with just a bit of paint and geometry


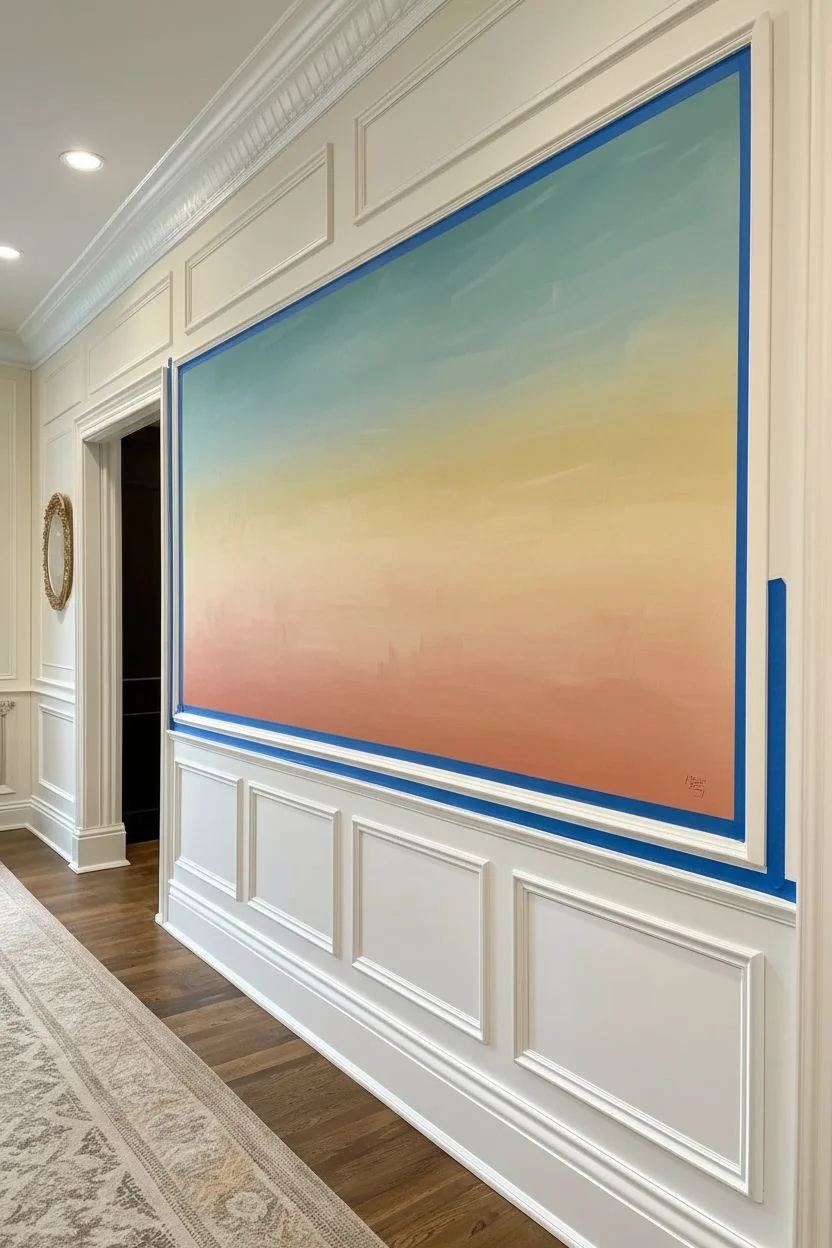
Dreamy Ombre Gradient
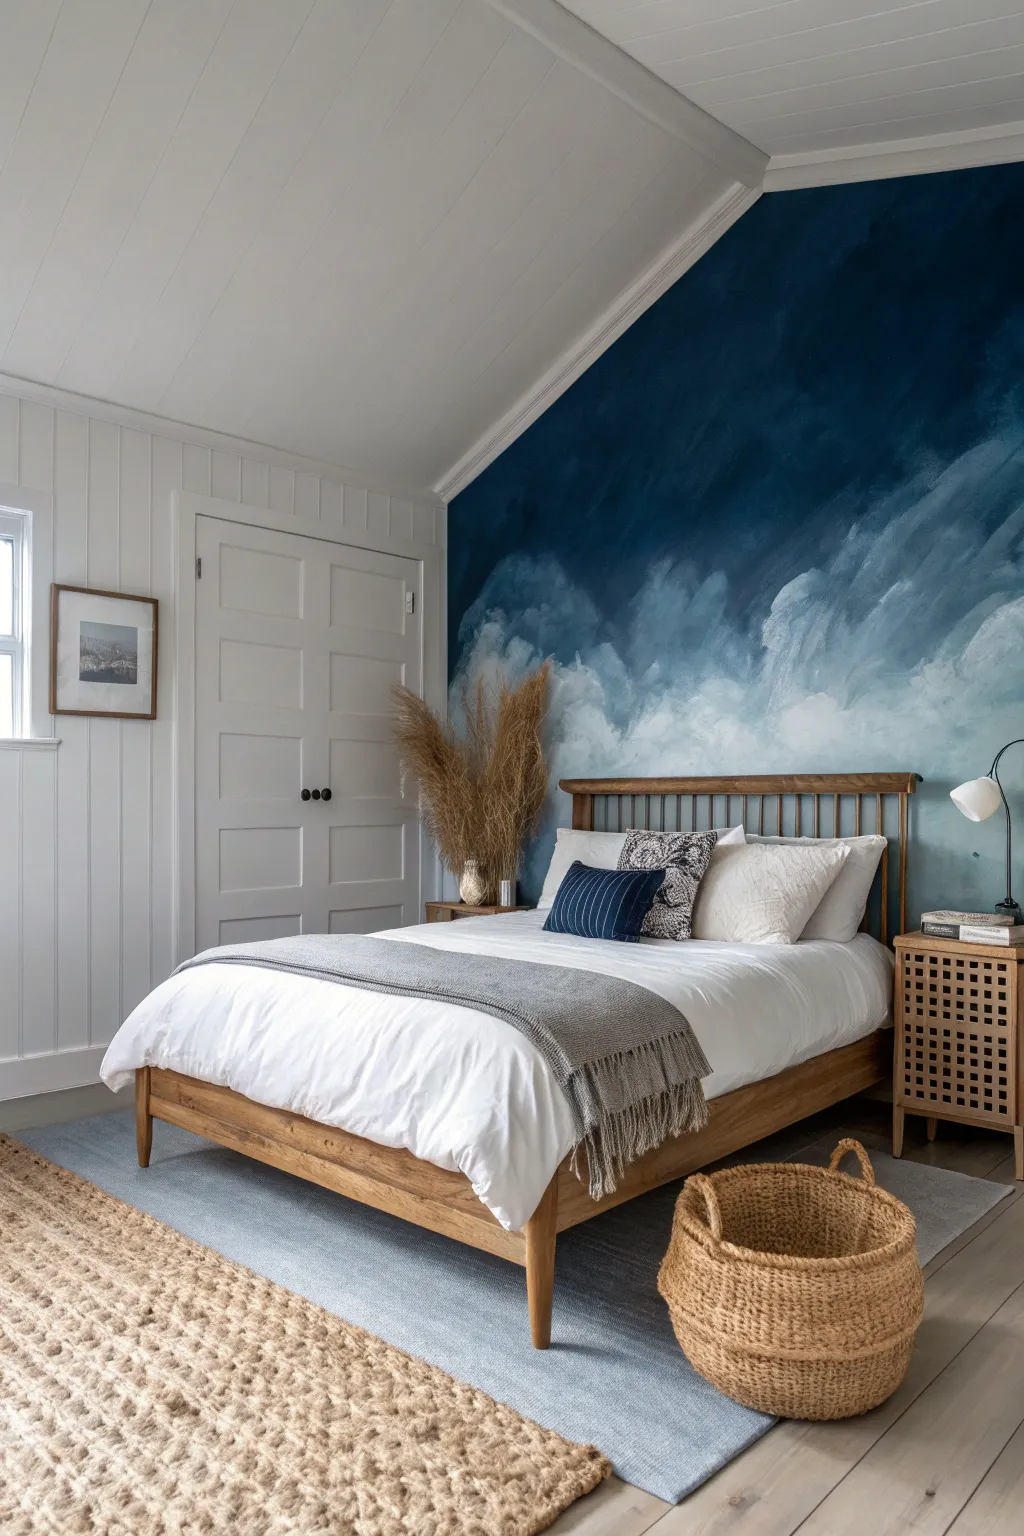
Transform a plain bedroom wall into a dramatic, ethereal dreamscape with this moody cloud mural technique. Using a blend of deep navy, slate, and soft whites, you’ll create a stormy yet calming atmosphere that acts as a stunning focal point.
How-To Guide
Materials
- Interior latex paint (Deep Navy, Slate Blue, Crisp White)
- Clear acrylic glazing liquid
- Large 4-inch block brushes or staining brushes
- Assorted smaller chip brushes
- Natural sea sponge
- Painter’s tape
- Paint trays and liners
- Lint-free rags
- Drop cloths
- Step ladder
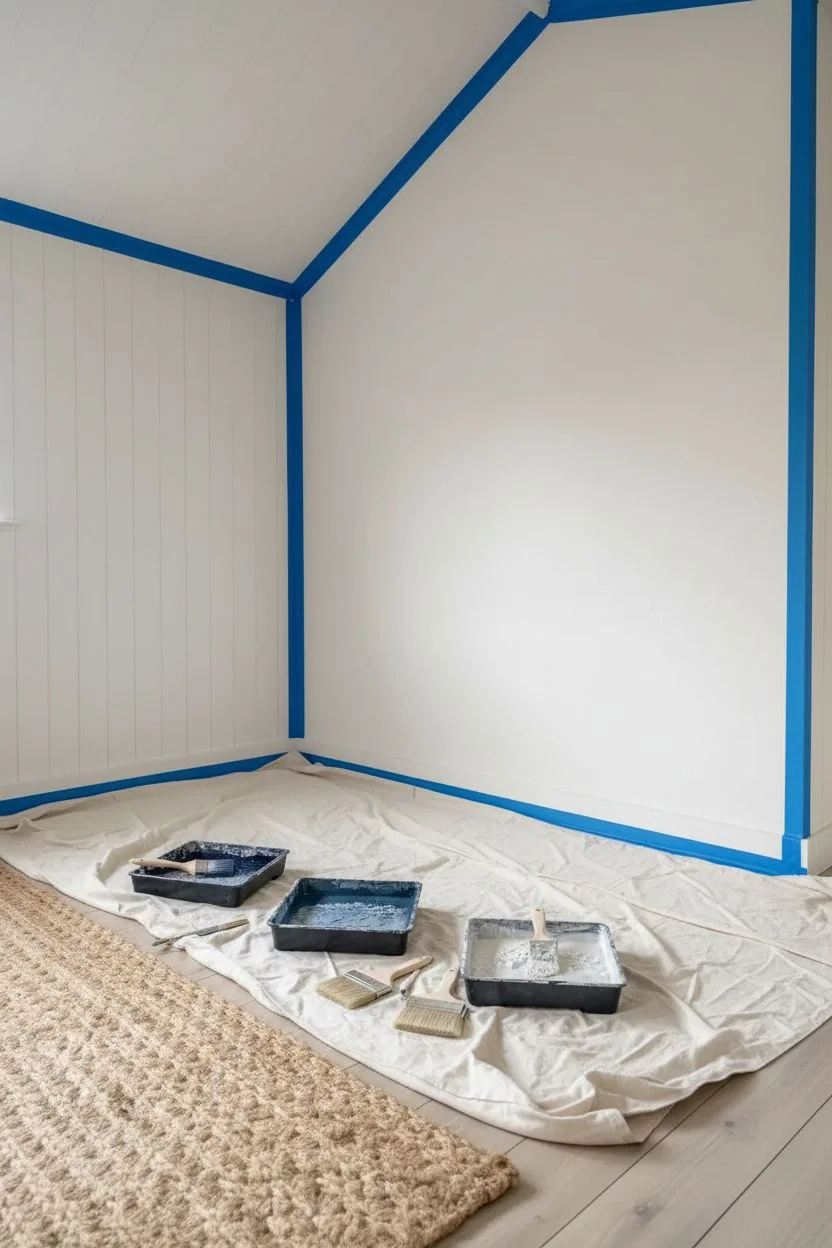
Step 1: Preparation & Mixing
-
Protect the perimeter:
Clear the area and lay down drop cloths to protect your floor. Apply painter’s tape generously along the ceiling line, baseboards, and adjacent walls, pressing the edges down firmly to prevent bleed-through. -
Prepare the paint mix:
In separate trays, mix each of your three paint colors with the acrylic glazing liquid. Follow the bottle’s ratio instructions, but a 1:1 mix usually works well to extend drying time and increase translucency for better blending. -
Map out the gradient:
Visualize a diagonal line across the wall. The top right corner will be your darkest zone (Deep Navy), transitioning to the center (Slate Blue), down to the bottom left (White). You don’t need to draw this, just keep the organic diagonal flow in mind.
Step 2: Applying the Base Layer
-
Apply the darks:
Starting in the top right corner, use a large block brush to apply the Deep Navy mixture. Use uneven, crisscross strokes rather than straight lines to begin building texture. -
Add the mid-tones:
While the navy is still wet, brush the Slate Blue mixture into the middle section of the wall. Overlap the wet navy edge by about six inches. -
Fill the light areas:
Apply the White mixture to the bottom left section, bringing it up to meet the Slate Blue. Ensure the entire wall surface is covered with wet paint. -
The initial blend:
Take a clean, dry block brush and work along the transition lines where colors meet. Use rapid ‘X’ motions to mix the wet paints directly on the wall, softening the harsh boundary lines into a blurry gradient.
Don’t Rush the Dry
Glazing liquid keeps paint wet longer, which is the secret to smooth blending. Don’t panic if it looks messy at first; the extended working time gives you plenty of room to fix and blend.
Step 3: Creating the Cloud Texture
-
Build cloud forms:
Dip a chip brush into the white paint mix. Dab and swirl it onto the blue sections to create organic, billowing cloud shapes rather than perfect circles. -
Create movement:
Use a sweeping motion to drag the wet white paint sideways and upwards, imitating the look of wind-blown vapor. I like to let this feel sporadic and messy for a natural storm look. -
Soften with a sponge:
Dampen a sea sponge and wring it out completely. Lightly pounce it over areas where the brushstrokes look too distinct, blurring them into a misty fog. -
Add depth:
Dip a small brush into the un-thinned Navy paint. Add small, darker shadows underneath the white cloud masses to give them volume and dimension. -
Blend the shadows:
Use a dry soft brush to feather these dark shadows out so they don’t look like hard lines, merging them into the background gradient.
Metallic Magic
For a magical touch, mix a small amount of metallic silver paint into your final white highlights. It will catch the light subtly and make the storm clouds shimmer.
Step 4: Refining & Finishing
-
Step back and assess:
Walk to the back of the room to view the composition. Look for areas that seem too heavy or empty. -
Add highlights:
Using a small amount of pure, un-thinned white paint, highlight the top crests of your biggest clouds. This opaque layer will make them pop against the dreamy background. -
Dry brush finish:
Once the paint is tacky but not fully dry, take a large, clean dry brush and very lightly whisk over the entire surface in long sweeping motions to unify the texture. -
Remove tape:
Carefully peel off the painter’s tape while the paint is still slightly damp to ensure a crisp, clean edge. -
Final cure:
Allow the wall to cure undisturbed for at least 24 hours before moving furniture back against it, as the glaze extends the drying time significantly.
Now you have a breathtaking, custom art piece right on your wall that sets a serene mood for the whole room.
Oversized Monstera Leaf Motifs
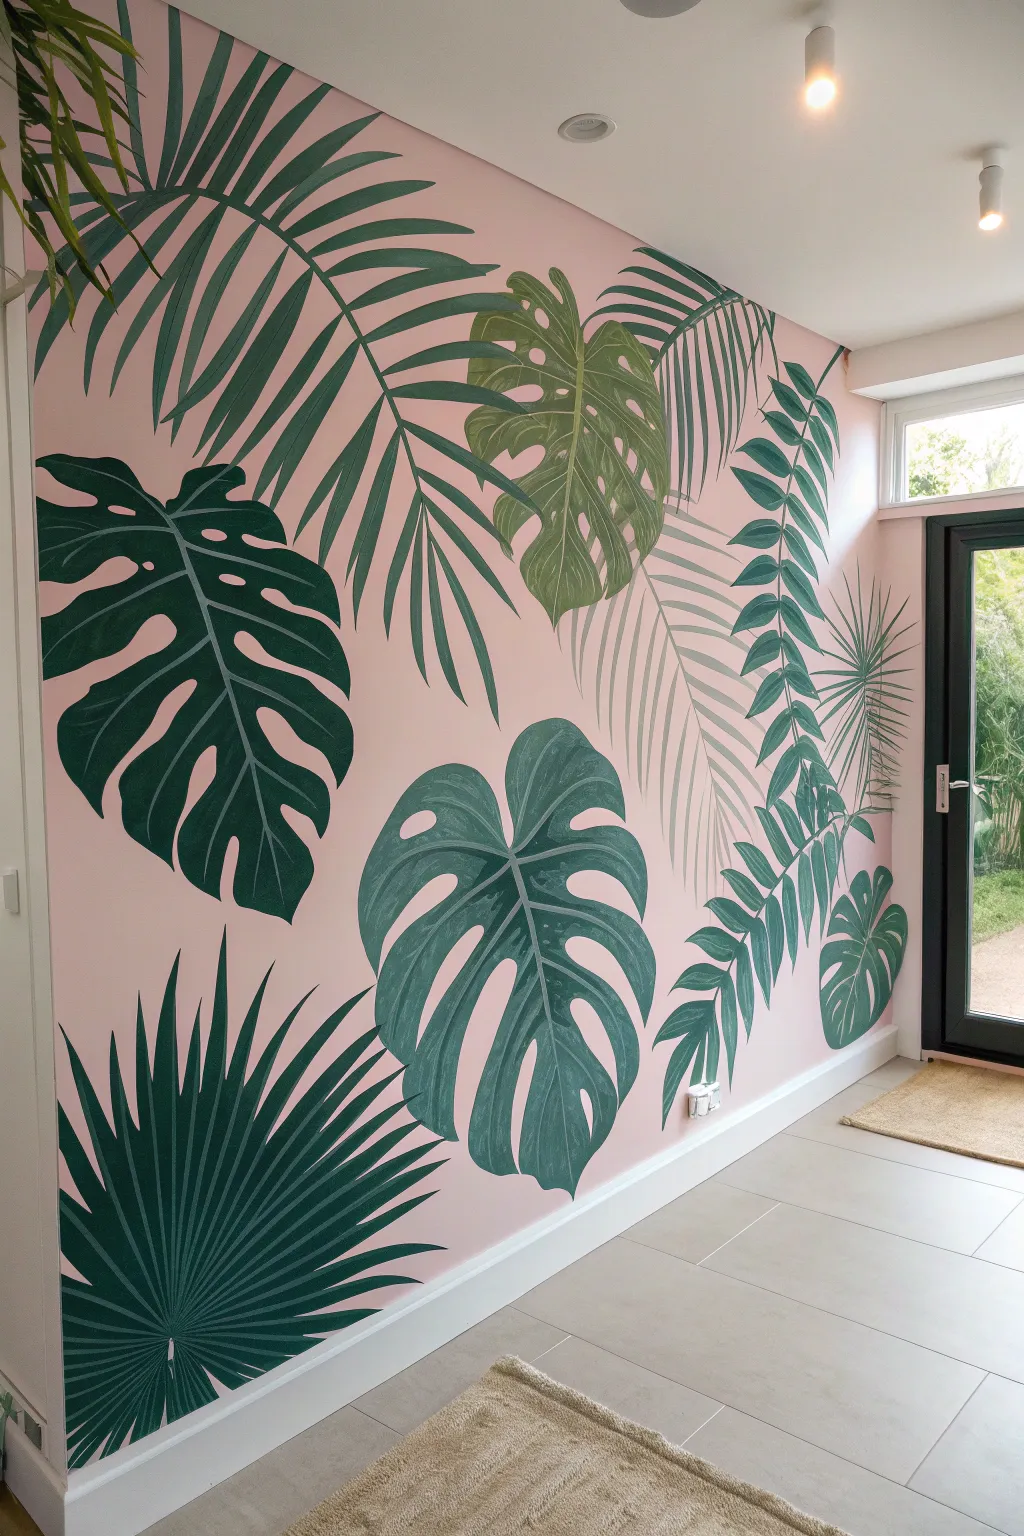
Transform a plain wall into a lush indoor garden with this large-scale botanical mural. By layering oversized Monstera and palm leaves over a soft pink base, you create a sophisticated yet playful statement piece.
Detailed Instructions
Materials
- Interior latex paint (Matte finish: Dusty Pink, Dark Hunter Green, Teal Green, White, Yellow)
- Angled sash brush (2-inch)
- Synthetic artist brushes (Sizes 4, 8 round and 1-inch flat)
- White or light grey chalk
- Painter’s tape and drop cloths
- Paper plates or palette
- Step ladder
- Damp microfiber cloth
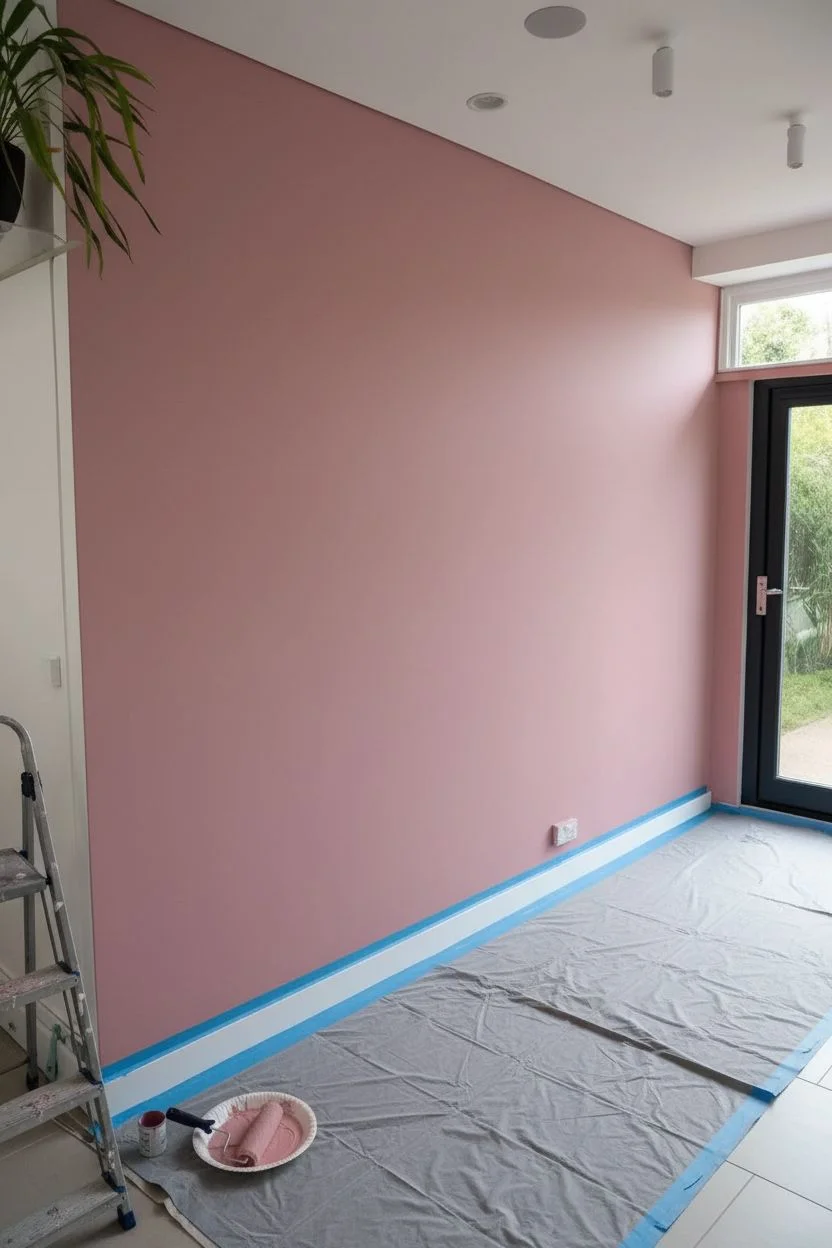
Step 1: Preparation and Base
-
Prepare the space:
Clear the area and apply painter’s tape to the baseboards, ceiling line, and adjacent walls. Lay down drop cloths to protect your flooring from drips. -
Apply background color:
Roll two even coats of the dusty pink paint onto the entire wall. Allow the wall to dry completely, preferably overnight, as drawing on tacky paint can ruin the texture.
Step 2: Composition and Sketching
-
Plan the layout:
Visualize the placement of the largest leaves first. To keep the design balanced, aim to have leaves creating a canopy effect from the top and grounding elements at the bottom. -
Sketch the outlines:
Using white chalk, lightly sketch the large Monstera leaf shapes. Focus on the main outline and the signature fenestrations (holes) first. -
Add variety:
Draw the fan palm shapes in the bottom corner and lower sections. Add long, arching stems for the taller palms reaching in from the sides. -
Fill the gaps:
Sketch a few ‘background’ fern fronds in the empty spaces. Keep these shapes simpler as they will be painted in lighter tones to create depth.
Fixing Wobbly Lines
If your leaf edges look shaky, don’t worry. Wait for the green to dry fully, then use a small angled brush with the pink background paint to cut back into the shape for a razor-sharp edge.
Step 3: Painting the Foliage
-
Paint dark palms:
Dip your angled sash brush into the dark hunter green. Fill in the fan palm at the bottom left, using long, confident strokes that taper toward the leaf tips. -
Block in Teal Monstera:
Switch to the teal green paint and a 1-inch flat brush. Fill in the large split-leaf Monstera shapes, carefully edging around the internal holes (fenestrations) you sketched. -
Create the olive tone:
Mix a small amount of hunter green with yellow and a touch of white to create a warm olive color. Use this for the variegated leaf near the top center. -
Paint ghost leaves:
Mix a very pale grey-green by combining white with a tiny drop of green and a dab of the pink wall color (to desaturate it). Paint the background ferns with this sheer, ghostly shade. -
Dry time:
I prefer to let these base blocks dry for at least two hours before starting the detail work to prevent colors from muddying.
Level Up: Texture Contrast
Apply a clear semi-gloss varnish over just the dark green leaves after they cure. This adds a realistic, waxy sheen that contrasts beautifully with the matte pink wall and light background ferns.
Step 4: Details and Veining
-
Mix vein colors:
Create a lighter version of your teal green by adding white. It should be distinct enough to show up against the dry base coat. -
Add Monstera structures:
Using a size 4 round brush, paint the central midrib down the center of the Monstera leaves. Then, pull thin curved lines outward to the leaf edges to create veins. -
Detail the olive leaf:
Use an off-white or cream mixture to paint the complex vein structure on the olive-colored leaf, giving it a graphic, illustrated look. -
Refine palm fronds:
For the feathery palms at the top right, use the tip of a size 8 round brush to flick paint outward, mimicking the natural growth pattern of the needles. -
Clean up edges:
Once the green paint is fully dry, inspect your outlines. If you see any rough spots, use a small brush with the original pink wall paint to crisp up the edges. -
Remove chalk:
Gently wipe away any remaining visible white chalk lines with a damp microfiber cloth.
Enjoy your vibrant indoor jungle that remains perfectly lush no matter the season
The Painted Faux Headboard
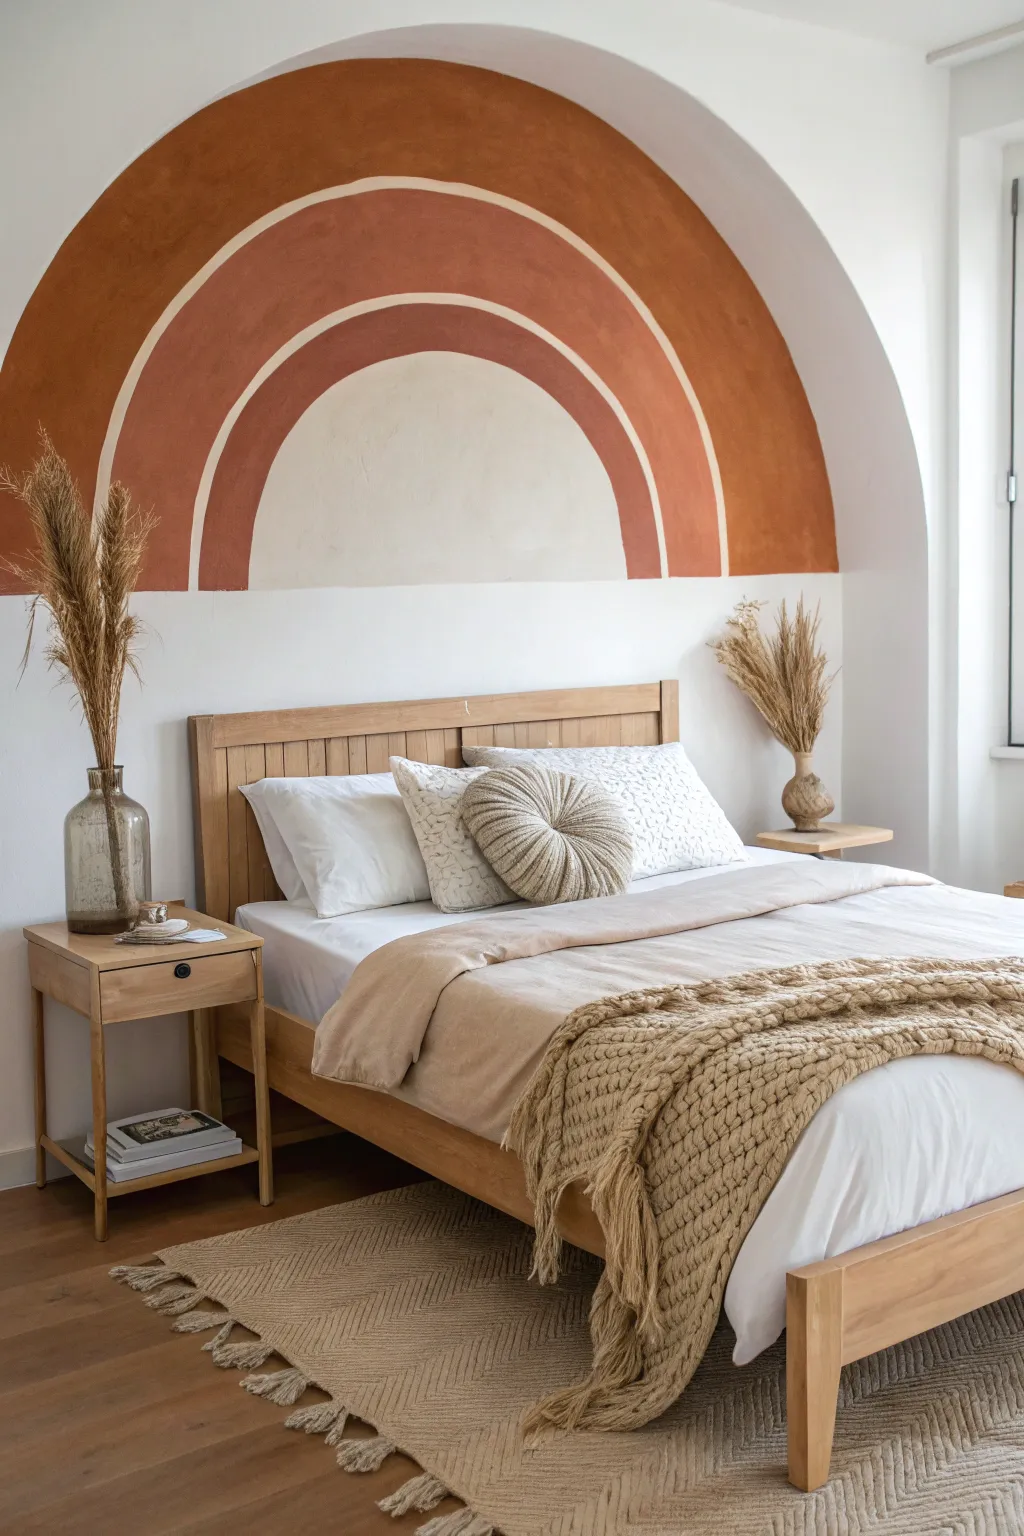
Transform your bedroom into a warm, bohemian sanctuary with this painted arch feature. By layering concentric semi-circles in earthy tones, you create a stunning faux headboard that adds instant height and architectural interest using just paint.
How-To Guide
Materials
- Interior wall paint (Terracotta, Clay, and Cream shades)
- Painter’s tape
- String or non-stretchy twine
- Pencils and eraser
- Push pin or small nail
- Spirit level
- 2-inch angled sash brush
- 4-inch mini roller with tray
Step 1: Preparation & Mapping
-
Prepare the surface:
Move your bed frame away from the wall and wipe the surface down with a damp cloth to remove dust, ensuring the paint adheres smoothly. -
Establish the center:
Measure the width of your bed and mark the center point on the wall; this ensures your arch frames the furniture perfectly. -
Create the horizon line:
Use a long level to draw a light horizontal line across the wall at your desired starting height, typically just below the top of the mattress. -
Protect the bottom edge:
Apply a strip of painter’s tape along this horizontal line to ensure a crisp, straight bottom edge for your artwork. -
Set the pivot point:
Hammer a small nail or push a tack firmly into the wall exactly at the center point of your horizontal line to serve as the anchor for your compass.
Step 2: Drawing the Arches
-
Rig the compass:
Tie a piece of non-stretchy string to a pencil and secure the other end to your center pivot nail. -
Draft the outer arch:
Extend the string to your desired maximum height, keep it taut, and lightly swing the pencil to draw the outermost semi-circle curve. -
Define the outer band:
Shorten the string by about 8 inches (or your preferred thickness) and draw the inner curve of the first large arch. -
Mark the negative space:
Shorten the string again by 1-2 inches to create the gap, then draw the top line for the second colored band. -
Draft the inner band:
Reduce the string length to match the thickness of the first band and draw the inner curve of the second arch. -
Outline the center:
Shorten the string one last time to trace the top of the central solid semi-circle, leaving another small gap of negative space above it.
Shaky Edges?
Don’t stress if your curves aren’t perfect. Once dry, use a small artist’s brush and your original wall color to “cut back” into the shape and refine any wobbly lines.
Step 3: Painting
-
Cut in the outer arch:
dip an angled sash brush into your darkest terracotta paint and carefully trace the pencil lines of the largest arch; I find holding the brush close to the ferrule helps steady my hand on curves. -
Fill the outer band:
Use a mini roller to fill in the body of the outer arch for a consistent texture, blending it into your wet brush strokes. -
Paint the middle arch:
Switch to your medium clay tone and repeat the edging and rolling process for the second arch band, being careful not to bridge the gap between sections. -
Fill the center:
Paint the central semi-circle with your lightest cream shade, outlining the curve first and rolling the middle last. -
Apply second coats:
Allow the first layer to dry completely, then apply a second coat to any areas that look patchy to ensure rich, opaque color. -
Remove tape:
Peel off the bottom painter’s tape slowly at a 45-degree angle while the final coat is still slightly tacky to prevent chipping. -
Clean up details:
Once the paint is fully cured, gently erase any visible pencil marks remaining in the unpainted gaps.
Textured Finish
To mimic the earthy, plaster-like texture seen in the photo, try mixing baking soda into your paint (approx. 1 part soda to 4 parts paint) before applying the final coat.
Step back and admire how this simple geometric design brings a cozy, artistic focus to your room.
Textured Limewash Cloud Effect
Transform a plain surface into a textural masterpiece that mimics the soft, shifting movement of storm clouds. This mineral-based technique creates a matte, velvety suede effect that captures natural light and shadows beautifully.
Step-by-Step Tutorial
Materials
- Limewash paint (stone or greige tone)
- Mineral-based primer (crucial for adhesion)
- Large natural bristle block brush (5-6 inch)
- Painter’s tape
- Drop cloths
- Two clean buckets
- Mixing text/paddle attachment for drill
- Spray bottle with water
- Rags
Step 1: Surface Preparation
-
Protect the area:
Remove all furniture from the wall area and lay down drop cloths, as limewash can be quite splashy due to its thin consistency. -
Tape edges:
Apply high-quality painter’s tape to the ceiling line, baseboards, and adjoining walls, pressing down firmly to prevent bleed-through. -
Apply mineral primer:
Using a standard roller, apply a coat of mineral-based primer specifically designed for limewash. This creates the necessary ‘bite’ for the limestone paint to adhere to. -
Cut in edges:
While the roller work is fresh, use a small brush to ensure the primer covers corners and edges completely. -
Allow to cure:
Let the primer dry completely according to the manufacturer’s instructions, ensuring a uniform, flat base.
Step 2: First Wash Layer
-
Mix the limewash:
Pour your limewash into a clean bucket. Use a drill with a paddle attachment to mix it thoroughly until it reaches a consistency similar to heavy cream. -
Prep the brush:
Dip your large block brush into clean water and shake off the excess. The bristles should be damp but not dripping. -
Load the paint:
Dip the tips of the block brush into the paint, covering about an inch of the bristles. Don’t overload it. -
Begin the texture:
Start at the top corner of the wall. Apply the paint using short, chaotic cross-hatch strokes (creating X shapes). -
Feather the edges:
As you move across the wall, flick the brush tips at the edges of your painted patch to feather the paint out, preventing hard lines where sections join. -
Maintain a wet edge:
Work in irregular sections of about 3×3 feet. I like to move diagonally down the wall to ensure the leading edge stays damp. -
Complete the first coat:
Cover the entire wall. It will look transparent and uneven at this stage—this is normal. -
Let it dry:
Allow the first coat to dry until it is dry to the touch. It will lighten significantly as the limestone calcifies.
Don’t Panic!
Limewash looks dramatically darker and transparent when wet, often resembling wet mud. Do not judge the color or texture until it has fully calcified and dried, which makes it turn pastel and opaque.
Step 3: Building the Cloud Effect
-
Start the second coat:
Once dry, begin the second layer. This is where the ‘cloud’ visual is built. -
Intensify the stroke:
Use the same X-stroke technique, but vary your pressure. Press harder in some spots to deposit more pigment and lighter in others for transparency. -
Overlap randomly:
Overlap your previous strokes in a random pattern. The goal is to avoid any recognizable grid or rows. -
Create distinct clouds:
Identify areas where you want more depth and dab slightly more paint there, feathering it out immediately into the surrounding lighter areas. -
Check from a distance:
Periodically step back 10 feet to view the whole composition. Look for any areas that look too uniform or too heavy. -
Final drying:
Let the wall dry undisturbed. The true variegation and ‘blooming’ effect will only appear once the wall is 100% dry, often overnight. -
Remove tape:
Carefully score the edge of the painter’s tape with a blade and peel it away slowly to reveal crisps lines.
Pro Choice: The Brush
Avoid synthetic brushes. You must use a natural bristle masonry or block brush. Natural bristles hold water differently, releasing the wash unevenly, which is exactly how you get that cloudy magic.
Enjoy the shifting mood of your room as the sun tracks across your new textured masterpiece.
Whimsical Doorway Vines
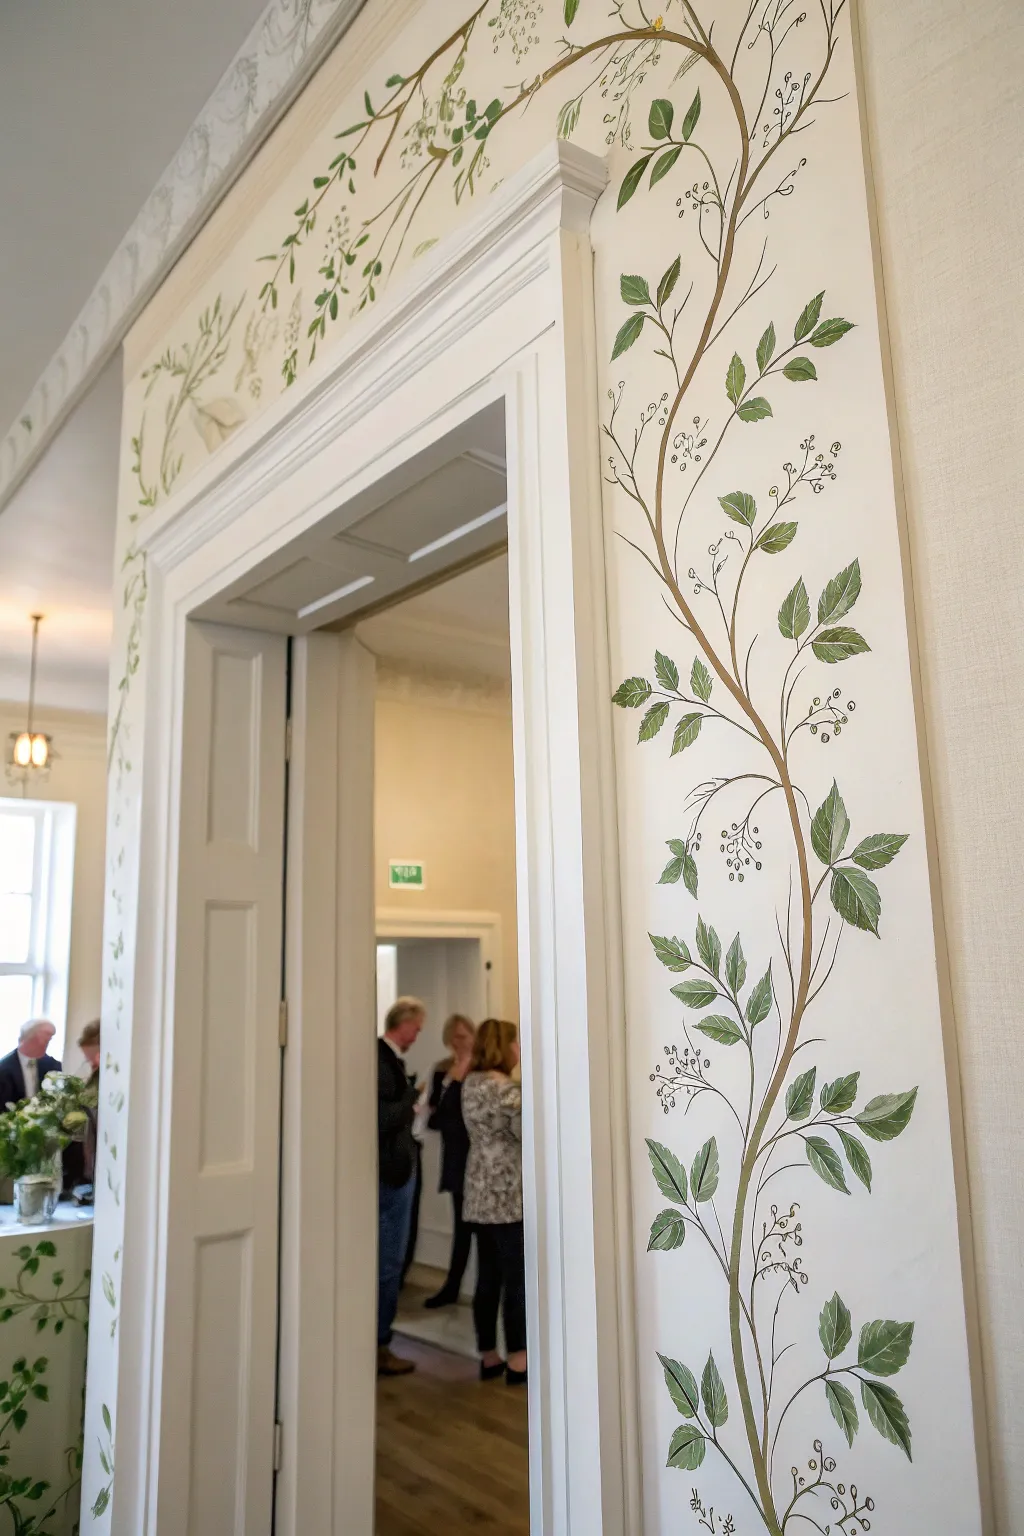
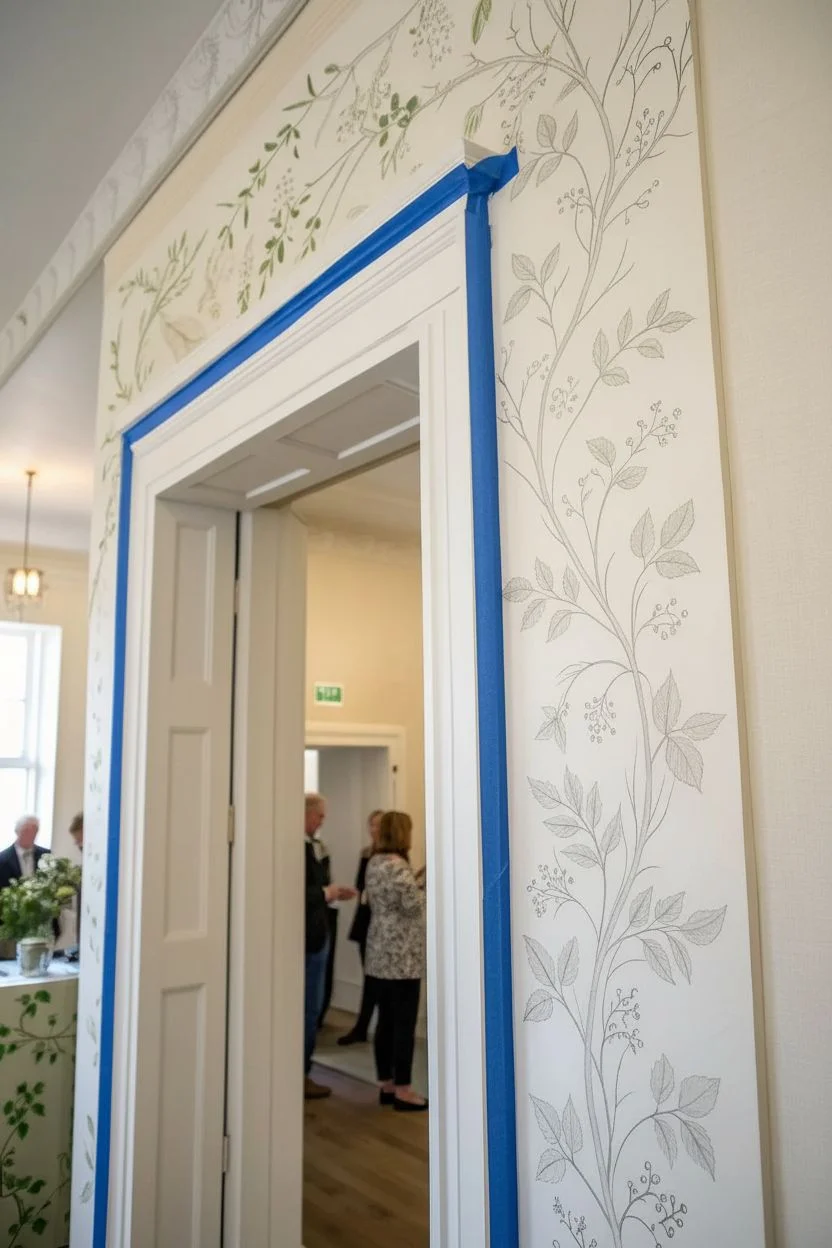
Frame your entryway with the elegance of nature by hand-painting delicate vines that climb up and over the doorframe. This project transforms a plain transitional space into a storybook garden feature using simple brushstrokes and a steady hand.
How-To Guide
Materials
- High-quality acrylic craft paints (Chestnut Brown, Forest Green, Sap Green, White)
- Fine round liner brush (size 0 or 1)
- Small angled shader brush (size 4)
- HB Pencil
- Kneaded eraser
- Painter’s tape
- Palette or paper plate
- Step ladder
Step 1: Planning the Flow
-
Prep the surface:
Wipe down the wall next to and above the doorframe to ensure it is dust-free and dry. -
Protect the trim:
Apply painter’s tape carefully along the edge of the door molding to protect the woodwork from accidental brush slips. -
Sketch the path:
Using a light pencil, sketch a meandering vertical line that winds gently up the wall, mimicking the natural S-curves of a growing vine. -
Extend the design:
Continue sketching the line horizontally across the top of the doorframe, letting it dip slightly to create a draped garland effect. -
Mark placement:
Lightly mark small ticks along the main stem where you plan to place diverging branches and leaf clusters.
Paint Too Sheer?
If your acrylics look streaky, don’t overload the brush. Instead, let the first layer dry completely and apply a second coat for solid, opaque coverage.
Step 2: Root & Stem
-
Prepare the brown paint:
Mix your brown acrylic paint with a tiny drop of water; I find this improves flow and helps create smoother, longer lines. -
Paint the main vine:
Use a size 2 round brush to paint the thickest part of the stem, following your pencil sketch from the floor up. -
Taper the strokes:
As you move higher up the wall, apply slightly less pressure to the brush so the vine naturally thins out. -
Add branches:
Switch to a fine liner brush to paint the delicate offshoot stems, keeping the lines wispy and organic. -
Dry time:
Allow the brown stems to dry completely before moving on to the foliage to keep your colors crisp.
Morning Dew
Add tiny dots of white gloss medium or pearlescent paint to the tips of a few leaves to mimic the look of fresh morning dew catching the light.
Step 3: Foliage & Flourishes
-
Mix green shades:
Squeeze out Forest Green and Sap Green. Mix a little white into the Sap Green to create a highlight shade. -
Form the leaves:
Using the small angled brush, press down to create the wide body of the leaf and lift sharply to form the pointed tip. -
Add texture:
Use the very tip of your detail brush to pull out tiny jagged points along the leaf edges for a realistic serrated look. -
Group foliage:
Paint leaves in clusters of three or five, alternating between dark and light green mixes to create visual depth. -
Paint veins:
Once the leaves are dry, use the liner brush with diluted dark green to paint thin central veins. -
Create buds:
Paint tiny, hollow circles or small dots at the ends of the finest stems to represent flower buds or berries. -
Add tendrils:
Paint whimsical curling tendrils near the buds using your finest brush, swirling the stroke quickly for a fluid look.
Step 4: Final Polish
-
Review and refine:
Step back to check the overall balance, adding a stray leaf or tendril to fill any awkward gaps. -
Clean up:
Gently erase any visible pencil marks with a kneaded eraser once the paint is fully cured. -
Reveal:
Slowly peel away the painter’s tape to reveal the sharp, professional edge against the doorframe.
You now have a charming garden entrance that brings a breath of fresh air to your home interior.
Framed Mural Panels

Transform a blank hallway wall into a breathtaking window to the outdoors with this classical landscape mural project. Using atmospheric perspective and rich autumnal tones, you will create a sense of vast depth and elegance right inside your wainscoting frames.
Step-by-Step
Materials
- High-quality acrylic wall paints (matte)
- Artist acrylic tubes (burnt sienna, yellow ochre, sap green, alizarin crimson, phthalo blue, titanium white, carbon black)
- Acrylic glazing medium
- Painter’s tape (low tack)
- Large 3-inch flat brush (for sky)
- Assorted angular sash brushes
- Fan brush
- Rigger or liner brush
- Sea sponge (optional)
- Spray bottle with water
Step 1: Preparation and The Sky
-
Protect the perimeter:
Begin by carefully applying painter’s tape along the inner edges of your molding or wall frame to protect the woodwork. If you are painting on canvas to install later, stretch and prime your canvas now. -
Lay the sky foundation:
Mix a soft teal-blue for the upper sky, a pale yellow for the mid-section, and a warm peach tone for the horizon line. Apply these colors in horizontal bands, covering the top third of the panel. -
Blend the gradient:
While the paint is still wet, use a clean, slightly damp 3-inch brush to blend the bands together using long, horizontal crisscross strokes. Work quickly to create a seamless transition from the blue down to the peach glow.
Step 2: Atmospheric Depth
-
Paint distant mountains:
Mix a hazy blue-grey color by combining phthalo blue, white, and a touch of black. Paint the silhouette of the distant mountains right along the horizon line where the peach sky ends. -
Add the mist layer:
Mix a very watery glaze using water, glazing medium, and a drop of white paint. Lightly brush this over the base of the mountains to simulate rising morning fog. -
Create the mid-ground forest:
Mix a desaturated deep green using sap green and a touch of blue. Paint the treeline in front of the mountains, using vertical dabbing motions to suggest the tops of evergreen trees without defining every branch.
Pro Tip: Blending
Keep a mister bottle handy. A very light mist of water over your acrylics on the wall keeps the paint workable longer, allowing for that buttery, smooth gradient in the sky without harsh lines.
Step 3: The Golden Meadow
-
Block in the field colors:
For the large grassy meadow, use a large brush to apply a base coat of yellow ochre and raw sienna. Brush in sweeping curves that follow the slope of the land from left to right. -
Add meadow shadows:
While the base is tacky, blend in burnt umber on the left side and in the dips of the field to create rolling hills. I like to keep my strokes loose here to mimic the movement of wind through grass. -
Highlight the field:
Mix a pale wheat color and dry-brush highlights onto the crests of the hills where the imaginary sun hits the grass.
Level Up: Impasto
Mix flexible modeling paste with your acrylics for the foreground flowers and tree bark. This adds physical 3D texture that catches the room’s light, making the painting feel more like a high-end oil work.
Step 4: Foreground and Details
-
Structure the main trees:
On the right side, use a dark brown-black mix to paint the tall, slender trunks of the foreground trees. Let the branches reach high into the sky area, tapering them as they extend outward. -
Add autumn foliage:
Using a sea sponge or an old scruffy brush, dab on the leaves using burnt sienna, rust orange, and deep red. Keep the foliage airy so the sky peeks through the branches. -
Simulate tall grasses:
Switch to a fan brush or liner brush. Load it with light cream and yellow paint to flick vertical grass blades in the immediate foreground at the bottom of the mural. -
Paint the wildflowers:
Dip a small round brush into bright orange and red paint. Dot in clusters of wildflowers among the foreground grass, varying the sizes to show perspective. -
Final highlights:
Add tiny touches of pure white to the tips of the nearest grass blades and the edges of the tree bark to simulate the morning light catching the textures. -
Seal the work:
Once the painting is fully cured (usually 24-48 hours), gently remove the painter’s tape and apply a clear matte varnish to protect the artwork and unify the sheen.
Step back and admire how your new artistic landscape adds a timeless, stately atmosphere to your home gallery.
Trompe-l’œil 2D Vases
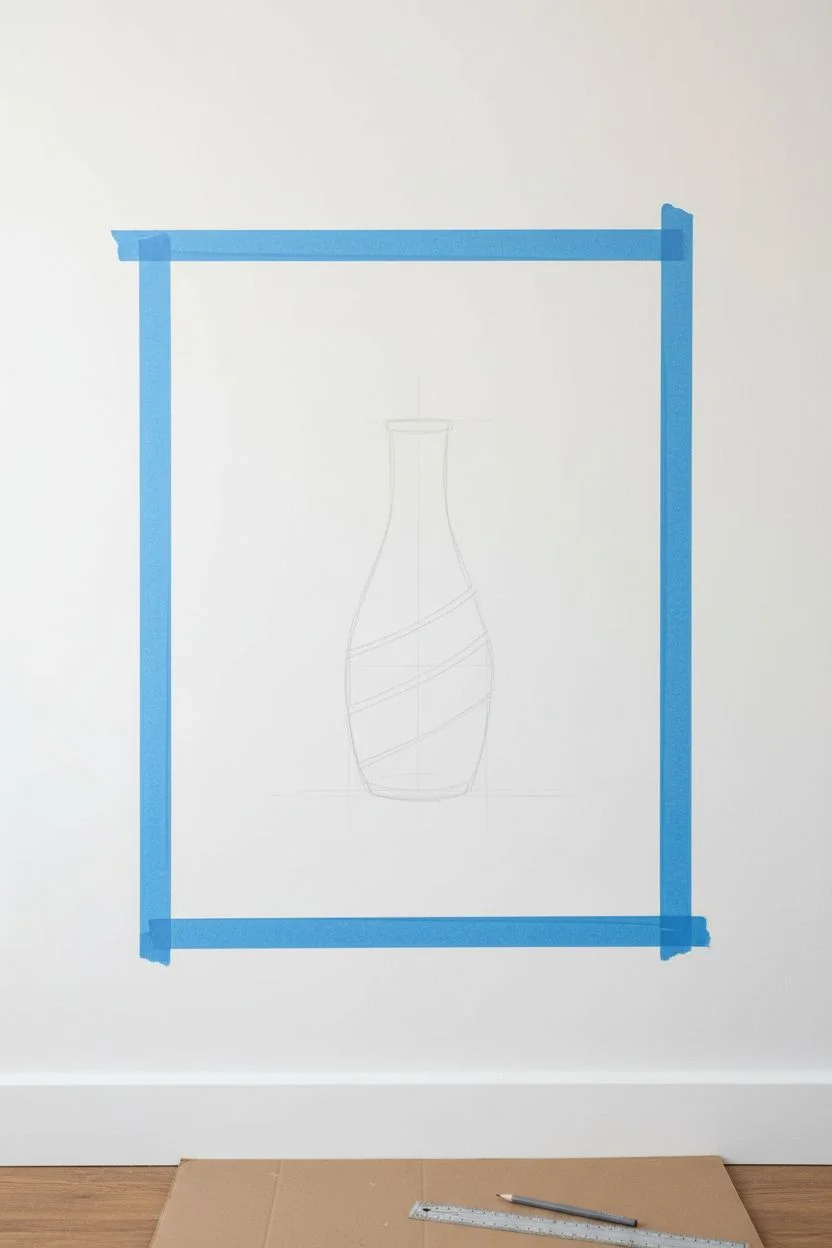
Transform a simple wall into an eye-catching feature with a trompe-l’œil vase painting. This project mimics a vase placed on a surface using clever paint techniques.
Step-by-Step Tutorial
Materials
- Acrylic paints (terracotta, white, beige)
- Painter’s tape
- Fine-tip paintbrush
- Medium-sized paintbrush
- Palette or mixing surface
- Pencil
- Ruler
- Varnish (optional)
Step 1: Prepare Your Canvas
-
Clean the Wall:
Ensure the wall surface is clean and dry. Remove any dust or grease for better paint adhesion. -
Define the Area:
Use painter’s tape to outline the area where you’ll paint the vase. This keeps your work neat and defined.
Fixing Fuzzy Edges
If the paint seeps under the tape, touch up any uneven edges with a fine-tip brush.
Step 2: Sketch Your Design
-
Draw the Basic Shape:
Lightly sketch the outline of the vase using a pencil, creating a tall and narrow shape for a more realistic look. -
Add Geometric Patterns:
Using a ruler, draw simple geometric patterns to give your vase a decorative touch.
Step 3: Paint the Vase
-
Apply Base Layer:
With a medium-sized brush, paint the entire vase shape with terracotta paint. Let it dry thoroughly. -
Create Highlights:
Mix a small amount of white into the terracotta paint to create a lighter shade. Add highlights on one side of the vase for depth. -
Detail with White:
Use pure white to paint over your geometric patterns, making them stand out against the base color.
Unleash Your Colors
Experiment with different colors and patterns to match your room’s theme or decor.
Step 4: Add Textures
-
Mimic Shadows:
Add a touch of beige paint to simulate shadows at the vase’s base and curves, enhancing the 3D effect. -
Blend Carefully:
Gently blend the shadows into the base color with a fine-tip brush for a seamless look.
Step 5: Final Touches
-
Remove the Tape:
Carefully peel off the painter’s tape to reveal clean edges. -
Seal Your Artwork:
Once all paint is dry, apply a clear varnish to protect your design.
Enjoy the stunning trompe-l’œil effect and the compliments from your guests.
Gold Leaf Abstract Accents
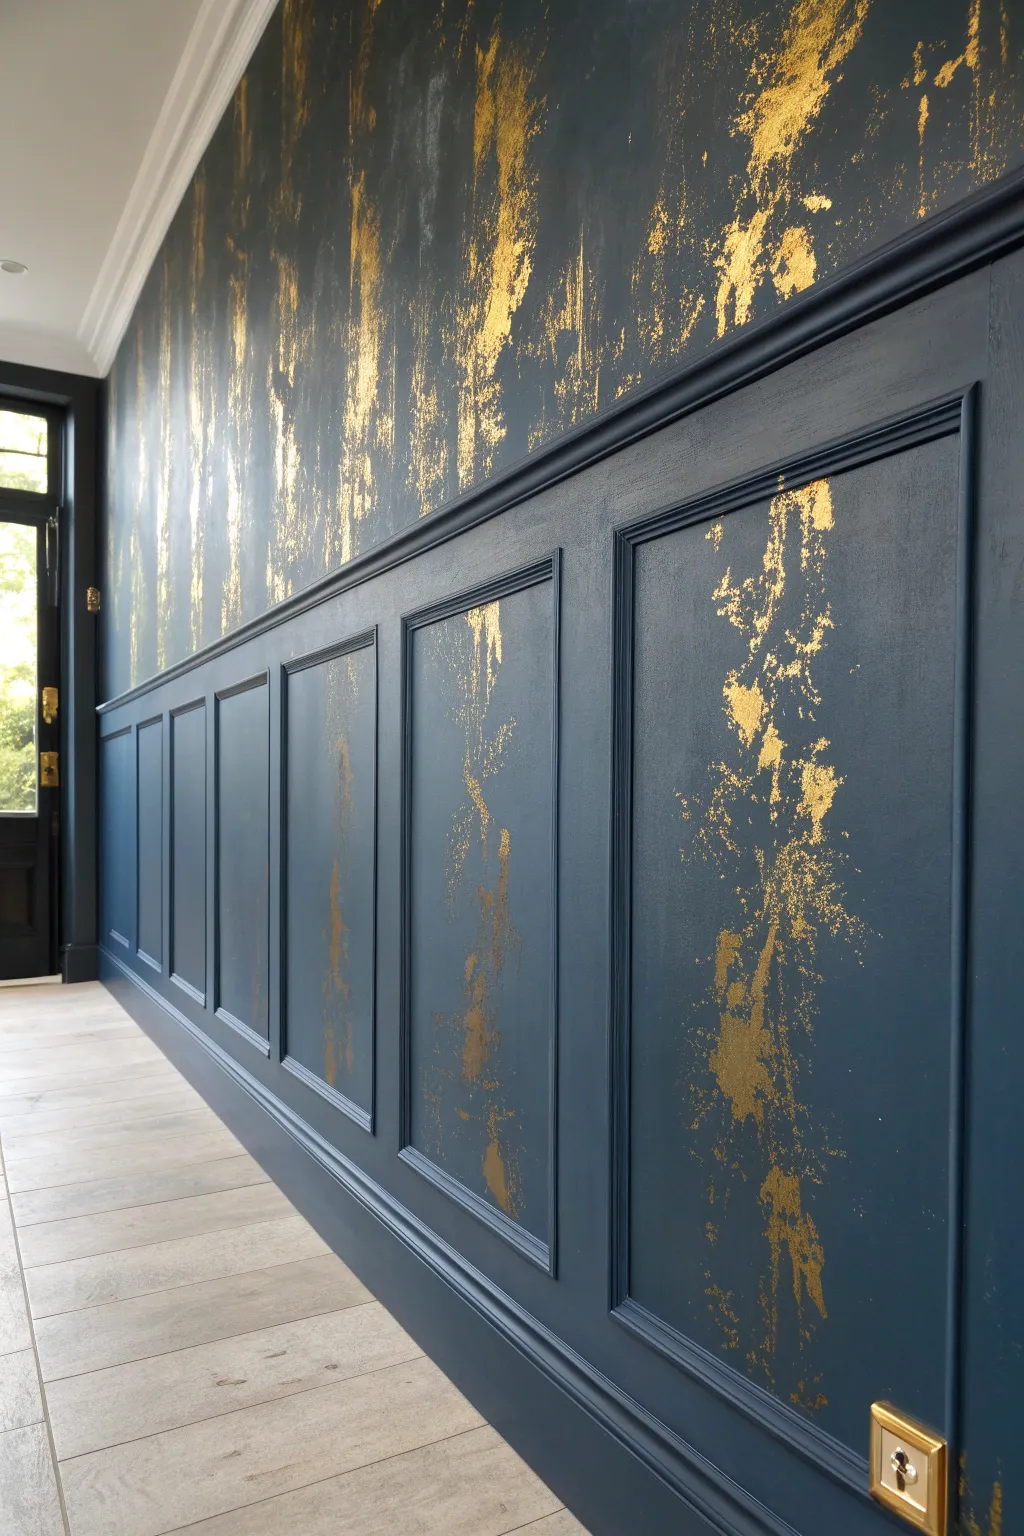
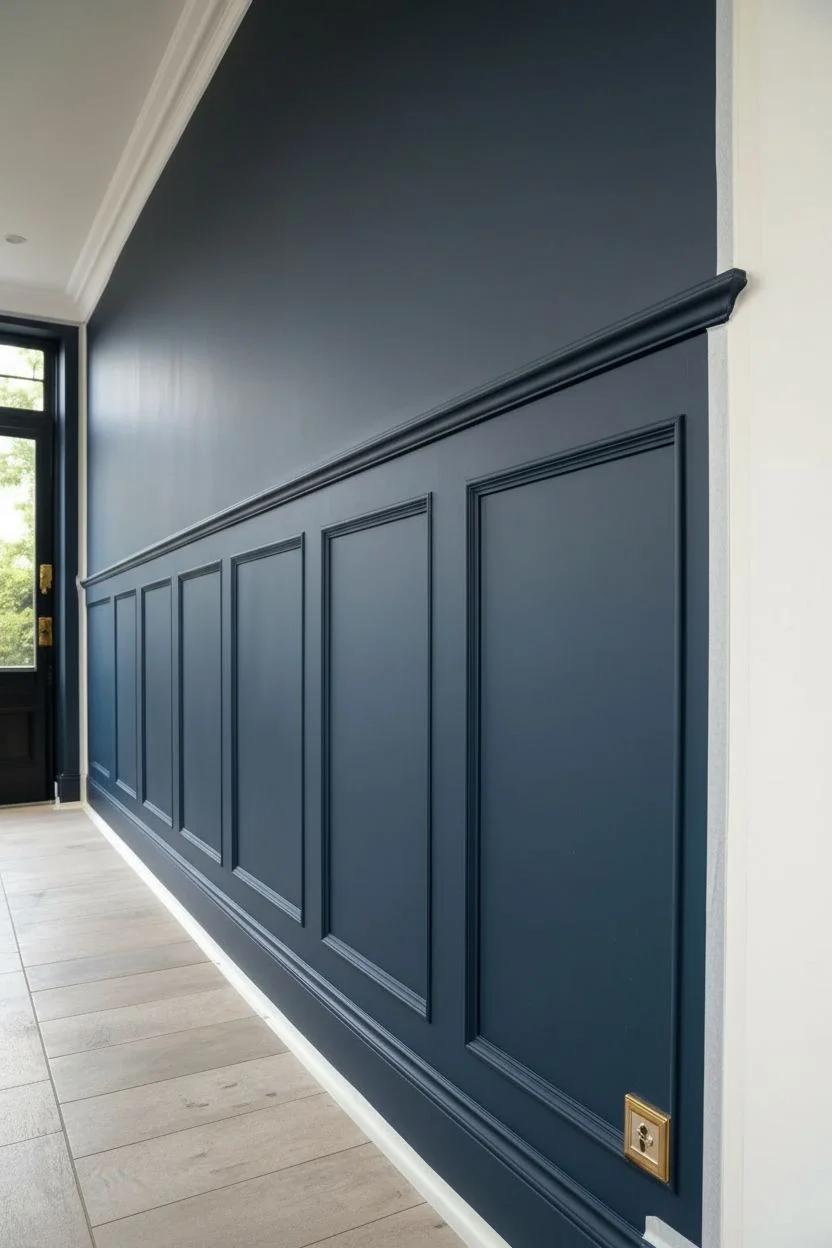
Transform a plain wall or paneled hallway into a dramatic statement piece using the timeless combination of deep navy and gold. This project uses a dry-brush gilding technique to create a distressed, cascading waterfall effect that catches the light beautifully.
Detailed Instructions
Materials
- Deep navy blue interior paint (matte or eggshell finish)
- Imitation gold leaf sheets (loose or transfer)
- Water-based metal leaf adhesive (sizing)
- Inexpensive chip brushes (2-inch width)
- Soft makeup brush or gilding mop
- Painter’s tape
- Drop cloths
- Vacuum with hose attachment
- Clear acrylic sealer spray (gloss or satin)
Step 1: Base Coat Preparation
-
Prep the surface:
Ensure your wall and any wainscoting or molding are clean, dry, and free of dust. Use painter’s tape to mask off the ceiling, baseboards, and any adjacent walls you aren’t painting. -
Cut in the edges:
Using an angled sash brush, paint the navy color along the taped edges, corners, and deep into the crevices of any molding or panel frames. -
Roll the main color:
Use a roller to apply the navy paint to the larger flat surfaces. If you have paneling, watch for drips pooling in the corners of the molding squares. -
Apply a second coat:
Once the first coat is dry to the touch, apply a second coat to ensure a rich, opaque finish. Using a high-quality matte paint really helps the gold pop later. -
Dry completely:
Allow the base paint to cure for at least 24 hours. The wall must be perfectly dry before applying any adhesive, or the gold leaf may stick where you don’t want it.
Too Heavy-Handed?
If a patch of gold looks too solid or blocky, use a piece of masking tape to gently lift some of the leaf off. This re-exposes the blue and restores the distressed, artistic look.
Step 2: Creating the Sticky Pattern
-
Prepare the adhesive:
Pour a small amount of water-based metal leaf sizing into a disposable plastic cup or tray. -
Load the chip brush:
Dip just the tips of a stiff, dry chip brush into the sizing. Dab excess off on a paper towel; you want the brush to be semi-dry, not dripping. -
Drag vertical strokes:
Starting from the top of your intended art area, drag the brush vertically down the wall in long, sweeping motions to create random streaks. -
Vary the pressure:
Press harder in some spots and lighter in others to create irregular patches. I like to twist the wrist slightly to create natural breaks in the pattern. -
Cross the molding:
If working over wainscoting, drag the brush right over the molding ridges. The gold helps highlight the architectural details. -
Wait for tackiness:
Allow the sizing to dry until it turns from milky blue to clear. It should feel sticky on your finger, like the back of a postage stamp. This usually takes 15 to 30 minutes.
Seamless Hardware
Don’t let white plastic outlets ruin the vibe. Paint your switch plates the same navy blue, then add a small flake of gold leaf to the corner before sealing for a custom, high-end finish.
Step 3: Applying the Gold
-
Apply the leaf:
Pick up a sheet of gold leaf and gently press it against the sticky areas on the wall. The leaf is delicate, so shield it from drafts. -
Press into place:
Use the backing paper or a soft, dry cloth to pat the gold leaf onto the sizing. Don’t worry if the sheet cracks; specific jagged edges are part of the aesthetic. -
Cover all adhesive:
Continue applying sheets until all the sticky sections you painted are covered with gold. Overlapping sheets is perfectly fine. -
Brush off excess:
Once the wall is covered, take a soft makeup brush and vigorously brush over the gold surface. This ‘burnishing’ removes the loose flakes where there was no glue. -
Clean the crevices:
Pay special attention to the corners of the molding boxes, using the soft brush to sweep away loose gold dust caught on the ledges. -
Collect the debris:
Gold leafing creates a lot of metallic dust. Use a vacuum with a hose attachment to carefully clean the floor and baseboards. -
Seal the work:
Spray a thin layer of clear acrylic sealer over the gold areas. This prevents the copper content in imitation gold leaf from tarnishing or turning green over time.
Step back and admire how your new feature wall captures the light and adds sophisticated drama to the room


Have a question or want to share your own experience? I'd love to hear from you in the comments below!