Painting functional ceramics is one of the most rewarding ways to merge your artistic expression with daily utility. Let’s explore some creative themes specifically designed for the unique flow of a spoon rest, transforming a plain bisque piece into a kitchen centerpiece.
Classic Sicilian Lemons

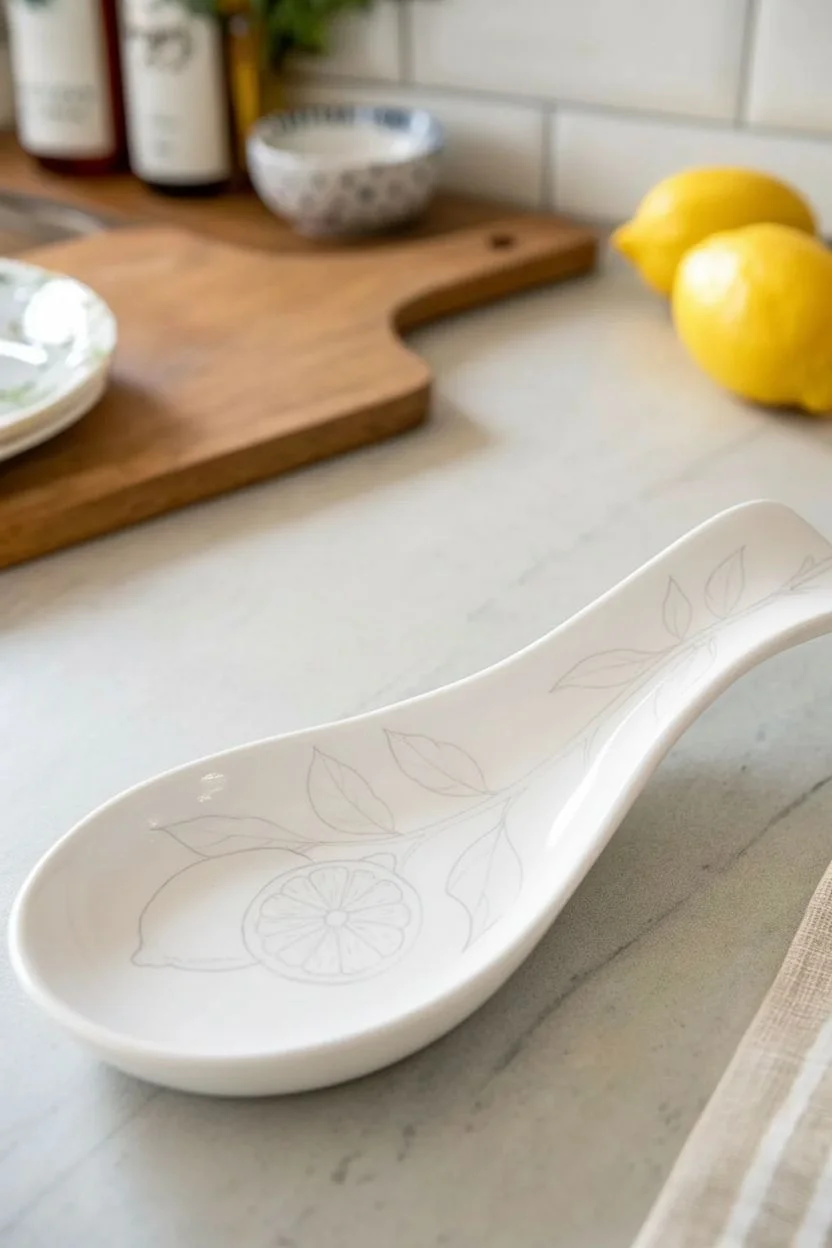
Bring the warmth of the Mediterranean to your kitchen counter with this elegant citrus design. Using simple ceramic paints, you will recreate the translucent, watercolor-style look of classic Italian pottery featuring a vibrant lemon and fresh foliage.
How-To Guide
Materials
- White ceramic spoon rest (glazed)
- Porcelain or glass paints (Lemon Yellow, Golden Ochre, Olive Green, Forest Green, Brown, Anthracite Grey)
- High-gloss glaze medium (optional)
- Round synthetic brushes (sizes 2 and 4)
- Fine liner brush (size 00)
- Rubbing alcohol and cotton pads
- Pencil
- Palette or ceramic tile
- Oven for curing
Step 1: Preparation and Sketching
-
Clean the surface:
Wipe down the entire spoon rest with rubbing alcohol to remove any oils or fingerprints. This ensures the paint adheres perfectly to the glaze. -
Map out the design:
Using a pencil, lightly sketch the branch running diagonally from the handle down to the bowl. Draw an oval for the whole lemon on the left and a circle for the slice on the right. -
Refine the sketch:
Add the outlines of the leaves attached to the branch and lightly mark the segments inside the lemon slice circle. Don’t worry about graphite marks; they will wash off or burn away later.
Clean Edges
Make a mistake? Since ceramic paint is slippery on glazing, simply use a damp cotton swab or a rubber texture tool to wipe away wet errors instantly without leaving a stain.
Step 2: painting the Fruit
-
Paint the lemon base:
Mix a small amount of glazing medium with Lemon Yellow to increase transparency. Paint the entire body of the whole lemon and the outer rind ring of the slice. -
Fill the slice:
Using the same diluted yellow, fill in the triangular segments of the lemon slice, leaving thin white gaps between them to represent the pith. -
Add dimension:
While the yellow is still slightly tacky, mix a tiny drop of Golden Ochre into your yellow. Apply this to the bottom curve of the whole lemon to create a rounded shadow effect. -
Texture the peel:
Take your fine liner brush with undiluted ochre and add tiny, random stippling dots near the bottom of the lemon skin for that pitted citrus texture. -
Detail the slice center:
Paint a very small, pale starburst shape in the center of the slice using a mix of white (or the stunning white of the ceramic) and pale yellow.
Step 3: Adding Greenery and Branches
-
Paint the main branch:
Use the Brown paint and a liner brush to trace the branch stem. Vary the pressure on your brush to make the branch look natural—thicker at the handle, thinning as it reaches the fruit. -
Base coat the leaves:
With the size 4 round brush, fill in the leaf shapes with Olive Green. I like to keep this layer quite watery so the white ceramic shines through, mimicking watercolor. -
Shade the foliage:
Load the tip of your brush with Forest Green and blend it into the base of the leaves and along one side of each leaf to create depth and curvature. -
Add leaf veins:
Once the leaves are dry to the touch, use the liner brush and dark green paint to draw a thin central vein and delicate side veins on each leaf. -
Paint decorative sprigs:
Add tiny, wispy stems coming off the main branch using the liner brush and Grey or Green paint. Add tiny dots at the ends to mimic small buds.
Pro Tip: The Watercolor Look
To get that artistic ‘fade’ seen in the image, load your brush with water or medium first, then pick up pigment on just the tip. Paint creates a natural gradient as you pull the stroke.
Step 4: Finishing Touches
-
Paint the yellow rim:
Load a round brush with Lemon Yellow. Carefully drag the belly of the brush along the top edge of the spoon rest to create a smooth, colorful border. -
Add the shadow line:
For a sophisticated look, paint a very fine line of Anthracite Grey or diluted Brown just inside the yellow rim on the handle area, creating a framed effect. -
Final outline check:
If you want a sharper illustration style, use your thinnest liner brush and watery Grey paint to loosely outline the bottom of the lemons and leaves. -
Dry the project:
Allow the spoon rest to air dry for at least 24 hours. The paint must be completely moisture-free before baking. -
Bake to set:
Place the spoon rest in a cool oven, then set the temperature to 300°F (150°C). Bake for 35 minutes, then turn the oven off and let it cool completely inside.
Now you have a durable, custom piece of Italian-inspired art ready to brighten up your cooking routine


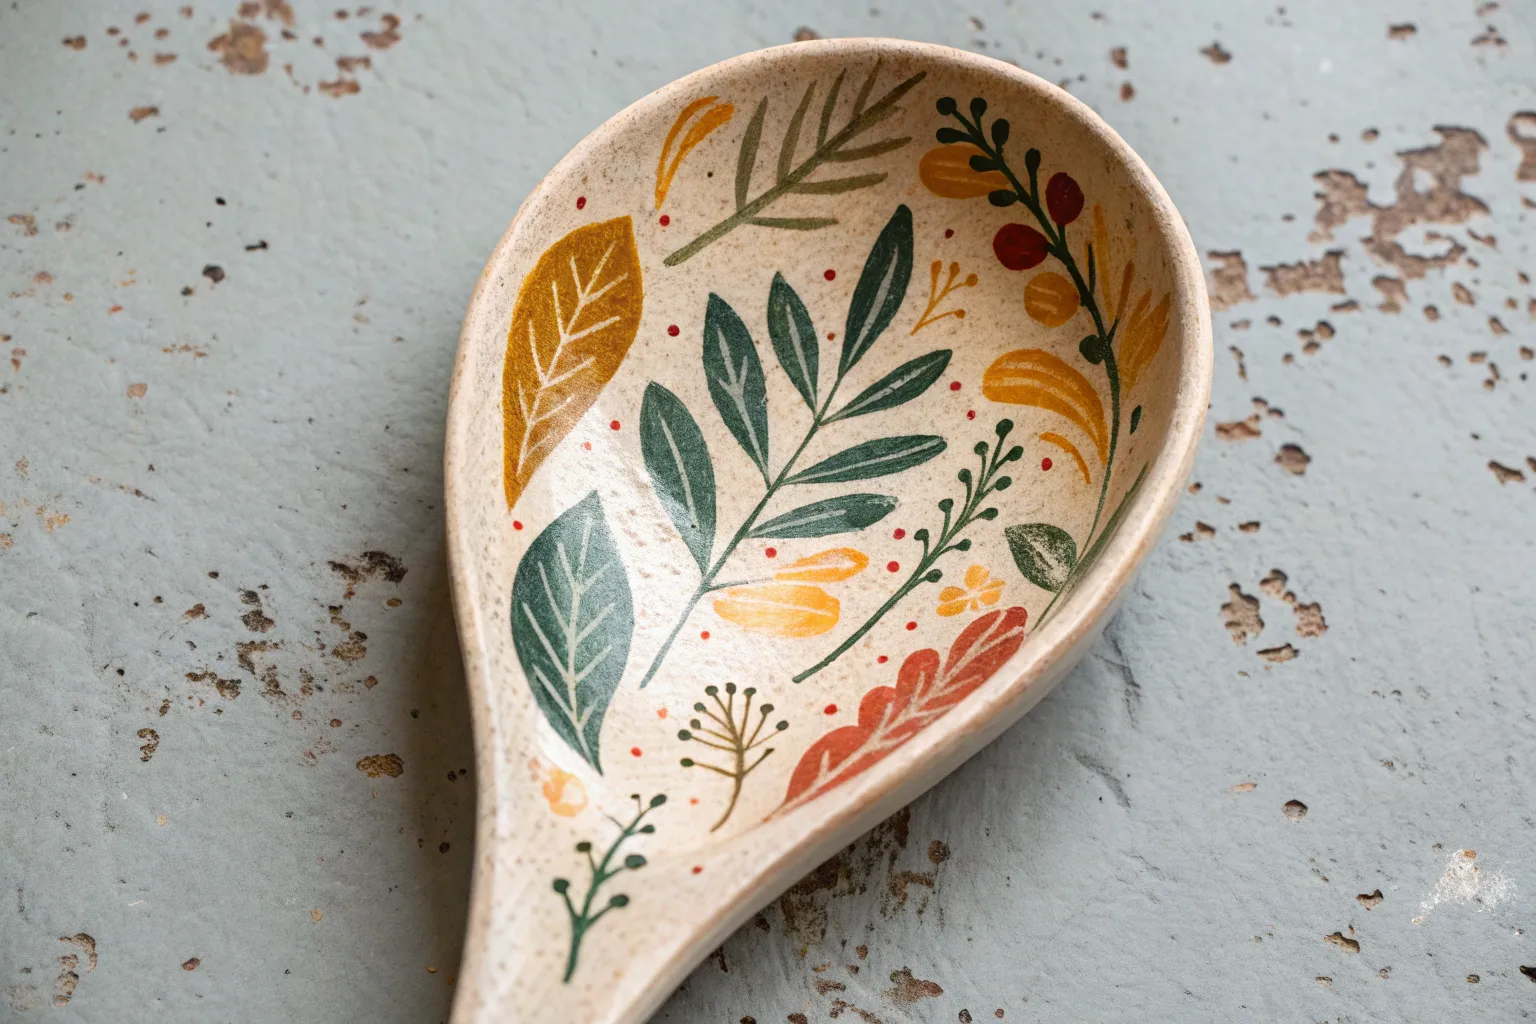
Olive Branch Flow
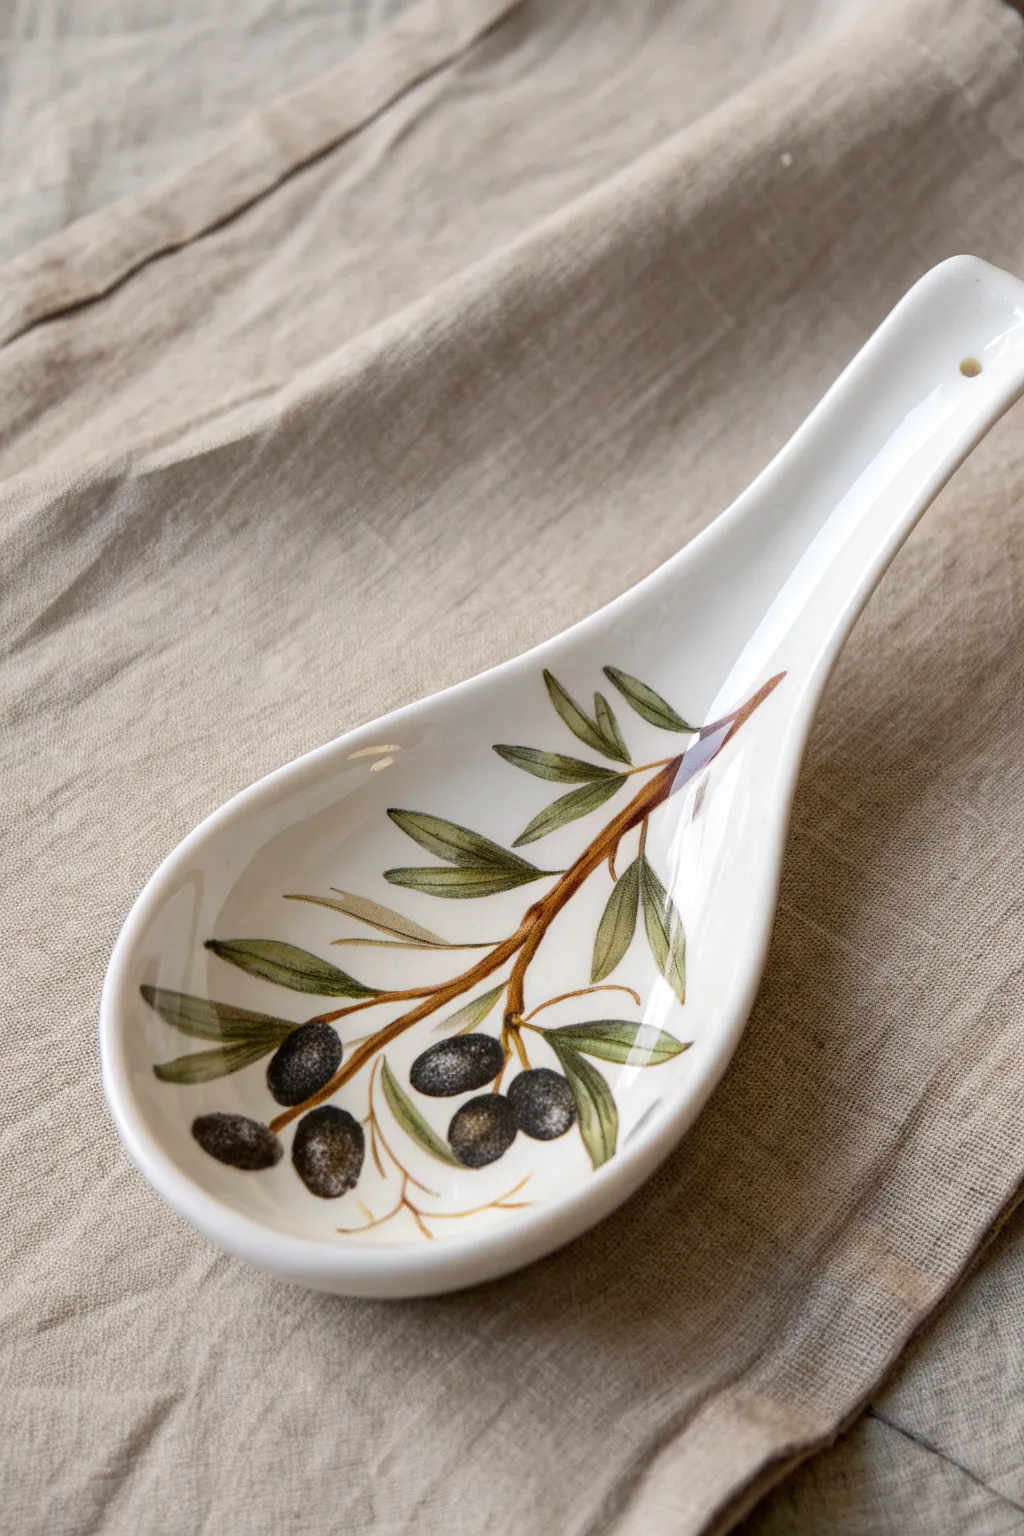
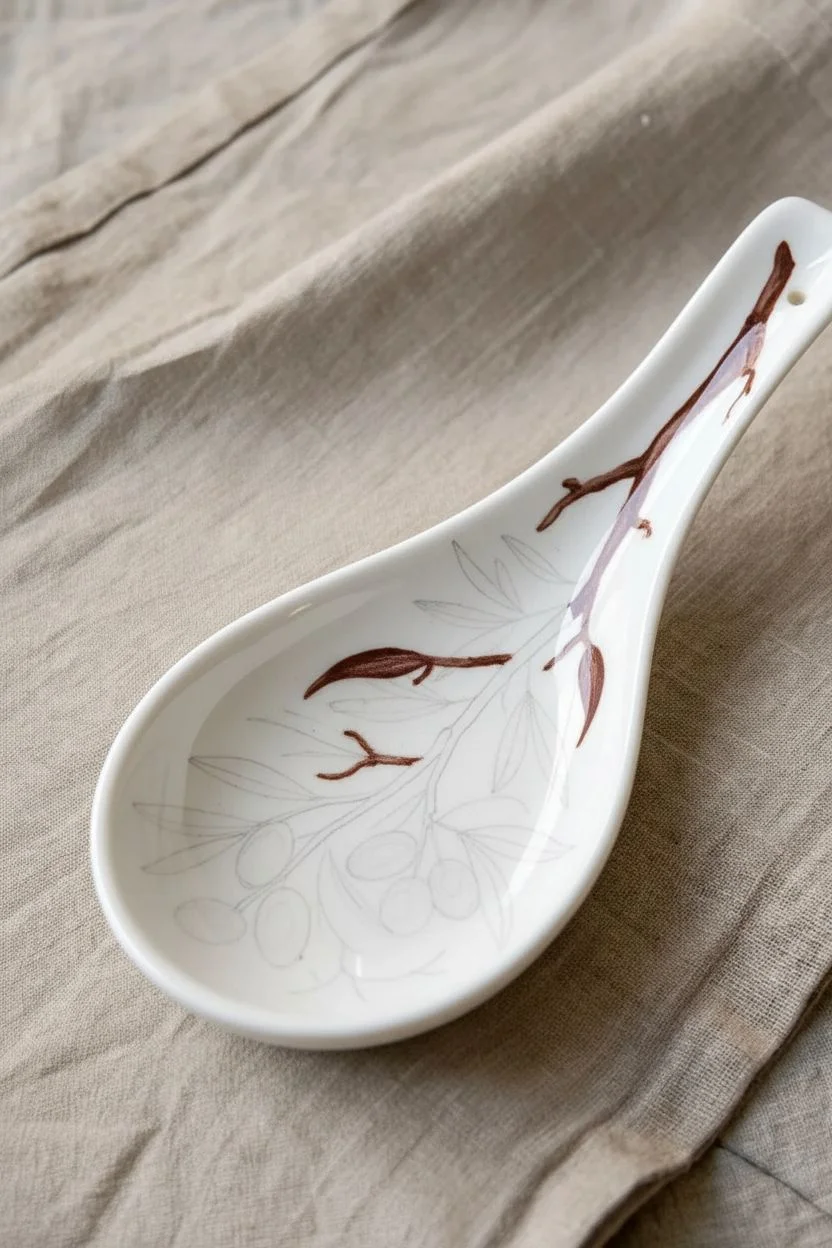
Transform a plain white ceramic blank into an Italian-inspired kitchen staple with this delicate painting project. Using simple brushstrokes to create an organic flow, you’ll capture the rustic elegance of ripening olives and verdant leaves.
Step-by-Step
Materials
- White ceramic spoon rest
- Gloss enamel or porcelain paints (Olive Green, Burnt Umber, Yellow Ochre, Black, Deep Purple)
- Rubbing alcohol
- Round brush (size 4)
- Detail liner brush (size 00 or 10/0)
- Soft pencil (B or 2B)
- Paper towels
- Palette
Step 1: Preparation & Structure
-
Clean everything:
Wipe the entire surface of the spoon rest with rubbing alcohol and a paper towel to remove oils and fingerprints, ensuring the paint adheres perfectly. -
Map the flow:
Using your soft pencil, lightly sketch a single curved line starting from the neck of the handle and swooping down into the center of the bowl. -
Mark placement:
Lightly draw small ovals where you want your olives to sit, clustering them near the bottom of the branch, and mark the general direction for the main leaves. -
Mix the wood tone:
On your palette, mix Burnt Umber with a tiny drop of Black to create a deep, rich wood color. Thin it slightly with water or medium if the paint feels too thick. -
Paint the main branch:
Using the liner brush, paint along your main pencil line. Apply more pressure at the top (handle side) and lift gradually as you move down to taper the branch. -
Add twig offshoots:
Paint shorter, thinner lines branching off the main stem to hold the leaves, keeping your movements quick and fluid to avoid shaky lines.
Pro Tip: Texture is Key
For the olives, don’t aim for a perfect glossy finish. Dab your brush slightly dry to create a micro-texture. This mimics the waxy, dusty bloom often found on real ripe olives.
Step 2: Foliage & Fruit
-
Create base green:
Mix Olive Green with a touch of Yellow Ochre. This will serve as the warm, sun-lit base color for your leaves. -
Paint leaf shapes:
Load the size 4 round brush. Start at the stem, press the belly of the brush down to widen the stroke, then lift as you pull away to create a sharp leaf tip. -
Add depth:
While the green is still slightly wet, dip just the tip of your brush into a darker green and streak it along the bottom edge of a few leaves for natural shading. -
Vary the tones:
Paint a few smaller, top-facing leaves using a lighter mix (more Yellow Ochre) to simulate new growth catching the light. -
Connect the leaves:
Use your liner brush and the brown mix to ensure every leaf is physically connected to a branch with a tiny, delicate stem. -
Mix the olive hue:
Combine Black with a small amount of Deep Purple and Burnt Umber. Real black olives have complex undertones, not just flat darkness. -
Paint the olives:
Fill in your oval sketches with this dark mixture. I like to use a stippling motion (dabbing vertical dots) here rather than smooth strokes to give the olives a textured, realistic skin. -
Add olive stems:
Use the liner brush to paint very fine brown connectors from the branch to the tops of your olives.
Step 3: Details & Curing
-
Highlight the fruit:
Mix a tiny bit of white into your olive color to make a dark grey. Dab a faint highlight on the upper curve of each olive to make them look round. -
Define leaf veins:
With the thinnest liner brush and watered-down brown paint, drag a whisper-thin line down the center of the largest leaves. -
Check balance:
Look at the composition from a distance. If a spot looks empty, add a small floating leaf or a tiny twig extension. -
Clean up:
Use a damp cotton swab or toothpick to gently scrape away any paint that went outside your intended lines or any visible pencil marks. -
Dry thoroughly:
Let the piece air dry for at least 24 hours. The paint must be fully dehydrated before heat setting. -
Bake to set:
Place the spoon rest in a cool oven, set to 300°F (150°C), and bake for 35 minutes. Turn the oven off and let it cool completely inside before removing.
Level Up: Gilded Edge
Once the main painting is dry, use a metallic gold porcelain paint pen to trace the very rim of the spoon rest. This adds a classic Italian ceramic look that frames the artwork beautifully.
Now you have a stunning, functional piece of art ready to cradle your messy sauce spoons with style.


Farmhouse Rooster
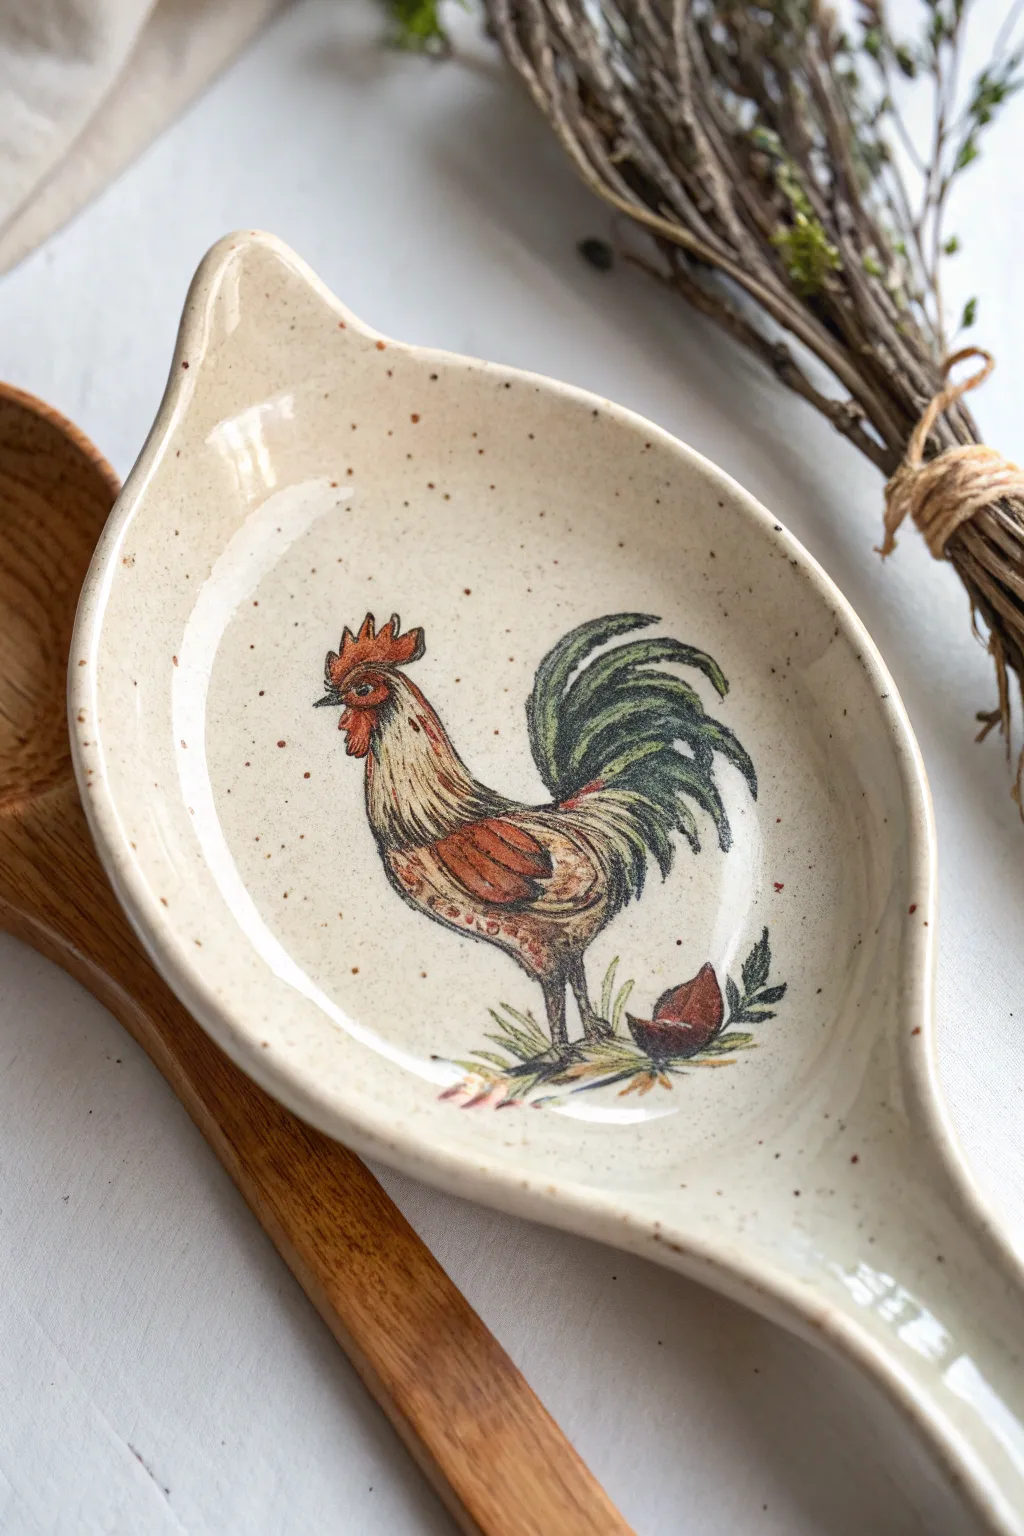
Bring a touch of French country charm to your kitchen with this classic rooster design featuring earthy tones and a delightful speckled finish. This project relies on layering fine strokes to mimic the look of a vintage illustration on ceramic.
How-To Guide
Materials
- Bisque ceramic spoon rest
- Speckled oatmeal or cream underglaze
- Underglazes: Hunter Green, Burnt Sienna, Golden Ochre, Barn Red, Jet Black
- Fan brush (for background)
- Round brush (size 4)
- Fine liner brush (size 00 or 000)
- Pencil
- Clear dipping or brushing glaze
- Damp sponge
Step 1: Setting the Stage
-
Clean surface:
Begin by wiping down your bisque spoon rest with a damp sponge to remove any dust that might resist the paint. -
Apply background:
Using a fan brush, apply three even crisscross coats of a speckled oatmeal or cream underglaze to the entire top surface. -
Let it cure:
Allow the background to dry until it is chalky and cool to the touch before starting your design. -
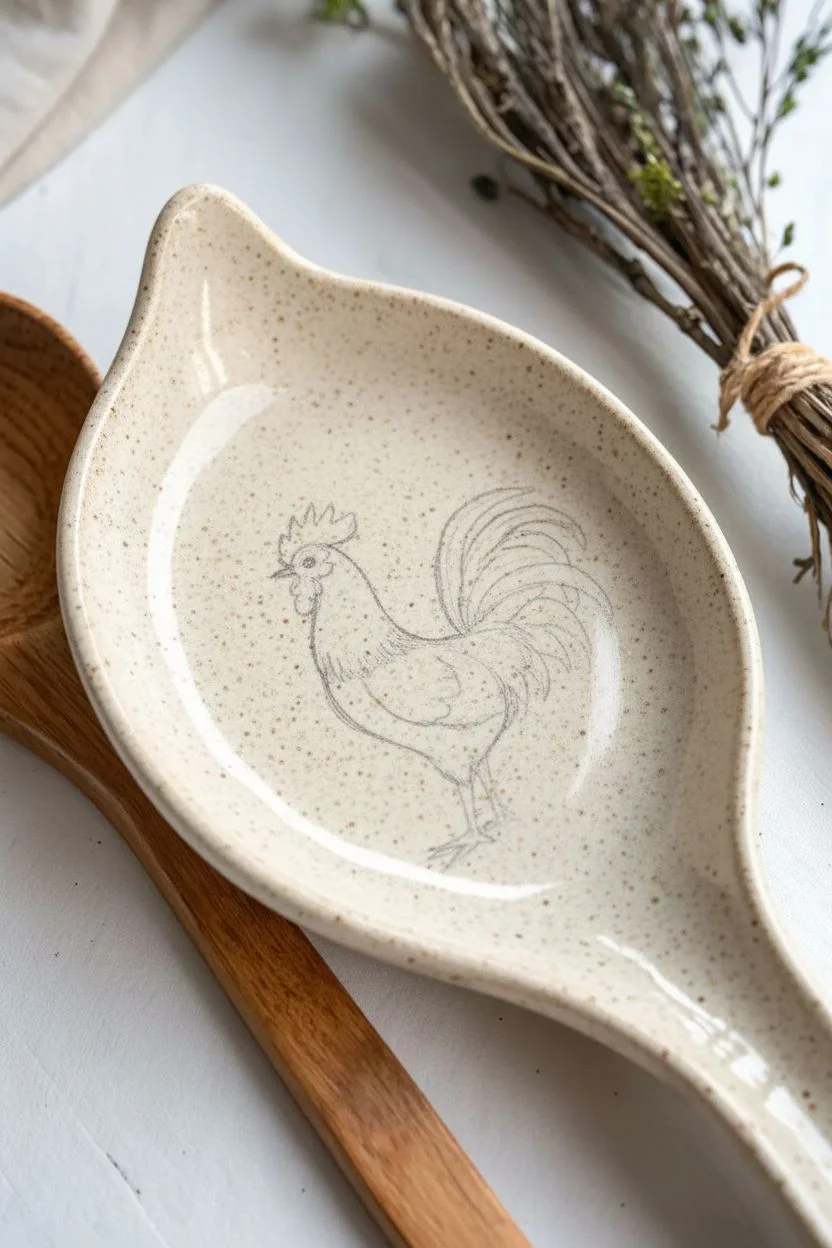
Sketch the silhouette:
Lightly sketch the outline of the rooster in the center of the bowl with a pencil; don’t worry about marks, as the graphite will burn off in the kiln.
Step 2: Blocking the Colors
-
Paint the comb:
Load your round brush with Barn Red and fill in the rooster’s comb and wattle with careful, solid dabs of color. -
Neck base:
Wash in a light layer of Golden Ochre on the neck area, allowing it to fade slightly as it moves toward the body. -
Body warmth:
Fill the wing and lower body area with a diluted wash of Burnt Sienna to create a warm, rusty undertone. -
Tail foundation:
Paint sweeping, curved strokes of Hunter Green to establish the shape of the tail feathers, letting the ends taper off naturally.
Pro Tip: Faux Speckles
If you don’t have speckled pottery paint, use a plain cream base. Flick a toothbrush loaded with thinned brown paint over the wet base to create your own organic speckles.
Step 3: Feather Texture
-
Neck details:
Using the tip of your round brush, add thin streaks of Burnt Sienna over the dried Ochre neck to create the look of hackle feathers. -
Wing definition:
Layer darker, shorter strokes of Burnt Sienna on the wing to suggest overlapped feathers, keeping the edges slightly rough. -
Tail depth:
Add a few strokes of black or dark brown mixed with green into the tail area to separate the individual plumes. -
Grounding elements:
Paint a few simple, jagged blades of grass near the feet using a mix of green and ochre to ground the figure. -
Adding the egg:
Paint a small, broken eggshell shape near the feet using the Barn Red or Rust color for a narrative touch.
Level Up: Rim Detail
Use a damp sponge lightly dipped in Burnt Sienna to wipe the very edge of the spoon rest rim. This creates a distressed, vintage border that frames the art perfection.
Step 4: Fine Lines & Glazing
-
Prepare liner brush:
Thin your Jet Black underglaze slightly with water until it has an ink-like consistency that flows smoothly. -
Outline the beak:
Carefully outline the beak and add a tiny dot for the eye, leaving a speck of white for the highlight if possible. -
Sketch style outline:
Use the liner brush to loosely outline the rooster’s body, using broken, scratchy lines to mimic the illustrative style shown in the photo. -
Feather accents:
I prefer to drag very fine black lines through the green tail feathers to emphasize their curve and movement. -
Leg details:
Draw the legs and feet using thin lines, adding small claws at the tips. -
Final clear coat:
Once the underglaze is completely dry, apply your clear brushing glaze or dip the piece, then fire according to your clay body’s specifications.
Place this charming piece by your stove to keep your counters clean with farmhouse flair.


Delft Blue Patterns
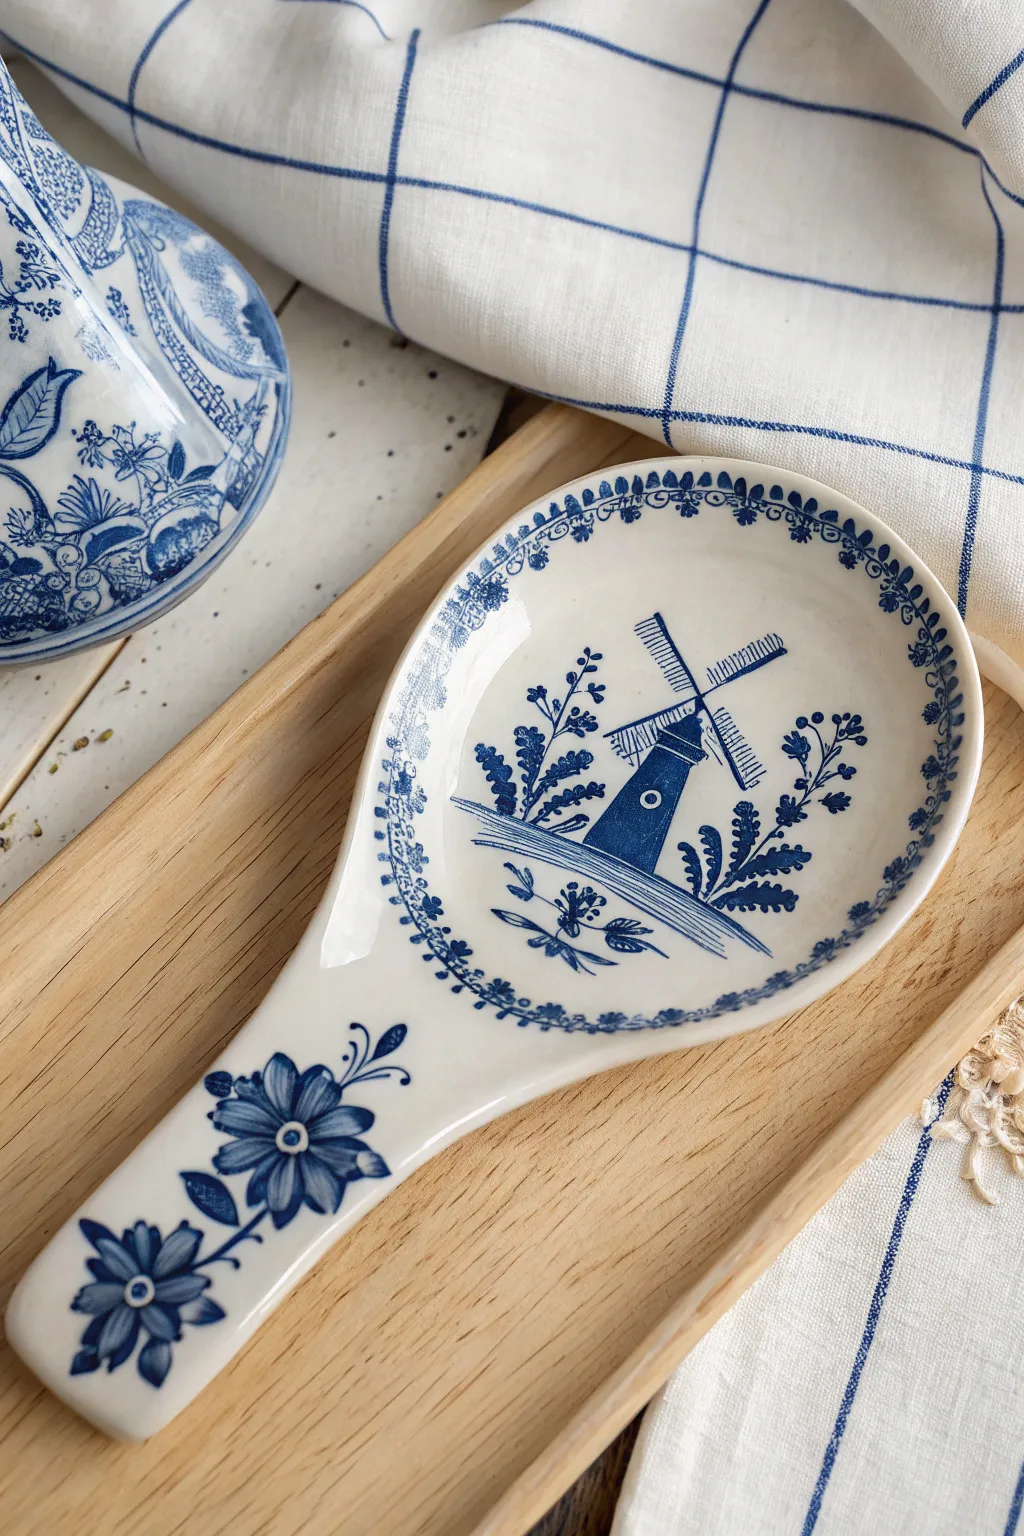
Bring a touch of Dutch tradition to your kitchen with this elegant spoon rest featuring the iconic blue and white pottery style. This project replicates the detailed windmill scene and stylized floral motifs using cobalt underglaze for an authentic ceramic look.
Detailed Instructions
Materials
- Ceramic bisque spoon rest
- Cobalt blue underglaze
- Clear transparent glaze
- Synthetic liner brush (size 00 or 000)
- Round brush (size 2 or 4)
- Pencil (HB)
- Clean sponge and water context
- Palette or small tile
Step 1: Preparation & Sketching
-
Clean the surface:
Wipe down your bisque spoon rest with a damp sponge to remove any dust that might interfere with the glaze adhesion. -
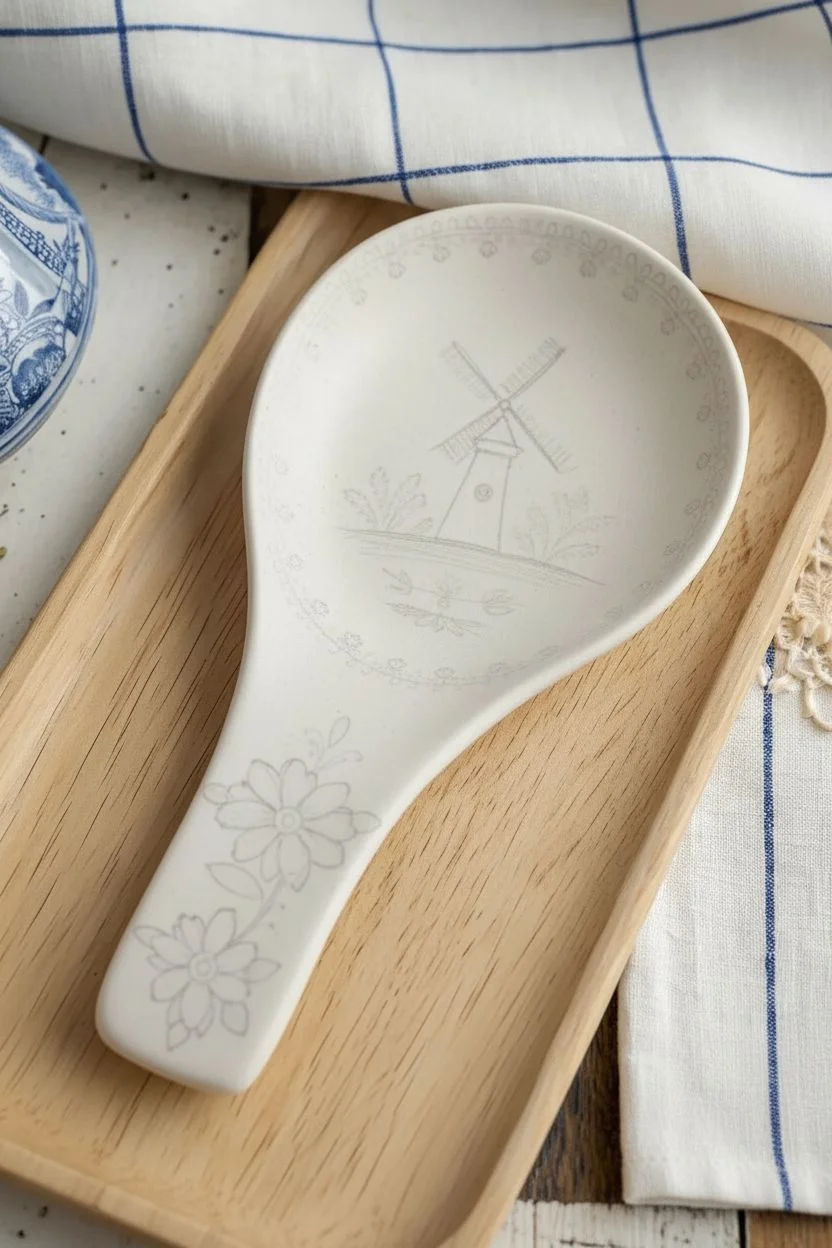
Sketch the centerpiece:
Using a pencil, lightly draw the windmill in the center of the bowl and a horizontal line for the ground. Don’t worry about erasing; the graphite will burn away in the kiln. -
Map the flowers:
Sketch the placement of the two large flowers on the handle and the decorative border around the inner rim of the bowl.
Step 2: Painting the Windmill Scene
-
Outline the structure:
Load your liner brush with cobalt blue and carefully outline the body of the windmill. Keep your hand steady to create crisp, dark lines. -
Fill the body:
Fill in the windmill’s body with solid blue, but leave a small circular area unpainted near the center to represent the window or axle point. -
Add the blades:
With the tip of your liner brush, paint the four blades. Add tiny horizontal hatch marks across each blade to mimic the lattice structure. -
Create the ground:
Paint a few horizontal strokes beneath the windmill to establish the ground, tapering the lines at the ends for a stylistic look. -
Add flanking foliage:
Paint the fern-like bushes on either side of the windmill. I find it easiest to start at the stem and press down slightly as I pull the brush outward to create leafy shapes. -
Detail the foreground:
Add the small, symmetrical floral sprig at the very bottom center of the scenic picture, just below your ground lines.
Clean Lines Hack
If you struggle with unsteady hands on the geometric windmill blades, you can use thin automotive masking tape (1/8 inch) to block out the straight lines before painting.
Step 3: Border & Handle Details
-
Paint the rim border:
Using the very tip of your brush, create the repetitive floral pattern around the inner rim. Think of these as small ‘C’ shapes or scallops containing tiny dots. -
Start the handle flowers:
Moving to the handle, paint the small center circles for the two main flowers using a solid dab of blue. -
Create the petals:
Load your round brush nicely. Place the tip near the flower center, press down to widen the bristle, and lift as you pull away to create the teardrop petal shap. -
Add flower details:
Once the blue petals are dry, you can use a fine point to add a tiny dot of white glaze in the center of the blue pistil if you want extra contrast, or leave as is. -
Connect the vines:
Paint thin, curving stems connecting the flowers to the main body of the spoon rest, adding small leaves along the curves. -
Refine the edges:
Check your work for any smudges. If you spot a mistake, you can gently scrape the blue dry underglaze off with a craft knife or stiff brush.
Level Up: Delft Shading
Authentic Delftware uses one color in varying tones. Water down your cobalt on a palette to create a lighter ‘wash’ for the flower petals, keeping the full-strength paint for outlines.
Step 4: Glazing & Firing
-
Dry thoroughly:
Allow the underglaze to dry completely. It should look chalky and matte before you proceed. -
Apply clear glaze:
Dip the entire spoon rest into a clear dipping glaze, or brush on three smooth coats of clear brushing glaze. -
Stilt and fire:
Wipe the foot of the spoon rest clean with a sponge so it doesn’t stick to the kiln shelf, then fire according to your clay and glaze specifications (usually Cone 06 or 6).
Once fired, you will have a stunning, functional piece of art that looks like an antique heirloom
BRUSH GUIDE
The Right Brush for Every Stroke
From clean lines to bold texture — master brush choice, stroke control, and essential techniques.
Explore the Full Guide
Cheeky Kitchen Puns
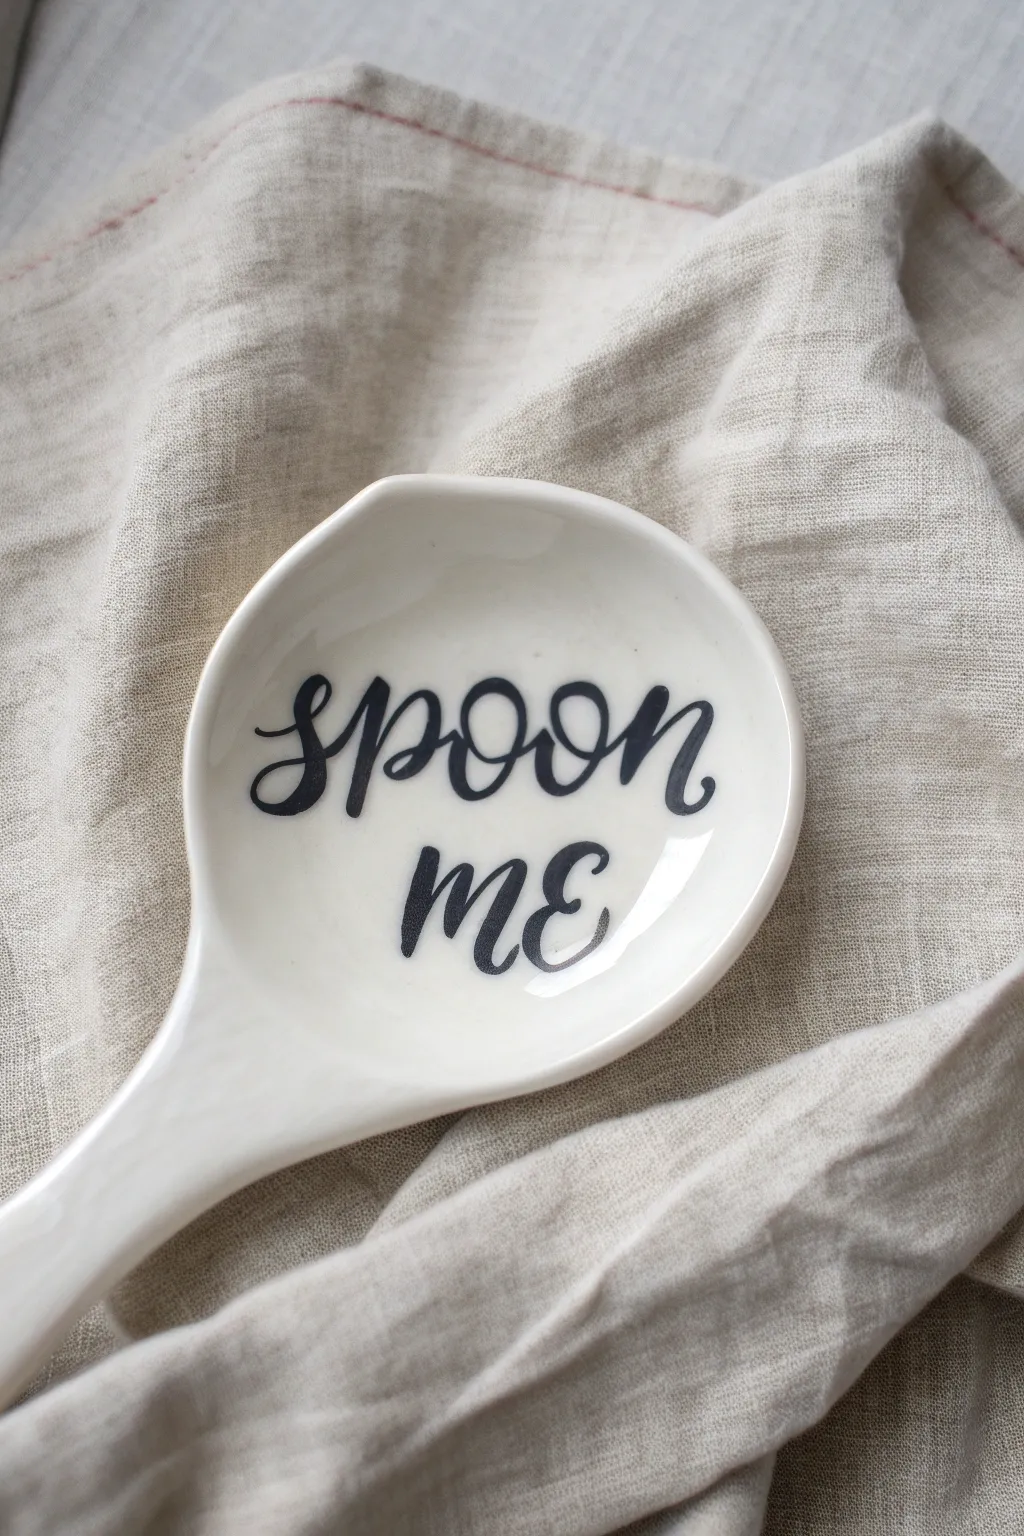
Add a touch of humor to your stovetop with this minimalist, typography-focused spoon rest. Using a simple ceramic painting technique, you can replicate this clean, modern look that serves up a daily smile alongside your dinner.
Step-by-Step
Materials
- White ceramic spoon rest
- Black porcelain paint marker (fine tip)
- Rubbing alcohol
- Cotton pads
- Cotton swabs
- Paper towel
- Soft graphite pencil
- Domestic oven
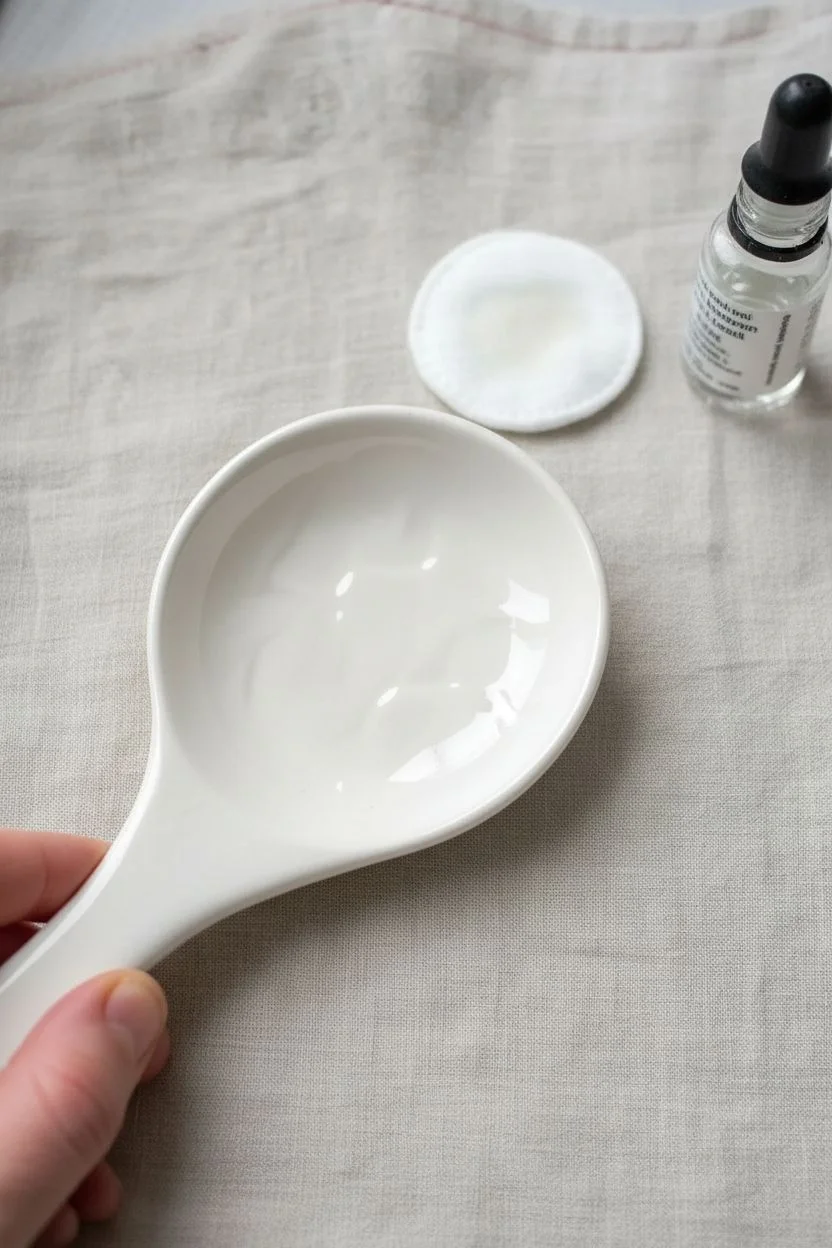
Step 1: Surface Preparation
-
Wash and dry:
Begin by thoroughly washing your ceramic spoon rest with warm soapy water to remove any dust or sticker residue. -
Degrease the surface:
Once dry, soak a cotton pad with rubbing alcohol and wipe down the entire inner bowl of the spoon rest. -
Avoid touching:
From this point on, handle the spoon rest by the edges or the underside only to keep oils from your fingers off the painting surface.
Oops, smudge?
Make a mistake? correcting is easy. Simply dip a cotton swab in rubbing alcohol and wipe away the wet paint. Wait for the alcohol to evaporate completely before re-drawing that section.
Step 2: Design and Layout
-
Practice your script:
On a piece of scrap paper, practice writing ‘Spoon Me’ in a looping cursive style until you are happy with the flow. -
Mark the center:
Using a soft graphite pencil, lightly mark the center point of the spoon rest’s bowl to guide your text alignment. -
Sketch the baseline:
Draw a faint horizontal curve where you want the word ‘spoon’ to sit, ensuring it follows the contour of the dish. -
Draft the text:
Lightly sketch the lettering onto the ceramic with your pencil. Don’t worry about thickness yet; just focus on spacing and position.
Step 3: Painting the Lettering
-
Prime the marker:
Shake your porcelain paint marker well and press the tip on a paper towel until the black ink flows smoothly. -
Trace the skeleton:
carefully trace over your pencil lines with the marker to create the base ‘skeleton’ of the letters. -
Identify downstrokes:
Look at your lettering and identify every line where your pen moved downward. -
Thicken the lines:
Go back and thicken only those downward strokes to create a faux-calligraphy look, adding weight to the left side of the ‘o’s and the stems of the ‘p’ and ‘m’. -
Refine the curves:
Smooth out the connections between the thick and thin lines so the transition looks natural and fluid. -
Rest your hand:
I like to rest my pinky finger on a dry part of the ceramic or a bridge of books to keep my hand steady for these details. -
Check the second line:
Ensure the word ‘Me’ is centered below ‘Spoon’ and apply the same thickening technique to its downstrokes. -
Clean edges:
If any lines look jagged, use a damp cotton swab to gently tidy up the edges while the paint is still tacky. -
Remove pencil marks:
Allow the paint to surface-dry for about an hour, then very gently wipe away any visible pencil guidelines with a damp cloth.
Level Up
Add a pop of color by painting a tiny red heart inside one of the ‘o’ letters, or paint a thin solid line around the outer rim of the spoon rest to frame the text.
Step 4: Curing Process
-
Long dry:
Let the spoon rest sit undisturbed for 24 hours to allow the paint to fully settle before baking. -
Cold start:
Place the spoon rest into a cold oven. Do not preheat, as sudden temperature changes can crack the ceramic. -
Bake the piece:
Turn the oven to 300°F (150°C) or the temperature specified on your paint marker brand, and bake for 35 minutes. -
Cool down naturally:
Turn the oven off and leave the spoon rest inside until the oven is completely cool.
Your cheeky new kitchen accessory is now ready to hold your messiest ladles in style.
Delicate Meadow Wildflowers
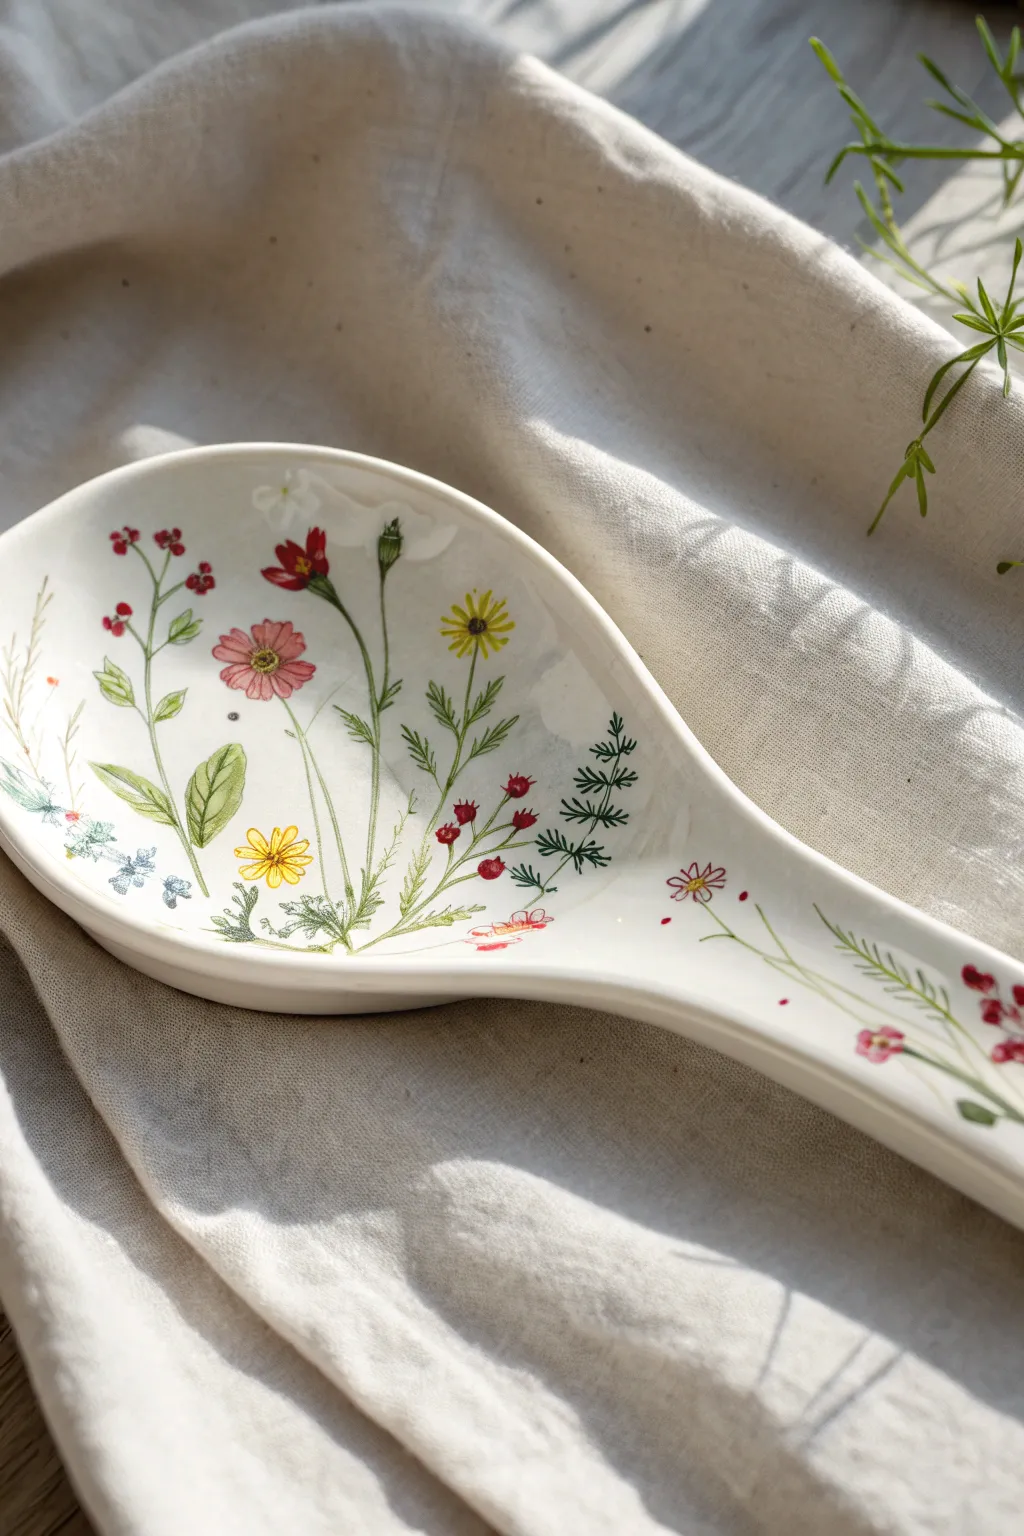
Transform a plain ceramic spoon rest into a piece of functional art with this delicate wildflower design. Using fine lines and soft washes of color, you will create a scientific illustration style that looks lovely on any kitchen counter.
Detailed Instructions
Materials
- White ceramic spoon rest
- Porcelain 150 paints or acrylic enamels (greens, pink, red, yellow, blue, brown)
- Rubbing alcohol and paper towel
- Fine detail brushes (size 00 and 0 round)
- Small flat brush (size 2)
- Palette or small white plate
- Cotton swabs
- Oven (for curing)
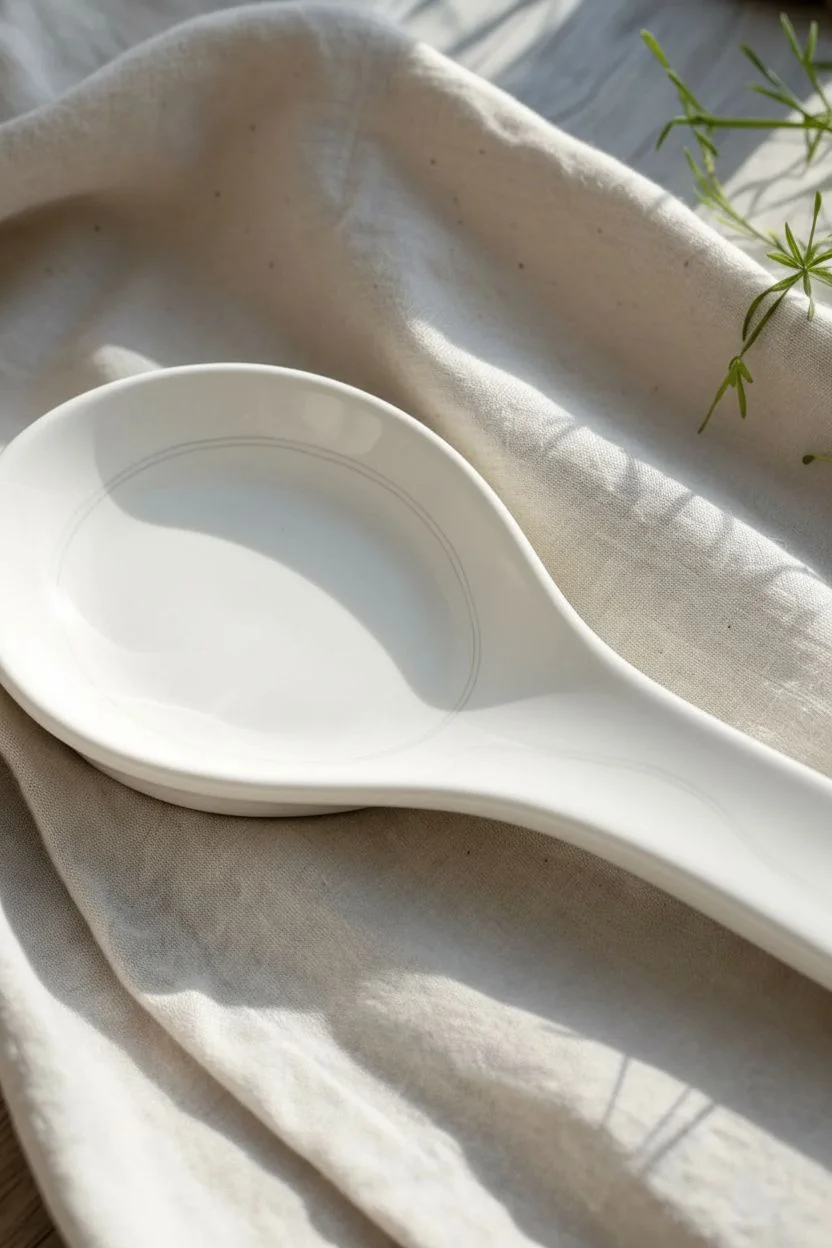
Step 1: Preparation & Layout
-
Clean the surface:
Before painting glazed ceramic, thoroughly wipe the entire spoon rest with rubbing alcohol to remove any oils or fingerprints that could prevent the paint from adhering. -
Plan the flow:
Visualize a gentle ‘S’ curve starting from the bottom left of the bowl and extending up into the handle area to guide your composition.
Step 2: Painting the Foliage
-
Mix your greens:
On your palette, prepare two shades of green: a fresh sap green for stems and a muted olive for the fern leaves. -
Paint main stems:
Using a size 0 detail brush and the sap green, paint long, incredibly thin lines following your visualized curve. Keep your hand light so the lines taper naturally. -
Add fern fronds:
Switch to the olive green and paint the delicate fern leaf on the right side. Use short, quick strokes outward from a central vein to mimic a feathery texture. -
Create broad leaves:
For the larger leaves near the base, mix a drop of water or glazing medium into your green to make it translucent. I like to paint these with a single confident stroke of a slightly larger round brush. -
Detail the leaves:
Once the broad leaves are touch-dry, use your smallest 00 brush and unthinned dark green to sketch very fine veins on top of them.
Fixing Mistakes
Paint beading up? Ensure the ceramic is totally oil-free by wiping with alcohol again. If a stroke goes rogue, wipe it away instantly with a damp Q-tip before it starts to tack up.
Step 3: Adding the Blooms
-
Paint the pink cosmos:
Using a soft pink, paint the largest flower in the center left. Press down with the belly of the brush and lift up toward the center to create teardrop-shaped petals. -
Add the yellow daisy:
Paint a small, sunny yellow rosette near the bottom center using short, radiating dashes. -
Create berry accents:
Load a fine brush with deep red or burgundy. Add tiny scattered dots at the ends of the tall, thin stems reaching up the handle. -
Paint blue fillers:
Using a light blue, dab tiny clusters of three or four dots near the bottom left to represent forget-me-nots or filler flowers. -
Decorate the handle:
Carry a few wisps of greenery and a couple of small red buds all the way up the handle neck to balance the design.
Level Up
Personalize this project by swapping the generic wildflowers for specific birth month flowers of a family member, or hide tiny monochrome initials within the leaves on the handle.
Step 4: Refining & Curing
-
Define flower centers:
Use a dark brown or black to dot the centers of your yellow and pink flowers. This high contrast detail makes the illustration pop. -
Connect the elements:
Look for any ‘floating’ flowers and draw hair-thin green lines to connect them back to the main stem grouping. -
Verify opacity:
If any petals look too sheer, carefully layer a second coat of paint over just those areas, leaving the edges soft. -
Clean edges:
Dip a cotton swab in rubbing alcohol to wipe away any wayward smudges or refine the shape of your leaves. -
Dry thoroughly:
Let the spoon rest sit undisturbed for at least 24 hours to ensure the paint is completely dry beneath the surface. -
Bake to set:
Place the spoon rest in a cold oven. Set the temperature to 300°F (150°C) or the manufacturer’s recommendation works best. Bake for 35 minutes, then turn the oven off and let it cool completely inside.
Now you have a durable, botanical beauty ready to hold your utensils with style

PENCIL GUIDE
Understanding Pencil Grades from H to B
From first sketch to finished drawing — learn pencil grades, line control, and shading techniques.
Explore the Full Guide
Radiant Sunflowers
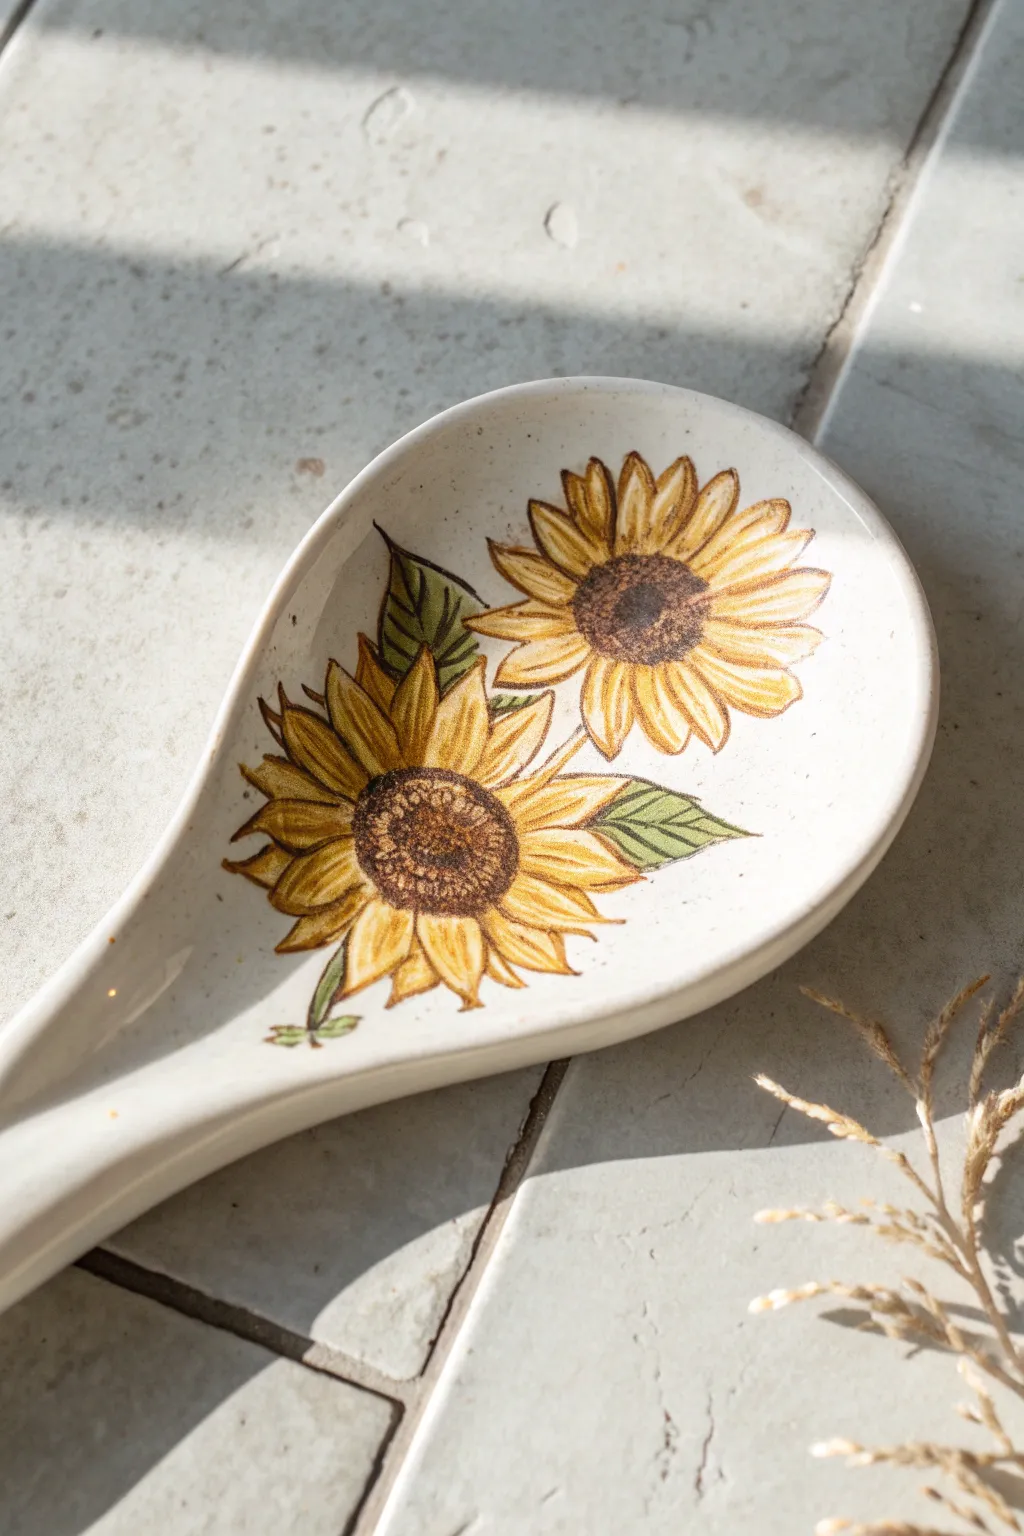
Bring a touch of eternal summer to your kitchen counter with this charming, hand-painted spoon rest. The design features two detailed sunflowers with illustrative outlines, perfect for adding a rustic farmhouse feel to your cooking space while keeping your surfaces clean.
How-To Guide
Materials
- Ceramic spoon rest (bisque or glazed)
- Ceramic underglazes or enamel paints (Golden Yellow, Mustard, Chocolate Brown, Olive Green, Black)
- Small round brush (size 4)
- Ultra-fine liner brush (size 00)
- Pencil
- Water cup and paper towels
- Clear glaze (if firing) or food-safe sealer (if cold painting)
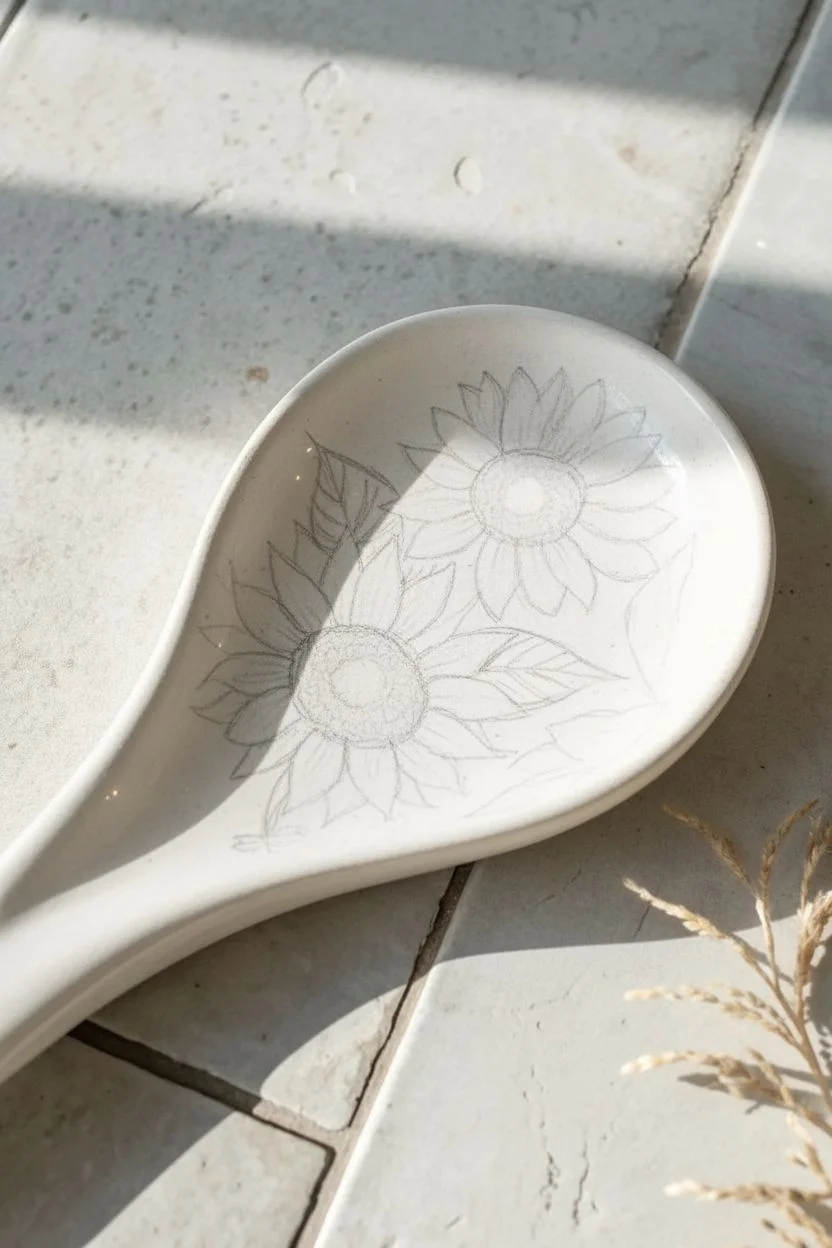
Step 1: Planning the Composition
-
Clean the surface:
Wipe down your spoon rest with a damp sponge to remove any dust or oils that might prevent the paint from adhering properly. -
Position the centers:
Using a pencil, lightly sketch two circles to serve as the centers of your sunflowers. Place one slightly lower left and the other higher right for a balanced composition. -
Sketch the petals:
Draw elongated, slightly pointed petal shapes radiating outward from the centers. Don’t worry about making them perfect; a little variation adds to the natural look. -
Add the foliage:
Sketch a few jagged leaves tucking out from behind the flowers to fill the negative space.
Step 2: Applying Base Colors
-
Paint the petals:
Load your round brush with Golden Yellow and fill in all the petal shapes. Apply two to three coats to ensure the color is solid and opaque. -
Color the leaves:
Fill in the leaf shapes with Olive Green. I prefer to keep this layer fairly thin initially so the pencil lines are still faintly visible for detailing later. -
Fill the centers:
Paint the circular centers with a solid coat of Chocolate Brown. -
Add petal depth:
Once the yellow base is dry, take a little Mustard or light brown paint and brush it starting from the center of the flower moving halfway up each petal to create a shadow gradient.
Use A Bridge
To keep your hand steady during the fine line work, rest your wrist on a clean mug or a ‘hand bridge’ placed over your spoon rest. This prevents smudging wet paint.
Step 3: Line Work and Details
-
Prepare the liner brush:
Thin your black or very dark brown paint slightly with water until it has an ink-like consistency that flows roughly off your fine liner brush. -
Outline the centers:
Carefully trace the circumference of the brown centers. Make the line slightly broken or wavy rather than a perfect geometric circle. -
Create texture:
Stipple tiny dots inside the brown centers using the tip of your brush to mimic the seeds. Concentrating dots on the outer edge creates a nice 3D effect. -
Outline the petals:
Outline each individual petal. Allow your hand to close the shapes with organic, natural lines rather than stiff straight strokes. -
Add petal veins:
Paint two or three thin, quick lines inside each petal, radiating from the center outward. This gives the flower that distinct illustrative texture shown in the photo. -
Detail the leaves:
Outline the leaves and draw a central vein down the middle of each, adding diagonal veins branching off to the sides. -
Speckle the background:
To recreate the stoneware look, dip an old toothbrush in watered-down brown paint and run your thumb over the bristles to flicker tiny specks onto the white background. -
Seal the piece:
Once fully dry, dip in clear glaze and fire (if using pottery underglaze) or apply a robust, food-safe resin or varnish (if using acrylics) to protect your artwork.
Level Up: Kitchen Set
Expand this project by painting matching sunflowers on a ceramic utensil crock, salt and pepper shakers, or a butter dish to create a cohesive farmhouse kitchen collection.
Now you have a functional piece of art that brightens up your stove area every time you cook
Garden Tomato Pop
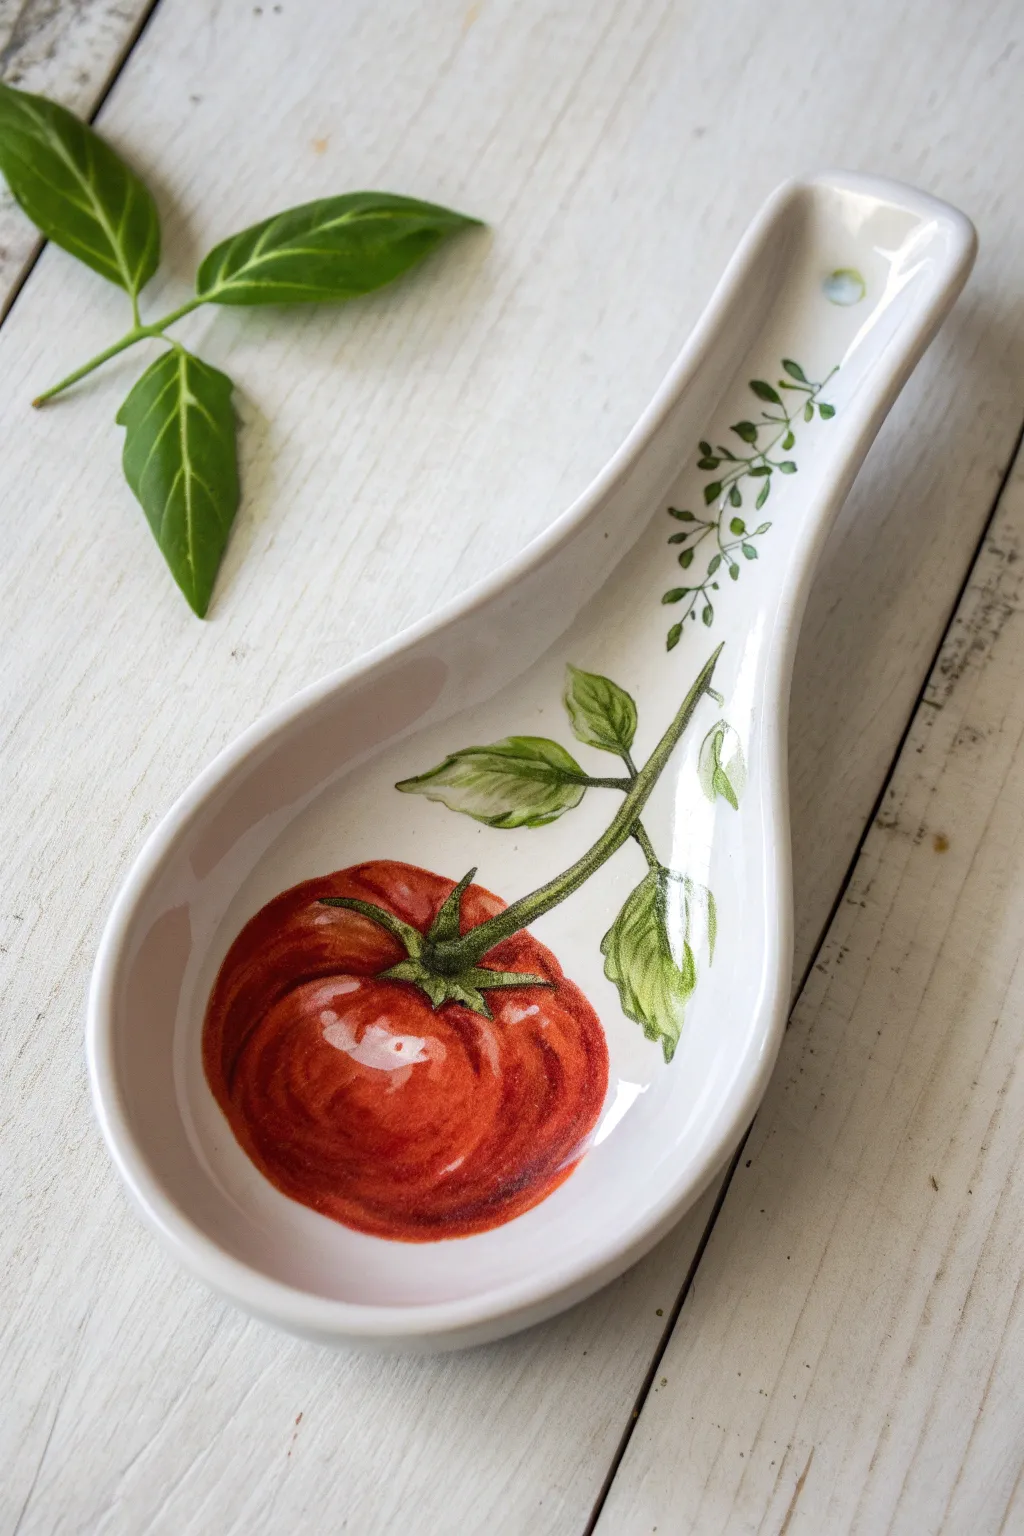
Bring the freshness of the garden into your kitchen with this clean, vibrant design. By combining bold reds with delicate botanical details, you’ll create a functional piece of art that looks lovely even when it’s covered in sauce.
Step-by-Step Tutorial
Materials
- White ceramic spoon rest
- Rubbing alcohol and cotton pads
- Gloss enamel paints for ceramics (Red, Leaf Green, Dark Green, White, Burnt Umber)
- Soft detailed pencil or graphite paper
- Small flat brush (size 4 or 6)
- Fine liner brush (size 0 or 00)
- Paint palette
- Oven (for curing)
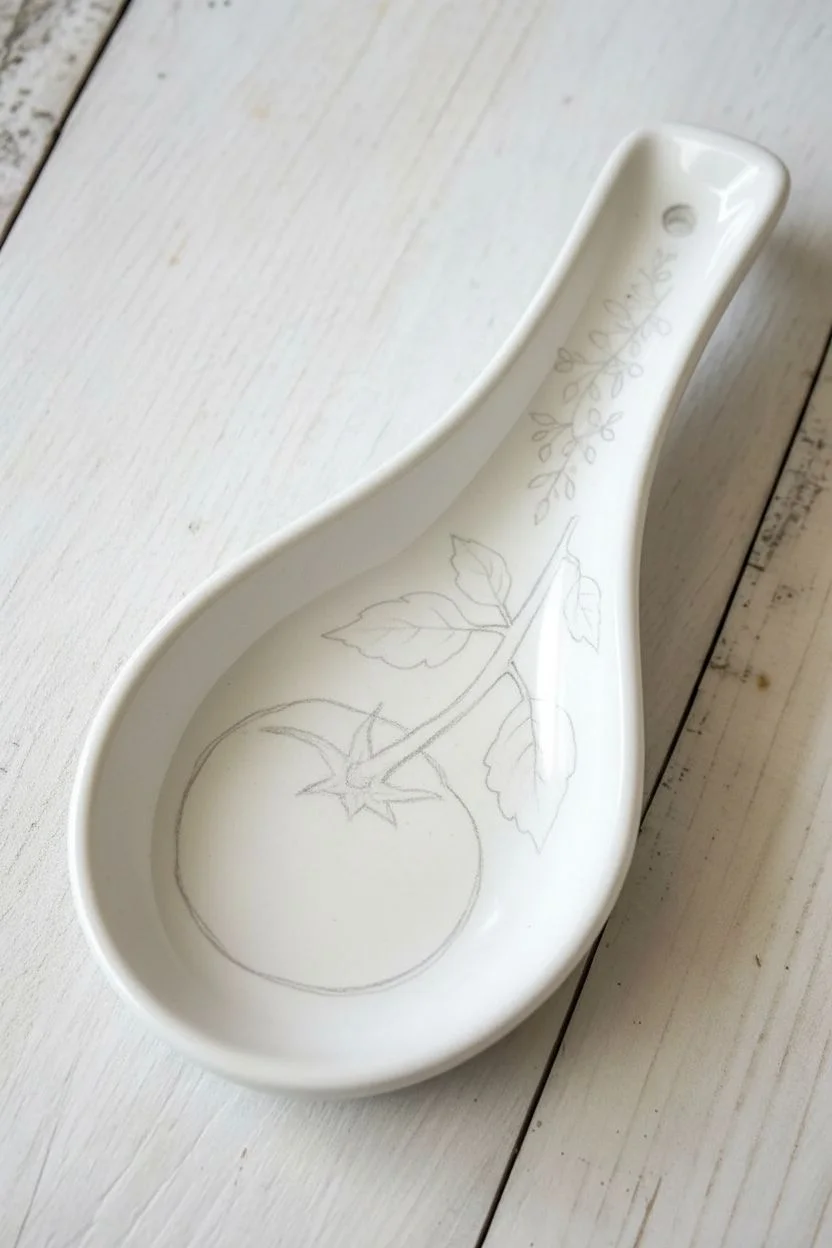
Step 1: Preparation & Sketching
-
Clean surface:
Wipe the entire spoon rest down thoroughly with rubbing alcohol on a cotton pad to remove any oils or dust, which ensures the paint adheres properly. -
Position the tomato:
Using a soft pencil, lightly sketch a large circle for the tomato in the deep bowl section of the spoon rest, slightly off-center to make room for the stem. -
Draft the greenery:
Sketch a thick stem curving up toward the handle and two large leaves branching off to the right. Add a faint line extending up the handle for the herb sprig.
Clean Lines Hack
Keep a cotton swab dipped in rubbing alcohol nearby while painting. It acts like a magic eraser for ceramic paint, letting you reshape edges instantly.
Step 2: Painting the Tomato
-
Base coat:
Load your flat brush with bright red enamel and fill in the tomato shape, working with smooth, curved strokes to mimic the roundness of the fruit. -
Create depth:
While the red is still wet, mix a tiny dot of Burnt Umber into a corner of your red paint to create a deep burgundy. -
Add shadows:
Blend this darker red along the bottom edge and right side of the tomato to create a shadowed, 3D effect. -
Dry layer:
Allow the red base to dry for about 15 minutes so you don’t muddy the colors in the next steps. -
The highlights:
I usually wait until the red is tacky before taking a clean brush with pure white paint to add the large, kidney-bean-shaped reflection on the upper left curve.
Step 3: Adding the Foliage
-
Stem base:
Using the liner brush and Leaf Green, paint the sturdy stem connecting the tomato to the ‘neck’ of the spoon rest. -
The Calyx:
Paint the star-shaped leafy cap (calyx) right where the stem meets the red fruit, letting the green points overlap the red slightly. -
Leaf fill:
Fill in the two side leaves with Leaf Green, purposefully leaving the edges slightly jagged for a natural look. -
Leaf details:
Mix Dark Green with a touch of Umber and use the liner brush to paint thin veins inside the leaves and outline one side of the stem for contrast. -
Herb accent:
For the sprig on the handle, switch to a watered-down Dark Green to paint a very thin, delicate central line going up towards the hanging hole. -
Tiny leaves:
Using just the tip of your smallest brush, dab tiny, paired teardrop shapes along that upper stem to resemble a sprig of thyme or oregano.
Make It Yours
Personalize the design by painting a family name or the word ‘Sauce’ in a playful script font along the very top of the handle.
Step 4: Finishing Touches
-
Refine highlights:
Add tiny flecks of white to the top of the green leaves to make them look glossy and fresh. -
Cleanup:
Check for any smudges on the white ceramic background and wipe them away gently with a damp Q-tip. -
Cure time:
Let the spoon rest dry for at least 24 hours to ensure the paint hardens completely before handling. -
Bake to set:
Place the item in a cold oven, heat to the temperature specified on your paint bottle (usually 300°F/150°C), bake for 30-35 minutes, and let it cool inside the oven.
Once baked and cooled, your vibrant new spoon rest is ready to handle your messiest pasta nights in style.


Calming Lavender Sprigs
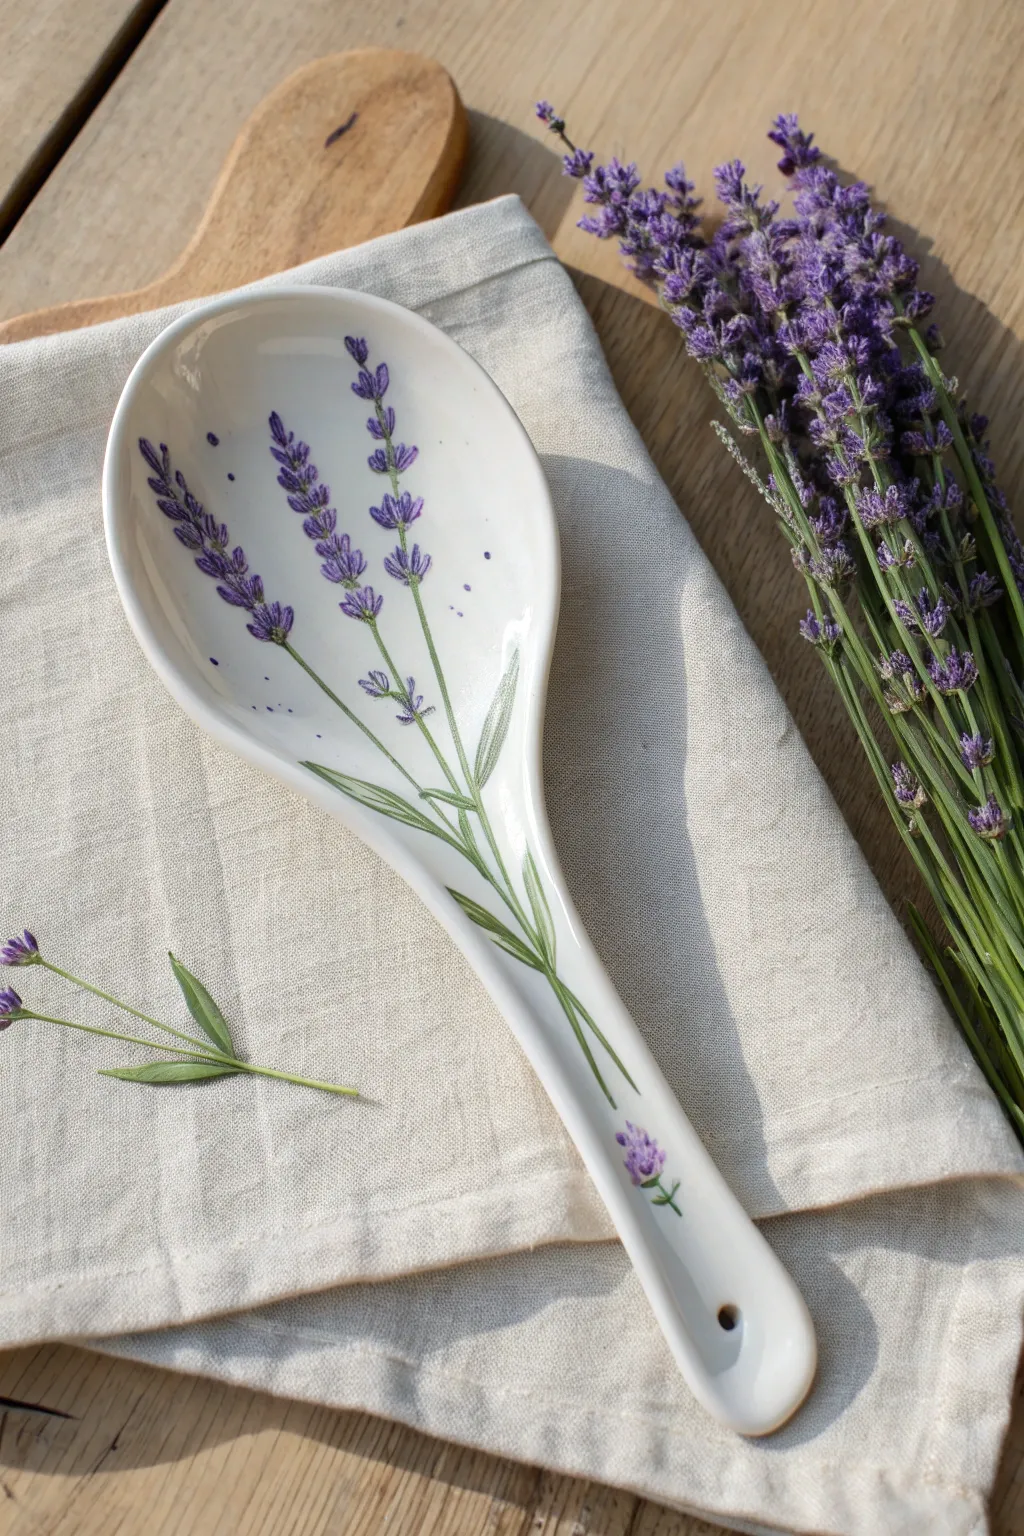
Bring the calming essence of a French countryside garden into your kitchen with this delicate painting project. By layering simple dabs of purple and fine green lines, you will transform a plain ceramic blank into a functional piece of botanical art.
Step-by-Step
Materials
- White ceramic spoon rest (glazed)
- Rubbing alcohol and cotton pads
- Porcelain or glass paint (Deep Purple, Lilac, Olive Green)
- Detail liner brush (size 00 or 000)
- Small round brush (size 1)
- Mixing palette
- Paper towels
- Domestic oven (for curing)
Step 1: Surface Prep & Stem Structure
-
Clean the surface:
Wipe the entire spoon rest thoroughly with rubbing alcohol to remove any fingerprints or oils, which helps the paint adhere properly. -
Prepare green paint:
Place a small amount of olive green paint on your palette. If the paint is very thick, thin it slightly with a drop of water or thinner so it flows like ink. -
Paint the central stem:
Using your fine liner brush, paint a single, slightly curved line starting from the bottom of the spoon bowl, reaching about two-thirds of the way up. -
Add flanking stems:
Paint two more stems on either side of the first one. I like to angle these slightly outward so they fan gracefully across the wider part of the dish. -
Cross the bottoms:
Extend the bottom of the stems so they intersect and overlap near the neck of the spoon rest, mimicking a gathered bouquet. -
Add the handle sprig:
Paint a solitary, short stem near the bottom of the handle or hanging hole for a cute, isolated detail.
Step 2: Blossoming the Lavender
-
Load deep purple:
Switch to your size 1 round brush and load it with the deep purple paint. You want enough paint to create texture, but not a dripping blob. -
Start the base buds:
Starting about halfway up one green stem, press the brush tip gently to create small, teardrop-shaped dabs on either side of the stem. -
Build the flower spike:
Continue adding pairs or clusters of purple dabs moving upward. As you reach the tip of the stem, make the dabs smaller to create a tapered cone shape. -
Create distinct whorls:
Leave tiny gaps between some of the flower clusters on the stem. This negative space mimics how real lavender grows in segmented whorls. -
Repeat for all stems:
Apply the same technique to the remaining two main stems and the small sprig on the handle, varying the height of the flowers slightly for a natural look. -
Add artistic splatter:
Dip the very tip of your brush in purple and touch a few random spots in the background near the flowers to look like falling pollen or loose buds.
Paint Beading Up?
If the wet paint pulls apart or beads up on the ceramic surface, it means there is still grease present. Wipe the error away immediately and re-clean that specific spot vigorously with rubbing alcohol.
Step 3: Highlights & Leaves
-
Apply highlights:
Without cleaning your brush thoroughly, pick up some lilac paint. Dab this lighter color on top of the dark purple buds, focusing on the tips and one side to suggest sunlight. -
Paint the leaves:
Switch back to the clean liner brush and green paint. Add long, slender leaves near the base of the stems using a quick, lifting motion to get sharp points. -
Connect the leaves:
Ensure the bottom of each leaf connects smoothly to the main stalk, blending the green paint slightly where they meet. -
Dry time:
Allow the spoon rest to dry undisturbed for at least 24 hours. The paint must be fully dry below the surface before heat setting.
Make it a Set
Use this same technique to paint a matching border around the rim of a ceramic butter dish or salt cellar. The lavender motif works beautifully as a cohesive theme for countertop accessories.
Step 4: Curing the Design
-
Load the oven:
Place your spoon rest into a strictly *cold* oven. Do not preheat, as thermal shock can crack the ceramic. -
Bake carefully:
Set the temperature to 300°F (150°C) or according to your specific paint manufacturer’s instructions. Once the oven hits that temperature, set a timer for 35 minutes. -
Cool down slowly:
Turn the oven off and crack the door slightly, but leave the spoon rest inside until the oven matches room temperature completely.
Once cooled, your charming spoon rest is ready to hold messy utensils while keeping your counter stylishly clean.
Multicolor Polka Dots
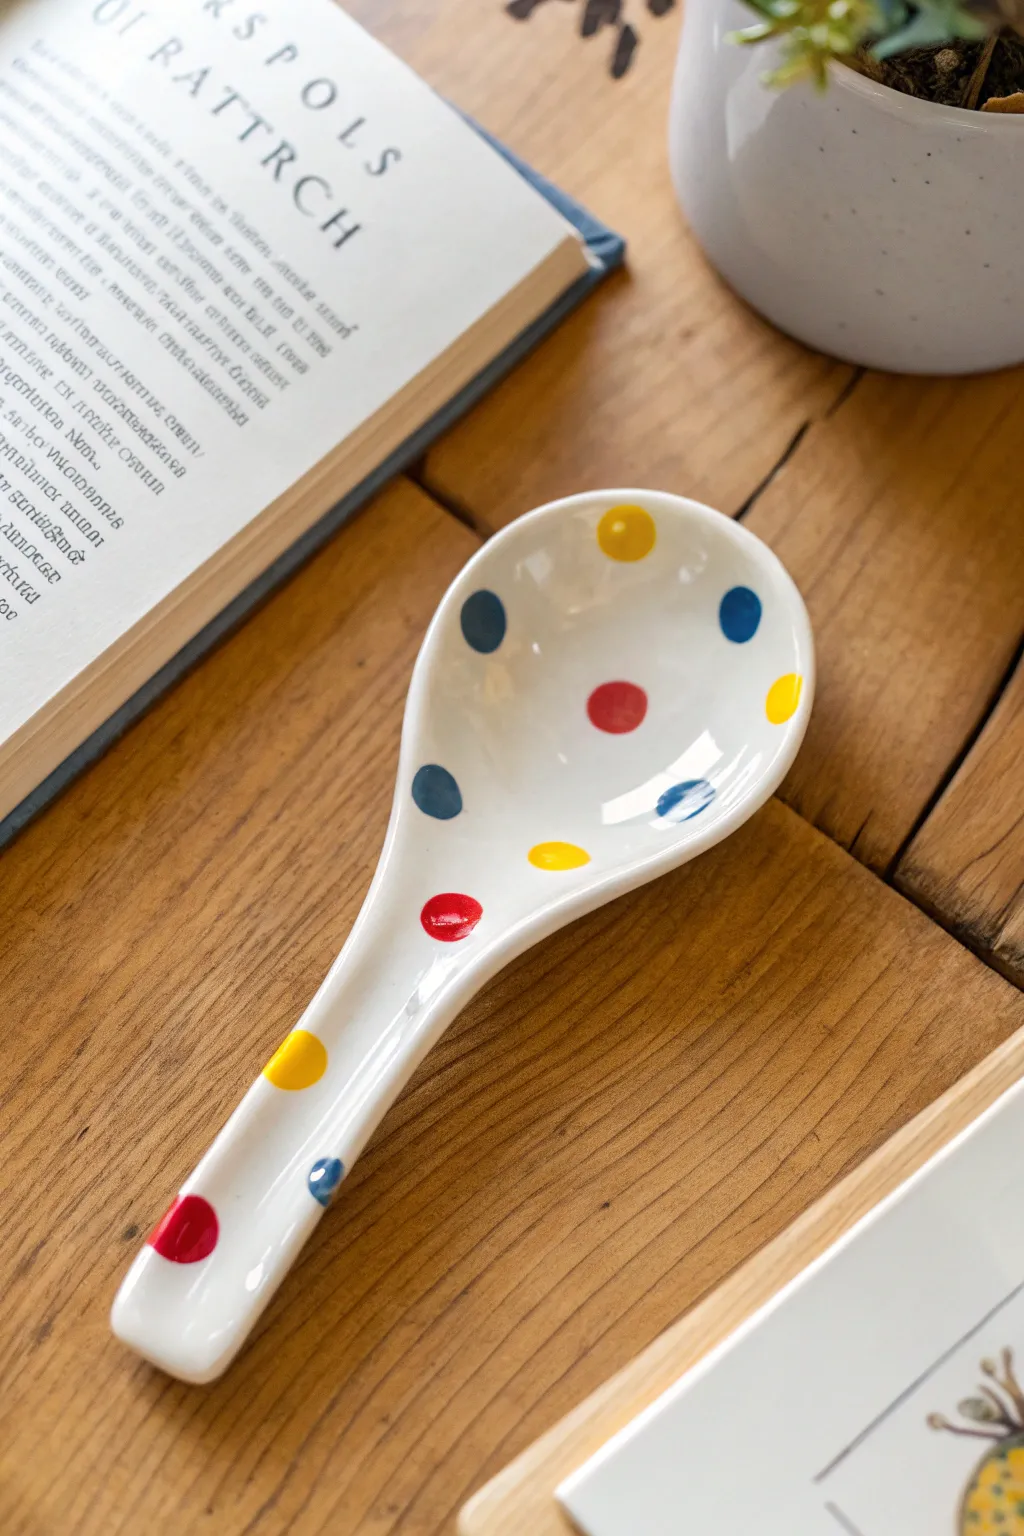
This cheerful kitchen accessory combines a crisp white background with playful primary colors for a timeless look. It is a simple yet striking project that brightens up a stovetop while keeping surfaces clean.
How-To Guide
Materials
- Ceramic bisque spoon rest
- Multi-surface acrylic paints (White, Bright Red, Sunny Yellow, Navy Blue)
- Medium round paintbrush
- Small round paintbrush
- High-gloss clear varnish or sealer (food-safe recommended)
- Palette or paper plate
- Water cup
- Paper towels
Step 1: Creating the Canvas
-
Clean the surface:
Wipe the ceramic spoon rest with a slightly damp paper towel to remove any dust or debris from the bisque. -
Apply base white:
Load your medium round brush generously with white paint and apply smooth, long strokes across the entire top surface. -
Check the edges:
Run the brush along the rim of the bowl and the sides of the handle to ensure full coverage. -
Dry the first layer:
Let this initial coat dry for about 20 minutes until it is no longer tacky to the touch. -
Apply second coat:
Paint a second layer of white to ensure the background is opaque and bright, hiding the raw ceramic color underneath. -
Final base dry:
Allow the white base to dry completely before moving on to colors; this prevents the dots from blending into the background.
Oops, a smear!
If a dot accidentally smears, don’t wipe it! Let it dry completely, then paint over the mistake with white base coat before re-painting the colored dot.
Step 2: Dotting the Design
-
Prepare the palette:
Dispense dime-sized amounts of the red, yellow, and blue paints onto your palette, keeping them well separated. -
Start with yellow:
Dip the clean medium brush into the yellow paint; I prefer starting with the lightest color so rinse water stays cleaner. -
Paint yellow dots:
Press the brush tip gently onto the bowl area and give it a slight swirl to create a round dot roughly the size of a pea. -
Space them out:
Place 3 to 4 yellow dots randomly across the spoon rest, ensuring you place at least one on the handle. -
Rinse thoroughly:
Wash your brush completely and dry it on a paper towel before switching colors. -
Add red accents:
Load the brush with red paint and fill in some of the empty white spaces with red dots, keeping the sizing consistent with the yellow ones. -
Positioning tip:
Try to place some dots near the edges of the curved bowl to create a sense of movement. -
Switch to blue:
Clean your brush again and switch to the navy blue paint for the final set of dots. -
Fill the gaps:
Target large empty areas for the blue dots, ensuring the overall distribution of colors feels balanced visually. -
Handle details:
Add a final blue dot near the bottom of the handle or wherever the design feels too sparse.
Step 3: Sealing and Protecting
-
Dry the design:
Let the polka dots dry strictly for at least one hour so the thick paint does not smear during sealing. -
Touch ups:
If any dots look transparent, carefully dab a second layer of color directly on top of the dry dot. -
Apply varnish:
Brush a thin layer of high-gloss clear sealer over the entire piece to replicate the glazed ceramic look shown in the photo. -
Cure:
Allow the project to cure fully according to the varnish bottle instructions before using it in the kitchen.
Level Up: Perfect Circles
For perfectly uniform dots without brushstrokes, dip the handle end of a paintbrush or a foam pouncer into the paint and stamp it onto the ceramic.
Enjoy using your cheerful and spotty creation next to your stove or coffee station.
Black and White Mudcloth
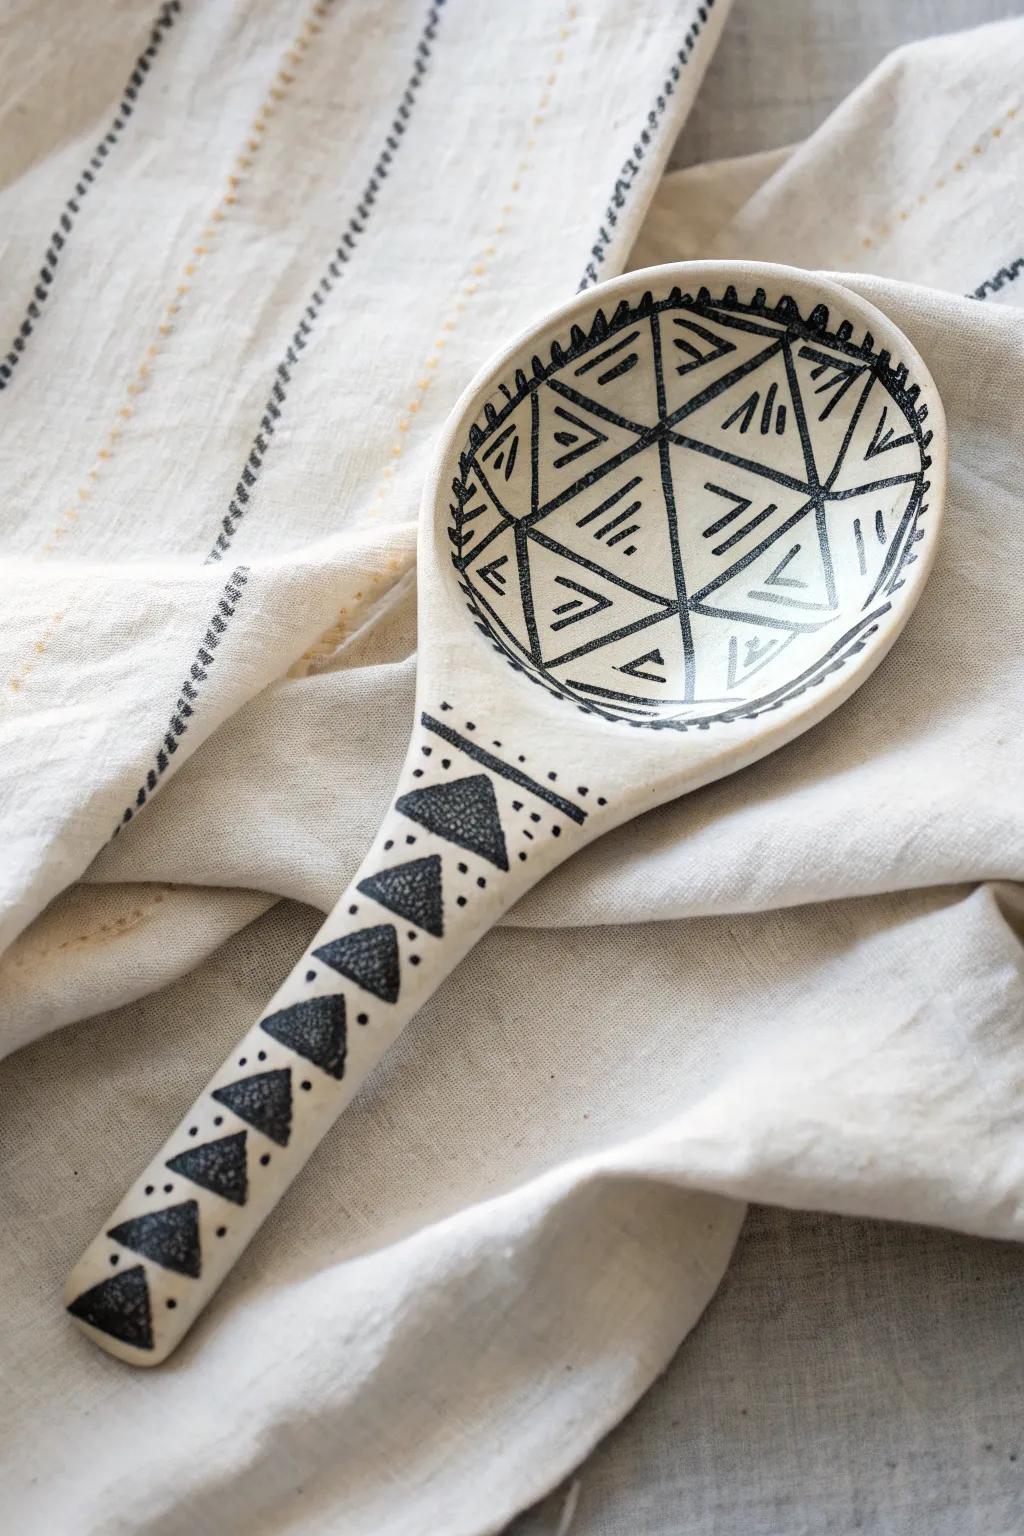
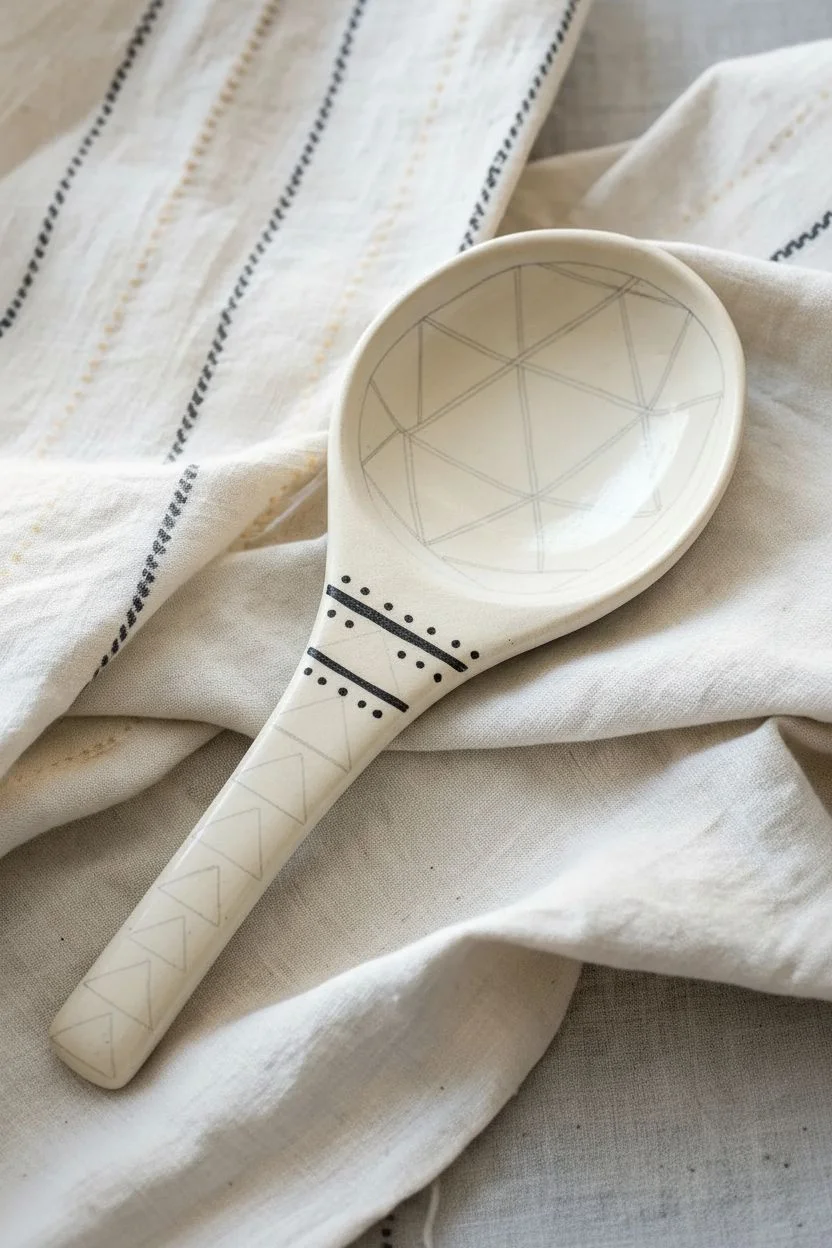
Bring a touch of global bohemia to your kitchen with this striking black and white spoon rest. The design mimics traditional mudcloth fabric, featuring bold geometric triangles and hand-painted imperfections that give it character.
Step-by-Step Tutorial
Materials
- Ceramic spoon rest (bisque)
- Black underglaze or ceramic paint
- Matte cream underglaze (optional base)
- Fine liner brush (size 0 or 00)
- Graphite pencil
- Clean sponge
- Clear transparent glaze
Step 1: Preparation and Base
-
Clean the surface:
Wipe down your ceramic bisque with a damp sponge to remove any dust or oils that might prevent the paint from adhering properly. -
Apply background color:
If your clay body isn’t naturally cream, apply two to three coats of a matte cream or off-white underglaze to the entire top surface. Let this dry completely. -
Mark the neck:
Using a graphite pencil, lightly draw a horizontal line across the narrowest part of the handle, separating it from the bowl. -
Decorate the neck band:
Paint this horizontal line with black underglaze. Add a row of small dots just above this line, followed by a second, thinner horizontal line above the dots.
Pro Tip: Steady Hands
Rest your pinky finger on a dry area of the spoon to stabilize your hand while painting the fine geometric lines. This anchors your brush for better control.
Step 2: Painting the Handle
-
Sketch the triangles:
Lightly sketch a vertical column of equilateral triangles running down the center of the handle, pointing upward toward the bowl. -
Fill the shapes:
Load your brush with black underglaze and carefully fill in the triangles. I like to outline them first and then puddle the paint in the middle for solid coverage. -
Add side details:
Using the very tip of your brush, dab small dots along the left and right sides of the handle, flanking each black triangle. -
Add base details:
At the very bottom of the handle, paint a few more triangles, but space them out slightly to create a finished look at the base.
Troubleshooting: Smudges
If you smudge black paint onto the cream area, let it dry completely. Then, gently scratch the mistake away with a wooden toothpick or a cleanup tool.
Step 3: Designing the Bowl
-
Create the framework:
In the bowl of the spoon, lightly sketch a large hexagon or circle. Divide this shape into six or eight triangular ‘pie slice’ sections meeting at the center. -
Paint structural lines:
Go over your sketched structural lines with the black paint. Make these lines relatively thick and bold to define the geometric segments. -
Detail the ‘V’ sections:
In alternating sections, paint nested ‘V’ shapes or smaller triangles inside the main segment. Keep the lines somewhat loose to mimic the woven look of fabric. -
Detail the dash sections:
In the remaining empty sections, paint short horizontal dashes or lines. Vary the length of the dashes to fit the tapering shape of the triangle slice. -
Create the rim border:
Paint a circle around the outer perimeter of your geometric design. This frames the artwork within the bowl. -
Add the teeth:
Paint small, sharp triangles or ‘teeth’ pointing inward from the rim border you just painted. Ensure they face the center of the spoon.
Step 4: Finishing Up
-
Clean up sketches:
Most underglaze pencils burn off in the kiln, but if you used heavy graphite, you can gently dab it away with a damp sponge once the paint is bone dry. -
Apply clear glaze:
Once the black design is completely dry to the touch, apply two coats of clear transparent glaze over the entire piece to seal it. -
Final fire:
Fire the piece in a kiln according to the clay and glaze manufacturer’s instructions to make it food-safe and durable.
Now you have a functional piece of art ready to hold your saucy spoons in style.
Meditative Dot Mandalas

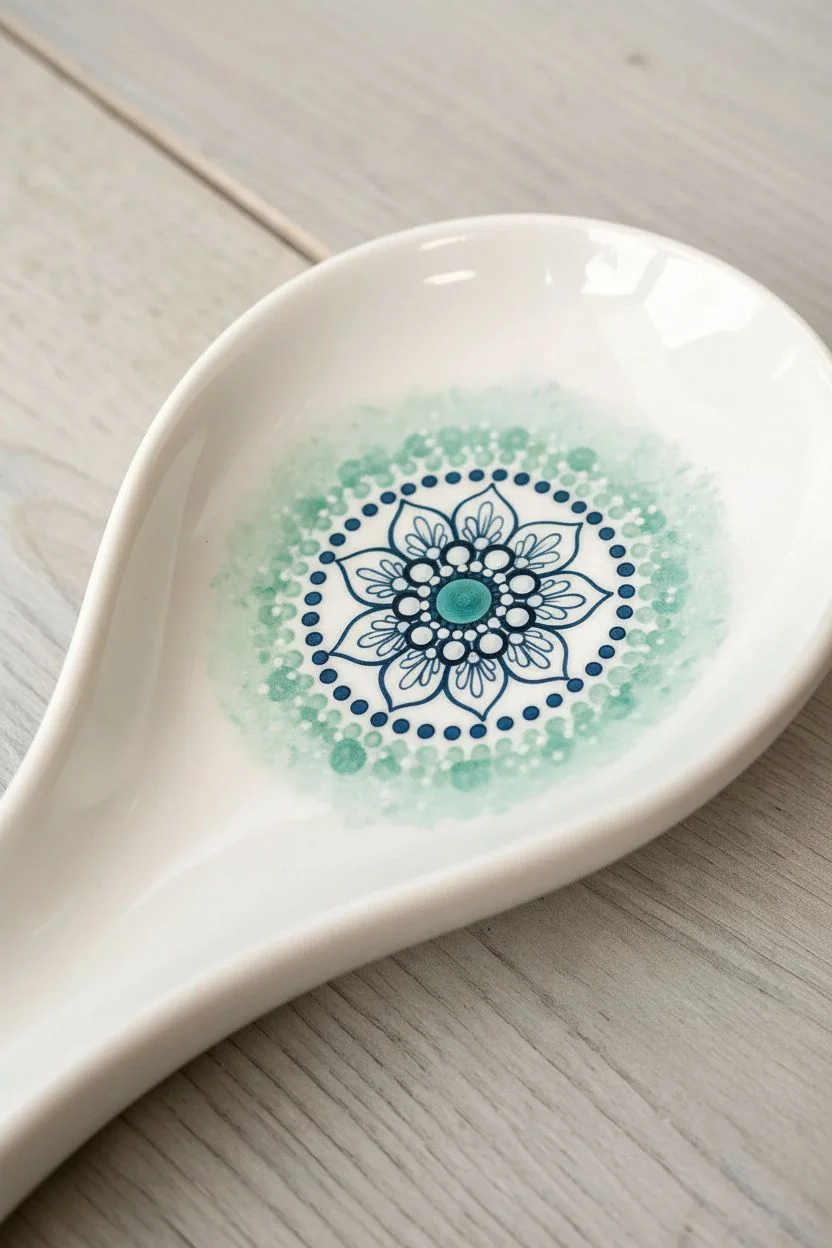
Transform a plain ceramic blank into a functional piece of kitchen art with this soothing mandala design. Using a palette of cool blues and teals, you will build up layers of intricate dots and swooshes for a mesmerizing, meditative finish.
How-To Guide
Materials
- White ceramic spoon rest
- Multi-surface acrylic paints (Navy Blue, Teal, Mint Green, White)
- Set of dotting tools (various sizes)
- Fine liner brush (size 00 or 000)
- Isopropyl alcohol and lint-free cloth
- Paper towel and palette
- Cotton swabs (for cleanup)
Step 1: Center Motif
-
Prep the Surface:
Wipe the entire spoon rest down with isopropyl alcohol to remove any oils or dust. This ensures the paint adheres perfectly to the glazed ceramic. -
The Focal Point:
Using a medium-sized dotting tool, place a single teal dot in the absolute center of the spoon rest’s bowl. -
Inner Flower:
Dip a smaller tool in white paint and place 6 to 8 dots closely around the teal center. While the paint is wet, use a fine needle tool or toothpick to drag the white dots outward slightly, creating small petal shapes. -
Detailed Linework:
Once the white petals are dry, use your finest liner brush with slightly thinned navy blue paint to outline the white petals and draw delicate loop details inside them. -
First Dot Ring:
Switch back to a small dotting tool. create a tight ring of navy blue dots encircling the white flower motif. -
Soft Stippling:
Mix a very watery wash of mint green and white. Gently dab this around the navy ring to create a soft, misty background halo before starting the larger petals.
Fixing Peaks
If your dots dry with pointy ‘Hershey Kiss’ peaks, your paint is too thick. Mix in a drop of pouring medium or water to get a creamy consistency that settles flat.
Step 2: The Petal Ring
-
Marking Layout:
To keep things symmetrical, use a tiny dot of paint at the 12, 3, 6, and 9 o’clock positions to mark where the tips of your large petals will go. -
Petal Outline:
Using the liner brush and navy blue paint, draw the tear-drop shape of the large petals. Aim for about 12-14 petals total around the circle. -
Two-Tone Filling:
Fill the bottom/outer half of each teardrop with navy blue paint. Immediately fill the top/inner half with teal paint. -
Blending:
While both colors are still wet inside the petal, carefully blend them where they meet to create a subtle gradient, or leave a clean line for a bolder look. -
White Accents:
I like to let the petals dry for a few minutes before this step. Take the liner brush with white paint and draw a curved highlight line separating the navy and teal sections of each petal, adding a tiny dot at the tip of the teal section. -
Petal Highlights:
Add a small swipe of lighter mint or white near the rounded bottom of the navy section of each petal to give it dimension.
Level Up: Resin Coat
For a glass-like finish that is ultra-durable against ladles and moisture, coat the painted area with a layer of food-safe art resin after the paint has fully cured.
Step 3: Outer Details & Handle
-
Radiating Dots:
Using a small tool, create lines of ‘walking dots’ (dots that get progressively smaller) with navy paint, radiating outward in the spaces between the large petals. -
Outer Scatter:
Add scattered, tiny dots of mint and navy around the outer tips of the petals to soften the edge of the design. -
Handle Design:
Move to the handle. Place a large navy dot at the base, followed by a medium hollow circle of teal (use a large tool to dot, then a smaller clean tool to remove the center paint), and finish with a line of trailing navy dots down the shaft. -
Clean Up:
Check for any unwanted splashes. Use a damp cotton swab to wipe away mistakes before they cure. -
Curing:
Allow the piece to air dry for 24 hours. To make it dishwasher safe (check your paint label), place the spoon rest in a cool oven, heat to 350°F, bake for 30 minutes, and let it cool completely inside the oven.
Enjoy using your beautiful new spoon rest during your next cooking adventure!
Watermelon Slice
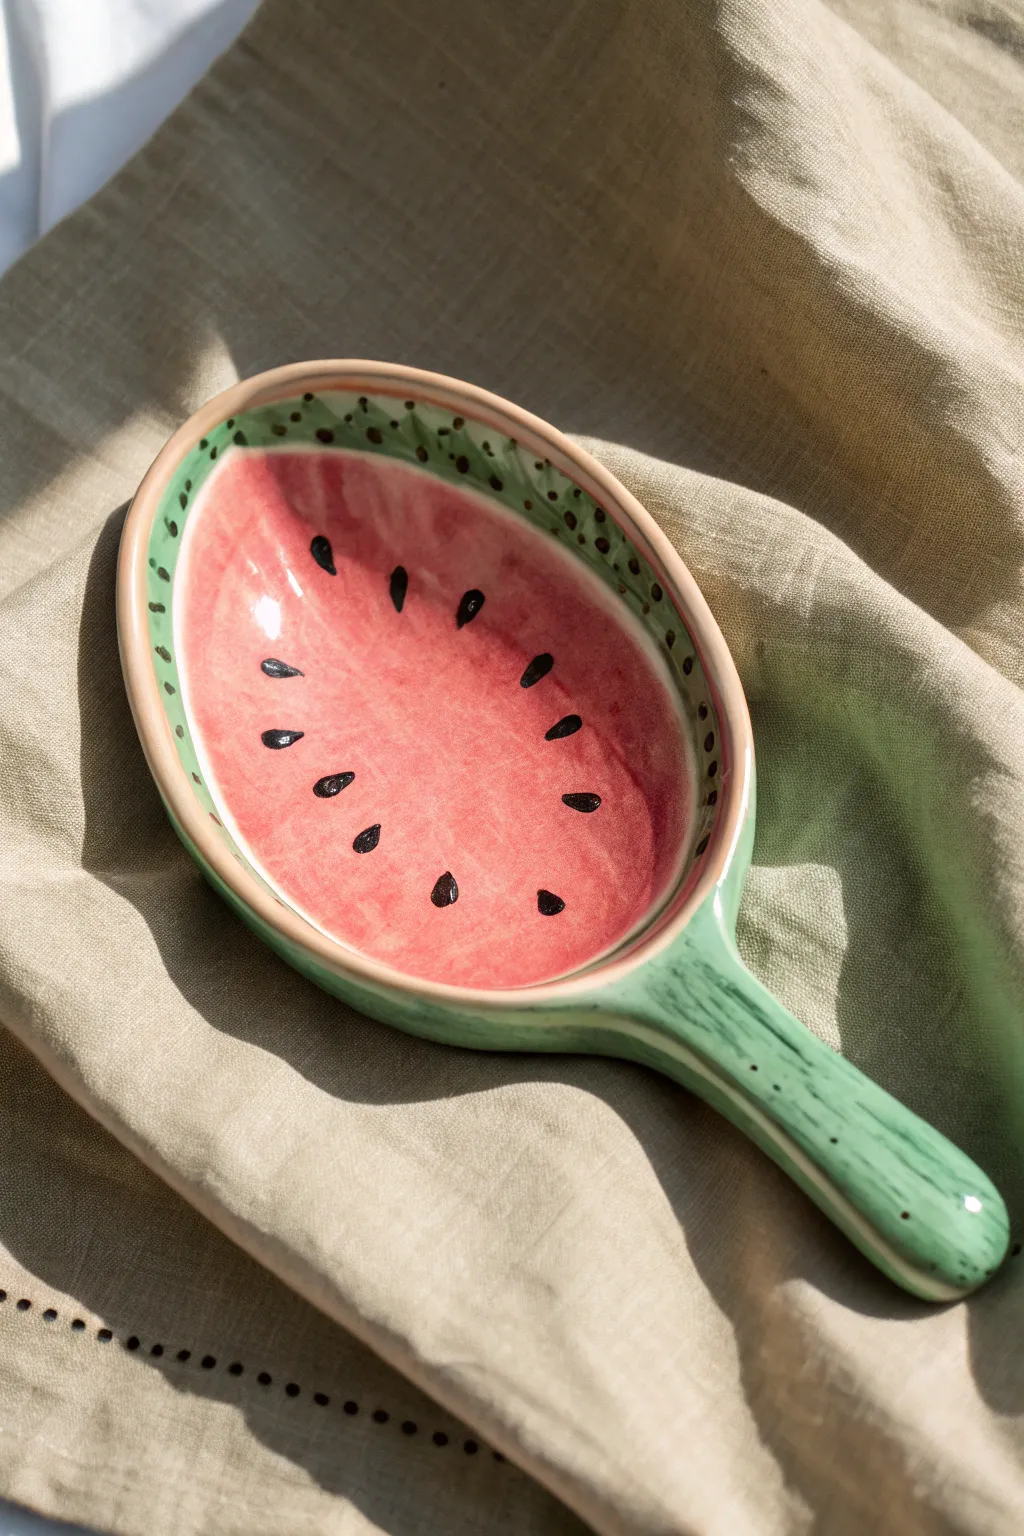
Bring a splash of summer into your kitchen with this glossy, watermelon-themed spoon rest. This project uses ceramic underglazes to achieve that vibrant, juicy look with a food-safe finish perfect for holding messy utensils.
Detailed Instructions
Materials
- Bisque ceramic spoon rest (oval/leaf shape)
- Underglaze: Bright Watermelon Pink
- Underglaze: Mint Green or Lime Green
- Underglaze: Forest Green
- Underglaze: Jet Black
- Clear dipping or brush-on glaze
- Soft fan brush
- Small round synthetic brush (size 4)
- Fine liner brush
- Damp sponge
- Pencil
Step 1: Preparation & Base Colors
-
Clean surface:
Wipe down your ceramic bisque with a damp sponge to remove any kiln dust, ensuring the paint adheres smoothly. -
Sketch the rind:
Lightly sketch an oval line about a quarter-inch from the edge of the bowl area using a pencil; this marks where the pink fruit meets the green rind. -
Apply pink center:
Using a soft fan brush or large round brush, fill the inner oval with the watermelon pink underglaze. -
Layer the pink:
Ceramic colors often fire semi-transparent, so apply a second and third coat of pink, letting the paint dry to the touch between layers. -
Paint the rim:
Switch to a clean brush and apply the mint green underglaze to the outer rim, carefully meeting the edge of the pink section. -
Coat the handle:
Continue painting the mint green all the way down the handle, covering the front, back, and sides. -
Green opacity:
Just like the pink section, apply two more coats of mint green to the rim and handle to ensure a solid, opaque finish after firing.
Fixing Smudges
If you accidentally drip black paint on the pink, scratch it off gently with a wooden toothpick once dry, then dab a little pink over the spot.
Step 2: Texturing the Rind
-
Mix dark green:
Prepare a small amount of forest green underglaze on your palette; you want this consistency to be smooth and flow easily from a liner brush. -
Handle stripes:
Using the liner brush, paint long, thin, slightly shaky organic lines down the length of the handle to mimic the texture of a watermelon rind. -
Rim details:
Add small, rhythmic dashes or dots of forest green along the top edge of the rim, spacing them unevenly for a natural look. -
Inner border definition:
I like to gently dab small dots of forest green right on the seam where the pink meets the light green rim, softening the transition.
Make it Shine
Add a tiny white speck (using underglaze) to the rounded top of each black seed before applying the clear glaze. It mimics light reflection permanently.
Step 3: Seeds & Glazing
-
Load black paint:
Load a size 4 round brush with black underglaze, ensuring the tip is pointed. -
Create seed shapes:
Press the belly of the brush down onto the pink area and lift up quickly to create a teardrop shape. -
Seed placement:
Arrange the seeds in a loose radial pattern around the center of the spoon rest, keeping the points of the teardrops facing inward. -
Dry completely:
Allow all paint layers to dry thoroughly—usually about 20 minutes—until the surface is chalky and room temperature. -
Apply clear glaze:
Dip the entire piece into a clear dipping glaze, or carefully apply two coats of brush-on clear glaze using a soft fan brush. -
Fire the piece:
Fire the spoon rest in a kiln according to the specifications of your clay and glaze (typically Cone 06 for earthenware).
Once fired, you’ll have a durable, glossy slice of summer ready to brighten up your stovetop.
Tropical Monstera Leaf
Bring a permanent touch of the tropics to your kitchen with this handcrafted ceramic spoon rest. The deep green reactive glaze captures the natural variance of a real leaf while the carved veins guide sauce and liquids away from the handle.
Step-by-Step Tutorial
Materials
- White stoneware clay
- Rolling pin and canvas mat
- Needle tool or fettling knife
- Loop carving tool
- Pottery sponge
- Breaking green glaze (translucent)
- Small soft brush
- Kiln access
Step 1: Shaping the Leaf
-
Prepare the slab:
Begin by wedging your clay to remove air bubbles, then roll it out into an even slab approximately 1/4 inch thick. -
Outline the shape:
Using a needle tool, lightly trace a large heart shape that tapers into a long stem (which will serve as the handle) directly onto the clay surface. -
Cut the form:
Once satisfied with the outline, commit to the cut with your fettling knife, ensuring the stem is thick enough to support the weight of a spoon. -
Smooth the edges:
Dip a sponge in water and wring it out well, then run it along all cut edges to round them off and remove any sharp burrs. -
Form the curve:
Gently lift the sides of the leaf and press the center down slightly to create a shallow bowl shape; this ensures your spoon rest catches drips effectively. -
Add fenestrations:
Use your needle tool to cut oval-shaped holes (fenestrations) into the leaf body, mirroring the natural gaps found in monstera leaves. -
Refine the cutouts:
I usually spend extra time here smoothing the inside edges of these holes with a damp brush or finger so they don’t snag on sponges later.
Step 2: Detailing and Drying
-
Carve the center vein:
Take a loop tool and carve a central line running from the base of the leaf tip down towards the stem, going deep enough to feel but not cutting through. -
Add side veins:
Branching off the center line, carve curved veins outwards toward the leaf edges, creating a skeletal structure for the glaze to interact with. -
Create definition:
Go back over your carved lines with a damp sponge to soften the hard edges, which helps the glaze ‘break’ (turn lighter) over the high points. -
Dry slowly:
Cover the piece loosely with plastic to let it dry slowly to a leather-hard state, preventing the stem from warping or cracking. -
Bisque fire:
Once bone dry, fire the piece in a kiln to cone 04 (or according to your clay’s specifications) to prepare it for glazing.
Warp Watch
To prevent the stem from curling up during drying, place a small, lightweight sandbag or specialized kiln weight gently on the handle area.
Step 3: Glazing Process
-
Clean the bisque:
Wipe the fired piece down with a damp sponge to remove any kiln dust that might repel the glaze. -
Apply first coat:
Using a soft brush, apply a generous coat of translucent breaking green glaze, ensuring it gets into all the carved veins. -
Layer for depth:
Apply two more coats of glaze, allowing each to dry slightly in between; the thickness is key for achieving that deep, glossy finish. -
Check the edges:
Make sure the glaze isn’t too thick on the sharp rim of the cutouts, as you want the clay body to show through slightly after firing. -
Clean the foot:
Carefully wipe away any glaze from the underside of the spoon rest so it doesn’t fuse to the kiln shelf. -
Glaze fire:
Fire the piece to the temperature recommended for your specific glaze (typically cone 5 or 6 for stoneware) to melt the glass and seal the clay.
Level Up: Texture
Use a speckled clay body instead of plain white. The specks will bleed through the translucent green glaze, mimicking organic mold and leaf spots.
Place your finished leaf by the stove and enjoy the pop of botanical color every time you cook.
Galaxy Night Sky
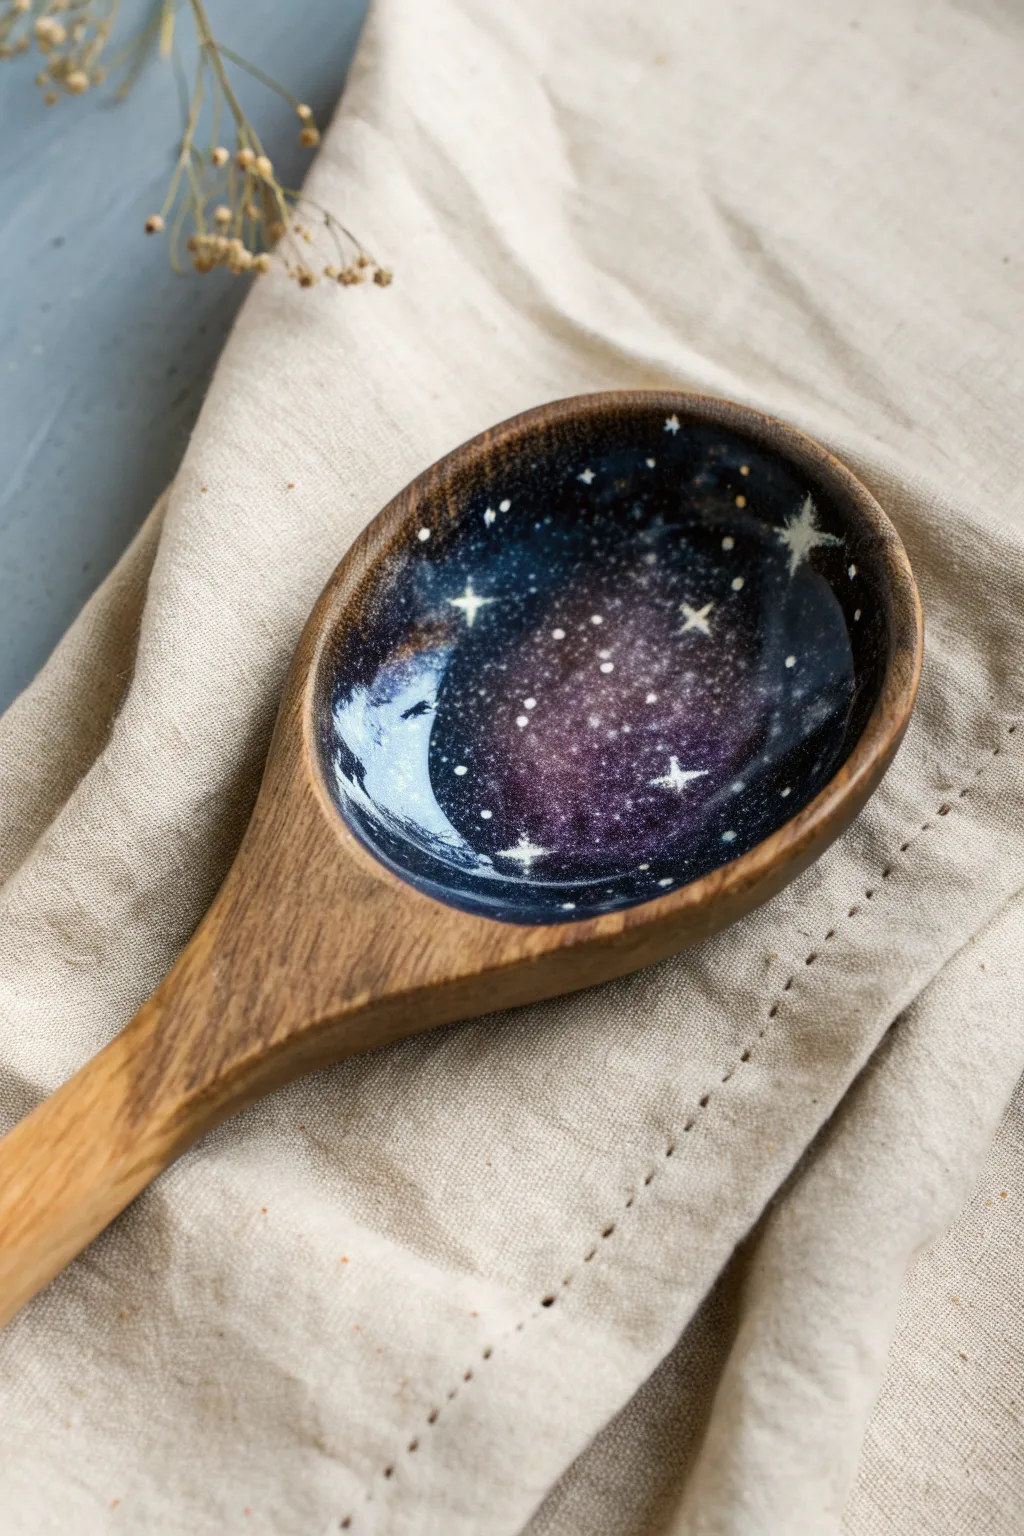
Transform a simple kitchen utensil into a captivating portal to the universe. This project combines the rustic warmth of natural wood with the deep, glossy mystery of a starry nebula, creating a stunning piece of functional art.
Step-by-Step Guide
Materials
- Wooden spoon with a deep bowl
- Fine-grit sandpaper (220 grit)
- Acrylic paints (Black, Navy Blue, Purple, White, Teal)
- Small cosmetic sponge or kitchen sponge piece
- Fine detail brush (00 or 000 size)
- Old toothbrush
- Masking tape
- High-gloss polyurethane varnish or food-safe resin
Step 1: Preparation & Base
-
Smooth the surface:
Lightly sand the inside bowl of the wooden spoon to remove any existing finish or rough fibers, ensuring a smooth canvas for your paint. -
Clean the wood:
Wipe the spoon thoroughly with a damp tack cloth to remove all sanding dust. -
Protect the rim:
Carefully apply masking tape around the very top edge of the spoon’s rim if you want a sharp line, or prepare to paint freehand for the organic look shown in the photo. -
Apply the void:
Paint the entire inside of the bowl with a solid coat of black acrylic paint and let it dry completely.
Muddy Galaxy?
If your colors look gray or muddy, you likely over-blended wet paint. Let the dark base layers dry completely before sponging on the lighter nebula clouds to keep them vibrant.
Step 2: Painting the Nebula
-
Sponge the first layer:
Dip a small corner of your sponge into navy blue paint and dab it roughly around the outer edges of the bowl, leaving the black visible in the deepest shadows. -
Add purple depth:
Using a fresh side of the sponge, dab purple paint into the middle areas, overlapping slightly with the navy blue to create a transition. -
Create the glow:
Mix a tiny amount of white with teal or light blue. Lightly sponge this into the center of the purple area to create the bright heart of the nebula. -
Blend the cosmos:
While the paint is still tacky, use a clean, dry part of the sponge to soften the edges between the black, blue, and purple so there are no harsh lines. -
Intensify the contrast:
I like to go back in with a little black on the sponge to re-darken the very edges if the blue spread too far, creating a vignette effect.
Level Up: Deep Sparkle
Mix a tiny pinch of ultra-fine holographic glitter into your first layer of clear varnish. This gives the galaxy a subtle, shifting depth that sparkles when the light hits it.
Step 3: Stars & Details
-
Prepare the stars:
Water down a small amount of white acrylic paint until it reaches an inky consistency. -
Splatter background stars:
Dip an old toothbrush into the thinned white paint, hold it over the spoon, and run your thumb across the bristles to spray a fine mist of distant stars. -
Paint the hero stars:
Using your finest detail brush, paint a few larger four-point ‘cross’ stars in the lighter nebula areas. -
Add star cores:
Place a tiny, solid white dot in the absolute center of your cross shapes to make them look like they are glowing intensely. -
Dry completely:
Allow the paint to cure fully for at least an hour before moving to the sealing phase.
Step 4: Glassy Finish
-
First seal coat:
Apply a thick, even layer of high-gloss varnish or resin to the inside of the spoon bowl. -
Check for bubbles:
Inspect the wet finish immediately and pop any tiny air bubbles with a pin or by gently blowing on them. -
Build the gloss:
To achieve the liquid-glass look in the photo, apply 2-3 coats of varnish, allowing full drying time between each layer. -
Final cure:
Let the spoon rest undisturbed for 24-48 hours to ensure the finish is rock-hard and durable.
Display your cosmic creation on the counter to inspire a little wonder while you cook
Mexican Talavera Style
Bring the warmth and vibrancy of traditional Mexican pottery to your kitchen with this stunning cobalt and orange spoon rest. By breaking down the intricate Talavera patterns into simple brushstrokes, you can achieve this classic glazed look right at home.
Detailed Instructions
Materials
- White ceramic spoon rest (glazed)
- Enamel or ceramic paint (Cobalt Blue)
- Enamel or ceramic paint (Bright Orange)
- Enamel or ceramic paint (White – optional for detailing)
- Round brush (size 4)
- Fine liner brush (size 0 or 00)
- Rubbing alcohol
- Cotton pads
- Pencil (optional)
- Domestic oven (for curing)
Step 1: Preparation and Base
-
Clean the surface:
Wipe the entire spoon rest down thoroughly with rubbing alcohol and a cotton pad to remove any oils or fingerprints, ensuring the paint adheres perfectly. -
Mark the center:
Using a pencil, lightly mark a small dot in the exact center of the bowl area to serve as the anchor for your floral design. -
Map the quadrants:
Lightly sketch a vertical and horizontal line crossing through your center dot to help keep the symmetry of the flower petals you are about to paint.
Steady Hand Pro-Tip
Rest your pinky finger on a dry area of the ceramic surface while painting. This anchors your hand and gives you much more control for the fine liner brushwork.
Step 2: Painting the Bowl Design
-
Create orange petals:
Load your round brush with orange paint and create six petal shapes radiating from the center dot; press down to widen the petal and lift up to create a point. -
Add petal details:
While the orange paint is still wet, gently use a clean, damp liner brush to lift a line of paint from the center of each petal to create the white vein, or wait until dry and paint a thin white line on top. -
Paint the center:
Dip the handle end of a brush into cobalt blue paint and stamp a perfect dot right in the center of your orange flower. -
Add blue flourishes:
Using the liner brush and cobalt blue, paint fan-shaped motifs in the spaces between the orange petals, consisting of three or four teardrop strokes. -
Detail with dots:
Add tiny orange dots near the tips of the blue flourishes to fill the empty white space and balance the color distribution.
Step 3: Decorating the Handle
-
Paint the neck motif:
Where the handle meets the bowl, paint a blue semi-circle or fan shape with radiating strokes, pointing towards the bowl. -
Create the top motif:
Mirror the previous step by painting a similar blue fan shape at the very top tip of the handle. -
Connect with vines:
I like to lightly sketch this part first: draw flowing, curvy blue vines connecting the top and bottom fans, adding small scroll leaves along the sides. -
Add orange accents:
Paint small orange ovals or berries nestled within the curves of the blue vines on the handle.
Level Up: Signed Pottery
Use your liner brush to paint your initials and the year on the back of the spoon rest in blue. It adds that authentic ‘signed artist’ feel found on real Talavera pottery.
Step 4: Borders and Finishing
-
outline the rim:
Load your liner brush with inky blue paint and carefully trace the raised rim of the spoon rest, creating a continuous border. -
Frame the handle:
Continue two blue lines down the sides of the handle, connecting them to the rim border around the bowl. -
Clean up edges:
If any lines went astray, use a damp cotton swab or a toothpick to gently scrape away or wipe off the excess paint before it sets. -
Dry properly:
Allow the piece to air dry for at least 24 hours to ensure all moisture evaporates from the paint. -
Bake to cure:
Place the spoon rest in a cool oven, then set the temperature to 300°F (150°C) (or per your paint manufacturer’s instructions), bake for 35 minutes, and let it cool completely inside the oven.
You now have a beautiful, durable piece of functional art ready to brighten up your stovetop
Bubble Glaze Effect
Capture the organic beauty of sea foam or cellular patterns with this fun bubble glazing technique. This project transforms a simple ceramic bisque blank into a stunning, texture-rich functional piece for your kitchen using nothing but soap and underglaze.
How-To Guide
Materials
- Bisque-fired ceramic spoon rest
- Dark teal or forest green underglaze
- Clear transparent glaze (brush-on or dipping)
- Liquid dish soap
- Water
- Small plastic cup
- Drinking straw
- Damp sponge
- Shallow plastic tub or newspaper (for mess control)
- Kiln access
Step 1: Preparation & Mixing
-
Clean the bisque:
Start by wiping down your bisque spoon rest with a damp sponge to remove any kiln dust or oils from handling. -
Prepare the workspace:
Bubble glazing can get messy, so I prefer to set my project inside a shallow plastic tub to catch any flying foam. -
Measure underglaze:
Pour approximately two tablespoons of your teal underglaze into a small plastic cup. -
Dilute the mixture:
Add about one tablespoon of water to the cup to thin the pigment slightly. -
Add the bubbling agent:
Squeeze in a generous dash of liquid dish soap; usually, about one teaspoon is sufficient. -
Mix thoroughly:
Stir the solution vigorously with your drinking straw to ensure the soap and pigment are fully combined.
Troubleshooting Bubbles
If your bubbles pop too quickly before landing, add a few more drops of dish soap. If the rings are too faint, try adding more underglaze to the mix.
Step 2: Creating the Bubble Texture
-
Generate the foam:
Insert the straw into the liquid and blow steadily until a mountain of bubbles rises above the rim of the cup. -
Apply to the bowl:
Gently tilt the cup over the bowl section of the spoon rest, allowing the foam to cascade onto the clay. -
Avoid liquid transfer:
Be careful to let only the bubbles land on the piece, not the heavy liquid from the bottom of the cup. -
Build density:
Continue blowing and applying bubbles until the bowl of the spoon is piled high with foam. -
Fade the handle:
Apply a smaller amount of bubbles to the handle area, spacing them out to create a gradient effect that fades toward the end. -
Let them settle:
Allow the bubbles to sit and pop naturally on their own; do not touch them while they are wet. -
Observe the pattern:
As the bubbles pop, the pigment will settle into circular rings, creating the distinctive cellular look.
Step 3: Finishing & Firing
-
Dry the underglaze:
Wait until the bubble pattern is completely dry and powdery to the touch. -
Clean up:
Wipe away any stray marks on the underside or rim of the spoon rest with a clean damp sponge. -
Apply clear glaze:
Apply a coat of clear transparent glaze over the entire piece to seal the design and make it food safe. -
Final drying:
Let the clear glaze coat dry thoroughly before moving the piece. -
Fire the piece:
Fire the spoon rest in a kiln according to the specific temperature requirements of your clay and glaze (typically Cone 06 or Cone 6).
Pro Tip: Layering
For a deeper effect, let the first layer dry, then apply a second layer of bubbles using a contrasting blue for a complex, multi-tonal ocean look.
Once fired, your spoon rest will showcase a mesmerizing, glossy web of color ready to brighten up your stovetop.
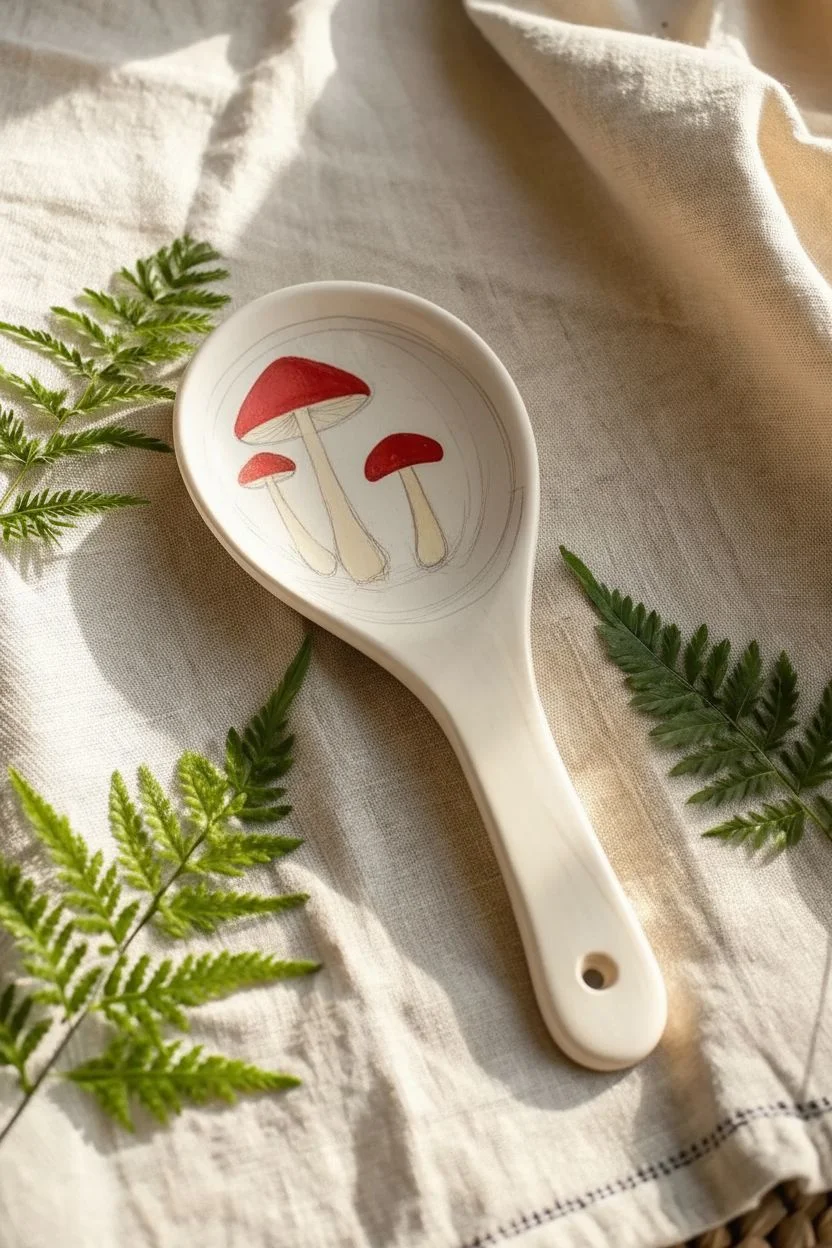
Whimsical Mushrooms
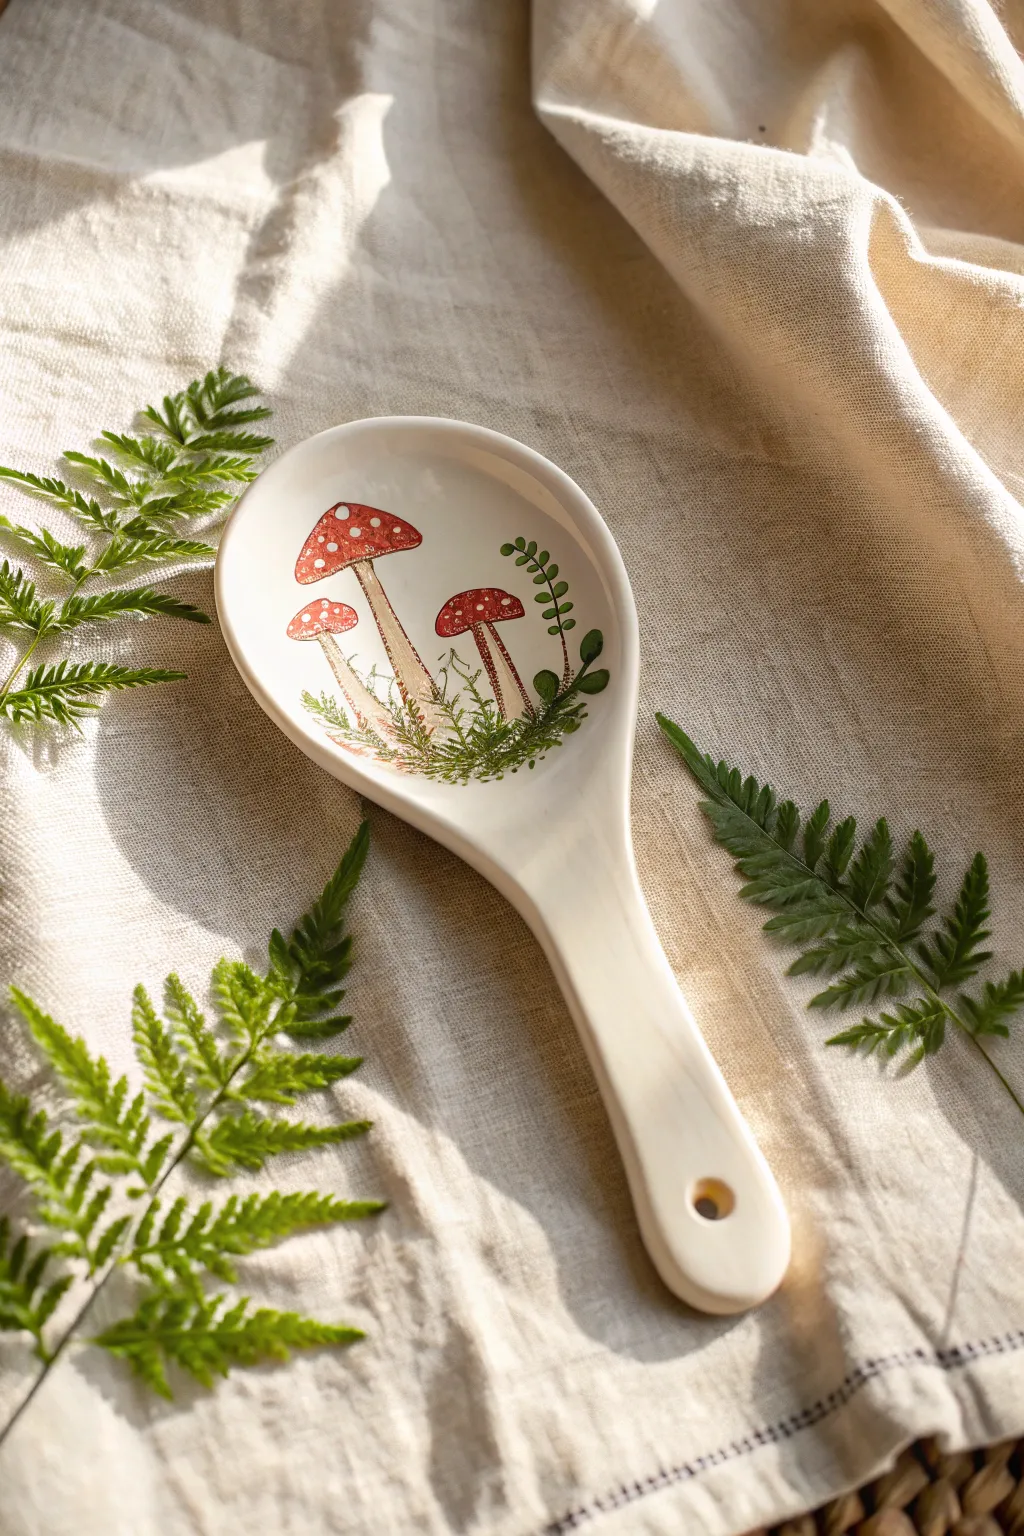
Bring a touch of cottagecore charm to your kitchen counter with this delightful mushroom-themed spoon rest. Using bake-able ceramic paints, you will create a durable and functional piece that captures the magic of a forest floor.
Detailed Instructions
Materials
- White or cream ceramic spoon rest
- Rubbing alcohol and cotton pads
- Ceramic or enamel paints (Red, Cream, Sap Green, Dark Green, White, Burnt Umber)
- Pencil
- Synthetic bright brush (size 2)
- Fine liner brush (size 00 or 0)
- Paint palette
- Paper towels
- Home oven (for curing)
Step 1: Preparation and Base Shapes
-
Clean the surface:
Wipe the entire bowl area of the spoon rest with rubbing alcohol to remove oils or fingerprints, ensuring the paint adheres perfectly. -
Sketch the layout:
Lightly sketch three mushrooms in the center of the bowl using a pencil: a large one in the middle-left, a medium one on the right, and a tiny one tucked on the far left. -
Paint the stems:
Mix a cream color with a tiny drop of burnt umber to get a natural stalk shade. Use the size 2 brush to paint the three stems, making them slightly thicker at the base. -
Add the caps:
Using your bright red paint, fill in the caps of the mushrooms. Shape the largest one like a rounded triangle and the others as soft semi-circles. -
Let the base dry:
Allow these base layers to touch-dry for about 15 minutes prevents colors from muddying when we add details.
Step 2: Adding Texture and Detail
-
Texturize the stems:
Dilute a bit of burnt umber with water or glazing medium. Use the liner brush to paint very faint, vertical streaks up the stems for a fibrous look. -
Paint the gills:
Using a very dilute light brown, paint fine lines on the underside of the caps connecting the stem to the rim. -
Create the signature spots:
Dip the tip of a brush handle or a small round brush into pure white paint to dot the red caps. Keep the dots irregular in size and spacing for a natural appearance. -
Ground the mushrooms:
Switch to sap green. Use a stippling motion (rapid light taps) at the very bottom of the stems to create a bed of moss and grass.
Paint Beading Up?
If your paint separates or beads up on the ceramic surface, it likely still has oil residues. Wipe the area again firmly with alcohol and let it dry completely before reapplying paint.
Step 3: Painting the Greenery
-
Draft the fern stems:
With your fine liner brush and dark green paint, draw a long, curving line rising up the right side of the bowl, mimicking a fern stem. -
Add fern leaves:
Paint tiny, tear-drop shaped leaves extending from both sides of that fern stem, getting smaller toward the tip. -
Layer in grass blades:
Using a lighter sap green, flick quick, upward strokes around the base of the mushrooms to look like wild grass blades mixing with the moss. -
Add a secondary vine:
I like to add a second, smaller vine or leafy plant on the left side to balance the composition, keeping the leaves rounded. -
Highlight the greens:
Mix a little white into your green and add tiny highlights to the tips of the fern leaves for dimension.
Gilded Edges
For an extra elegant touch, paint a thin rim of gold ceramic paint around the outer edge of the spoon rest depression to frame your illustration.
Step 4: Curing and Finishing
-
Clean up edges:
If any paint went outside your desired lines or strayed onto the rim, wipe it away gently with a damp cotton swab or toothpick. -
Initial drying phase:
Let the painted spoon rest sit undisturbed for at least 24 hours to allow the moisture to fully evaporate from the paint. -
Baking the piece:
Place the spoon rest in a cold oven. Set the temperature to 300°F (or per your paint manufacturer’s instructions) and bake for 35 minutes. -
Cooling down:
Turn the oven off and leave the door closed. Let the ceramic cool down completely inside the oven to prevent cracking.
Now you have a charming, durable piece of art ready to brighten up your cooking routine
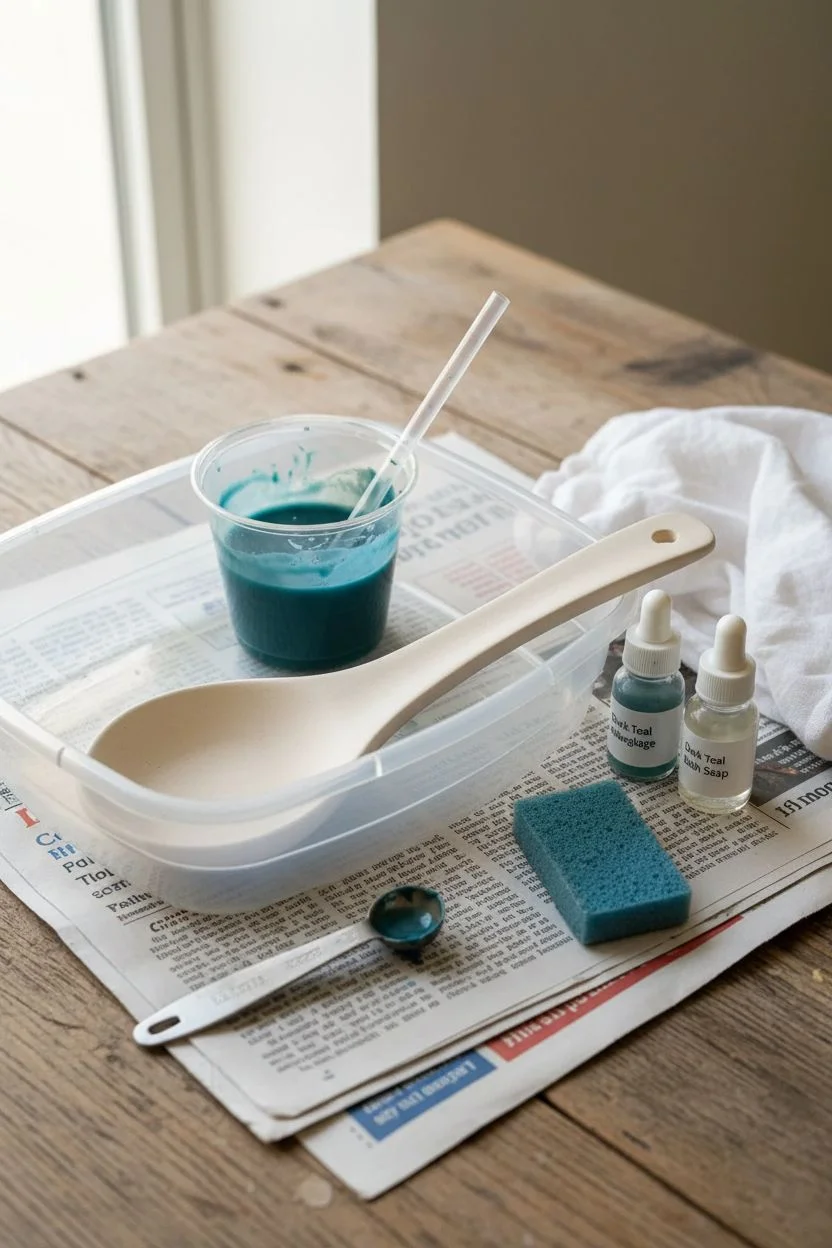
Modern Abstract Splatter
Transform a plain kitchen staple into a striking piece of modern art that features vibrant, fluid neon hues against a stark black background. This project combines the freedom of abstract splatter techniques with a sleek galaxy-inspired aesthetic.
How-To Guide
Materials
- Ceramic or wooden spoon rest blank
- Multi-surface acrylic paints (Black, Neon Pink, Bright Yellow, Cyan)
- Glossy clear sealant (dishwasher safe recommended)
- Small round paintbrush
- Old toothbrush or stiff bristle brush
- Palette or small cups for mixing
- Water for thinning paint
- Paper towels
Step 1: The Dark Canvas
-
Prepare the surface:
Wipe down your spoon rest with a damp cloth or rubbing alcohol to remove any dust or oils, ensuring a clean surface for the paint to adhere to. -
Apply the base coat:
Using a flat brush, apply a smooth layer of black paint over the entire top surface of the spoon rest. -
Build opacity:
Allow the first layer to dry completely to the touch. Apply a second coat of black to ensure rich, solid coverage with no streaks showing through. -
Check the edges:
Don’t forget to paint the sides and outer rim of the spoon rest so the design looks finished from every angle. -
Full dry:
Let the black base cure fully before moving on to the colors, otherwise the bright neons might muddy up.
Drizzle Control
If your lines are breaking or looking gloopy, your paint is too thick. Add water one drop at a time until the paint flows continuously off your brush without dripping uncontrollably.
Step 2: Controlled Chaos
-
Thin the colors:
Place a dollop of yellow, pink, and cyan paint into separate small cups. Add a few drops of water to each until the consistency resembles warm honey—fluid, but not watery. -
Start the yellow streams:
Load a round brush heavily with the thinned yellow paint. Hold it over the spoon rest and let fine lines drizzle across the handle and bowl in sweeping, curved motions. -
Add cyan movement:
Clean your brush and repeat the drizzling process with the cyan paint, allowing some lines to cross over the yellow while keeping others separate to create depth. -
Create the pink focal point:
For the large pink splash seen in the bowl area, gently pour a small amount of pink paint directly from the cup or load your brush generously and let it pool. -
Refine the pool:
I like to use the handle of the paintbrush to gently drag the edges of the pink pool outward, creating that sense of motion and fluid splashes. -
Add handle accents:
Drizzle a few sharp lines of pink across the handle area to balance the visual weight of the design.
Step 3: Galactic Details & Seal
-
Load the splatter tool:
Dip barely the tips of an old toothbrush or stiff brush into the yellow paint. You want the bristles damp, not soaking wet. -
Flick the stars:
Hold the brush near the surface and run your thumb across the bristles to flick fine speckles over the black negative space, creating a starry effect. -
Add variety:
Repeat the flicking motion sporadically with the cyan paint to add dimension to your splatter galaxy. -
Extended drying time:
Because the pooled paint (especially the pink splash) is thick, let the project sit undisturbed for at least 24 hours to ensure the center is fully dry. -
Apply protection:
Once fully cured, apply a coat of high-gloss sealant. Use long, soft strokes to avoid dragging the underlying paint. -
Final coat:
Apply a second or third coat of sealant, allowing proper drying time between each, to create a glass-like finish that is durable for kitchen use.
Glow Up
Swap the yellow splatter for glow-in-the-dark acrylic interior paint. During the day it looks like standard abstract art, but at night it becomes a glowing deep-space galaxy.
Place your distinctive new spoon rest by the stove and enjoy a pop of cosmic color every time you cook.


Have a question or want to share your own experience? I'd love to hear from you in the comments below!