There is something incredibly satisfying about creating miniature works of art that live inside your favorite novels, marking the spot where imagination paused. Whether you are looking to organize a weekend painting session or simply use up scrap paper, these small-scale projects offer a quick and rewarding way to explore creativity without the pressure of a large canvas.
Simple Wet-on-Wet Gradients
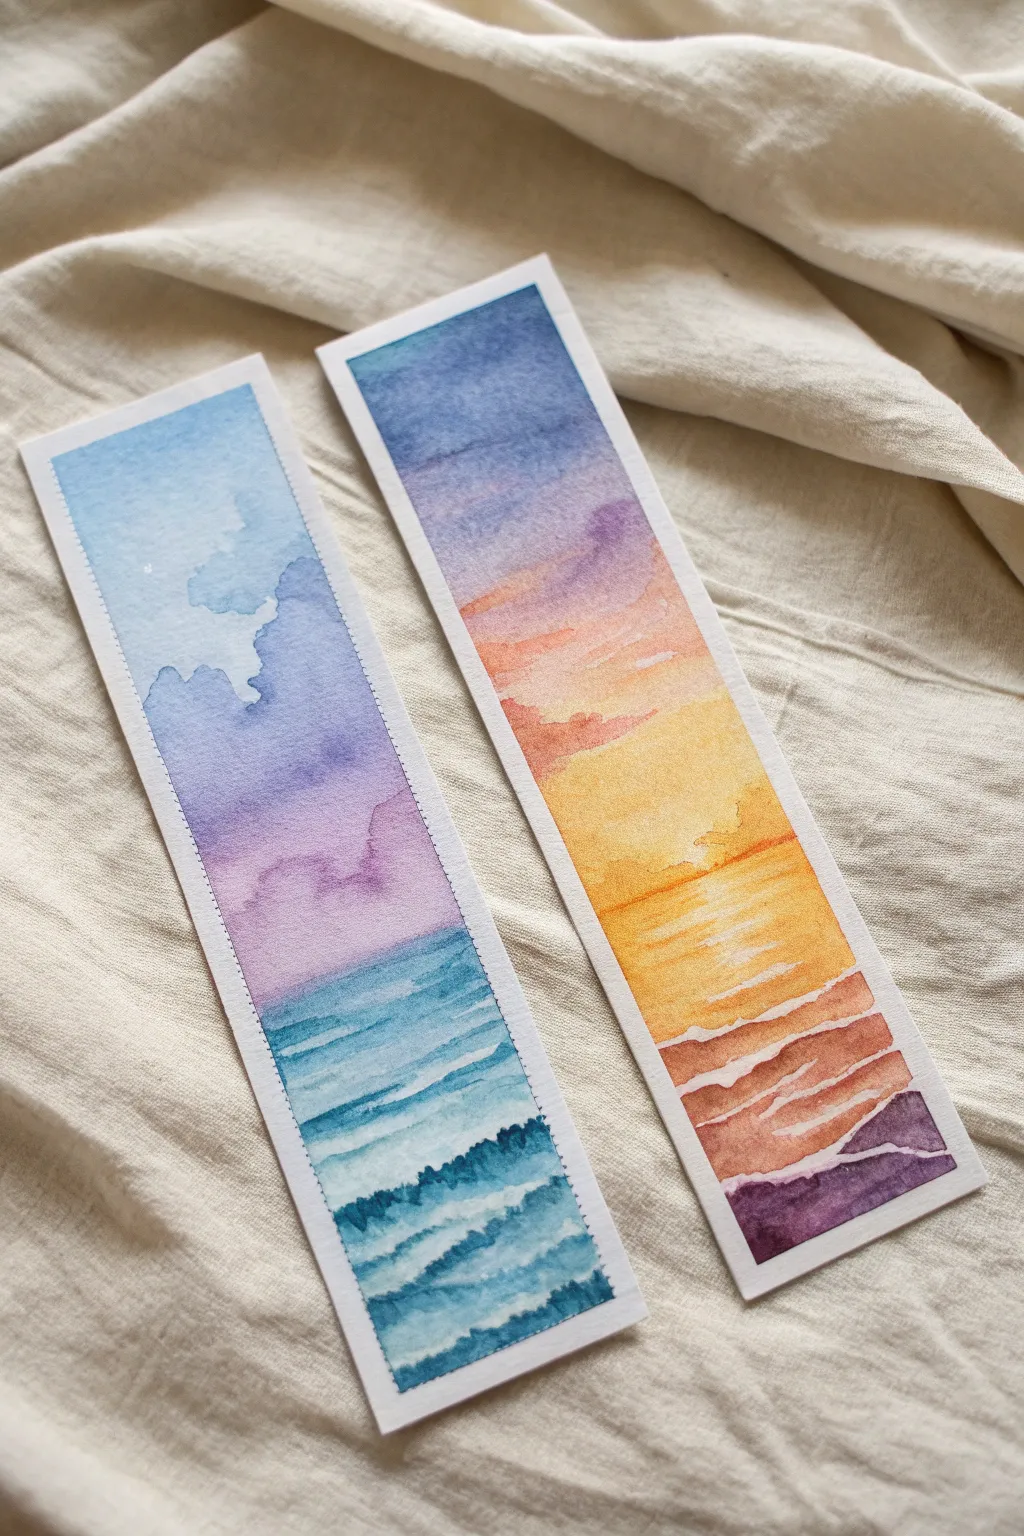
Capture the mood of the ocean at two different times of day with these atmospheric watercolor bookmarks. Utilizing wet-on-wet techniques for the skies and layered strokes for the waves creates a stunning depth that looks professional yet is surprisingly beginner-friendly.
How-To Guide
Materials
- 300gsm cold press watercolor paper
- Watercolor paints (Indigo, Violet, Cerulean Blue, Cadmium Yellow, Alizarin Crimson)
- White gouache or white gel pen
- Round watercolor brushes (size 4 and size 8)
- Painter’s tape or washi tape
- Jar of clean water
- Paper towels
- Rigid board for taping down paper
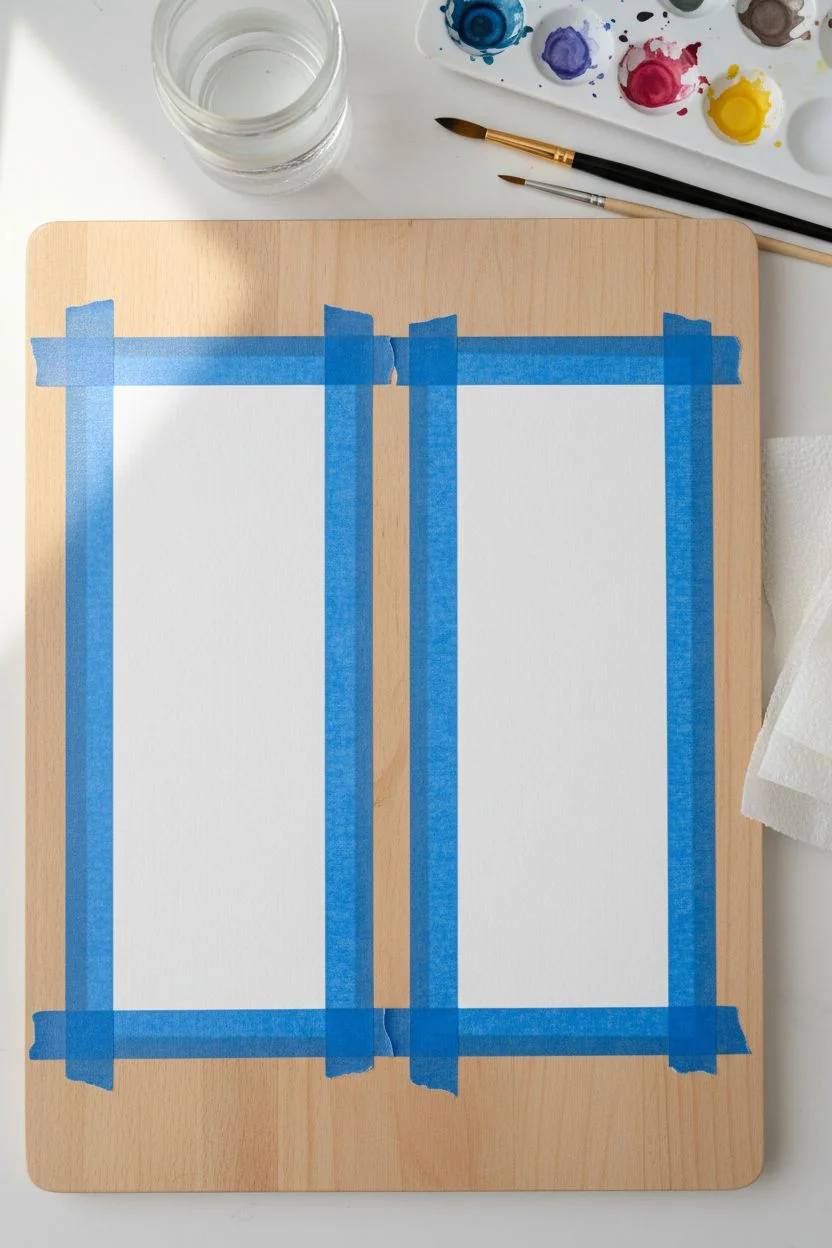
Step 1: Preparation & Setup
-
Size the paper:
Cut your watercolor paper into two strips, roughly 2 inches by 6 inches each. -
Secure the borders:
Tape the paper strips down onto a board using painter’s tape. Cover about 1/4 inch of the paper on all sides to create the crisp white frame seen in the finished project.
Angle is Everything
When lifting clouds (drying paint), keep your tissue or brush jagged and irregular. Perfect circles look unnatural; messy blobs look like real clouds!
Step 2: The Daylight Sky (Left Bookmark)
-
Wet the sky area:
On the first bookmark, apply clean water to the top two-thirds of the paper until it glistens evenly. -
Drop in the blue:
Load your size 8 brush with watered-down Cerulean Blue and touch it to the top left corner, letting it flow diagonally down. -
Add violet shadows:
While the paper is still wet, drop a small amount of diluted Violet into the lower right of the sky section to create a soft transition. -
Lift the clouds:
Rinse your brush and dry it thoroughly on a paper towel. Use the damp brush to ‘lift’ paint away in organic shapes to create fluffy white clouds. -
Wait for the dry:
Allow the sky section to dry completely before moving to the ocean to prevent bleeding.
Make it Sparkle
For the sunset bookmark, mix a tiny amount of gold metallic watercolor or mica powder into the yellow horizon line for a genuine sun-kissed glow.
Step 3: The Daylight Ocean
-
Establish the horizon:
Draw a straight line of varying blue mixed with a touch of purple across the horizon using your size 4 brush. -
Paint the gradient:
Fill the rest of the bottom section with a light wash of blue, gradually getting darker as you move toward the bottom of the bookmark. -
Define the waves:
Once the base wash is semi-dry, use a mix of Indigo and Cerulean to paint horizontal, zig-zagging strokes that mimic choppy waves. -
Deepen the foreground:
Add the darkest pigment (pure Indigo) at the very bottom edge to pull the perspective forward.
Step 4: The Sunset Sky (Right Bookmark)
-
Create the sunset gradient:
Wet the top half of the second bookmark. Paint a stripe of Indigo at the top, blending into Violet, then Red, and finally Cadmium Yellow near the horizon line. -
Blend smoothly:
Tilt your board slightly to help the colors merge softly without creating hard lines. -
Add cloud texture:
Before the wash dries, dab a little concentrated Violet into the upper sky to suggest wispy sunset clouds.
Step 5: The Golden Reflection
-
Mirror the light:
Paint the water section starting with yellow directly under the horizon, transitioning into orange and finally purple at the bottom. -
Add shimmer lines:
Once the water layer is completely dry, use white gouache or a gel pen to draw thin, broken horizontal lines across the water to represent sunlight reflecting on waves. -
Add dark contrasts:
Paint jagged purple shapes at the very bottom corners to represent a darker shore or crashing waves in shadow.
Step 6: The Reveal
-
Remove the tape:
Wait until the paper is bone dry. Peel the tape away slowly at a 45-degree angle to reveal your clean, crisp borders.
Set these aside to flatten under a heavy book overnight, and you’ll have beautiful placeholders for your next reading adventure.


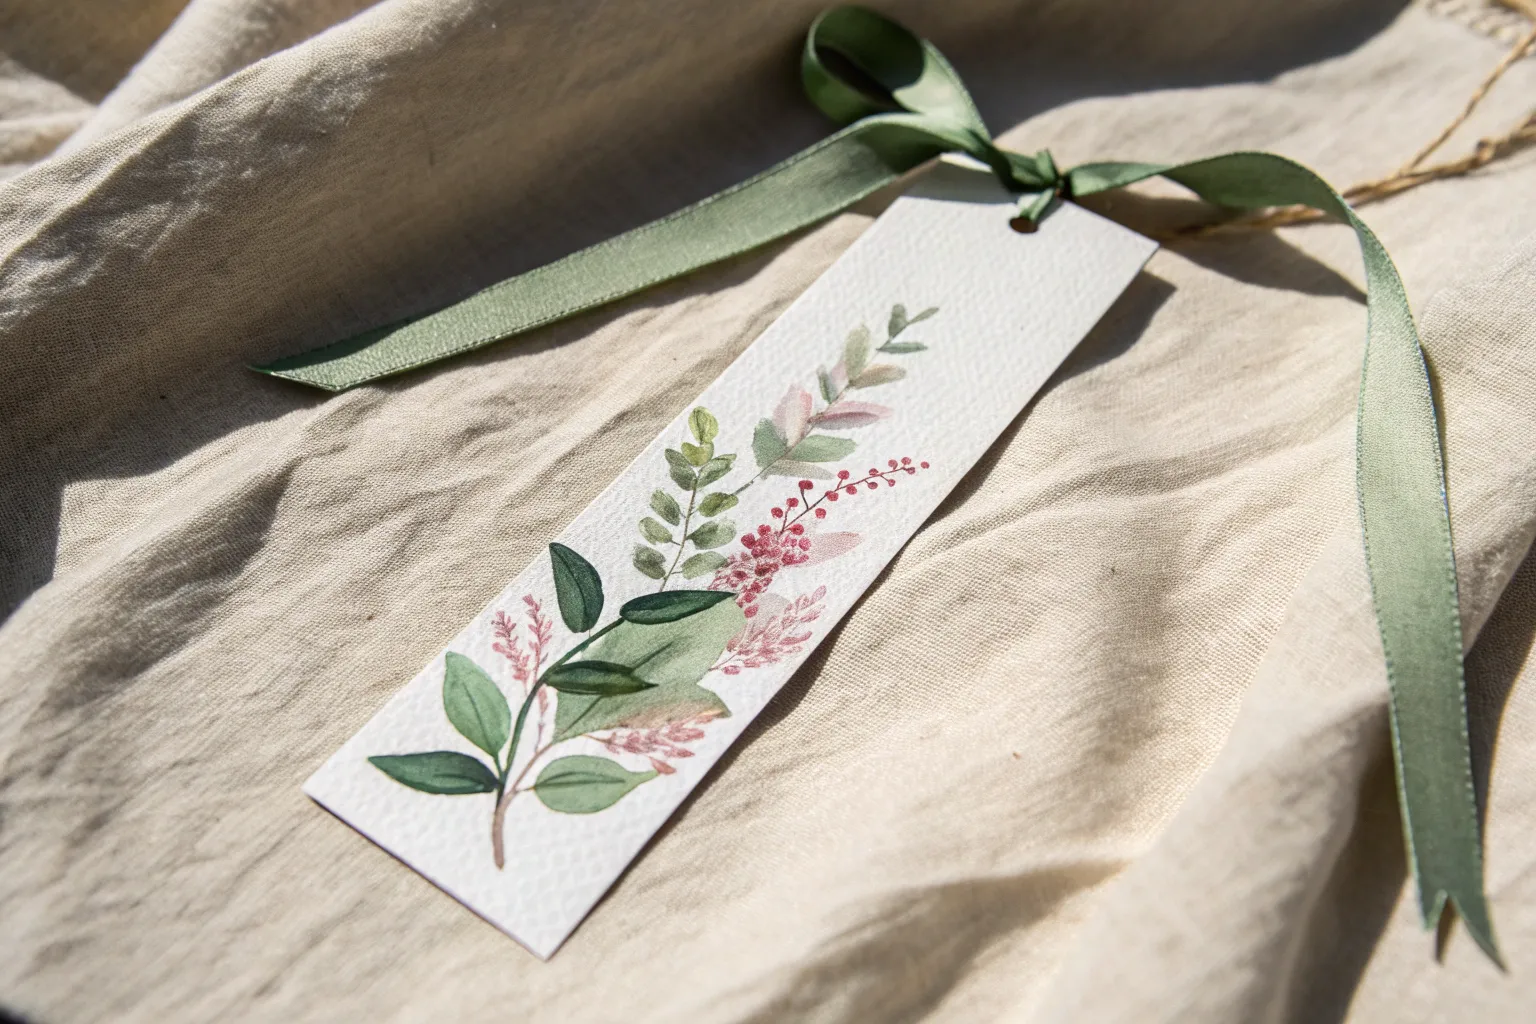
Vertical Floral Stems
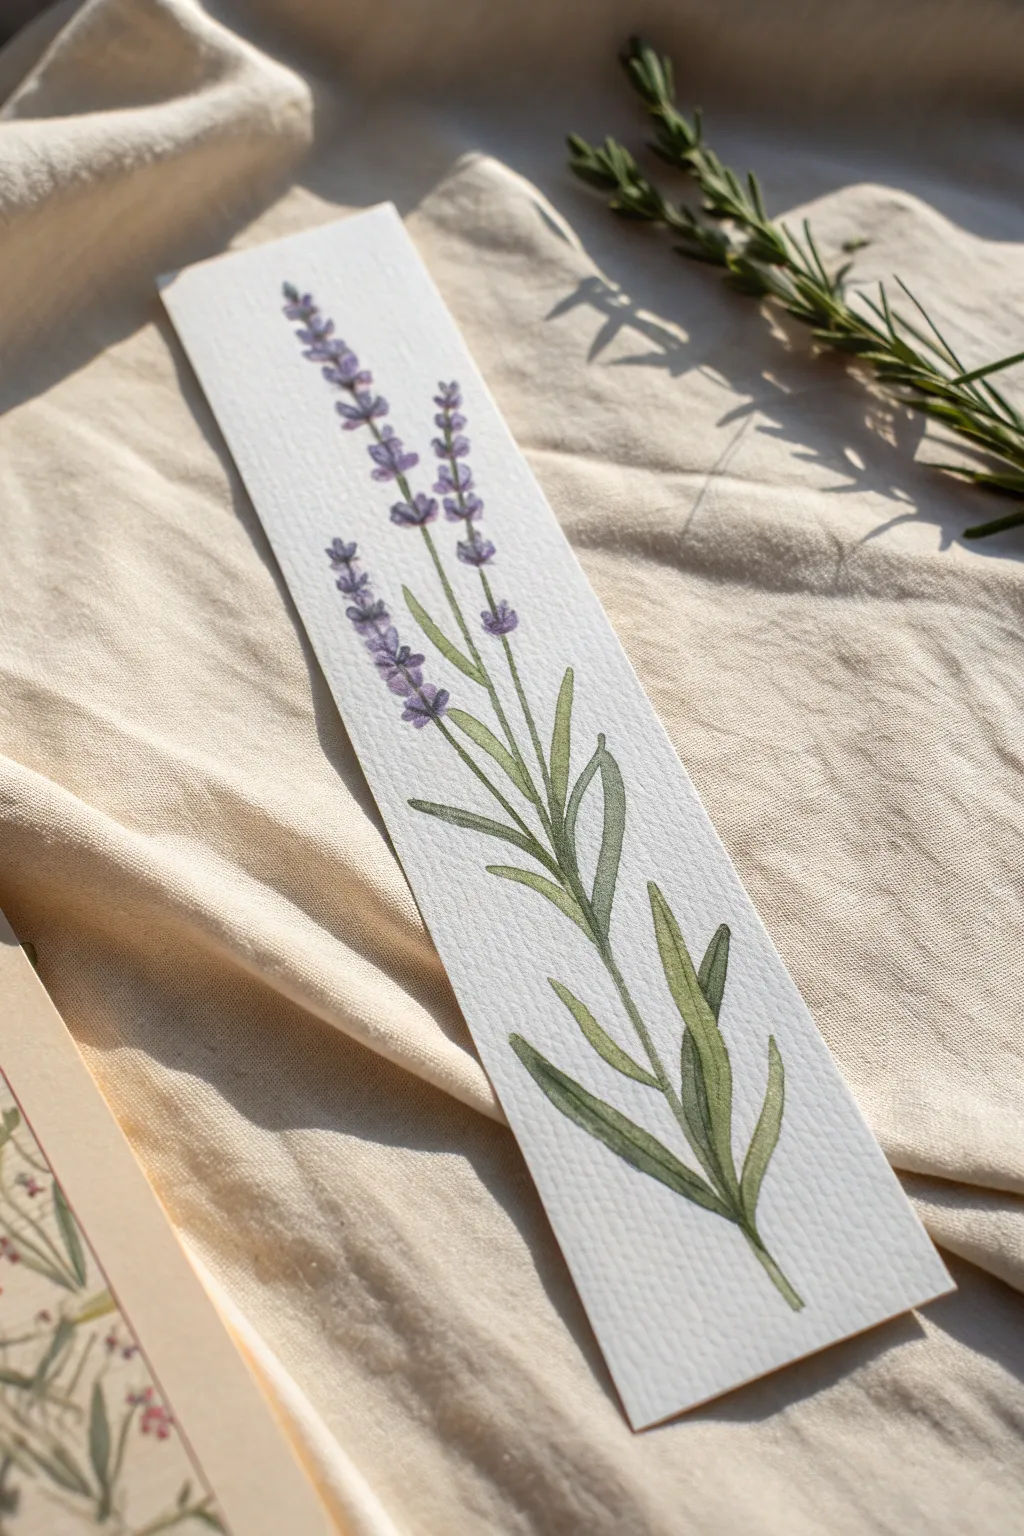
Capture the soothing essence of lavender with this graceful vertical design. This watercolor bookmark features slender green stems topped with clusters of purple buds, perfectly suited for the narrow paper format.
Step-by-Step
Materials
- Cold press watercolor paper (cut to 2×6 inches)
- Round watercolor brush (size 2 or 4)
- Watercolors (Sap Green, Olive Green, Violet, Ultramarine)
- H or HB pencil
- Kneaded eraser
- Water cup and paper towel
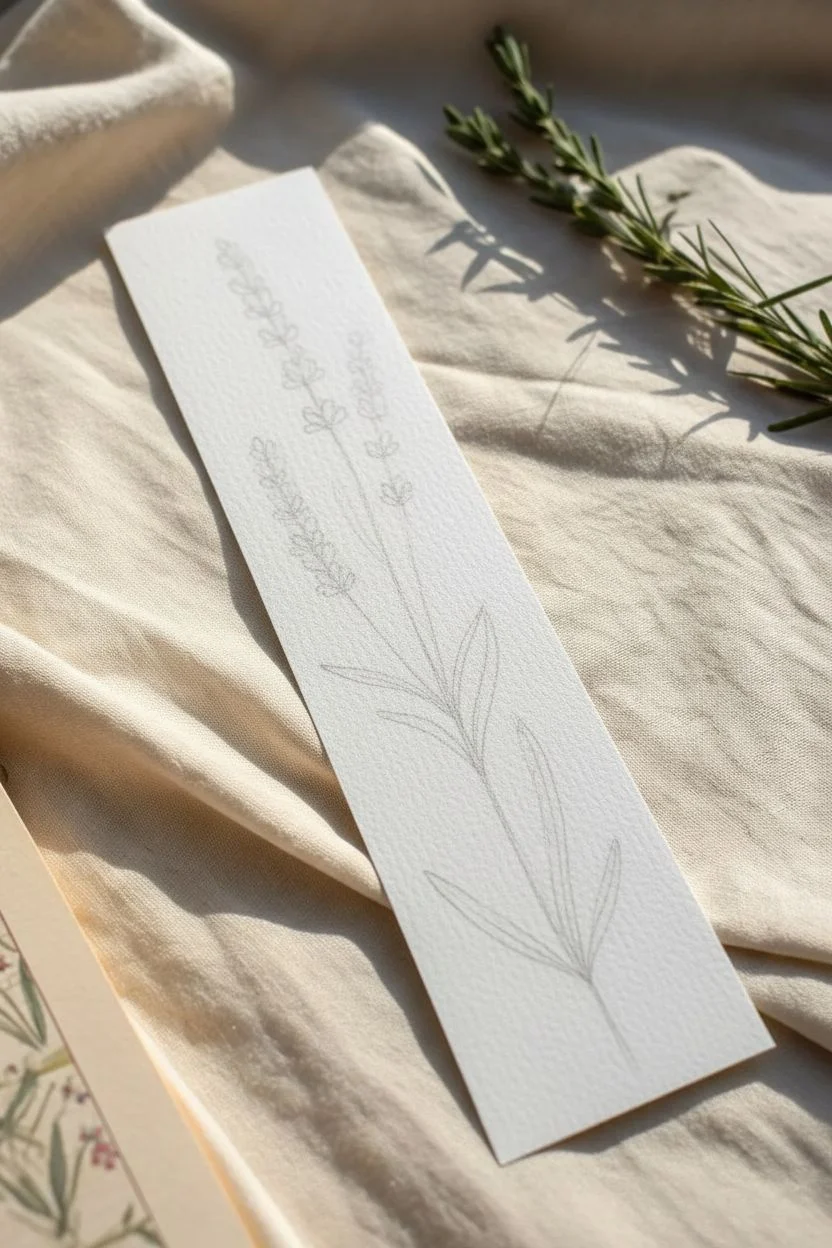
Step 1: Sketching the Layout
-
Prepare the paper:
Cut your cold press watercolor paper to size, ensuring clean straight edges. -
Draw the main stem:
Using a hard pencil (H or HB), lightly sketch a slightly curved vertical line starting from the bottom center, reaching about three-quarters up the paper. -
Add side branches:
Sketch two smaller stems branching off the main line—one lower on the left and one higher on the right—to create staggering heights. -
Map the leaves:
Mark positions for long, slender leaves occurring in pairs along the lower half of the stems. -
Outline flower zones:
Draw very faint dashed lines at the top of each stem to indicate where the flower spikes will sit, ensuring they don’t run off the page.
Use Texture to Help
Using cold-press paper is key here. The bumpy texture breaks up the brushstrokes naturally, giving the flower buds a realistic, grainy look without extra effort.
Step 2: Painting the Greenery
-
Mix stem color:
Create a watery mix of olive green with a tiny touch of brown to desaturate it for a natural look. -
Paint the stems:
Using the tip of your round brush, paint thin, consistent lines over your pencil sketch for the stems. -
Mix leaf color:
Darken your green mixture slightly by adding a bit more pigment or a touch of blue for variety. -
Paint lower leaves:
Starting at the bottom, paint the larger leaves using a ‘press and lift’ motion: touch the tip, press down to widen the stroke, and lift as you pull away to create a point. -
Add upper leaves:
Paint the smaller leaves higher up the stems using the same technique but with less pressure for a thinner shape. -
Dry completely:
Wait until all green paint is bone dry to prevent bleeding into the flower section.
Muddy Colors?
If green stems bleed into the purple flowers, you painted too soon. Ensure the green layer is completely dry before starting the buds to keep the colors crisp.
Step 3: Creating the Blooms
-
Mix base purple:
Prepare a diluted wash of violet. Any basic purple works, but adding a dot of blue cools it down nicely. -
Paint first buds:
Dab small, irregular teardrop shapes along the top section of the central stem, leaving tiny white gaps between them. -
Build the shape:
Continue dappling these small spots upward, tapering the cluster so it gets narrower at the very top. -
Repeat for all stems:
Apply the same technique to the side stems, ensuring the flower clusters are different lengths for visual interest. -
Add depth:
While the purple is still slightly damp, drop concentrated violet pigment into the bottom of a few individual buds to create shadow. -
Overlay detail:
I like to wait for the first purple layer to dry, then add a few sharp, dark purple dots on top to simulate texture.
Step 4: Finishing Touches
-
Connect the parts:
Use a very fine line of green to connect the floating purple buds to the main stem if any gaps look too wide. -
Clean up:
Once absolutely dry, gently erase any visible pencil marks, specifically around the leaf tips. -
Flattening:
If the paper has buckled from the water, place the dry bookmark under a heavy book overnight.
Slip this calming piece of art into your current read or gift it to a book-loving friend.


Salt-Speckled Galaxy Skies
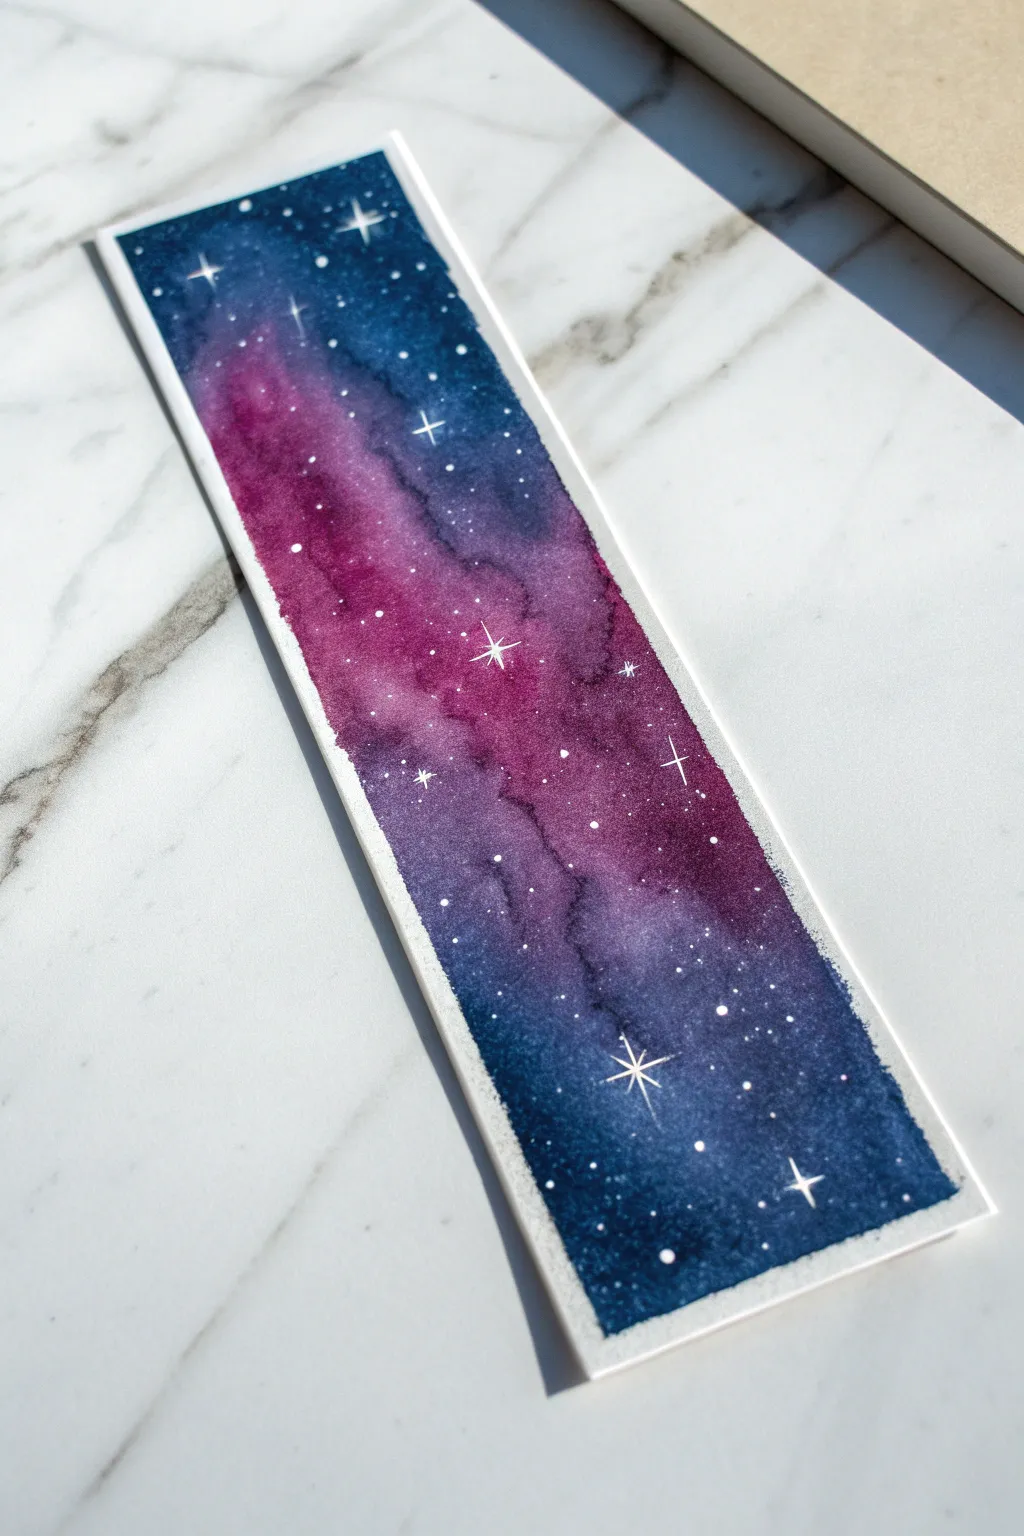
Capture the magic of deep space with this vibrant watercolor project. By blending rich indigo and magenta hues with crisp white stars, you will create a functional piece of art that marks your page with a touch of wonder.
Detailed Instructions
Materials
- Cold press watercolor paper (300gsm)
- Masking tape or painter’s tape
- Watercolor paints (Indigo, Violet, Magenta)
- Round paintbrush (size 6)
- Small detail brush or white gel pen
- White gouache or opaque white acrylic ink
- Table salt
- Cup of water and paper towels
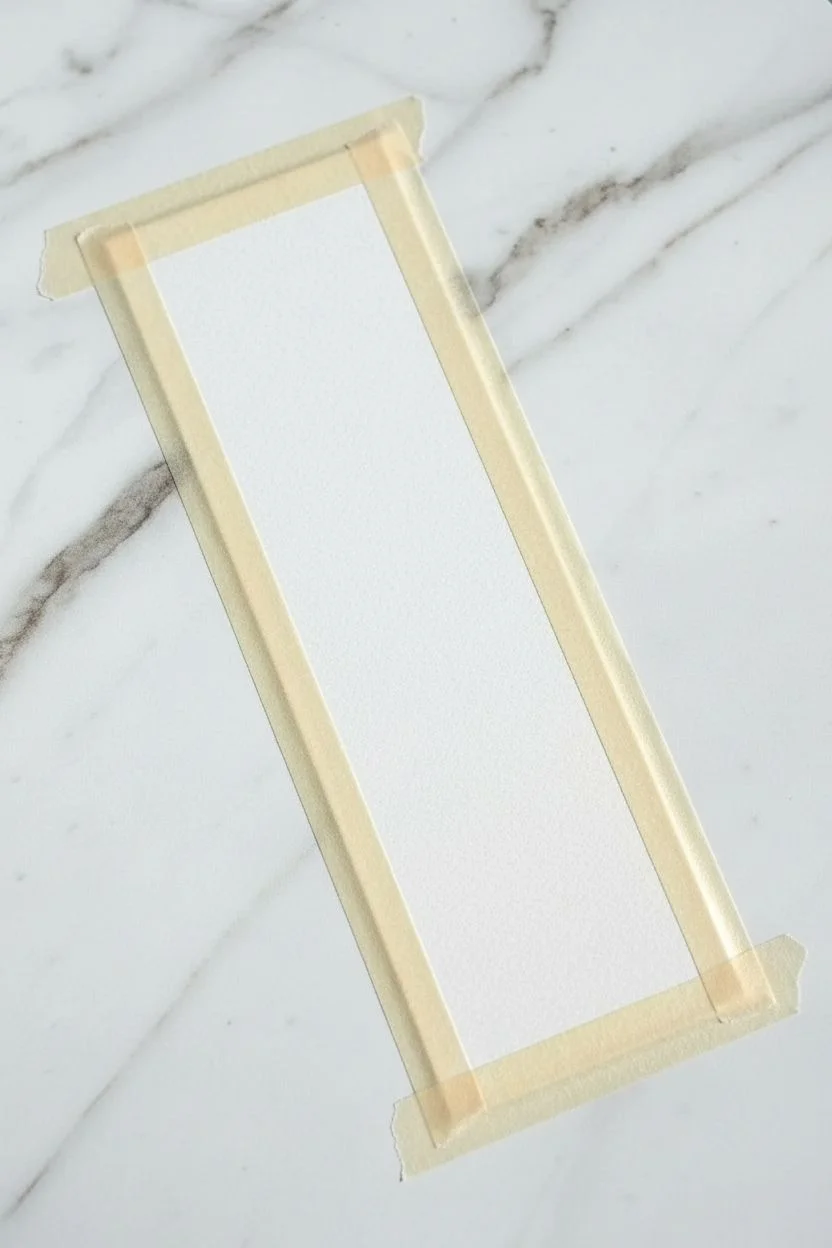
Step 1: Setting the Scene
-
Size the paper:
Cut your watercolor paper into a rectangular strip, approximately 2 inches by 6 inches, or your preferred bookmark size. -
Create the border:
Place the paper on a flat, hard board. Apply masking tape over all four edges, covering about 1/4 inch of the paper to shield the borders. -
Secure the seal:
Run your fingernail or a bone folder firmly along the inner edge of the tape to ensure a tight seal so paint doesn’t seep underneath.
Paint Bleeding?
If paint seeped under the tape, use a slightly damp brush to gently scrub the unwanted paint (a ‘lift’), then blot with a paper towel.
Step 2: Painting the Nebula
-
Pre-wet the paper:
Dip your clean size 6 brush into water and coat the entire exposed surface of the paper until it glistens evenly. -
Apply the core color:
Load your brush with vibrant violet or magenta. Paint a diagonal swathe across the center of the bookmark. -
Add the darkness:
Clean your brush, then pick up a deep indigo or navy blue. Apply this to the top left and bottom right corners, leaving space between the blue and pink. -
Blend the transition:
Gently nudge the wet blue paint towards the pink so they touch. Let the water on the paper do the work of mixing them into a soft purple transition. -
Deepen the contrast:
While the paper is still wet, drop more concentrated indigo pigment into the very corners to create a sense of deep space. -
Add texture:
To achieve the look mentioned in the section title, sprinkle a small pinch of table salt onto the damp areas of the paint where you want subtle texture. -
Wait for drying:
Allow the painting to dry completely. This is crucial—if the paper is cool to the touch, it is still damp. -
Remove salt:
Once bone dry, gently rub off any salt crystals with your finger.
Level Up
Instead of random dots, arrange your larger stars to form your favorite constellation or zodiac sign for a personalized touch.
Step 3: Stargazing Details
-
Prep the stars:
Squeeze a pea-sized amount of white gouache onto your palette and mix with a tiny drop of water until it has a heavy cream consistency. -
Create the splatter:
Load your brush with the white mix. Hold it over the bookmark and tap the handle against another brush to spray fine specks across the galaxy. -
Select major stars:
Using a fine detail brush or a white gel pen, identify 3 or 4 spots where you want prominent stars to shine. -
Draw the cross:
Draw a small vertical line, then cross it with a horizontal line of the same length to create a four-point star shape. -
Highlight the center:
Place a tiny, solid white dot in the absolute center of your crossed lines to make the star look like it is glowing intensely. -
The reveal:
I always find this part most satisfying: slowly peel the tape away from the paper at a 45-degree angle to reveal the crisp white border.
Enjoy using your new cosmic bookmark to save your place in your next adventure


High-Contrast Silhouettes
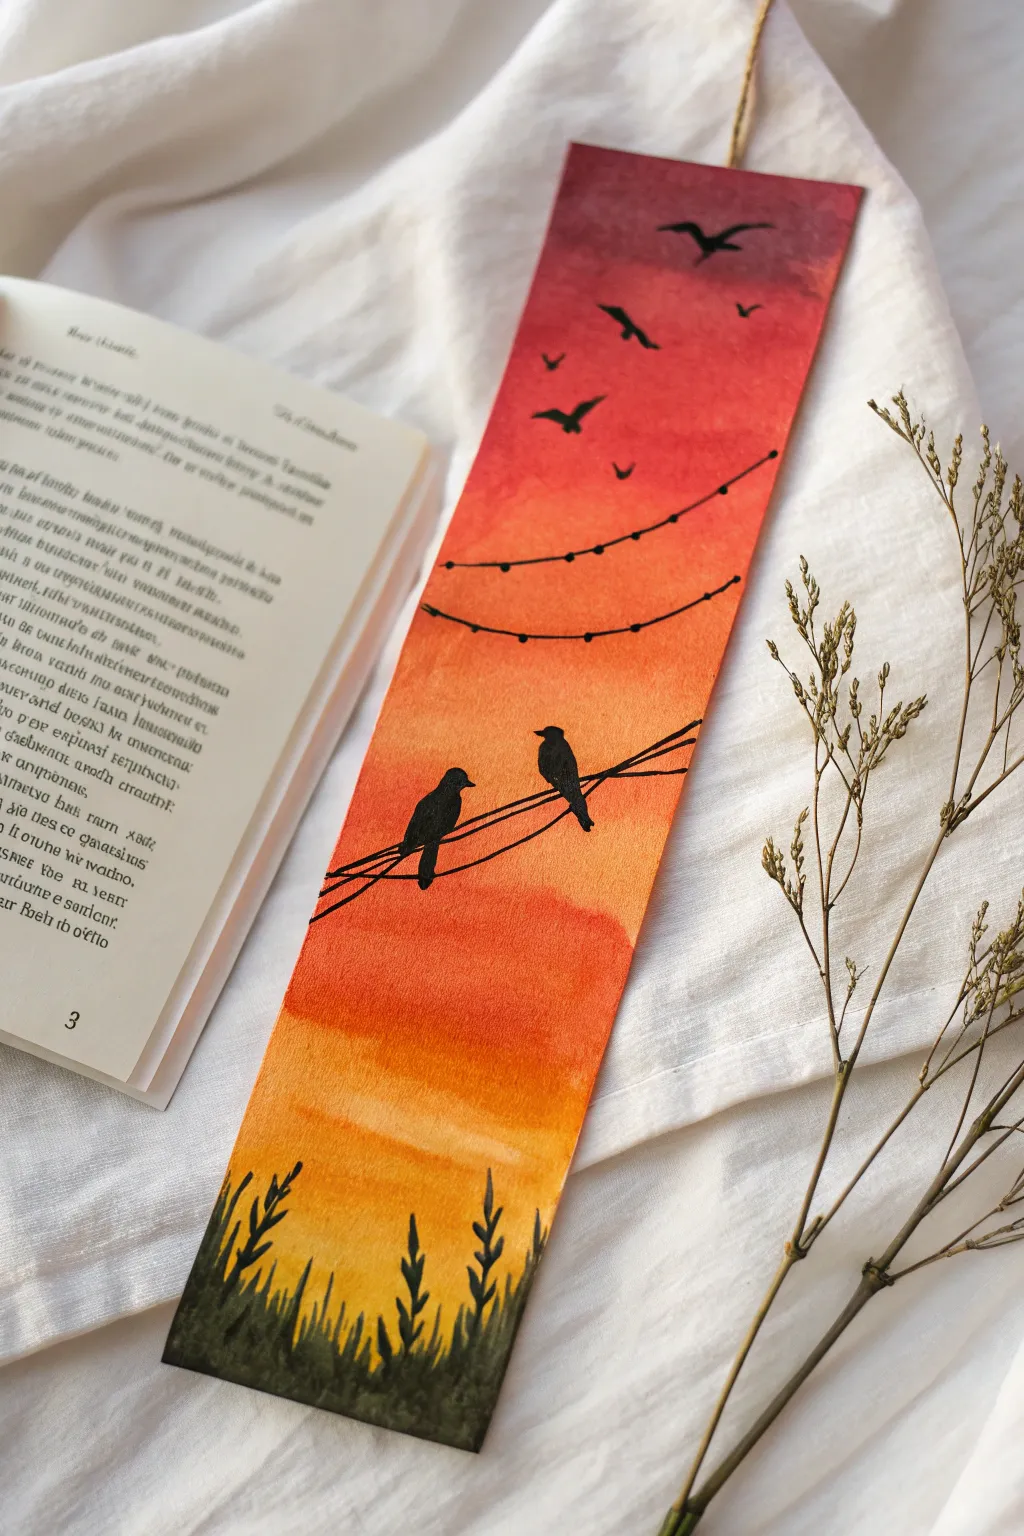
Capture the serenity of evening with this high-contrast watercolor project. You will create a vibrant, glowing gradient sunset that serves as the perfect backdrop for sharp, black silhouettes of birds and power lines.
Step-by-Step
Materials
- Cold press watercolor paper (300gsm), cut to approx. 2 x 7 inches
- Watercolors: Lemon Yellow, Cadmium Orange, Alizarin Crimson (or similar red)
- Black gouache paint or black acrylic ink
- Fine liner brush (size 0 or 00)
- Medium flat brush (for the wash)
- Masking tape or washi tape
- Palette and two water jars
- Pencil and eraser
- Hole punch and jute twine
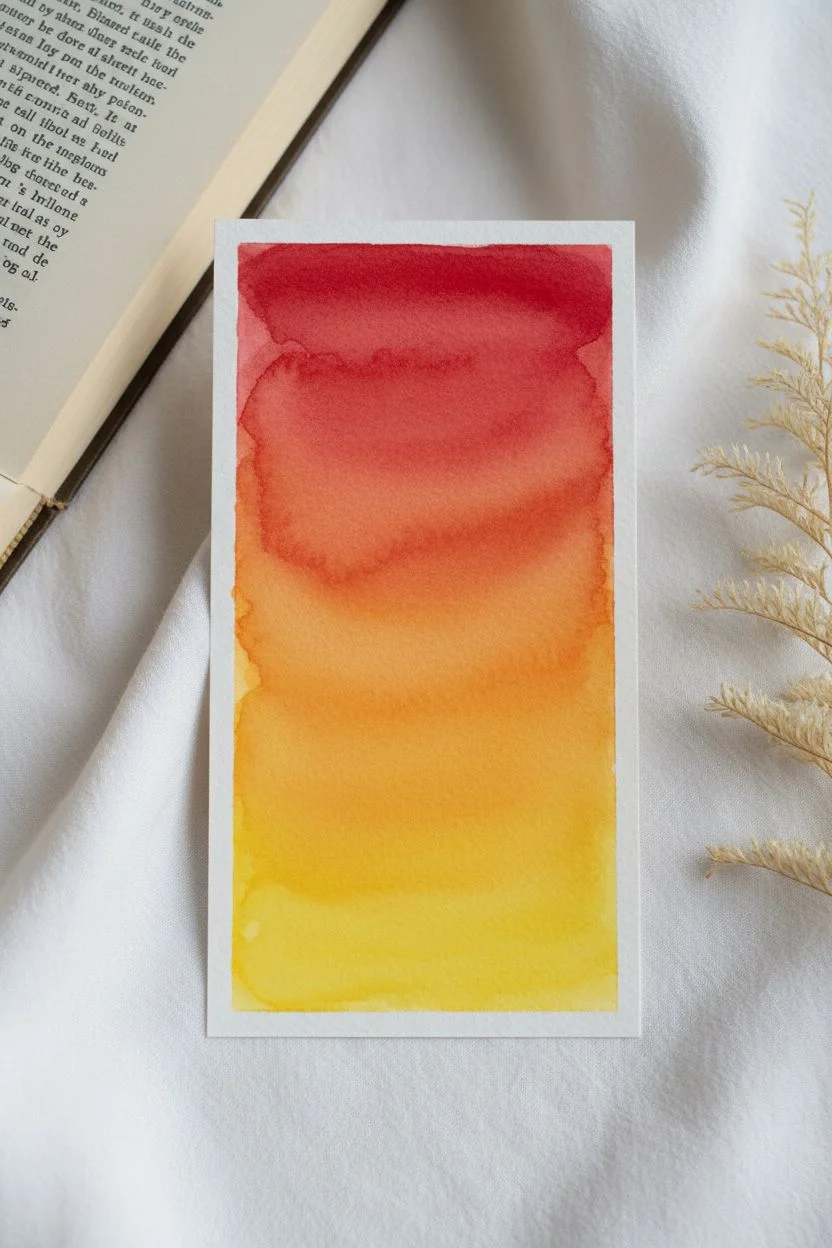
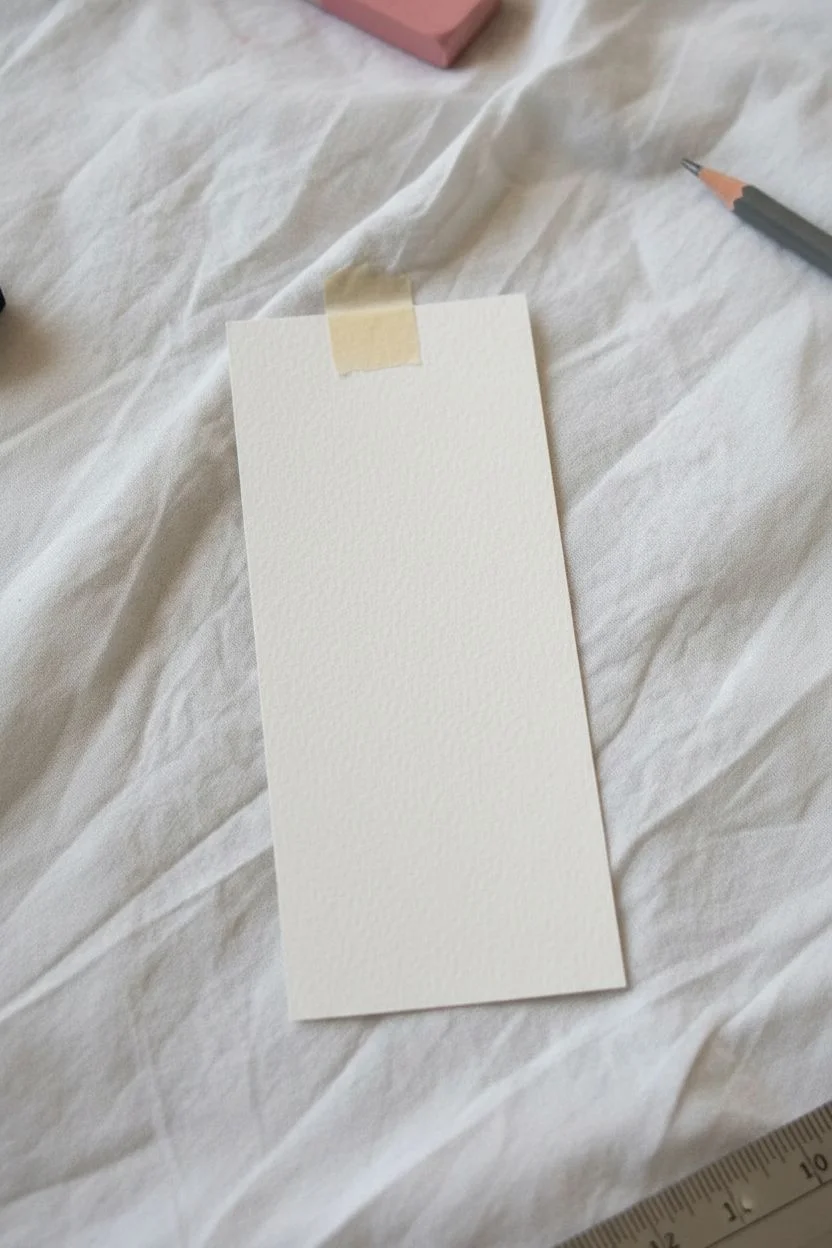
Step 1: Setting the Sky
-
Secure the paper:
Tape your watercolor paper down to a hard board on all four sides. This prevents buckling and creates a clean white border around your artwork. -
Pre-wet the surface:
Using your flat clean brush, apply a coat of clean water over the entire paper surface until it shines evenly but isn’t dripping wet. -
Apply the glow:
Load your brush with Lemon Yellow and apply it to the bottom third of the bookmark, brushing horizontally. -
Transition to warmth:
Mix Cadmium Orange and paint the middle section, slightly overlapping the yellow while the paint is still wet to create a soft blend. -
Deepen the sky:
Apply your red tone to the very top section. Use horizontal strokes to pull the red down into the orange, smoothing out the gradient. -
Refine the blend:
Clean and dry your brush slightly, then run it gently back and forth over the transition areas to remove any harsh lines. -
Let it dry completely:
Allow the paper to bone-dry. If you touch it and it feels cool, it needs more time.
Clean Lines Pro-Tip
If you struggle with shaky hands for the wires, don’t stress! Use a black waterproof fine-liner pen instead of a brush for the thin lines and birds. It offers way more control.
Step 2: Adding High-Contrast Details
-
Switch to black:
Squeeze out a small amount of black gouache or ink. I prefer gouache here because it is opaque and creates a truer, flatter silhouette than black watercolor. -
Paint the main wires:
Using your finest liner brush, paint two diagonal lines moving upward from left to right across the middle orange section. -
Add the perched birds:
Paint two small bird shapes sitting on the upper wire. Start with a small oval for the body, a smaller circle for the head, and a tail pointing down. -
Detail the beaks:
Add tiny triangular beaks pointing toward each other to suggest interaction. -
Create the upper garland:
Paint a draped, curved line horizontally across the upper red section. Add tiny dots along the line at intervals to resemble distant lights or markers. -
take to the skies:
Paint flying birds in the top red section. Use simple ‘V’ shapes with varying wing angles to show movement
Level Up: Sparkle
Mix a tiny amount of gold watercolor or metallic ink and dot it over the ‘lights’ on the upper draped wire for a magical effect that catches the light.
Step 3: Grounding the Scene
-
Establish the ground:
At the very bottom of the bookmark, paint a solid uneven strip of black to represent the earth. -
Grow the grass:
Using quick, upward flicking motions with the tip of your fine brush, pull grass blades up from the black base into the yellow sky. -
Vary the vegetation:
Make some grass blades taller and thicker, and add small leaf shapes to the sides of a few stalks for variety. -
Reveal the border:
Once the black paint is fully dry, carefully peel away the masking tape at a 45-degree angle to reveal crisp white edges. -
Add the finishing touch:
Punch a hole in the top center of the bookmark and loop a piece of jute twine through it.
Place this beautiful silhouette in your current read and enjoy the instant sunset vibes
BRUSH GUIDE
The Right Brush for Every Stroke
From clean lines to bold texture — master brush choice, stroke control, and essential techniques.
Explore the Full Guide
Bibliophile Typography and Quotes

Create a serene reading companion with this soft watercolor bookmark featuring a dreamy blue-to-pink fade. The minimalist design puts the focus on the elegant hand-lettered quote, making it a perfect gift for the book lover in your life.
Step-by-Step Tutorial
Materials
- Cold-press watercolor paper (300gsm recommended)
- Watercolor paints (Sky Blue and Pastel Pink)
- Round watercolor brush (size 6 or 8)
- Black brush pen or waterproof fineliner
- HB Pencil
- Eraser
- Ruler
- Scissors or paper trimmer
- Jar of water and paper towels
Step 1: Shaping the Canvas
-
Measure dimensions:
Using your ruler, mark out a rectangle approximately 2.5 by 6 inches on your watercolor paper. -
Cut the shape:
Use scissors or a paper trimmer to cut out the bookmark cleanly. -
Secure the paper:
Place a loop of masking tape on the back of the bookmark to stick it to your workspace; this keeps it still without blocking the front edges from paint.
Step 2: Creating the Wash
-
Mix the blue:
Prepare a watery, diluted wash of sky blue on your palette. -
Wet the top:
With a clean, damp brush, wet the top 1.5 inches of the paper with just water. -
Apply blue wash:
Touch your brush loaded with blue paint to the very top edge, letting the color bleed down into the wet area. -
Fade the color:
Rinse your brush slightly and pull the blue pigment downwards, fading it out completely into the white paper before you reach the middle. -
Mix the pink:
Clean your brush thoroughly and mix a soft, watery pastel pink or rose shade. -
Wet the bottom:
Apply clean water to the bottom 1.5 inches of the bookmark. -
Apply pink wash:
Dab the pink paint along the bottom edge, allowing it to bloom upward into the wet section. -
Fade upward:
Use a damp, clean brush to soften the top edge of the pink, creating a seamless fade into the white center. -
Dry completely:
Allow the paper to dry fully. I usually wait until the paper no longer feels cool to the touch to ensure it’s bone dry.
Pro Tip: Surface Texture
If you find lettering on bumpy texture difficult, use ‘Hot Press’ watercolor paper. It is much smoother and easier for pens to glide over while still handling paint well.
Step 3: Adding the Typography
-
Draft guidelines:
Lightly sketch a horizontal center line with your pencil to help align your text. -
Sketch the words:
Pencil in the script. Write ‘one more’ centered just above the line, and ‘chapter’ centered below it. -
Refine the composition:
Adjust your spacing so the ‘h’ and ‘t’ in ‘chapter’ extend nicely upward, creating a balanced look. -
Ink the outlines:
Using your brush pen or fineliner, carefully trace over your penciled words. -
Add line weight:
If using a brush pen, apply pressure on downstrokes. If using a fineliner, visually thicken the downward strokes manually (faux calligraphy method). -
Let ink set:
Wait at least 10 minutes to ensure the black ink is completely dry and smear-proof. -
Erase pencil:
Gently erase your pencil guidelines, holding the paper taut so it doesn’t crinkle. -
Final smooth:
If the paper buckled slightly from the water, place the finished bookmark under a heavy book overnight to flatten it.
Level Up: Rounded Edges
Use a corner-rounding punch or carefully trim the four sharp corners with scissors. This gives the bookmark a softer, store-bought finish and prevents dog-eared corners.
Slip this lovely creation between the pages of your current read and enjoy the motivation to read just a little bit longer.
Minimalist Line Art over Color
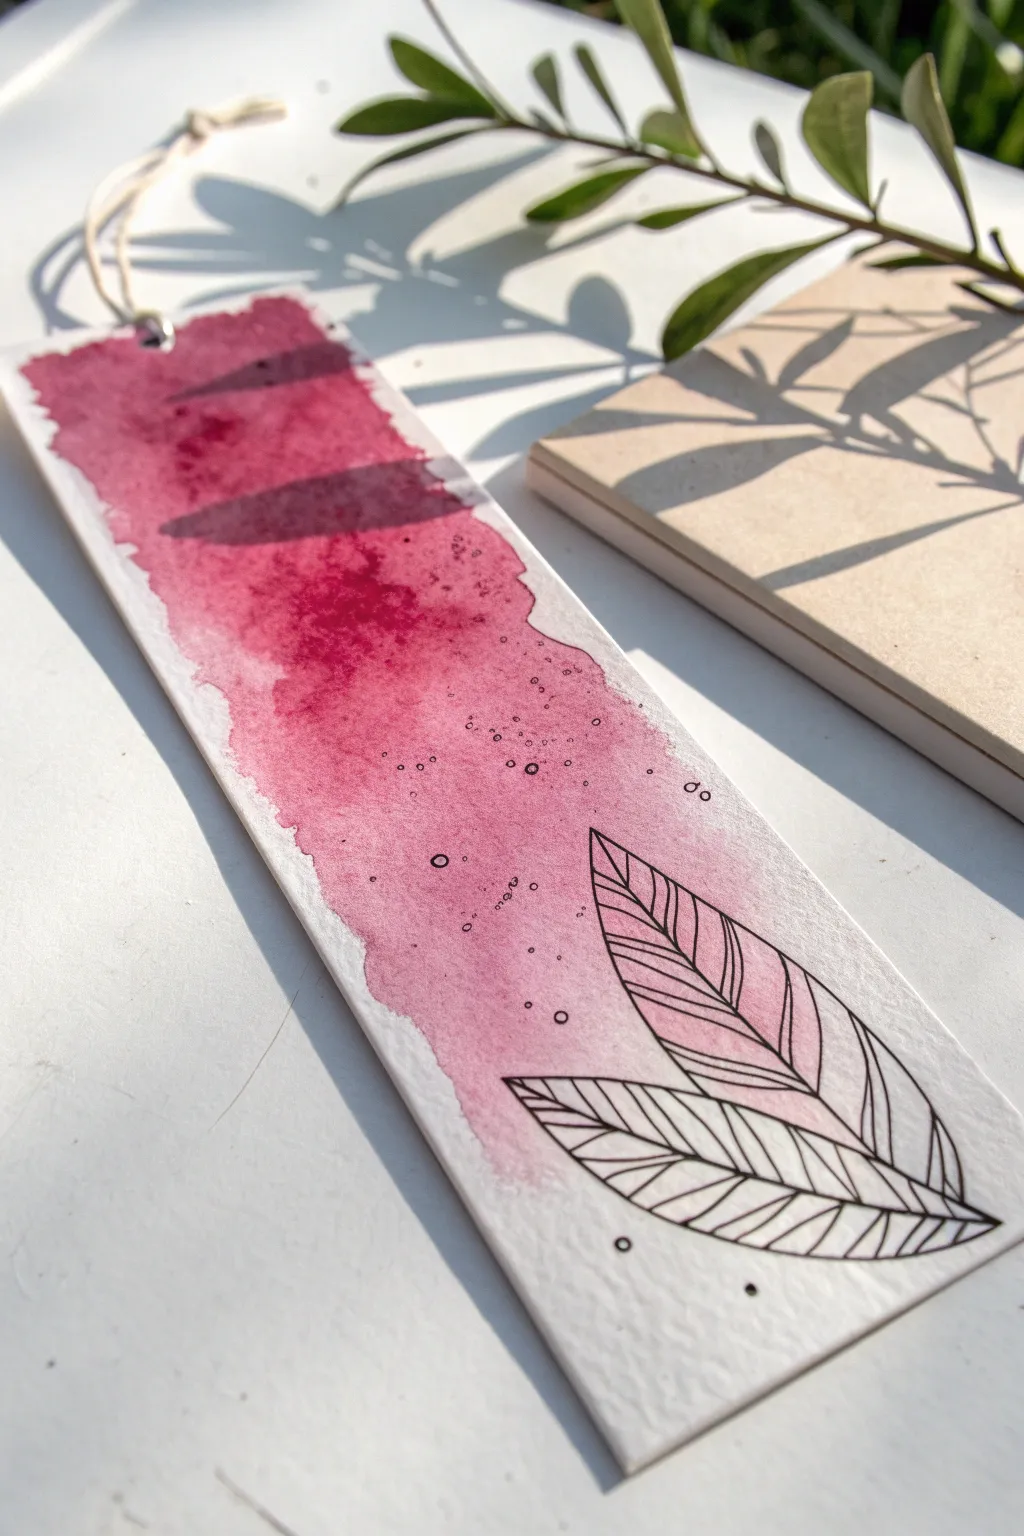

Capture the beauty of simplicity with this elegant bookmark project that marries loose, expressive watercolors with crisp pen illustrations. The contrast between the organic, flowing magenta wash and the structured botanical line art creates a modern, sophisticated look perfect for marking your place in any novel.
Detailed Instructions
Materials
- Cold press watercolor paper (300 gsm)
- Watercolor paints (Magenta or Alizarin Crimson)
- Round watercolor brush (size 6 or 8)
- Waterproof black fine liner pen (sizes 0.3 or 0.5)
- Jar of water
- Paper towels
- Pencil and eraser (optional)
- Hole punch
- Natural twine or hemp string
- Masking tape
Step 1: Setting the Scene
-
Size the paper:
Cut your cold press watercolor paper into a standard bookmark strip, approximately 2 inches wide by 7 inches tall. -
Secure the workspace:
Place the paper on a flat, waterproof surface or drawing board. -
Tape the edges:
Use masking tape to secure the paper to your board on the top and bottom only, or just tape the back to hold it steady if you want raw edges.
Ink Smudging?
If your pen lines bleed, the paper likely wasn’t 100% dry. Use a hairdryer on a low, cool setting to ensure all moisture is gone before drawing.
Step 2: Applying the Watercolor Wash
-
Mix the color:
Load your brush with water and pick up a generous amount of magenta or deep crimson paint. You want a saturated mix, not too watery. -
Start the wash:
Starting near the top of the bookmark (leaving some white space for the hole), apply the paint in a loose, downward stroke. -
create the gradient:
Dip your tip in water to dilute the remaining paint on the brush slightly, and pull the color further down the strip. -
Shape the edges:
Allow the edges of the painted area to remain rough and organic rather than painting a perfect rectangle; this loose style adds character. -
Add texture:
While the paint is still wet, tap your brush handle to splatter tiny droplets of saturated pigment or clean water onto the wash to create blooms and speckles. -
Let it fade:
Stop painting about three-quarters of the way down, letting the color fade out naturally into the white paper. -
Dry completely:
Allow the paper to dry thoroughly. I usually wait until the paper no longer feels cool to the touch before moving to ink.
Step 3: Inking the Details
-
Outline the leaves:
Using your waterproof fine liner, draw the outline of two large, pointed leaves at the bottom right corner, overlapping the painted area. -
Add structure:
Draw a central line down the middle of each leaf shape to mimic the midrib. -
Draw the veins:
Fill the leaves with diagonal hatching lines to represent veins, keeping your spacing somewhat consistent but hand-drawn. -
Add floating bubbles:
Draw small, uneven circles and tiny dots floating upward from the leaves through the colored wash to create an effervescent effect. -
Enhance the texture:
If your painted texture is subtle, add a few more tiny ink dots around the splashing edges of the watercolor to integrate the styles.
Level Up
Add a touch of metallic gold paint splatters over the dry magenta wash for a glamorous, shimmering finish that catches the light.
Step 4: Final Assembly
-
Punch the hole:
Use a hole punch to create a centered hole at the very top of the bookmark within the white space. -
Prepare the string:
Cut a length of natural twine, approximately 6 inches long. -
Attach the tassel:
Fold the twine in half, push the loop through the hole, and thread the loose ends through the loop to secure it with a lark’s head knot. -
Smooth it out:
If the paper curled slightly during painting, place the finished dry bookmark under a heavy book overnight to flatten it.
Now you have a stunning, hand-painted accessory that makes reading even more enjoyable.

PENCIL GUIDE
Understanding Pencil Grades from H to B
From first sketch to finished drawing — learn pencil grades, line control, and shading techniques.
Explore the Full Guide
Mist-Covered Pine Forest
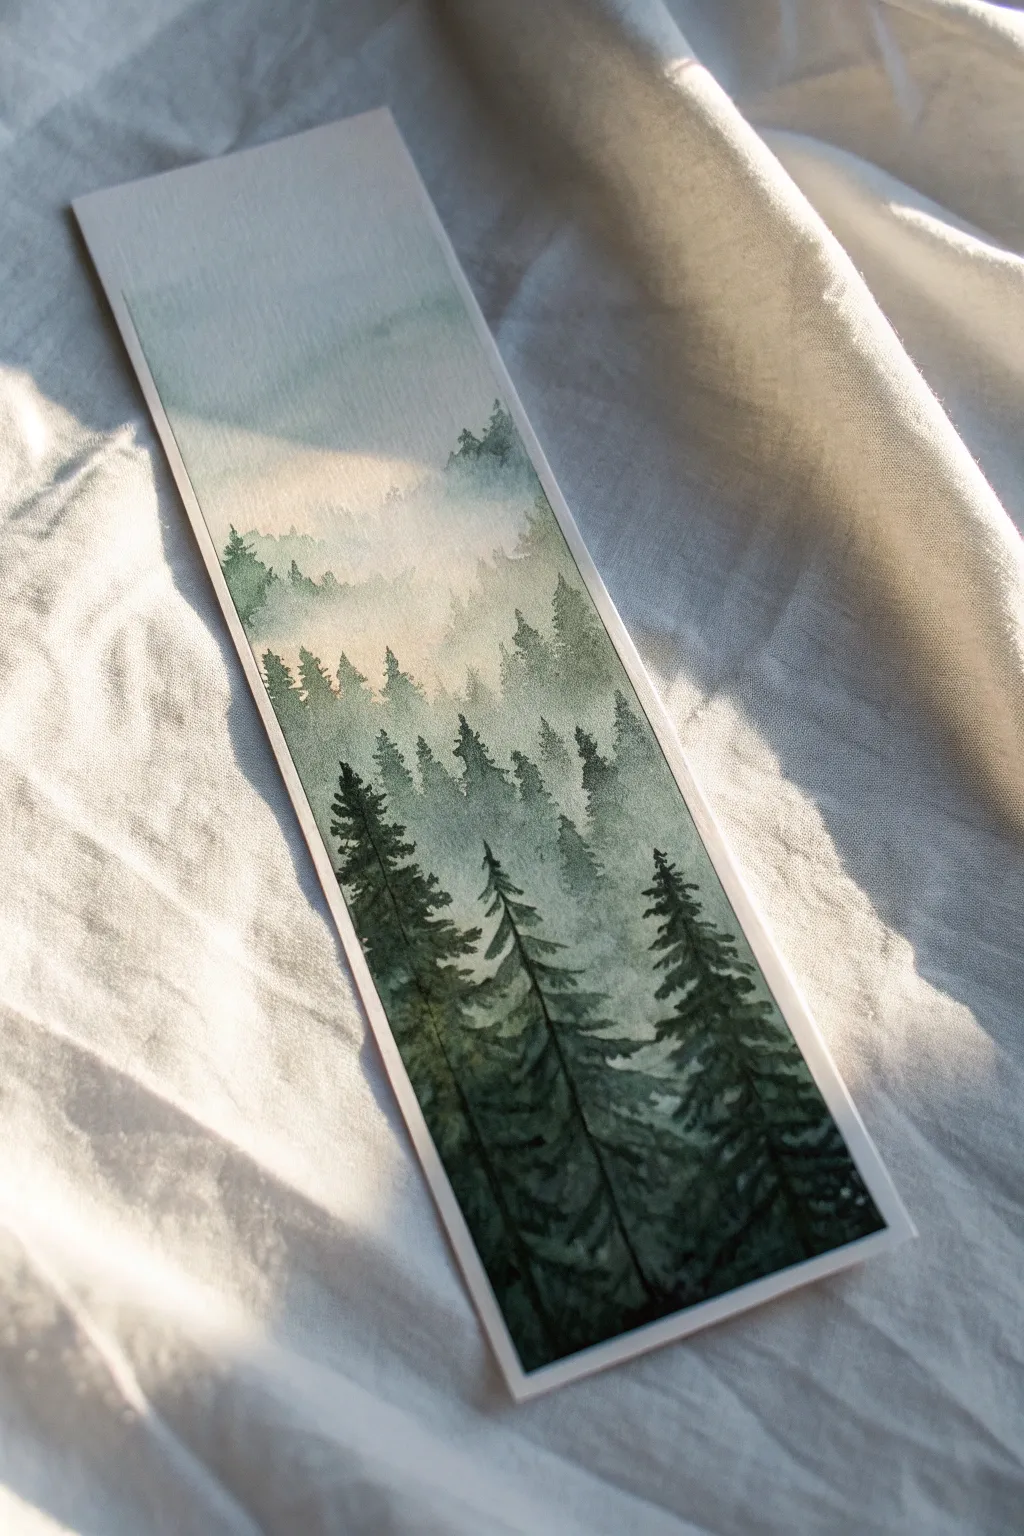

Capture the serene mood of a foggy mountain range with this atmospheric watercolor project. By layering thin washes of paint from light to dark, you will create a stunning sense of depth on a small scale.
Step-by-Step
Materials
- Cold press watercolor paper (cut to 2×7 inches)
- Watercolor paints (Indigo, Hooker’s Green, Payne’s Gray)
- Round brush (size 4 or 6)
- Detail brush (size 0 or 1)
- Masking tape
- Jar of clean water
- Paper towels
- Heat tool or hair dryer (optional)
Step 1: Setting the Scene
-
Secure the paper:
Tape your bookmark strip down to a hard board using masking tape on all four sides. This creates a crisp border and prevents the paper from buckling when wet. -
Wet the sky:
Using your larger round brush and clean water, gently wet the top third of the paper. You want an even sheen, not puddles. -
Initial atmosphere:
Dilute a tiny amount of Indigo with lots of water to create a very pale, grayish-blue tea consistency. -
Paint the sky:
Touch the loaded brush to the very top of the wet paper. Let the color flow down naturally, tilting the board slightly if needed, so it fades into white nothingness before reaching the middle. -
Dry completely:
Allow this initial layer to bone dry. The paper must be warm to the touch before proceeding, or your tree lines will bleed.
Control the Mist
Work quickly when softening the bottom edges of your tree lines. If the paint starts to dry before you add the clean water, you’ll get a hard line instead of a soft foggy gradient.
Step 2: Distant Ridges
-
Mix the first tree color:
Create a wash involving Hooker’s Green and a touch of Payne’s Gray. It should still be very watery and transparent. -
Paint the furthest tree line:
About one-third down the paper, paint the tops of tiny trees using the tip of your brush. Keep the shapes jagged and irregular to mimic distant pines. -
Create the mist:
Immediately rinse your brush, dab it on a paper towel so it is just damp, and run it along the bottom edge of your fresh paint line to blur it downward into the white paper. -
Let it set:
Wait for this layer to dry completely. This patience allows the sharp top edges of the next layer to stand out against the soft background. -
Second ridge:
Mix slightly more pigment into your puddle to darken the value. Paint a second row of tree tops slightly lower than the first, ensuring these trees look a bit larger. -
Soften the edge:
Repeat the water-blurring technique on the bottom of this new ridge to maintain that foggy, misty aesthetic.
Forest Texture
For the largest foreground trees, try using a slightly ‘dry brush’ technique. Blot your brush on a towel before painting branches to create rough textures that look like pine needles.
Step 3: Foreground Giants
-
Prepare dark paint:
Mix a creamy, thick consistency of equal parts Hooker’s Green and Indigo. This needs to be opaque and dark for strong contrast. -
Start the foreground trees:
Switch to your detail brush. paint a tall, dominant pine tree on the left side, starting with a thin vertical trunk line. -
Add branches:
Using a zigzag or tapping motion, paint branches extending from the trunk. I prefer to make them wider and denser as I move toward the bottom. -
Add a companion tree:
Paint another large tree on the right side or slightly behind the first one, varying the height so it doesn’t look too symmetrical. -
Deepen the forest floor:
Fill the very bottom of the bookmark with your darkest paint mixture, merging the bottoms of the foreground trees into a solid dark shadow. -
Add final details:
Use the very tip of the brush to add tiny stray branches or tree tops peaking out from the lower mist layers for added texture. -
Dry and reveal:
Ensure the painting is 100% dry. Carefully peel away the masking tape at a 45-degree angle to reveal the clean, crisp edges.
Now you have a tranquil, moody landscape to mark your place in your next reading adventure.
Climbing Vines and Botanical Borders
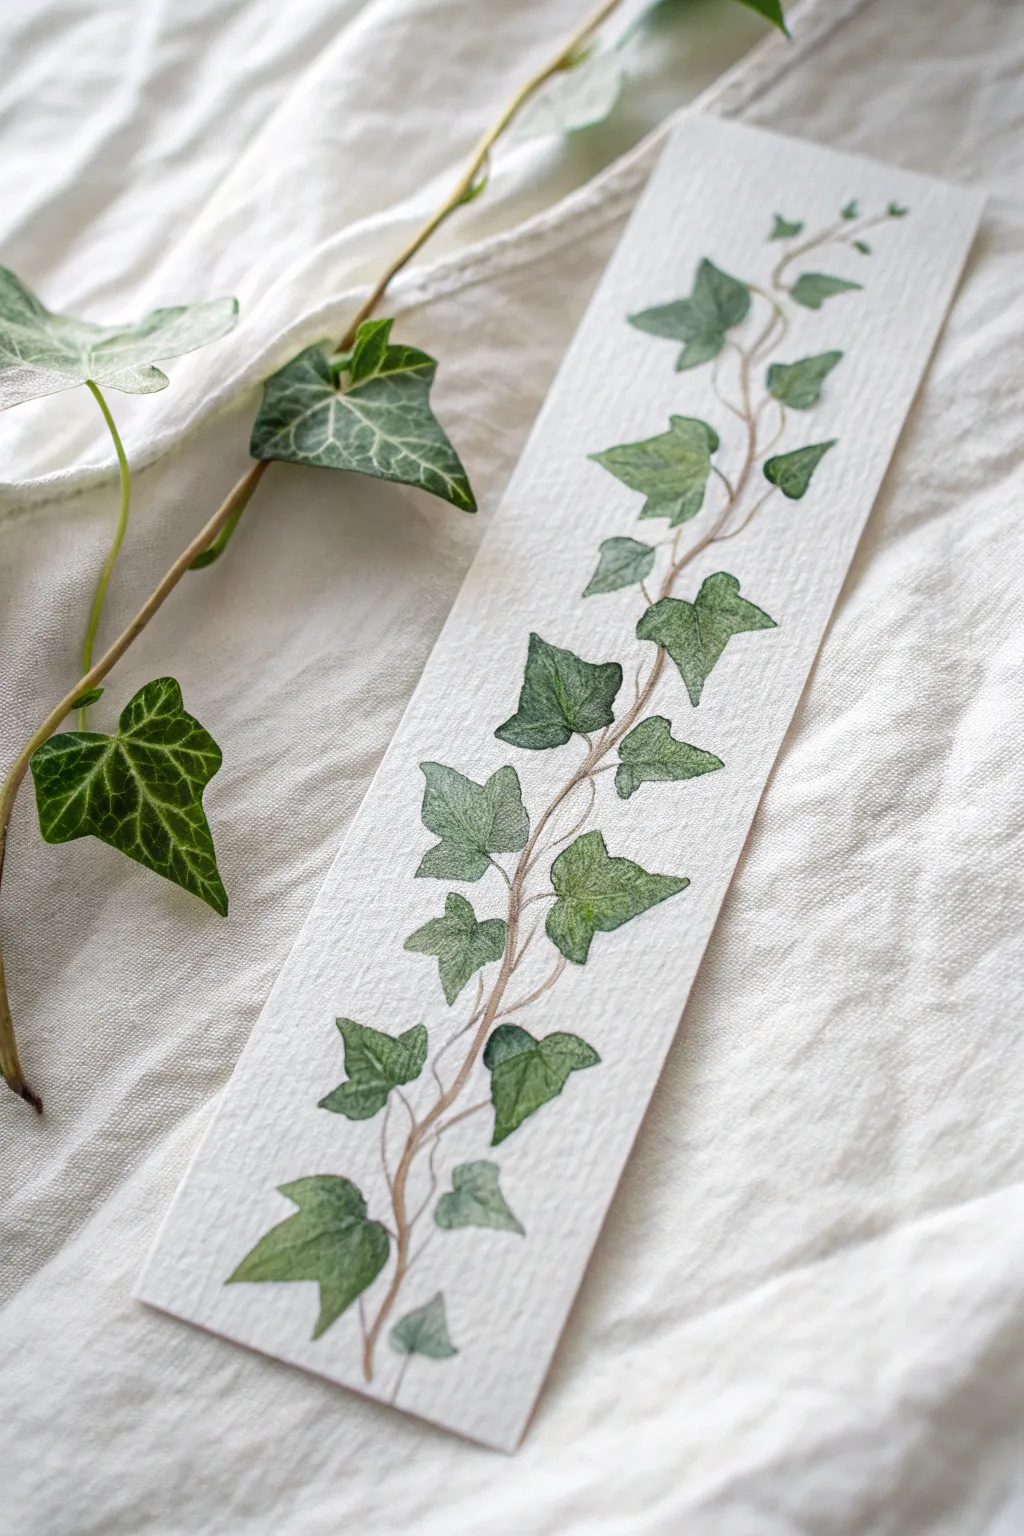
Capture the organic beauty of English Ivy with this botanical watercolor project. The composition focuses on a trailing vine that fits perfectly within the vertical constraints of a bookmark, utilizing the white space to make the greens pop.
Detailed Instructions
Materials
- Cold press watercolor paper (300 gsm)
- Watercolor paints (Sap Green, Hooker’s Green, Burnt Umber)
- Round brushes (size 2 and size 0 or 00 for details)
- HB or H pencil
- Kneaded eraser
- Jar of water
- Paper towel
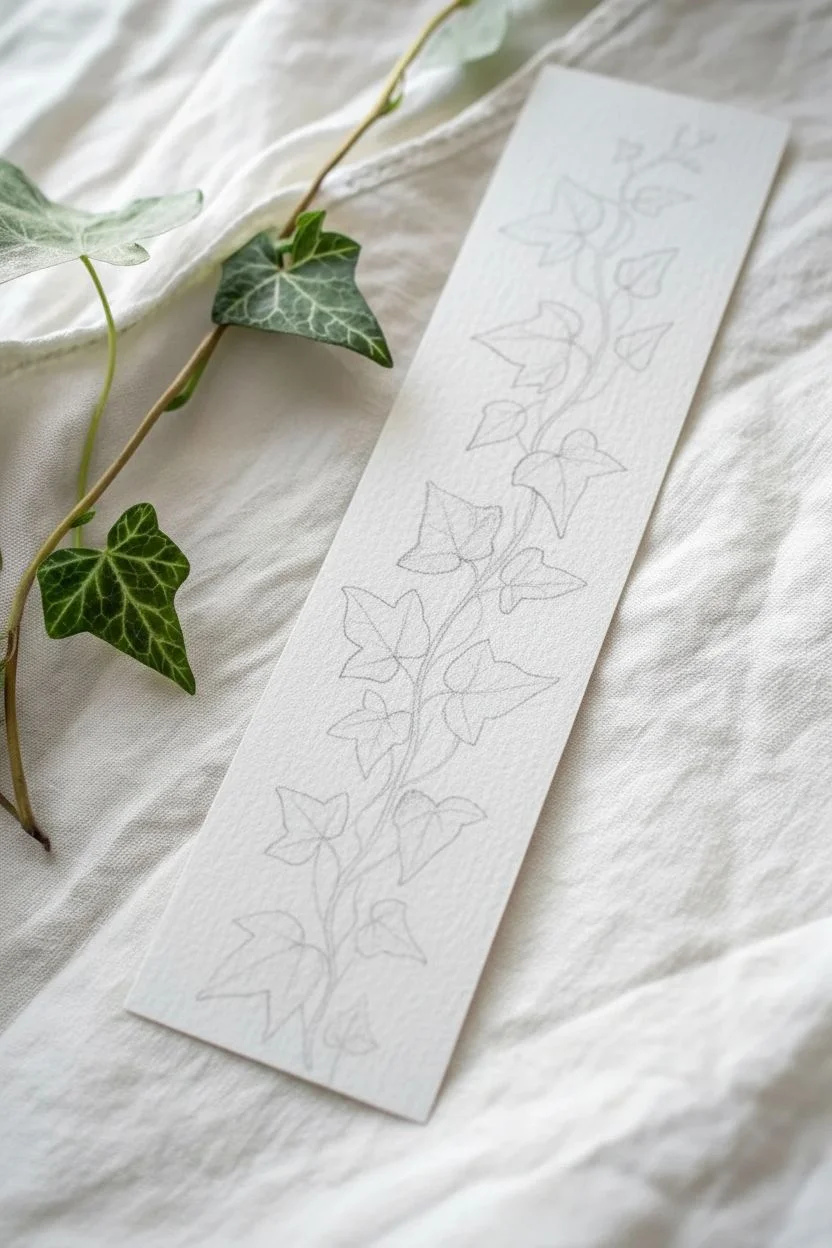
Step 1: Sketching the Composition
-
Prepare the paper:
Cut your watercolor paper into a standard bookmark strip, approximately 2 inches by 7 inches. -
Map the stem:
Using a hard pencil like an H or HB, lightly sketch a meandering, wavy line running from the top to the bottom of the paper to serve as the main vine. -
Place the leaves:
Sketch the outline of the ivy leaves along the vine. Aim for an alternating pattern, placing one leaf on the left, then a bit lower on the right. -
Define the shapes:
Refine the leaf shapes to have that characteristic sharp, three-to-five lobed ‘star’ appearance common in ivy. -
Vary the sizes:
Draw larger leaves toward the middle of the composition and smaller, younger leaves near the top and bottom tips of the vine. -
Lighten the guides:
Gently roll a kneaded eraser over the entire sketch. You want the pencil lines to be barely visible so they disappear under the paint.
Step 2: Painting the Foliage
-
Mix the first green:
Create a watery mix of Sap Green on your palette for a fresh, light base tone. -
Base layer:
Using the size 2 brush, fill in about half of the leaves with this light green mix. Keep the edges crisp. -
Vary the tone:
While the first leaves dry, mix a slightly darker green by adding a touch of Hooker’s Green or a tiny dot of brown to your base mix. -
Fill remaining leaves:
Paint the remaining unpainted leaves with this darker shade to create natural variety in the foliage. -
Let it dry:
Allow the leaves to dry completely. If the paper feels cool to the touch, it’s still damp. -
Add depth:
I like to glaze a second, translucent layer of green over just the bottom half of a few leaves to suggest curvature and shadow.
Clean Lines
bWater control is key for sharp edges. If your paint pools at the leaf edges, blot your brush on a paper towel and touch it to the puddle to lift the excess liquid.
Step 3: Stems and Details
-
Mix the stem color:
Mix a diluted Burnt Umber to get a light, woody brown color. It should be fluid enough to flow easily from a thin brush. -
Paint the main vine:
Switch to your size 0 or 00 brush. Carefully paint over your initial wavy pencil line to create the main stem. -
Connect the leaves:
Paint thin petioles (stem connectors) extended from the main vine to the base of each leaf. Let these lines crisscross naturally. -
Mix vein color:
Create a concentrated dark green mix. It should be darker than your darkest leaf tone. -
Paint central veins:
With your finest brush tip, paint a thin line down the center of each leaf, stopping just before the tip. -
Add side veins:
Add tiny, branching veins extending from the central vein toward the leaf lobes. Keep these extremely delicate. -
Final clean up:
Once the artwork is 100% dry, gently erase any visible pencil marks that weren’t covered by paint.
Level Up
For a magical touch, use a gold gel pen or metallic watercolor paint for the veins instead of dark green. This adds a subtle shimmer that catches the light as you turn the page.
Now you have a serene piece of nature to mark your place in your favorite book.


Geometric Tape Resist Patterns
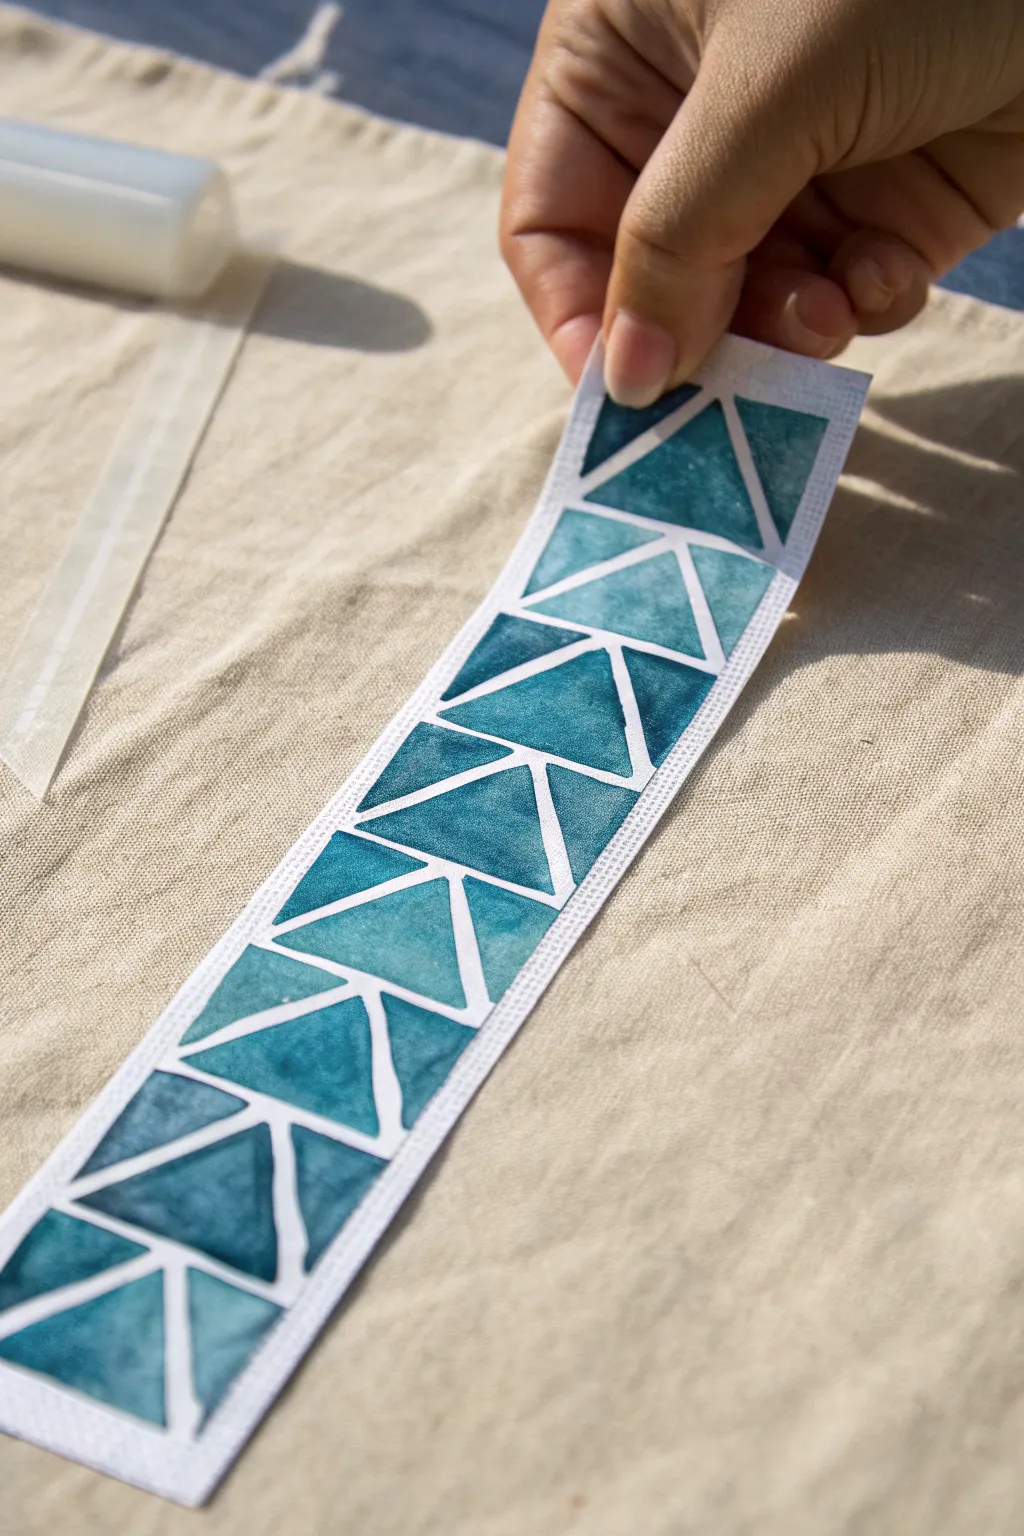
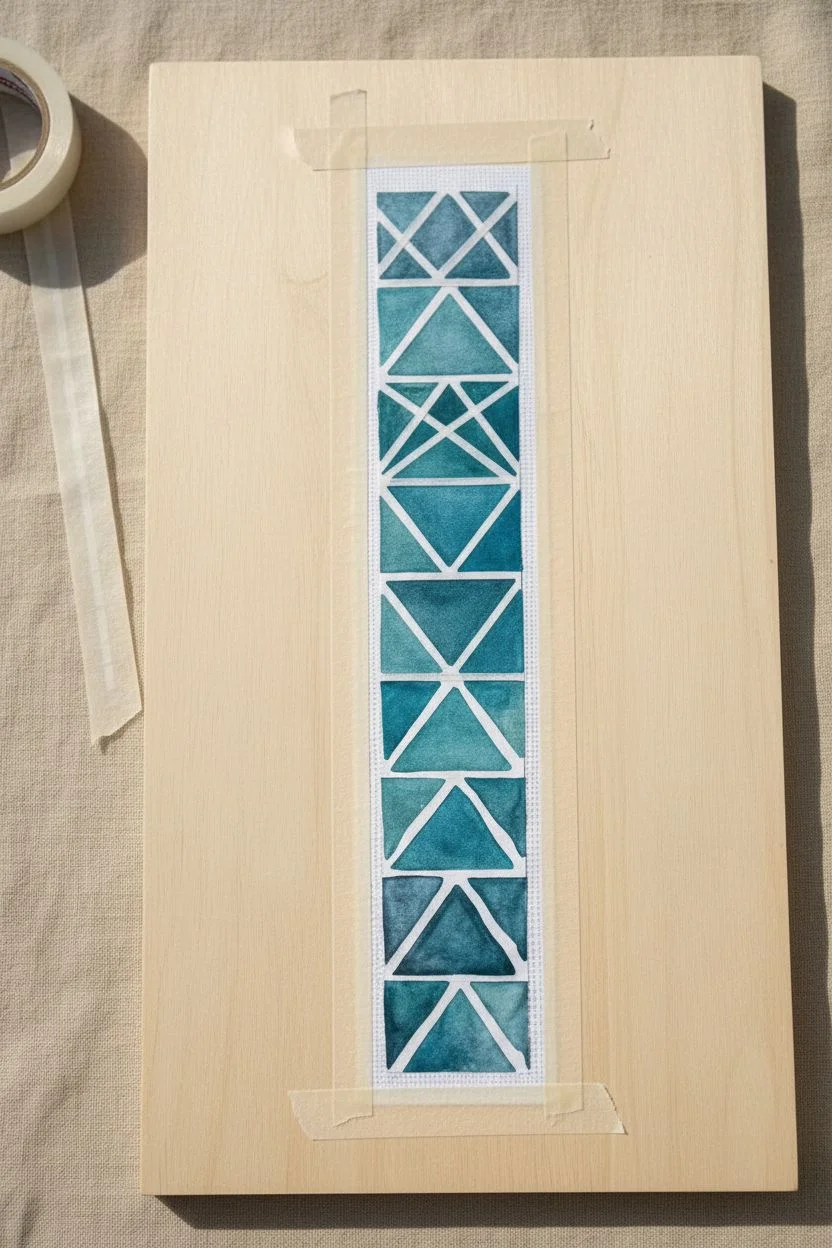
Capture the serenity of the ocean with this geometric watercolor bookmark using a simple tape resist technique. The crisp white lines created by the masking tape contrast beautifully with the organic, flowing variety of teal and turquoise washes. It is an easy yet satisfying project that turns simple triangles into a stunning stained-glass effect.
Step-by-Step Tutorial
Materials
- Cold pres watercolor paper (approx. 2 x 7 inches)
- Thin masking tape or washi tape (1/8 inch or 3mm width)
- Watercolor paints (Teal, Turquoise, Indigo)
- Round watercolor brush (size 4 or 6)
- Painter’s tape or masking tape (standard width)
- Paper towels
- Jar of clean water
- Rigid board or work surface
Step 1: Creating the Resist Grid
-
Secure the paper:
Tape your watercolor paper strip down to a rigid board using standard masking tape along all four edges. This creates a clean white border and keeps the paper flat while wet. -
Prepare thin strips:
If you don’t have specialist 1/8 inch tape, simply stick a long piece of standard masking tape to a clean cutting mat and slice it into narrow strips using a ruler and craft knife. -
Lay the first diagonals:
Apply your thin tape in a zig-zag pattern running up the length of the bookmark. Angle the tape to form the sides of your triangles. -
Complete the shapes:
Add horizontal or intersecting lines of thin tape to close off the zig-zags, forming a vertical column of stacked triangles or a tessellating pattern. -
Seal the edges:
Run your fingernail or a bone folder firmly over all the tape lines. I always double-check the intersections to ensure the tape is completely adhered, which prevents paint from creeping underneath.
Clean Line Secret
To get razor-sharp lines, paint a thin layer of clear clean water over the tape edges first. This seals any tiny gaps with water, so the colored paint sits on top rather than bleeding underneath.
Step 2: Painting the Washes
-
Mix your palette:
Prepare a puddle of teal, a puddle of turquoise, and a smaller amount of deep indigo on your palette. Keep them fairly watery/transparent. -
Start with a light wash:
Dip your brush into the clean water, then pick up a small amount of turquoise. Paint inside one of the triangle shapes. -
Add depth:
While that shape is still wet, touch the tip of your brush into the teal or indigo paint and drop it into one corner of the triangle. -
Let it flow:
Tilt the board slightly or nudge the paint gently to let the colors blend naturally within the shape, creating a gradient from dark to light. -
Vary the tones:
Move to the next triangle, perhaps starting with the darker teal this time. I like to alternate light and dark shapes to create visual interest across the pattern. -
Fill the grid:
Continue painting until every geometric section is filled with color, being careful not to leave any white gaps next to the tape edges. -
Blot excess:
If any puddles form on top of the tape itself, gently lift them with the corner of a paper towel so they don’t seep under the edges.
Level Up: Salt Texture
While the paint inside the triangles is still wet, sprinkle a few grains of table salt into the pigment. Once dry, brush the salt off to reveal a beautiful, starry texture in the watercolor.
Step 3: The Reveal
-
Dry completely:
Allow the painting to dry fully. The paper should feel room temperature to the touch, not cool. -
Peel the pattern:
Slowly peel off the thin masking tape strips. Pull the tape away from the paper at a 45-degree angle to ensure a crisp line. -
Remove the border:
Finally, remove the border tape holding the paper to the board, revealing the clean white frame around your artwork. -
Flatten if needed:
If the bookmark curls slightly, place it under a heavy book overnight once it is absolutely bone dry.
Now you have a striking geometric bookmark ready to save your place in your next favorite read.
Stacked Books Motif
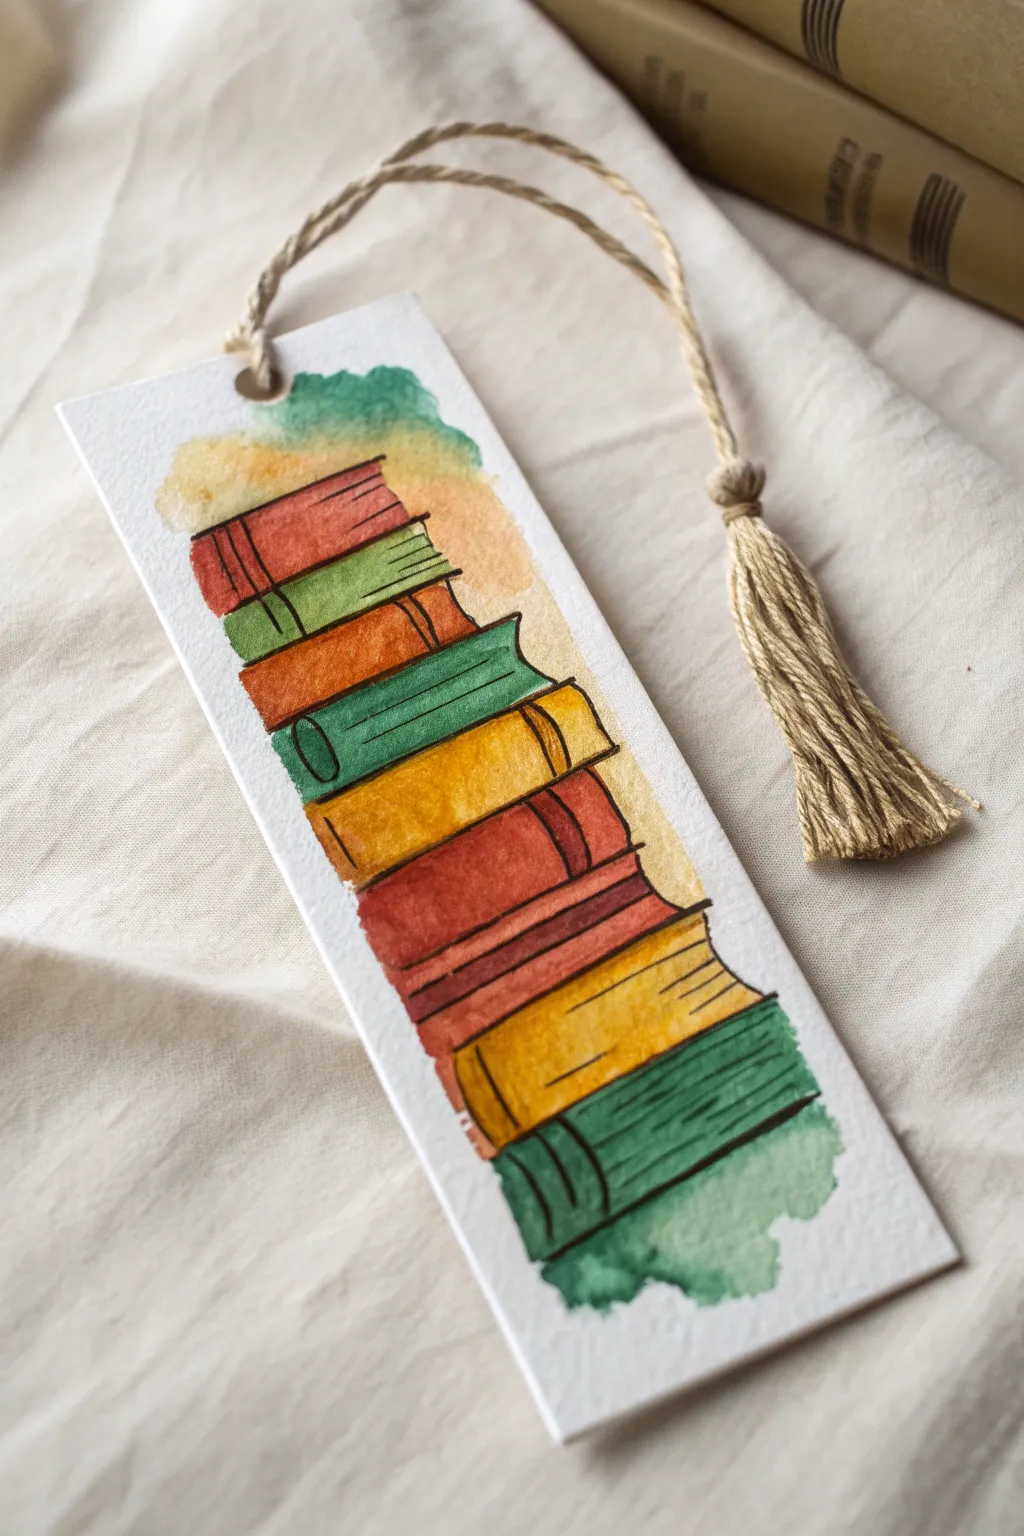
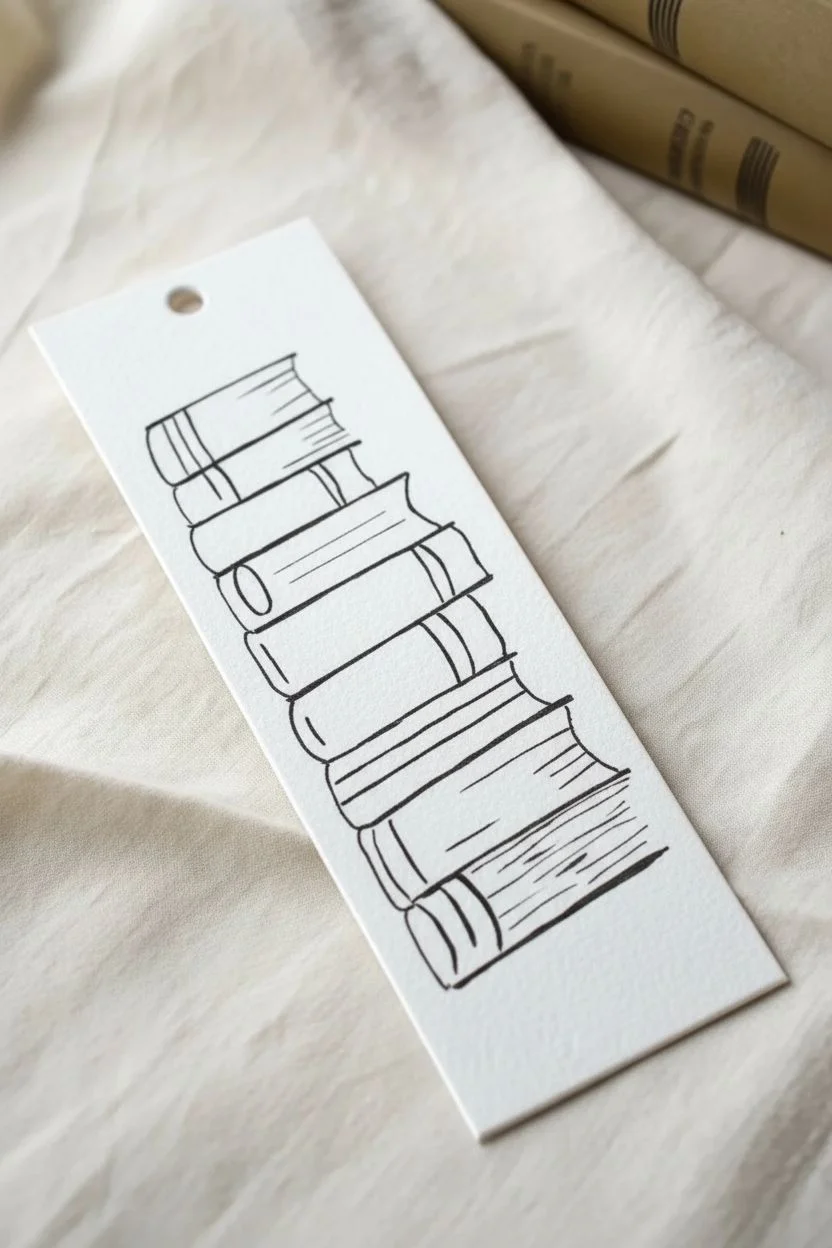
Capture the cozy charm of a messy reading list with this loose line-and-wash watercolor bookmark. This project embraces imperfections, using wobbly ink lines and free-flowing paint to create a relaxed, artistic aesthetic.
How-To Guide
Materials
- Cold-press watercolor paper (300 gsm)
- Waterproof black fineliner (0.3mm or 0.5mm)
- Watercolor paint set
- Round paintbrush (size 4 or 6)
- HB Pencil and kneaded eraser
- Jute twine or heavy string
- Hole punch
- Scissors
Step 1: Sketching the Stack
-
Cut the paper:
Begin by cutting your watercolor paper into a standard bookmark strip, approximately 2 inches wide and 7 inches tall. -
Outline the books:
Using a pencil, lightly sketch a stack of about eight books. Vary the thickness and width of each book to give the tower a bit of personality, rather than making a perfect column. -
Add details:
Draw curved lines on the left side of the stack to indicate the spines depending on which way they are facing, and add slight indentations for the pages. -
Ink the lines:
Trace over your pencil sketch with a waterproof fineliner. Keep your hand loose; a slightly wavering line adds to the illustrative character of this piece. -
Refine the ink work:
Add double lines to some of the spines or small vertical ticks to suggest binding ridges. Once the ink is fully dry, gently erase the pencil marks.
Ink Advice
Ensure your pen is labeled ‘waterproof’ or ‘archival.’ Standard gel pens or water-based markers will smear instantly when you apply the watercolor washes.
Step 2: Adding Color
-
Mix your palette:
Prepare your paints by activating earthy tones: terracotta red, olive green, mustard yellow, and burnt orange. -
Paint the red books:
Start with the top book and the sixth book down. Fill them with a wash of terracotta red. Don’t worry if you go slightly outside the lines; it enhances the style. -
Apply green tones:
Paint the second, fourth, and bottom books with variations of green. I like to add a touch of blue to the bottom book’s mix for separation. -
Fill the remaining covers:
Use your ochre or yellow for the fifth and seventh books, and paint the third book with a bright burnt orange to create contrast in the middle of the stack. -
Shade the spines:
While the paint is still slightly damp, drop more concentrated pigment of the same color along the spine edge of each book to create a rounded shadow effect. -
Add the background wash:
Wet the paper area immediately surrounding the top and bottom of the stack with clean water. Dab in some leftover green and yellow pigment, letting it bleed outward into a soft, abstract cloud.
Step 3: Finishing Touches
-
Dry and flatten:
Allow the painting to dry strictly on a flat surface to prevent warping. If the paper curled, place it under a heavy book overnight. -
Punch the hole:
Use a hole punch to create a centered hole at the very top of the bookmark, leaving about a half-inch of space from the edge. -
Start the tassel:
To make the tassel, wrap your jute twine around three or four fingers approximately 15 times. -
Secure the loop:
Cut a separate piece of twine, thread it through the top of your wrapped loop, and tie it tight. This piece will attach to the bookmark. -
Create the tassel head:
Cut another short piece of twine and wrap it horizontally around the bundle of loops, about half an inch from the top, tying it securely to form the tassel ‘head’. -
Trim the fringe:
Cut the bottom loops of the wrapped bundle and trim the ends evenly with sharp scissors. -
Attach and enjoy:
Thread the top tie of your tassel through the punched hole in the bookmark and secure it with a lark’s head knot or a simple double knot.
Personalize It
Once the paint is bone dry, use a white gel pen to write the titles of your actual favorite novels on the painted spines for a custom library tracker.
Slide this colorful creation into your current read and enjoy the handmade charm every time you open the page
Metallic Gold Accents
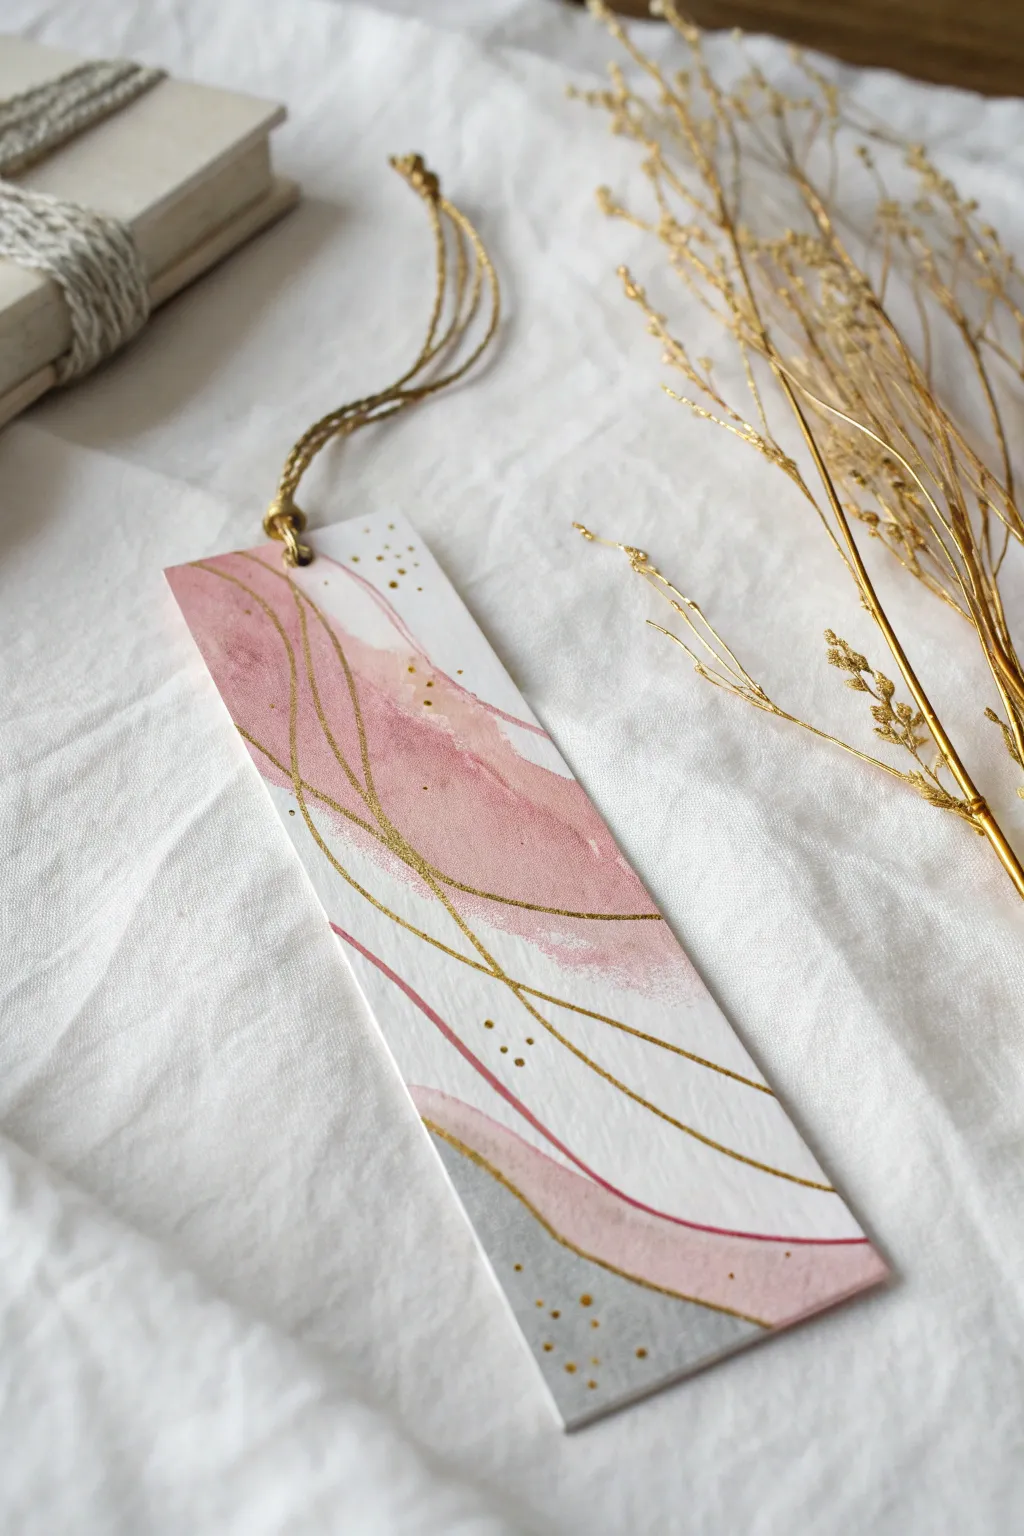
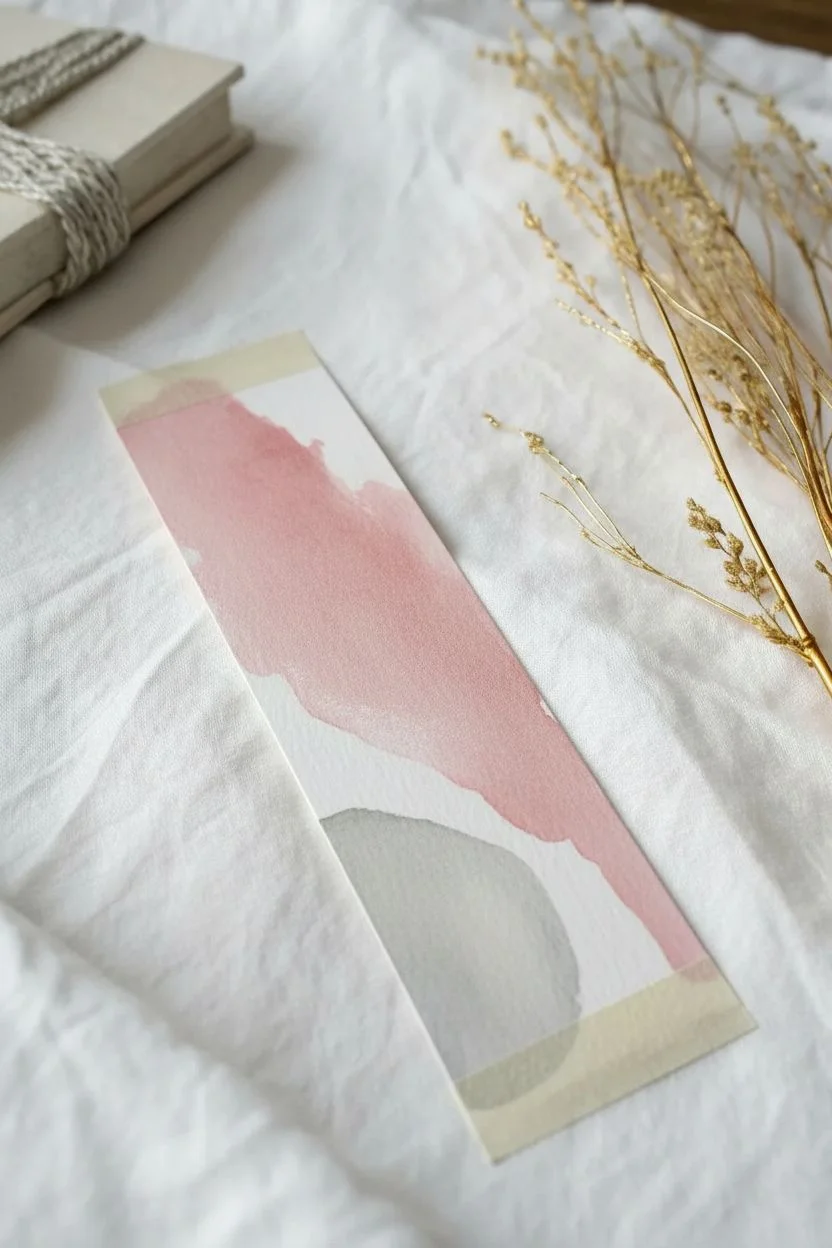
Combine the soft translucency of watercolor with the crisp elegance of metallic lines to create this sophisticated bookmark. This project explores free-flowing shapes and precise detailing, resulting in a piece that looks effortlessly chic marking your page.
Step-by-Step
Materials
- Cold press watercolor paper (140lb/300gsm)
- Watercolor paints (Dusty Rose, Payne’s Grey)
- Liquid gold leaf or metallic gold ink
- Round brush (size 6)
- Fine liner brush (size 00)
- Gold embroidery floss or metallic twine
- Hole punch
- Gold eyelet setter (optional)
Step 1: The Watercolor Base
-
Prepare the paper:
Cut your heavy watercolor paper to a standard bookmark size, approximately 2 inches wide by 7 inches tall. -
Secure the workspace:
Tape the paper down to your desk or a drawing board using gentle painter’s tape to keep it flat while painting. -
Mix the rose hue:
Create a dusty pink shade by diluting a red pigment with water and adding a tiny dot of green or brown to desaturate the brightness. -
Paint the main wave:
Using a size 6 round brush, paint a broad, organic swoosh starting from the top left area and flowing diagonally toward the middle right. -
Add texture:
While the pink wash is still wet, drop a little extra water or pigment into the center of the shape to create natural blooms and variation. -
Mix the grey accent:
Rinse your brush thoroughly and mix a very watery, pale grey wash using a touch of darker grey or black pigment. -
Apply the bottom wash:
Paint a smaller organic shape in the bottom left corner, keeping a small gap of white space between this grey section and the pink wave. -
Dry completely:
Allow the paper to dry fully; if the paper is even slightly damp or cool to the touch, the gold lines next will bleed.
Troubleshooting Shaky Lines
Struggling with the liner brush? Swap it for a fine-tip metallic gold paint pen (0.7mm). It offers much more stability than a brush while still delivering that brilliant shine.
Step 2: Gilded Details
-
Prep the metallic gold:
Shake your liquid gold leaf well or mix your gold watercolor pan until it reaches a creamy, opaque ink consistency. -
Load the liner brush:
Coat the bristles of your fine liner brush (size 0 or 00), wiping any excess drip on the rim of the container. -
Paint the primary curve:
Draw a long, confident line that generally follows the curve of the pink wash, allowing it to cross over both the painted area and the white background. -
Add intersecting lines:
Add two or three more flowing lines that intersect the first one; I find that moving my whole arm rather than just my wrist helps keep these curves smooth. -
Create gold speckles:
Using the very tip of the liner brush, carefully place small dots in clusters near the top and bottom of the composition for a confetti effect. -
Cure the gold:
Let the artwork sit undisturbed until the metallic lines are completely set and dry.
Level Up: Texture Contrast
For a tactile finish, leave the watercolor paint matte but apply a coat of gloss varnish just over the dry pink and grey sections before adding your gold lines on top.
Step 3: Finishing Touches
-
Punch the hole:
Use a hole punch to create a centered hole about half an inch from the top edge of the bookmark. -
Install eyelet:
Place a gold eyelet into the hole and set it with your tool to protect the paper and add a professional finish. -
Prepare the tassel:
Cut four strands of gold embroidery floss or twine, each roughly 8 to 10 inches long. -
Attach the tassel:
Fold the strand bundle in half, push the loop through the eyelet from front to back, and pull the loose ends through the loop to secure. -
Secure the knot:
Tighten the knot gently near the grommet and trim the ends of the tassel so they are even.
Enjoy using this elegant piece of art to keep your place in your next favorite read
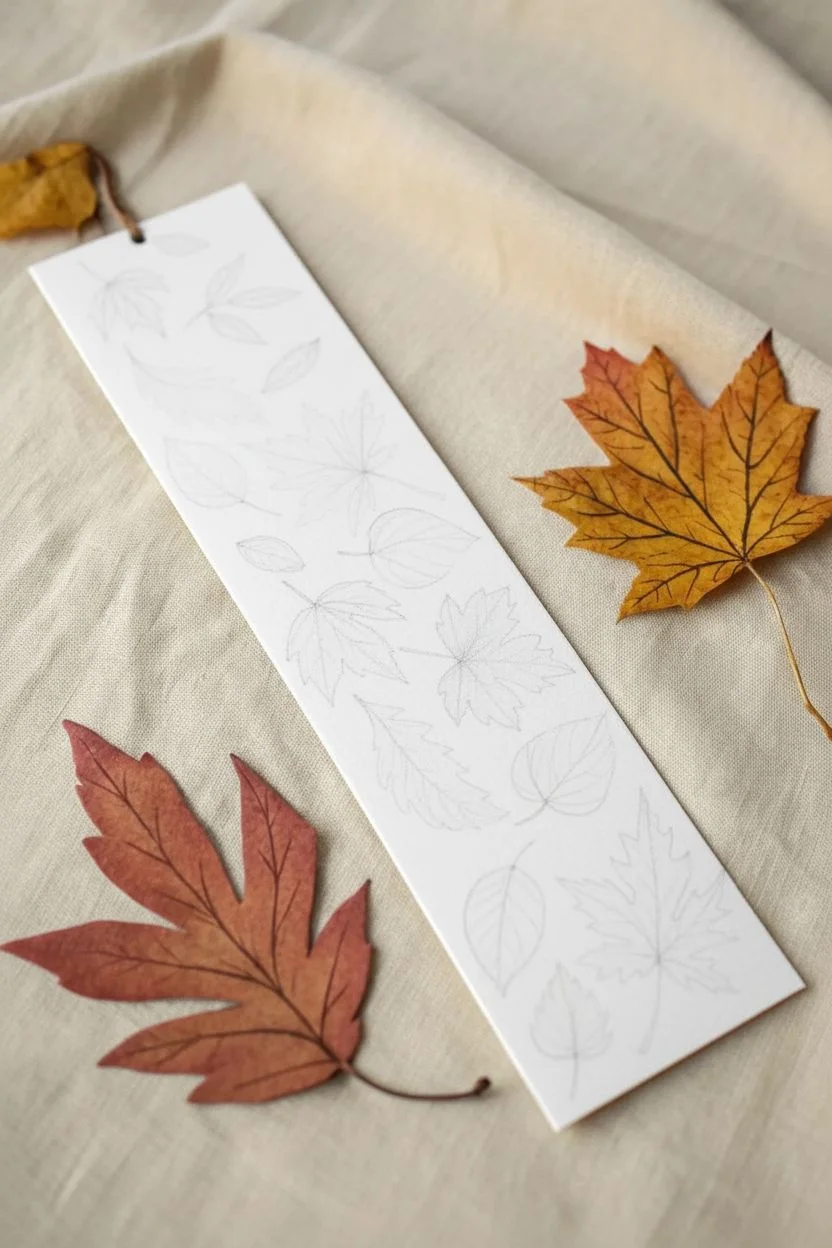
Seasonal Atmospheric Themes
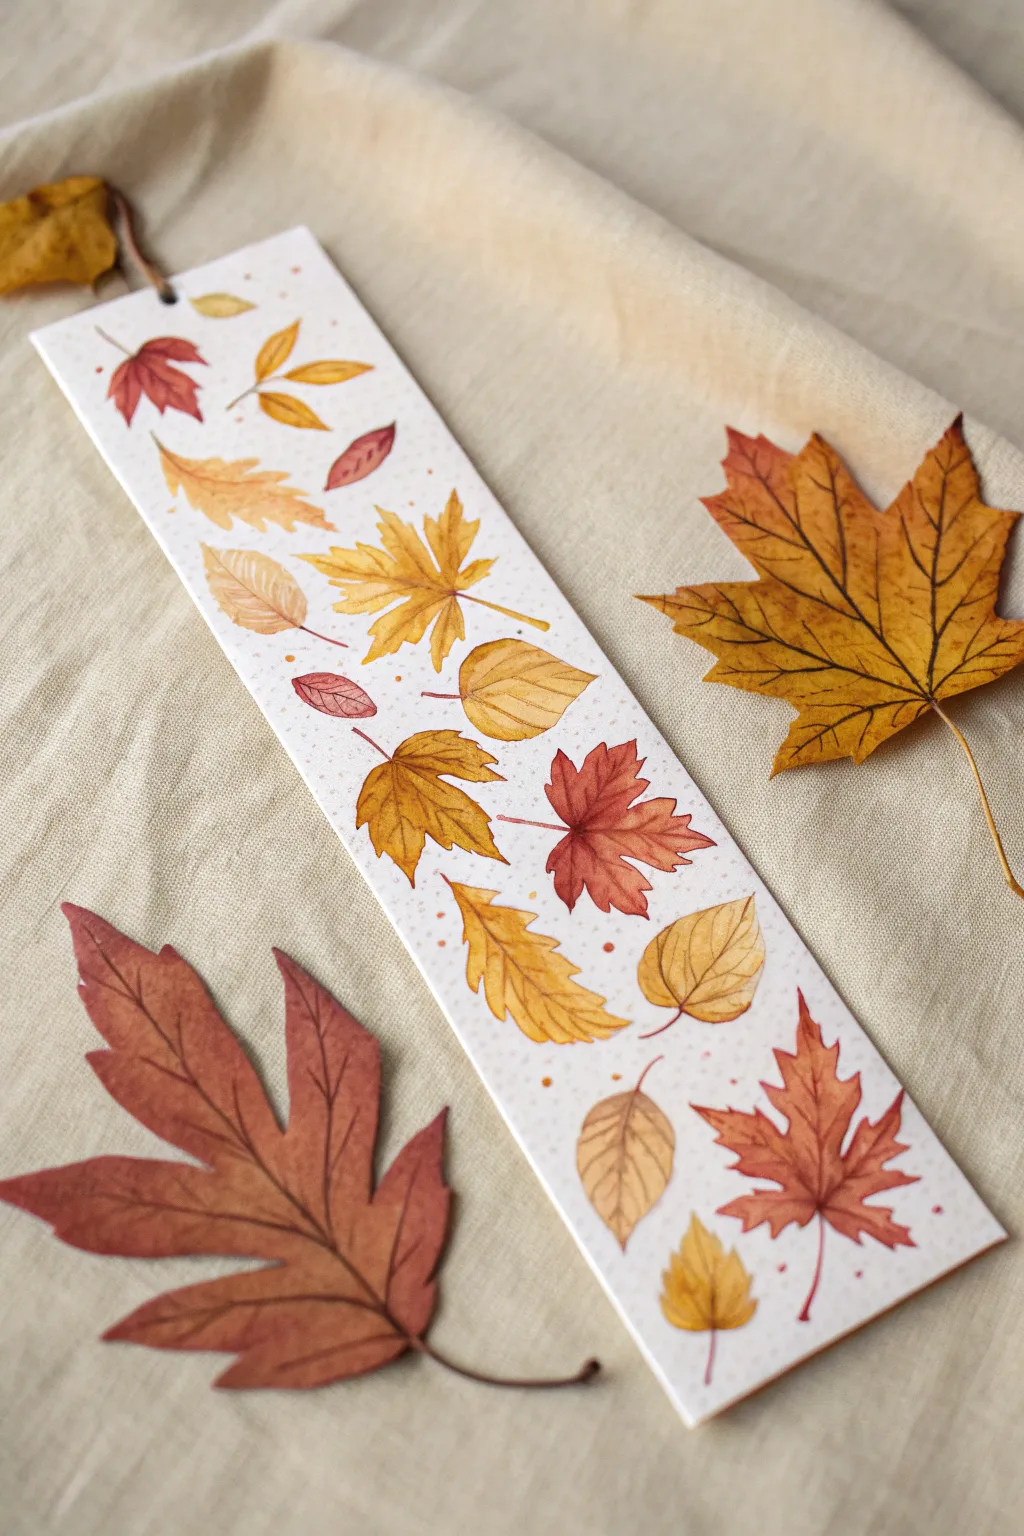
Capture the delicate beauty of falling leaves with this warm and cozy watercolor project. By layering rich earthy tones on a crisp white background, you will create a functional piece of art that celebrates the changing seasons.
How-To Guide
Materials
- Cold press watercolor paper (300gsm/140lb)
- Watercolor paints (Yellow Ochre, Burnt Sienna, Burnt Umber, Alizarin Crimson, Cadmium Yellow)
- Round watercolor brushes (Size 4 for washes, Size 0 or 00 for details)
- HB Pencil and kneaded eraser
- Palette for mixing
- Paper towels and water cup
- Hole punch
- Thin brown leather cord or suede lace
Step 1: Sketching the Composition
-
Size the paper:
Cut your watercolor paper into a standard bookmark strip, approximately 2 inches wide by 7 inches tall. -
Plan the flow:
Imagine a gentle ‘S’ curve running down the paper. You will arrange your leaves loosely along this unseen path to create a natural, drifting falling-leaf effect. -
Sketch maple shapes:
Using your pencil very lightly, draw a few multi-pointed maple leaves. Keep them small and rotate them at different angles so no two look exactly aligned. -
Add variety:
Fill the gaps with different leaf shapes, such as oval beech leaves, serrated birch leaves, or lobed oak leaves to create visual interest. -
Clean up:
Gently roll your kneaded eraser over the sketch to lift up the graphite, leaving only the faintest ghost lines to guide your painting.
Bleeding edges?
If your veins look fuzzy, the base layer wasn’t dry enough. Wait until the paper feels dry and cool to the back of your hand before adding fine lines.
Step 2: Painting the Foliage
-
Prepare the palette:
Pre-mix puddles of your fall colors: a sunny yellow, a deep rusty orange, a bright red, and a soft brown. Keep them watery for transparency. -
First wash – Yellows:
Start with the lightest leaves. Load your Size 4 brush with yellow and fill in a few of the shapes. I usually keep the edges crisp but the center wet. -
Wet-on-wet blending:
While the yellow leaves are still damp, touch the tip of your brush loaded with orange to the edges or base of the leaf, letting the color bleed naturally. -
Mid-tones:
Move on to the orange and light brown leaves. Ensure adjacent leaves aren’t touching while wet, or they will bleed into each other. -
Dark accents:
Paint the remaining leaves in your deepest reds or reddish-browns. This contrast anchors the composition. -
Let it dry:
Allow the bookmark to dry completely. The paper must be room temperature to the touch before starting the next phase.
Step 3: Detailing and Finishing
-
Mix vein colors:
Create a concentrated mix of reddish-brown (Burnt Sienna mixed with a little Umber). It should be darker than your dried leaves. -
Paint central veins:
Switch to your Size 0 detail brush. With a steady hand, paint the central vein line down the middle of each leaf. -
Add delicate branching:
Paint fine lines branching off the central vein towards the leaf points. Keep these lines extremely thin and delicate. -
Connect the stems:
Extend a small stem from the base of each leaf. Vary the length slightly to mimic natural imperfections. -
Create atmosphere:
Load a brush with watered-down orange paint. Tap the handle against another brush over the paper to create a fine mist of speckles around the leaves. -
Final erase:
Once the paint and speckles are 100% dry, gently erase any remaining visible pencil marks. -
Punch and tie:
Use a hole punch to create a hole centered near the top edge. Thread a piece of brown leather cord through and loop it to finish the rustic look.
Pro Tip
Leave tiny slivers of white paper unpainted within the leaves’ base layers. These ‘sparkles’ mimic light hitting the glossy leaf surface.
Now you have a charming seasonal bookmark that brings the warmth of autumn into your favorite reading nook.
Negative Space Leaves
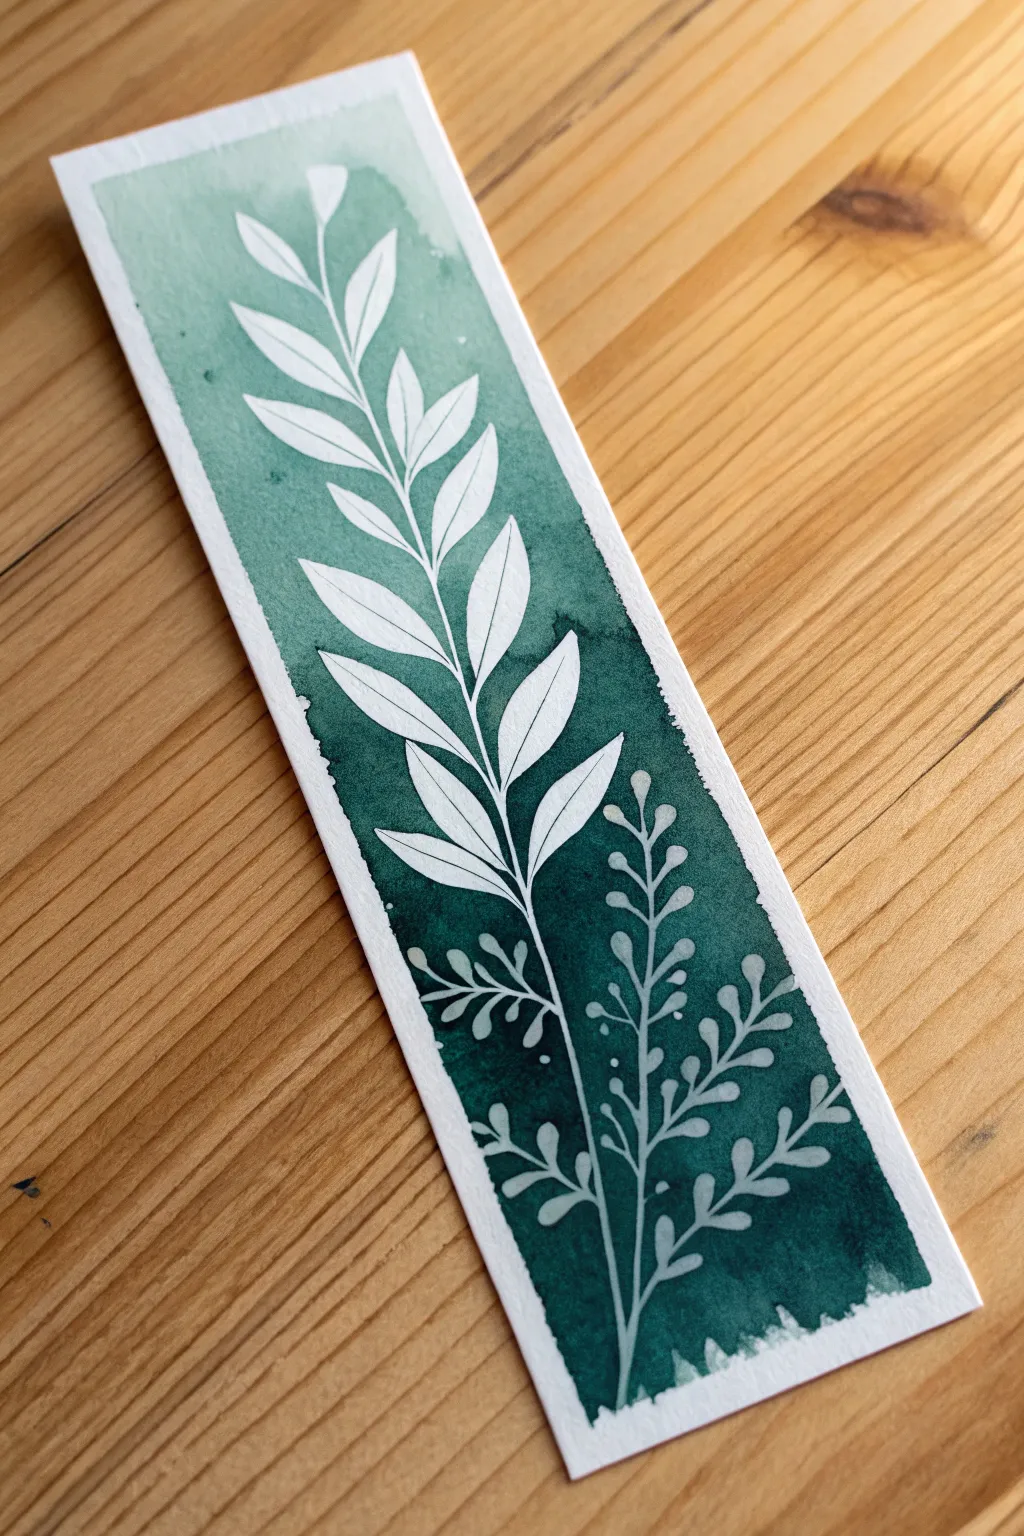
This project uses the magic of masking fluid to create crisp, bright white leaves against a moody, deep green background. It is a satisfying exercise in negative space painting that results in a professional-looking bookmark perfect for gifting.
Step-by-Step Guide
Materials
- Cold press watercolor paper (300 gsm)
- Masking fluid (drawing gum)
- Watercolor paints (Dark Green, Prussian Blue, or Indigo)
- Old paintbrush or silicone applicator
- Medium round brush (size 6 or 8)
- Masking tape or Washi tape
- Pencil and adhesive eraser
- Jar of water
- Paper towel
Step 1: Preparation & Sketching
-
Size the paper:
Cut your watercolor paper into a standard bookmark strip, approximately 2 inches wide by 7 inches tall. -
Secure the borders:
Tape the bookmark down to a hard board or table using masking tape along all four edges. This creates the clean white frame seen in the photo. -
Draw the main stem:
Using a light pencil touch, draw a slightly curved line running from the bottom center almost to the top of the paper. -
Add leaf shapes:
Sketch long, pointed almond-shaped leaves extending from the main stem. Keep the arrangement somewhat symmetrical but organic, reaching upward. -
Add filler details:
At the bottom of the design, sketch two smaller, fern-like sprigs with tiny rounded leaves to fill the negative space near the base.
Brush Saver Tip
Never use your good brushes for masking fluid! Even with soap, it clumps. Use an old, frayed brush, a cheap plastic brush, or a specialized silicone sculpting tool for easy cleanup.
Step 2: Masking
-
Prepare your applicator:
If using a brush to apply masking fluid, dip it in dish soap first to coat the bristles. This prevents the rubber from ruining your brush permanently. -
Mask the stems:
Carefully paint the masking fluid over your pencil lines for the main central stem and the delicate bottom fern stems. -
Mask the leaves:
Fill in the leaf shapes with masking fluid. Ensure you have full coverage so no paint seeps through later. -
Refine the edges:
Check that your masked edges are sharp and pointed at the leaf tips to match the botanical style. -
Let it cure:
Allow the masking fluid to dry completely. It should turn yellowish and feel tacky but solid to the touch. Patience is key here.
Step 3: Painting the Gradient
-
Mix the color:
Create a deep, saturated teal or emerald color on your palette. I personally like mixing Viridian Green with a touch of Payne’s Gray for depth. -
Wet the paper:
Using your clean medium brush, apply a layer of clean water over the entire paper surface (wet-on-wet technique). -
Apply base color:
Load your brush with the concentrated paint and drop it onto the bottom third of the bookmark. -
Start the blend:
Clean your brush slightly and drag the paint upward into the middle section, allowing it to dilute naturally. -
Fade to top:
Dip your brush in clean water again and pull the color toward the top, creating a very pale wash that fades to near-white. -
Texturize (Optional):
While the paint is still wet at the bottom, drop in tiny varying amounts of water or darker pigment to create the subtle ‘blooms’ seen in the texture. -
Dry completely:
Let the paint dry thoroughly. The paper must be bone-dry and flat before the next step.
Level Up: Veins
Once the mask is removed and paper is dry, use a fine-tip waterproof green pen or a very sharp colored pencil to draw a delicate central vein line down the middle of each white leaf.
Step 4: The Reveal
-
Remove the mask:
Gently rub your finger or a rubber cement pickup tool over the masked areas to peel away the dried fluid, revealing the white paper. -
Clean up sketches:
Use an eraser to gently remove any visible pencil lines left inside the white leaf shapes. -
Peel the tape:
Slowly peel away the border tape at a 45-degree angle, pulling away from the artwork to ensure clean edges.
Place this lovely botanical marker in your current read and enjoy the crisp contrast every time you turn the page.
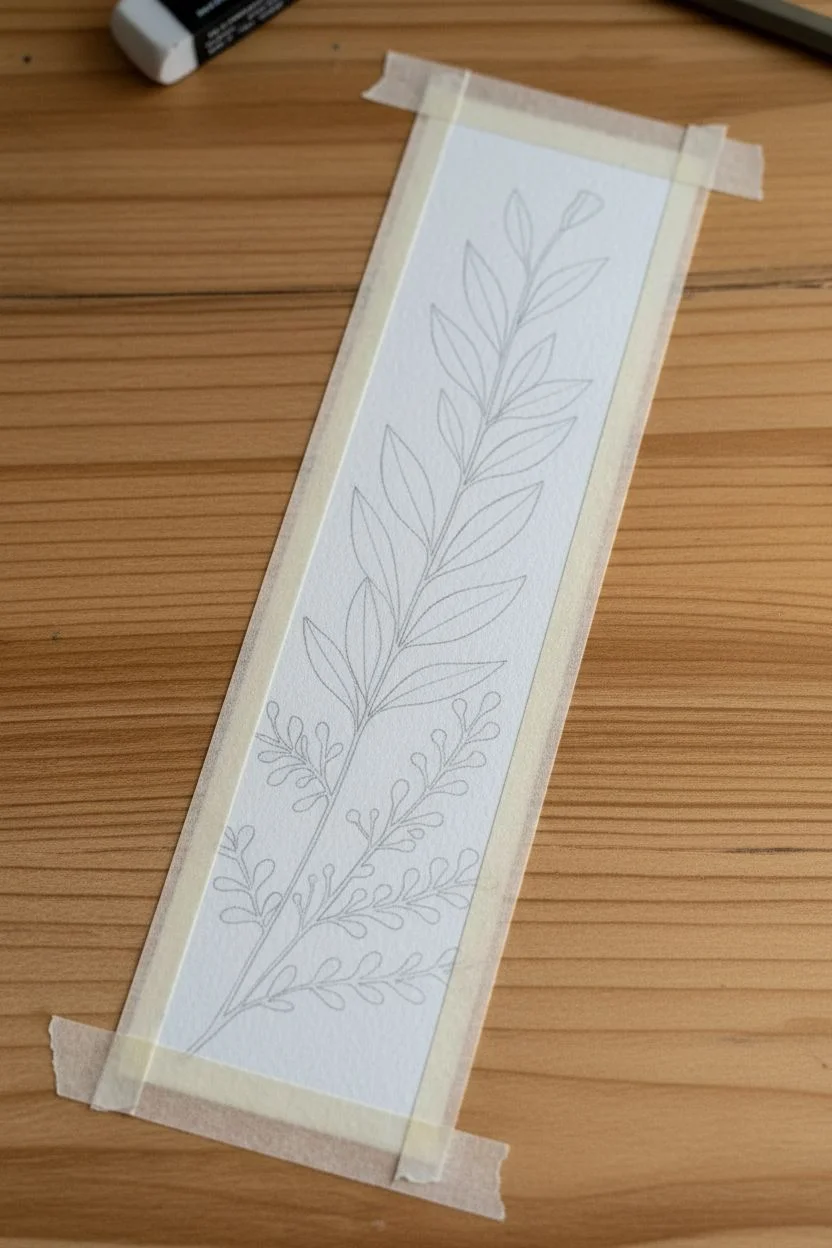
Adding Tassels and Finishing Touches
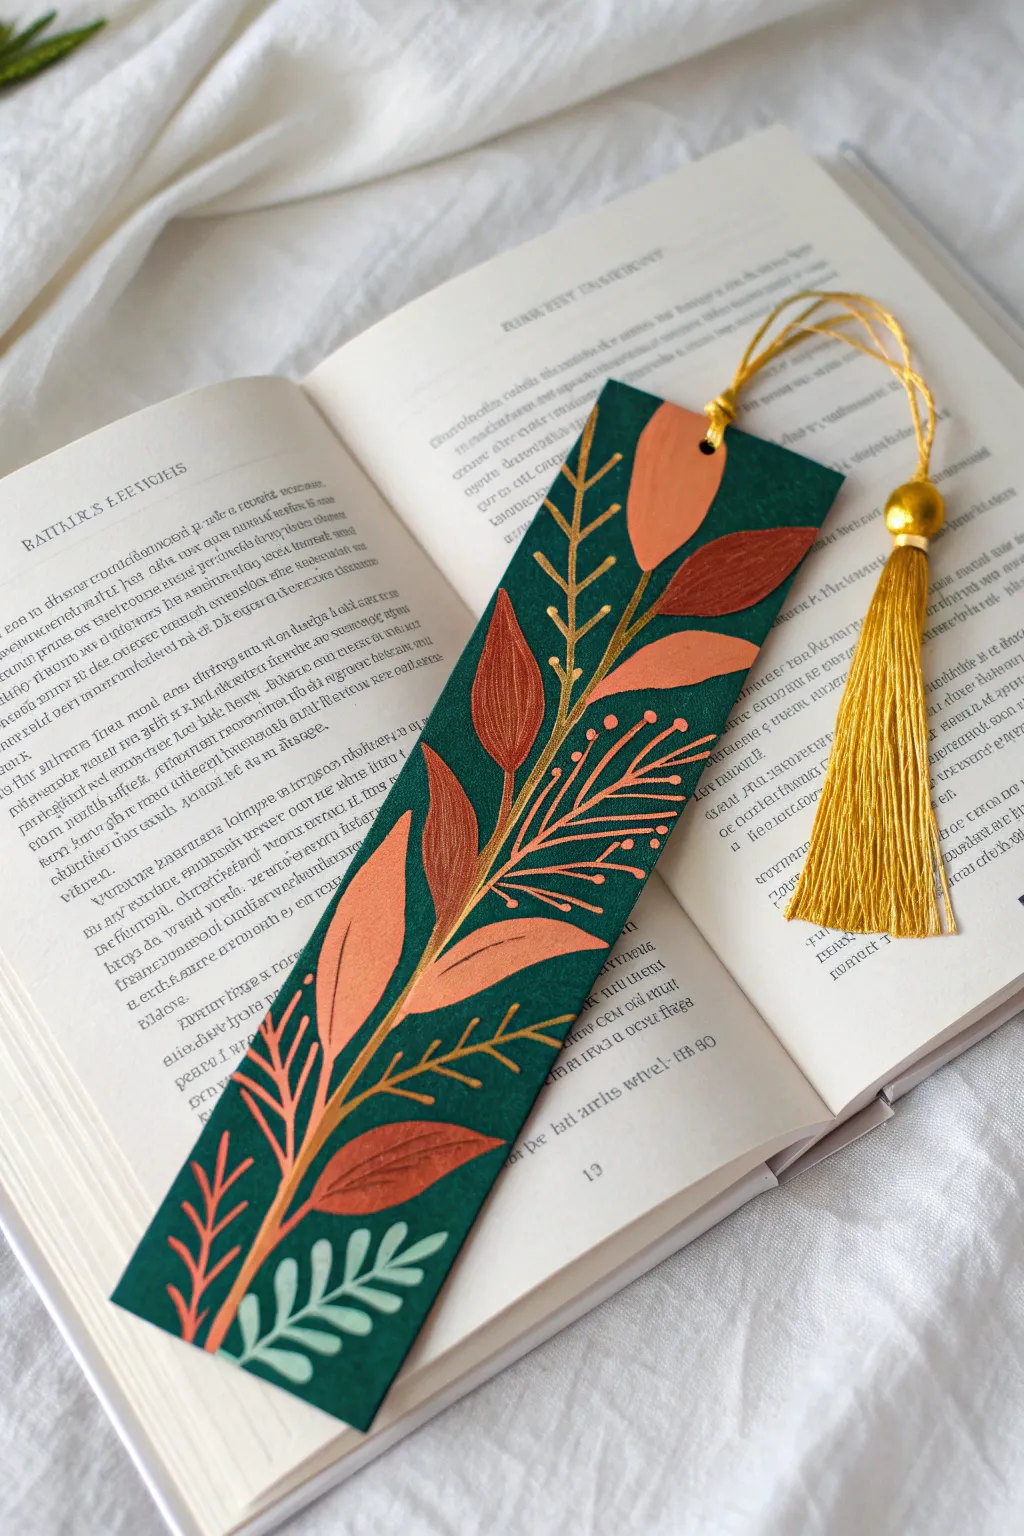
Capture the cozy warmth of fall with this elegant bookmark featuring stylized leaves on a deep hunter green background. The contrasting colors and classic tassel make it a sophisticated addition to any reading routine.
How-To Guide
Materials
- Heavyweight watercolor paper or cardstock (300gsm)
- Gouache or acrylic paints (Hunter Green, Burnt Sienna, Clay Orange, Mustard Yellow, Mint Green)
- Flat synthetic brush (size 6)
- Fine detail brush (size 0 or 00)
- Hole punch (standard 1/4 inch)
- Gold tassel
- Masking tape
- Pencil and eraser
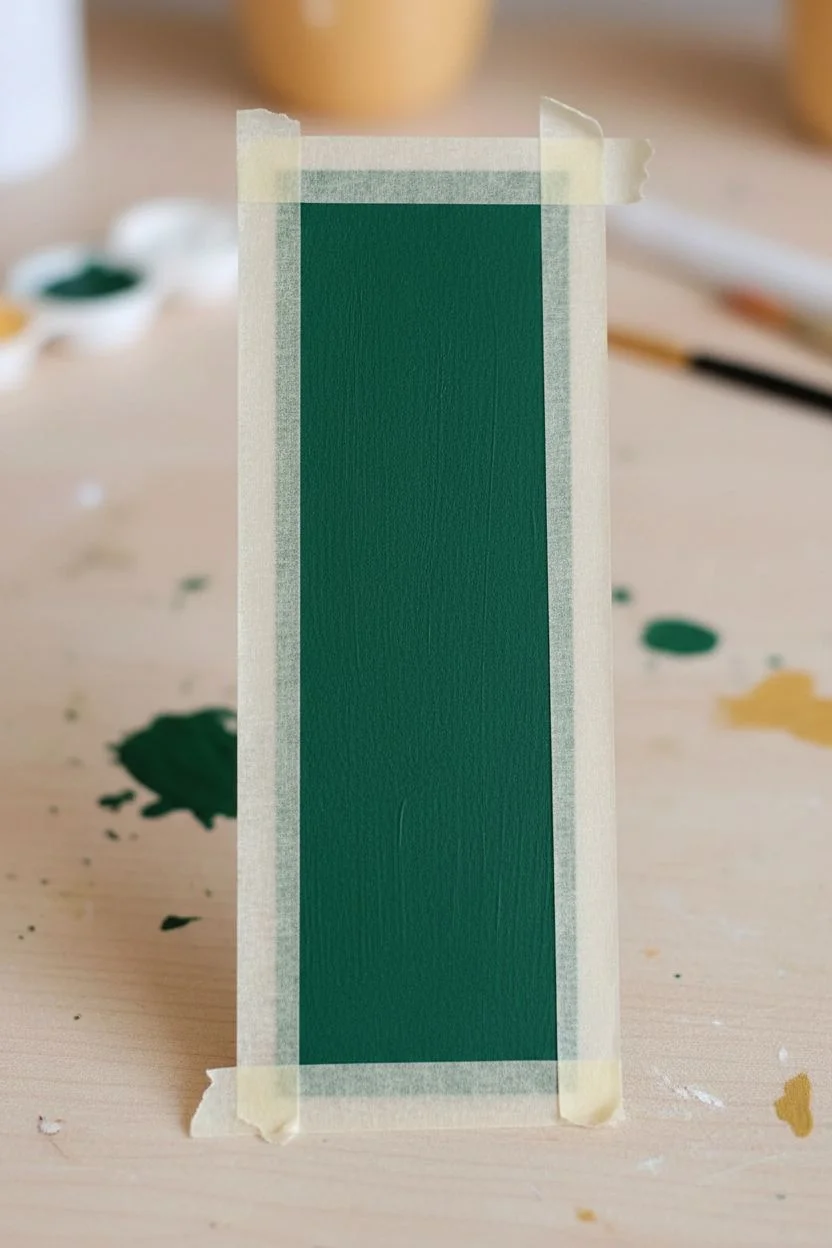
Step 1: Preparing the Base
-
Cut and measure:
Cut your heavyweight paper into a standard bookmark rectangle, approximately 2 inches wide by 6 or 7 inches tall. -
Secure the paper:
Tape the edges of the paper down to your work surface using masking tape to keep it flat and create a clean border if desired. -
Mix the background color:
Mix a deep, rich hunter green. If using acrylics, you might need a touch of black or dark blue to get that forest-like depth. -
Apply the base coat:
Using the flat brush, paint the entire surface with the green mixture. Apply even, vertical strokes. -
Let it cure:
Allow the base coat to dry completely. If the paper still shows through, apply a second coat for opacity.
Pro Tip: Opacity
Since you are painting light colors over a dark background, mix a tiny dot of white paint into your orange and yellow shades to ensure they cover the green effectively.
Step 2: Painting the Foliage
-
Sketch the composition:
Once dry, use a pencil to very lightly sketch a curving central line for the stem and rough outlines for the main leaves. -
Paint the clay leaves:
Mix a soft clay or peach-orange shade. Paint the large, rounded leaf shapes near the top and middle using your round brush. -
Add rust accents:
Using a burnt sienna or rust color, paint the textured, almond-shaped leaves situated between the clay ones. -
Create the bottom fern:
At the very bottom, paint the small, fern-like fronds using a opaque mint or light sage green. -
Draw the stems:
Switch to your finest detail brush (size 0). Mix a mustard yellow or ochre and paint the main central stem and the thin, spiky branches extending outward. -
Add secondary stems:
Continue using the mustard color to add the delicate sweeping stalks that serve as filler between the larger leaves.
Level Up: Metallic Pop
Swap the mustard yellow paint for metallic gold acrylic or a gold gel pen for the stems. This will catch the light and perfectly match the gold tassel.
Step 3: Details and Assembly
-
Detail the clay leaves:
Mix a slightly darker orange and paint fine central veins on the clay-colored leaves. -
Texture the rust leaves:
For the rust-colored leaves, I like to use a lighter orange or creamy mix to add fine vertical texture lines or hatching. -
Refine the mint leaves:
Clean up the edges of the bottom mint leaves with the fine brush to ensure they look crisp against the dark background. -
Final drying:
Let the entire painting sit until bone dry to avoid smudging the fine lines. -
Punch the hole:
Use a single-hole punch to create a centered hole about half an inch from the top edge of the bookmark. -
Prepare the tassel:
Take your gold tassel and thread the hanging loop through the hole engaging from the front to the back. -
Secure the knot:
Pass the tail of the tassel through the loop and pull gently to secure it with a lark’s head knot.
Place your beautiful new bookmark in your current read and enjoy the botanical vibes.


Have a question or want to share your own experience? I'd love to hear from you in the comments below!