
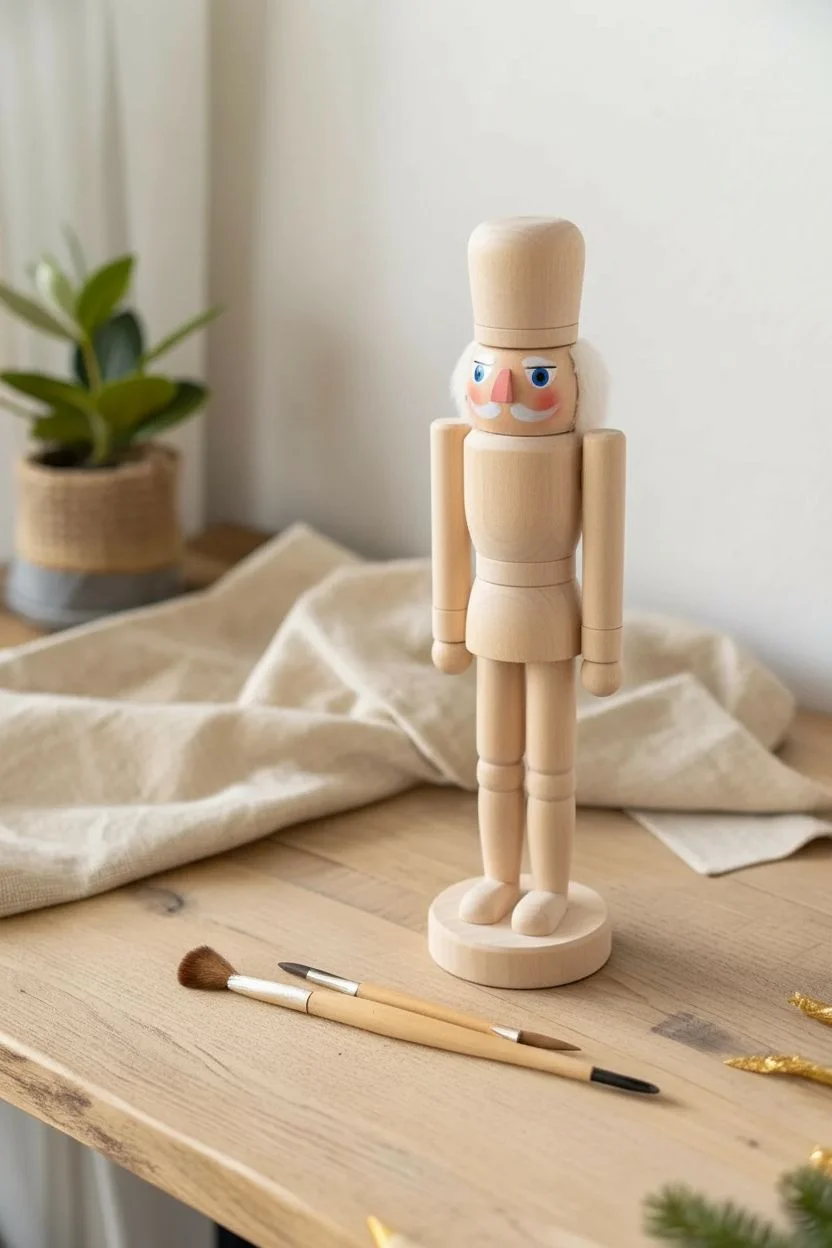
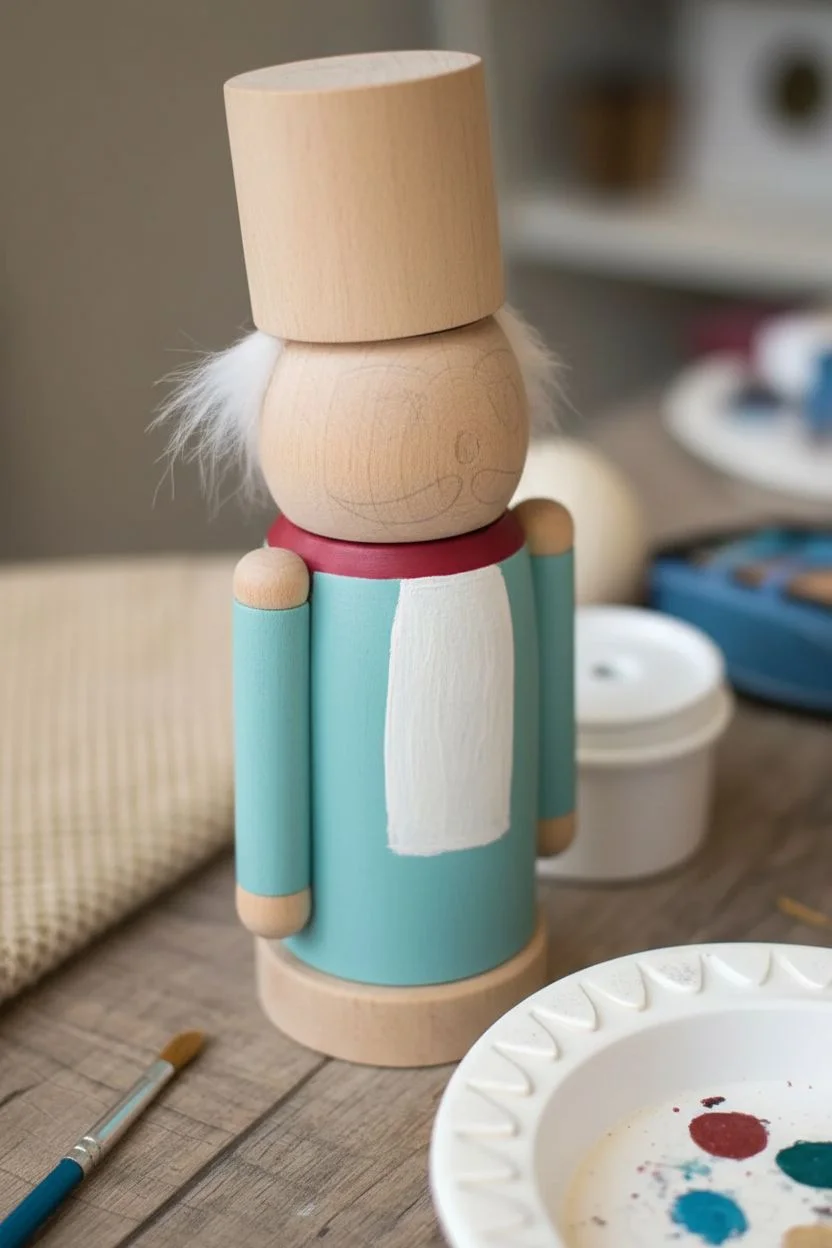
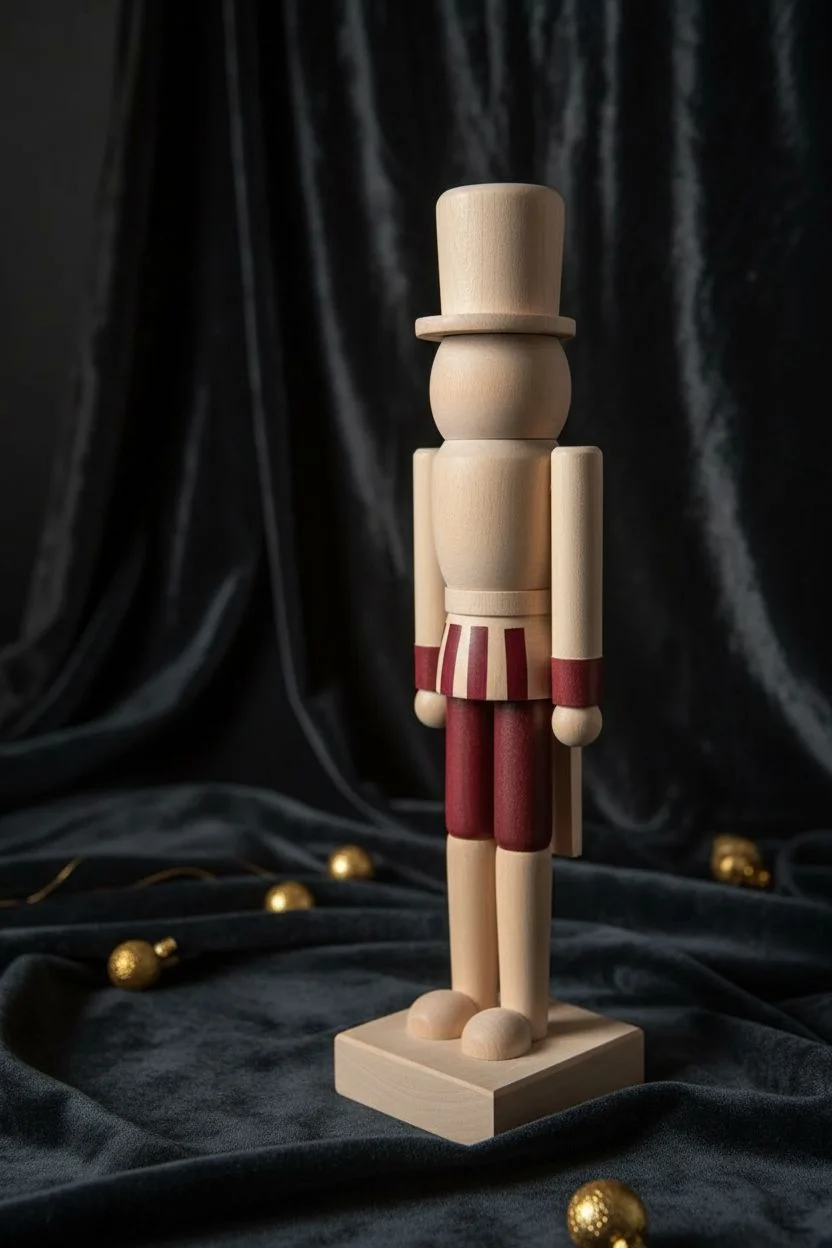
Transforming unfinished wooden figures into holiday treasures is one of my absolute favorite creative traditions to kick off the festive season. A customized nutcracker adds such a deeply personal touch to your mantel or entryway, allowing you to perfectly match this classic symbol to your unique decorating style.
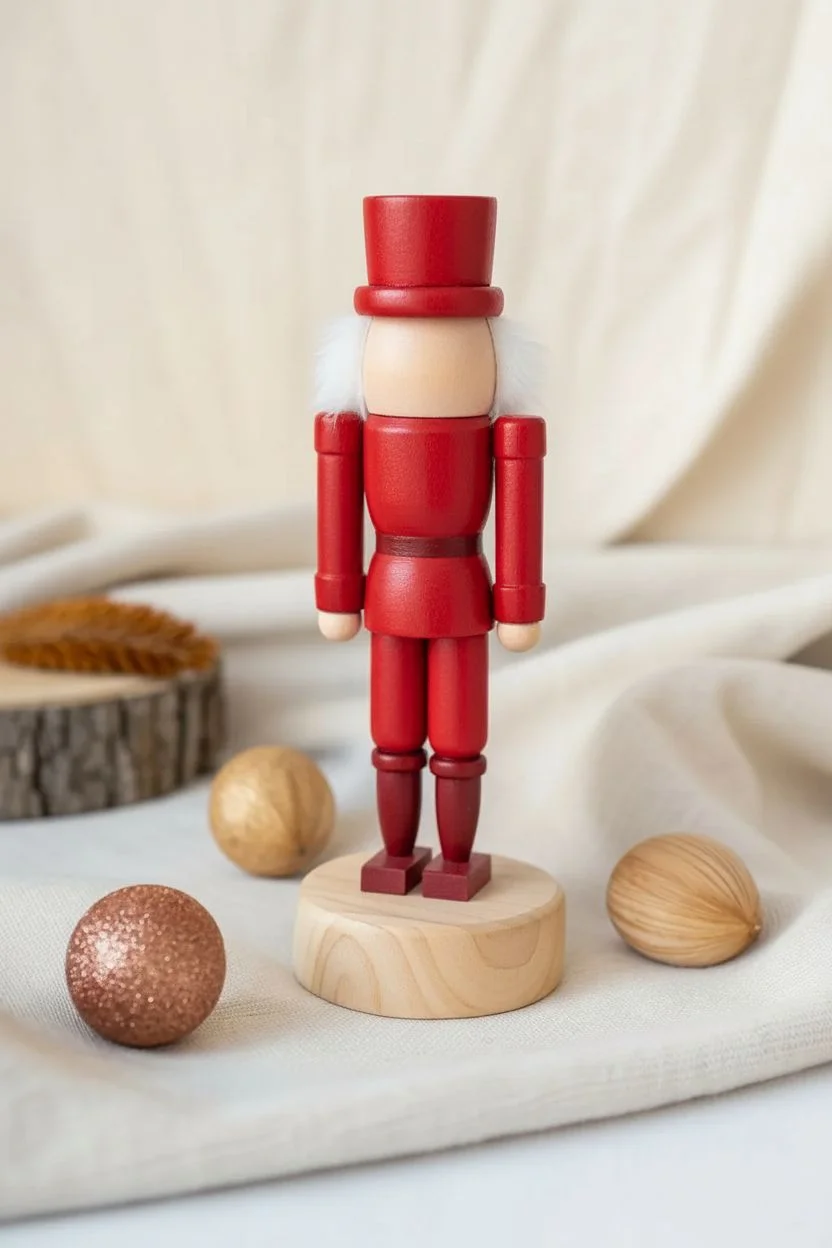
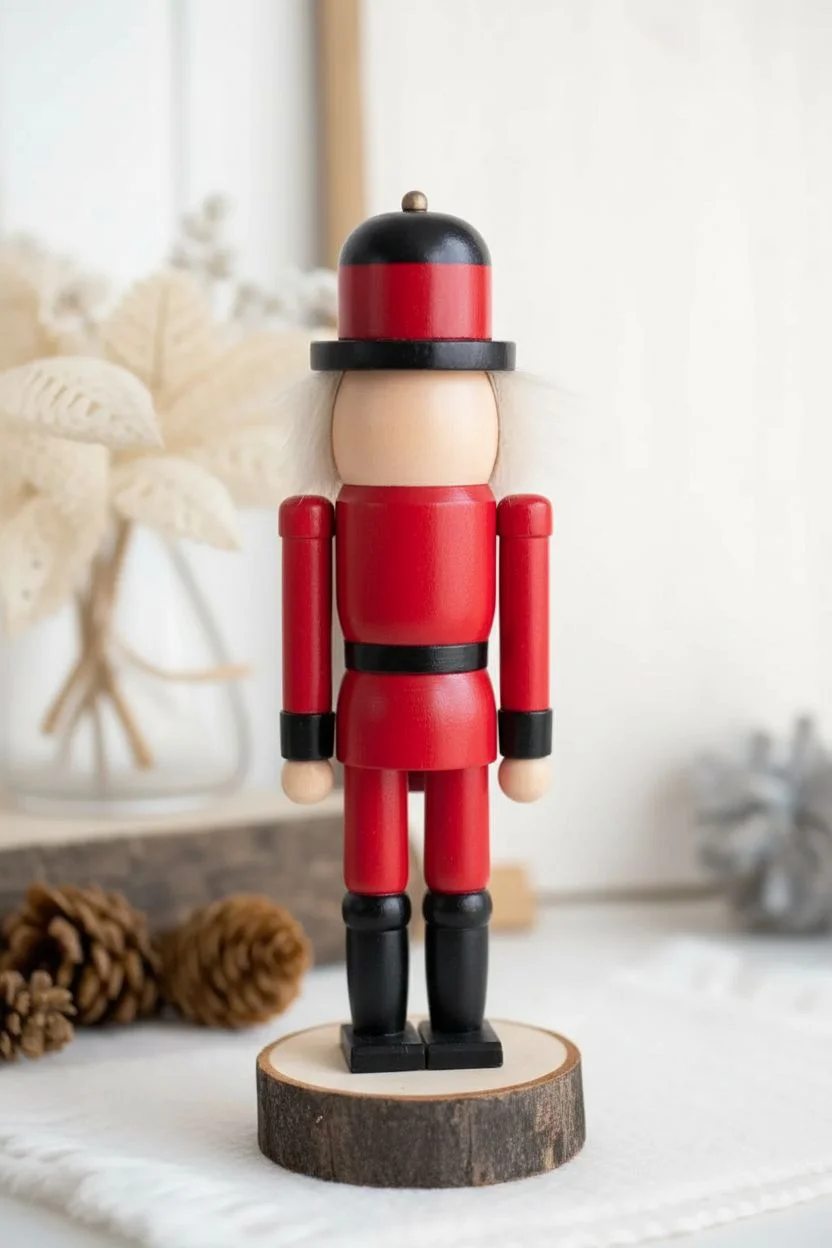
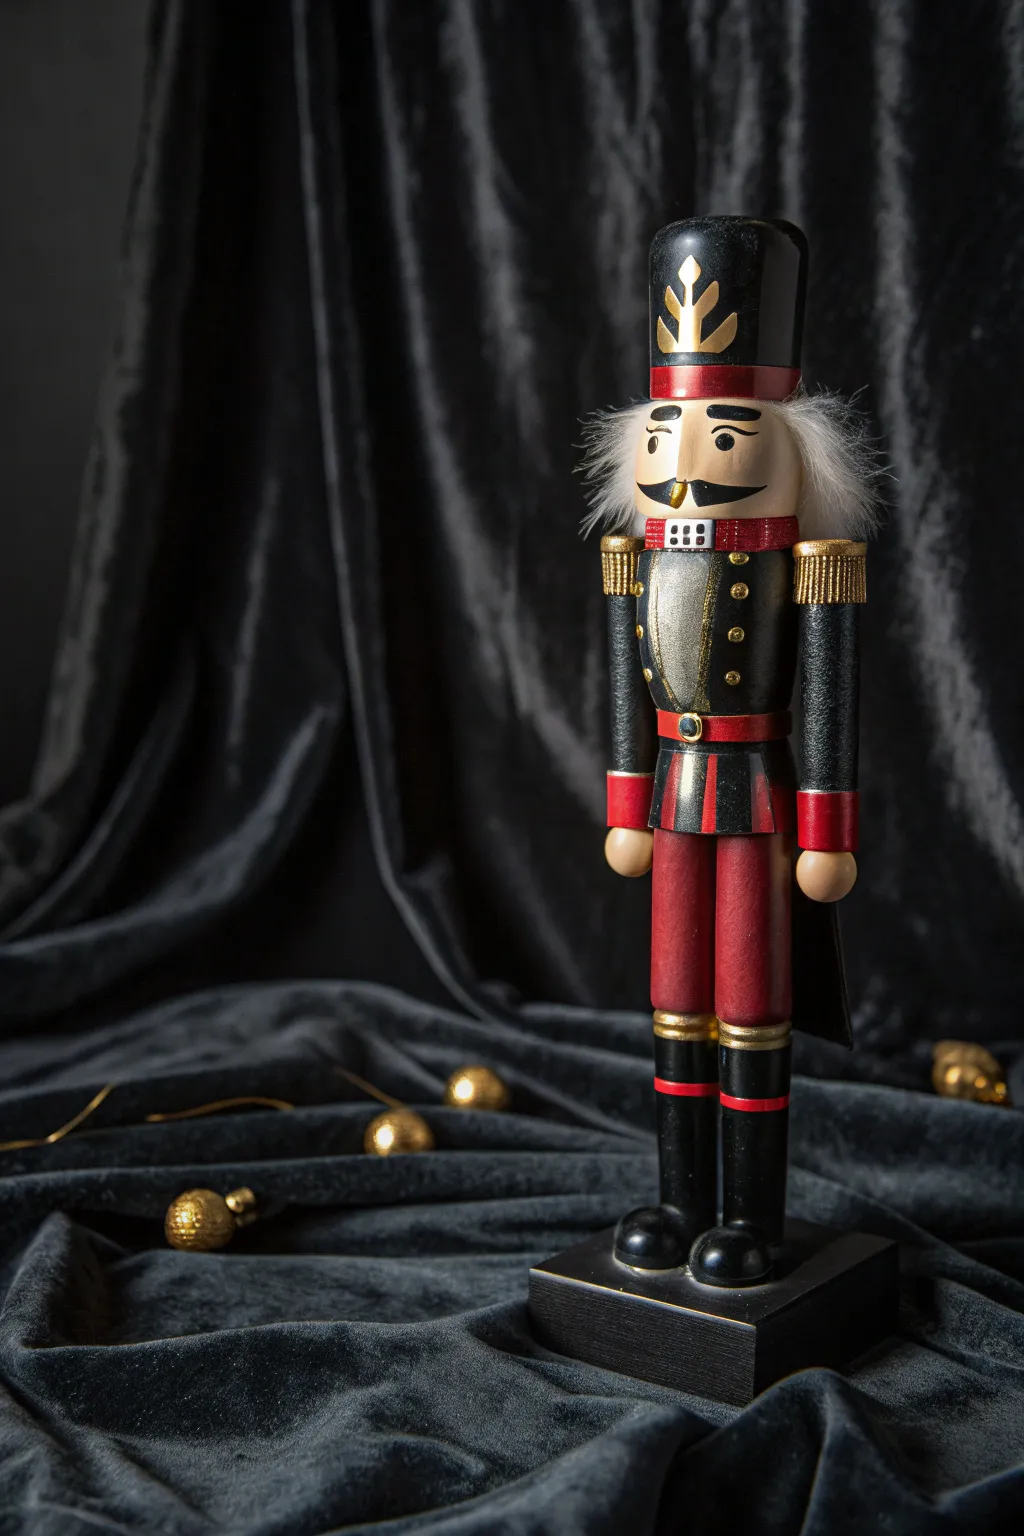
The Classic Royal Guard
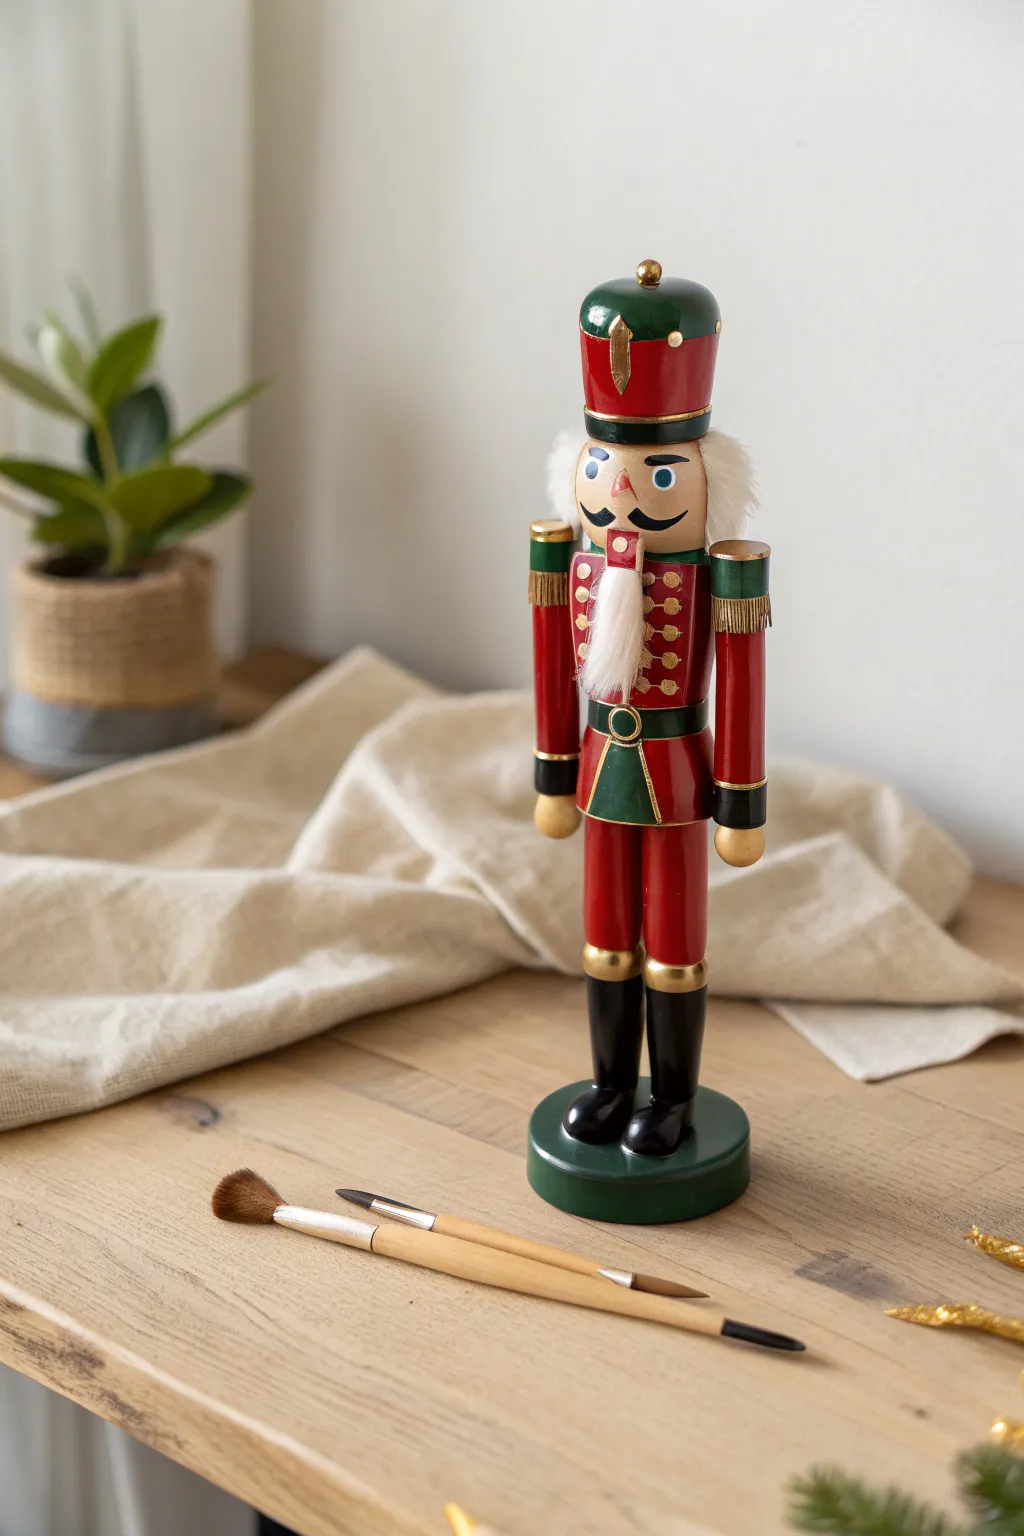
Embrace the timeless holiday spirit with this sophisticated soldier design. His crisp red uniform, hunter green accents, and gilded details make him a standout piece for any festive mantel display.
Step-by-Step Guide
Materials
- Unfinished wooden nutcracker
- Acrylic paints (Crimson Red, Hunter Green, Gloss Black, Metallic Gold, Flesh Tone, White, Blue)
- Fine detail brushes (size 00 or 0)
- Small flat shader brush
- Faux white fur fabric
- Craft glue or hot glue gun
- Fine-grit sandpaper
- pencil
Step 1: Preparation & Face
-
Smooth the Surface:
Lightly sand the wooden figure with fine-grit sandpaper to remove any rough edges or splinters, then wipe away the dust with a damp cloth. -
Base Skin Tone:
Paint the face, nose, and hands with your chosen flesh-tone acrylic paint. -
Eye Details:
Using your smallest brush, paint two clean white ovals for the eyes, then add blue irises and tiny black pupils in the center. -
Facial Hair:
Carefully paint a black handlebar mustache that curls upward at the ends, positioning it just under the nose. -
Rosy Cheeks:
I like to water down a tiny drop of red paint to create a translucent wash, lightly dabbing it onto the cheeks and nose for a natural blush.
Perfect Button Hack
Instead of using bristles, dip the flat back end of your paintbrush handle into the gold paint and stamp it onto the chest. This creates perfectly round, uniform buttons instantly.
Step 2: Painting the Uniform
-
The Red Coat:
Paint the main body of the hat, the torso jacket, and the legs in a bright crimson red. -
Green Accents:
Switch to hunter green to paint the rounded brim of the hat and the shoulder epaulettes. -
Defining the Waist:
Paint the waist area hunter green, creating a triangular shape pointing downward at the center to simulate the uniform’s cut. -
Boots:
Paint the lower legs black to create tall boots, stopping right at the ankle line. -
The Base:
Coat the entire round wooden base in hunter green to anchor the color scheme.
Level Up: Texture
Use gold puffy fabric paint (dimensional paint) for the buttons and belt trim instead of standard acrylic to give the uniform raised, 3D details.
Step 3: Gilded Details & Assembly
-
Golden Hardware:
Use metallic gold paint to color the very top finial of the hat and the round knee joints. -
Trim Work:
Paint thin gold horizontal bands separating the hat from the brim, the red sleeves from the hands, and the top of the black boots. -
Chest Buttons:
Add two vertical rows of three small gold dots on the red chest area to represent brass buttons. -
Shoulder Fringe:
Using your finest brush, paint vertical gold stripes hanging down from the green shoulder epaulettes to mimic fringe. -
Belt Buckle:
Outline the green waist section with thin gold lines and add a gold oval or diamond in the center for the buckle. -
Attaching the Beard:
Cut a small triangular piece of faux white fur and glue it to the chin, ensuring the point hangs down over the chest. -
Adding Hair:
Cut a strip of faux fur long enough to wrap around the back of the head and glue it in place from ear to ear.
Your stoic royal guard is now ready to stand watch over your holiday festivities


Shimmering Winter Wonderland
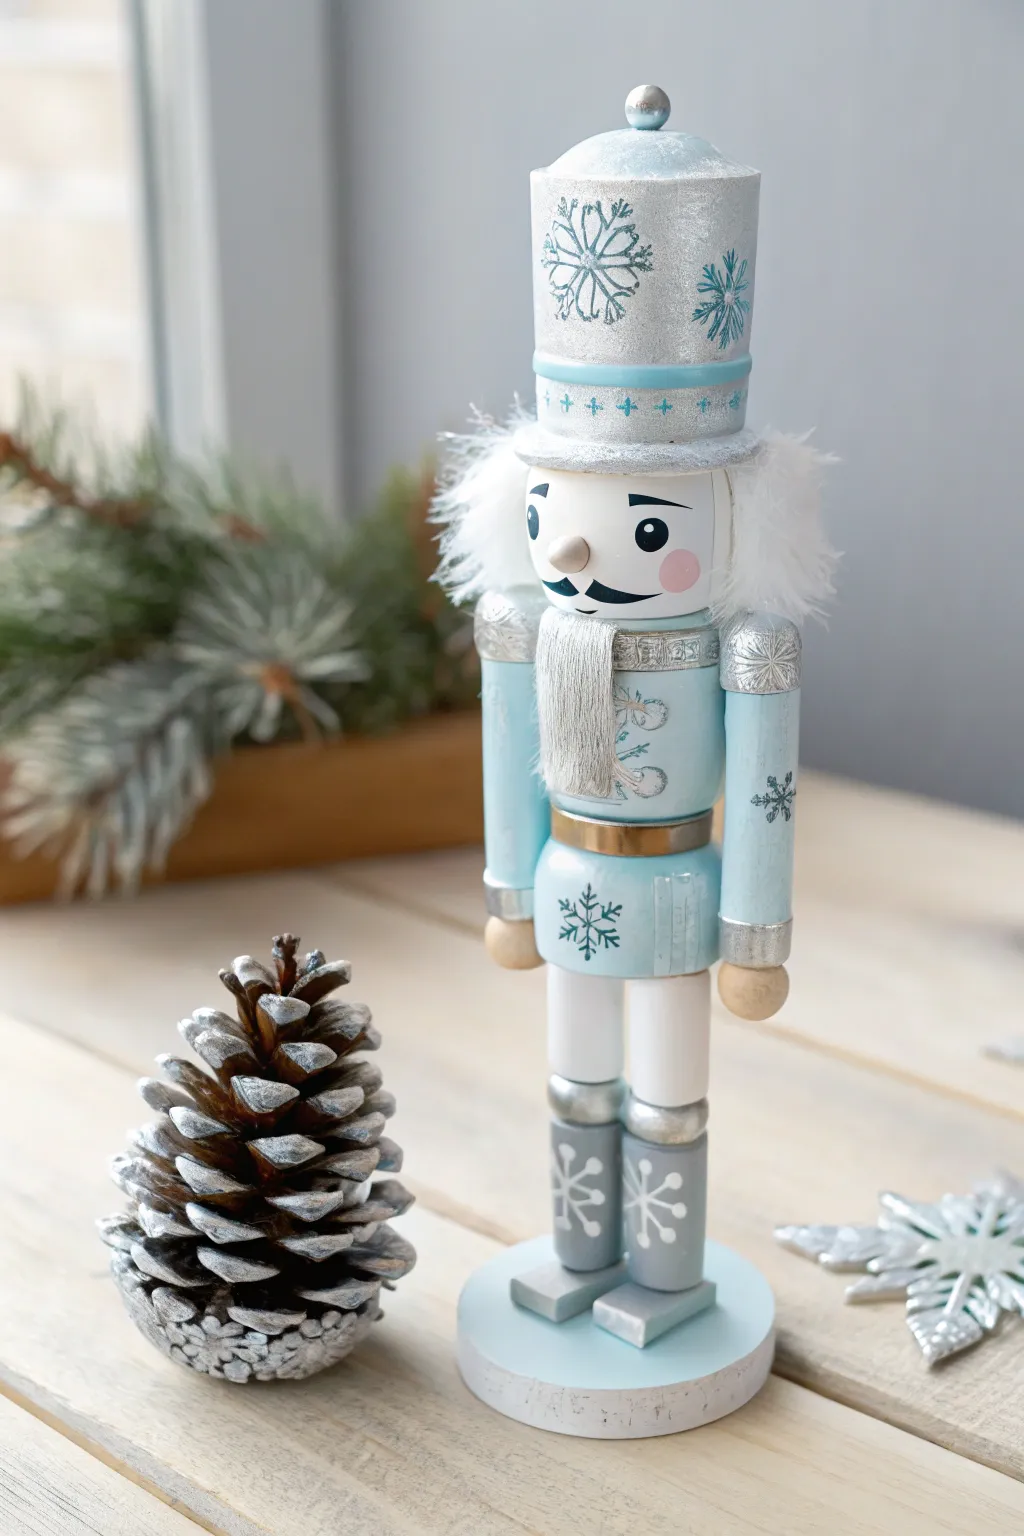
Transform a plain wooden figure into a shimmering winter guardian using a palette of icy blues, metallic silver, and crisp white. This project focuses on delicate snowflake details and soft textures to capture the essence of a frozen wonderland.
How-To Guide
Materials
- Unfinished wooden nutcracker
- Acrylic paints (baby blue, metallic silver, white, black, skin tone, teal)
- Small flat brush
- Fine liner brush (size 0 or 00)
- White faux fur or marabou trim
- Craft glue or hot glue gun
- Small sponge (optional)
- Pencil
- Metallic gold paint (small amount)
Step 1: Setting the Foundation
-
Prepare the surface:
Wipe down your wooden nutcracker with a dry cloth to remove dust. If there are rough patches, lightly sand them smooth. -
Paint the skin:
Using a flat brush, apply a flesh-tone acrylic to the face and hands. You may need two coats for a solid, opaque finish. -
Apply the icy blue base:
Mix your baby blue paint with a tiny drop of white to soften it. Paint the jacket, the pants, and the brim of the hat with this mixture. -
Add silver accents:
Paint the main dome of the hat, the shoulder epaulets, the belt, and the top and bottom cuffs of the boots with metallic silver paint. -
Paint the boot shafts:
For the middle section of the boots, mix a little silver into your grey or blue paint for a slate-colored metallic look, then apply it smoothly between the silver cuffs. -
Detail the belt:
Carefully paint the small rectangular buckle on the waist belt using metallic gold or bronze paint for a subtle contrast.
Troubleshooting: Shaky Lines
Struggling to paint perfect snowflakes with a brush? Allow the base coat to dry completely, then use a fine-tip metallic or white paint pen to draw the designs. It offers much more control.
Step 2: Face and Frosty Details
-
Create rosy cheeks:
Dip a dry brush or a small sponge into pink paint, wipe most of it off on a paper towel, and gently dab circular rosy cheeks onto the face. -
Paint the facial features:
Using your fine liner brush, paint two large white circles for eyes. Once dry, add black circles inside, topped with small white highlight dots. sketch and paint a black handlebar mustache. -
Detail the hat band:
On the blue brim of the hat, use a fine brush dipped in teal or darker blue to paint a horizontal line, then add small cross-stitches along it. -
Add hat snowflakes:
On the silver dome of the hat, use teal paint to create large, intricate snowflakes. I usually start with a simple ‘X’ and add a cross through it, then detail the tips. -
Add jacket snowflakes:
Switch to a darker silver or grey paint to add a large snowflake on the center of the chest and smaller ones on the sides of the jacket. -
Decorate the legs:
Using white or silver paint, carefully draw simple snowflake stars on the thigh area of the pants. -
Detail the boots:
Add white snowflake motifs to the dark grey shafts of the boots to tie the winter theme all the way to the ground.
Pro Tip: Metallic Pop
Silver paint can sometimes be translucent. To make it shine brightly without needing five coats, paint the area light grey first, let it dry, and then apply the silver metallic paint on top.
Step 3: Finishing Touches
-
Attach the hair:
Cut two small strips of white faux fur or marabou trim. Glue them vertically on either side of the head to create the hair. -
Attach the beard:
Cut a small rectangle or U-shape of the faux fur. Glue it directly under the painted chin to form the beard. -
Complete the pedestal:
Paint the top of the wooden base in the same icy blue used for the jacket. Once dry, paint the vertical edge of the base in metallic silver.
Now your nutcracker is ready to stand guard over your holiday display with his sparkling winter attire.


Luxe Metallic Finishes
Transform a standard unfinished nutcracker into a sophisticated holiday statement piece with this monochromatic metallic design. By combining a smooth champagne gold finish with subtle silver glitter accents, you achieve a high-end department store look for a fraction of the price.
Detailed Instructions
Materials
- Unfinished wooden nutcracker
- Metallic spray paint (Champagne Gold or Brass)
- Acrylic craft paint (flesh tone, black, white, red)
- Fine silver glitter
- Mod Podge or white craft glue
- White faux fur trim
- Painter’s tape
- Fine grit sandpaper (220 grit)
- Small flat brush
- Fine detail liner brush
- Hot glue gun
Step 1: Prep and Base Coat
-
Smooth the surface:
Begin by lightly sanding the entire wooden nutcracker with 220-grit sandpaper to remove any rough splinters or fuzz, ensuring the metallic paint will lay down smoothly. -
Remove hardware:
If your nutcracker has a lever on the back or faux hair already attached, remove these elements carefully if possible; otherwise, protect the hair with plastic wrap. -
Mask key areas:
Tear off small pieces of painter’s tape and carefully cover the round face area and the hands. This keeps the wood raw for the flesh-tone paint later. -
Apply the gold base:
In a well-ventilated area, spray the entire nutcracker with your metallic gold paint. Hold the can 10 inches away and use short, sweeping bursts. -
Maximize coverage:
Apply a second light coat of spray paint after roughly 15 minutes. Using multiple thin coats prevents drips and creates that factory-finish look. -
Reveal the wood:
Once the gold paint is fully dry to the touch (usually about an hour), gently peel away the painter’s tape from the face and hands.
Step 2: Painting Details
-
Paint skin tones:
Using a small flat brush, carefully paint the face and hands with your chosen flesh-toned acrylic paint. I usually apply two coats to get a solid, opaque color. -
Define the belt:
Switch to black acrylic paint and a steady hand to fill in the belt area around the waist. Keep the lines crisp where the black meets the gold. -
Prep the chest piece:
Paint the oval ‘bib’ or shield area on the chest with a coat of white acrylic paint. This acts as a bright base for the glitter to pop. -
Add the sparkle:
Brush a thick layer of Mod Podge or craft glue over the white chest area you just painted. -
Apply glitter:
While the glue is wet, generously sprinkle fine silver glitter over the chest. Tap the nutcracker gently to knock off excess sparkles. -
Seal the glitter:
Once the glitter is dry, lightly dab a thin layer of Mod Podge over the top to seal it in so it doesn’t shed on your mantle.
Clean Lines Secret
For ultra-crisp separation between the gold and the painted details, use a metallic gold paint pen to trace over any spots where your brush might have slipped.
Step 3: Face and Finishing Touches
-
Draft the face:
If you are nervous about freehanding, lightly sketch the eyes and mustache placement with a pencil. -
Paint the eyes:
Use a detail brush to paint two large white ovals for the eyes. Once dry, add the colored iris and a black pupil. -
Add character details:
Using your finest liner brush and black paint, create the signature handlebar mustache, eyebrows, and a small line for the nose. -
Add the lips:
Paint a small red mouth just below the mustache. A simple horizontal oval often works best for these classic figures. -
Prepare the hair:
Cut your white faux fur into two small strips for the sideburns/hair and one triangular piece for the beard. -
Attach the fur:
Using a hot glue gun, attach the fur pieces to the sides of the head and the chin. Fluff the fur with your fingers to blend the edges.
Troubleshooting: Sticky Tape
If the painter’s tape peeled up some wood grain, smooth it with a dab of wood filler and spot-paint with skin tone before continuing with the face.
Set your golden guardian by the entryway or fireplace to add a touch of regal elegance to your holiday decor


Whimsical Candyland Pastels
Transform a traditional unfinished wooden figure into a sugary sweet character straight out of a candy kingdom. This project uses soft pastel acrylics and playful patterns to create a whimsical holiday decoration.
How-To Guide
Materials
- Unfinished wooden nutcracker
- Acrylic paints: pastel pink, mint green, white, beige/skin tone, black, metallic gold
- Gesso or white primer
- Synthetic paint brushes (size 4 flat, size 0 liner)
- Wooden disk and thin dowel (for lollipop)
- White faux fur trim
- Hot glue gun and glue sticks
- Gold adhesive gems or half-pearls
- Pencil
- Matte sealant spray
Step 1: Preparation & Base Colors
-
Prime the surface:
Lightly sand any rough spots on the wood, then coat the entire figure with white gesso. This step is crucial so your pastel colors appear bright and opaque rather than soaking into the wood. -
Block in the jacket:
Paint the torso jacket area in mint green. You may need two coats for a smooth, solid finish, letting the paint dry fully between layers. -
Paint limbs and skin:
Use your pastel pink to paint the sleeves, the upper thigh area, and the round base stand. Use a beige or skin-tone mix for the face and hands. -
Color the crown:
Paint the main cylinder of the hat mint green. Paint the rounded ball fixture on top of the crown in pink.
Step 2: Pattern Work
-
Sketch the stripes:
Using a pencil, lightly draw horizontal lines on the lower legs and diagonal lines on the waist (skirt) area to guide your painting. -
Paint leg stripes:
Alternating between white and pastel pink, paint the horizontal stripes on the lower legs to resemble candy canes. -
Detail the skirt:
Paint the diagonal sections of the skirt area in alternating white and mint green. I find a flat angled brush helps stay inside the lines here. -
Add pink accents:
Paint the cuffs of the sleeves and the belt area around the waist with pastel pink. Add small white polka dots to the belt once the pink is dry.
Pro Tip
When cutting faux fur, turn it over and use a craft knife to cut only the fabric backing. This prevents you from shearing off the long fluffy ends of the fur.
Step 3: Face & Fine Details
-
Paint facial features:
With your finest liner brush, paint oval blue eyes with black pupils. Add a small black handlebar mustache and thick black eyebrows. -
Add rosy cheeks:
Mix a little water into your pink paint to create a translucent glaze, then dab two round circles on the cheeks for a flushed look. -
Decorate the jacket:
Glue small gold gems down the center of the mint jacket to simulate buttons. Alternatively, you can paint these on with metallic gold paint. -
Embellish the crown:
Paint pink geometric triangles or scallops around the top rim of the crown. Add gold dots or small stick-on gems to the points of the crown design.
Level Up
Coat the lollipop swirl and the ball on top of the hat with a layer of clear glitter paint or Mod Podge sprinkled with fine iridescent glitter for a sugary texture.
Step 4: Accessories & Assembly
-
Create the lollipop:
Paint a white spiral on your wooden disk. Fill the gaps between the spiral with mint and pink to create a swirl candy effect. Allow it to dry. -
Construct the accessory:
Paint the thin dowel stick beige or white, then hot glue it to the back of the painted candy disk. -
Attach the hair:
Cut small strips of white faux fur. Glue a triangular piece to the chin for a beard and two strips around the sides of the head for hair. -
Final assembly:
Glue the lollipop stick securely into the nutcracker’s hand. Finish the project with a light mist of matte sealant to protect your work.
Now you have a charming, candy-colored guardian ready to sweeten up your holiday display.
BRUSH GUIDE
The Right Brush for Every Stroke
From clean lines to bold texture — master brush choice, stroke control, and essential techniques.
Explore the Full Guide
Mastering the Facial Details
This charming project balances natural wood grain with soft teal acrylics and crisp facial details for a modern heirloom look. By leaving the face unpainted, you let the warmth of the wood serve as a natural skin tone.
Step-by-Step Guide
Materials
- Unfinished wooden nutcracker cylinder
- Acrylic paints: Light Teal, Deep Red, White, Mars Black, Metallic Gold, Navy Blue
- Fine detail brushes (Line size 00 or 10/0)
- Small flat shader brush (Size 4)
- Pencil with eraser
- White faux fur trim
- Strong craft glue
- Palette or paper plate
Step 1: Planning and Base Coats
-
Smooth the Surface:
Before opening your paints, run a fine-grit sandpaper over the wooden figure to remove any splinters or rough patches, focusing on the face area. -
Sketch the Design:
Use a pencil to lightly sketch the facial features, the line where the coat meets the pants, and the scarf position directly onto the wood. -
Paint the Jacket:
Load your flat shader brush with Light Teal and paint the main body of the jacket, being careful to cut a clean line around the collar area. -
Add the Collar:
Rinse your brush thoroughly and apply a band of Deep Red around the neck area for the collar. -
Create the Scarf Base:
Using white paint, block in the long, draping shape of the scarf over the dried teal jacket paint.
Step 2: Facial Features
-
Eye Whites:
Using your smallest detail brush, carefully fill in the almond shapes of the eyes with white paint. -
Iris and Pupil:
Once the white is dry, paint a navy blue circle in the center, followed by a smaller black pupil in the middle of that. -
Lash Definition:
With a 00 liner brush and slightly watered-down black paint, sweep on the eyelashes and thick, expressive eyebrows. -
The Sparkle:
Dip the tip of a toothpick or brush handle into white paint and add a tiny dot to the upper right corner of each pupil to bring him to life. -
Mustache and Nose:
Paint the small wooden nose bead white. Then, using black paint, carefully stroke outward from the center to create the sweeping handlebar mustache. -
Rosy Cheeks:
Mix a tiny drop of red with water to create a translucent wash. I prefer to dab this on with a dry brush to create a soft, blushing effect on the cheeks rather than a solid circles.
Anchor Your Hand
For steady lines on the scarf and lashes, rest your pinky finger on the dry part of the nutcracker’s head to stabilize your painting hand.
Step 3: Details and Assembly
-
Scarf Fringe:
Return to the now-dry white scarf. Use your liner brush and watered-down light brown or diluted black to paint thin, vertical lines to mimic fringe texture. -
Jacket Buttons:
Dip the handle end of a brush into Metallic Gold paint and stamp three evenly spaced dots down the front of the teal jacket. -
Arm Cuffs:
Paint small white rectangles at the end of the painted arms, adding vertical teal stripes once dried to distinguish the cuffs. -
Hat Pattern:
On the natural wood hat section, paint a row of teal triangles pointing upward to create a geometric crown effect. -
Applying the Hair:
Cut small strips of white faux fur and glue them to the sides of the head near the ears, pressing firmly until the glue sets.
Make it 3D
Instead of painting the gold buttons, glue on tiny real brass brads or beads for extra texture and dimension on his coat.
Display your handsome soldier on the mantel along with some greenery for a festive touch.
Scandi Style with Raw Wood Accents
Transform a traditional unfinished nutcracker into a sophisticated piece of modern holiday decor with this minimalist approach. Using a warm monochromatic palette and subtle gold detailing creates a clean, serene look that perfectly complements Scandinavian styling.
Step-by-Step Tutorial
Materials
- Unfinished wooden nutcracker
- 220-grit sandpaper
- Tack cloth or damp rag
- White or clear wood primer
- Cream or warm white chalk paint
- Dark brown acrylic paint
- Metallic gold acrylic paint
- Sky blue acrylic paint (tiny amount for eyes)
- Medium flat synthetic brush
- Small round detail brush (size 0 or 1)
- Matte spray sealer
Step 1: Preparation & Priming
-
Smooth the Surface:
Begin by lightly sanding the entire unfinished nutcracker with 220-grit sandpaper to remove any rough splinters or fuzz, paying special attention to the nose and hands. -
Clean Up Dust:
Wipe away all the sanding dust thoroughly using a tack cloth or a slightly damp rag to ensure a clean painting surface. -
Apply Primer:
Brush a thin, even coat of wood primer over the entire figure; this prevents the raw wood from soaking up your paint and ensures true color. -
Let it Set:
Allow the primer to dry completely according to the manufacturer’s instructions before moving on to the color.
Smooth Operator
Water down your chalk paint very slightly for the first coat. Thinner paint seeps into the wood carvings better and reduces the risk of clumping in the beard texture.
Step 2: The Monochromatic Base
-
First Cream Coat:
Load your medium flat brush with the cream chalk paint and apply the first coat to the entire nutcracker, including the hat, hair, uniform, and boots. -
Get into Crevices:
Use the tip of your brush to push paint into the deep grooves of the beard, hair, and teeth, ensuring no raw wood shows through. -
Dry and Assess:
Let this first coat dry fully; chalk paint dries quickly, but patience here prevents dragging the paint. -
Sanding Between Coats:
I like to give the surface a very gentle quick rub with the sandpaper again at this stage to remove any brush marks for a porcelain-like finish. -
Second Cream Coat:
Apply a second coat of cream paint to ensure solid, opaque coverage, smoothing out any drips as you go. -
Base Touch-ups:
Don’t forget to paint the underside of the stand area so it looks finished from every angle.
Step 3: Fine Details
-
Outline the Eyes:
Switch to your smallest detail brush and carefully paint the whites of the eyes using a stark white (or just use the base color if it’s light enough), then add the blue irises. -
Pupils and Highlights:
Add tiny black dots for pupils and a microscopic white speck in each pupil to bring the face to life. -
Facial Hair:
Using the dark brown acrylic and a steady hand, paint the mustache and eyebrows, following the sculpted lines of the wood. -
Gold Accents:
dip your small brush into metallic gold paint and carefully color the belt buckle. -
Chest Details:
Paint the decorative chains across the chest in gold. If your nutcracker has raised ‘buttons’ or beads like the one in the photo, highlight the tops of them with gold or a pearlescent shade. -
Shoulder Trim:
Add very subtle gold lines to the edges of the epaulets (shoulder pads) if you want a hint more glitz, or keep them cream for a flatter look. -
Final Inspection:
Look over the piece for any stray brown or gold marks and clean them up with your cream base color.
Level Up
Instead of just painting the chest details, glue on actual tiny pearl beads or small gold jewelry chain links to create 3D texture that mimics the reference photo perfectly.
Step 4: Protection
-
Seal the Work:
Once all paint is perfectly dry, take the nutcracker to a well-ventilated area. -
Apply Varnish:
Spray a light, even coat of matte sealer over the entire project to protect the finish without adding unwanted shine.
Place your finished nutcracker on a mantle or bookshelf to enjoy its calm, architectural beauty.

PENCIL GUIDE
Understanding Pencil Grades from H to B
From first sketch to finished drawing — learn pencil grades, line control, and shading techniques.
Explore the Full Guide
Glitter and Texture Overlays

Transform a plain wooden figure into a festive keepsake featuring a dazzling textured finish. This project combines traditional acrylic painting with a dense glitter overlay technique to create a uniform that catches the holiday light perfectly.
Step-by-Step Guide
Materials
- Unfinished wooden nutcracker
- Acrylic paints (bright red, skin tone, black, white, metallic gold)
- Fine red loose glitter
- Gloss glaze or decoupage medium (like Mod Podge)
- Flat shader brush
- Fine detail liner brush
- White faux fur or craft hair
- Craft glue or hot glue gun
- Fine grit sandpaper
Step 1: Preparation and Base Colors
-
Smooth the surface:
Begin by lightly sanding the entire wooden nutcracker with fine-grit sandpaper to potential rough spots, then wipe it clean with a dry cloth. -
Paint the skin:
Using a small flat brush, apply a flesh-toned acrylic paint to the face and hands; you may need two coats for a smooth, opaque finish. -
Apply the red base:
Paint the hat cylinder, jacket torso, and pant legs with a coat of bright red acrylic paint to create a solid background for the glitter. -
Paint the boots:
While the red dries, paint the shin and foot area of the boots with a deep red or burgundy shade, keeping the finish matte for now. -
Seal the red areas:
Allow the red base coat to dry completely for at least 30 minutes before moving on to the texture phase.
Step 2: Creating the Glitter Overlay
-
Mix the texture medium:
In a small disposable cup, mix equal parts clear gloss glaze (or decoupage medium) with fine red loose glitter until you have a thick, sparkling paste. -
Apply to the hat:
Brush this glitter mixture onto the red section of the hat, ensuring an even layer without big clumps. -
Coat the jacket:
Continue carefully applying the glitter paste to the jacket area, stopping neatly at the waistline. -
Finish the pants:
Apply the final bit of red glitter mix to the legs, then let the figure stand undisturbed until the milky glaze creates a clear, hard, sparkly finish.
Glitter Sealant
To prevent glitter from shedding over time, dab a final thin coat of clear gloss varnish over the glittered areas once they are fully cured.
Step 3: Detailing the Uniform
-
Paint gold accents:
Using metallic gold paint, carefully fill in the hat brim, the shoulder epaulets, and the cuff bands on the sleeves. -
Add the belt:
Paint a thin black strip around the waist to define the separation between the jacket and pants. -
Add hat details:
Paint a thin black band just above the gold brim of the hat and add small gold dots for decoration. -
Create buttons:
Dip the back end of a paintbrush into gold paint and stamp three small dots vertically down the center of the jacket for buttons. -
Detail the boots:
Switch to your finest liner brush and paint white crisscross laces or zig-zag patterns on the front of the boots.
Style Upgrade
For a more antique look, mix a tiny drop of brown paint into your gold metallic color to give the buttons and hat brim an aged, vintage brass appearance.
Step 4: Face and Finishing Touches
-
Paint the eyes:
Paint two white ovals for eyes, then add black pupils and simple arched eyebrows once the white is dry. -
Add the mustache:
Paint a classic black handlebar mustache curving upwards under the nose detail. -
Attach the hair:
Cut two small tufts of white faux fur or craft hair and glue them to the sides of the head. -
Attach the beard:
Glue a triangular piece of the white faux hair to the chin area. -
Final Assembly:
If your nutcracker was detached from its base, glue the feet securely to the center of the wooden stand.
Place your sparkling soldier on the mantelpiece and enjoy the festive texture you’ve created.
Deep Jewel Tone Elegance
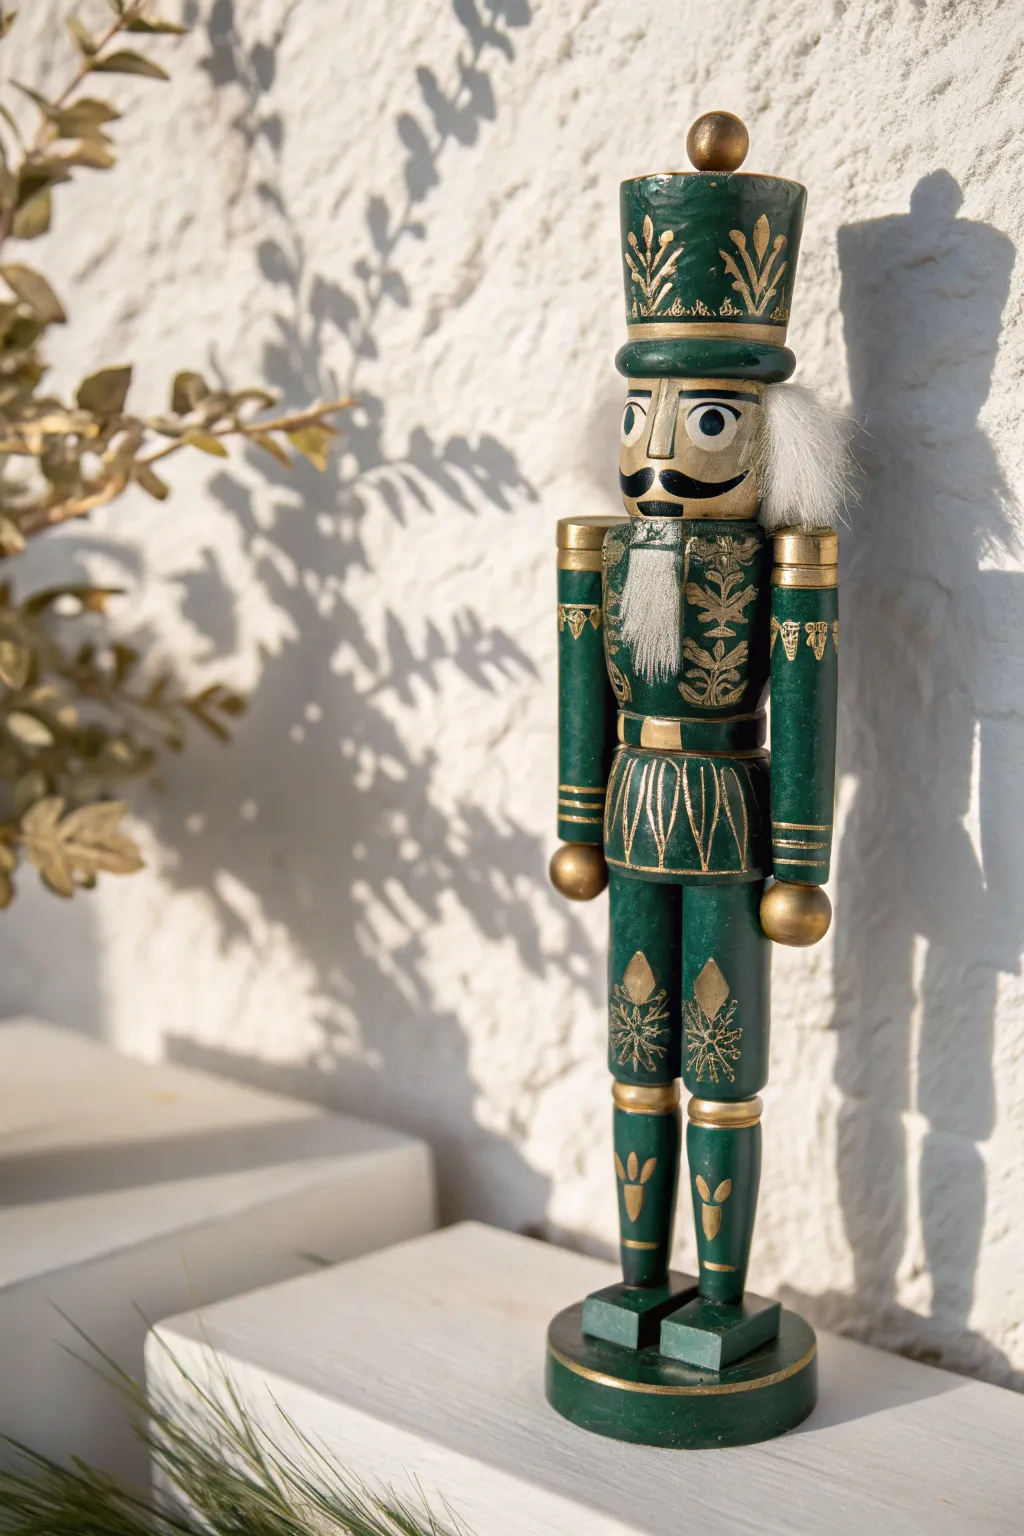
Transform a plain wooden figure into a regal holiday decoration using a sophisticated palette of deep forest green and shimmering gold. This project relies on steady brushwork to create elegant botanical motifs that pop against the dark jewel-tone background.
Step-by-Step Tutorial
Materials
- Unfinished wooden nutcracker
- Deep emerald green acrylic paint
- Metallic gold acrylic paint
- Skin-tone, black, and white acrylic paint
- Fine detail brushes (sizes 0/00)
- Small flat shader brush
- White faux fur strip
- Craft glue
- Pencil and sandpaper
Step 1: Preparation & Base Colors
-
Smooth the surface:
Before opening your paint, give the wooden nutcracker a quick sanding with fine-grit sandpaper to remove any splinters, then wipe it clean with a tack cloth. -
Map the design:
Lightly sketch lines with a pencil to mark where the shirt cuffs end and hands begin, as well as the hairline and face area. -
Paint skin areas:
Using a skin-tone acrylic, paint the face and hands. Apply two thin coats for opaque coverage, letting the first dry completely before adding the second. -
Apply the emerald base:
Using a flat shader brush, paint the hat, jacket, arms, pants, and boots in deep emerald green. I suggest two or three layers here to get that rich, dark jewel tone. -
Paint the stand:
Don’t forget the base! Paint the top and sides of the wooden stand in the same emerald green to match the uniform.
Corrections
Shaky hands with the fine details? Use a metallic gold paint marker or pen instead of a brush for the intricate leaf patterns—it offers much more control.
Step 2: Facial Features
-
Draft the face:
Lightly sketch large almond-shaped eyes, eyebrows, and a curled handlebar mustache onto the skin-colored face with a pencil. -
Paint the eyes:
Fill in the eye shapes with white paint. Once dry, add a large colored iris (blue or brown) and a black pupil in the center, finishing with a tiny white highlight dot. -
Add character details:
Using your finest liner brush and black paint, carefully fill in the bushy eyebrows and the curled mustache. Add a thin line of eyeliner above the eyes for definition.
Level Up
Apply a coat of gloss varnish over the green painted areas (avoiding the face and fur) to make the nutcracker look like glazed ceramic.
Step 3: Gilded Details
-
Block in solid gold:
Switch to metallic gold paint. Color the sphere on top of the hat, the round connectors at the shoulders, the waist belt, the knee bands, and the spheres on the stand lever. -
Create hat flourishes:
On the green hat tall, use a liner brush to paint vertical stylized wheat or fern sprigs in gold. Space them evenly around the circumference. -
Decorate the jacket:
Paint symmetrical leafy patterns on the chest area of the jacket. It helps to start from the center line and paint mirrored leaves outward toward the arms. -
Detail the uniform skirt:
Paint vertical curved lines on the ‘skirt’ area around the hips to simulate pleated fabric or armor tassets. -
Adorn the legs:
On the shin area, paint a simple diamond shape with small bursts or floral star shapes inside to maintain the elegant botanical theme. -
Finish the boots:
Add small gold leaf accents to the tops of the boots and paint a thin gold stripe around the edge of the circular base stand.
Step 4: Final Assembly
-
Prepare the hair:
Cut a small rectangle of white faux fur for the beard and a longer strip for the hair. Check the fit against the nutcracker before gluing. -
Attach the beard:
Apply a dab of craft glue to the chin area and press the beard piece firmly in place, ensuring it sits right under the painted mouth lever. -
Attach the hair:
Glue the longer strip of fur around the back of the head, styling it so it naturally flows out from under the hat rim.
Place your elegant creation on the mantle and enjoy the classic charm it brings to your holiday decor


Antique Glazing for an Aged Look
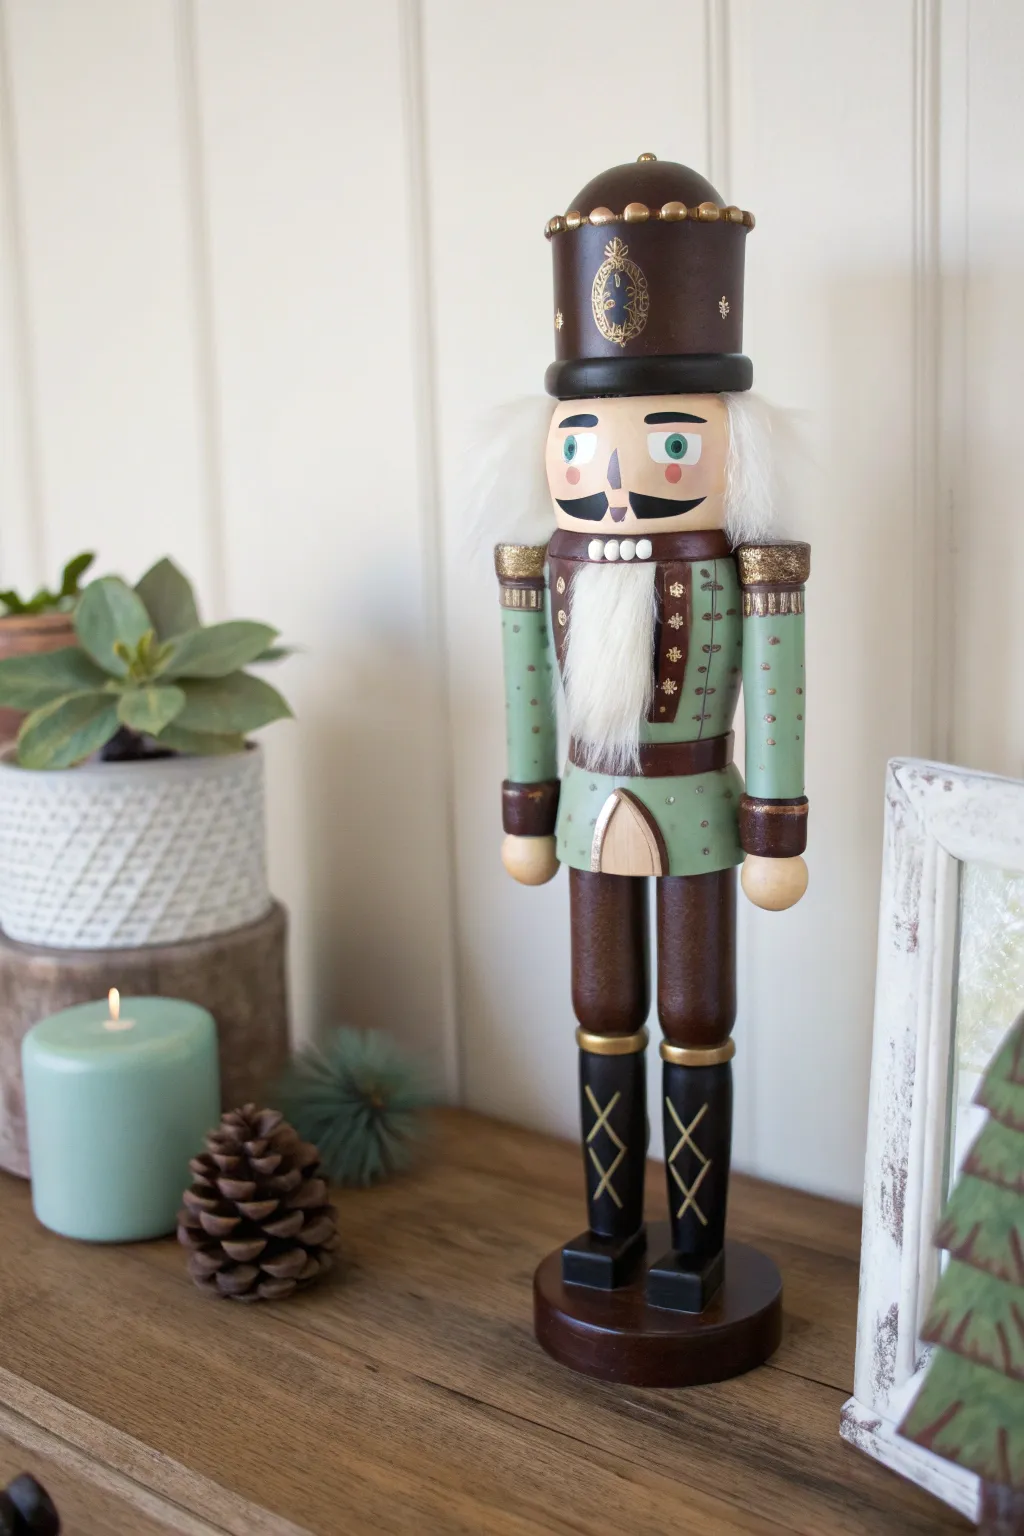
Transform a plain wooden blank into a sophisticated, time-worn holiday treasure using a simple glazing technique. This project combines a muted sage and chocolate palette with metallic accents for a look that feels genuinely vintage.
Step-by-Step Tutorial
Materials
- Unfinished wooden nutcracker
- Acrylic paints: Sage green, dark chocolate brown, black, skin tone, metallic gold
- Glazing medium (or water)
- Flat shader brushes (medium and small)
- Fine liner brush (for details)
- White faux fur trim
- Hot glue gun
- Paper towels
- Sandpaper (fine grit)
Step 1: Base Blocking
-
Prepare the surface:
Give the unfinished wood a quick sanding with fine-grit sandpaper to remove any rough splinters, then wipe it clean with a dry cloth. -
Paint the dark wood tones:
Using a medium flat brush, apply the dark chocolate brown paint to the hat, the legs (pants), the belt area, and the round base. You may need two coats for full opacity. -
Apply the jacket color:
Carefully paint the torso and arm sections with sage green acrylic. I prefer using a smaller flat brush here to keep the lines crisp against the brown belt and pants. -
Block in skin and boots:
Paint the face and hands with your chosen skin tone, then paint the boots solid black, ensuring you cover the bottom edges of the feet.
Step 2: Detailed Features
-
Paint the face details:
With a fine liner brush, paint two white ovals for the eyes. Once dry, add colored irises and black pupils, then carefully paint a curling black mustache and thick eyebrows. -
Add gold trims:
Use the metallic gold paint to color the brim of the hat, the shoulder epaulets, and the cuffs at the wrists. -
Create the jacket pattern:
Dip the tip of a small round brush or a toothpick into the gold paint and create a pattern of small dots down the front of the green jacket and along the sleeves. -
Detail the boots:
Using your liner brush and gold paint, draw crisscross ‘X’ laces on the front of the black boots, adding a horizontal line at the top to define the boot cuff. -
Embellish the hat:
Paint a freehand decorative emblem or shield shape on the center front of the hat using gold paint to mimic an insignia.
Glazing Works Best Fast
Work in small sections when glazing (e.g., just one arm at a time). If the paint dries before you wipe it back, you’ll be left with streaks rather than a soft, aged patina.
Step 3: Antiquing Glaze
-
Mix the glaze:
Create a glazing wash by mixing a pea-sized amount of the dark brown paint with a generous amount of glazing medium or water until it is the consistency of ink. -
Apply the wash:
Working in sections, brush this translucent brown mixture over the painted green jacket and the gold details. -
Wipe back:
Immediately use a paper towel to gently wipe away the wet glaze. The brown will stay in the crevices and corners, instantly aging the piece. -
Antique the gold:
Lightly dab the glaze over the bright gold areas on the hat and boots, then wipe it back to dull the shine and give it a burnished brass look.
Level Up: Texture
Before painting the gold rim on the hat, glue on small beads or dried lentils. Paint them gold along with the rim to simulate riveted metal texture.
Step 4: Finishing
-
Seal the paint:
Once the glaze is completely dry, apply a coat of matte varnish over the entire nutcracker to protect the finish and unify the sheen. -
Attach the hair:
Cut a strip of white faux fur to wrap around the back of the head and glue it in place slightly under the hat rim. -
Add the beard:
Cut a tapered triangle of faux fur for the beard and hot glue it directly under the painted mouth area.
Place your finished nutcracker on a mantel or among greenery to enjoy the classic charm of your handiwork
Preppy Plaid and Tartan Uniforms
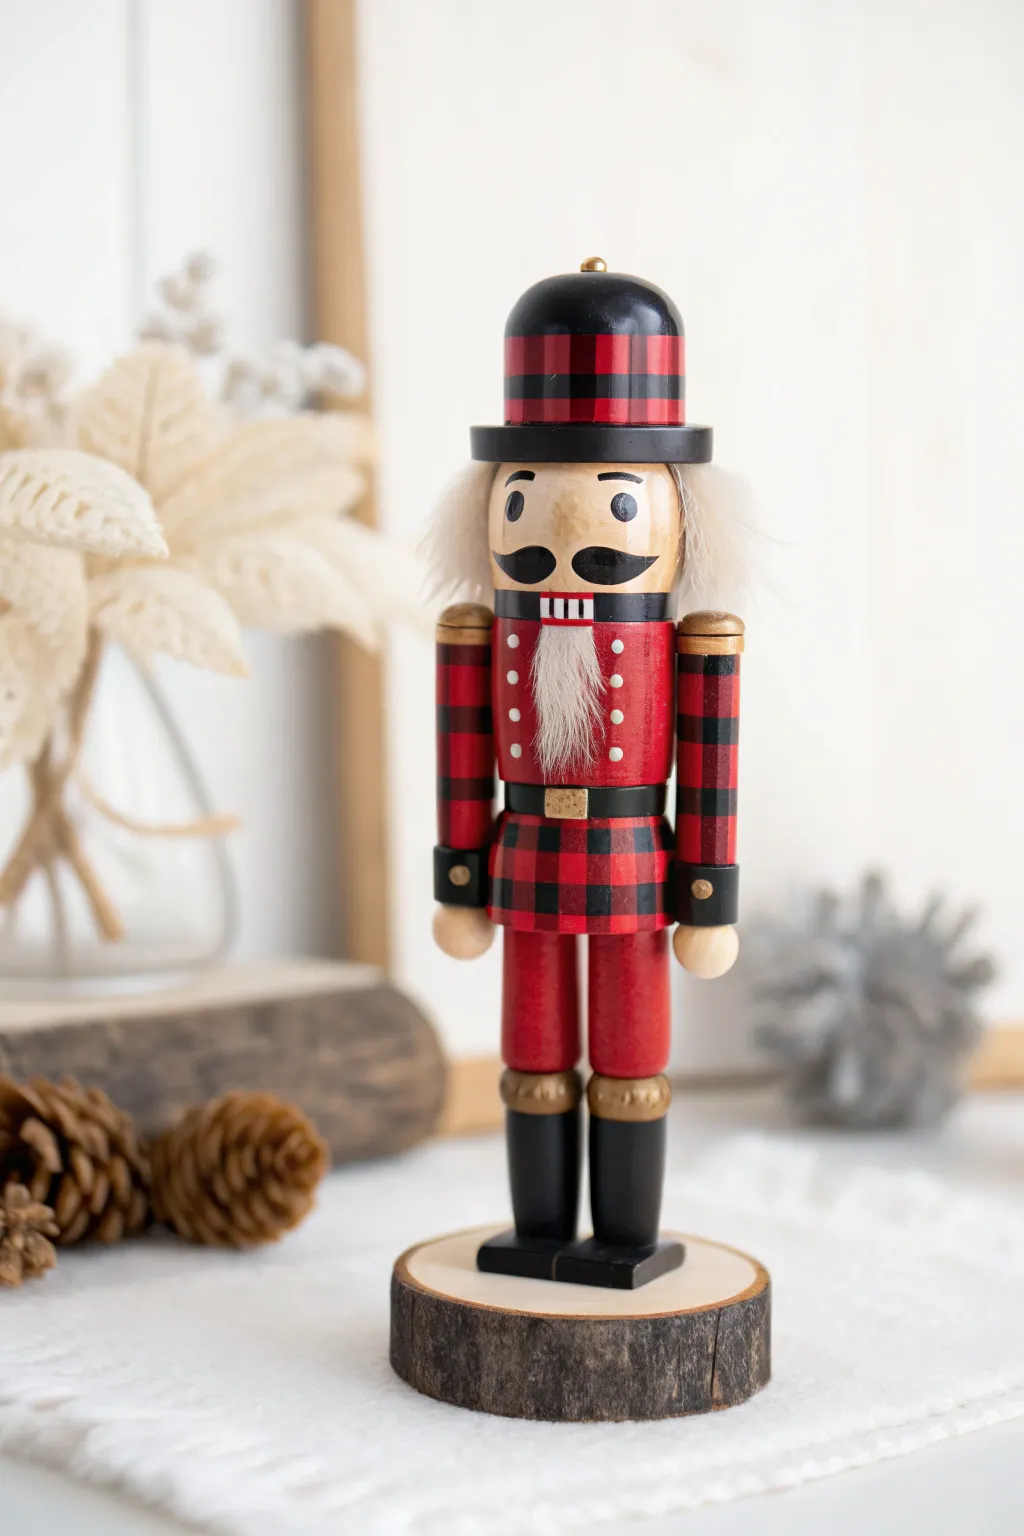
Bring a touch of cozy cabin charm to your holiday decor with this lumberjack-inspired design featuring a bold buffalo check unform. This modern farmhouse twist on the traditional soldier combines crisp plaid patterns with natural wood textures for a warm, festive look.
Step-by-Step Guide
Materials
- Unfinished wooden nutcracker
- Natural wood slice (with bark edge)
- Acrylic paints: Bright Red, Lamp Black, Titanium White, Metallic Gold, Flesh Tone
- Small flat shader brush (approx. 1/4 inch)
- Fine liner detail brush
- Small dotting tool or toothpick
- White craft fur or yarn
- Hot glue gun and glue sticks
- Sandpaper (fine grit)
Step 1: Base Coating
-
Prepare the surface:
Start by lightly sanding the wooden nutcracker to remove any rough splinters, then wipe it down with a damp cloth to ensure a smooth painting surface. -
Paint skin areas:
Using a small brush, apply flesh-toned paint to the face area and allow this to dry completely before moving to the darker colors. -
Apply the red base:
Paint the jacket, the ‘skirt’ hip section, and the band around the hat in bright red. These areas will become your plaid pattern later. -
Paint the pants:
Coat the legs in the same bright red, ensuring a solid, opaque coverage as these will remain solid and not be checkered. -
Block in black areas:
Carefully paint the boots, the belt, and the main body of the hat (brim and top dome) with black acrylic paint. -
Detail the hands:
Paint the hands and wrist cuffs black to simulate gloves, keeping the edges crisp where they meet the red sleeves.
Step 2: Creating the Buffalo Plaid
-
Vertical jacket stripes:
Using your flat shader brush, paint evenly spaced vertical black stripes down the front of the red jacket. Loading the brush well helps create a smooth stroke in one pass. -
Horizontal jacket stripes:
Paint horizontal black stripes across the jacket to create a grid pattern. Where the black lines cross, the color will naturally be darker, mimicking woven fabric. -
Pattern the hips:
Continue this same grid technique on the skirt/hip section of the nutcracker so it matches the jacket uniform. -
Check the hat band:
Switch to a slightly smaller brush if necessary and replicate the red and black grid pattern on the hat’s band.
Pro Tip: Perfect Plaid
To get consistent square sizes without measuring, choose a flat brush that is exactly the width you want your stripes to be. Simply drag the brush width, skip one width, and repeat.
Step 3: Details and Gold Accents
-
Add metallic touches:
Use metallic gold paint to color the cuffs at the top of the boots and the small square belt buckle. -
Gold shoulder details:
Add small dabs of gold to the shoulders to create epaulets, and a thin line of gold separating the hat brim from the plaid band. -
Button details:
Dip a dotting tool or the decorative end of a paintbrush into white paint and stamp a vertical row of small dots down the center of the jacket. -
Paint the face:
Using your finest liner brush, paint two black circles for eyes, adding a tiny white speck in each for a ‘glint’ of life. -
Facial hair:
Paint a swooping black handlebar mustache and thick eyebrows. I like to keep the shapes simple and bold for a classic toy look. -
The mouth:
Paint a small white rectangle for the teeth, then use your liner brush or a fine tip black marker to draw vertical lines to define the individual teeth.
Troubleshooting: Wobbly Lines
If your grid lines look uneven, don’t worry! Buffalo plaid is meant to look rustic. You can neaten edges with a touch of red paint, but slight imperfections actually add to the flannel fabric effect.
Step 4: Assembly and Finishing
-
Attach the hair:
Cut a small strip of white craft fur and hot glue it around the back of the head, tucked just under the hat brim. -
Attach the beard:
Cut a small V-shape of faux fur and glue it directly under the painted mouth to create the beard. -
Prepare the base:
Take your natural wood slice and ensure the top surface is clean and dust-free. -
Final assembly:
Apply a generous amount of hot glue to the bottom of the nutcracker’s boots and firmly press him onto the center of the wood slice.
Place your finished woodsman on a mantle or shelf to enjoy that warm, handcrafted holiday aesthetic
Incorporating Faux Fur Elements
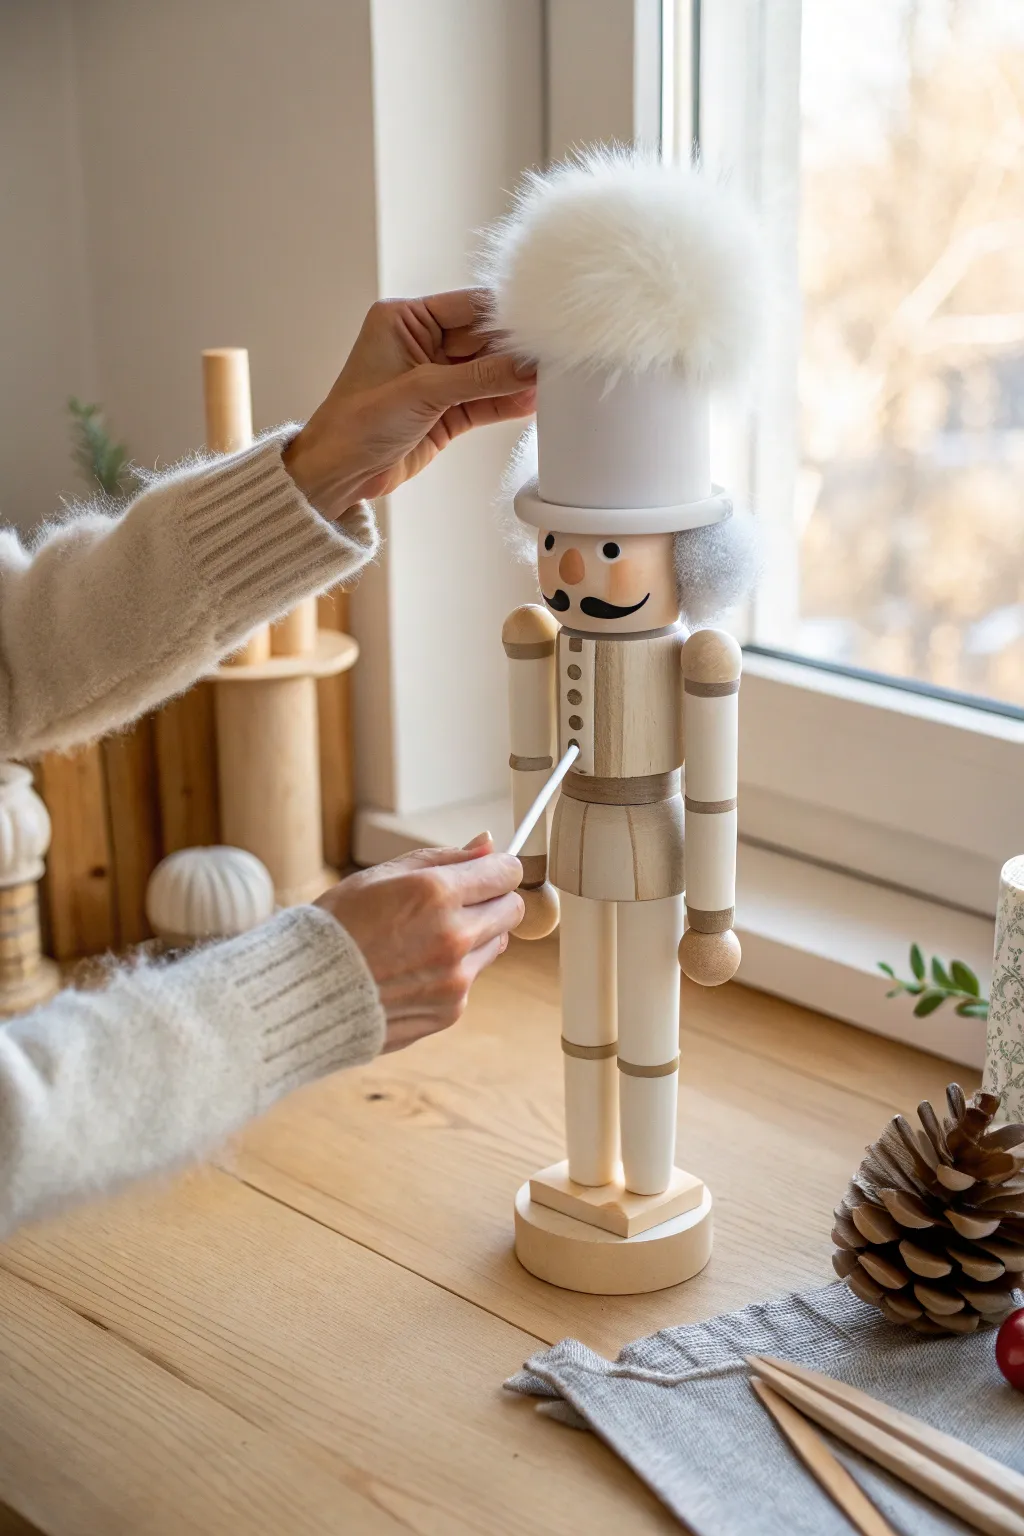
Embrace the cozy minimalist aesthetic with this Scandinavian-inspired nutcracker project. By combining raw natural wood tones with crisp white paint and luxurious faux fur accents, you can create a sophisticated holiday decoration that feels both modern and warm.
Step-by-Step Tutorial
Materials
- Unfinished wooden nutcracker
- High-pile white faux fur fabric
- Short-pile gray faux fur (optional for hair)
- Matte white acrylic paint
- Black acrylic paint
- Fine detail paintbrush (size 0 or 00)
- Flat shader brush (size 4)
- Painter’s tape or washing tape
- Hot glue gun with clear sticks
- Craft knife or razor blade
- Fine-grit sandpaper
Step 1: Preparing and Painting the Body
-
Smooth the surface:
Begin by lightly sanding the entire wooden surface with fine-grit sandpaper to remove any rough splinters, focusing on the joints and round areas. -
Wipe it down:
Use a tack cloth or a slightly damp paper towel to remove all sanding dust so your paint adheres perfectly. -
Mask the natural wood:
Decide which parts of the nutcracker will remain raw wood; use painter’s tape to mask off the legs and arms, leaving bands exposed where you want white cuffs or boots. -
Paint the boots and cuffs:
Using your flat brush and matte white acrylic, paint the boots and the wrist cuffs, applying thin even coats to avoid brushstrokes. -
Create the tunic placket:
Paint a vertical rectangular strip down the center of the chest using white paint; use tape to guide you if you have a shaky hand, ensuring crisp, straight edges. -
Add belt details:
Paint a horizontal band around the waist and thin rings around the knees and elbows if desired, keeping the lines clean and minimalist. -
Paint the buttons:
Once the white chest strip is dry, dip the handle end of a paintbrush into a dark gray or taupe paint and dot row of buttons down the center.
Loose Fiber Fix
Fur shedding everywhere? After cutting your pieces, immediately run a lint roller along the raw cut edges of the backing to grab loose fibers before you start gluing.
Step 2: Facial Features
-
Sketch the face:
Use a pencil to very faintly mark out the position of the eyes and mustache to ensure symmetry before painting. -
Paint the eyes:
With your smallest detail brush, paint two solid black circles for eyes; once dry, I like to add a tiny white speck in the upper right corner of each for a life-like glint. -
Add the mustache:
Paint a stylized, curling mustache in black beneath the nose, keeping the ends taper to sharp points. -
Create soft cheeks:
Mix a very watery wash of pink or peach paint, wipe most of it off on a paper towel, and gently dry-brush rosy circles onto the cheeks.
Step 3: Adding the Fur Elements
-
Measure the hat:
Wrap a measuring tape around the wooden hat cylinder to find the circumference, then measure the height. -
Mark the fur backing:
Turn your white faux fur face down and mark the dimensions on the knit backing using a pen or marker. -
Cut the fur correctly:
Using a craft knife, carefully slice through *only* the backing fabric; do not use scissors to cut through the fur itself, or you will give the fabric a blunt ‘haircut’. -
Attach the hat fur:
Apply hot glue to the wooden hat cylinder and press the fur strip firmly in place, ensuring the pile direction points downward or upward depending on the look you want. -
Create the hair tufts:
Cut two small semi-circles of gray or white fur for the hair on the sides of the head, using the same careful cutting technique. -
Secure the hair:
Glue these hair pieces to the sides of the face, tucked slightly under the rim of the hat area. -
Final grooming:
Use an old toothbrush or your fingers to fluff the fur at the seams, hiding the join lines and giving the hat a full, rounded appearance.
Pro Tip: Seamless Seams
To make the seam on the hat invisible, use the tip of a sewing needle to gently pull any trapped fur fibers out from under the glued seam line, blending the joint.
Display your charming Nordic creation on a mantel or windowsill to add a touch of texture to your holiday decor
Dark Academia Gothic Aesthetic
Transform a standard holiday figure into a moody, sophisticated piece of decor perfect for a library shelf or gothic mantle. This project combines a rich matte palette of obsidian and burgundy with striking gold accents for a timeless look.
Detailed Instructions
Materials
- Unfinished wooden nutcracker
- Acrylic paints: Mars Black, Deep Maroon or Burgundy, Antique Gold, Skin Tone, Titanium White
- Synthetic white craft fur
- Brushes: Flat shader (size 6), Round (size 2), Detail liner (00)
- Fine-grit sandpaper
- Hot glue gun
- Matte spray varnish
Step 1: Prep and Base Colors
-
Sand the surface:
Before opening any paint, lightly sand the entire wooden figure with fine-grit sandpaper to remove rough spots and ensure a smooth finish. -
Paint the face:
Using a flat brush, apply the skin tone to the face area. You may need two coats here to hide the wood grain completely. -
Apply the burgundy accents:
Paint the trousers, the waist belt area, the cuffs on the wrists, and the band around the hat using your deep maroon or burgundy paint. -
Detail the jacket stripes:
Carefully paint the vertical stripes on the lower part of the jacket in burgundy, leaving space between them for black stripes later.
Fixing Shakey Lines
If your gold lines on the hat or boots look wobbly, don’t panic. Wait for the gold to dry completely, then use your black or burgundy paint to carefully cut back in and straighten the edge.
Step 2: The Dark Aesthetic
-
Block in the black:
Switch to Mars Black and paint the tall hat, the main torso of the jacket, the boots, and the square base. I like to use a slightly larger flat brush here to get smooth, even coverage. -
Fill jacket gaps:
Use a smaller round brush to paint the alternating black stripes on the lower jacket skirt, cleaning up the edges next to the burgundy. -
Paint the arms:
Paint the sleeves black, being careful not to overlap the burgundy cuffs you painted earlier. -
Define the mouth:
Paint the rectangular mouth area black. Once dry, use a detail brush and white paint to create a simple grid for the teeth.
Step 3: Gilded Details
-
Add gold shoulder pads:
Paint the epaulets on the shoulders with Antique Gold. Using a dabbing motion can help deposit more metallic pigment for a solid shine. -
Create the buttons:
Using the tip of a round brush or a dotting tool, place small gold dots down the center of the jacket and on the epaulets. -
Highlight the boots:
Paint a thin gold band around the top of the boots where they meet the red pants. -
Paint the hat trim:
Add a gold stripe at the very bottom of the hat rim and create a small gold belt buckle square at the waist. -
Design the emblem:
Freehand a stylized fleur-de-lis or leaf shape on the front of the hat using your finest liner brush and gold paint.
Level Up: Velvet Texture
To enhance the luxurious gothic feel, glue a thin strip of real black velvet ribbon around the waist instead of painting the belt, adding tactile contrast to the wood.
Step 4: Final Touches
-
Paint the face features:
Use a fine liner with black paint to draw arched eyebrows, simple eyes, and a curled handlebar mustache. -
Seal the paint:
Once all paint is fully dry, apply a coat of matte spray varnish to protect the finish and unify the sheen. -
Prepare the hair:
Cut small strips of white craft fur for the hair and a small triangle for the beard. -
Attach the fur:
Secure the hair to the sides of the head and the beard under the mouth using a hot glue gun.
Place your finished artwork on a textured cloth or near candlelight to let those gold accents truly shine.
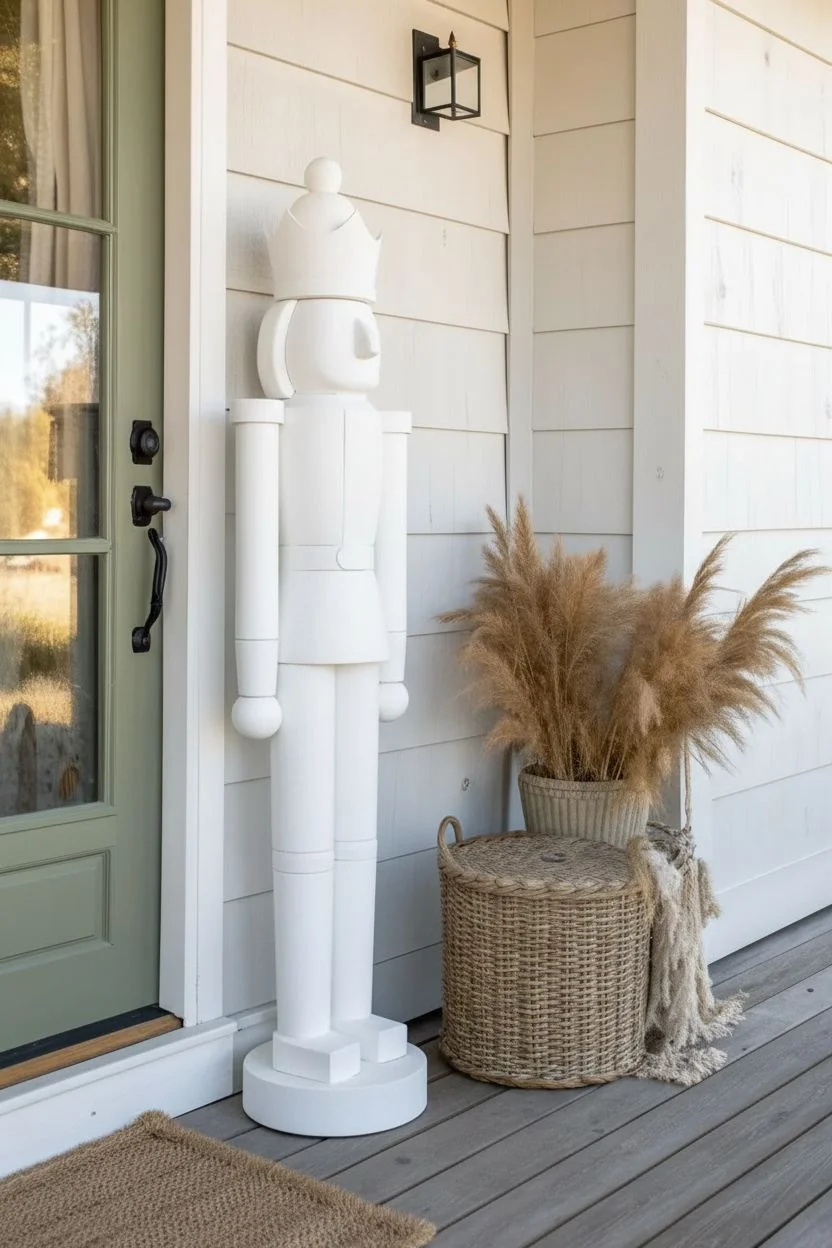
Large Scale Porch Statements
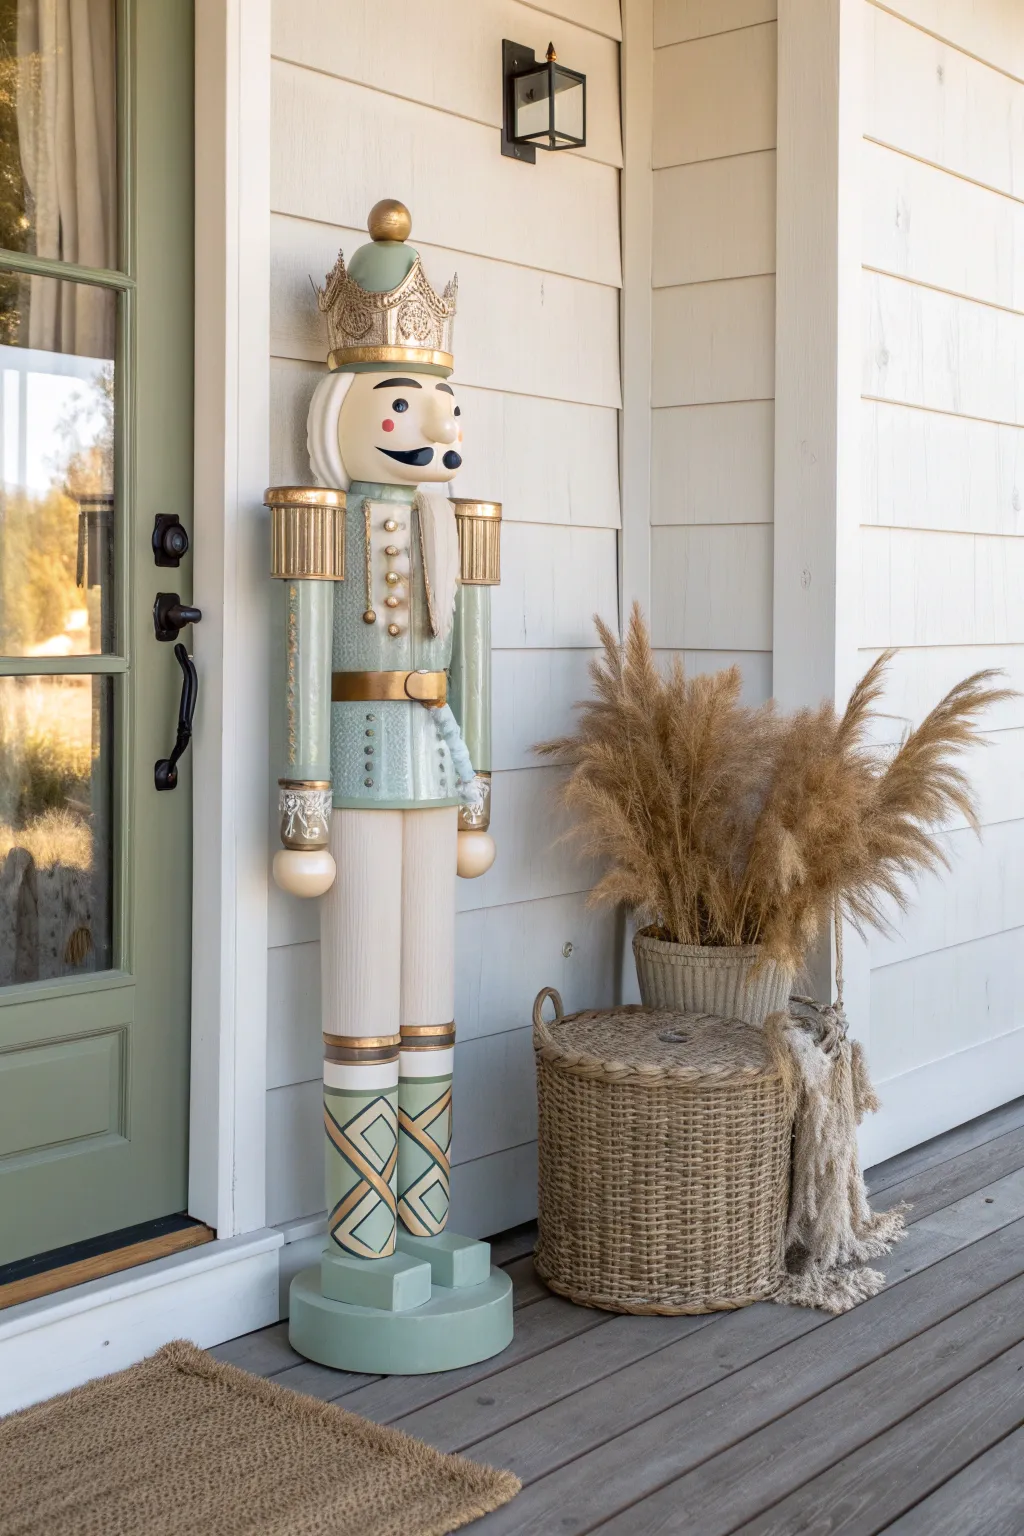
Transform a standard unfinished garden statue into a stately porch guardian with a sophisticated, high-end palette. This project swaps traditional bright reds for calming sage, cream, and antique gold to achieve a modern farmhouse aesthetic that elevates your entryway decor.
How-To Guide
Materials
- Large unfinished nutcracker (wood or resin)
- Sandpaper (220 grit)
- Spray primer (white or gray)
- Outdoor acrylic paints: Sage Green, Warm Cream, Flesh Tone, Carbon Black
- Metallic paints: Rich Gold, Antique Bronze
- Wide flat synthetic brush
- Small angled brush
- Fine detail liner brush
- Painter’s tape
- Matte UV-resistant clear spray sealer
Step 1: Preparation & Base Coating
-
Clean and sand:
Wipe down your unfinished nutcracker with a damp cloth to remove any manufacturing dust. If the surface feels rough, lightly scuff it with 220-grit sandpaper to help the paint adhere focusing on the smooth areas like the legs and face. -
Prime the surface:
Apply a sweeping, even coat of spray primer over the entire figure. I like to do two thin coats rather than one heavy one to prevent drips in the crevices of the beard and uniform details. -
Let it cure:
Allow the primer to dry completely according to the can’s instructions, usually overnight, to ensure a durable foundation for your porch display. -
Base coat the trousers:
Using a wide flat brush, paint the legs and trousers in Warm Cream. Apply long vertical strokes to minimize brush marks, and apply a second coat if the primer shows through. -
Paint the jacket:
Switch to a clean flat brush and apply your Sage Green paint to the jacket area, being careful to cut in neatly around the belt line and lapels. -
Fill in the hat:
Continue using the Sage Green to paint the rounded dome of the hat, keeping the crown area distinct for later metallic work.
Uneven Lines?
If you struggle with shaky hands on the straight lines like the belt or cuffs, use high-quality painter’s tape to mask off the areas. Press the edges down firmly to prevent bleed-under.
Step 2: Metallic Details & Accents
-
Gild the structure:
Using your Rich Gold metallic paint, fill in the crown, the shoulder epaulets, the belt, and the cuffs. Use a smaller angled brush here to get into the grooves of the crown molding. -
Detail the boots:
The boots in this design utilize the main Sage Green color for the base. Once dry, use a fine liner brush and Gold paint to carefully draw the criss-cross lattice pattern on the shins and the horizontal bands at the top. -
Add antique depth:
To make the gold look less like plastic, dry-brush a tiny amount of Antique Bronze over the high points of the crown and epaulets. This adds a lovely aged dimension. -
Buttons and trim:
Dip a small round brush into the Gold paint and carefully dab the buttons on the jacket and the fine trim lines along the jacket’s edge.
Step 3: Face, Hair & Final Touches
-
Paint skin tone:
Apply the Flesh Tone paint to the face and hands. This area is smooth, so use soft strokes to keep it looking natural. -
Highlight the hair:
Paint the beard and hair using your Warm Cream (or a slightly lighter off-white). To highlight the texture, I prefer to drag the brush downwards following the sculpted hair lines. -
Draw the eyes:
Using a fine liner brush and Carbon Black, paint two simple ovals for eyes and thin arches for eyebrows. Keep the expression neutral and stately. -
Add the mustache:
Paint the signature handlebar mustache in Carbon Black, tapering the ends into fine points that curl upward slightly. -
Rosy cheeks:
Mix a tiny drop of red into your flesh tone or dilute a pink paint with water. Gently create soft, circular blushes on the cheeks with a dry brush for a subtle glow. -
Seal for weather:
Once all paint is fully cured (give it at least 24 hours), take the nutcracker outside and spray the entire piece with a matte UV-resistant sealer to protect the finish from sun and moisture.
Spin It Around
Place your heavy nutcracker on a lazy susan or a rotating plant stand while you paint. This allows you to reach the back and sides easily without having to awkwardy adhere to wet paint.
Place your finished nutcracker by the front door to greet guests with timeless elegance and holiday cheer


Have a question or want to share your own experience? I'd love to hear from you in the comments below!