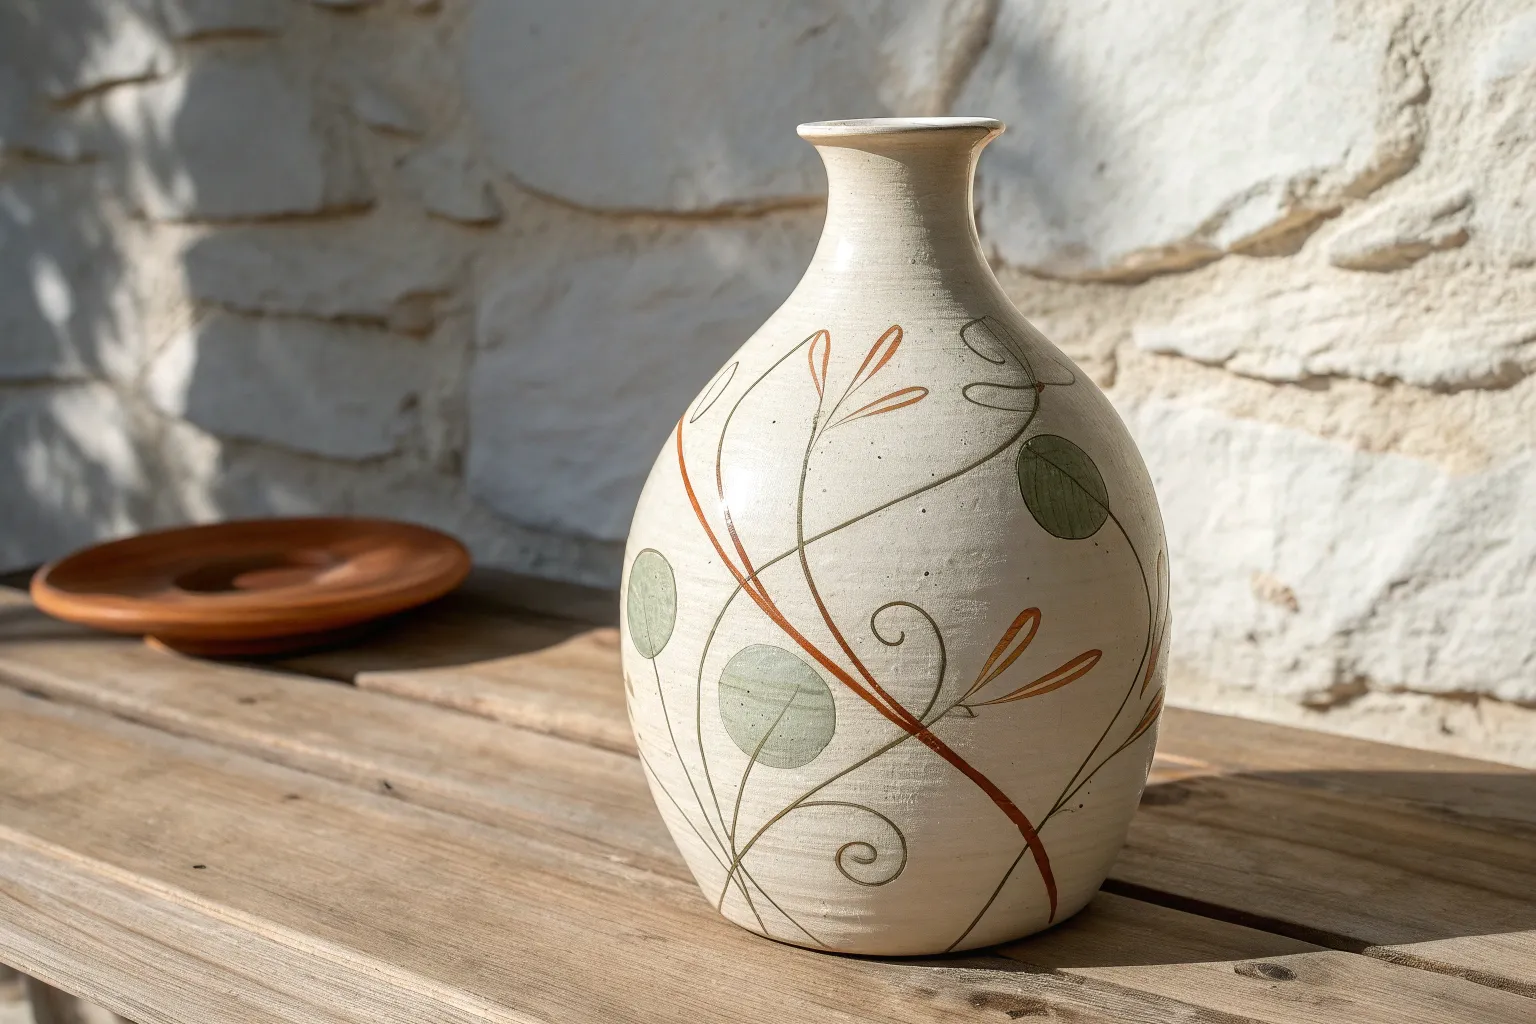
There is something incredibly satisfying about taking a simple glass jar or a thrifted vessel and transforming it into a stunning piece of home decor with just a little pigment. I love how vase painting ideas allow us to experiment with texture and color on a three-dimensional canvas, turning everyday objects into cherished art.
Minimalist Boho Arches
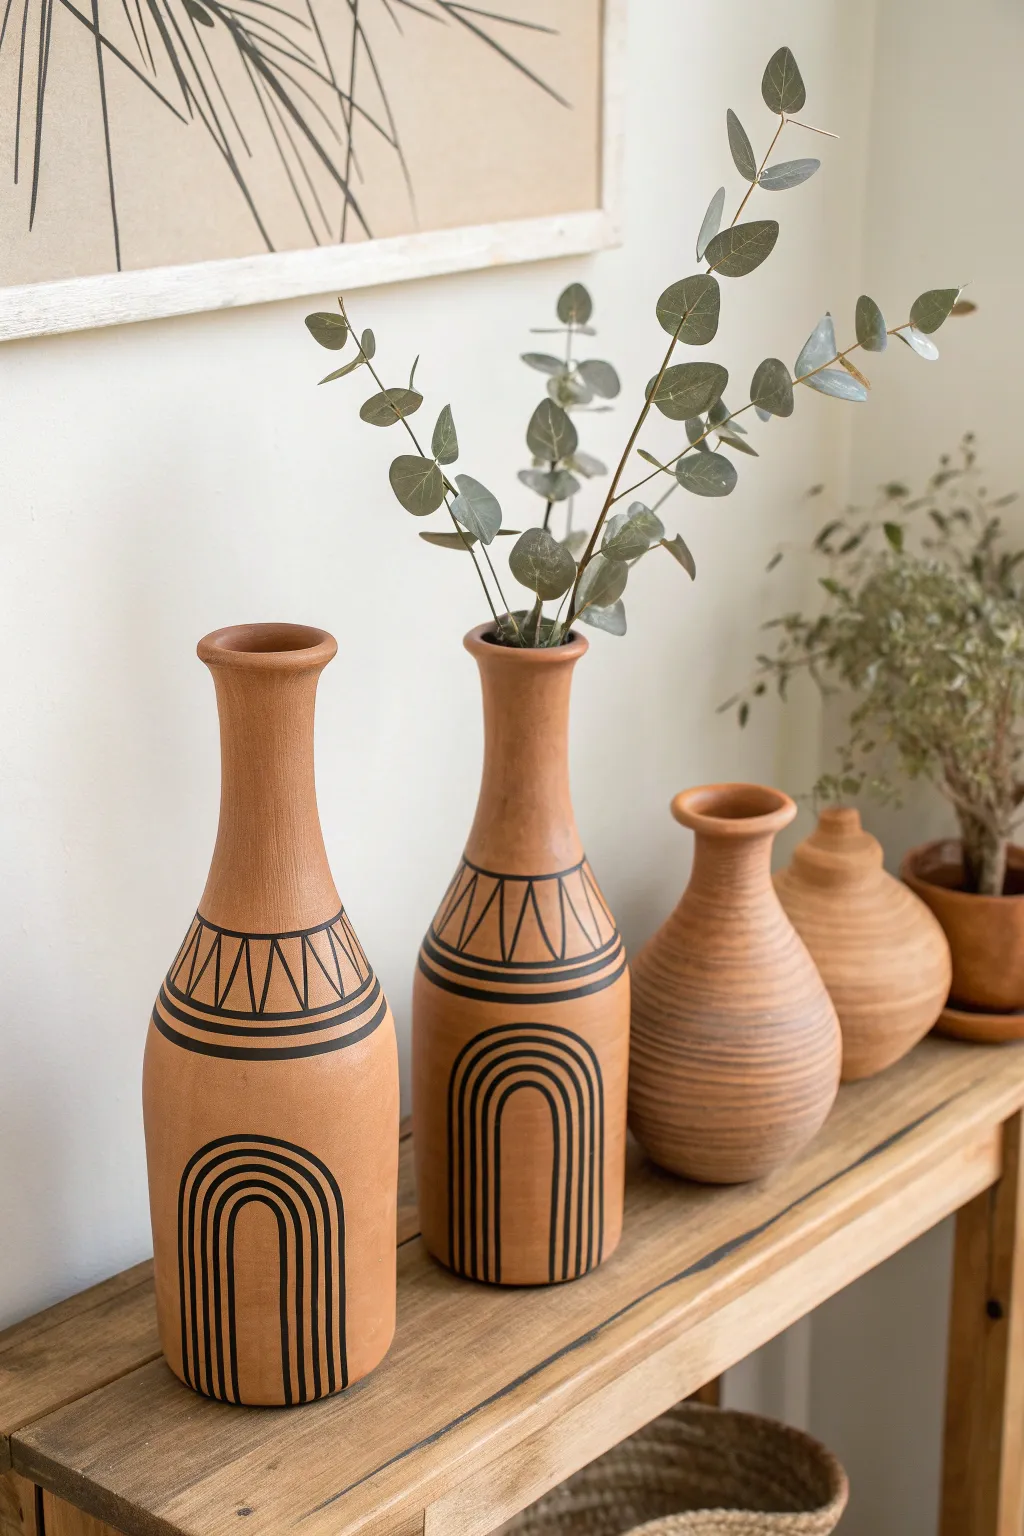
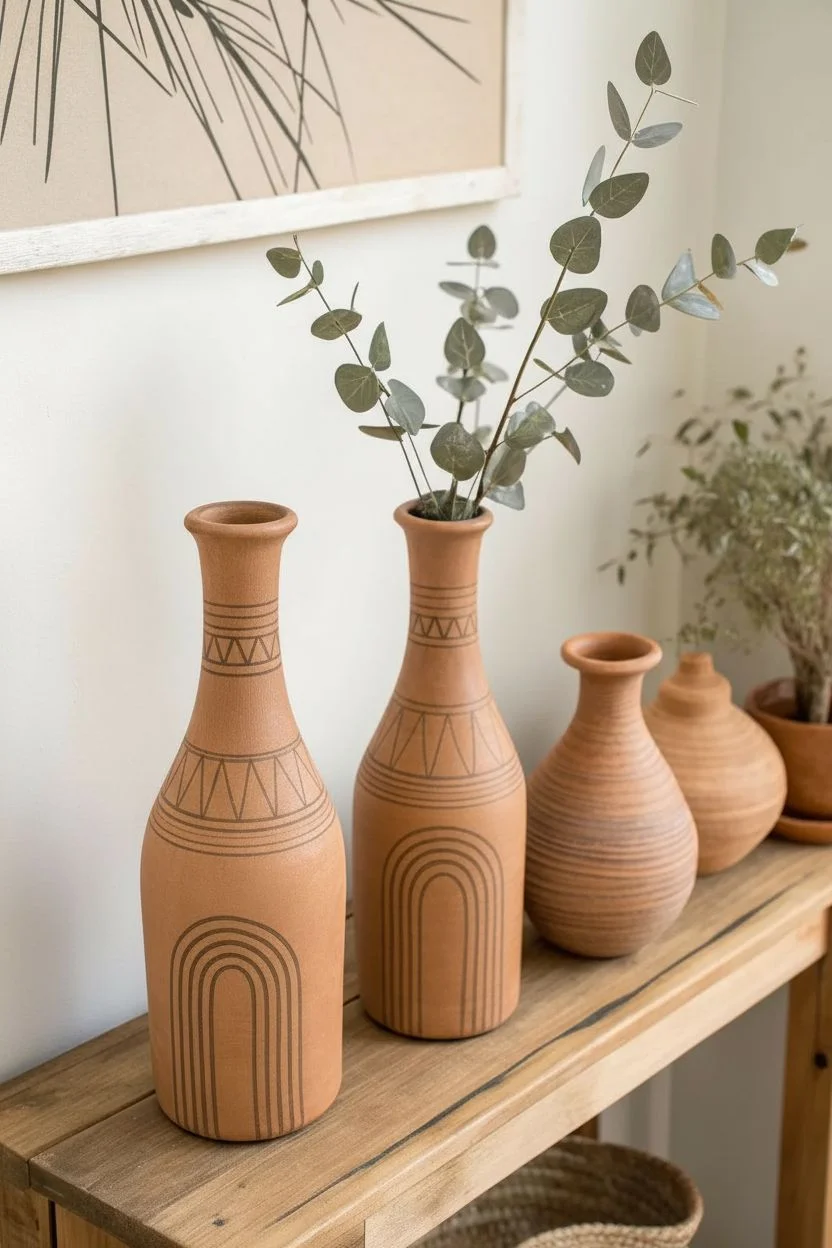
Transform plain bottle vases into modern decor staples with this striking geometric project. The contrast of matte black lines against warm terracotta creates a sophisticated yet earthy look that fits perfectly in minimalist homes.
How-To Guide
Materials
- Tall terracotta or ceramic bottle vases
- Matte black acrylic paint
- Fine liner brush (size 0 or 1)
- Flat brush (optional, for broader lines)
- Pencil and white eraser
- Flexible measuring tape
- Palette or small dish
- Matte spray sealant
Step 1: Planning the Layout
-
Clean surface:
Wipe the vase down efficiently with a damp cloth to remove any dust or oils that might repel the paint, then let it dry completely. -
Find the center:
Identify the ‘front’ of your vase and use your flexible measuring tape to find the vertical center line. -
Mark the arch peak:
Using a pencil, make a small dot where you want the highest point of keyhole arch to sit—usually about halfway up the body of the vase. -
Sketch the outer arch:
Lightly sketch the outermost curve of the arch first, extending the leg lines straight down to the bottom of the vase. -
Fill the interior:
Sketch two or three smaller, concentric arches inside the first one, keeping the spacing between lines consistent. -
Define the neck band:
Move to the neck of the vase and use the tape measure to lightly pencil two horizontal rings around the circumference. -
Add geometric details:
Sketch a zig-zag or triangle pattern between the two neck rings to create the tribal-inspired collar.
Smooth Operator
For the crispest lines on a curved surface, load your brush fully but wipe the excess off the tip. This prevents blobs effectively.
Step 2: Painting the Design
-
Prepare the paint:
Squeeze a dollop of black acrylic onto your palette and thin it very slightly with a drop of water until it has an inky consistency. -
Start at the top:
Begin painting the neck details first so you don’t accidentally smudge your work with your hand while holding the vase base. -
Paint the rings:
Use the liner brush to trace the horizontal rings. I find it easiest to hold the brush steady and slowly rotate the vase itself. -
Fill the zig-zags:
Carefully paint the triangle or zig-zag pattern within the bands, using the tip of the liner brush for sharp corners. -
Outline the main arch:
Move down to the body design and paint over your pencil sketch for the outermost arch line first to define the boundary. -
Paint vertical legs:
Drag the brush smoothly down from the curve to the base; apply slightly more pressure to keep the line width consistent. -
Detail inner arches:
Paint the remaining concentric arches, working from the outside in to ensure your hand has a resting place. -
Correct edges:
If any lines look shaky, use a slightly damp, angled brush or a toothpick to gently nudge wet paint or scrape away mistakes.
Step 3: Finishing Touches
-
Erase guidelines:
Once the paint is absolutely dry to the touch, gently erase any visible pencil marks, being careful not to rub the paint off. -
Cure the paint:
Let the vase sit in a dry area for at least 24 hours to ensure the acrylic adheres fully to the porous surface. -
Seal the work:
Take the vase to a well-ventilated area and apply a light coat of matte spray sealant to protect the design from scratches.
Level Up: Texture Play
Mix a teaspoon of baking soda into a base coat of terracotta paint before starting. This gives a plain glass vase a gritty, realistic pottery feel.
Style your new vases with dried eucalyptus or grasses to complete that warm, desert-inspired vignette


Crisp Two-Tone Dipped Look
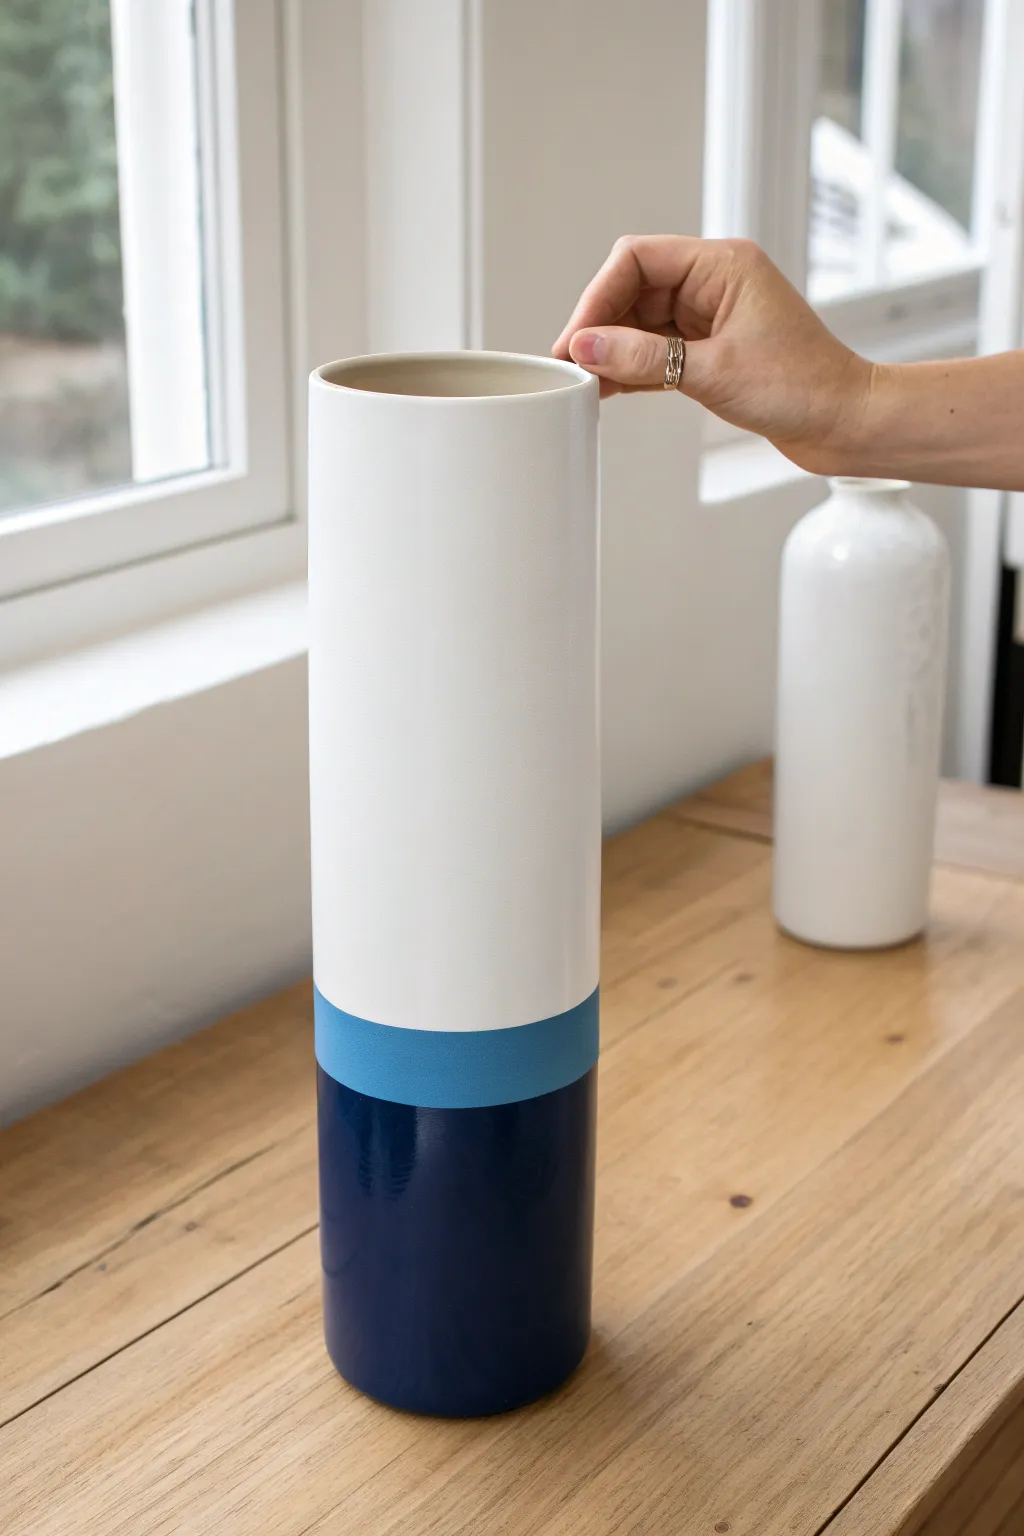
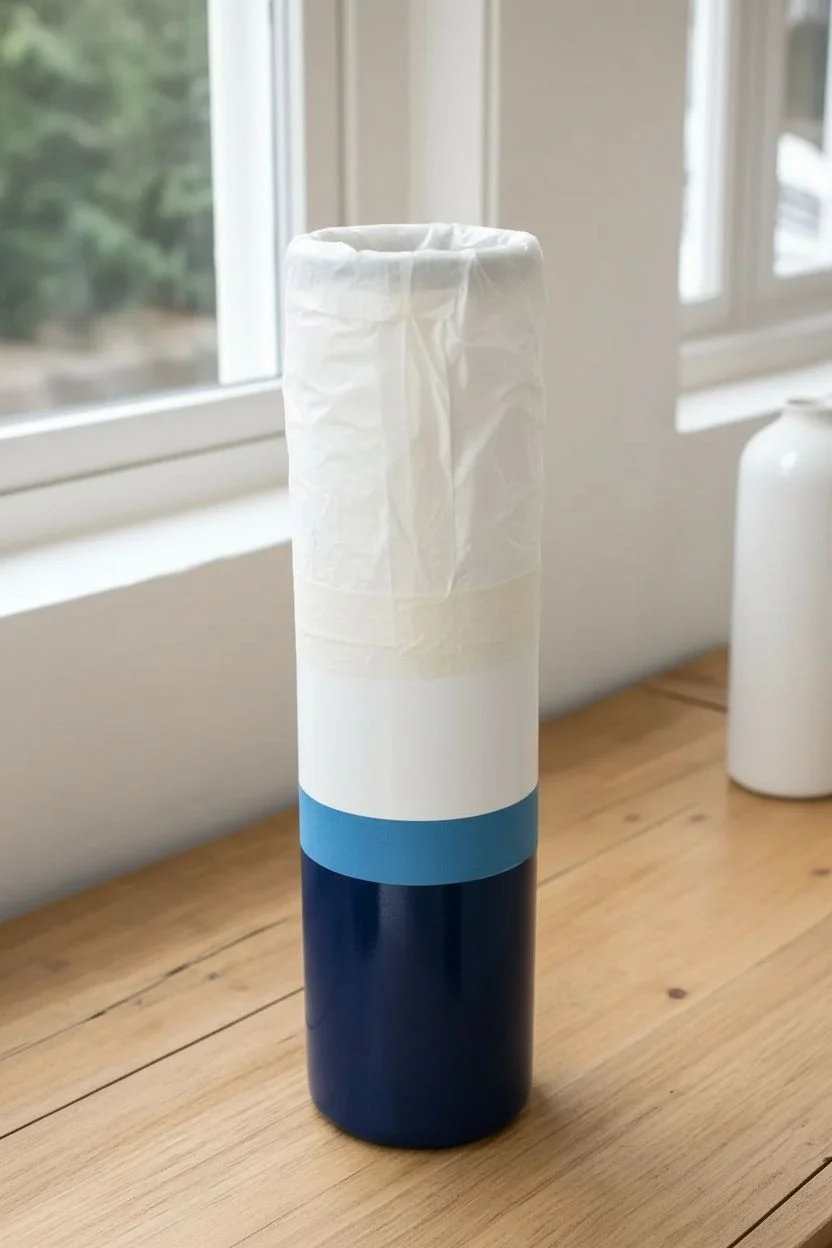
Transform a plain ceramic vessel into a piece of modern art with this precise taping technique. This project simulates the heavy, luxurious look of dipped glazing while giving you full control over the color palette and finish.
Step-by-Step
Materials
- Tall white ceramic cylinder vase
- High-quality painter’s tape (low tack)
- Matte light blue spray paint
- High-gloss navy blue spray paint
- Rubbing alcohol
- Plastic bag or masking paper
- Ruler or measuring tape
Step 1: Preparation & First Mask
-
Clean surface:
Wipe down the entire vase with rubbing alcohol and a paper towel to remove any oils or dust that might hinder paint adhesion. -
Define the top edge:
Determine where the white section should end—visually, about two-thirds down the vase works best. -
Apply initial tape:
Apply a strip of painter’s tape around the circumference at your chosen height. -
Check alignment:
I like to measure from the bottom up at several distinct points around the vase to ensure the tape line is perfectly level. -
Seal edges:
Run your fingernail firmly along the bottom edge of the tape to seal it tight and prevent bleeding. -
Protect the top:
Cover the entire top white section of the vase with a plastic bag or paper, taping it securely to your main tape line.
Fuzzy Paint Lines?
If a little paint bled under the tape, use a damp Q-tip or a wooden toothpick to gently scrape away the excess while the paint is still fresh.
Step 2: The Middle Blue Layer
-
Prepare paint:
Shake your matte light blue spray paint can vigorously for at least one minute. -
Apply base coat:
Spray the entire exposed bottom third of the vase with even, sweeping motions. -
Ensure coverage:
Don’t worry about the very bottom section being perfect; just ensure the area directly below the tape has solid, even coverage. -
Dry time:
Let this layer dry completely, usually about 1-2 hours depending on humidity, before touching it.
Step 3: The Deep Navy Dip
-
Measure the band:
Once dry, measure about 1.5 inches down from your original tape line to define the width of your light blue strip. -
Mask the band:
Apply a new line of painter’s tape over the light blue paint at this mark to preserve the band. -
Verify protection:
Ensure the rest of the vase above this new line is still fully protected by your plastic covering. -
Apply dark coat:
Switch to the high-gloss navy blue spray paint for the bottom section. -
Spray technique:
Spray the remaining exposed bottom section, holding the can slightly closer to get a wetter, glossier finish. -
Simulate dipping:
To mimic a true dipped look, I prefer to make this final coat slightly heavier (without dripping) to build up a nice texture.
Add Some Shine
Apply a very thin strip of gold washi tape or metallic gold paint over the transition lines for a luxurious, gilded detail between the colors.
Step 4: The Reveal
-
Remove tape early:
Carefully peel back the bottom tape strip while the navy paint is still slightly tacky (after about 15 minutes) to keep the edge sharp. -
Final unmasking:
Once fully dry to the touch, remove the remaining top tape and plastic covering. -
Cure:
Let the vase sit for 24 hours to fully cure before handling or adding water.
Display your new vase near a window to let the contrast between the matte and gloss finishes really shine


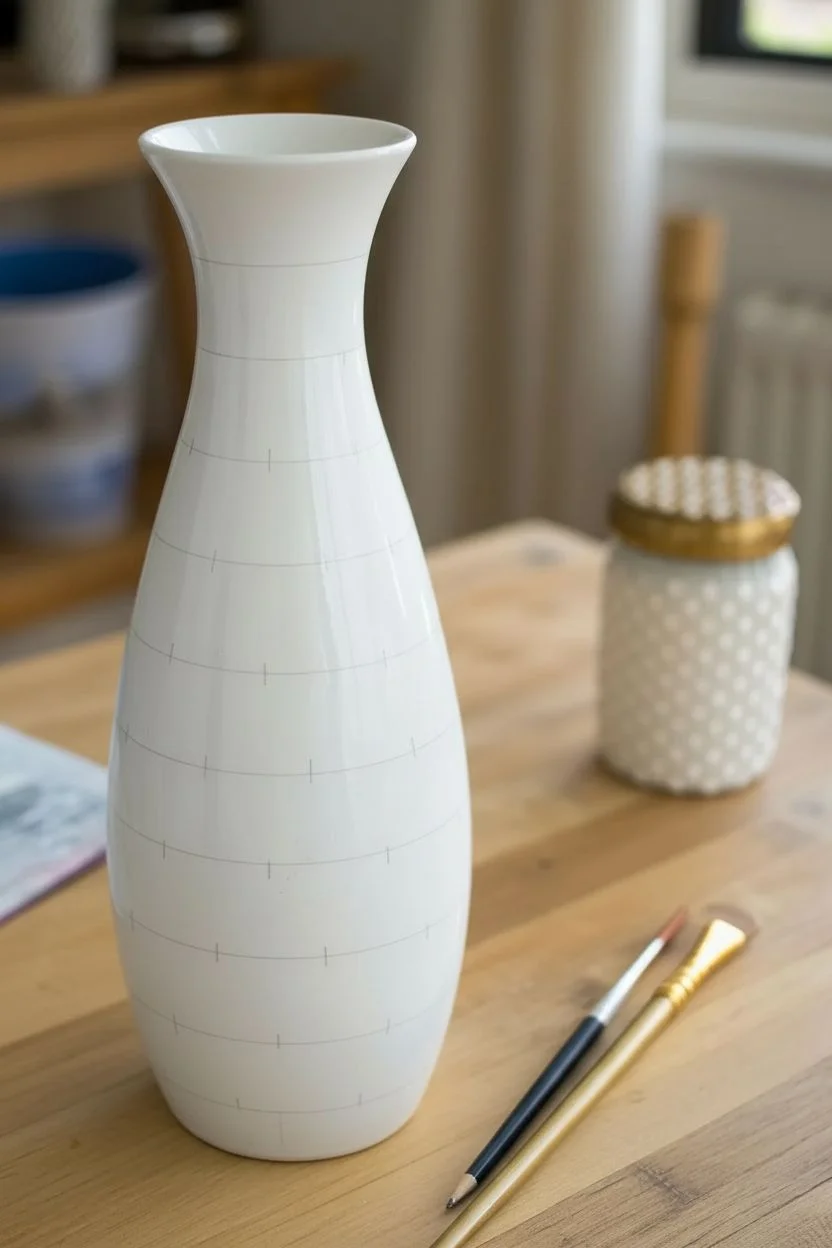
Geometric Tape Resist Patterns
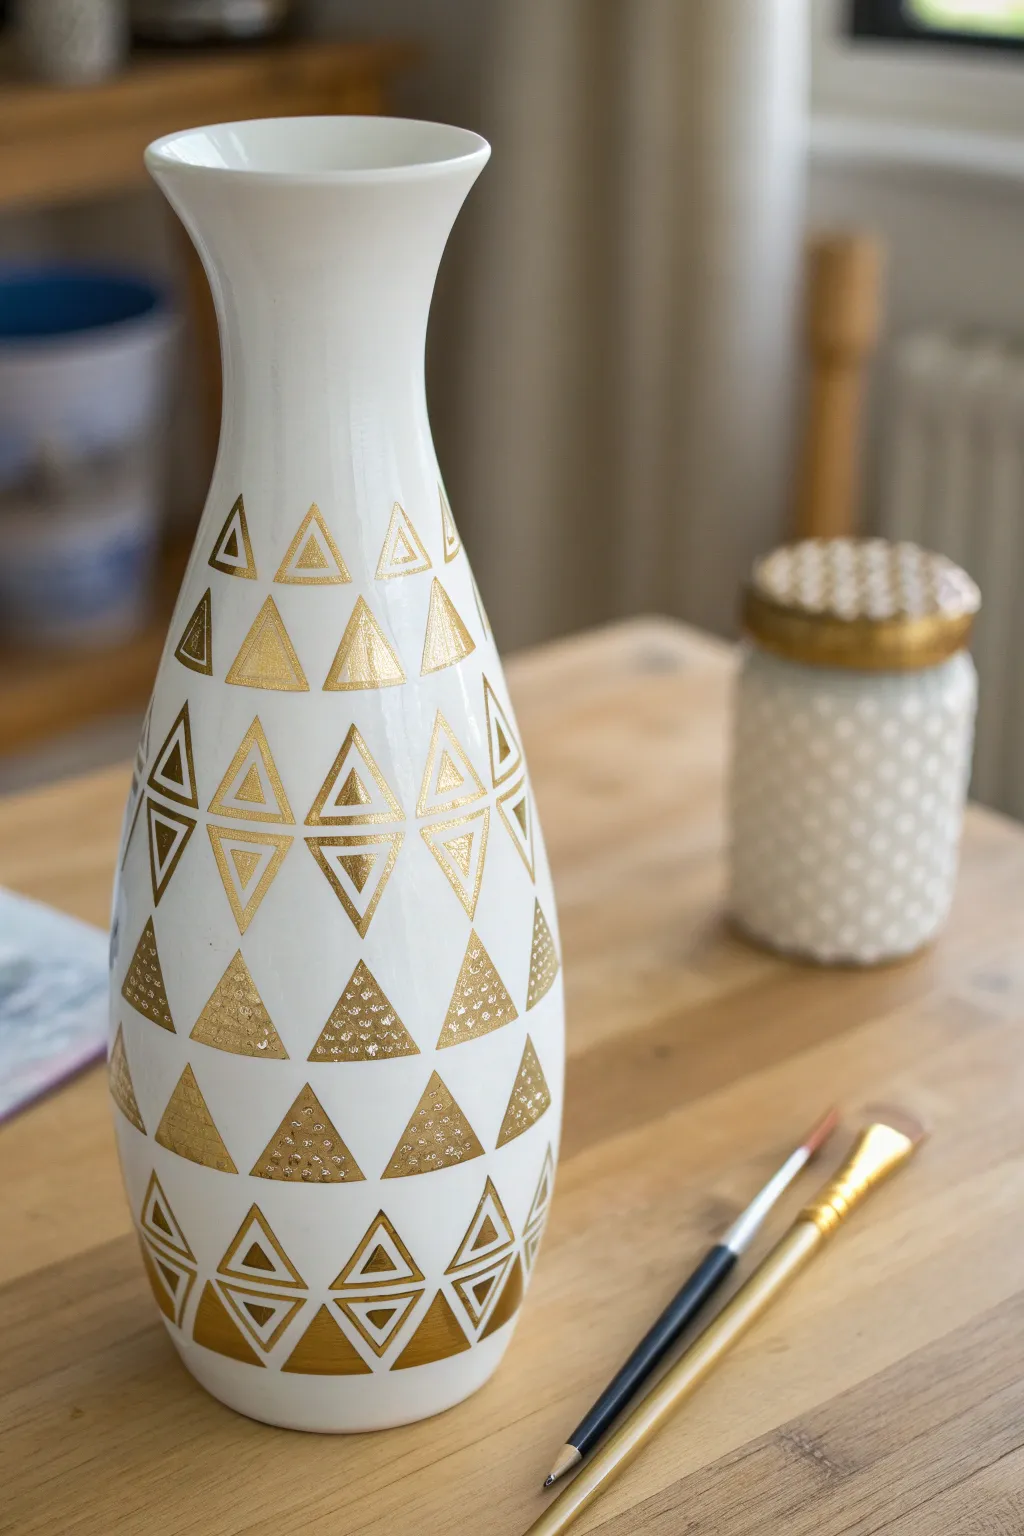
Transform a plain white ceramic vessel into a stunning modern art piece using nothing but tape and metallic paint. This project layers different textures of gold—including solids, outlines, and stippled effects—to create a chic, high-end look on a budget.
Step-by-Step Tutorial
Materials
- Tall white ceramic vase
- Painter’s tape or geometric drafting tape (0.25 inch width is ideal)
- Rubbing alcohol
- Cotton pads
- Metallic gold enamel paint (glass/ceramic suitable)
- Gold glitter or textured ceramic paint
- Small flat synthetic brush
- Fine detail liner brush
- Craft knife
- Pencil
Step 1: Surface Preparation
-
Clean the surface:
Wipe the entire exterior of the vase with rubbing alcohol and a cotton pad to remove dust, oils, and fingerprints, ensuring the tape adheres perfectly. -
Mark horizontal bands:
Using a pencil, lightly mark horizontal rings around the vase where you want the bottom of your triangle rows to sit. Space these rows out evenly, leaving about 1.5 to 2 inches between them. -
Plan vertical spacing:
Make small tick marks along your horizontal lines to denote the center point of each triangle, ensuring they are staggered relative to the row above and below for a balanced pattern.
Clean Lines Hack
If you struggle with bleeding edges, paint a thin layer of clear acrylic medium over the tape edges first. This seals the gap, so any leaking is clear, keeping the gold perfect.
Step 2: Taping the Resist Shapes
-
Cut tape strips:
Pre-cut several strips of painter’s tape, approximately 2 inches long, sticking them to the edge of your table for easy access. -
Form the first triangle:
Place two strips of tape to form an inverted ‘V’ shape, with the point meeting at your top pencil mark. Connect the bottom with a straight piece of tape to close the triangle. -
Define the negative space:
Remember, for this resist technique, you are taping around the *outside* of the triangle area you want to paint, creating a stencil on the vase. -
Complete the grid:
Continue creating these triangular tape windows across the vase at your marked locations, pressing firmly. -
Seal the edges:
Run your fingernail or a credit card firmly over the inner edges of the tape triangles to prevent the metallic paint from bleeding underneath.
Level Up: Mixed Metals
Create more depth by alternating the metallic shades. Use rose gold for the solid triangles and bright yellow gold for the fine line details to create a sophisticated contrast.
Step 3: Painting the Gold Styles
-
Paint solid triangles:
Select specific triangles to be solid gold. Use the flat brush to apply the metallic enamel, brushing from the tape inward to avoid pushing paint under the rim. -
Create the textured effect:
For the glittery or rough-textured triangles seen in the design, dip your brush into the textured gold paint and use a pouncing or stippling motion (up and down) rather than smooth strokes. -
Paint linear triangles:
For the geometric outline triangles, take your fine liner brush with standard gold enamel. Carefully paint a smaller triangle *inside* the taped area, leaving the center unpainted. -
Add nested details:
To recreate the double-triangle look, paint a second, even smaller triangle inside the one you just painted using the tip of your liner brush. -
Create the horizontal stripe style:
For the triangles with horizontal lines, simply use the fine liner brush to paint straight horizontal stripes across the open taped area. -
Check for coverage:
I like to hold the vase up to the light to check for thin spots; apply a second coat to the solid gold triangles if the ceramic white is showing through.
Step 4: The Reveal and Finish
-
Remove tape carefully:
Carefully peel off the painter’s tape while the paint is still slightly tacky—do not wait for it to be fully hard, or the paint might chip. -
Tidy up edges:
If any paint has bled, gently scrape it away with a craft knife or a toothpick dipped in water before it cures completely. -
Erase guidelines:
Once the paint is dry to the touch, gently erase any visible pencil marks with a soft white eraser. -
Cure the paint:
Follow the instructions on your specific bottle of enamel paint; this usually involves letting it air cure for 21 days or baking the vase in a cool oven that heats up to 350°F.
Place your newly gilded vase in a sunlit spot where the different gold textures can really shine.


Rustic Aged Faux-Terracotta
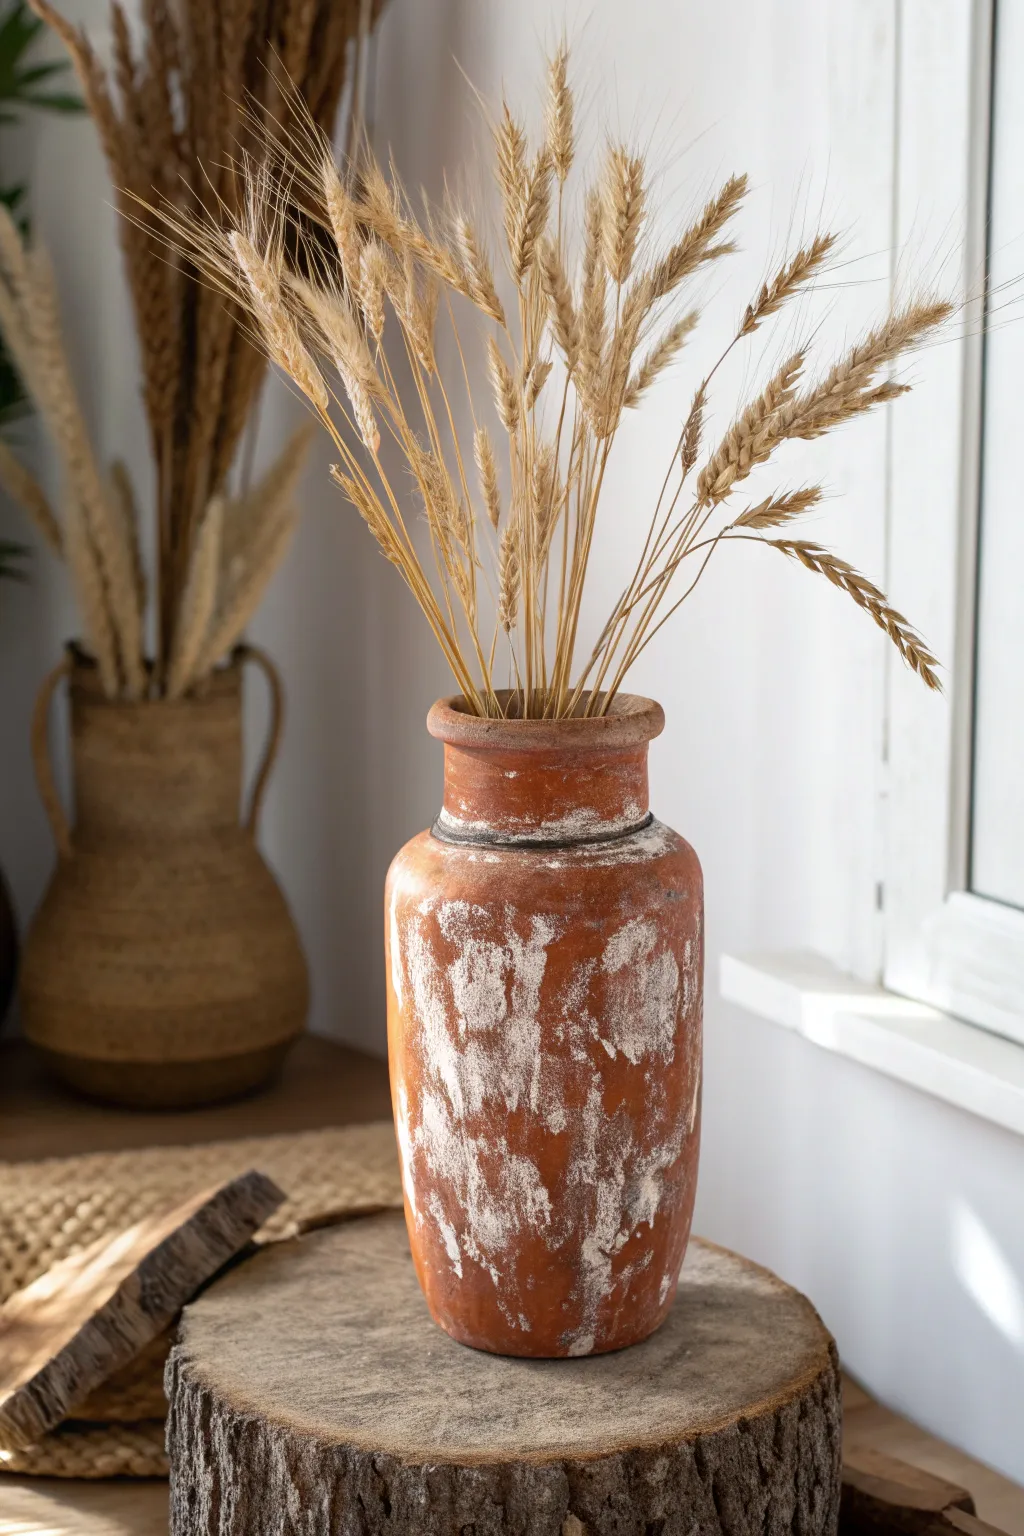
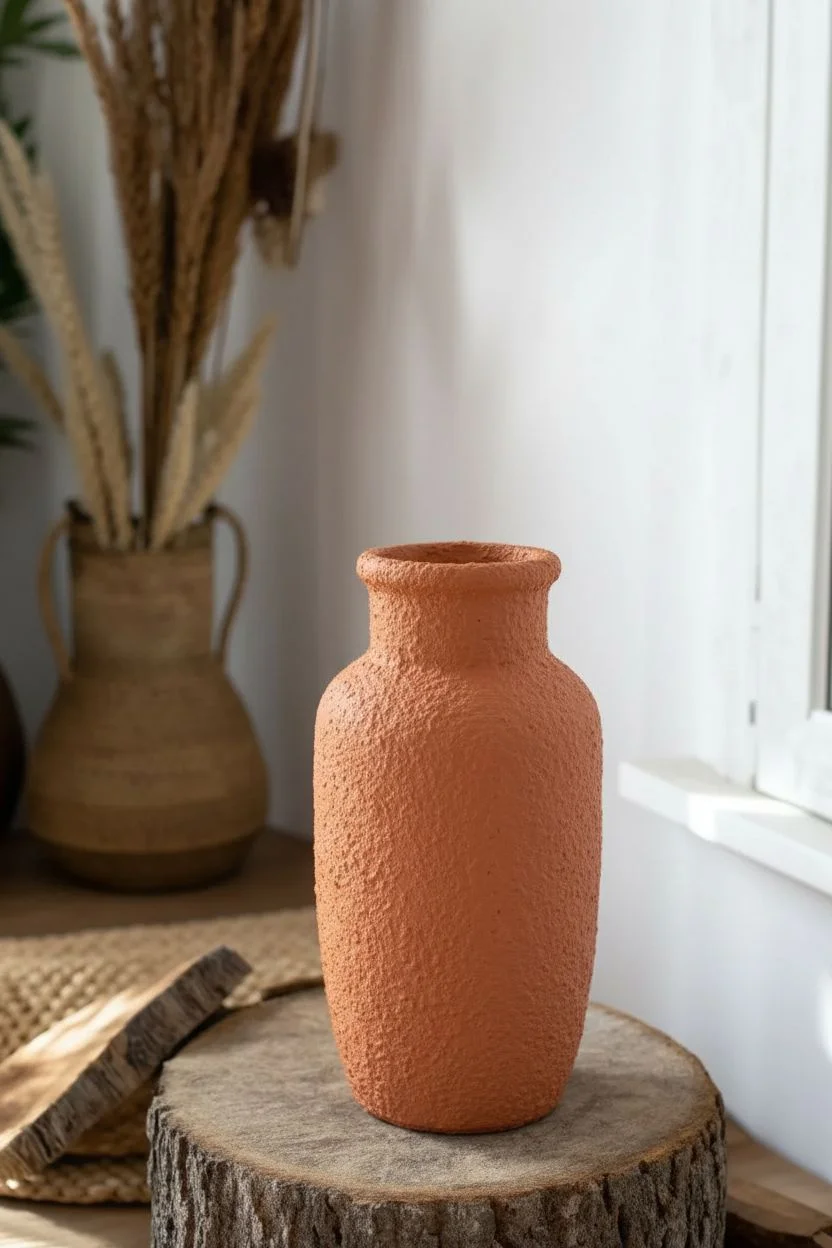
Transform a standard glass or ceramic vessel into a piece that looks like it was unearthed from an ancient Mediterranean ruin. Using a simple baking soda texture technique, you will achieve that signature gritty, matte clay finish complete with faux calcium deposits and weathering.
How-To Guide
Materials
- Glass or ceramic vase (upcycled)
- Acrylic paint (Terracotta/Burnt Sienna)
- Acrylic paint (Warm White or Cream)
- Acrylic paint (Burnt Umber or Black)
- Baking soda
- Matte spray sealer
- Foam sponge brush
- Chip brush or old bristle brush
- Paper towels
- Palette or paper plate
Step 1: Creating the Clay Base
-
Clean surface:
Thoroughly wipe down your vase with rubbing alcohol or soap and water to remove any oils or dust that might prevent adhesion. -
Mix base color:
On your palette, pour out a generous amount of the terracotta or burnt sienna acrylic paint. -
Create texture:
Sprinkle baking soda into the paint. Aim for a 1:1 ratio, mixing until you have a thick, fluffy consistency similar to mousse or frosting. -
Apply first coat:
Using a foam sponge brush, dab the thick mixture onto the vase rather than brushing it. This dabbing motion builds up the necessary gritty texture. -
Let dry:
Allow this base layer to dry completely, which typically takes about 20 to 30 minutes depending on humidity. -
Apply second coat:
Repeat the process with a second layer of the paint and baking soda mixture to ensure the underlying glass is completely opaque and the texture is uniform.
Pro Texture Tip
Mix the baking soda and paint immediately before application. If the mixture sits too long, the soda dissolves and you lose the fluffy, plaster-like graininess.
Step 2: Deepening the Shadows
-
Mix dark wash:
Combine a small amount of Burnt Umber or Black paint with water to create a thin, runny wash. -
Paint the crevice:
Use a small brush to apply this dark wash specifically into the groove around the neck of the vase, mimicking accumulated grime. -
Blend the shadow:
I like to use a damp paper towel to immediately wipe away the excess dark paint, smudging it slightly downwards so it stains the terracotta texture without looking like a harsh line.
Paint Sliding Off?
If the paint slips off the glass surface, lightly sand the vase with medium-grit sandpaper first to give it ‘tooth’, or spray it with a basic primer before painting.
Step 3: The Weathered Patina
-
Prepare white paint:
Pour a small amount of warm white paint onto a clean section of your palette; do not add water. -
Load the brush:
Dip an old, dry bristle brush or chip brush into the white paint, then offload most of it onto a paper towel until the brush is almost dry. -
Apply vertical streaks:
Lightly drag the dry brush vertically down the sides of the vase to create faded, streak-like markings. -
Add heavy deposits:
Reload the brush with a bit more paint and dab it onto random areas of the vase body to simulate lighter patches of calcification or salt deposits. -
Distress wetter areas:
While the white patches are still tacky, use a crumpled paper towel to blot them unevenly, removing some paint to reveal the orange clay underneath for a natural look. -
Check balance:
Step back and view the vase; add more white stippling to the widest part of the vase if needed, keeping the neck and base slightly darker. -
Seal the work:
Once everything is bone dry, spray the entire vase with a clear matte sealer to protect the texture and prevent the baking soda from shedding over time.
Now you have a stunning, rustically aged vessel ready to display dried botanicals or stand alone as a statement piece.
BRUSH GUIDE
The Right Brush for Every Stroke
From clean lines to bold texture — master brush choice, stroke control, and essential techniques.
Explore the Full Guide
Soft Ombré Gradient Blends
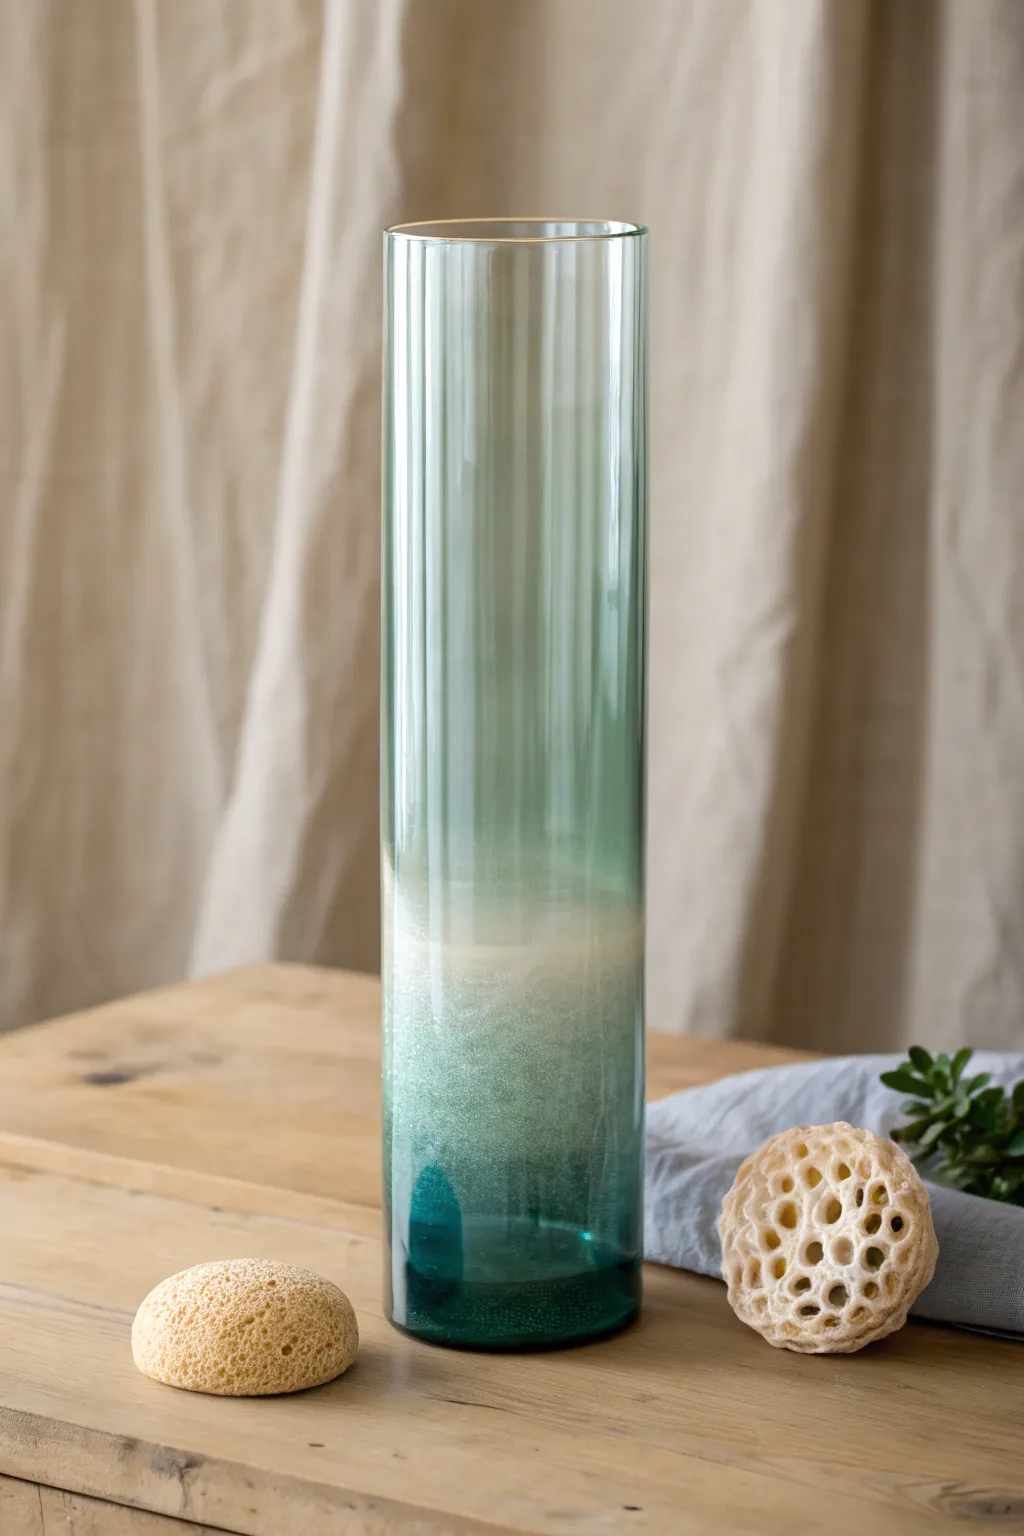
Capture the serene beauty of rolling sea mist with this elegant glass painting project. By layering translucent sea-glass sprays and frosted finishes, you will create a tranquil vessel that transitions from deep teal to a milky white haze.
Step-by-Step
Materials
- Tall cylindrical glass vase
- Rubbing alcohol and lint-free cloth
- Painter’s tape
- Sea glass spray paint (Teal or Aqua)
- Frosted glass spray paint (Matte White)
- Newsprint or kraft paper (for masking)
- Cardboard box or drop cloth
- Latex gloves
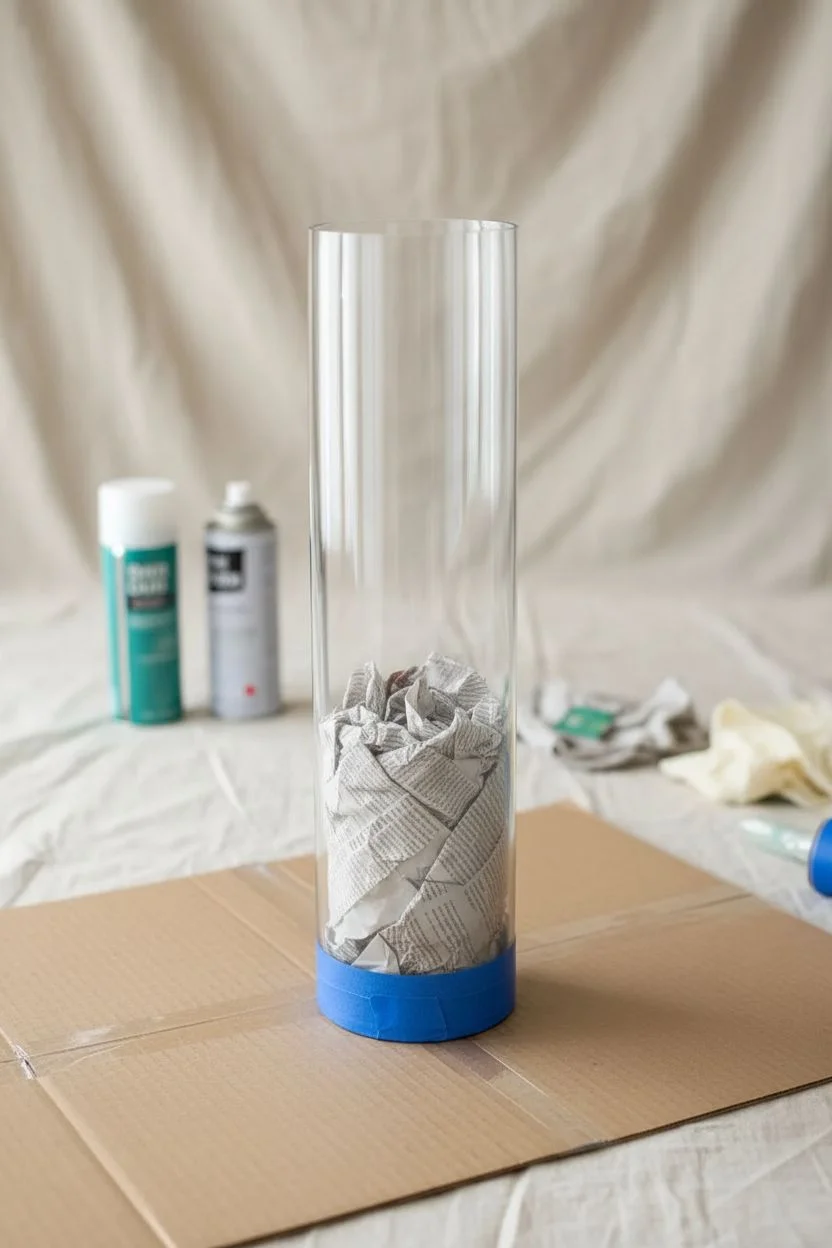
Step 1: Preparation & Masking
-
Clean the surface:
Wash your glass vase thoroughly with warm soapy water to remove any sticker residue or dust, then dry it completely. -
Degrease the glass:
Wipe the entire outer surface with rubbing alcohol on a lint-free cloth to remove invisible oils from your fingerprints. -
Mask the interior:
Stuff the opening of the vase with newsprint to prevent overspray from getting inside the vessel. -
Protect the rim:
Carefully run a strip of painter’s tape around the very top rim if you want to keep the drinking edge clear and crisp. -
Set up the workspace:
Place your vase upside down on a cardboard box or drop cloth in a well-ventilated area.
Pro Tip: No Drips
To prevent drips, start spraying into the air beside the vase and sweep across it, ending the spray in the air on the other side. Never start or stop directly on the glass.
Step 2: Applying the Deep Teal Base
-
Prepare the paint:
Shake your teal sea glass spray paint vigorously for at least one minute to ensure the pigment is perfectly mixed. -
Test the spray:
Spray a quick burst onto your cardboard scrap to double-check the nozzle is clear and the stream is even. -
Apply the bottom coat:
Hold the can about 10-12 inches away and spray the bottom third of the vase (which is currently facing up) with a steady, sweeping motion. -
Build the color:
Apply a second light coat to the very bottom to deepen the teal, making it the darkest point of your gradient. -
Feather the edge:
As you move the spray can slightly lower down the vase body, pull your hand back further to create a lighter, misty dusting of teal that fades out. -
Dry briefly:
Allow the teal layer to dry for about 15 minutes, or until it feels tacky but set.
Level Up: Sea Foam Texture
While the white frost layer is still wet, splatter fine droplets of water onto it using a toothbrush. Let it dry, then seal it; this creates a pitted, salt-spray texture.
Step 3: Creating the Frosted Transition
-
Shake the frost paint:
Take your frosted glass or matte white spray paint and shake it thoroughly. -
Target the transition zone:
Aim the nozzle at the middle section of the vase where the solid teal begins to fade. -
Create the mist:
Use short, controlled bursts to spray a band of white frost, overlapping slightly with the teal to blend the colors softenly. -
Blend upward:
I like to angle the can slightly upward here, allowing the overspray to drift gently onto the clear glass section without creating a hard line. -
Check density:
Add a little more frost spray to the center of the gradient if needed to make the white section midway more opaque and milky.
Step 4: Finalizing the Piece
-
Inspect the gradient:
Look for any spots that need a quick mist to smooth out the transition, but avoid over-spraying to keep the look delicate. -
Remove tape:
Carefully peel off the painter’s tape from the rim while the paint is still slightly tacky to prevent chipping. -
Remove paper stuffing:
Gently pull the paper out of the vase opening, ensuring no painted debris falls inside. -
Full cure:
Let the vase sit undisturbed for 24 hours to allow the paint to fully cure and harden onto the glass.
Once fully cured, your vase is ready to hold dried botanicals or fresh blooms, bringing a calming ocean atmosphere to your space.
Energetic Splatter Paint Design
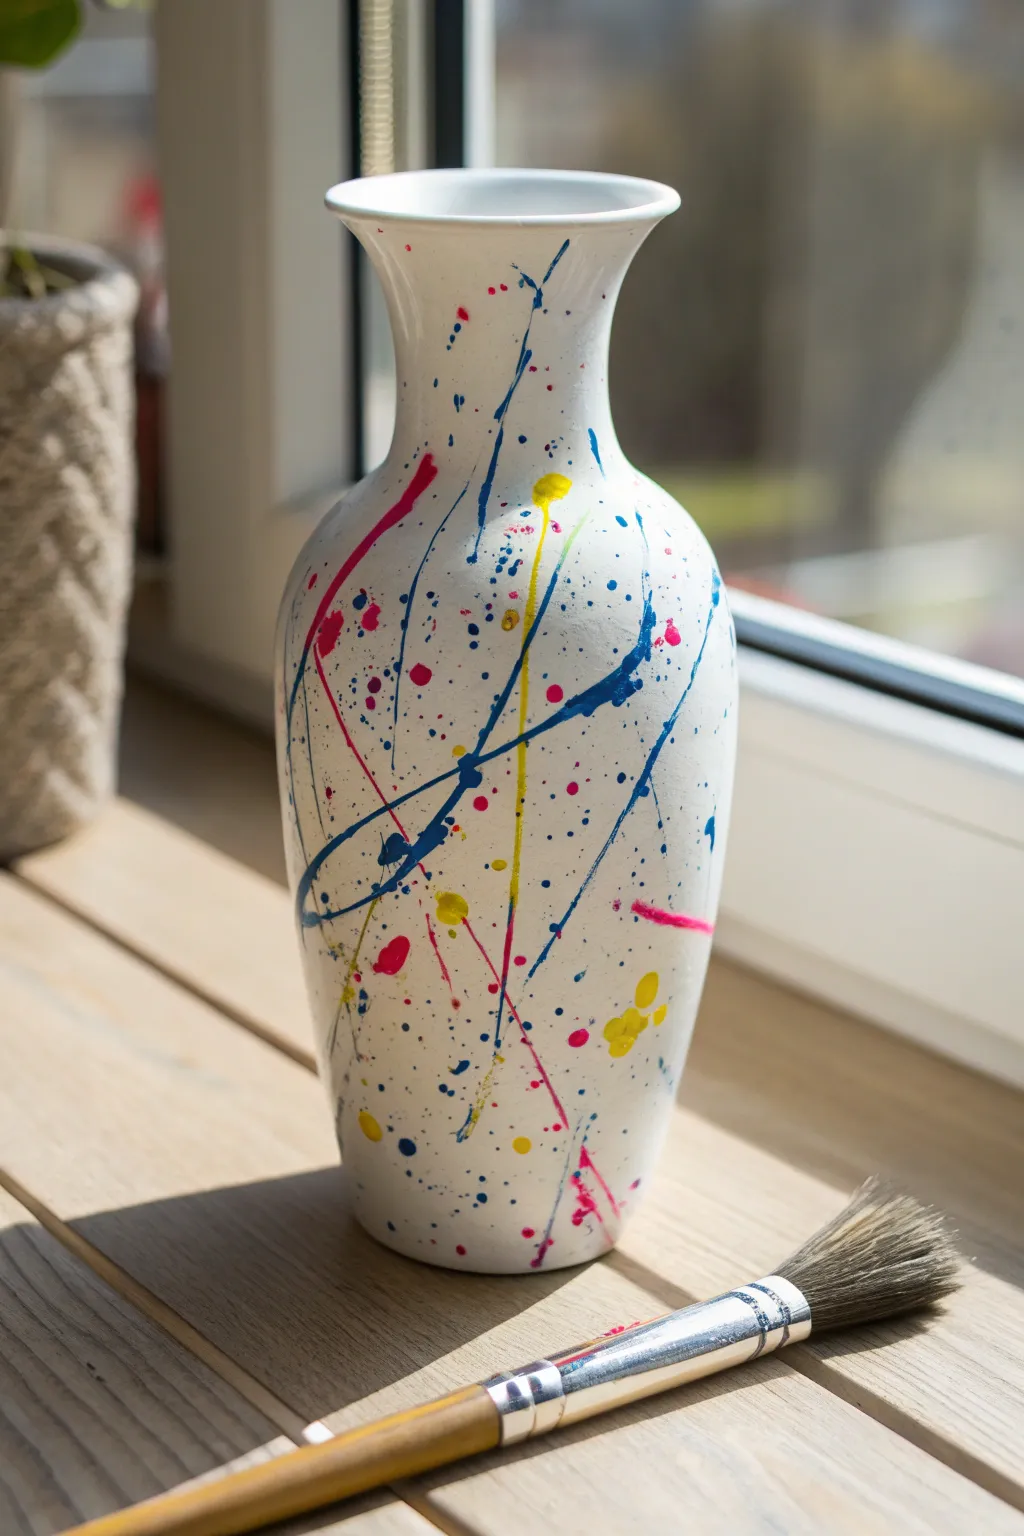
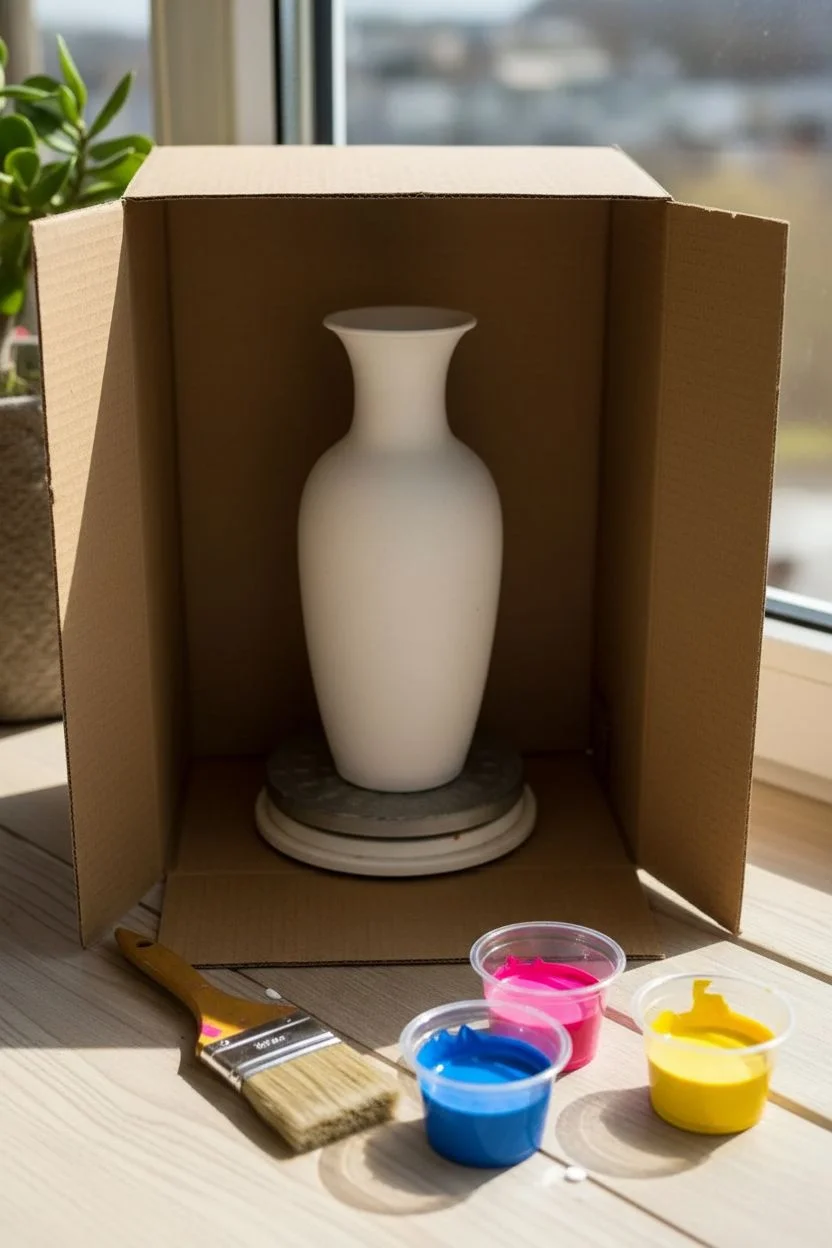
Bring the kinetic energy of an abstract art studio into your home with this playful splatter-paint project. Using a simple white vessel as a high-contrast canvas, you will layer vibrant streams of primary colors to create a dynamic, modern centerpiece.
Detailed Instructions
Materials
- White ceramic vase (bisque or glazed)
- Acrylic paints (Royal Blue, Magenta, Bright Yellow)
- Acrylic flow improver or pouring medium (optional)
- Stiff-bristled paintbrush
- Soft round paintbrush
- Large cardboard box (to catch splatter)
- Rubbing alcohol
- Paper towels
- Clear spray sealant (glossy)
Step 1: Preparation & Workspace
-
Clean the surface:
Thoroughly wash your vase with warm soapy water to remove any dust or retail stickers. -
Degrease the ceramic:
Wipe the entire exterior with a paper towel dampened with rubbing alcohol. This removes invisible oils from your fingerprints that could prevent the paint from stunningly adhearing. -
Create a splatter station:
Set up a large cardboard box on its side to create a three-walled spray booth. This is crucial, as this technique can get messy. -
Position the vase:
Place the vase in the center of the box. If you have an old Lazy Susan or turntable, placing the vase on it now will make the rotation process much easier later. -
Mix the paint consistency:
Squeeze your blue, pink, and yellow paints into separate wells on a palette or into small cups. -
Thin the pigment:
Add a small amount of flow improver or water to the blue paint. I prefer a consistency similar to heavy cream—fluid enough to fly off the brush, but thick enough to hold its shape. -
Prepare remaining colors:
Repeat the thinning process for the pink and yellow paints so they are all ready to go before you start swinging the brush.
Step 2: Applying the Design
-
Test the flick:
Before hitting the vase, do a test flick on a piece of scrap paper inside your box to ensure the paint creates lines rather than just mist. -
Apply the first color (Blue):
Load the stiff brush with blue paint. Stand back slightly and use a sharp ‘whipping’ wrist motion to cast long, sweeping lines across the vase. -
Add texture:
For smaller speckles, hold the brush near the vase and run your thumb across the bristles to spray a fine mist of dots. -
Rotate and repeat:
Turn the vase roughly 90 degrees to expose a clean side and continue applying blue lines and splatters until you are happy with the coverage of this first tone. -
Clean or switch brushes:
Wash your brush thoroughly or switch to a fresh one to avoid muddying the colors. -
Apply the second color (Pink):
Using the same whipping motion, apply the pink paint. Aim to cross over some of the blue lines to create depth and visual interest. -
Add the accent color (Yellow):
Dip a soft round brush into the yellow paint. Since yellow is lighter, try dropping a few larger globules near the top rim and letting them naturally run down vertically. -
Fill in gaps:
Look for any large white negative spaces that feel unbalanced and target them with a final flick of yellow or pink. -
Tidy the rim:
If paint has splattered inside the mouth of the vase, use a damp paper towel to wipe the interior rim clean for a professional finish.
Paint Flow Pro-Tip
Mix a dedicated pouring medium into your acrylics instead of water. This keeps the colors vibrant, improves flow for those long sweeping lines, and prevents the paint from cracking when dry.
Step 3: Finishing Touches
-
Dry time:
Allow the vase to sit undisturbed for at least 24 hours. Because the splatters can be thick, they take longer to dry than a standard thin coat. -
Seal the artwork:
Once fully dry, take the vase to a well-ventilated area and apply two thin coats of clear glossy spray sealant to protect the design from chipping.
Runaway Drips?
If a paint drip is running too fast down the side, quickly turn the vase upside down. This uses gravity to stop the line in its tracks and creates an interesting directional twist in the pattern.
Place your newly decorated vase on a sunny windowsill and enjoy the bright splash of color it adds to the room

PENCIL GUIDE
Understanding Pencil Grades from H to B
From first sketch to finished drawing — learn pencil grades, line control, and shading techniques.
Explore the Full Guide
Elegant Gold Leaf Accents
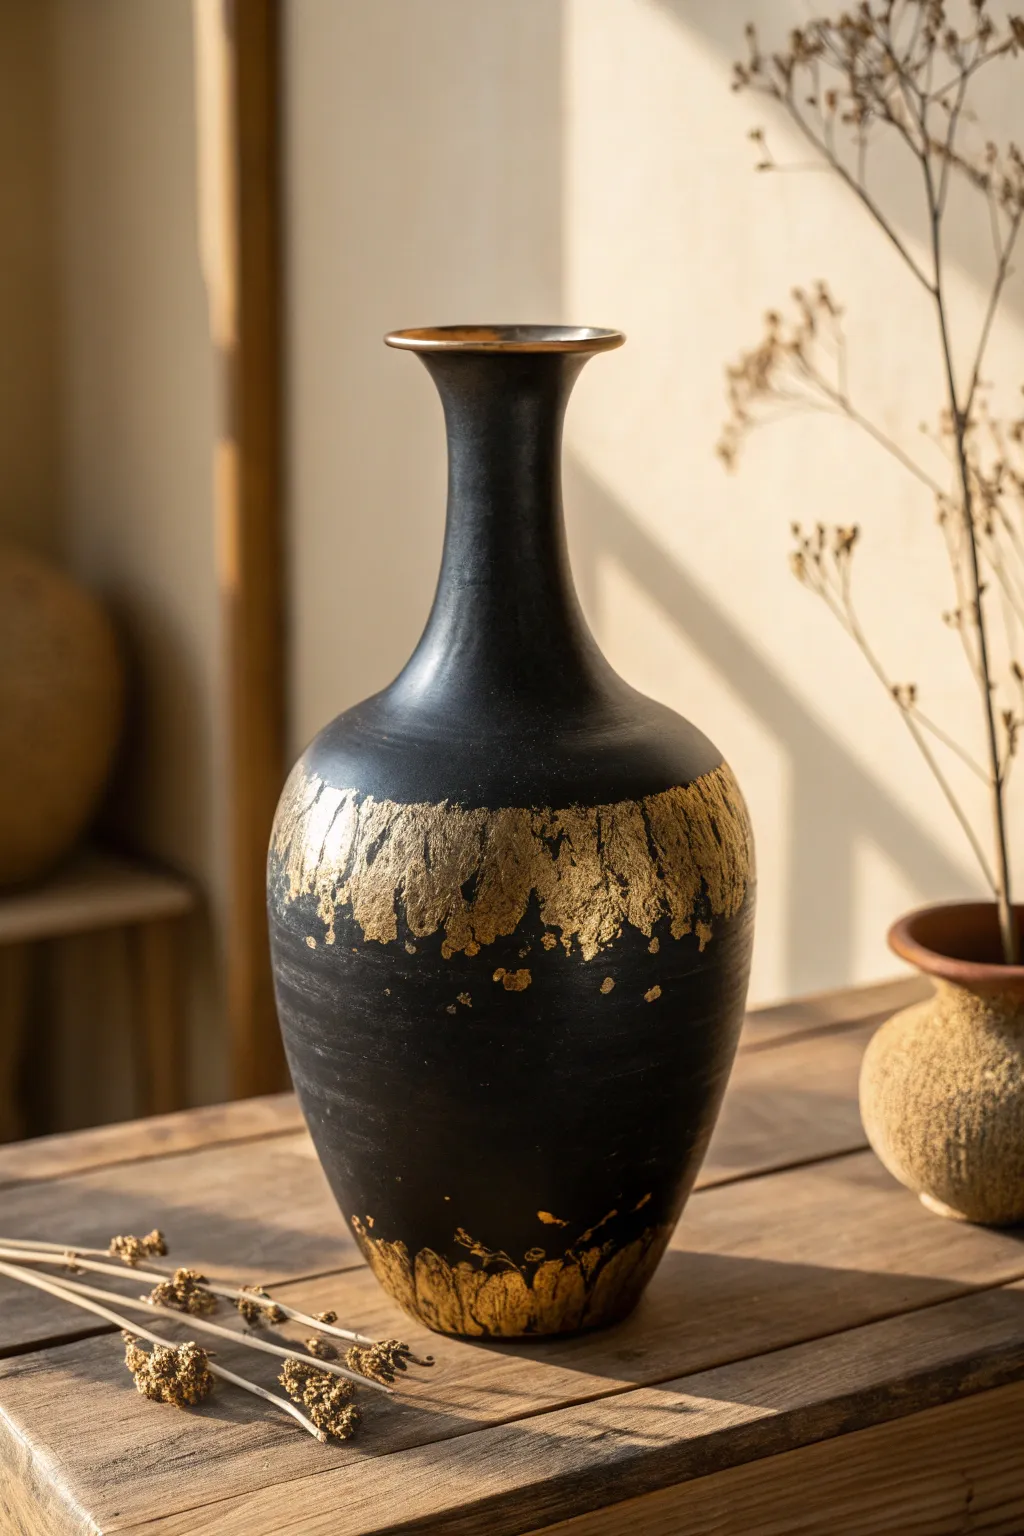
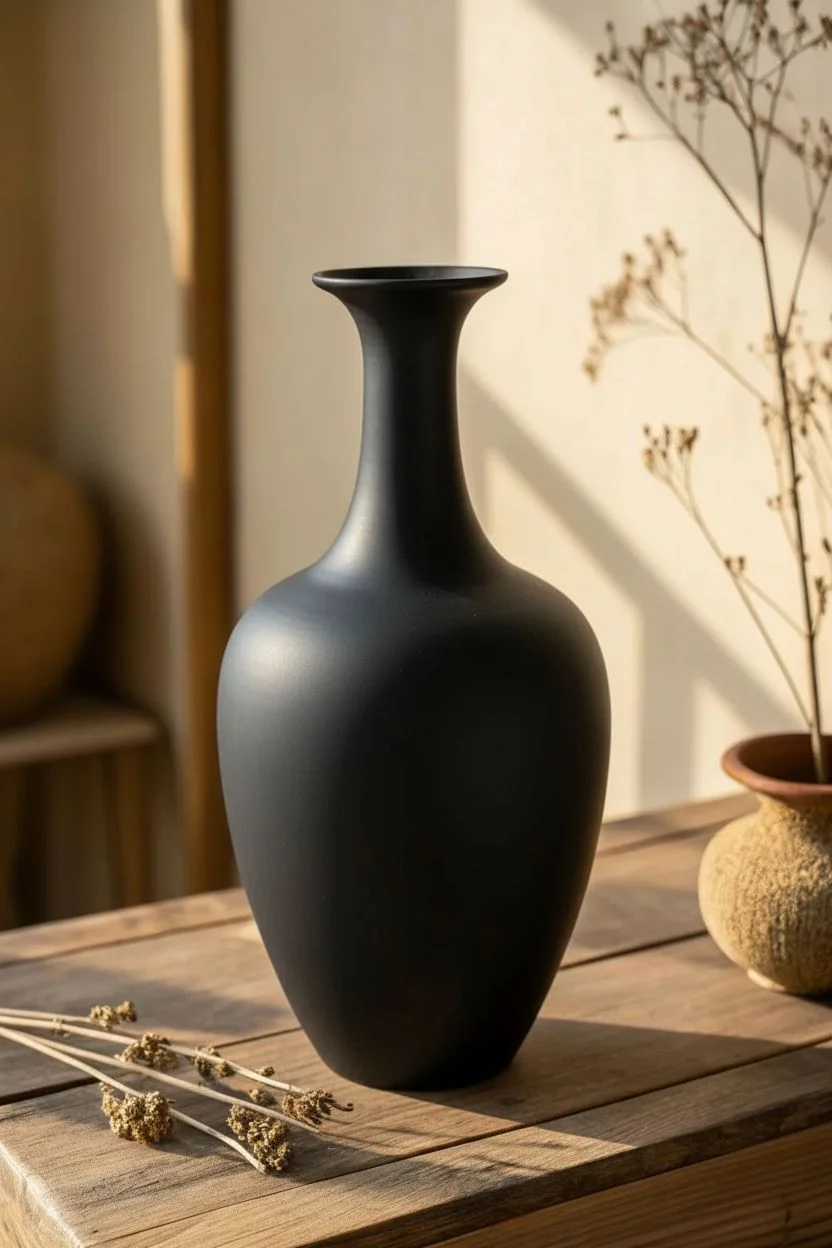
Transform an ordinary glass or ceramic vase into a statement piece of modern art with high-contrast textures. This project balances deep, matte black chalk paint with ragged, organic bands of shimmering gold leaf for a look that is both rustic and luxuriously elegant.
How-To Guide
Materials
- Tall ceramic or glass vase
- Matte black chalk paint
- Gesso or multi-surface primer
- Imitation gold leaf sheets
- Water-based metal leaf sizing (adhesive)
- Glossy clear sealer (spray or brush-on)
- Wide flat paintbrush
- Two soft synthetic brushes (one for sizing, one for leaf)
- Stiff bristle brush (for distressing)
- Fine-grit sandpaper
- Lint-free cloth
Step 1: Surface Preparation
-
Clean and Degrease:
Since oils from your hands can repel paint, wash the vase thoroughly with warm soapy water. Wipe it down with rubbing alcohol on a lint-free cloth and let it dry completely. -
Establish a Key:
If your vase is glazed ceramic or shiny glass, scuff the surface lightly with fine-grit sandpaper. This creates a ‘tooth’ for the primer to grip onto. -
Prime the Surface:
Apply a thin, even coat of gesso or multi-surface primer over the entire exterior. This ensures the dark topcoat will be opaque and adhere properly. -
Apply Base Color:
Once the primer is dry, brush on a coat of matte black chalk paint. Use long, vertical strokes to minimize texture, though chalk paint is generally very forgiving. -
Deepen the Tone:
Allow the first coat to dry for about 30 minutes, then apply a second coat of black. You want a solid, velvety finish with absolutely no light passing through.
Step 2: Structuring the Gold
-
Map the Design:
Visualize where you want the gold band. For the look in the image, aim for a wide band encircling the ‘belly’ of the vase and a smaller accent at the very bottom. -
Apply Sizing to the Center:
Dip a dedicated soft brush into the metal leaf sizing. Paint a band around the middle, but intentionally feather the top and bottom edges so they look ragged and uneven. -
Create Scattered Texture:
Using the tip of your brush, dab small dots of sizing just above and below the main band. This will create the ‘falling flake’ effect seen in the photo. -
Detail the Extremities:
Apply a thin strip of sizing around the very bottom foot of the vase and along the top rim lip. -
The Tacky Phase:
This is the most crucial step: wait for the sizing to turn from milky white to clear. It should feel sticky like tape, but not wet to the touch (usually 15-30 minutes).
Sticky Situation?
If the gold leaf refuses to stick, you likely applied it too late (sizing dried out) or too early (sizing was wet). The sizing must be clear and tacky. If missed, just re-apply sizing over the top.
Step 3: Application and Finishing
-
Apply the Leaf:
Pick up a sheet of gold leaf and gently lay it over the sticky center band. Don’t worry if it wrinkles; texture is desirable here. -
Cover All Areas:
Continue applying sheets until the sticky areas at the belly, base, and rim are fully covered. Overlapping sheets is perfectly fine. -
Initial Burnish:
Take a clean, soft dry brush and gently rub over the gold leaf backing paper (or directly on the leaf) to ensure it adheres firmly to the sizing. -
Distress the Edges:
Switch to a stiff bristle brush. Scrub vigorously in circular motions to remove the non-adhered leaf. This shreds the edges and reveals the scattered ‘fleck’ pattern. -
Clean Up:
Use a large fluffy brush to sweep away all the loose gold dust from the black areas of the vase. -
Seal the Work:
Because imitation gold leaf can oxidize and turn green over time, carefully apply a clear sealer over the gold areas to preserve the shine.
Pro Tip: Rustic Edges
To get that perfectly imperfect jagged edge, use an old, splayed paintbrush or even a scrunched-up piece of sponge to apply the sizing. Avoid straight lines to keep the look organic.
Place your finished vase near a window where natural light can catch the gold textures and contrast beautifully with the matte black base
Cosmic Galaxy Night Sky
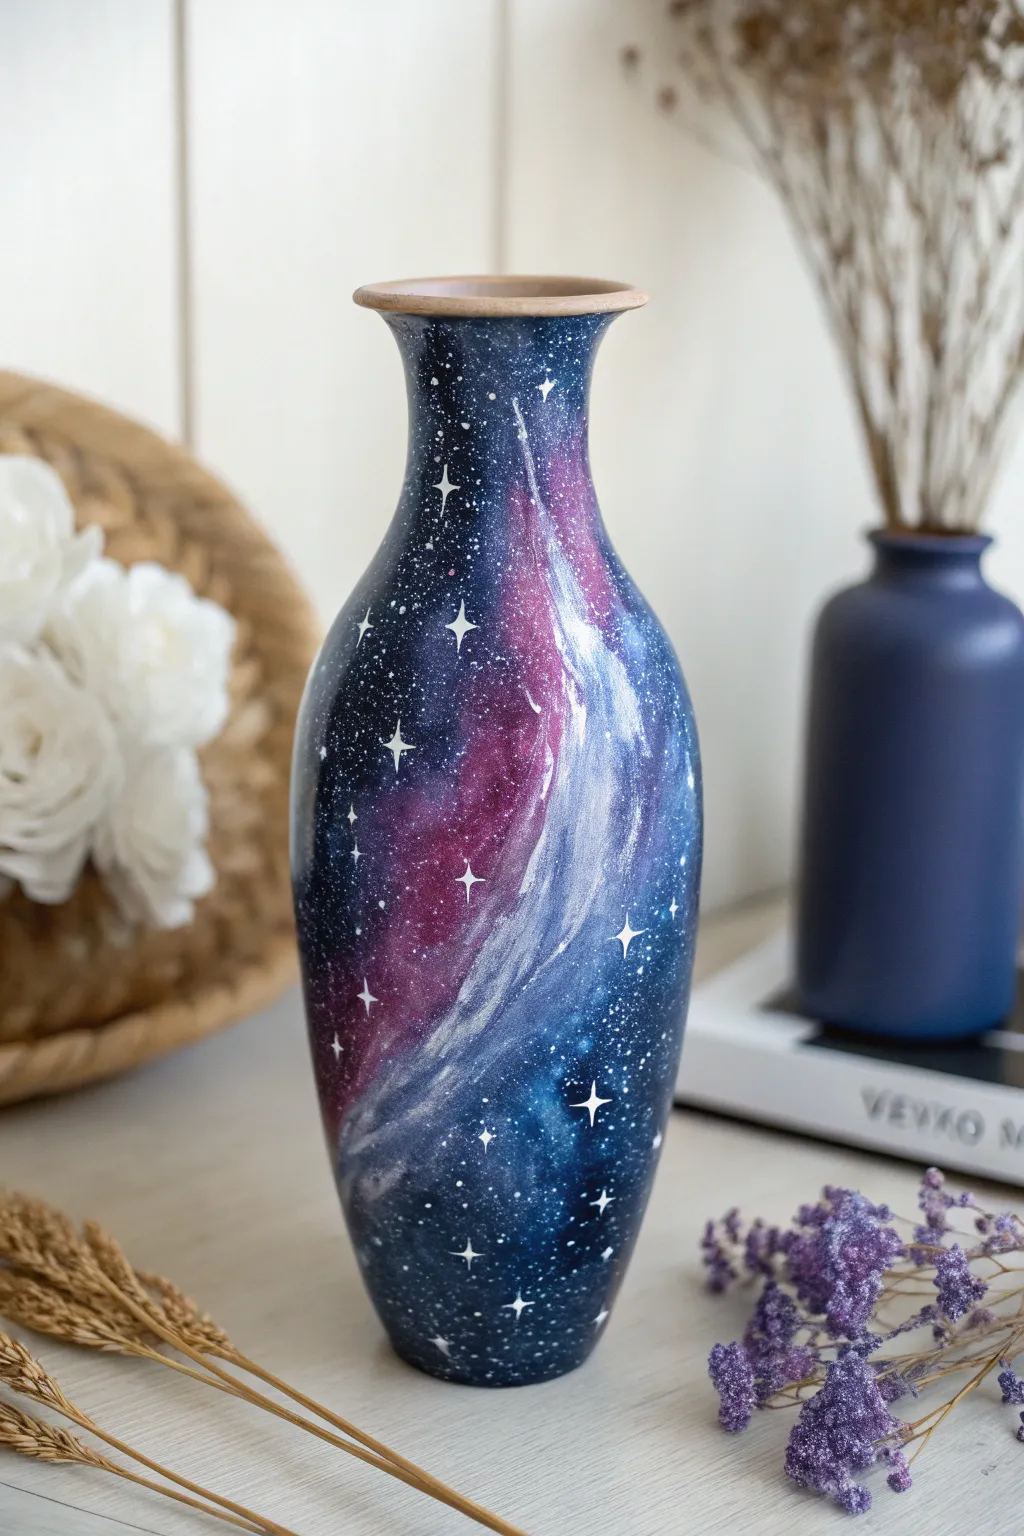
Transform a plain ceramic vase into a mesmerizing piece of the cosmos featuring deep indigo depths and glowing stardust trails. This project uses simple sponge techniques to achieve a professional, blended nebula effect that looks stunning on any shelf.
Step-by-Step
Materials
- Ceramic or glass vase (primed white)
- Acrylic paints (Black, Midnight Blue, Phthalo Blue, Magenta, White)
- Cosmetic makeup wedges (sponges)
- Wide flat paintbrush
- Fine liner detail brush (size 00 or 000)
- Old toothbrush
- Glossy clear acrylic sealer
- Paper plate or palette
- Water cup and paper towels
Step 1: Setting the Background
-
Prepare the surface:
Wipe down your vase with rubbing alcohol or soapy water to remove any oils. If the vase is glossy ceramic, give it a light sanding or apply a coat of bonding primer. -
Mix the night sky:
On your palette, mix a large amount of black with a touch of Midnight Blue. You want a color that is almost black but has a rich, cold undertone. -
Apply the base coat:
Using the wide flat brush, paint the entire exterior of the vase with your dark mixture. Use long, smooth strokes to minimize texture. -
Apply a second coat:
Let the first layer dry completely. Apply a second coat to ensure pure opacity; you don’t want the original vase color peeking through space.
Step 2: Creating the Nebula
-
Start the color trail:
Pour a small amount of Phthalo Blue and Magenta onto your palette. Dampen a makeup sponge slightly and squeeze out excess water. -
First nebula layer:
Dip the sponge into the Phthalo Blue. Dab—don’t drag—the paint onto the vase in a diagonal, curving line to mimic the shape shown in the image. -
Add warmer tones:
Using a fresh corner of the sponge, pick up some Magenta paint. Dab this along the edges of your blue swirl, allowing them to overlap slightly to create purple transitions. -
Build intensity:
Wait a few minutes for the paint to become tacky, then sponge a second layer of colored paint over the same areas to make the colors vibrant against the dark background. -
Create the glowing core:
Load a clean sponge area with a tiny bit of White paint. Gently dab this into the center of your blue swirl where you want the light to look most intense. -
Blend the light:
I like to use a clean, dry sponge to tap around the edges of the white patch while it’s wet, softening the transition so it looks like glowing gas rather than a solid white shape.
Muddy Galaxy?
If your nebula colors start turning brown or muddy, you are likely blending wet paint too much. Stop, let the layer dry completely, and then come back with fresh paint and a clean sponge.
Step 3: Starlight and Finishing
-
Prepare star paint:
Mix a small amount of white paint with a few drops of water until it reaches the consistency of heavy cream or ink. -
Spatter background stars:
Dip the bristles of an old toothbrush into the thinned white paint. Point the bristles toward the vase and run your thumb along them to flick a fine mist of tiny stars over the dark areas. -
Paint major stars:
Using your fine liner brush and undiluted white paint, create the larger ‘hero’ stars. Paint a small cross or four-pointed diamond shape like the ones in the reference photo. -
Add highlights:
Place a tiny white dot in the center of your four-pointed stars to make them pop. You can also add singular larger dots randomly around the nebula using the end of a paintbrush handle. -
Dry and seal:
Allow the vase to dry for at least 24 hours. Once fully cured, apply a coat of glossy clear acrylic sealer to protect the paint and give it that glass-like, polished finish.
Add Dimension
To make the nebula look like it has real depth, mix a very small amount of metallic silver or pearlescent medium into your white highlight paint for a subtle shimmer that catches the light.
Now you have a stunning custom centerpiece that captures the magic of the night sky right in your home


Serene Coastal Horizon
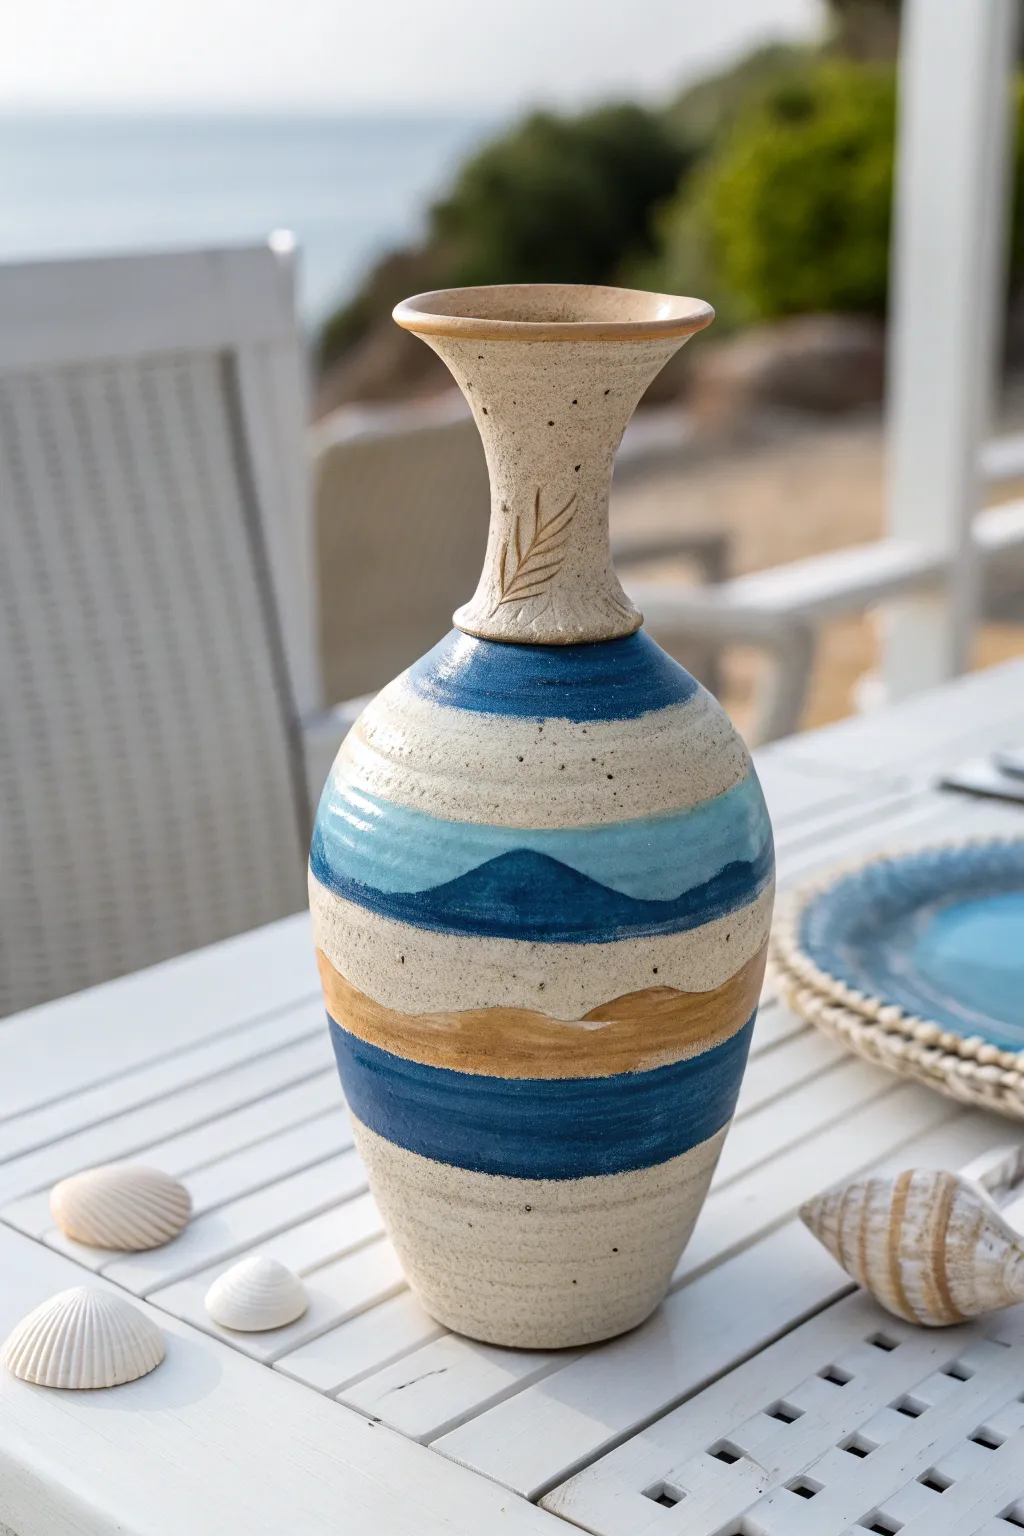
Bring the calming colors of the coast into your home with this faux-ceramic painting project. By layering sandy beiges, deep ocean blues, and warm ochres, you will transform a plain vase into a piece that mimics the look of high-end glazed pottery.
Step-by-Step Guide
Materials
- Bisque or plain ceramic vase (amphora shape preferred)
- Acrylic paints: Sand Beige, Navy Blue, Turquoise, Golden Ochre, Burnt Umber
- High-gloss varnish or sealer
- Texture paste or heavy body acrylic gel
- Flat synthetic brushes (medium and large)
- Fine liner brush
- Old toothbrush
- Pencil
- Paper plate or palette
Step 1: Base & Texture Prep
-
Clean and prime:
Wipe down your vase with a damp cloth to remove dust. If the surface is very slick, give it a light sanding to help the paint adhere. -
Apply the base color:
Mix a creamy Sand Beige color. Paint the entire vase, including the rim and inside the neck. Let this coat dry fully. -
Add a second coat:
Apply a second layer of the Sand Beige to ensure solid, opaque coverage without brushstrokes showing through. -
Create the stoneware speckle:
Dilute a small amount of Burnt Umber paint with water until it is inky. Dip an old toothbrush into this mixture. -
Splatter texture:
Hold the toothbrush near the vase and run your thumb over the bristles to flick tiny speckles onto the surface. I find doing this outdoors helps keep the mess contained. -
Dry completely:
Allow the speckles to dry completely so they don’t smear during the next steps.
Pro Tip: Authentic Glaze Look
Avoid using masking tape for your lines. Real pottery glazes naturally pool and wave. Hand-painting the bands creates those organic imperfections that make the piece look authentic.
Step 2: Painting the Ocean Bands
-
Mark the sections:
Lightly sketch horizontal guide lines around the vase with a pencil to mark where your colored bands will go, keeping the lines slightly wavy for an organic look. -
Paint the neck ring:
Using the Navy Blue, paint a bold ring right where the neck creates a curve, leaving the upper neck sandy beige. -
Add the turquoise water:
Directly below the navy ring, paint a band of Turquoise. Blend the bottom edge slightly while wet for a softer transition. -
Create the central mountain:
Paint a thick, wavy band of Navy Blue across the widest part of the vase. Create a small peak in the center to mimic a distant island or wave. -
Add the sand dune:
Beneath the central blue wave, paint a band of Golden Ochre. Let the top edge of this band follow the curves of the blue paint above it. -
Paint the deep sea bottom:
Add a final wide band of Navy Blue near the bottom of the vase, leaving the very base exposed in the original Sand Beige color. -
Refine the edges:
Go back over your bands with a steady hand. The lines don’t need to be perfectly straight; a slight wobble mimics hand-dipped pottery glaze.
Level Up: Texture Hack
Mix a teaspoon of baking soda into your Sand Beige paint before applying the base coat. This creates a gritty, gritty stone-like texture that feels just like unglazed terra cotta.
Step 3: Detailing & Glazing
-
Sketch the leaf:
On the upper neck (the sandy section), lightly pencil in a simple fern or wheat leaf shape. -
Create raised relief:
Use a liner brush and texture paste (or very thick paint) to paint over your leaf sketch. This builds up a physical ridge that looks like carved clay. -
Antiquing the leaf:
Once the texture paste is dry, mix a watery wash of Sand Beige and a tiny drop of Brown. Lightly brush this over the leaf to accentuate the grooves. -
Final inspection:
Check for any uneven patches in your blue and gold bands and touch up as needed. -
Apply the glaze:
Finish the project with two coats of high-gloss varnish. This is the secret step that turns matte acrylic paint into convincing ceramic glazing.
Place your beautiful new vase in a sunny spot and enjoy the serene, beachy atmosphere it creates.
Abstract Continuous Line Faces
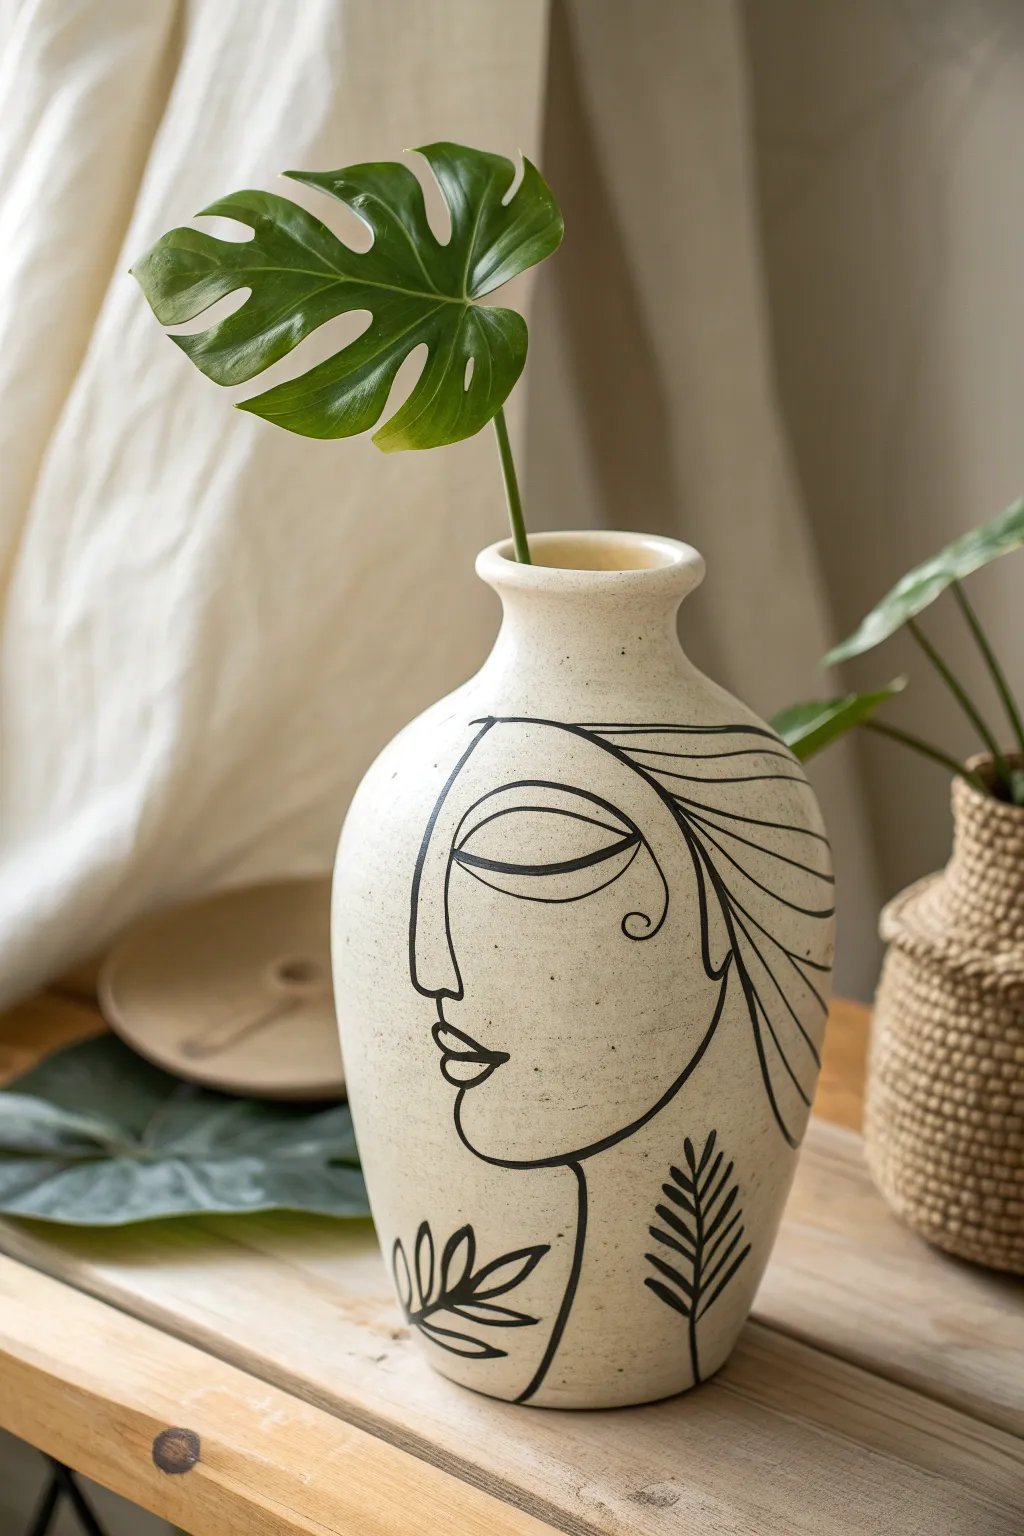

Transform a plain ceramic vessel into a piece of high-end modern décor using a faux stone finish and fluid line art. This project mimics the trendy continuous line aesthetic, featuring a serene face and botanical accents on a speckled cream background.
Detailed Instructions
Materials
- Ceramic or glass vase (smooth shape)
- Cream or off-white chalk paint
- Carbon black fluid acrylic paint
- Fine grit sandpaper (220 grit)
- Old toothbrush
- Pencil with distinct eraser
- 00 Script liner brush (long bristles)
- Matte clear spray sealer
- Paper plate or palette
- Water cup
Step 1: Preparing the Faux Stone Base
-
Clean the surface:
Wash your vase thoroughly with warm soapy water to remove any grease or dust. Dry it completely with a lint-free cloth. -
Creating tooth:
Lightly scuff the entire exterior of the vase with 220-grit sandpaper. This creates a rough texture that helps the paint adhere properly, especially if the original vase is glossy. -
First base coat:
Apply a base layer of cream chalk paint using a soft flat brush. Chalk paint is ideal here as it dries to a matte, plaster-like finish. -
Second coat application:
Once the first layer is dry to the touch, apply a second coat to ensure fully opaque coverage. I prefer to paint in cross-hatch motions here to add a subtle organic texture. -
Prepare the speckle mix:
Mix a tiny amount of black paint with a little water on your palette until it is runny. Dip the bristles of an old toothbrush into this mixture. -
Apply the speckles:
Hold the toothbrush about 6 inches from the vase and run your thumb across the bristles to flick tiny specks of paint onto the surface. Rotate the vase to get even coverage, creating that faux ceramic stone look. -
Complete dry time:
Allow the vase to dry completely, ideally for a few hours. The surface must be hard and dry before you start sketching.
Mastering the Flow
For smooth lines without shaky edges, hold your breath slightly while pulling the brush for long strokes. Resting your pinky finger on a dry part of the vase acts as a stabilizer.
Step 2: Sketching the Design
-
Plan the placement:
Visualize where the face will sit. The nose profile usually looks best centered on the widest part of the vases curve. -
Draft the profile:
Using a pencil very lightly, draw the forehead curve transitioning into the nose. Keep the line smooth and elongated. -
Feature details:
Sketch the lips and chin below the nose, and draw the large almond-shaped eye. The eye should connect near the bridge of the nose to maintain the abstract style. -
Hair flow:
Draw swooping detailed lines extending from the forehead and side of the face around the curve of the vase to represent flowing hair. -
Botanical accents:
Sketch two small fern-like stems near the base or chin area to balance the composition, as seen in the inspiration image.
Step 3: Painting the Line Art
-
Prepare flowing paint:
Mix your carbon black acrylic with a few drops of water or flow medium. The consistency should be like ink or heavy cream so it flows off the brush without dragging. -
Load the liner brush:
Saturate your long-bristled script liner brush with the inky paint. Twist the tip on the palette to ensure a sharp point. -
Paint the profile:
Starting from the top of the forehead, paint over your pencil lines. Apply steady, even pressure to keep the line width consistent. -
Detail the eye:
Paint the eye shape. Pay attention to the eyelid crease and the pupil; these curved lines give the face its serene expression. -
Execute the hair lines:
Paint the long hair strands. Use your whole arm rather than just your wrist to get smooth, confident sweeps that wrap around the vase. -
Fill the botanical leaves:
Paint the central stem for the leaves first, then attach the small leaflets. Press down slightly more on the brush to widen the leaf, then lift up to taper the point. -
Clean up:
Check for any uneven edges. If you made a major slip, you can touch it up with a dab of your cream base paint once the black is dry. -
Final seal:
Once all artwork is cured (wait at least 24 hours), spray the vase with a clear matte sealer to protect the paint from chipping and moisture.
Mistake Eraser
Don’t wipe wet black paint if you mess up! It will smear into a gray mess. Let the mistake dry completely, then paint over it with your cream base color to act as ‘liquid paper’.
Place a single bold monstera leaf inside and admire your chic new art piece.
Easy Hydro-Dipped Marbling
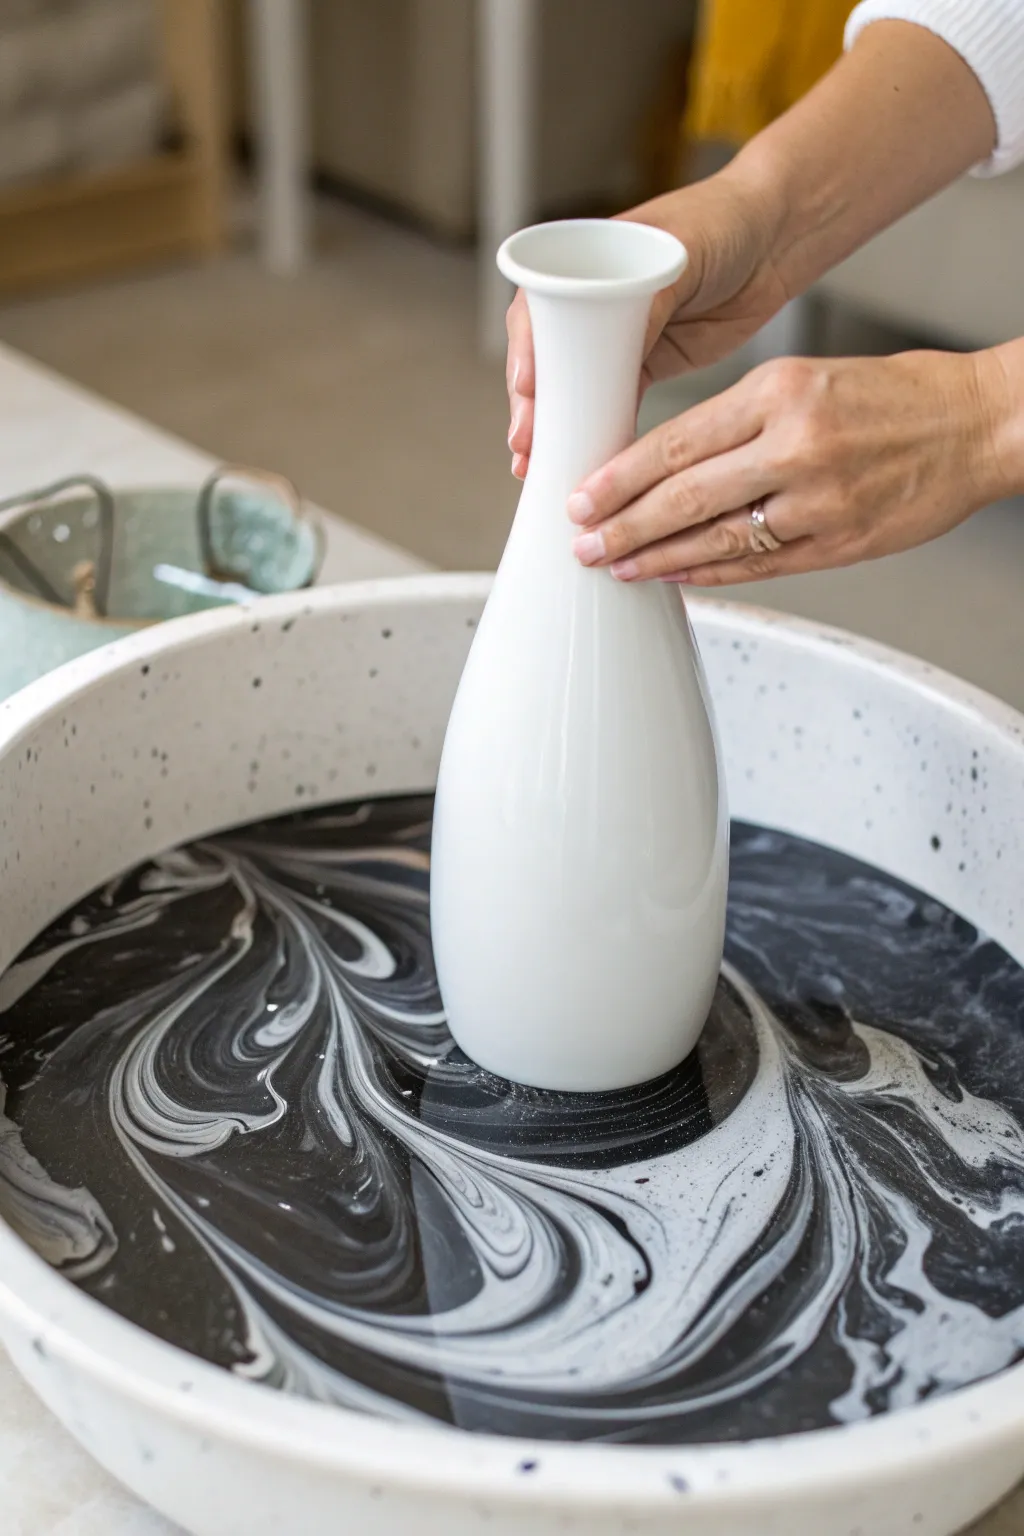
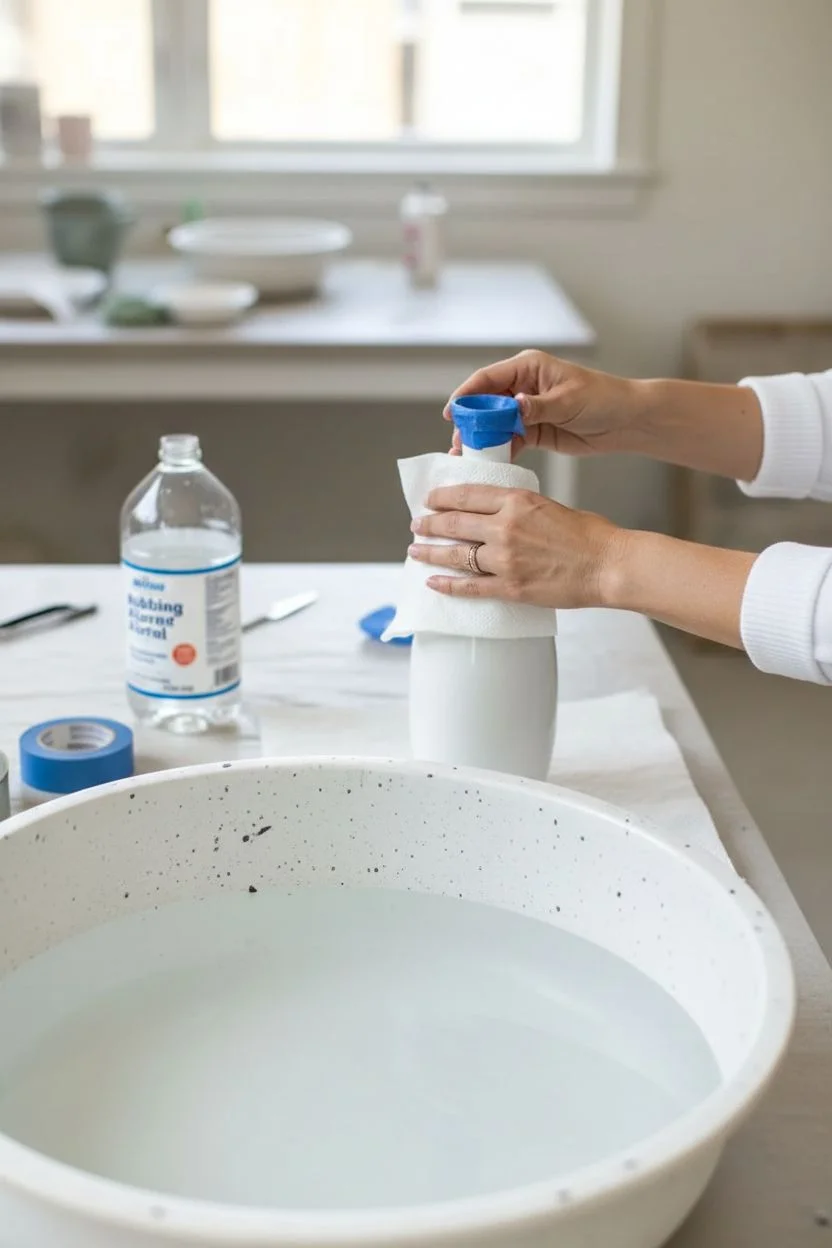
Transform a plain white ceramic vessel into a piece of modern art with this mesmerizing hydro-dipping technique. The swirling black and white patterns create a sophisticated marble effect that looks far more expensive than it actually is.
Step-by-Step Tutorial
Materials
- Tall white ceramic vase
- Large plastic tub or basin (deep enough to submerge that vase)
- Black and white marbling paints (or oil-based enamels)
- Wooden skewer or toothpick
- Painter’s tape
- Disposable gloves
- Paper towels
- Rubbing alcohol
- Clear acrylic sealer spray (optional)
Step 1: Preparation
-
Clean the surface:
Wipe the entire exterior of the vase with a paper towel dampened with rubbing alcohol to remove any oils or dust. -
Protect the interior:
Apply a strip of painter’s tape to the inside rim of the vase neck to keep the interior clean. -
Fill the basin:
Fill your large tub with room-temperature water, leaving enough space at the top so the water doesn’t overflow when the vase is added. -
Check temperature:
Ensure the water isn’t too cold or too hot, as extreme temperatures can cause the paint to clump or set too quickly.
Paint Sinking?
If your paint drops sink straight to the bottom instead of floating, your water is likely too cold. Let a new batch of water sit until it reaches room temperature.
Step 2: Creating the Marble Pattern
-
Prepare the paint:
Shake your black and white marbling paint bottles vigorously to ensure the pigments are well mixed. -
Apply the dark tone:
Gently drip several drops of black paint onto the surface of the water; it should spread out into a thin film. -
Add the highlights:
Immediately drip white paint into the center of the black circles or around the edges. -
Repeat for density:
Continue alternating drops of black and white until the water’s surface is mostly covered with paint. -
Swirl the design:
Take your wooden skewer and gently drag it through the paint surface to create swirls, but I advise against over-mixing to avoid muddy gray tones. -
Put on protection:
Slip on your disposable gloves now, as oil-based paints can be very stubborn to remove from skin.
Gilded Edges
Once the marbling is fully dry, run a gold leaf pen along the edges of the largest black swirls to create a luxurious Kintsugi-inspired effect.
Step 3: Dipping and Curing
-
Position the vase:
Hold the vase securely by the top rim, positioning it over the section of the pattern you like best. -
The dip:
Slowly and steadily lower the vase vertically into the water, letting the paint wrap around the ceramic surface. -
Submerge fully:
Continue pushing the vase down until the water line reaches the neck or your desired coverage point. -
Clear the surface:
While the vase is still underwater, quickly blow on the surface or use a piece of cardboard to sweep away the remaining paint film. -
Remove the vase:
Lift the vase out of the water only after the surface is clear; this prevents a second, messy layer of paint from ruining the pattern. -
Shake off excess:
Give the vase a very gentle shake to remove large water droplets, then set it upright on a covered surface. -
Dry completely:
Allow the vase to dry untouched for at least 24 hours to let the oil paint cure fully. -
Finishing touches:
Peel off the painter’s tape from the rim and, if desired, spray a light coat of clear acrylic sealer to protect the finish.
Place your newly marbled vase in a bright spot to show off those intricate organic patterns
Raised Dot Mandala Texture

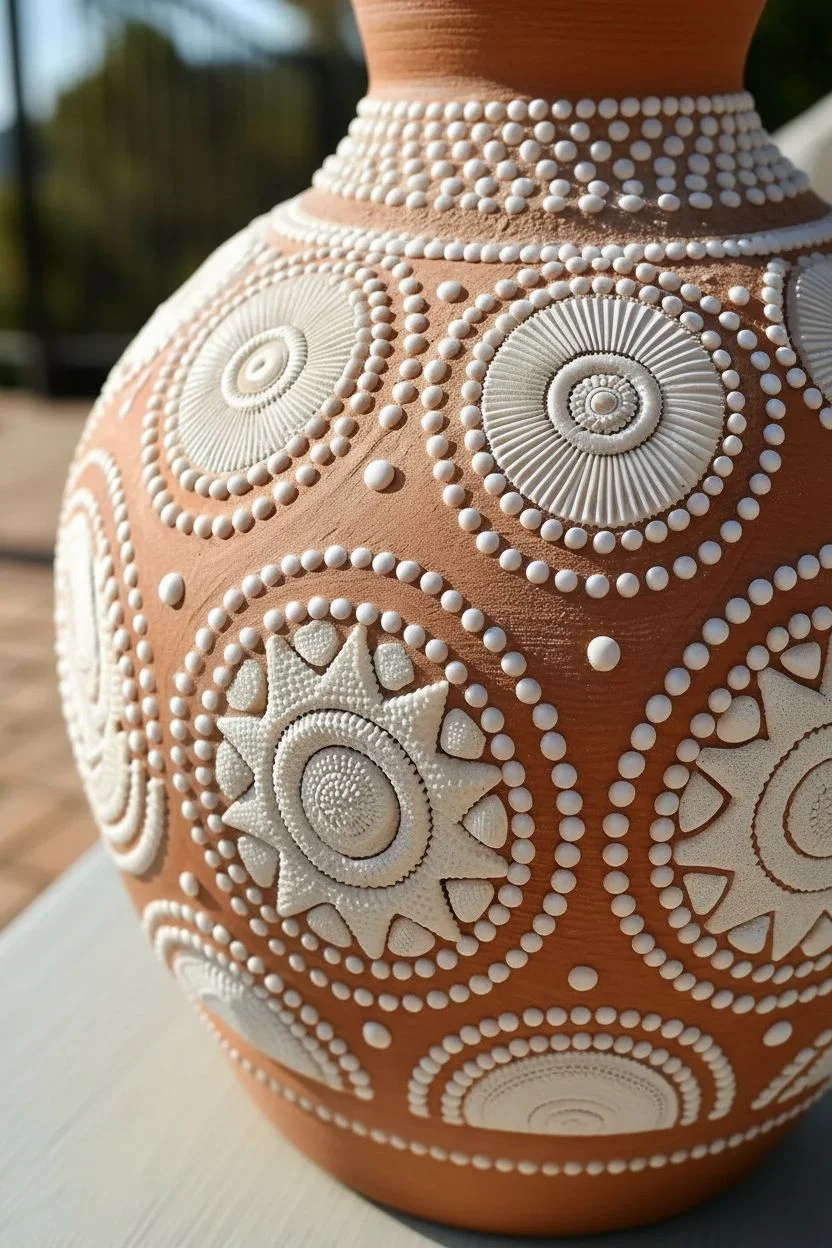
Transform a simple garden pot into a sophisticated art piece that mimics intricate slip-trailed pottery. By combining sculpted clay appliques with dimensional piping, you will build up layers of rich texture that beg to be touched.
Detailed Instructions
Materials
- Plain terracotta vase
- White air-dry clay
- White dimensional fabric paint (puff paint) or relief paste in a writer bottle
- Craft glue
- Sculpting marks tool or toothpick
- Stiff bristle brush
- Matte spray sealer
- Pencil
Step 1: Sculpting the Medallions
-
Clean surface:
Wipe your terracotta vase down with a damp cloth to remove any dust or oils and let it dry completely. -
Plan layout:
Lightly sketch the position of your main circular and sunburst elements using a pencil to ensure balanced spacing. -
Form clay discs:
Roll walnut-sized balls of air-dry clay and flatten them into smooth, even discs about 2-3 inches wide. -
Attach discs:
Apply a dab of craft glue to the back of a clay disc and press it firmly onto one of your marked circular spots. -
Create ridges:
Press a toothpick or needle tool into the center of the disc and drag it outward to the edge to create deep radiating lines. -
Refine texture:
Continue scoring lines all around the disc until it resembles a sand dollar or mushroom cap texture. -
Center detail:
Press the end of a paintbrush handle into the center to create a neat depression, then place a tiny ball of clay inside it. -
Sculpt stars:
For the star shapes, attach a clay disc and pinch the outer edges between your fingers to form triangular rays. -
Stipple surface:
Tap a stiff bristled brush vigorously over the star’s surface to create a rough, pebbled texture like coral. -
Dry components:
Allow all the clay appliques to dry and harden completely, which usually takes overnight.
Flatten Those Peaks
If your paint dots form sharp ‘Hershey Kiss’ peaks, lightly tap the bottom of the vase on the table immediately after piping to help them settle into smooth domes.
Step 2: Piping the Dots
-
Test flow:
Squeeze your dimensional paint bottle onto a scrap paper first to ensure the nozzle is clear and the flow is smooth. -
Frame elements:
Holding the bottle like a pen, gently squeeze to pipe a ring of uniform dots hugging the outer edge of your dried clay circles. -
Expand pattern:
Add a second and third concentric ring of dots around the medallions, perhaps slightly increasing the dot size for variety. -
Connect shapes:
Create undulating lines of dots that snake between the main clay features, connecting the design elements. -
Fill gaps:
I like to fill the empty triangular spaces between shapes with a cluster of dots, placing a large one in the center and smaller ones around it. -
Layer borders:
For the sunburst shapes, pipe dots in between the clay rays to emphasize the pointy silhouette. -
Dry paint:
Let the vase sit undisturbed for at least 24 hours to ensure the dimensional paint cures hard and won’t flatten. -
Seal artwork:
Finish by spraying the entire vase with a clear matte sealer to protect the raw clay and paint from moisture.
Cracking Clay?
If the clay shrinks and pops off while drying, glue it back on with strong heavy-duty adhesive. In the future, keep clay layers thinner to minimize shrinkage stress.
Display your textured masterpiece in a sunny spot where the light can cast dramatic shadows across the reliefs.
Faux Mediterranean Tile Mosaic
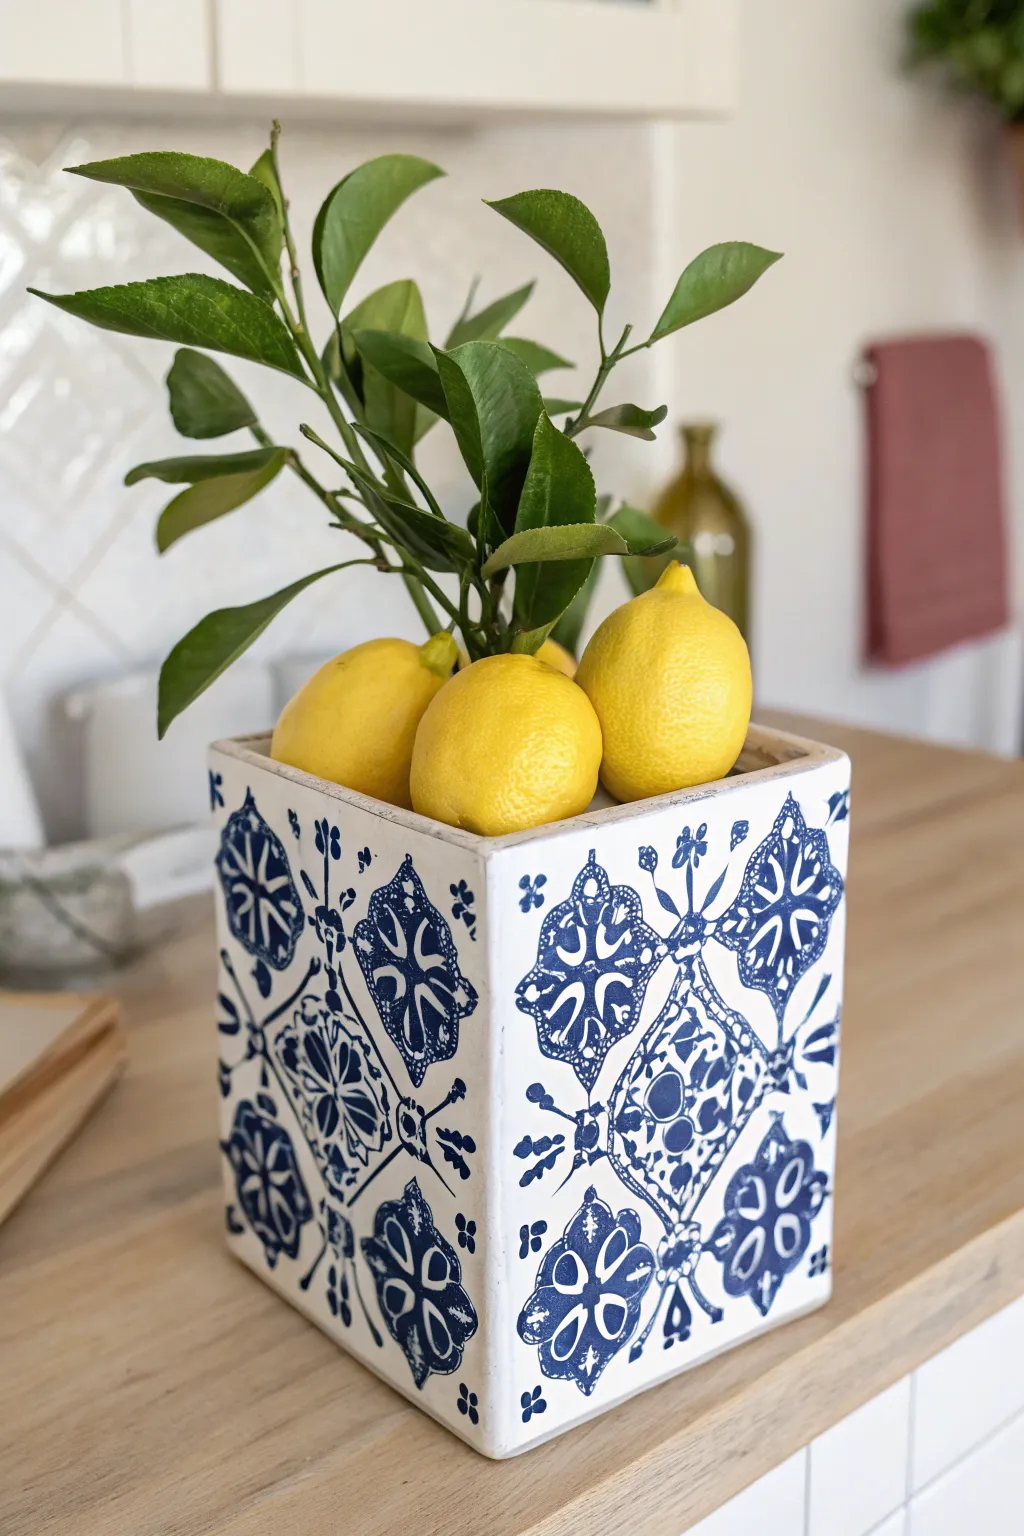
Capture the timeless elegance of Portuguese azulejos with this faux-tile painting project. By applying a geometric grid and specialized floral motifs to a simple square planter, you can create a high-end Mediterranean look that adds a splash of coastal charm to any room.
Step-by-Step
Materials
- Square ceramic or concrete planter
- Surface primer (spray or brush-on)
- Acrylic paint (Warm White and Navy/Cobalt Blue)
- Small flat brush
- Fine liner brush (size 00 or 0)
- Ruler or measuring tape
- HB Pencil
- Eraser
- Matte clear sealant spray
Step 1: Base Preparation
-
Clean the surface:
Wipe down your planter with a damp cloth to remove any dust, stickers, or grease. Let it dry completely. -
Apply primer:
Coat the exterior of the planter with a thin layer of primer to ensure your paint adheres well, especially if the surface is glazed. -
Paint the base coat:
Using the flat brush, cover the planter with the warm white acrylic paint. Apply long, smooth strokes. -
Apply a second coat:
Once the first layer is dry, apply a second coat of white to ensure a solid, opaque background. Allow this to cure fully before drawing on it.
Step 2: Creating the Grid
-
Measure the center points:
Using your ruler, measure the height of the planter and mark the horizontal center point on each side with a pencil. -
Draw the main diamonds:
Draw diagonal lines connecting the center points of adjacent sides. The lines should wrap around the corners, creating a large diamond shape on the corner edges. -
Create the inner markings:
Lightly sketch a smaller diamond inside each large diamond section to serve as a border for your floral motif. -
Sketch the motifs:
Lightly draw a four-petal flower shape in the center of the diamonds and small scroll details in the triangular spaces between diamonds. Don’t worry about perfection; pencil lines are just guides.
Control Freak?
If using a brush for the straight grid lines feels too intimidating, substitute the brush for a navy blue oil-based paint marker. It gives you the stability of a pen with the permanence of paint.
Step 3: Painting the Design
-
Mix your blue:
Squeeze out your navy blue paint. If it feels too thick, add a tiny drop of water to help it flow smoothly off the liner brush. -
Outline the grid:
Carefully paint over your main diagonal pencil lines with the blue paint to establish the ’tile’ boundaries. -
Paint the floral centers:
Fill in the four-petal shapes in the center of your diamonds. Leave small white gaps between the petals to mimic the look of stenciled tiles. -
Add petal details:
I like to add a tiny white dot or line inside the blue petals while they are wet to give them depth, or paint them solid and add white on top later. -
Fill the decorative triangles:
paint the scroll or floral details in the triangular sections above and below the diamonds. -
Add ornamental flourishes:
Using the very tip of your fine brush, add small dots and thin lines extending from the main floral shapes to fill empty white space. -
Refine the lines:
Go back over your diamond borders to thicken them slightly if needed, mimicking the grout lines of real tile.
Pro Tip: Consistency
Cut a small diamond template out of cardstock that fits your grid size. Trace around this template for every section instead of free-handing to ensure your pattern stays perfectly symmetrical.
Step 4: Finishing
-
Clean up:
Once the blue paint is dry to the touch, gently erase any visible pencil lines that weren’t covered by paint. -
Touch up:
Use a small brush with white paint to clean up any blue smudges or sharpen edges that became too thick. -
Seal the work:
Spray the entire planter with a matte clear sealant to protect your design from water and wear.
Now, fill your beautiful new vessel with fresh lemons or greenery to complete that sunny Mediterranean vibe.
Midnight Garden Silhouettes
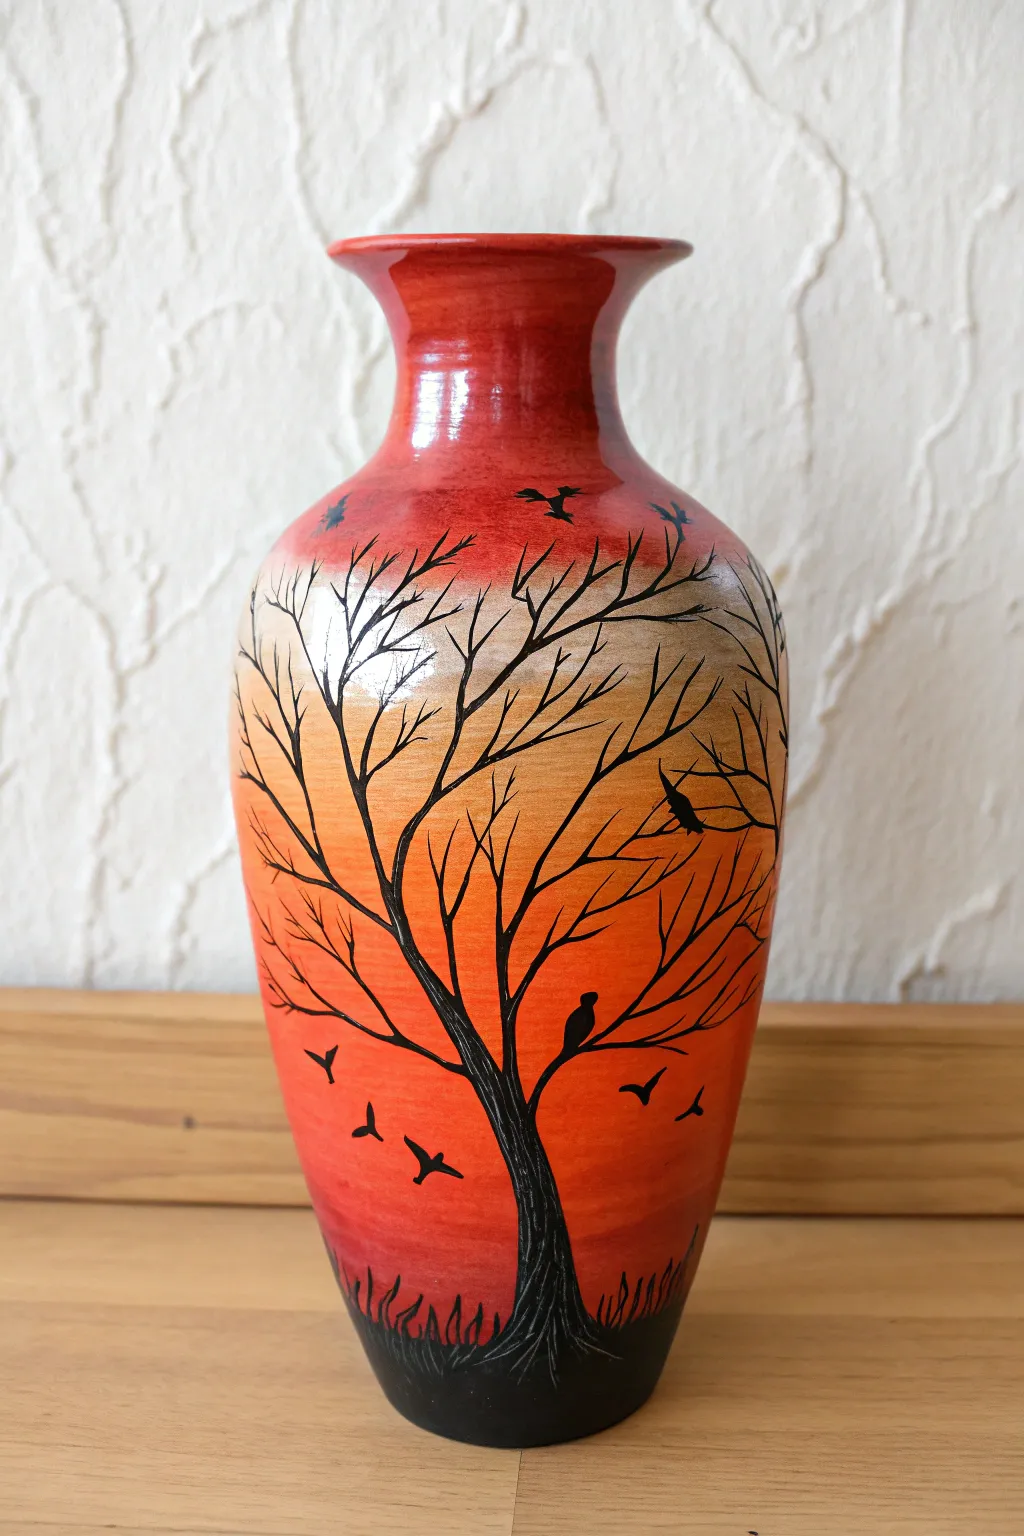
Transform a plain ceramic vase into a stunning twilight scene featuring a glowing gradient background. This project captures the quiet beauty of a bare tree against a setting sun using warm acrylic blending and crisp silhouette techniques.
Step-by-Step Guide
Materials
- Ceramic or glass vase
- Rubbing alcohol and paper towel
- White gesso or primer
- Acrylic paints (Crimson Red, Pumpkin Orange, Bright Yellow, White, Mars Black)
- Wide flat brush (3/4 inch)
- Medium round brush
- Fine liner brush (size 0 or 00)
- Acrylic gloss varnish
- Palette and water cup
Step 1: Preparation and Base
-
Clean the surface:
Wipe down the entire exterior of the vase with rubbing alcohol to remove any oils or dust, ensuring the paint adheres properly. -
Prime the vase:
Apply a coat of white gesso or primer over the entire surface. This white base is crucial to make the transparent sunset colors appear vibrant. -
Let it dry:
Allow the primer to dry completely. If the coverage is patchy, apply a second thin coat and let it dry again.
Blending Troubles?
If the paint dries too fast while blending the sunset, mix a drop of ‘slow drying medium’ or retarder into your acrylics. This keeps the paint workable longer giving you a smoother fade.
Step 2: Creating the Sunset Gradient
-
Mix the highlight color:
On your palette, mix a small amount of white with bright yellow to create a pale, creamy sunlight color. -
Paint the highlight band:
Using the wide flat brush, paint a band of the pale yellow mix around the upper-middle section of the vase, where the sun’s glow is strongest. -
Apply the orange bands:
Clean your brush, then apply pumpkin orange immediately above and below the pale yellow band. -
Add the red sections:
Paint the neck and the lower body of the vase with crimson red, leaving space at the very bottom for the black ground. -
Blend the transitions:
While the paint is still wet, gently softly brush over the lines where colors meet to create a smooth gradient. I like to use a slightly damp brush here to help the colors melt together. -
Apply a second coat:
Once the first layer is dry, repeat the gradient process. Acrylics often need two coats to look solid and opaque.
Level Up
Add depth by mixing a dark grey for distant trees in the background before painting the main black tree. This creates an atmospheric layering effect known as perspective.
Step 3: Painting the Silhouette
-
Create the ground:
Using black paint and a medium round brush, paint the bottom inch of the vase solid black, creating an uneven, organic line for the terrain. -
Start the trunk:
Switch to a smaller brush. Paint the main tree trunk rising from the ground, making it wider at the base and tapering as it moves upward. -
Paint main branches:
Extend 3 to 4 main branches from the trunk, reaching up towards the neck of the vase. Ensure they bend and twist naturally. -
Add intricate twigs:
Using your finest liner brush and thinned black paint (ink consistency), pull tiny twigs off the main branches. Use very light pressure for delicate lines. -
Add the grass:
At the black base, use the liner brush to flick short, quick strokes upward to mimic blades of grass.
Step 4: Details and Finish
-
Paint the perched bird:
Choose a sturdy branch and paint a small, simple oval shape with a beak and tail to represent a perched bird. -
Add flying birds:
Paint small ‘V’ or ‘M’ shapes in the upper red/orange section to create the illusion of a flock flying in the distance. -
Check for gaps:
Look over your silhouette work. If the black looks thin in areas, dab a little more paint on to ensure it is solid and dark. -
Seal the artwork:
Allow the vase to dry for at least 24 hours. Apply a coat of acrylic gloss varnish to protect the paint and give it a polished, ceramic shine.
Place your beautiful new vase on a shelf where it can catch the light and show off that warm sunset glow


Have a question or want to share your own experience? I'd love to hear from you in the comments below!