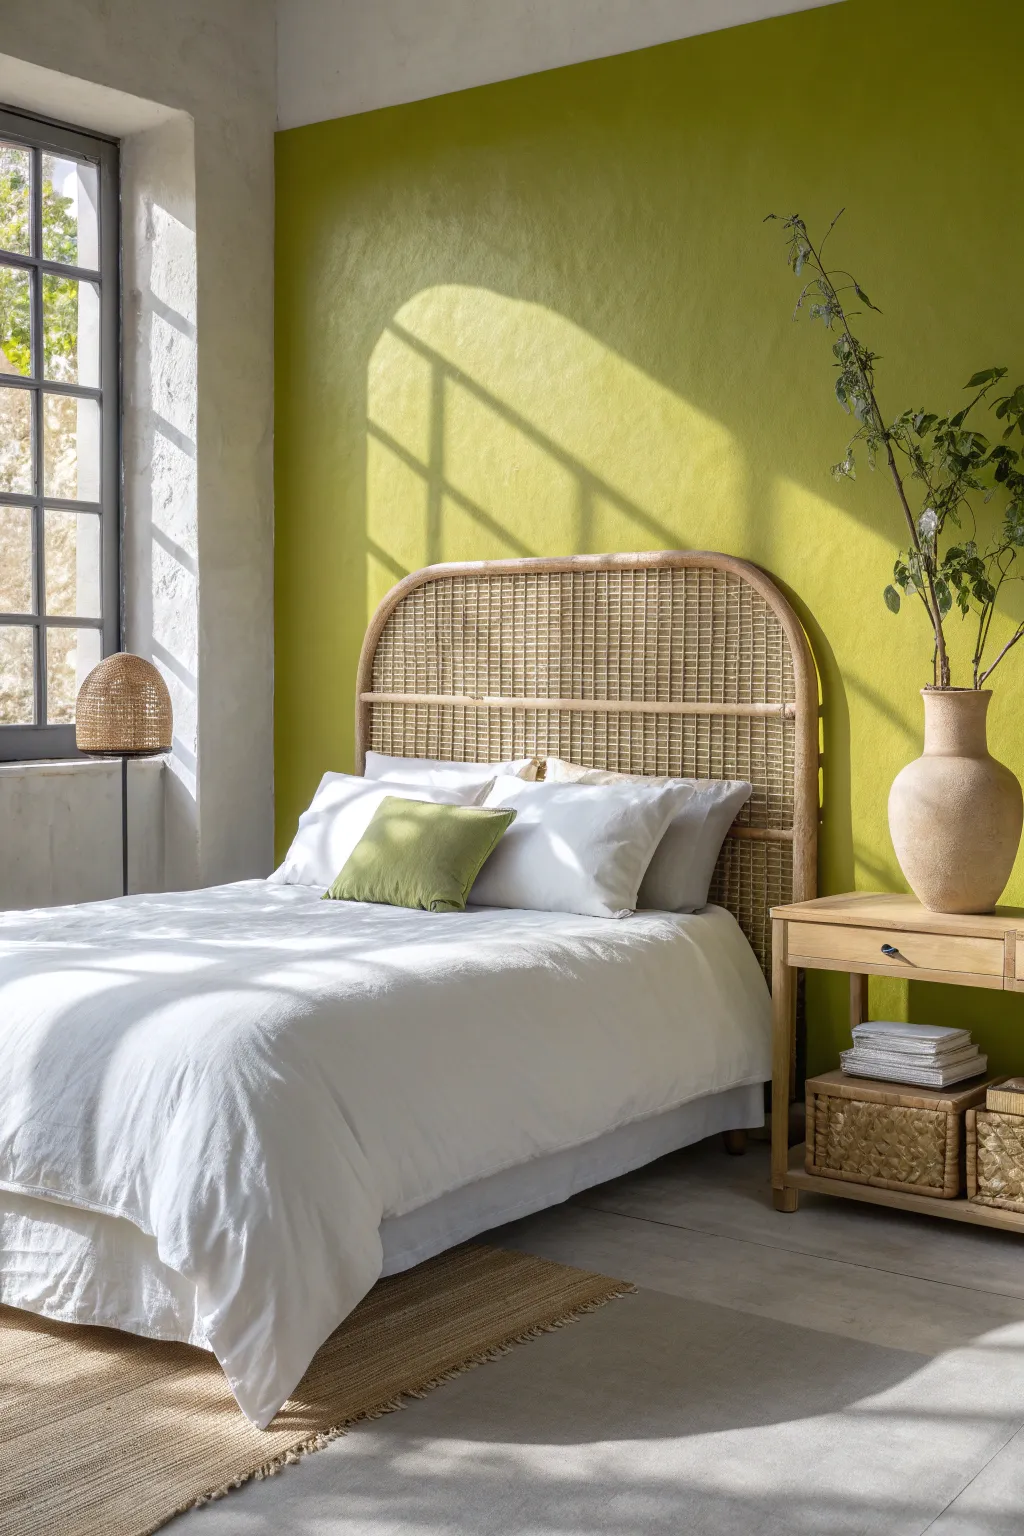
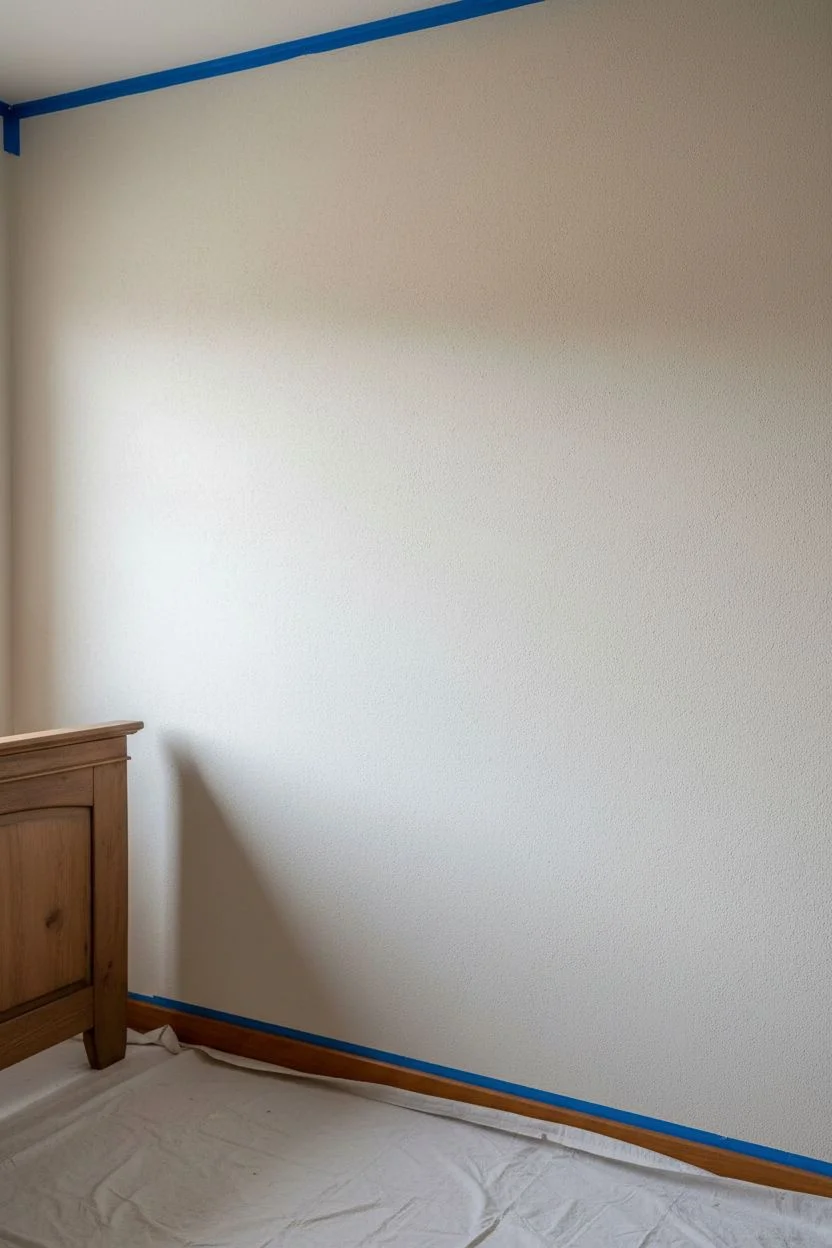
Transforming your personal sanctuary begins with choosing the right palette, and I have gathered my favorite inspirations from the studio to help you treat your walls like a fresh canvas. Whether you are craving a moody, cocoon-like atmosphere or a light-filled retreat, these artistic concepts will guide you toward the perfect hue for your space.
Layered Warm Whites
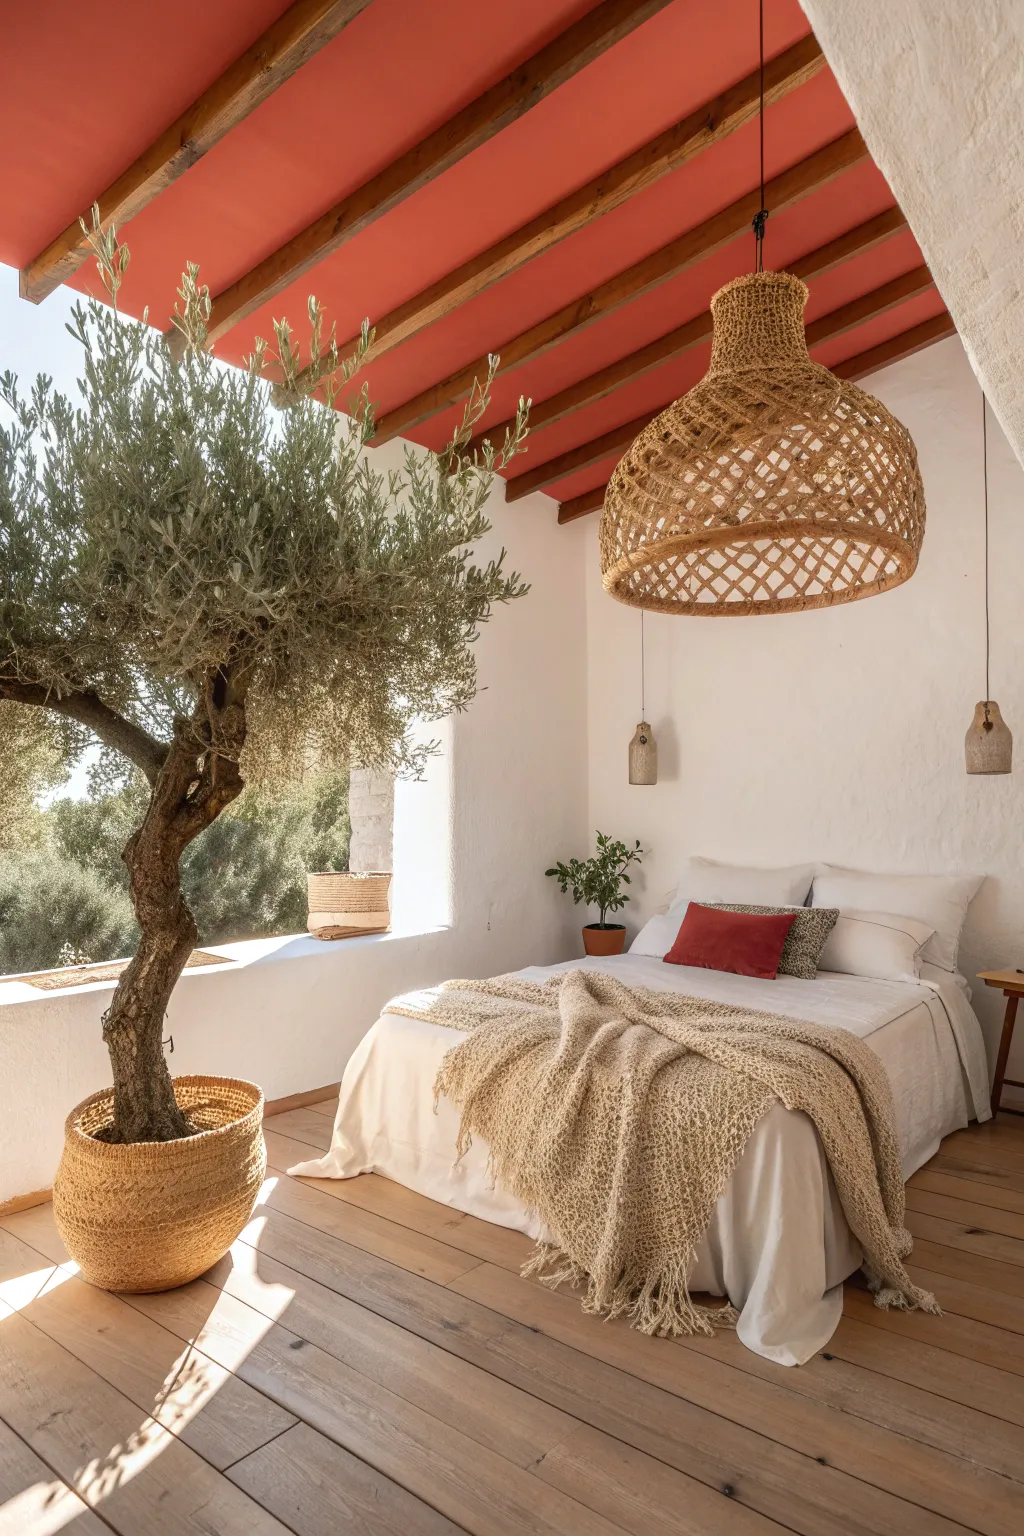
“t”: “Mediterranean Wabi-Sabi Bedroom Makeover”,
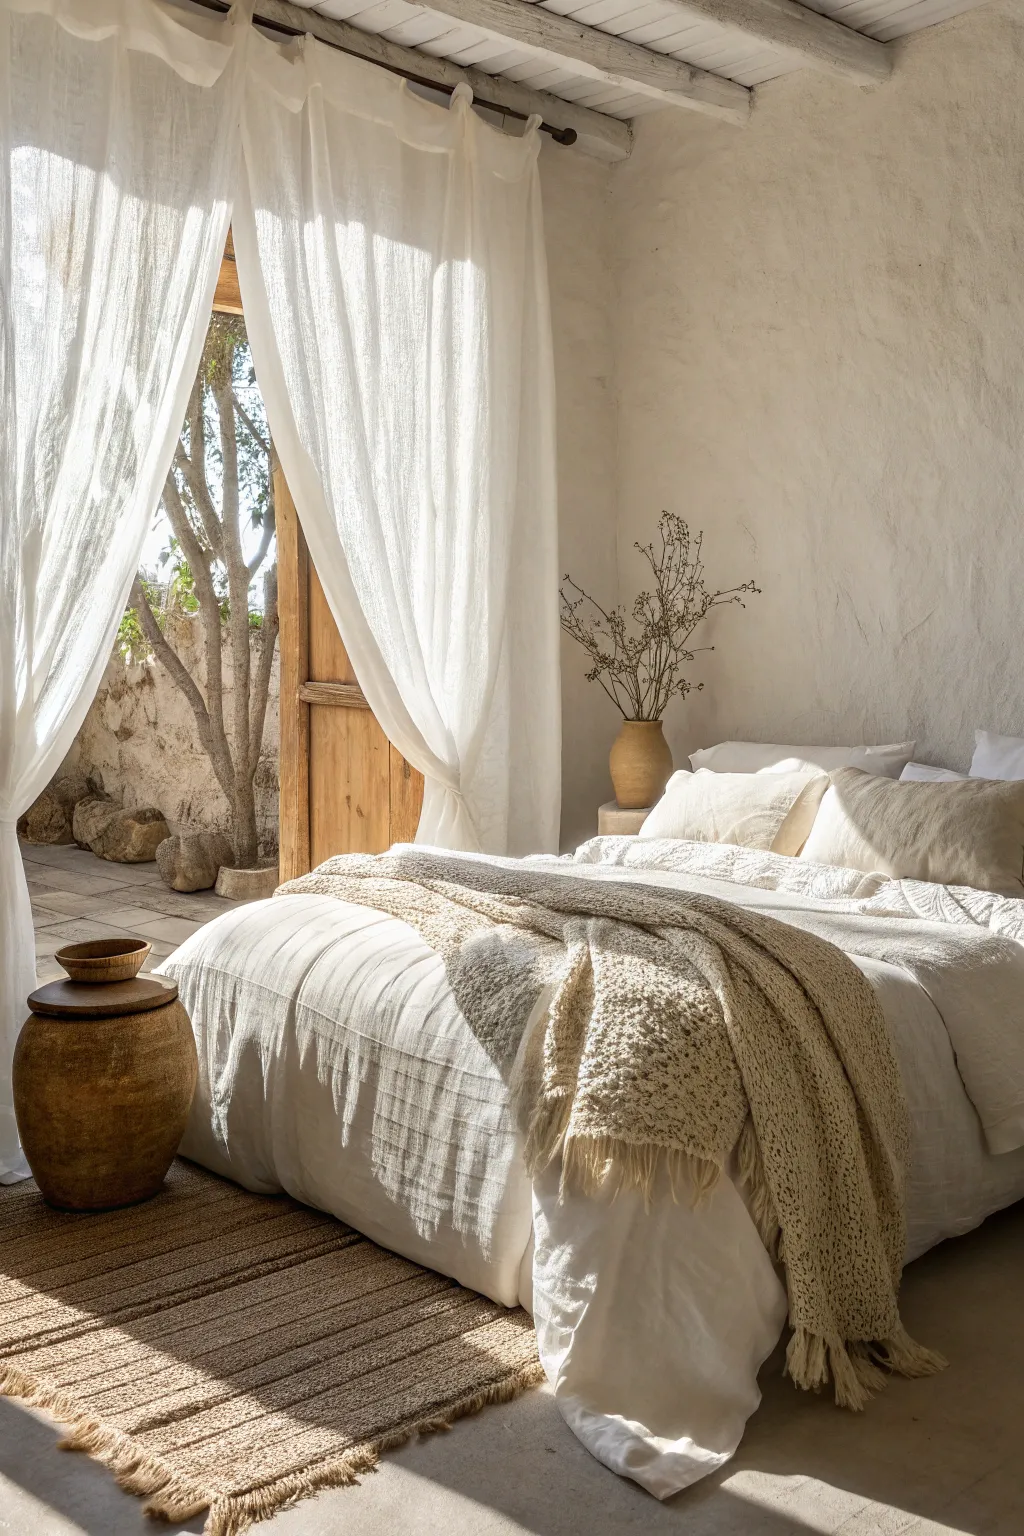
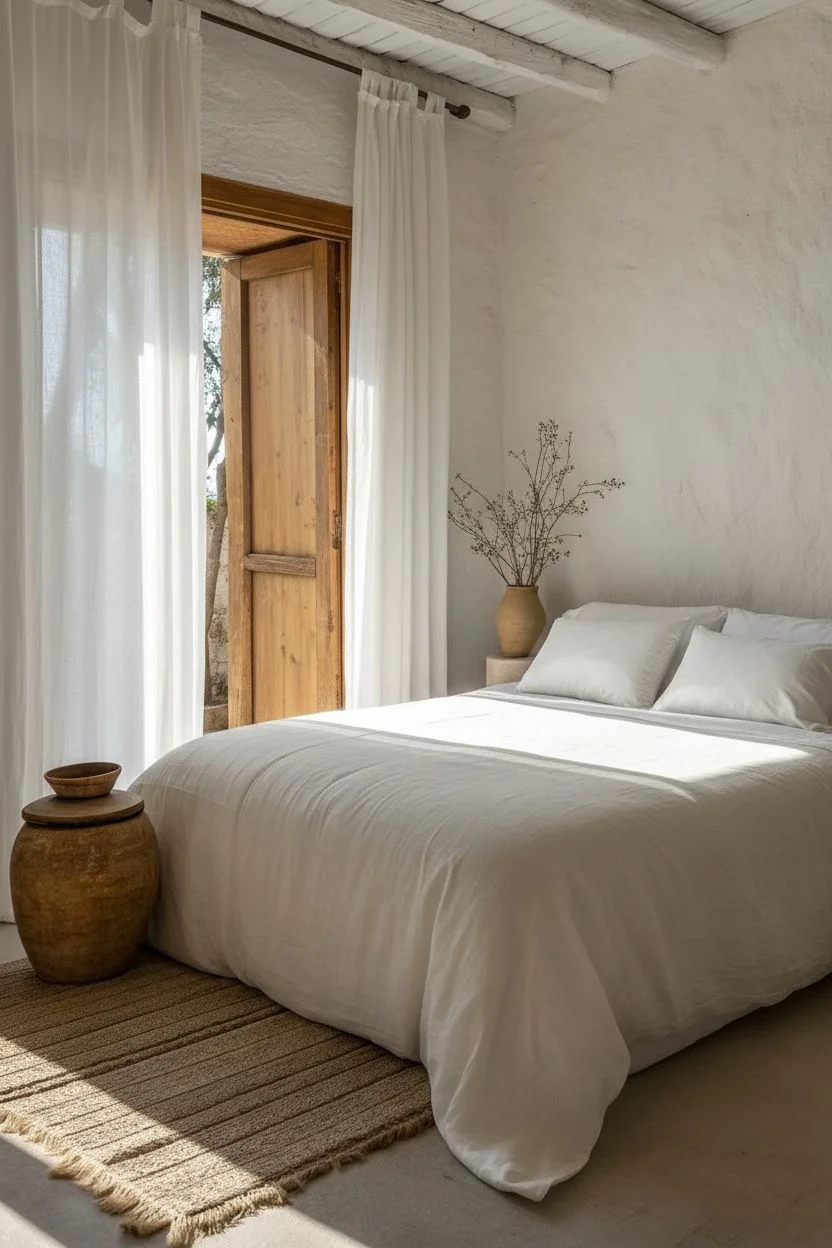
“i”: “Transform your space into a serene, light-filled sanctuary using textured limewash techniques and layered organic textiles. This project focuses on achieving that cloudy, old-world wall finish and styling with warm whites for a cohesive, restful look.”,
“m”: [
“Lime-based paint (Warm White or Sand)”,
“Acrylic mineral primer”,
“5-inch masonry/block brush”,
“Painter’s tape”,
“Drop cloths”,
“Mixing bucket and


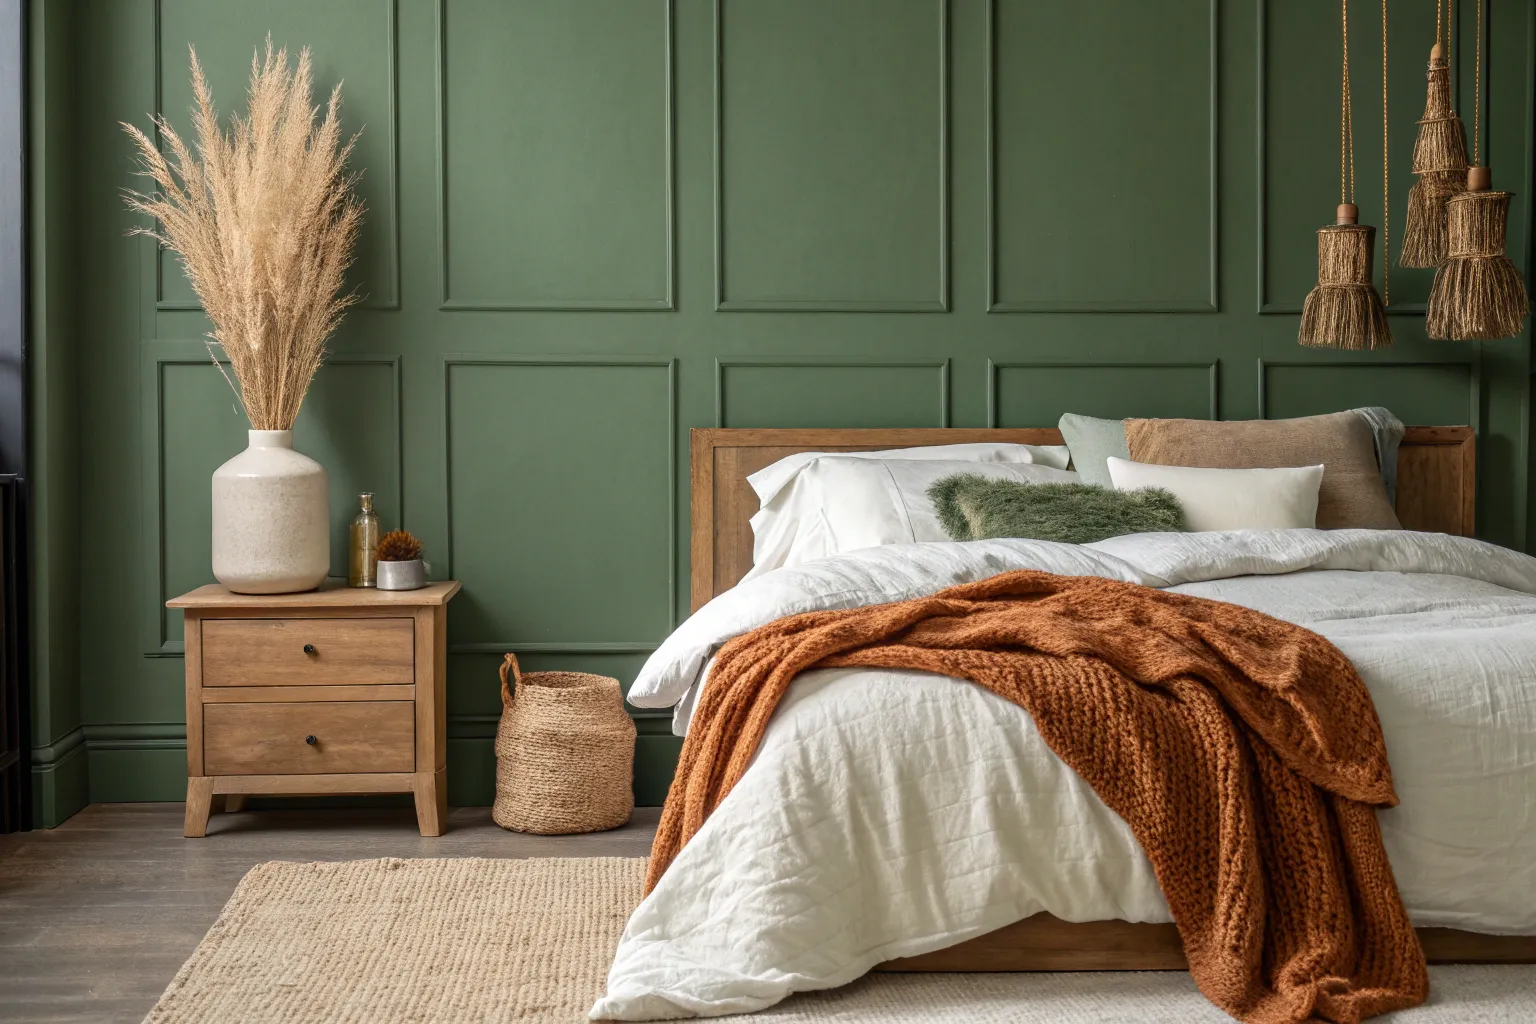
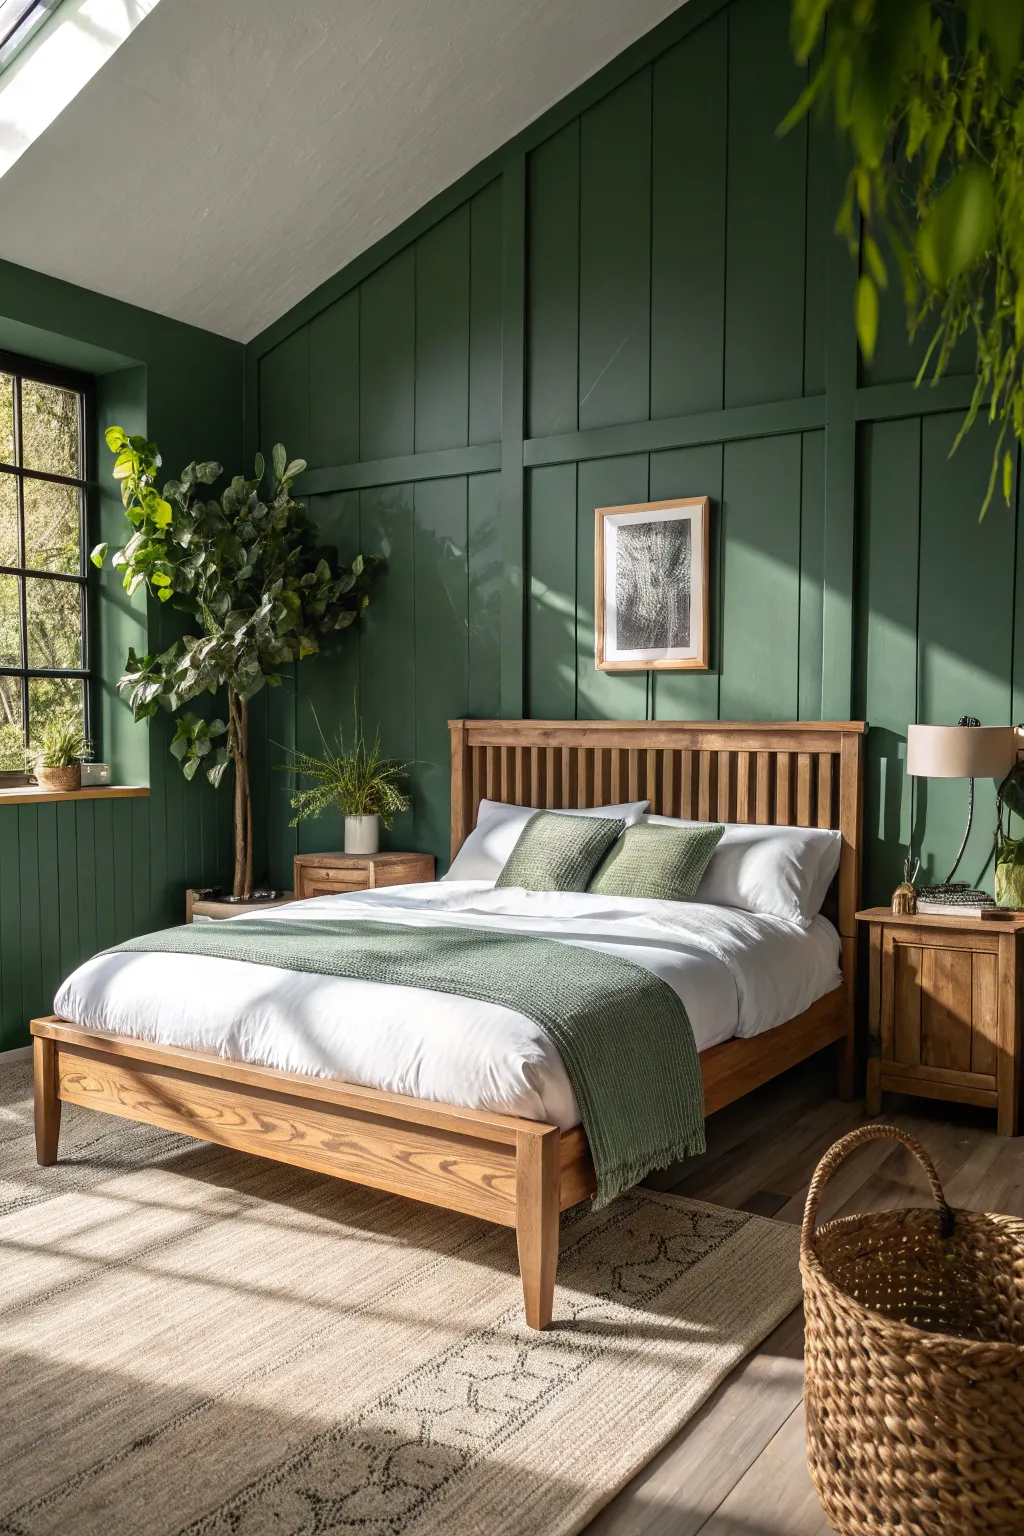
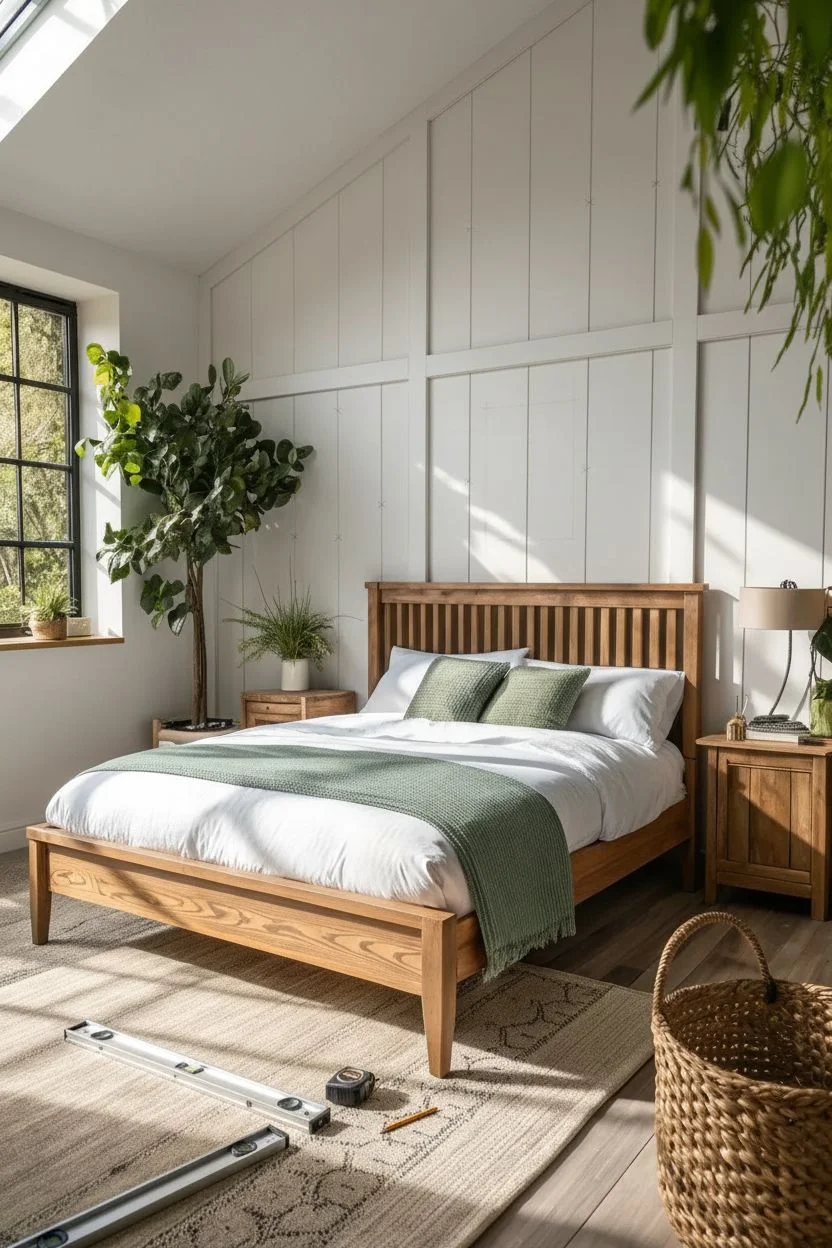
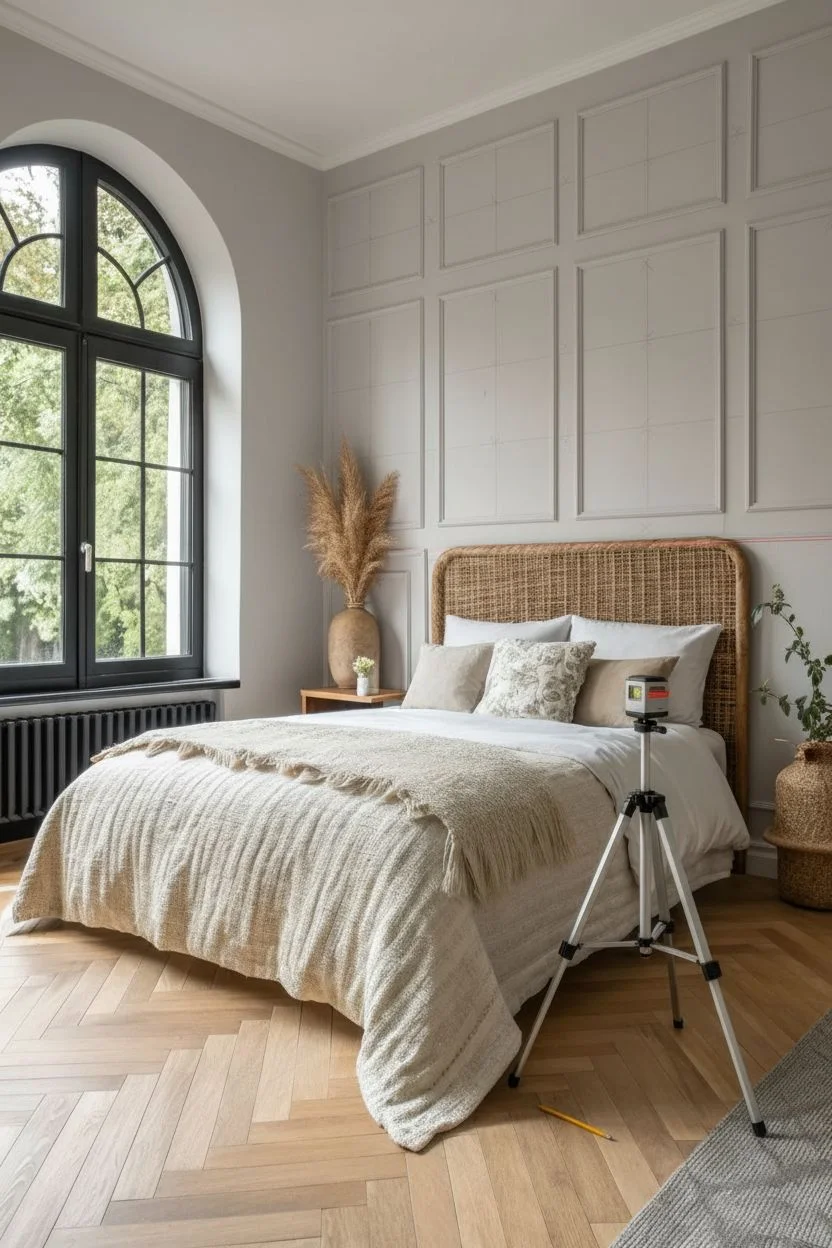
Soothing Greige Backgrounds
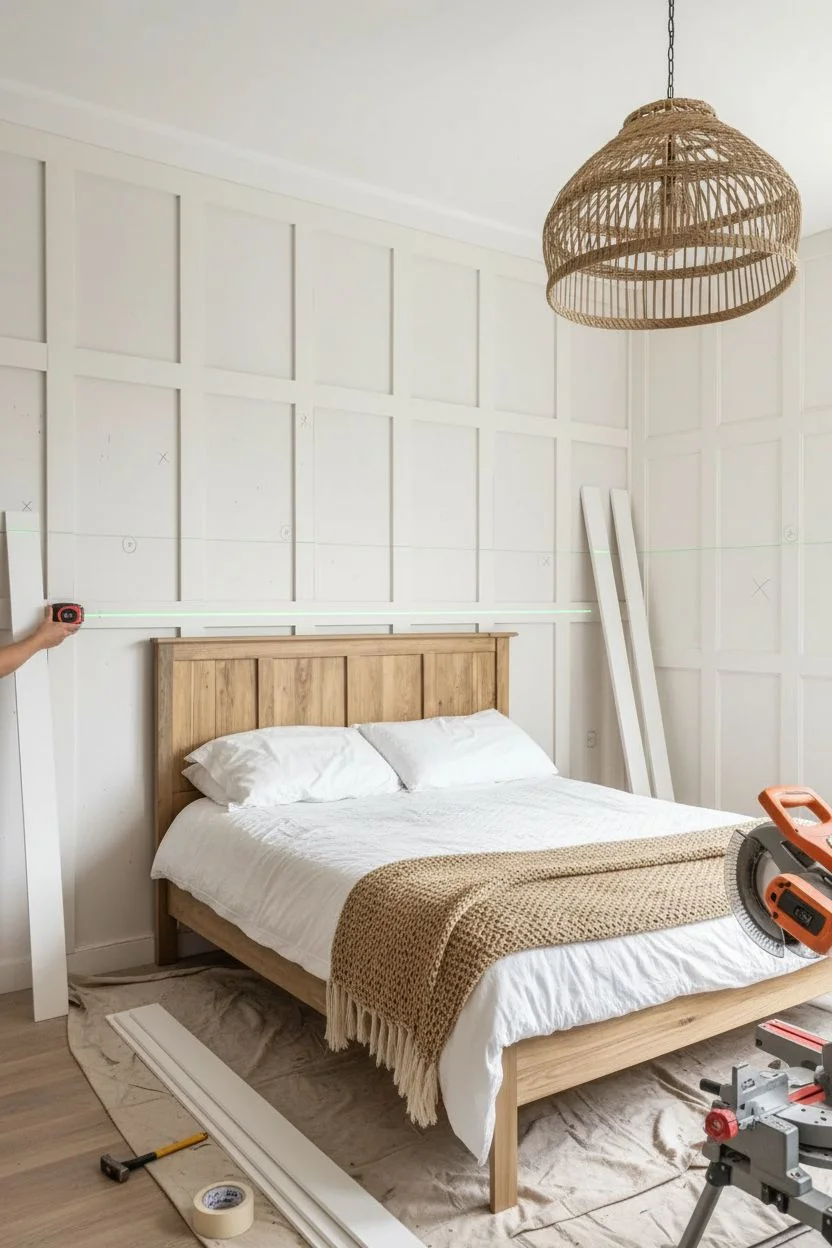
Transform a flat bedroom wall into a sophisticated focal point with this architectural DIY project. The vertical detailing adds implied height to the room, while the monochromatic greige palette creates the perfect warm, calming backdrop for relaxation.
Step-by-Step
Materials
- 2×1 inch MDF strips or pine lattice (quantity depends on wall width)
- Construction adhesive (e.g., Liquid Nails)
- Brad nailer and 1.5-inch nails
- Paintable latex caulk
- Wood filler
- Sanding block (medium grit)
- Interior paint in ‘Greige’ (Satin or Eggshell finish)
- High-quality primer
- 2-inch angled sash brush
- Microfiber paint roller
- Laser level (or standard spirit level)
- Measuring tape and pencil
Step 1: Preparation & Layout
-
Clear and clean:
Remove all furniture, switch plates, and artwork from the wall. Wipe the surface down with a damp cloth to remove dust and let it dry completely. -
Measure the span:
Measure the total width of your wall. To achieve the balanced look in the photo, you’ll want your vertical battens spaced about 12 to 16 inches apart. -
Do the math:
Calculate your spacing by subtracting the total width of all your battens from the wall width, then dividing the remaining space by the number of gaps you want. Adjust until the numbers feel right. -
Mark the guide lines:
Using a pencil and your level, draw vertical reference lines on the wall where each batten will go. This ensures you don’t wander off-center during installation.
Step 2: Installation
-
Cut vertical strips:
Measure the height from the top of your existing baseboard to the ceiling (or your desired top rail height). Cut your MDF strips to size. Only cut one at a time, as floors are rarely perfectly level. -
Apply adhesive:
Apply a wavy line of construction adhesive to the back of your first wood strip. This helps hold it in place and reduces the number of nails needed. -
Secure the first batten:
Place the strip against your first pencil line. Check it with the level one last time, then secure it using the brad nailer, placing a nail roughly every 10-12 inches. -
Install remaining battens:
Work your way across the room, cutting, gluing, and nailing each strip. I find using a ‘spacer block’ cut to the exact width of your gap speeds this up significantly compared to measuring every time. -
Add a top rail (optional):
If you aren’t going all the way to the ceiling cornice, install a horizontal rail across the top of your vertical battens to cap off the design cleanly.
Why Caulk Matters
Don’t skip the caulking step! The gap between the board and the textured wall will cast a tiny shadow if left unsealed. Caulking eliminates this shadow, making the wood and wall look like one unified piece.
Step 3: Flawless Finish
-
Fill the holes:
Dab a small amount of wood filler into every nail hole. Overfill slightly to account for shrinkage as it dries. -
Sand smooth:
Once the filler is dry, sand the spots flat. Also, run your sanding block lightly over any rough edges on the MDF strips to ensure a soft furniture-grade touch. -
Caulk the seams:
Run a thin bead of paintable caulk along both long sides of every batten where it meets the drywall. This step is crucial for making the wood look built-in rather than just stuck on. -
Smooth the caulk:
Immediately smooth the caulk bead with a wet finger or a damp rag, removing excess so there are no ridges left behind.
Sheen Strategy
For a subtle designer touch, paint the flat wall sections in a flat/matte finish and the vertical wood battens in a satin finish of the exact same color. The light will hit them differently, adding depth!
Step 4: Painting the Greige
-
Protect boundaries:
Apply painter’s tape to the adjacent walls, ceiling, and white baseboards to protect them from the greige paint. -
Prime the surface:
Apply a coat of primer, focusing heavily on the MDF strips (which soak up paint) and the wood filler spots. Let this dry according to the can’s instructions. -
Cut in edges:
Open your greige paint. Use the angled sash brush to paint the corners, the sides of the battens, and along the ceiling and floor lines first. -
Roll the rest:
Use the microfiber roller to paint the flat wall sections and the front faces of the battens. Roll in a ‘W’ pattern for even coverage. -
Apply second coat:
After the first coat is fully dry, apply a second coat to ensure a rich, true color depth that hides any remaining brush strokes. -
Remove tape:
Peel off the painter’s tape while the paint is still slightly tacky to get the crispest possible line against your white skirting boards.
Once the paint cures, move your bed back in and enjoy the peaceful, custom atmosphere you’ve built.


Restorative Sky Blues
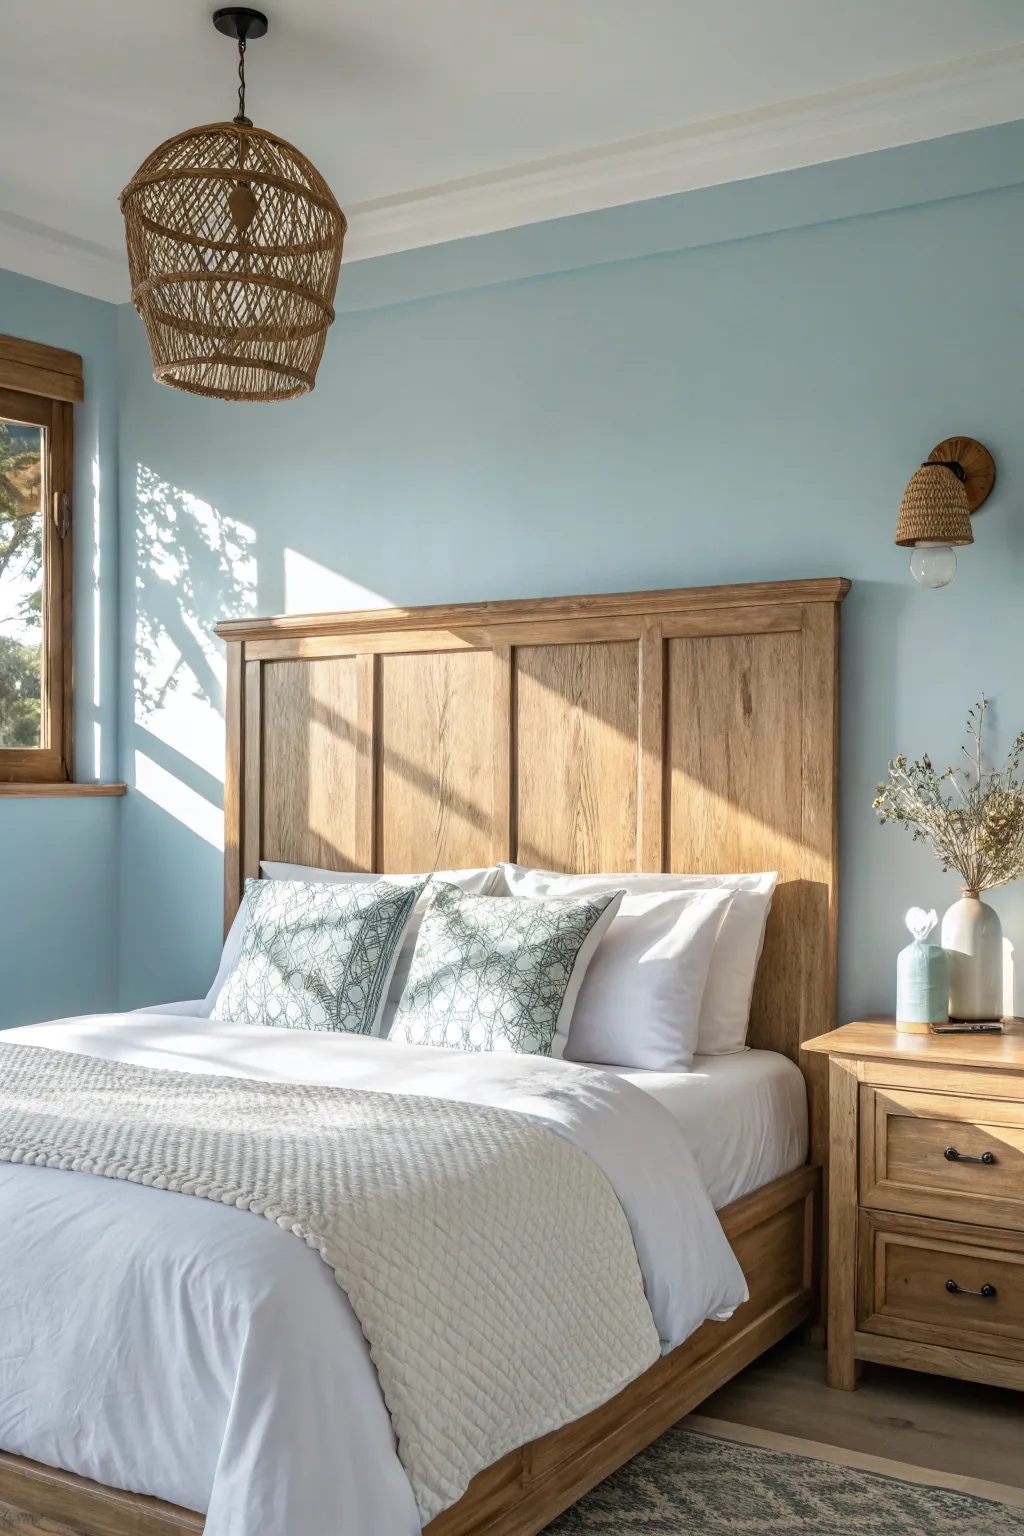
“t”: “Restorative Sky Blue Bedroom Retreat”,
“i”: “Transform your sleeping space into a serene sanctuary by recreating this airy, nature-inspired bedroom design. This project balances cool sky-blue walls with warm wooden textures and crisp white bedding to create a peaceful atmosphere perfect for relaxation.”,
“m”: [
“Sky blue interior latex paint (eggshell or satin finish)”,
“White semi-gloss trim paint (optional for moldings)”,
“Painter’s tape (multi-surface)”,
“Drop cloths or plastic sheeting”,
“Spackle and putty knife”,
“Fine-grit sanding sponge”,
“Angled sash brush (2.5 inch)”,
“Paint roller frame with 3/8 inch nap covers”,
“Paint tray and liner”,
“Tall wooden panel headboard (oak or pine finish)”,
“Rattan pendant light fixture”,
“White cotton bedding set”,
“Geometric patterned throw pillows (teal/white)”,
“Chunky knit throw blanket (cream)”
],
“p”: [
{
“n”: “Wall Preparation”,
“s”: [
{
“t”: “Clear the area”,
“d”: “Remove all furniture from the room or move it to the center and cover completely with drop cloths to protect your flooring.”
},
{
“t”: “Inspect and patch”,
“d”: “Check the walls for any nail holes or dents. Fill these imperfections with spackle and smooth it out with a putty knife.”
},
{
“t”: “Sand for smoothness”,
“d”: “Once the spackle is dry, lightly sand the patched areas with a fine-grit sponge to ensure a flush surface.”
},
{
“t”: “Clean surfaces”,
“d”: “Wipe down the walls with a damp cloth and mild detergent to remove dust and oils, which helps the paint adhere better.”
},
{
“t”: “Apply painter’s tape”,
“d”: “Carefully apply tape along the baseboards, window trim, and the ceiling line. I like


Organic Sage Green
Transform a plain bedroom into an organic sanctuary by creating this stunning full-wall board and batten feature. This project combines architectural depth with a calming sage green palette to bring the outdoors in. It is a manageable weekend DIY that completely changes the character of your space.
How-To Guide
Materials
- 1×2 or 1×3 MDF strips (battens)
- Construction adhesive
- Brad nailer and 2-inch nails
- Wood filler
- Paintable latex caulk
- Sage green interior paint (eggshell or satin finish)
- Medium-grit sandpaper
- Level and tape measure
- Paint roller and angled sash brush
Step 1: Planning and Layout
-
Measure the wall:
Measure the full height and width of your feature wall to calculate exactly how much lumber you will need. -
Design the grid:
Decide on the spacing for your grid; a roughly 24-inch square pattern works well for the balanced look seen in the image. -
Mark the studs:
Use a stud finder to locate the wall studs and mark them lightly with a pencil to know where you have solid nailing points. -
Draw the lines:
Using a long level and a pencil, map out the entire grid directly on the wall to ensure your future battens will be perfectly straight.
Step 2: Installation
-
Install vertical battens:
Cut your vertical MDF strips to fit the full height of the wall, from baseboard to ceiling. -
Adhere and nail:
Apply construction adhesive to the back of the first vertical strip, place it on your marked line, and secure it with the brad nailer. -
Check for plumb:
Before the adhesive sets, double-check that the strip is perfectly vertical using your level; this is crucial for a professional finish. -
Cut spacer blocks:
I like to cut two scrap wood blocks to the exact width of my grid spacing to use as templates, making the rest of the installation faster. -
Install remaining verticals:
Install the rest of the vertical battens across the wall, using your spacer blocks to maintain even gaps. -
Cut horizontal pieces:
Measure the distance between each vertical strip individually (walls extend and shrink!) and cut horizontal pieces to fit snugly. -
Install horizontal battens:
Glue and nail the horizontal pieces into place, verifying that each one is level.
Seamless Caulk Tip
Keep a damp rag handy while caulking. Smooth the bead with a wet finger and wipe away excess immediately for crisp, paint-ready corners.
Step 3: Finishing and Painting
-
Fill the holes:
Fill every nail hole and potential gap in the wood with wood filler, leaving it slightly overfilled to account for shrinkage. -
Caulk the seams:
Run a bead of paintable caulk along every edge where the wood meets the wall to create a seamless, built-in appearance. -
Sand smooth:
Once dry, sand the wood filler flush and lightly scuff the battens to ensure the paint adheres properly. -
Clean surface:
Wipe down the entire wall with a tack cloth or damp rag to remove all sawdust. -
Tape edges:
Apply painter’s tape to the adjacent walls, ceiling, and floor to protect them from the green paint. -
Cut in corners:
Use an angled brush to paint the corners, edges, and the sides of the battens where a roller can’t reach. -
Roll the wall:
Use a medium-nap roller to apply the sage green paint to the flat wall sections and the faces of the battens. -
Apply second coat:
Allow the first coat to dry completely, then apply a second coat for rich, opaque color coverage. -
Style and finish:
Remove the tape while the paint is still slightly tacky for crisp lines, then bring in organic textures like wood and plants to complete the look.
Level Up: Color Drenching
For a truly immersive look, paint the baseboards and even the door frames in the same sage green to maximize the modern, organic vibe.
Step back and enjoy the calming atmosphere your new architectural feature wall brings to the room.
BRUSH GUIDE
The Right Brush for Every Stroke
From clean lines to bold texture — master brush choice, stroke control, and essential techniques.
Explore the Full Guide
Earthy Terracotta Tones
“t”: “Sun-Baked Faux Limewash Wall”,
“i”: “This tutorial guides you through recreating the warm, textured terracotta feature wall that anchors this bedroom scene. By using a faux limewash technique, you will achieve that velvety, cloudy depth and Old World charm without the complex chemistry of traditional limestone paints.”,
“m”: [
“Matte latex paint (Terracotta/Rust color)”,
“Clear acrylic glazing medium”,
“White latex paint (for lightening, optional)”,
“Wide block brush (4-6 inch masonry brush)”,
“Standard paint roller and tray”,
“Painter’s tape”,
“Lint-free rags”,
“Water bucket”,
“Drop cloths”
],
“p”: [
{
“n”: “Preparation & Base Layer”,
“s”: [
{
“t”: “Clear and Protect”,
“d”: “Move furniture to the center of the room and cover the floor with drop cloths, taping off the baseboards, ceiling line, and any adjacent walls you want to keep neutral.”
},
{
“t”: “Surface Prep”,
“d”: “Fill any nail holes with spackle and sand smooth once dry, ensuring the wall is clean and free of dust so the texture adheres properly.”
},
{
“t”: “Roll the Base”,
“d”: “Pour your solid terracotta paint into a tray and apply an even base coat over the entire wall using a standard roller to ensure full color coverage.”
},
{
“t”: “Cut In Edges”,
“d”: “While the roller work is wet, use a standard sash brush to cut in the corners and edges for a seamless foundation color.”
},
{
“t”: “Full Dry”,
“d”: “Allow this base coat to dry completely, usually at least 4-6 hours, as the subsequent wash layers need a stable surface to sit on top of.”
}
]
},
{
“n”: “Mixing the Wash”,
“s”: [
{
“t”: “Create the Solution”,
“d”: “In a bucket, mix one part of your terracotta paint with one part clear glazing medium and two parts water.”
},
{
“t”: “Test the Consistency”,
“d”: “Stir the mixture thoroughly until it resembles the consistency of heavy cream or a thin soup; it needs to be translucent but not dripping wet.”
},
{
“t”: “Optional Tonal Variation”,
“d”: “I like to mix a second, smaller batch with a tiny drop of white paint added to create a slightly lighter version for added depth.”
}
]
},
{
“n”: “Applying the Texture”,
“s”: [
{
“t”: “Load the Brush”,
“d”: “Dip the tips of your wide block brush into the main wash mixture, tapping off excess so the brush is damp but not soaking.”
},
{
“t”: “The X-Stroke Technique”,
“d”: “Starting in a top corner, apply the wash using large, crisscrossing ‘X’ strokes, varying the angle and length of each sweep to avoid a uniform pattern.”
},
{
“t”: “Work in Clouds”,
“d”: “Paint in random, cloud-like clusters rather than straight rows, leaving small irregular gaps where the base coat shows through slightly.”
},
{
“t”: “Blend the Edges”,
“d”: “As you move across the wall, constantly feather the edges of your wet patch into the dry space to prevent hard stop-lines from forming.”
},
{
“t”: “Layering the Light”,
“d”: “If using the lighter highlighted mix, organically brush small amounts of it into the wet darker wash in random areas to mimic sun-bleached plaster.”
},
{
“t”: “Maintain Wet Edge”,
“d”: “Work quickly across the wall diagonally to keep a ‘wet edge,’ preventing the wash from drying before you can blend the next section into it.”
},
{
“t”: “Softening Harshness”,
“d”: “Keep a clean, dry rag handy to dab away any drips or heavy pools of paint immediately, which keeps the texture soft and limestone-like.”
},
{
“t”: “Step Back”,
“d”: “Periodically move back from the wall to view the overall balance of light and dark areas, touching up any spots that look too empty or uniform.”
}
]
},
{
“n”: “Finishing Touches”,
“s”: [
{
“t”: “Final Dry”,
“d”: “Let the wall dry undisturbed overnight; the color will often lighten and the texture will become more pronounced as the water evaporates.”
},
{
“t”: “Remove Tape”,
“d”: “Carefully score the edge of the painter’s tape with a utility knife before peeling it off to ensure you don’t pull up any of your beautiful new finish.”
},
{
“t”: “Styling”,
“d”: “Reintroduce your wooden furniture and ceramics against the wall to accent the rich, earthy tones you have created.”
}
]
}
],
“boxes”: [
{
“title”: “Uneven Patches?”,
“content”: “troubleshooting: If you see hard lines where sections dried too fast, dampen a clean sponge with water and gently rub the area to reactivate the glaze and blur the harsh edge.”
},
{
“title”: “Sunlit Sparkle”,
“content”: “level_up: To mimic the shimmering texture in the photo, mix a tiny amount of metallic gold paint into a clear glaze and dry-brush it very sparingly over the highest texture points.”
}
],
“f”: “Enjoy the cozy, Mediterranean
Deep Navy Saturation
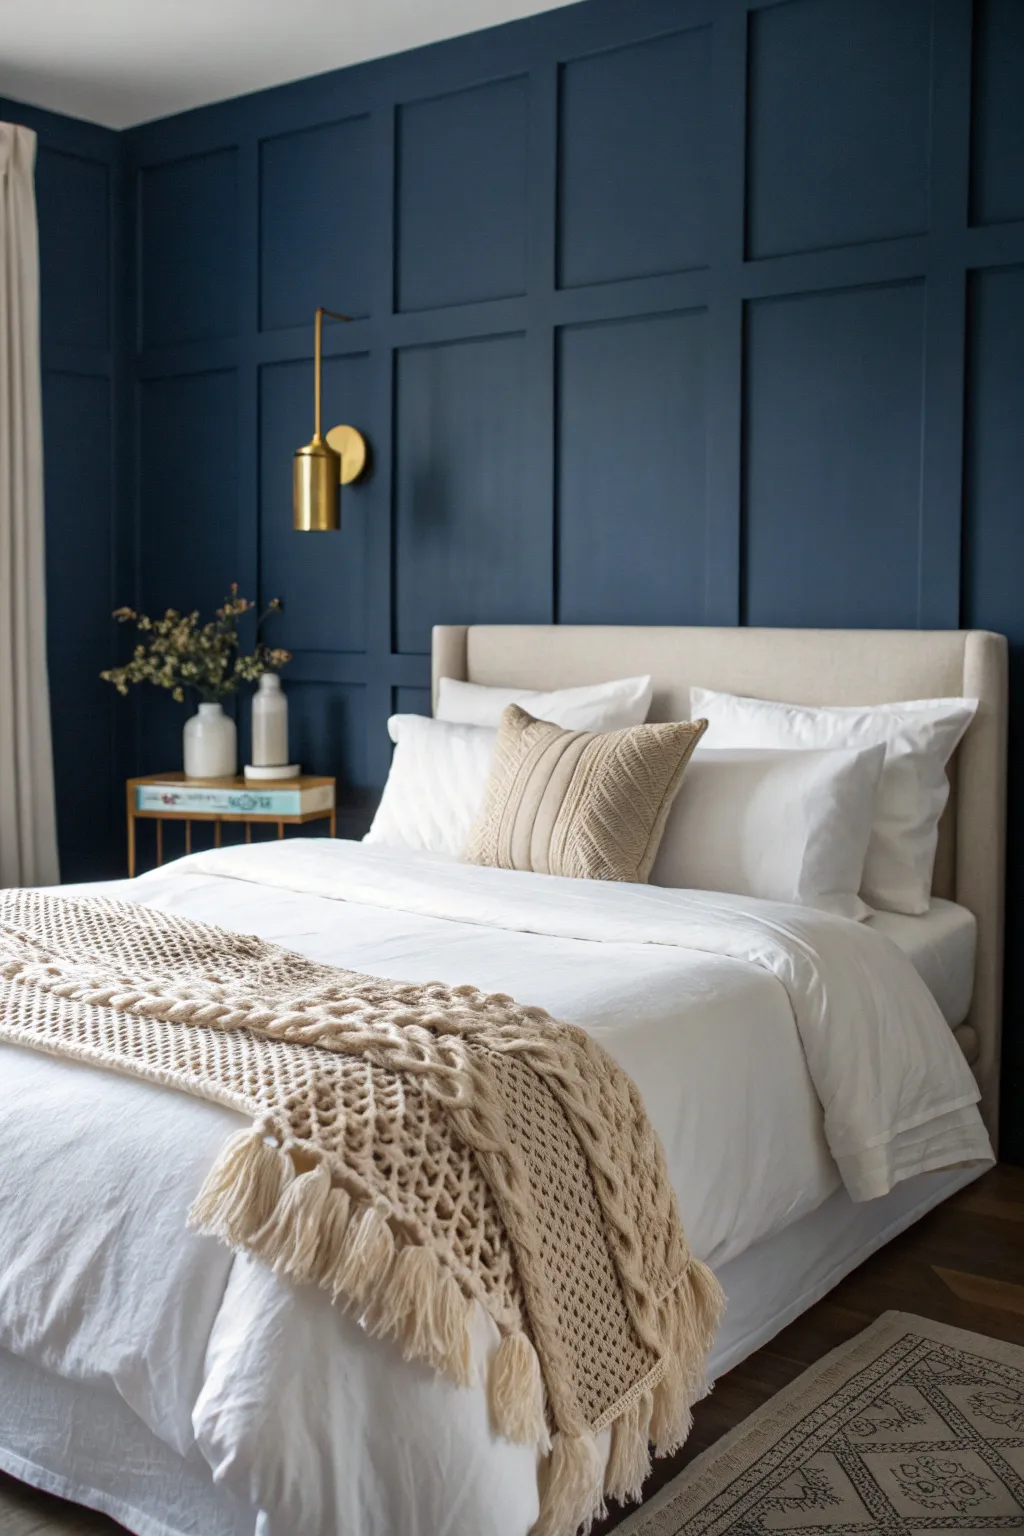
Transform your bedroom into a sophisticated sanctuary by recreating this dramatic architectural feature wall. This project combines the depth of saturated navy paint with the structured elegance of a geometric grid, creating a cozy yet high-end backdrop for your bed.
Step-by-Step
Materials
- 1×3 pre-primed MDF boards (quantity based on wall size)
- 1×4 MDF boards (optional, for top/bottom rails)
- Construction adhesive (e.g., Liquid Nails)
- Brad nailer and 1.5 to 2-inch brad nails
- Laser level (highly recommended) or 4ft spirit level
- Paintable latex caulk
- Wood filler
- Medium and fine grit sandpaper (120 and 220)
- Deep Navy Paint (Satin or Eggshell finish)
- High-quality angled sash brush
- Microfiber paint roller and tray
- Miter saw
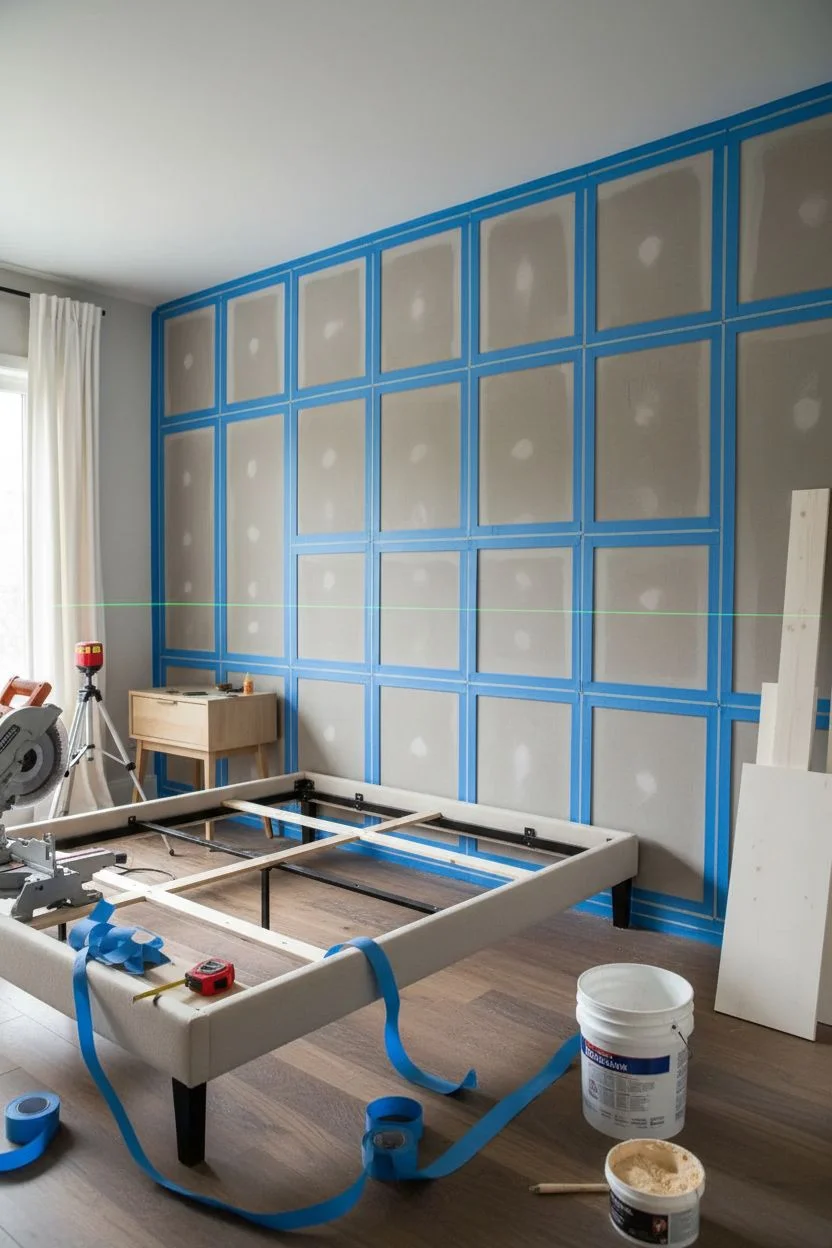
Step 1: Planning the Grid
-
Measure and Calculate:
Measure your wall’s total width and height precisely. To get perfect squares, determine how many vertical columns you want, then subtract the total width of all vertical boards from the wall width. Divide the remaining number by the number of spaces to find your exact gap distance. -
Visualize the Layout:
I like to use painter’s tape to mark the board positions on the wall first. This helps confirm that the grid won’t awkwardly intersect with outlets or switches. -
Prepare the Surface:
Remove existing baseboards and gently sand the wall surface to knock down any texture, ensuring better adhesion for the glue and a smoother final paint finish.
Uneven Wall Troubles?
If your walls are wavy, boards might not sit flush. Don’t force them flat with nails; instead, rely on construction adhesive and fill the gaps behind the board with extra caulk for a hidden fix.
Step 2: Installing the Frame
-
Install Boundaries:
Attach your top horizontal rail flush against the ceiling and your bottom rail along the floor. Secure them into studs using your nail gun. -
Set Vertical Stiles:
Install the far left and far right vertical boards first. Then, using your laser level to ensure perfect plumb, install the remaining vertical boards at the calculated intervals. -
Adhere and Nail:
Apply a zigzag of construction adhesive to the back of each board before nailing. This ensures the boards stay tight to the drywall even if you miss a stud. -
Cut Horizontal Bridges:
Measure the distance between vertical boards individually for each row. Walls are rarely perfectly straight, so cutting these ‘bridging’ pieces one by one ensures a snug fit. -
Install Horizontal Rails:
Use a ‘spacer block’ cut to your exact desired vertical gap height to support the horizontal pieces as you nail them in. This guarantees every row is perfectly aligned without constant measuring.
Step 3: Seamless Finishing
-
Fill the Holes:
Apply wood filler to every nail hole, slightly overfilling to account for shrinkage as it dries. -
Caulk the Seams:
Run a bead of paintable caulk along every edge where wood meets wall and where boards meet each other. Smooth it with a wet finger to create a seamless transition. -
Sand Smooth:
Once dry, sand the wood filler flush with the board surface using 220-grit paper. Run your hand over it—if you can feel the hole, you will see it after painting. -
Dust Off:
Wipe the entire wall down with a tack cloth or damp rag to remove sanding dust, which is crucial for a smooth paint application.
Add the Lighting
To exactly match the photo, plan for a brass sconce installation. Rough in the electrical wiring to the center of a grid square before you start attaching the boards to hide the cables.
Step 4: Deep Saturation
-
Cut In Edges:
Using your angled brush, paint the interior corners of the grid squares and along the ceiling and floor lines with your navy paint. -
Roll the Surfaces:
Use a small microfiber roller to paint the flat faces of the boards and the drywall inside the squares. This texture matches better than brushing everything. -
Drying Time:
Allow the first coat to dry completely. Dark colors often look patchy and terrifying after coat one—don’t panic! -
Final Coats:
Apply a second and possibly third coat. Developing that rich, velvety saturation shown in the image requires building up pigment layers.
Step back and admire how this bold color and structured design completely redefine the atmosphere of your room.

PENCIL GUIDE
Understanding Pencil Grades from H to B
From first sketch to finished drawing — learn pencil grades, line control, and shading techniques.
Explore the Full Guide
Sophisticated Charcoal Depths
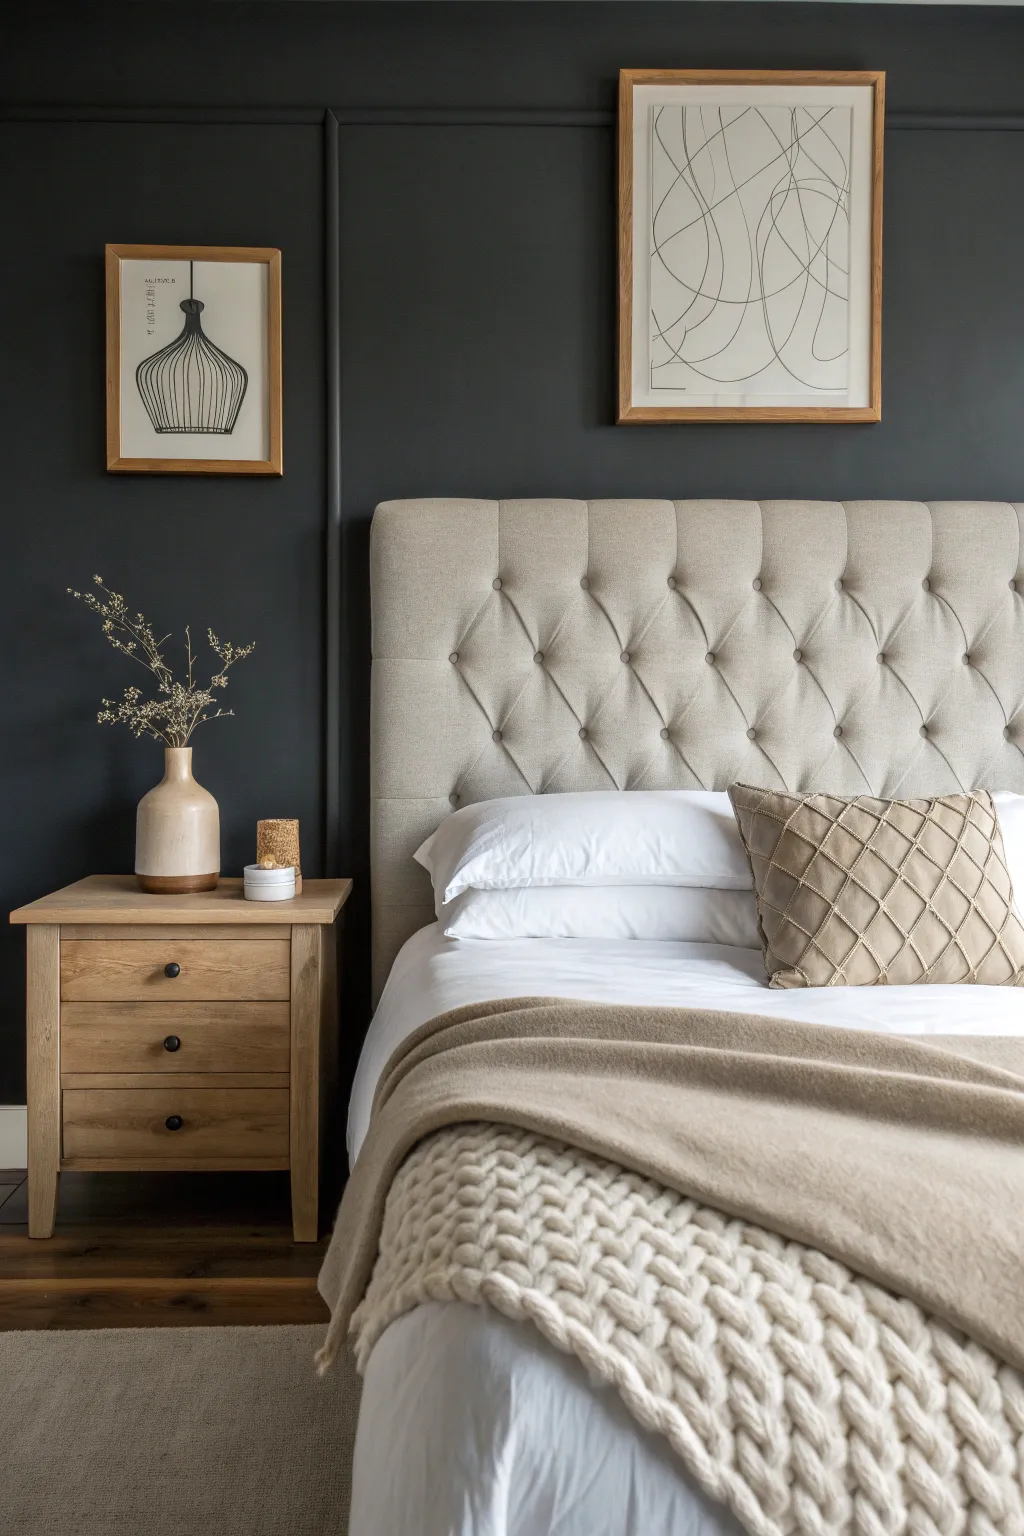
Transform a plain bedroom into a sophisticated retreat by creating this dramatic charcoal feature wall with architectural molding. This project combines simple woodworking with moody color theory to build a stunning backdrop that makes neutral textures pop.
Detailed Instructions
Materials
- Matte charcoal interior paint
- Primer (suitable for wood and drywall)
- 1×2 or 1×3 MDF strips or pine lattice
- Construction adhesive
- Brad nailer and 1.5-inch brad nails
- Paintable caulk and caulk gun
- Wood filler
- Fine-grit sandpaper
- Laser level or spirit level
- Tape measure
- Angled sash brush
- Medium-nap paint roller
- Drop cloths
- Pencil
Step 1: Planning and Preparation
-
Measure and map:
Measure the total width of your wall to calculate the spacing for your vertical battens. -
Visualize the grid:
I like to use a pencil and a long level to draw the layout directly on the wall, ensuring the spacing looks balanced before cutting any wood. -
Prep the surface:
Lightly sand existing wall paint to help the new glue adhere better and wipe away any dust with a damp cloth. -
Mark studs:
Locate and mark all wall studs so you know where you have solid anchoring points for the wood strips.
Seamless Joints
If your wood cuts aren’t perfect and leave gaps, don’t worry. Fill large gaps with wood filler and smaller cracks with caulk before painting to hide all imperfections.
Step 2: Installing the Woodwork
-
Cut verticals:
Cut your MDF or pine strips to the height of the wall (minus baseboards if you are keeping them). -
Secure the first batten:
Apply a zigzag of construction adhesive to the back of your first strip and place it on your layout line. -
Nail in place:
Use a level to ensure the strip is perfectly plumb, then secure it with your brad nailer. -
Install remaining verticals:
Repeat the glue and nail process for all vertical strips, checking often to ensure they remain parallel. -
Add horizontal rails:
If creating a grid look, measure the distance between verticals precisely and cut horizontal pieces to fit snugly between them. -
Attach cross pieces:
Glue and nail these horizontal pieces at your desired height (often near the top or forming a wainscoting height).
Step 3: Finishing and Painting
-
Fill holes:
Fill all nail indentations with wood filler, leaving it slightly mounded to account for shrinkage as it dries. -
Smooth the surface:
Once dry, sand the filler flush with the wood surface for an invisible repair. -
Caulk the seams:
Run a thin bead of paintable caulk along every edge where the wood meets the drywall to create a seamless, built-in look. -
Prime the wood:
Apply a coat of primer over the raw wood strips and any patched areas to ensure the final finish is uniform. -
Cut in edges:
Using an angled brush, paint the charcoal color along the ceiling line, baseboards, and inside the corners of your molding. -
Roll the wall:
Use a roller to cover the flat wall sections and the face of the battens with your charcoal paint. -
Apply second coat:
After the first coat dries, apply a second layer to achieve that rich, light-absorbing depth.
Dramatic Lighting
Install brass wall sconces directly onto the paneling between the vertical battens. The warm metal pops against charcoal, and the light will emphasize the texture of your molding.
Step 4: Styling the Look
-
Position furniture:
Place your beige upholstered headboard against the wall; the light fabric will contrast beautifully with the dark paint. -
Hang art:
Mount wood-framed line art symmetrically, ensuring the frames align nicely with your new wall paneling. -
Add nature:
Finish by placing a ceramic vase with dried botanicals on the nightstand to soften the architectural lines.
Step back and admire how this bold, moody wall completely redefines the atmosphere of your room.
Complete Color Drenching
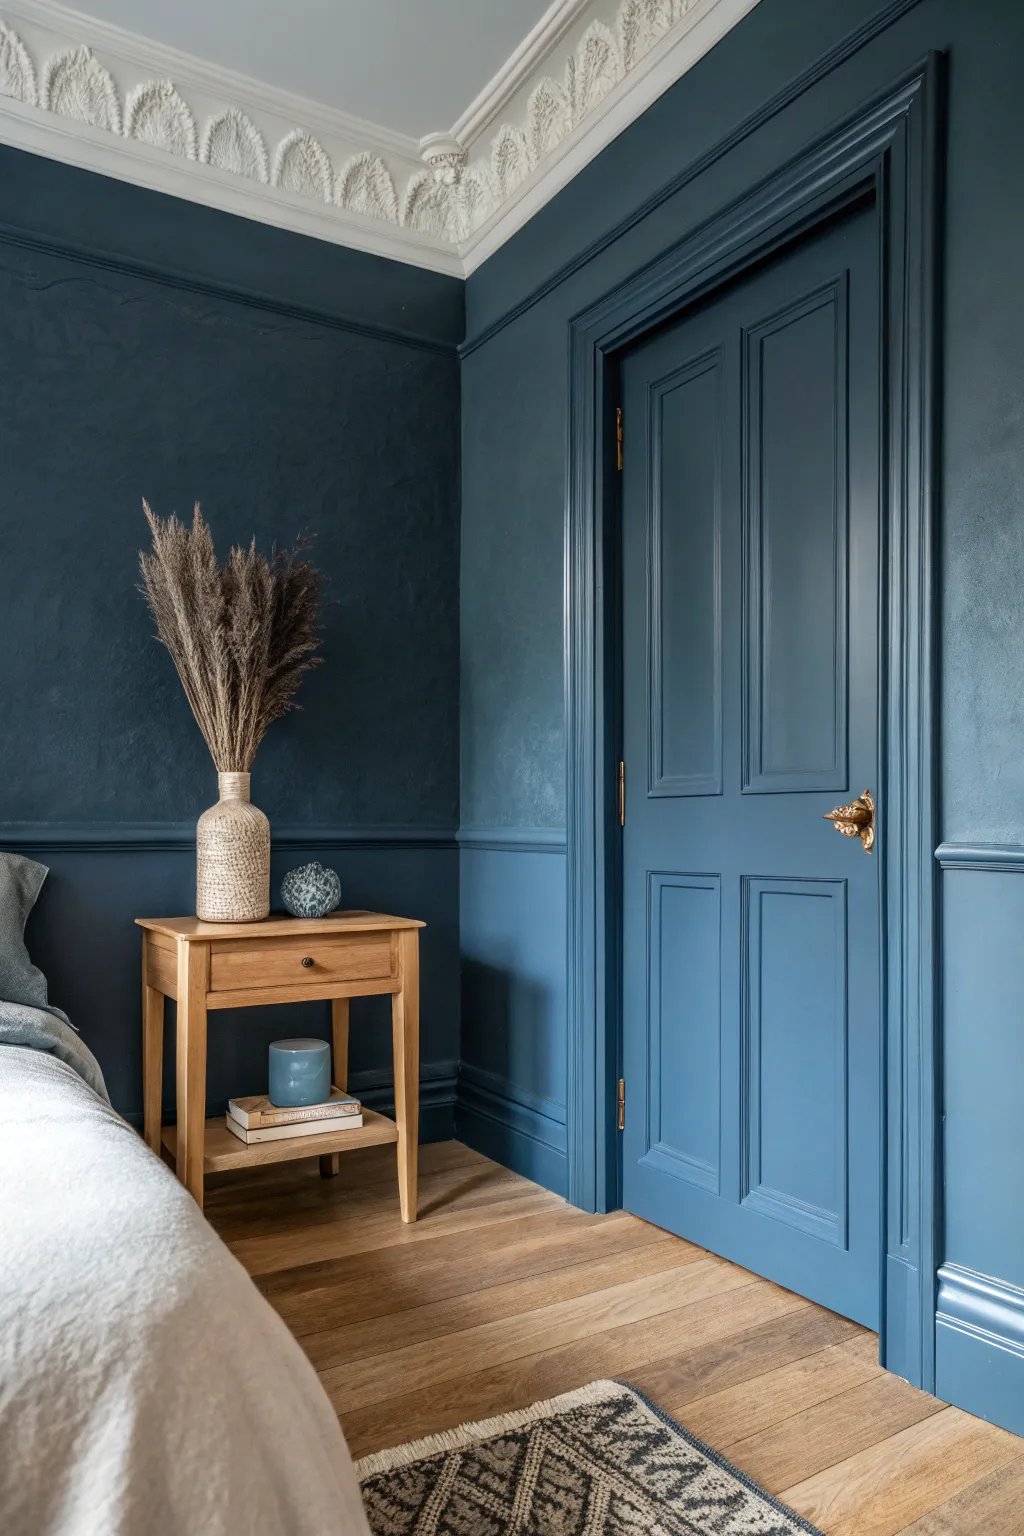
Embrace the drama of color drenching by wrapping your bedroom in a rich, deep teal. This technique blurs the lines between walls and woodwork, creating a seamless, cozy cocoon that makes the space feel unexpectedly expansive.
Step-by-Step
Materials
- Deep Teal interior wall paint (Matte finish)
- Deep Teal wood paint (Satin or Eggshell finish)
- Wood primer (grey tinted recommended)
- 2-inch angled sash brush
- 9-inch medium pile roller and tray
- 120-grit sandpaper and block
- Painter’s tape (low tack)
- Sugar soap or degreaser
- Drop cloths
- Gold door handle styling prop
- Oak bedside table styling prop
- Dried pampas grass and textured vase
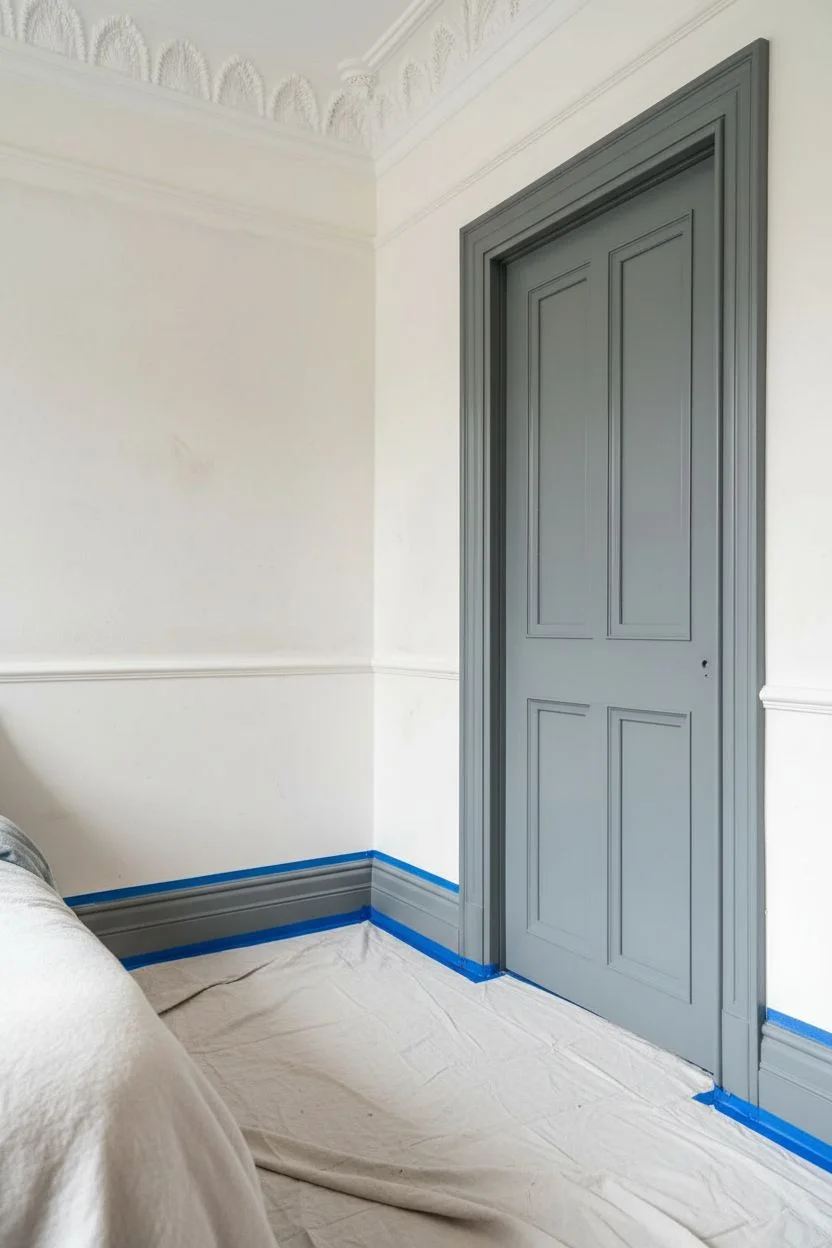
Step 1: Preparation & Priming
-
Clear and clean:
Remove all furniture from the working area and unscrew existing door handles or light switch covers. Wash the walls and especially the woodwork with sugar soap to remove grease and dust. -
Sand the woodwork:
Using the 120-grit sandpaper, thoroughly sand the door, door frame, and skirting boards. You don’t need to strip the paint, just de-gloss the surface to create a ‘key’ for the new paint to grip. -
Protect boundaries:
Apply painter’s tape along the ceiling line (if keeping it white) and protect the floor at the base of the skirting boards. Lay down your drop cloths. -
Prime the wood:
Apply a coat of wood primer to the door and trim. Since we are using a dark teal, I recommend using a grey-tinted primer rather than white to help build depth faster.
Seamless Sheen Tip
Even though walls are matte and wood is satin, color matching can be tricky. Have your wood paint custom-mixed at the store using the exact same color code as your wall paint for a perfect match.
Step 2: Painting the Woodwork
-
Start with the details:
Open your Satin/Eggshell wood paint. Using the angled sash brush, paint the intricate molding within the door panels first. -
Paint the panels:
Fill in the flat centers of the door panels using vertical brush strokes, then move to the horizontal rails and vertical stiles of the door structure. -
Trim and skirtings:
Continue with the brush to paint the door frame and the skirting boards. Watch for drips in the corners of the molding and smooth them out immediately. -
Second wood coat:
Allow the wood paint to dry for the time specified on the tin (usually 4-6 hours). Lightly sand any bumps, then apply a second coat for full, rich opacity.
Step 3: Walls & Styling
-
Cut in the walls:
Switch to your Matte wall paint. Use a clean brush to ‘cut in’ a 2-inch border around the ceiling line, corners, and right up against the newly painted door frame and skirting. -
Roll the surfaces:
Load your roller and apply the paint to the main wall sections. Use a ‘W’ motion to distribute paint evenly, then finish with vertical strokes to smooth out texture. -
Apply final coat:
Once the first wall coat is dry to the touch, apply a second coat. This ensures the crushing depth of color seen in the inspiration photo. -
Reveal clean lines:
Carefully peel away the painter’s tape while the paint is still slightly tacky. This prevents the dried paint film from ripping. -
Hardware installation:
Once the door is fully cured (give it 24 hours if possible), install the gold door handle. The metallic sheen pops beautifully against the matte teal. -
Furniture placement:
Place the light oak bedside table against the wall. The warm wood tones are essential to balance the cool, dark wall color. -
Final flourish:
Style the space with a textured ceramic vase and tall dried pampas grass to add height and organic softness to the room.
Troubleshooting: Sticky Door
If the door feels sticky or peels when closed, this is ‘blocking.’ Paint takes longer to cure than to dry. Leave the door slightly ajar for at least 48 hours to ensure it hardens completely.
Step back and admire how this bold, unified color creates an instantly sophisticated retreat.


Cheerful Mustard Vibes
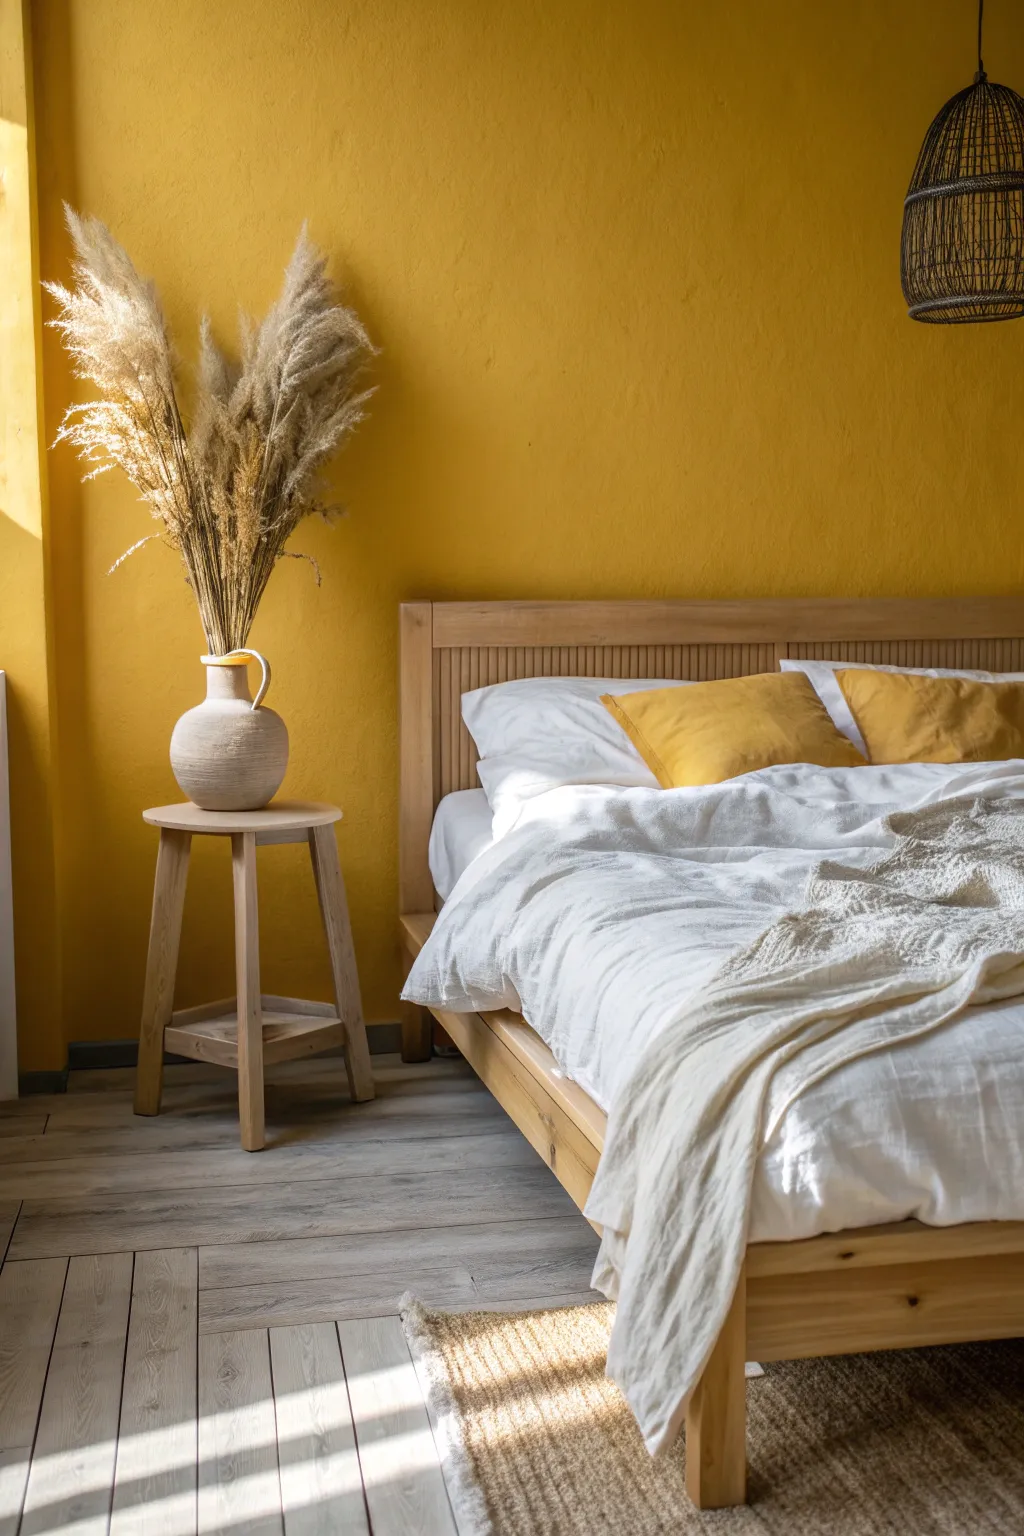
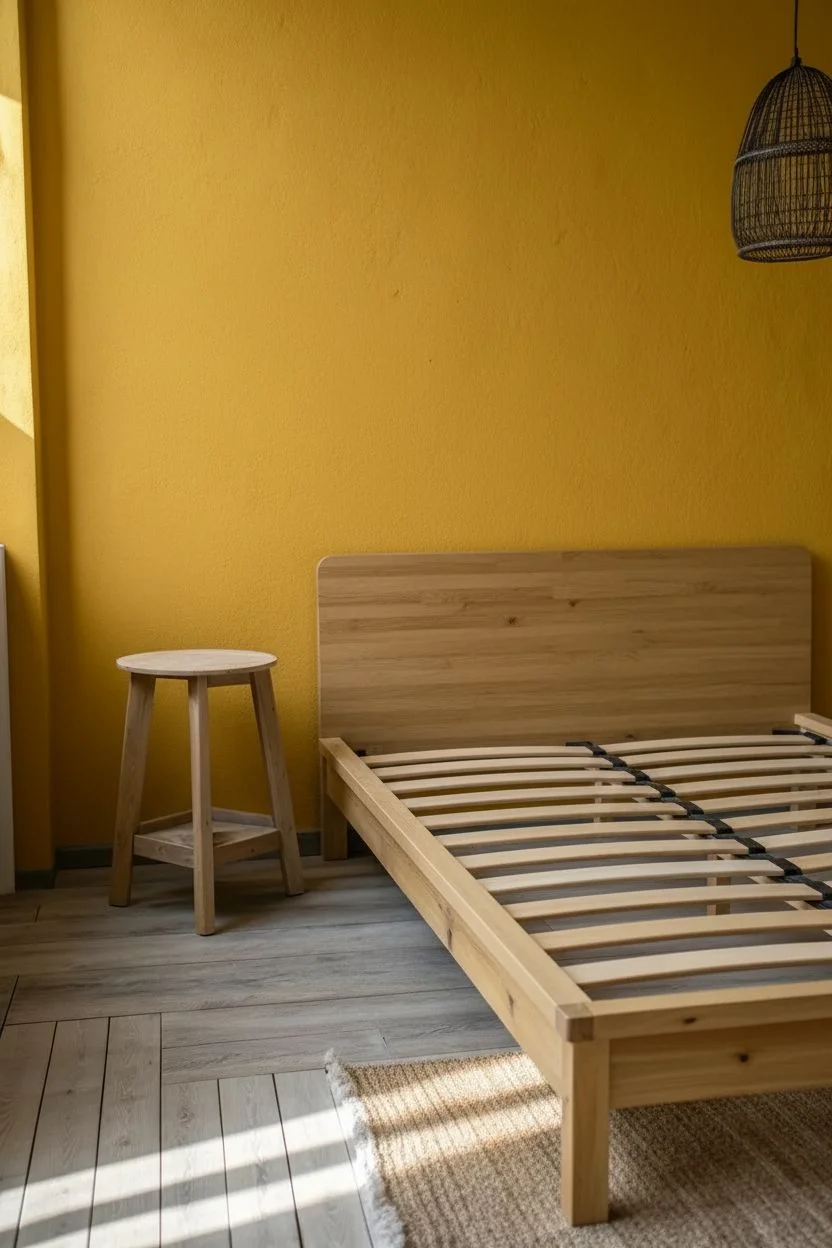
“t”: “Earthy Mustard Limewash Bedroom Transformation”,
“i”: “Bring the golden hour indoors permanently with this textured bedroom makeover featuring a stunning mustard feature wall. You will use a limewash technique to recreate that soft, velvety depth and style the space with organic textures for a cohesive, sunny sanctuary.”,
“m”: [
“Mustard yellow limewash or mineral paint”,
“Mineral primer (compatible with your chosen paint)”,
“4-inch or 5-inch natural bristle block brush”,
“Painter’s tape”,
“Drop cloths”,
“Sandpaper (120 grit)”,
“Large ceramic jug or vase (earthy tone)”,
“Dried pampas grass or tall reeds”,
“White linen duvet set”,
“Mustard yellow linen pillowcases”,
“Wooden bedside stool”,
“Jute or sisal rug”
],
“p”: [
{
“n”: “Preparing the Canvas”,
“s”: [
{
“t”: “Clear and protect”,
“d”: “Move furniture away from your chosen feature wall and cover the flooring with drop cloths to catch any stray droplets.”
},
{
“t”: “Surface preparation”,
“d”: “Lightly sand the wall surface to remove any sheen or bumps, ensuring a slight ‘tooth’ for the mineral paint to grip.”
},
{
“t”: “Clean the wall”,
“d”: “Wipe down the entire wall with a damp cloth to remove sanding dust, as debris can mar the final textured finish.”
},
{
“t”: “Tape the edges”,
“d”: “Apply painter’s tape meticulously along the ceiling line, baseboards, and adjacent walls to ensure crisp, professional edges.”
},
{
“t”: “Apply primer”,
“d”: “Roll on a coat of mineral-based primer specifically designed for limewash paints. This ensures uniform absorption and color fidelity.”
},
{
“t”: “Let it cure”,
“d”: “Allow the primer to dry completely according to the manufacturer’s instructions before opening your colored paint.”
}
]
},
{
“n”: “Creating the Limewash Effect”,
“s”: [
{
“t”: “Mix the paint”,
“d”: “Stir your mustard limewash thoroughly. The natural pigments often settle at the bottom, so ensure an even consistency.”
},
{
“t”: “Load the brush”,
“d”: “Dip just the tips of your block brush into the paint. I like to tap off any excess to prevent drips and ensure a thin, controlling layer.”
},
{
“t”: “Cut in the perimeter”,
“d”: “Use the brush to paint a small border around the edges of the wall, feathering the paint inward so you don’t leave harsh straight lines.”
},
{
“t”: “Apply with X-strokes”,
“d”: “Begin painting the main wall area using random criss-cross ‘X’ motions. This technique creates the signature cloudy, textured movement seen in the photo.”
},
{
“t”: “Maintain a wet edge”,
“d”: “Work in small, distinct patches (about 3×3 feet), blending the edges of each new section into the previous one while the paint is still damp.”
},
{
“t”: “Ignore opacity for now”,
“d”: “Don’t worry if the first coat looks patchy or sheer; this transparency contributes to the final depth.”
},
{
“t”: “Dry and repeat”,
“d”: “Let the first coat dry until it is dry to the touch. It will appear much lighter as it dries.”
},
{
“t”: “Apply the second coat”,
“d”: “Repeat the X-stroke application with a second layer. Focusing on filling in thinner areas while maintaining the varied brush direction.”
},
{
“t”: “Remove tape”,
“d”: “Peel off the painter’s tape slowly while the final coat is still slightly tacky to prevent the dried mineral paint from chipping.”
}
]
},
{
“n”: “Styling the Vibe”,
“s”: [
{
“t”: “Dress the bed”,
“d”: “Layer the bed with white linen sheets. Linen naturally wrinkles, which adds to the relaxed, organic aesthetic we want.”
},
{
“t”: “Add color accents”,
“d”: “Place mustard yellow pillowcases against the headboard to visually connect the bed with the new wall color.”
},
{
“t”: “Prepare the botanicals”,
“d”: “Take your dried pampas grass or reeds and gently shake them outdoors to remove loose
Romantic Dusty Mauve
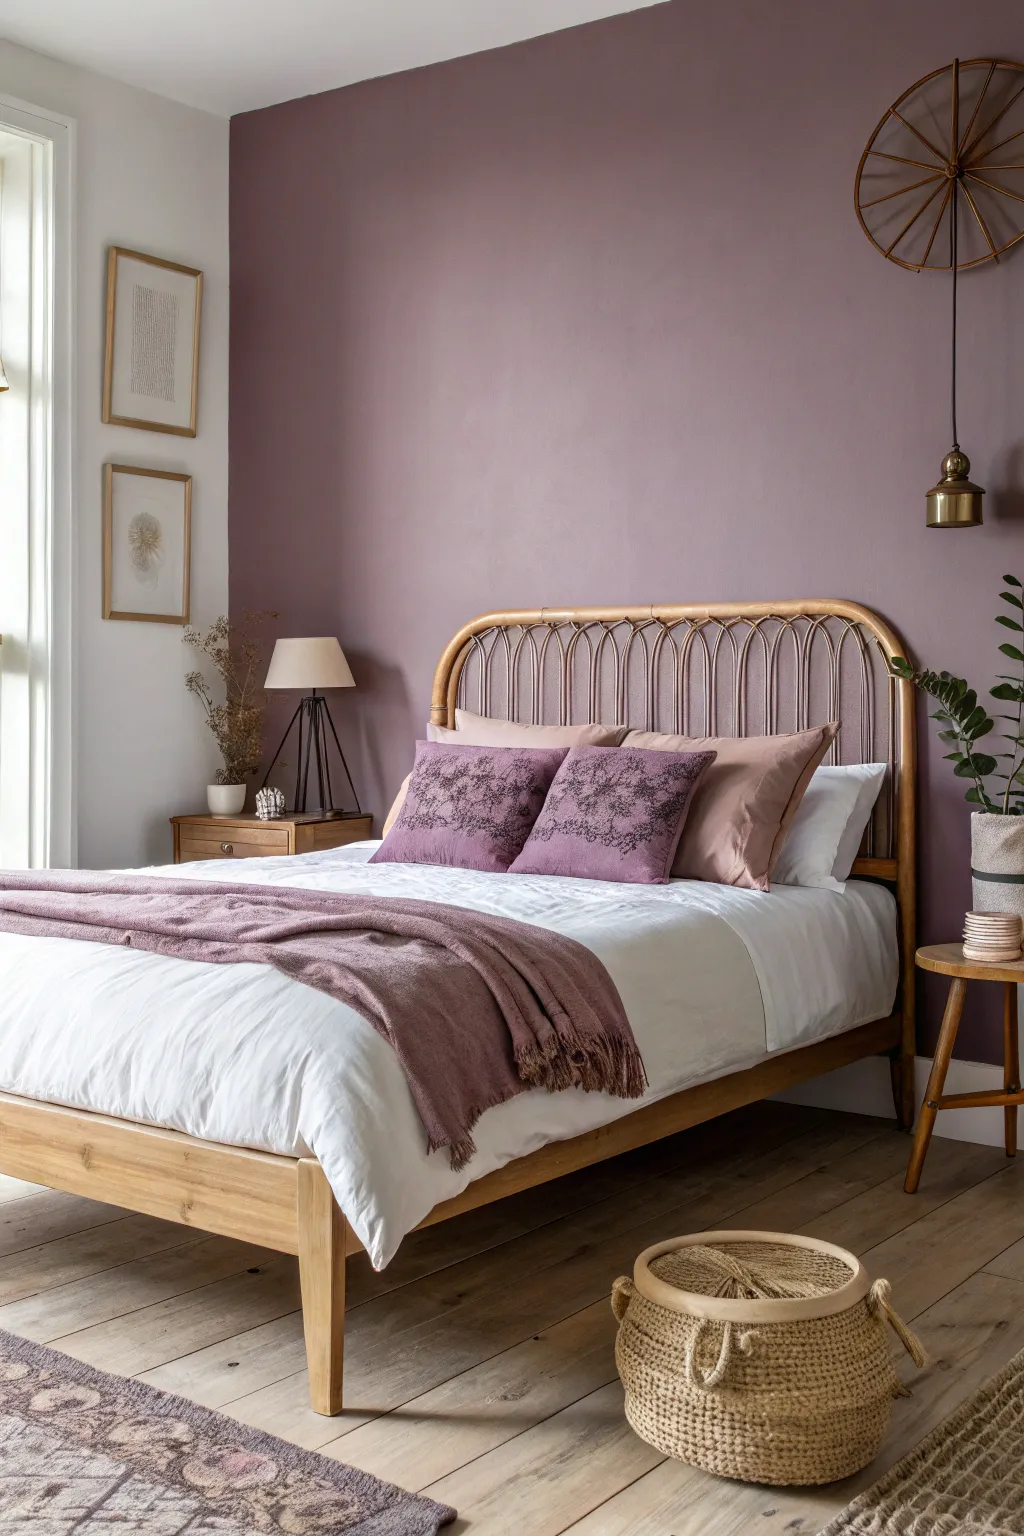
Transform a plain white bedroom into a romantic retreat with this warm, sophisticated accent wall project. By combining a dusty mauve paint color with natural textures like rattan and wood, you create a cozy atmosphere that feels both modern and gathered.
Step-by-Step Tutorial
Materials
- Interior latex paint (Matte or Eggshell finish in Dusty Mauve)
- White ceiling paint (optional for crisp edges)
- Painter’s tape
- Drop cloths
- Spackling paste and putty knife
- Fine-grit sandpaper (120-grit)
- Angled sash brush (2.5 inch)
- 9-inch paint roller frame and microfiber covers
- Paint tray and liner
- Rattan or cane headboard
- White linen bedding set
- Mauve knit throw blanket
- Embroidered purple accent pillows
Step 1: Wall Preparation
-
Clear the workspace:
Move the bed and nightstands to the center of the room or into the hallway to give yourself plenty of space to work freely near the accent wall. -
Clean surfaces:
Wipe down the wall with a mix of warm water and a mild detergent or TSP substitute to remove dust and oils, ensuring the paint adheres perfectly. -
Patch and smooth:
Inspect the wall for nail holes or mood divots along the surface. Fill them with spackling paste, let dry, and sand flush with fine-grit sandpaper. -
Tape the perimeter:
Apply painter’s tape along the baseboards, the ceiling line, and the adjacent walls. Press the tape edges down firmly with a putty knife to prevent bleed-through. -
Protect the floor:
Lay down your drop cloths, pushing them right up against the baseboard to catch any accidental drips or roller splatter.
Uneven Color?
Mauve paints can sometimes dry blotchy due to pigment density. If you see streaks, a third thin coat rolled vertically often solves it better than spot-touching.
Step 2: Painting the Feature Wall
-
Cut in the edges:
Dip your angled brush into the dusty mauve paint and carefully paint a 3-inch border along the tape lines at the ceiling, corners, and baseboards. -
Load the roller:
Pour paint into your tray and load the roller evenly. I like to roll it on the ribbed part of the tray several times so it’s saturated but not dripping. -
Apply the first coat:
Start rolling in a ‘W’ pattern to distribute the paint, then fill in the section with vertical strokes. Work in small sections to keep a wet edge. -
Let it cure:
Allow the first coat to dry completely according to the can’s instructions, usually about 2 to 4 hours, before assessing coverage. -
Second coat application:
Repeat the cutting in and rolling process for a second coat. This deeper color often needs two layers to achieve that rich, velvety saturation shown in the photo. -
Remove tape:
Peel off the painter’s tape slowly at a 45-degree angle while the paint is still slightly tacky to ensure a crisp, sharp line.
Level Up: Texture
Add a woven jute basket next to the bed. The rough natural fiber complements the smooth wall and ties in perfectly with the rattan headboard.
Step 3: Styling the Space
-
Position the bed:
Once the wall is fully cured (give it 24 hours if possible), move your bed frame back into place against the new mauve backdrop. -
Install the headboard:
Attach or lean your open-weave rattan headboard against the wall. The natural wood tone provides a necessary contrast to the painted surface. -
Layer the bedding:
Start with crisp white sheets and a white duvet. The bright white prevents the mauve wall from making the room feel too dark or enclosed. -
Add texture with throws:
Drape a heavy mauve or purple knit throw blanket across the foot of the bed. Let it bunch naturally rather than folding it perfectly flat. -
Arrange the pillows:
Place solid blush or terracotta pillowcases behind, followed by distinctive embroidered purple throw pillows in front to tie the wall color to the bed. -
Final touches:
Add a wooden nightstand with a simple lamp and dried botanicals to echo the earthy, romantic vibe of the feature wall.
Step back and enjoy the warmth and romance your new feature wall brings to the room.
Moody Forest Green
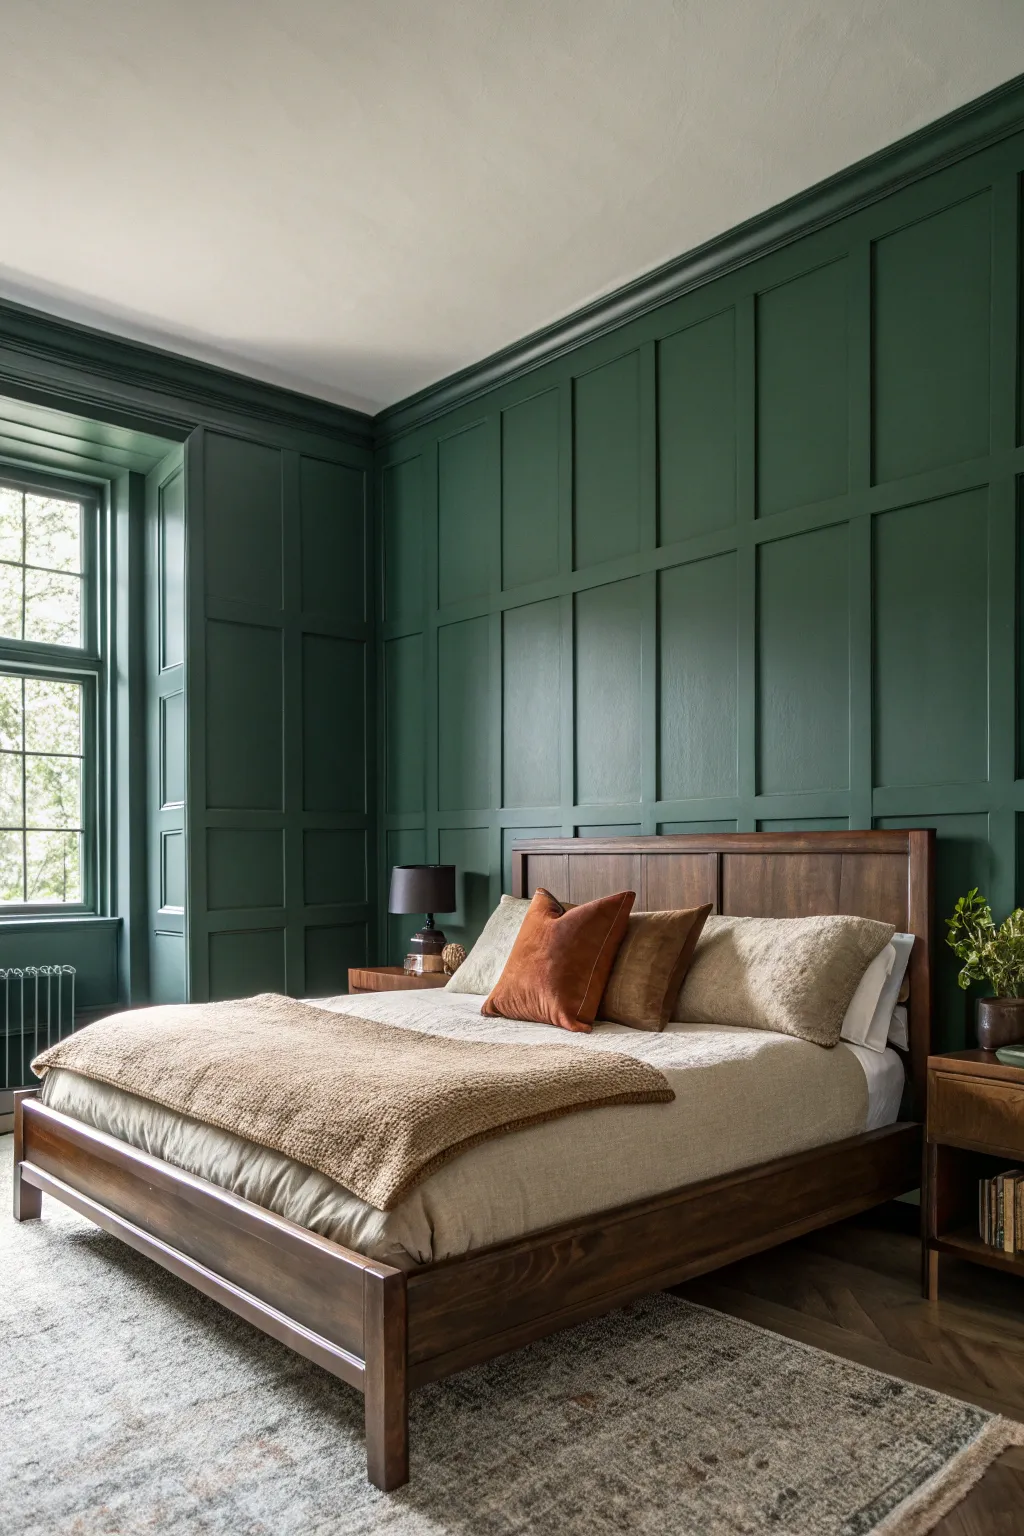
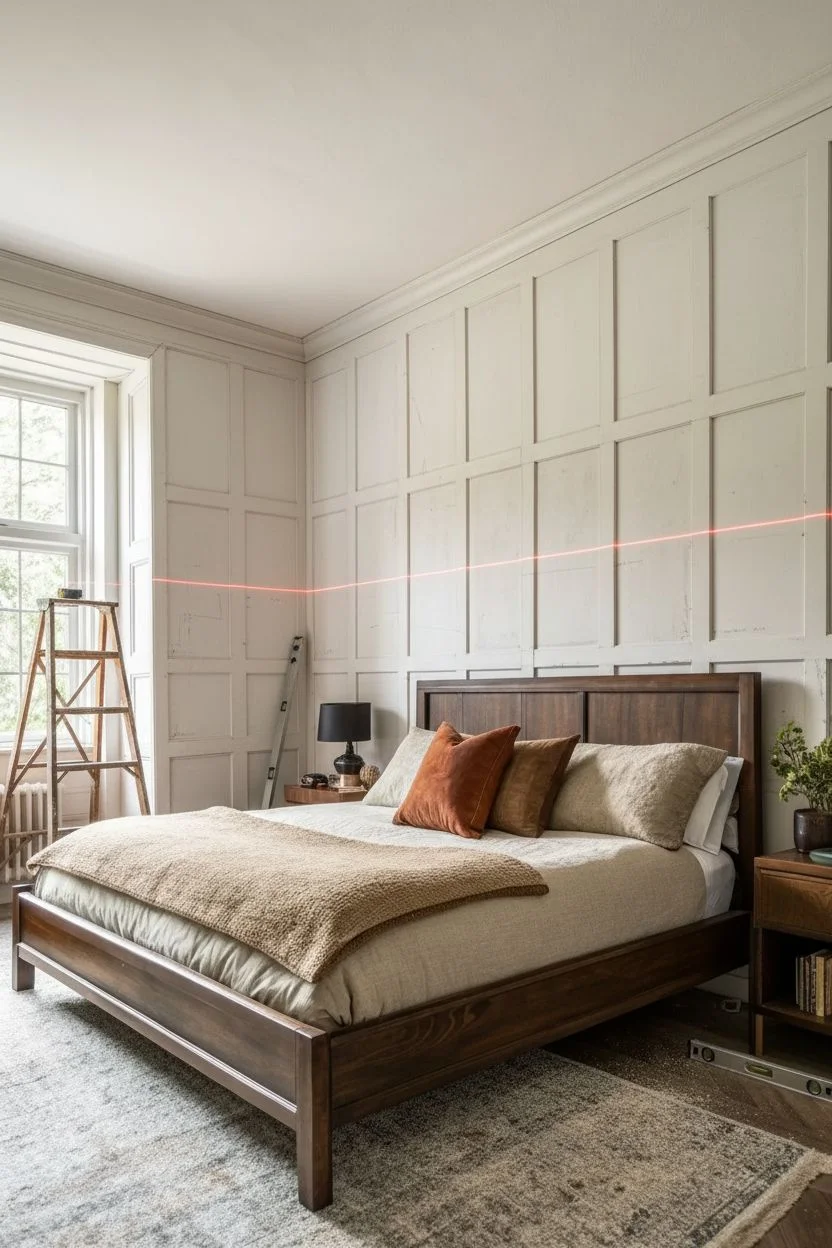
Transform a plain bedroom into a sophisticated, moody sanctuary with this full-wall grid paneling project. By combining architectural structure with a deep, monochromatic color drench, you create a cozy and high-end built-in look.
Detailed Instructions
Materials
- Pre-primed MDF boards (1×3 inch)
- Construction adhesive
- Brad nailer and 2-inch nails
- Laser level or spirit level
- Wood filler
- Paintable latex caulk
- Sandpaper (120 and 220 grit)
- Deep forest green paint (Satin finish)
- High-density foam roller
- Angled sash brush
- Tape measure
Step 1: Planning and Layout
-
Assess the dimensions:
Measure your wall height and width precisely. To replicate the look in the image, you want a grid of squares or slightly vertical rectangles spanning from floor to ceiling. -
Calculate the grid:
Divide your wall width by your desired number of columns to determine spacing. Sketch this out on paper first to ensure the squares are evenly sized, adjusting the outer measurements if necessary. -
Prepare the surface:
Remove existing baseboards and crown molding if possible, or plan to integrate them. Lightly sand the existing wall texture to help the adhesive bond.
Gap Patrol
If your walls are wavy and create gaps behind the boards, don’t force the wood back. Fill larger gaps with backer rod or extra caulk to hide the shadow line.
Step 2: Installing the Framework
-
Frame the perimeter:
Install horizontal boards along the floor (as new baseboard) and along the ceiling. Use construction adhesive on the back and secure with brad nails into studs where possible. -
Mark vertical guides:
Using your calculated measurements, mark the center points for each vertical batten on the wall. I find using a laser level here saves immense amounts of time to ensure perfectly straight lines. -
Install vertical battens:
Cut your MDF boards to fit vertically between the floor and ceiling strips. Apply adhesive, align them with your laser line or marks, and nail them into place. -
Cut horizontal rails:
Measure the distance between two vertical battens. Cut a ‘test’ piece to ensure a snug fit. Once confirmed, cut all horizontal rail pieces for that column. -
Install horizontal rails:
Place the horizontal pieces between the verticals to form your grid. Use a pre-cut wood spacer block to ensure every horizontal rail is spaced exactly the same distance apart without constant measuring. -
Address window trim:
If your wall has a window, frame it out with the same MDF boards to integrate it into the grid, creating a seamless transition from the paneling to the window casing.
Step 3: Seamless Preparation
-
Fill nail holes:
Dab a small amount of wood filler into every brad nail hole. Overfill slightly as the filler shrinks when drying. -
Sand until smooth:
Once dry, sand the filler flush with the wood using 220-grit sandpaper. Run your hand over the spots; if you can feel the hole, you will see it after painting. -
Caulk the seams:
Apply a thin bead of paintable caulk along every edge where the board meets the wall and where boards meet each other. Smooth it with a wet finger for a seamless, built-in appearance. -
Final cleaning:
Vacuum up all sawdust and wipe down the entire wall with a tacky cloth to remove fine dust particles.
Level Up
For total immersion, consider painting the crown molding and even the radiator in the same forest green shade to make the room feel larger and more cohesive.
Step 4: The Moody Finish
-
Prime the surface:
Apply a coat of primer to any raw wood ends or filler spots. If your MDF wasn’t pre-primed, prime the entire grid to prevent paint absorption. -
Cut in edges:
Use your angled sash brush to paint the deep forest green into the corners of each grid square and along the ceiling and floor lines. -
Roll the grid:
Use a small foam roller to paint the flat surfaces of the boards and the wall sections inside the grid. The foam roller eliminates texture for a smooth, cabinet-like finish. -
Apply second coat:
Allow the paint to dry according to the can’s instructions, then apply a second coat for full opacity and depth of color. -
Paint the trim:
To achieve the specific monochromatic look from the photo, paint the window casings and sills in the exact same green paint.
Step back and admire how this rich, structured wall completely redefines the atmosphere of your bedroom.
The Painted Fifth Wall
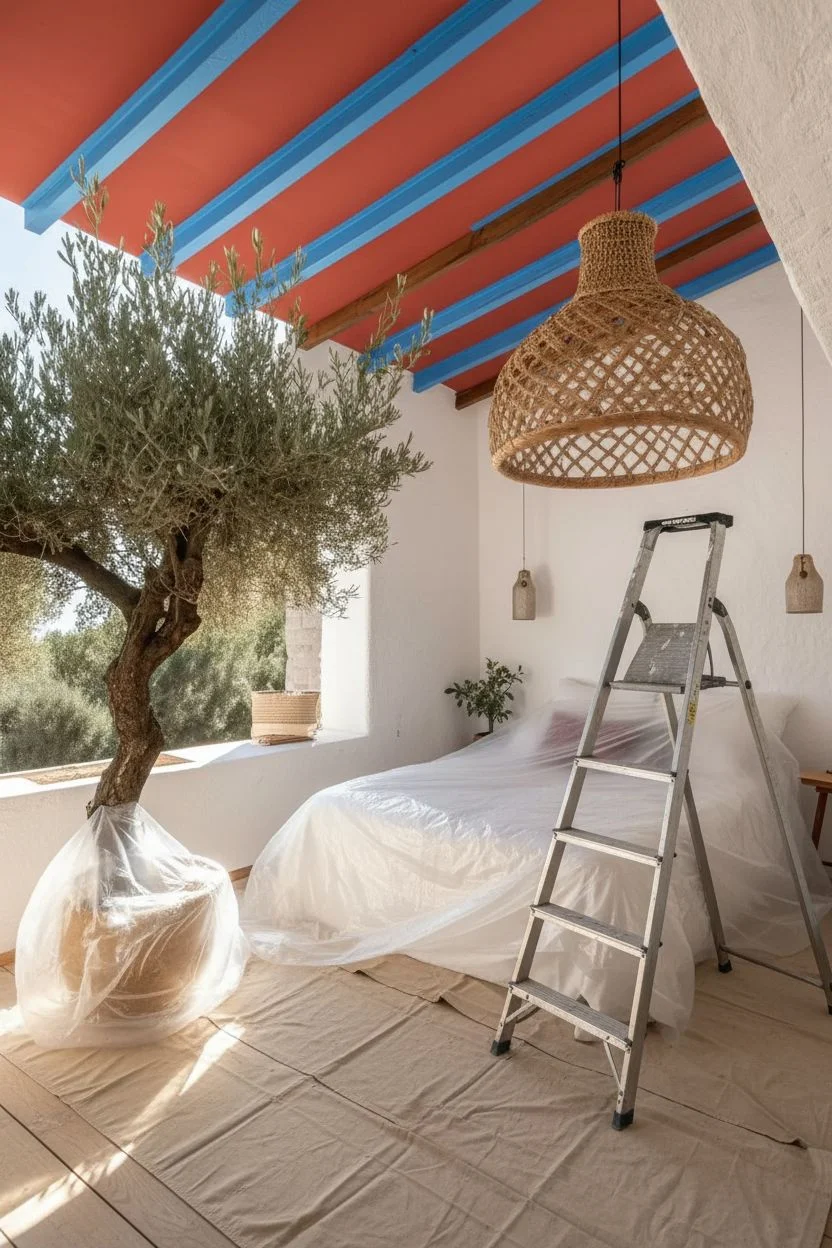
Transform the feeling of your entire bedroom by adding a warm, vibrant hue to the ceiling spaces between exposed beams. This project brings a cozy, sun-drenched villa atmosphere to your space using a bold coral or terracotta paint.
Step-by-Step Guide
Materials
- Interior latex paint (Coral/Terracotta, matte finish)
- Stain-blocking primer (optional)
- 2.5-inch angled sash brush
- 4-inch mini roller frame
- 3/8-inch nap mini roller covers
- High-quality painter’s tape
- Canvas drop cloths
- Sturdy stepladder
- Sanding sponge (fine grit)
- Damp cleaning rags
- Putty knife
- Stir stick
Step 1: Preparation and Taping
-
Clear the area:
Move as much furniture out of the room as possible, or shift the bed to the center and cover it completely with plastic sheeting to protect it from overhead drips. -
Protect the flooring:
Lay down heavy canvas drop cloths over the entire floor area, ensuring they stay flat to prevent tripping hazards while you move the ladder. -
Clean the surface:
Use a duster or a dry rag on a pole to sweep out the corners between the beams and the ceiling surface to remove any cobwebs or dust bunnies. -
Inspect and sand:
Check the dry wall or plaster between the beams for rough spots; lightly scuff these areas with a fine-grit sanding sponge. -
Tape the beams:
Apply painter’s tape along the top distinct edge of every wooden beam where it meets the ceiling surface. -
Seal the tape edges:
Run a putty knife firmly along the edge of the tape to ensure a tight seal, which prevents the bold color from bleeding onto the natural wood.
Step 2: Painting the Bays
-
Mix the paint:
Stir your coral paint thoroughly with a stir stick, ensuring the pigments at the bottom of the can are fully incorporated for a consistent color. -
Load the brush:
Dip your angled sash brush about one-third of the way into the paint and tap distinctively against the side of the can to remove excess. -
Cut in the first section:
Starting in one corner bay, carefully paint the perimeter where the ceiling meets the beams and the wall, creating a two-inch border. -
Switch to the roller:
Load your 4-inch mini roller with paint; I personally find these smaller rollers much easier to maneuver between beams than standard 9-inch ones. -
Fill in the field:
Roll the paint onto the flat section of the ceiling bay, overlapping your wet brush strokes to ensure a seamless texture. -
Check for ridges:
Lightly pass the roller over the area one last time without adding new paint to smooth out any heavy lines or ridges. -
Repeat the process:
Move your ladder and repeat the cutting and rolling process for each individual section between the beams, completing one bay before starting the next. -
Allow to dry:
Let the first coat dry completely according to the manufacturer’s instructions, usually about two to four hours.
Beam Protection Tip
If your beams are rough-hewn or uneven, press the painter’s tape into the texture with a dry rag, then paint a thin line of clear matte medium over the tape edge first to create a perfect seal.
Step 3: Second Coat and Finishing
-
Apply the second coat:
Repeat the cutting and rolling steps for a second coat to ensure the rich coral color is fully opaque and vibrant. -
Remove tape carefully:
While the paint is still slightly tacky to the touch, slowly peel off the painter’s tape at a 45-degree angle to keep a crisp line. -
Check for bleeds:
Inspect the beams for any tiny spots where paint may have seeped through; essentially, use a damp cloth wrapped around a fingernail to scrape them off gently. -
Final clean up:
Fold up your drop cloths carefully—inward—to trap any dried paint flakes, then reset your beautiful olive tree and furniture.
Uneven Coverage?
Painting overhead often leads to missed spots due to lighting angles. Set up a bright work light on the floor pointed upward to easily spot thin patches before the paint dries.
Enjoy the warm glow and instant character your new statement ceiling brings to the room.
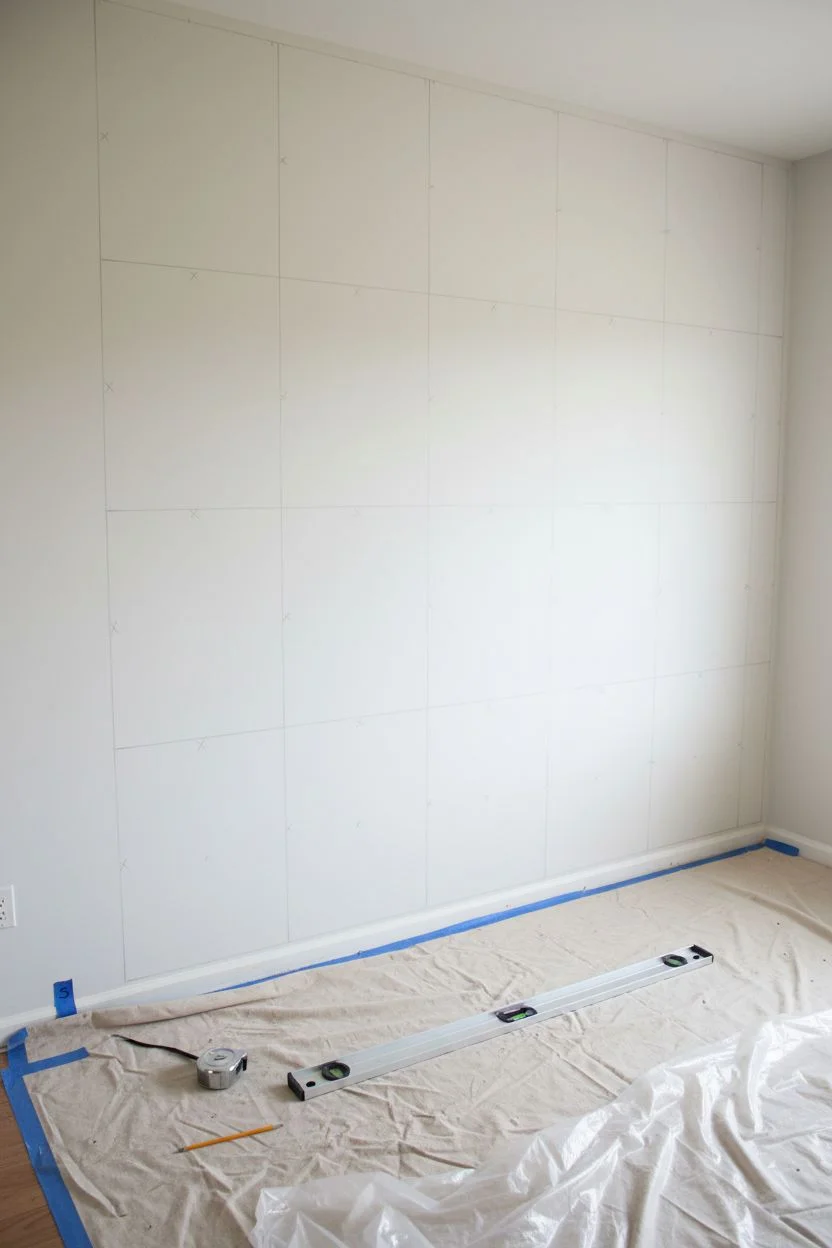
The Classic Accent Wall

Transform your bedroom with this sophisticated board and batten feature wall that adds instant architectural character and depth. By combining a geometric grid pattern with a deep, moody green, you create a stunning focal point that feels both modern and timeless.
Detailed Instructions
Materials
- Pre-primed MDF boards (1×3 inch)
- Construction adhesive (Liquid Nails)
- Brad nailer
- 2-inch brad nails
- Spackle or wood filler
- Paintable latex caulk
- Caulk gun
- Sandpaper (120 and 220 grit)
- Interior paint (Deep Forest Green, satin or eggshell finish)
- Paint roller with medium nap cover
- Angled sash brush
- Laser level (highly recommended) or spirit level
- Tape measure
- Pencil
- Miter saw
Step 1: Planning and Layout
-
Measure the wall:
Measure the full width and height of your wall to calculate the total square footage and linear feet of board needed. -
Determine grid spacing:
Decide on the number of squares you want. A good rule of thumb is aiming for squares roughly 20-24 inches wide. Determine the number of vertical styles (vertical boards) and horizontal rails needed to achieve even spacing. -
Check for studs:
Use a stud finder to mark the location of wall studs near the ceiling and floor. While adhesive helps, nailing into studs provides the most secure hold.
Wavy Walls?
Walls are rarely perfectly flat. If a board won’t sit flush, don’t force it. Use construction adhesive liberally and insert small wood shims behind the board to bridge gaps, then caulk the sides heavily.
Step 2: Installing the Grid
-
Frame the perimeter:
Cut and install boards along the ceiling line, floor (baseboard), and both side corners of the wall first to create a complete frame. Apply construction adhesive to the back of each board before nailing. -
Mark vertical positions:
Using your math from step 2, mark the exact center points for each vertical board along the top and bottom frame pieces. -
Install vertical battens:
Cut your vertical MDF boards to fit snugly between the top and bottom frame. Apply adhesive, align them with your marks, ensure they are plumb using a level, and secure with the nail gun. -
Measure horizontal gaps:
I prefer to measure the distance between verticals individually for each row, as walls are rarely perfectly straight, and millimetres matter here. -
Cut horizontal rails:
Cut the horizontal pieces to fit between the vertical stiles. Group them by row if specific measurements vary slightly. -
Install horizontal rails:
Starting from the bottom, use your level (or a pre-cut spacer block for speed) to position the horizontal rails. Glue and nail them into place, ensuring the grid lines appear continuous.
Spacer Block Hack
Cut a scrap piece of wood to the exact height of your grid squares. Use this ‘spacer block’ to support the horizontal rails while you nail them, ensuring every row is perfectly identical without measuring.
Step 3: Seamless Prep
-
Fill nail holes:
Apply a dab of spackle or wood filler to every nail hole, slightly overfilling to account for shrinkage as it dries. -
Sand smooth:
Once dry, sand the filler flush with the wood surface using 220-grit sandpaper. Run your hand over it—if you can feel the bump, you will see it after painting. -
Caulk the seams:
Apply a thin bead of paintable caulk along every edge where wood meets the wall and where boards meet each other. This step is crucial for that high-end, built-in look. -
Smooth the caulk:
Run a wet finger or a damp rag along the caulk bead immediately to smooth it out and remove excess. Let everything dry completely according to product instructions.
Step 4: Painting
-
Cut in the edges:
Using your angled sash brush and the deep green paint, carefully paint around the perimeter, inside the corners of each grid square, and along the intricate edges of the molding. -
Roll the panels:
Use a small roller or a standard roller to paint the flat wall sections inside the grid squares. Watch for drips pooling in the corners of the woodwork. -
Paint the faces:
Roll the front faces of the grid boards. Using a roller here instead of a brush helps achieve a smooth, consistent texture across the whole wall. -
Apply second coat:
Dark colors often require two or even three coats for true depth. Allow the first coat to dry, then repeat the process for a rich, velvety finish.
Step back and admire how this bold geometric feature completely redefines the atmosphere of your room.
Stark Black Contrast
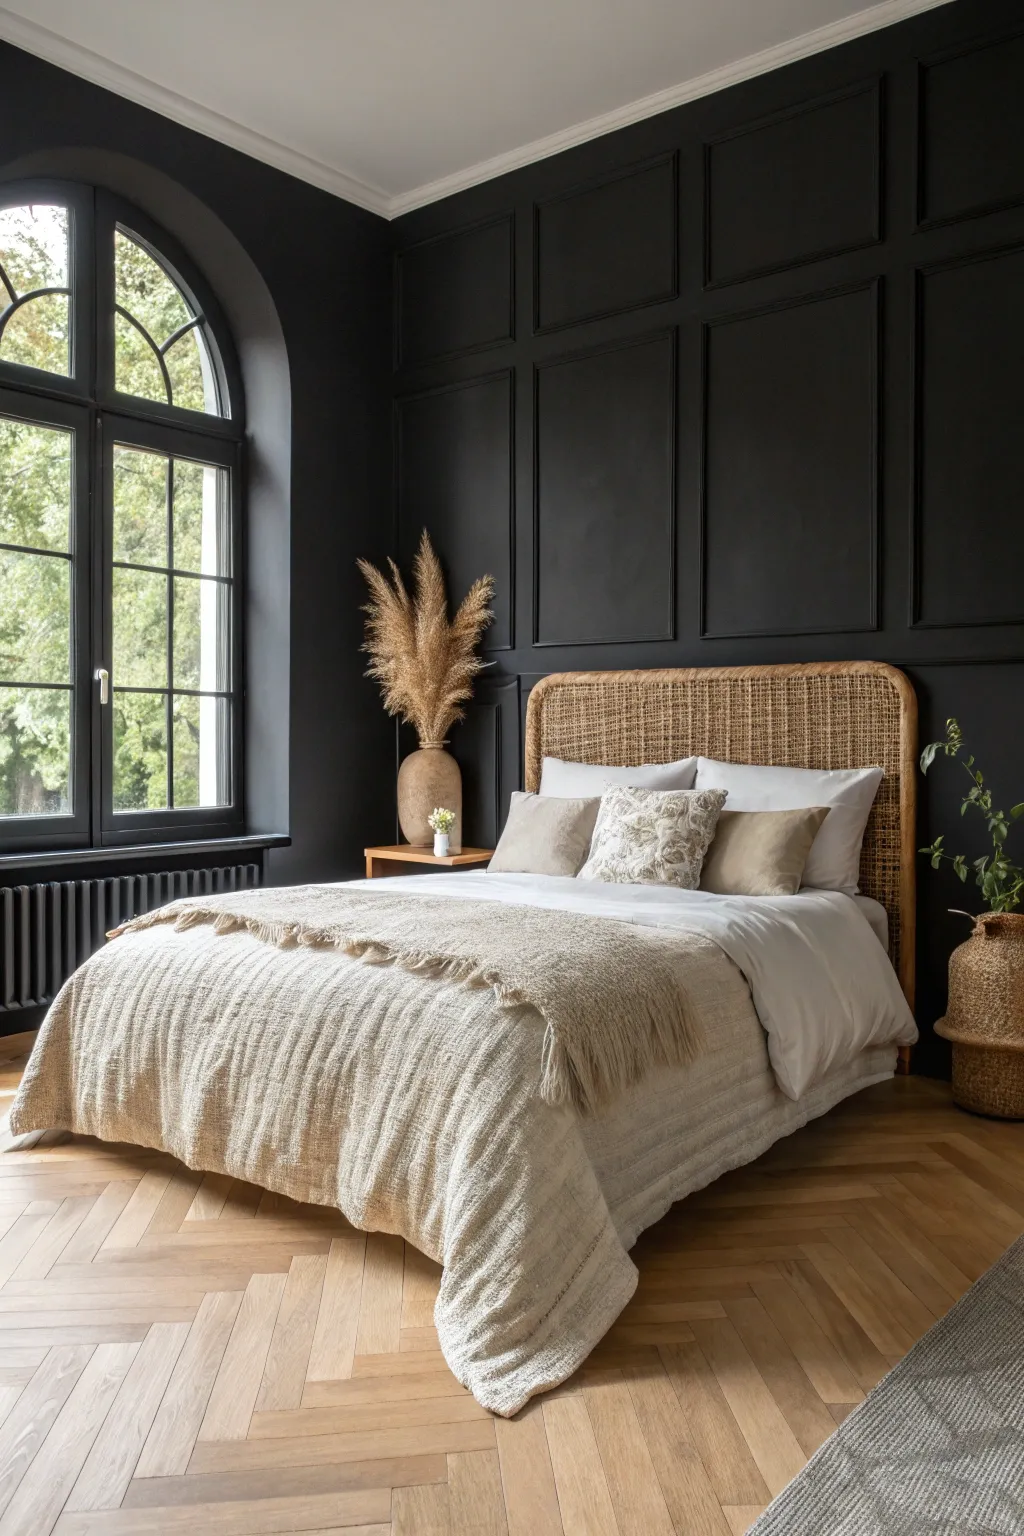
This project transforms an ordinary bedroom into a dramatic sanctuary by combining architectural interest with a bold, monochromatic color palette. You will install a DIY board and batten grid system and finish it in a deep, matte black to create a stunning backdrop for lighter furniture and decor.
Step-by-Step Guide
Materials
- 1×3 inch pre-primed MDF or pine boards
- Construction adhesive (e.g., Liquid Nails)
- Finish nailer and 2-inch brad nails
- Laser level (or spirit level)
- Paintable wood filler
- Paintable acrylic latex caulk
- Caulk gun
- Sandpaper (120 and 220 grit)
- Matte black interior latex paint
- 2.5-inch angled sash brush
- 3/8-inch microfiber roller cover and frame
- Paint tray and liners
- High-quality painter’s tape
Step 1: Planning and Layout
-
Measure and calculate:
Measure the total width and height of your feature wall. Determine your spacing by dividing the width by the desired number of ‘boxes’ to ensure they are evenly sized. -
Mark the wall:
Use a pencil and a long level (or laser level) to draw your grid layout directly on the wall. This helps visualize the final look and locate studs before cutting any wood. -
Locate studs:
Use a stud finder to mark the horizontal location of studs along the top and bottom of the wall, as well as intermittently throughout the field.
Step 2: Installing the Grid
-
Frame the perimeter:
Install the top horizontal board flush with the ceiling and the bottom board above the skirting (or replace skirting for a seamless look). Apply adhesive to the back and nail into studs. -
Install vertical stiles:
Cut your vertical boards to fit between the top and bottom rails. Install the far left and right boards first, then fill in the remaining verticals according to your grid markings. -
Add horizontal battens:
Measure the distance between each vertical board individually—walls are rarely perfectly straight. Cut the small horizontal pieces to fit snugly between the verticals. -
Secure the cross pieces:
Apply adhesive to the back of each horizontal batten, ensure it is perfectly level, and nail it into place. I like to use a spacer block cut to the exact height to speed up this process.
Pro Tip: Sheen Selection
For black walls, selecting a ‘Matte’ or ‘Flat’ finish is essential. Higher gloss levels reflect light, which highlights imperfections in the drywall and reduces the velvety depth of the dark color.
Step 3: Seamless Prep Work
-
Fill nail holes:
Use a putty knife to press wood filler into every nail hole. Overfill them slightly, as the filler will shrink when it dries. -
Sand smooth:
Once the filler is completely dry, sand the patches flush with the wood using 220-grit sandpaper until they are undetectable to the touch. -
Caulk the seams:
Run a thin bead of paintable caulk along every edge where wood meets wall and where boards join each other. This is crucial for achieving that ‘built-in’ appearance. -
Smooth the caulk:
Immediately smooth the caulk bead with a wet finger or a caulking tool to remove excess and ensure a clean transition. -
Protect adjacent surfaces:
Apply painter’s tape to the adjacent walls, ceiling, and floor. Press the tape edges down firmly to prevent the black paint from bleeding.
Level Up: Camouflage
Don’t stop at the walls! Paint your outlet covers, switch plates, and even radiators (using high-heat paint) the same matte black. This makes visual clutter disappear for a truly immersive luxury look.
Step 4: The Blackout Finish
-
Cut in edges:
Using your angled sash brush, paint the interior corners of the grid squares and the perimeter of the wall with the matte black paint. -
Brush the trim:
Brush paint onto the faces and sides of the trim boards. This ensures the roller doesn’t have to work too hard to get into the tight corners. -
Roll the first coat:
Use the microfiber roller to apply paint to the flat wall sections inside the grid and over the face of the trim, smoothing out any brush marks. -
Apply second coat:
Allow the first coat to dry for at least 4 hours. Apply a second coat to ensure deep, opaque coverage without streaks. -
Remove tape:
Peel off the painter’s tape slowly while the final coat is still slightly tacky to ensure a crisp line.
Step back and admire how the depth of the black wall completely redefines the atmosphere of your room.
Zesty Chartreuse Energy
“t”: “Zesty Chartreuse Lime Wash Wall”,
“i”: “Transform your bedroom with the vibrant energy of a chartreuse lime wash simply by using a block brush and natural pigments. This textured, matte finish adds a sophisticated, organic feel that captures light beautifully and serves as the perfect backdrop for natural materials.”,
“m”: [
“High-quality painter’s tape”,
“Canvas drop cloths”,
“Spackle and sanding block”,
“Mineral-based primer”,
“Lime wash paint (Chartreuse color)”,
“Wide block brush (masonry brush)”,
“Paint stirrer”,
“Paint tray”,
“Damp rags”
],
“p”: [
{
“n”: “Preparation & Priming”,
“s”: [
{
“t”: “Protect the area”,
“d”: “Clear the room or move furniture to the center, then cover the floor completely with canvas drop cloths to catch any stray drips.”
},
{
“t”: “Tape the boundaries”,
“d”: “Apply painter’s tape carefully along the baseboards, ceiling line, and adjacent walls, pressing the edges down firmly to prevent bleed-through.”
},
{
“t”: “Smooth the surface”,
“d”: “Inspect the wall for any nail holes or dents, fill them with spackle, and sand the patches smooth once dry.”
},
{
“t”: “Clean the wall”,
“d”: “Wipe the entire wall surface with a slightly damp rag to remove sanding dust and potential oils that could hinder adhesion.”
},
{
“t”: “Apply primer”,
“d”: “Roll on a coat of mineral-based primer, which is essential for lime wash to bond correctly; standard latex primer might not work as well, so check your paint tin’s instructions.”
},
{
“t”: “Allow to dry”,
“d”: “Let the primer cure fully according to the manufacturer’s time frame before opening your colored paint.”
}
]
},
{
“n”: “The Cloud Application”,
“s”: [
{
“t”: “Mix the paint”,
“d”: “Stir your chartreuse lime wash thoroughly, ensuring all the heavy pigments at the bottom are completely incorporated into the liquid.”
},
{
“t”: “Load the brush”,
“d”: “Dip the tips of your large block brush into the paint, tapping off any excess to prevent heavy dripping.”
},
{
“t”: “Begin the first coat”,
“d”: “Start at a top corner, applying the paint in rough, crisscross ‘X’ strokes rather than straight vertical lines.”
},
{
“t”: “Create texture”,
“d”: “Continue working in random, cloud-like patches, feathering the edges of each section into the next to avoid hard lines.”
},
{
“t”: “Maintain a wet edge”,
“d”: “Work across the wall maintaining a ‘wet edge,’ meaning you should blend new paint into the previous section before it dries completely.”
},
{
“t”: “Finish first layer”,
“d”: “Cover the entire wall and let it dry; don’t panic if it looks patchy or transparent at this stage, as that is normal.”
}
]
},
{
“n”: “Building Depth & Finishing”,
“s”: [
{
“t”: “Assess the color”,
“d”: “Once the first coat is dry, observe the lighter, chalky finish that has developed.”
},
{
“t”: “Apply second coat”,
“d”: “Repeat the X-stroke application for the second layer, focusing on filling in areas that look too thin while preserving the brush stroke texture.”
},
{
“t”: “Feather the final bits”,
“d”: “I like to use a lighter touch on this final pass to really emphasize the cloudy, suede-like movement of the paint.”
},
{
“t”: “Remove tape”,
“d”: “Peel off the painter’s tape slowly while the paint is still slightly damp to ensure a crisp, clean edge.”
},
{
“t”: “Cure time”,
“d”: “Allow the wall to cure for at least 24
Textured Limewash Finish
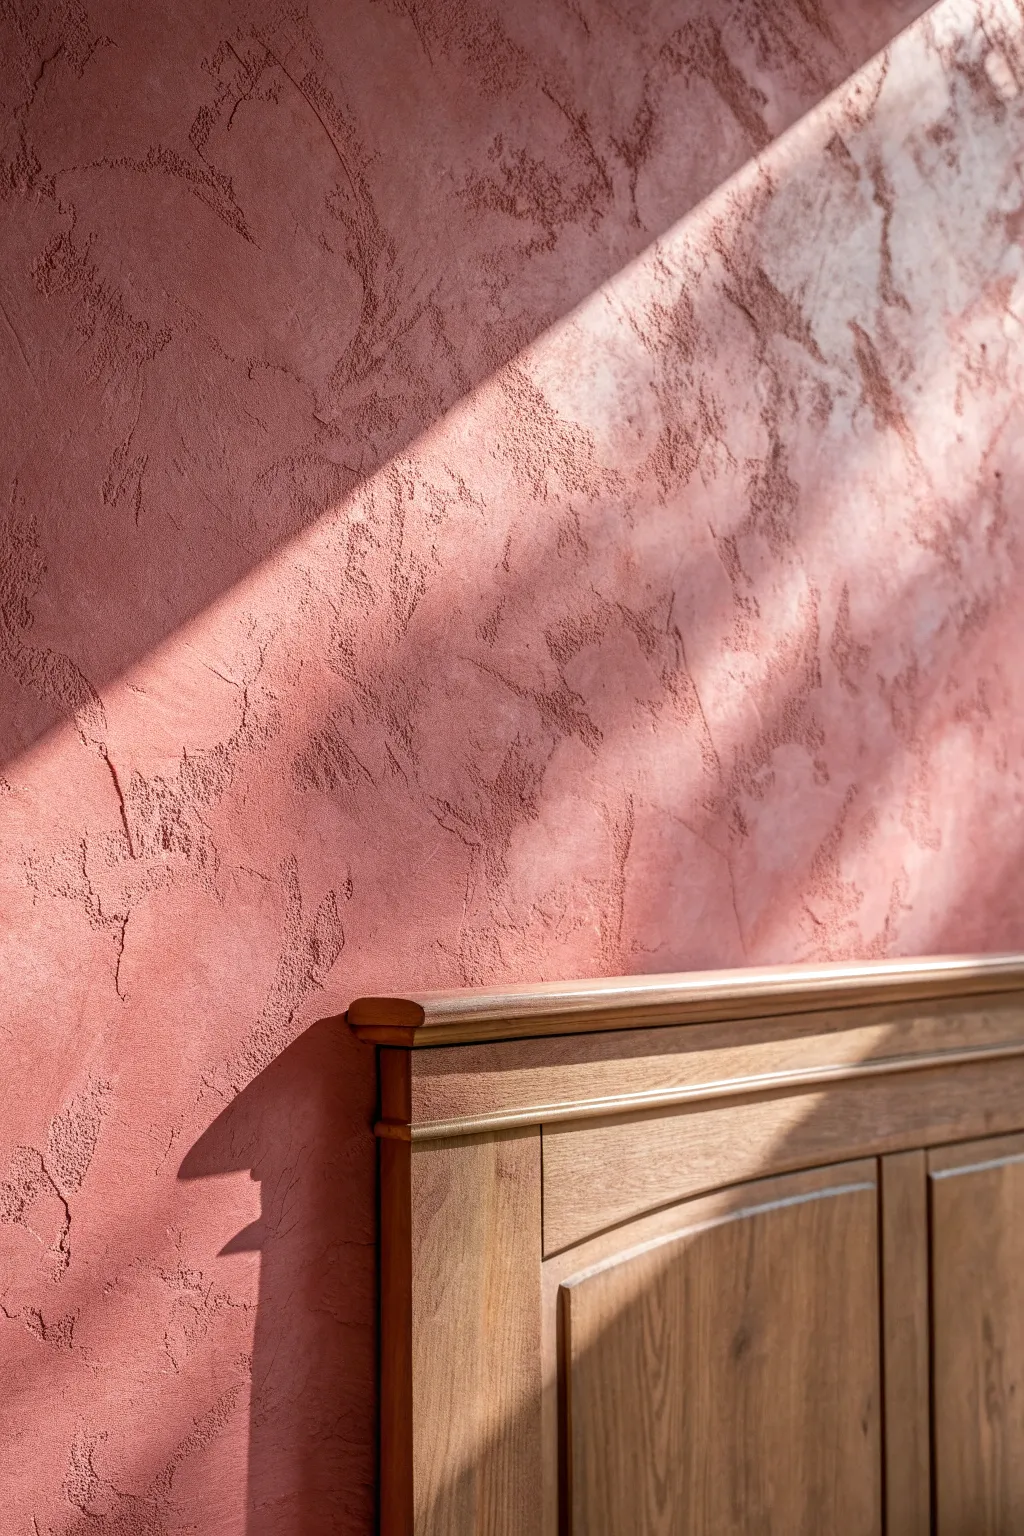
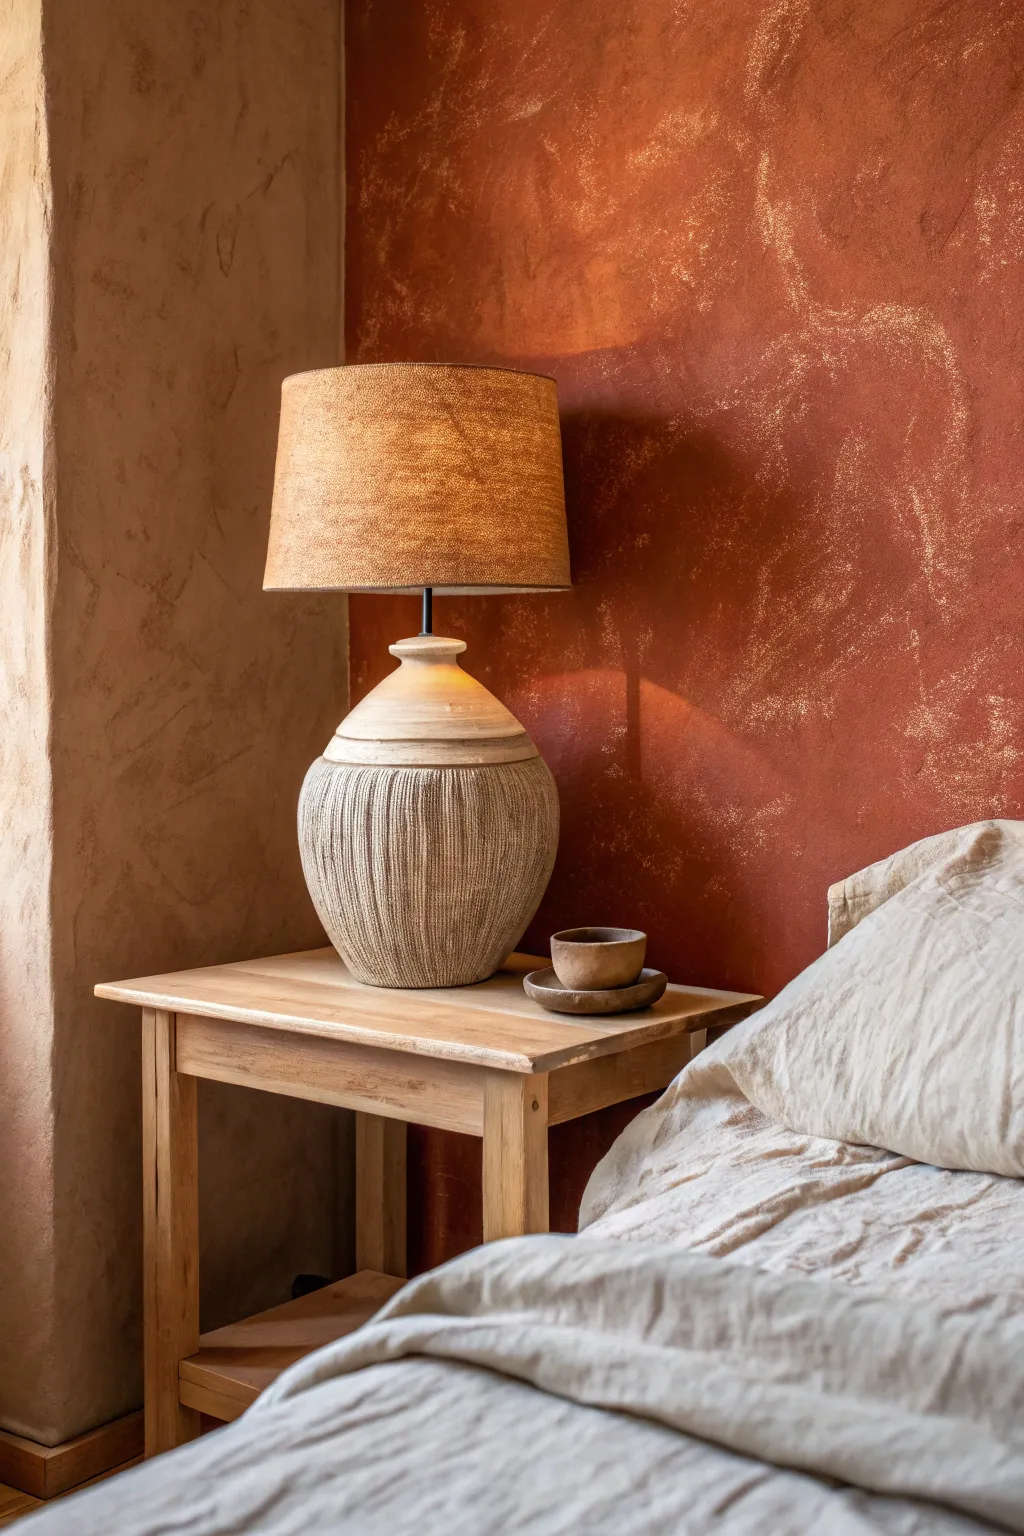
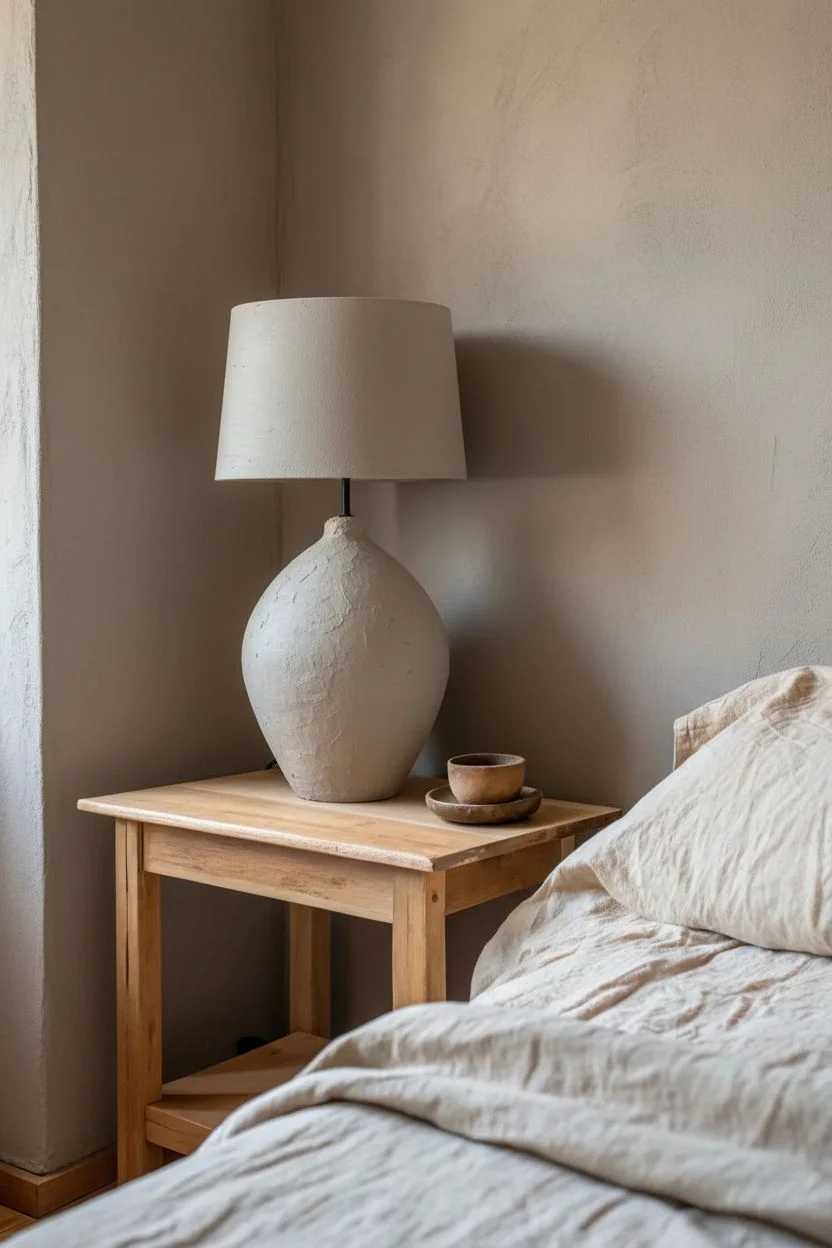
This finish brings the rustic warmth of a Mediterranean villa straight to your bedroom with a surface that demands to be touched. By layering lime-based paint with a specific trowel technique, you will recreate the rich, pitted texture and play of light seen in the photo.
How-To Guide
Materials
- High-build lime paint (in Dusty Rose or Terracotta)
- Mineral or Quartz primer (essential for adhesion)
- Large block brush (4-6 inch masonry brush)
- Stainless steel trowel (rounded edges)
- Painter’s tape
- Drop cloths
- Mixing paddle and drill
- Clean bucket for water
- Rags
Step 1: Preparation & Priming
-
Clear the area:
Move the bed and furniture away from the wall to give yourself ample working space for broad artisan strokes. -
Protect surfaces:
Lay down drop cloths and tape off the skirting boards, ceiling line, and adjacent walls carefully. -
Patch and prep:
Fill any deep nail holes with spackle, but don’t worry about minor imperfections; the texture will hide them. -
Apply mineral primer:
Unlike standard paint, lime needs a gritty surface to grip. Roll on a coat of quartz or mineral primer evenly across the entire wall. -
Wait for the cure:
Allow the primer to dry completely, usually overnight. It must be gritty and hard to the touch before you proceed.
Texture Pro-Tip
To get the exact look in the photo, hold the trowel at a 30-degree angle. If you hold it too flat, you’ll smooth out too much characteristic texture.
Step 2: Building the Base Texture
-
Mix the lime paint:
Use your drill and mixing paddle to stir the lime paint thoroughly. It should be thick and creamy like cake batter. -
Cut in the edges:
Use a smaller brush to dab paint along the masked edges, keeping the application messy rather than a straight line to blend later. -
Apply the first coat:
Dip your block brush into the paint and apply it to the wall using a cross-hatch ‘X’ motion. -
Work in clouds:
Focus on 3-foot sections at a time. I like to keep the edges of these sections wet and irregular to avoid creating visible seam lines. -
Build coating thickness:
Do not stretch the paint too thin. You want a decent layer of material on the wall to establish the base for the texture. -
Let it dry:
Wait for the first coat to dry fully (typically 2-4 hours). The color will lighten significantly as it dries.
Level Up: Depth
For more dramatic visual depth, tint your second coat of lime paint just 10% lighter or darker than the base coat to accentuate the shadows.
Step 3: Creating the Relief Finish
-
Prepare the second coat:
For the layer shown in the image, apply the paint slightly thicker than the first round. -
Apply with brush:
Brush the paint onto a small section, again using chaotic X-strokes to create high and low ridges. -
The trowel technique:
While the paint is still wet (but tacky), take your clean stainless steel trowel and drag it lightly over the surface at a shallow angle. -
Skip and drag:
Allow the trowel to ‘skip’ over the ridges. This flattens the high spots (creating darker, smooth areas) while leaving the deep pits (lighter, rough areas) untouched. -
Vary your pressure:
Press harder in some spots to reveal the underlying layer, and lighter in others to leave the texture rough. This creates that specific detailed relief. -
Clean the blade:
Keep a damp rag nearby and wipe your trowel blade frequently to prevent dried heavy buildup from scratching your work. -
Burnish for sheen:
As the wall begins to set (about 30-40 minutes later), run the clean trowel over the surface again with firm pressure to polish the high spots. -
Remove tape:
A gentle peel while the wall is still slightly damp ensures you get a crisp line without chipping the hard lime finish.
Once fully cured, your wall will capture the sunlight just like the image, creating a warm, living backdrop for your bedroom.
Playful Color Blocking
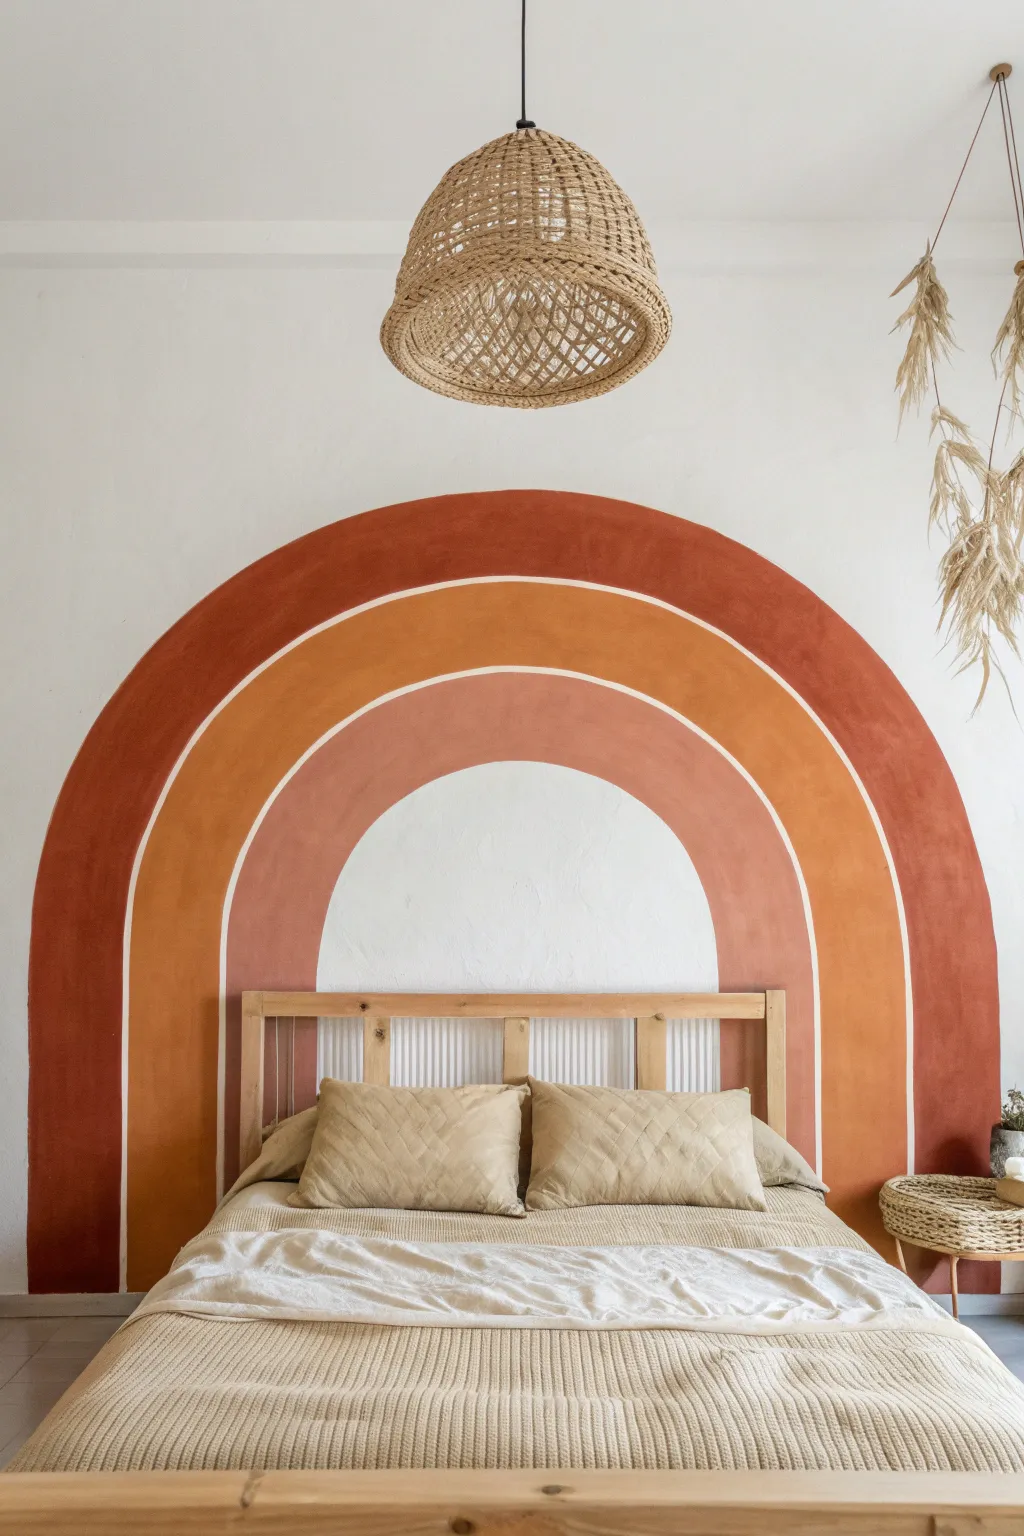
Transform a plain white wall into a warm, bohemian sanctuary with this earthy rainbow mural. By using a simple string-compass technique, you can paint perfect arches that frame your bed and add instant architectural character.
Step-by-Step
Materials
- Interior latex paint (Deep Terracotta, Burnt Ochre, Muted Clay Pink)
- 2-inch angled sash brush
- 4-inch mini foam roller and tray
- Pencil and good quality eraser
- Non-stretchy string or twine
- Hammer and small nail (or tack)
- Painter’s tape
- Long level or straight edge
- Drop cloth
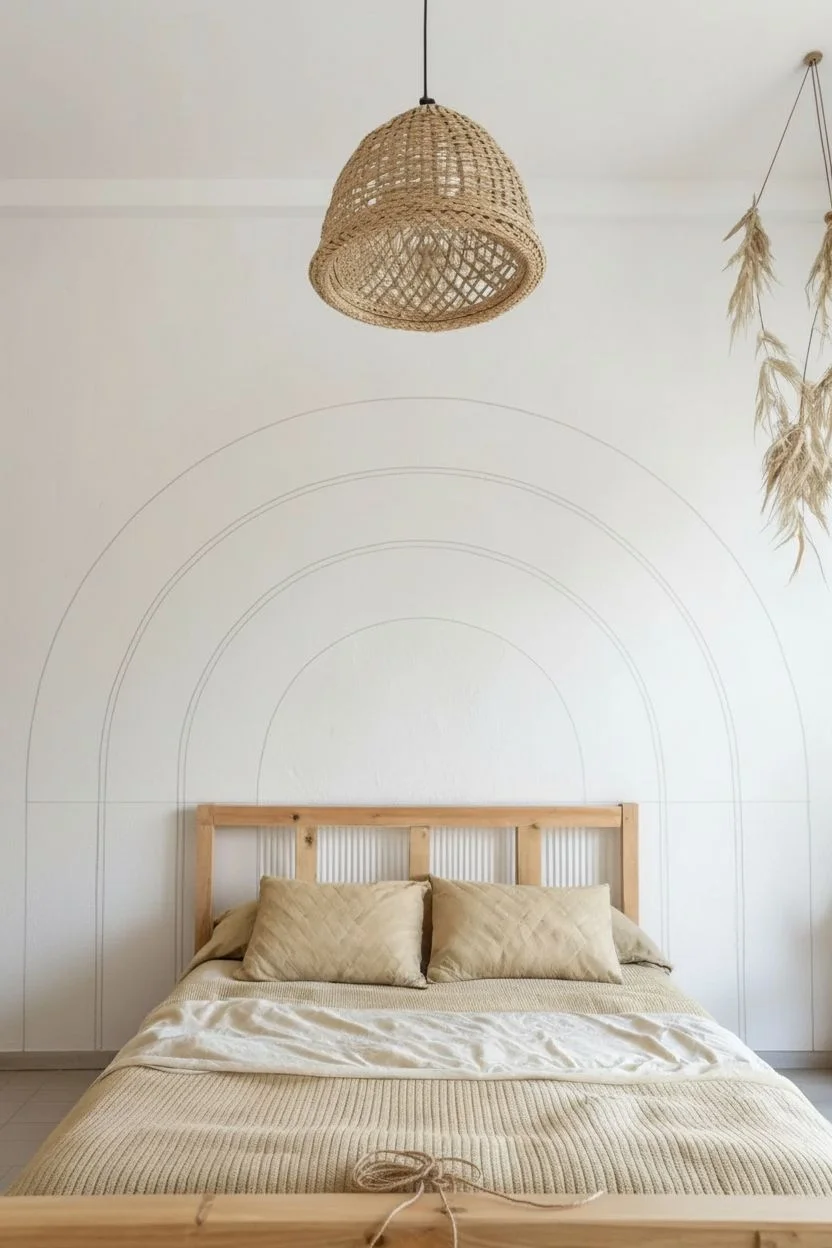
Step 1: Planning and Drafting
-
Prepare the workspace:
Clear the wall completely, moving the bed frame away to give yourself plenty of room. Wipe the wall down with a damp cloth to remove dust and ensure the tape and paint adhere properly. -
Find your center:
Measure the width of your bed or intended area to find the exact center point. Mark this center spot on the wall baseboard or just above the floor level; this will be the anchor for your arch. -
Create a string compass:
Cut a piece of non-stretchy string slightly longer than the height you want the highest arch to reach. Tie one end securely to a pencil and the other end to the small nail or tack. -
Anchor the compass:
Hammer the nail into your marked center point near the floor. Pull the string taut upwards to test the height of your outer arch, ensuring it clears headboard height comfortably. -
Draft the outer curve:
Keeping the string pulled tight and your hand steady, guide the pencil from the left side of the floor, up over the peak, and down to the right to draw your first semi-circle. -
Define the first band:
Shorten the string by about 5-6 inches (depending on how thick you want the bands) and draw a second arc inside the first one. This creates the outline for your outer Terracotta band. -
Mark the spacer gap:
Shorten the string again by about 1 inch to create the white gap between colors. Draw a light guide line here so you know where the next color starts. -
Draft remaining bands:
Repeat the process: shorten string for the Ochre band width, draw arc, shorten for gap, draw arc, shorten for the final Pink band width, and draw the final inner arc. -
Extend vertical lines:
If your semi-circles don’t reach the floor due to the nail placement, use a long level or straight edge to extend the arched lines straight down to the baseboard perfectly vertically.
Knot Security
Double-check your knots on the pencil before drawing! If the string slips even a fraction of an inch while you are swinging the arc, your rainbow layers will look wobbly or uneven.
Step 2: Painting the Gradient
-
Outline the outer band:
Dip your angled sash brush into the Deep Terracotta paint. carefully ‘cut in’ the paint along the pencil lines of the absolute largest arch. I find holding the brush like a pencil gives better control on curves. -
Fill the outer band:
Once the edges are defined, use the 4-inch mini roller to fill in the center of the Terracotta band. The roller helps avoid brush strokes and covers ground quickly. -
Outline the middle band:
Moving inward, use a clean brush to cut in the Burnt Ochre paint. Be extremely careful to respect the 1-inch gap you marked earlier; this negative space is crucial for the definition. -
Fill the middle band:
Roll the Burnt Ochre paint between your cut-in lines to complete the middle section. -
Paint the inner arch:
Repeat the cutting-in and rolling process with the Muted Clay Pink for the smallest, innermost arch. -
Clean up straight edges:
If you struggle with freehanding the straight vertical lines near the floor, place painter’s tape along those vertical pencil marks now to ensure sharp legs for the rainbow. -
Apply second coats:
Allow the first layer to dry (check can instructions, usually 2-4 hours). Apply a second coat to all bands to ensure the colors are rich, opaque, and non-streaky. -
Erase guidelines:
Once the paint is fully cured (give it 24 hours to be safe), gently use your eraser to remove any visible pencil marks in the white gaps between the colors.
Level Up: Texture
To mimic the look of old-world plaster or fresco, mix a small amount of texture additive (or plain baking soda) into your paint cups just before applying for a tactile, matte finish.
Step back and enjoy the warm, soothing atmosphere your new feature wall brings to the room


Have a question or want to share your own experience? I'd love to hear from you in the comments below!