Transforming a blank canvas into a vibrant space is one of the most satisfying creativity boosters for any artist or homeowner. These paint techniques range from simple structural hacks to expressive freehand designs that add instant personality to your studio or living area.
The Moody Accent Wall Anchor
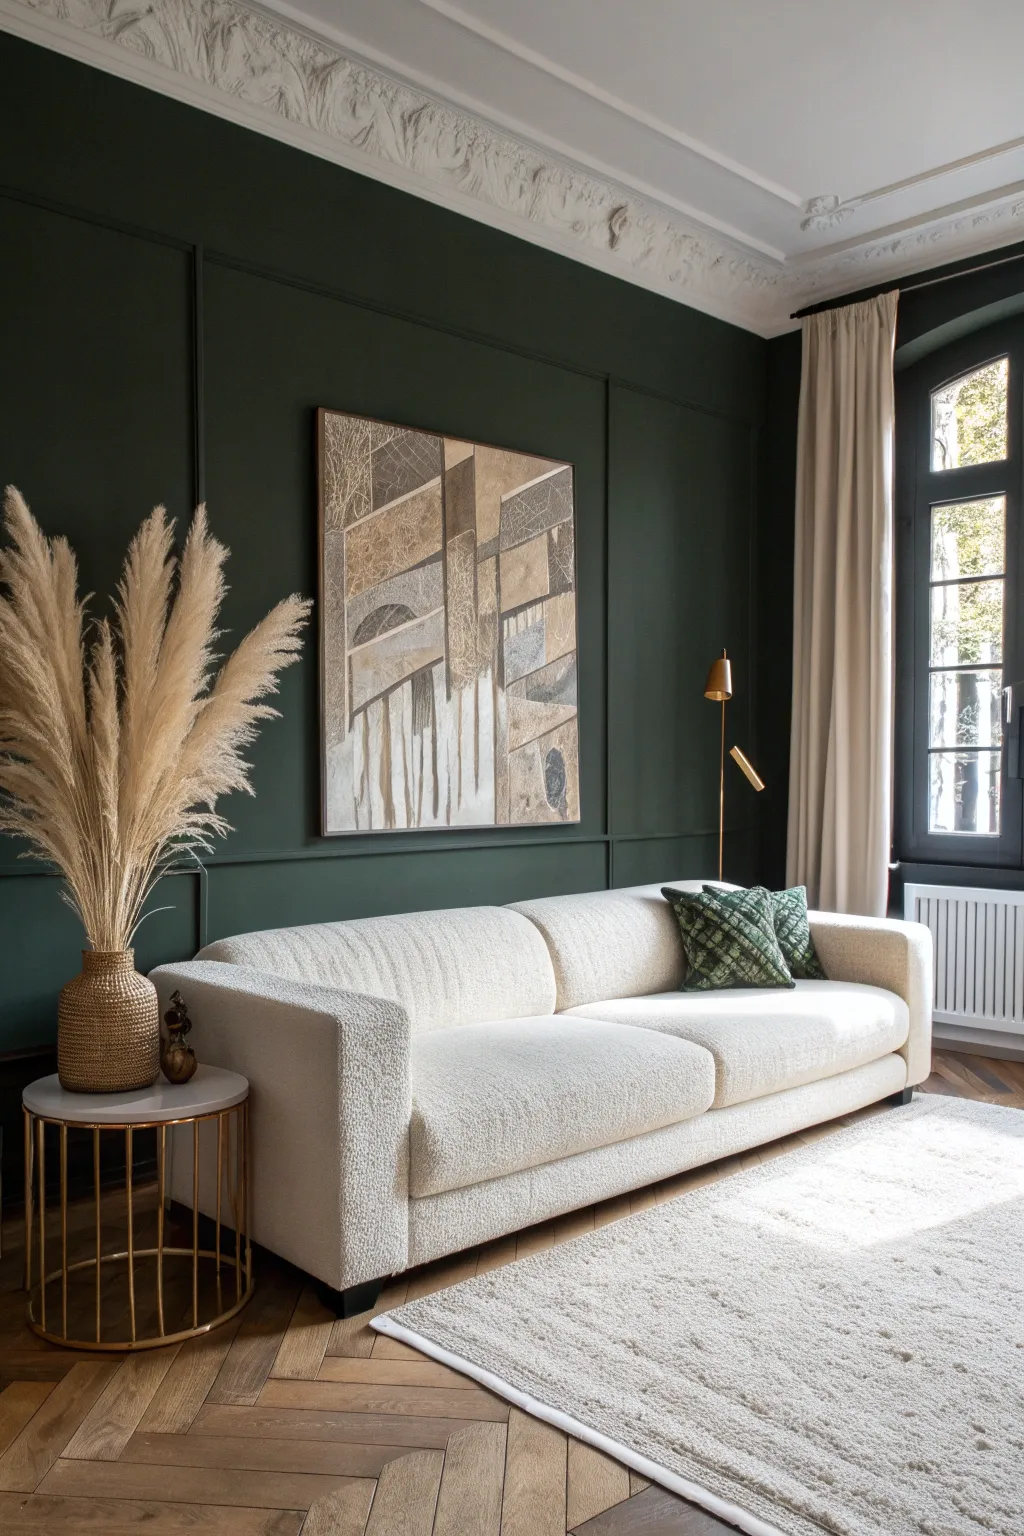
Transform a plain room into a sophisticated sanctuary by combining architectural molding with sultry, deep green paint. This project adds depth and historical character, creating a dramatic backdrop for modern furniture.
Step-by-Step Tutorial
Materials
- Deep forest green interior paint (matte or eggshell)
- Primer (if paneling is bare wood/MDF)
- 1-inch decorative picture frame molding
- Construction adhesive (e.g., Liquid Nails)
- Painter’s tape
- Wood filler
- Paintable latex caulk
- Miter saw (or miter box)
- Level (laser or spirit)
- Tape measure and pencil
- Brad nailer (or hammer and finish nails)
- 220-grit sandpaper
- Angled sash brush
- Medium nap paint roller
Step 1: Planning the Layout
-
Measure the canvas:
Measure the total width and height of your wall area between the baseboard and crown molding (or ceiling). -
Calculate the boxes:
Determine how many boxes you want. A standard look is 3-4 inches of spacing between boxes and edges. Sketch this on paper first to balance the math. -
Mark the wall:
Transfer your measurements to the wall using a pencil. I like to draw the full outline of each box on the drywall to ensure the proportions feel right before cutting wood. -
Check for level:
Use a large spirit level or a laser level to verify that your drawn lines are perfectly vertical and horizontal.
Spacer Strategy
Cut a scrap piece of wood to the exact width of your desired gap (e.g., 4 inches). Use this ‘spacer block’ to verify the distance between moldings instantly without measuring every time.
Step 2: Installing the Trim
-
Set up the saw:
Set your miter saw to a precise 45-degree angle. Sharp cuts are essential for tight corners. -
Cut the frames:
Cut your molding strips to length according to your wall markings. Label the back of each piece (e.g., ‘Box 1 Top’) to stay organized. -
Apply adhesive:
Apply a thin bead of construction adhesive to the back of your first molding piece. -
Secure the molding:
Place the molding on your pencil line. Secure it with a brad nailer, placing a nail every 10-12 inches. If you aren’t hitting studs, angle the nails slightly for better grip. -
Complete the boxes:
Continue installing sides and bottom pieces, ensuring the mitered corners meet tightly. Repeat until all boxes are on the wall.
Step 3: Seamless Finishing
-
Fill the imperfections:
Use wood filler to cover all nail holes and any small gaps in the corner miters. Overfill slightly as it shrinks when drying. -
Sand smooth:
Once dry, sand the filled areas with 220-grit paper until the wood feels perfectly smooth to the touch. -
Caulk the edges:
Run a thin bead of paintable latex caulk along the inside and outside edges where the molding meets the drywall. Smooth it with a damp finger. -
Prime the trim:
If your molding is raw wood or MDF, apply a coat of primer to the trim pieces so they absorb paint evenly with the wall.
Full Drench Look
To achieve the immersive mood seen in the photo, paint your baseboards and even the radiator in the same color as the wall. Use a satin or semi-gloss finish for trim to add subtle contrast.
Step 4: The Mood Application
-
Protect boundaries:
Apply painter’s tape to the baseboards, ceiling line, and adjacent walls to ensure crisp lines. -
Cut in the color:
Using an angled sash brush, paint the detailed profile of the molding first, then ‘cut in’ the corners and edges of the wall. -
Roll the first coat:
Use a roller to paint the flat wall sections inside and around the boxes. Work in ‘W’ shapes to distribute paint evenly. -
Apply second coat:
Allow the first coat to dry completely according to the can’s instructions, then apply a second coat for that rich, opaque velvet look. -
Remove tape:
Peel off the painter’s tape carefully while the paint is still slightly tacky to prevent peeling.
Step back and admire how this elegant wall treatment completely redefines the atmosphere of your space


Painting the Fifth Wall Ceiling
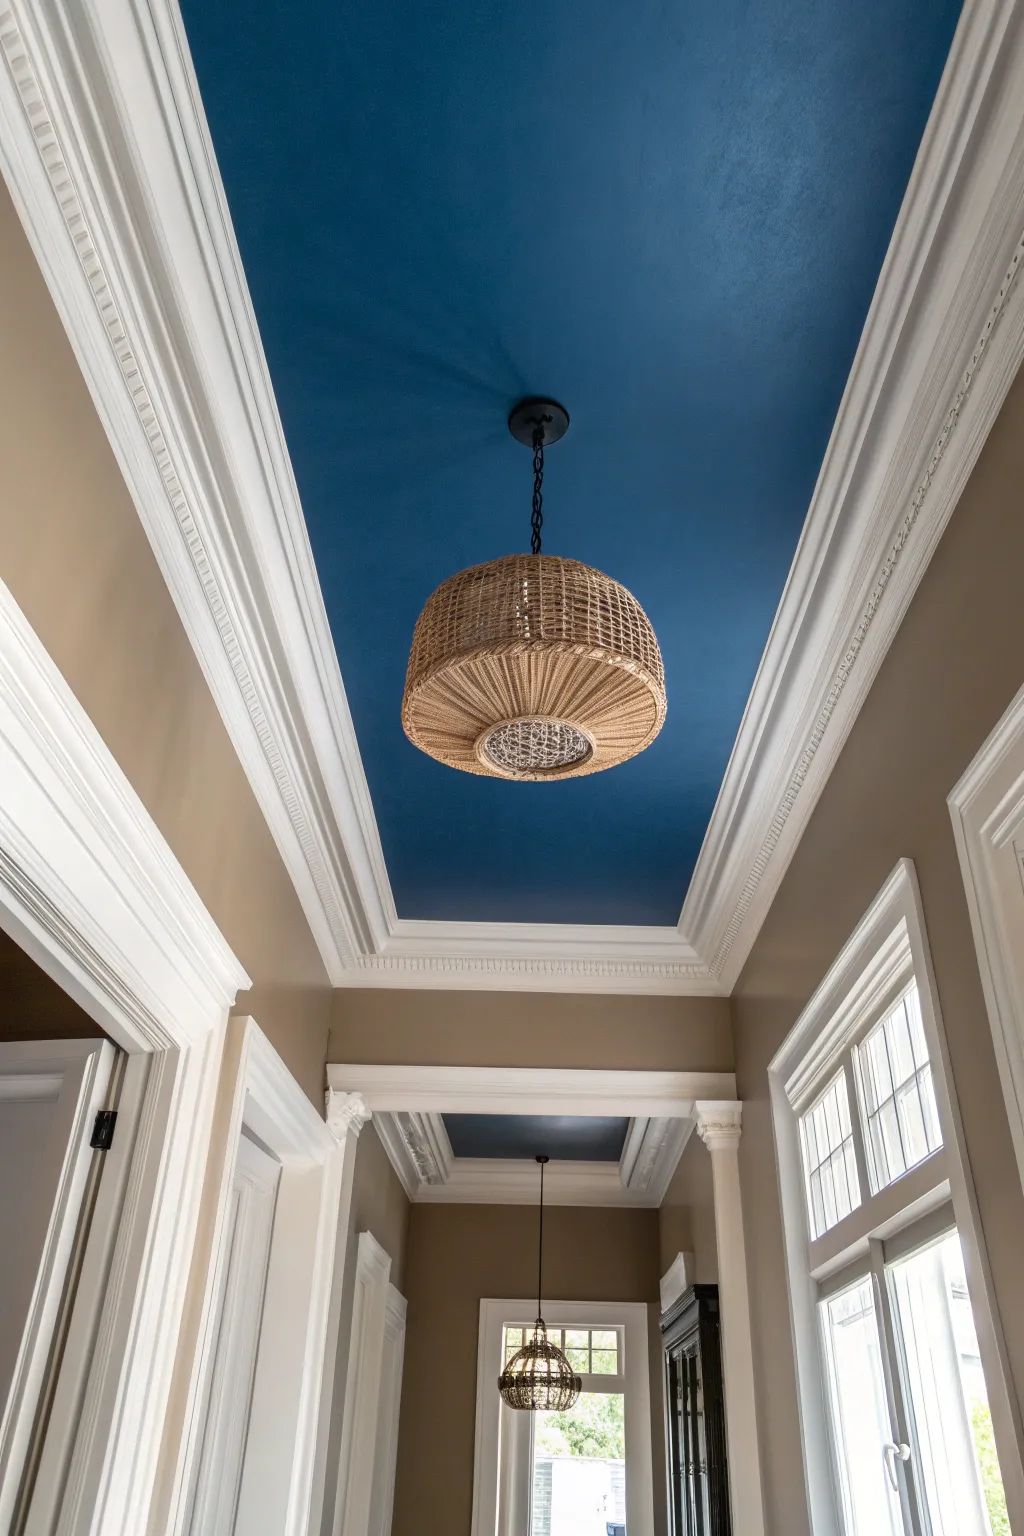
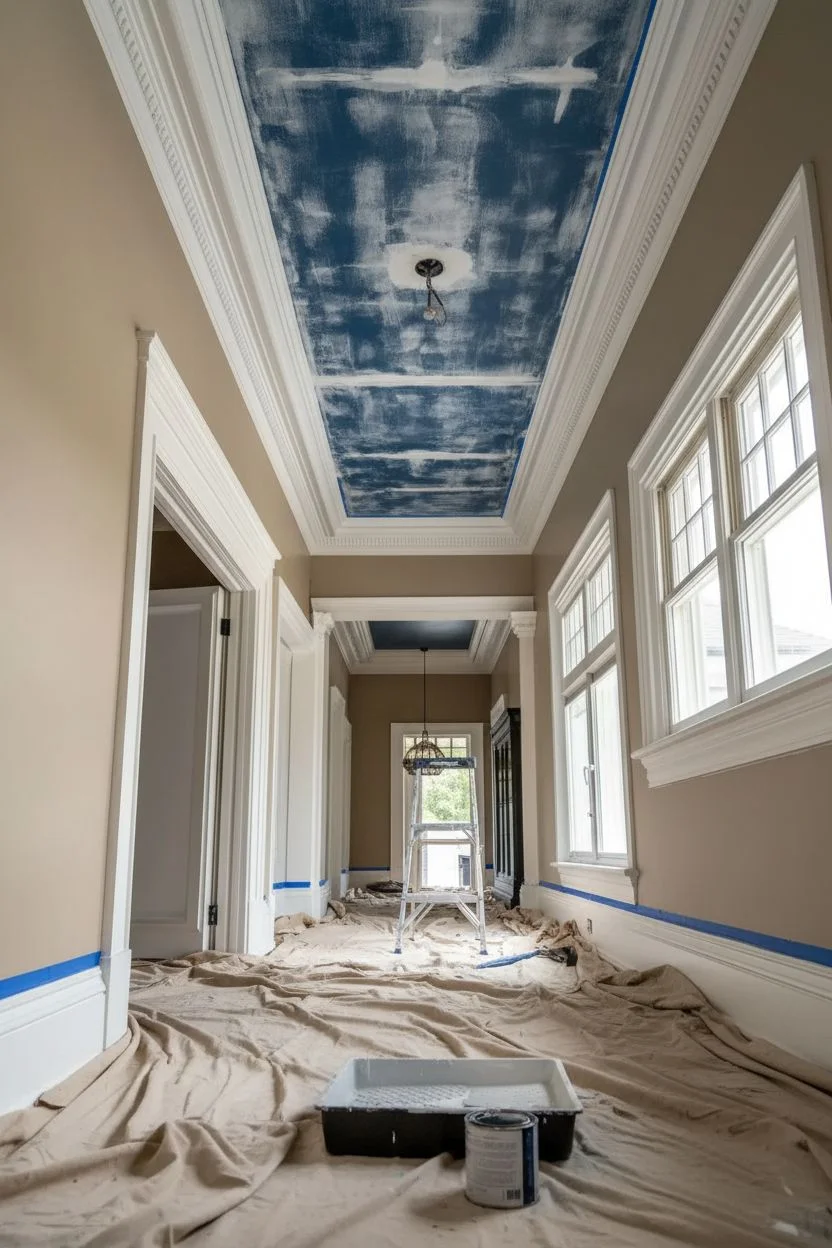
Elevate a standard hallway by transforming the ceiling into a captivating focal point with a bold splash of deep blue. This project creates a sophisticated architectural look by contrasting rich navy paint against crisp white crown molding and neutral beige walls.
Detailed Instructions
Materials
- Deep navy blue interior latex paint (flat finish)
- High-gloss white trim paint
- Beige wall paint (satin finish)
- Angled sash brush (2.5 inch)
- Small artist brush
- High-density foam roller
- Medium nap roller (3/8 inch)
- Paint tray and liners
- Delicate surface painter’s tape
- Canvas drop cloths
- Ladder
- Extension pole
- Spackle and fine-grit sandpaper
Step 1: Preparation & Priming
-
Clear the area:
Remove the existing light fixture carefully and cover the entire floor with canvas drop cloths to protect against overhead drips. -
Patch imperfections:
Inspect the ceiling and molding for cracks or holes, filling them with spackle and sanding the area smooth once dry. -
Clean surface:
Wipe down the molding ledges thoroughly with a damp cloth or degreaser to ensure the new paint adheres well to the intricate grooves. -
Tape the perimeter:
Apply painter’s tape along the bottom edge of the crown molding where it meets the wall to protect the beige wall surface later. -
Prime if needed:
If you are painting over a dark color or bare drywall, apply a coat of high-quality stain-blocking primer to the ceiling first.
Step 2: Painting the Ceiling
-
Mix the blue:
Open your deep blue paint and stir it thoroughly to ensure the dark pigments are evenly distributed from the bottom of the can. -
Cut in the edges:
Using the angled sash brush, carefully ‘cut in’ a 3-inch border of blue paint along the perimeter of the ceiling where it meets the inner crown molding. -
Mind the gap:
I like to take my time here to ensure no blue gets onto the face of the molding, keeping a damp rag handy to wipe distinct errors immediately. -
Roll the center:
Attach the medium nap roller to an extension pole and load it with blue paint, rolling the ceiling surface in a ‘W’ pattern for even coverage. -
Apply second coat:
Allow the first coat to dry completely according to the can’s instructions, then apply a second coat for a rich, opaque depth of color.
Sheen Strategy
Use flat paint for the ceiling to hide drywall imperfections, while semi-gloss or high-gloss on the molding will reflect light and highlight architectural details.
Step 3: Detailed Trim Work
-
Tape the ceiling:
Once the blue ceiling is fully cured (wait at least 24 hours), tape off the ceiling edge adjacent to the molding using delicate surface tape. -
Paint the grooves:
Paint the complex crown molding with high-gloss white paint, using the sash brush to work paint into the recessed grooves and crevices. -
Smooth the flat areas:
For the flat vertical sections of the tray ceiling or molding, use a small foam roller to smooth out brush marks for a factory-like finish. -
Layer the white:
Apply a second coat of white to the trim if necessary to achieve a bright, solid finish that pops against the dark blue. -
Remove tape carefully:
Peel the tape from the ceiling slowly at a 45-degree angle while the trim paint is still slightly tacky to prevent pulling up any dried film.
Tape Bleed Fix
If blue paint bleeds onto the white trim, wait for it to fully cure, then use a small artist’s brush and white paint to carefully clean up the distinct line.
Step 4: Walls & Final Touches
-
Protect the trim:
Tape the bottom edge of the now-dry crown molding to protect your fresh white paint work. -
Cut in walls:
Cut in the beige wall color along the ceiling line, corners, and baseboards using a clean angled brush. -
Roll the walls:
Roll the walls with the satin beige paint, blending the wet edges with your cut-in lines for a seamless look. -
Install lighting:
Reinstall your woven pendant fixture in the center of the blue ceiling, ensuring the canopy sits flush against the new paint. -
Inspect and touch up:
Turn on the light and check for any missed spots or uneven lines, using a small artist brush for tiny corrections.
Enjoy the stunning depth and character your new blue ceiling brings to the hallway.


Monochromatic Color Drenching
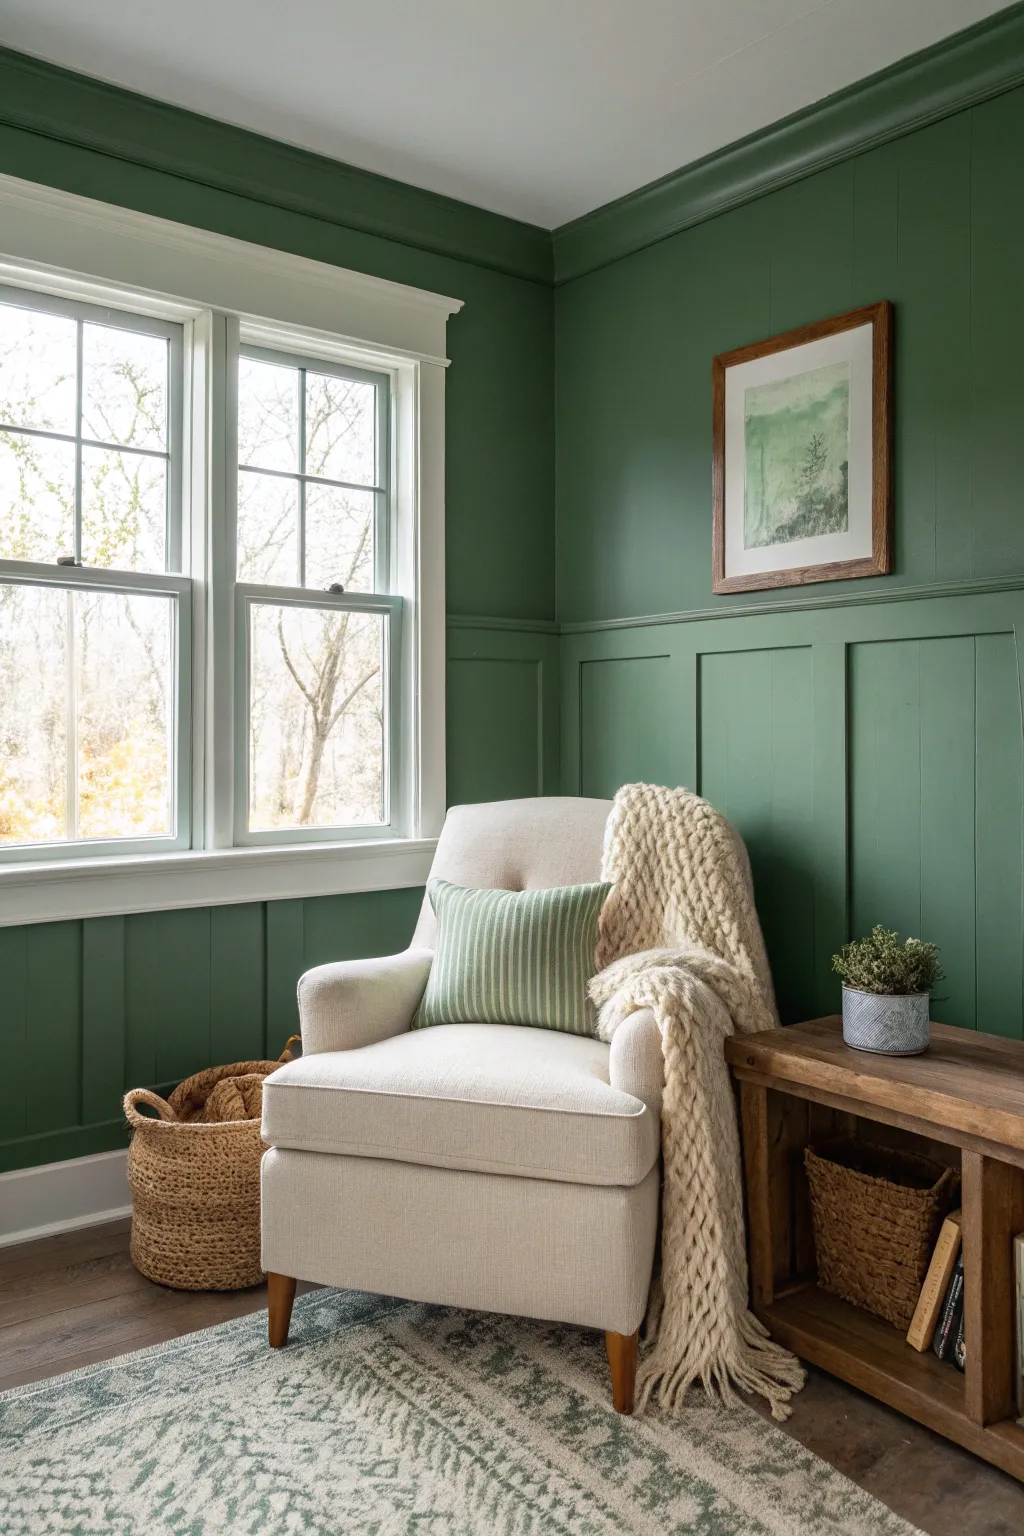

Transform a plain room into a cozy sanctuary with this monochromatic board and batten project. By bathing both the wainscoting and the upper walls in a deep, soothing sage green, you create an immersive and sophisticated atmosphere.
Step-by-Step
Materials
- 1×4 MDF or pine boards (for rails and battens)
- Small top cap molding (optional)
- Construction adhesive
- Brad nailer and 1.5-inch nails
- Wood filler
- Paintable caulk
- Sandpaper (120 and 220 grit)
- Satin finish interior paint (Sage Green)
- High-quality angled sash brush
- Paint roller with medium nap covers
- Painter’s tape
- Level and measuring tape
Step 1: Planning and Layout
-
Determine the height:
Decide how high you want your wainscoting. A height of about one-third to one-half of the wall height works best; mark a level line around the room at this height for your top rail. -
Calculate spacing:
Measure the total wall length and determine how far apart to space your vertical battens (usually between 16 to 24 inches). Adjust the math so you avoid awkward slivers of space in the corners. -
Locate wall studs:
Use a stud finder to mark the stud locations along the walls. This helps ensure your horizontal rails have a solid anchor.
Wavy Wall Woes?
If your walls aren’t perfectly flat, the boards might gap. Don’t force them back; nail them secure and fill gaps with caulk. The paint will hide the transition perfectly.
Step 2: Installing the Woodwork
-
Install the horizontal rails:
Cut your 1×4 boards to length. Apply construction adhesive to the back and nail the top horizontal rail along your marked level line into the studs. -
Place the baseboard:
Install a matching 1×4 board along the floor to serve as the bottom rail/baseboard. If you have existing baseboards, you can choose to keep them or replace them for a unified look. -
Cut vertical battens:
Measure the distance between the top rail and the baseboard for each specific spot (floors can be uneven) and cut your vertical battens individually. -
Attach the battens:
Apply adhesive and nail the vertical battens into place. I like to use a pre-cut wood ‘spacer block’ to quickly position each batten without measuring every single time. -
Add the top cap:
For a finished edge, install a small trim piece or narrow ledge board on top of the upper horizontal rail.
Step 3: Prep for a Seamless Finish
-
Fill the holes:
Dab a small amount of wood filler into every nail hole. Overfill slightly to account for shrinkage as it dries. -
Sand until smooth:
Once dry, sand the filler flush with the wood surface. Also, give the cut edges of your boards a quick sand to remove sharp burrs. -
Caulk the seams:
Run a bead of paintable caulk along every seam where wood meets wall or wood meets wood. Smooth it with a wet finger. This step is critical for making the wainscoting look like one integrated piece. -
Protect trim:
Apply painter’s tape carefully around window casings and the ceiling line if you aren’t painting the ceiling.
Pro Tip: Consistent Spacing
Cut a piece of scrap wood to the exact width of your desired spacing. Use this ‘jig’ between battens as you install them to ensure perfect uniformity without constant measuring.
Step 4: Color Drenching
-
Prime the wood:
If using raw wood or MDF, apply a coat of primer to the wainscoting to ensure an even sheen later. -
Cut in edges:
Using your angled brush, paint the sage green color along the corners, ceiling line (including crown molding if present), and intricate corners of the wainscoting. -
Paint the panels:
Brush paint into the corners of the board and batten grid first, then use a small roller to cover the flat faces of the boards and the wall sections between them. -
Roll the upper walls:
Switch to a standard roller and apply the same sage green paint to the upper walls. Merging the woodwork and wall color creates the ‘drenched’ effect. -
Apply second coat:
Once the first coat is dry, apply a second coat to ensure deep, rich coverage and eliminate any patchiness. -
Remove tape:
Peel off the painter’s tape while the final coat is still slightly tacky to get a crisp, clean line against your white window trim.
Enjoy the calm and character your new color-drenched space brings to your home


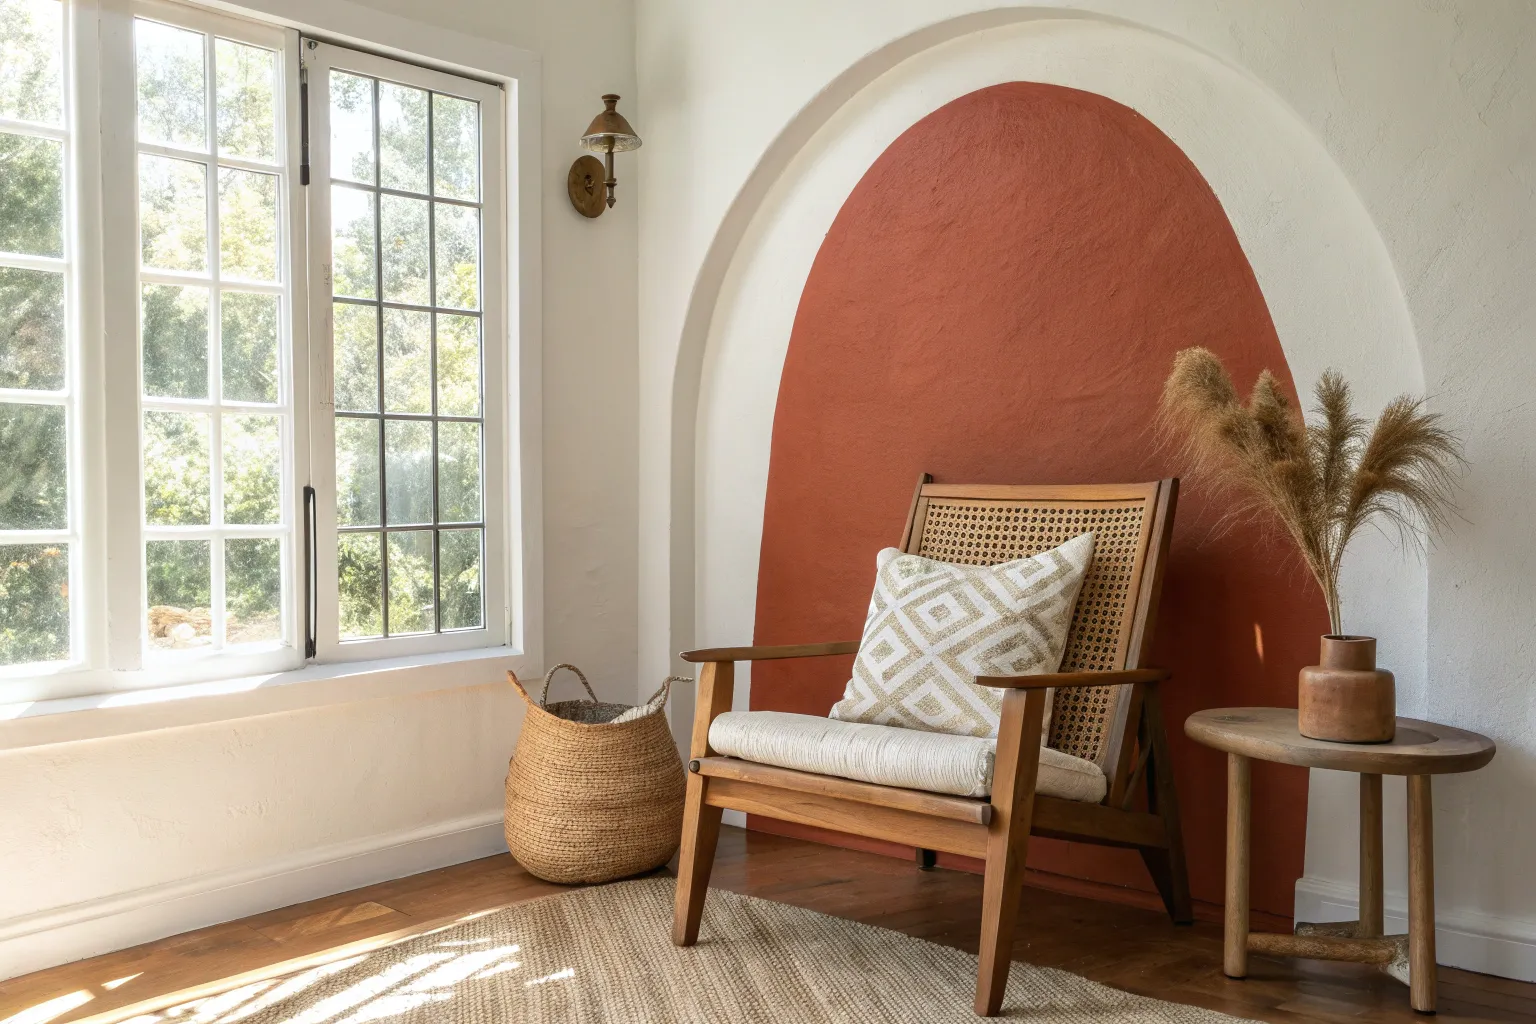
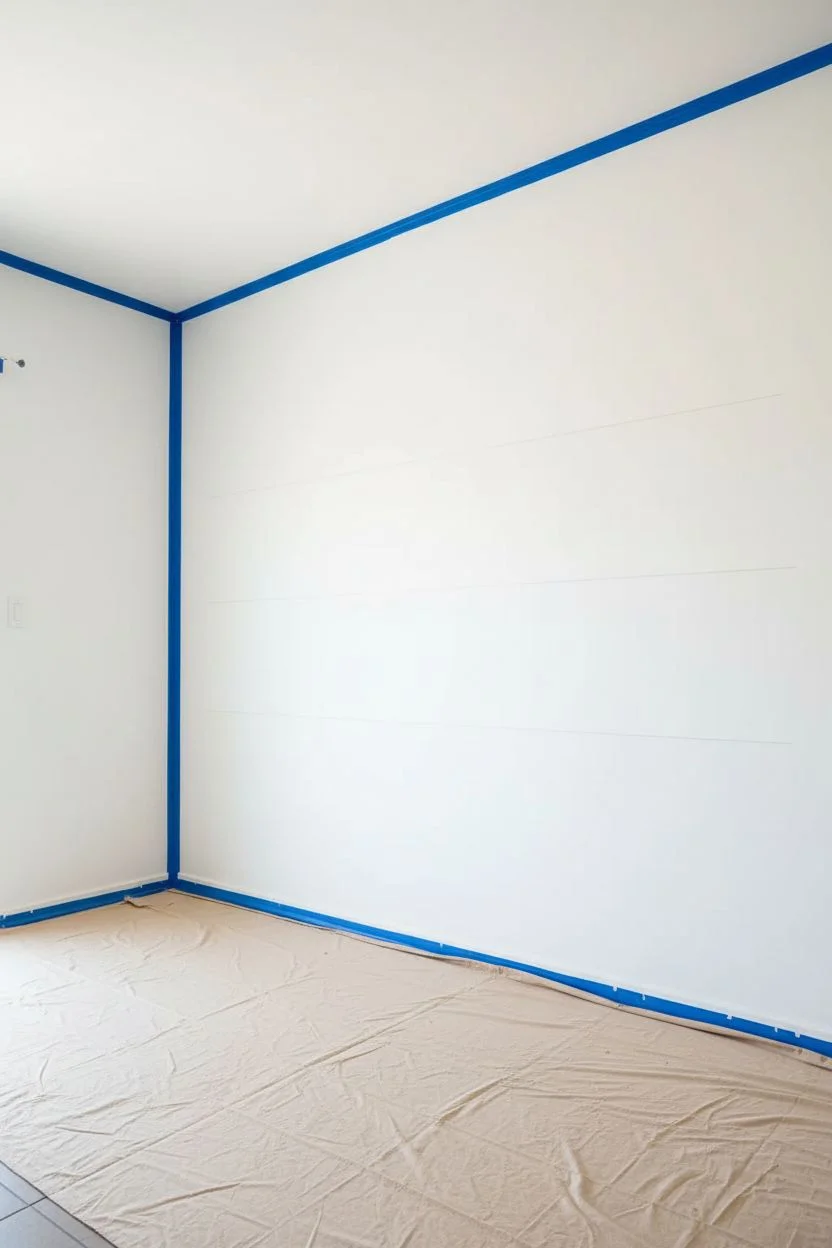
Crisp Horizontal Split Design
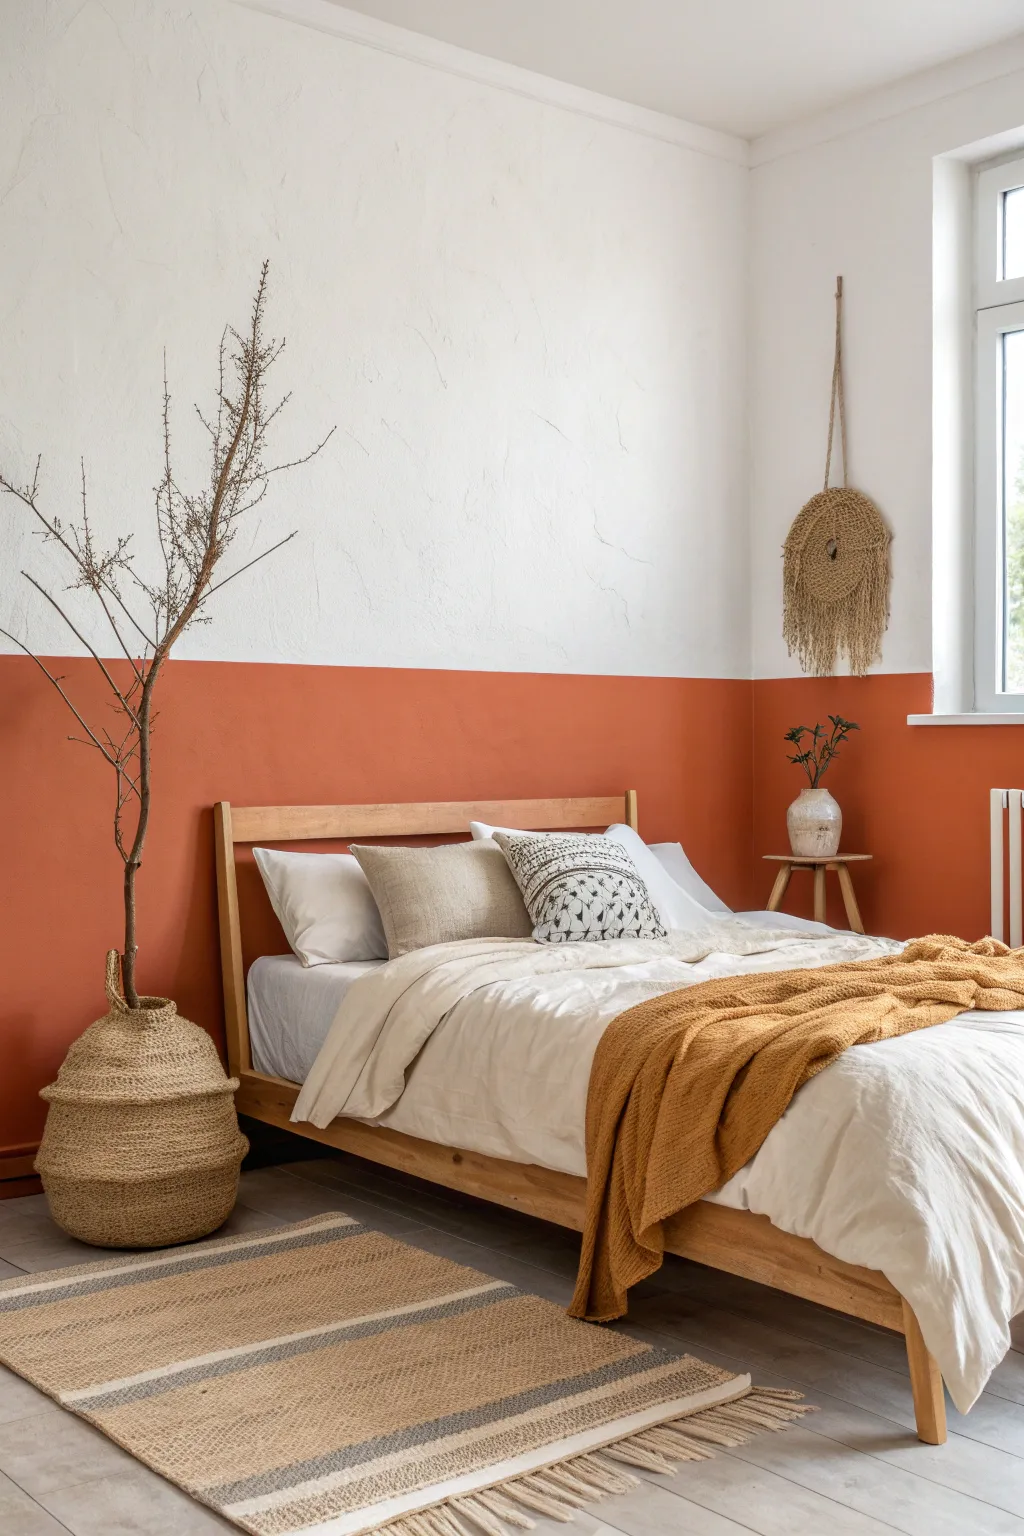
Transform your bedroom into a warm, grounding sanctuary with this crisp color-block technique. This project combines a clean white upper wall with an earthy terra cotta lower section to add visual height and architectural interest to a standard room.
Step-by-Step Tutorial
Materials
- Matte interior latex paint (White)
- Matte interior latex paint (Terra Cotta/Burnt Orange)
- Painter’s tape (high-adhesion)
- Laser level or 4-foot spirit level
- Measuring tape and pencil
- 9-inch paint roller frame with microfiber covers
- 2-inch angled sash brush
- Paint tray and liners
- Drop cloths
- Spackling paste and putty knife (if needed)
Step 1: Preparation & Planning
-
Clear the area:
Move all furniture away from the wall to give yourself ample working space and lay down drop cloths to protect your flooring. -
Clean the surface:
Wipe down the wall with a damp cloth or mild degreaser to remove dust and oils, ensuring the tape adheres perfectly later. -
Patch imperfections:
Fill any nail holes or dents with spackle, allow it to dry according to package instructions, and sand smooth. -
Refresh the base:
If your upper wall color looks dull, paint the entire wall with your chosen white shade first and let it cure for at least 24 hours before taping.
Visual Height Trick
To duplicate the image’s proportions effectively, ensure your paint line sits about 6-8 inches above the top of your headboard or pillows.
Step 2: Creating the Horizon Line
-
Determine the height:
Measure from the floor up to your desired breakdown point; a good rule of thumb is roughly 48 to 52 inches high for a standard ceiling. -
Mark the level line:
Use a pencil and a measuring tape to mark this height at several points across the wall, then connect them using a laser level or long spirit level to draw a faint, straight horizontal guideline. -
Apply the tape:
Run a continuous strip of painter’s tape across the wall so that the *bottom* edge of the tape aligns perfectly with your pencil line. -
Burnish the tape:
Run a credit card or putty knife firmly along the bottom edge of the tape to ensure a tight seal against the wall texture. -
Seal the edge:
I like to lightly brush a thin layer of the *top wall color* (white) over the bottom edge of the tape. This fills any tiny gaps with white paint so the orange won’t bleed through.
Step 3: Painting the Color Block
-
Cut in the perimeter:
Using your angled sash brush and the terra cotta paint, carefully paint along the baseboards, corners, and just below the tape line. -
Roll the first coat:
Saturate your roller and apply the terra cotta paint to the lower section using ‘W’ shaped strokes to distribute the paint evenly. -
Allow to dry:
Let the first coat dry completely, usually about 2 to 4 hours depending on humidity, before assessing coverage. -
Apply the second coat:
Roll on a second layer of paint to ensure a rich, opaque color depth that matches the warmth of the inspiration image.
Level Up: Texture
The photo shows a subtle plaster texture. To get this look, use a specialized limewash paint or mix a texture additive into your latex paint before rolling.
Step 4: The Finish
-
Remove tape immediately:
While the second coat is still slightly wet, slowly peel the tape off at a 45-degree angle pulling away from the fresh paint to keep the line sharp. -
Touch up:
Inspect the line once fully dry; use a small artist’s brush to correct any minor imperfections if necessary. -
Reset the room:
Wait for the paint to fully cure before moving your bed frame and furniture back against the new feature wall.
Step back and appreciate how this simple color split introduces a modern, cozy architecture to your space
BRUSH GUIDE
The Right Brush for Every Stroke
From clean lines to bold texture — master brush choice, stroke control, and essential techniques.
Explore the Full Guide
The Painted Headboard Illusion
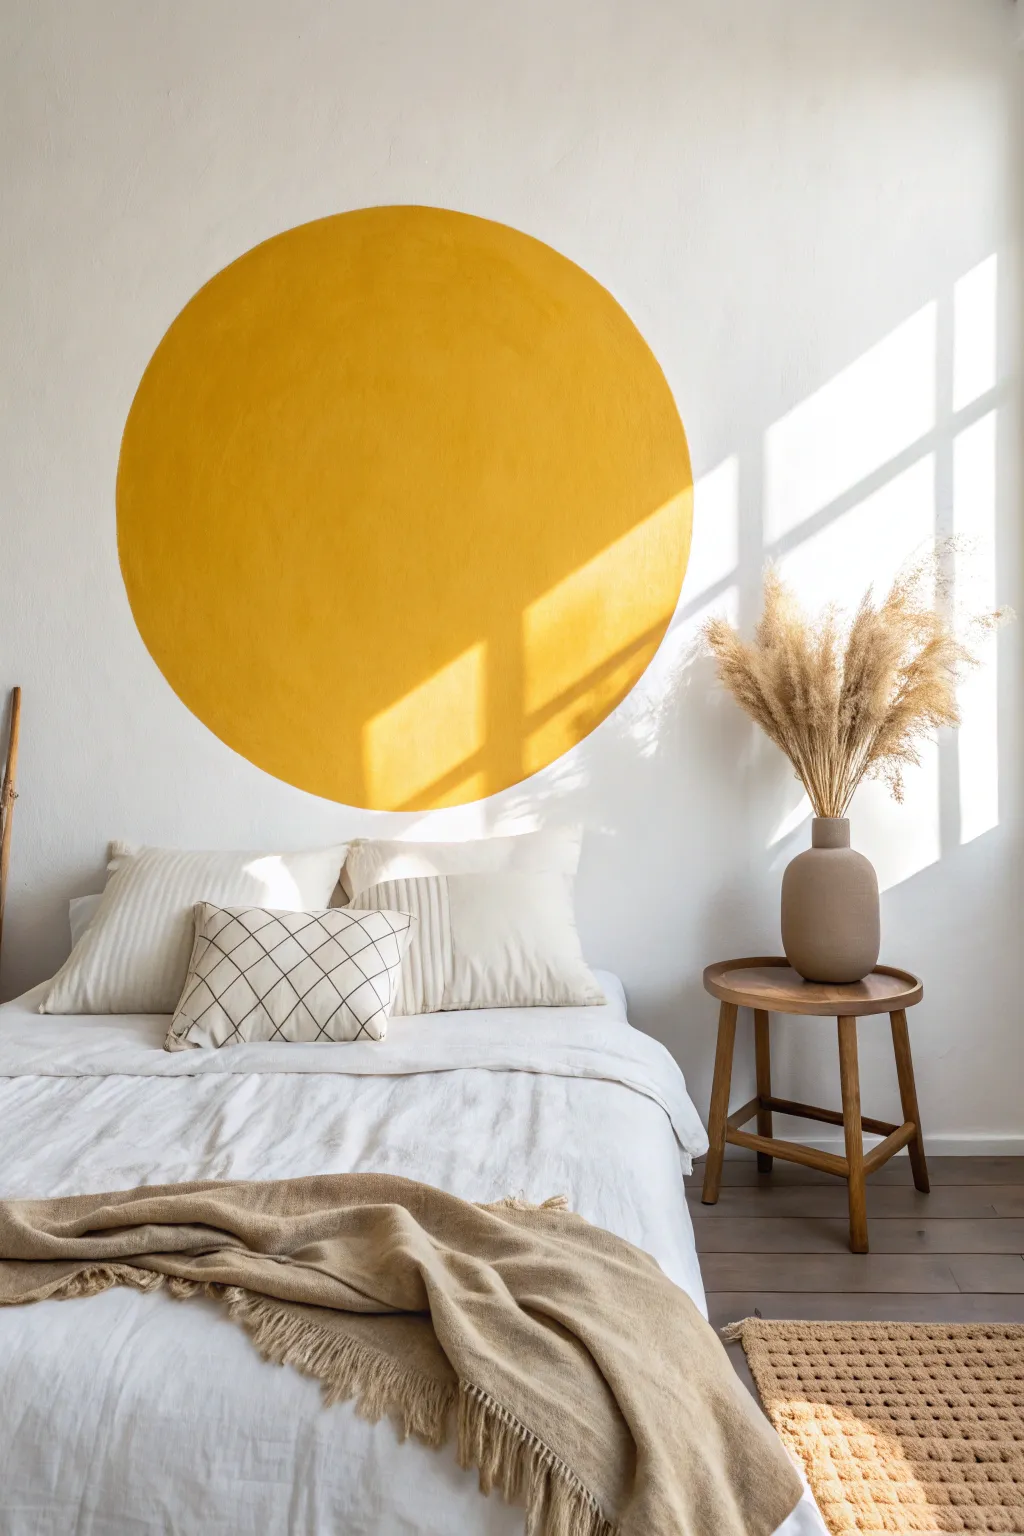
Infuse your bedroom with eternal sunshine using this bold, geometric accent piece. This painted circle acts as a minimalist headboard, grounding your sleeping space with warm, earthy tones and a striking modern silhouette.
Step-by-Step Guide
Materials
- Mustard or ochre interior latex paint (matte finish)
- High-quality angled sash brush (1.5 or 2 inch)
- 4-inch mini paint roller with handle
- Microfiber roller covers
- Non-stretchy string or twine
- Pencil
- Push pin or small finishing nail
- Measuring tape
- Painter’s tape (optional)
- Drop cloth
Step 1: Planning and Mapping
-
Prepare the space:
Pull the bed away from the wall to give yourself ample working room and lay down a drop cloth to protect your flooring. -
Clean the surface:
Wipe down the wall area with a damp cloth to remove dust or oils, ensuring the paint adheres perfectly. -
Find the center point:
Measure the width of your bed or intended headboard area. Mark the exact horizontal center on the wall with a pencil. -
Determine the height:
Decide how high you want the circle to sit. For a dramatic sun look, the center point usually sits just above where a standard headboard would end. -
Create the compass:
Cut a piece of non-stretchy string slightly longer than your desired radius. Tie one end securely around a pencil. -
Anchor the pivot:
Tie a loop in the other end of the string at your exact measured radius distance. Secure this loop to your center wall mark using a push pin or small nail.
Troubleshooting: Shaky Edges?
If your freehand circle edge looks uneven, don’t panic. Wait for it to dry, then use a tiny artist’s brush with your white wall paint to ‘erase’ and refine the outer line back to a crisp curve.
Step 2: Drafting the Shape
-
Trace the circumference:
Pull the string taut—keeping tension consistent is key here—and lightly trace the circle onto the wall with the pencil. -
Check the perspective:
Step back to the doorway to ensure the size feels balanced within the room before you commit to painting. -
Remove the guide:
Take out the push pin and string. You can leave the tiny hole for now or put a dab of spackle on it immediately if it protrudes.
Step 3: Painting the Sun
-
Load the edging brush:
Dip your angled sash brush into the mustard paint, tapping off excess so the bristles are loaded but not dripping. -
Cut in the outline:
Carefully paint along the inside edge of your pencil line. I find it helps to hold my breath slightly for the steadiest hand on curves. -
Widen the border:
Expand this painted border to about two or three inches wide so your roller won’t accidentally hit the white traverse wall later. -
Roll the interior:
Switch to the 4-inch mini roller. Fill in the large center area of the circle using random W-shaped strokes to avoid track marks. -
Let it cure:
Allow the first coat to dry completely according to the paint can’s instructions, usually 2 to 4 hours. -
Apply the second coat:
Repeat the edging and rolling process. This second layer will deepen the yellow saturation and provide a solid, opaque finish. -
Finalize the center:
If you haven’t already, fill the tiny center pinhole with a fingertip of spackle, let dry, and dab a final spot of paint over it.
Level Up: Texture Effects
For an earthy, old-world plaster look, mix baking soda into your paint (roughly 1 part soda to 4 parts paint) before applying. This adds a subtle, suede-like dimension.
Once the paint is fully cured, push your bed back into place and enjoy the warmth of your personal sunrise
Defining Zones with Painted Arches

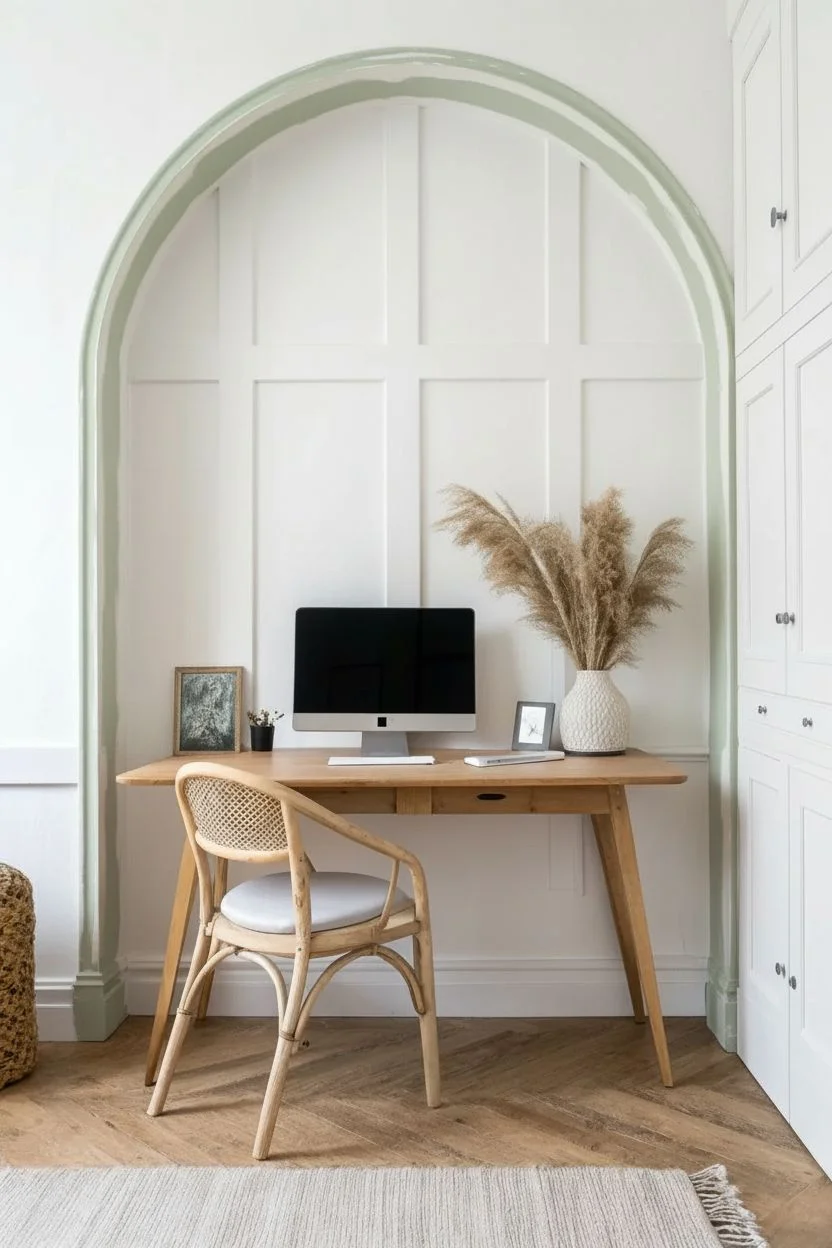
“t”: “Sage Green Arch & Paneled Nook Makeover”,
“i”: “Transform a standard alcove into a sophisticated home office zone by combining a textured board-and-batten backdrop with a striking painted arch. This project relies on the contrast between the crisp white grid paneling and the soothing sage green frame to create an architectural focal point.”,
“m”: [
“MDF strips or pre-primed batten molding (2 inch width)”,
“Construction adhesive”,
“Paintable latex caulk & caulk gun”,
“Wood filler or spackle”,
“Fine-grit sandpaper (120-220 grit)”,
“Interior paint (Crisp White, Eggshell finish)”,
“Interior paint (Sage Green, Satin finish)”,
“2-inch angled sash brush”,
“High-quality painter’s tape (like FrogTape)”,
“Spirit level”,
“Small foam roller and tray”
],
“p”: [
{
“n”: “Creating the Grid Paneling”,
“s”: [
{
“t”: “Map the layout”,
“d”: “Measure the width and height of the back wall of your niche to determine the spacing for your square grid, aiming for boxes roughly 12-16 inches square.”
},
{
“t”: “Cut vertical battens”,
“d”: “Cut your MDF strips to the full height of the wall for your vertical stiles using a saw.”
},
{
“t”: “Install verticals”,
“d”: “Apply beads of construction adhesive to the back of the vertical strips and press them onto the wall, checking firmly with a spirit level to ensure they are plumb.”
},
{
“t”: “Secure the strips”,
“d”: “Use painter’s tape to hold the strips in place while the adhesive sets, or use a brad nailer if you have one for extra hold.”
},
{
“t”: “Cut horizontal rails”,
“d”: “Measure the exact distance between the installed vertical strips and cut the horizontal pieces individually to ensure a tight fit, as walls are rarely perfectly straight.”
},
{
“t”: “Install horizontals”,
“d”: “Glue and place the horizontal rails to complete the grid pattern, using a spacer block to keep the height consistency perfect between rows.”
},
{
“t”: “Fill imperfections”,
“d”: “Once the adhesive cures, apply wood filler to any nail holes or joints where the horizontal and vertical pieces meet.”
},
{
“t”: “Seal the edges”,
“d”: “Run a thin bead of paintable caulk along every edge where the wood meets the wall to create a seamless, built-in look.”
},
{
“t”: “Sand smooth”,
“d”: “After the fillers dry, lightly sand the wood filler and construction areas until the surface feels completely smooth to the touch.”
},
{
“t”: “Paint the recesses”,
“d”: “Use an angled brush to paint the inside corners of the grid pattern with your Crisp White eggshell paint.”
},
{
“t”: “Roll the surface”,
“d”: “Finish the paneling by using a foam roller to apply the white paint over the faces of the battens and the wall sections for a smooth, brush-mark-free finish.”
}
]
},
{
“n”: “Painting the Feature Arch”,
“s”: [
{
“t”: “Prep the trim”,
“d”: “Clean the architrave or wall arch surrounding the niche with a damp cloth to remove dust and grease.”
},
{
“t”: “Mask the interior”,
“d”: “Apply painter’s tape precisely along the inner edge where your new white paneling meets the arch trim.”
},
{
“t”: “Seal the tape”,
“d”: “I like to brush a very thin layer of the *white* paint over the edge of the tape first; this seals it and prevents the green paint from bleeding under.”
},
{
“t”: “Cut in the color”,
“d”: “Dip your angled sash brush into the Sage Green satin paint and carefully cut in along the edges of the arch.”
},
{
“t”: “Fill the arch form”,
“d”: “Paint the face of the architrave using long, smooth strokes to conform to the curve.”
},
{
“t”: “Apply second coat”,
“d”: “Allow the first coat to dry for the time recommended on the can (usually 2-4 hours), then apply a second coat for rich, opaque color coverage.”
},
{
“t”: “Remove tape”,
“d”: “Peel away the painter’s tape slowly at a 45-degree angle while the final coat of paint is still slightly tacky to reveal a crisp, professional line.”
}
]
}
],
“boxes”: [
{
“title”: “Pro Tip: Seamless Joints”,
“content”: “When filling the joints where horizontal and vertical battens meet, overfill slightly with wood filler. Since filler shrinks as it dries, this ensures flush surface after sanding.”
},
{
“title”: “Troubleshooting: Wavy Walls”,
“content”: “If your wall isn’t perfectly flat and the MDF strips pop out, use a few dabs of hot glue alongside the construction adhesive. The hot glue holds instantly while the heavy-duty adhesive cures.”
}
],
“f”: “Step back and admire how this elegant color-blocking and texture completely redefine your workspace

PENCIL GUIDE
Understanding Pencil Grades from H to B
From first sketch to finished drawing — learn pencil grades, line control, and shading techniques.
Explore the Full Guide
Elongating Vertical Stripes
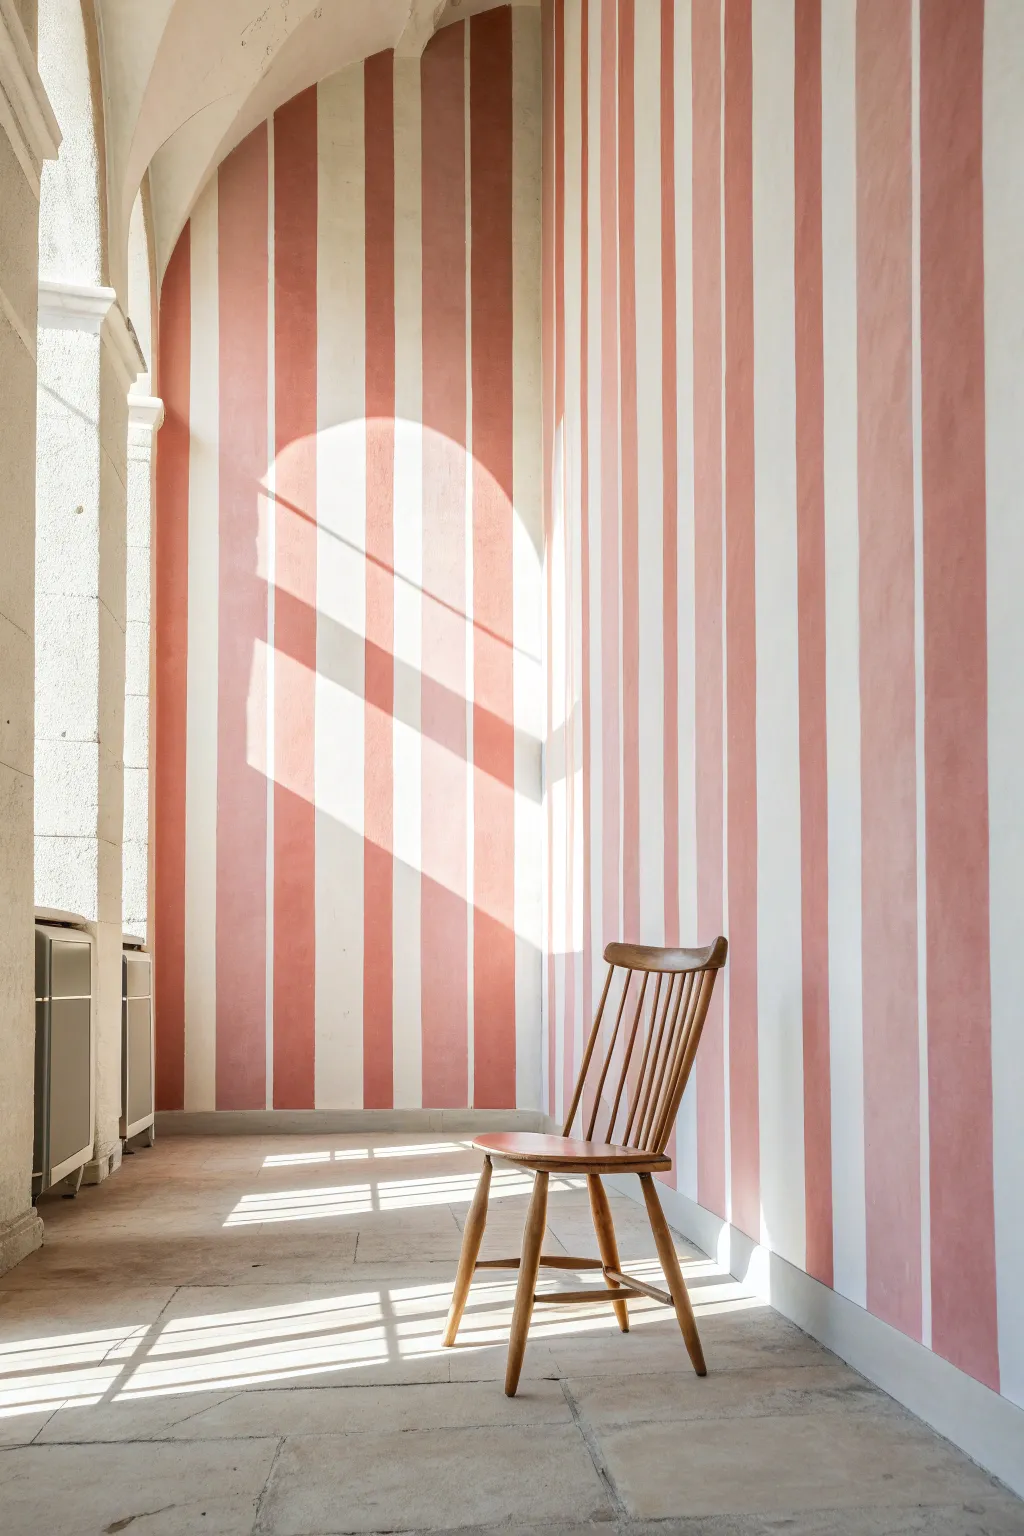
Bring an airy, Mediterranean feel to any room while visually raising the ceiling height with these elegant vertical stripes. Using a soft terra-cotta pink against a creamy white base creates a warm, inviting atmosphere that feels both historic and modern.
How-To Guide
Materials
- Matte interior latex paint (Creamy White)
- Matte interior latex paint (Coral/Terra-cotta)
- High-quality painter’s tape (1.5 or 2 inch width)
- Laser level or plumb line
- Measuring tape and pencil
- 9-inch roller and tray
- 4-inch mini foam roller
- Angled sash brush
- Drop cloths
- Putty knife (optional)
Step 1: Preparation & Base Coat
-
Clear and clean:
Remove all furniture from the wall area and lay down drop cloths to protect your flooring, especially if working with stone tiles like in the photo. -
Surface prep:
Inspect the wall for nail holes or cracks. Fill these with spackle, let dry, and sand smooth so your stripes don’t encounter any bumps. -
Apply base color:
Roll two coats of your lighter base color (the creamy white) over the entire wall. This ensures a uniform background. -
Allow extensive drying:
Let the base coat cure for at least 24 to 48 hours. If the paint is even slightly fresh, the painter’s tape might peel it off later.
Crisp Line Secret
Does your wall have texture? Taping alone often fails. Paint your *base color* over the tape edge first. This fills gaps with white paint so the pink cannot bleed through.
Step 2: Measuring & Taping
-
Calculate stripe width:
Measure the total width of your wall. Divide this number to find a stripe width that fits evenly (usually between 4 to 8 inches looks best). -
Set the guide line:
Set up a laser level to project a perfectly straight vertical line starting from the left corner. This is much more accurate than relying on the room’s corners, which are rarely plumb. -
Mark the intervals:
Using a pencil, lightly mark the width of each stripe along the top and bottom of the wall, moving across the room. -
Apply the tape:
Run your painter’s tape vertically, using the pencil marks and laser level as guides. Place the tape on the *outside* of the area you intend to paint pink. -
Mark the negative space:
Place a small piece of tape or a faint ‘X’ made of tape inside the white stripes as a visual reminder of which zones strictly stay white. -
Seal the edges:
I like to run a putty knife or a credit card firmly over the edges of the tape to ensure a tight bond with the wall texture.
Level Up: Texture
To exactly mimic the photo’s Old World charm, use ‘limewash’ paint instead of standard latex. It creates that subtle, cloudy color variation and velvet-like matte finish.
Step 3: Painting the Stripes
-
The anti-bleed trick:
Paint a light coat of your *base color* (white) over the edge of the tape where the pink stripe will be. This seals the tape; any paint that bleeds under will be white and invisible. -
Let the seal dry:
Wait about 30 minutes for this sealing line to dry completely before opening the pink paint. -
Cut in the color:
Use an angled brush to carefully paint the terra-cotta color at the very top and bottom of the stripe where the roller can’t reach. -
Roll the stripes:
Use the mini foam roller to fill in the vertical stripes with the terra-cotta paint. The small roller gives you better control than a large one. -
Second coat:
Once the first coat is dry to the touch, apply a second coat of pink for rich, opaque coverage. -
Remove tape:
Peel off the tape slowly at a 45-degree angle while the second coat of paint is still slightly damp. This prevents the dried paint from cracking along the line.
Step back and enjoy the dramatic height and warmth your precise handiwork has added to the space
Playful Scalloped Borders
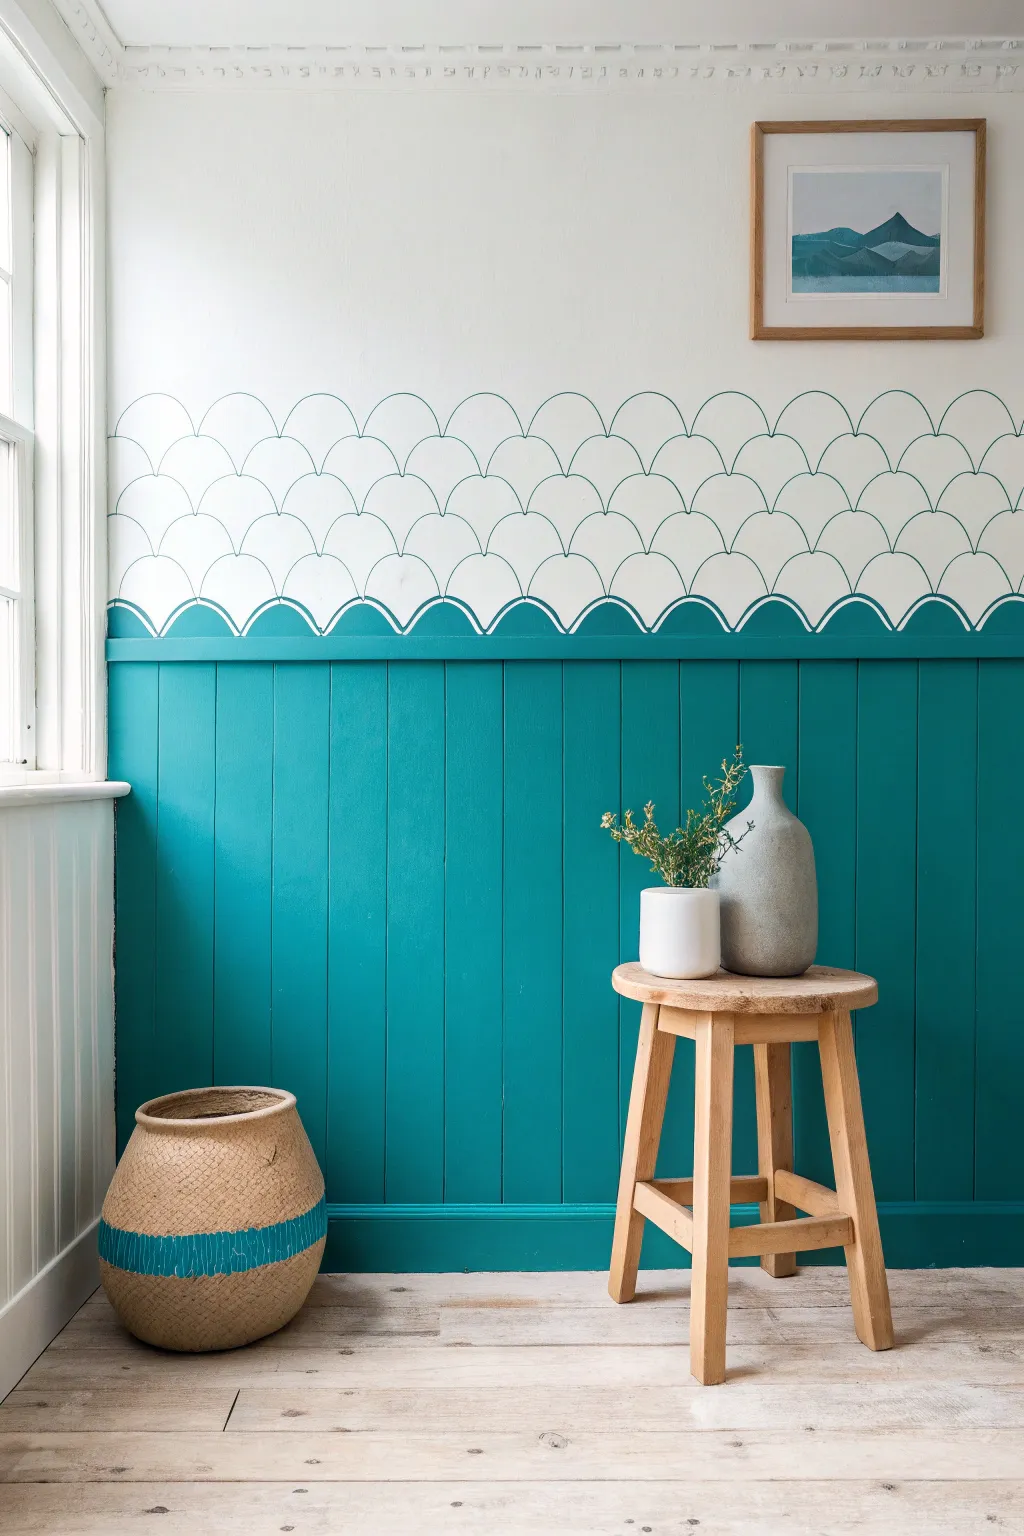

This whimsical wall treatment creates a focal point by combining bold tongue-and-groove paneling with delicate, hand-painted ‘fish scale’ arches. The result is a fresh, aquatic dimensionality that brings a quiet movement to any room.
Detailed Instructions
Materials
- Teal interior satin paint
- White matte wall paint
- Heavy cardstock or cereal box cardboard
- Small bowl or dessert plate (approx. 5-6 inches diameter)
- Pencil and white eraser
- Scissors
- Spirit level
- Fine liner or rigger brush (size 1)
- 2-inch angled sash brush
- Painter’s tape
- Small roller (for paneling)
Step 1: Setting the Stage
-
Prepare the surface:
Ensure your wall is clean and filled. If you have existing wood paneling or beadboard on the lower half, lightly sand it to ensure paint adhesion. If not, you can install dado railing and paneling sheets before painting. -
Establish the white base:
Paint the upper portion of the wall (above the railing) with a crisp matte white. Apply two coats if necessary and allow it to dry completely for at least 24 hours; a fully dry surface is crucial for the sketching phase. -
Paint the foundation:
Paint the lower wood paneling and the shelf ledge in your chosen deep teal shade using a small roller for the flat areas and a brush for the grooves.
Wobbly Hand Fix
struggling with the brush? Use a water-based acrylic paint marker in a matching teal shade. It offers the control of a pen while depositing real paint for the outlines.
Step 2: Creating the Solid Wave
-
Craft your template:
Place your bowl upside down on the cardstock and trace around it. Cut out the circle, then fold it perfectly in half to find the center line before cutting into a semi-circle. This is your master stencil. -
Trace the base row:
Place the flat edge of your stencil directly on the top surface of the dado rail or shelf. Use a pencil to trace the curved arch onto the white wall. Slide the template over until the edges touch and repeat across the entire wall length. -
Fill the solids:
Using the teal paint and your angled sash brush, carefully paint the inside of these bottom arches. This creates a solid ‘wave’ sitting on the shelf that transitions into the white wall. -
Refine the edges:
Go back with the liner brush to crisp up the curved edges of the solid teal shapes, ensuring smooth, confident lines where the blue meets the white.
Level Up: Ombré Effect
For a softer look, mix a little white into your teal paint for each ascending row of scallops. The lines will get lighter as they go up, creating a fading mist effect.
Step 3: The Delicate Scallops
-
Mark the offset:
For the second row, you want a ‘fish scale’ pattern. Position the center of your template directly above the point where two solid scallops meet below. -
Trace the grid:
Trace the arch lightly with a pencil. Continue this offset pattern horizontally across the wall. I find it helpful to use a spirit level periodically to ensure the rows aren’t drifting up or down. -
Build the height:
Repeat the tracing process for two to three more rows moving upward, always centering the new arch over the meeting point of the two arches below it. -
Prepare the line paint:
Put a small amount of teal paint on a plate and mix in a tiny drop of water. You want an ink-like consistency that flows smoothly from a fine brush without dragging. -
Paint the outlines:
Load your fine liner brush. Starting from the top peak, pull the brush down one side of the arch, then reload and do the other side. Keep a loose wrist to maintain a fluid curve. -
Connect the intersections:
Pay special attention to where the lines meet the row below. They should touch the peak of the lower scallop gently without creating heavy blobs of paint. -
Add finishing touches:
Once the paint is fully cured (give it a few hours), gently gaze over the wall and use a clean white eraser to remove any visible pencil marks that weren’t covered by paint.
Step back and admire how this simple repetitive pattern adds a sophisticated, handcrafted texture to your space.


Wrapping Corner Color Blocks
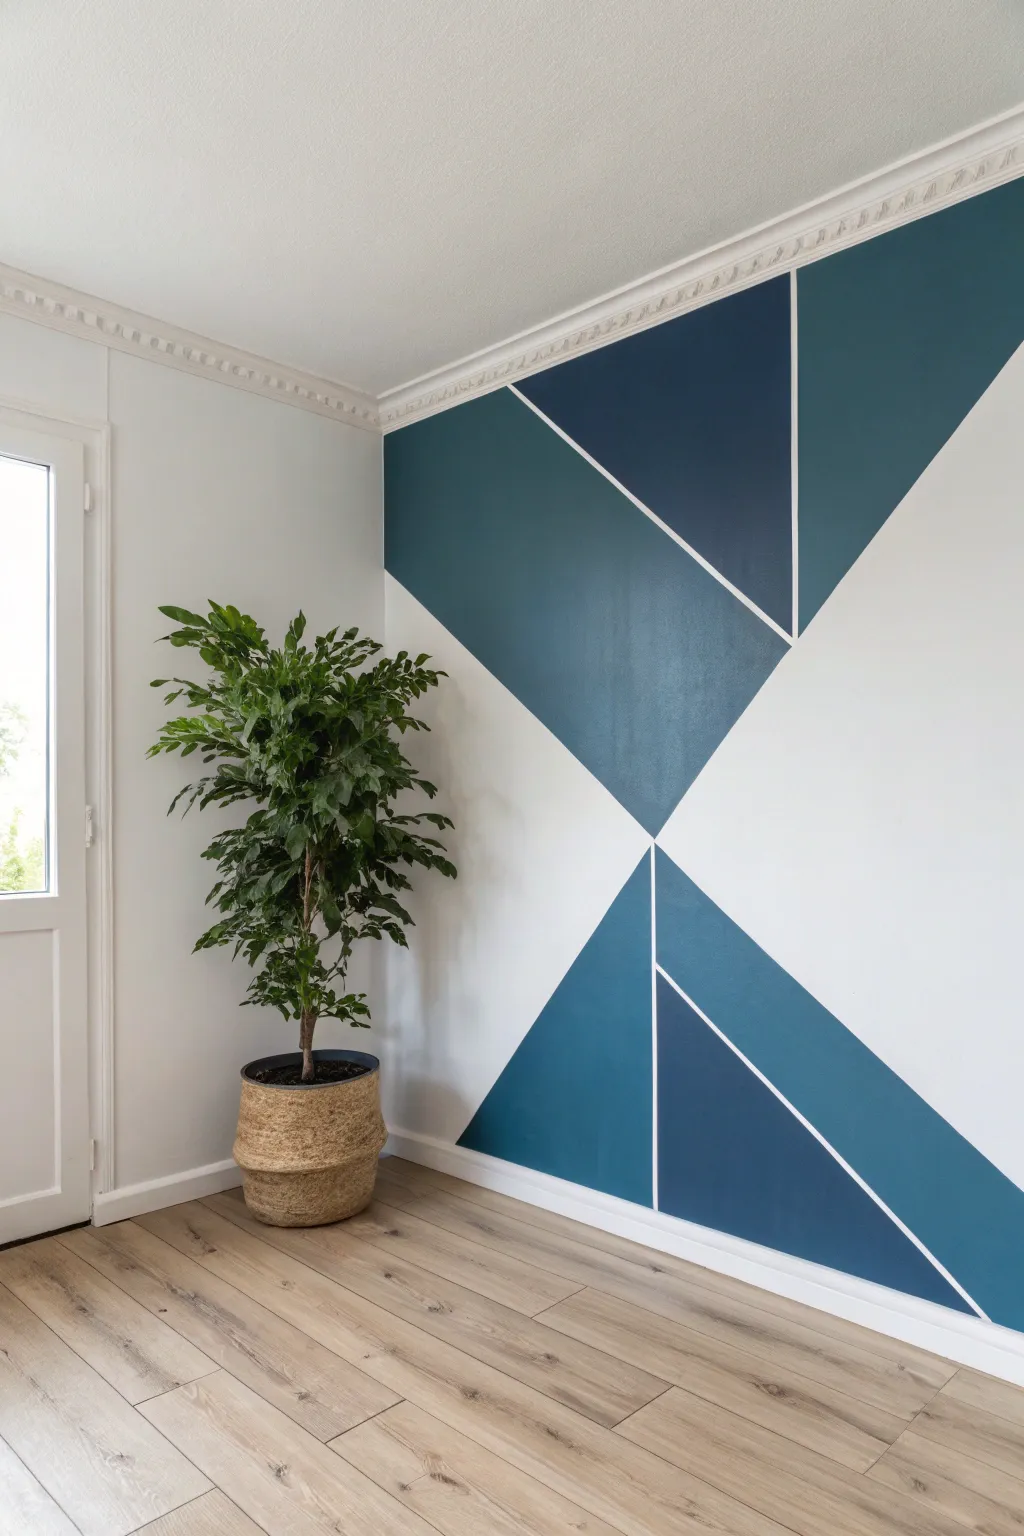
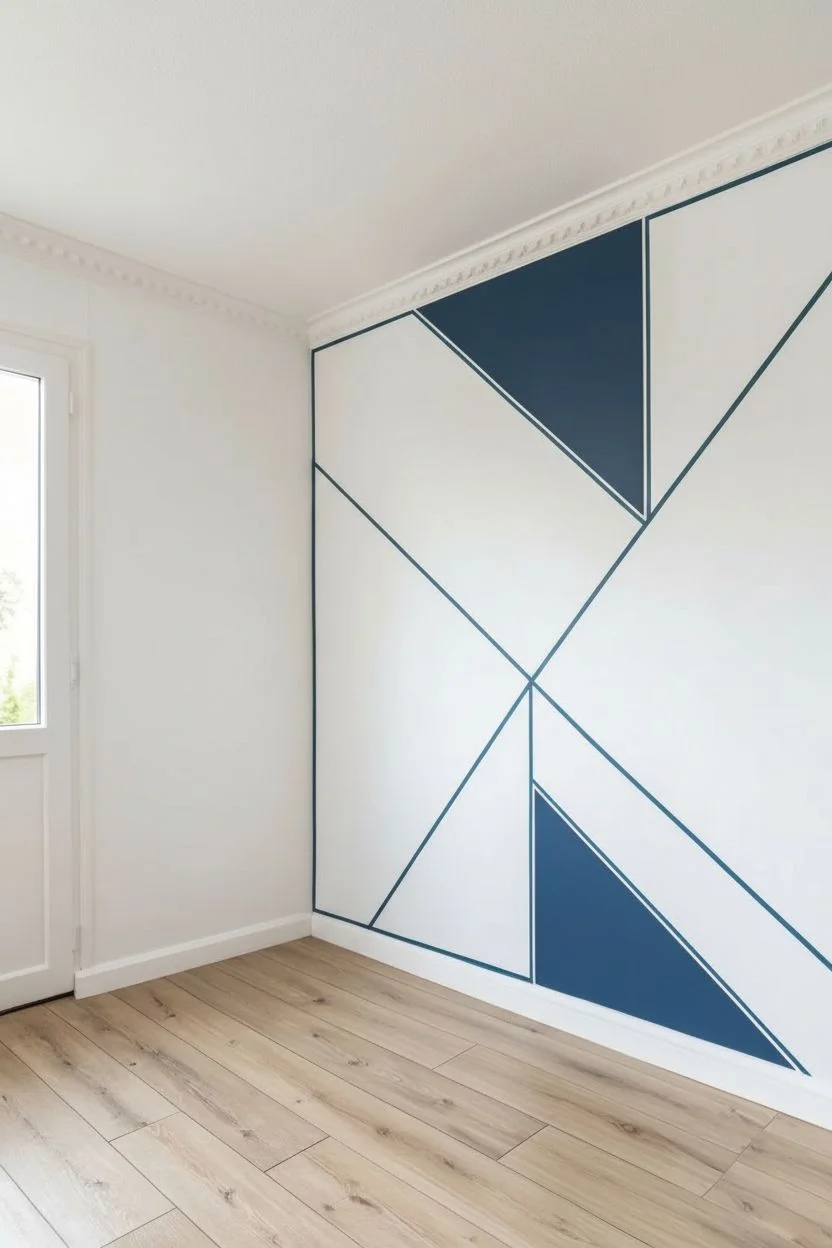
Transform a plain room corner into a stunning architectural focal point with this bold geometric color-blocking technique. By wrapping deep teal and navy triangular forms around the walls, you create an optical illusion of depth that makes the space feel modern and dynamic. The crisp white negative space lines are the secret to keeping the look clean and professional.
Step-by-Step Guide
Materials
- Interior latex paint (bright white base, deep teal, navy blue)
- High-quality painter’s tape (1.5 inch width)
- Drop cloths
- Sugar soap or mild detergent
- Spackling paste and sandpaper
- 2-inch angled sash brush
- Microfiber paint roller and tray
- Laser level or long straightedge
- Pencil
- Putty knife or credit card
Step 1: Preparation & Base Coat
-
Clear and clean:
Remove any furniture, outlet covers, and wall decor near the corner. Clean the walls thoroughly with sugar soap or mild detergent to remove grease and dust, ensuring proper paint adhesion. -
Patch imperfections:
Inspect the walls for nail holes or dents. Fill them with spackling paste, let dry according to package instructions, and sand until perfectly smooth. -
Apply base color:
Since the white lines in the design are actually the wall color showing through, paint the entire area with your bright white base paint. Apply two coats if necessary and allow it to cure completely (at least 24 hours) so the tape won’t peel it off later.
Bleed Breakthroughs?
If paint leaked under the tape, wait for it to fully dry. Then, use a small artist’s brush and your original white base paint to carefully touch up the edge and ‘erase’ the unwanted color.
Step 2: Drafting the Design
-
Mark the center:
Measure and mark a center point in the corner crease about waist-high. This will reflect the distinct ‘X’ shape where the upper and lower triangles meet. -
Draw guide lines:
Using a laser level or a long straightedge, lightly sketch your geometric plan with a pencil. Extend large diagonals from the corner center point outward across both walls. -
Tape the main dividing lines:
Apply painter’s tape along the outside of your pencil lines where you want the white dividers to be. Remember, the area *under* the tape will remain white. -
Create the inner divisions:
Tape off the section that separates the darker navy triangle from the lighter teal zones. Ensure your tape lines meet precisely at the intersections for sharp points. -
Seal the tape edges:
Run a putty knife or an old credit card firmly over all tape edges to press them down. This is crucial for preventing paint bleed on textured walls.
Corner Continuity
To ensure the design looks continuous, double-check that your tape lines meet exactly in the corner crease. A laser level is invaluable here to keep lines straight across the 90-degree fold.
Step 3: Painting the Color Blocks
-
The anti-bleed trick:
Here is a step I rely on for crisp lines: lightly brush a thin layer of your *base white paint* over the edges of the tape. This seals any tiny gaps with white paint so the colored paint can’t creep underneath. -
Cut in the teal sections:
Once the seal is dry, use your angled brush to carefully paint the edges and corners of the areas designated for the teal color. -
Roll the teal:
Use the roller to fill in the rest of the teal triangles. Apply light, even pressure to avoid distinct roller marks. -
Paint the navy sections:
Repeat the cutting-in and rolling process for the navy blue sections. Be very careful not to accidentally paint into the teal zones if they share a tape line. -
Apply second coats:
Allow the first coat to dry to the touch, then apply a second coat to both colors for rich, opaque coverage.
Step 4: Finishing Touches
-
Peel the tape:
Do not wait for the paint to fully cure. Carefully remove the tape while the second coat is still slightly tacky to prevent the paint film from ripping. -
Pull at an angle:
Pull the tape slowly moving away from the painted edge at a 45-degree angle for the sharpest possible line. -
Inspect and correct:
Check your lines for any small imperfections. A tiny artist’s brush with a bit of white paint can act as an eraser for any minor bleeds. -
Cleanup:
Remove drop cloths and reinstall outlet covers once the paint is fully hard to the touch. -
Style the corner:
Place a tall potted plant or floor lamp in the corner to accentuate the verticality of your new design.
Step back and enjoy the depth and modern flair your precise brushwork has brought to the room
Faux Wallpaper with Brushstroke Dashes
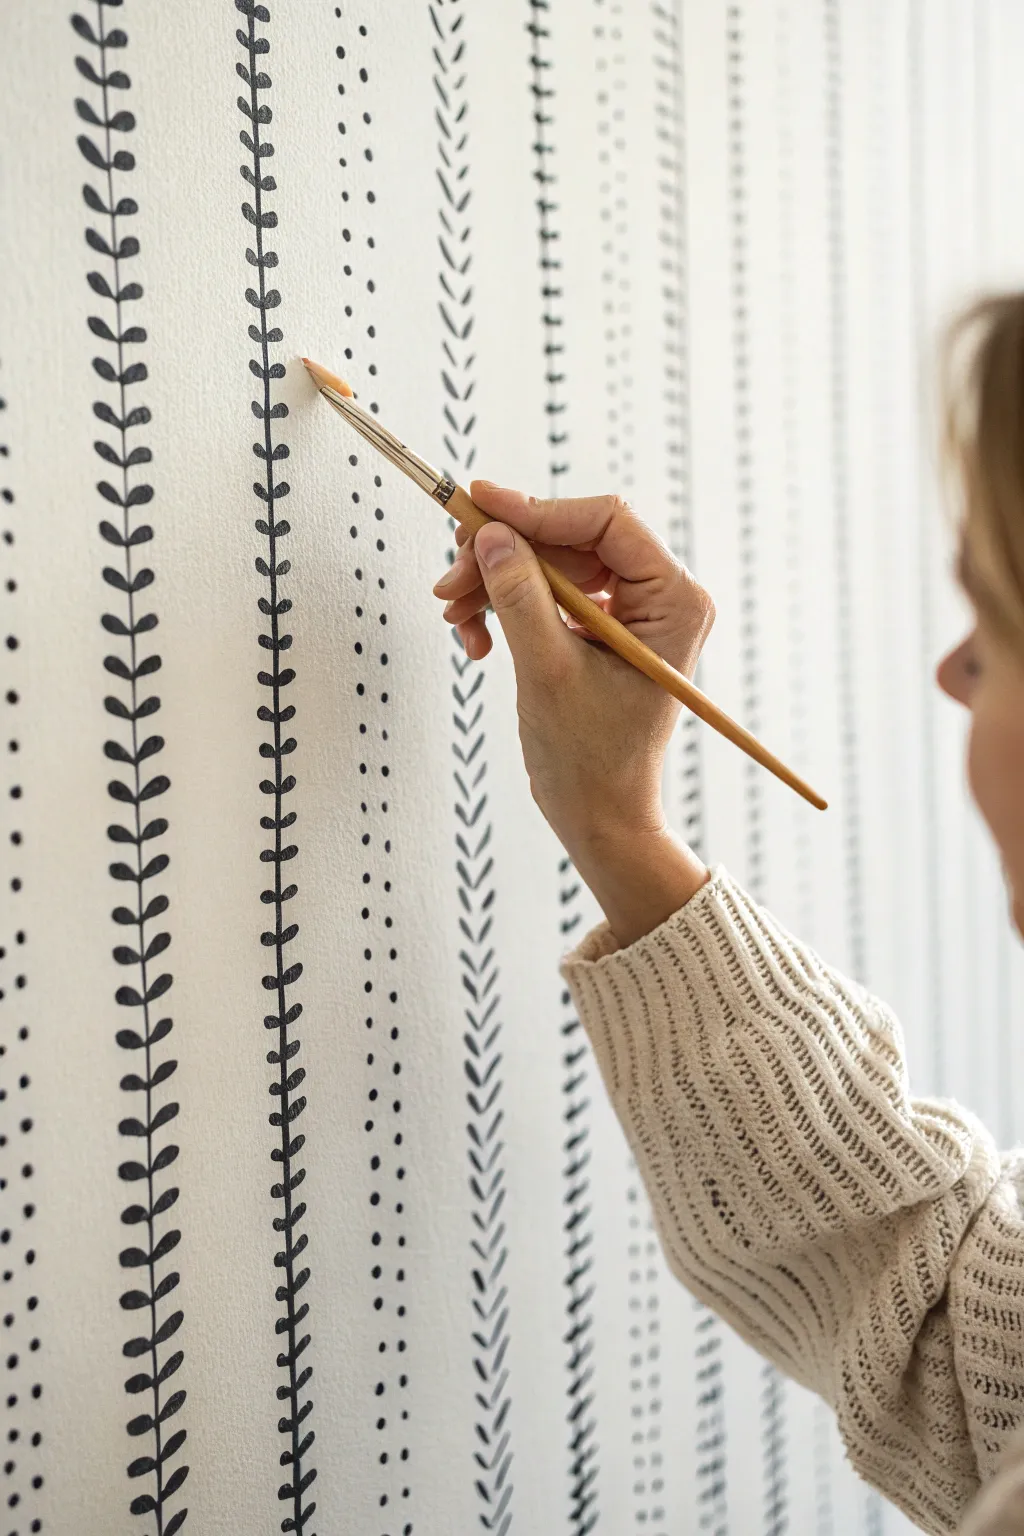
Transform a plain white wall into a charming, organic feature with this faux wallpaper technique. By painting easy-to-repeat vertical patterns, you get the structure of wallpaper with the warmth of a hand-done mural.
Step-by-Step
Materials
- Light colored interior wall paint (satin or eggshell)
- Black or charcoal acrylic craft paint (or interior latex)
- Round artist brushes (sizes 4 and 6)
- Laser level or plumb line
- HB Pencil
- White eraser
- Step ladder
- Small cup for water
- Paper plate or palette
- Damp rag
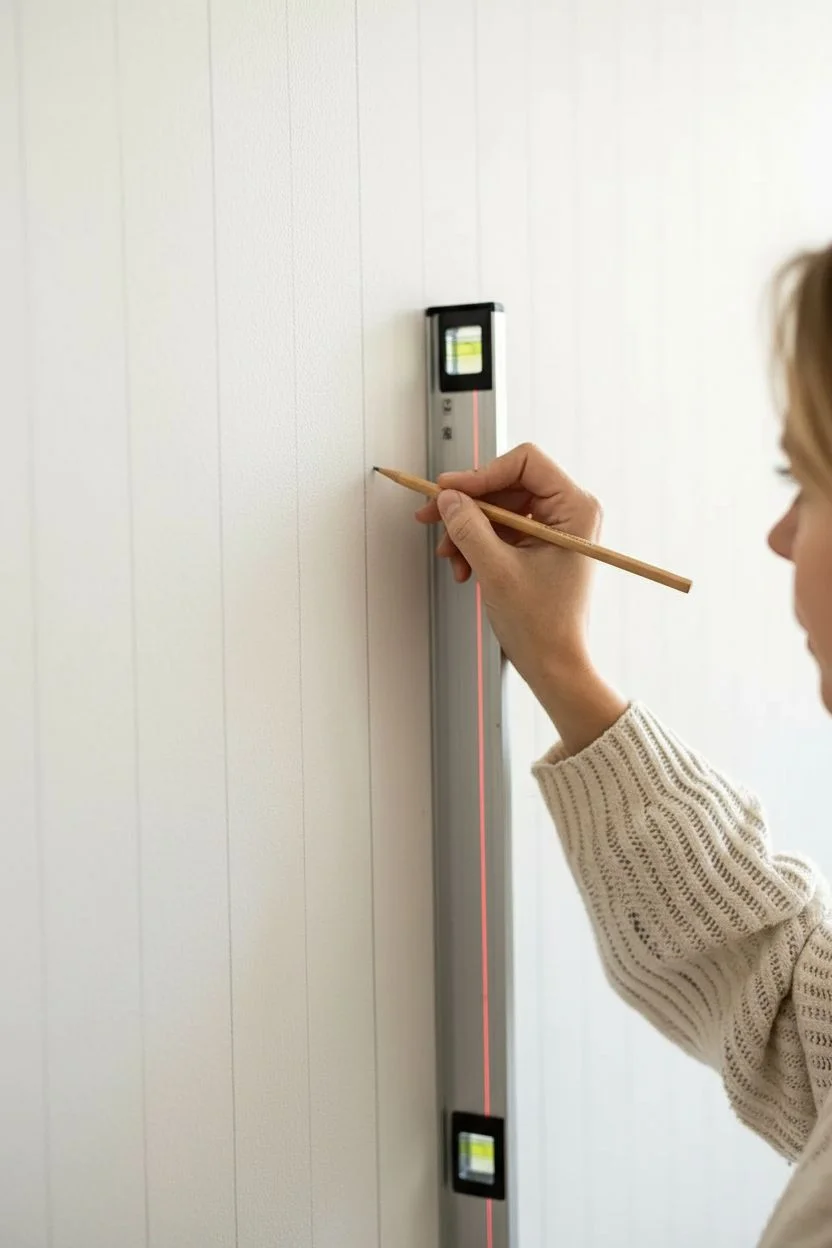
Step 1: Planning the Grid
-
Clean surface:
Wipe down your wall with a damp cloth to remove dust and grease, ensuring a smooth surface for the detail work. -
Determine spacing:
Measure the width of your wall. Aim for columns spaced about 4 to 6 inches apart to mimic the density of a wallpaper roll. -
Mark vertical guides:
Using a laser level as your guide, lightly mark vertical lines from floor to ceiling with a pencil. These faint lines will serve as the spine for your patterns. -
Plan the rotation:
Decide on your pattern sequence. This project uses three distinct styles: a leafy vine, a dotted line, and a chevron stack. Repeats usually look best as A-B-C-A-B-C.
Uneven Lines?
Don’t stress if your hand shakes or a vine isn’t perfectly straight. The goal is a hand-drawn aesthetic. These small imperfections disappear when you view the entire wall.
Step 2: Painting the Motifs
-
Prepare the paint:
Squeeze a dollop of black acrylic paint onto your palette. I like to add a tiny drop of water to improve the flow, making it ink-like but not runny. -
Load the brush:
Dip your #4 round brush into the paint, rolling it slightly to maintain a sharp point. -
Anchor your hand:
When painting fine details, extend your pinky finger and rest it gently against the wall to stabilize your hand. -
Paint the Vine pattern:
For the first style, paint a continuous (or broken) thin vertical line down your pencil guide. -
Add the leaves:
Using the ‘press and lift’ method, add small leaves on alternating sides of the stem. Press the belly of the brush down for width, then lift as you pull away to create a point. -
Paint the Dot pattern:
Move to the next pencil line. Use the tip of the brush to create small, evenly spaced dots. Don’t worry about perfect circles; organic ovals look more authentic. -
Paint the Chevron pattern:
On the third line, paint small ‘V’ shapes or arrowheads pointing downward. Stack them closely so they resemble a braided rope. -
Paint the Cross-Dash pattern:
For variety, you can do a vertical line interrupted by small horizontal dashes, crossing the line like tiny ‘t’ shapes. -
Work vertically:
Complete one full column from top to bottom before moving to the next. This helps maintain consistent brush pressure throughout that specific pattern. -
Reload frequently:
Paint starts to dry on small brushes quickly. Rinse your brush in water every 10 minutes to prevent the bristles from stiffening.
Level It Up
Add subtle depth by mixing a dark grey for half the columns and true black for the others. The slight tonal variation creates a richer, more textile-like appearance.
Step 3: Finishing and Refining
-
Check for gaps:
Step back periodically to look at the wall as a whole. If the pattern looks too sparse in areas, you can go back in and thicken a line or add a leaf. -
Dry time:
Allow the paint to cure fully for at least 2 hours. Acrylics dry fast, but you don’t want to smudge them while erasing. -
Erase guides:
Gently run a white eraser over the wall to remove any pencil lines that are still visible between your painted strokes. -
Wipe clean:
Brush away the eraser shavings with a clean, dry cloth.
Enjoy the custom character your steady hand has brought to the room.
Ethereal Watercolor Wash Technique
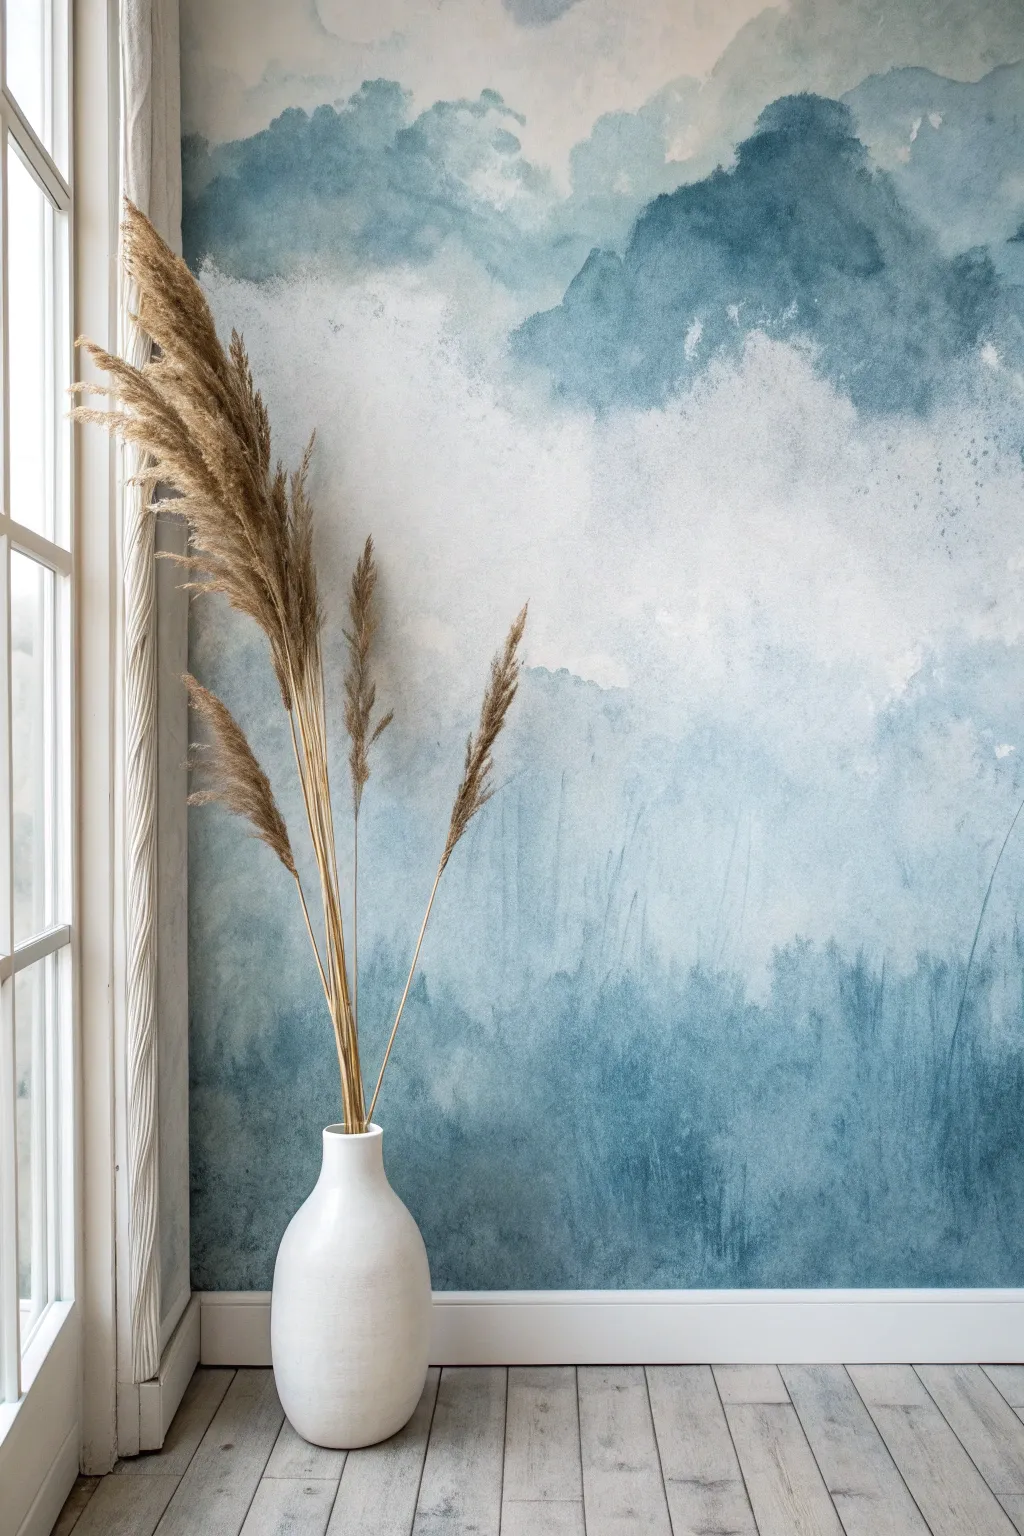

Transform a plain wall into an ethereal masterpiece that mimics the soft, fluid movement of watercolor paint on paper. This technique uses translucent glazes to overlap shades of teal, indigo, and white, creating a moody yet calming atmosphere perfect for a bedroom or reading nook.
Step-by-Step Guide
Materials
- Interior latex paint (White base)
- Interior latex paint (Deep Indigo/Navy)
- Interior latex paint (Muted Teal/Slate)
- Clear acrylic glazing mixing medium
- Large painter’s sea sponges
- Large soft-bristle blending brush
- Spray bottle with water
- Painter’s tape and drop cloths
- Lint-free cotton rags
- Mixing buckets or trays
Step 1: Preparation & Base Coat
-
Protect the perimeter:
Clear the area and apply high-quality painter’s tape to the ceiling line, baseboards, and any adjacent walls you aren’t painting. Lay down drop cloths, as this technique involves dripping water. -
Apply the canvas layer:
Roll on a solid coat of crisp white or off-white eggshell paint. Allow this to dry completely for at least 4 to 6 hours; this ensures the glaze glides over the surface rather than soaking in immediately. -
Mix your glazes:
In separate buckets, mix your paints with the glazing liquid. A standard ratio is 1 part paint to 4 parts glaze for transparency, but adjust according to the bottle instructions. You want a ‘Deep Indigo’ mix, a ‘Slate Teal’ mix, and a ‘Translucent White’ mix.
Step 2: Painting the Sky
-
Moisten the surface:
Working in a 4-foot section at the top right corner, mist the wall lightly with your water spray bottle. This effectively breaks the surface tension and encourages the paint to bleed. -
Apply the darkest tones:
Dip a sea sponge into the ‘Deep Indigo’ glaze and dab it onto the upper wall in organic, cloud-like shapes. Leave plenty of white space between the patches. -
Soften the edges:
Immediately use a damp lint-free rag to blot the edges of your indigo patches. I like to twist the rag slightly as I blot to create unpredictable, natural textures. -
Introduce the mid-tones:
Load a clean sponge with the ‘Slate Teal’ glaze. Dab this slightly over the indigo edges and extend it downwards into the white space, creating a gradient. -
Blend with a dry brush:
Take your large, dry soft-bristle brush and gently sweep over the wet paint in varying directions. This ‘feathers’ the colors together, eliminating any sponge marks and creating that misty look. -
Create the misty middle:
As you move toward the center of the wall, switch to the ‘Translucent White’ glaze mix. Blend this upward into the teal to soften the transition, leaving the middle of the wall mostly light and vaporous.
Paint drying too fast?
If edges are hardening before you can blend, mist the area with more water. You can also add a ‘paint extender’ or retarder to your glaze mix to buy extra working time.
Step 3: Grounding the Composition
-
Start the bottom anchor:
Mist the bottom section of the wall heavily with water. You want this area to feel heavier and more saturated, like a landscape or deep water. -
Apply vertical strokes:
Using a brush aimed upwards, pull streaks of the ‘Deep Indigo’ glaze from the baseboard up towards the middle. Unlike the clouds above, keep these strokes somewhat vertical to mimic tall grass or rain. -
Layer in teal accents:
While the indigo is wet, streak in the ‘Slate Teal’ glaze, allowing them to mix on the wall. The water mist will cause runs and drips—let them happen naturally. -
Soften the horizon:
Where the bottom colors meet the misty white middle, use a clean damp sponge to dab and lift some paint away. This creates a foggy ‘horizon line’ rather than a sharp separation. -
Assessment step back:
Walk to the other side of the room to view the composition. Look for areas that seem too heavy or hard-edged. -
Refine the details:
If a section has dried with a hard line, mist it precisely with water and scrub gently with a damp rag to reactivate and soften the glaze. -
Final drying process:
Let the wall dry untouched for 24 hours. Because the glaze keeps the paint open longer, it will remain tacky for quite a while.
Pro Tip: Depth Control
Don’t try to get the color perfectly dark on the first pass. It looks best if you let the first layer dry, then add a second, localized layer of indigo for intense depth.
Step back and enjoy the serene, custom atmosphere you’ve brought into your home.
Seamless Ombre Gradient
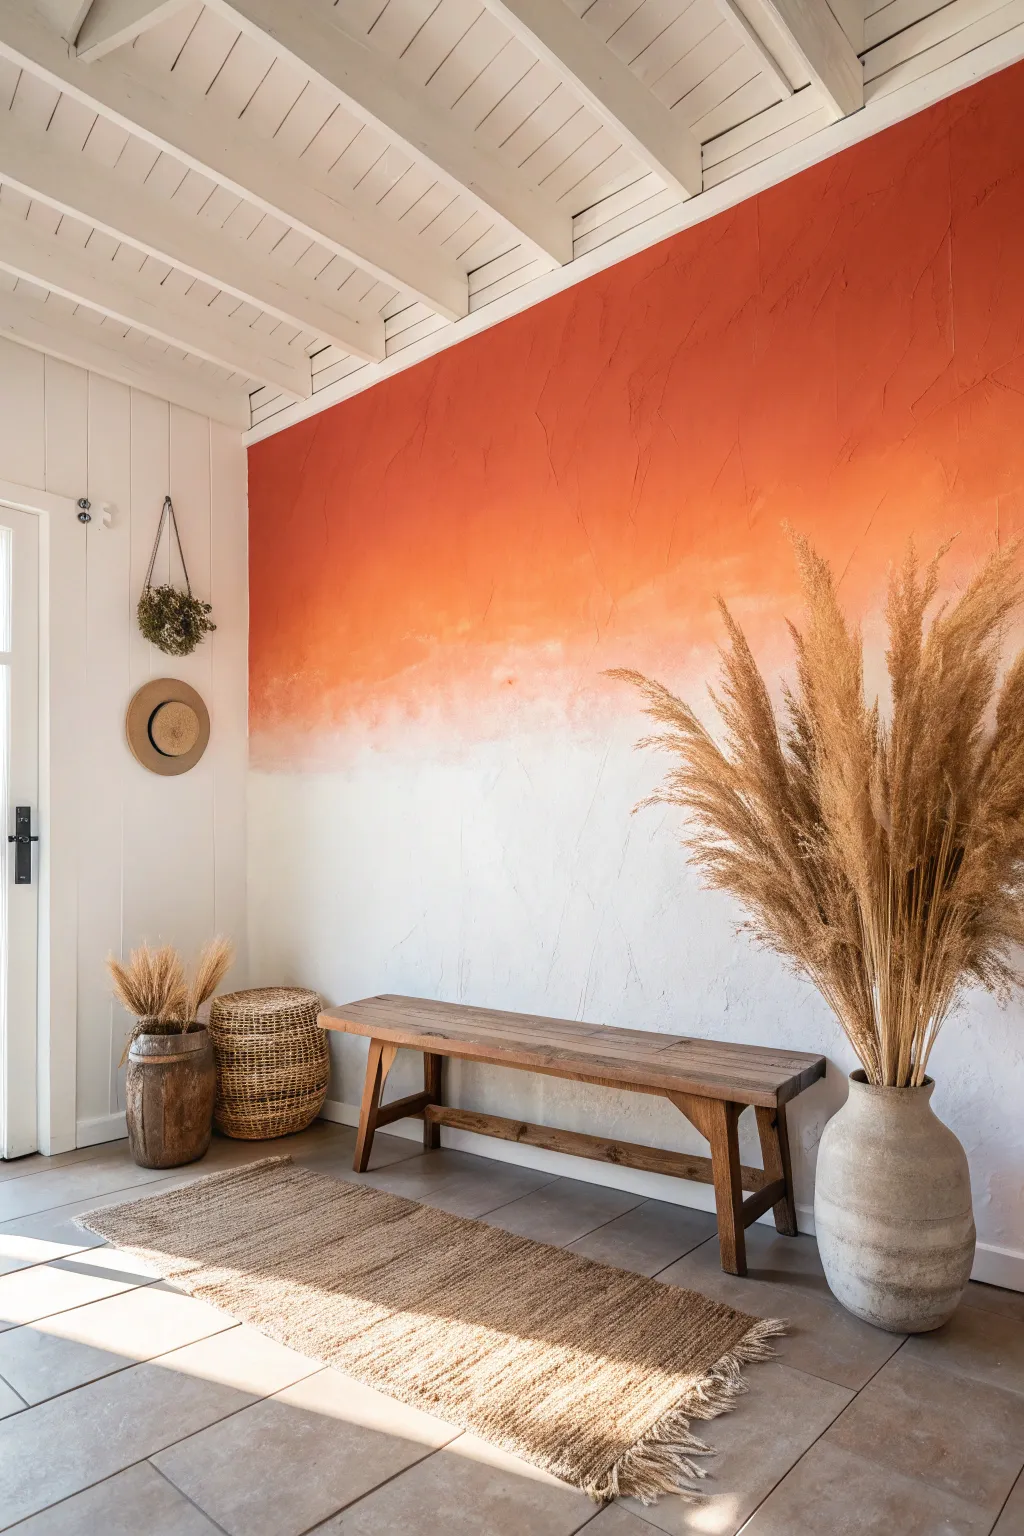
Bring the warmth of golden hour into your home permanently with this textured, sunset-inspired gradient wall. This project transforms a flat white surface into a stunning visual anchor using a three-tone blending technique.
Detailed Instructions
Materials
- Latex paint (White, Soft Peach, Deep Terracotta)
- Acrylic glazing liquid (slow-dry medium)
- 3 Paint trays and liners
- 3 Medium-nap rollers
- 2 Large dry blending brushes
- Water spray bottle (fine mist)
- Painter’s tape
- Drop cloths
- Pencil
Step 1: Preparation & Setup
-
Clear and clean:
Remove all furniture, including benches and wall decor, to ensure you have a completely unobstructed canvas to work with. -
Protect boundaries:
Apply painter’s tape deeply into the corners, along the ceiling line, and across the baseboards to ensure crisp edges. -
Map the gradient:
Using a pencil, lightly mark the wall into three horizontal sections, though they don’t need to be perfectly equal. -
Mix the glaze:
Mix your acrylic glazing liquid into each of your three paint colors according to the bottle instructions; this I find essential for keeping the paint wet long enough to blend.
Keep it workable
Work in manageable 4-foot wide vertical sections rather than trying to paint the entire wall width at once. This ensures your paint edges stay wet for blending.
Step 2: Blocking the Colors
-
Apply the base:
Pour your white paint into a tray and use a roller to paint the bottom third of the wall, bringing it up slightly past your first pencil mark. -
Feather the edge:
While the white paint is still wet, use a brush to feather out the top edge so it isn’t a hard horizontal line. -
Apply the mid-tone:
Using a fresh roller, apply the soft peach color to the middle section, leaving about a 3-inch gap between it and the white paint for now. -
Apply the dark tone:
Roll the deep terracotta paint onto the top section of the wall, again leaving a small gap between this color and the peach section below.
Hard lines appearing?
If the paint starts to set and creates a hard stripe, spray it immediately with water and scrub vigorously with a clean, dry chip brush to soften it back up.
Step 3: The Wet Blend
-
Mist the transition:
Lightly spritz the gap between the white and peach sections with your water spray bottle to reactivate the edges. -
Merge the lower colors:
Dip a large blending brush lightly into the peach paint and use quick ‘X’ shaped strokes to marry the white and peach sections together. -
Create texture:
Continue using cross-hatching motions rather than straight lines to mimic the plaster-like texture seen in the photo. -
Clean the brush:
Wipe your blending brush on a rag or grab a fresh dry brush before moving to the next color zone. -
Mist the upper transition:
Spray a fine mist over the gap between the peach and terracotta sections to ensure the darker paint is pliable. -
Blend the upper colors:
Use your brush to pull the dark terracotta down into the peach using the same random, cross-hatch strokes to create a cloudy effect. -
Variable height:
I like to vary the height of the blend slightly across the wall so it looks organic rather than like a rigid stripe.
Step 4: Finishing Touches
-
Assess from afar:
Step back to the other side of the room to identify any areas where the transition looks too harsh or blocky. -
Soften imperfections:
use a barely-damp clean brush to lightly stipple or dab any distinct lines until they disappear into a soft haze. -
Remove tape:
Peel off the painter’s tape carefully while the paint is still tacky to prevent peeling the dried film. -
Dry completely:
Allow the wall to cure for at least 24 hours before moving furniture or wall hangings back into place.
Enjoy the warm glow of your new feature wall even on the cloudy days.
Large-Scale Geometric Abstraction
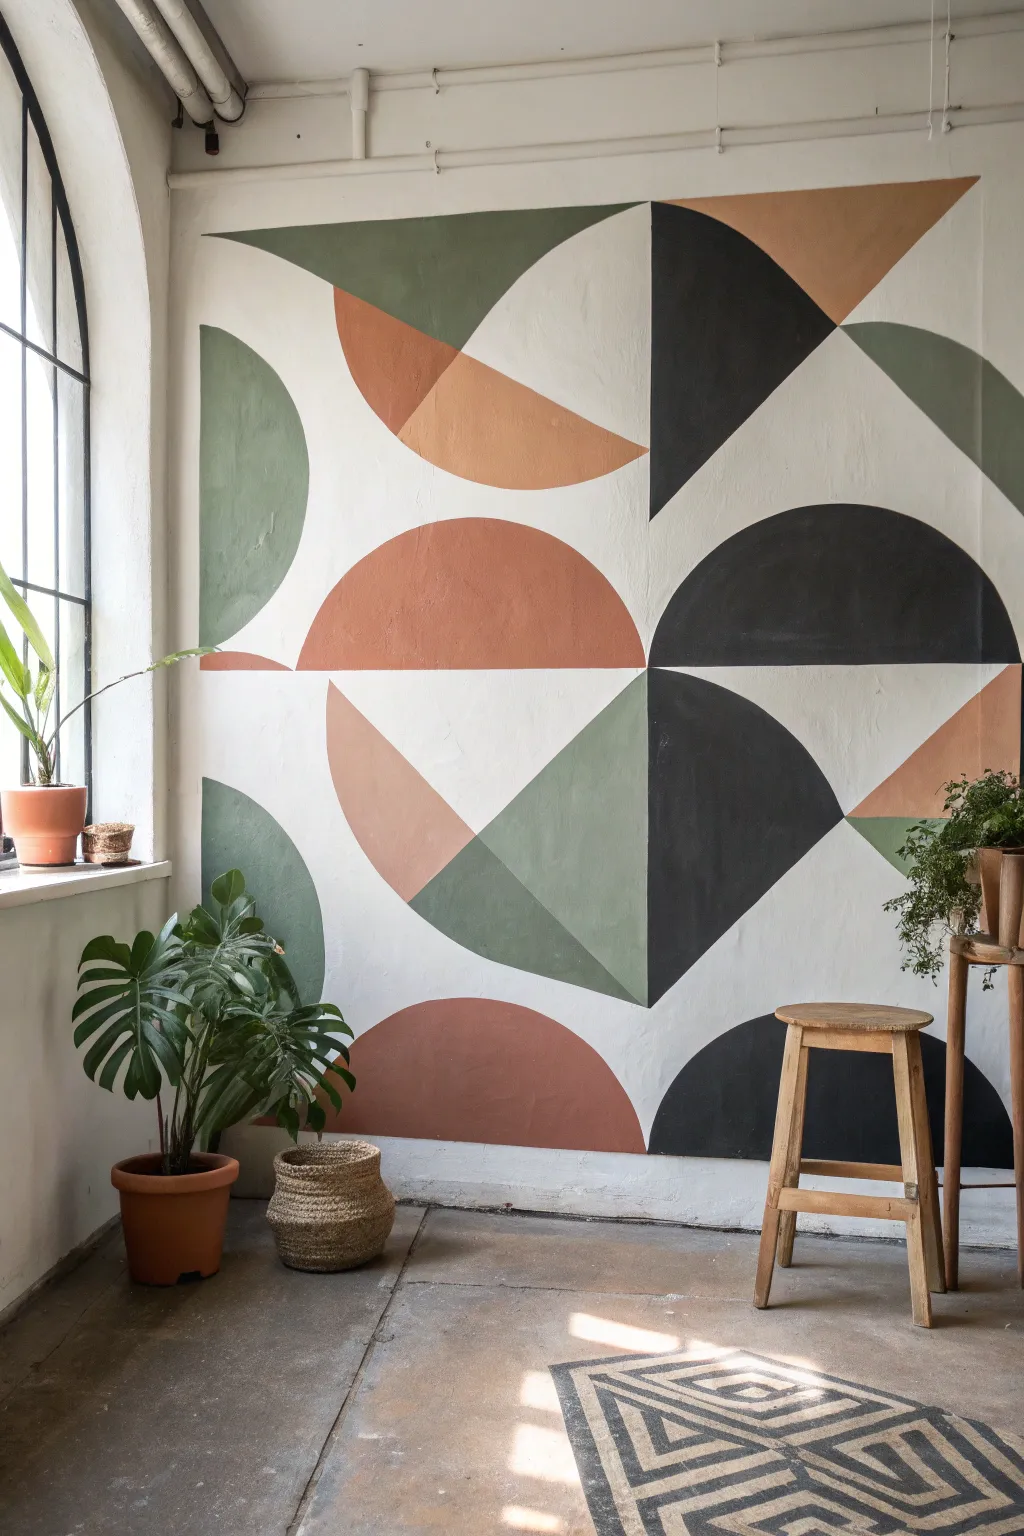
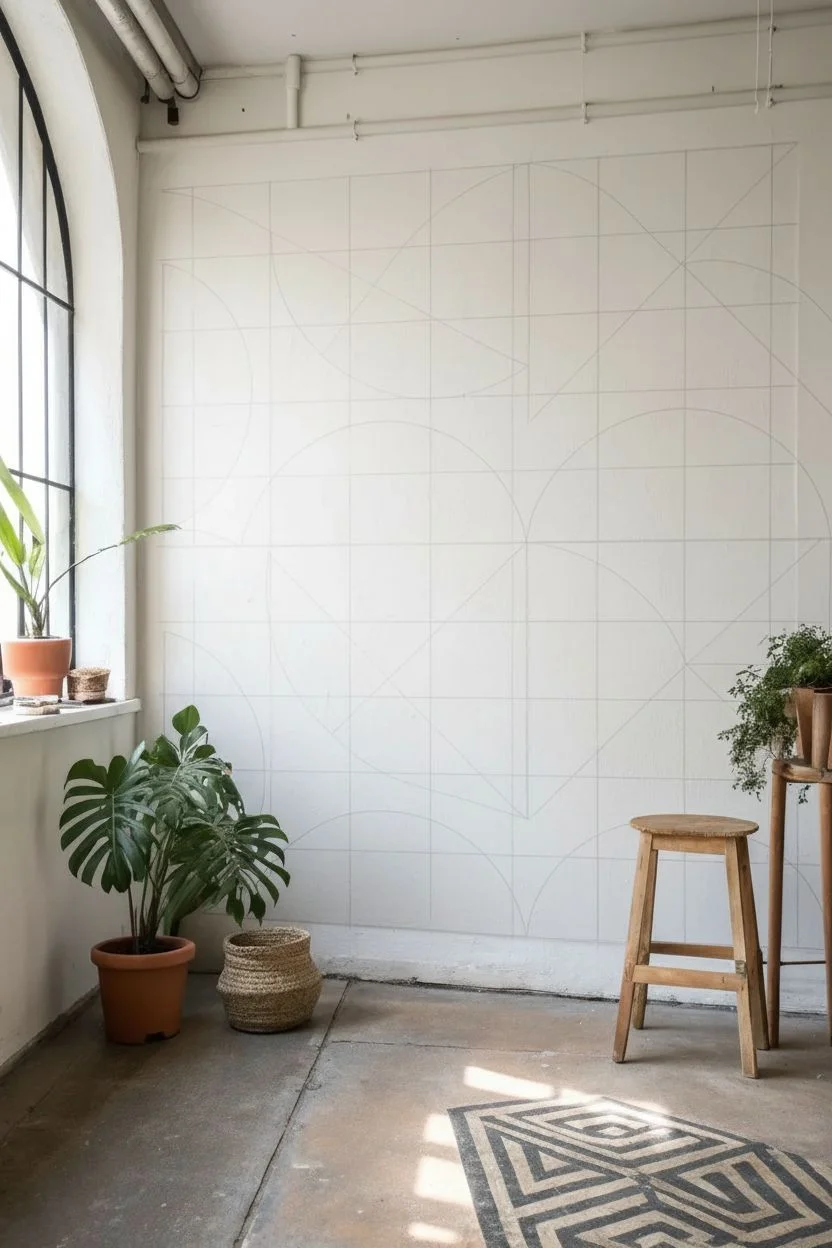
Transform a plain white wall into a striking piece of oversized art with this mid-century inspired geometric mural. By balancing bold semicircles and triangles in terracotta, sage, and charcoal, you will create a warm, dynamic focal point that feels both structured and organic.
Step-by-Step Tutorial
Materials
- Interior latex paint (White/Cream base, Terracotta, Sage Green, Charcoal)
- Painter’s tape (standard green and delicate surface yellow)
- Laser level or long spirit level
- Measuring tape
- Pencil and eraser
- String and thumbtack (for the compass method)
- Angled sash brush (2-inch)
- Mini foam rollers and tray
- Artist detail brush
- Drop cloths
Step 1: Grid & Sketching
-
Prime the canvas:
Ensure your wall is clean and coated with your chosen base color, typically a warm white or cream. Allow this base to cure for at least 24 hours before applying any tape. -
Map the grid:
Measure the total width and height of your intended mural area. Using a level and a light pencil touch, draw a large-scale grid of squares (e.g., 24×24 inches) to serve as the skeleton for your design. -
Outline straight shapes:
Consult the reference image to locate the triangular sections. Use a straight edge to draw diagonal lines connecting the corners of your grid squares where needed. -
Create a string compass:
Tie a piece of non-stretchy string to a pencil. Measure the string length to match the radius of your circles (half the width of your grid squares). -
Draw the curves:
For semicircles, press a thumbtack into the center point of a grid line, loop the string around it, and swing the pencil to draw a perfect arc. For quarter circles, place the tack at the grid corner. -
Review the composition:
Step back and check your pencil lines against the design. Erase any grid lines that run through the middle of your shapes so they don’t confuse you later.
Step 2: Taping Strategy
-
Isolate non-touching shapes:
You cannot paint adjacent shapes at the same time. Select a ‘first batch’ of shapes that do not share a common border (e.g., the top-right black triangle and bottom-left green curve). -
Tape the curves:
Apply painter’s tape along your pencil lines. For curves, tear off small 2-3 inch pieces of tape and overlap them slightly to guide the tape around the arc smoothly. -
Seal the tape edges:
I like to firmly press the tape edges down with a credit card or putty knife to ensure a tight bond with the wall texture. -
The anti-bleed trick:
Brush a very light coat of your *base wall color* (white) over the edge of the tape. This seals gaps; if any paint bleeds under, it will just be white, keeping your colored lines crisp.
Pro Tip: Crisp Curves
When taping curves with small overlapping pieces, run your thumbnail along the inner edge of the tape curve to burnish it flat. This prevents the ‘jagged’ look that tape ends can sometimes create.
Step 3: Painting & Revealing
-
Apply first colors:
Once the seal is dry, use the mini roller to fill in the shapes with their respective colors (terracotta, green, or charcoal). Use a brush for tight corners. -
Apply second coat:
Let the first coat dry to the touch, then apply a second coat for rich, opaque saturation. -
Remove tape promptly:
Peel off the tape while the second coat is still slightly tacky. Pull slowly at a 45-degree angle away from the paint edge to avoid ripping the film. -
Dry time:
Allow this first batch of shapes to dry completely—ideally overnight—before taping over them. -
Tape remaining shapes:
Now tape off the adjacent shapes. Where the tape crosses onto fresh paint you applied yesterday, use ‘Delicate Surface’ (yellow) tape to avoid peeling up your hard work. -
Paint and peel:
Repeat the painting process for the remaining triangles and semicircles. Remember to remove the tape gently while the paint is still damp.
Level Up: Texture Play
Mix a sand texture additive into your paints to give the shapes a tactile, plaster-like quality, making the mural feel more like an integrated architectural fresco than a flat painting.
Step 4: Finishing
-
Touch ups:
Inspect your lines. Use a small artist brush and a steady hand to fix any tiny bleeds or wobble in the curves. -
Clean grid lines:
Gently erase any remaining visible pencil grid lines from the white negative space areas. -
Step back:
Check the wall from a distance to ensure the color balance feels right. -
Clear coat (optional):
If the wall is in a high-traffic area, you can apply a clear matte protective finish over the entire wall, though usually, quality latex paint is durable enough.
Enjoy the sophisticated, gallery-like atmosphere this graphic mural brings to your space.
Organic Freehand Botanicals
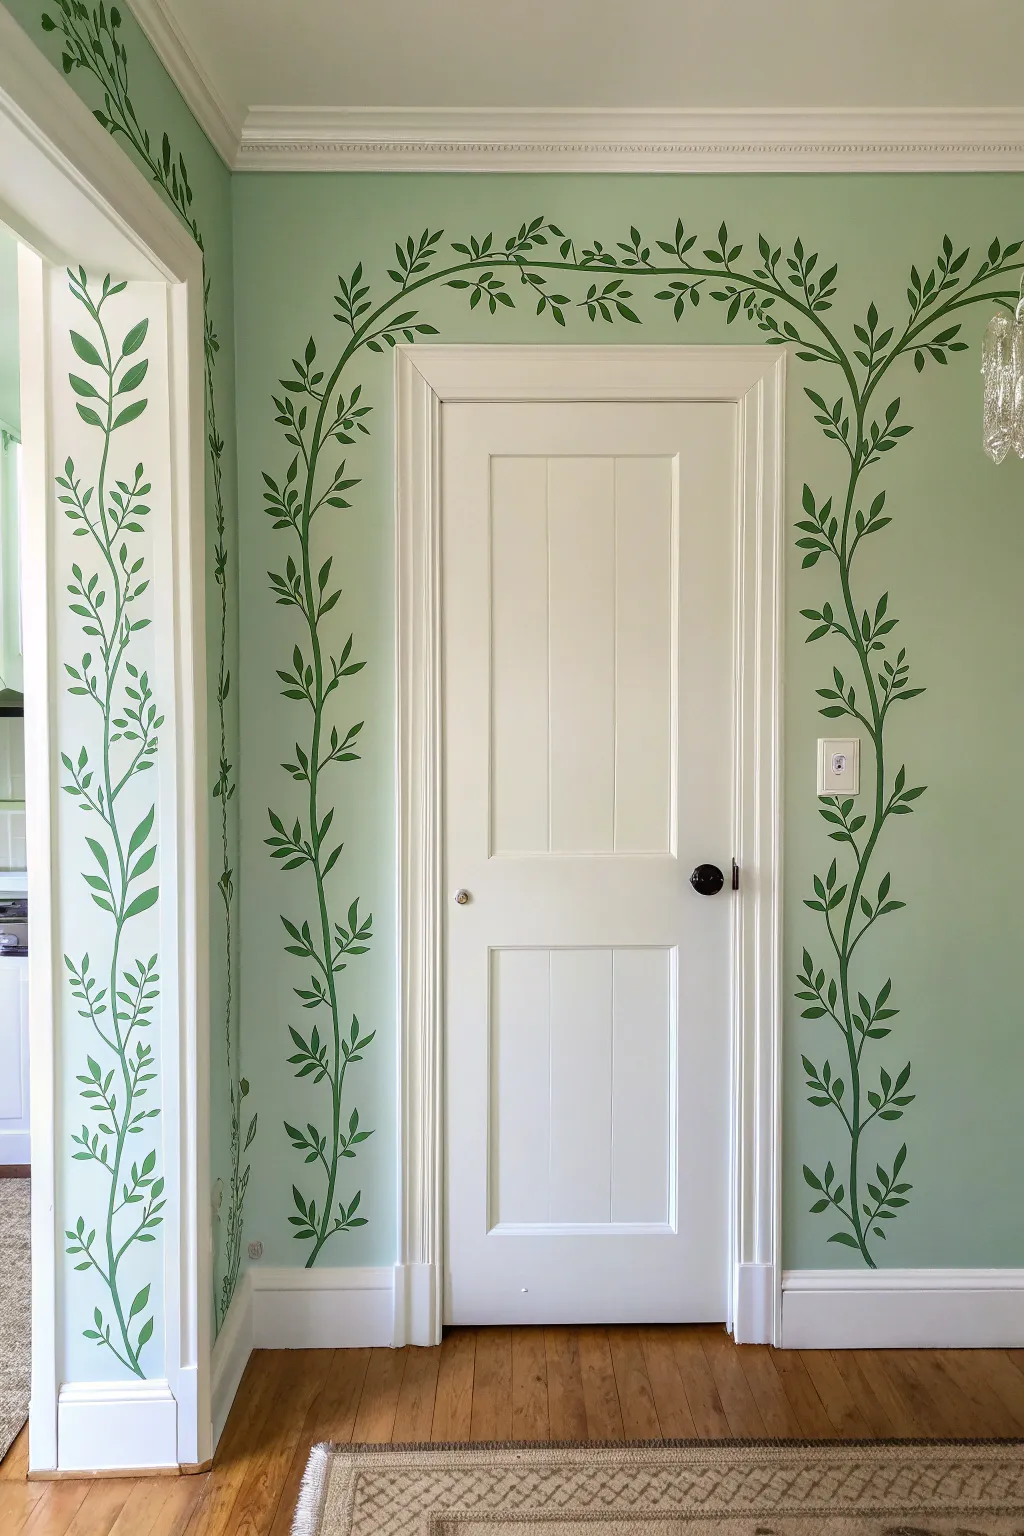
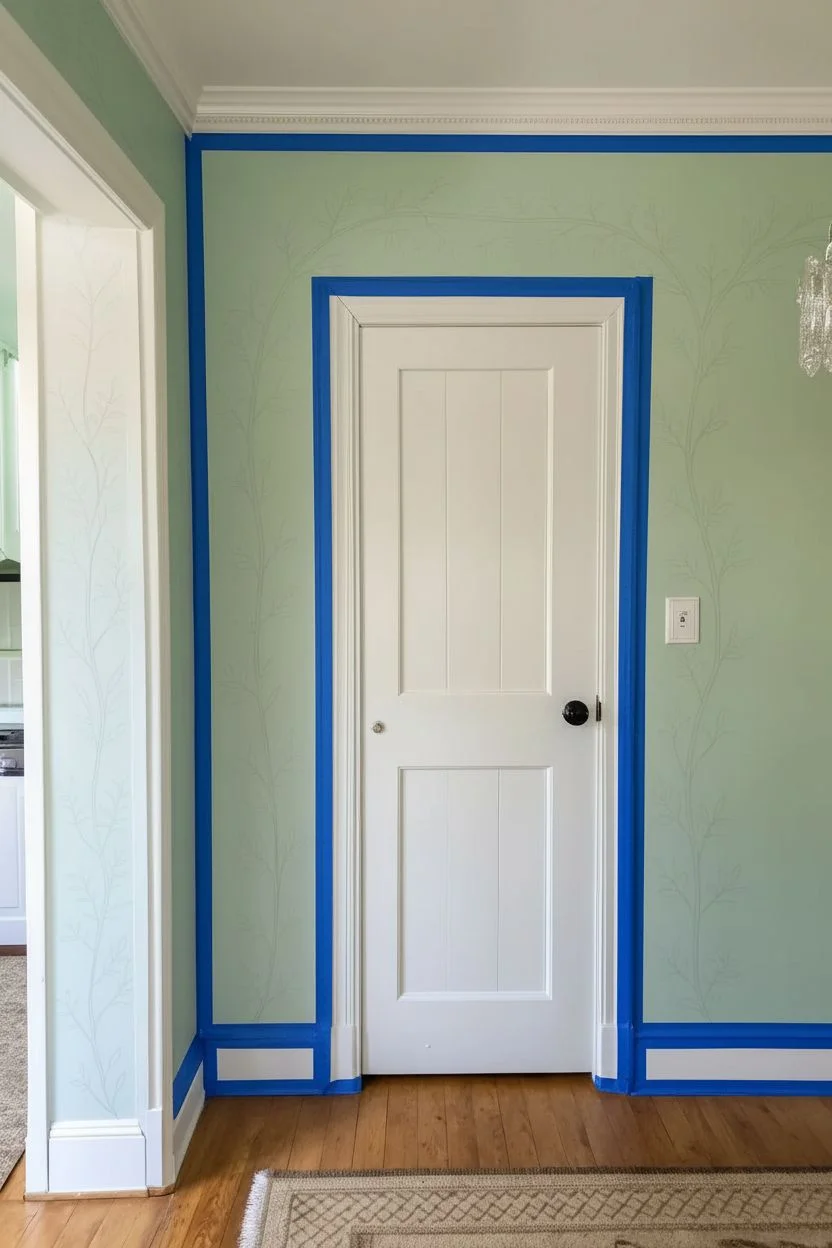
Bring the calming influence of nature indoors with this hand-painted botanical mural that frames your doorway in lush greenery. By using simple, repetitive brushstrokes, you can create an organic vine design that adds whimsical elegance to any room.
Detailed Instructions
Materials
- Latex wall paint (Deep Forest Green)
- Small synthetic round brushes (Sizes #4 and #8)
- Liner or Rigger brush (Size #1)
- HB Pencil
- Soft white eraser
- Painter’s tape
- Paper plate or palette
- Step ladder
- Cardboard (for practice)
Step 1: Preparation & Layout
-
Clean the surface:
Wipe down the wall area around the door frame with a damp cloth to remove dust or oils, ensuring the paint adheres smoothly. -
Protect the trim:
Apply painter’s tape along the edge of the door casing and the baseboards to create crisp boundaries where the vines spring from the floor. -
Draw the main stems:
Using an HB pencil, lightly sketch the primary vine lines starting from the baseboard and moving vertically up the wall. -
Sketch the arch:
Continue your pencil line up and over the door frame, allowing the lines from the left and right sides to curve inward and gently cross at the apex. -
Plan the foliage:
Lightly mark the placement of leaves with small tick marks along the stems, alternating sides to mimic natural growth patterns.
Master the Stroke
Use a ‘press, drag, lift’ motion for the leaves. Pressing harder creates a wider leaf, while lifting quickly creates a sharp, realistic tip.
Step 2: Painting the Vines
-
Prepare the paint:
Pour a small amount of deep green latex paint onto your palette; if the paint feels too thick, thin it with a few drops of water to improve flow. -
Paint the main lines:
Load a #8 round brush and carefully trace over your main stem pencil lines, keeping the pressure consistent for an even width. -
Taper the ends:
As you reach the top of the arch or the ends of branches, gradually lift the brush to let the line taper off into a thin point. -
Add side branches:
Using the same brush, pull smaller stems (petioles) out from the main vine where you marked your leaf locations. -
Paint the adjoining trim:
If you are painting a nearby architectural column or trim as shown in the photo, repeat the vertical vine process there to maintain continuity.
Step 3: Adding Foliage & Details
-
Practice the leaf stroke:
Before hitting the wall, grab your cardboard and practice the leaf motion: start with light pressure, press down to widen the belly of the leaf, and lift up to create a point. -
Paint the lower leaves:
Using the #8 brush, paint the larger leaves near the bottom of the doorway, attaching them to the small stems you painted earlier. -
Paint the upper leaves:
Switch to a #4 round brush for the upper section and the archway to create smaller, more delicate leaves as the vine reaches higher. -
Refine the connections:
I like to use a #1 liner brush to go back and sharpen the connection points where the leaves meet the stems, ensuring everything looks attached and organic. -
Check for gaps:
Step back from the wall to look for any bald spots in the design; add small extra leaves or tendrils to fill these areas nicely. -
Clean up:
Allow the paint to cure for at least 24 hours before gently erasing any visible pencil marks and peeling away the painter’s tape.
Add Dimension
Mix a tiny drop of yellow or white into your green paint and add a single, thin highlight stroke to the top edge of each leaf for a sun-kissed 3D effect.
Enjoy the serene atmosphere your new hand-painted garden creates every time you walk through the door.


Have a question or want to share your own experience? I'd love to hear from you in the comments below!