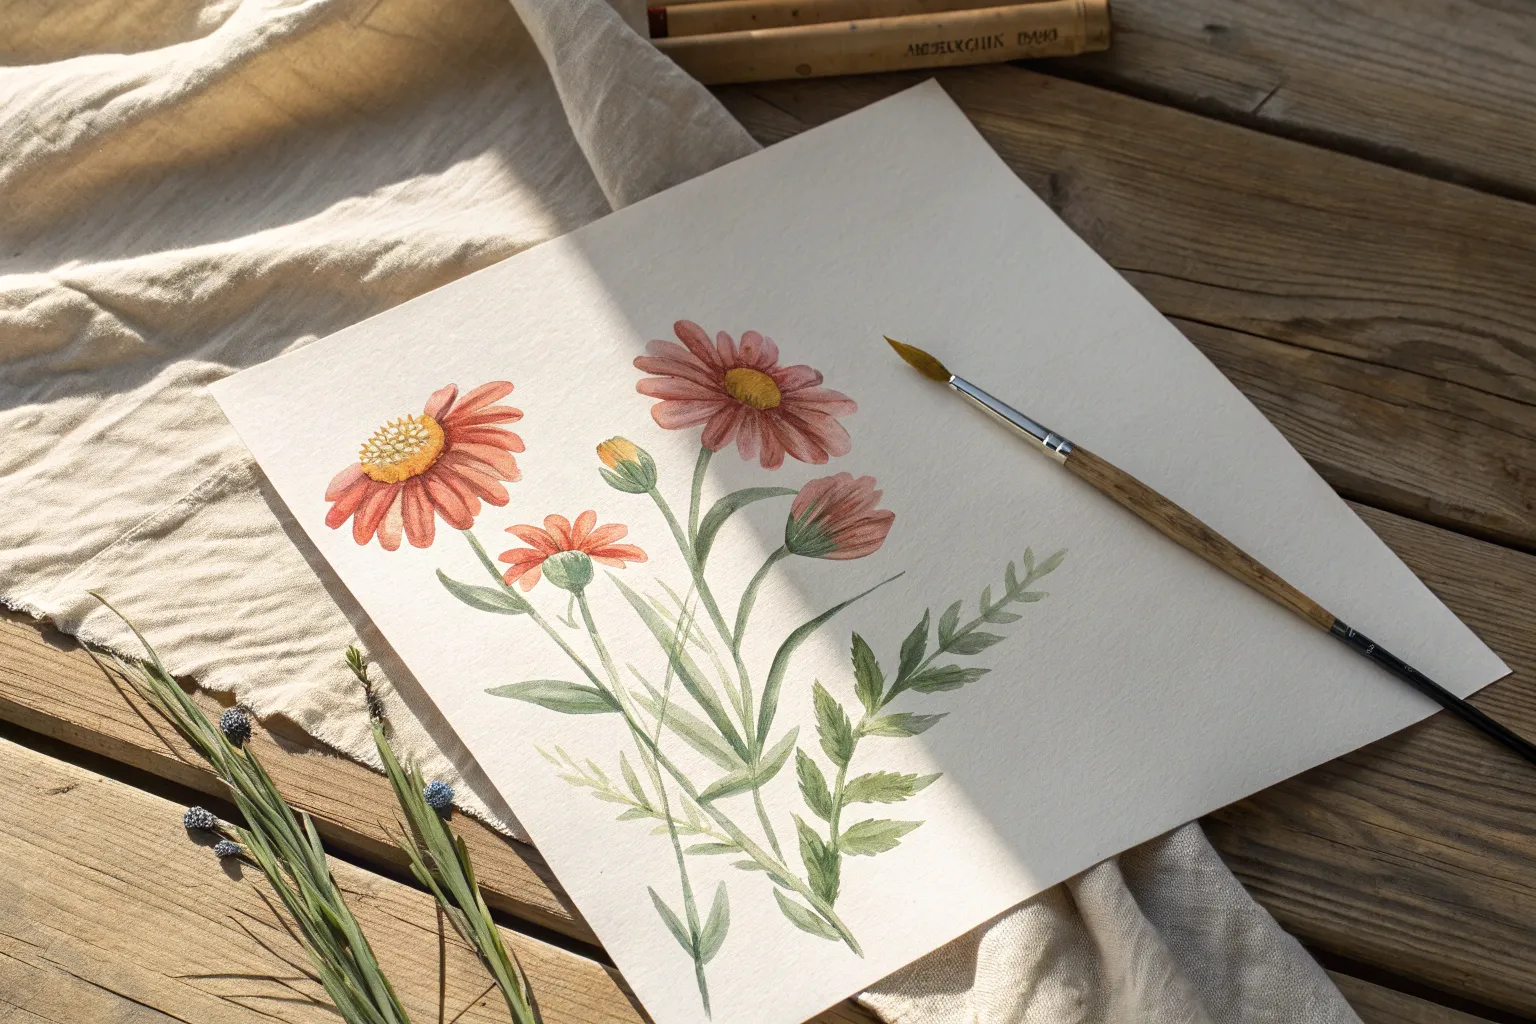
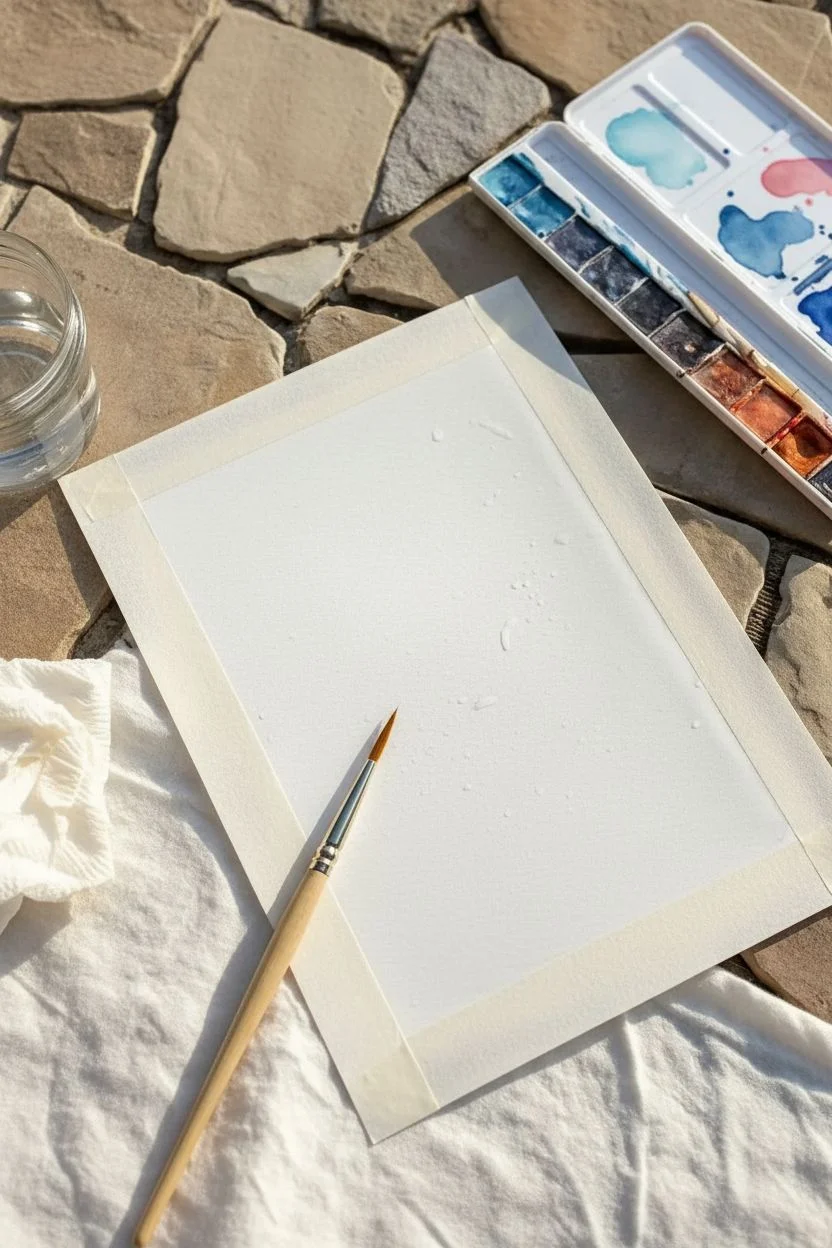
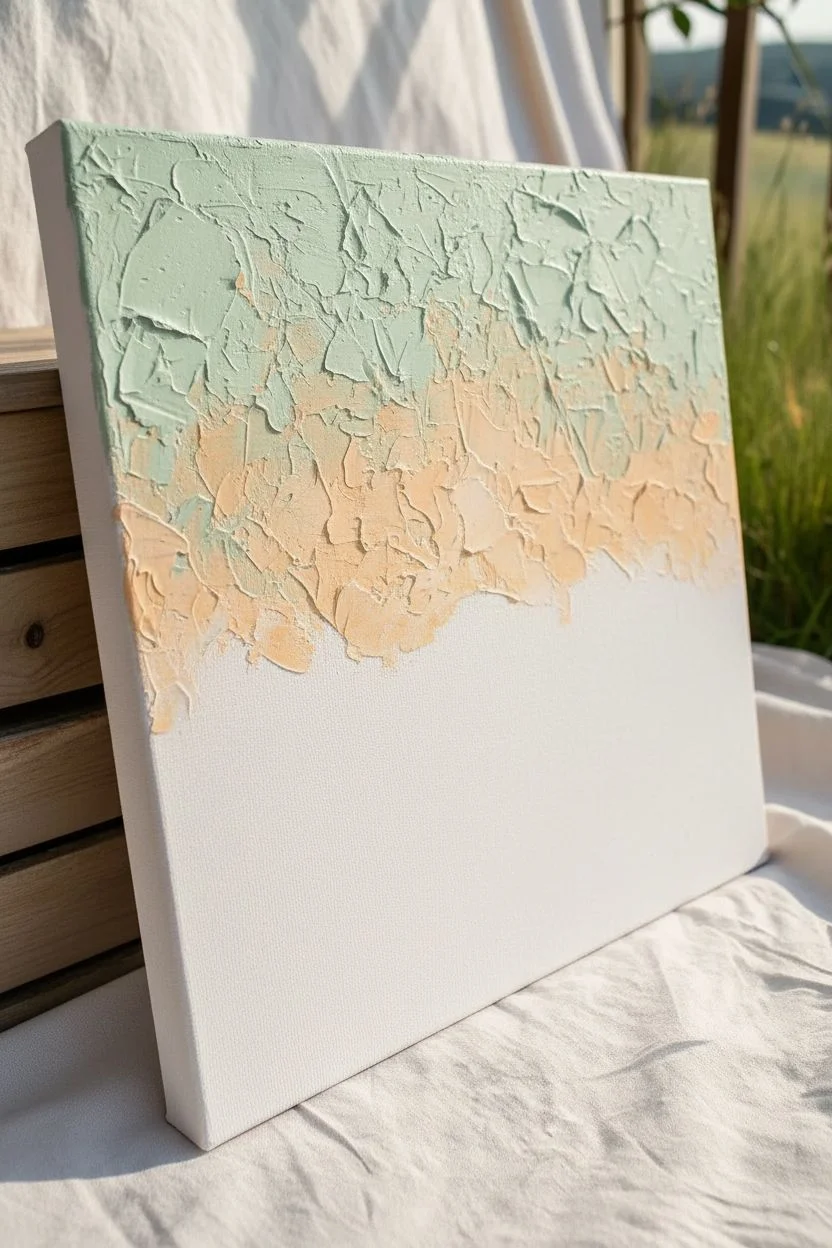
There is something incredibly soothing about watching colors blend across a canvas, regardless of how steady your hands might be today. I love seeing how simple adaptations, like using larger brushes or unconventional tools, can turn a daunting blank page into a vibrant expression of joy.
The Rhythmic Circular Tree
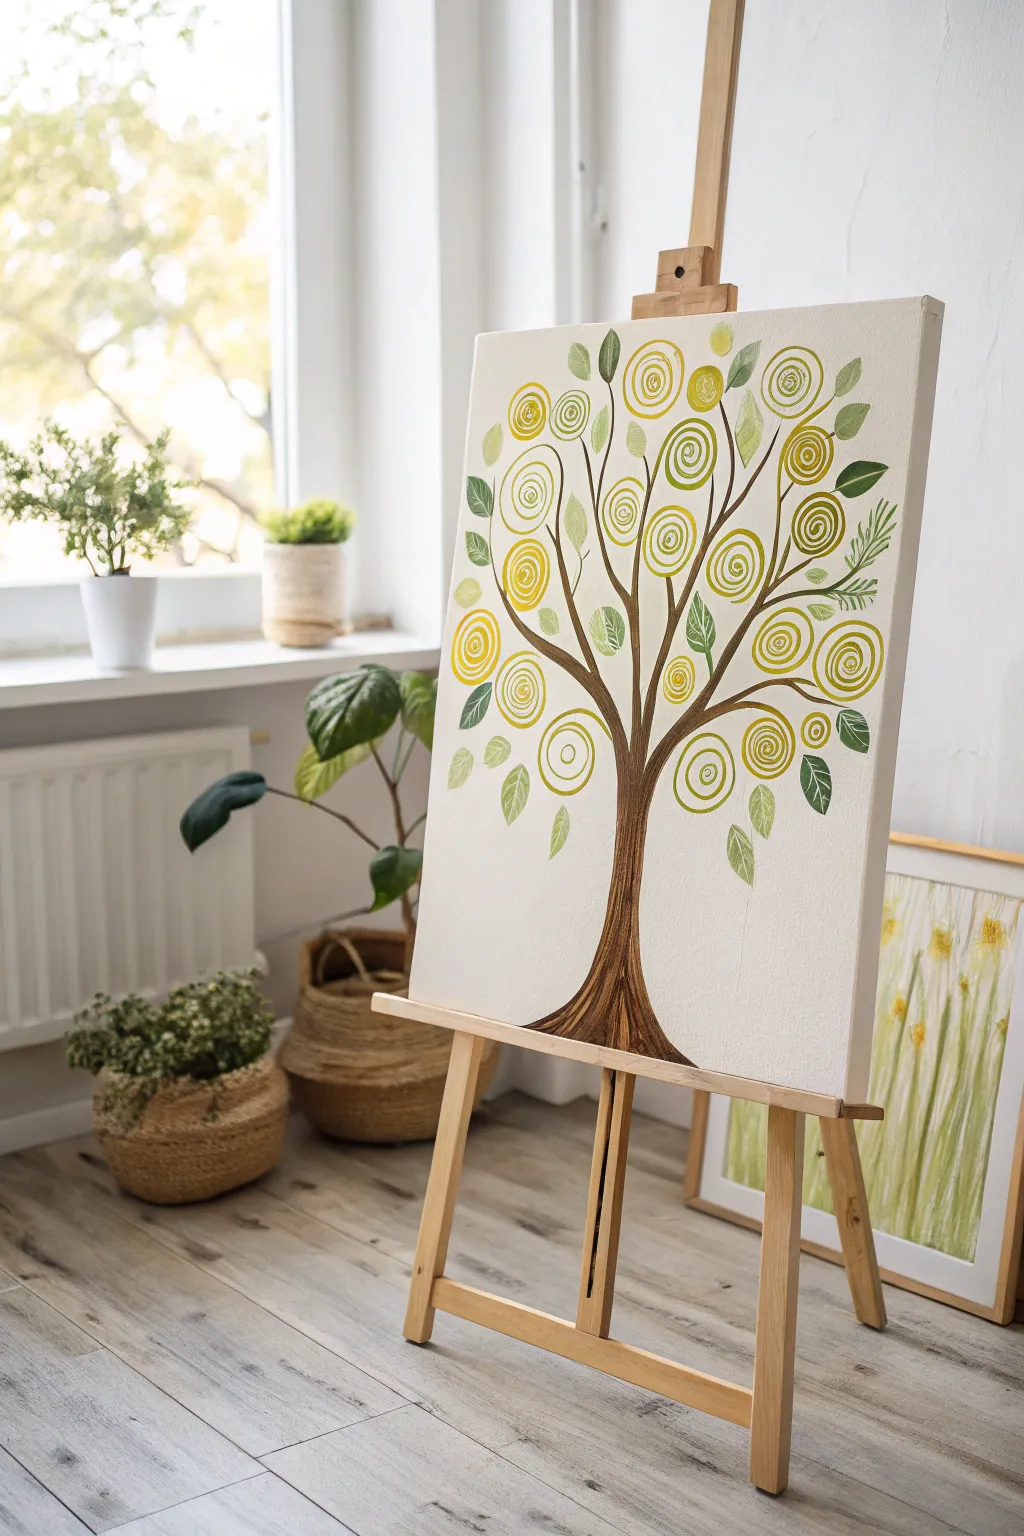
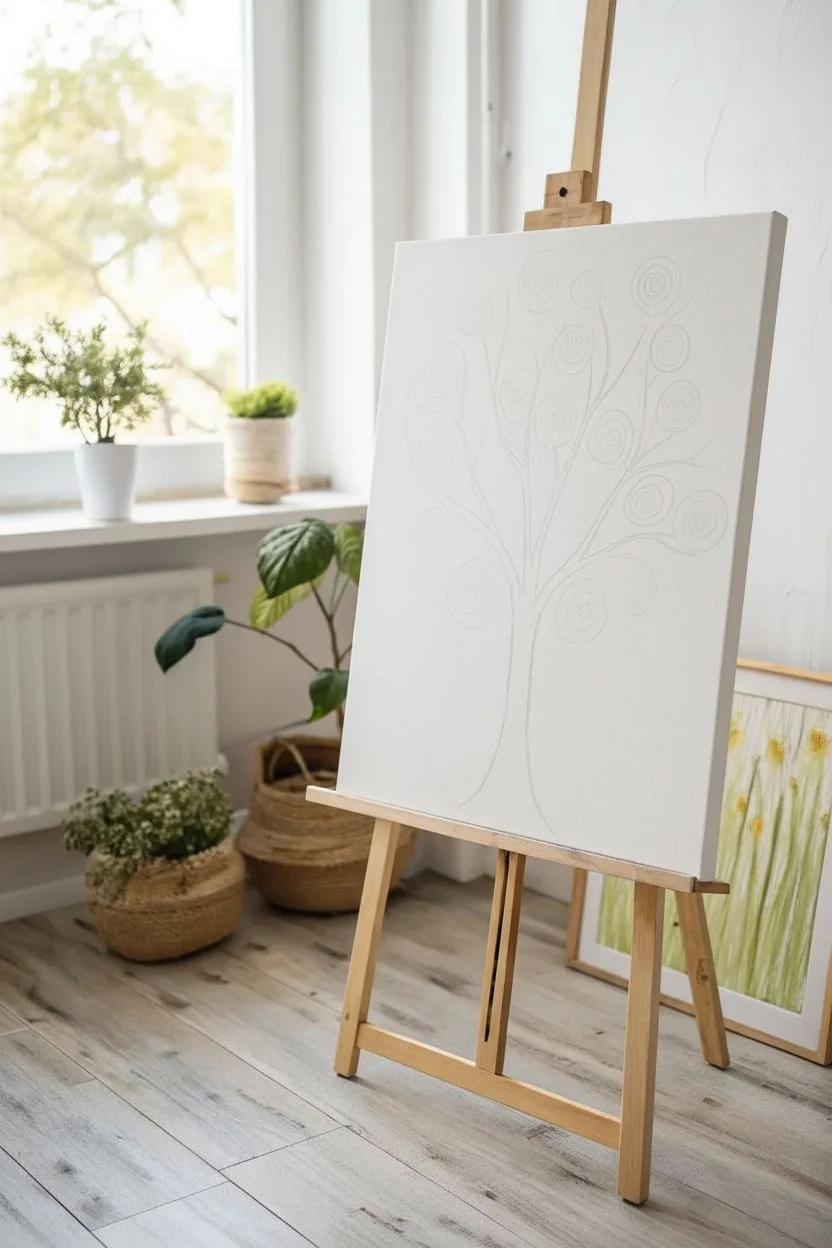
This project combines simple organic shapes with a rhythmic pattern that is incredibly soothing to paint. The result is a modern, stylized tree that brightens any room with its sunny spirals and earthy tones.
Step-by-Step Tutorial
Materials
- Stretched canvas (16×20 inch recommended)
- Acrylic paints: Burnt Umber, Primary Yellow, Yellow Ochre, Sap Green, Olive Green, Titanium White
- Round brushes (sizes 4, 6, and 8)
- Fine liner brush
- Pencil and eraser
- Palette and water cup
Step 1: Sketching the Composition
-
Outline the trunk:
Start with a clean canvas. Using a pencil, lightly sketch the trunk in the center, widening it at the bottom to suggest roots and branching out towards the top. -
Position the spirals:
Draw faint circles scattered across the upper canvas where you want your main spiral ‘blossoms’ to sit. -
Connect the branches:
Sketch thin lines connecting your circle placeholders to the main trunk, ensuring the tree looks balanced and full.
Wobbly Spirals?
Thin your yellow paint with a drop of water until it has an inky consistency. This helps the brush glide smoothly on the canvas for creating continuous curves without drag.
Step 2: Painting the Trunk
-
Base coat:
Load a size 8 round brush with Burnt Umber. Fill in the trunk using long, vertical strokes that follow the curve of the tree. -
Add dimension:
While the brown paint is still wet, pick up a tiny bit of white or ochre on your dirty brush and streak it through the trunk to create a bark-like texture. -
Extend branches:
Switch to a size 6 brush and paint the smaller branches, tapering them to a fine point as they reach toward the pencil circles. -
Drying time:
I like to let the trunk dry completely before moving on so the dark brown doesn’t accidentally smudge into the yellow spirals.
Add Some Sparkle
Once the yellow paint is fully dry, trace over a few selected spirals with metallic gold acrylic paint to give the artwork an elegant, light-catching shimmer.
Step 3: Creating the Golden Spirals
-
Mix the color:
On your palette, mix primary yellow with a touch of yellow ochre to achieve a warm, golden sunlight hue. -
Paint the first spiral:
Using a size 4 round brush, start at the center of one of your sketched circles and paint a continuous line winding outward like a snail shell. -
Vary the line weight:
Don’t worry about perfect uniformity; pressing slightly harder in some curves creates a lovely organic variation in line thickness. -
Fill the canopy:
Continue painting spirals over your pencil marks. Make some large and bold, while keeping others smaller to fill gaps. -
Check opacity:
Yellow paint can be transparent, so you may need to retrace the spirals with a second coat once the first is dry for vibrant color.
Step 4: Adding Foliage
-
Paint green leaves:
Using Sap Green and a size 6 brush, paint simple almond-shaped leaves attached to the branches or floating near the spirals. -
Vary the shades:
Mix some Olive Green or add a touch of white to your green to create varied leaf colors, giving the tree depth. -
Add leaf details:
Once the green leaves are dry, use a fine liner brush with thinned white paint or pale green to draw delicate veins on a few selected leaves. -
Final touches:
Step back to view the whole composition. If any area looks too sparse, add a small floating leaf or a tiny yellow spiral to fill the space.
Hang your masterpiece in a sunny spot to let those golden spirals truly shine.


Vertical Birch Forest
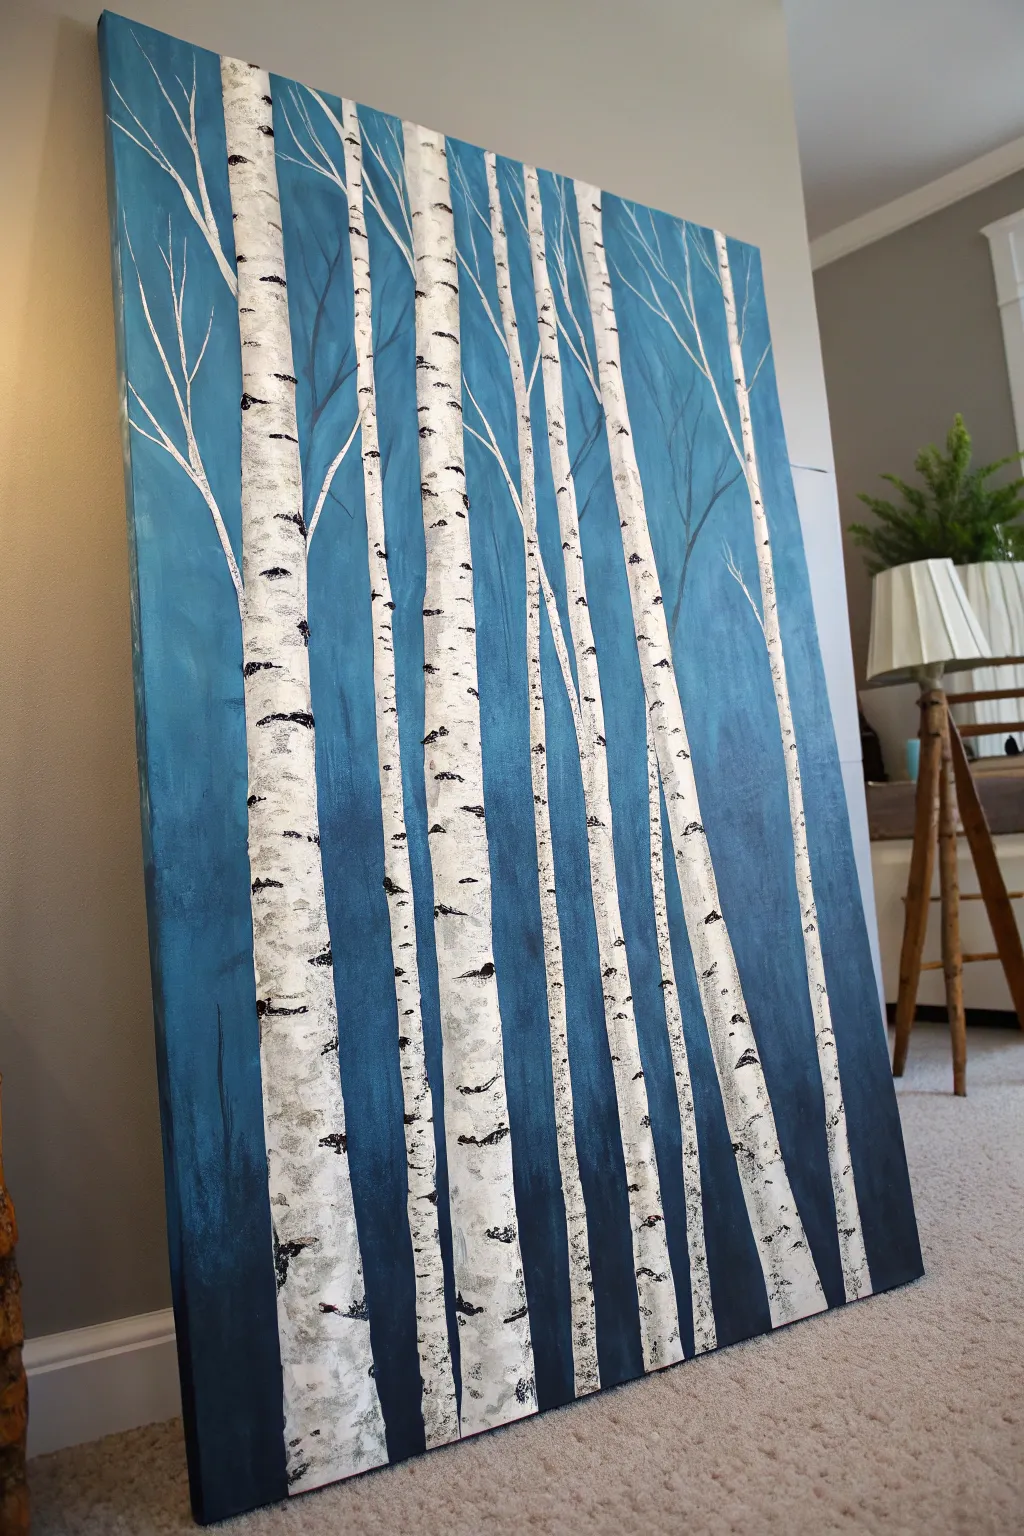
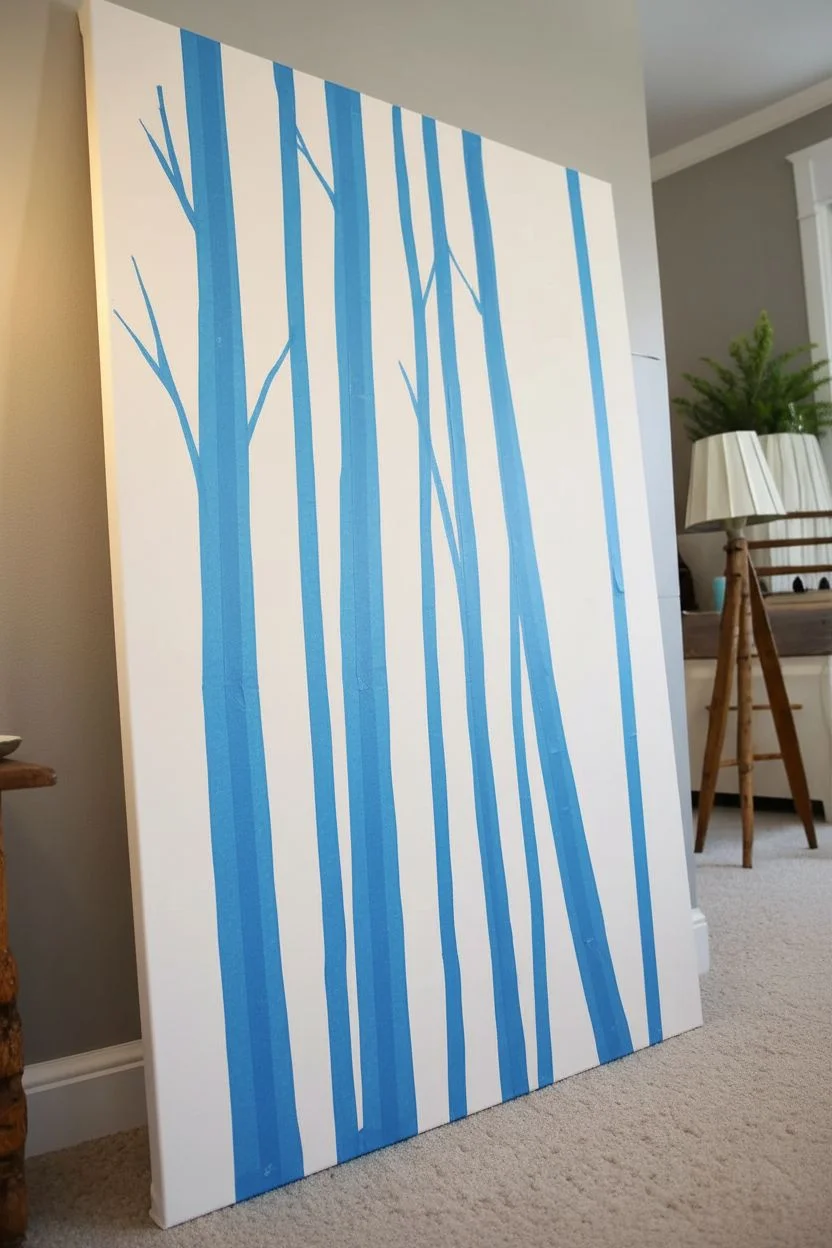
Create a serene woodland scene focused on the striking contrast between white birch bark and a moody blue gradient background. This project uses a clever taping method that makes straight tree trunks incredibly easy to achieve.
Step-by-Step
Materials
- Large stretched canvas (vertical orientation)
- Acrylic paints: Phthalo Blue, Titanium White, Mars Black
- Painter’s tape or masking tape (varied widths preferred)
- Wide flat paintbrush (2-3 inches)
- Small round liner brush
- Old plastic gift card or stiff palette knife
- Paper towels and water cup
Step 1: Masking the Grove
-
Plan your trees:
Lay your canvas on a flat surface. Decide where your trees will stand, keeping in mind that an odd number of groupings usually looks more natural. -
Apply the tape:
Run strips of painters tape from the bottom edge all the way to the top edge to represent the trunks. Feel free to angle some slightly so they aren’t all perfectly parallel. -
Vary the width:
If you have wider trees, place two strips of tape side-by-side or use wider tape. For thinner trees in the distance, you can cut a strip of tape in half lengthwise. -
Seal the edges:
Run your fingernail or the back of a spoon firmly along the edges of every tape strip. I always double-check this step to prevent too much paint from bleeding underneath.
Bleeding Paint?
If blue paint snuck under your tape, don’t worry. Let it dry completely, then simply paint over the mistake with opaque Titanium White before adding the black texture.
Step 2: The Atmospheric Background
-
Mix the darkest blue:
Squeeze out a generous amount of Phthalo Blue and a tiny touch of black to create a deep navy. Apply this to the bottom third of the canvas, painting right over the tape. -
Transition to mid-tone:
Mix Phthalo Blue with a little Titanium White to create a medium teal. Paint the middle section of the canvas, blending the bottom edge into the dark navy while the paint is still wet. -
Paint the upper canopy:
Add significantly more white to your blue mixture to get a pale sky blue. Paint the top third of the canvas. -
Smooth the gradient:
Use your large brush with long, vertical strokes to smooth out the transitions between the three blue zones until you have a seamless fade from dark to light. -
Dry time:
Let the background paint dry completely. This is crucial so we don’t smudge the sky when we peel the tape.
Pro Tip: Perspective
When scraping the black bark texture, slightly curve your motion downward at the bottom of the tree and upward at the top to enhance the tall, towering perspective.
Step 3: Bark and Texture
-
The big reveal:
Carefully peel off the masking tape strips to reveal the white canvas underneath. If your canvas wasn’t bright white to begin with, paint these strips with a fresh coat of Titanium White now. -
Load the scraper tool:
Squeeze a small blob of Mars Black onto your palette. Dip the long edge of an old plastic gift card (or stiff palette knife) lightly into the paint. -
Create the markings:
Place the card edge against the side of a white tree trunk and drag it horizontally across. Press firmly at the start and lift off as you drag to create the tapering birch ‘eye’ marks. -
Vary the texture:
Repeat this scraping process up and down the trunks. I find it looks best to alternate sides—scraping from left-to-right, then right-to-left—spacing them out randomly. -
Add visual weight:
Make the markings slightly heavier and darker near the bottom of the trees to ground them, and lighter as you go higher up.
Step 4: Branches and Finishing Touches
-
Mix branch color:
Mix a light grey using mostly white with a speck of black. We want the branches to be subtle against the blue sky. -
Paint main branches:
Using your fine liner brush (dampened with water to help the paint flow), paint thin lines reaching upward from the tree trunks. -
Add delicate twigs:
Paint smaller V-shaped twigs branching off your main branches. Keep your hand loose and shaky to mimic natural wood growth. -
Add depth:
If some trees feel too flat, dilute a little grey paint with water and run a very thin shadow line down one side of the trunk to suggest roundness. -
Final check:
Step back and look for any bare spots. Add a few more horizontal black scratches or small twigs where needed to balance the composition.
Enjoy the peaceful atmosphere your wintery birch forest brings to the room.


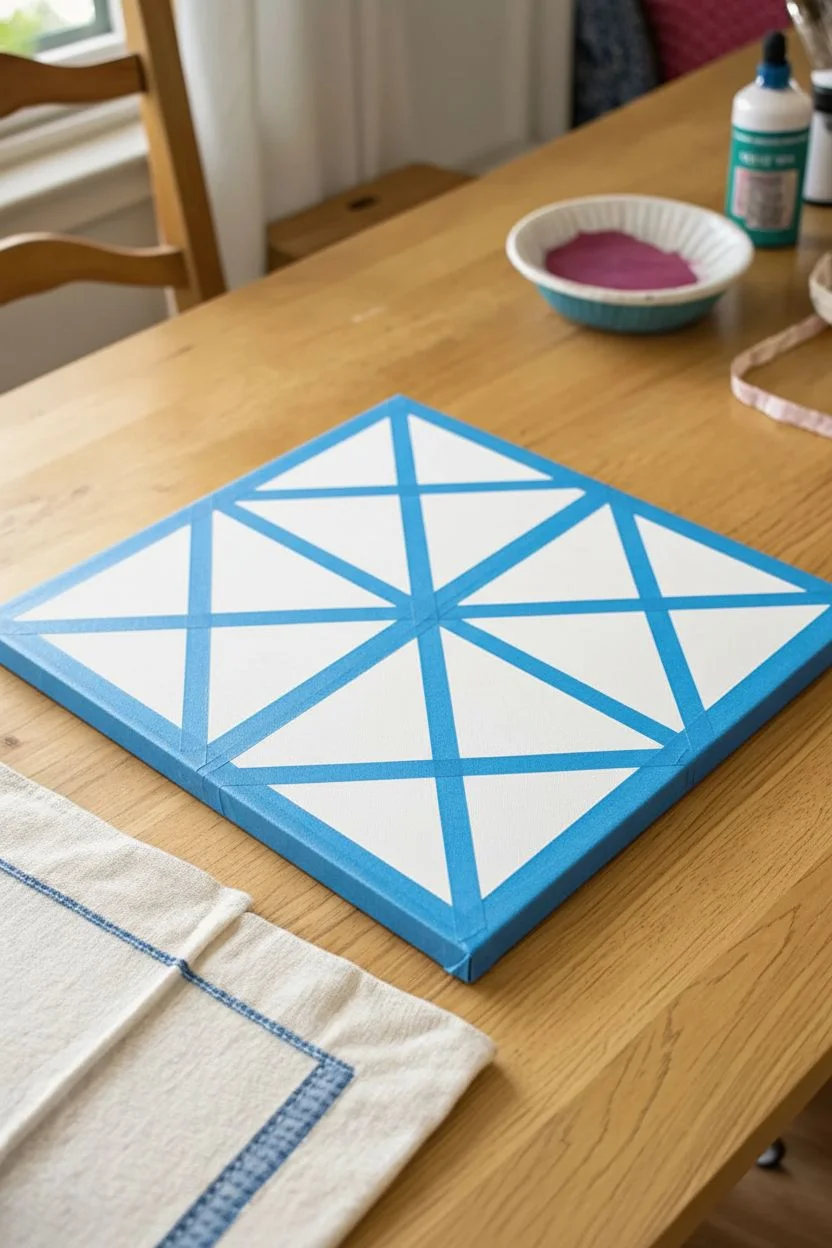
Tape-Resist Stained Glass
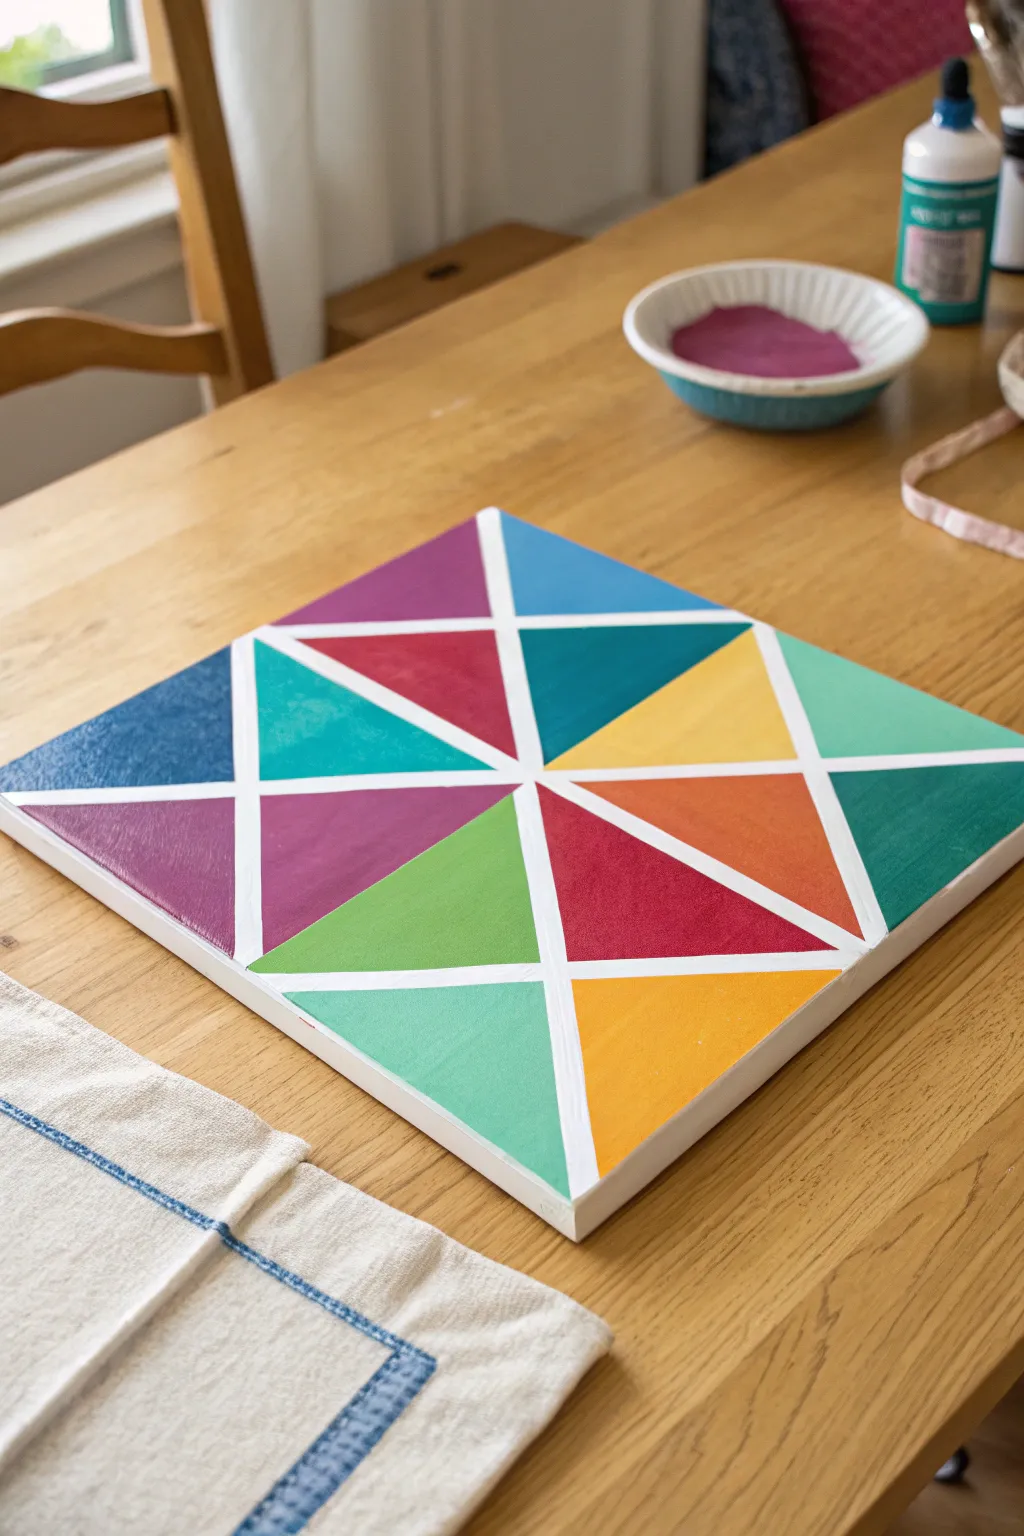
This relaxing project uses painter’s tape to create crisp, white lines that mimic the look of modern stained glass on canvas. It is a wonderful way to experiment with bright color combinations without needing a steady hand for detailed outlines.
Step-by-Step Guide
Materials
- Square stretched canvas (12×12 inches suggested)
- Painter’s tape or masking tape (1/4 to 1/2 inch width)
- Acrylic paints (teal, navy, magenta, red, orange, yellow, bright green, mint)
- Medium flat paintbrushes
- Palette or paper plate
- Cup of water and paper towels
- Spoon or credit card (for burnishing)
Step 1: Designing the Grid
-
Prepare your workspace:
Lay down a protective cloth or newspaper on your table and place your square canvas in the center. -
Create the first diagonal:
Tear off a long strip of painter’s tape and attach it diagonally from one corner of the canvas to the opposite corner. -
Form an X shape:
Place a second long strip of tape connecting the remaining two corners, creating a large ‘X’ in the middle of your canvas. -
Add vertical and horizontal lines:
Apply a strip of tape vertically through the center, and another horizontally across the middle, intersecting your X. -
Create smaller sections:
Add one or two more diagonal lines that cut through the existing shapes to create a variety of smaller and larger triangles, just like the finished project shown. -
Smooth the tape initially:
Run your fingers along all the tape strips to ensure they are stuck down to the canvas surface. -
Burnish the edges:
I always use the back of a spoon or an old credit card to rub firmly over the tape edges. This ‘burnishing’ step is critical to stop paint from seeping underneath.
Pro Tip: Seal the Deal
Before adding color, paint a thin layer of white acrylic over the tape edges. This seals any gaps. If any paint bleeds under, it will be white and invisible!
Step 2: Adding Color
-
Load your palette:
Squeeze dime-sized amounts of your various acrylic paint colors onto your palette. -
Start with the lightest colors:
Dip your flat brush into yellow or light orange paint and fill in a few random triangles scattered across the canvas. -
Protect the edges:
When painting, try to brush from the top of the tape inward toward the center of the canvas shape. This helps prevent pushing wet paint under the tape barrier. -
Clean your brush:
Rinse your brush thoroughly in the water cup and dry it on a paper towel before switching to a new color. -
Apply cool tones:
Switch to your blues, teals, and purples. Paint sections that are not directly touching your yellow sections if possible, to keep the contrast high. -
Fill remaining shapes:
Continue painting the remaining white triangles with reds, magentas, and greens until every section is filled with color. -
Check for coverage:
Acrylics dry fast, so peek back at your first shapes. If the canvas texture is showing through too much, apply a quick second coat for solid, opaque color.
Troubleshooting: Fuzzy Lines
If you see jagged edges after peeling, don’t worry. Wait for the paint to be 100% dry, then use a small liner brush and white paint to tidy up the straight lines.
Step 3: The Reveal
-
Let the paint set:
Allow the painting to dry for about 15 to 20 minutes. You want the paint to be slightly tacky or dry to the touch, but not fully hardened for days. -
Find the last strip:
Identify the piece of tape you applied last—this will be on top of the pile and is the easiest place to start peeling. -
Lift the tape:
Gently lift the edge of the tape and pull it slowly back at a 45-degree angle, rather than pulling straight up, to keep the paint lines sharp. -
Remove all tape:
Continue removing the strips one by one until the entire white grid is revealed. -
Final cure:
Let the entire canvas dry completely overnight before displaying or framing.
Enjoy the satisfaction of peeling back the tape to see your vibrant geometric masterpiece come to life.


Q-Tip Bundle Blossoms

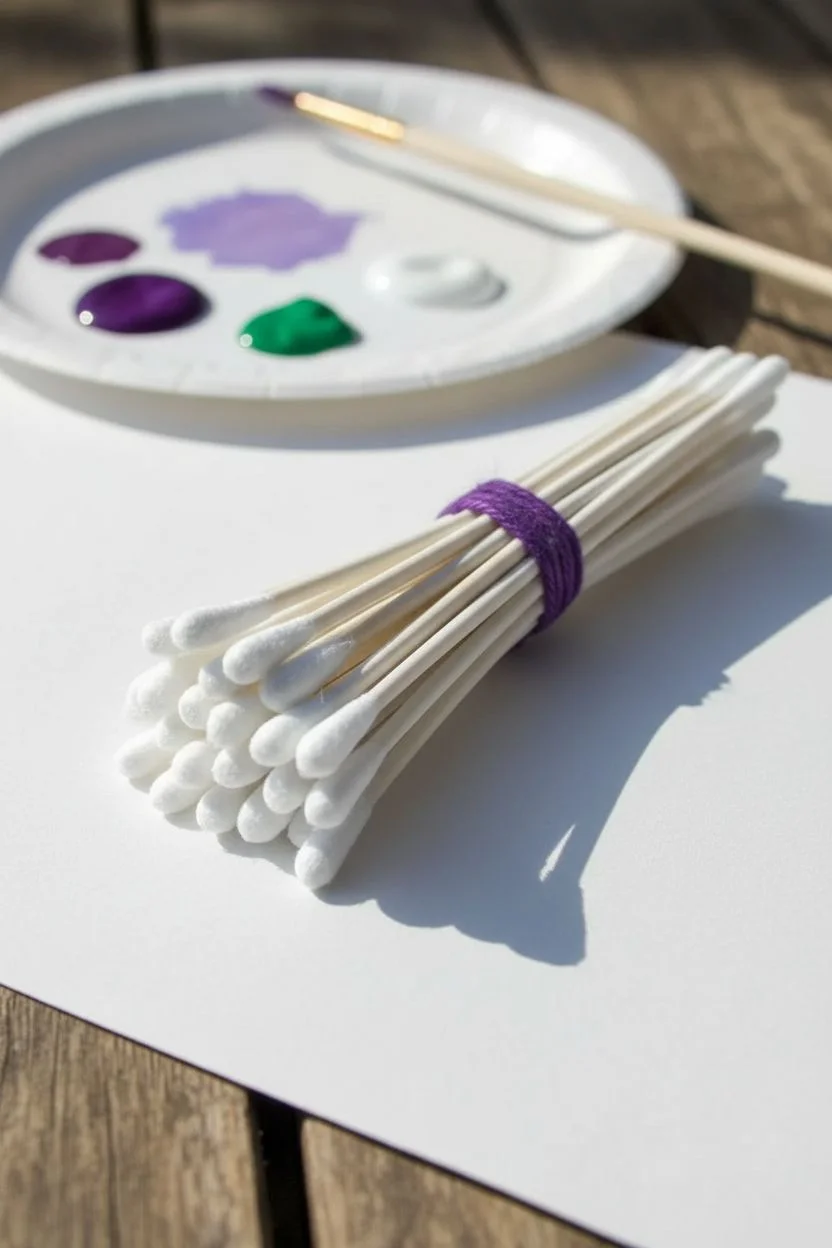
Capture the lush texture of hydrangea blossoms without needing advanced brush skills by creating your own stamping tool. This simple technique uses a bundle of cotton swabs to produce lovely, uniform clusters of petals perfect for spring art.
Step-by-Step Tutorial
Materials
- 15-20 cotton swabs (Q-tips)
- Purple string, yarn, or rubber bands
- Acrylic paints (various purple shades, white, green)
- Heavy watercolor paper or cardstock
- Paper plate or painting palette
- Single paint brush (for stems)
Step 1: Assembling the Tool
-
Gather materials:
Collect a handful of standard cotton swabs; around 15 to 20 swaps create a nice full brush head. -
Align the tips:
Hold the swabs loosely in your hand and tap the ends gently against a flat table surface. -
Check alignment:
Ensure all the cotton heads are perfectly flush with each other to create an even stamping surface. -
Secure the bundle:
Wrap a rubber band tightly around the middle of the stick bundle to hold them firmly in place. -
Add the decorative tie:
Take a piece of purple string or yarn and wrap it firmly over the rubber band area. -
Knot the string:
Tie the string fast; this mimics the look in the photo and adds a comfortable grip to your custom tool.
Muddy Petals?
If the individual dots are merging into a blob, you have too much paint on the swabs. Blot the bundle on a paper towel before stamping paper.
Step 2: Preparing the Paint
-
Dispense colors:
Squeeze dabs of dark purple, light lavender, and white acrylic paint onto your paper plate. -
Create a mix:
Use a spare swab to lightly swirl the colors together, but do not blend them completely. -
Keep it streaky:
I like to leave distinct streaks of white and dark purple, as this adds natural depth to the stamped petals. -
Prepare the workspace:
Lay out your textured paper, ensuring it is flat and ready for stamping.
Step 3: Stamping the Blossoms
-
Load the brush:
Dip the flat, aligned end of your cotton swab bundle directly into the swirled paint mix. -
Remove excess:
Dab the bundle once gently onto a paper towel to remove heavy globs of paint. -
First stamp:
Press the bundle vertically down onto your paper to create the center of your flower. -
Lift carefully:
Pull the tool straight up to ensure the individual dots remain crisp and defined. -
Build the shape:
Reload the paint and stamp again, slightly overlapping the first circle to widen the flower head. -
Rotate for texture:
Rotate the bundle slightly in your hand between presses to make the petal arrangement look random and organic. -
Finish the cluster:
Continue stamping in a circular pattern until you have a large, fluffy hydrangea shape.
Color Variation
Dip one half of your bundle in blue and the other in purple before stamping. This creates a realistic multi-colored hydrangea bloom effect.
Step 4: Adding Details
-
Paint stems:
Dip a single cotton swab or a small paintbrush into green paint to draw thin lines downward from the blooms. -
Add leaves:
Paint simple oval leaf shapes along the stems to ground the composition.
Enjoy watching your colorful garden grow on paper with this relaxing stamping technique.
BRUSH GUIDE
The Right Brush for Every Stroke
From clean lines to bold texture — master brush choice, stroke control, and essential techniques.
Explore the Full Guide
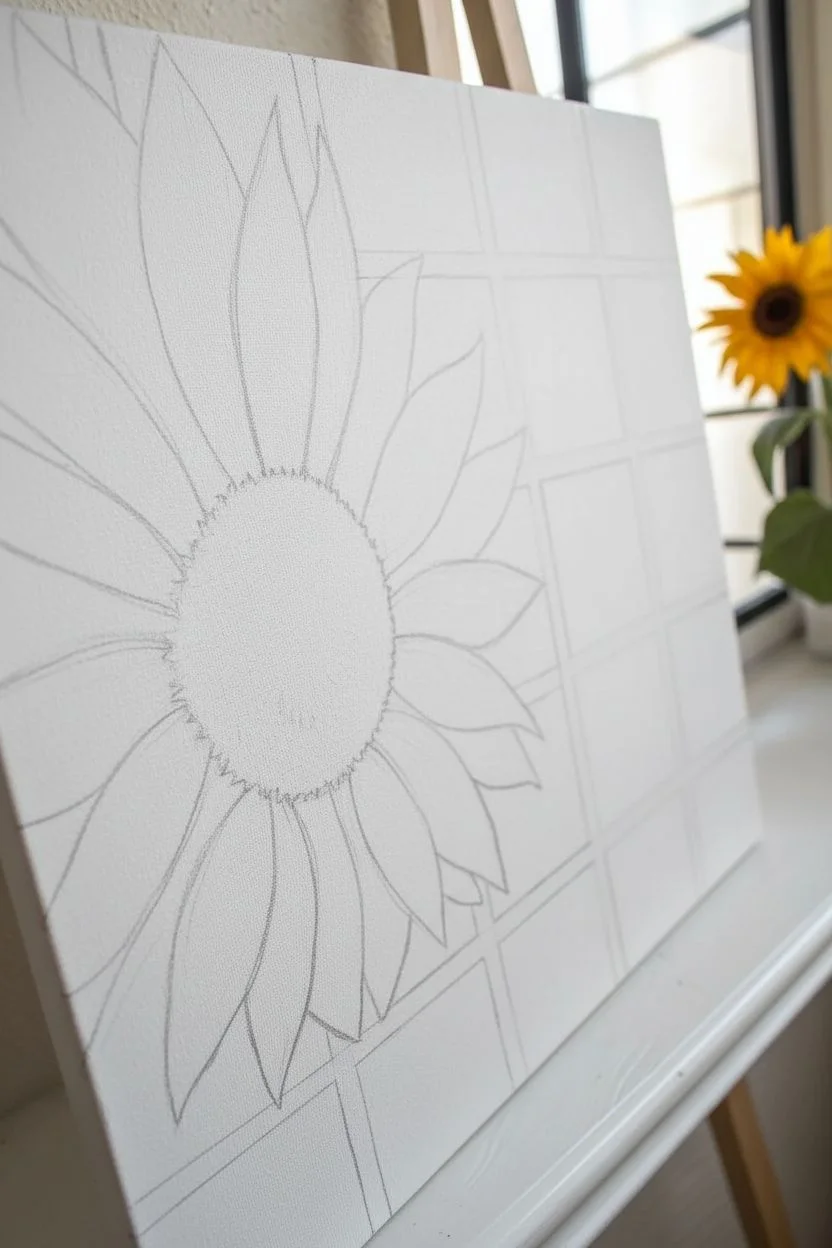
Zoomed-In Macro Florals
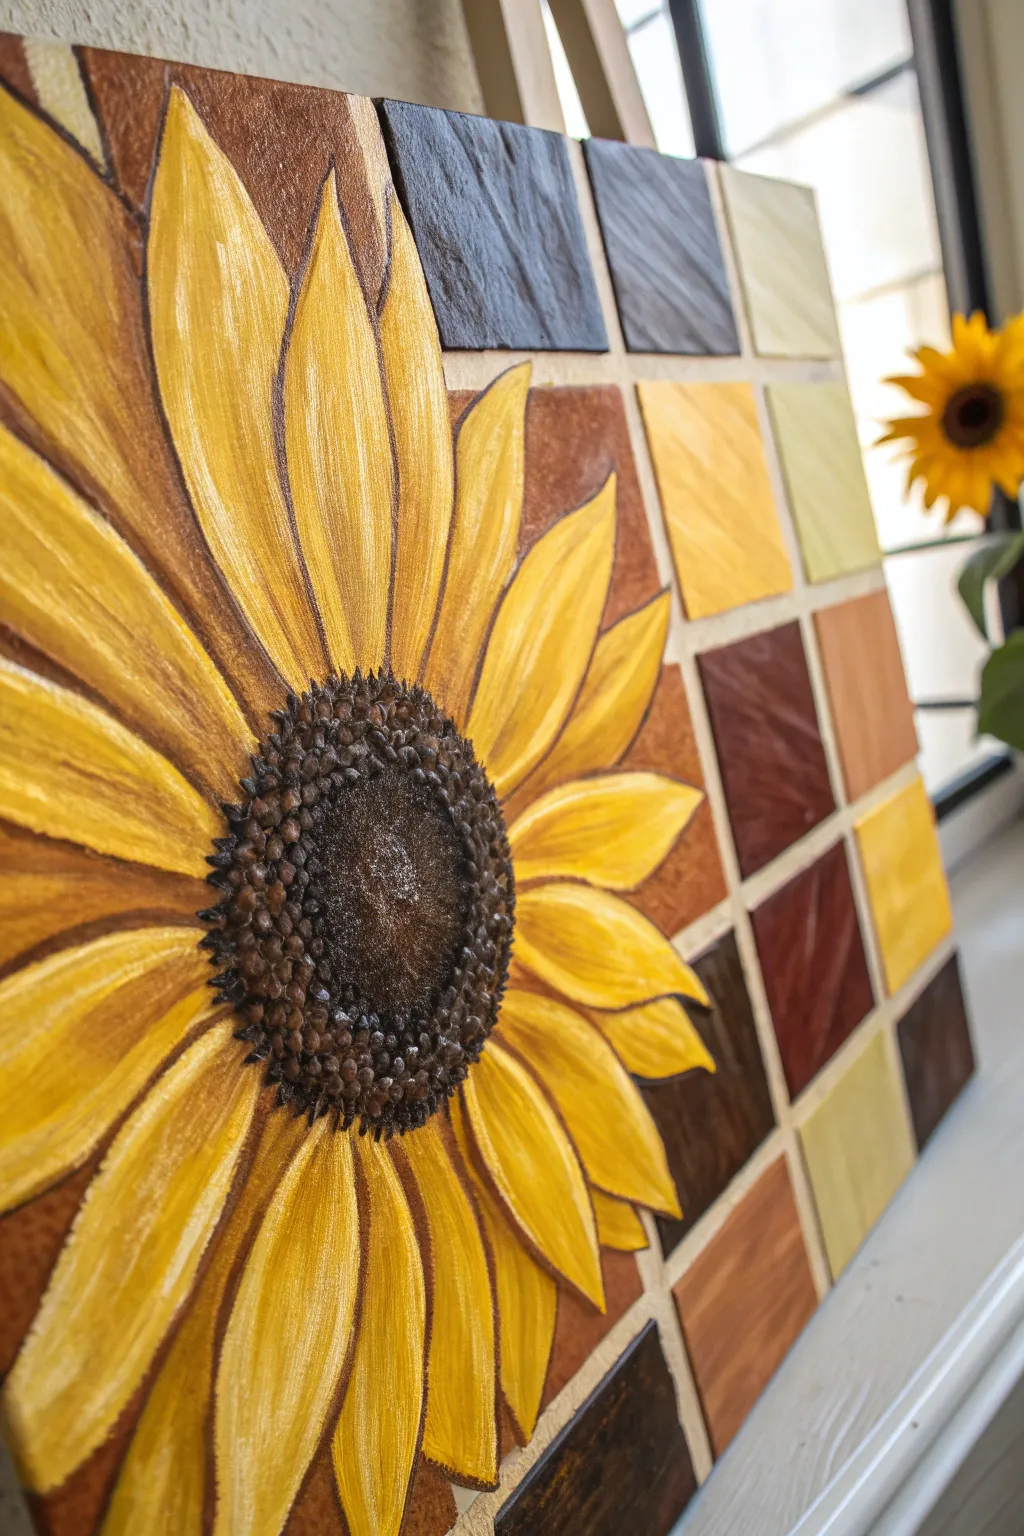
This project combines the organic beauty of a macro floral with a structured, geometric background, making it a fantastic exercise in contrast and composition. The grid pattern simplifies the background work, while the zoomed-in sunflower offers a chance to play with thick textures and warm, sunny hues.
Step-by-Step
Materials
- Square canvas (12×12 inches suggested)
- Acrylic paints: Cadmium Yellow, Yellow Ochre, Burnt Umber, Burnt Sienna, Mars Black, Titanium White, Cream
- Flat shader brush (size 8 or 10)
- Small round brush (size 4)
- Old stiff-bristle brush or sea sponge
- Ruler and pencil
- Modeling paste or heavy structure gel (optional for texture)
- Palette for mixing
Step 1: Setting the Structure
-
Grid layout:
Using your ruler and pencil, lightly draw a grid of squares on the right-hand side and top edge of your canvas. The squares should be about 2-3 inches wide. You don’t need to grid the entire left side where the flower will sit. -
Sketching the floral placement:
On the left side, draw a large partial circle representing the sunflower’s center. Sketch long, pointed petals radiating outward, letting them extend off the canvas edges to create that dramatic ‘macro zoomed-in’ look. -
Planning the overlap:
Ensure some of your sketched petals overlap into the grid area you drew. The petals will sit on top of the squares, so erase grid lines that fall inside your petal shapes.
Texture Pro Tip
If you don’t have modeling paste, mix a small amount of clean sand or used (dry) coffee grounds into your brown paint. This creates a brilliant, gritty seed texture for the flower center.
Step 2: Painting the Backdrop
-
Mixing earth tones:
Prepare a palette of warm neutrals: mix Burnt Sienna with White for a terracotta, Burnt Umber with Black for deep espresso, and Straight Ochre and Cream for lighter tiles. -
Filling the grid:
Use the flat shader brush to paint the exposed grid squares. Alternate your colors randomly—place a dark square next to a light one to create visual interest. Keep your edges relatively neat. -
Flower background:
Paint the negative space between the petals on the left side of the canvas. I like to use a solid coat of Burnt Sienna or warm brown here to make the yellow petals pop later. -
Drying time:
Allow the background layer to dry completely before starting on the yellow petals, so the colors don’t mud together.
Step 3: Creating the Sunflower
-
Petal base coat:
Paint each petal with a solid coat of Yellow Ochre. Don’t worry about shading yet; just establish the opaque shape covering the background. -
Building brightness:
Once the ochre is tacky, load your brush with bright Cadmium Yellow. Paint broad strokes from the base of the petal toward the tip, leaving some ochre showing on the edges for shadow. -
Adding highlights:
Mix a little Titanium White with your yellow. Add thin, streaky highlights down the center of each petal to give them a curved, dimensional appearance. -
Defining the edges:
Using your small round brush and thinned Burnt Umber, very gently outline the petals and paint the small crevices where petals overlap. This separates them visually.
Level Up: 3D Elements
For a mixed-media twist, glue actual darker-colored beads or dark lentils into the center circle before painting. This adds real tactile elements to the piece.
Step 4: The Textured Center
-
Preparing the mix:
Mix dark brown (Burnt Umber + Black) with a bit of modeling paste if you have it. If not, just use the paint thick and undiluted. -
Stippling texture:
Use an old stiff brush or a sponge to dab this dark mixture into the center circle. Use an up-and-down pouncing motion to create a rough, bumpy texture resembling seeds. -
Creating the outer ring:
Make the outer ring of the center—where it touches the petals—slightly darker and denser with texture to show depth. -
Highlighting the seeds:
Mix a light brown or tan color. Lightly dab this over the very center of the seed head, keeping the pressure light so you only catch the tops of the texture bumps. -
Final check:
Step back and look at your composition. If the grid lines look too messy near the petals, tidy them up with your small brush.
Hang your finished painting near a window to let the natural light catch those textured details and vibrant yellows.
High-Contrast Black Canvas
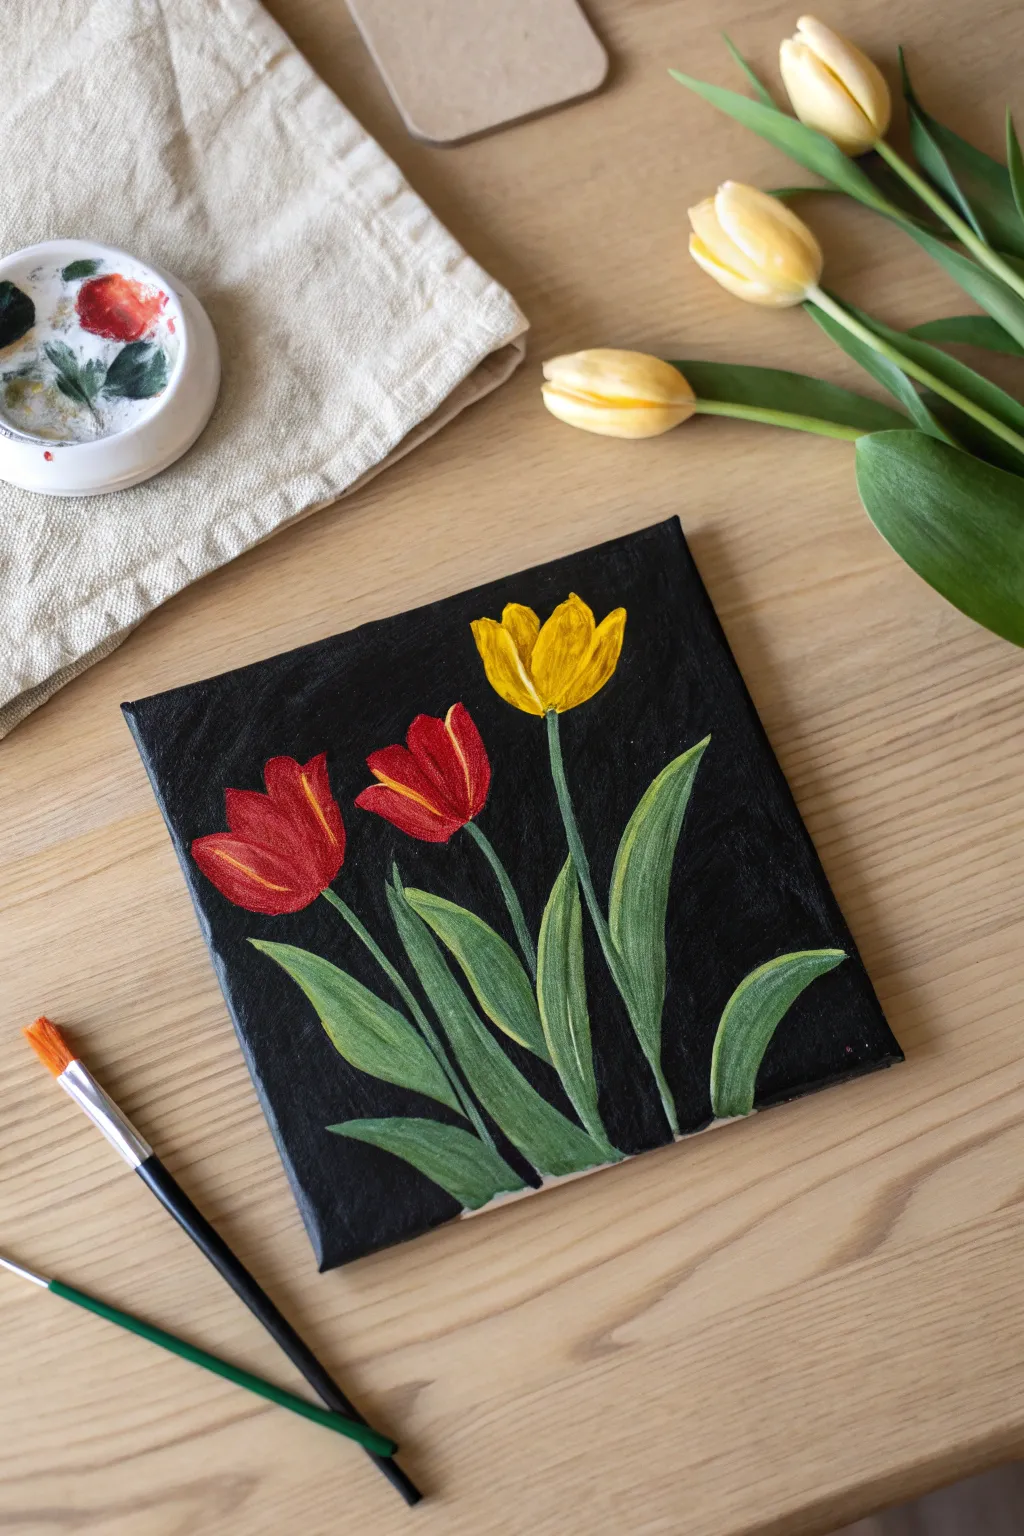

High-contrast painting is a fantastic way to make simple shapes look sophisticated and vibrant. In this project, you will create a trio of bright tulips that seem to glow against a dramatic midnight background.
Detailed Instructions
Materials
- Square canvas (approx. 8×8 or 10×10 inches)
- Acrylic paints: Black, Bright Red, Yellow, Sap Green, White
- Large flat brush (for background)
- Medium filbert or round brush (for petals)
- Small liner brush (for stems)
- Piece of white chalk
- Palette and water cup
Step 1: Setting the Stage
-
Create the void:
Using your largest flat brush, cover the entire front and sides of the canvas with black acrylic paint. Apply the paint thick enough to ensure the white canvas doesn’t peek through. -
Wait for dryness:
Allow the black background to dry completely. This is crucial—if the background is wet, it will muddy your bright flower colors. A hairdryer can speed this up. -
Sketch the layout:
Once dry, use a piece of white chalk to lightly sketch the position of your three flowers. Drawing on black can be tricky, so I prefer using chalk because it wipes away easily if I make a mistake. -
Outline the stems:
Draw three simple curved lines for stems meeting at the bottom center. Place the rightmost flower slightly higher than the others.
Make Colors Pop
Can’t get good coverage? Painting yellow directly on black often looks muddy. Always paint a layer of white silhouette first, let it dry, and then apply the bright color on top.
Step 2: Painting the Greenery
-
Mix your green:
On your palette, mix your sap green with a tiny amount of white. This helps the green stand out against the black canvas. -
Paint the stems:
Using a thin liner brush, paint over your chalk lines for the stems. Keep your hand loose to create a natural, slight curve. -
Form the leaves:
Switch to a medium round brush. Start from the bottom of the canvas and press down, dragging the brush upward and lifting off at the end to create pointed leaf shapes. -
Fill the foliage:
Add about four to five large leaves. Let some leaves cross over the stems slightly for a natural look. Don’t worry about perfect coverage yet. -
Add leaf highlights:
Mix a little more yellow or white into your green to make a lighter shade. Add simple streaks along the top curves of the leaves to suggest light hitting them.
Step 3: The Colorful Blooms
-
Base coat for flowers:
Because yellow and red are naturally transparent, paint the silhoutte of the tulip heads in white first. This ‘primer’ layer is my secret to vibrant colors on dark backgrounds. -
Dry the white base:
Let the white flower shapes dry to the touch before proceeding. -
Paint the yellow tulip:
Paint the rightmost flower with bright yellow. Use vertical distinct strokes to mimic the texture of petals. -
Paint the red tulips:
Paint the two left flowers with your bright red. Use the tip of your brush to create the jagged points at the top of the petals. -
Add depth to yellow:
Mix a tiny dot of red into your yellow to create orange. Paint a few thin lines near the bottom of the yellow tulip to distinguish the separate petals. -
Highlight the red:
Dip your brush in yellow paint (wipe most of it off) and gently streak the edges of the red tulip petals. This gives them a fiery, glowing effect. -
Clean up:
Once the paint is fully dry, take a damp cloth and gently wipe away any visible chalk lines. -
Final touch-ups:
If any colors went outside the lines, use a small brush with black paint to ‘erase’ the mistakes and crisp up the edges.
Chalk Marks Stuck?
If the damp cloth doesn’t remove the chalk sketch completely, simply use a small flat brush with a little black paint to cover over the white sketch lines.
Hang your bold creation on a light-colored wall to really show off that dramatic contrast.

PENCIL GUIDE
Understanding Pencil Grades from H to B
From first sketch to finished drawing — learn pencil grades, line control, and shading techniques.
Explore the Full Guide
Wet-on-Wet Watercolor Sky
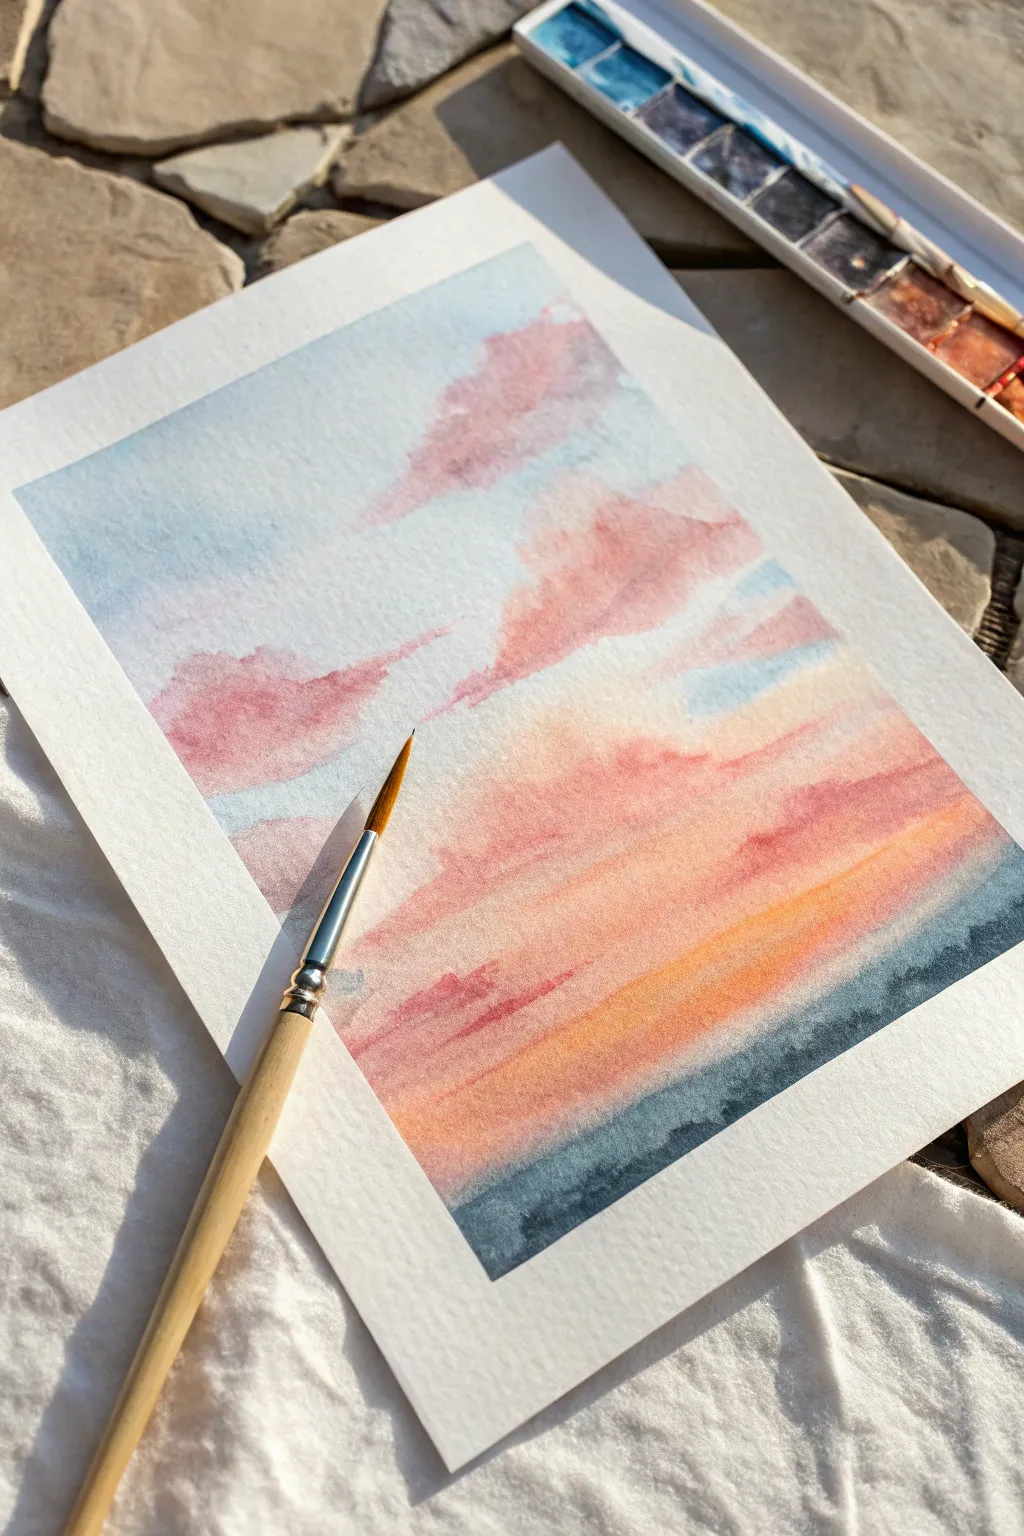
Capture the fleeting beauty of twilight with this soft, wet-on-wet watercolor project. By letting the water do most of the blending work for you, you will create dreamy transitions from blue to pink to golden orange.
Step-by-Step Guide
Materials
- Cold press watercolor paper (300gsm recommended)
- Watercolor paints (Cerulean Blue, Alizarin Crimson, Yellow Ochre, Indigo)
- Round watercolor brush (size 6)
- Masking tape or painter’s tape
- Jar of clean water
- Paper towel
Step 1: Preparation
-
Secure the paper:
Tape your paper down to a hard board or table on all four sides. Press the tape edges firmly to ensure a clean, crisp white border later. -
Prepare your palette:
Dilute your paint colors in your palette wells before starting. You want watery puddles of blue, soft pink, peach (yellow mixed with a tiny bit of red), and a concentrated dark indigo. -
Pre-wet the paper:
Dip your clean brush into water and paint the entire surface of the paper. It should look glossy and reflective, but not have standing puddles.
Avoid Muddy Skies
If your brush has blue residue when you start painting the yellow horizon, the mix will turn green. Always double-rinse your brush when switching from cool (top) to warm (bottom) colors.
Step 2: Painting the Sky
-
Apply the blue:
Load your brush with the diluted blue paint. Gently touch the top left and right corners of the paper, letting the paint bloom downwards naturally. -
Soften the edges:
Rinse your brush slightly and pull the blue color down towards the middle, fading it out so it becomes very pale. -
Add pink clouds:
While the paper is still wet, pick up your pink mixture. Dab irregular, horizontal cloud shapes into the middle section, just below the blue. -
Create wispy details:
Use the tip of your brush to touch a few smaller streaks of pink into the upper blue section. Since the paper is wet, these strokes will soften automatically. -
Clean the brush:
Rinse your brush thoroughly in clean water. This step is vital to prevent turning your sunset green when we switch to yellow tones.
Step 3: Golden Horizon & Silhouette
-
Apply the glow:
Pick up your peach or yellow ochre mixture. Paint horizontal strokes across the lower third of the paper, staying underneath the main pink clouds. -
Blend generally:
Allow the top edge of the yellow band to touch the wet pink paint above it. Watch as they merge softly on their own to create a warm orange transition. -
Deepen the horizon:
Add a slightly more saturated line of orange or red right near the bottom edge of the paper to intensify the sunset effect. -
Check dampness:
Wait about a minute. The paper should still be damp and cool to the touch, but the shine should be disappearing. -
Paint the landscape:
Load your brush with the thick, dark indigo paint (use very little water). Paint a jagged, uneven line across the very bottom of the paper. -
Let it bleed:
I like to let the top loose edge of this dark line bleed slightly upward into the orange sky, creating the illusion of distant, misty trees. -
Dry completely:
Leave the painting flat to dry completely. Do not touch it until the paper feels room temperature rather than cool. -
Reveal the border:
Gently peel away the masking tape. Pull the tape slowly away from the center of the painting to reveal your crisp white edges.
Pro Tip: Tape Removal
To prevent the tape from ripping your finished masterpiece, heat the tape briefly with a hair dryer on a low setting before peeling. This loosens the adhesive for a perfect release.
Enjoy the peaceful gradient you’ve created and the satisfaction of peeling back that tape for a clean finish
Sponge-Dabbed Autumn Foliage
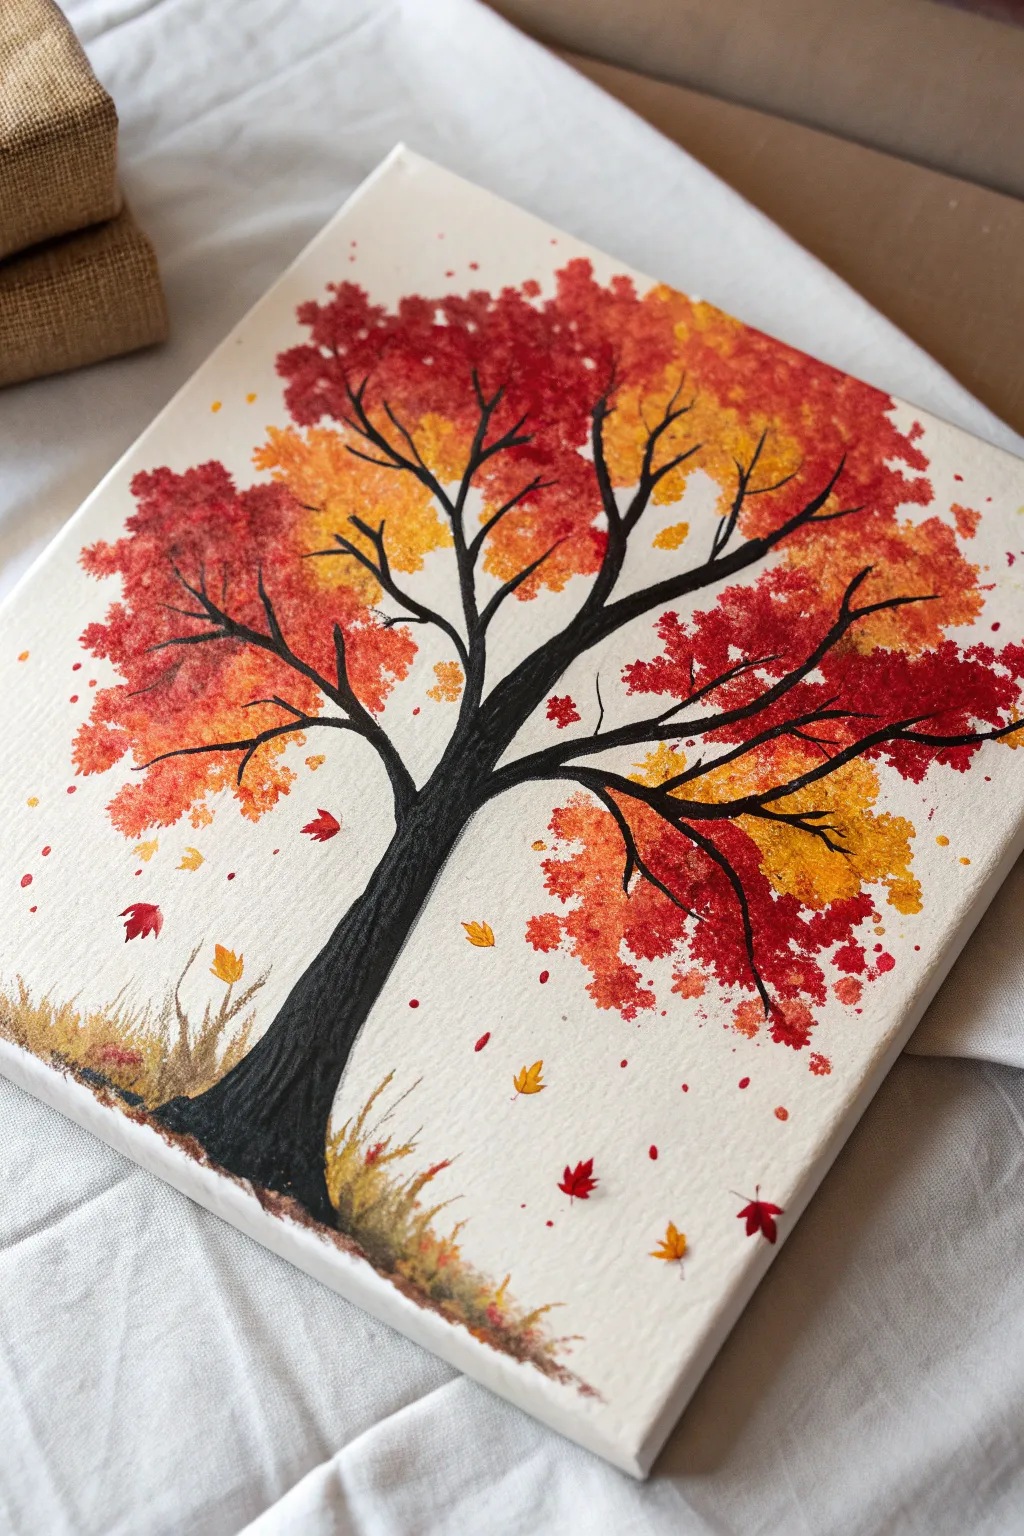
Capture the crisp beauty of fall with this textured painting technique that uses a common household sponge. This project creates a stunning, complex-looking foliage effect without requiring steady hands or advanced brushwork.
Step-by-Step Tutorial
Materials
- Stretched canvas (square or rectangular)
- Acrylic paints: Cadmium Red, Pumpkin Orange, Sun Yellow, Mars Black, Burnt Umber
- Kitchen sponge (new and dry)
- Small round brush (size 2 or 4)
- Palette or paper plate
- Paper towels
- Cup of water
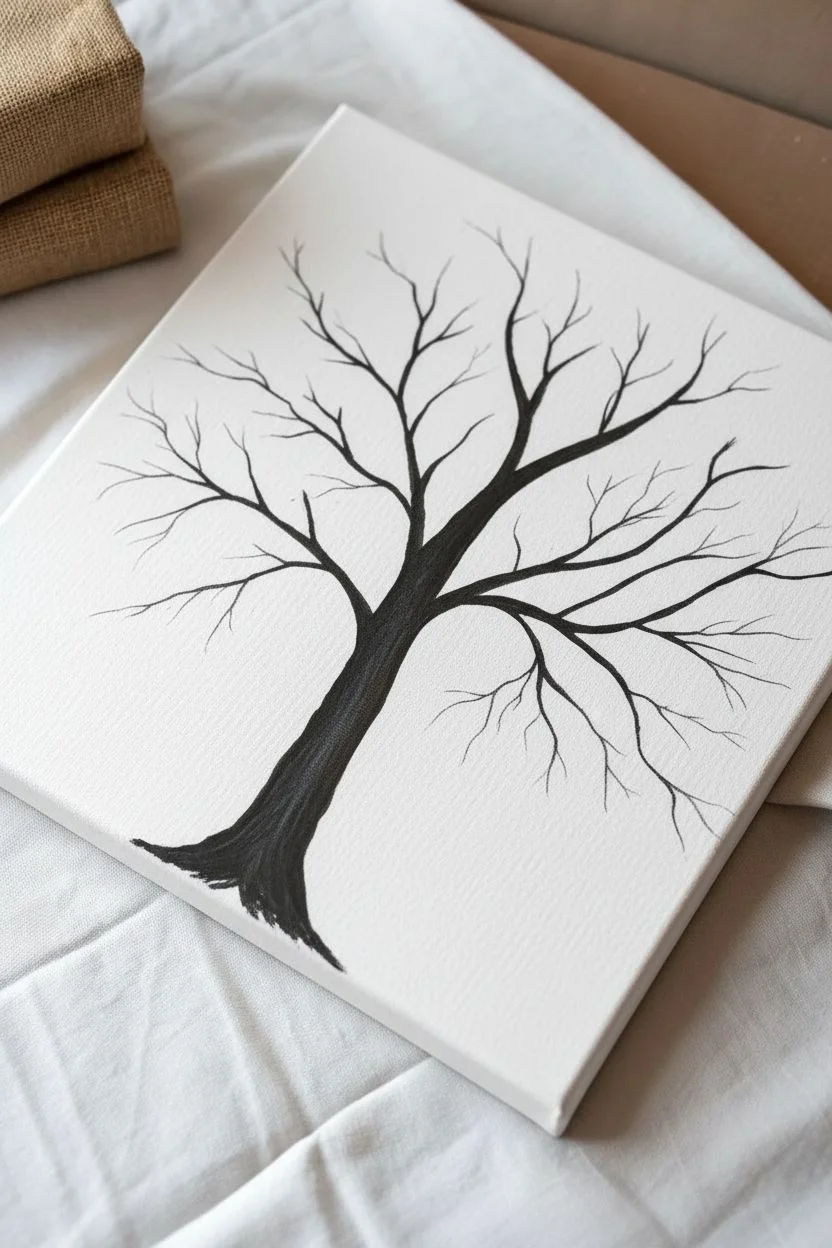
Step 1: Creating the Skeleton
-
Mix the trunk color:
On your palette, mix a large amount of black with a small touch of brown to create a warm, dark charcoal color. -
Establish the base:
Using the round brush, paint the base of the trunk at the bottom center of the canvas, making it about two inches wide. -
Draw the trunk:
Extend the paint upward, tapering the trunk gradually as you go higher; give it a slight curve to make it look organic. -
Split into branches:
About halfway up the canvas, split the trunk into three or four heavy main branches reaching toward the corners. -
Add fine twigs:
Using just the very tip of your brush, pull thin lines from the main branches to create delicate twigs. -
Dry the structure:
Let the black paint dry completely before moving on; this prevents the dark paint from smearing into your bright leaves.
Muddy Colors?
If your leaves are turning a muddy brown, stop and let the red layer dry completely (about 10 mins) before sponging the yellow on top.
Step 2: Dabbing the Foliage
-
Prepare the sponge:
Cut your kitchen sponge into approximate 1-inch cubes so you have distinct corners to work with. -
Start with deep reds:
Dip a sponge corner into red paint, blot the excess onto a paper towel, and gently dab it around the ends of the branches. -
Create variety:
Group your dabs into clusters rather than covering the whole area evenly, leaving some white space between branches. -
Layer the orange:
Switch to a clean sponge piece, dip it in orange, and dab over the red layers and into open white spaces. -
Add sunlight (yellow):
Using a fresh sponge piece with yellow paint, dab lightly on the very tops and outer edges of the foliage clumps for highlights. -
Overlay the trunk:
I like to dab a few spots of color directly over the black branches to make it look like leaves are growing in the foreground.
Level Up: Sparkle
Once the painting is fully dry, sponge a tiny amount of metallic gold paint onto the edges of the leaves for a shimmering, high-end finish.
Step 3: Atmosphere and Ground
-
Falling leaves:
Using your small round brush, paint small diamond or tear-drop shapes floating in the empty white space around the tree. -
Create the grassy base:
Without washing your brush, pick up some yellow and orange paint and use upward flicking motions at the bottom of the canvas. -
Blend the roots:
Flick the grass colors slightly over the base of the black trunk to settle the tree into the ground. -
Add detailed ground leaves:
Paint a few defined red and orange leaf shapes resting on top of the grassy area. -
Final check:
Look for any large empty spots in the tree canopy and fill them with a light dab of yellow to balance the composition.
Sign your canvas in the corner and enjoy the warm, seasonal atmosphere you have captured.


Impasto Texture Landscapes
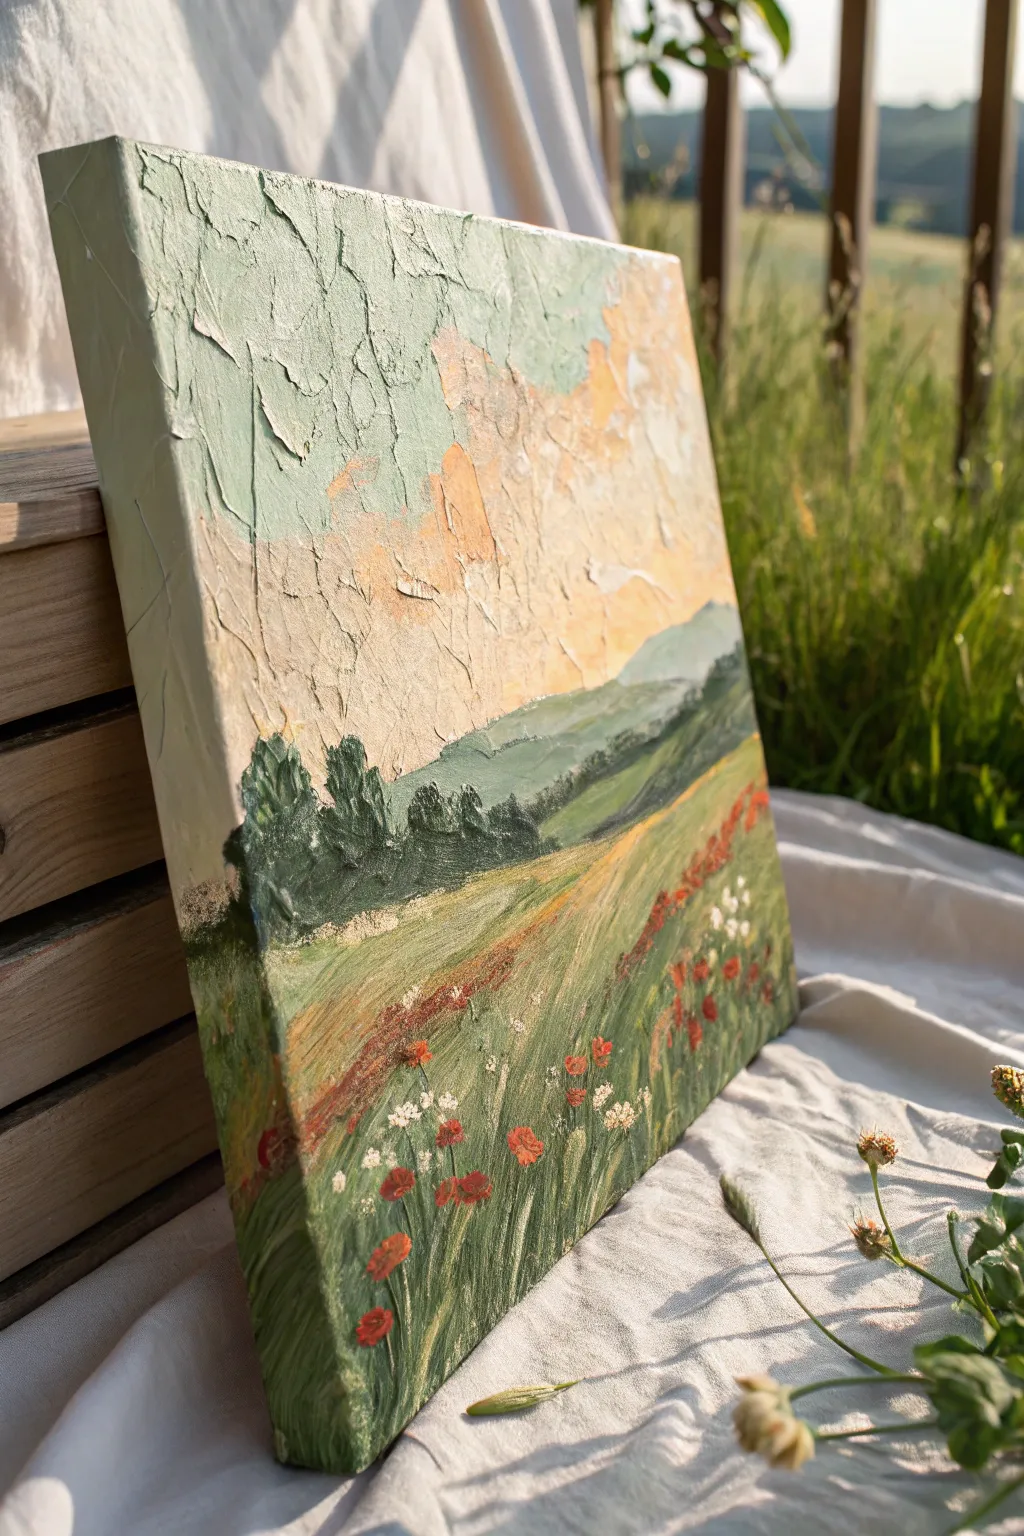
This project focuses on the sensory joy of impasto painting, using thick textures to create a landscape that literally stands out from the canvas. The forgiving nature of the palette knife makes it perfect for creating organic, flowing fields without needing steady hands for fine details.
Step-by-Step Guide
Materials
- Small gallery-wrapped canvas (square)
- Acrylic modeling paste or heavy gel medium
- Acrylic paints: White, Mint/Teal, Peach/Light Orange, Olive Green, Dark Green, Red, Yellow Ochre
- Set of palette knives (trowel shape is best)
- Small round brush
- Paper towels
Step 1: Sculpting the Sky
-
Prepare the vibrant paste:
Start by scooping a generous amount of modeling paste onto your palette. Separate it into two piles. Mix a drop of mint or teal paint into one pile, and a drop of peach or light orange into the other to create soft pastel mixtures. -
Apply the first sky color:
Using a palette knife, scoop up the mint-colored paste. Spread it thickly onto the upper left corner of the canvas, effectively buttering the surface like toast. -
Add the warm clouds:
Wipe your knife clean, then pick up the peach-colored paste. Apply this to the center and right side of the sky area, roughly filling the top two-thirds of the canvas. -
Create texture:
Use the edge of your clean knife to scrape slightly across the wet paste in random directions. This creates the cracked, stucco-like texture seen in the reference. -
Blend the transition:
Gently gently lightly drag the knife where the two colors meet so they blur together without turning muddy. Leave the surface rough and raised; perfection is not the goal here.
Tip: Keep it Clean
Wipe your palette knife with a paper towel between every single color switch. Impasto relies on clean colors sitting next to each other, and a dirty knife will quickly turn your sky grey.
Step 2: Layering the Landscape
-
Paint the distant mountains:
Mix a small amount of regular blue paint with a touch of white and green (no paste needed). Use the flat side of the knife to smooth this color just below the sky to create a distant mountain range. -
Establish the tree line:
Mix a dark forest green. Using the tip of your knife or a stiff brush, dab a horizontal line of trees varying in height across the middle of the canvas, overlapping the base of the mountains. -
Base the field:
Mix olive green with yellow ochre to get a warm grassy color. Apply this to the bottom third of the canvas using long, diagonal sweeping strokes. -
Add movement to the grass:
While the green is wet, streak in some pure yellow ochre or light brown using the side of the palette knife. Move diagonally from the tree line down toward the bottom right to simulate wind-swept grass. -
Wrap the edges:
I always take a moment here to paint the sides of the canvas with the corresponding colors—sky color on top, grass color on the bottom sides—so the frame looks finished even without a frame.
Step 3: Flowering Details
-
Switch to a brush:
Once the heavy background layers are in place, pick up a small round brush for the delicate details. -
Plant the poppies:
Dip your brush into bright red paint. Dab small, irregular spots into the foreground grass, clustering more of them at the bottom right corner for perspective. -
Add depth:
Make the red dots smaller and spaced further apart as you move up the field toward the tree line, which creates the illusion of distance. -
Sprinkle wildflowers:
Clean your brush thoroughly. Dip just the tip into pure white paint and gently tap tiny clusters of dots near the red poppies. -
Final highlights:
If you wish, add a few thin, vertical flicks of light green or yellow among the flowers to suggest protruding stems catching the sunlight.
Troubleshooting: Flat Texture
If your painting looks too flat, you aren’t using enough material. Be bold! Scoop up the modeling paste as if you are icing a cake; the ridges create shadows that make the painting come alive.
Allow your masterpiece to dry flat for at least 24 hours to ensure the thick peaks set completely hard
Simple Sunset Silhouettes

This serene project captures the peaceful transition of day into night with a stunning gradient sky and stark silhouettes. Utilizing simple layering techniques to create depth, this painting is a relaxing activity that produces a sophisticated result.
Detailed Instructions
Materials
- Small square canvas (e.g., 6×6 inches)
- Acrylic paints: Titanium White, Rose Pink, Pale Orange, Dark Grey, Purple, Mars Black
- Flat shader brush (medium size)
- Small round detail brush
- Cup of water and paper towels
- Palette or paper plate
Step 1: Setting the Sky
-
Pink application:
Load a clean flat brush with rose pink paint and apply it to the top half of the canvas using smooth horizontal strokes. -
Peach application:
While the pink is still wet, rinse your brush rapidly and load it with pale orange or peach paint. -
Creating the gradient:
Paint the bottom half of the canvas, working your way upward until you meet the wet pink paint. -
Blending:
Gently sweep the brush back and forth along the seam where the two colors meet to create a seamless, soft blend. -
Edge details:
Make sure to extend the gradient colors around the sides of the canvas so the artwork looks finished from every angle. -
Drying:
Allow the background layer to dry completely to the touch before attempting to paint over it.
Step 2: Majestic Mountains
-
Mountain base color:
Mix a dark grey paint; I like to add a tiny touch of purple to this mix to give the mountains a distant, hazy look. -
Outlining peaks:
Using a smaller brush, paint the outline of three sharp, triangular mountain peaks across the middle-left of the canvas. -
Filling in:
Fill in the mountain shapes with your grey-purple mixture, creating a solid opaque layer. -
Foothills:
Paint a slightly lower, rolling hill shape in front of the main mountains using a slightly more purple tone to establish depth. -
Mixing highlights:
Mix Titanium White with a very small drop of grey to create a bright highlight color for the snowy peaks. -
Applying snow:
Using a small brush, drag this white mixture down only the right side of each mountain peak to suggest a directional light source. -
Texturing:
Apply the white paint somewhat unevenly or roughly to mimic the texture of rugged rock and snow.
Smooth Blending
Work quickly during the sky phase; acrylic dries fast, and blending works best when both the pink and orange paints are still wet on the canvas.
Step 3: Silhouette Details
-
Foreground base:
Switch to pure black paint and use your brush to create an uneven, jagged horizon line across the very bottom of the canvas. -
Distant trees:
Add small vertical spikes along the left side of this black bottom layer to represent a distant forest line. -
Main trunk:
For the feature tree, paint a thin vertical line on the right side of the canvas, extending from the bottom nearly to the top. -
Top branches:
Starting at the top tip of the trunk, use the very point of your brush to dub small, downward-slanting dashes for the finest branches. -
Middle foliage:
As you work your way down the trunk, press slightly harder to make the branches wider and denser. -
Filling the base:
Continue adding branches all the way to the bottom, allowing the lowest ones to fan out wide and merge into the black foreground. -
Final touches:
Check for any see-through spots in the black paint and apply a second coat if necessary for a solid silhouette.
Level Up
Use a small fan brush for the large tree silhouette. Tap the brush gently using just the corner bristles to create realistic pine needle texture instantly.
With your final tree complete, you have a peaceful landscape ready to brighten up a small shelf or desk
Scraper Tool Cityscapes
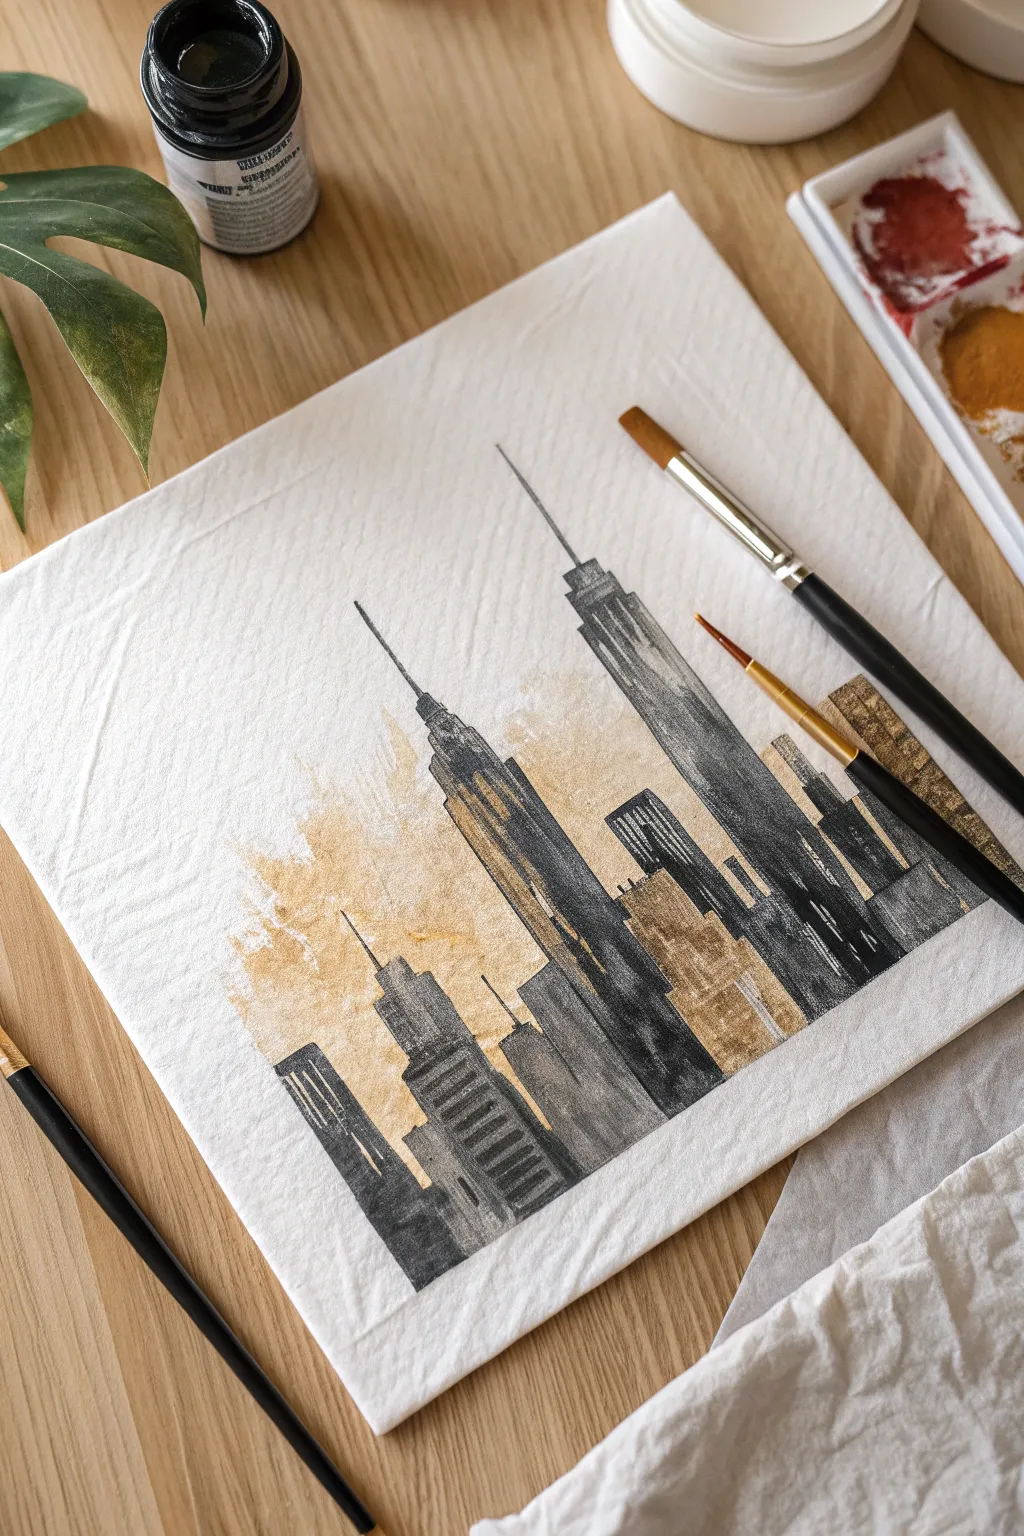
Capture the moody elegance of a cityscape without needing perfect drawing skills. By combining loose watercolor washes with a clever scraping technique, you can create sharp, architectural lines that contrast beautifully with a soft, atmospheric background.
Step-by-Step Guide
Materials
- Heavyweight texture paper or canvas sheet
- Yellow ochre watercolor paint
- Black India ink or heavy body black acrylic
- Old plastic card (credit card style) or stiff cardboard
- Medium flat brush
- Fine liner or rigger brush
- Palette or small flat dish
- Paper towels
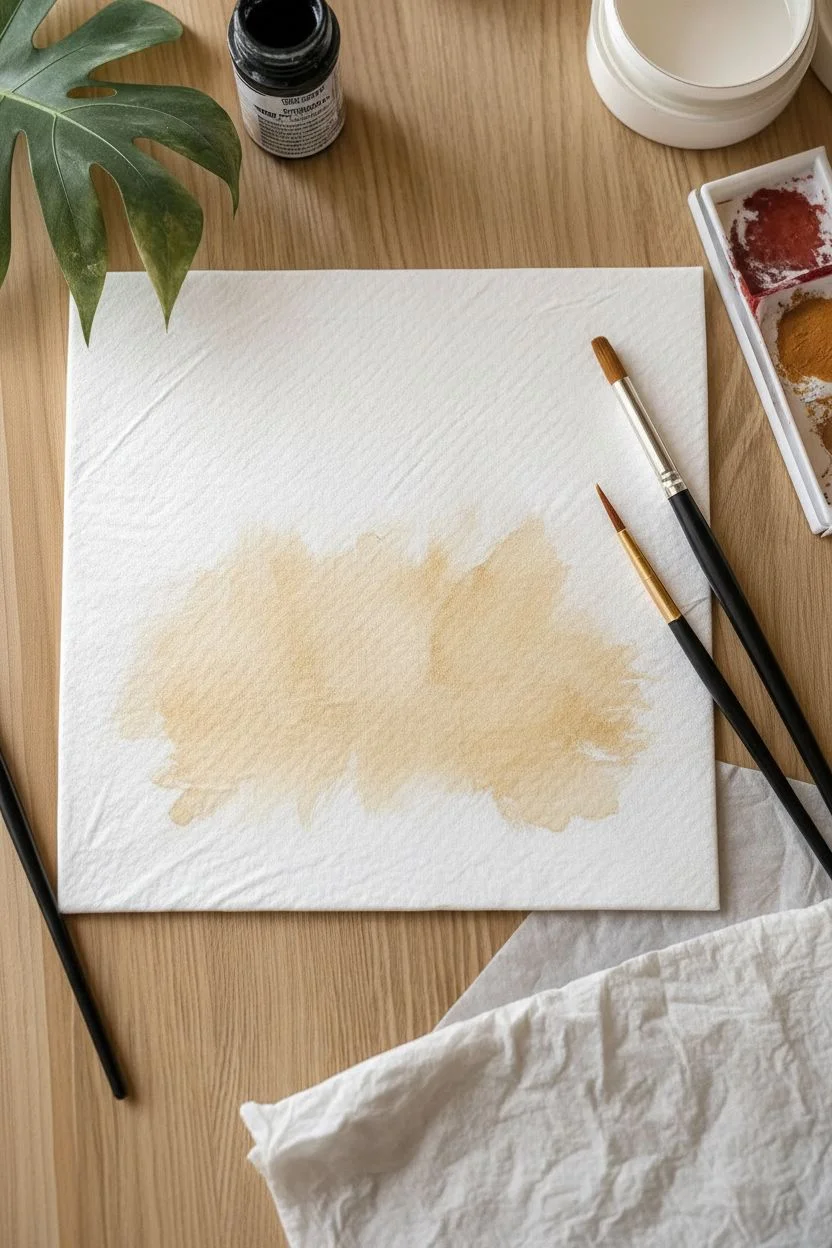
Step 1: Setting the Atmosphere
-
Prepare the surface:
Lay your textured paper or canvas sheet on a flat surface. If you are using loose paper, you might want to tape the corners down slightly to prevent shifting. -
Mix the glow:
On your palette, dilute a small amount of yellow ochre watercolor with plenty of water. You want a transparency that looks like stained glass rather than thick paint. -
Apply the wash:
Using your flat brush, paint a loose, abstract patch of this gold color in the lower center of the paper. This represents the city lights reflecting against the smog or dusk mist. -
Feather the edges:
Rinse your brush and use just clean water to soften the outer edges of your gold patch so it fades out naturally into the white paper. -
Let it dry:
Wait until the paper is completely bone-dry to the touch. If the paper is damp, the black ink we apply next will bleed uncontrollably.
Custom Scrapers
Cut an old gift card into different widths (1/2 inch, 1 inch, etc). This creates a ‘set’ of scrapers that makes varying your building widths incredibly easy.
Step 2: raising the Skyline
-
Prepare the scraper:
Take your old plastic card or stiff cardboard. I find it helpful to cut it into slight variations—one piece about an inch wide, another slightly narrower. -
Load the ink:
Pour a puddle of black India ink or fluid acrylic onto your flat dish. Dip the straight edge of your clean scraper tool directly into the ink so the rim is evenly coated. -
Scrape the first tower:
Place the inked edge near the bottom of your gold wash and drag it upwards in a single, confident stroke. Lift the card away abruptly where you want the building to end. -
Build the cluster:
Re-dip your card and create a second building right next to the first. Vary the height so it doesn’t look like a picket fence. -
Create the centerpiece:
For the main skyscraper (resembling the Empire State Building), use a slightly wider drag for the base. Let this shape sit centrally within the gold wash. -
Upper tier technique:
To narrow the building as it goes up, switch to a shorter edge of your card (or just use the corner) to drag a thinner block on top of the main base. -
Add variety:
Continue adding smaller buildings on the sides. Allow some ink to look ‘scratchy’ or broken; this texture adds character and suggests windows. -
Ground the city:
Use the remaining ink on your scraper to fill in the very bottom edge of the painting, creating a solid dark foundation for your buildings.
Step 3: Details and Definition
-
Switch to a brush:
Pick up your fine liner brush and dip it into the black ink. We will use this to sharpen the silhouettes. -
Add the spires:
Carefully paint a thin, straight vertical line extending from the top of your tallest building to create the antenna needle. -
Refine the edges:
If the scraper left any edges too messy for your liking, use the fine brush to gently straighten them out, particularly on the prominent rooftops. -
Create depth:
Paint a few smaller, solid rectangular shapes between the scraped buildings to make the city look dense and layered. -
Suggest windows:
If you have a fairly dry brush with just a tiny bit of ink, you can drag it horizontally across some of the gold areas to suggest rows of distant windows. -
Review the composition:
Step back and look at your skyline. Does it need a small antenna on a secondary building for balance? Add that now. -
Final dry:
Allow the thick ink to dry completely. India ink can stay wet longer than watercolor, so give it plenty of time before framing.
Level Up: Night Lights
Once the black ink is 100% dry, use a white gel pen or a metallic gold marker to add tiny dots or lines on the black buildings to mimic lit-up windows.
Enjoy the sleek, modern look of your city skyline as you display it proudly.
Salt-Textured Galaxies
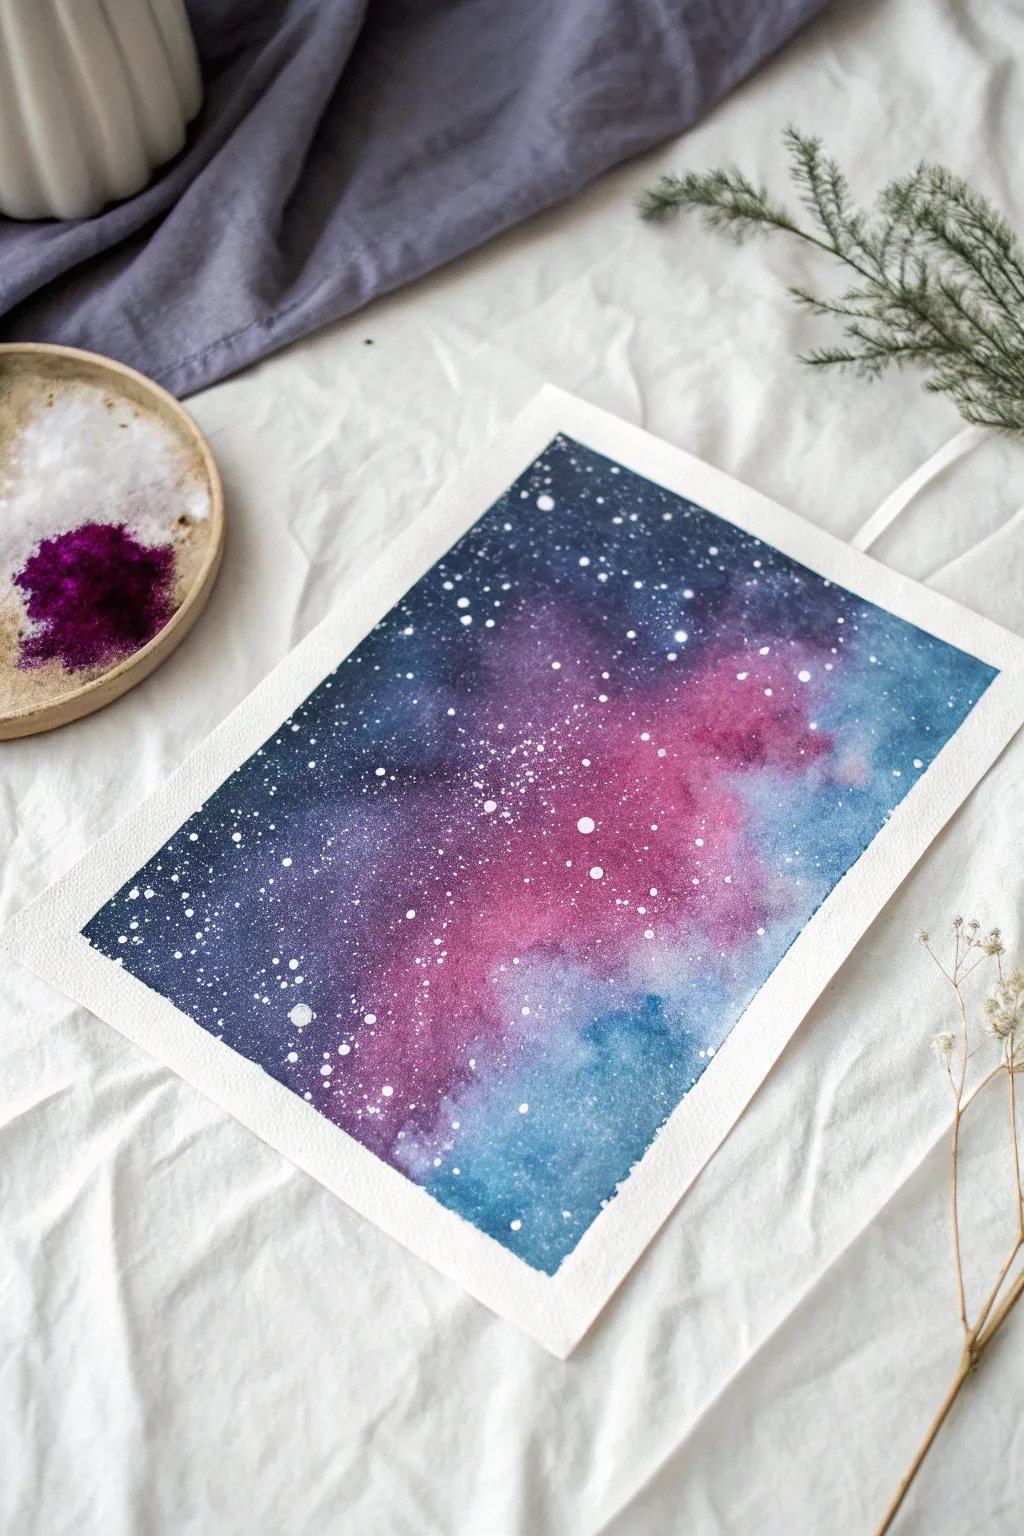
Capture the magic of the deep universe using simple watercolor techniques and common table salt. This project creates a stunning, ethereal nebula effect with unique textures that look complicated but are effortlessly achieved.
Detailed Instructions
Materials
- Cold press watercolor paper (300 gsm)
- Masking tape or artist tape
- Watercolor paints (Indigo, Purple, Magenta, Cyan)
- Table salt or coarse sea salt
- Round watercolor brushes (sizes 8 and 4)
- White gouache or opaque white acrylic paint
- Old toothbrush (optional)
- Clean water and paper towels
- Rigid backing board
Step 1: Setting the Stage
-
Tape the borders:
Place your watercolor paper on a rigid backing board. Use masking tape to tape down all four edges, covering about a half-inch of the paper to create a crisp, clean border later. -
Seal the edges:
Run your fingernail or a spoon handle firmly along the inner edge of the tape to ensure a tight seal, preventing paint from seeping underneath. -
Pre-wet the paper:
Dip a large, clean brush into water and coat the entire exposed paper surface. You want it to be glistening and damp, but not forming puddles.
Salt Wisdom
If the salt doesn’t create ‘blooms,’ the paper was likely too dry. The paper needs to be visibly shiny (damp) for the salt to absorb the water and push the pigment.
Step 2: Creating the Nebula
-
Apply the light colors:
Load your brush with magenta or bright pink. Drop this color diagonally across the center of the wet paper, letting it bloom and spread naturally. -
Add midway tones:
Introduce a cyan or light blue to the areas adjacent to the pink, allowing the edges to touch and mix on the paper to create soft purples. -
Deepen the background:
Using a dark purple or violet, fill in the areas surrounding your lighter central band, blending gently outward. -
Darken the corners:
Load your brush with a heavy concentration of indigo or navy blue. Apply this to the outer corners and edges to create the depth of deep space. -
Enhance saturation:
While the paper is still wet, drop in more concentrated pigment into the dark areas to ensure the colors dry vividly. -
Blend softly:
Rinse your brush and shake off excess water. Use the damp brush to soften any hard lines where colors meet, ensuring a smooth transition.
Level Up: Silhouettes
Once the sky involves drying, use black gouache to paint a simple silhouette of a forest line or mountaintops along the bottom edge for a stunning landscape.
Step 3: Adding Texture and Stars
-
Check the moisture:
Observe the paper sheen. It should still be damp but no longer soaking wet. If it’s too shiny, wait a moment; if it’s matte, it’s too dry. -
Sprinkle the salt:
Take a pinch of salt and sprinkle it sparingly over the darker and mid-tone sections of your painting. The salt will push the pigment away, creating star-like textures. -
Let it dry completely:
Allow the painting to dry undisturbed. I find it best to leave it flat for at least an hour to ensure the salt texture fully develops. -
Remove the salt:
Once the paper is bone dry and warm to the touch, gently rub off the salt crystals with your hand or a clean, dry cloth. -
Prepare the stars:
Dilute a small amount of white gouache or acrylic paint with a few drops of water until it reaches a milky consistency. -
Splatter creates stars:
Dip an old toothbrush or a stiff brush into the white paint. Hold it over the painting and tap the handle (or run your thumb over bristles) to spray fine white dots. -
Add highlight stars:
Use a small detail brush dipped in undiluted white paint to manually dot a few larger, brighter stars in the dark corners for contrast. -
Reveal the border:
Wait for the white stars to dry completely. Then, slowly peel the masking tape away at a 45-degree angle, away from the painting.
Now you have a breathtaking piece of the cosmos captured right on your paper.
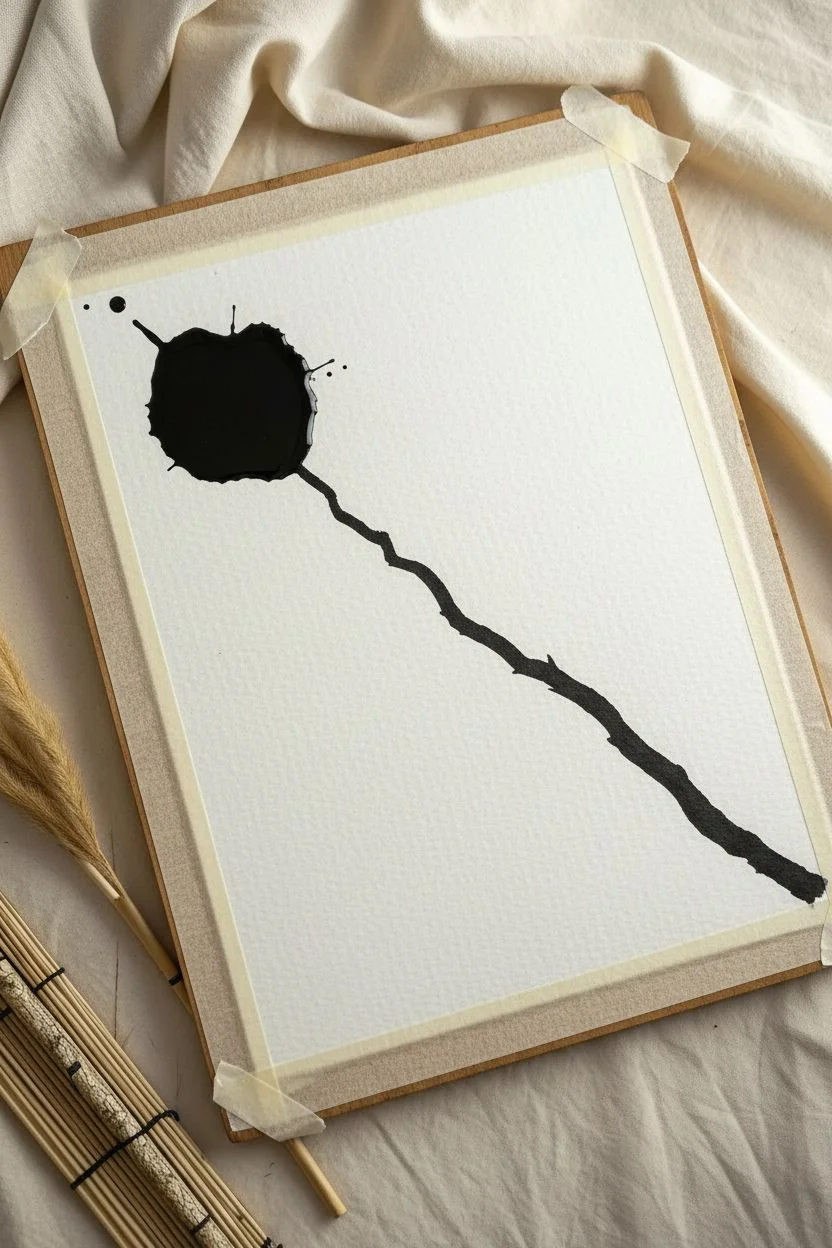
Blow-Painting Branches
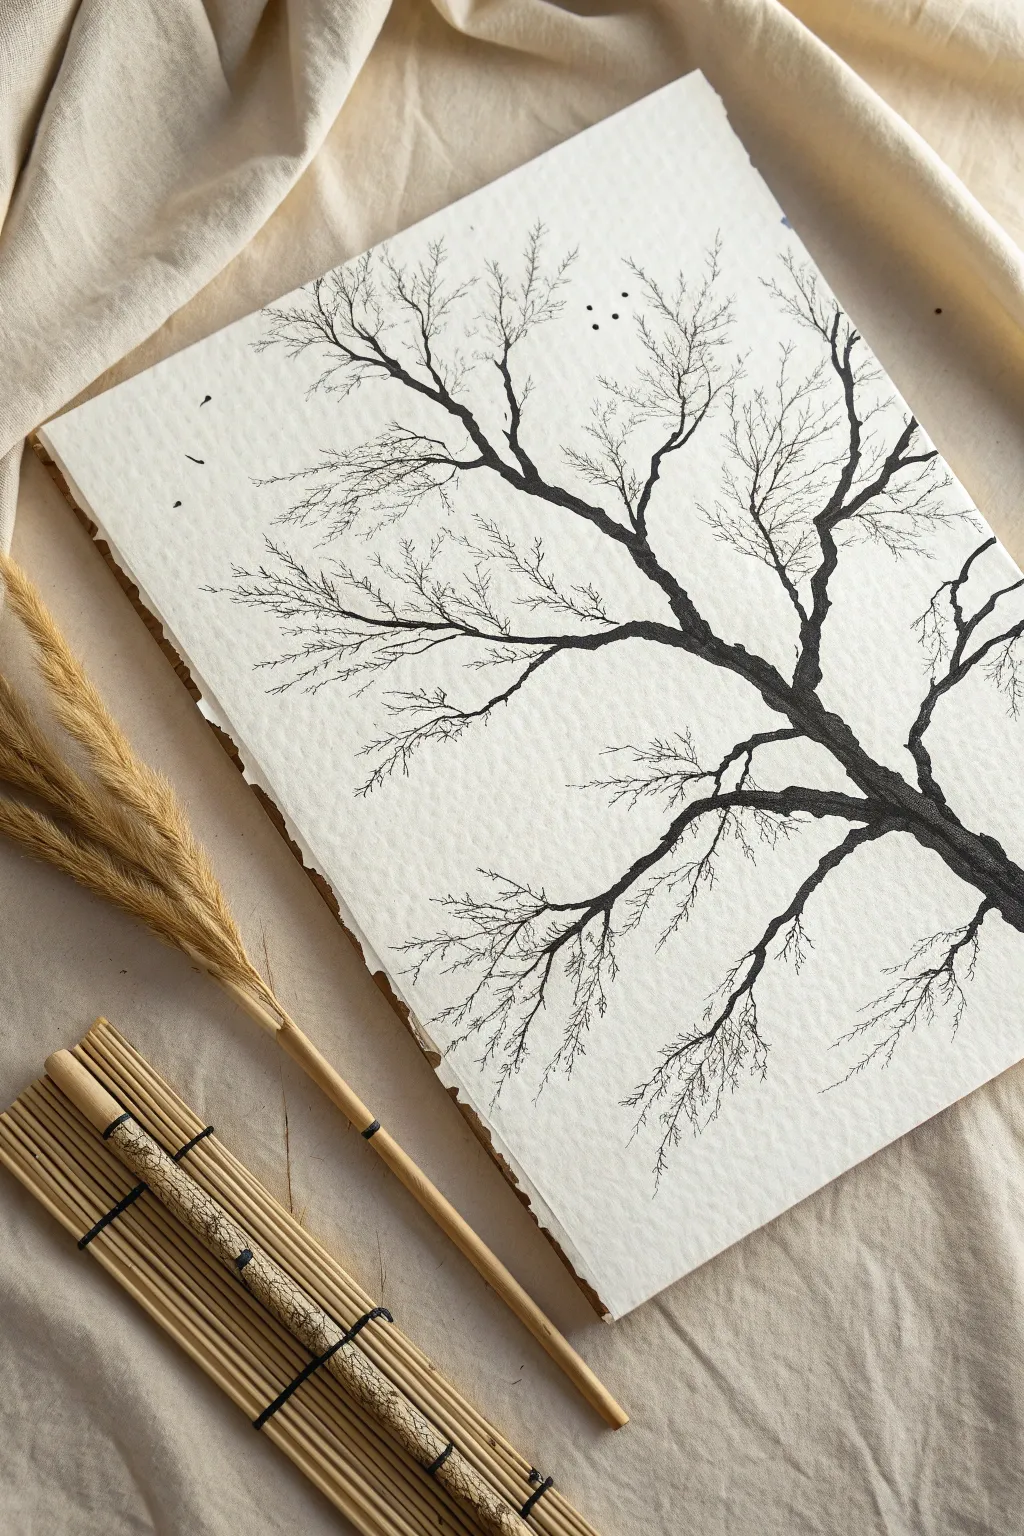
This calming project utilizes the unpredictable nature of fluid ink to create a stunning, organic winter tree silhouette. By using air instead of a brush stroke, you achieve natural, fractal-like branches that taper perfectly into delicate twigs.
Step-by-Step Guide
Materials
- Heavyweight cold press watercolor paper (300 gsm)
- Black India ink or high-flow fluid acrylic paint
- Round paintbrush (size 6 or 8)
- Plastic drinking straw
- Water cup
- Palette or small dish
- Masking tape
- Paper towels
Step 1: Preparation and Base
-
Prepare the paper:
If you want the rustic look shown in the photo, gently tear the edges of your watercolor paper against a ruler to create a ‘deckled’ edge. -
Secure the surface:
Tape the paper down to your work surface or a drawing board to prevent it from buckling when the wet ink is applied. -
Check ink consistency:
Pour a small amount of India ink into your dish. It should be fluid; if using acrylics, mix in a few drops of water until it has the consistency of heavy cream. -
Paint the anchor:
Using your round brush fully loaded with ink, paint a thick, diagonal line starting from the bottom right edge. This will be the main trunk. -
Create a reservoir:
At the very end of your painted trunk line, dab a generous puddle of wet ink. Do not let this dry.
Step 2: Shaping the Branches
-
Position the straw:
Hold the straw about one inch away from the wet puddle of ink at the top of your painted trunk. -
The first breath:
Blow a sharp, short burst of air through the straw to force the ink puddle outward. It should split into a ‘Y’ shape. -
Extend the limb:
Move your straw to follow one of these new rivulets. Blow gently to push the ink further out, creating a longer branch. -
Reloading ink:
The ink will eventually run out or dry. Dip your brush into the ink and deposit a fresh, small bead of ink at the tip of a branch you want to extend. -
Splitting the branches:
Blow onto this new bead of ink from a lower angle to force it to splay out into thin, spider-web twigs. -
Rotate your work:
I find it helpful to physically rotate the paper or board to blow the ink in specific directions without straining my neck. -
Create the crown:
Repeat this process, moving upward and outward. Keep adding clear water or ink droplets to branch tips and blowing them to fill the upper left area of the paper.
Pro Tip: Pinch for Precision
Pinch the end of your straw to flatten the opening. This restricts and speeds up the airflow, allowing you to blow much thinner, sharper lines for the tiniest twigs.
Step 3: Fine Details
-
Add side shoots:
Return to the thicker parts of the trunk. Paint a tiny dot of fresh ink on the side of the main branch and blow it outward to create smaller, lower limbs. -
Refine the connections:
Use the tip of your paintbrush to smooth out any areas where the blown ink connects to the painted trunk, ensuring a seamless transition. -
Manual touch-ups:
If the straw missed a spot or a branch looks too thick, use your smallest brush to manually paint very fine lines extending from the tips. -
Add atmosphere:
For the finishing touch seen in the image, dip an old toothbrush or stiff brush in ink and flick it lightly to add a few tiny scattered dots near the top branches. -
Dry flat:
Allow the artwork to dry completely flat for at least an hour before removing the tape to ensure the heavy ink doesn’t run.
Troubleshooting: Stubborn Ink
If the ink refuses to move when you blow, it is likely too thick or has started to dry. Immediately drop a tiny bit of clean water onto the stubborn spot and blow again.
Enjoy the peaceful process of watching your unique tree grow across the page naturally.
Mindfulness Neurographic Lines
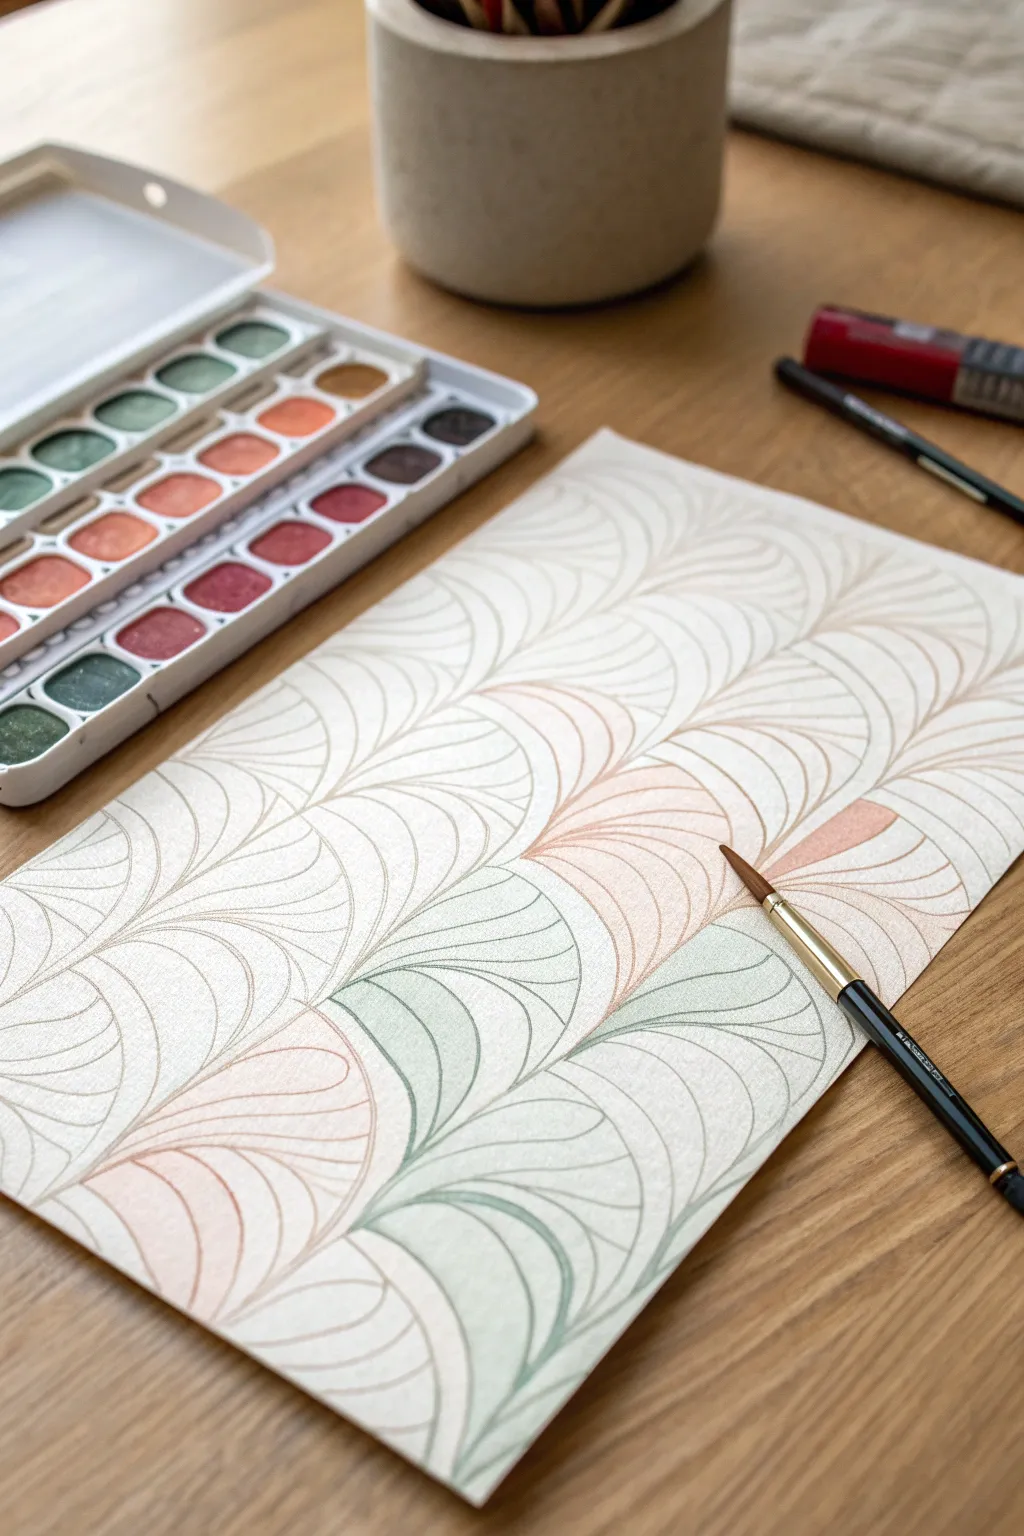
This project combines the rhythmic calm of repeating geometric shapes with soft, healing watercolor tones. By painting a classic fan-like pattern in muted sage and peach, you create a visual meditation that is as relaxing to make as it is to look at.
Detailed Instructions
Materials
- Cold-pressed watercolor paper (A4 or similar)
- Watercolor pan set (featuring greens and warm reds/oranges)
- Round synthetic brush (size 4 or 6)
- Pencil (HB) and eraser
- Compass or a small circular object to trace (like a jar lid)
- Ruler
- Jar of clean water
- Paper towel
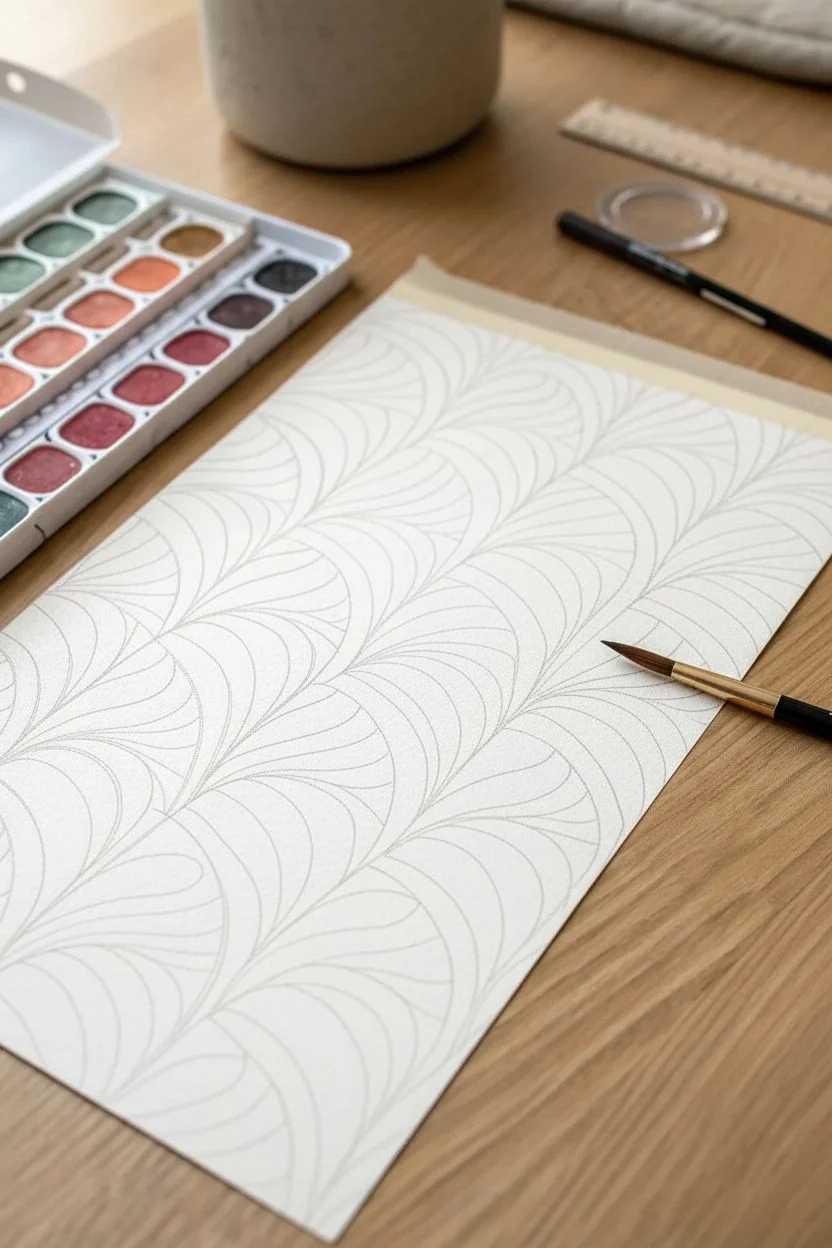
Step 1: Drafting the Pattern
-
Prepare your space:
Tape your watercolor paper to a flat surface or board to prevent buckling when the paper gets wet. -
Draw the baseline:
Using your ruler and pencil, lightly draw horizontal lines across the paper spaced about 1.5 to 2 inches apart. -
Start the first row:
On the bottom line, place your compass point (or tracing object) and draw semi-circles that touch side-by-side without overlapping. -
Offset the second row:
For the row above, position your semi-circles so the center of each arc sits directly above the meeting point of the two arcs below it. -
Fill the page:
Continue this alternating brick-like pattern until the entire sheet is covered in these primary scallops. -
Add internal details:
Inside each large semi-circle, draw 2 or 3 smaller concentric arcs to create the layered fan effect shown in the example. -
Lighten the lines:
Gently roll a kneaded eraser over your sketch to lighten the graphite so it won’t be too visible under the paint.
Bleeding Colors?
If paint seeps into the wrong section, you are painting adjacent areas too quickly. Work on opposite sides of the paper to allow neighbors to dry.
Step 2: Mixing the Hues
-
Activate the paints:
Place a few drops of clean water into your paint pans to soften the pigment. -
Create the sage green:
Mix a standard green with a tiny touch of brown or grey, then add plenty of water to achieve a transparent, subtle sage tone. -
Create the soft peach:
Mix orange with a little bit of red or pink, then dilute it significantly with water until it becomes a pale, pastel peach. -
Test your transparency:
I always like to test the colors on a scrap piece of paper first to ensure they are light and airy, not opaque.
Step 3: Painting the Mindfulness Flow
-
Start with green:
Load your brush with the sage mix and carefully fill in the outer arc of a random fan shape. -
Paint the inner sections:
While the outer arc is drying, skip the middle stripe and paint the smallest inner arc of the same fan. -
Switch to peach:
Rinse your brush thoroughly and pick a different fan section nearby to fill with your peach mixture. -
Vary the fill:
You don’t need to paint every single stripe; leave some sections unpainted to let the white of the paper breathe. -
Control the edges:
Use the fine tip of your round brush to keep the paint strictly within the pencil lines for a crisp look. -
Mind the wetness:
Avoid painting two touching sections while both are wet, as the colors might bleed into each other. -
Create a gradient:
If you want depth, drop a slightly more concentrated amount of pigment at the bottom corners of the fans while the wash is still damp. -
Review the composition:
Step back and look at the balance of green, peach, and white space, adding color only where it feels too empty. -
Dry completely:
Let the artwork sit flat until completely dry before removing the tape or framing.
Pro Tip: Stencil Hack
If using a compass is difficult for your hands, trace a small jar lid or a coin. It guarantees perfect circles without the fiddly mechanics.
Enjoy the rhythmic motion of your brush as you bring this peaceful pattern to life
Wax Resist Ocean Waves
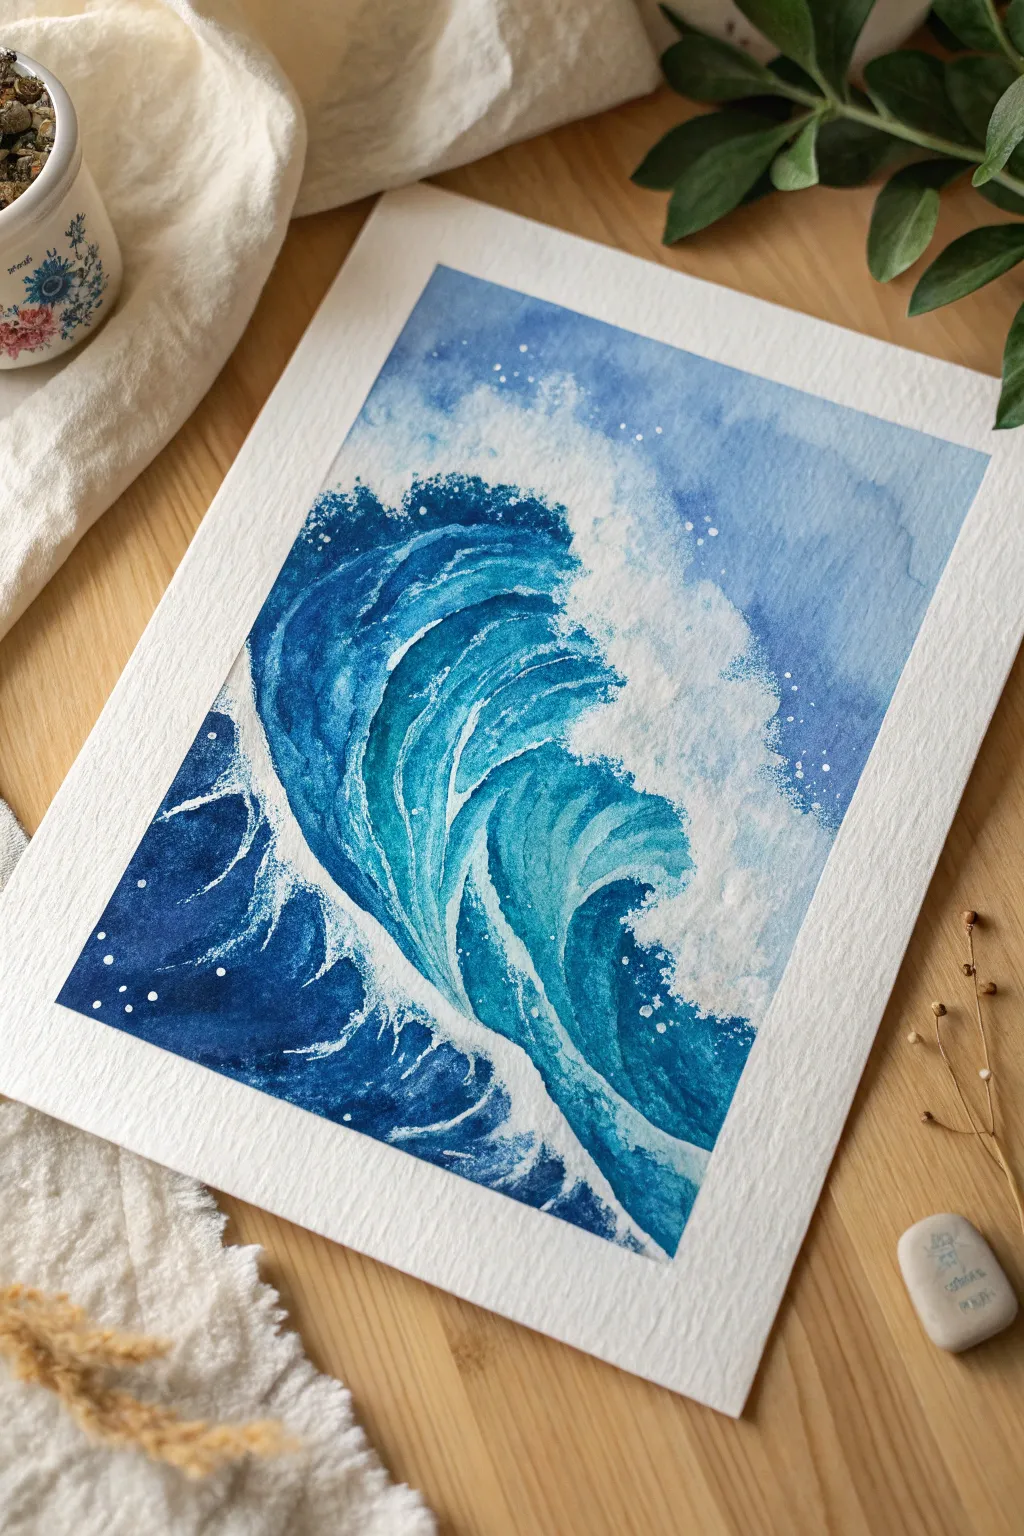
Capture the dynamic movement of the sea using a simple white crayon to preserve the bright whites of the paper. This technique creates a beautiful, organic texture for sea foam that looks impressive but is surprisingly forgiving to paint.
Step-by-Step Guide
Materials
- Cold press watercolor paper (300gsm)
- Painter’s tape or masking tape
- Watercolor paints (Phthalo Blue, Prussian Blue, Turquoise)
- White wax crayon or white oil pastel
- Pencil and eraser
- Round watercolor brushes (size 8 and 4)
- Two jars of water
- Paper towel
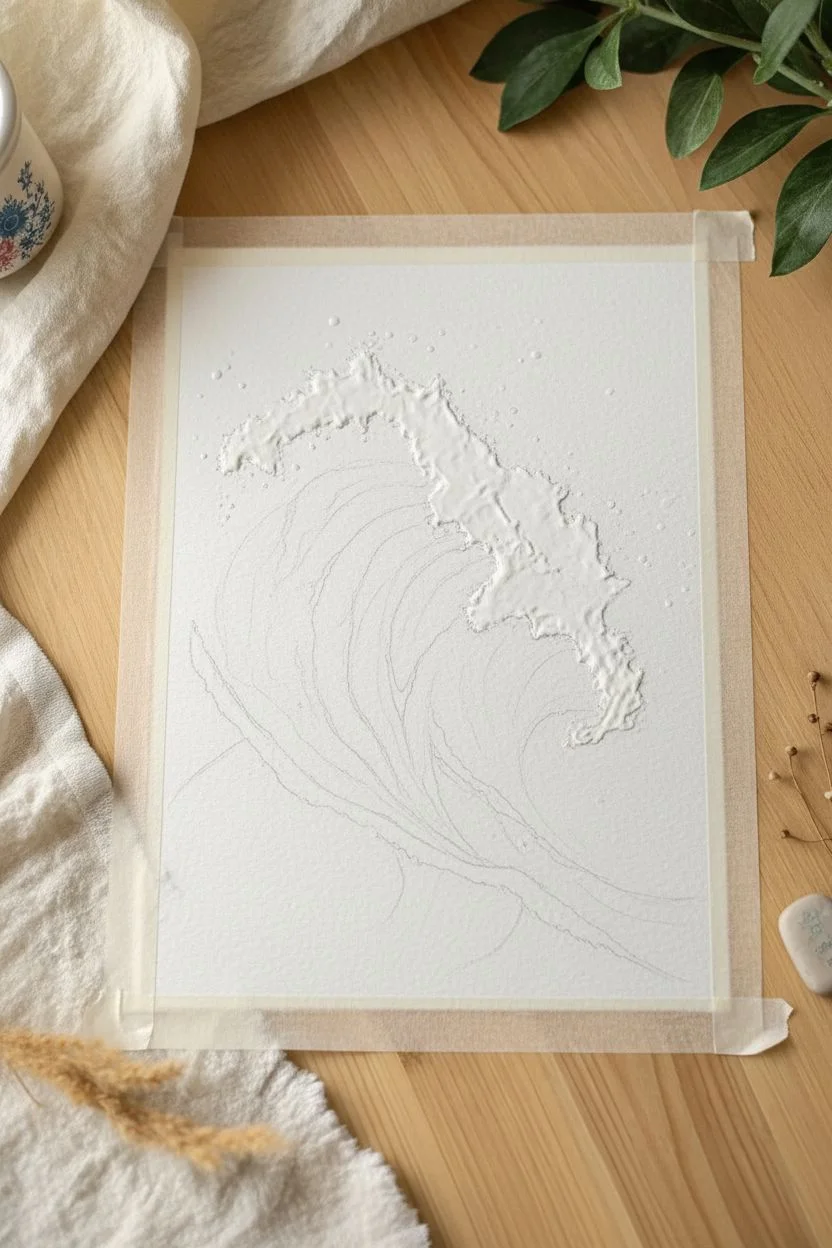
Step 1: Preparation & Shielding
-
Secure the paper:
Tape down all four edges of your watercolor paper to a board or table to create a clean white border and prevent buckling. -
Sketch the wave:
Using a pencil, lightly draw the outline of a large ‘C’ shape crashing from right to left, occupying the center of the paper. -
Define the foam:
Sketch a jagged, fluffy area along the top rim of the wave where the water is breaking into foam. -
Apply the wax:
Take your white wax crayon and color firmly inside the foam area you just drew at the top of the wave. -
Create movement lines:
Pressing hard with the crayon, draw curved streaks inside the body of the wave, following the curve of the water. -
Add sea spray:
Dot the crayon randomly in the air above and around the crashing wave to represent flying droplets of water.
Visible Wax Trick
Is it hard to see your white crayon on white paper? Tilt your paper sideways under a lamp—the light will catch the sheen of the wax so you can see where you’ve drawn.
Step 2: Washing and Blending
-
Prepare the sky color:
Mix a very watery, pale blue wash on your palette using plenty of water. -
Paint the background:
Brush this pale wash over the sky area and the far right side of the painting, painting right over your wax dots. -
Mix the teal tone:
Mix a vibrant turquoise or teal color with a moderate amount of water. -
Fill the wave center:
Paint the inner curve of the wave (the ‘tunnel’ part) with the turquoise, letting the wax lines resist the paint to show white streaks. -
Mix deep ocean blue:
Create a concentrated dark blue, like Prussian or Indigo, with very little water for maximum intensity. -
Paint the shadows:
Apply this dark blue to the bottom left corner and the underside of the crashing foam lip.
Step 3: Depth & Details
-
Blend the transition:
Where the dark blue meets the turquoise, use a clean, slightly damp brush to soften the edge so the colors merge smoothly. -
Define the foam edge:
Carefully paint dark blue right up against the bottom edge of the wax-resist foam area to make the white pop. -
Emphasize spray:
Dab small spots of blue paint around the white crayon dots you made earlier to help them stand out against the background. -
Final dry:
Let the painting dry completely. I prefer to wait at least 30 minutes before handling. -
Reveal the border:
Gently peel away the masking tape at a 45-degree angle to reveal the crisp edges.
Level Up: Sea Salt
While the blue paint in the bottom corner is still wet, sprinkle a pinch of table salt on it. As it dries, the salt pushes the pigment away, creating a unique texture.
Enjoy the refreshing splash of color you’ve created with this fun resist technique!
Foil-Stamped Rock Textures
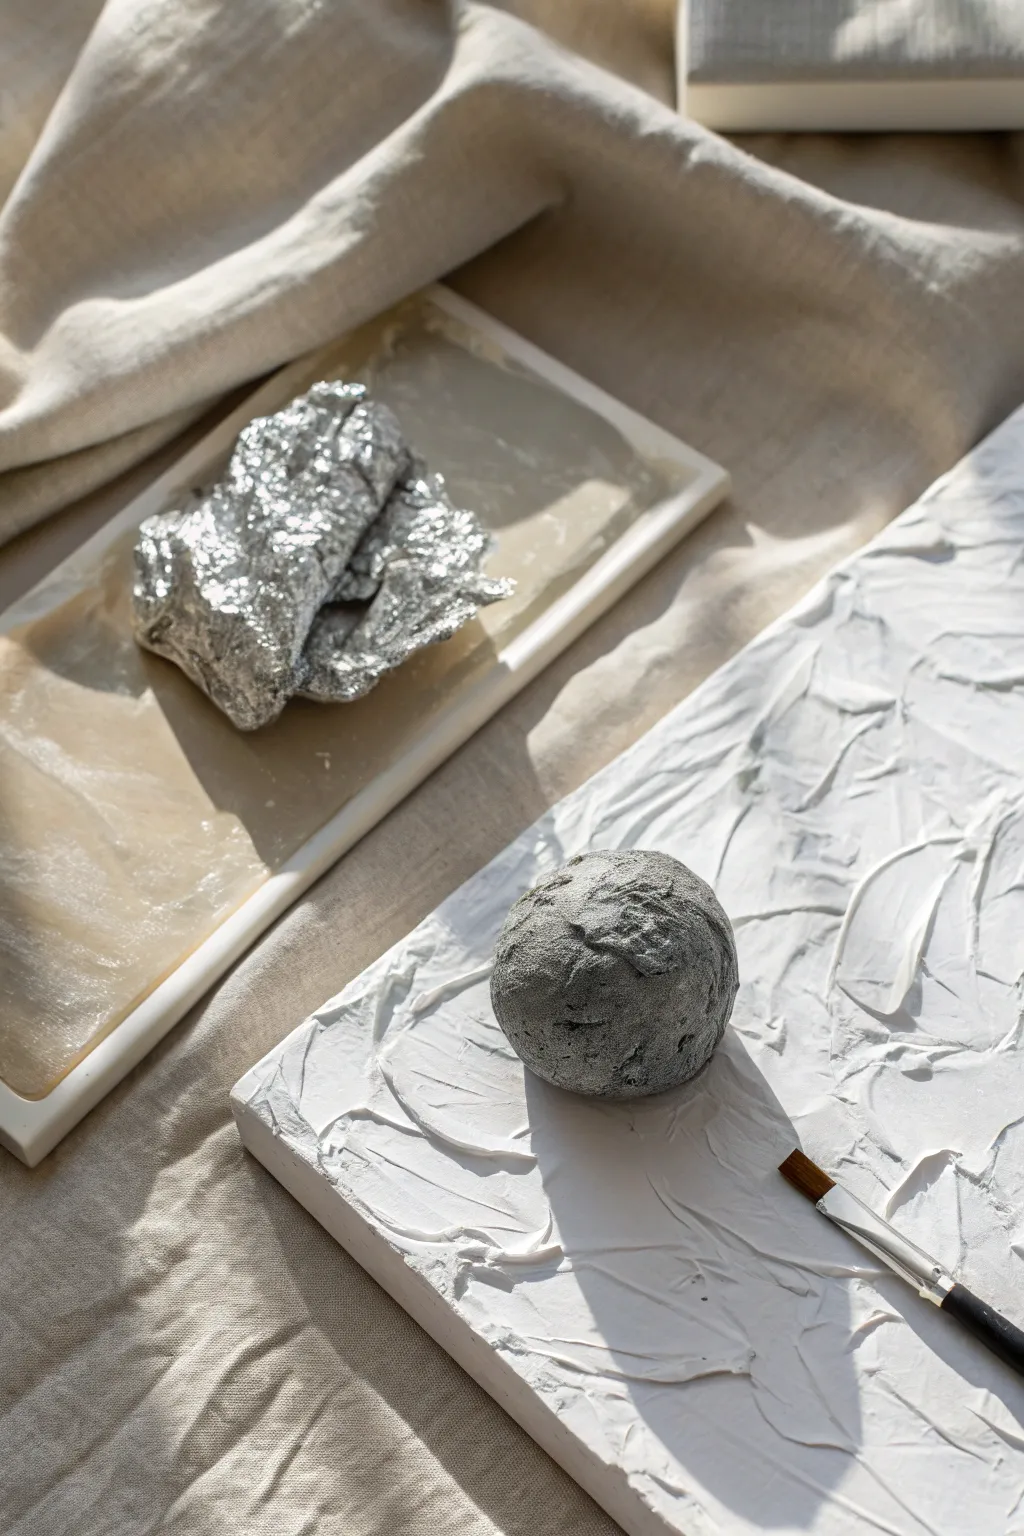
This tactile project combines heavy-body painting techniques with simple sculpting to create a minimalist, Zen-inspired art piece. You will learn to create a realistic stone effect using common kitchen foil and mount it on a beautiful impasto background.
Detailed Instructions
Materials
- Small white canvas panel or block
- White modeling paste (or heavy texture gel)
- Palette knife
- Air-dry clay (white or grey)
- Aluminum foil
- Acrylic paint (black and white)
- Small flat paintbrush
- Strong craft glue
- Water cup and paper towel
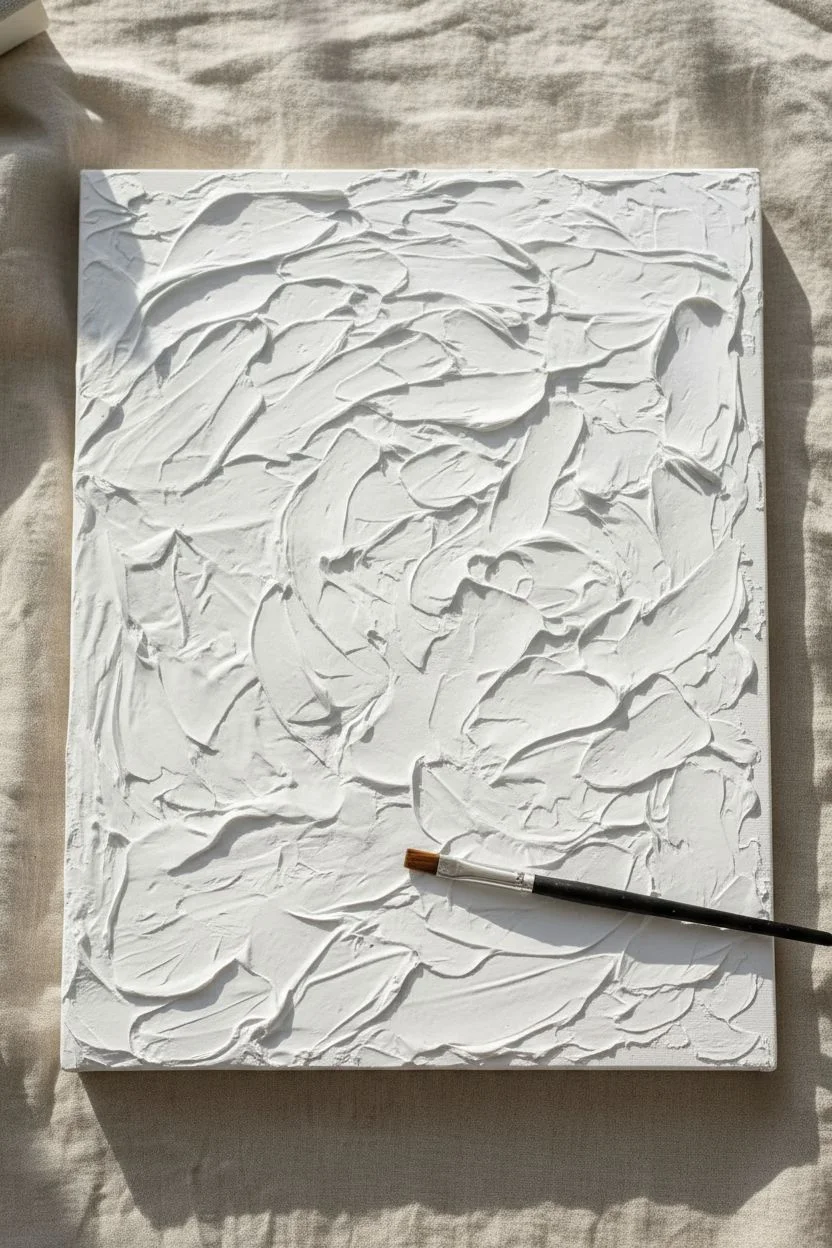
Step 1: Creating the Impasto Base
-
Prepare your canvas:
Lay your canvas flat on a protected surface. Ensure it is free of dust or lint before beginning. -
Apply texture paste:
Using a palette knife, scoop a generous amount of white modeling paste onto the center of the canvas. -
Spread the medium:
Spread the paste outward towards the edges similar to how you would frost a cake, ensuring the entire surface is covered. -
Create ridges:
Use the edge of your palette knife to create random, sweeping motions. Lift the knife occasionally to create raised peaks and valleys. -
Refine the pattern:
Avoid making the pattern too uniform; a chaotic, organic texture looks best for this style. -
Allow to dry:
Set the canvas aside to dry completely. This may take several hours or overnight depending on the thickness of the paste.
Natural Variation
Don’t try to make the clay ball a perfect sphere. Real river stones have lumps and uneven sides, which adds to the organic realism of the piece.
Step 2: Sculpting the Stone
-
Portion the clay:
Take a handful of air-dry clay and roll it between your palms to form a sphere roughly the size of a tangerine. -
Prepare the foil tool:
Tear off a sheet of aluminum foil and crumple it into a loose ball. This will be your texture stamp. -
Imprint texture:
Press the crumpled foil firmly against the surface of your clay sphere repeatedly. Rotate the ball to cover every side. -
Deepen the details:
For a rugged look, press harder in some areas to create deeper divots resembling a natural rock surface. -
Flatten the base:
Press the sphere gently onto a flat surface to create a slight flat spot on the bottom. This ensures it will sit securely on the canvas later. -
Cure the clay:
Let the clay stone dry completely according to the package instructions.
Step 3: Painting and Assembly
-
Mix your grey:
On a palette, mix white and a tiny drop of black acrylic paint to create a medium stone-grey shade. -
Base coat:
Paint the entire surface of the dried clay stone with the grey mixture, working the bristles into the foil-created crevices. -
Add depth:
While the paint is still wet, I like to mix a slightly darker grey and dab it randomly into the deeper textures for dimension. -
Dry brush highlights:
Once the base is dry, dip a dry brush into pure white paint, wipe most of it off, and lightly whisk it over the raised parts of the stone. -
Final drying:
Allow the paint on the stone to dry fully to the touch. -
Position the stone:
Apply a generous dab of strong craft glue to the flat spot on the bottom of your stone. -
Mount artwork:
Press the stone firmly onto the textured white canvas, holding it for a moment to ensure initial adhesion.
Cracked Clay?
If small hairline cracks appear in your clay as it dries, don’t worry. Paint usually fills these in, and they actually enhance the weathered rock look.
Now you have a serene, tactile piece of multimedia art ready to display.
Finger-Painted Abstract Gardens
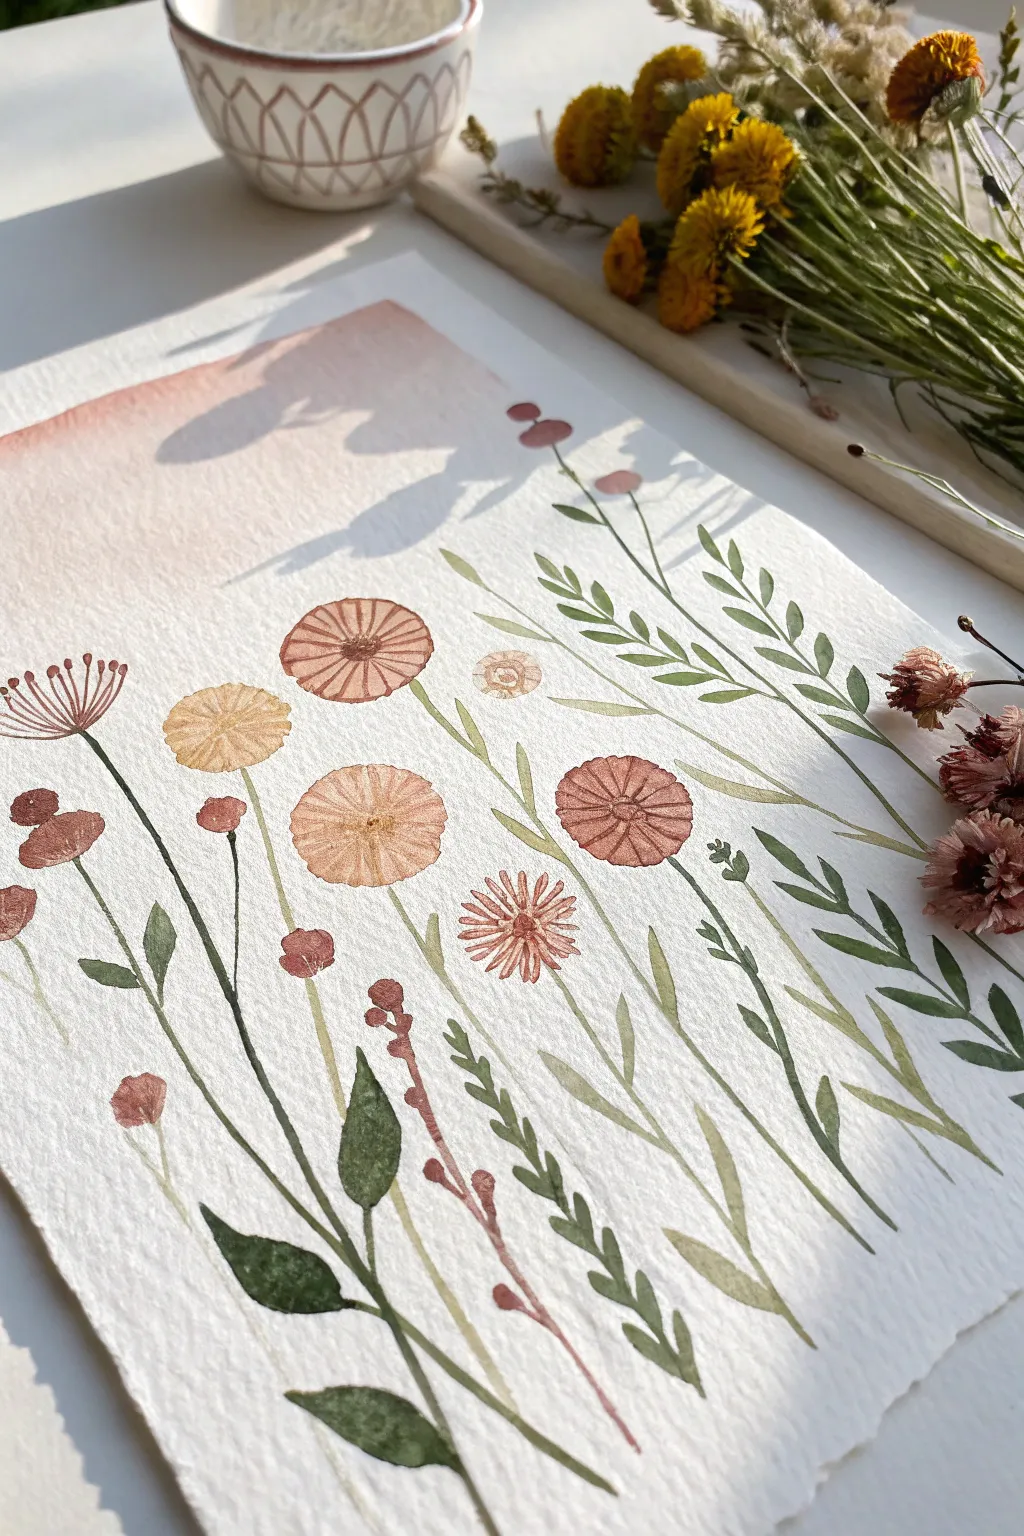
Capture the delicate beauty of a dried flower garden with this relaxing watercolor project. Using earthy tones and simple, repetitive brushstrokes, you will create a vertically oriented composition that celebrates the gentle imperfections of nature.
Step-by-Step
Materials
- Cold press watercolor paper (300gsm/140lb)
- Watercolor paints (Terracotta, Yellow Ochre, Dusty Rose, Olive Green, Sepia)
- Round brushes (size 2 or 4 for details, size 8 for wash)
- clean water jar
- Paper towel
- Painter’s tape or masking tape
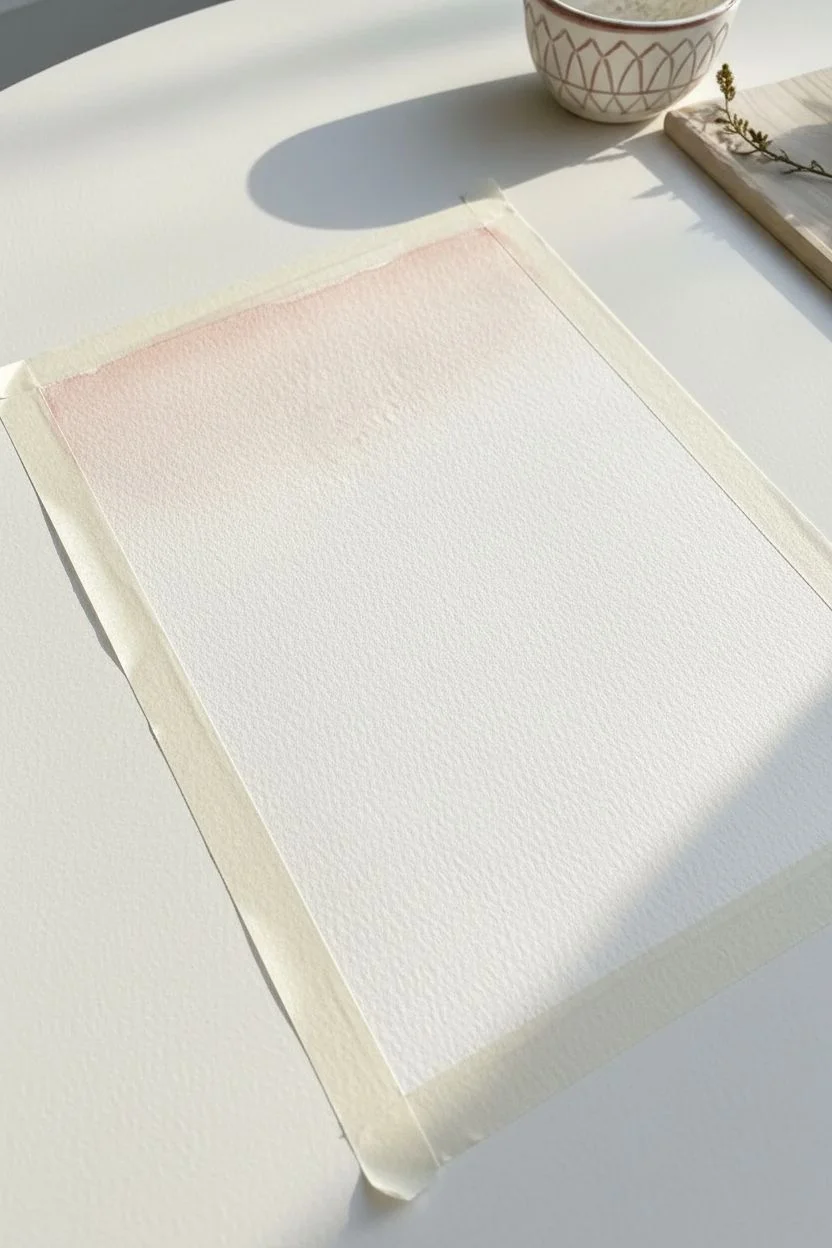
Step 1: Setting the Scene
-
Secure the paper:
Tape your paper down to a flat surface or drawing board using masking tape. This creates a clean white border and prevents buckling when wet. -
Mix the background tint:
Dilute a very small amount of Dusty Rose or a pale Terracotta with plenty of water until it is transparent and tea-like. -
Apply the top wash:
Using your larger size 8 brush, brush this pale wash across the top third of the paper. Add clean water to the bottom edge of the stroke so it fades seamlessly into the white paper. -
Let it dry completely:
Wait until the paper is bone dry before proceeding. If you paint too soon, the flower shapes will bleed into the sky.
Shaky Hands Helper
Rest your pinky finger on a dry part of the paper to stabilize your hand while painting the long, thin stems. It acts as a pivot anchor for smoother control.
Step 2: Painting the Blooms
-
Mix your flower colors:
Prepare puddles of Terracotta, Yellow Ochre, and a deep reddish-brown on your palette. Aim for a milky consistency, not too watery. -
Create the pinwheels:
Switch to your size 4 brush. Randomly place 2-3 circles using the Terracotta paint. Instead of filling them in solid, paint them like bicycle wheels with lines radiating from a center point to the outer edge. -
Add solid rounds:
Using the Yellow Ochre, paint a few solid, imperfect circles near the middle and lower sections. I keep these slightly smaller than the pinwheels for variety. -
Paint the seed head:
On the left side, paint a ‘dandelion’ shape by drawing a small semi-circle base and radiating thin lines outward in a fan shape using a dark brownish-red. -
Scatter small buds:
Dab tiny, irregular spots of Dusty Rose or varying shades of pink in empty spaces to represent small flower buds or berries.
Step 3: Stems and Foliage
-
Mix your greens:
Create two shades of green: a light, warm Olive Green and a darker, cool Forest Green to add depth to the garden. -
Draw the main stems:
Using the tip of your size 2 brush and the lighter green, draw thin, wavy lines connecting your floating flower heads to the bottom of the page. Don’t worry if they wobble; nature isn’t perfectly straight. -
Add fern-like leaves:
For the tall texturized leaves, paint a central stem, then use short, quick dabs on either side creating a ‘V’ pattern all the way up. -
Paint broad leaves:
Dip into the darker green. Press the belly of the brush down and lift slowly as you drag it to create teardrop-shaped leaves attached to the base of the stems. -
Add floating vines:
Paint a few standalone vines with small leaves that weave between the flowers, filling the gaps without overcrowding the composition. -
Include reddish stems:
Mix a brownish-red and paint a singular, branch-like stem with small nubs to mimic a dried twig. This contrasting color adds warmth to the greenery.
Level Up: Ink Accents
Once fully dry, use a fine-tip waterproof black pen to loosely outline some petals or draw veins on the larger leaves for a modern illustrative look.
Step 4: Final Details
-
Define the centers:
Once the flowers are dry, use a concentrated brown or dark red to place a small dot in the exact center of your pinwheel and solid flowers. -
Add petal texture:
For the solid yellow circles, use a slightly darker yellow mix to paint very fine lines radiating from the center, giving the impression of petals. -
Ground the composition:
Add a few extra blades of grass relative to the bottom edge using quick, upward flicks of your brush. -
Reveal the border:
Ensure the painting is totally dry to the touch, then slowly peel away the masking tape at a 45-degree angle to reveal your crisp edges.
Frame your botanical study or gift it to a friend to bring a touch of eternal spring indoors.


Have a question or want to share your own experience? I'd love to hear from you in the comments below!