I believe that turning your desk setup into a canvas is one of the most satisfying ways to bring artistic joy into your daily routine. By exploring these keyboard painting ideas, you can transform a mundane tool into a personalized masterpiece that inspires you every time you type.
The Seamless Ombre Gradient
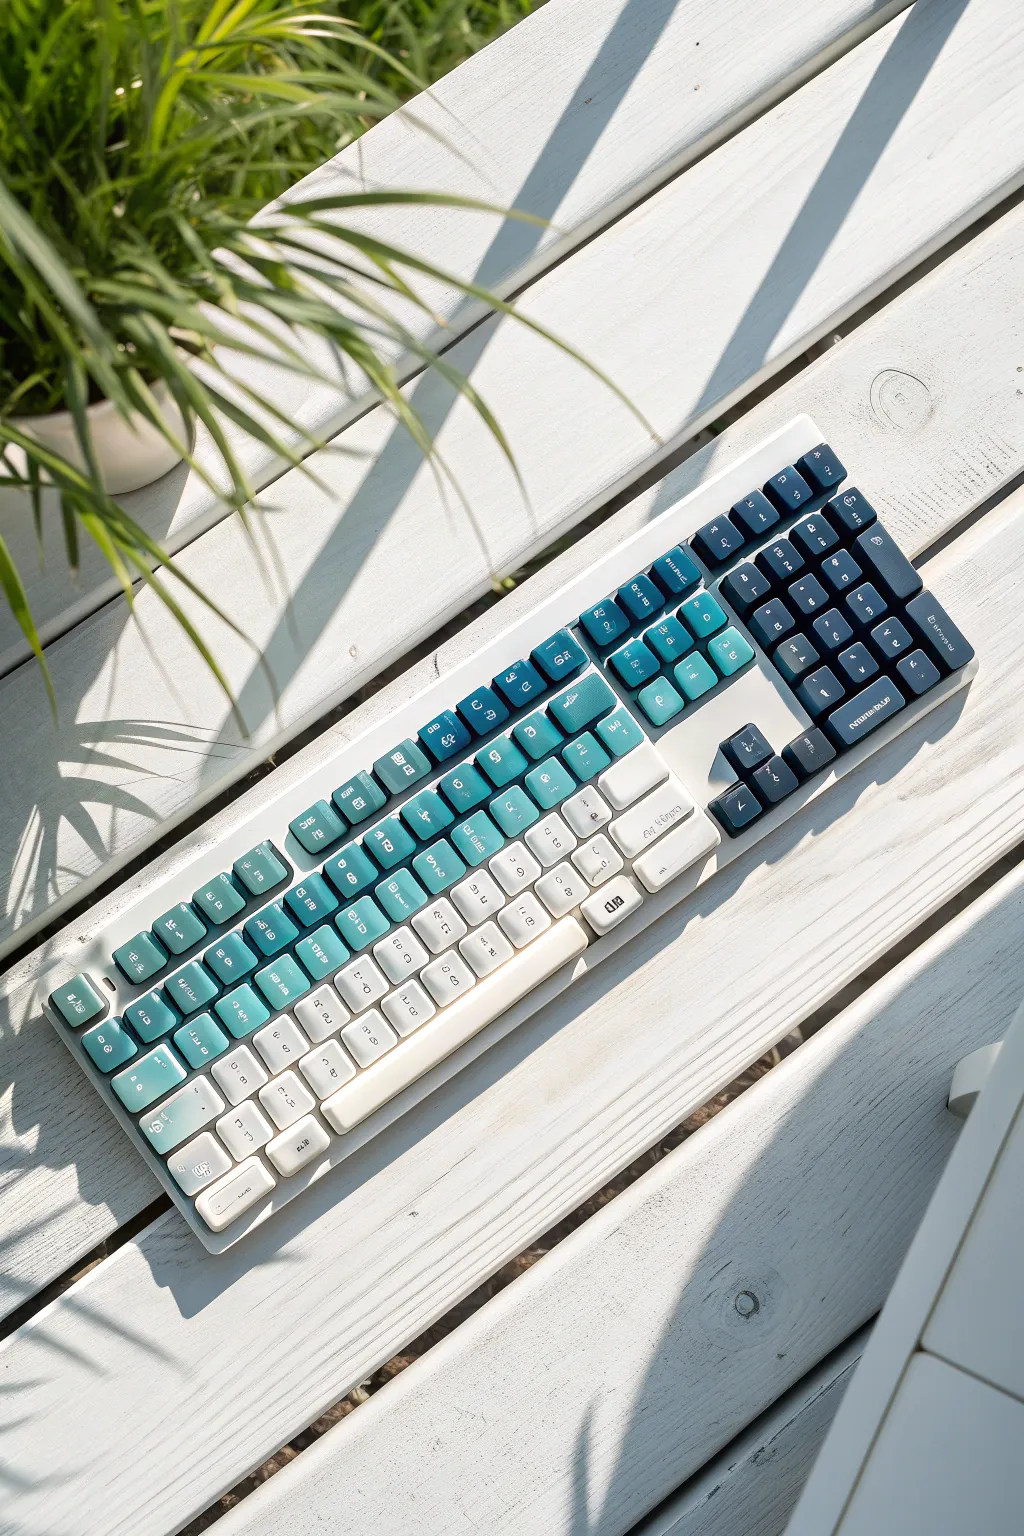
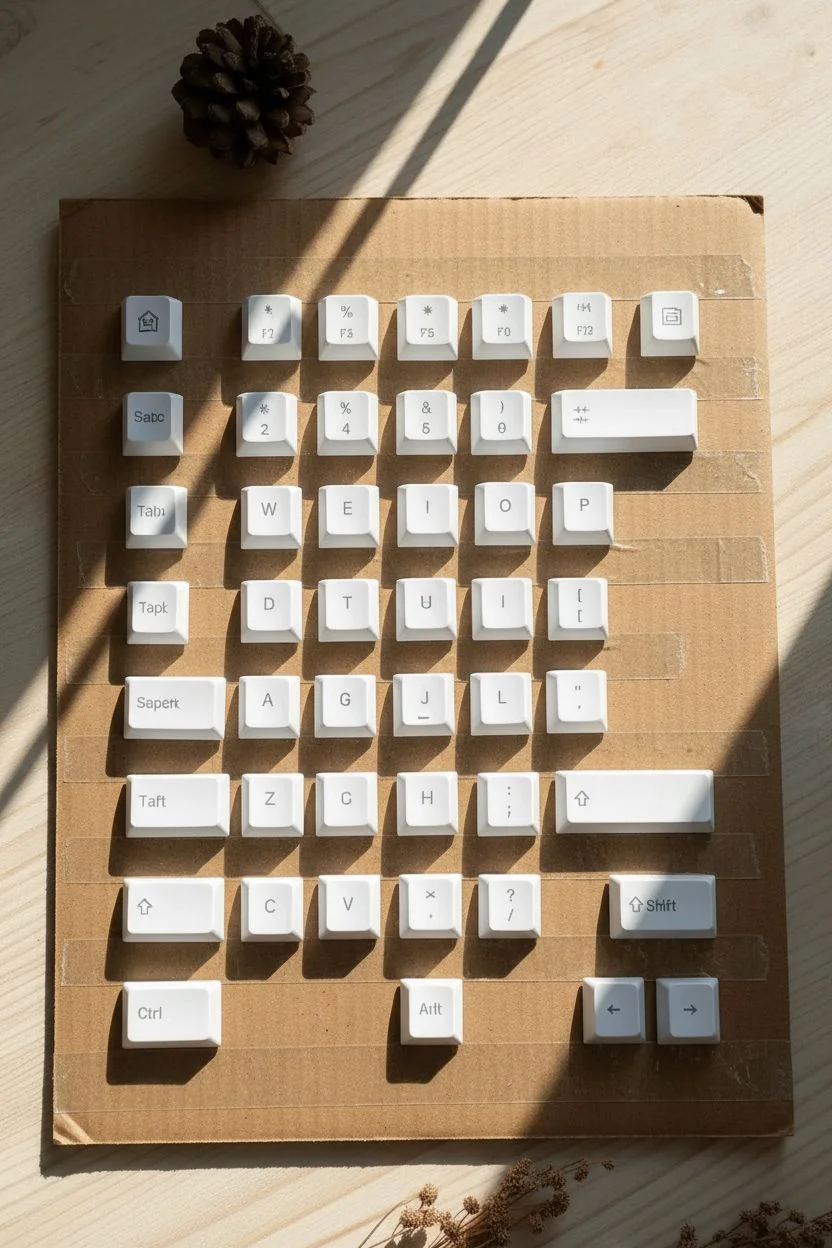
Transform a standard mechanical keyboard into a fluid visual wave with this seamless gradient technique. By blending deep navy into soft turquoise and finally crisp white, you create a calming, aquatic aesthetic that flows diagonally across the entire board.
Step-by-Step Guide
Materials
- Mechanical keycap set (PBT or ABS)
- Keycap puller tool
- Sandpaper (400 and 800 grit)
- Plastic primer spray
- Spray paints: Navy Blue, Teal/Turquoise, Flat White
- Matte clear topcoat spray
- Large sheet of cardboard
- Strong double-sided mounting tape
- Blu-tack or modeling clay
- Isopropyl alcohol
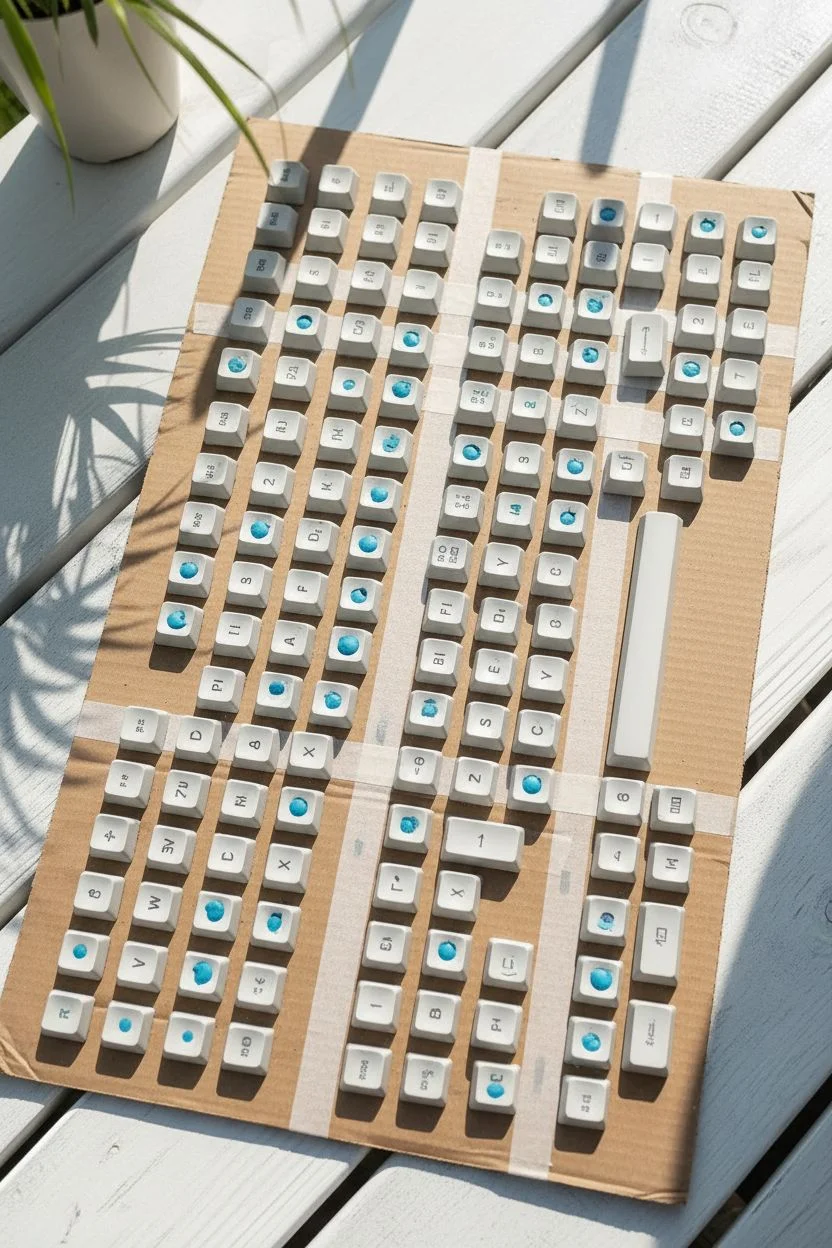
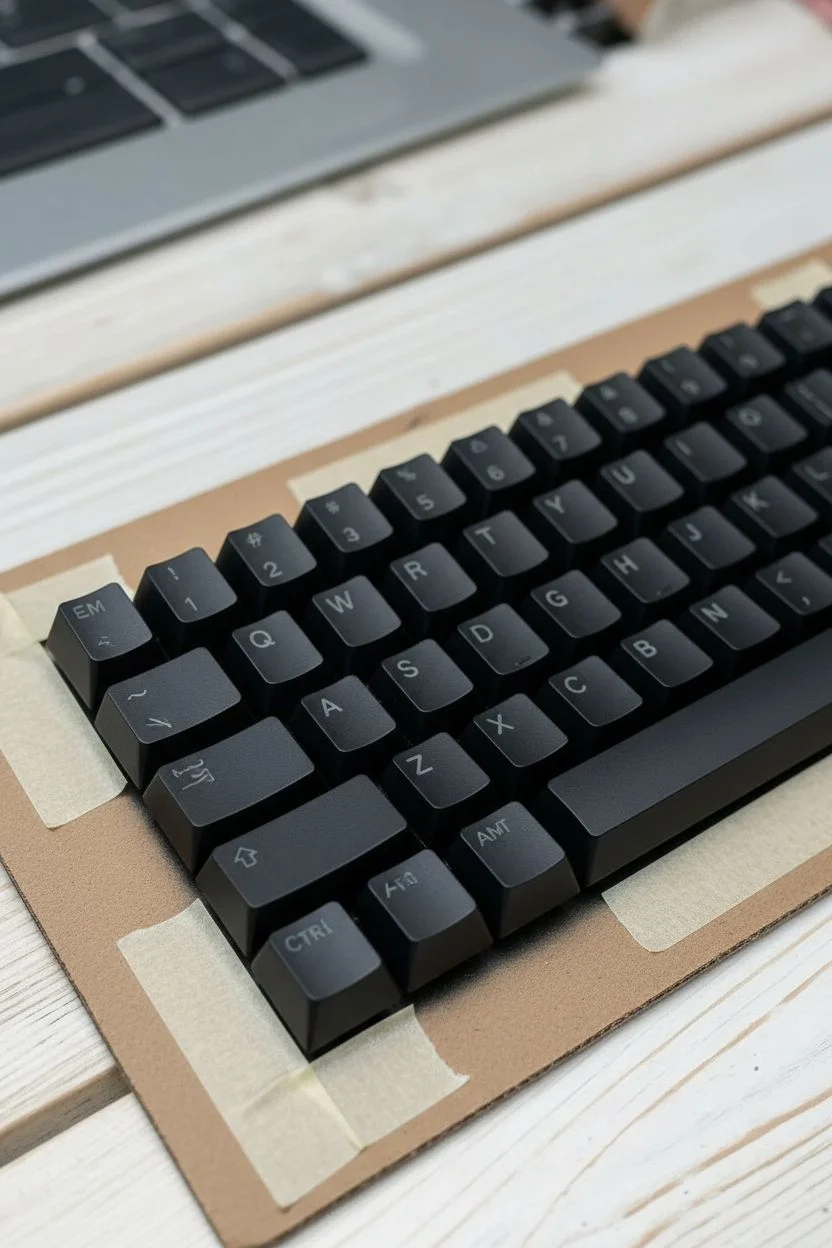
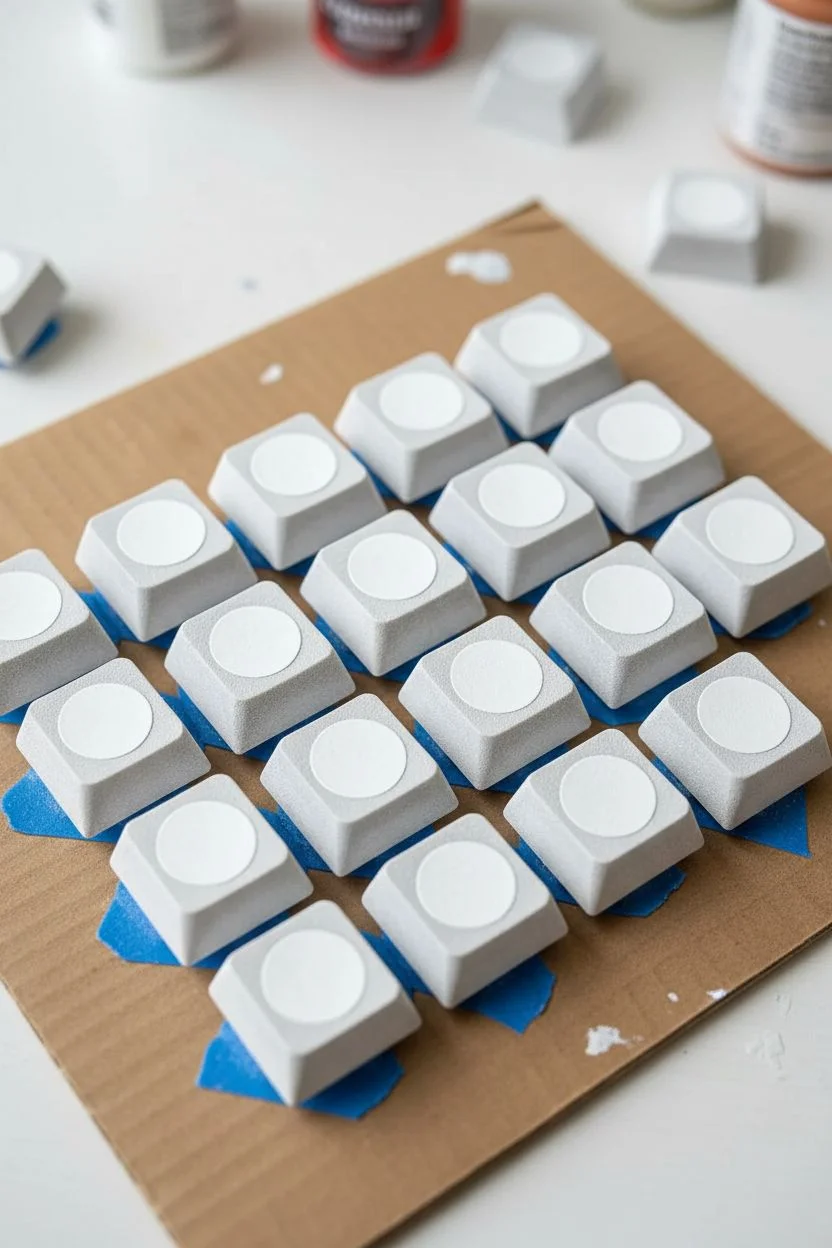
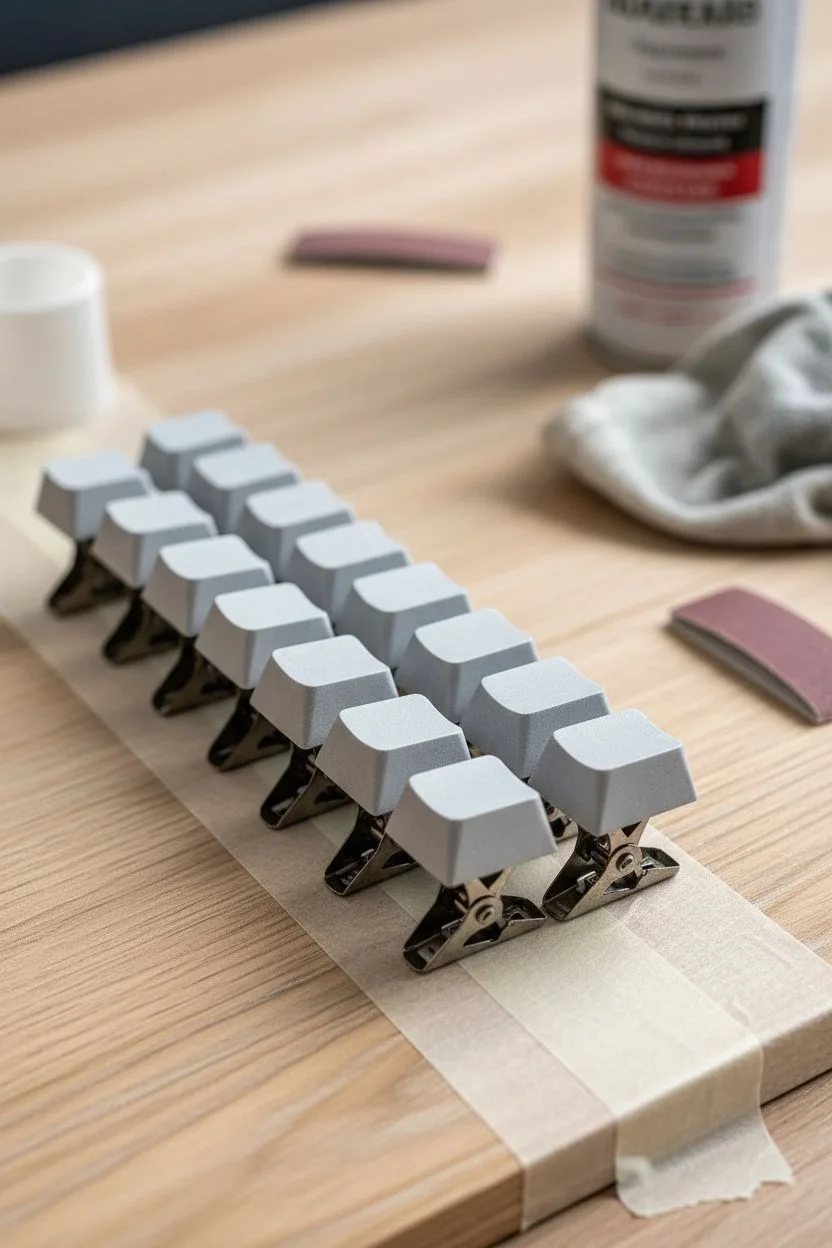
Step 1: Preparation and Mounting
-
Remove and organize:
Remove all keycaps from your keyboard using the puller tool. Keep them organized in their correct rows on a separate surface so you don’t lose track of their profile heights. -
Surface sanding:
Gently scuff the top and sides of each keycap with 400-grit sandpaper. You don’t need to remove the old color, just create a rough texture for the paint to grip. -
Degreasing:
Wipe every keycap down with a cloth soaked in isopropyl alcohol to remove finger oils and sanding dust. -
Protect the stems:
This is crucial: Insert a small ball of blu-tack or clay into the underside stem of every keycap. This prevents paint from getting inside the mounting illusion, which would make the keys stick or not fit later. -
Create the painting board:
Apply strips of double-sided tape to your large cardboard sheet. Stick the keycaps onto the tape, recreating the exact layout of your keyboard. Ensure the keys are spaced slightly further apart than usual (about 1cm) to allow paint to reach the sides.
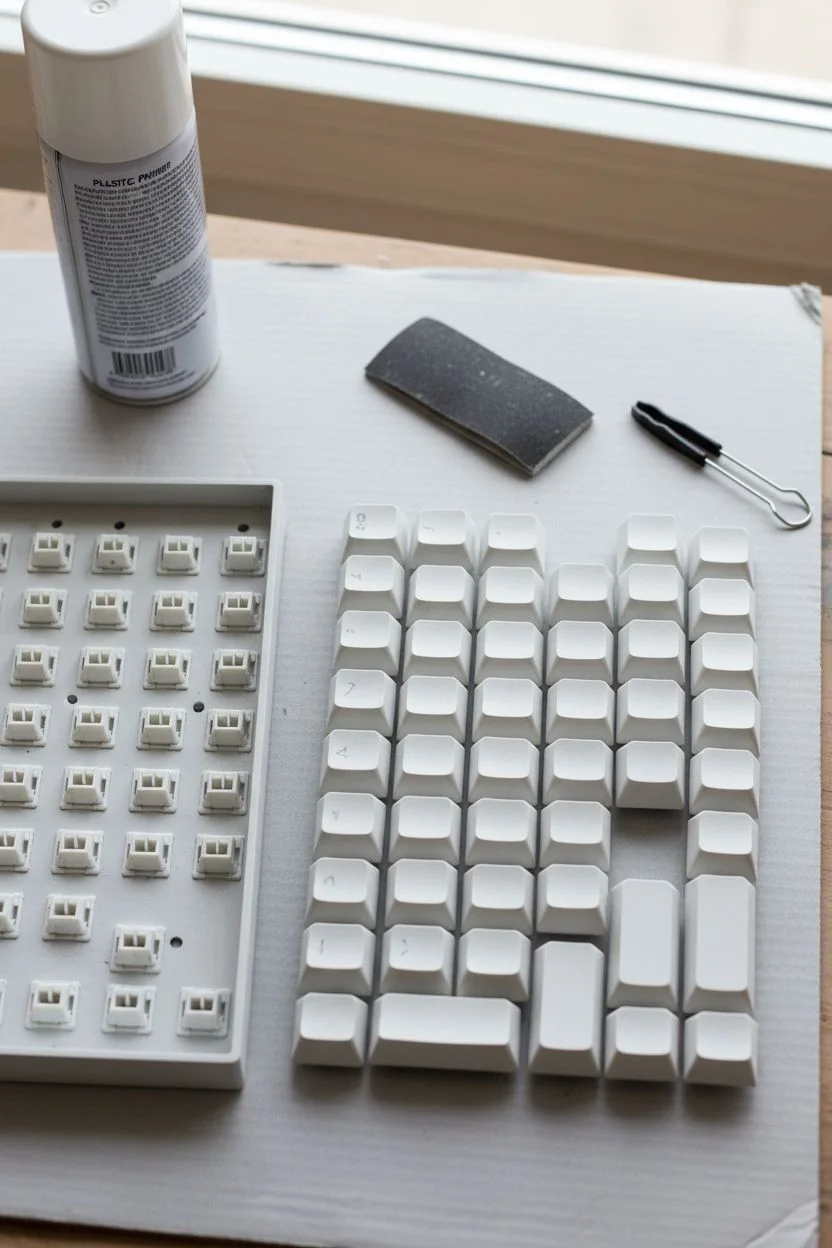
Step 2: Priming and Base Layer
-
Apply primer:
Spray a thin, even coat of plastic primer over the entire set. Move the can constantly to avoid drips. Let this dry for about 15 minutes. -
The white base:
If your keycaps aren’t already white, spray the entire board with Flat White paint. This ensures your colors pop and provides the lightest part of the gradient. Let this dry for a full hour.
Fixing “Orange Peel”
If the surface looks bumpy like an orange skin, you sprayed too close or too thick. Once dry, wet sand gently with 800-grit paper until smooth, wipe clean, and re-spray a lighter coat.
Step 3: Spraying the Ombre
-
Map the diagonal:
Visualize a diagonal line cutting across the board. The top left will remain white, the middle will be teal, and the bottom right will be navy. -
The dark corner:
Start with the Navy Blue. Spray the bottom right corner, holding the can about 10-12 inches away. Gently feather the spray toward the middle, letting the paint particles naturally thin out. Do not spray a hard line. -
The mid-tone transition:
Switch to your Teal/Turquoise paint. Start spraying in the navy section and move diagonally upward into the white section. I like to pulse the spray nozzle lightly here to control the blend. -
Correction pass:
If the transition looks harsh, lightly mist the lighter color back over the darker edge to soften the gradient. The goal is a seamless ‘fizz’ of color, not stripes. -
Dry and inspect:
Let the paint dry for 30 minutes. Check for any lighter patches on the sides of the keys and touch up gently if needed.
Level Up: Side Legends
For a super clean look, apply your letter decals to the front-facing side of the keycap (side-print) instead of the top. This keeps the gradient artwork completely uninterrupted.
Step 4: Finishing Touches
-
Apply legends (Optional):
If you want letters like in the image, apply white dry-transfer lettering or vinyl decals now that the paint is dry to the touch. Use tweezers for precision placement. -
Seal the deal:
Apply 3-4 thin coats of Matte Clear Topcoat. This is essential for durability since your fingers are abrasive. Wait 15 minutes between each coat. -
The long cure:
Let the keys cure undisturbed for at least 24 hours (48 is better). Reassembling too early can leave fingerprints in soft paint. -
Reassembly:
Remove the blu-tack from the stems and press the caps back onto your switches.
Enjoy the rhythmic satisfaction of typing on your personalized ocean of colors.


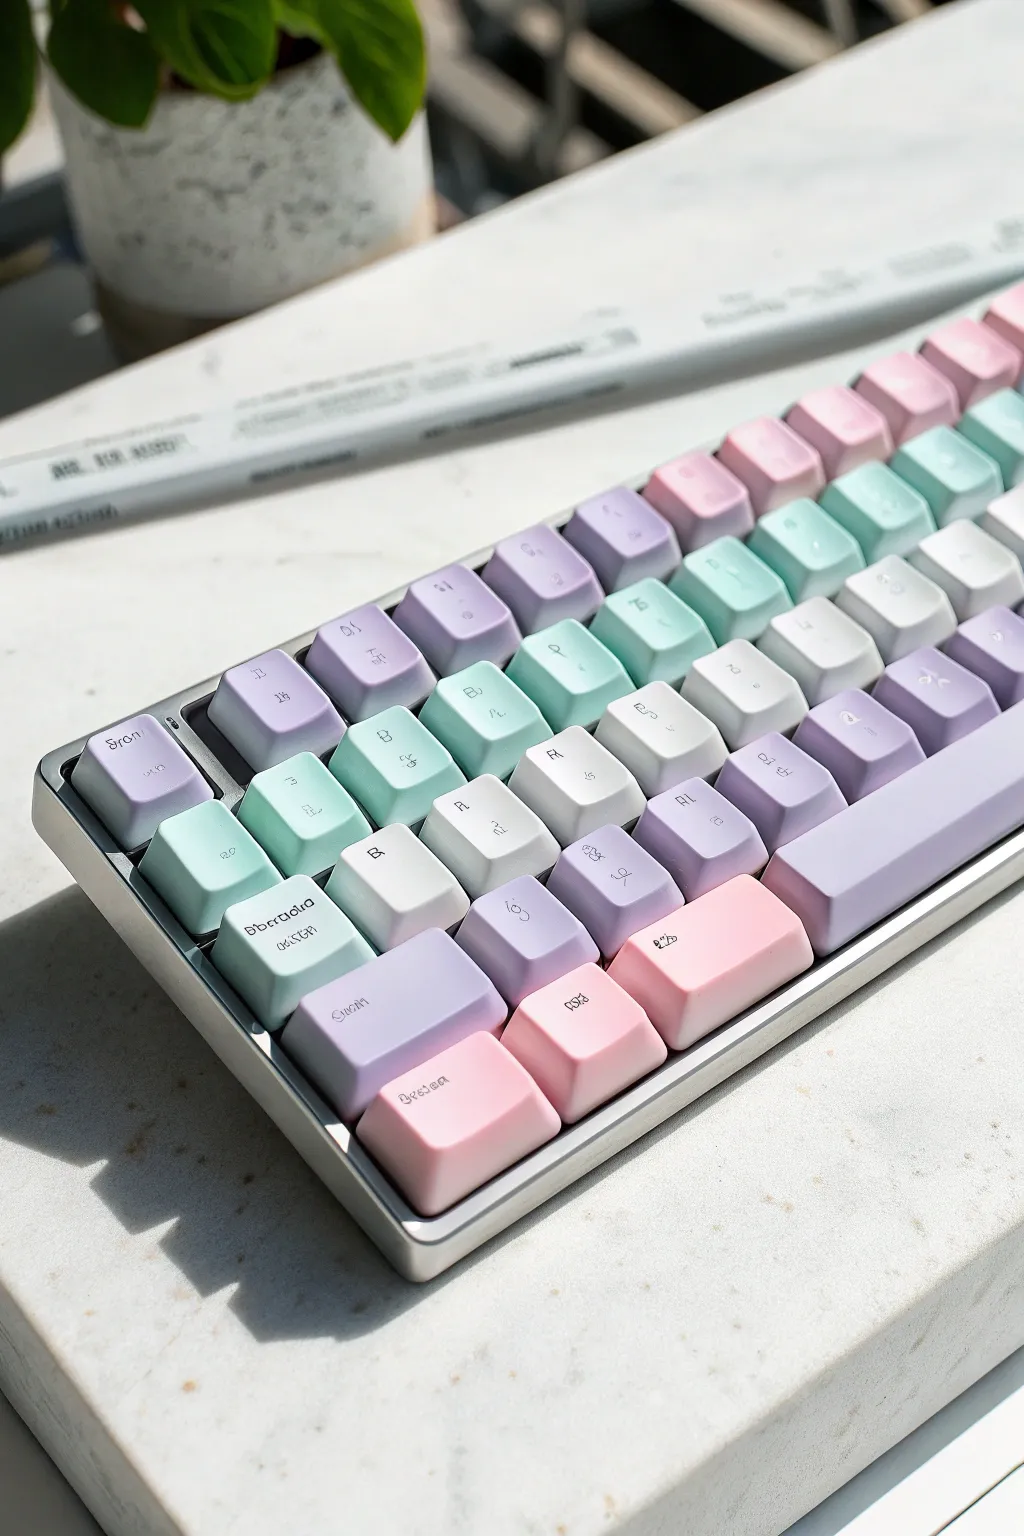
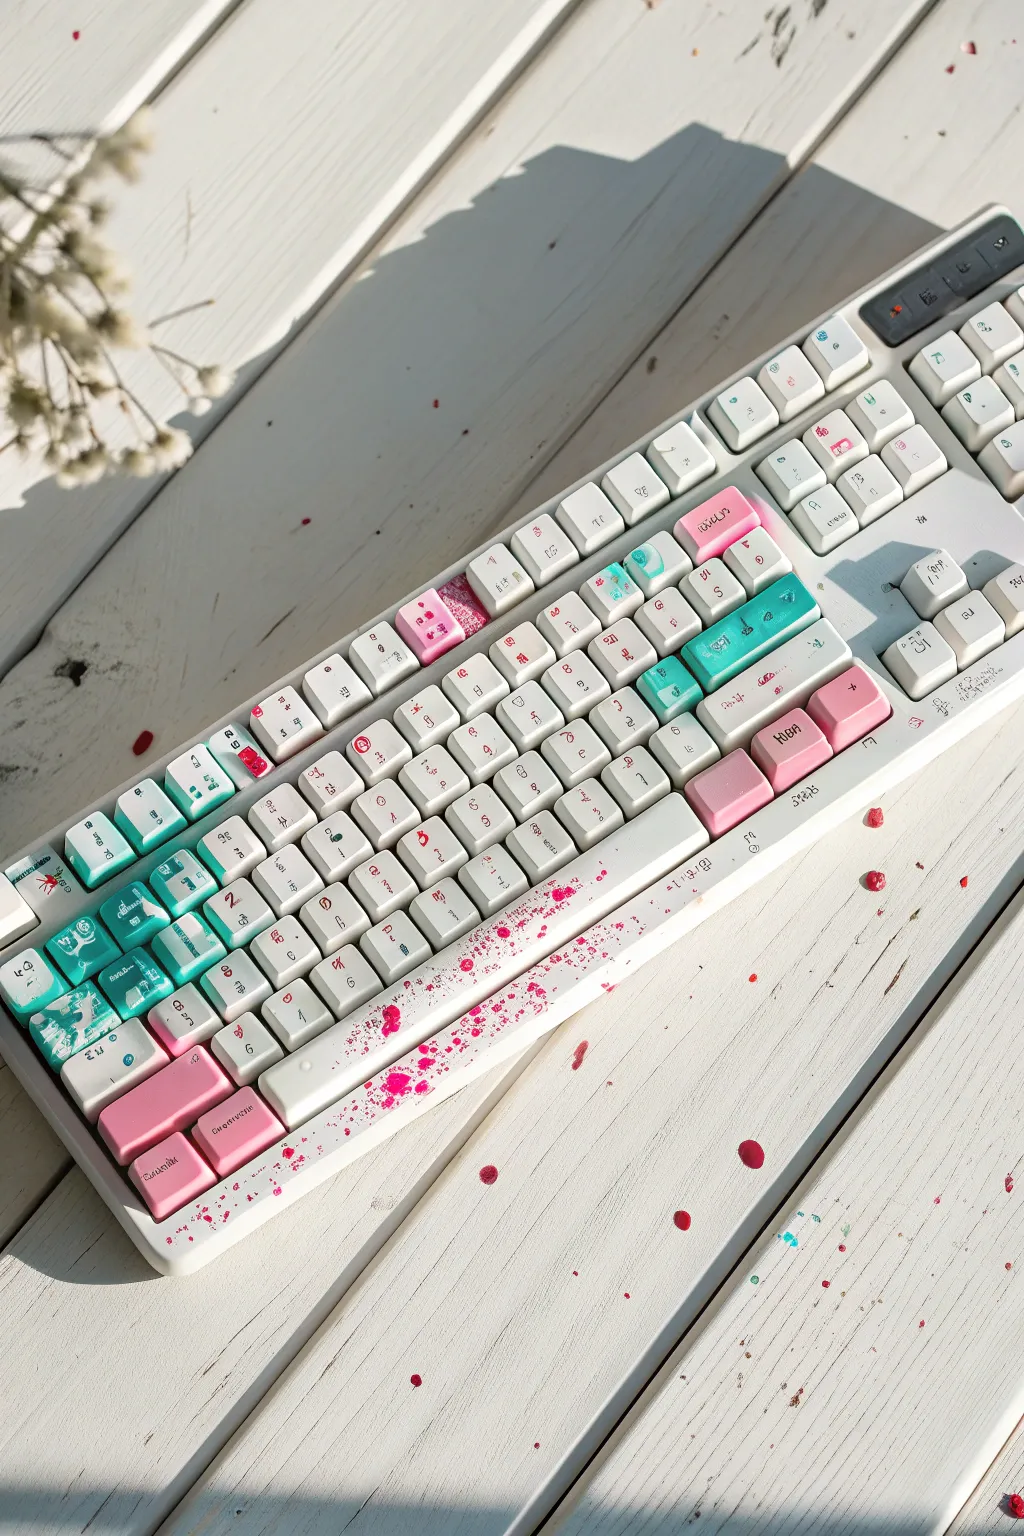
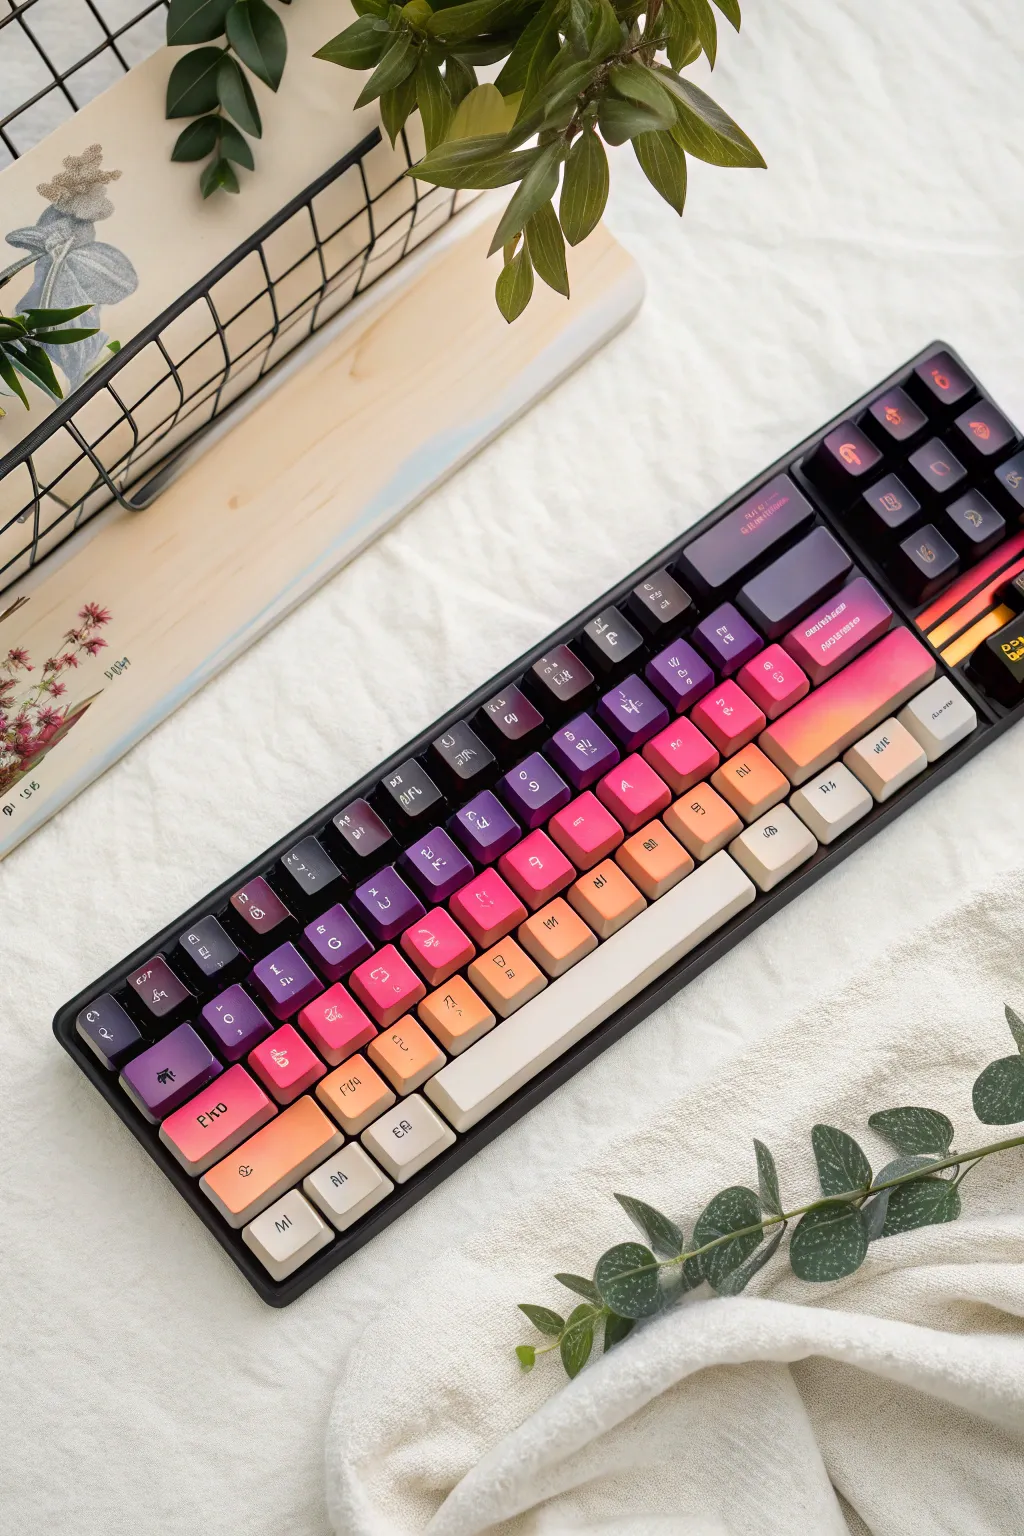
A Vibrant Rainbow Spectrum
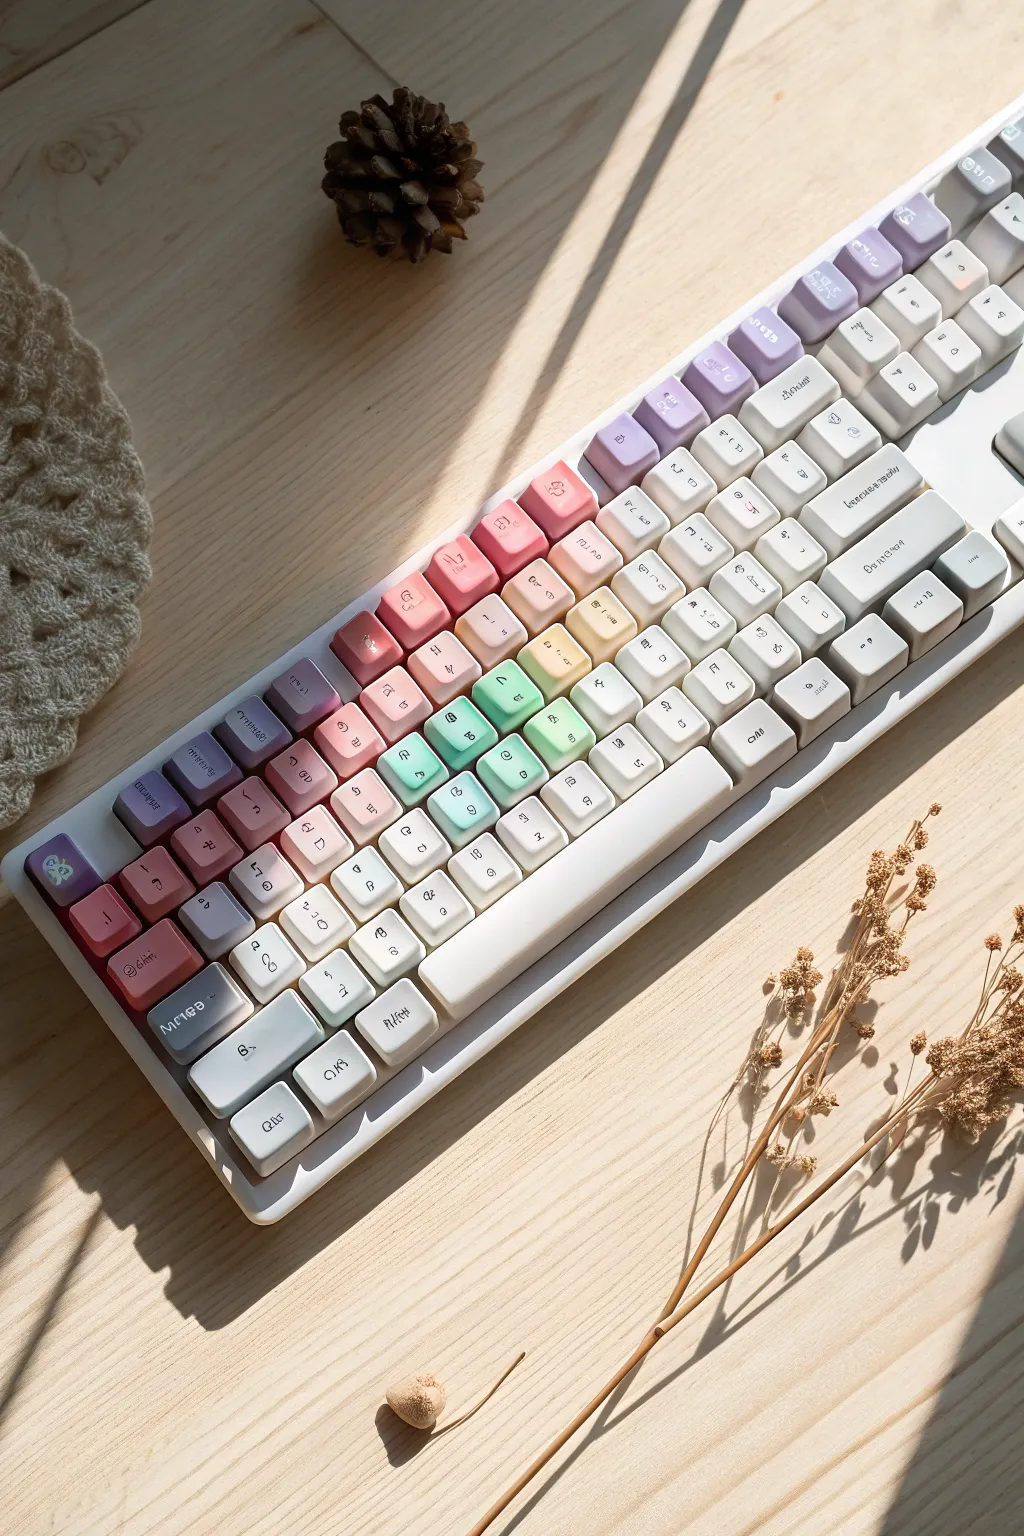
Transform your mechanical keyboard into a soft, dreamy spectrum of colors inspired by morning light. This project uses a gentle gradient technique to shift from deep lavenders to soft mints, replacing stark factory standard keys with a custom work of art.
Step-by-Step Tutorial
Materials
- Set of PBT or ABS white keycaps
- Fine-grit sandpaper (400-600 grit)
- Isopropyl alcohol wipes
- Cardboard or foam board (large surface)
- Strong double-sided tape
- Plastic-bonding spray primer (White)
- Spray paints (Lavender, Pastel Pink, Mint Green, Pale Yellow)
- Matte clear finishing spray
- Face mask and gloves
Step 1: Preparation & Mounting
-
Map the layout:
Before removing any keys, take a clear photo of your keyboard so you know exactly where each key belongs later. -
Clean the caps:
Remove the keycaps and wash them thoroughly in a bowl of warm, soapy water to remove finger oils, then let them air dry completely. -
Scuff the surface:
Gently rub the top and sides of each keycap with fine-grit sandpaper; you just want to create a slightly rough texture to help the paint stick. -
Wipe down:
Clean off the sanding dust using isopropyl alcohol wipes to ensure a perfectly clean surface. -
Create the painting station:
Apply strips of double-sided tape across your cardboard sheet. -
Secure the keys:
Press the keycaps onto the tape in their actual keyboard layout (QWERTY), leaving about an inch of space between each key for even airflow.
Gradient Pro Tip
To get the smoothest blend, start spraying the air *before* the stream hits the keys and end the spray *after* passing them. This prevents initial splatters from ruining the smooth gradient.
Step 2: Creating the Palette
-
Prime the surface:
Apply a thin, even coat of white primer over all the keys to create a neutral base and ensure the pastel colors will pop. -
Start with the darkest tone:
Using the Lavender spray, lightly mist the top-left corner keys (Esc, Tab, Q, 1), holding the can 10 inches away. -
Feather the edge:
When finishing the Lavender section, pull your hand away from the board as you spray to create a soft, faded edge rather than a hard line. -
Apply the second band:
Spray the Pastel Pink diagonally across the next section (WASD area), slightly overlapping the faded edge of the Lavender to blend them. -
Transition to warm tones:
Apply the Pale Yellow to the central keys, again keeping the layers very misty to avoid drips or thick buildup. -
Finish with cool tones:
Spray the Mint Green on the remaining right-side keys, letting it fade out into white on the far bottom-right if you want that bright highlight seen in the example.
Step 3: Sealing & Assembly
-
Check transitions:
Look at the board from a distance; if any color transition looks too harsh, do a very quick, distant mist of the lighter color over the line to soften it. -
Let it cure:
Allow the paint to dry for at least 24 hours; I prefer waiting closer to 48 hours to ensure the paint doesn’t stay tacky. -
Seal the deal:
Apply 2-3 thin coats of Matte clear finishing spray to protect your paint job from daily typing wear. -
Final reassembly:
Once fully cured and dry to the touch, carefully peel the keys off the tape and press them back onto your keyboard switches.
Level Up: Lettering
Since painting covers the original letters, apply dry-transfer letter decals (available at craft stores) onto the dried color *before* your final clear coat to restore functional legends.
Enjoy the satisfying click-clack of your new, custom-colored masterpiece as it brightens up your desk setup.


Soft Pastel Color Blocking
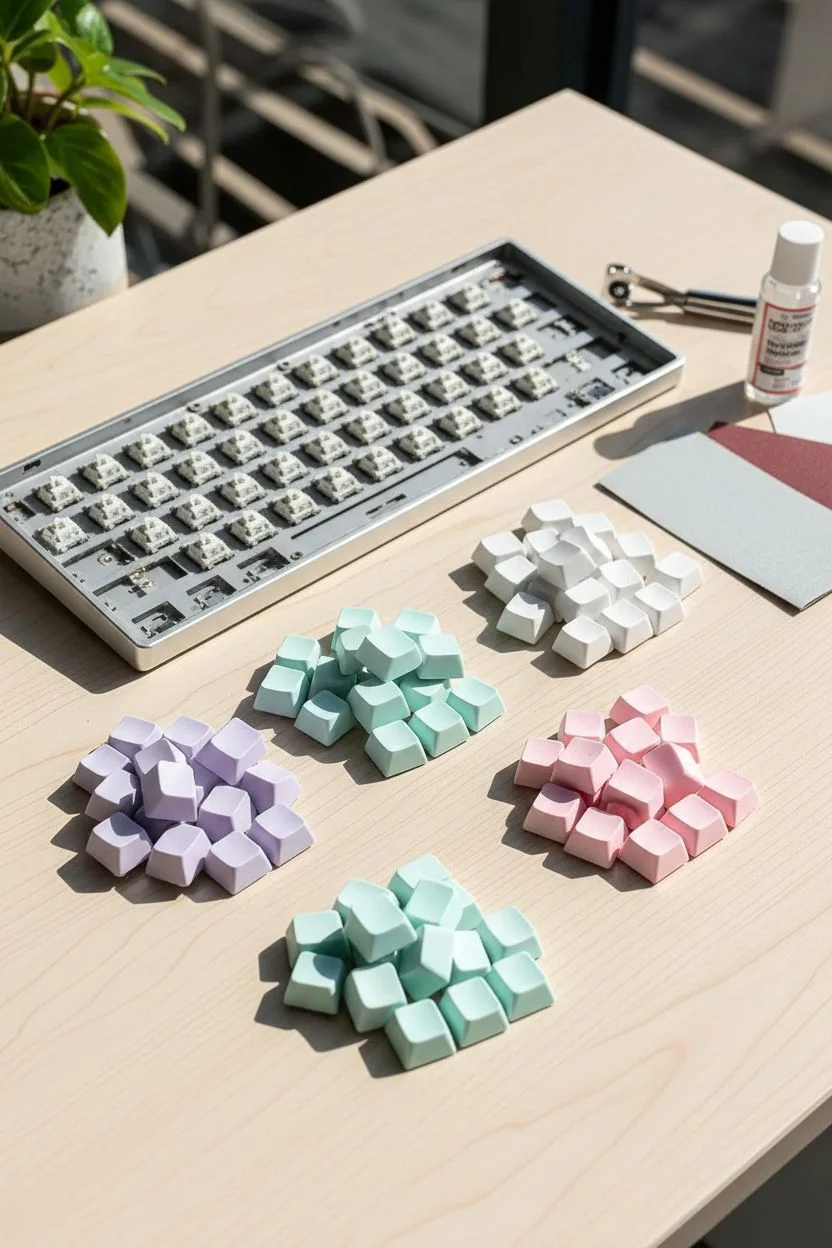
Transform a standard mechanical keyboard into a soft, airy piece of desk art using a soothing pastel palette. By arranging colors in diagonal blocks, you’ll create a cohesive gradient flow that looks dreamy and distinctly custom.
How-To Guide
Materials
- Mechanical keyboard keycaps (PBT or ABS)
- Keycap puller
- Fine-grit sandpaper (400-600 grit)
- White primer spray paint (plastic bonding)
- Pastel spray paints (Lavender, Mint, Baby Pink)
- White spray paint
- Ultra-fine black paint marker (0.5mm)
- Matte clear topcoat spray
- Cardboard box and masking tape
- Isopropyl alcohol
Step 1: Preparation & Mapping
-
Remove keycaps:
Use your keycap puller to gently remove all keys from the board, keeping them organized if you plan to keep the original layout. -
Clean surfaces:
Wash the keycaps in warm soapy water to remove finger oils, then wipe them down with isopropyl alcohol for a perfectly clean surface. -
Light sanding:
Gently scuff the top and sides of each keycap with fine-grit sandpaper. This creates a ‘tooth’ for the primer to grab onto without ruining the shape. -
Map the gradient:
Before painting, arrange the loose keycaps on a table in their final keyboard layout. Decide where your colors will flow diagonally—typically purple top-left, fading to mint, white, and finally pink bottom-right. -
Group by color:
Once you are happy with the color map, separate the keys into four distinct piles: Purple, Mint, White, and Pink.
Clean Lines Pro-Tip
Warm up your spray paint cans in a bowl of warm water for 5 minutes before spraying. This thins the paint slightly, resulting in a much smoother, mist-like finish with fewer splatters.
Step 2: Priming & Painting
-
Mounting stations:
Create painting stations by placing loops of masking tape on a piece of cardboard and pressing the underside of the keycaps firmly onto the tape. -
Apply primer:
Spray a thin, even coat of white primer over all keycaps. The white base is crucial to make the pastel colors pop vibrantly later. -
Primer drying:
Allow the primer to dry completely according to the can’s instructions—usually about 30 minutes to an hour. -
First color coat:
Take your grouped batches and spray the first light coat of their respective pastel colors. Keep the can 8-10 inches away. -
Second color coat:
Once the first coat is tacky dry, apply a second coat to ensure full coverage, making sure to hit the sides of the caps as well. -
Full cure time:
I usually let these sit overnight to fully cure. The paint needs to be hard enough to handle for the lettering phase.
Step 3: Detailing & Finishing
-
Hand-lettering legends:
Use the ultra-fine black paint marker to hand-write proper legends (Q, W, E, R…) or abstract symbols onto the keys. Keep the font thin and whimsical to match the aesthetic. -
Correction window:
If you make a mistake with the marker, you can quickly wipe it away with a damp Q-tip before it sets, then try again. -
Seal with clear coat:
Apply a thin layer of matte clear coat over the keys. This seals the paint and prevents your hand-drawn legends from rubbing off during typing. -
Second seal:
Apply one final layer of clear coat for durability. The matte finish will give it that soft, powdery look seen in the reference image. -
Reassembly:
Once the clear coat is bone dry (give it 24 hours to be safe), press the keycaps back onto your keyboard switches following your original gradient map.
Level Up: Texture
For a dreamy ‘sugared’ texture, hold the clear coat can further away (12+ inches) during the final spray. The droplets will dry in mid-air slightly and land with a subtle, tactile grain.
Enjoy the satisfying click-clack of your new pastel masterpiece as you tackle your next typing task.


Dreamy Galaxy and Nebula Effects
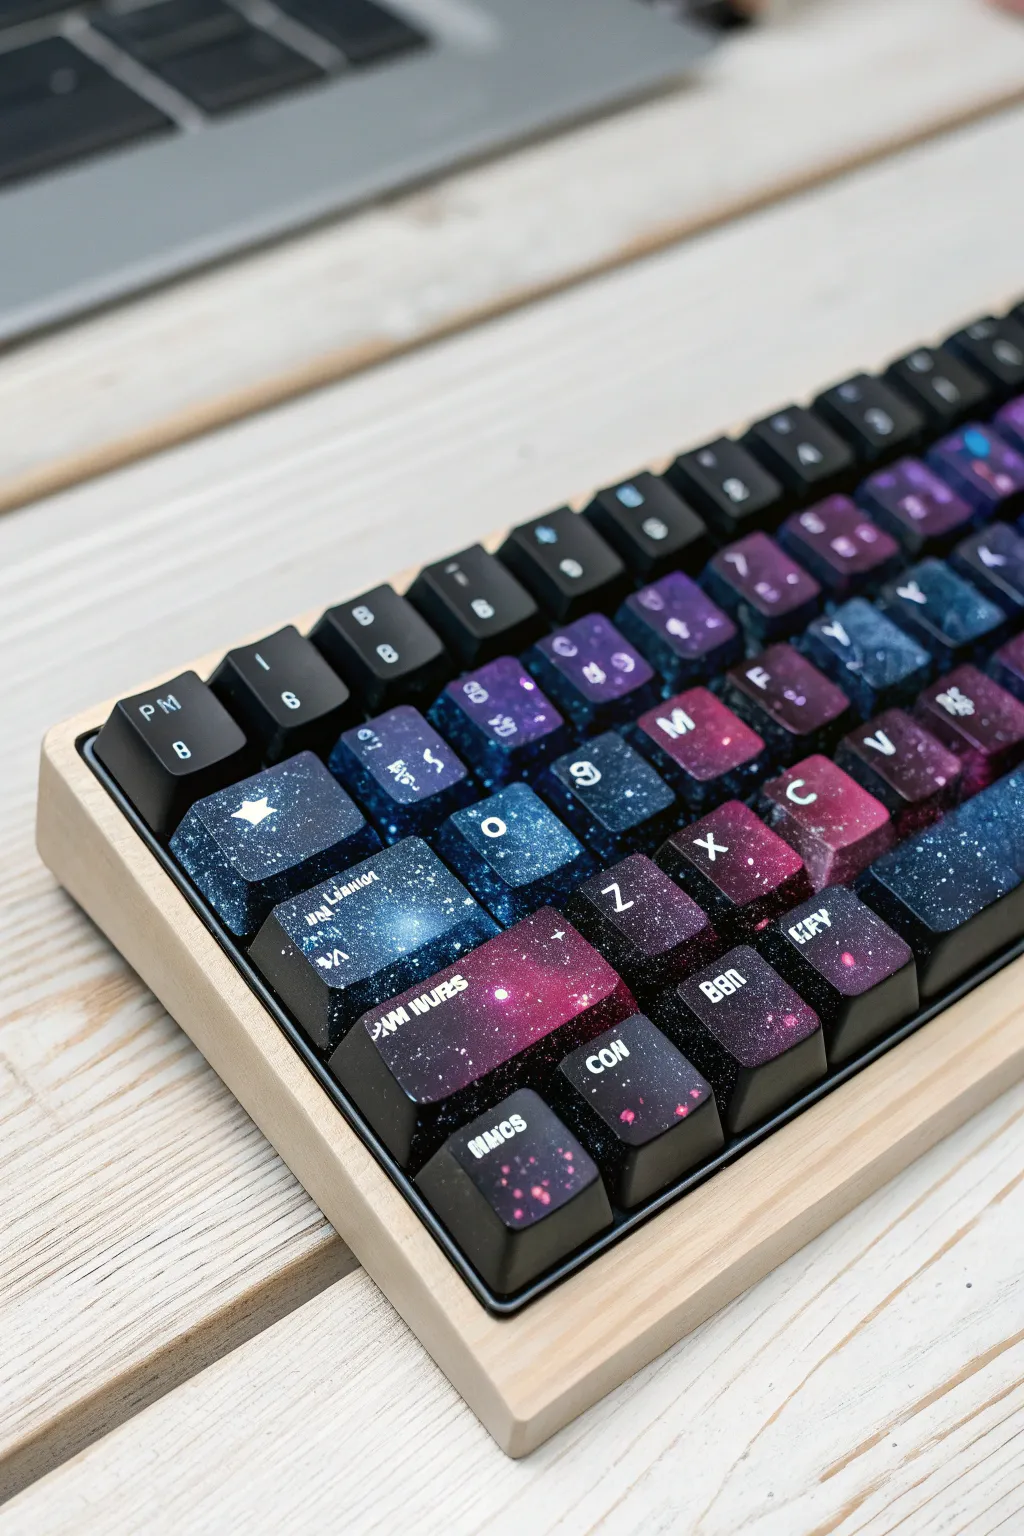
Transform your mechanical keyboard into a window to the cosmos with this detailed painting guide. By layering acrylics and creating a seamless nebula effect across your keycaps, you will achieve a deep, starry aesthetic that pairs beautifully with a light wood case.
Detailed Instructions
Materials
- Mechanical keyboard keycaps (PBT or ABS)
- Sandpaper (600 and 1000 grit)
- Black spray primer (plastic bonding)
- Heavy body acrylic paints (Phthalo Blue, Dioxazine Purple, Magenta, Titanium White, Teal)
- Cosmetic wedge sponges
- Stiff-bristled toothbrush
- Fine detail brush (00 size)
- White dry-transfer letters or vinyl legend stickers
- Matte or Satin clear coat spray
- Masking tape and cardboard
Step 1: Preparation and Base
-
Remove and organize:
Pull all keycaps from your board using a keycap puller. Arrange them in the correct standard layout on a piece of cardboard to maintain the flow of the design. -
Surface scuffing:
Gently sand the top and sides of each keycap with 600-grit sandpaper. This removes the factory shine and gives the primer something to bite into. -
Clean thoroughly:
Wipe every key down with isopropyl alcohol or wash with soapy water to remove all sanding dust and finger oils. Let them dry completely. -
Mounting for stability:
Roll loops of masking tape and stick them to your cardboard, then press the underside of each keycap onto the tape. This keeps them steady and organized while you paint. -
Prime with black:
Apply a thin, even coat of black spray primer to all keys. I like to do two light coats rather than one heavy one to avoid drips. Allow this to cure for at least 2 hours.
Texture Control
If the key surface feels rough or bumpy after sponging, you likely used too much paint. Lightly sand the textured area with 1000-grit paper, wipe clean, and re-apply a thin wash of color.
Step 2: Creating the Nebula
-
Plan your gradient:
Look at the reference image; notice how the colors flow from deep blues on the left to purples and magentas on the right. Visualize this flow across your mounted keys. -
Sponging the dark tones:
Dab a cosmetic sponge into Phthalo Blue. Offload most of the paint on a paper towel until the sponge is almost dry, then gently dab random cloud shapes onto the left and center keys. -
Layering purple hues:
Using a fresh sponge edge, apply Dioxazine Purple. overlap the edges of the blue areas and create new clusters on the right side of the board for a rich transition. -
Adding vibrancy:
Mix a small amount of Magenta with a tiny dot of White to make it opaque. Lightly sponge this into the center of your darkest purple clouds to create a glowing core effect. -
Highlighting with teal:
Use the Teal paint sparingly on the blue sections. Dab very lightly to create dimension, ensuring you leave plenty of black negative space visible for the ‘deep space’ look. -
Softening transitions:
If any sponge marks look too harsh, go back in with a sponge dipped in a tiny amount of black paint to mist over the edges and push layers back into the distance.
Cosmic Shimmer
To replicate the glittering depth of space, mix a drop of iridescent medium or color-shifting interference paint into your first layer of clear topcoat for a sparkle that shifts in the light.
Step 3: Stars and Details
-
Mixing splatter paint:
Dilute a small amount of Titanium White acrylic with water until it reaches the consistency of heavy cream or ink. -
Flicking the stars:
Dip the bristles of a toothbrush into the thinned white paint. Test on paper first, then run your thumb across the bristles to flick a fine mist of stars across the keys. -
Painting hero stars:
Use your 00 detail brush to paint a few distinct, larger stars. For the ‘hero’ star seen on the Shift key, paint a small cross with tapered points and a solid center dot. -
Applying legends:
Once the paint is bone dry, carefully apply white dry-transfer letters or vinyl stickers to the center of each key to restore the function labels (Q, W, E, R, etc.). -
First sealing coat:
Spray a light coat of matte or satin clear finish over the keys to lock in the paint and protect the lettering. -
Final cure:
Apply a second, slightly wetter coat of sealant for durability. Let the keys cure for 24 hours before reinstalling them on your board to prevent the paint from feeling tacky.
Pop your new custom caps onto your keyboard and enjoy the feeling of typing amongst the stars.
BRUSH GUIDE
The Right Brush for Every Stroke
From clean lines to bold texture — master brush choice, stroke control, and essential techniques.
Explore the Full Guide
Abstract Splatter Expression
Transform a standard mechanical keyboard into a modern art piece featuring a soft teal gradient clashed with aggressive hot pink splatters. This design balances calm aesthetics with a touch of chaotic energy, centering on a dramatic spacebar.
Step-by-Step Tutorial
Materials
- Mechanical keyboard with removable keycaps
- Keycap puller
- Fine-grit sandpaper (400-600 grit)
- Plastic primer (spray preferred)
- Acrylic paints (Teal, Mint, White, Hot Pink)
- Fine-tip black paint pen or liner brush
- Old toothbrush or stiff bristle brush
- Matte clear coat spray
- Makeup sponges (wedges)
- Cardboard box (splatter station)
Step 1: Preparation & Priming
-
Remove Keycaps:
Use your keycap puller to gently remove all caps from the board. Arrange them in order on a separate surface if you want to keep track of their original positions, though we will be painting over the legends. -
Clean Surfaces:
Wash the keycaps in warm soapy water to remove finger oils and dust. Let them air dry completely on a towel. -
Scuff Sanding:
Lightly sand the top surface of each keycap with fine-grit sandpaper. You don’t need to remove the old color, just create a rough texture for the primer to grip. -
Apply Primer:
Place the keycaps on a piece of cardboard or mounting stand. Apply a thin, even coat of plastic primer. I like to do two light coats rather than one heavy one to avoid drips.
Step 2: Color Blocking
-
Paint the Modifiers:
Identify the ‘Enter’, ‘Shift’, and ‘Backspace’ keys. Paint these a solid, vibrant hot pink using a brush or sponge. Apply multiple thin layers for full opacity. -
Create the Teal Cluster:
On the left side of the keyboard (roughly the WASD area and surrounding keys), apply your teal acrylic paint. Use a makeup sponge to dab the paint on; this reduces brush strokes and creates a nice texture. -
The Fade Effect:
For the keys transitioning from the teal section to the white section, mix teal with a little white or mint. Sponge this lighter color onto these specific keys to create a soft, dissolving gradient look. -
The White Base:
Paint the remaining alpha keys and the spacebar a clean, solid white. These will serve as the canvas for your details and splatter.
Sticky Keys?
If keys feel tight or sticky after painting, you may have gotten paint inside the stem mount. Use a small folded piece of sandpaper to gently clean out the underside socket before installing.
Step 3: Splatter & Details
-
Prepare the Splatter Paint:
Mix a small amount of hot pink acrylic paint with a few drops of water. The consistency should be fluid like heavy cream, but not watery. -
Splatter the Spacebar:
Place the white spacebar inside a cardboard box to catch the mess. Dip an old toothbrush into the pink mix. -
Flick Technique:
Hold the brush near the spacebar and run your thumb across the bristles to flick tiny specks of paint onto the surface. Focus the heaviest concentration on the left side to match the reference. -
Hand-Drawn Glyphs:
Once the base colors are bone dry, use a fine-tip black paint pen to draw the legends. Instead of standard letters, mimic the style in the photo by using scribbly, abstract strokes or stylized runes. -
Random Accents:
Add small, random marks or tiny splashes of teal on the white keys to tie the design together.
Pro Tip: Ombré Sponge
To get a smoother gradient on the teal keys, put both teal and white paint on the same sponge side-by-side and dab the key repeatedly. The colors will blend naturally right on the plastic.
Step 4: Finishing Up
-
Seal the Work:
This is the most critical step for durability. Apply 3-4 thin layers of matte clear coat spray to every painted keycap. -
Drying Time:
Allow the clear coat to cure for at least 24 hours. If you reassemble too soon, the paint might feel tacky or chip easily. -
Reassembly:
Press the keycaps back onto the switch stems, enjoying the new visual rhythm of your abstract creation.
Type away on your new masterpiece and enjoy the personalized flair it brings to your desk setup.
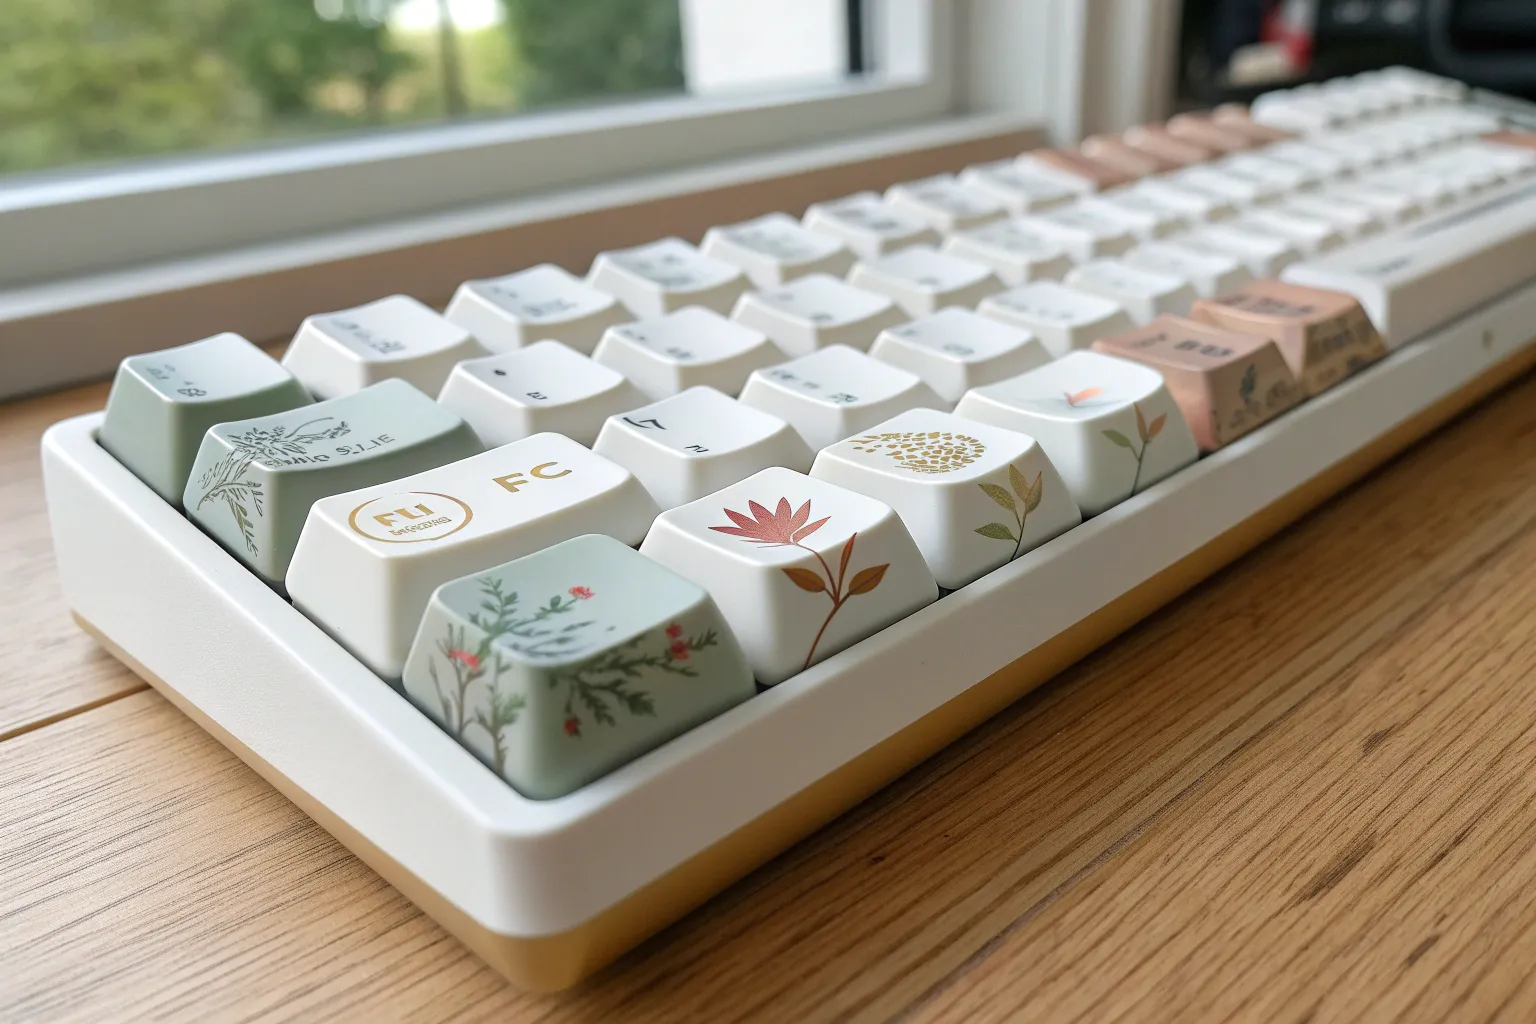
Delicate Botanical Vines
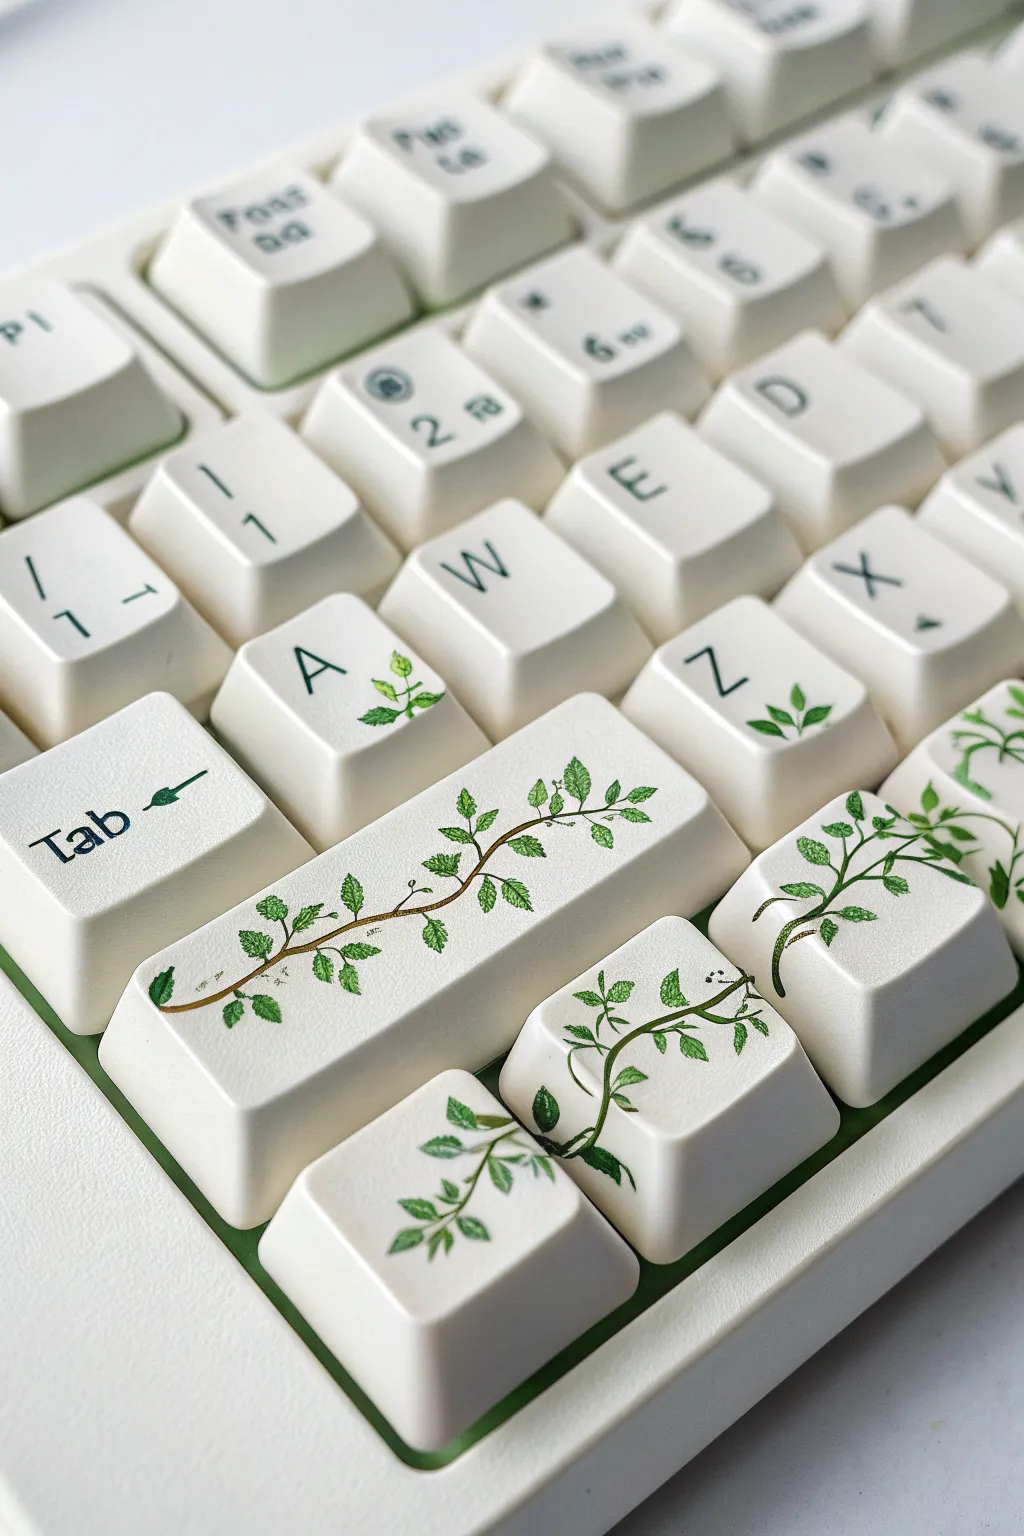
Transform a plain mechanical keyboard into a lush, creeping garden with this delicate vine design. This project focuses on painting a continuous organic motif that flows seamlessly across your modifier and alpha keys.
Detailed Instructions
Materials
- Mechanical keycaps (white or cream)
- High-flow acrylic paints (Burnt Umber, Sap Green, Hooker’s Green, White)
- synthetic liner brush (size 10/0 or 000)
- Small round brush (size 0)
- Fine-grit sandpaper (400-600 grit)
- Isopropyl alcohol and cotton pads
- Matte or satin spray sealant (polyurethane)
- Painters tape or double-sided tape
- Pencil
Step 1: Surface Preparation
-
Identify target keys:
Select the keycaps you want to paint, specifically grouping the Shift, Enter, and nearby alpha keys (like A, Z, and X) to create a cluster for the design. -
Clean the surface:
Wipe every selected keycap thoroughly with isopropyl alcohol to remove any finger oils or factory grease. -
Scuff for adhesion:
Gently sand the top surface of each keycap with fine-grit sandpaper. You don’t want deep scratches, just a matte texture to help the paint stick. -
Group the canvas:
Remove the keycaps from the board and place them on a flat surface. I prefer to use a strip of double-sided tape to stick them down in their exact keyboard layout, keeping the gaps tight.
Sticky Situation?
If acrylic paint beads up or separates on the plastic, the surface is too smooth. Let it dry, sand that spot again lightly, and repaint. The ‘tooth’ from sanding is essential.
Step 2: Sketching and Stems
-
Plan the flow:
Using a pencil, very lightly sketch a winding line that travels from the wider modifier keys (like Shift) up toward the letter keys. -
Bridge the gaps:
Ensure your pencil line jumps logically across the gaps between keys so the vine looks continuous when reassembled. -
Mix stem color:
Create a flowing consistency of Burnt Umber paint by adding a tiny drop of water; it should be inky but opaque. -
Paint the main vine:
Using your finest liner brush, trace the main vine structure over your pencil marks. -
Add variance:
Vary the pressure on your brush slightly to make the vine thicker in some spots and thinner in others for a natural look. -
Add offshoots:
Paint tiny, thread-like branches splitting off from the main stem, curving outward to where you want the leaves to sit.
Step 3: Foliage and Detail
-
Base leaf layer:
Mix Sap Green with a touch of White to create a fresh, light green. Paint small almond shapes attached to your stems using the size 0 round brush. -
Paint standalone leaves:
On keys that aren’t touching the main vine (like the ‘A’ or ‘Tab’ key), paint small sprigs of distinct leaves to carry the theme without connecting directly. -
Create depth:
Once the base green is dry, use Hooker’s Green (darker) to paint the bottom half of each leaf near the stem. -
Blend the shadows:
While the paint is still slightly wet, feather the dark green into the light green for a soft gradient. -
Detailing veins:
Switch back to the liner brush and the dark green paint to add a microscopic center vein to the larger leaves. -
Highlighting:
Mix a very pale lime green (mostly White) and add tiny dots or lines to the tips of the leaves to make them look sun-kissed.
Pro Tip: Flow Control
To make the vine look seamless across gaps, place the keys on a flat piece of cardboard in their exact arrangement. Paint the stem right over the gap, then slice the paint with an X-Acto knife.
Step 4: Protection
-
Curing time:
Let the paint dry completely for at least 24 hours to ensure all moisture has evaporated from the acrylic. -
First seal coat:
Apply a thin, misted layer of matte spray varnish. Do not spray heavily or the paint might run. -
Final smooth coat:
Apply 2-3 more thin coats of varnish, allowing proper drying time between each, to protect your artwork from daily typing friction.
Pop your keys back onto the board and enjoy the serene feeling of typing in your own secret garden.

PENCIL GUIDE
Understanding Pencil Grades from H to B
From first sketch to finished drawing — learn pencil grades, line control, and shading techniques.
Explore the Full Guide
Faux Marble Texture Design
Transform your standard mechanical keyboard into a high-end desk accessory with this faux marble painting technique. This project uses a simple layering method to create organic, smoky grey veins over a crisp white background.
Step-by-Step Guide
Materials
- Mechanical keyboard keycaps (PBT or ABS)
- White spray primer (plastic bonding)
- Matte white acrylic paint
- Cool grey acrylic paint
- Acrylic glazing medium or flow improver
- Plastic cling wrap
- Fine detail brush (size 0 or 00)
- 400-grit sandpaper
- Painter’s tape
- Clear matte polyurethane spray sealant
- Disposable gloves
Step 1: Preparation & Priming
-
Remove and clean:
Remove all keycaps from your board using a keycap puller. Wash them in a bowl of warm, soapy water to remove finger oils and dust, then dry them completely. -
Mask the stems:
This is crucial: Cut small strips of painter’s tape and cover the crusiform stems underneath each cap. Paint buildup here can prevent the keys from fitting back onto the switches. -
Surface scuffing:
Lightly sand the top and sides of each keycap with 400-grit sandpaper. You don’t need to remove the old color, just create a rough texture for the primer to grip. -
Mount for painting:
Place the keycaps on rolled tape attached to a piece of cardboard, or place them on wooden skewers stuck into a foam block. This allows you to spray all sides at once. -
Prime the surface:
Apply a thin, even coat of plastic-bonding white primer. Spray from about 8-10 inches away using sweeping motions to avoid drips. -
Base coat application:
Once the primer is dry, apply two thin coats of matte white acrylic paint, allowing full drying time between layers to ensure a solid, opaque canvas.
Veins look too fake?
Avoid straight lines or perfect zig-zags. Roll the brush between your fingers while dragging it to create natural, jittery wanders. Real stone fractures unpredictably!
Step 2: Creating the Marble Veins
-
Prepare the glaze:
Mix a small amount of cool grey paint with your glazing medium (approx. 1 part paint to 3 parts medium). The mixture should be translucent, not solidly opaque. -
Apply wet patches:
Working on 2-3 keys at a time so the paint doesn’t dry, brush irregular patches of the grey glaze diagonally across the keycap surface. -
The plastic wrap technique:
Immediately crumple a small piece of plastic cling wrap. Gently blot and dab the wet grey paint. This lifts some pigment and creates organic, random edges that mimic stone. -
Refining the shape:
I like to let this blotchy layer dry briefly, then inspect the pattern. If it looks too heavy, dab it with a clean, slightly damp sponge to soften the look. -
Painting fine veins:
Dip your fine detail brush into undiluted grey paint. Draw very thin, trembling lines through the center of your glazed areas to create the ‘primary’ deep cracks in the marble. -
Softening the lines:
Before the fine lines dry, feather them out slightly with a dry brush to blend them into the background, ensuring there are no harsh start or stop points. -
Adding texture detail:
Use a toothbrush dipped in diluted grey paint to flick incredibly tiny speckles onto the keys from a distance. This mimics the mineral sediment found in real Carrara marble.
Step 3: Sealing & Assembly
-
Final cure time:
Allow the painted marble effect to cure for at least few hours. The paint must be bone-dry before sealing prevents cloudiness. -
Protective clear coat:
Spray a coat of clear matte polyurethane sealant. Keyboards see heavy use, so a high-quality sealant is vital to prevent the paint from wearing off under your fingertips. -
Second seal layer:
Apply a second light coat of sealant after the first has dried completely. This ensures durability against hand oils. -
Unmasking:
Carefully peel the painter’s tape off the stems underneath. If there is any paint buildup on the bottom edges, lightly sand it away. -
Reassembly:
Press the keycaps back onto your keyboard switches, ensuring the marble patterns flow nicely across the board.
Level Up: Gold Kintsugi
For a luxe touch, trace a few of your darkest grey veins with metallic gold paint or gold leaf adhesive. This mimics the Japanese art of Kintsugi or natural gold quartz deposits.
Enjoy the satisfying click of your typing on your sophisticated new custom setup
Miniature Fruit Slice Keys
Transform standard white keycaps into a refreshing, juicy array of citrus, melon, and kiwi using acrylics and a secret glazing technique. These tiny works of art feature a high-gloss finish that mimics the wet texture of fresh fruit slices, adding a vibrant pop of color to your desk setup.
Step-by-Step Guide
Materials
- White mechanical keycaps (XDA or DSA profile recommended)
- High-flow acrylic paints (Yellow, Lime Green, Pink, White, Black)
- Detail brushes (Size 00/000)
- Fine-grit sandpaper (400-600 grit)
- UV Resin and UV Lamp (or high-gloss dimensional glaze)
- Rubbing alcohol
- Toothpicks or dotting tool
- Painter’s tape or sticky tack
Step 1: Preparation & Base Layers
-
Surface Prep:
Remove the keycaps from your board and clean them thoroughly with rubbing alcohol to remove any oils. -
Sanding:
Gently scuff the top surface of each keycap with fine-grit sandpaper; I find this crucial for preventing the paint from chipping off the smooth plastic later. -
Mounting:
Stick the keycaps onto a piece of cardboard or wood using sticky tack or double-sided tape to keep them stable while you paint. -
Base White:
Paint a thin, solid circle of white in the center of the keycap to serve as a primer, which helps the neon fruit colors pop against the plastic.
Step 2: Painting the Fruit Varieties
-
Lemon Base:
For the lemon keys, mix a bright sunshine yellow and paint a round circle over your white primer, leaving a very thin white rim if you want a rind effect. -
Lemon Segments:
Use your finest brush to paint thin white lines radiating from the center of the yellow circle like bicycle spokes to create the fruit segments. -
Kiwi Base:
Paint a lime green circle for the kiwi and let it dry completely. -
Kiwi Center:
Mix a small amount of white into your green to create a very pale green, then paint an oval in the direct center of the kiwi. -
Kiwi Seeds:
Dip the very tip of a toothpick into black paint and create a ring of tiny dots around the pale center oval. -
Watermelon Flesh:
Paint a vibrant pinkish-red circle, ensuring you leave a slightly thicker white border around the edge to represent the rind. -
Watermelon Seeds:
Using your 000 brush or a toothpick, add small black teardrop shapes scattered near the center of the pink circle.
Sticky Situation?
If your resin remains tacky after curing under the lamp, wipe the surface with a cotton pad soaked in rubbing alcohol to remove the inhibition layer.
Step 3: The ‘Juicy’ Finish
-
Drying Time:
Allow the acrylic paint to cure fully for at least one hour; moisture trapped under the next layer can cause cloudiness. -
Resin Application:
Pour a small drop of UV resin (or dimensional glaze) into the center of the fruit design. -
Creating the Dome:
Use a clean toothpick to guide the liquid resin to the edges of the fruit circle, letting the surface tension create a nice, rounded dome effect. -
Removing Bubbles:
Briefly pass a lighter flame or heat gun over the wet resin to pop any tiny air bubbles that may have formed. -
Curing:
Place the keycaps under a UV lamp for 2-3 minutes (or let glaze air-dry overnight) until the surface is rock hard and non-tacky. -
Final Buff:
Once fully cured, wipe the surface with a lint-free cloth and reattach the caps to your keyboard.
Pro Tip: Translucency
Mix a tiny drop of clear glazing medium into your acrylic paints before applying. This makes the color semi-transparent, mimicking real fruit flesh.
Now you have a refreshing customized keyboard that looks good enough to eat.


Reviewing Retro Vaporwave Aesthetics

Transform a standard mechanical keyboard into a retro-futuristic art piece with this diagonal ombre effect. This project captures the vintage sleekness of vaporwave aesthetics, blending deep voids of violet into warm, peachy horizons.
Step-by-Step Tutorial
Materials
- Mechanical keyboard keycap set
- Spray paints or airbrush (Black, Deep Purple, Magenta, Peach, Dark Cream)
- Plastic primer (White)
- Matte clear coat (2K recommended for durability)
- Painter’s tape and double-sided tape
- Large sheet of cardboard
- Isopropyl alcohol and lint-free cloth
- Fine-grit sandpaper (600-800 grit)
- White extra-fine paint pen or dry-transfer lettering
Step 1: Preparation
-
Remove Keycaps:
Carefully pull all keycaps off your keyboard using a wire keycap puller to avoid scratching the sides. -
Clean Surfaces:
Wipe down every keycap individually with isopropyl alcohol to remove finger oils, which is crucial for paint adhesion. -
Mask Stems:
Roll small pieces of painter’s tape and stuff them inside the mounting stems on the underside of each key. This prevents paint from building up inside, which would make the keys stick later. -
Scuff Sanding:
Lightly sand the top and sides of each keycap with 600-grit sandpaper just enough to dull the surface sheen. -
Mounting Layout:
Apply strips of double-sided tape to your cardboard sheet and firmly press the keycaps down in their exact keyboard layout (QWERTY), ensuring they are straight and evenly spaced.
Sticky Keys?
If paint got inside the stem despite masking, the key won’t rebound properly. Gently scrape the excess paint out of the cross-stem interior using an X-Acto knife or a small file.
Step 2: Creating the Gradient
-
Priming:
Apply a thin, even coat of white primer over all the keys. The white base is essential to make the neon and pastel colors pop. -
Dry Check:
Allow the primer to dry completely according to the can’s instructions before starting the color gradient. -
Zone 1: The Highlight:
Start at the bottom-right corner (arrow keys and numpad). Spray the Dark Cream color here, dusting it lightly upwards toward the middle to start the fade. -
Zone 2: Warmth:
Spray the Peach color diagonally across the lower-middle section, overlapping slightly with the cream to create a soft transition. -
Zone 3: The Transition:
Apply the Magenta or Hot Pink spray through the center diagonal band of the keyboard, keeping your hand moving to avoid pooling. -
Zone 4: Deep Tones:
Spray the Deep Purple on the upper-left section, blending it carefully into the pink line. -
Zone 5: The Void:
Finish the very top-left corner (Esc key area) with a quick pass of Black to add depth and contrast to the gradient. -
Review Blend:
I like to step back and squint at the board to check the blending; if a transition looks too harsh, mist a little of the lighter color over the border to soften it.
Level Up: Starry Night
Before the final clear coat, flick a stiff toothbrush dipped in white paint over the dark purple sections to create a subtle distant galaxy star field effect.
Step 3: Detailing and Sealing
-
Full Cure:
Let the paint cure for at least 24 hours. The paint needs to be hard enough to handle for the next step. -
Adding Legends:
Use an extra-fine white paint pen or apply dry-transfer lettering to add your characters. You can mimic the alien-style font shown in the example or stick to standard letters. -
First Seal:
Apply a light, mist coat of matte clear coat to lock in the lettering without causing the ink to run. -
Final Coat:
Apply a heavier, wet coat of the matte sealer. Since fingers touch these constantly, a high-quality polyurethane or 2K clear coat is best. -
Unmasking:
Once fully cured, remove the keycaps from the tape and use tweezers to pull the masking tape out of the stems. -
Reassembly:
Press the keys back onto your keyboard switches to complete the look.
Enjoy the satisfying click-clack of your new vaporwave masterpiece!
Cute Animal Faces and Ears
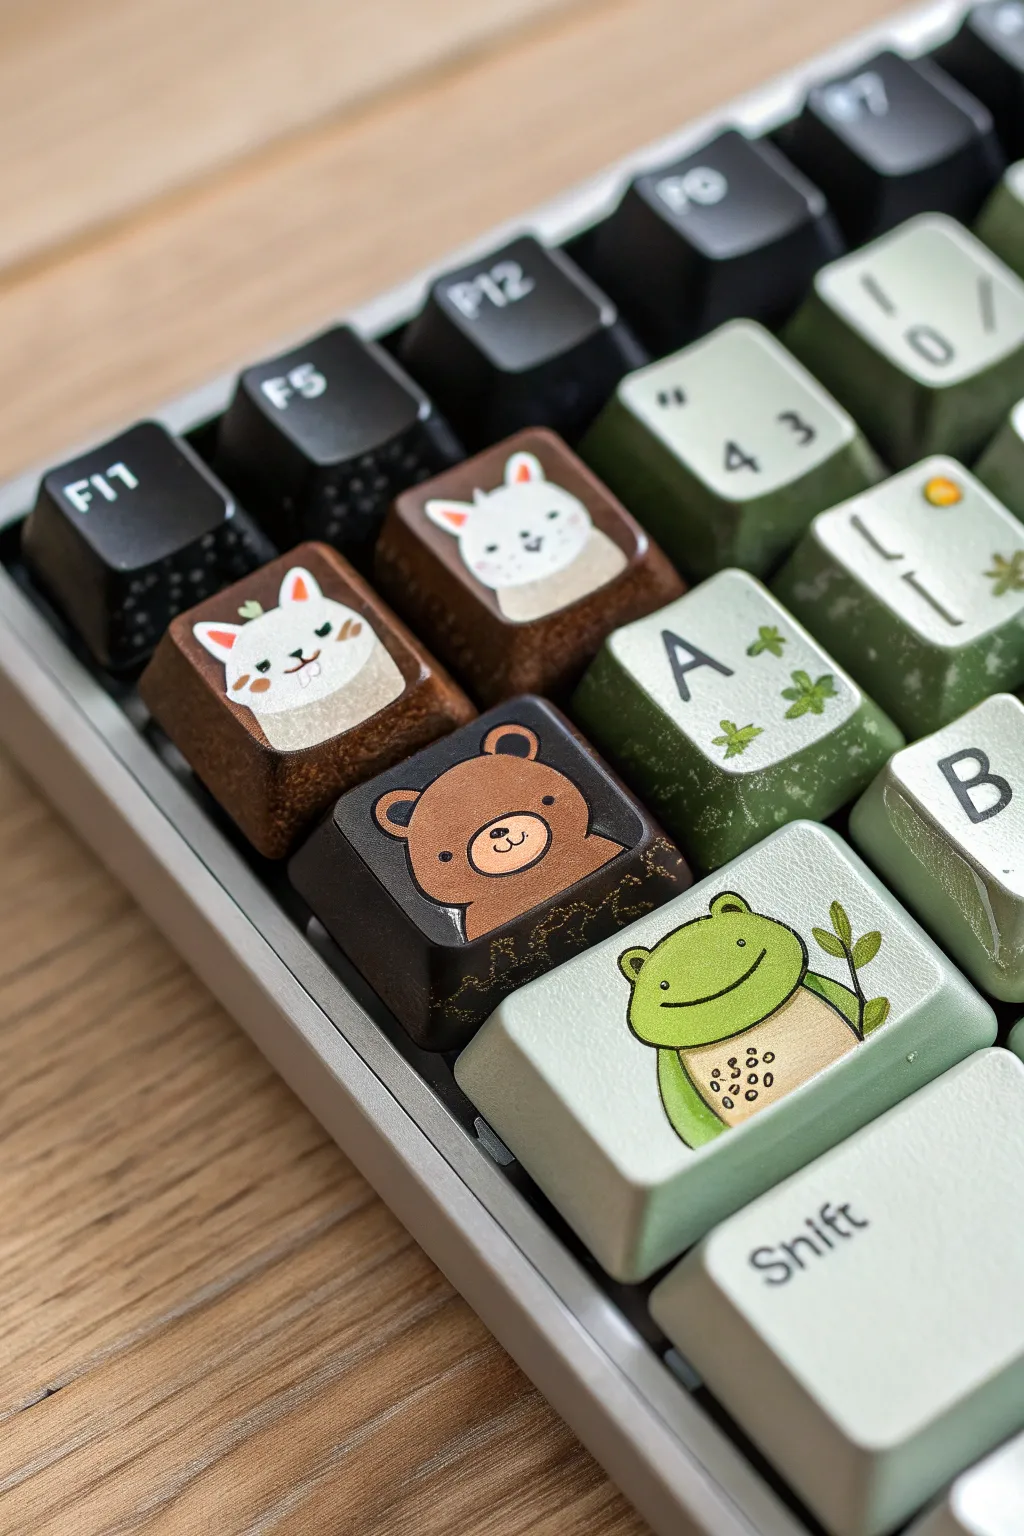
Transform your mechanical keyboard into a cozy forest scene with these adorable hand-painted animal keycaps. Using precise brushwork and earthy tones, you’ll create a friendly bear, a smiling frog, and peeking cats to accompany your typing.
Step-by-Step Guide
Materials
- Blank or spare PBT/ABS keycaps
- Fine grit sandpaper (400-600 grit)
- Plastic primer (spray or brush-on)
- Acrylic paints (dark brown, tan, leaf green, sage green, white, black, pink)
- Detail brushes (sizes 0/0 and 000)
- Matte spray varnish or sealant
- Rubbing alcohol
- Painter’s tape or alligator clips
- Pencil
Step 1: Surface Preparation
-
Clean the surface:
Wipe down your chosen keycaps with rubbing alcohol to remove any finger oils or grease. -
Sand for adhesion:
Gently scuff the top and sides of each keycap with fine-grit sandpaper. This creates a texturized surface for the paint to grip. -
Mount the caps:
Place the keycaps on small stands or alligator clips to hold them steady without touching the sides while painting. -
Prime the base:
Apply a thin, even coat of plastic primer. I prefer using a spray primer for the smoothest finish, but a brushed layer works if carefully smoothed out.
Step 2: Blocking Backgrounds
-
Mix background colors:
Prepare your base colors: a deep chocolate brown for the bear key, a muted sage green for the frog key, and a warm wood-brown for the cat keys. -
Apply base coats:
Paint the entire top surface of the keys with their respective background colors. Apply 2-3 thin layers rather than one thick one to avoid brushstrokes. -
Letter keys:
For the surrounding keys (like ‘A’ and ‘B’), sponge or paint a mottled green gradient to mimic a mossy texture.
Sticky Paint?
If acrylics feel tacky after drying, the layers might be too thick. Let them cure longer, or apply a light dusting of translucent setting powder before the final spray varnish.
Step 3: Painting the Animals
-
Sketch placement:
Once the base is bone-dry, use a pencil to very lightly outline the shape of the bear head, the frog body, and the cats. -
Block the bear:
On the dark brown key, paint a medium-brown circle with two small semi-circles on top for ears using a size 0 brush. -
Bear details:
Mix a light tan shade and paint a small oval for the snout. Use your finest 000 brush to add tiny black dots for eyes and a nose. -
Shape the frog:
On the sage key, paint a vibrant lime green frog body. Make it look round and friendly, with a cream-colored belly patch in the center. -
Frog features:
Use a steady hand to paint a thin black smile and wide-set eyes. Add a tiny brown twig explicitly held by the frog’s arm. -
Create the cats:
On the warm brown keys, paint white shapes rising from the bottom edge to look like cats peeking over a ledge. Add triangular ears. -
Cat nuances:
Paint pink triangles inside the ears and add tiny orange blush marks. Create different expressions—one winking, one looking curious—using thin black lines.
Texture Time
To mimic the mossy look on the ‘A’ key, dab a piece of torn sponge lightly with green and white paint instead of brushing it on. This creates disjointed, organic patterns.
Step 4: Sealing and Finishing
-
Add highlights:
Place tiny white dots in the eyes of the bear and frog to bring them to life. -
Dry completely:
Allow the painted details to cure for at least 24 hours to ensure they hard. -
Apply varnish:
Spray the keys with a matte varnish. Apply 2-3 thin coats, waiting for each to dry, to protect your art from finger oils and wear.
Pop these cuties onto your keyboard and enjoy your new woodland companions.
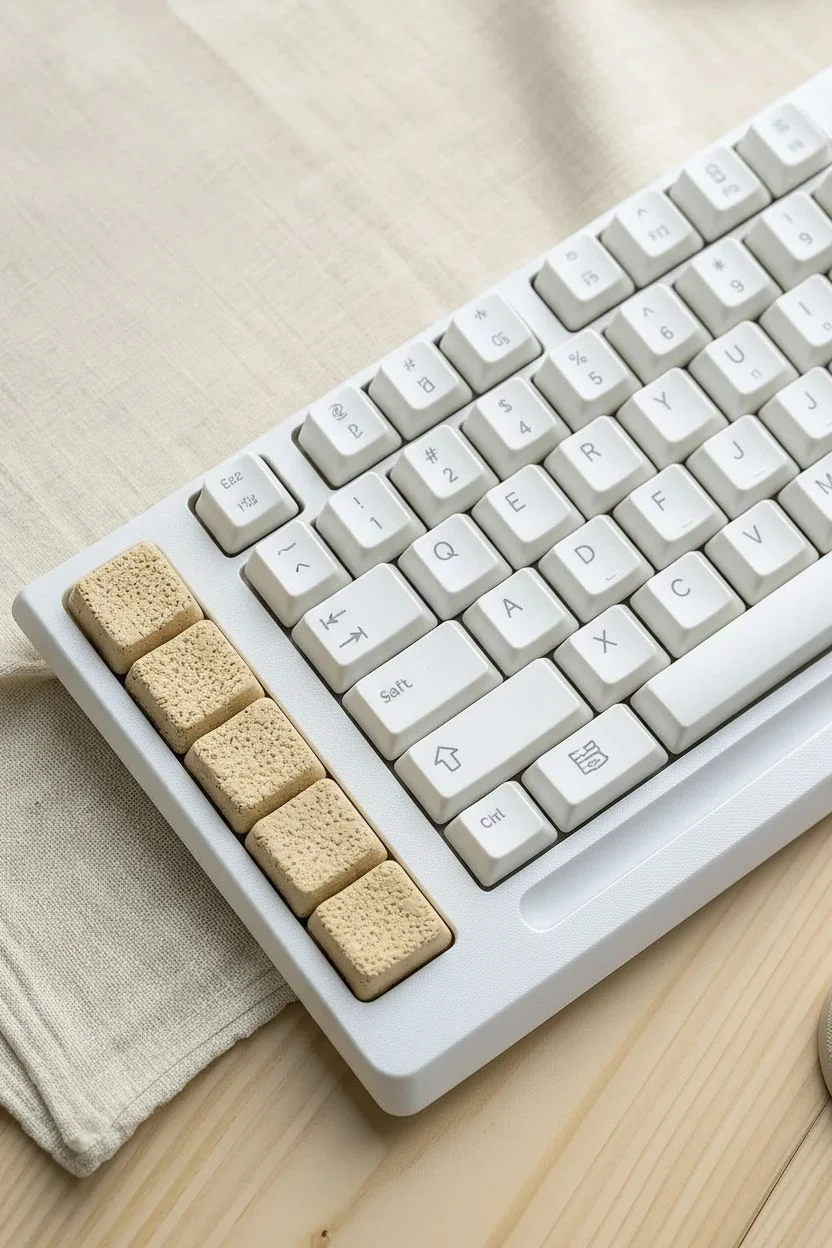
The Food Buffet Theme
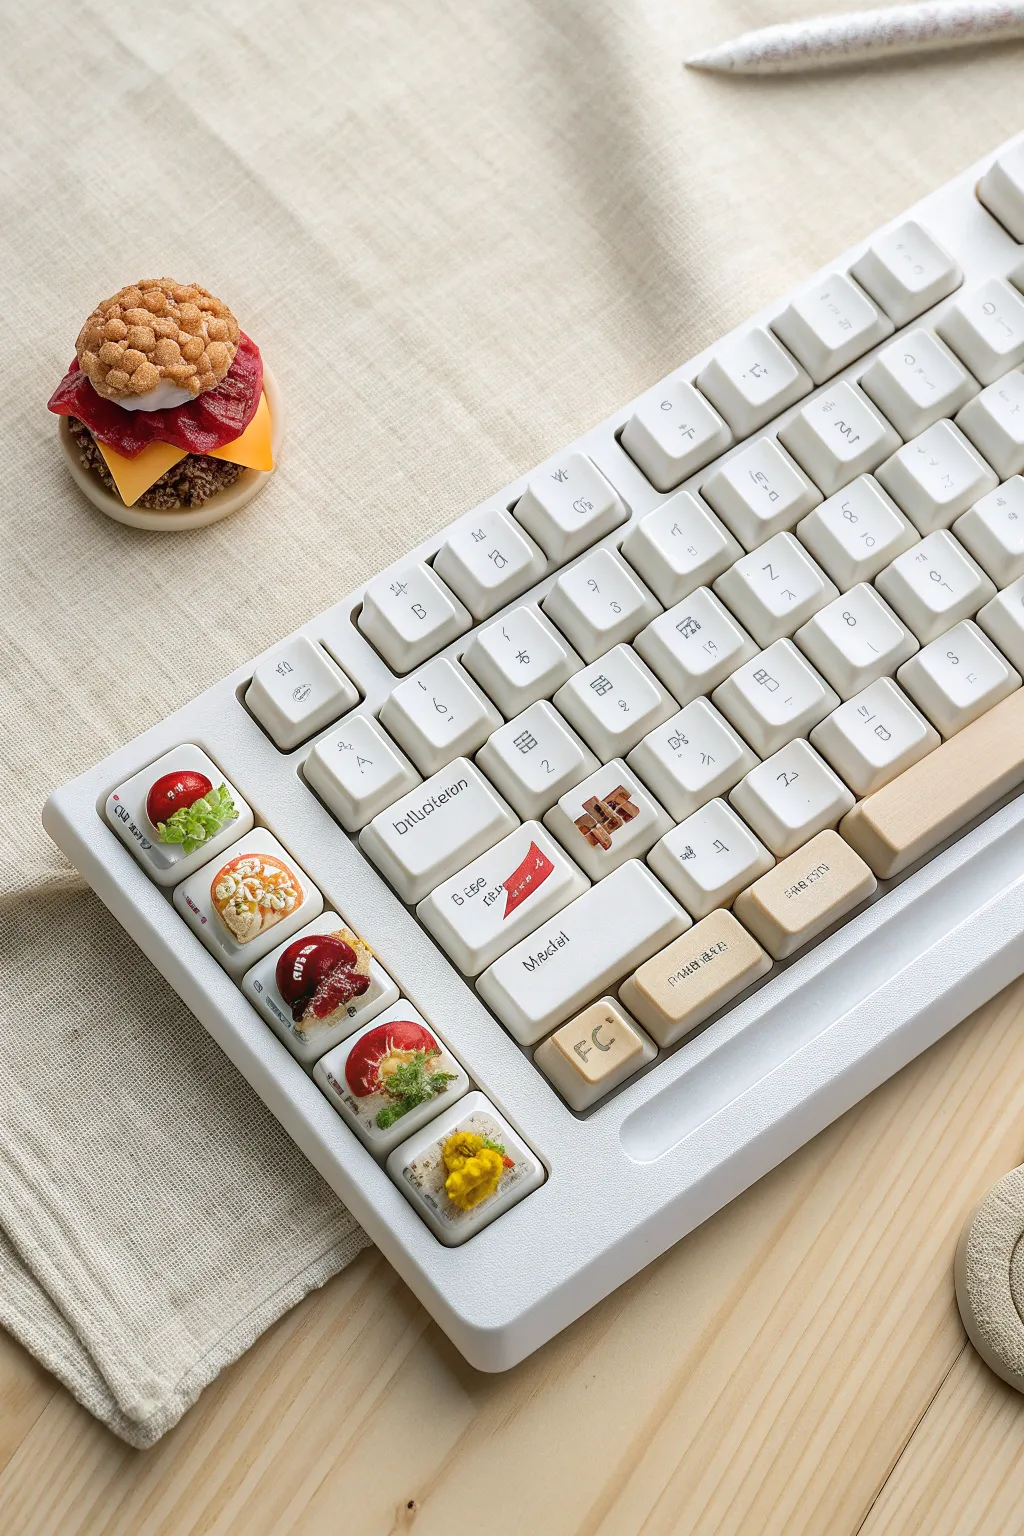
Transform your mechanical keyboard into a miniature café with this delightful project that combines painting and sculpting. By adding 3D food artisans to your macro or function keys and hand-painting delightful accents on the alphas, you create a workspace that looks good enough to eat.
Detailed Instructions
Materials
- Blank PBT keycaps (white or beige, XDA profile recommended)
- Polymer clay (beige, red, green, yellow, translucent)
- Set of fine sculpting tools (needle tool, dotting tool)
- Crumpled aluminum foil and an old toothbrush
- Soft chalk pastels (ochre, orange, brown)
- Acrylic paints (primary colors, white)
- Detail brush (size 000 or 0000)
- UV resin or gloss glaze
- Matte varnish spray
- Super glue or liquid clay (Bake & Bond)
- Oven (for baking clay)
Step 1: Base Preparation
-
Clean the canvas:
Wipe down your chosen PBT keycaps with isopropyl alcohol to remove any finger oils. PBT plastic is preferred here because it can withstand the oven temperatures required to cure the clay. -
Create the bread base:
Condition a small amount of beige polymer clay by rolling it in your hands until warm. Press a thin, square layer onto the top of the specialized keys (like the left-column macro keys) to serve as the toast or tart crust. -
Texture the dough:
For a realistic baked look, gently tap the surface of the clay with an old toothbrush or a ball of crumpled aluminum foil. This creates the porous texture of bread or pastry.
Chef’s Kiss Texture
To make ‘powdered sugar’ for dessert keys, stipple white acrylic paint with a nearly dry stiffness bristles brush over the finished fruit tart. It adds incredible depth.
Step 2: Sculpting the Toppings
-
Sculpting the greens:
Mix a tiny bit of green clay with translucent clay. Flatten it into a paper-thin sheet, tear off jagged little pieces, and fold them accordion-style to mimic ruffled lettuce leaves. Press these onto your savory toast keys using a drop of liquid clay. -
Adding proteins and veggies:
Roll tiny balls of red clay for cherry tomatoes or fruit toppings. For the egg tart, create a small dome of yellow clay. Use a needle tool to gently indent the center of the tomatoes for realism. -
Shading the crust:
Before baking, scrape some chalk pastel dust (ochre and light brown) onto a piece of paper. Use a dry brush to dust the edges of your clay bread and tarts to give them a golden-brown, baked appearance. -
Baking:
Place the keycaps on a baking tray or ceramic tile. Bake according to your polymer clay instructions (usually around 275°F/130°C for 15-20 minutes). Keep an eye on the oven to ensure the plastic caps don’t warp. -
Cooling:
Turn the oven off and let the caps cool down completely inside with the door slightly ajar. Sudden temperature changes can crack the clay.
Step 3: Detailed Painting & Glazing
-
Painting the legends:
While the 3D caps cool, focus on the alpha keys. Use a 0000 detail brush and acrylic paint to add small, minimalist icons like the red flag, small pretzels, or text legends seen on the ‘Shift’ or ‘Enter’ keys. -
Sealing the painted keys:
Once the acrylic paint is fully dry, spray the painted alpha keys with a matte varnish to protect your artwork from finger wear. -
Adding the ‘sauce’:
Return to your cooled 3D artisan keys. Mix a drop of red acrylic paint with UV resin (or gloss glaze) to create a jam or ketchup consistency. Carefully apply this over the fruit or savory toppings to make them look wet and fresh. -
The final glaze:
Cure the UV resin with a UV lamp or let the gloss glaze dry. This shiny finish is the secret to making miniature food looking appetizing rather than dry and chalky. -
Accessories construction:
I like to use remaining clay scraps to sculpt a matching desk accessory, like the standalone burger, using the same texturing and shading techniques used for the keycaps.
Level Up: Resin Drip
For melted cheese, mix yellow paint into UV resin and let it drip slightly over the ‘bread’ edge before curing. It freezes the drip in mid-air for a dynamic look.
Step 4: Assembly
-
Mounting the keys:
If any clay parts feel loose after baking, secure them with a tiny dot of super glue. Carefully press your new custom caps onto the keyboard switches. -
Final arrangement:
Arrange the beige and white keys in an alternating pattern if you have them, placing the sculpted food keys in a prominent vertical row for that buffet-line aesthetic.
Your keyboard is now served, offering a visual treat that brings a touch of whimsy to every keystroke.
Cohesive Landscape Scene

Transform your mechanical keyboard into a seamless work of art where a misty forest transitions into a vibrant sunset across the keys. By treating the entire board as a single canvas, you will create a cohesive landscape that flows uninterrupted from one distinct zone to another.
Step-by-Step Guide
Materials
- Full set of PBT or ABS keycaps (light color preferred)
- Fine-grit sandpaper (600-800 grit)
- White or grey plastic primer spray
- High-quality acrylic model paints (Teal, Sage Green, Cream, Navy, Burnt Orange, Yellow, Black)
- Detail brushes (Size 0, 00, and a small flat shader)
- Mounting board (cardboard or wood)
- Double-sided tape
- Clear matte varnish spray
Step 1: Preparation & Layout
-
Organize the canvas:
Remove all keycaps from your keyboard. Place strips of double-sided tape onto your mounting board and press the keycaps down in their exact keyboard layout, keeping the spacing tight but not touching. -
Surface prep:
Lightly scuff the tops and sides of the keycaps with fine-grit sandpaper. This creates a ‘tooth’ for the paint to grip without damaging the plastic integrity. -
Priming:
Apply thin, even coats of white primer over the mounted keycaps. I prefer doing several light passes to avoid drips pooling in the stem mounts underneath.
Sticky Keys?
If paint bridges the gap between keys, don’t pull them apart! Use an X-Acto knife or razor blade to slice the paint bridge precisely before removing the keys from the board.
Step 2: Creating the Gradients
-
Map the zones:
Visualize a diagonal line splitting the board. The top-left will be your misty forest (cream/green), and the bottom-right including the spacebar will be the twilight sunset (navy/orange). -
Paint the forest base:
Mix a pale cream color. Paint the top-left cluster (Esc, number row, Q, W, A) solid cream. -
Paint the transition zone:
Mix sage green and teal. Paint a diagonal band across the middle of the board, blending into the cream section while the paint is still slightly wet for a soft fade. -
Paint the twilight base:
On the bottom-right section and the right half of the spacebar, apply a deep navy blue or dark teal to represent the night sky and mountain base. -
The sunset gradient:
On the spacebar and Enter key area, blend a vibrant burnt orange into the navy blue. Use a small sponge or dry brush to create a smooth transition where the sun meets the dark sky.
Step 3: Detailed Imagery
-
Forest line work:
Using a size 0 brush and dark pine green paint, draw vertical lines on the left-side keys to establish tree trunks. Ensure these lines continue naturally from one key to the key below it. -
Foliage stippling:
With a tiny amount of paint on your brush, use a stippling motion (rapid dots) to create pine needle textures branching off the trunks. Keep the tops of the trees pointy and widen them at the base. -
Mountain silhouettes:
On the spacebar and bottom-right modifiers, paint solid black jagged shapes to represent distant mountains against the sunset background. -
The sun and highlights:
Paint a semi-circle of bright yellow or pale orange emerging from behind the mountain silhouette on the spacebar. -
Atmospheric texture:
Dilute a bit of white paint. Gently flick the bristles of a brush to splatter tiny ‘stars’ over the navy blue section and ‘snow’ over the forest section for texture. -
Adding runes:
To mimic the cryptic text in the reference, use a 00 brush with off-white paint to carefully draw small, stylized runes or alien lettering on the front faces of select keycaps.
Galaxy Texture
For the dark right-side section, use a piece of torn sponge dipped in metallic blue or purple paint to dab subtle nebula clouds into the navy sky before adding your stars.
Step 4: Finishing Touches
-
Separation check:
Before the paint fully hardens, run a thin blade carefully between the gaps of the keycaps to ensure no dried paint bridges them together. -
First seal:
Apply a light coat of clear matte varnish spray to lock in the acrylic. Let this dry for at least an hour. -
Final cure:
Apply two more coats of varnish, allowing proper drying time between each. This is vital to prevent the paint from wearing off under your fingers during typing.
Mount your keys back onto the switch stems and enjoy typing on your own personalized panoramic landscape.
Classic Pixel Art Sprites
Transform a plain white mechanical keyboard into a retro gaming homage with these manually painted pixel-art sprites. By treating each keycap as a canvas, you will create crisp icons like health hearts and inventory items that pop against the clean background.
Step-by-Step
Materials
- Blank white PBT or ABS keycaps
- Extra-fine acrylic paint markers (0.7mm tip, Posca recommended)
- Fine-grit sandpaper (400-600 grit)
- Isopropyl alcohol and lint-free cloth
- HB Pencil and white eraser
- Matte clear coat spray sealant
- Cardboard (for painting mount)
Step 1: Surface Preparation
-
Remove Keycaps:
Carefully pull the specific keycaps you intend to paint off the keyboard using a keycap puller. -
Degrease:
Wipe every surface of the keycap with isopropyl alcohol to remove factory oils and finger grease. -
Create Texture:
Gently scuff the top face of each keycap with sandpaper. You don’t want deep scratches, just a cloudy matte finish to help the paint stick. -
Dust Removal:
Wipe the keys down with alcohol one last time to ensure no sanding dust remains trapped in the texture.
Step 2: The Big Pixel Heart
-
Grid Sketching:
On your largest keycap (like Shift or Caps Lock), lightly sketch a grid using your pencil to guide the pixel placement. -
Red Base:
Using a red acrylic marker, dab the paint to fill in the squares that make up the heart shape, leaving the eye and mouth pixels empty. -
Square Edges:
I like to use the side of the marker nib to keep the edges of the pixels sharp and boxy rather than rounded. -
Face Details:
Once the red is fully dry to the touch, fill in the empty grid spaces with black paint for the eyes and smile. -
Outline:
Trace the outer perimeter of the heart with the black marker to give it that sticker-like cartoon finish.
Paint Beading Up?
If the paint pulls away or beads up, the plastic is too smooth. Let it dry, sand that spot specifically again, and re-apply paint to the roughed-up surface.
Step 3: Inventory Icons
-
Background Color:
For the crossed-tools key, paint a solid teal rounded square in the center and let it dry completely. -
Tool Silhouettes:
Draw the simple geometric shapes of the tools (handle, blade, wrench head) in white or light grey on top of the dried teal base. -
Adding Definition:
Outline the tools with your ultra-fine black marker to separate them from the background. -
Potion Bottles:
On single letter keys, draw small flask shapes with outline black ink. -
Liquid Fill:
Fill the bottom half of the flask with red paint, then add a tiny white dot in the red area to look like a glass reflection.
Corrections
Keep a wooden toothpick nearby. While the paint is tacky or even fully dry, you can use the wood tip to ‘push’ messy lines back into shape without smearing.
Step 4: Stitched Hearts & Finishing
-
Organic Shapes:
For the ‘stitched’ hearts, paint freehand red heart shapes that look slightly rough or organic. -
Stitching Detail:
Draw small, perpendicular black tick marks all around the edge of the red hearts to simulate thread sewing. -
Clean Up:
Use a toothpick to gently scratch away any paint that went outside your intended lines; on PBT plastic, it scrapes off cleanly. -
Mounting:
Place your painted keys on a piece of cardboard on a flat surface, ensuring they aren’t touching. -
Sealing:
Apply 2-3 very thin coats of matte spray varnish, waiting 15 minutes between coats, to protect your art from finger wear.
Pop your custom artisan keycaps back onto your board and enjoy your new, personalized gaming setup.
Industrial Hazard Stripes
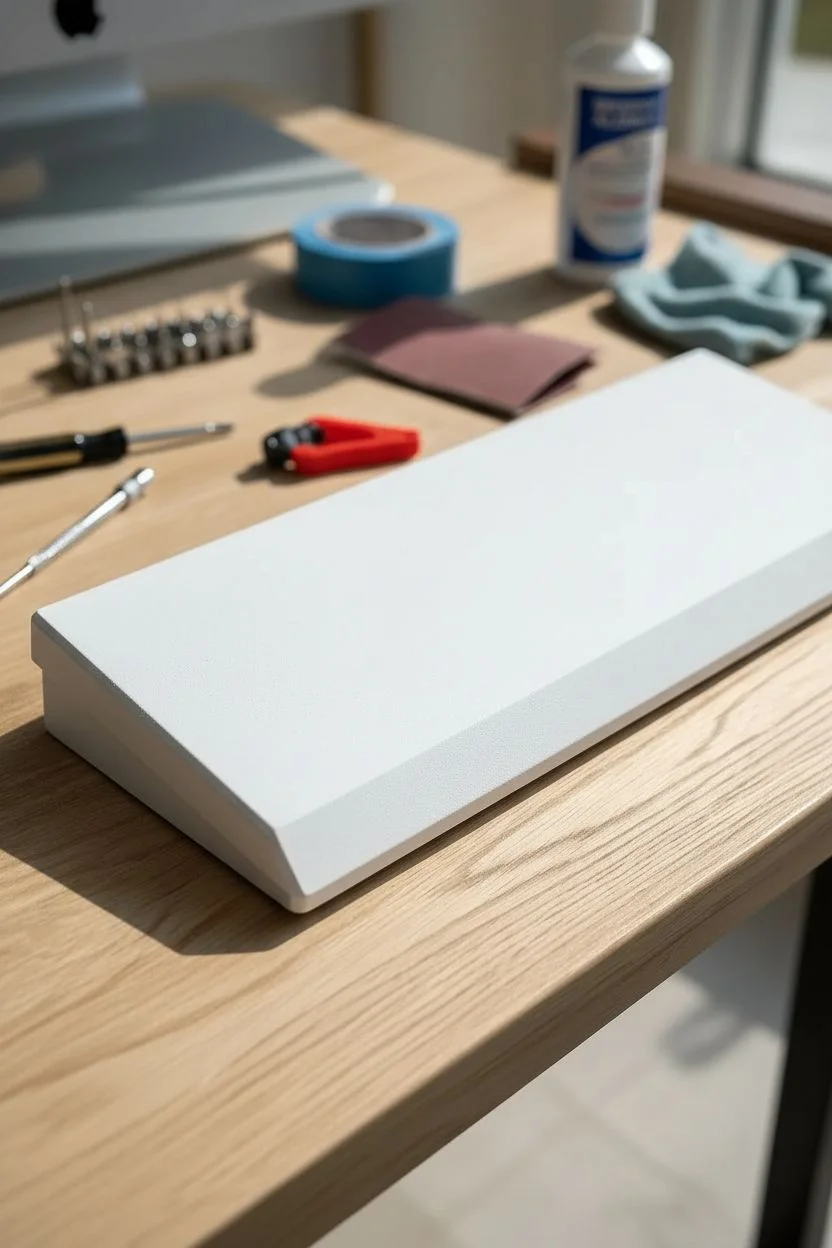
Transform a standard mechanical keyboard into a piece of heavy machinery with this industrial design. By combining a clean white chassis with a bold, caution-tape style bevel, you create a striking contrast that looks straight out of a futuristic workshop.
Step-by-Step Guide
Materials
- Mechanical keyboard with a high-profile case
- Screwdriver set and keycap puller
- Sandpaper (400 and 800 grit)
- Painter’s tape (high quality)
- Spray Paint: White Primer, Safety Yellow, Flat Black, Matte White
- Matte Clear Coat
- Isopropyl alcohol and microfiber cloth
- X-Acto knife and ruler
Step 1: Disassembly and Prep
-
Teardown:
Remove all keycaps using your puller. Unscrew the case and carefully separate the PCB, plate, and battery (if wireless) from the bottom case shell. You only want the plastic or metal frame. -
Sanding:
Scuff the entire surface of the case with 400-grit sandpaper. Focus especially on the beveled edge where the stripes will go to ensure maximum paint adhesion. -
Cleaning:
Wipe the case down thoroughly with isopropyl alcohol and a lint-free cloth to remove all dust and oils from your hands. -
Priming:
Apply two light coats of white primer to the entire case, allowing about 10 minutes of drying time between them.
Step 2: Painting the Hazard Zone
-
Base Color:
Spray the bottom beveled edge (or whichever area you want striped) with Safety Yellow. Don’t worry about overspray on the rest of the case for now; just ensure the yellow is opaque and vibrant. -
Curing:
Let the yellow paint dry completely. I prefer to let this sit overnight to ensure the tape won’t peel up the paint in the next step. -
Tape Application:
Cut thin strips of painter’s tape approx 1/4 inch wide. Apply them diagonally across the yellow area at a 45-degree angle. These covered areas will remain yellow. -
Spacing:
Use a scrap piece of tape as a spacer between your stripes to keep the gap width consistent across the entire length of the board. -
Sealing Edges:
Press the tape edges down firmly with your fingernail or a plastic card to prevent bleeding. -
Black Coat:
Spray a coat of Flat Black over the taped yellow area. Apply thin layers to avoid paint ridges building up against the tape. -
The Reveal:
Carefully peel off the tape strips while the black paint is still slightly tacky (usually after about 20 minutes). Pull the tape away at a sharp angle for the cleanest line.
Clean Line Pro-Tip
Before spraying the black paint, spray a very light coat of Yellow over your masking tape. This seals the tape edges with the base color, preventing any black leak-through.
Step 3: The White Finish
-
Protecting the Stripes:
Once the stripes are fully cured (dry to the touch and hard), mask off the entire striped hazard area with fresh tape and paper to protect it. -
Main Body Paint:
Spray the remaining exposed parts of the case with Matte White. Apply 2-3 thin coats for an even, factory-like finish. -
Unmasking:
Remove the masking from the hazard area. You should now have a crisp division between the white upper body and the striped industrial edge.
Level Up: Weathering
For a grittier look, dry-brush a tiny amount of silver paint onto the edges of the black stripes to mimic chipped metal and wear from heavy industrial use.
Step 4: Assembly
-
Clear Coat:
Apply two layers of Matte Clear Coat over the entire case. This unifies the finish and protects your paint job from scratches. -
Hardening:
Allow the case to cure for at least 24 hours before handling heavy assembly. -
Rebuild:
Reinstall the PCB, screw the case back together, and press your keycaps back on.
Enjoy the sound of clicking keys on your rugged new industrial command center.
High-Gloss Resin Finish
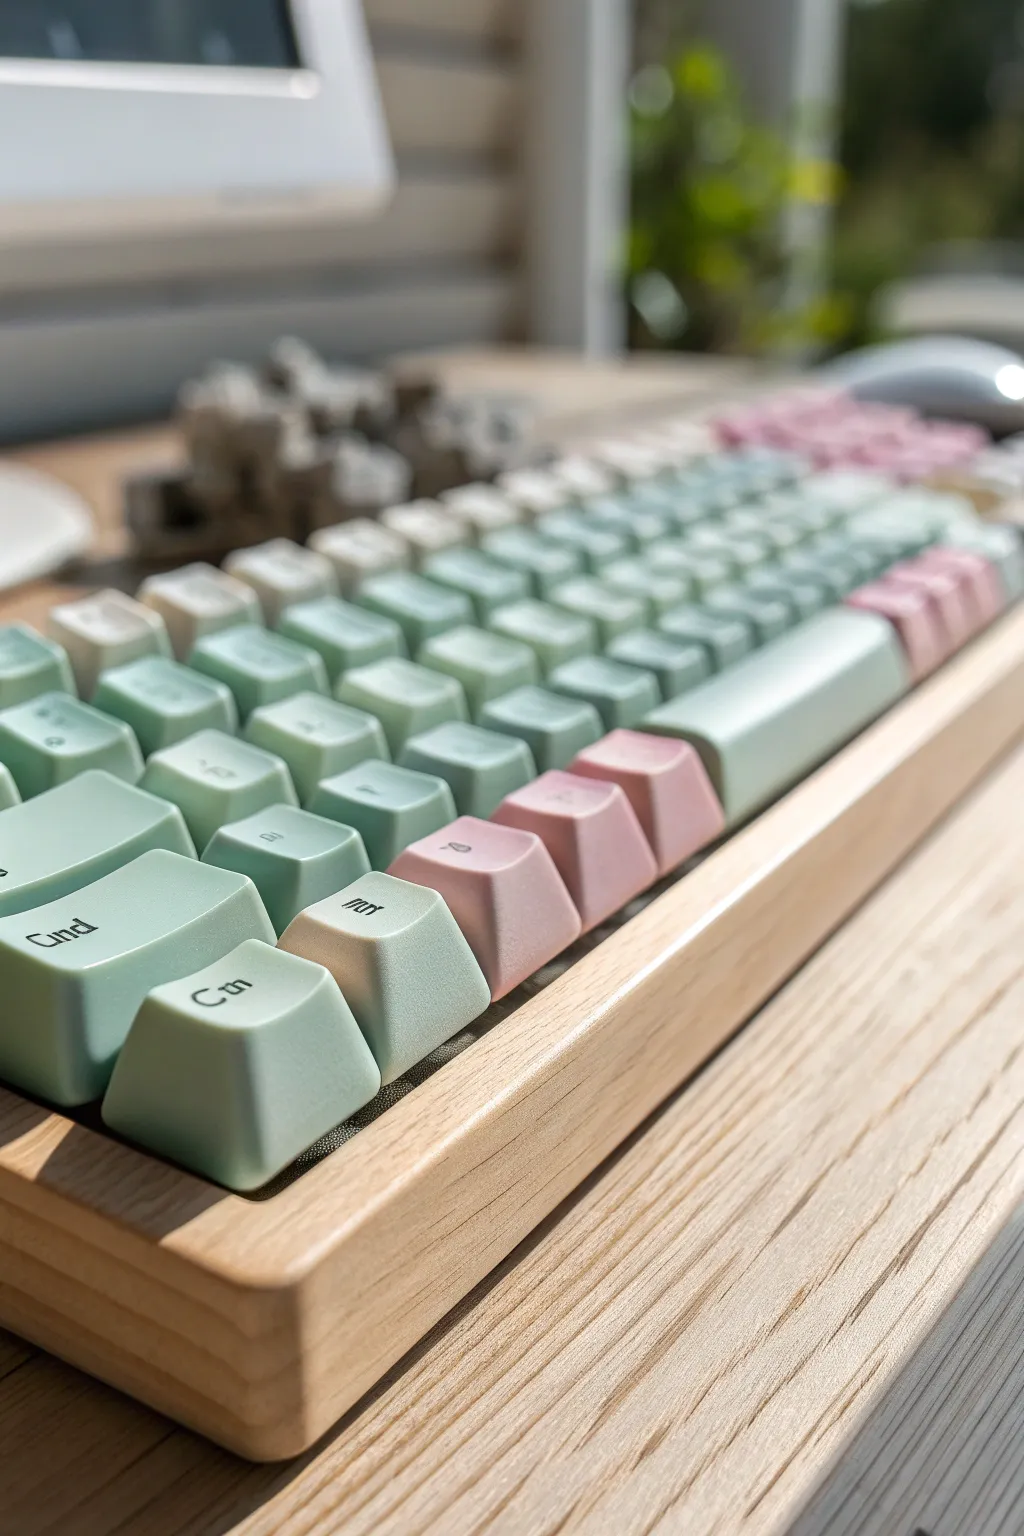
Transform a standard mechanical keyboard into a piece of desk art with a creamy, high-gloss finish that mimics the look of expensive ceramic keycaps. This project combines soft pastel mints and pinks with a thick, glass-like resin coating for a premium tactile feel.
How-To Guide
Materials
- Set of Keycaps (PBT or ABS)
- Spray Paint (Pastel Mint Green, Blush Pink)
- Sandpaper (600 and 1000 grit)
- High-Gloss UV Resin (Crystal Clear)
- UV Curing Lamp
- Waterslide Decal Paper (for legends)
- Silicone Brush
- Wooden Skewers and Blu-Tack
- Isopropyl Alcohol
- Wooden Keyboard Case (60% or 65% size)
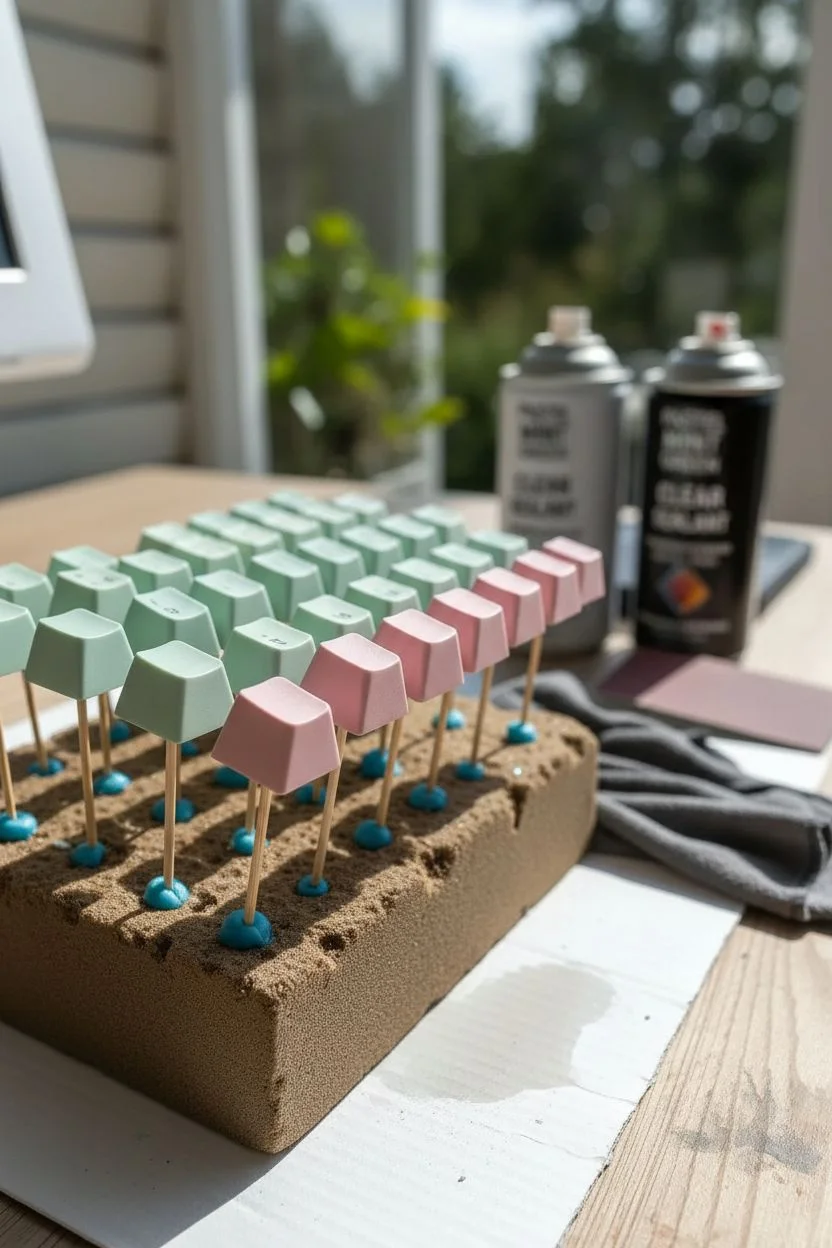
Step 1: Preparation & Base Color
-
Organize your canvas:
Remove all keycaps from your board and separate them into two piles: one for the mint green alphas and one for the pink modifiers. -
Create painting stands:
Attach a small ball of Blu-Tack to the blunt end of wooden skewers, then press the inside stem of each keycap onto the tack so the caps ‘float’ securely. -
Surface Prep:
Lightly scuff the surface of each keycap with 600-grit sandpaper to remove the factory coating and help the paint adhere. -
Degrease:
Wipe down every cap with a cloth dampened in isopropyl alcohol to remove sanding dust and oils. -
Apply base color:
Spray the mint green paint onto the alpha keys and the blush pink onto the modifiers. Use short, sweeping bursts from 10 inches away. -
Layering:
Apply 2-3 thin coats rather than one heavy coat, allowing about 15 minutes of drying time between each pass. -
Full cure:
Let the paint cure fully overnight before attempting to handle them for the decal stage.
Pro Tip: Stem Protection
Before resin coating, wrap a tiny piece of masking tape around the bottom stem of the keycap where it meets the switch. This ensures no resin flows inside tightly, which would ruin the fit.
Step 2: Legends & Branding
-
Design your legends:
Print your desired font (like the ‘Cmd’ shown in the photo) onto waterslide decal paper using a standard inkjet or laser printer. -
Seal the ink:
Spray the printed decal sheet with a clear sealant to lock the ink in, then let it dry completely. -
Apply decals:
Cut out individual letters, soak them in water for 30 seconds, and gently slide the film off the backing paper directly onto the painted keycaps. -
Smooth it out:
Use a damp cotton swab to gently press out any water or air bubbles trapped under the decal so it sits perfectly flat.
Level Up: Wood Case Polish
To match the image perfectly, sand your wooden case with fine-grit paper and rub in a beeswax polish. This creates a satin sheen that contrasts beautifully with the high-gloss keys.
Step 3: The High-Gloss Resin Finish
-
Prepare the resin:
Pour a small amount of UV resin onto a palette or disposable cup. I prefer working with small drops to avoid waste. -
First coat application:
Using a silicone brush, apply a thin, even layer of resin over the top and sides of the keycap while it is still on the skewer. -
Create the meniscus:
Add a tiny extra drop of resin to the center of the keycap top to create a slight dome effect, which gives that ceramic look. -
Bubble patrol:
Pass a lighter or heat gun quickly over the wet resin surface to instantly pop any micro-bubbles. -
Lock it in:
Immediately hold the keycap under your UV lamp for 60-90 seconds to hard cure the resin before it drips. -
Inspect and repeat:
Check the surface for uneven spots; if necessary, lightly sand with 1000-grit and apply a second thin ‘finish’ coat. -
Stem maintenance:
Once fully cured, flip the caps over and use an X-Acto knife to carefully trim any resin that might have dripped near the stem opening. -
Final assembly:
Install your glossy custom caps into the wooden case to complete the warm, organic aesthetic shown in the artwork.
Enjoy the satisfying clack of your new, ultra-durable ceramic-style keyboard!


Have a question or want to share your own experience? I'd love to hear from you in the comments below!