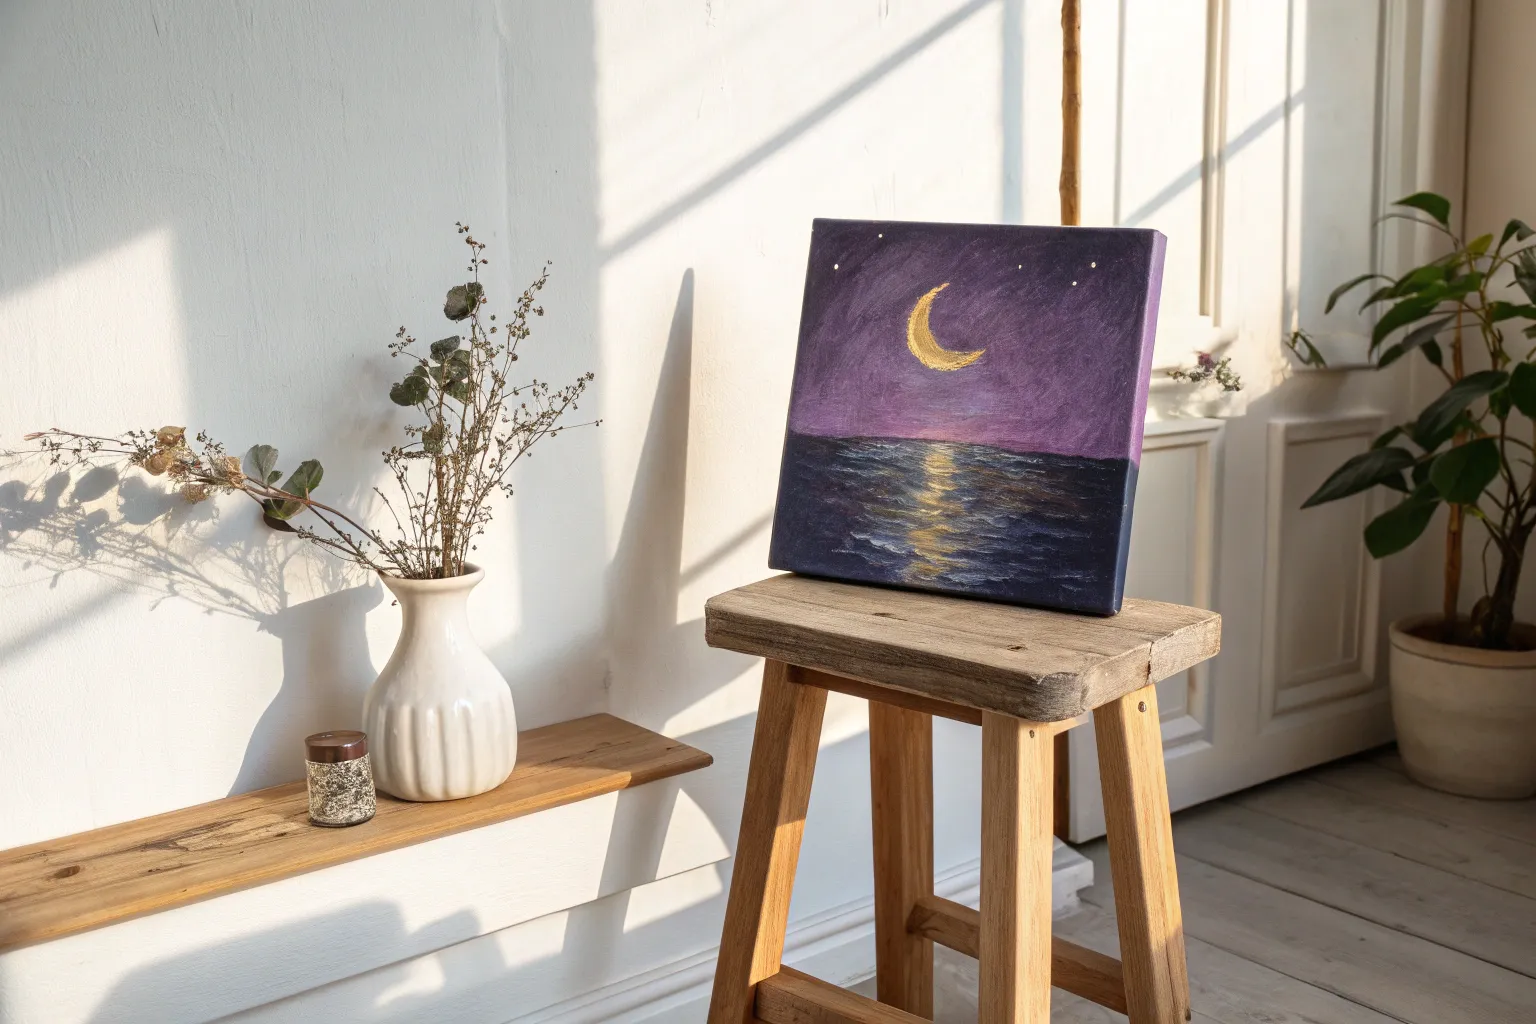
I truly believe that everyone has a spark of creativity waiting to be unleashed on a blank canvas, regardless of their prior experience. Here is a curated collection of approachable projects that focus on forgiving subjects and simple techniques to help you find your artistic flow.
Classic Gradient Sunset
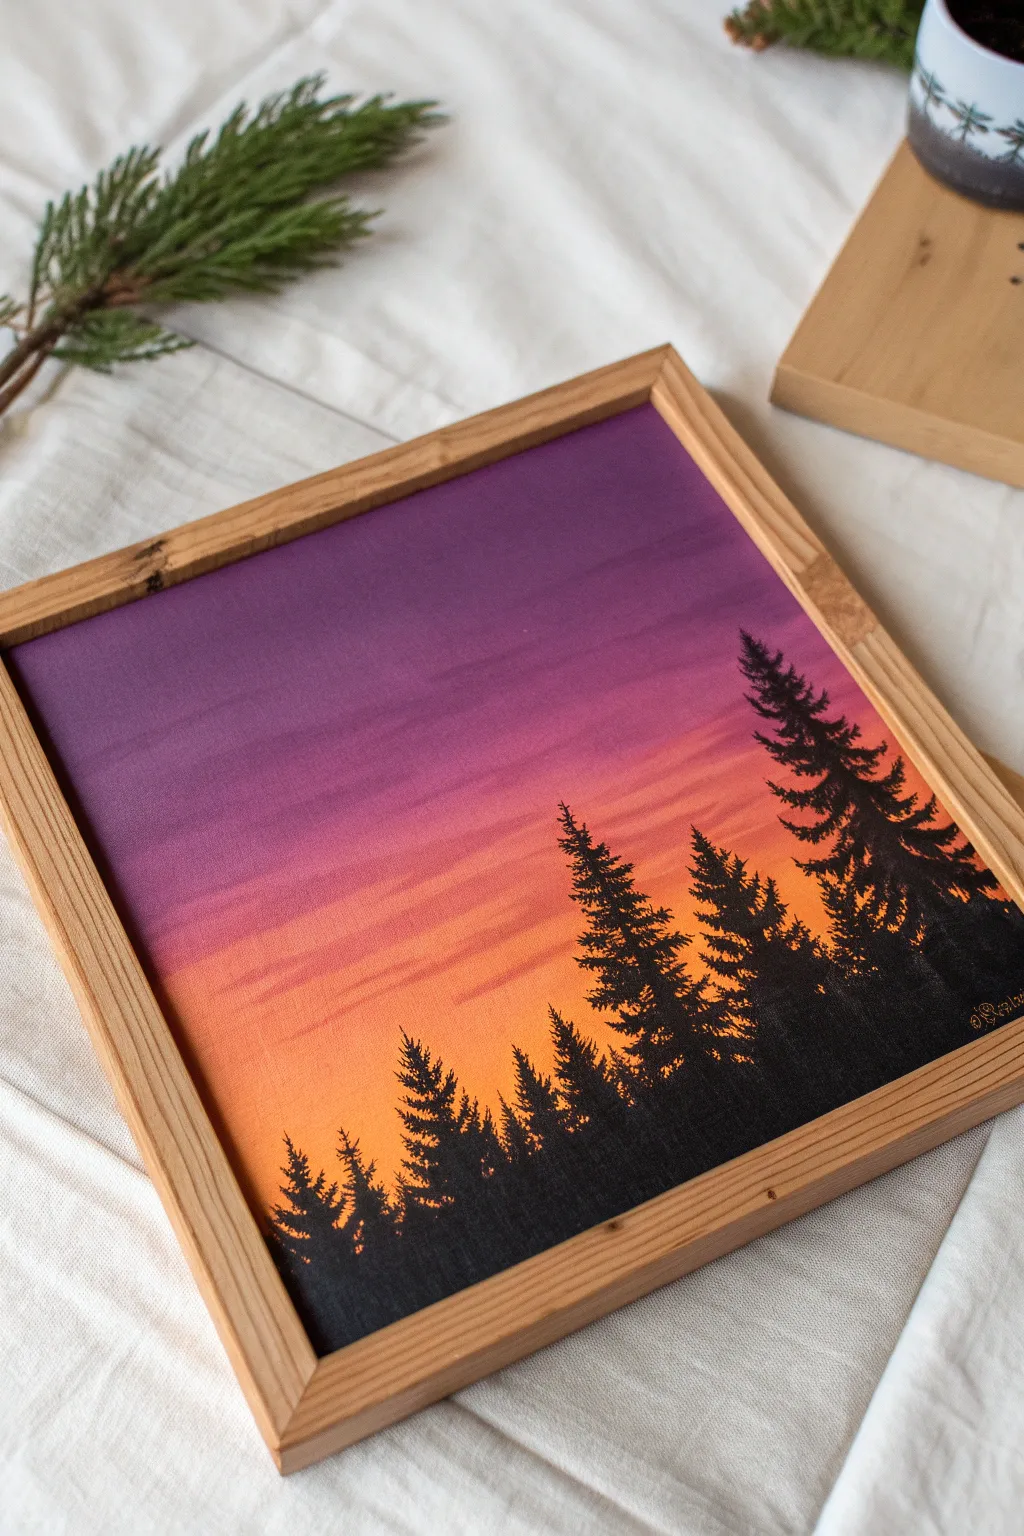
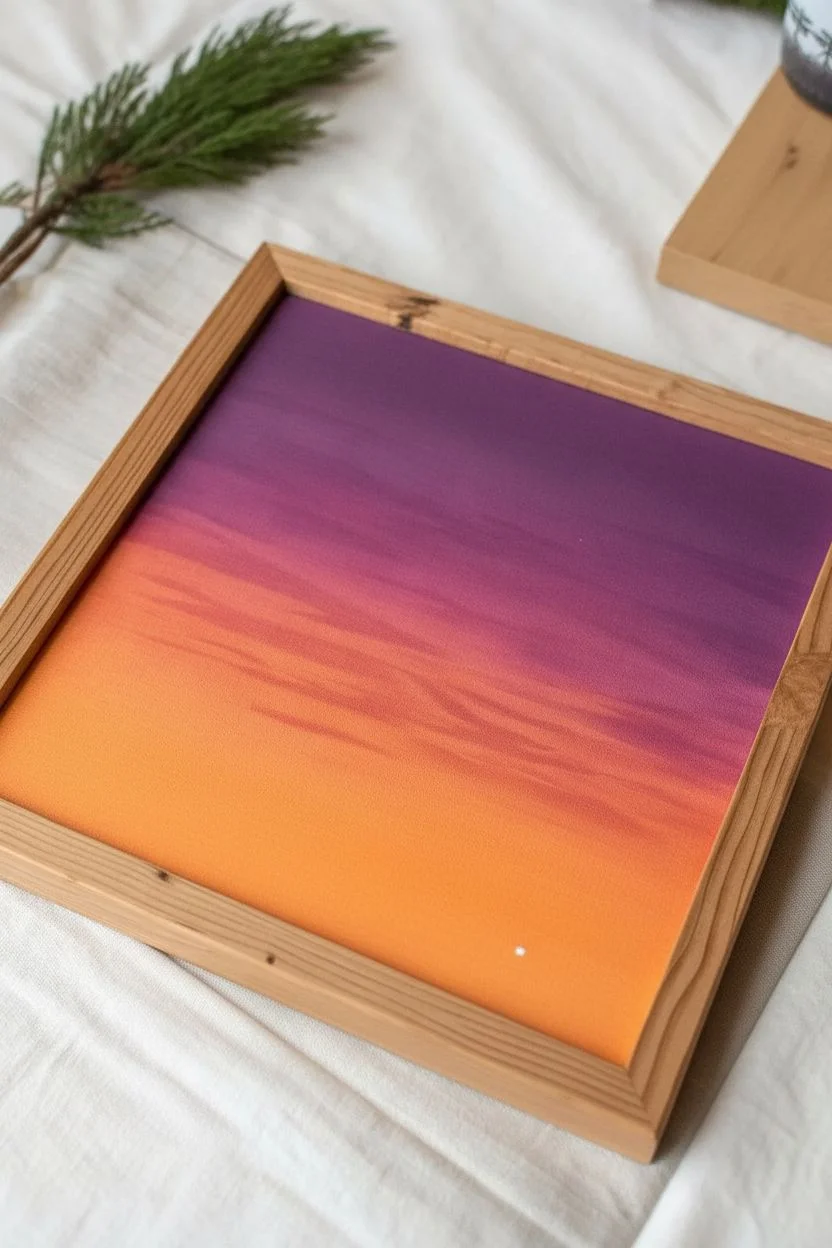
Capture the serene beauty of twilight with this classic beginner project involving a vibrant gradient sky and high-contrast silhouettes. You will learn to blend acrylics seamlessly to create a glowing atmosphere before adding the stark, natural shapes of a pine forest.
Step-by-Step Tutorial
Materials
- Square canvas or canvas panel (e.g., 10×10 inches)
- Acrylic paints: Deep Violet, Magenta/Rose, Cadmium Orange, Titanium White, Mars Black
- Wide flat brush (1 inch)
- Small angle brush or flat shader brush
- Fine liner brush (size 1)
- Cup of water and paper towels
- Mixing palette
- Wooden frame (optional)
Step 1: Creating the Gradient Sky
-
Prepare the palette:
Squeeze out your sky colors: Deep Violet, Magenta, Cadmium Orange, and a small amount of Titanium White. -
Start at the top:
Using the wide flat brush, paint a thick band of Deep Violet across the top quarter of the canvas using long horizontal strokes. -
Create a transition color:
Mix a little Magenta into the Deep Violet on your palette to create a reddish-purple hue. -
Paint the second band:
Apply this transitional mix directly below the violet strip, overlapping the wet edge slightly. -
Clean the brush:
Rinse your wide brush thoroughly and dry it well; this prevents the dark purple from overpowering the brighter colors coming next. -
Apply the mid-tone:
Paint the next section with pure Magenta, blending it upwards into the reddish-purple band while both are still wet. -
Mix the orange transition:
Combine Magenta with Cadmium Orange to create a warm coral color. -
Paint the lower sky:
Apply the coral mix below the pink section, smoothing the line where they meet with gentle back-and-forth strokes. -
The glowing horizon:
Finish the bottom quarter with pure Cadmium Orange mixed with a tiny dot of Titanium White to make it look luminous. -
Final blending pass:
With a clean, slightly damp brush, run horizontal strokes across the entire sky to soften any harsh ridges between color zones. -
Dry completely:
Let the canvas dry fully. I like to take a short break here, because painting black over wet sky paint will result in a muddy gray mess.
Step 2: Painting the Forest Silhouette
-
Establish the ground:
Switch to Mars Black paint and create a solid, slightly uneven strip along the very bottom edge to represent the forest floor. -
Mark tree positions:
Using a small brush, paint vertical lines of varying heights rising from the bottom strip to determine where your trees will stand. -
Vary the heights:
Make sure some lines are tall and others shorter to create a natural, organic rhythm rather than a picket fence look. -
Start the branches:
Switch to a fine liner brush or the corner of your small angle brush. -
Form the tree peaks:
Start at the very top of a vertical line and tap tiny horizontal dashes, getting slightly wider as you move down. -
Build the body:
Continue working down the trunk, using a dabbing motion to create jagged, irregular branches that form a triangular pine shape. -
Fill the canopy:
Allow the branches to overlap noticeably near the bottom, creating a dense wall of black where the trees are thickest. -
Add detail dabs:
Go back and add a few stray touches of black on the outer edges of the trees to mimic loose needles or uneven growth. -
Final check:
Step back and ensure the bottom is solid black, filling in any gaps between the trunks at the horizon line.
Muddy Sky Colors?
If your orange and purple allow themselves to mix too much, they will turn brown. Always keep a buffer zone of pink/magenta between the dark top and light bottom to keep the colors clean.
Natural Tree Tips
Don’t try to paint perfect individual pine needles. Use a frayed, old brush and use a disorganized tapping or ‘stippling’ motion. Rougher textures look more realistic in silhouettes.
Once framed in natural wood, this vibrant sunset brings a permanent golden hour glow into your home.


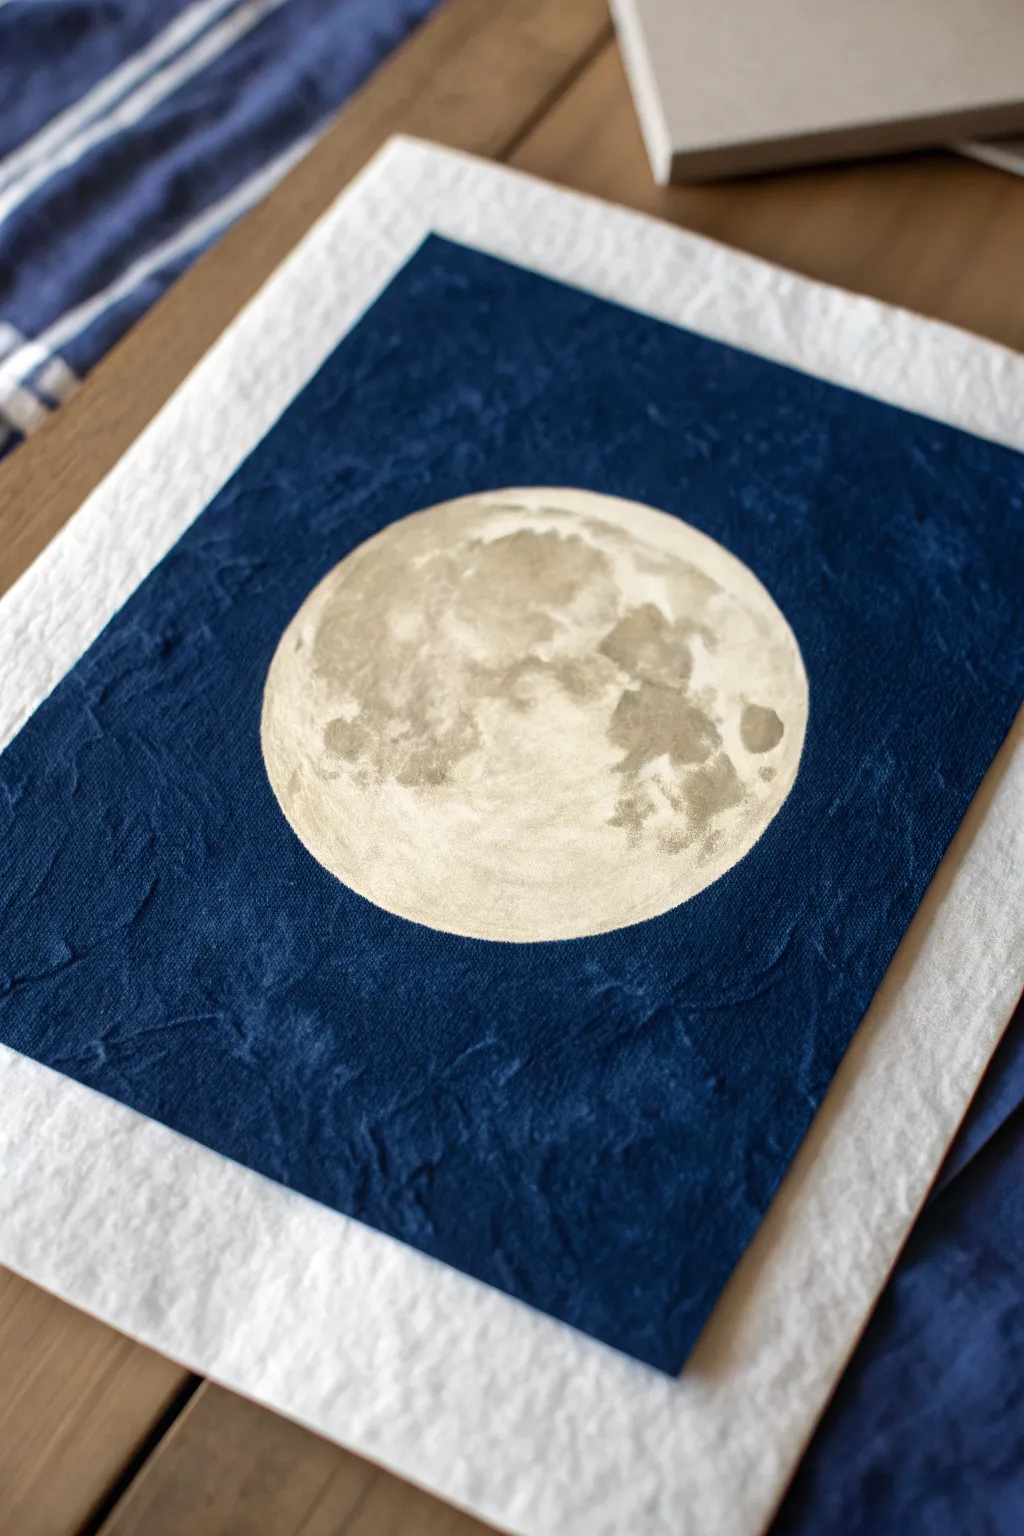
Silhouette Landscape
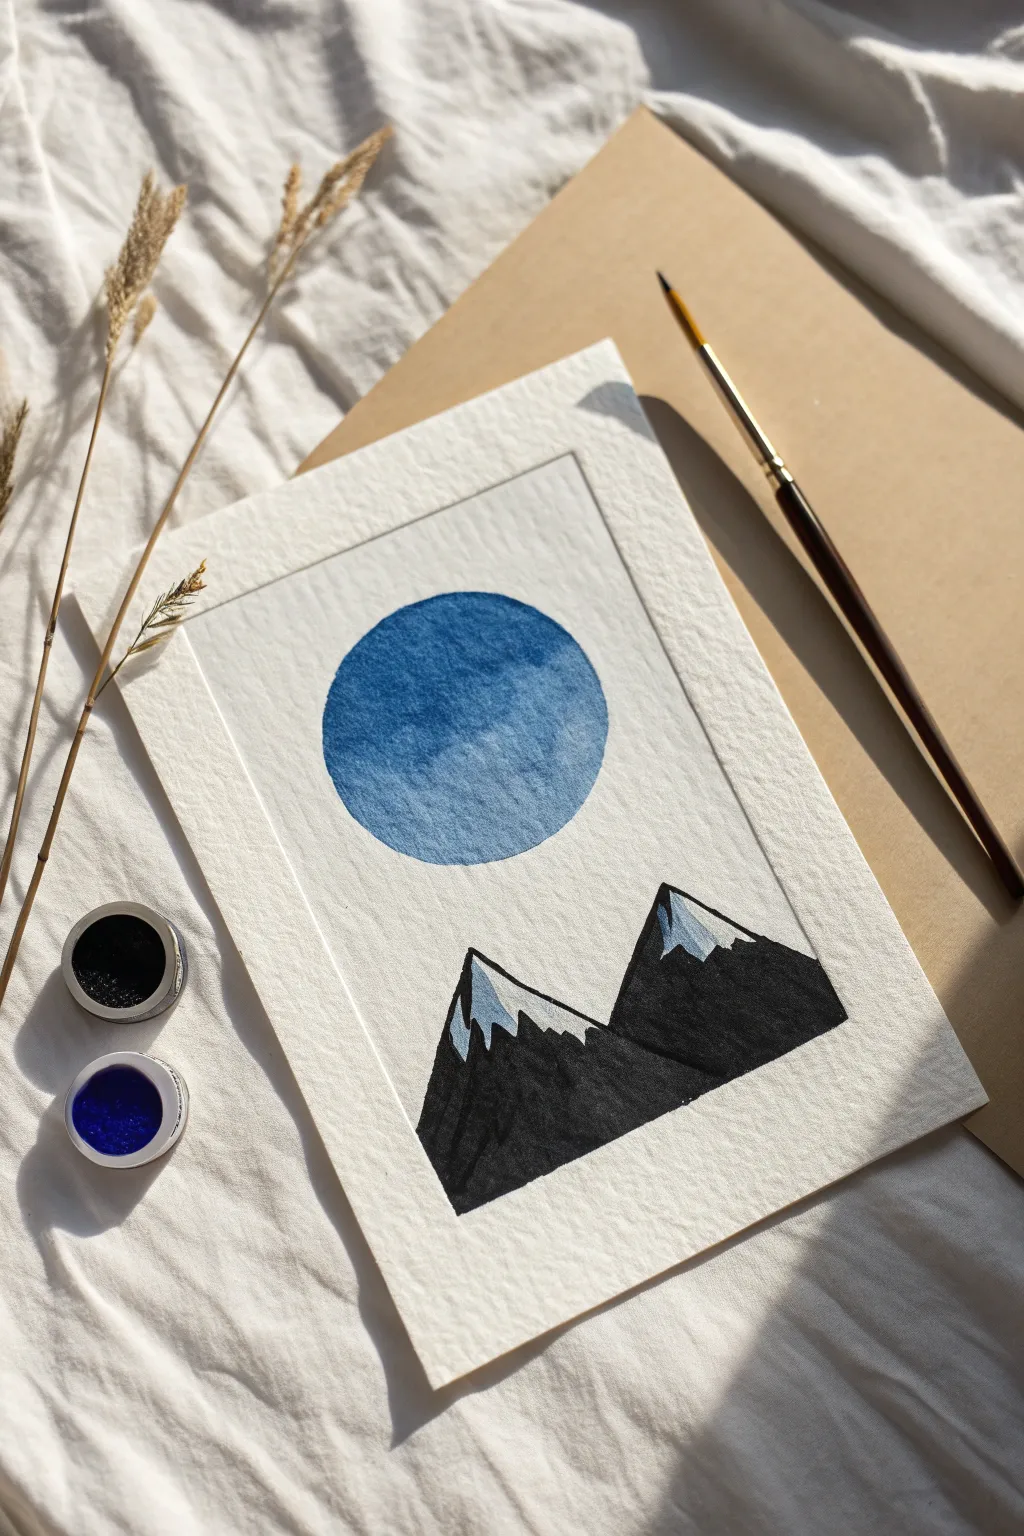
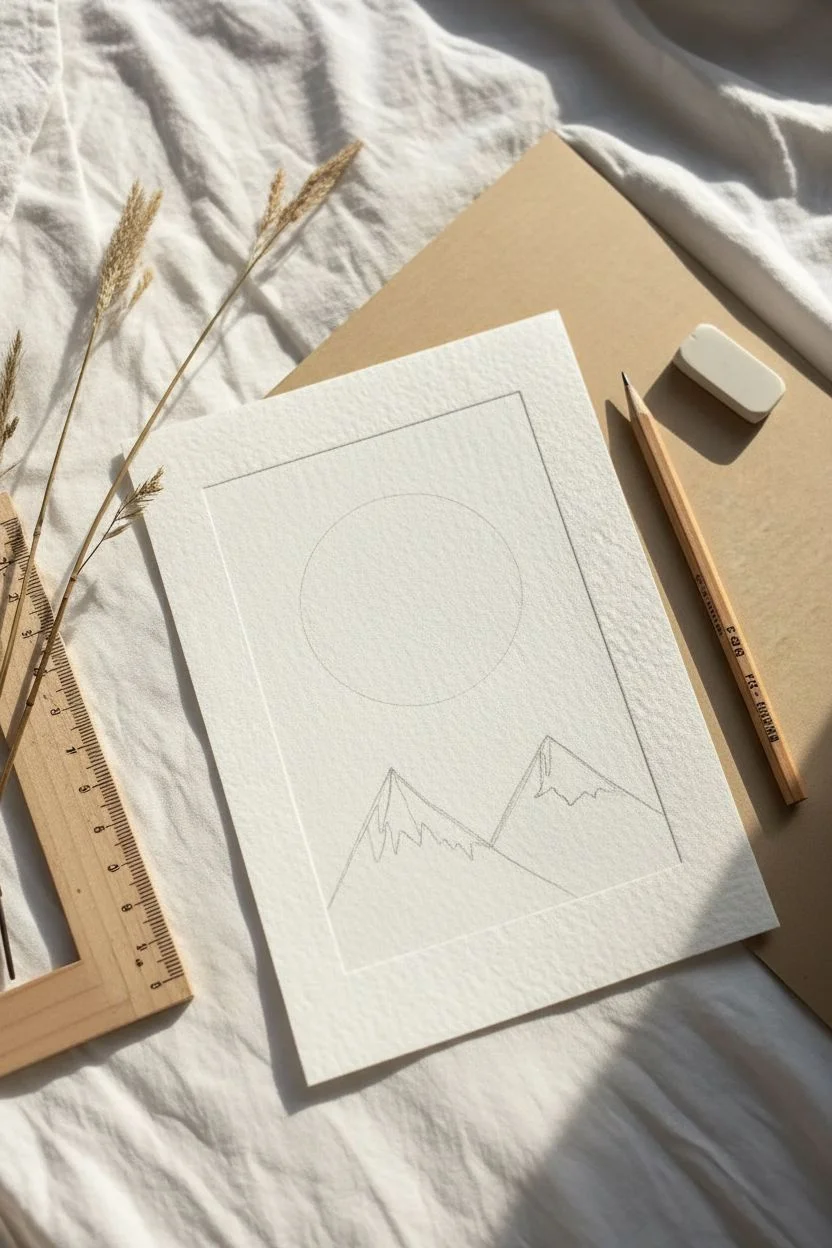
This striking project combines bold geometry with organic watercolor textures for a modern, minimalist look. The deep blue moon contrasts beautifully against the sharp, black mountain silhouettes, making it a perfect exercise in brush control and negative space.
Detailed Instructions
Materials
- Cold-press watercolor paper (300gsm)
- Watercolor paints (Indigo/Prussian Blue)
- Black watercolor or Black Gouache
- Round brushes (sizing 2 and 6)
- F H pencil and soft eraser
- Ruler
- Compass or circular object to trace
- Jar of clean water
Step 1: Sketching the Layout
-
Create the border:
Use a ruler to lightly draw a rectangle in the center of your watercolor paper, leaving a wide margin around the outside to mimic a mat frame. -
Outline the moon:
Position a compass or a small round object (like a jar lid) in the upper center of your rectangle and trace a perfect circle lightly with your pencil. -
Sketch the peaks:
Draw two overlapping triangle shapes at the bottom for the mountains, making the right mountain slightly larger and positioned in the foreground. -
Define the snow line:
Inside the peak of each triangle, sketch a jagged, erratic line to define where the snowy summit ends and the dark rock begins.
Fussy Edges?
If your circle’s edge looks shaky, wait for it to dry completely, then carefully trace over the outline with a blue watercolor pencil or fine-liner pen to smooth it out.
Step 2: The Textured Moon
-
Mix the blue:
Load a medium round brush with deep blue watercolor, such as Indigo or Prussian Blue. You want a mix that flows well but is rich in pigment. -
Outline the circle:
Using the tip of your brush, carefully paint closely along the pencil line of the circle to ensure a sharp, clean edge. -
Fill and texture:
Quickly fill in the rest of the circle. While the paint is still wet, I like to drop in small dabs of clean water or darker pigment to create “blooms” and crater-like textures. -
Dry completely:
Allow the blue circle to dry fully before moving on. The paper must be dry to the touch so you don’t smudge the sky while working on the mountains.
Step 3: Mountains & Snow
-
Paint snow shadows:
Dilute your blue paint significantly with water to create a very pale, icy wash. -
Apply shadows:
Paint the “shadow” side of the snow caps within your jagged lines, leaving parts of the white paper dry to represent the brightest highlights. -
Prepare the black:
Switch to a smaller brush and load it with opaque black watercolor or black gouache for maximum coverage. -
Carve the edges:
Starting at the jagged snow line, carefully paint downwards, carving out the bottom edge of the snow caps with the black paint. -
Fill the silhouette:
Fill in the rest of the mountain bodies with solid black paint, being careful to stay strictly within the rectangular border lines you drew earlier. -
Refine the foreground:
Ensure the mountain on the right visually sits in front of the left one by keeping the black paint solid and consistent across the shape. -
Final erase:
Once the artwork is totally bone dry—wait longer than you think!—gently erase the visible pencil border and construction lines for a crisp finish.
Pro Tip: Salt Texture
Sprinkle a few grains of table salt onto the wet blue moon paint. The salt absorbs water as it dries, creating beautiful star-like textures once brushed off.
Display your mini masterpiece in a simple frame or tape it to your inspiration wall for a daily dose of calm.


Glowing Moon Phase
This project combines tactile paper-distressing techniques with simple acrylic shading to create a moody, atmospheric piece. The result is a stunning full moon that looks like it is resting on deep blue velvet or crushed fabric.
Step-by-Step Tutorial
Materials
- Heavyweight watercolor paper (two sheets)
- Acrylic paints: Indigo (or Payne’s Gray), Titanium White, Unbleached Titanium (Cream), Raw Umber
- Flat synthetic brush (1 inch)
- Small round detail brush
- Small sea sponge or stiff bristle brush
- Compass or round object to trace (approx. 4-5 inches)
- Spray bottle with water
- Paper towels
- Glue stick or matte medium
Step 1: Preparing the Canvas
-
Sizing the paper:
Cut one sheet of watercolor paper into a rectangle, approximately 8×10 inches. This will become your blue night sky layer. -
Wetting the paper:
Using your spray bottle, thoroughly mist both sides of this cut sheet until the paper is damp and pliable, but not dripping wet. -
Creating texture:
Gently crumple the damp paper into a loose ball in your hands. Squeeze it slightly to create deep veins and creases. -
Flattening:
Carefullyuncrumple the paper and lay it flat on a waterproof surface. Smooth it out gently with your palm, leaving the wrinkles visible. -
Drying:
Allow this textured sheet to dry completely before applying any paint to prevent tearing.
Tear Trouble?
If the wet paper tears while unfolding, don’t panic! Gently nudge the torn edges back other. Once painted and glued, the tear becomes an intentional-looking part of the rugged, ancient texture.
Step 2: Painting the Sky
-
First pass:
Using your flat brush, apply a coat of Indigo or Payne’s Gray paint over the entire textured surface. -
Enhancing texture:
I like to water down the second coat slightly; this allows the dark pigment to settle into the crinkled crevices, emphasizing the texture. -
Drying time:
Let the blue background dry thoroughly. If the paper curled, place it under a heavy book for an hour once dry.
Celestial Shimmer
Mix a small drop of iridescent medium or metallic gold paint into your moon highlights. This gives the celestial body a subtle, magical glow that shifts beautifully when viewed from different angles.
Step 3: Painting the Moon
-
Outline:
Center your circular object or compass on the dried blue paper and lightly trace the moon’s outline with a pencil. -
Base coat:
Mix Titanium White with a small touch of Unbleached Titanium to create a warm off-white. fill within the circle using a round brush. -
Opacity check:
For a crisp look, apply a second coat of the base color to ensure the dark blue background doesn’t show through. -
Mixing shadows:
Create a shadow tone by mixing Unbleached Titanium with a tiny dot of Raw Umber or gray. -
Sponging craters:
Dip a small piece of sea sponge or a stiff brush into the shadow mix. Blot excess paint onto a paper towel until almost dry. -
Applying shadows:
Lightly dab the shadow color onto the moon, focusing on the right side and random patches to mimic the lunar maria (seas). -
Highlighting:
Using pure Titanium White on a small detail brush, add tiny highlights to the edges of your darker crater shapes to give them dimension. -
Softening:
If any edges look too harsh, use a clean, slightly damp brush to gently feather/blend the colors together.
Step 4: Assembly
-
Backing paper:
Take your second, larger sheet of watercolor paper. You can leave it smooth or repeat the crumple-and-dry technique (without paint) for a matching white border. -
Mounting:
Apply glue or matte medium to the back of your painted blue rectangle. -
Final press:
Center the painting onto the white backing sheet and press down firmly to secure the finished piece.
Display your textured moon art in a shadow box to fully appreciate the depth and light.


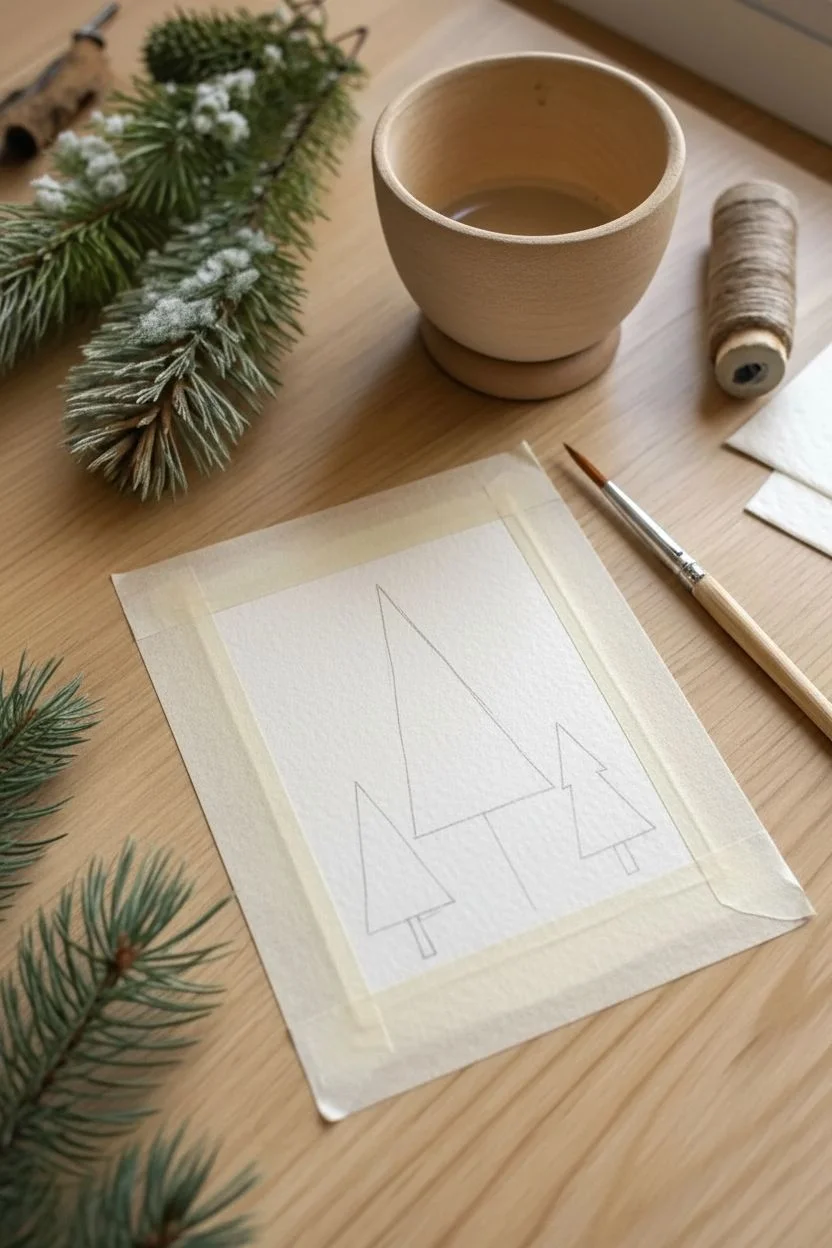
Simple Pine Trees
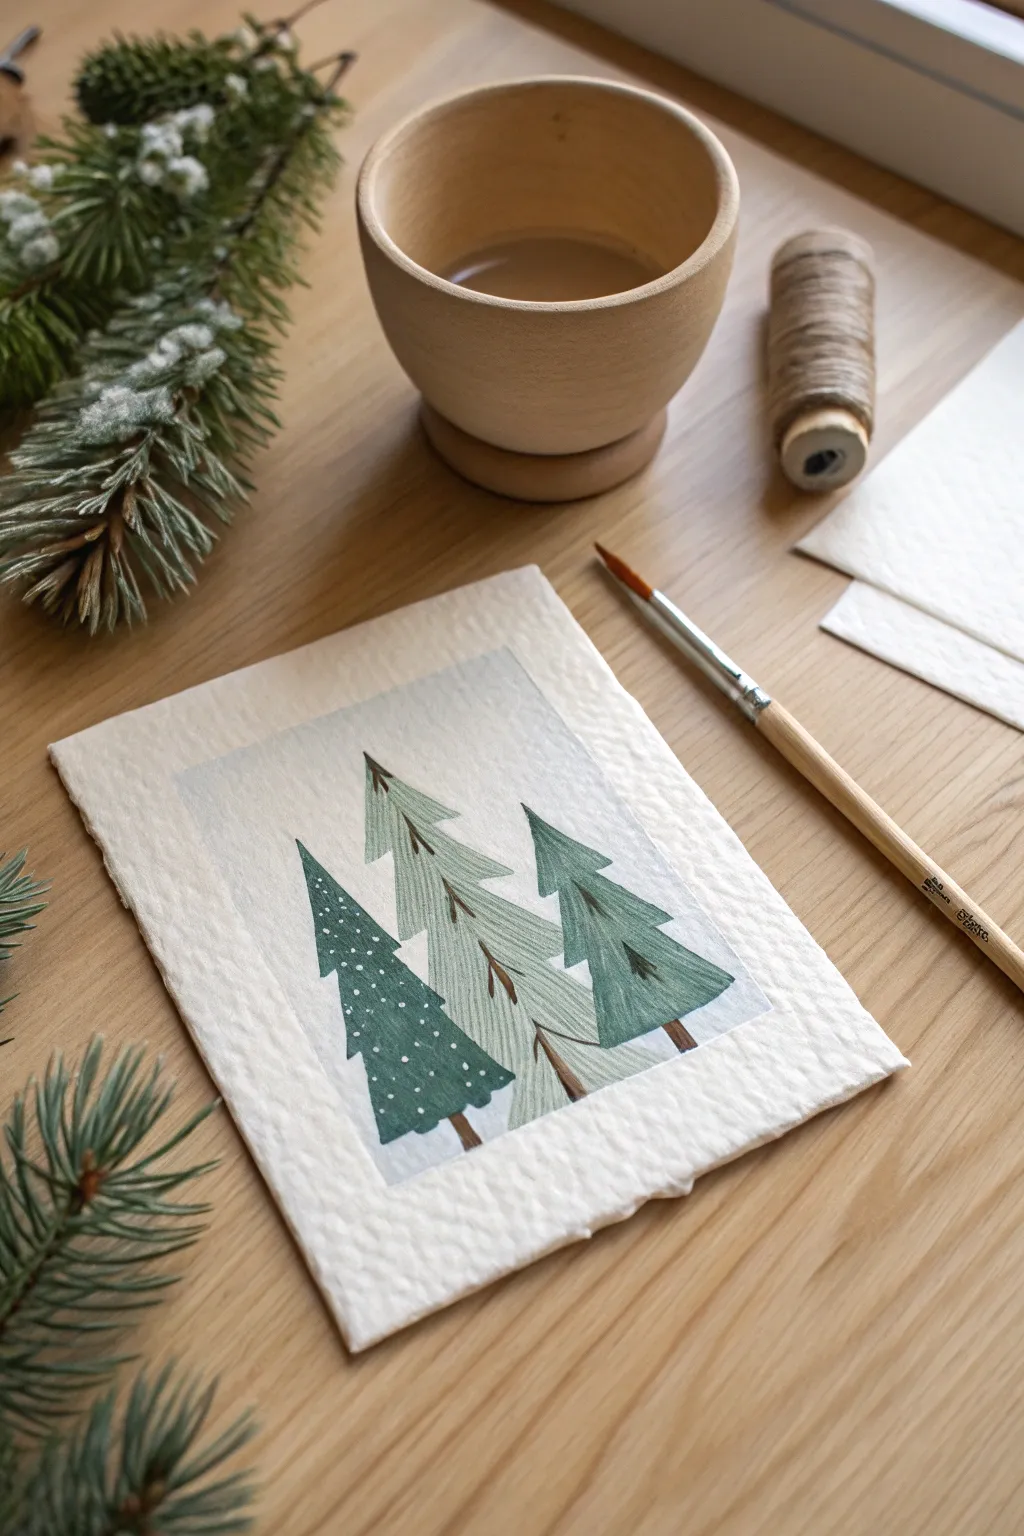
Capture the cozy essence of winter with this trio of stylized pine trees, each featuring unique textures and shades of green. Using gouache or opaque watercolors creates a crisp, illustrated look perfect for holiday cards or framed mini-art.
Step-by-Step
Materials
- Cold-press watercolor paper (heavyweight/cotton rug)
- Gouache or watercolor paints (Sage, Forest Green, Teal, Brown, White)
- Round brushes (Size 4 and Size 0/detail)
- Masking tape or Washi tape
- Mixing palette
- Cup of water and paper towels
Step 1: Setting the Scene
-
Tape the border:
Begin by applying masking tape to your paper to create a clean, rectangular frame in the center. Press the edges down firmly to prevent paint bleeding. -
Create a background wash:
Mix a large amount of water with a tiny drop of grey-blue paint. Apply this very faint wash inside your taped rectangle to define the painting area. -
Dry completely:
Wait until the background wash is bone dry before proceeding. If the paper is cool to the touch, it needs more time. -
Sketch the placement:
Lightly trace the positions of three triangles with a pencil. Place the tallest one in the middle, slightly higher up, and the two flanking trees lower down.
Clean Lines Pro-Tip
To prevent the paper from tearing when removing tape, heat the tape gently with a hair dryer on a low setting for a few seconds before peeling.
Step 2: Painting the Base Shapes
-
Mix the middle shade:
Combine green with a little white to create a soft sage or mint color. Paint the middle tree shape, giving it jagged, tiered edges to mimic branches. -
Paint the right tree:
Mix a teal or blue-green shade. Paint the tree on the right, making it slightly shorter and creating three distinct tiered sections. -
Paint the left tree:
Use a deep forest green for the final tree on the left. Paint this one as a simple, elongated triangle with straight edges rather than tiered branches. -
Let the bases set:
Allow these base layers to dry fully. I usually take this time to clean my brushes thoroughly so the next colors stay crisp.
Step 3: Adding Texture & Trunks
-
Texture the middle tree:
Using a slightly darker version of your sage mix and a fine detail brush, paint thin vertical lines down the length of the center tree to simulate bark or needle texture. -
Detail the middle tree branches:
Add small, darker triangular shadows underneath the tiered points of the middle tree to give it dimension. -
Detail the right tree:
On the teal tree, paint inverted ‘V’ shapes or dark triangles just under the main branch tiers to suggest depth and shadow. -
Snow on the left tree:
Dip a detail brush or a toothpick into pure white gouache. Dot distinct ‘snow’ flakes all over the dark green tree on the left. -
Paint the trunks:
Mix a warm brown. Paint simple, thin rectangular trunks extending from the center bottom of each tree. -
Shadow the trunks:
Add a thin line of darker brown or black to the right side of each trunk to create a cylindrical shape. -
The reveal:
Once the painting is 100% dry, slowly peel away the masking tape at a 45-degree angle to reveal your crisp, perfect edges.
Level Up: Festive Sparkle
Swap the white snow dots on the left tree for metallic gold paint to turn this into an elegant holiday illustration perfect for gift tags.
Now you have a charming woodland scene ready to frame or gift!
BRUSH GUIDE
The Right Brush for Every Stroke
From clean lines to bold texture — master brush choice, stroke control, and essential techniques.
Explore the Full Guide
Cotton Candy Clouds
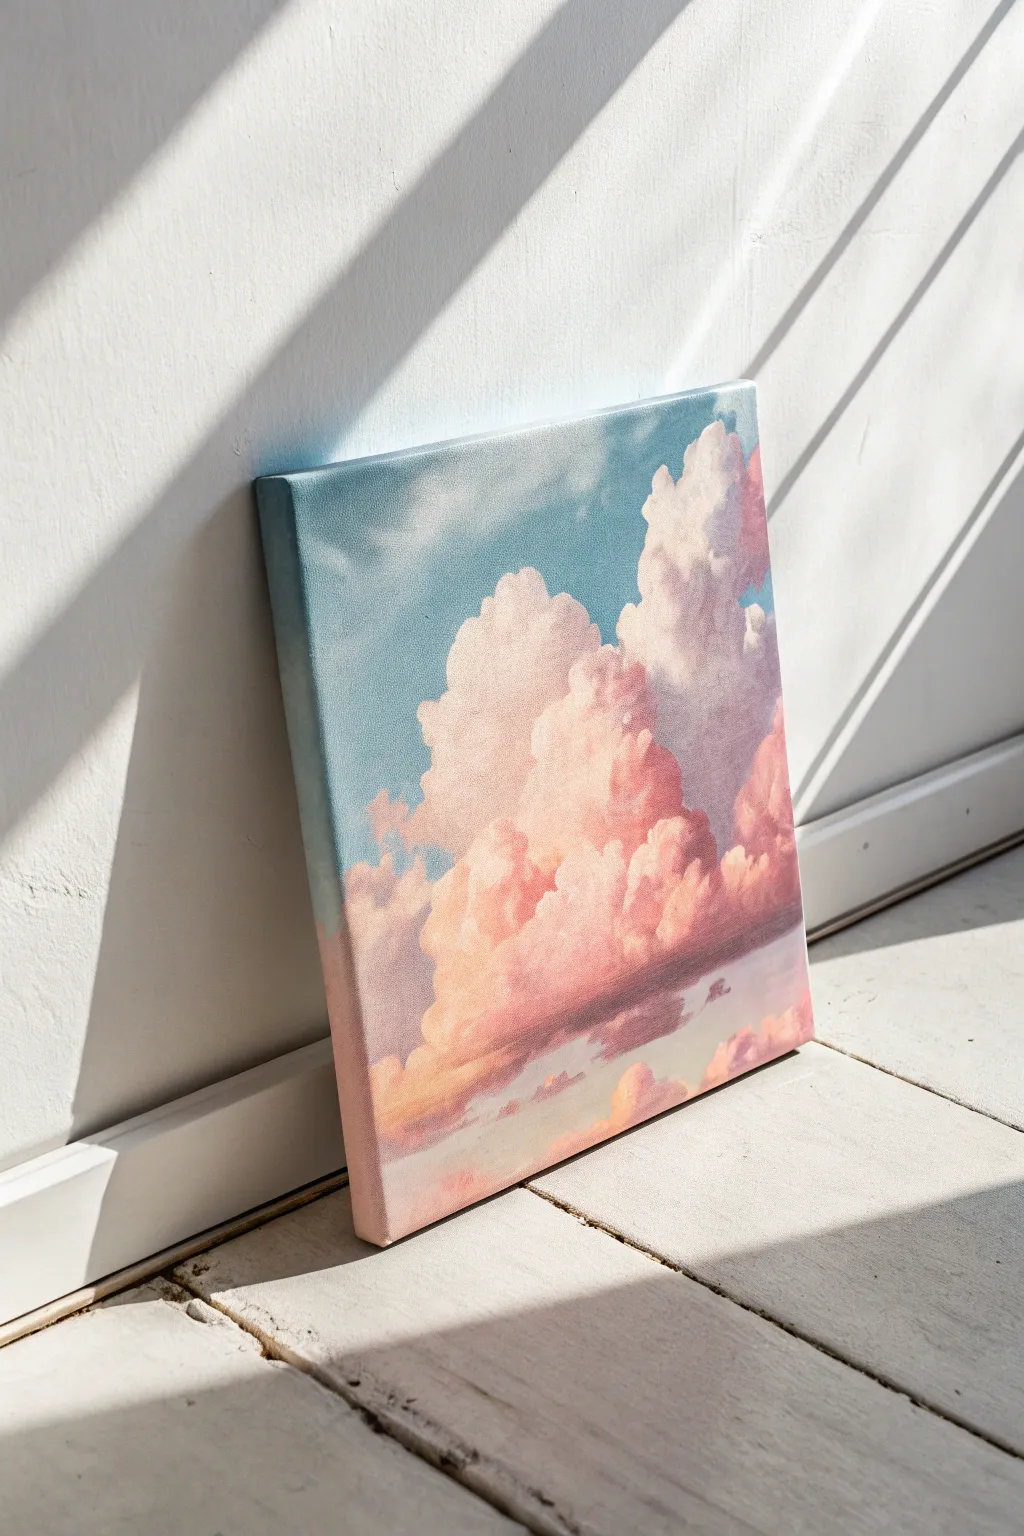
Capture the whimsy of a dreamlike sky with this soft, pastel acrylic painting. You will learn to blend a smooth teal gradient and build voluminous, fluffy clouds using scumbling techniques.
Detailed Instructions
Materials
- Square canvas (approx 10×10 or 12×12)
- Acrylic paints: Titanium White, Phthalo Blue (or Turquoise), Magenta, Cadmium Yellow
- Large flat brush (for sky)
- Medium filbert brush (rounded tip)
- Small round brush
- Palette
- Water cup and paper towels
Step 1: Setting the Atmosphere
-
Mix the sky color:
Combine a large amount of White with a tiny dot of Phthalo Blue and a pinhead of Yellow to create a pale, refreshing teal. -
Apply the upper sky:
Using the large flat brush, paint the top third of the canvas with your teal mix, using long, horizontal strokes. -
Create a gradient:
Add more White to your teal mix on the palette. Paint the middle section of the canvas, blending it slightly upwards into the darker teal while the paint is still wet. -
Fade to the horizon:
Use almost pure White with just a whisper of the blue pigment for the bottom third. Blend this upwards to create a seamless transition from blue to white. -
Paint the edges:
Don’t forget to wrap your colors around the sides of the canvas for a polished, gallery-ready look. Let the background dry completely before proceeding.
Dry Brush Magic
Keep your brush dry and use very little paint when adding the final white highlights. Use circular scrubbing motions to create that signature soft, cotton-like fluffiness.
Step 2: Forming the Cloud Mass
-
Mix the base pink:
Mix White with a small amount of Magenta and a touch of Yellow to create a soft, warm peach-pink color. -
Map the shape:
With a filbert brush, sketch the general outline of the large, towering cumulus cloud in the center. Think of it as a stacking of irregular cauliflower shapes. -
Fill the form:
Fill in the entire cloud shape with your peach-pink mix. Don’t worry about shading yet; just get the silhouette solid against the blue sky. -
Add floating islands:
Paint a few smaller, horizontal cloud wisps near the bottom horizon line using the same pink base color.
Step 3: Adding Volume and Fluff
-
Mix the shadow tone:
Add a tiny touch of Blue to your pink mix to create a soft lavender or mauve shadow color. -
Define the bottoms:
Apply this lavender tone to the bottom and right-hand side of the cloud clusters. This establishes where the light is not hitting. -
Blend the shadows:
Use a clean, slightly damp brush to gently soften the edge where the lavender meets the pink, creating a rounded appearance. -
Prepare the highlight:
Clean your brush thoroughly. Squeeze out fresh Titanium White with the tiniest hint of pink. -
Scumble the highlights:
Load a small amount of paint onto a dry filbert brush. Using a circular scrubbing motion (scumbling), apply bright highlights to the top-left curves of the cloud puffs. -
Refine the edges:
I like to use an almost dry brush to lightly dab the outer edges of the clouds, making them look wispy and soft rather than crisp. -
Enhance the horizon:
Add horizontal streaks of slightly darker mauve near the bottom to suggest distance and atmosphere beneath the main cloud. -
Final touches:
Add pure white accents to the very peaks of the clouds for maximum contrast against the blue sky.
Muddy Colors?
If your pinks look grey against the blue sky, the background wasn’t dry enough. Let the sky dry completely, or use a hairdryer, before starting the cloud layer.
Hang your new masterpiece and enjoy the calming vibes of your eternal sunset
Galaxy Night Sky
Capture the infinite beauty of the cosmos on a small canvas with this beginner-friendly painting project. Using simple sponging techniques, you will create a vibrant nebula surrounded by a field of delicate stardust.
Step-by-Step
Materials
- Rectangular canvas panel or stretched canvas
- Acrylic paints (Black, Prussian Blue, Violet, Magenta, Teal, Titanium White)
- Kitchen sponge or cosmetic wedge sponges
- Small round detail brush (size 0 or 1)
- Old toothbrush (optional, for splattering)
- Palette or paper plate
- Water cup
Step 1: Setting the Dark Void
-
Prepare the base color:
Squeeze a generous amount of black acrylic paint onto your palette. Mix in a tiny drop of Prussian Blue to give the black a cold, deep space undertone rather than a flat darkness. -
Coat the canvas:
Using a large flat brush or a sponge, cover the entire canvas with your black mixture. Ensure you paint the sides of the canvas if using a stretched frame for a finished look. -
Dry completely:
Allow this base layer to dry fully. This is crucial; if the base is wet, your colorful nebula layers will turn muddy when applied on top.
Cloudy colors?
If your galaxy colors look dull or gray, you likely blended them too much into the wet black base. Let the canvas dry completely, then sponge a fresh layer of bright color on top.
Step 2: Building the Nebula
-
Load the sponge:
Dampen a small piece of sponge and squeeze out all excess water. Dip it lightly into Prussian Blue or Navy paint, dabbing off the excess on a paper towel until the texture looks dry and cloudy. -
Create the pathway:
Gently dab the blue sponge across the canvas in a diagonal shape, moving from the bottom left roughly toward the top right. This establishes the flow of your galaxy. -
Add violet tones:
Using a fresh corner of the sponge (or a new one), pick up some Violet paint. Dab this over the blue areas, interacting with the edges but letting some of that deep blue show through. -
Brighten the core:
Mix a little Magenta with Violet to create a brighter purple. Sponge this concentrated color into the center of your diagonal nebula cloud to create a glowing core effect. -
Add teal accents:
I like to add small touches of Teal or Aqua on the outer edges of the purple cloud. Dab sparingly to create contrasting gas clouds within the nebula. -
Blend the transitions:
If the transition between the colors and the black background looks too harsh, take a clean, slightly damp sponge and gently tap over the border where the color meets the black to soften the edges. -
Intensify the blacks:
If your sponge work accidentally covered too much of the background, take a little black paint on a brush and carefully darken the four corners of the canvas again to frame the galaxy.
Make it shimmer
Once the painting is fully dry, paint over the brightest white stars with a tiny dab of iridescent or gold glitter glue to make the artwork sparkle when the light hits it.
Step 3: Creating Striking Stars
-
Prepare splatter paint:
Mix a small amount of Titanium White with water until it reaches the consistency of heavy cream or ink. It needs to flow easily but still be opaque. -
Test the splatter:
Dip an old toothbrush or a stiff bristled brush into the thinned white paint. Point it away from the canvas and run your thumb across the bristles to test the spray pattern. -
Create distant stars:
Holding the brush about 6 inches above the canvas, flick the bristles to spray a fine mist of white dots over the diagonal nebula band. Add fewer stars in the dark corners. -
Paint hero stars:
Switch to your finest detail brush (size 0). Identify where you want your brightest ‘hero’ stars to sit—usually 3 to 5 spots balanced across the composition. -
Draw the star cross:
For each hero star, paint a thin vertical line. Then, paint a horizontal line crossing through the center. Keep the lines tapered at the ends so they look like focused light rays. -
Add diagonals:
For the largest stars, add two very tiny diagonal lines between the main cross arms, making an eight-pointed glimmer. -
Final highlights:
Dip the very tip of your brush (or a toothpick) into thick, unthinned white paint and place a single dot in the center of your hero stars to make them shine.
Display your new celestial masterpiece on a desk easel or hang it up to add a touch of cosmic wonder to your room

PENCIL GUIDE
Understanding Pencil Grades from H to B
From first sketch to finished drawing — learn pencil grades, line control, and shading techniques.
Explore the Full Guide
Potted Cactus
Capture the charm of a potted succulent with this clean and vibrant watercolor tutorial. You will learn to build volume through shading and add crisp details to create a realistic yet illustrative piece.
How-To Guide
Materials
- Cold press watercolor paper (300gsm)
- Watercolor paints (Sap Green, Viridian, Burnt Sienna, Burnt Umber, Indigo, Payne’s Grey)
- Round brushes (sizes 6 and 2)
- Detail brush (size 0) or white gel pen
- HB pencil and kneaded eraser
- White gouache paint
- Palette
- Water jars
Step 1: Sketching the Outline
-
Draft the pot shape:
Begin by lightly drawing the terracotta pot near the bottom center of your page. Sketch an oval for the rim and a tapered cylindrical shape for the body. -
Outline the cactus:
Draw an elongated dome shape rising from inside the pot rim. Make it slightly taller than the pot itself. -
Mark the ridges:
Lightly sketch curved vertical lines running from the top center of the cactus down to the base to indicate the ribs. -
Refine the paper edges:
For the rustic look shown in the example, carefully tear the edges of your watercolor paper against a ruler rather than cutting them.
Step 2: Painting the Pot
-
Base wash:
Mix Burnt Sienna with a touch of water to create a tea-like consistency. Fill in the main body and the rim of the pot with this warm terracotta color. -
Add volume:
While the paint is still damp, drop slightly more concentrated pigment along the right side and bottom of the pot to suggest a rounded form and shadow. -
Darken the soil:
Mix Burnt Umber with a little Indigo for a dark soil color. Carefully paint the small crescent shape inside the back rim where the cactus meets the pot. -
Define the rim shadow:
Once the base is dry, run a stripe of darker Burnt Sienna just under the rim of the pot to create a distinct cast shadow.
Pro Tip: Torn Edges
To get the ‘deckled’ edge look without expensive paper, trace a line of water with a brush along your cut line, wait a moment, then tear gently.
Step 3: Painting the Cactus
-
First green layer:
Mix a light Sap Green wash. Paint the entire body of the cactus, ensuring you stay within your pencil lines. -
Creating ridges:
Once the first layer is dry, mix a darker green using Viridian and a touch of Indigo. Paint vertical stripes following the ‘valleys’ between the ribs you sketched earlier. -
Blending the form:
Use a clean, damp brush to soften the edges of your dark stripes, blending them slightly outward to make the ribs look rounded rather than sharp. -
Deepening shadows:
Apply a concentrated dark green mix to the right side of the cactus and at the very bottom where it meets the soil to enhance the 3D effect. -
Top detail:
The top of the cactus is where the ridges converge. Carefully taper your dark green lines toward the center point at the apex.
Troubleshooting: Flat Cactus
If the cactus looks flat, glaze a thin layer of cool blue-green over the entire shadowed side (right) to push it back and round out the form.
Step 4: Details & Shadows
-
Cast shadow:
Mix a watery grey using Payne’s Grey or diluted Indigo. Paint an oval shadow on the ground extending to the left of the pot base. -
Adding spines:
Using a size 0 brush with opaque white gouache (or a white gel pen), draw small star-shaped clusters of spines along the vertical ridges. -
Highlighting:
Add a few single white lines or dots randomly between spine clusters to catch the light. -
Top crown:
Paint a small cluster of yellowish-white spines standing straight up at the very top center of the cactus. -
Final drying:
Let the white details dry completely before erasing any visible pencil marks to avoid smudging.
Now you have a tranquil botanical study perfect for framing or gifting.
Geometric Mountain Range
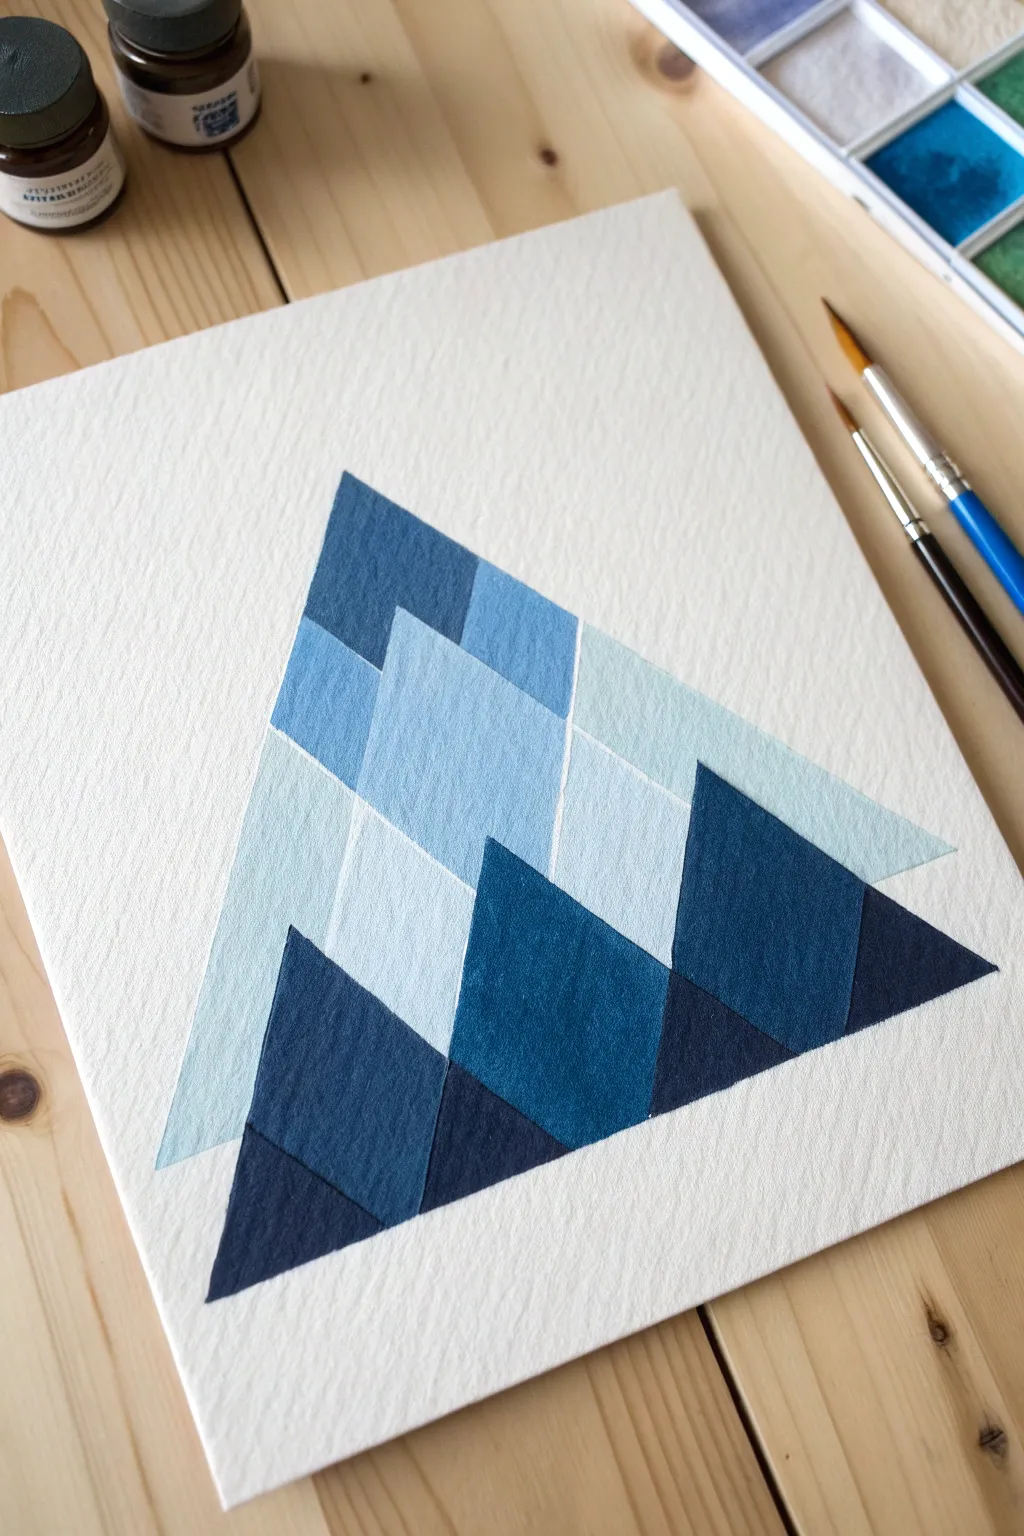
Create a soothing, modern piece of art using simple geometry and a calming blue palette. This project explores value and precision, teaching you how to build depth through shifting shades of a single color while mastering brush control.
Step-by-Step Tutorial
Materials
- Cold press watercolor paper (300 gsm)
- Watercolor paints (pan set or tubes)
- Small round brushes (size 2 and 4)
- Synthethic flat brush (optional, for mixing)
- HB Pencil
- Ruler
- Eraser
- Palette or white ceramic plate
- Two jars of water
- Paper towels
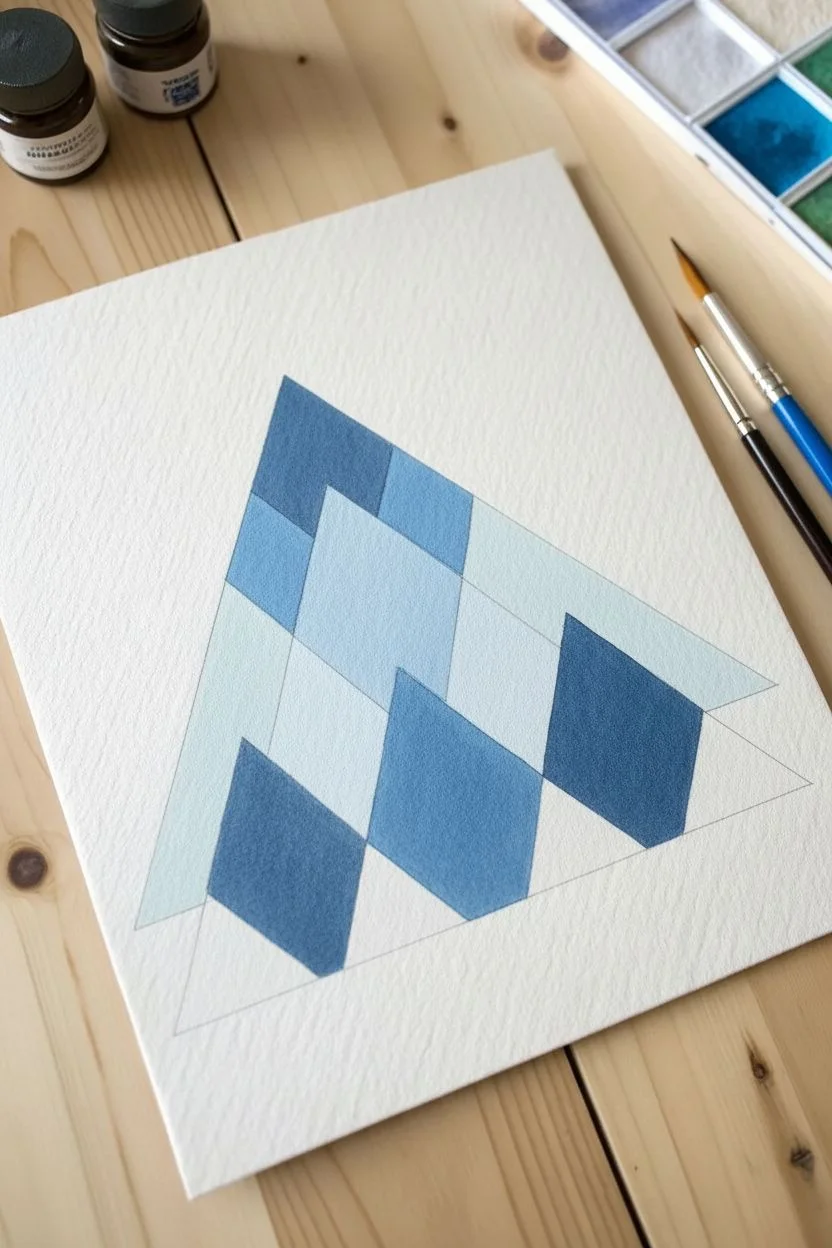
Step 1: Drafting the Geometry
-
Establish the base:
Place your paper on a flat surface. Using your ruler and pencil, lightly draw a horizontal line near the bottom third of the paper to serve as the base of your mountain range. -
Define the peak:
Find the center point above your base line and mark a dot about two-thirds up the page. Connect this dot to the ends of your base line to form a large, equilateral-style triangle. -
Sketch the foreground:
Inside the main triangle, draw three smaller, jagged triangular peaks along the bottom edge. These will eventually store your darkest colors. -
Create the middle ground:
Draw a second row of diamond and irregular quadrilateral shapes emerging from behind the foreground peaks. Let them overlap slightly but keep lines straight and angular. -
Outline the summit:
Fill the remaining space at the top with elongated diamond shapes or simple triangles that point toward the main apex. -
Refine the gaps:
Go over your sketch. I like to double-check that every shape has its own distinct boundary line, as these pencil lines will act as the ‘no paint’ zones to create the white channels later.
Pro Tip: Steady Hands
To get straighter lines without a ruler, exhale slowly as you pull the brush along the edge of the shape. Locking your pinky finger on the table for stability also helps immensely!
Step 2: Mixing the Palette
-
Prepare the workspace:
Set up your palette. Squeeze out a generous amount of a deep blue pigment, such as Prussian Blue or Indigo. -
Create the darkest shade:
In one well of your palette, mix the pigment with just a drop of water to create a thick, opaque consistency. This is for your bottom row (Level 1). -
Mix the mid-tones:
In a second and third well, take some of that original blue and dilute it with increasing amounts of water. You want a distinct ‘Denim’ blue and a lighter ‘Sky’ blue. -
Prepare the highlight:
In a final well, mix a very watery wash that is barely tinted. This ‘Ice Blue’ will be used for the very top shapes.
Step 3: Painting the Mosaic
-
Start at the summit:
Dip your size 4 brush into the ‘Ice Blue’ wash. Carefully fill in the shapes at the very top of the triangle. -
Mind the gap:
As you paint, stop your brush about 1 millimeter away from your pencil lines. Leaving this tiny sliver of dry paper creates the crisp, white geometric separation seen in the photo. -
Work downwards:
Switch to your ‘Sky Blue’ mix. specific shapes in the middle-upper section using the same technique—painting carefully up to, but not over, the pencil lines. -
Apply the mid-tones:
Load your brush with the ‘Denim’ blue. Fill in the central band of shapes. If a shape touches a wet area above it, wait a moment for the top one to dry so the colors don’t bleed across your white gap. -
Anchor with darks:
Using your darkest Indigo mix, paint the foreground triangles at the bottom. The high contrast here provides visual weight to the piece. -
Refine edges:
Switch to your smaller size 2 brush to tidy up any corners or sharpen the edges of the shapes where the paint might have been uneven. -
Dry completely:
Allow the painting to sit undisturbed until bone dry. The rich darks will take longer to set than the light washes. -
Erase guidelines:
Once you are 100% sure the paint is dry, gently run your eraser over the white gaps to remove the visible graphite pencil lines, leaving clean white paper channels.
Level Up: Metallic Pop
Instead of leaving the channels white, paint them in with a fine gold gel pen or metallic watercolor after the blue paint dries for a luxurious, kintsugi-inspired finish.
Frame this modern geometric piece in a simple wood frame to complement the clean lines and cool tones.


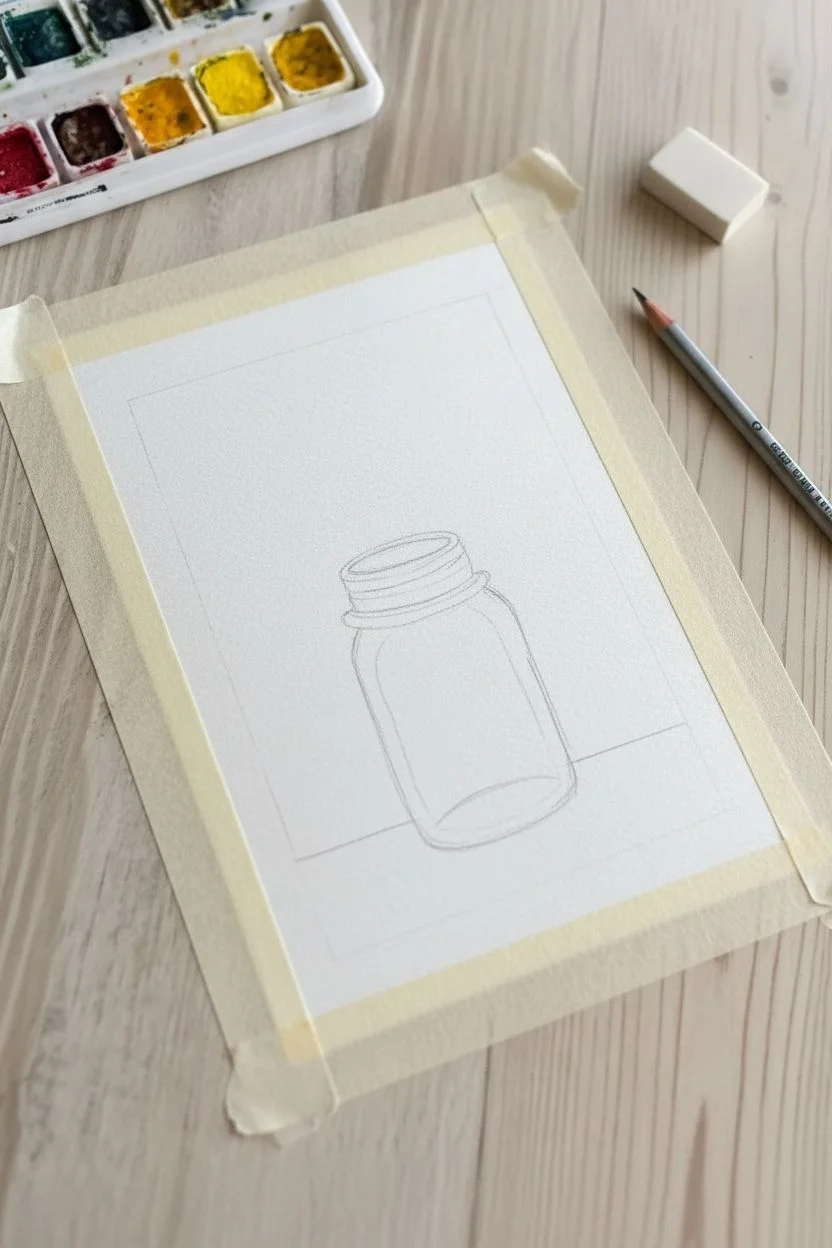
Fireflies in a Jar
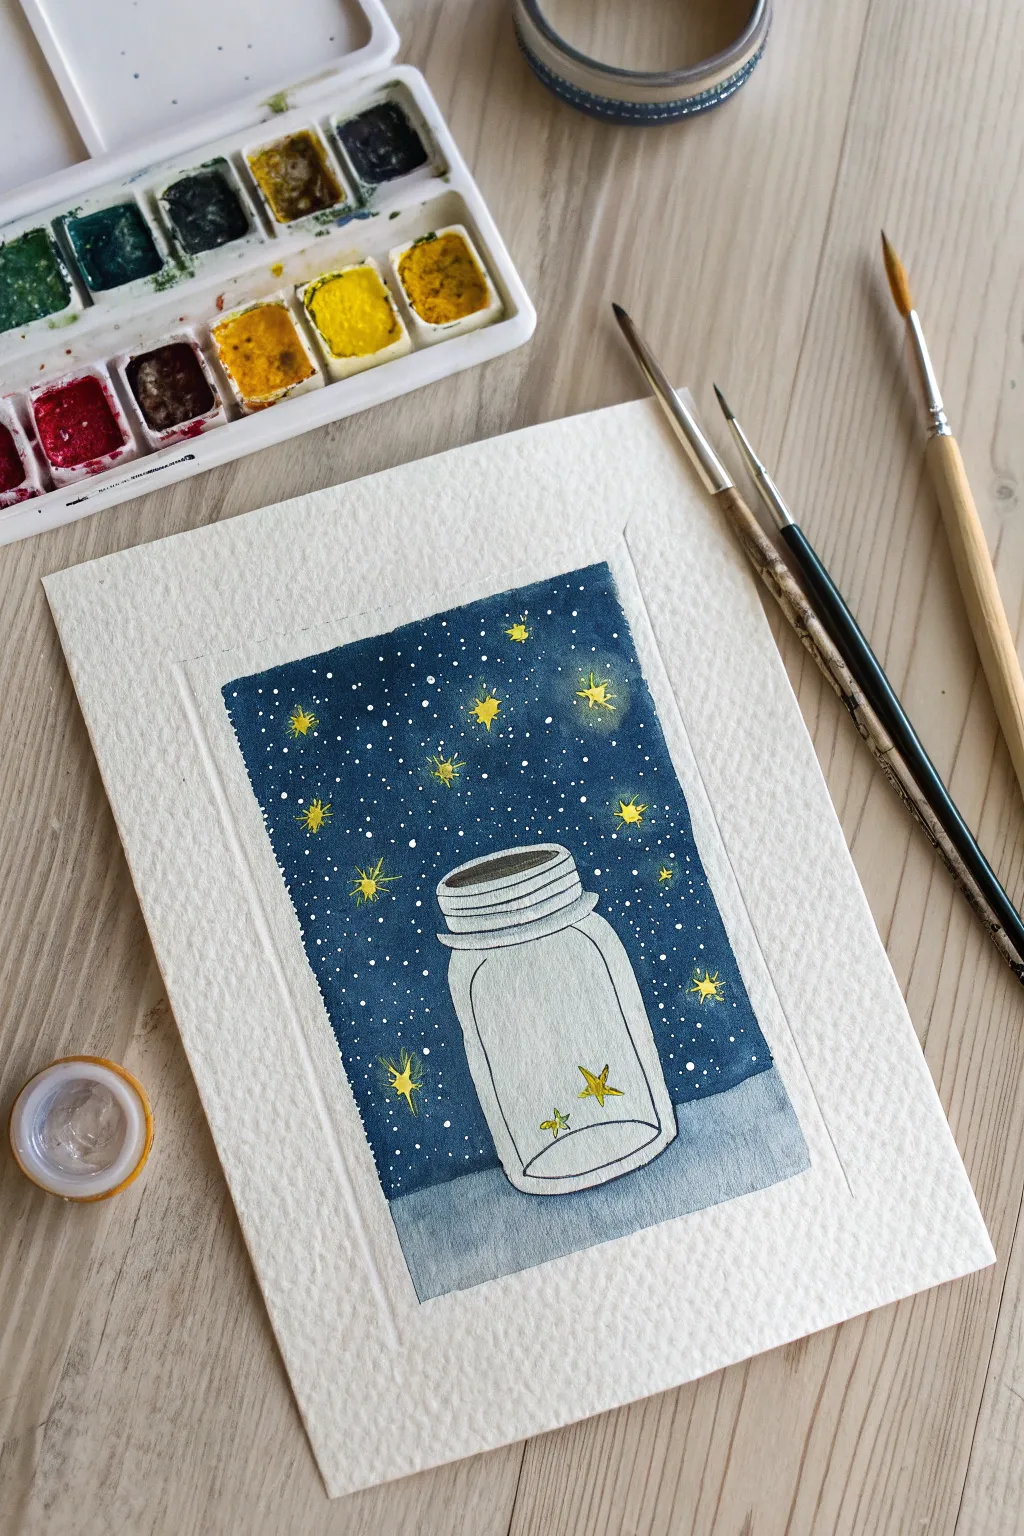
This whimsical watercolor project captures the magic of fireflies on a starry night using high-contrast colors and simple shapes. It creates a cozy, dreamy atmosphere perfect for practicing control over negative space and fine details.
How-To Guide
Materials
- Cold press watercolor paper
- Watercolor pan set (Indigo, Yellow, Black)
- Round brushes (size 4 and 0)
- Pencil and eraser
- Masking tape
- White gouache or white gel pen
- Jar of water and paper towels
Step 1: Sketching the Composition
-
Prepare the borders:
Begin by taping the edges of your paper to a flat surface. Inside this area, lightly draw a smaller rectangle with a pencil to serve as the painted frame seen in the example. -
Outline the jar:
In the lower center of your rectangle, lightly sketch a mason jar. Start with a flat oval for the opening, add the neck rings below it, and draw a rounded cylinder for the body. -
Mark the horizon:
Draw a faint horizontal line behind the jar, positioning it about one-fifth of the way up from the bottom border to separate the table surface from the sky.
Bleeding Lines?
If your dark blue sky accidentally bleeds into the white jar, don’t panic. Blot it immediately with a clean paper towel, and cover any stain later with opaque white gouache.
Step 2: Painting the Background
-
Mix the night sky:
Load your size 4 brush with a deep indigo or navy blue. You want a saturated, dark consistency to contrast with the bright stars later. -
Fill the sky:
Carefully paint the area above the horizon line and outside the jar. Take your time edging around the jar’s rim to keep the glass shape crisp. -
Create the surface:
Clean your brush and mix a very watery, pale gray-blue. Paint the area below the horizon line, creating a soft, lighter ground for the jar to sit on. -
Let it dry completely:
I usually wait about 10-15 minutes here; the paper must be bone-dry before we add the next layers to prevent bleeding.
Step 3: Defining the Jar
-
Shadow the rim:
Using a diluted gray mix and a smaller brush, paint thin lines along the threads of the jar neck to give them dimension. -
Add glass reflections:
Paint a curved vertical line down the left side of the jar and a small curve at the bottom right. This subtle shading implies roundness without filling the whole shape.
Make it Glow
To make the fireflies look glowing, dampen the paper slightly in a small circle before dropping in your yellow paint. This creates a soft, fuzzy edge around the light.
Step 4: Adding the Magic
-
Splatter the stars:
Mix white gouache with a tiny drop of water. Tap your brush against a finger over the blue sky area to create a spray of tiny white distant stars. -
Paint the fireflies:
Switch to your smallest brush (size 0) and bright yellow paint. Paint small asterisks or star shapes scattered in the sky. -
Fill the jar:
Paint two small yellow stars resting at the bottom inside the jar to look like captured fireflies. -
Highlight the stars:
Once the yellow is dry, add a tiny dot of white gouache or use a gel pen in the center of the largest stars to make them really shine. -
Reveal the border:
Ideally, wait for everything to be completely dry, then gently peel away the masking tape to reveal your clean white edges.
Now you have a charming little lantern scene ready to frame or give as a card.
Single Daisy

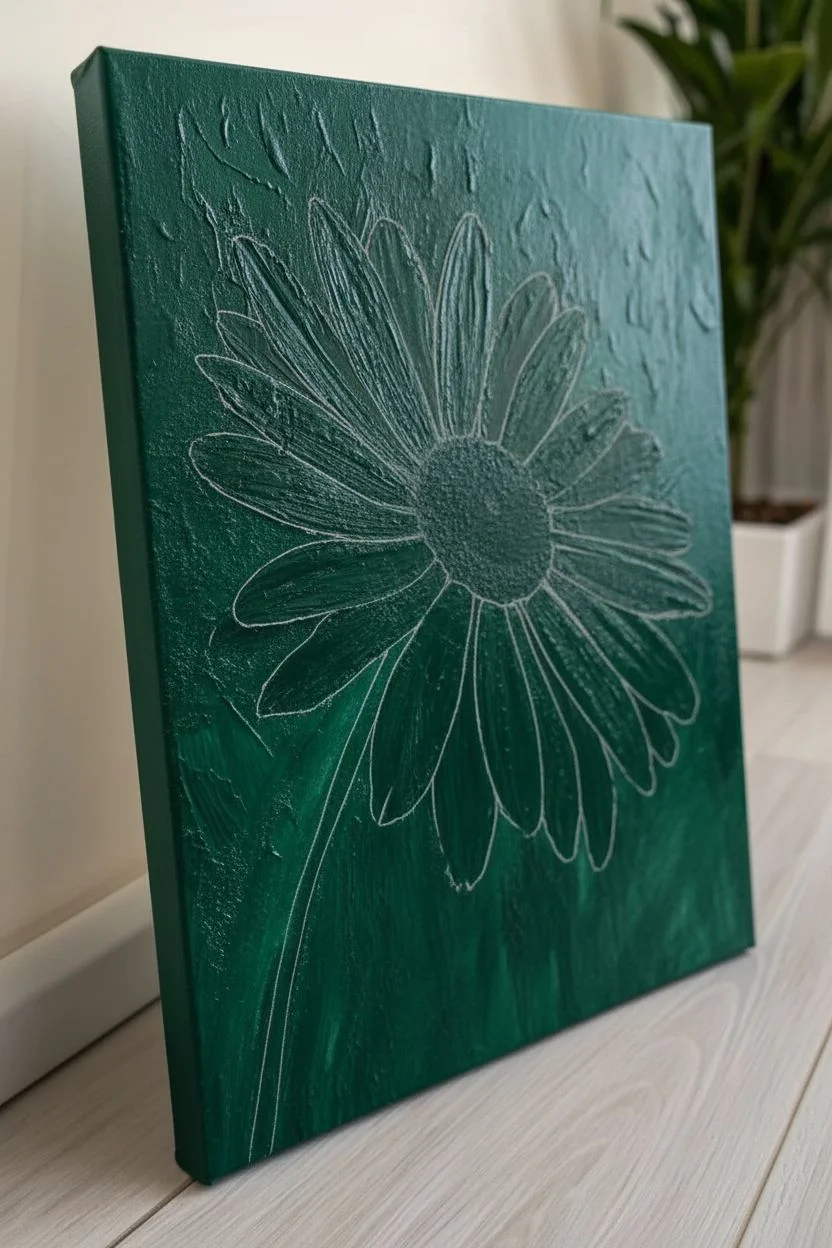
This project focuses on building dimension using heavy body acrylics to make the flower pop off the canvas. You will create a rich, moody background that contrasts beautifully with the stark, textured white petals.
Step-by-Step Tutorial
Materials
- Stretched canvas (8×10 recommended)
- Heavy body acrylic paints (Titanium White, Phthalo Green, Sap Green, Cadmium Yellow, Burnt Umber)
- Modeling paste (optional but recommended for texture)
- Palette knife (trowel or diamond shape)
- Stiff synthetic bristle brushes (filbert and round)
- Palette
- Water cup and paper towels
Step 1: Setting the Scene
-
Sketch the layout:
Lightly use a pencil to draw a large oval for the flower center in the upper middle area, then draw a curved line leading down for the stem. -
Map the petals:
Sketch purely directional lines where the petals will go to ensure the flower looks balanced before you start painting. -
Mix the background color:
Combine Phthalo Green with a small amount of Burnt Umber on your palette to create a very deep, dark forest green. -
Apply the background base:
Paint the entire negative space around your flower sketch with this dark green mix, using a stiff brush to work the paint into the canvas weave. -
Texturize the background:
While the green is still wet, use a palette knife or a dry brush to scrub in vertical and diagonal strokes, creating a rough surface. -
Add background variation:
Mix a slightly lighter green and scumble it randomly over parts of the wet background to suggest blurred foliage. -
Dry time:
Allow the background to dry completely to ensure the white petals don’t turn green later.
Texture Trick
To get those deep grooves on the petals, don’t overwork the paint. Lay the thick paint down in one confident stroke with the knife and leave it alone to dry.
Step 2: Center and Stem
-
Paint the stem base:
Mix Sap Green with a touch of white and paint the stem, following your initial sketched curve. -
Highlight the stem:
Add a streak of lighter green along the right side of the stem to give it a cylindrical volume. -
Mix the center color:
Combine Cadmium Yellow with a tiny dot of Burnt Umber to achieve a golden ochre hue. -
Stipple the center:
Use a round brush to tap this yellow mixture into the center oval, creating a bumpy texture. -
Enhance center texture:
Dab slightly lighter yellow dots on the upper right of the center and darker ochre dots on the lower left to create a domed 3D effect.
Step 3: Petals and Details
-
Prepare the petal mix:
Mix Titanium White with modeling paste using your palette knife; if you lack paste, just use undiluted heavy body white paint. -
Paint the bottom layer:
Identify where petals overlap and paint the bottom (furthest back) petals first, pulling paint from the center outward. -
Apply thick texture:
Load the underside of your palette knife with the white mix and gently press and drag to create raised, ridged petals. -
Layer the top petals:
Apply the top layer of prominent petals over the others, using even thicker globs of paint to make them stand out physically. -
Refine the edges:
I like to wipe the knife clean between strokes to keep the white crisp and ensure the petal tips look naturally ragged. -
Add petal details:
Use the edge of your knife to gently scratch linear indentations into the wet white paint, mimicking the veins of the flower. -
Final adjustments:
Touch up the connection points where the white petals meet the yellow center, ensuring there is no unpainted canvas gap.
Muddy Petals?
If your white paint starts picking up green from the background, stop immediately. It means the base layer isn’t dry. Use a hairdryer to set the background before continuing.
Allow the thick layers to dry overnight before displaying your dimensional floral piece
Tropical Palm Leaves
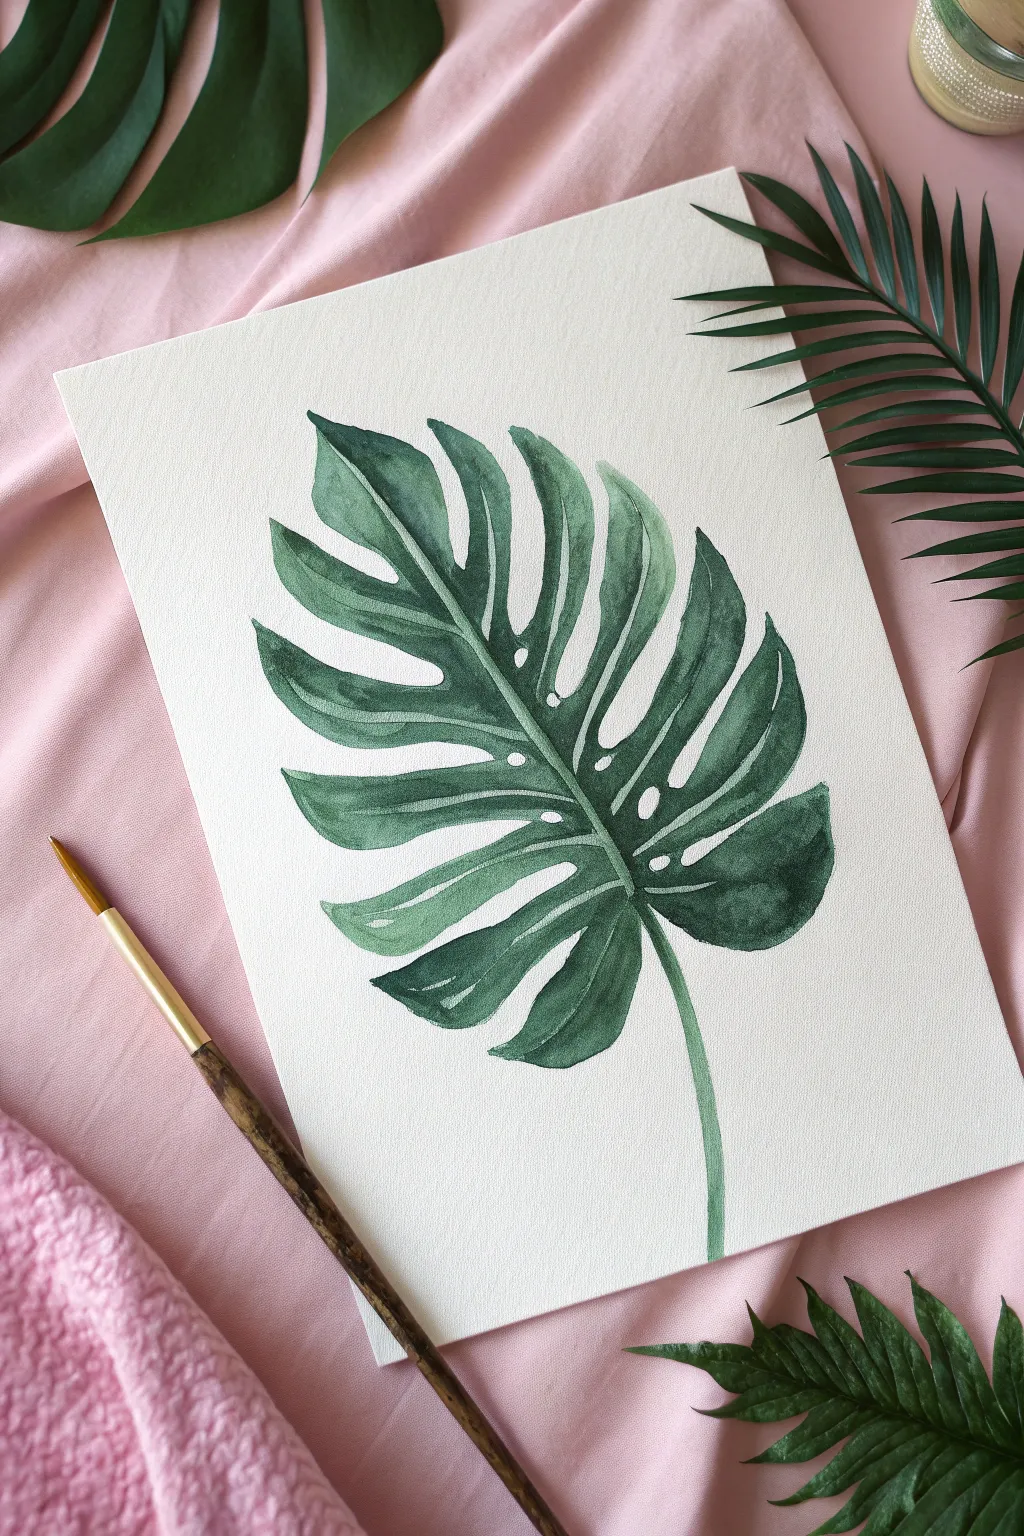
Capture the vibrant beauty of the jungle with this Monstera Deliciosa leaf tutorial. Using wet-on-dry techniques and careful negative painting, you will build up a rich, dimensional piece that pops against the stark white paper.
Detailed Instructions
Materials
- Cold press watercolor paper (300 gsm)
- Round watercolor brushes (Size 6 and 10)
- Watercolor paints (Sap Green, Hooker’s Green, Indigo)
- HB Pencil
- Kneaded eraser
- Two jars of water
- Ceramic or plastic palette
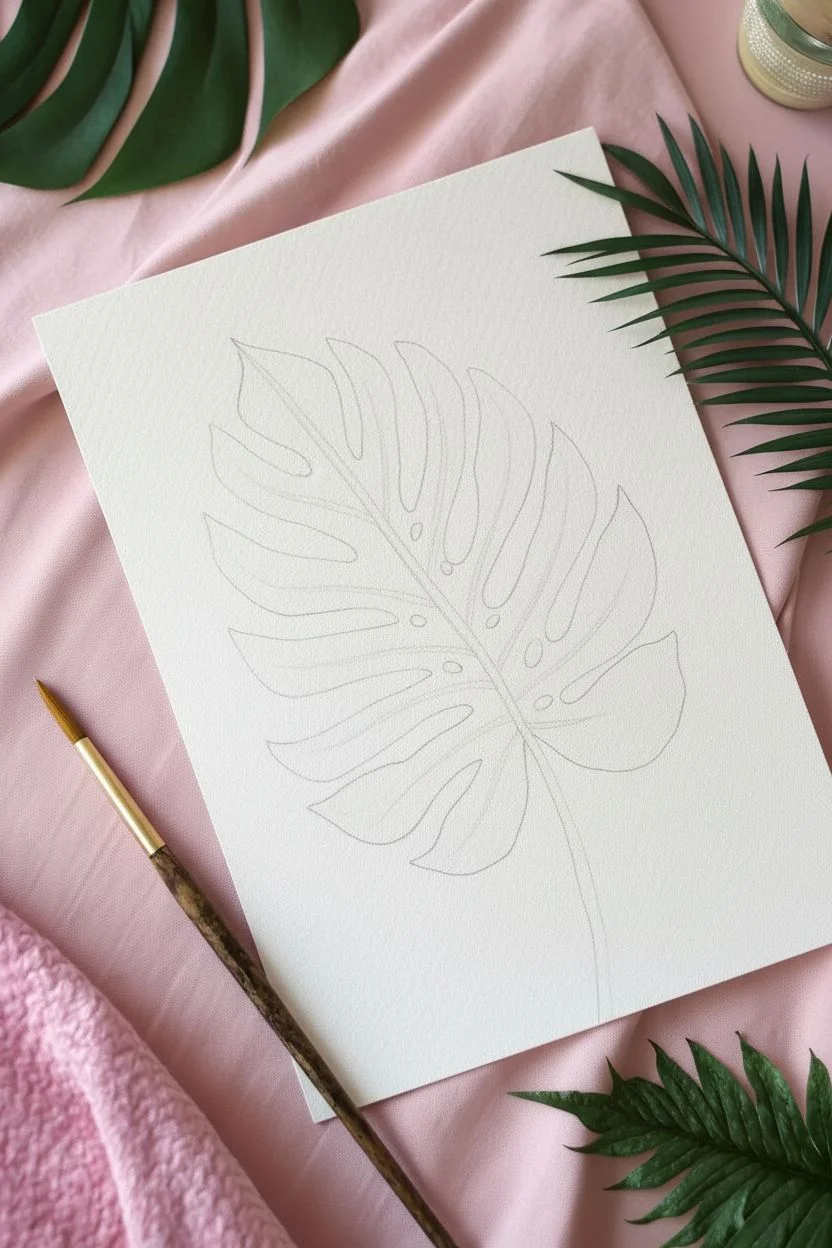
Step 1: Sketching the Structure
-
Establish the curve:
Begin by lightly drawing a gently curved line diagonally across your paper to serve as the leaf’s central midrib and stem. -
Outline the heart:
Sketch a large, wide heart shape around your central line, tapering slightly towards the bottom tip to define the general boundary of the leaf. -
Create the fenestrations:
Along the edges of your heart shape, draw deep V-shaped notches pointing inward toward the center vein. -
Add inner details:
Draw small oval or tear-drop shapes inside the wider sections of the leaf canvas to create the iconic inner holes. -
Refine and lighten:
Erase the original heart outline, leaving only the notched leaf shape. Roll a kneaded eraser over the remaining sketch so the graphite is barely visible.
Step 2: Painting the Foliage
-
Mix your base greens:
Prepare a large puddle of medium green on your palette using Sap Green and a touch of Hooker’s Green. -
Mix a shadow shade:
In a separate well, mix a darker, cooler green by adding a little Indigo or Payne’s Grey to your green mix. -
Start with the top lobe:
Using the size 6 brush, load the medium green and paint the topmost segment of the leaf. -
Define the midrib:
As you paint near the center, leave a tiny, hairline sliver of white paper untouched along the central vein line to act as a highlight. -
Add wet-on-wet depth:
While the paint on the first segment is still wet, touch the tip of your brush loaded with the darker shadow mix into the area nearest the center vein. -
Work section by section:
Move to the next leaf segment (lobe) down. I prefer to skip a section and paint every other lobe initially to prevent wet edges from bleeding into each other. -
Navigate the holes:
Use the fine tip of your brush to carefully paint around the inner oval sketches, ensuring the white paper remains pristine inside the holes. -
Fill the gaps:
Once the first set of lobes is dry to the touch, go back and paint the remaining segments using the same technique. -
Vary the tone:
To make the leaf look organic, add a little more water to your brush for some segments to make them lighter, and more pigment for others to make them darker.
Fixing Water Blooms
If you get cauliflower-like edges (blooms) inside the leaf, don’t worry. This texture adds organic character to botanicals. If unwanted, smooth them out instantly with a damp, clean brush.
Step 3: Stem and Finishing
-
Paint the stem:
Using a single smooth stroke, paint the stem starting from the bottom of the leaf and trailing off the page. -
Blend the connection:
Where the stem meets the leaf base, drop in a slightly darker green to visualize the shadow where the leaf curves. -
Soft glaze shadows:
Once the entire painting is bone dry, mix a watery glaze of your dark green. Apply this gently along the veins of the lower lobes to enhance richness. -
Clean up:
Check the edges of your fenestrations (splits). If any are ragged, use a damp brush to gently smooth the paint edge, or a little fresh paint to sharpen the point.
Pro Tip: Hard Edges
For those crisp, modern edges seen in the photo, ensure your paper is completely dry before painting adjacent leaf sections to keep the segments distinct.
Frame this piece in natural wood or hang it with a simple clip for an instant botanical refresh.
Citrus Slice

Capture the fresh, vibrant energy of citrus with this textured watercolor study. Using rough paper and layered yellow tones creates a juicy, realistic pulp effect that pops off the page.
How-To Guide
Materials
- Heavyweight cold-press or rough watercolor paper
- Watercolor paints (Lemon Yellow, Yellow Ochre or Gamboge)
- Round synthetic brush (size 4 or 6)
- Pencil (HB or lighter)
- Kneaded eraser
- Compass or two circular objects (like cups) for tracing
- Clean water and paper towels
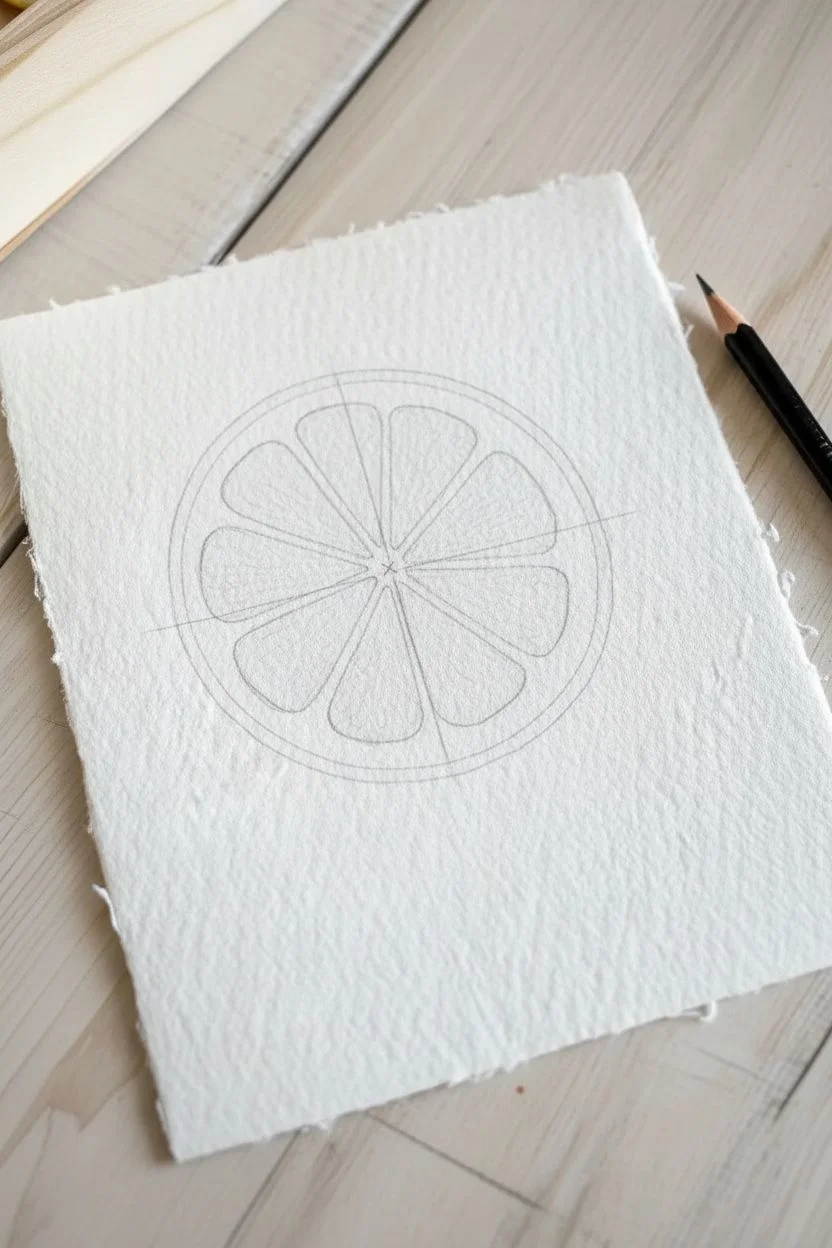
Step 1: Sketching the Structure
-
Outline the shape:
Begin by lightly tracing a circle in the center of your paper using a compass or a round object like a jar lid. -
Define the rind:
Draw a slightly smaller circle inside the first one, leaving about a quarter-inch gap between them to represent the lemon’s pith and rind. -
Find the center:
Mark the exact center point of the inner circle and lightly draw a vertical line and a horizontal line through it to create four equal quadrants. -
Create segments:
Bisect each of the four quadrants with a diagonal line, giving you eight equal triangular slices in total. -
Round the corners:
Inside each triangular section, sketch a teardrop shape for the fruit pulp, rounding off the sharp corners so they don’t touch the center point or the outer rind line.
Clean Lines Tip
Rotate your paper as you work on different segments. This keeps your hand from resting in wet paint and ensures you are always pulling the brush stroke at a comfortable angle.
Step 2: Painting the Fruit
-
Prepare the palette:
Mix a generous amount of Lemon Yellow with water on your palette until you have a tea-like consistency. -
First segment layer:
Load your brush and fill in the first fruit segment, carefully staying within your rounded pencil lines. -
The skip-space method:
Skip the segment immediately next to the one you just painted and move to the third one; this prevents wet paint from bleeding across the white pith lines. -
Fill remaining segments:
Continue painting every other segment, let them dry for a minute, and then return to fill in the empty ones until all eight slices are yellow. -
Paint the rind:
Using the same yellow mixture, carefully paint the thin channel between your two outer circles to create the lemon skin.
Step 3: Adding Texture and Depth
-
Mix a shadow tone:
Add a touch of Yellow Ochre or a deeper Golden Yellow to your original lemon mixture to create a slightly darker, richer shade. -
Create juice sacs:
Using the tip of your brush, paint thin, radiating lines inside each segment, starting from the center and flicking outward toward the rind. -
Layering details:
I like to add a few concentrated drops of the darker yellow near the narrow center of each segment to simulate depth and shadow. -
Enhance texturing:
Paint a second layer of fine lines over the segments, allowing the rough texture of the paper to show through to mimic the organic look of pulp. -
Clean the edges:
Once the paint is completely bone dry, use your kneaded eraser to gently lift any visible pencil lines from the white areas. -
Final assessment:
If the outer rind looks too pale, add a final glaze of pure yellow over the ring to make it stand out.
Level Up
Mix a tiny amount of iridescent gold medium into your yellow paint for the final texture layer to make the lemon slice look barely wet and glistening.
Display your finished citrus slice in a light wood frame or on a clipboard for a minimalistic, summery vibe.
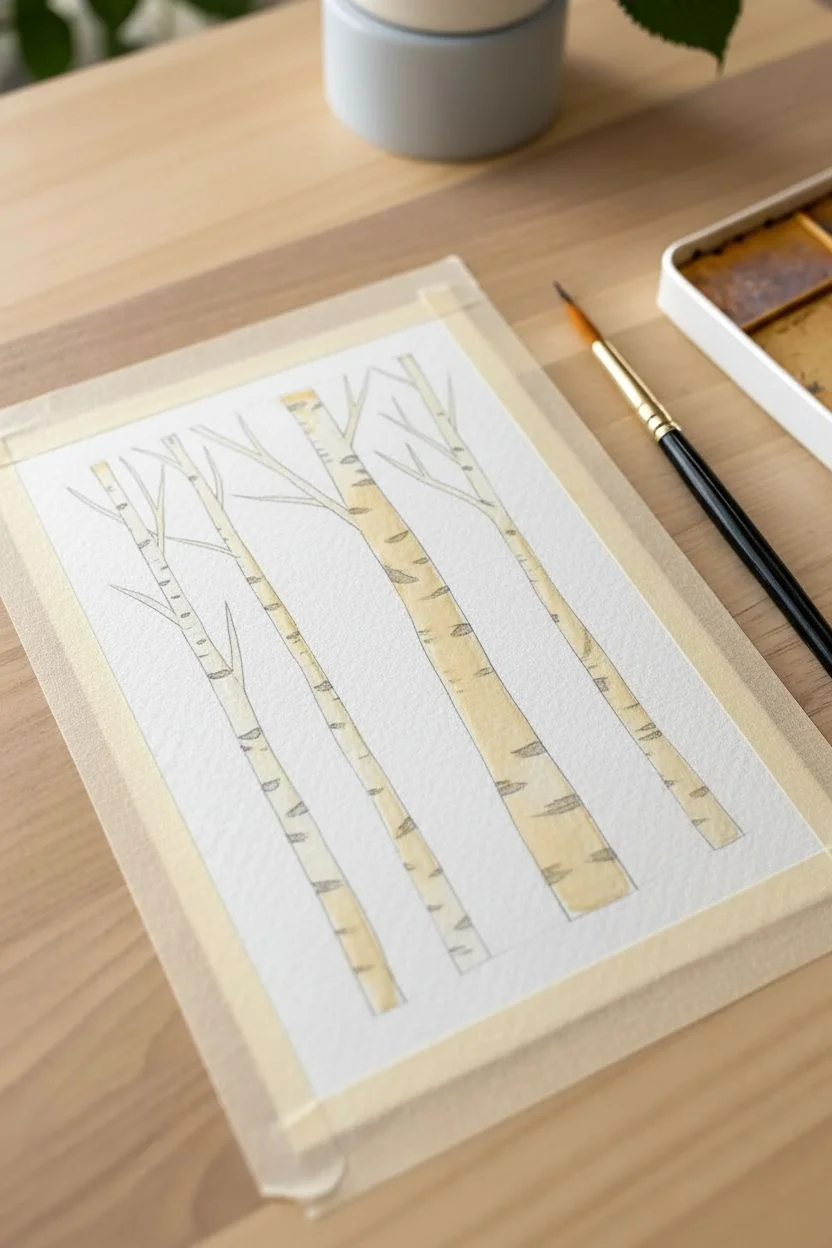
Winter Birch Forest
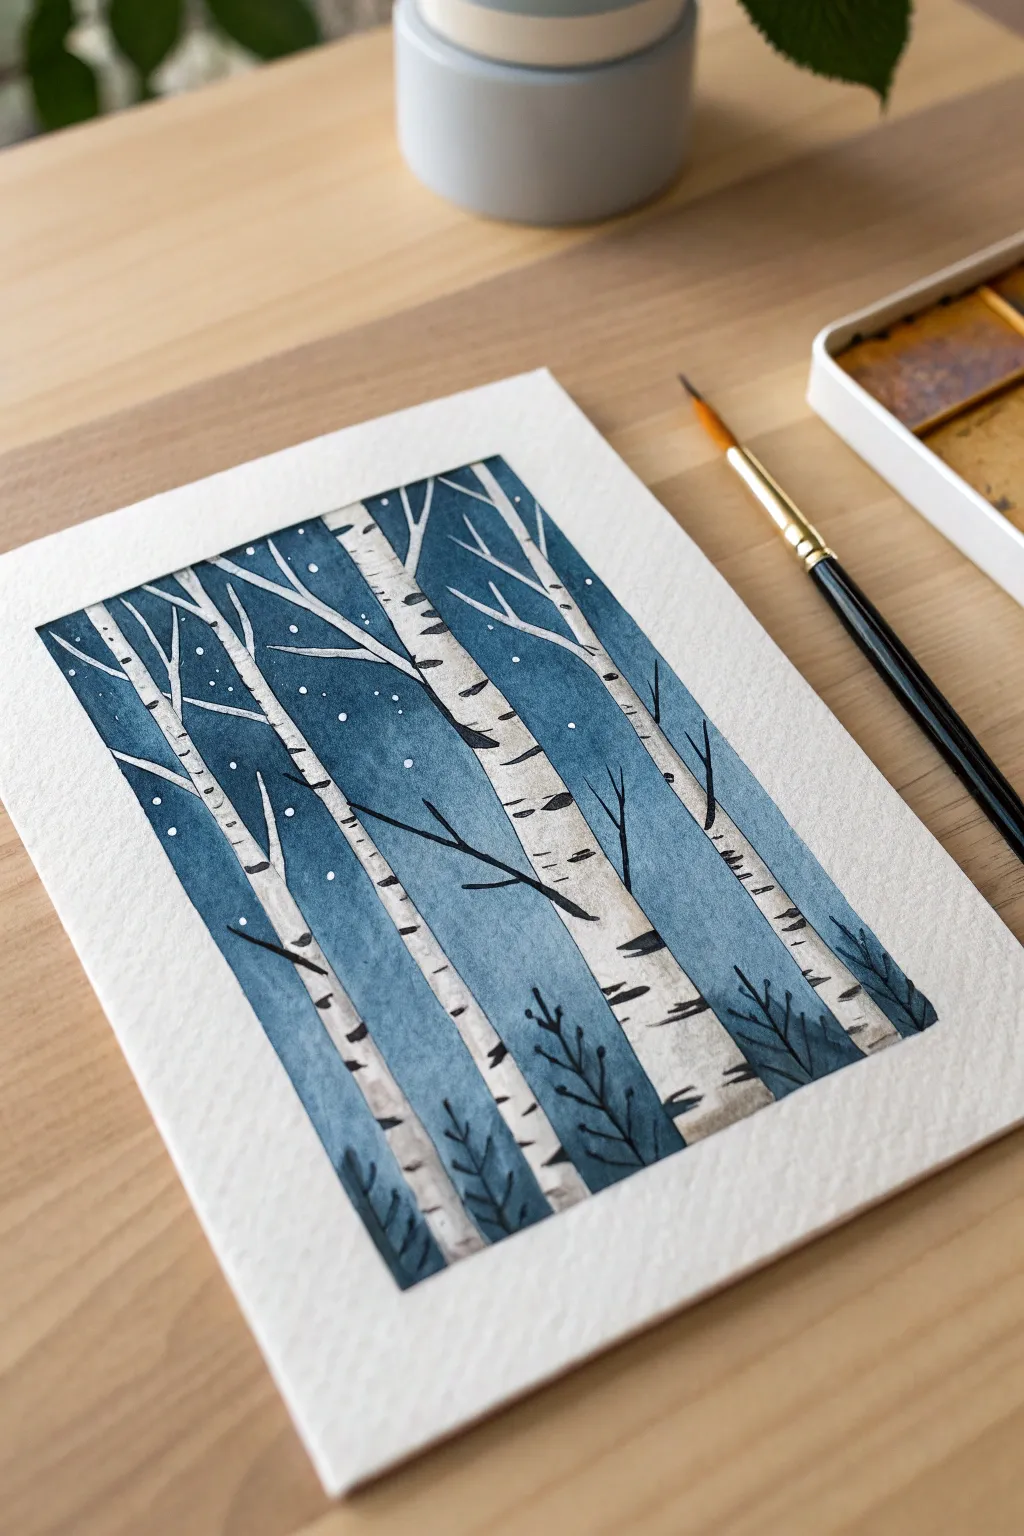
Capture the silent beauty of a snowy evening with this high-contrast watercolor project. You will create stark white birch trunks popping against a moody indigo backdrop using a simple masking technique.
Step-by-Step
Materials
- Cold press watercolor paper (300gsm/140lb)
- Masking tape (for borders)
- Masking fluid (drawing gum)
- Watercolor paints (Indigo, Payne’s Gray, Lamp Black)
- White gouache or white gel pen
- Old brush or silicone tool (for masking fluid)
- Round brushes (size 6 and size 2)
- Pencil and eraser
Step 1: Preparation & Masking
-
Secure the paper:
Tape down all four edges of your watercolor paper to a board or table to create a clean, crisp frame. -
Sketch the grove:
Lightly sketch 4-5 vertical birch tree trunks slightly tapering towards the top; make them slightly curved so they don’t look like stiff poles. -
Add main branches:
Draw a few jagged, upward-reaching branches connected to the main trunks. -
Apply masking fluid:
Using an old brush or silicone tool, carefully fill in the sketched trunks and branches with masking fluid. -
Let it cure:
Allow the masking fluid to dry completely until it turns yellowish or transparent and is firm to the touch.
Paper Tearing?
If the paper rips when removing masking fluid, ensure the paper is 100% dry first. Also, try pulling the mask gently towards the painted area rather than away from it.
Step 2: The Midnight Sky
-
Mix the background color:
Create a rich, dark wash using Indigo or a mixture of Blue and Black; you want enough paint to cover the sky area without stopping. -
Paint the wash:
Using a size 6 brush, paint the entire background right over the masked trees, ensuring the blue fills all the negative space. -
Create depth:
While the paint is wet, charge in slightly darker pigment at the very top of the sky or near the edges for a vignette effect. -
Dry completely:
Let the paint dry thoroughly. I prefer to wait at least 15-20 minutes to ensure no moisture remains trapped under the mask.
Step 3: Revealing & Texturing
-
Remove the mask:
Gently rub away the masking fluid with your finger or a rubber cement pickup tool to reveal the pristine white paper underneath. -
Add volume:
Mix a very watery, pale gray shade and paint a thin vertical strip down one side of each trunk to create a cylindrical shadow. -
Paint bark markings:
Using the small size 2 brush and thick black paint, dab small horizontal lines and triangles up and down the trunks. -
Vary the marks:
Make sure these black notches vary in size and spacing to keep the bark looking organic and natural. -
Background branches:
Paint fine, dark blue or black lines in the background between the white trees to represent distant twigs.
Level Up: Salt Texture
Sprinkle a pinch of table salt onto the wet blue sky wash before it dries. Once dry, brush it off to create beautiful, frost-like blooms in the background.
Step 4: Foreground & Snow
-
Paint the undergrowth:
Mix a dark blue-gray shade and paint small, leaf-like shapes at the very bottom of the paper to form shadowy bushes. -
Add scrubby details:
Use the tip of your small brush to add thin vertical twigs sticking out of the bushes. -
Make it snow:
Using white gouache or a gel pen, add small dots throughout the blue sky, clustering some on the branches. -
Reveal the frame:
Carefully peel away the painter’s tape at a 45-degree angle to reveal your clean white borders.
Now you have a serene winter landscape ready to frame or gift!
Floating Jellyfish
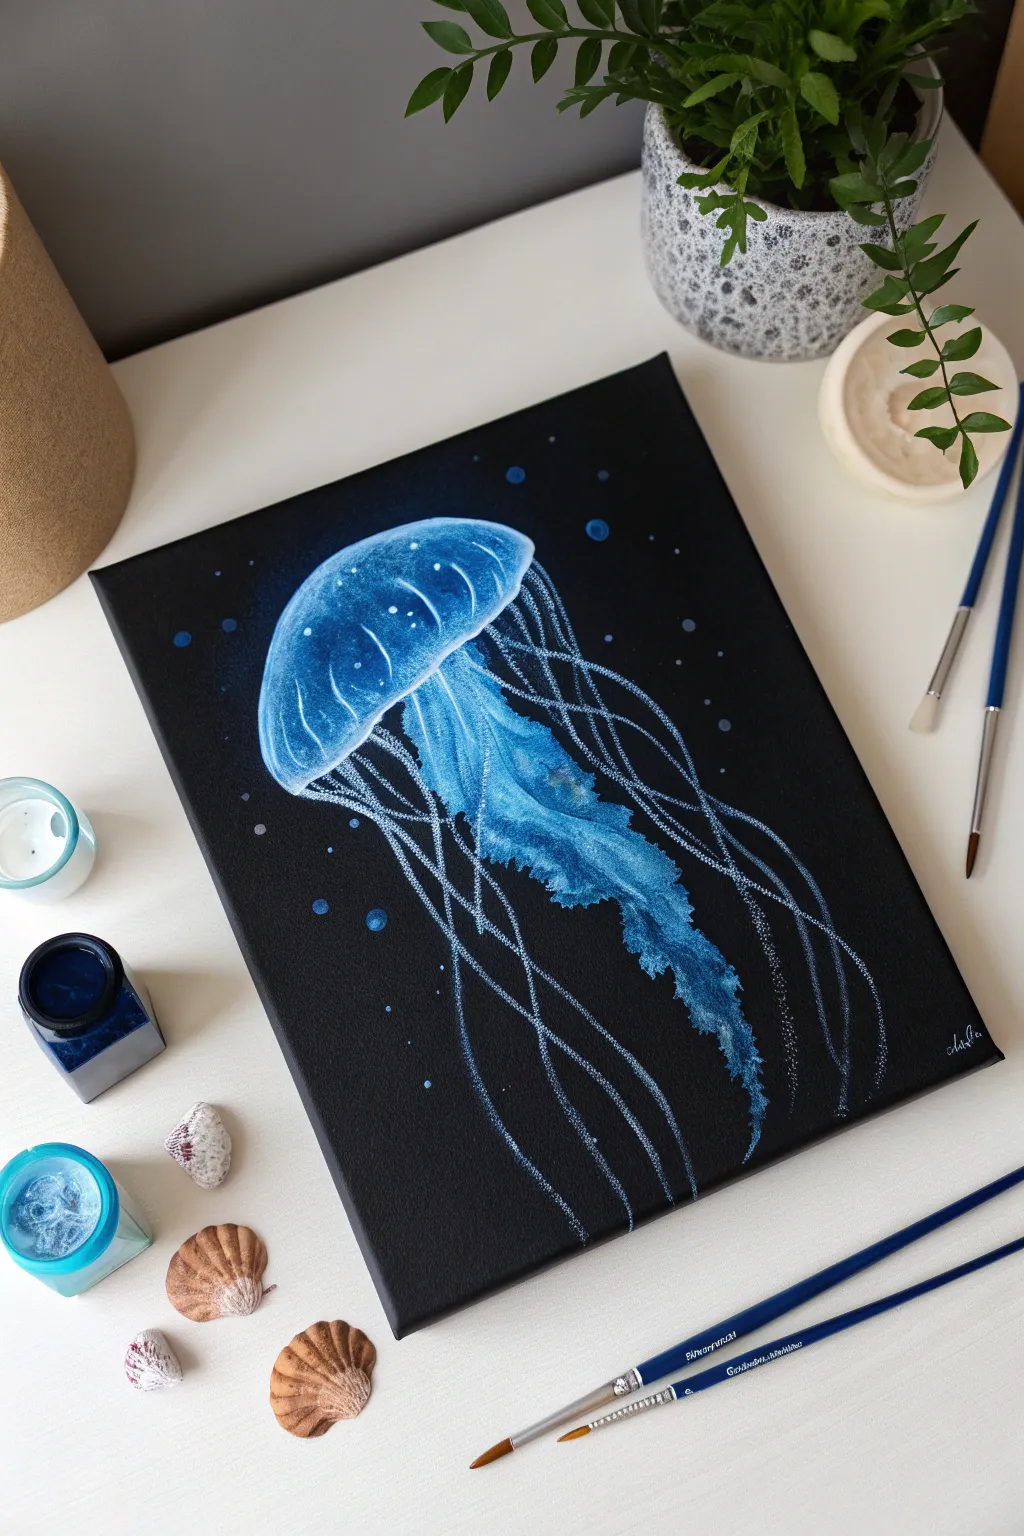
Capture the ethereal beauty of bioluminescence with this striking acrylic painting project. Using high-contrast layering on a dark background, you will create a translucent jellyfish that appears to float and glow right off the canvas.
How-To Guide
Materials
- Black stretched canvas or canvas panel (8×10 or similar)
- Acrylic paints: Titanium White, Phthalo Blue, Turquoise/Cyan, Mars Black
- White charcoal pencil or chalk
- Flat shader brush (size 6 or 8)
- Small round brush (size 2 or 4)
- Detail liner or rigger brush (size 0 or 00)
- Palette and water cup
- Paper towels
Step 1: Shaping the Bell
-
Prep the background:
If you don’t have a pre-primed black canvas, coat a standard white canvas with two layers of Mars Black acrylic. allow it to dry completely until matte. -
Sketch the outline:
Using a white charcoal pencil or a piece of chalk, lightly sketch a tilted mushroom-cap shape in the upper left quadrant. Keep the lines faint so they are easy to cover later. -
Base transparency layer:
Mix a small amount of Phthalo Blue with water to create a thin, transparent wash. Paint the entire interior of the bell shape. This creates the illusion of a see-through body. -
Define the rim:
Mix Titanium White with a little Turquoise. Using a round brush, paint a curved line along the bottom rim of the bell, making it slightly thicker in the center and tapering at the edges. -
Add the ribs:
With the same turquoise mix, paint curved vertical lines running from the top of the bell down to the rim. Curve them outwards to give the jellyfish 3D volume.
Tentacle Trouble?
If your fine lines look shaky or too thick, wait for them to dry completely. Then, use black paint to ‘carve’ back into the line from the sides, thinning it down to a perfect hair-width strand.
Step 2: Creating the Glow
-
Blend the ribs:
While the rib lines are slightly wet, use a clean, slightly damp brush to feather the paint outwards. This softness creates the internal ‘glow’ effect. -
Deepen the shadows:
Mix Phthalo Blue with a tiny dot of black. Paint extremely thin glazes between the light ribs to emphasize the rounded shape. -
Highlight the dome:
Dip your round brush into pure Titanium White. Paint thin, crisp lines directly on top of your previous turquoise rib lines, but stop before reaching the very bottom rim. -
Enhance the rim:
Add touches of pure white to the bottom edge of the bell where the light would naturally catch the most intensity.
Step 3: The Oral Arms
-
Block in the center mass:
Combine Turquoise and White to make a bright sky blue. Paint a ruffled, cloud-like shape descending from the center of the bell. -
Texturize the frills:
Using a scumbling technique—scrubbing the brush in small circles—add darker Phthalo Blue spots within the ruffled mass to create folds and depth. -
Highlight edges:
Use the tip of your small round brush with pure white to outline the jagged edges of the ruffled oral arms, making them look sharp and distinct against the black.
Level Up: UV Magic
Swap your standard white and blue paints for fluorescent or phosphorescent acrylics. Under a blacklight, your jellyfish will actually glow in the dark, mimicking real bioluminescence.
Step 4: Tentacles and Atmosphere
-
Prepare inky paint:
Mix water into your white paint until it has the consistency of ink or heavy cream. This flows better for long lines. -
Paint dotted tentacles:
Using a detail liner brush, gently dot lines trailing down from the bell. Vary the spacing of the dots to simulate movement. -
Add flowing tentacles:
Reload your liner brush. Paint long, continuous wavy lines extending to the bottom of the canvas. I like to cross a few lines over each other to create a tangled, organic look. -
Fade the ends:
As you reach the bottom of the tentacles, lift pressure on the brush so the lines taper off and fade into the darkness. -
Create floating particles:
Dip an old toothbrush or stiff brush in watered-down white paint. Run your thumb over the bristles to flick tiny specks onto the background, creating ocean debris. -
Final glow check:
Once everything is dry, add one final, tiny stroke of pure white to the brightest part of the bell and the thickest tentacles to maximum contrast.
Sign your name in the corner and enjoy the peaceful drift of your new deep-sea creation
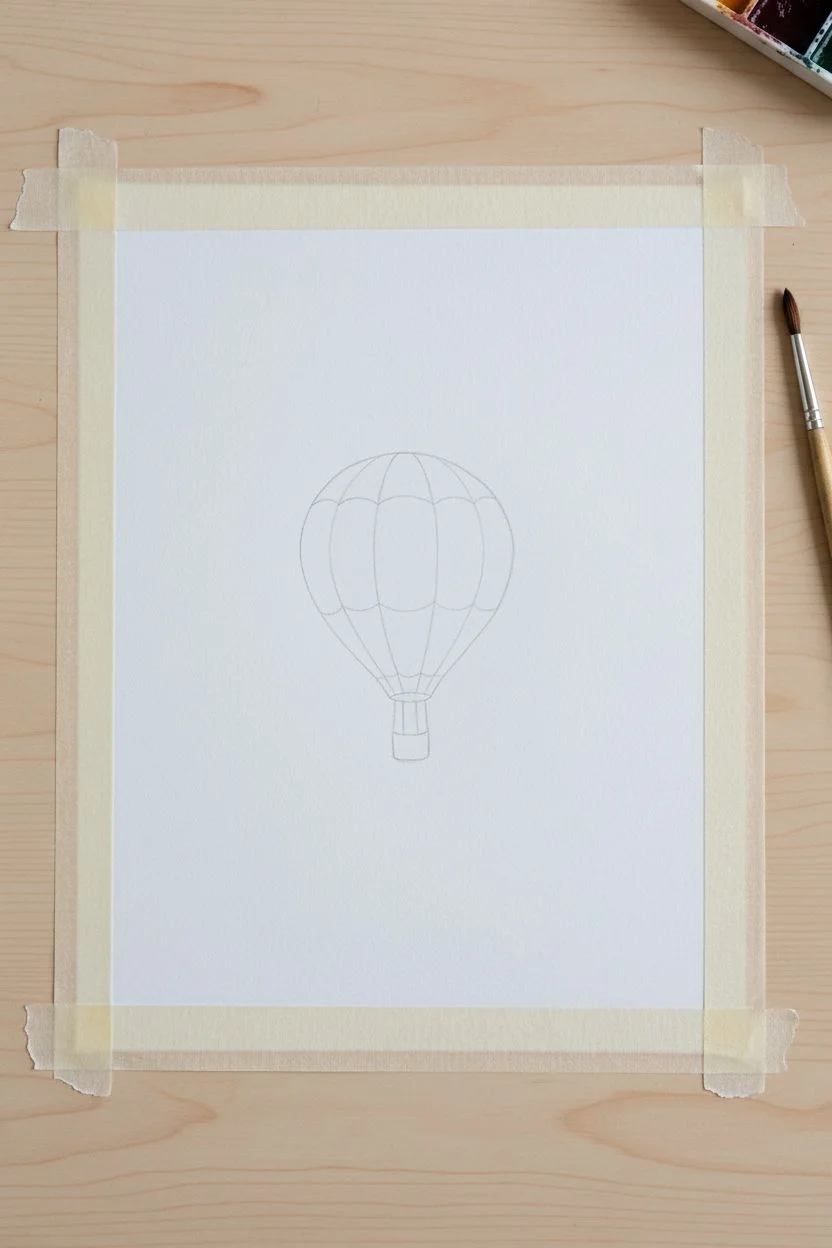
Hot Air Balloon Silhouette
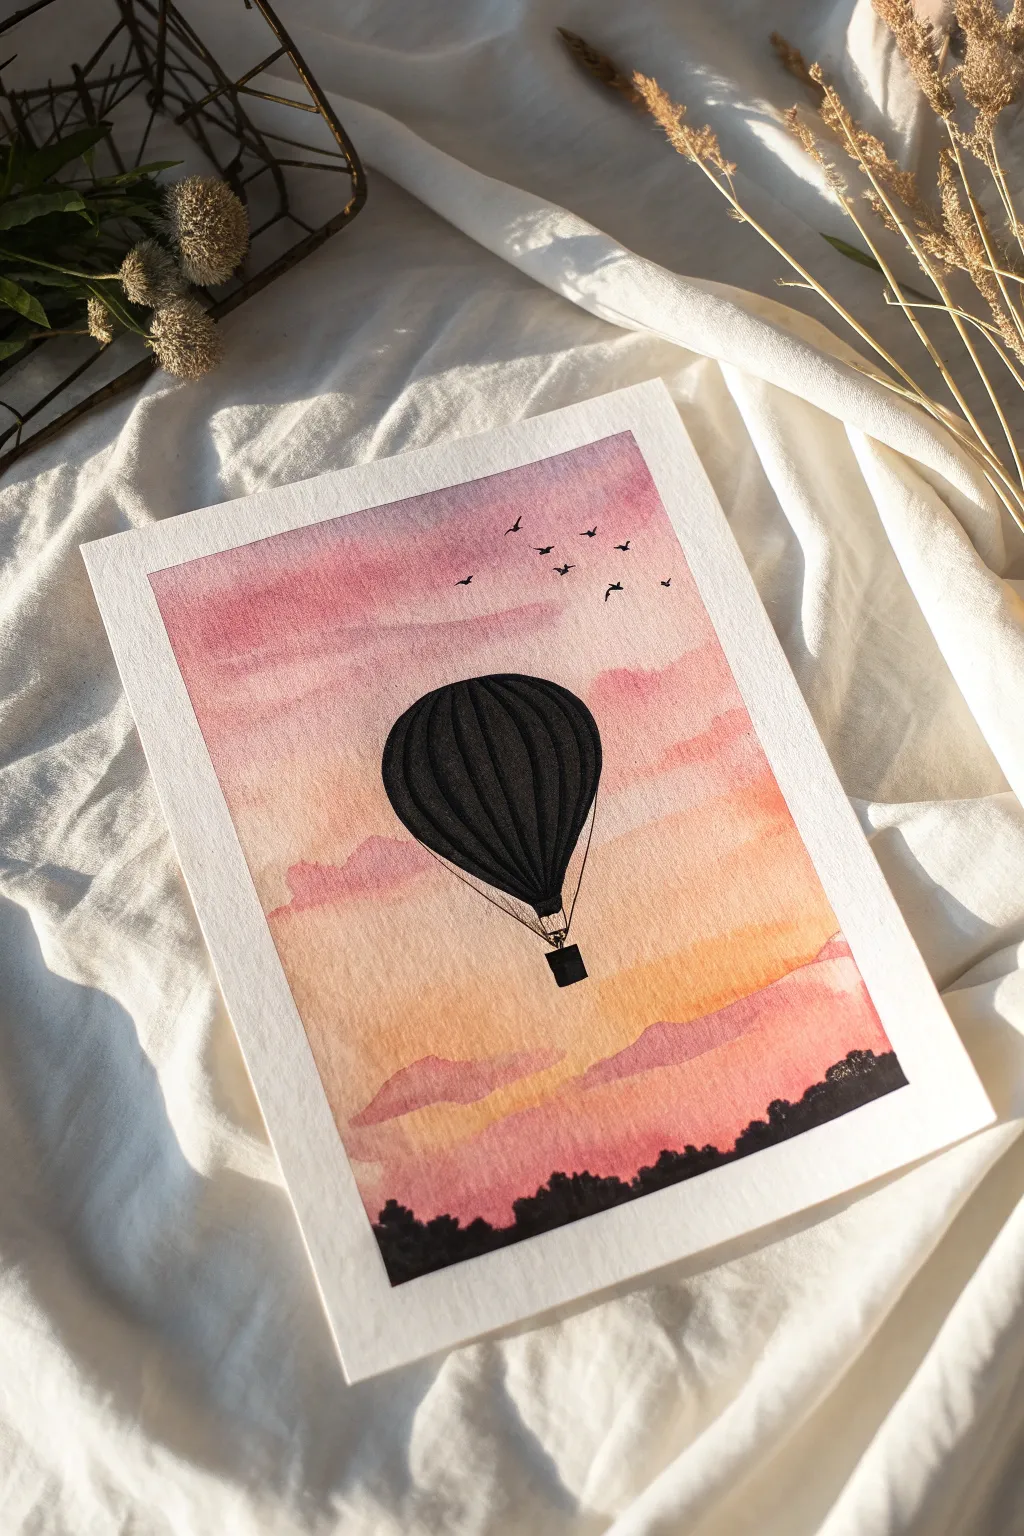
Capture the peaceful feeling of dusk with this high-contrast watercolor project. You will combine a soft, dreamy wet-on-wet background with a crisp, opaque silhouette for a striking finished piece.
Step-by-Step
Materials
- Cold press watercolor paper (300gsm)
- Watercolor paints (Pink, Orange, Purple, Black)
- Flat wash brush (3/4 inch)
- Round brushes (sizes 2 and 6)
- Masking tape
- Pencil and eraser
- Jars of water
- Paper towels
Step 1: Setting the Scene
-
Secure the paper:
Tape your watercolor paper down to a board or table on all four sides using masking tape. This creates a clean white border and prevents buckling. -
Sketch the outline:
Using a light hand, draw the basic oval shape of the hot air balloon in the center of the page. Keep it simple; you don’t need to draw the basket details or trees yet.
Step 2: The Gradient Sky
-
Pre-wet the paper:
Use your clean flat wash brush to apply a layer of clean water over the entire sky area, working around your balloon sketch if possible, though painting over it is fine too. -
Apply the orange:
Load your brush with a warm orange watercolor. Paint horizontal strokes starting from just above the bottom horizon line, fading it out as you move upward toward the balloon. -
Add the pink:
Switch to a rosy pink color. Start painting from the top of the paper downwards. Let the pink meet the orange in the middle, allowing them to blend naturally on the wet paper. -
Create soft clouds:
While the sky is still damp, mix a slightly stronger purple-pink shade. Using a size 6 round brush, gently dab in horizontal cloud shapes across the sky. -
Soften edges:
If the clouds look too harsh, rinse your brush and use it damp to soften the edges, letting the color bleed slightly into the background. -
Dry completely:
This is crucial: wait until the paper is bone dry. If the paper is cool to the touch, it is still wet. You can use a hair dryer to speed this up.
Bleeding Lines?
If black paint starts spiderwebbing into the sky, stop immediately! Your background wasn’t dry enough. Let it dry completely, then paint over the mistakes with opaque black to hide them.
Step 3: The Balloon Silhouette
-
Mix opaque black:
Prepare a very concentrated black watercolor. It should have the consistency of heavy cream to ensure it is opaque and flat. -
Outline the balloon:
With your size 2 brush, carefully outline the main oval shape of the balloon to get a crisp edge. -
Fill the form:
Fill in the balloon shape with black. I like to paint in vertical curved stripes to mimic the panels (gores) of the balloon simply through brush texturing. -
Add the basket:
Paint a small square or rectangle a short distance below the balloon. Connect it to the main balloon envelope with two thin V-shaped lines.
Make it Shine
Once the artwork is dry, use a white gel pen to add a tiny highlight curve on the upper left of the balloon, or add a few white stars in the darker pink area of the sky.
Step 4: Landscape and Details
-
Paint the horizon:
Using the same thick black mix, paint an irregular uneven line across the very bottom of the paper. -
Create trees:
Dab the tip of your round brush along the top of this black line to create the bumpy texture of distant tree tops. Vary the heights to make it look natural. -
Add flight:
Switch to your smallest brush. Paint tiny ‘V’ or ‘M’ shapes in the upper sky to represent a flock of birds. Vary their sizes to show depth. -
The reveal:
Once the black paint is completely dry, slowly peel away the masking tape at a 45-degree angle to reveal your crisp white border.
Step back and admire how that bold silhouette pops against your dreamy sunset sky.
Glowing Camping Tent
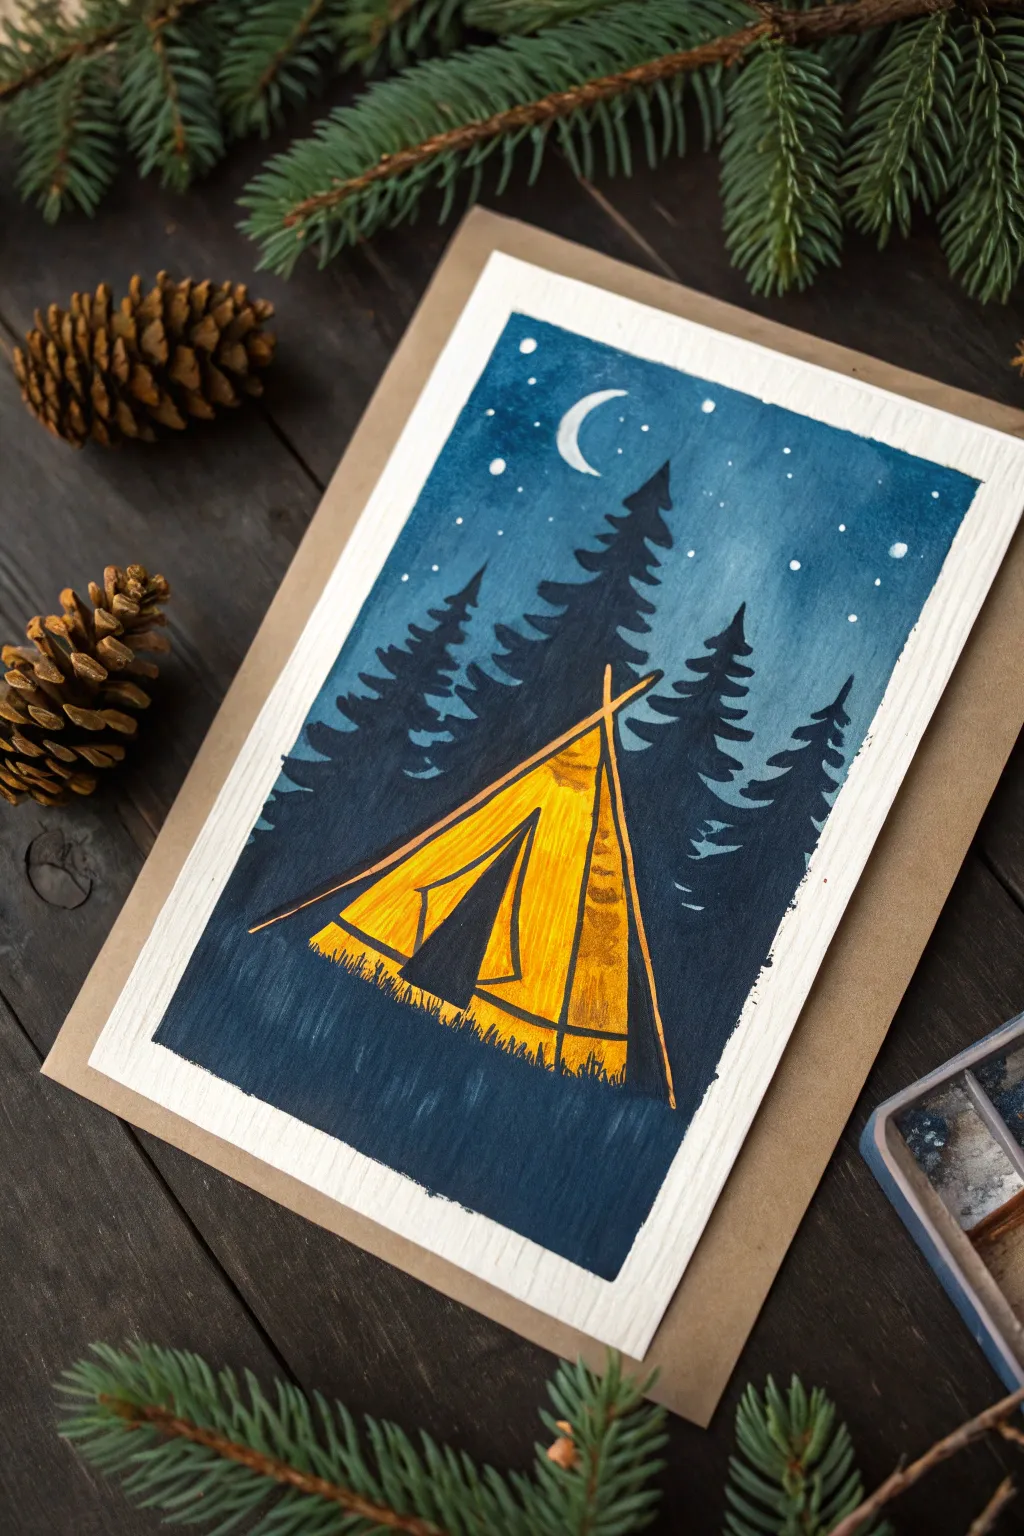
Capture the cozy feeling of a warm shelter amidst a cold, dark forest with this high-contrast painting project. By using opaque paints like gouache or acrylics, you will learn to create a glowing lighting effect against a deep moody background.
How-To Guide
Materials
- Gouache or Acrylic paint (Indigo, Black, White, Lemon Yellow, Orange)
- Watercolor paper (300gsm cold press recommended)
- Masking tape or Washi tape
- Flat brush (3/4 inch)
- Small round brush (size 2 or 4)
- Detail liner brush (size 00)
- Palette and water cup
Step 1: Setting the Scene
-
Create borders:
Secure your paper to a flat surface using masking tape along all four edges. Press the edges of the tape down firmly to ensure a crisp, clean white collection border later. -
Sketch the structure:
Using a pencil, lightly sketch a large triangle in the lower third of the paper for the tent. Add a vertical line in the center for the opening. -
Mix the night sky:
On your palette, mix a deep Indigo blue with a touch of Black. If you only have primary blue, add a little brown and black to deepen it significantly.
Fixing Muddy Colors
If your yellow looks greenish, the blue background wasn’t dry enough. Let it dry fully, paint a layer of white over the mistake, wait for that to dry, then re-apply yellow.
Step 2: Painting the Background
-
Apply the dark sky:
Using your flat brush, paint the top third of the paper with your dark mix. Use horizontal strokes for a smooth finish. -
Create a gradient:
As you move down toward the middle of the paper, mix a little White or water into your dark blue. This creates a lighter, hazier blue for the horizon line behind the trees. -
Paint the tree silhouettes:
Switch to your round brush. Using the dark Indigo mix, paint jagged, vertical shapes to form the pine trees. Start the top of the tree with a fine point and widen the branches as you go down. -
Layering the forest:
Paint some trees slightly lighter (more water) in the background, and darker, larger trees in the foreground to create depth. Paint right up to the pencil lines of your tent, but try not to paint inside the triangle. -
Dry time:
Allow the blue background layer to dry completely. This is crucial so the yellow paint doesn’t mix with the blue and turn green.
Step 3: The Glowing Tent
-
Base layer:
Load your round brush with pure Lemon Yellow. Paint the entire exterior of the tent, covering the white paper triangle. I find applying this thickly helps the opacity. -
Add warmth:
While the yellow is still slightly wet, streak in a small amount of Orange on the right side of the tent and near the bottom corners to suggest folds in the fabric and shadow. -
The heavy shadows:
Mix a dark Indigo (almost black). Paint the triangular opening of the tent in the center. The sharp contrast against the yellow makes the tent look illuminated. -
Structural details:
Using a detail liner brush and light brown or orange-yellow paint, draw the thin tent poles extending from the top and the tension ropes stretching to the ground.
Add a Texture Pop
Before the night sky dries completely, sprinkle a tiny pinch of salt onto the wet paint. Brush it off when dry to create a unique, mottled texture that looks like distant galaxies.
Step 4: Final Atmosphere
-
Grounding:
Use the dark blue mix to paint small, upward flicking strokes along the bottom of the tent to mimic grass blades covering the hem. -
Celestial details:
Dip your smallest brush or a toothpick into pure White paint to create the crescent moon and tiny dots for stars in the upper sky. -
The reveal:
Once the painting is 100% dry to the touch, slowly peel away the masking tape at a 45-degree angle to reveal your crisp borders.
Frame your mini masterpiece or turn it into a handmade greeting card for an outdoorsy friend.
Koi Fish Pond

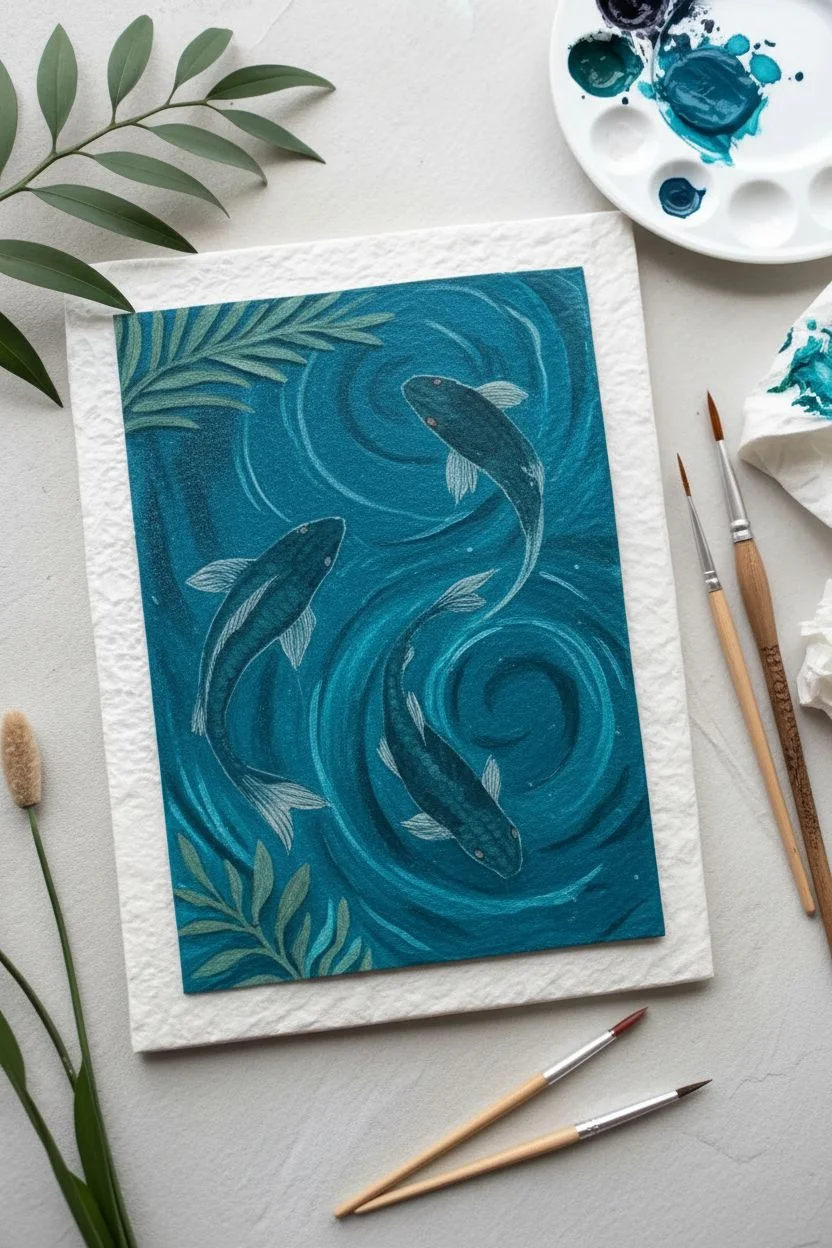
Capture the serene movement of a garden pond with this vibrant gouache painting project. You will learn to layer opaque colors to create depth in the water and bring three graceful koi fish to life against a swirling teal background.
Step-by-Step
Materials
- Heavyweight handmade cotton paper (rough texture)
- Gouache paint set (Teal, Prussian Blue, White, Orange, Yellow, Red, Sap Green)
- Round synthetic brushes (Size 4 for wash, Size 0 and 1 for details)
- Mixing palette
- HB Pencil and kneaded eraser
- Cup of water and paper towels
Step 1: Sketching and Water Base
-
Composition sketch:
Lightly sketch three koi fish swimming in a circular formation using an HB pencil. Add fern-like leaves in the top left corner and broader aquatic plants in the bottom left. -
Mixing the deep water color:
On your palette, mix a generous amount of Prussian Blue with a touch of Teal and a tiny dot of Black to create a deep, dark ocean color. -
Blocking the background:
Paint the water area around the fish and leaves using the size 4 brush. Don’t worry about being perfectly smooth; the texture adds to the rippling effect. -
First layer of ripples:
Mix Teal with a little White. While the dark base is dry, paint swirling, curved strokes following the circular path of the fish to suggest movement. -
Deepening the swirls:
Add more White to your teal mix. Switch to a size 1 brush and paint thinner, lighter ripple lines inside the broader swirls to create dimension.
Chalky Finish?
If your dried dark colors look too chalky or dull, you may have added too much water. Add a second coat of paint with a creamier, thicker consistency to restore richness.
Step 2: Painting the Koi
-
Base coats for the fish:
Paint the silhouette of the middle fish with pure Orange. For the bottom fish, mix Orange and Yellow. For the top fish, leave the head and tail area white (or the paper color) and paint the center blotches Red-Orange. -
Adding gradients:
While the base paint is still slightly damp, drop a tiny bit of darker Red-Orange onto the spines of the orange fish to make them look rounded. -
Painting the fins:
Dilute some White and light Orange with water to make a semi-translucent wash. Paint the delicate tail and side fins, letting them overlap the blue water slightly. -
Defining the scales:
Once the bodies are fully dry, use your smallest size 0 brush and a mix of dark Orange/Brown particularly on the bottom fish to paint tiny ‘U’ shapes for scales. -
Facial features:
Paint two small black dots for eyes on the side of each head. Add fine lines to the fins using a very diluted brown mix for texture.
Pro Tip: Texture
Embrace the “dry brush” technique for the water ripples. Load your brush with paint, wipe most of it off on a paper towel, and drag it lightly to let the paper’s rough texture show through.
Step 3: Foliage and Finishing Touches
-
Top fern leaves:
Mix Sap Green with a touch of Blue for a cool green tone. Paint the fern leaves in the top left, using quick confident strokes that taper at the end. -
Bottom aquatic plants:
Mix Sap Green with Yellow for a warmer, olive tone. Paint the broader leaves in the bottom corner, layering them slightly. -
Leaf details:
I like to wait for the green to dry completely, then use a darker green mix to add a central vein and shadow to the bottom of the leaves. -
Bright water highlights:
Take pure White paint with a detail brush. Add very thin, sharp curved lines along the brightest part of the ripples to make the water look wet and shimmering. -
Bubbles and splash:
Dip the back of your brush handle into white paint and dot a few random bubbles into the water. Add tiny white specks around the fish tails to mimic splashed water.
Frame this peaceful pond scene to add a splash of color and zen to your favorite room.


Have a question or want to share your own experience? I'd love to hear from you in the comments below!