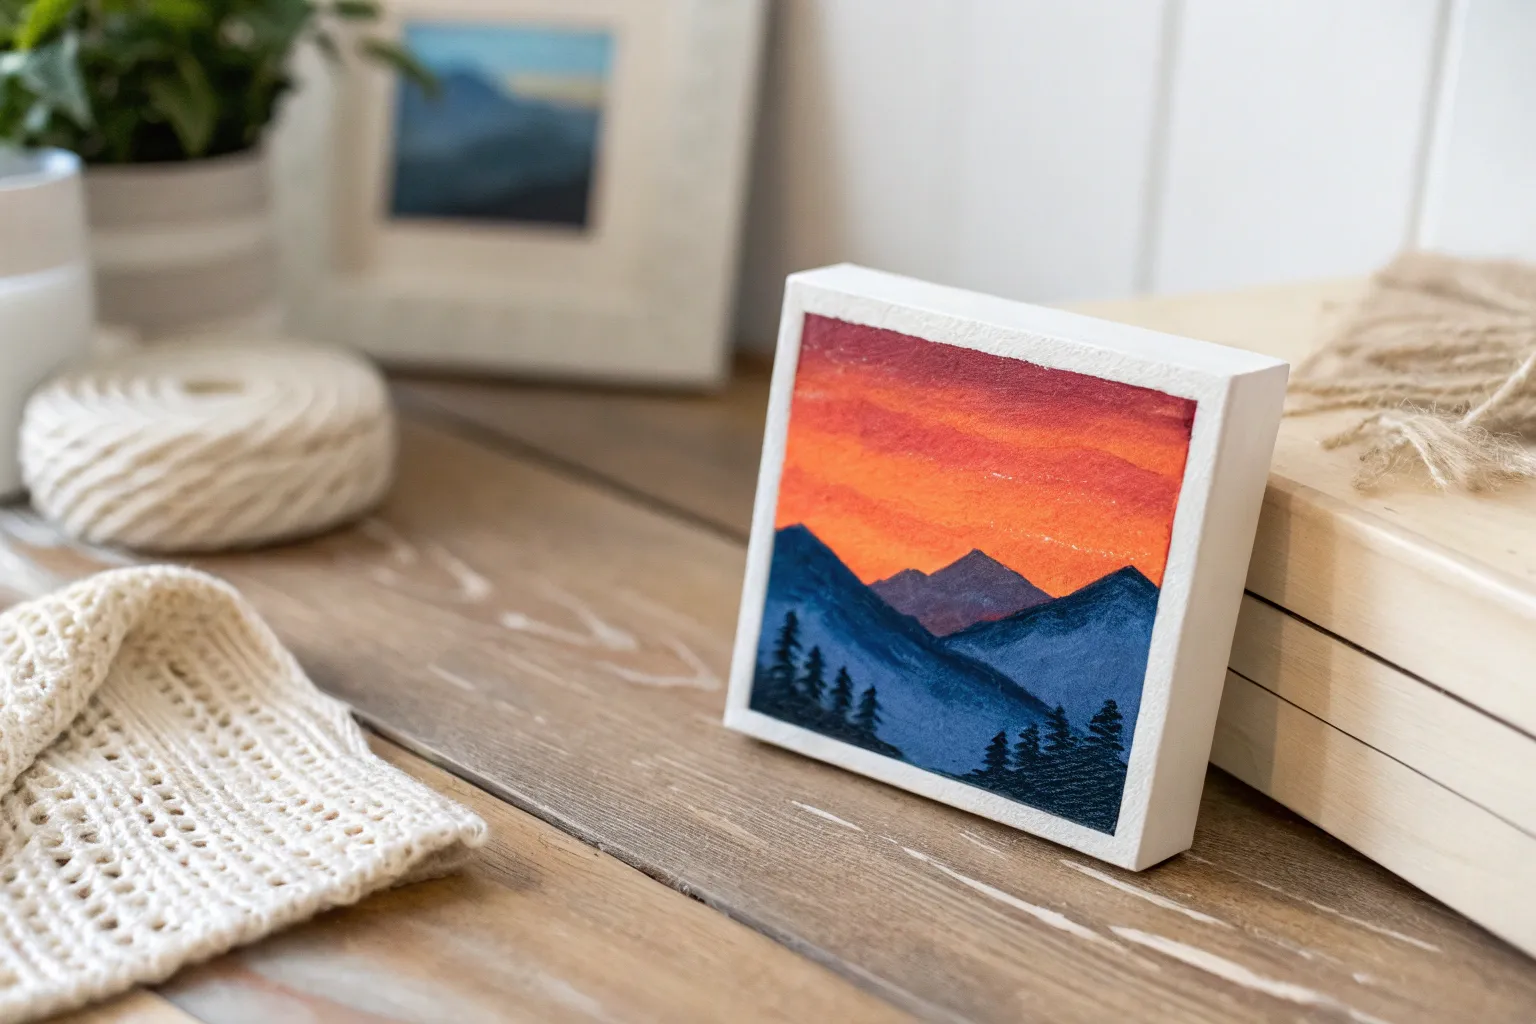
Creating miniature art is the perfect way to explore new techniques without the pressure of filling a large canvas, allowing you to finish a satisfying project in just one sitting. These tiny masterpieces, often no larger than a coaster, offer a delightful opportunity to experiment with bold colors and simplified compositions that look stunning on small easels or arranged in a grid.
Classic Gradient Sunsets with Silhouettes

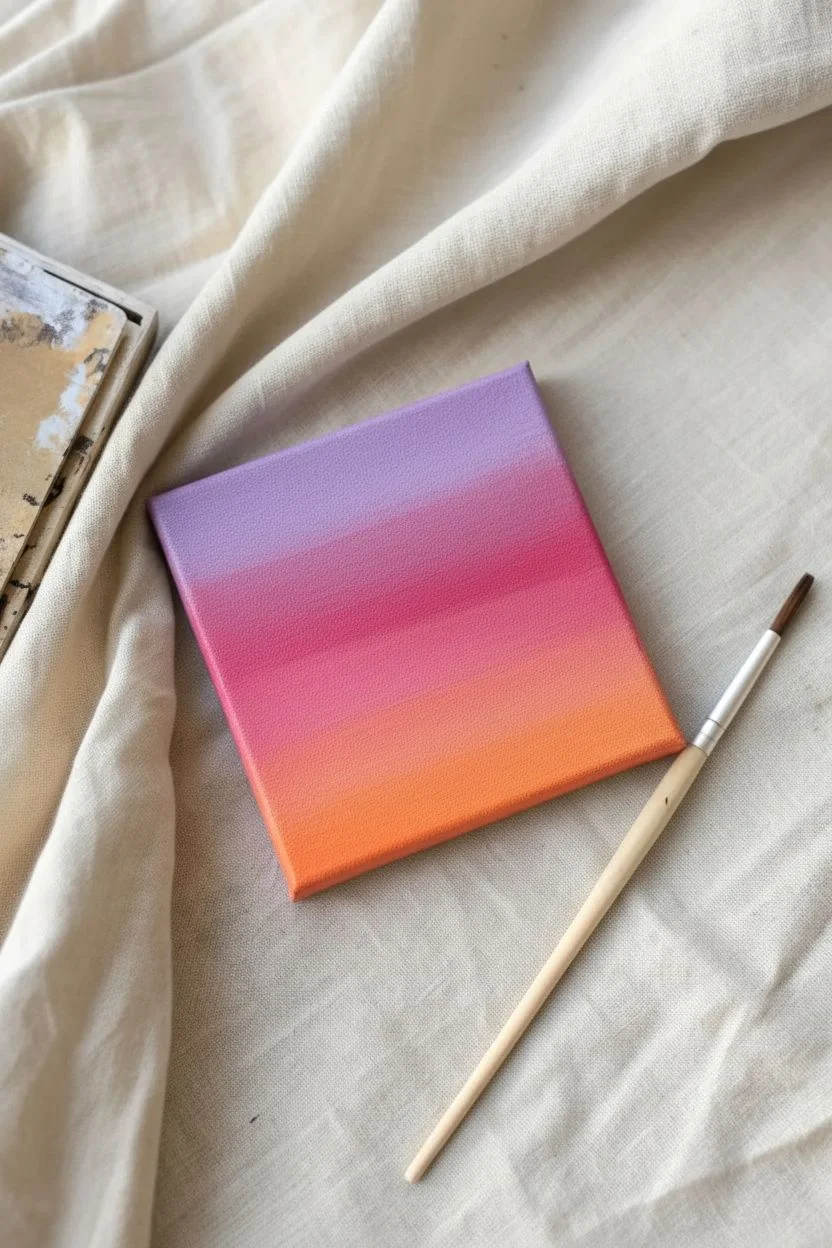
Capture the warmth of a golden hour evening on a tiny canvas with this vibrant gradient painting. This project focuses on mastering smooth color transitions and using stark black silhouettes to create depth and contrast.
Step-by-Step
Materials
- Mini stretched canvas (4×4 or 3×3 inch)
- Acrylic paints (Purple, Magenta/Pink, Orange, Black, Titanium White)
- Flat shader brush (size 6 or 8)
- Fine liner or detail brush (size 0 or 00)
- Palette or mixing plate
- Cup of water
- Paper towels
Step 1: Creating the Gradient Sky
-
Prepare the palette:
Squeeze out your purple, pink, orange, and white paints onto your palette. I like to pre-mix a tiny bit of white into the purple to make it more opaque and pastel-like for the top of the sky. -
Paint the top section:
Using your clean flat brush, apply the light purple mix across the top third of the canvas using long, horizontal strokes. Ensure the paint is applied generously enough to stay wet for a moment. -
Apply the middle color:
Wipe your brush on a paper towel without rinsing it fully. Load it with the pink or magenta paint. -
Blend the transition:
Paint the middle third of the canvas with the pink, slightly overlapping the bottom edge of the purple. Use swift horizontal strokes to blend the two colors where they meet, creating a soft transition. -
Add the bottom glow:
Wipe the brush deeply again. Pick up your orange paint and fill the bottom third of the canvas. -
Final gradient blend:
Work the orange paint upwards into the pink section while both are still wet. Go back and forth gently until the lines blur and you have a seamless sunset gradient. -
Wrap the edges:
Don’t forget to extend your colors around the sides of the canvas to give the piece a finished, professional look from every angle. -
Let it dry:
Allow the background to dry completely. This is crucial; if the background is wet, the black silhouette layer will mix with the sunset colors and become muddy.
Smooth Blends
Work quickly on the background while the paint is wet. If the acrylics drag or feel sticky, dip just the corner of your brush in water to improve the flow.
Step 2: Painting the Foreground
-
Establish the ground:
Switch to your smaller brush or use the edge of the flat brush with Mars Black paint. Paint an uneven, low horizon line along the very bottom edge. -
Add texture:
Use a dabbing or stippling motion with the brush tip along the top of your black strip to simulate the look of grass and distinct vegetation. -
Position the main trunk:
Using your fine liner brush and black paint, draw a slightly curved line extending from the center-right ground up toward the purple section. I usually taper it so it is thinner at the top. -
Draft the fronds:
From the top of the trunk, paint five or six curved lines radiating outward like fireworks to act as the ‘skeleton’ for your palm leaves. -
Flesh out the leaves:
Along each curved branch line, make tiny, quick flicking strokes downward to create the hanging palm leaves. Lift your brush at the end of each flick to keep the tips sharp. -
Add the smaller tree:
Paint a second, significantly smaller palm tree on the left side, lower down on the horizon. This scale difference creates a sense of distance and depth. -
Detail the small fronds:
Repeat the leaf technique on the smaller tree, using even lighter touches with just the very tip of your liner brush. -
Final inspection:
Check for any areas where the black paint might be translucent and apply a second coat if needed to ensure a solid, opaque silhouette.
Level Up
Add a few tiny white specks in the purple section with a toothpick to create early evening stars, or paint a thin crescent moon for extra atmosphere.
Once the black paint is fully dry, you have a beautiful pocket-sized sunset ready to display


Centralized Single Fruit Portraits
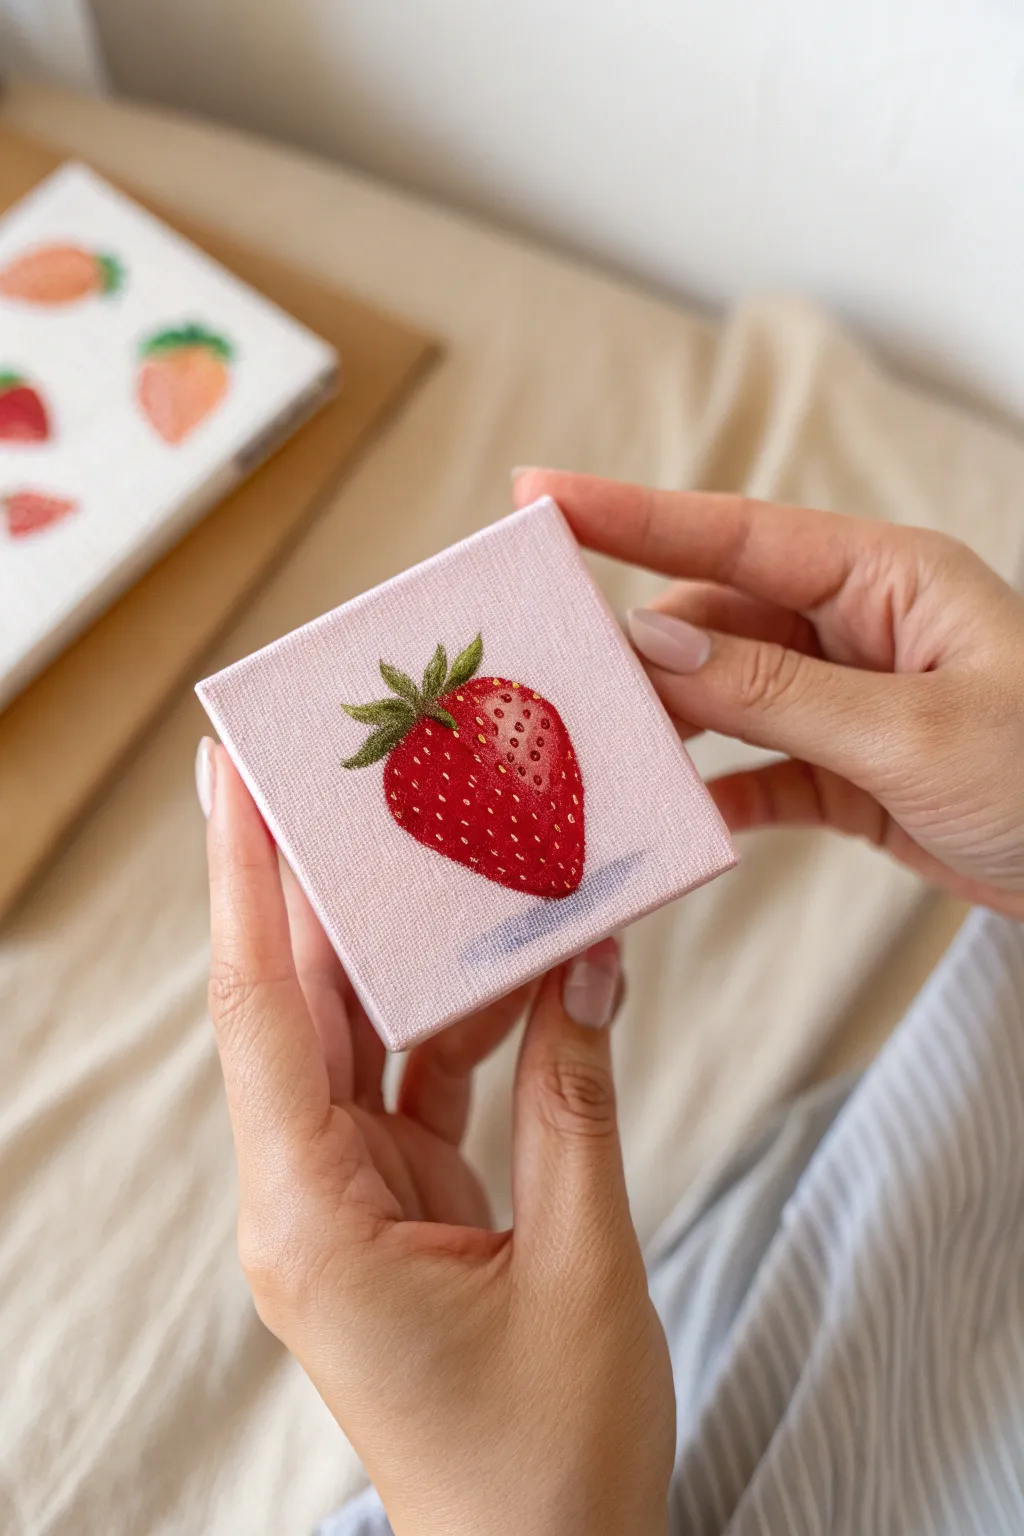
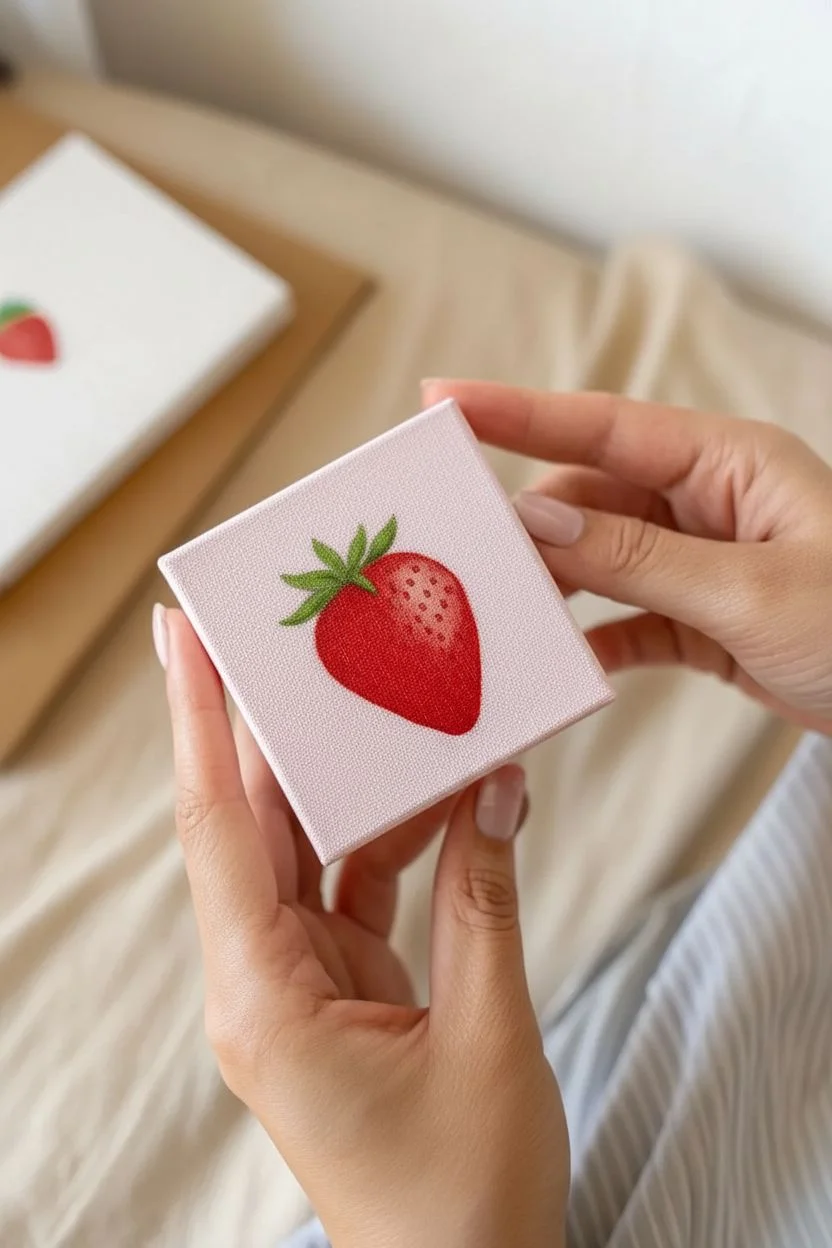
Capture the juicy vibrance of a single strawberry in this charming mini canvas project. This detailed study focuses on texture, light, and creating a focal point against a soft pastel background.
Detailed Instructions
Materials
- Mini square canvas (3×3 or 4×4 inch)
- Acrylic paints (Titanium White, Cadmium Red, Hooker’s Green, Yellow Ochre, Ultramarine Blue, Burnt Umber)
- Flat brush (size 6 or 8)
- Round brush (size 2)
- Detail liner brush (size 00)
- Pencil and eraser
- Mixing palette and water cup
Step 1: Preparation & Base Layers
-
Background Color:
Mix a large amount of Titanium White with a tiny dot of Red to create a soft, pastel pink. Use the flat brush to coat the entire canvas face and edges for a clean finish. -
Drying Time:
Allow the background layer to dry completely to the touch before sketching; this prevents the graphite from digging into wet paint. -
Outline Sketch:
Lightly sketch the strawberry shape in the center using a pencil. Draw a rounded triangle for the fruit and add a cluster of jagged sepals (leaves) at the top. -
Fruit Base:
Fill in the fruit body with pure Cadmium Red using the round brush, being careful to paint around the leaves but adhering to your sketched outline. -
Leaf Base:
Paint the leaves with a mid-tone green. If your green is too bright, mix in a speck of red to tone it down for a more natural look.
Muddy Shadows?
To deepen red shadows without making them dull, avoid using black paint. Instead, mix a tiny bit of contrasting green or purple into your red for a rich, vibrant deep tone.
Step 2: Shading & Form
-
Deepening Shadows:
Mix a darker red by adding a touch of Blue or Purple to your base Red. Apply this to the bottom curve and the right side of the berry to create volume. -
Highlight Zone:
Mix Red with a little White or Yellow to create a lighter coral tone. Paint this on the upper-left ‘shoulder’ of the berry where the light hits. -
Blending:
While the paints are slightly tacky, use a damp, clean brush to gently soften the transition between the dark shadow, pure red, and the highlight zone. -
Leaf details:
Use the liner brush to add dark green veins near the center of the leaves and lighter yellow-green highlights on the tips.
Level Up: Glossy Finish
Apply a coat of high-gloss acrylic medium or varnish specifically over the strawberry part once dry. This contrasts with the matte background, making the fruit look freshly washed.
Step 3: Texture & Final Details
-
Seed Pits:
Using your darkest red mixture and the liner brush, make small, rhythmic divots or dashes across the surface of the strawberry where the seeds will sit. -
Planting Seeds:
Mix Yellow Ochre with a tiny bit of White. Carefully place a tiny dot inside each dark divot you just painted. I find steadying my hand against the table helps here. -
Seed Highlights:
Add a microscopic dot of pure White on the top-left edge of each yellow seed to make them look glossy and embedded. -
Skin Shine:
Paint a soft, white highlight on the lightest part of the red skin to stimulate the glossy texture of the fruit. -
Cast Shadow Mix:
Create a transparent wash by thinning down a mix of Blue, Red, and a touch of Burnt Umber with mostly water to get a purplish-grey. -
Painting the Shadow:
Swipe this watery wash underneath the strawberry, slightly offset to the right, to ground the object so it doesn’t look like it’s floating. -
Clean Up:
Check the pink background for any accidental smudges and touch them up with your original pastel mix if necessary.
Display your mini masterpiece on a small easel or group it with other fruit paintings for a sweet gallery wall


Dreamy Cloud Studies
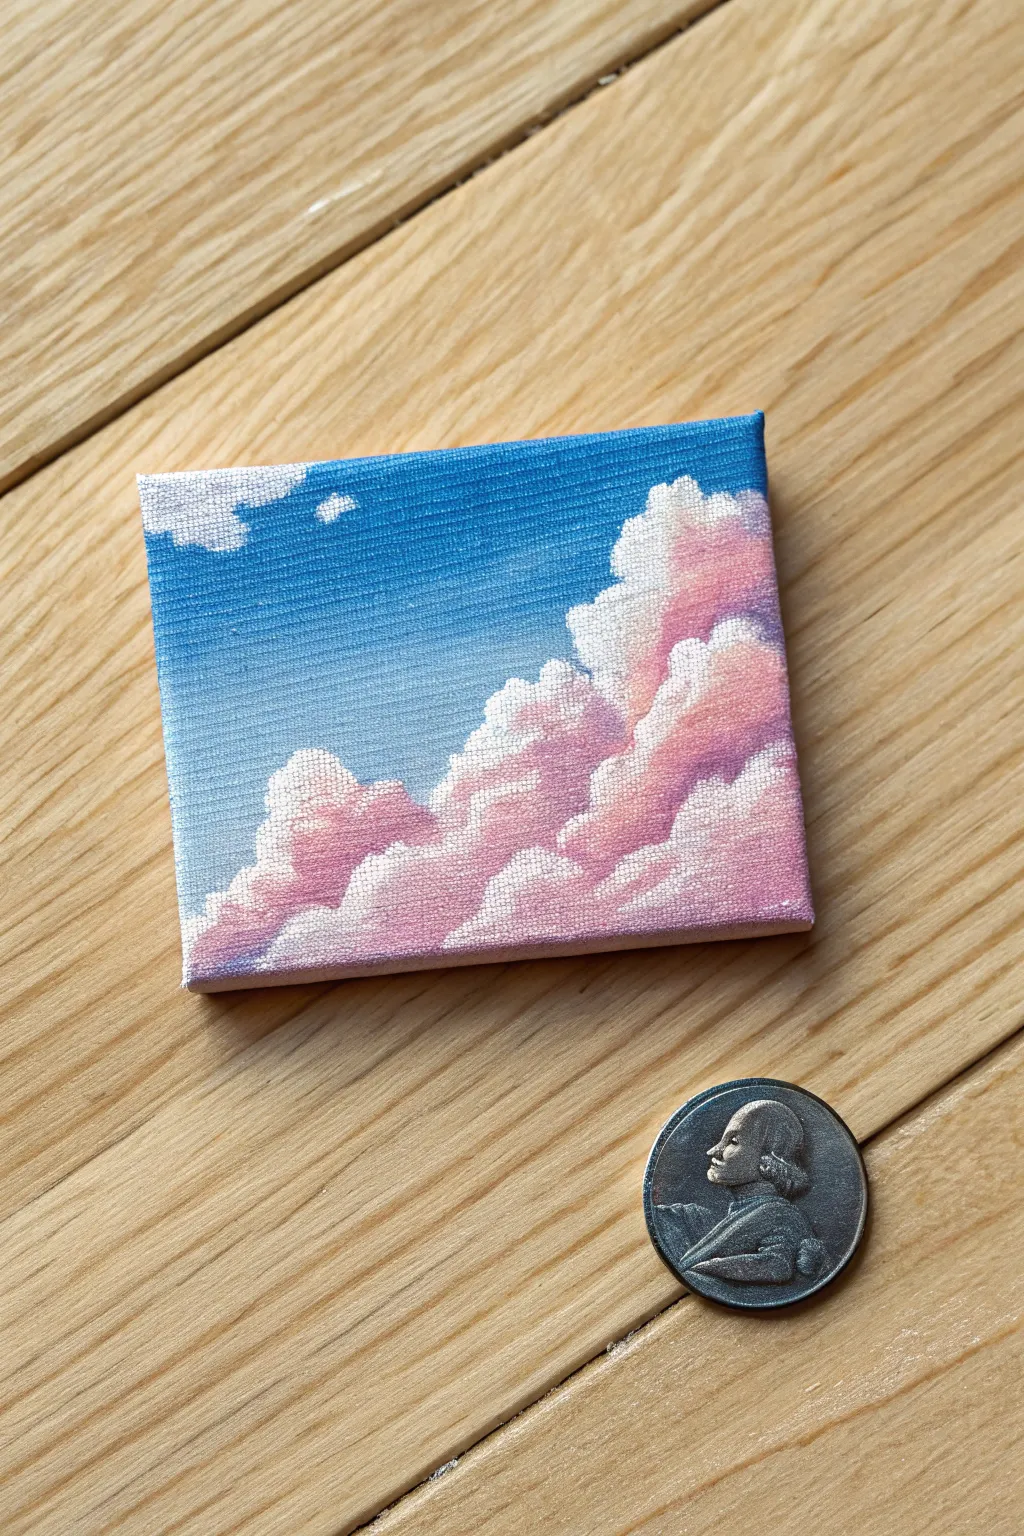
Capture the ethereal beauty of a cotton-candy sky on a tiny canvas that fits in the palm of your hand. This project focuses on soft blending and building voluminous shapes to create a dreamy, romantic atmosphere.
How-To Guide
Materials
- Miniature stretched canvas (approx. 2×3 inches)
- Acrylic paints (Phthalo Blue, Quinacridone Magenta, Titanium White, Dioxazine Purple)
- Small flat brush (size 2 or 4)
- Small filbert brush or rounded shader
- Detail brush (size 0 or 00)
- Palette and water cup
- Paper towels
Step 1: Setting the Sky gradient
-
Mix the sky base:
Start by mixing a bright sky blue using Phthalo Blue and a generous amount of Titanium White on your palette. -
Apply the darker top:
Paint the top left corner of the canvas with this mix, covering about one-third of the sky area. -
Lighten the gradient:
Add more white to your blue mix to create a significantly paler shade. Apply this below the darker blue, blending the seam while the paint is still wet. -
Fade to white:
For the area where the clouds will sit (bottom right), paint almost pure white with just a hint of blue, creating a seamless ombre effect from corner to corner. -
Dry completely:
Allow the background to dry fully. This is crucial so your pink clouds don’t accidentally mix with the blue to turn muddy purple.
Muddy Skies?
If your pink clouds turn a muddy purple while painting, your blue background wasn’t dry enough. Let it cure completely before layering clouds on top.
Step 2: Blocking the Cloud Shapes
-
Mix shadow color:
Create a muted mauve color for the cloud shadows by mixing Magenta, a tiny speck of Purple, and White. It should be darker than the final pink highlights. -
Map the cloud mass:
Using a filbert brush, tap in the general shape of the clouds, occupying the bottom right diagonal of the canvas. Keep the edges irregular and bumpy. -
Add floating strays:
Dab a small, lonely cloud or two in the upper left blue section to balance the composition. -
Soften the edges:
While the mauve paint is wet, use a clean, slightly damp brush to gently dab the edges, ensuring they look fluffy rather than sharp.
Tiny Easel Display
Since this canvas is so small, craft a simple easel out of toothpicks or popsicle sticks to display your artwork on a desk or shelf.
Step 3: Building Volume and Light
-
Mix mid-tone pink:
Clean your brush and mix a vibrant bubblegum pink using Magenta and White. -
Layer the mid-tones:
Apply this pink to the upper rounded sections of your cloud shapes, leaving the darker mauve visible at the bottoms and crevices. -
Create billows:
Use a tapping or ‘scumbling’ motion with your brush to create the texture of rounded, puffy cumulus clouds. -
Brighten the mix:
Add more White to your pile of pink to create a very pale, pastel highlight shade. -
Apply upper highlights:
I like to use a smaller detail brush here to place this pale pink effectively on the very tops of the cloud curves where the sun would hit. -
Refine the transitions:
If the transition between the mauve shadow and pink highlight looks too stark, lightly dab clean water between them to blur the line.
Step 4: Final Details
-
Pure white peaks:
Load your smallest brush with pure Titanium White paint. -
Rim lighting:
delicately outline the topmost ridges of the main cloud bank and the small floating cloud to make them pop against the blue sky. -
Texturize:
Add tiny dots of white within the pink areas to suggest extra fluffiness and dimension. -
Paint the edges:
Don’t forget to extend the painting over the sides of the canvas for a polished, gallery-ready look. -
Varnish (optional):
Once fully dry, apply a satin or gloss varnish to protect the miniature and deepen the color saturation.
Now you have a serene little window to a sunset sky that you can keep in your pocket.


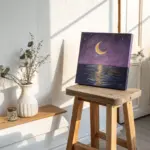
Minimalist Night Sky and Moon
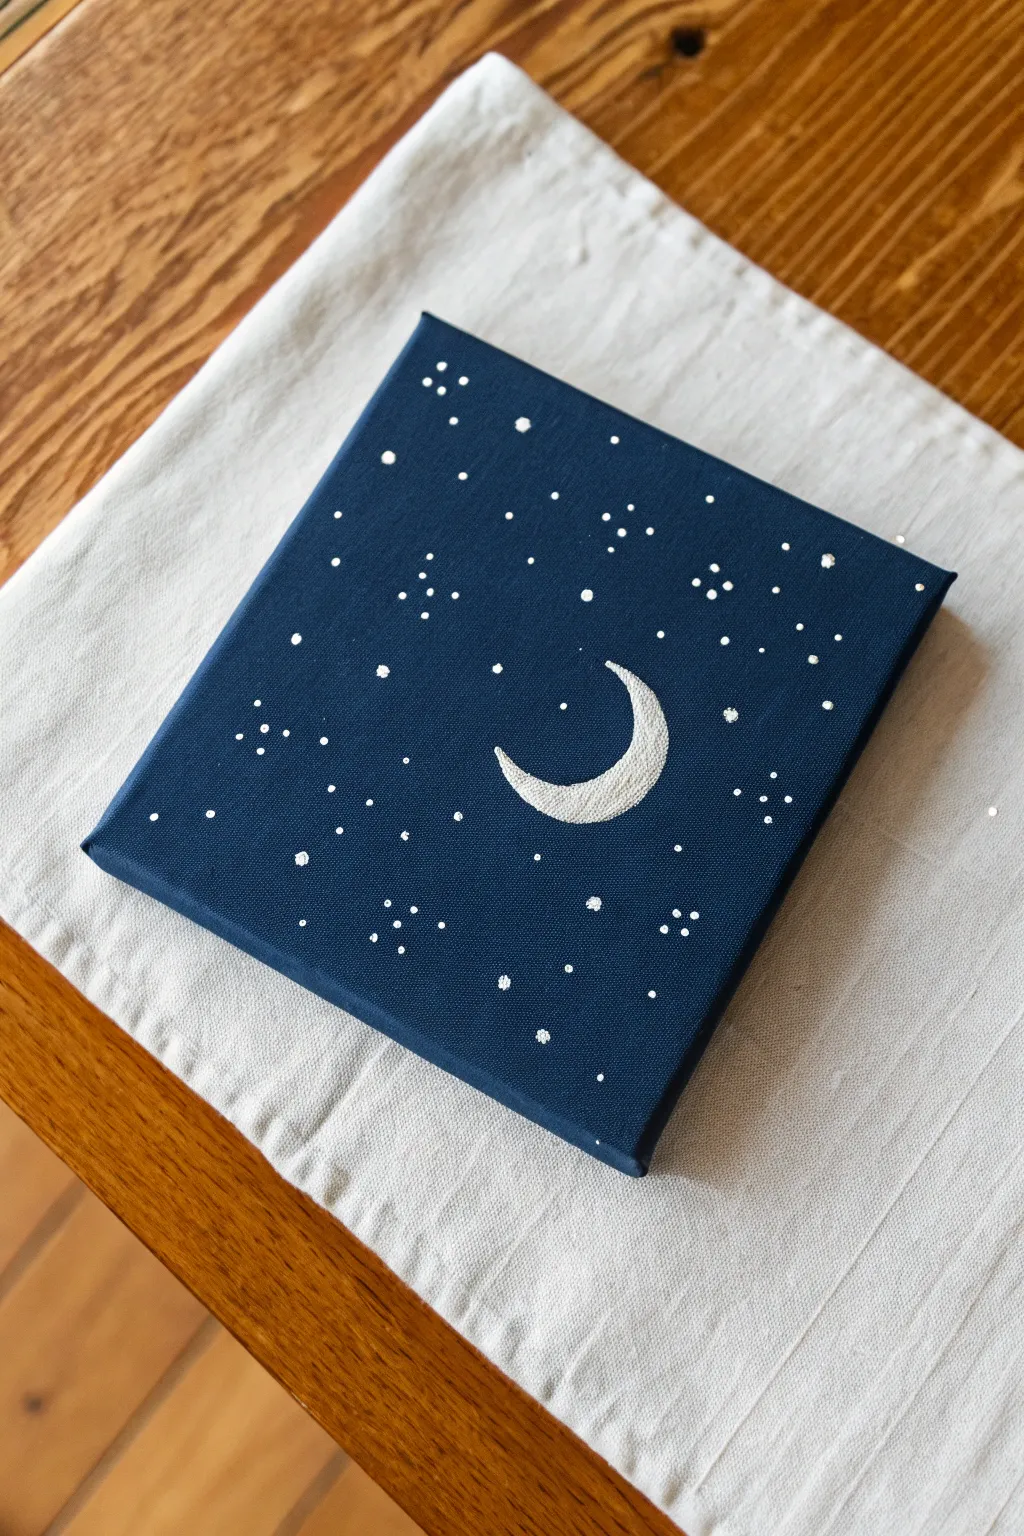

Capture the serenity of a midnight sky on a miniature canvas with this high-contrast painting project. You will focus on creating a rich, matte background that allows the textured moon and delicate stars to truly pop.
Step-by-Step Tutorial
Materials
- Mini stretched canvas (4×4 inch or similar)
- Navy blue acrylic paint (matte finish recommended)
- Titanium white acrylic paint (heavy body)
- Small flat shader brush
- Fine liner brush (size 0 or 00)
- White pastel pencil or chalk
- Toothpick or dotting tool
- Palette
Step 1: Setting the Scene
-
Base coat:
Squeeze a generous amount of navy blue acrylic onto your palette. -
Apply background:
Using the flat shader brush, paint the entire front surface of the canvas in long, even strokes. -
Mind the edges:
Paint the four sides of the canvas to create a finished, gallery-wrapped look that doesn’t require a frame. -
Dry completely:
Allow the first coat to dry fully to the touch. -
Full opacity:
Apply a second coat of navy blue if you can still see the canvas weave through the paint; a solid, dark background is essential.
Clean Dots
Reload your tool with fresh paint after every 2-3 stars. If the paint starts to dry on the tool, wipe it off completely before continuing to keep your stars round.
Step 2: The Textured Moon
-
Sketching:
Use a white pastel pencil or chalk to lightly outline a crescent moon shape slightly offset from the center. -
Load the brush:
Load your fine liner brush with undiluted heavy body white paint; you want the paint thick to create texture. -
Directional strokes:
Fill in the crescent shape using short, curved strokes that follow the arc of the moon. -
Creating texture:
Layer the paint deliberately so that the brushstrokes remain visible, mimicking the threaded look seen in the photo. -
Refine shape:
Carefully smooth out the outer edge of the crescent with the tip of your brush for a sharp silhouette. -
Inner curve:
I like to leave the inner curve slightly softer, but ensure the points of the crescent taper off neatly.
Step 3: Starry Details
-
Prepare for dots:
Place a fresh drop of white paint on your palette; for stars, the paint should be creamy but not too thick. -
Large stars:
Dip the non-brush end (the handle) of a small paintbrush into the white paint. -
Placement:
Gently press the handle tip onto the canvas to create the larger, perfectly round stars scattered mainly towards the edges. -
Tiny stars:
Switch to a toothpick or the very tip of your liner brush for the smaller stars. -
Filling space:
Add tiny pinprick stars throughout the empty blue space, varying the density to look natural. -
Constellations:
Group small clusters of three or four dots together to simulate distant constellations. -
Final touches:
Check for any uneven paint blobs and allow the entire piece to dry undisturbed.
Metallic Upgrade
Swap the matte white moon paint for a pearlescent white or metallic silver acrylic to give your artwork a slight shimmer that catches the light.
Display your celestial miniature on a small easel or shelf to add a touch of starlight to your room.
BRUSH GUIDE
The Right Brush for Every Stroke
From clean lines to bold texture — master brush choice, stroke control, and essential techniques.
Explore the Full Guide
Vibrant Daisy Close-Ups
This mini canvas project focuses on capturing the high contrast between a deep, shadowy garden background and the brilliant white of a sunlit flower. You will learn to layer acrylics to build realistic texture in the fuzzy center and create depth in the overlapping petals.
Detailed Instructions
Materials
- 4×4 inch mini stretched canvas
- Acrylic paints (Titanium White, Sap Green, Phthalo Green, Cadmium Yellow, Burnt Sienna, Payne’s Gray)
- Small flat shader brush
- Small filbert brush (size 2-4)
- Fine detail liner brush (size 0 or 00)
- Palette and water cup
- White charcoal pencil or chalk
Step 1: Setting the Scene
-
Mix the background color:
Combine Sap Green with a touch of Phthalo Green and a tiny drop of Payne’s Gray. You want a very deep, rich forest green that almost looks black but retains its vibrancy. -
Base coat the canvas:
Using the flat shader brush, cover the entire front of the canvas with your dark green mixture. Ensure the weave of the canvas is fully filled. -
Paint the edges:
Don’t forget the sides even on a mini canvas like this. Painting the deep green around the edges gives the piece a professional, gallery-wrapped finish. -
Let it dry:
Allow the background to dry completely to the touch. This prevents your white petals from turning muddy later. -
Sketch the composition:
With a white charcoal pencil, lightly draw a slightly off-center oval for the flower’s disk. Then, sketch the general direction of the petals radiating outward, ensuring some overlap.
Step 2: Petals and Depth
-
Mix a shadow tone:
Create a light grey by mixing a large amount of Titanium White with a speck of Payne’s Gray. It should be subtle, like the color of a cloud. -
Block in the petals:
Using the filbert brush, paint the shape of all the petals using this light grey mixture. This serves as your base layer and will act as the shadowed areas later. -
Establish the negative space:
Use your liner brush and the dark background green to redefine the gaps between petals near the center. Creating these ‘V’ shapes separates the petals visually. -
Mix the mid-tone white:
Clean your brush and load it with pure Titanium White mixed with the tiniest touching of Cadmium Yellow to warm it up slightly. -
Apply the first highlight layer:
Paint over the grey petals, starting from the tip and stroking inward halfway. Leave the grey visible near the center and where petals sit underneath others. -
Add the brightest highlights:
Using pure Titanium White, add a second coat just to the very tips and edges of the petals that receiving the most ‘sunlight’ to make them pop. -
Create transparency:
I like to glaze a tiny amount of the background green over the bottom-most petals. This subtle tint makes them look thinner and shadowed by the flower itself.
Pro Tip: Texture Trick
To get that fuzzy pollen look in the center, let the paint dry slightly until it’s tacky, then dab it repeatedly with a coarse brush. The paint will peak and hold its shape.
Step 3: Textured Center
-
Base the center:
Fill the center oval with solid Cadmium Yellow. Use the tip of your brush to make the edges messy and bumpy, rather than a perfect circle. -
Mix the shadow pollen:
Combine Cadmium Yellow with a small amount of Burnt Sienna to create a golden-orange hue. -
Stipple the shading:
Using a dry brush or the tip of your liner, ‘stipple’ (repeatedly tap) this orange color onto the bottom half of the yellow center to create a 3D shadowy curve. -
Add deep contrast:
Mix a tiny bit of Payne’s Grey into your orange mixture. Stipple a few tiny dots right along the bottom edge of the yellow center for maximum volume. -
Highlight the pollen:
Mix Cadmium Yellow with Titanium White. Stipple this bright pale yellow onto the upper-left area of the center to simulate sunlight hitting the texture.
Level Up: Impasto
Mix heavy body gel medium into your white acrylic for the final petal highlights. This creates physical ridges that catch the light, mimicking real petal veins.
Step 4: Final Touches
-
Refine the edges:
Check the outer tips of the petals. If any look ragged, use your dark green background color to cut back in and sharpen the shape. -
Add subtle veining:
With an extremely faint wash of grey and your finest brush, pull a few very thin lines down the center of the largest petals to suggest texture. -
Final inspection:
Step back and look at the contrast. If the white isn’t bright enough against the green, add one last layer of thick white paint to the brightest spots.
Place your finished mini masterpiece in a spot with natural light to really let those white highlights shine.
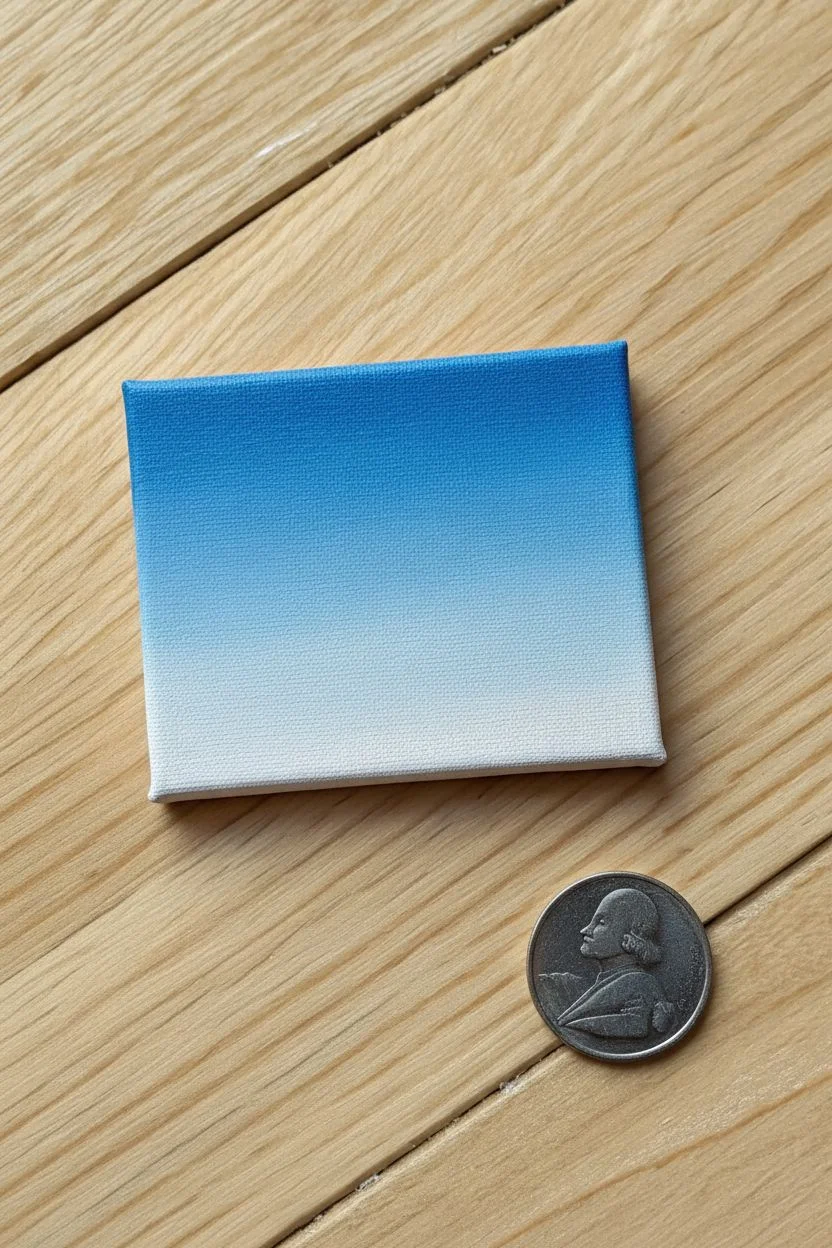
Simple Seascape Horizon
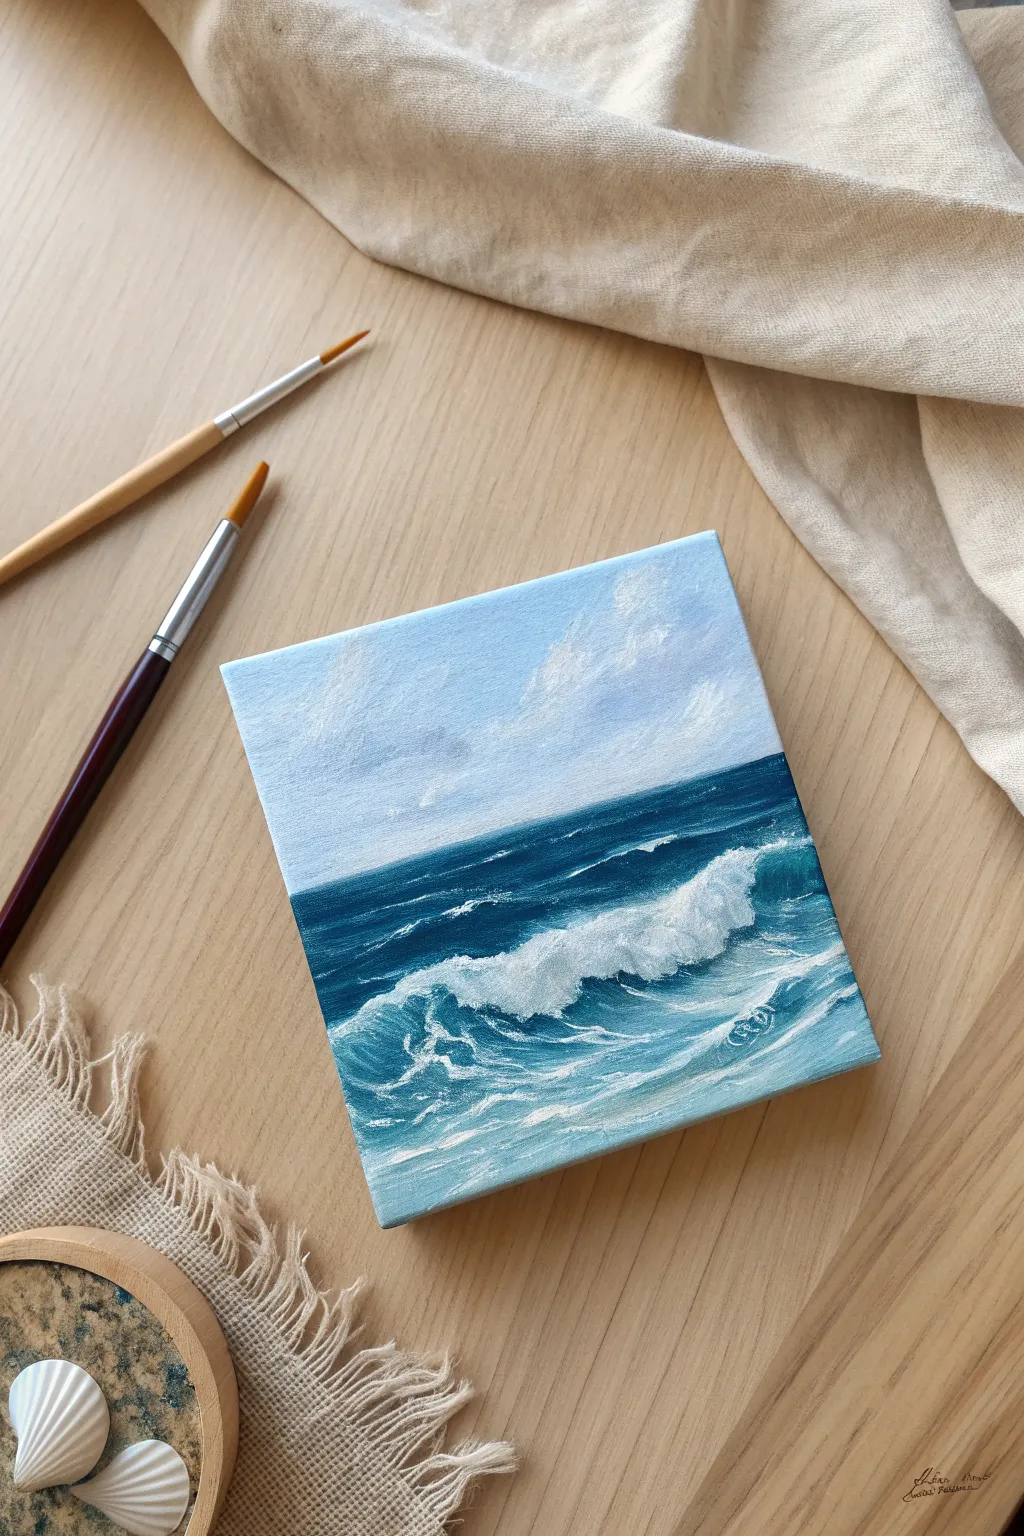
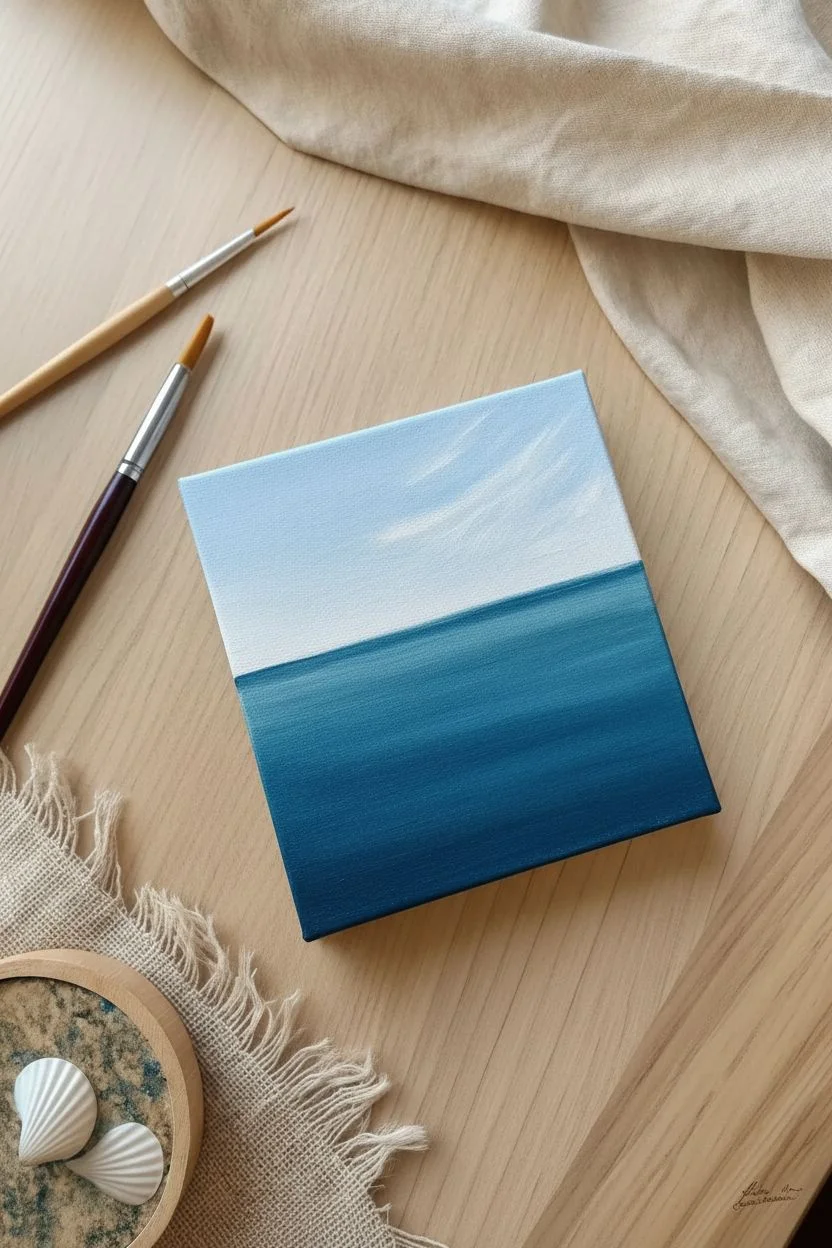
Capture the raw energy of the ocean on a tiny canvas with this dynamic seascape tutorial. You will balance soft, blending techniques for the sky with textured, energetic strokes to create the crashing wave.
Step-by-Step
Materials
- Small square canvas (e.g., 4×4 or 6×6 inches)
- Acrylic paints: Titanium White, Phthalo Blue, Ultramarine Blue, Teal, Payne’s Grey
- Small flat brush (size 4 or 6)
- Small round detail brush (size 0 or 1)
- Palette knife (optional for texture)
- Jar of water and paper towels
Step 1: Sky and Horizon
-
Prime the sky:
Mix a large amount of Titanium White with a tiny spec of Ultramarine Blue. Paint the top third of the canvas with this pale blue mixture. -
Create a gradient:
While the paint is still wet, add a little more white to your brush and blend the color downwards so it becomes nearly pure white just above the horizon line. -
Establish the horizon:
Using a flat brush and a mix of Phthalo Blue and Payne’s Grey, draw a straight horizontal line across the canvas about one-third of the way down. -
Add wispy clouds:
Wipe your brush dry and pick up a tiny amount of pure white. Lightly scumble diagonal, wispy strokes into the upper right sky to suggest wind-swept clouds.
Step 2: Ocean Depth
-
Paint the deep water:
Below the horizon line, paint a band of dark blue (Phthalo Blue mixed with a touch of Teal) to create the distant, deep ocean. -
Transition to foreground:
As you move down the canvas, mix more Teal and White into your blue. Paint the bottom half of the water area with this lighter, aqua tone. -
Block in the wave:
Using your darkest blue mix, paint a shadow shape in the middle of the water. This dark curve will serve as the heavy shadow underneath the crashing white foam. -
Shape the trough:
In the immediate foreground (bottom edge), paint horizontal strokes using a mix of Teal and White to represent the shallow, churning water in front of the wave.
Muddy Waters?
If your white foam highlights are turning light blue, stop and let the blue base layer dry completely. Apply the white again once the surface feels dry to the touch.
Step 3: The Crashing Wave
-
Start the foam:
Load a round brush with Titanium White. Dab paint along the top edge of your dark wave shadow to create the crest. -
Create the crash:
On the right side where the wave creates a ‘barrel’, use a circular scrubbing motion with your white paint to mimic the turbulent spray hitting the water. -
Drag the details:
From the top of the white crest, gently drag your brush down and to the left, following the curve of the water fitting into the pipe of the wave. -
Paint the back spray:
On the left side of the wave (the unbroken part), paint a thin, sharp white line along the top ridge where the light hits the water.
Sun-Kissed Sparkle
For a magical touch, mix a tiny pinch of iridescent medium or pearl white paint into your final highlights to make the water look like it is glistening in the sun.
Step 4: Texture and Highlights
-
Foreground webbing:
Thin down some white paint with water. Use your smallest detail brush to paint delicate, spider-web patterns on the teal water in the foreground, mimicking sea foam. -
Enhance the shadows:
If the dark shadow under the wave got covered, re-establish it with a thin glaze of dark blue to ensure high contrast against the white foam. -
Add mist:
I like to take a dry brush with very little white paint and tap it lightly above the crashing section to simulate fine mist and sea spray. -
Final impasto:
Load a generous amount of pure white on your brush or palette knife. Apply thick dabs of paint to the brightest parts of the foam for a 3D texture effect. -
Clean edges:
Paint the sides of your canvas with a neutral color or continue the image around the edges for a finished, gallery-style look.
Place your finished mini masterpiece on a small easel to bring a breath of fresh ocean air to your room.

PENCIL GUIDE
Understanding Pencil Grades from H to B
From first sketch to finished drawing — learn pencil grades, line control, and shading techniques.
Explore the Full Guide
Whimsical Toadstools
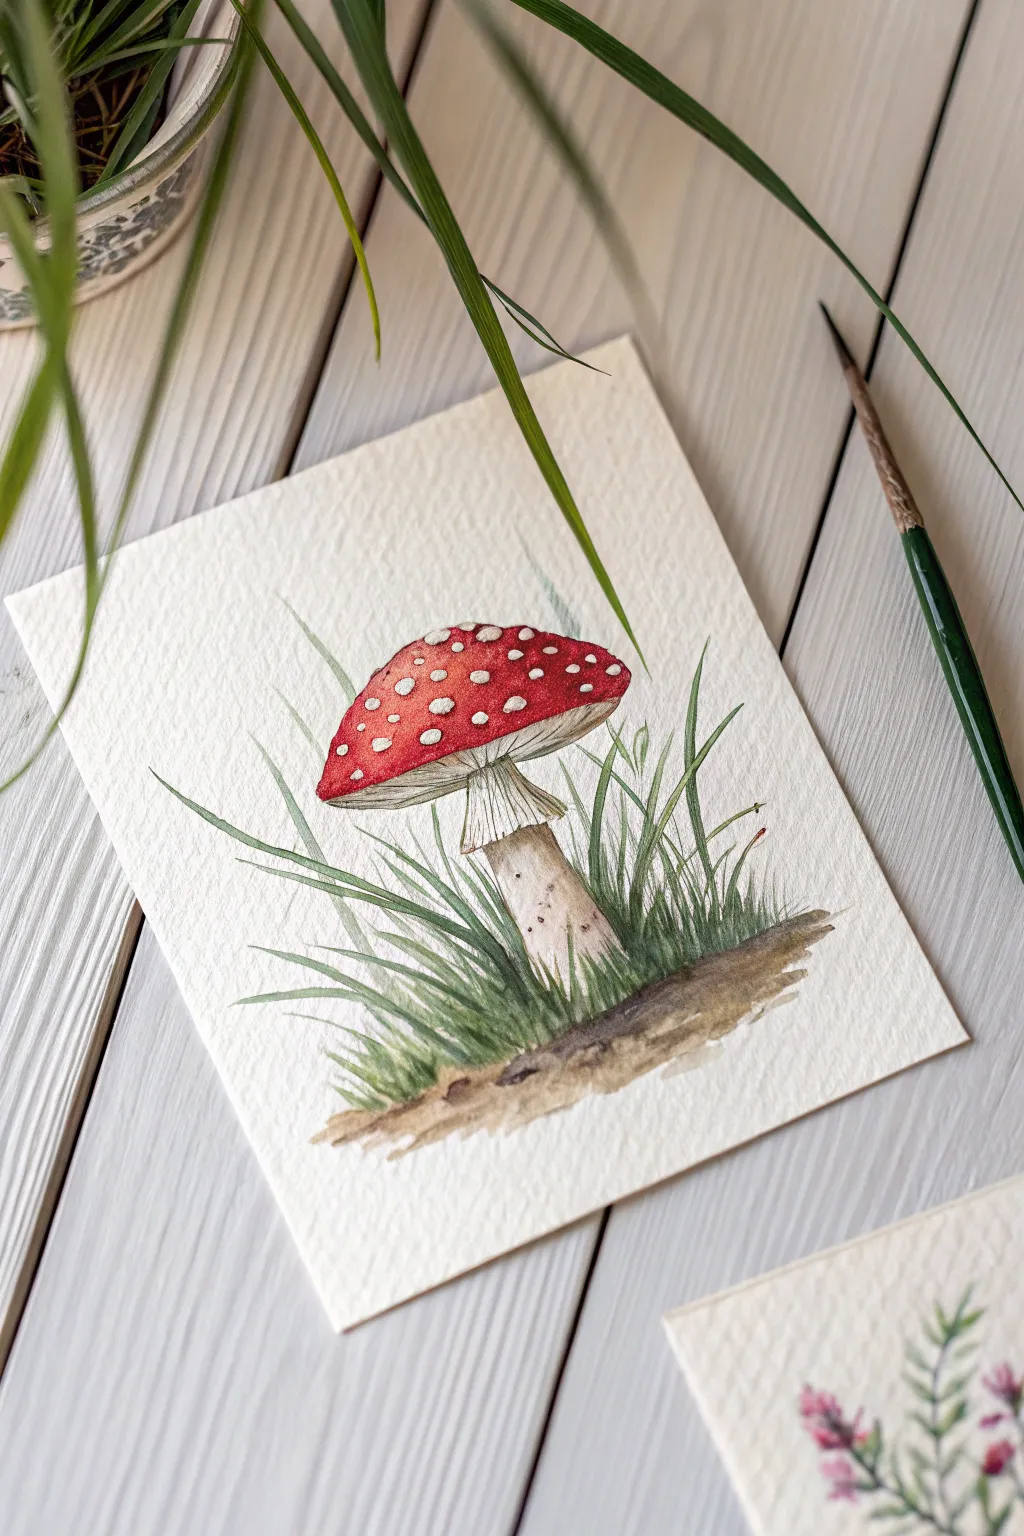
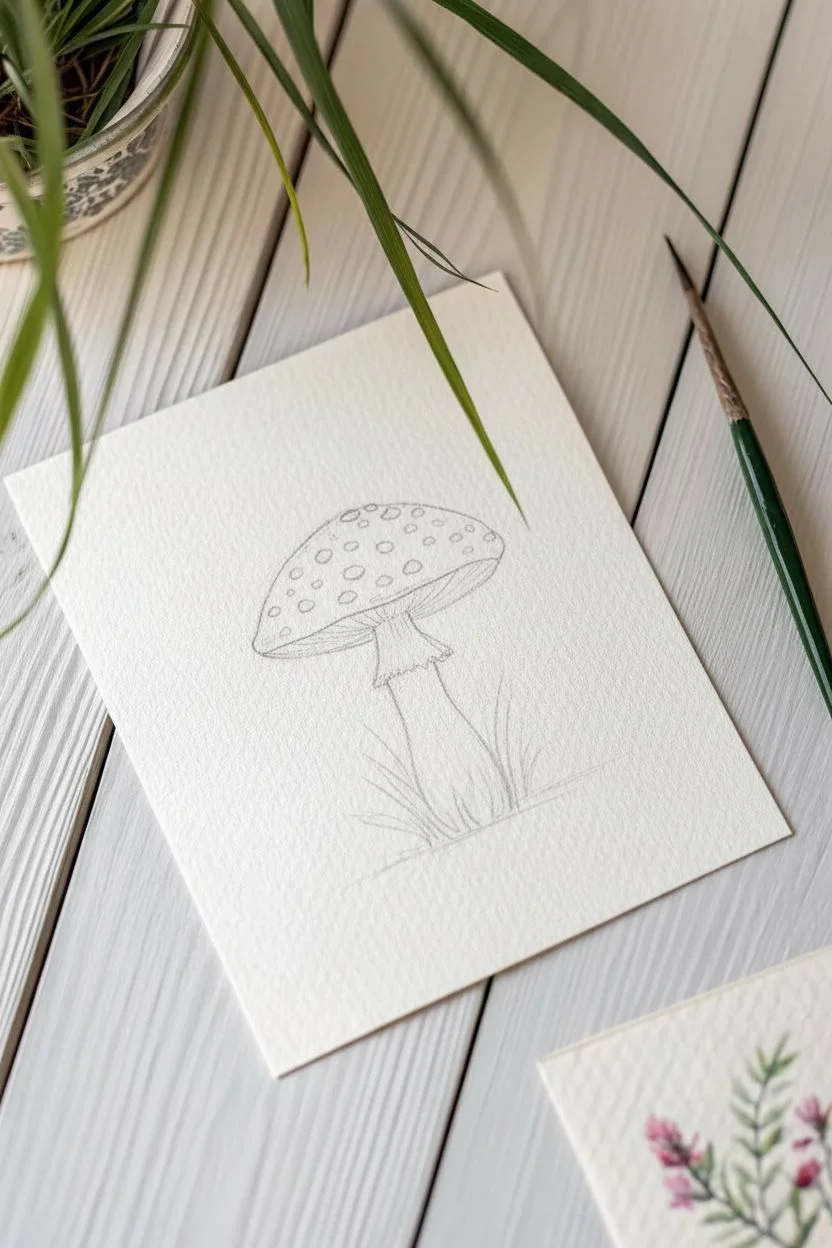
Capture the magic of the forest floor with this classic red-capped mushroom study. The textured cold-press paper and layered watercolor washes bring a lovely organic feel to this botanical illustration.
Step-by-Step Guide
Materials
- Cold press watercolor paper (300gsm)
- Watercolor paints (Scarlet Red, Sepia, Sap Green, Indigo)
- Round brush (size 4 or 6)
- Detail brush (size 0 or 1)
- White gouache or white gel pen
- HB Pencil and kneadable eraser
- Two jars of water
Step 1: Sketching the Outline
-
Basic Shapes:
Start by lightly sketching a wide semi-circle for the mushroom cap in the center of your paper. -
Stem Structure:
Draw the stem curving slightly downward, making the base thicker and rounder than the top. -
The Skirt:
Add the ‘skirt’ (annulus) hanging just below the cap, using jagged, uneven lines to make it look ruffled. -
Mapping Slots:
Sketch small, irregular circles across the top of the cap where the white spots will remain. -
Clean Up:
Gently dab your drawing with a kneadable eraser so the graphite allows the paint to shine through without dirtying it.
Brush Control Tip
For those sharp, tapered grass blades, press down firmly at the start of the stroke (the root) and lift your brush quickly as you flick upward to the tip.
Step 2: Painting the Cap
-
Mixing Red:
Create a vibrant red pool on your palette, perhaps mixing a bit of warm brown into a scarlet red to make it earthy. -
First Layer:
Using your round brush, carefully paint the red section of the cap, purposefully leaving the sketched circular spots unpainted (white). -
Adding Depth:
While the red is still slightly damp, drop a more concentrated red or deep crimson along the bottom edge of the cap to create volume. -
Drying Time:
Let this red layer dry completely. If you engage the next steps too soon, the red might bleed into the stem.
Red Bleeding?
If your red paint bleeds into the white spots, don’t panic. Wait for it to dry completely, then paint over the mistake with opaque white gouache to tidy the edges.
Step 3: Stem and Gills
-
Stem Wash:
Dilute a sepia or light brown color with plenty of water until it is very pale. -
Painting the Stalk:
Wash this pale color over the stem and the skirt, keeping the center of the stem slightly lighter for a highlight. -
Gill Details:
Switch to your detail brush. Mix a slightly darker variation of your stem color. -
Fine Lines:
Paint very thin, closely spaced lines underneath the cap, moving from the edge of the cap inward toward the stem to mimic gills. -
Earthy Texture:
I like to use the tip of my brush to tap tiny brown dots near the very bottom of the stem, simulating dirt texture.
Step 4: Ground and Grass
-
Ground Base:
Mix a dark brown and apply a small patch of uneven wash directly under the stem anchor the mushroom. -
Initial Grass:
Take a mossy green and use quick, upward flicking motions to create blades of grass shooting up from the dirt patch. -
Grass Variation:
Mix a darker, cooler green (add a touch of indigo). Add more grass blades behind and in front of the lighter ones for depth. -
Integration:
Allow a few grass blades to overlap the very bottom of the mushroom stem to make it look settled in the earth.
Step 5: Final Touches
-
Spot Shadows:
Mix a barely-there grey and paint tiny crescents on the bottom-right of the white spots on the cap to make them look 3D. -
Highlights:
If you accidentally painted over any spots, use white gouache or a gel pen to reclaim those bright whites now.
Now you have a charming little piece of woodland art ready to frame or turn into a greeting card.
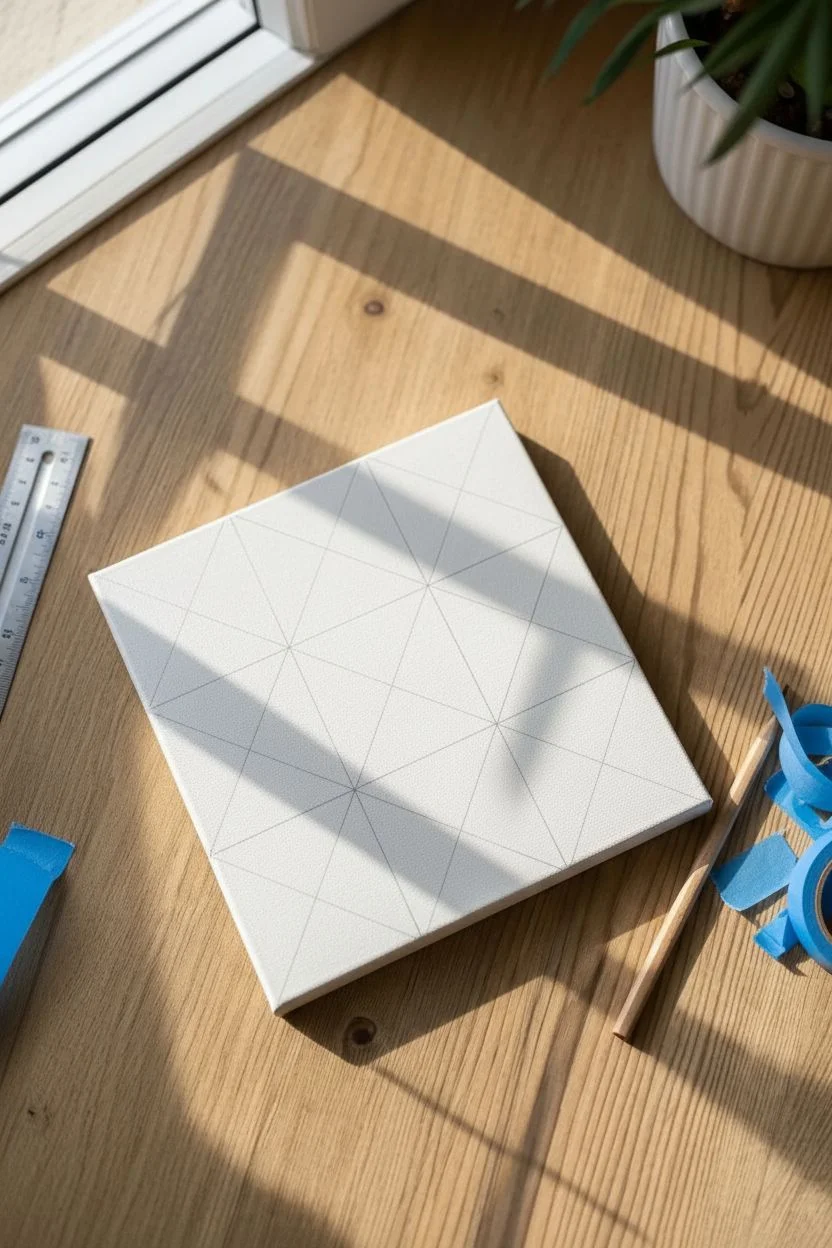
Geometric Tape Resist Patterns
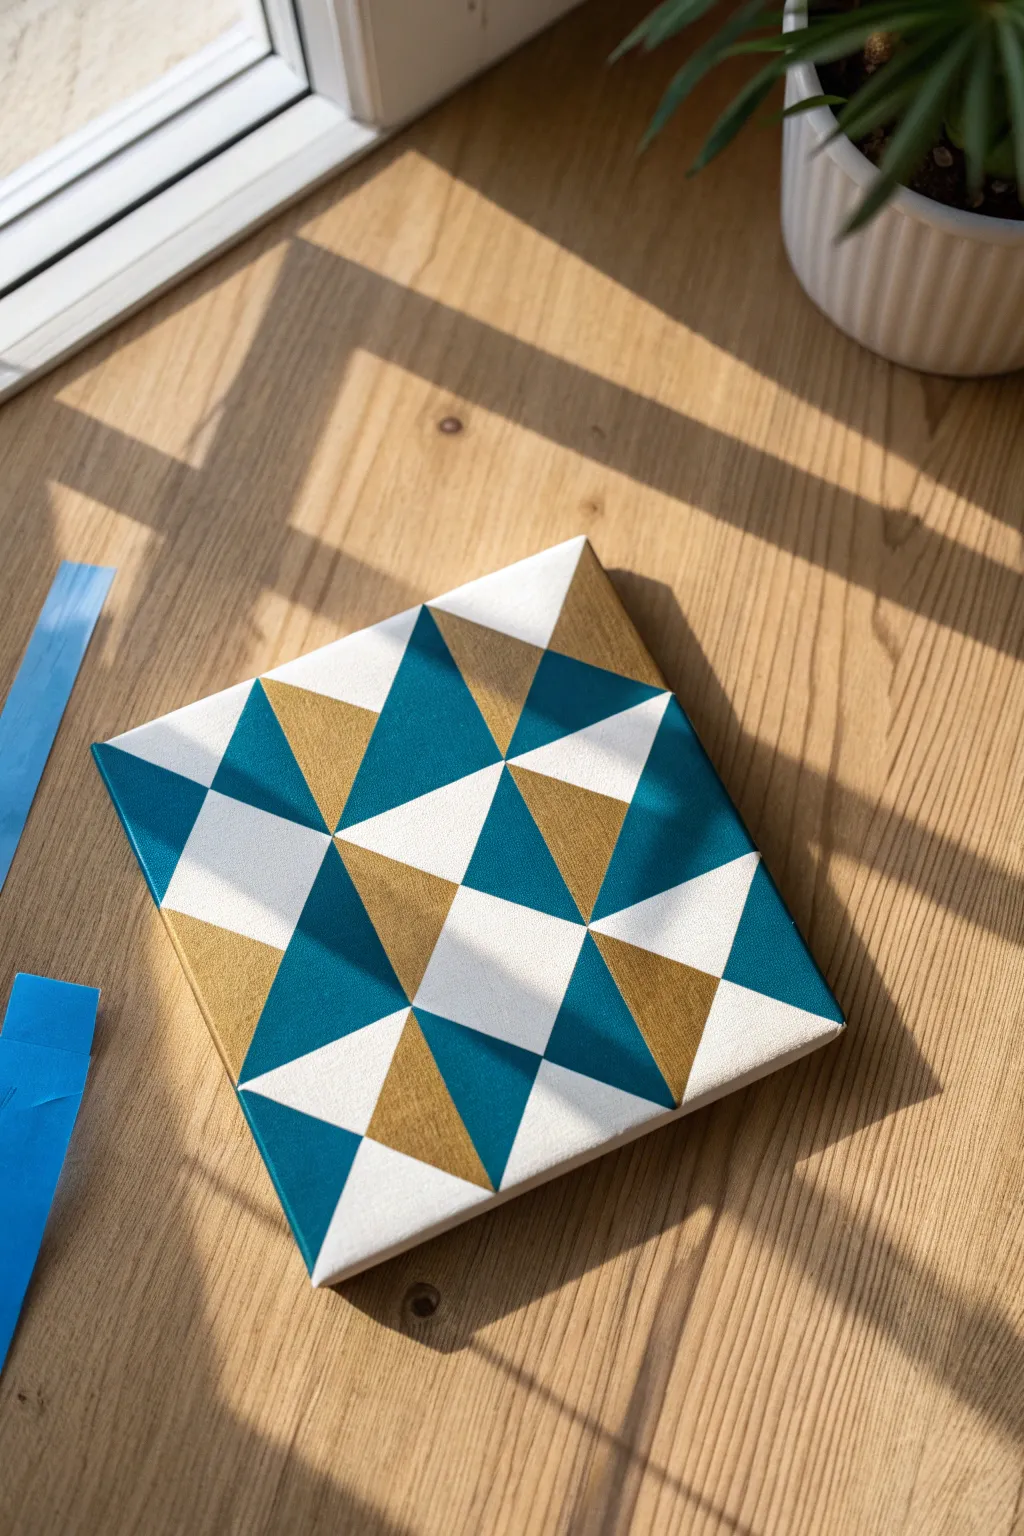
This modern, quilt-inspired design uses clean lines and metallic accents to pop against a crisp white background. By using a clever masking technique, you can achieve these razor-sharp triangles without needing a steady hand for outlines.
How-To Guide
Materials
- Small square canvas (6×6 or 8×8 inches)
- Acrylic paint: White, Dark Teal, Metallic Gold
- Blue painter’s tape (0.5 to 1 inch width)
- Flat shader brush (medium size)
- Small liner brush (for touch-ups)
- Ruler
- Pencil
Step 1: Preparation & Grid
-
Base coat:
Start by painting your entire canvas with a solid coat of white acrylic paint. Even if the canvas came primed, this ensures a smooth, consistent texture. -
Let it cure:
Allow the white base coat to dry completely. It must be dry to the touch so the pencil and tape won’t damage it. -
Mark the grid:
Using your ruler and pencil lightly, divide your canvas into a 4×4 grid of equal squares. -
Draw diagonals:
Draw diagonal lines through the squares to create triangles. Refer to the photo to match the alternating directions of the diagonals that create the distinct pattern.
Fixing Bleeds
Did paint sneak under the tape? Don’t panic! Wait for it to dry hard, then use a tiny brush with white paint to ‘cut’ the line back to straight.
Step 2: Painting the Teal Triangles
-
Mask the first batch:
Select the triangles that will be painted Teal. Apply strips of painter’s tape along the outlines of these specific shapes, masking off the areas you want to keep white or gold. -
Burnish the edges:
Run your fingernail or a credit card firmly over the edges of the tape to ensure a tight seal against the canvas. -
The sealing trick:
I always paint a thin layer of White paint over the edge of the tape first. This fills any tiny gaps with white, preventing the teal from bleeding under. -
Paint the teal:
Once the seal layer is dry (it happens fast), paint the exposed triangles with your Dark Teal acrylic. -
Remove tape:
Carefully peel back the tape while the teal paint is still slightly wet. Pull at a 45-degree angle for the cleanest line. -
Dry completely:
Let the teal sections dry fully before moving to the next color to avoid smudging.
Pro Tip: Batching
Don’t try to tape everything at once. Since the triangle points touch, you must paint one color group, let it dry, and then tape for the next color group.
Step 3: Adding the Gold Accents
-
Mask for gold:
Now, tape off the boundaries for the Gold triangles. You may need to place tape gently over the dried teal sections—this is why thorough drying was essential! -
Seal again:
Just like before, apply a quick seal of white paint along the new tape edges. -
Apply metallic paint:
Paint the exposed triangles with Metallic Gold. Metallics can be translucent, so you might need two thin coats for opaque coverage. -
Reveal:
Peel off the tape carefully to reveal your second set of triangles.
Step 4: Final Touches
-
Erase guidelines:
Once the painting is 100% dry, gently use an eraser to remove any visible pencil grid lines in the white sections. -
Clean up:
If any paint bled through, use your small liner brush and a dot of white paint to tidy up the points and edges. -
Protect:
Give the canvas a coat of clear varnish if desired to protect the metallic sheen and make the colors last.
Now you have a striking geometric piece that looks professionally printed!


Black Power Lines on Twilight
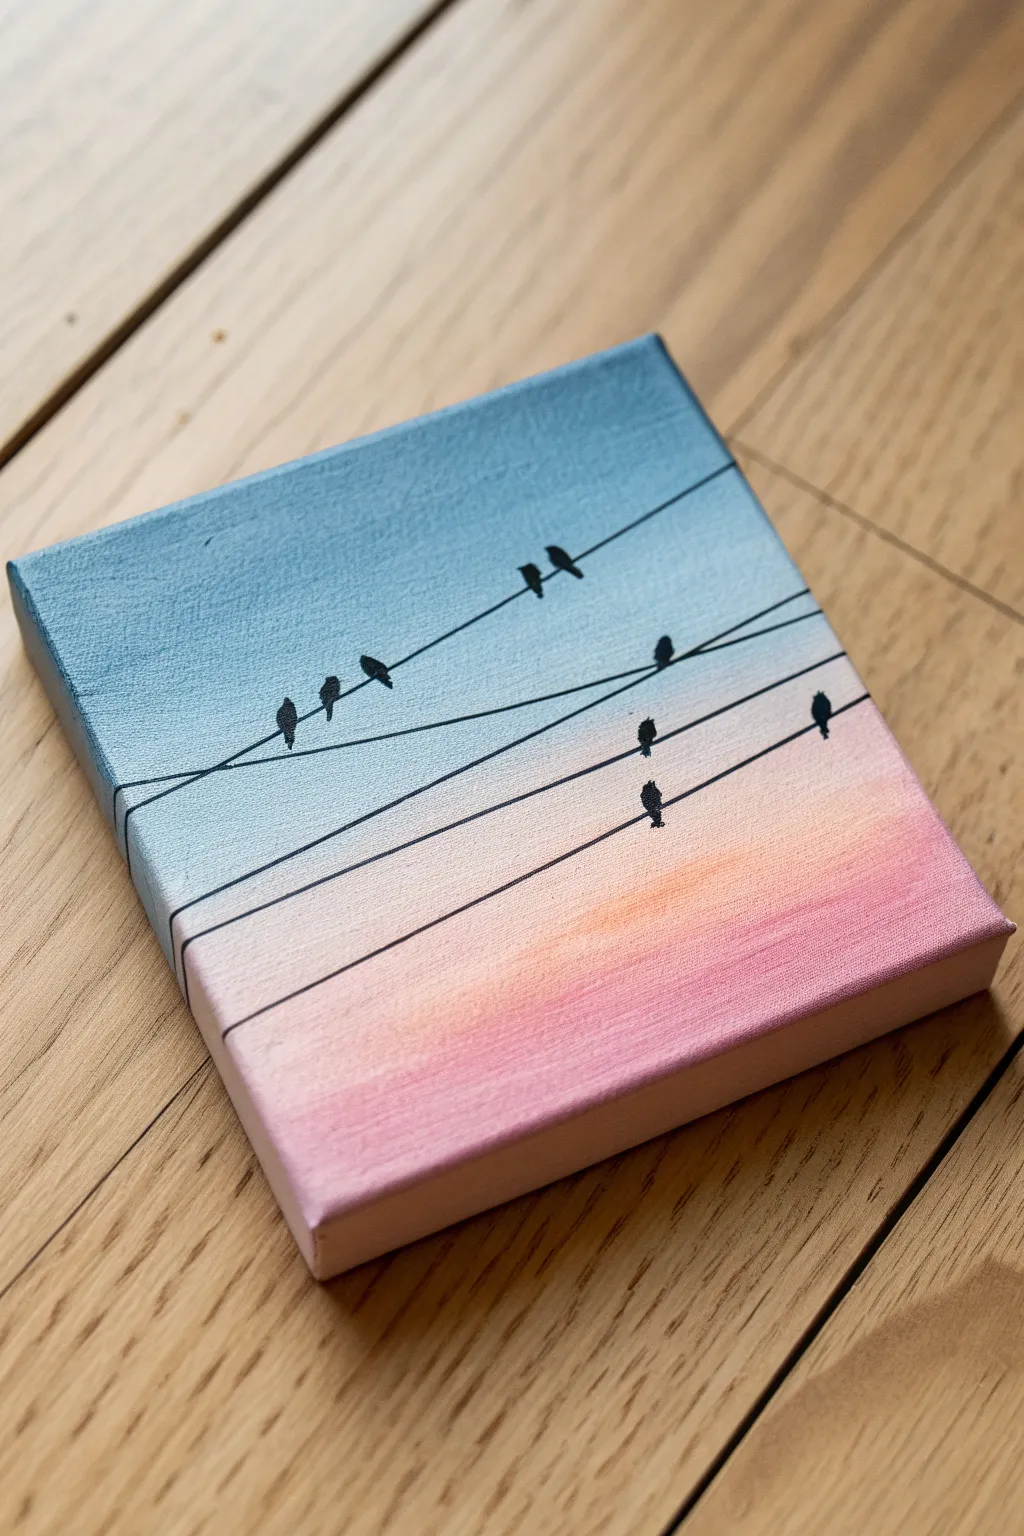
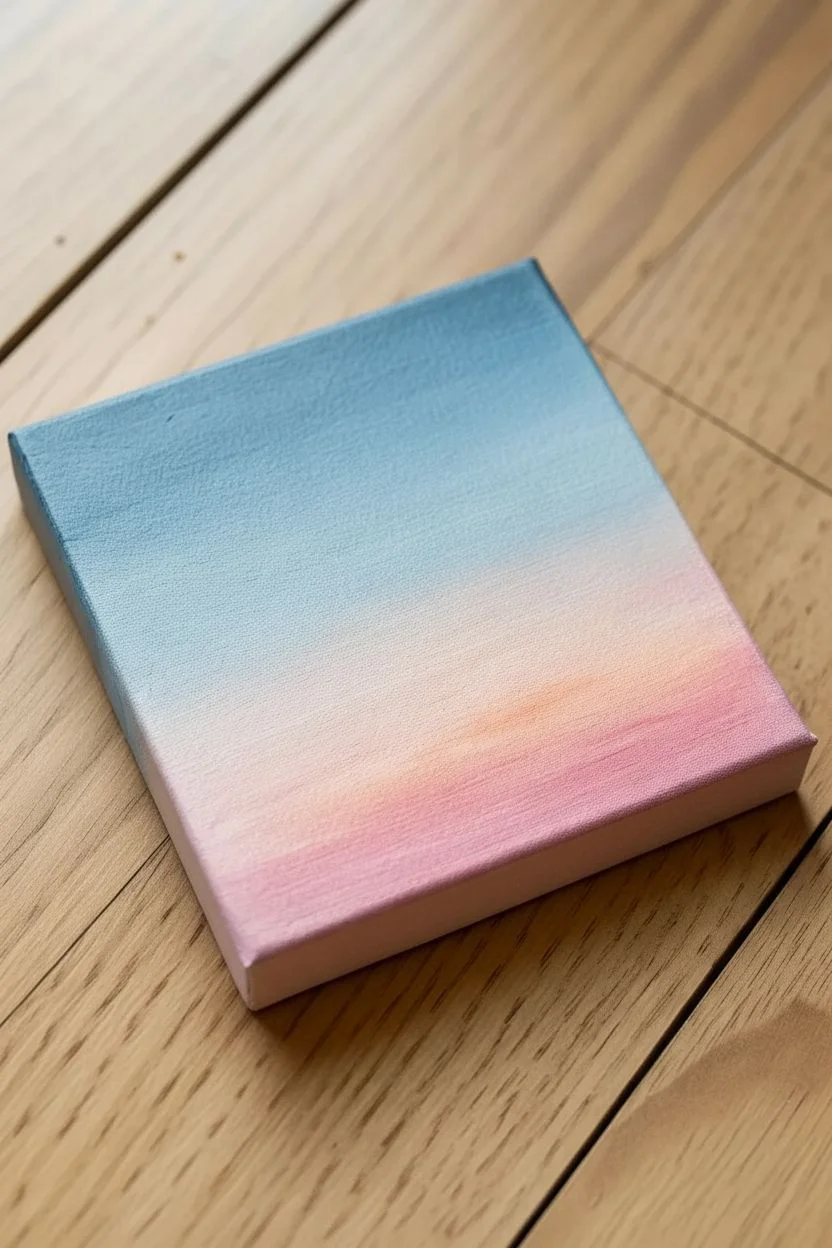
Capture the peaceful transition of a setting sun with this charming mini canvas project. You will create a seamless ombre background fading from cool blue to warm pink, finished with delicate silhouettes of birds perched on power lines.
Step-by-Step Tutorial
Materials
- Mini canvas (4×4 or 6×6 inches)
- Acrylic paints: Cerulean Blue, Titanium White, Peach or Light Orange, Rose Pink, Mars Black
- Flat shader brush (1/2 inch)
- Fine liner brush (size 0 or 00)
- Paint palette
- Cup of water and paper towels
Step 1: Painting the Sunset Gradient
-
Preparing the blue:
Squeeze out your paint colors onto text, leaving plenty of space for mixing. Start by creating a sky blue mix using Cerulean Blue and a generous amount of Titanium White. -
Applying the top layer:
Paint a horizontal strip across the top third of the canvas with your blue mix, ensuring smooth, even coverage. -
Creating the transition tone:
Without cleaning your brush, pick up more white to create a very pale, almost white blue. Apply this directly below the blue strip. -
Blending the sky:
While the paint is still wet, use horizontal brush strokes to gently blend the boundary where the blue and pale blue meet, creating a soft fade. -
Adding the warmth:
Wipe your brush clean. Load it with your Peach or Light Orange paint mixed with a little white. Paint a strip across the middle of the canvas, just below the pale blue area. -
Blending the middle:
Work rapidly to blend the top edge of the peach section into the pale blue above it so there are no harsh lines. -
Applying the base color:
Mix Rose Pink with a touch of white. Apply this directly to the bottom third of the canvas. -
Finalizing the gradient:
Blend the pink upward into the peach section using long, smooth horizontal strokes until the colors transition seamlessly. -
Finishing the edges:
Don’t forget to extend your gradient colors onto the sides of the canvas; paint the sides to match the front layout for a professional gallery-wrap look. -
Drying time:
Allow the background to dry completely. The canvas must be dry to the touch before you add the black details to prevent smudging.
Step 2: Stringing the Power Lines
-
Preparing inky black:
Mix a small drop of water into your Mars Black paint on the palette. I find this creates an inky consistency that allows for longer, smoother lines. -
Planning the layout:
Using your fine liner brush, visualize where your four lines will go. They should span horizontally with slight angles, not perfectly straight across. -
Painting the first wire:
Starting from the left edge about one-third down, gently pull your brush across to the right edge, slightly angling upward. -
Adding lower wires:
Paint a second line below the first. Continue adding a third and fourth line in the lower half of the canvas, varying the spacing slightly to look natural. -
wrapping the lines:
Carefully extend the black lines over the painted edges of the canvas so the scene continues around the sides.
Sticky Blending?
If acrylics dry too fast to blend smoothly, mix in a retarder medium or keep a water mister handy to lightly spritz the paints on the canvas.
Step 3: Adding the Bird Silhouettes
-
Shaping the bodies:
Using the tip of your liner brush and undiluted black paint, dab small teardrop or oval shapes sitting on top of the wires to form the bird bodies. -
Positioning the flock:
Place the birds randomly. Put a pair close together on the top wire, and scatter single birds on the wires below. -
Detailing heads:
Add a tiny dot on the top of each oval to represent the head. Keep these very small to maintain the sense of scale. -
Adding beaks and tails:
Use the very finest point of your brush to flick a tiny line downwards for a tail or sideways for a beak on a few birds. -
Final touches:
Check for any light spots in your black silhouettes and fill them in to ensure they are solid and opaque.
Steady Hand Trick
For crisp power lines, rest your pinky finger on a dry part of the canvas or the table to stabilize your hand while dragging the brush across.
Display your finished mini masterpiece on a small easel or hang it as part of a wall collage.
Planetary Rings and Cosmic Dust
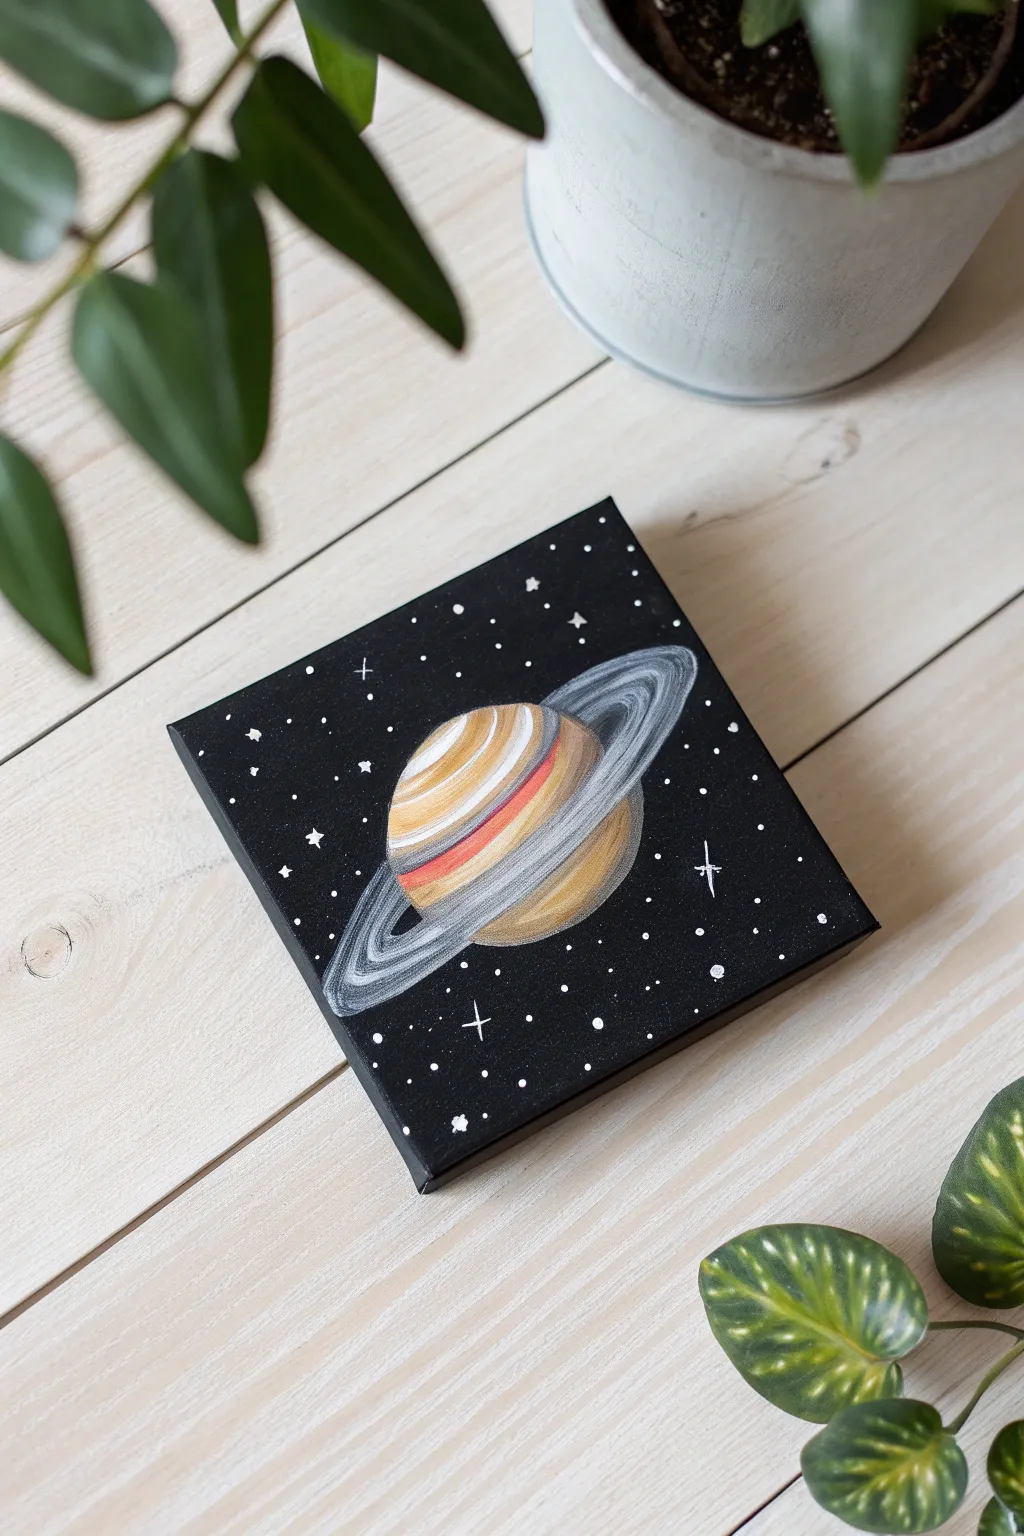
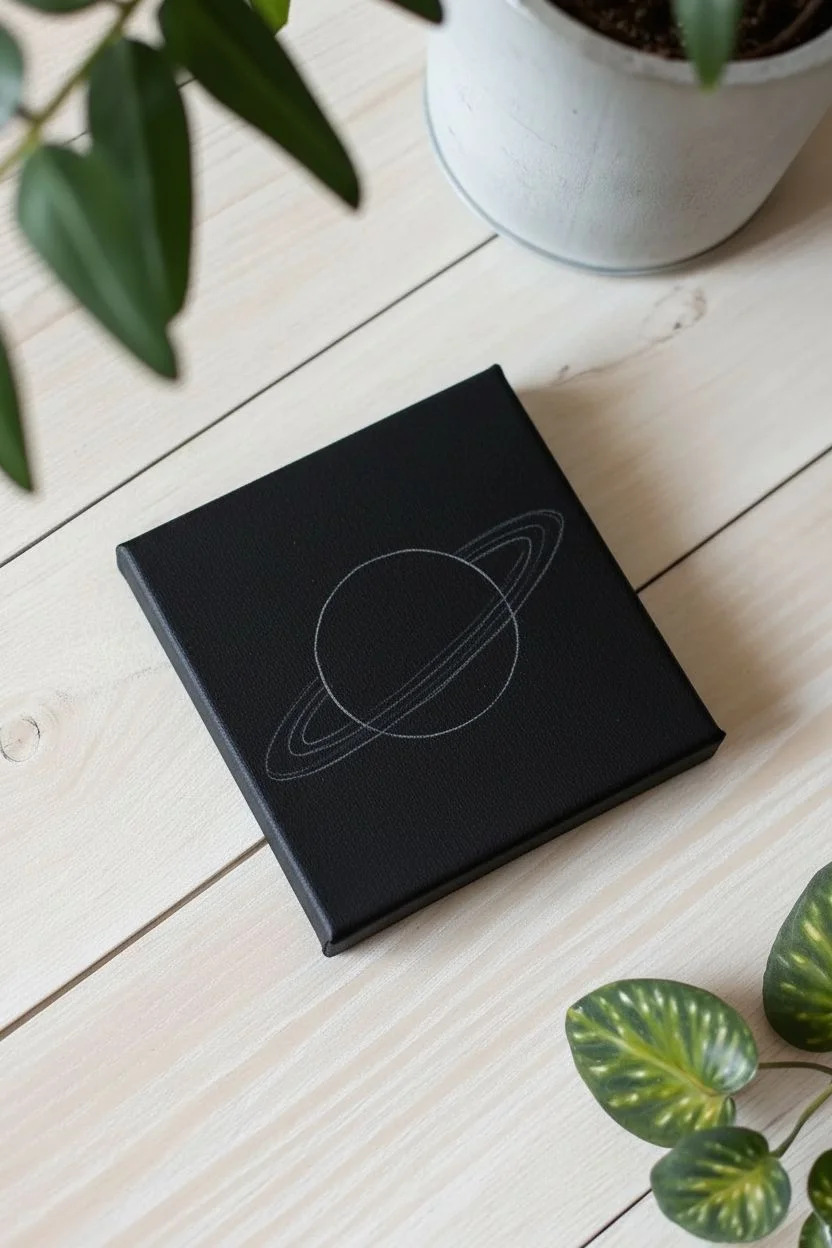
Capture the beauty of outer space on a tiny scale with this charming planetary painting. The high-contrast design makes the colorful banding of the planet and the sweeping rings truly pop against the deep black void.
Step-by-Step Guide
Materials
- Small square canvas (4×4 or 6×6 inches)
- Acrylic paint: Mars Black, Titanium White, Yellow Ochre, Burnt Sienna
- Small flat brush (size 4 or 6)
- Detail liner brush (size 00)
- White coloring pencil or chalk
- Palette for mixing
- Water cup and paper towel
Step 1: Setting the Stage
-
Prepare the Void:
Paint the entire front and sides of your canvas with a solid coat of Mars Black. Ensure full coverage so no white canvas shows through. -
Allow to Cure:
Let this black background dry completely before proceeding. Use a hairdryer on a cool setting if you want to speed this process up. -
Draft the Shape:
Using a white coloring pencil or a piece of chalk, very lightly sketch a circle in the center of the canvas. Then, draw a long, thin oval around it diagonally to mark the path of the rings.
Step 2: Painting the Planet
-
Base Color:
Load your small flat brush with Yellow Ochre mixed with a touch of White. Fill in the top half of the circle, following the curve of your sketch. -
Adding Warmth:
While the paint is still slightly wet, pick up some Burnt Sienna. Paint a curved band across the middle of the planet, blending the edges softly into the yellow section. -
Creating Shadow:
Mix a tiny amount of Black into your Yellow Ochre to create a dark brownish-gold. Apply this to the bottom third of the planet to create a spherical shadow effect. -
Bright Highlight:
Clean your brush and pick up some Titanium White. Add a curved highlight near the top left of the sphere to simulate a light source hitting the planet. -
Smooth the Blend:
With a clean, slightly damp brush, gently stroke over the transitions between the color bands to create a smooth, round appearance.
Cosmic Flow
Make the paint for the rings slightly fluid with a drop of water. This helps the brush glide smoothly for that continuous elliptical shape without stuttering.
Step 3: Forming the Rings
-
Mix Ring Color:
Create a light grey on your palette by mixing plenty of Titanium White with a small dot of Black. -
Back Ring:
Using the edge of your flat brush or the liner brush, paint the part of the ring that goes behind the planet. Keep this line slightly thinner. -
Front Ring:
Paint the front section of the ring that crosses over the face of the planet. Make this section slightly thicker and brighter than the back. -
Texture Guidelines:
I like to add thin streaks of pure White along the curve of the rings to accentuate the motion and separate the ring bands. -
Ring Shadows:
If necessary, create a small break or darken the line where the ring passes behind the planet’s shadow to add depth.
Level Up
Mix a clear iridescent medium or glitter glaze into the white paint for the rings to give the artwork a genuine shimmering ‘stardust’ effect when it catches the light.
Step 4: Cosmic Details
-
Distant Stars:
Dip the very tip of your liner brush into water-thinned Titanium White paint. Gently tap tiny dots scattered randomly across the black background. -
Cluster Variance:
Group a few dots closer together in some areas to mimic distant galaxies or star clusters. -
Major Stars:
Choose three or four spots to place slightly larger, brighter white dots to serve as the main stars in your composition. -
Twinkle Effect:
Using the liner brush, carefully draw a small cross or ‘plus sign’ through the largest stars to give them a twinkling lens-flare look. -
Gallery Finish:
Once the painting is dry, check the sides of the canvas one last time. Touch up any stray paint with Mars Black for a crisp, professional edge.
Display your miniature galaxy on a small easel or shelf to add a touch of cosmic wonder to your room
The Solitary Candle Flame

Capturing the serene and dramatic contrast of a single light source, this mini canvas project focuses on luminosity and texture. With just a few colors, you will transform a dark void into a warm, glowing scene that feels cozy and contemplative.
How-To Guide
Materials
- Mini square canvas (3×3 or 4×4 inch)
- Acrylic paints: Mars Black, Titanium White, Cadmium Yellow, Cadmium Orange
- Small flat shader brush (size 4 or 6)
- Fine detail liner brush (size 0 or 00)
- Cup of water and paper towels
- Palette or small plate
Step 1: Setting the Darkness
-
Base Coat:
Begin by covering the entire front and sides of your mini canvas with Mars Black paint. -
Check Coverage:
Ensure the weave of the canvas is fully saturated; you may need a second coat once the first is dry to ensure no white specks show through. -
Full Dry:
Allow the background to dry completely before moving on to the white paint, otherwise, you run the risk of creating a muddy grey mess.
Keep it Clean
If your yellow glow looks too chalky or opaque, you likely had too much paint on the brush. Let it dry, paint over it with black, and try again with a barely-damp brush.
Step 2: Constructing the Candle
-
Mixing a Base Tone:
Mix a tiny amount of black into your Titanium White to create a very light off-white or pale grey. -
Blocking the Shape:
Using the small flat brush, paint a vertical rectangle in the lower center of the canvas to form the candle body. -
Rounding the Top:
Paint a flattened oval shape at the top of your rectangle to represent the melted wax pool. -
Building Opacity:
The white shape will likely look transparent against the black; apply a second layer of pure Titanium White to the center of the candle to brighten it. -
Adding Texture:
Use vertical strokes with a slightly dry brush to mimic the striations and dripping texture of old wax. -
The Saucer:
At the bottom of the candle, paint a loose, curved U-shape or oval rim to suggest a small glass or metal holder catching the candle. -
Refining the Base:
Add a few touches of thinned white paint to the saucer rim to create glass-like highlights.
Softer Edges
To ruin the ‘cut-out’ look and make the object sit naturally in the dark, avoid hard outlines. Use your finger to gently smudge the edges of the glow into the black background.
Step 3: Igniting the Flame
-
The Wick:
Switch to your fine liner brush and paint a small, slightly curved black line originating from the center of the wax pool. -
Flame Silhouette:
Paint a teardrop shape around the wick using pure Titanium White to establish the brightest part of the fire. -
Yellow Glaze:
Once the white teardrop is tacky but almost dry, glaze over it with Cadmium Yellow. -
The Core of the Fire:
While the yellow is wet, blend a tiny dot of Cadmium Orange near the base of the flame, right where it meets the wick, to add heat intensity. -
Hottest Point:
I prefer to add a final tiny speck of pure white right in the center of the flame to show the highest intensity of light.
Step 4: Creating Atmosphere
-
Prepare for Dry Brushing:
Clean your flat brush and dry it thoroughly on a paper towel; pick up a very small amount of yellow paint. -
Testing the Load:
Wipe most of the yellow paint off onto a towel until almost no pigment comes off the brush. -
Scumbling the Glow:
Gently scrub the dry brush in circular motions around the flame on the black background to create a hazy, ambient glow. -
Wax Reflection:
Mix a little yellow with white and paint a small highlight on the front rim of the melted wax pool, showing the fire reflecting on the liquid wax. -
Final Assessment:
Step back and check if the glow needs to be softened further; if so, gently glaze with a watery black to push it back.
Now you have a flickering calm captured on canvas to brighten up any small corner.
Lavender Field Texture
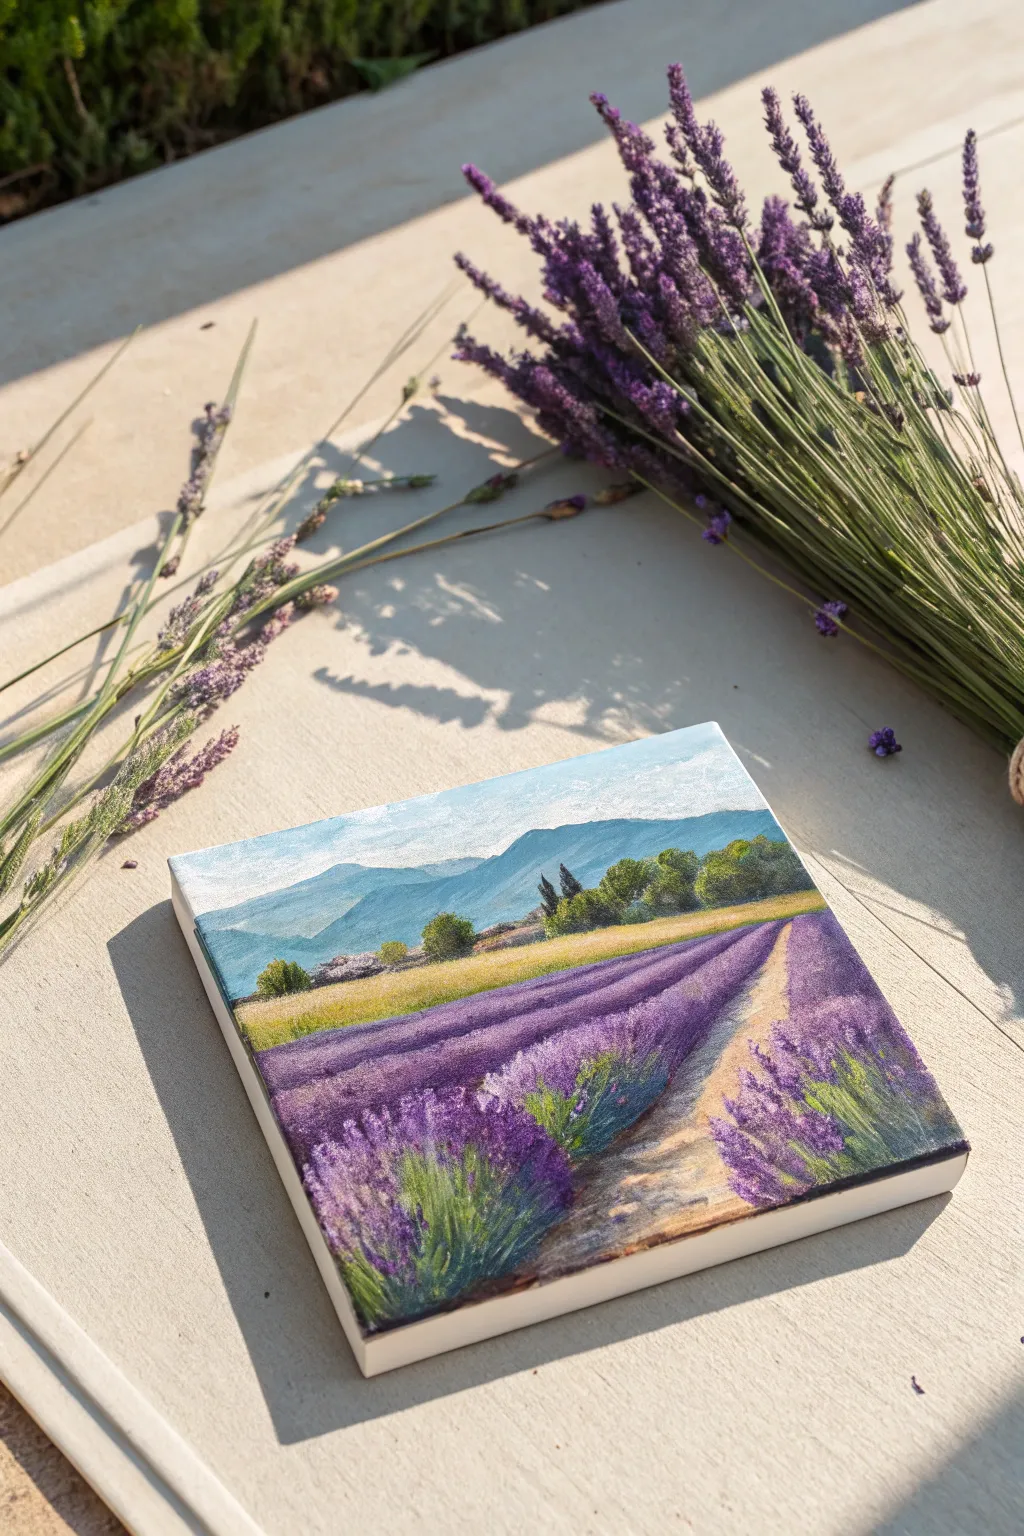
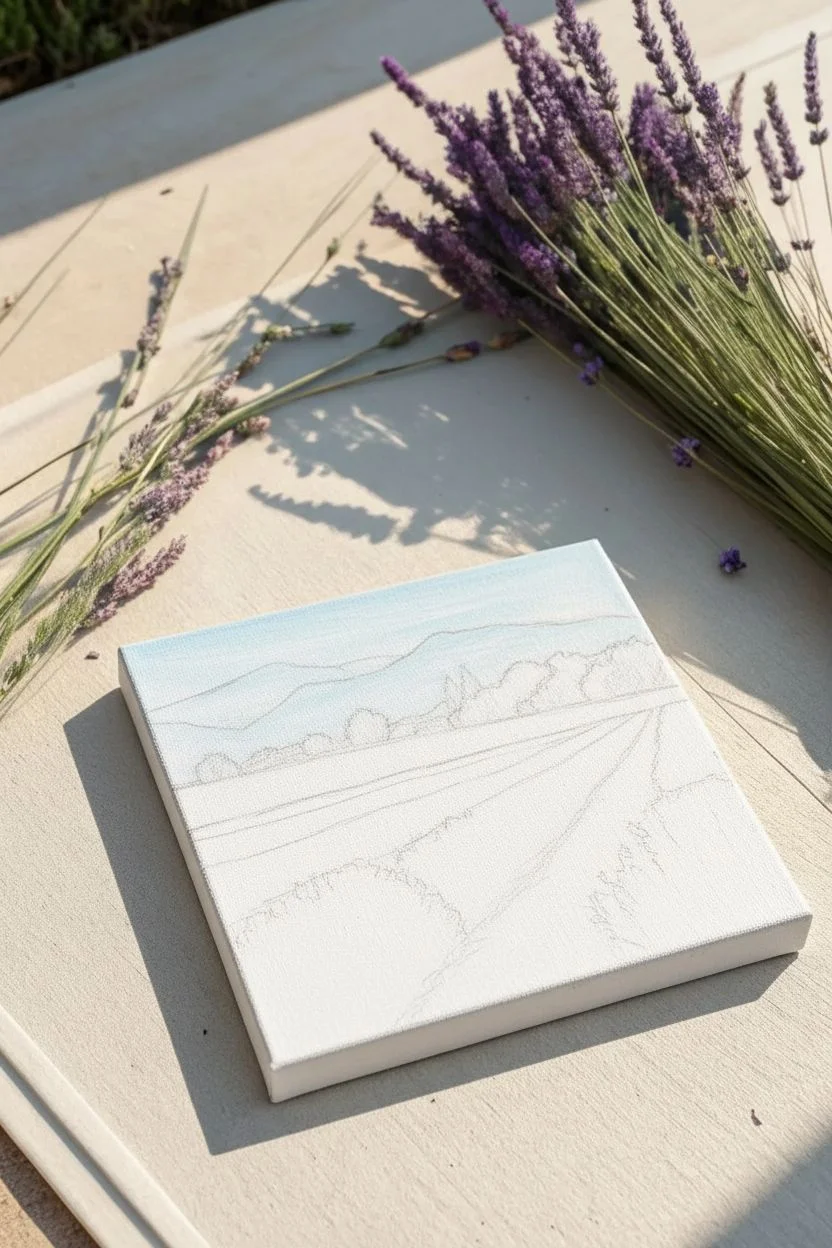
Capture the soothing beauty of a sun-drenched landscape on a compact canvas. This project focuses on atmospheric perspective and building rich textures to make the lavender blooms pop against the distant mountains.
Step-by-Step
Materials
- Mini square canvas (e.g., 6×6 or 8×8 inch)
- Acrylic paints: Titanium White, Ultramarine Blue, Phthalo Blue, Dioxazine Purple, Magenta, Sap Green, Yellow Ochre, Burnt Umber
- Brushes: medium flat brush, small round brush, fine liner brush
- Palette and water cup
- Pencil for sketching
- Paper towel or rag
Step 1: Sketching and Sky
-
Establish the horizon:
Using a pencil, lightly draw a horizontal line across the canvas, positioning it about one-third of the way down from the top edge. -
Map the mountains:
Sketch the outline of the mountain range just above your horizon line, varying the heights to create a natural, organic look. -
Draft the perspective:
Mark a vanishing point on the right side of the horizon line. Draw diagonal lines radiating from this point to the bottom left and bottom center to mark the lavender rows and the dirt path. -
Paint the sky:
Mix Titanium White with a tiny touch of Phthalo Blue. Paint the sky area using horizontal strokes, keeping the color very pale and airy. -
Paint the mountains:
Mix Ultramarine Blue, a little White, and a dot of Green. Fill in the mountains with this cool, muted tone so they look distant.
Step 2: Middle Ground and Underpainting
-
Create the golden field:
Mix Yellow Ochre with White and paint the horizontal strip of land directly below the mountains and tree line. -
Block in the trees:
Use Sap Green mixed with a little Burnt Umber to dab in the shapes of the bushes and trees sitting between the mountains and the golden field. -
Underpaint the path:
Fill the diagonal path section with a mix of White, Yellow Ochre, and a small touch of Burnt Umber to create a dusty earth tone. -
Base coat the lavender:
Mix Dioxazine Purple with a little Ultramarine Blue. Paint the wide diagonal strips for the lavender rows, following your pencil guides strictly.
Depth Perception
If the field looks flat, verify your perspective lines. The lavender rows must get significantly narrower as they approach the horizon to create the illusion of distance.
Step 3: Texture and Details
-
Add tree highlights:
Mix Sap Green with Yellow Ochre. Generally, I like to dab this on the top-right distinct edges of the trees to suggest sunlight hitting the foliage. -
Layering the lavender shadows:
Take your dark purple mix and add a tiny bit of Magenta. Apply this to the bottom half of the lavender rows to deepen the shadows near the ground. -
Creating flower texture:
Mix Purple with White and a touch of Magenta. Using a small brush, apply short, vertical, stabbing strokes to the tops of the lavender rows to simulate the flower spikes. -
Scale the texture:
Make your brushstrokes larger and more distinct for the flowers in the foreground, and very small and blended for the rows as they recede into the distance. -
Add greenery:
Using a liner brush and Sap Green mixed with White, paint short, upward flicks at the very base of the foreground lavender clumps to show the stems. -
Refine the path:
Add shadows to the path using watered-down Burnt Umber along the edges where the lavender overhangs the dirt. -
Final highlights:
Mix a very pale purple (mostly White). Add tiny touches to the tips of the closest lavender flowers to make them sparkle in the light.
Texturing Tip
For the closest flowers, use a dry brush with very little paint. Use a frantic, vertical dabbing motion to create a fuzzy, organic texture rather than painting individual petals.
Let your painting dry completely before displaying your little slice of the French countryside.
Abstract Palette Knife Swipes
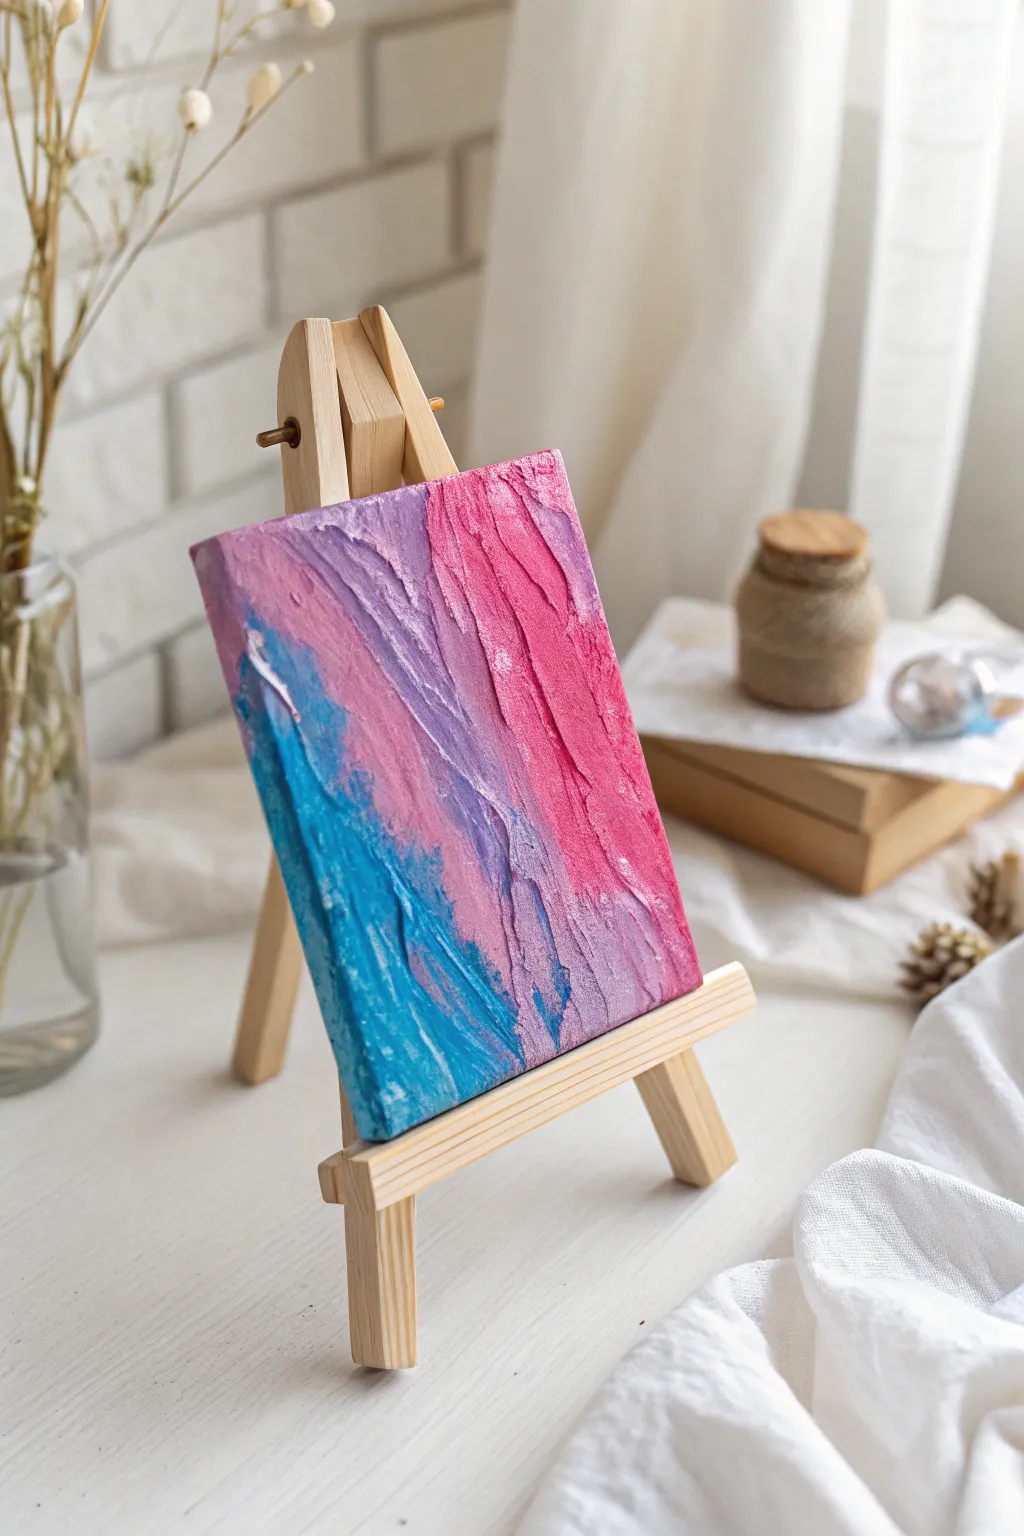
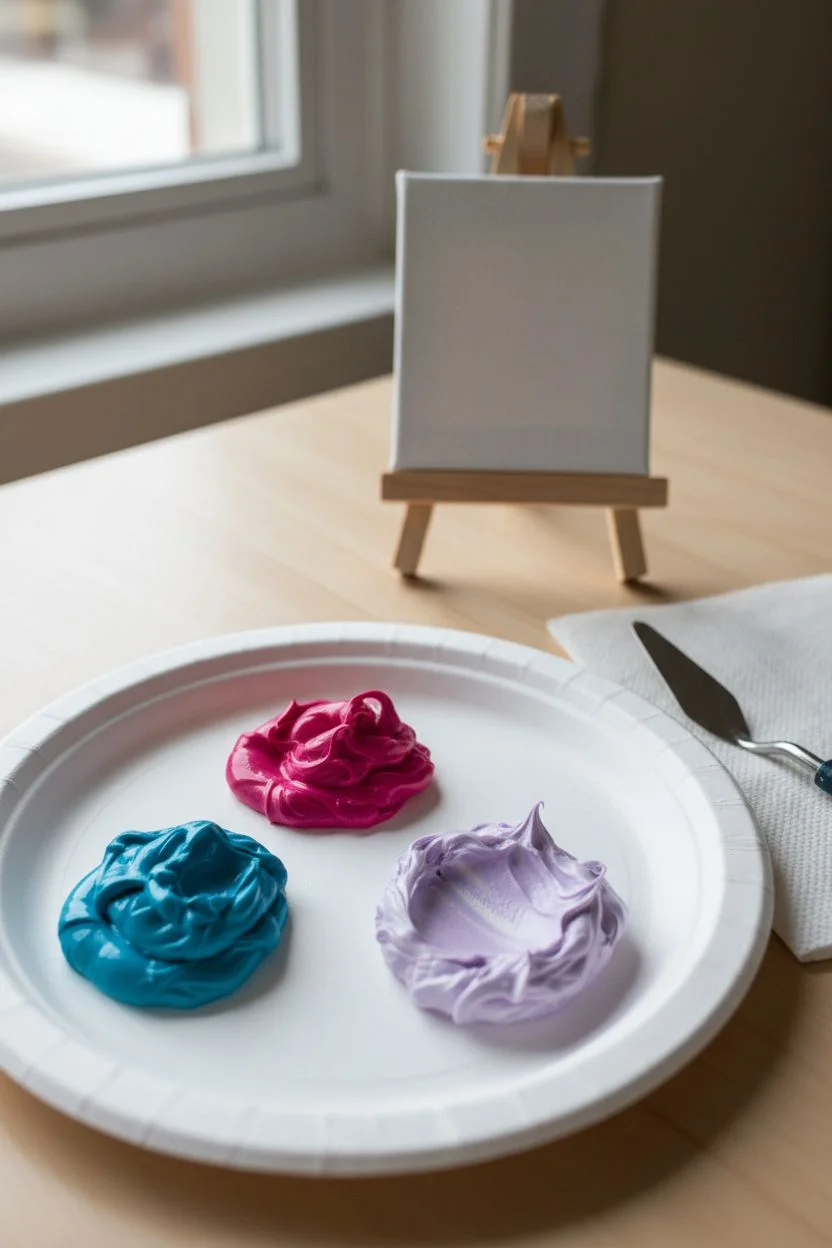
This abstract project relies on heavy texture and vibrant color transitions to transform a tiny canvas into a modern masterpiece. Using a palette knife creates satisfying, raised ridges that catch the light beautifully.
Step-by-Step Tutorial
Materials
- Mini canvas (approx. 4×6 inches)
- Modeling paste or texture gel
- Heavy body acrylic paints (Cyan, Magenta, Violet, Titanium White)
- Palette knife (diamond or trowel shape)
- Palette or paper plate
- Paper towels
- Mini wooden easel (optional for display)
Step 1: Preparing the Medium
-
Prepare the paste:
Scoop out three separate, generous dollops of modeling paste onto your palette. -
Mix the blue:
Add a drop of cyan paint to the first pile of paste and mix thoroughly with your palette knife until the color is consistent. -
Mix the pink:
Clean your knife, then mix magenta paint into the second pile of paste. -
Mix the purple:
For the third pile, mix in violet paint. I like to add a tiny touch of white here to make the lavender tone really pop against the darker colors. -
Check consistency:
Ensure the mixtures are stiff enough to hold a peak, similar to cake frosting.
Clean Knife Policy
Wipe your palette knife on a paper towel between every single stroke during the blending phase. Taking this extra second prevents your vibrant colors from turning muddy.
Step 2: Applying the Base Colors
-
Load the blue:
Scoop a large amount of the blue mixture onto the back of your palette knife. -
Apply the first swipe:
Starting at the bottom-left corner of the canvas, press the knife down and swipe diagonally upward towards the center. -
Create texture:
Lift the knife slightly at the end of the stroke to create rough ridges rather than smoothing it flat. -
Clean up:
Wipe your palette knife completely clean with a paper towel. -
Apply the pink:
Load the knife with the pink mixture and start at the top-right corner. -
Swipe downward:
Swipe diagonally downward towards the center, stopping before you touch the blue section.
Step 3: Blending and Finishing
-
Fill the center:
Clean the knife again, then load it with the purple mixture. -
Bridge the gap:
Apply the purple in the diagonal empty space between the blue and pink sections. -
Blend the edges:
Gently pull the purple paste slightly over the edges of the blue and pink areas to create a soft gradient. -
Add highlights:
Mix a tiny amount of white with a speck of pink, and lightly skim this pale color over the very tops of the highest ridges for dimension. -
Fix the sides:
Don’t forget to wrap the color around the sides of the canvas for a professional, finished look. -
Dry properly:
Lay the canvas flat to dry. Because the paste is thick, I recommend letting it cure for at least 24 hours.
Gilded Touch
Once the painting is 100% dry, lightly brush a metallic gold paint or liquid leaf just across the raised tips of the texture ridges for a luxurious finish.
Display your mini textured art on a small easel to add a splash of color to any desk or shelf.
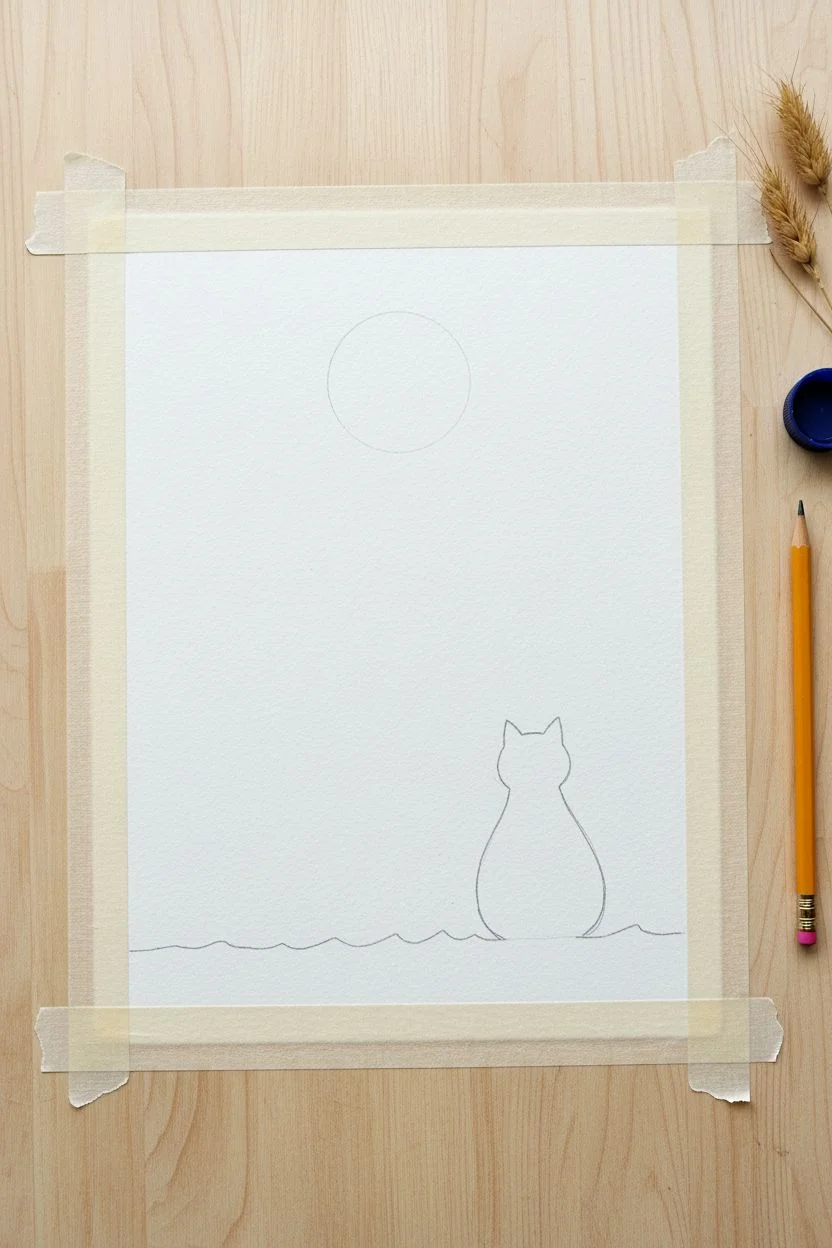
Wandering Cat Silhouettes
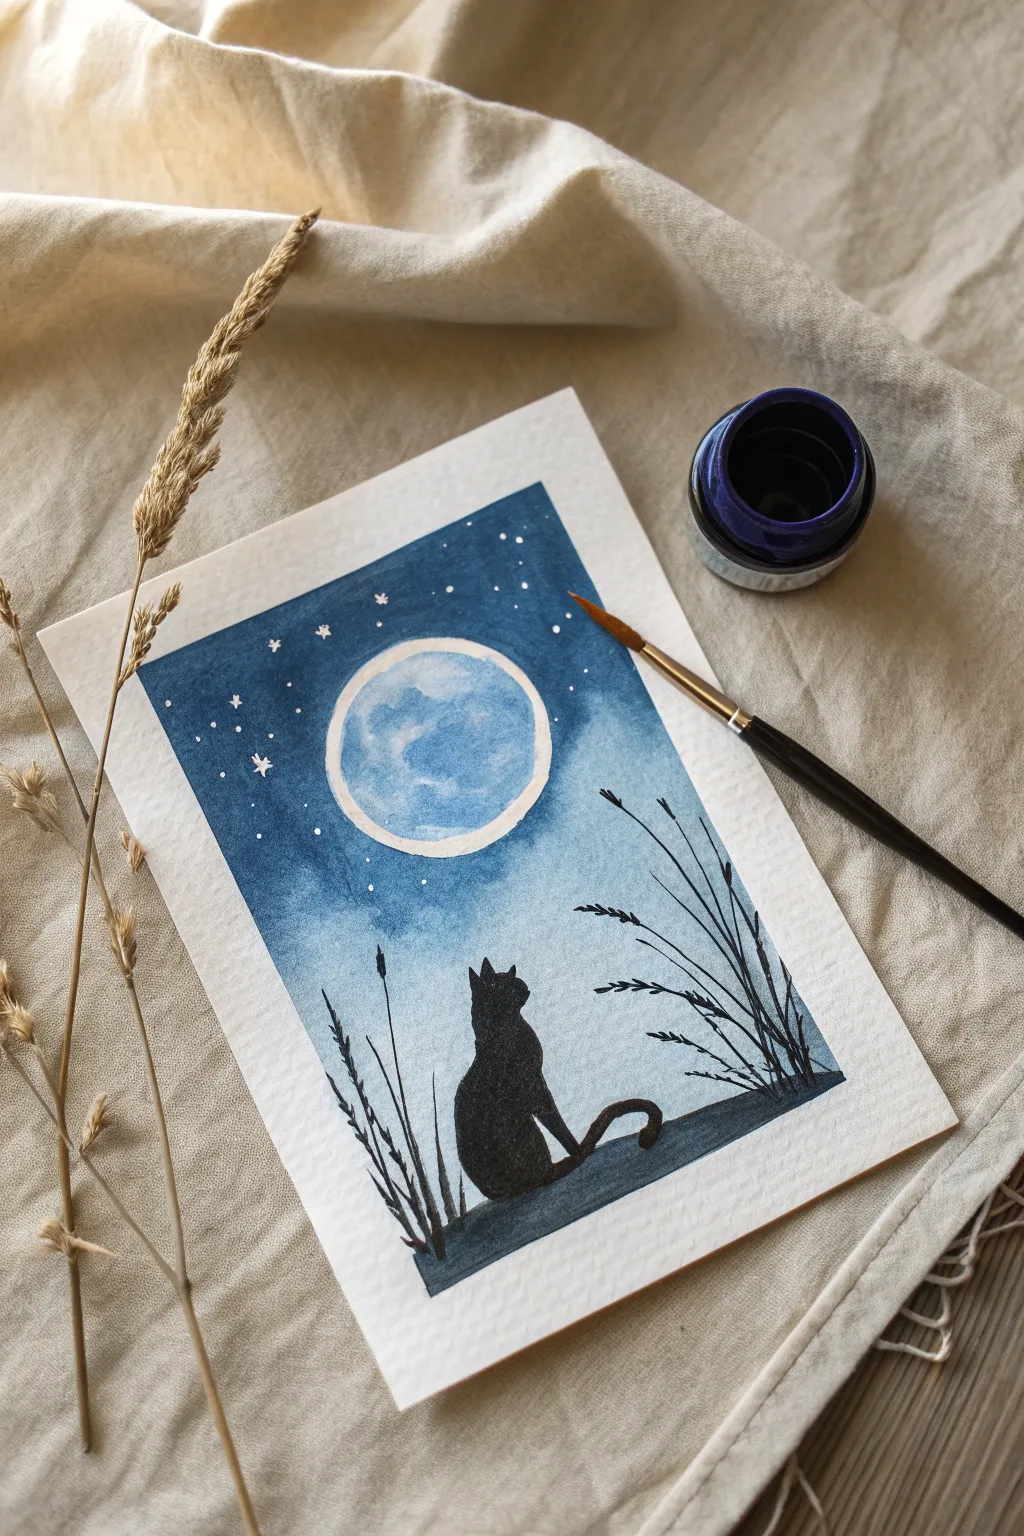
Capture the serene beauty of a quiet night with this high-contrast mini watercolor painting. Using deep indigo hues against stark black silhouettes creates a dramatic, moody atmosphere that is surprisingly simple to achieve.
How-To Guide
Materials
- Cold press watercolor paper (approx. 5×7 inches)
- Watercolor paints (Indigo, Prussian Blue)
- Black India ink or black gouache
- White gel pen or white gouache
- Synthetic round brush (size 6)
- Fine detail brush (size 0 or 1)
- Pencil and eraser
- Masking tape
- Small circular object (like a bottle cap) for tracing
Step 1: Preparation and Sketching
-
Secure the paper:
Tape down all four edges of your watercolor paper to a board using masking tape. This creates a crisp white border and prevents buckling. -
Outline the moon:
Place your small circular object in the upper center of the paper. lightly trace a circle around it with a pencil to establish the full moon. -
Sketch the silhouette:
Lightly sketch the outline of the ground at the bottom and a simple seated cat shape. Think of the cat as a large teardrop for the body and a smaller circle for the head.
Step 2: Painting the Night Sky
-
Mix the sky color:
Prepare a watery mix of Prussian Blue and a darker, saturated mix of Indigo on your palette. -
Paint the moon:
Using the size 6 brush, paint the inside of the moon circle with clean water, then drop in a very faint amount of diluted blue to create subtle crater textures. -
Start the gradient:
Begin painting the sky at the very top of the paper using the dark Indigo. I like to keep the paint quite saturated here for a deep night effect. -
Blend downwards:
As you move down the paper, dip your brush in water to lighten the pigment color, transitioning into the Prussian Blue tones. -
Define the moon edge:
Carefully paint around your pencil circle with the blue mix. Leave a tiny hairline of dry white paper between the moon and sky if possible to make it glow. -
Wash to the horizon:
Continue the wash down to the bottom, allowing the blue to become lighter and more textured as it reaches the area where the silhouettes will go. -
Create texture:
While the sky is still damp, you can drop in tiny touches of clean water to create soft ‘blooms’ that look like distant nebulae. -
Dry completely:
Wait for the paint to be bone dry before proceeding to the next step to prevent the black ink from bleeding.
Tape Trick
Before applying masking tape to your paper, stick it to your clothes once or twice. This removes some tackiness and prevents the paper from tearing when you remove it later.
Step 3: Inking the Silhouette
-
Fill the ground:
Switch to your black ink or gouache. Paint the solid ground at the bottom, covering your initial pencil lines. -
Paint the cat body:
Fill in the shape of the cat carefully. Use the fine detail brush to keep the edges of the fur smooth and distinct against the sky. -
Add simple ears:
Paint two small triangles on top of the head for ears, making one slightly distinct to show the head is turned. -
Add the tail:
Draw a curved line extending from the base of the cat, creating a looping tail that rests on the ground. -
Anchor the stalks:
Paint fine vertical lines emerging from the ground on both sides of the cat to represent the stems of tall grass. -
Detail the grass heads:
Add small, angled dashes at the top of the stems to create the look of wheat or wild oat seeds. -
Vary the heights:
Ensure the grass blades are at different heights and angles to make the scene look organic and natural.
Moon Magic
To make the moon really pop, use a tiny amount of white gouache mixed with a drop of blue for the craters instead of just watercolor to get an opaque, glowing texture.
Step 4: Final Details
-
Add stars:
Using a white gel pen or opaque white gouache, dot small stars throughout the blue sky, concentrating them in the darker areas. -
Highlight the moon:
Add a crisp white rim to the bottom edge of the moon if needed to increase the contrast. -
Reveal the border:
Once everything is unmistakably dry, slowly peel away the masking tape at a 45-degree angle.
Frame this miniature piece or send it as a greeting card to a fellow night owl
Styling with Miniature Wooden Easels
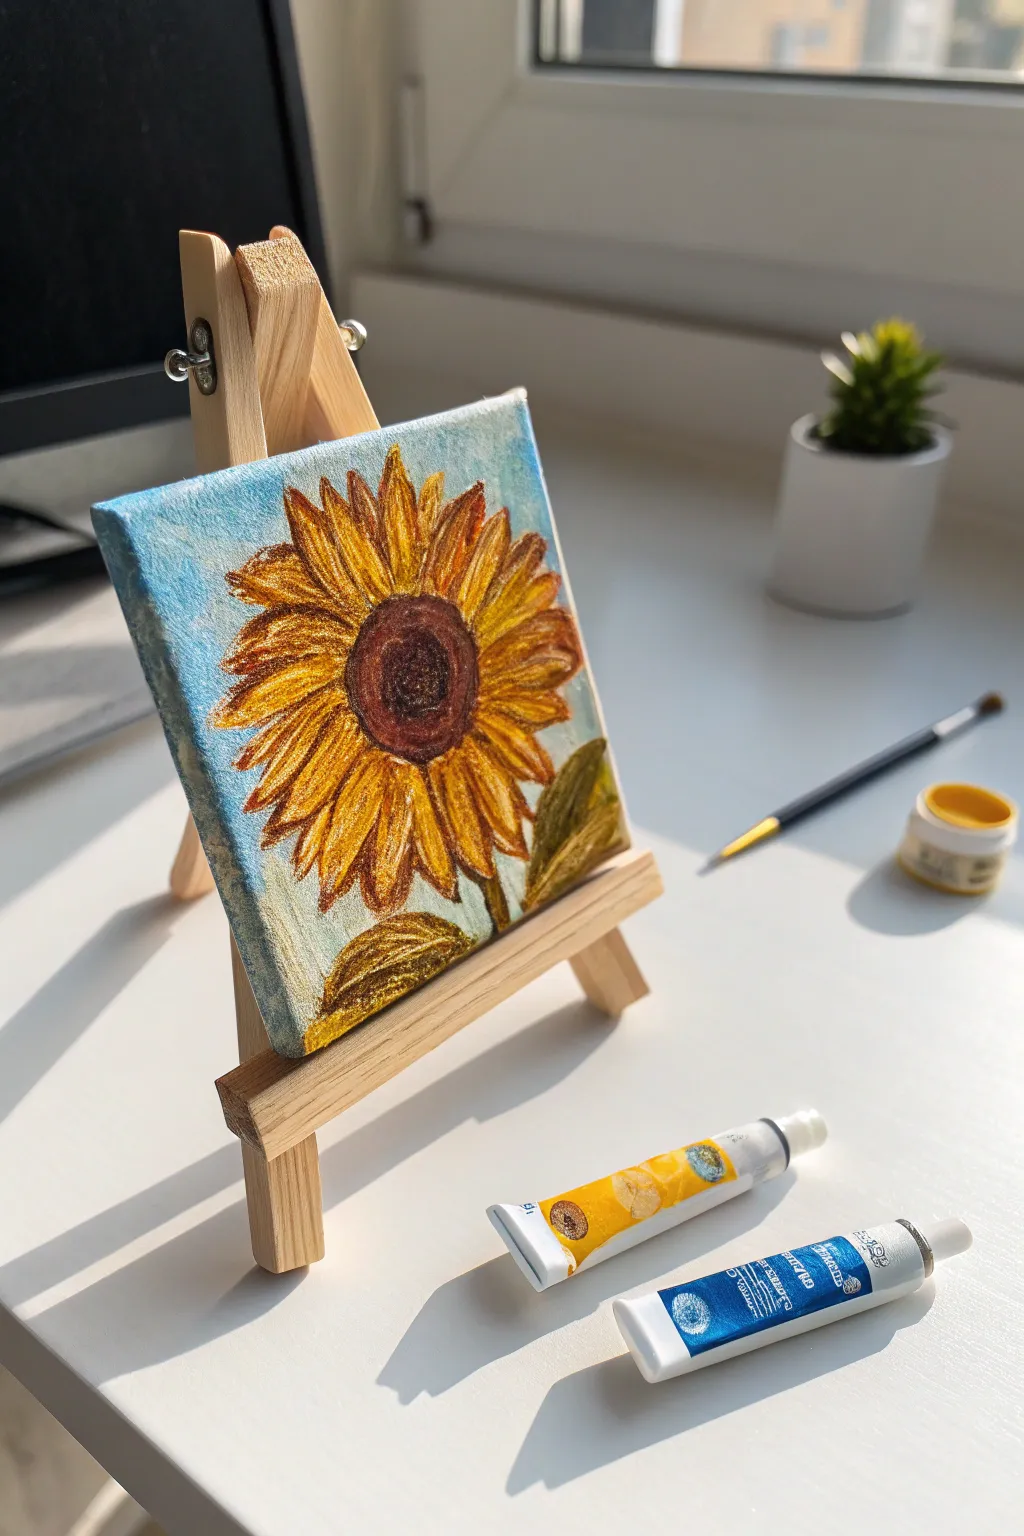
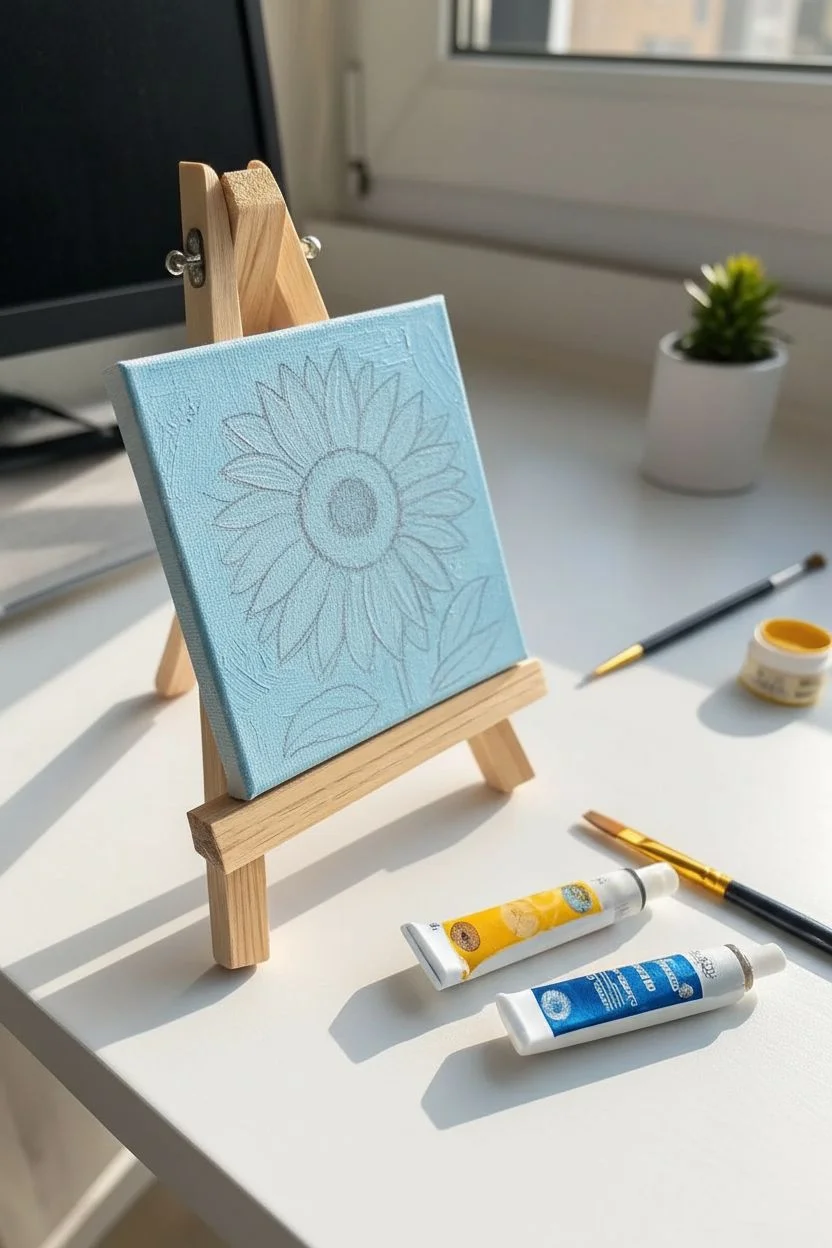
Capture the warmth of summer on a tiny scale with this vibrant sunflower painting project. Displayed on a charming wooden easel, this miniature artwork adds a sunny pop of color to any desk or shelf.
Step-by-Step Tutorial
Materials
- Mini stretched canvas (3×3 or 4×4 inch)
- Miniature wooden easel
- Acrylic paints (Titanium White, Sky Blue, Cadmium Yellow, Yellow Ochre, Burnt Sienna, Sap Green)
- Small flat brush (size 2 or 4)
- Fine detail round brush (size 0 or 00)
- Pencil for sketching
- Palette and water cup
Step 1: Sketching and Sky
-
Prepare the workspace:
Set up your mini canvas on the wooden easel. This not only holds it steady while you work but also helps you judge the final perspective. -
Outline the flower:
Using a pencil, lightly sketch a large circle slightly off-center for the seed head. Draw rough, elongated petal shapes radiating outward to fill most of the canvas. -
add leaf outlines:
Sketch two tear-drop shapes in the bottom right corner to represent the leaves, and a faint line for the stem. -
Mix the sky color:
On your palette, mix a large amount of White with a tiny dot of Sky Blue to create a very pale, airy blue. -
Paint the background:
Use the small flat brush to paint around your pencil sketch. Don’t worry about being perfectly smooth; visible brushstrokes add to the painterly charm. -
Refine sky edges:
Bring the blue paint right up to your pencil lines, or slightly over them, to ensure no white canvas shows through later.
Muddy yellow?
Yellow is naturally translucent. If the blue background shows through, paint the petal area white first, let it dry, and then apply your yellow.
Step 2: The Center and Petals
-
Base coat the center:
Fill in the central circle with Burnt Sienna. I like to dab the paint on here to start building up a seeded texture. -
Darken the core:
Mix a tiny bit of blue or black into your brown to create a darker shade. Paint a smaller circle in the very middle of the flower center. -
Add seed details:
Using the tip of your round brush, stipple (dot) the dark brown mix around the outer edge of the center circle to simulate depth. -
Petal base layer:
Paint the petals using Yellow Ochre. Start your stroke at the center and pull outward toward the edge of the canvas. -
Brighten the petals:
Once the ochre is dry, layer Cadmium Yellow over the petals, leaving some of the darker underpainting visible at the base of the petals. -
Create highlights:
Mix a little White into your Cadmium Yellow. Apply this pale yellow to the very tips and centers of the petals for a sun-kissed look. -
Define the petals:
Use your fine detail brush and watered-down Burnt Sienna to paint very thin lines separating the individual petals.
Pro Tip
Don’t over-mix your paints on the palette. Leaving the mix slightly streaky creates beautiful, natural color variation on the petals.
Step 3: Leaves and Final details
-
Base coat the leaves:
Fill in the leaf shapes and stem with Sap Green. -
Add leaf texture:
Mix a little yellow into your green and paint rough streaks on the upper parts of the leaves to suggest veins and light reflection. -
Deepen contrast:
Go back with your dark brown mix and redefine the edge where the yellow petals meet the brown center to make the flower pop. -
Add texture highlights:
Use thick, undiluted white, faintly tinted with yellow, to add a few final impasto strokes on the brightest petals. -
Paint the edges:
Don’t forget to wrap your sky blue and petal colors around the sides of the canvas for a polished, professional finish. -
Final display:
Let the painting dry completely before setting it back on the miniature easel for display.
Your sunny miniature masterpiece is now ready to brighten up any corner of your home
Monochrome Mountain Layers
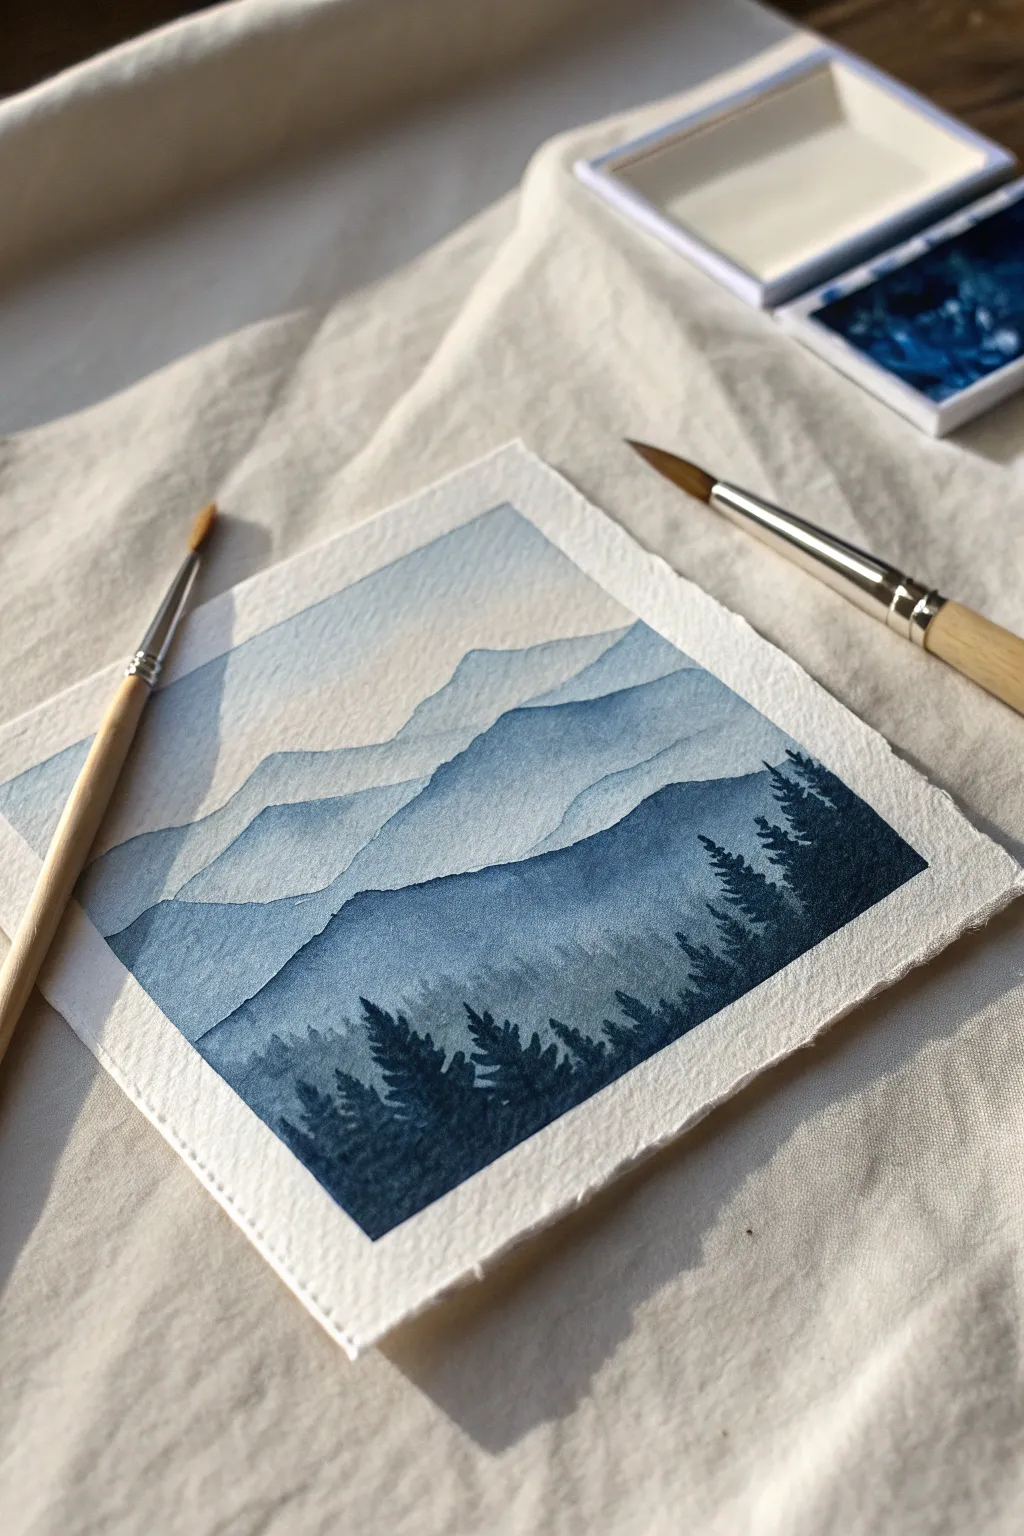
Capture the serene beauty of a mountain range fading into the distance using just a single color of watercolor paint. This project teaches you how to master atmospheric perspective by controlling water-to-pigment ratios creates stunning depth.
How-To Guide
Materials
- Cold press watercolor paper (300gsm/140lb)
- Watercolor paint (Indigo or Prussian Blue)
- Round watercolor brush, size 6
- Detail brush, size 2 or 0
- Masking tape or painter’s tape
- Two jars of water
- Palette or white ceramic plate
- Paper towels
Step 1: Preparation and Sky
-
Secure the paper:
Cut your paper to a small square and tape all four edges down firmly onto a board or table to create a clean white border later. -
Prepare the palette:
Squeeze a pea-sized amount of indigo paint onto your palette. Create a large puddle of water next to it. -
Mix the sky wash:
Pull a tiny amount of pigment into the large water puddle. You want a very pale, almost transparent tea-like consistency. -
Paint the sky:
Using your size 6 brush, apply this pale wash to the top third of the paper. You can add clear water to the bottom edge of this wash to fade it out seamlessly. -
Dry completely:
Let this layer dry fully. The paper must be flat and warm to the touch before proceeding.
Patience is Key
Ensure each layer is bone dry before starting the next. If the paper feels cool to the touch, it is still damp. Painting too soon will cause the sharp mountain edges to bleed into the layer above.
Step 2: Layering the Ranges
-
First mountain range:
Add a little more pigment to your mix to slightly darken it. Paint a jagged, organic line across the paper, overlapping the bottom of the sky area. -
Soften the bottom:
Rinse your brush and drag clean water along the bottom edge of this fresh paint shape so it fades into white nothingness near the bottom. -
Dry and darken:
Wait for the first range to dry. Add more pigment to your palette puddle to create a medium-light blue. -
Second mountain range:
Paint the second ridge line below the first one, varying the shape of the peaks so they don’t look identical to the layer above. -
Create the fade:
I prefer to use a damp, clean brush to pull the pigment down from this second ridge, fading it out near the bottom tape again. -
Third mountain range:
Once dry, mix a medium-strength blue. Paint a third mountain layer, making the peaks slightly larger and the valleys deeper.
Level Up: Starry Night
Once the painting is fully dry, flick a toothbrush loaded with white gouache or white acrylic ink over the top sky section to create a dusting of stars for a nighttime scene.
Step 3: Foreground and Details
-
Darkest ridge:
Mix a creamy, saturated blue with very little water. Paint the final, lowest mountain shape, filling it solidly down to the tape. -
Start the treeline:
Switch to your size 2 detail brush while the darkest layer is still damp (or dry, for sharper edges). Load it with concentrated paint. -
Paint tree trunks:
Draw tiny vertical lines extending upward from the dark foreground hill. -
Add pine details:
Using the very tip of the brush, stipple tiny horizontal dashes on either side of the trunk lines to create pine tree silhouettes. -
Vary the heights:
Make some trees taller and others shorter to create a natural, organic forest line. Cluster a few together for density. -
Final dry:
Allow the entire painting to dry completely, preferably for at least 20 minutes to prevent smudging. -
The reveal:
Gently peel the masking tape away from the paper at a 45-degree angle to reveal your crisp white borders.
Frame your mini masterpiece or gift it to a friend who loves the outdoors.
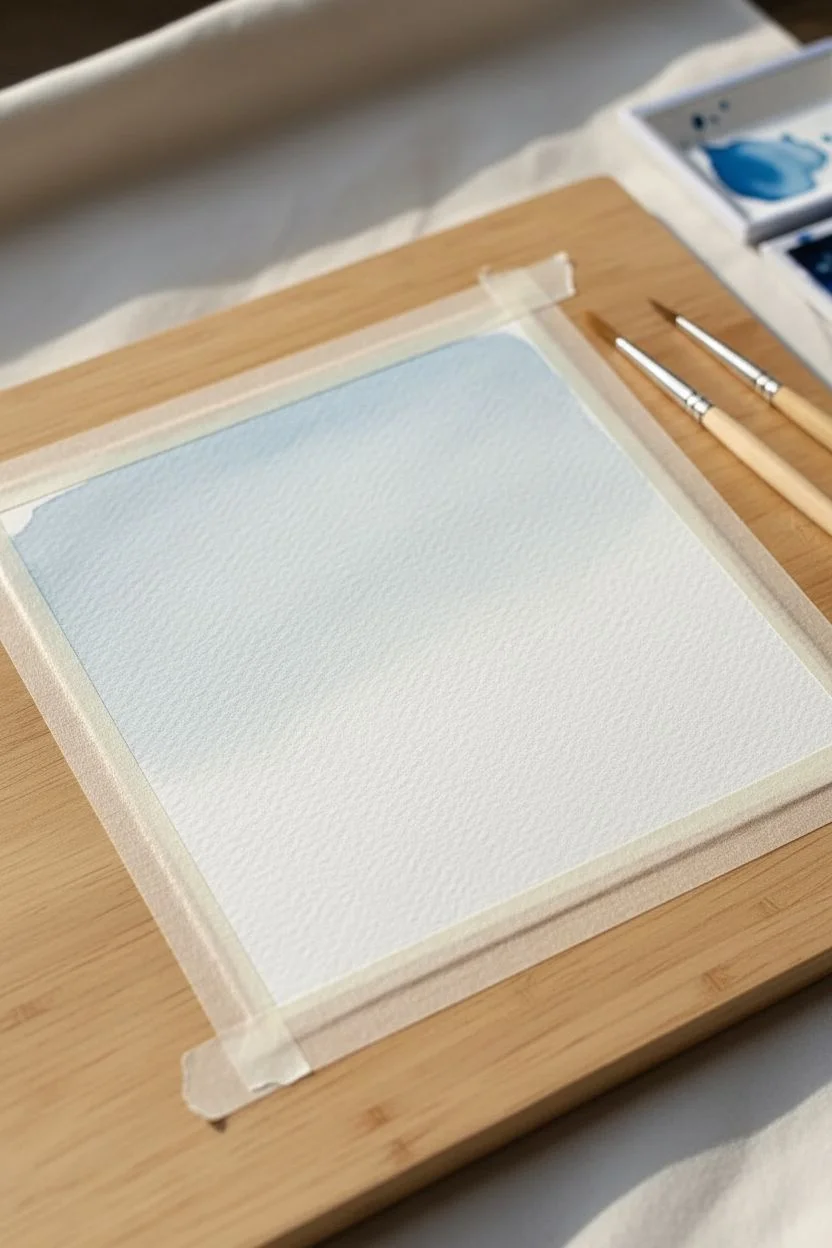
The Patchwork Grid Display
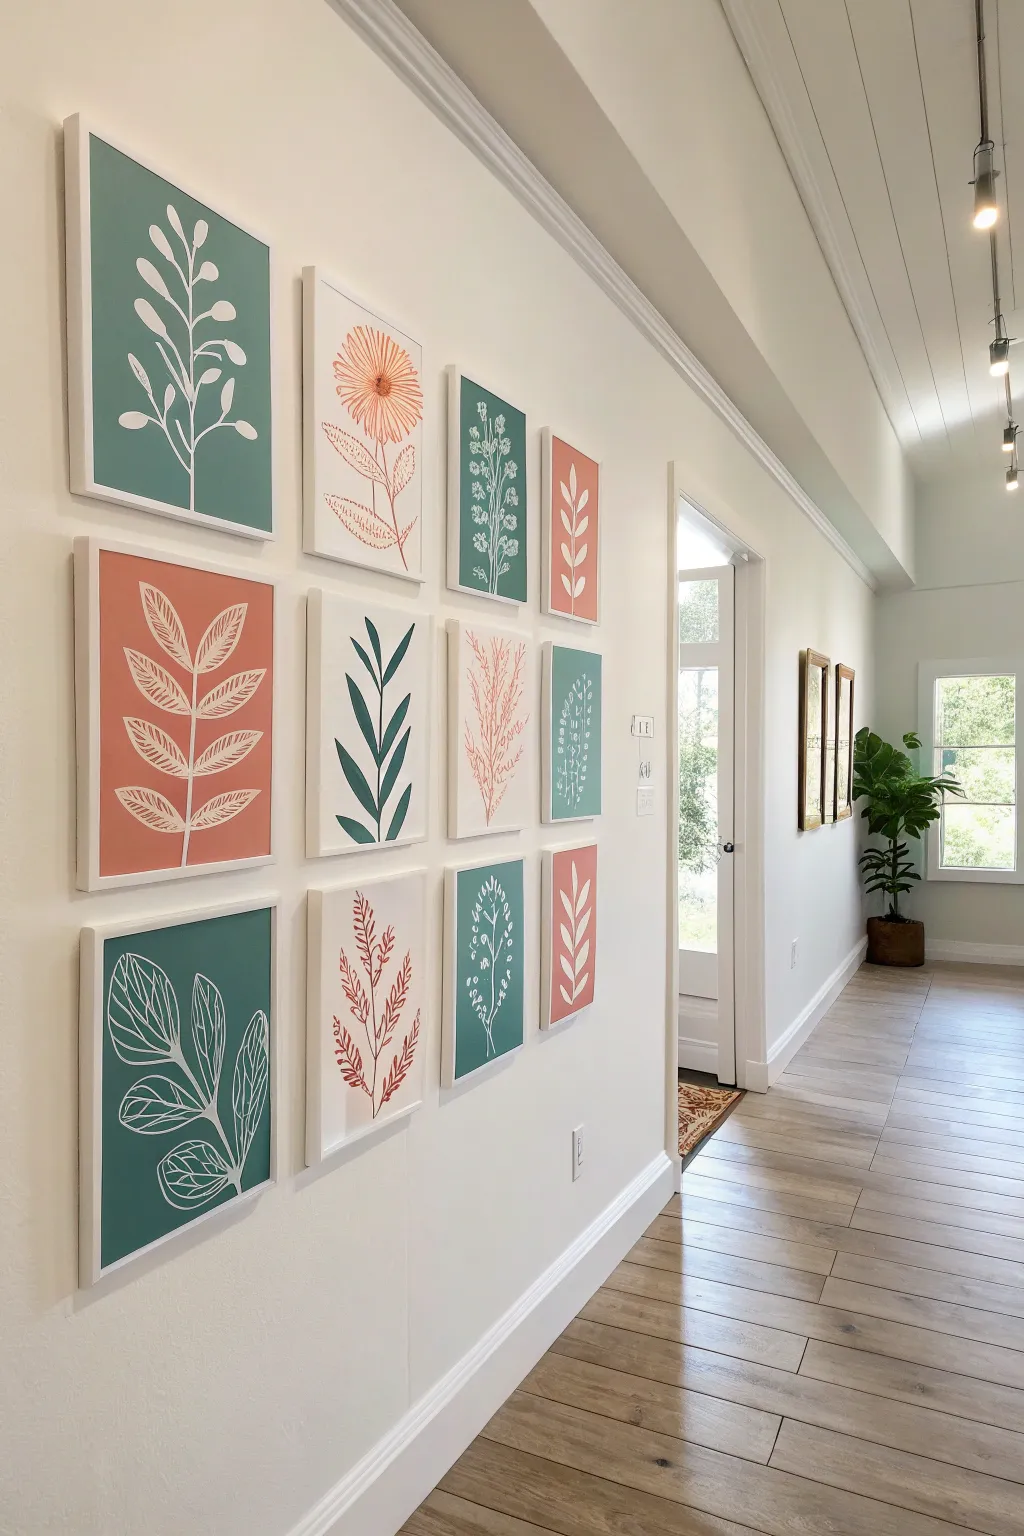
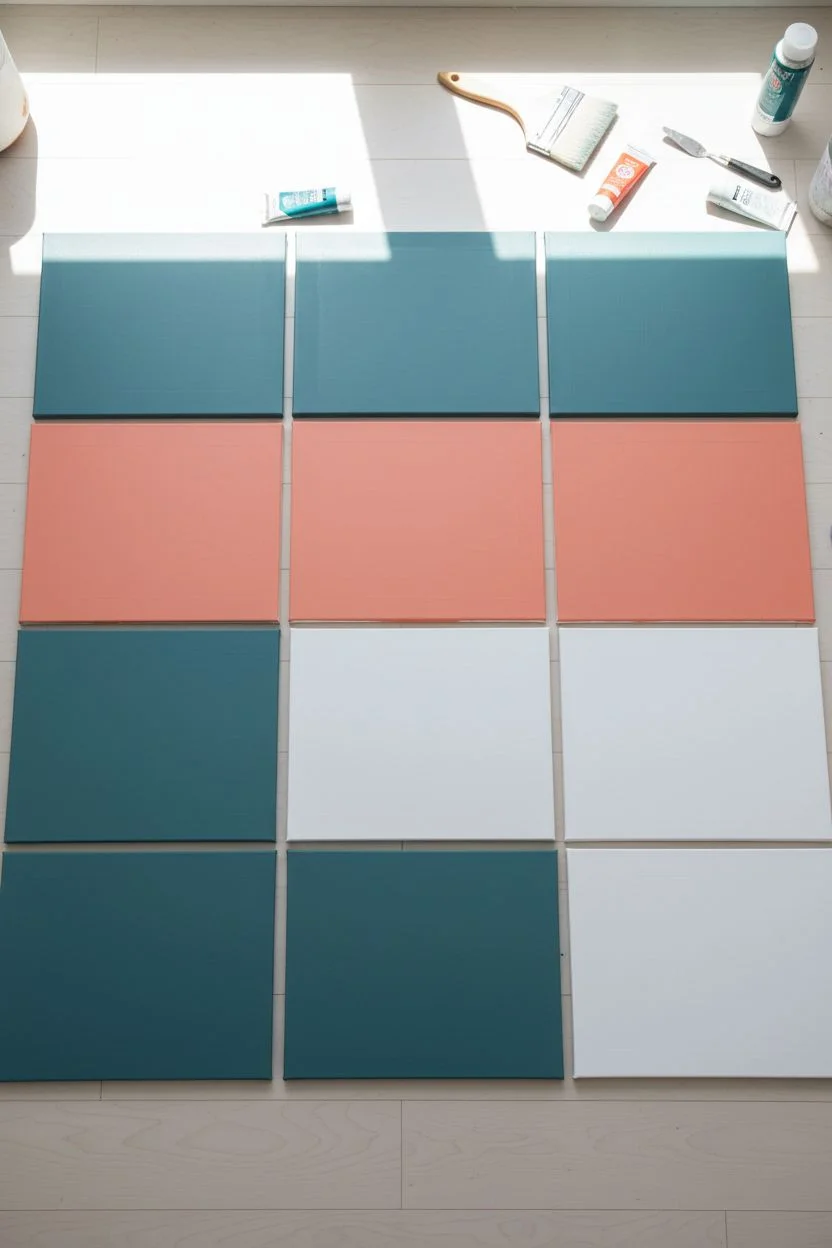
Transform a blank wall into a statement feature with this set of twelve cohesive mini-paintings. By restricting your palette to deep teal, soft coral, and crisp white, you create a sophisticated interplay of positive and negative space that looks professionally curated.
Step-by-Step
Materials
- 12 Canvas panels or flat boards (8×10 or 9×12 inches)
- Acrylic paint: Deep Teal, Coral/Peach, Titanium White
- Flow improver medium (optional)
- Wide flat synthetic brush (for backgrounds)
- Round size 4 brush
- Fine liner brush (size 1 or 0)
- HB Pencil and soft eraser
- 12 Matching white frames
Step 1: Planning the Palette
-
Sort the surfaces:
Lay out all twelve of your canvas panels on the floor in a 3×4 grid pattern. Deciding the arrangement now ensures a balanced color distribution later. -
Assign background colors:
Select 5 panels to be painted Teal, 3 to be Peach, and 4 to remain White. You can adjust this ratio based on your preference, but this mix creates the nice weighted balance seen in the example.
Clean Line Pro Tip
If you struggle with shaky hands on long stems, rest your pinky finger on a dry part of the canvas for stability, or use a ‘mahl stick’ (or a ruler propped up on books) to bridge over the wet paint.
Step 2: Base Coating
-
Apply the first coat:
Using your wide flat brush, paint the backgrounds of your sorted panels. Stroke in one horizontal direction for a smooth finish. For the white panels, give them a fresh coat of Titanium White rather than leaving them raw, as this prevents yellowing over time. -
Sand and recoat:
Once the first layer is touch-dry, I like to lightly sand the surface with fine-grit paper if there are rough brush ridges. Apply a second coat of paint to ensure the colors are opaque and rich. -
Dry completely:
Allow the base coats to cure fully—usually about an hour—before attempting to sketch, otherwise your pencil might dig into soft paint.
Level Up: Texture
Mix a little modeling paste into your white paint for the botanical lines. This will raise the image slightly off the flat background, adding a subtle tactile quality that looks expensive.
Step 3: Designing the Flora
-
Sketch the stems:
Using a light hand and a pencil, draw a central stem line on each canvas. Vary the types: make some straight and vertical, others curved or swaying to the side. -
Add leaf shapes:
Flesh out your botanical sketches. Create variety by drawing fern fronds on one, broad tropical leaves on another, and delicate wildflowers or wheat-like stalks on the rest. Keep the designs simple and graphic.
Step 4: Painting the Motifs
-
Prepare the detail paint:
Mix your paint with a drop of flow improver or water. You want the consistency of heavy cream so the paint glides off your liner brush without skipping. -
Paint white on color:
For the Teal and Peach backgrounds, use the fine liner brush loaded with Titanium White to trace your pencil lines. Start at the base of the stem and pull the brush upward. -
Fill the leaves:
Switch to the round size 4 brush to fill in larger leaf shapes on the colored backgrounds. Use the liner brush again to add veins or texture inside the leaves if you want a ‘block print’ look. -
Paint color on white:
On your white background panels, reverse the scheme. Paint the botanical shapes using your Teal and Peach paints. Try not to let your hand rest on the pristine white background while you work. -
Refine the edges:
Go back over any shaky lines with your liner brush. The beauty of this style lies in the crisp contrast, so take your time smoothing out the silhouettes.
Step 5: Assembly
-
Erase guidelines:
Ensure the artwork is 100% dry (give it overnight if possible), then gently erase any visible pencil marks. -
Seal the work:
Apply a coat of matte varnish to all panels. This unifies the sheen of the different paint colors and protects the white areas from dust. -
Frame and hang:
Place the panels into clean white frames. When hanging, use a spacer or level to ensure precise spacing between the frames for that grid perfection.
Step back and admire your new gallery wall, enjoying the calm and rhythmic beauty of your handcrafted grid.


Have a question or want to share your own experience? I'd love to hear from you in the comments below!