There is something deeply satisfying about walking into a studio and transforming a piece of plain white bisqueware into a functional treasure that you can use every day. Whether you are looking to design a cozy ceramic mug or a decorative platter, these pottery painting ideas will help you get past the blank-canvas fear and start creating.
The Party Confetti Splatter
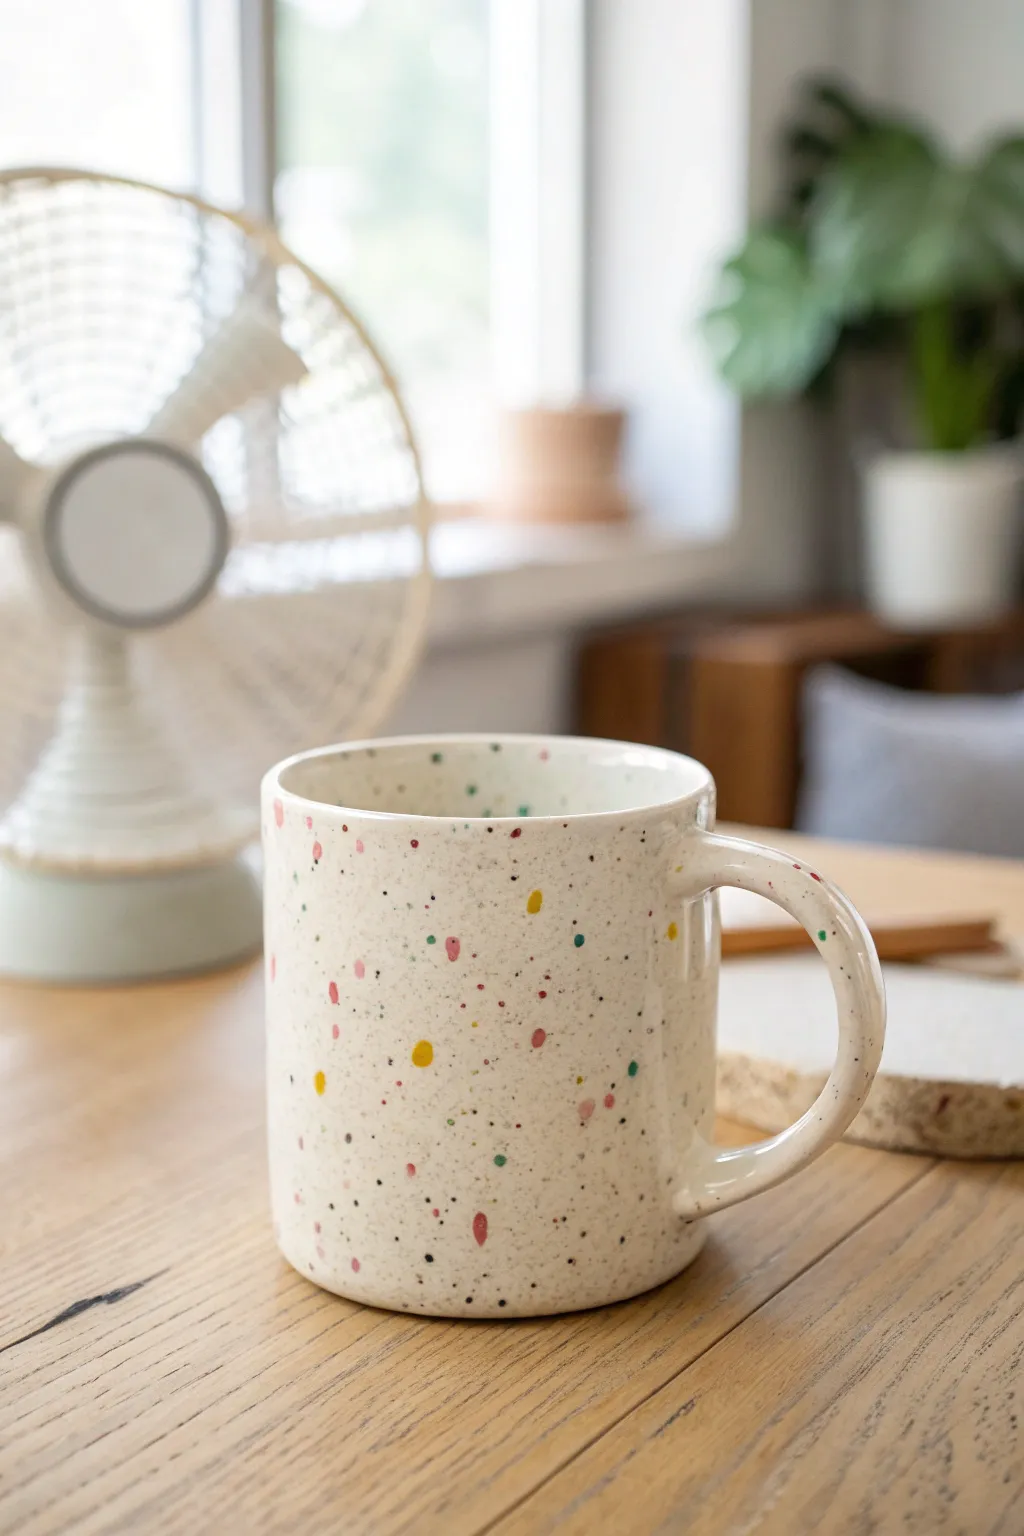
This joyful yet minimalist design mimics the look of colorful terrazzo or party confetti frozen in time. Using a splatter technique over a creamy base, you will create a modern, speckled masterpiece perfect for your morning coffee.
Detailed Instructions
Materials
- Bisque ceramic mug
- Cream or off-white underglaze
- Underglazes in pink, mustard yellow, teal, and black
- Fan brush
- Stiff-bristled brush or splatter tool
- Old toothbrush
- Sponge
- Clear glaze
Step 1: Base Coat Application
-
Prep the surface:
Wipe down your bisque mug with a damp sponge to remove any shelf dust, which ensures the paint adheres properly. -
Load the base color:
Pour a generous amount of cream or off-white underglaze onto your palette and load a soft fan brush. -
Apply first layer:
Brush on the first coat of cream underglaze using long, smooth horizontal strokes around the mug. -
Dry and repeat:
Wait until the first coat loses its sheen and looks chalky, then apply a second coat. -
Final opacity:
Apply a third coat of the base color to ensure completely solid, opaque coverage so no bare clay shows through.
Step 2: Creating the Texture
-
Mix the micro-speckle:
Dilute a small dollop of black underglaze with water until it reaches an inky, milky consistency. -
Load the toothbrush:
Dip just the tips of an old toothbrush into the diluted black mixture, tapping off any excess dripping liquid. -
Mist the mug:
Hold the toothbrush about 6 inches from the mug and run your thumb briskly across the bristles to create a fine, sandy mist of black specks. -
Rotate and inspect:
Turn the mug and repeat the misting process until you have a uniform, sandy texture all around.
Pro Splatter Tip
Vary the moisture in your brush. A wetter brush creates larger, softer splatters, while a drier brush yields finer, sharper specks for that textured look.
Step 3: The Confetti Pop
-
Prepare accent colors:
Place your pink, mustard, and teal underglazes on the palette, adding a tiny drop of water to each to loosen them up. -
Splatter the pink:
Dip a stiff bristled brush into the pink paint. Hold the brush handle in one hand and tap it sharply against your finger or a stick to send medium-sized dots onto the mug. -
Control the density:
I like to go sparingly at first; remember you can always add more dots, but you can’t easily take them away. -
Switch to yellow:
Clean your brush thoroughly, load it with the mustard yellow, and repeat the tapping technique to intersperse yellow dots among the pink. -
Add cool tones:
Repeat the process with the teal or green underglaze, aiming for the larger empty spaces to balance the composition. -
Review the pattern:
Step back and look at the mug from a distance. If you see large gaps, use a small detail brush to manually place a few dots. -
Add variety:
Using the detail brush, lightly dot a few tiny specks of the accent colors to bridge the gap between the big confetti and the fine black mist.
Oops! Blobs?
If a splatter lands where you don’t want it, wait for it to dry instantly. Then, gently scrape it off with a toothpick or crafting knife to avoid smearing the base.
Step 4: Finishing
-
Dry thoroughly:
Allow the splatter work to dry completely. The dots are thicker than normal brushstrokes and may need extra time. -
Clear glaze application:
Apply two coats of clear dipping or brushing glaze over the entire mug to seal the design. -
Clean the foot:
Use a wet sponge to wipe all glaze off the very bottom of the mug to prevent it from sticking to the kiln shelf. -
Fire:
Have the piece fired in the kiln according to the clay and glaze specifications.
Enjoy your festive new mug that brings a little celebration to every sip.


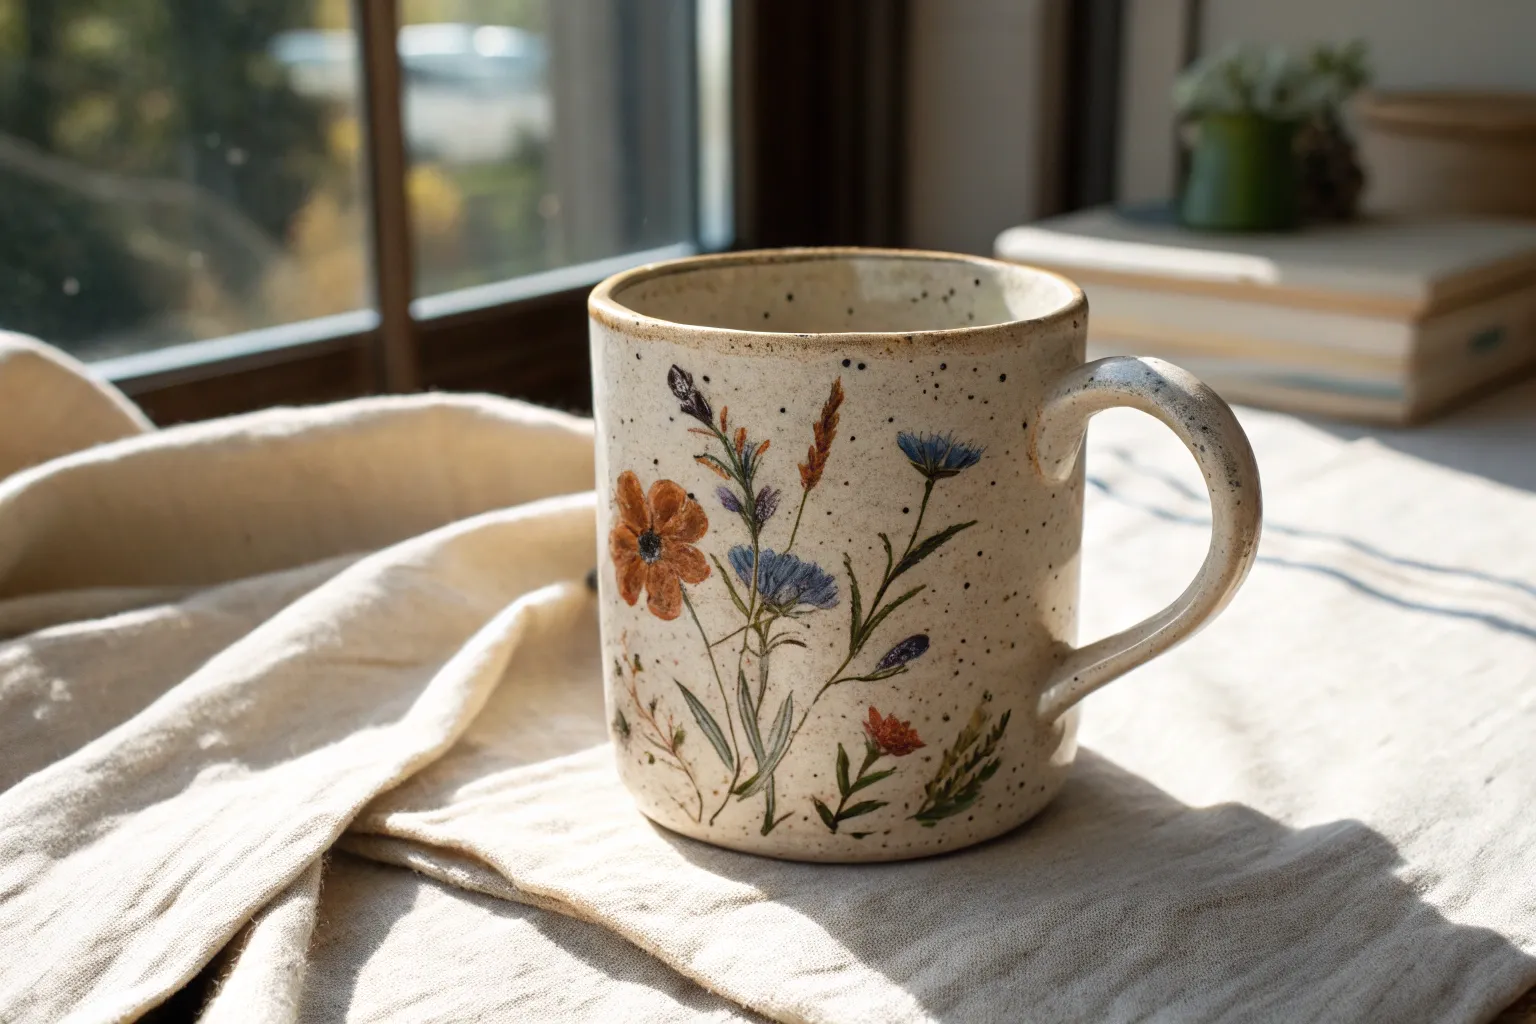
Dainty Wildflower Stems
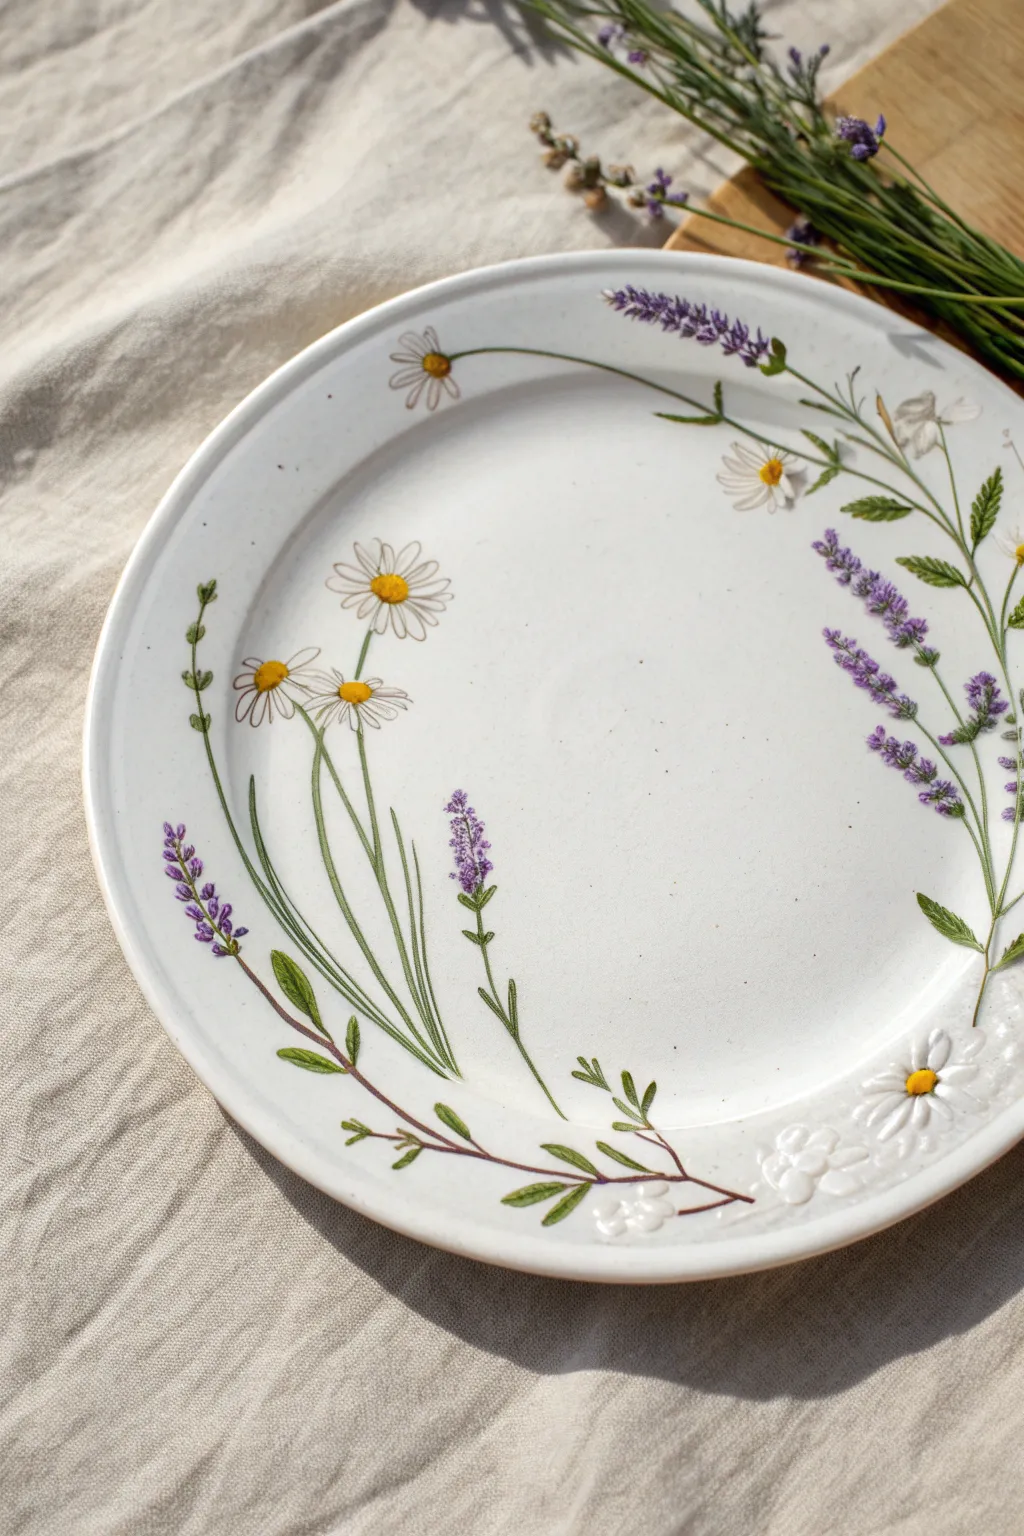
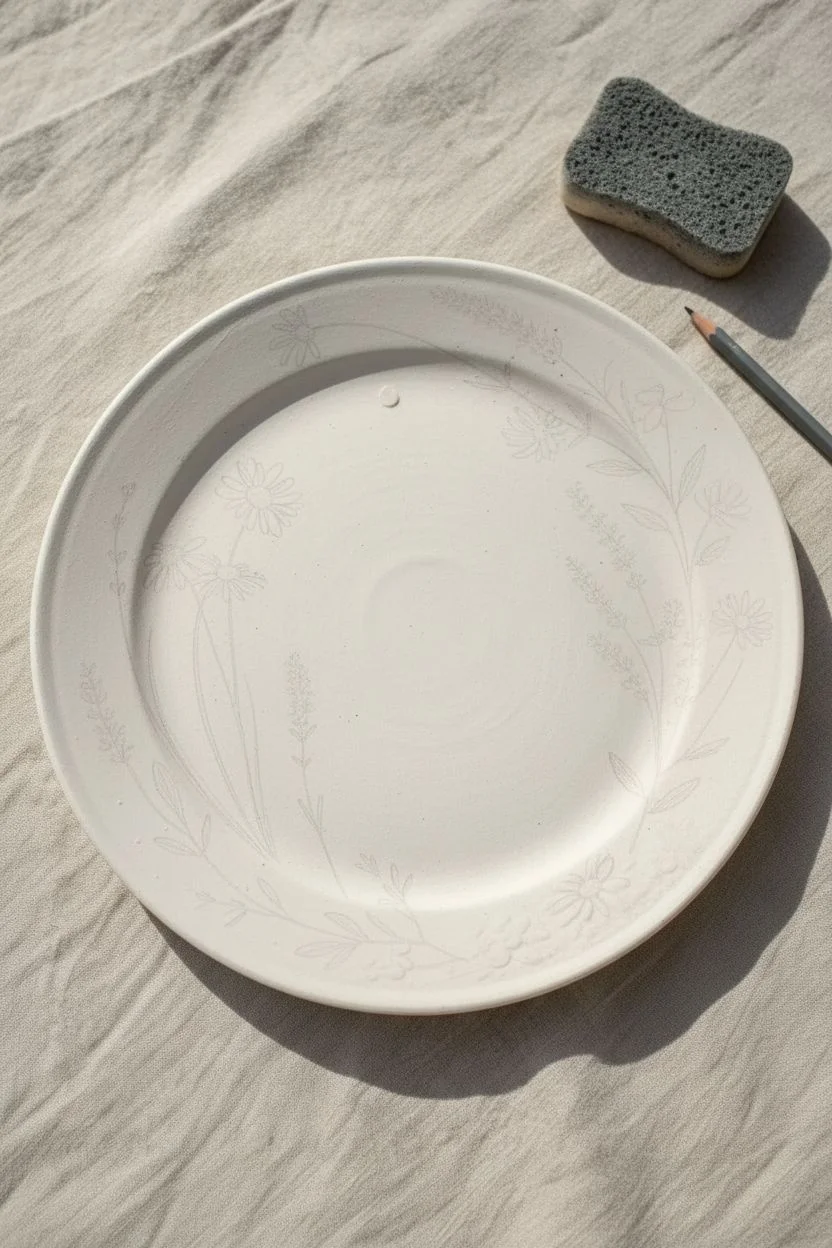
Capture the airy beauty of a summer field with this delicate botanical design. You will use fine brushwork and layout techniques to create a dainty composition of lavender and chamomile that curves naturally around the rim of your pottery.
Step-by-Step Guide
Materials
- Bisque ceramic dinner plate
- Underglazes: Sage Green, Olive Green, Deep Purple, Lilac, Golden Yellow, Opaque White, Sepia brown
- Fine liner brush (size 00 or 000)
- Script liner brush (long bristles)
- Small round brush (size 2)
- 2 oz slip trailer bottle with fine metal tip (optional)
- No. 2 pencil
- Damp sponge
- Clear dipping glaze
Step 1: Planning the Layout
-
Prep the surface:
Wipe your bisque plate down with a damp sponge to remove any dust, which ensures the underglaze adheres smoothly. -
Sketch the curve:
Using a pencil, lightly draw a swooping ‘C’ curve along the right side and bottom rim of the plate. This will serve as the anchor for your stems. -
Mark flower placements:
Sketch small circles where you want your daisy heads to be and light vertical lines where the lavender stalks will rise. Keep the center of the plate mostly open for a spacious, modern look.
Shaky Lines?
breathe out while painting long stems to steady your hand. If a line gets too thick, wait for it to dry completely and gently scratch the edges away with a wooden skewer to thin it back down.
Step 2: Painting Greenery
-
Mix your greens:
On a palette, pour out your Sage and Olive greens. I like to slightly mix them in the middle to create a third, transitional shade for variety. -
Paint main stems:
Load your script liner brush with the thinned Olive green. Using long, fluid strokes, paint the main stems following your pencil guidelines. Keep the pressure very light to ensure thin, elegant lines. -
Add grassy leaves:
At the base of the design (bottom left), paint long, blade-like leaves curving upward. Use the Sage green here to differentiate them from the stems. -
Detail the lavender foliage:
Along the lavender stems, paint small, paired leaves. These should be short and narrow, branching off symmetry. -
Connect the stems:
Ensure all your flower stems connect logically to the main vine or disappear off the edge of the plate rim for a natural cropping effect.
Petal Pop
For the embossed look seen on the bottom flowers, mix a little ceramic gloop or paste into your white underglaze, or simply apply 3-4 heavy layers, letting each dry in between.
Step 3: Blooming Details
-
Start the lavender:
Using the point of a small round brush, dab ‘Deep Purple’ dots in clustered cones at the top of the lavender stems. -
Layering lavender:
Once the dark purple is touch-dry, add smaller dabs of ‘Lilac’ on top of the clusters to create highlight and volume. -
Daisy centers:
Paint small, domed circles using ‘Golden Yellow’ for the centers of your chamomile/daisy flowers. -
Flat petals:
For the upper flowers, use the small round brush to paint simple, flat white petals radiating from the yellow centers. Use two coats if the white is translucent. -
Textured petals:
For the flowers at the bottom right, apply the ‘Opaque White’ thickly. You can let a drop sit on the brush tip or use a slip trailer to create a raised, 3D relief texture. -
Defining the petals:
Once the flat white petals are dry, use your finest liner brush and thinned ‘Sepia’ brown to outline the individual petals. Keep the lines broken and organic, not like a coloring book. -
Detailing the centers:
Add tiny brown specks or a small crescent shadow on the bottom side of the yellow daisy centers to give them roundness.
Step 4: Finishing Touches
-
Clean up:
If any paint smudged onto the white background, gently scratch it off with a toothpick or a clean, stiff brush and water. -
Pencil check:
Don’t worry about erasing your sketch marks; the graphite will burn away completely in the kiln. -
Glazing:
Dip the entire plate into a clear glaze. Ensure the glaze doesn’t pool too thickly over the raised white petals to preserve the texture.
Once fired, sit back and enjoy serving your next meal on your own piece of everlasting spring scenery.


Fresh Citrus Slices
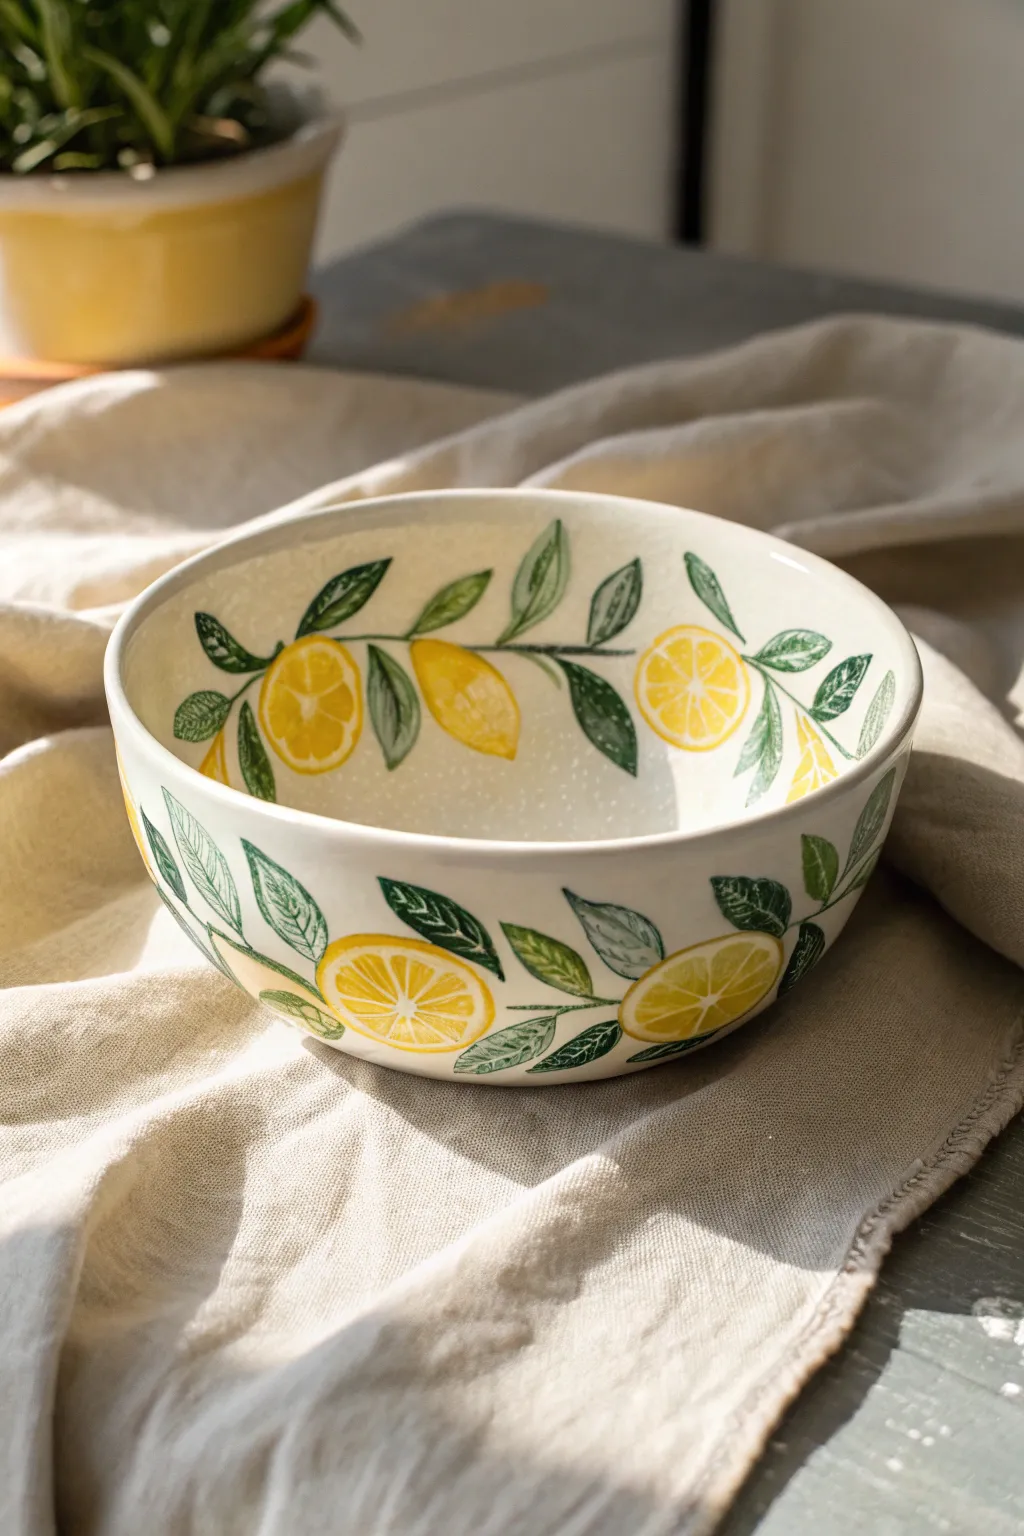
Bring the freshness of a summer orchard to your table with this hand-painted citrus bowl. The design features a playful mix of whole lemons and cut slices dancing on a leafy vine, wrapping around both the interior and exterior for a delightful vivid finish.
Step-by-Step
Materials
- Ceramic bisque bowl
- Underglaze paints: Bright Yellow, Deep Green, Sage Green, White
- No. 2 pencil
- Damp sponge
- Fine liner brush (size 0 or 00)
- Small round brush (size 2 or 4)
- Clear dipping glaze
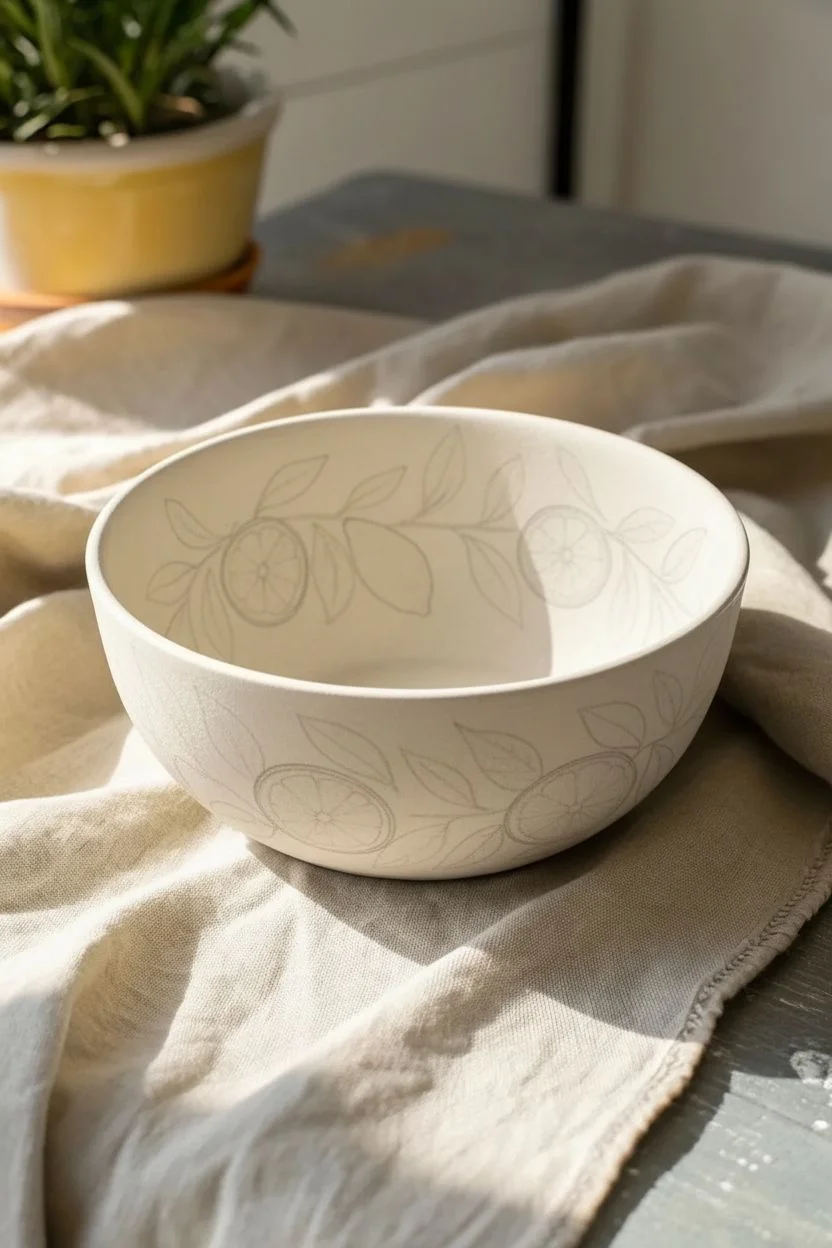
Step 1: Planning the Vine
-
Prep the surface:
Begin by wiping the entire bisque bowl with a damp sponge to remove any dust, which ensures the glaze adheres perfectly. -
Sketch the exterior vine:
Using a No. 2 pencil, lightly draw a wavy line around the exterior circumference of the bowl. Let it dip and rise gently to create a natural flow. -
Sketch the interior vine:
Repeat the wavy line process on the inside of the bowl, roughly matching the height of the exterior line so the design feels continuous. -
Place the fruit:
Sketch alternating shapes along your vines: ovals for whole lemons and circles for the slices. Space them out evenly, leaving room for leaves in between.
Step 2: Painting the Citrus
-
Block in whole lemons:
With your round brush and Bright Yellow underglaze, fill in the oval shapes. Apply smooth strokes to follow the curve of the fruit. -
Outline the slices:
For the circular slices, paint a thick yellow ring to represent the lemon rind. -
Paint the segments:
Inside the yellow rings, paint triangular wedge shapes for the fruit segments. I carefully leave a thin gap of bare bisque between the segments to represent the white pith. -
Apply a second coat:
Once the first layer is dry to the touch, apply a second coat of yellow to all fruit to ensure a solid, bright color after firing. -
Add highlights:
Dip the tip of a clean brush into White underglaze and add a tiny curved hash mark on the top curve of the whole lemons for a glossy ‘shine’ effect.
Bisque is Best
For the white lines inside the lemon slices, leave the raw bisque unpainted instead of using white paint. The natural clay color creates crisper, more defined segments.
Step 3: Adding Foliage & Vines
-
Trace the vines:
Switch to your fine liner brush and Deep Green underglaze. Trace over your pencil vine lines with a steady hand, connecting the lemons to the main stem. -
Outline the leaves:
Using the same Deep Green, paint the outlines of pointed leaf shapes coming off the vines. Vary the sizes for a natural look. -
Fill the leaves:
Switch to the Sage Green (or lighter green) to fill in the leaf outlines. You can water this down slightly for a semi-transparent, watercolor look. -
Detail the veins:
Once the leaf fill is dry, go back in with the liner brush and Deep Green to add a central vein line and small branching veins to each leaf. -
Repeat inside:
Recreate the leaves and vines on the interior of the bowl, ensuring the style matches the exterior work.
Texture Trick
Use a stiff-bristled brush to gently stipple a tiny amount of darker yellow or orange onto the bottom of the whole lemons to give them a realistic, textured skin appearance.
Step 4: Finishing Touches
-
Check the rim:
Wipe the rim with a damp sponge if any stray paint marks landed there, keeping the edge crisp and clean. -
Glaze application:
Once all underglaze is completely dry, dip the entire bowl into clear glaze using dipping tongs, or brush on two coats of clear brushing glaze. -
Fire the piece:
Load the bowl into the kiln and fire it according to the clay and glaze specifications (usually cone 06 or cone 6).
Now you have a refreshing, summer-ready bowl that looks just as good on display as it does filled with fruit.


Crisp Geometric Angles with Tape
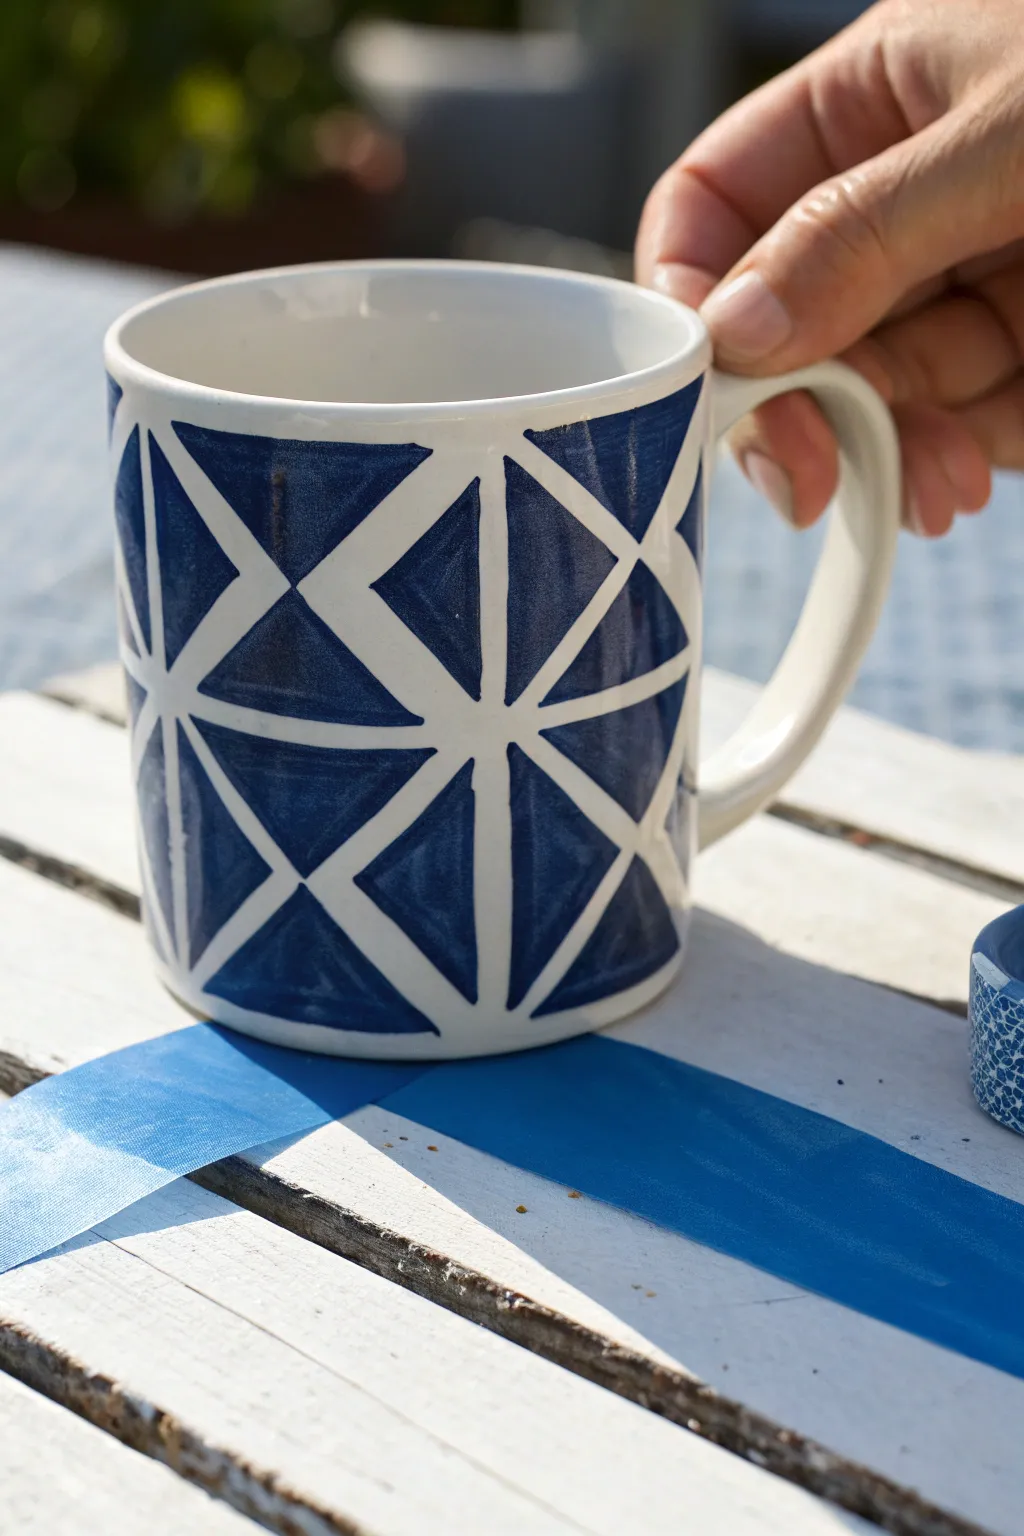
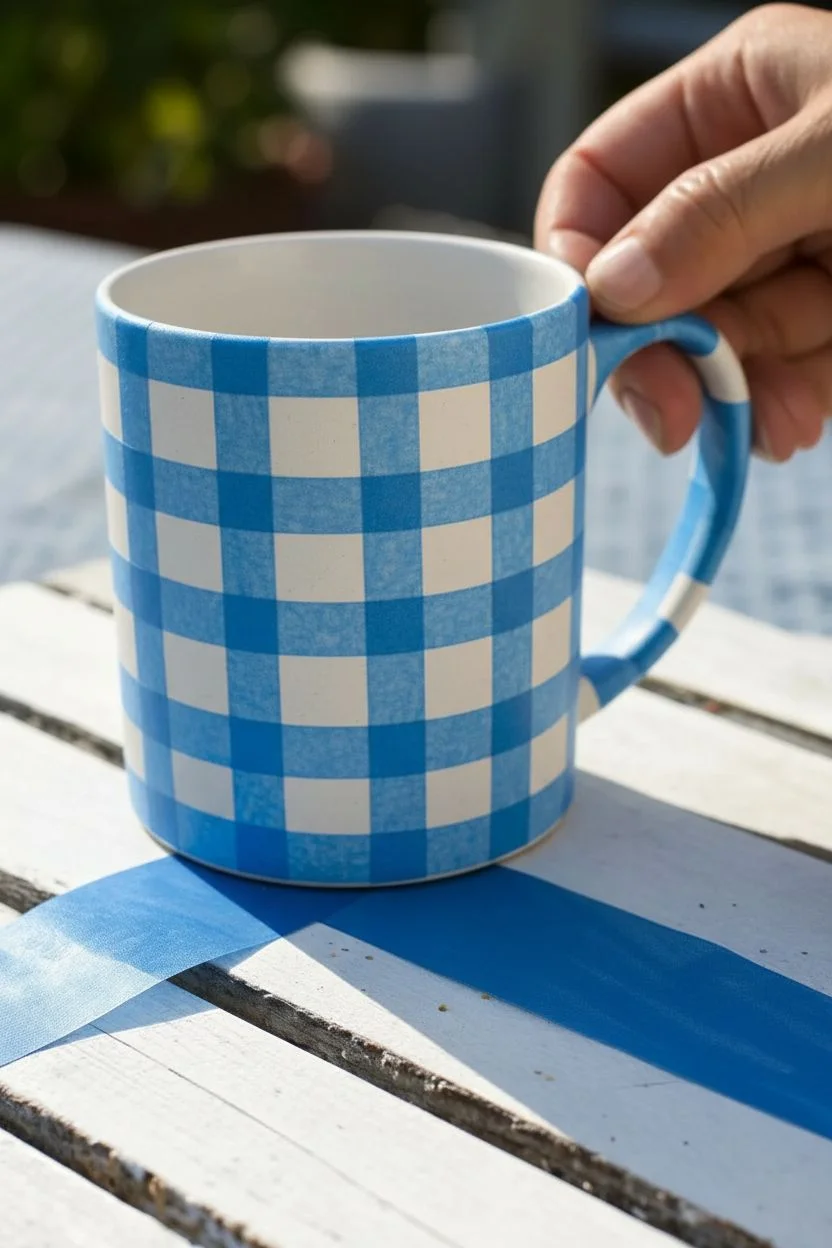
Achieve a stunningly modern look with the clean, architectural lines of tape resist. This project transforms a simple white mug into a bold statement piece using deep navy underglaze and strategic masking.
Detailed Instructions
Materials
- Bisque fired ceramic mug
- 1/4 inch flat masking tape or automotive detailing tape
- Navy blue underglaze
- Soft fan brush or shader brush
- Damp sponge
- Fettling knife or precision craft knife
- Clear transparent glaze
- Hard card or spoon (for burnishing)
Step 1: Creating the Grid
-
Clean surface:
Wipe down your bisque mug with a damp sponge to remove any kiln dust or oils from your hands, ensuring a clean surface for tape adhesion. -
Establish vertical lines:
Apply strips of the 1/4 inch tape vertically from the rim to the base. Space them evenly around the mug, leaving about 2 inches of space between each strip. -
Trim the ends:
Use your craft knife to gently trim the excess tape at the rim and the foot of the mug so the tape lays completely flat without bunching. -
Add horizontal bands:
Apply horizontal rings of tape around the mug, intersecting the vertical lines to create a grid of squares. -
Check your squares:
Look over your grid; the open un-taped spaces should look like uniform squares or rectangles depending on your spacing. -
First diagonal pass:
Begin creating the triangles by running tape diagonally through your squares, from the top-left corner to the bottom-right corner of each box. -
Complete the stars:
Run the final set of tape strips diagonally in the opposite direction (top-right to bottom-left) to complete the ‘X’ shape inside every square. -
Burnish the edges:
This is crucial: firmly run a hard card or the back to a spoon over every strip of tape. I like to double-check intersections to ensure no paint can seep underneath.
Seal the deal
Before painting blue, paint a thin layer of the clear base glaze over the tape edges. This creates an invisible barrier that prevents color bleeding.
Step 2: Painting the Pattern
-
Load the brush:
Load a soft brush generously with navy blue underglaze. You want the brush full but not dripping. -
Apply first coat:
Paint over the entire designated area, brushing specifically away from the tape edges toward the center of the exposed triangles to prevent bleeding. -
Allow to dry:
Let the first coat dry until the sheen has disappeared and it feels chalky to the touch. -
Apply second coat:
Apply a second layer of underglaze. If you brushed horizontally the first time, try brushing vertically this time for even coverage. -
Apply third coat:
Add a third and final coat to ensure the dark blue fires to a solid, opaque finish without streakiness. -
Partially dry:
Allow the paint to set but not bone dry; it should still be slightly cool to the touch.
Level up your design
Instead of one solid color, mix a gradient or use three different shades of blue in random triangles to create a faceted ‘gemstone’ effect.
Step 3: The Reveal
-
Locate tape ends:
Find the end of your last applied piece of tape. You always want to work in reverse order of application. -
Peel slowly:
Gently pull the tape off at a sharp angle close to the mug surface rather than pulling distinctively outward. -
Clean neatening:
If any tiny spots of blue bled onto the white lines, use a precision knife or a stiff toothpick to gently scrape them away. -
Smooth the ridges:
Once fully dry, lightly run a clean finger over the painted edges to knock down any high ridges where the paint met the tape. -
Glaze and fire:
Dip the mug in clear transparent glaze and fire according to your clay body’s instructions.
Enjoy your morning coffee in a mug that looks professionally designed and architecturally inspired
BRUSH GUIDE
The Right Brush for Every Stroke
From clean lines to bold texture — master brush choice, stroke control, and essential techniques.
Explore the Full Guide
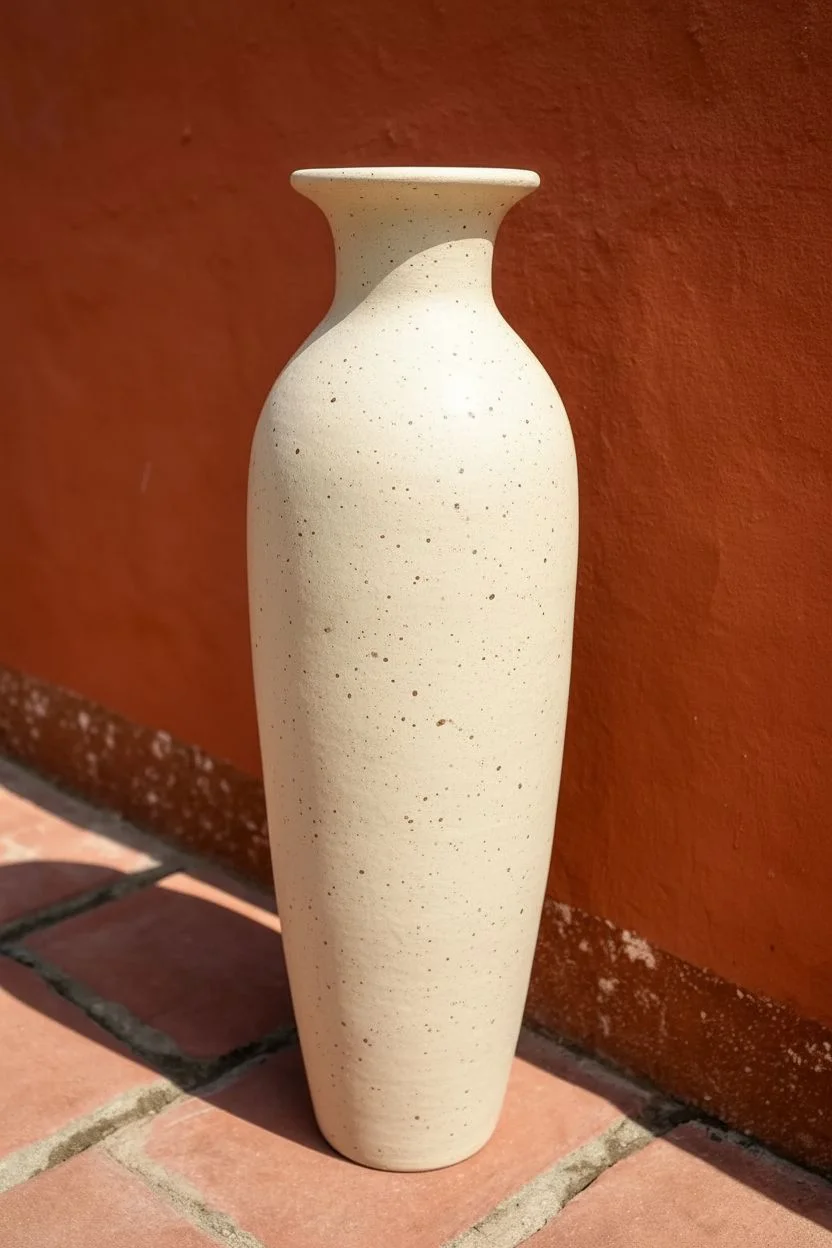
Sunset Ombre Blends
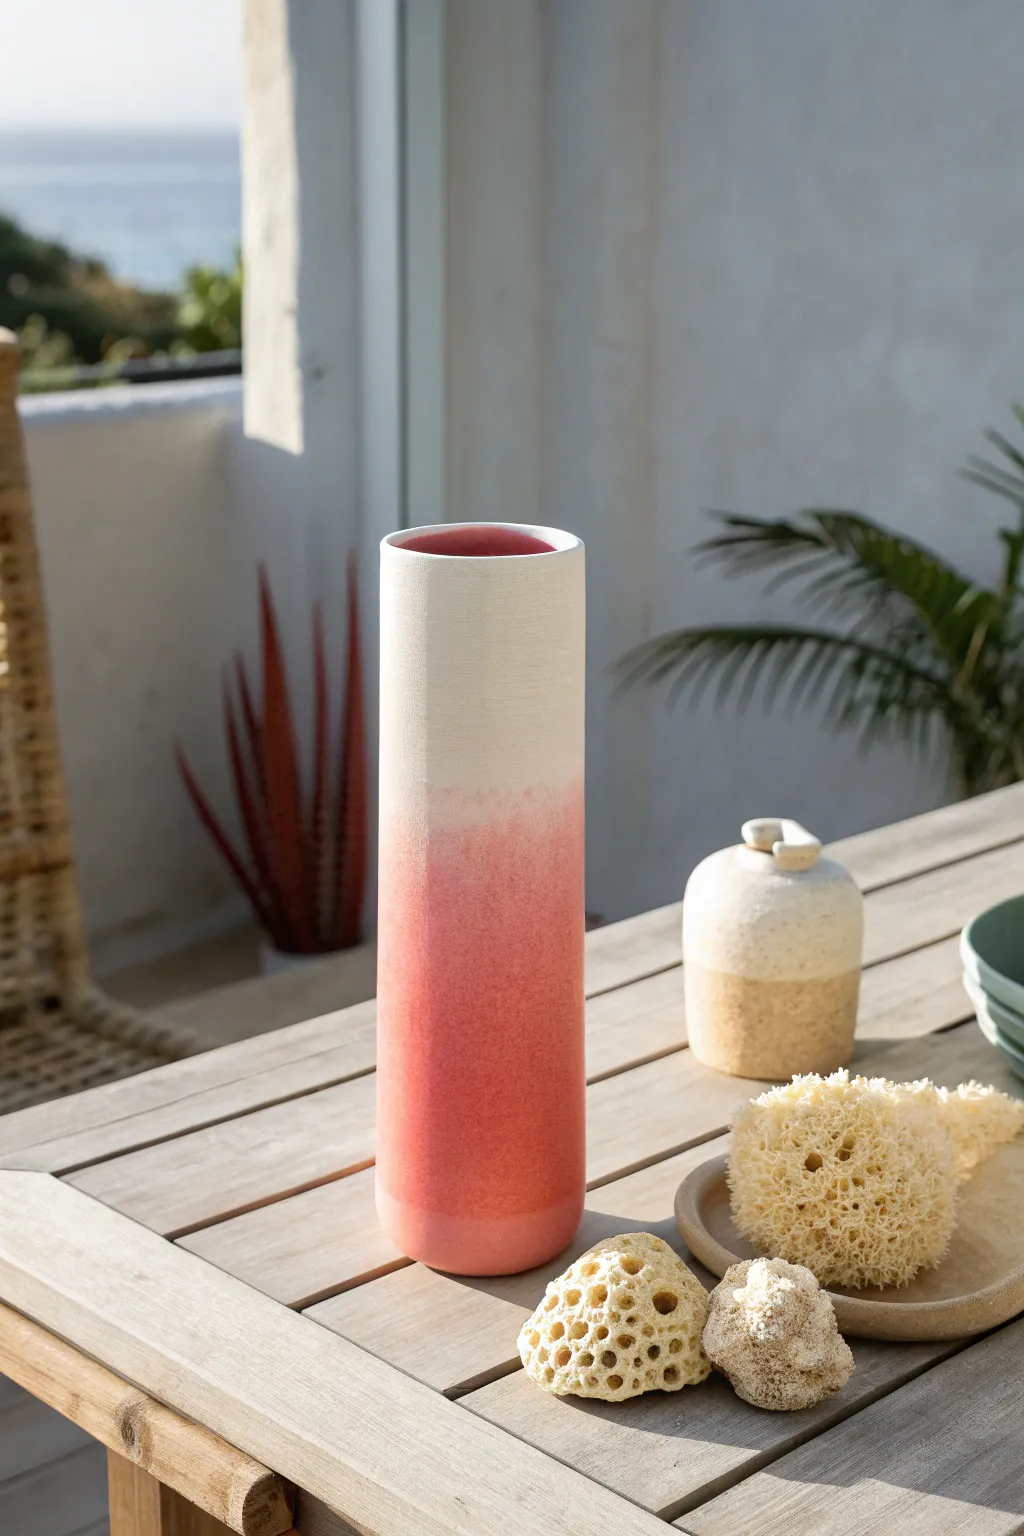
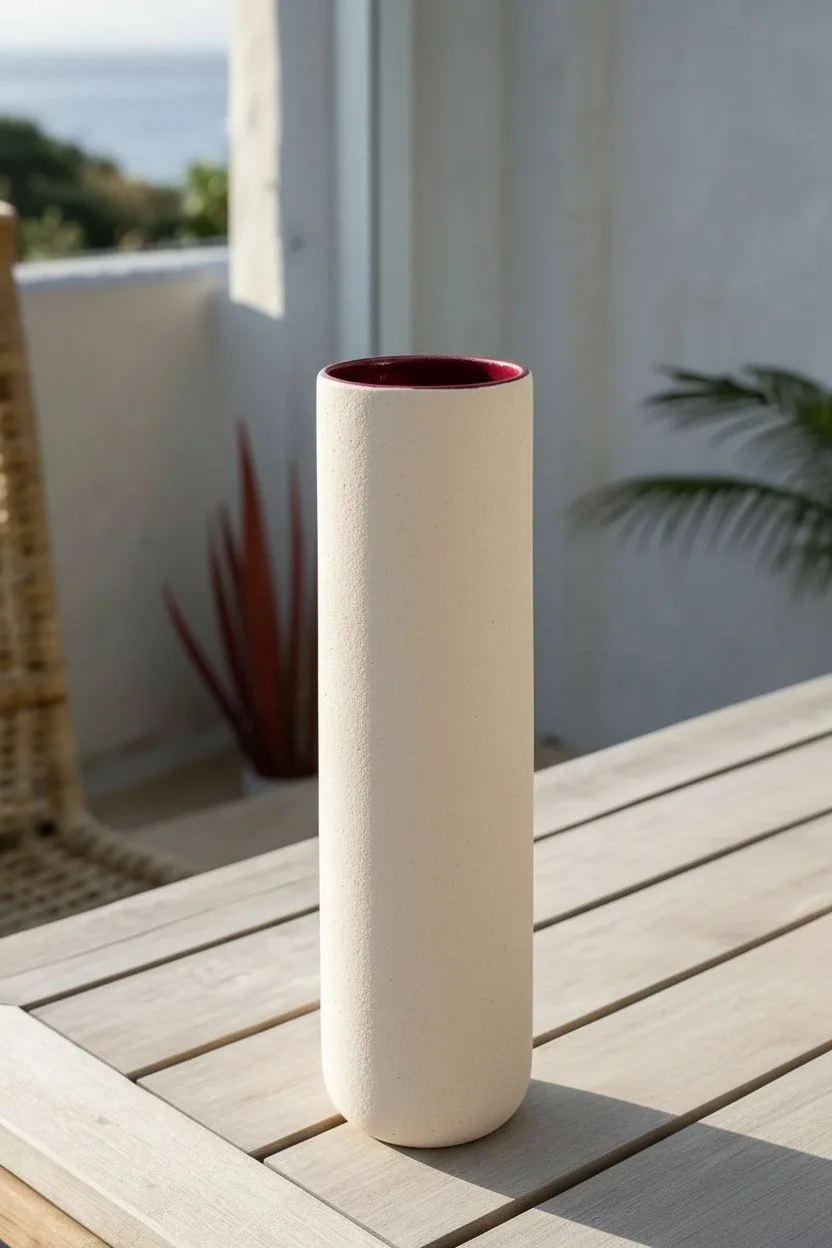
Capture the serene feeling of a seaside sunset with this soft, two-tone ombre design. By using a stippling technique, you will create a powdery transition from terracotta pink to creamy white that mirrors the gentle fade of evening light.
How-To Guide
Materials
- Tall cylindrical bisque vase
- Matte white underglaze
- Coral or terracotta pink underglaze
- Deep burgundy gloss glaze
- Soft fan brush
- Sea sponge or synthetic texture sponge
- Palette or tile
- Matte clear finishing glaze
Step 1: Prepping the Canvas
-
Clean the bisque:
Wipe down your ceramic bisque vase with a clean, damp sponge to remove any dust or oils from handling. -
Glaze the interior:
Pour a generous amount of deep burgundy gloss glaze into the vase to coat the inside. -
Roll and empty:
Carefully rotate the vase in your hands to ensure the glaze covers every inch of the interior walls, then pour the excess back into your glaze bottle. -
Clean the rim:
Use a damp sponge to wipe the rim of the vase completely clean, ensuring a crisp separation between the interior and exterior.
Gradient Glitches?
If your sponge leaves hard circular marks, your paint might be too thick. Mist the sponge lightly with water to thin the pigment on the applicator, allowing for a softer, mistier lay-down of color.
Step 2: Base Coat Application
-
Apply white base:
Using a soft fan brush, apply a smooth coat of matte white underglaze to the entire exterior of the vase. -
Layer for opacity:
Let the first layer dry until it loses its sheen, then apply a second and third coat. This ensures a solid, opaque background for your gradient. -
Dry completely:
Allow the white base to dry until it is cool and chalky to the touch before moving on to the color work.
Step 3: Creating the Ombre
-
Prepare the sponge:
Dampen your sea sponge and squeeze it out tightly; it should be moist enough to be pliable but not wet enough to drip water. -
Load the color:
Pour a dollop of coral pink underglaze onto your palette and dip the sponge in, dabbing the excess off on a clean spot of the tile. -
Anchor the color:
Start by firmly pouncing the sponge around the bottom two inches of the vase to create a solid, dense band of pink. -
Begin the fade:
Work your way upward, gradually lightening your hand pressure. I like to twist the sponge slightly as I dab to avoid repeating the exact same texture pattern. -
Feather the edge:
As the sponge runs low on paint, tap gently into the white area to create a speckled, airy transition. -
Deepen the base:
Reload the sponge with fresh pink underglaze and go over the very bottom edge again to ensure it is the darkest, most saturated part of the gradient. -
Refine the blend:
If the transition line looks too harsh, take a clean, barely-damp sponge and gently dab the border where the pink meets the white to soften the look.
Golden Hour Glow
For an extra dimension of warmth, dab a very faint line of golden-yellow underglaze right at the transition line where the pink fades into white. It creates a stunning ‘setting sun’ luminosity.
Step 4: Finishing Up
-
Check for drips:
Inspect the vase for any stray splashes of pink on the pure white upper section and gently scrape or sand them off if found. -
Seal the piece:
To maintain the organic look shown in the photo, apply a coat of matte clear glaze over the exterior. This seals the underglaze without adding a high-gloss shine. -
Fire:
Place the vase in the kiln and fire according to your glaze and clay specifications.
Once fired, fill your new vase with dried botanicals to complement those warm, sandy textures.
Simple Polka Dot Mandalas
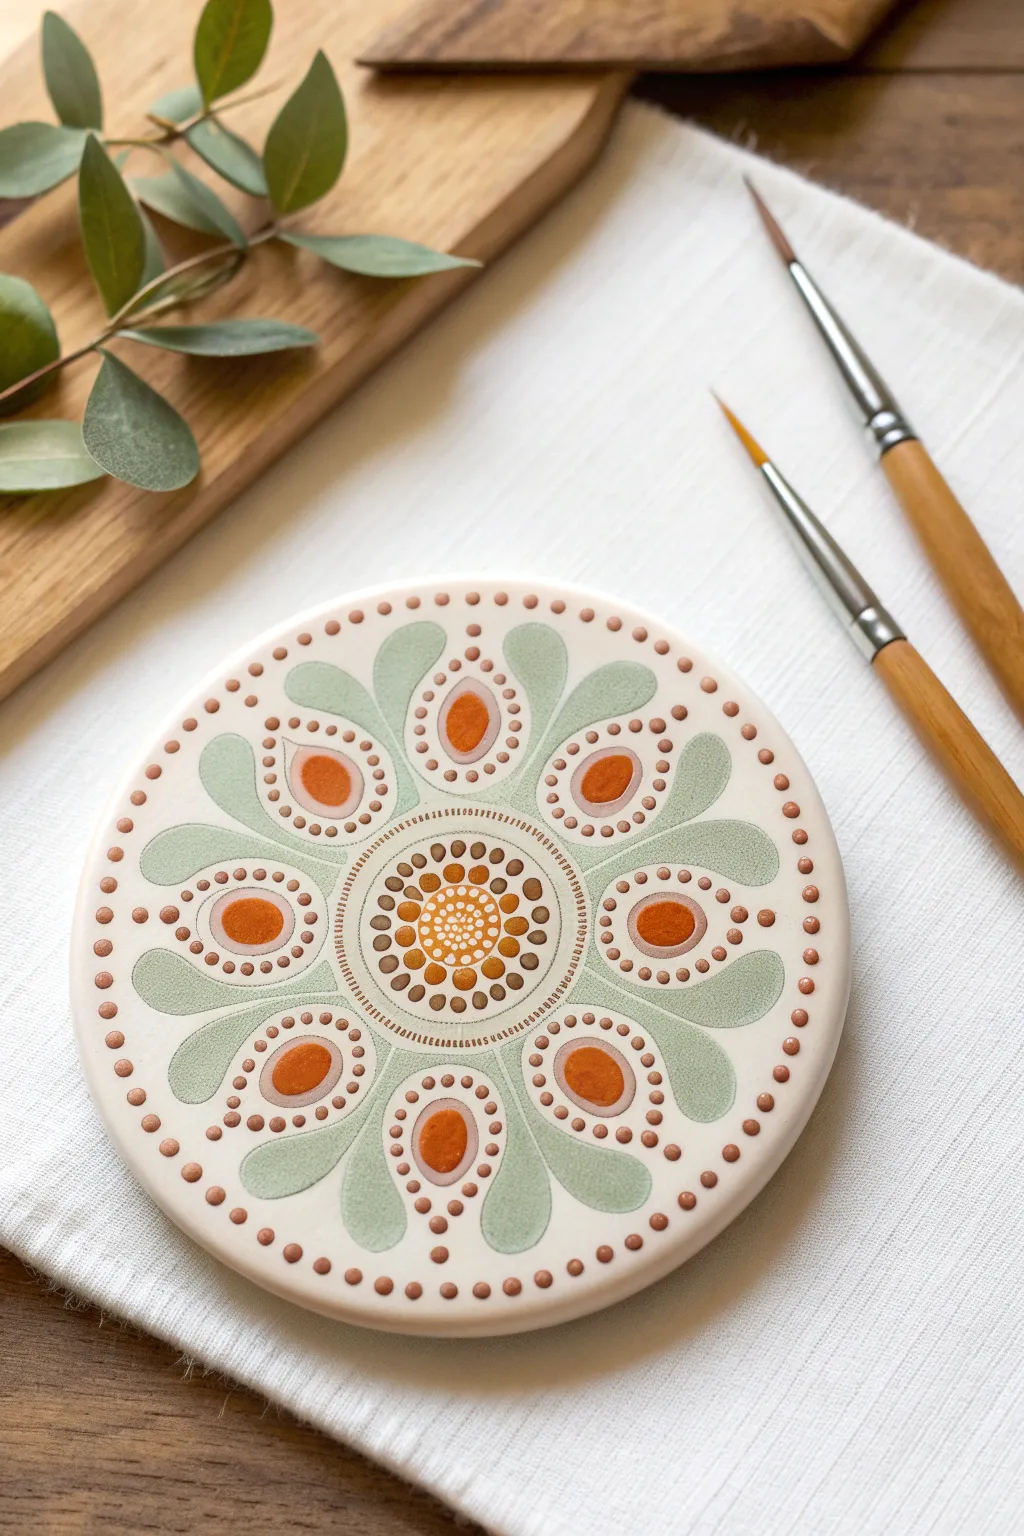
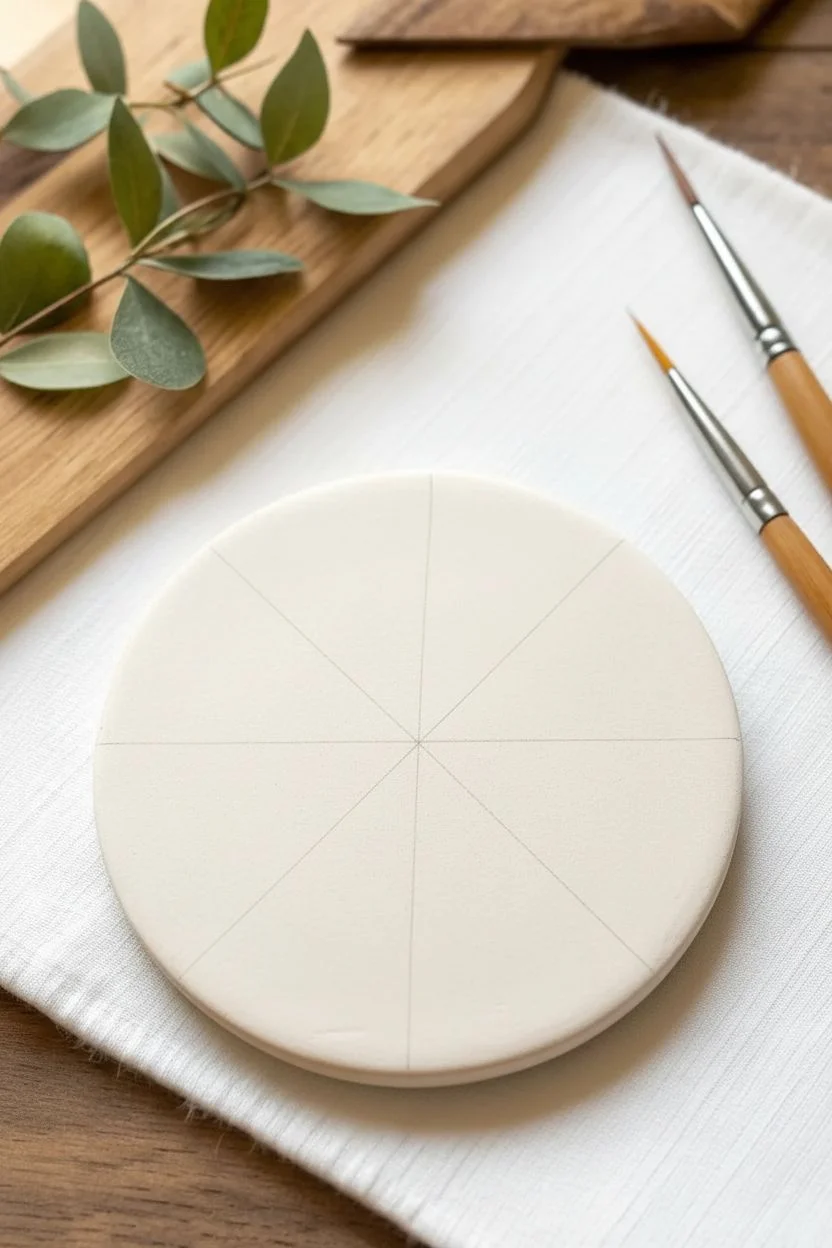
Capture the essence of calm with this symmetrical mandala design featuring a soothing palette of sage green, terracotta, and warm clay tones. This project mixes simple brushwork with precise dotting techniques to create a stunning, professional-looking coaster.
Step-by-Step Tutorial
Materials
- Round bisque ceramic coaster (approx. 4 inches)
- Underglazes: Sage Green, Terracotta Orange, Mustard Yellow, Cream/Off-White
- Clear transparent dipping glaze
- Set of dotting tools (varying flat-head diameters)
- Fine detail brush (size 0 round)
- Pencil and ruler
- Damp sponge
Step 1: Base Preparation
-
Clean surface:
Wipe the bisque coaster with a damp sponge to remove any kiln dust, ensuring a smooth painting surface prevents glaze crawling. -
Apply base color:
Paint two to three even coats of Cream/Off-White underglaze over the entire top surface. Let it dry until chalky to the touch between coats. -
Mark guidelines:
Lightly use a pencil and ruler to find the exact center. Draw a vertical and horizontal line to divide the circle into quarters, then divide again to create eight equal pie slices.
Step 2: The Center Motif
-
Central seeds:
Using a small dotting tool dipped in Mustard Yellow, create a tight cluster of random, small dots right in the center, covering an area about the size of a dime. -
Inner ring:
Switch to a slightly larger dotting tool and Terracotta paint. Place a neat ring of dots immediately surrounding your yellow center cluster. -
Second ring:
Using a mix of Mustard and Terracotta on your palette, add a second, slightly looser ring of miscellaneous dots outside the previous one. -
Detail border:
With your finest detail brush and Terracotta glaze, paint two very thin concentric circles enclosing the central dot work. Fill the space between these lines with tiny vertical hash marks.
Consistency Pro-Tip
Underglaze should be the consistency of heavy cream. If it’s too thick, the dots will peak and break. Add a drop of water to your palette if needed.
Step 3: Petals and Accents
-
Drafting petals:
On the eight pencil guidelines, lightly sketch eight large, teardrop-shaped ‘leaves’ that radiate outward. The points should face out. -
Painting leaves:
Fill these 8 curved leaf shapes with Sage Green using your round brush. I like to do two thin coats here for solid opacity without ridges. -
Orange ovals:
In the V-shaped spaces between the green leaves, paint a floating oval using Terracotta Orange. Keep them centered between the green shapes. -
Dotted halos:
Once the orange ovals are dry to the touch, use a small dotting tool and Terracotta glaze to create a halo individual dots outlining each oval. -
Outer leaf accents:
Add a tiny Terracotta dot at the very outer tip of each green leaf for a sharp finishing touch.
Level Up: Texture
Use a slip-trailer (small bottle with a needle tip) instead of dotting tools for the orange dots. This leaves a raised, tactile texture on the finished piece.
Step 4: Finishing Borders
-
The rim design:
Dip a medium-sized dotting tool into Terracotta glaze. Place evenly spaced dots around the very edge of the coaster, trying to keep them aligned with the interior pattern. -
Clean up:
Check for any pencil lines still visible. If the paint is fully dry, these will burn off in the kiln, but you can gently dab them with a damp brush if they are very dark. -
Glazing:
Once fully dry (allow 24 hours), apply a clear dipping glaze to seal the design, making it food safe and giving it that glossy finish shown in the photo.
Enjoy using your beautiful new coaster for your morning coffee or tea.

PENCIL GUIDE
Understanding Pencil Grades from H to B
From first sketch to finished drawing — learn pencil grades, line control, and shading techniques.
Explore the Full Guide
The Watermelon Bowl
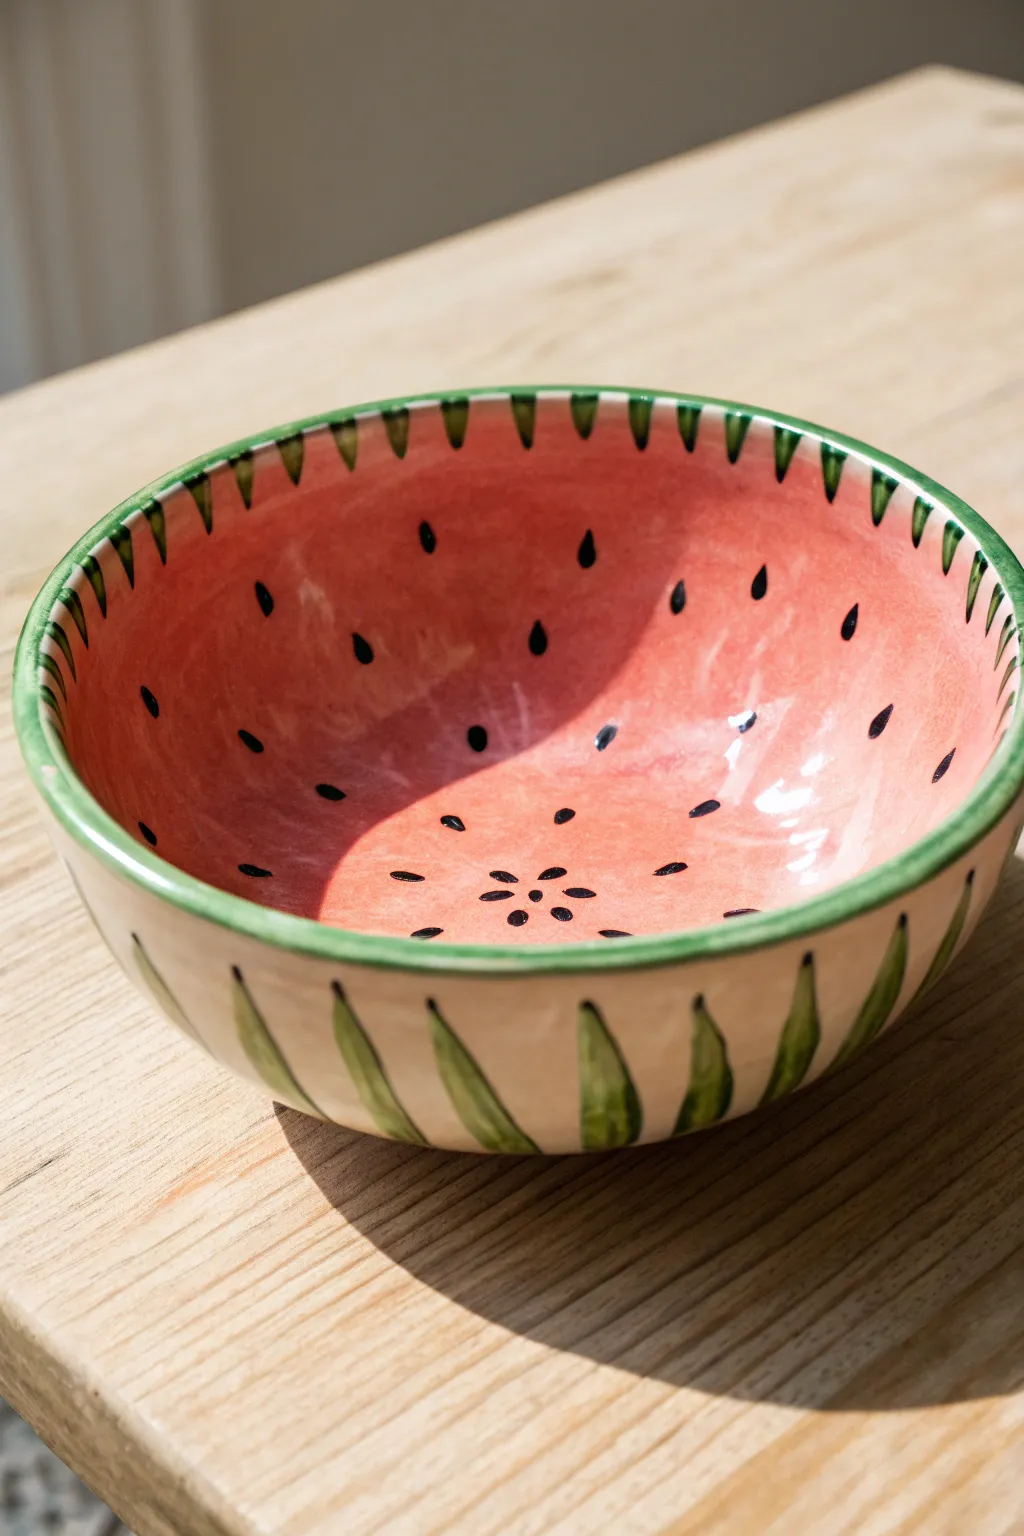
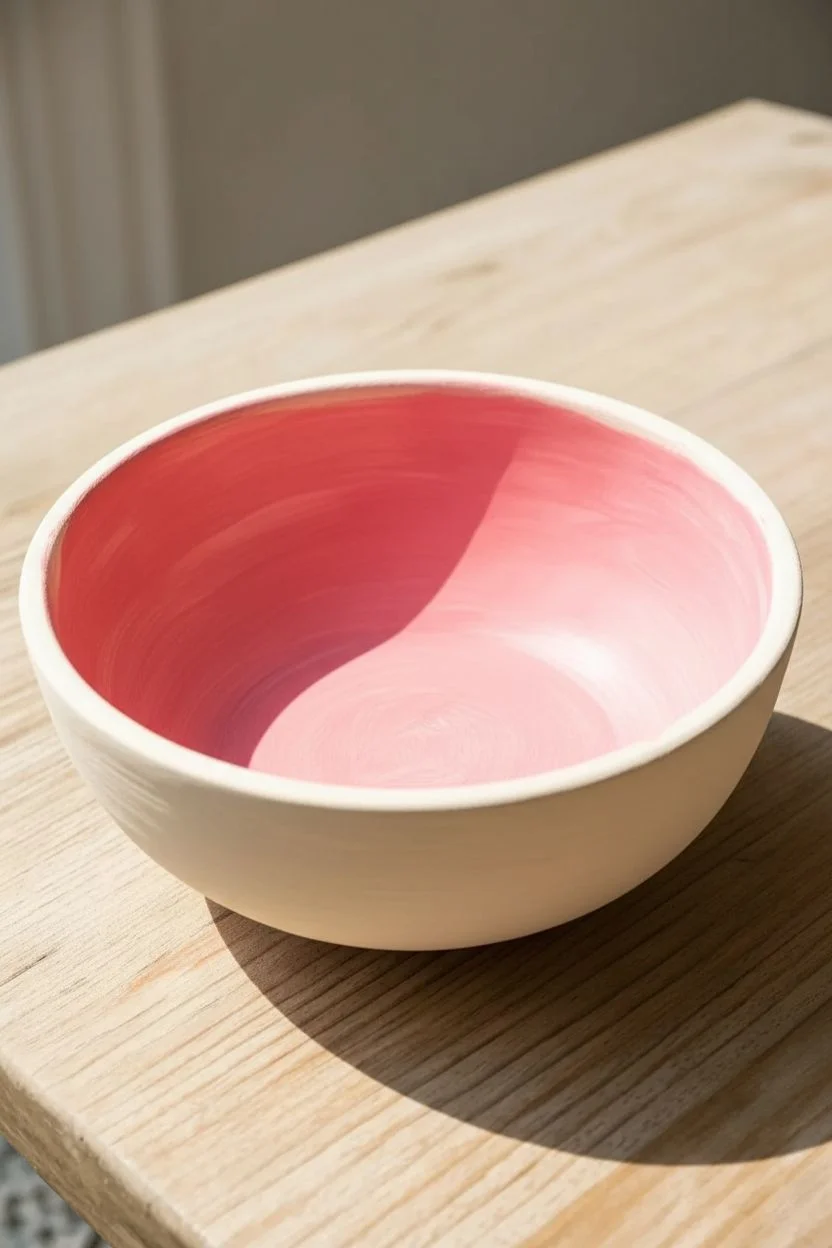
Capture the essence of summer with this vibrant, juicy-looking bowl that mimics the cross-section of a fresh watermelon. This project relies on layering starkly different colors—bright pinks and deep greens—to create a functional piece of art that looks good enough to eat.
How-To Guide
Materials
- Bisque ceramic bowl
- Underglazes: Bright Pink, Cream/Off-White, Deep Green, Black
- Fan brush or soft sponge
- Round brush (size 4 or 6)
- Detail liner brush
- Clear dipping glaze
Step 1: Setting the Scene
-
Clean the bisque:
Before dipping your brush, wipe down the entire bisque bowl with a slightly damp sponge to remove any kiln dust and ensure the glaze adheres smoothly. -
Pink interior base:
Load a fan brush or sponge with your bright pink underglaze. Apply a generous coat to the entire interior of the bowl, stopping right at the rim. -
Layering the pink:
Because pinks can sometimes be translucent, apply two to three total coats. Let the glaze dry until it is chalky and matte between each layer to prevent dragging. -
Cream exterior:
Flip the bowl over. Apply the cream or off-white underglaze to the entire exterior surface. I prefer to use a soft wide brush here to smooth out ridges. -
Exterior opacity:
Just like the interior, apply a second and third coat of cream to the outside to ensure a solid, opaque background for your green patterns.
Oops! Smudged Seed?
Black glaze is potent! If you accidentally smudge a seed, let it dry completely. Then, gently scrape the error off with a pin or toothpick and touch up with pink.
Step 2: Creating the Rind
-
Rim foundation:
Using a round brush and Deep Green underglaze, paint the very top edge of the rim. It doesn’t need to be perfect; a hand-painted look adds charm. -
Inner rind details:
To create the transition from rind to fruit, paint small, downward-pointing triangles or ‘teeth’ along the inside of the green rim, extending slightly onto the pink. -
Spacing the teeth:
Keep these green triangles relatively evenly spaced around the interior circumference, about a half-inch apart, ensuring the points are sharp. -
Exterior stripes start:
Moving to the outside of the bowl, load your round brush with the same Deep Green. Starting from the bottom center, press the brush down firmly. -
Pulling the leaves:
Pull the brush upward toward the rim, lifting pressure as you go to taper the stroke into a point like a long leaf. Stop about an inch below the rim. -
completing the pattern:
Repeat these leaf-like stripes all around the bowl’s exterior, leaving cream space between them. Vary the heights slightly for a natural, organic feel.
Uneven Exterior
For a more rustic rind look, dilute the green glaze slightly with water for the exterior stripes. This creates a watercolor effect where the brush layers overlap.
Step 3: Seeding & Glazing
-
Detail brush prep:
Switch to your finest liner brush and the Black underglaze. Ensure the brush is not overloaded so you can control the shape. -
Painting the seeds:
Paint small teardrop shapes scattered across the pink interior. The round bottom of the teardrop should face the center, with the point facing the rim. -
Creating depth:
Stagger the placement of the seeds so they look random rather than arranged in strict rows, filling the middle section of the bowl walls. -
The center flower:
At the very bottom center of the bowl, paint a small circle of seeds with their points facing inward, creating a small flower-like cluster. -
Cleaning the foot:
Use a damp sponge to wipe any stray glaze off the bottom foot ring of the bowl so it won’t stick to the kiln shelf. -
Clear glaze application:
Once the underglaze is bone dry, dip the entire bowl into clear glaze (or brush firmly with clear brushing glaze). -
Final fire:
Fire the piece in the kiln according to your clay and glaze specifications specific to your studio.
Once fired, fill your new bowl with fruit salad for the ultimate summer centerpiece
Negative Space Leaves
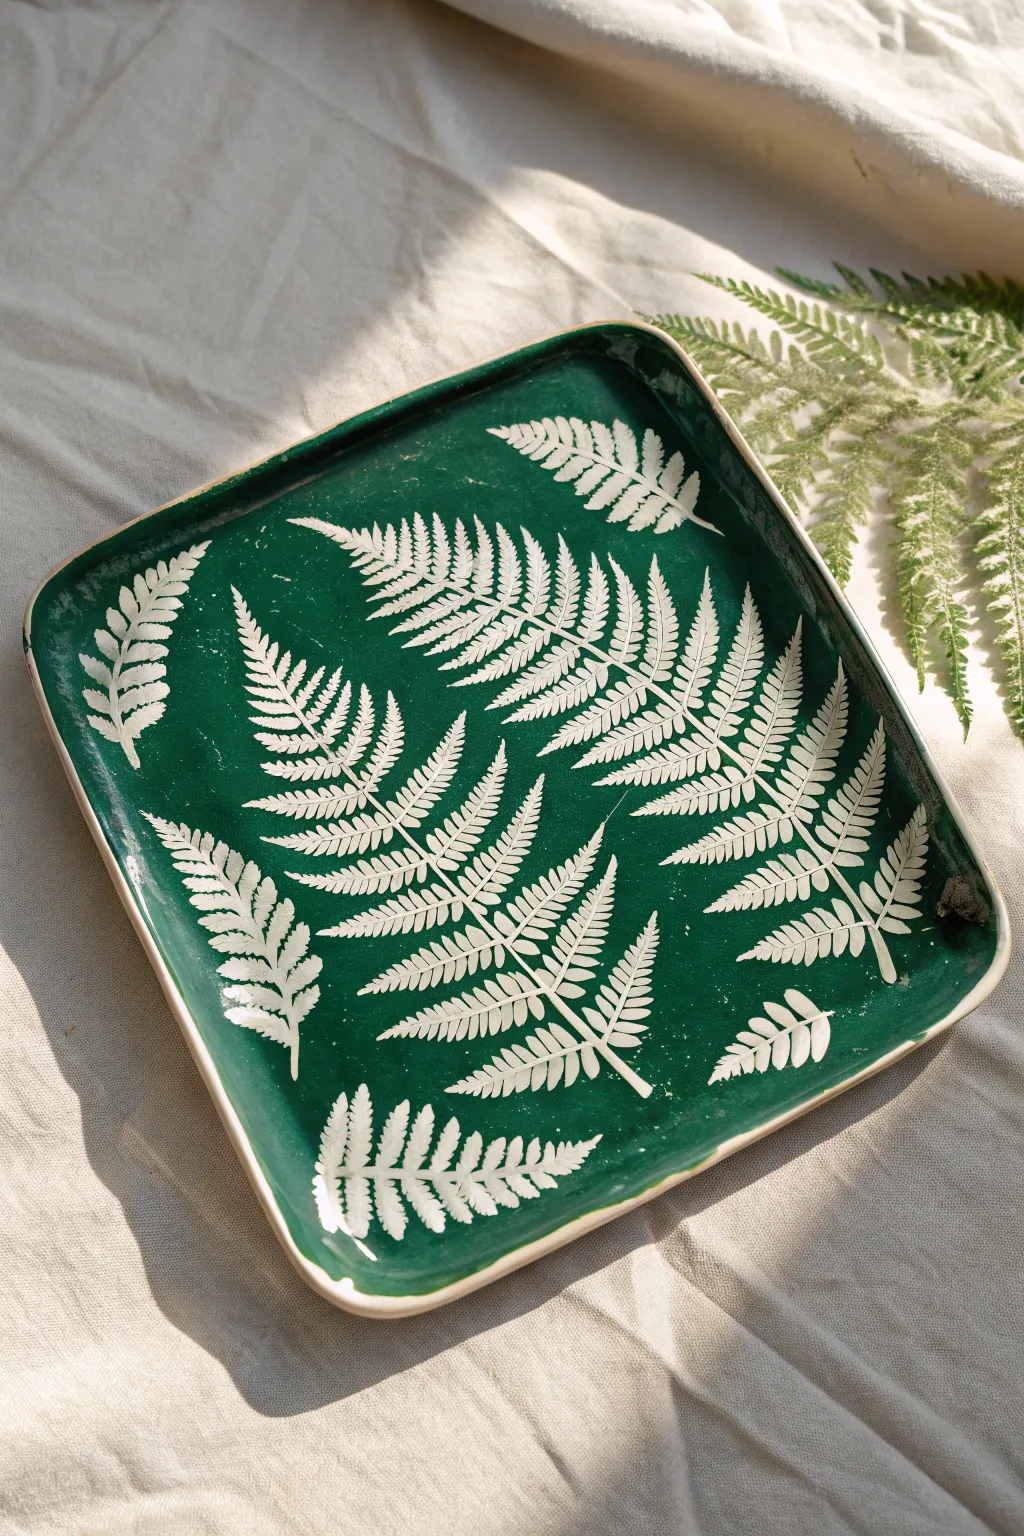
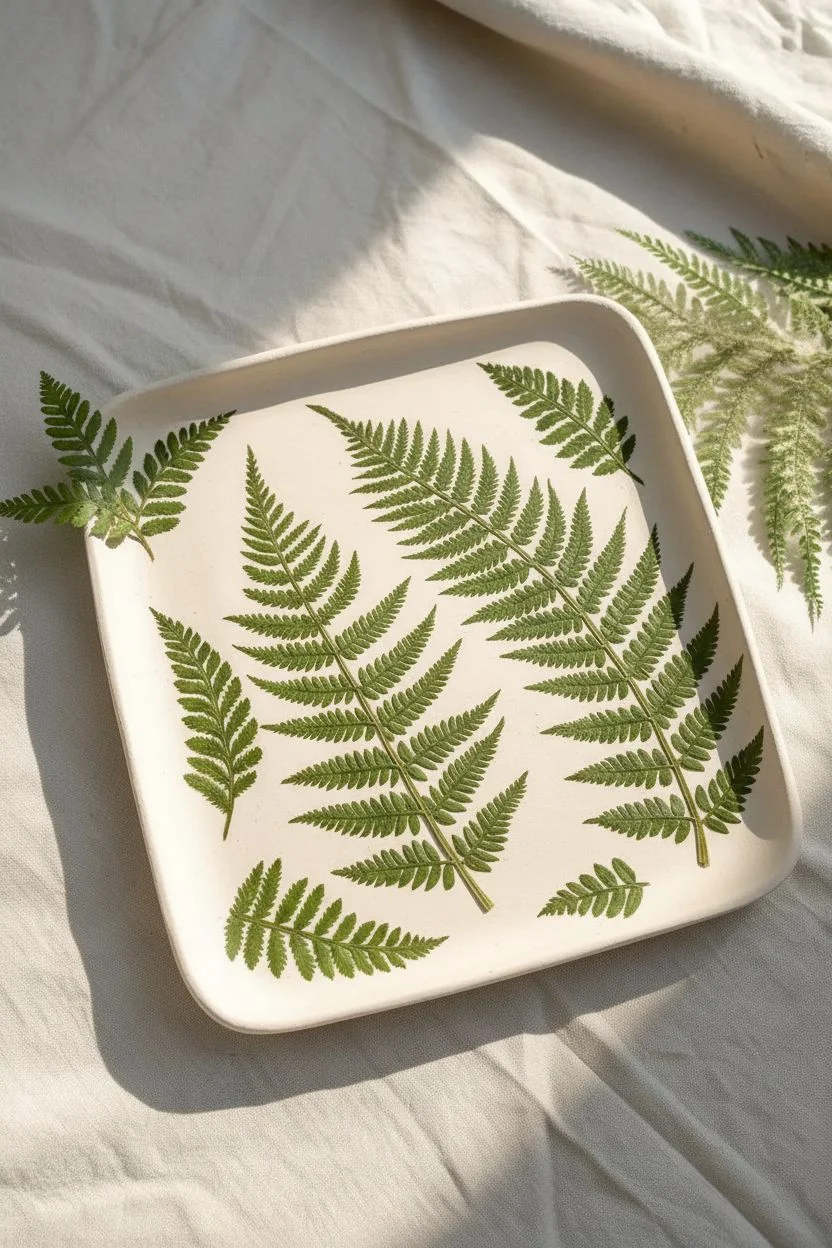
Capture the delicate beauty of nature with this striking negative space pottery project. using real leaves as a resist against deep green underglaze creates crisp, detailed botanical silhouettes on a handmade platter.
Detailed Instructions
Materials
- Leather-hard white clay slab
- Various fresh fern fronds
- Dark forest green underglaze
- Soft fan brush
- Synthetic sponge
- Pin tool or tweezers
- Rubber rib or smooth scraping tool
- Clear transparent glaze
- Rolling pin
Step 1: Preparation and Layout
-
Prepare the slab:
Roll out your white clay to about 1/4 inch thickness. Cut it into a rectangular shape and gently curve the edges upward to create a shallow tray form. -
Smooth the canvas:
Before adding any organic materials, use a rubber rib to compress and smooth the surface of the clay. A super-smooth surface ensures the leaves stick flat and keeps the paint lines sharp. -
Selecting foliage:
Choose fresh, flat fern fronds. Avoid dried or crinkly leaves, as they will crack when pressed and let paint seep underneath. -
Dry run composition:
Lay your dry ferns onto the clay to plan your design. Try arranging them at different angles, allowing some to ‘run off’ the edge of the plate for a natural look.
Bleeding Lines?
If paint seeped under a leaf, wait for the underglaze to be fully bone dry. Then, use a sharp needle tool to gently scratch the green speck off the white clay, restoring the crisp edge.
Step 2: Applying the Resist
-
Dampen the leaves:
Dip a fern into a bowl of water, then shake off the excess. The leaf should be damp and pliable, but not dripping wet. -
Adhere to clay:
Place the damp leaf onto the leather-hard clay in your desired position. Press it down gently with your fingers, starting from the stem and working outward. -
Seal the edges:
This is crucial: take a damp synthetic sponge and firmly pat over the entire leaf. Ensure every tiny leaflet tip is stuck flat against the clay. -
Repeat the process:
Continue dampening and pressing down the rest of your ferns until your composition is complete.
Level Up: Texture
After peeling the leaves, lighter veins might disappear. Use a needle tool to gently carve fine lines back into the white shapes, mimicking the fern’s natural ribbing for added realism.
Step 3: Painting and Reveal
-
First coat:
Load a soft fan brush with dark forest green underglaze. Apply a generous coat over the entire tray, painting right over the ferns. paint from the center of the leaves outward to avoid lifting the edges. -
Dry and repeat:
Let the first coat dry until it’s no longer shiny. Apply a second coat to ensure a solid, opaque green background. I like to apply a third thin coat just to be safe. -
Touch dry:
Allow the underglaze to dry to the touch. It should feel chalky, not cool or damp, before you proceed to the next step. -
Lift the stems:
Use a pin tool or tweezers to carefully lift the very tip of a fern stem. Do not dig into the clay; just catch the plant matter. -
The peel:
Slowly peel the fern away from the clay. The green underglaze will come off with the leaf, revealing the pristine white clay underneath. -
Clean up:
If any tiny specks of green paint bled under the leaves, gently scrape them away with your pin tool to clean up the silhouette.
Step 4: Finishing
-
Bisque fire:
Let the tray dry completely (slowly, to prevent warping) and fire it to bisque temperature (usually Cone 04). -
Glazing:
Dip the entire bisque-fired tray into a clear, transparent glaze. This will seal the piece and make the green color pop. -
Final fire:
Fire the piece again to your clay’s maturity temperature (e.g., Cone 6) to finish your functional artwork.
Enjoy using your botanical tray for serving or display, knowing those perfect details came straight from nature.


Classic Cobalt Blue Patterns


Keep it classic by transforming a plain bisque pitcher into a stunning heirloom inspired by historical Delftware patterns. Using deep cobalt blue against a creamy white background creates a crisp, elegant vessel perfect for holding wildflowers or iced tea.
Step-by-Step
Materials
- White bisque ceramic pitcher
- Cobalt blue underglaze
- Pencil (No. 2 or HB)
- Round brush (size 4)
- Detail/Liner brush (size 0 or 1)
- Damp sponge
- Water cup
- Clear glazing (for firing)
Step 1: Preparation & Mapping
-
Clean surface:
Wipe the entire bisque pitcher down with a damp sponge to remove any dust or oils that might repel the underglaze. -
Mark boundaries:
Using your pencil, lightly trace a horizontal line around the neck of the pitcher, about two inches down from the rim, to mark where the geometric border will sit. -
Sketch the main stem:
Draw a large, flowing S-curve starting from the bottom right and reaching up toward the left side of the pitcher body to act as the central vine. -
Outline foliage:
Draft jagged, lance-shaped leaves branching off the main stem, varying their angles to create movement. -
Place the bloom:
Sketch a large, circular flower shape near the base of the pitcher at the start of your vine.
Step 2: Painting the Flora
-
Mix consistency:
Ensure your cobalt underglaze is the consistency of heavy cream; add a drop of water if it feels too thick or draggy. -
Paint the stem:
Using the size 4 round brush, paint the main thick vine following your pencil line, applying steady pressure for a smooth stroke. -
Block in leaves:
Fill in the leaf shapes with the blue underglaze, leaving the edges slightly rough to mimic the serrated look of the botanical design. -
Add texture:
I like to leave small slivers of unpainted white space inside the larger leaves to suggest light hitting the foliage. -
Detail the flower:
Paint the petals of the bottom flower, working from the center outward, and stipple dot patterns in the center for a pollen texture.
Fixing Smudges
Don’t wipe wet mistakes! If you smudge blue on the white background, let it dry completely, then gently scrape it off with a craft knife or a toothpick.
Step 3: Fine Details
-
Switch brushes:
Move to your fine liner brush (size 0 or 1) for the delicate work. -
Add veining:
Paint thin, dark lines through the center of the dried blue leaves to create veins and depth. -
Create tendrils:
Paint swirling, curly tendrils branching off the main stem into the negative white spaces to fill out the design. -
Refine edges:
Use the liner brush to sharpen the tips of the leaves, giving them distinct points.
Pro Tip: Varying Tone
For a vintage watercolor look, water down your blue slightly for the leaves, then go back over with full-strength paint for the veins and outlines.
Step 4: Borders & Handle
-
Paint neck border:
Along your top pencil line, paint a row of repeating teardrop or petal shapes standing upright. -
Connect the pattern:
Paint a thin, solid line underneath the teardrops to anchor them, creating a continuous band. -
Decorate handle:
Run a single vine stroke down the spine of the handle, adding small, simple leaves on alternating sides. -
Bottom rim:
Paint a simple scalloped or wavy line around the very bottom edge of the pitcher to frame the artwork. -
Cleanup:
Check for any blue smudge marks on the white areas and gently scratch them away. -
Final dry:
Allow the underglaze to dry completely until it is chalky and matte before handing it off for clear glazing and firing.
Once fired with a glossy clear coat, your pitcher will shine with the charm of traditional countryside pottery
Wraparound Landscape Horizons
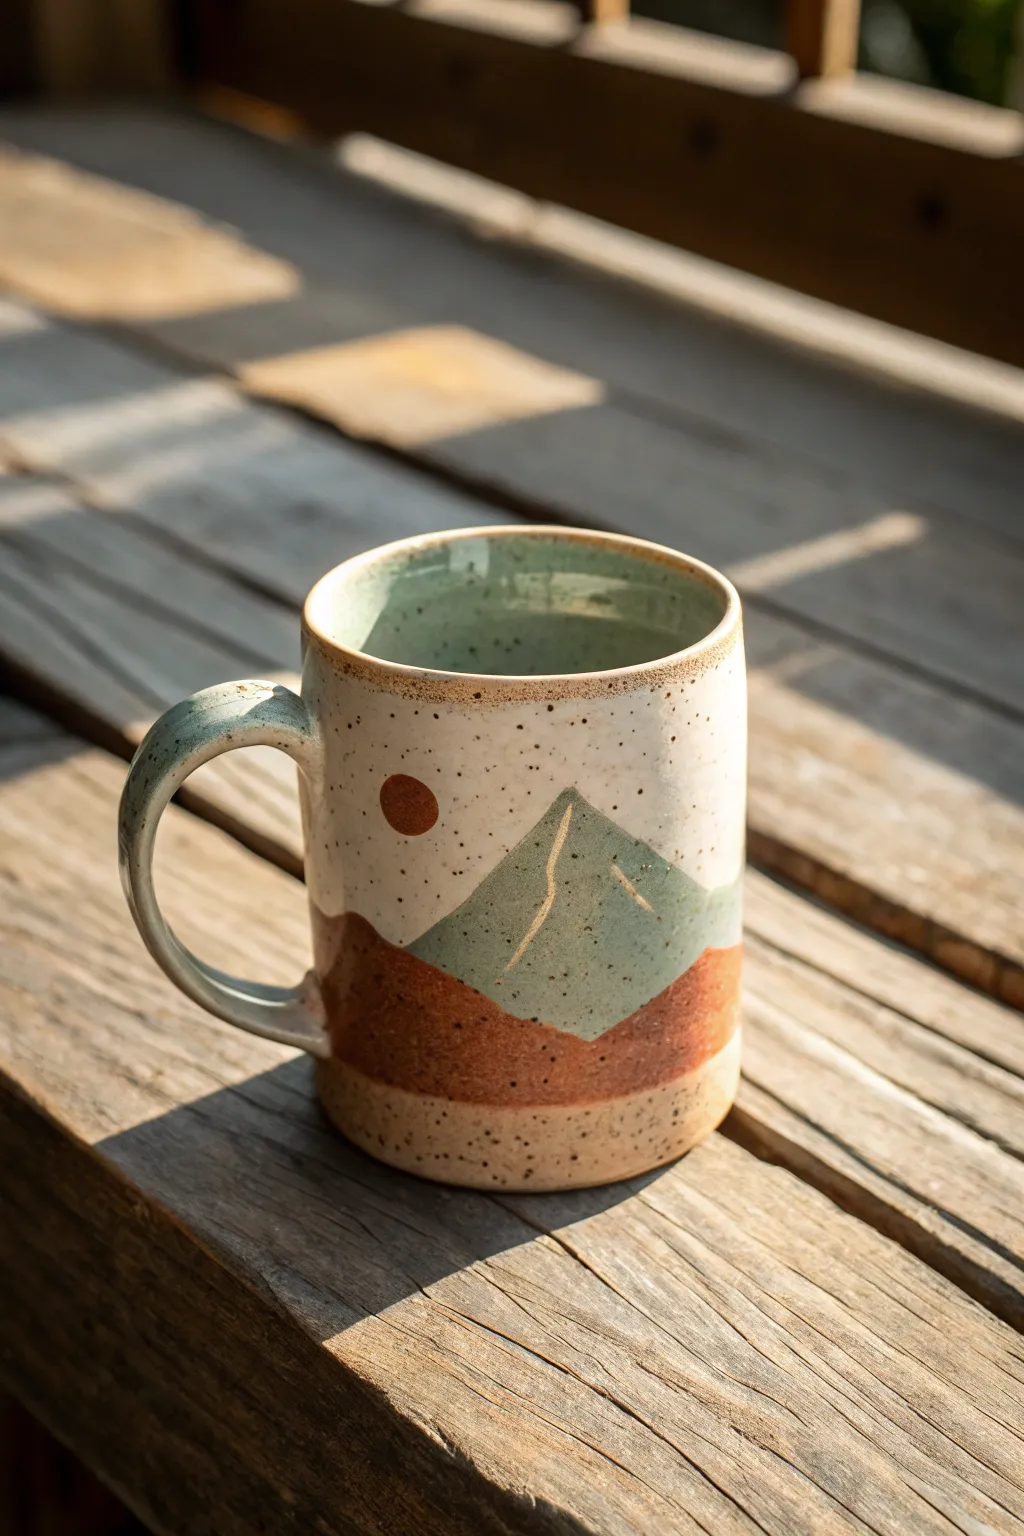
Capture the serenity of a mountain sunrise with this modern geometric landscape design. Using a combination of earthy terracotta and sage glazes against a speckled cream background, you will create a wraparound scene that feels both cozy and refined.
Step-by-Step Guide
Materials
- Bisque-fired ceramic mug (preferably speckled clay body)
- Damp sponge
- No. 2 pencil
- Glaze: Sage Green or Teal (sem-opaque)
- Glaze: Rusty Orange or Terracotta
- Glaze: Speckled Cream or Matte White
- Soft fan brush
- Small detail liner brush
- Flat shader brush
- Wax resist (optional)
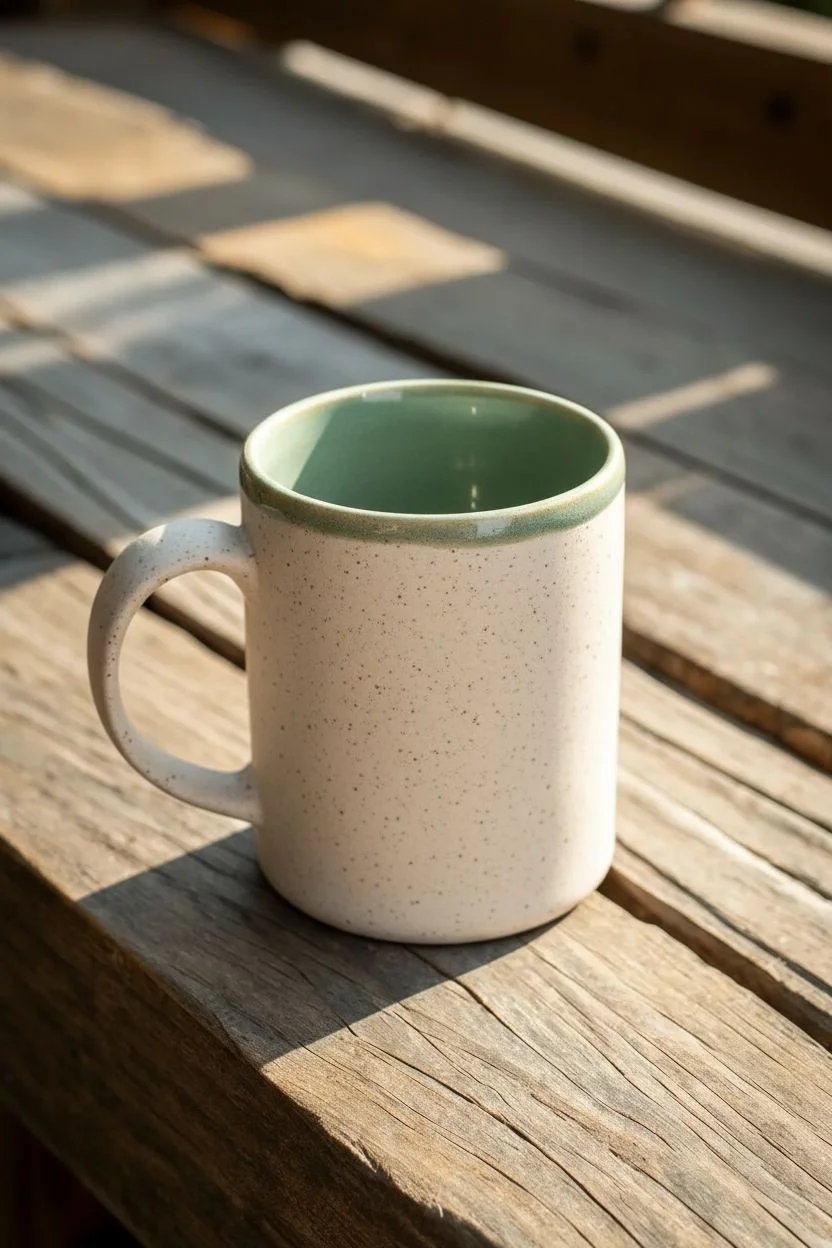
Step 1: Preparation & Interior
-
Clean surface:
Begin by gently wiping down your bisque mug with a damp sponge to remove any dust or oils that might repel the glaze. -
Glaze interior:
Pour a small amount of the Sage Green glaze into the mug, roll it around to coat the entire interior surface, and pour the excess back into your container. -
Wipe the rim:
Immediately use your damp sponge to wipe any excess green glaze off the rim, ensuring a clean edge for your exterior design.
Step 2: Mapping the Landscape
-
Sketch the horizon:
Using a No. 2 pencil, lightly sketch a horizon line about one-third of the way up from the bottom of the mug. Don’t worry, the graphite will burn off in the kiln. -
Draw features:
Draw a large triangle resting on the horizon line for your mountain, and a small circle hovering in the sky to the left for the sun. -
Block the sun:
Dip your detail brush into the Rusty Orange glaze and carefully fill in the sun circle. I like to apply this quite thick to get a rich color. -
Protect the sun:
Once the sun is dry to the touch, apply a coat of wax resist over the orange circle. This makes painting the sky much faster later on.
Fixing Smudges
If you accidentally paint over a line, don’t wipe it while wet! Let the mistake dry completely, then gently scratch the unwanted glaze off with a toothpick or needle tool before repainting.
Step 3: Painting the Scene
-
Paint the foreground:
Using a flat shader brush, fill in the area below your horizon line with three coats of the Rusty Orange glaze to create the rolling hills. -
Create the mountain:
Switch to a clean brush and fill in the triangle shape with the Sage Green glaze. Use vertical strokes to mimic the upward slope of the peak. -
Add texture:
While the second coat of green is still damp, lightly drag a dry brush through the center of the triangle to create the subtle textural streaks seen in the reference. -
Glaze the sky:
Dip a fan brush into the Speckled Cream glaze and apply it to the remaining ‘sky’ area of the mug. -
Cut in edges:
Use a smaller brush to carefully paint the Cream glaze right up to the edges of your mountain and hills, ensuring no bare bisque is left exposed between colors. -
Coat the background:
Apply two more coats of Speckled Cream to the sky area to ensure an even, opaque finish. -
Accent the handle:
For a cohesive look, brush a single, watery coat of the Sage Green glaze onto the handle to give it a tinted, rustic appearance.
Pro Tip: Pencil Guide
Make your sun perfect by tracing a coin or bottle cap with your pencil. The graphite marks act as a temporary barrier that helps keep your glaze flowing within the lines.
Step 4: Finishing Touches
-
Clean the foot:
Use a sponge to wipe the bottom of the mug and partially up the side of the foot completely clean of glaze. -
Inspect borders:
Check the points where your colors meet. If glazes have overlapped too heavily, gently scrape the excess with a crafting knife to prevent muddy colors during firing. -
Dry completely:
Allow the mug to dry overnight before load it into the kiln to ensure all moisture has evaporated from the clay.
Once fired, enjoy your morning coffee with a view of the mountains every single day.
Retro Checkerboard Grid
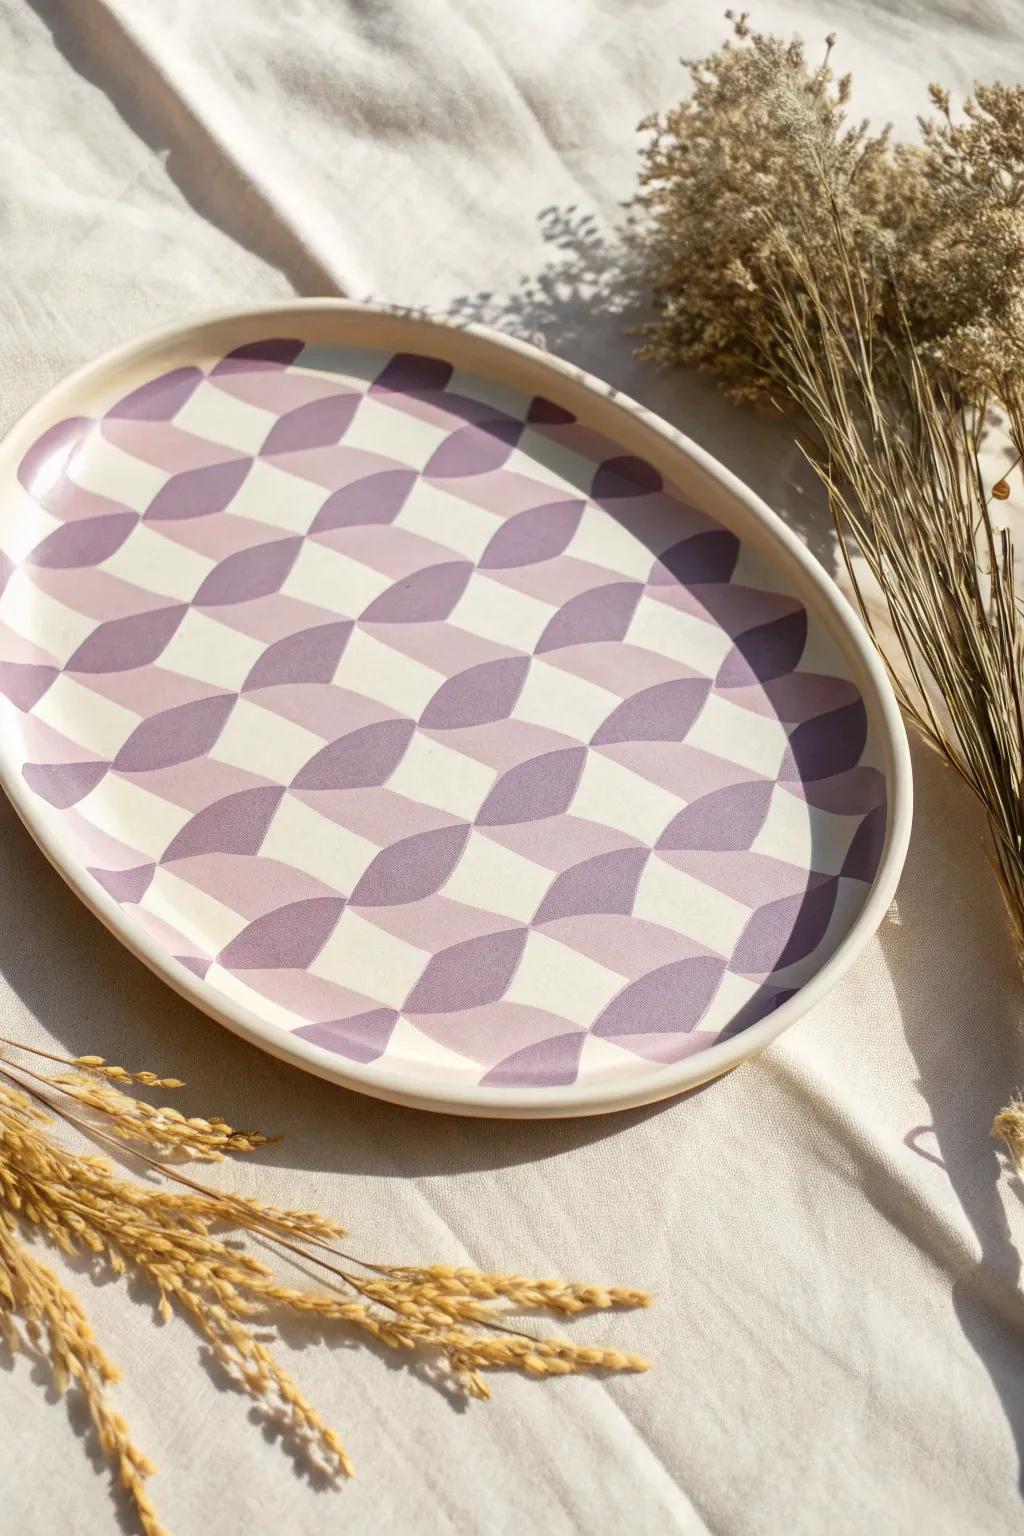
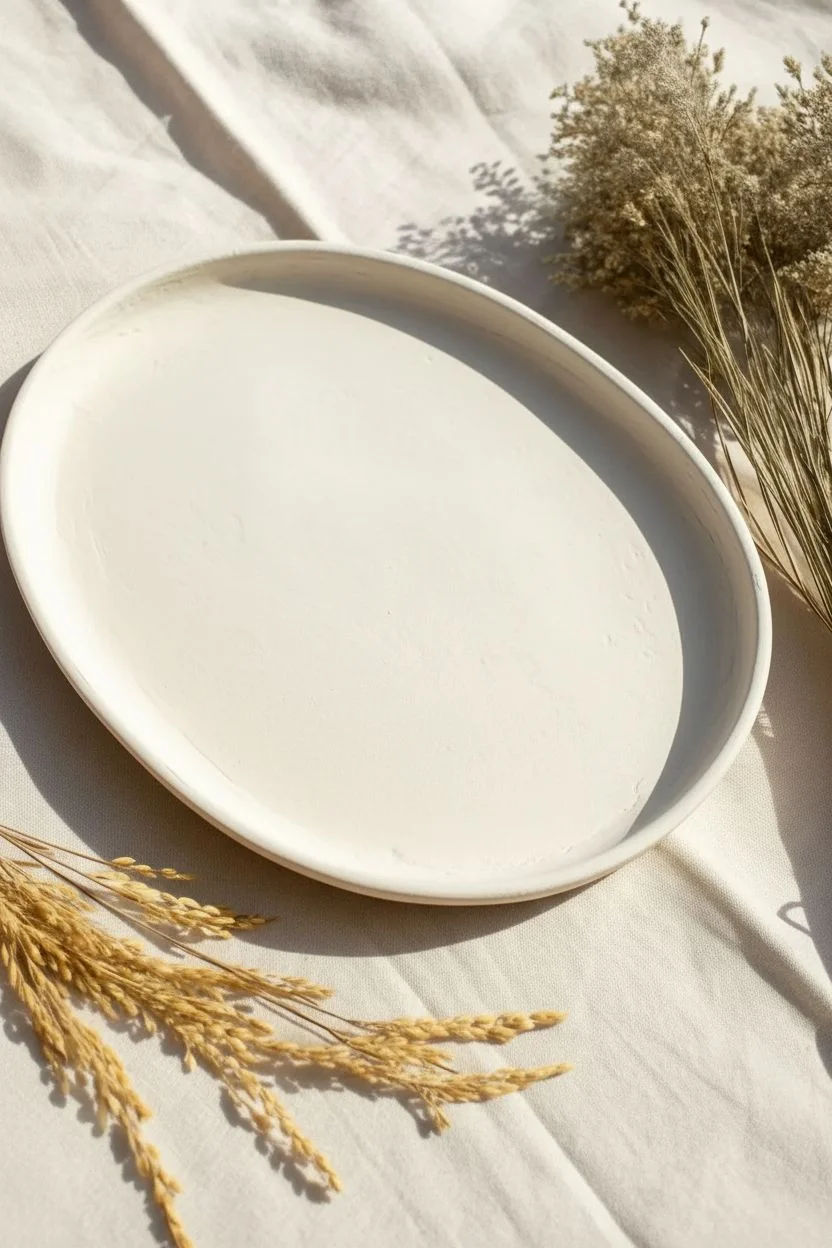
Bring a touch of the 1970s to your table with this optical illusion platter featuring soft purples and cream. The geometric “warped grid” design looks complex, but structurally, it is just a playful variation on a standard checkerboard.
Detailed Instructions
Materials
- Oval bisque ceramic platter
- Cream or Off-White underglaze
- Lilac/Lavender underglaze
- Deep Plum/Dark Purple underglaze
- Wide flat brush (for base coat)
- Round synthetic brush (size 4 or 6)
- Detail liner brush
- No. 2 pencil
- Bowl of water and sponge
Step 1: Preparing the Canvas
-
Clean the bisque:
Wipe down the entire platter with a damp sponge to remove any dust or debris that might repel the paint. -
Apply base color:
Using a wide flat brush, apply 3 even coats of Cream underglaze to the top of the platter. -
Let it dry:
Allow the base coat to dry completely until it is chalky and cool to the touch before moving to the sketching phase.
Step 2: Drafting the Warped Grid
-
Mark the center:
Using your pencil, lightly mark a small dot in the absolute center of the platter to anchor your design. -
Sketch vertical waves:
Draw curved, wavy lines running from the top edge to the bottom edge. Space them about 1.5 inches apart, allowing them to curve outward toward the rim. -
Sketch horizontal waves:
Draw wavy horizontal lines running from left to right, intersecting the vertical lines. Try to create a grid of ‘pillowy’ shapes rather than perfect squares. -
Analyze your grid:
Your lines should create two types of shapes: convex ‘almond’ shapes (like footballs) and concave ‘star’ shapes (four-pointed diamonds). We will be painting the almonds and leaving the stars white.
Don’t Sweat the Sketch
Don’t worry about visible graphite marks! Your pencil lines will burn away completely in the kiln, leaving only your clean paint lines behind.
Step 3: Painting the Pattern
-
Start with Dark Plum:
Load your round brush with the Deep Plum underglaze. Select a diagonal row of ‘almond’ shapes and paint them in. -
Continue the pattern:
Skip the next diagonal row of almonds, then paint the following row in Deep Plum. The result should look like diagonal stripes of dark almonds separated by unpainted rows. -
Switch to Lilac:
Clean your brush thoroughly or switch to a fresh one. Load it with the Lilac/Lavender underglaze. -
Fill the gaps:
Paint the remaining rows of empty ‘almond’ shapes with the Lilac color. -
Leave the negative space:
Ensure you are strictly painting the football/almond shapes; the four-pointed star shapes in between should remain the Cream base color. -
Apply second coats:
Go back over all your purple and lilac shapes with a second and third coat of underglaze to ensure the colors come out solid and opaque after firing.
Make it Luxe
For a high-end look, apply a thin line of real gold luster to the rim of the platter (requires a third, lower-temperature firing after the glaze firing).
Step 4: Refining and Finishing
-
Tidy the edges:
I like to use a slightly damp, stiff-bristled detail brush to gently ‘erase’ any purple paint that went outside the lines onto the cream background. -
Sharpen the points:
Use a liner brush with a tiny bit of Cream underglaze to touch up the tips where the almond shapes meet, ensuring the points look sharp and crisp. -
Check the rim:
Smooth out the paint along the rim of the platter with a damp sponge for a professional finish. -
Final dry:
Let the entire piece dry completely before handing it over for clear glazing and firing.
Once fired, this platter will serve as a stunning, retro-inspired centerpiece for your next dinner party.
Minimalist Continuous Line Art

Transform a plain ceramic vessel into a piece of modern art with this minimalist continuous line project. The contrast between the organic, speckled stone texture and the bold, fluid black lines creates a sophisticated, gallery-worthy look.
Step-by-Step
Materials
- Tall ceramic bisque or matte vase
- Cream or beige acrylic paint (chalk finish preferred)
- Black fluid acrylic paint or ceramic paint
- Fine liner brush (size 0 or 00)
- Old toothbrush (for texture)
- HB Pencil and eraser
- Matte clear sealant spray
- Palette for mixing
Step 1: Creating the Stone Texture
-
Clean surface:
Wipe down your vase with a damp cloth to remove any dust or oils, ensuring a clean bonding surface for the paint. -
Apply base coat:
Paint the entire exterior of the vase with your cream or beige chalk paint. You may need two coats for full opacity; let the first coat dry completely before applying the second. -
Create speckles:
Dip an old toothbrush into slightly watered-down brown or grey paint. Run your thumb across the bristles to flick tiny speckles onto the vase. -
Dry thoroughly:
Allow the vase to dry for at least an hour. The surface must be completely dry and hard before you attempt to draw on it.
Brush Control Tip
Improve your line quality by pulling the brush toward you rather than pushing it away. This helps maintain consistent pressure.
Step 2: Sketching the Design
-
Position the face:
Using a pencil with a light hand, mark the center of the vase where the nose profile will sit to ensure the face is centered. -
Sketch the profile:
Draw the forehead line curving down into the bridge of the nose, then extend it outward to form the tip of the nose. -
Define the mouth:
Continue the line downward from the nose, creating a small curve inward for the philtrum and outlining a full upper and lower lip. -
Draw the chin and neck:
Sweep the line back from the lip to form a soft chin, then draw a long, elegant S-curve downwards to create the neck and shoulder line. -
Add the eye:
Place a large, closed almond shape slightly back from the nose bridge to represent the eye, adding a downward curve for the lashes. -
Outline the hair:
Start a new line from the top of the forehead, sweeping up and around the side of the vase to suggest long, flowing hair framing the face. -
Add the botanical element:
Sketch a large leaf shape overlapping the forehead area almost like a headpiece, drawing a central spine through it. -
Detail the leaf:
Lightly sketch the veins extending from the central spine of the leaf to the outer edges.
Step 3: Painting the Lines
-
Prepare the paint:
Thin your black acrylic paint with a tiny amount of water until it has an ink-like consistency. I prefer to test clarity on a scrap paper first. -
Load the brush:
Fully saturate your fine liner brush with the thinned black paint, twirling the tip on your palette to keep it sharp. -
Paint the profile:
Begin at the top of the forehead and trace your pencil lines down the nose and lips. Use your pinky finger against the dry vase for stability. -
Complete the neck:
Reload your brush and continue the fluid line from the chin down the neck in one confident stroke if possible. -
Fill the eye:
Carefully trace the heavy eyelids. Thickening the upper line slightly adds visual weight and makes the expression more serene. -
Trace the hair:
Paint the long sweeping hair line. It’s okay if line width varies slightly; it adds to the hand-painted charm. -
Outline the leaf:
Trace the outer perimeter of the leaf shape located at the forehead. -
Detail the veins:
Using the very tip of your brush, paint the internal veins of the leaf with delicate, thin strokes. -
Add the rim detail:
Paint a solid black line around the very top neck of the vase, just below where the rim flares out, to frame the artwork.
Level Up: Gold Accent
Paint the leaf shape with liquid gold leaf or metallic bronze paint instead of black outline for a luxurious mixed-media effect.
Step 4: Finishing Up
-
Erase guidelines:
Once the black paint is bone dry (give it at least 30 minutes), gently erase any visible pencil marks. -
Seal the artwork:
Spray the vase with a matte clear sealant to protect your paint from chipping and to unify the surface sheen.
Place your finished vase near a window where natural light can highlight the textures and your beautiful line work.
Bubble Glazing Texture
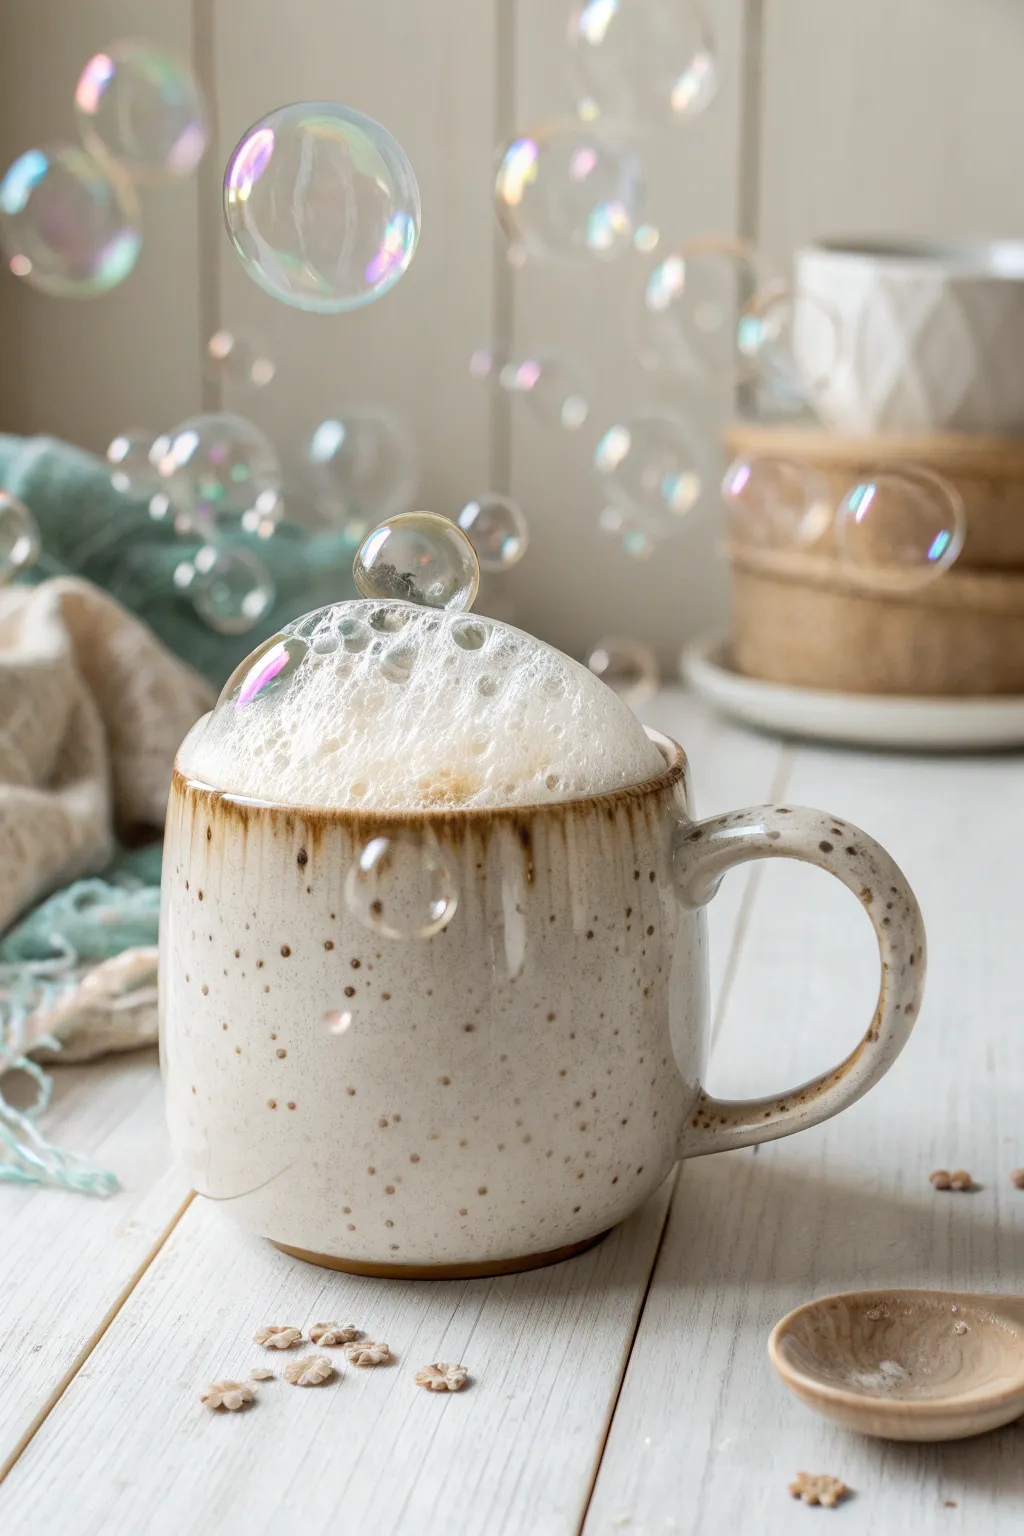

Transform a plain piece of bisque ware into an effervescent work of art using the fun and unpredictable bubble glazing technique. This method creates organic, cellular patterns that look like sea foam frozen in time.
Step-by-Step Tutorial
Materials
- Bisque-fired ceramic mug
- Cream or white speckled stoneware glaze
- Contrast glaze (rust, brown, or teal)
- Liquid dish soap
- Small plastic cup
- Drinking straw
- Soft fan brush
- Sponge
- Wax resist
- Kiln access
Step 1: Preparation & Base Coat
-
Clean the bisque:
Start by wiping your bisque mug with a slightly damp sponge to remove any kiln dust or oils from your hands, ensuring a clean surface for adhesion. -
Protect the foot:
Apply a coat of liquid wax resist to the bottom foot ring of the mug and about 2mm up the side to prevent glaze from running onto the kiln shelf. -
Prepare base glaze:
Mix your main speckled cream glaze thoroughly until it reaches the consistency of heavy cream. -
Glaze the interior:
Pour the cream glaze inside the mug, rotate it to coat the entire inner surface, and pour the excess back into your bucket. -
Clean the rim:
Use a damp sponge or finger to gently wipe any drips off the rim to ensure a smooth transition for the exterior coat. -
Apply first exterior coat:
Using a soft fan brush, apply a smooth, even layer of the cream glaze to the outside of the mug. -
Dry and repeat:
Allow the first coat to dry until it’s cool to the touch but no longer tacky. Apply a second and third coat to ensure full opacity.
Sad Bubbles?
If bubbles pop too fast without leaving color, your mix is too thin. Add a teaspoon of thick glaze to the cup. The bubbles need pigment weight to leave a mark.
Step 2: Bubble Texture Application
-
Mix the bubble solution:
In a small plastic cup, mix about two tablespoons of your contrast glaze (rust or brown) with one tablespoon of water. -
Add the soap:
Squeeze a generous amount of liquid dish soap into the thinned glaze mixture—roughly a teaspoon creates good suds. -
Create the foam:
Insert your drinking straw into the cup and blow gently to create a mountain of bubbles rising above the rim of the cup. -
Safety check:
Be very careful to only blow out; I always remind myself to take deep breaths away from the straw prevents accidental inhalation of raw glaze material. -
Apply to the mug:
Quickly tilt the cup over your mug so the foam spills onto the rim and upper section of the piece. You can also use a spoon to scoop the bubbles onto specific areas. -
Let them settle:
Allow the bubbles to sit on the surface undisturbed. As they pop naturally, they will deposit the pigment in ring-like patterns. -
Layering density:
If you want a denser texture, wait for the first round of bubbles to pop and dry slightly, then apply a second layer of foam.
Step 3: Finishing & Firing
-
Clean up drips:
Check the bottom of the mug again. If the bubble mixture dripped down to the foot, wipe it away cleanly with a sponge. -
Final drying:
Let the mug dry completely overnight. The bubble texture might look powdery and fragile, so handle the rim carefully. -
Load the kiln:
Place the mug in the kiln, ensuring it doesn’t touch other pieces, as the bubble glaze can sometimes be a bit active. -
Fire:
Fire the piece simply according to your clay and glaze specifications (typically Cone 5 or 6 for stoneware) to melt the texture into the base glaze.
Level Up: Double Dip
Create depth by using two different bubble colors. Apply a layer of dark brown bubbles first, let dry, then top with a lighter tan bubble mix for a 3D effect.
Enjoy your morning coffee in a mug that perfectly captures the beauty of sea foam and bubbles.
Hidden Interior Surprises
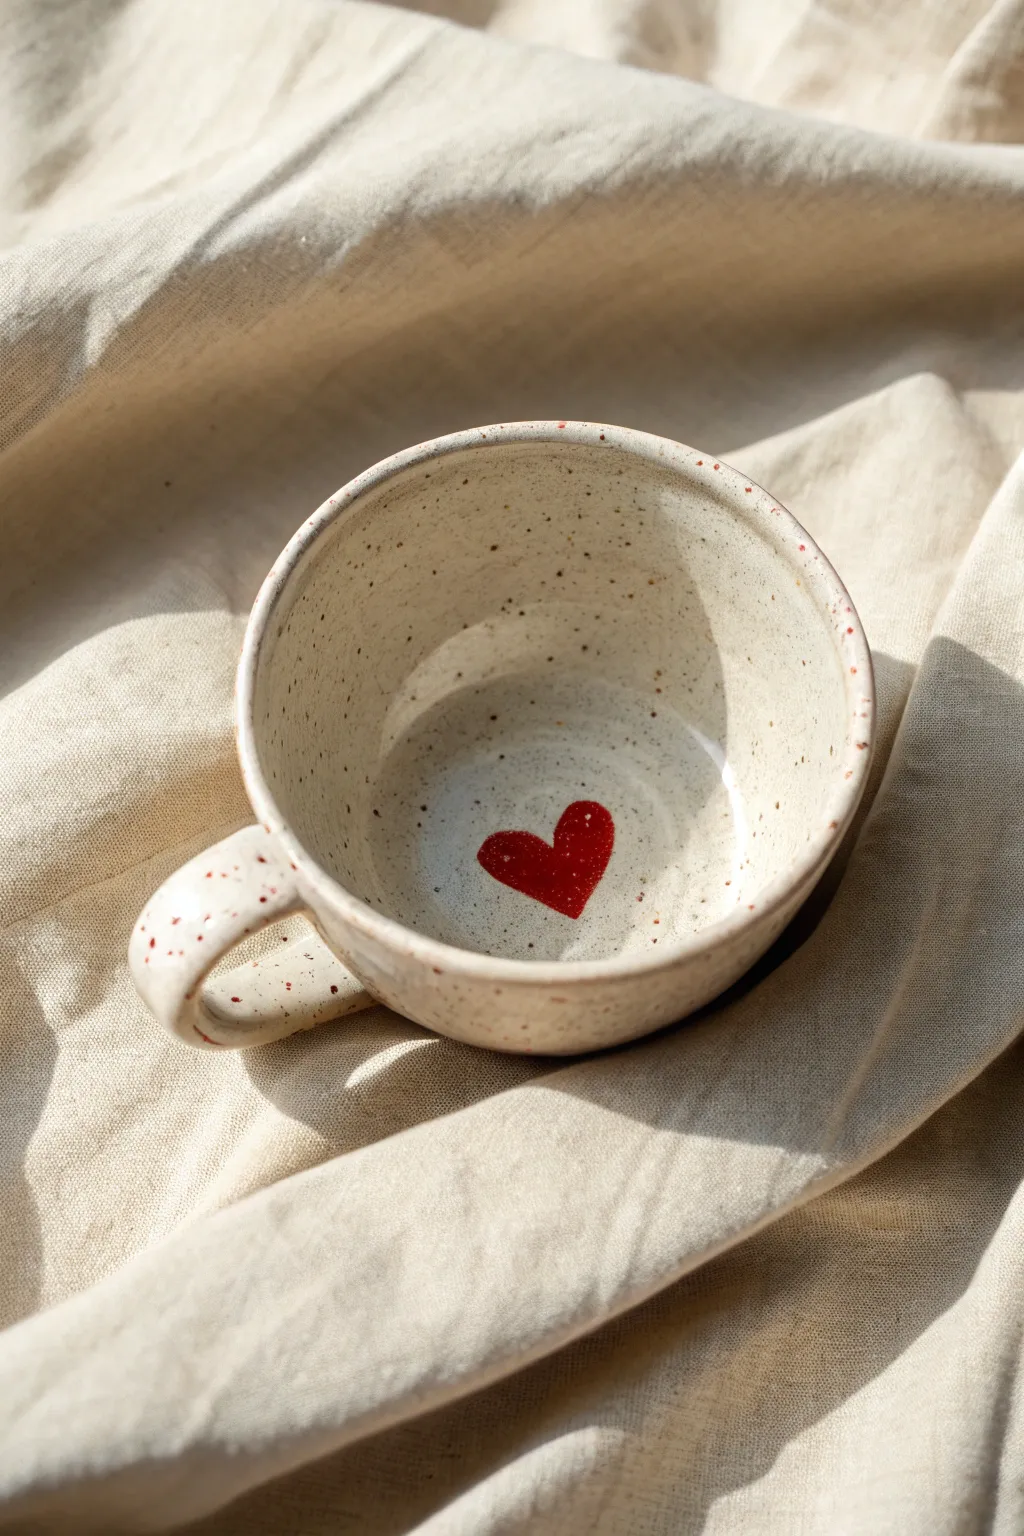

Create a delightful morning surprise with this speckled ceramic mug that reveals a hidden motive as you sip. Using a warm, creamy glaze with built-in speckles and a pop of bright red, you’ll achieve a cozy, rustic aesthetic perfect for gift-giving.
Detailed Instructions
Materials
- Bisque ceramic mug
- Bright red underglaze
- Speckled cream/oatmeal glaze (cone 06 or 6)
- Small round detail brush (size 2 or 4)
- Wide fan brush or glaze mop
- Wax resist
- Damp sponge
- Bowl of water
Step 1: Painting the Surprise
-
Surface Prep:
Begin by wiping down your bisque mug with a clean, damp sponge to remove any dust or oils that might repel the glaze. -
Brush Choice:
Select a long-handled brush if possible; this makes it significantly easier to reach the bottom of the mug without smudging the sides with your knuckles. -
Outline the Shape:
Dip your detail brush into the red underglaze and carefully paint a small ‘V’ shape in the direct center of the interior floor to establish the bottom of the heart. -
Fill the Heart:
Round out the top lobes of the heart, filling in the shape completely. Don’t worry about texture yet; just get the shape defined. -
Layering Red:
Let the first coat dry until matte, then apply a second layer of red underglaze. I like to do a third coat to ensure the red pops vividly against the cream background. -
Protecting the Design:
Once the red underglaze is bone dry, carefully paint a layer of wax resist exactly over the heart shape. This will prevent the main glaze from covering your artwork. -
Wax Drying:
Allow the wax resist to dry completely; it usually darkens slightly and feels firm to the touch when ready.
Clean Lines
If you don’t have wax resist, you can paint the cream glaze around the heart, but leave a tiny gap. Then, carefully fill that gap with a small brush for a seamless look.
Step 2: Glazing the Vessel
-
Mixing the Glaze:
Shake or stir your speckled cream glaze vigorously. The heavy speckle particles tend to sink to the bottom, and you want an even distribution. -
Interior Pour:
Pour a generous amount of the cream glaze into the mug, filling it about one-third of the way full. -
Roll and Coat:
Rotate the mug slowly in your hands, angling it so the glaze rolls up the sides and coats the entire interior surface evenly. -
Pour Out:
Pour the excess glaze back into the bottle while rotating the mug to ensure no drips form a thick ridge near the rim. -
Clean the Heart:
Check the waxed heart inside. If beads of cream glaze are sitting on top of the wax, gently wipe them away with a damp finger or sponge so the red stays clean. -
Exterior Coat One:
Using a fan brush, apply the first coat of speckled glaze to the outside of the mug. Use long, smooth strokes to minimize brush marks. -
Handle Detail:
Dab the brush carefully into the crevices of the handle, ensuring the connection points are fully covered. -
Exterior Coat Two:
Wait for the first coat to lose its sheen, then apply a second coat moving in a cross-hatch direction (perpendicular to the first layer) for better coverage. -
Exterior Coat Three:
Apply a final third coat to the exterior. This ensures the glaze is opaque and the speckles have enough depth to develop properly in the kiln. -
Rim Cleanup:
Run a damp finger lightly around the rim to smooth out any heavy drips or sharp edges where the interior and exterior glazes meet. -
Foot Ring:
Clean the bottom foot of the mug with a sponge, removing all glaze where the piece will touch the kiln shelf.
Level Up
Personalize the surprise by painting the recipient’s initials or a tiny date inside the heart using a fine liner brush and black underglaze before waxing.
Once fired, sit back with a warm drink and enjoy the sweet reveal waiting at the bottom of your cup.
Sgraffito Scratching Technique
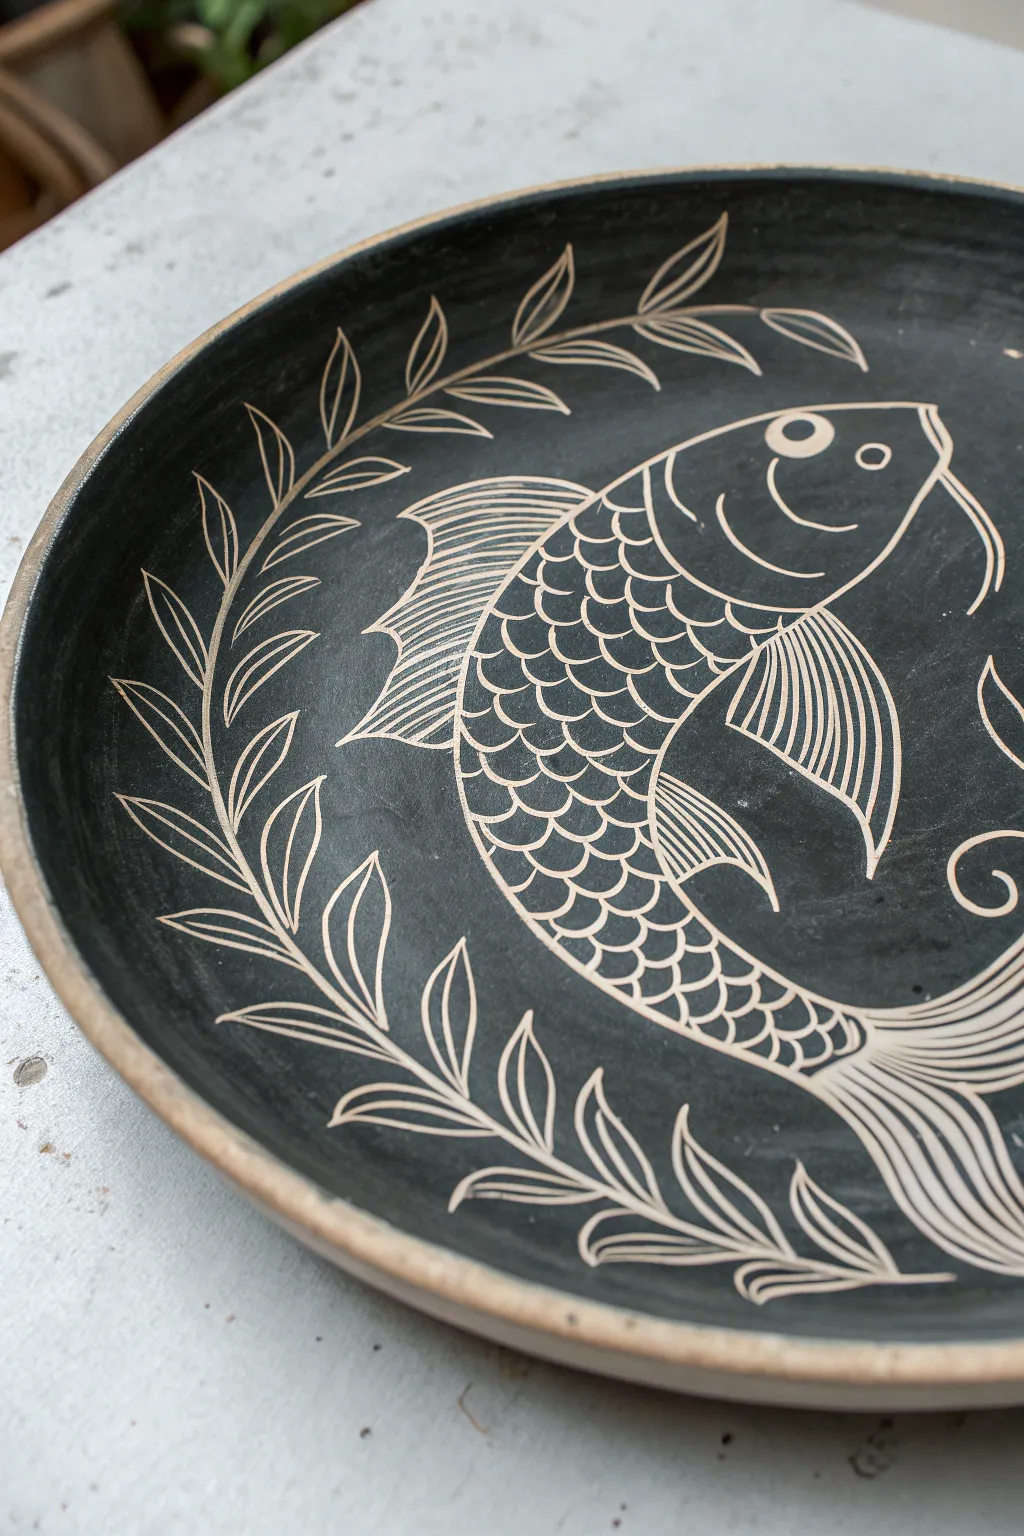
This stunning project utilizes the sgraffito technique to reveal the bright white clay body beneath a matte black surface. It is a satisfying subtractive process that transforms a simple leather-hard plate into a high-contrast aquatic masterpiece.
Step-by-Step Guide
Materials
- Leather-hard clay plate (white clay body)
- Black underglaze
- Soft fan brush
- Sgraffito tool (small wire loop or stylus)
- Pencil
- Tracing paper (optional)
- Soft, fluffy brush (for cleanup)
- Clear transparent glaze
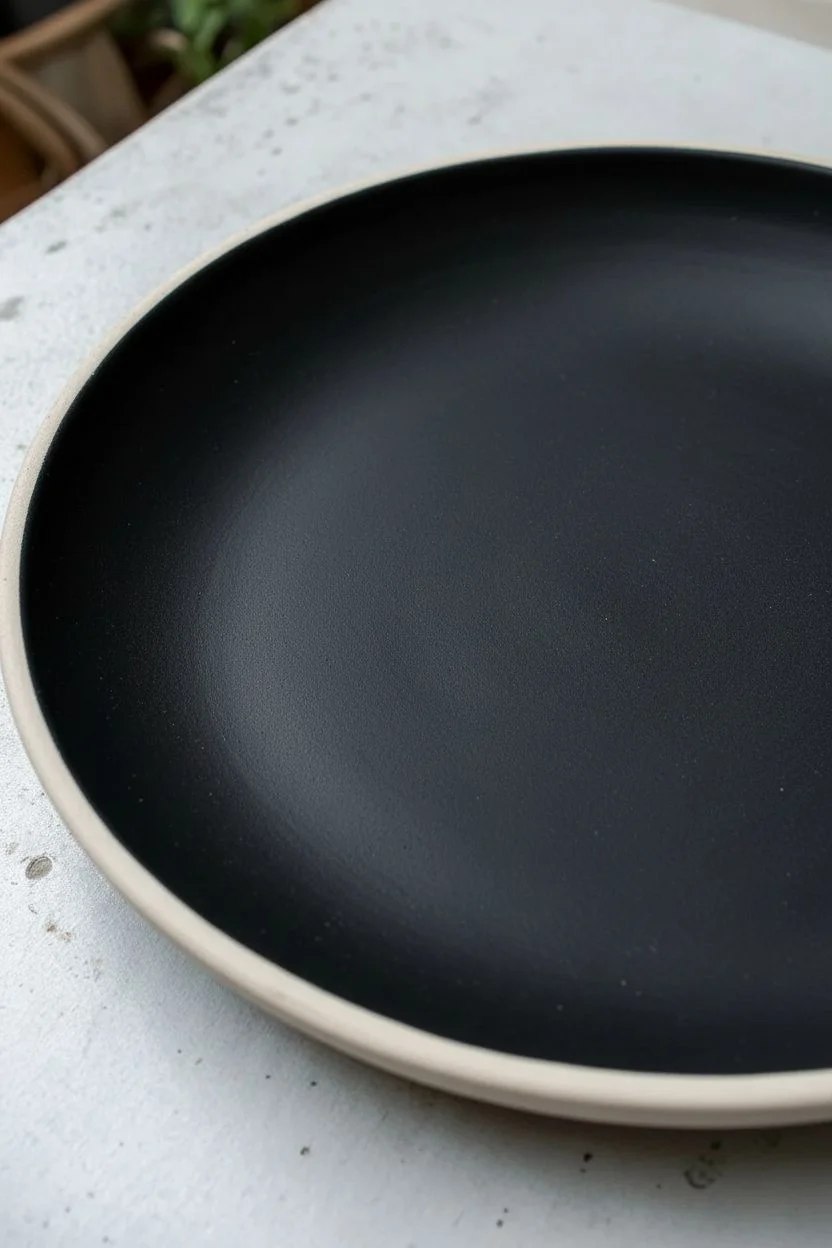
Step 1: Preparing the Canvas
-
Smoothen surfaces:
Begin with a leather-hard clay plate. Use a slightly damp sponge to wipe down the surface, ensuring the rim is smooth and free of any grog or rough texture. -
Apply base color:
Using a soft fan brush, apply a generous coat of black underglaze to the entire interior surface of the plate. -
Layering:
Once the first coat loses its wet sheen, apply a second coat crosswise to ensure opaque, solid coverage. -
Drying time:
Allow the underglaze to dry until the surface is cool to the touch but no longer tacky. The clay underneath should still be leather-hard, not bone dry.
Clean Sweep
Never blow the clay crumbs away with your breath, as this puts silica dust in the air. Instead, keep a large, fluffy makeup brush handy to gently sweep debris into a trash bin.
Step 2: Drafting the Design
-
Outline loosely:
Using a regular pencil, lightly sketch the outline of the fish and the border vines directly onto the black underglaze. The graphite will shine slightly against the matte black, acting as a guide. -
Define the fish body:
Start carving by outlining the main torpedo shape of the fish with your sgraffito tool. Use steady pressure to cut through the black layer just enough to reveal the white clay. -
Carve facial features:
Scratch out a round eye near the front, leaving a small black dot in the center for the pupil. Add a curved line for the gill plate and a simple arc for the mouth. -
Add whiskers:
Carve two flowing, curved lines extending from the mouth area to create the long, elegant whiskers characteristic of carp or catfish designs.
Chipping Lines?
If the black underglaze chips off in jagged chunks rather than smooth lines, your clay is likely too dry. Mist the plate lightly with water and wrap it in plastic for an hour to rehydrate.
Step 3: Adding Texture and Detail
-
Outline the fins:
Carve the shapes of the dorsal (top), pectoral (side), and tail fins, giving them slightly jagged or wavy edges. -
Fin striations:
Fill the fin shapes with closely spaced parallel lines that follow the curve of the fin, leaving thin black lines between your scratches for definition. -
Create the scales:
Starting near the head, carve overlapping ‘U’ or scallop shapes to create the scales. I find it easiest to work in rows moving toward the tail to keep the spacing consistent. -
Continue the pattern:
Maintain the scale pattern all the way to the tail, allowing the scales to get slightly smaller as you approach the caudal fin.
Step 4: Border and Finishing
-
Carve the stems:
For the border, carve a continuous fluid line that curves around the left and bottom edges of the plate to form the main vine stem. -
Add leaves:
Carve almond-shaped outlines branching off the main stem. Keep the leaves simple and spaced somewhat evenly. -
Leaf detailing:
Add a single central vein line down the middle of each leaf outline to tie the border style in with the detailed fish. -
Clean off burrs:
Once the carving is complete, use a soft, dry brush to gently sweep away all the carved-out clay crumbs (burrs) without smudging the black underglaze. -
Bisque fire:
Allow the plate to dry completely to the bone-dry stage, then slow-fire it in a bisque kiln. -
Glaze and final fire:
Apply a coat of clear transparent glaze over the entire piece and fire it again to your clay body’s maturation temperature to make it food safe.
Enjoy using your striking high-contrast plate or displaying it as a piece of wall art
The Cohesive Breakfast Set
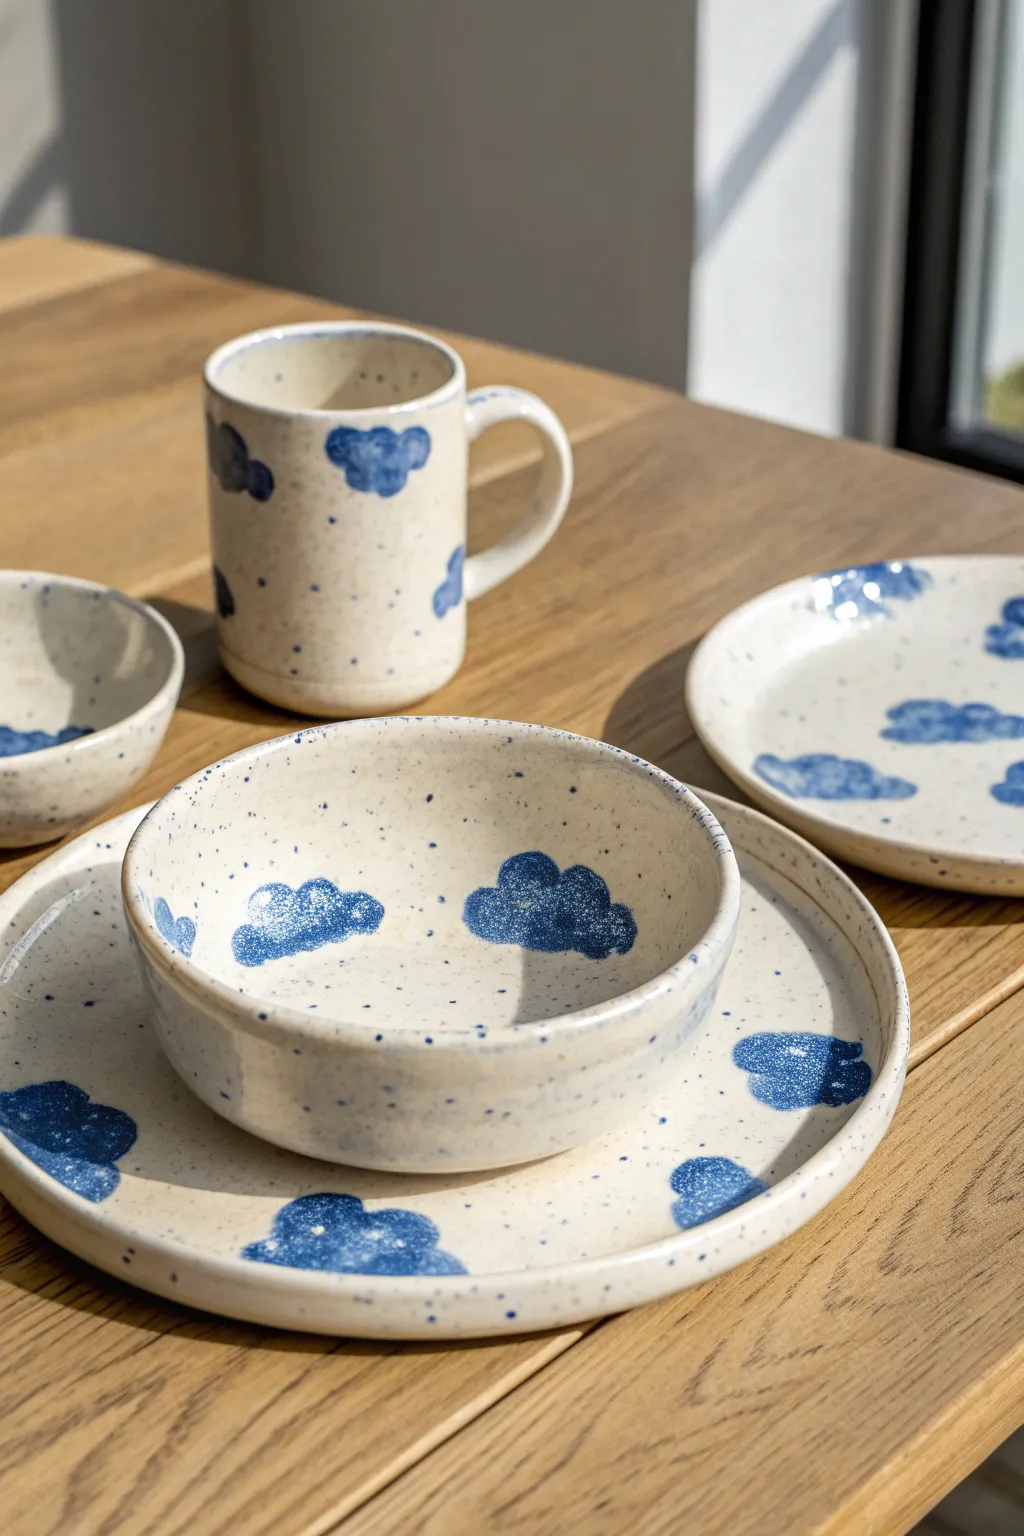
Turn your morning routine into a whimsical experience with this cohesive ceramic set featuring fluffy blue clouds on a speckled cream background. The organic shapes and scattered speckles give these pieces a trendy, hand-thrown pottery feel that looks cozy on any table.
How-To Guide
Materials
- Bisque pottery set (mug, bowl, plate)
- Cream or Off-White underglaze
- Medium ‘Denim’ Blue underglaze
- Dark Brown underglaze (diluted)
- Fan brush
- Round synthetic brush
- Old toothbrush
- Pencil
- Clear glaze
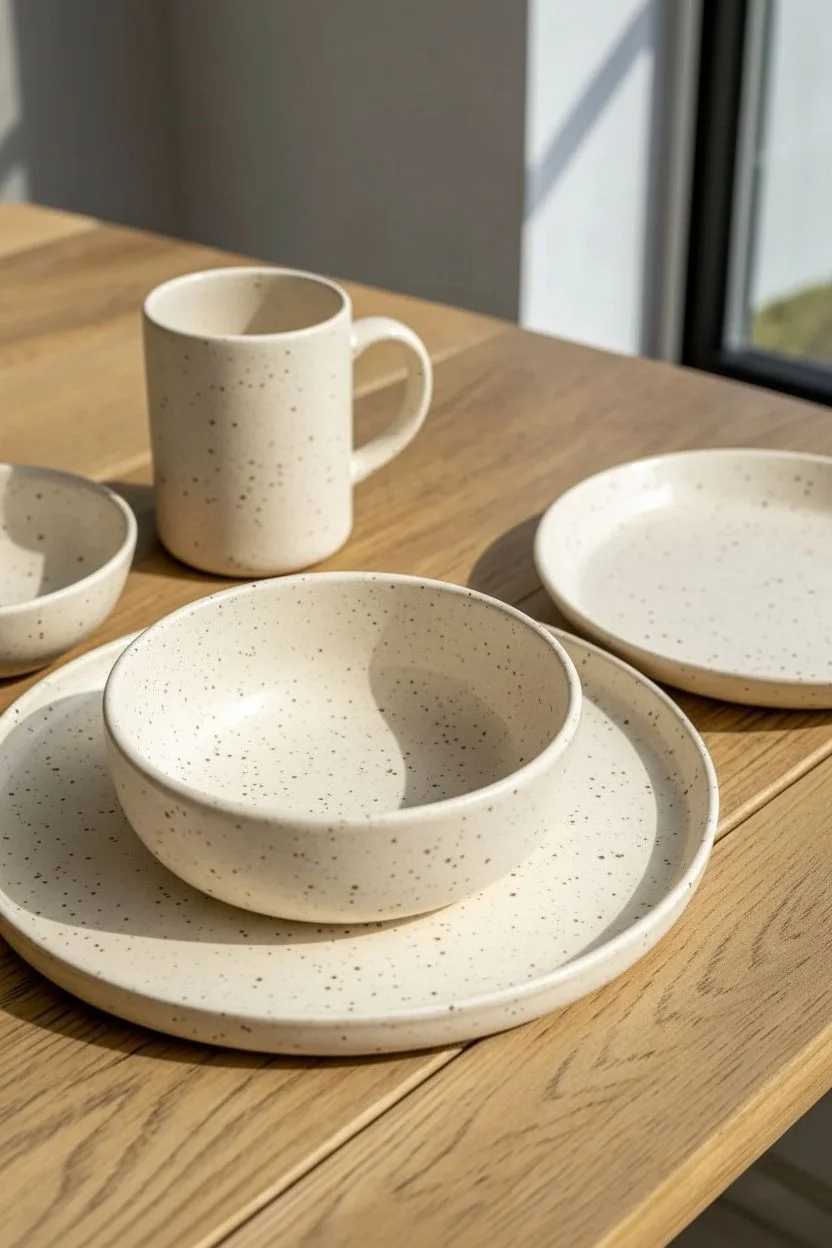
Step 1: Creating the Faux-Stone Base
-
Clean the bisque:
Wipe down your mug, bowl, and plate with a damp sponge to remove any dust that might resist the paint. -
Apply base color:
Using a fan brush, apply a smooth coat of cream or off-white underglaze to the entire surface of all pieces. -
Layer the opacity:
Once the first coat is dry to the touch, apply a second and third coat. You want a solid, opaque background so the white bisque doesn’t show through. -
Prepare the speckle mix:
Dilute a small amount of dark brown underglaze with water until it reaches an inky consistency. -
Test your splatter:
Dip an old toothbrush into the brown mix and run your thumb over the bristles to spray a test sheet, ensuring a fine mist of dots. -
Apply background speckles:
Gently flick the toothbrush bristles to splatter fine brown dots over all the pieces. I like to do this inside a cardboard box to contain the mess. -
Dry completely:
Allow the speckled base to dry fully before moving on to the design phase to prevent smearing.
Pro Tip: Edge Work
When painting clouds near the rim, paint over the edge just slightly. This ‘bleeding’ effect makes the pattern feel continuous rather than stamped on.
Step 2: Forecast: Cloudy
-
Sketch the layout:
Lightly draw cloud outlines with a pencil. Vary the sizes and let some drift off the edges of the plates and mug for a natural look. -
Plan the composition:
Space the clouds out generously—leave plenty of negative space to let that lovely speckled background shine through. -
Start painting clouds:
Dip a round brush into the denim blue underglaze. Outline the scalloped edges of your first cloud. -
Fill the shapes:
Fill in the cloud bodies. Don’t worry about perfect smoothness; a slightly uneven application adds to the organic, painterly texture. -
Add a second blue layer:
Apply a second coat of blue to the clouds to deepen the color, ensuring the creamy background doesn’t wash them out. -
Wrap the design:
For the mug and bowl, ensure some clouds wrap around the curvature or dip slightly inside the rim for continuity.
Level Up: Sponge Clouds
Instead of painting with a brush, cut a small kitchen sponge into a cloud shape. Use it to stamp the blue paint for an instantly fluffy, textured look.
Step 3: Finishing Touches
-
Mix blue splatter:
Dilute a drop of your blue underglaze with water, just like you did for the brown earlier. -
Add blue accents:
Using a stiff brush or toothbrush, flick a few larger blue droplets around the clouds to tie the color palette together. -
Clean up:
If any blue splatter landed in unwanted areas, gently scrape it away with a scratch tool or damp Q-tip. -
Final dry:
Let all the underglaze dry completely until it’s chalky and matte. -
Glaze and fire:
Dip or brush a clear gloss glaze over the entire piece and fire according to the glaze manufacturer’s instructions.
Unload the kiln and enjoy your dreamy, sky-blue breakfast set every morning


Have a question or want to share your own experience? I'd love to hear from you in the comments below!