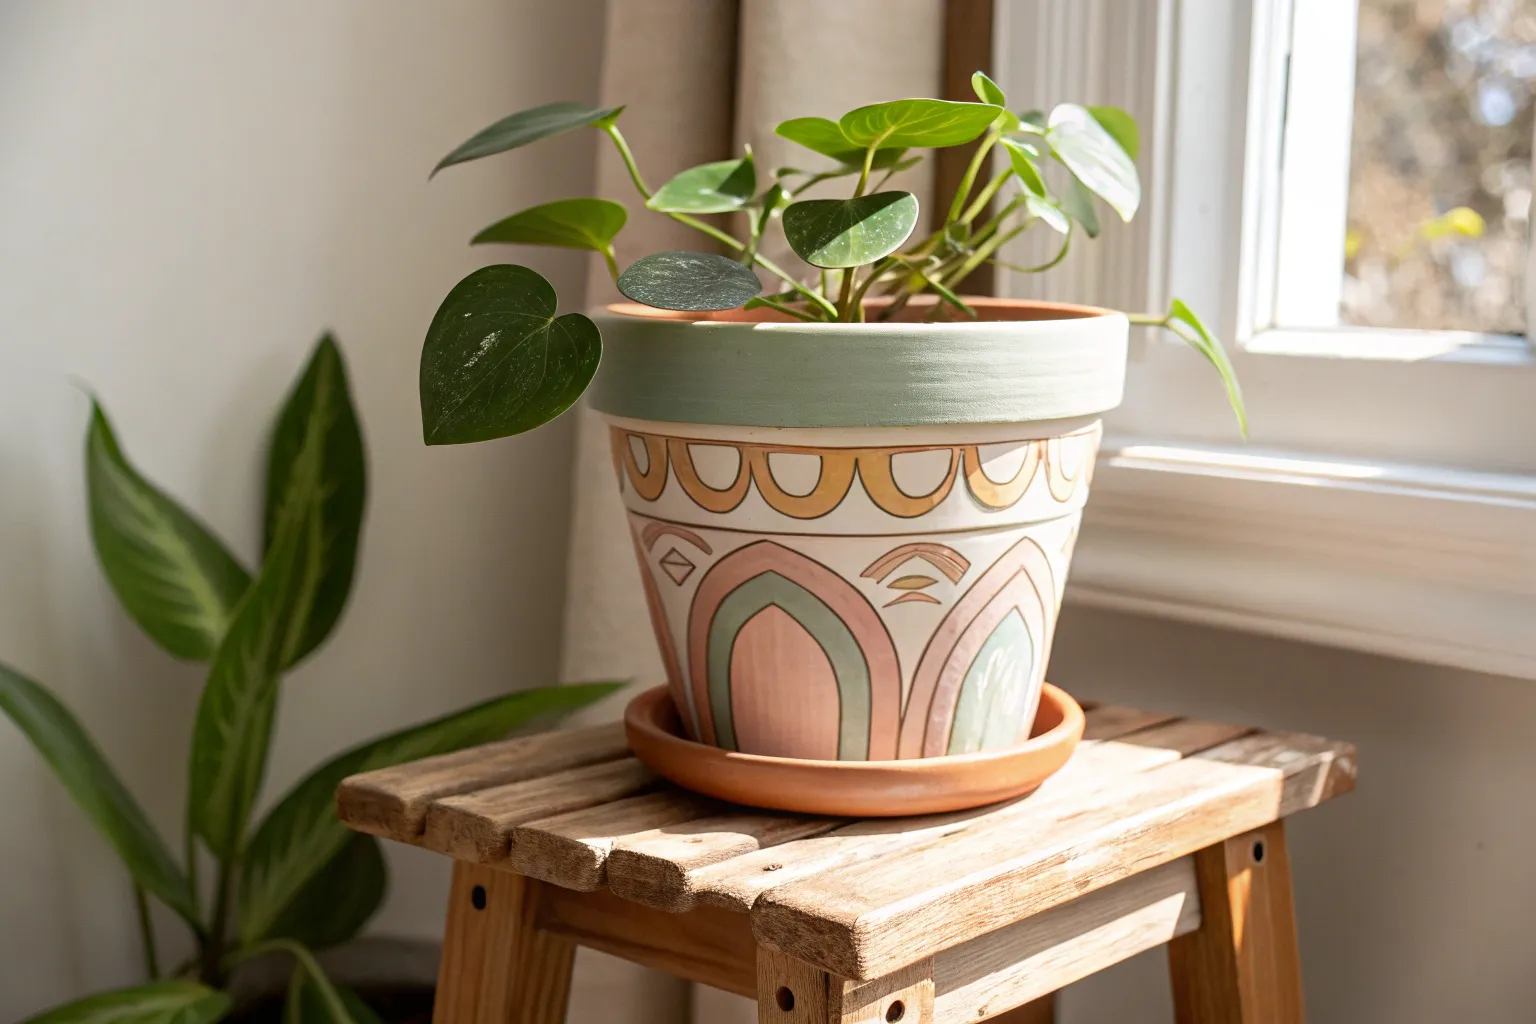
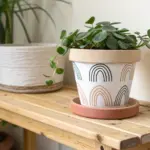
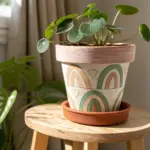
Transforming plain terracotta into art is one of my favorite ways to add personality to a creative space or sunny windowsill. It is amazing how a simple coat of paint can turn a humble planter into a custom statement piece that perfectly highlights your indoor garden.
Geometric Color Blocking
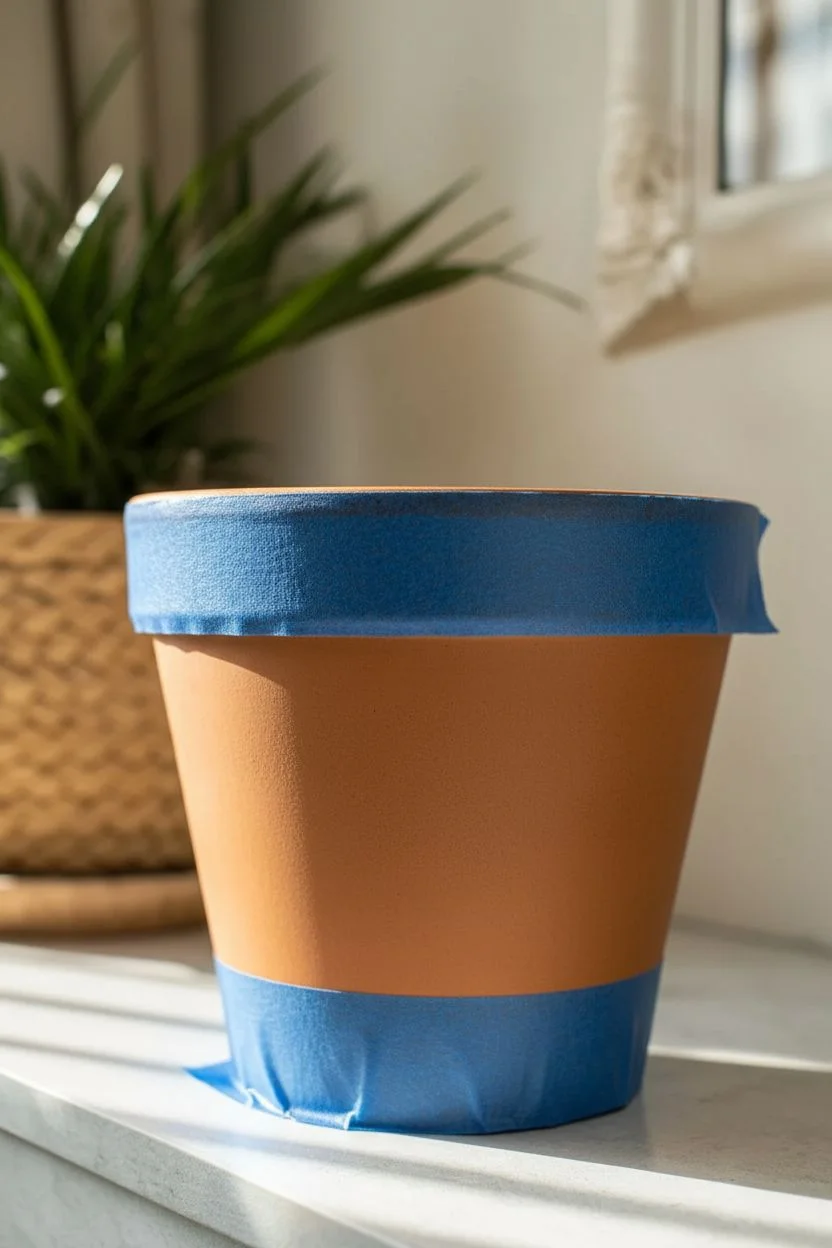
Transform a plain garden staple into a chic decor piece with this modern geometric design. By using thin tape strips to mask off the natural clay, you create crisp outlines that separate bold metallic gold and clean white chevrons.
Step-by-Step Tutorial
Materials
- Terracotta pot (clean and dry)
- White acrylic paint
- Metallic gold acrylic paint
- Thin painter’s tape (1/4 inch width) or standard tape cut into strips
- Flat paintbrushes (small and medium)
- Pencil
- Scissors
Step 1: Preparation & Planning
-
Clean surface:
Wipe down your terracotta pot with a damp cloth to remove any dust or sticker residue. Let it dry completely so the tape adheres properly. -
Mark vertical guides:
To ensure your pattern meets up evenly around the pot, lightly mark 4 to 6 evenly spaced dots around the top rim with a pencil. -
Prepare tape strips:
If you don’t have thin detailing tape, unroll a length of standard blue painter’s tape on a clean cutting mat and slice it into narrow 1/4 inch strips.
Crisp Line Secret
Before painting, run a credit card or your fingernail firmly over the tape edges. This “burnishing” creates a tight seal that stops paint from bleeding underneath, keeping your terracotta lines sharp.
Step 2: Masking the Pattern
-
Mask the rim:
Apply a strip of tape horizontally around the pot, just below the rim. This defines the top edge of your painted area. -
Create the first zigzag:
Create a zigzag line around the pot using your tape strips. Imagine a series of V shapes connecting your pencil marks. This tape line will separate the top white section from the middle gold band. -
Form the second zigzag:
Place a second row of tape strips parallel to the first zigzag, spacing it about an inch down. This gap will become the gold chevron band. -
Form the third zigzag:
Apply a third row of tape strips parallel to the second one, spaced another inch down. This gap will define the lower white chevron band. -
Define the base:
The area below this third tape line will remain unpainted terracotta triangles, just like the rim. -
Secure the edges:
I always take a moment here to press down firmly on all tape edges with a fingernail to ensure a tight seal against paint bleeds.
Make It Last
If you plan to keep this pot outdoors, apply a clear acrylic spray sealer over the finished design. This protects the paint from sun and rain while preventing moisture from bubbling beneath the layers.
Step 3: Painting
-
Paint the white sections:
Using a flat brush, paint the top row of inverted triangles (the space between the rim tape and the first zigzag) with white acrylic. -
Paint the lower band:
Apply white paint to the bottom channel as well (the space between the second and third zigzag tape lines). -
Apply gold accent:
Switch to a clean brush and fill the middle channel (between the first and second zigzag lines) with metallic gold paint. -
Second coat:
Let the first layer dry for about 10 minutes. Apply a second coat to the white areas to ensure they are opaque and bright. -
Gold touch-up:
Add a second coat of gold if you want a richer, more solid metallic shine.
Step 4: Finishing
-
Peel carefully:
While the final coat of paint is still slightly tacky (not fully hard), slowly peel off the tape strips at a 45-degree angle. -
Clean up:
If any paint seeped under the tape, gently scrape it away with a damp toothpick or a detailed brush dipped in water. -
Dry time:
Allow the pot to cure for at least 24 hours before adding soil and plants.
Now you have a stunning custom planter that looks like high-end boutique decor.

Summer Watermelon Design
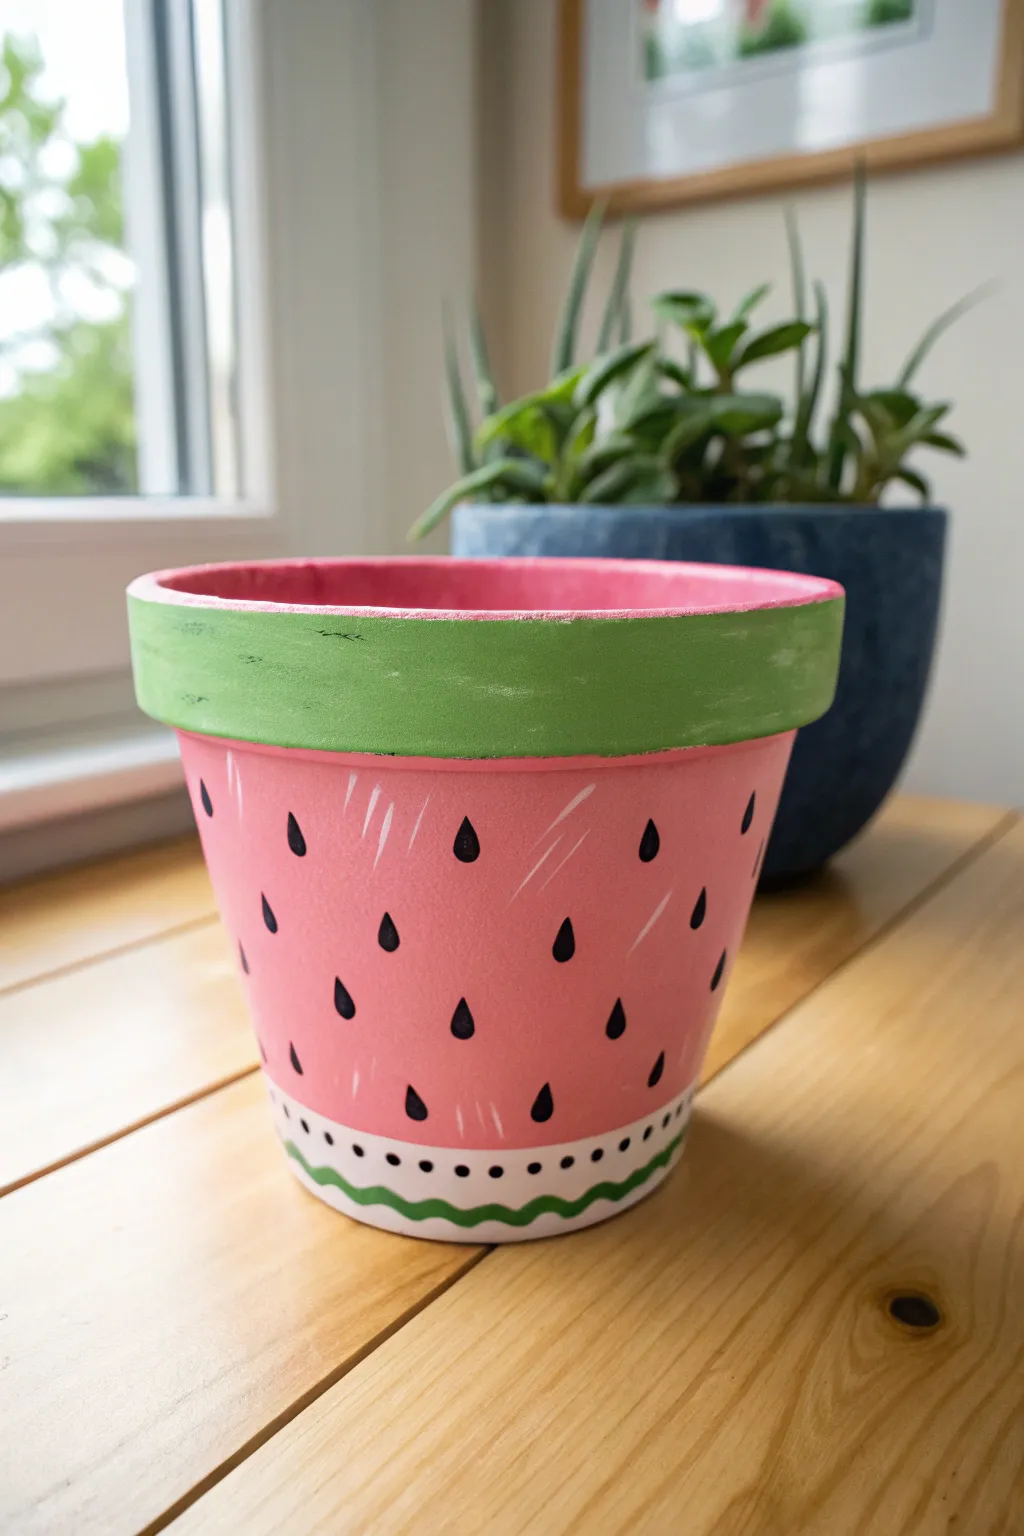
Bring a slice of summer into your home with this cheerful watermelon-themed terracotta pot. The combination of bright coral, contrasting seeds, and stylized highlights makes for a refreshing addition to any windowsill.
Detailed Instructions
Materials
- Terracotta pot (standard size)
- White gesso or primer
- Acrylic paint: Coral Pink
- Acrylic paint: Grass Green
- Acrylic paint: Mars Black
- Acrylic paint: Titanium White
- Flat brush (1/2 inch)
- Round detail brush (small)
- Fine liner brush
- Clear acrylic sealer spray
Step 1: Base Colors
-
Clean the surface:
Wipe down the terracotta pot with a damp cloth to remove any dust or debris and let it dry completely. -
Apply primer:
Paint the entire exterior with white gesso or primer. This step is vital to make the coral pink pop against the clay. -
Paint the body:
Using a flat brush, paint the main body of the pot with your coral pink acrylic. -
Map out the bottom:
Stop painting the pink about half an inch from the bottom edge to leave room for the white band later. -
Second coat:
Apply a second layer of coral pink once the first is dry to ensure solid, opaque coverage. -
Paint the rim:
Color the thick rim of the pot with a bright grass green. -
Paint the interior:
Paint the top two inches of the inside of the pot pink so the soil level looks polished. -
Add the bottom band:
Carefully paint the unpainted strip at the very bottom with titanium white.
Clean Lines Tip
To get a crisp separation between the green rim and the pink body, wrap a thick rubber band around the pot to use as a painting guide.
Step 2: Seeds & Details
-
Start the seeds:
Using a small round brush loaded with black paint, create teardrop shapes on the pink body. -
Seed spacing:
I prefer to scatter the seeds randomly rather than placing them in perfect rows for a more natural look. -
Orient the seeds:
Ensure the pointy end of the teardrop seeds is facing upward. -
Highlight preparation:
Switch to a very fine liner brush and thin down a little white paint with a drop of water. -
Add texture marks:
Paint thin, scratchy white lines vertically near the seeds to simulate the fibrous texture of watermelon flesh. -
Vary the lines:
Make some lines short and others slightly longer, letting them fade out at the ends. -
Decorate the bottom band:
Paint a wavy horizontal line in green running through the center of the white bottom band. -
Add bottom dots:
Place small black dots in the white spaces created by the dips of the green wavy line. -
Seal the project:
Once fully dry, spray the pot with a clear acrylic sealer to protect the paint from water damage.
Make it a Set
Paint the matching saucer dark green with lighter green zig-zag stripes to resemble the outer rind of a whole watermelon.
Now your plant has a sweet new home that looks good enough to eat


Minimalist Boho Faces
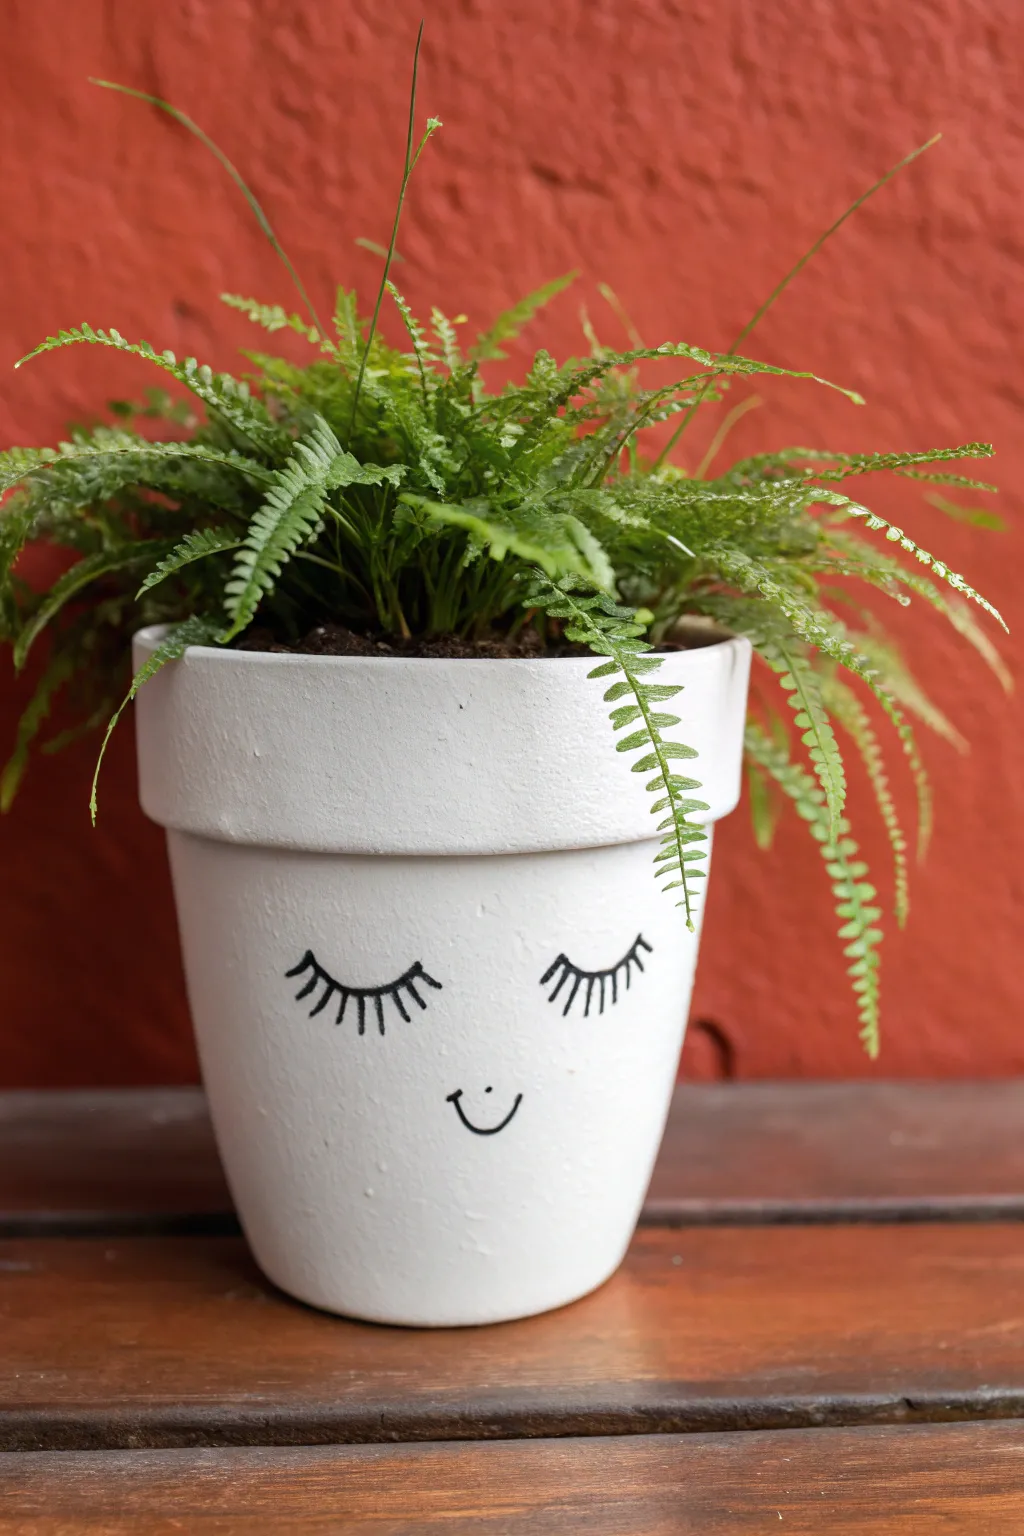
Transform a plain terracotta pot into a charming character with just a fresh coat of white paint and a few simple strokes. This minimalist ‘sleeping face’ design adds a touch of whimsy to your indoor garden without overwhelming your decor.
How-To Guide
Materials
- Standard terracotta pot (6-inch)
- White acrylic paint (matte or satin finish)
- Wide flat paintbrush or foam brush
- Black oil-based paint pen (medium tip)
- Pencil and eraser
- Clear matte acrylic sealer spray
- Fern or leafy houseplant
- Potting soil
Step 1: Prepping and Priming
-
Clean surface:
Begin by wiping down your terracotta pot with a damp cloth to remove any store dust or loose clay particles. -
Dry completely:
Allow the pot to dry fully before you start painting; moisture in the clay can bubble your paint later. -
First coat:
Apply the first layer of white acrylic paint using a flat brush, covering the exterior surface. -
Rim detail:
Don’t forget to paint the top rim and about two inches down the inside of the pot so the raw clay won’t show once filled with soil. -
Drying time:
Let this coat sit for about 15 to 20 minutes until it is dry to the touch. -
Second coat:
Add a second coat of white paint to ensure a solid, opaque finish where no orange clay peeks through. -
Smoothing:
Check for any drippy areas or brush strokes and smooth them out lightly while the paint is still wet.
Step 2: Drawing the Face
-
Sketching:
Using a pencil, very lightly sketch two downward curving arches for the eyes and a small ‘U’ shape for the mouth about halfway down the pot. -
Ink prep:
Shake your black paint pen well and press the tip on a scrap piece of paper to get the ink flowing smoothly. -
Tracing eyes:
Trace over your pencil lines for the closed eyelids with steady, fluid motions. -
Adding lashes:
Draw 7 to 9 short vertical dashes coming down from each eyelid arch to create the eyelashes. -
Drawing the smile:
Trace the small smile curve centered below the eyes, keeping the line weight consistent with the eyes. -
Ink drying:
Wait at least 10 minutes for the paint pen ink to cure completely so it won’t smudge. -
Cleanup:
Gently erase any visible pencil marks that weren’t covered by the black ink.
Ink Confidence
Work with the curve of the pot by resting your wrist on a steady object (like a stack of books) while drawing the face details.
Step 3: Finishing Touches
-
Sealing:
Take the pot to a well-ventilated area and spray a light cost of clear matte sealer to protect your design from water damage. -
Protecting drainage:
Place a small mesh screen or coffee filter over the drainage hole inside the pot to keep soil in. -
Planting:
Fill the pot with fresh potting soil and transplant your fern, pressing the dirt firmly around the roots. -
Rim check:
Wipe away any loose soil from the white rim with a damp paper towel to leave your new planter looking pristine.
Add a Blush
Dip your finger in a tiny bit of pink paint and dab ‘cheeks’ onto the ends of the smile for a sweeter look.
Place your adorable new pot on a sunny shelf and enjoy the happy vibes it brings to your room


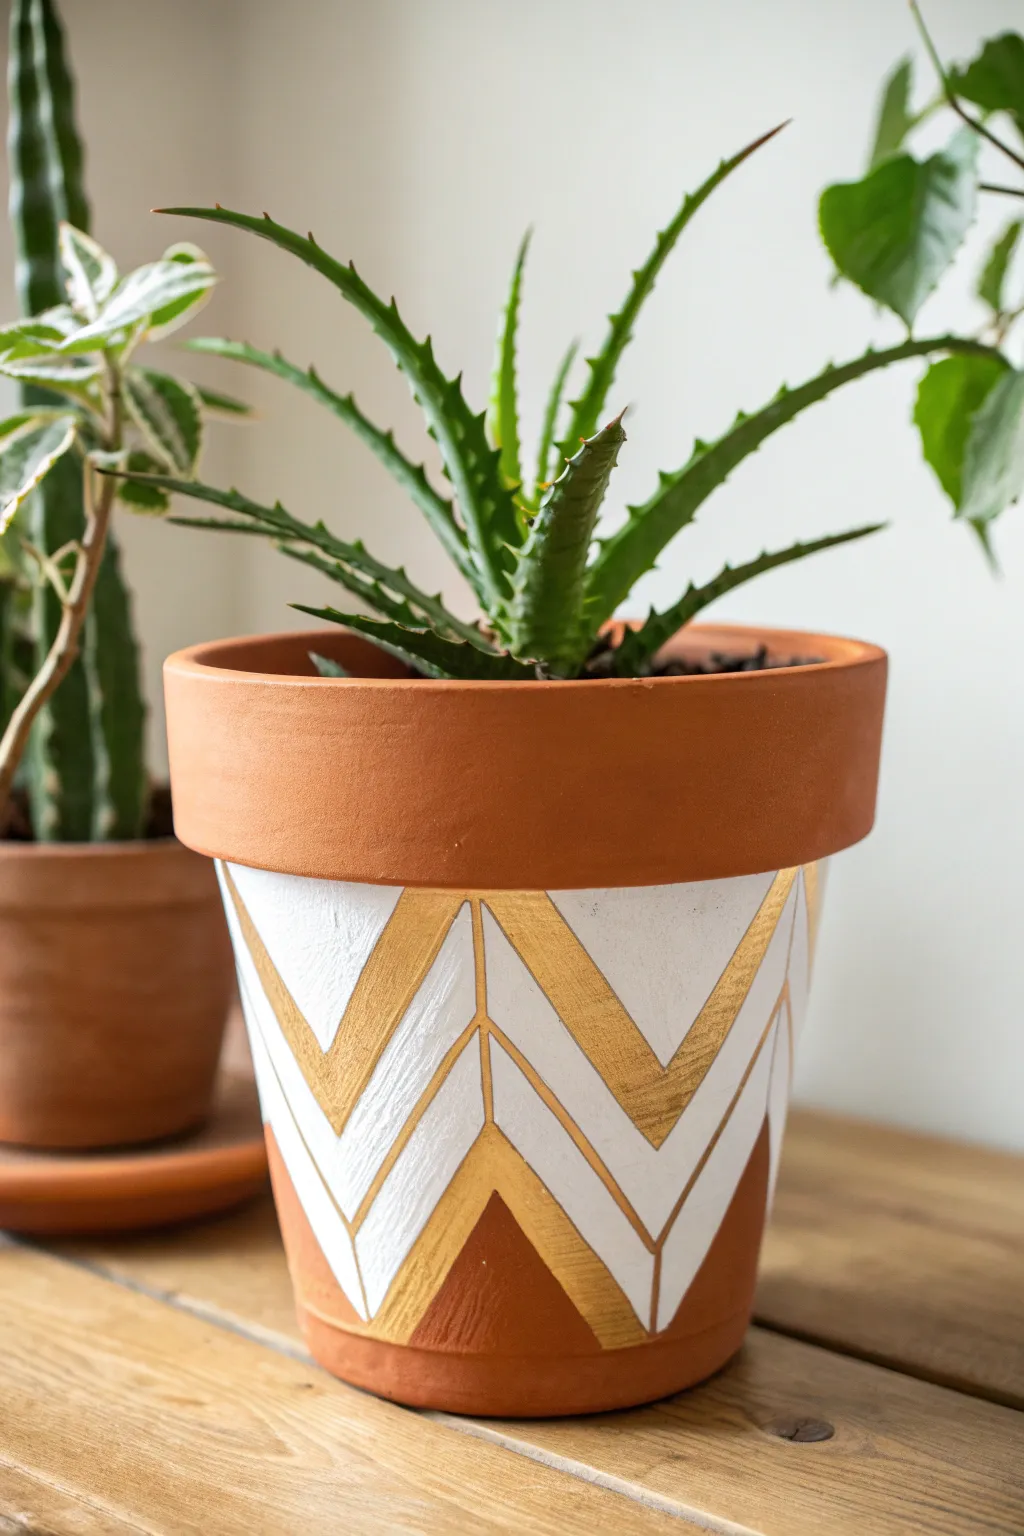
Metallic Gold Dipped Effect
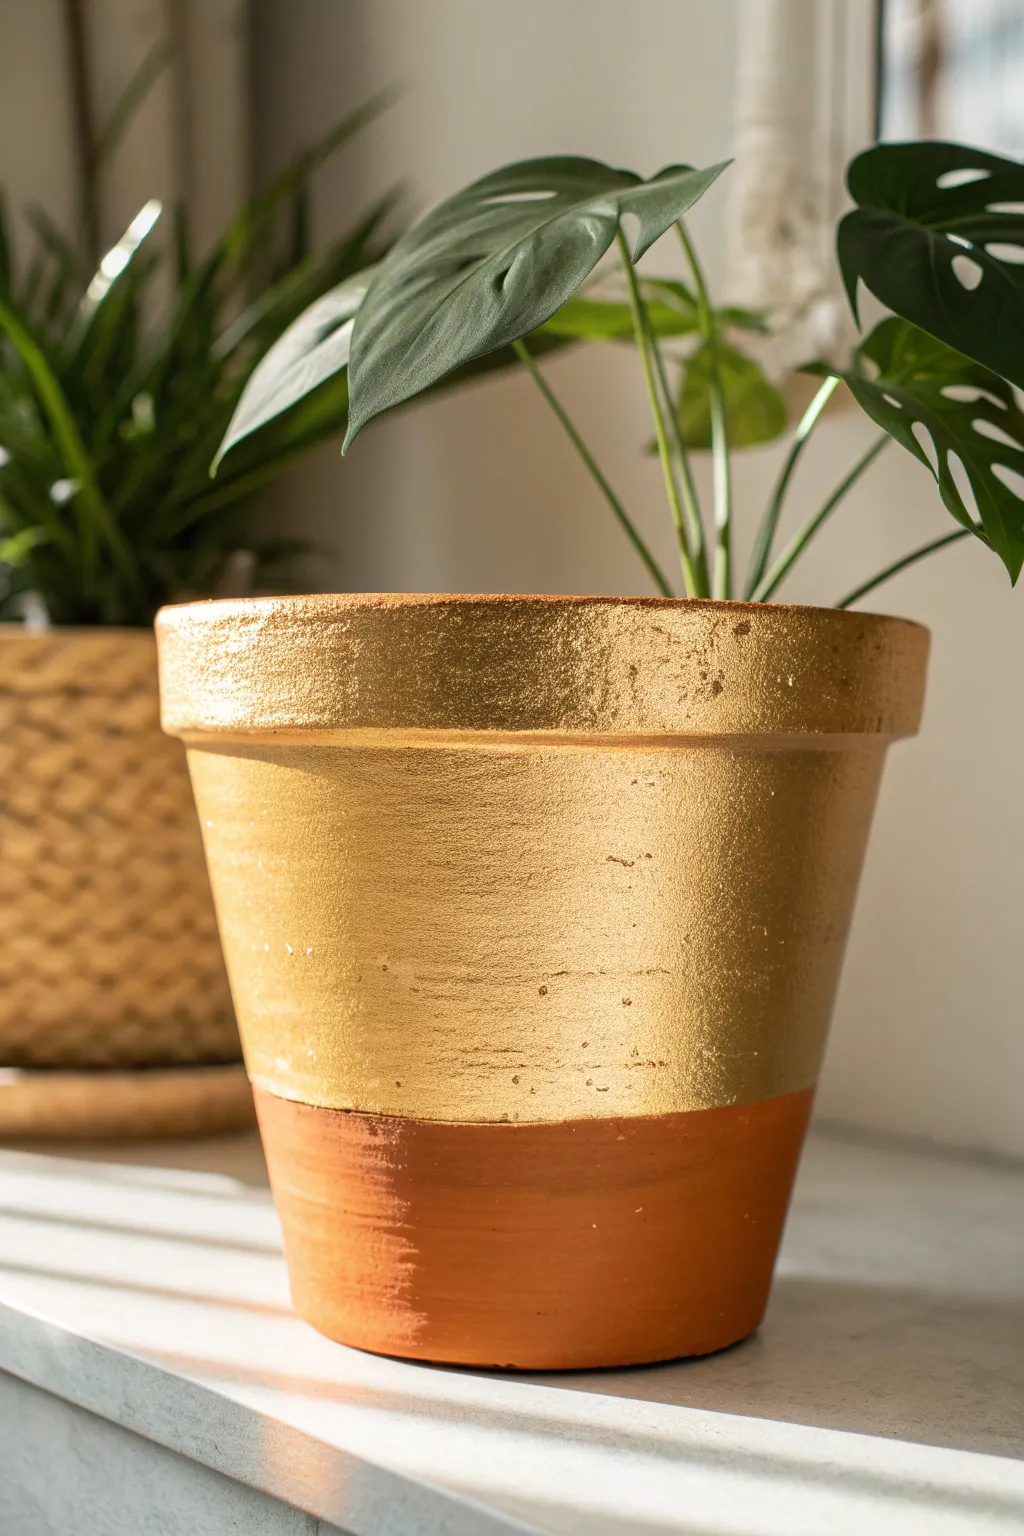
Elevate a humble garden staple into a piece of modern home decor with this striking gold-dipped effect. The contrast between the raw, rustic terra cotta and the shimmering metallic finish creates a sophisticated look that catches the sunlight beautifully.
How-To Guide
Materials
- Terra cotta pot
- Painter’s tape or masking tape
- Metallic gold acrylic paint (heavy body)
- Flat synthetic paintbrush (1 inch)
- Small detail brush
- Cup of water
- Lint-free cloth
- Paper towel
- Clear matte sealer (optional)
Step 1: Preparation
-
Clean the surface:
Wipe down your terra cotta pot with a damp lint-free cloth to remove any warehouse dust or loose clay particles. -
Dry completely:
Allow the pot to air dry fully; if the clay is cold or damp, the tape won’t adhere properly. -
Determine the line:
Visualize where you want the gold to stop; the example uses a ratio of about one-third raw clay to two-thirds gold. -
Apply tape:
Wrap your painter’s tape around the circumference of the pot at your chosen height, ensuring the line is straight and level. -
Secure the edge:
Press the bottom edge of the tape down firmly with your fingernail to seal it against the porous texture of the clay.
Step 2: Applying the Gold
-
Load the brush:
Dip your flat paintbrush into the gold metallic paint, ensuring you have a generous amount but not dripping. -
Seal the seam:
Paint a very thin layer of gold directly over the edge of the tape, stroking away from the tape line to prevent seepage. -
Apply base coat:
Brush the gold paint over the rest of the exposed area above the tape, using horizontal strokes. -
Cover the rim:
Continue painting up the side and over the top lip of the pot. -
Paint the interior:
Bring the gold paint down just an inch or two inside the pot; this ensures it looks finished even when the soil level drops. -
Dry briefly:
Let the first coat set for about 20 minutes until it is dry to the touch. -
Apply second coat:
Apply a second layer of gold paint, this time using vertical strokes to work the pigment into the clay’s texture. -
Inspect coverage:
Hold the pot up to the light to check for thin spots where the orange clay might still be peeking through. -
Final touch-up:
Dab a little extra paint into any deep pores or pitted areas of the terra cotta for a solid metallic look.
Crisp Line Secret
To prevent bleeding on porous clay, paint a thin layer of clear matte medium or sealer over the tape edge first. This fills the microscopic surface gaps before you apply the gold.
Step 3: Finishing
-
Remove tape:
Carefully peel back the painter’s tape while the final coat is still slightly tacky to ensure a crisp edge. -
Clean up edges:
I prefer to use a slightly damp detail brush immediately to wipe away any tiny smudges that may have bled under the tape. -
Let it cure:
Allow the pot to sit undisturbed for at least 24 hours so the paint can fully harden. -
Optional sealing:
If you plan to keep this outdoors, spray a clear sealer over the entire exterior to protect the finish. -
Pot your plant:
Fill with potting soil and add your favorite leafy friend to complete the look.
Fixing Mistakes
If gold paint accidentally gets on the raw section, don’t wipe it while wet! Let it dry completely, then gently scrape it off with a craft knife or a bit of sandpaper.
Place your shimmering new planter in a sunny spot and enjoy the warm glow it adds to your space
BRUSH GUIDE
The Right Brush for Every Stroke
From clean lines to bold texture — master brush choice, stroke control, and essential techniques.
Explore the Full Guide
Polka Dot Confetti Pattern
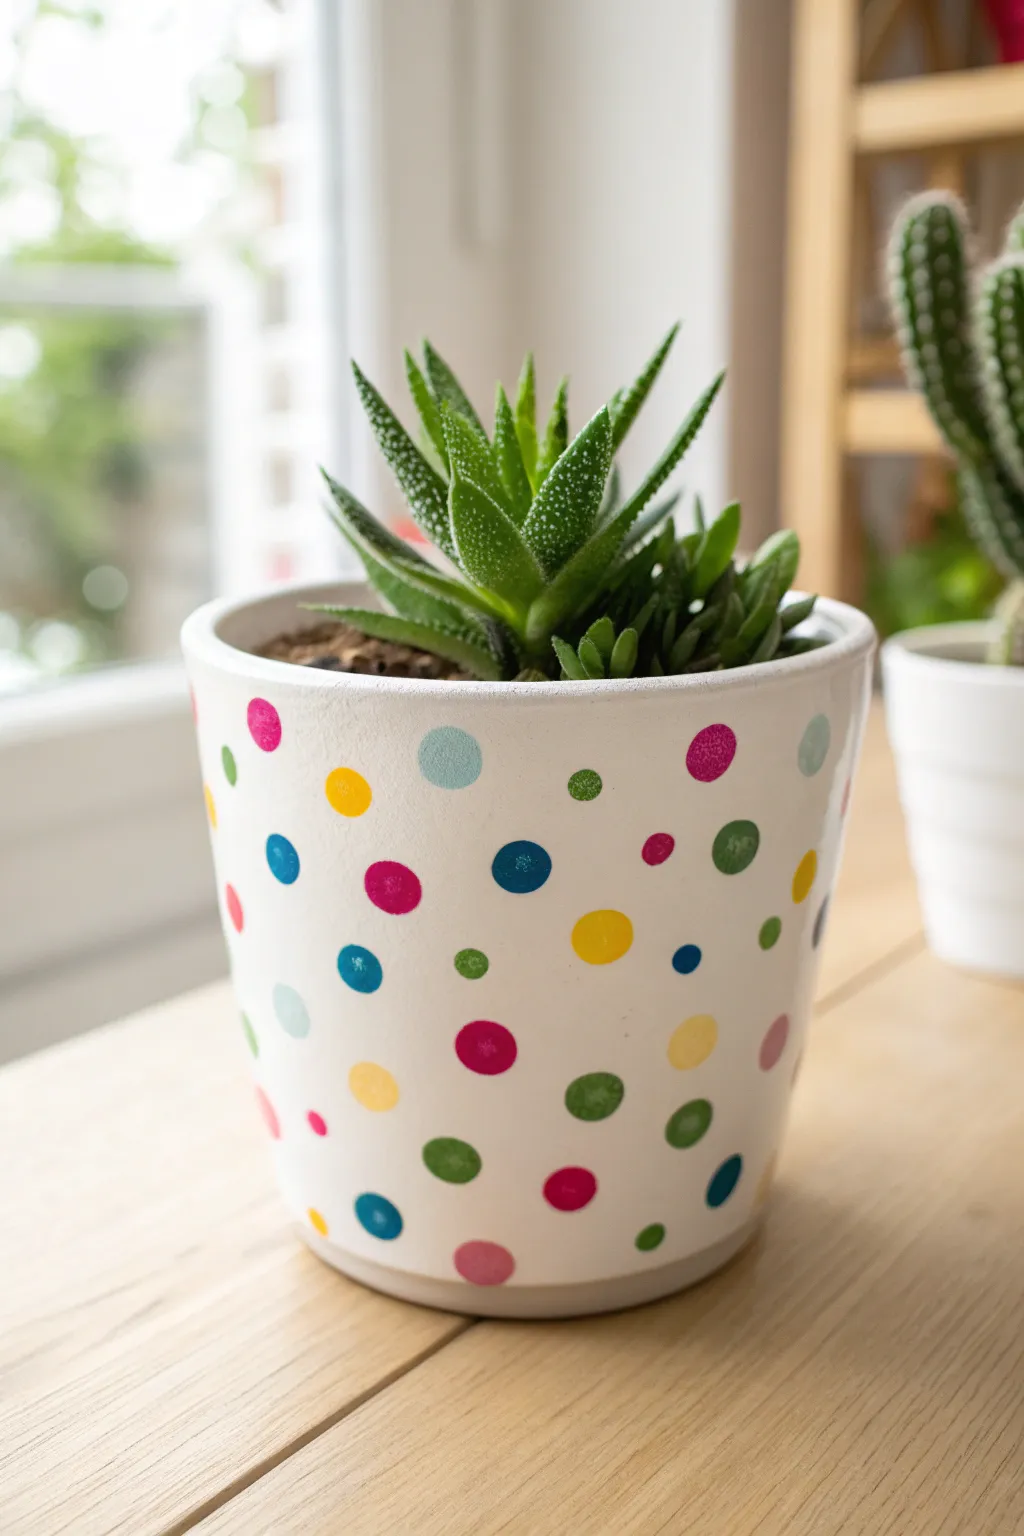
Transform a plain pot into a celebration of color with this scattered confetti pattern. The crisp white background makes the multi-sized dots pop, creating a cheerful and modern home for your favorite succulents.
How-To Guide
Materials
- Terracotta or ceramic pot (4-6 inch)
- White acrylic paint (or primer spray paint)
- Multi-surface acrylic paints (yellow, pink, blue, green, teal)
- Foam pouncers (various small sizes)
- Cotton swabs or paintbrush handle
- Clear acrylic sealer spray (matte or satin)
- Paper plate or palette
- Damp cloth
Step 1: Base Preparation
-
Clean the surface:
Wipe down your pot with a damp cloth to remove any dust or sticker residue. If using terracotta, let it dry completely before painting. -
Apply base coat:
Paint the entire exterior of the pot with white acrylic paint. I prefer using a spray paint primer for the initial layer to get a really smooth, uniform finish. -
Layer for opacity:
Allow the first coat to dry for 20 minutes. Apply a second or third coat until the clay color is completely hidden and the white is bright and solid. -
Dry completely:
Let the base coat cure for at least an hour so the surface is hard enough to handle without leaving fingerprints.
Fixing Smudges
If paint bleeds under the pouncer, you likely have too much paint loaded. Let it dry, paint over it with white, and re-stamp with less paint.
Step 2: Creating the Pattern
-
Prepare the palette:
Squeeze dime-sized amounts of your colorful acrylic paints onto a paper plate or palette. -
Start with largest dots:
Dip a medium-sized foam pouncer into your first color (like the bright yellow). Dab off excess paint on a paper towel to prevent globs. -
Apply first color:
Press the pouncer gently onto the pot to create random circles. Space them out widely to leave room for other colors. -
Add second color:
Switch to a clean pouncer and apply your next color (e.g., deep blue), placing these dots in the empty negative spaces. -
Vary the sizes:
For medium-sized dots, dip the eraser end of a new pencil into the paint and stamp it onto the pot. Use colors like hot pink or lime green here. -
Create tiny accents:
Use the back end of a small paintbrush handle or a cotton swab to add the smallest dots. These look great in lighter shades like teal or pastel pink. -
Check balance:
Rotate the pot and look for any large empty gaps. Add a few small ‘confetti’ dots to fill these spaces without overcrowding. -
Clean edges:
If any dots look uneven or smeared, wait for them to dry, then carefully touch them up with a tiny brush and a bit of white paint.
Step 3: Finishing Touches
-
Let paint cure:
Allow all the polka dots to dry. Since acrylics dry fast, 30 to 60 minutes should be sufficient. -
Seal the design:
Take the pot to a well-ventilated area and apply a clear acrylic sealer spray. This prevents the paint from bubbling when you water your plants. -
Apply second coat:
Once the first seal coat is dry to the touch, add a second light coat for extra durability. -
Pot your plant:
Once fully cured (usually 24 hours), fill with potting soil and add your succulent.
Perfect Circle Hack
Don’t have foam pouncers? Use the flat ends of different sized drill bits or a round chopstick dipped in paint for perfectly crisp circles.
Now you have a playful, speckled planter that adds a burst of joy to any windowsill
Whimsical Garden Bumblebees
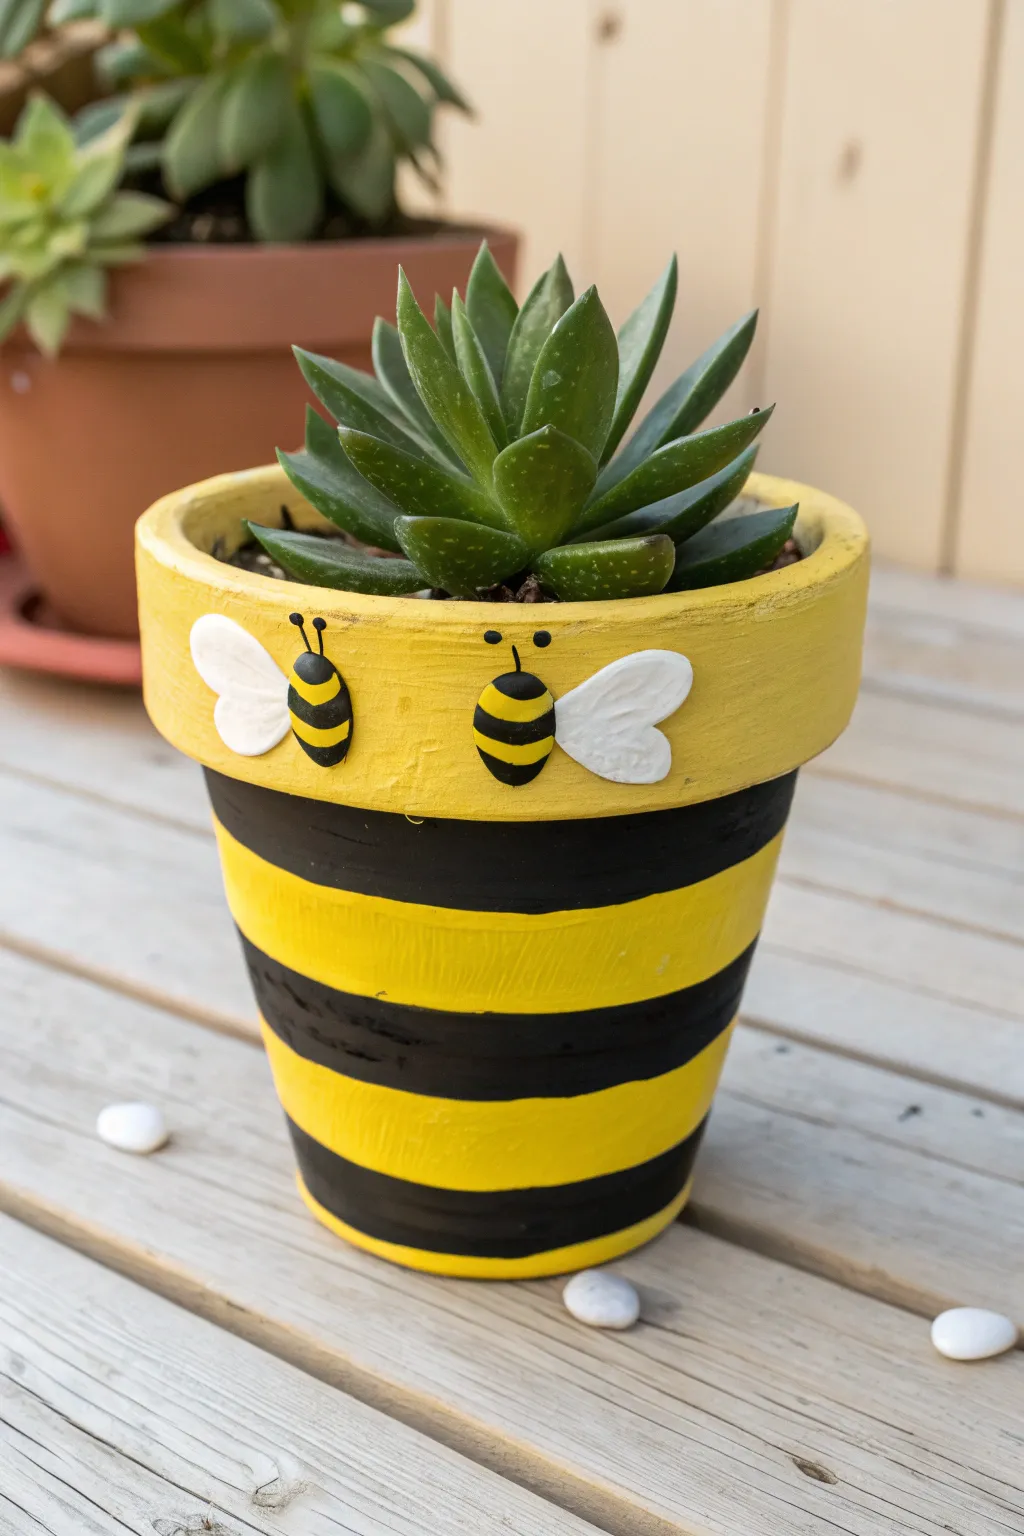
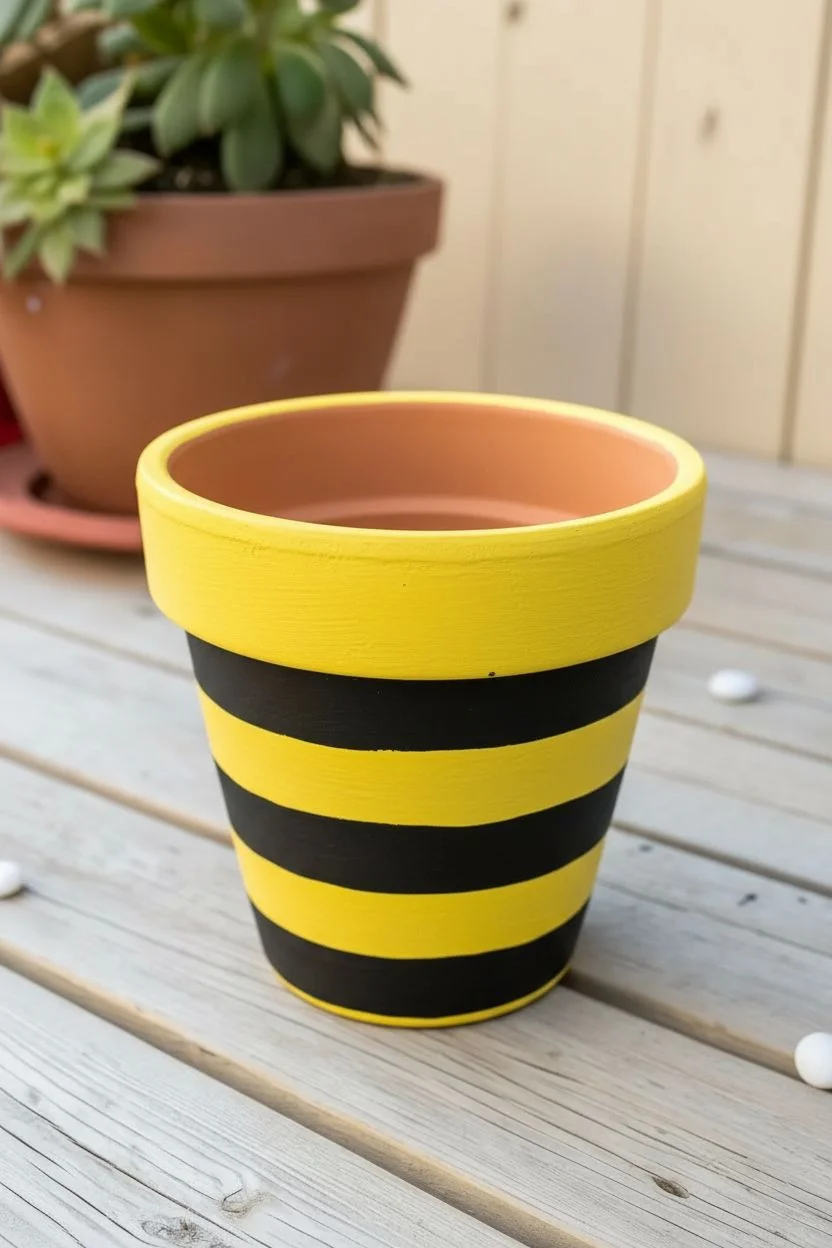
Transform a standard terracotta vessel into a sweet, honey-themed home for your succulents. This project combines simple stripe painting with easy clay sculpting elements to create adorable 3D bees that look like they just landed on the rim.
Detailed Instructions
Materials
- Terracotta pot (4-6 inch)
- Acrylic paint (Bright Yellow, Black, White)
- Air-dry modeling clay
- Flat shader paintbrush
- Fine detail paintbrush
- Super glue or heavy-duty craft glue
- Clear spray sealant (matte or satin)
- Pencil
- Toothpick or sculpting tool
Step 1: Preparing the Hive
-
Clean surface:
Wipe down your terracotta pot with a damp cloth to remove any dust or sticker residue, then let it dry completely. -
Sketch the pattern:
Using a pencil, lightly mark horizontal rings around the pot to designate your stripes. Aim for three to four wide bands depending on the height of your pot. -
Base yellow layers:
Paint the rim and the alternating bands on the body with bright yellow acrylic paint. -
Build opacity:
I like to let the first coat dry briefly before adding a second; yellow can be sheer, so repeat until you have a solid, opaque color. -
Paint black stripes:
Fill in the remaining bands with black acrylic paint, using a flat brush to create smooth, even strokes. -
Refine edges:
Use a smaller brush to tidy up the lines where the black and yellow meet to ensure a crisp separation between the colors.
Pro Tip: Brighter Yellows
Yellow paint is notoriously translucent on dark terracotta. To save time and get a vibrant finish, paint a base layer of white acrylic over the yellow sections first, let it dry, then apply your yellow topcoat.
Step 2: Sculpting the Bees
-
Shape the wings:
Pinch off two very small, pea-sized pieces of air-dry clay for each bee. Flatten them into teardrop shapes to form the wings. -
Add wing texture:
Use a toothpick to gently press indentations or tiny veins into the clay wings for a realistic 3D effect. -
Form the bodies:
Roll a slightly larger oval of clay to serve as the bee’s body. I prefer to flatten the bottom slightly so it sits flush against the pot. -
Secure the clay:
Apply a dab of super glue to the back of the clay pieces and arrange them on the yellow rim of the pot. -
Dry time:
Allow the clay to dry and harden completely according to the package instructions before painting.
Level Up: Pearlescent Wings
Give your bees a magical touch by mixing a tiny drop of metallic pearl paint or white glitter into the white acrylic used for the wings. It adds a lovely shimmer that catches the light in the garden.
Step 3: Painting the Details
-
Color the bodies:
Paint the hardened clay oval bodies with the same yellow acrylic used for the pot rim. -
Brighten the wings:
Paint the wing sections with two coats of white acrylic to make them pop against the yellow background. -
Add bee stripes:
Using your finest detail brush, carefully paint two or three horizontal black stripes across the yellow clay bodies. -
Paint antennae:
Directly on the pot rim, just above the clay body, paint two thin black lines curving outward for the antennae, adding tiny dots at the tips. -
Seal the work:
Once all paint is fully dry, take the pot to a ventilated area and coat it with a clear spray sealant to protect your artwork from water damage.
Now your cheerful bumblebee pot is ready to be filled with soil and your favorite prickly succulent.

PENCIL GUIDE
Understanding Pencil Grades from H to B
From first sketch to finished drawing — learn pencil grades, line control, and shading techniques.
Explore the Full Guide
Trendy Terrazzo Style
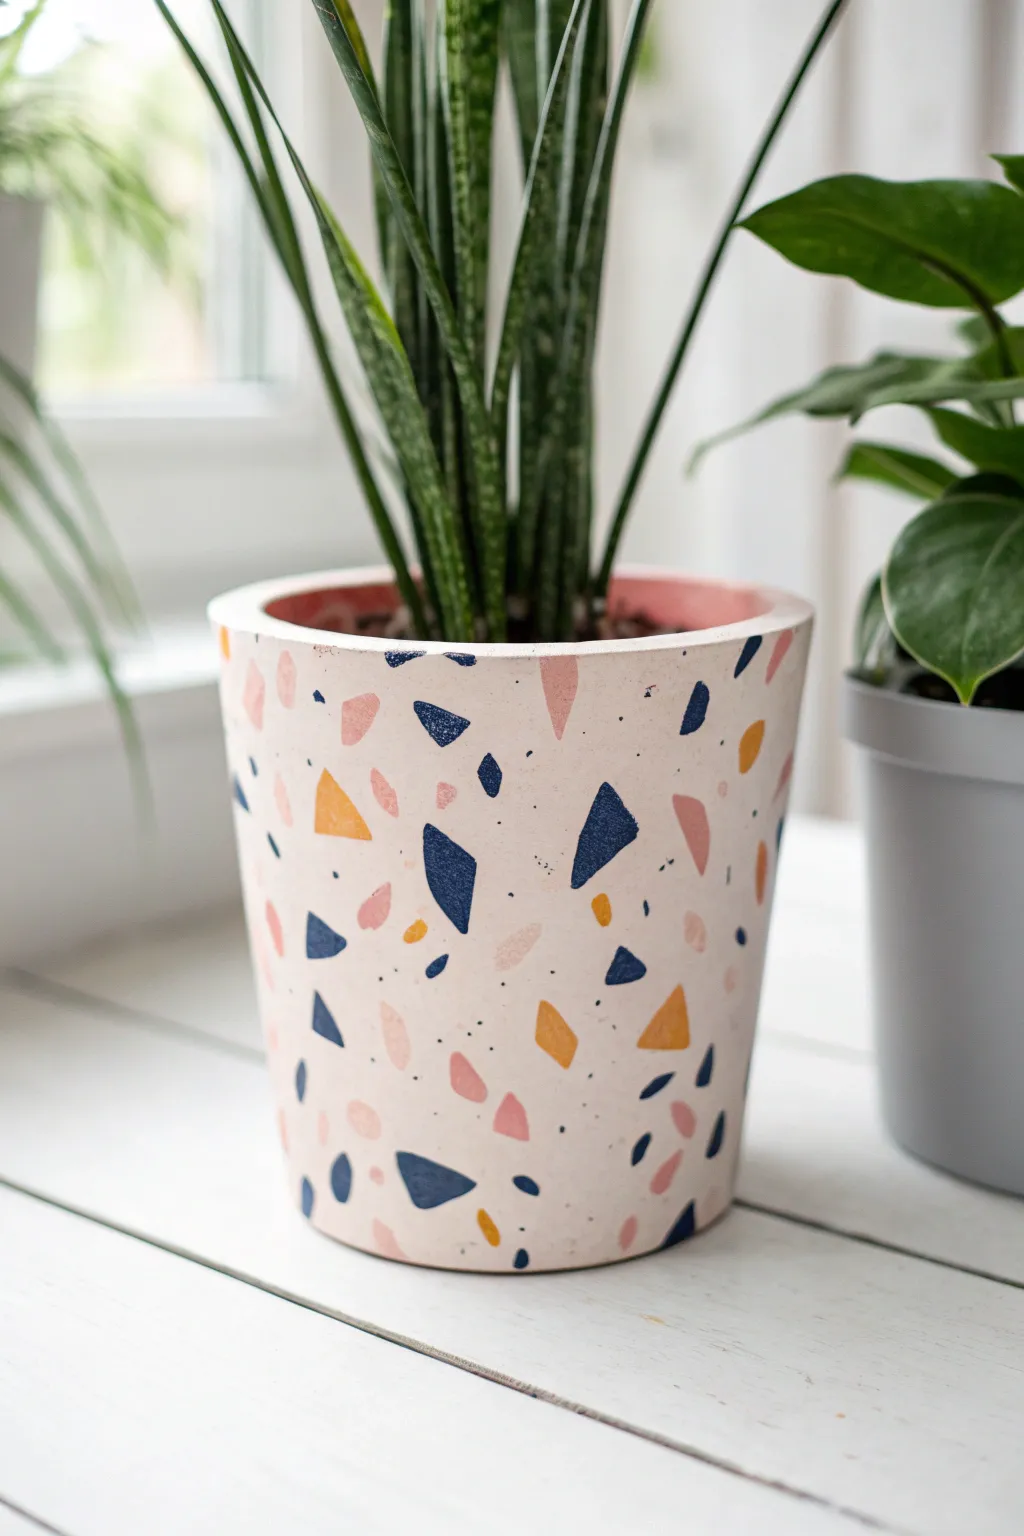
Transform a plain vessel into a trendy statement piece using a simple painting technique that mimics real stone. This project captures the stylish, fragmented look of terrazzo using a soft color palette of navy, mustard, and blush set against a creamy background.
Step-by-Step Tutorial
Materials
- Terracotta or concrete pot
- White primer
- Acrylic paints (Cream, Navy Blue, Mustard Yellow, Blush Pink, Black)
- Small flat angular brush
- Fine tip liner brush
- Matte clear sealant spray
- Palette
- Water cup
Step 1: Preparing the Canvas
-
Clean surface:
Wipe down your pot with a damp cloth to remove any dust or oils, ensuring a smooth surface for the paint to adhere to. -
Apply primer:
Coat the exterior of the pot with a layer of white primer. This seals the porous surface and makes your top colors pop. -
Mix base color:
Create your background shade. I like to mix white with a tiny drop of brown or peach to get a warm, stony cream color rather than stark white. -
Base coat:
Paint the entire exterior with your mixed cream color. Use long, smooth strokes to avoid ridges. -
Second layer:
Once the first coat is dry to the touch, apply a second coat to ensure fully opaque coverage where no primer shows through. -
Dry completely:
Allow the base coat to dry fully before starting the pattern. If the base is wet, the colored shapes might blend into it mud.
Oops! Smudged edge?
If a shape looks messy, wait for it to dry completely. Then, simply paint over the mistake with your cream base color—it works just like an eraser.
Step 2: Painting the “Chips”
-
Start with Navy:
Load your small angular brush with Navy Blue paint. Paint random, irregular geometric shapes around the pot. -
Shape varying:
Keep the shapes angular—think triangles, trapezoids, and shards—rather than round blobs. Vary the sizes from dime-sized to smaller fragments. -
Rotate frequently:
Turn the pot as you work to ensure even distribution, leaving plenty of negative space for the other colors. -
Add Mustard accents:
Clean your brush thoroughly and switch to Mustard Yellow. Paint similar angular shards in the gaps left between the blue shapes. -
Apply Blush Pink:
Switch to Blush Pink. Fill in remaining larger gaps with pink shapes. I prefer to let some shapes nearly touch while others float freely. -
Touch ups:
If any colors look streaky, dab a little extra paint on top of the shapes to make them solid and bold.
Step 3: The Speckled Finish
-
Prepare detail brush:
Switch to your finest distinct liner brush and dip it into black acrylic paint. -
Add micro-specks:
Paint tiny, irregular dots and dashes in the open cream spaces. These represent the smallest aggregate stones found in real terrazzo. -
Create randomness:
Cluster a few tiny black dots near the larger colored shapes, and leave some areas sparse for a natural, organic look. -
Full cure:
Let the pot sit overnight to ensure all layers of paint are completely hardened. -
Seal the work:
Take the pot to a well-ventilated area and spray it with a clear matte sealant to protect your design from water and UV light.
Textured Effect
For a realistic stone feel, mix a teaspoon of baking soda into your cream base paint before applying it. It adds a gritty, concrete-like texture.
Pop your favorite houseplant inside and enjoy the modern, artistic tailored look you created
Lush Botanical Leaves
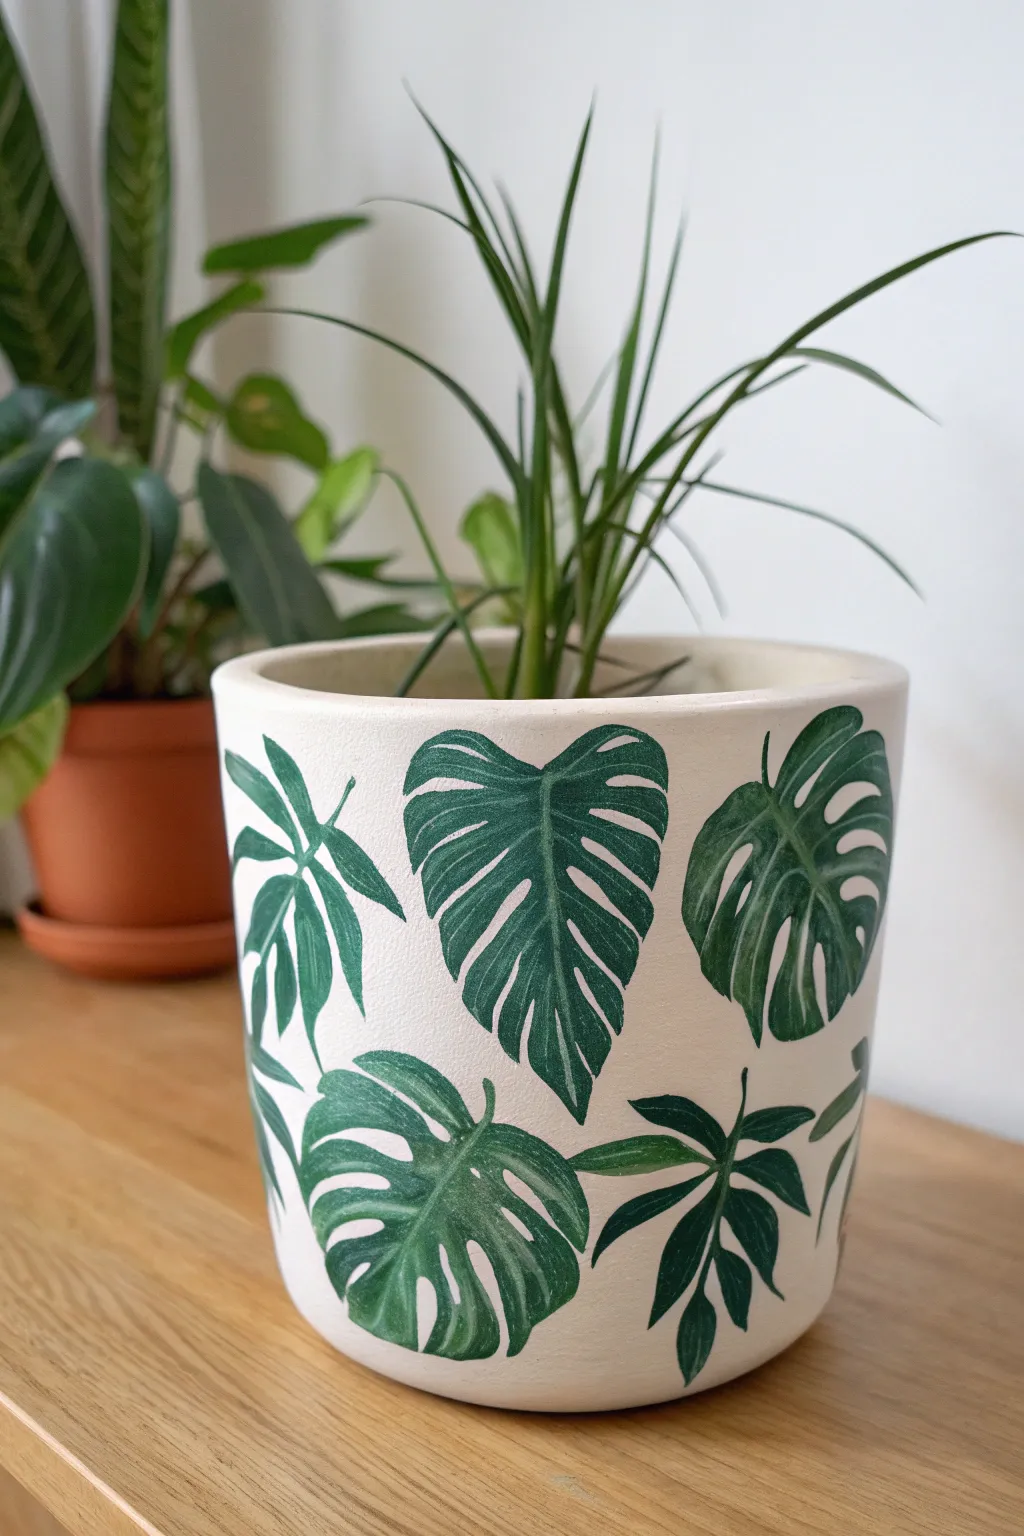
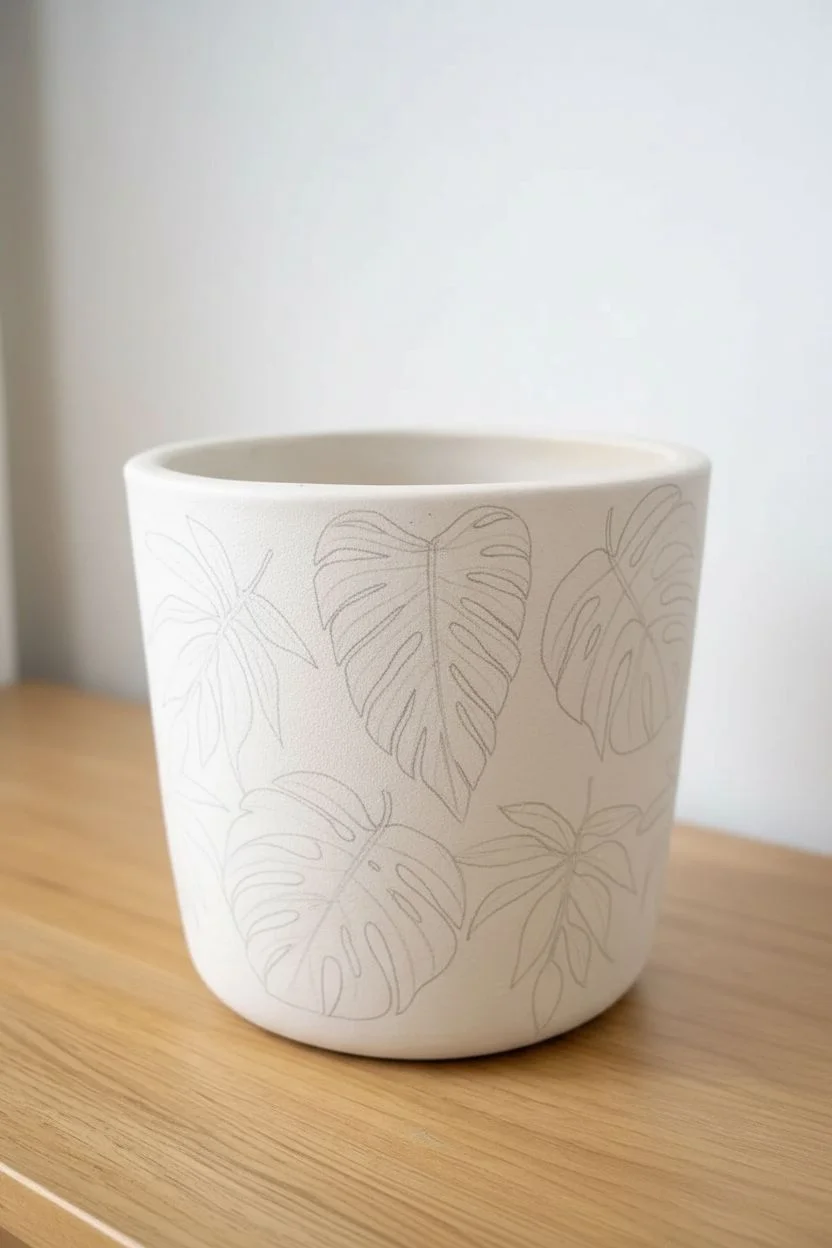
Transform a plain ceramic vessel into a lush indoor garden statement piece featuring classic Monstera and philodendron leaf motifs. This clean, high-contrast design brings an immediate sense of freshness to your space, regardless of what plant resides inside.
Step-by-Step
Materials
- Ceramic or terracotta pot (primed white or cream)
- Acrylic paint (Dark Forest Green, Leaf Green, White, Yellow)
- Round synthetic brush (size 4 or 6)
- Fine liner brush (size 0 or 1)
- Pencil and eraser
- Paint palette
- Matte spray varnish or sealer
- Water cup and paper towels
Step 1: Preparation & Layout
-
Surface Prep:
Ensure your pot is completely clean and dry. If using a raw terracotta pot, apply two coats of white or cream acrylic paint as a base and let it dry completely. -
Sketching the Monstera:
Using a pencil, lightly draw large heart shapes around the pot to serve as the base for your Monstera leaves. -
Adding Fenestrations:
Inside your heart outlines, draw the characteristic deep notches (splits) extending from the outer edges inward, leaving a solid center stem area. -
Sketching Filler Leaves:
In the gaps between the Monstera leaves, sketch smaller, palm-like leaves with five to seven long, finger-like sections radiating from a central point.
Steady Hand Trick
If you struggle with shaky lines during the detailing phase, rest your pinky finger on a dry section of the pot to stabilize your hand while painting the fine veins.
Step 2: Painting the Base Layers
-
Mixing the Base Green:
On your palette, mix a Deep Forest Green. If your tube green is too bright, add a tiny dot of black or red to deepen it for that rich botanical look. -
Outlining Shapes:
Using the round brush, carefully paint over your pencil outlines with the dark green mixture to define the distinct edges of the leaves. -
Filling In:
Fill in the rest of the leaf shapes with the same dark green. I prefer to use smooth, singular strokes pulling toward the center of the leaf to keep the texture flat. -
Touch Ups:
Rotate the pot and check for any patchy areas. Apply a second coat of green if the white background is showing through the brushstrokes. -
Drying Time:
Allow the green paint to dry completely. It must be dry to the touch before adding details to prevent muddying the colors.
Step 3: Detailing & Veins
-
Mixing Highlight Color:
Mix a lighter green shade by taking your base green and adding a generous amount of white and a touch of yellow. -
Painting Monstera Veins:
Switch to your fine liner brush. Paint a thin line down the center of each Monstera leaf, following the curve of the shape. -
Adding Ribs:
Paint curved lines extending from the center vein toward the edges of the leaf carefully creating the ribbed texture shown in the design. -
Detailing Filler Leaves:
For the palm-like leaves, paint a single thin line down the center of each finger-like leaflet. -
Cleanup:
If any lines went astray, wait for them to dry, then use a small brush with your white background, paint to ‘delete’ the mistake.
Pro Tip: Pencil Choice
Sketch your design using a light green watercolor pencil instead of standard graphite. The lines will dissolve into your acrylic paint as you work, leaving no dark marks behind!
Step 4: Finishing Touches
-
Erase Marks:
Once the paint is rock hard and fully cured, gently use an eraser to remove any visible pencil lines that weren’t covered by paint. -
Sealing:
Take your pot outdoors or to a ventilated area and spray an even coat of matte varnish over the entire exterior to protect the artwork from water damage. -
Final Cure:
Let the sealer dry according to the manufacturer’s instructions before potting your plant.
Now you have a stunning, persistent patch of greenery that looks perfect in any corner of your home.


Soft Ombre Gradient
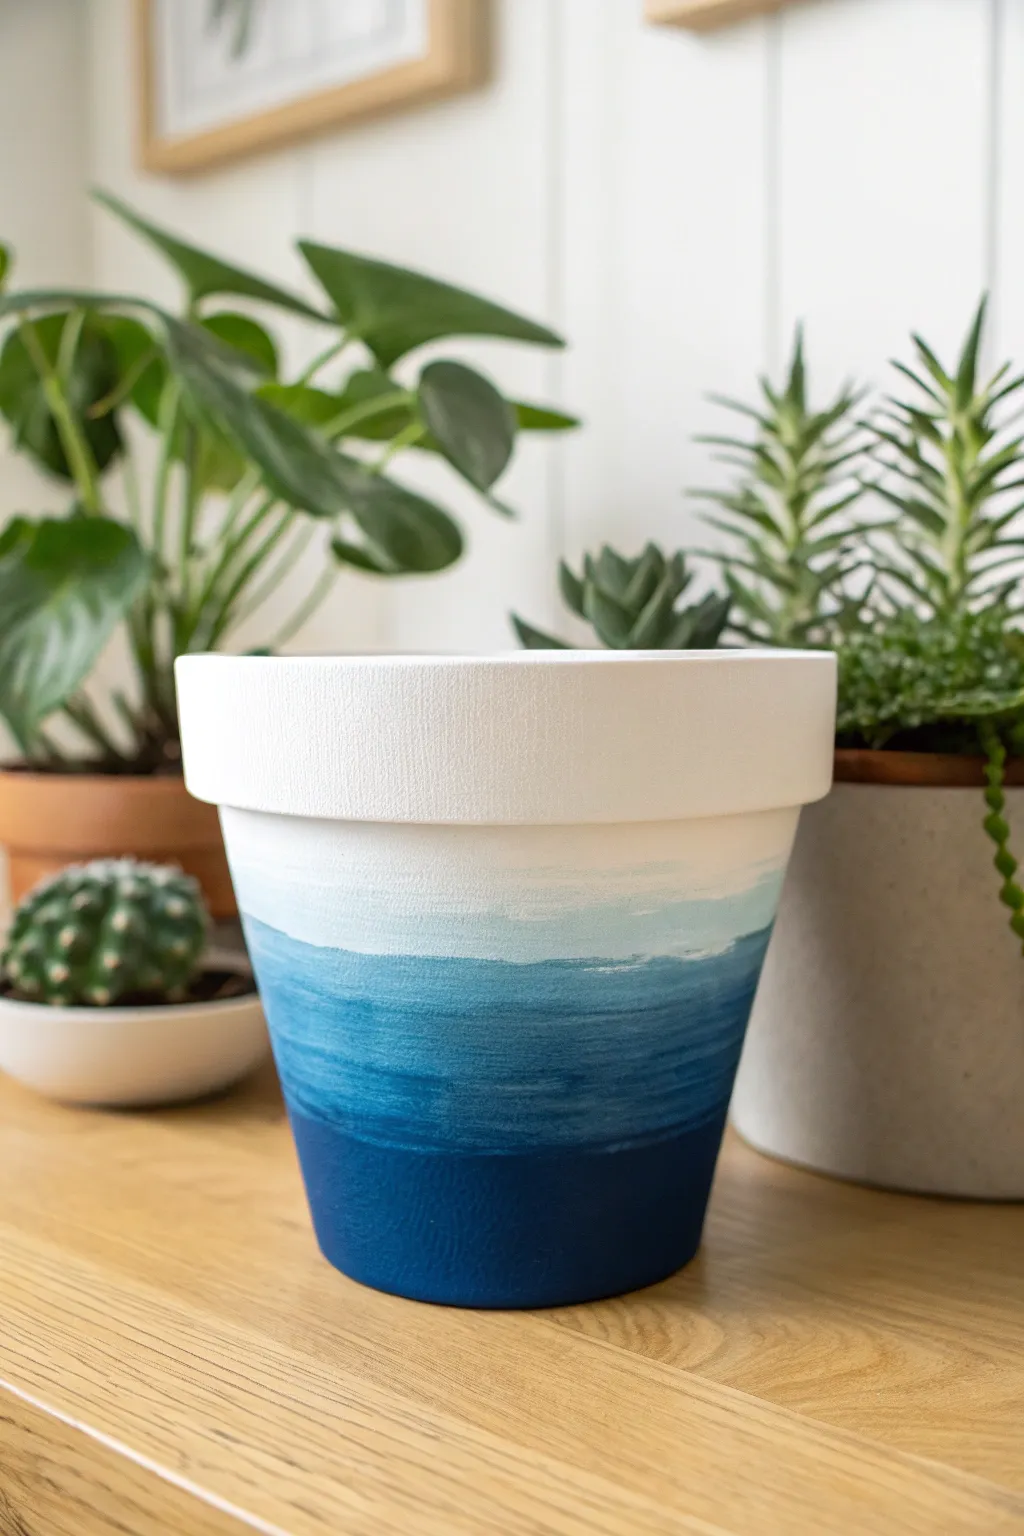
Bring the calming vibes of the ocean into your home with this textured gradient planter. By layering shades of blue from deep navy to frothy white, you’ll create a stunning piece that mimics the horizon where the sea meets the sky.
Step-by-Step Tutorial
Materials
- Terra cotta pot (any size)
- White acrylic paint (heavy body preferred)
- Navy blue acrylic paint
- Teal or cerulean blue acrylic paint
- Wide flat paintbrush (synthetic)
- Small angled paintbrush
- Palette or paper plate
- Water cup and paper towels
- Matte spray sealer
Step 1: Prime and Prepare
-
Clean surface:
Wipe down your terra cotta pot with a damp cloth to remove any dust or warehouse grime, ensuring a clean surface for the paint to adhere to. -
Base coat:
Using your wide flat brush, paint the entire exterior of the pot, including the rim, with a coat of white acrylic paint. -
Second layer:
Allow the first coat to dry to the touch (about 15 minutes), then apply a second coat of white to ensure the terra cotta color is completely blocked out. -
Rim perfection:
Apply a final, thick coat of white specifically to the rim of the pot to create that crisp, bright contrast seen in the photo.
Textured Waves
To replicate the painterly texture in the photo, avoid over-blending. Leave visible horizontal brushstrokes to create the illusion of rippling water and depth.
Step 2: Painting the Ocean Depths
-
Prepare palette:
Squeeze out a generous amount of navy blue, teal, and white paint onto your palette, keeping them separate for now. -
The deep blue:
Start at the very bottom of the pot. Paint a band of pure navy blue that covers the bottom inch or two of the vessel. -
Mixing the mid-tone:
Mix a little bit of teal into your navy blue on the palette to create a transition shade. -
The second band:
Paint a second band directly above the navy layer using your new dark-teal mix, letting the wet edges touch. -
Horizontal blending:
While both bands are still wet, use your brush to stroke horizontally back and forth where the colors meet to blur the hard line.
Fixing Harsh Lines
If a line between colors dries too fast and looks like a stripe, dampen your brush slightly with water and scrub gently over the line to reactivate and blend the paint.
Step 3: Creating the Horizon
-
Teal layer:
Clean your brush, then paint the next section using pure teal or cerulean blue, working your way up the middle of the pot. -
Lightening up:
Mix a significant amount of white into your teal paint to create a soft sky-blue shade. -
Upper body paint:
Apply this light blue mix to the upper section of the pot’s body, stopping just below the rim. -
Texture technique:
Instead of blending this perfectly smooth, use quick horizontal brush strokes to drag the teal up into the light blue, mimicking waves. -
The white cap:
Dip your dirty brush (with the light blue on it) into a bit of pure white paint. -
Final transition:
Paint the very top of the pot body, right under the rim, bridging the gap to the light blue section. -
Dry styling:
I like to wipe most of the paint off the brush and lightly ‘dry brush’ horizontal white streaks across the middle blue section for a weathered look. -
Clean up rim:
If any blue paint accidentally got onto the white rim, use your small angled brush to touch it up with fresh white paint.
Step 4: Finishing
-
Full dry:
Let the pot sit for at least an hour until the paint is completely dry and no longer cool to the touch. -
Seal it:
Take the pot to a well-ventilated area and apply a clear matte spray sealer to protect your artwork from water damage.
Now you have a serene, custom planter ready to showcase your favorite greenery
Galaxy Night Sky
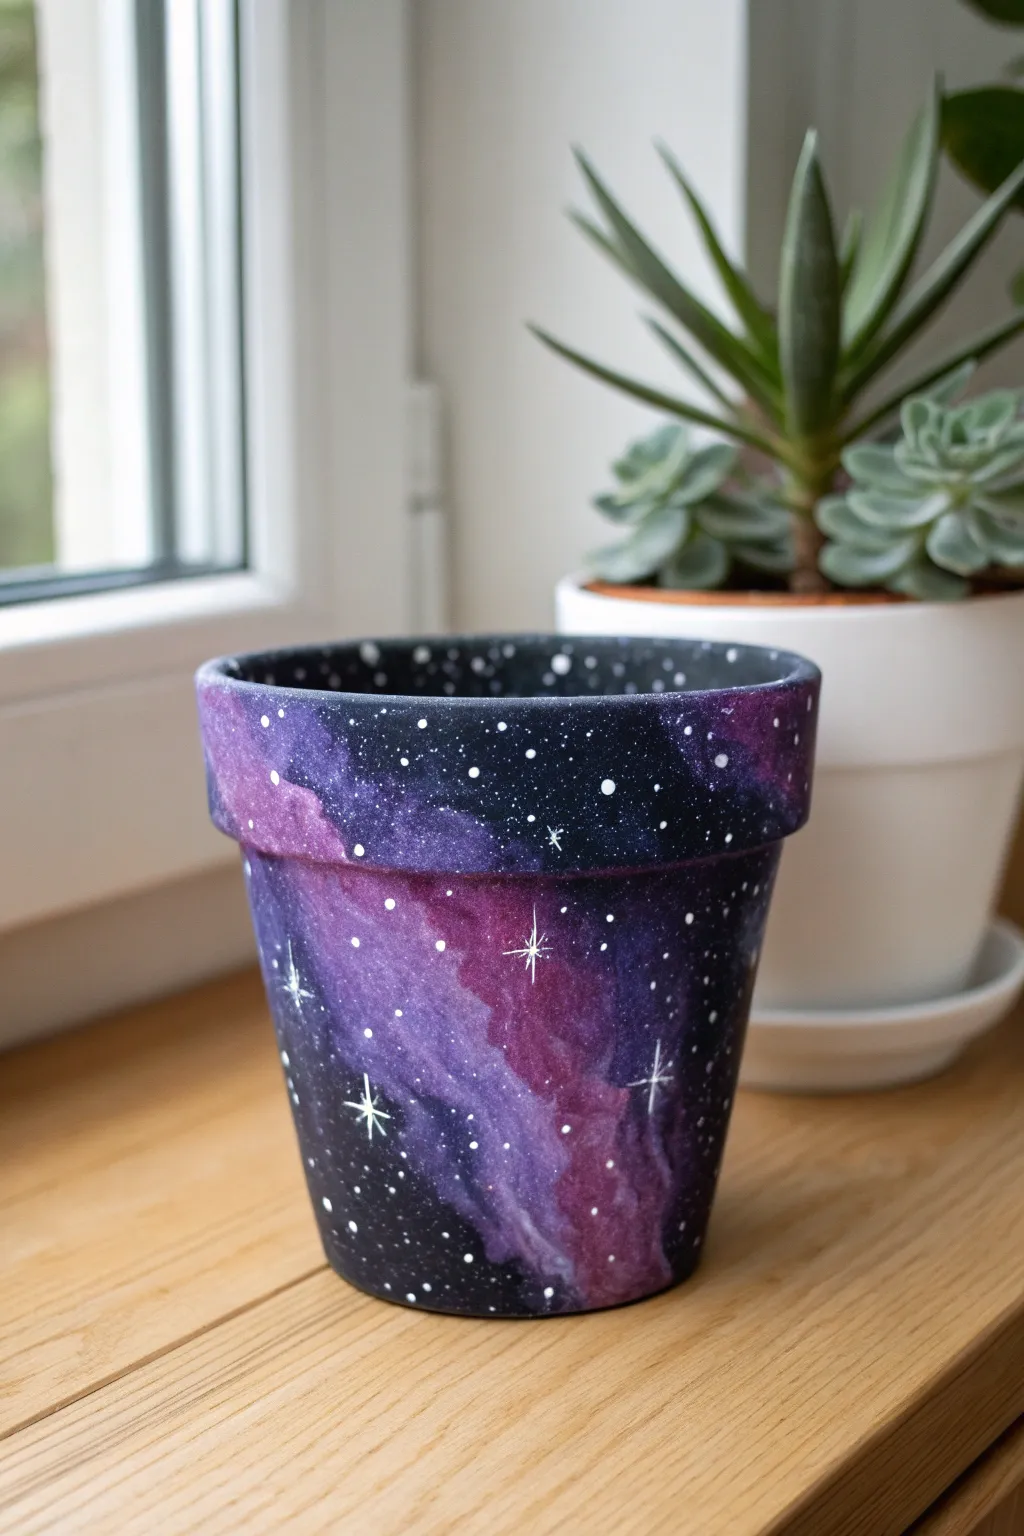
Transform a standard terracotta pot into a stunning piece of deep space art featuring nebulas and twinkling stars. This beginner-friendly project uses sponging techniques to create a dreamy, celestial gradient that looks beautiful with succulents.
Step-by-Step Guide
Materials
- Terracotta pot
- Acrylic paints (Black, Deep Purple, Magenta, White)
- Flat paintbrush (medium)
- Small makeup sponges or kitchen sponge pieces
- Old toothbrush or stiff bristle brush
- Fine liner detail brush (size 0 or 00)
- Water cup and paper towels
- Spray sealer or Mod Podge (matte or glossy)
Step 1: Preparation and Base Coat
-
Surface Prep:
Wipe down your terracotta pot with a damp cloth to remove any dust or sticker residue. Let it dry completely to ensure the paint adheres properly to the clay surface. -
The Void:
Using your flat paintbrush, apply a coat of black acrylic paint to the entire exterior of the pot. -
Rim Detail:
Don’t forget to paint the top rim and about two inches of the inner rim black. This creates a finished look since the potting soil won’t fill the pot to the very top. -
Second Coat:
Terracotta is porous and soaks up paint quickly, so apply a second coat of black once the first is dry. You need an opaque, solid dark background for the galaxy effect to pop.
Muddy Nebula?
If your galaxy clouds look muddy or gray, you likely haven’t let the layers dry enough. Let the black base dry 100% before sponging on color, and use separate sponges for purple and pink.
Step 2: Creating the Nebula
-
Sponge Prep:
Take a makeup sponge or cut a small piece of kitchen sponge. Dampen it slightly with water and squeeze it out thoroughly so it is soft but not dripping. -
Purple Haze:
Dip the sponge into Deep Purple paint and dab the excess off onto a paper towel until the texture looks soft and airy, not gloopy. -
Cloud Formation:
Gently dab the purple paint onto the pot in a diagonal, cloud-like shape. Keep the edges irregular and wispy rather than making a solid block of color. -
Adding Magenta:
While the purple is still slightly tacky, switch to a fresh corner of the sponge (or a new sponge) and pick up the Magenta paint. Dab off the excess heavily. -
Highlighting:
Apply the Magenta over the center areas of the purple clouds. Keep this layer smaller than the purple layer underneath to create a glowing gradient effect. -
Blending:
If the transition between black, purple, and pink looks too harsh, I like to take a clean, slightly damp sponge and gently tap over the edges to blur the colors together. -
Bright Centers:
Mix a tiny drop of white into your magenta to make a pale pink. Sponge this very sparingly into the absolute center of your deepest nebula clouds for intense brightness.
Pro Tip: Depth of Field
Create depth by splattering the tiny stars first, and then painting the nebula clouds lightly *over* some of them. Wait for that to dry, then add a final fresh layer of bright stars on top.
Step 3: A World of Stars
-
Star Mixture:
On your palette or plate, mix white acrylic paint with a few drops of water until it has the consistency of heavy cream or ink. -
The Splatter Technique:
Dip an old toothbrush or stiff brush into the thinned white paint. Test the splatter on a piece of paper first by running your thumb across the bristles. -
Starry Background:
Flick the bristles to spray fine white specks all over the pot. Focus more density over the nebula clouds and less on the black space for contrast. -
Major Stars:
Using your fine detail liner brush and undiluted white paint, hand-paint a few larger stars. Start by painting a small vertical line. -
Crossing Lines:
Paint a horizontal line crossing through the center of the vertical one to create a cross shape. Try to taper the ends of the lines so they are sharp. -
Sparkle Detail:
For the largest focal stars, add a tiny diagonal ‘X’ in the center of the cross, keeping these lines much shorter than the main ones. -
Final Dots:
Use the back end of your paintbrush handle to dot a few larger round planets or stars randomly around the galaxy to add variation in size.
Step 4: Sealing
-
Drying Time:
Allow the painted stars and nebula to dry completely for at least one hour. If the white paint is wet during sealing, it will smear. -
Protection:
Apply a spray sealer or brush on a coat of Mod Podge. A matte finish gives a realistic space look, while glossy makes the colors appear more vibrant.
Now you have a gorgeous celestial home ready for your favorite succulent or houseplant
Southwestern Aztec Print
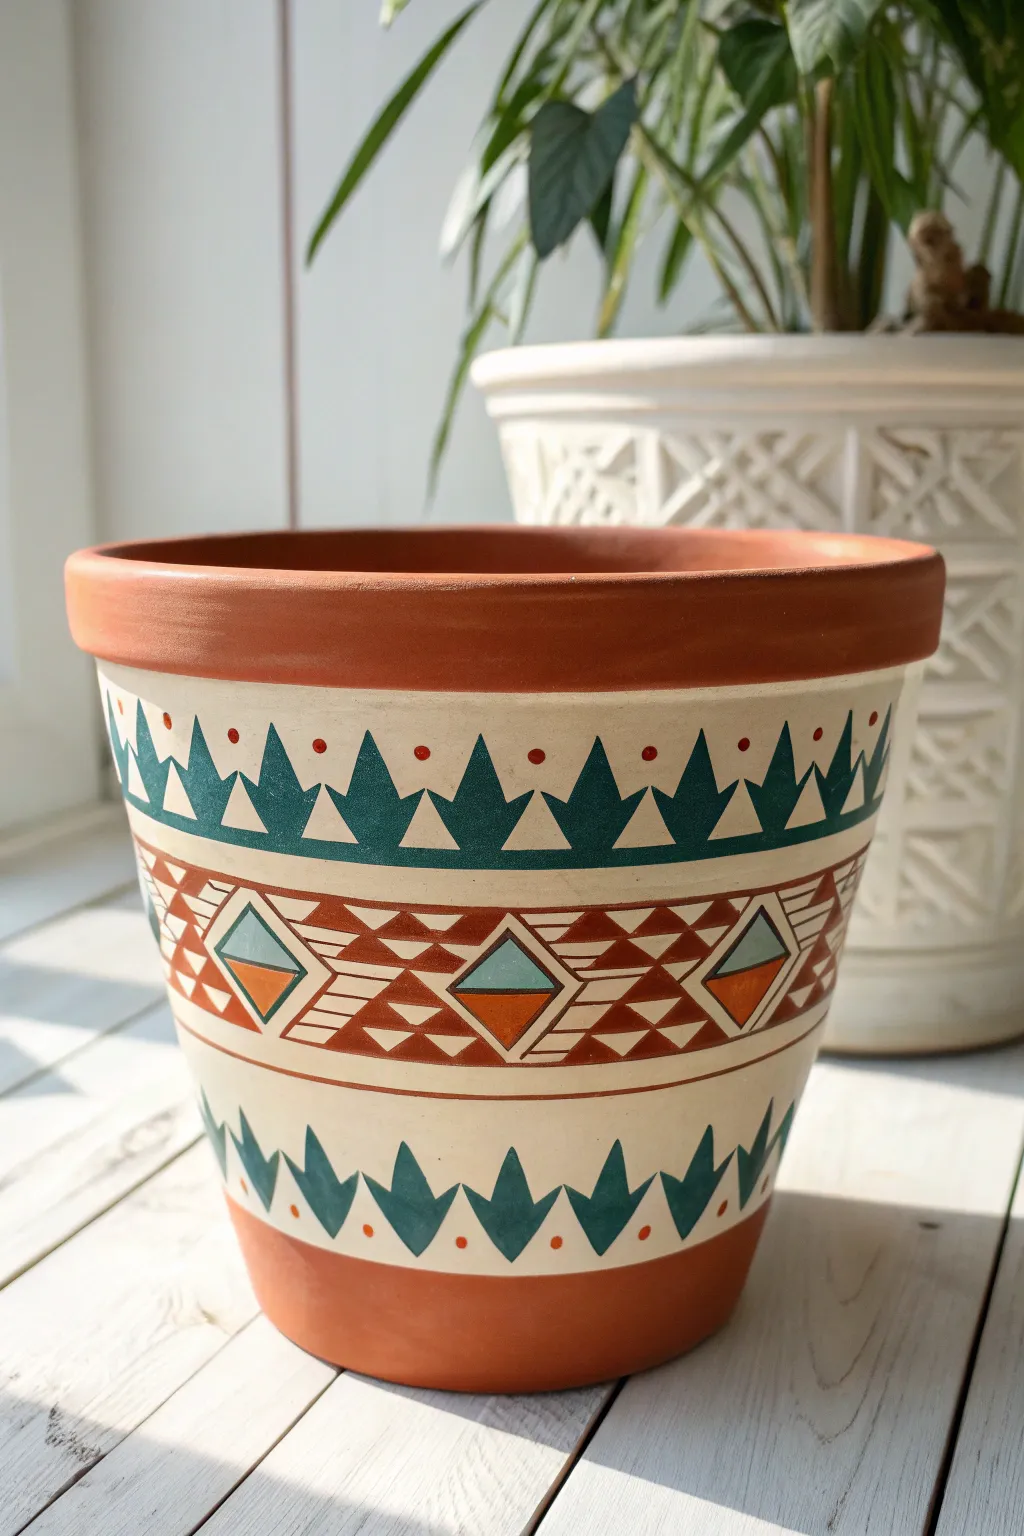
Transform a standard terracotta planter into a warm, geometric statement piece that echoes the colors of the desert. This project relies on steady line work and precise blocking to create a stunning Southwestern motif.
Step-by-Step
Materials
- Terracotta pot (clean and dry)
- Acrylic paints: Cream/Off-white, Deep Teal, Burnt Orange, Dark Brown, Muted Light Blue
- Painter’s tape (1-inch width)
- Flat shader brush (medium)
- Fine detail liner brush (size 0 or 1)
- Pencil and eraser
- Flexible ruler or tape measure
- Matte spray sealer
Step 1: Setting the Stage
-
Clean surface:
Ensure your pot is completely free of dust and sticker residue; wipe it down with a damp cloth and let it dry fully so the paint adheres properly. -
Tape the boundaries:
Apply a strip of painter’s tape around the top rim and another strip around the bottom base. This preserves the natural clay color (or a painted rust base) at the top and bottom. -
Apply the background:
Using a wide flat brush, paint the exposed middle section of the pot with your cream or off-white acrylic. -
Build opacity:
Allow the first coat to dry, then apply a second or third coat of cream until the terracotta color is completely hidden and the finish is smooth. -
Remove tape:
CAREFULLY peel off the painter’s tape while the last coat is still slightly tacky to ensure a crisp, clean edge.
Pattern Drift
If your pattern doesn’t meet perfectly at the back, don’t panic. Simply widen or narrow the last few shapes slightly to bridge the gap; no one will notice!
Step 2: Drafting the Pattern
-
Mark horizontal zones:
Lightly sketch two horizontal lines around the circumference of the cream section to divide it into three bands: a top border, a wide middle section, and a bottom border. -
Create a vertical grid:
Use a flexible ruler to measure the circumference and mark even intervals for your repeating peaks and diamonds. I usually stick to 1-inch intervals for the borders to keep things symmetrical. -
Sketch the borders:
In the top band, lightly pencil in a zigzag pattern to create upward-pointing triangles. In the bottom band, sketch the inverse: downward-pointing triangles.
Step 3: Painting the Borders
-
Paint top triangles:
Load a small flat brush with Deep Teal. Carefully fill in the upward-pointing triangles on the top band, using the flat edge of the brush to keep the lines sharp. -
Paint bottom triangles:
Repeat the process for the bottom band with Deep Teal, filling in the downward-pointing triangles. -
Add dot accents:
Dip the handle end of a paintbrush into Burnt Orange paint and gently stamp a dot between each teal peak on the top band and each teal valley on the bottom band.
Level Up: Texture
Mix a teaspoon of baking soda into the Burnt Orange paint used for the geometric shapes to create a raised, gritty texture that mimics embroidery.
Step 4: The Central Motif
-
Outline the center:
Using your fine liner brush and Dark Brown paint, outline the main diamond shapes in the center of the middle band, based on your grid marks. -
Fill the diamonds:
Paint the top half of each diamond with Muted Light Blue and the bottom half with Burnt Orange. A steady hand is key here. -
Create the steps:
Sketch and then paint the stepped, geometric zig-zags connecting the diamonds using the Burnt Orange tone. These should look like abstract stairs. -
Add linear details:
With the liner brush and Dark Brown paint, add thin parallel hatching lines inside the white spaces between your ‘stairs’ and diamonds to add texture. -
Enhance contrast:
Go back with your Dark Brown liner brush and outline the orange geometric shapes to make the pattern pop against the cream background.
Step 5: Finishing Touches
-
Tidy up:
Use a small brush with your cream background color to touch up any areas where the color may have bled outside the lines. -
Seal the work:
Once fully dry (give it a few hours), spray the entire pot with a matte clear sealer to protect your artwork from water and sunlight.
Pop in a spikey succulent or a trailing plant to complete the desert vibe of your new creation.
Scenic Mountain Landscape
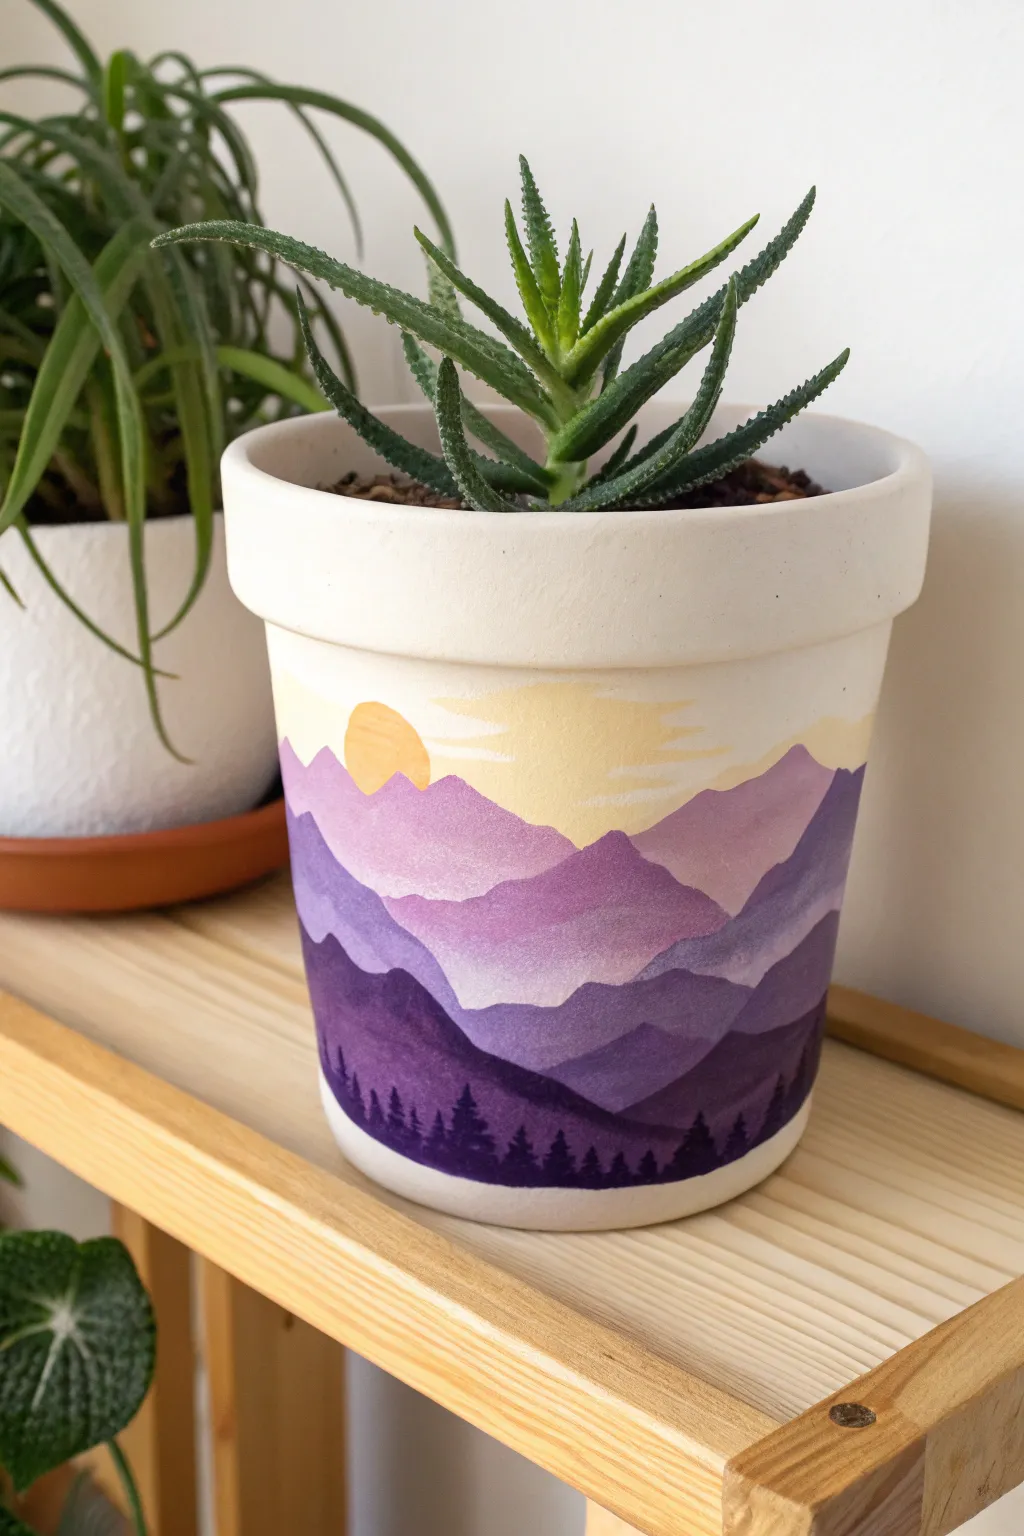

Transform a plain pot into a serene vista using atmospheric perspective and simple layering techniques. This project captures the beauty of a mountain sunset with fading purple gradients and crisp tree silhouettes.
How-To Guide
Materials
- Terracotta pot (clean and dry)
- White acrylic gesso or primer
- Acrylic paints (Titanium White, Cadmium Yellow, Violet/Purple, Black)
- Flat shader brushes (sizes 6 and 10)
- Fine liner brush (size 0 or 00)
- Palette for mixing
- Water cup and paper towels
- Matte spray varnish
Step 1: Preparing the Canvas
-
Prime the surface:
Start by applying a base coat of white gesso or acrylic paint to the exterior of the pot. A white background is essential to make the sunset colors pop. -
Apply a second coat:
Once the first layer feels dry to the touch, apply a second coat of white to ensure full opacity and a smooth working surface. Let this dry completely.
Step 2: The Sky and Sun
-
Paint the sky:
Mix white with a tiny drop of yellow to create a pale buttery cream color. Paint the top third of the pot with this mixture, letting the bottom edge remain rough. -
Create the sun:
Mix a slightly more saturated yellow-orange. Using a small flat brush, paint a semi-circle or full circle shape where you want your sun to sit, ensuring it contrasts against the pale sky.
Clean Lines Hack
Struggling with crisp mountain ridges? Use a flat-headed brush and let the width of the bristles create the straight slopes for you, rather than trying to draw the outline with a tip.
Step 3: Layering the Mountains
-
Mix the lightest lavender:
For the furthest mountain range, mix a large amount of white with a very small dot of violet. You want a faint, hazy purple that almost blends into the sky. -
Paint the distant peaks:
Paint a jagged, rolling line across the pot, slightly overlapping the sun. Fill in the area below this line for about an inch. -
Darken the mixture:
Add a little more violet to your previous mix to create a distinct, medium lilac shade. This establishes depth through atmospheric perspective. -
Paint the second range:
Paint the next mountain layer below the first one, varying the peaks and valleys so they don’t look identical to the row above. -
Create the mid-ground color:
Mix a true medium purple. I usually test the color on a paper towel first to ensure it is clearly darker than the previous layer. -
Add the third layer:
Apply this medium purple range, bringing the paint further down the pot. Keep your edges crisp by using the flat edge of your brush. -
Mix the foreground purple:
Create a deep violet by mixing your purple with a touch of black or dark blue. This should be a rich, shadowy hue. -
Paint the closest mountains:
Paint the final mountain shapes near the bottom of the pot. Fill this dark color all the way down to the base rim.
Level Up
Add a touch of magic by using a toothbrush to flick a tiny mist of white paint over the darkest purple layer before adding trees, creating the illusion of fireflies or distant stars.
Step 4: Details and Finish
-
Mix the darkest shade:
Mix black with a little purple to create a near-black indigo. -
Switch to a liner brush:
Load your fine liner brush with the dark mixture. To get sharp lines, twist the bristles into a point on your palette. -
Paint the tree line:
Along the very bottom edge, paint varying vertical lines to represent tree trunks. Use quick, short strokes angling downward from the trunks to create pine branches. -
Vary tree heights:
Ensure the trees are different heights and widths to look natural. Group some together and leave small gaps elsewhere. -
Seal the artwork:
Allow the paint to cure for at least 24 hours. Finish by applying a matte spray varnish to protect your landscape from water damage.
Now you have a stunning piece of functional art that brings the calmness of the mountains right into your home.


Have a question or want to share your own experience? I'd love to hear from you in the comments below!