
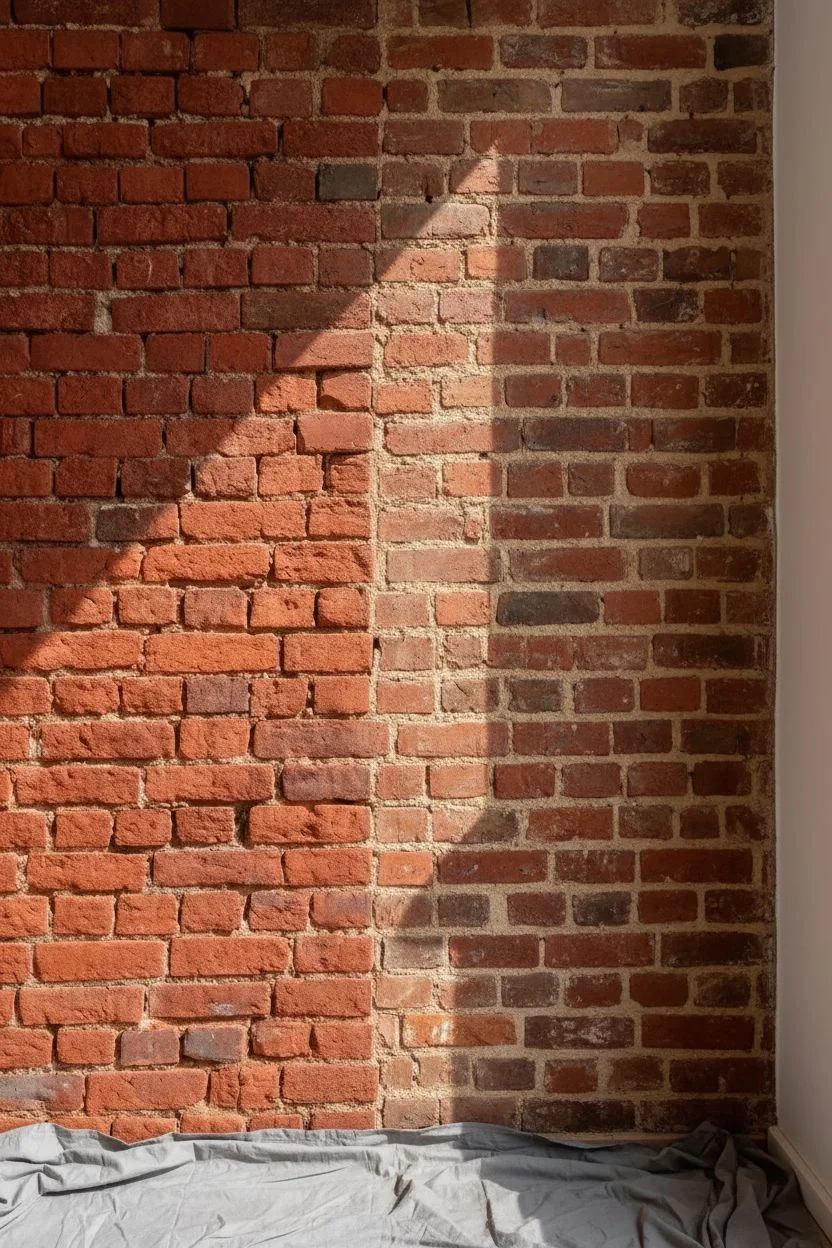
Transforming the rough, porous surface of masonry into a modern masterpiece is one of my absolute favorite ways to breathe new life into a space. Whether you are looking to refresh a dated fireplace or completely overhaul your home’s exterior, there is a perfect balance of paint texture and color waiting to be discovered.
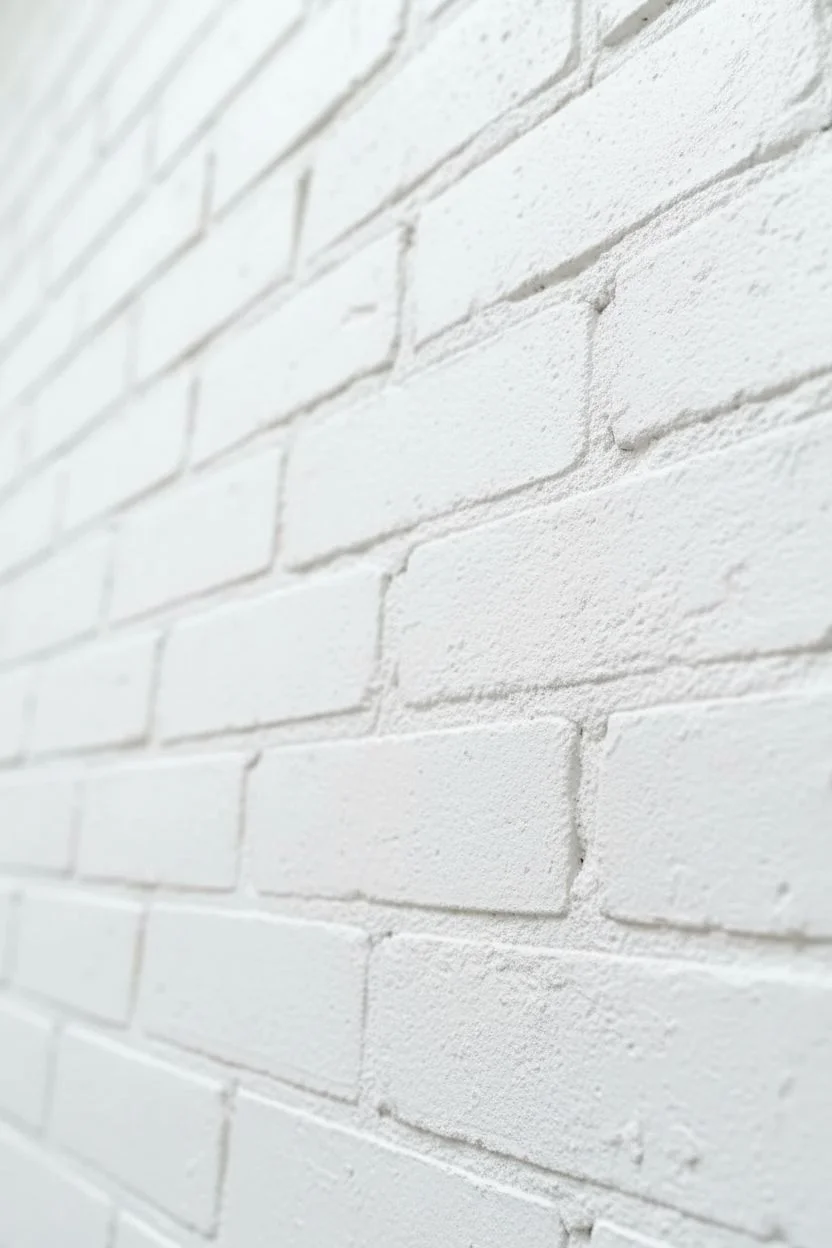
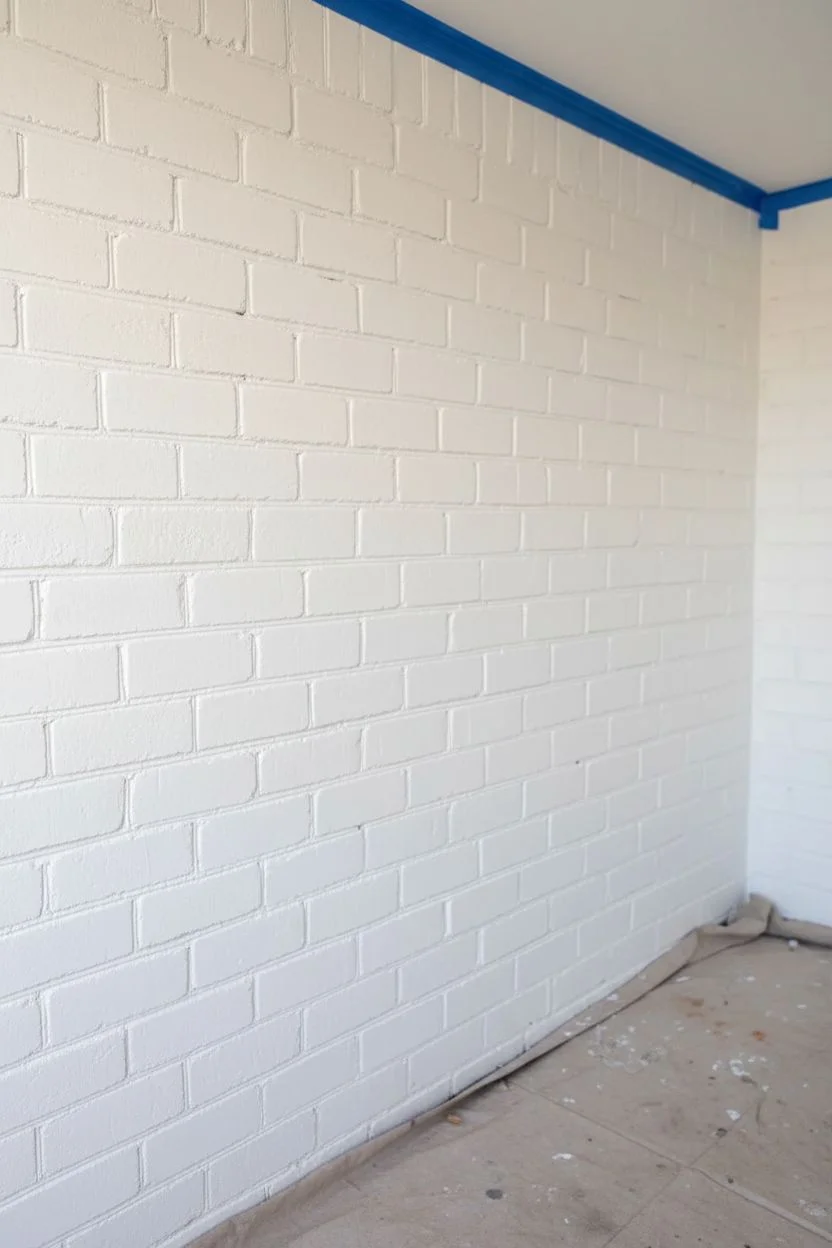
The Classic Opaque White
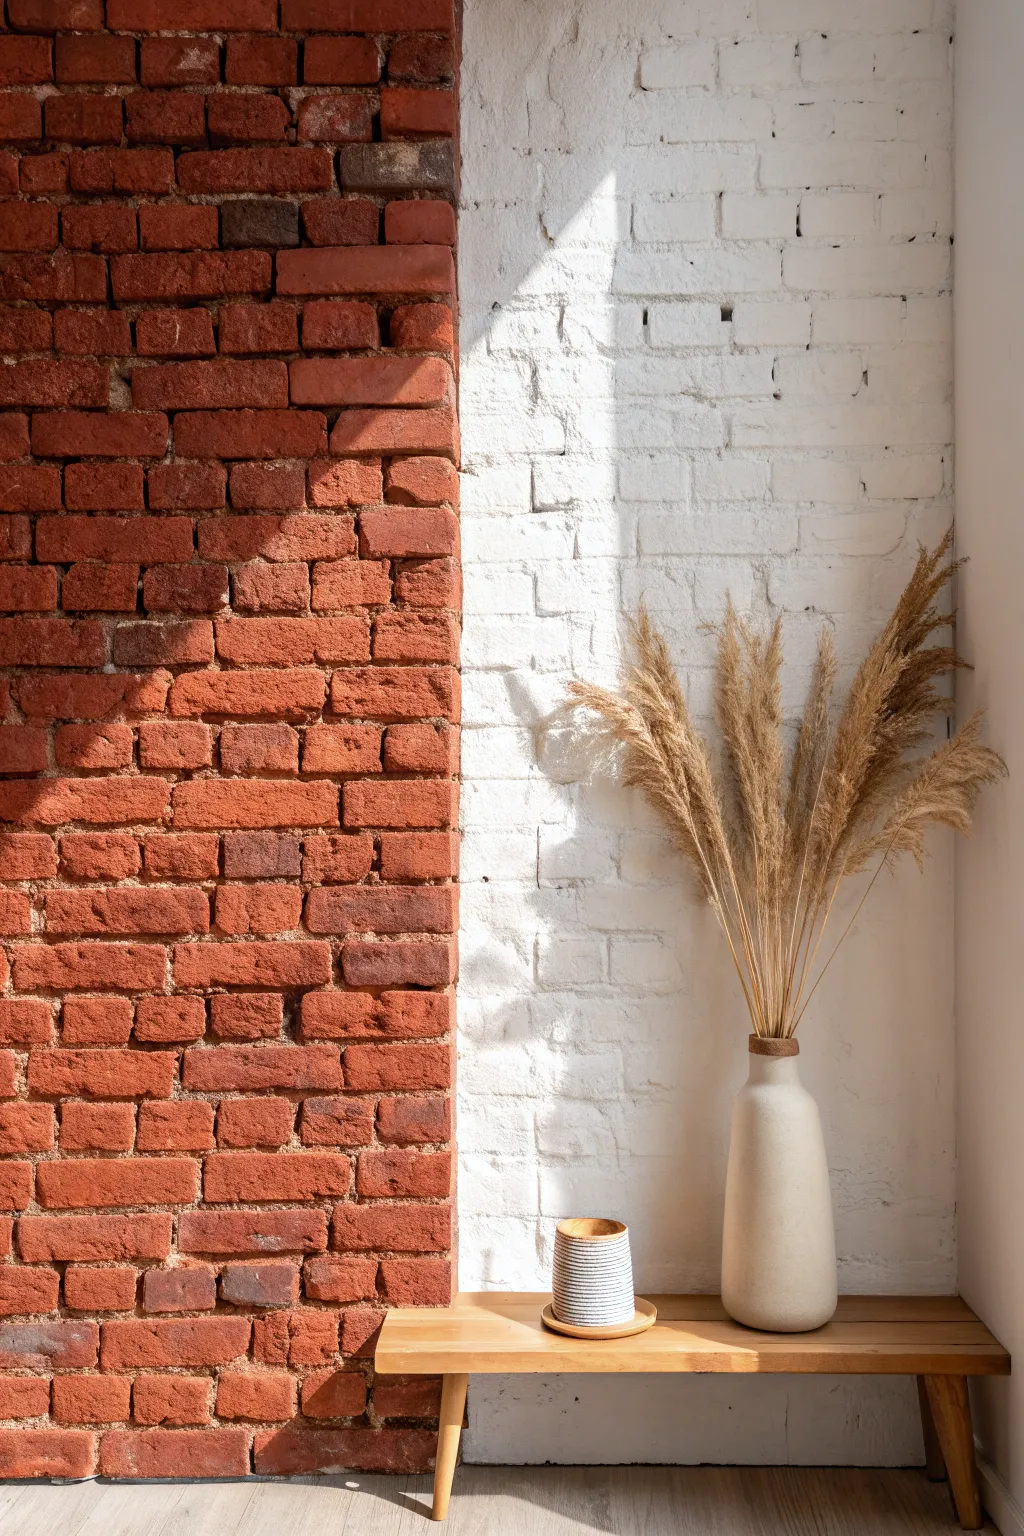
This project transforms a rustic interior by painting a specific section of exposed brick in a crisp, opaque white while leaving the adjacent wall in its natural state. The result is a stunning visual contrast that balances industrial texture with modern brightness.
Step-by-Step Guide
Materials
- Stiff wire brush
- Vacuum with brush attachment
- TSP (Trisodium Phosphate) hard surface cleaner
- Bucket and sponge
- High-adhesion painter’s tape
- Heavy-duty drop cloths
- Stain-blocking masonry primer
- Premium acrylic latex paint (Matte White)
- 3/4-inch to 1-inch nap roller cover
- Roller frame and extension pole
- 2-inch angled sash brush (synthetic)
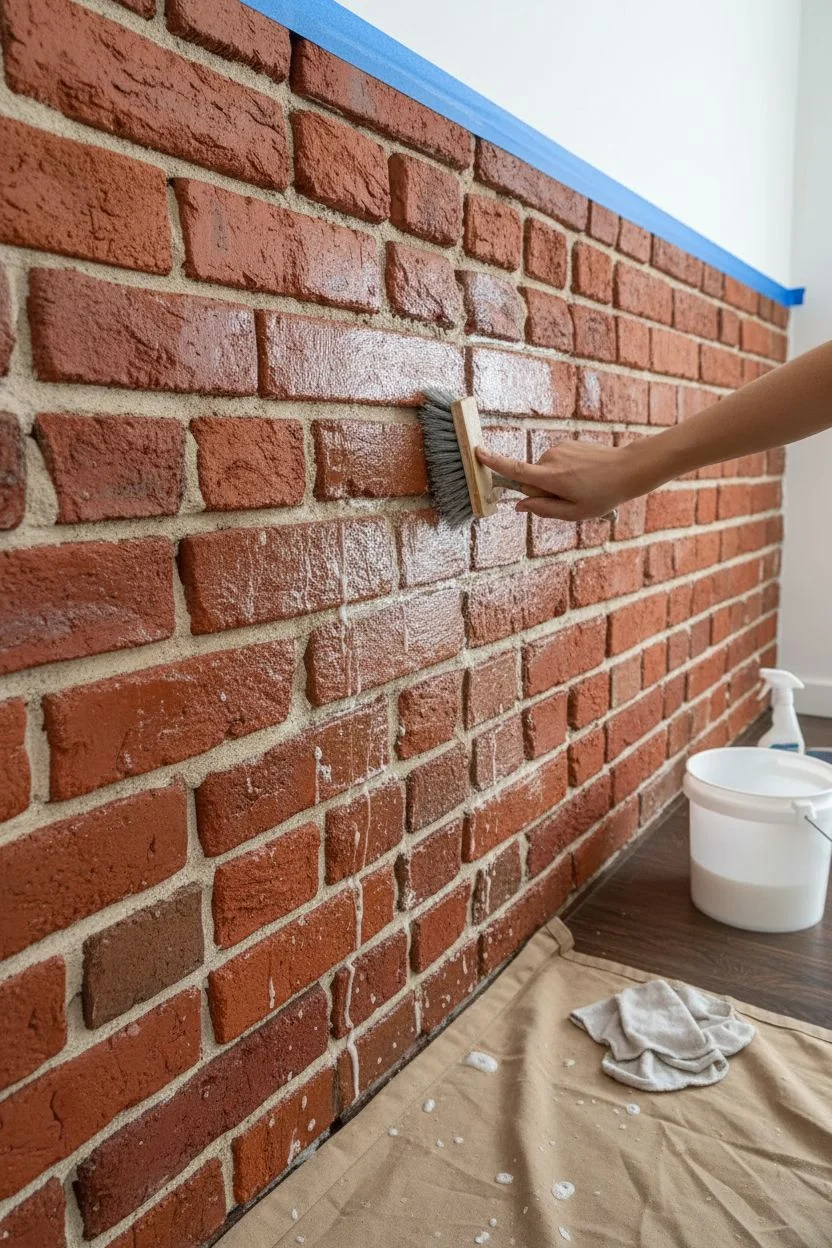
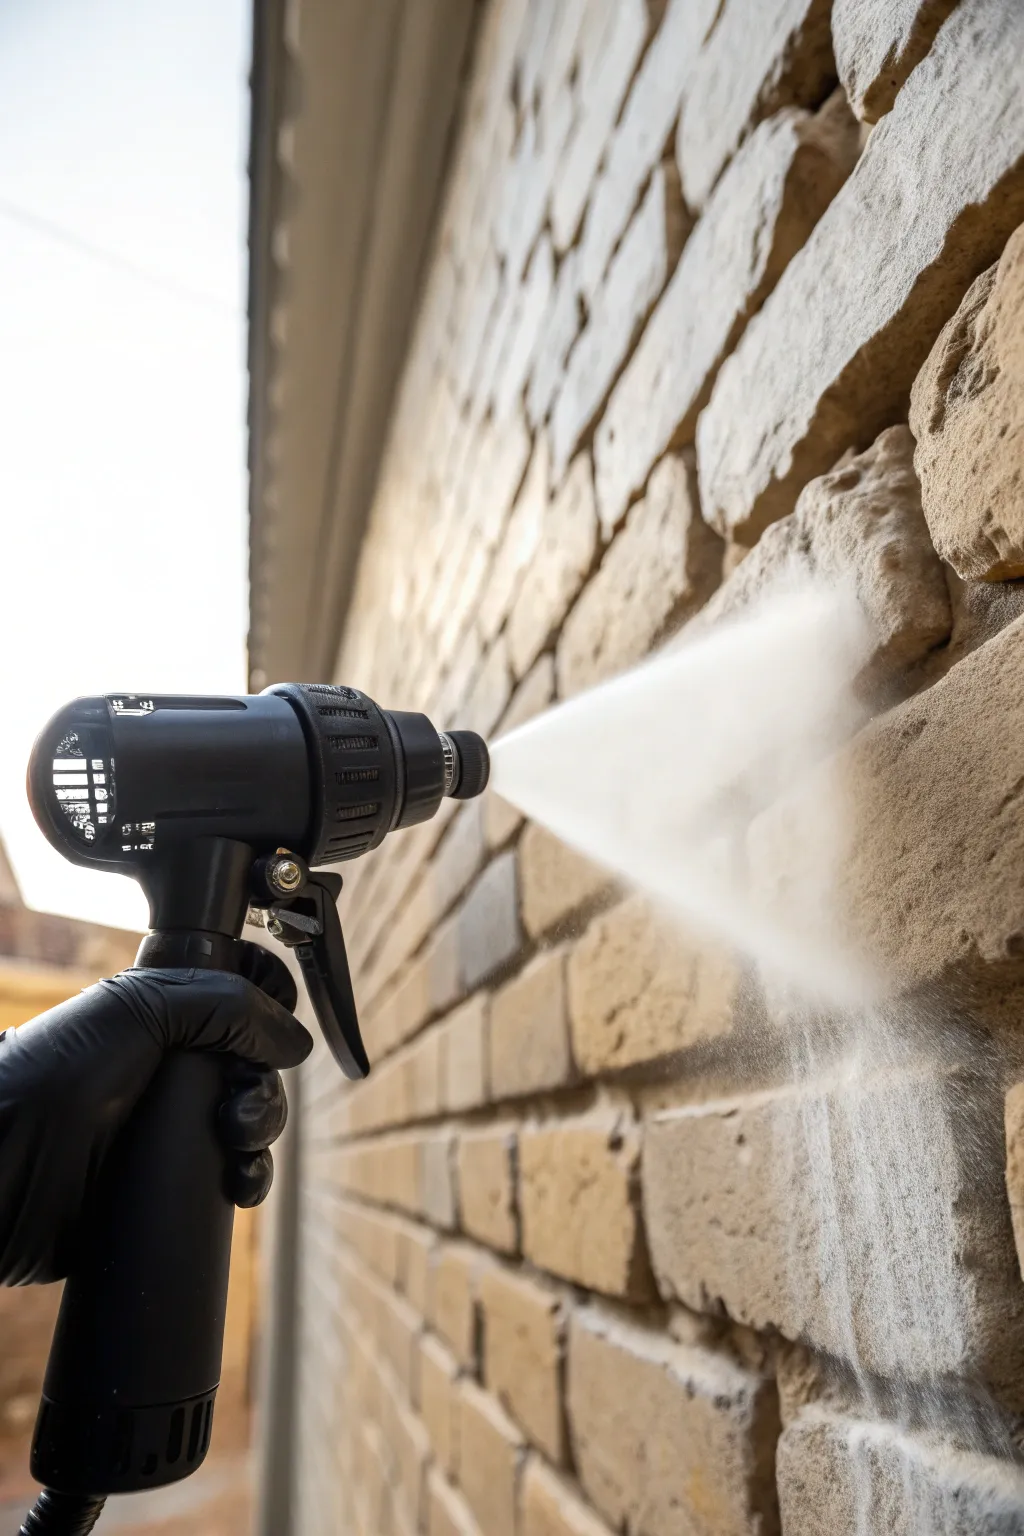
Step 1: Cleaning and Prep
-
Clear and protect:
Move all furniture away from the wall and lay down heavy-duty drop cloths to protect your flooring from drips and brick dust. -
Remove loose debris:
Scrub the entire surface of the brick vigorously with a stiff wire brush to knock loose any crumbling mortar or flaking brick fragments. -
Vacuum thoroughly:
Run a vacuum with a brush attachment over the wall to capture the dust you just created, paying special attention to the grout lines. -
Wash the surface:
Mix TSP with warm water in a bucket and scrub the bricks down with a stiff sponge to remove years of grime and grease. -
Rinse and dry:
Wipe the wall down with clean water to remove the cleaning residue and let the brick dry completely for at least 24 hours.
Pro Tip: Save Your Good Brushes
Brick is extremely abrasive. Use an old or inexpensive brush for the initial ‘cutting in’ and grout work, as the rough texture will ruin the bristles.
Step 2: Defining the Line
-
Mark the transition:
Decide exactly where the white paint will stop and the natural brick will begin, ensuring the line is perfectly vertical. -
Apply tape:
Run a strip of high-adhesion painter’s tape down your predetermined line. -
Seal the edge:
Press the tape firmly into the irregularities of the brick and mortar using a putty knife or your fingers to minimize bleed-through.
Step 3: Priming
-
Select the right primer:
Ensure you are using a high-quality masonry primer that blocks stains, as brick is porous and can leach tannins that turn white paint yellow. -
Cut in the grout:
Use your angled brush to work the primer into the recessed grout lines and deep pores first. -
Roll the surface:
Saturate your thick-nap roller and apply the primer to the faces of the bricks, rolling in different directions to cover all angles. -
Check for voids:
Inspect the wall for missing spots or pinholes and dab them with your brush before the primer dries.
Level Up: The Soft Transition
For a softer look, mix water with your white paint (1:1 ratio) to create a whitewash effect instead of opaque paint, letting some brick texture peek through.
Step 4: Painting
-
Cut in edges:
Dip your clean angled brush into the matte white paint and carefully paint along the ceiling, floor, and the taped vertical line. -
Prevent bleeding:
When painting near the tape, brush away from the tape edge rather than towards it to keep the line crisp. -
Roll the first coat:
Apply the first coat of white paint using the high-nap roller, moving slowly to prevent splatter from the textured surface. -
Stipple deep textures:
I like to keep a brush handy while rolling to immediately ‘stipple’ (tap vertically) paint into deep crannies the roller misses. -
Allow to dry:
Let the first coat dry according to the manufacturer’s instructions; brick often takes a bit longer due to absorption. -
Apply second coat:
Roll on a second coat to achieve that solid, opaque look shown in the photo, ensuring no dark brick color shows through. -
Remove tape:
Carefully peel back the painter’s tape while the paint is still slightly tacky to avoid pulling up dry paint chips.
Once the paint cures, style your bright new corner with natural elements like pampas grass or wood to warm up the space.


Authentic Limewash Glaze
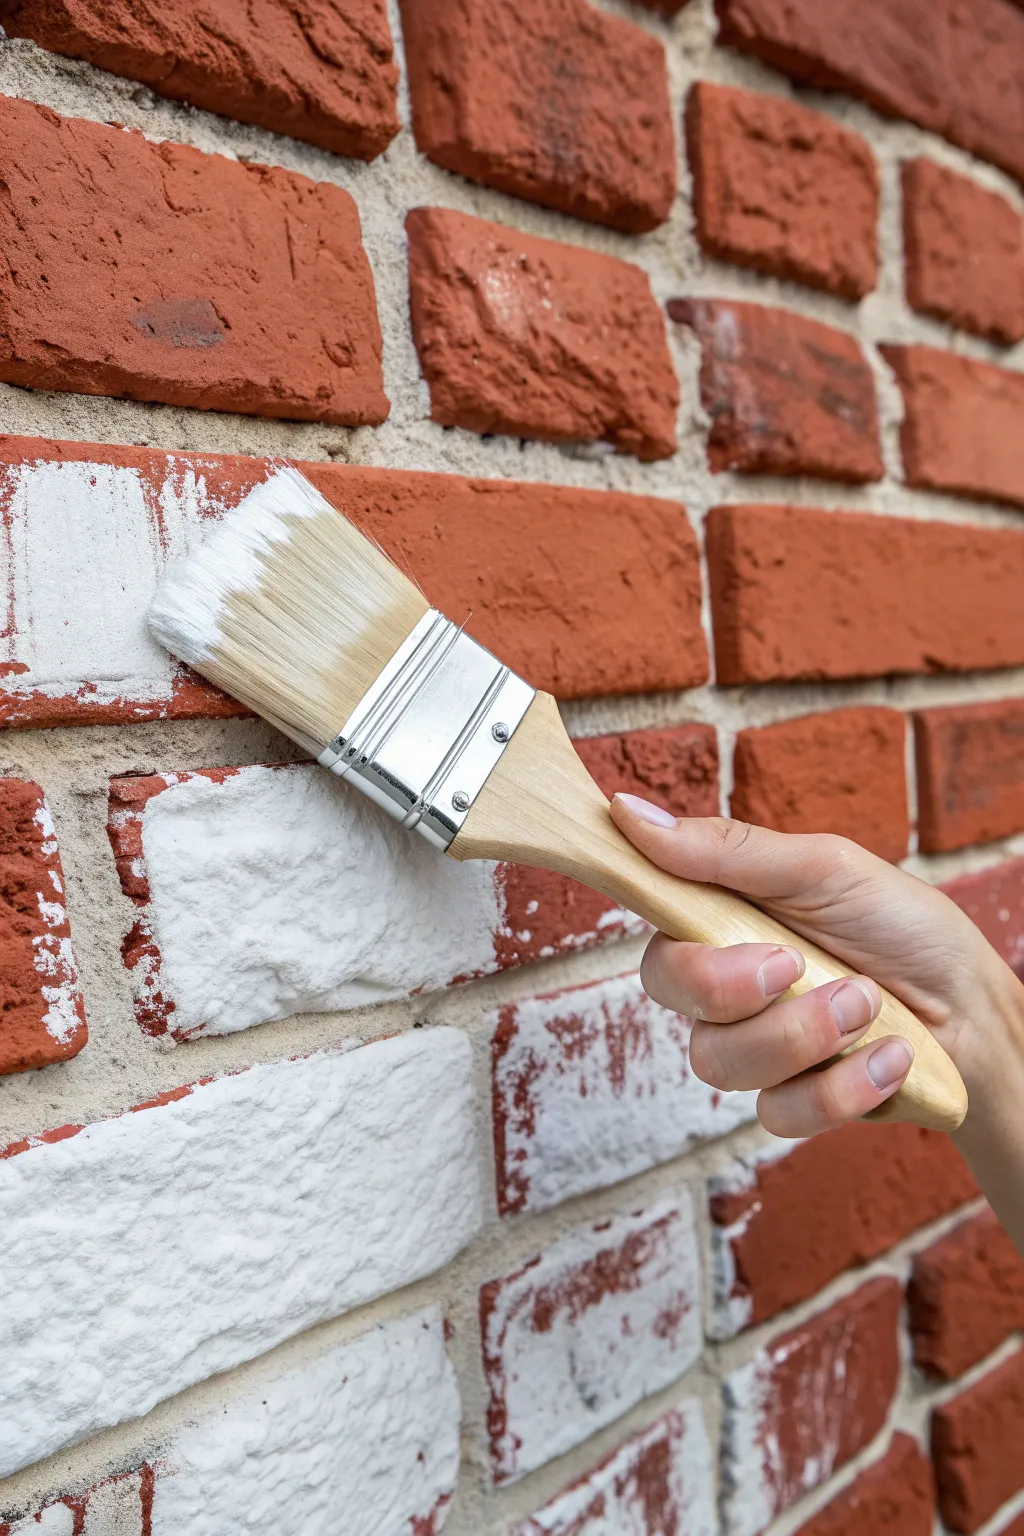
Transform jarring red masonry into a soft, weathered masterpiece using an authentic limestone-based glaze. This technique allows the brick to breathe while creating a beautiful, chalky patina that naturally ages over time.
Step-by-Step Tutorial
Materials
- Class A hydrated lime putty or limewash powder
- Water (for mixing and dampening)
- Large 4-inch block masonry brush
- Large clean mixing bucket
- Paint stir stick or drill attachment
- Spray bottle with clean water
- Clean, lint-free cotton rags
- Painter’s tape
- Canvas drop cloths
- TSP substitute (for cleaning)
- Scrub brush
Step 1: Surface Preparation
-
Clear the area:
Move furniture away from the wall and lay down canvas drop cloths to protect your flooring from splashes. -
Clean the brick:
Vacuum the brick thoroughly to remove loose dust, cobwebs, and debris from the mortar lines. -
Scrub the surface:
Mix a TSP substitute with warm water and use a stiff bristle brush to scrub away any oils, soot, or grime that could repel the wash. -
Rinse well:
Wipe the wall down with plain water and a sponge to remove any cleaning residue. -
Mask edges:
Apply painter’s tape carefully along the ceiling, baseboards, and any adjacent walls to ensure crisp lines.
Keep It Thirsty
Authentic limewash relies on a chemical reaction with water to bond. Never skip the misting step—painting on bone-dry brick causes the wash to “chalk off” later.
Step 2: Mixing the Solution
-
Combine ingredients:
In your bucket, mix the lime putty or powder with water according to package directions. -
Achieve consistency:
Stir until the mixture resembles the consistency of whole milk or heavy cream; I usually aim for something that coats the stick but isn’t gummy. -
Test the opacity:
Apply a small test patch in an inconspicuous lower corner to see how thick the coverage is, remembering it will dry much lighter and more opaque than it looks when wet.
Layered Depth
For a richer look, apply a second, thinner coat heavily diluted with water (1 part lime to 3 parts water). This creates a translucent haze over the exposed red areas.
Step 3: Applying the Wash
-
Dampen the wall:
Using the spray bottle, mist a manageable 3×3 foot section of the brick with water just before painting. -
Load the brush:
Dip your block brush into the lime mixture, tapping off the excess to prevent heavy dripping. -
Start with mortar:
Push the bristles into the mortar joints first to ensure the deep crevices are coated. -
Brush the face:
Use horizontal strokes to sweep the wash across the face of the bricks, blending it out from the mortar lines. -
Feather the edges:
Ensure you feather the edges of your working section so you don’t end up with visible lap lines when you move to the next patch. -
Continue sectioning:
Move across the wall in small sections, always spraying the brick with water before applying the fresh lime coat.
Step 4: Distressing and Finishing
-
Monitor drying:
Watch the wash carefully as it begins to dry; you execute the distressing while the lime is damp, not fully cured. -
Wipe back:
Use a damp cotton rag to wipe paint off specific bricks where you want the original red color to peek through. -
Add variance:
Rub harder on some bricks and lighter on others to create a natural, time-worn appearance rather than a uniform pattern. -
Final inspection:
Step back to look at the overall balance of the wall, touching up areas that look too bare or wiping down areas that look too heavy. -
Allow to cure:
Let the wall dry completely for at least 24 hours, during which the limewash will calcify and reach its final, beautiful white tone.
Enjoy the bright, airy atmosphere your new feature wall brings to the space


Rustic German Smear
Transform a dated or dark brick fireplace into a bright, textural focal point using the German smear technique. This method uses wet mortar to create an Old World uneven finish that softens hard lines while keeping the rustic charm intact.
How-To Guide
Materials
- White Portland cement or pre-mixed white mortar
- Water
- 5-gallon bucket
- Drill with mixing paddle attachment
- Heavy-duty rubber gloves
- Masonry trowel
- Large grout sponge
- Spray bottle
- Painter’s tape
- Drop cloths
- Stiff bristle brush
- TSP substitute (for cleaning)
Step 1: Preparation
-
Clean the surface:
Scrub the entire fireplace with a stiff bristle brush and TSP substitute to remove soot, dust, and loose debris. -
Protect the area:
Lay down heavy drop cloths and tape them to the floor; this process is messy and mortar is heavy. -
Tape edges:
Apply painter’s tape along the walls and around the wooden mantel to protect them from splashes.
Manual Control
Keep a bucket of clean water nearby. Wearing heavy rubber gloves allow you to dip your hand in water and finger-paint the mortar into tight corners.
Step 2: Mixing the Mortar
-
Combine ingredients:
Pour the dry white mortar into your bucket and gradually add water. -
Mix consistency:
Use the drill mixer to blend until you achieve a texture similar to thick peanut butter or heavy cake batter. -
Let it slake:
Allow the mixture to rest for about 10 minutes to activate the chemicals, then mix briefly one more time.
Color Panic
If the mortar looks gray while applying, don’t worry! Wet mortar is much darker than dry mortar; it will whiten significantly as it cures overnight.
Step 3: Application
-
Dampen the brick:
Mist a small 3-foot section of the brick with your spray bottle; wet brick helps the mortar adhere propery. -
Load the trowel:
Scoop a generous amount of mortar onto your trowel or hawk. -
Smear the joints:
Press the mortar into the grout lines first to ensure they are filled and flush with the brick. -
Spread the faces:
Drag the mortar over the face of the bricks, varying your pressure to leave different thicknesses. -
Achieve heavy coverage:
For the look in the photo, apply a thicker layer that covers roughly 90% of the brick color. -
Create texture:
I like to use a sporadic sweeping motion to mimic the look of aged, weathered masonry.
Step 4: Distressing & Finishing
-
Wait briefly:
Let the applied section set for 20-30 minutes until it is stiff but not fully cured. -
Soften ridges:
Wipe a damp sponge gently over the surface to smooth out sharp trowel peaks. -
Expose details:
If you want more definition, use a wire brush to scrape small areas of brick face back into view. -
Repeat the process:
Continue working in sections (mist, smear, wait, sponge) until the entire fireplace and hearth are covered. -
Clean up:
Remove the painter’s tape carefully before the mortar fully hardens to prevent chipping. -
Cure:
Allow the fireplace to dry for at least 24-48 hours before decorating.
Once cured, style your bright, textured fireplace with natural woods and dried florals to complete the organic look.


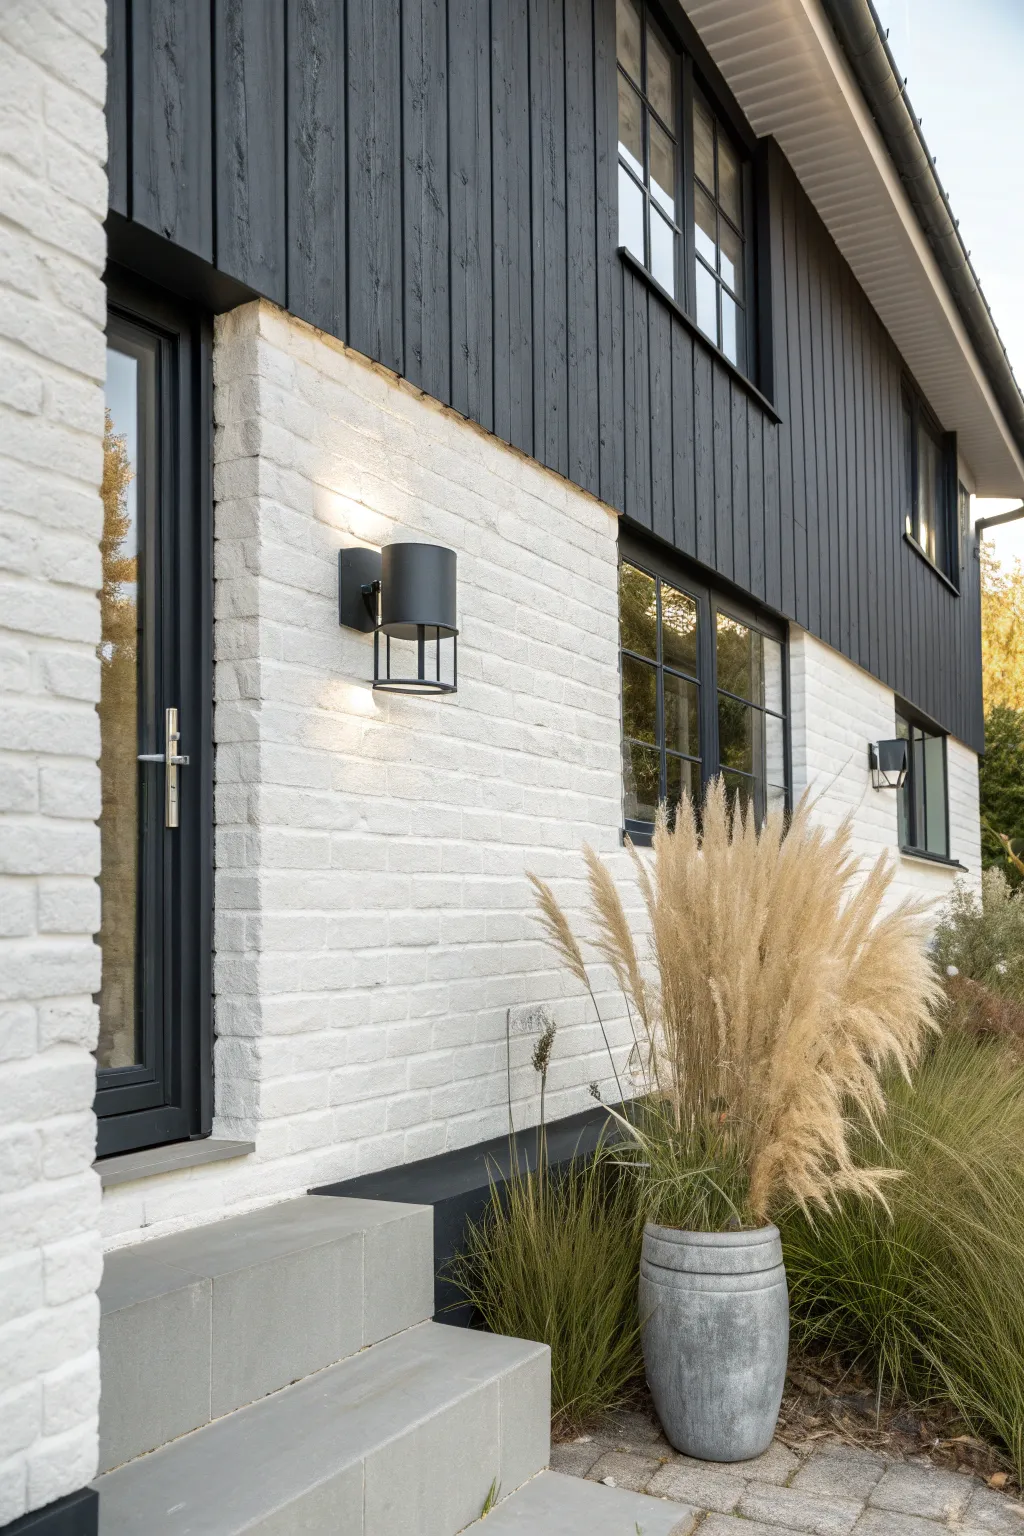
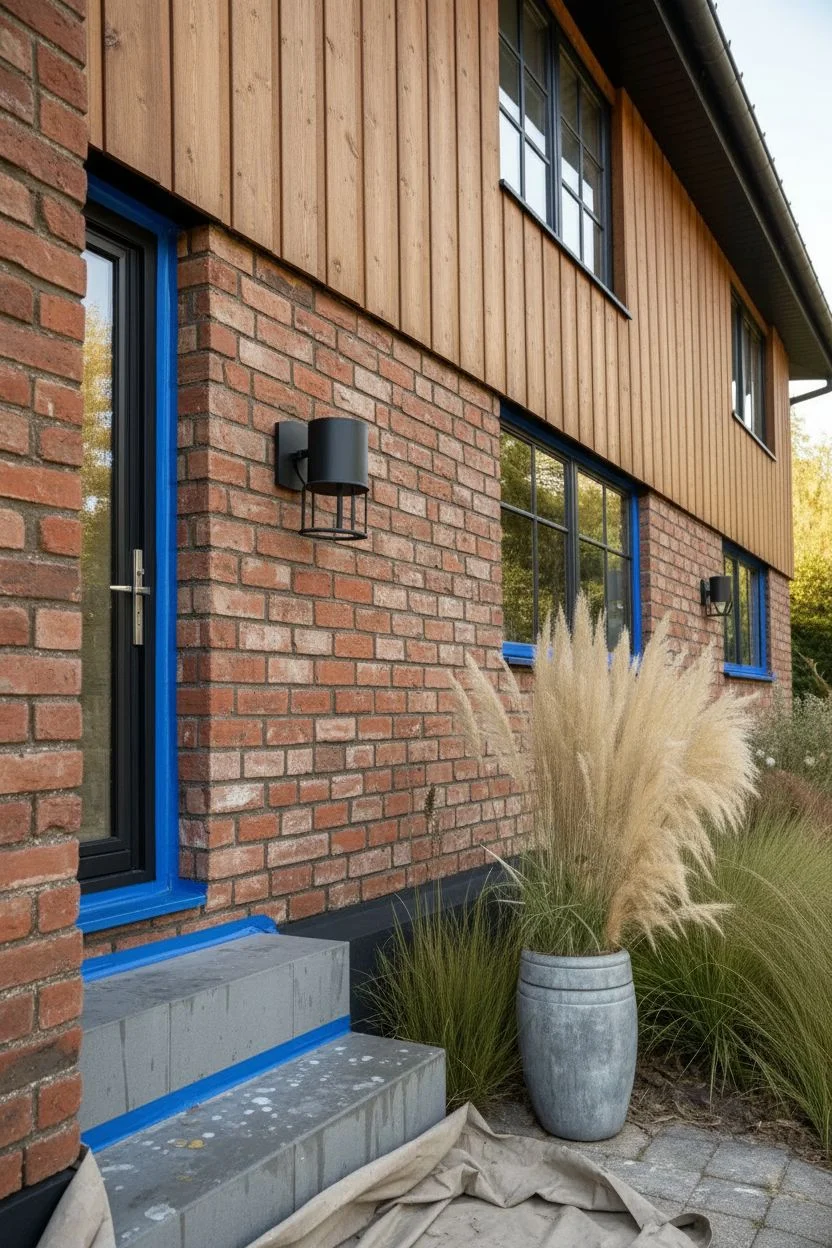
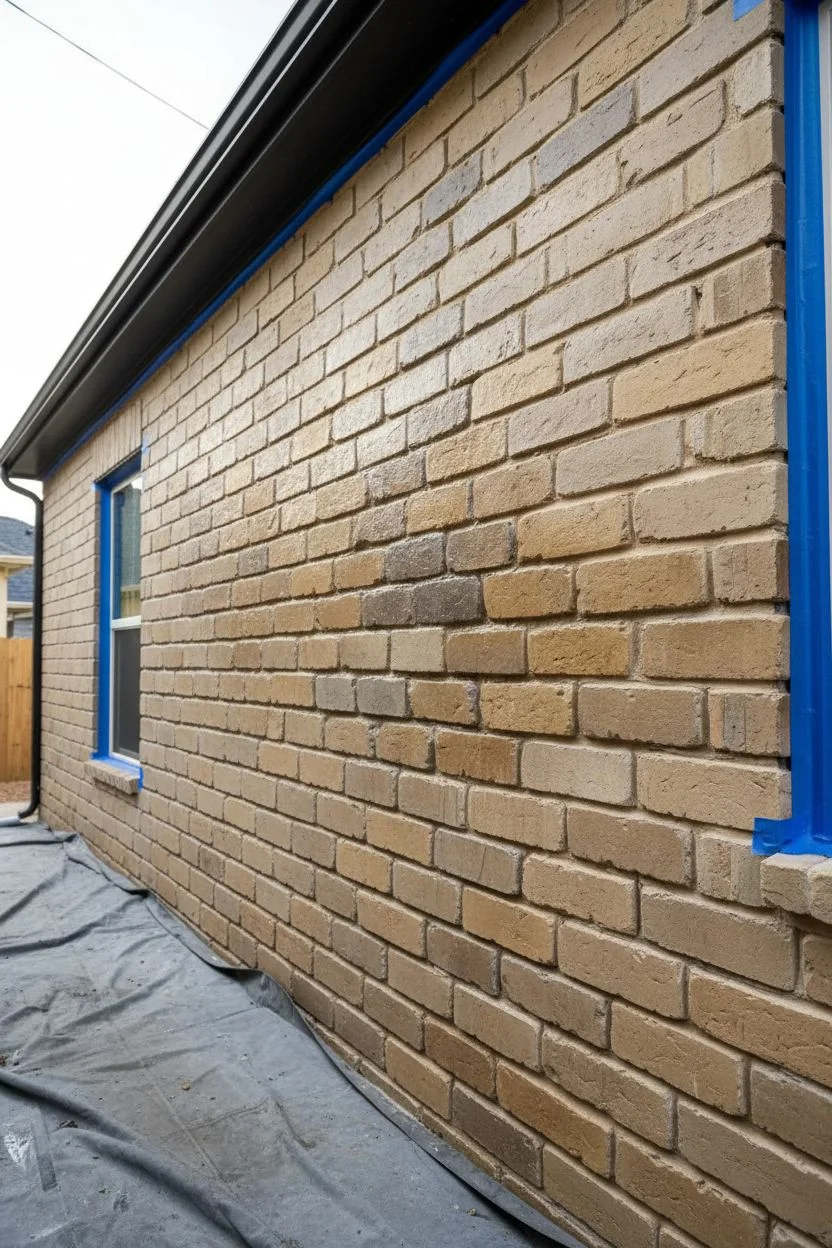
Dramatic Moody Charcoal
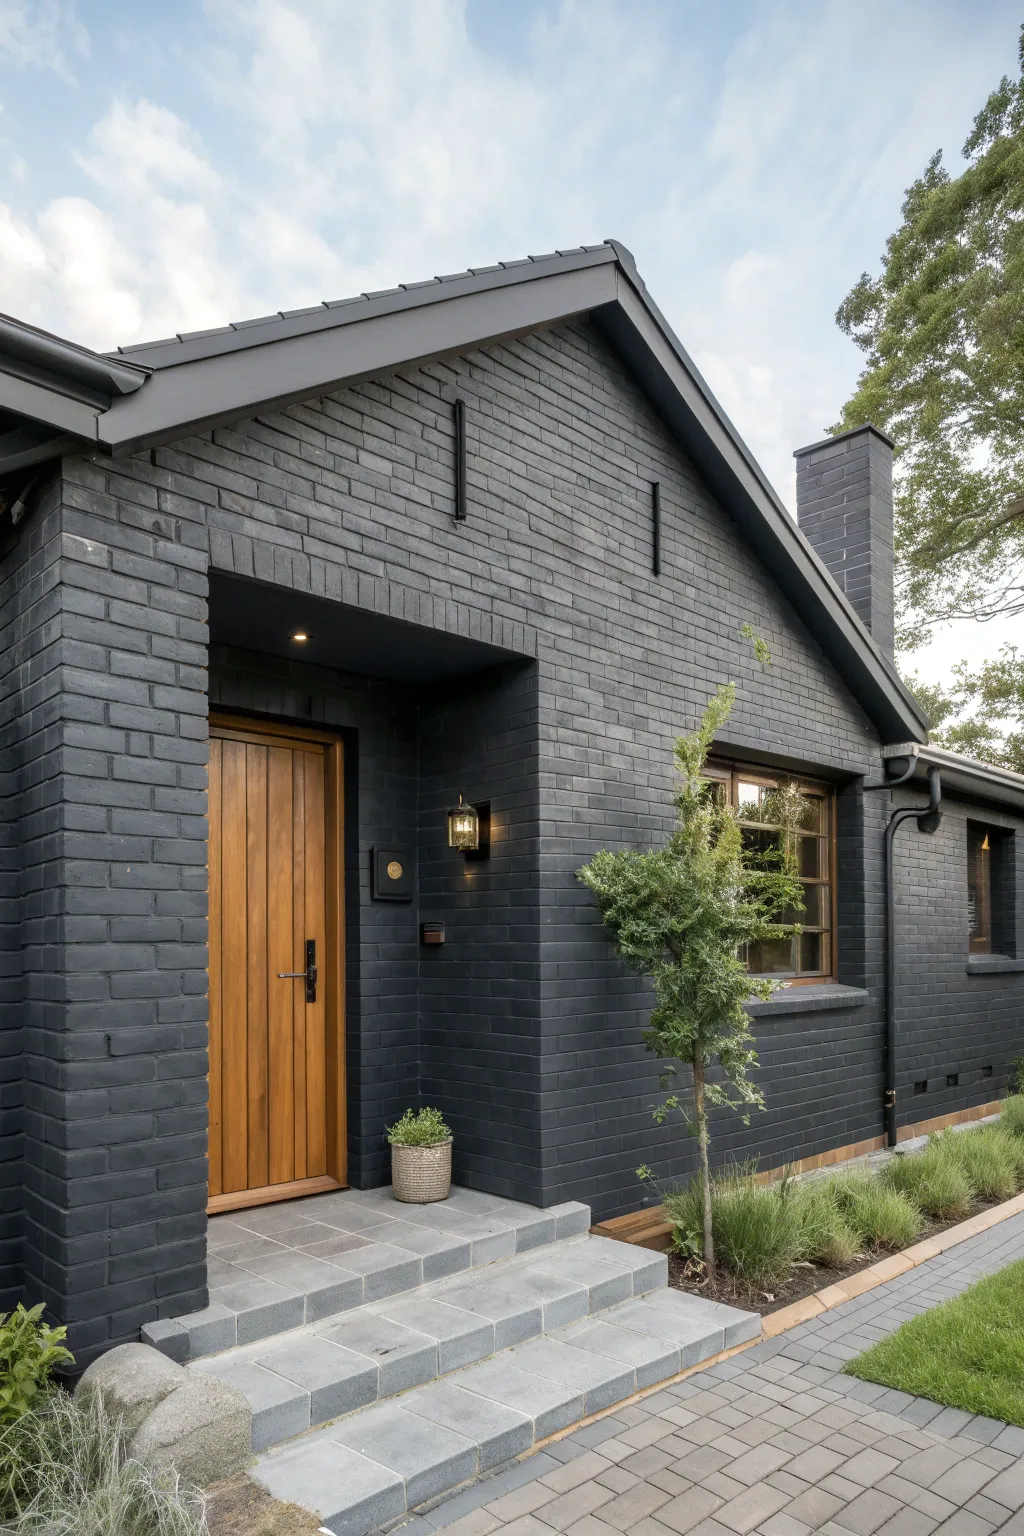
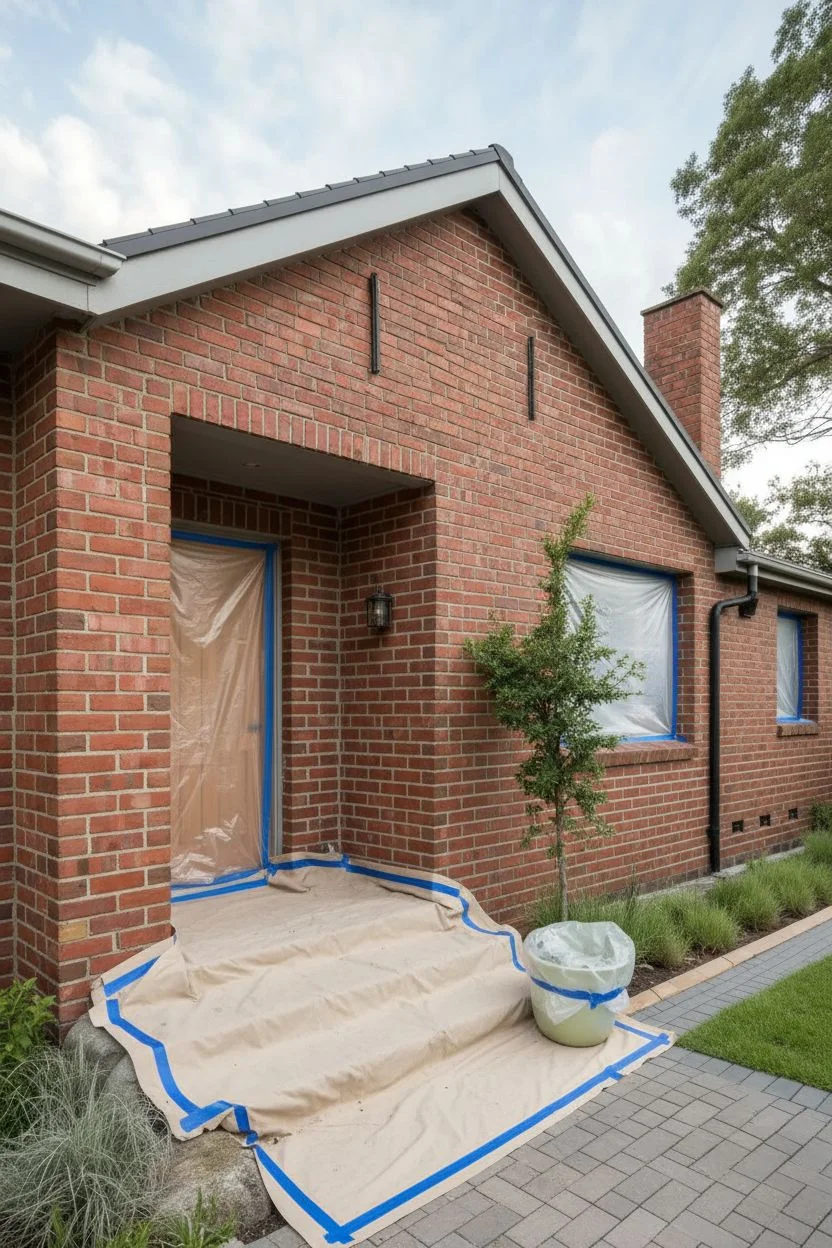
Transform your home’s exterior into a modern statement piece with this monochromatic charcoal brick painting project. This guide captures the moody elegance of the example, balancing the dark masonry with the warmth of a natural timber door and sleek paving.
Step-by-Step
Materials
- High-quality exterior masonry paint (Charcoal/Soft Black)
- Masonry bonding primer
- Pressure washer
- TSP substitute (cleaner)
- Stiff wire scrub brush
- Painter’s tape (exterior grade)
- Plastic masking sheeting
- Drop cloths
- 1-inch to 1.25-inch nap roller covers
- Heavy-duty paint roller frame and pole
- Angled nylon/polyester sash brush
- Caulk gun and exterior masonry caulk
Step 1: Preparation & Cleaning
-
Inspect the masonry:
Walk the perimeter of the house and check the mortar joints for any cracks or loose crumbling bits. -
Repair damage:
Fill any cracks with exterior masonry caulk or patch significant gaps with fresh mortar, allowing it to cure fully before proceeding. -
Scrub the surface:
Mix a TSP substitute with water and vigorously scrub the bricks with a stiff wire brush to remove efflorescence, dirt, and loose material. -
Power wash:
Thoroughly pressure wash the entire exterior, working from the top down, to rinse away all cleaning agents and debris. -
Dry time is critical:
Allow the brick to dry for at least 24 to 48 hours; painting over damp brick will trap moisture and cause immediate peeling.
Step 2: Masking & Priming
-
Remove hardware:
Take down house numbers, mailboxes, and light fixtures like the sconce shown to ensure a seamless finish underneath. -
Protect surroundings:
Lay drop cloths over the slate steps and pavers, taping them down so they don’t shift while you work. -
Mask the door and windows:
Use painter’s tape and plastic sheeting to completely cover the wooden door and window glass; preserving the natural wood tone is key to this look. -
Cut in the primer:
Using your angled brush, apply masonry primer around the edges, corners, and under the roofline where a roller won’t reach. -
Roll the primer:
Saturate a thick-nap roller with primer and apply it to the walls, using heavy pressure to force the product into the brick pores.
Pro Tip: The Monochromatic Look
Don’t stop at the brick! Keep the gutters, downspouts, and soffits the same color as the walls. This creates the sleek, modern silhoutte essential to this specific style.
Step 3: Applying the Charcoal
-
Mix the paint:
Stir your charcoal masonry paint thoroughly to ensure the dark pigments are perfectly blended for a uniform matte finish. -
Cut in the topcoat:
Brush the charcoal paint around the perimeter, windows, and soffits, creating a 3-inch border for the roller to meet. -
Roll the first coat:
Load your heavy-nap roller and apply the first coat of paint; I like to roll in a ‘W’ pattern to distribute paint evenly before smoothing it out. -
Check for pinholes:
Inspect the brick from different angles; deep crevices often get missed by the roller and show the original red color. -
Brush the gaps:
Use your brush to manually ‘stipple’ or dab paint into deep mortar joints or textured pockets that the roller skipped. -
Apply second coat:
Once the first coat is dry (check can instructions), apply a second coat to achieve the deep, opaque saturation seen in the photo. -
Paint the trim:
To recreate the seamless look, paint the downspouts, soffits, and window trim in the exact same charcoal shade.
Troubleshooting: Paint Bubbling
If you see bubbles, moisture is likely trapped inside. Brick must be bone-dry before starting. If it rains after washing, extend your drying time by another full day.
Step 4: Finishing Touches
-
Remove masking:
Peel off the tape while the final coat is still slightly tacky to get a crisp line against the door frame and steps. -
Reinstall fixtures:
Mount your light fixtures back in place; consider upgrading to a brass fixture like the one shown for a pop of luxury. -
Clean up:
Fold up drop cloths carefully to avoid spilling paint dust onto your pavers and dispose of used plastic sheeting.
Step back and admire how this bold color choice completely redefines the architectural character of your home.
BRUSH GUIDE
The Right Brush for Every Stroke
From clean lines to bold texture — master brush choice, stroke control, and essential techniques.
Explore the Full Guide
Testing Swatches on Mortar
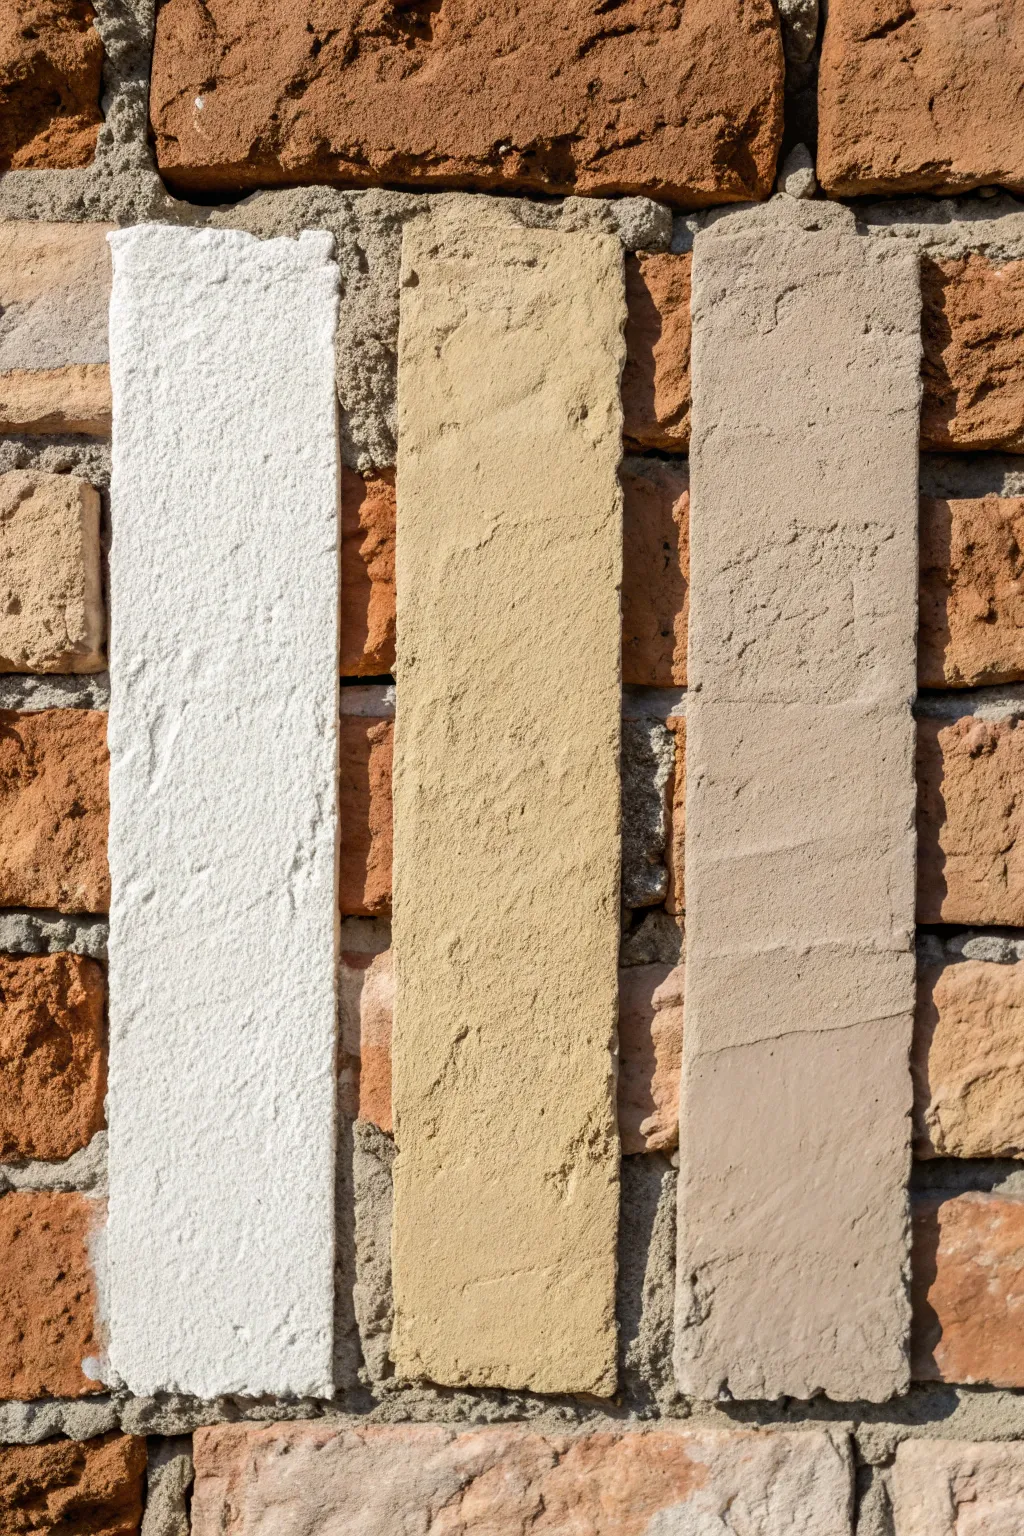
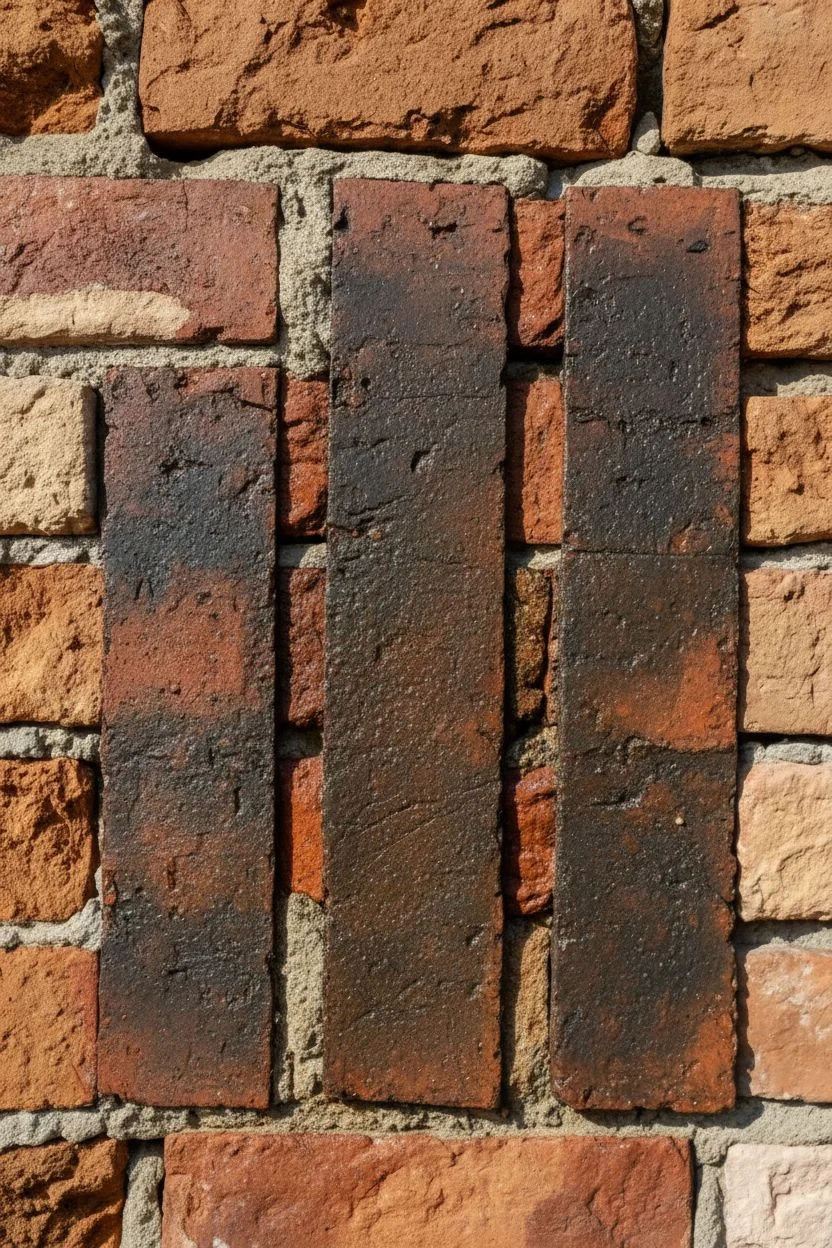
Before committing to a full limewash or German smear renovation, visually testing your color options is essential. This project guides you through creating three distinct, textured vertical swatches directly on your brickwork to compare stark white, warm sand, and neutral taupe tones.
How-To Guide
Materials
- White Portland cement
- Hydrated lime (Type S)
- Fine silica sand
- Masonry pigments (Yellow Ochre, Raw Umber)
- Water
- Margin trowel
- 3 Small mixing buckets
- Wire brush
- Spray bottle with water
- Protective gloves
Step 1: Surface Preparation
-
Select the test area:
Choose a section of the wall that receives average lighting—not a spot that is permanently in deep shadow or blinding direct sun. -
Clear debris:
Scrub the chosen brick area vigorously with a stiff wire brush to remove moss, dirt, or loose crumbling mortar. -
Rinse the brick:
Spray the area generously with water. The bricks should be damp but not dripping; this prevents them from sucking moisture out of your sample swatches too quickly.
Pro Tip: Pigment Potency
Masonry pigments are incredibly strong. Start with a pea-sized amount and mix thoroughly before adding more—you can always go darker, but you can’t lighten it back up easily!
Step 2: Mixing the Base Mortar
-
Create the dry mix:
In a main bucket, combine equal parts White Portland cement and hydrated lime, then add about 3 parts fine silica sand for that gritty texture shown in the photo. -
Add water:
Slowly stir in cool water until the mixture reaches the consistency of thick peanut butter or frosting. It needs to hold its shape on a trowel without sliding off. -
Divide the batch:
Separate the wet mortar equally into three smaller containers. These will become your three color variations.
Step 3: Applying the Swatches
-
Prepare the White Swatch:
Leave the first container as is. This pure mixture will dry to a brilliant, clean white. -
Apply the first strip:
Load your margin trowel with the white mix. Starting at the top of your test zone, pull the trowel straight down to create a vertical band about 3-4 inches wide. -
Adjust the thickness:
Aim for a layer about 1/4 inch thick. Press hard enough to fill the mortar joints, but leave enough material on the face of the brick to hide the red color completely. -
Add texture:
I like to lightly pat the surface with the flat of the trowel to create the rough, stucco-like peaks visible in the left swatch. -
Mix the Sand Swatch:
In the second container, add a small amount of Yellow Ochre masonry pigment. Mix thoroughly until you achieve a warm, buttery limestone color. -
Apply the middle strip:
Skip about 3 inches of exposed brick to the right of your white swatch. Apply the yellow mix in a parallel vertical strip, matching the length and width of the first one. -
Refine the edges:
Use the edge of your trowel to scrape away any accidental drips on the surrounding brick, keeping the vertical lines relatively straight but organic. -
Mix the Taupe Swatch:
In the third container, add a very small pinch of Raw Umber pigment (and a tiny speck of yellow if needed) to create a muted, grayish-beige tone. -
Apply the final strip:
Apply this third swatch to the right of the yellow one, maintaining the same spacing. This creates the ‘trio’ layout perfect for comparison. -
Final texturing:
Check all three strips. If they have smoothed out too much, dab them gently with a damp sponge or brush to re-introduce the gritty surface texture.
Level Up: The Daily Watch
Don’t decide immediately. Observe your test swatches at sunrise, high noon, and dusk. Natural light temperature changes dramatically throughout the day and will alter how warm or cool the tones appear.
Step 4: Curing and Evaluation
-
Mist the samples:
Once the surface is firm to the touch (usually 30-60 minutes), lightly mist them with water to help the cement cure slowly and strongly. -
Let dry fully:
Allow the swatches to dry for at least 24 to 48 hours. The color of wet mortar is significantly darker than the final cured result.
Once dry, these swatches will give you the confidence to tackle your entire wall with the perfect shade.
Warm Greige Neutrals
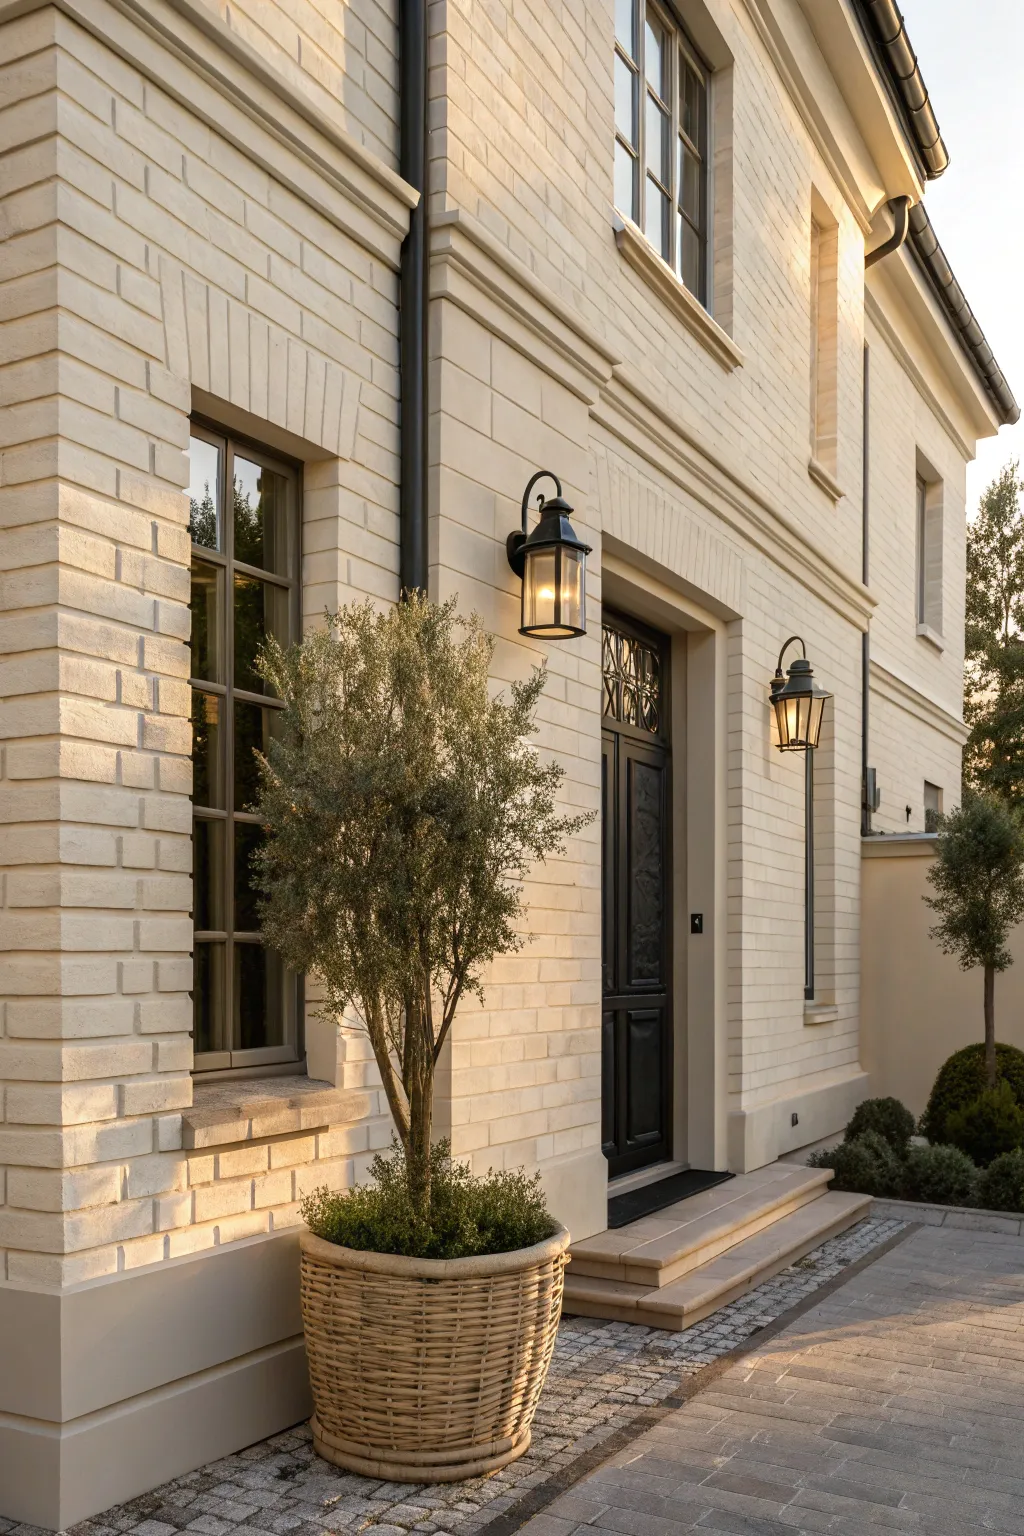

Achieve the look of luxurious limestone with this exterior masonry painting project. By layering a soft, warm greige over standard brick, you create an inviting, modern façade tailored to catch the golden hour light perfectly.
Step-by-Step Tutorial
Materials
- High-quality exterior masonry paint (Warm Greige/Limestone tint)
- Masonry bonding primer
- Pressure washer (or hose with high-pressure nozzle)
- TSP substitute cleaner
- Stiff bristle scrub brush
- Exterior masonry caulk & gun
- 1-inch nap roller covers
- Heavy-duty roller frame & extension pole
- 3-inch angled synthetic sash brush
- Painter’s tape and plastic sheeting
- Drop cloths
Step 1: Preparation & Cleaning
-
Assess the surface:
Inspect the brickwork for any crumbling mortar or deep structural cracks that need professional pointing before painting. -
Clean with solution:
Mix a TSP substitute solution with water in a bucket to help break down accumulated grime and mildew. -
Scrub the brick:
Use a stiff bristle brush to scrub the brick faces, focusing on areas with moss or heavy dirt buildup. -
Rinse thoroughly:
Pressure wash the surface on a low setting (or use a hose) to rinse away all cleaning residue, working from top to bottom. -
Allow to dry:
Let the masonry dry completely for at least 24 to 48 hours; trapping moisture behind paint causes peeling later. -
Mask trim:
Apply painter’s tape carefully around window frames, door jambs, and adjacent soffits to protect them. -
Cover hardware:
Remove exterior light fixtures if possible, or wrap them securely in plastic bags and tape. -
Protect the ground:
Lay drop cloths over garden beds, walkways, and patios to catch any drips or splatters.
Missed Spots?
Brick is porous! If you see tiny paint-free pinholes after rolling, don’t press harder. Instead, load a medium brush and ‘stipple’ (dab) paint directly into those stubborn textures.
Step 2: Priming the Masonry
-
Seal small cracks:
Run a bead of exterior masonry caulk into hairline cracks and smooth it out to prevent moisture intrusion. -
Cut in edges:
Use your angled brush to apply masonry primer around the perimeter, corners, and right up against the taped trim. -
Roll the primer:
Dip the 1-inch nap roller into the primer and apply it to the walls; the thick nap helps reach into the mortar joints. -
Back-brush if needed:
I usually keep a brush handy to dab primer into deep crevices that the roller might miss on the first pass.
Step 3: Applying the Greige
-
Mix the paint:
Stir your warm greige masonry paint thoroughly to ensure the color pigments are perfectly blended. -
Cut in the color:
Brush a 3-inch border of the finish paint around all windows, doors, and rooflines. -
Roll the first coat:
Apply the first coat of paint using slow, methodical M-shaped strokes to ensure even coverage without heavy splatter. -
Check for pinholes:
Inspect the brick from different angles to spot any tiny pores where the natural brick color is peeking through. -
Apply second coat:
Once the first coat is dry (check can for times), roll on a second coat to achieve that solid, rich limestone opacity. -
Remove tape:
Pull off the painter’s tape while the final coat is still slightly tacky to ensure a crisp, clean line. -
Reinstall fixtures:
Once fully cured, reattach your exterior lighting (like the sleek black lanterns shown) to contrast against the pale brick.
add contrast
To recreate the exact sophisticated vibe of the photo, ensure your trim and door hardware are matte black or dark bronze. This high contrast anchors the airy greige walls.
Step back and enjoy the curb appeal of your freshly modernized, sun-drenched exterior.

PENCIL GUIDE
Understanding Pencil Grades from H to B
From first sketch to finished drawing — learn pencil grades, line control, and shading techniques.
Explore the Full Guide
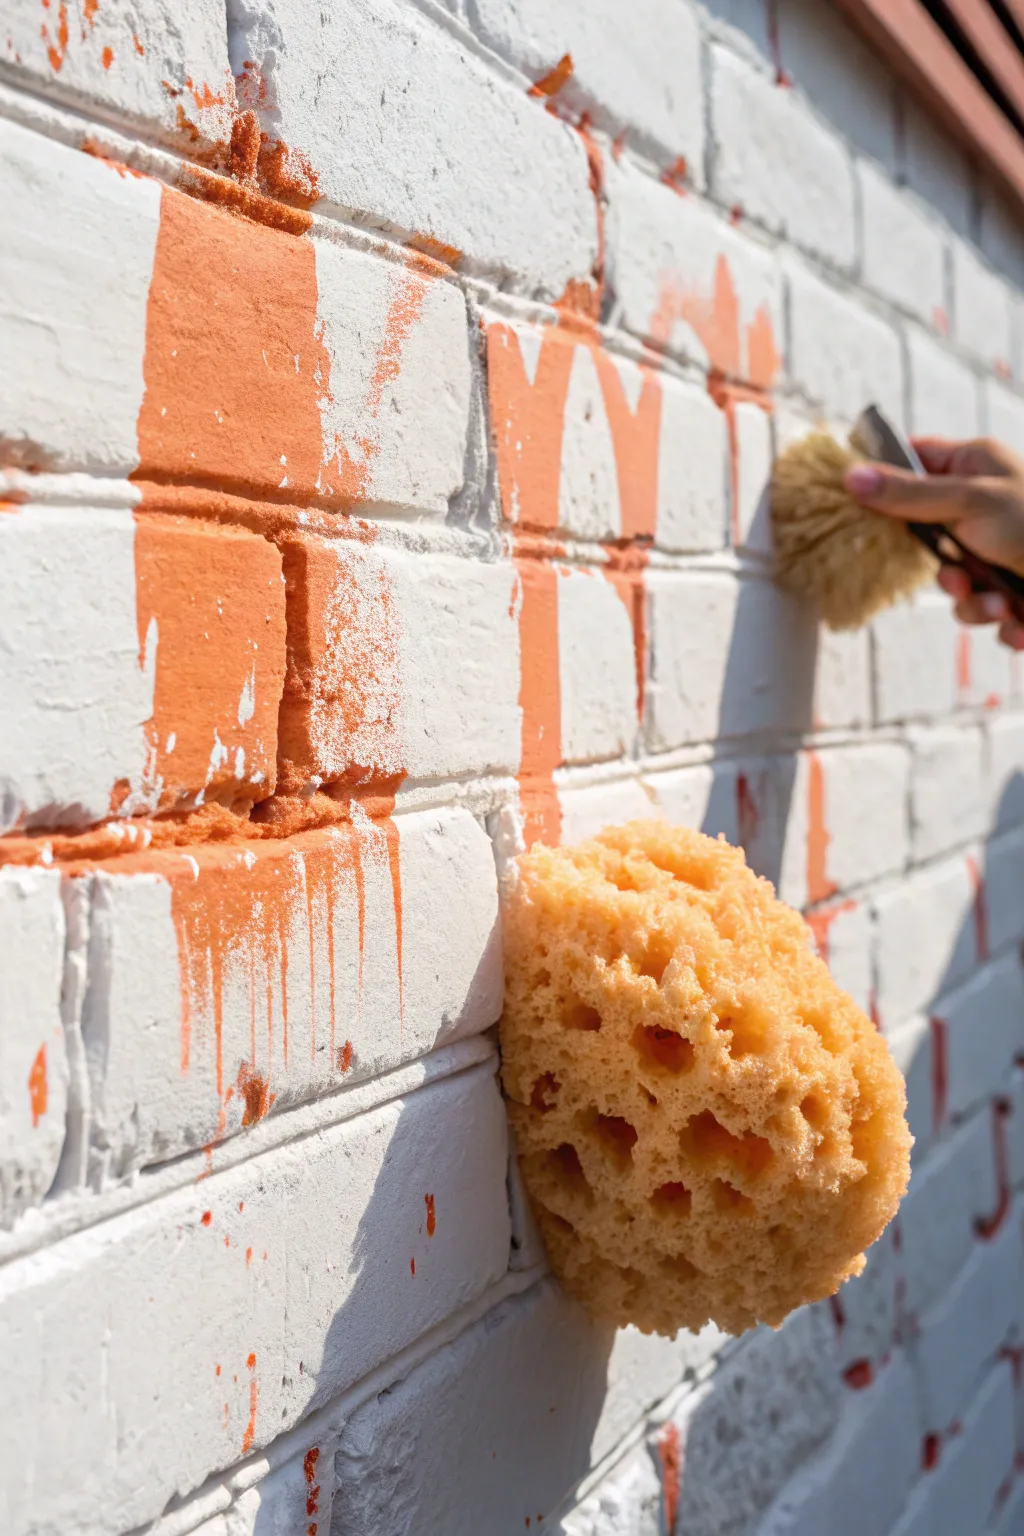
The Sanded Distressed Look
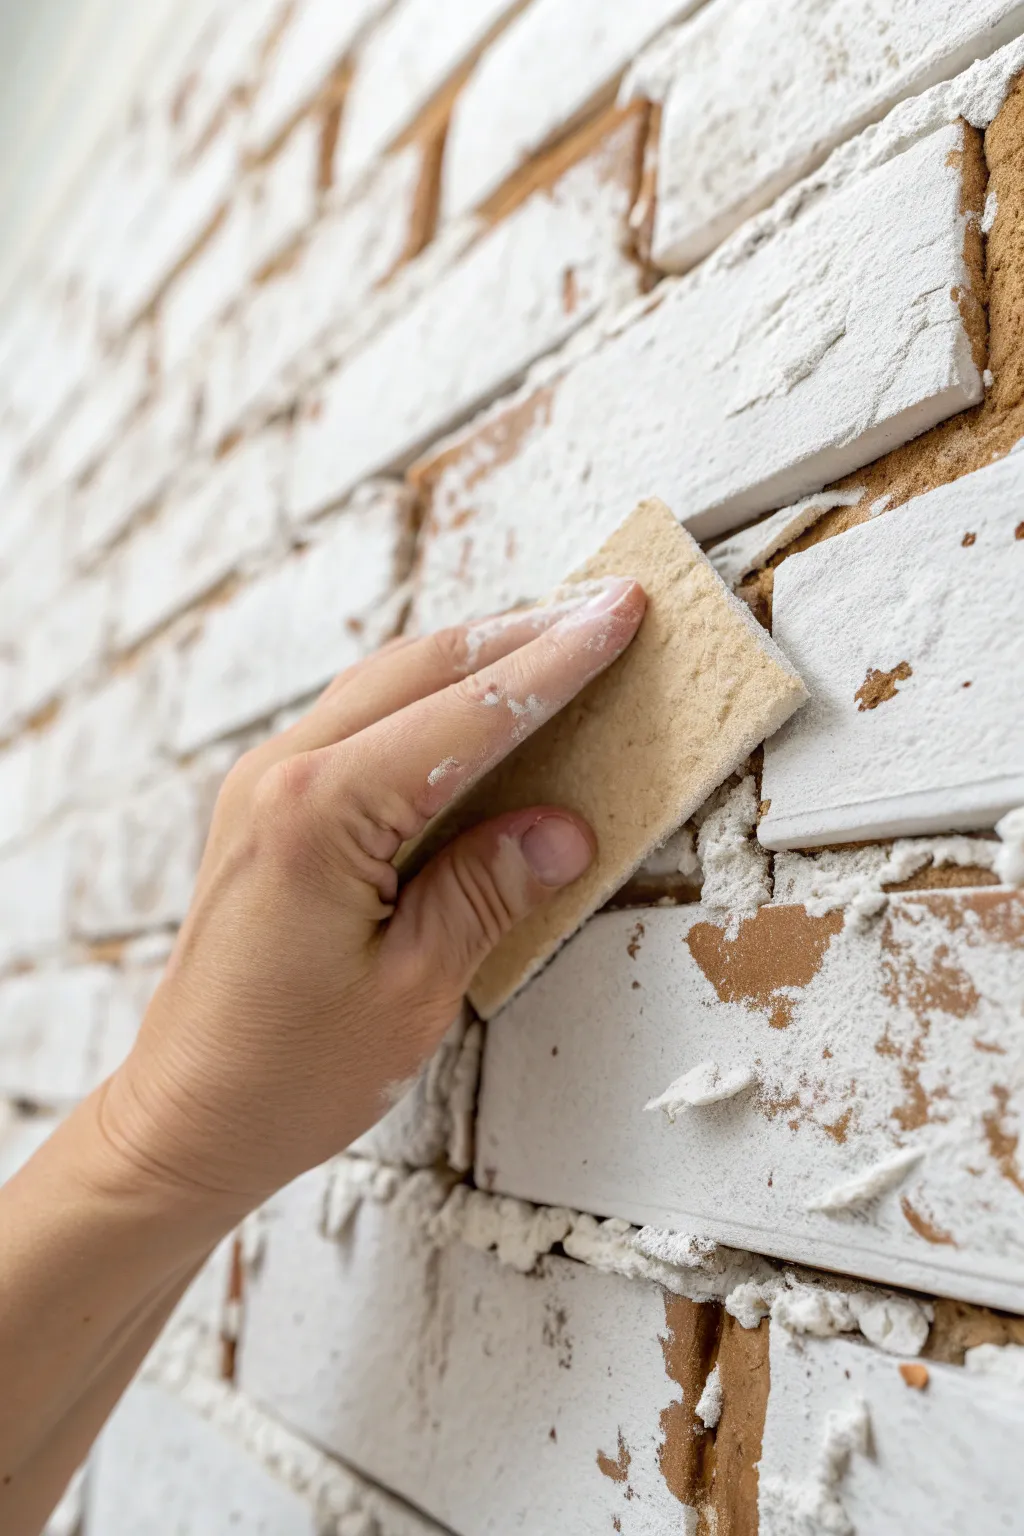
Transform ordinary brick into a textured, time-worn feature by manually distressing a fresh coat of white paint. This technique mimics years of natural wear and allows the warmth of the original clay to peek through the modern finish.
Detailed Instructions
Materials
- TSP substitute or heavy-duty degreaser
- Cleaning rags and scrub brush
- Painter’s tape
- Heavy-duty drop cloths
- Flat white latex paint or white chalk-style paint
- Stiff-bristled paintbrush (2-3 inch)
- Sanding sponges (medium and coarse grit)
- Vacuum with brush attachment
Step 1: Preparation & Application
-
Protect the floor:
Lay down drop cloths securely at the base of the wall, as this process involves dripping paint and falling dust. -
Clean the brick:
Scrub the entire surface with a stiff brush and TSP substitute to remove oils, dust, and soot that could prevent paint adhesion. -
Rinse well:
Wipe down the wall with clean water and a sponge, then allow it to dry completely before proceeding. -
Tape edges:
Apply painter’s tape to adjacent walls, ceilings, and baseboards to ensure crisp edges. -
Choose your paint:
Select a flat latex or chalk-style paint; I prefer chalk-style formulas because they create a fine dust when sanded rather than peeling off in strips. -
Load the brush:
Dip a stiff paintbrush generously into the paint; you don’t need to be too precious about smooth loading for this rustic look. -
Paint mortar first:
Push the bristles into the mortar joints first to ensure they are fully coated white. -
Cover the faces:
Brush paint over the faces of the bricks, working in small 3-foot sections until you have achieved solid, opaque coverage. -
Dry briefly:
Let the paint dry until it is no longer tacky to the touch, usually around 2 to 3 hours, but do not let it cure for days.
Step 2: The Distressing Process
-
Prepare the sponge:
Take a medium-to-coarse grit sanding sponge, which conforms nicely to the uneven surface of the brick. -
Test the pressure:
Find an inconspicuous spot near the floor and start sanding to gauge how much pressure is needed to strip the paint. -
Start distressing:
Rub the sponge firmly back and forth over the face of the brick, focusing on the center texture. -
Target the edges:
Angle the sponge to sand the sharp edges and corners of the bricks, as these are the areas that would naturally weather over time. -
Review the aesthetic:
Sand until you see the original brick color showing through clearly; ragged, uneven patches look most authentic. -
Randomize the look:
Heavily distress some bricks while leaving others mostly white to avoid a uniform, artificial pattern. -
Step back:
Frequently move away from the wall to assess the overall balance of the distressing. -
Detail mortar lines:
Lightly run the sanding block over the mortar if you want to bring back some of the gritty texture there too. -
Vacuum dust:
Use a shop vac with a brush attachment to suction the fine paint powder out of the crevices and pores. -
Final wipe:
Wipe the finished wall with a barely-damp cloth to remove any remaining white haze.
Timing is Key
Start sanding the same day you paint, once it’s dry to touch. If you wait 24+ hours, modern paints cure and become very hard to remove manually.
Stubborn Paint?
If the sanding sponge isn’t removing enough paint, switch to a wire brush or a 60-grit sandpaper block for more aggressive distressing power.
Now you have a stunning feature wall rich with texture and character that transforms the entire feel of your room
Deep Forest Green Accents
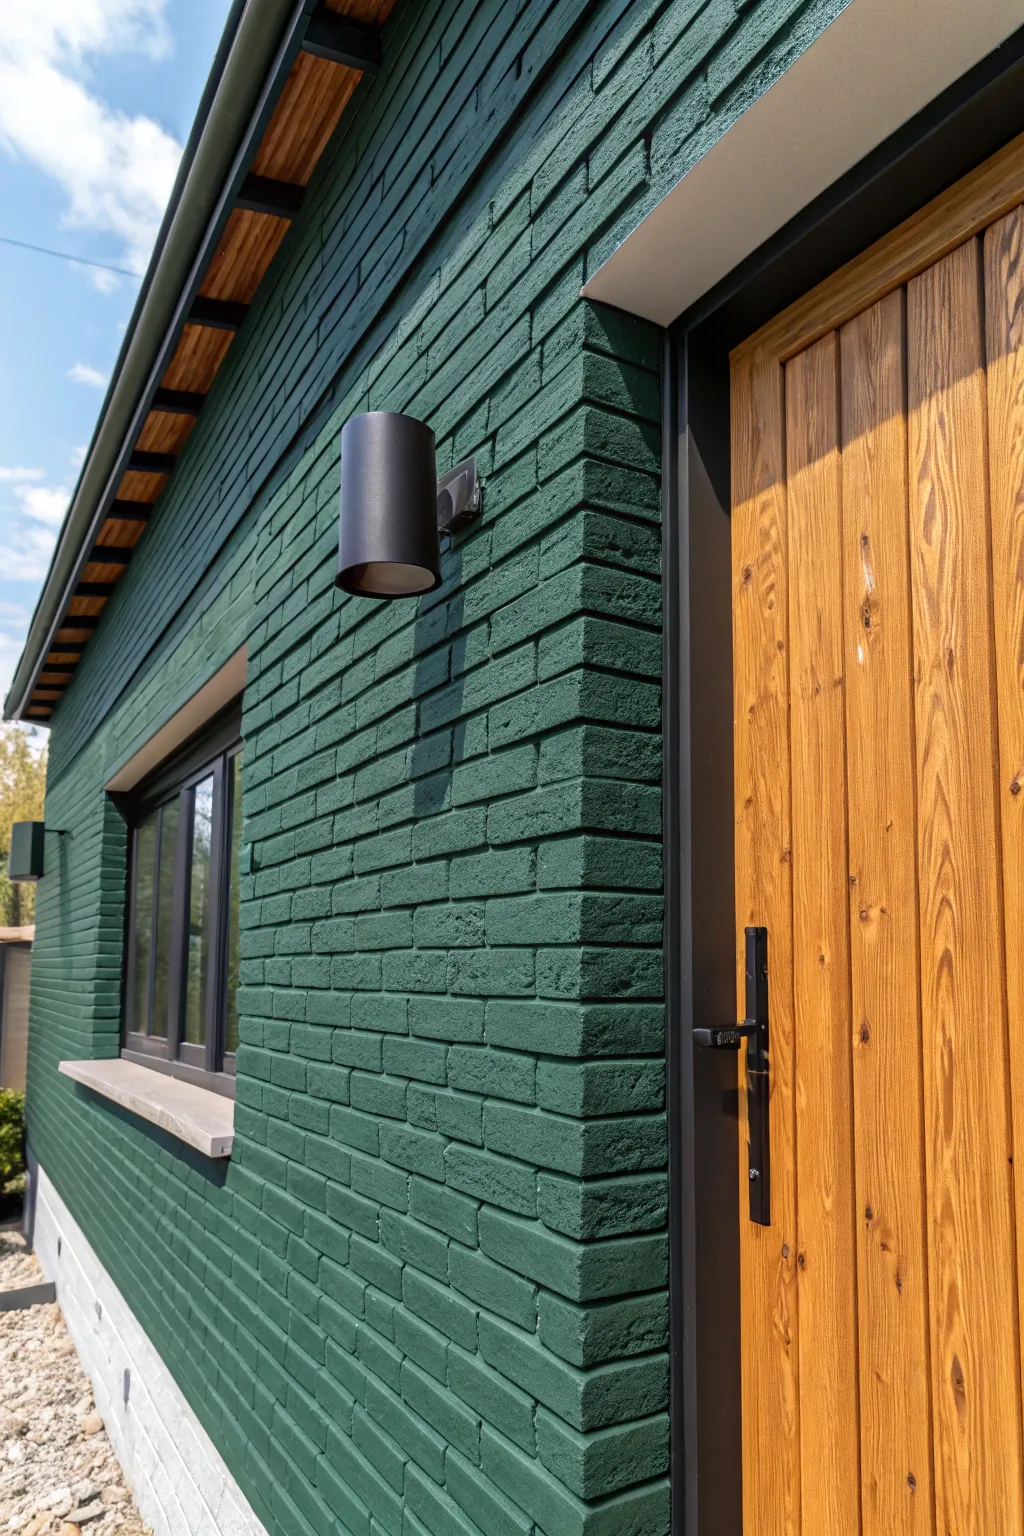
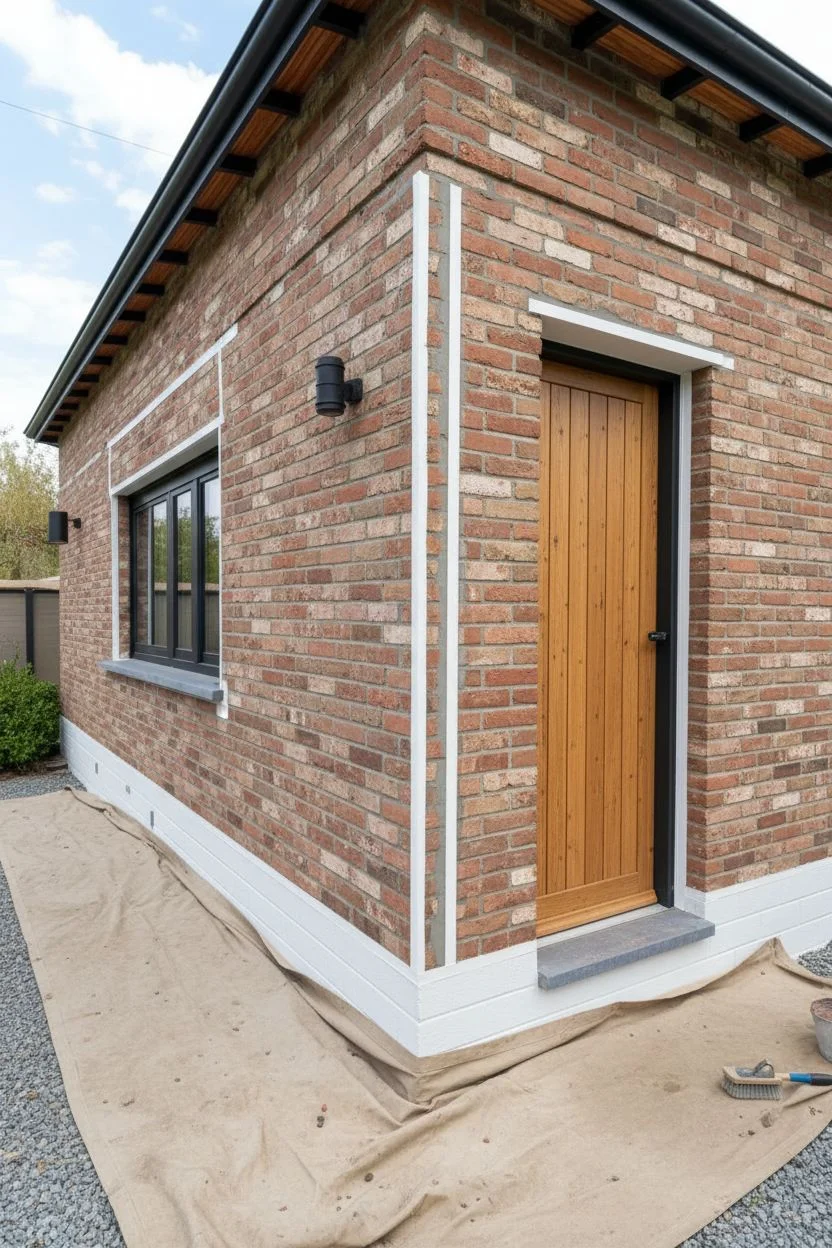
Transform dated exterior masonry into a moody, sophisticated statement with this deep green brick painting guide. This project relies on a matte finish to modernize the texture while creating a stunning contrast against natural wood elements and black fixtures.
Step-by-Step Tutorial
Materials
- Exterior masonry paint (Deep Forest Green, flat or satin finish)
- Masonry bonding primer (tintable suggested)
- TSP (Trisodium Phosphate) or heavy-duty masonry cleaner
- Pressure washer
- Stiff-bristle synthesis scrub brush
- Exterior painter’s tape
- Canvas drop cloths
- Airless paint sprayer (optional but recommended)
- 1-inch nap roller covers and heavy-duty frame
- Angled sash brush (2.5 inch, nylon/polyester blend)
- Exterior masonry caulk
- Ladder
Step 1: Preparation & Repairs
-
Inspect the mortar:
Walk the perimeter and check for crumbling mortar or large cracks in the brick. Fill these gaps with exterior masonry caulk or mortar patch and let them cure fully. -
Deep clean the surface:
Mix TSP with water according to package directions. Scrub the brick vigorously with a stiff-bristle brush to remove dirt, mildew, and chalky residue. -
Rinse thoroughly:
Use a pressure washer on a low-to-medium setting to rinse the cleaner off. Avoid high pressure, which can damage old mortar. -
Allow extensive drying time:
Wait at least 24 to 48 hours for the brick to dry completely. Brick is porous and holds water; painting wet brick will cause immediate bubbling. -
Protect surroundings:
Lay canvas drop cloths over landscaping and the white foundation plinth shown in the reference image to keep them pristine. -
Apply masking tape:
Carefully tape off the window frames, soffits, and door trim. Press the tape edges firmly into the brick texture to prevent bleed-through.
Pro Texture Tip
If spraying, keep a dry brush handy. Use a stippling (poking) motion to force paint into deep mortar joints that the sprayer mist skips over.
Step 2: Priming the Masonry
-
Select the right primer:
Choose a high-quality masonry bonding primer. I find that tinting the primer toward gray or green helps with coverage later. -
Cut in the edges:
Use your angled sash brush to apply primer around the windows, door frame, and under the eaves where a roller can’t reach. -
Apply primer to the face:
Use the 1-inch nap roller to apply the primer. The thick nap is essential for getting liquid into the deep crevices of the brick. -
Inspect for pinholes:
Check the surface for missed spots or deep pores that weren’t filled. Dab these areas with your brush before moving on. -
Let the primer cure:
Follow the manufacturer’s drying time, usually 4-8 hours, before applying the topcoat.
Troubleshooting: Peeling
If paint peels shortly after application, trapped moisture is usually the culprit. Always verify brick is bone-dry with a moisture meter if unsure.
Step 3: Painting the Green
-
Mix the paint:
Stir your Deep Forest Green masonry paint thoroughly. If you are using multiple cans, box (mix) them together in a large bucket for color consistency. -
Brush the perimeter:
Start by cutting in the green paint around the black window frames and wood soffits with your angled brush. -
Apply the first coat:
Using the sprayer or the heavy-nap roller, apply a generous first coat of green. If spraying, I always back-roll immediately to push the paint into the texture. -
Check angles:
Brick texture hides unpainted spots effortlessly. Look at the wall from the side and from below to catch any red peek-throughs. -
Apply the second coat:
Once the first coat is dry, apply a second coat. This deep green color relies on saturation to look rich rather than patchy. -
Remove tape:
Pull the painter’s tape while the final coat is still slightly tacky to ensure a crisp, clean line against the trim.
Step 4: Finishing Touches
-
Touch up edges:
Use a small artist’s brush to fix any blemishes near the window frames or where the green meets the white foundation. -
Install fixtures:
Mount the black cylindrical light fixture to the dry surface to complete the modern contrast look.
Enjoy the dramatic curb appeal of your freshly painted, forest-inspired home exterior


Two-Tone Material Contrast
Transform a tired exterior into a contemporary statement piece by utilizing a high-contrast two-tone palette. By pairing textured white brick on the lower half with sleek vertical black siding above, you create a striking visual balance that looks architecturally designed.
How-To Guide
Materials
- High-quality exterior masonry paint (White)
- Exterior wood stain/paint (Matte or Satin Black)
- Masonry primer
- Pressure washer
- Mildewcide cleaner
- Exterior caulk and gun
- Wire brush
- High-nap roller covers (3/4 inch to 1 inch)
- Nylon/polyester angle sash brush
- Extension pole
- Heavy-duty painter’s tape
- Drop cloths
- Ladder
Step 1: Cleaning and Prep Work
-
Inspect surfaces:
Walk the perimeter of the house, checking the brick for deep cracks or crumbling mortar. Repair these with masonry filler or caulk and allow them to cure fully. -
Deep clean:
Pressure wash the entire façade to remove dirt, moss, and loose paint. I find adding a mildewcide to the wash helps prevent future growth under the new paint. -
Dry time:
Allow the masonry to dry for at least 24 to 48 hours. Painting over damp brick is the number one cause of premature peeling. -
Wire brushing:
Use a stiff wire brush to scrub any areas where old paint is flaking or where efflorescence (white salty deposits) has appeared. -
Protect surroundings:
Lay drop cloths over garden beds, walkways, and porches. Tape off window frames, door hardware, and light fixtures precisely using heavy-duty exterior tape.
Pro Tip: The ‘W’ Roll
When rolling brick, move the roller in a ‘W’ or ‘M’ pattern rather than straight up and down. This attacks the texture from multiple angles for better coverage.
Step 2: The White Brick Base
-
Prime the masonry:
Apply a high-quality masonry primer. This seals porous brick and creates a surface the topcoat can stick to. -
Cut in edges:
Use your angled sash brush to paint the perimeter of the brick walls, working around the door frames and along the ground line. -
Roll the first coat:
Load a thick-nap roller with your white masonry paint. The thick nap is essential for getting paint into the deep irregularities of the brick texture. -
Work in sections:
Roll in vertical columns, then back-roll horizontally to push paint into the mortar joints. -
Check for pinholes:
Inspect the painted area for missed pores or deep crevices. I keep a brush handy to dab paint into these stubborn spots immediately. -
Second coat:
Once the first coat is dry (check manufacturer times), apply a second coat for a solid, opaque finish that completely hides the original brick color.
Troubleshooting: Bleed Through?
If stains seep through your white brick paint, the brick likely wasn’t sealed enough. Spot-prime the stained area with an oil-based primer, then repaint.
Step 3: The Black Cladding Upper
-
Prep the siding:
Move your ladder to the upper section. Check the wood siding for rot and sand down any rough patches. -
Cut in the top section:
Carefully brush the black paint or solid stain along the roofline (soffits) and around upper windows. -
Paint the grooves:
If you have vertical siding like the project image, use a brush to apply paint inside the vertical grooves first so you don’t miss spots. -
Roll the flats:
Use a medium-nap roller to cover the flat faces of the siding boards effectively. -
Clean the divide:
Pay special attention to the line where the wood meets the brick. Use a steady hand or a fresh line of tape to ensure a crisp separation between black and white. -
Final coat:
Apply a second coat to the black siding to ensure rich, deep color saturation and weather protection.
Step 4: Finishing Details
-
Remove tape:
Peel off the painter’s tape while the paint is still slightly tacky to avoid pulling up dried flakes. -
Hardware update:
Install modern matte black light fixtures, like the cylindrical sconce shown, to tie the lower white section to the upper black section. -
Add greenery:
Place large concrete or grey planters with ornamental grasses near the entrance to soften the high-contrast look.
Step back and admire your home’s bold new curb appeal that perfectly balances modern drama with classic texture.
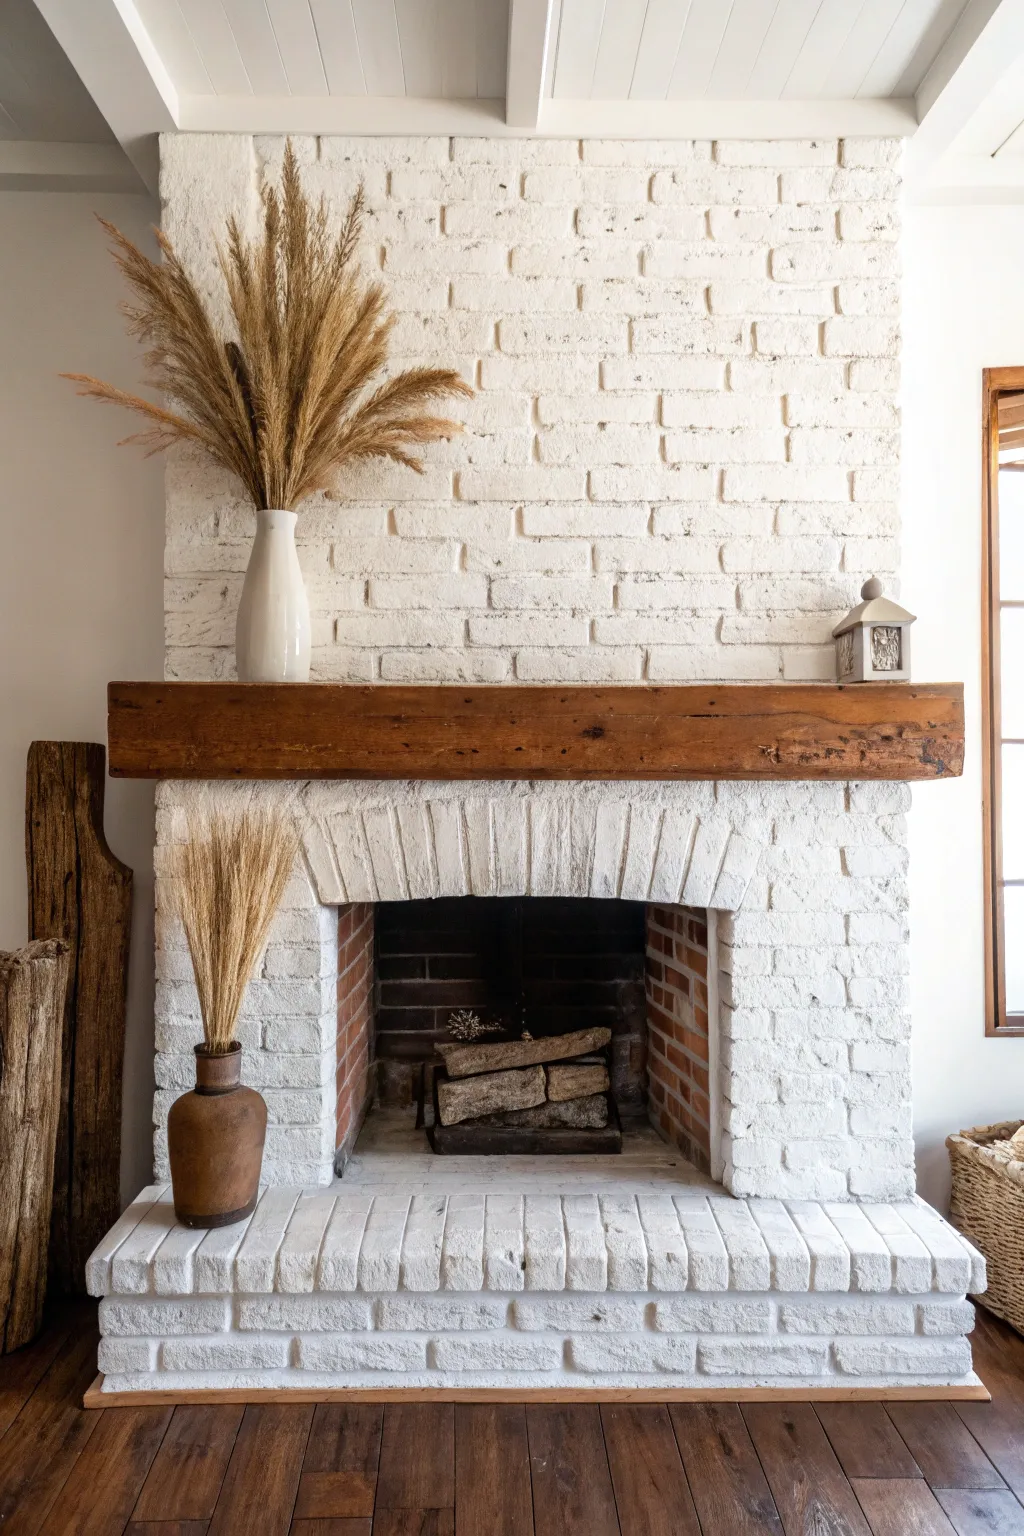
Bright Interior Hearth Update
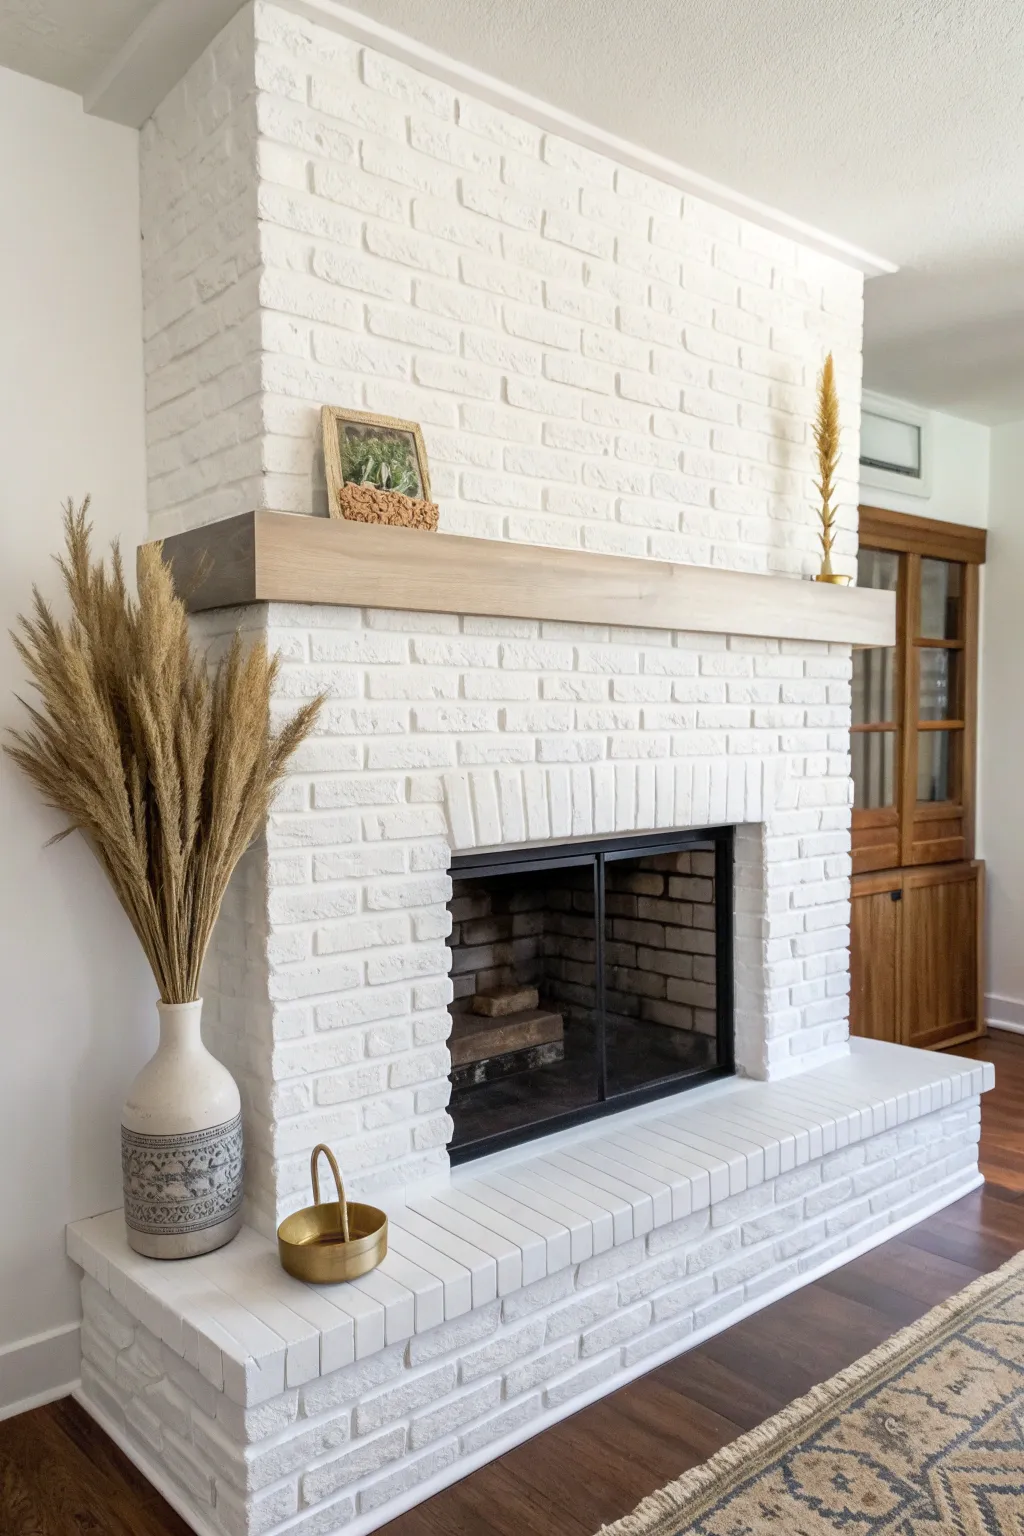
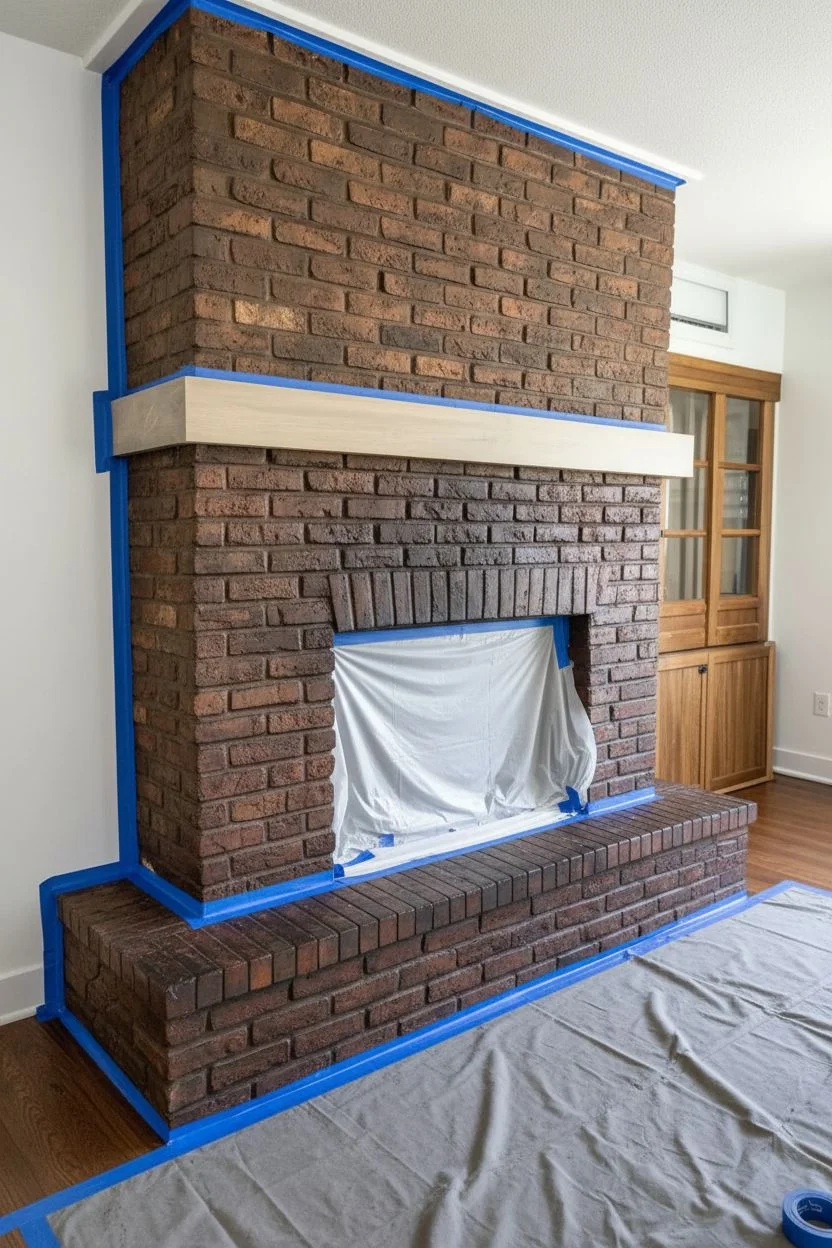
Transform a heavy, dark masonry feature into a light and airy focal point with a fresh coat of crisp white paint. This project modernizes the texture of traditional brick while brightening your entire living space for a clean, contemporary look.
Step-by-Step Guide
Materials
- TSP substitute (Trisodium Phosphate cleaner)
- Stiff bristle scrub brush
- Painter’s tape
- Drop cloths or plastic sheeting
- Stain-blocking masonry primer
- High-quality acrylic latex interior paint
- 1-inch nap roller cover (for rough surfaces)
- Roller frame and paint tray
- 2.5-inch angled sash brush (nylon/polyester)
- Small wire brush
- Vacuum with brush attachment
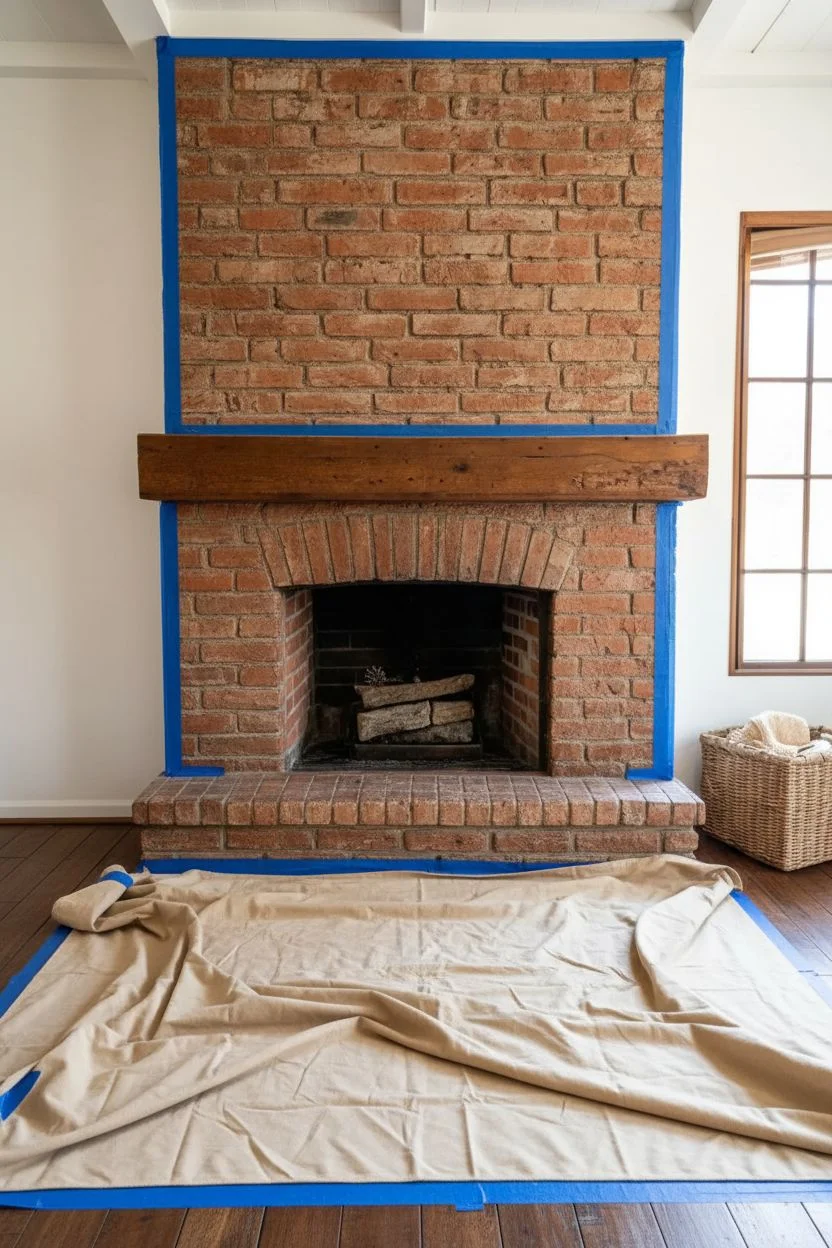
Step 1: Cleaning and Prep Work
-
Clear the area:
Remove all decor, fireplace screens, and tools from the hearth and mantel to create a clear workspace. -
Remove loose debris:
Run a vacuum with a brush attachment over the entire brick surface to suck up dust, cobwebs, and loose mortar bits from the crevices. -
Scrub the brick:
Mix your TSP substitute with water according to package directions. Use a stiff scrub brush to vigorously clean the bricks, focusing heavily on areas with soot buildup. -
Rinse thoroughly:
Wipe down the bricks with a clean sponge and fresh water to remove any cleaning residue, which can prevent paint adhesion. -
Allow to dry:
Let the masonry dry completely for at least 12 to 24 hours. Painting damp brick can trap moisture and cause peeling later. -
Protect surroundings:
Apply painter’s tape along the walls, ceiling, and mantel where they meet the brick. Spread drop cloths over the flooring and secure them with tape. -
Mask the insert:
Cover the metal fireplace insert or glass doors completely with plastic sheeting and tape the edges precisely to protect them from splatters.
Step 2: Priming the Surface
-
Select the right primer:
Ensure you are using a stain-blocking primer designed for masonry. This is crucial to prevent soot stains from bleeding through your white topcoat. -
Cut in the mortar:
Use your angled brush to apply primer into the deep mortar lines and recessed corners that a roller can’t reach. -
Roll the surface:
Load your heavy-nap roller with primer and roll over the brick faces. The thick nap will help push the primer into the textured surface. -
Inspect for bleed-through:
Once the primer dries, check for dark stains. I usually spot-prime stubborn soot marks a second time to ensure a pristine base.
Bleeding Soot?
If yellow or brown stains appear through the primer, switch to a shellac-based primer specifically for those spots. It creates an impenetrable seal that latex primers sometimes can’t match.
Step 3: Painting the Brick
-
Paint the joints first:
Dip your angled brush into the white paint and coat the mortar lines within a 2-foot section. It’s easier to work in small zones than to do all the mortar at once. -
Roll the section:
While the mortar paint is still wet, follow up immediately with your 1-inch nap roller to cover the brick faces in that section, blending the textures. -
Use the dabbing technique:
For significantly pitted bricks, jab the tip of your brush into deep holes to deposit paint where the roller bridges over. -
Repeat until covered:
Continue this brush-then-roll method across the entire fireplace, working from the top down to avoid drips on finished work. -
Apply a second coat:
Let the first coat dry for the recommended time, then apply a second coat to ensure solid, opaque coverage and a rich finish. -
Remove tape:
Peel off the painter’s tape while the final coat is still slightly tacky to ensure a crisp clean line without pulling up dried paint.
Save Your Good Brushes
Rough brick destroys paintbrushes quickly. Use an older brush or buy a budget-friendly multipack for the initial priming and cutting-in work so you don’t ruin your best tools.
Step back and enjoy the bright, refreshing energy your updated hearth brings to the room.
High-Contrast Black Trim
Transform a dated exterior into a crisp, modern farmhouse statement piece by combining bright white masonry with high-contrast black accents. This project relies on clean lines and specifically formulated paints to ensure the brick breathes while the trim pops.
Step-by-Step
Materials
- High-quality white masonry paint or mineral paint
- Exterior satin or semi-gloss trim paint in deep black
- Masonry primer (if required by paint type)
- TSP substitute or brick cleaner
- Stiff bristle scrub brush
- Pressure washer (optional)
- Painter’s tape (exterior grade)
- Masking paper or plastic sheeting
- 1-inch nap roller sleeve and frame
- Angled sash brush (2.5 inch)
- Detail brush
- Paint tray and liners
- Exterior caulk and gun
- Drop cloths
Step 1: Prep and Clean
-
Clear the area:
Move any planters, furniture, or decorative items away from the wall to give yourself ample working room. -
Scrub the masonry:
Mix your cleaning solution according to the bottle instructions and scrub the brick vigorously with a stiff brush to remove dirt, moss, or efflorescence. -
Rinse thoroughly:
Rinse the entire wall with a garden hose or pressure washer on a low setting, moving from top to bottom, and let the brick dry completely for at least 24 hours. -
Inspect and repair:
Check the old mortar joints for cracks; fill any gaps with exterior caulk or mortar patch and allow it to cure before painting. -
Protect the surroundings:
Lay down heavy-duty drop cloths over the ground, patio stones, or decks to catch any potential splatter from the roller.
Texture Tip
When painting rough brick, always use a roller with a very thick nap (at least 3/4 inch to 1 inch). This holds more paint and reaches deep into the mortar grooves without requiring constant reloading.
Step 2: The White Backdrop
-
Mask the trim:
Apply painter’s tape carefully around the window frame where it meets the brick to separate your work zones. -
Cut in the edges:
Using a masonry brush, paint the white masonry paint along the edges of the wall, around the window tape, and under any ledges. -
Roll the first coat:
Load up a roller with a thick 1-inch nap and apply the paint to the large brick surfaces. -
Work into crevices:
I prefer to apply a bit of pressure here, rolling in different directions to force the paint into the rough texture of the brick and mortar lines. -
Allow to dry:
Wait the manufacturer’s recommended drying time, usually 4 to 6 hours for exterior masonry products. -
Apply second coat:
Roll a second coat to ensure full opacity and consistent coverage, looking out for any pinholes in the brick texture.
Step 3: The Black Distinction
-
Switch masking:
Once the white brick is fully cured, remove the old tape and re-mask the glass panes of the window and the newly painted brick edge. -
Sand the trim:
Lightly scuff-sand the window frame to help the new black paint adhere, then wipe away the dust with a damp cloth. -
First black coat:
Use an angled sash brush to carefully apply the black exterior trim paint to the window frame and muntins (the grid bars). -
Watch for drips:
Keep a close eye on the corners of the window panes where paint tends to pool, smoothing it out immediately. -
Second black coat:
After the first layer dries, apply a second thin coat of black for a deep, rich finish that stands up to weather. -
Reveal the clean lines:
Peel the tape off slowly while the black paint is still slightly tacky to ensure a razor-sharp edge between the glass and the frame. -
Final touch-ups:
Inspect the junction between the black frame and white brick; use a small artist’s brush to fix any tiny bleeds for a perfect finish.
Level Up: Organic Styling
Soften the stark high-contrast look by adding natural textures near the base. A large woven seagrass basket with a structural green plant, like the one in the photo, bridges the gap perfectly.
Step back and enjoy the dramatic curb appeal your fresh, high-contrast facade brings to the neighborhood
Breathable Mineral Paint Finish
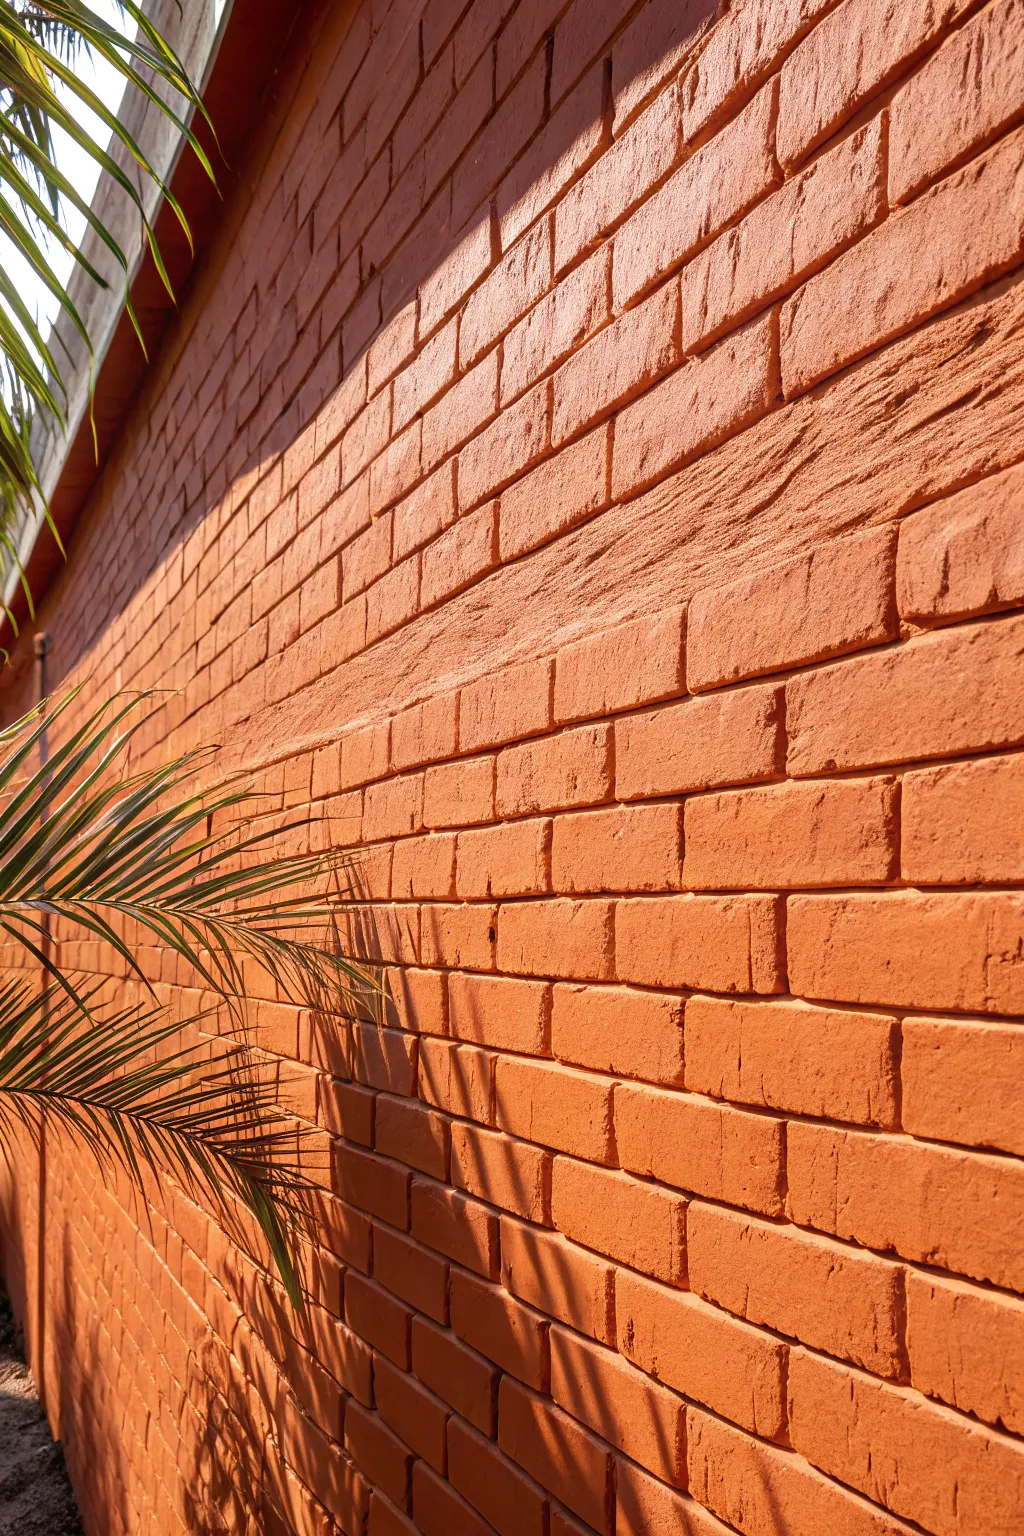
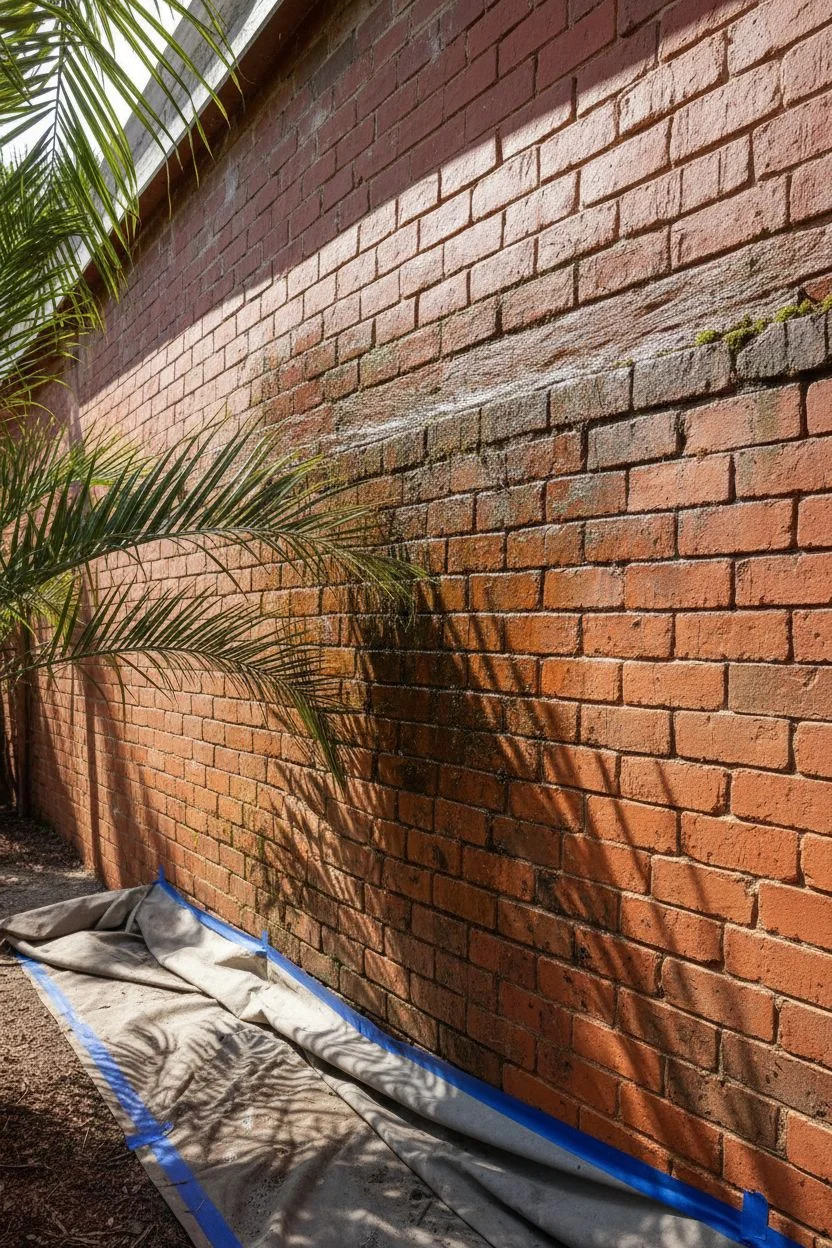
Transform dull exterior masonry into a warm, sun-drenched feature using breathable mineral paint. This finish allows the brick to release moisture naturally while providing a rich, matte color that creates beautiful textural contrasts under harsh light.
Detailed Instructions
Materials
- High-quality mineral silicate masonry paint (terracotta/burnt orange)
- Mineral paint fixative/primer
- Stiff-bristle scrubbing brush
- Pressure washer or hose with spray nozzle
- Masonry cleaner or mild detergent
- High-nap roller (3/4 inch to 1 inch nap)
- Wide masonry brush (4-6 inch)
- Painter’s tape
- Heavy-duty drop cloths
- Paint tray and liner
- Extension pole
Step 1: Surface Preparation
-
Inspect the masonry:
Walk along the wall and check for loose mortar or spalling bricks; repair these defects with matching mortar and let it cure fully before painting. -
Remove surface debris:
Use a stiff-bristle brush to vigorously scrape away any moss, ivy tendrils, or loose dirt clinging to the brick and grout lines. -
Apply cleaner:
Mix a masonry cleaner or mild detergent with water and saturate the wall, scrubbing stubborn stains to ensure the paint bonds chemically. -
Rinse thoroughly:
Wash the entire surface down with a pressure washer on a low setting or a hose, ensuring no soap residue remains. -
Dry completely:
Allow the brickwork to dry for at least 24 to 48 hours; mineral paint requires a dry, porous surface to absorb properly. -
Protect surroundings:
Lay down heavy-duty drop cloths and tape off any adjacent trim or windows, as mineral paint essentially turns to stone and is very difficult to remove once dry.
Step 2: Priming and Cutting In
-
Mix the primer:
Combine your mineral fixative or primer according to the manufacturer’s ratio, designed to equalize the suction of porous bricks. -
Apply primer coat:
Roll or brush the primer onto the wall, ensuring it saturates the face of the bricks and the mortar joints. -
Let primer cure:
Wait the recommended time (masking usually overnight) for the fixative to bond with the masonry substrate. -
Stir the paint:
Open your terracotta mineral paint and stir thoroughly, lifting pigment from the bottom since mineral paints can settle heavily. -
Cut in edges:
Use your masonry brush to paint the perimeter of the wall, jamming the bristles into the mortar joints for full coverage.
Paint drying too fast?
If the brick is hot or very porous, the paint may drag. Mist the wall lightly with water immediately before painting to improve flow and workability.
Step 3: Application
-
Load the roller:
Saturate the high-nap roller with paint; the thick nap is essential for reaching into the deep texture of the brick. -
Roll the first section:
Apply the paint in a ‘W’ pattern over a 3×3 foot section, applying gentle pressure to force paint into the pores. -
Back-brushing:
I prefer to immediately go over the wet rolled area with a masonry brush to push paint into deep crevices the roller might have missed. -
Maintain a wet edge:
Work across the wall in manageable sections, blending the wet edges into each other to prevent lap marks. -
Dry the first coat:
Allow the first layer to dry (usually 12 hours) until it feels chalky and dry to the touch. -
Apply second coat:
Roll on the second coat for full color depth and opacity, moving perpendicular to your first coat spread pattern if possible. -
Check for holidays:
Inspect the wall from different angles to spot any ‘holidays’ (missed spots) in deep grout lines and touch quickly them up with a small brush. -
Remove tape:
Peel off the painter’s tape while the paint is still slightly tacky to ensure a clean, crisp edge. -
Clean up:
Wash tools immediately with water; once mineral paint cures on a brush, the tool is essentially ruined.
Create an aged look
For an antique aesthetic, dilute a small amount of dark grey mineral paint with water (1:4 ratio) and sponge it randomly over the dry terracotta to mimic weathering.
Step back and enjoy the warmth of your newly revitalized, breathable masonry wall.
Framing the Entryway Arch
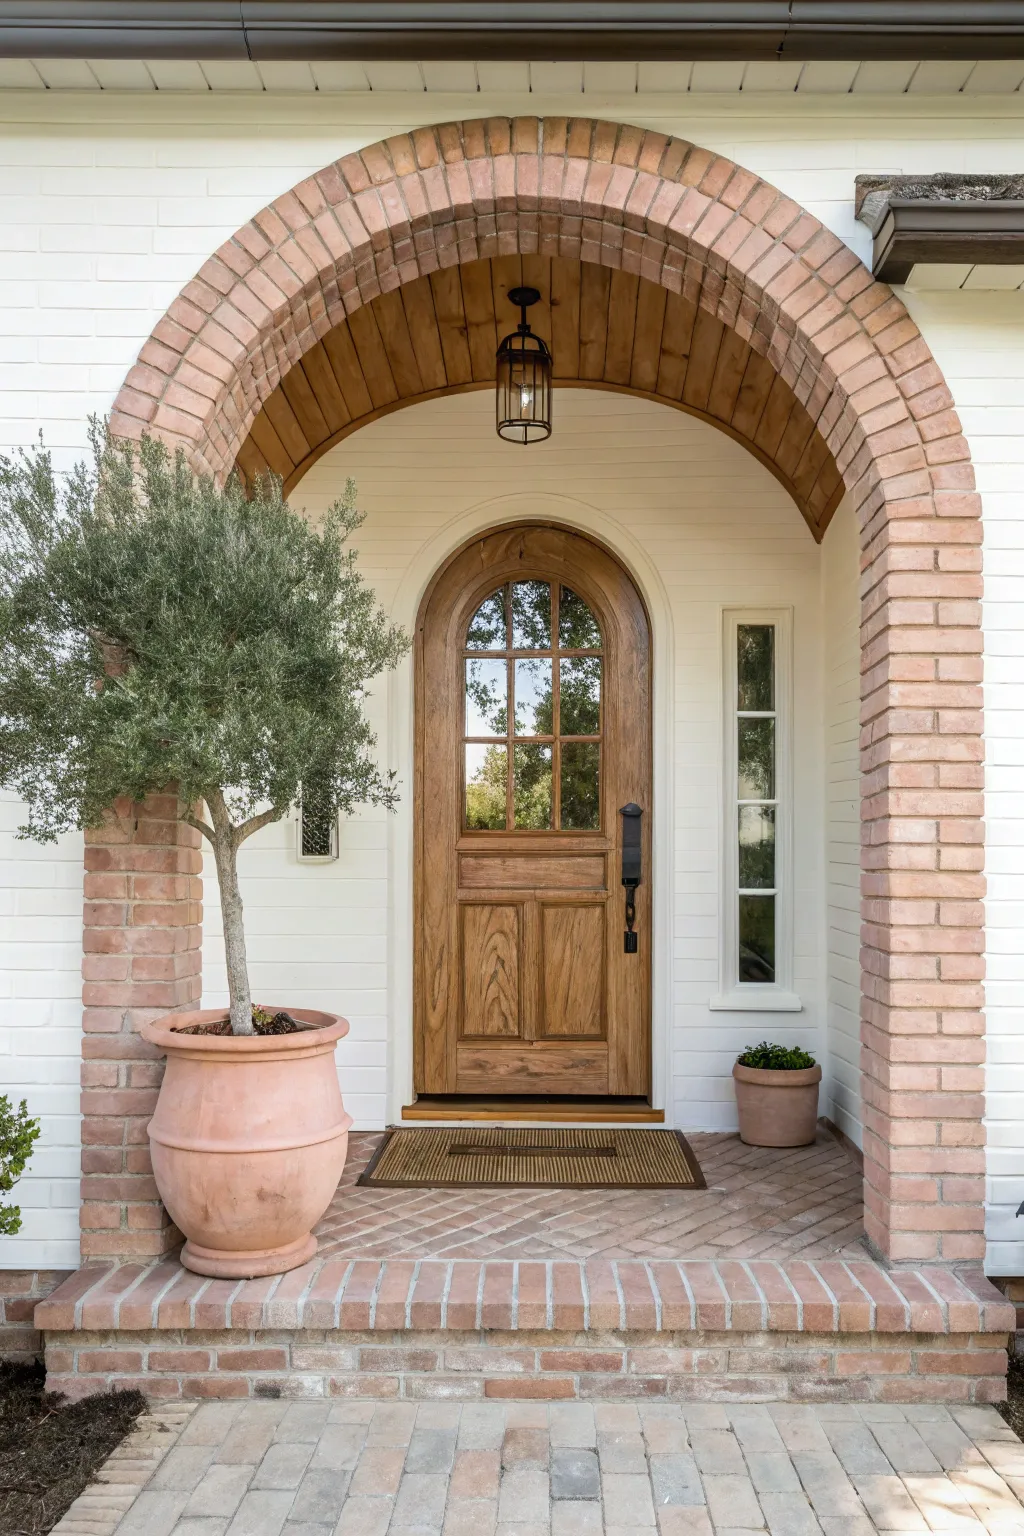
Transform a standard red brick archway into a soft, sun-baked architectural feature reminiscent of an Italian villa using a custom whitewash technique. This project balances the warmth of antiqued masonry with crisp white siding to create a framing effect that feels both historic and fresh.
Step-by-Step Guide
Materials
- Matte latex paint (warm cream or off-white)
- Water bucket
- Large masonry brush or block brush
- Clean lint-free rags
- Stiff bristle scrub brush
- Painter’s tape
- Drop cloths
- Spray bottle with water
- Exterior white paint (for siding)
- Angled sash brush
Step 1: Surface Preparation
-
Clean the masonry:
Begin by scrubbing the brick surface thoroughly with a stiff bristle brush and water to remove dirt, moss, or loose mortar. -
Rinse and dry:
Spray down the brick to rinse away debris and let it dry until it is just slightly damp, not soaking wet. -
Protect the area:
Lay drop cloths on the porch floor and use painter’s tape to mask off the door frame, windows, and any hardware you want to protect.
Too Opaque?
If a spot looks too solid or heavy, spray it immediately with water and scrub aggressively with a bristle brush to lift the pigment before it cures completely.
Step 2: Mixing the Wash
-
Create the mixture:
In a bucket, mix your cream-colored matte paint with water. I usually start with a 1:1 ratio for a semi-transparent look. -
Test the consistency:
Stir until the texture resembles thin milk; if it feels too thick, add small amounts of water until it flows easily off the mixing stick. -
Perform a spot test:
Apply a small amount to an inconspicuous brick near the bottom corner to ensure the opacity is to your liking.
Add Depth
To mimic the look of aged terra cotta, mix a very small amount of brownish-gray acrylic into a cup of your wash and apply it sporadically to random corners or brick edges.
Step 3: Applying the Whitewash
-
Pre-wet the section:
Use your spray bottle to lightly mist a small 2-foot section of the brick arch before painting, which helps the wash glide on smoothly. -
Brush on the wash:
Dip the masonry brush into the mixture and apply it over the bricks and mortar joints in the dampened section. -
Stipple the grout:
Use a dabbing motion to push the wash into the deep crevices of the grout lines so no dark mortar is left completely stark. -
Distress immediately:
While the paint is still wet, take a crumpled rag and dab or wipe off surfaces of the individual bricks to reveal some of the original clay color. -
Vary the pressure:
Wipe harder on some bricks and softer on others to create a natural, timeworn variation rather than a uniform coat. -
Work around the arch:
Continue this apply-and-wipe process, moving up one side of the arch and down the other, blending the edges of your sections carefully.
Step 4: Framing with White
-
Prepare the siding:
Once the brick work is complete and dry, ensure the adjacent siding or stucco walls are clean and ready for painting. -
Cut in the edges:
Using an angled sash brush and pure white exterior paint, carefully cut in heavily around the curve of the brick arch to create a sharp, clean line. -
Fill the field:
Paint the remaining wall siding white to create a high-contrast backdrop that makes your antiqued brick pop. -
Remove masking:
Peel away the painter’s tape from the door and trim while the white paint is still slightly tacky to prevent peeling.
Step back and admire how this subtle color shift completely redefines the character of your entryway.
Random Brick Color Blocking
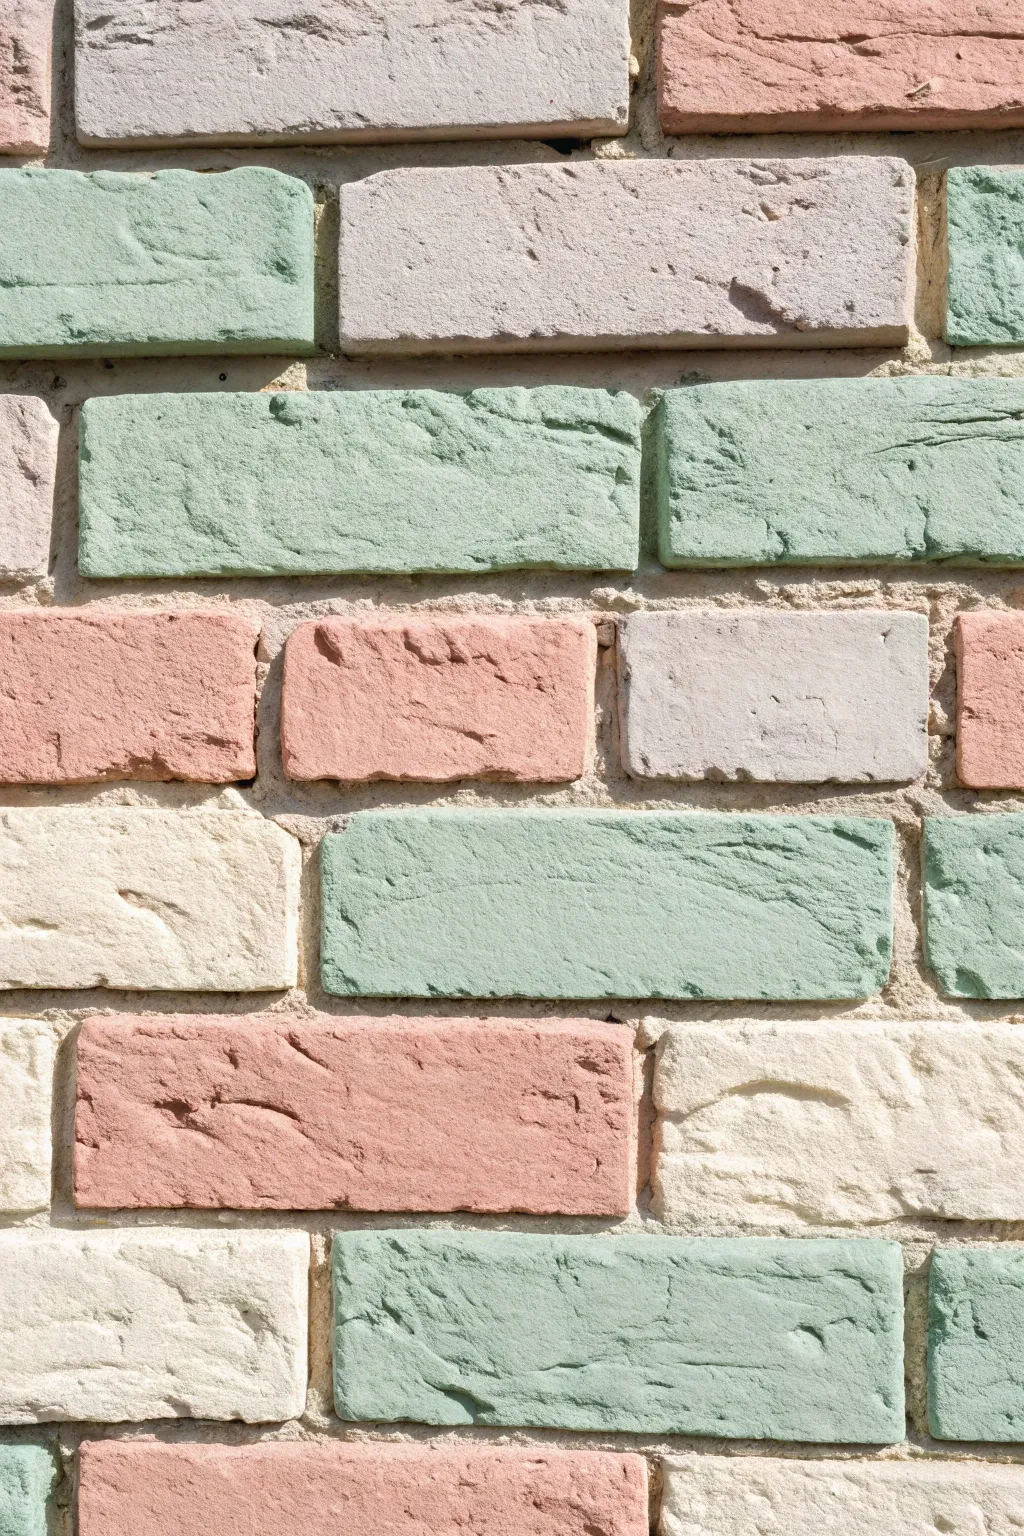
Transform a plain masonry surface into a playful, soft-hued feature wall using a random color-blocking technique. This project creates a charming patchwork effect with creamy whites, dusty pinks, and sage greens while keeping the mortar lines distinct.
How-To Guide
Materials
- Masonry paint (Cream, Sage Green, Dusty Pink, Light Grey)
- Masonry primer (clear or tintable)
- TSP substitute or heavy-duty degreaser
- Stiff wire brush
- Vacuum with brush attachment
- 1.5-inch angled sash brush
- Small plastic cups or containers
- Painter’s tape
- Drop cloths
- Stir sticks
Step 1: Surface Preparation
-
Scrub the surface:
Begin by vigorously scrubbing every brick with a stiff wire brush to remove any loose mortar, efflorescence, or peeling debris. -
Vacuum dust:
Run a vacuum with a brush attachment over the wall and the floor base to capture all the fine dust created by the wire brushing. -
Deep clean:
Wash the bricks using a TSP substitute and warm water to remove hidden grease or oils, which ensures the paint adheres properly. -
Allow to dry:
Let the brickwork dry completely for at least 24 hours; trapped moisture can cause your new paint to bubble later on. -
Protect surroundings:
Lay down drop cloths to protect your flooring and apply painter’s tape to any adjacent walls, trim, or ceiling lines.
Mortar Defense
Keep a small, damp artist’s brush nearby. If you accidentally get paint on the unpainted mortar, wipe it away instantly before it soaks in.
Step 2: Painting the Pattern
-
Decant paints:
Pour a small amount of each paint color (Cream, Sage, Pink, Grey) into separate plastic cups for easy handling. -
Prime the faces:
Apply a coat of masonry primer strictly to the face of the bricks you intend to paint, being careful to avoid the mortar lines. -
Start with the neutral base:
Dip your angled sash brush into the Cream paint (the most dominant color) and begin painting random bricks across the wall. -
Cut in the edges:
Carefully run the bristles along the edge of the brick where it meets the mortar, creating a sharp line without getting paint on the grout. -
Fill the texture:
Dab the brush into the pockmarks and crevices of the brick face to ensure full coverage, as brick is naturally porous and uneven. -
Map the second color:
Switch to the Dusty Pink paint and select bricks that are not directly touching; I like to step back frequently to ensure the distribution feels balanced. -
Apply the third color:
Fill in remaining gaps with the Sage Green paint, maintaining the random spacing and careful edging technique. -
Add the accents:
Use the Light Grey paint effectively as an accent, painting just a few scattered bricks to break up the warmer tones. -
Check angles:
Inspect the bricks from different angles to spot any missed pinholes or deep pores that the first pass might have missed. -
Apply second coat:
Once the first layer is dry to the touch, apply a second coat to any bricks that look transparent or patchy for a solid, matte finish. -
Clean up borders:
Remove the painter’s tape slowly at a 45-degree angle while the paint is still slightly tacky to ensure crisp lines at the wall edges.
Vintage Vibe
For a rustic look, lightly sand the painted bricks with 120-grit sandpaper after drying to reveal some of the original texture underneath.
Enjoy your beautifully customized wall that brings a fresh, artistic geometric flair to the room.
Spray Gun Application
Transforming textured stone or brick with a sprayer offers a uniform finish that would take hours to achieve with a brush. This method drives the coating deep into crevices while preserving the masonry’s natural relief, resulting in a modern, clean look.
Step-by-Step
Materials
- Handheld airless paint sprayer
- Masonry paint or mineral-based limewash
- Water (for thinning)
- 5-gallon mixing bucket
- Paint strainer mesh bags
- Painter’s tape
- Heavy-duty drop cloths
- Black nitrile gloves
- Stiff bristle brush
- Safety goggles and respirator
Step 1: Surface Preparation
-
Scrub the masonry:
Use a stiff bristle brush to vigorously remove any loose mortar, dirt, or moss from the brick face. -
Wash and rinse:
Spray the wall down with a hose or low-pressure power washer to remove the dust you just loosened. -
Allow to dry:
Wait until the brick is completely dry to the touch; moisture trapped inside can cause paint failure later. -
Mask edges:
Apply painter’s tape around window frames, soffits, and any trim that meets the brickwork. -
Protect the ground:
Lay down heavy-duty drop cloths at the base of the wall, extending them at least three feet out to catch overspray.
Clog Stopper
Straining your paint is non-negotiable. Even fresh factory paint has tiny dried skin flakes that will jam a sprayer tip instantly.
Step 2: Paint Setup
-
Mix the paint:
Pour your masonry paint into a mixing bucket; if using a limewash or seeking a sheer look, precise thinning is required here. -
Strain the material:
Pour the mixed paint through a mesh strainer bag into a clean container to remove any dried clumps that could clog the nozzle. -
Fill the canister:
Unscrew the reservoir cup from your sprayer and fill it with the strained paint, being careful not to overfill past the max line. -
Prime the pump:
Reattach the canister tightly and follow your specific model’s instructions to prime the vac valve, removing air from the suction tube. -
Adjust the spray pattern:
Rotate the nozzle tip to select a vertical fan pattern, which usually offers the best control for horizontal brick rows.
Antique Effect
For a varied texture, spray a small section and immediately dab the wet bricks with a damp sponge to expose some of the stone underneath.
Step 3: Application
-
Gear up:
Put on your safety goggles, mask, and a pair of black nitrile gloves to keep your hands clean during the process. -
Test the flow:
Spray a test burst onto a piece of scrap cardboard to check the pressure; adjust until you see a consistent, fine mist without spitting. -
Position the sprayer:
Stand so the nozzle is roughly 8 to 12 inches away from the wall surface, keeping the tool perpendicular to the brick. -
Begin movement:
Start moving your arm across the wall before you pull the trigger to prevent a heavy buildup of paint at the starting point. -
Apply the coating:
Squeeze the trigger fully and sweep across the bricks in a steady, smooth motion, keeping your wrist locked stiff. -
Overlap passes:
On your return pass, aim to overlap the previous stroke by about 50 percent to ensure total coverage without streaking. -
Check different angles:
I like to pause occasionally and inspect the wall from the side to ensure the spray has penetrated the deep mortar grooves. -
Clean immediately:
Once finished, empty the paint cup and flush the sprayer with water or solvent specifically designed for your paint type to prevent internal hardening.
Enjoy the fresh, uniform look of your newly updated masonry wall.
Artistic Color Washing
Transform sterile white brick into a warm, weathered feature with this tactile color-washing technique. By layering diluted terracotta tones and texturing with a large natural sea sponge, you create an organic, cascading effect that mimics the charm of aged outdoor masonry.
Step-by-Step Tutorial
Materials
- White latex masonry paint (for base)
- Terracotta or burnt orange latex paint
- Clear acrylic glazing liquid
- Large natural sea sponge
- 2-inch angled sash brush
- Water spray bottle
- Mixing bucket
- Lint-free rags
- Painter’s tape and drop cloth
Step 1: Preparation & Base
-
Clean surface:
Scrub the brick wall with a stiff brush and mild soapy water to remove dust, spiderwebs, or grease, then let it dry completely. -
Protect surroundings:
Secure painter’s tape along the ceiling and adjacent walls, and lay a thick drop cloth on the floor to catch the inevitable drips from this fluid technique. -
Apply base coat:
If your brick isn’t already white, apply two coats of white masonry paint to create a bright, high-contrast canvas for the color wash.
Step 2: Mixing the Glaze
-
Combine ingredients:
In your mixing bucket, combine one part terracotta paint with one part clear glazing liquid to increase transparency. -
Thin mixture:
Add small amounts of water gradually, stirring constantly, until the mixture reaches the consistency of heavy cream. -
Test opacity:
Brush a small amount of the glaze onto a spare brick or an inconspicuous corner to ensure it is translucent enough to let the texture show through.
Drip Control
If the drips are running too fast down the wall, your mixture is too watery. catch the run with a rag immediately and add a splash more paint to your bucket to thicken the glaze slightly.
Step 3: Application Technique
-
Prepare sponge:
Soak your large natural sea sponge in water and wring it out thoroughly so it is damp but not dripping. -
Load glaze:
Dip just the face of the sponge into the paint mixture, ensuring you don’t saturate the entire tool. -
Apply to brick:
Press the sponge firmly against the face of selected bricks, applying heavy pressure to force paint into the porous holes. -
Encourage drips:
Using the angled sash brush, drag the wet paint downward from the sponged areas to create vertical drip lines. -
Define shapes:
I like to use the brush to outline roughly rectangular shapes on the brick face, mimicking the look of painted blocks. -
Work in sections:
Focus on a 3×3 foot area at a time so the paint remains wet enough to manipulate.
Add Depth
Mix a small amount of dark brown paint into a separate glaze batch. Dab this sparingly into the deepest crevices and chipped corners of the brick to create a 3D shadow effect.
Step 4: Refining Texture
-
Lift and soften:
While the glaze is still tacky, press a clean part of the sponge over the painted areas to lift off excess pigment and reveal the white texture beneath. -
Blot pooling:
Use a lint-free rag to gently blot any paint that has pooled too thickly in the mortar lines, unless you prefer a very heavy look. -
Check balance:
Step back frequently to view the wall from a distance, checking that the color distribution looks organic and not too patterned. -
Mist and correct:
If an area looks too solid, mist it lightly with the water spray bottle and wipe with a rag to dilute the color. -
Final dry:
Allow the artistic wash to cure for at least 24 hours before placing furniture against the wall.
Enjoy the warm, artistic vibe your new feature wall brings to the room
Metallic Dry-Brush Highlights
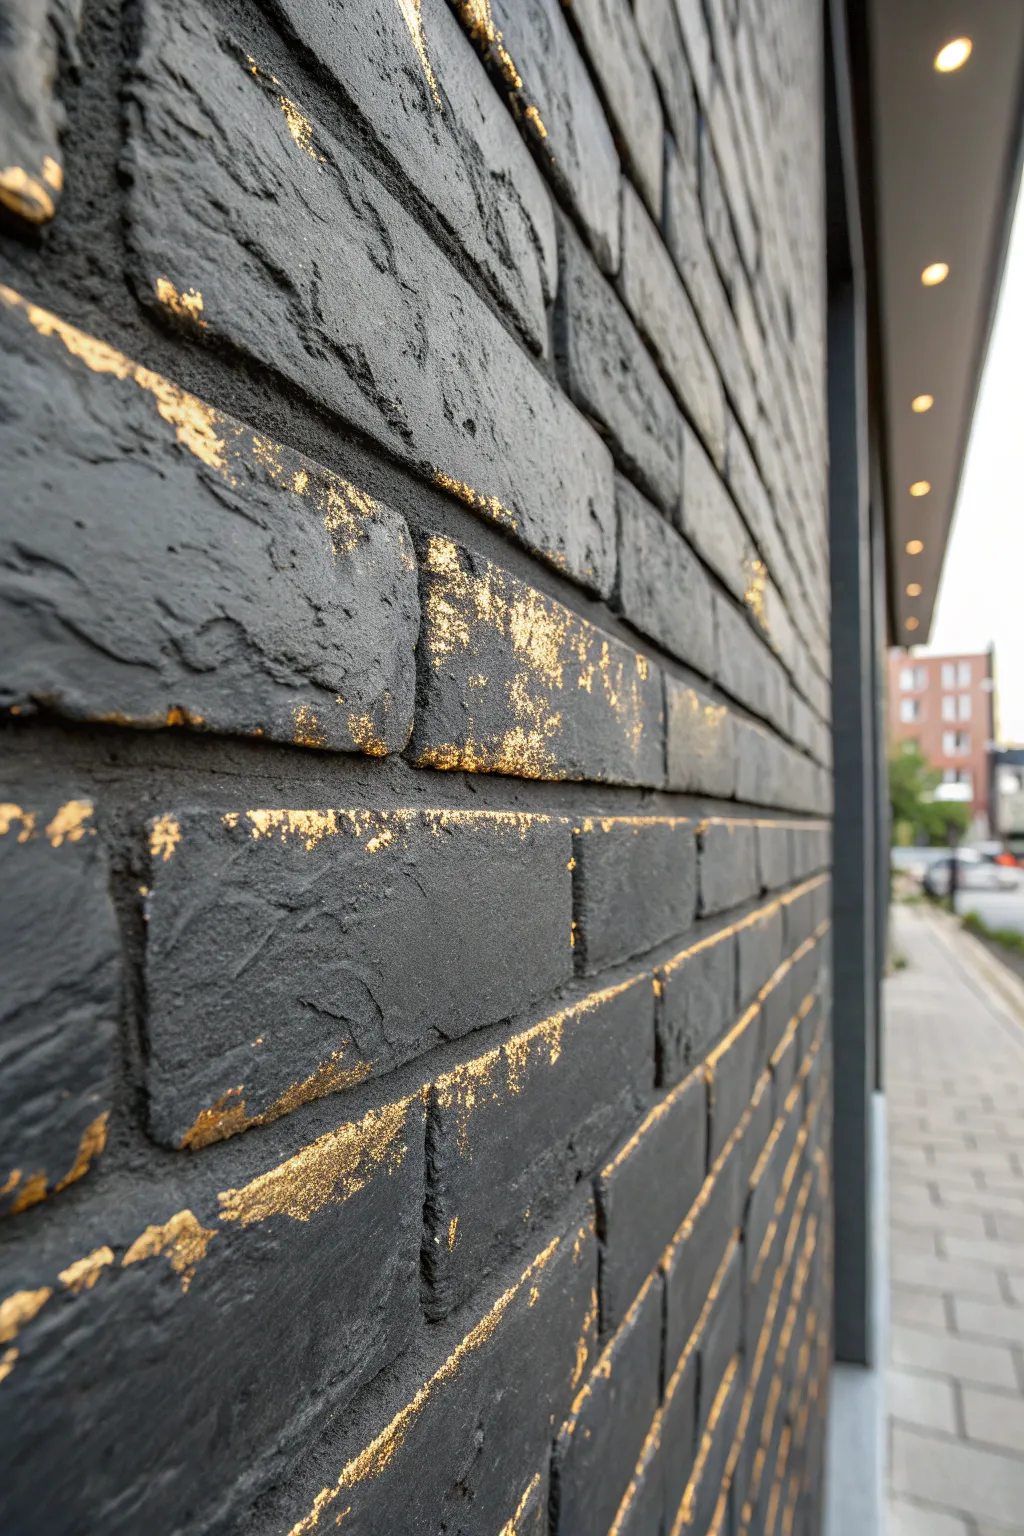
Transform a standard brick surface into a statement of modern luxury using high-contrast tones. This project combines a velvety matte black base with shimmering metallic gold dry-brushing to highlight the brick’s natural texture.
Step-by-Step Guide
Materials
- TSP substitute or heavy-duty degreaser
- Stiff wire brush
- Painter’s tape and drop cloths
- Masonry primer (tinted gray preferable)
- Matte black masonry paint
- Exterior-grade metallic gold acrylic paint
- 3/4-inch nap paint roller and frame
- Angled sash brush (for cutting in)
- Several cheap masonry or chip brushes (2-3 inches wide)
- Scrap cardboard
- Lint-free rags
Step 1: Preparing the Canvas
-
Clean surface:
Scrub the brick thoroughly with a wire brush and TSP solution to remove dust, cobwebs, and loose mortar. -
Dry time:
Rinse the wall with water and allow it to dry completely; trapped moisture can cause the paint to bubble later. -
Protect surroundings:
Apply painter’s tape to adjacent trim, windows, or siding, and lay drop cloths to catch splatter. -
Prime the brick:
Roll on a coat of masonry primer—ideally tinted gray—to ensure a strong bond and help with color coverage. -
Roll the base:
Apply the matte black masonry paint using the thick 3/4-inch nap roller to push paint deep into the porous crevices. -
Fill the gaps:
Use an angled brush to hand-paint the mortar lines and deep pits that the roller couldn’t reach. -
Second coat:
Once the first coat is dry to the touch, apply a second layer of black to ensure a rich, fully opaque finish. -
Full cure:
Let the black base coat cure for at least 24 hours so the surface is hardened before adding the decorative finish.
Cheap Brushes Work Best
Use an inexpensive “chip brush” for this step. The stiff, naturally uneven bristles create a better distressed texture than a high-quality soft brush.
Step 2: The Golden Touch
-
Prepare palette:
Squeeze a dollop of bold metallic gold acrylic paint onto a piece of scrap cardboard or a paper plate. -
Load the brush:
Dip just the tips of a dry, coarse chip brush into the gold paint, picking up a very small amount. -
Offload excess:
Vigorously scrub the brush on a clean section of cardboard until the bristles appear almost entirely dry. -
Initial swipe:
Approach the wall and lightly graze the face of a single brick with the side of the bristles to test the effect. -
Create texture:
Use horizontal sweeping motions to catch the gold hanging on the raised ridges and bumps of the brick. -
Highlight edges:
Apply slightly more pressure on the bottom lip or corners of the bricks to accentuate their shape. -
Vary texture:
I like to occasionally stipple or dab the brush to create heavier, organic concentrations of gold that look like foil. -
Maintain depth:
Keep the recessed grout lines black; avoiding gold in the cracks creates better visual depth and 3D pop. -
Check balance:
Step back five to ten feet every few minutes to assess the density and flow of the highlights across the wall. -
Layer slowly:
Add layers gradually, reloading your brush sparingly; it is much easier to add more sparkle than to cover it up. -
Break uniformity:
If a section looks too uniform, break it up by cross-hatching lightly with a barely-there gold load. -
Final dry:
Remove the tape carefully and allow the gold accents to cure fully according to the paint manufacturer’s instructions.
Too Much Bling?
If you accidentally apply a heavy glob of gold, don’t panic. Just dab a little matte black paint over the bright spot to knock it back into the background.
Now you have a stunning, dramatic feature wall that perfectly balances industrial ruggedness with high-end elegance.
Stenciled Motif Overlay
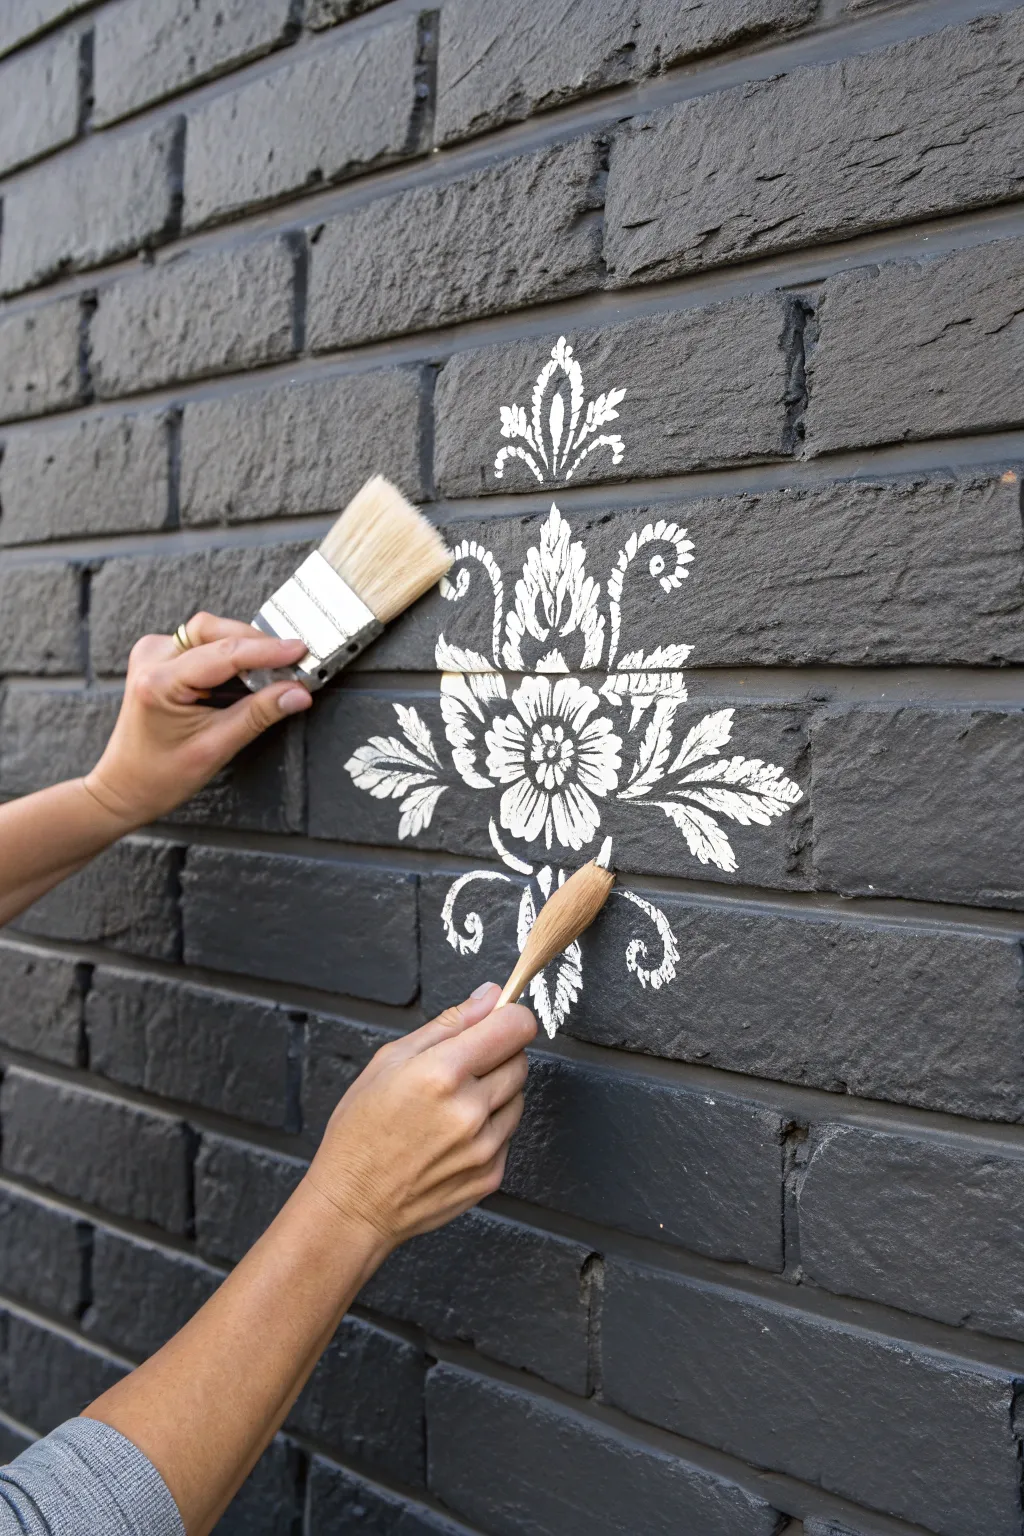
Transform a textured brick wall into a work of art by layering a delicate, damask-style motif over a moody dark background. This high-contrast technique creates the sophisticated look of vintage wallpaper while retaining the rugged character of the masonry.
Step-by-Step
Materials
- Dark charcoal exterior masonry paint
- White exterior acrylic or masonry paint
- Large floral or damask wall stencil
- Painter’s tape
- Wire brush and cleaning supplies
- Paint roller with nap suitable for brick
- Stiff-bristled stencil brush
- Small angled artist brush
- Paper towels
Step 1: Wall Preparation & Base Coat
-
Clean the surface:
Scrub the brick thoroughly with a wire brush to dislodge any loose mortar or old flaky paint. -
Wash and dry:
Wash the wall with a mild detergent solution to remove dust and grease, then rinse well and let it dry completely for at least 24 hours. -
Apply primer:
If the brick is raw or unpainted, apply a high-quality masonry primer to ensure an even finish. -
Roll on base color:
Using a thick-nap roller, apply the dark charcoal masonry paint, pressing firmly to get the paint into the crevices and pores. -
Apply second coat:
Once the first coat is dry, add a second layer to ensure rich, opaque coverage with no brick color showing through. -
Cure the base:
Allow the base coat to cure for a full day; I prefer to wait overnight to ensure the painter’s tape won’t pull up any fresh paint later.
Step 2: Stenciling the Motif
-
Position the design:
Determine the placement of your motif, using a level to ensure the pattern aligns perfectly with the horizontal mortar lines. -
Secure the stencil:
Tape the stencil flat against the brick using painter’s tape on all four corners to prevent it from shifting while you work. -
Load the brush:
Dip the tip of your stiff stencil brush into the white paint, picking up only a very small amount. -
Offload excess paint:
Rub the brush vigorously onto a paper towel until it feels almost dry—this ‘dry brush’ technique is the secret to crisp lines on rough surfaces. -
Stipple the pattern:
Apply the paint over the stencil openings using a straight up-and-down dabbing motion rather than brushing side-to-side. -
Build opacity:
Repeat the dabbing process to build up the white intensity gradually, which prevents paint from bleeding underneath the stencil edges.
Pro Tip: Seamless Look
To make the motif look like it was hand-painted rather than stenciled, use a fine liner brush to paint over the small ‘bridges’—the little gaps in the lines that hold the stencil together.
Step 3: Freehand Detailing
-
Remove stencil:
Carefully peel the stencil away from the wall, pulling it straight back to avoid smudging the wet design. -
Inspect edges:
Look closely at the design for any areas where the paint might have bled into the deep texture of the brick. -
Refine with dark paint:
Dip a small angled artist brush into your dark charcoal base color and carefully touch up any messy edges or bleed-outs to sharpen the shape. -
Brighten highlights:
Switch to a clean detail brush with white paint to fill in any gaps or ‘bridges’ left by the stencil for a seamless, hand-painted look. -
Add final flourishes:
If you feel confident, use the small brush to extend intricate details like leaf tips or swirls to customize the shape further. -
Final cure:
Let the decorative work dry for 24 hours before touching or cleaning the surface.
Troubleshooting: Paint Bleed
On rough brick, paint bleed is common. If edges look fuzzy, wait for the white paint to dry fully, then use your dark base color and a tiny brush to ‘cut in’ and sharpen the outline.
With a steady hand and a bit of patience, you will have a stunning, custom-patterned wall that adds instant architectural interest to your space.


Have a question or want to share your own experience? I'd love to hear from you in the comments below!