
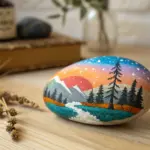
Turning a gray afternoon into a creative burst is easier than you think when you have a handful of smooth river rocks. Let’s dive into some colorful projects that transform ordinary stones into a canvas for your child’s imagination.
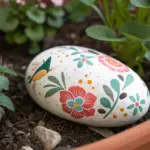
Classic Garden Ladybugs
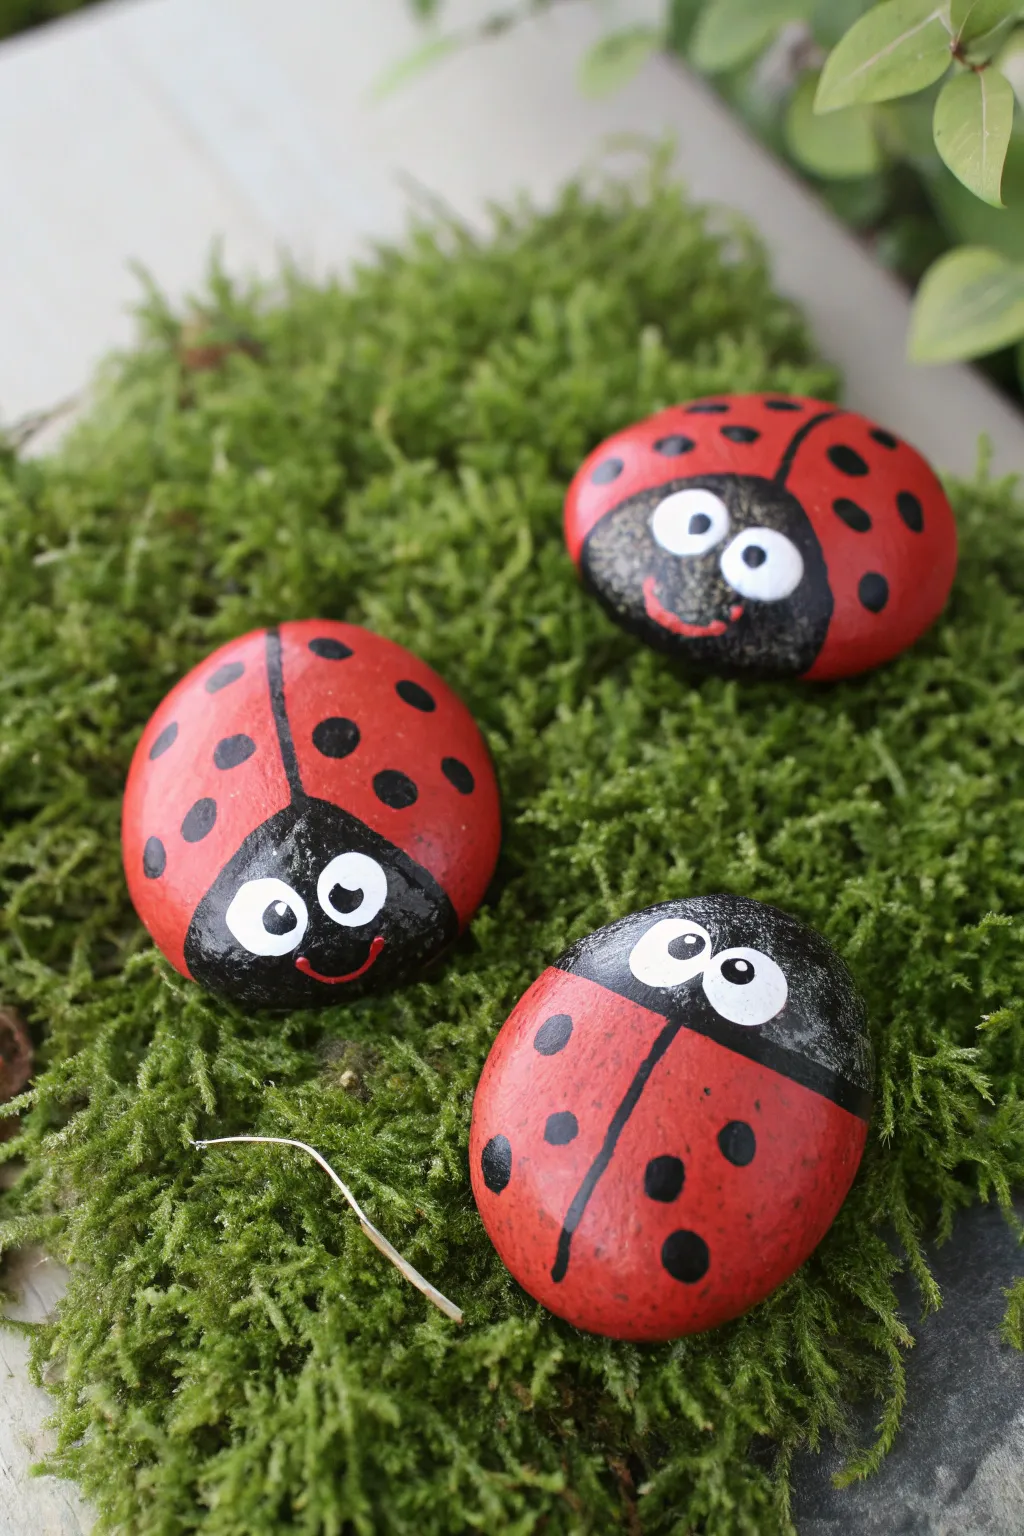
Transform smooth river stones into charming little beetles that bring a pop of color to any flower bed. These classic ladybugs feature bright red wings and friendly faces that are perfect for hiding among the moss and leaves.
Detailed Instructions
Materials
- Smooth, round or oval rocks
- Acrylic paint (Bright Red, Black, White)
- Flat paintbrush (medium size)
- Fine detail brush or liner brush
- Water cup and paper towels
- Palette or paper plate
- Clear outdoor sealant (optional)
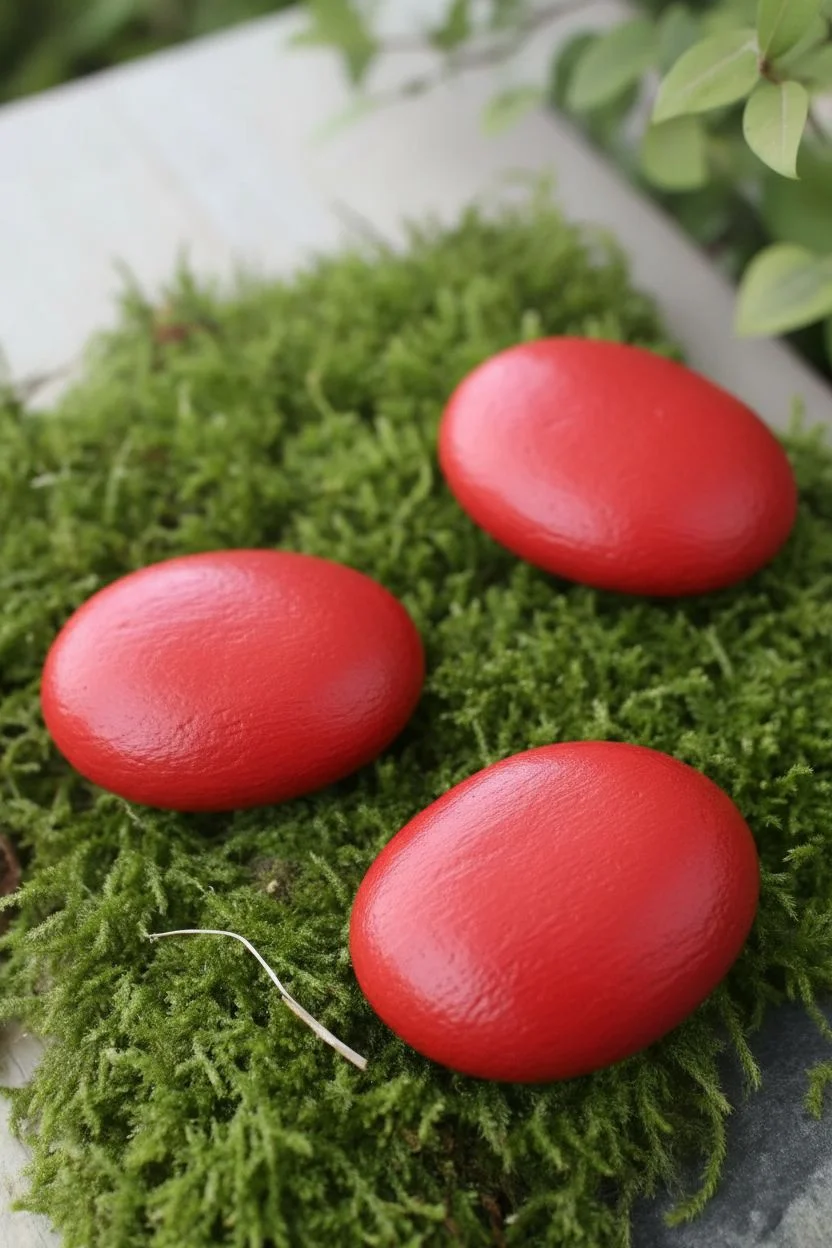
Step 1: Preparing the Base
-
Clean the canvas:
Scrub your rocks with warm soapy water to remove any dirt or grit, then let them dry completely so the paint sticks properly. -
Apply the red coat:
Using your flat brush, paint the entire top surface of the rock with bright red acrylic paint. -
Let it dry:
Allow the first coat to dry securely to the touch. -
Second coat:
Apply a second layer of red paint to ensure the color is solid and opaque, hiding the stone’s natural color beneath. -
Full dry time:
Wait for the red base to be completely dry before moving on to the black details.
Red Transparency?
If your red paint looks streaky or dark against the stone, paint a layer of white acrylic first. Let the white dry fully, then paint the red on top for a vibrant, opaque finish.
Step 2: Creating the Body
-
Paint the face:
Paint a semi-circle shape in black on the front one-third of the rock to create the ladybug’s face. -
Draw the center line:
Switch to your fine liner brush and carefully paint a straight black line starting from the center of the face down to the back of the rock. -
Thicken the line:
Go over the center line gently if needed to make it distinct, separating the two ‘wings’ of the beetle. -
Add wing spots:
Dip a small round brush into black paint and dab circles onto the red wings. -
Vary spot placement:
Place the spots randomly but keep them somewhat balanced on both sides of the dividing line. -
Edge spots:
Don’t forget to paint a few half-circles near the edges of the rock to make the pattern look natural and wrapped around.
Perfect Circles Tool
Struggling to paint round spots? Dip the handle end of a paintbrush or a Q-tip into the black paint and stamp it onto the rock. It makes perfectly uniform dots every time!
Step 3: Facial Features
-
Paint the eyes:
Dip a clean brush handle or a medium round brush into white paint and create two large ovals on the black face area. -
Dry the whites:
Allow the white eye shapes to try completely; I like to speed this up with a hair dryer on a cool setting if I’m impatient. -
Add pupils:
Using a tiny detail brush, paint small black dots inside the white ovals to create the pupils. -
Create a smile:
With your finest brush, paint a thin, curved red line on the black face area just below the eyes for a happy expression. -
Highlighting:
Add a tiny speck of white to the black pupils if you want extra sparkle in the eyes. -
Seal the deal:
Once all paint is fully cured, apply a coat of clear outdoor varnish to protect your ladybugs from rain and sun.
Now your cheerful little beetles are ready to nestle into the garden moss or guard your potted plants


Silly Googly-Eyed Monsters
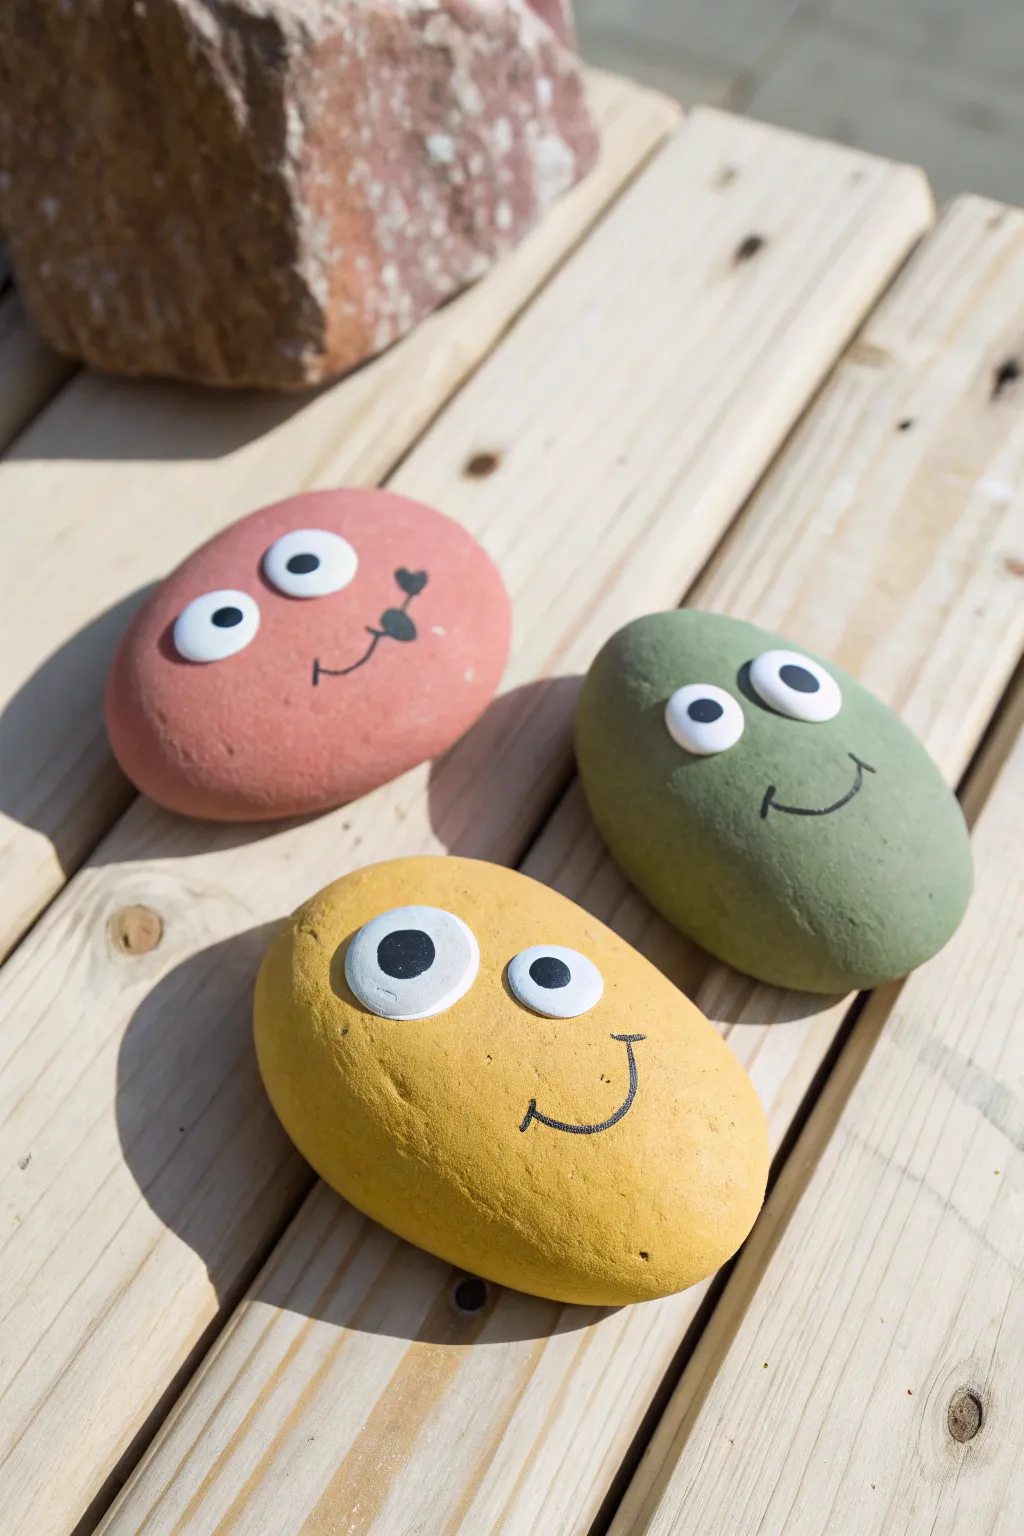
These expressive pebble buddies bring a pop of personality to any garden path or windowsill. With their oversized eyes and simple smiles, this project transforms ordinary smooth stones into a cheerful group of colorful characters.
Step-by-Step
Materials
- Smooth, oval river stones (palm-sized)
- Acrylic craft paint (terracotta red, olive green, mustard yellow, white, black)
- Flat paintbrush
- Small round detail brush
- Black fine-tip paint pen or permanent marker
- Clear acrylic sealer (spray or brush-on)
- Water cup and paper towels
Step 1: Preparing the Base
-
Select your stones:
Choose three rocks with smooth surfaces and flattened oval shapes, similar to eggs, as these make the best canvases for faces. -
Clean the surface:
Scrub the rocks thoroughly with warm soapy water to remove any dirt or oils, then let them dry completely in the sun or with a towel. -
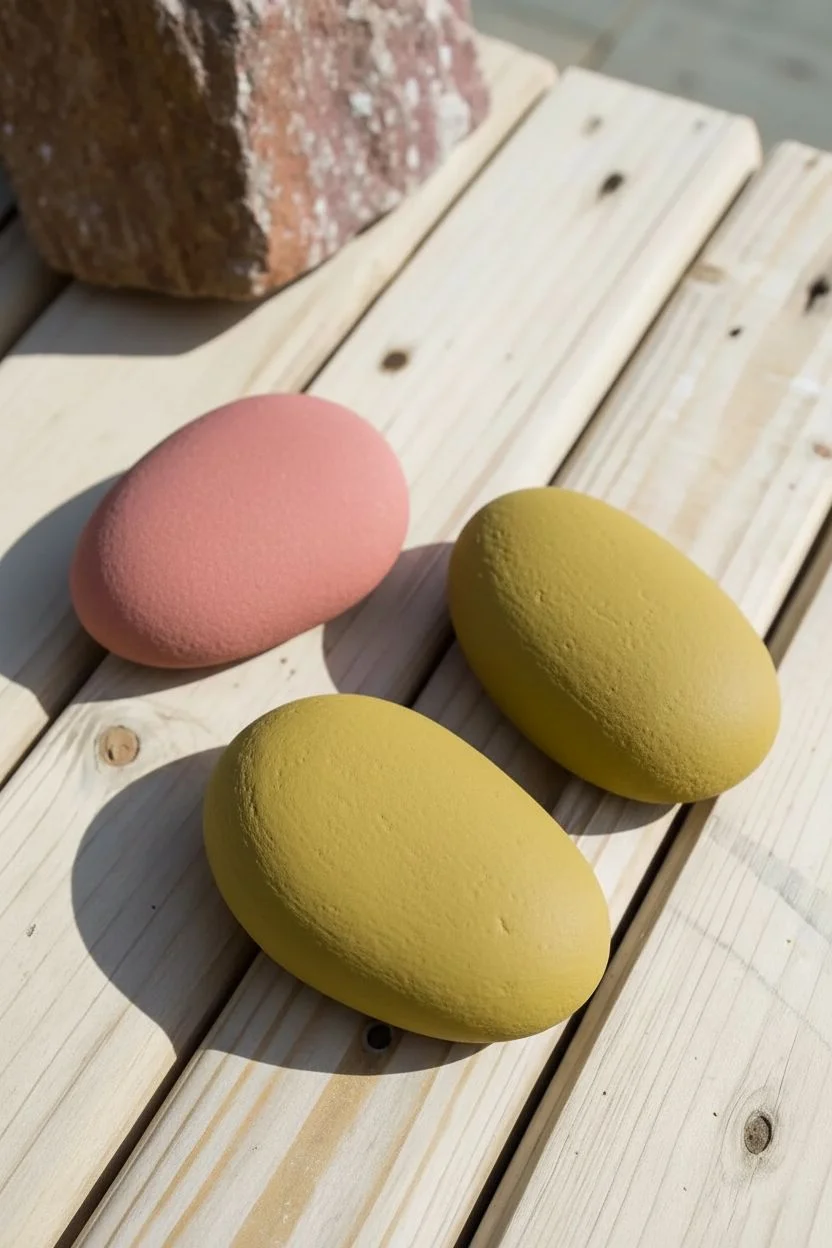
Apply the red base:
Paint the top surface of the first rock with the terracotta red or pinkish-red paint, using smooth strokes to avoid ridges. -
Apply the green base:
Coat the second rock entirely in olive green acrylic paint. -
Apply the yellow base:
Paint the third rock with mustard yellow; I often find yellow requires two coats for solid coverage, so let the first layer dry before adding a second if needed. -
Dry completely:
Allow all the base coats to dry for at least 20 to 30 minutes until they are matte and dry to the touch.
Stamp It Out
For perfectly round eyes without a steady hand, use the flat circular end of a sponge pouncer or the handle end of a large paintbrush dipped in white paint to stamp the circles.
Step 2: Painting the Features
-
Create the eye whites:
Using a small round brush or a white paint pen, paint two large, solid white circles on the upper half of each rock. -
Vary the placement:
Place the circles close together for the green and yellow rocks to create a focused look, but space them slightly apart on the red rock. -
Let the white dry:
Wait until the white circles are completely dry—this is crucial to keep the black mix from turning gray. -
Add pupils:
With a black paint pen or total brush, place a black dot inside each white circle. -
Create expression:
Look at the direction of the gaze; paint the pupils looking to the side or slightly crossed to give them that silly ‘googly’ effect. -
Draw the green smile:
Use the black paint pen to draw a simple, curved smiling line below the eyes on the green rock. -
Draw the yellow smile:
On the yellow rock, draw a wider U-shaped smile and add tiny vertical tick marks at the ends to simulate dimples. -
Add the red rock details:
For the red rock, draw a small squiggly mouth line and add a tiny solid heart shape near the cheek to look like a kiss or beauty mark.
Step 3: Finishing Touches
-
Dry details:
Let the facial features dry for at least 15 minutes so the marker won’t smudge. -
Seal the rocks:
Apply a coat of clear acrylic sealer or Mod Podge over the entire painted surface to make your rock art weather-resistant and give it a nice sheen.
Running Ink?
If using a permanent marker over paint, ensure the paint is 100% cure-dry first. If the marker tip gets clogged with paint, scribble on a scrap paper to clear it.
Arrange your new stone friends in the garden or on a shelf to greet everyone who passes by


Buzzing Bumblebees
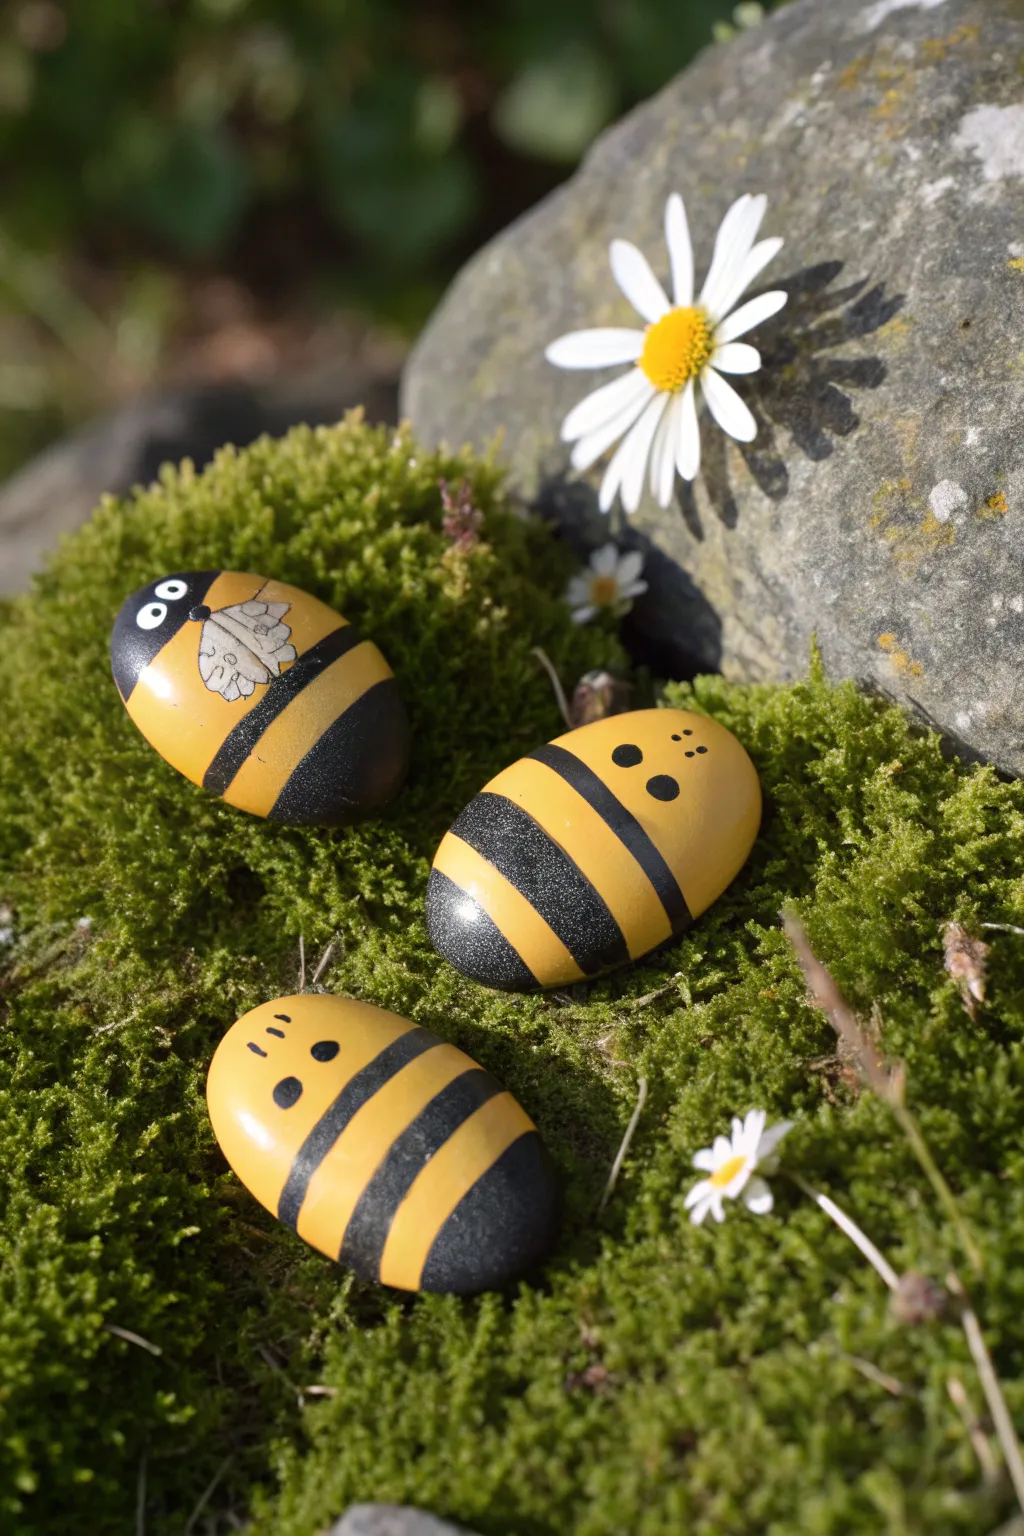
Transform smooth river stones into a friendly swarm of bumblebees with just a few colors of paint. These bright yellow and black striped critters feature varied expressions and are perfect for hiding in mossy patches or brightening up a flower pot.
Step-by-Step Guide
Materials
- Smooth oval river rocks
- Bright yellow acrylic paint
- Black acrylic paint
- White acrylic paint or paint pen
- Flat shader brush (size 4 or 6)
- Fine detail liner brush
- Dotting tool or toothpick
- Pencil
- Clear gloss varnish or spray sealer
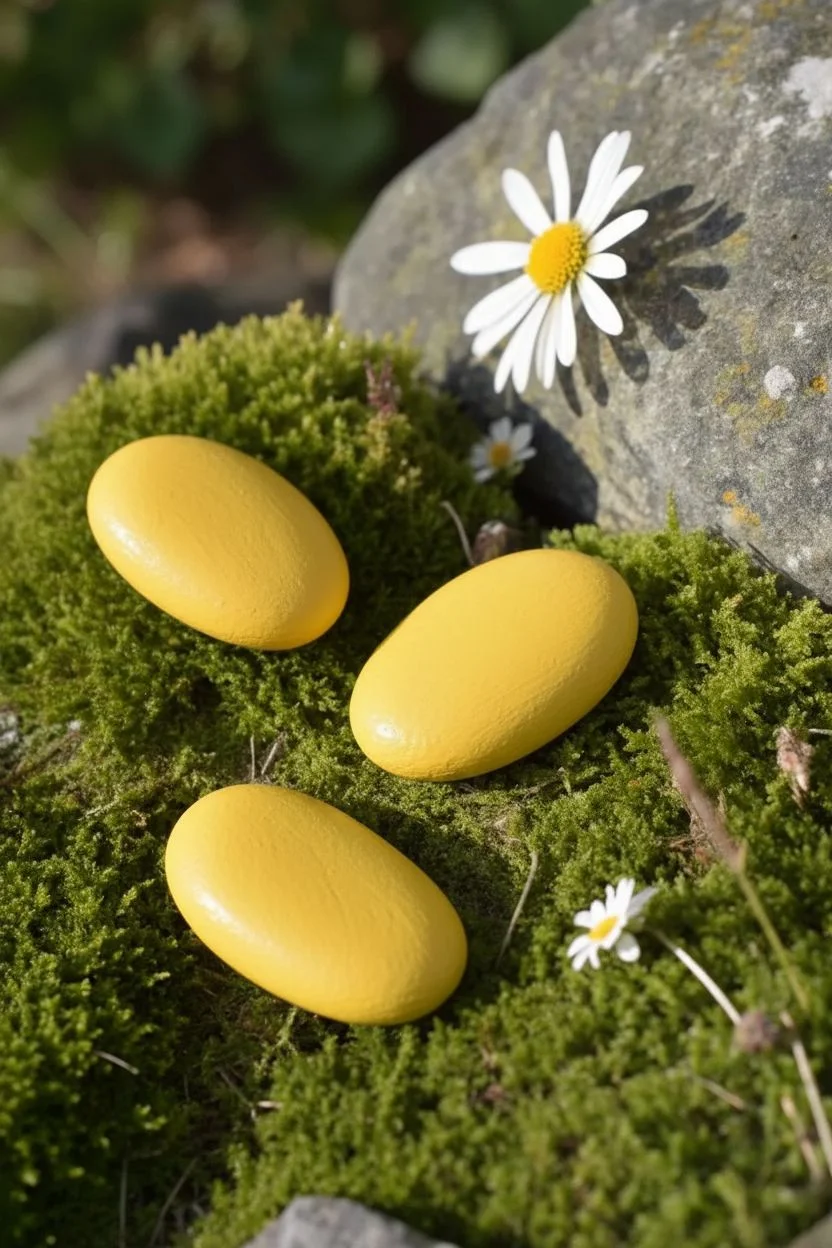
Step 1: Preparing the Hive
-
Clean the canvas:
Wash your rocks with warm soapy water and let them dry completely to ensure the paint adheres properly. -
Base coat application:
Paint the entire top surface of the rock with bright yellow acrylic paint. -
Dry and repeat:
Yellow is often translucent, so let the first coat dry and apply a second or third coat until you have a solid, opaque color. -
Check the edges:
Make sure the yellow paint extends down the sides of the rock so the natural stone only shows on the very bottom.
Step 2: Earning Their Stripes
-
Sketch the bands:
Once the yellow is fully dry, lightly use a pencil to mark curved lines where your black stripes will go. -
Paint the tail:
Using a flat shader brush, paint the bottom-most section of the rock black to create the bee’s tail. -
Add the middle stripe:
Skip a section of yellow, then paint a thick black band across the middle of the body. -
Optional head cap:
For the bee looking upward, paint a black semi-circle at the very top of the head; for the other bees, leave the face entirely yellow. -
Clean up edges:
If your black lines are wiggly, wait for them to dry and use a small brush with yellow paint to crisp up the edges.
Paint Pen Precision
I prefer using a white paint pen for the wing details instead of a brush. It gives crisper lines and makes drawing the tiny veins on the wings significantly easier for beginners.
Step 3: Faces and Wings
-
Create simple eyes:
For the standard bees, dip the handle end of a paintbrush into black paint and dot two wide-set eyes onto the yellow face area. -
Add cartoon eyes:
For the top bee, paint two small white circles first, let them dry, and add black pupils inside for a goofy look. -
Give them personality:
Use a fine liner brush to paint three tiny dots or dashes between the eyes to mimic little hair tufts. -
Draw the wings:
For the winged bee, use a white paint pen or fine brush to draw a heart-shaped outline on the yellow section of the back. -
Wing transparency:
Fill the wings with a very watered-down layer of white paint so the yellow still faintly shows through, or just leave them outlined. -
Wing finishing touches:
Draw delicate internal lines on the wings with a fine black pen or brush to create the vein texture.
Coverage Trouble?
If your yellow paint looks streaky or the dark rock shows through, paint a coat of white primer or white acrylic on the rock first. The yellow will pop much better on top.
Step 4: Sealing the Swarm
-
Curing time:
Allow the rocks to dry at least overnight to ensure moisture isn’t trapped under the sealant. -
Apply varnish:
Coat each bee with a clear gloss sealer to make the colors pop and protect them from weather.
These little bees are now ready to swarm your garden paths or nestle into your indoor potted plants.


Travel Tic-Tac-Toe Game
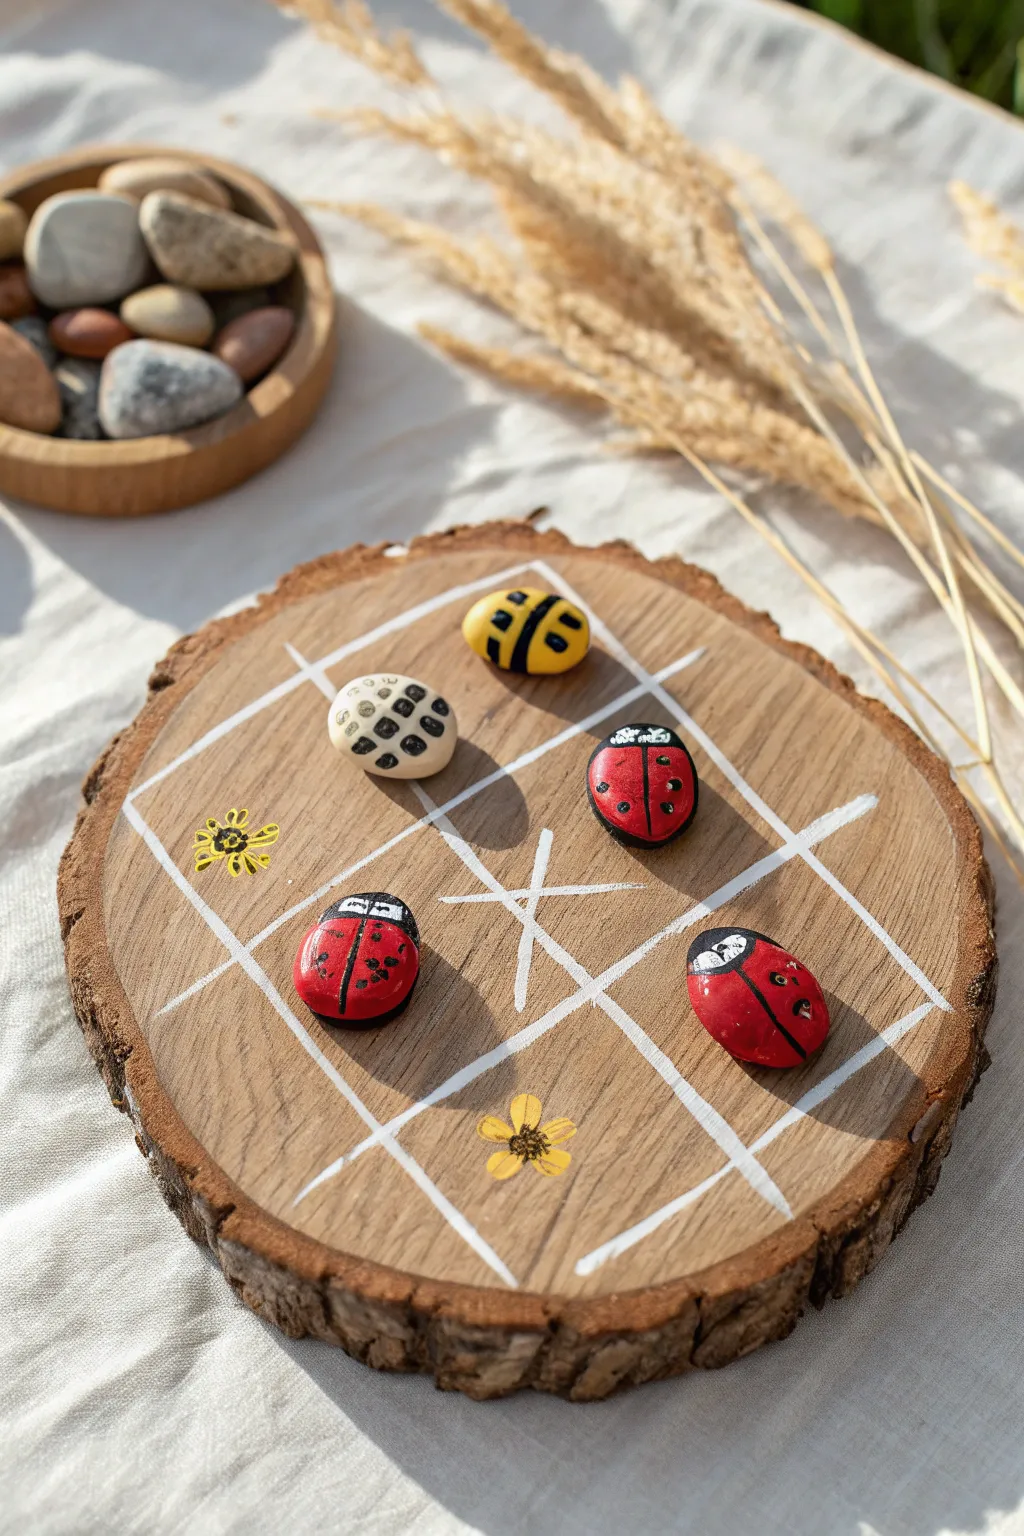
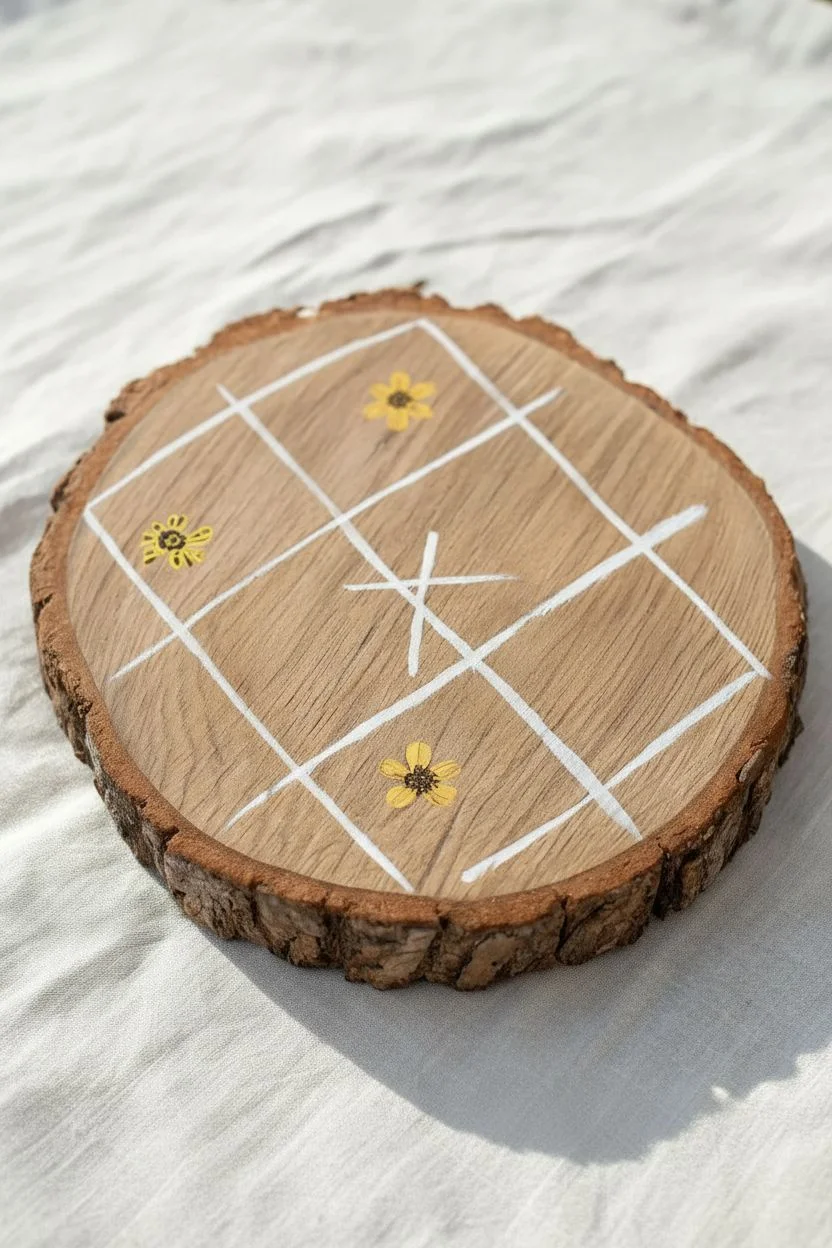
Transform a rustic wood slice and smooth river rocks into a charming, portable game set inspired by nature. This project features adorable hand-painted ladybugs and beetles, making it a perfect handmade gift or a fun addition to your backyard picnic.
Detailed Instructions
Materials
- Large wood slice (approx. 8-10 inches)
- 10 smooth river stones (roughly 1-2 inches each)
- Acrylic craft paint (red, yellow, cream, black, white)
- Set of paintbrushes (flat base and fine liner)
- Pencil and ruler
- Clear spray sealer or Mod Podge
Step 1: Preparing the Game Board
-
Clean the surface:
Wipe down your wood slice with a dry cloth or stiff brush to remove any loose sawdust or dirt from the bark. -
Map the grid:
Using a ruler and pencil, lightly sketch a standard hashtag shape (#) in the center of the wood slice to create the playing grid. -
Paint the lines:
With a thin round brush and white acrylic paint, carefully trace over your pencil lines. You may need two coats to ensure the white stands out against the wood grain. -
Add floral accents:
Dip a small brush into yellow paint and create simple five-petal flowers in the empty spaces around the grid. -
Detail the flowers:
Once the yellow petals dry, use a fine liner brush to add a tiny black center and delicate detail lines to the flowers.
Step 2: Creating Team Ladybug
-
Base coat:
Select five stones for your first team. Paint the entire top surface of each rock with bright red acrylic paint. -
Paint the head:
Paint a semi-circle of black at the front of each red stone to create the ladybug’s face. -
Draw the wings:
Use a liner brush and black paint to draw a straight line down the center of the red back, starting from the head. -
Add the spots:
Dip the handle end of a paintbrush into black paint and dot it onto the red wings to create uniform spots. -
Add face details:
Using the handle end of a smaller brush, place two small white dots onto the black head section to create eyes.
Rock Prep Tip
Make sure to wash your river stones with warm soapy water and let them dry completely before painting. This removes dust and oils, ensuring your acrylic paint adheres properly without peeling.
Step 3: Creating Team Beetle
-
Base coat:
For the opposing team, paint the remaining five stones. You can use yellow for bees or cream for spotted beetles as shown in the photo. -
Define the head:
Just like the ladybugs, paint the front section of these stones black. -
Detail the yellow stones:
If making bees, I like to use a liner brush to paint two or three horizontal black stripes across the yellow body. -
Detail the cream stones:
If making the spotted beetle variation, paint a grid of black squares or dots across the cream body. -
Finish the faces:
Add two white dots to the black head section of each stone to match the ladybugs.
Make it Portable
Sew or buy a small burlap drawstring bag to store the rock pieces. You can even paint a second grid on the bag itself to have a soft, travel-friendly version of the board!
Step 4: Sealing the Project
-
Let it cure:
Allow all the painted stones and the wooden board to dry completely, preferably overnight. -
Protective coat:
Apply a clear satin spray sealer or a coat of Mod Podge over the rocks and the wood surface to prevent chipping during play.
Pack up your new custom game set and head outside for some classic fun in the sun.
BRUSH GUIDE
The Right Brush for Every Stroke
From clean lines to bold texture — master brush choice, stroke control, and essential techniques.
Explore the Full Guide
Kindness and Message Stones

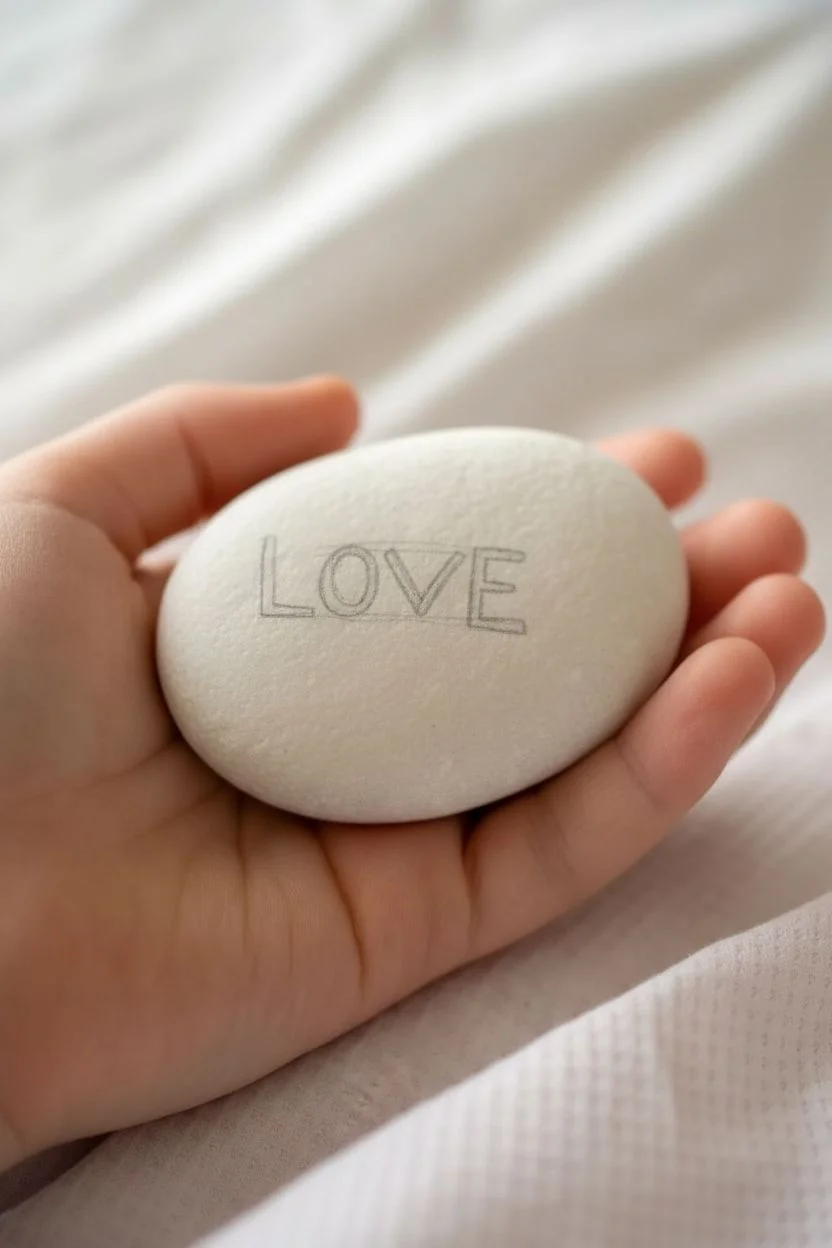
Send a simple message of affection with this minimalist rock painting design. Using a natural white stone as your canvas, the bold lettering and scattered hearts create a sweet, hand-drawn aesthetic that is perfect for gifting.
How-To Guide
Materials
- Smooth white river rock (flat surface)
- Black extra-fine tip acrylic paint pen
- Dusty rose fine tip paint pen
- Deep red fine tip paint pen
- Light pink fine tip paint pen
- Graphite pencil (HB or lighter)
- Soft white eraser
- Clear matte spray sealer
Step 1: Preparation
-
Clean the canvas:
Wash your stone thoroughly with warm soapy water to remove any dirt or oils that might prevent the paint from sticking. -
Dry completely:
Pat the stone dry with a towel and let it sit for a few minutes to ensure ample time for any moisture in the porous surface to evaporate. -
Select the best side:
Examine your rock to find the flattest, smoothest side which will serve as the front of your message stone. -
Draft the text:
Lightly sketch the word ‘LOVE’ across the center of the stone using your pencil, keeping the letters evenly spaced.
Blob Prevention
Paint pens can sometimes surge. Always tap the tip onto a piece of scrap cardboard or paper towel immediately before touching the stone to prevent a puddle of ink.
Step 2: Lettering
-
Prime the black pen:
Shake your extra-fine black paint pen well and press the nib on scrap paper to get the ink flowing smoothly. -
Outline the first letter:
Carefully trace over your pencil sketch for the letter ‘L’, using a steady hand to keep the line width consistent. -
Continue the word:
Draw the ‘O’ and ‘V’ next, maintaining the same height and style as the first letter. -
Finish the text:
Complete the word by inking the letter ‘E’, ensuring the horizontal bars are crisp and clear. -
Ink drying time:
I like to let this black lettering dry for at least 5 minutes to ensure I don’t accidentally smudge it while adding the colorful details.
Hidden Gem
Turn the stone over and write the date and a secret secondary message on the back, keeping the front simple while making the object a personalized keepsake.
Step 3: Adding Hearts
-
The center heart:
Using the dusty rose paint pen, draw a medium-sized heart directly below the letters ‘O’ and ‘V’ to anchor the design. -
Fill the center:
Color in the dusty rose heart, using light strokes to give it a slightly textured, hand-drawn look rather than a solid block of color. -
Add red accents:
Switch to your deep red paint pen and draw two small hearts, one floating above the ‘E’ and another positioned to the left of the central heart. -
Create balance:
Add another small red heart underneath the letter ‘L’ to balance the composition on the left side. -
Light pink details:
Pick up the light pink pen and draw tiny hearts in the remaining gaps, such as near the top left corner. -
Soft touches:
Add one final faint pink heart near the right edge of the stone to complete the scattered confetti effect.
Step 4: Final Touches
-
Full cure:
Set the stone aside in a safe place and allow all the paint colors to dry completely to the touch. -
Clean up guidelines:
Once you are 100% sure the paint is hard and dry, gently use a soft eraser to remove any visible pencil marks from your initial sketch. -
Preserve the art:
Take the stone individually outside or to a well-ventilated area to apply the sealer. -
Apply sealer:
Spray a light, even coat of matte clear sealer over the entire surface to protect your artwork from chipping or fading.
Give your stone to someone special to brighten their day with this handmade token of love
Colorful Tropical Fish
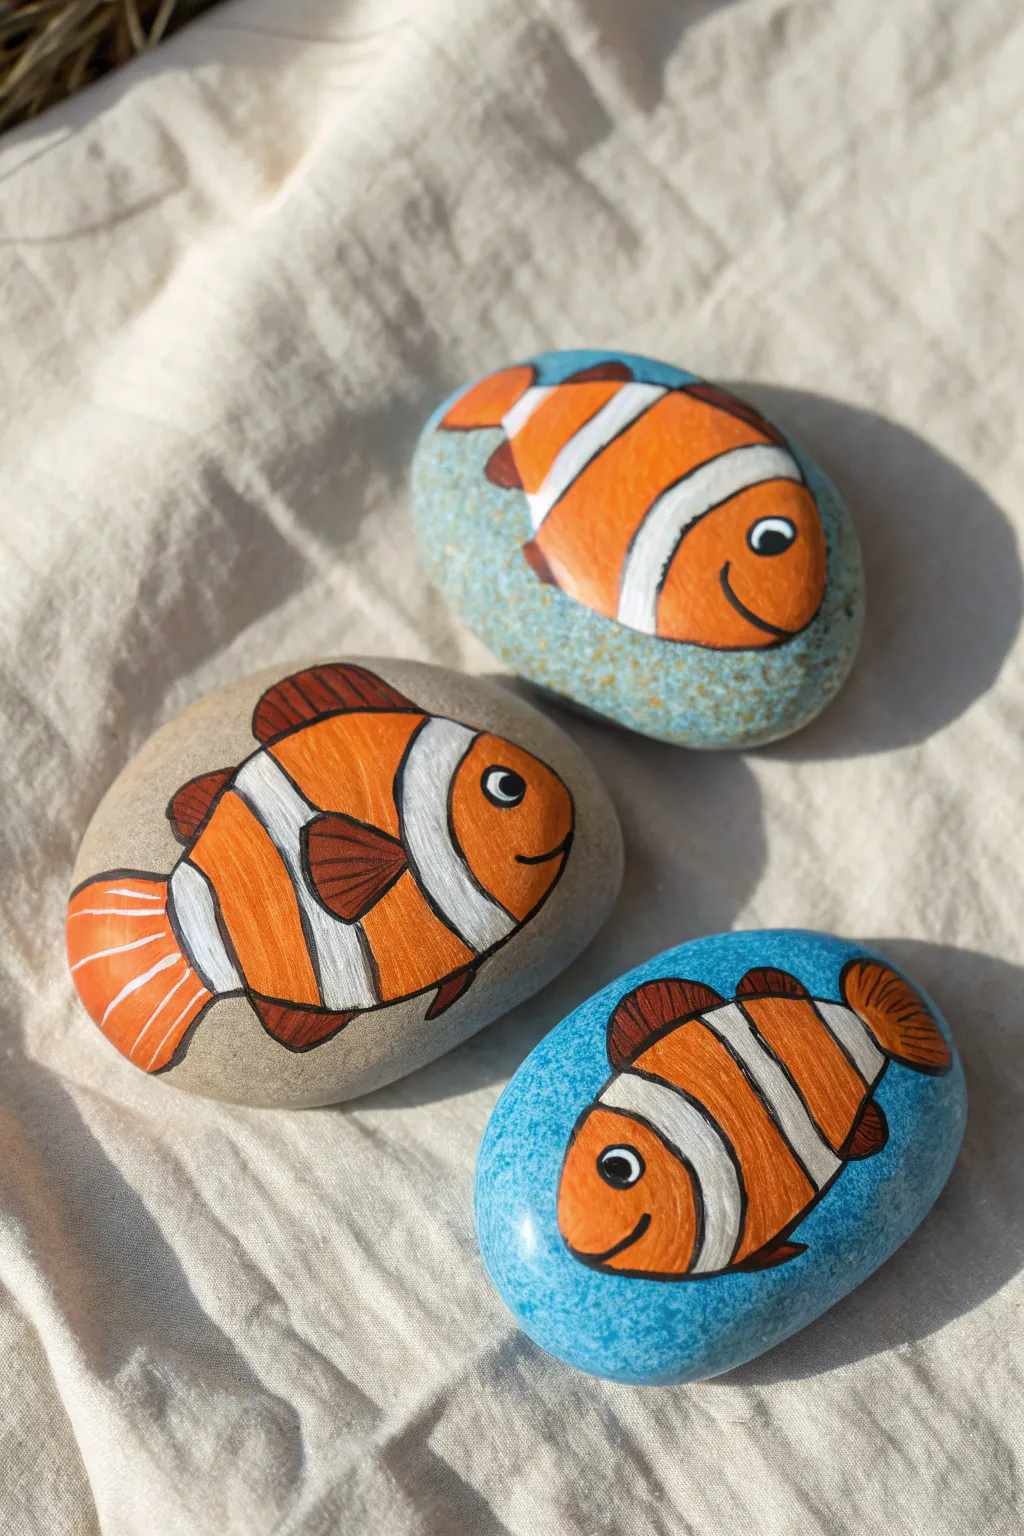
Bring a splash of the ocean to your garden or desk with these vibrant clownfish painted rocks. With bold orange stripes and expressive eyes, these little swimmers capture the charm of tropical reefs on smooth river stones.
Step-by-Step Tutorial
Materials
- Smooth, oval river rocks
- Acrylic paints (bright orange, white, black, teal, sky blue)
- Fine detail brushes
- Black acrylic paint marker (extra fine tip) or liner brush
- Pencil
- Clear spray sealer or varnish
- Old toothbrush (optional for texture)
Step 1: Setting the Scene
-
Prep your canvas:
Scrub your rocks with warm soapy water and let them dry completely to ensure the paint adheres smoothly. -
Choose a background style:
Decide on the look for each rock. You can leave the stone natural for an organic feel or paint a background patch. -
Paint the water base:
For a blue water background, paint a large oval shape using teal or sky blue paint. You don’t need to cover the whole rock, just the area behind the fish. -
Add watery texture:
Once the blue is dry, create a speckled effect. I like to dip an old toothbrush in watered-down white or light blue paint and gently flick it over the base.
Step 2: Blocking the Colors
-
Sketch the outline:
Use a pencil to lightly draw the oval shape of the fish body and mark the position of the fins. -
Mark the stripes:
Draw two curving vertical lines across the body to mark where the white stripes will go—one usually behind the head and one near the tail. -
Apply the orange:
Load a small flat brush with bright orange paint. Fill in the head, the main body section, and the base of the tail. -
Layer for opacity:
Acrylics can be transparent, so apply a second coat of orange once the first is dry to get that solid, vibrant color. -
Paint the white bands:
Fill in the vertical stripe sections with white paint. Be careful to keep the edges relatively neat, though we will outline them later. -
Add the fins:
Paint the dorsal fin on top, the pectoral fin on the side, and the tail fin. Mixing a tiny bit of brown into your orange gives these areas nice contrast.
Selection Pro-Tip
Using a luscious black paint pen (like a Posca marker) instead of a brush makes outlining infinitely easier and usually results in much cleaner, steadier lines.
Step 3: Defining Features
-
Paint the eye:
Using a detail brush or the end of a brush handle, dot a white circle near the front of the face. -
Add the pupil:
Once the white circle is dry, add a smaller black dot in the center. -
Create a sparkle:
Add a tiny white pin-prick dot on the black pupil to act as a catchlight, giving the fish a lively expression.
Ocean Level Up
Paint tiny white bubbles rising from the fish’s mouth, or add green wavy lines in the background to represent seaweed for a full underwater scene.
Step 4: Outlining & Finishing
-
Outline the body:
Using a black paint marker or a very fine liner brush, trace the entire outer edge of the fish. -
Define the stripes:
Trace the curved lines where the orange and white sections meet to make the stripes pop. -
Detail the fins:
Outline the fins and draw thin straight lines inside them to simulate the texture of fin rays. -
Give a smile:
Draw a simple, curved line for the mouth just below the eye to complete the face. -
Seal the deal:
Allow the artwork to dry overnight, then apply a coat of clear varnish or spray sealer to protect your fish from the elements.
Now you have a colorful school of fish that never needs feeding

PENCIL GUIDE
Understanding Pencil Grades from H to B
From first sketch to finished drawing — learn pencil grades, line control, and shading techniques.
Explore the Full Guide
No-Water Potted Cactus
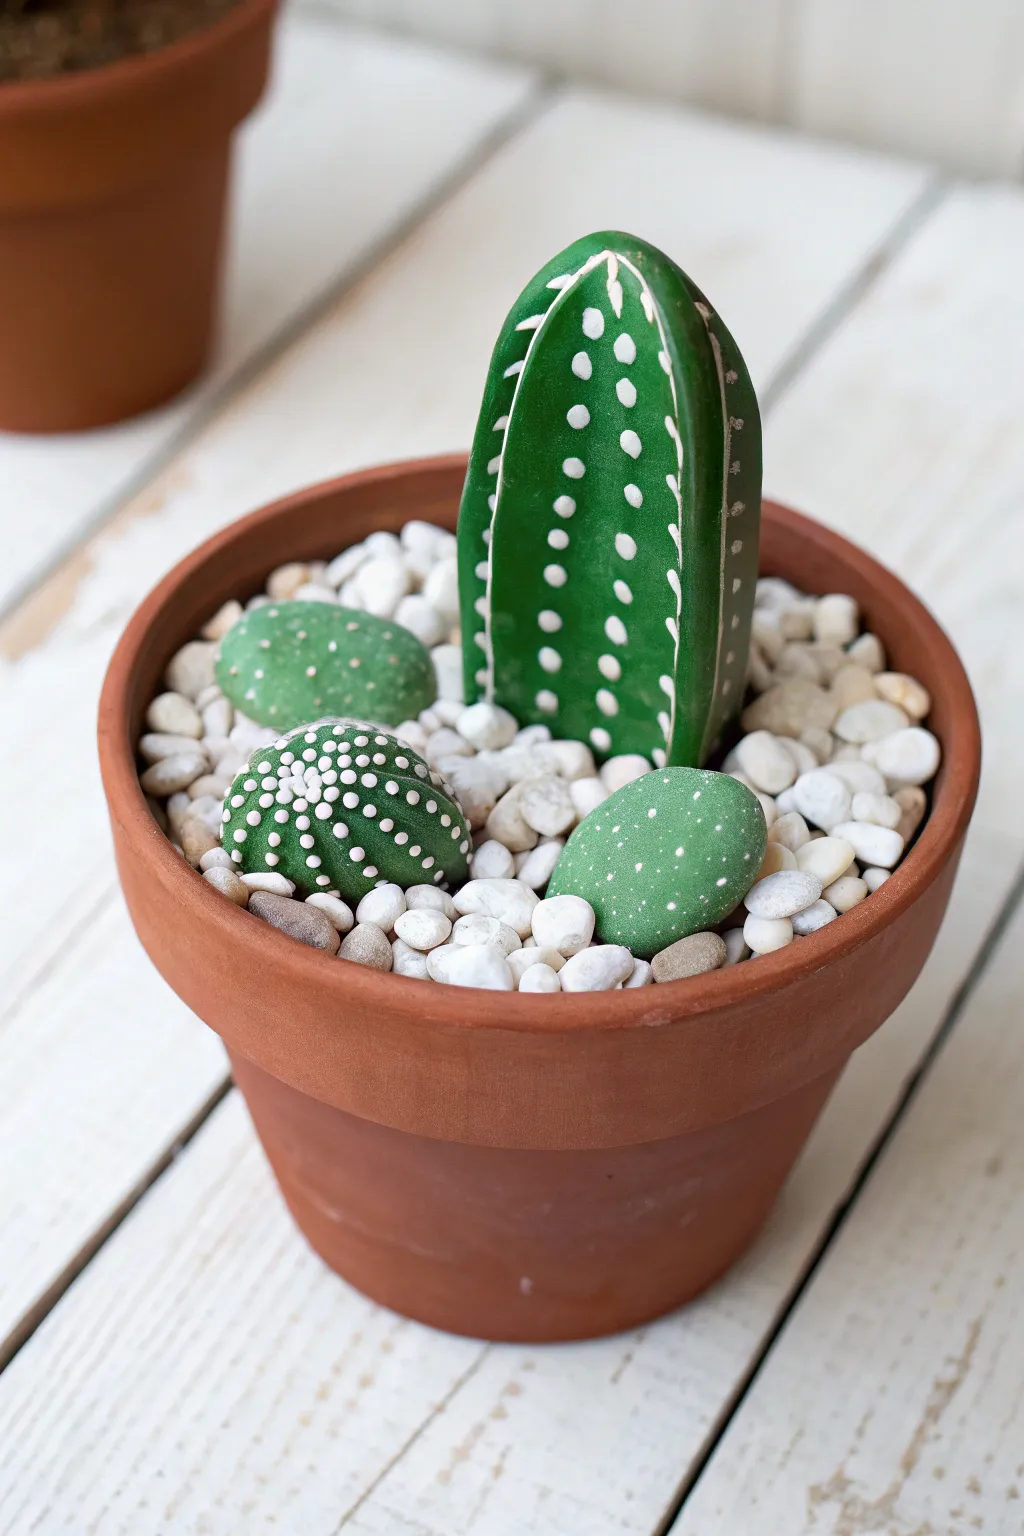
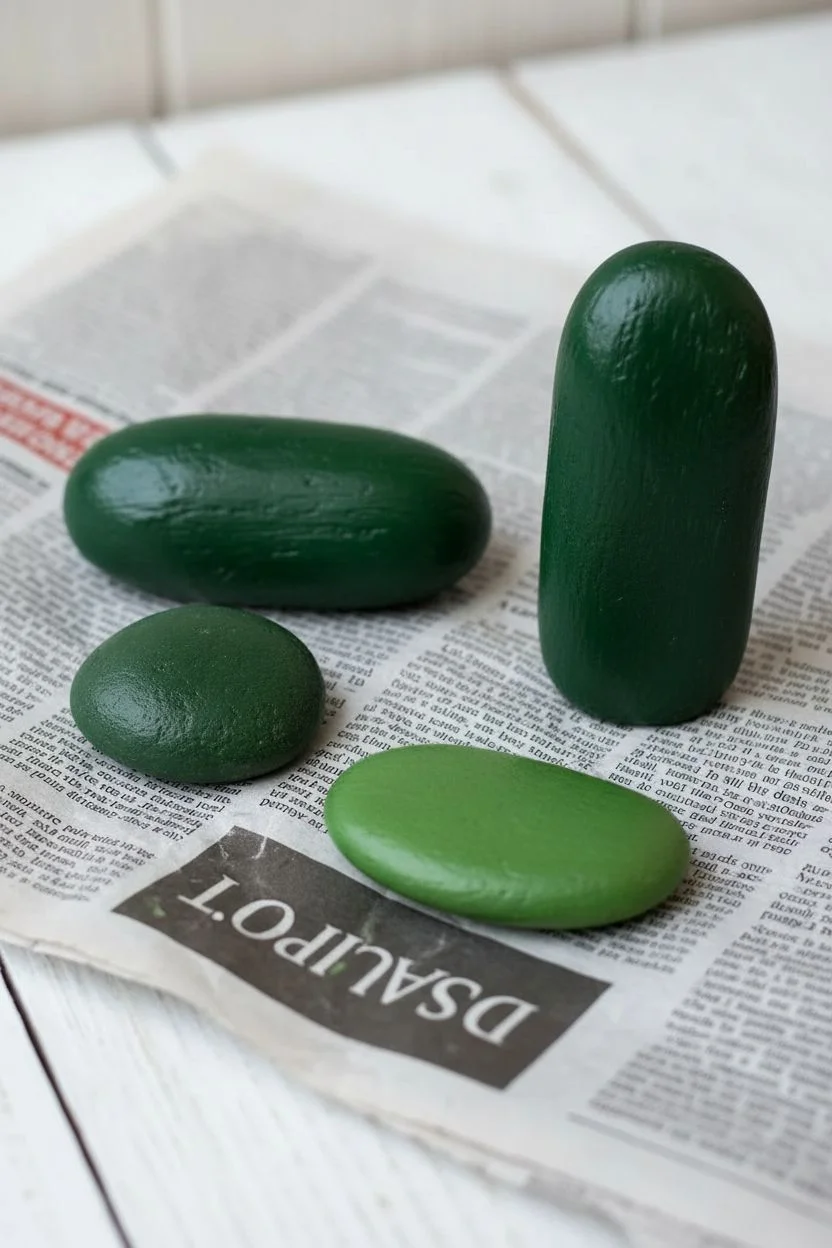
Create an adorable, unkillable plant display using nothing but river stones and some paint. This project transforms ordinary garden rocks into a vibrant cactus arrangement that adds a touch of greenery to any room without the sharp spines.
Detailed Instructions
Materials
- Smooth river rocks (1 tall/flat, 3 small round/oval)
- Acrylic paint (dark green, light green, white)
- Fine detail paintbrush
- Flat paintbrush
- Small terracotta pot
- Small white gravel or pebbles
- Newspaper or foil (optional filler)
Step 1: Green Foundations
-
Select your stones:
Find smooth, flat rocks. You will need one longer, oblong rock for the main cactus and a few smaller round or oval pebbles for the accent cacti. -
Clean the surface:
Wash the rocks thoroughly with soap and water to remove any dirt or oily residue, then dry them completely so the paint adheres well. -
Base coat the tall cactus:
Using a flat brush, paint the entire surface of your tallest rock with a deep, dark green acrylic paint. -
Base coat the round cactus:
Paint the roundest rock with the same dark green shade to match the tall one. -
Mix a lighter shade:
For variety, mix a little white or yellow into your green paint to create a lighter, brighter olive tone for the remaining flat oval rocks. -
Apply second coats:
Allow the first layer to dry to the touch, then apply a second coat to ensure the stone color doesn’t show through. I like to let this dry completely before starting the detailed work.
Step 2: Spines and Details
-
stripe the tall cactus:
Switch to a fine detail brush and white paint. On the tall dark rock, paint thin vertical lines running from the top curve down to the bottom to mimic natural ridges. -
Add detail dots:
Along the vertical white lines you just painted, carefully dab small white dots to represent the cactus spines. -
Detail the round cactus:
On the round dark green rock, paint lines radiating from the very center of the top down the sides, resembling a pincushion cactus. -
Dotted spines:
Add rows of small white dots along these radial lines, keeping them evenly spaced. -
Texture the oval rocks:
For the lighter green rocks, skip the lines and just apply a pattern of scattered white dots. -
Vary dot sizes:
Dip the handle end of your paintbrush into white paint to create larger, perfect circles on one of the oval rocks. -
Create tiny speckles:
For the final rock, use a toothpick or a very fine brush tip to create a texture of tiny, dense speckles.
Wobbly Cactus?
If your tall rock keeps falling over, try gluing it to a heavy flat stone at the bottom of the pot before adding the gravel. This creates a hidden anchor base.
Step 3: Potting the Plants
-
Prepare the pot:
Fill the bottom half of your terracotta pot with crumpled newspaper or crushed foil. This saves weight and means you need fewer decorative stones. -
Add the gravel:
Pour the small white gravel into the pot, covering the filler material until the pot is nearly full. -
Plant the tall cactus:
Push the base of the tall painted rock deep into the gravel in the center back of the pot so it stands firmly upright. -
Arrange the accents:
Nestle the smaller round and oval rocks into the gravel around the base of the tall cactus, angling them slightly for a natural look. -
Final adjustment:
Shift the gravel around the base of the rocks with your finger to ensure everything is secure and the filler material is completely hidden.
Blooming Rocks
Glue a small, brightly painted pebble (pink or yellow) to the top of the tallest cactus to mimic a desert flower in bloom and add a pop of color.
Now you have a charming desert oasis that will stay green forever without a single drop of water.
Simple Story Stones
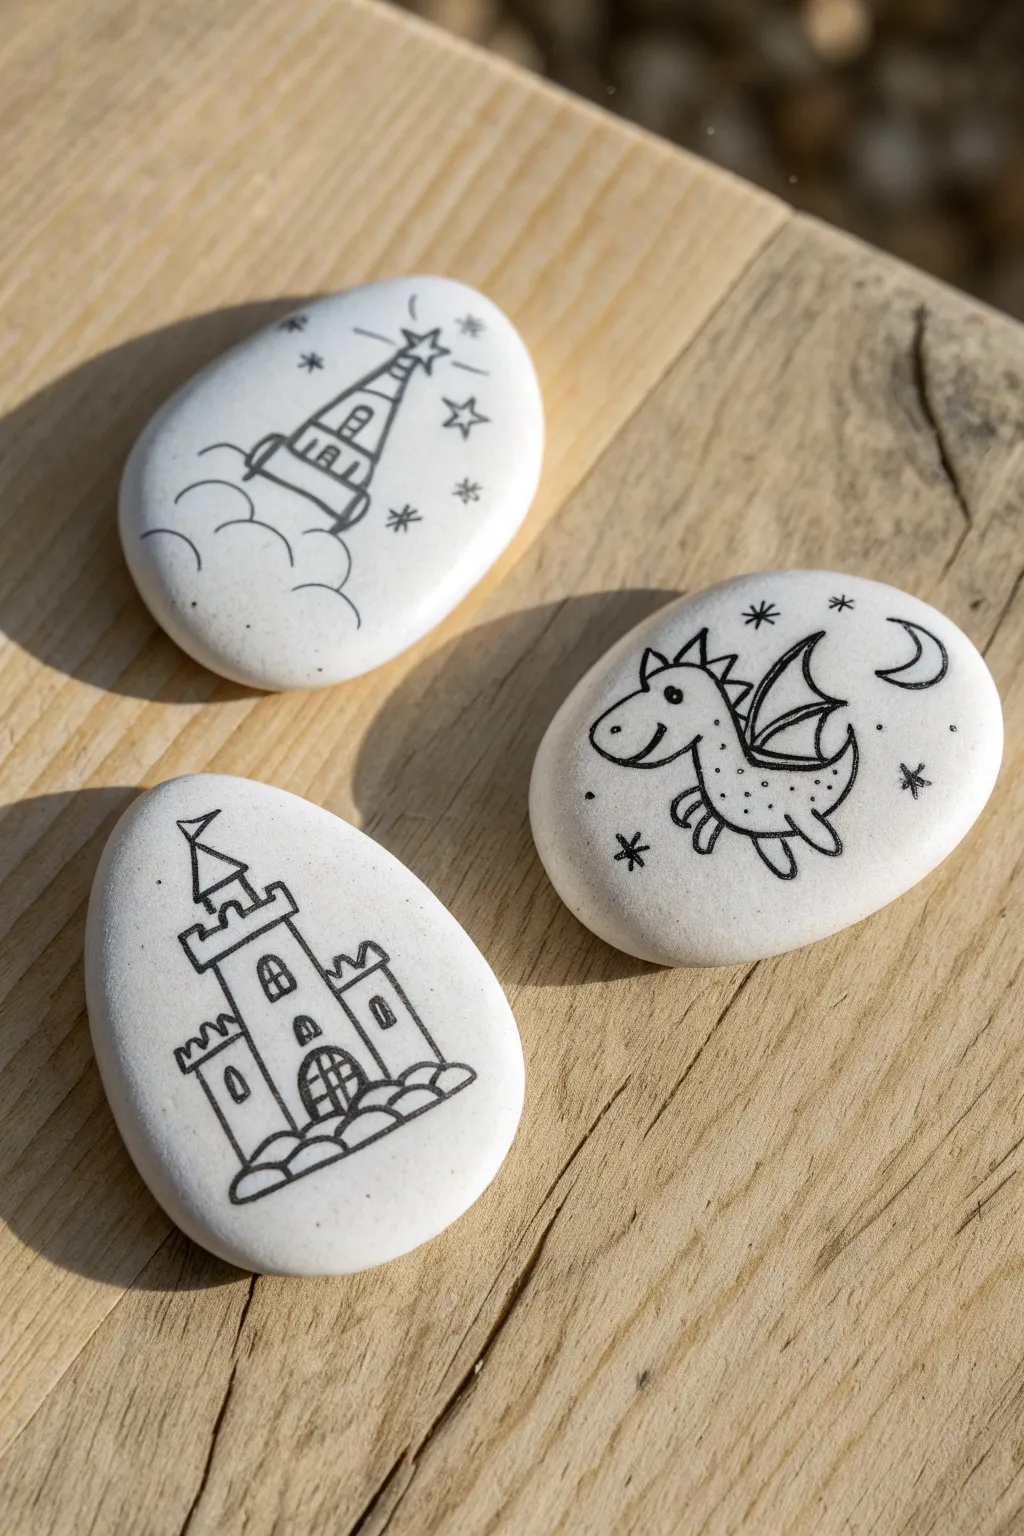
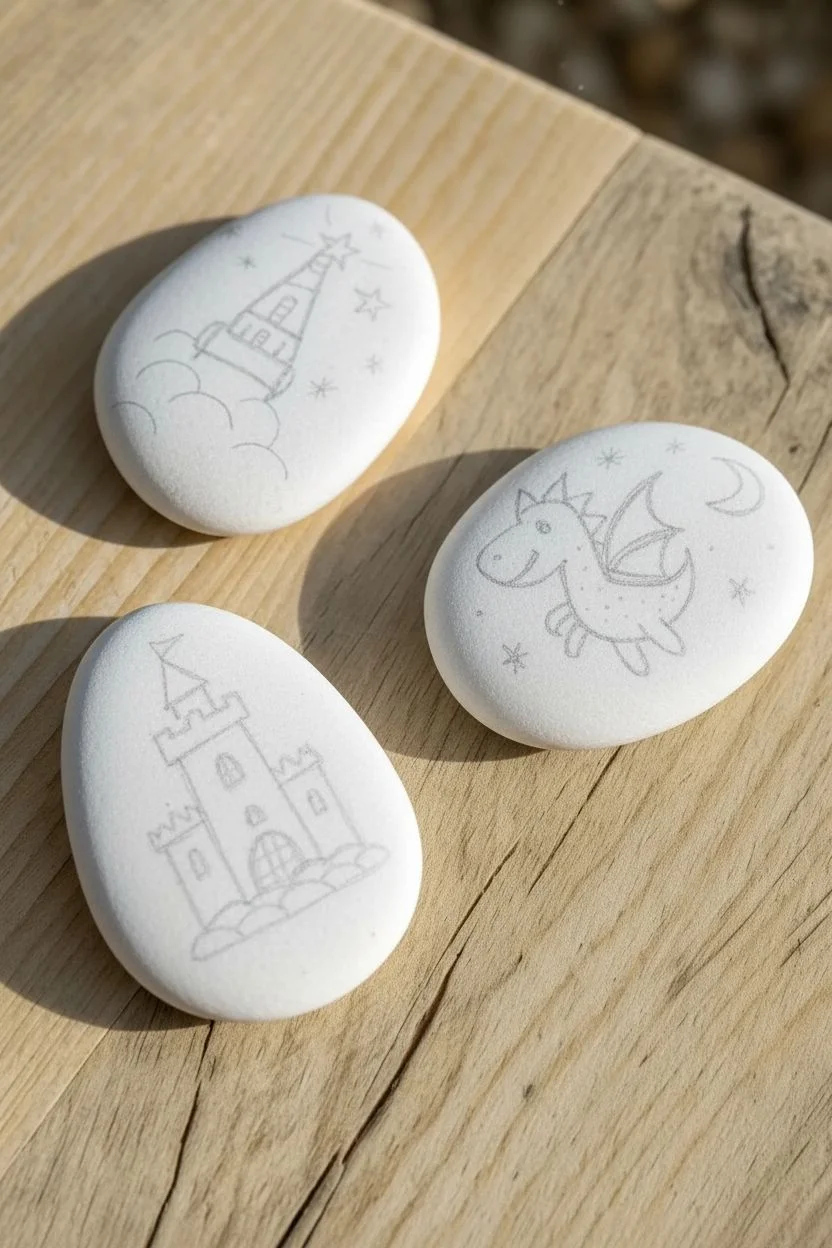
Using simple doodle techniques on smooth white pebbles, you can create a charming set of storytelling prompts. These high-contrast designs are perfect for sparking imagination during creative playtime.
Step-by-Step Tutorial
Materials
- 3 Smooth white river stones (approx. 2-3 inches)
- HB pencil
- Soft white eraser
- Extra-fine tip black acrylic paint pen (0.7mm) or permanent marker
- Clear matte spray sealer
Step 1: Preparation & Sketching
-
Clean the canvas:
Wash your stones thoroughly with soap and warm water to remove any dust or oils, then let them dry completely. -
Plan the designs:
Using an HB pencil, very lightly sketch your three designs—a cloud tower, a castle, and a dragon—onto the stones to establish the proportions.
Steady Hand Pro-Tip
Anchor your pinky finger against the table or the stone itself while drawing. This acts as a stabilizer, giving you much smoother control over fine lines compared to drawing with your hand hovering.
Step 2: Drawing the Cloud Tower
-
Outline the base:
With your black paint pen, draw a series of connected, bumpy curves at the bottom of the first stone to create a fluffy cloud base. -
Raise the tower:
Draw two vertical lines rising from the cloud, leaning slightly to the right, and connect them with curved horizontal lines to create segments. -
Add the roof:
Top the tower with a triangular cone shape, placing a small star at the very peak. -
Fill in details:
Add small rectangles for windows and a little ladder on the side, then scatter simple asterisks around the sky for stars.
Level Up: Story Bag
Make these portable by sewing a simple drawstring bag to hold them. You can even trace the characters onto the fabric bag using a fabric marker so you know which story set is inside!
Step 3: Drawing the Fortress
-
Ground the structure:
On the second stone, draw two rows of rounded, mound-like shapes at the bottom to represent the rocky ground. -
Construct the walls:
Draw the main central building structure and two shorter side towers using vertical lines. -
Add battlements:
Draw the crenallations (the square-toothed pattern) along the top of all three roof sections. -
Add architectural features:
Draw an arched double door at the base with a grid pattern, add small arched windows above, and finish with a triangular flag on the tallest tower.
Step 4: Drawing the Dragon
-
Shape the head:
Start near the left side of the third stone, drawing a rounded snout that curves up into a smile, adding a small dot for the nostril and a circle for the eye. -
Form the body:
I prefer to draw the back as one continuous curved line that swoops down and flicks up to form the tail. -
Add wings and limbs:
Draw a triangular wing with a curved scallop inside, then add two simple U-shaped legs underneath the body. -
Decorative spikes:
Draw small triangles along the back of the dragon’s head and spine for spikes, and add small dots on the body for texture. -
Night sky:
Complete the scene by drawing a crescent moon in the upper right corner and a few star motifs.
Step 5: Finishing Touches
-
Dry thoroughly:
Allow the black ink to dry for at least 30 minutes to ensure it won’t smudge during the next step. -
Clean up:
Gently erase any visible pencil lines using the white eraser, being careful not to rub too hard over the ink. -
Protect the art:
Take the stones outside and apply a light coat of matte spray sealer to prevent the drawings from chipping during play.
Now you have a durable set of story stones ready to inspire magical tales.


Sleeping Garden Owls
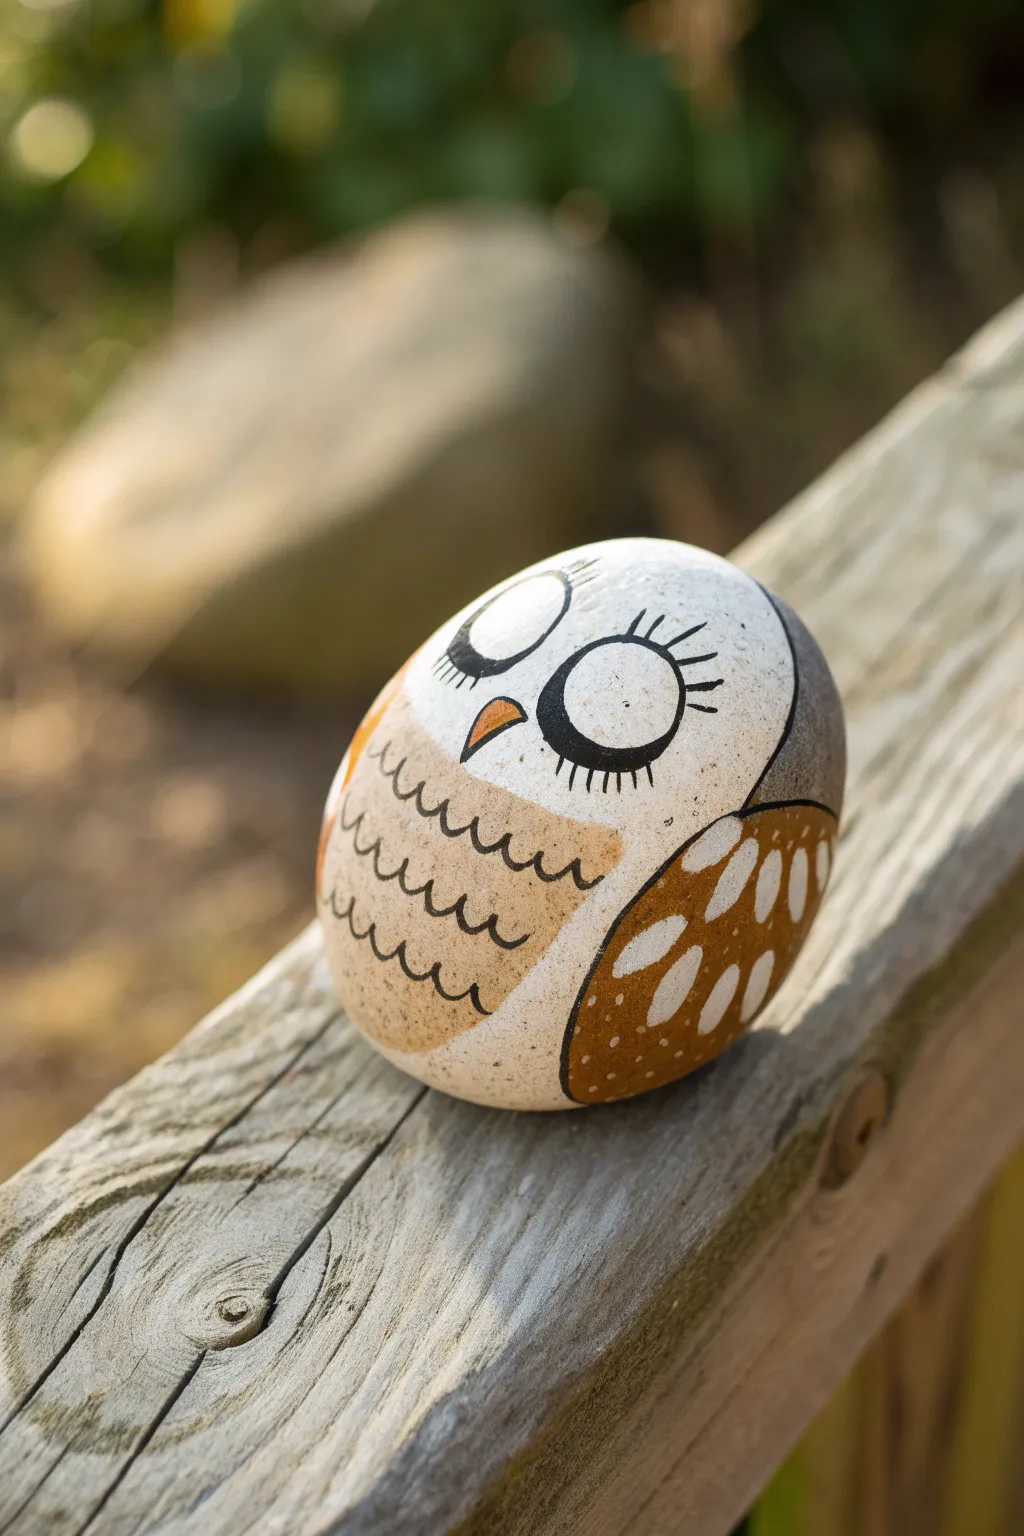
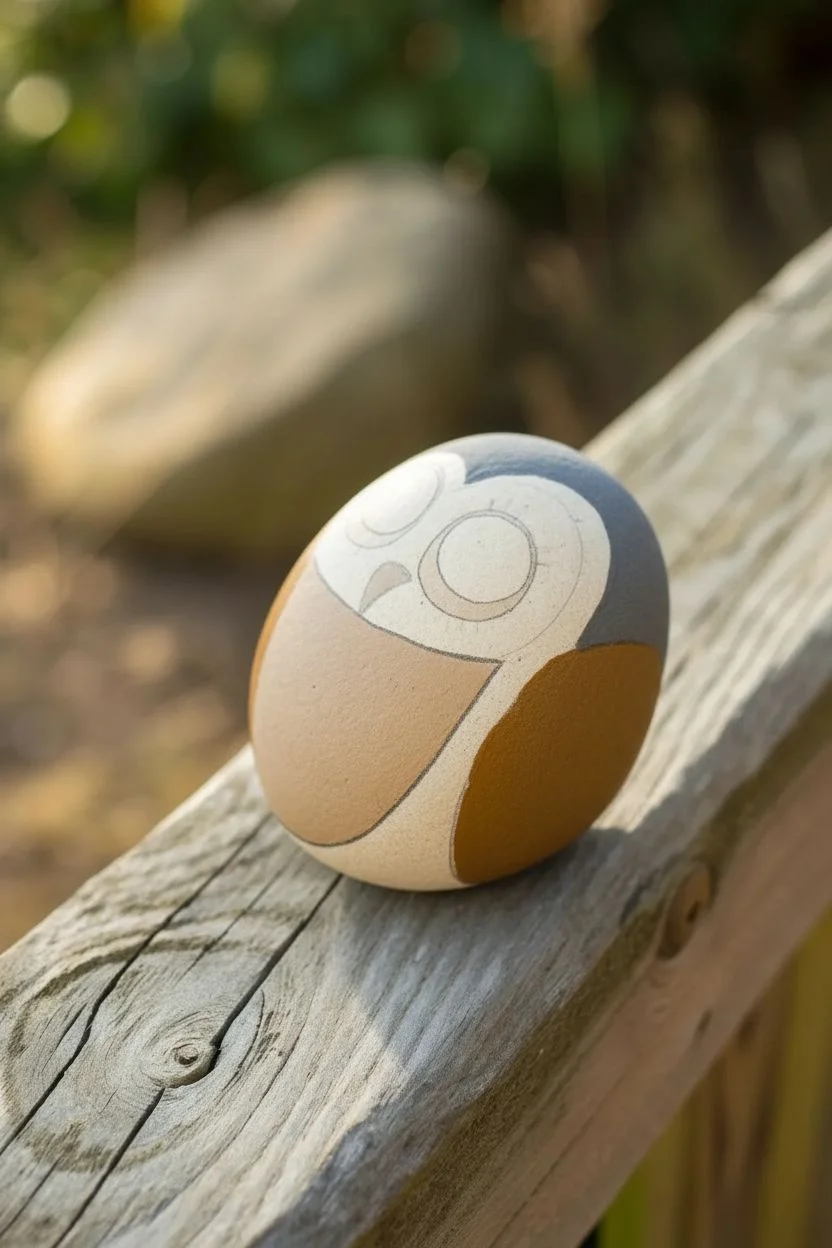
Transform a smooth garden stone into a peaceful, sleeping owl with this charming painting project. The finished piece features clean lines, warm earth tones, and sweet closed-eye details that make it perfect for hiding among flower pots.
Step-by-Step Guide
Materials
- Smooth, oval-shaped river rock
- Acrylic paints (Cream, Grey, Golden Brown, Tan, White, Orange, Black)
- Pencil for sketching
- Flat paintbrush (size 4 or 6)
- Fine detail liner brush (size 0 or 00)
- Black acrylic paint pen (optional but recommended for outlines)
- Clear spray sealer or varnish
Step 1: Base Coats
-
Clean the surface:
Begin by scrubbing your rock with soap and water to remove any dirt or grit, then let it dry completely so the paint adheres properly. -
Sketch the layout:
Using a pencil, lightly draw a large oval on the front for the face, two curved shapes on the sides for wings, and a U-shaped patch on the lower belly for the chest texture. -
Paint the face:
Fill in the large facial oval using cream or off-white acrylic paint. -
Apply a second coat:
Cream paint can be transparent, so apply a second layer once the first is dry to ensure a solid, opaque finish. -
Color the sides:
Paint the area surrounding the face and the back of the rock with a medium grey paint to frame the owl. -
Fill the chest:
Use a tan or beige paint to fill in the U-shaped belly patch you sketched earlier. -
Paint the wings:
Color the wing shapes on the left and right sides using a rich golden brown paint. -
Let everything cure:
Allow the rock to sit for about 15 minutes until all base colors are completely dry to the touch.
Step 2: Feathers & Features
-
Add wing details:
Dip a small brush into white paint and create teardrop shapes or elongated dashes inside the brown wing areas to simulate feathers. -
Create the beak:
Paint a small, inverted triangle in the center of the face using bright orange paint. -
Outline the eyes:
Using thin black paint or a paint pen, draw two large circles that touch in the middle, sitting just above the beak. -
Draw the eyelids:
Inside the eye circles, draw a horizontal curved line across the lower third to show the closed eyelids. -
Add the lashes:
Carefully paint long, vertical lines extending downward from the eyelid curve to create the sleeping lashes. -
Texture the chest:
I like to use a paint pen here to draw rows of small, scalloped ‘w’ shapes across the tan belly patch. -
Define the wings:
Outline the brown wing shapes with your black fine liner to make them pop against the grey background. -
Add subtle highlights:
If you like, add a few tiny white dots or dashes on the grey areas for extra stone-like texture. -
Seal the artwork:
Once fully dry, protect your owl from the elements with a coat of clear weather-resistant sealer.
Fixing Shaky Lines
If painting the thin black eyelashes is difficult with a brush, switch to an extra-fine tip acrylic marker. It offers control like a normal pen.
Pro Tip: Wing Shape
For uniform white teardrops on the wings, press the belly of a small round brush down and lift up quickly to create a tapered point.
Place your sleeping owl in a cozy corner of the garden to enjoy your handiwork.
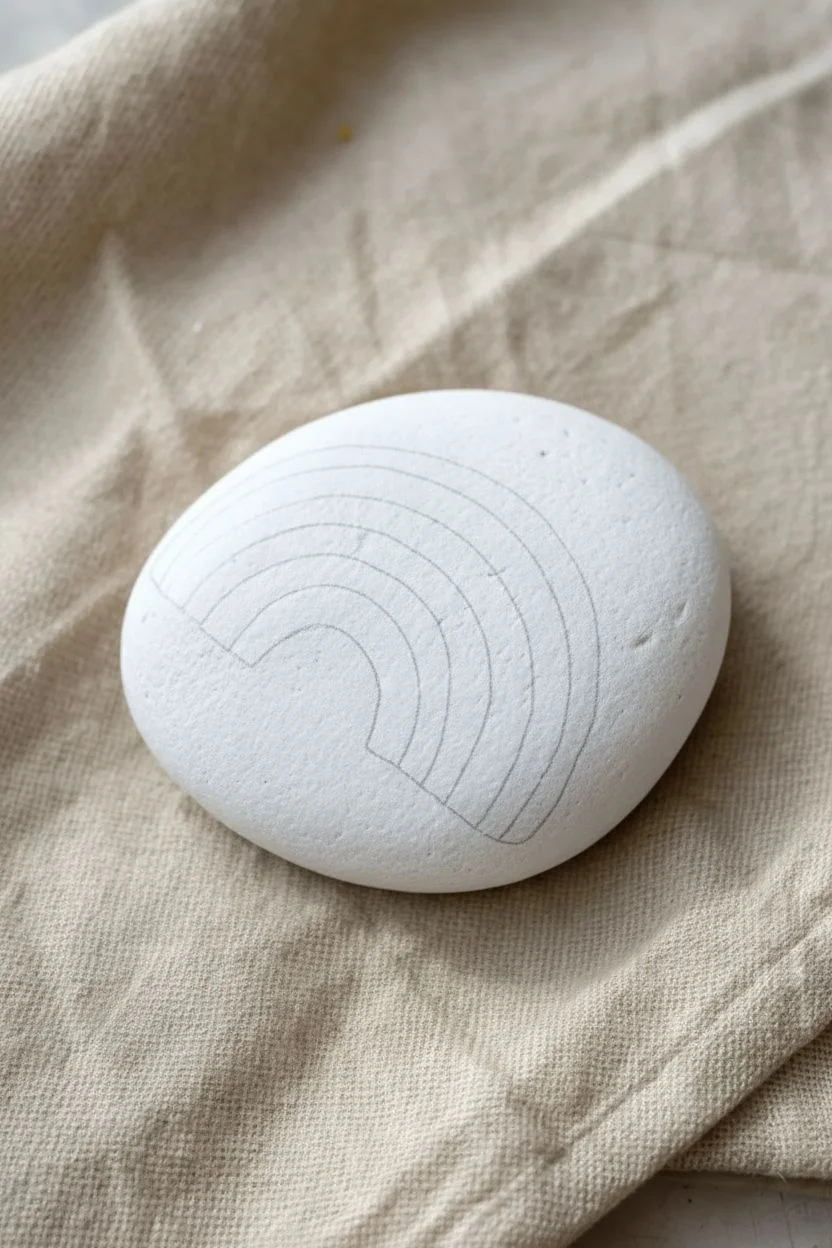
Bright Rainbow Arches
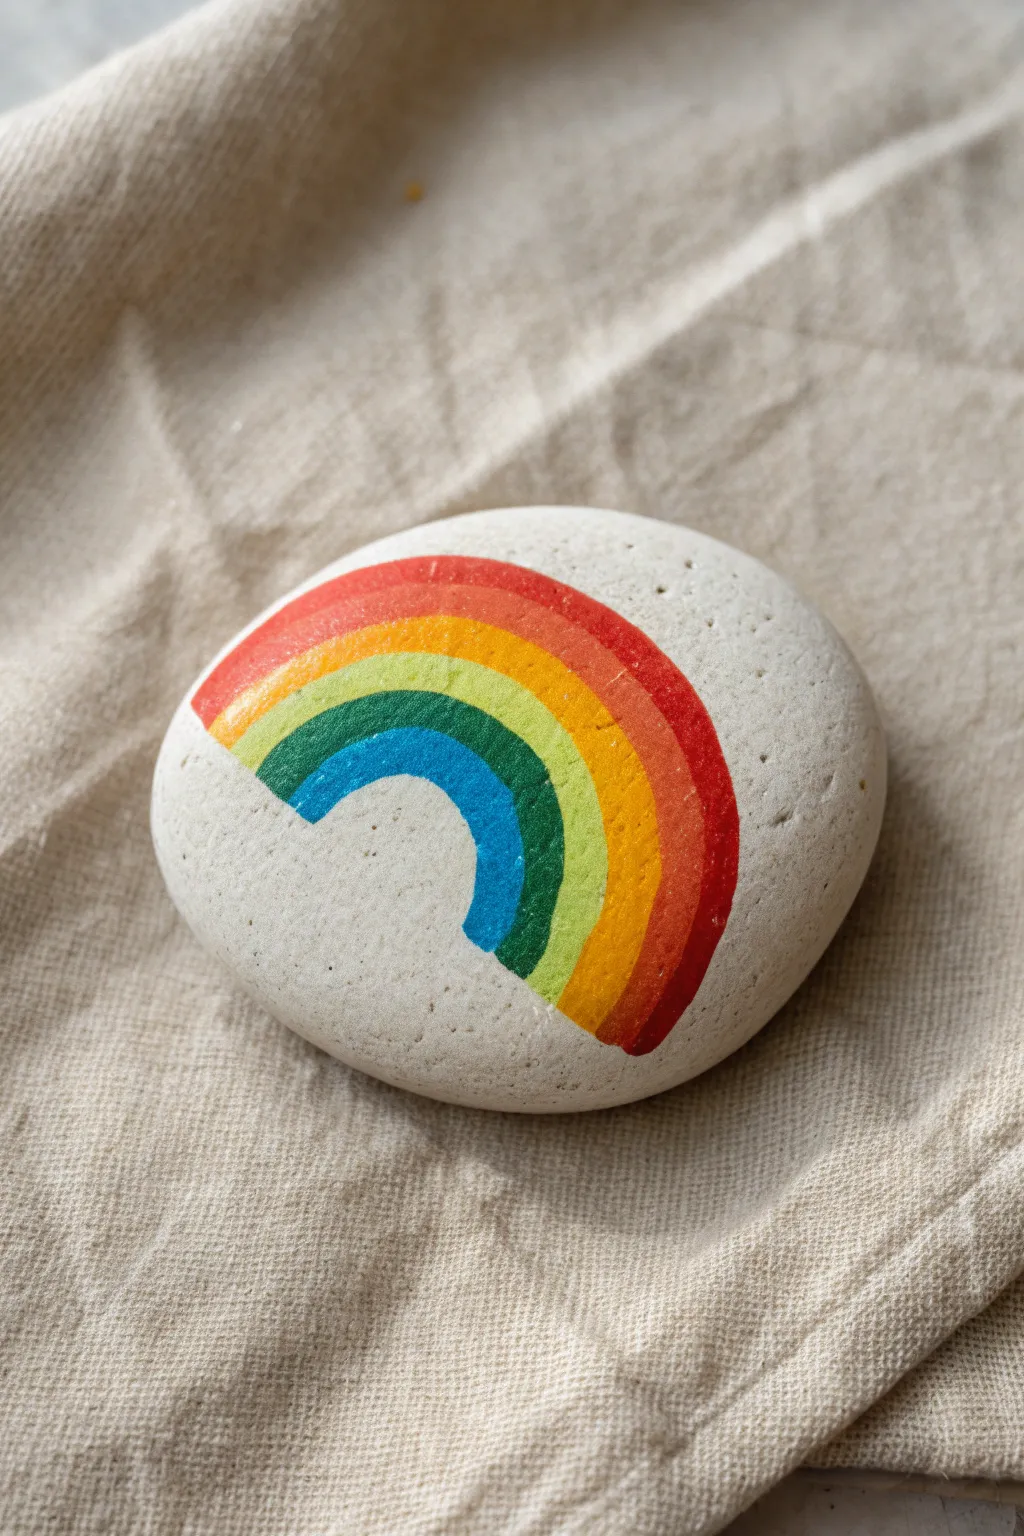
This rock brings a splash of pure joy with its vibrant, classic color spectrum on a smooth natural canvas. It is a perfect beginner project that practices steady hand control and color layering for a clean, graphic look.
Step-by-Step Tutorial
Materials
- Smooth oval river rock
- White acrylic paint (for priming)
- Acrylic paints (red, orange, yellow, green, blue)
- Small flat paint brush
- Fine detail liner brush
- Pencil and eraser
- Water cup and palette
- Clear spray sealer or Mod Podge
Step 1: Preparation & Sketching
-
Clean the surface:
Scrub the rock thoroughly with soap and warm water to remove any dirt or grease that might prevent paint adhesion. -
Dry completely:
Dry the stone with a towel or let it sit in the sun until there is no moisture left in the porous surface. -
Prime the area:
Paint a solid white semi-circle shape where you want the rainbow to go; this base layer helps the colors pop against the grey stone. -
Let primer cure:
Allow the white base coat to dry fully to the touch before moving on to the next step. -
Outline the shape:
Using a pencil, lightly draw the outermost arch to define exactly how large your rainbow will be. -
Mark the center:
Draw the smallest, innermost arch near the bottom center of your white patch. -
Create the bands:
Lightly sketch three guidelines between your top and bottom arches to create the five separate bands for your colors.
Fixing Wobbly Lines
If colors bleed or lines get messy, let the paint dry completely. Then, paint over the mistake with white acrylic to ‘erase’ it before reapplying the correct color.
Step 2: Painting the Spectrum
-
Start with red:
Load a small flat brush with bright red acrylic paint and carefully fill in the top band. -
Clean your tool:
Rinse your brush thoroughly in water and dab it on a paper towel until it runs clear. -
Add the orange:
Moving inward, paint the second band with orange paint, being careful not to let it bleed into the wet red. -
Paint the yellow:
Apply the yellow paint next; I find applying two thin coats helps here since yellow pigment is often transparent. -
Apply the green:
Paint the fourth band with a cheerful grass green shade, keeping your brush strokes following the curve of the arch. -
Finish with blue:
Fill in the smallest bottom arch with a deep sky blue to complete the spectrum.
Cloudy Comfort
For a whimsical addition, dab white paint at the bottom ends of the rainbow using a sponge or cotton swab to create fluffy little clouds for the arch to rest on.
Step 3: Finishing Touches
-
Touch up gaps:
Inspect the rock for any unintentional white gaps between colors and gently fill them in with a fine liner brush. -
Dry time:
Allow the artwork to dry completely, preferably overnight, to ensure the thick layers of paint are solid. -
Clean up sketch:
If any pencil guidelines are still visible on the bare stone areas, gently erase them now. -
Seal the art:
Apply a coat of clear spray sealer or gloss varnish to protect your rainbow from chipping.
Place this cheerful stone in a garden or on a windowsill to brighten up the day
Mix-and-Match Funny Faces
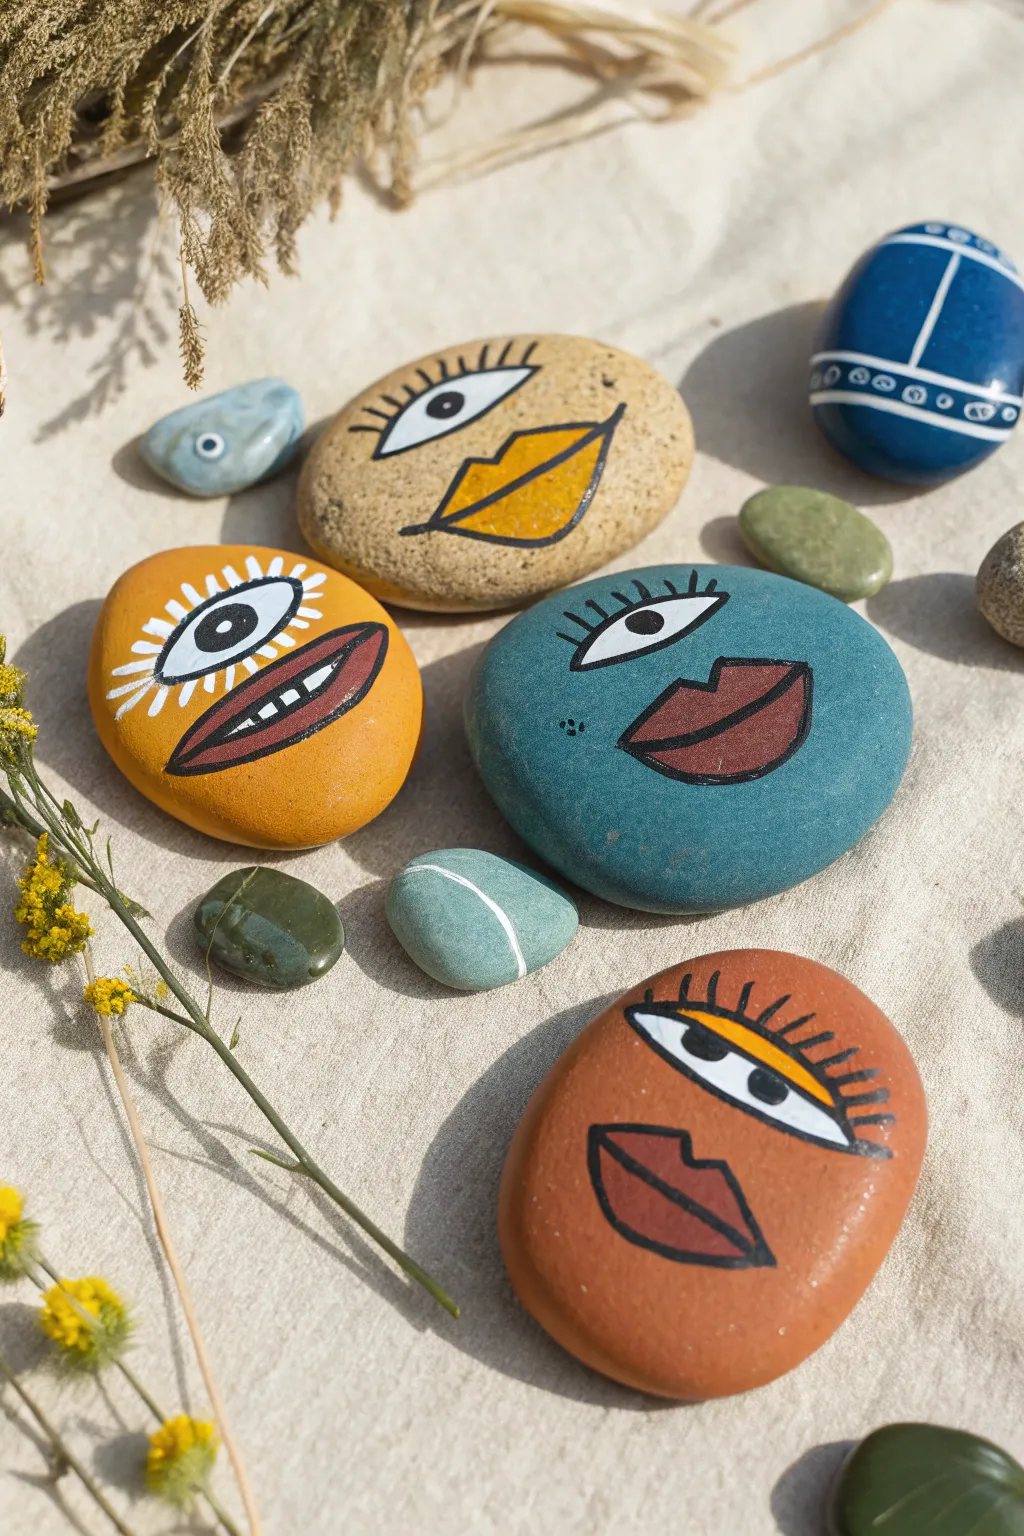
Transform ordinary river stones into a quirky gallery of abstract portraits inspired by modern art. With bold block colors and graphic black outlines, these expressive faces are perfect for adding personality to potted plants or shelves.
Step-by-Step
Materials
- Smooth oval river rocks
- Acrylic paints (teal, mustard yellow, terracotta, maroon, white, black, bright yellow)
- Flat paintbrush (for base coats)
- Fine detail brush or liner brush
- Black acrylic paint pen (extra fine tip)
- Clear matte varnish or sealer
Step 1: Base & Background
-
Clean the canvas:
Scrub your collected stones with warm soapy water and let them dry completely to ensure the paint adheres well. -
Apply colors:
Choose a moody, earthy palette; paint the entire surface of three rocks in solid teal, mustard yellow, and terracotta orange. -
Natural option:
Leave one rock in its natural beige state, or paint it a warm sand color if you want a more uniform texture. -
Dry and repeat:
Allow the base coats to dry fully, then apply a second coat if the rock’s dark surface is showing through.
Marker Magic
I highly recommend using a black acrylic paint pen for the outlining steps. It offers much better control than a brush for getting those crisp, consistent lines.
Step 2: Blocking in Features
-
Paint the eyes:
Dip a small brush in white paint and create large almond or oval shapes for the eyes on the upper half of each rock. -
Mouth base colors:
On the mustard, teal, and terracotta rocks, paint a maroon shape for the lips (oval or kiss-shaped). -
Contrast lips:
For the natural beige rock, paint the lip shape in bright yellow instead of maroon to make it pop. -
Add teeth:
Paint a white horizontal strip inside the maroon oval on the mustard rock to represent teeth. -
Add eyelids:
On the terracotta rock, paint a thick yellow arch directly above the white eye to create a colorful eyelid. -
Pupils:
Once the white eye bases are completely dry, paint a solid black circle in the center of each for the iris.
True Mix & Match
Paint eyes on smaller stones and mouths on separate stones. This lets you physically rearrange the pieces on your table to create constantly changing expressions.
Step 3: Graphic Details
-
Outline eyes:
Using a black paint marker or a fine liner brush with thinned black paint, carefully trace the outline of the white eye shapes. -
Add lashes:
Draw the eyelashes; use clear vertical strokes on the top lid for the teal and beige rocks. -
Sunburst effect:
For the mustard rock, white or black lines radiating around the entire eye perimeter look fantastic. -
Define lips:
Outline the lips with the black marker, ensuring the lines are distinct and bold. -
Mouth centers:
Draw a horizontal line through the center of the lips on the teal and natural rocks to separate the upper and lower lip. -
Teeth grid:
On the mustard rock, draw a vertical grid over the white mouth strip to define the individual teeth. -
Freckles:
Add a few clusters of small black dots on the cheeks of the teal rock for texture. -
Protect:
Once all paint is cured, brush on a layer of matte varnish to protect your art from scratches.
Now you have a collection of quirky characters ready to spark conversation!
Glow-in-the-Dark Fireflies

Transform a simple garden stone into a magical glowing beetle using high-contrast colors. This stylized design uses a dark background to make the gold and yellow details pop, simulating the bioluminescence of a firefly at night.
Step-by-Step Guide
Materials
- Smooth, oval river rock
- Black acrylic paint
- Flat paintbrush
- Yellow paint pen (fine tip/Posca style)
- White or cream paint pen (extra fine tip)
- White charcoal pencil or chalk
- Spray sealer or varnish
Step 1: Setting the Background
-
Clean the canvas:
Start by scrubbing your rock with soap and water to remove any dirt or grease, then dry it completely with a towel. -
Paint the night sky:
Apply a base coat of black acrylic paint to the top surface of the rock, smoothing out brush strokes as you go. -
Check opacity:
Allow the first layer to dry for about 15 minutes; if you can still see the stone color, apply a second coat for a solid, matte finish. -
Fully dry:
Wait until the black paint is completely dry to the touch before attempting any details to prevent colors from muddying.
Step 2: Sketching the Firefly
-
Create a guide:
Using a white charcoal pencil or a piece of chalk, lightly mark a vertical center line to help keep your insect symmetrical. -
Outline the body:
Sketch a small oval shape in the lower center of the rock for the firefly’s abdomen. -
Add the head:
Draw a small semi-circle or mushroom-cap shape sitting directly on top of the oval abdomen. -
Draft the wings:
Sketch two large, leaf-shaped wings extending outward from where the head meets the body.
Super Glow Tip
To make the yellow actually glow in the dark, paint a layer of white first, let it dry, and then top it with special phosphorescent glow paint.
Step 3: Adding the Glow
-
Color the light:
Take your yellow paint pen and fill in the abdomen oval, but leave two or three thin horizontal gaps unpainted to create the black stripes. -
Wing outlines:
I prefer to trace the outer edge of the wings with the yellow pen first to define the shape clearly. -
Wing veins:
Draw a central line down the middle of each wing, then add delicate V-shaped lines branching off to mimic insect wing veins. -
Refine the head:
Switch to your extra-fine white or cream paint pen and fill in the semi-circle head shape solid. -
Add antennae:
Using the same white pen, draw two thin lines coming from the head that crossover in a loop-de-loop pattern. -
Add shimmer dots:
Using the tip of your yellow marker, gently tap a series of small dots near the bottom of the rock to look like scattered pollen or light dust.
Fixing Smudges
If your black background bleeds into the yellow, wait for it to dry completely, then touch up the black areas with a very small liner brush.
Step 4: Finishing Touches
-
Erase guides:
Once the paint markers are 100% dry, gently wipe away any visible chalk or charcoal sketch lines with a barely damp cloth. -
Protect the art:
Take the rock outside and apply a coat of spray sealer to protect the paint from chipping and give it a nice sheen. -
Final cure:
Let the rock sit undisturbed for several hours until the varnish is no longer tacky.
Now you have a luminous little creature to light up your garden path or windowsill.
DIY Rock Domino Set
Turn a collection of smooth river stones into a stylish, playable domino set with this simple painting project. The deep black finish with crisp white pips creates a striking high-contrast look that feels organic yet sophisticated.
Step-by-Step
Materials
- 28 smooth, flat river rocks (approx. similar size)
- Black acrylic paint
- White acrylic paint
- Flat paintbrush
- Dotting tool or brush handle end
- Matte or satin clear sealer
- Dish soap and water
- White chalk pencil (optional)
- Palette or paper plate
Step 1: Preparation & Base Coat
-
Select your stones:
Gather 28 stones that are relatively flat and oval-shaped; finding rocks of similar size helps the set feel cohesive. -
Wash thoroughly:
Scrub each rock with warm soapy water and an old toothbrush to remove dirt, debris, and oils that might prevent paint adhesion. -
Dry completely:
Lay the stones out on a towel and let them air dry until there is absolutely no moisture left in the porous surface. -
Apply first black coat:
Squeeze black acrylic paint onto your palette and use a flat brush to cover the top surface of each rock. -
Blend the edges:
Bring the paint down around the sides of the rock, feathering it out so it blends naturally with the unpainted bottom. -
Let dry:
Allow the first coat to dry for about 20 minutes; I prefer to prop them on a wire rack so the edges don’t stick to paper. -
Second coat:
Apply a second layer of black paint to ensure a deep, opaque background that hides the stone’s original color. -
Full cure:
Let the base coats dry completely, preferably for an hour or two, to create a solid foundation for the dots.
Oops! Uneven Dot?
Don’t wipe it while wet! Let the mistake dry completely, paint over it with your black base color, and re-dot it once dry.
Step 2: Painting the Pips
-
Map out the game:
Consult a chart for a standard “Double-Six” domino set, which includes every combination from 0-0 to 6-6. -
Mark positions (optional):
If you are nervous about spacing, use a white chalk pencil to lightly mark an imaginary center line and the dot locations. -
Prepare white paint:
Place a small blob of white acrylic paint on your palette; do not thin it with water, as you want it thick for raised dots. -
Load the tool:
Dip a dotting tool or the non-brush end of a paintbrush handle vertically into the white paint. -
Dot the rocks:
Press the tool gently onto the rock surface to create a perfectly round pip, lifting straight up to avoid smears. -
Maintain symmetry:
Paint one half of the domino number, leave a small gap for the invisible center line, and then paint the number for the other half. -
Refresh paint:
Reload your tool with fresh paint after every one or two dots to keep them consistent in size and opacity. -
Correct opacity:
If the black shows through any dots, wait for them to dry fully and carefully dab a second layer of white directly on top.
Step 3: Finishing Touches
-
Dry the details:
Allow the white dots to dry completely, which is crucial to prevent streaking during the sealing phase. -
Apply sealer:
Brush a thin coat of matte or satin varnish over the painted top to protect against chipping during play. -
Final cure:
Let the sealer cure according to the bottle instructions before tossing them into a bag for storage.
Color Code It
Make the game easier for kids by using a different color for each number group (e.g., all 6s are blue, all 5s are red).
Now gather your friends and family to enjoy a classic game with your beautiful, hand-painted set.
Weather Station Stones

Turn simple garden pebbles into an interactive weather station for kids with these charming painted designs. Using bright, opaque colors on natural stone creates a striking contrast that makes checking the forecast fun.
Step-by-Step Tutorial
Materials
- Smooth, flat river rocks (dark grey and white)
- Acrylic paint pens (fine tip: yellow, white, blue, black)
- Rubbing alcohol and cotton pads
- Clear acrylic spray sealer (matte or gloss)
- Scrap paper for testing pens
Step 1: Preparation
-
Clean the canvas:
Wash your stones with warm soapy water to remove any dirt or grit, then rinse and let them dry completely in the sun. -
Surface degreasing:
Wipe the surface of each rock with a cotton pad dipped in rubbing alcohol to ensure the natural oils don’t repel the paint.
Step 2: The Sunshine Stone
-
Base circle:
Select a dark grey stone to make the yellow pop. Draw a solid yellow circle slightly off-center using a paint pen. -
Layering up:
Yellow can be translucent on dark rocks, so I usually let the first layer dry for about five minutes and then color over the circle again for opacity. -
Sun rays:
Draw long, straight lines radiating outward from the circle, extending almost to the edge of the stone. -
Filling the gaps:
Add shorter ray lines in between the longer ones to create a full, bursting sunburst effect. -
Sunny face:
Once the yellow circle is totally dry, use a fine-tip black paint pen or a permanent marker to add two small dots for eyes and a tiny curve for a smile.
Color Pop Issues?
If the yellow or white paint looks dull or absorbs into the porous rocks, don’t press harder. Let the ink dry fully, then apply a second or third coat.
Step 3: The Rainy Cloud
-
Cloud outline:
On another dark grey stone, use a white paint pen to draw the fluffy top of a cloud using three or four connected semi-circles. -
Closing the shape:
Connect the bottom of the bumps with a straight or slightly curved line to close the cloud shape. Leave the inside unpainted to show the stone’s color. -
Falling rain:
beneath the cloud, add rows of small dashes or teardrop shapes with the white pen to represent rain. -
Varying angles:
Angle the raindrops slightly to the side to give the impression of wind-blown rain.
Level Up
Expand the set! Paint a grey swirly rock for ‘windy,’ a solid white rock for ‘foggy,’ and a rock with a lightning bolt for ‘stormy’ days.
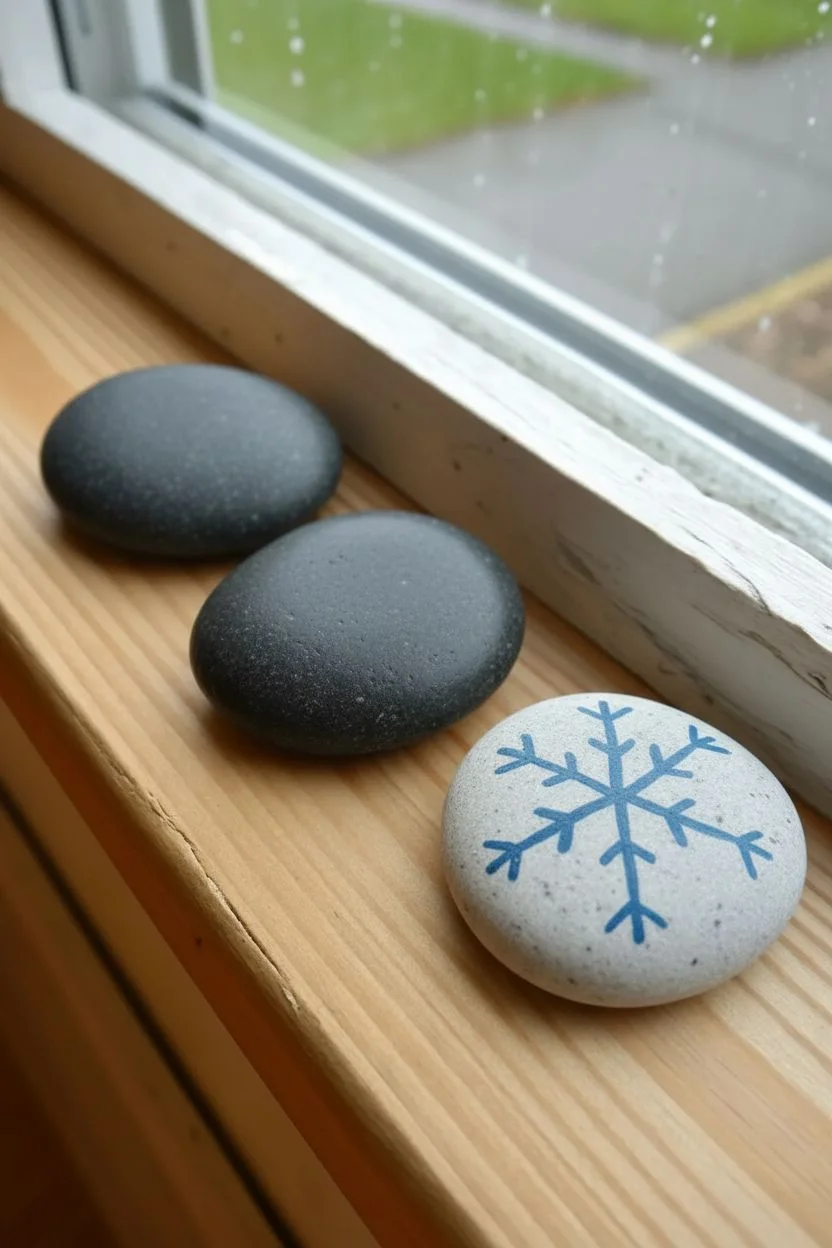
Step 4: The Snowflake Stone
-
Stone selection:
Choose a naturally white or very light grey stone for this design, or paint a dark stone white and let it cure first. -
Central cross:
Using a blue paint pen, draw a vertical line heavily down the center, then draw a horizontal line across it to make a plus sign. -
Diagonal lines:
Draw two diagonal lines intersecting the center point to create an eight-pointed star shape. -
Icy details:
Add small ‘V’ shapes or little branches at the end of each line, facing outward, to mimic the crystalline structure of a snowflake. -
Sealing:
Once all stones are fully dry (give them at least an hour), spray them with a clear acrylic sealer to make them weatherproof.
Now place these on your windowsill so the kids can match the rock to the sky every morning.
Number and Alphabet Learners
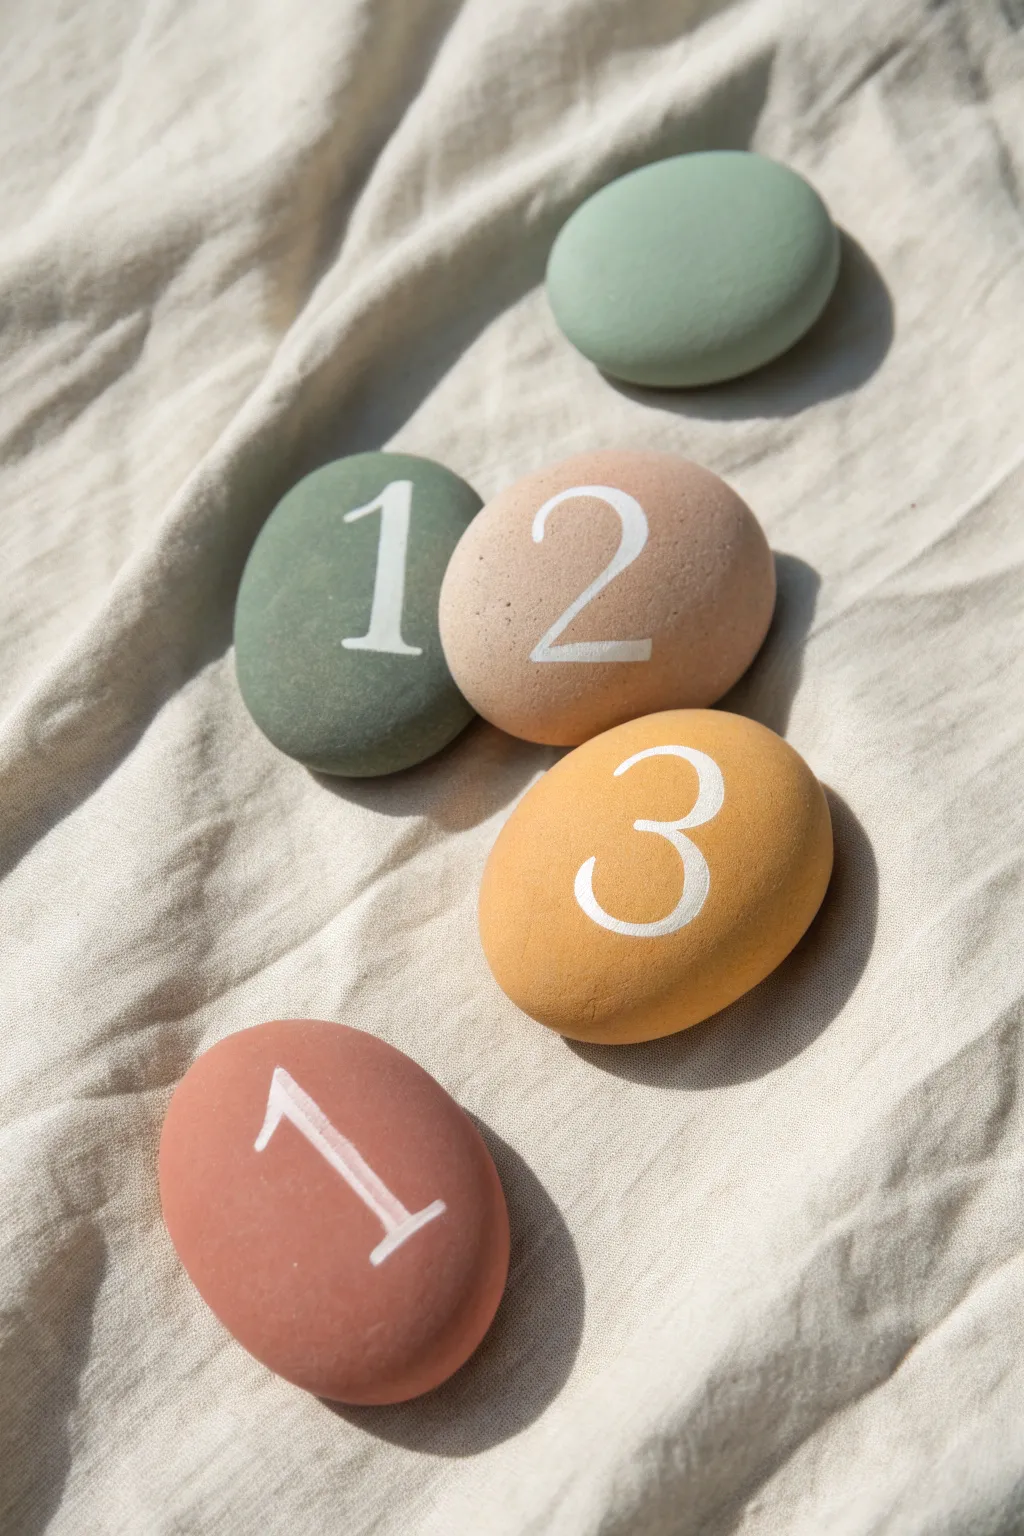
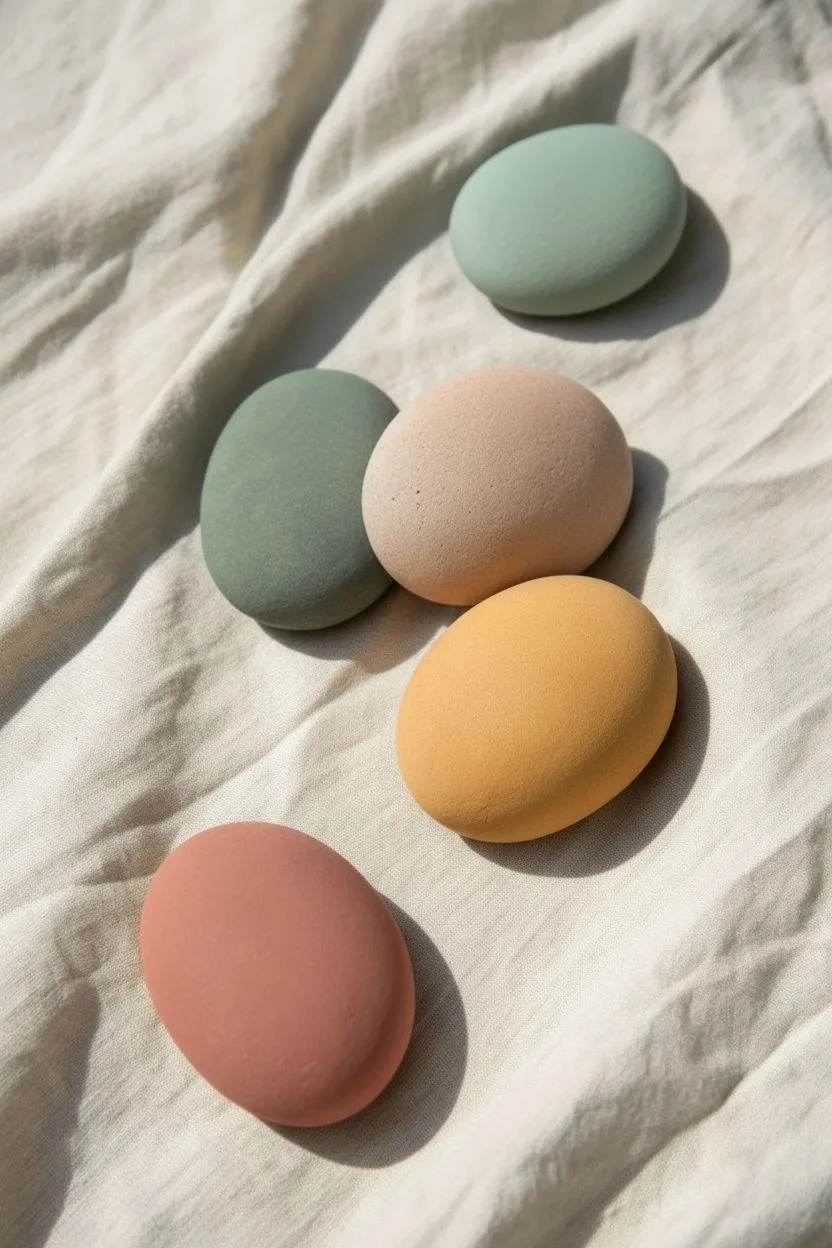
These beautifully simple stones combine tactile learning with a soothing, nature-inspired palette. Perfect for little hands, they make practicing numbers feel like play while looking lovely enough to display on a shelf.
Step-by-Step Guide
Materials
- Smooth, flat river rocks (approx. 2-3 inches wide)
- Matte acrylic paints (Rust Red, Mustard Yellow, Sage Green, Beige/Sand, White)
- Flat synthetic paintbrush (size 6 or 8)
- Fine detail liner brush (size 0) OR white extra-fine paint pen
- Graphite pencil with eraser
- Matte spray sealer or varnish
- Palette or paper plate
- Water cup and paper towels
Step 1: Creating the Matte Base
-
Clean and test:
Begin by washing your stones with soap and water to remove any dirt or oils, then let them dry completely. Smooth stones work best for writing numbers later. -
Mix the rust tone:
Squeeze out your red acrylic and mix in a tiny drop of brown or orange to achieve a warm, earthy rust color. -
Paint the first rock:
Using the flat paintbrush, coat the top surface of your first stone with the rust mixture. Long, smooth strokes help avoid ridges. -
Mustard yellow base:
Clean your brush and prepare the mustard yellow paint. Apply this to a second stone, ensuring you cover the sides well. -
Sand and sage colors:
Paint the remaining stones in the beige/sand tone and the sage green color. I like to paint a spare stone solid green just for variety. -
Apply second coats:
Acrylics often need two layers for solid coverage. Once the first layer is dry to the touch, apply a second coat to all distinct colors. -
Check texture:
Inspect the stones for any brush hairs or lumps. The surface needs to be very smooth for the lettering step, so gently sand any bumps if necessary. -
Full drying time:
Allow the base coats to dry completely—at least 20 minutes. If the paint is tacky, the pencil or pen used in the next step might dig in.
Steady Hands
To get crisp lines when painting numbers, rest your pinky finger on a dry part of the rock or the table surface to stabilize your painting hand.
Step 2: Lettering the Numbers
-
Sketch the digits:
Using a graphite pencil lightly, draw a ‘1’ on the rust stone and the green stone. Draw a ‘2’ on the beige stone, and a ‘3’ on the mustard stone. -
Refine the font style:
To match the reference, add small serifs (little feet) to the bottom of the ‘1’ and the ends of the ‘2’ and ‘3’. This gives them a classic textbook look. -
Prepare white paint:
If using a brush, thin your white acrylic paint with a drop of water until it has an ink-like consistency for smoother flow. -
Paint the straight lines:
Start with the number ‘1’ on the rust stone. Use the liner brush or paint pen to trace the straight vertical line first. -
Add the serifs:
Carefully paint the small diagonal line at the top and the horizontal base at the bottom of the ‘1’. -
Curve the two:
Move to the beige stone. Paint the curved neck of the ‘2’ in one continuous motion if possible, then connect it to the flat base. -
Loop the three:
On the mustard stone, paint the top curve of the ‘3’, stopping at the middle, then paint the bottom curve. Add tiny teardrop shapes at the ends for the serif effect. -
Repeat for duplicates:
Paint the white ‘1’ on the green stone using the same technique as the first one. -
Clean up edges:
If you made any mistakes with the white, wait for it to dry, then use the original base color to carefully paint over and ‘erase’ the error.
Step 3: Sealing
-
Final dry:
Let the white numbers dry for at least an hour to ensure they don’t smear during sealing. -
Apply varnish:
Finish the project with a matte spray sealer. This protects the paint from chipping during play while maintaining that soft, natural look.
Paint Pen Alternative
If you struggle with brush control for the numbers, an extra-fine tipped acrylic paint pen (0.7mm) is much easier to control and gives very clean opaque lines.
Once sealed and dry, these charming stones are ready to help someone learn their numbers in style
Galaxy and Space Stones
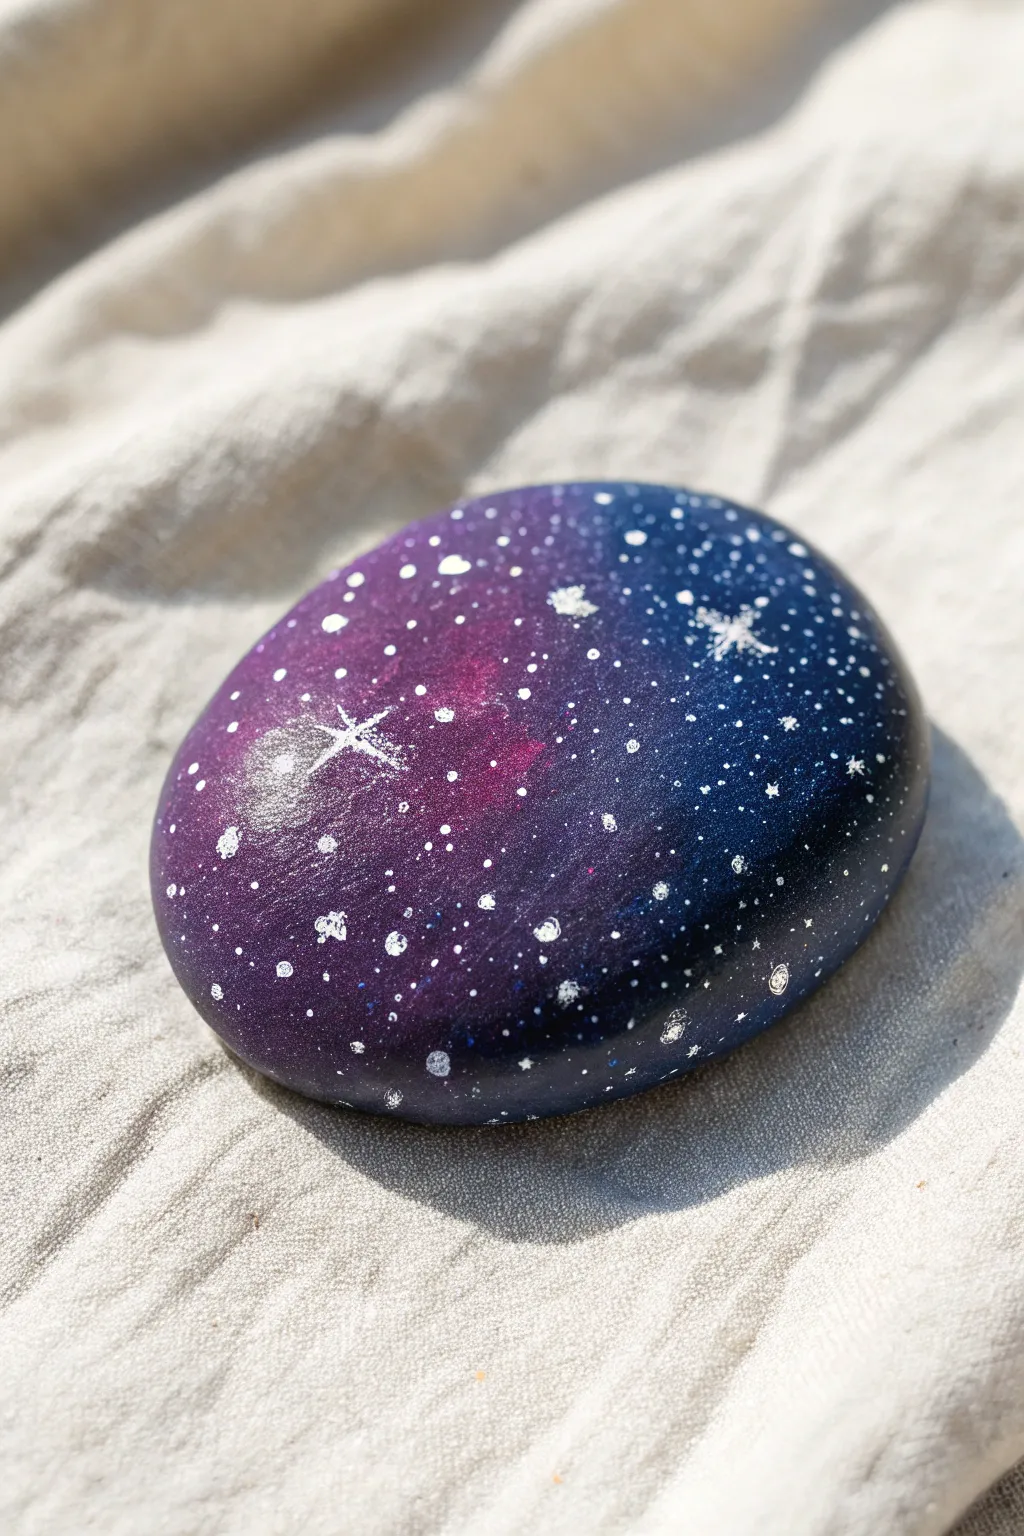
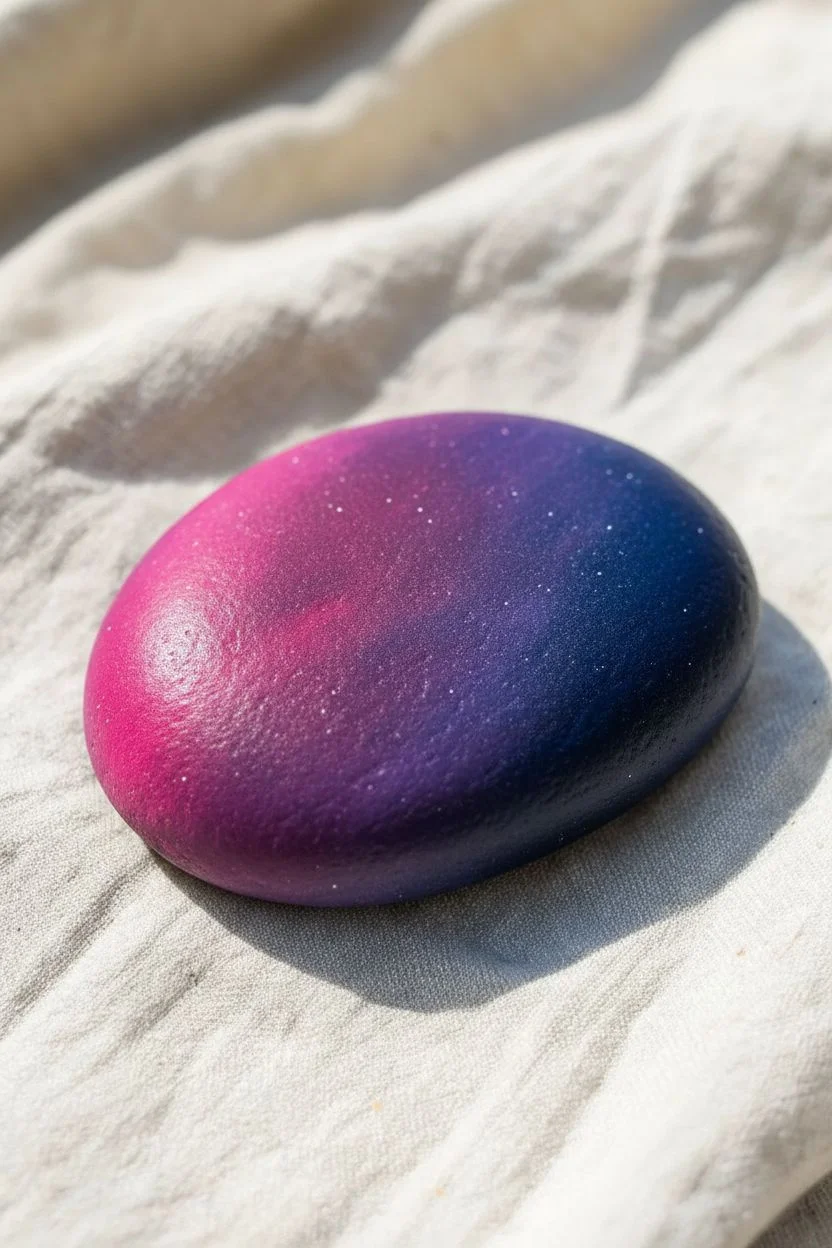
Transform a smooth, ordinary stone into a captivating pocket-sized universe with this fun painting technique. You will learn to blend varying shades of acrylics to create a deep, glowing nebula effect before dusting it with a constellation of white stars.
Step-by-Step Guide
Materials
- Smooth, oval river rock
- Acrylic paints (Black, Navy Blue, Deep Violet, Magenta, Titanium White)
- Makeup sponge wedges
- Old toothbrush
- Fine detail brush (Size 0 or 00 liner)
- Toothpick or dotting tool
- Gloss varnish or clear sealer
- Palette or paper plate
- Water cup and paper towels
Step 1: Creating the Nebula Base
-
Prepare the stone:
Wash your rock with soap and water to remove any dirt or grit, then dry it completely with a cloth. -
Apply outline base:
Paint the entire top surface of the rock with a coat of black acrylic paint to ensure the colors applied later will stand out vividly. -
Dry the base:
Allow the black base coat to dry fully before moving on to the color blending steps. -
Set up the palette:
Squeeze out dime-sized amounts of navy blue, violet, and magenta paint onto your palette, keeping them slightly separated. -
Start the dark side:
Dip the flat bottom of a makeup sponge wedge into the navy blue paint mixed with a tiny dot of black. -
Sponge the dark area:
Dab the sponge repeatedly on the right side of the rock, covering about a third of the surface with this dark indigo shade. -
Add the mid-tone:
Using a fresh section of the sponge (or a new wedge), pick up the violet paint and dab it into the center of the rock. -
Blend the transition:
Gently tap the violet sponge over the edge where it meets the navy blue to create a soft, seamless transition between the colors. -
Add the highlight:
Dip a clean corner of the sponge into the magenta paint and apply it to the far left side of the rock. -
Finalize the gradient:
Lightly tap the magenta section where it meets the violet, blending them until you have a smooth fade from pink to purple to dark blue.
Sponge Tactics
Dampen and squeeze out your makeup sponge before dipping it in paint. A slightly moist sponge prevents the paint from drying too fast and creates a much softer, cloud-like texture.
Step 2: Adding the Stars
-
Dry the gradient:
Wait for the colorful background to be mostly dry to touch so the white stars won’t mix with the colors and turn pink or blue. -
Mix star paint:
Mix a small amount of white acrylic paint with a few drops of water until it has the consistency of thin ink or heavy cream. -
Create distant stars:
Dip the bristles of an old toothbrush into the thinned white paint. Point it at the rock and run your thumb along the bristles to flick a fine mist of specks onto the surface. -
Connect the constellation:
Dip a toothpick or the handle end of a paintbrush into undiluted white paint and gently press dots onto the rock to create larger, distinct planets. -
Paint the hero stars:
Using your finest liner brush, paint a few large stars by drawing a thin vertical line crossed by a slightly shorter horizontal line. -
Highlight the glimmer:
I like to add a tiny white dot right in the center of the crossed lines to make the star look like it is glowing intensely. -
Seal the artwork:
Once the white paint is completely dry, apply a coat of gloss varnish to protect the paint and give the galaxy a wet, shiny look.
Splatter Control
If your toothbrush splatter creates large unexpected blobs, the paint mixture is likely too watery. Wipe the brush on a paper towel first to test the spray pattern before aiming at your rock.
Display your finished galaxy stone on a desk or shelf to add a little cosmic wonder to your room
Melted Crayon Art
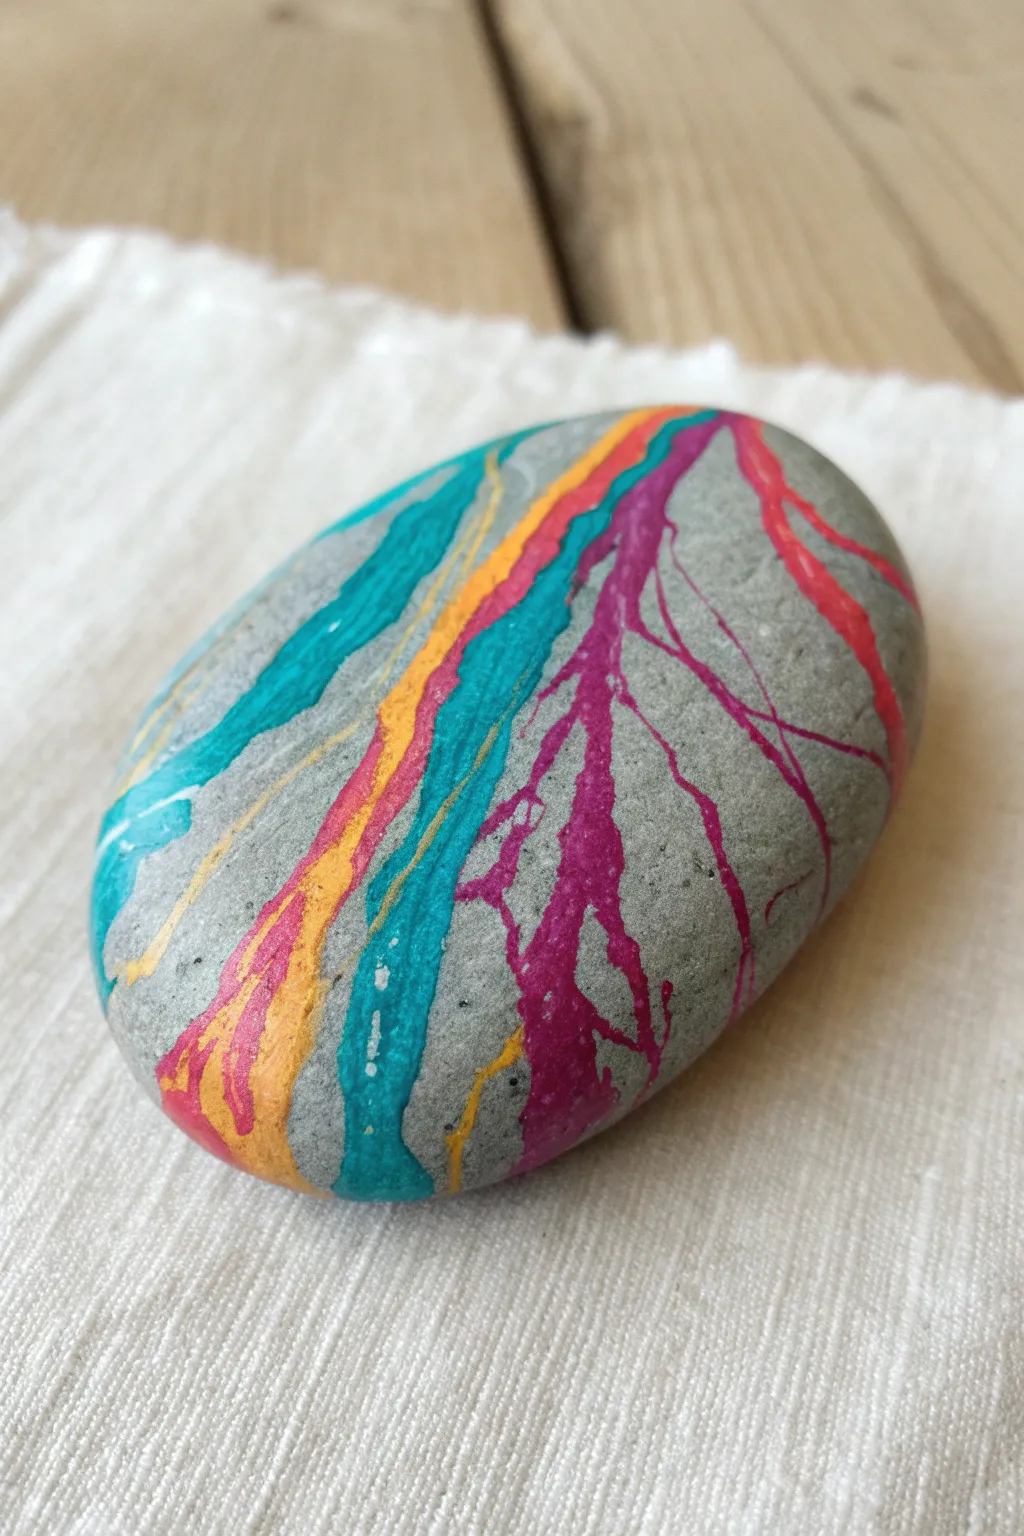
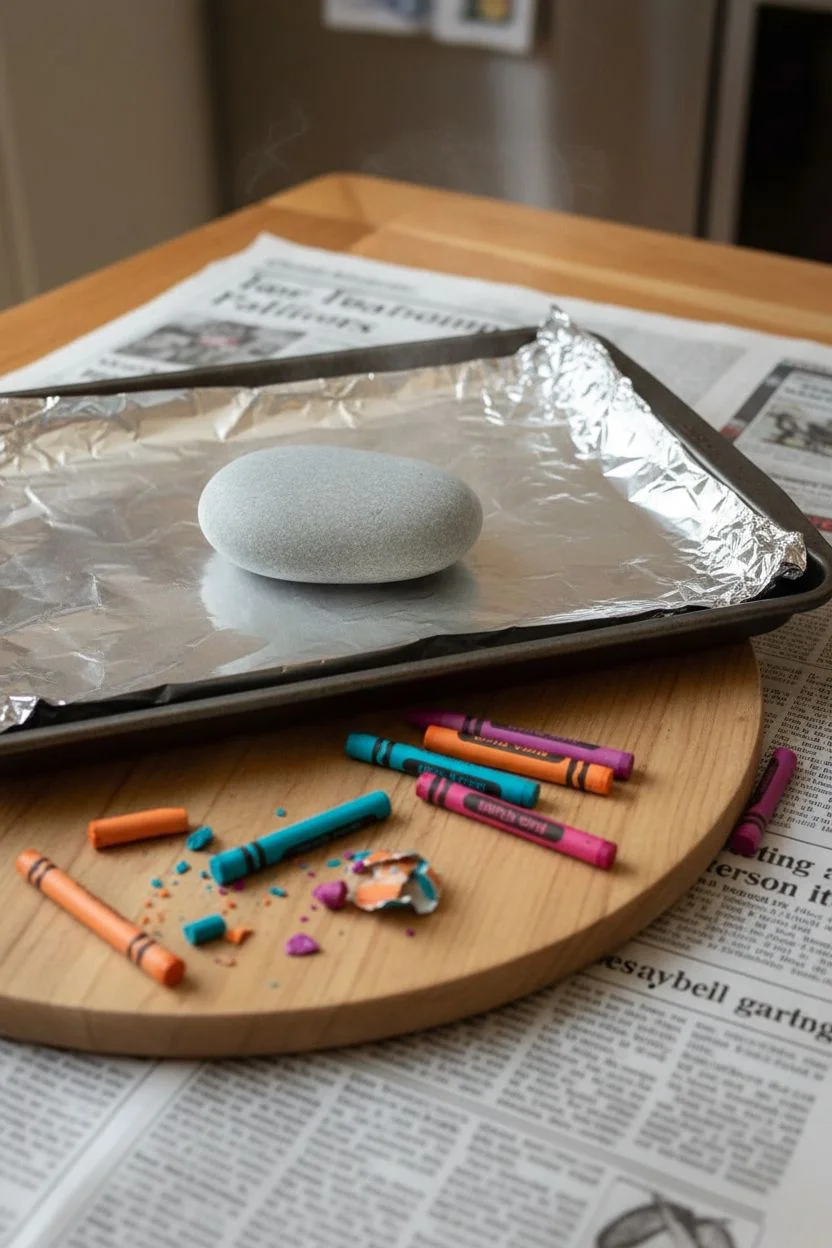
Transform ordinary grey stones into vibrant, glossy masterpieces using the science of heat. This melted crayon technique creates stunning, organic patterns that dry to a smooth, professional finish.
How-To Guide
Materials
- Smooth oval river rock
- Wax crayons (bright colors like teal, orange, magenta)
- Baking sheet
- Aluminum foil
- Oven mitts
- Heat-safe trivet or thick wooden board
- Old newspapers (for table protection)
Step 1: Heating the Canvas
-
Clean the stone:
Wash your river rock thoroughly with soap and water to remove any dirt or grit, then dry it completely so no moisture remains. -
Prepare the oven:
Preheat your household oven to 350°F (175°C). -
Protect the tray:
Line a baking sheet with aluminum foil to catch any potential wax drips and keep your pan clean. -
Bake the rock:
Place the clean rock in the center of the baking sheet and bake it for about 10 to 15 minutes. The rock needs to be hot enough to sizzle the wax on contact. -
Prepare the crayons:
While the rock heats, peel the paper wrappers off your chosen crayons. I like to break them into smaller, manageable chunks for easier handling. -
Set up the workspace:
Cover your table with layers of newspaper and place a heat-safe trivet or wooden board in the center.
Keep it Hot
If the rock cools down too much while you are working and the wax stops flowing, give it a quick blast with a hair dryer to get things melting again.
Step 2: Melting the Colors
-
Transfer safely:
With an adult’s help, put on oven mitts and carefully move the hot rock from the oven to your heat-safe trivet. -
Test the heat:
Touch the tip of a teal crayon to the rock surface. It should melt immediately and glide like lipstick. -
Create the first band:
Slowly draw a diagonal line across the upper left section of the rock using the teal crayon. Press gently to deposit a thick layer of wax. -
Add a contrasting stripe:
Pick up an orange or yellow crayon and draw a parallel line right next to the teal one. The heat will help the edges touch and blend naturally. -
Form the veins:
Switch to a magenta or dark pink crayon for the right side of the rock. -
Branching technique:
Instead of drawing a straight line, wiggle the crayon slightly as you move downwards to create organic, root-like branches. -
Add fine details:
If you have a thin shard of crayon, use the sharp edge to drag thinner lines outward from the main magenta stem, mimicking the look of lightning or veins. -
Let colors settle:
Pause for a moment to let the heat settle the wax. If a color looks too thin, dab more crayon over that specific area.
Sparkle Upgrade
Sprinkle a tiny pinch of fine silver or gold glitter over the wet wax immediately after drawing. It will stick to the melting color for a magical finish.
Step 3: Cooling Down
-
Do not touch:
Resist the urge to touch the rock or the wet wax. Let it sit completely undisturbed for at least an hour. -
Cooling process:
As the stone cools, the wax will harden into a smooth, shiny shell that looks almost like enamel. -
Final polish:
Once the rock is ice-cold to the touch, you can gently buff it with a soft cloth to maximize the shine.
Display your glossy creation on a shelf or use it as a cheerful paperweight.


Have a question or want to share your own experience? I'd love to hear from you in the comments below!