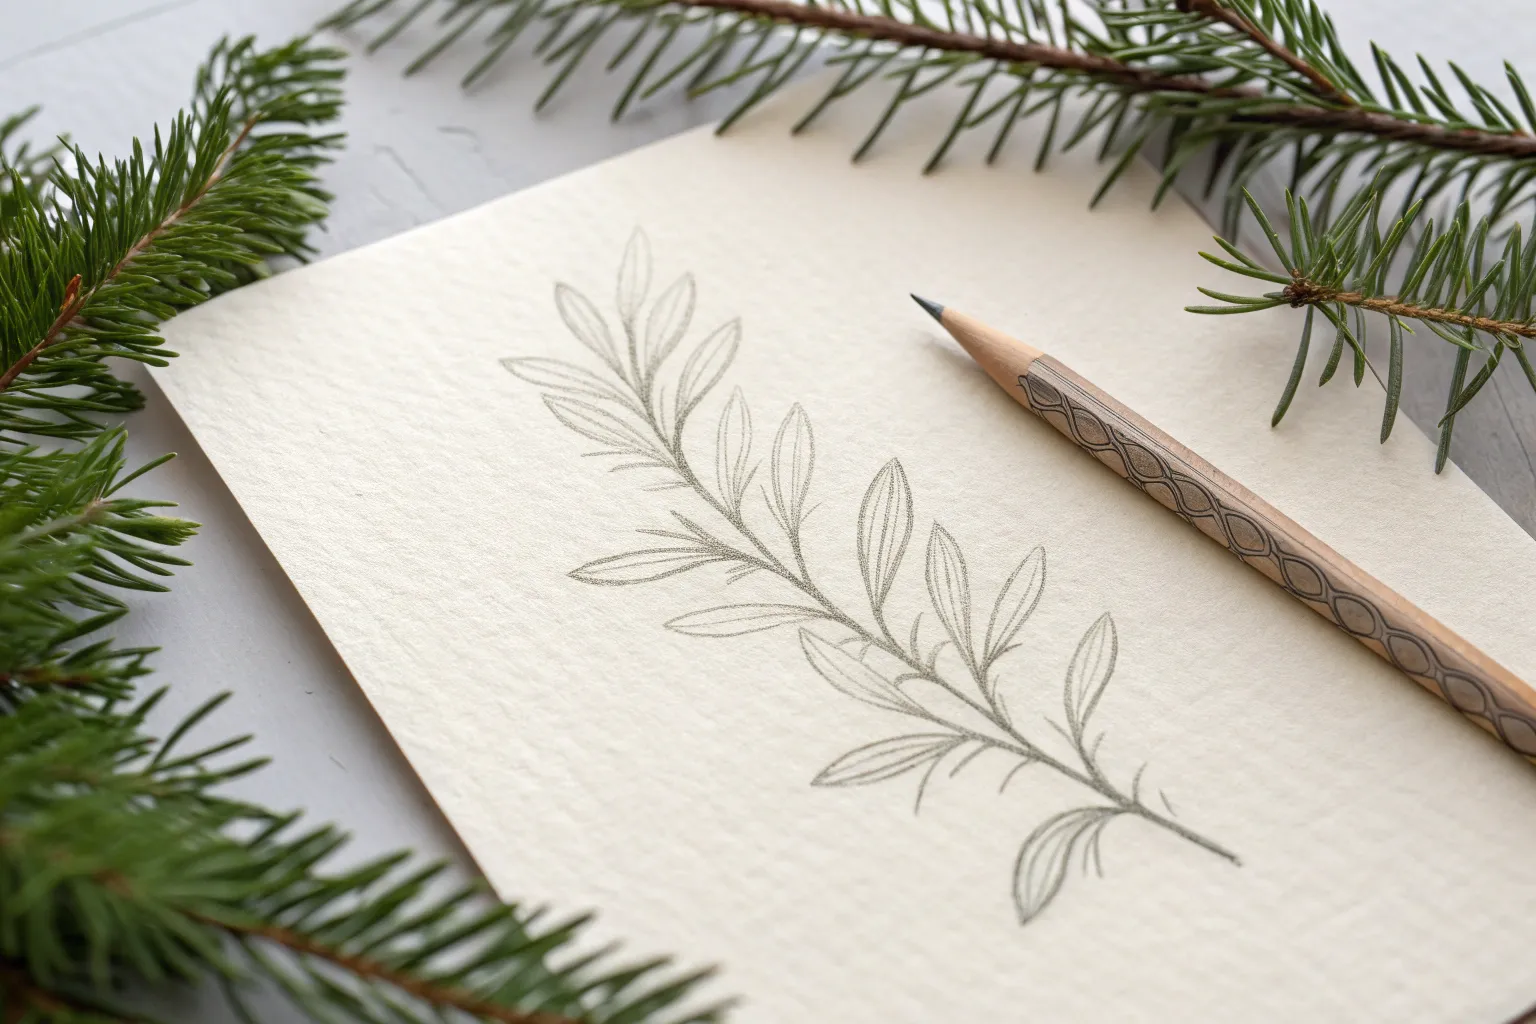
Finding inspiration for your sketchbook doesn’t have to be intimidating, especially when you start with sketch drawing ideas easy enough for any skill level. Whether you are looking to relax after a long day or practice your technique, these simple prompts will help you fill your pages with creativity and joy.
Simple Mountain Ranges
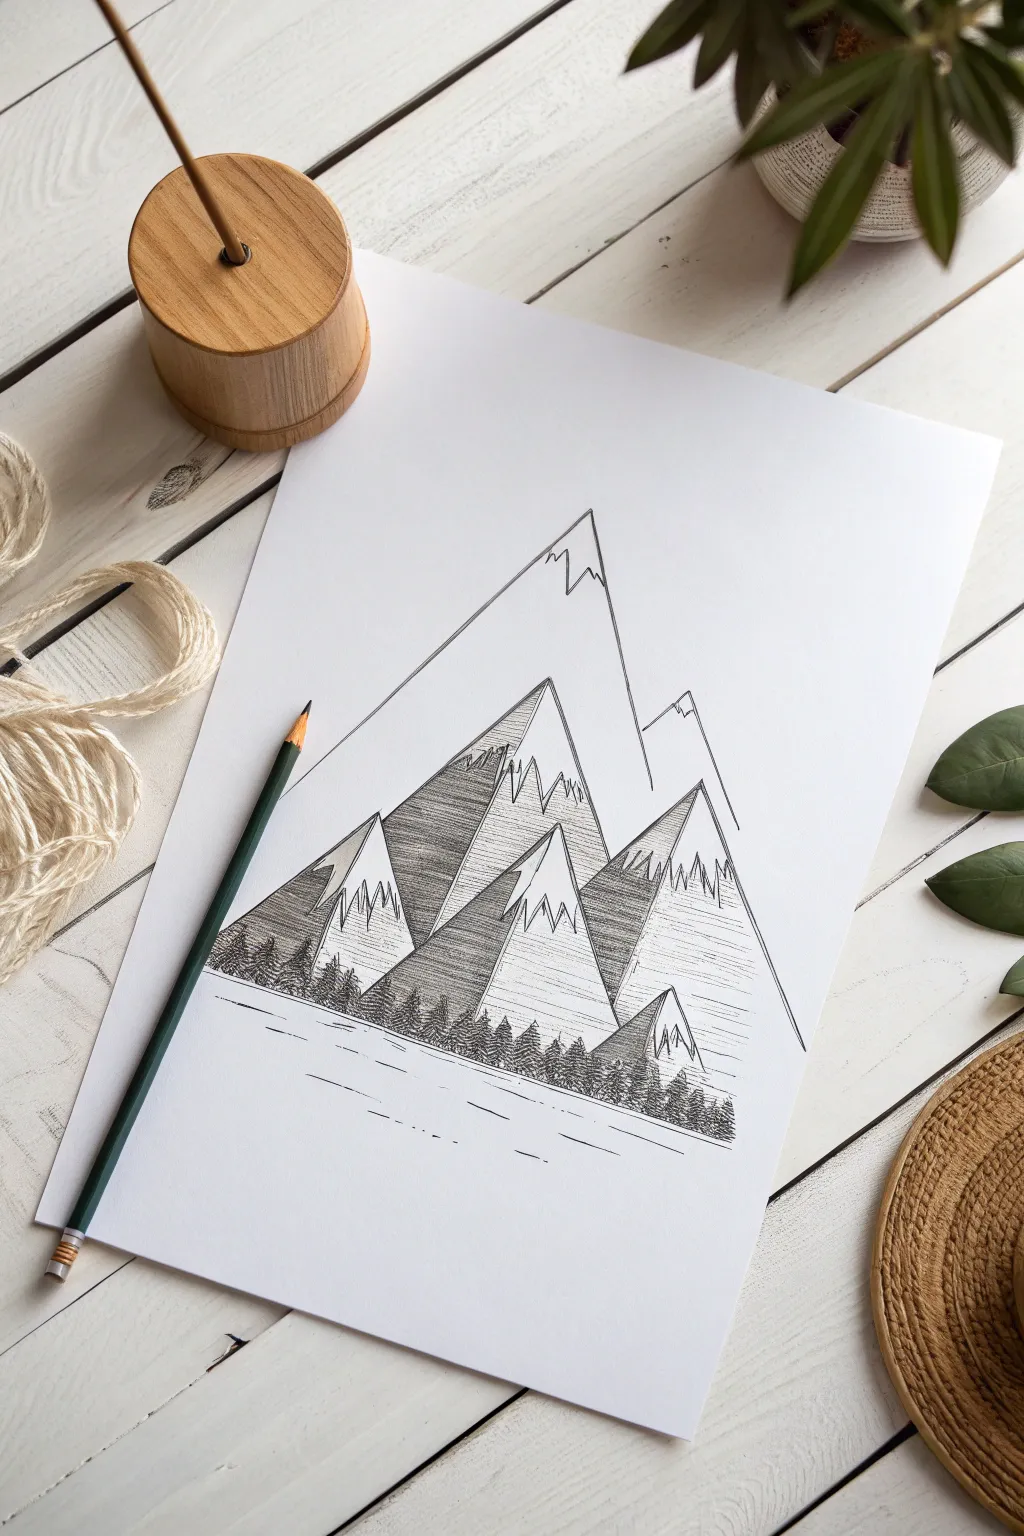
Capture the crisp, geometric beauty of high-altitude peaks with this serene sketching project. Using simple triangular forms and hatching techniques, you will create a modern landscape that contrasts sharp rocks with soft water reflections.
Step-by-Step
Materials
- Heavyweight smooth drawing paper
- HB graphite pencil
- High-quality eraser
- Black fine liner pens (sizes 0.1mm and 0.5mm)
- Ruler
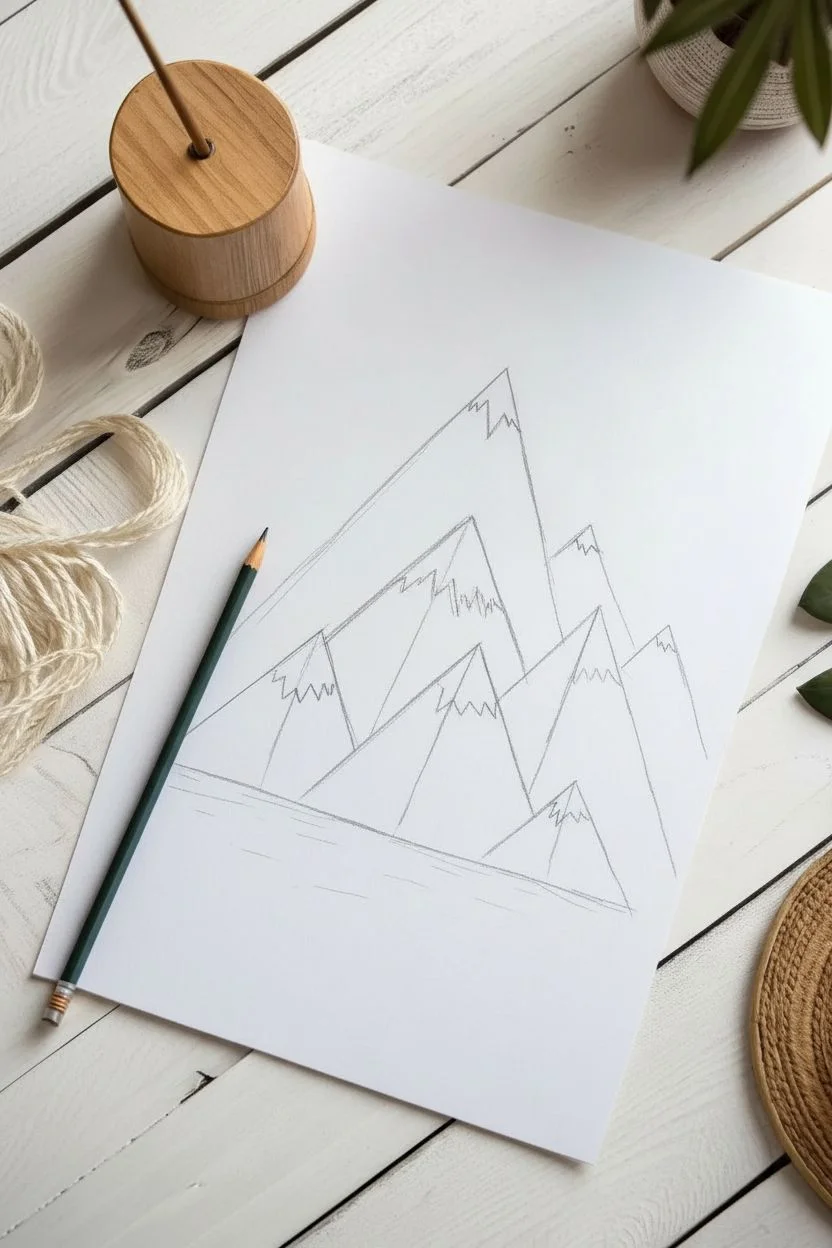
Step 1: Structural Sketching
-
Establish the tall peak:
Using your pencil and ruler, draw a large, steep triangle slightly off-center to serve as the highest background mountain. -
Add foreground layers:
Overlap two wider, shorter triangles in front of the tall peak to create the main mountain cluster. -
Background details:
Sketch a small, distant peak peeking out from the right side of the main range to add scale. -
Snow lines:
Draw jagged, uneven zigzag lines near the top of each triangle to define where the snowcaps end and the rock begins. -
Base line:
Lightly sketch a horizontal line across the very bottom of the mountains to mark the shore.
Keep It Clean
Place a scrap piece of paper under your drawing hand. This acts as a shield to prevent your palm from smearing the fresh ink or graphite.
Step 2: Inking the Outlines
-
Trace outer edges:
Switch to your 0.5mm pen and trace the clean, straight edges of the mountain slopes. -
Define the snow:
Ink the jagged snow lines carefully, making sure the points are sharp and crisp. -
Internal ridges:
Draw a vertical line down the center of each mountain triangle to separate the lit side from the shadowed side. -
Clean up:
Once the ink is completely dry to the touch, gently erase all underlying pencil marks.
Step 3: Shading and Texture
-
Shadow mapping:
Imagine the light coming from the right; this means all left-facing slopes will be shaded. -
Dark hatching:
On the left-facing slopes, use a ruler to draw tightly spaced horizontal lines from the ridge to the edge. -
Cross-hatching depth:
For the darkest crevices between peaks, layer diagonal lines over the horizontal ones to deepen the shadow. -
Light texture:
I like to add very faint, broken horizontal dashes on the right-facing slopes to suggest rock texture without darkening the area. -
Preserve the white:
Leave the snowcaps completely blank to contrast against the textured rock.
Shadow Depth
Make the hatching lines on the nearest peaks slightly thicker or closer together than the distant ones to enhance the atmospheric perspective.
Step 4: Forest and Water
-
Tree line base:
Along the bottom horizon line, use the 0.1mm pen to draw small, vertical strokes. -
Creating pines:
Scribble tight, pointed zigzag shapes to mimic the silhouette of a dense pine forest. -
Varying heights:
Make sure some trees are slightly taller than others to give the forest a natural, organic look. -
Water reflections:
Draw long, steady horizontal lines below the tree line, becoming more broken and spaced out as you move down the page.
Step back and admire your sharp, modern mountain landscape.


Whimsical Paper Airplanes

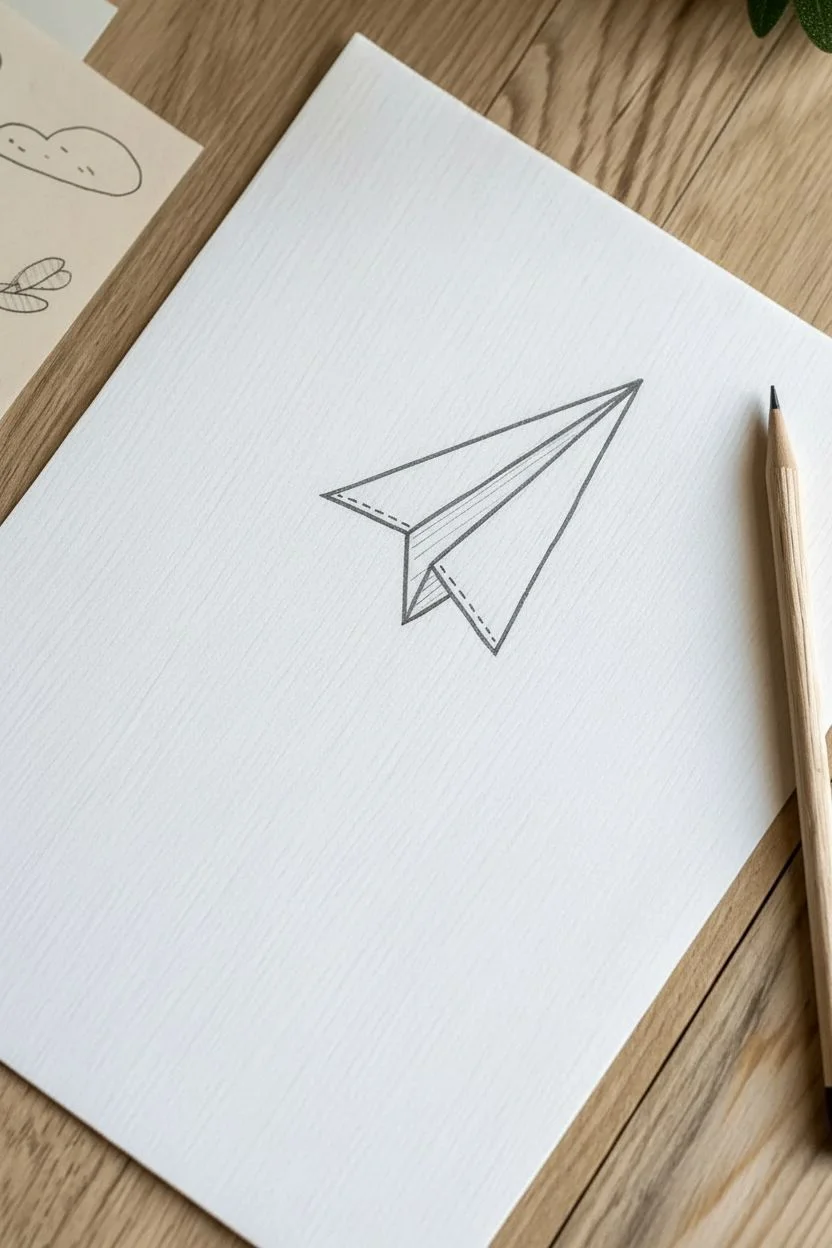
Capture the simple joy of aerodynamics with this minimalist pencil sketch. By combining crisp geometric lines with a playful motion trail, you will create a drawing that looks ready to zoom right off the page.
Detailed Instructions
Materials
- White drawing paper or cardstock
- Graphite pencil (HB or 2B)
- Pencil sharpener
- Eraser
- Ruler (optional)
Step 1: Constructing the Plane
-
Draw the spine:
Start by drawing a long, straight diagonal line pointing towards the upper right corner of your paper to act as the central crease. -
Form the nose:
From the top tip of your spine line, draw two angled lines moving backward to form a sharp ‘V’ shape for the wing edges. -
Define the wings:
Close off the wing shape by connecting the ends of the ‘V’ back to the central spine with slightly angled lines. -
Add the keel:
Beneath the central spine, draw a smaller, narrow triangle hanging down; this represents the vertical grip or ‘keel’ of the plane. -
Detail the folds:
Draw faint parallel lines inside the main wing shape to suggest the layers of folded paper. -
Refine the outline:
Go over the outer perimeter of the plane with slightly heavier pressure to make the shape pop against the white paper.
Straight & Steady
For the crispest paper plane look, feel free to use a ruler for the fuselage lines, but keep the flight trail freehand for energy.
Step 2: Shading and Texture
-
Stitch effects:
On the left wing fold near the nose, draw a tiny dotted line to mimic a perforation or crease detail. -
Shadowing the keel:
Fill the bottom keel triangle with closely spaced, parallel vertical lines. -
Keel definition:
I prefer to press a bit harder at the top of these hatch lines to show depth where the paper meets the fuselage. -
Clean up:
Use your eraser to remove any initial construction lines that overlap, keeping the drawing looking crisp.
Step 3: The Motion Path
-
Plan the route:
Very lightly sketch a sweeping loop-the-loop curve starting from the bottom left and ending at the plane’s tail. -
Start the dash:
Beginning at the furthest end of the tail, start tracing over your curve with small, even dashes. -
Complete the loop:
Continue the dashed line around the loop, trying to keep the spacing between dashes consistent. -
Fade out:
As you reach the beginning of the trail (the bottom left), make the dashes slightly smaller and lighter to suggest distance. -
Final touches:
Sharpen your pencil one last time and reinforce the darkest parts of the plane to ensure high contrast.
Smudge Alert
Place a scrap piece of paper under your drawing hand to prevent your palm from smearing the graphite as you work across the page.
Now you have a charming little artwork that captures the nostalgia of childhood play


Zen Patterns and Doodles
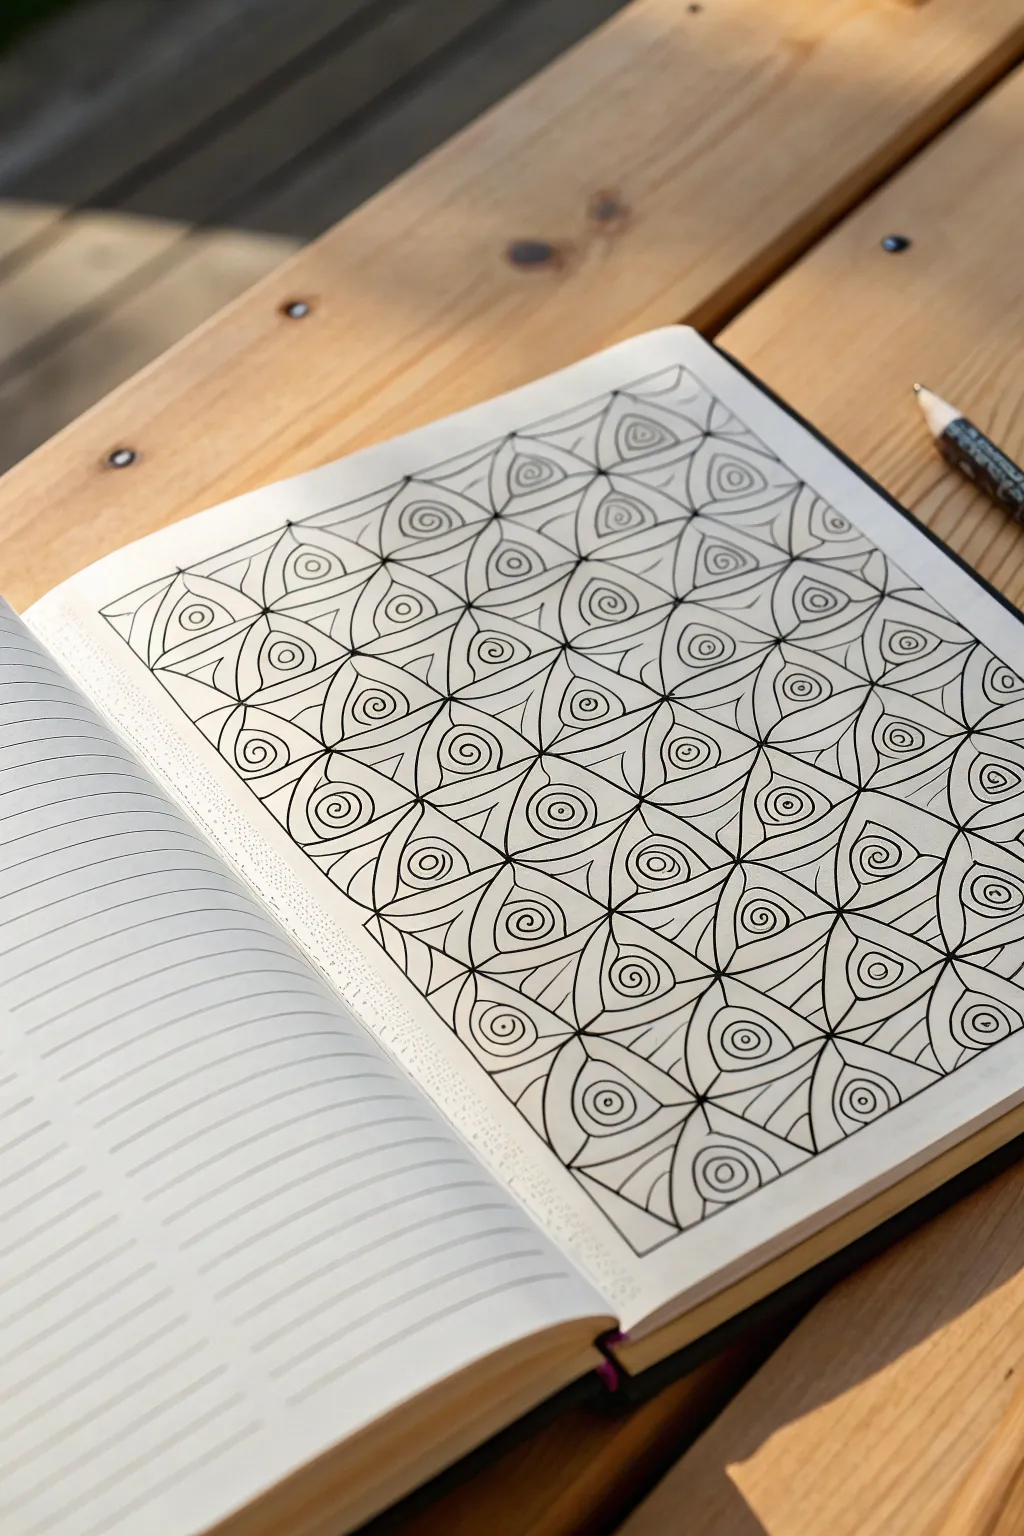
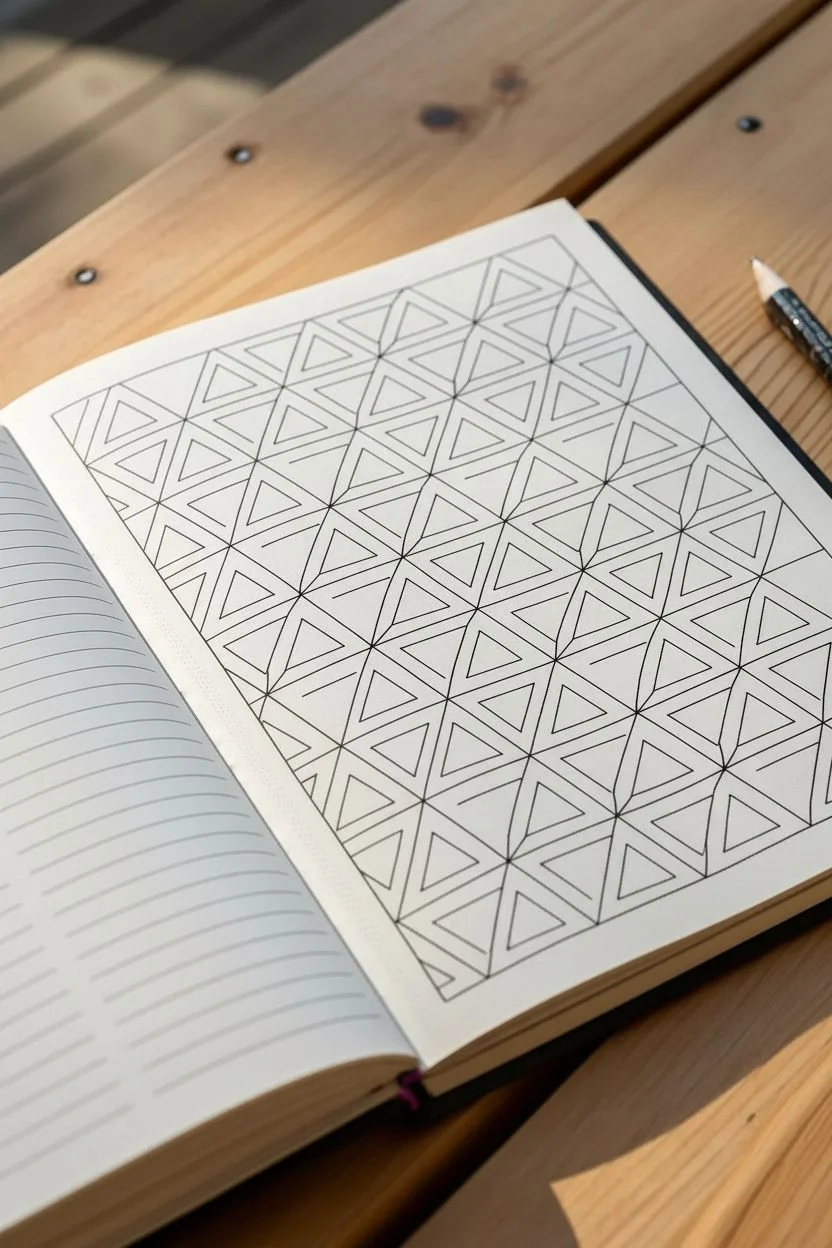
Discover the relaxing rhythm of geometric zen doodling with this intricate-looking yet surprisingly simple pattern. By combining a rigid grid with organic flowing curves, you’ll create a mesmerizing page that appears to ripple and fold like structured fabric.
Step-by-Step
Materials
- High-quality drawing paper or dot-grid notebook
- HB Pencil
- Ruler
- Black fine-liner pen (fixed width, approx 0.5mm)
- Eraser
Step 1: Drafting the Skeleton
-
Create the base grid:
Use your pencil and ruler to draw a light grid of even squares across your page. A size of about 3cm x 3cm (approx 1.2 inches) works well for beginners. -
Start the diagonals:
In the first square of the top row, draw a diagonal line connecting the top-left corner to the bottom-right corner. -
Alternate the direction:
For the next square to the right, flip the direction: draw the diagonal from bottom-left to top-right. -
Complete the first row:
Continue across the row, alternating the direction of the diagonal line for every single square. It should look like a zigzag pattern. -
Start the second row:
Move to the second row. Ensure you alternate the pattern vertically as well. If the square above had a top-left to bottom-right diagonal, the one below it should be bottom-left to top-right. -
Check your lattice:
Step back and look at your pencil marks. The diagonals should meet at the grid intersections to form large diamond shapes spanning across the squares. -
Ink the structure:
Switch to your black fine-liner. Carefully trace over all your pencil grid lines—both the square borders and the diagonals. -
Clean up:
Once the ink is completely dry, gently erase the graphite pencil marks to leave a clean black geometric web.
Step 2: Filling the Pattern
-
Identify the anchor point:
Focus on a single triangle. Locate the ‘square’ corner (the 90-degree angle), not the sharp pointed corners. -
Draw the spiral:
Nestled tightly into that 90-degree corner, draw a small, neat spiral. I like to keep the spiral relatively tight so I have room for the arches. -
Add the first aura:
Draw a curved line (an ‘aura’) starting from one straight side of the triangle, curving around the spiral, and ending on the other straight side. -
Stack the curves:
Continue drawing these curved arches, stacking them outwards from the spiral. Each line should start and end on the triangle’s straight legs. -
Shape the flow:
As you get closer to the long diagonal line (the triangle’s hypotenuse), bow the curves outward slightly. This creates a pillowy, 3D effect. -
Fill the square:
Move to the other triangle within the same square. Find its 90-degree corner (it will be opposite the first one) and repeat the process. -
Observe the clusters:
As you fill adjacent squares, you’ll notice the spirals form groups of four at certain intersections, while other intersections remain pointy. This rhythm creates the movement in the piece. -
Complete the page:
Work your way through the grid one section at a time. Rotating your notebook as you work can make drawing the curves much easier on your wrist.
Lost in the Grid?
If you get confused about where to put the spiral, mark the 90-degree corners of every triangle with a tiny pencil dot before you start inking. This acts as a roadmap for your pen.
Add Depth
To make the pattern pop, use a soft pencil to lightly shade the corners where the spirals sit. This mimics shadow and makes the curved ‘shells’ look like they are bulging off the page.
Now you have a stunning page of geometric waves that looks incredibly complex but was built one simple line at a time.


Crescent Moon and Fluffy Clouds
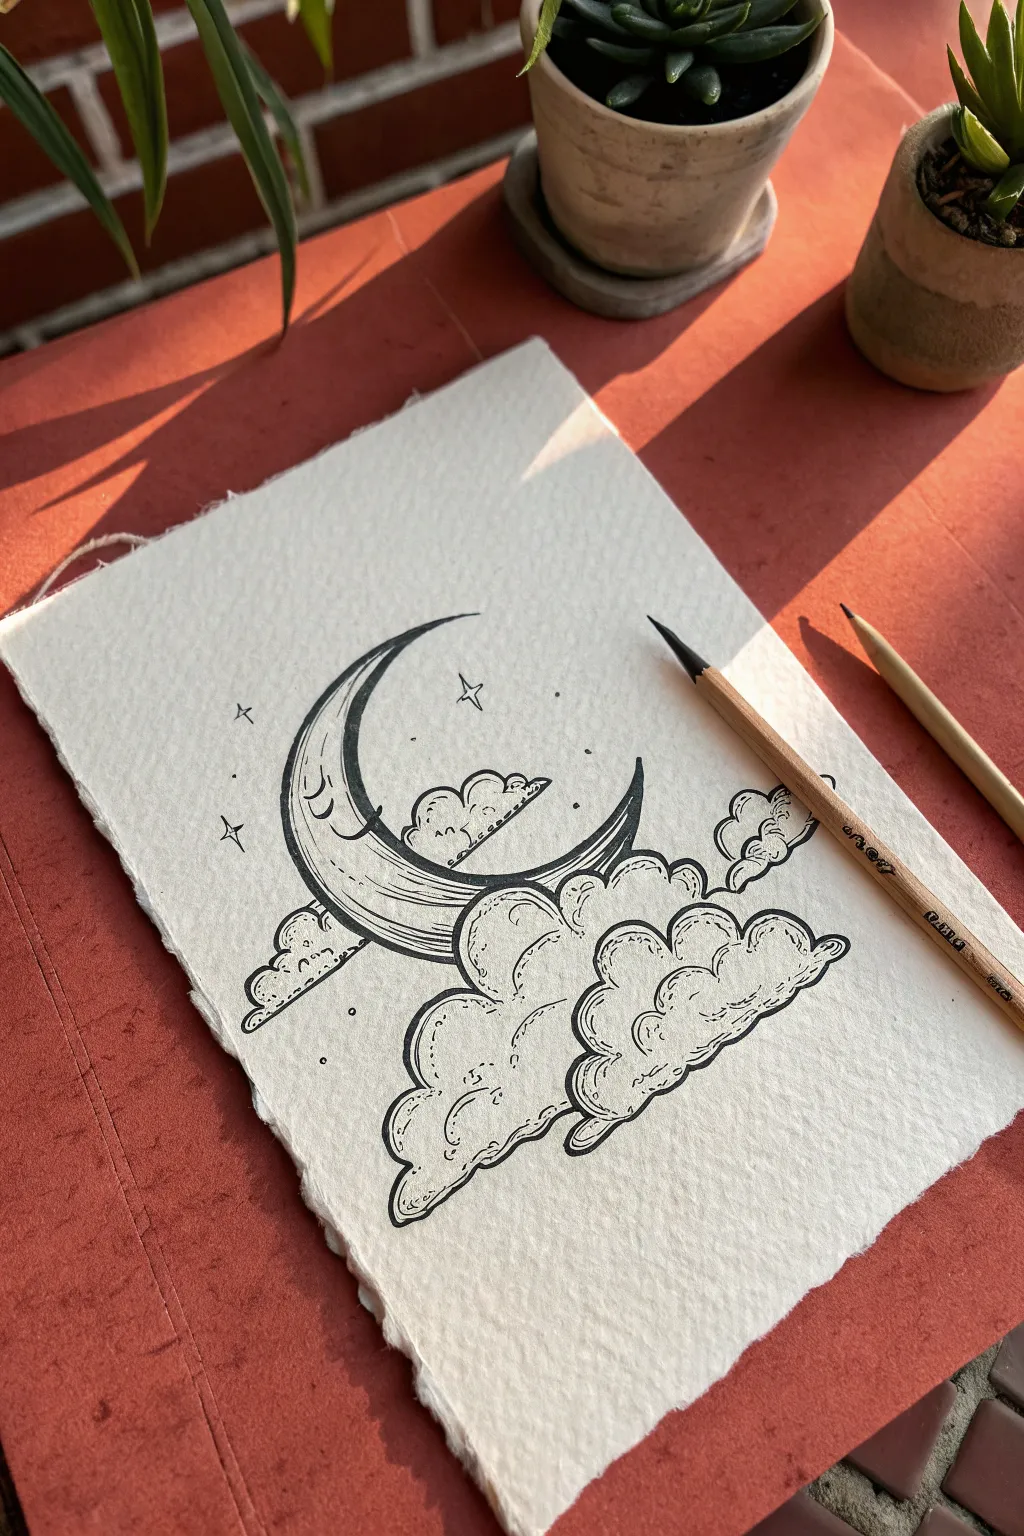
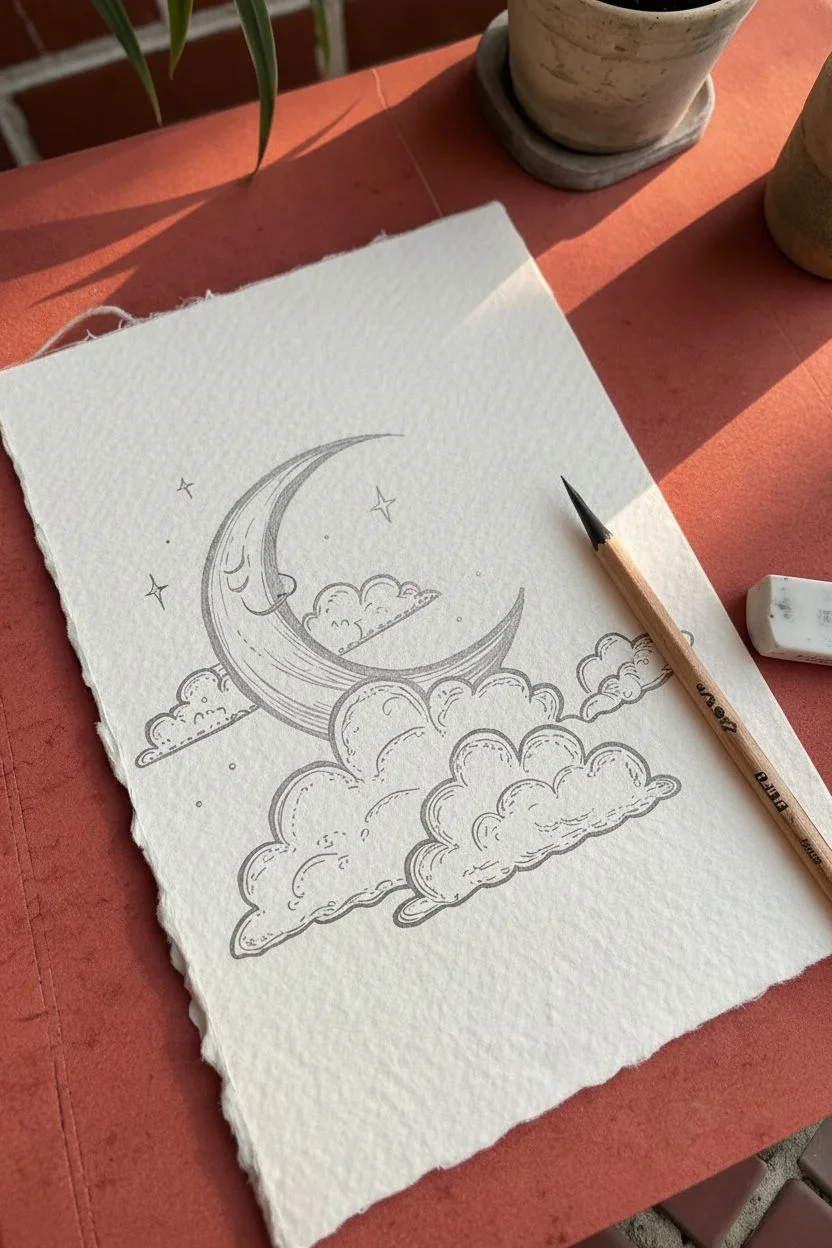
Capture the serene beauty of a sleeping moon nestled among fluffy clouds with this contrasting blackwork illustration. The texture of the paper combined with fine stippling details gives this piece a cozy, vintage storybook feel.
Step-by-Step Guide
Materials
- Textured paper (handmade cotton rag or cold-press watercolor paper)
- HB graphite pencil
- Kneaded eraser
- Black fine liner pens (sizes 01, 03, and 05)
- Ruler (optional)
Step 1: Pencil Framework
-
Draft the moon shape:
Lightly sketch a large ‘C’ shape in the upper center of your paper. Make the top point sharp and the body of the moon gradually thicken towards the bottom. -
Profile features:
Along the inner curve, sketch a facial profile. Draw a rounded forehead, a protruding nose, and a curved chin that tucks back into the crescent shape. -
Cloud placement:
Sketch a large cluster of clouds hugging the bottom curve of the moon. Use overlapping semi-circles to create a bumpy, cumulus look. -
Background elements:
Add a few smaller cloud clusters floating on the left and right sides. Mark small positions for stars around the upper moon tip.
Ink Bleeding?
Handmade paper is beautiful but thirsty! If your ink starts feathering (spreading), switch to drawing faster, lighter strokes. Slow pens allow too much ink to soak into the fibers.
Step 2: Inking the Moon
-
Main outline:
Using a 05 pen, trace the outer curve of the moon. Keep your hand steady to create a smooth, continuous arc. -
Face details:
Switch to a 03 pen for the face. Carefully ink the nose and chin profile. Draw a small, u-shaped closed eye with three tiny lashes and a small, contended smile. -
Contouring:
Draw faint, slightly curved lines running horizontally across the moon’s body using the 01 pen. These follow the curvature of the crescent to give it volume. -
Cheek accent:
Add a tiny ‘C’ shape curve just under the eye to suggest a rosy cheek.
Level Up: Celestial Gold
Take this sketch to the next level by filling in the four-pointed stars or the stripes on the moon with metallic gold watercolor or a gold gel pen for a magical shimmer.
Step 3: Inking the Clouds
-
Cloud outlines:
Use the 03 pen to ink the perimeter of the clouds. Use bumpy, scalloped lines, varying the size of the humps to make them look natural and fluffy. -
Inner volume:
Draw incomplete scalloped lines inside the main cloud shapes. These interior lines suggest layers of fluff piling up. -
Small floaters:
Ink the isolated clouds on the far left and right. Keep these lines slightly thinner or broken to make them feel distant. -
Bottom shaping:
Define the bottom edge of the cloud cluster with a straighter, yet still wavy line to ground the composition.
Step 4: Shading and Texture
-
Cloud shadows:
Using the 01 pen, add stippling (tiny dots) to the bottom right areas of each cloud hump. This creates a shadow effect suggesting light coming from the top left. -
Moon texture:
Add denser hatching lines at the very bottom interior of the crescent moon to weight it down visually. -
Starry sky:
Draw four-pointed stars using the 03 pen. Add tiny solid dots scattered randomly around the moon to represent distant stardust. -
Clean up:
Wait at least five minutes for the ink to fully cure. I prefer to wait a bit longer on textured paper. -
Erase:
Gently dab and rub with the kneaded eraser to remove all underlying pencil sketches without roughing up the paper surface.
Now you have a dreamy piece of art perfect for a bedroom wall or a greeting card.
BRUSH GUIDE
The Right Brush for Every Stroke
From clean lines to bold texture — master brush choice, stroke control, and essential techniques.
Explore the Full Guide
Botanicals in a Mason Jar
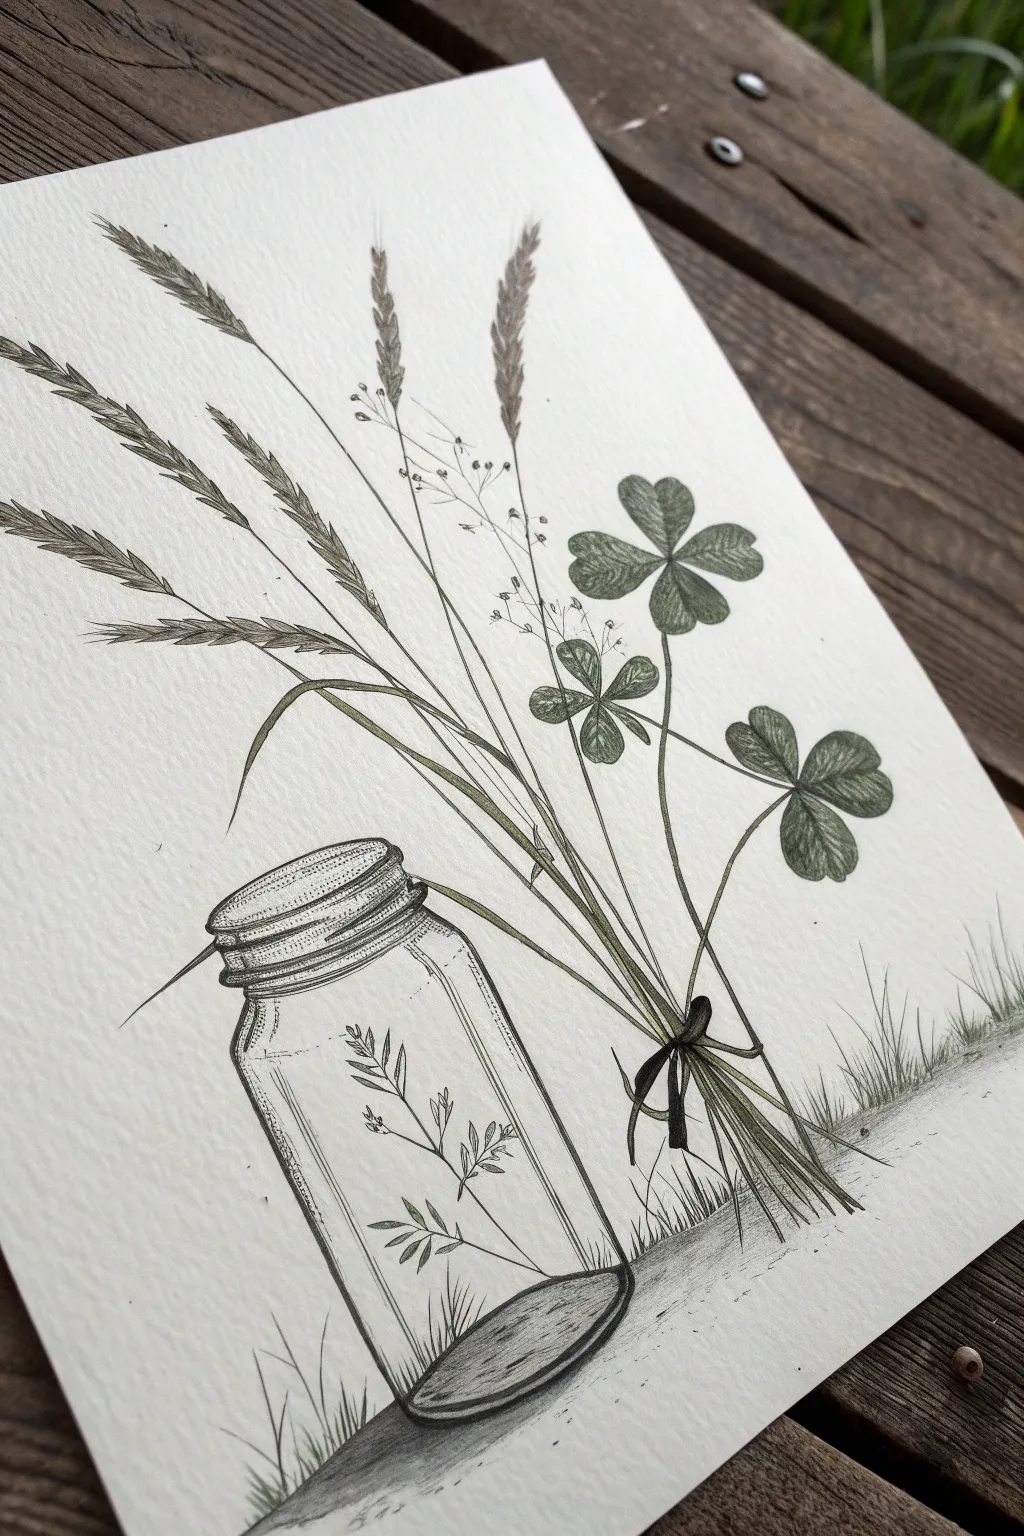
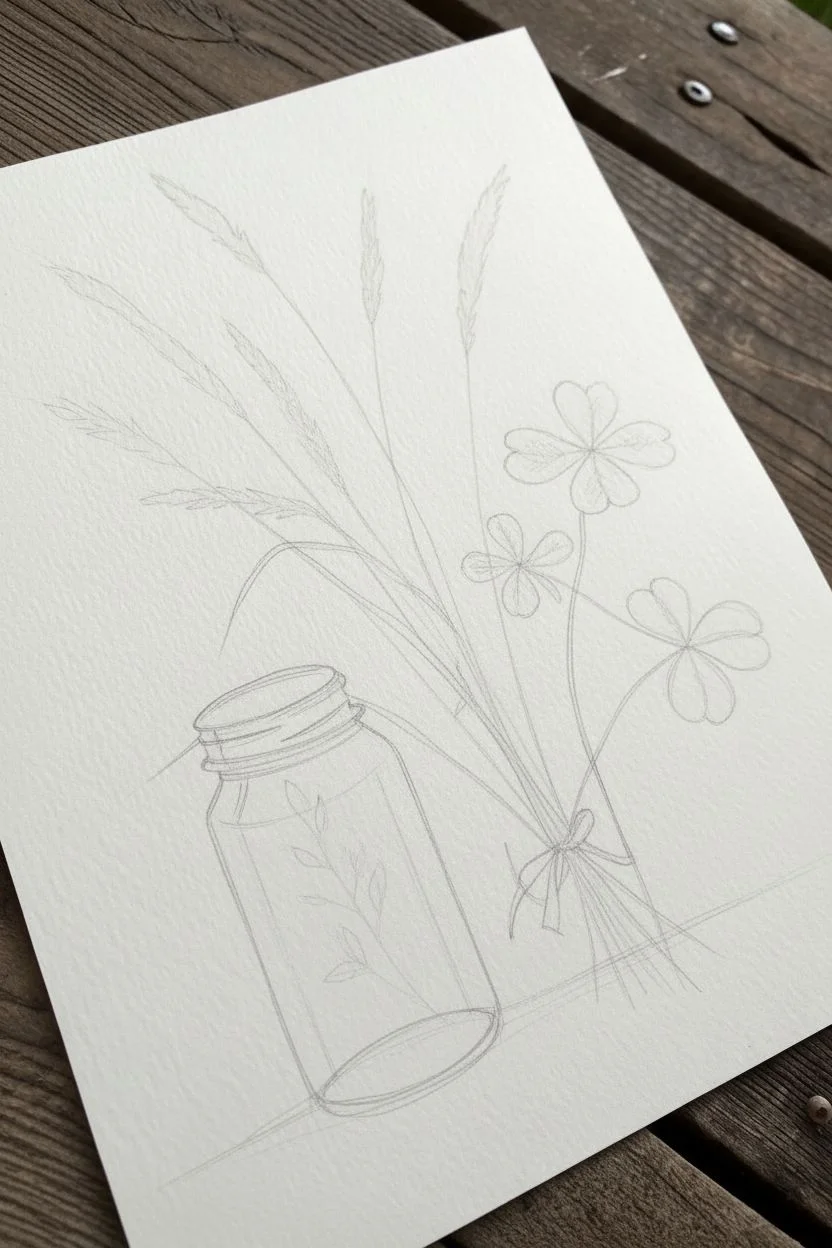
Capture the delicate beauty of roadside wildflowers with this detailed botanical illustration. Using a mix of fine ink lines and soft colored pencils, you’ll create a realistic texture that highlights the contrast between the rigid glass jar and the organic flow of the grass and clover.
Step-by-Step
Materials
- Cold press watercolor paper or textured sketch paper
- HB graphite pencil and kneaded eraser
- Fine liner pens (sizes 0.05, 0.1, and 0.3)
- Colored pencils (Sage Green, Olive, Cool Grey)
Step 1: Sketching the Composition
-
Establish the ground line:
Lightly draw a diagonal line near the bottom right to represent the ground where the grass bunch will rest. -
Outline the jar shape:
To the left, sketch a cylinder for the mason jar. drawing two ovals (ellipses) for the top and bottom to get the perspective right. -
Draft the stems:
Sketch long, sweeping curves originating from the bottom right, fanning out upwards to create the skeleton of your bouquet. -
Place the botanical heads:
Mark the positions of the clover leaves and the tall grass heads at the tips of your stem lines.
Wobbly Ellipses?
Draw a vertical centerline through your jar sketch first. This acts as a mirrored guide to ensure the curves on the left match the right side perfectly.
Step 2: Inking the Mason Jar
-
Detail the lid:
Using a 0.1 pen, ink the rings of the screw-top lid. I find it helpful to break the lines slightly to suggest light hitting metal. -
Texture the lid:
Use the 0.05 pen to add stippling (tiny dots) to the top surface of the lid to create a matte, textured shadow effect. -
Ink the glass outlines:
Trace the vertical sides of the jar with the 0.3 pen for a stronger silhouette. -
Add glass reflections:
Draw the curvature of the glass using thin, broken lines with the 0.05 pen. Leave gaps to represent highlights. -
Draw the interior plant:
Ink the small sprig inside the jar. Keep these lines very delicate to make it look like it’s behind the glass.
Step 3: Inking the Flora
-
Ink the grass heads:
Use short, upward hatching strokes to create the feathery texture of the grain heads, following the direction of growth. -
Outline the clovers:
Carefully ink the heart-shaped leaflets of the shamrocks, adding a thin central vein to each. -
Define the stems:
Draw the long stems with confident, continuous strokes. Allow them to overlap naturally. -
Add the ribbon:
Draw the small bow where the stems gather. Fill the dark parts of the knot with solid black ink for contrast.
Vintage Style
Swap the green pencils for sepia tones and use brown ink instead of black to instantly give your artwork an antique, aged herbarium aesthetic.
Step 4: Color and Shading
-
Erase pencil guides:
Once the ink is completely dry, gently remove all graphite sketch lines with your kneaded eraser. -
Apply base green:
Lightly shade the stems and clover leaves with a sage green colored pencil. Leave the tips of the grass heads uncolored or very faint. -
Deepen the shadows:
Use an olive green pencil to add depth to the center of the clovers and the shaded side of the stems. -
Ground the objects:
Use the cool grey pencil to shade the ground beneath the jar and the bouquet to anchor them to the surface. -
Final shadow details:
Add a final layer of ink stippling (dots) concentrated at the base of the jar and under the stems to create a realistic cast shadow.
Now you have a timeless botanical study perfect for framing or a nature journal.
Symmetrical Butterflies
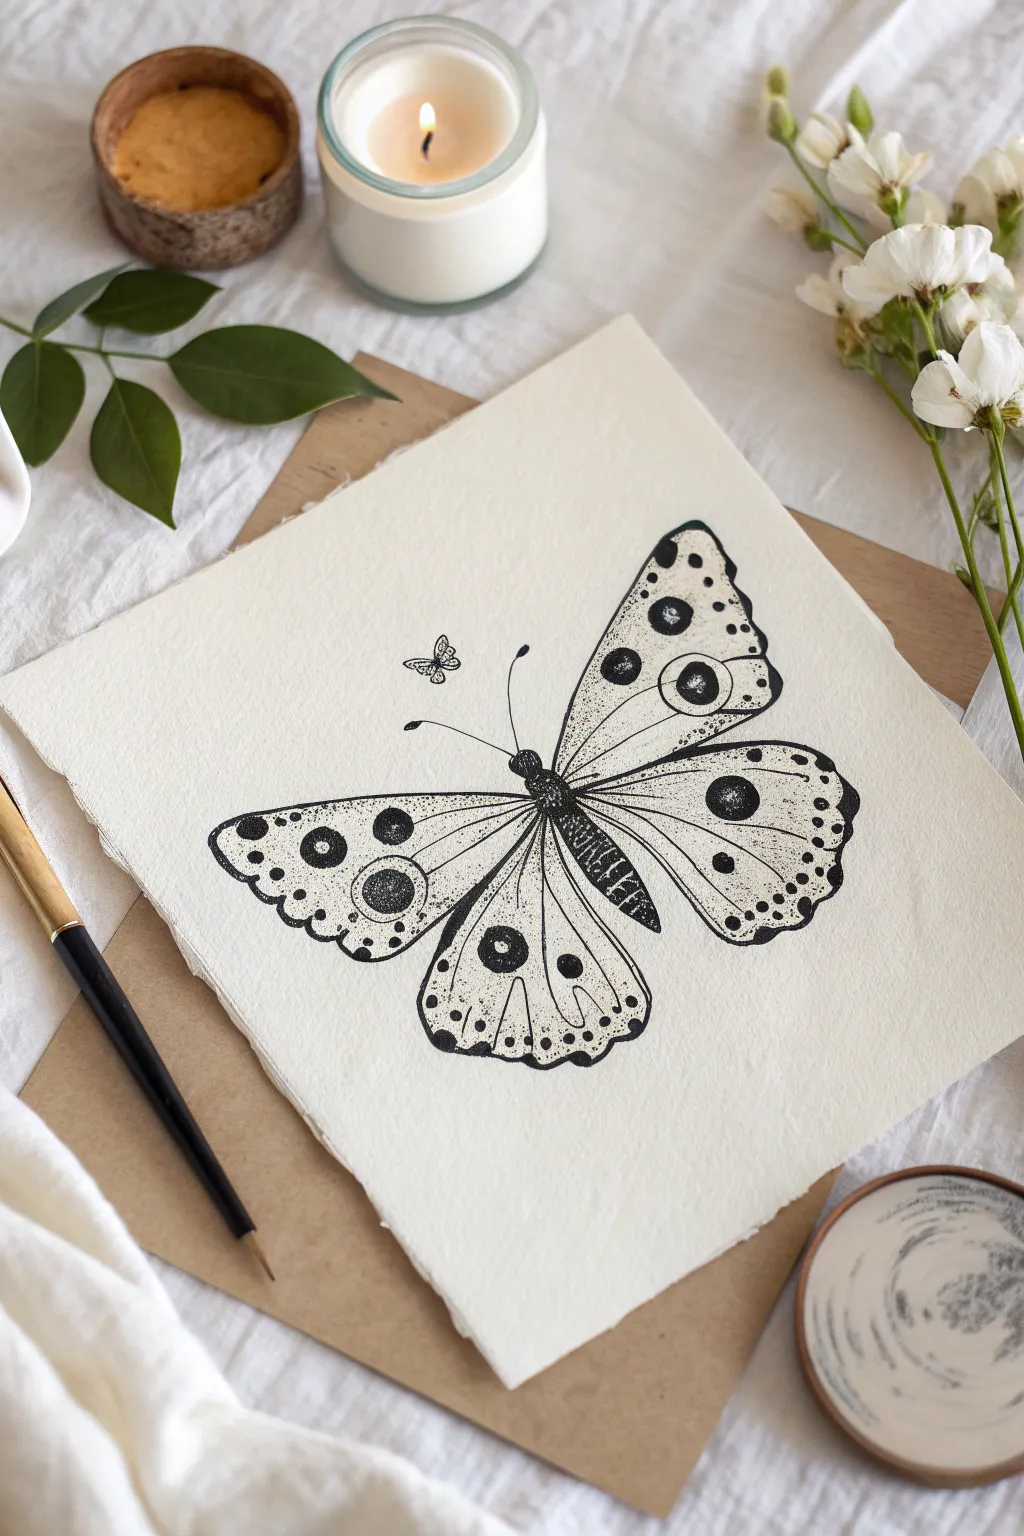
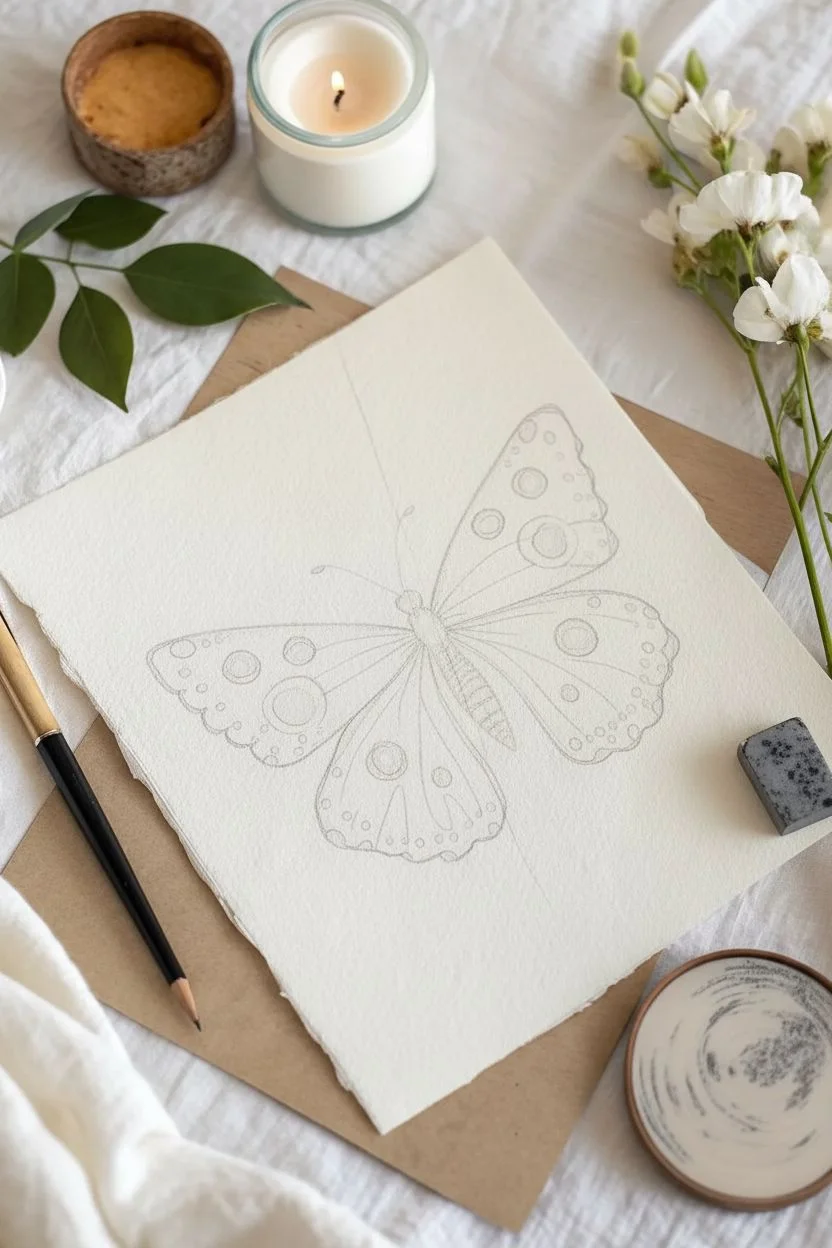
Create a stunning, vintage-inspired illustration using high-contrast ink techniques on textured paper. This project focuses on mastering symmetry and the meditative art of stippling to create depth and intricate wing patterns.
How-To Guide
Materials
- Heavyweight textured watercolor paper (deckle edge optional)
- Fine liner pens (sizes 005, 01, and 05)
- HB Drawing pencil
- Kneaded eraser
- Ruler
Step 1: Drafting the Symmetry
-
Establish the centerline:
Using your ruler and HB pencil, draw a very faint vertical line in the center of your paper to serve as an anchor for symmetry. -
Sketch the body:
Draw an elongated oval along the centerline for the thorax and a longer, thinner section below it for the abdomen. -
Block in upper wings:
Lightly sketch large, triangular shapes extending outward from the upper thorax, angling slightly upward. -
Block in lower wings:
Draw rounded, teardrop shapes originating from the lower abdomen and meeting the bottom of the upper wings. -
Refine the contours:
Go over your geometric sketched shapes and soften edges, adding gentle scallops to the bottom margins of the wings for a natural look. -
Map internal patterns:
Lightly sketch the distinct circles and ‘eye’ spots on the wings, ensuring they mirror each other on the left and right sides.
Ink Smudge Alert?
Textured paper absorbs ink slowly. If you are right-handed, work from the left wing to the right (and vice versa) to avoid dragging your hand through wet ink.
Step 2: Inking the Outline
-
Outline the wings:
Switch to a size 05 fine liner. Carefully trace the outer perimeter of the wings, allowing the ink to bleed slightly into the paper texture for character. -
Texture the body:
Instead of a solid line, use short, flicking strokes with a size 01 pen to outline the body, creating a fuzzy, insect-like texture. -
Define the veins:
Draw smooth, sweeping lines radiating from the body to the wing edges with a 01 pen to establish the wing structure. -
Contour the spots:
Ink the outlines of your circular patterns and spots, keeping your hand steady to maintain their round shape.
Pro Tip: Dot Verticality
Hold your pen completely vertical (90 degrees) when stippling. Slanted angles create ‘commas’ instead of perfect round dots, which can ruin the clean texture.
Step 3: Shading and Stippling
-
Fill the darkest areas:
Use your 05 pen to fill in the dark spots and the center of the ‘eye’ patterns with solid black ink. -
Begin the gradients:
Switch to the finest 005 pen. Start placing small dots (stippling) densely near the body and wing veins where shadows would naturally fall. -
Fade the stippling:
As you move away from the veins toward the center of the wing panels, space the dots further apart to create a smooth fade from dark to light. -
Detail the circles:
Add a ring of medium-density stippling inside the large wing circles to give them dimension, rather than leaving them stark white. -
Add texture to the lower wings:
Apply lighter, scattered stippling on the lower wings, focusing the density around the scalloped edges.
Step 4: Finishing Touches
-
Draw the antennae:
With a confident, sweeping motion, draw two long, curved antennae extending from the head, topping them with small bulbs. -
Add the mini companion:
To the left of the main butterfly, draw a tiny silhouette of a second butterfly using solid black fill for contrast and scale. -
Erase guidelines:
I prefer to wait at least 15 minutes to ensure the ink is bone-dry before gently lifting the pencil grid with a kneaded eraser. -
Final contrast check:
Step back and assess your drawing; if any areas look too flat, add a few more dots to deepen the shadows.
Frame your intricate creation or gift this delicate artwork to a nature lover.

PENCIL GUIDE
Understanding Pencil Grades from H to B
From first sketch to finished drawing — learn pencil grades, line control, and shading techniques.
Explore the Full Guide
Woodland Mushrooms
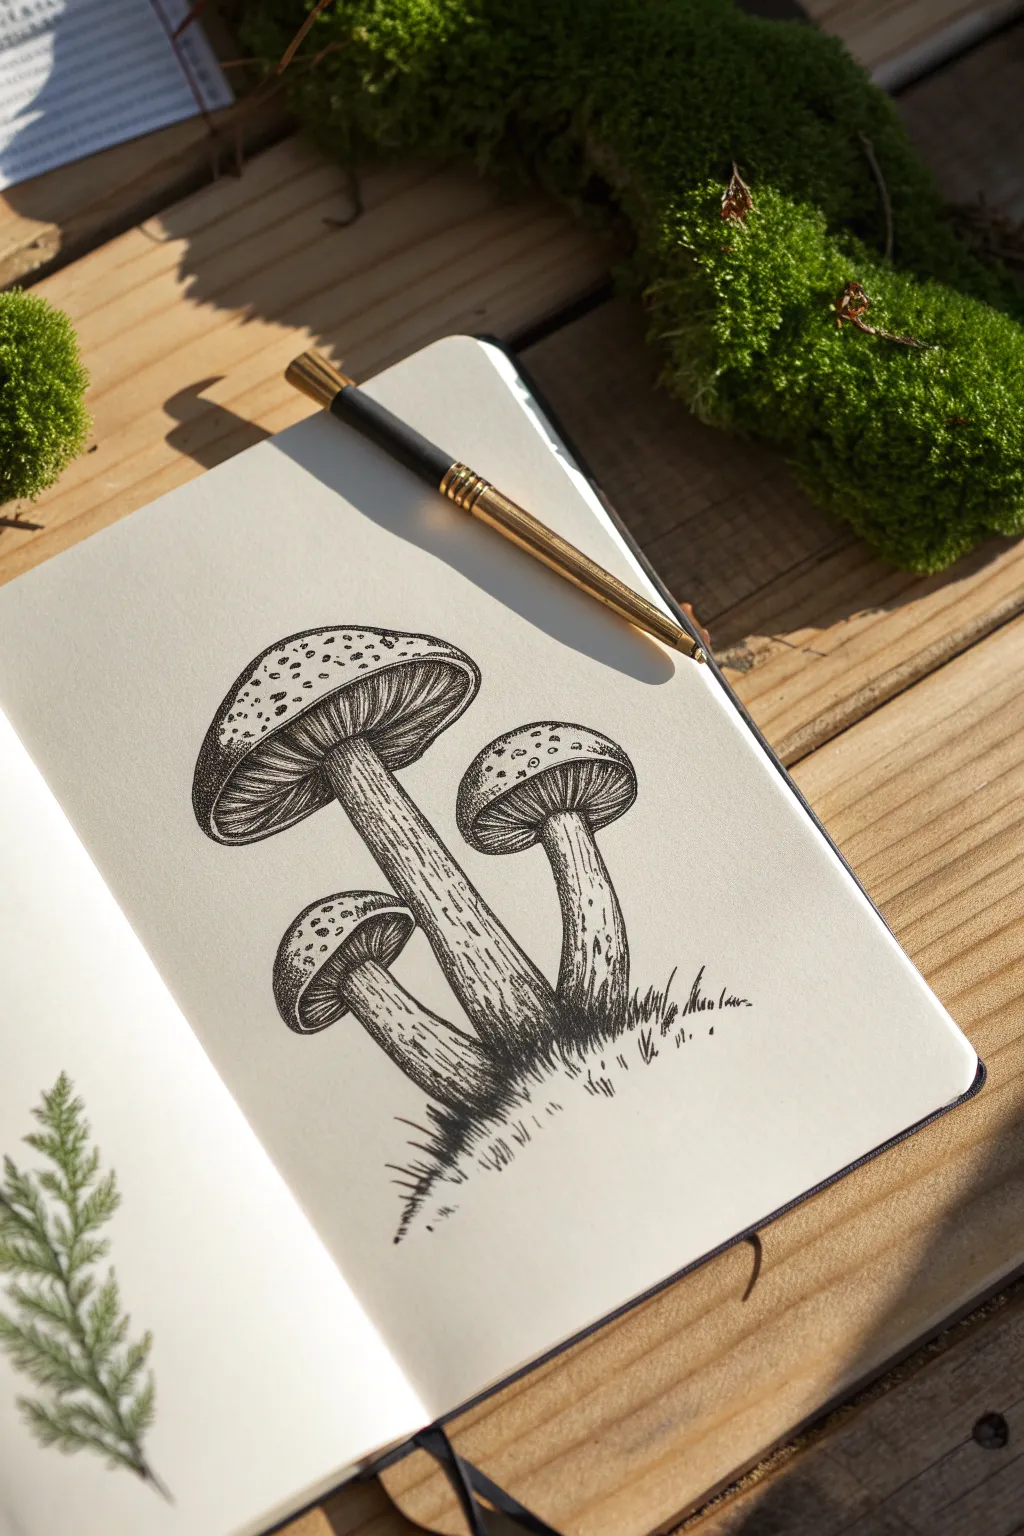
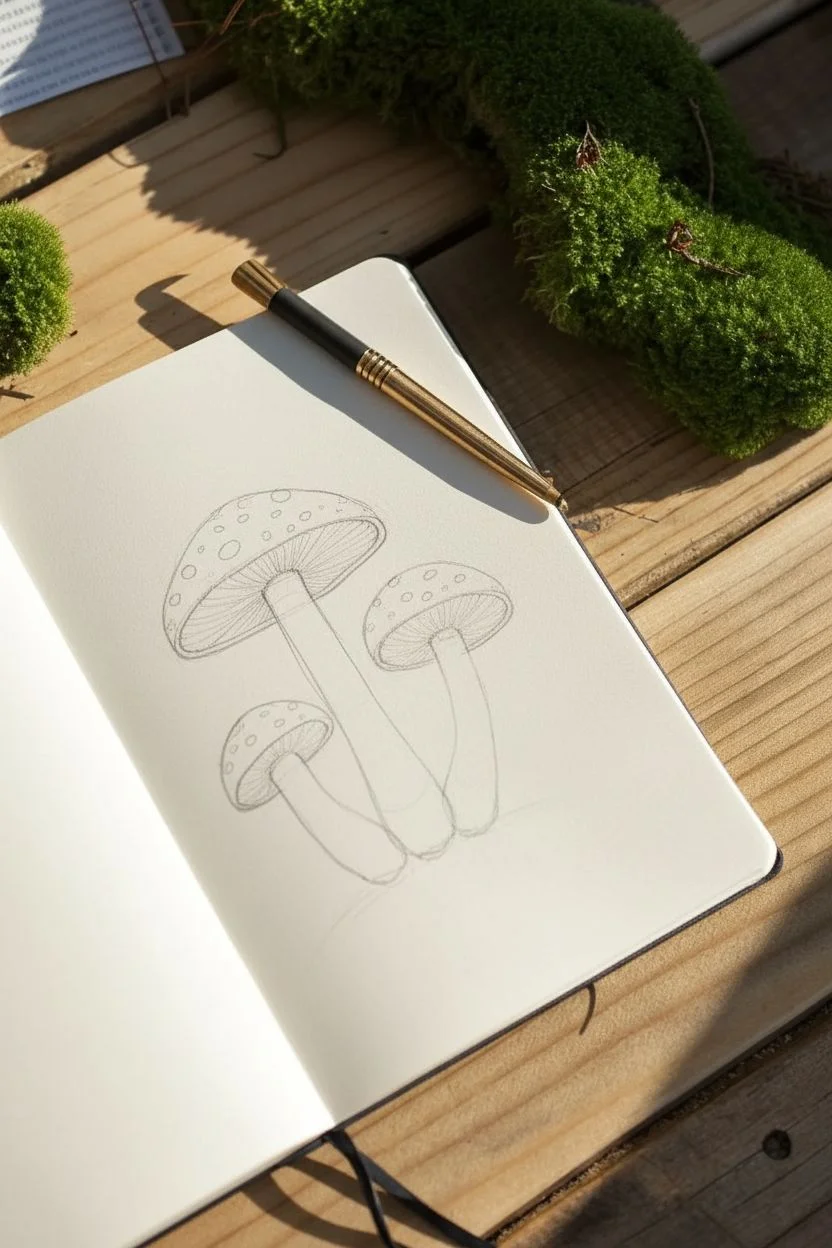
Create a charming field study in your sketchbook with this detailed pen and ink tutorial. You will learn to combine stippling and hatching techniques to bring a realistic texture to this family of three mushrooms.
Step-by-Step Tutorial
Materials
- Sketchbook (smooth or vellum finish)
- HB Graphite pencil
- Kneaded eraser
- Black fine liner pens (sizes 0.05, 0.1, and 0.5)
- Ruler (optional)
Step 1: The Pencil Framework
-
Position the stems:
Using your HB pencil, lightly sketch three slightly curved vertical lines to act as the spine for each mushroom stem. Place the tallest in the center, a medium one to the right, and a small one low on the left. -
Form the stalks:
Draw elongated, organic cylinders around your spine lines. Make the bases slightly thicker than the tops to show weight. -
Cap foundations:
At the top of each stem, draw a flattened oval to represent the underside of the cap. -
Dome structure:
Sketch a semi-circle or dome shape sitting on top of each oval to complete the cap silhouette. -
Marking details:
Lightly sketch small, irregular circles scattered across the top of the caps to mark where the light spots will remain.
Step 2: Inking the Gills and Stems
-
Detailing the gills:
Switch to your 0.05 fine liner. Draw very fine, tightly packed lines radiating from the top of the stem out to the edge of the cap. -
Building depth:
I like to go back over the inner part of the gills (closest to the stem) with a second pass of lines to create a deep shadow. -
Stem outlines:
Use a 0.1 pen to trace the outer edges of the stems. Use a slightly shaky or broken line rather than a perfect curve to mimic natural organic texture. -
Fibrous texture:
Draw vertical, broken lines running down the length of the stems. Vary the length of these lines to make the surface look fibrous. -
Curve hatching:
Add small, curved horizontal hatch marks wrapping around the stems to emphasize their cylindrical volume.
Smudge Prevention
Ink smears easily on smooth paper. Place a clean scrap piece of paper under your drawing hand to protect your artwork from skin oils and accidental smears.
Step 3: The Stippled Caps
-
Outline the spots:
With the 0.1 pen, carefully ink the outlines of the irregular circles you sketched on the caps earlier. -
Start stippling:
Begin tapping small dots (stippling) across the cap surface, carefully avoiding the inside of the circles you just drew. -
Create volume:
Concentrate your dots more densely near the bottom edges of the dome and lighter toward the top center. This gradient creates a 3D effect. -
Darkest accents:
Use a 0.5 pen to add a few larger, darker dots on the very edges of the caps for contrast.
Botanical Spread
To complete the look, try drawing a delicate fern frond on the opposite page of your sketchbook, just like in the reference photo, for a full forest study vibe.
Step 4: Grounding and Finish
-
Grassy base:
Use quick, upward flicking motions with the 0.1 pen to create grass blades at the base of the stems. -
Soil mount:
Add cross-hatching (diagonal intersecting lines) beneath the grass to imply a dark, earthy mound. -
Final shadows:
Darken the area where the stems meet the ground and directly under the caps with your thickest pen to make the image pop. -
Clean up:
Wait at least five minutes to ensure the ink is bone dry, then gently erase all remaining pencil marks.
Now you have a stunning botanical illustration that captures the rustic beauty of the woodland floor.
Floating Balloons with Strings

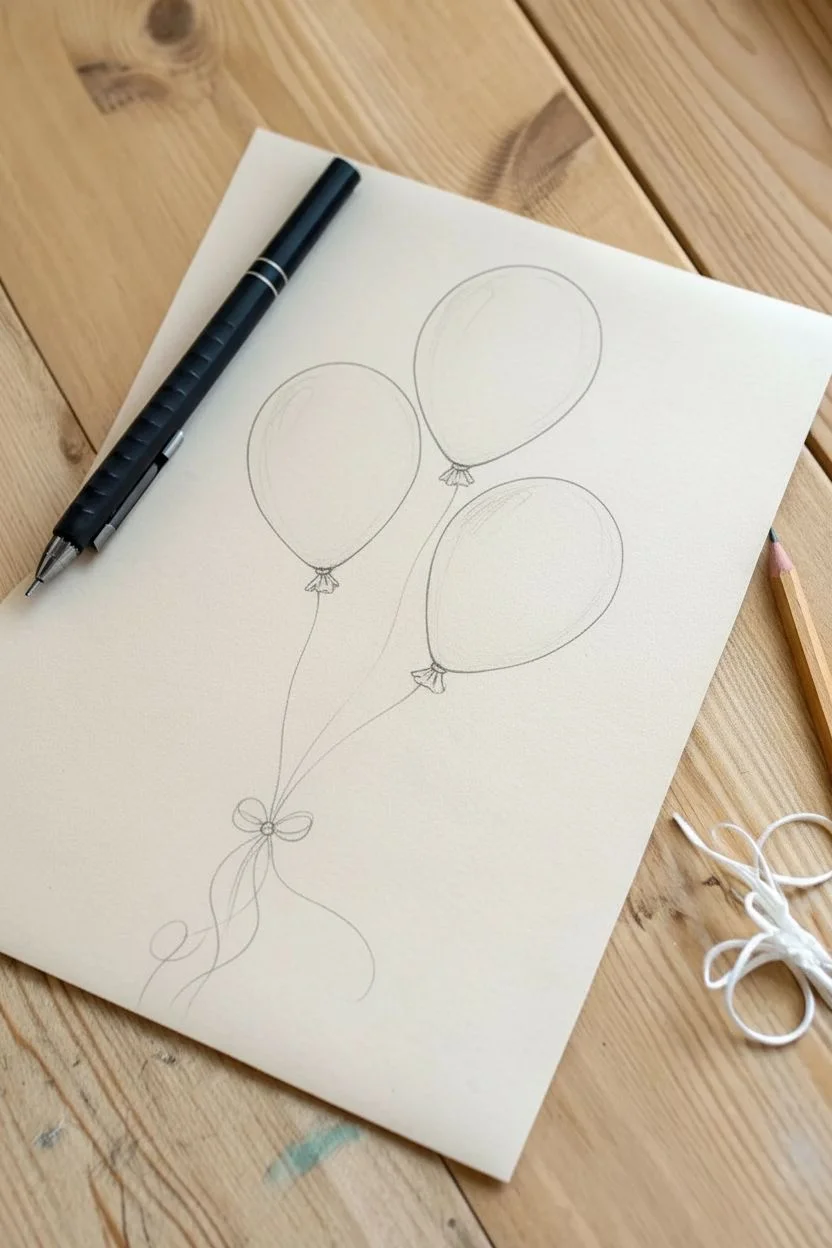
Capture the lightness of floating balloons using this simple shading technique on toned paper. The contrast between soft graphite shadows and bright white highlights creates a convincing 3D volume that pops off the page.
Step-by-Step Guide
Materials
- Toned sketch paper (tan or cream)
- Mechanical pencil (HB or 2B lead)
- White colored pencil or white charcoal pencil
- Blending stump (tortillon) or tissue
- Kneaded eraser
Step 1: Outlining the Shapes
-
Position the first balloon:
Start by drawing a lightly sketched oval near the top right of your paper to represent the highest balloon. -
Add the companions:
Sketch a second oval slightly lower and to the left of the first one, then place a third oval underneath, tucked comfortably between the top two. -
Detail the necks:
At the bottom center of each oval, draw a small, puckered shape to represent the tied neck where the balloon is knotted. -
Clean up contours:
Go over your initial oval sketches with a confident line, smoothing out any wobbles to ensure the balloons look fully inflated.
Scratchy Shading?
If your pencil lines look too rough, layer the graphite slowly. Cross-hatch lightly first, then buff the area with a tissue or paper stump to meld the strokes into a seamless gradient.
Step 2: Shading for Volume
-
Establish the light source:
Decide on a light source coming from the upper right; this means shadows will fall on the bottom and left distinct curves. -
Apply base shading:
Using the side of your pencil lead, gently shade the left and bottom edges of the first balloon. -
Create a gradient:
Decrease pressure as you stroke toward the center, letting the gray fade into the paper tone before reaching the upper right area. -
Repeat for all balloons:
Apply similar shading curves to the remaining two balloons, ensuring the darkest values are on the sides furthest from the light. -
Blend the graphite:
I like to take a blending stump here and smudge the pencil strokes in small circles to create an ultra-smooth, rubbery texture. -
Deepen the contrast:
Go back with your pencil and darken the very edges and the puckered knots to add weight to the forms.
Paper Choice Matters
This 3D effect works best on toned paper (tan, grey, or Kraft). The paper acts as your mid-tone, allowing the white pencil to shine brightly, which wouldn’t happen on standard white paper.
Step 3: Strings and Highlights
-
Draw the strings:
Sketch three thin, slightly wavy lines dropping down from the balloon necks, converging at a central point. -
Tie the bow:
Where the strings meet, draw a small knot and two simple loops to form a bow. -
Add drifting ribbons:
Extend the string lines below the bow, letting them curl and loop loosely toward the bottom of the page for a whimsical feel. -
Erase highlight placement:
Use your eraser to lift up any graphite smudge on the upper right curve of each balloon, creating a clean spot for the reflection. -
Apply the white highlight:
Take your white pencil and firmly color in the erased oval area; this high-contrast reflection makes the balloons look glossy. -
Final accents:
Add tiny faint touches of white to the top ridges of the bow loops to finish the drawing.
Now you have a charming trio of balloons that look like they could float right off your desk.


Landscapes Inside Circles
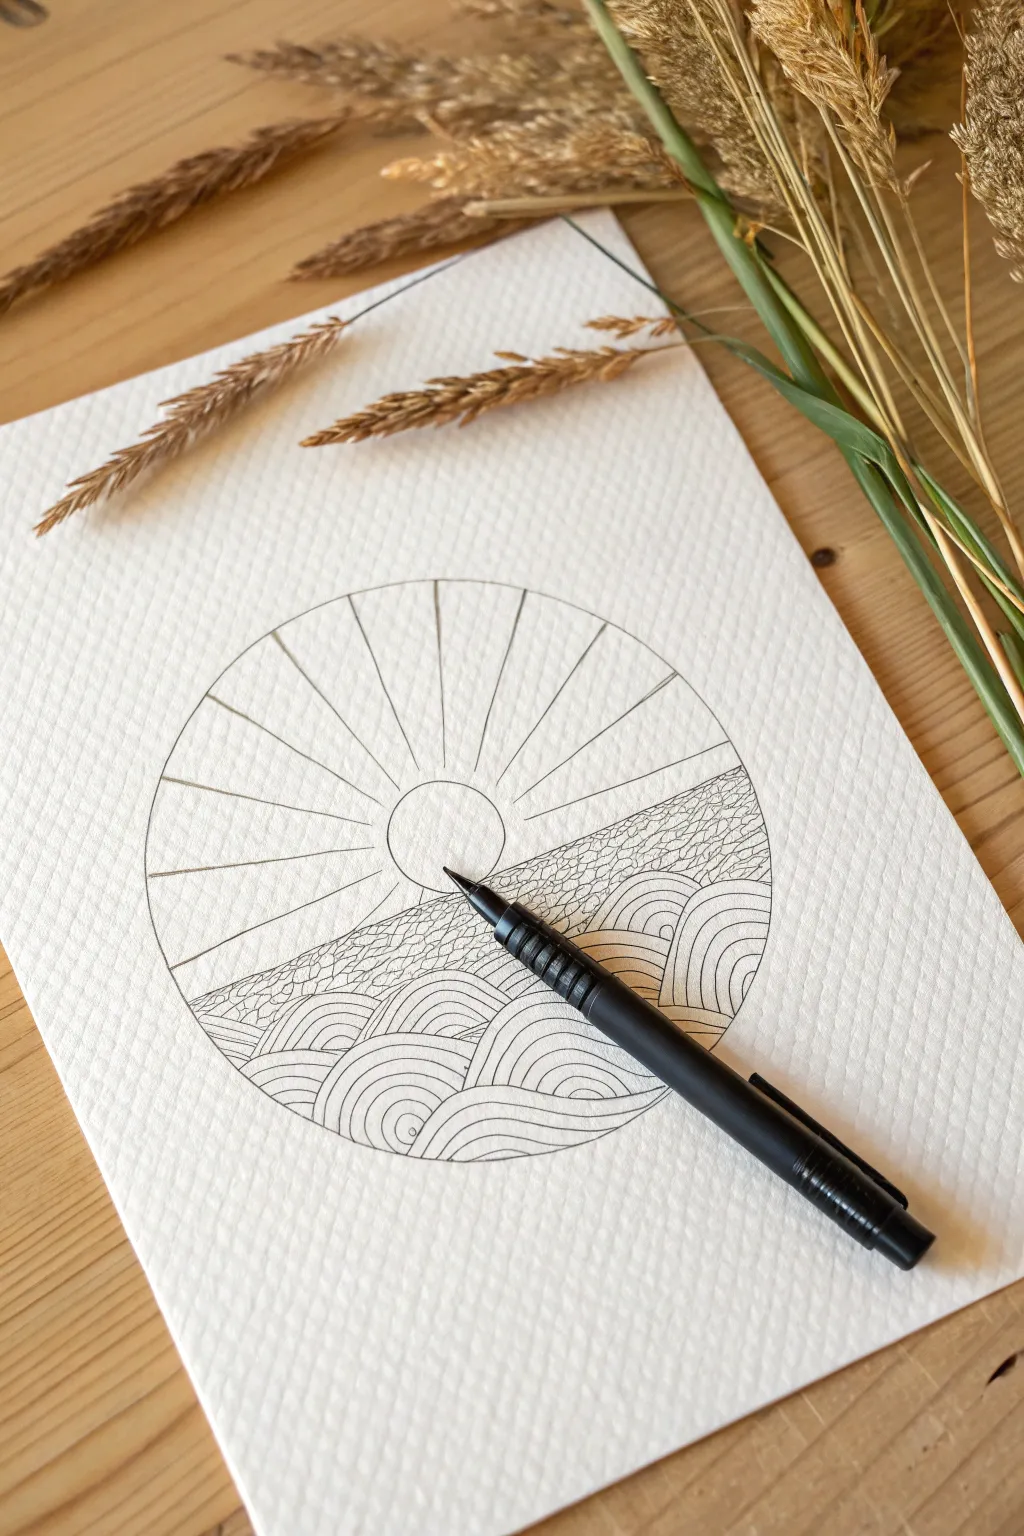
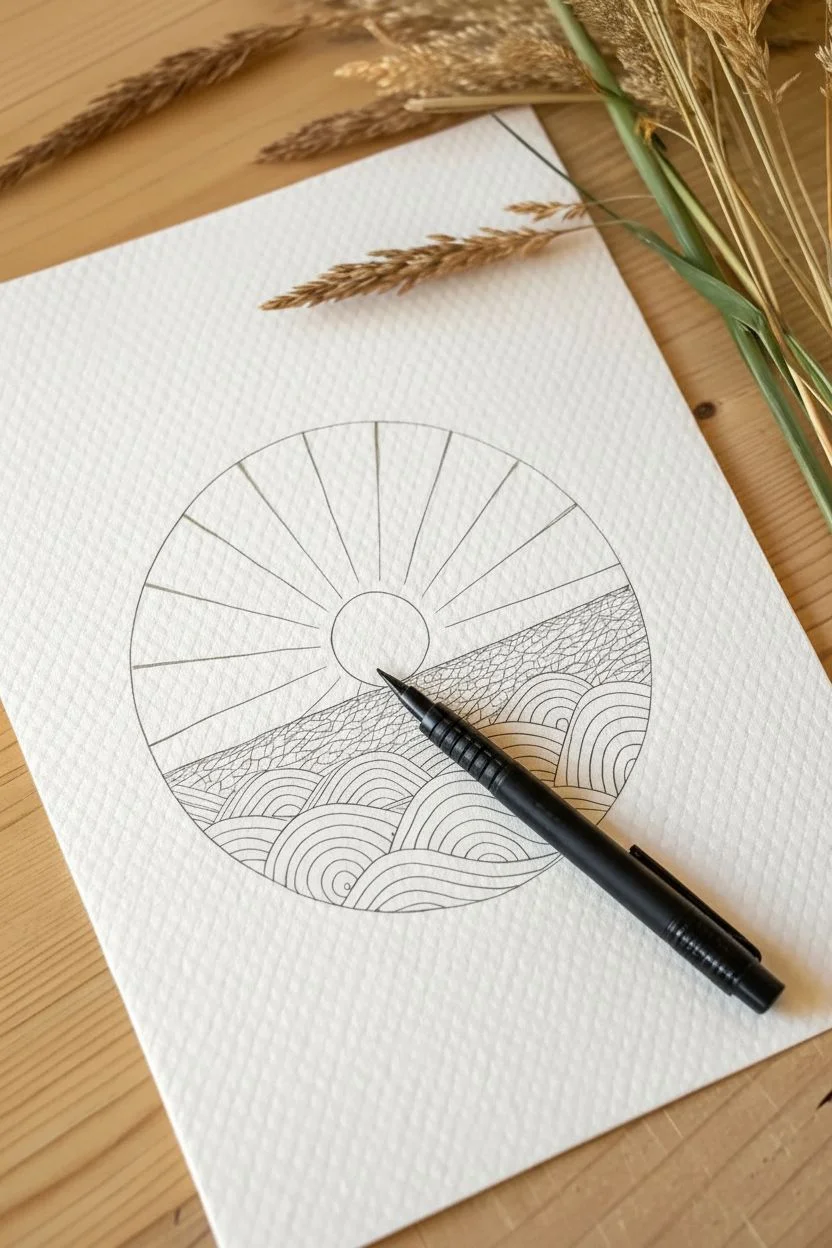
Capture the serenity of a sunset over the water with this clean, geometric line drawing. Using textured paper adds a lovely depth to the crisp ink lines, creating a striking contrast between the organic waves and the structured sun rays.
Step-by-Step
Materials
- Textured watercolor paper (Cold Press)
- HB Pencil
- High-quality eraser
- Black fineliner pen (0.4mm or 0.5mm)
- Compass or small bowl (for tracing)
- Ruler
Step 1: Laying the Foundation
-
Create the boundary:
Begin by drawing a perfect circle in the center of your textured paper using a compass or by lightly tracing around a small bowl. -
Set the horizon:
Lightly sketch a horizontal line slightly below the center of the circle to mark the horizon where the sky will meet the land. -
Position the sun:
Draw a smaller semi-circle sitting directly on top of the horizon line to represent the setting sun. -
Sketch the rays:
Using a ruler, lightly pencil in straight lines radiating from the center of the sun outward to the edge of the main circle. -
Draft the foreground:
Below the horizon, sketch overlapping mounds or semi-circles to represent stylized waves or rolling hills.
Pro Tip: Line Consistency
When drawing the long sun rays, wipe the edge of your ruler with a tissue after every few lines. This prevents ink buildup on the ruler edge that could smear across your clean sky.
Step 2: Inking the Sky
-
Outline the sun:
Switch to your black fineliner and carefully trace over the semi-circle of the sun. -
Ink the rays:
Use your ruler and pen to ink the radiating lines, stopping exactly at the circle’s outer edge. -
Define the sky boundary:
Trace the upper arc of the main circle, sealing in the sky section.
Step 3: Structuring the Earth
-
Create the transition zone:
Between the horizon and the tops of your waves, draw a band of irregular, angular shapes. -
Texture the land:
Fill this band with a ‘cracked earth’ pattern by drawing small, interlocking polygons or stones. -
Vary the organic shapes:
Keep these shapes random and uneven to contrast against the straight lines of the sky.
Level Up: Golden Hour
Since you used watercolor paper, try adding a translucent wash of gold or amber paint over just the sun and rays after the ink is fully waterproof for a pop of color.
Step 4: Flowing Waves
-
Outline the wave mounds:
Ink the main pencil outlines of your foreground waves, ensuring the overlapping sections are clear. -
Start the ripples:
Inside each wave mound, draw a smaller curve that mimics the outer shape. -
Fill with concentric lines:
Continue drawing concentric curves inside each mound, spacing them evenly until the shape is filled. -
Mind the texture:
I like to draw these lines slowly to let the pen nib skip slightly over the paper’s texture, giving it a natural look. -
Close the composition:
Ink the bottom half of the main circle’s perimeter to frame the entire scene.
Step 5: Final Polish
-
Let it set:
Allow the ink to dry completely for several minutes to prevent any smearing during the next step. -
Erase guidelines:
Gently erase all underlying pencil marks, leaving only the crisp black ink.
Now you have a serene, structured landscape that perfectly balances geometric precision with organic flow
Silhouette Figures
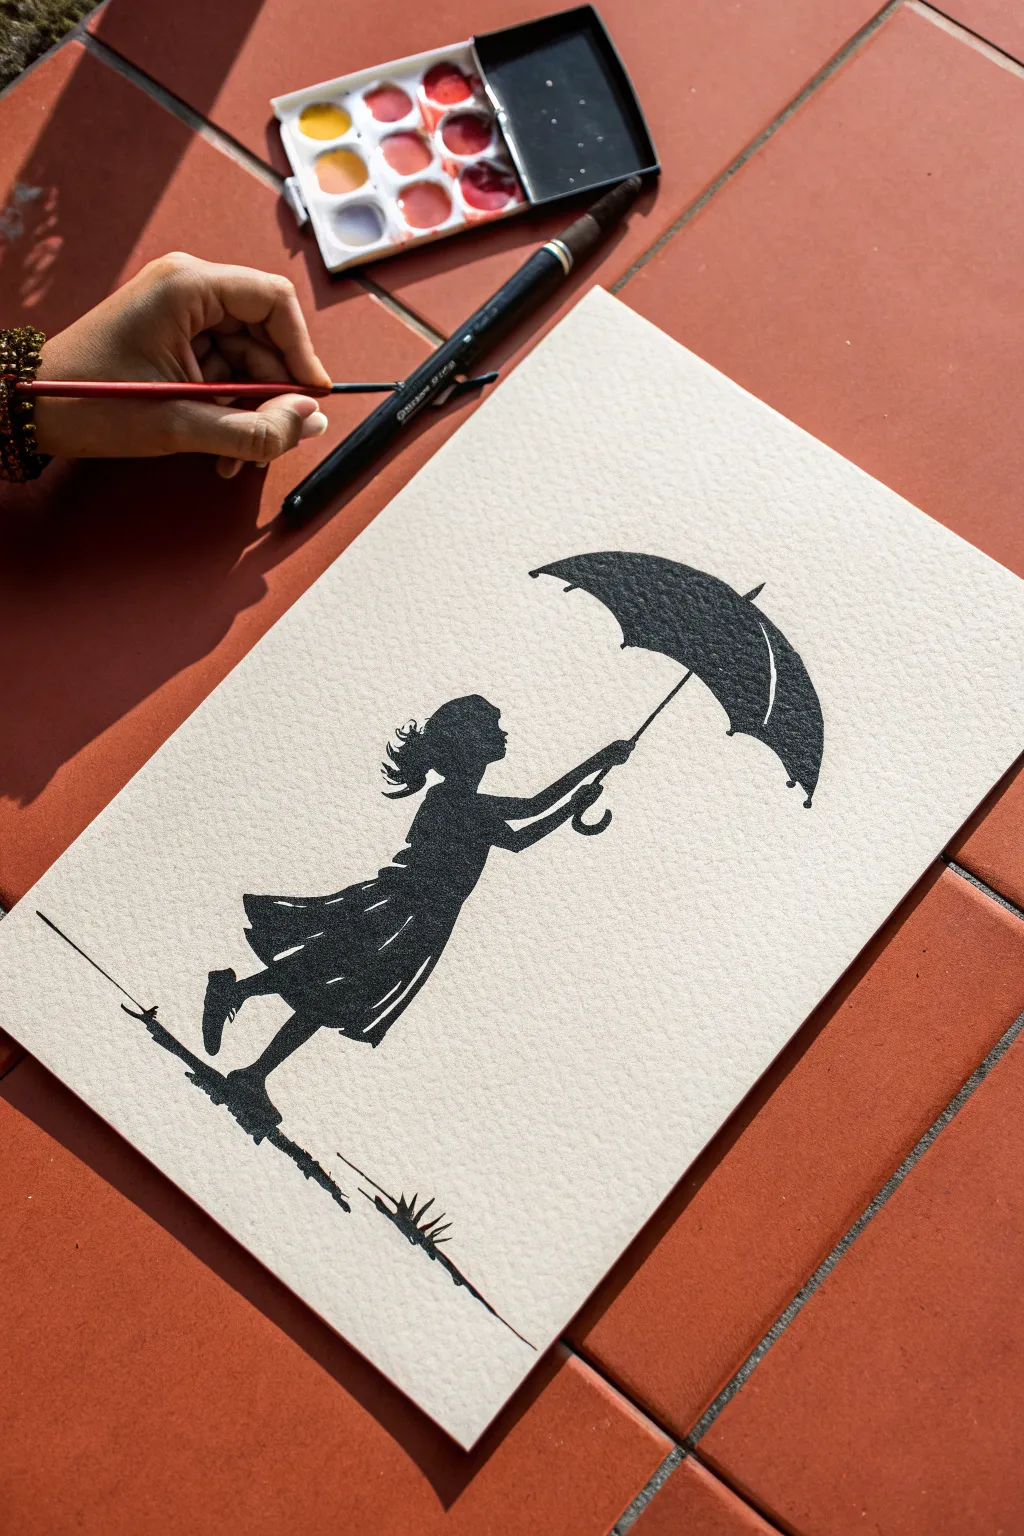
Capture the whimsical movement of a windy day with this high-contrast monochromatic art piece. Using rich black paint on textured paper creates a striking silhouette that isolates the subject beautifully against the negative space.
Step-by-Step Guide
Materials
- Cold-press watercolor paper (heavy texture)
- Black watercolor paint or black gouache
- Small round brush (size 2 or 4)
- Fine detail brush (size 0 or 00)
- HB Pencil and eraser
- Water cup and palette
- Masking tape
Step 1: Sketching the Scene
-
Secure the paper:
Tape your watercolor paper down to a flat surface to prevent it from buckling when the wet paint is applied. -
Draft the ground line:
Using your pencil, lightly draw a slanted, jagged line near the bottom left to represent the grassy ground. Keep this loose and organic. -
Outline the posture:
Sketch the stick-figure frame of the girl. To show she is fighting the wind, angle her body slightly backward while her legs step forward. -
Sketch the dress:
Draw the dress blowing forward in the direction of the wind. Sketch curved lines across the skirt to indicate where the fabric folds will be. -
Add the umbrella:
Place the umbrella in her hands, angling it downwards to shield against the imaginary wind. Draw the canopy shape and the arched handle. -
Refine details:
Add details like the ponytail blowing in the wind, the shape of the shoes, and her profile. I find it helpful to keep pencil lines light so they are easy to erase later.
Step 2: Painting the Silhouette
-
Prepare the paint:
Mix your black watercolor with a little water until it has an inky, cream-like consistency. You want it opaque enough to cover in one coat. -
Start with the umbrella:
Using the detail brush, carefully outline the umbrella canopy. Leave thin slivers of unpainted paper between sections to represent the umbrella ribs. -
Paint the handle:
Switch to your finest brush to paint the straight shaft of the umbrella and the curved handle hook held in her hand. -
Define the profile:
Paint the girl’s face profile. Use the very tip of your brush to flick paint outward for the ponytail strands to simulate movement. -
Fill the upper body:
Fill in the arms and torso with solid black. Ensure the connection between the hands and the umbrella handle looks natural. -
Outline the skirt folds:
Before filling the skirt, look at your pencil sketch. You want to leave thin white gaps (negative space) to show the folds of the fabric. -
Fill the skirt:
Paint the sections of the dress solid black, being extremely careful to preserve those thin white lines that define the shape and volume. -
Paint the legs:
Fill in the legs and shoes. Lift the heel of the back foot to enhance the illusion of walking forward. -
Create the ground:
Use the side of your round brush to create rough, textured strokes along your bottom pencil line. Add small upward flicks to look like grass blades.
Crisp Line Pro-Tip
If painting around the thin white lines on the dress and umbrella is too difficult, paint the whole shape solid black. Once dry, use a white gel pen to draw the details back on top.
Step 3: Final Touches
-
Let it dry:
Allow the paint to dry completely. If the black looks patchy or grey in some spots, apply a second layer strictly over the dry black areas. -
Clean up sketches:
Once the paper is bone dry, gently use your eraser to remove any visible pencil lines around the silhouette for a crisp finish.
Fuzzy Edges?
If your silhouette edges are bleeding, your brush has too much water or the paper is damp. Dry your brush on a paper towel before loading paint to ensure sharp, crisp outlines.
Display your artwork in a simple frame to highlight the striking contrast of your silhouette technique.
The Finger Heart Gesture
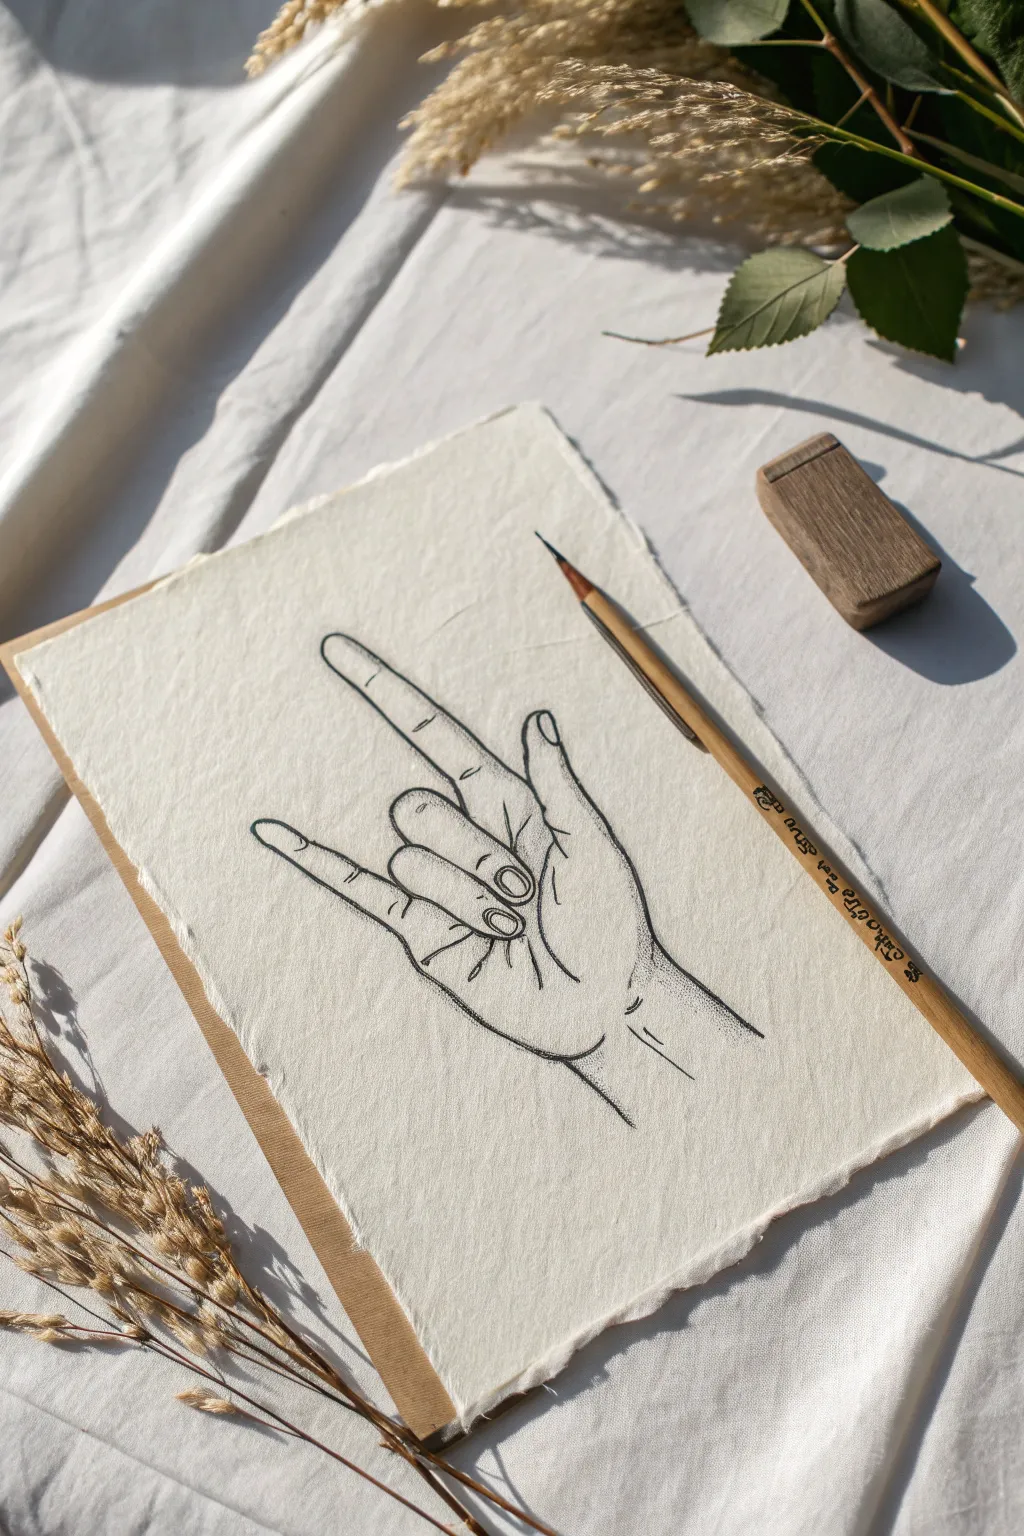
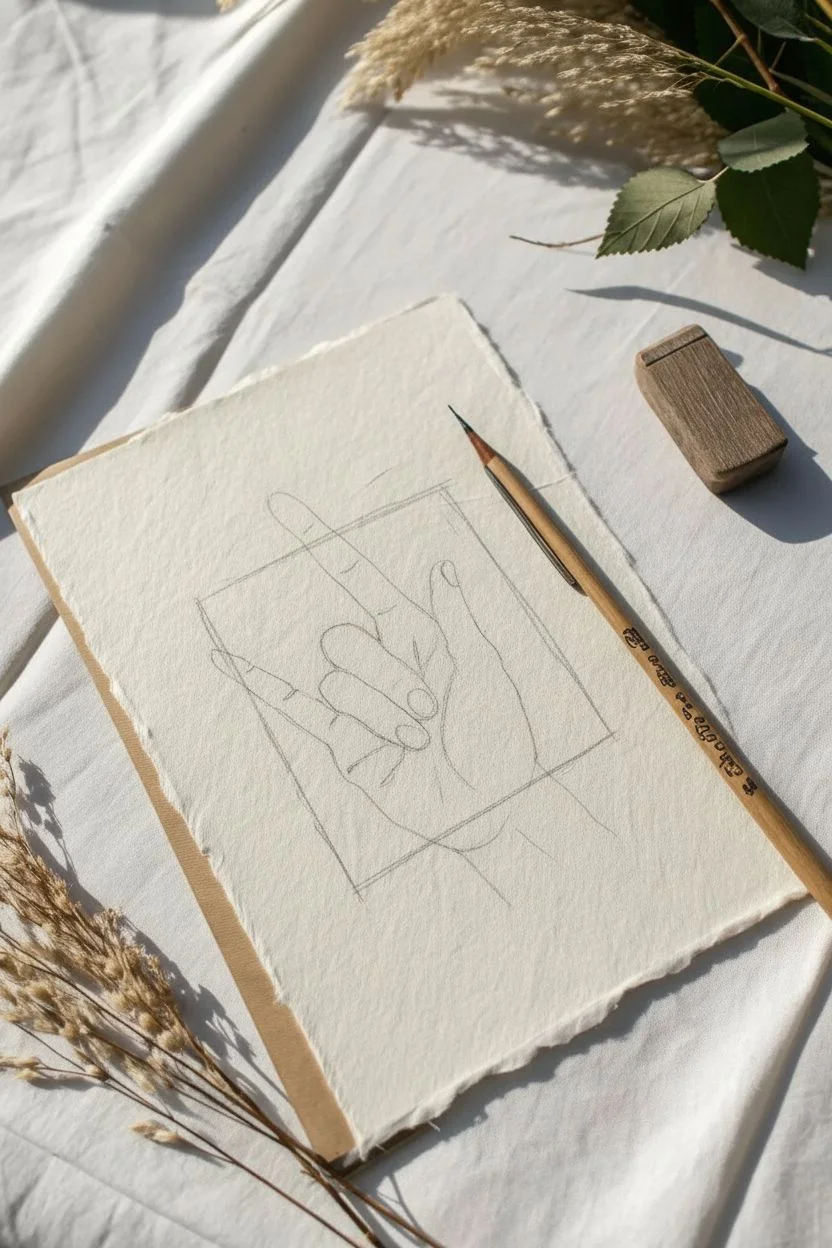
Capture the classic ‘I Love You’ or ‘Rock On’ hand sign with this minimalist line art tutorial. Using textured paper and simple ink techniques, you will create a piece that feels both organic and stylish.
Detailed Instructions
Materials
- Textured sketch paper (deckle edge recommended)
- HB graphite pencil
- Fine liner pen (black, size 0.5)
- Kneaded eraser
- Reference photo of your own hand
Step 1: Structural Sketch
-
Palm placement:
Start by drawing a loose, roughly square shape in the center of your paper to represent the palm. Tilt it slightly to the right. -
Wrist foundation:
Extend two parallel lines downwards from the bottom of the palm to create the wrist. -
Finger skeletons:
Draw faint lines to map the fingers: one line sticking straight up for the index, one for the pinky, and one extending to the left for the thumb. -
Folded fingers:
Sketch two bent shapes in the middle of the palm to represent the middle and ring fingers curling inwards.
Step 2: Refining the Form
-
Outline the index:
Draw the contour around your index finger guide, making sure to bulge the line slightly for the knuckles. -
Pinky details:
Outline the pinky finger, keeping it significantly shorter and thinner than the index finger. -
Thumb shape:
Flesh out the thumb, curving the tip slightly inward towards the palm for a natural look. -
Knuckles and folds:
Refine the two folded fingers in the center. The knuckles should be the highest point of these distinct shapes. -
Connections:
Connect all fingers to the main palm shape, smoothing out the transition areas between the fingers. -
Nail beds:
Sketch small U-shapes near the tips of the extended fingers and the thumb to indicate fingernails.
Troubleshooting
If the fingers look rigid or like sausages, curve the lines slightly at each joint segment. Real fingers are rarely perfectly straight.
Step 3: Inking
-
Trace contour:
Switch to your fine liner pen. Carefully trace the outer silhouette of the hand with a confident, continuous line where possible. -
Internal details:
Ink the folded fingers and the fingernails. I prefer to leave small gaps in the nail lines so they don’t look too heavy. -
Wrist creases:
Add two short, horizontal lines across the wrist area to show skin folds. -
Palm lines:
Draw a curved line inside the palm near the thumb to represent the life line. -
Erase pencil:
Wait for the ink to dry completely, then gently remove the graphite guidelines with your eraser.
Level Up
Try dipping a brush in diluted coffee or tea and spattering small droplets across the paper background for a vintage, artistic aesthetic.
Step 4: Shading and Texture
-
Stippling method:
To add depth, use a stippling technique—creating shading by grouping many small dots together. -
Right side shadows:
Apply stippling along the right edge of the hand and wrist to give the drawing volume. -
Finger depth:
Add a few dots under the curled fingers and on the knuckles to suggest shadows cast by the skin folds. -
Final assessment:
Step back and check your contrast. If the hand looks flat, add a few more dots to the darker areas to deepen the shadow.
Now you have a cool, hand-drawn gesture ready to frame or gift to a friend
Crystal Clusters
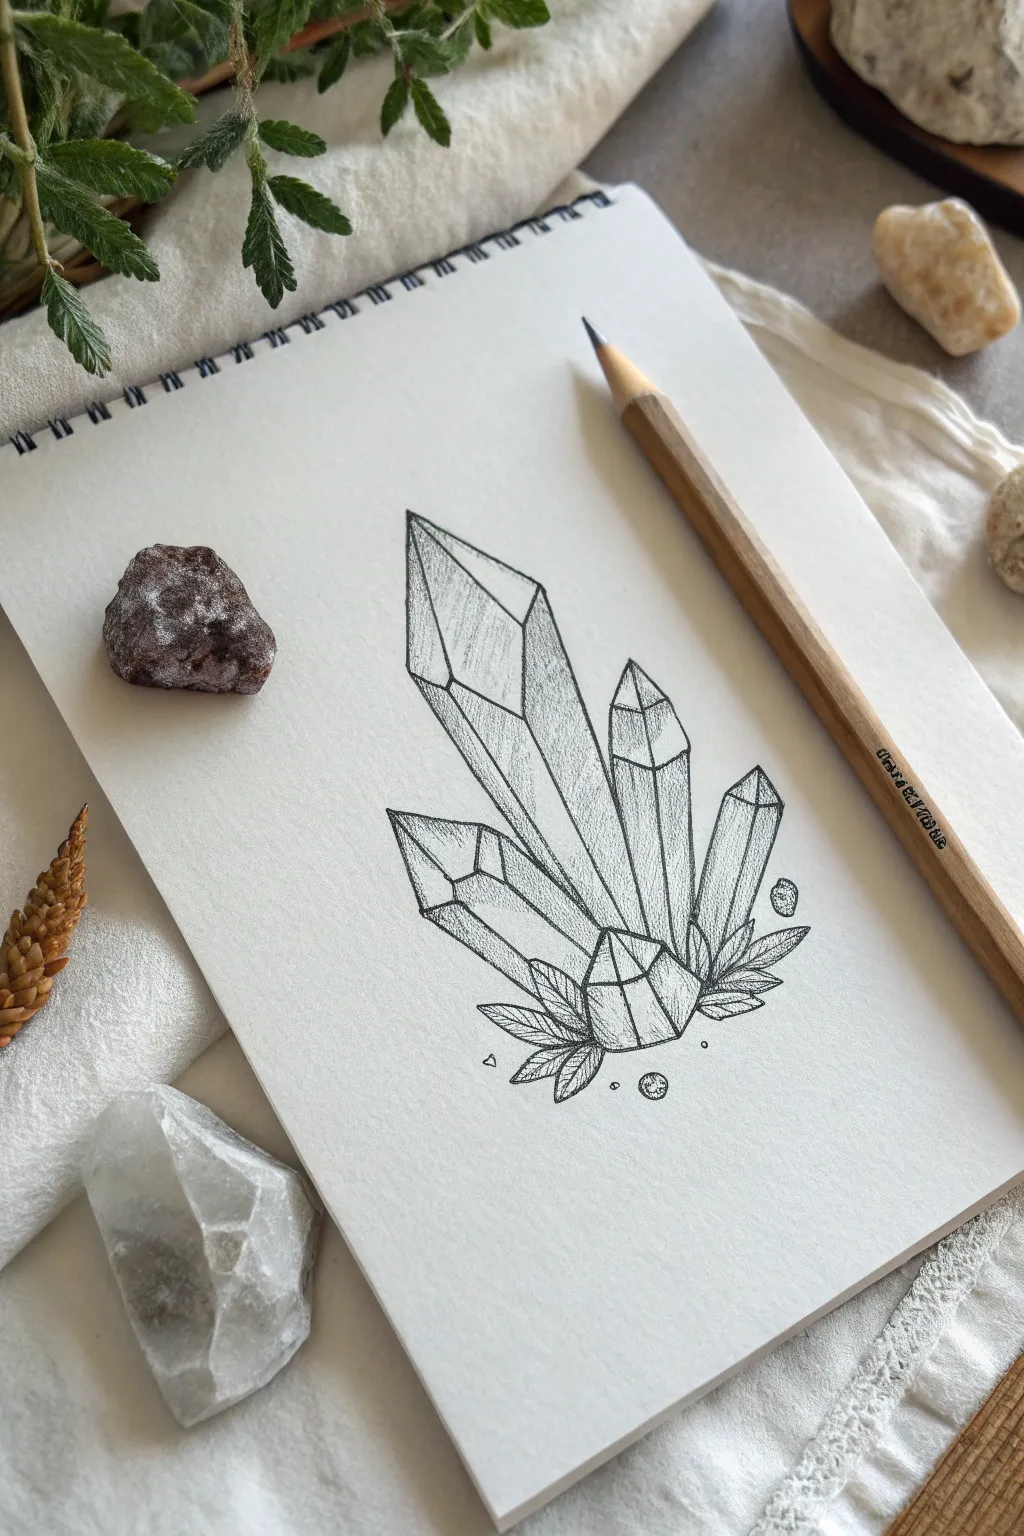
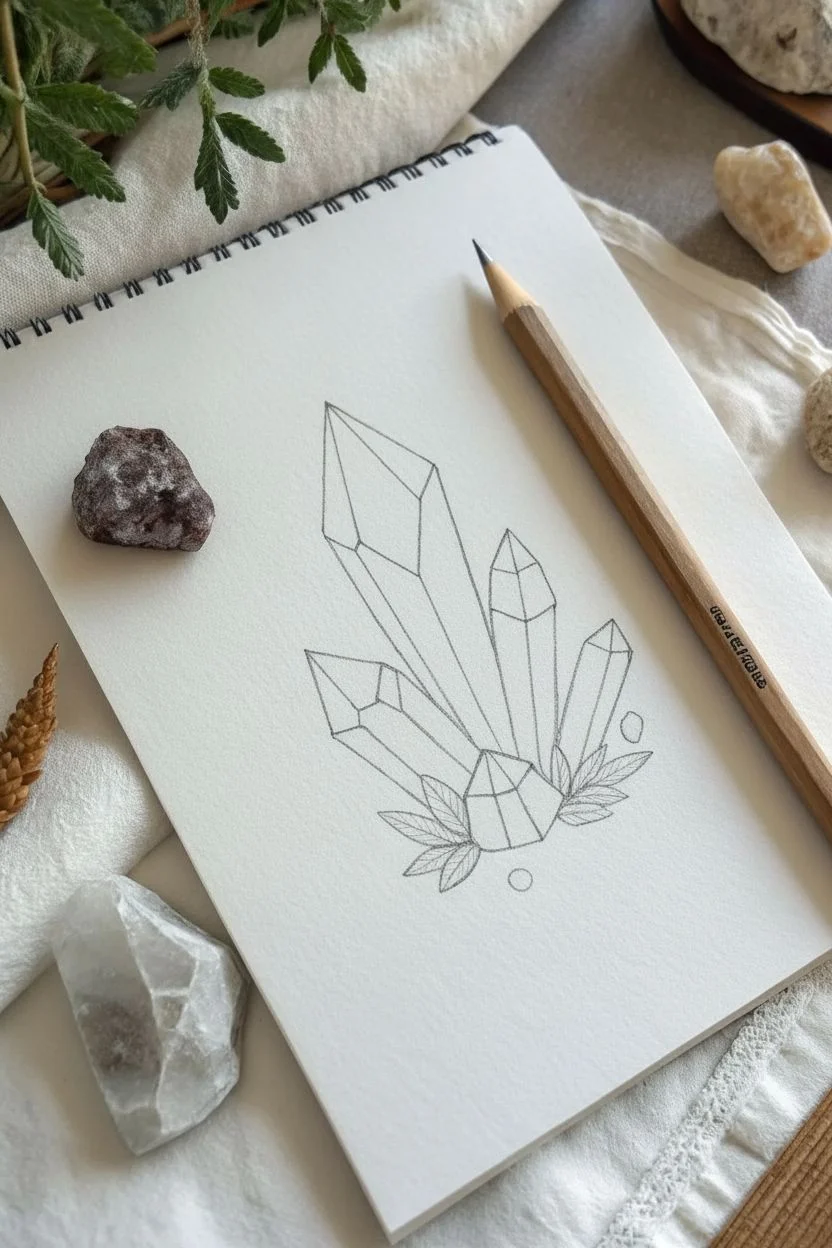
Capture the sharp elegance of quartz with this detailed crystal cluster study. This project focuses on straight lines and careful shading to create a dimensional, mystical look on simple sketch paper.
Step-by-Step Guide
Materials
- Sketchbook paper
- HB pencil (for outlines)
- 2B or 4B pencil (for shading)
- Fine-point eraser
- Ruler (optional)
- Pencil sharpener
Step 1: Structural Outline
-
Central Spire:
Begin by drawing the tallest crystal in the center. Sketch a long rectangle with a pointed triangular top, resembling a sharpened pencil shape. -
Side Crystals:
Add a medium-sized crystal leaning out to the left, slightly tucked behind the main spire. Then, draw two smaller shards on the right side at varying heights. -
Anchor Crystal:
Sketch a short, squat geometric shape at the very bottom center. This acts as the anchor point where all the other crystals seem to grow from. -
Faceting:
Draw lines inside the crystal tips to create facets. Connect the tip of the peak to the corners of the rectangle body to show different angled planes. -
Vertical definitions:
Extend vertical lines down the length of each crystal body to separate the front face from the side faces.
Looking Flat?
If the crystals look 2D, increase the contrast. Ensure one facet is very dark (shadow), one is medium (mid-tone), and one is pure white (light). This contrast creates the 3D illusion.
Step 2: Nature Details
-
Foliage Base:
Sketch small, pointed leaves branching out from the bottom of the cluster. Arrange them symmetrically, with three or four on each side. -
Leaf Veins:
Draw a center line down each leaf to define its structure. -
Floating Elements:
Add small circles or irregular geometric shapes floating near the base to represent magic dust or pebbles.
Clean Edges
For this geometric style, sharpness is key. Rotate your pencil frequently to maintain a sharp point, or use a mechanical pencil to keep your facet lines crisp and consistent.
Step 3: Shading and Texture
-
Firm Outlines:
Go over your structural lines with a sharpened pencil, making the outer edges slightly darker than the internal facet lines. -
Hatching:
Use parallel diagonal lines (hatching) to shade the side facets of the crystals. Keep the front-facing planes white to represent highlighted surfaces. -
Gradient Depth:
Darken the shading near the bottom of each crystal where they meet the base. I like to press a bit harder here to create a sense of depth and shadow. -
Stippling:
Add tiny dots (stippling) inside the darker shadowed areas and near the base to create a gritty, realistic texture. -
Foliage Shading:
Shade the leaves using short, directional strokes that follow the shape of the leaf, keeping the tips lighter. -
Particle Detail:
Fill in the floating pebbles with a textured, scribbled pattern to differentiate them from the smooth crystals. -
Final Contrast:
Review the drawing and deepen the darkest shadows, particularly in the crevices between the crystals, to make the white highlights pop.
Now you have a striking geometric sketch ready to be framed or inked!
Lightbulb Florals
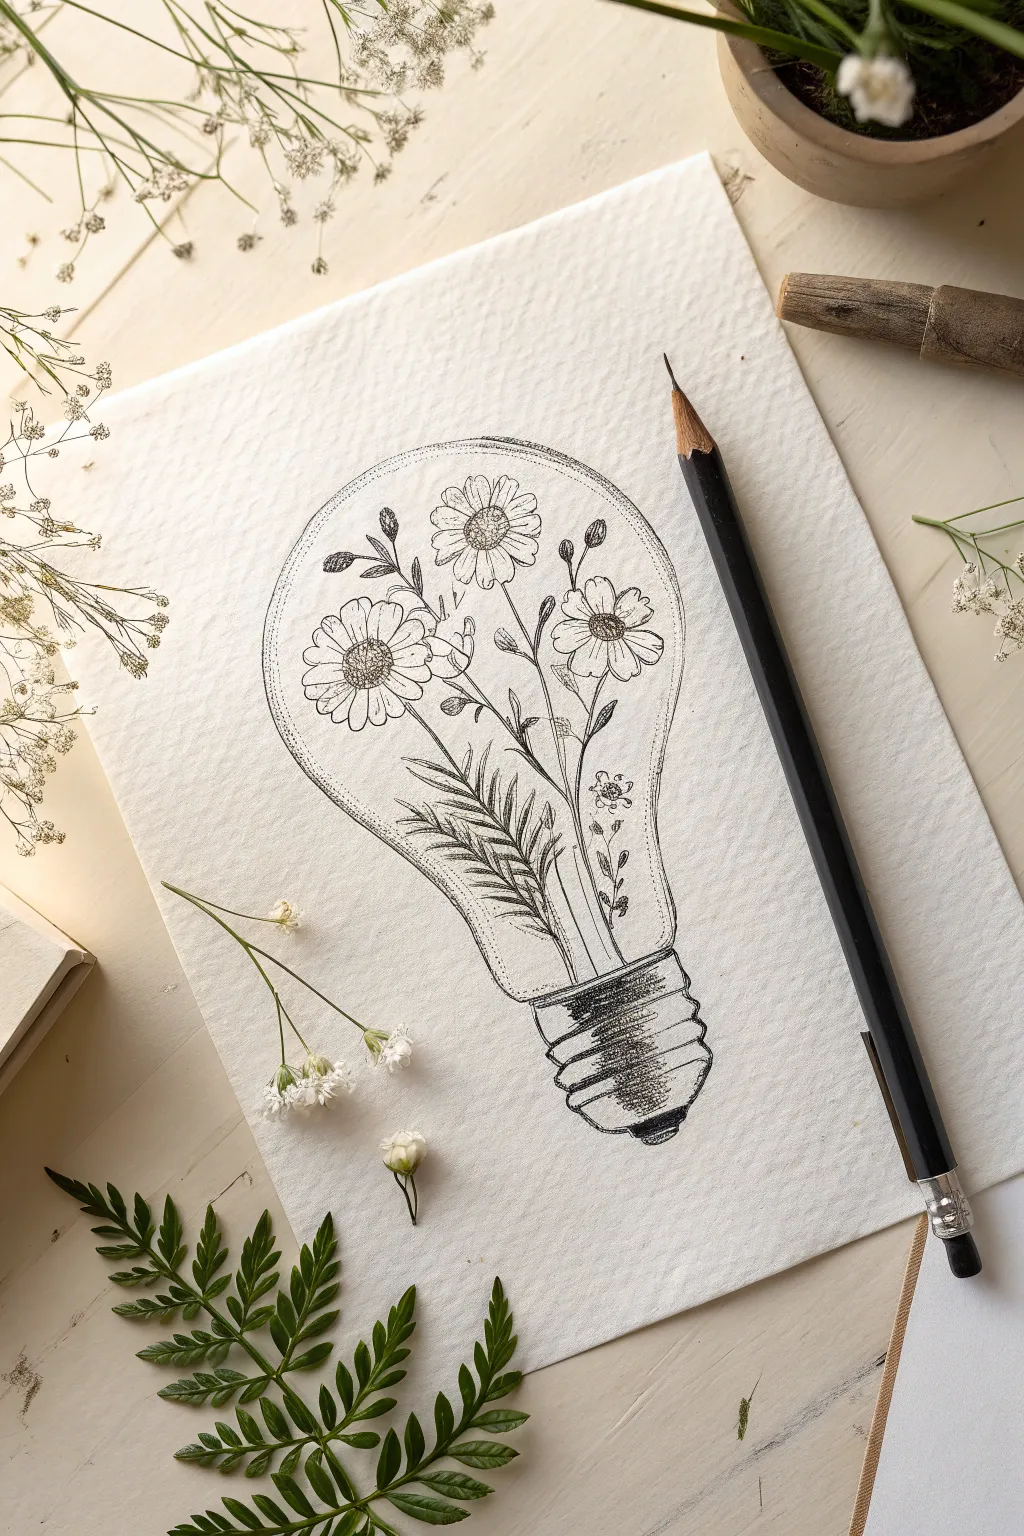
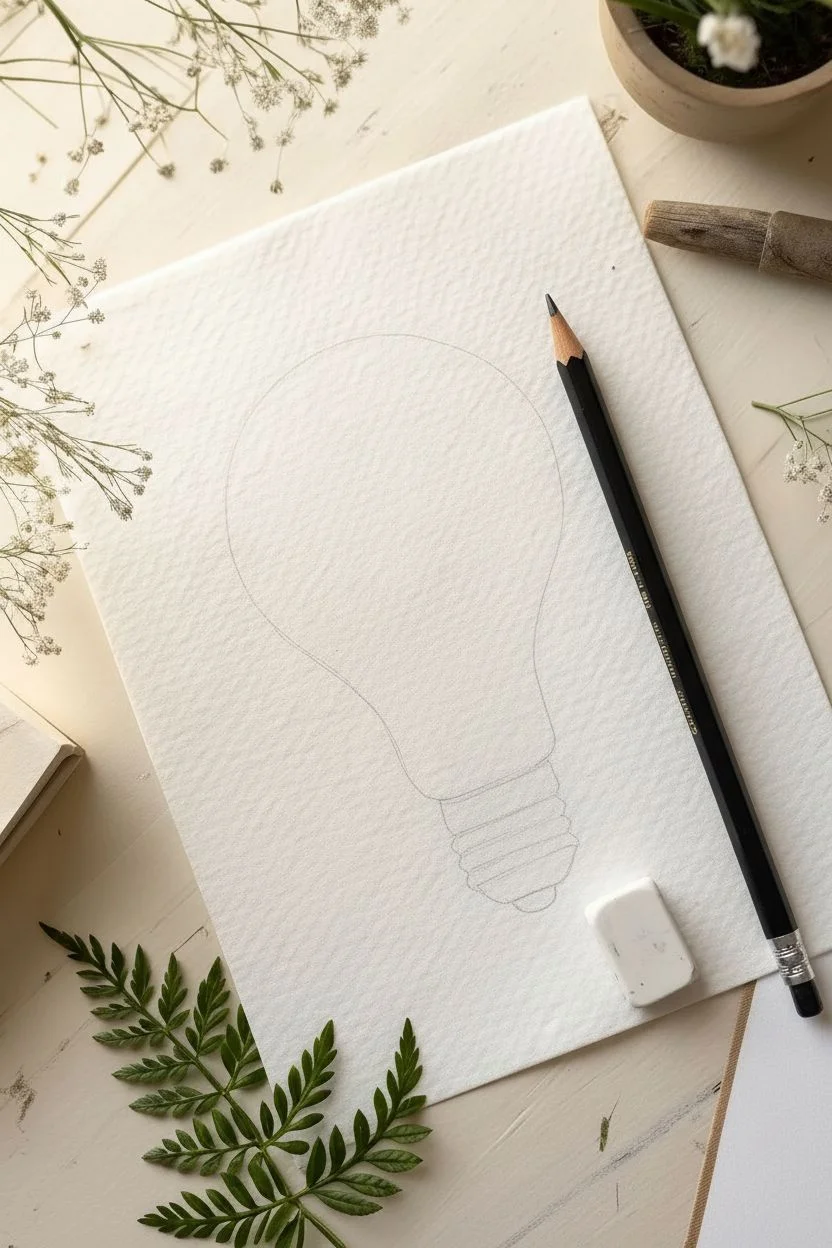
Capture the poetic contrast between industrial objects and organic nature with this delicate fine-line drawing. This project masters the art of stippling and texture to encase a wild garden inside a vintage lightbulb.
Detailed Instructions
Materials
- Cold-press watercolor paper (heavily textured)
- HB graphite pencil
- Kneaded eraser
- Black fine liner pens (sizes 0.05, 0.1, and 0.5)
- Ruler (optional)
Step 1: Drafting the Glass Vessel
-
Establish the sphere:
Begin with your HB pencil, lightly sketching a large circle in the center of your textured paper to form the main body of the bulb. -
Form the neck:
Draw two vertical lines tapering slightly inward extending from the bottom of the circle. -
Curve the transition:
Smooth out the connection points between the circle and the neck so it looks like one continuous piece of blown glass. -
Sketch the base:
At the bottom of the neck, sketch a rounded rectangular shape for the metal screw cap. -
Add the contact point:
Draw a small, flattened semi-circle at the very bottom tip of the screw cap to represent the electrical contact point.
Step 2: Planting the Garden
-
Position the main blooms:
Sketch three daisy-like circles inside the bulb: one near the top left, one central, and one facing sideways on the right. -
Add floating stems:
Draw thin, waving lines connecting the flower heads down toward the neck of the bulb, crossing them over each other naturally. -
Insert the fern:
In the lower left space of the bulb, sketch a sweeping line for a fern frond, adding small tick marks where leaves will go. -
Fill the gaps:
Add tiny circles for berry buds and smaller stems to fill empty negative spaces, keeping the composition balanced. -
Refine pencil lines:
Go over your sketch to ensure the flowers stay strictly inside the glass outline, erasing any parts that spill over.
Rotate for curves
Turn your paper physically as you draw the large curve of the lightbulb. Your hand creates a more natural, symmetrical arc when pulling the pen toward you rather than pushing it away.
Step 3: Inking outlines
-
Trace the petals:
Switch to a 0.1 fine liner. Ink the flower petals with slightly shaky or broken lines to mimic organic textures. -
Define the centers:
Draw a tight circle for the flower centers and fill them with tiny dots (stippling) to create a fuzzy, pollen-like look. -
Ink the foliage:
Carefully trace the stems. For the fern, draw small, lance-shaped leaves extending from the main stem you sketched earlier. -
Outline the glass:
I like to use a slightly thicker 0.3 pen here to trace the bulb’s outer shape, occasionally breaking the line to suggest light reflection. -
Detail the filler plants:
Ink the tiny buds and smaller leaves using your finest 0.05 pen for delicate precision.
Level Up: Watercolor Wash
After the ink is waterproof-dry, use a small brush to add faint washes of yellow to the petals and green to the ferns, keeping the color strictly inside the glass for a magical look.
Step 4: Shading and Texture
-
Structure the metal base:
Using a 0.5 pen, draw thick horizontal curved lines on the screw base. -
Shade the metal:
Use close horizontal hatching lines between the thick bands to make the metal look threaded and rounded. -
Add glass volume:
Add very subtle stippling (dots) along the inner edges of the glass bulb to simulate curvature and shadow. -
Darken the focal points:
Add more ink density to the bottom of the stems where they bundle together in the neck of the bulb. -
Clean up:
Wait at least 10 minutes for the ink to fully set, then gently erase all remaining pencil marks.
Now you have a captured botanical specimen that glows without electricity.
Yin Yang Koi Fish
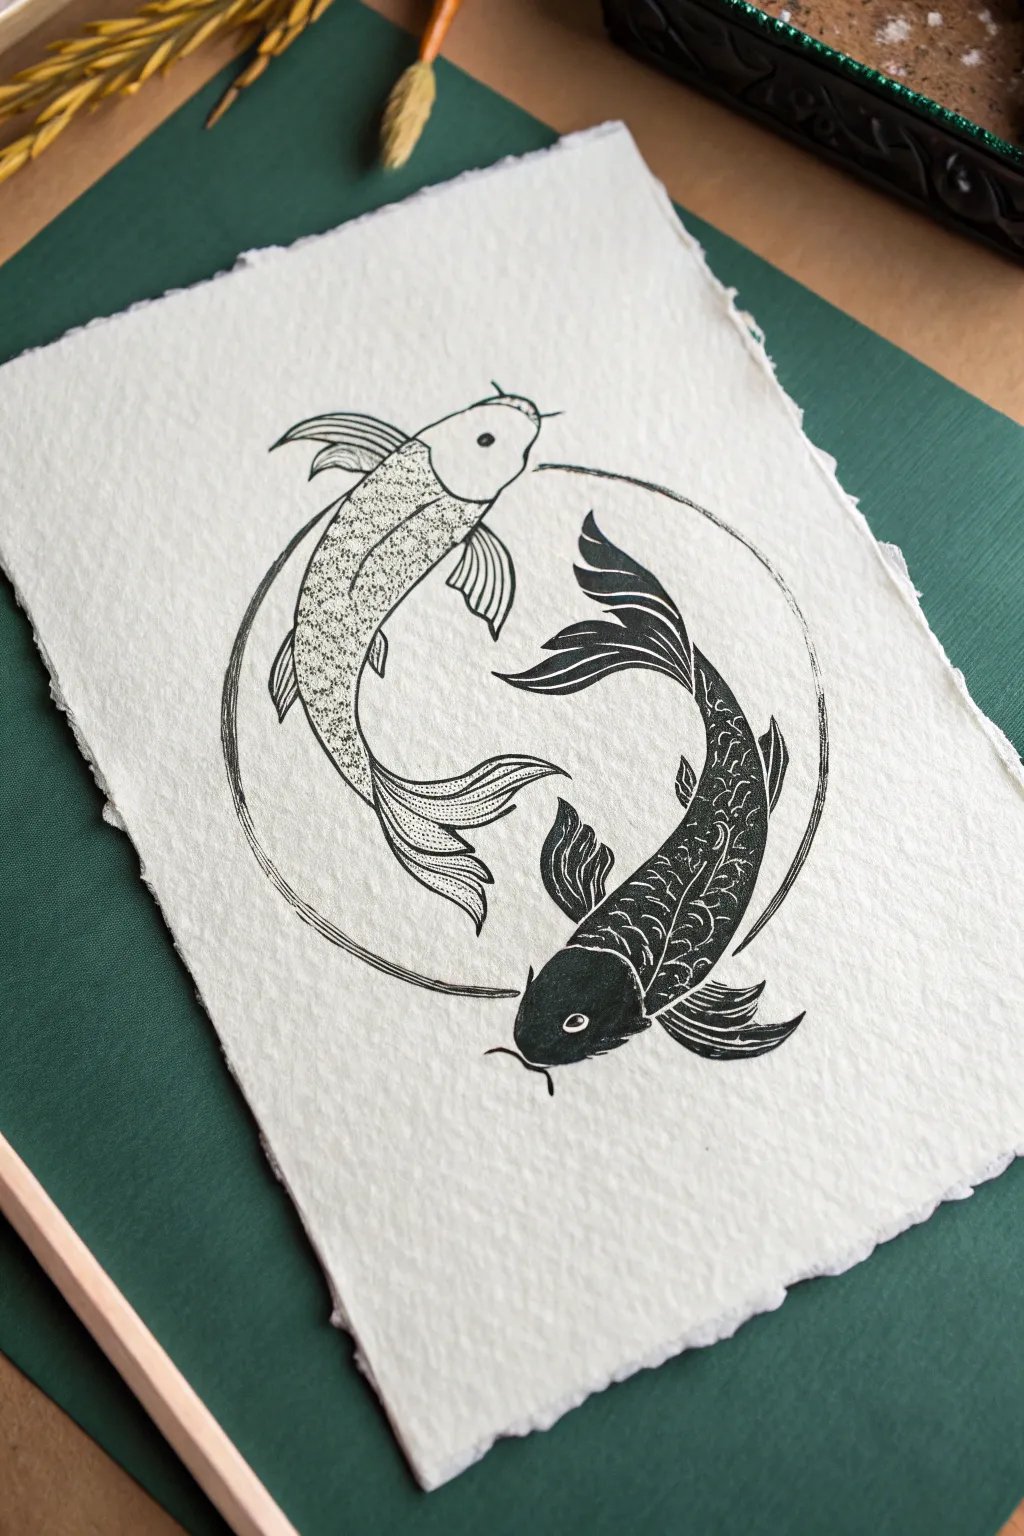
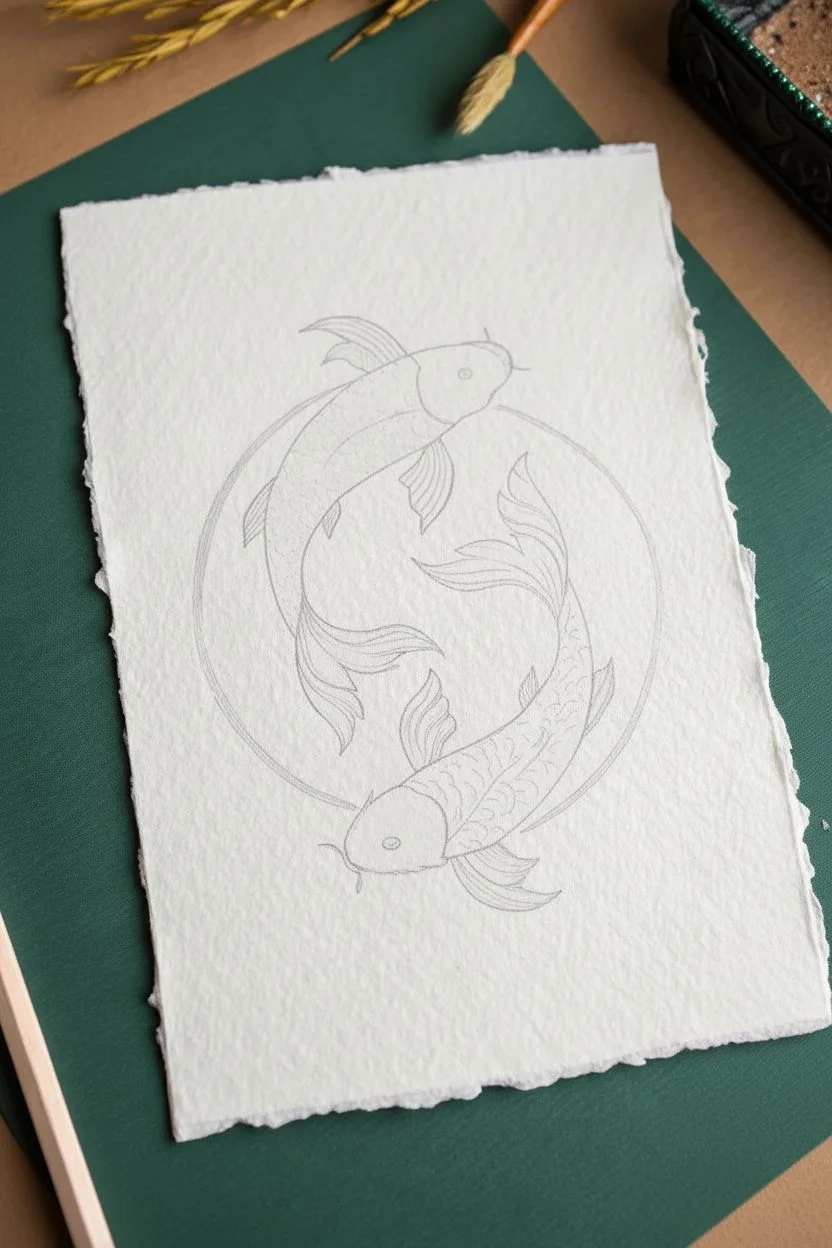
Create a harmonious piece of art that balances negative space with bold ink work. This project captures two koi fish circling in a Yin Yang formation, using stippling for texture on one and solid black fill for dramatic contrast on the other.
Step-by-Step Tutorial
Materials
- Heavyweight textured paper (deckle edge recommended)
- Fine liner pens (sizes 005, 01, and 05 or 08)
- HB Pencil
- Kneaded eraser
- Compass or a small circular bowl (approx. 4-5 inches)
- White gel pen (optional for corrections)
Step 1: Sketching the Composition
-
Create the boundary:
Begin by lightly tracing a circle in the center of your textured paper using a compass or by tracing around a small bowl. -
Divide the circle:
Sketch a gentle ‘S’ curve through the center of the circle to define the separation between the two fish. -
Form the bodies:
Draw a teardrop shape for each fish body within the divided sections, making sure the head of one aligns with the tail of the other. -
Add flowing fins:
Sketch the dorsal (back) and pectoral (side) fins. Ensure the fins curve slightly creating a sense of movement in the water. -
Define the tails:
Draw the tail fins sweeping outward, following the curve of the outer circle to maintain the rotational energy. -
Detail the faces:
Lightly mark the placement of the eyes near the front of the heads and add two curving barbels (whiskers) to each mouth.
Stippling Patience
For the light fish, don’t rush the dots! Hold your pen vertically and tap gently. Randomize the placement rather than making rows to avoid a mechanical grid look.
Step 2: Inking the Light Fish (Top)
-
Outline the top fish:
Using a size 01 fine liner, carefully trace the pencil outline of the top fish, keeping the lines crisp but organic. -
Add texture with stippling:
Switch to a 005 pen for delicate details. Instead of drawing solid scales, apply small dots (stippling) along the spine and the top of the head to create shading. -
Shade the fins:
Use the 005 pen to draw fine, wispy lines inside the fins and tail, starting from the body and fading out toward the tips. -
Deepen the contrast:
Add more dots densely on the left side of the fish’s body to give it a rounded 3D appearance, fading to white on the belly.
Level Up: Gold Leaf
Add a touch of luxury by applying liquid gold leaf or metallic gold ink to the eyes of the fish or the outer circle ring for a stunning mixed-media effect.
Step 3: Inking the Dark Fish (Bottom)
-
Outline the bottom fish:
Trace the outer shape of the bottom fish with the 01 pen, just as you did with the first one. -
Draw the scale grid:
Inside the body, lightly draw a pattern of small, overlapping scalloped curves to represent the scales. Do not fill them yet. -
Thicken the scale lines:
Go over your scale lines again to make them double-thick, creating a ‘channel’ of white space for each scale. -
Fill the black void:
I prefer to use a thicker 05 or 08 pen for this stage. Carefully color in the body of the fish, coloring *around* the scale lines so they remain white against the black ink. -
Detail the black fins:
Similar to the body, outline the structural ribs in the fins and tail first, then fill the spaces between them with black ink, leaving thin white separators. -
Ink the eye:
Fill in the face with black, leaving a small white ring for the eye and a tiny white highlight dot in the center.
Step 4: Final Touches
-
Inking the circle:
Trace the main outer circle twice loosely with an 01 pen to give it a sketchy, artistic border rather than a perfect geometric line. -
Erase and clean:
Wait at least 15 minutes to ensure the heavy black ink is completely dry, then gently erase all visible pencil marks. -
Correction check:
If you accidentally covered a white line on the dark fish, use a white gel pen to restore the detail.
Frame your beautiful symbol of duality and enjoy the peaceful balance it brings to your space
Aesthetic Polaroid Snapshots
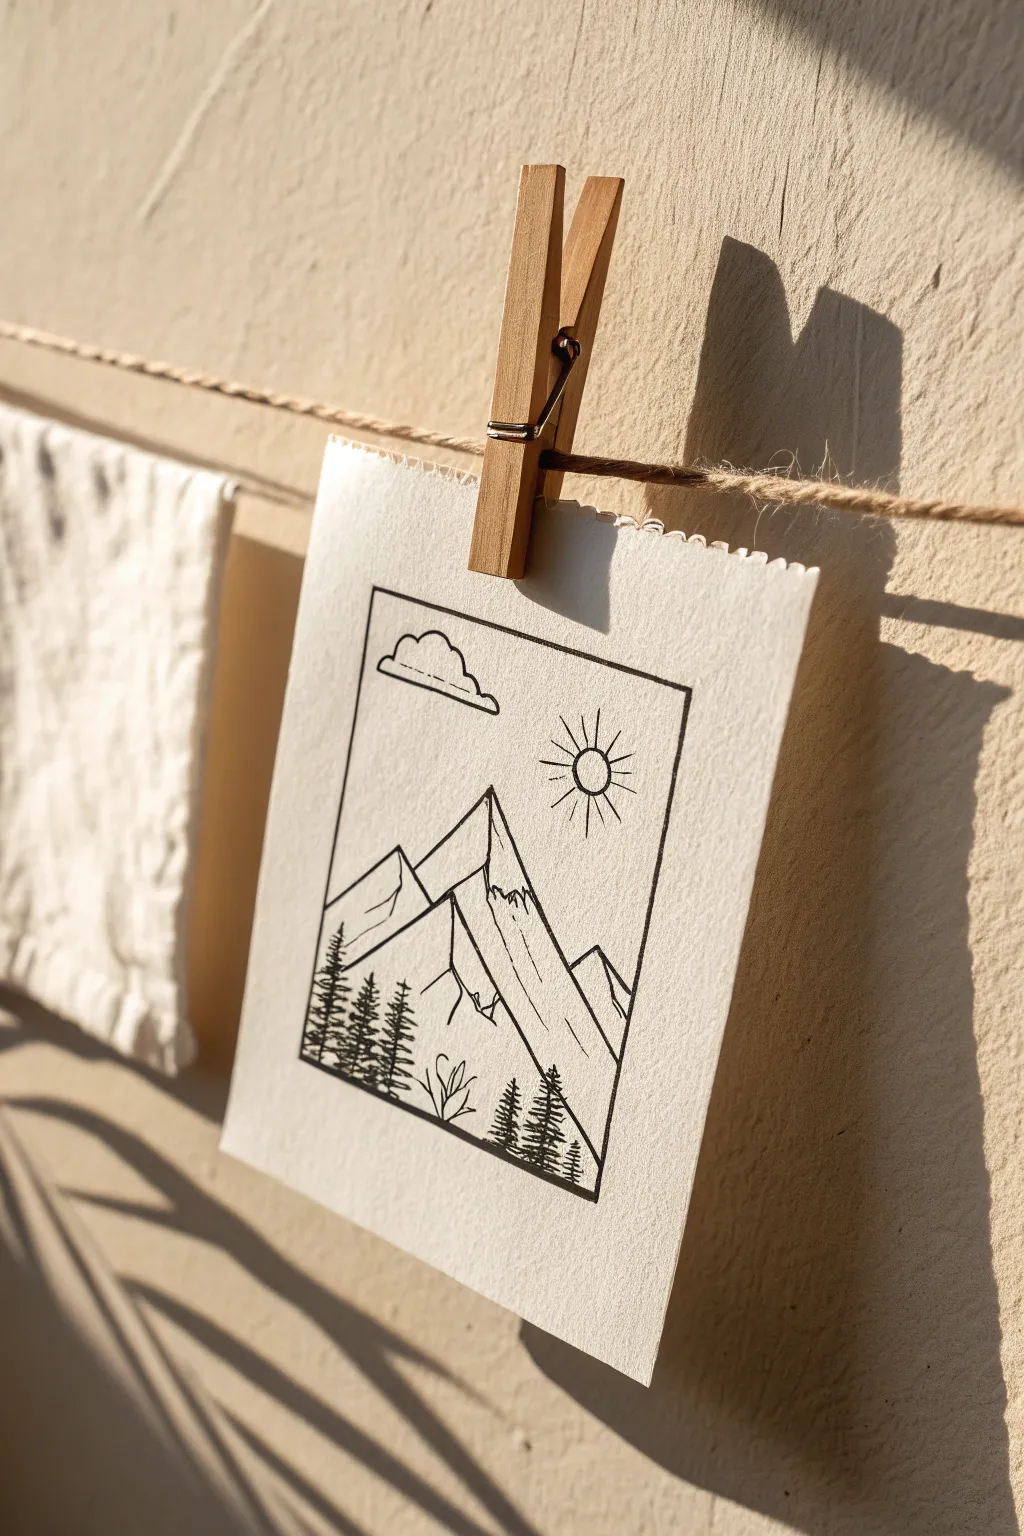
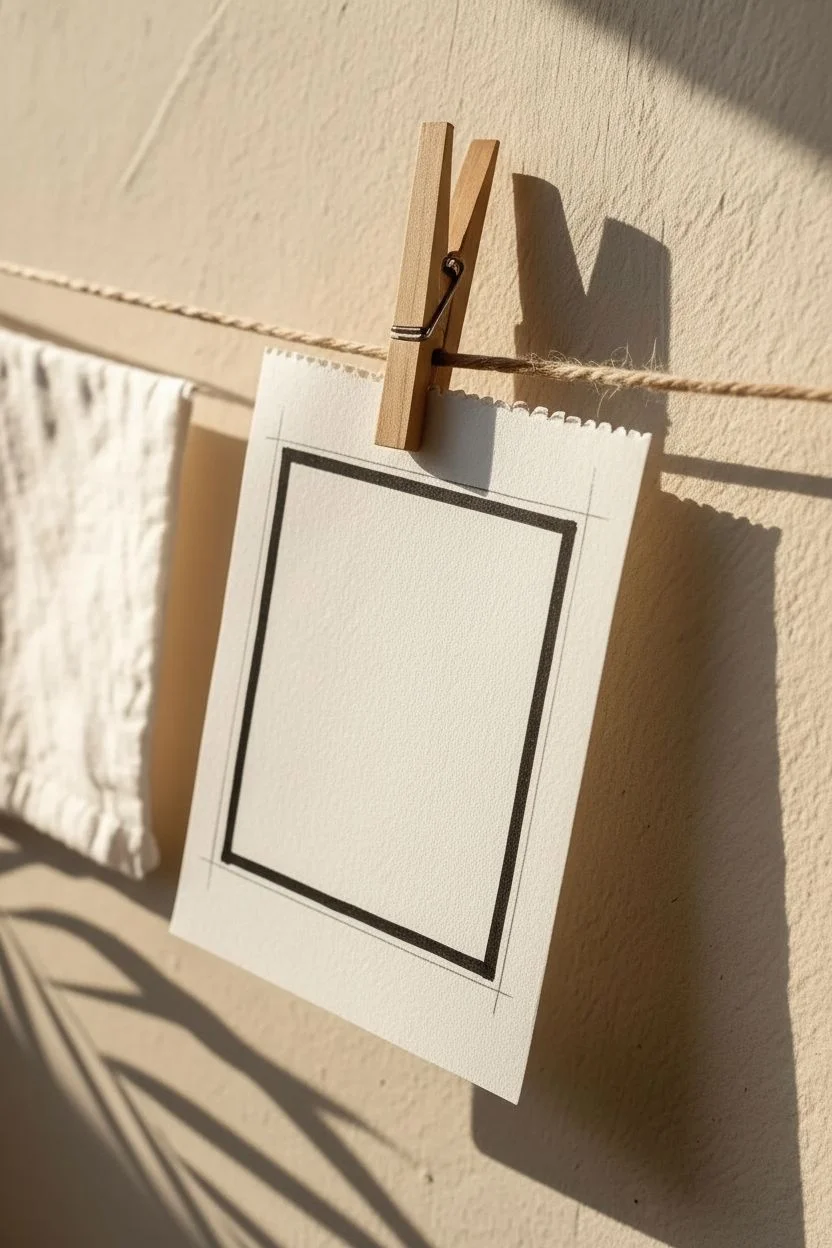
Capture the serenity of the outdoors with this charming ink drawing that mimics the nostalgic format of a Polaroid picture. This project uses clean lines and simple textures to create a rustic art piece perfect for hanging on twine.
Step-by-Step
Materials
- Cold press watercolor paper (300 gsm) or heavy cardstock
- Black diverse fine liner pens (sizes 01, 03, 05)
- HB Pencil
- Kneaded eraser
- Ruler
- Scissors or craft knife
Step 1: Preparing the Canvas
-
Cut the paper:
Cut your paper into a rectangle approximately 3.5 by 4.5 inches. To match the reference photo, tear the top edge against a ruler or use paper from a spiral sketchbook to keep the perforated ‘deckled’ edge. -
Measure the border:
Using your ruler and pencil, mark a rectangle inside the paper. Leave about a 0.5-inch margin on the top and sides, and a slightly larger 1-inch margin at the bottom to mimic the classic instant camera film look. -
Draw the frame:
Trace over your pencil border using the size 05 pen to create a bold, defined box for your landscape. Let the ink dry for a moment to avoid smudging.
Step 2: Sketching the Scene
-
Outline mountains:
With your pencil, lightly sketch a large central peak that reaches slightly above the midpoint of the frame. Add two smaller peaks flanking it on the left and right sides. -
Define the snowcaps:
Draw jagged zigzag lines near the top of each peak to separate the snow-covered tips from the rocky base. -
Add landscape elements:
Sketch a simplified cloud shape in the upper left corner and a circle for the sun in the upper right. Draw a sloping line at the very bottom to establish the foreground ground level. -
Position the trees:
Mark vertical lines where your pine trees will go—group a few on the bottom left and a couple on the bottom right.
Straight Line Hack
If you struggle with drawing the straight border frame freehand, keep your wrist locked and move your entire arm from the elbow to maintain a straight trajectory.
Step 3: Inking and Detailing
-
Ink the mountains:
Switch to a 03 pen. Trace the mountain outlines, using confident strokes. I find it helps to pull the pen towards you rather than pushing it away for smoother lines. -
Add mountain texture:
Using the 01 fine pen, draw thin, broken vertical lines down the shaded sides of the mountains (usually the right side) to suggest craggy rock texture. -
Draw the sun:
Ink the sun’s circle with the 03 pen. Add rays extending outward using the 01 pen, alternating slightly between longer and shorter strokes for a dynamic look. -
Ink the cloud:
Outline the cloud with the 03 pen. Keep the bottom line relatively flat and the top curves fluffy and rounded. -
Create the pine trees:
Using the 03 pen, start at the top of your tree markers. Use a tight, horizontal zigzag motion that gets wider as you move down the trunk to create the pine branches. -
Foreground details:
Ink the ground slope line. You can add a small, simple plant or tuft of grass in the bottom center directly with the pen for a touch of organic detail. -
Check line weights:
Look over the drawing. Use the 05 pen to re-trace the outer mountain ridges if you want them to pop more against the background. -
Final clean up:
Wait at least five minutes to ensure the ink is completely cured. Gently erase all underlying pencil sketch marks with the kneaded eraser.
Vintage Vibes
Before starting your drawing, lightly brush the paper with diluted coffee or tea and let it dry. This gives the paper a warm, aged parchment look suitable for this style.
Hang your miniature masterpiece with a small clothespin and enjoy the view.
Cosmic Space Whales
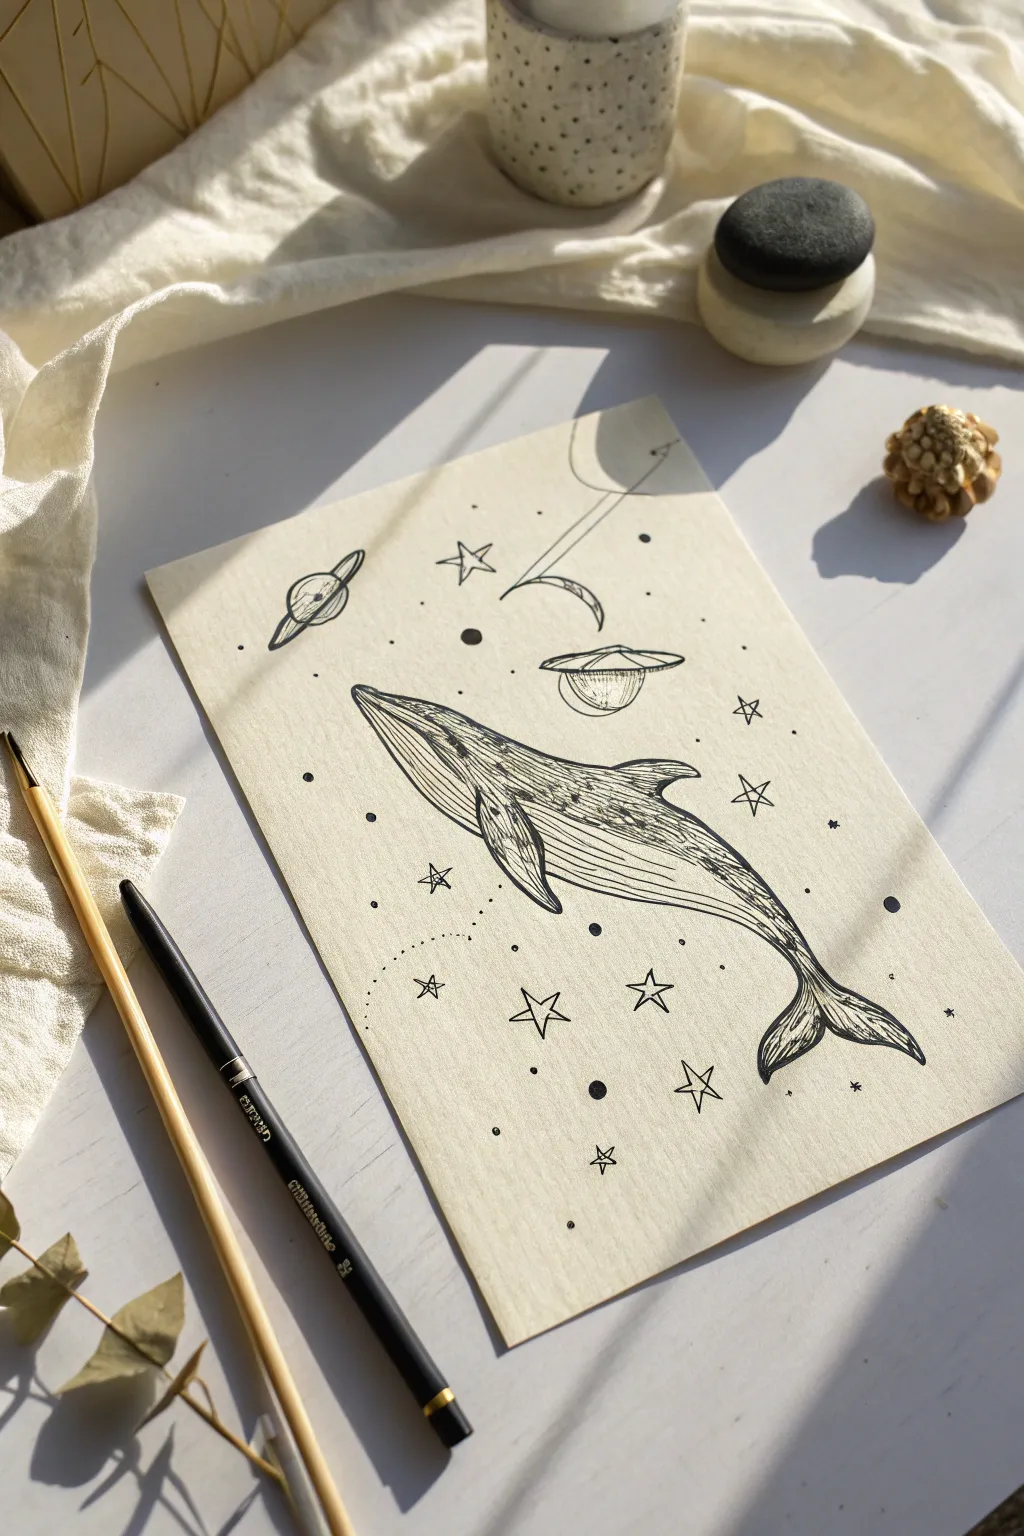
Capture the majestic silence of the cosmos with this whimsical illustration featuring a humpback whale drifting among the stars. Using simple fine liners on cream paper creates a warm, vintage aesthetic that makes the black ink pop.
Step-by-Step Tutorial
Materials
- Cream or off-white mixed media paper (A5 size)
- HB graphite pencil
- Kneaded eraser
- Black fine liner pens (sizes 01, 03, and 05)
- Ruler (optional)
Step 1: Pencil Skeleton
-
Body shape:
Begin lightly with your pencil, drawing a large, elongated kidney bean shape diagonally across the center of your page to represent the whale’s torso. -
Tail features:
At the tapered lower end of the body, sketch the flukes (tail fins), keeping them wide and slightly curved at the tips. -
Add fins:
Sketch the long pectoral fin extending from the middle of the body downwards, and a small dorsal fin on the top curve of the back. -
Belly details:
Lightly draw curved lines running from the chin down towards the belly to mark the ventral pleats. -
Cosmic layout:
Roughly sketch the positions of the larger celestial elements, like the ringed planet and the crescent details, to ensure the composition is balanced.
Smudge Prevention
Place a scrap piece of paper under your drawing hand while you ink. This protects the cream paper from hand oils and prevents you from smearing fresh wet ink.
Step 2: Inking the Leviathan
-
Main outline:
Switch to your 05 fine liner. Carefully trace the outer silhouette of the whale, using a confident, continuous stroke to keep the line smooth. -
Belly grooves:
Using a finer 01 pen, ink the ventral pleats on the underside. Break the lines slightly here and there so the texture doesn’t look too rigid. -
Fin details:
Outline the pectoral fin, adding small bumps or undulations on the leading edge for a realistic humpback look. -
Facial features:
Place a small dot for the eye near the corner of the mouth line, and darken the jawline slightly for depth. -
Texturing the skin:
With the 01 pen, add small dashes, stippling dots, and scratches along the upper back and tail to simulate leathery whale skin. -
Shadowing:
I like to build up darker shading where the fins meet the body using dense hatching lines to create dimension.
Step 3: Creating the Galaxy
-
Ringed planets:
Ink the planet shapes with the 03 pen. For the ringed planet, draw the ellipse of the ring first, then the sphere behind it. -
Drawing stars:
Draw several five-pointed stars scattered around the whale. Keep them hollow (outlined) rather than filled in for an illustrated style. -
Solid bodies:
Fill in a few small circles with solid black ink to represent distant planets or black holes. -
Stardust and variation:
Use the tip of your 01 pen to dot the background randomly. vary the pressure to create different sized specks of stardust. -
Constellation lines:
Connect a few of your smaller stars with faint dotted lines to suggest constellations.
Gold Dust Level Up
For a magical touch, re-draw the five-pointed stars using a metallic gold gel pen or paint a dab of gold watercolor inside the planets.
Step 4: Final Polish
-
Erase guidelines:
Once the ink is completely dry, gently roll your kneaded eraser over the entire page to lift strictly the pencil marks. -
Line weight adjustment:
Go back with the 05 pen and thicken the bottom curves of the whale and the planets to give the drawing visual weight. -
Clean up:
Check for any gaps in your main lines and close them up for a clean, professional finish.
Now you have a serene piece of cosmic art ready to frame or gift.


Have a question or want to share your own experience? I'd love to hear from you in the comments below!