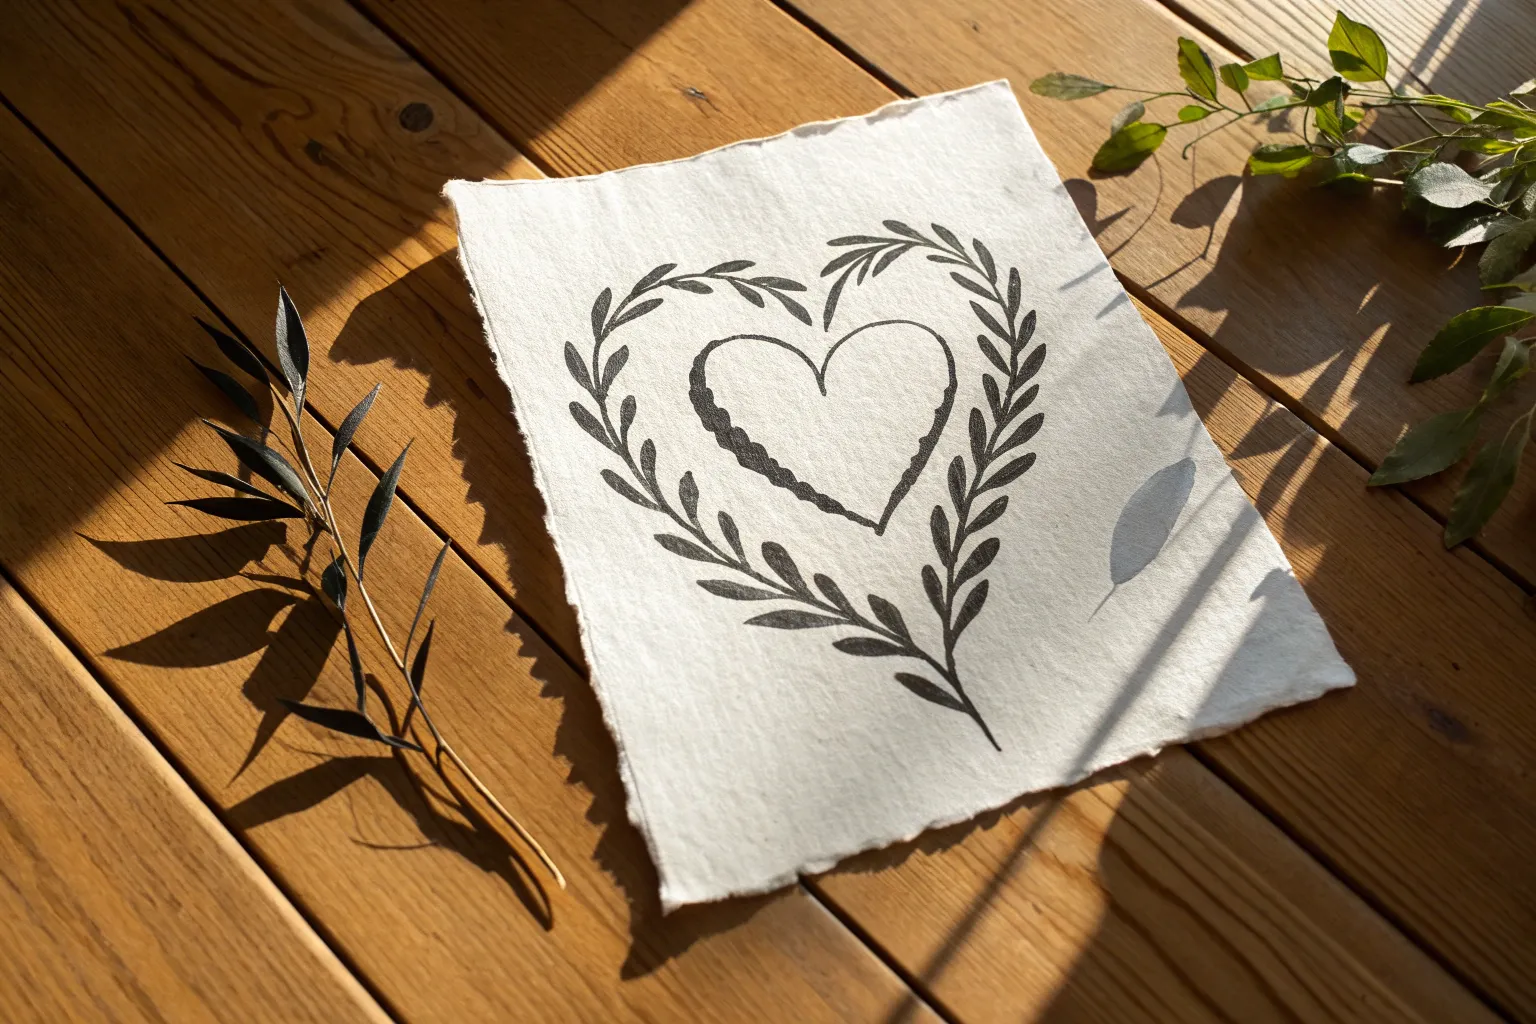
There is something inherently romantic about spending an afternoon mixing shades of crimson and blush to create something that speaks from the heart. Whether you are looking for a playful date night project or a heartfelt handmade gift, these artistic concepts will help you channel your affection onto the canvas.
Classic Tape Resist Hearts
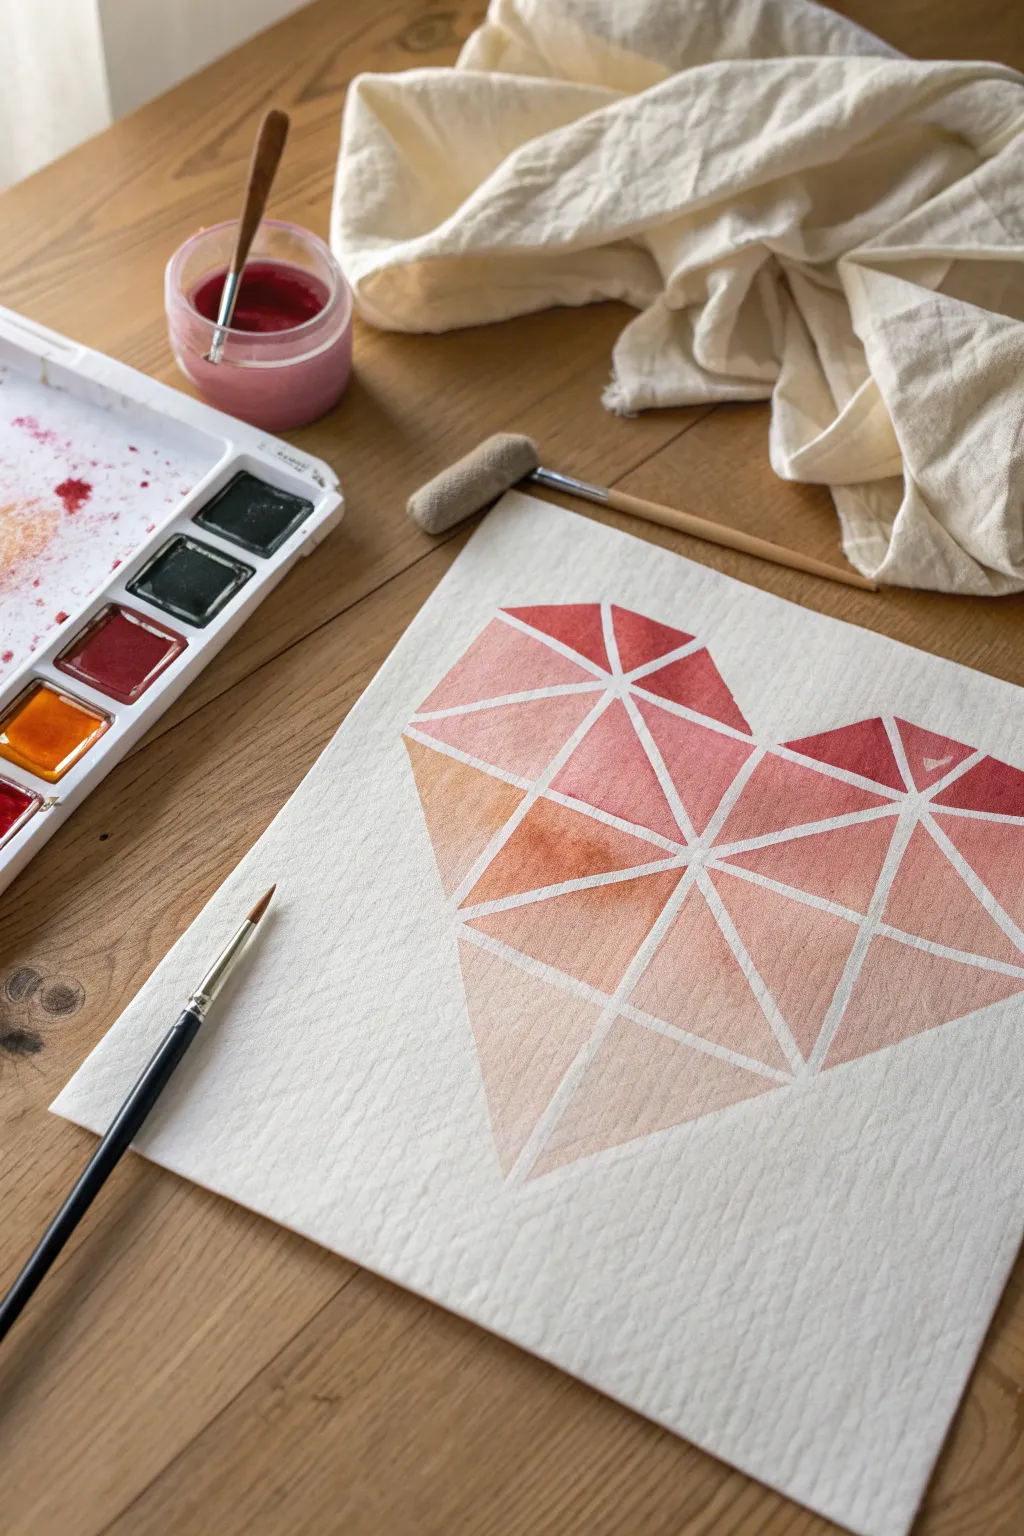
Create a stunning faceted heart design that blends modern geometry with the soft, organic flow of watercolors. This project uses a resist technique to keep crisp white lines between sections of warming red, coral, and peach gradients.
Detailed Instructions
Materials
- Cold press watercolor paper (300gsm/140lb)
- Watercolor pan set (focus on red, orange, yellow)
- Round watercolor brush (size 6 or 8)
- Low-tack artist masking tape or washi tape
- Cutting mat and craft knife (or scissors)
- Pencil and eraser
- Two jars of water
- Paper towels
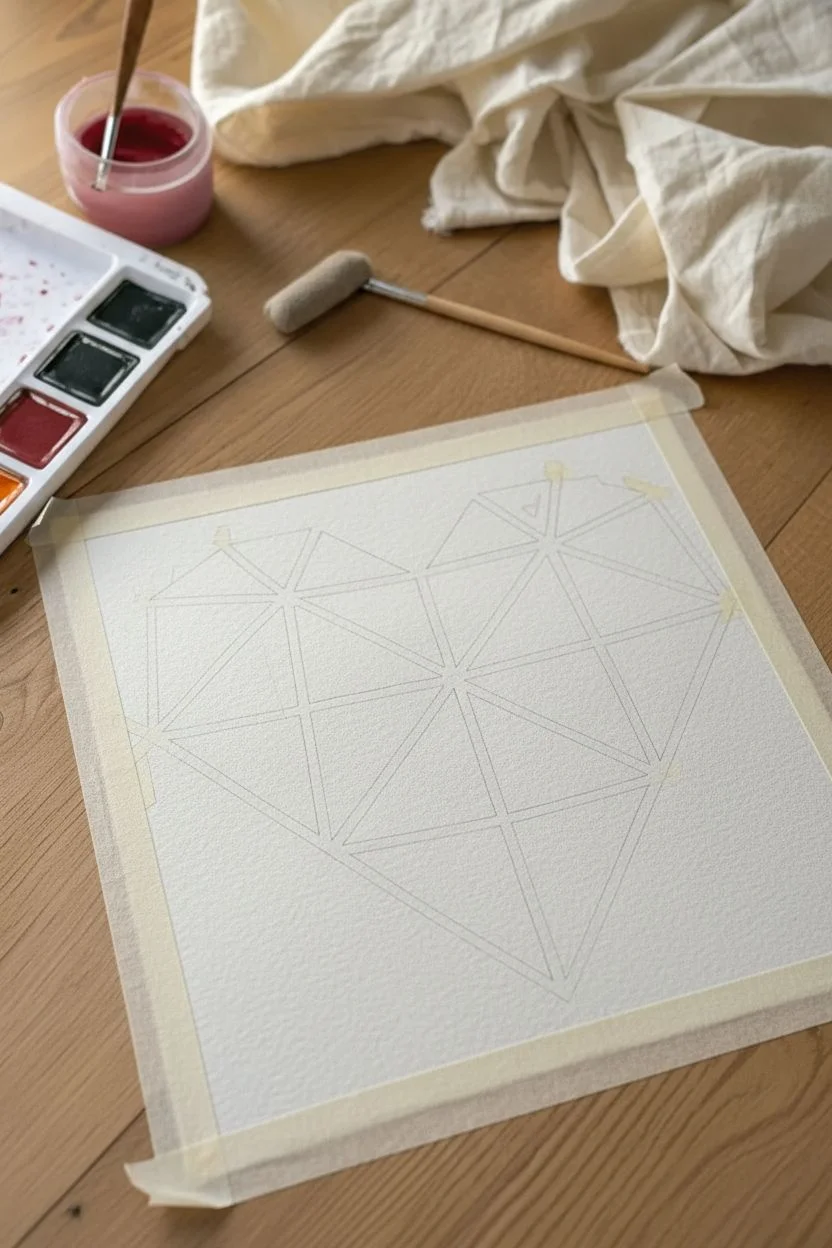
Step 1: Preparation & Taping
-
Secure the paper:
Tape your watercolor paper down to a flat surface or drawing board to prevent buckling when the paper gets wet. -
Sketch the outline:
Using a pencil, lightly draw a large, symmetrical heart shape in the center of your paper. -
Prepare tape strips:
Standard masking tape is often too wide for this delicate look. Place a long strip of tape on a clean cutting mat and use a craft knife to slice it lengthwise into thinner strips, approximately 3-5mm wide. -
Create the main geometry:
Apply long strips of your thinned tape across the heart, creating intersecting lines. I usually start with two or three main lines radiating from the center or crossing neatly. -
Add detail lines:
Fill in the larger open spaces with smaller strips of tape to create triangles and geometric polygons. -
Trim the edges:
Use scissors or your craft knife to carefully trim any tape that extends far beyond your pencil heart outline so you can eventually paint a clean edge. -
Seal the tape:
Run the back of your fingernail or a bone folder firmly over every piece of tape, paying special attention to the intersections, to ensure a tight seal against the paper.
Sticky Situation?
If your tape is ripping the paper, try heating it briefly with a hair dryer to loosen the adhesive, or stick the tape to your clothes before applying it to reduce tackiness.
Step 2: Painting the Gradient
-
Activate paints:
Add a few drops of water to your red, orange, and yellow paint pans to soften them up. -
Mix the darkest tone:
Prepare a puddle of saturated deep red on your palette. This will be for the upper right section of the heart to create the shadow effect. -
Paint the top darks:
Fill in the geometric shapes at the top right of the heart with the deep red. Use enough water so the pigment floats in the texture of the paper. -
Transition to coral:
Add a touch of orange to your red mix. Paint the shapes in the middle section of the heart, overlapping slightly with the red zone visual flow. -
Shift to peach:
Rinse your brush partially and mix a watery orange-yellow. Fill in the center-left shapes. -
Finish with light tones:
For the bottom tip and far left edge, dilute your paint significantly with water so you get a very pale, soft wash. -
Refine the edges:
Make sure you paint right up to and slightly over the tape lines, and carefully trace the outer pencil curve of the heart to keep the main shape distinct. -
Add texture:
While the paint is still wet in some facets, I like to drop in a tiny bit of clear water or a darker pigment dot to encourage ‘blooms’ and texture as it dries.
Pro Tip: Crisp Lines
To prevent paint bleeding under the tape, brush a very thin layer of clear water (or white fluid matte medium) over the tape edges and let it dry before applying color.
Step 3: The Reveal
-
Wait for drying:
Let the painting sit until the paper is completely bone dry and room temperature to the touch. Patience is key here to avoid tearing. -
Peel carefully:
Start peeling the tape slowly at a sharp 45-degree angle, pulling away from the painted area rather than straight up. -
Clean up:
Once all tape is removed, gently erase any visible pencil marks from the outer perimeter of the heart.
Frame your geometric masterpiece or turn it into a beautiful handmade card for someone special.


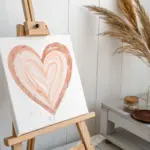
Radiant Ombre Gradient Heart
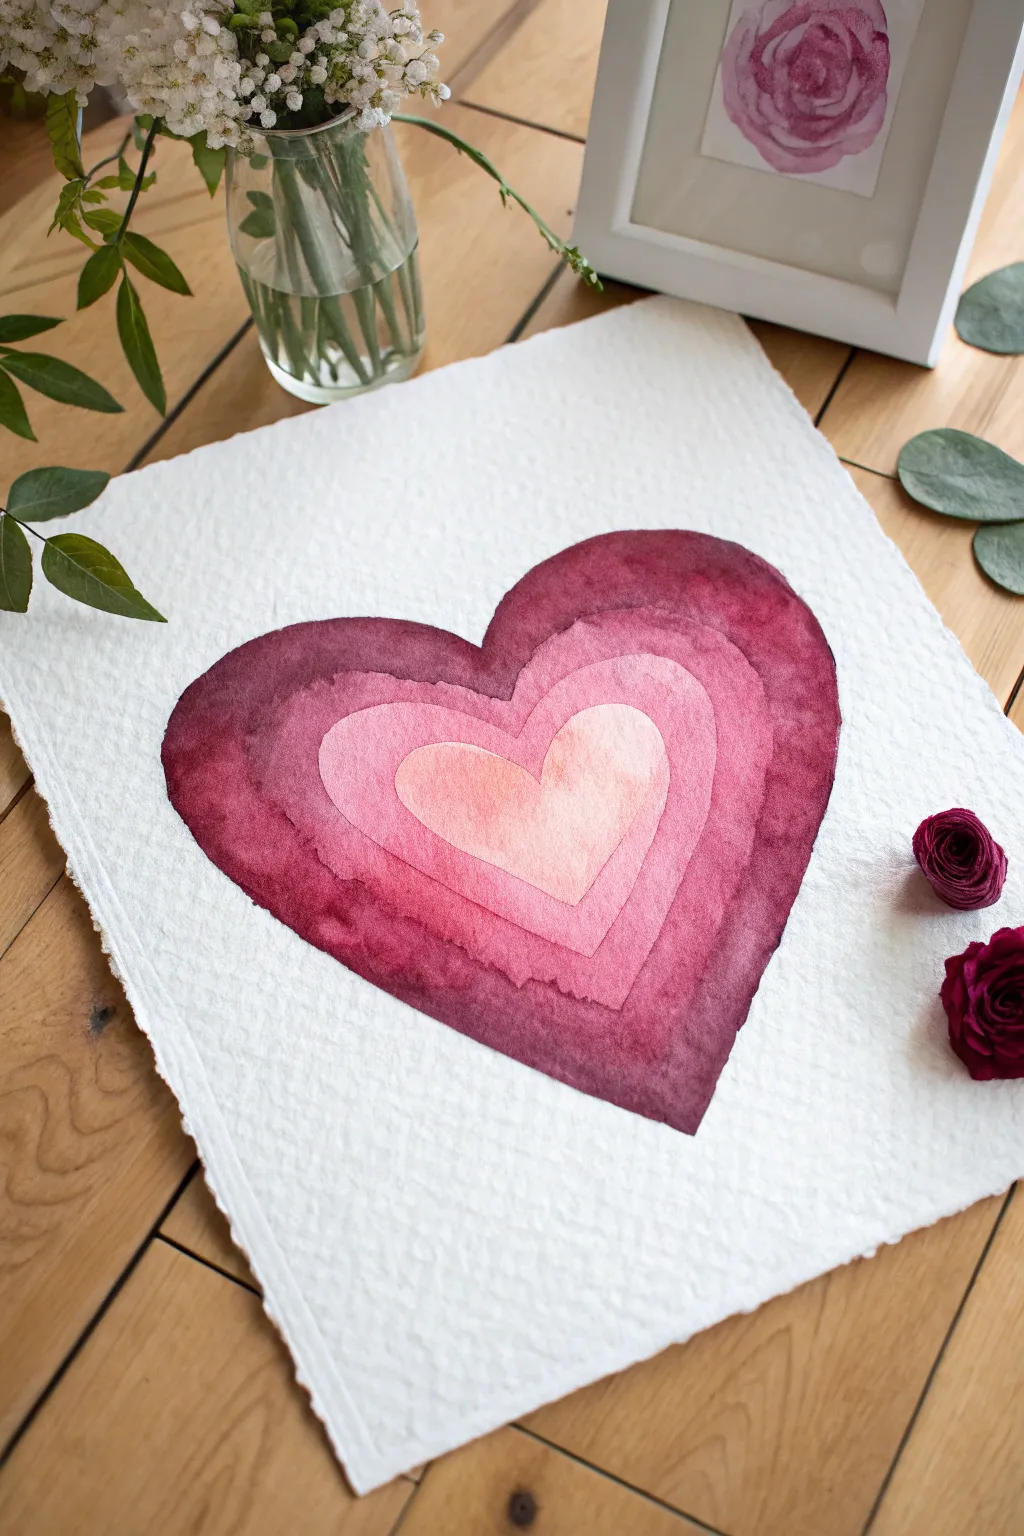
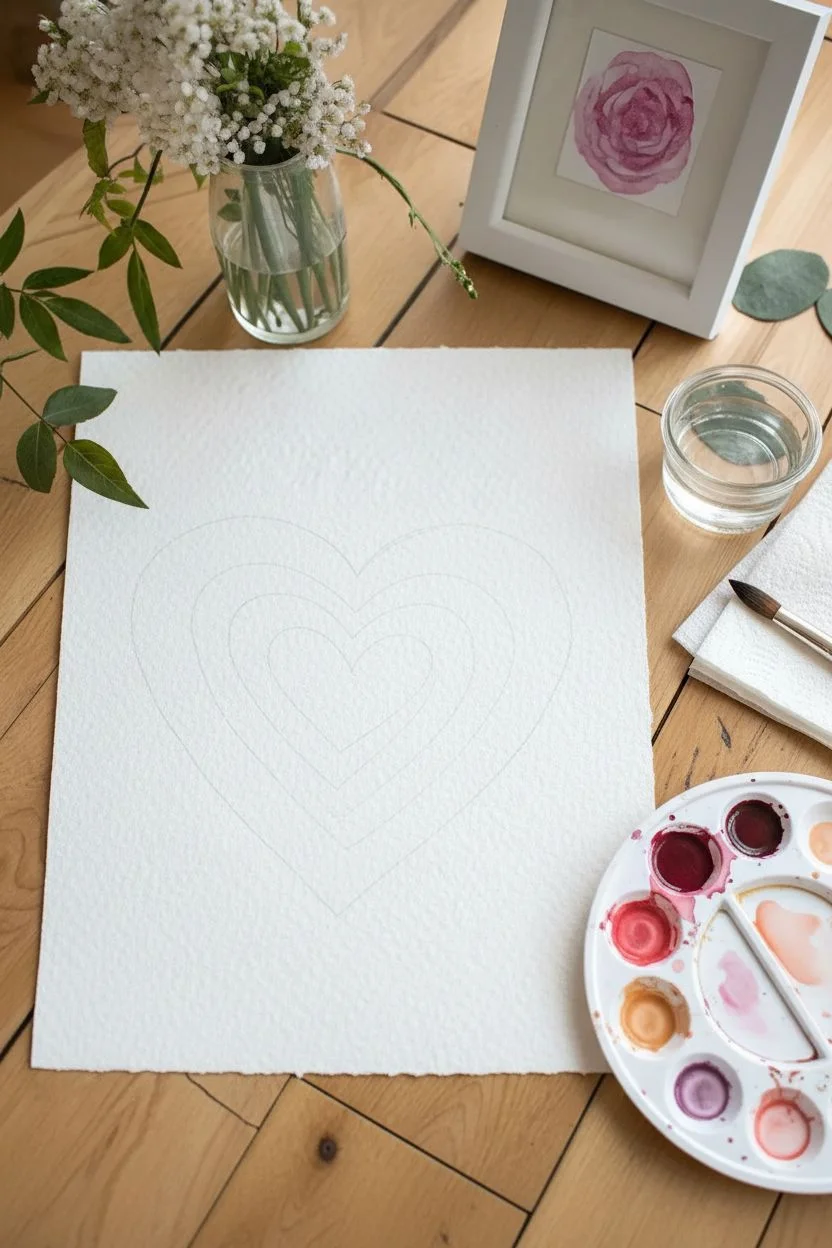
Capture the warmth of affection with this stunning gradient heart project that uses concentric layers to create a visually beating effect. The transition from a delicate peach center to a bold burgundy edge makes this piece pop off the textured paper.
Step-by-Step Tutorial
Materials
- Heavyweight cold-press watercolor paper (300 gsm)
- Watercolor paints (Alizarin Crimson, Rose Madder, Yellow Ochre)
- Round watercolor brushes (Size 4 and Size 8)
- clean water jars
- Mixing palette
- HB Pencil
- Kneaded eraser
- Paper towels
Step 1: Preparation & Sketching
-
Paper Setup:
Place your deckled-edge paper on a flat surface. If you don’t have deckled paper, you can carefully tear the edges of a standard sheet against a ruler for that rustic look. -
Outline the Shape:
Using an HB pencil, very lightly sketch the outline of a large heart in the center of your paper. Keep the pressure light so it doesn’t emboss the paper. -
Create the Rings:
Inside the large heart, lightly specific three smaller, concentric heart shapes. You should end up with a central heart and three surrounding bands. -
Prepare the Palette:
Squeeze out a generous amount of Alizarin Crimson and a touch of Rose Madder onto your palette. -
Mix the Darkest Shade:
Create a concentrated puddle of the Alizarin Crimson with very little water for the outermost layer. This needs to be rich and opaque. -
Mix the Middle Tones:
In two separate wells, dilute the crimson mix. Add more water to the first for a medium rose, and even more to the second for a soft pink. -
Mix the Center Shade:
For the center, take your palest pink mix and add a tiny dot of Yellow Ochre to warm it up into a peach tone.
Bleeding Colors?
If your rings assume a tie-dye look instead of crisp bands, you didn’t wait long enough between layers. Ensure the paper is bone-dry before starting the next ring.
Step 2: Painting the Layers
-
Start at the Center:
Load your Size 4 brush with the peach mixture and fill in the smallest, central heart. -
Wait for It:
Let this center section dry completely. This is crucial—if it’s wet, the next ring will bleed into it and ruin the defined separation. -
The Second Ring:
Switch to your Size 8 brush. Load it with the soft pink mixture. -
Outline and Fill:
Carefully trace around the dried center heart first to establish a clean edge, then fill in the rest of the second ring. -
Check Consistency:
I like to drop a tiny bit of clear water into the wet wash occasionally to create subtle texture blooms as it dries. -
Dry Again:
Allow the second ring to dry fully. Use a hairdryer on a low, cool setting if you are impatient. -
The Third Ring:
Load your brush with the medium rose mixture. It should be noticeably more vibrant than the previous layer. -
Paint the Third Layer:
Paint the third band, carefully cutting in against the edge of the previous pink layer. Keep the outer edge of this band loose for now. -
Final Outer Layer:
Once the previous layer is dry, load your brush heavily with the concentrated dark crimson mix. -
The Deep Border:
Paint the final outer band. This is where you define the ultimate shape of the heart. -
Softening the Edges:
For the very outer rim of the heart, allow the brush bristles to dance slightly to create a natural, organic edge rather than a rigid line.
Step 3: Finishing Touches
-
Final Drying:
Let the entire piece sit until the paper is cool to the touch, indicating all moisture has evaporated. -
Clean Up:
Once absolutely dry, use a kneaded eraser to gently lift any pencil marks that might still be visible around the edges.
Pro Tip: Bloom Effect
While a layer is still wet, sprinkle a few grains of coarse salt on the paint. Brush it off once dry for a beautiful, starry texture in the pigment.
Frame your beautiful gradient heart in a white frame to let those rich colors truly sing on the wall


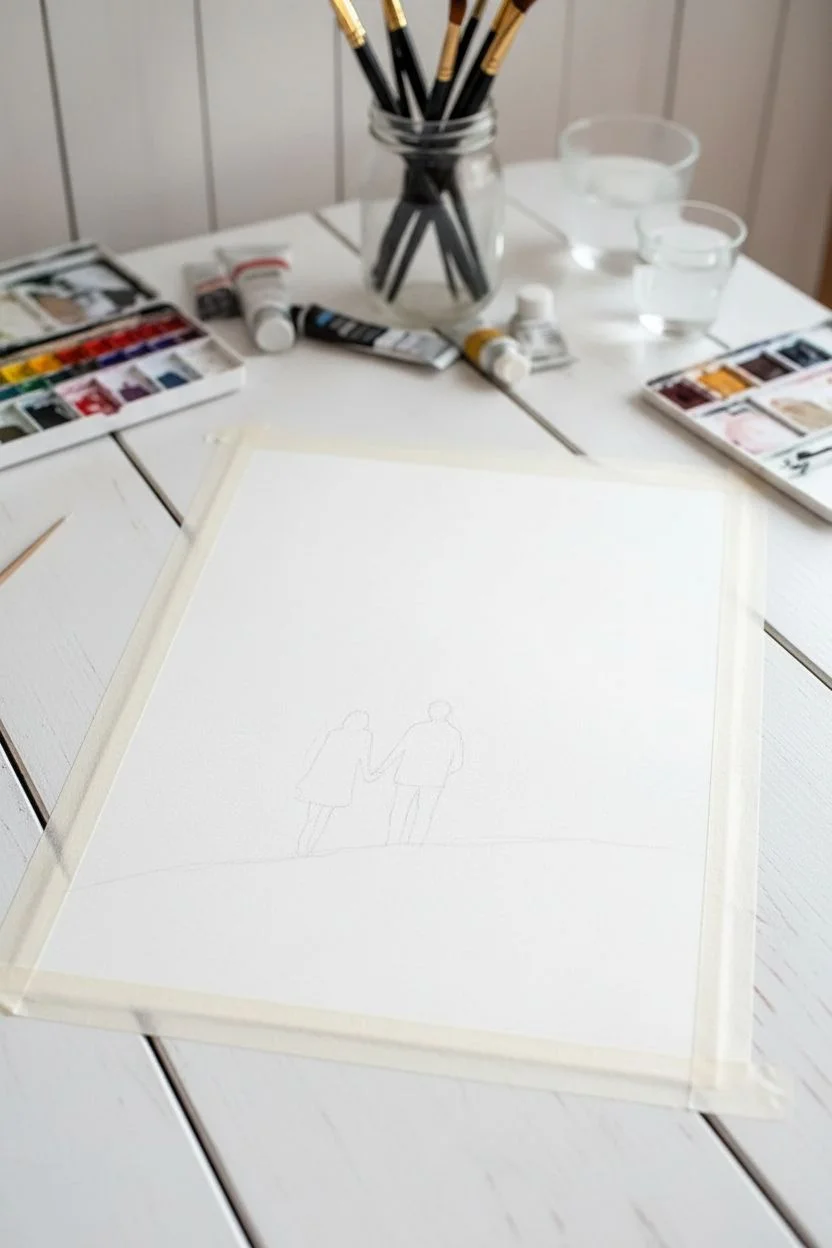
Sunset Silhouette Couples
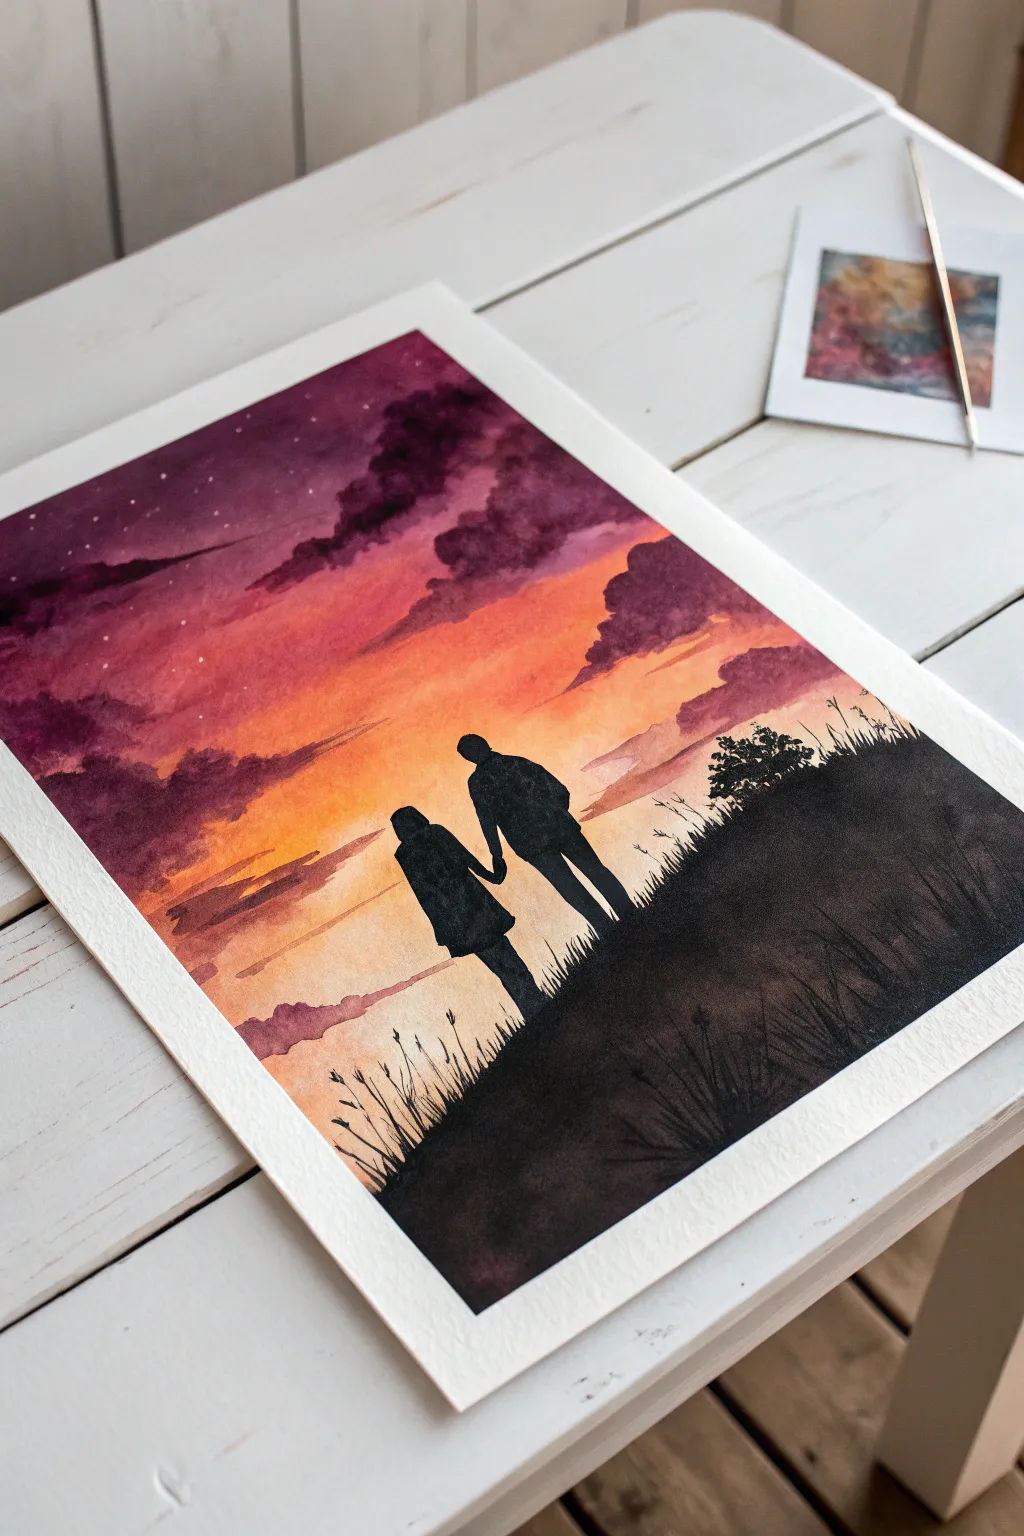
Capture a romantic moment frozen in time with this stunning watercolor project characterized by a vibrant sunset gradient and stark, contrasting silhouettes. The wet-on-wet technique creates a dreamy backdrop that makes the sharp foreground figures pop.
Detailed Instructions
Materials
- Cold press watercolor paper (140lb/300gsm)
- Masking tape
- Pencil and eraser
- Watercolor paints (Indigo, Alizarin Crimson, Cadmium Orange, Lemon Yellow, Lamp Black)
- White gouache or white gel pen
- Large flat wash brush
- Medium round brush (size 6 or 8)
- Fine liner or detail brush (size 0 or 1)
- Palette and two water jars
Step 1: Preparation
-
Secure the paper:
Tape all four edges of your paper down to a board or table, ensuring the tape is pressed firmly to create clean white borders later. -
Sketch the horizon:
Lightly draw a sloping hill line across the bottom third of the paper using a pencil. -
Outline the figures:
Sketch the outline of the couple holding hands within the hill area; keep the drawing light and focus only on the outer shape since it will be filled with black.
Step 2: The Sunset Sky
-
Pre-wet the paper:
Using your large flat brush and clean water, thoroughly wet the entire sky area above the hill line, stopping just short of your pencil sketch. -
Apply the horizon light:
Load a medium round brush with Lemon Yellow mixed with a touch of Cadmium Orange and paint a horizontal strip just above the hill. -
Transition to warmth:
While the yellow is still wet, introduce Alizarin Crimson or a pinkish-red above the orange line, letting the colors bleed slightly where they meet. -
Deepen the upper sky:
Mix a rich Indigo with a bit of purple and paint the top third of the paper, pulling the color down to meet the pink layer. -
Blend the gradient:
With a clean, damp brush, gently smooth out the transition area between the purple and pink layers to remove any hard lines. -
Dry partially:
Wait until the paper loses its glossy sheen but is still cool to the touch before proceeding to the clouds.
Pro Tip: Avoiding Blooms
Control your water ratio. When adding clouds to the drying sky, ensure the paint on your brush is thicker (cream consistency) than the paint already on the paper to prevent water back-runs.
Step 3: Atmospheric Details
-
Paint cloud shapes:
Mix a concentrated purple-red (less water than the background) and dab in horizontal cloud shapes across the darker upper sections of the sky. -
Soften cloud edges:
I prefer to use a slightly damp brush to gently run along the bottom edges of these clouds to blend them into the background while keeping the tops distinct. -
Add stars:
Once the sky is completely dry, use a white gel pen or a small dot of white gouache to place tiny stars in the darkest purple section at the top. -
Dry completely:
Ensure the entire painting is bone-dry before starting the black silhouette to prevent the black paint from bleeding into the sky.
Level Up: Hidden Message
Use the white gel pen to connect specific stars into a real constellation, or arrange the stars to subtly spell out a date or initials hidden in the night sky.
Step 4: Foreground Silhouettes
-
Mix the darkest dark:
Prepare a thick mixture of Lamp Black paint; for more depth, you can add a touch of Indigo or brown to make the black richer. -
Fill the hill:
Paint the grassy hill area solid black, following the slope of your initial sketch. -
Outline the couple:
Switch to your fine liner brush and carefully outline the heads and bodies of the figures using your pencil marks as a guide. -
Fill the figures:
Fill in the bodies with solid black, ensuring there are no transparent gaps within the silhouettes. -
Add grass texture:
Using quick, upward flicking motions with the tip of your liner brush, create blades of grass along the top edge of the hill and around the figures’ feet. -
Intensify foliage:
Add a slightly larger bush shape or cluster of tall grasses on the right side of the hill to balance the composition. -
Reveal the border:
Once the black paint is fully dry, slowly peel away the masking tape at a 45-degree angle alongside the paper to reveal the crisp edges.
Step back and admire how the dark silhouettes accentuate the glowing warmth of your painted sunset


Sweet Lovebirds on a Branch
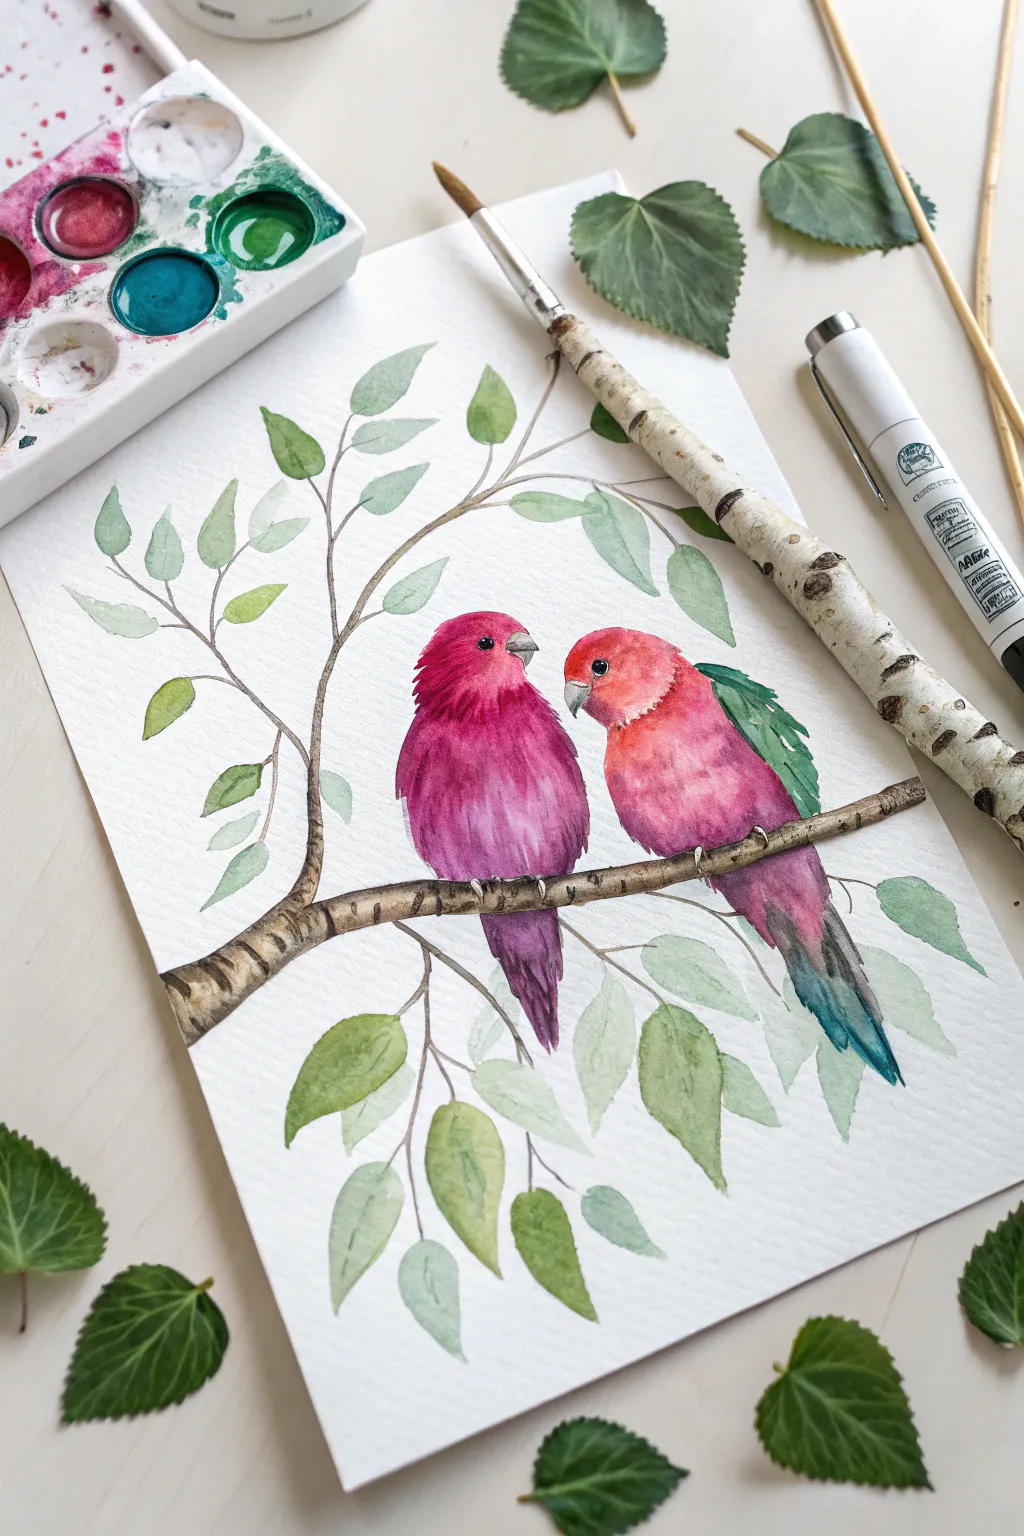
Capture the sweetness of affection with this charming watercolor painting of two bright birds resting on a birch branch. The soft gradients of the feathers contrast beautifully with the crisp texture of the tree bark, creating a perfect handmade Valentine.
Step-by-Step Tutorial
Materials
- Cold press watercolor paper (300 gsm)
- Watercolor paints (Magenta, Scarlet, Purple, Turquoise, Sap Green, Burnt Umber, Payne’s Gray)
- Round brushes (size 2 for details, size 6 for washes)
- HB pencil and kneaded eraser
- Palette for mixing
- Two jars of water
- Paper towels
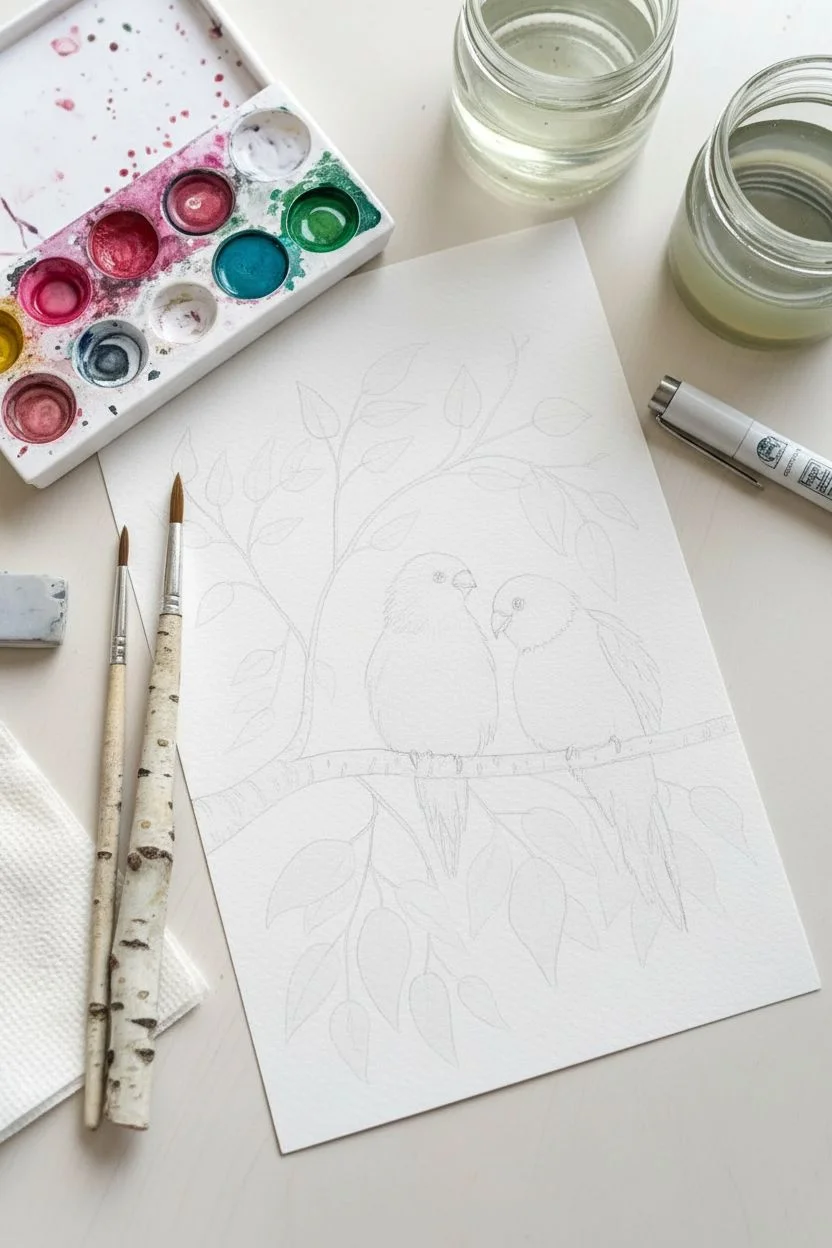
Step 1: Sketching the Composition
-
Outline the branch:
Begin by lightly sketching a curved branch entering from the left side of the paper. Add smaller offshoot twigs that arch gently upwards to frame the scene. -
Position the birds:
Draw two oval shapes sitting close together on the main branch. The bird on the left should be slightly turned toward the right, and the right bird facing left, creating a connection between them. -
Refine the details:
Add the triangular shapes for the tails hanging down. Sketch small curved beaks and round eyes. Lightly draw leaf shapes scattered along the upper twigs, varying their sizes for a natural look.
Eye Sparkle Trick
Leave a tiny pinprick of white paper unpainted inside the black eye circle. This ‘catchlight’ is essential for making the birds look alive and alert.
Step 2: Painting the Birds
-
Base layer for the left bird:
Load your size 6 brush with watery magenta. Paint the entire body of the left bird, leaving the beak and eye area white. -
Add depth:
While the paint is still wet, drop concentrated purple into the bottom of the belly and the tail area to create a soft, shadowed gradient. -
Start the right bird:
For the partner bird, start with a wash of scarlet red on the head and chest. Rinse your brush slightly and transition into magenta as you move down the body. -
Wing details:
Wait for the red body layer to dry completely. Once dry, paint the folded wing using a rich turquoise or deep green mix, letting it overlap the pink body slightly. -
Bird tails:
Paint the tail feathers with a mix of purple and turquoise. Use the tip of your brush to create slight separation lines at the very bottom of the feathers.
Hidden Initials
Personalize this valentine by subtly incorporating your and your partner’s initials into the dark horizontal lines of the birch tree bark texture.
Step 3: Creating the Birch Branch
-
Branch underpainting:
Mix a very pale, watery brown using Burnt Umber. Paint the entire branch and twigs with this translucent wash. -
Adding texture:
Once the base is damp (not soaking), take a smaller brush with concentrated Paynes Gray or dark brown. Paint short, horizontal dashes along the edges of the branch to mimic birch bark markings. -
Shadows:
Run a thin line of darker brown along the bottom edge of the branch to give it volume and cylindrical form.
Step 4: Leaves and Final Touches
-
Mixing greens:
Prepare two shades of green on your palette: a warm yellow-green and a cooler, blue-green for variety. -
Painting leaves:
Fill in the leaf sketches. I like to paint one half of a leaf first, leave a tiny hairline of white space for the vein, and then paint the other half. -
Varying opacity:
Make some leaves very pale and others more saturated to create depth, as if some leaves are catching the light more than others. -
Facial features:
Using your smallest brush and black paint, carefully fill in the round eyes. Paint the beaks with a pale gray wash, adding a tiny dark line where the beak opens. -
Highlighting:
If you accidentally painted over the eye highlights, use a white gel pen to add a tiny white dot to each eye for a spark of life.
Frame this delightful pair in a simple wood frame to create a heartfelt gift that celebrates togetherness.
BRUSH GUIDE
The Right Brush for Every Stroke
From clean lines to bold texture — master brush choice, stroke control, and essential techniques.
Explore the Full Guide
Two-Canvas Connected Heart
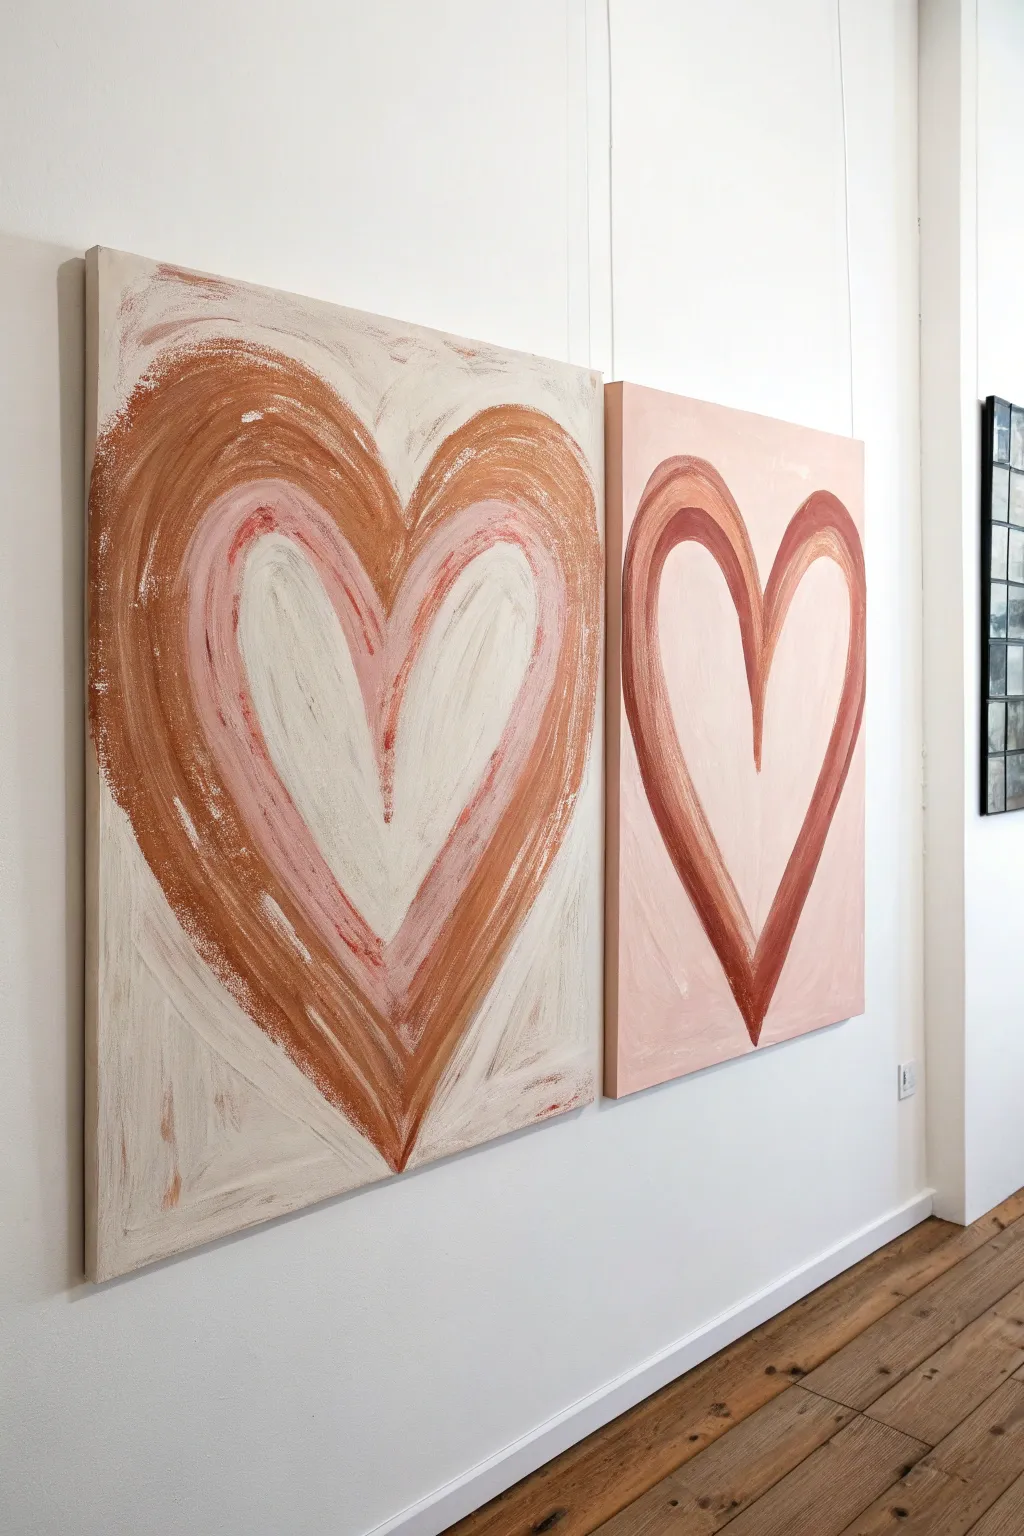
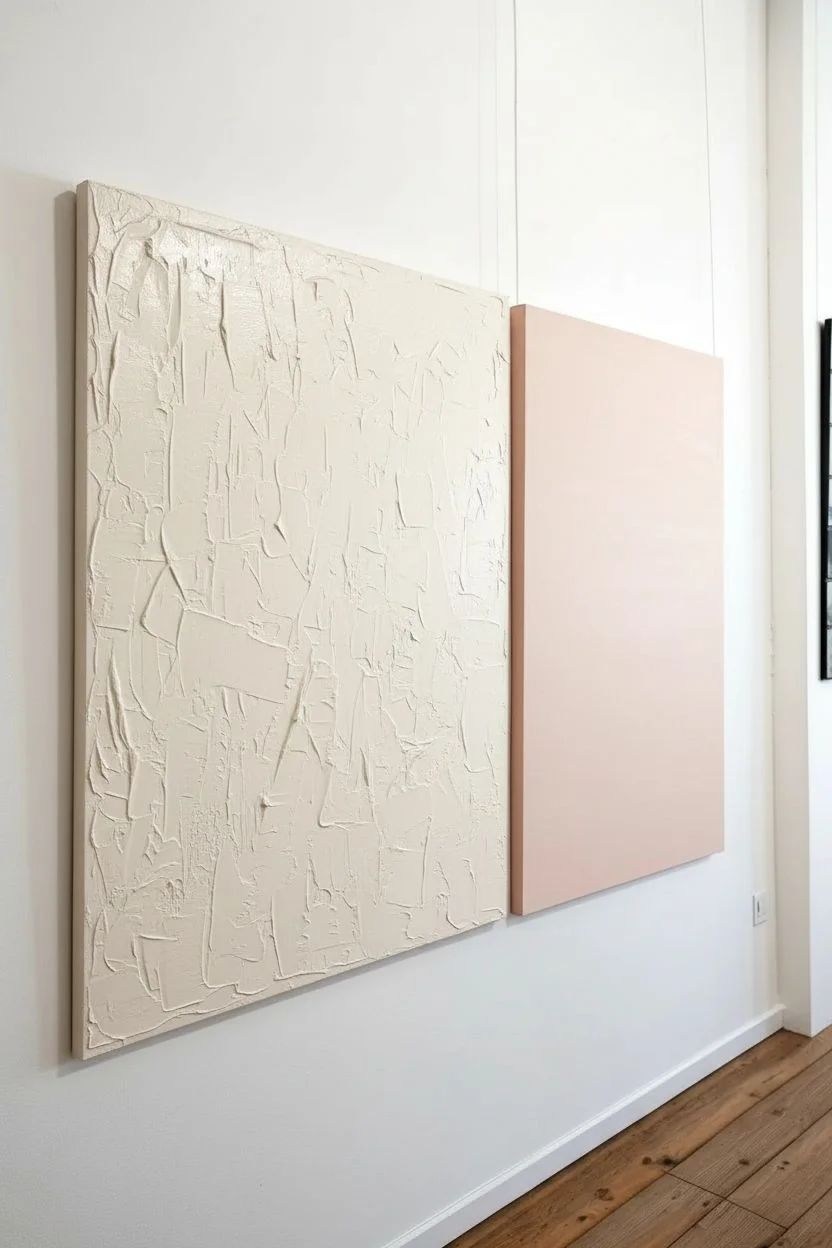
Embrace the beauty of imperfection with this stunning diptych art project. Using earthy tones and heavy texture, you will create two complementary canvases—one filled and layered, the other open and linear—that unite to form a modern statement piece.
Step-by-Step
Materials
- Two large gallery-wrapped canvases (e.g., 24×36 inches)
- Heavy body acrylic paints (Titanium White, Unbleached Titanium, Burnt Sienna, Red Oxide)
- Acrylic modeling paste or gel medium
- Large flat paintbrush (2-3 inch)
- Inexpensive chip brushes (for texture)
- Palette knife
- Palette or paper plate
- Jar of water and paper towels
Step 1: Setting the Scene
-
Prepare the palette:
Squeeze out a generous amount of Titanium White. In separate piles, place Unbleached Titanium, Burnt Sienna, and Red Oxide to have your earth tones ready. -
Mix the background blush:
For the right canvas, mix a large batch of ‘Blush’ by combining White with a very small dot of Red Oxide and Burnt Sienna. You want a pale, smooth pinkish-beige. -
Paint the right background:
Coat the entire surface of the right canvas with your Blush mix using the large flat brush. Keep the strokes smooth and even, then set it aside to dry completely. -
Create the textured base:
For the left canvas, mix Titanium White and Unbleached Titanium. Stir in a scoop of modeling paste to thicken the consistency significantly. -
Apply the left background:
Spread this thick cream mixture over the left canvas. I prefer using a palette knife or a stiff chip brush here to intentionally leave ridges, vertical streaks, and rough patches for visual interest.
Pro Tip: Cheap Brushes
Use cheap hardware store chip brushes for the left canvas. Their stiff, coarse bristles create those beautiful scratchy striations much better than soft key art brushes.
Step 2: Painting the Layered Heart
-
Mix the rust tone:
Combine Burnt Sienna with Red Oxide to create a deep, warm ‘Terracotta Rust’ color. -
Draft the outer shape:
On the textured left canvas (it can still be slightly tacky), paint a large, wide heart shape using the Rust mix. Don’t worry about clean edges; rough and painterly is the goal. -
Soften the edges:
While the rust paint is wet, take a dry chip brush and drag it lightly over the outer edges of the heart to feather the color into the cream background. -
Add the middle ring:
Mix a ‘Soft Peach’ tone by adding White to your Rust mix. Paint a smaller heart shape inside your large rust heart, overlapping the inner edges so the colors blend slightly. -
Fill the center:
Load a brush with pure Titanium White and fill the very center of the heart shape, blending it outward into the Soft Peach layer. -
Create movement:
Use a palette knife or dry brush to scrape downwards vertically through the heart layers. This drags the white into the peach and the peach into the rust, unifying the look. -
Add highlights:
Dab a little extra white texture on the upper curves of the heart to simulate light hitting the heavy paint.
Step 3: The Linear Heart
-
Check dryness:
Ensure the background of the right (Blush) canvas is dry to the touch so your lines remain crisp. -
Outline the shape:
Using the ‘Terracotta Rust’ mix, paint a single bold heart outline. Try to match the general size and placement of the heart on the left canvas. -
Thicken the stroke:
Go over your outline again to widen the brushstroke. The line should feel substantial, roughly an inch or two thick, rather than delicate. -
Create brushy texture:
Instead of making the line perfectly solid, allow the brush bristles to show through slightly at the start and end of your strokes for a hand-painted, organic feel. -
Balance the composition:
Stand the canvases side-by-side. If the left heart feels much visually heavier, slightly darken or thicken the outline on the right canvas to balance the visual weight.
Level Up: Gallery Frame
Build simple floating frames using light pine wood strips. The raw wood tone complements the rust and cream palette perfectly and unifies the two pieces.
Hang your unique masterpieces side by side and enjoy the warm, artistic atmosphere they bring to your space.
Rustic Truck Delivering Love

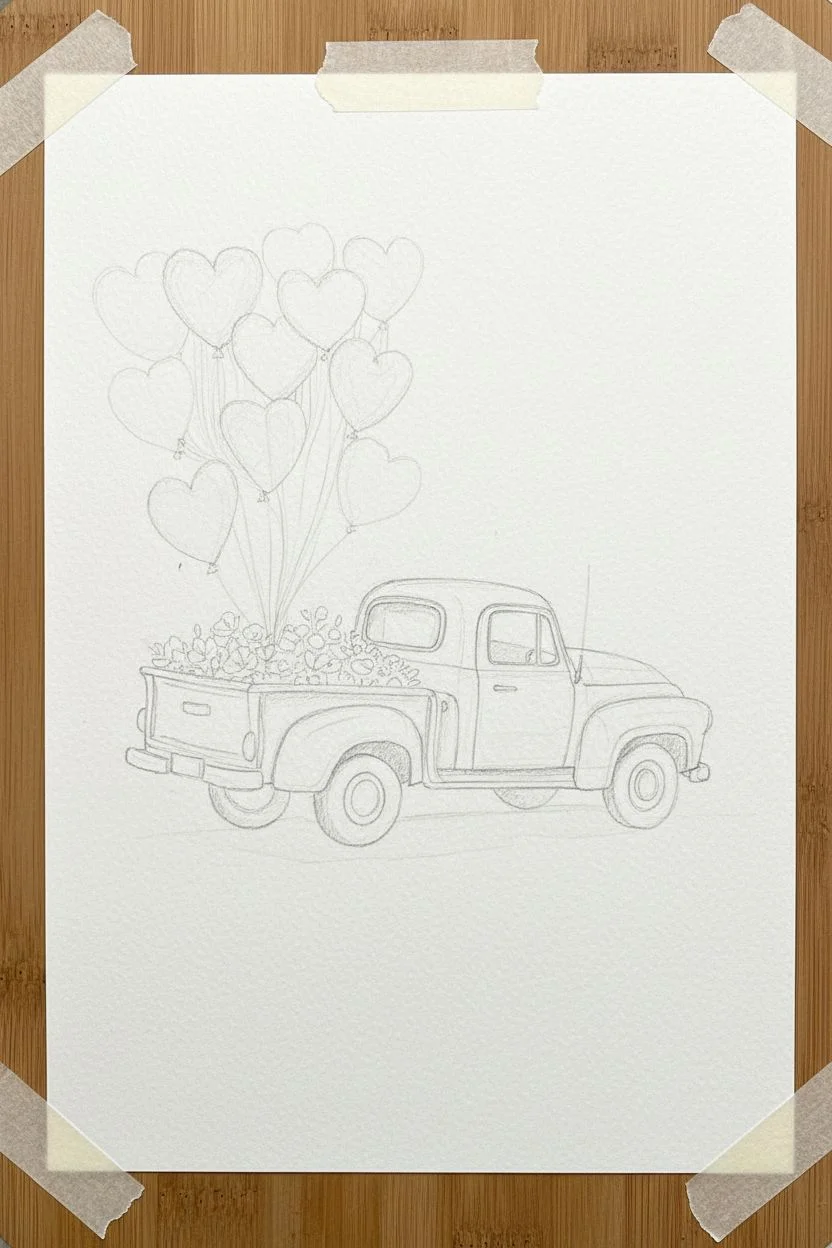
Capture the romance of the open road with this charming watercolor illustration. Featuring a classic teal pickup truck hauling a bed full of blooms and trailing a bouquet of heart balloons, this project focuses on capturing light, shadow, and whimsical movement.
Step-by-Step Guide
Materials
- Cold press watercolor paper (300 gsm)
- Watercolor paints (Turquoise, Alizarin Crimson, Payne’s Gray, Burnt Umber, Sap Green)
- Round brushes (sizes 2, 6, and a finer liner brush)
- HB Pencil and kneaded eraser
- Palette for mixing
- Paper towels
- Masking tape
- White gel pen or white gouache (optional)
Step 1: Sketching the Composition
-
Prepare the paper:
Tape your watercolor paper down to a board on all four sides to prevent buckling when the water is applied. -
Outline the truck body:
Using an HB pencil, lightly sketch the rear three-quarter view of the vintage truck. Focus on the rounded shapes of the wheel fenders and the rectangular cab window. -
Add floating elements:
Sketch a cluster of heart shapes floating above the truck bed, varying their sizes and angles to look natural. Lightly draw the pile of flowers in the truck bed. -
Refine the details:
Add small details like the bumper, license plate, side mirror, and door handle, keeping your pencil lines very faint so they won’t show through the paint.
Step 2: Painting the Truck
-
Base wash:
Mix a watery turquoise or teal color. Apply a light wash over the entire body of the truck, carefully painting around the window, bumper, tires, and the flower bed. -
Deepen the shadows:
While the first layer is dry, mix a more concentrated teal. Paint the shadowed areas along the bottom of the fenders, under the door handle, and the side of the truck bed to create a 3D rounded effect. -
Paint the window:
Use a diluted Payne’s Gray to paint the rear window. While wet, lift a small horizontal line of paint with a clean, damp brush to create a reflection streak. -
Tires and bumper:
Paint the tires with a dark gray (dampen distinct tread lines if you like), leaving the hubcaps unpainted or very pale gray. Use a light blue-gray wash for the chrome bumper to suggest metallic reflection.
Balloon Translucency
To make the balloons look helium-filled and airy, lift a tiny dot of paint from the top right of each heart while it’s still wet using a thirst brush to create a soft highlight.
Step 3: The Cargo and Balloons
-
Fill the truck bed:
Using a mix of reds and crimsons, dab small dots into the truck bed area to represent a dense pile of berries or roses. Vary the saturation to show depth. -
First balloon layer:
Paint the lightest pink balloons first using very watered-down red paint. Let the watercolor pool naturally to create texture. -
Layering hearts:
Once the first hearts are dry, paint the darker red balloons overlapping them slightly. This glazing technique makes the bunch look full and translucent. -
Connecting the strings:
I prefer to use a rigger or very fine liner brush for this step. Mix a dark gray and paint thin lines connecting each balloon down to the truck bed.
Troubleshooting Shadows
If your ground shadows look too heavy or dark, blot them immediately with a paper towel and re-wet the edge to feather it out for a dusty road effect.
Step 4: Atmosphere and Final Detail
-
Grounding the vehicle:
Mix a warm light gray or sandy brown. Paint a stripe of shadow beneath the truck, softening the edges with fresh water so it fades into the paper. -
Scattered hearts:
Paint tiny red hearts falling onto the road behind the truck, leading the eye off the page. -
Sky details:
With a very pale pink wash, add subtle cloud-like shapes in the sky. Add a few tiny ‘V’ shapes in gray to represent distant birds. -
Highlights:
If you lost any crisp whites during painting, use a white gel pen or a dot of white gouache to add highlights to the balloons and the truck’s chrome bumper.
Let your painting dry completely before framing this sweet delivery of love.

PENCIL GUIDE
Understanding Pencil Grades from H to B
From first sketch to finished drawing — learn pencil grades, line control, and shading techniques.
Explore the Full Guide
Blossoming Heart-Shaped Tree
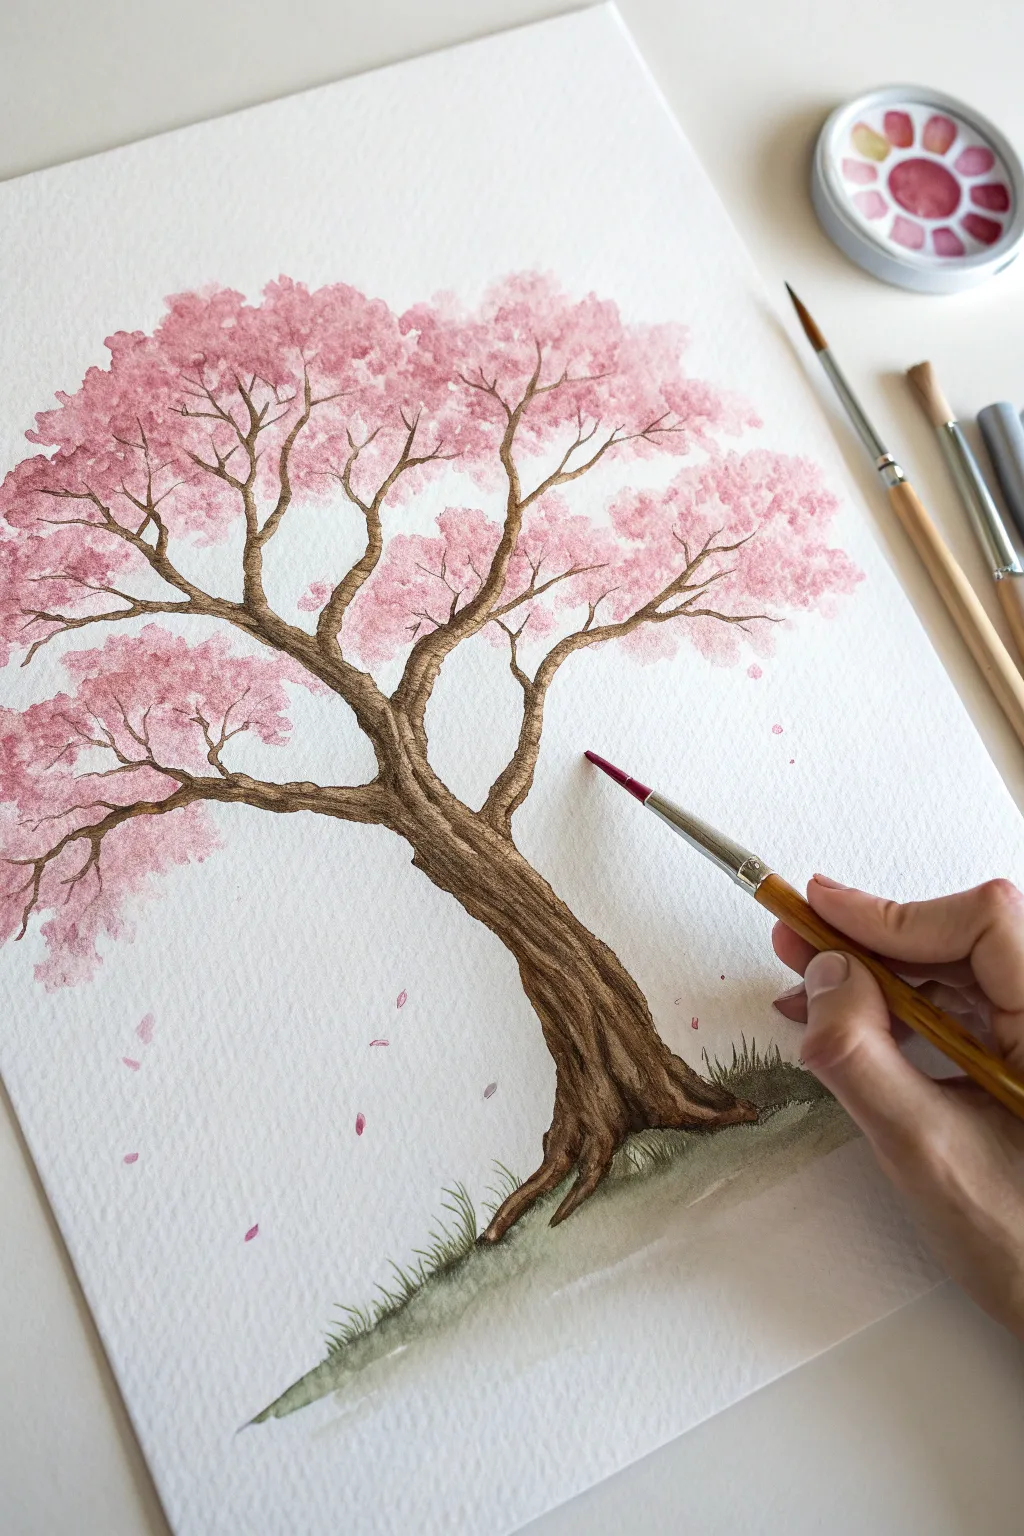
Capture the romance of nature with this lovely watercolor painting featuring a sturdy, textured trunk and a canopy of soft pink blossoms. This project focuses on building organic textures and controlling water flow to create a dreamy, blossoming effect.
Step-by-Step
Materials
- Cold press watercolor paper (300 gsm)
- Watercolor paints (Sap Green, Burnt Umber, Sepia, Rose Madder, Opera Pink)
- Round brushes (size 2, 6, and 10)
- Pencil and eraser
- Jar of clean water
- Paper towel
Step 1: Planning and First Wash
-
Sketch the outline:
Lightly sketch the curve of the trunk and the general ‘cloud’ shapes of the floral canopy using a pencil. Keep the lines faint so they don’t show through the paint later. -
Mix your lightest pink:
On your palette, dilute a small amount of Rose Madder with plenty of water to create a very pale, translucent pink wash. -
Paint the first blossom layer:
Using the size 10 brush, dab the pale pink into the canopy areas. Use an irregular stippling motion to create fluffy, cloud-like shapes rather than solid circles. -
Add depth while wet:
While the first layer is still damp, drop in slightly concentrated Opera Pink into the center and bottom of each flower cluster. This creates an immediate soft gradient. -
Let it dry:
Allow the pink sections to dry completely. This is crucial so the brown branches don’t bleed into the flowers.
Step 2: Sculpting the Trunk
-
Base coat for the trunk:
Mix a wash of Burnt Umber. Paint the main shape of the trunk, starting from the roots and sweeping upward. -
Create main branches:
Extend the brown color upwards, splitting the trunk into two or three main thick branches that reach toward the pink clusters. -
Add shadows:
While the brown wash is still slightly wet, run a line of darker Sepia along the right side of the trunk and the underside of the branches to establish a light source. -
Wait for dryness:
I like to take a short break here to ensure the paper is bone dry before adding the fine bark details, otherwise the lines will blur.
Leave the White
Don’t fill the canopy solid pink. Leave small patches of white paper showing through the blossom clouds to represent sunlight filtering through the tree.
Step 3: Details and Texture
-
Paint fine branches:
Switch to your size 2 brush. Mix a dark brown and paint thin, tapering lines that connect the main tree structure into the heart of the pink clouds. -
Texture the bark:
Using the very tip of the small brush and the Sepia paint, draw wavy, vertical lines following the curve of the trunk. This mimics the rough texture of old bark. -
Layer the blossoms:
Mix a saturated pink. Add small, distinct dabs of paint over the dry flower clouds to suggest individual clusters of petals and add volume. -
Paint the grassy base:
Mix Sap Green with a touch of brown. Paint a small mound at the base of the roots. Use short, upward flicks to simulate blades of grass. -
Add falling petals:
With your smallest brush and pink paint, create tiny teardrop shapes floating in the air and resting on the grass below the tree. -
Refine contrast:
Look for areas where branches disappear into leaves. Add a tiny dot of dark brown at these junction points to anchor the visuals.
Muddy Colors?
If your pinks and browns are turning grey where they touch, your first layer wasn’t dry enough. Let layers fully cure, or use a hair dryer to speed up the process.
Now you have a timeless symbol of love that blooms permanently on your wall.
Cozy Walk Under a Red Umbrella
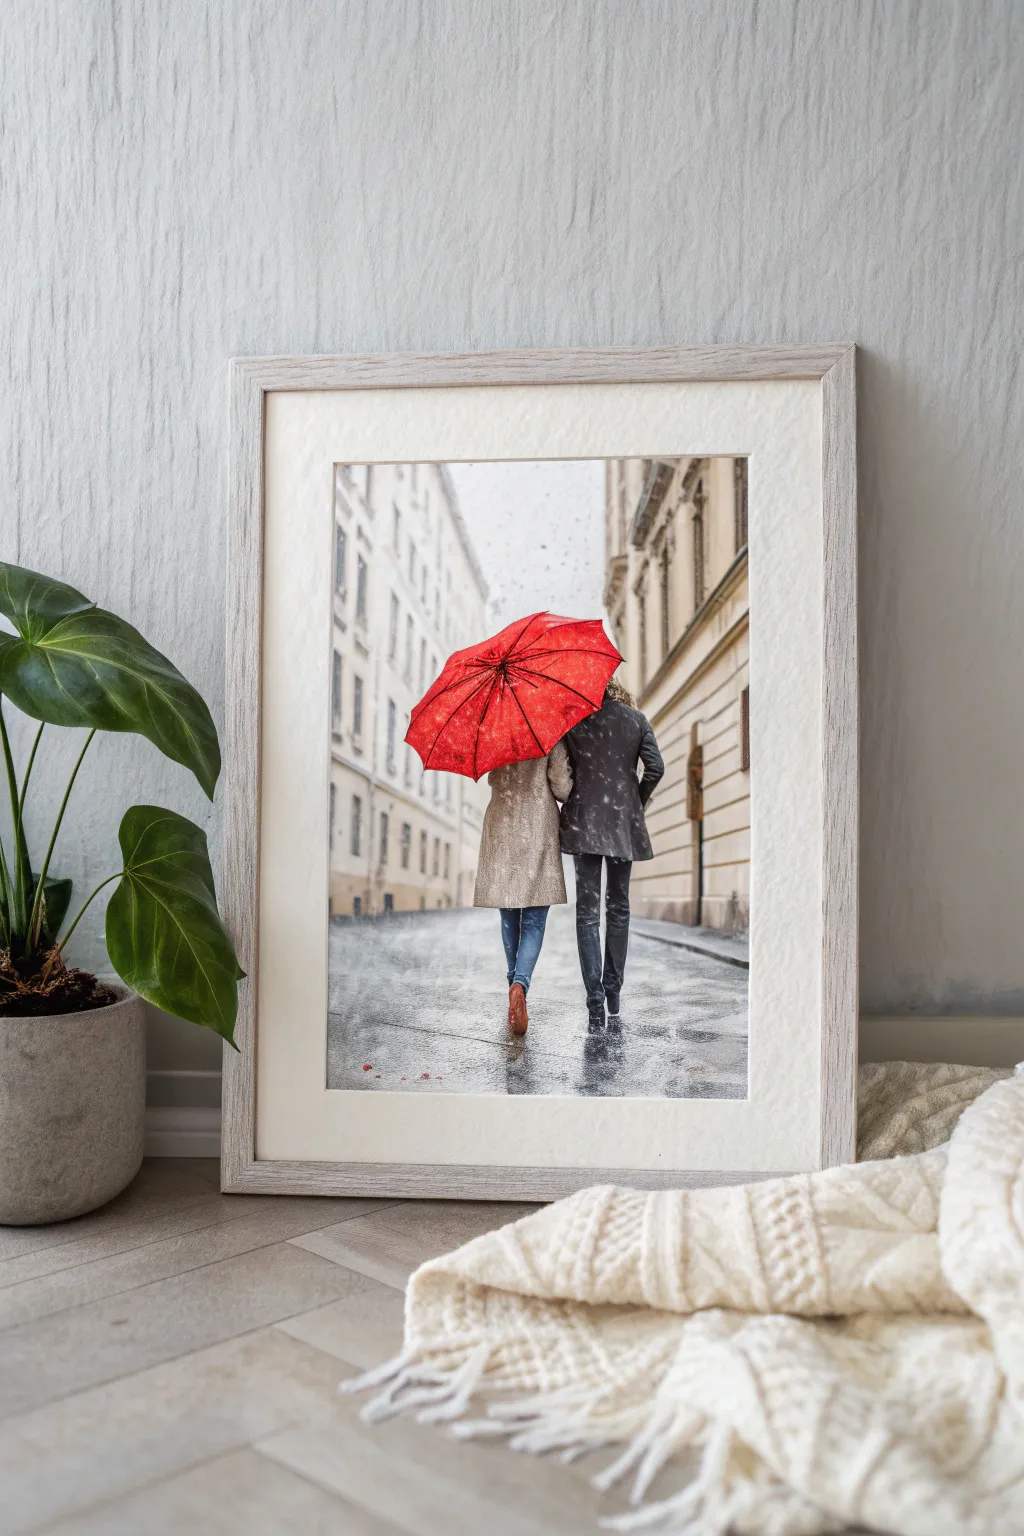
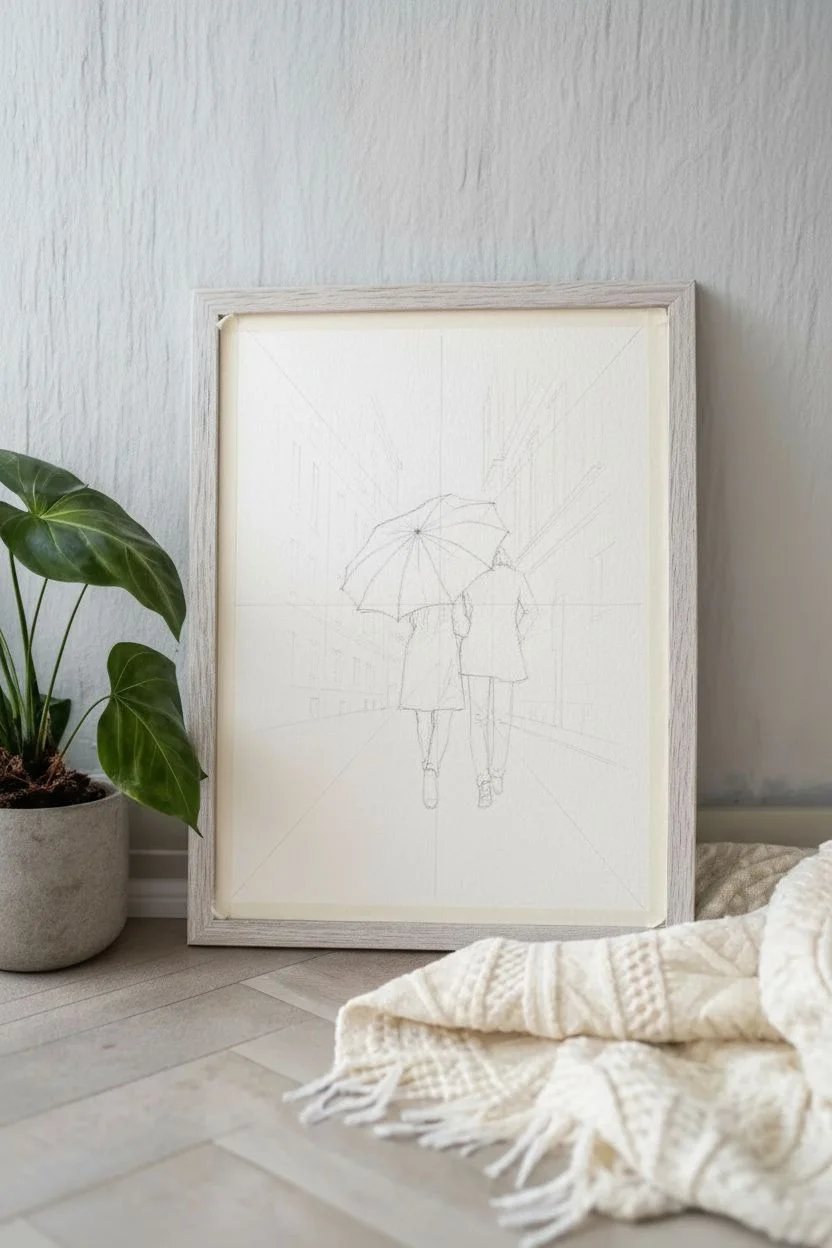
Capture the cozy intimacy of a rainy walk with this moody watercolor project. You will learn to paint a soft, atmospheric city background that allows the bright red umbrella and the couple beneath it to truly pop off the page.
Step-by-Step Tutorial
Materials
- Cold-press watercolor paper (300gsm)
- Watercolor paints (Cadmium Red, Payne’s Gray, Yellow Ochre, Burnt Sienna, Ultramarine)
- White Gouache or White Acrylic paint
- Round brushes (sizes 4 and 8)
- Fine liner or rigger brush
- Masking tape and board
- Pencil and eraser
- Jar of water and paper towels
Step 1: Sketching the Scene
-
Prepare the paper:
Tape your watercolor paper down to a board on all four sides to prevent buckling when we add water. -
Establish perspective:
Draw a horizon line about one-third up the page and a vanishing point near the center. -
Draft the architecture:
Lightly sketch diagonal lines radiating from the vanishing point to form the tops and bottoms of the buildings on either side. -
Outline the subjects:
Sketch the couple in the center foreground, focusing on the large umbrella shape first, then their coat silhouettes and legs below.
Muddy Background?
If your buildings look like blobby mud, you likely worked the paper while it was too wet. Let it dry completely, then add crisp architectural lines on top to recover structure.
Step 2: Atmospheric Background
-
Wet-on-wet sky:
With a large clean brush, wet the sky area and the building facades with clean water, avoiding the couple. -
Initial wash:
Drop in a very watery mix of Payne’s Gray and a touch of Yellow Ochre to create a foggy, muted city atmosphere. -
Building forms:
While the paper is still damp, paint vertical strokes of slightly darker gray to suggest the sides of buildings, letting the edges bleed softness. -
Architectural details:
Use a smaller brush to add hints of windows and cornices using a thicker gray mix; keeping this vague helps depth perception. -
Painting the street:
Mix a cool gray-blue for the wet pavement and apply it horizontally across the bottom third, painting around the legs. -
Creating reflections:
While the street paint is wet, drag a damp brush vertically downwards from the figures and buildings to create blurry reflections.
Personalize It
Customize the painting by changing the coat colors to match favorite jackets owned by you and your partner, adding a hidden layer of personal meaning to the artwork.
Step 3: The Couple & Umbrella
-
Woman’s coat:
Paint the left figure’s coat with a textured wash of Burnt Sienna or light beige, blotting slightly with a tissue to create a fabric look. -
Man’s coat:
Use a saturated mix of Payne’s Gray and Ultramarine to paint the right figure’s jacket, keeping edges crisp. -
Reviewing dryness:
I usually pause here to ensure the coats are dry before painting the legs to avoid colors bleeding into each other. -
Legs and boots:
Paint the jeans with a denim blue mix and use dark brown or black for the boots, grounding them firmly on the pavement. -
Umbrella base:
Fill the umbrella shape with a bright, clean Cadmium Red. -
Umbrella shading:
Once the red is dry, mix a little brown into your red and paint the shadowed segments to show the umbrella’s curve. -
Fine details:
Use your finest liner brush and black paint to draw the metal ribs of the umbrella and the handle.
Step 4: Finishing Touches
-
Deepening shadows:
Add concentrated dark gray directly under the figures’ feet to anchor them to the ground. -
Creating rain:
Dilute white gouache or acrylic with a little water until it has a creamy consistency. -
Splatter effect:
Load a brush with the white mix and tap the handle against another brush over the painting to create falling snow or rain.
Frame this piece behind glass to protect the delicate watercolor texture and enjoy your romantic rainy day scene


Intertwined Tree Trunks
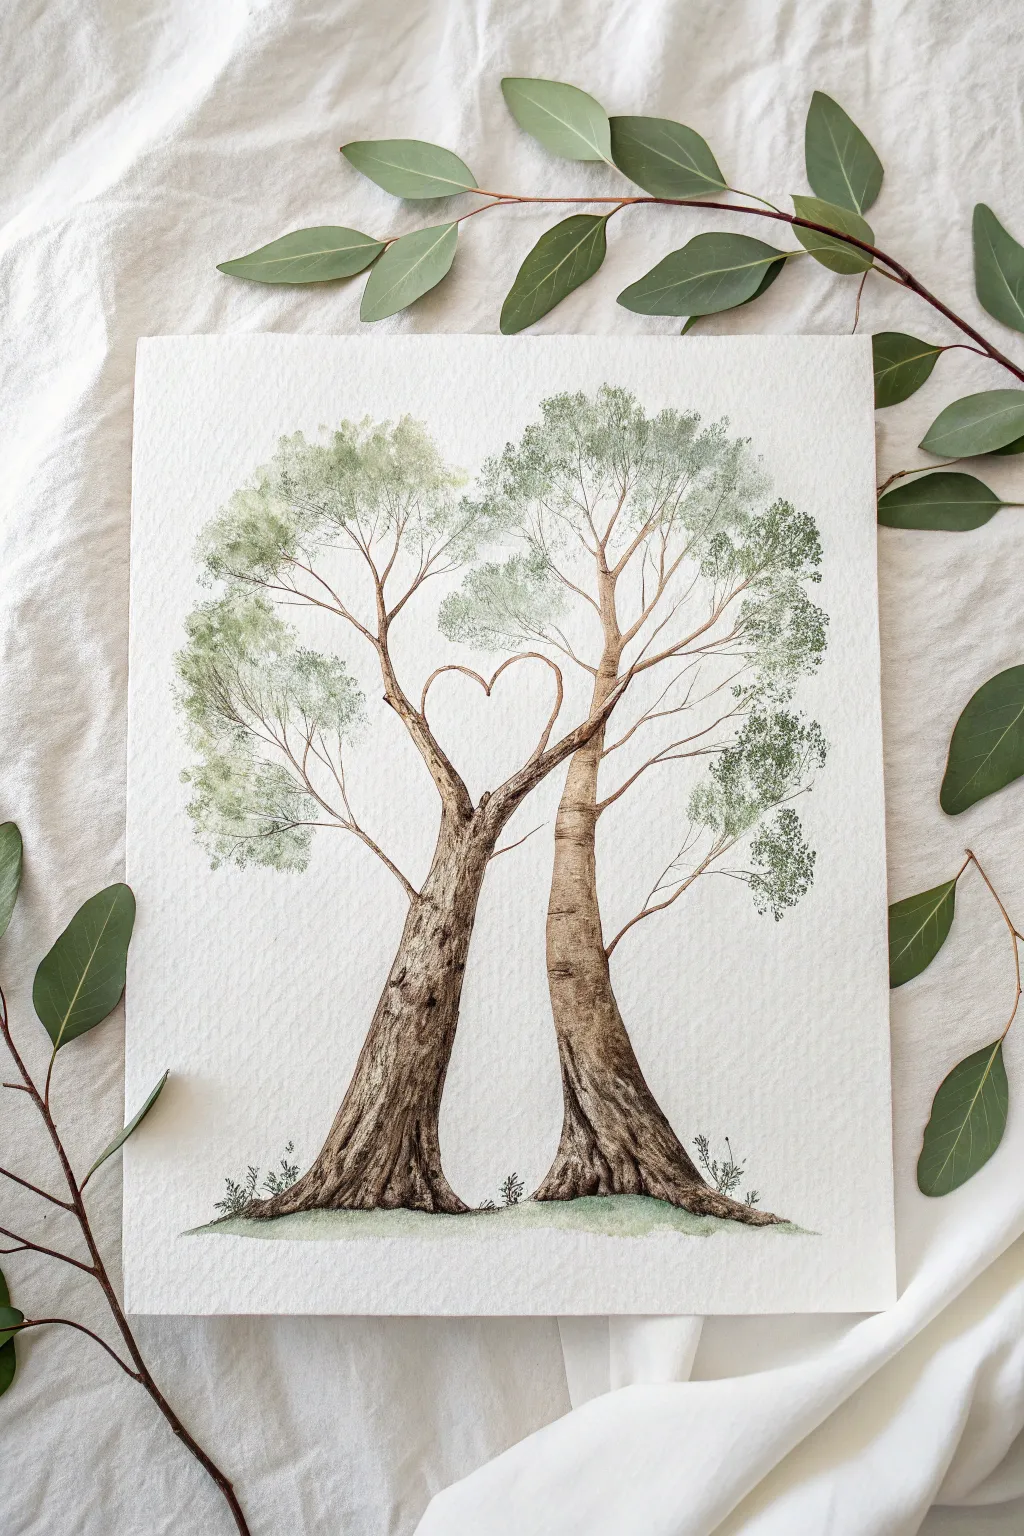
Capture the quiet romance of nature with this delicate watercolor tutorial featuring two eucalyptus trees growing together. The airy foliage and detailed bark textures create a sophisticated look, while the branches meeting to form a subtle heart shape adds a perfect sentimental touch for Valentine’s Day.
Step-by-Step Tutorial
Materials
- Cold press watercolor paper (300 gsm)
- Watercolor paints (Sepia, Burnt Umber, Yellow Ochre, Sap Green, Payne’s Grey)
- Round watercolor brushes (Size 4 or 6 for washes)
- Detail brush (Size 0 or 00) or rigger brush
- Fine tip brown archival ink pen (optional)
- HB pencil and kneaded eraser
- Palette, water jar, and paper towel
Step 1: Sketching the Composition
-
Establish the ground:
Lightly draw a gentle, hilly curve near the bottom of your paper to serve as the ground line where the trees will take root. -
Outline the trunks:
Sketch two tree trunks rising from the ground. Draw the left tree leaning slightly to the right, and the right tree leaning slightly left, so they are close but not touching at the base. -
Form the heart:
Before drawing the branches, lightly sketch a floating heart shape in the empty space between the upper trunks. This will act as your guide. -
Connect the branches:
Draw slender branches extending from both trunks that trace over your heart outline, interlocking them at the top and bottom of the heart to finalize the connection.
Natural Imperfection
Don’t make your bark lines perfectly straight. Let your hand shake slightly as you paint the vertical texture; these ‘jittery’ lines make the wood look much more realistic and organic.
Step 2: Painting the Textured Bark
-
Base trunk wash:
Mix a diluted wash of Yellow Ochre and a touch of Burnt Umber. Paint the entire shape of both trunks, keeping the color watery and transparent. -
Add shadows:
While the base layer is still slightly damp, drop in a darker mix of Sepia along the outer edges of the trunks to create roundness and cylindrical form. -
Create bark texture:
Once the paper is bone dry, use your smallest brush with a concentrated mix of Sepia and Payne’s Grey. Paint thin, vertical, broken lines traveling up the trunk to mimic rough bark. -
Enhance the knots:
Add small, irregular dark spots or ‘eyes’ on the trunk where old branches might have fallen off, intensifying the rustic look specifically near the roots and mid-trunk. -
Root details:
Darken the base of the trees where they meet the ground, flaring the strokes outward to show the roots gripping the earth.
Step 3: Foliage and Fine Details
-
Mix the green:
Create a eucalyptus green by mixing Sap Green with a little Payne’s Grey or Sepia to desaturate it. You want a muted, dusty green rather than a bright vibrant one. -
Paint foliage clumps:
Using the tip of your round brush (size 4), dab paint loosely at the ends of the upper branches. I like to keep these strokes airy and separate to resemble individual leaves. -
Does it need density?:
While the green is wet, touch in a slightly darker, more concentrated green mixture into the bottom center of each foliage clump to add volume. -
Define the heart:
Use your size 0 detail brush or a brown fine liner pen to sharply define the thin branches creating the heart shape, ensuring they stand out against the background. -
Extend fine twigs:
Draw or paint whisper-thin lines extending from the main branches out into the foliage clumps to connect the leaves to the tree structure. -
Ground the scene:
Wash a light green color over the ground hill you sketched earlier. While wet, flick tiny upward strokes with a detail brush to suggest grass blades near the roots. -
Final Contrast:
Add the darkest accents of dark brown/black to the deepest crevices of the bark and the underside of the main branches for final contrast.
Troubleshooting: Blobby Leaves
If your foliage looks like solid heavy blobs, you likely used too much water or pressure. Wait for it to dry, then paint tiny individual leaf shapes around the edges to break up the silhouette.
Step back and admire how the natural elements frame that sweet central symbol of love you have created
Bold Typography Love Art
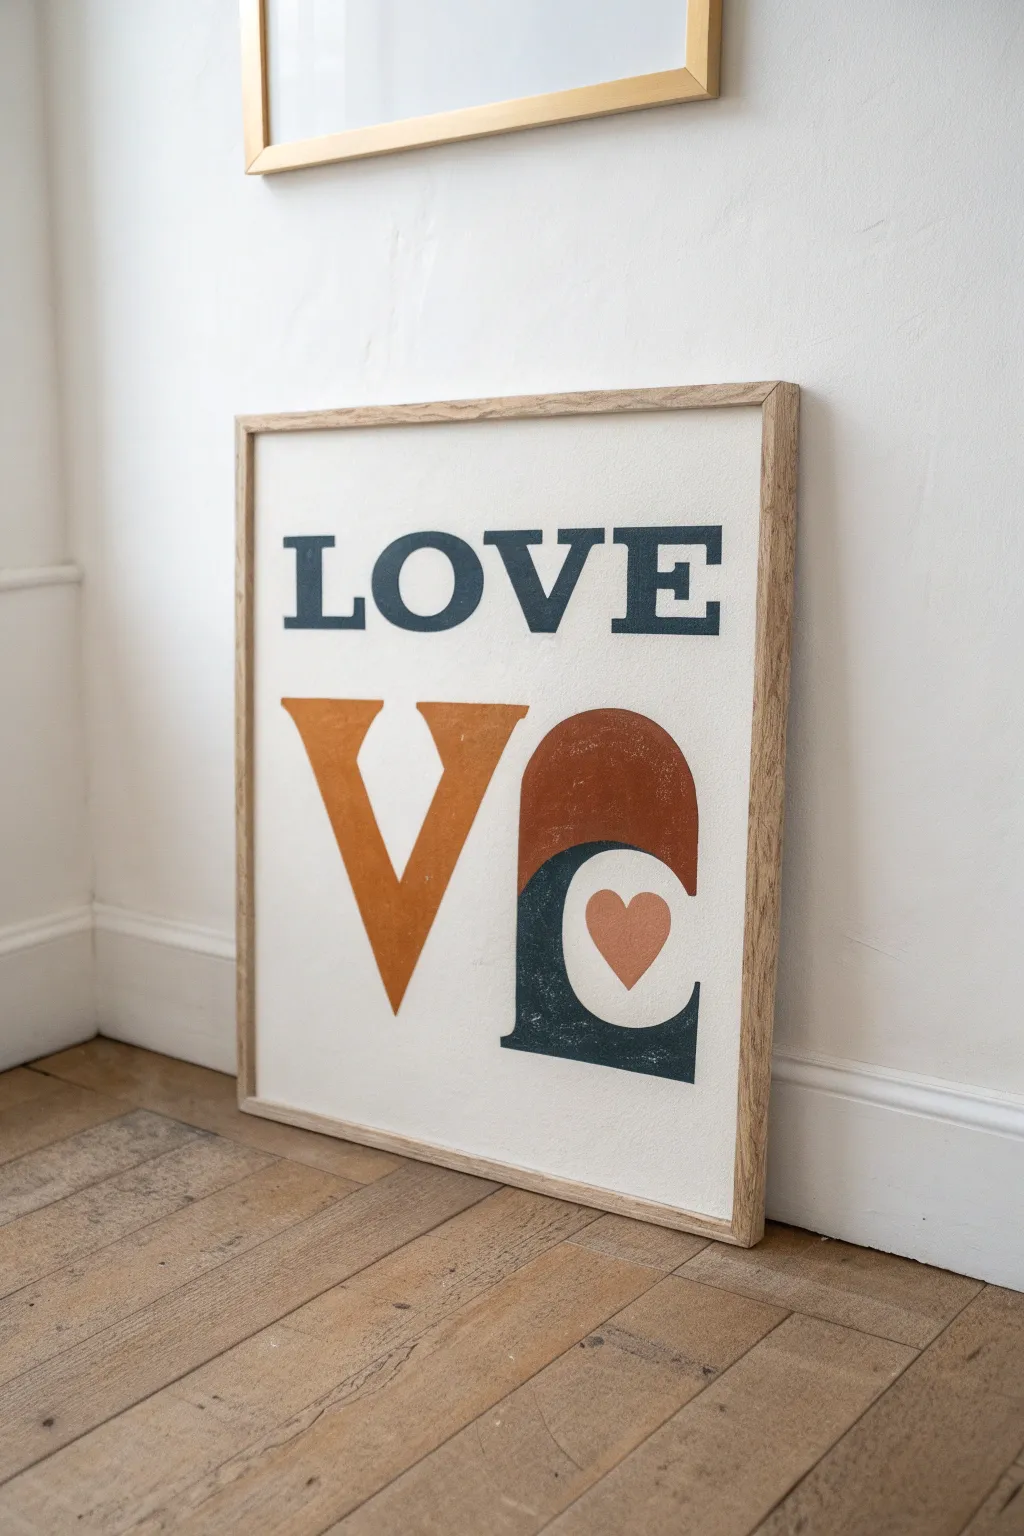
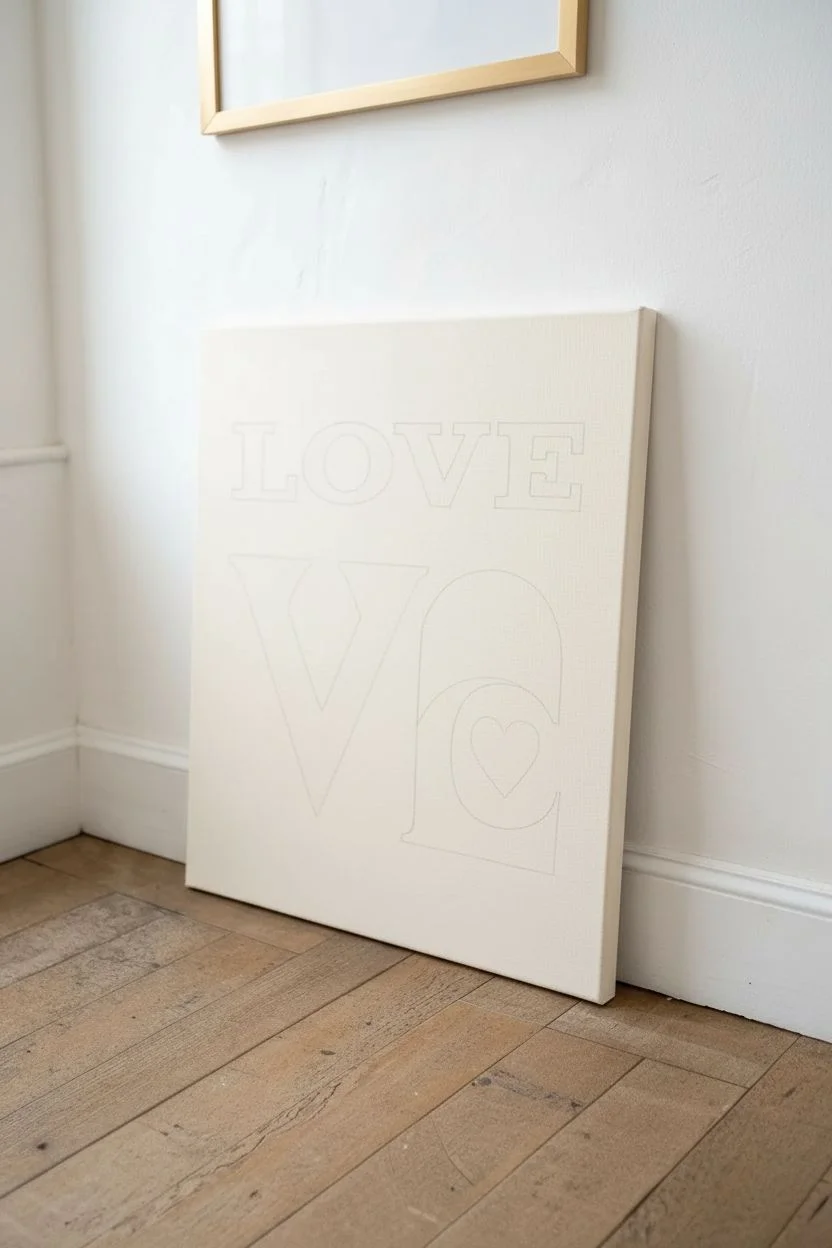
Create a modern, art-gallery style statement piece with this bold typography painting. By combining sharp serif fonts with abstract color-blocked shapes, you will achieve a warm, mid-century modern aesthetic that is perfect for Valentine’s Day or year-round decor.
Step-by-Step Guide
Materials
- 16×20 inch stretched canvas
- Acrylic paints (Cream, Deep Teal, Mustard Yellow, Terracotta, Muted Pink)
- Flat shader brushes (sizes 4 and 8)
- Small liner brush (size 0 or 1)
- Pencil and eraser
- Ruler or straight edge
- Painters tape (optional but helpful)
- Light wood floating frame
Step 1: Preparation and Sketching
-
Base Coat:
Begin by covering the entire canvas with your cream or off-white acrylic paint. Use a large flat brush to ensure even coverage. -
Second Layer:
Once the first coat is dry to the touch, apply a second coat of cream to create a solid, opaque background that hides the raw canvas weave. -
Layout Planning:
Measure the canvas to divide it visually: the top third will hold the word ‘LOVE’, and the bottom two-thirds will feature the large graphic shapes. -
Sketching Text:
Using a pencil and ruler, lightly sketch the word ‘LOVE’ in a bold serif font centered in the top section. Keep the letter spacing wide for an airy look. -
Sketching the V:
On the left side of the bottom section, ruler out a large, sharp letter ‘V’ that spans most of the vertical space remaining. -
Sketching the Abstract Shapes:
To the right of the V, sketch a large arch shape (the top of the abstract E) and below it, a curved wave shape (the bottom of the E). -
Adding the Heart:
Draw a simple heart shape in the negative space between the arch and the bottom wave curve.
Clean Lines Hack
If you struggle with shaky hands on the curves, try using a paint pen instead of a brush for the outlines of the abstract shapes, then fill in the centers with your regular brush.
Step 2: Painting the Design
-
Text Painting:
Load a size 4 flat brush with Deep Teal paint. Carefully fill in the ‘LOVE’ letters, using the flat edge of the brush to create crisp serifs. -
Refining Edges:
For the tips of the letters and sharp corners, switch to your small liner brush to sharpen the points without going outside your pencil lines. -
Taping the V:
Apply painters tape along the outside edges of your large V pencil lines to ensure a perfectly straight edge. -
Painting the V:
Fill the V shape with Mustard Yellow paint. Brush away from the tape edge to prevent bleeding underneath. -
Remove Tape:
Gently peel back the tape while the yellow paint is still slightly damp to reveal a crisp line. -
Painting the Arch:
Use the Terracotta paint for the top arch shape. Freehand the curve carefully using the corner of your larger flat brush. -
Painting the Curve:
Fill the bottom wave shape with the same Deep Teal used for the top text, creating visual balance. -
Painting the Heart:
Fill the small heart shape with Muted Pink. I usually need two coats here to make the pink pop against the background.
Step 3: Finishing Touches
-
Cleanup:
Inspect your edges. If any paint went astray, specificially around the curves, use the original cream background color to carefully ‘cut in’ and cover mistakes. -
Erase Marks:
Once the painting is 100% dry, gently erase any visible pencil sketch lines. -
Framing:
Place the canvas into a light wood frame to complete the warm, neutral aesthetic shown in the photo.
Level Up: Texture
Mix a teaspoon of baking soda into your acrylic paints before applying the colored shapes. This creates a gritty, velvety matte texture that makes the artwork look like a high-end vintage print.
Hang your new masterpiece in a bright spot and enjoy the cozy, artistic atmosphere it brings to the room
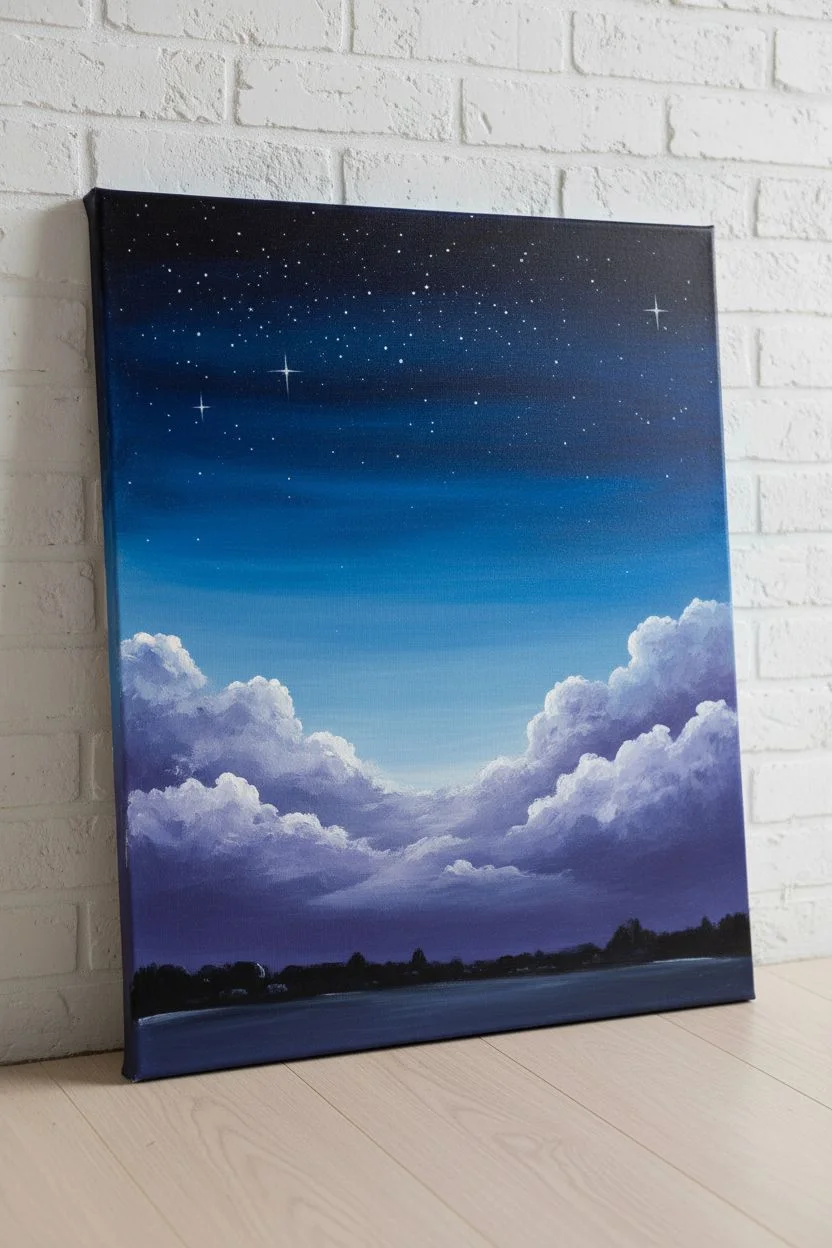
Moonlight Cherry Blossoms
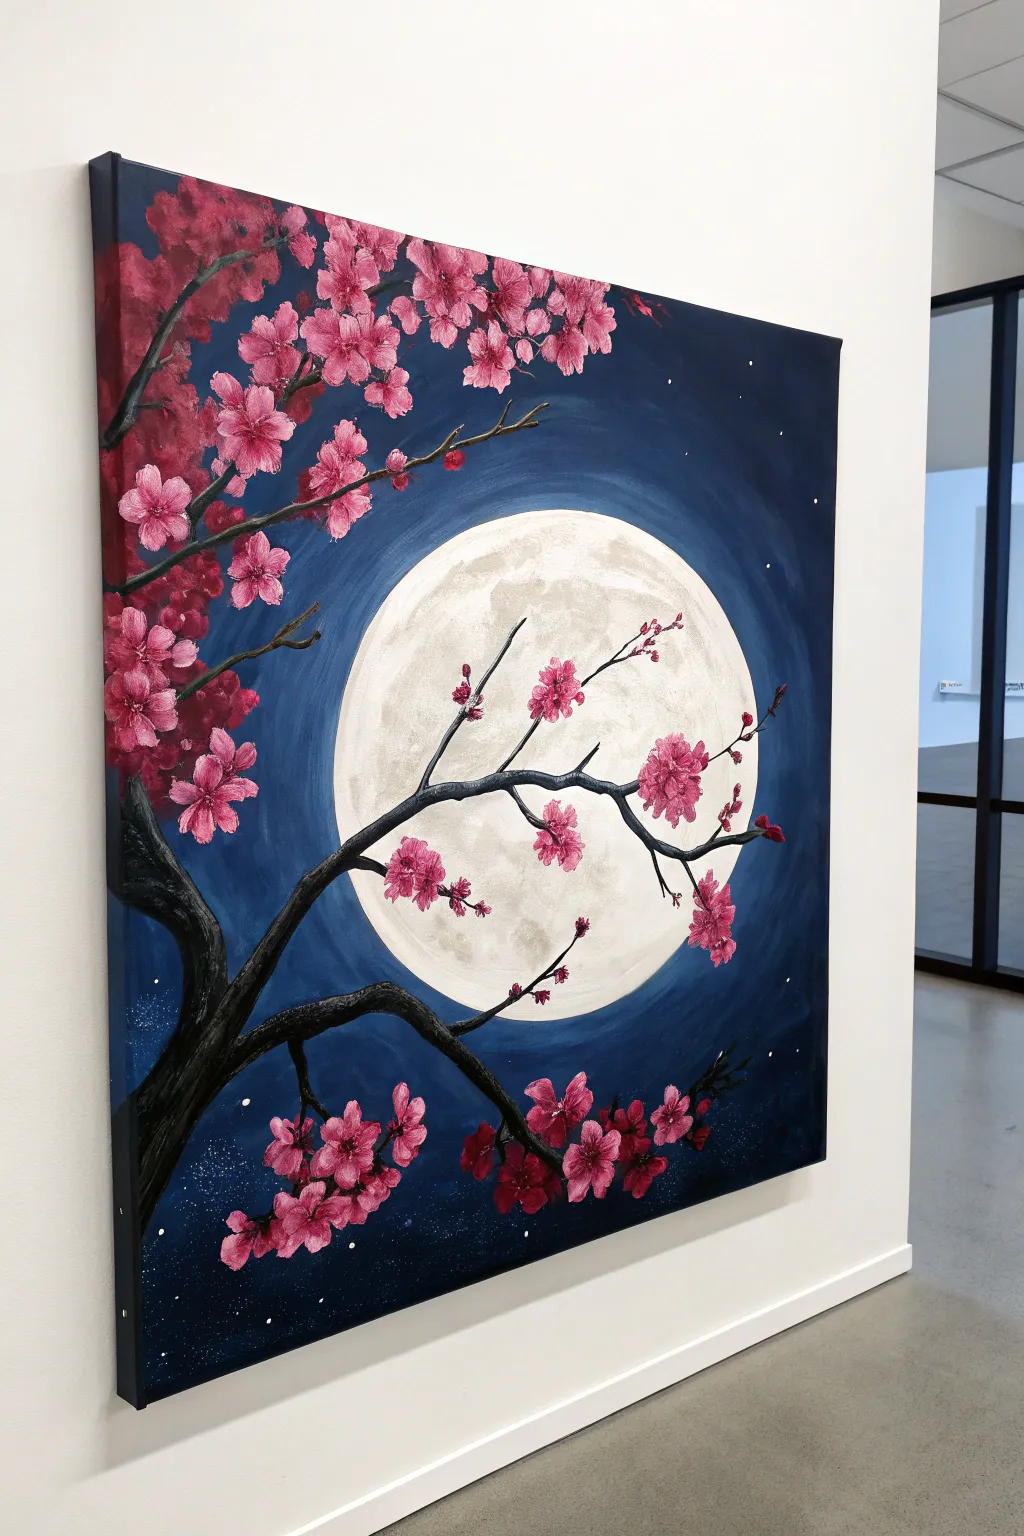
Capture the romance of a secluded night walk with this striking acrylic painting featuring delicate cherry blossoms silhouetted against a luminous full moon. The dramatic contrast between the deep navy sky and the soft pink petals creates a captivating scene perfect for Valentine’s décor.
Detailed Instructions
Materials
- Stretched canvas (16×20 or similar)
- Acrylic paints: Phthalo Blue, Mars Black, Titanium White, Burnt Umber, Magenta/Primary Red, Yellow
- Large flat brush (1 inch)
- Medium filbert brush
- Small round liner brush (size 1 or 2)
- Circular object to trace (like a dinner plate)
- Chalk or pastel pencil
- Old toothbrush (optional for stars)
- Palette and water cup
Step 1: Setting the Scene
-
Outline the moon:
Place your circular object slightly off-center on the canvas, leaning towards the right. Lightly trace around it with a piece of chalk or a pastel pencil to establish the moon’s position. -
Mix the night sky:
Create a deep midnight blue by mixing Phthalo Blue with a small amount of Mars Black. You want a color that is dark but not completely black. -
Paint the background:
Using the large flat brush, paint the outer edges and corners of the canvas with your dark mix. Work your way inward toward the moon circle, but stop about two inches away from the outline. -
Create the glow:
Mix a lighter shade of blue by adding a touch of Titanium White to your original blue mix. Apply this around the moon’s outline, blending it outwards into the wet dark blue to create a glowing halo effect. -
Blend the transition:
Wipe your brush clean and keep it slightly damp. Gently sweep over the area where the light and dark blues meet to soften the transition, eliminating harsh lines. -
Add stars:
Dilute a small amount of white paint with water until it’s inky. Cover the moon area with a piece of paper, then flick the paint bristles with your thumb or an old toothbrush to spray tiny starry specks across the blue sky.
Step 2: Painting the Moon
-
Base coat:
Paint the inside of the moon circle with pure Titanium White mixed with the tiniest dot of yellow or cream to warm it up. -
Add lunar texture:
Mix a very pale grey. Using a small piece of scrunched-up paper towel or a dry sponge, lightly dab faint gray patches onto the moon to mimic craters and surface texture. Keep this subtle. -
Define the edge:
Use a medium filbert brush with fresh white paint to carefully clean up the distinct circular edge of the moon so it stands out sharply against the blue background.
Clean Edges
Paint the sides of your canvas as you work, extending the image around the edges. This ‘gallery wrap’ style creates a polished look that’s ready to hang without a frame.
Step 3: Growing the Tree
-
Sketch the branches:
Using your chalk, sketch the main tree trunk entering from the bottom left corner. Draw branches stretching diagonally upwards and across the moon. -
Block in the trunk:
Mix Mars Black with Burnt Umber to get a very dark brown. Paint the thickest parts of the trunk and main branches using a round brush. -
Add bark detail:
While the brown paint is still tacky, mix a slightly lighter brown and streak it along the length of the trunk to create the illusion of rough bark texture. -
Extend fine twigs:
Switch to your smallest liner brush. Use thinned black/brown paint (add a drop of water to improve flow) to paint delicate, wispy twigs branching off the main limbs. Let some cross directly over the white moon for depth. -
Add shadows:
I like to add a touch of pure black on the underside of the main branches to give the tree weight and dimension.
Glow Up
Mix a tiny amount of iridescent or pearl medium into your white moon paint. It will give the moon a subtle, shimmering quality that changes as you move around the room.
Step 4: Blossoming Flowers
-
Mix petal colors:
Prepare three shades of pink on your palette: a dark magenta, a medium pink, and a very pale pastel pink (almost white). -
Paint flower clusters:
Dip a small round brush into the medium pink. Dab clusters of five small dots to form flower shapes along the branches, grouping them tightly in some areas. -
Add depth:
Dab the dark magenta into the center of the flower clusters and on the shadowed undersides of the petals. -
Highlight the blooms:
Using the pale pink, add highlights to the tops of the petals, especially those positioned against the dark sky, to make them pop. -
Detail centers:
Use the tip of your liner brush to place tiny dots of dark red or yellow in the very center of the open blossoms. -
Falling petals:
Paint a few single petals floating in the empty blue space below the branches to suggest a gentle breeze.
Step back and admire your serene moonlit landscape, ready to bring a touch of peaceful romance to any wall.
Family Fingerprint Balloon Bouquet
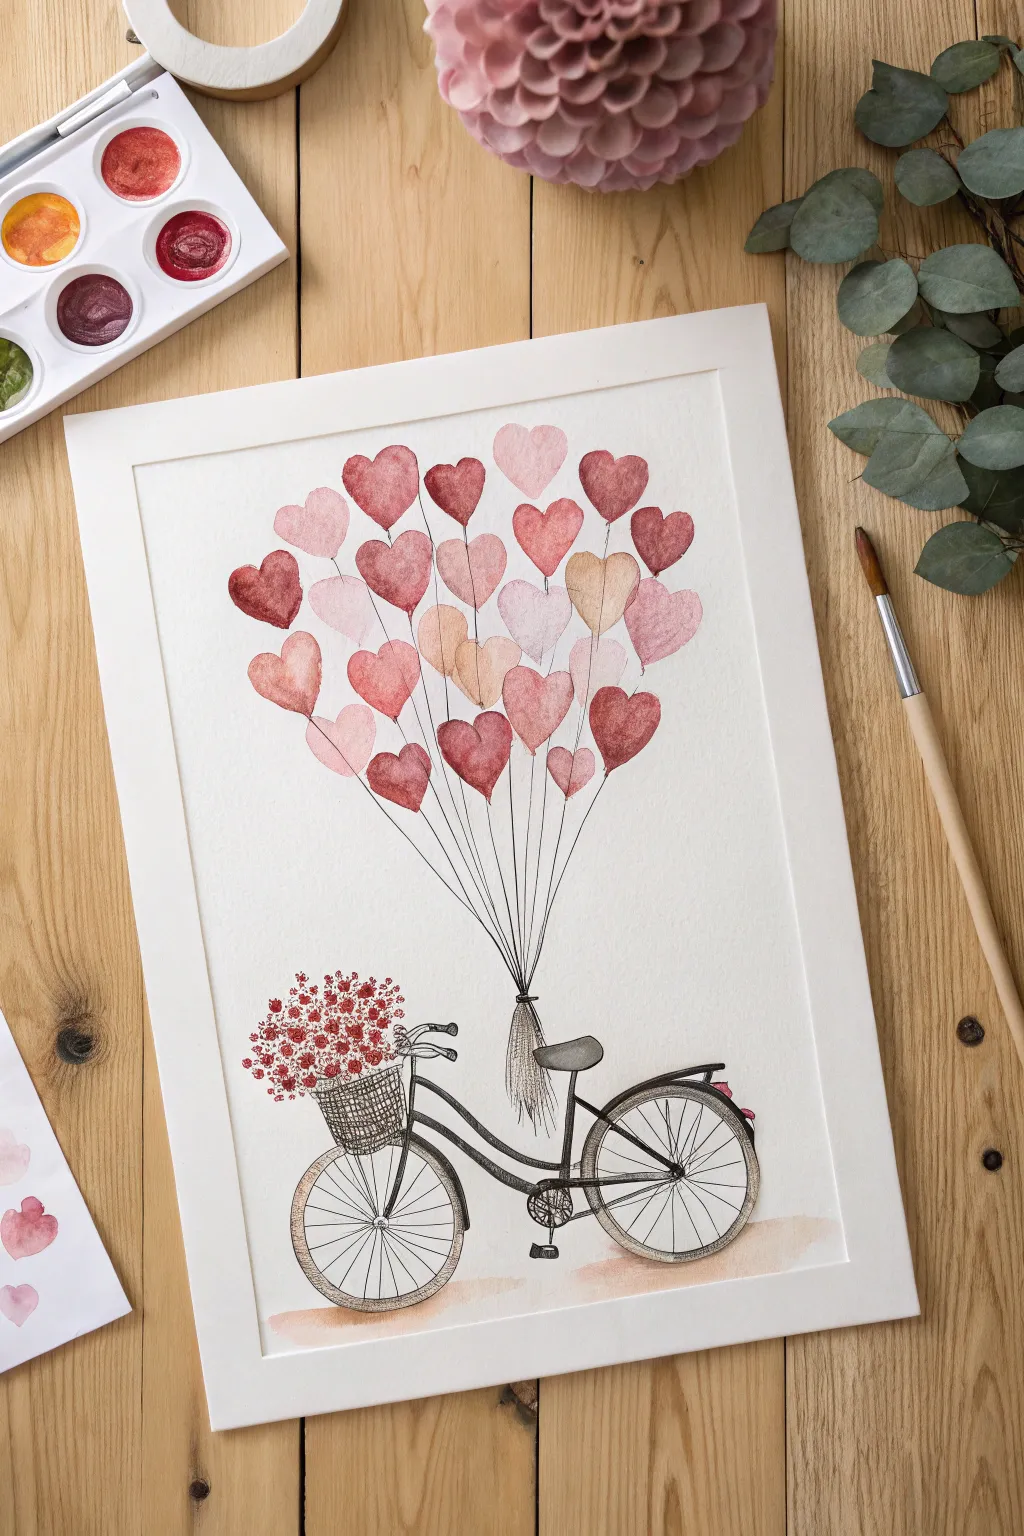
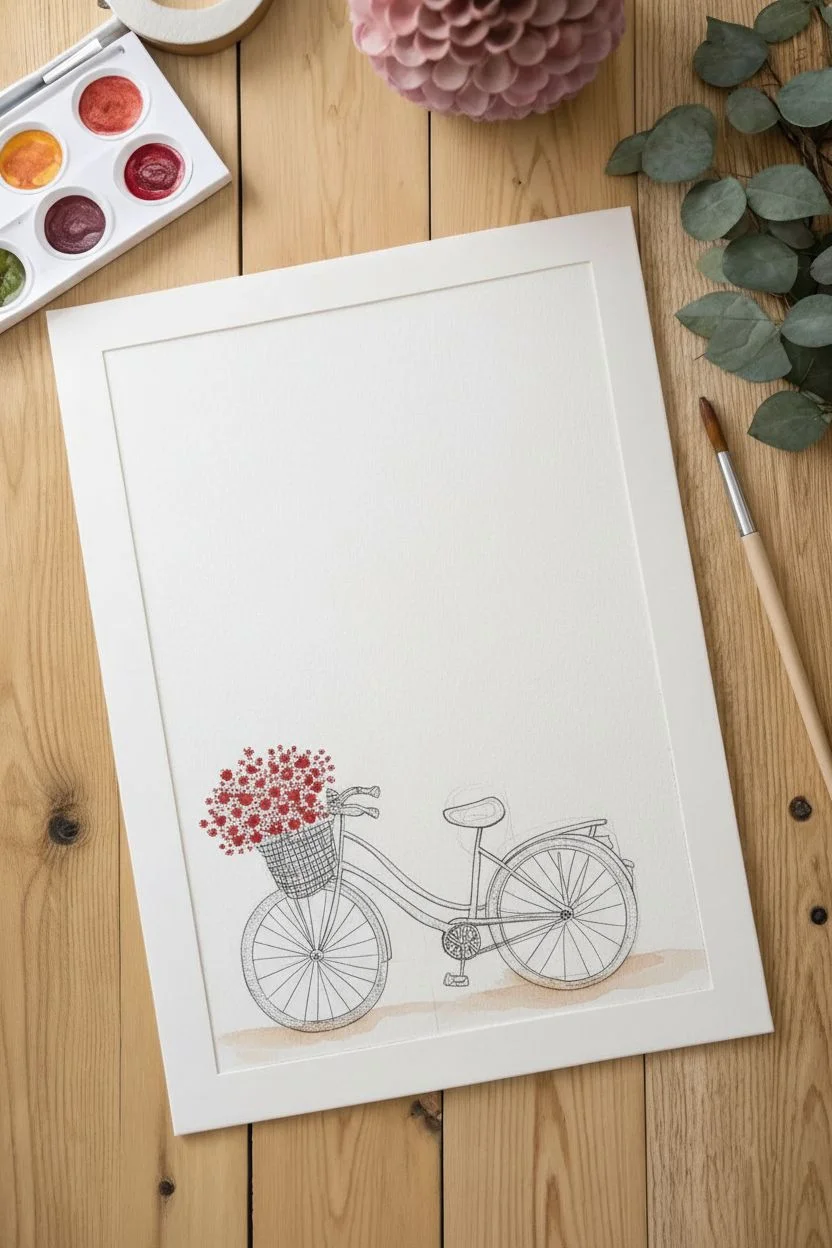
Capture the romance of adventure with this lovely artwork featuring a vintage bicycle being lifted by a bouquet of heart-shaped balloons. The contrast between the crisp, inked lines of the bike and the soft, translucent watercolor hearts creates a balanced and heartwarming composition.
Step-by-Step Guide
Materials
- Cold-press watercolor paper (300gsm)
- Waterproof fine liner pens (Black, sizes 0.1 and 0.5)
- Watercolor paints (Crimson, Dust Pink, Burnt Sienna, Ochre)
- Round watercolor brushes (Sizes 4 and 8)
- HB Pencil and kneaded eraser
- Ruler
Step 1: Sketching & Inking the Cycle
-
Placement:
Lightly sketch a horizontal line near the bottom of your paper for the ground, leaving plenty of vertical space above for the balloons. -
Wheel outlines:
Draw two circles for the bicycle wheels about 3 inches apart, ensuring they sit on your ground line. -
Frame structure:
Sketch a vintage ‘step-through’ curved frame connecting the wheels, adding a rectangular basket shape to the front handlebars. -
Inking the outline:
Using your 0.5 pen, trace over your pencil lines for the frame, tires, and basket, keeping your hand relaxed for smooth curves. -
Fine details:
Switch to the thinner 0.1 pen to draw delicate spokes in the wheels, the chain details, and a cross-hatch pattern on the basket. -
Basket blooms:
Using a small brush with concentrated red paint, dab tiny stippled dots into the basket area to resemble a dense bunch of flowers.
Preventing Muddy Colors
To keep your balloon cluster vibrant, ensure the first layer of hearts is mostly dry before painting overlapping ones. If you paint wet-on-wet with different colors, they might turn brown where they mix.
Step 2: Painting the Heart Bouquet
-
Color palette:
Mix three distinct puddles of watercolor: a soft blush pink, a deep romantic red, and a muted earth tone like beige or warm grey. -
First shapes:
Starting high above the bike, paint your first few heart shapes with the size 8 brush, leaving white space between them. -
Varying values:
Add more hearts, varying the water-to-paint ratio so some appear translucent and pale while others are bold and saturated. -
Creating depth:
Once the first layer is touch-dry, paint new hearts that slightly overlap the existing ones to create a sense of depth and abundance. -
Balloon shape:
Continue adding hearts until you have a large, inverted tear-drop cluster shape, tapering narrower as it gets closer to the bike. -
Grounding shadow:
While you have paint on your brush, add a very faint, watery wash of brown under the bicycle wheels to ground the object.
Step 3: Connecting the Strings
-
Drying time:
I prefer to wait until the paper is completely bone-dry before this step to prevent the ink from bleeding into damp paper. -
Drawing stems:
Using a ruler and your 0.1 pen, draw a straight line from the bottom point of the lavish top balloon down to the bike’s rear rack. -
Filling the bundle:
Draw individual lines from every single heart balloon, converging them all to meet at that same point on the bicycle. -
The knot:
Add a few short, scribbled vertical lines where the strings meet the bike to simulate the tied knot and tassel ends. -
Final cleanup:
Gently erase any visible pencil sketch lines once the ink is totally set to leave a clean, professional finish.
Level Up: Family Fingerprints
Customize this piece by using family members’ fingerprints to make the hearts! Press two thumbprints in a ‘V’ shape to form each heart, using ink pads or paint for a truly personal keepsake.
Frame your beautiful watercolor bicycle illustration to add a touch of romance to any room in your home
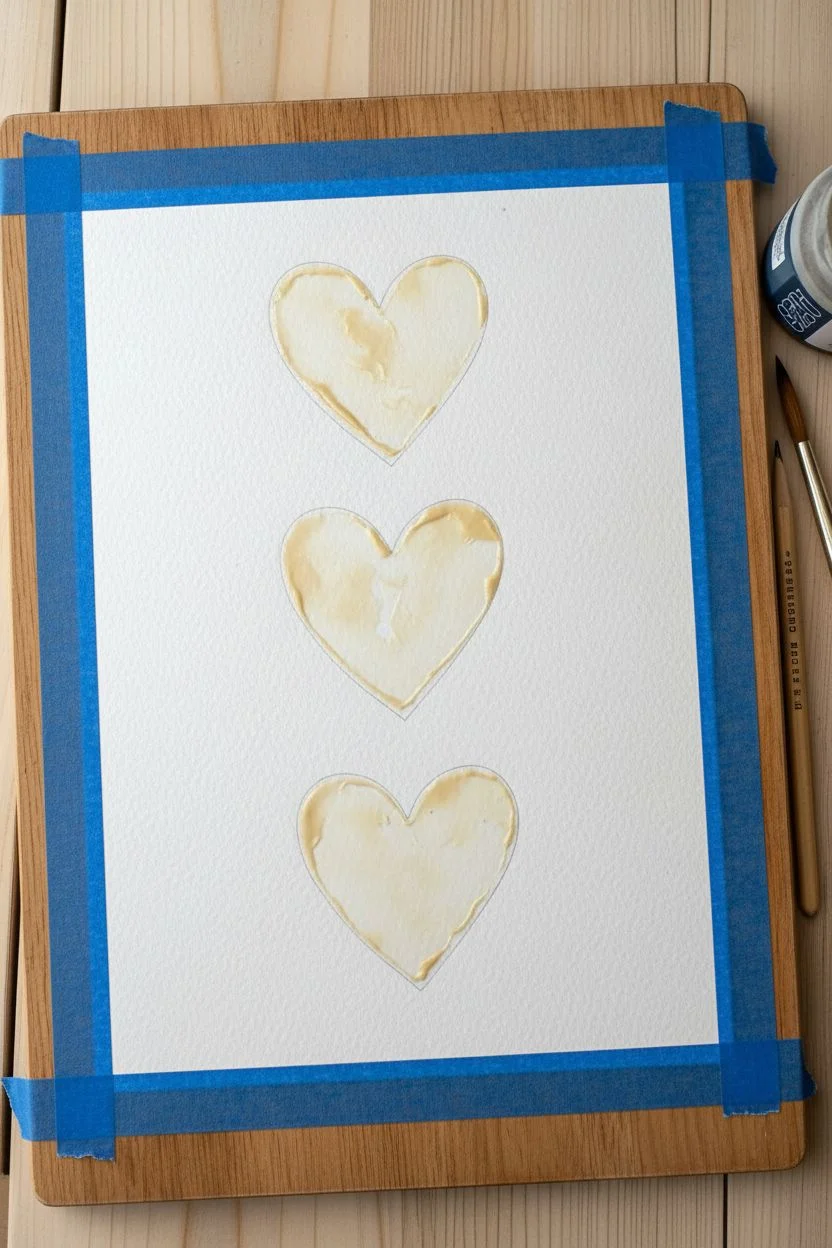
Watercolor Negative Space Hearts
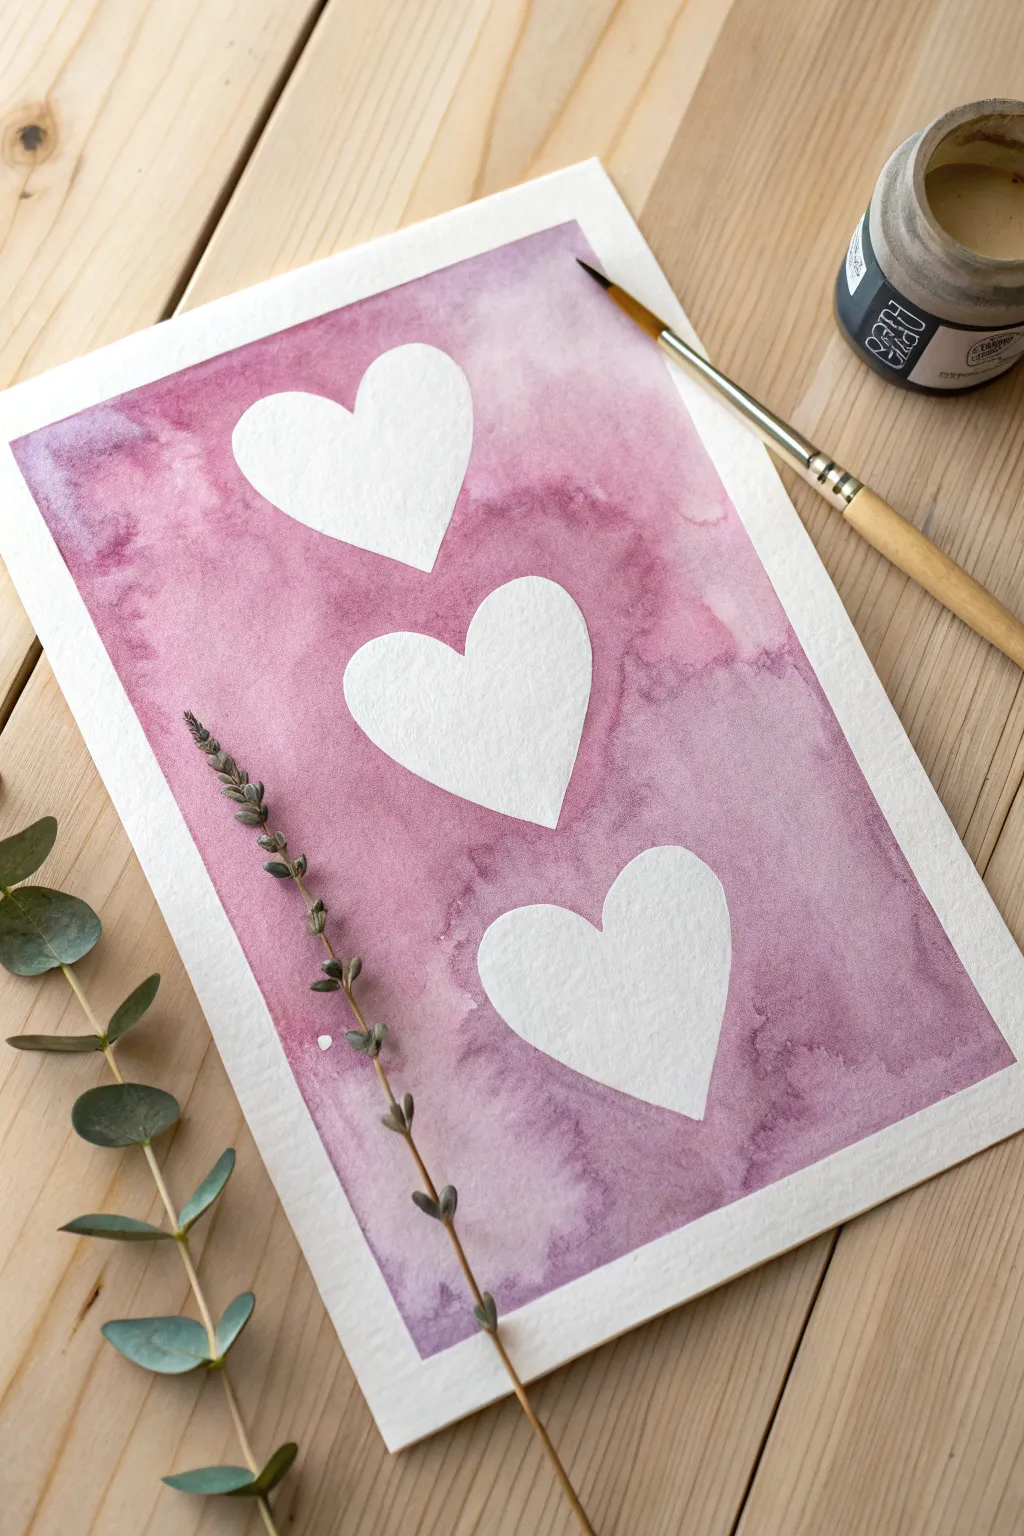
Utilizing the beauty of negative space, this project creates a striking contrast between crisp white hearts and a moody, textured violet background. It is a relaxing exercise in wet-on-wet technique that yields professional-looking results perfect for framing or gifting.
Step-by-Step
Materials
- Cold press watercolor paper (300 gsm)
- Watercolor paints (Purple/Violet, Burnt Sienna)
- Round watercolor brush (size 8 or 10)
- Liquid masking fluid (or masking tape)
- Old brush or silicone applicator (for masking fluid)
- Painter’s tape
- Pencil and eraser
- Jar of water and mixing palette
- Hard board
Step 1: Preparation & Masking
-
Secure the paper:
Tape all four edges of your watercolor paper down to a hard board using painter’s tape to create a crisp white border. -
Sketch the layout:
Lightly draw three heart shapes stacked vertically down the center of the paper using a pencil, leaving even space between them. -
Apply masking fluid:
Using an old brush or silicone tool, carefully fill in the heart shapes with liquid masking fluid. You can also cut heart shapes from masking tape. -
Check the edges:
Ensure the edges of your masked hearts are smooth and follow your sketch lines accurately. -
Let it cure:
Allow the masking fluid to dry completely; it should turn somewhat transparent and be firm to the touch.
Don’t Rush the Peel
Touch the paper with the back of your hand—if it feels cool, it’s still damp deep down. Only remove masking fluid when the paper is totally room temperature to avoid tearing.
Step 2: Painting the Wash
-
Mix the color:
On your palette, mix a generous puddle of purple paint; I like to add a tiny dot of burnt sienna to warm it into a mauve tone. -
Wet the paper:
Dip your round brush in clean water and wet the entire background area around the hearts, going right up to the masking tape border. -
Apply the color:
Load your brush with the purple mix and touch it to the wet paper, letting the color flow and spread naturally. -
Vary the intensity:
Add more concentrated pigment to some areas and leave others more watery to create depth and interest. -
Create blooms:
While the paint is still wet but starting to settle, drop in small beads of clean water or a darker pigment to create the textured ‘cauliflower’ effects seen in the example. -
Check the borders:
Ensure the paint extends all the way to the blue painter’s tape on the edges for a clean frame later. -
Let it settle:
Avoid overworking the paint with your brush; let the water do the work to keep the texture organic.
Metallic Touch
Once the purple wash is dry, try splattering fine flecks of gold watercolor or metallic ink over the background for a magical, shimmering finish.
Step 3: The Reveal
-
Dry completely:
Leave the painting to dry flat until the paper is bone dry and no longer feels cool to the touch. -
Remove mask:
Gently rub the masking fluid with your dry finger or a rubber cement pickup tool to peel it away, revealing the white paper. -
Clean up lines:
If you used masking tape hearts, peel them up slowly at a sharp angle to avoid lifting the paper grain. -
Erase sketches:
Use a clean, soft eraser to gently remove any visible pencil marks from around the white hearts. -
Remove border:
Slowly peel off the painter’s tape from the edges, pulling away from the painting to ensure a crisp, clean frame.
Now you have a stunning piece of art that balances color and space beautifully.
Parisian Street Lamp at Dusk

Capture the romance of the City of Light with this atmospheric acrylic painting featuring the iconic Eiffel Tower and a glowing vintage street lamp. The rich blues of the night sky contrast beautifully with the warm, golden light to create a stunning piece of wall art.
Step-by-Step Tutorial
Materials
- Stretched canvas (16×20 or similar)
- Acrylic paints: Prussian Blue, Ultramarine, Dioxazine Purple, Titanium White, Mars Black, Burnt Umber, Cadmium Yellow, Yellow Ochre
- Brushes: Large flat brush, medium filbert, fine liner brush
- Acrylic glazing medium
- Chalk or pastel pencil for sketching
- Palette and water cup
Step 1: Setting the Night Sky
-
Base gradient:
Start with Prussian Blue and a touch of Black at the very top corners of the canvas, brushing horizontally. -
blending down:
Gradually mix in Ultramarine and then Purple as you move down the canvas, creating a deep, twilight transition. -
Cloud formation:
Near the bottom third of the sky, mix Titanium White with Purple to Scumble in soft, billowy clouds. I find using a dry brush here helps create that fluffy, misty texture. -
Starry details:
Load a toothbrush with watered-down White paint and flick it gently to create a spray of distant stars across the upper blue section. -
Specific stars:
Use a liner brush to add a few larger, distinct stars with cross-shapes for extra twinkle.
Glow Like a Pro
Don’t use just paint for the glow. Mixing glazing medium with your yellow creates a transparency that makes the light look real rather than chalky.
Step 2: The Parisian Backdrop
-
Distant skyline:
Mix a dark blue-grey and paint the silhouette of distant trees and buildings along the low horizon line. -
Eiffel structure:
Using a small round brush and a mix of Yellow Ochre and Burnt Umber, paint the skeletal shape of the Eiffel Tower in the distance. -
Tower illumination:
Highlight the lattice structure of the tower with touches of pure Yellow and White to make it look illuminated. -
Bare trees:
On the right side, paint a tall, bare tree using Burnt Umber and Black. Use the tip of your liner brush to drag out thin, delicate branches reaching toward the sky.
Level Up: Texture
Before painting the lamp post, apply heavy body gel or modeling paste to the canvas in the shape of the post. Once dry, paint over it for a 3D relief effect.
Step 3: The Bridge and Foreground
-
Guideline sketch:
Lightly sketch the diagonal line of the bridge railing and the placement of the main lamp post using chalk. -
Stone railing:
Paint the balustrade (railing) using cool greys and blues. Keep the side facing away from the lamp darker to emphasize shadows. -
Pavement reflection:
Paint the ground with dark blues, but wet-blend streaks of Yellow Ochre and Orange directly under where the lamp will be to simulate wet pavement reflecting light.
Step 4: The Vintage Lamp Post
-
Iron column:
Paint the main post of the lamp using Mars Black. Make the base wider and add decorative bumps along the pole for a cast-iron look. -
Lantern housing:
Construct the lantern shape at the top with black lines, ensuring the frame looks hexagonal or octagonal. -
The glow source:
Inside the lantern glass, paint the center pure White, blending out to Cadmium Yellow, then Orange at the edges of the glass panes. -
Creating the halo:
Mix a tiny amount of Cadmium Yellow with glazing medium. Lightly brush this transparent mix over the sky immediately surrounding the lamp to create a glowing halo effect. -
Metal highlights:
Use a liner brush with light grey or metallic bronze paint to add highlights on the lamp post ridges where the light would hit the metal. -
Final details:
Add a second, smaller lamp post in the distance along the railing using the same steps but with less detail to create depth.
Sign your name in the bottom corner and enjoy your romantic evening stroll through paint


Have a question or want to share your own experience? I'd love to hear from you in the comments below!