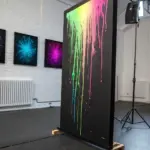
There is something incredibly magical about watching vibrant fluorescent pigments come to life against a deep, dark background. I love how neon painting transforms a simple canvas into an electrically charged masterpiece that captures everyone’s attention.
Creating Simple Neon Signage Effects
Bring a touch of modern industrial style to your space with this mixed-media neon art piece. By combining a textured dark canvas with flexible lighting, you can simulate the look of a custom bent glass sign without the high voltage or fragility.
How-To Guide
Materials
- Square stretched canvas (approx. 12×12 inches)
- Matte charcoal or black acrylic paint
- EL wire kit (electroluminescent wire) in neon pink or white
- Foam roller or texture sponge
- White stick chalk
- Hand drill or craft awl
- Clear, fast-setting super glue (gel consistency)
- Duct tape or gaffer tape
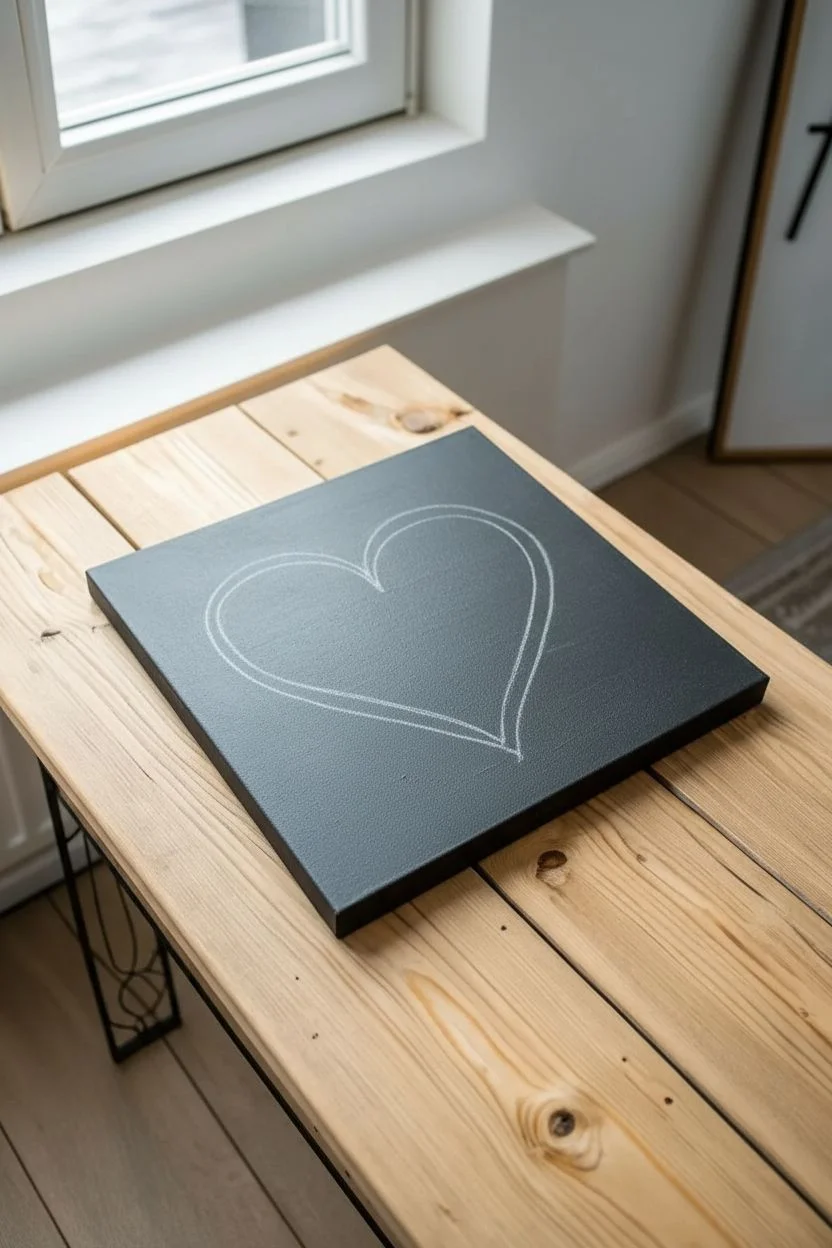
Step 1: Preparing the Backdrop
-
Protect your surface:
Lay down newspaper or a drop cloth on a flat table to protect your workspace from paint spills. -
Mix the base color:
Squeeze a generous amount of matte charcoal paint onto a palette; if you only have black, mix in a tiny drop of white to soften it slightly. -
Apply the first coat:
Use a foam roller to apply an even layer of paint across the entire face and sides of the canvas. -
Add texture:
While the paint is still wet, I like to dab the surface gently with a sponge or a crumpled paper towel to create a slightly rough, concrete-like finish. -
Dry and repeat:
Allow the first coat to dry completely, then apply a second layer to ensure the white canvas is fully obscured. -
Sketch the design:
Once the paint is fully cured, use a piece of white chalk to lightly sketch a heart shape in the center of the canvas. -
Refine the shape:
Wipe away mistakes with a damp cloth until you are happy with the symmetry and size of your heart outline.
Step 2: Installing the Light
-
Mark entry points:
Make a small mark at the bottom point of the heart where the two lines meet; this is where the wire will enter and exit. -
Create holes:
Carefully use a hand drill or a sharp craft awl to punch two holes side-by-side at your mark, just large enough for the wire to pass through. -
Thread the wire:
Feed the non-battery end of the EL wire from the back of the canvas through to the front via one of the holes. -
Anchor the start:
Pull the wire through until you hit the connector on the back, then add a drop of glue at the hole on the front to secure the starting point. -
Trace and glue:
Apply small dots of fast-setting gel glue along the chalk line for the first inch of the curve. -
Press in place:
Press the wire firmly into the glue and hold it for 10-15 seconds until it bonds. -
Work in sections:
Continue gluing and pressing the wire one small section at a time, moving up and around the arches of the heart. -
Finish the loop:
Once you complete the shape and return to the bottom point, feed the remaining tail of the wire through the second exit hole to the back. -
Secure the back:
Flip the canvas over and pull any slack tight, then tape the excess wire and the battery casing to the wooden frame of the canvas so it doesn’t dangle. -
Clean up:
Use a slightly damp Q-tip or cloth to gently wipe away any visible chalk marks remaining on the front of the artwork.
Corner Technique
EL wire pushes back against sharp bends. Use extra glue at the bottom point of the heart and hold it longer than usual to ensure the sharp V-shape stays crisp without popping up.
Background Glow
Before gluing the wire, dry-brush a very faint, hazy line of neon pink acrylic paint along your chalk line. This creates a realistic ‘light bloom’ effect on the dark background.
Flip the switch on your battery pack and enjoy the cozy, modern glow of your new illuminated art piece


Splattered Galaxy Stars and Nebulas


Capture the mysteries of the universe on a small square canvas using vibrant neon acrylics against a deep black void. This project uses simple sponging and splattering techniques to create a stunning, professional-looking nebula effect that glows with cosmic energy.
Step-by-Step Tutorial
Materials
- Square canvas (approx. 8×8 or 10×10 inches)
- Acrylic paints: Mars Black, Titanium White, Neon Pink/Magenta, Turquoise/Teal, Violet
- Kitchen sponge or cosmetic wedges
- Stiff bristle brush or toothbrush (for splattering)
- Fine liner brush (size 0 or 00)
- Flat base coat brush
- Palette and water cup
- Paper towels
Step 1: Setting the Background
-
Coat the canvas:
Begin by applying a solid, even coat of Mars Black acrylic paint over the entire canvas. Don’t forget to paint the sides for a finished look. -
Ensure full coverage:
Let the first layer dry completely. If you can still see the texture of the canvas weave showing through clearly, apply a second coat of black to ensure a deep, opaque void.
Neon Pro Tip
Neon acrylics are naturally translucent. To make them pop against black, mix them with a tiny speck of white paint. It changes the hue slightly but makes the glow much more intense.
Step 2: Creating the Nebula
-
Prepare your sponges:
Tear a kitchen sponge into small, rough chunks, or use fresh cosmetic wedges. The rougher the texture, the more organic your clouds will look. -
Lay the purple foundation:
Dab a sponge lightly into violet paint and tap off the excess on a paper towel. Gently pat a diagonal cloud formation across the center of the black canvas, keeping it faint and misty. -
Add teal clusters:
Using a fresh piece of sponge, pick up some turquoise or teal paint. Lightly dab two separate clusters on either side of the central purple path, leaving black space between them. -
Introduce the main color:
Load a sponge with neon pink or magenta. Start dabbing this through the center of your purple diagonal, pressing lightly to build up opacity slowly. -
Brighten the core:
To make the nebula look like it’s glowing, mix a tiny drop of Titanium White into your pink paint. Sponge this lighter mix into the very center of the pink streak to create a ‘hot’ core. -
Soften the transitions:
With a clean, slightly damp sponge, very gently dab the edges where the colors meet the black background to ensure there are no harsh lines.
Level Up: Cosmic shimmer
Once the painting is dry, lightly brush a clear glitter glaze or holographic top coat over just the pink and teal nebula sections for a subtle sparkle that shifts in the light.
Step 3: The Starfield
-
Prepare splatter paint:
On your palette, mix a small amount of white paint with water until it reaches the consistency of heavy cream or ink. -
Test the consistency:
Dip a stiff brush or old toothbrush into the watered-down white mix and flick it over a piece of scrap paper first to ensure the droplets are small and round, not stringy. -
Create distant stars:
Hold the brush over the canvas and tap the handle against another brush or your finger to spray a fine mist of white dots across the nebula and black voids. I often vary the distance to get different dot sizes. -
Check density:
Step back and look at your galaxy. Add a few more flicks if needed, but remember that we will be hand-painting larger stars next, so leave some breathing room.
Step 4: Highlights and Flares
-
Switch to a liner brush:
Take your finest liner brush and dip it into pure, unthinned Titanium White paint. You need a sharp point for this step. -
Paint star centers:
Choose about 5 to 7 spots on the canvas where you want bright ‘hero’ stars. Place a small, solid white dot at these locations. -
Draw vertical rays:
From the center of a dot, carefully pull a thin line straight up and straight down, lifting the brush at the end to taper the line into a point. -
Draw horizontal rays:
Repeat the process horizontally, pulling a thin line left and right from the center dot to create a cross shape. -
Add diagonals (optional):
For the largest stars, you can add tiny diagonal lines between the main cross arms to create extra sparkle. -
Highlight specific clusters:
Use the tip of the brush to add a few manually painted dots around the teal and pink sections to suggest star clusters within the nebula gases. -
Final dry:
Allow the white stars to dry completely before touching or moving the canvas to prevent smudging your crisp lines.
Now you have a stunning piece of the cosmos ready to brighten up your wall or desk.


Bioluminescent Deep Sea Jellyfish
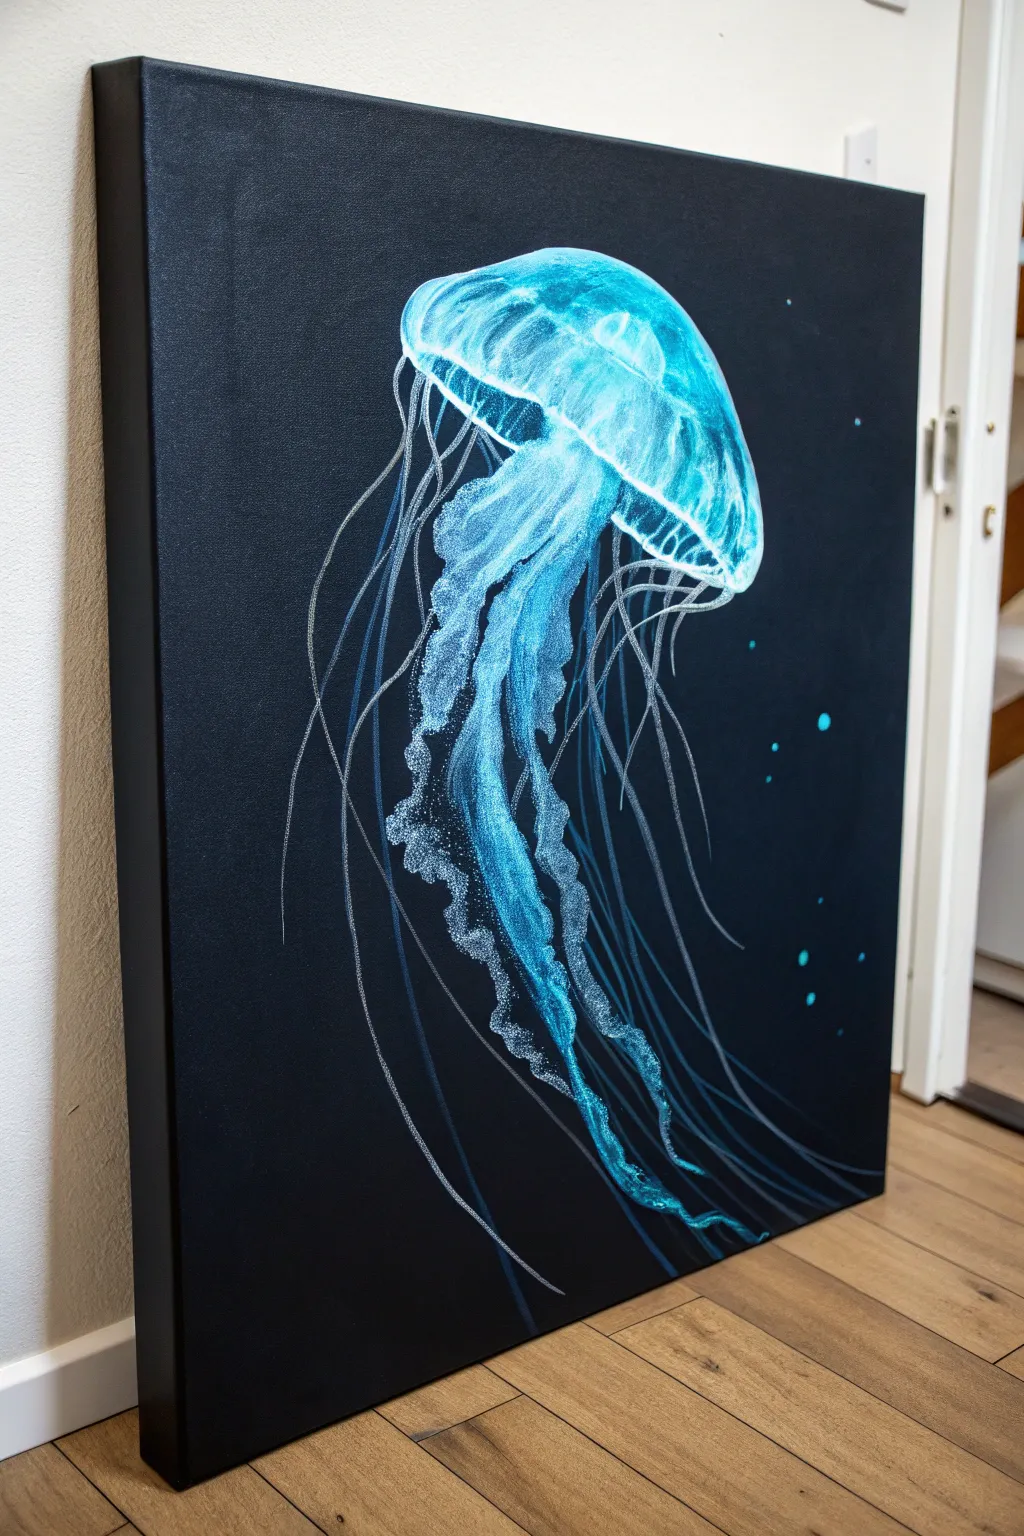
Capture the ethereal beauty of the abyss with this striking acrylic painting. By layering translucent blues on a deep black background, you will create a bioluminescent effect that makes the jellyfish appear to float right off the canvas.
Step-by-Step Tutorial
Materials
- Deep edge square canvas
- Mars Black acrylic paint (or black gesso)
- Titanium White acrylic paint
- Phthalo Blue and Turquoise acrylic paint
- Iridescent medium or fine glitter glaze (optional)
- White charcoal pencil or chalk
- Large flat brush
- Filbert brush (medium)
- Fine liner or rigger brush
- Old stiff bristle brush or sponge
- Palette and water cup
Step 1: Setting the Abyss
-
Prime the canvas:
Cover the entire canvas with two coats of Mars Black, ensuring the sides are painted for that finished gallery look. -
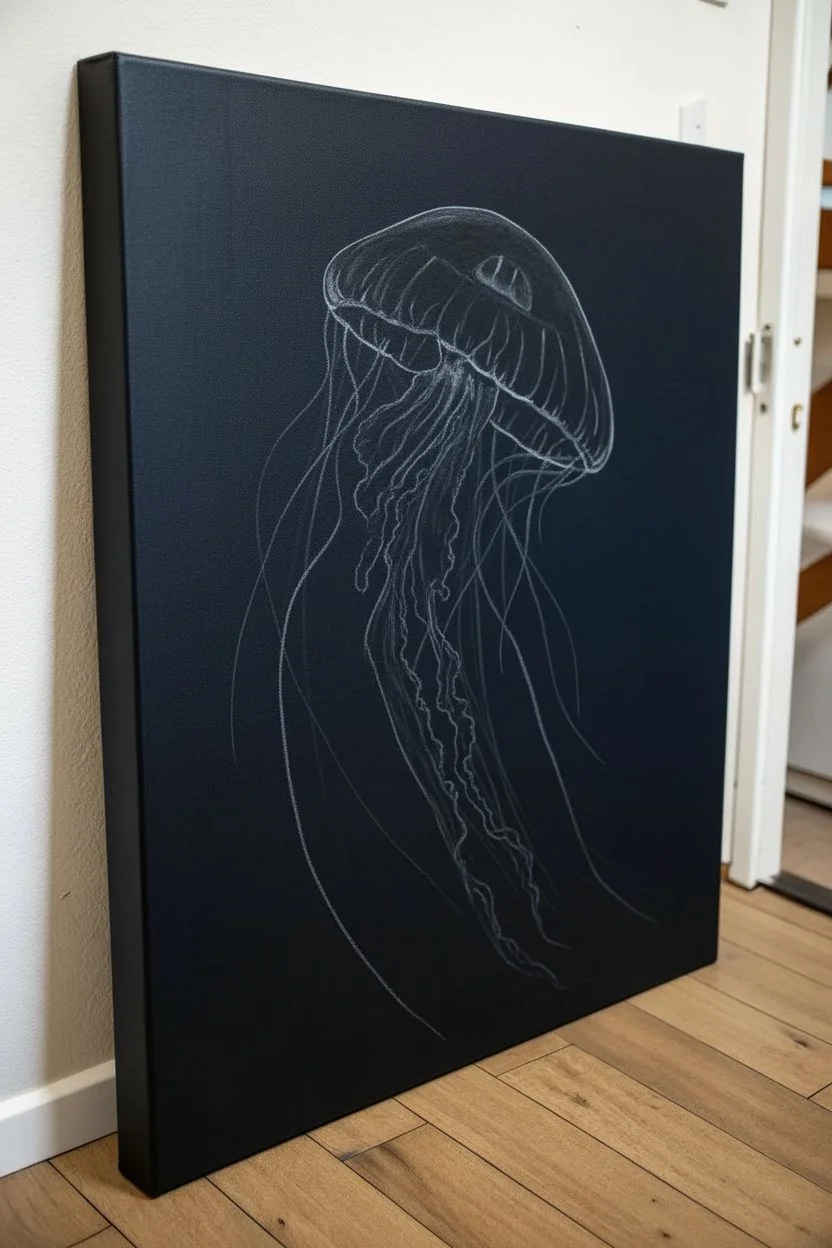
Sketch the outline:
Once dry, use a white charcoal pencil to lightly sketch the mushroom-cap shape of the jellyfish bell in the upper center. -
Draft the tentacles:
Lightly mark the flow of the tentacles; draw wavy lines extending downward to ensure you have good composition before painting.
Step 2: The Luminous Bell
-
Base wash:
Mix a small amount of Turquoise with water to create a very transparent glaze. Paint the entire interior of the bell shape. -
Define the structure:
Mix Titanium White with a tiny dot of Turquoise. Paint curved vertical lines down the bell to create the ribbed structure. -
Blend the ribs:
While the paint is slightly damp, use a clean, dry filbert brush to gently feather the edges of your lines so they look soft and round. -
Highlight the rim:
Use thicker white paint to define the bottom rim of the bell, making it the brightest part of the hood. -
Add the glow:
Dry brush a little pure Phthalo Blue around the top curve of the bell, fading it into the black simply by rubbing gently.
Jellyfish Wobbles?
If your long tentacle lines look shaky or jagged, your paint is likely too thick. Add a few drops of water to improve flow, and try moving your arm from the shoulder, not just your wrist.
Step 3: Texturing the Oral Arms
-
Mix a textured blue:
Combine white, turquoise, and a drop of water. If you have iridescent medium, I like to mix it in here for extra shimmer. -
Create the ruffled core:
Paint the thick, central tentacles (oral arms). Use a twisting motion with your brush to create a ruffled, ribbon-like appearance. -
Stipple for bubbles:
Dip an old, stiff brush or a sponge into thick white paint. Dab it over the central tentacles to create that sparkly, grainy texture shown in the image. -
Enhance contrast:
Add dots of pure white on the edges of the ruffles to make them pop against the darker blue sections.
Make it Real Neon
Swap the standard white and blue paints for fluorescent UV-reactive acrylics. This will allow the jellyfish to actually glow vividly under a blacklight.
Step 4: Tentacles and Details
-
Prepare inky paint:
Thin your white and pale blue paint with water until it has the consistency of ink. This helps the paint flow smoothly. -
Paint long filaments:
Using your fine liner brush, drag long, sweeping lines from the rim of the bell down to the bottom of the canvas. -
Vary the pressure:
Press harder at the start of the stroke and lift off gently at the end to make the tentacles taper off naturally. -
Layer the depth:
Paint some tentacles with bright white and others with a darker blue mix to create a sense of depth and overlapping. -
Add marine snow:
Dip a toothbrush in watered-down turquoise and flick it lightly to spray tiny specks on the background, mimicking floating particles. -
Final highlights:
Add a few final bright white touches to the top of the bell and the tips of the brightest tentacles to complete the glow.
Step back and admire your glowing creature of the deep, suspended beautifully in its dark ocean home.


Piercing Animal Eyes
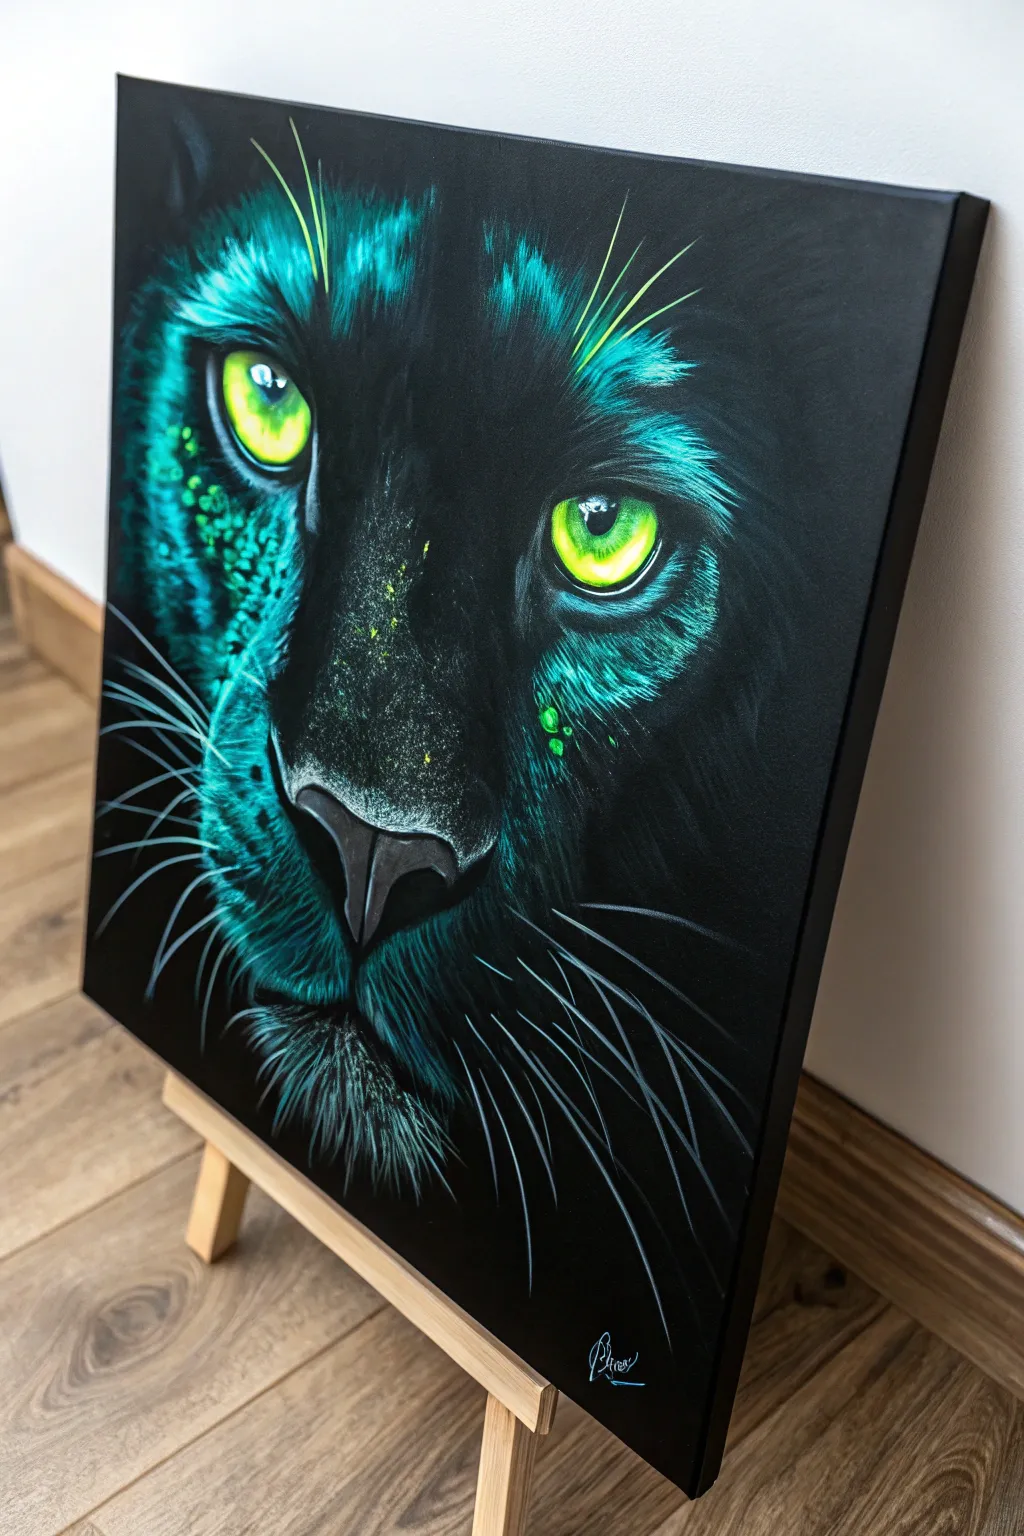
Capture the mysterious allure of the jungle with this high-contrast painting that features a panther fading into shadow. The secret to this striking look is mastering the interplay between deep black void space and electric, translucent neon accents.
Step-by-Step Tutorial
Materials
- Black Stretched Canvas (or canvas panel)
- Heavy Body Acrylics: Mars Black, Titanium White
- Neon Acrylics: Electric Green, Lemon Yellow
- Standard Acrylics: Phthalo Turquoise/Teal
- White Charcoal Pencil
- Brushes: Small Filbert, Rigger/Liner, Angled Shader
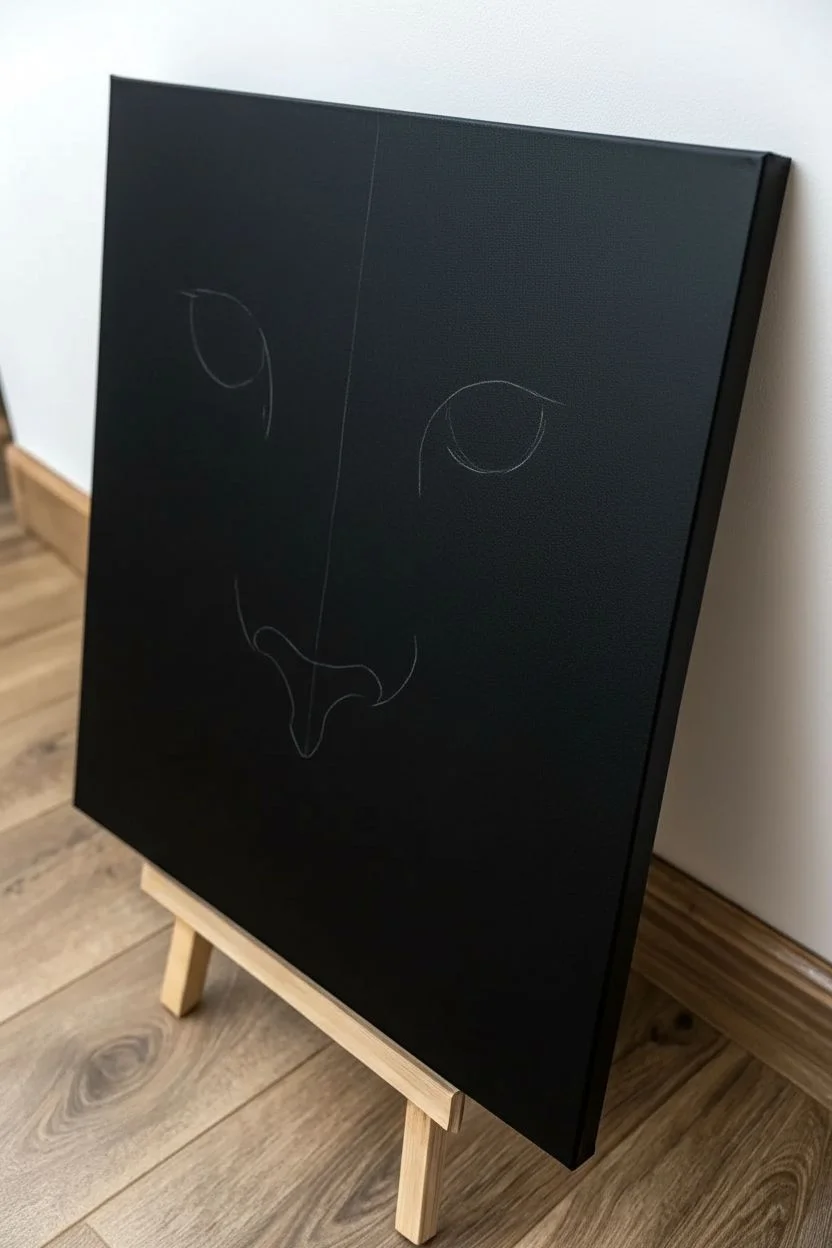
Step 1: Setting the Shadows
-
Prepare the Surface:
Ensure your background is perfectly uniform. If you aren’t using a pre-primed black canvas, apply two coats of Mars Black paint to a white canvas and let it dry completely. -
Map the Face:
Using a white charcoal pencil, lightly sketch the placement of the eyes, the bridge of the nose, and the general shape of the muzzle. Keep these lines very faint. -
Establish the Void:
Even though the canvas is black, I like to paint a fresh layer of wet black around the outline of the face so the texture of the background matches the painted areas.
Neon opacity fix
If your neon eyes look dull or streaky, avoid piling on thick neon paint. Instead, apply another smooth coat of Titanium White, let it fully cure, and then re-apply the neon glaze.
Step 2: The Glowing Eyes
-
The White Base:
Paint the entire iris shape with pure Titanium White. Neon paints are naturally transparent and will vanish on black; this white base is crucial for the ‘pop’. -
Gradient Base:
Once the white is dry, glaze the outer edges of the iris with Neon Green, blending it toward the center. -
Center Fire:
Apply Neon Yellow near the pupil area, wet-blending it into the green while the paint is still tacky to create a rounded, glowing sphere effect. -
The Pupil:
Using a small round brush, paint the sharp, vertical slit of the pupil with Mars Black. Ensure the edges are crisp. -
The Spark of Life:
Add a small, sharp dab of Titanium White overlapping the top of the pupil and iris to create the glossy reflection.
Make it react
Swap standard neon acrylics for UV-reactive fluorescent paints. Under normal light, the painting looks intense, but under a blacklight, the eyes and fur highlights will physically glow in the dark.
Step 3: Fur & Texture
-
Cool Undertones:
Mix Phthalo Turquoise with a tiny drop of white to create a deep teal. Use a dry filbert brush to scrub this color where light hits the brow and cheek. -
Building Layers:
Add a bit more white and a touch of Neon Green to your teal mix. Switch to a smaller brush and begin making short, flicking strokes to mimic fur texture. -
Directional Stroking:
Pay close attention to fur direction: flick upward quickly above the eyes, and curve strokes downward around the nose bridge. -
Nose Texture:
Instead of strokes, use a stippling (dotting) motion on the left side of the muzzle to replicate the porous, leathery texture of the nose skin. -
Highlighting:
Use your brightest mix (mostly white with a tint of turquoise) to add only the sharpest highlights on the brow bone and wet areas of the nose.
Step 4: Whiskers & Final Details
-
Inking the Paint:
Mix Titanium White with a little water until it has the consistency of ink. It must flow smoothly off the brush without breaking. -
Long Whiskers:
Load a rigger or liner brush. deeply. Plant the brush tip firmly on the muzzle and flick outward with speed to create long, tapered whiskers. -
Brow Hairs:
Add three or four long, thin hairs protruding from the eyebrow area, curving them slightly upward. -
Color Glazing:
If the white whiskers look too stark, wait for them to dry and gently glaze over the base of them with a very watered-down teal to seat them in the shadow. -
Final Cleanup:
Use black paint to tidy up any fur strokes that went too far into the shadows, re-establishing the sharp contrast.
Step back and admire how that piercing gaze seems to follow you around the room.
BRUSH GUIDE
The Right Brush for Every Stroke
From clean lines to bold texture — master brush choice, stroke control, and essential techniques.
Explore the Full Guide
Abstract Fluid Drip Painting
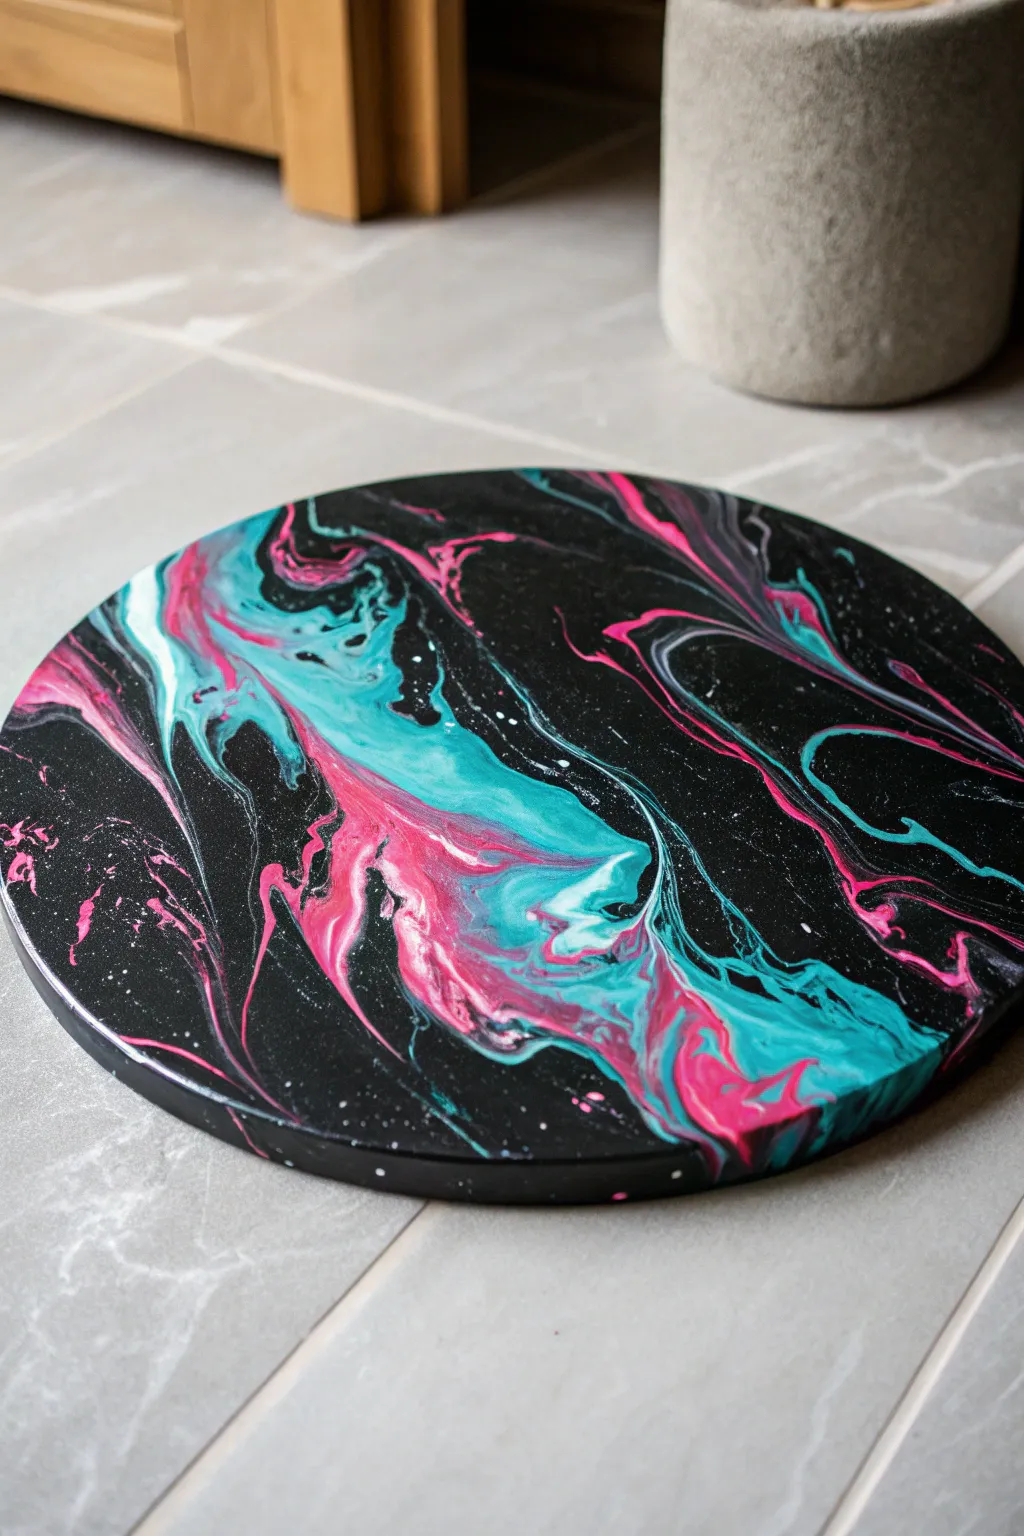
Create a stunning vivid contrast piece with this fluid art technique that captures the look of a neon galaxy swirling in deep space. Using a round canvas and high-contrast acrylics, you will manipulate liquid paint to form organic waves and wispy, smoke-like tendrils.
Detailed Instructions
Materials
- Round stretched canvas or wood panel (12-16 inch)
- Acrylic paints: Carbon Black, Neon Pink, Cyan/Turquoise, Titanium White
- Pouring medium (like Floetrol or Liquitex)
- Silicone oil (optional, for cells)
- Hair dryer with a concentrator nozzle
- Kitchen torch or heat gun
- Plastic cups and stirring sticks
- Water (for thinning)
- Drop cloth and gloves
- High-gloss varnish
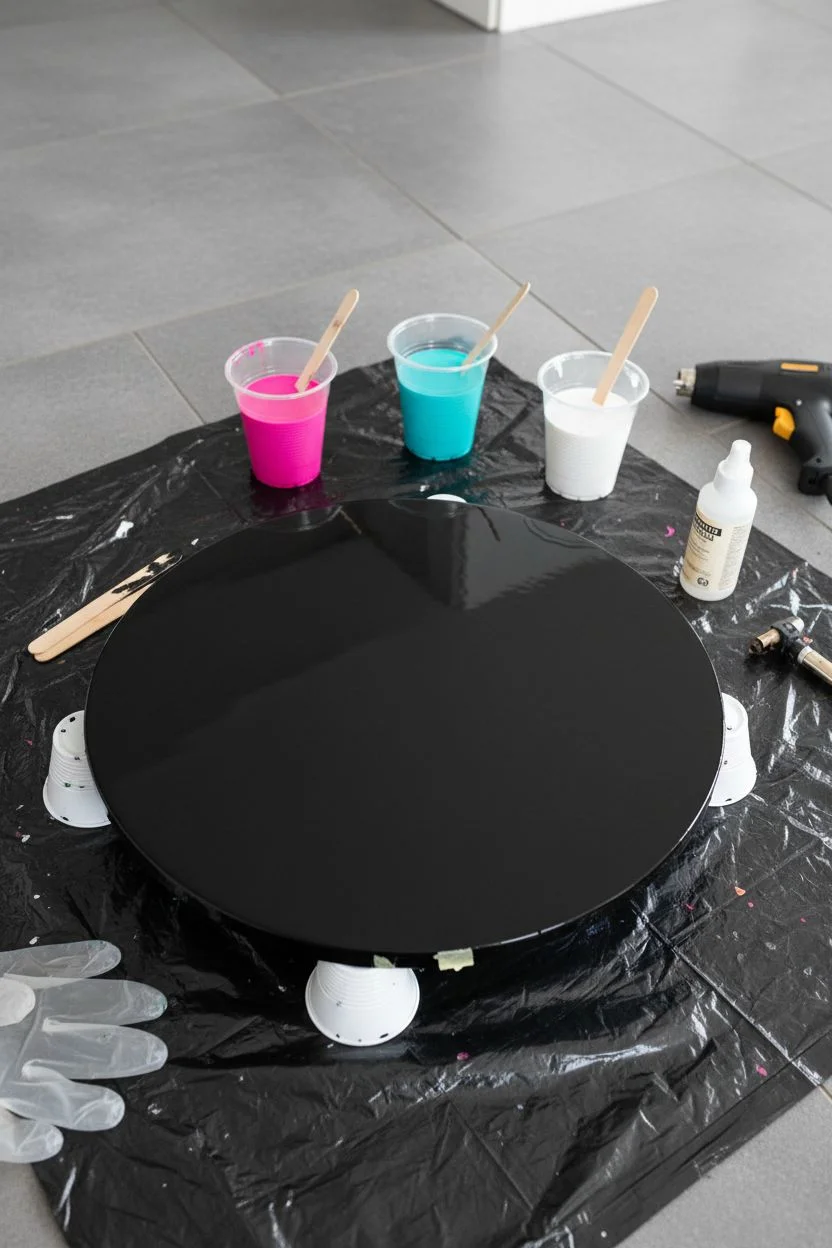
Step 1: Mixing and Preparation
-
Workspace setup:
Cover your entire work surface with a drop cloth or heavy plastic sheeting, as fluid art can get messy. -
Prep the canvas:
Flip your round canvas over and use painter’s tape to cover the back edges; this keeps the underside clean and makes for a professional finish. -
Elevate:
Place the canvas on four overturned cups or push pins to raise it off the table, ensuring fluid can drip freely off the edges. -
Mix the pouring medium:
In separate cups, mix your acrylic paints with your chosen pouring medium. A standard ratio is 1 part paint to 2 parts medium. -
Adjust consistency:
Add water sparingly, drops at a time, stirring until the paint flows like warm honey or heavy cream off your stick without breaking. -
Settling time:
Let the mixed paints sit for a few minutes to allow air bubbles created during stirring to rise to the surface.
Muddy Colors?
Avoid over-blowing the paint. If you mix the wet colors too much on the canvas, they will turn grey. Stop manipulating the paint while the lines are still distinct.
Step 2: The Pour
-
Flooding the base:
Pour a generous amount of the Carbon Black mix onto the center of the canvas. -
Spreading the background:
Tilt the canvas gently or use a palette knife to spread the black paint until the entire surface and edges are covered in a smooth, wet layer. -
Pop bubbles:
Briefly run a kitchen torch or heat gun over the wet black paint to pop any remaining air bubbles for a glass-smooth finish. -
Layering neon pink:
Pour a confident, diagonal wave of Neon Pink across the canvas, directly on top of the wet black base. -
Adding cool tones:
Follow the curve of the pink with a stream of Cyan/Turquoise, allowing the colors to maintain their own lanes. -
Highlighting:
Drizzle a thinner line of Titanium White between the colors to create separation and brightness. -
Encasing the color:
Pour a small amount of fresh black paint specifically around the perimeter of your colored river to help
Step 3: Creating the Swirls
-
The initial push:
Using a hair dryer on the low, cool setting, gently blow the extra black paint you just poured slightly over the edges of the colored stripe. -
Blowing out the composition:
Change the angle of the dryer to blow the colors outward across the black background, creating those beautiful, wispy transitions. -
Refining with air:
I prefer using a clean drinking straw here to blow on specific areas, creating delicate tendrils or separating colors that look too clumpy. -
Creating stars:
Dip a small brush into the white or pink paint and flick it over the black negative space to create tiny splatters resembling distant stars. -
Final torch:
Pass the torch quickly over the colored areas to pop new bubbles.
Level Up: Cosmic Shimmer
Mix a clear iridescent pouring medium into your black base paint. It will be invisible indoors but will sparkle like a real galaxy under direct sunlight.
Step 4: Drying and Sealing
-
Drip check:
Run a finger or stick along the underside edge of the canvas to remove dripping paint ridges. -
Slow drying:
Leave the painting to dry in a dust-free area for at least 24-48 hours; do not use heat to speed this up or the paint may crack. -
Varnishing:
Once fully cured (usually after 2-3 weeks), apply two coats of high-gloss varnish to protect the surface and make the neon colors pop.
Hang your cosmic creation on a well-lit wall and enjoy the vibrant energy it brings to the room
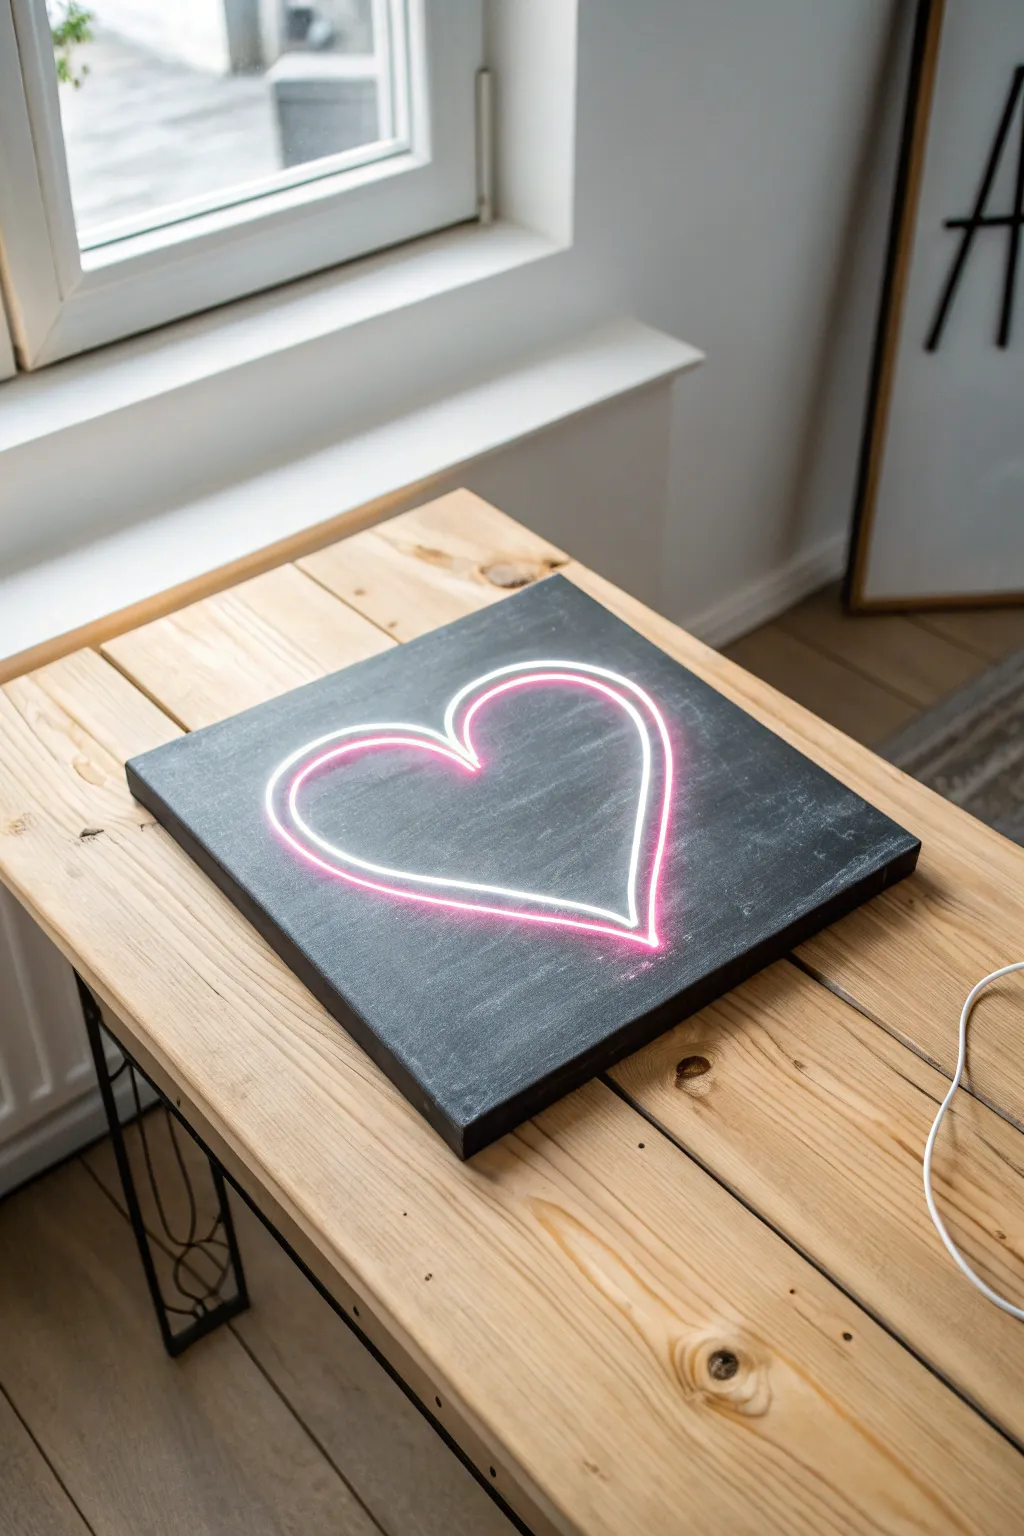
Floating Transparent Bubbles
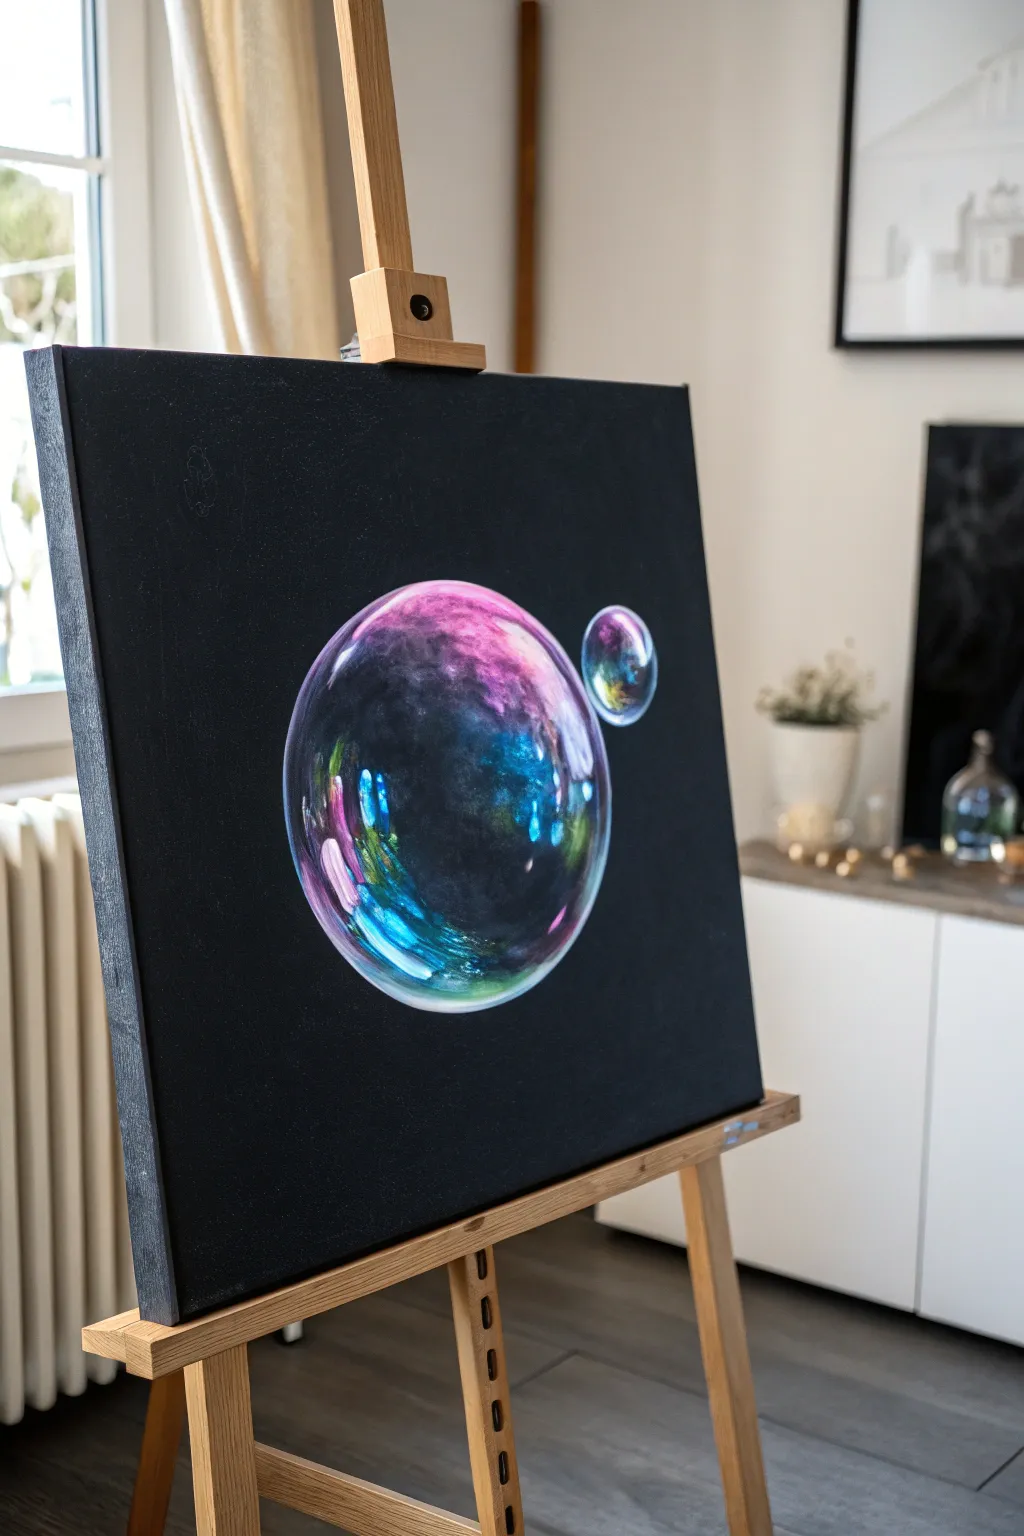
Capture the fragile beauty of soap bubbles against a dramatic dark void in this acrylic painting project. The contrast between the matte black background and the neon iridescence creates a glowing 3D effect that looks ready to float off the canvas.
How-To Guide
Materials
- Square stretched canvas (approx. 12×12 inches)
- Black acrylic paint or black gesso (matte finish)
- Titanium White acrylic paint (heavy body)
- Neon/Interference acrylic paints (Magenta, Cyan, Lime Green)
- Acrylic glazing medium
- Soft filbert brushes (sizes 4 and 8)
- Fine liner brush (size 0 or 00)
- White pastel pencil or chalk
- Compass or two round objects for tracing
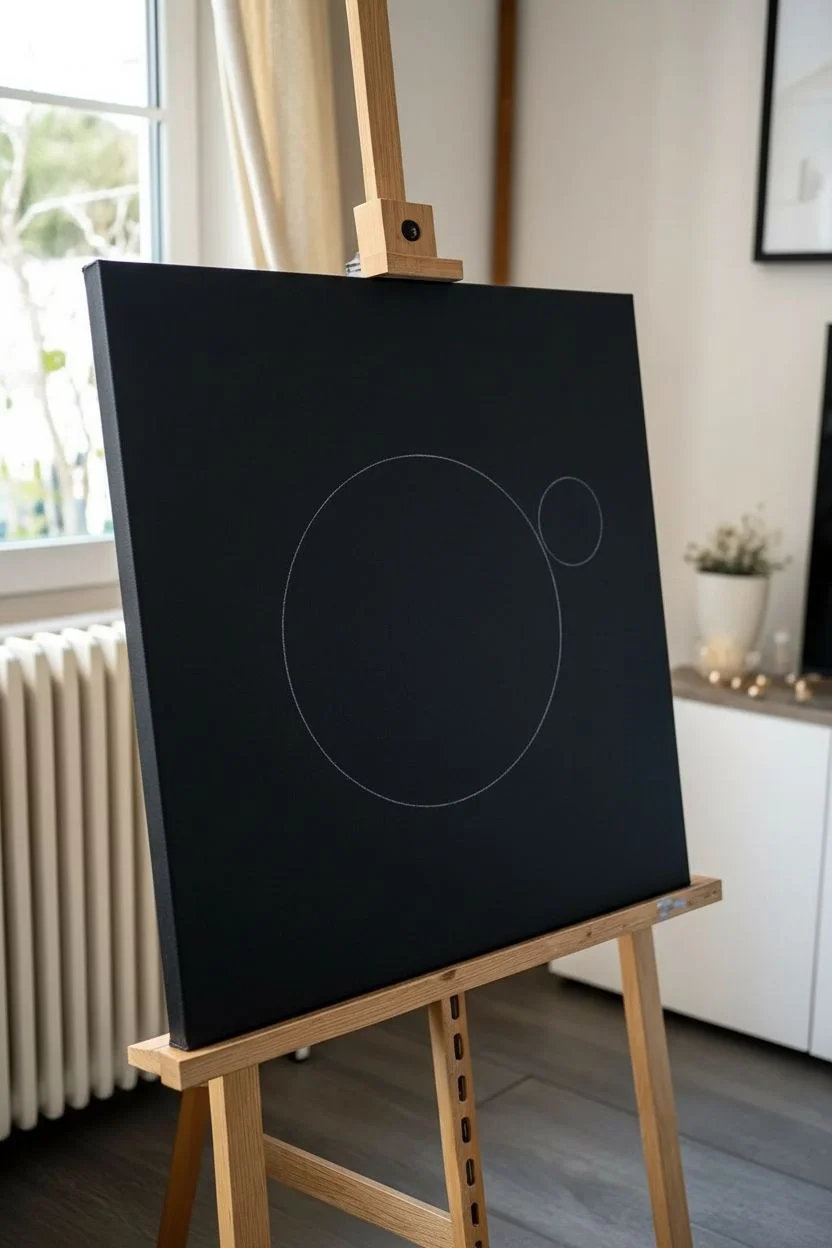
Step 1: Setting the Stage
-
Prepare the void:
Cover your entire canvas with matte black acrylic paint or black gesso. Apply two coats to ensure there is absolutely no canvas texture showing through; a smooth, deep void is essential for the neon effect. -
Allow to cure:
Let the background dry completely. If the black looks streaky, add a third coat. It must be perfectly solid. -
Map the spheres:
Using a compass or by tracing round objects (like a bowl and a cup), lightly outline one large circle in the center and a much smaller circle floating to the upper right. Use a white pastel pencil so the lines are visible but easy to erase.
Step 2: Creating Dimensions
-
Mix a hazy glaze:
Mix a tiny amount of Titanium White with a drop of water or glazing medium. Your goal is a semi-transparent, milky consistency, not solid white. -
Establish the curve:
With a filbert brush, gently paint the outer rim of the large bubble. Keep the stroke just *inside* your traced line. The paint should fade out immediately as it moves toward the center of the circle. -
Dry brush the interior:
Wipe most of the paint off your brush. Gently buff swirling, cloudy shapes inside the bubble to represent the thin soap film. Leave large areas of the black background visible in the center. -
Repeat for the satellite:
Apply the same technique to the smaller bubble. Give it a distinct rim, but keep the center dark and mysterious.
Pro Tip: Soften the Blow
Use a dry mop brush to gently tickle the area where two colors meet while the paint is still wet. This creates that seamless, airy gradient characteristic of soap film.
Step 3: Infusing Neon Color
-
Prepare neon glazes:
Mix your Magenta, Cyan, and Lime Green paints individually with glazing medium. High-flow or neon paints work best here because they are naturally translucent. -
Apply the magenta:
Glaze the magenta over the upper-left quadrant of the white cloudy areas you painted earlier. The white underneath will make the neon pop, while the black swallows it where there is no white. -
Blend the cyan:
Apply cyan to the lower right and center areas. Where the cyan meets the magenta, gently feather them together to create a subtle violet transition. -
Add toxic green accents:
Dab small hints of lime green near the edges of the cyan sections to create an iridescent oil-slick appearance. -
Layering for depth:
I like to let this dry briefly and add a second layer of color in just the brightest spots to intensify the saturation.
Troubleshooting: Flat Look?
If the bubbles look flat, you likely have too much paint in the center. Regain dimension by glazing a thin layer of black over the center of the bubble to push it back into the distance.
Step 4: Reflections and Highlights
-
Drafting the distorted windows:
Bubbles reflect their environment. Using your liner brush and pure Titanium White (slightly thinned), paint distorted rectangular shapes near the edges. Imagine a window reflection curving around a sphere. -
Sharpening the rim:
Add very thin, crisp white lines along parts of the outer edge of the circle, but do not outline the entire circle. Breaking the line makes the object look transparent. -
The brightest spark:
Place one or two hard, bright dots of pure white on the surface where the ‘light source’ hits the bubble directly. -
Color reflections:
Add tiny dashes of pure neon color (without white underneath) right next to your bright white highlights to mimic light refraction. -
Final cleanup:
Use fresh black paint to carefully tidy up the outer edges of the bubbles, covering any chalk marks or over-painting to ensure the spheres are perfectly round.
Hang your stunning, high-contrast masterpiece in a well-lit area to watch those neon colors truly glow.

PENCIL GUIDE
Understanding Pencil Grades from H to B
From first sketch to finished drawing — learn pencil grades, line control, and shading techniques.
Explore the Full Guide
Striking Lightning Bolts
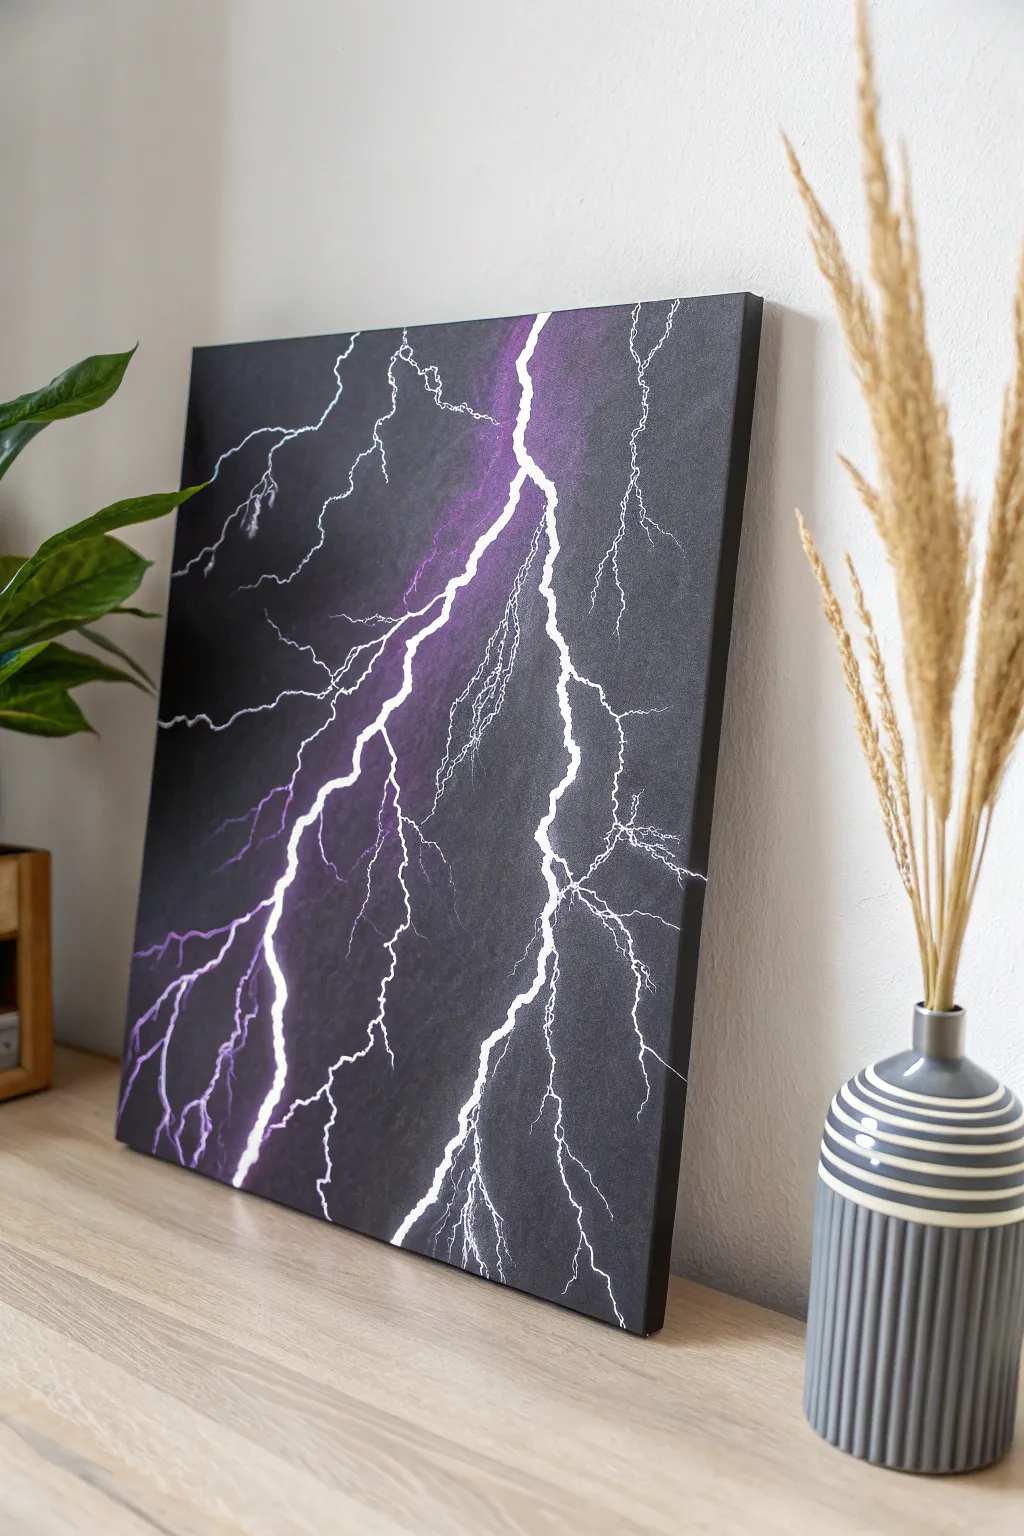

Capture the raw energy of a thunderstorm with this high-contrast lightning painting. By layering translucent purples under striking white lines, you will create a convincing neon glow that crackles against the dark background.
Detailed Instructions
Materials
- Stretched canvas (approx. 16×20 inches)
- Acrylic paints: Mars Black, Titanium White, Dioxazine Purple
- Large flat brush (for background)
- Old stiff bristle brush (for dry brushing)
- Fine liner or rigger brush (size 0 or 1)
- Palette and water cup
- Paper towels
Step 1: Setting the Atmosphere
-
Base Coat:
Begin by covering the entire canvas with Mars Black using your large flat brush. -
Ensure Opacity:
Let the first layer dry to the touch, then apply a second coat if necessary to ensure a solid, deep matte black coverage with no canvas showing through. -
Dry Completely:
Allow the background to dry fully. This is crucial so your next steps don’t mix with the black paint.
Step 2: Creating the Ultraviolet Glow
-
Prepare Purple:
Squeeze out a small amount of Dioxazine Purple onto your palette. -
Load the Dry Brush:
Dip the tip of your old stiff brush into the purple, then wipe 90% of the paint off onto a paper towel until the brush is almost dry. -
Scrub the Haze:
Gently scrub the brush in a diagonal motion down the center of the canvas where you plan your main lightning strike. Use circular motions to create a soft, cloud-like edge. -
Second Glow Area:
Repeat the dry-brushing process on the right side of the canvas for the secondary bolt, keeping the color subtle and transparent. -
Background Static:
Mix a tiny amount of white into your purple to make a lavender shade. Using your liner brush, paint a few very faint, thin jagged lines inside the purple haze to represent distant electricity.
Fixing Broken Lines
If your lightning lines look scratchy or skip over the canvas texture, your paint is too thick. Add water drop-by-drop to your white paint until it glides smoothly off the brush.
Step 3: Striking the Lightning
-
Thin the White:
Take your Titanium White and mix in a few drops of water until the paint has the consistency of ink or heavy cream. This improves flow for long lines. -
The Main Bolt:
Load the fine liner brush fully. I like to roll the bristles in the paint to sharpen the tip. -
Paint the Strike:
Starting near the top center, drag the brush diagonally down through the purple glow using erratic, zigzag hand movements. -
Vary Pressure:
Press down firmer for the thick upper parts of the bolt, and lift your brush gradually as you move down to create tapering, needle-sharp ends. -
Secondary Bolt:
Paint the second vertical lightning bolt on the right side, keeping the line shaky and natural rather than perfectly straight. -
Add Forks:
Paint smaller branches splitting off from the main lines. Ensure these forks always point downward or outward, mimicking how real electricity seeks the ground. -
Fine Details:
Use just the very tip of your brush to add microscopic, hair-thin tendrils extending from the forks into the black space. -
Intensify Brightness:
Once the white is dry, go back over just the thickest segments of the main bolts with undiluted Titanium White to make them pop intensely.
Make It Truly Electric
Once dry, paint over the white lightning bolts with a clear glow-in-the-dark acrylic medium. In daylight it remains white, but at night your storm will actually glow!
Hang your masterpiece and enjoy the dramatic energy it adds to the room.
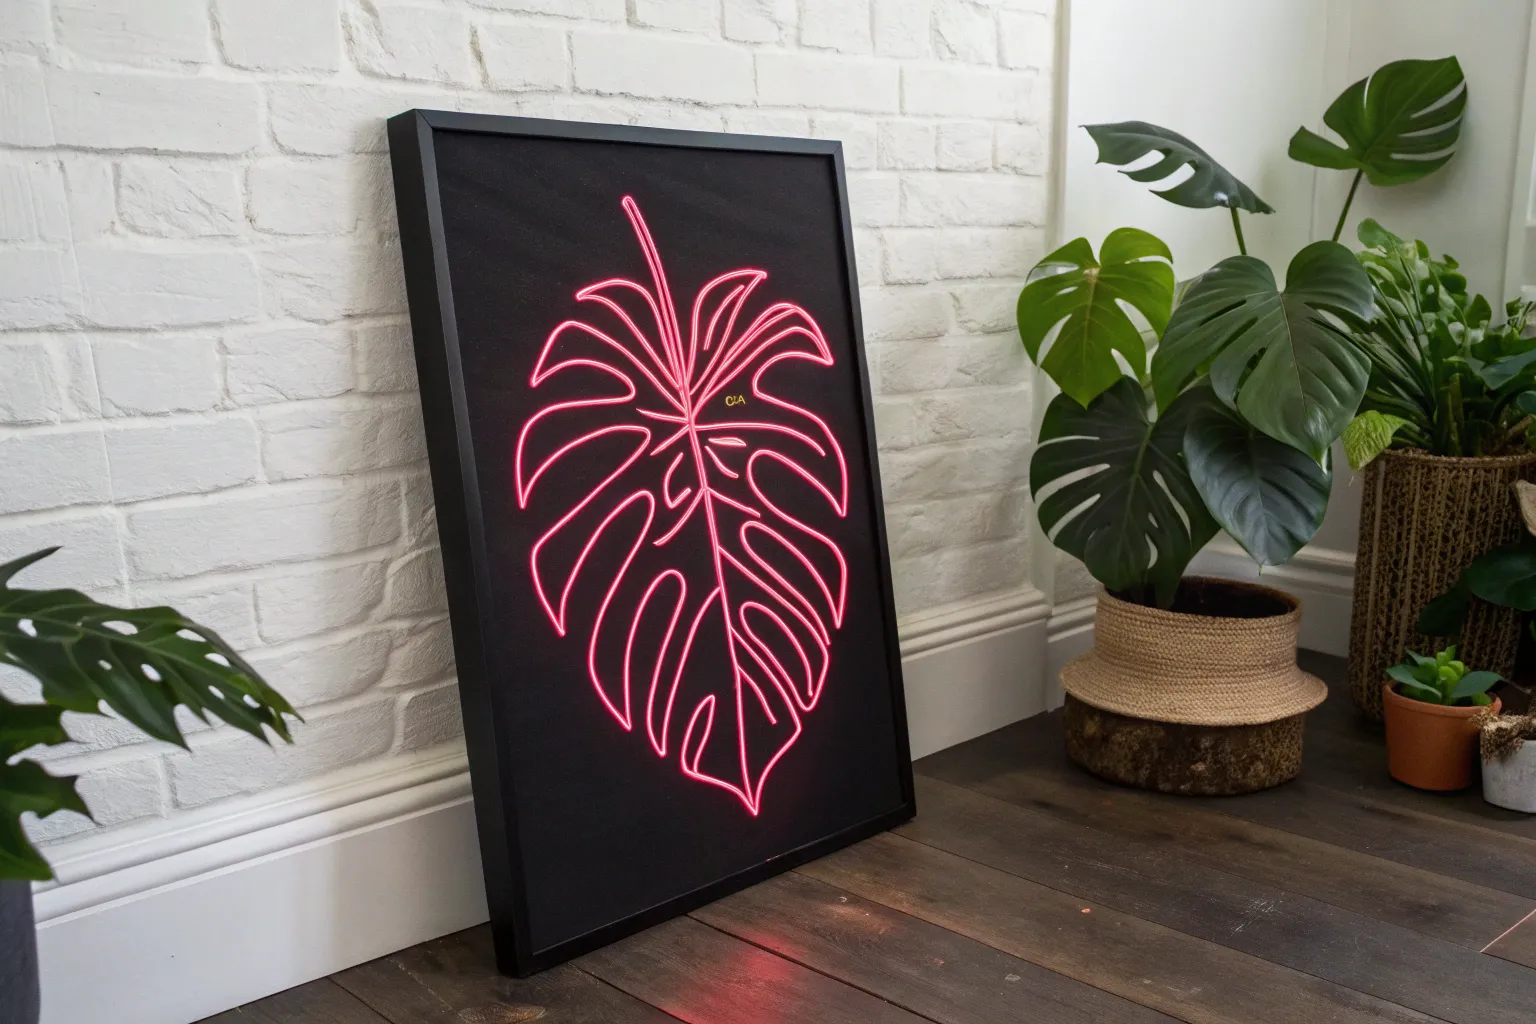
Interactive Blacklight Art
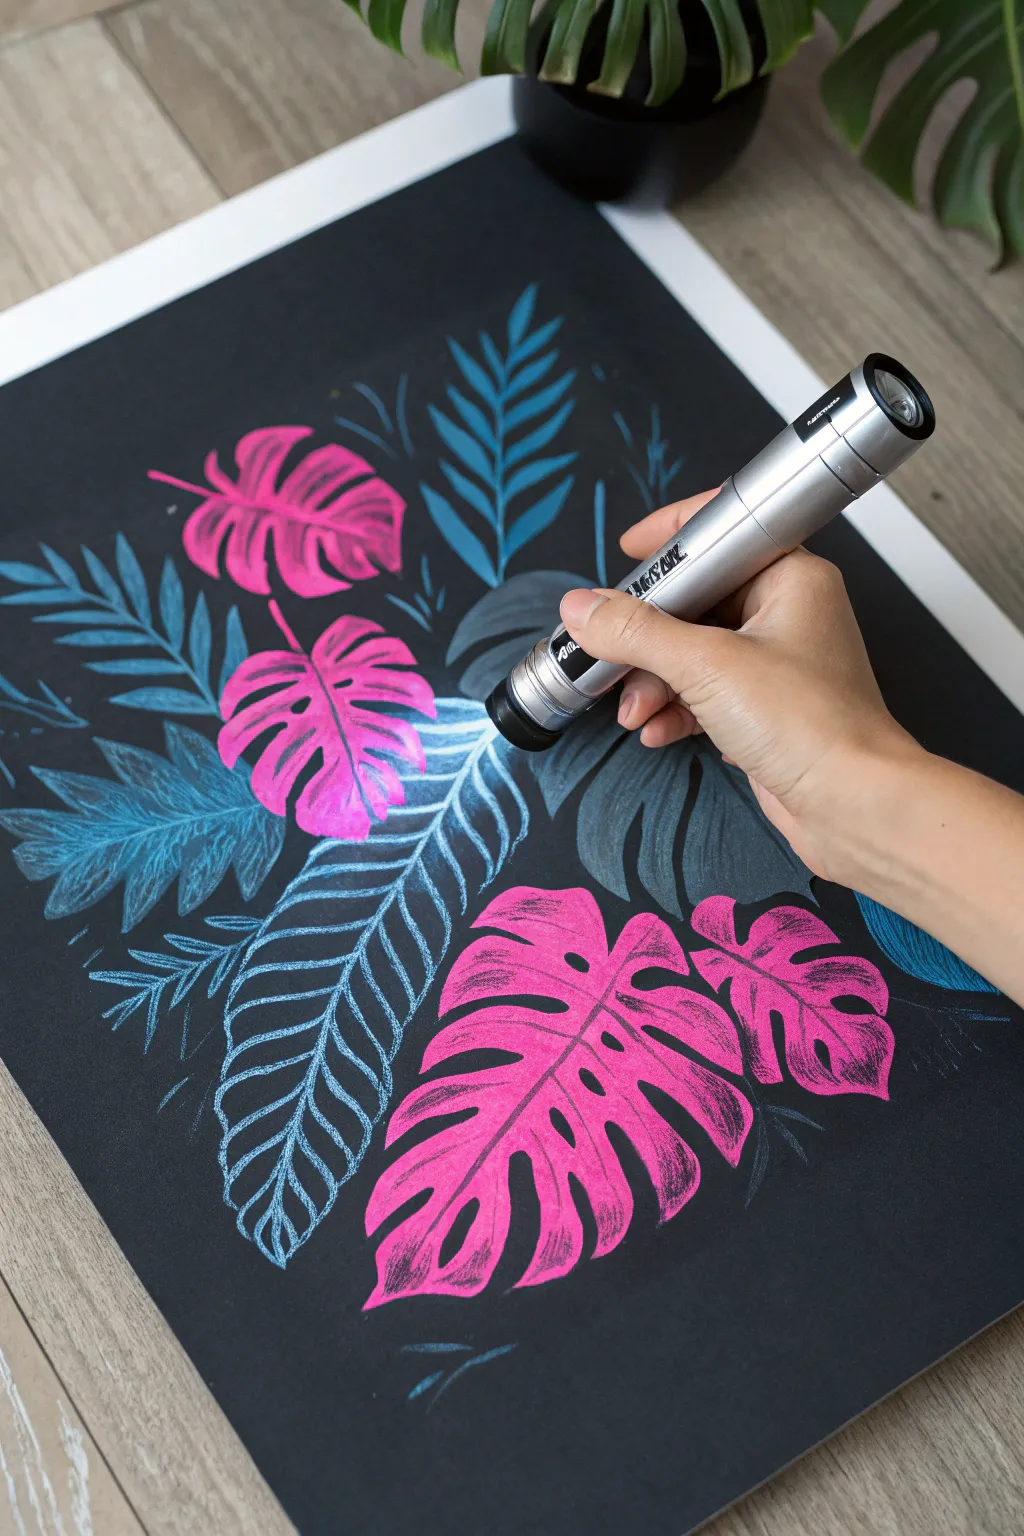

Transform a simple sheet of black paper into a glowing tropical paradise using vibrant neon pastels. This project plays with high-contrast botanicals that look striking in daylight and absolutely electric under a UV flashlight.
How-To Guide
Materials
- Heavyweight black paper or cardstock (smooth finish)
- Neon oil pastels or soft pastels (Pink and Blue)
- White charcoal pencil or pastel pencil
- UV / Blacklight flashlight
- Kneaded eraser
- Sheet of scrap paper
- Makeup sponge or blending stump (optional)
Step 1: Planning the Foliage
-
Map the composition:
Using your white charcoal pencil, very lightly sketch the placement of your leaves. Aim for three large masses for the pink Monstera leaves and a central spine for the blue fern. -
Define the Monstera shapes:
Refine the outlines of the pink leaves. Draw the classic heart shapes, ensuring you sketch in the ‘fenestrations’ (the natural holes and slits) which are characteristic of this plant. -
Sketch the fern structure:
Draw the swooping stems for the blue foliage. Place a large one curving through the center and smaller stems branching off into the background.
Step 2: Applying Neon Color
-
Start the main pink leaf:
Take your neon pink pastel and begin filling in the large bottom Monstera leaf. Apply firm pressure to really pack the pigment into the black paper grain. -
Create directional texture:
Instead of coloring randomly, use strokes that follow the direction of the leaf veins. This adds a subtle, realistic texture to the illustration. -
Fill the remaining pink leaves:
Move to the middle and top pink leaves. I like to keep the edges slightly rough to mimic the organic nature of the plant. -
Outline the fern stem:
Switch to your neon blue pastel. Draw a thick, confident line over your sketched central stem. -
Draw the leaflets:
Using quick, flicking motions, draw the individual leaflets extending from the stem. Start the pressure heavy at the stem and lift off as you reach the tip for a sharp point. -
Add background depth:
Use a lighter touch to draw the smaller blue fronds in the background. Pressing softly makes them appear further away than the bright foreground leaves.
Glow-Boosting Base
For maximum neon wattage, lay down a layer of white pastel first, then color over it with your neon pastels. The white primer makes the colors explode!
Step 3: Interactive Refinement
-
The blacklight check:
Turn on your UV flashlight and shine it over the artwork. This reveals exactly where the pigment is thin and needs reinforcement. -
Boost the saturation:
While holding the light, go back over any patchy areas with another layer of pastel to ensure a solid glow. -
Deepen the contrast:
Use a black pastel or charcoal to tidy up the negative space. Carefully trace around the edges of your neon leaves to cover any places where you went outside the lines. -
Add highlights:
For an extra pop, lightly layer a tiny bit of white pastel on the tips of the blue fern and the top curves of the pink leaves. -
Blend lightly:
If the texture is too grainy, use a finger or blending stump to smooth just the centers of the leaves, leaving the edges crisp. -
Clean up:
Use a kneaded eraser to lift any stray pigment dust from the black background to keep the contrast sharp.
Smudge Prevention
Black paper shows every smudge. Keep a clean sheet of scrap paper under your drawing hand to protect the artwork as you move across the page.
Now turn off the room lights, switch on your UV torch, and admire your radiant night garden


Have a question or want to share your own experience? I'd love to hear from you in the comments below!