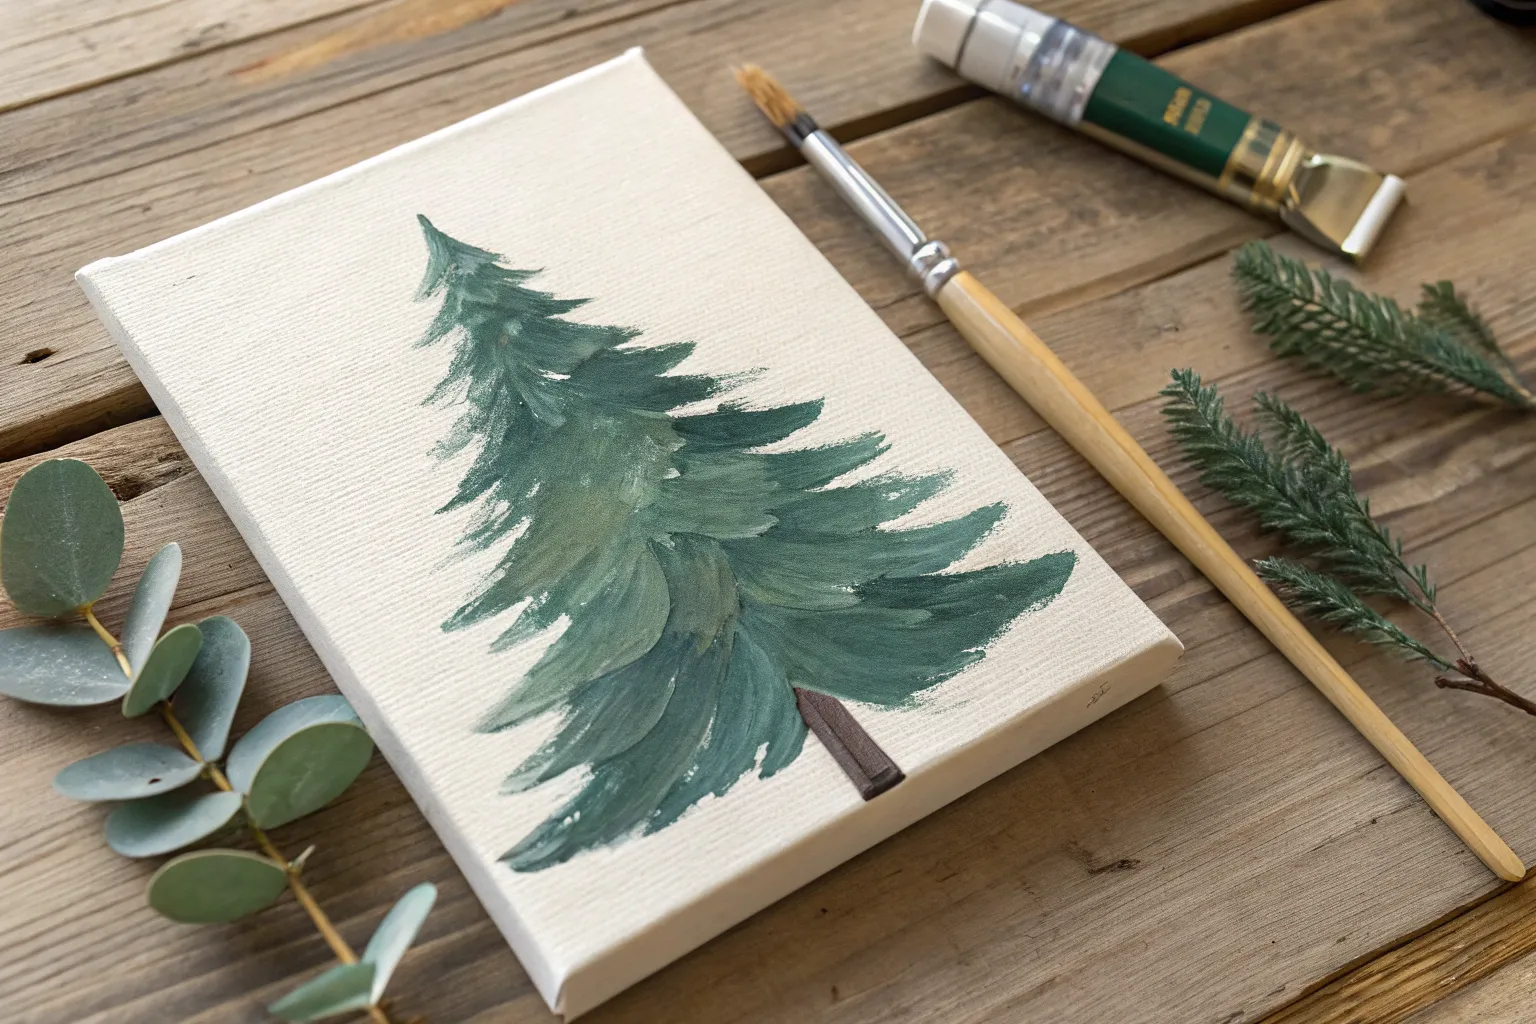
There is something truly magical about capturing the warmth of the holidays on canvas, even if you are just starting your artistic journey. I have gathered a collection of beginner-friendly projects that focus on simple shapes, bold colors, and the pure joy of creating festive decor.
Geometric Christmas Trees
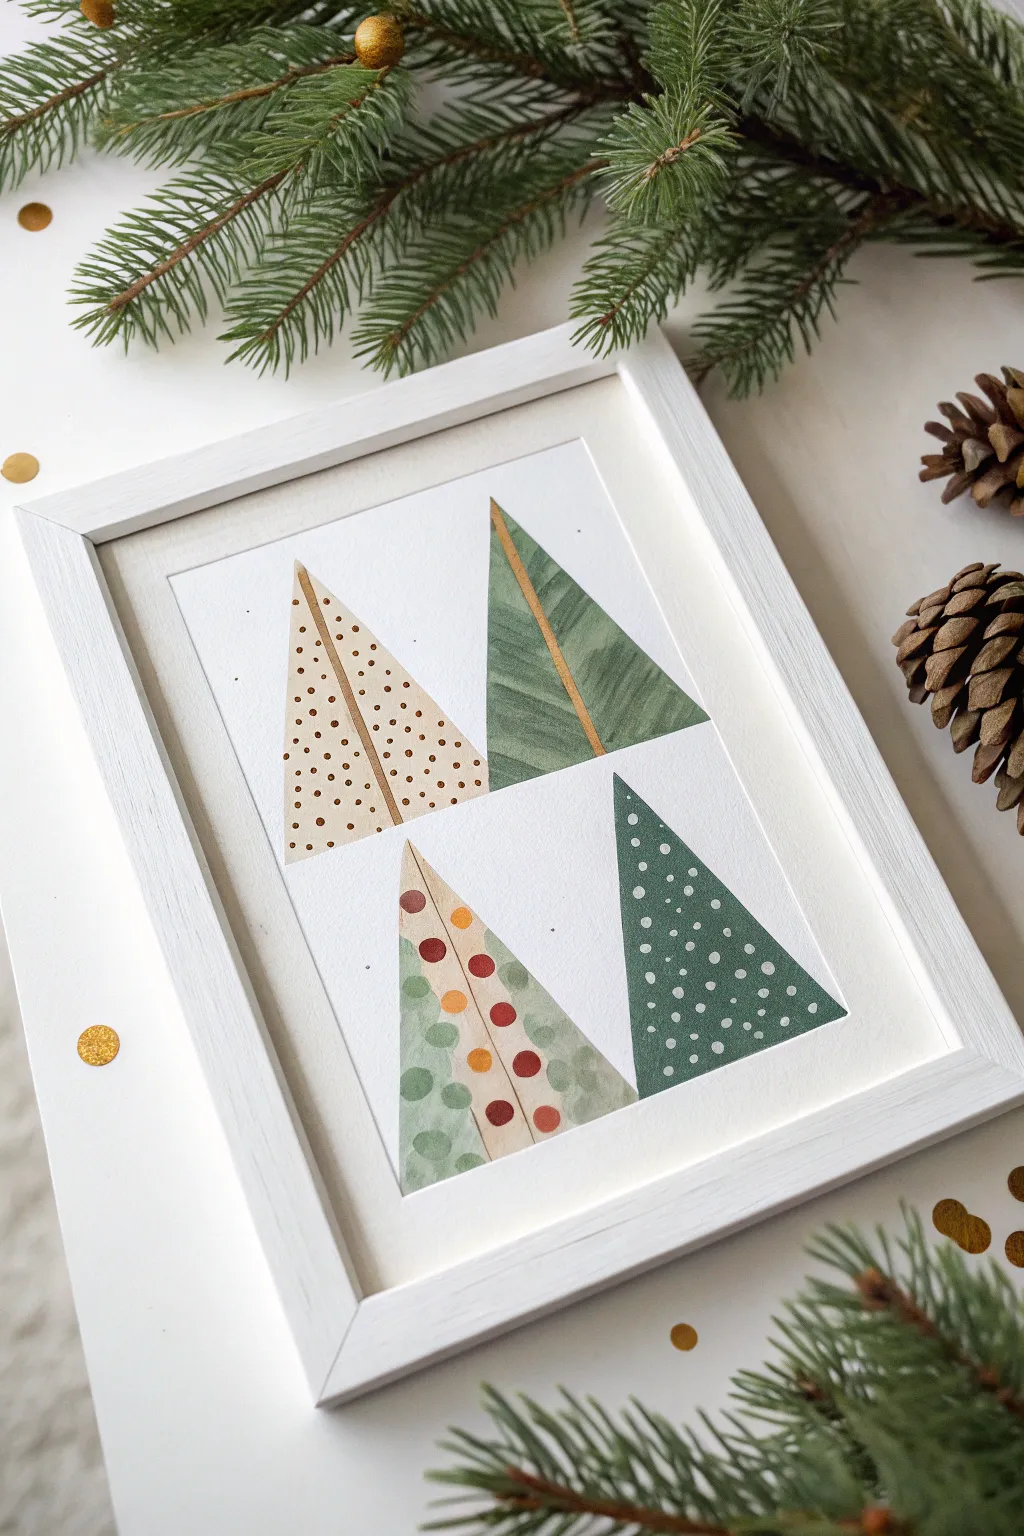
Embrace a minimalist aesthetic this holiday season with this set of four patterned Christmas trees. This project combines crisp watercolor techniques with metallic accents for a sophisticated, frame-ready result.
How-To Guide
Materials
- Cold press watercolor paper (A4 or 8×10)
- Watercolor paints (Deep green, sap green, beige/ochre, red)
- Gold metallic paint or gold gel pen
- White opacity gouache or white gel pen
- Ruler and hard pencil (2H)
- Artist tape or washi tape
- Round brushes (size 4 and size 0 for details)
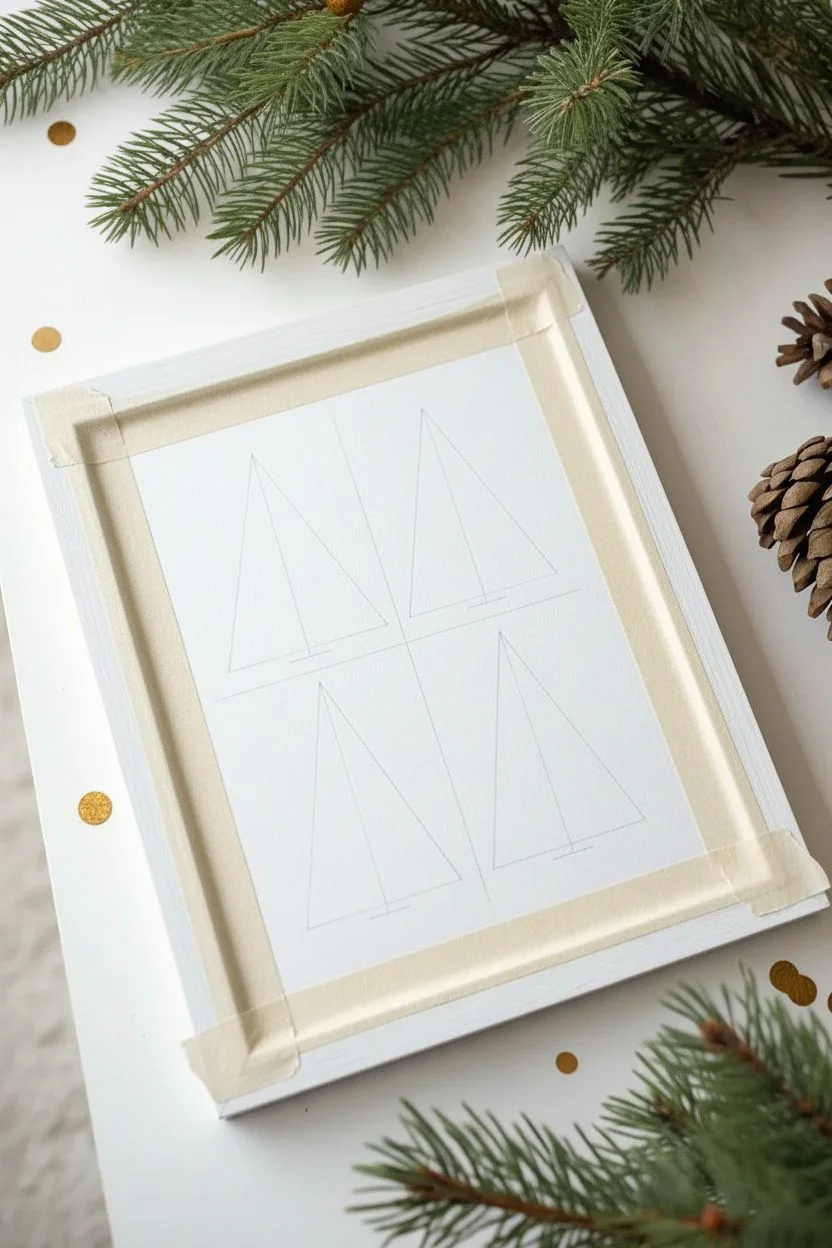
Step 1: Layout and Sketching
-
Prepare the workspace:
Tape your watercolor paper down to a hard board or table on all four sides to prevent buckling when the paper gets wet. -
Establish the grid:
Using a ruler, lightly marks the vertical and horizontal center of your paper to divide the space into four invisible quadrants. -
Draw the baselines:
In the lower half of each quadrant, draw a horizontal line about 2 inches wide to serve as the base for each tree. -
Complete the triangles:
Mark a point centered above each baseline to form the peak, then connect the dots to create four identical tall triangles. -
Mask the shapes:
For the sharpest edges, I prefer to outline the outside of the triangles with tape, but you can also just paint carefully within the pencil lines.
Bleeding Edges?
To get razor-sharp lines like the photo, allow each shape to dry fully before painting a neighbor, or run a fingernail along your tape edge to seal it tight.
Step 2: Painting the Base Layers
-
Top Left: Sandy wash:
Mix a very watery beige or watered-down ochre and fill in the top-left triangle completely, keeping the wash even. -
Bottom Right: Deep forest:
While the first one dries, move diagonal. Paint the bottom-right triangle with a saturated, opaque layer of deep emerald green. -
Top Right: Textured sap:
Using a medium green, paint the top-right triangle. Use confident, slightly dry brush strokes to create a subtle vertical woodgrain texture. -
Bottom Left: Cream foundation:
Paint the final triangle with a very pale cream wash or simply leave it bare paper if you prefer a high-contrast look. -
Complete drying:
Allow all four triangles to dry completely. The paper must be bone-dry before adding the precise details in the next phase.
Step 3: Adding Patterns and Details
-
Draw the spines:
Using a ruler and your gold paint or gel pen, draw a straight vertical line from the peak to the center base of the top two trees. -
Top Left: Stippling:
Dip a fine brush in brown paint (or use a fine-tip marker) to dab small, widely spaced dots over the beige background. -
Bottom Right: Snowfall:
On the dark green tree, use white gouache or a gel pen to create scattered dots, varying the pressure to make some ‘snowflakes’ larger than others. -
Bottom Left: The center divide:
Draw a faint pencil line down the center of the bottom-left tree to split it into two vertical halves. -
Bottom Left: Green patterns:
On the left half of this tree, paint soft, semi-transparent green circles or blobs that touch each other. -
Bottom Left: Red ornaments:
On the right half, paint distinct red and gold circles, spacing them out like ornaments hanging in a row. -
Final Erasure:
Once all paint and ink is unmistakably dry, gently erase any visible pencil marks from your initial grid.
Add Dimension
Create a 3D mixed-media effect by replacing the painted gold lines with actual gold embroidery thread stitched directly through the paper.
Place your finished piece in a simple white frame to let the geometric patterns really pop.


The Stacked Snowman Family
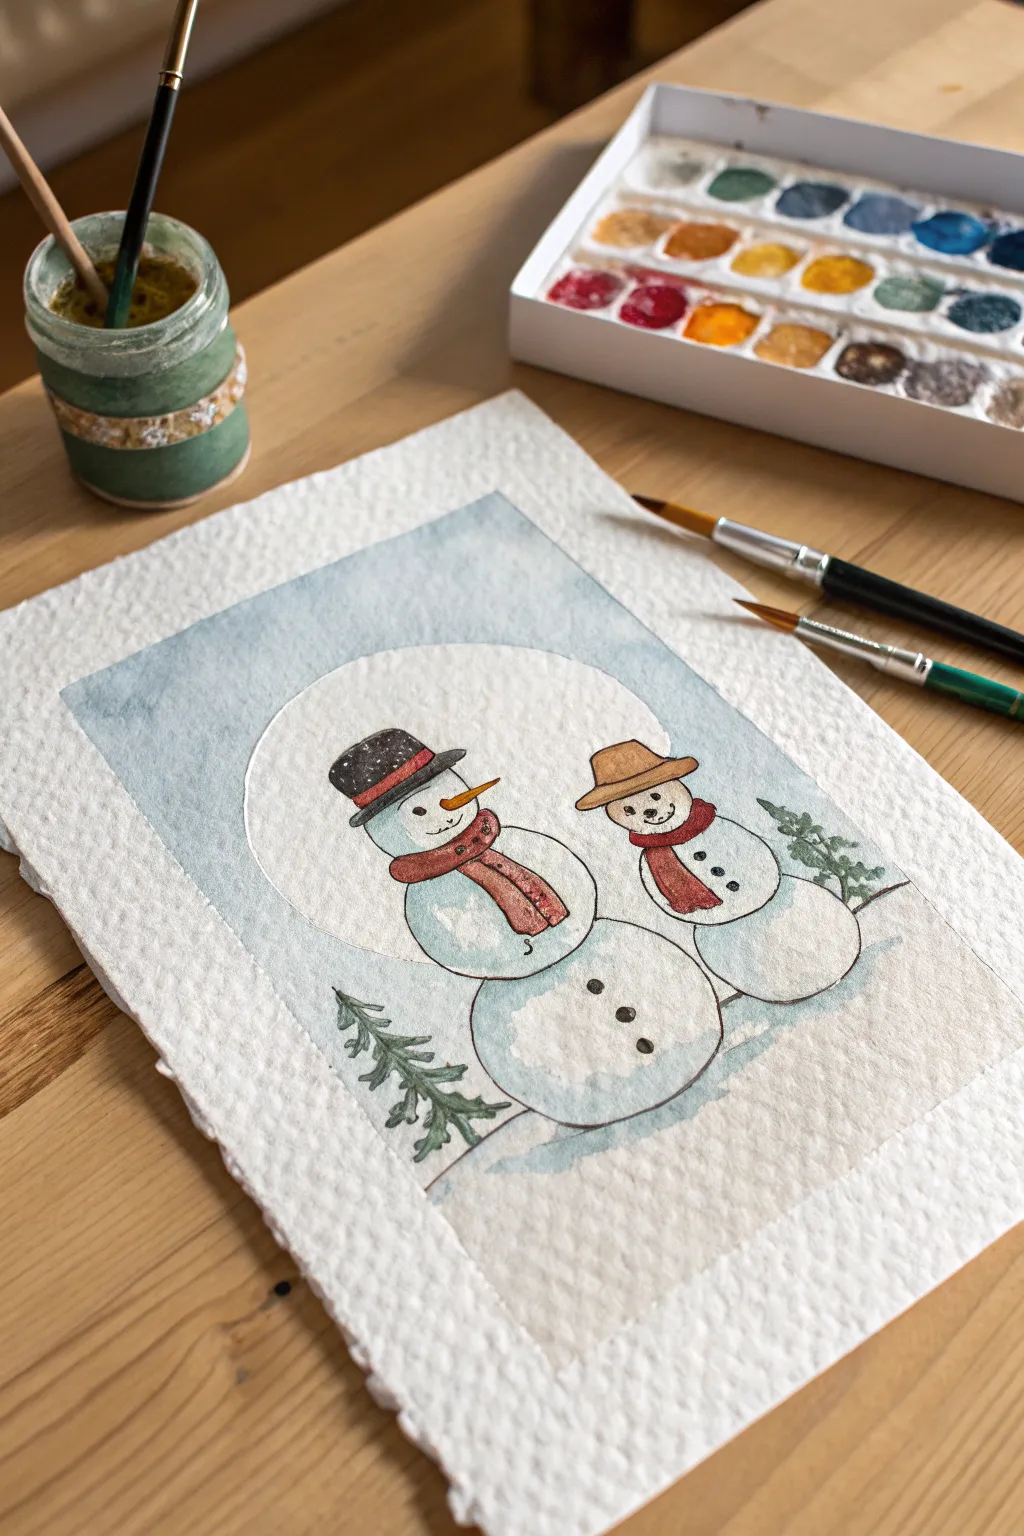
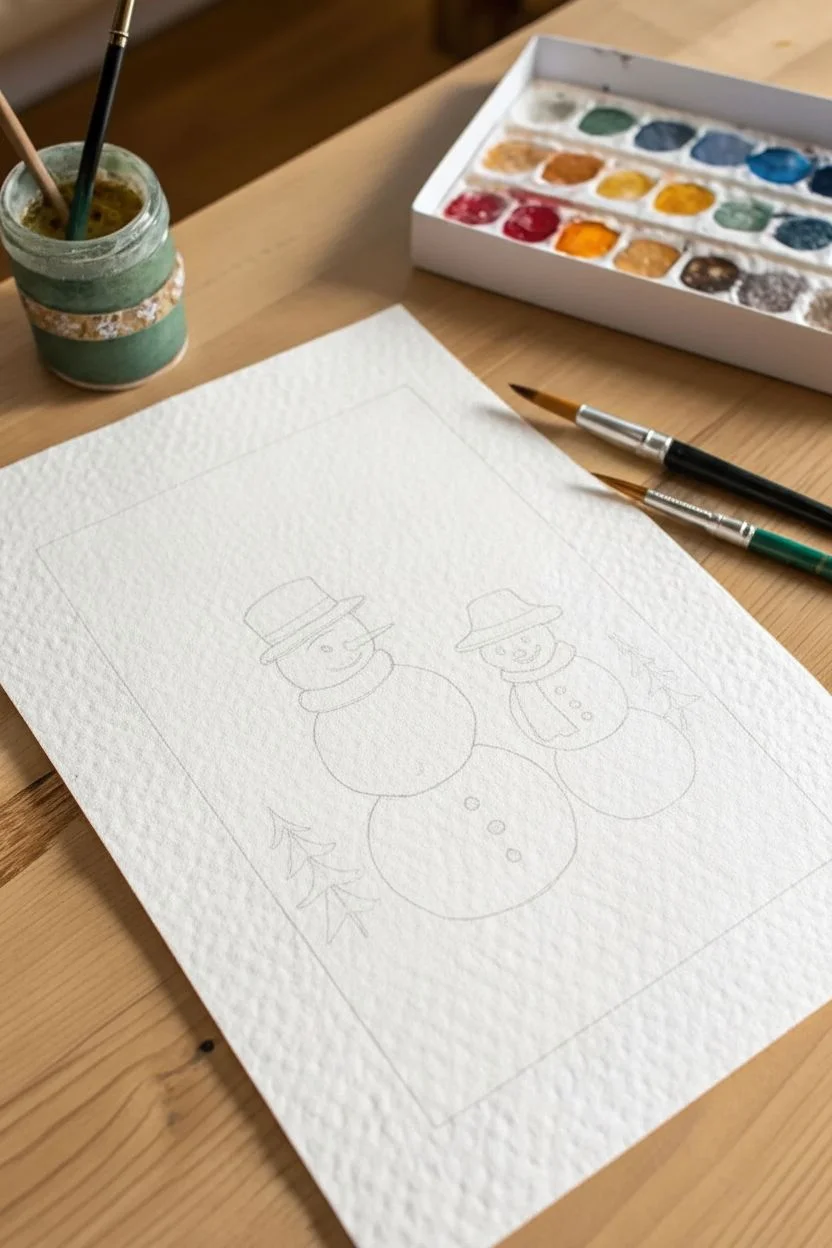
Capture the joy of winter with this charming duo of painted snowmen set against a crisp blue sky. This project combines simple watercolor washes with defining ink lines to create a classic illustration style that looks wonderful on textured paper.
Step-by-Step Guide
Materials
- Cold press watercolor paper (rough texture preferred)
- Watercolor paints (pan or tube set)
- Round watercolor brushes (sizes 2 and 6)
- Black waterproof fineliner pen (0.3mm or 0.5mm)
- HB Pencil and eraser
- Jar of clean water
- Paper towels or cloth
Step 1: Sketching the Scene
-
Define the boundary:
Lightly draw a rectangular frame in the center of your paper to serve as the boundary for your background wash. -
Draw the tall snowman:
Sketch the left snowman using three stacked circles, making the bottom circle the largest and the head the smallest. -
Add the companion:
Draw the smaller snowman on the right using just two circles, positioning it close to the first one as if they are posing together. -
Sketch accessories:
Add a tall top hat to the left figure and a wide-brimmed hat to the right, then sketch flowing scarves around both necks. -
Add nature elements:
Draw small, simple pine tree shapes on the far left and right edges inside your rectangular frame.
Wobbly Lines?
Don’t stress about making your ink lines perfectly straight. A slightly shaky or broken line adds character and enhances the hand-drawn, illustrative charm of this piece.
Step 2: Painting the Wash
-
Mix the sky color:
Prepare a watery, pale blue wash on your palette, adding plenty of water to keep it transparent. -
Paint the background:
Carefully paint the sky area inside your rectangle, working around the snowmen and trees so those shapes remain the white of the paper. -
Create snow shadows:
Mix a slightly darker blue-grey tint and paint crescent shapes on the left side of each snowball to give them roundness and dimension. -
Dry time:
I like to let the background settle and dry completely here so subsequent colors don’t bleed into each other.
Pro Tip: Soft Shadows
To make the snowmen look rounder, use a clean, slightly damp brush to soften the inner edge of your blue shadow paint immediately after applying it.
Step 3: Adding Color & Details
-
Paint the hats:
Fill in the top hat with a dark charcoal or black, and paint the brimmed hat a warm light brown. -
Color the scarves:
Use a festive red to paint the scarves, perhaps varying the tone slightly to show where the fabric folds. -
Accents and trees:
Paint the carrot noses bright orange and use a dusty green for the pine trees, dabbing the brush to create texture. -
Verify dryness:
Wait until the paper is bone dry to the touch; moisture will cause your ink lines to feather in the next step.
Step 4: Inking the Illustration
-
Outline the figures:
Use your waterproof fineliner to trace the pencil outlines of the snowmen, hats, and scarves with a loose, relaxed hand. -
Draw faces:
Add small black dots for eyes and buttons, and draw a simple curved line for their smiles. -
Detail the trees:
Go over the pine trees with jagged, quick scribbles to mimic pine needles. -
Cleanup:
Once the ink is fully set, gently erase any remaining pencil marks to reveal your clean illustration.
Display your frosty masterpiece in a simple frame to bring a touch of handmade winter cheer to your home.


Vintage Red Pickup Truck
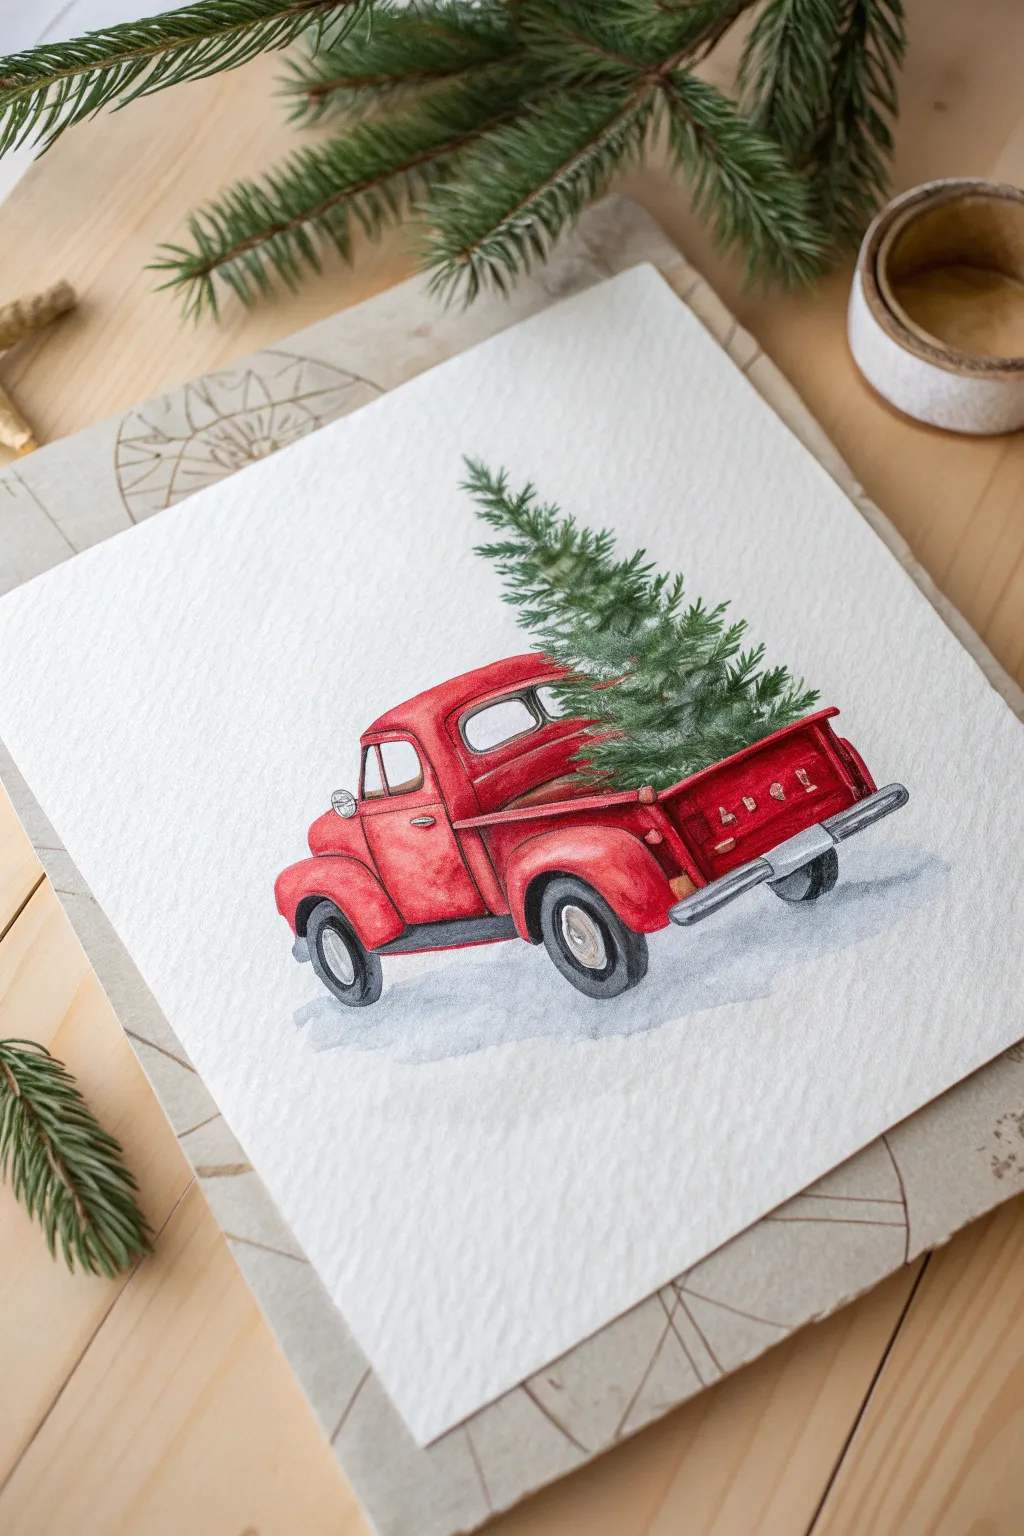
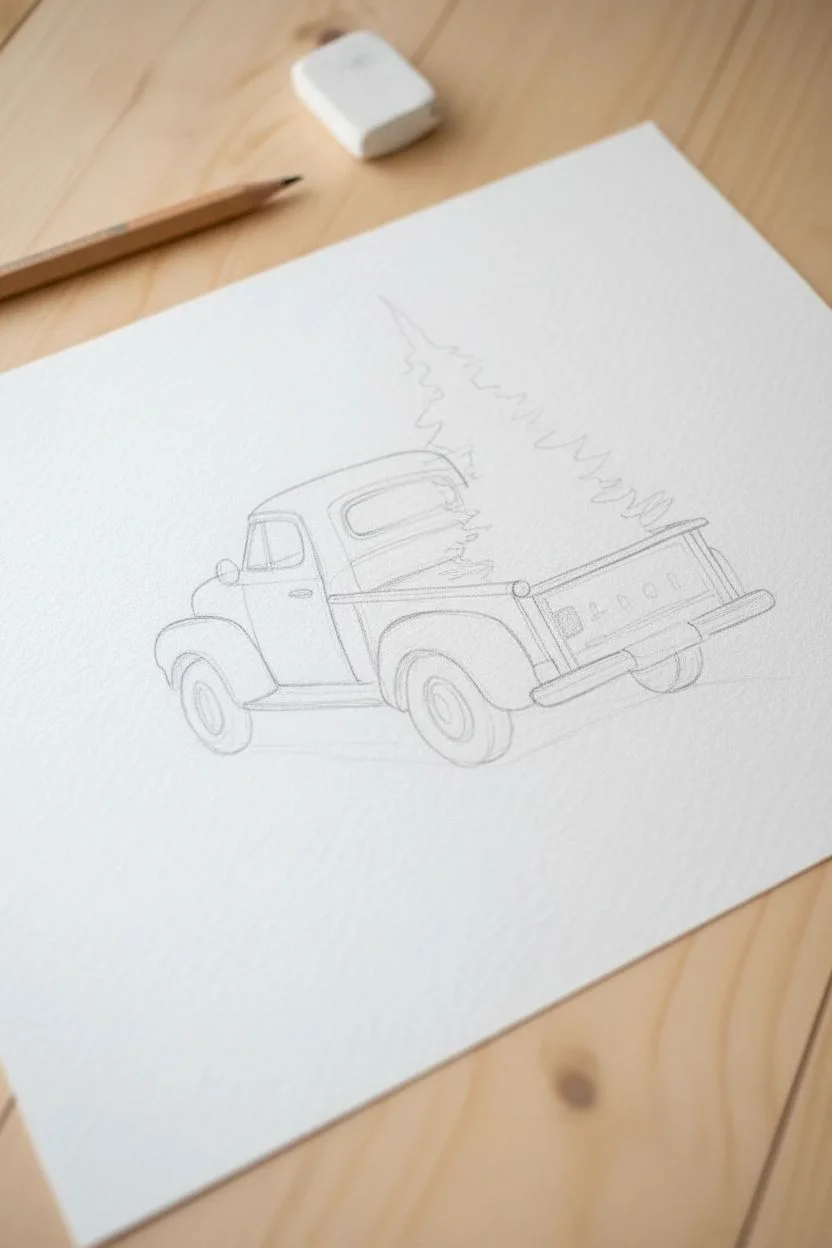
Capture the nostalgia of a classic country Christmas with this charming watercolor painting of a red pickup hauling a fresh pine tree. This project focuses on layering reds for dimension and using dry brush techniques for realistic pine needles.
Step-by-Step
Materials
- Cold press watercolor paper (140lb)
- Watercolor paints (Cadmium Red, Alizarin Crimson, Sap Green, Payne’s Grey, Burnt Sienna, Ultramarine Blue)
- Round brushes (size 6 and 2)
- Pencil (HB)
- Kneaded eraser
- Paper towels
- Jar of water
Step 1: Sketching the Outline
-
Establish the shape:
Lightly sketch the pickup truck using a pencil, focusing on a 3/4 rear view angle. Block out the cab, the truck bed, and the rounded fenders. -
Add wheel details:
Draw oval shapes for the tires and inner hubcaps, making sure the rear tires look slightly wider to match the perspective. -
Sketch the cargo:
Sketch a rough, triangular cone shape resting in the truck bed to represent the Christmas tree volume.
Muddy Colors?
If the green tree touches the wet red truck, you’ll get brown mud. Ensure the truck body is bone dry before starting the pine needles.
Step 2: Painting the Body
-
First red wash:
Mix a watery Cadmium Red and apply it to the cab door and truck bed side. Work quickly to keep the edges wet. -
Deepen the shadows:
While the first layer is still damp, drop in concentrated Alizarin Crimson along the bottom edges and corners to create rounded volume. -
Paint the tailgate:
Fill in the tailgate with your red mix. I like to use the tip of my brush to carefully paint around the embossed letters if you drew them, or paint over them to lift later. -
Fender focus:
Paint the curved fenders with a saturated red. Leave a thin sliver of white paper unpainted on the top curve to act as a high-gloss reflection. -
Running boards:
Mix a dark grey using Payne’s Grey and a touch of brown. Paint the running board connecting the fenders, keeping the line crisp.
Step 3: Adding the Greenery
-
Tree base layer:
Ensure the red paint is completely dry so colors don’t bleed. Mix Sap Green with plenty of water and wash in the basic tree shape. -
Building texture:
Once the green base is tacky, use a smaller brush with less water and darker green to dab in texture, mimicking clusters of needles. -
Pine needle details:
Mix Sap Green with a little Blue for a deep forest tone. Use a dry-brush flicking motion to paint individual branches sticking out from the main mass.
Let it Snow
Dip a stiff toothbrush in white gouache and flick the bristles to splatter ‘snow’ over the finished dry painting.
Step 4: Chrome and Tires
-
Tire treads:
Paint the tires with a thick mix of Payne’s Grey. Leave the edges somewhat soft where they meet the snow. -
Hubcaps:
Dilute your grey significantly to paint the metallic hubcaps, leaving a small white highlight in the center of each. -
Bumper details:
Paint the rear bumper with a light grey wash. Add a thin dark line along the bottom edge to give the metal thickness. -
Window glass:
Mix a very pale Ultramarine Blue. Paint the rear window, but leave a harsh white diagonal stripe to imply a glass reflection.
Step 5: Grounding the Scene
-
Shadow mixing:
Create a cool shadow color using watery Indigo or diluted Payne’s Grey. -
Cast shadow:
Apply a loose wash underneath the tires and truck body to ground the vehicle, softening the edges with clean water as you move outward. -
Final touches:
Use a white gel pen or opaque white gouache to add tiny highlights on the door handle, mirror, and tail lights for extra sparkle.
Frame this nostalgic piece in rustic wood to complete the cozy farmhouse vibe.


Silent Night Silhouettes
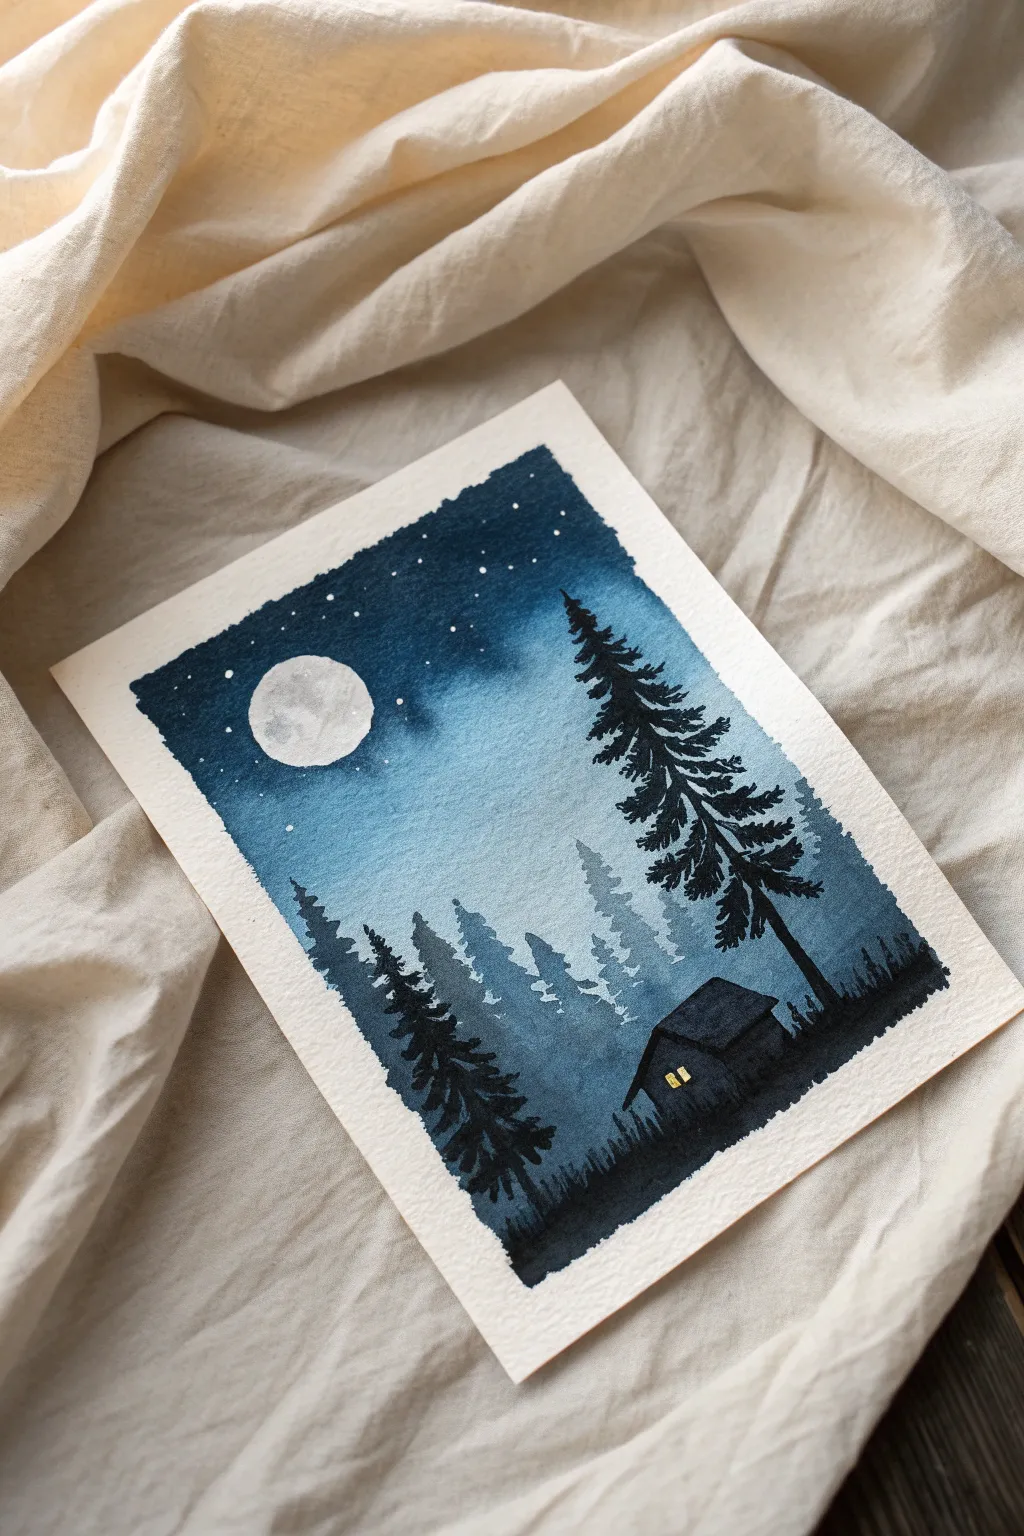

Capture the stillness of a winter night with this moody watercolor landscape. Using a monochrome palette of deep blues contrasted against stark silhouettes, you will create a serene scene featuring a glowing cabin and a bright, textured moon.
How-To Guide
Materials
- Cold press watercolor paper (300gsm)
- Watercolor paints (Indigo, Prussian Blue, Lamp Black)
- White Gouache or opaque white ink
- Yellow or orange watercolor/gouache
- Masking tape
- Masking fluid (optional) or a small coin
- Round brushes (sizes 4, 8, and a fine liner)
- Palette and two water jars
Step 1: Preparation and Sky
-
Secure the borders:
Tape all four sides of your watercolor paper down to a board or table to create a clean, crisp frame and prevent buckling. -
Sketch the layout:
Lightly sketch a circle for the moon in the upper left quadrant and a simple horizon line in the lower third for the ground. -
Mask the moon:
Apply masking fluid to the moon circle to preserve the white paper. If you don’t have masking fluid, carefully trace around a coin and paint around this circle in the next steps. -
Wet the paper:
Once the masking fluid is totally dry, use your largest brush to apply a layer of clean water over the entire sky area, stopping at the tree line. -
Apply deep blue:
Load your brush with a mix of Indigo and Prussian Blue. Start dropping pigment into the top corners and edges of the paper. -
Create the gradient:
Gently pull the dark color towards the center and the moon, adding water to dilute it as you get closer to create a glowing effect around the moon area. -
Let it dry:
Allow the paper to dry completely. I usually touch the tape to check—if it’s cold, the paper is still damp.
Dry Brush Trick
For realistic pine trees, use a brush with very little water (dry brush technique) when painting the outer branches. This creates a rough, organic texture that mimics needles flawlessly.
Step 2: Background Layers
-
Reveal the moon:
Gently rub off the masking fluid to reveal the stark white circle. Paint faint grey-blue shadows inside it to mimic craters. -
Mix a mid-tone:
Dilute your Indigo paint with water to create a misty, medium-blue tone for the distant trees. -
Paint ghost trees:
Paint simple vertical shapes for distant pines along the horizon. Keep the edges slightly uneven to suggest branches, but don’t worry about perfect details here. -
Dry the layer:
Wait for this background layer of trees to dry fully before moving to the foreground, or the colors will bleed together.
Step 3: Silhouettes and Details
-
Mix the darkest shade:
Combine Indigo with a touch of Lamp Black to create a deep, rich shadow color with a creamy consistency. -
Paint the main tree:
On the right side, paint a tall vertical line for the trunk. Using the tip of a smaller brush, dab jagged horizontal strokes downward to create pine branches. -
Add foreground trees:
Repeat the process on the left side with smaller trees, varying their heights to keep the composition natural. -
Create the cabin:
Paint the silhouette of the small cabin roof and walls on the lower right hill, ensuring the shape feels tucked into the landscape. -
Ground the scene:
Fill in the bottom area with your dark black-blue mix, using vertical flicking motions to suggest grass blades along the ridge. -
Light the window:
Using thick yellow gouache or paint (so it sits on top of the dark paper), paint two tiny squares for the glowing window. -
Add the stars:
Load a small brush with white gouache. Tap the handle against another brush over the painting to splatter tiny stars across the sky. -
The final reveal:
Once everything is bone dry, carefully peel away the masking tape at a 45-degree angle to reveal your crisp white borders.
Level Up: Magic Glow
Mix a tiny pinch of metallic gold watercolor into your yellow window paint. It creates a warm, shimmering candlelight effect that catches the light when viewed from different angles.
Step back and admire your peaceful winter sanctuary.
BRUSH GUIDE
The Right Brush for Every Stroke
From clean lines to bold texture — master brush choice, stroke control, and essential techniques.
Explore the Full Guide
Oversized Ornaments on a Branch
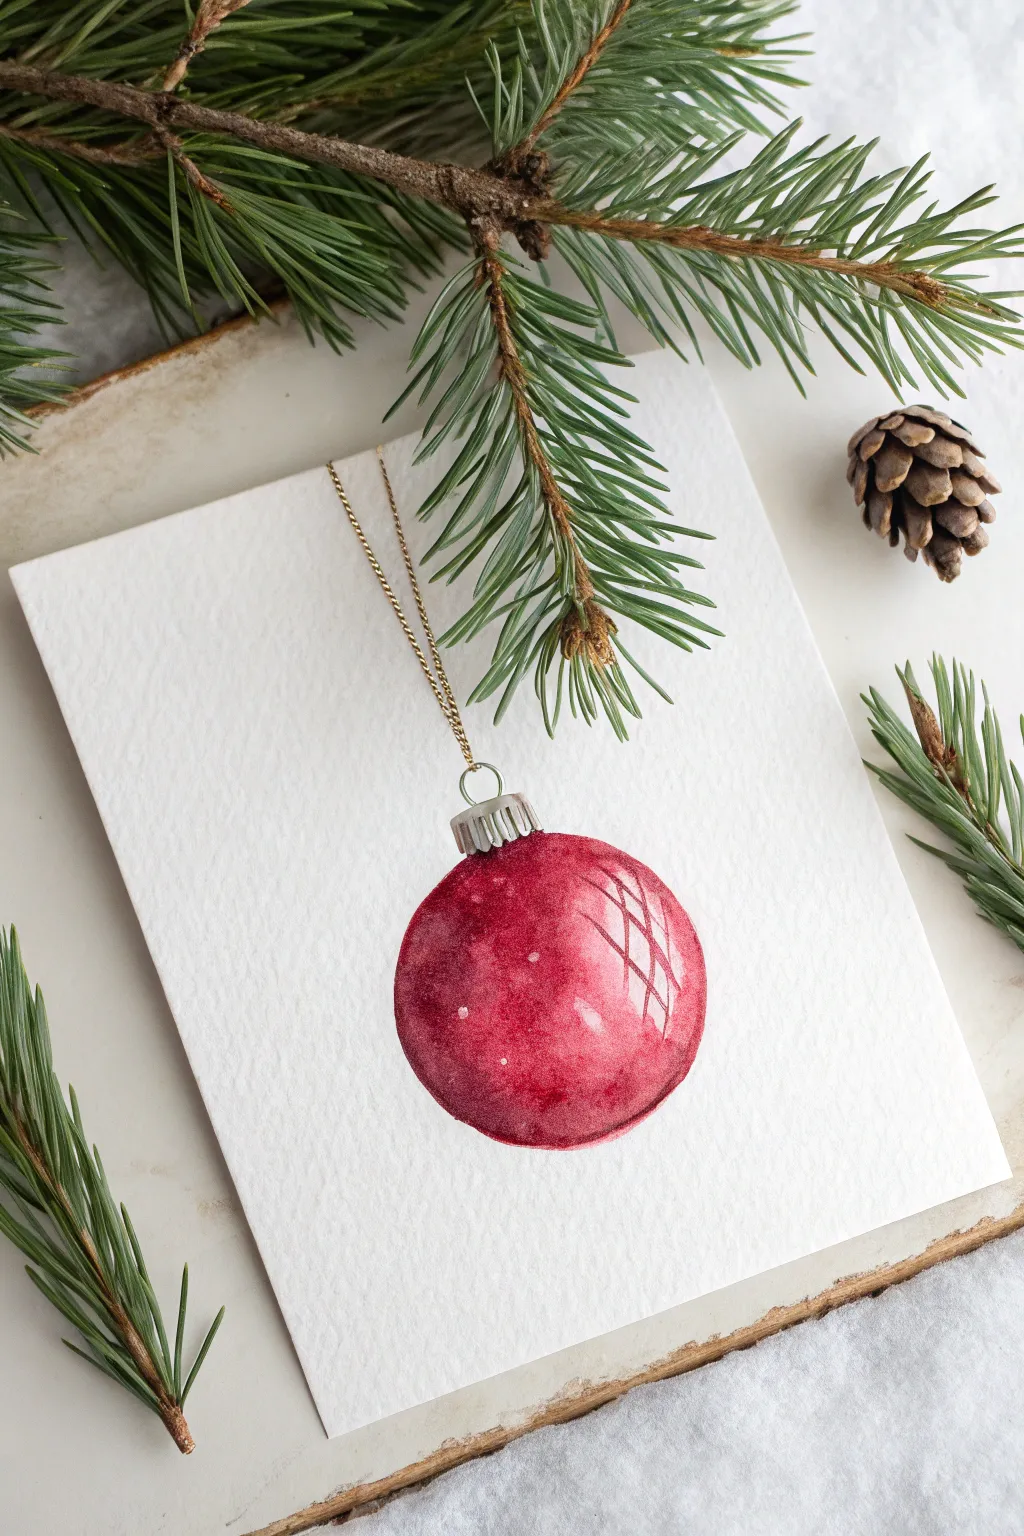
Capture the glossy shine of a traditional Christmas ornament using simple watercolor techniques. The wet-on-wet method creates a beautiful, dimensional texture that makes the red pop against the crisp white paper.
Step-by-Step Tutorial
Materials
- Cold-press watercolor paper (300 gsm, textured)
- Round watercolor brushes (size 6 and size 0)
- Pencil (HB or lighter)
- Kneaded eraser
- Watercolor paints (Alizarin Crimson, Payne’s Gray, Yellow Ochre/Gold)
- Clean water
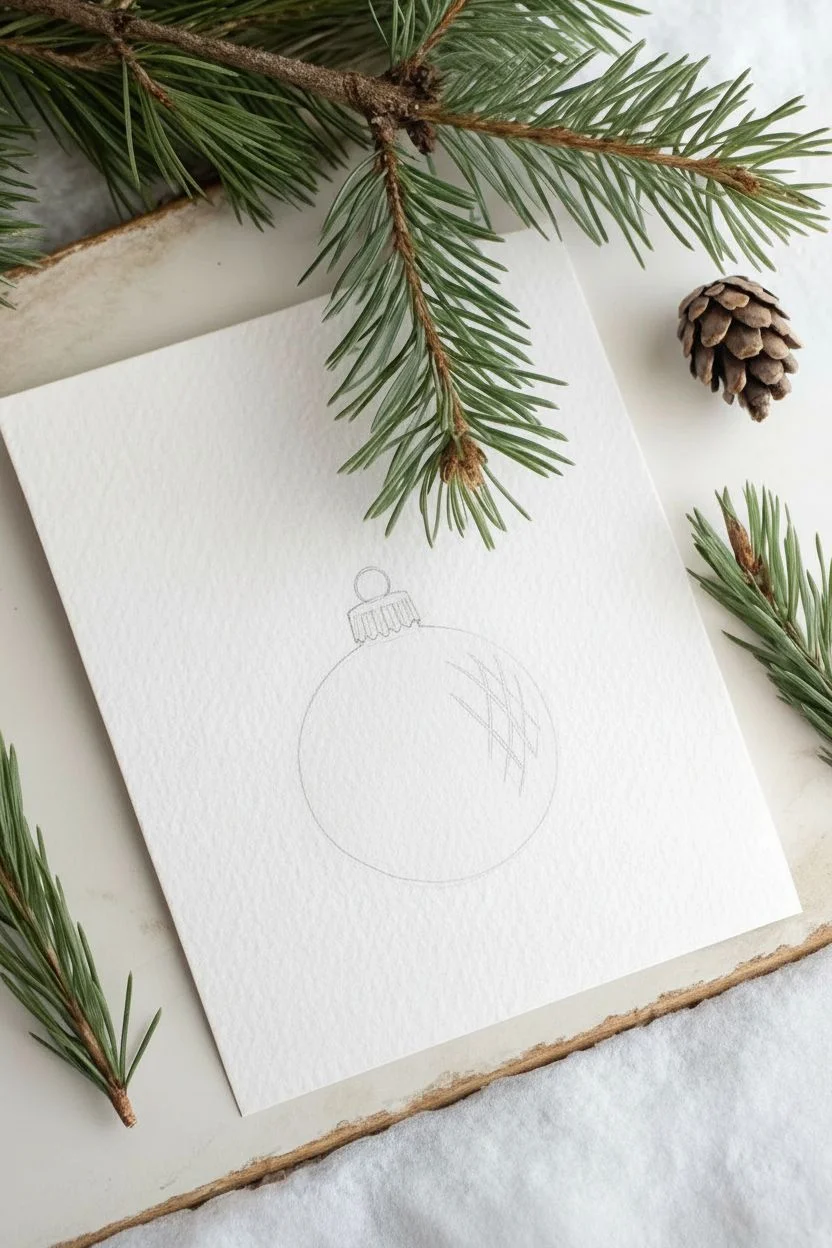
Step 1: Sketching the Outline
-
Draw the shape:
Lightly sketch a circle roughly 2-3 inches wide in the center of your paper using an HB pencil. -
Add the cap:
Draw a small rectangular shape at the top of the circle for the metal cap, adding scalloped edges at the bottom where it meets the ornament. -
Map the reflection:
Sketch a distorted window-pane grid on the upper right side of the sphere to indicate the glossy reflection; these areas will remain white. -
Clean lines:
Use a kneaded eraser to lighten your pencil lines until they are just barely visible.
Stay Clean
If painting around the intricate highlight grid is difficult, apply masking fluid over the pencil lines first and rub it off after the paint dries.
Step 2: Painting the Ornament
-
Prepare the red:
Mix a generous amount of Alizarin Crimson or a deep red on your palette with water. -
Wet the paper:
Using your size 6 brush, apply clean water to the inside of the circle, carefully avoiding the reflection grid shapes. -
Apply base color:
Drop the red paint into the wet area, allowing it to flow and spread naturally. -
Deepen the shadows:
While the paint is still wet, drop clearer, more concentrated red pigment along the bottom and left edge to create roundness. -
Soft transitions:
Use a clean, slightly damp brush to soften the edges near the white highlights so the transition isn’t too harsh. -
Adding texture:
I like to sprinkle a tiny drop of water or salt onto the drying wash to create subtle speckles for texture. -
Let it dry:
Allow the red layer to dry completely before moving on to avoid color bleeding.
Step 3: Details & Hardware
-
Paint the cap base:
Mix a very watery grey and fill in the rectangular cap shape. -
Define the ridges:
Once the grey base is dry, use the size 0 brush with a darker grey mixture to paint vertical curved lines representing the metal ridges. -
Add the loop:
Paint a small, thin silver ring emerging from the top of the cap. -
Paint the chain:
Switch to Yellow Ochre or gold paint. Using the tip of your smallest brush, paint tiny interlocking loops extending upward from the cap ring. -
Enhance contrast:
Once everything is dry, add a final glaze of dark red to the shadowed bottom edge if the ornament needs more depth.
Level Up: Real Shimmer
Trace over the painted chain with a gold metallic gel pen or metallic watercolor paint to make the jewelry element truly sparkle.
Enjoy the festive atmosphere this simple yet elegant painting brings to your holiday collection.
Santa’s Hat and Beard
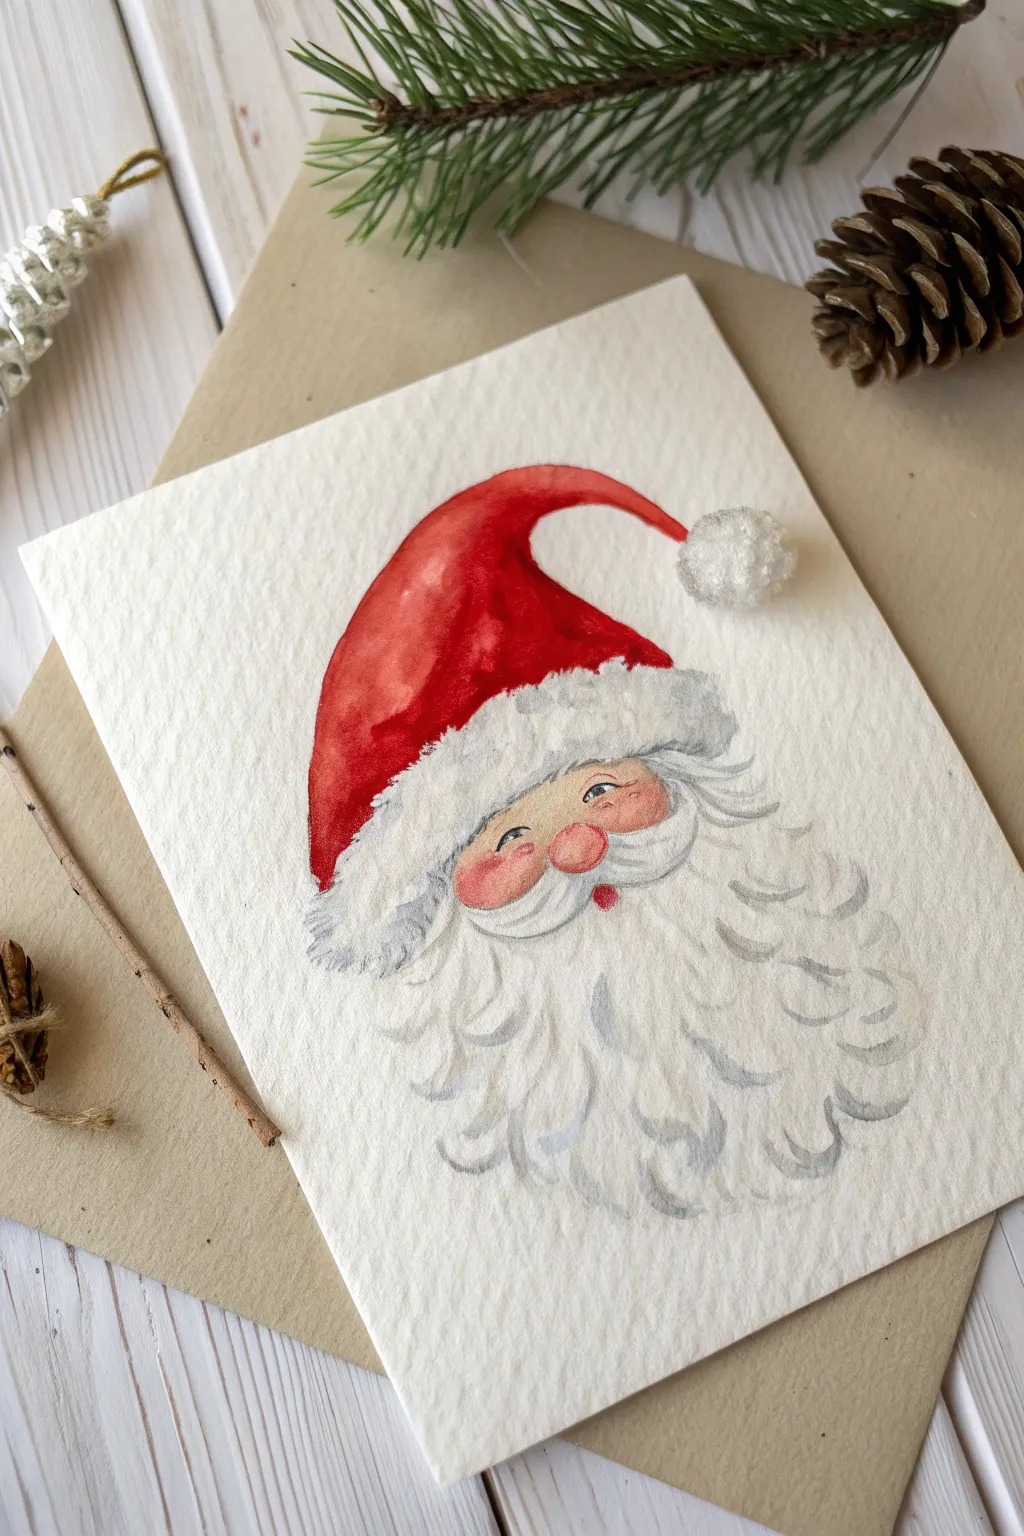
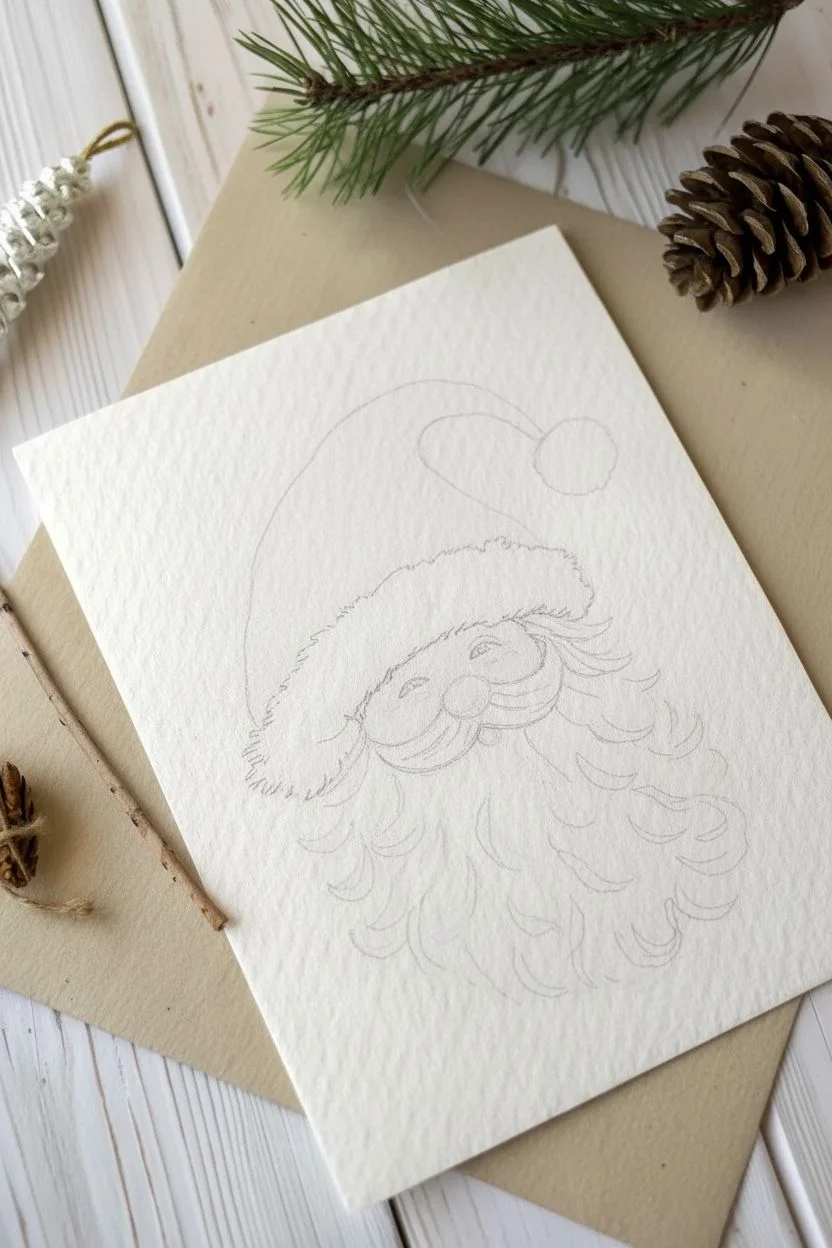
This charming project captures the warmth of the season with a soft, illustrative style. Using simple watercolor techniques, you will create a jolly face with rosy cheeks and a distinctively fluffy white beard.
Detailed Instructions
Materials
- Cold-press watercolor paper (300gsm)
- Round watercolor brushes (size 4 and 8)
- Watercolors: Cadmium Red, Yellow Ochre, Alizarin Crimson, Indigo or Payne’s Grey
- Pencil and kneaded eraser
- Table salt (optional)
- White gouache or white gel pen
- Paper towels
Step 1: Sketching the Shape
-
Outline the head:
Begin with a faint pencil sketch on your textured paper. Draw a wide U-shape for the bearded face area, ensuring it occupies the lower center of the page. -
Add the hat:
Sketch a floppy triangular shape acting as the hat, curving the tip over to the right side. Add a small circle at the tip for the pom-pom. -
Define the trim:
Draw the fluffy hat trim and the mustache using cloud-like, bumpy lines. Keep these lines light, as we want the paint to define the softness later. -
Map facial features:
Place a round nose right above the mustache and two small arched lines for smiling eyes. Mark the cheek area lightly so you know where to add color.
Bleeding Colors?
If your red hat bleeds into the white trim, stop immediately. Use a clean, thirsty brush to ‘lift’ the unwanted red paint out, then wait for the red to be 100% dry before continuing.
Step 2: Painting the Face
-
Mix skin tone:
Create a watery wash using very diluted Yellow Ochre and a tiny touch of Red to make a pale peach skin tone. -
Apply the base wash:
Gently fill in the face area and the nose with this peach mixture, being careful to paint around the eyes and mustache. -
Add the rosy glow:
While the face wash is still wet, drop a small amount of concentrated pink or diluted Alizarin Crimson onto the cheeks and the nose tip. Let the colors bleed naturally for a soft transition. -
Paint the eyes:
Once the skin is semi-dry, use a fine tip brush with a mix of Indigo and Brown to paint the eye arches, adding small lashes at the corners for a jolly expression. -
Add the mouth:
Paint a tiny, dark red shape just under the mustache center to suggest a smiling mouth or tongue.
Make it Pop
For an extra festive touch, apply a thin layer of glue to the pom-pom and hat trim, then sprinkle with iridescent glitter to mimic real snow.
Step 3: The Red Hat
-
Base red layer:
Load your larger brush with bright Cadmium Red. Start painting the hat from the top curve downwards. -
Create dimension:
While the red is wet, drop slightly darker red (mixed with a touch of brown or purple) along the left edge and the underside of the curve to create a shadow. I like to leave the upper right section slightly lighter for a highlighted look. -
Salt texture (optional):
If you want a frosty look on the hat itself, sprinkle a tiny pinch of salt on the wet red paint and let it dry completely before brushing it off.
Step 4: Beard and Fur Texture
-
Mix a shadow grey:
Dilute Indigo or Payne’s Grey with plenty of water until you have a very pale, cool grey specific for shadows. -
Define the hat trim:
Dab this pale grey onto the bottom of the white hat trim. Use a stippling motion to suggest fluffy fur, keeping the top of the trim paper-white. -
Paint the mustache shadows:
Paint thin grey lines along the underside of the mustache curls to separate them from the beard. -
Create beard volume:
Instead of painting individual hairs, paint ‘C’ shaped squiggles and curved shadows throughout the beard area using your pale grey. This negative painting technique makes the unpainted paper look like fluffy curls. -
Deepen the contrast:
Go back into the deepest recesses of the beard with a slightly darker grey mix to add volume near the neck area. -
The pom-pom:
Paint the pom-pom circle with a very light grey wash, stippling the edges to make it look fuzzy. Drop a dot of darker grey in the center bottom for weight.
Step 5: Final Details
-
Highlights:
Using white gouache or a gel pen, add a tiny white dot to the nose and cheeks for a ‘shiny’ look. -
Cleanup:
Once absolutely dry, gently erase any visible pencil lines to keep the look soft and ethereal.
Enjoy displaying your cheerful Santa artwork or turning it into a beautiful holiday card

PENCIL GUIDE
Understanding Pencil Grades from H to B
From first sketch to finished drawing — learn pencil grades, line control, and shading techniques.
Explore the Full Guide
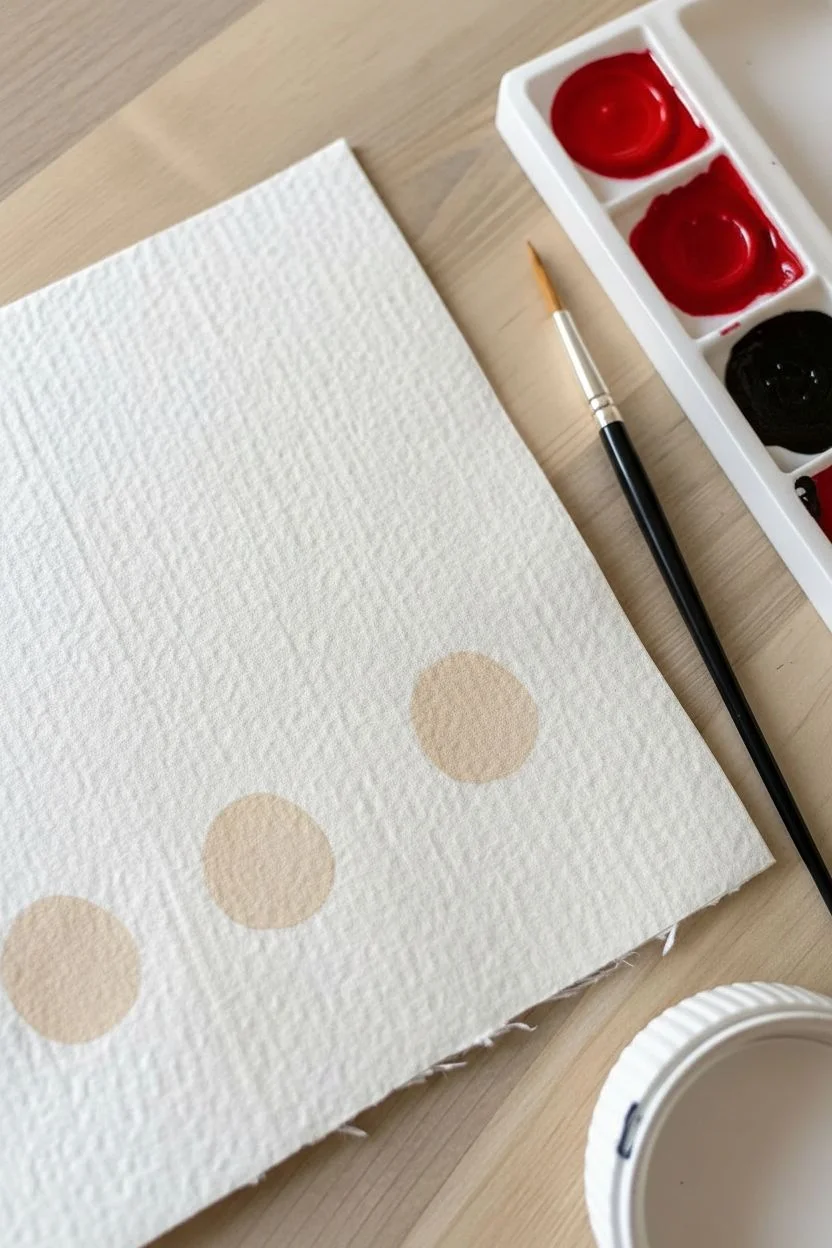
Minimalist Reindeer Noses

Capture the festive spirit with this clean and charming watercolor project that focuses on simple shapes and bold contrast. Using textured paper and a few basic colors, you will create a diagonal row of whimsical reindeer perfect for holiday cards or framed decor.
How-To Guide
Materials
- Cold-press watercolor paper (300 gsm)
- Watercolor paints (Light Brown/Ocher, Black, Bright Red)
- Small round paintbrushes (Size 2 and Size 0)
- Water cup and paper towel
- Masking tape (optional)
Step 1: Painting the Faces
-
prepare your palette:
Mix a light brown or yellow-ocher pigment with plenty of water. You want a soft, transparent beige tone for the reindeer faces, not a dark muddy brown. -
paint the first circle:
Using your size 2 brush, paint a circle about the size of a coin near the bottom left corner of your paper. -
position the second face:
Paint a second circle of the same size in the middle of the page, positioning it slightly higher and to the right of the first one to start a diagonal line. -
finish the row:
Add the third circle near the top right, maintaining that upward diagonal flow. This composition creates a nice sense of movement. -
let it dry:
Allow these circles to dry completely. I usually touch the paper with the back of my knuckle to check for dampness; the paper must be bone-dry before the next step to prevent bleeding.
Paper Texture Tip
Using ‘Cold Press’ paper is key here. The bumpy texture breaks up the black brushstrokes slightly, giving the antlers that lovely organic, hand-drawn look seen in the photo.
Step 2: Adding Antlers and Ears
-
mix the black:
Prepare a rich black paint. Keep the consistency slightly thicker, like heavy cream, so the lines stay sharp and crisp on the textured paper. -
paint the antler stems:
Switch to your size 0 or fine liner brush. Starting from the top of the tan circle, paint two curved lines reaching upward and outward for the main antler beams. -
add the branches:
Add smaller, curved offshoots to the main antler beams. Keep your wrist loose to make them look organic and branch-like rather than stiff geometric lines. -
paint the ears:
Rinse your brush and switch back to the light brown mix. Paint two small leaf shapes sticking out horizontally just below the antlers on each head. -
outline the ears:
Once the ear shapes are damp-dry, use the fine brush with a tiny amount of black paint to outline just the top edge of each ear for definition.
Fixing Bleeds
If the black paint feathers into the brown face, your base layer was too wet. Stop immediately, let it dry, and create the remaining details with a waterproof fine-liner pen instead.
Step 3: Features and Noses
-
dot the eyes:
Using the tip of your size 0 brush and black paint, create two small vertical oval dots for eyes. Place them widely apart on the upper half of the face circle. -
draw the smile:
Paint a wide, shallow U-curve connecting the area between the eyes for a cheerful smile. -
prepare the red:
Clean your brush thoroughly. Load it with a bright, opaque red paint. You want this color to be bold and saturated to stand out against the beige. -
paint the nose:
Paint a confident red circle centered right above the smile line. It can slightly overlap the black smile line for a cohesive look. -
create a highlight:
While painting the nose, I prefer to leave a tiny pin-prick spot of white paper unpainted on the upper side. This creates a shiny highlight effect instantly.
Now you have a charming trio of reindeer ready to bring holiday cheer to your home
Festive Holly and Berries
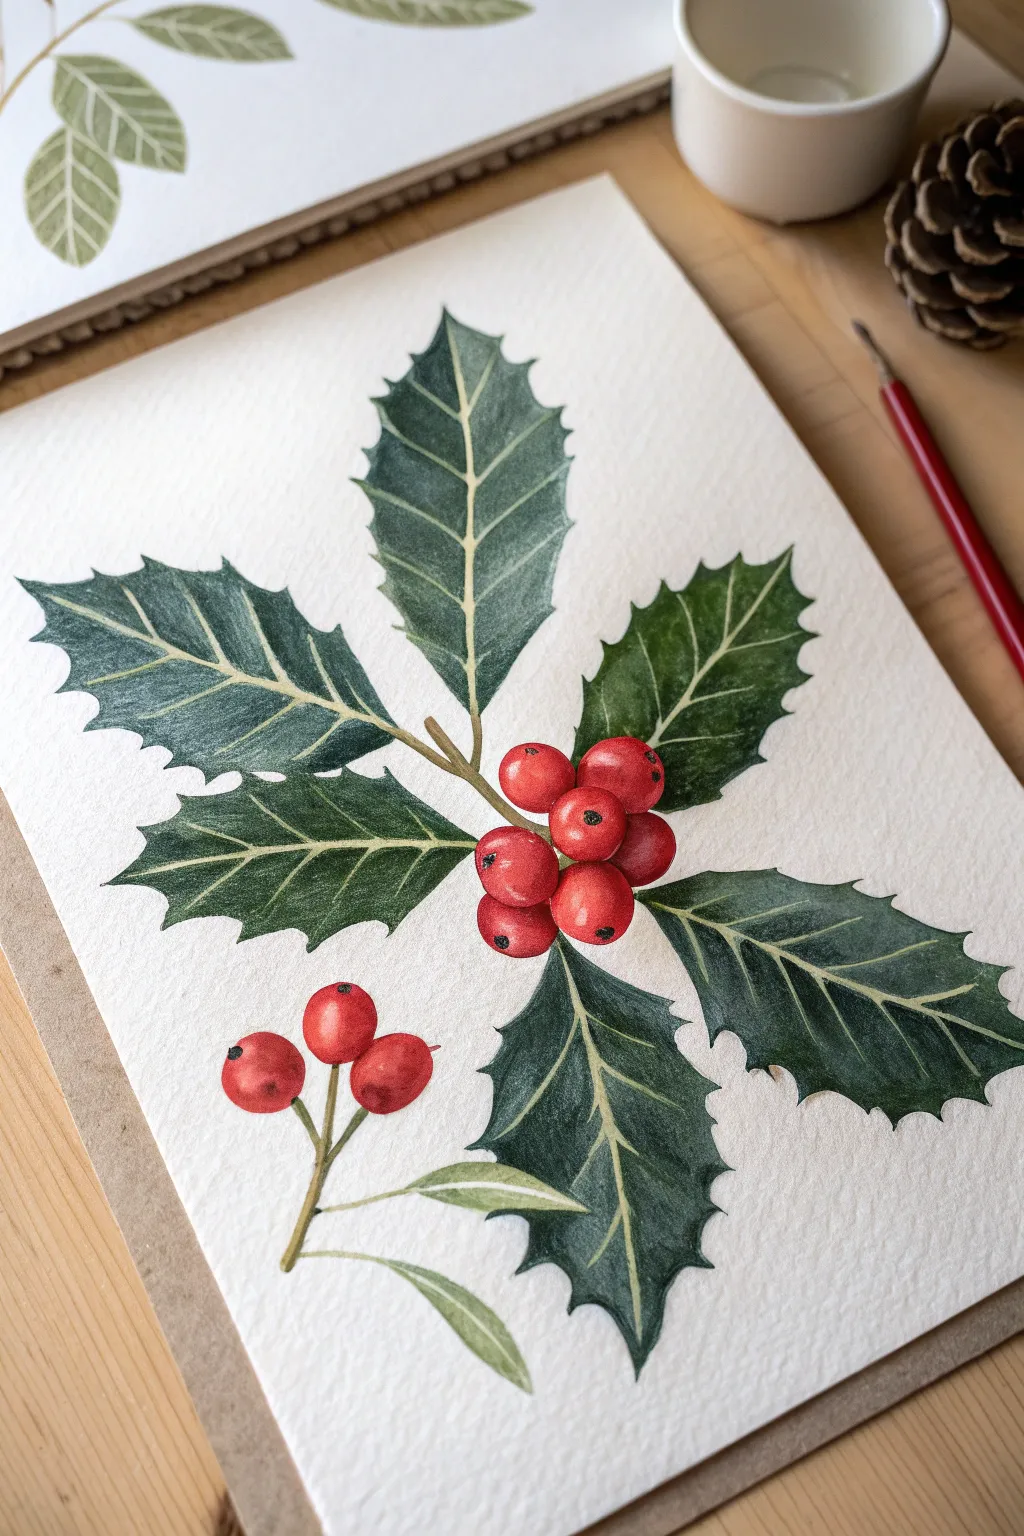
Capture the timeless elegance of the holidays with this botanical-style watercolor painting. This project focuses on creating rich, deep green foliage and vibrant red berries on textured paper, perfect for a handmade Christmas card or framed seasonal decor.
Step-by-Step
Materials
- Cold-press watercolor paper (300gsm)
- Watercolor paints (Sap Green, Hooker’s Green, Alizarin Crimson, Cadmium Red, Burnt Umber)
- Round brushes (size 6 for leaves, size 2 for details)
- HB pencil and kneaded eraser
- Jar of water
- Paper towels
- White gouache or white gel pen (optional)
Step 1: Sketching the Composition
-
Map the center:
Start by lightly marking the center of your paper where the main cluster of berries will sit. -
Outline the main leaves:
Sketch five main holly leaves radiating outward from the center point. Use curved, serrated lines to create those iconic spiky edges, ensuring the leaves vary slightly in size and angle for a natural look. -
Add the central vein:
Draw a faint double line down the center of each leaf to indicate the midrib. This helps you remember to leave this area unpainted later to create the light vein effect. -
Sketch the berries:
Draw a tight cluster of round berries in the center where the leaves meet. Group them closely, with some overlapping others to create depth. -
Add the lower sprig:
Below the main arrangement, sketch a separate, smaller stem featuring three berries and two elongated, smoother leaves.
Bleeding Colors?
If your red berries bleed into the green leaves, the leaves weren’t fully dry. Let the green layer dry completely—warm to the touch—before painting adjacent red areas.
Step 2: Painting the Foliage
-
Mix your greens:
Prepare a rich, dark green mix using Hooker’s Green with a touch of Burnt Umber or blue to deepen it. I usually mix enough to cover all the main leaves to ensure color consistency. -
Paint the first leaf half:
Using your size 6 brush, paint one side of a main holly leaf. Carefully follow the spiky outer edge and stop just short of the center pencil line you drew, leaving a thin strip of white paper for the vein. -
Add tonal variation:
While the paint is still wet, drop a slightly darker concentration of green near the center vein and let it diffuse outward toward the spiky tips. This creates a natural 3D curve. -
Complete the leaf:
Paint the other half of the leaf in the same manner, being careful not to bridge that center gap so the white vein remains crisp. -
Repeat for main leaves:
Continue this process for the remaining four large leaves. Rotate your paper as needed to keep your hand from smudging wet paint. -
Paint the lower leaves:
For the separate sprig at the bottom, dilute your green with more water for a paler, more translucent look. Paint these leaves loosely, allowing the white paper to show through for the veins.
Step 3: Bringing Berries to Life
-
Base red layer:
Load your size 2 brush with bright Cadmium Red. Paint each berry, carefully leaving a tiny speck of dry white paper near the top left of each circle to serve as a glossy highlight. -
Add shadows:
While the red is still damp, touch the bottom right curve of each berry with Alizarin Crimson or a reddish-brown mix. Let the colors bleed slightly to create a rounded, spherical form. -
Paint the lower berries:
Repeat the highlight and shadow process for the three isolated berries on the bottom sprig.
Make it Sparkle
For an extra festive touch, dot the center of the berries with clear glitter glue or add very subtle metallic gold splatter to the background once the painting is finished.
Step 4: Stems and Final Details
-
Connect the elements:
Using a thin mix of brown and green, paint the fine stems connecting the berries and leaves. Use the very tip of your size 2 brush for these delicate lines. -
Add berry details:
Once the red paint is completely dry, use a strong mix of black or dark brown to paint a tiny dot or distinct ‘eye’ on the center of each berry. -
Refine secondary veins:
If you want more detail on the dark leaves, you can use a very sharp colored pencil or a fine brush with faint green paint to suggest lateral veins branching from the white center line. -
Enhance highlights:
If your white veins got covered by paint, simply go over them with a white gel pen or a thin line of white gouache to restore that crisp contrast. -
Erase guidelines:
Wait until the painting is bone dry—I usually give it at least 20 minutes—then gently erase any visible pencil marks to clean up the illustration.
Once dry, this classic holly illustration looks beautiful mounted on a kraft paper card or framed as part of a holiday vignette.


Cozy Nordic Gnomes
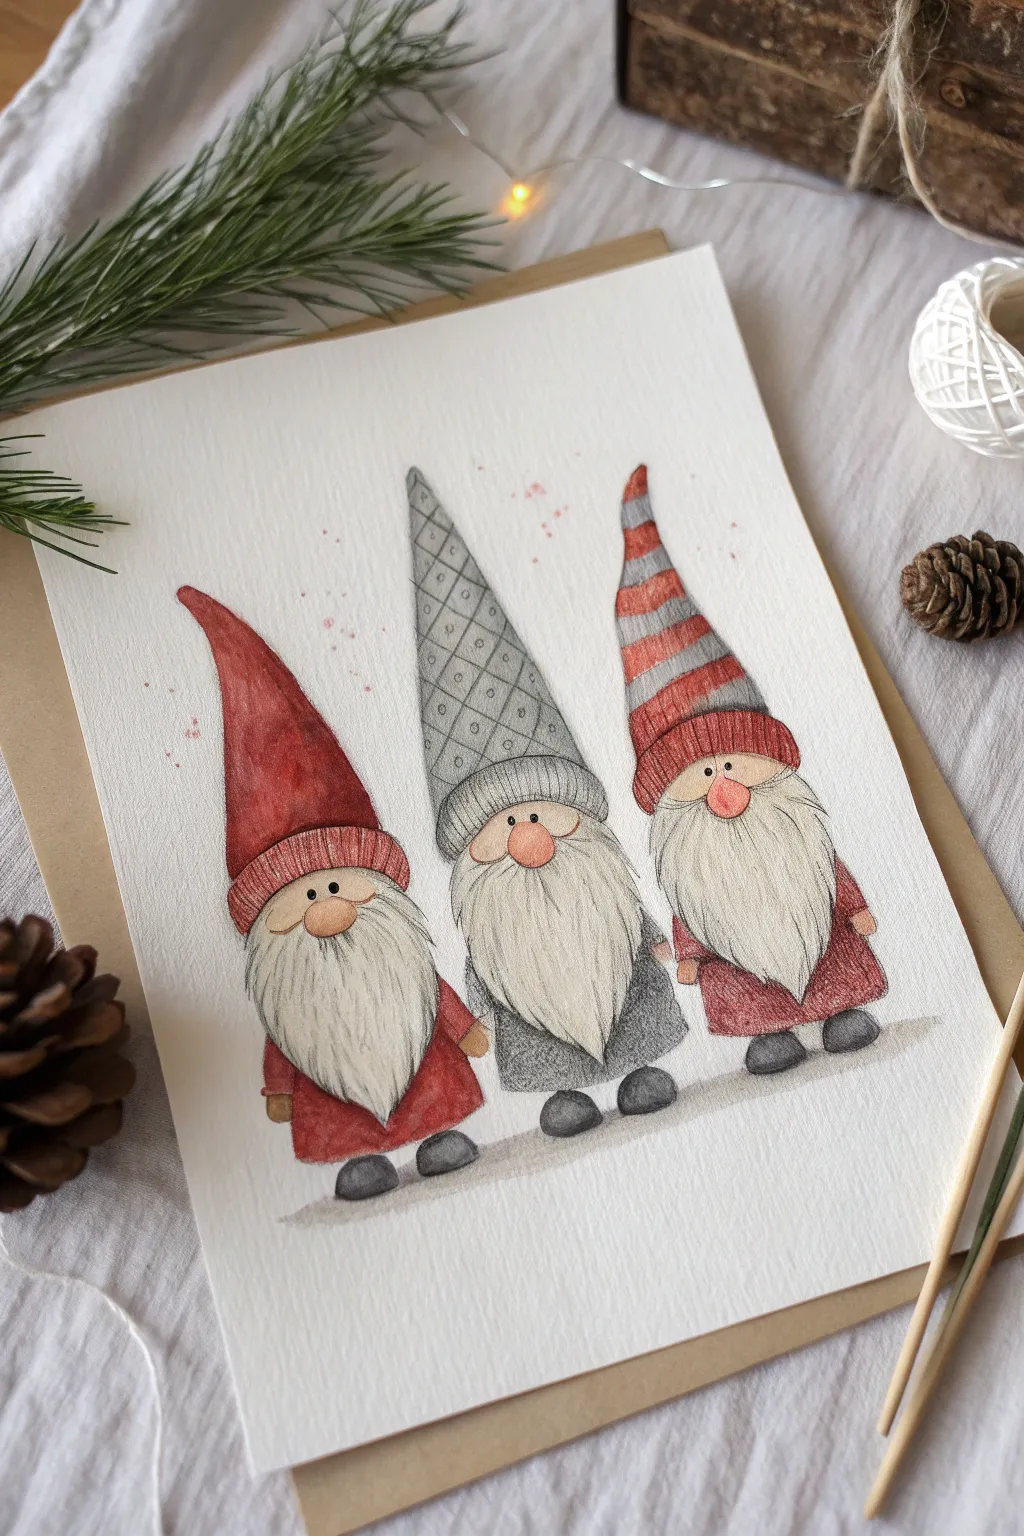
Capture the cozy charm of Nordic folklore with this mixed-media illustration. By combining soft watercolor washes with precise colored pencil details, you will create textured, lively gnomes perfect for a holiday card.
Detailed Instructions
Materials
- Cold press watercolor paper (300 gsm)
- Watercolor paints (Red, Cool Grey, Peach/Flesh tint)
- Round brushes (Size 4 and 0)
- Colored pencils (Red, darker Grey, Black, light Brown)
- HB Pencil and kneaded eraser
- Paper towel and water cup
Step 1: Sketching the Shapes
-
Position the trio:
Lightly sketch three ovals side-by-side near the bottom of your paper to serve as the bodies. -
Add character features:
Draw three round circles for noses resting on the top edge of the body ovals. -
Draft the hats:
Sketch tall, triangular hats extending upward from the noses. Allow them to curve or bend slightly at the tips for a whimsical look. -
Define the beards:
Draw the beard outlines flowing from under the noses down to the bottom of the coats, tapering slightly. -
Add accessories:
Sketch small oval shoes poking out from under the coats and define the thick, ribbed brims of the hats.
Step 2: Watercolor Base Layers
-
Paint the noses:
Mix a watery peach or flesh tone and fill in the three round noses. -
Apply red washes:
Using a saturated red, paint the hat on the left, the coat on the far left, the coat on the far right, and the stripes on the right-hand hat. -
Apply grey washes:
Dilute a cool grey paint. Fill in the center hat and coat, the boots, and the alternating stripes on the right hat. -
Paint the brims:
Fill the hat brims with slightly diluted versions of their respective hat colors, keeping the edges soft. -
Let it dry:
Allow the paper to dry completely. I like to touch the paper’s corner to ensure it’s not cold or damp before starting the pencil work.
Fixing Harsh Lines
If your pencil beard strokes look too stiff or dark, gently run a clean, slightly damp brush over them. This softens the graphite into the paper for a fluffier look.
Step 3: Pencil Detailing
-
Texture the beards:
Using a sharp grey pencil, draw fine, vertical strokes through the white beard areas to simulate hair strands. -
Contour the noses:
Use a light brown or dark peach pencil to shade the bottom and sides of the noses to make them look spherical. -
Create the diamond pattern:
On the central grey hat, use a dark grey pencil to draw a grid of diagonal lines, creating small diamond shapes. -
Detail the knitting:
Add vertical tick marks on the hat brims using colored pencils to mimic a ribbed knit texture. -
Deepen the shadows:
Use a dark red pencil to shade the edges of the red hats and coats where the fabric would fold. -
Define the boots:
Darken the boots with a black or charcoal colored pencil, pressing harder at the bottom for weight.
Level Up: Metallic Pop
Use a silver metallic gel pen or paint to add small dots inside the diamond pattern of the grey hat for a festive, shimmering detail.
Step 4: Final Touches
-
Ground the gnomes:
Mix a very watery grey wash and paint a horizontal strip beneath their feet so they aren’t floating in space. -
Add speckles:
Load a small brush with red paint and tap the handle against your finger to splatter tiny dots around the hats for a magical effect.
Once dry, your charming Scandinavian trio is ready to bring holiday cheer to any mantelpiece!
The Green Monster Hand
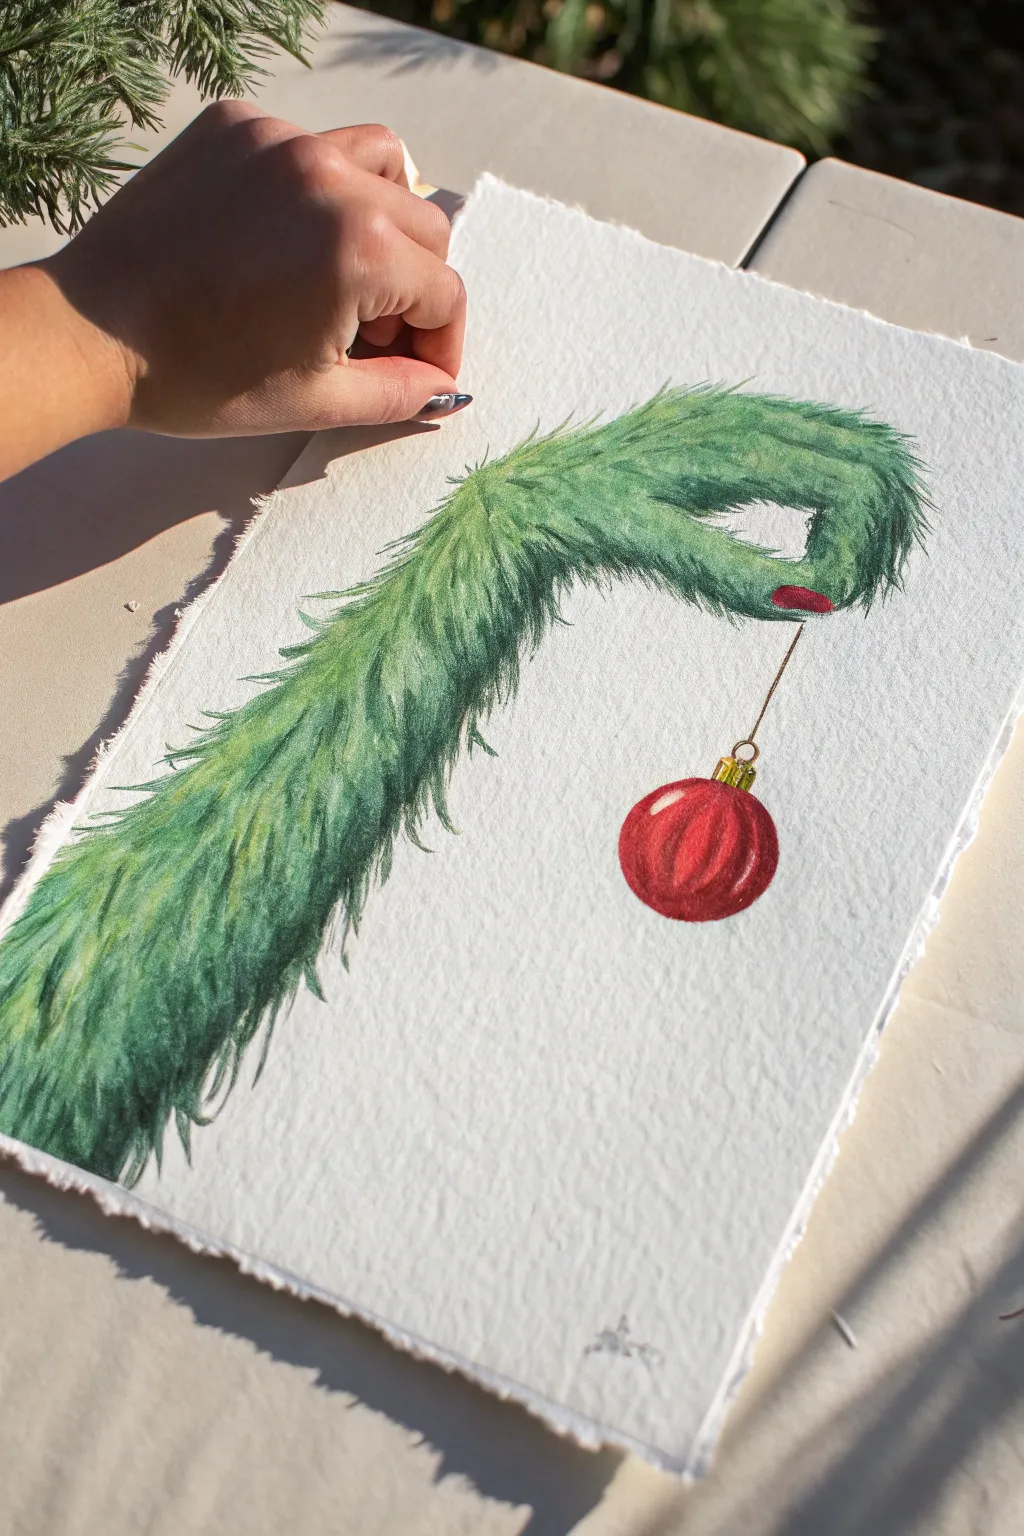
Capture the whimsical spirit of the holidays with this charming watercolor painting of a famous furry green arm. Using layers of directional brushstrokes, you will learn how to build realistic fur texture and create a shiny, dimensional ornament.
Step-by-Step Guide
Materials
- Cold press watercolor paper (300gsm, rough texture preferred)
- Watercolor paints (Sap Green, Hooker’s Green, Lemon Yellow, Cadmium Red, Alizarin Crimson, Yellow Ochre, Burnt Umber)
- Round brushes (sizes 6 and 2)
- Detail or liner brush (size 0 or 00)
- HB Pencil and kneaded eraser
- Clean water and paper towels
- White gouache or gel pen (optional)
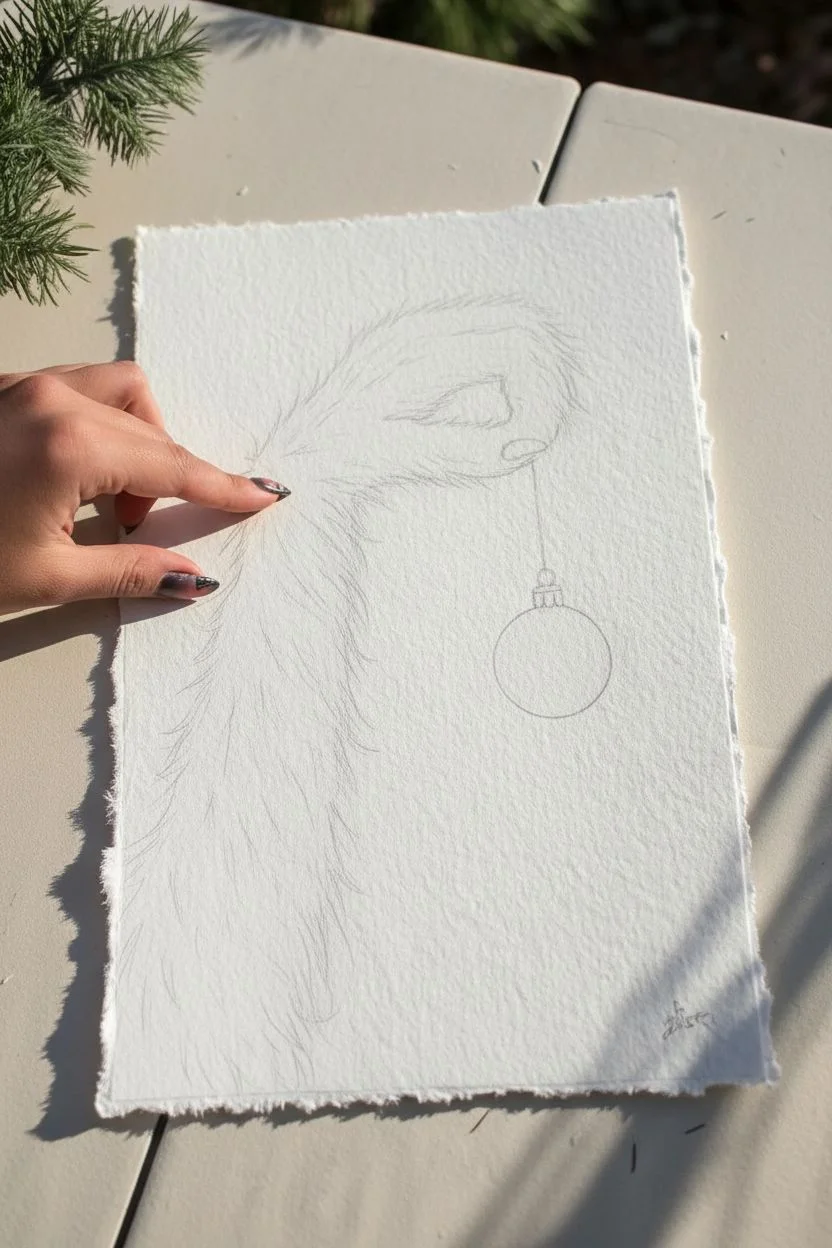
Step 1: Sketching the Scene
-
Map the Curve:
Begin by lightly sketching a large, sweeping ‘C’ shape starting from the bottom left corner of your paper, tapering narrower as it reaches the center right where the hand will be. -
Define the Fingers:
At the end of the curve, sketch two pointy, furry fingers pinching together. The positioning should look like they are delicately holding a thread. -
Add the Ornament:
Draw a small vertical line dropping down from the pinched fingers, ending in a circle for the bauble. Sketch the small rectangular cap on top of the circle.
Flick of the Wrist
For realistic fur, use a ‘flicking’ motion. Place the brush tip down firmly, then lift it quickly as you drag it. This creates a stroke that is thick at the base and tapers to a fine point.
Step 2: Painting the Ornament
-
Base Red Layer:
Using your size 6 brush, mix a bright Cadmium Red. Paint the bauble, but leave a small, curved white sliver on the upper left side unpainted to act as a crisp highlight. -
Building Form:
While the red is still slightly damp, drop in some Alizarin Crimson along the bottom right edge to create a rounded shadow effect. -
The Golden Cap:
Once the red draws, use a mix of Yellow Ochre and a tiny touch of brown to paint the ornament cap. Use vertical strokes to mimic the ridges in the metal.
Level Up: Mixed Media
Make the artwork pop by using actual gold metallic paint for the ornament cap. You can also carefully glue a real piece of golden thread for the string to add physical texture.
Step 3: Base Coat & Fur Texture
-
Mixing the Lime Base:
Mix a generous amount of Lemon Yellow with Sap Green to create a bright, lime-green hue. Add plenty of water to make a tea-like consistency. -
Initial Wash:
Paint the main body of the arm with this lime mix. Don’t paint a solid edge; instead, use the tip of your brush to flick outward at the edges, establishing the first suggestion of messy fur. -
First Texture Layer:
Wait for the base to dry completely. Mix a slightly darker green using Sap Green. Switch to your size 2 brush and begin painting short, flicking strokes over the arm following the curve of the sketch. -
Direction is Key:
Ensure your brushstrokes all flow in the same direction—down the arm towards the hand. This creates the illusion of grooming and gravity. -
Deepening Values:
Mix Hooker’s Green with a touch of blue or brown for a deep forest shadow tone. Apply this sparingly, focusing on the bottom edge of the arm and the areas between the fur tufts for volume.
Step 4: Hand Details & Finishing
-
Defining the Fingers:
Use your dark green mix to outline the separation between the thumb and fingers. Paint the fur on the fingers shorter and more curved to show the pinching action. -
The Thread:
Switch to your finest liner brush or a size 0. Mix a watery Burnt Umber or grey and paint the extremely thin string connecting the fingers to the ornament cap. -
Refining the Edges:
I like to take a dry brush with the dark green mix and add a few rogue ‘flyaway’ hairs on the outer edges of the arm to make it look extra fuzzy. -
Highlight Pop:
If you accidentally painted over your ornament highlight, use a tiny dot of white gouache or a gel pen to restore the shine on the red bauble.
Hang your masterpiece once dry to add a touch of playful mischief to your holiday decor
Candy Cane Heart
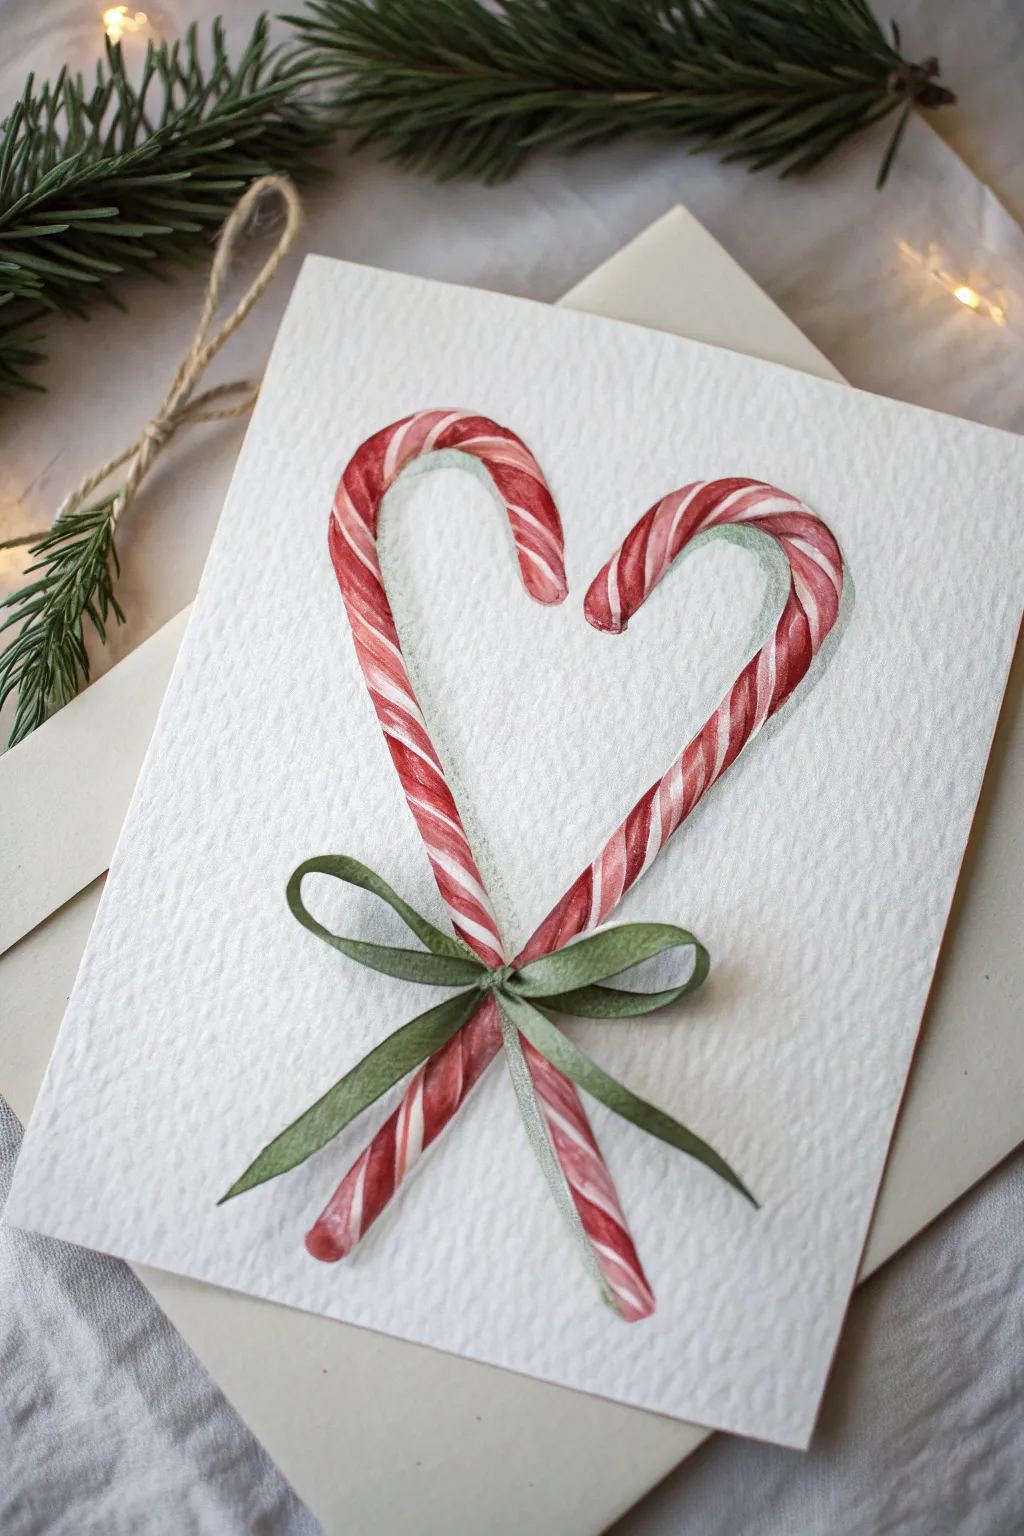
Capture the classic charm of Christmas confectionery with this delicate watercolor project. By focusing on simple shading and precise striping, you will transform a flat sketch into a dimensional, festive artwork perfect for holiday cards.
Step-by-Step
Materials
- Cold press watercolor paper (300gsm recommended)
- Watercolor paints (Cadmium Red, Sap Green, Payne’s Grey)
- Round brushes (Size 4 and Size 0/1 detailed brush)
- HB Pencil
- Kneaded eraser
- Water jar and paper towels
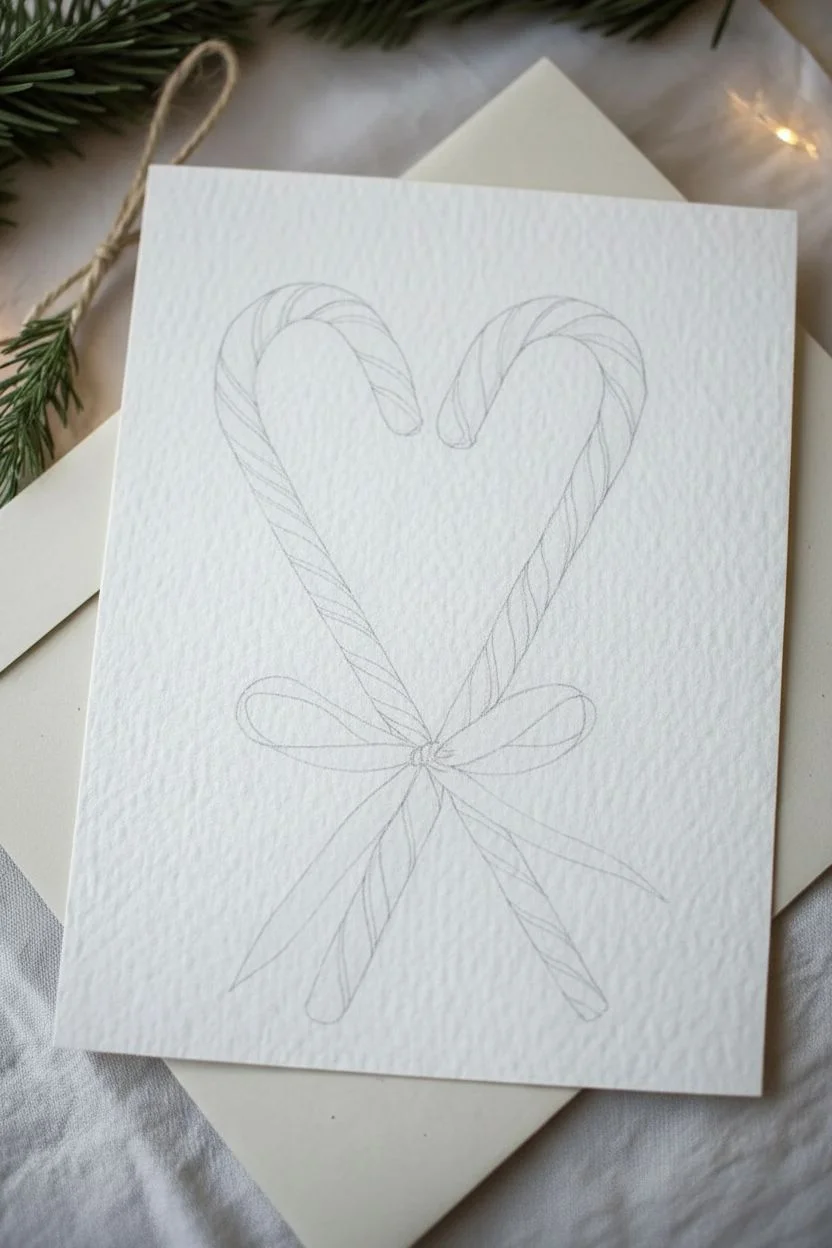
Step 1: Sketching the Outline
-
Drawing the guide:
Start by lightly drawing a large, symmetrical heart shape in the center of your watercolor paper to serve as a compositional guide. -
Outlining the canes:
Sketch the two candy canes within the heart shape, positioning the curved hooks at the top facing each other and the straight stems crossing near the bottom. -
Adding stripes:
Draw diagonal lines across both canes for the stripes. Curve these lines slightly like a ‘smile’ or ‘frown’ rather than straight lines to mimic the roundness of the candy. -
Drafting the bow:
Sketch a small knot right where the canes cross, then add two floppy loops and two hanging ribbon tails extending downwards. -
Preparation:
Gently roll a kneaded eraser over your entire sketch to lift excess graphite, leaving only faint phantom lines to guide your brush.
Striping Secret
Curving your diagonal pencil lines slightly instead of drawing them straight across immediately makes the candy look round and 3D before you even start painting.
Step 2: Painting the Candy Canes
-
Shading the white:
Mix a very dilute wash of indigo or grey and paint a subtle shadow along the inner/shaded edge of the white sections. This gives volume before adding color. -
First red layer:
Using a size 4 round brush, paint the alternating stripes with a bright, festive red like Cadmium or Alizarin Crimson. -
Adding volume:
While the red paint is still wet, drop a more concentrated pigment into the outer edges of each stripe, leaving the center slightly lighter to act as a highlight. -
Drying time:
Allow the red sections to dry completely. This is crucial to ensure the red doesn’t bleed into your crisp white stripes.
Step 3: Ribbon and Details
-
Blocking the bow:
Load your brush with an earthy green (like Sap Green mixed with a tiny touch of grey) and paint the shapes of the ribbon loops and tails. -
Creating folds:
While the green wash is still damp, drop darker green paint into the area near the knot and underneath the loops to create the look of fabric folds. -
Defining the knot:
Use the tip of a smaller brush to paint the center knot, leaving a tiny sliver of unpainted paper on the top edge to simulate a highlight. -
Cast shadows on canes:
Once the main colors are dry, mix a transparent grey-purple wash and paint a small shadow on the candy canes right underneath where the ribbon creates an overhang. -
Cast shadows on paper:
Using the same grey-purple mix, paint a shadow falling to the right and bottom of the candy canes and ribbon onto the white paper background. -
Softening edges:
Clean your brush, dampen it slightly, and run it along the outer edge of the paper cast shadows to soften them into the texture of the page. -
Final contrast:
I like to go back in with a fine liner brush and deepen the darkest red crevices where the canes overlap or curve sharply. -
Check highlights:
Assess the white stripes; if they feel too flat, glaze a microscopic amount of blue-grey on the shadowed side to integrate them.
Bleed Control
If red paint accidentally touches a wet white area, quickly dab it straight up with a clean tissue. Let it dry fully, then patch it with a dab of opaque white gouache.
Now you have a charming, hand-painted design ready to warm someone’s heart this holiday season.
2D Gingerbread House
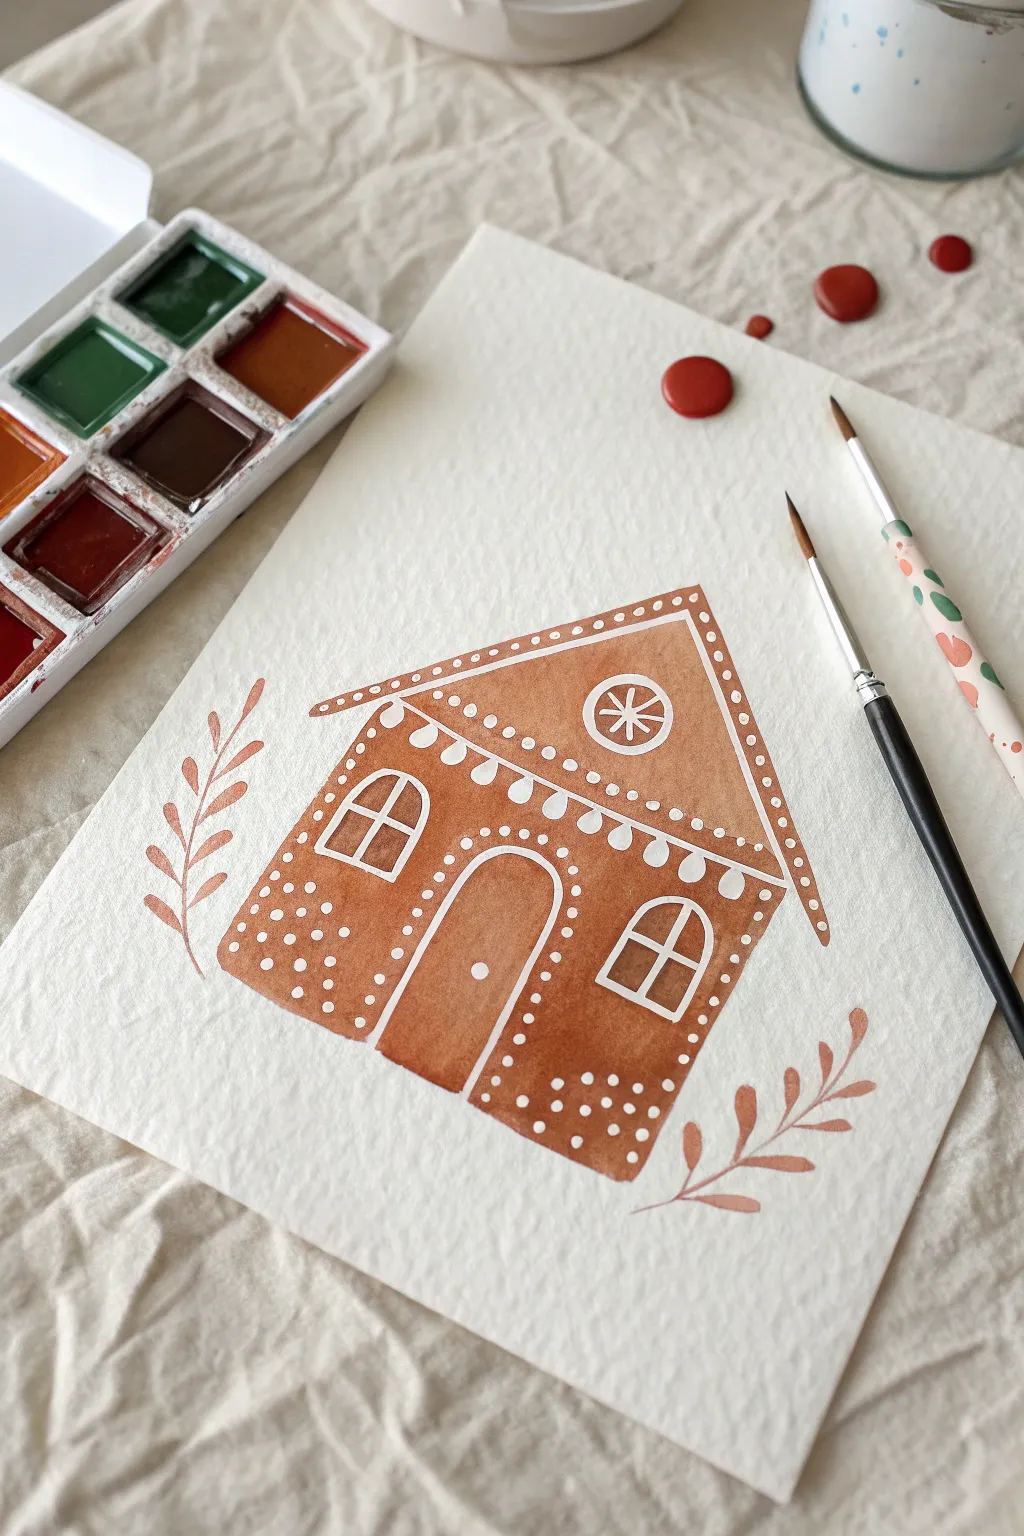
Capture the festive spirit without the sticky kitchen mess by painting this charming, minimalist gingerbread house. Using a simple color palette of warm terracotta and crisp white, you will create a stylized illustration that pops beautifully against textured paper.
Step-by-Step Guide
Materials
- Cold-press watercolor paper
- Watercolor paint (Burnt Sienna or Red Iron Oxide)
- White gouache or opaque white ink
- Round brush (size 6)
- Fine detail brush (size 0 or 1)
- Pencil and eraser
- Palette and water cup
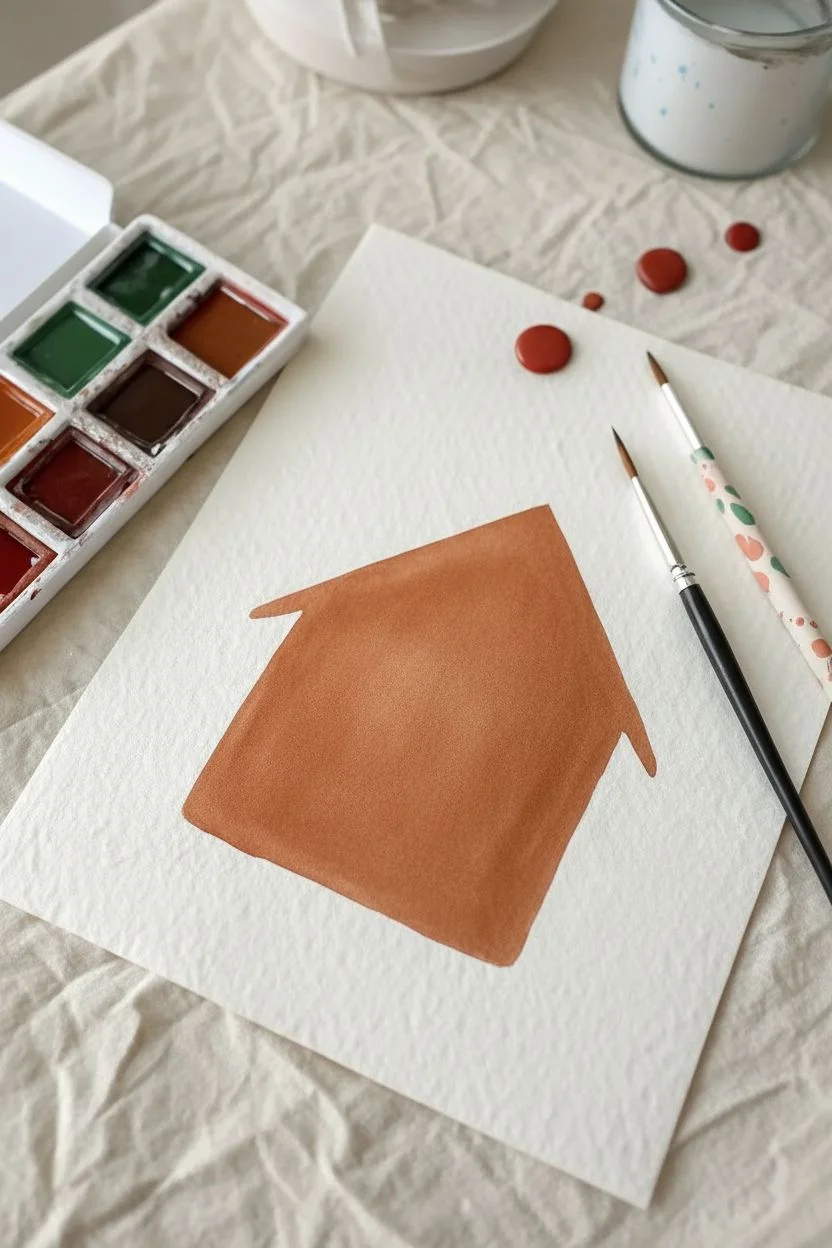
Step 1: Baking the Base
-
Sketch the outline:
Lightly draw a simple pentagon shape in the center of your paper to represent the house—a rectangle bottom with a triangular roof. -
Mix the dough color:
Create a rich, warm brown on your palette; I suggest using Burnt Sienna with a tiny touch of red for that baked cookie look. -
Paint the roof:
Load your size 6 round brush with the brown mixture and fill in the triangular roof section with an even wash. -
Paint the walls:
Immediately continue painting the rectangular body of the house, letting the wet paint merge seamlessly with the roof area. -
Let it dry:
Allow the base layer to dry completely; the paper must be bone dry before adding white details to prevent blurring.
Step 2: Adding the Frosting
-
Prepare the white:
Squeeze out a small amount of white gouache; add a drop of water to achieve a creamy consistency that flows but remains opaque. -
Roof details:
Using your fine detail brush, paint straight lines along the angled upper edges of the roof. -
Decorative dots:
Add a row of small, evenly spaced dots just inside the roof border lines for extra texture. -
The garland:
Paint a scalloped, wavy line horizontally across the house where the roof meets the walls to mimic hanging icing. -
Attic window:
Create a circular window in the center of the roof triangle and add a simple star or snowflake pattern inside it. -
Main windows:
Outline two arched windows on the main body of the house and carefully paint the cross-panes inside them. -
The door:
Paint a large arched outline for the door in the center of the bottom edge, adding a single dot for the knob. -
Sugar sprinkles:
Frame the door arch with a line of decorative dots and scatter a few more dots on the walls to fill empty spaces.
Creamy Lines
Mix your white gouache to the consistency of heavy cream. If it’s too watery, it will dry transparent; too thick, and it won’t flow off the brush smoothly.
Step 3: Botanical Borders
-
Paint the stems:
Switch back to your brown watercolor mixture and paint a simple curved line floating to the left of the house. -
Add leaves:
Add leaves to the stem by pressing the belly of the brush down and lifting up quickly to create a tapered teardrop shape. -
Mirror the design:
Create a similar leafy sprig on the right side, mirroring the curve to frame your festive cottage perfectly.
Fixing Opacity
If your white lines look faded after drying, simply paint a second layer directly over the first once it is dry to make the white pop.
Once dry, this cozy artwork is ready to frame or turn into a heartwarming holiday card.
Simple Triangular Angels
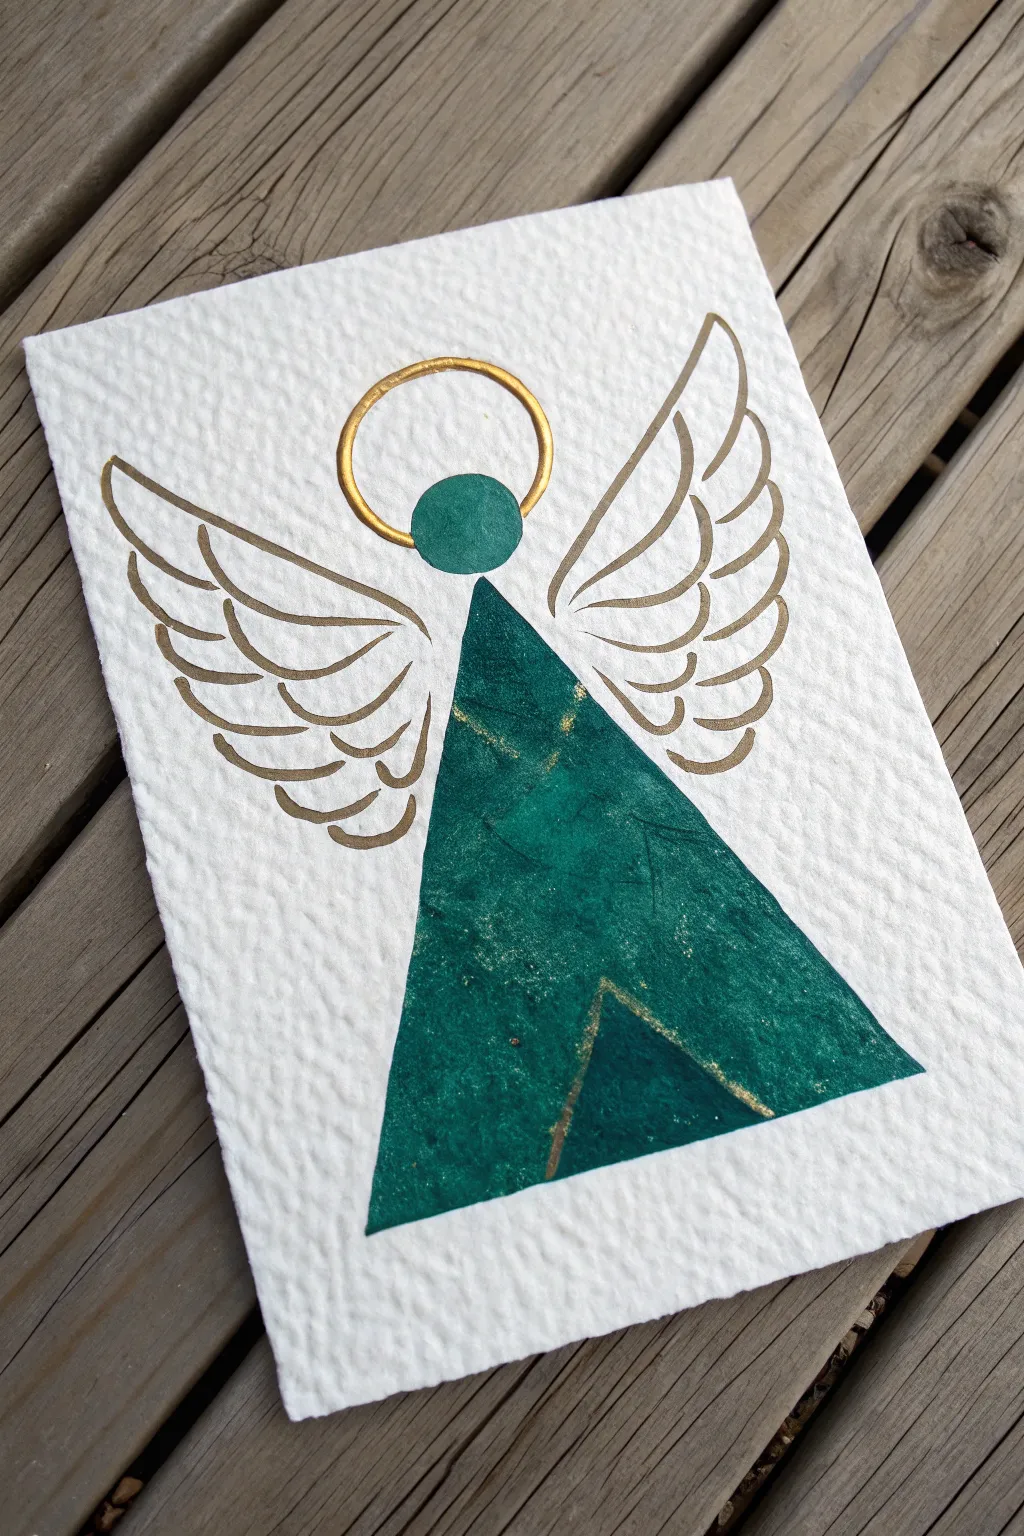
This elegant project combines the minimalist beauty of geometric shapes with the rich contrast of deep emerald green and metallic gold. The result is a sophisticated, textured holiday card or art piece that looks far more complex than it actually is.
How-To Guide
Materials
- Heavyweight cold-press watercolor paper (300lb is ideal for texture)
- Emerald green gouache or acrylic paint
- Metallic gold paint pen (fine tip)
- Round paintbrush (size 6)
- Ruler
- Pencil
- Eraser
- Water cup and paper towel
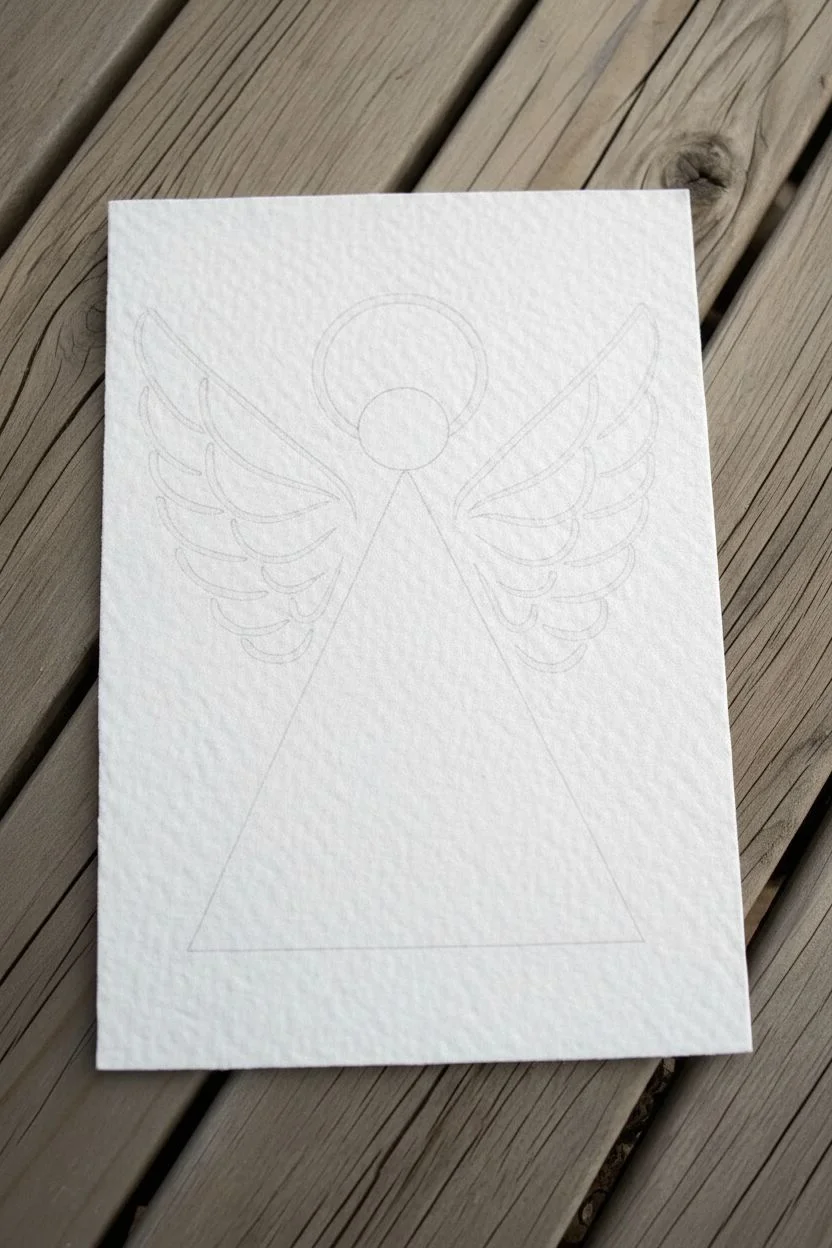
Step 1: Preparing the Canvas & Sketch
-
Size the paper:
Cut your watercolor paper to a standard 5×7 inch card size, or your preferred dimensions for a framed piece. -
Create deckled edges:
To achieve the raw look from the photo, hold a ruler firmly along the edge of your paper and tear the excess strip off manually rather than cutting with scissors. -
Find the center:
Using your ruler, lightly mark a vertical centerline down the middle of the paper with a pencil to ensure your angel stands straight. -
Sketch the head:
Draw a small circle centered on your guide line, positioned about one-third of the way down from the top edge. -
Outline the body:
Draw a tall, narrow triangle starting just below the circle. The point should just touch the bottom of the circle, and the base should be wide at the bottom of the page. -
Draft the halo:
Sketch a larger ring floating just above the circle head, leaving a small gap between the head and the halo. -
Mark wing placement:
Lightly sketch two curved guidelines extending outward from the ‘shoulders’ of the triangle to define where the wings will sweep up.
Pro Tip: Texture Helper
If your watercolor paper is extremely textured, the gold pen might skip. Run the tip slowly to allow the ink to pool into the paper valleys for a solid line.
Step 2: Painting the Emerald Form
-
Prepare the green:
Squeeze out your emerald green paint. If using acrylics, thin it slightly with a drop of water to help it flow into the paper’s texture without losing opacity. -
Paint the head:
Carefully fill in the circle sketch with the green paint, keeping the edges as round and crisp as possible. -
Fill the body:
Paint the large triangle shape. I find it helpful to outline the shape with the brush first, then fill in the center to maintain sharp corners. -
Create texture:
While the paint is wet, dab the surface gently with your brush if you want to enhance the mottled, organic texture seen in the reference. -
Dry completely:
Let the green paint dry fully. This is crucial because the gold marker needs a dry surface to remain shiny and crisp.
Step 3: Gilding the Wings & Details
-
Test the gold pen:
Shake your gold paint pen well and depress the nib on a scrap piece of paper to ensure the ink is flowing smoothly. -
Draw the halo:
Trace over your pencil sketch for the halo. Go over the circle twice if needed to replicate the thick, golden ring look. -
Outline the upper wings:
Draw a long, sweeping curve upward from the top corner of the triangle body on the left side, then repeat on the right. -
Add wing feathers:
Create the feathers by drawing three tiers of scalloped ‘U’ shapes connected to the main wing line, getting slightly smaller as they go down. -
Mirror the wings:
Repeat the feathering process on the right side, trying to keep the scallops roughly symmetrical to the left side. -
Add the skirt detail:
Using the gold pen and a ruler, draw an inverted ‘V’ shape at the bottom center of the green triangle to create the geometric fold detail. -
Clean up:
Once the gold ink is totally dry, gently erase any visible pencil guidelines, being careful not to rub off the gold sheen.
Level Up: Celestial Twist
Swap the emerald green for a deep navy blue and add tiny white splatter stars around the background for a ‘Silent Night’ theme.
Display your finished angel on a mantelpiece or use it as a stunning handmade holiday card.


Have a question or want to share your own experience? I'd love to hear from you in the comments below!