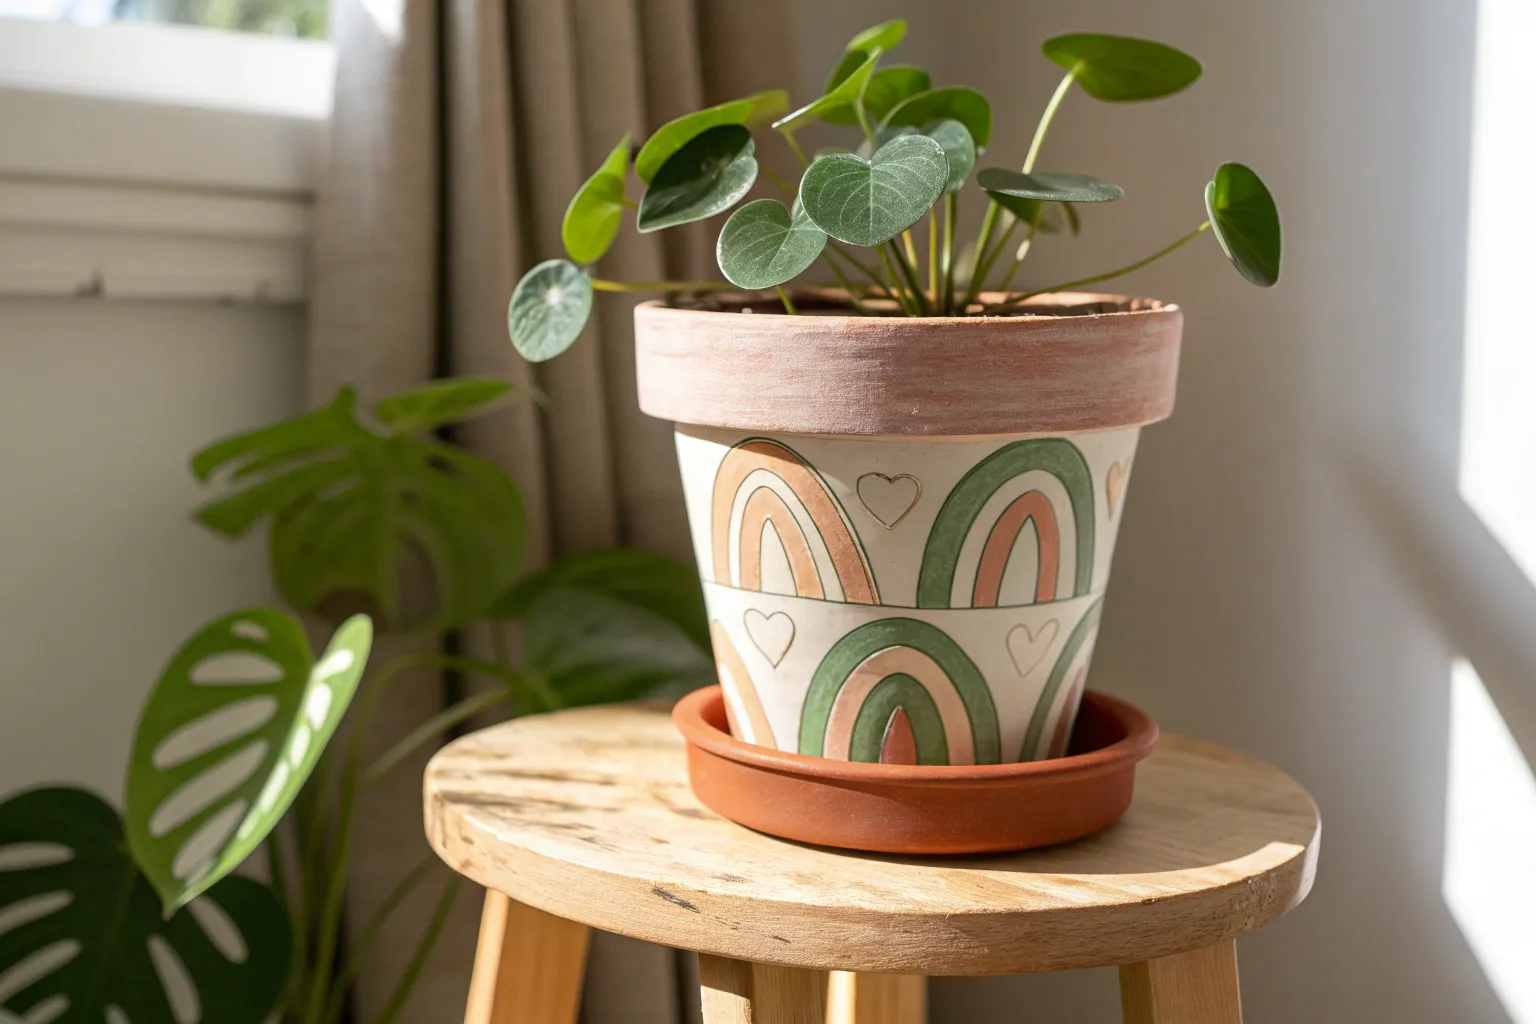
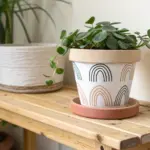
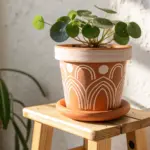
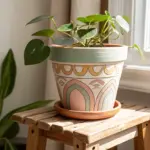
Transforming a standard planter into a unique piece of decor is one of the most satisfying ways to explore clay pot painting ideas without needing expensive supplies. Whether you want to add a pop of color to your indoor garden or create personalized gifts, the humble terra cotta surface offers the perfect canvas for your artistic expression.
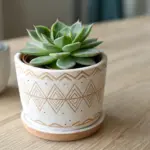
Geometric Tape Resist Patterns
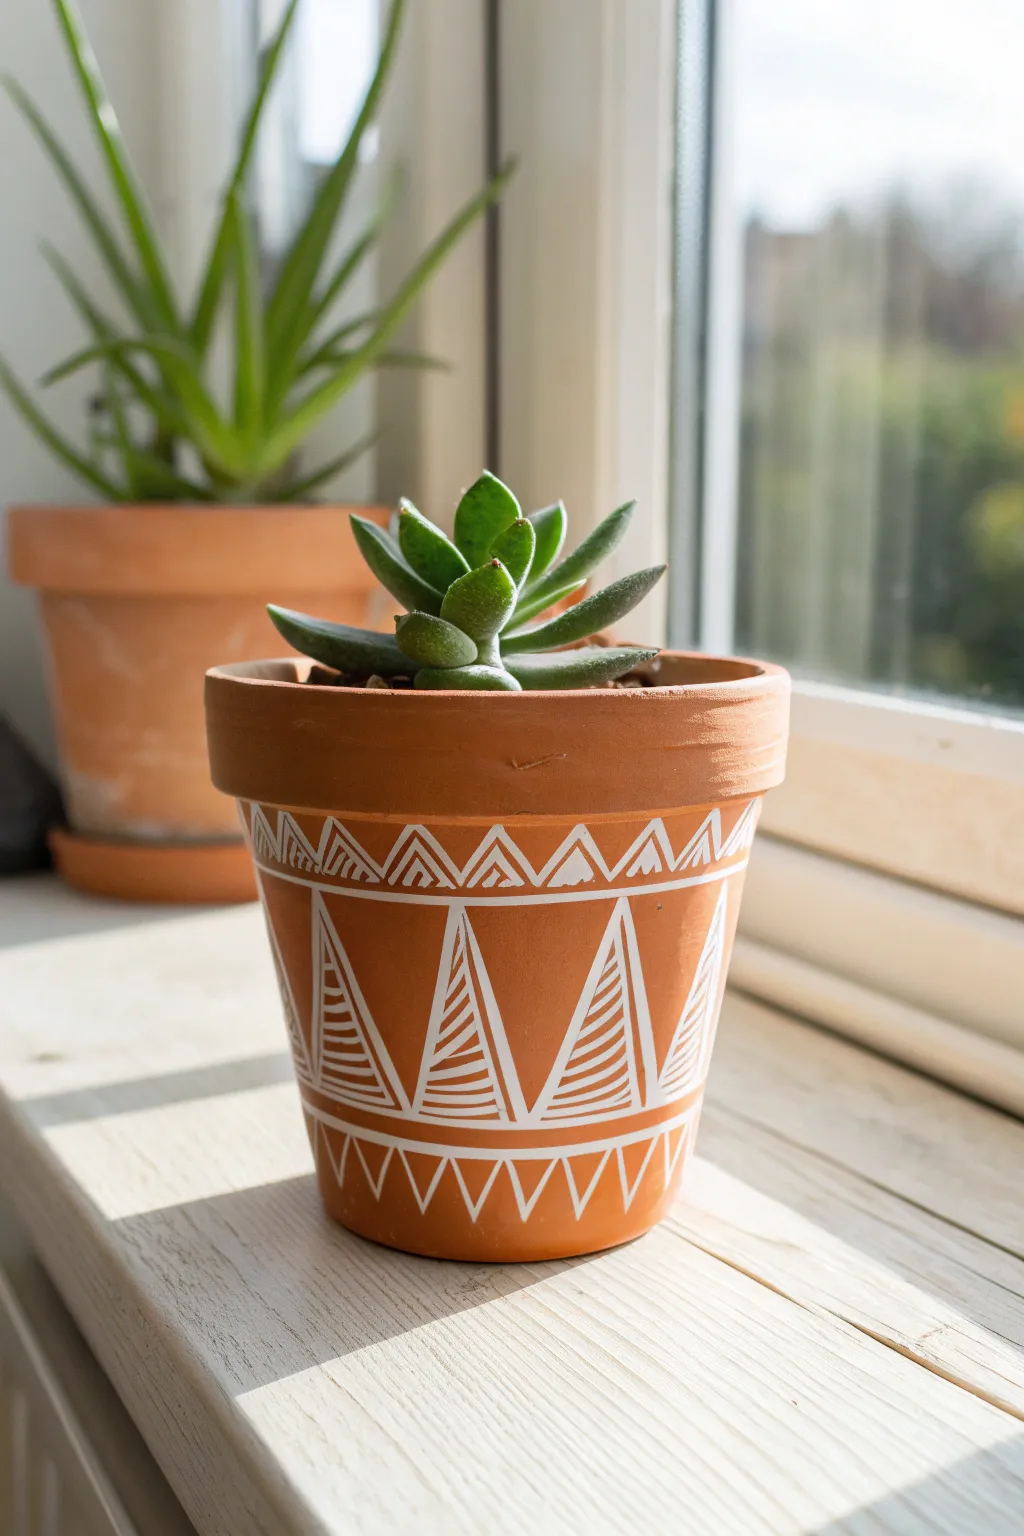
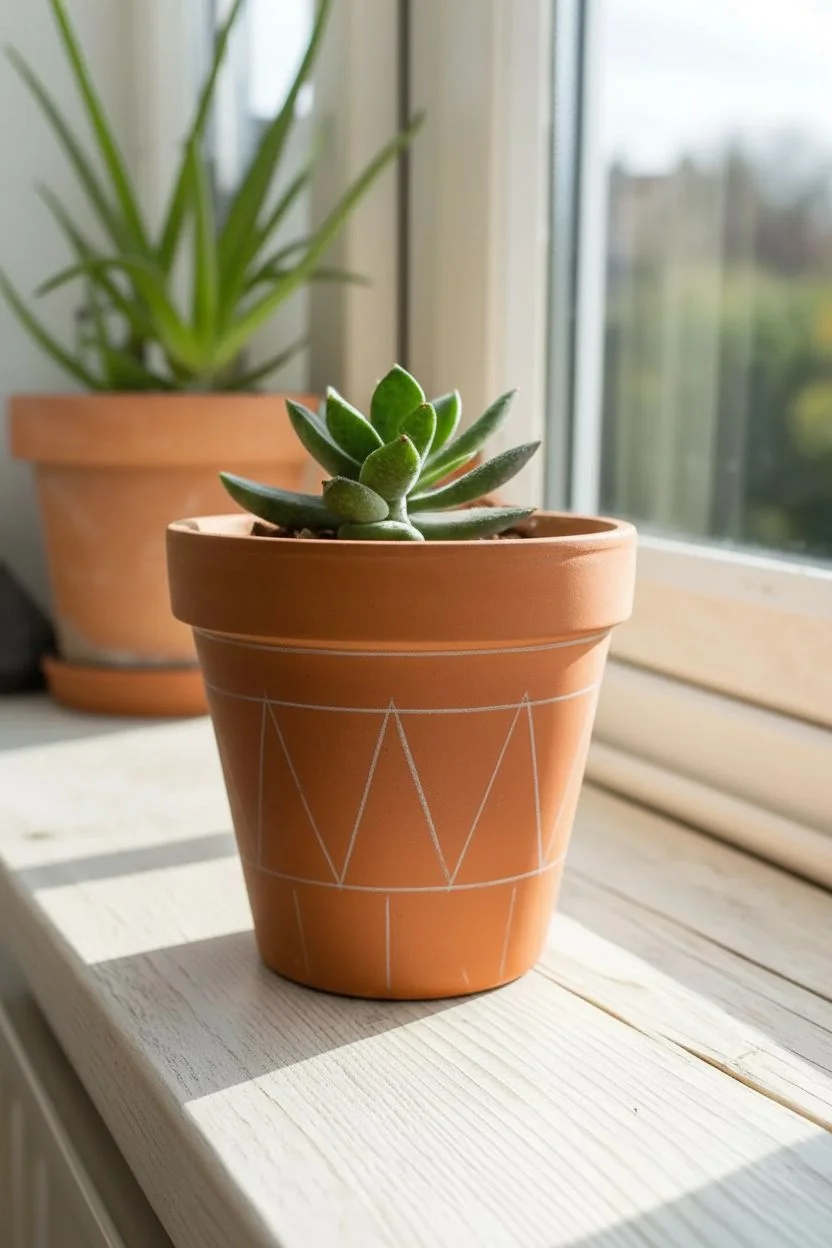
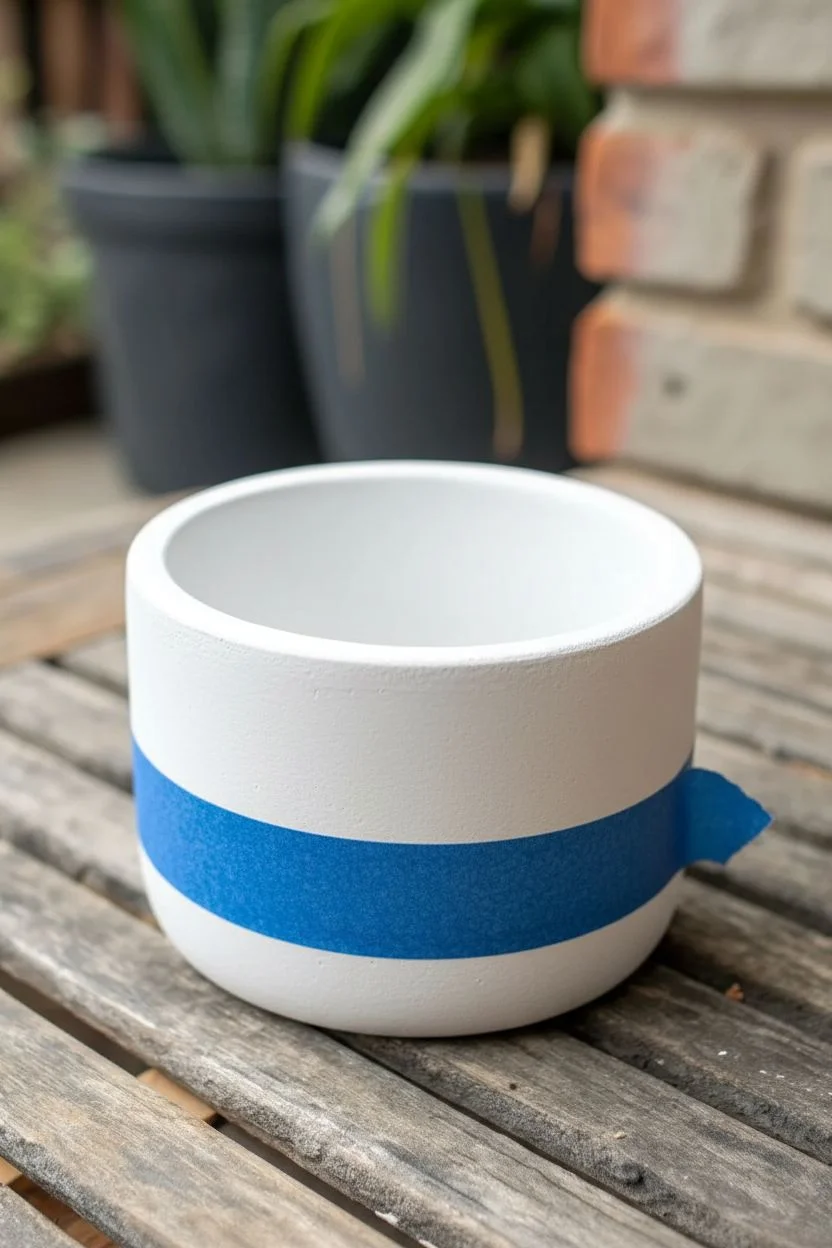
Transform a standard nursery planter into a striking decorative piece using high-contrast geometric motifs. This project combines the warmth of natural clay with crisp white lines to create a modern, tribal-inspired aesthetic that looks intricate but is built from simple shapes.
Step-by-Step
Materials
- Terracotta pot (cleaned and fully dried)
- White acrylic paint pen (fine tip, oil-based works best)
- Painter’s tape or washi tape (low tack)
- Pencil and eraser
- Flexible measuring tape
- Clear matte acrylic sealer spray
Step 1: Preparation & Layout
-
Surface Prep:
Ensure your terracotta pot is completely clean and free of dust. If you washed it, let it dry for at least 24 hours so moisture doesn’t trap under the paint. -
Marking Boundaries:
Using your pencil, lightly draw a horizontal ring around the pot about 1 inch below the rim. Draw a second ring about 1 inch up from the bottom base. These will define your pattern zones. -
Planning the Triangles:
Measure the circumference of the middle section. Divide this number by how many smooth triangles you want (usually 4 or 5) and mark the bottom corners of each triangle along the lower pencil line.
Step 2: Creating the Main Structure
-
Taping Guides:
Apply strips of painter’s tape to outline the large central triangles. Place the tape so the edges form the ‘V’ shape connecting your bottom marks to a peak near the top rim. -
Tracing the Outlines:
Using your white paint pen, trace along the inner edge of the tape to create sharp, straight outlines for your triangles. I find drawing away from the tape edge prevents bleeding. -
Remove and Reveal:
Wait a minute for the paint to set slightly, then carefully peel away the tape at a sharp angle to reveal your crisp triangle outlines. -
Filling the Triangles:
Freehand horizontal stripes inside each large triangle. Start from the wide base and work your way up to the tip, spacing the lines evenly like a ladder.
Fixing Wobbly Lines
If a line goes rogue or looks messy, don’t panic. Wait for the paint to dry completely, then gently scrape the excess away with a craft knife or sandpaper. The terracotta is forgiving!
Step 3: Detailing the Borders
-
Top Rim Line:
Draw a solid white line following your top pencil guide, creating a separation between the rim and the main body. -
Upper Zigzags:
In the band above that line, draw a continuous zigzag pattern. Keep the points sharp and consistent. -
Upper Hatching:
Add visual weight to the top border by drawing small vertical lines or nested ‘V’ shapes inside the zigzag triangles you just created. -
Bottom Border:
Repeat the zigzag pattern along the bottom band of the pot. Since the pot tapers here, keep these triangles slightly smaller and simpler. -
Adding Texture:
Draw small vertical hatch marks inside the bottom zigzags to mirror the detail on the top rim.
Make It Pop
For an extra modern twist, paint the saucer/tray a solid color like matte black or deep forest green to contrast with the terracotta and white design.
Step 4: Finishing Touches
-
Cleanup:
Once the paint is completely dry (give it about an hour), gently erase any visible pencil guidelines. -
Sealing:
Take the pot to a ventilated area and apply a light coat of matte clear sealer. this protects the design from water damage when you water your plants.
Place your favorite succulent inside and enjoy the handmade charm of your new planter!


Confetti Polka Dots
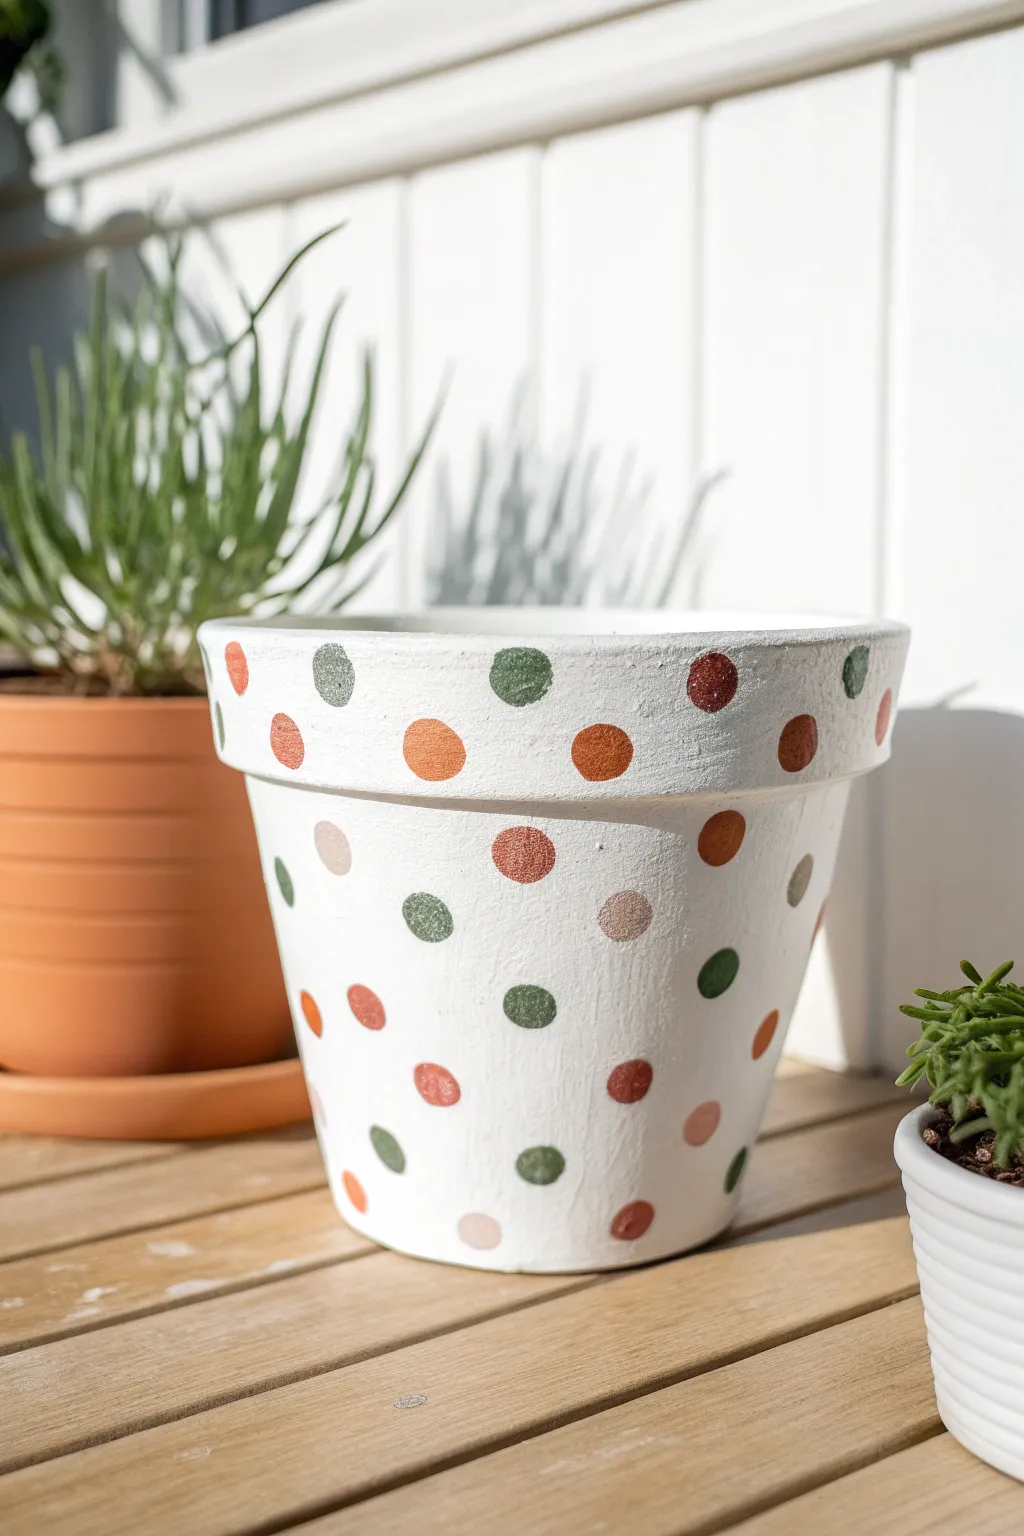
Transform a plain terracotta pot into a modern home decor piece with this fun confetti pattern. Using simple foam pouncers, create a lively arrangement of earthy-toned dots on a clean white background.
Step-by-Step Tutorial
Materials
- Terracotta pot
- White acrylic paint (matte finish)
- Acrylic paints (Forest Green, Sage, Rust, Terracotta, Blush)
- Round foam sponge pouncers (approx. 0.5 inch / 1.5 cm)
- Paint palette or paper plate
- Flat paintbrush (for base coat)
- Paper towels
- Clear matte acrylic sealer spray
Step 1: Prepping the Canvas
-
Clean surface:
Wipe down your terracotta pot with a damp cloth to remove any dust or sticker residue, ensuring a smooth surface for painting. -
First base coat:
Using a wide flat brush, apply a generous layer of white acrylic paint to the exterior of the pot. -
Include the rim:
Don’t forget to paint the top rim and about one inch down the inside of the pot where the soil line will sit. -
Dry time:
Allow the first coat to dry completely for about 20 minutes until it is dry to the touch. -
Full opacity:
Apply a second or third coat of white paint as needed until the terracotta color is completely covered and the finish is opaque. -
Final smooth:
Let the white base cure fully for at least an hour to prevent the dotting process from lifting the base paint.
Step 2: Dotting the Design
-
Palette setup:
Squeeze a coin-sized amount of your five accent colors (Forest Green, Sage, Rust, Terracotta, Blush) onto your paper plate. -
Load the sponge:
Dip your round foam pouncer into your darkest color first, such as the Forest Green. -
Blot excess:
Before touching the pot, dab the sponge continually on a clean part of the plate or a paper towel to remove globs of paint. -
First application:
Press the sponge straight down onto the pot surface and lift straight up to create a crisp circle. -
Random placement:
Apply several green dots around the pot, leaving plenty of empty white space between them for the other colors. -
Clean or switch:
Wash and dry your sponge thoroughly, or grab a clean one for the next color. -
Adding warmth:
Load the sponge with the Rust color and stamp dots into the larger gaps left by the green. -
Layering tones:
Repeat the process with the Terracotta and Sage colors, gently turning the pot to ensure even distribution. -
Rim details:
Make sure to stamp a few dots on the rim of the pot to continue the pattern upwards. -
Filling gaps:
I like to use the lighest color, the Blush tone, last to fill in any remaining small awkward spaces. -
Edge check:
Allow some dots to go off the edge of the bottom or rim for a natural, seamless wallpaper effect.
Fuzzy Circles?
If your dots look messy or are bleeding at the edges, you likely have too much paint on the sponge. Blotting excess paint onto a paper towel before stamping is key to crisp edges.
Step 3: Protecting the Art
-
Full dry:
Let the polka dots dry completely, which usually takes about an hour depending on how thick the paint application was. -
Seal it:
In a well-ventilated area, spray the entire exterior with a clear matte acrylic sealer to protect the paint from water damage.
Size It Up
For a more dynamic confetti look, try using two different sizes of foam pouncers. Mixing small 0.5-inch dots with larger 1-inch dots creates great visual texture.
Once sealed and dry, your speckled pot is ready to house your favorite succulents or herbs


Sunset Ombre Gradient
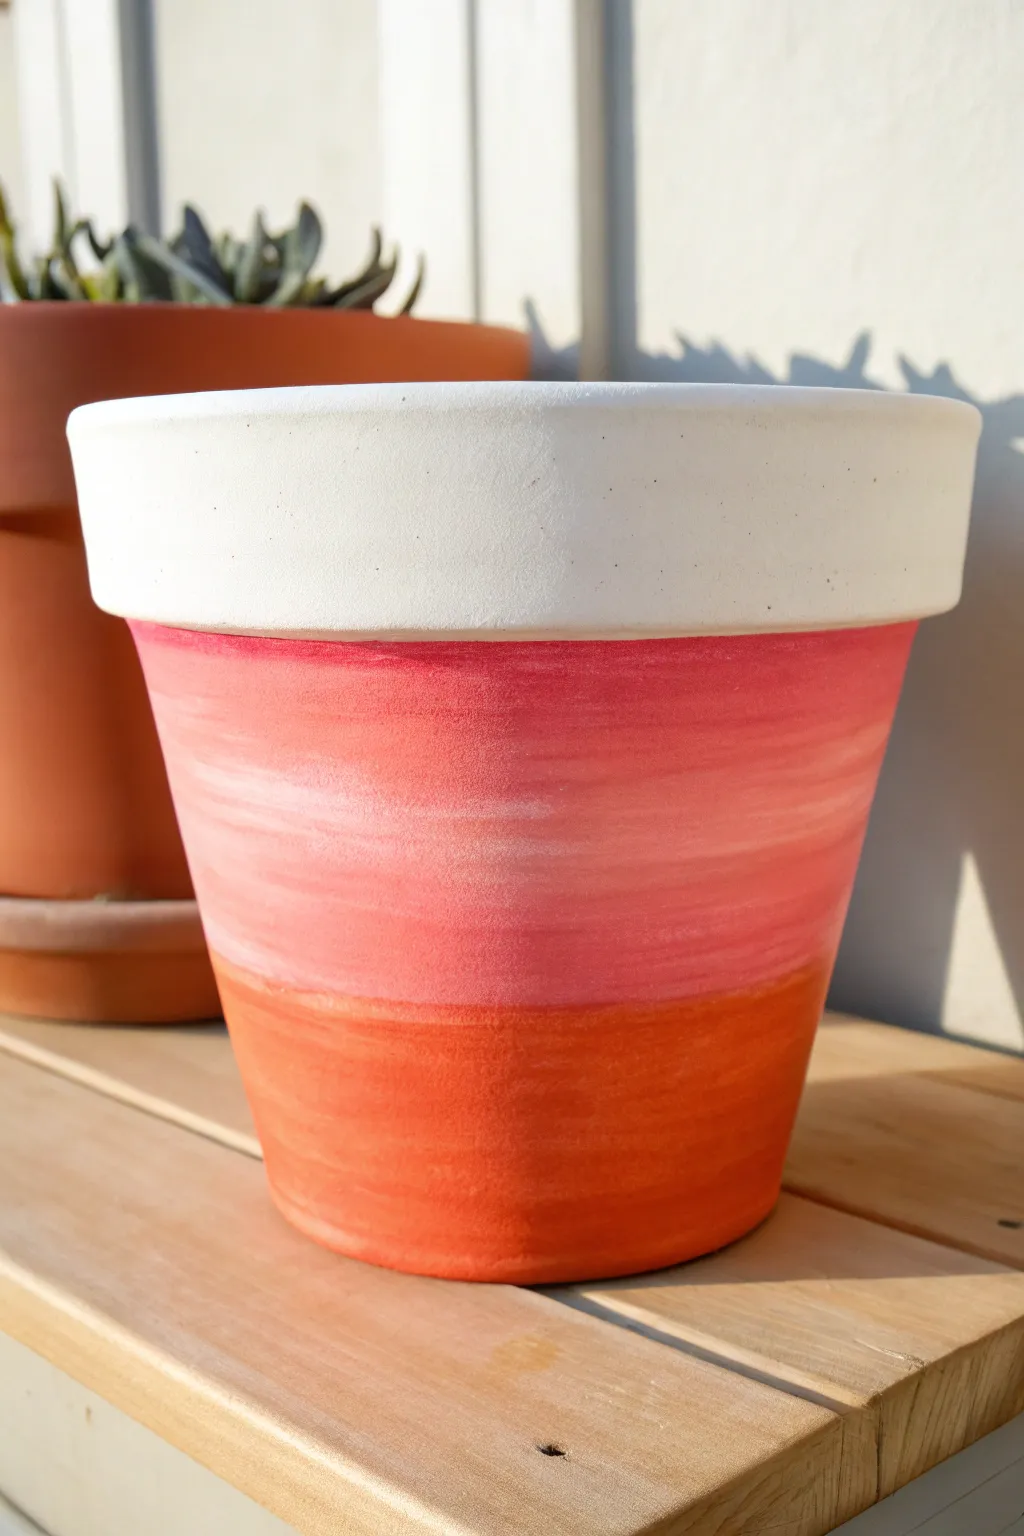
Capture the warmth of the golden hour with this soft gradient design that mimics a summer sunset. By blending coral pinks into deep oranges against a crisp white rim, you create a glowing home for your succulents.
Detailed Instructions
Materials
- Terracotta pot
- White acrylic paint (matte)
- Coral or salmon pink acrylic paint
- Deep orange acrylic paint
- Flat synthetic paintbrushes (1 inch and 0.5 inch)
- Palette or paper plate
- Cup of water
- Paper towels
- Matte clear spray sealer
Step 1: Preparation & Base
-
Clean surface:
Wipe the terracotta pot down with a damp cloth to remove any warehouse dust or oils and let it dry completely. -
Prime the pot:
Paint the entire exterior of the pot with a coat of white acrylic paint. -
Why prime?:
This white base layer is crucial; without it, the porous clay will absorb your colored paint, making the orange and pink look dull and muddy. -
Dry thoroughly:
Allow this base coat to dry fully for about 15 to 20 minutes before moving on to colors.
Muddy Gradient?
If your colors turn brown while blending, stop and rinse your brush immediately. You are overworking the paint. Let it dry, then layer fresh color on top to try again.
Step 2: Defining the Rim
-
Paint the rim:
Apply a second, thick coat of white paint specifically to the rim of the pot. -
Check coverage:
Ensure the coverage is opaque and solid white, painting just slightly under the lip of the rim for a clean look. -
Hard edge:
Be careful not to get too much fresh white paint on the body of the pot below the rim, as we want a distinct separation line here.
Step 3: Creating the Gradient
-
Apply the base color:
Using a larger flat brush, paint the bottom third of the pot with your deep orange paint. -
Apply the top color:
Rinse your brush thoroughly, then paint a band of coral pink directly under the white rim, covering the top third of the body. -
Fill the gap:
Quickly add more paint to the unpainted middle section, applying pink to the top separation and orange to the bottom. -
Start blending:
While the paint is still wet, use your brush to sweep back and forth horizontally where the two colors meet. -
Refine the transition:
Dip your tip in water and blot it slightly; I like to use this semi-damp brush to drag the pink paint down into the orange for a smoother fade. -
Texture check:
Maintain horizontal brush strokes to mimic the look of horizon lines, allowing some streaks to remain for texture. -
Touch up:
If the orange gets too high up, add a tiny dot of pink to your brush and blend it back down to regain the gradient balance.
Level Up
For a ‘golden hour’ sparkle, mix a drop of gold metallic paint into the orange section before you blend it, giving the bottom of the pot a subtle shimmer.
Step 4: Finishing
-
Dry time:
Let the ombre section dry completely, which may take longer than the base coat due to the thicker paint application. -
Final rim check:
If any pink paint accidentally got onto the white rim during blending, carefully touch it up with a small brush and white paint. -
Seal:
Take the pot to a well-ventilated area and apply a clearer matte spray sealer to protect the paint from water damage.
Pot your favorite greenery and enjoy the permanent sunset glow this planter adds to your room


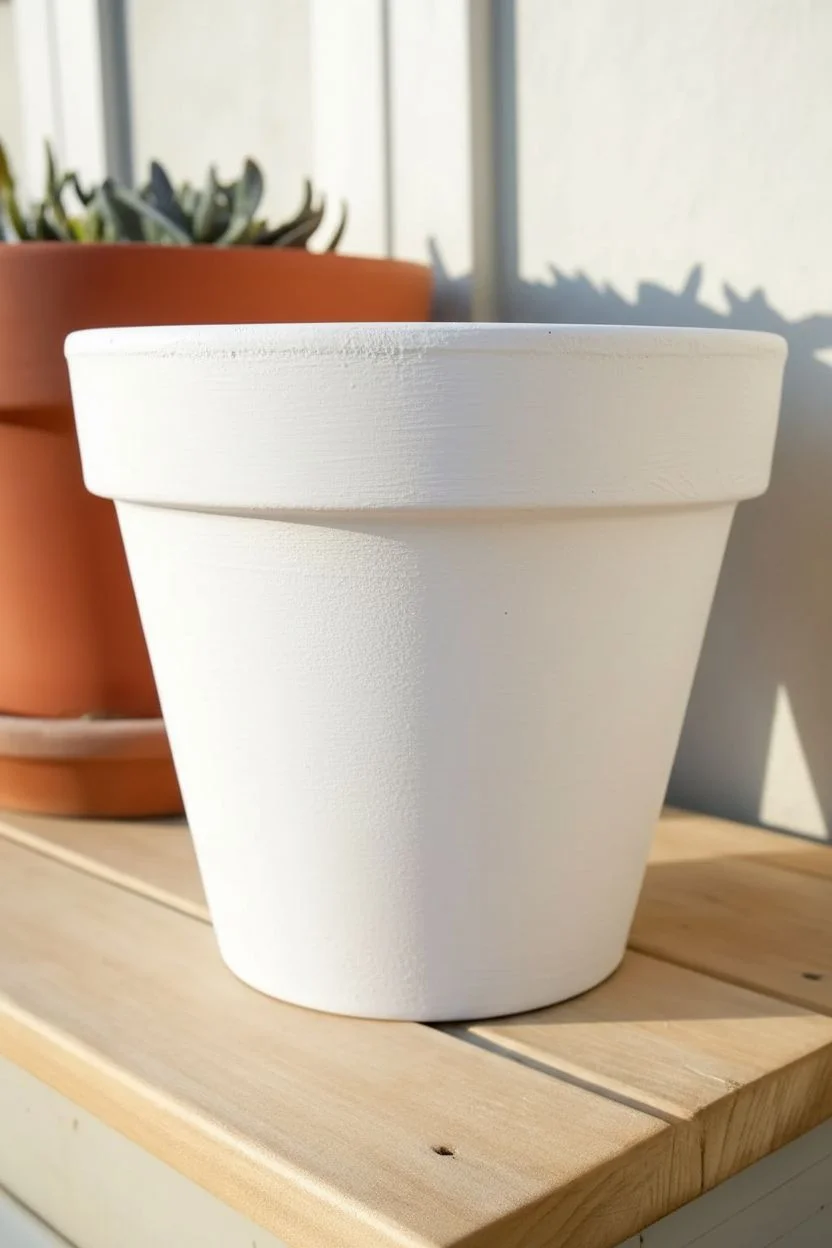
Metallic Gold Dipped Accents
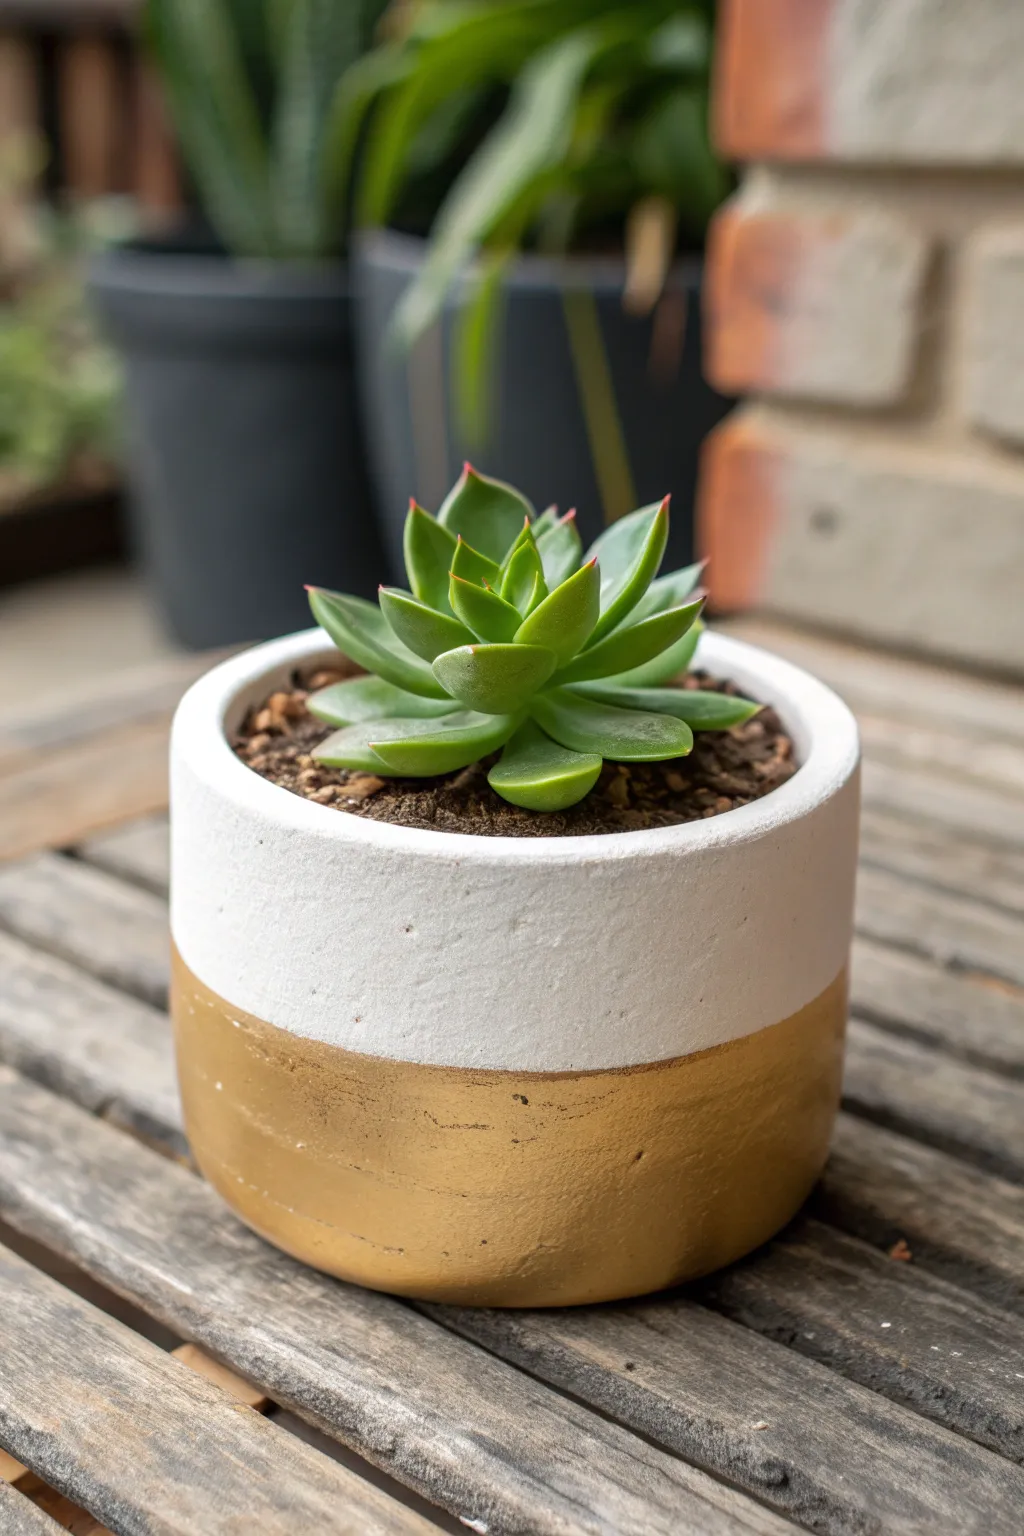
Transform a plain cylinder pot into a modern decor piece with this crisp, two-tone design. By combining a matte white upper straight with a shimmering gold base, you create a sophisticated faux-dipped look that elevates any succulent.
Step-by-Step
Materials
- Cylindrical terracotta or concrete pot
- Matte white acrylic paint
- Metallic gold acrylic paint
- High-quality painter’s tape
- Medium flat paintbrush
- Small foam brush (optional)
- Fine-grit sandpaper
- Paper plate or palette
- Damp cloth
Step 1: Preparation & Base Coat
-
Clean surface:
Wipe the pot down thoroughly with a damp cloth to remove any dust or oils that might prevent adhesion. -
Smooth textures:
If your pot feels overly rough, gently scuff it with fine-grit sandpaper to create a nicer surface for painting. -
Remove debris:
Wipe away any sanding dust completely and let the pot dry fully. -
Pour white paint:
Dispense a generous amount of matte white acrylic paint onto your palette. -
Apply first layer:
Paint the entire exterior of the pot with the white paint using your flat brush. -
Refine the rim:
Extend the white paint over the top rim and about an inch down the inside for a professional finish. -
Dry and repeat:
Allow the first coat to dry to the touch, roughly 20 minutes. -
Second coat:
Apply a second layer of white paint to ensure opacity, covering any clay streaks. -
Full cure:
Let the white base coat dry completely for at least an hour effectively prevent the tape from peeling it up later.
Step 2: Creating the Gold Section
-
Position tape:
Decide on the height of your gold accent, usually the bottom third looks best. -
Apply masking:
Wrap a strip of painter’s tape horizontally around the pot, ensuring the line is perfectly straight. -
Seal the edge:
Run your fingernail or a credit card firmly along the bottom edge of the tape to prevent bleeding. -
Prepare liquid gold:
Stir your metallic gold paint well to mix the shimmer particles evenly. -
Start painting gold:
Dip your clean brush into the gold paint and apply it to the exposed bottom section of the pot. -
Brush technique:
I like to brush downwards, moving away from the tape edge, as this keeps paint from being forced under the masking. -
Paint the bottom:
Don’t forget to paint the underside base of the pot so the gold looks continuous when lifted. -
Check coverage:
Apply a second coat of gold if the white base is still visible through the metallic sheen. -
Reveal the line:
While the gold paint is still slightly tacky but not wet, slowly peel off the tape at a 45-degree angle. -
Final dry:
Allow the finished pot to cure overnight before potting your plant.
Crisp Line Secret
Before applying gold, paint a thin layer of white over the tape’s bottom edge. This seals gaps so the gold line stays razor-sharp.
Fuzzy Edges?
If paint bled slightly, wait for it to fully dry. Then, use a liner brush with a tiny bit of white paint to tidy up the border.
Pop in your favorite succulent and enjoy the modern elegance this metallic accent brings to your space
BRUSH GUIDE
The Right Brush for Every Stroke
From clean lines to bold texture — master brush choice, stroke control, and essential techniques.
Explore the Full Guide
Floral Napkin Decoupage
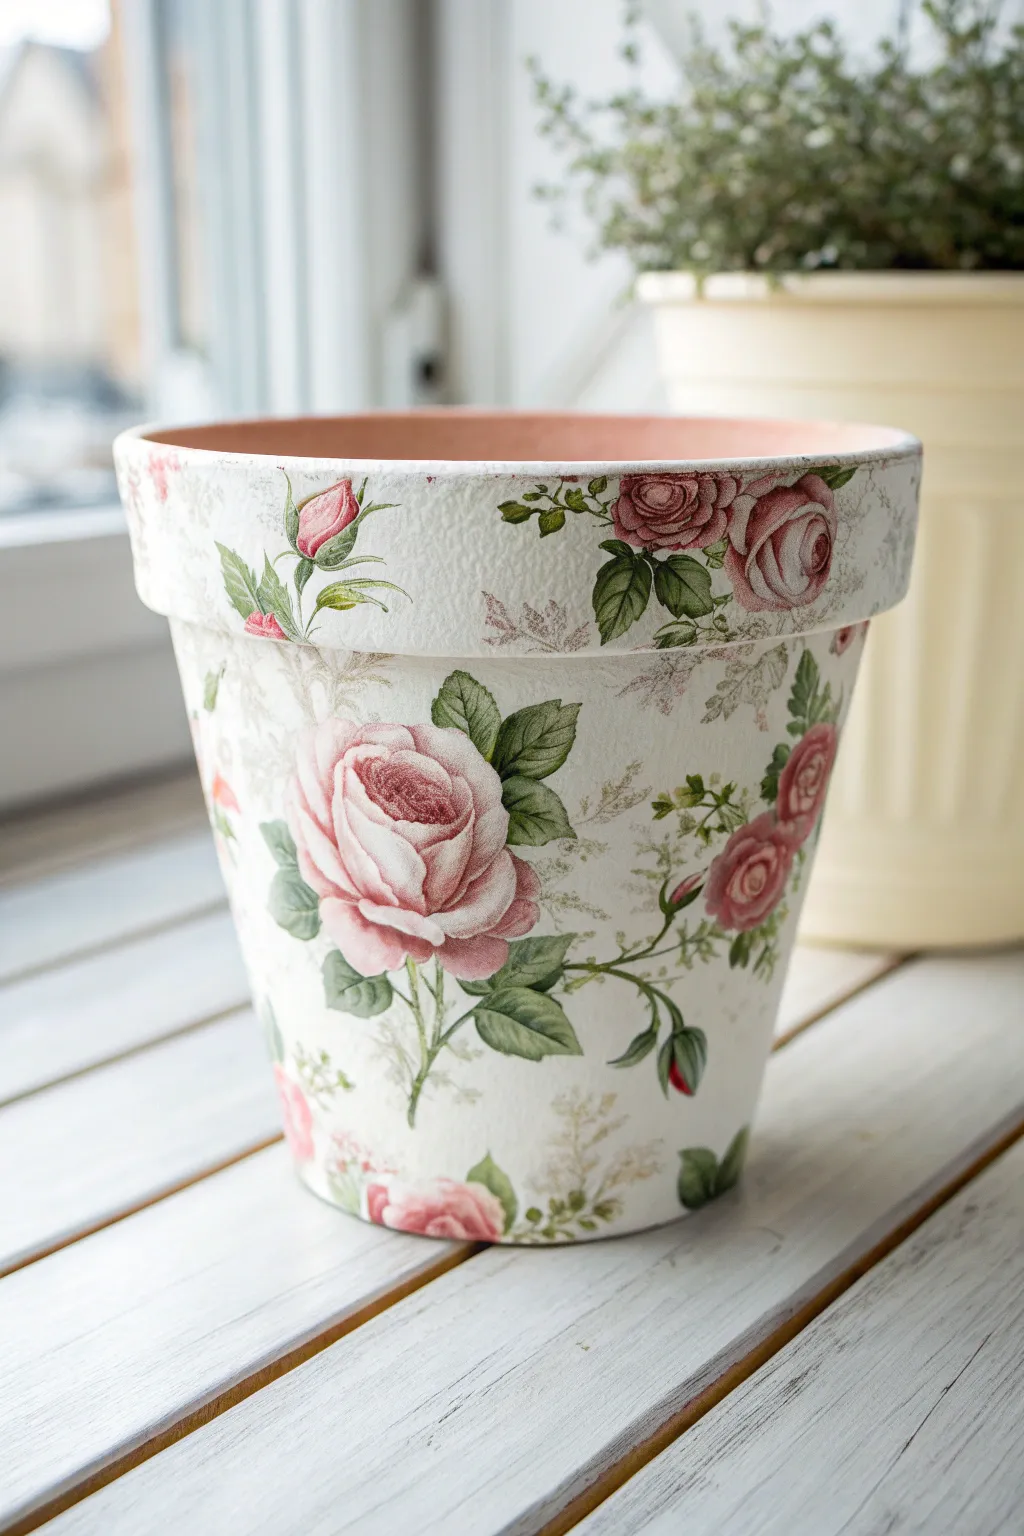
Transform a standard terracotta pot into a piece of romantic garden decor that mimicks fine porcelain. This project achieves a beautiful hand-painted look by carefully layering detailed floral napkin motifs over a textured white base.
Step-by-Step Tutorial
Materials
- Terracotta pot (clean and dry)
- White chalk paint or acrylic paint
- Paper napkins with vintage rose print
- Decoupage glue (like Mod Podge Matte)
- Foam sponge brush
- Small fine-point scissors
- Soft flat synthetic brush
- Clear outdoor varnish or sealer
Step 1: Preparing the Base
-
Clean the surface:
Wipe down your terracotta pot with a damp cloth to remove any dust or loose clay particles and let it dry completely. -
Apply the first coat:
Using a foam sponge brush, dab white paint onto the exterior of the pot. A dabbing motion creates a slight texture that helps the final design look more organic. -
Paint the rim:
Continue painting over the top lip and about one inch down the inside of the rim, as this area will be visible when planted. -
Let it dry:
Allow the paint to dry fully. Acrylics usually take about 20 minutes, while chalk paint might dry faster. -
Add a second coat:
Apply a second layer of white paint to ensure the orange clay doesn’t show through, creating a solid, bright canvas for your flowers.
The Plastic Wrap Trick
To smooth wrinkles without tearing the wet napkin, place a piece of plastic wrap over the flower and gently rub with your finger. Lift the plastic to reveal a perfect finish.
Step 2: Preparing the Motifs
-
Select your flowers:
Open your paper napkin and identify the rose clusters and trailing vines you want to feature on the pot. -
Cut out the designs:
Use small, sharp scissors to cut closely around the flower edges. You don’t need to be perfectly precise, but try to minimize the white background space. -
Separate the layers:
This is the most crucial step. Carefully peel away the white backing layers of the napkin until you are left with only the single, thin printed ply.
Step 3: Decoupage Application
-
Plan the layout:
Hold your cutouts against the dry pot to decide where the large roses will look best without applying glue yet. -
Apply adhesive:
Brush a thin, even layer of decoupage glue onto the pot where your first main flower will go. -
Place the main rose:
Gently lay the napkin cutout onto the wet glue. Start from the center of the flower. -
Smooth the design:
Using your soft brush with a tiny bit more glue, gently smooth the napkin from the center outward to push out air bubbles. -
Add trailing vines:
Glue down the smaller leaf and vine cutouts around the main rose to create a natural, growing pattern. -
Decorate the rim:
Apply smaller horizontal rose buds or leaf strips along the upper rim of the pot to frame the design perfectly. -
Inspect edges:
Check the edges of every cutout. If any are lifting, adhere them down with a small dab of glue on your brush.
Antique Finish
To give the pot an aged, vintage look, lightly dab a mix of brown paint and clear wax along the rim and bottom edges using a dry sponge before the final sealer.
Step 4: Sealing and Finishing
-
Apply a top coat:
Once the designs are dry to the touch, brush a full coat of decoupage glue over the entire painted surface of the pot to seal the edges. -
Let it cure:
Allow this sealing layer to dry completely, preferably for a few hours. -
Final weatherproofing:
I always recommend finishing with a coat of clear outdoor varnish or acrylic sealer to protect your artwork from water and soil.
Now you have a stunning custom planter that looks like it came from a vintage garden shop
Summer Watermelon Design
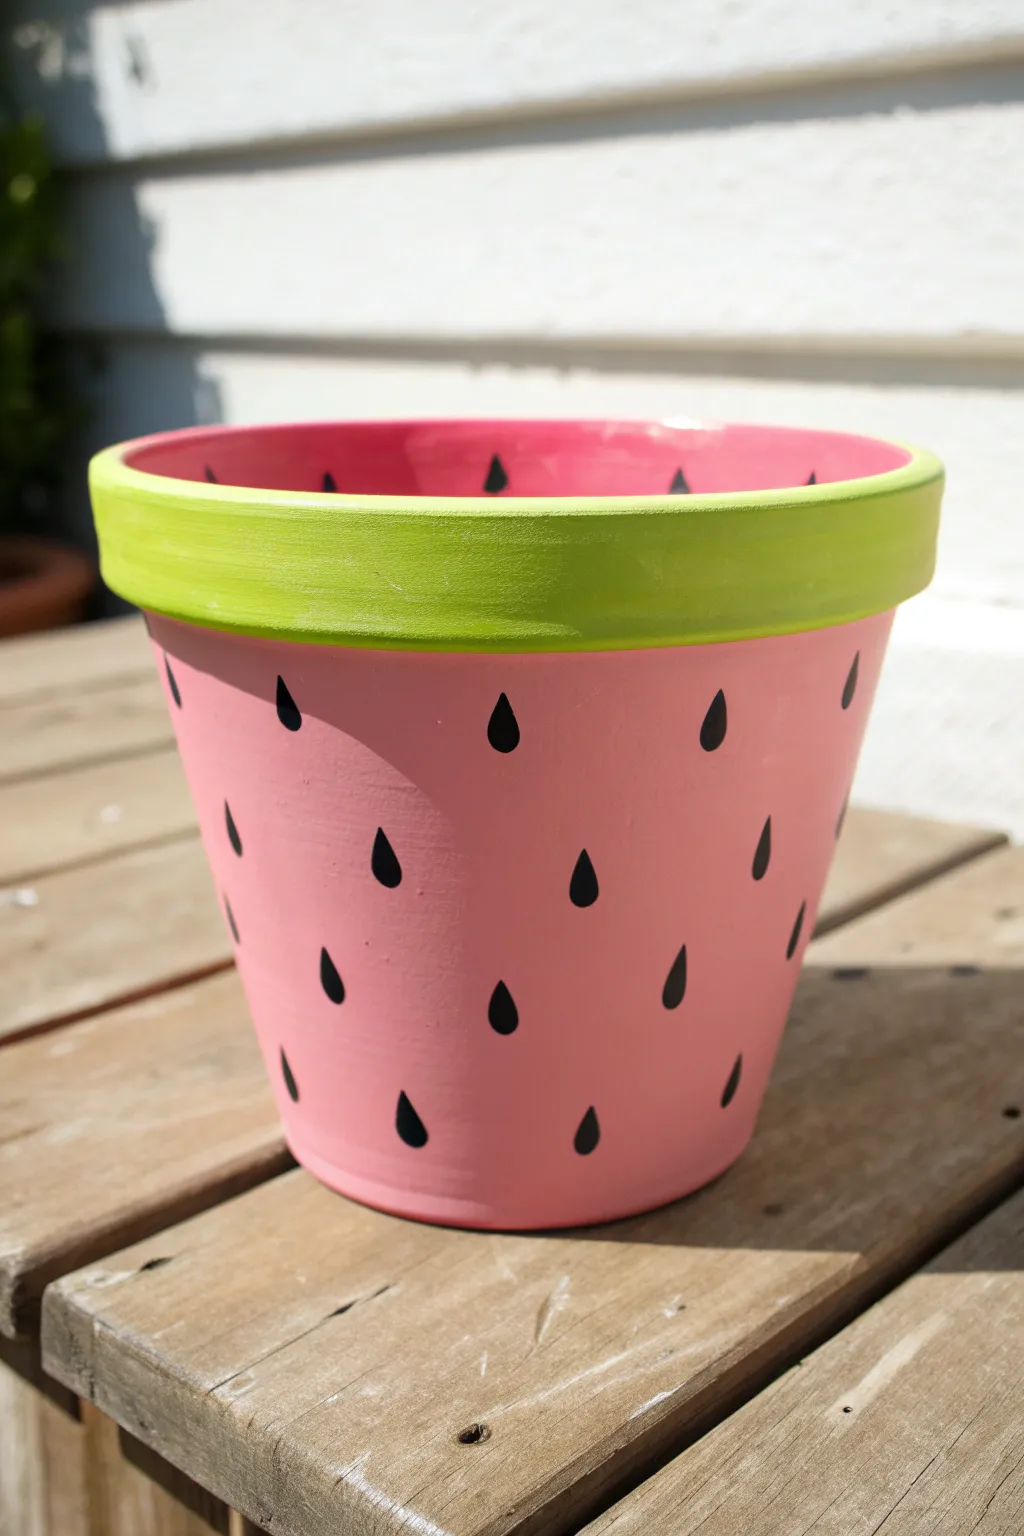
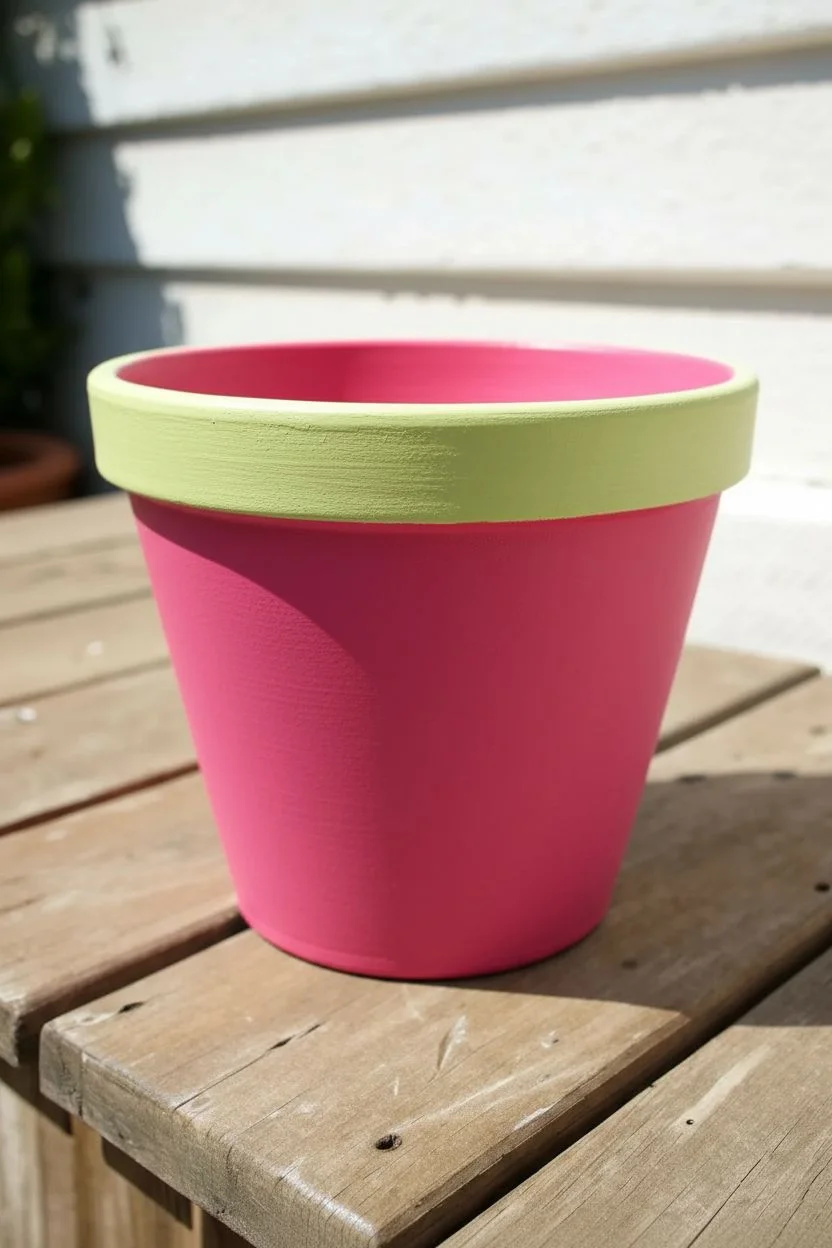
Capture the essence of summer with this vibrant watermelon-themed planter that instantly brightens up any porch or windowsill. This design features a bright pink base, a zesty lime green rim, and classic black seeds for a fresh, fruity look.
Step-by-Step
Materials
- Terracotta pot (any size)
- White acrylic paint (priming)
- Bright pink acrylic paint
- Lime green acrylic paint
- Black acrylic paint
- Flat paintbrush (1 inch)
- Small round detail brush (#2 or #4)
- Water cup and paper towels
- Clear acrylic spray sealer (matte or gloss)
Step 1: Priming and Base Color
-
Surface prep:
Begin by wiping down your terracotta pot with a damp cloth to remove any dust or debris, then let it dry completely. -
Base coat:
Apply a coat of white acrylic paint over the entire exterior and the inner rim of the pot. This acts as a primer and ensures your neon colors will look vibrant rather than muddy against the clay. -
Drying time:
Allow the white primer layer to dry fully to the touch before moving on to the colors. -
Painting the interior:
Using your flat brush, paint the interior of the pot bright pink. You only need to paint down about three inches or as far as the soil line will hide. -
Painting the body:
Paint the exterior body of the pot (everything below the rim) with the same bright pink shade. -
Second coat:
Once the first layer of pink is dry, apply a second coat to ensure solid, opaque coverage without streaks.
Wobbly Lines?
If you struggle to paint a straight line where the green rim meets the pink body, apply a strip of painter’s tape around the pot before painting the green to ensure a crisp edge.
Step 2: The Rind and Seeds
-
Green rim:
Clean your flat brush thoroughly, then dip it into the lime green paint. -
Applying the rind:
Carefully paint the raised rim of the pot with the lime green. I find it easiest to hold the brush steady and slowly rotate the pot to get a clean line. -
Rind coverage:
Be sure to paint the top lip of the rim and slightly over the edge into the interior so the green meets the pink inside cleanly. -
Touch ups:
Let the green paint dry, then apply a second coat if the white primer is still showing through. -
Seed brush prep:
Switch to your small round detail brush and load it with black acrylic paint. You want the paint to be fluid but not dripping. -
Seed technique:
To create the seed shape, press the belly of the brush down gently to create the round bottom of the seed, then lift up quickly to create the sharp point. -
Seed placement:
Paint your first few seeds randomly around the pink body of the pot. Aim for a teardrop shape with the point facing upward. -
Filling in:
Continue adding seeds around the entire circumference, spacing them out unevenly to keep the pattern looking organic rather than grid-like. -
Final drying:
Allow the black paint to cure fully for at least an hour to prevent smudging during the sealing process.
Make it Sweet
For extra realism, paint a thin, uneven line of very pale green or white right in the crease between the pink body and the green rim to mimic the inner rind.
Step 3: Sealing
-
Protection:
Take the pot to a well-ventilated area and spray it with a clear acrylic sealer. -
Final coat:
Apply a second light coat of sealer once the first is dry to ensure your artwork is weather-resistant.
Now your juicy watermelon pot is ready to be filled with your favorite summer blooms

PENCIL GUIDE
Understanding Pencil Grades from H to B
From first sketch to finished drawing — learn pencil grades, line control, and shading techniques.
Explore the Full Guide
Minimalist Line Art Faces
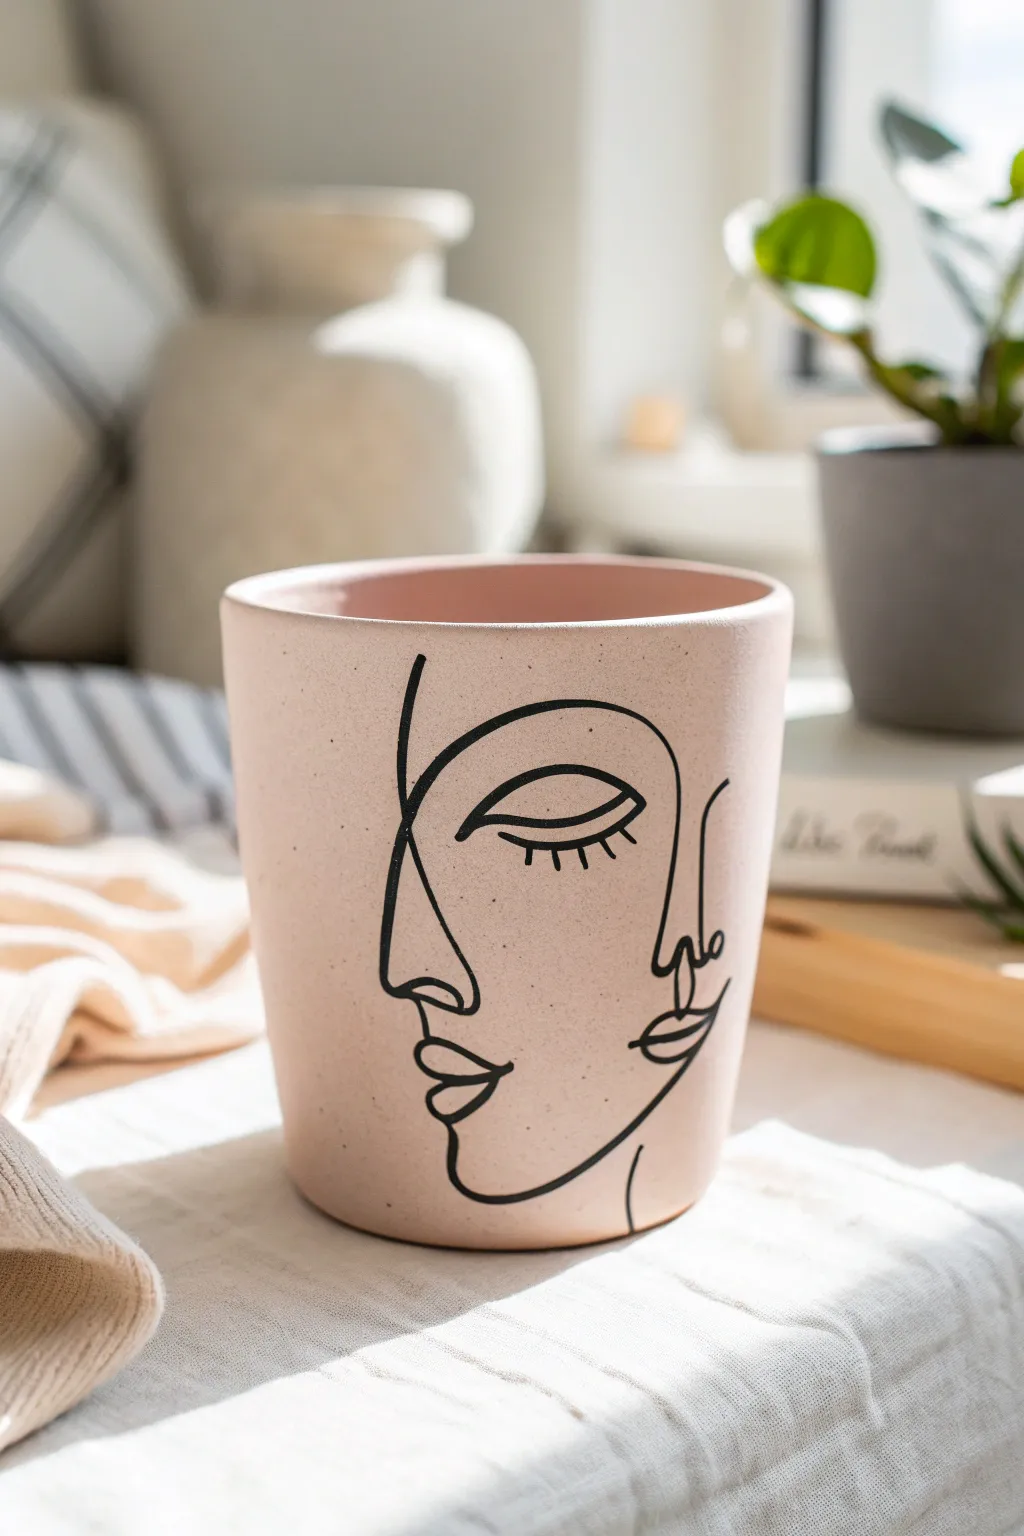
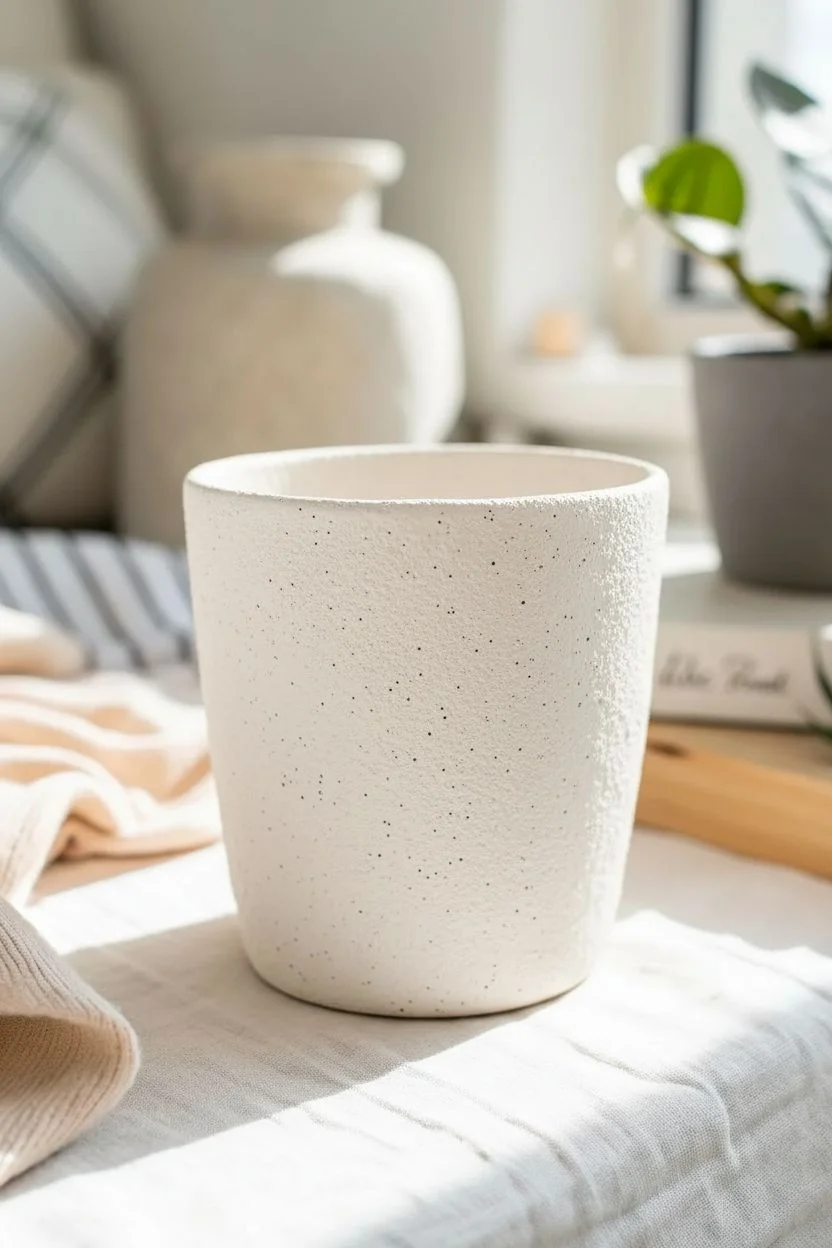
Transform a plain planter into a piece of modern art with this minimalist line drawing project. Using a soft, stone-like texture and continuous line techniques, you will create a trendy vessel that looks high-end and uniquely creative.
Step-by-Step Guide
Materials
- Terracotta or ceramic cylinder pot
- Acrylic paint (Pale Pink, Beige, White, Black)
- Baking soda (optional for texture)
- Flat paintbrush
- Old toothbrush
- Pencil and eraser
- Black oil-based paint marker (medium tip)
- Matte spray sealer
Step 1: Creating the Faux Stone Base
-
Clean the surface:
Wipe down your pot with a damp cloth to remove any dust or oils, ensuring the paint adheres properly. -
Mix the custom shade:
Combine white acrylic paint with a small amount of beige and a tiny drop of pale pink. You want a soft, fleshy, off-white hue. -
Add texture:
I like to sprinkle a teaspoon of baking soda into the paint mixture. This creates a gritty, matte finish that resembles real stone or unglazed ceramic. -
Apply the first coat:
Paint the entire exterior of the pot using a flat brush. Don’t worry if it looks streaky; the texture helps hide imperfections. -
Let it dry:
Wait about 20 minutes for the first layer to set to the touch. -
Apply the second coat:
Add a second layer of your textured paint for opaque, full coverage. Ensure the rim is painted as well. -
Create the speckles:
Dilute a drop of black paint with water. Dip an old toothbrush into it, then run your thumb across the bristles to flick tiny speckles over the pot. -
Allow full cure:
Let the pot dry completely, preferably for an hour, so the pencil sketch won’t dig into the soft paint.
Uneven Lines?
If your hand shakes or the marker skips over the texture, don’t panic. Wait for the black ink to dry, then use a small brush with your base pink color to “erase” and reshape the line.
Step 2: Drawing the Faces
-
Plan placement:
Identify the ‘front’ of your pot where the surface is smoothest. -
Sketch the central line:
With a pencil, lightly draw the profile outline first—the forehead, nose, and lips—down the center of the pot. -
Add the left eye:
To the left of the nose bridge, draw a large downward curve for the closed eye, adding small dashes for eyelashes. -
Outline the left face:
Draw the curving line that starts at the forehead and sweeps down to form the cheek and chin of the left face. -
Sketch the right features:
On the right side of the central profile, add a simple distinct line for the second nose and a curved line for the lips. -
Review the composition:
Step back and look at your pencil marks. The lines should feel fluid and abstract. Erasures are fine, just be gentle.
Step 3: Inking and Finishing
-
Trace over pencil:
Depress the tip of your black paint marker to get the ink flowing on a scrap paper, then carefully trace your pencil lines on the pot. -
Vary line weight:
Try to keep steady pressure. If you want a bolder look, you can go over the main profile line a second time to thicken it slightly. -
Clean up:
Once the black marker ink is fully dry, gently erase any visible pencil marks remaining around the edges. -
Seal the art:
Take the pot outdoors and spray it with a matte clear sealer. This prevents water from damaging the design when you water your plant.
Pro Tip: Pivot the Pot
Keep your drawing hand planted firmly on the table. Instead of moving your hand to draw long curves, slowly rotate the pot while holding your pen still for smoother lines.
Pop your favorite houseplant inside and enjoy your chic new art piece.
Detailed Mandala Dots
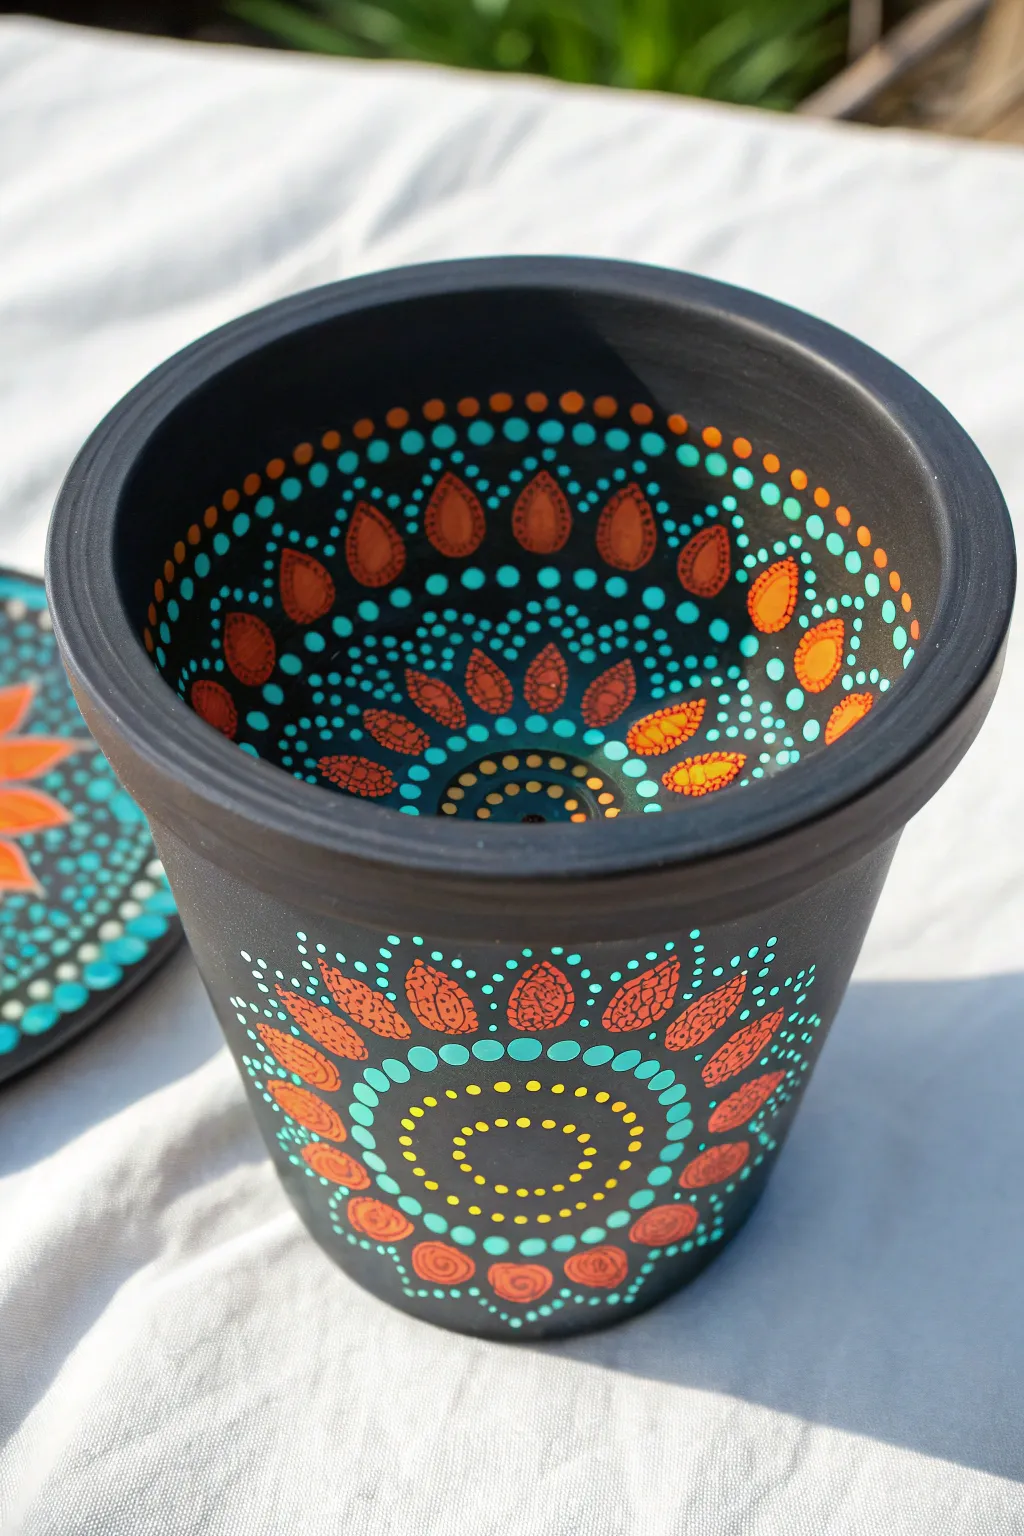
This striking project turns a standard clay pot into a mesmerizing art piece by featuring a detailed mandala design on both the exterior and the interior. The matte black background makes the vibrant turquoise, orange, and yellow dots pop with incredible contrast.
Step-by-Step
Materials
- Terracotta pot (4-6 inch diameter)
- Matte black acrylic paint
- Acrylic paints (Turquoise, bright yellow, burnt orange)
- Set of dotting tools (various sizes)
- Flat paintbrush
- Cotton swabs
- Spray sealer (matte or satin)
- Palette or paper plate
Step 1: Preparation & Base
-
Clean surface:
Wipe the terracotta pot down with a damp cloth to remove any fine dust or debris ensuring a smooth painting surface. -
Apply base coat:
Using the flat paintbrush, cover the entire pot, including the inside walls and the bottom, with matte black paint. -
Second coat:
Once the first layer is dry to the touch, apply a second coat of black to ensure solid, opaque coverage without streaks. -
Dry completely:
Allow the black base to cure fully; I generally wait at least an hour to ensure the dotting tools don’t lift the base paint.
Step 2: Exterior Mandala
-
Start the center:
Flip the pot upside down or lay it on its side. Using a medium-small dotting tool, create two concentric rings of yellow dots in the center of your design area. -
Add turquoise ring:
Switch to a slightly larger tool and place a ring of turquoise dots immediately surrounding the yellow rings. -
Paint the petals:
Using a small brush or a large stylus, paint teardrop shapes in burnt orange extending outward from the turquoise ring. -
Texture the petals:
To get the textured look seen in the image, you can lightly dab a second, lighter orange hue inside the teardrops while they are still slightly wet. -
Walk the dots:
Dip a small tool in turquoise paint. Place the first dot at the top tip of an orange petal, then continue dotting down the side of the petal without re-dipping to create gradually smaller dots. -
Complete the frame:
Repeat this ‘walking the dots’ technique on the other side of the petal, and do this for every orange petal on the exterior.
Consistency Key
If your paint peaks too much, mix in a tiny drop of pouring medium or water. You want a heavy cream consistency so the dots settle into smooth, round domes.
Step 3: Interior Design
-
Positioning:
Turn the pot right-side up. You will need to angle the pot comfortably to reach the inner walls. -
Inner floor center:
Start at the very bottom inside the pot. Create a central dot pattern similar to the exterior using yellow and turquoise rings. -
Inner wall petals:
Paint a row of orange teardrop shapes along the inner walls. Unlike the exterior, orient these so the pointed tops face inward toward the bottom of the pot. -
Frame interior petals:
Use the turquoise paint and the dot-walking technique to frame these interior orange petals, just as you did on the outside. -
Upper rim border:
Using a medium tool, place a consistent row of turquoise dots just below the rim of the pot to frame the entire inner design. -
Rim accents:
Add smaller orange dots in the spaces between the larger turquoise rim dots to tie the color palette together.
Oops, A Smudge!
If you smudge a wet dot, don’t wipe it! Let it dry completely, paint over the mistake with black, and re-dot the area once the repair is dry.
Step 4: Finishing Touches
-
Clean up:
If there are any visible sketch lines or mistakes, carefully touch them up with a small brush and the matte black base paint. -
Final drying:
Let the pot sit undisturbed for 24 hours to ensure the thick dots of paint are dry all the way through. -
Seal the work:
Take the pot outside and apply two light coats of spray sealer to protect the paint from chipping and moisture.
Display your beautiful dual-sided mandala pot in a sunny spot to let the vibrant colors shine


Garden Ladybugs and Bees
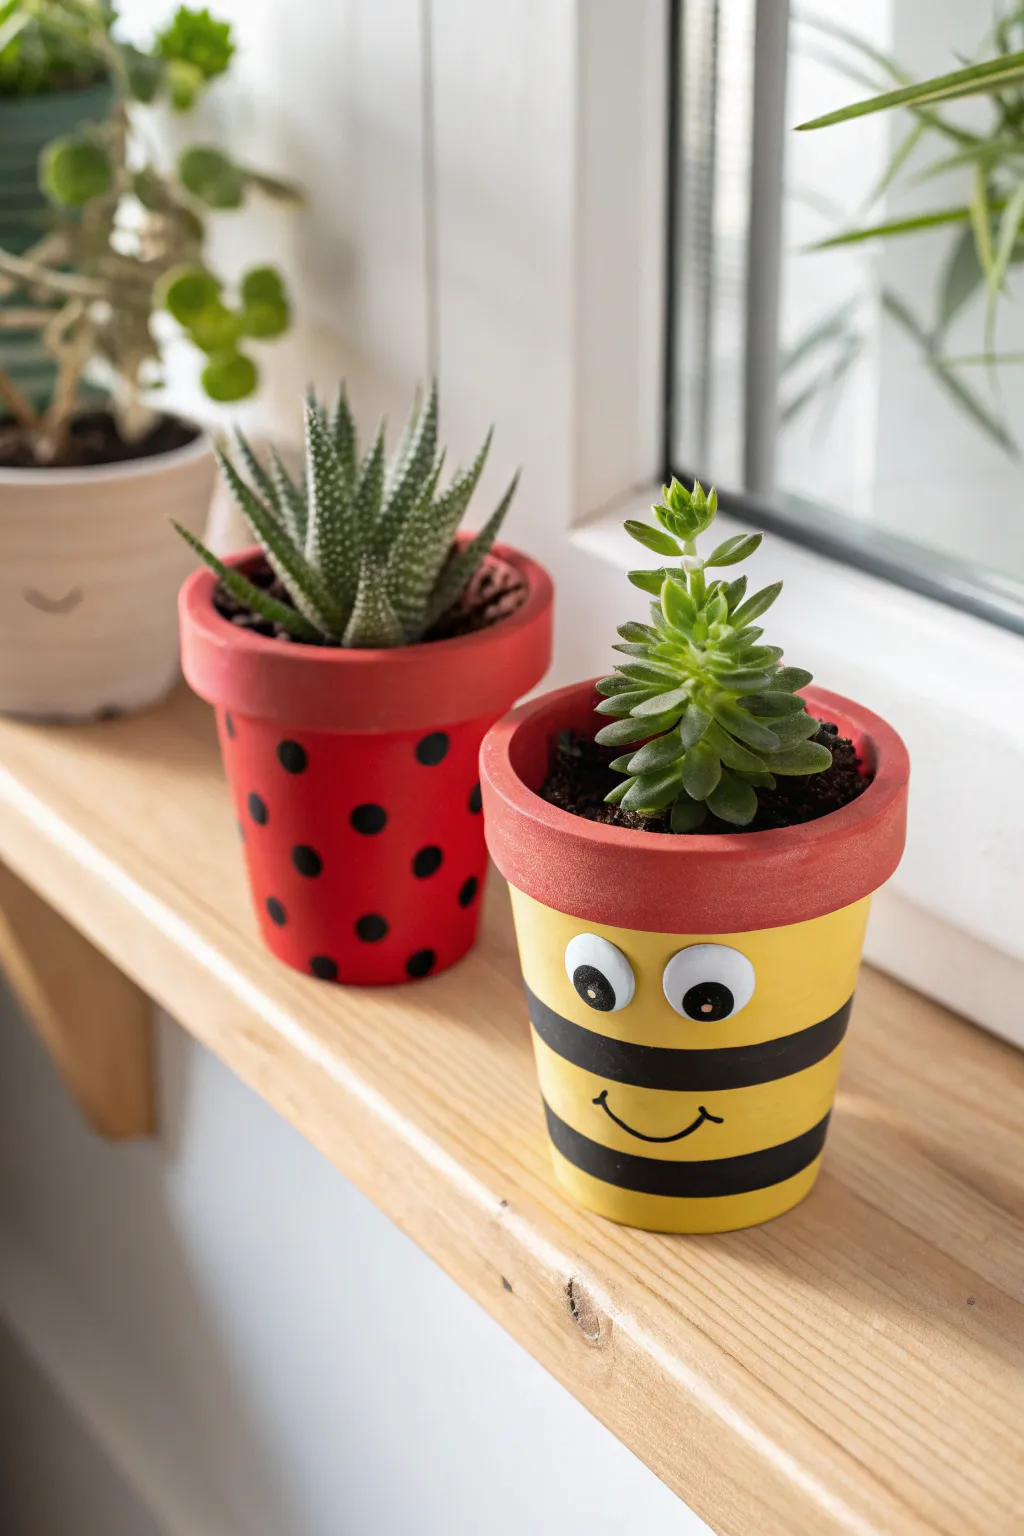
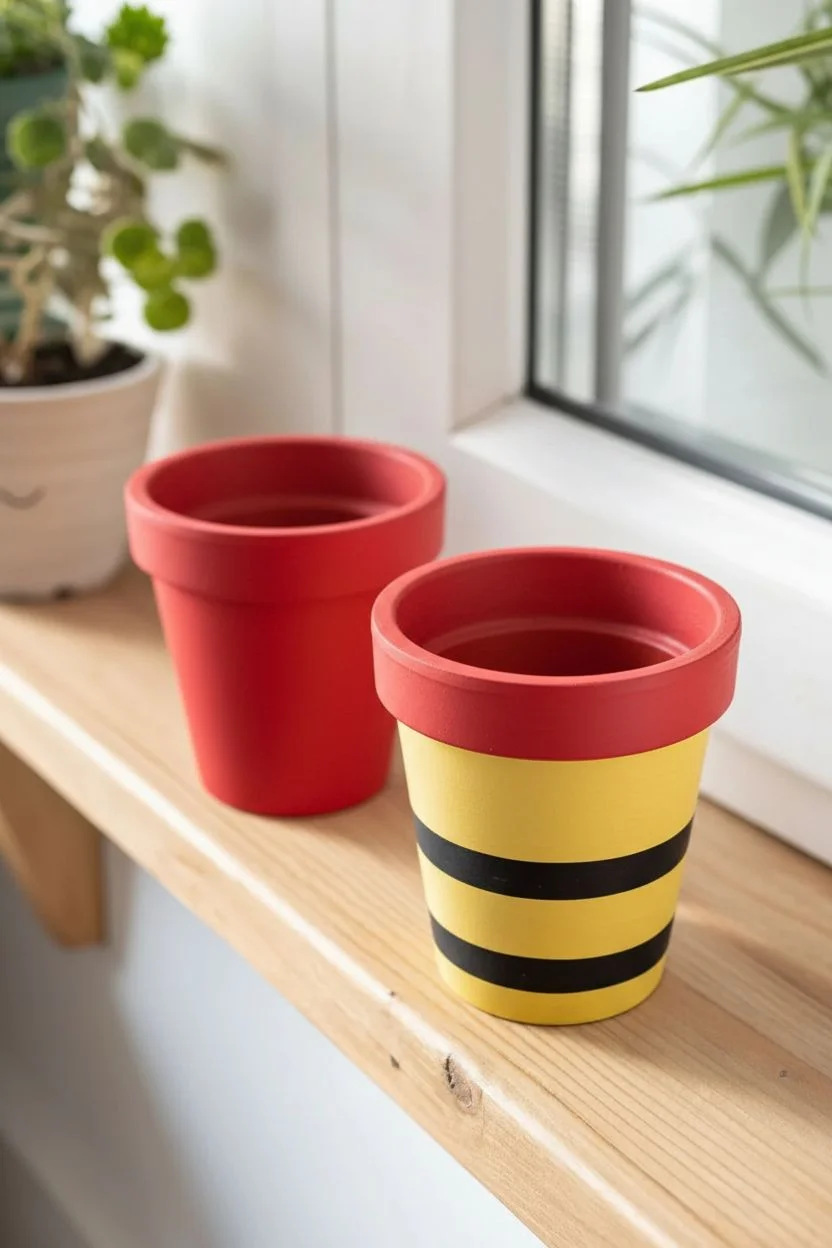
Transform ordinary terracotta pots into a charming pair of garden friends with this bright and cheerful painting project. These ladybug and bumblebee planters use bold acrylic colors and simple shapes to add a playful touch to any windowsill.
How-To Guide
Materials
- 2 Small terracotta pots (4 inch)
- Acrylic craft paint (bright red, sunny yellow, black)
- Flat paintbrush (0.5 inch)
- Small round detail brush
- Large googly eyes
- Strong craft glue (e.g., E6000 or hot glue)
- Clear acrylic sealer (spray or brush-on)
- Pencil
- Newspaper or drop cloth
Step 1: Base Coats
-
Prep the surface:
Wipe down your terracotta pots with a damp cloth to remove any dust or sticker residue, ensuring the surface is completely dry before painting. -
Base the ladybug:
Using a flat paintbrush, cover the entire exterior of the first pot with bright red paint. -
Paint the rim:
Extend the red paint over the top rim and down about one inch on the inside, so the clay won’t show once filled with soil. -
Base the bee:
For the bee pot, paint just the top rim red to match its partner, extending the color partially inside as well. -
Add yellow body:
Rinse your brush thoroughly and paint the body of the bee pot—below the rim—with sunny yellow. -
Apply second coats:
Allow the pots to dry for about 15 minutes; I usually apply a second coat to the yellow section specifically to ensure the terracotta color doesn’t bleed through.
Uneven Yellow Paint?
Yellow pigment is often translucent. If the clay color shows through, apply a base coat of white paint first to make the yellow pop, or be patient and apply 3-4 thin layers.
Step 2: Adding Details
-
Create ladybug spots:
Using black paint, create various sized circles scattered randomly around the red body of the ladybug pot. -
Refine the circles:
Use a small detail brush to smooth out the edges of your black spots so they look nice and round. -
Sketch bee stripes:
Once the yellow paint is fully dry, lightly use a pencil to mark off horizontal bands around the bee’s body to guide your painting. -
Paint the stripes:
Fill in your penciled bands with black paint, keeping your hand steady to maintain clean lines. -
Draw the smile:
Using your finest brush, paint a small, curved black smile on the yellow section, slightly off-center. -
Add cheek lines:
Paint two tiny, short perpendicular ticks at the ends of the smile to give the bee a friendly expression.
Step 3: Assembly & Finish
-
Attach the eyes:
Apply a dab of strong craft glue to the back of two large googly eyes and press them firmly onto the yellow space above the smile. -
Seal the artwork:
Once all paint is cured, apply a coat of clear acrylic sealer over the outside and rim of the pots to protect them from moisture damage. -
Let it cure:
Allow the sealer to dry completely according to the bottle instructions before handling. -
Planting:
Fill the pots with soil and add your favorite succulents like Haworthia or Sedum to give your bug friends some ‘hair’.
Circle Hack
Struggling to paint perfect circles for the ladybug spots? Dip the flat eraser end of a pencil or a round foam pouncer into black paint and stamp the dots onto the pot instead.
Place your new insect friends in a sunny spot and enjoy the pop of color they bring to your space
Cosmic Galaxy Night Sky
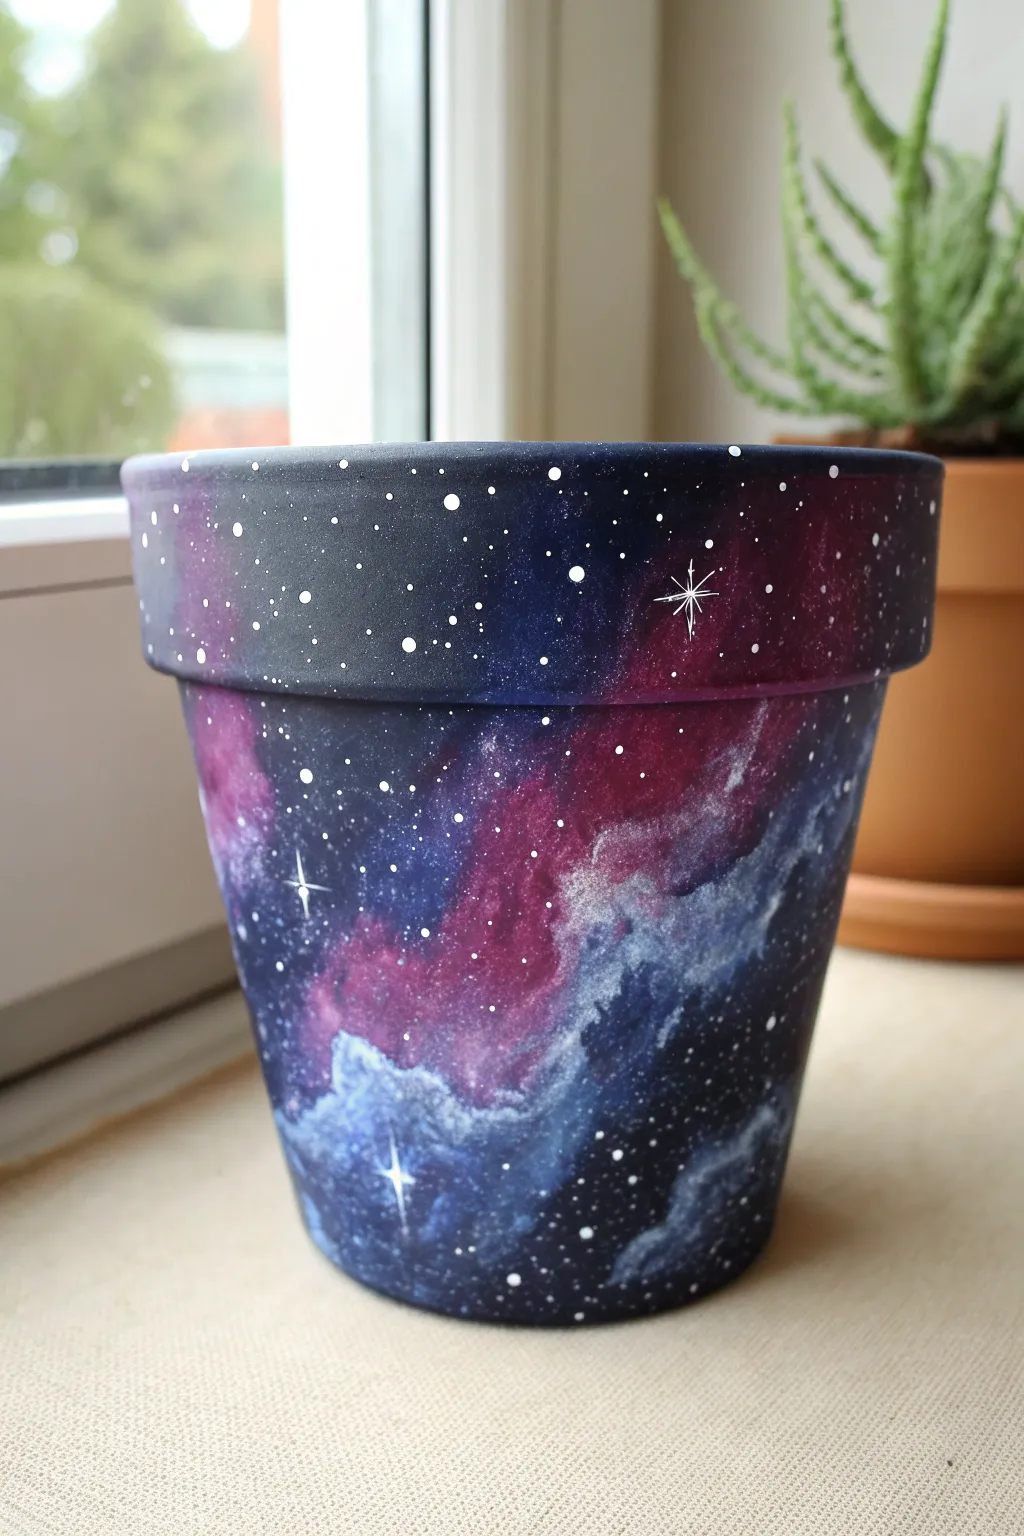
Transform a standard clay planter into a stunning window to the universe. This project layers acrylics to create deep, swirling nebula clouds and bright twinkling stars that pop against a dark background.
Step-by-Step Tutorial
Materials
- Terracotta pot
- Acrylic paints (Black, Navy Blue, Purple, Magenta, White)
- Small makeup sponge or kitchen sponge (cut into pieces)
- Medium flat paintbrush
- Fine liner brush (size 0 or 00)
- Old toothbrush
- Paper plate or palette
- Water cup and paper towels
- Clear acrylic sealer (spray or brush-on)
Step 1: Base Preparation
-
Clean surface:
Wipe down your terracotta pot with a damp cloth to remove any dust or debris, ensuring a smooth painting surface. -
Apply base coat:
Paint the entire exterior of the pot, including the top rim and a few inches inside the rim, with black acrylic paint. -
Ensure opacity:
Allow the first coat to dry completely, then apply a second coat of black to ensure the orange clay is fully covered and the background is solid.
Nebula Troubleshooting
If your galaxy colors start turning muddy or gray, stop blending immediately. Let the current layer dry completely before adding the next brighter color on top.
Step 2: Creating the Nebula
-
Prepare sponge tools:
Cut your sponge into small, manageable cubes so you have a fresh surface for different colors. -
Start with navy:
Dampen a sponge piece slightly, dip it into navy blue paint, and dab off the excess on a paper towel until the texture looks soft and cloud-like. -
Sponge application:
Gently sponge the navy blue in diagonal, irregular patches across the pot, wrapping from the bottom up to the rim. -
Layer purple tones:
Using a fresh sponge piece, lightly dab purple paint over the center of the navy blue areas, leaving the dark blue edges visible for depth. -
Add magenta highlights:
Apply magenta or bright pink paint sparingly to the center of the purple clouds to create a glowing effect. -
Create the core:
Mix a tiny drop of white into your magenta to create a pale pink, then sponge this into the very center of the nebula for the brightest point of the cloud. -
Blend transitions:
If the color transitions look too harsh, I like to take a sponge with a little black paint and lightly dab the edges to soften them back into the background.
Step 3: Painting the Stars
-
Prepare splatter paint:
Mix white paint with a few drops of water on your palette until it reaches an ink-like consistency. -
Splatter technique:
Dip an old toothbrush into the watered-down white paint, face the bristles toward the pot, and run your thumb across the bristles to flick tiny specks onto the surface. -
Clean up large drops:
If any large distracting blobs land on the pot, quickly gently dab them up with a damp paper towel corner before they dry. -
Paint larger stars:
Use your fine liner brush and pure white paint (undiluted) to place specific, slightly larger dots randomly around the galaxy. -
Add twinkle stars:
Select a few of the larger white dots and carefully paint a long vertical line and a shorter horizontal line through them to create a four-point starburst shape. -
Highlight the rim:
Don’t forget to extend a few star splatters and nebula clouds onto the rim of the pot so the design looks continuous.
Pro Tip: Depth Control
Keep the black background visible! Don’t cover the whole pot with color. The negative space is what makes the colored nebula clouds look bright and dimensional.
Step 4: Final Steps
-
Dry thoroughly:
Allow the pot to sit for at least an hour to ensure all layers, especially the thickest sponge areas, are completely dry. -
Protect the gentle art:
Apply a coat of clear sealer over the entire painted surface to protect the design from water damage and fading.
Once sealed and dry, your cosmic creation is ready to house an out-of-this-world plant.
Whimsical Mushroom Toadoostools
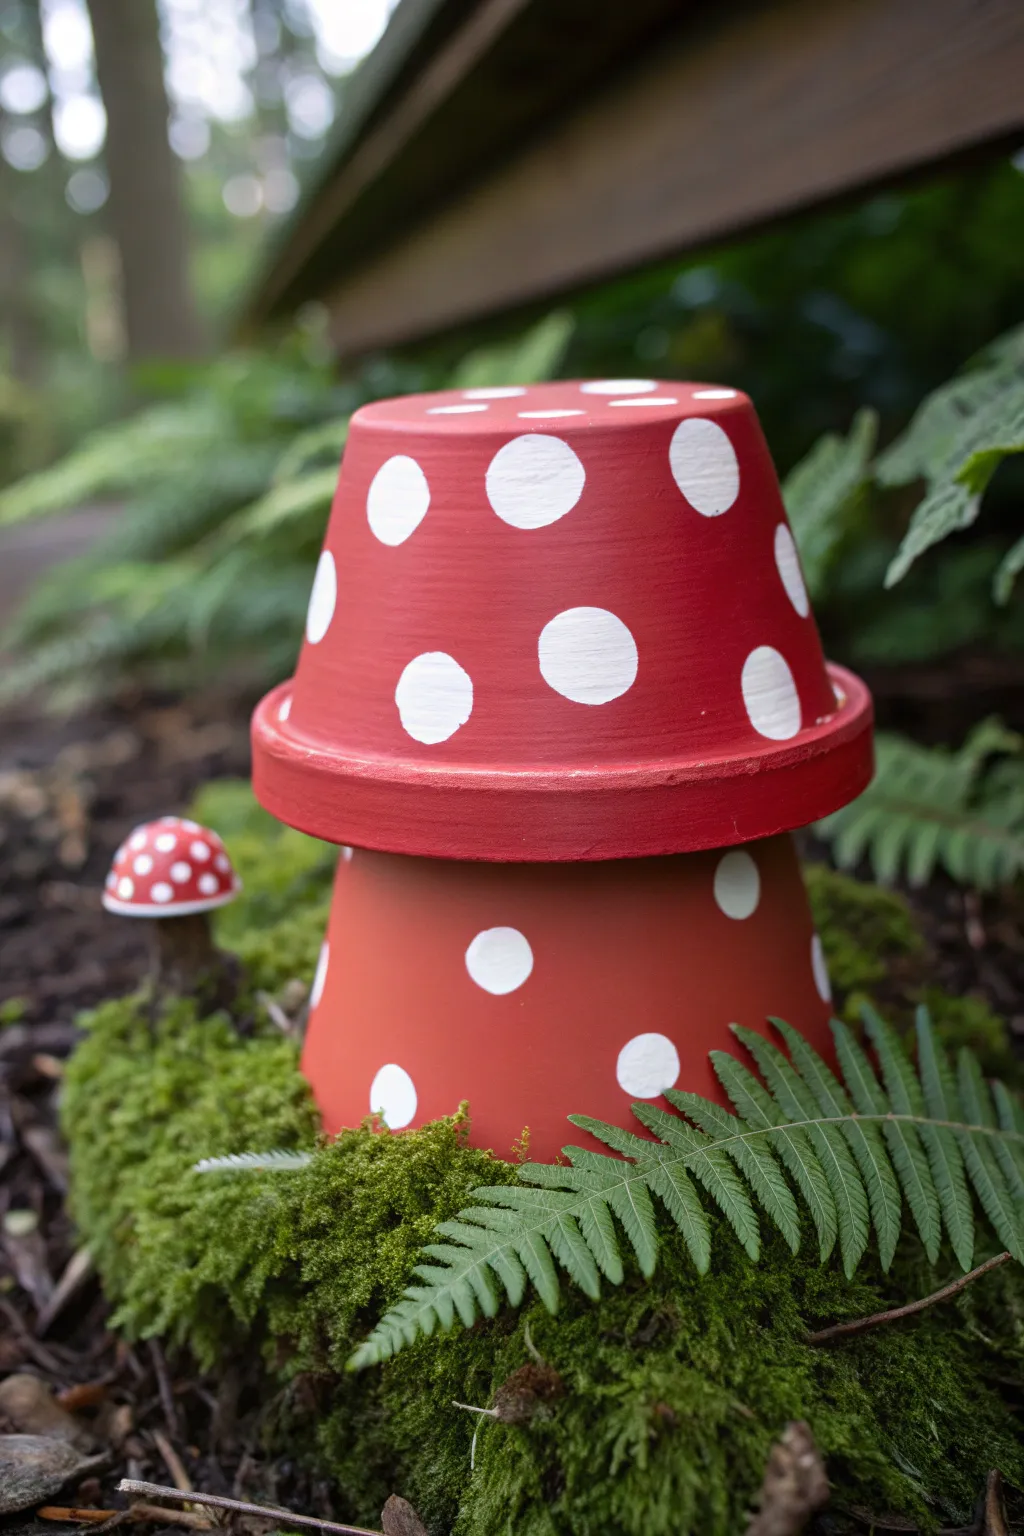
Transform plain clay planters into a magical woodland scene with this classic toadstool project. Using two differently shaped pots and high-contrast paints, you will build a durable garden decoration that looks right at home among moss and ferns.
Step-by-Step Guide
Materials
- Standard terracotta pot (4-inch or 6-inch)
- Shallow terracotta bulb pan or saucer (one size larger than the standard pot)
- Outdoor acrylic craft paint (Bright Red)
- Outdoor acrylic craft paint (Titanium White)
- White or clear primer spray (optional)
- Wide flat synthetic paintbrush
- Round foam pouncer (1 inch)
- Small round paintbrush
- Strong waterproof adhesive (e.g., E6000)
- Clear matte UV-resistant spray sealer
Step 1: Preparation & Base Coat
-
Clean surface:
Thoroughly wipe down your terracotta pots with a damp cloth to remove any garden center dust or sticker residue. -
Dry completely:
Allow the clay to air dry fully so no moisture gets trapped under the paint. -
Prime the pots:
Spray a light coat of primer or apply a thin white base coat to stop the porous clay from soaking up your red paint. -
Position the pieces:
Flip both the tall pot and the shallow bowl upside down on your work surface; the tall pot will be the stem and the bowl will be the cap. -
First red layer:
Using the wide flat brush, paint the exterior of the taller pot and the entire surface of the inverted bowl using the bright red paint. -
Dry and repeat:
Let the first coat dry for about 20 minutes before applying a second coat to achieve a solid, opaque red finish. -
Detail the rims:
Pay special attention to the thick rim of the cap piece, ensuring the red paint gets into the crevices under the lip.
Step 2: Dotting & Assembly
-
Prepare the pouncer:
Pour a small puddle of white acrylic paint onto a palette or paper plate and dip your round foam pouncer into it. -
Test the stamp:
Press the pouncer onto a scrap piece of paper first to ensure the sponge is evenly loaded but not dripping. -
Dot the cap:
Press the foam pouncer firmly onto the red ‘cap’ piece, making sure to place dots randomly but spacing them out evenly. -
Decorate the stem:
Repeat the process on the tall ‘stem’ pot, adding a few dots around the circumference. -
Touch up edges:
If your foam pouncer left any bubbly edges, use a small round paintbrush to smooth out the white circles while the paint is still wet. -
Full dry time:
Allow both painted pieces to dry completely, preferably for an hour, to prevent smudging during assembly. -
Apply adhesive:
Squeeze a generous ring of waterproof adhesive onto the bottom (now the top) of the inverted stem pot. -
Stack the mushroom:
Carefully center the painted red bowl on top of the stem pot and press down firmly to bond them. -
Cure the glue:
Reference your glue’s instructions and let the tower sit undisturbed until the bond is fully cured. -
Seal the work:
Take the project outside and spray it with a clear matte UV-resistant sealer to protect the color from sun and rain. -
Create the scene:
Nestle the base of the terracotta stem into garden soil, surrounding it with sheet moss or small ferns to complete the look.
Twist for Crispness
When lifting the foam pouncer off the pot, I like to give it a tiny, gentle twist. This breaks the suction and helps leave a crisp circular edge rather than pulling up peaks of paint.
Fairy Garden Upgrade
Before sealing, use a detail brush to paint a tiny arched wooden door and a gold doorknob at the base of the stem to turn your mushroom into a hidden fairy house.
Once the sealer is dry, your whimsical toadstool is ready to add a pop of color to a shady corner of your garden
Coastal Stacked Lighthouse
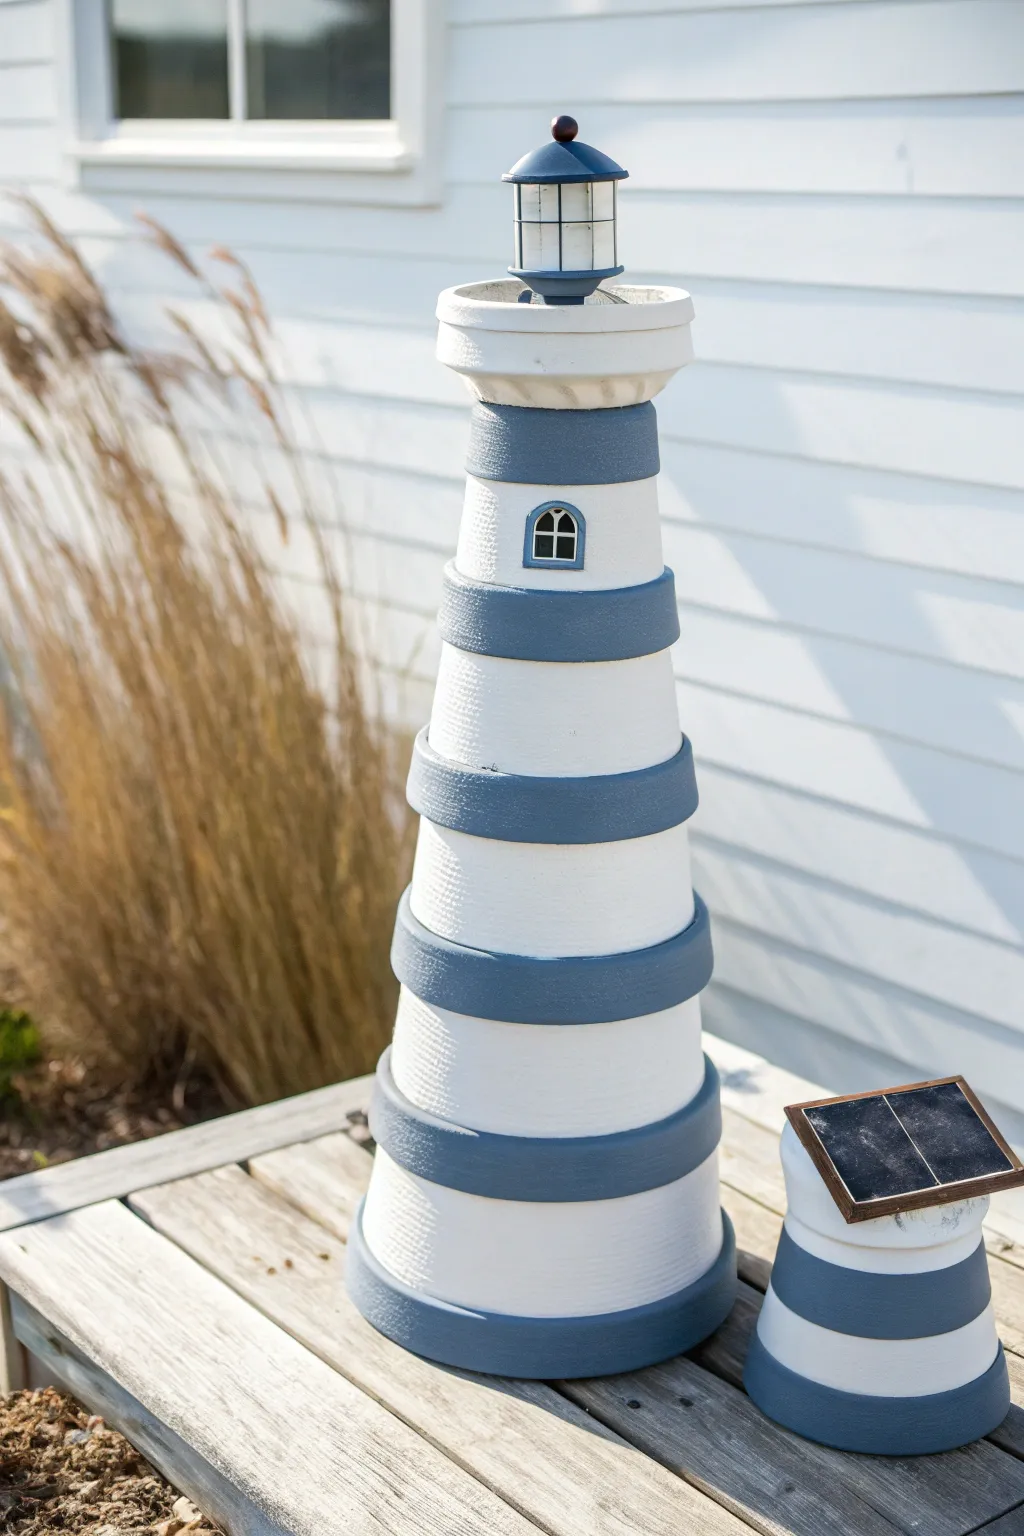
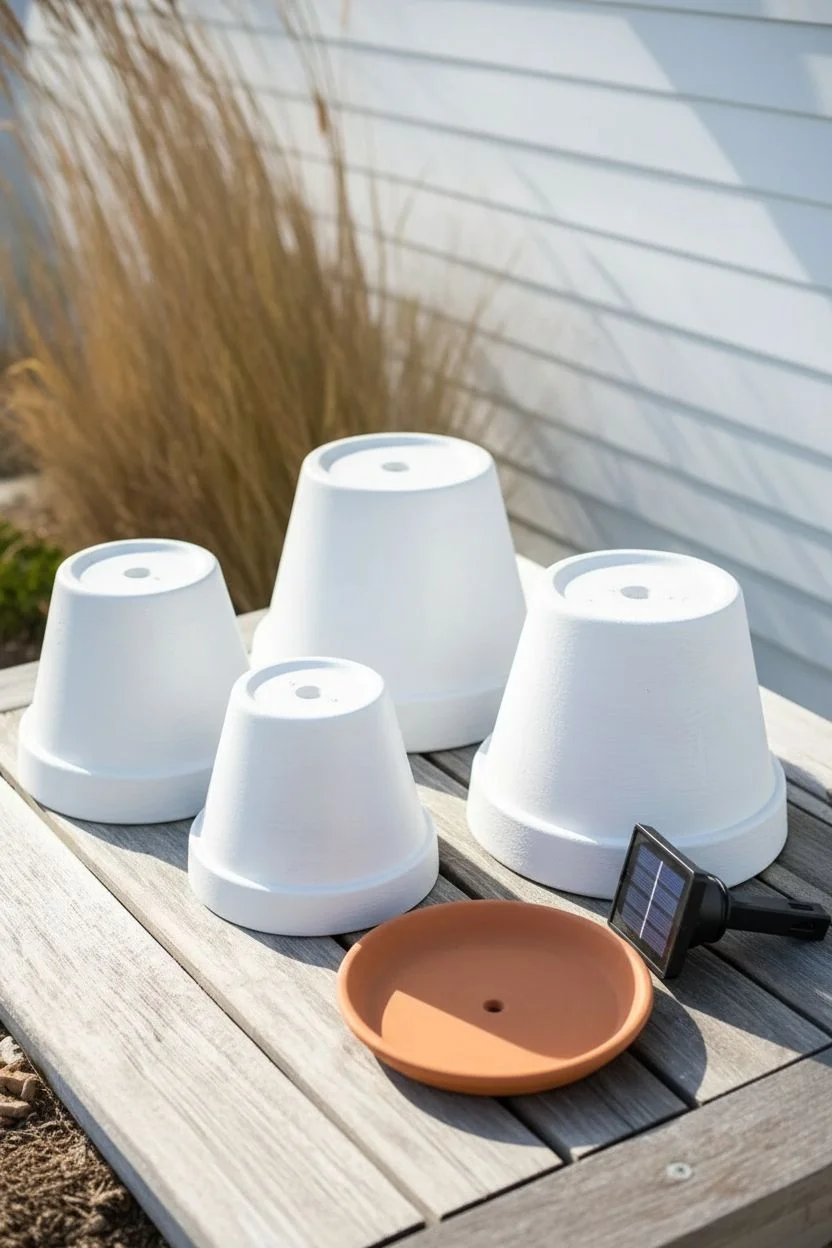
Transform ordinary terracotta planters into a charming coastal beacon that brightens up your garden day and night. By stacking graduating pot sizes and topping them with a simple solar light, you can create a sturdy, weather-resistant decoration with classic nautical flair.
Step-by-Step
Materials
- 4 Terracotta clay pots (graduating sizes, e.g., 10″, 8″, 6″, 4″)
- 1 Terracotta saucer (sized to fit the flat bottom of the smallest pot)
- Outdoor acrylic craft paint (White, Navy Blue, Black)
- Solar path light (stake removed)
- Strong outdoor adhesive (e.g., E6000 or construction adhesive)
- Foam brushes and small detail paintbrushes
- Painter’s tape
- Clear outdoor sealant spray (matte or satin)
- Pencil
Step 1: Preparation and Base Coat
-
Clean the terracotta:
Remove any price stickers and scrub the pots and saucer with warm soapy water to remove dust. Allow them to dry completely, as moisture will trap inside the clay and peel the paint. -
Prime the surface:
Apply a base coat of white paint to the exterior of all pots and the saucer. Terracotta is porous and soaks up the first layer, so this acts as your primer. -
Apply solid coverage:
Paint 2-3 additional coats of white on the body of the pots until the reddish clay tone is completely hidden. I prefer to let the paint dry to the touch between coats to avoid dragging the brush. -
Smooth the texture:
If you want a rustic look, brush strokes are fine, but for a smoother finish, use a foam brush or light sanding between fully dry coats.
Step 2: Painting Nautical Details
-
Tape the rims:
Once the white base is fully cured, apply painter’s tape just under the rim of each pot to ensure a crisp line. -
Paint the stripes:
Paint the protruding rim of each inverted pot with navy blue paint. Don’t forget to paint the outer rim of the saucer in matching blue. -
Remove tape:
Peel off the painter’s tape while the blue paint is still slightly wet; this helps prevent the dried latex from pulling away with the tape. -
Draft the window:
On the second smallest pot (which will be near the top), use a pencil to lightly sketch a small arched window shape. -
Paint window details:
Fill in the arch with black paint. Once dry, use a fine detail brush and white paint to create a grid, making it look like window panes. -
Customize the lantern:
Take your solar path light and disassemble the ground stake. Paint the top plastic housing navy blue to match your lighthouse stripes, being careful not to cover the solar panel itself.
Wobbly Stack?
Terracotta pots often have uneven bottoms. Before gluing, rotate the stacked pots 360 degrees until they ‘lock’ into the most level position, then mark alignment with a pencil.
Step 3: Assembly and Sealing
-
Dry fit the stack:
Invert the pots and stack them from largest to smallest to check stability. Rotate them until they nest securely without rocking. -
Glue the tower:
Apply a generous ring of strong outdoor adhesive to the bottom (now top) of the largest pot. Center the next size pot on top and press down firmly. -
Continue stacking:
Repeat the gluing process for the remaining pots, checking alignment from different angles to ensure your tower isn’t leaning. -
Attach the saucer:
Glue the painted saucer upside down (or right side up, depending on fit) to the flat bottom of the smallest, top-most pot to create a wider platform for the light. -
Mount the light:
Apply adhesive to the base of the solar light housing and center it on the top saucer. -
Weatherproof the project:
Once all glue is cured (usually 24 hours), spray the entire structure with two coats of clear outdoor sealant to protect the paint from sun and rain.
Pro Tip: Solar Prep
Make sure to pull the battery activation tab underneath the solar cap BEFORE you glue it down permanently, otherwise you won’t be able to turn the light on!
Place your finished lighthouse in a sunny spot in the garden and enjoy the soft glow it casts every evening.
Enchanted Fairy House
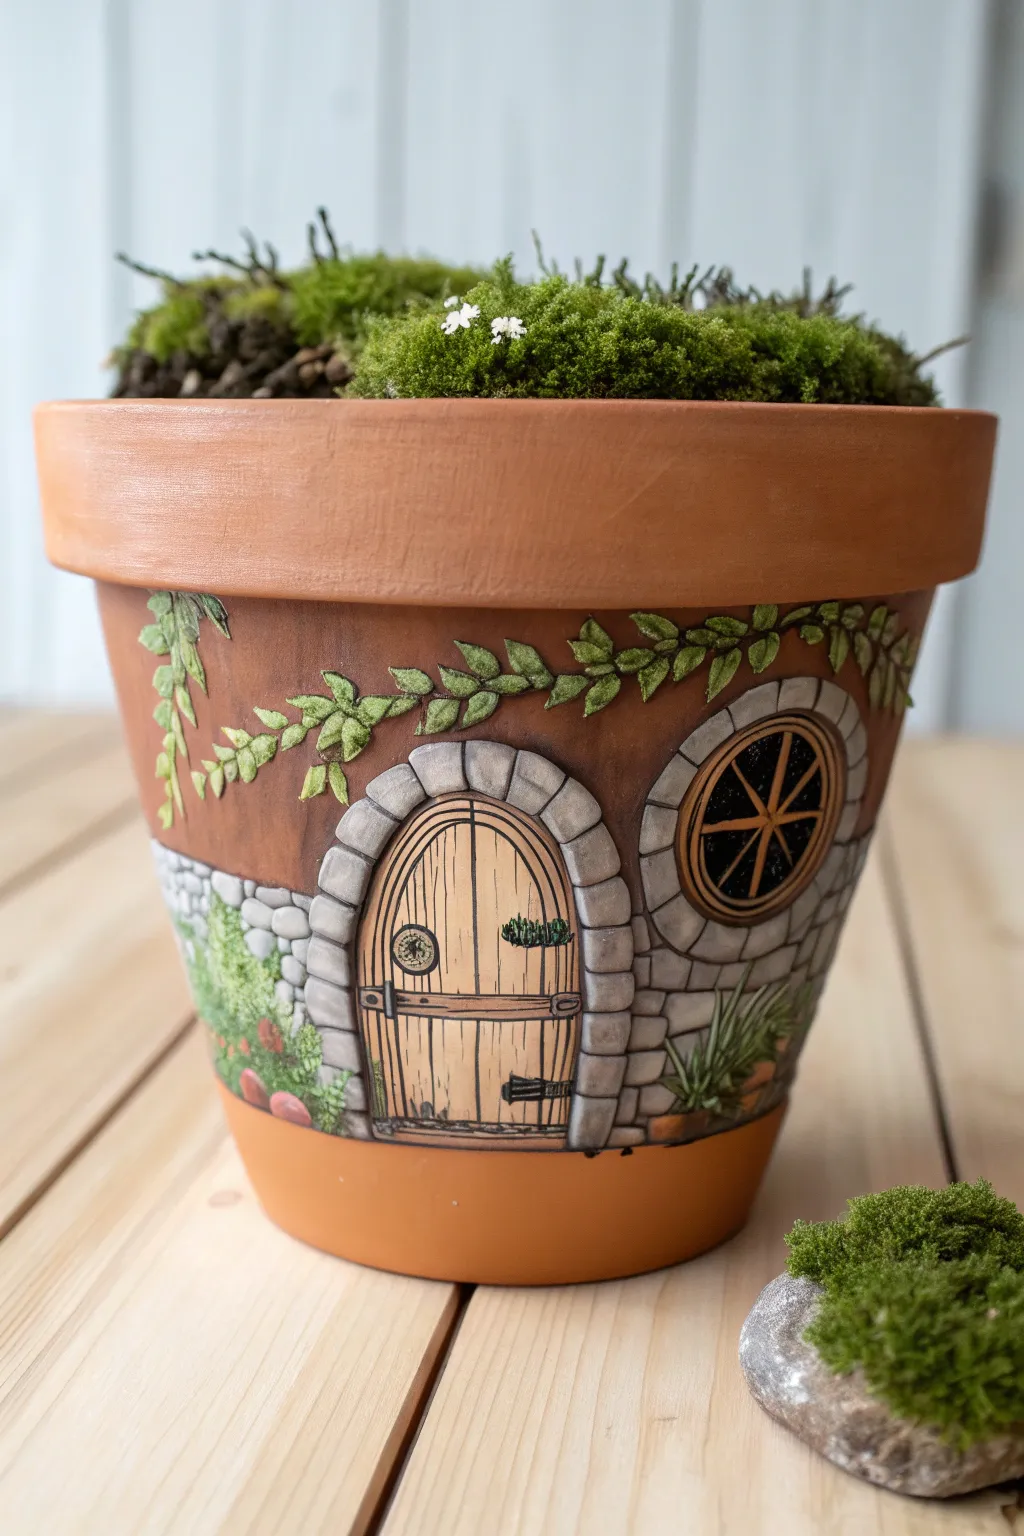
Transform a standard garden vessel into a whimsical dwelling straight out of a fantasy novel. By combining simple clay sculpting with illustrative painting techniques, you will create a charming 3D textured fairy house.
How-To Guide
Materials
- Standard terracotta pot (6-inch)
- Air-dry modeling clay
- PVA glue or tacky glue
- Acrylic paints (ochre, burnt sienna, grey, black, forest green, lime green)
- Sculpting tools (or a toothpick and butter knife)
- Detail brushes (liner and small flat)
- Black acrylic paint pen (extra fine)
- Matte spray sealer
Step 1: Sculpting the Features
-
Clean and sketch:
Wipe the creative dust off your pot with a damp cloth. Once dry, lightly sketch the outline of a round-top door, a circular window, and a dripping vine pattern near the rim using a pencil. -
Form the door:
Roll a flat slab of air-dry clay about 1/4 inch thick. Cut it into the arch shape of your door sketch. Apply a thin layer of PVA glue to the back of the clay and press it firmly onto the pot. -
Texture the wood:
Using a sculpting tool or knife, score vertical lines into the door clay to mimic wooden planks. Add a few knots and grain wobbles for character. -
Build the stone arch:
Roll small, flattened balls of clay to act as stones. Glue them individually around the door frame, pressing them close together to form a sturdy archway. -
Create the window:
Form a clay ring (donut shape) for the window frame and attach it to the right of the door. Add thin snakes of clay inside the circle to create the wheel-spoke mullions. -
Add climbing ivy:
Roll very thin coils of clay for vines and press them along the upper rim. Shape tiny teardrops of clay for leaves and attach them along the vines, overlapping them slightly for a lush look. -
Allow to cure:
Let the clay dry completely according to the package instructions. I prefer to leave this overnight to ensure no moisture remains before painting.
Crack Control
If the clay cracks slightly while drying, don’t panic. Mix a tiny bit of fresh clay with water to make a paste and smooth it into the cracks with your finger.
Step 2: painting and Detailing
-
Base coat the walls:
Paint the terracotta surface around your sculpted elements with a mix of burnt sienna and ochre to create a warm, stucco-like wall color. You may need two coats for opacity. -
Paint the woodwork:
Fill in the door planks with a light tan or honey color. Paint the interior of the window panes black to create depth. -
Stone foundation:
Paint the sculpted archway stones and the window frame light grey. Paint a 2D stone foundation around the base of the pot using the same grey to ground the house. -
Wood grain details:
Mix a watery brown paint. use a fine liner brush to trace over the scored grooves in the door, highlighting the separation between planks. -
Stone shading:
Dip your brush in diluted dark grey paint and dab it into the crevices between the sculpted stones. Wipe away excess from the raised surfaces to accentuate the texture. -
Greenery gradients:
Paint the clay ivy leaves a medium forest green. Once dry, add highlights to the tips of the leaves with a lime green to simulate sunlight hitting the vines. -
Garden base painting:
Paint some 2D shrubbery and small red flowers near the bottom stone foundation to blend the painted world with the 3D sculpture. -
Inking the outlines:
To achieve the illustrative style seen in the photo, use an extra-fine black acrylic paint pen to outline the stones, the door hinges, and the leaves. -
Hardware essentials:
Paint two horizontal bands across the door for hinges and a small circle for the handle using black or metallic bronze paint. Add tiny silver dots for nails. -
Protective finish:
Once all paint is bone dry, spray the entire pot (inside and out) with a matte sealer to protect your artwork from moisture.
Secret Glow
Paint the inside of the window panes with yellow glow-in-the-dark paint instead of black so the fairy house looks ‘occupied’ at night!
Fill your new enchanted vessel with soft moss or a delicate fern to complete the living roof of this magical abode.


Have a question or want to share your own experience? I'd love to hear from you in the comments below!