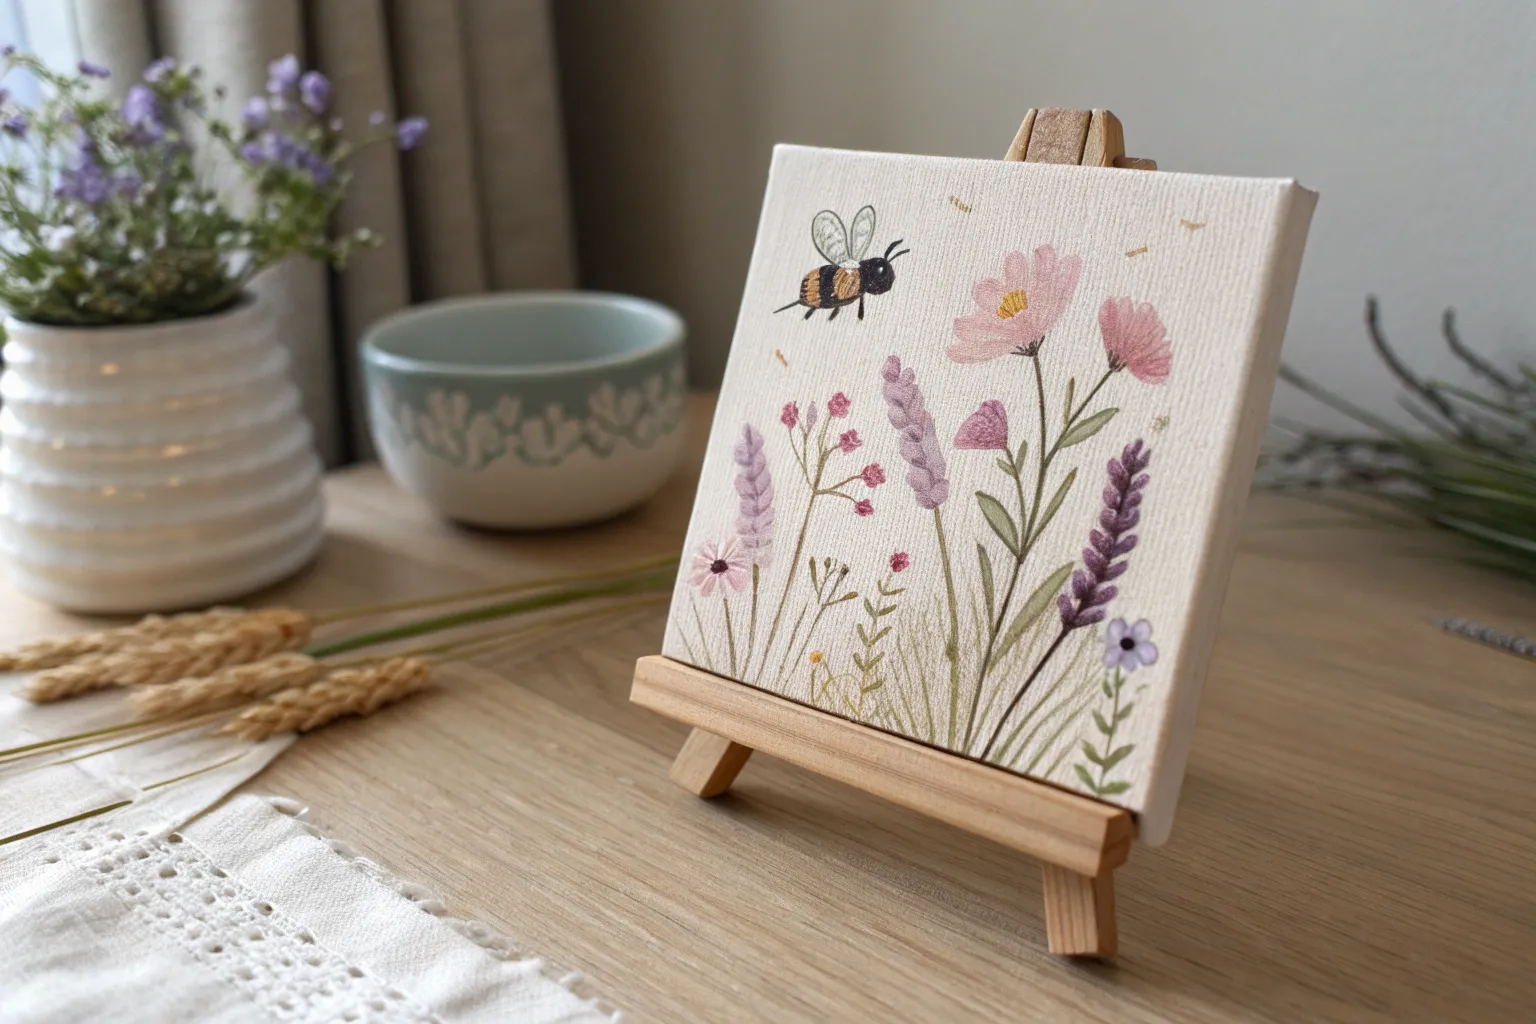
When you want something sweet, simple, and satisfying, cute canvas painting ideas are my go-to—especially on tiny canvases you can finish in one sitting. I pulled together my favorite beginner-friendly concepts that look adorable with soft colors, playful shapes, and just enough detail to feel polished.
Pastel Sunset With Fluffy Cotton-Candy Clouds
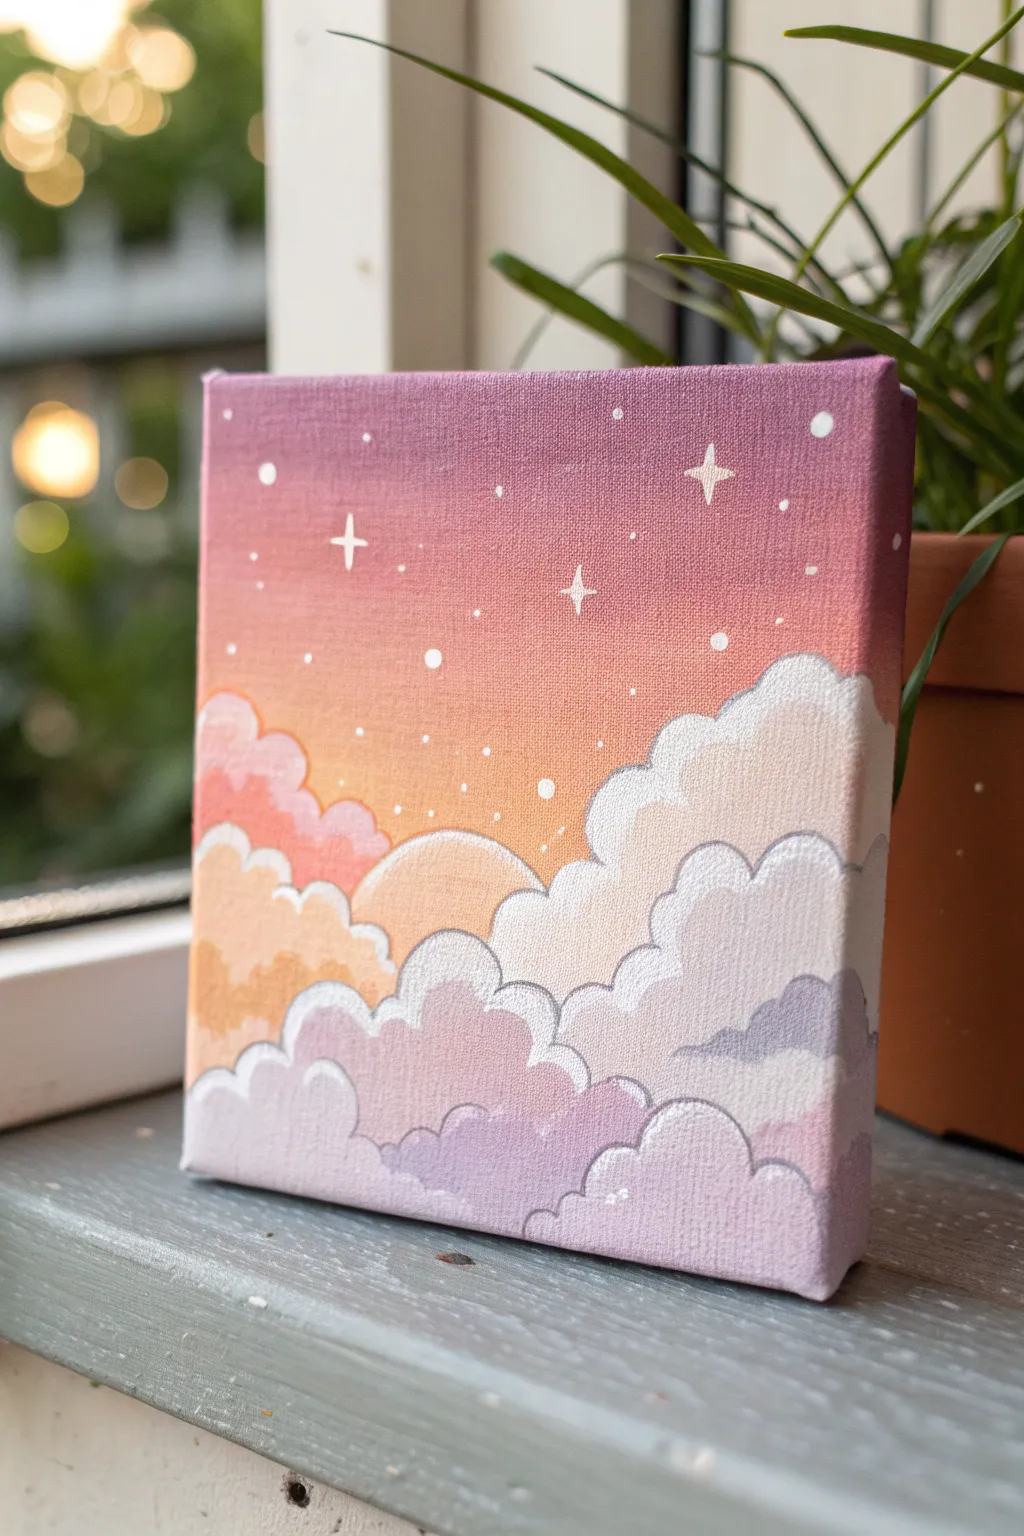
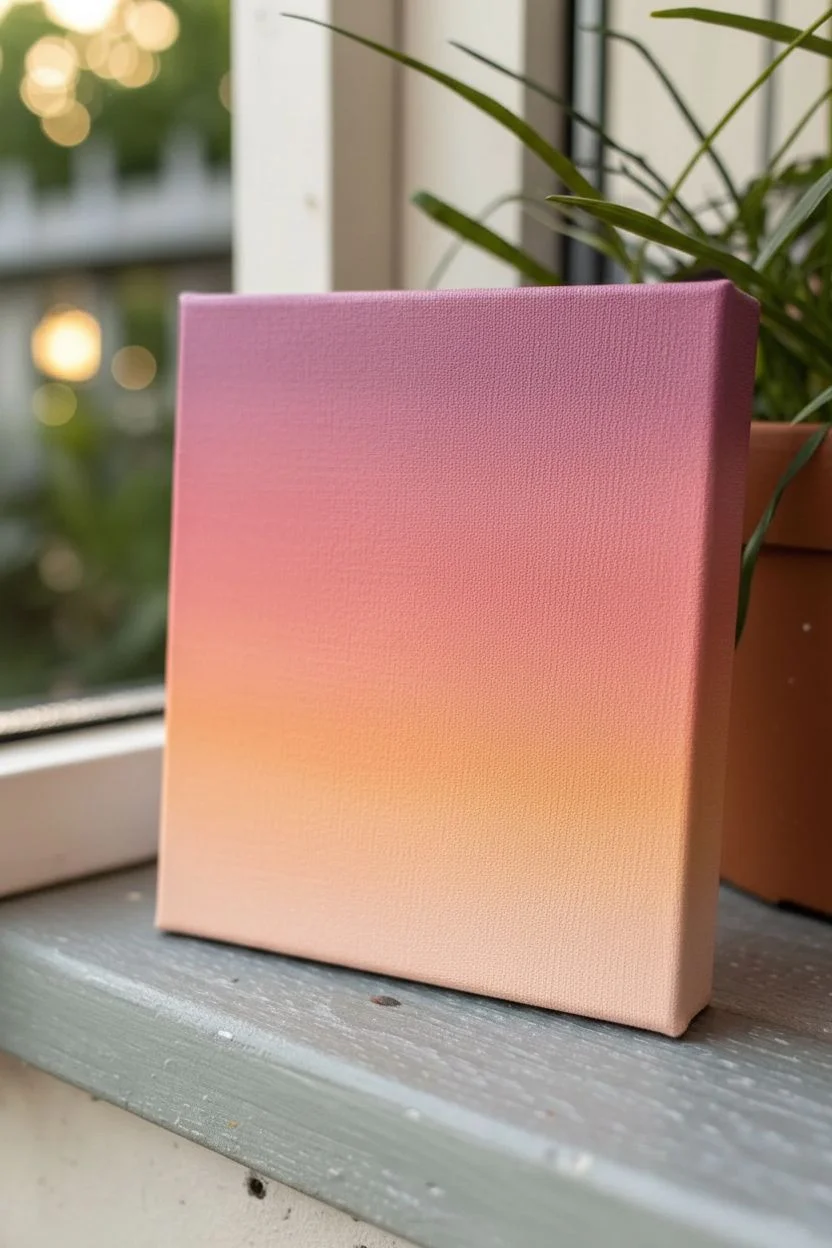
Capture the magic of twilight with this ethereal canvas painting featuring a seamless pastel gradient and whimsical, cartoon-style clouds. This project focuses on soft blending and clean linework to create a serene, dreamy aesthetic perfect for brightening any small corner.
Step-by-Step Guide
Materials
- Small square canvas (e.g., 6×6 or 8×8)
- Acrylic paints (Titanium White, Magenta, Orange, Lavender/Purple, Light Blue)
- Flat shader brush (medium size for background)
- Round brush (size 4 or 6 for clouds)
- Detail liner brush (size 0 or 1 for outlining and stars)
- Cup of water
- Paper towels
- Palette or paper plate
Step 1: Painting the Sky Gradient
-
Prepare your colors:
Squeeze out a generous amount of Magenta, Orange, and Titanium White onto your palette. You’ll need enough paint to cover the entire upper 2/3 of the canvas without stopping. -
Start with the darkest tone:
Using your flat shader brush, mix a muted magenta (add a tiny dot of blue if it’s too bright) and paint a horizontal strip across the very top of the canvas. -
Transition to pink:
Without cleaning your brush, pick up some fresh Magenta and a touch of White. Paint the next section down, overlapping slightly with the top strip to begin blending while the paint is wet. -
Blend into orange:
Wipe your brush slightly, then pick up the Orange paint. Apply this below the pink section, using horizontal back-and-forth strokes. Work the orange up into the pink to create a smooth, seamless transition. -
Finish with a soft peach glow:
Mix a large amount of White into your Orange to create a pale peach color. Paint this near the bottom third of the canvas where the clouds will sit, ensuring the gradient gets lighter as it goes down. Let the background dry completely.
Step 2: Designing the Fluffy Clouds
-
Sketch the cloud shapes:
Using a very light pencil or thinned white paint, roughly map out your cloud formations. Create a large, heaped mountain of clouds on the right side and smaller, lower clusters on the left. -
Block in the large cloud:
Mix a soft lavender shade (Purple + White) and paint the base of the large right-side cloud formation. Don’t worry about the outlines yet; just get the solid color down. -
Add the highlighted tops:
Clean your round brush and mix an off-white or very pale pink. Paint the rounded tops of the right-side cloud formation, blending the bottom of this light color into the still-wet lavender base for a soft, puffy look. -
Paint the left side clouds:
For the clouds on the left, use warmer tones. Mix a peachy-pink and block in those shapes, keeping the tops rounded and ‘bubbly’. -
Layer the foreground:
Create a new row of low-lying clouds at the very bottom using a slightly darker purple-grey mix. This adds depth, making it look like the other clouds are further away. -
Refine the edges:
Go back over any patchy areas with a second coat of paint to ensure the colors are opaque and smooth.
Smooth Gradients
If your acrylics are drying too fast to blend, mist the canvas lightly with water or add a slow-drying medium to keep the paint workable longer.
Step 3: Outlining and Details
-
Prepare the liner paint:
Mix Titanium White with a tiny drop of water to make it inky and smooth. This helps the paint flow easily from your liner brush. -
Outline the upper clouds:
Using the detail liner brush, carefully trace the top curves of your main cloud mountain. I like to stabilize my hand by resting my pinky on the dry parts of the canvas. -
Define the cloud sections:
Add curved white lines inside the cloud masses to separate the ‘puffs.’ These internal lines define the shape and volume of the cotton-candy look. -
Outline the lower clouds:
Continue outlining the orange and purple clouds on the left and bottom. Vamping the line thickness slightly—thicker on curves and thinner at connection points—adds a nice stylistic touch. -
Add sparkle:
In the sky area, paint a few four-pointed stars using the liner brush. Start with a vertical line, then cross it with a horizontal one, tapering the ends to sharp points. -
Sprinkle in stardust:
using the tip of your brush or a toothpick, dot random tiny white specks around the main stars to fill the empty space. -
Final touches:
Paint the sides of the canvas to match the gradient or cloud colors so it looks polished from every angle.
Level Up: Glitter Glaze
Once fully dry, brush a thin layer of iridescent glitter glaze over just the cloud tops. It makes them shimmer beautifully in the sunlight.
Display your shimmering sunset on a mini easel or shelf to add a daily dose of calm to your room


Smiling Strawberry With Tiny Seed Dots
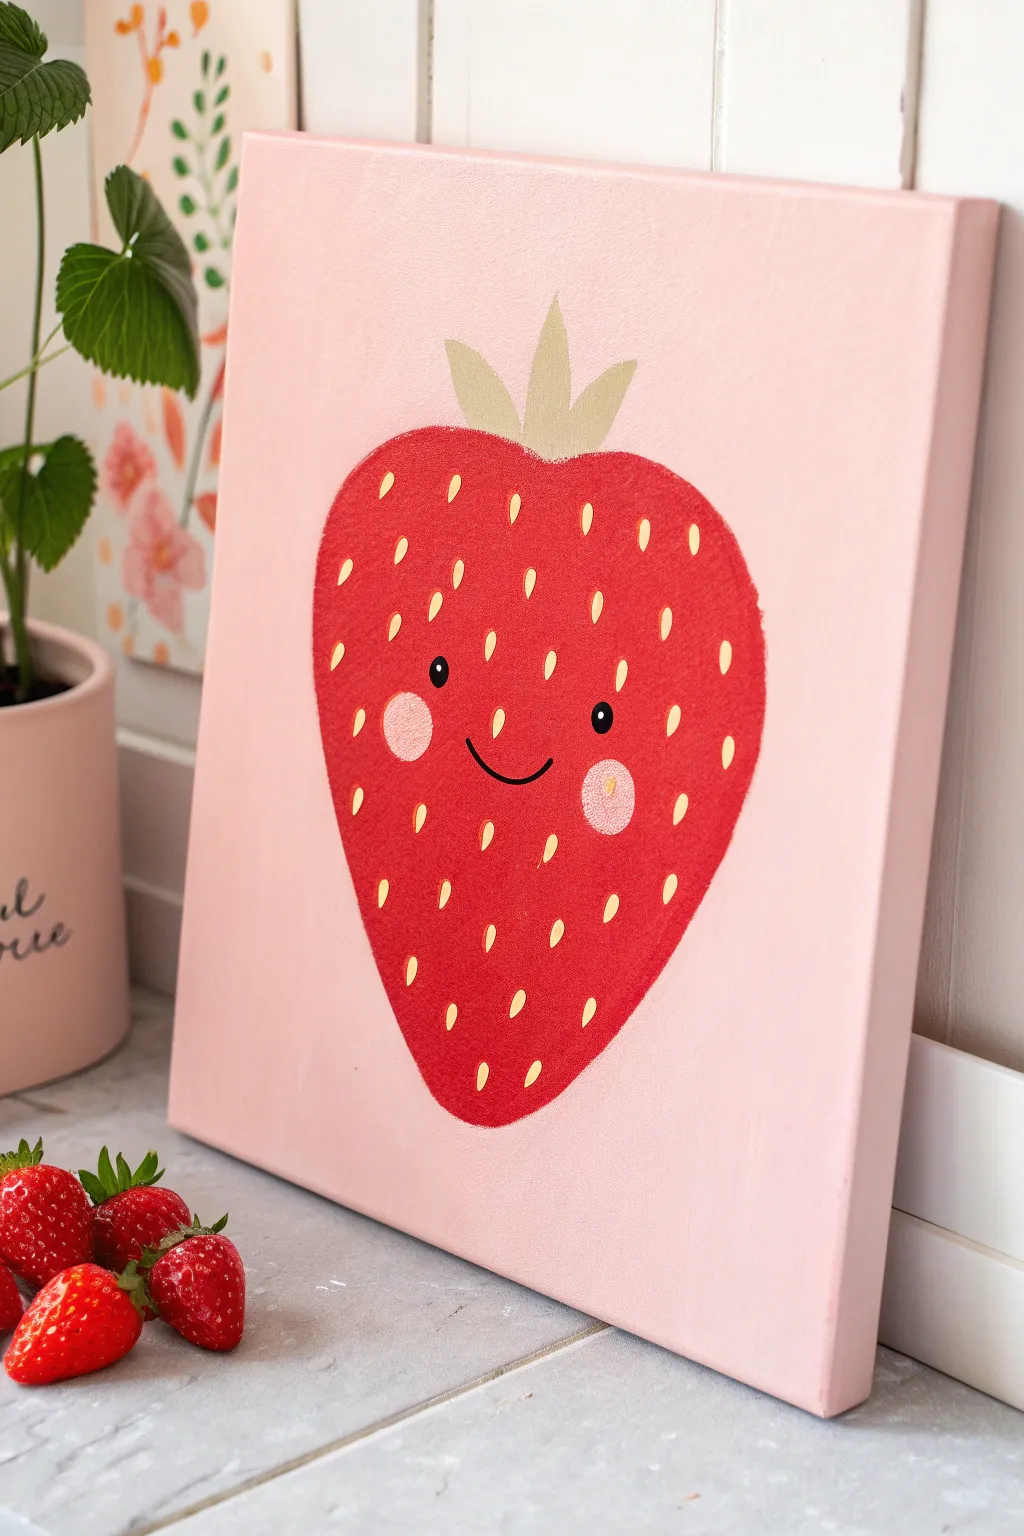
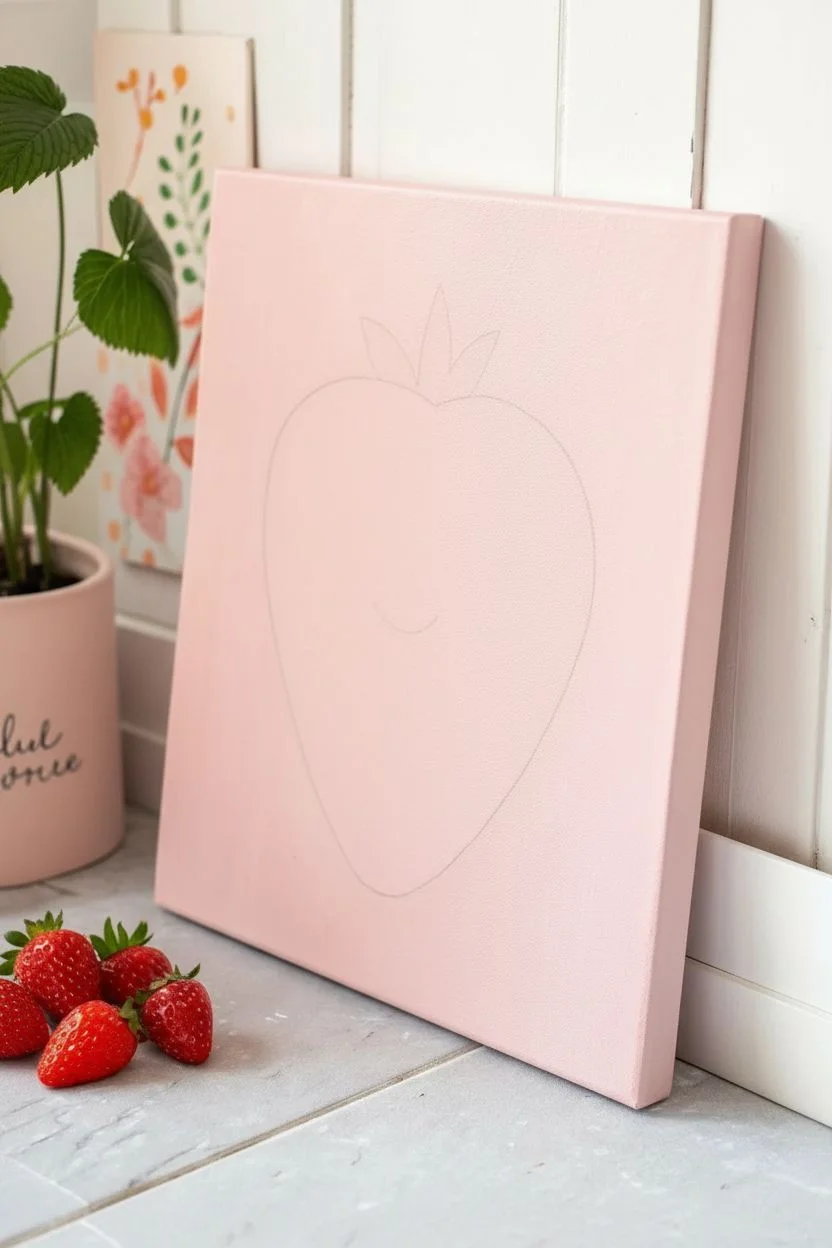
Brighten up any corner with this cheerful strawberry canvas that radiates pure joy. The soft pink backdrop and bold red fruit create a delightful contrast, while the kawaii-style face adds an irresistible dose of cuteness.
How-To Guide
Materials
- Square canvas (10×10 or 12×12 inches)
- Acrylic paints: Light pink, bright primary red, creamy yellow, sage green, black, white, and a darker dusty pink
- Flat paintbrush (medium width)
- Detail brush (fine round)
- Pencil for sketching
- Paper plate or palette
- Cup of water
- Paper towels
Step 1: Setting the Scene
-
Prep the background:
Begin by painting your entire canvas with a soft, pastel pink. Use smooth, horizontal strokes to ensure even coverage. Don’t forget to paint the sides of the canvas for a polished, professional look. -
Let it dry completely:
Allow the background layer to dry fully before moving on. This prevents the red paint from blending with the pink and keeps your edges crisp. -
Sketch the strawberry shape:
Using a pencil very lightly, draw a large heart-like shape in the center of the canvas. Instead of a sharp point at the bottom, round it off significantly to make it look plump and friendly.
Step 2: Painting the Fruit
-
Fill in the red:
Load your medium flat brush with bright primary red paint. Carefully outline your pencil sketch first, then fill in the center. Use confident strokes to create a solid, opaque block of color. -
Add a second coat:
Reds can be translucent, so once the first layer is dry to the touch, apply a second coat to make the strawberry look vibrant and rich. -
Create the stem:
Mix a soft sage green (or use it straight from the tube) and paint three leaf shapes at the top center of the berry. The middle leaf should point straight up, while the side leaves curve gently outward.
Clean Lines Pro Tip
For the smoothest seeds, load your thin liner brush with yellow paint, touch the tip to the canvas, press down slightly to widen the stroke, and lift up quickly to create a teardrop point.
Step 3: Adding the Personality
-
Sketch the face:
Once the red paint is bone dry, lightly sketch the facial features. Place the eyes wide apart about halfway down the berry, and add a small, simple smile right between them. -
Paint the eyes:
Using your fine detail brush and black paint, fill in two small, solid black circles for the eyes. Try to keep them as round and symmetrical as possible. -
Add the smile:
With the very tip of your detail brush and black paint, trace the smile line. A thin, delicate line works best here to keep the expression sweet. -
Make the cheeks:
Mix a small amount of white into your red or pink paint to create a soft, dusty pink color. Paint two medium-sized circles directly under the eyes for rosy cheeks. -
Add eye sparkles:
Dip the back end of your paintbrush handle into white paint and dot a tiny spec of white into the upper right corner of each black eye. This ‘catchlight’ brings the character to life.
Level Up With Texture
Mix a tiny bit of baking soda into your red paint before applying it. This will give the strawberry a slightly raised, grainy texture similar to real fruit skin.
Step 4: The Seedy Details
-
Prepare the seed color:
On your palette, ready your creamy yellow paint. You want a consistency that isn’t too runny so the seeds stand out clearly against the red. -
Start the seed pattern:
Using your detail brush, paint small teardrop shapes pointing upwards. I find it helpful to start around the outer edges of the strawberry to establish spacing. -
Fill in the rest:
Continue adding seeds across the entire red area, spacing them out evenly. Don’t worry about being mathematically perfect; a little variation looks more organic. -
Detail the cheeks:
Don’t forget to add a few seeds even over the pink cheek areas. This helps integrate the face onto the fruit surface naturally.
Hang your cheerful creation in the kitchen or a playroom to add a daily sprinkle of happiness


Peekaboo Panda Face Over the Bottom Edge
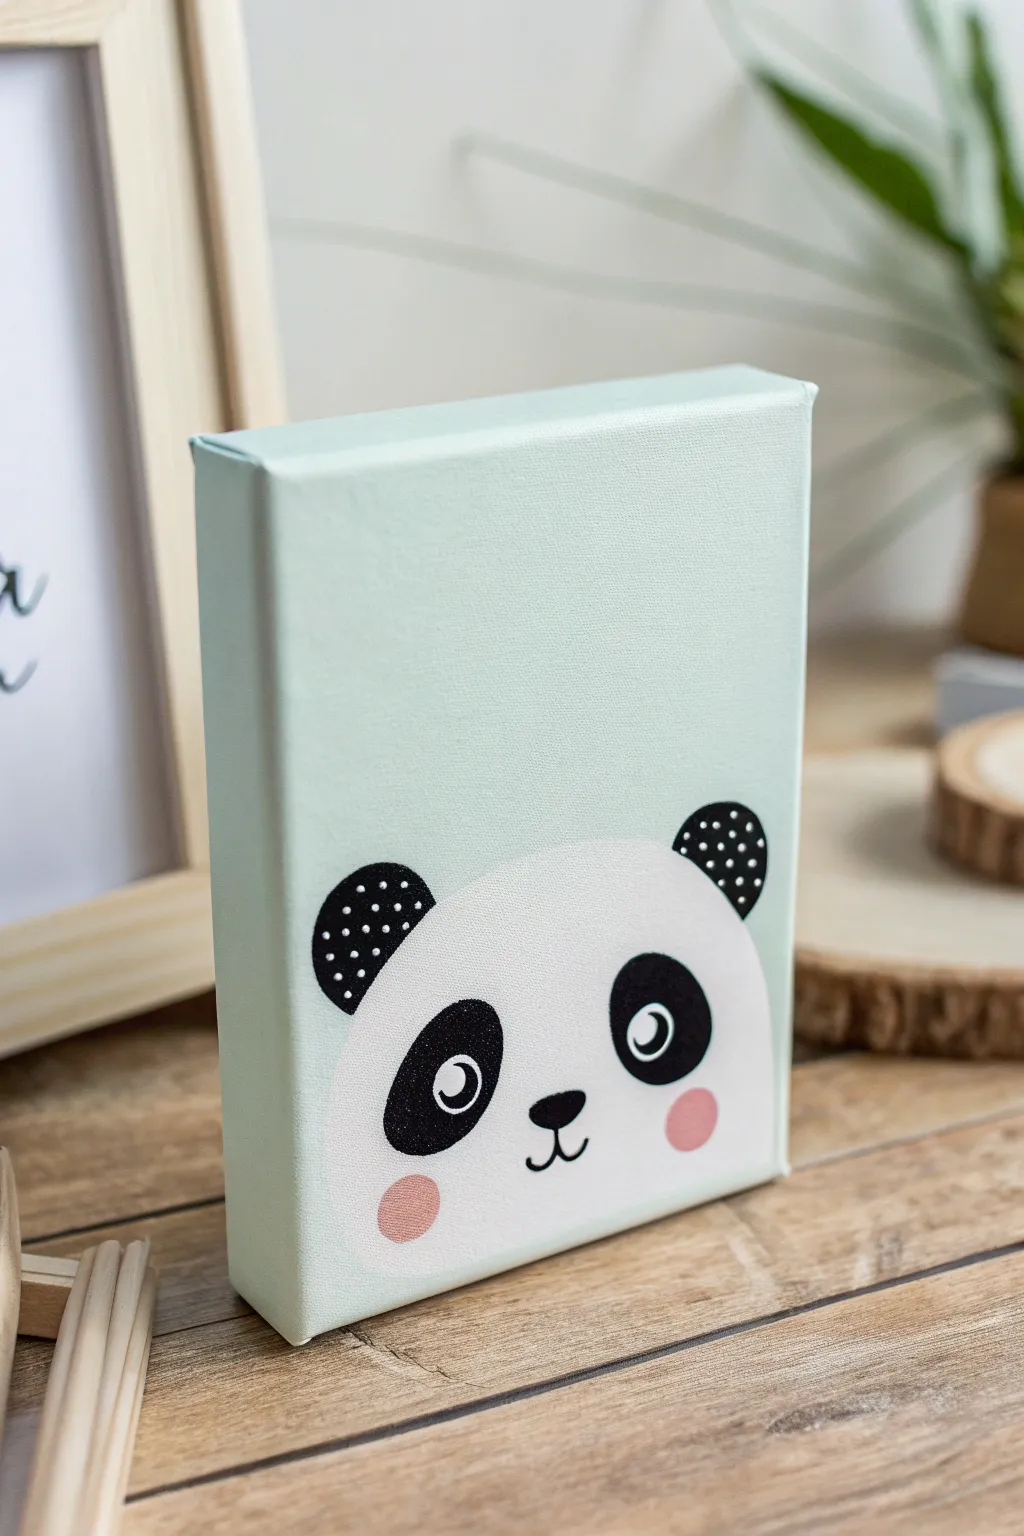
Add a touch of whimsy to any nursery or child’s room with this adorable peekaboo panda painting. The soft mint background pairs perfectly with the bold black and white character, creating a modern yet playful piece of art that looks much more complicated than it actually is.
Detailed Instructions
Materials
- Small rectangular stretched canvas (e.g., 5×7 or 6×8 inches)
- Acrylic paints: Mint green (or pastel teal), Titanium White, Mars Black, Soft Pink
- Flat paintbrush (1-inch width)
- Medium round brush
- Fine liner brush (for details)
- Pencil for sketching
- Compass or round object (like a mug) for tracing
- Palette or paper plate
- Cup of water and paper towels
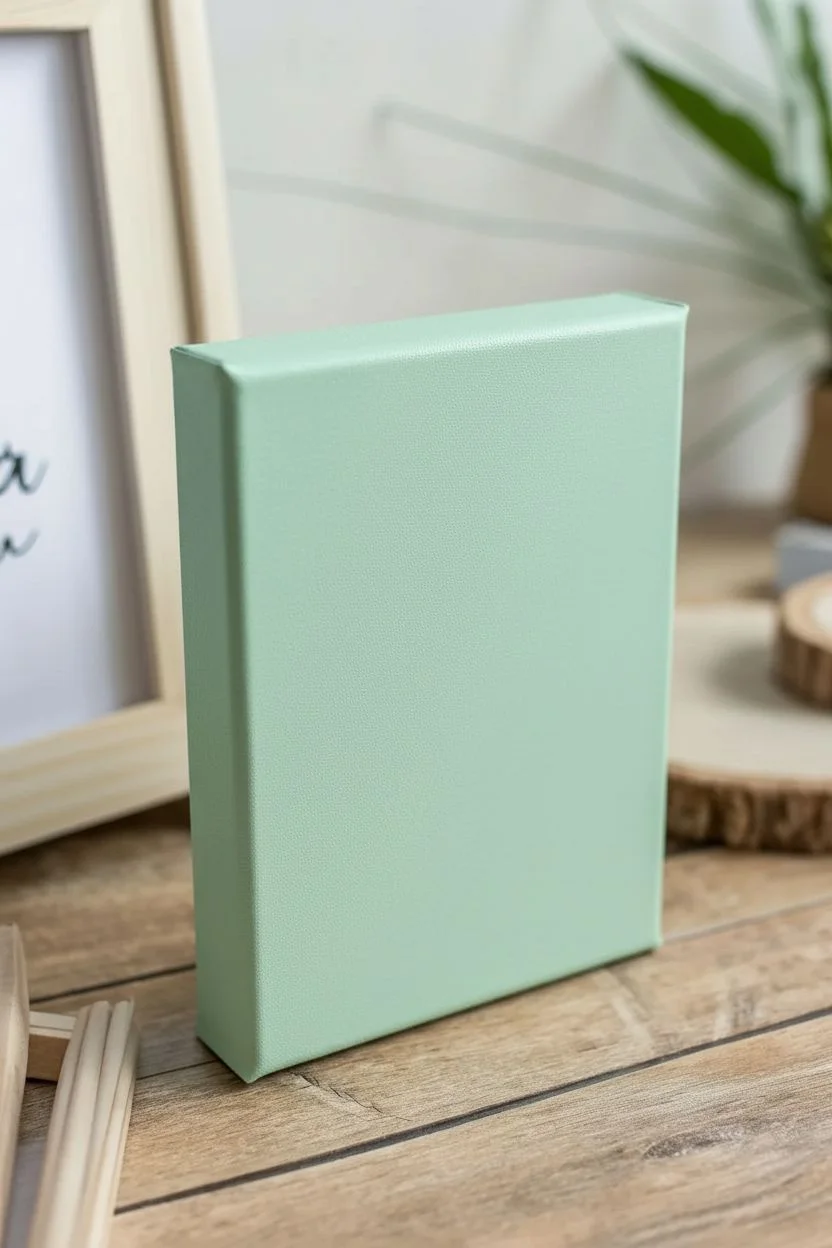
Step 1: Setting the Background
-
Prepare the Base Color:
Mix a soft mint green shade on your palette. If your green is too vibrant, add a significant amount of white to soften it into a pastel tone. -
Paint the Surface:
Using your wide flat brush, coat the entire front surface of the canvas with the mint paint. Ensure your strokes are smooth and run in one direction for a clean finish. -
Cover the Sides:
Don’t forget the edges! Paint the top and side edges of the canvas with the same mint color to give the artwork a professional, gallery-wrapped look. -
Let it Dry completely:
Allow the background layer to dry fully before moving on. This usually takes about 20-30 minutes, or you can speed it up with a hair dryer on a cool setting.
Clean Lines Hack
Use a small round object like a cup or masking tape roll to trace the curve of the panda’s head for a perfectly symmetrical arc.
Step 2: Drafting the Panda
-
Outline the Head shape:
Using a pencil, lightly sketch a large semi-circle starting from the bottom edge of the canvas. The top curve should reach about one-third up the canvas height. -
Position the Features:
Lightly sketch two smaller semi-circles on the top left and right of the head for ears. Then, mark spots for the large oval eye patches and a small nose in the center. -
Fill the Head:
With a clean medium round brush, fill in the large semi-circle head shape with Titanium White paint. You may need two coats to ensure the mint background doesn’t show through.
Step 3: Painting the Features
-
Paint the Ears:
Use black paint to fill in the ear shapes. Make sure the curves are neat where they meet the white head. -
Create the Eye Patches:
Paint two large, tilted oval shapes in black for the eye patches. They should slant slightly inwards toward the nose area. -
Add the Cheek Blush:
Mix a small amount of soft pink paint. Dab two soft pink circles on the cheeks, just below and outside the eye patches. -
Refine the Eyes:
Once the black eye patches are dry, paint white circles inside them for the eyes. I find painting the white circle slightly closer to the inner edge creates a cuter look. -
Add Eye Details:
Inside the white eye circles, add a smaller black pupil. Then, add a tiny white dot highlight in the pupil to bring the character to life.
Make It Pop
Paint the canvas sides in a contrasting color, like the soft pink used for the cheeks, to add a hidden pop of color when viewed from an angle.
Step 4: Finishing Touches
-
Paint the Nose:
Using your fine liner brush and black paint, create a small, soft triangular nose in the center of the face. -
Add the Mouth:
Draw a thin anchor shape or a small ‘w’ connecting from the bottom of the nose to create the smiling mouth. -
Dotted Texture:
Dip the back end of a paintbrush into white paint. Gently dot small spots onto the black ears to create a playful pattern. -
Inspect Edges:
Check the bottom edge of the canvas. Since the panda is ‘peeking,’ ensure the white body paint extends fully over the bottom lip of the canvas frame. -
Final Coat (Optional):
Once everything is completely dry, you can apply a layer of matte varnish to protect the paint and even out the sheen.
Place your finished panda on a shelf or hang it low on the wall so it looks like it’s peeking right at you


Rainbow Arc With Floating Heart Motifs
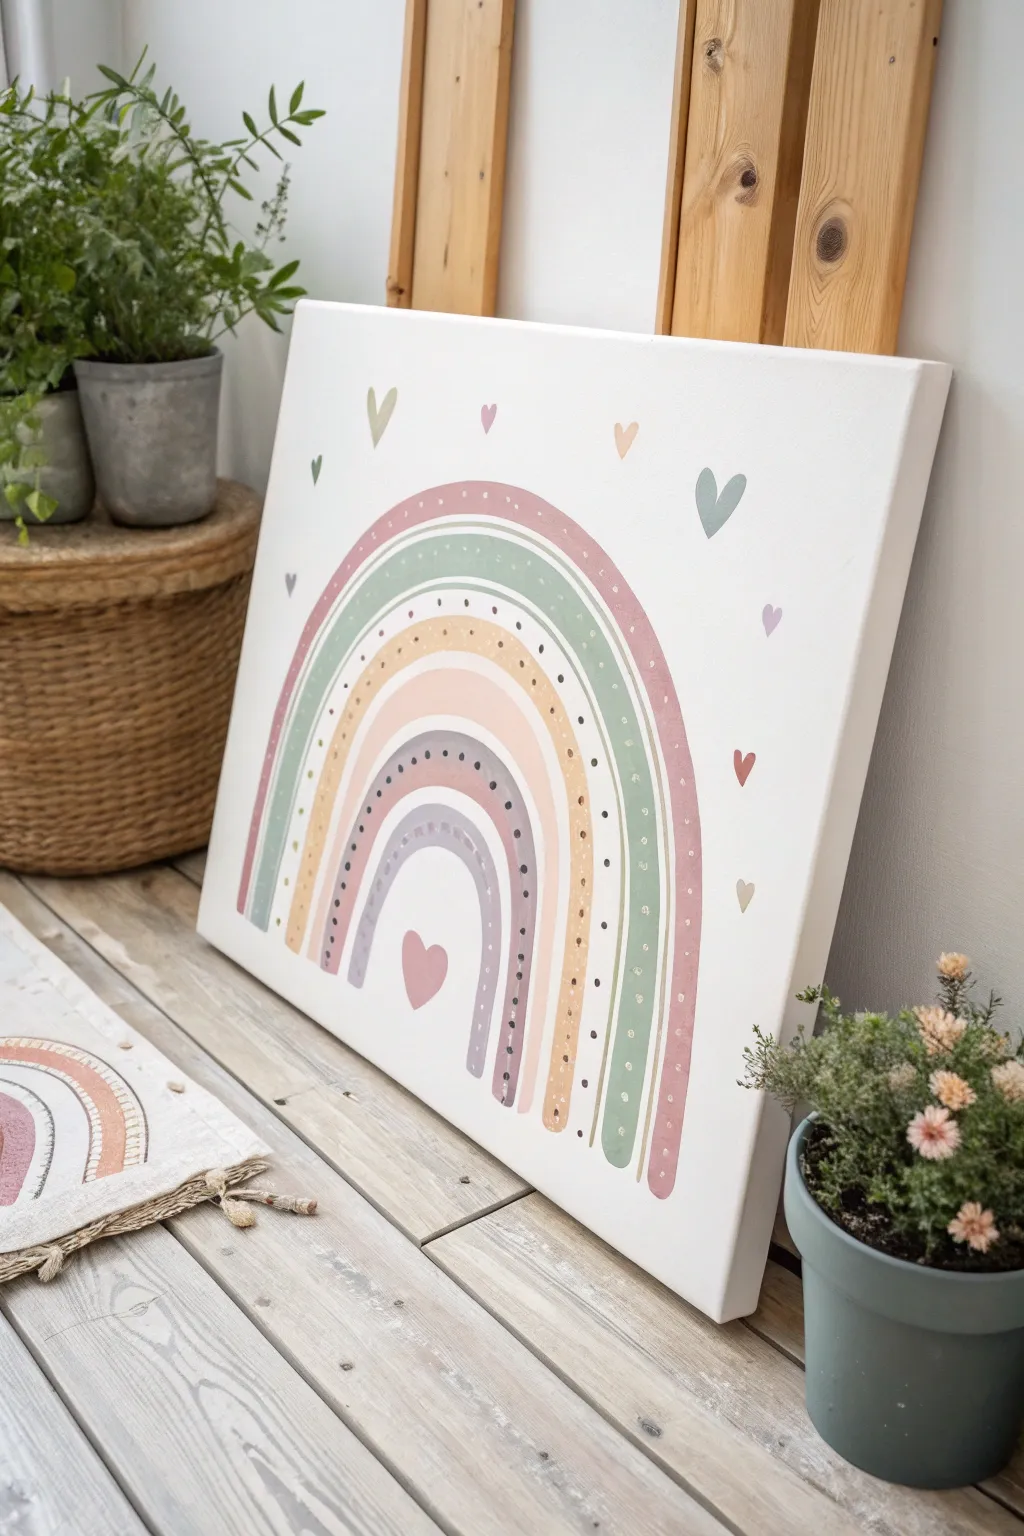
Bring a touch of whimsy to a nursery or playroom with this charming boho rainbow canvas painting. Featuring muted earthy pastels, delicate dot work, and floating heart motifs, this piece offers a modern and gentle take on the classic rainbow arc.
Step-by-Step
Materials
- Square white canvas (stretched, approx. 12×12 or 16×16 inches)
- Acrylic paints (muted mauve, warm sage green, mustard yellow, blush pink, lavender-grey)
- Titanium white acrylic paint (for mixing tints)
- Flat shader brushes (medium width for the arcs)
- Small round detail brush (size 0 or 1)
- Pencil and eraser
- Compass or round objects for tracing (bowls/plates)
- Painter’s palette or paper plate
- Cup of water and paper towels
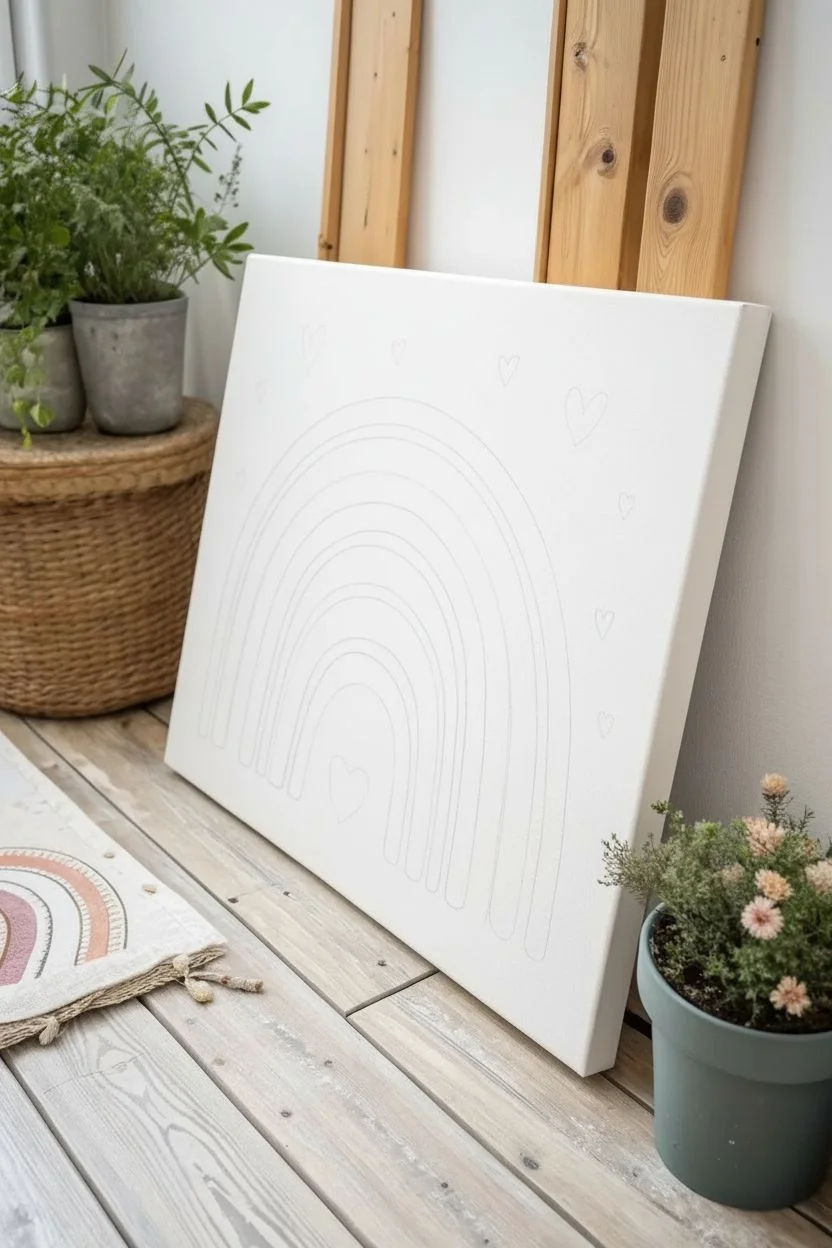
Step 1: Planning the Arcs
-
Find the center:
Begin by lightly marking the bottom center of your canvas with a pencil. This will be the anchor point for all your rainbow arcs to ensure symmetry. -
Trace the guides:
Using a compass or a series of concentric round objects like plates and bowls, sketch five arched lines radiating from your center point. Leave even spacing between them where the colored bands will go, and small gaps for white space. -
Sketch floating details:
Lightly sketch small hearts scattered randomly around the rainbow’s exterior. Add one larger heart tucked into the very center negative space under the smallest arch.
Wobbly Arches?
If your curves look shaky, don’t stress. Use a white paint pen or a small brush with white paint to ‘cut in’ and tidy up the edges of the colorful bands after they dry.
Step 2: Painting the Bands
-
Mix your palette:
Prepare your colors. For that boho look, mix a tiny dot of black or brown into your standard colors to desaturate them, or mix plenty of white into bold colors to create soft pastels. -
The outer arch:
Start with the largest, outermost band using the muted mauve color. Load a flat brush and follow your pencil curve smoothly. I usually turn the canvas sideways to get a better angle for curved strokes. -
The green layer:
Skip a small space (leaving the white canvas visible) and paint the second band in a warm sage green. Keep the edges relatively crisp. -
Mustard and blush:
Continue inward, painting the third band in a soft mustard yellow and the fourth in a pale blush pink. Rinse your brush thoroughly between color changes. -
The inner arch:
Paint the smallest, innermost arch in a lavender-grey tone. This final band anchors the rainbow structure. -
Refine edges:
Once the first coat is dry, inspect your edges. Go back with a smaller brush to smooth out any wobbles or add a second coat if the paint looks streaky.
Step 3: Adding Details
-
The central heart:
Paint the single heart located inside the bottom arch using the same mauve tone used for the outer band. -
Scattered hearts:
Fill in the floating hearts around the sky area. Use a variety of the colors already on your palette—sage, mustard, pink, and grey—to create a cohesive look. -
Dotted details: Outer band:
Using the back end of a small paintbrush dipped in white paint, stamp tiny, spread-out dots along the mauve outer band. -
Dotted details: Middle band:
Switch to a dark grey or black paint on your detail brush. Add tiny specks or dots along the mustard yellow band for contrast. -
Dotted details: Inner band:
Add a final row of dark grey dots along the innermost lavender arch. Keep the spacing random but balanced. -
White highlights:
For a bit of texture, add very subtle, random white specks or distressed scratch marks on the green and pink bands to give them a weathered feel. -
Erase guidelines:
Wait until the paint is completely, 100% dry to the touch. Gently erase any visible pencil marks left in the white spaces between the rainbow bands.
Textured Finish
Mix a teaspoon of baking soda into your acrylic paints before applying. This creates a fluffy, matte, terra-cotta texture that adds amazing dimension to boho art.
Hang your soft and dreamy artwork in a cozy corner to enjoy the peaceful vibes you’ve created
BRUSH GUIDE
The Right Brush for Every Stroke
From clean lines to bold texture — master brush choice, stroke control, and essential techniques.
Explore the Full Guide
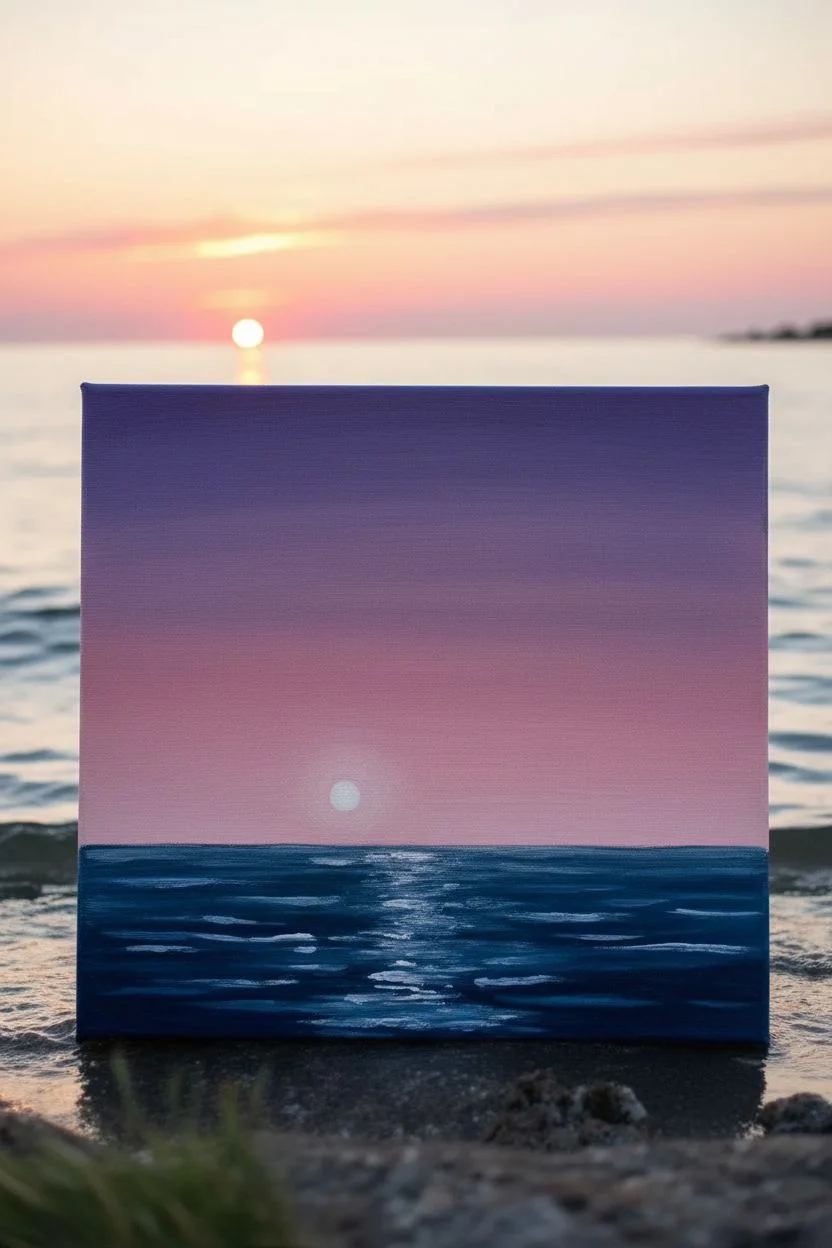
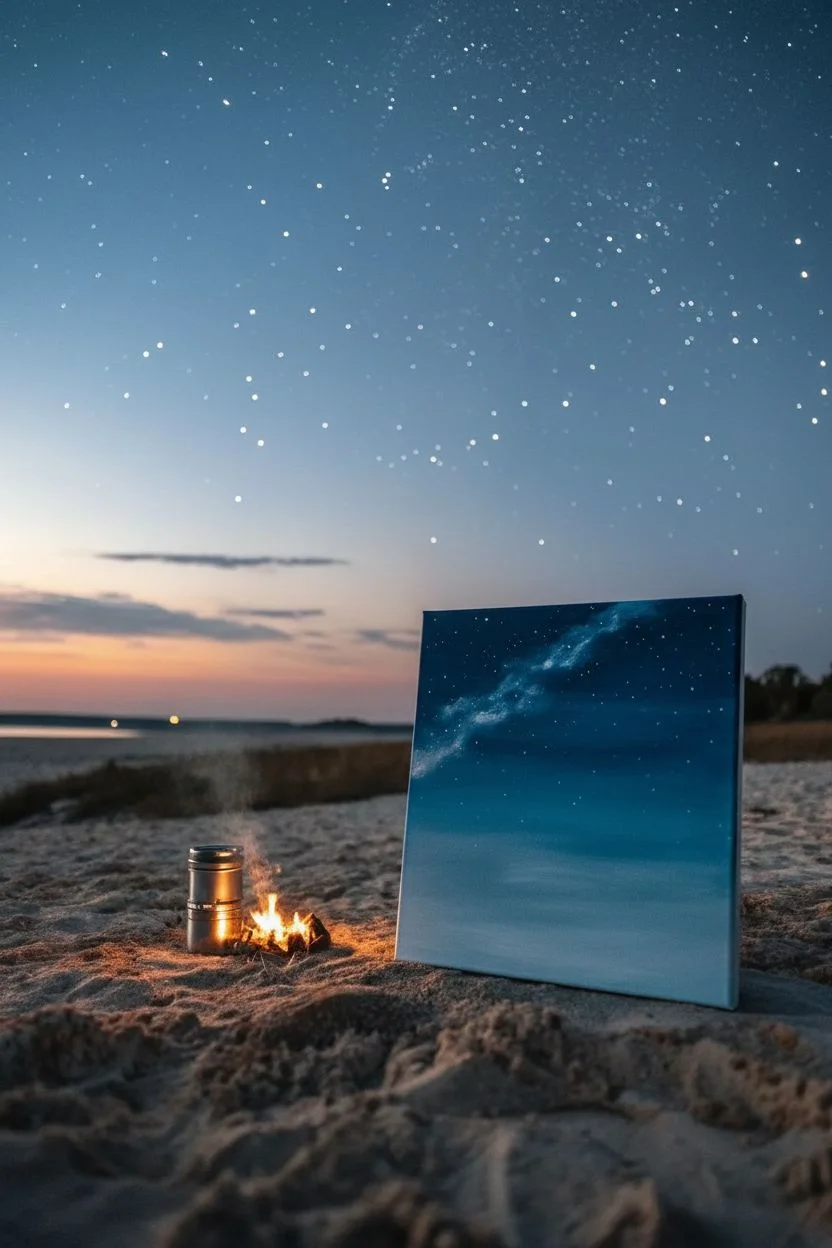
Pink Moon and Tiny Starry Night Sky
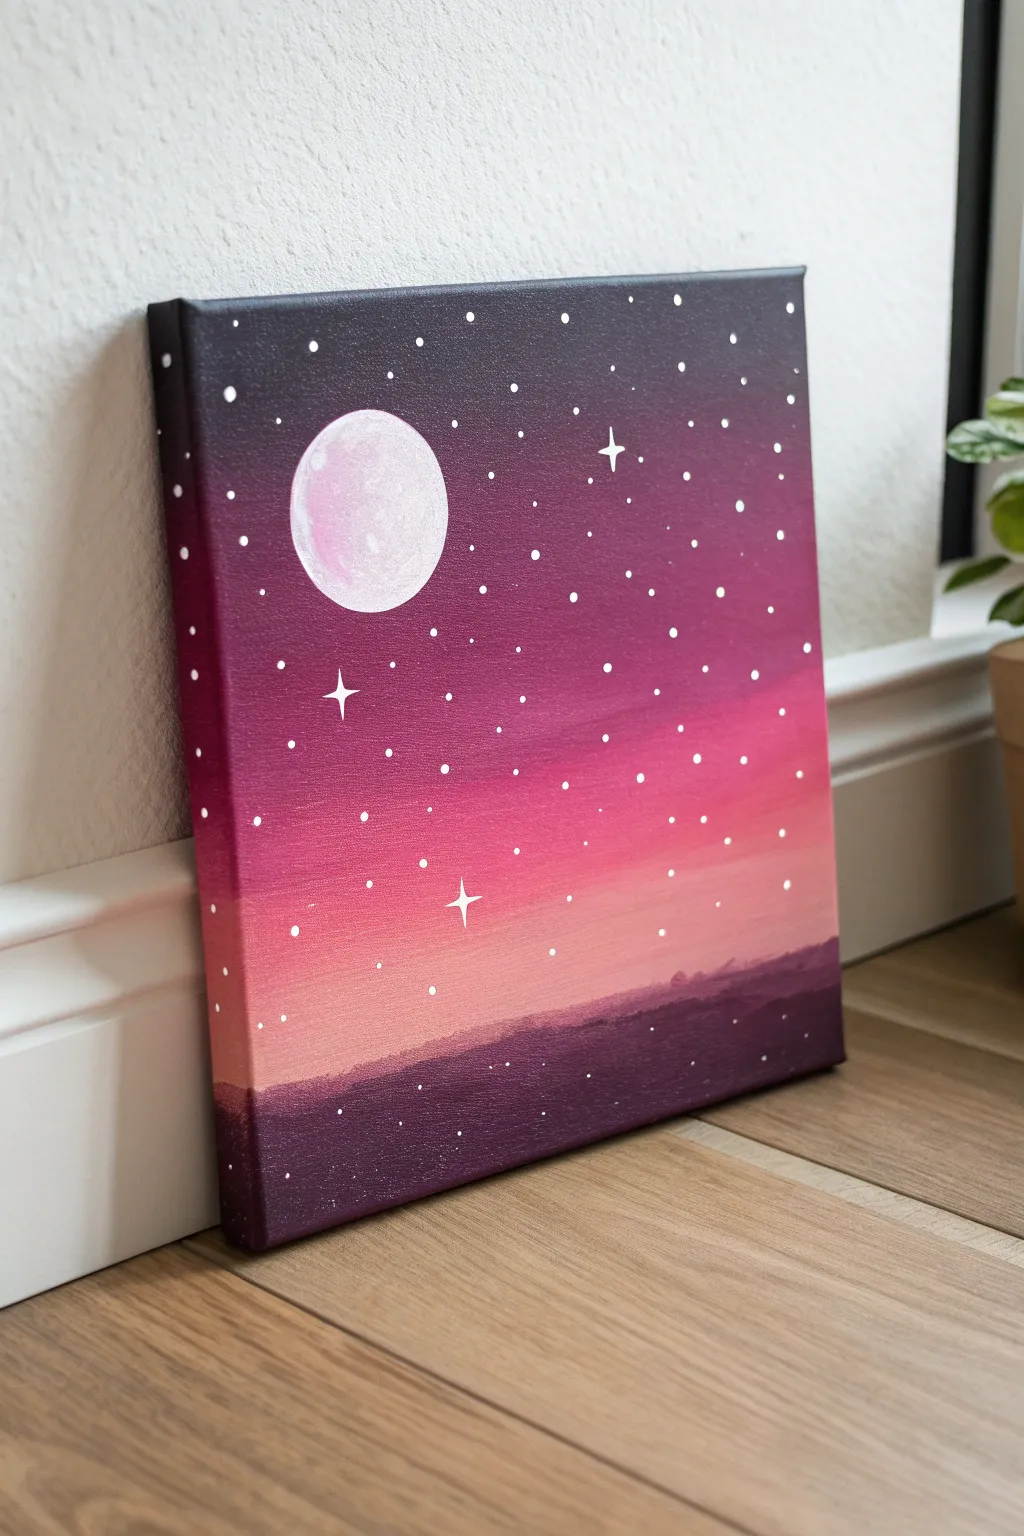
Capture the magic of a twilight sky with this dreamy gradient painting featuring a glowing pink moon and delicate starlight. The smooth transition from deep plum to soft peach creates a stunning backdrop for a simple yet striking silhouette.
Step-by-Step Guide
Materials
- Square stretched canvas (e.g., 8×8 or 10×10 inches)
- Acrylic paints: Deep Violet, Magenta, Titanium White, Peach (or Light Orange)
- Flat shader brush (medium size, approx. 3/4 inch)
- Small round detail brush (size 0 or 1)
- Water cup and paper towels
- Palette or paper plate
- Pencil (optional)
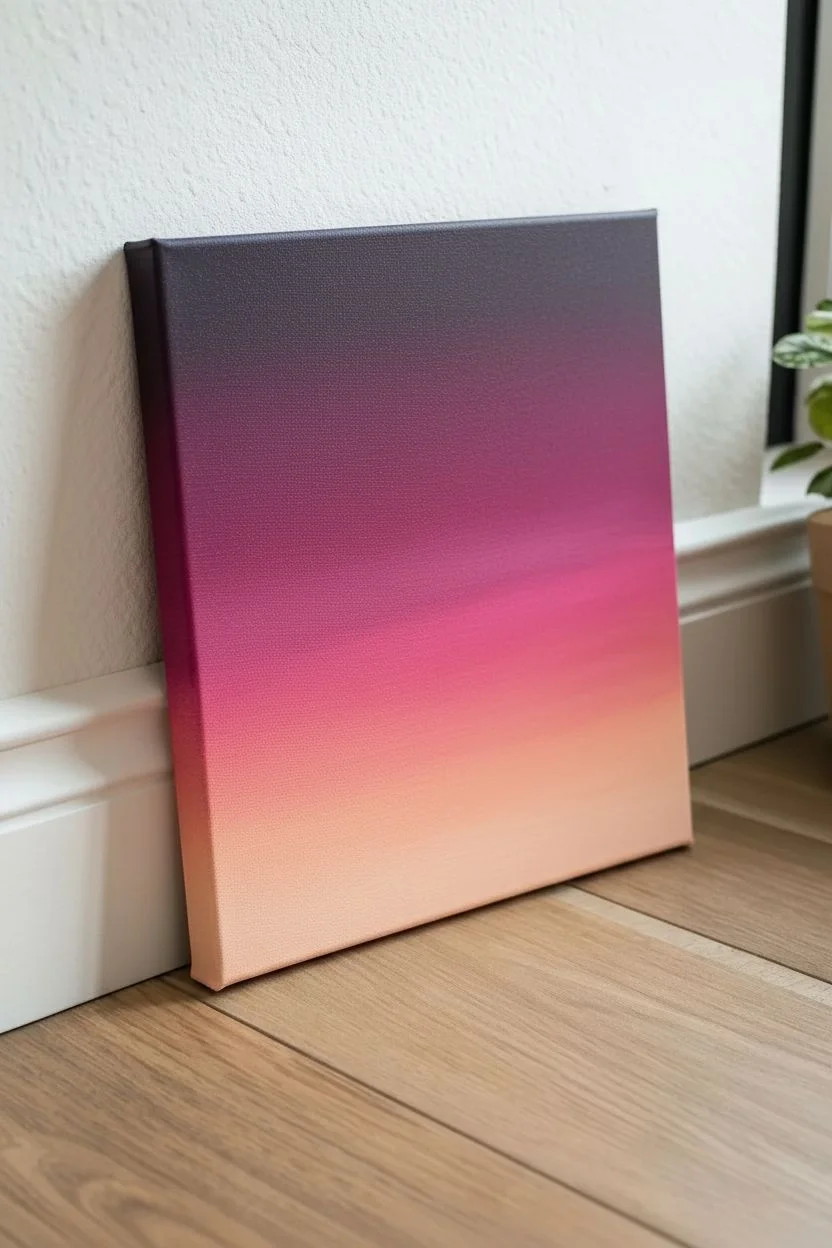
Step 1: Creating the Ombré Sky
-
Prepare your colors:
Squeeze out generous amounts of Deep Violet, Magenta, Titanium White, and Peach onto your palette. It helps to have these ready before you start so the paint stays wet for blending. -
Start the top section:
Using your flat shader brush, load up the Deep Violet paint. Apply this color across the top third of the canvas using long, horizontal strokes. Don’t forget to paint the top and side edges of the canvas for a finished look. -
Introduce the mid-tone:
Without washing your brush (wipe off excess purple if needed), pick up the Magenta paint. Apply this directly below the violet section. -
Blend the transition:
While both paints are still wet, work the brush back and forth where the purple and pink meet. The leftover violet on your brush will help smudge the line into a smooth gradient. -
Add the horizon glow:
Clean your flat brush thoroughly. Mix a little Peach with White to create a soft, warm glow color. Apply this to the lower portion of the sky, leaving about an inch of white space at the very bottom for the ground later. -
Final sky blend:
Use the brush to blend the peach upward into the magenta section. You want a seamless fade from dark purple at the top, through pink, down to that light peach. -
Let it dry completely:
Allow the background to dry fully. This is crucial because painting a crisp moon over wet gradient paint will result in a muddy mess.
Step 2: Painting the Moon
-
Sketch the placement:
Lightly trace a circle or use a small circular object (like a jar lid) to outline your moon in the upper left quadrant. -
Base coat the moon:
Using a clean brush, fill in the circle with Titanium White. It’s okay if the background shows through slightly; this adds depth. -
Add pink texture:
While the white is still slightly tacky, mix a tiny dot of Magenta into White to make a very pale pink. Dab this unevenly onto the moon’s surface to create craters and texture. -
Highlight the edge:
Take pure White on your small detail brush and carefully line the top-left edge of the moon to make it look like it’s glowing.
Gradient Not Blending?
If your paint dries too fast, dip your brush tip in a tiny bit of water or glazing medium to re-wet the canvas surface and smooth out harsh lines.
Step 3: Adding Stars and Landscape
-
Paint the ground silhouette:
Mix Deep Violet with a tiny touch of black (or just use pure Deep Violet if it’s dark enough). Using the flat brush, paint the bottom inch of the canvas to create a solid ground, extending the paint onto the bottom edge of the canvas. -
Create the horizon line:
Use the edge of your brush to tap unevenly along the top of the ground strip. This creates the illusion of distant hills or grass rather than a perfectly straight line. -
Dot the stars:
Switch to your smallest detail brush. Dip the tip into watered-down White paint and gently touch the canvas to create tiny dot stars scattered across the purple and pink sections. -
Vary star sizes:
Make some dots slightly larger than others. I like to cluster a few together to mimic constellations. -
Draw twinkle stars:
Choose 3 or 4 spots for larger ‘twinkle’ stars. Paint a small cross shape (+) and then extend the lines deeply to create four distinct points, tapering them to be thin at the ends. -
Add ground details:
Optionally, add a few tiny white dots on the dark ground area to look like fireflies or distant reflections.
Add Cosmic Depth
Use an old toothbrush dipped in watered-down white paint to flick a delicate spray of ‘galaxy dust’ over the darker purple sections.
Display your new celestial artwork on a shelf or hang it up to bring a peaceful night vibe to your room
Silhouette Art Whale Tail in Sparkly Water
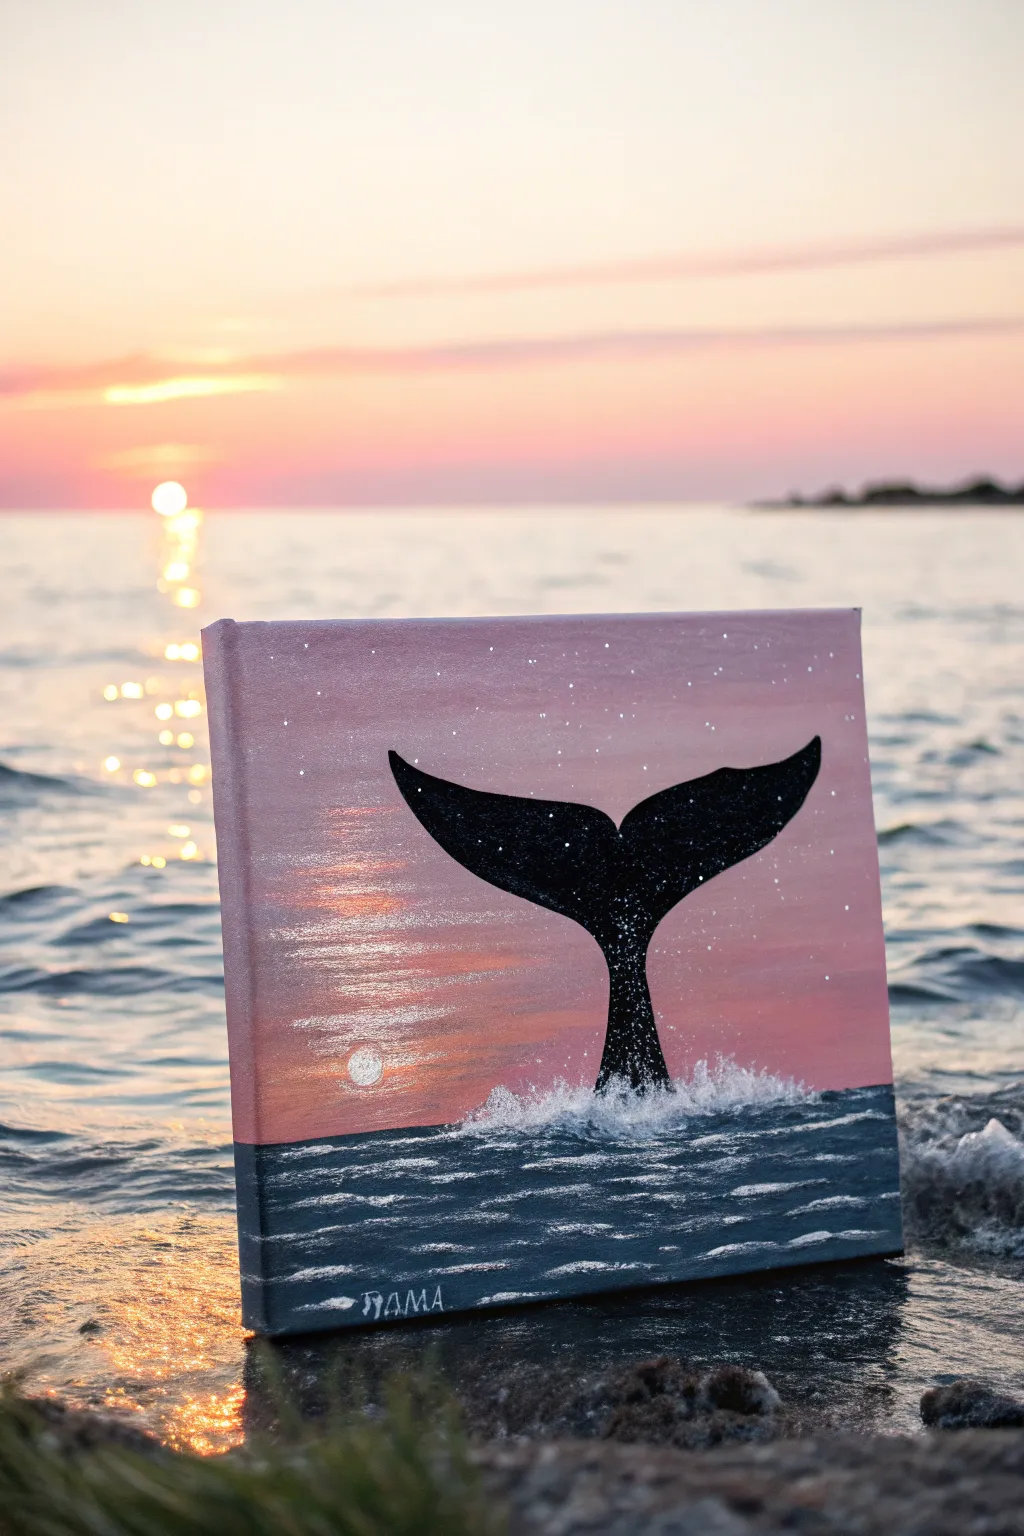
Capture the magic of a seaside evening with this stunning silhouette painting. Featuring a dreamy pink gradient sky and sparkling water effects, this project brings a serene ocean moment to life on your canvas.
Detailed Instructions
Materials
- Square stretched canvas (e.g., 10×10 or 12×12 inches)
- Acrylic paints: Titanium White, Mars Black, Phthalo Blue (or Navy), Magenta (or Deep Pink), Violet
- Flat shader brushes (large and medium)
- Small round detail brush
- Fan brush (optional, for splashes)
- Palette or paper plate
- Cup of water and paper towels
- Old toothbrush (for stars)
- Pencil and eraser
Step 1: Painting the Sky and Water
-
Establish the Horizon:
Use a pencil to lightly draw a straight horizontal line across the canvas, positioning it about one-third of the way up from the bottom edge. This separates your sky from the ocean. -
Mix the Sky Gradient:
Prepare a blend of Magenta and Titanium White to create a soft, dusty pink. paint the entire sky area with this base color using a large flat brush. -
Deepen the Gradient:
While the pink is still wet, mix a tiny amount of Violet into your pink mixture. Apply this darker shade at the very top of the canvas, blending it downward into the lighter pink for a smooth twilight transition. -
Create the Ocean Base:
Clean your brush thoroughly. Mix Phthalo Blue with a touch of Mars Black to create a deep navy color. Paint the section below the horizon line completely with this dark ocean hue. -
Add Ocean Waves:
Mix a slightly lighter blue by adding a drop of white to your navy mix. Using the edge of a flat brush, create horizontal streaks across the water area to simulate distant waves and movement. -
Paint the Sun Reflection:
Using a clean, dry brush with a small amount of Titanium White, dry-brush a vertical column of light in the water on the left side. Use a horizontal back-and-forth motion to make it look like light reflecting on ripples. -
Add the Sun:
Paint a small, soft white circle in the sky directly above your water reflection to represent the setting sun. -
Let it Dry:
The background needs to be completely dry before you paint the silhouette. Wait at least 15-20 minutes or use a hairdryer on a cool setting to speed up the process.
Clean Horizon Lines
For a perfectly straight horizon line, place a strip of painter’s tape across the canvas. Paint the sky, let it dry, remove the tape, and then paint the ocean.
Step 2: The Whale and Details
-
Sketch the Tail:
With a pencil, lightly outline the shape of the whale tail rising from the center of the horizon line. If you aren’t confident drawing freehand, print a template and trace it. -
Paint the Silhouette:
Fill in the whale tail shape using Mars Black and a medium round brush. Ensure the edges are crisp and opaque. You may need a second coat of black once the first one dries. -
Create Splash Effects:
Load a bristle brush or fan brush with watered-down Titanium White. Tap or stipple the brush vigorously at the base of the tail where it meets the water to create foamy splashes. -
Add Water Spray:
Flick tiny droplets of white paint around the base of the tail to mimic spray. You can do this by running your finger across the bristles of a toothbrush loaded with thin white paint. -
Paint the Stars:
Using the same toothbrush technique, gently flick a fine mist of white paint over the upper sky and the black whale tail to create a starry, magical effect. -
Highlight the Waves:
Take a fine round brush with pure Titanium White and paint thin, crisp highlights on the tops of the nearest waves in the foreground to give the water dimension. -
Whale Sparkles:
Dip the tip of a toothpick or a very fine brush into white paint and add a few specific, brighter distinct stars or sparkles directly onto the black tail for high contrast. -
Signature:
Sign your name in the bottom corner using a small brush and white paint, keeping the lines thin so they don’t distract from the scene.
Gradient Not Smooth?
If your sky looks streaky, the paint might be drying too fast. Mist the canvas lightly with water or add a slow-drying medium to keep the acrylics blendable longer.
Hang your new seascape in a sunny spot to let those white highlights truly shine

PENCIL GUIDE
Understanding Pencil Grades from H to B
From first sketch to finished drawing — learn pencil grades, line control, and shading techniques.
Explore the Full Guide
Tiny Heart Balloon Bunch Against a Cloudy Sky
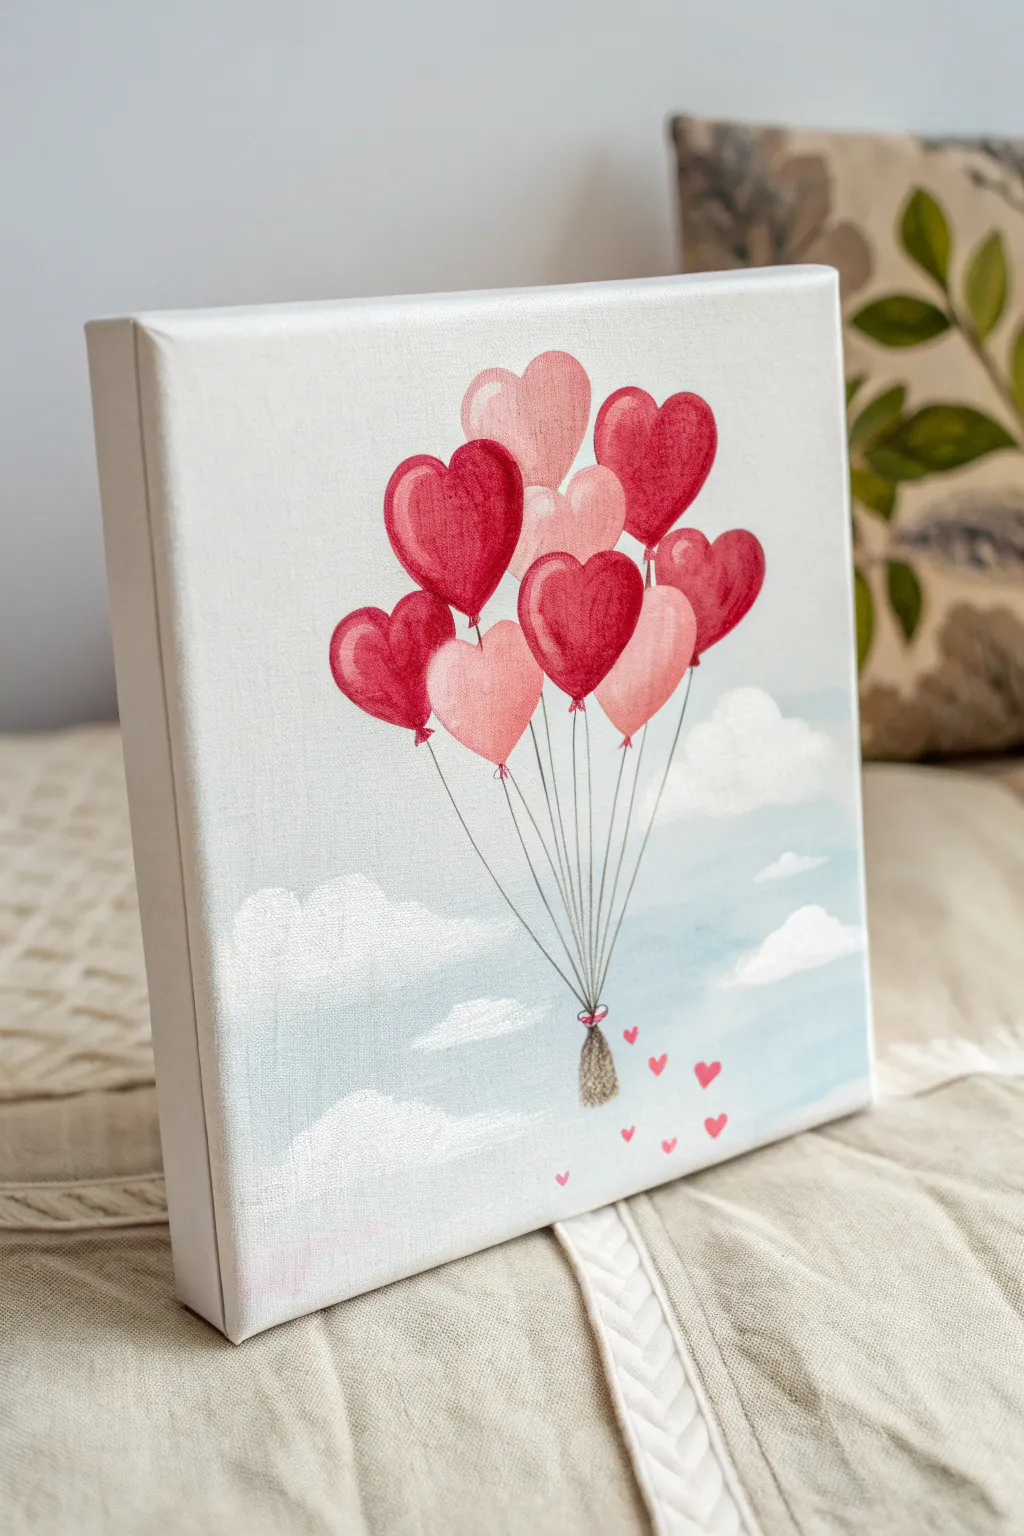
This charming canvas project captures a joyful bundle of heart-shaped balloons drifting through a soft, dreamlike sky. With gentle gradients and simple shapes, it’s a perfect beginner-friendly painting to add a touch of romance or sweetness to any room.
How-To Guide
Materials
- Small square stretched canvas (e.g., 8×8 or 10×10 inches)
- Acrylic paints: Titanium White, Cerulean Blue, Crimson Red, Pale Pink, Raw Umber (brown)
- Flat brush (1/2 inch or 3/4 inch) for the background
- Small round brush (size 2 or 4) for balloons
- Fine liner brush (size 0 or 00) for strings
- Pencil and eraser
- Palette or mixing plate
- Cup of water and paper towels
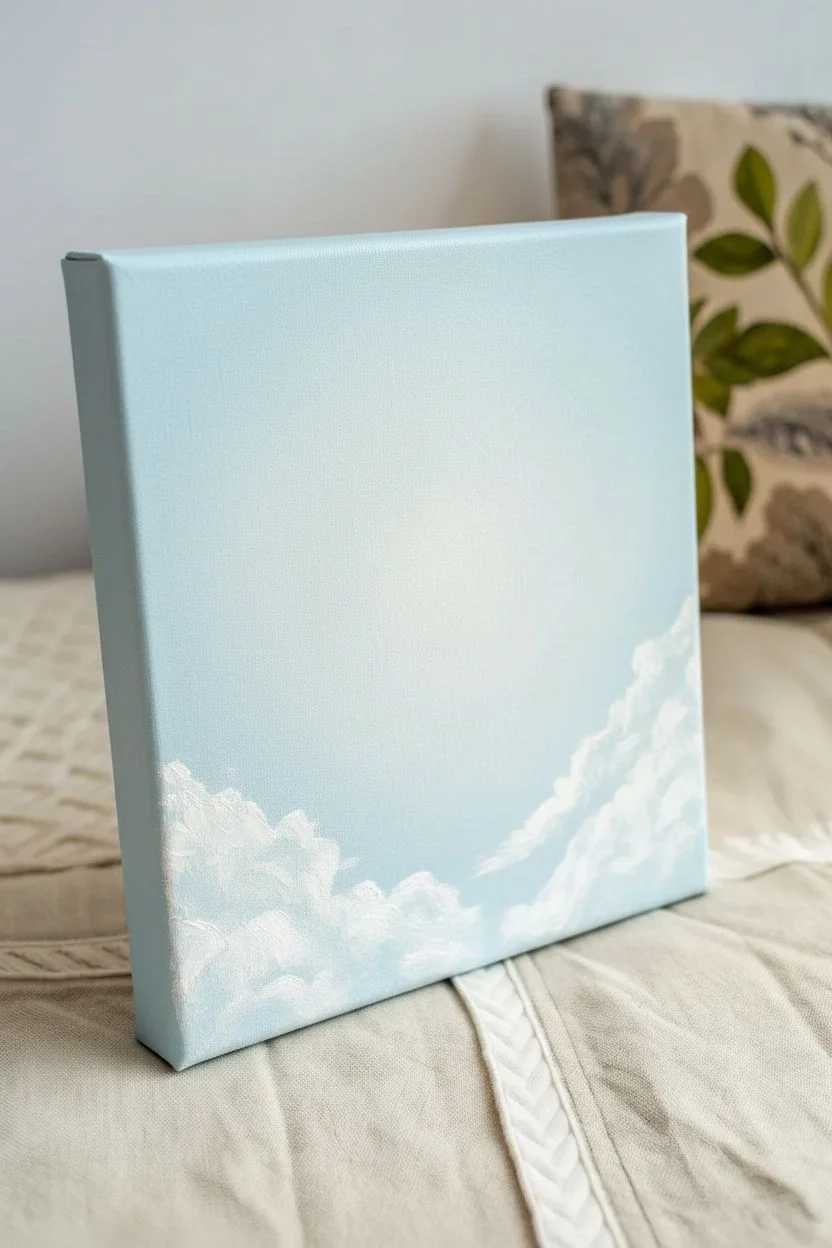
Step 1: Setting the Scene
-
Prepare the sky:
Start by mixing a very pale blue using a large amount of Titanium White and the tiniest dot of Cerulean Blue. The goal is an airy, pastel sky color rather than a deep blue. -
Paint the gradient:
Using your flat brush, paint the entire canvas with your pale blue mix. I like to add a slightly higher concentration of white towards the middle to create a soft, glowing effect. -
Add soft clouds:
While the blue layer is still slightly tacky but mostly dry, load a round brush with pure Titanium White. Gently dab curved, fluffy shapes near the bottom third of the canvas to create cloud banks. -
Refine the clouds:
Soften the bottom edges of your white clouds by dry-brushing them downward into the blue, making them look wispy and natural. Let the entire background dry completely before moving on.
Step 2: Sketching the Composition
-
Plotting the balloon cluster:
Using a pencil very lightly, sketch a cluster of about 9 to 10 overlapping heart shapes in the center-upper portion of the canvas. Vary their angles slightly so they look like they are jostling for space. -
Adding the anchor point:
Mark a small spot or tiny basket shape well below the balloons, centering it horizontally. This will be where all the strings eventually converge.
Clean Lines
If your hand is shaky on the strings, use a ruler and a fine-tip waterproof black marker instead of a paint brush. It creates perfectly straight, crisp lines effortlessly.
Step 3: Painting the Balloons
-
Base coat the red hearts:
Select 3 or 4 hearts to be your darkest red. Paint these with Crimson Red using your small round brush. You may need two coats for solid opacity. -
Paint the pink hearts:
Mix Crimson Red with White to create a soft bubblegum pink. Fill in another 3 or 4 hearts with this shade. -
Add the lightest hearts:
Create a very pale, almost translucent pink for the remaining background hearts. This helps create depth, making some balloons look further away than others. -
Create highlights:
Once the base colors are dry, mix a lighter version of each balloon color (or use pure white). Paint a small curved highlight on the upper left lobe of each heart to give them a 3D, inflated look. -
Add deep shading:
Mix a tiny bit of brown or darker red into your base colors. Apply this shadow color to the bottom points of the hearts and wherever one balloon overlaps another to define the edges.
Add Sparkle
Once the painting is fully dry, brush a thin layer of glitter glaze over the balloons, or add tiny adhesive rhinestones to the falling hearts for a textured, 3D effect.
Step 4: Tying it All Together
-
Drawing the strings:
Switch to your fine liner brush and thin down some grey or diluted black paint with a drop of water. The paint should be inky. -
Connect the balloons:
Carefully pull thin lines from the bottom point of each balloon down to your central anchor point. Use your pinky finger to stabilize your hand for straighter lines. -
Paint the basket connection:
At the convergence point, use a dab of Raw Umber to paint a tiny knot or basket weight. Add a tiny pink bow on top of the knot for extra cuteness. -
Falling petals:
Using the tip of your small round brush, dab tiny pink hearts falling from the basket area towards the bottom of the canvas, getting smaller as they descend. -
Final touches:
Check your cloud edges and balloon highlights. If the white clouds receded too much during drying, add a fresh bright white layer to the tops of the fluffiest parts.
Hang your lovely creation on the wall and enjoy the uplifting feeling of your floating heart bouquet
Baby Turtle With Bubbles and Blush Cheeks
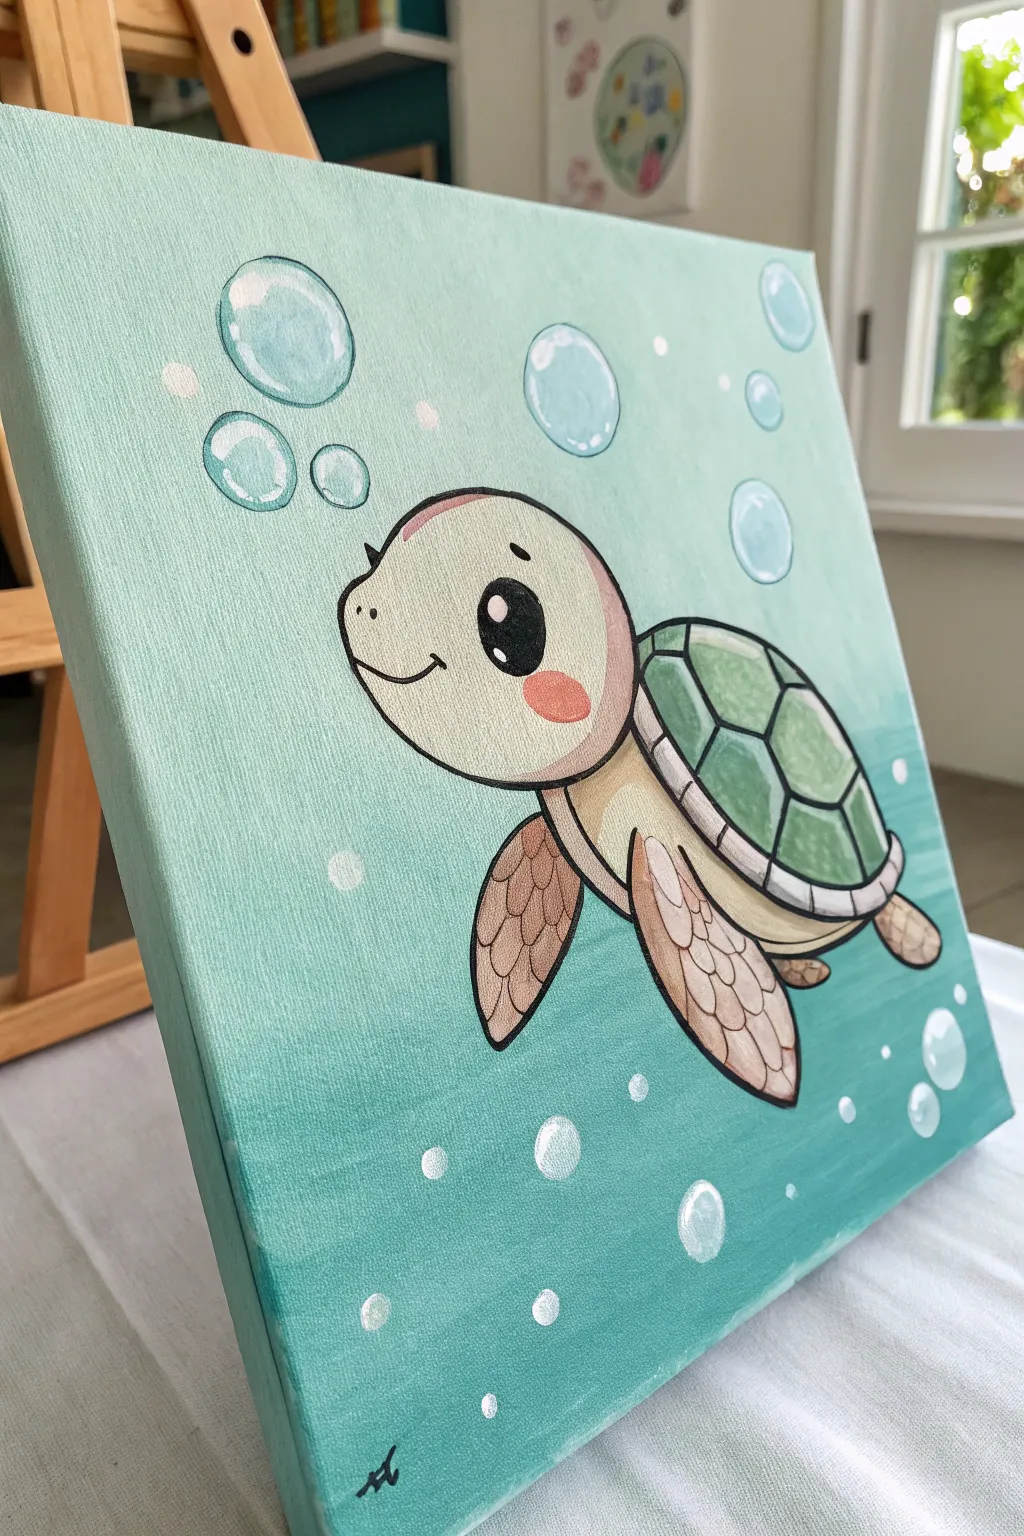
Dive into painting this adorable sea turtle swimming through a bubbly ocean scene. With its gentle teal gradient background and sweet, blushing expression, this canvas art makes a perfect addition to a nursery or kid’s room.
Step-by-Step
Materials
- Square stretched canvas (approx. 10×10 or 12×12 inches)
- Acrylic paints: Titanium White, Phthalo Blue (Green Shade) or Turquoise, Yellow Ochre, Burnt Sienna, Mars Black, Sap Green, Light Pink
- Flat shader brushes (medium and large)
- Round detail brushes (small #0 or #1, and medium #4)
- Pencil and eraser
- Mixing palette
- Cup of water and paper towels
- White paint marker (optional but recommended)
Step 1: The Ocean Gradient
-
Mix your base colors:
Start by preparing two main shades of teal on your palette. Mix Phthalo Blue (or Turquoise) with plenty of Titanium White for a very pale, minty aqua. Then, mix a slightly darker, deeper version of that same teal for the bottom of the canvas. -
Apply the background:
Using a large flat brush, paint the top two-thirds of the canvas with your palest teal mixture. While the paint is still wet, switch to the darker teal for the bottom third. -
Blend the transition:
Where the two colors meet, use clean horizontal strokes to blend them together softly. I like to keep the brush slightly damp to help the acrylics merge smoothly without harsh lines. Let the background dry completely before moving on.
Step 2: Sketching the Turtle
-
Outline the head:
With a pencil, draw a large, rounded oval shape in the center of the canvas for the turtle’s head. It should be slightly tilted upwards to the left. -
Add the shell and flippers:
Draw the shell as a curved dome attached to the right side of the head. Sketch a front flipper extending downward and back, and a smaller back flipper kicking behind. Add a tiny back leg peeking out near the tail area. -
Detail the face and shell:
Sketch a large, curved oval for the eye, a small smile line, and a circle for the cheek. Lightly draw the hexagonal scute patterns on the shell.
Uneven Outlines?
If painting thin black lines is difficult with a brush, wait for the paint to cure fully (24 hrs) and use a fine-tip black POSCA marker or permanent marker for steady, crisp control.
Step 3: Painting the Turtle Base
-
Fill in the skin:
Mix a creamy beige using Titanium White with a tiny dot of Yellow Ochre and a speck of Burnt Sienna. Use a medium round brush to fill in the head, neck, and the underside of the flippers. -
Paint the shell scutes:
Mix Sap Green with a little White to get a soft sage green. Carefully paint inside the hexagonal shapes on the shell, leaving the ridges between them unpainted for now. -
Detail the flipper scales:
Take your beige skin tone and darken it slightly with more Burnt Sienna to create a light tan. Paint the outer edges of the flippers where the scales will be. -
Add the shell rim:
Paint the rim of the shell and the underbelly with a very light cream color (White plus a tiny touch of Yellow Ochre).
Pro Tip: Bubble Transparency
Don’t paint the insides of bubbles solid white! Use a ‘dry brush’ technique with very little white paint to scumble the center, letting the background teal show through.
Step 4: Definitions and Details
-
Outline the character:
Using a small detail brush (size #0 or #1) and thinned Mars Black paint (or a black paint pen), carefully outline the entire turtle. Trace the shell patterns, the separate scales on the flippers, and the facial features. -
Paint the eye:
Fill the large eye shape with solid black. Leave a small clean circle for the highlight, or paint it white later. -
Add the blush:
Mix a soft coral pink using Light Pink and a touch of Orange (or mix Red and Yellow). Paint a soft oval cheek right under the eye. -
Highlight the shell:
Mix a lighter mint green and add subtle highlight curves to the top left of each green shell segment to make them look domed and shiny. -
Shade the flippers:
If you want extra depth, use a watered-down brown to add faint shadows at the base of the flipper scales.
Step 5: Bubbles and Final Touches
-
Block in bubble shapes:
Mix a translucent white glaze by adding lots of water to your Titanium White paint. Paint varying sizes of circles floating around the turtle. -
Outline the bubbles:
Use a fine liner brush with opaque white to outline these circles. Don’t make the line perfectly uniform; let it be thicker on one side to suggest light reflection. -
Add bubble highlights:
Paint a crisp, curved white highlight on the top left of each bubble and a smaller dot on the bottom right. You can add a faint touch of pale blue inside the bubbles for dimension. -
Final eye sparkle:
Ensure the black eye paint is dry, then add two distinct white dots—one large, one small—to bring the character to life. -
Sign your work:
Use a fine brush or pen to add your initials in the corner once everything is dry.
Hang your masterpiece on the wall and enjoy the calm, aquatic vibes it brings to the room


Cherry Blossom Corner Frame Around a Mini Mountain
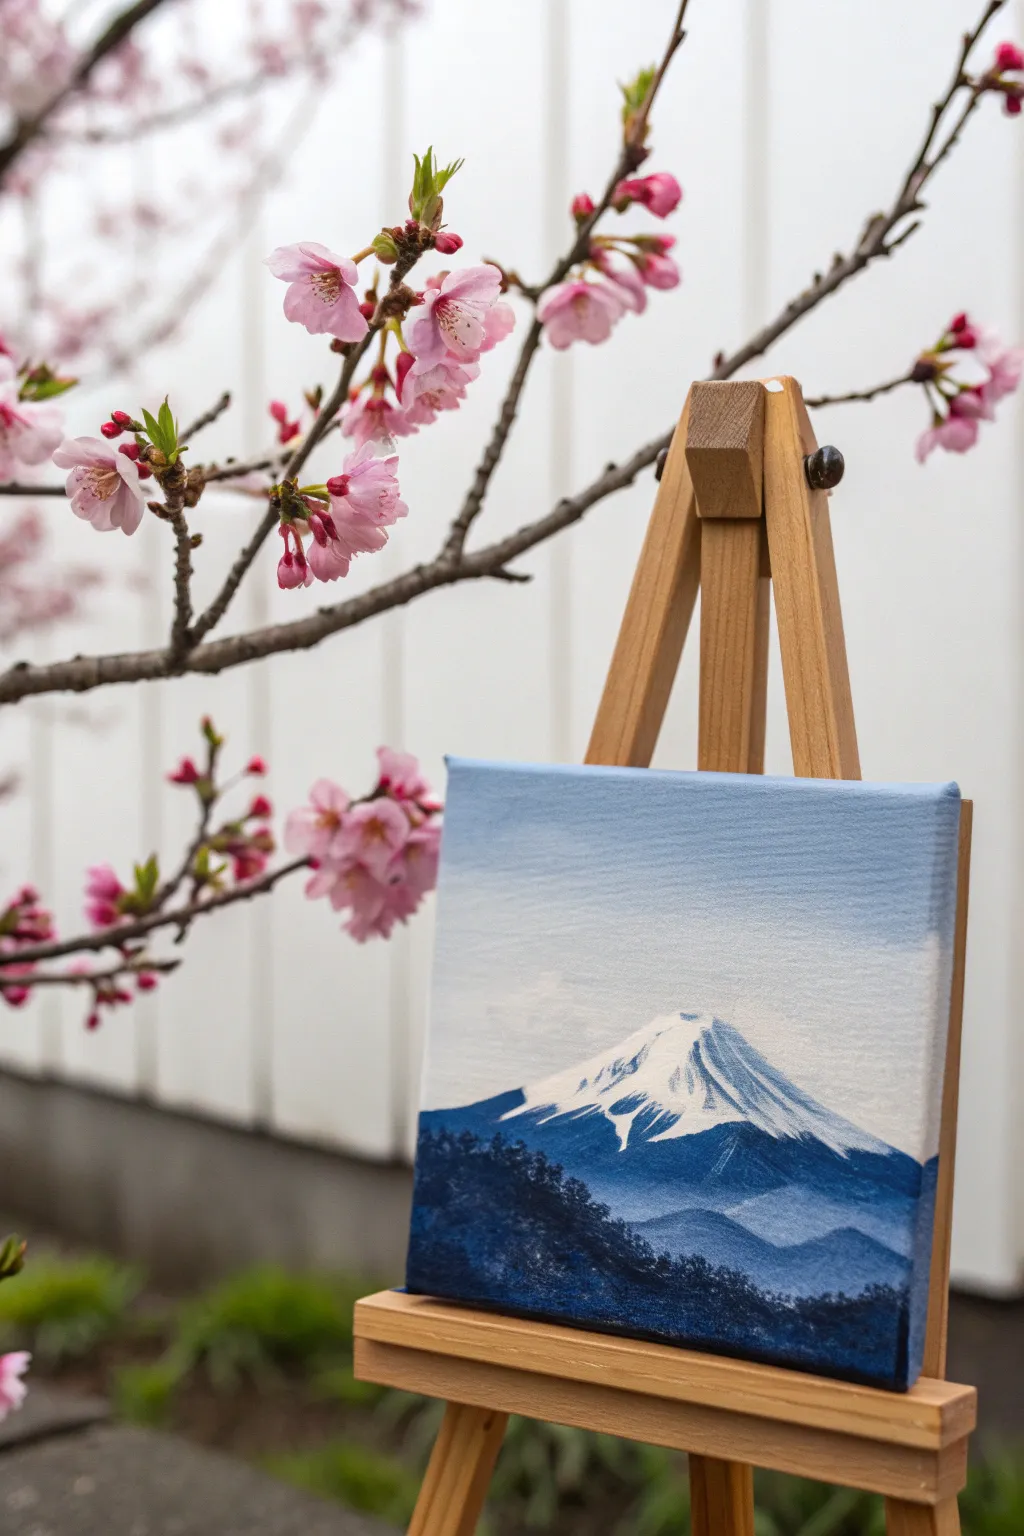
This serene project captures the majestic Mount Fuji using a limited palette of calming blues and whites. It is a perfect beginner-friendly study in atmospheric perspective, painted on a petite canvas that fits almost anywhere.
Step-by-Step
Materials
- Small square canvas (e.g., 4×4 or 6×6 inch)
- Mini wooden easel
- Acrylic paints: Titanium White, Ultramarine Blue, Prussian Blue, Phthalo Blue
- Paintbrushes: ½ inch flat brush, small round brush (size 2 or 4), fine liner brush
- Palette or paper plate
- Cup of water and paper towels
Step 1: Setting the Sky
-
Mix the sky gradient:
Start by mixing a very pale blue. Combine a generous amount of Titanium White with just a tiny dot of Ultramarine Blue. You want a color that looks like a clear, high-altitude sky. -
Apply the background:
Using your flat brush, paint horizontal strokes across the top two-thirds of the canvas. As you move down towards the middle, mix in a little more white directly on the canvas to create a subtle fade, making the horizon slightly lighter than the top edge. -
Add subtle clouds:
While the blue is still slightly wet, wipe your brush clean and pick up a small amount of pure Titanium White. Gently scumble in faint, wispy clouds around the middle area where the mountain peak will sit. Keep these very soft and undefined.
Step 2: Painting the Mountain Body
-
Outline the peak:
With a round brush and a medium blue mix (Ultramarine with a touch of Prussian Blue), lightly sketch the triangular shape of Mount Fuji. The peak shouldn’t be a sharp point but rather slightly flattened at the very top. -
Fill the mountain base:
Fill in the body of the mountain below your outline. For the base, darken your blue mix significantly by adding more Prussian Blue. We want the mountain to feel grounded and heavy compared to the airy sky. -
Create the mid-ground haze:
Blend a lighter blue tone near the bottom of the mountain where it meets the future foreground. This creates ‘atmospheric perspective,’ making the mountain look distant and majestic.
Dry Brushing Tip
For the dragged snow effect, test your brush on a paper towel first. If the paint is solid, wipe more off. You want a scratchy, broken line.
Step 3: Snow-Capped Details
-
Start the snow:
Once the blue base is dry to the touch, load a round brush with thick Titanium White paint. Start at the summit and pull strokes downward. -
Texture the slopes:
Instead of painting a solid white triangle, use a dry-brush technique. Wipe most of the paint off your brush and drag it lightly down the mountain sides so the blue underneath shows through, mimicking rough rock and snow streaks. -
Add the central ridge:
Create a distinct, crooked line of snow coming down the center-left face of the mountain, leaving a dark blue shadow area to its right. This specific shadow shape gives Fuji its recognizable character. -
Refine the summit:
Add a few solid dabs of white at the very top crater area to brighten the highlight where the sun hits directly.
Level Up: Pink Glow
Glaze a very watered-down neon pink over the snow cap once fully dry to simulate a sunrise reflection on the mountain.
Step 4: Foreground Foliage
-
Mix the darkest shadow:
Create your deepest color yet: Prussian Blue mixed with a tiny touch of black or dark purple if you have it. This needs to be a silhouette color. -
Block in the hills:
Using the flat brush, paint a rolling hill shape at the very bottom of the canvas, covering the bottom of the mountain slope. This foreground establishes depth. -
Stipple the trees:
Switch to a small round brush or even an old, frayed brush. Dip it into the dark mix and use a tapping or stippling motion along the top edge of the dark hill. -
Layer the forest:
Continue tapping to create the texture of dense tree tops. Let some of these dark trees rise higher on the left side to frame the mountain, pushing the white peak further into the background. -
Final adjustments:
If the foreground looks too flat, add a tiny bit of white to your dark blue mix and lightly tap a few highlights onto the tops of the closest trees to give them volume.
Now step back and admire your pocket-sized masterpiece, seeing how a few simple shades of blue can create such a vast landscape
Mini Planets on a Soft Galaxy Gradient
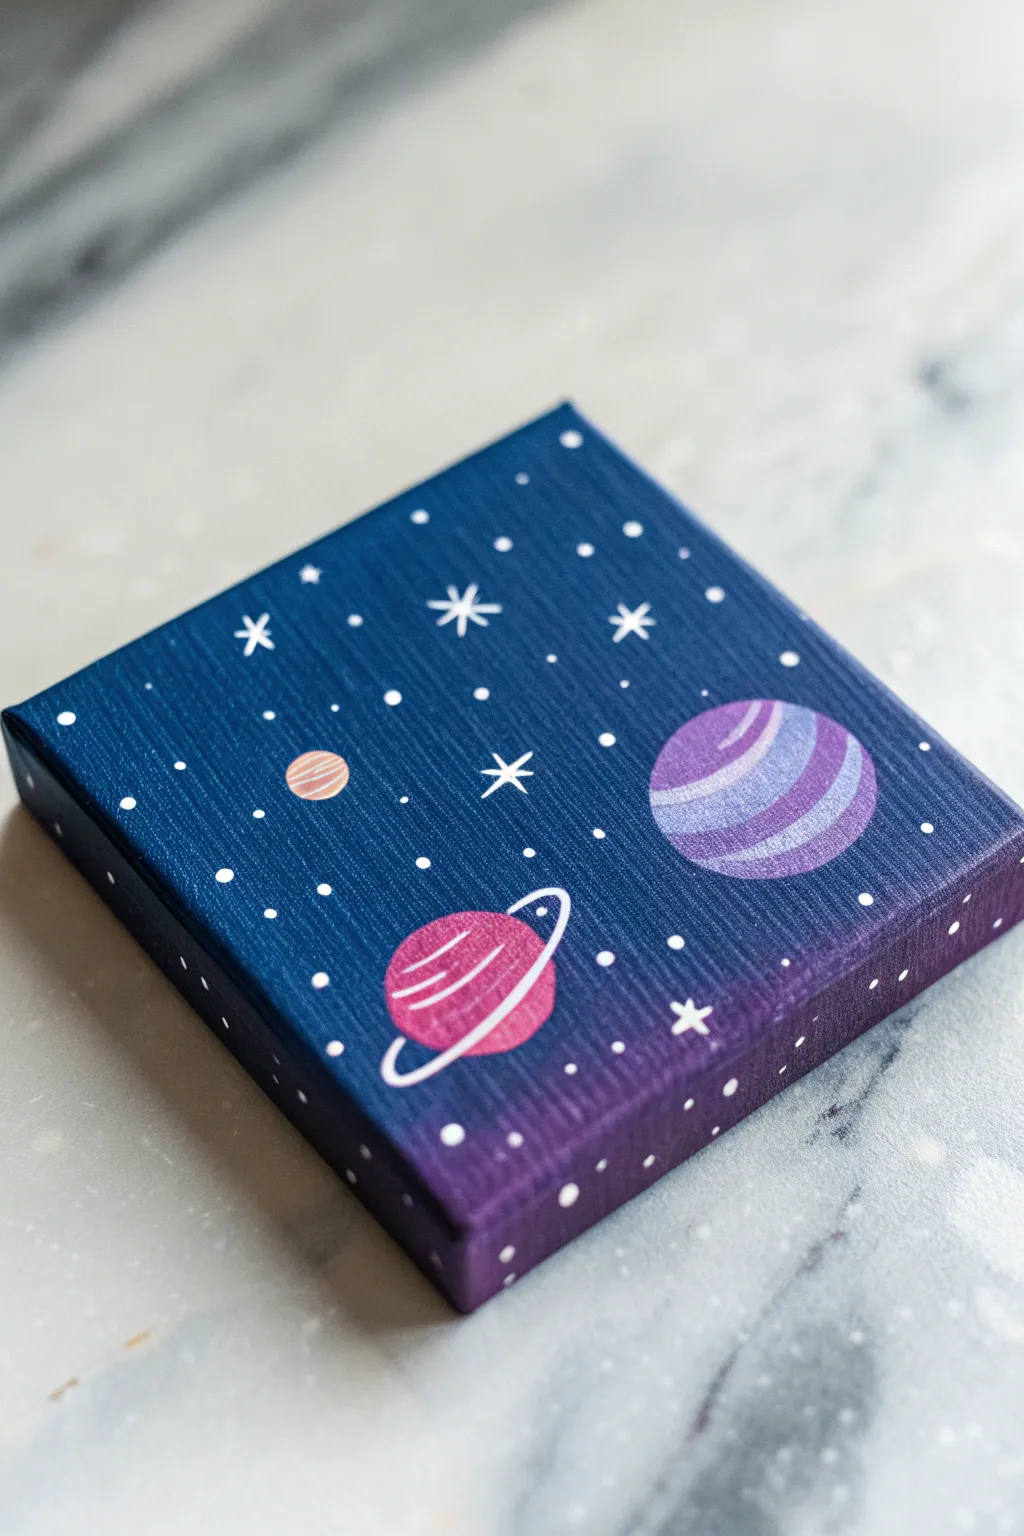

Create a tiny window into deep space with this charming mini canvas project. Using a smooth gradient technique and simple geometric shapes, you’ll paint a whimsical galaxy that fits right in the palm of your hand.
Step-by-Step Tutorial
Materials
- Small square canvas (approx. 4×4 or 6×6 inches)
- Acrylic paints: Navy Blue, Deep Purple, White, Magenta, Lilac, Light Orange
- Flat shader brush (medium size for background)
- Small round detail brush (size 0 or 1)
- Palette or paper plate
- Cup of water and paper towels
- Pencil (optional)
Step 1: Creating the Galaxy Background
-
Prepare the canvas:
Start with a clean, dry mini canvas. If the canvas texture is very rough, you might want to apply a layer of gesso first to smooth it out, but the raw texture works fine for a starry look. -
Mix your base colors:
Squeeze out a generous amount of Navy Blue and Deep Purple onto your palette. You want enough paint to cover the canvas quickly while it’s still wet. -
Paint the top dark section:
Using your flat brush, paint the top two-thirds of the canvas with Navy Blue. Don’t worry about the bottom edge being perfect yet. -
Add the gradient bottom:
While the blue is still wet, paint the bottom third with Deep Purple. Bring the purple up to meet the blue. -
Blend the transition:
Where the two colors meet, use horizontal brush strokes to gently blend them. I like to wipe my brush slightly so it’s dry, which helps drag the colors into each other for a seamless ombré effect. -
Paint the edges:
Don’t forget the sides of your canvas! Extend the blue and purple gradient around the edges to give your artwork a polished, finished look. -
Let it dry completely:
This is crucial. Wait until the background is totally dry to the touch before starting the planets, otherwise your colors will muddy.
Uneven Circles?
If painting perfect circles is tough, trace small household items like bottle caps or coins using a white charcoal pencil before painting.
Step 2: Painting the Planets
-
Sketch placement (optional):
If you’re nervous about free-handing, lightly sketch three circles with a pencil: a medium one on the right, a slightly smaller one on the bottom left, and a tiny one in the mid-left. -
Base coat the purple planet:
For the largest planet on the right, mix Lilac with a touch of Deep Purple. Paint a solid circle. -
Base coat the pink planet:
For the bottom left planet, use Magenta to paint a solid circle. Ideally, this color should pop against the dark background. -
Base coat the small moon:
Paint the smallest circle with Light Orange. This one is simple and adds a nice warm contrast. -
Add stripes to the purple planet:
Once the purple base is dry, use your detail brush and lighter Lilac (mixed with white) to paint curved stripes across the planet. Add a darker purple stripe for dimension. -
Detail the pink planet:
On the pink planet, paint thin, curved lines using a lighter pink or white. These suggest the spherical shape. -
Create the ring:
Using thin white paint and your smallest brush, carefully draw an oval ring around the pink planet. The line should break where it goes ‘behind’ the planet. -
Add highlights:
Mix a tiny bit of white into your planet colors and add a small curved highlight on top of each planet to verify the light source.
Glow Up
Mix glow-in-the-dark medium into your white paint for the stars. During the day it looks normal, but at night your galaxy will light up.
Step 3: Stars and Details
-
Paint large stars:
Using your finest brush and pure White paint, create a few large, four-pointed stars. Draw a simple cross shape, then curve the inner corners slightly inward. -
Add medium stars:
Dot the tip of your brush around the empty blue space to create medium-sized distinct stars. -
Create distant shimmer:
Dip the very end of a toothpick or the handle end of your brush into white paint to stamp tiny, perfect dots for distant stars. -
Final touches:
Review your work. If any background color shows through the planets, give them a quick second coat to make the colors solid and opaque.
Display your miniature universe on a small easel or group several together for a gallery wall effect
Cute Bear Face With Simple Shapes and Warm Neutrals
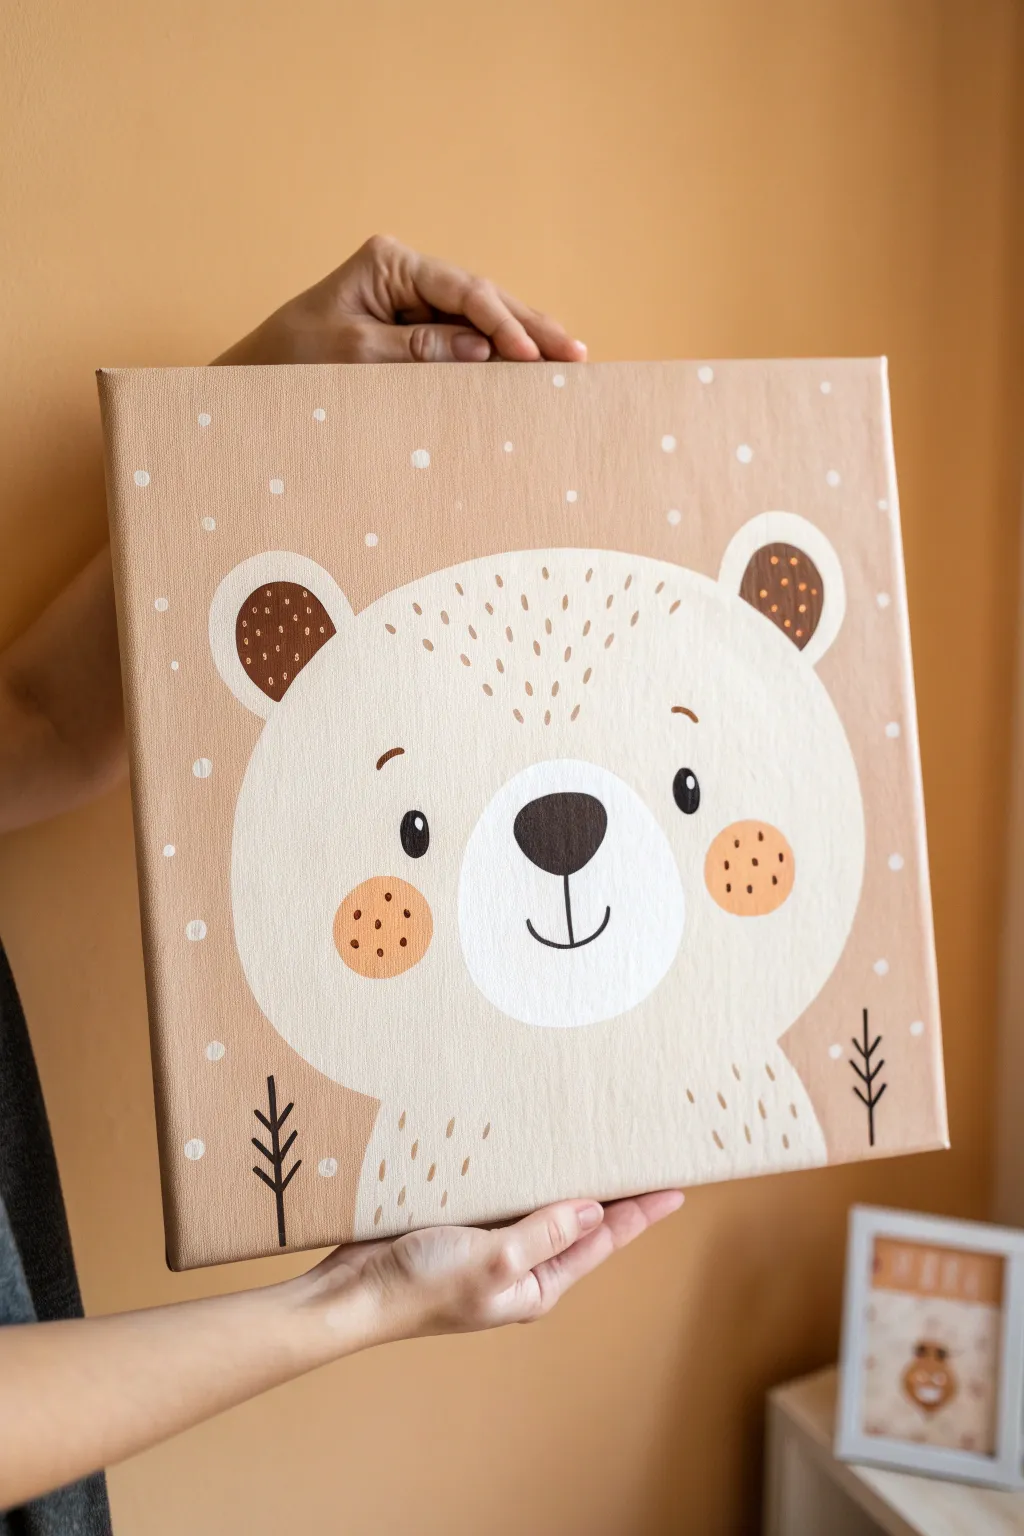
Warm your walls with this delightful bear face painting, featuring soft neutrals and simple geometric shapes. Perfect for a nursery or playroom, this project uses earthy tones to create a cozy, approachable piece of art.
How-To Guide
Materials
- Square stretched canvas (e.g., 12×12 or 16×16 inches)
- Acrylic paints: warm beige, cream/off-white, dark chocolate brown, terra cotta/muted orange
- Large flat brush (1-inch width)
- Medium round brush
- Small fine liner brush
- Pencil for sketching
- Palette or paper plate
- Cup of water and paper towels
Step 1: Preparing the Background
-
Base Coat Application:
Begin by covering the entire canvas with your warm beige paint. Use the large flat brush and long horizontal strokes for a smooth finish, ensuring you paint the edges of the canvas too. -
Second Layer:
Once the first coat is dry to the touch, apply a second coat if the canvas texture is still showing through too strongly. Let this dry completely before sketching.
Uneven Circles?
If you struggle painting perfect circles for the cheeks or eyes, trace a small coin or bottle cap lightly with pencil first, then fill it in.
Step 2: Sketching the Bear
-
Head Shape:
Using a pencil very lightly, draw a large partial circle or wide ‘U’ shape rising from the bottom edge of the canvas. This will be the bear’s head and body combined. -
Adding Ears:
Sketch two semicircles on the top left and right curves of the head. Add smaller inner ear shapes inside these semicircles. -
Facial Features:
Draw an oval in the lower center of the face for the snout area. Inside that oval, sketch a smaller, inverted rounded triangle for the nose. Mark spots for the eyes and circular cheeks.
Make it 3D
Add a small fabric bow tie or a real button onto the canvas with hot glue for a fun, mixed-media texture effect.
Step 3: Painting the Main Forms
-
Filling the Bear:
Load your medium brush with cream or off-white paint. Carefully fill in the large head shape, working around the pencil marks for the inner ears if you prefer, or painting over them if your paint is opaque enough. -
Opacity Check:
Cream paint over beige can be translucent. I usually apply two or three thin coats here rather than one thick gloimply one, letting each dry in between for a solid, crisp look. -
Inner Ears:
Paint the inner ear semicircles with dark chocolate brown paint. Use a steady hand to keep the curve smooth. -
Snout Detail:
Paint the large oval snout area with pure white or a very light cream that contrasts slightly with the face color to make it pop.
Step 4: Adding Details
-
Nose and Mouth:
With the dark brown paint and a smaller brush, fill in the nose shape. Switch to your fine liner brush to paint a vertical line down from the nose and curve it into a smile. -
Eyes and Brows:
Paint two small, solid black or dark brown ovals for eyes. Add tiny white dots near the top of the nose and eyes for catchlights. Paint small, floating eyebrows above the eyes. -
Rosy Cheeks:
Mix a terra cotta color or use muted orange. Paint two circles on either side of the snout. Once dry, use the fine liner to add three tiny brown dots onto each cheek for texture. -
Fur Texture:
Using the fine liner brush and thinned light brown paint, add small, dashed strokes around the top of the head and on the chest area. This mimics simple fur. -
Ear Details:
dip the back of your paintbrush handle into the terra cotta paint and dot it onto the dark brown inner ears to create a playful pattern.
Step 5: Background Accents
-
Polka Dots:
Using the back of a brush handle or a dotting tool, dip into white or light cream paint. Stamp random dots all over the beige background to create a snowy or starry effect. -
Adding Foliage:
With your fine liner brush and black or dark brown paint, draw simple vertical lines on the bottom left and right. Add small angled branches coming off them to create stylized trees. -
Final Touches:
Step back and check your work. If any lines look shaky, you can touch them up with the background color once everything is fully dry.
Hang your new friendly bear painting in a spot where it can bring a smile to everyone who sees it
Tiny Cottage With a Heart Window Glow
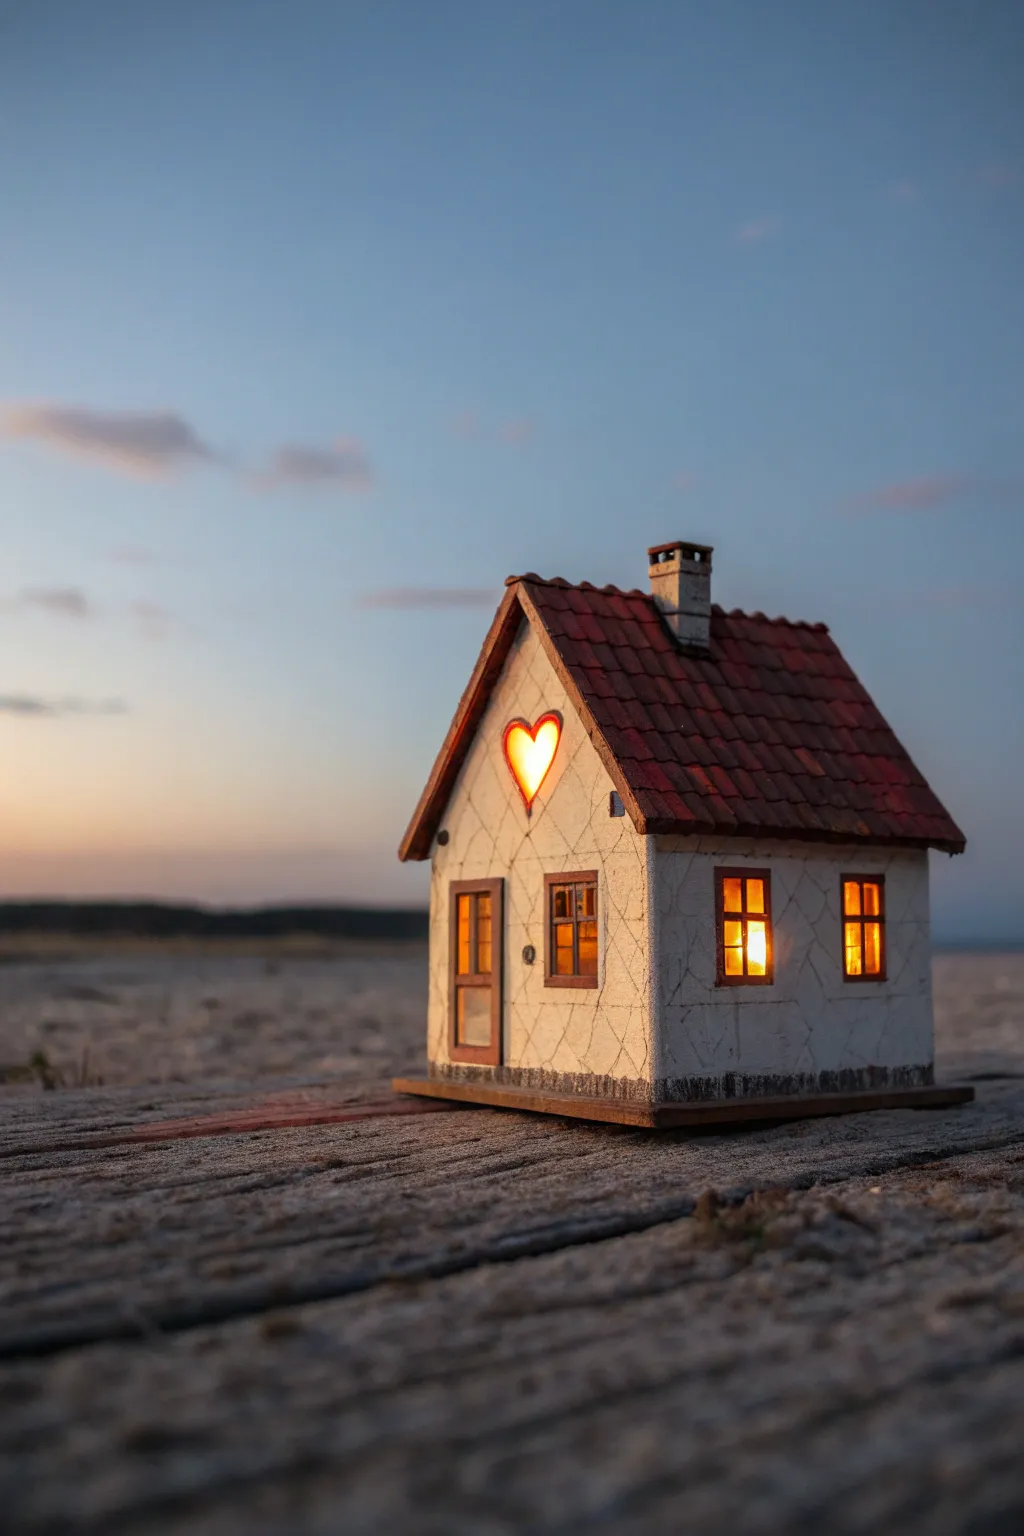
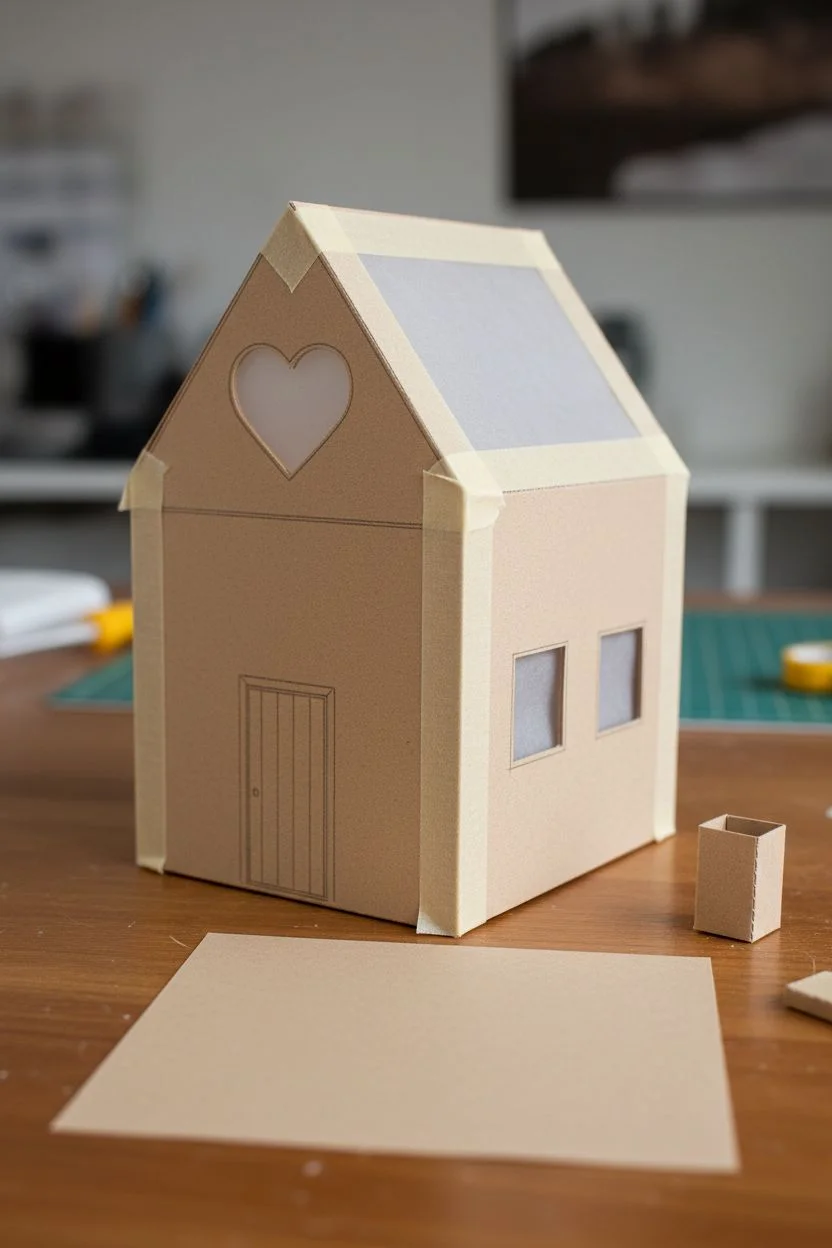
Capture the warmth of home with this adorable 3D mixed-media cottage, featuring a glowing heart window and rustic details. Even though it looks ceramic, you can build this charming little structure using accessible crafting materials and clever painting techniques.
Step-by-Step
Materials
- Heavyweight cardstock or chipboard
- Air-dry clay (white or light grey)
- Craft knife and cutting mat
- Tacky glue or hot glue gun
- Acrylic paints (White, Terracotta/Dark Red, Brown, Black, Yellow)
- Small LED tea light or fairy light strand
- Tracing paper or frosted vellum
- Texture paste or spackle (optional)
- Fine-point black pen
- Small flat brush and fine detail brush
Step 1: Building the Structure
-
Draft the template:
Sketch a simple house pattern on cardstock. You’ll need two pentagons for the front and back (about 3-4 inches wide) and two rectangles for the sides. Cut a slightly larger rectangle for the roof piece. -
Cut the windows:
Before assembling, carefully cut out the windows using your craft knife. For the front gable, carve out a heart shape. Cut standard square windows on the side panel. -
Create the window panes:
Cut small pieces of tracing paper or frosted vellum slightly larger than your window openings. Glue these to the *inside* of the walls to diffuse the light later. -
Door details:
Score the outline of a door on the front panel. You don’t need to cut this all the way through; just create indentations to define the frame and panels. -
Assemble the walls:
Glue the four wall sections together to form the house base. Use masking tape to hold the corners in place while the glue sets completely.
Step 2: Adding Texture and Roof
-
Apply the stucco texture:
Coat the exterior walls with a thin layer of air-dry clay or texture paste. I like to use a palette knife or even a popsicle stick to get that slightly uneven, hand-plastered look. -
Scribe the details:
While the clay is still damp, use a needle tool or toothpick to gently scratch irregular lines into the surface to mimic cracked masonry or stone block joints. -
Construct the chimney:
Fabricate a tiny rectangular chimney from cardstock remnants. Glue it to the roof piece before attaching the roof to the house. -
Create roof tiles:
You can either paint the roof directly or, for more realism, cut tiny squares of cardstock and layer them like shingles. Alternatively, press a tile pattern into a thin layer of clay spread over the roof cardstock. -
Attach the roof:
Glue the roof structure onto the walls. Ensure there is a slight overhang on the eaves.
Uneven Texture?
If your clay dries with cracks that are too large, fill them with a mix of white glue and paint, then smooth over with a damp finger.
Step 3: Painting and Illumination
-
Base coat the walls:
Paint the walls an off-white or cream color. Let the paint settle into the textured cracks you made earlier. -
Paint the roof:
Mix a deep terracotta or brick red color for the roof. Apply it somewhat unevenly to suggest weathering and age. -
Detail the woodwork:
Using a fine detail brush and brown paint, carefully fill in the window frames and the door outline. Add a tiny dot of black for the doorknob. -
Paint the heart glow:
If you aren’t using a real light, paint the vellum heart gradient yellow to orange. If using a light, keep the vellum clear but paint the rim of the heart red. -
Weathering wash:
Dilute some grey-brown paint with lots of water. Lightly brush this over the white walls and wipe it back immediately with a paper towel, leaving shadows in the crevices. -
Final assembly:
Place your LED tea light on your display surface and set the finished house over it to see the heart window glow warmly.
Pro Tip: Warm Glow
Paint the *inside* of the house walls with metallic gold or yellow paint. This reflects the LED light better, making the windows shine brighter.
Now you have a heartwarming miniature sanctuary to light up your shelf or desk
Tiny Tent Camping Scene With Heart Smoke
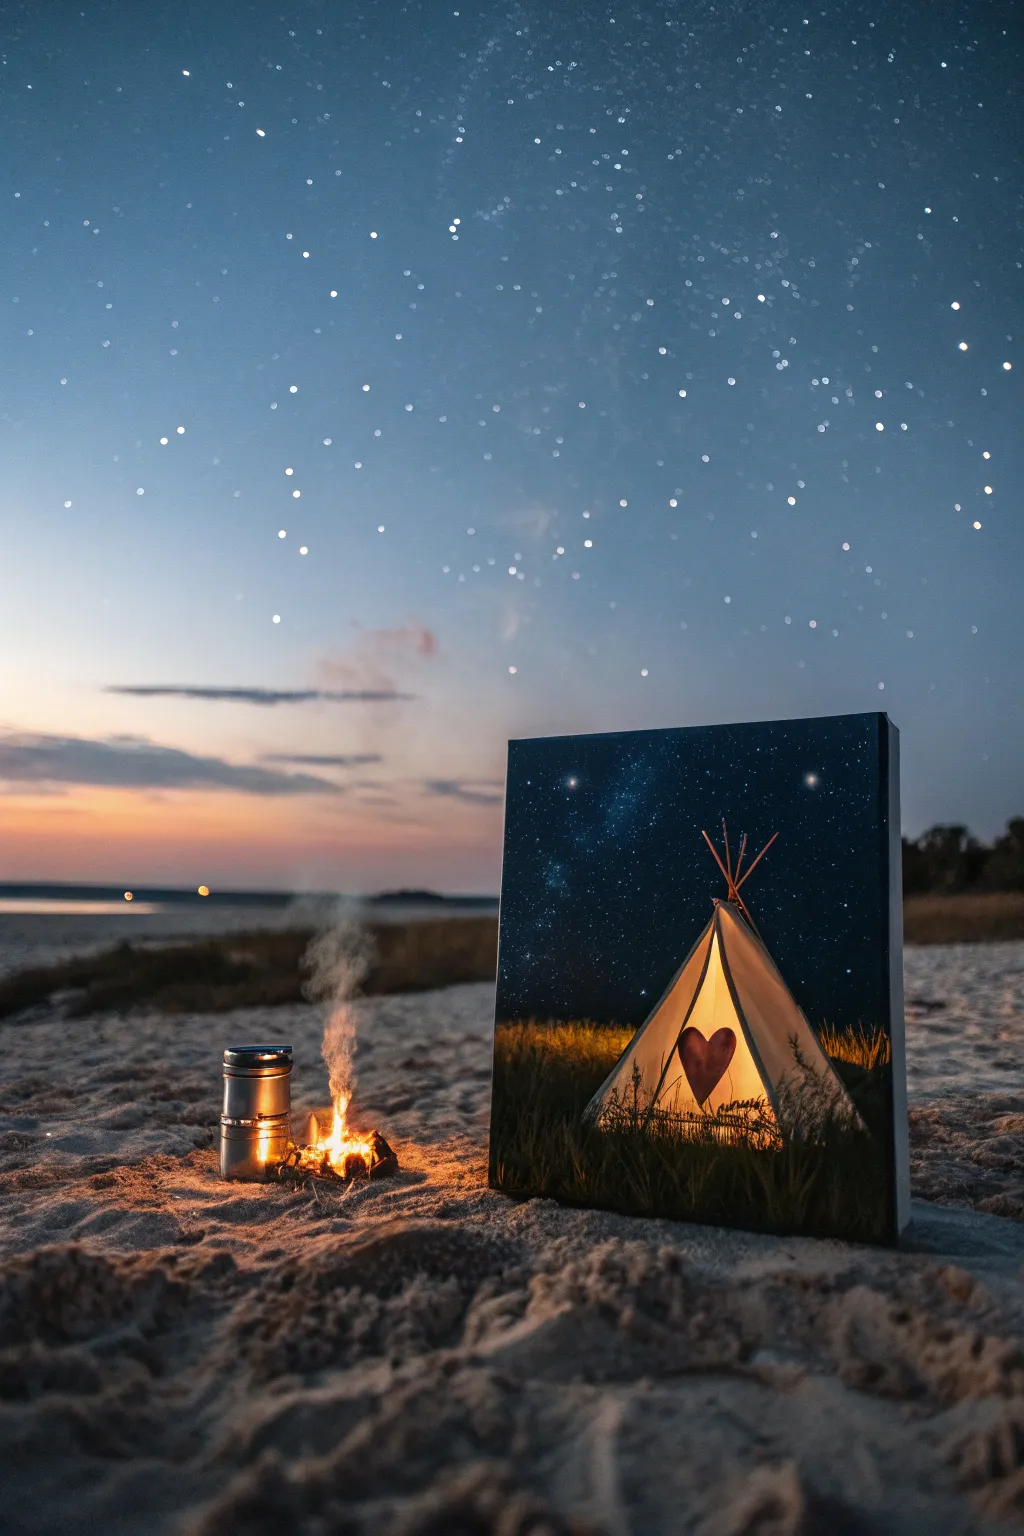
Capture the magic of cozy outdoor adventures with this illuminated tent painting set against a vast, starry galaxy. The central glowing heart adds a touch of warmth and whimsy to the cool nocturnal palette.
Detailed Instructions
Materials
- Square stretched canvas (e.g., 10×10 or 12×12 inches)
- Acrylic paints: Phthalo Blue, Ultramarine Blue, Black, White, Burnt Sienna, Yellow Ochre, Cadmium Yellow, Deep Red
- Assorted brushes: 1 inch flat wash, medium flat, small round, fine liner
- Pencil for sketching
- Ruler
- Mixing palette
- Cup of water and paper towels
- Old toothbrush (optional for stars)
Step 1: Painting the Galaxy Sky
-
Gradient Base:
Start by mixing Phthalo Blue and Black to create a very deep midnight blue. Apply this to the top third of the canvas using your wide flat brush. -
Mid-Sky Transition:
Mix pure Phthalo Blue with a touch of Ultramarine. Blend this wet-on-wet into the darker section, working your way down to the middle of the canvas. -
Horizon Line:
As you reach the bottom third (where the grass will be), mix in a tiny bit of White to the blue to create a faint horizon glow before letting the background dry completely. -
Galaxy Dust:
Using a dry sponge or a dry brush with a tiny amount of White and Ultramarine, gently dab a diagonal cloudy shape across the upper left to center sky. -
Starry Specks:
Create the stars by thinning down White paint with water until it’s inky. Dip an old toothbrush or stiff brush in it and flick the bristles to spray fine mist across the sky. -
Major Stars:
Use a fine liner brush and pure White to dot a few larger, brighter stars. Add tiny cross shapes to one or two of them to create a twinkling effect.
Step 2: Constructing the Tent
-
Sketching the Shape:
Once the sky is dry, use a ruler and pencil to lightly draw a triangle in the lower center of the canvas for the tent. Draw an inverted ‘V’ inside it to mark the opening flaps. -
Base Color:
Paint the exterior canvas of the tent using a mix of White and a tiny drop of Yellow Ochre for a creamy off-white tone. -
Shadows and Folds:
Mix a light grey-blue wash. Apply thin strokes along the edges and corners of the tent fabric to suggest folds and dimension. -
The Wooden Poles:
Mix Burnt Sienna with a touch of Black. Use a fine liner to paint the poles extending out from the top of the tent, crossing them over each other.
Cosmic Glow Tip
For a brighter galaxy, paint the white ‘cloud’ shape first, let it dry, and then glaze a transparent blue or purple over it. It adds instant depth.
Step 3: The Warm Interior Glow
-
Inner Light:
Fill the triangular opening of the tent with a bright mix of Cadmium Yellow and White. This is your light source. -
Gradient Warmth:
While the yellow is wet, blend a little Burnt Sienna around the very bottom edges of the opening to show depth. -
Heart Silhouette:
Mix a deep, warm red or a rust color. Carefully paint a heart shape right in the center of the glowing yellow opening. Keep the edges soft to make it look like a projection or smoke. -
Fabric Translucency:
Glaze a very watered-down yellow over the white canvas flaps near the opening to show the light shining through the fabric.
Wobbly Lines?
If your tent lines feel shaky, use painter’s tape to mark off the triangle sides. It ensures crisp, straight edges for the main tent structure.
Step 4: Foreground Textures
-
Grass Base:
Paint the bottom area around the tent with Black mixed with Burnt Sienna to create a dark, earthy ground layer. -
Illuminated Grass:
Switch to a fan brush or small round brush. Use different shades of Yellow Ochre and dark green to flick vertical grass blades around the base of the tent. -
Highlights:
Add bright yellow highlights only to the tips of the grass blades closest to the tent opening, simulating the firelight hitting them. -
Silhouetted Grass:
For the outer edges of the painting, use almost pure black to paint grass blades, framing the glowing center scene.
Now you have a peaceful camping scene that captures the warmth of a fire on a cool clear night
Paint-Pour Background With a Simple Bunny Outline
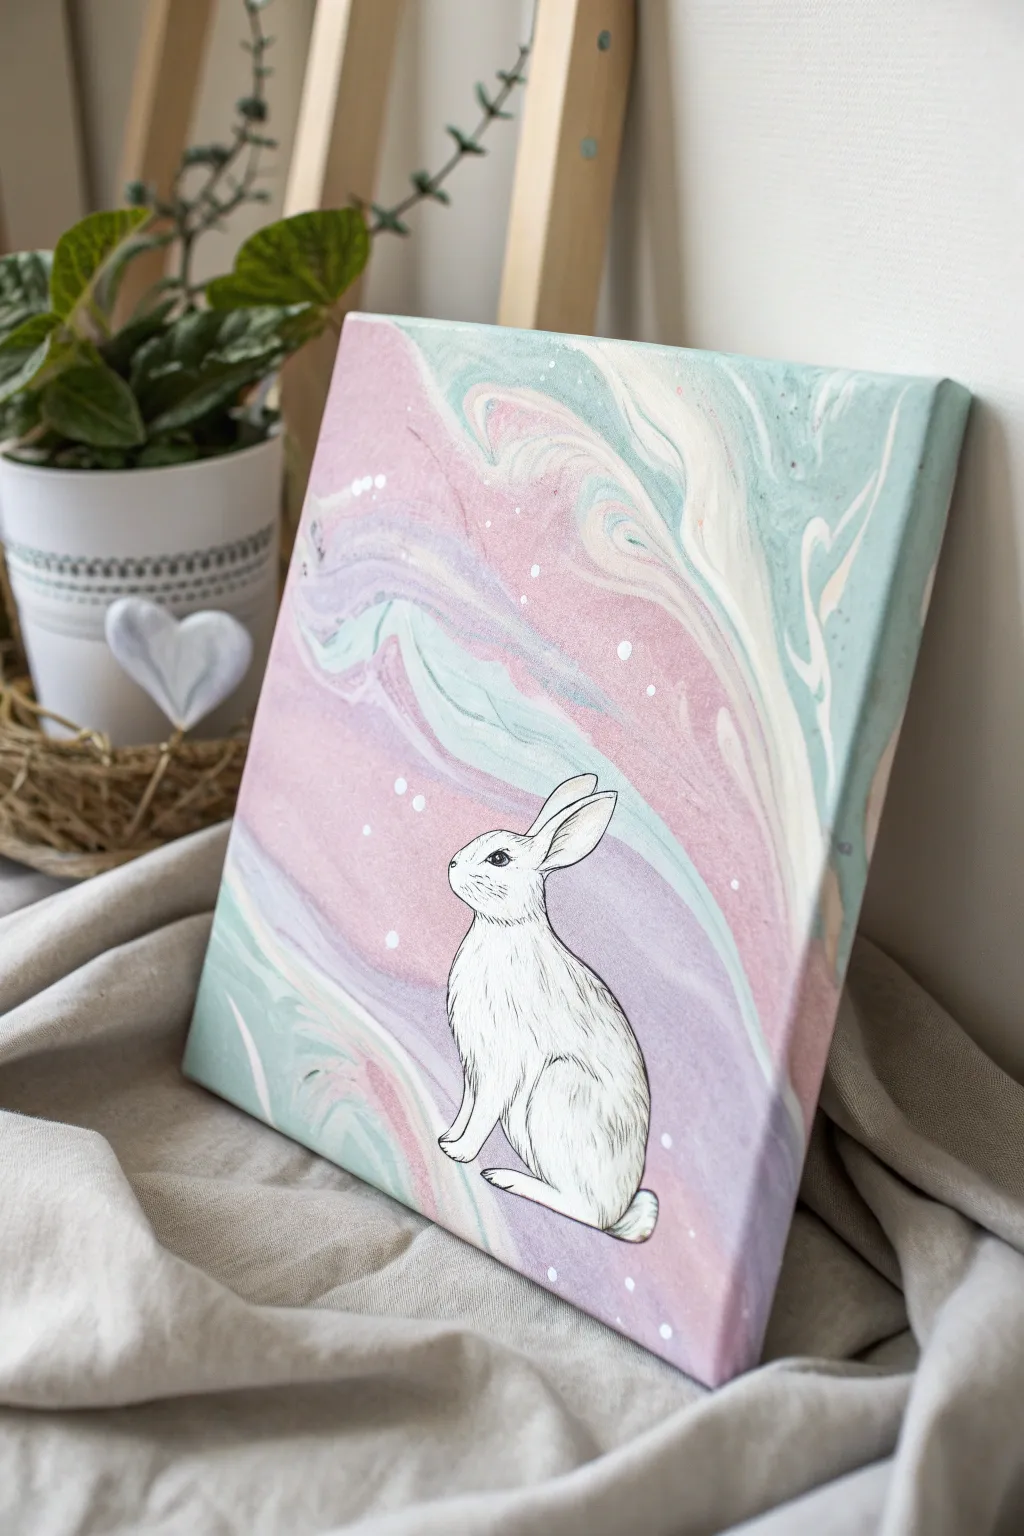
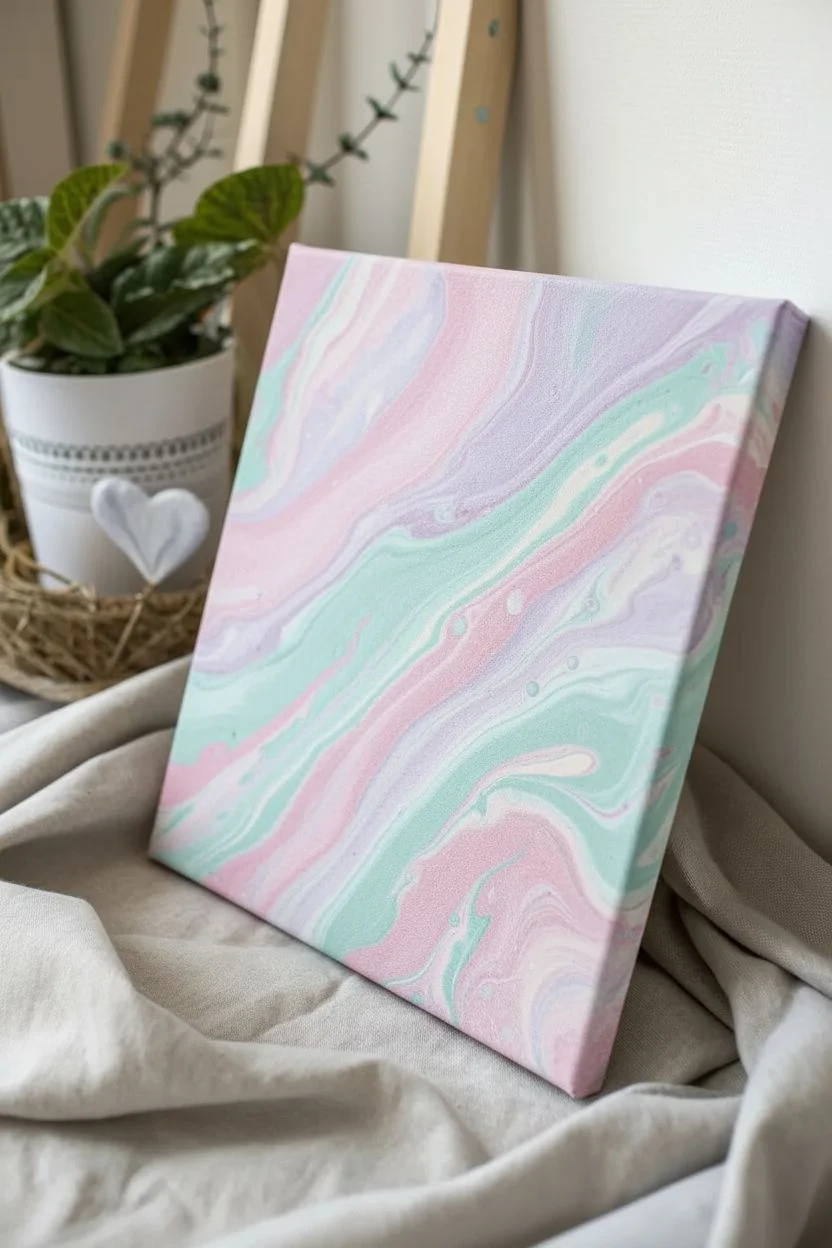
Combine the free-flowing beauty of fluid art with the precision of illustration in this charming canvas project. The soft pastel swirls create a dreamy atmosphere for the delicate line-art bunny, resulting in a piece that feels both modern and magical.
Step-by-Step Tutorial
Materials
- Small square canvas (e.g., 8×8 or 10×10 inches)
- Acrylic paints (pastel pink, teal/mint, white, soft purple)
- Pouring medium
- Disposable cups and stirring sticks
- Fine-grit sandpaper (optional)
- Black archival ink pen or fine-liner marker (0.3mm or 0.5mm)
- White acrylic paint pen or small detail brush
- Pencil and eraser
- Tracing paper (optional)
- Varnish or sealant (matte or satin finish)
Step 1: Creating the Swirled Background
-
Prepare your paints:
Mix each of your acrylic colors (pink, teal, purple, white) with pouring medium in separate cups. Getting the consistency right is key; aim for a texture like warm honey that flows easily but isn’t watery. -
Layer the cup:
Take a clean, empty cup and slowly pour small amounts of each color into it, layering them one by one. Do not stir. Repeat the layering process until the cup is about half full. -
Pour the base:
Pour the contents of your layered cup onto the center of the canvas. You can pour in a straight puddle or a slow wandering line to create different movement. -
Tilt and stretch:
Gently pick up the canvas and tilt it in various directions. Let the paint flow all the way to the edges and corners. Watch as the colors stretch and swirl together to create a marble effect. -
Dry thoroughly:
Place the canvas on cups or a drying rack to keep it elevated. This step requires patience, as poured paint is thick; allow at least 24-48 hours for it to dry completely to the touch.
Step 2: Adding the Bunny and Details
-
Assess the surface:
Once the paint is fully cured, run your hand over it. If there are any bumpy dried paint ridges, very lightly buff them with fine-grit sandpaper to create a smooth surface for drawing. -
Plan placement:
Find a nice open area in your swirl pattern where the bunny will sit. I usually look for a spot that feels like a natural ‘ground’ or a calmer section of the background. -
Sketch or trace:
Lightly sketch the outline of a sitting rabbit using a pencil. If you aren’t confident drawing freehand, print a bunny silhouette and use transfer paper to trace the shape onto the canvas. -
Ink the outline:
Using your black archival ink pen, carefully go over your pencil lines. Focus on the main shape of the body, ears, and head first. -
Add fur textures:
Use short, flicking pen strokes to create the illusion of fur. Concentrate these strokes around the chest, the curve of the leg, and the inside of the ears. Leave the center of the body mostly white or sparse to show the volume. -
Detail the face:
Draw the eye carefully, leaving a tiny white spot for the highlight to bring it to life. Add a small nose and a few delicate whiskers radiating from the muzzle. -
Fill opacity (optional):
If the background swirl is too dark and showing through your bunny, paint inside the outline with a thin layer of white acrylic paint. Let it dry, then redraw your fur texture on top. -
Add magical specks:
Dip a small detail brush or use a white paint pen to dot tiny white specks around the background. Group them in clusters of three or scattered lines to mimic stars or falling snow.
Ink refusing to flow?
If your pen clogs or skips over the acrylic skin, the surface might be too slick. Very gently rubbing the drawing area with a clean pencil eraser can add enough ‘tooth’ for the ink to grab.
Step 3: Finishing Touches
-
Clean up:
Gently erase any visible pencil marks once the ink is totally dry. Be careful not to smudge your fresh drawing. -
Seal the art:
Apply a coat of varnish over the entire piece. A matte or satin spray varnish works best here, as brushing liquid varnish over ink can sometimes cause smearing.
Add some sparkle
For an extra magical touch, mix a tiny pinch of fine iridescent glitter into your white paint before adding the final dots. It will catch the light beautifully without overpowering the subtle swirls.
Now you have a serene piece of art that perfectly balances chaotic color with delicate lines


Have a question or want to share your own experience? I'd love to hear from you in the comments below!