
Thanksgiving is basically a dream theme for painters: cozy colors, harvest textures, and iconic symbols that instantly read as “the holiday.” I pulled together my favorite Thanksgiving painting ideas that range from super beginner-friendly to more artsy, unexpected twists you can really make your own.
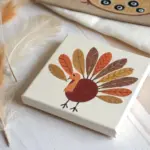
Classic Turkey Portrait With Warm Fall Colors
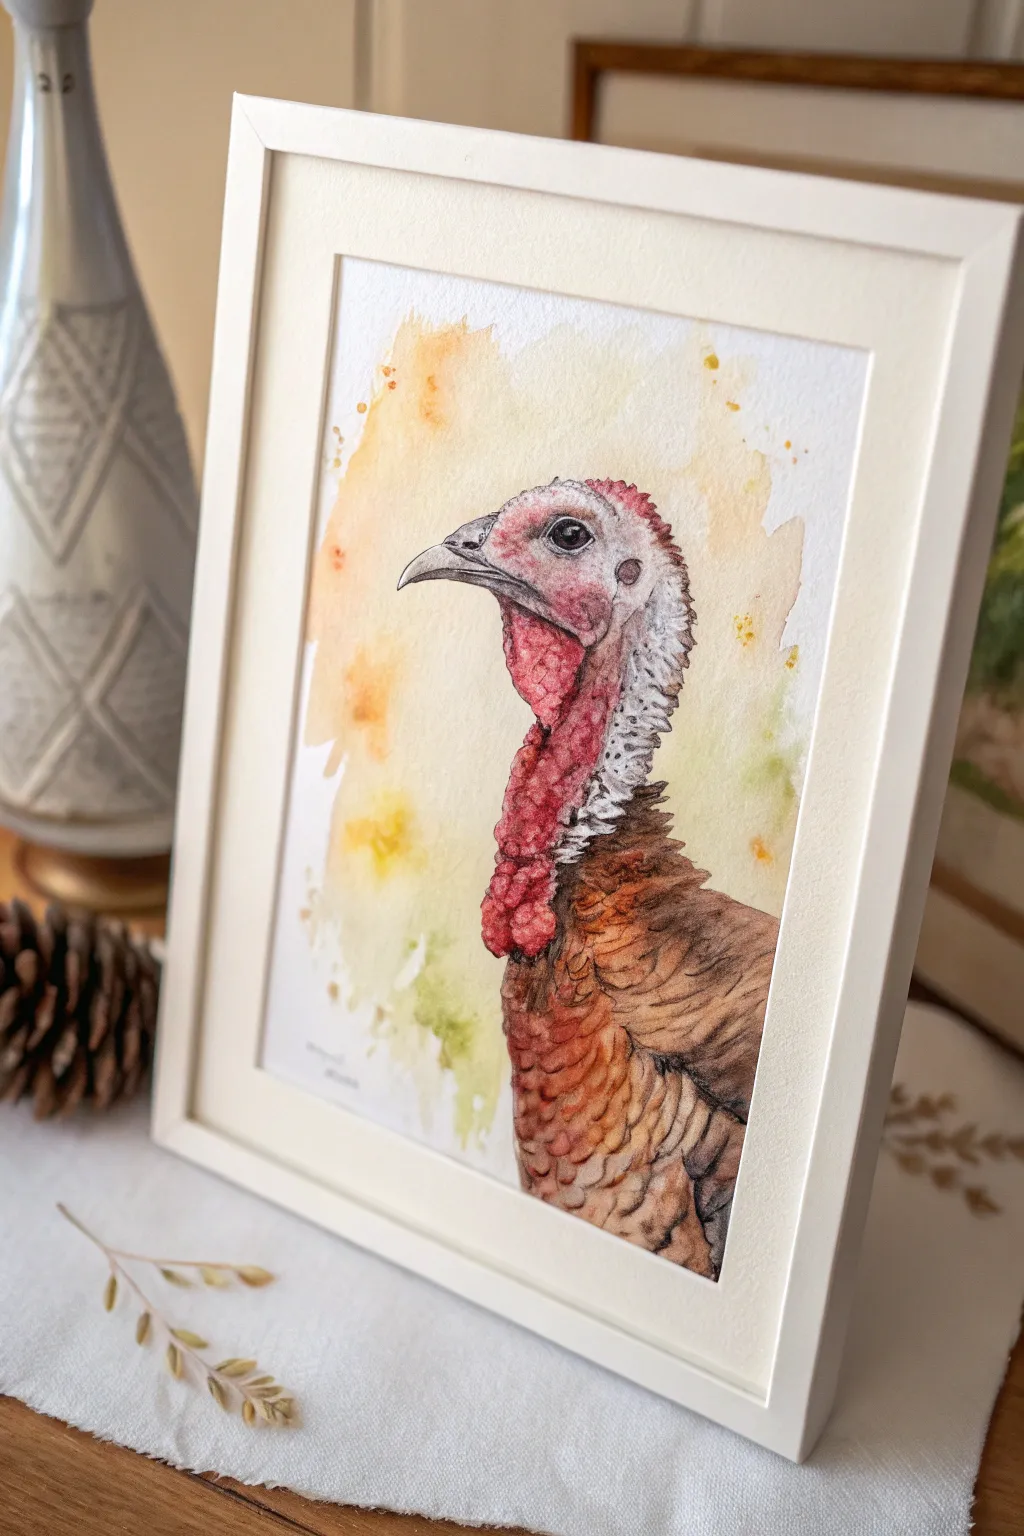

Capture the dignified spirit of the Thanksgiving season with this elegant watercolor portrait of a turkey. This project balances loose, warm background washes with detailed fine-line work to create a piece that feels both rustic and refined.
Step-by-Step Tutorial
Materials
- Cold press watercolor paper (140lb/300gsm)
- Pencil (HB or 2B) and kneadable eraser
- Watercolor paints (Alizarin Crimson, Burnt Sienna, Yellow Ochre, Sap Green, Paine’s Gray or Black)
- Round brushes (Size 8 for washes, Size 2 and 00 for details)
- Waterproof fine liner pen (black or sepia) – optional
- Two jars of water
- Paper towels
- Masking tape
Step 1: Sketching the Foundation
-
Profile Outline:
Begin by lightly sketching the profile of the turkey’s head and neck on your watercolor paper. Focus on the curve of the beak and the distinct wattle (the bumpy skin) that hangs down the neck. -
Body Shape:
Extend the lines downward to suggest the upper shoulders and chest. Don’t worry about drawing every feather yet; just capture the general mass and posture. -
Facial Features:
Carefully place the eye high on the head and define the beak’s separation line. Sketch the snood (the fleshy protuberance above the beak) and the bumpy texture of the neck skin lightly.
Muddy colors?
If your background colors are turning gray or brown where they mix, let the paper dry completely between color applications, or stick to analogous colors (reds, oranges, yellows) that blend cleanly.
Step 2: The Atmospheric Background
-
Wet the Paper:
Using your size 8 brush and clean water, dampen the area surrounding the turkey sketch. Be careful not to get water inside your pencil lines yet. -
Initial Glow:
Drop in a dilute wash of Yellow Ochre near the head and neck. Let the pigment bloom naturally into the wet paper. -
Adding Warmth:
While the paper is still damp, touch in bits of Burnt Sienna and Alizarin Crimson around the edges of the yellow to create an autumnal gradient. -
Hint of Green:
Near the bottom of the background, gently introduce a very watery Sap Green. This grounds the image without distraction. Allow the entire background to dry completely before touching the bird.
Level Up: Metallic Touch
Use metallic gold watercolor paint for the final splatters or to highlight the tips of the chest feathers. This adds a subtle shimmer that catches the light beautifully.
Step 3: Painting the Turkey’s Head
-
Pale Skin Tones:
Mix a very pale wash of Alizarin Crimson and a touch of gray. Apply this to the top of the head and the face area, keeping it very light. -
Vibrant Wattles:
Switch to a more saturated Alizarin Crimson. Paint the bumpy skin of the neck (wattles) using a stippling motion with your size 2 brush to mimic rough texture. -
Shadows and Depth:
While the red paint is damp, drop in tiny amounts of purple or blue-gray into the crevices of the neck skin to create instant volume. -
The Eye:
Using your smallest brush or a fine liner, paint the eye dark brown or black, leaving a tiny spec of white paper for the highlight. This brings the bird to life immediately. -
Beak Details:
Wash the beak with a light gray. Once dry, add a thin, dark line to separate the upper and lower mandibles.
Step 4: Feathers and Finish
-
Shoulder Feathers:
For the upper body feathers, mix Burnt Sienna with a little black to get a rich brown. Paint the feather shapes using short, overlapping strokes that follow the curve of the body. -
Layering Colour:
I like to glaze a thin layer of Yellow Ochre over the dried brown feathers to give them a golden sheen. -
Fine Texture:
Using a size 00 brush or a fine liner pen, add delicate scale-like patterns to the individual feathers on the chest. -
Neck Transition:
Soften the transition between the red neck skin and the brown feathers. Use small, dashed strokes to suggest tiny, hair-like feathers where the skin meets the plumage. -
Final Splatters:
Load your brush with watery Yellow Ochre or Gold paint. Tap the handle against your finger to create subtle splatters around the background for an artistic, loose finish.
Frame your finished piece in a simple white or wood frame to let those warm autumn tones really shine


Handprint Turkey Keepsake for Family Painting Time
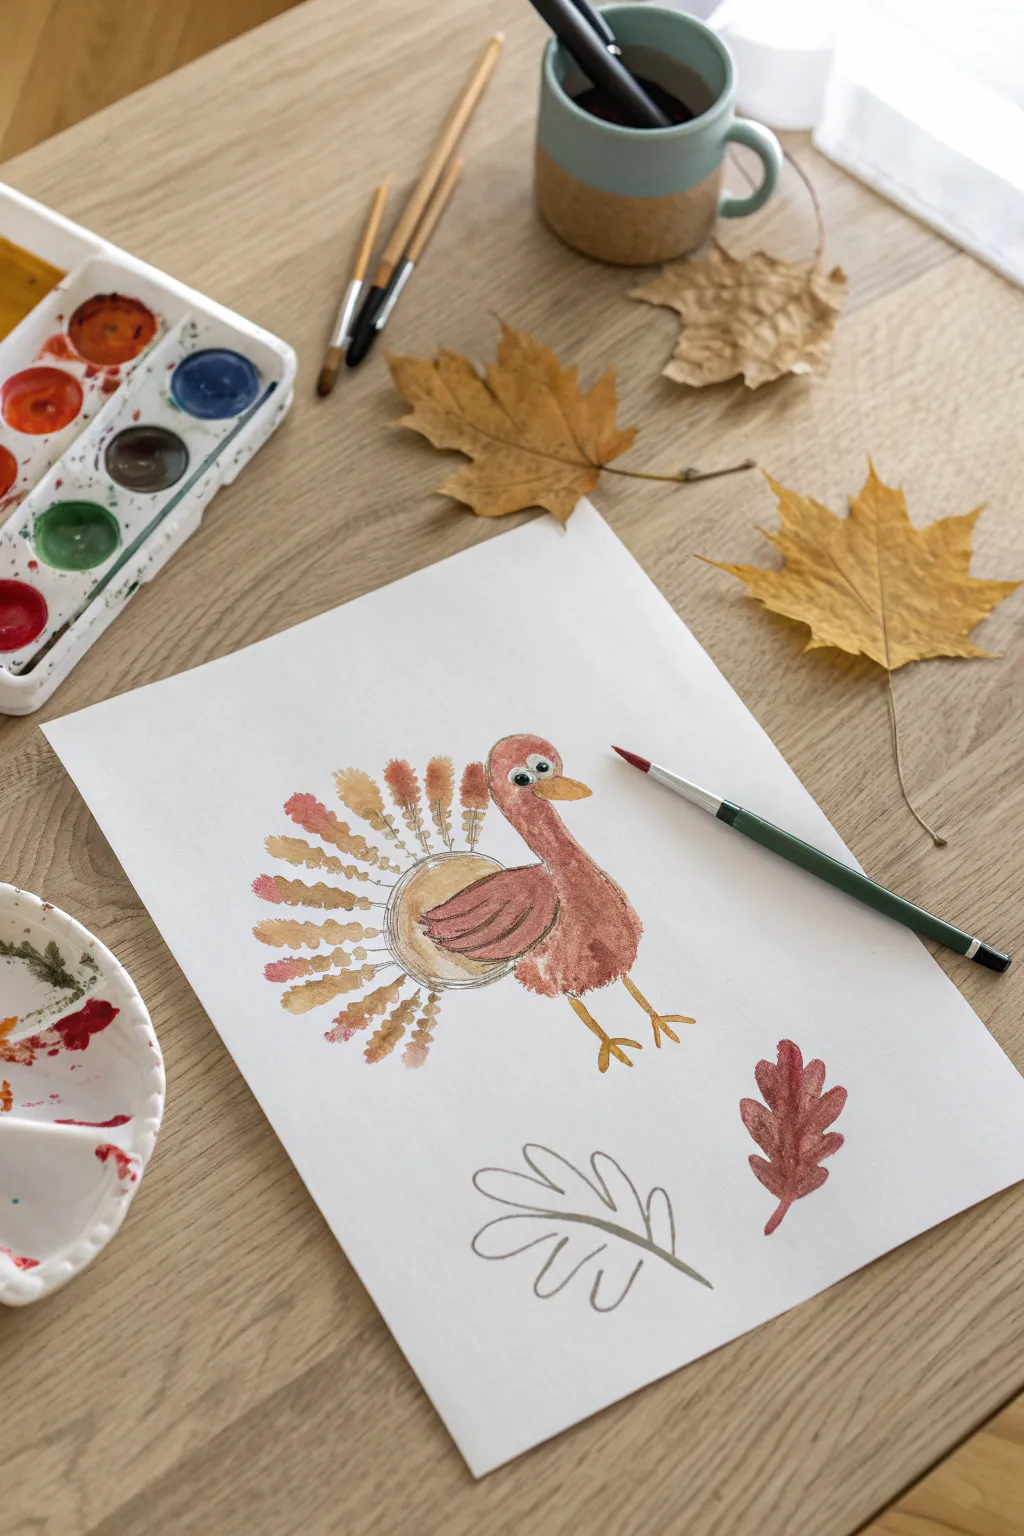
This charming project captures the essence of Thanksgiving with a playful, illustrative watercolor turkey. It features delicate feather details and warm autumnal tones, making it a perfect piece of seasonal wall art or a heartfelt greeting card cover.
Step-by-Step Guide
Materials
- Watercolor paper (cold press, 140lb recommended)
- Watercolor paint set (with brown, orange, red, yellow, and blue)
- Round watercolor brush (size 6 or 8)
- Small detail brush (size 0 or 2)
- Pencil for sketching
- Jar of clean water
- Paper towels
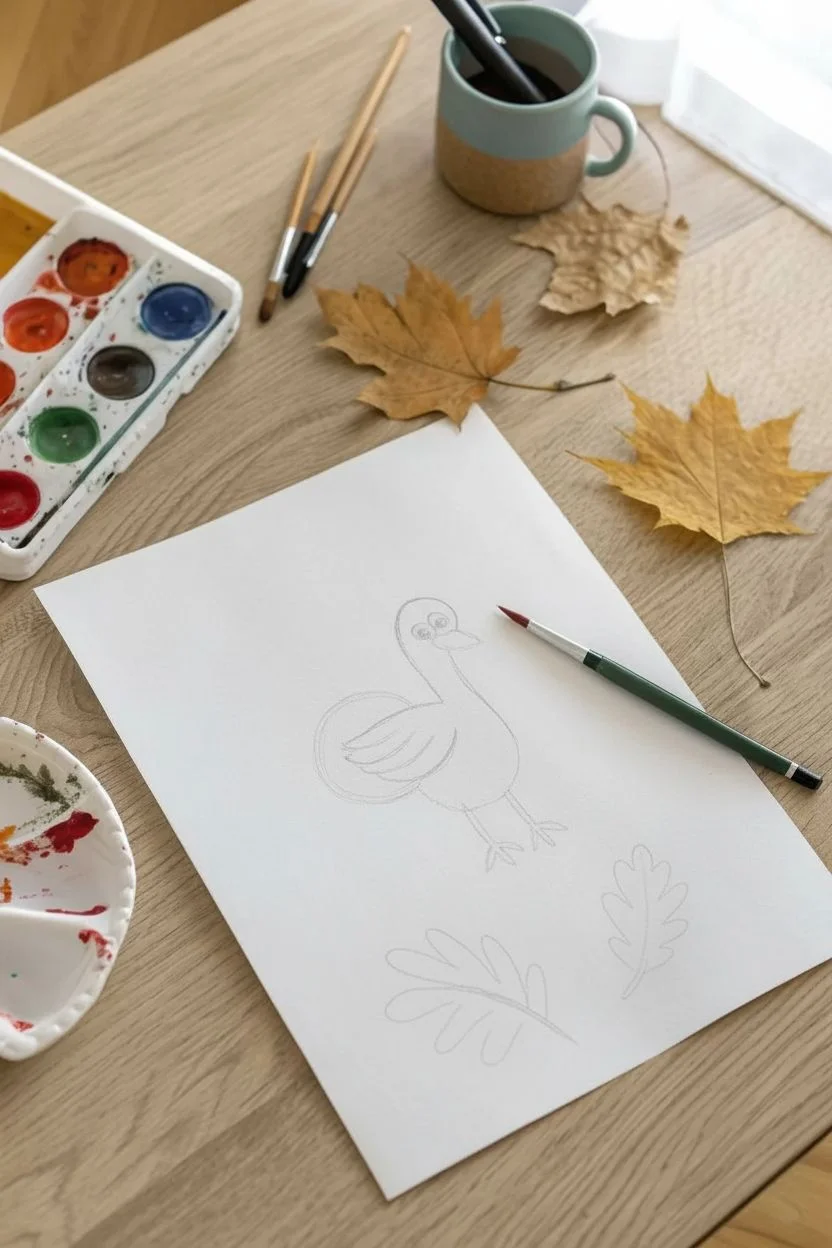
Step 1: Sketching the Outline
-
Draw the head and neck:
Begin by lightly sketching a small oval for the head near the center-right of your page. Extend two curved lines downward to form a slender neck that widens slightly at the base. -
Form the body:
Connect the neck to a larger, rounded oval shape for the turkey’s main body. Keep your pencil pressure very light so the graphite doesn’t show through the translucent watercolor later. -
Add the wing:
Sketch a teardrop-shaped wing on the side of the body, pointing slightly upward towards the tail area. -
Outline the tail fan:
Instead of a solid fan, lightly mark a semi-circle behind the turkey where the feathers will radiate. You don’t need to draw every feather yet; just establish the boundary.
Pro Tip: Dry Brush Effect
For the feather tips, blot your brush slightly before painting. This creates a jagged ‘dry brush’ texture that mimics real feather fuzz.
Step 2: Painting the Turkey
-
Base coat for body:
Load your medium brush with a warm, reddish-brown hue. Fill in the head, neck, and main body area. I like to keep this wash uneven, letting water pool slightly to create textual variation. -
Define the wing:
While the body is still damp but not soaking, paint the wing shape with a slightly darker or more saturated brown to distinguish it from the body. -
Paint the legs:
Switch to yellow ochre or gold paint. With a steady hand, paint two thin legs extending from the bottom of the body. Add three toes to each foot. -
Add the beak:
Using the same yellow tone, paint a small triangular beak on the face. Let these foundational layers dry completely before moving on.
Step 3: Creating the Feathers
-
Mix your feather colors:
Prepare puddles of fall colors on your palette: deep red, burnt orange, mustard yellow, and a soft beige. -
Paint the spine:
Using your smallest brush and a very pale brown, paint thin, straight lines radiating outward from the turkey’s back, following your semi-circle guide. -
Dab the feather tips:
Dip your medium brush into your various fall colors. Apply the paint in small, rounded dabs at the end of each spine line. Alternate colors to create a vibrant pattern. -
Add texture:
While the feather tips are wet, you can touch a tiny bit of a darker color into the center of a few dabs to let the colors bleed and blend naturally. -
Repeat for inner layers:
Create a second, inner row of shorter feathers closer to the body using the same method to make the plumage look full.
Troubleshooting: Muddy Colors
If your brown and orange start mixing into a dull gray on the paper, let the first color dry completely before painting a neighbor color next to it.
Step 4: Final Details
-
Paint the eye:
Once the head is totally dry, paint a small white circle for the eye. When the white is dry, add a tiny black pupil in the center. -
Outline the wing:
Use a darker brown and a fine brush to add a few curved lines on the wing to suggest individual feathers. -
Add decorative leaves:
In the empty space at the bottom right, sketch a simple oak leaf shape or outline. Fill one in with a reddish-brown wash and leave another as a simple pencil outline. -
Erase guidelines:
After ensuring the painting is 100% bone dry, gently erase any visible pencil marks, being careful not to smudge the paint.
Step back and admire your festive bird, ready to bring warmth to your holiday table


Pumpkin Patch Scene With Layered Orange Highlights
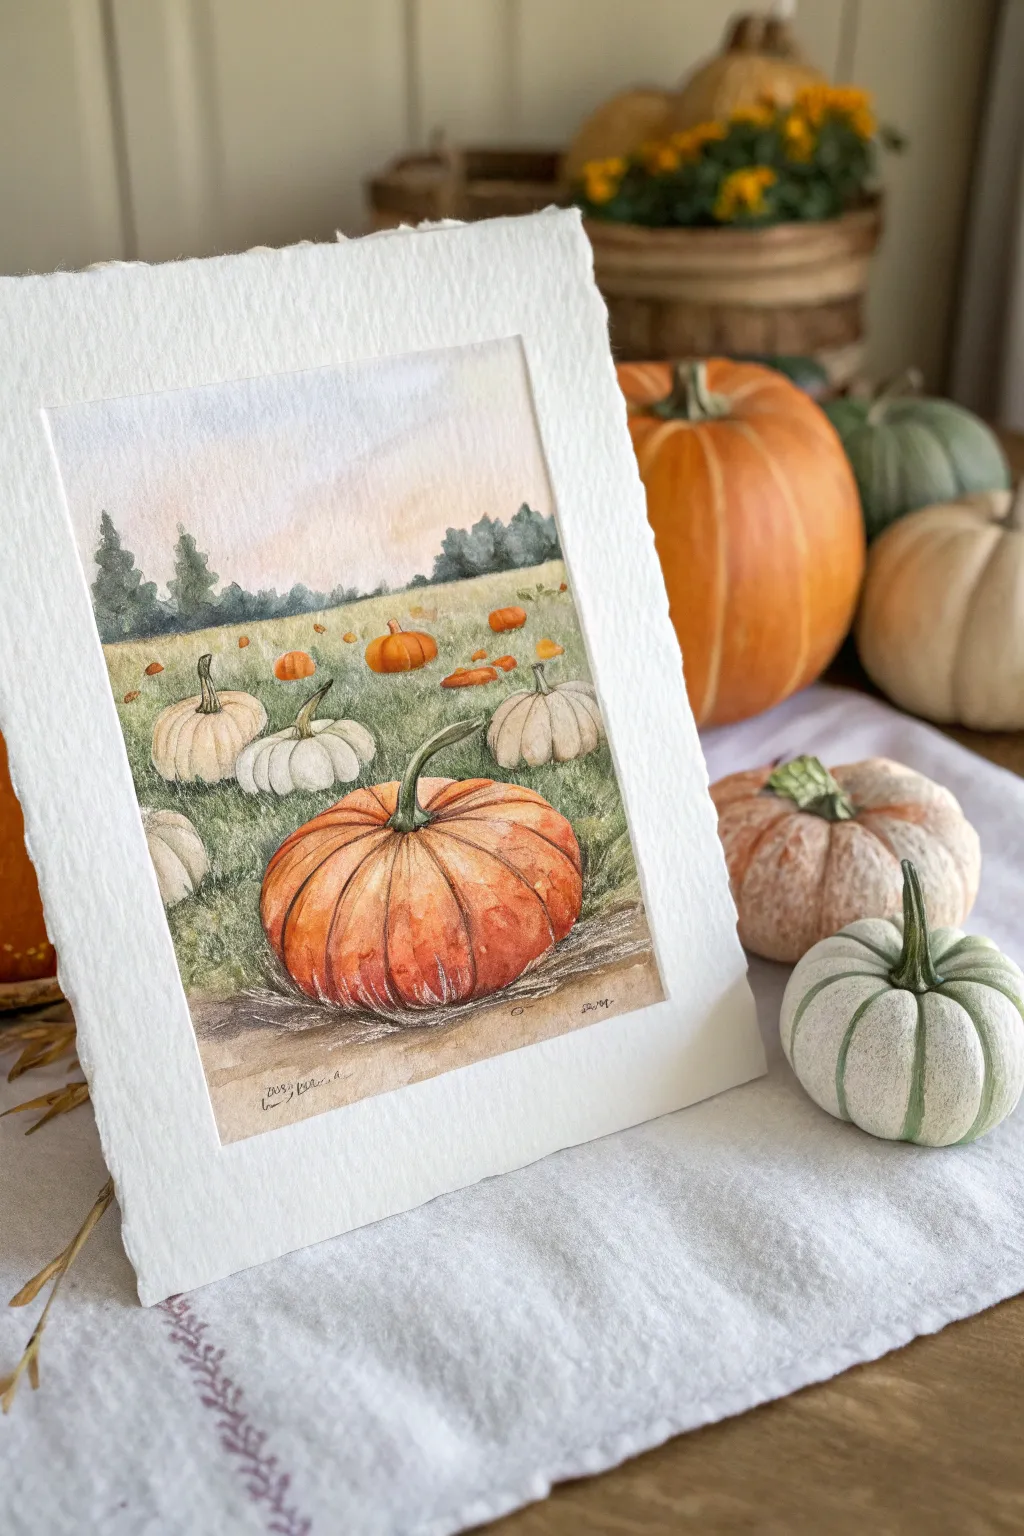
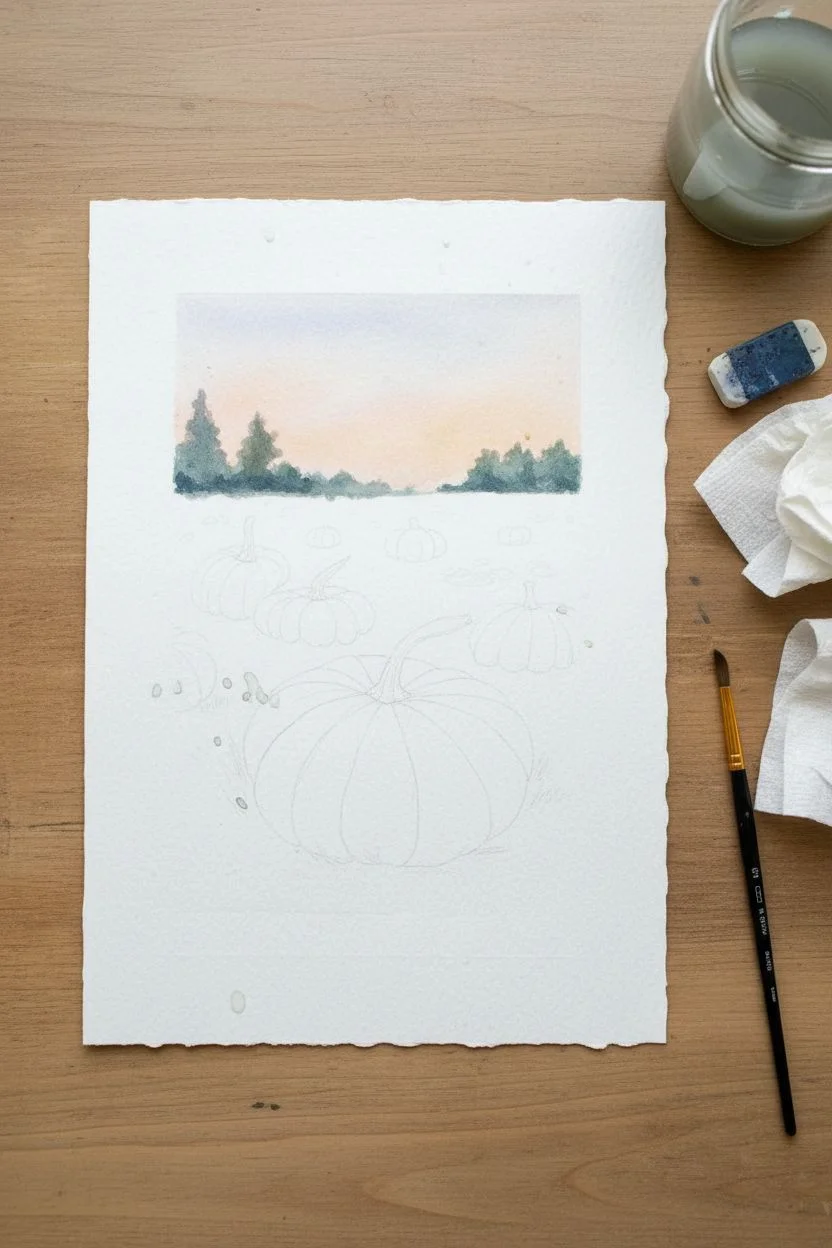
Capture the essence of a crisp autumn harvest with this ethereal watercolor pumpkin patch scene, featuring a striking orange gourd as the centerpiece. Soft washes of color and delicate layering create a sense of depth and atmospheric perspective that brings the field to life.
Step-by-Step
Materials
- Cold press watercolor paper (deckled edge optional)
- Watercolor paints (Burnt Sienna, Cadmium Orange, Sap Green, Yellow Ochre, Indigo, Payne’s Grey)
- Round brushes (sizes 2, 6, and 10)
- Pencil (HB or 2H)
- Kneaded eraser
- Masking fluid (optional)
- Clean water jars
- Paper towels
Step 1: Sketching & Sky
-
Light pencil sketch:
Begin by lightly sketching the horizon line just below the halfway point of your paper. Draw the main foreground pumpkin large and slightly off-center to the right, then add the surrounding smaller white pumpkins and vague shapes for the distant ones. -
Refine the details:
Add the stem details and the vertical rib lines on the pumpkins. Keep these lines faint, as watercolor is transparent. Use a kneaded eraser to lift any graphite that looks too dark. -
Wet-on-wet sky:
Wet the sky area above the horizon line with clean water. Drop in a very dilute wash of watered-down Cadmium Orange near the horizon, blending it upward into a faint touch of Indigo or violet for a soft, early evening sky. -
Distant trees:
While the sky is just damp (not soaking), dab in a mix of Indigo and Sap Green along the horizon line to create a soft, out-of-focus tree line. Vary the heights to simulate natural growth.
Don’t Overwork It
Watercolors look best when fresh. Resist the urge to fix every ‘mistake’ or blend too much. Let bloom and watermarks add organic texture to the field.
Step 2: Painting the Patch
-
Field base layer:
Mix a wash of Sap Green and Yellow Ochre. Apply this loosely across the grassy area, carefully painting around your sketched pumpkins. Let the color vary in intensity to suggest uneven ground. -
Distance rendering:
For the pumpkins far in the background, simply dab small spots of orange. They don’t need detail; simple blobs of color will read as pumpkins in the distance. -
Mid-ground pumpkins:
Paint the white pumpkins using a very watery mix of Yellow Ochre and a tiny dot of Grey. Paint the shadow sides leaves portions of the paper white for highlights. -
Pumpkin stems:
Using a size 2 brush and a mix of Sap Green and Burnt Sienna, paint the stems. Add a slight curl to the main pumpkin’s stem for character.
Step 3: The Hero Pumpkin
-
First orange wash:
Load your size 6 brush with Cadmium Orange. Paint the segments of the large foreground pumpkin, leaving thin slivers of white paper between some ribs to act as highlights. -
Deepening color:
Before the first layer fully dries, drop in Burnt Sienna at the bottom of the pumpkin and in the crevices between the ribs to create volume and roundness. -
Layering highlights:
Once the first layer is dry, add a second glaze of orange to intensify the color, still preserving the lightest highlight areas. This layering is crucial for that glowing effect. -
Adding texture:
Use a nearly dry brush with thicker orange pigment to add subtle vertical streaks, mimicking the pumpkin’s skin texture.
Vintage Framing
Float mount your finished piece on top of a mat board rather than behind a window. This shows off the beautiful deckled edges of the paper.
Step 4: Refining Details
-
Grass blades:
With your smallest brush and a darker green mix, flick upward strokes around the base of the pumpkins to seat them in the grass. -
Ground shadows:
Mix a transparent grey-brown and paint cast shadows underneath each pumpkin to ground them, preventing them from looking like they are floating. -
Final Contrast:
Assess the painting for contrast. I find adding a few touches of the dark Indigo mix into the deepest shadows of the pumpkin and the tree line really makes the orange pop.
Place your finished piece on a mantle or tablescape to bring a touch of the outdoors into your cozy holiday setting


“Give Thanks” Lettering Over a Watercolor Pumpkin Wash
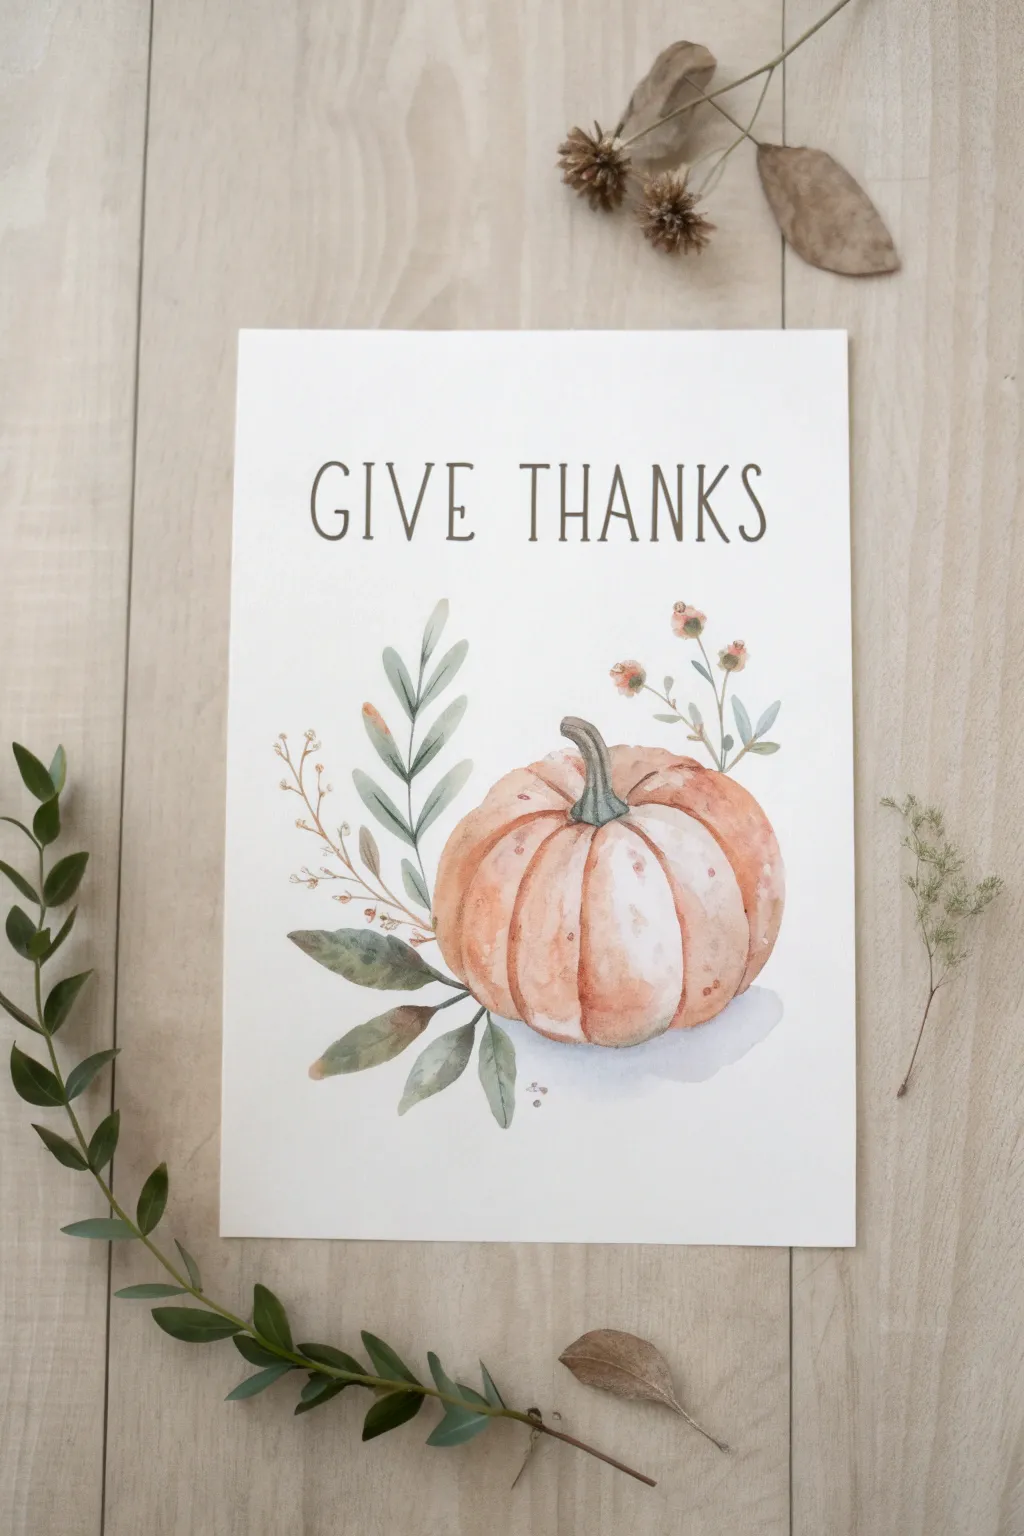

Capture the soft elegance of autumn with this illustrative watercolor project. This piece combines a muted, realistic pumpkin study with delicate greenery and crisp lettering for a timeless Thanksgiving greeting.
Detailed Instructions
Materials
- Cold-pressed watercolor paper (140lb/300gsm)
- Watercolor paints (Burnt Sienna, Yellow Ochre, Sap Green, Burnt Umber, Payne’s Grey, Alizarin Crimson)
- Round watercolor brushes (Size 4 and Size 2)
- Small detail brush (Size 0 or 00)
- Pencil (HB or H)
- Kneaded eraser
- Fine-liner pen (Sepia or Dark Grey) or very fine brush
- Paper towels
- Two jars of water
Step 1: Planning & Sketching
-
Map out the composition:
Begin by lightly marking the center of your paper. Decide where the pumpkin sits (roughly the bottom third) to leave ample white space at the top for your lettering. -
Sketch the pumpkin outline:
Draw the main oval shape of the pumpkin. Remember that pumpkins aren’t perfect circles; flatten the top and bottom slightly for a natural look. -
Define the ribs:
Lightly sketch the curved vertical lines that define the pumpkin’s ribs. Start from the center stem indentation and curve them outward and down to the base. -
Add nature elements:
Sketch a stem curling slightly to the left. Then, plan the foliage: a large leafy branch tucking behind the left side and delicate sprigs with berries on the right. -
Draft the lettering:
Using a ruler to keep the baseline straight, lightly pencil in ‘GIVE THANKS’ in a tall, narrow serif font. Center it horizontally above the pumpkin illustration. -
Refine the lines:
Use your kneaded eraser to roll over the sketch, lifting up most of the graphite so only faint ghost lines remain. This prevents pencil marks from showing through the transparent watercolor.
Muddy Colors?
If your orange looks dull, you likely mixed in too much green or blue initially. Let it dry completely, then glaze a layer of pure, vibrant orange over the top to bring the glow back.
Step 2: Painting the Pumpkin
-
Mix your base orange:
Create a muted orange mix using Burnt Sienna with a touch of Yellow Ochre. For a softer look, add plenty of water to make a tea-like consistency. -
First wash:
Paint every other rib of the pumpkin with this wash. Painting non-adjacent sections first prevents the wet paint from bleeding together, helping distinct ribs to form. -
Add definition:
While the paint is still damp, drop a slightly more concentrated mix of Burnt Sienna or a tiny dot of Alizarin Crimson into the bottom curves and the top indentation for shadow. -
Complete the form:
Once the first set of ribs is dry, paint the remaining sections. I like to leave tiny slivers of white paper between some ribs to act as highlights. -
Paint the stem:
Mix a greenish-brown using Sap Green and Burnt Umber. paint the stem, using vertical strokes to mimic the woody texture. -
Add surface texture:
Using a relatively dry brush (scumbling technique), add faint texture marks or distinct spots on the pumpkin skin using a reddish-brown mix.
Pro Tip: Soft edges
To get that dreamy illustrative look, avoid harsh outlines. If an edge looks too hard, run a clean, damp brush along it immediately after painting to soften the transition.
Step 3: Botanicals & Details
-
Foliage base layer:
Mix a dusty green using Sap Green neutralised with a bit of Alizarin Crimson. Paint the larger leaves on the left, letting the color fade out toward the tips. -
Layering leaves:
For the darker leaves tucked underneath the pumpkin, add a touch of Payne’s Grey to your green mix to create depth and shadow. -
Delicate sprigs:
Switch to your size 0 brush. Use a very watery brown-ochre mix to paint the fine stems on the left and right sides. -
Berry details:
Dip the tip of your small brush into a mix of red and orange. carefully dab in the small berries or floral buds on the right-hand sprigs. -
Grounding shadow:
Mix a very watery, pale violet-grey. Paint a soft, amorphous shape beneath the pumpkin to ground it, softening the edges with clean water so it fades into the white paper.
Step 4: Lettering & Finishing
-
Inking the text:
Using a sepia fine-liner or a very steady hand with your smallest brush and dark brown paint, carefully trace your ‘GIVE THANKS’ lettering. Keep the lines thin and consistent. -
Final assessment:
Step back and look at the composition. If the pumpkin looks too flat, you can glaze a very thin layer of Burnt Sienna over the shadowed side once everything is bone dry.
Now you have a charming piece of seasonal art ready to be framed or scanned for holiday cards
BRUSH GUIDE
The Right Brush for Every Stroke
From clean lines to bold texture — master brush choice, stroke control, and essential techniques.
Explore the Full Guide
Pilgrim Hat Turkey for a Cute, Classic Thanksgiving Look
Capture the charm of the harvest season with this whimsical folk-art style turkey painting. Using warm, earthy tones and simple shapes, you’ll create a festive piece perfect for framing or digitizing for Thanksgiving cards.
How-To Guide
Materials
- Cold press watercolor paper (A4 or similar size)
- Watercolor or gouache paint set (ochre, burnt sienna, deep red, black, olive green, warm yellow)
- Round paintbrushes (size 2 for details, size 6 for washes)
- Fine liner brush or 00 round brush
- Pencil (HB or H) and eraser
- Jar of clean water
- Mixing palette/plate
- Paper towels
Step 1: Planning and Sketching
-
Sketch the body:
Begin lightly in the center of your paper. Draw a rounded, bulbous shape for the turkey’s body, slightly tilted to the right. It should look a bit like a bean or a kidney shape. -
Add the neck and head:
Extend a long, curved neck upward from the front of the body, topping it with a small circular head. Keep the lines smooth and flowing into the main body shape. -
Outline the tail feathers:
Behind the body, sketch a large fan shape. Divide this fan into individual, rounded feather segments radiating outward from the turkey’s back. -
Detail the features:
Add a triangular beak, a small wattle hanging down the neck, and round wing shape on the side of the body. Sketch stick-like legs and a simple pilgrim hat—a trapezoid base with a brim—perched on the head. -
Draw surrounding elements:
Lightly sketch two large oak leaves floating above the turkey and simple leafy sprigs framing the bottom. Don’t press too hard, as watercolor is transparent.
Muddy colors?
If your browns look muddy, let layers dry completely before painting adjacent areas. Patience prevents the wet paint from bleeding together.
Step 2: Painting the Turkey
-
Base coat the body:
Mix a warm, brownish-red hue. Using your size 6 brush, fill in the main body and the neck. Don’t worry about perfect evenness; slight texture adds to the folk look. -
Paint the tailfan:
Using a light ochre or tan, paint the base of the tail feathers. While wet, you can drop in slightly darker brown near the body for depth, or paint alternating feathers in slightly different shades of light brown. -
Add the wing detail:
Paint the wing shape on the body using a golden ochre. Once dry, use a fine brush to add a cross-hatch pattern in dark brown to simulate texture. -
Detail the face:
Paint the beak a bright yellow-orange and the wattle a soft pinkish-red. Carefully paint the hat black, leaving a tiny square empty for the yellow buckle, or paint the buckle over top later if your yellow is opaque enough. -
Decorate the tail:
Once the tail base is completely dry, use red and orange paint to add circular spots near the tips of each feather. I find using the very tip of a round brush helps keep these circles uniform.
Step 3: Background and Finishing Touches
-
Ground the figure:
Mix a watery olive green. Swipe a broad, loose distinctive shape underneath the turkey’s feet to create a grassy mound. It doesn’t need to be perfectly symmetrical. -
Paint the floating leaves:
Fill in your floating oak leaves with a golden yellow mixing into light brown. Use the fine brush to add a central vein line in brown once the leaves are dry. -
Add the sprigs:
Using a dark, muted green, paint the leafy branches on the left and right sides. Use simple, single-stroke tear-drop shapes for the leaves. -
Define the legs and eye:
Switch to your finest liner brush and black paint. Draw the thin legs and feet. Add a small white dot for the eye with a black pupil in the center (gouache or a gel pen works best for the white). -
Add texture marks:
Using diluted white or very light cream paint, add tiny dots or dashed lines on the turkey’s red body to suggest feathers. -
Refine outlines:
Use a very fine brush with diluted brown or black paint to loosely outline the tail feathers and separate the segments, giving the piece a finished illustrative quality. -
Sprinkle decorative elements:
Fill any empty negative space with tiny red ‘v’ shapes or dots to represent falling leaves or berries, keeping them sparse and airy.
Cardstock cutout
Instead of painting the background, cut your finished turkey out carefully and mount it on kraft paper with foam tape for a 3D illusion.
Allow your painting to dry fully before erasing any visible pencil marks, revealing your charming seasonal artwork
Rustic Barn and Field With Late-November Skies
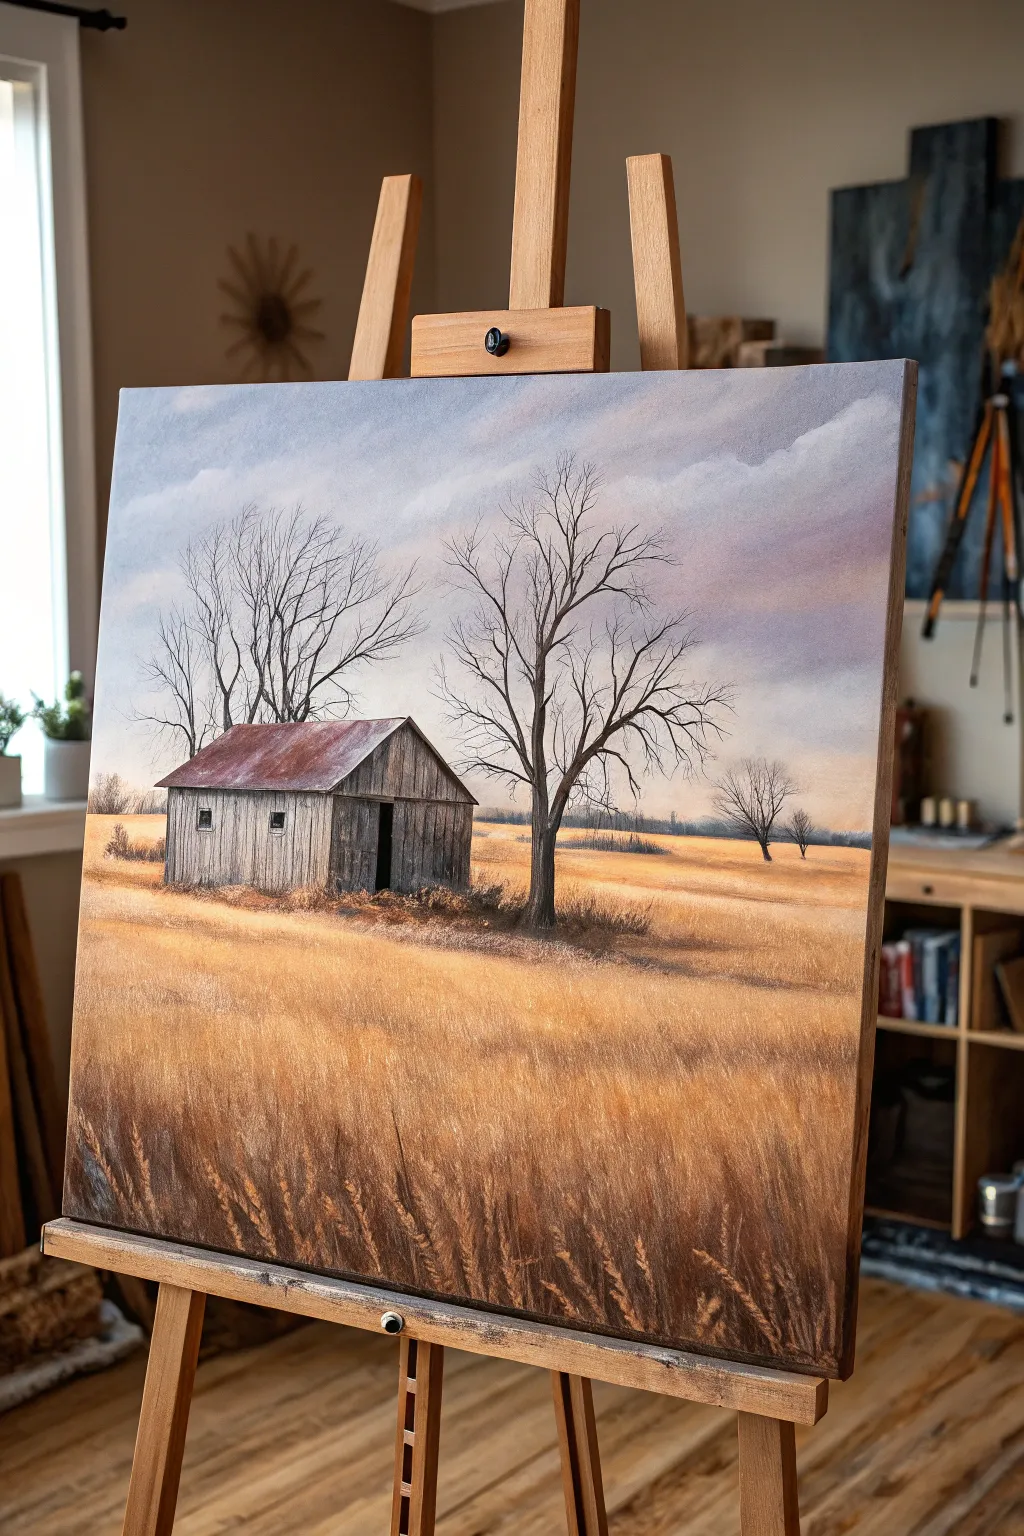
Capture the serene solitude of late autumn with this painting featuring a weathered barn amidst a sprawling field of dried grass. This piece balances the warmth of harvest golds with the cool, moody tones of a late-November sky, perfect for creating a cozy atmosphere.
Step-by-Step Guide
Materials
- Stretched canvas (e.g., 18×24 inch)
- Acrylic paints (Titanium White, Raw Umber, Burnt Sienna, Yellow Ochre, Ultramarine Blue, Alizarin Crimson, Paynes Grey)
- Assorted synthetic brushes (1-inch flat, medium filbert, script liner, fan brush)
- Palette knife
- Water container and paper towels
- Easel
- Pencil for sketching
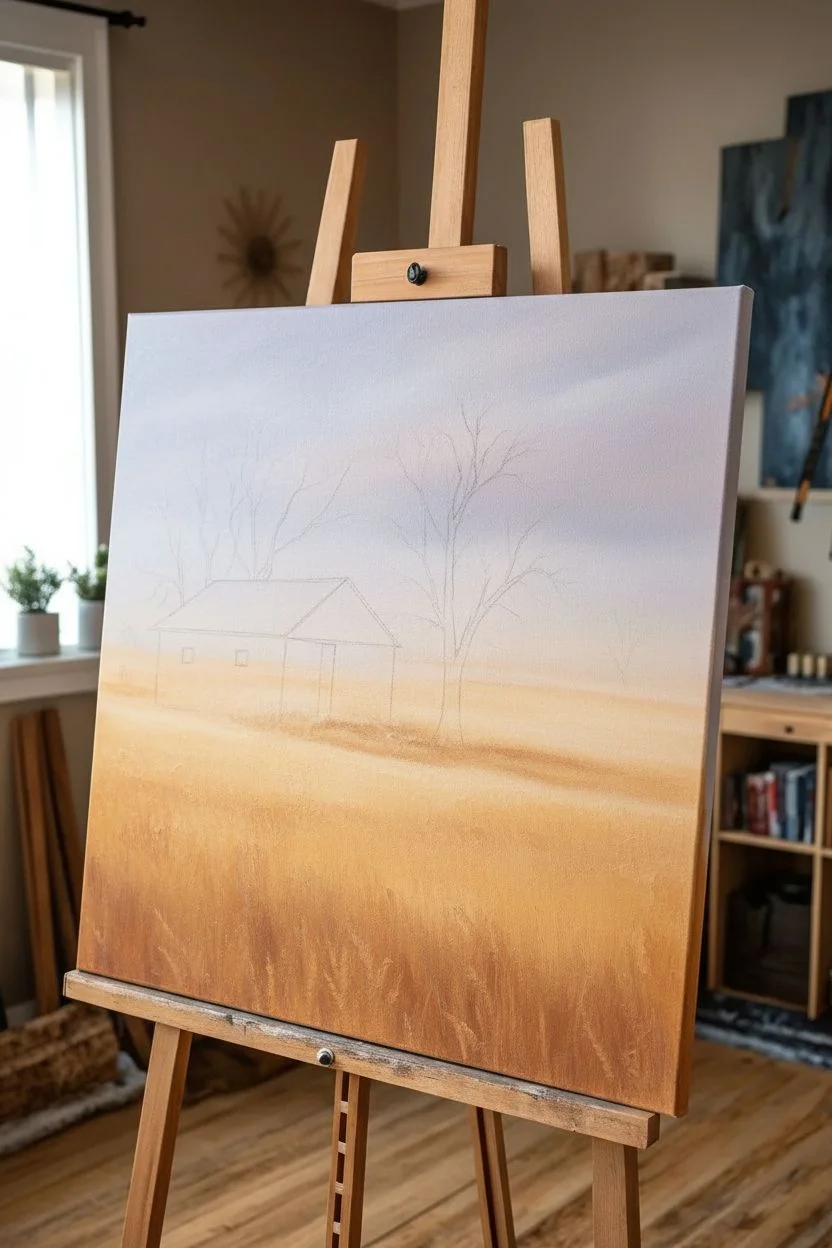
Step 1: Setting the Scene
-
Apply the background wash:
Start by mixing Titanium White with a touch of Ultramarine Blue and Alizarin Crimson to create a pale lavender-grey. Coat the upper two-thirds of the canvas with this mix using a large flat brush, keeping the strokes horizontal and smooth. -
Create the horizon haze:
While the sky is still slightly wet, blend a soft peach tone (White + tiny amount of Yellow Ochre + Alizarin Crimson) near the horizon line. Let this fade upward into the lavender for a soft, cloudy transition. -
Block in the field:
For the ground, mix Yellow Ochre with a bit of Burnt Sienna. Cover the bottom third of the canvas, brushing horizontally but allowing the brush texture to remain visible to suggest the lay of the land. -
Sketch the composition:
Once the base layers are dry, use a pencil or a small brush with watered-down Raw Umber to outline the barn’s perspective and the main tree trunks. Place the barn slightly off-center to key the composition.
Step 2: Constructing the Barn
-
Base coat the structure:
Fill in the barn walls with a mix of Paynes Grey and White to create a weathered wood color. Keep the shadowed side (the front face with the door) significantly darker than the illuminated side wall. -
Paint the rusted roof:
Mix Burnt Sienna with a touch of Alizarin Crimson. Apply this to the roof area, letting some of that grey underpainting peek through in patches for an aged, metallic effect. -
Add wood plank details:
Using a small liner brush and dark grey paint, draw vertical lines to suggest individual wooden planks. Vary the pressure so lines aren’t perfectly uniform, making the wood look warped and old. -
Detail the door and windows:
Paint the open doorway and small window frames with almost pure Paynes Grey or black. This deep contrast creates a sense of depth and mystery inside the structure. -
Create weathering effects:
Dry brush a little white mixed with brown over the roof and siding to simulate sun-bleaching and rust streaks.
Muddy Field Fix
If your grass colors are turning to mud, let the bottom layer dry completely before adding highlights. Clean your brush thoroughly between the dark unber tones and the pale ochre highlights.
Step 3: Trees and Vegetation
-
Paint the main tree trunk:
Mix Raw Umber and Paynes Grey. Using a filbert brush, paint the thick trunk of the prominent foreground tree. Taper it as it grows upward. -
Draw fine branches:
Switch to a script liner brush with thinned dark paint (inky consistency). Pull the brush outward from the trunk to create delicate, spindly winter branches that reach high into the sky. -
Add background trees:
For the distant trees on the right horizon, use a lighter, greyer version of your tree color. Keep them smaller and less detailed to push them into the distance. -
Ground the structures:
Darken the area immediately underneath the barn and the main tree with Burnt Umber to anchor them to the ground.
Level Up: Texture
Mix a little modeling paste into your acrylic paint when doing the barn roof or the thickest tree bark. This adds physical 3D texture that catches the light beautifully.
Step 4: Texturing the Field
-
Layer base grasses:
Mix Yellow Ochre, White, and a dot of Raw Umber. Using an upward flicking motion with a fan brush or an old flat brush, create layers of medium-length grass across the entire field. -
Add sunlit highlights:
Mix a brighter highlight shade using Yellow Ochre and more White. Focus these flicks on the foreground and areas where the light naturally hits the field. -
Paint foreground stalks:
I like to switch to a liner brush here to paint individual, tall stalks in the immediate foreground. Use Burnt Sienna for the seed heads to give them that distinct late-autumn look. -
Deepen the shadows:
Glaze a very thin wash of Burnt Umber over the bottom left and right corners. This vignette effect draws the viewer’s eye toward the brightly lit center field and barn. -
Final touches:
Step back and assess. Add a few tiny white highlights to the barn roof or the edges of the tree bark to make the details pop.
Step back and admire the stark, quiet beauty of your autumnal landscape

PENCIL GUIDE
Understanding Pencil Grades from H to B
From first sketch to finished drawing — learn pencil grades, line control, and shading techniques.
Explore the Full Guide
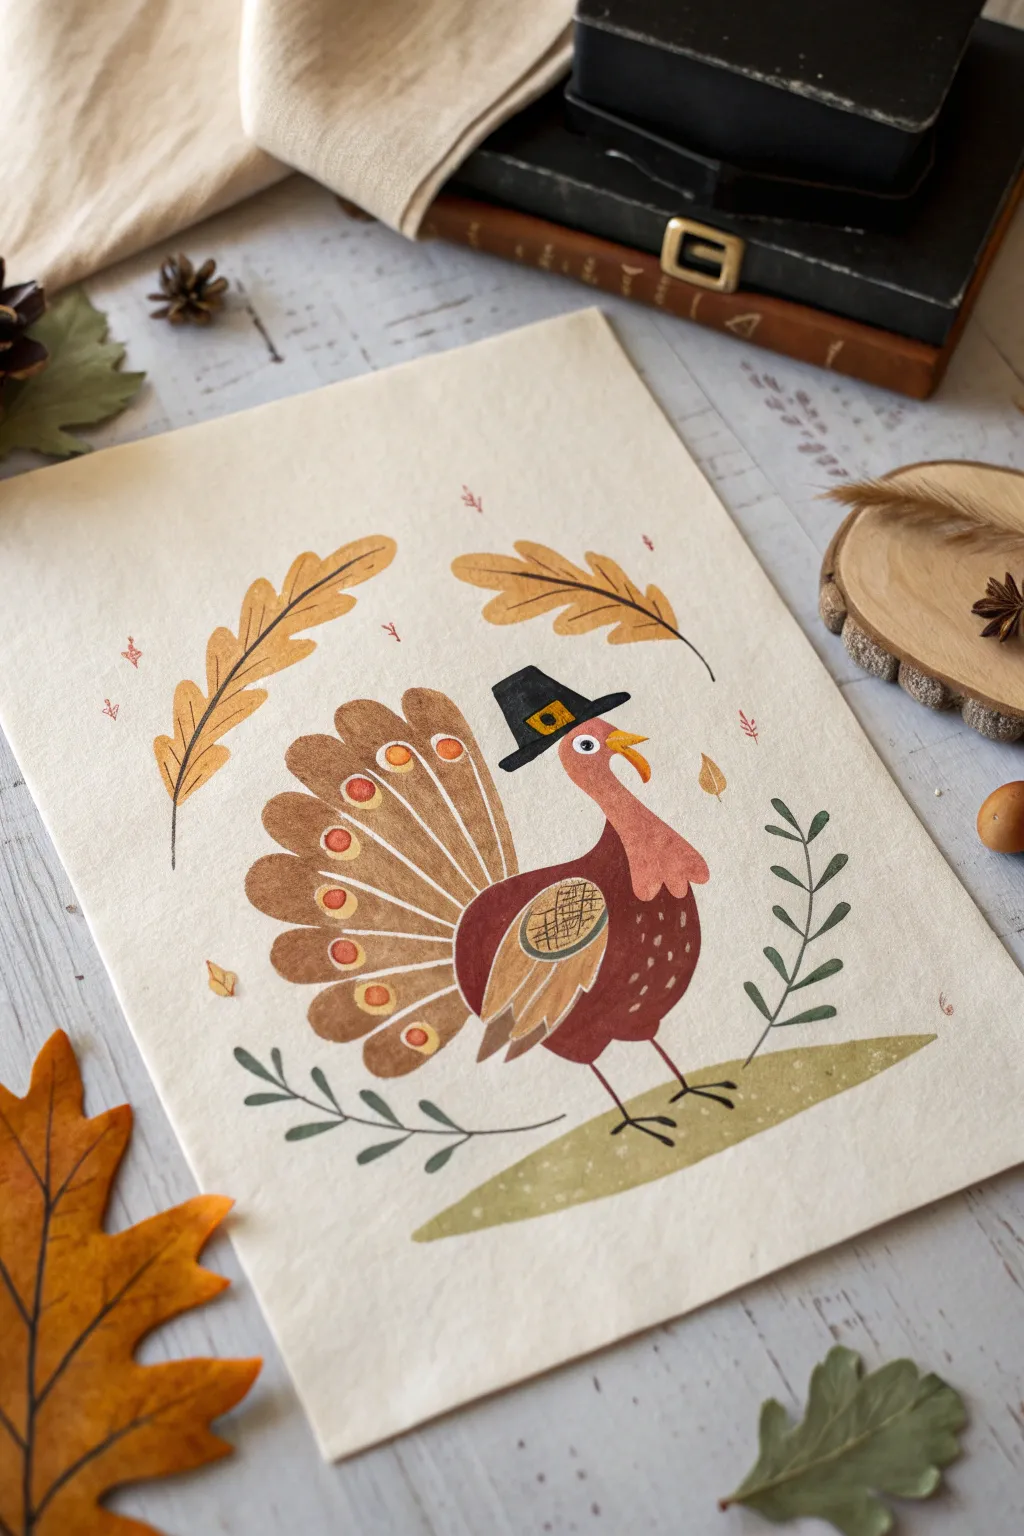
Patterned Thanksgiving Turkey Feathers With Folk-Art Shapes
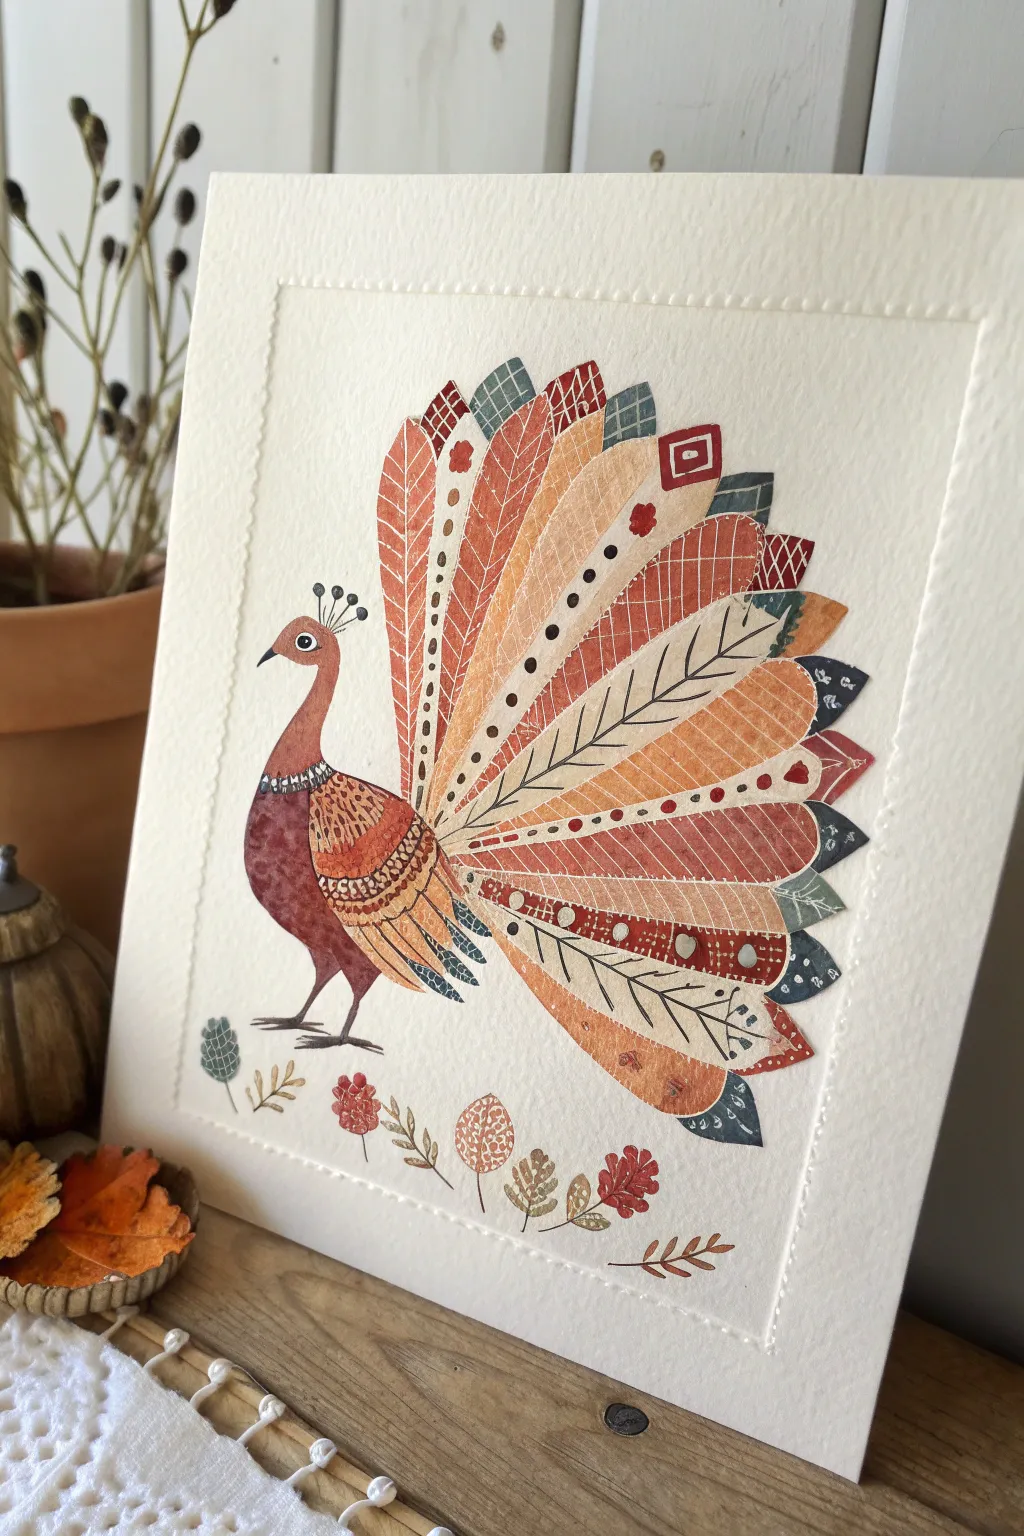
Embrace the warmth of autumn with this stunning folk-art-inspired turkey painting, featuring intricate patterned feathers in earthy tones. This project combines watercolor blending with precise detailing to create a textured, embossed-like finish that feels both traditional and modern.
Step-by-Step Guide
Materials
- Cold press watercolor paper (300 gsm)
- Watercolor paints (burnt sienna, ochre, terracotta, sage green, deep indigo)
- White gouache or white gel pen
- Fine liner brushes (size 0 and 00)
- Medium round brush (size 4 or 6)
- Pencil and eraser
- Ruler
- Mixing palette
- Paper towels
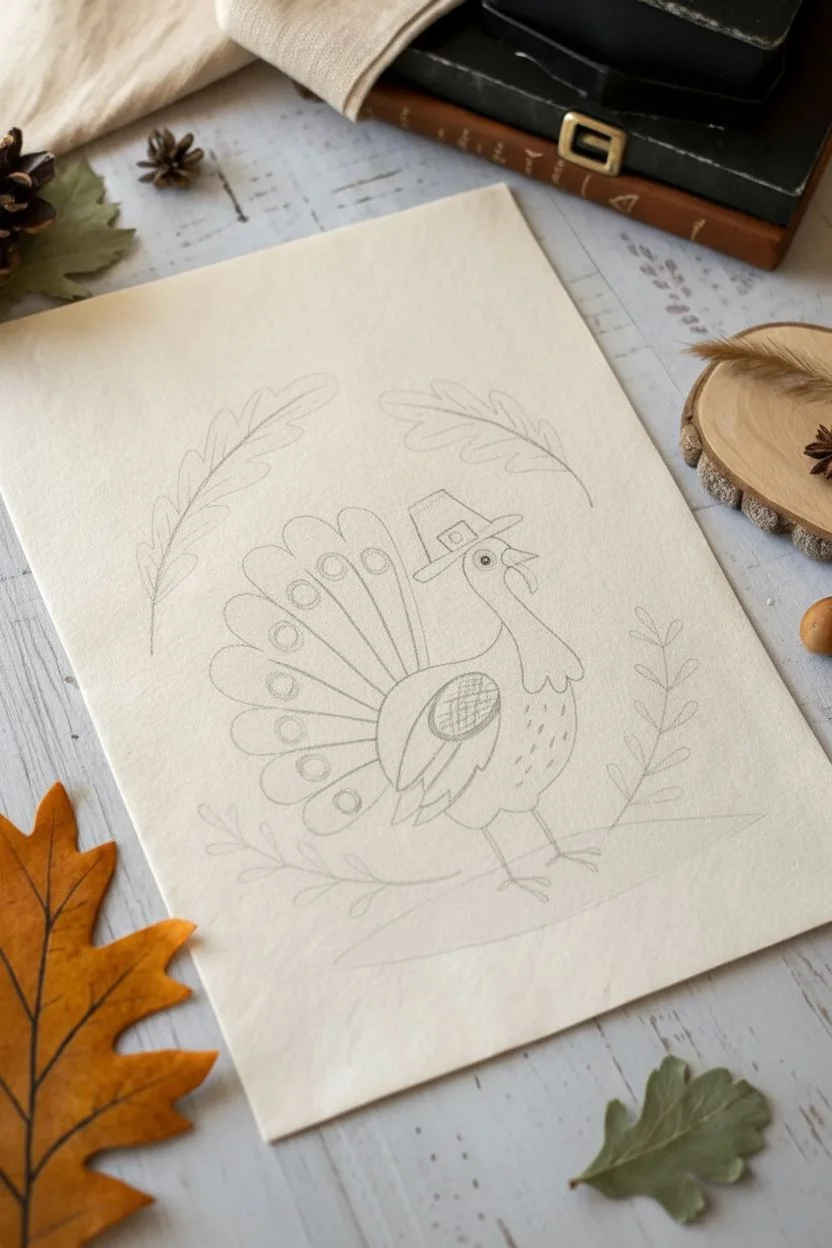
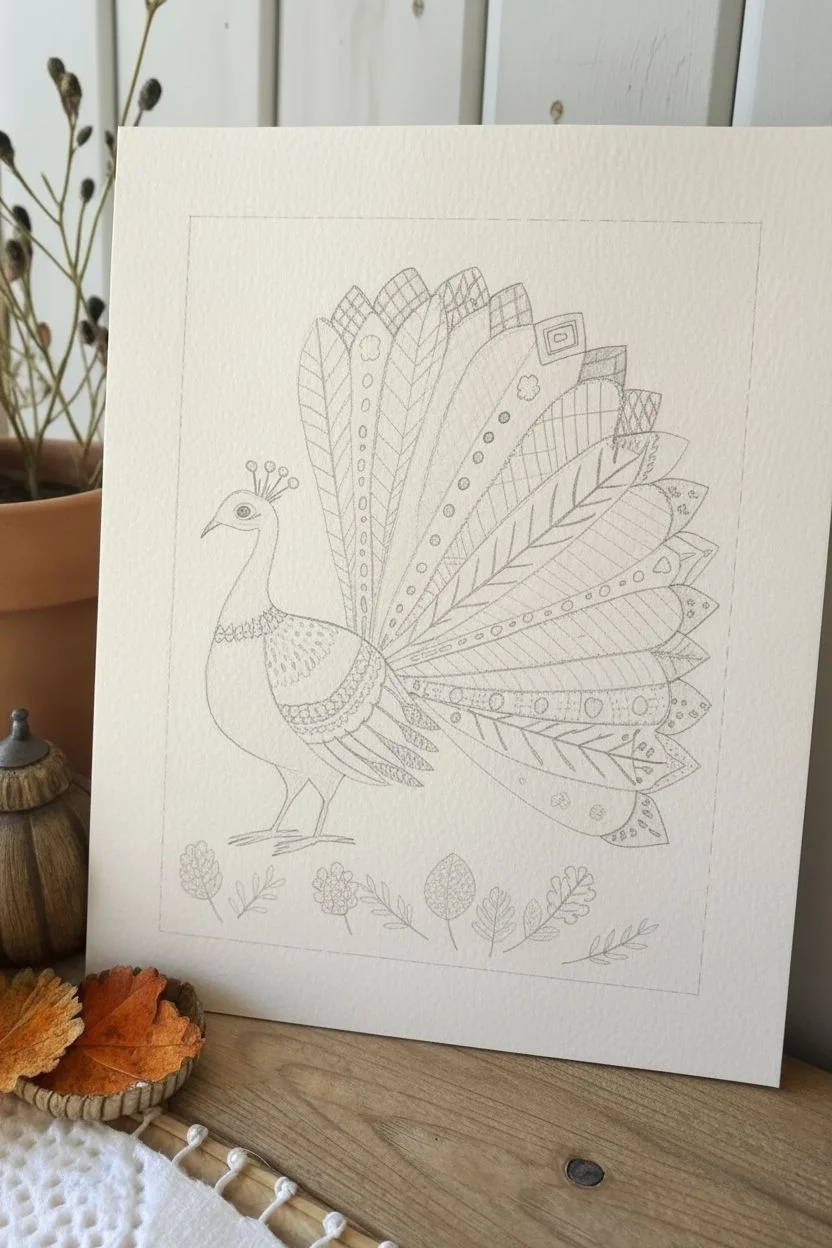
Step 1: Planning and Sketching
-
Prepare the border:
Begin by lightly measuring a rectangular border about an inch from the edge of your paper. Instead of drawing a solid line, create a gentle indented effect or use very faint pencil dots to mark this boundary. -
Sketch the body:
Draw the turkey’s body on the left side of the composition. Sketch a curved neck, a round breast, and legs standing firmly. Add a small crest of three feathers on top of the head. -
Map out the tail:
Fan out the tail feathers starting from the lower back of the bird. Draw large, elongated tear-drop shapes that radiate outward to the right side of the page, ensuring they overlap slightly for a full look. -
Add floating leaves:
Sketch a row of simple, stylized botanical elements along the bottom edge inside your border to frame the bird.
Steady Hand Trick
For the tiny white dots and lines, rest your wrist on a clean, dry sponge or a book next to your paper. This elevation gives you better control over the fine brush.
Step 2: Painting the Base Layers
-
Paint the body:
Mix a warm reddish-brown using burnt sienna and a touch of terracotta. Fill in the body shape, keeping the paint slightly translucent to show the paper’s texture. -
Layer the feathers:
For the tail feathers, work with an alternating palette of ochre, terracotta, light cream (diluted ochre), and soft sage green. Paint each feather shape individually. -
Manage drying time:
I like to skip every other feather while painting to prevent wet colors from bleeding into each other. Let the first batch dry completely before painting the adjacent feathers. -
Paint the botanical accents:
Fill in the small leaves and berries at the bottom using the same color palette to maintain harmony, alternating between red, green, and gold tones.
Step 3: Adding Patterns and Details
-
Add tip details:
Once the base feathers are dry, paint the very tips of the outer feathers with a contrasting color like deep indigo or dark terracotta to create dimension. -
Draw the quill lines:
Using a fine liner brush and a slightly darker shade of the feather’s base color, paint a thin central line down the middle of each feather. -
Create geometric patterns:
This is where the folk art style shines. Paint delicate veins, chevron lines, and small dots inside the feathers using your fine brush. Vary the patterns—some feathers get stripes, others get dots. -
Use white for contrast:
Dip your smallest brush into white gouache (or use a gel pen) to add crisp highlights. Add white dots along the spine of the feathers and small geometric shapes on the darker tips. -
Decorate the neck:
Paint a decorative ‘collar’ on the turkey’s neck with small white dots and triangles, giving it a jeweled appearance. Don’t forget the eye and the tiny crest details.
Opacity Issues
If your white geometric patterns disappear as they dry, your paint is too watered down. Use gouache straight from the tube with very little water for opaque, pop-off-the-page white details.
Step 4: Finishing Touches
-
Detail the bottom leaves:
Add veins to the floating leaves at the bottom using a thin line of darker paint or white gouache depending on the background leaf color. -
Create the embossed border:
To mimic the textured border in the reference, use a dry embossing tool or a dull pencil tip to press small dots along your original border guidelines, or simply paint tiny, rhythmic dots with pale grey paint.
Display your folk art turkey in a simple wooden frame to complement those beautiful warm earth tones
Abstract Thanksgiving Skyline of Pumpkins and Leaves
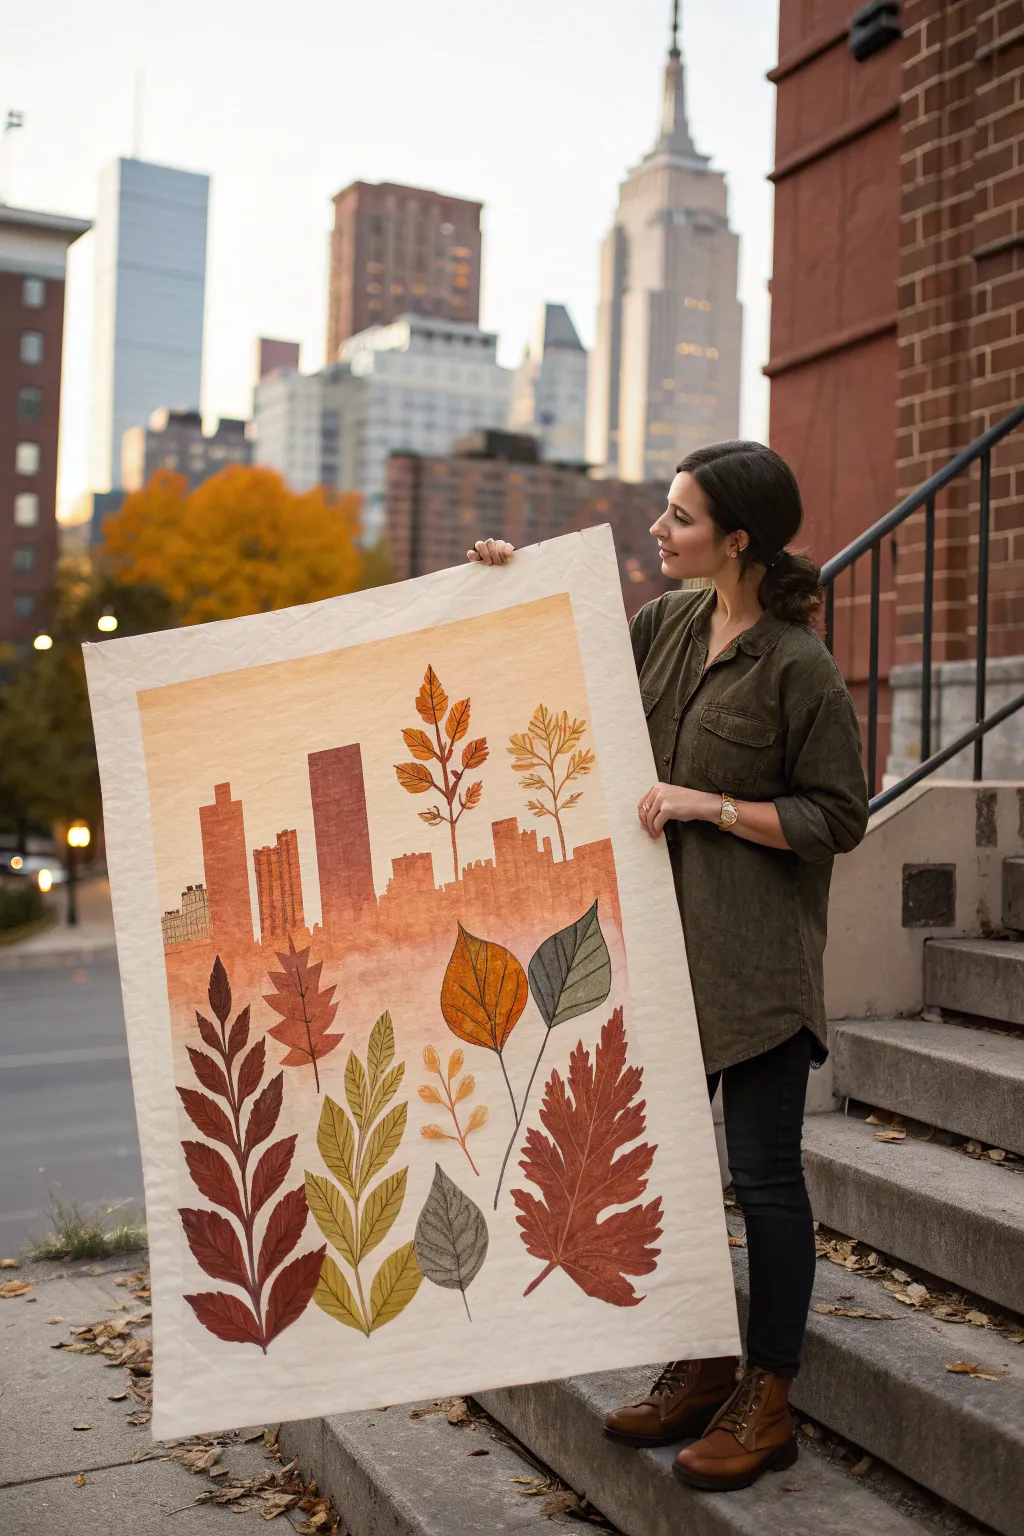
Blend the energy of the city with the tranquility of nature in this striking vertical canvas. This project combines a stylized, warm-toned skyline wash with crisp, detailed botanical illustrations for a sophisticated Thanksgiving centerpiece.
Step-by-Step Tutorial
Materials
- Large canvas or heavy watercolor paper (approx. 24×36 inches)
- Acrylic paints (burnt sienna, raw umber, yellow ochre, terracotta, deep green, white, black)
- Glazing medium or water for dilution
- Wide flat brush (2-3 inch)
- Angle brush (1 inch)
- Fine liner brush (size 1 or 0)
- Pencil and eraser
- Ruler
- Masking tape
- Palette or mixing plate
Step 1: Setting the Scene
-
Prepare the canvas:
Lay your large canvas or paper on a flat surface. Use masking tape to create a clean ½-inch border around the entire perimeter to frame your work later. -
Easel setup:
Since this is a large piece, you may want to tape it to a board or work on a large table. Ensure the surface is taut. -
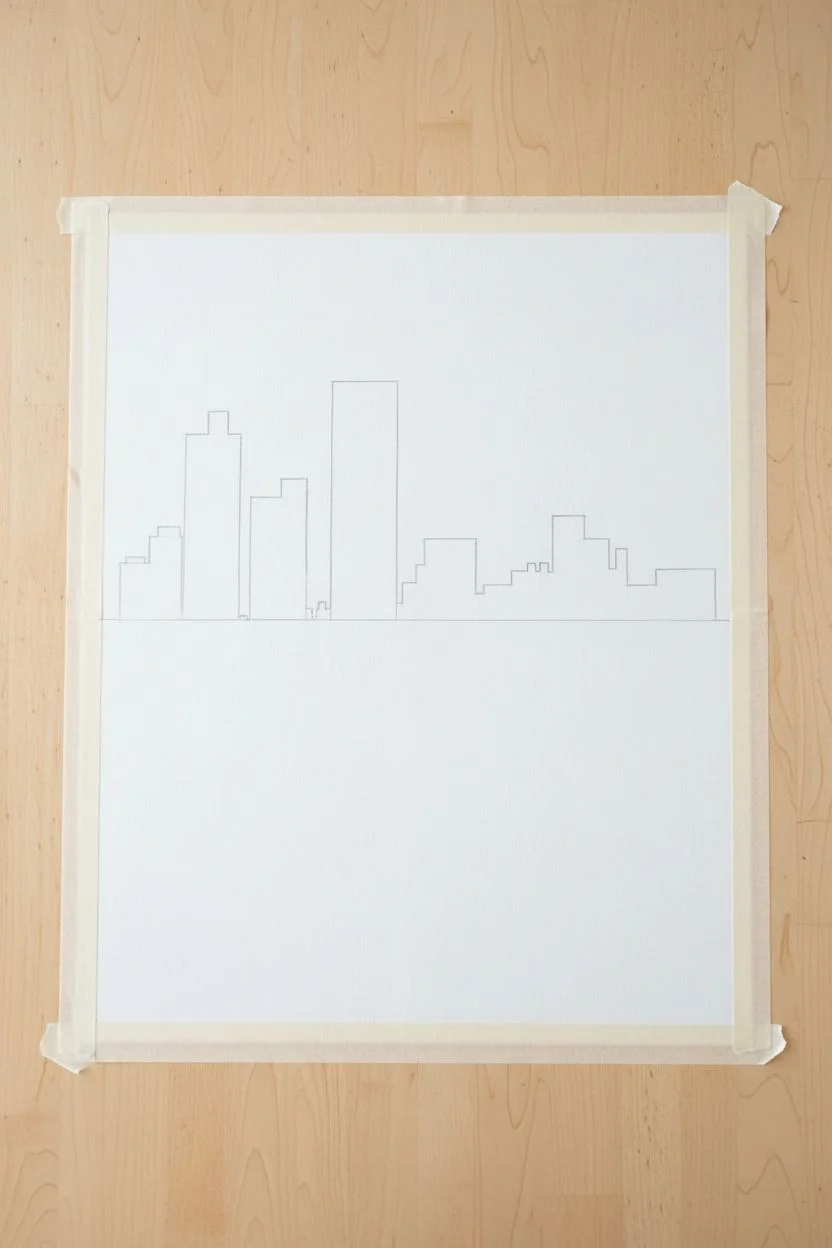
Draft the horizon:
Lightly sketch a horizontal line about halfway down the canvas. This will separate your distinct skyline from the foreground leaf area. -
Sketch the buildings:
Above the horizon line, sketch simple rectangular block shapes to represent skyscrapers. Vary the heights and widths to create visual interest, but keep the shapes 2D and graphic.
Step 2: Painting the Skyline
-
Mix the background gradient:
Create a very diluted wash of yellow ochre and white. Using the wide flat brush, paint the sky area behind the buildings, starting lighter at the top and getting slightly warmer as you move down. -
Block in buildings:
Mix terracotta and burnt sienna with a little glazing medium. Paint the skyscraper shapes. I like to keep the paint somewhat translucent so the texture of the canvas shows through. -
Add depth to architecture:
For a few select buildings, darken your mix with a touch of raw umber to create contrast. Add tiny rectangular details for windows on just one or two focal buildings using the tip of your angle brush. -
Create the fade:
While the bottom of the buildings is still slightly damp, use a clean, wet brush to blur the bottom edge where the city meets the leaf section, creating a misty transition.
Bleeding Lines?
If paint bleeds under your tape, wait for it to dry, then paint over the mistake with white acrylic or gesso to crisp up that edge again.
Step 3: Botanical Details
-
Sketch foliage placement:
Lightly draw large, overlapping leaf shapes in the bottom half. Include a mix of elongated ash leaves, broad maple shapes, and smaller filler sprigs. Allow some branches to reach up into the skyline area. -
Base coat leaves:
Fill in the leaf shapes with flat colors. Use deep green for one or two leaves, yellow ochre for others, and rust red for the large maple-like leaves. Let this layer dry completely. -
Add veining detail:
Switch to your fine liner brush. Mix a dark brown (burnt umber + black) and carefully paint the central veins and branching veins on each leaf. -
Highlight and shadow:
Mix a lighter version of your base colors (add white) to paint one side of the leaf veins, giving them dimension. Add a darker wash on the opposite side for depth. -
Paint the upper branches:
Paint the stems and leaves that overlap the skyline. Ensure these colors are slightly more saturated than the buildings so they pop forward visually.
Gold Leaf Accent
Apply gold leaf to just the veins of the largest leaves or the windows of the tallest building for a shimmering, elegant upgrade.
Step 4: Finishing Touches
-
Refine the edges:
Check the edges of your leaves. If the paint bled, use a little background color to tidy up the perimeter of the botanical shapes. -
Add texture:
If desired, dry brush a little bit of raw umber near the bottom of the canvas to ground the composition and add warmth. -
Remove tape:
Once the painting is 100% dry, slowly peel away the masking tape at a 45-degree angle to reveal your crisp white border.
Hang your masterpiece in a hallway or entry to welcome guests with sophisticated seasonal charm


Gratitude Tree With Painted Leaves as Written Thank-Yous
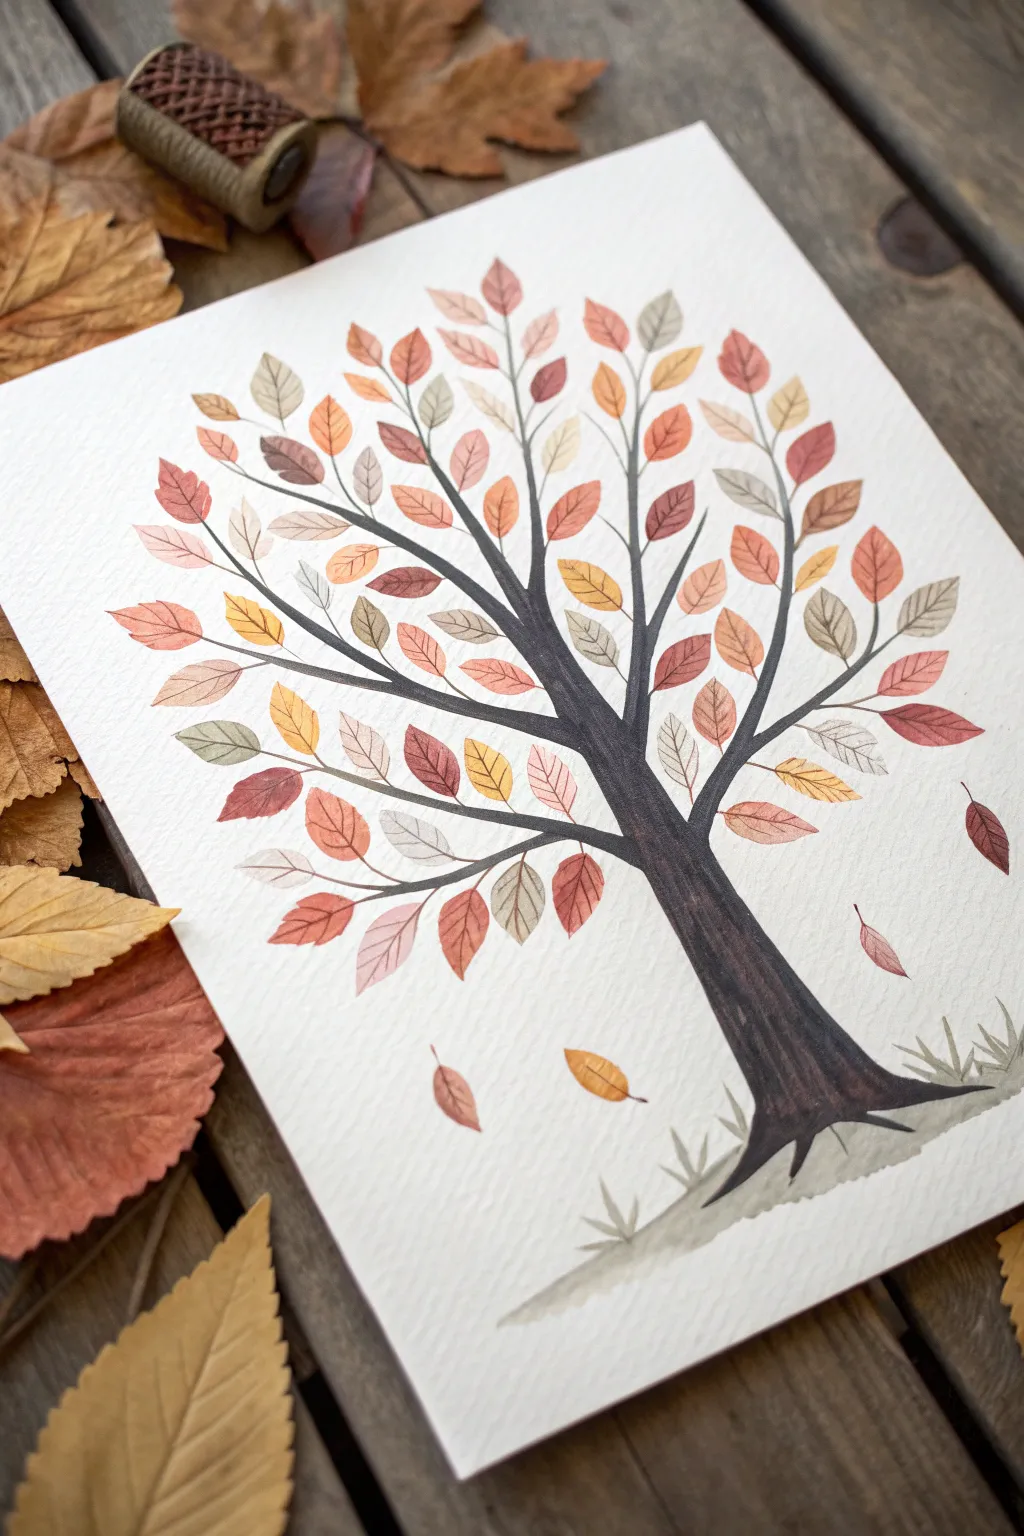
This charming autumn watercolor project captures the cozy warmth of the season with its rich palette of burnt oranges, deep reds, and soft sage greens. The stylized leaves offer perfect little spaces to write names or short messages of thanks, making it both beautiful art and a meaningful Thanksgiving keepsake.
How-To Guide
Materials
- Cold press watercolor paper (approx. 9×12 inches)
- Watercolor paints (pan or tube)
- Round brushes (sizes 2, 4, and 6)
- Pencil (HB or H)
- Kneaded eraser
- Clean water jar
- Paper towels
- Fine-tip waterproof pen (optional, for adding text later)
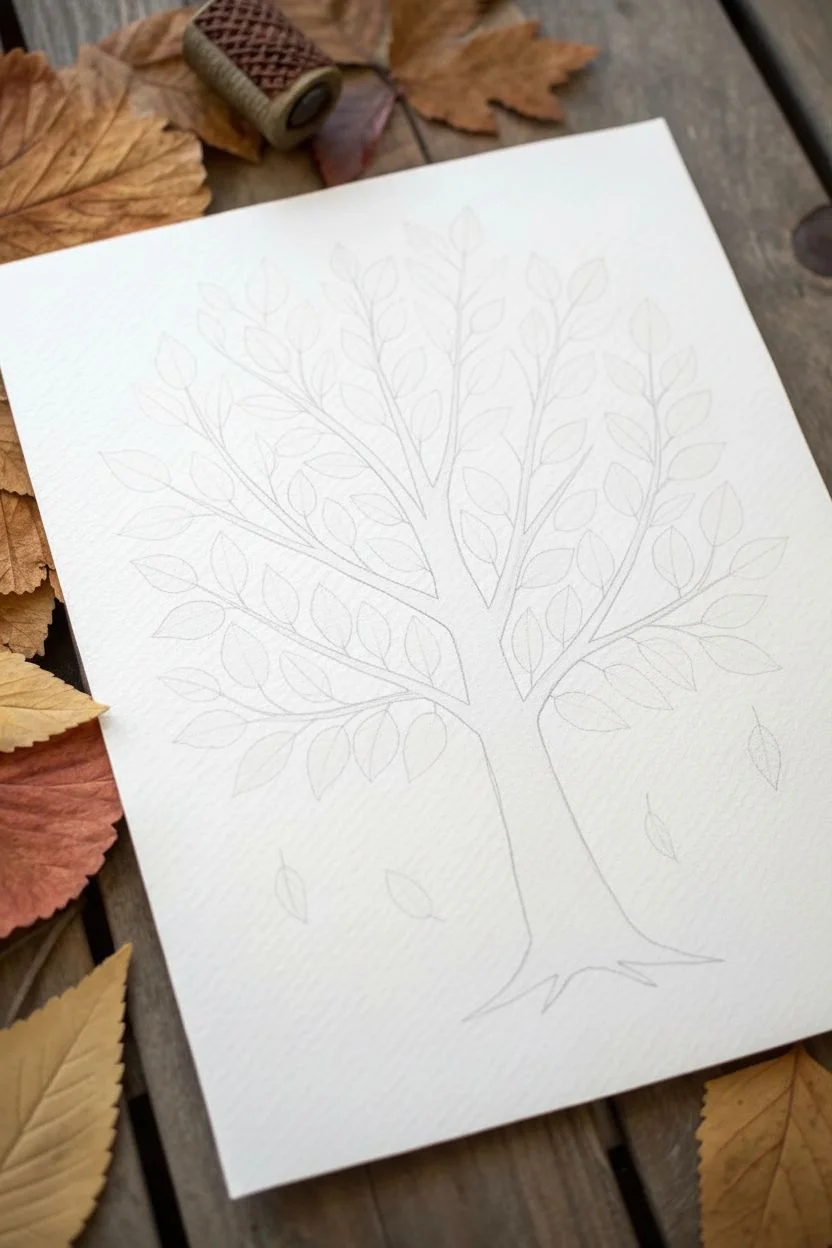
Step 1: Sketching the Framework
-
Outline the trunk:
Begin by lightly sketching the trunk centered at the bottom third of your paper. Draw a base that flares out gently into roots, then narrows as it moves upward. -
Branch out:
From the top of the trunk, split your lines into two or three main branches. Let these primary branches curve outward and upward in a soft ‘Y’ shape. -
Add secondary branches:
Draw smaller, thinner branches splitting off from your main limbs. Think of them like veins, reaching towards the edges of the paper to fill the empty space. -
Place the leaves:
Sketch small almond or teardrop shapes along the branches. It helps to vary their angles—some pointing up, some tilting sideways—to keep the tree looking organic. -
Include falling leaves:
Draw three or four floating leaves disconnected from the tree near the bottom right and left, creating a sense of movement and autumn breeze. -
Refine and lighten:
Gently roll your kneaded eraser over the sketch to lift up excess graphite. You want the lines to be barely visible guideposts so they don’t show through the translucent paint.
Clean Edges Trick
Leaf shapes tricky? Paint the leaf shape with clean water first, then touch your loaded brush to the center. The pigment will flood only the wet area!
Step 2: Painting the Tree Structure
-
Mix the bark color:
Create a deep, dark brown mixture. I like combining Burnt Umber with a touch of Ultramarine Blue or Payne’s Gray to get that rich, almost black-brown tone seen in the reference. -
Paint the trunk base:
Using a size 6 brush, fill in the trunk. Start at the bottom and pull your strokes upward to mimic the grain of the wood. -
Extend to branches:
Switch to a size 4 brush as the trunk splits. Continue painting into the main branches, tapering your pressure so the lines get thinner as you go. -
detail the twigs:
Use your smallest size 2 brush for the finest outer twigs. Use the very tip of the brush and a confident, quick stroke to keep these lines crisp and delicate. -
Add ground shading:
Dilute a bit of grey or watery brown paint. Swiftly paint a few jagged, grass-like strokes at the base of the roots to ground the tree, rather than having it float in white space.
Step 3: Adding the Foliage
-
Prepare your palette:
Mix puddles of your autumn colors: burnt sienna, yellow ochre, terracotta, light sage green, and a dusty pink. Keep the water varied so some colors are transparent and others more saturated. -
Paint the red tones:
Start with your darkest rust or red leaves. Select random leaves across the tree to paint with this color, ensuring they aren’t all clustered in one spot. -
Add golden hues:
While the red dries, pick up your yellow ochre or gold. Fill in scattered leaves, placing some near the darker ones for nice contrast. -
Introduce greens:
Use the sage green mixture for the next set of leaves. This cool tone balances the warmth of the other colors and adds a natural feel. -
Fill with neutrals:
Finish the remaining attached leaves with pale tan or dusty pink shades. These lighter colors help the tree look full without being overwhelming. -
Paint falling leaves:
Color the floating leaves near the bottom. Use a mix of the rust and gold to make them look like they are turning color as they fall. -
Detail the leaves:
Once the paint is completely dry, use your size 0 or 2 brush with a slightly darker version of the leaf color (or a fine pen) to paint a delicate central vein line down the middle of each leaf.
Interactive Gratitude
Make the leaves larger and keep colors pale. Before dinner, have guests write one thing they are thankful for on a leaf with a fine black pen.
Now you have a stunning piece of seasonal art that celebrates the beauty of gratitude.


Have a question or want to share your own experience? I'd love to hear from you in the comments below!