If you’ve been craving that fresh, colorful energy that only spring brings, a simple canvas painting is such a fun way to bottle it up. I pulled together my favorite spring painting ideas that feel totally doable, even if you’re still making friends with your paintbrush.
Cherry Blossom Branches Against a Soft Sky
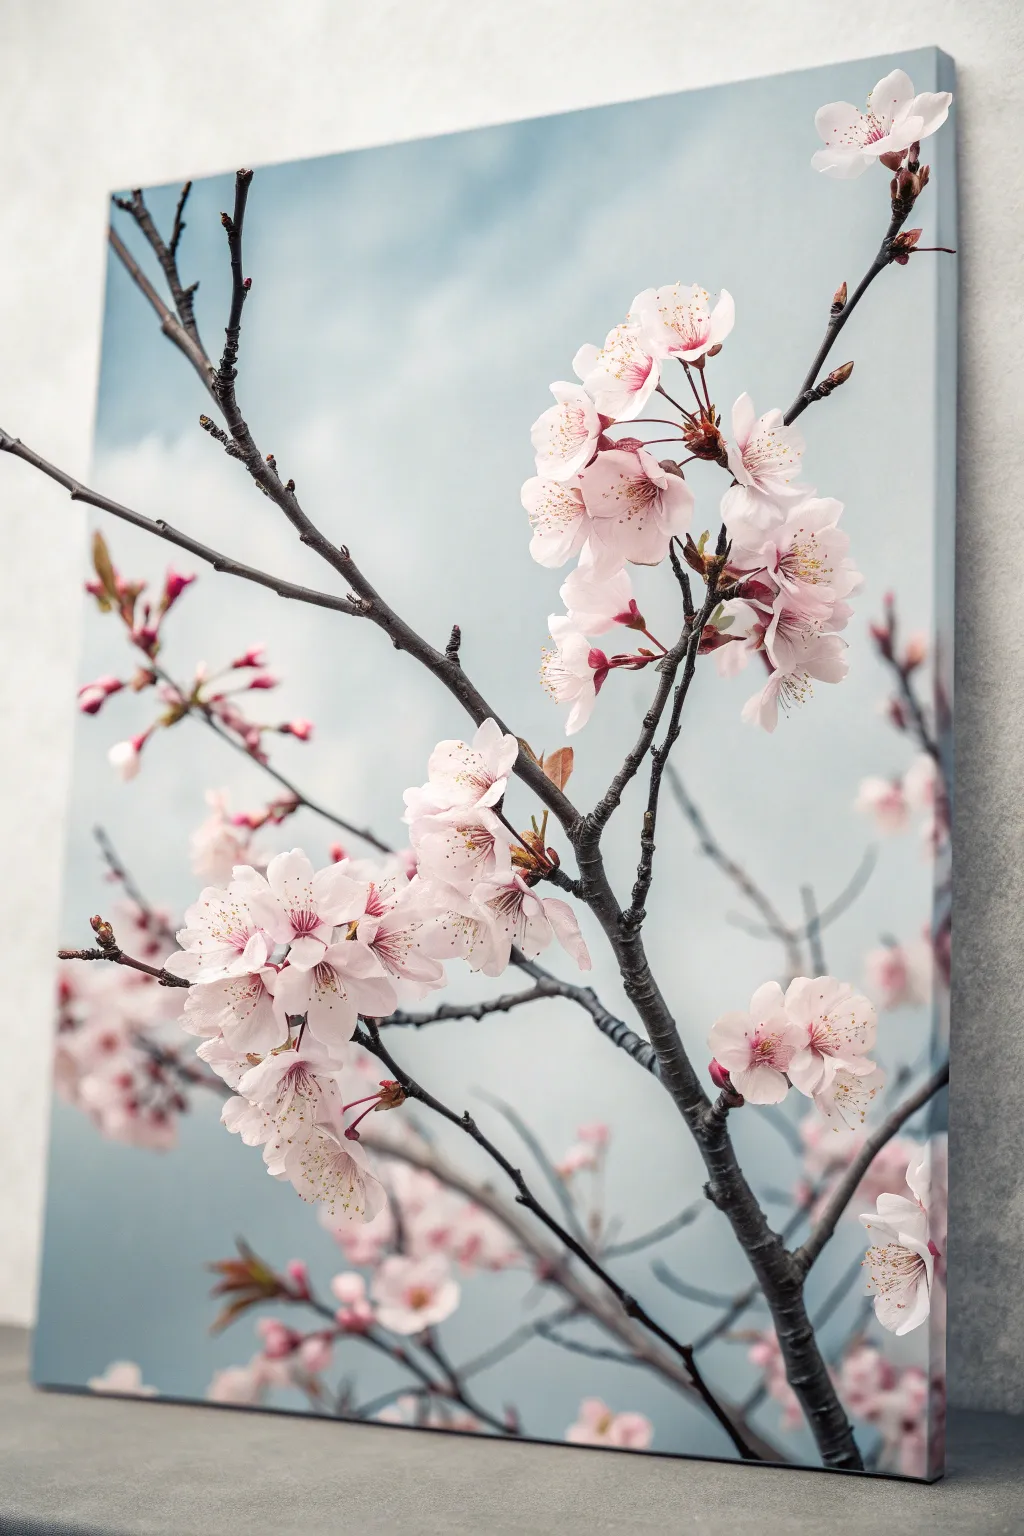
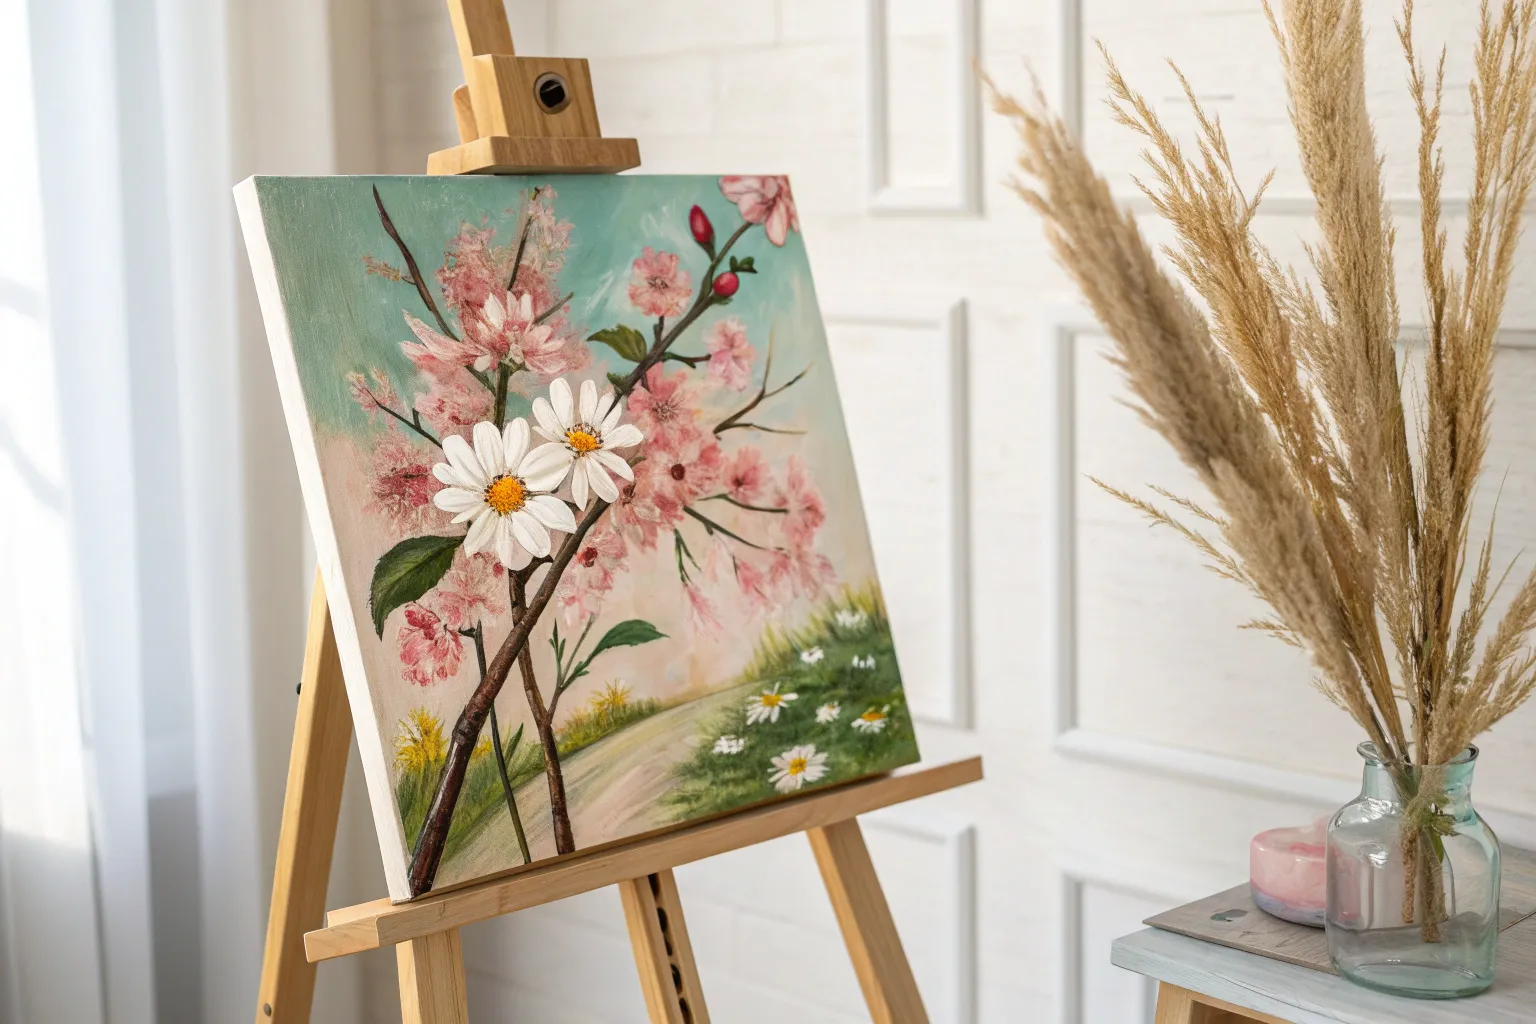
Capture the delicate beauty of spring with this serene acrylic painting tutorial. You will create realistic cherry blossom clusters resting on dark, textured branches against a dreamy, soft-focus sky background.
How-To Guide
Materials
- Rectangular stretched canvas (e.g., 18×24 inches)
- Acrylic paints: Titanium White, Phthalo Blue, Mars Black, Burnt Umber, Alizarin Crimson, Quinnacridone Magenta, Yellow Ochre
- Large flat brush (2 inch)
- Medium filbert brush (size 6 or 8)
- Small round detail brush (size 0 or 1)
- Palette knife (optional for branch texture)
- Slow-drying medium or retarder
- Water cup and paper towels
Step 1: Painting the Atmospheric Sky
-
Prepare the gradient palette:
Mix a large amount of Titanium White with a very small touch of Phthalo Blue. Create a separate pile of just Titanium White. The goal is a very pale, overcast sky tone, not a bright sunny blue. -
Apply the base sky layer:
Using your large flat brush, paint the entire canvas with the pale blue mixture. Work quickly while the paint is wet to ensure smooth coverage without harsh brushstrokes. -
Add cloud softness:
While the blue layer is still tacky, pick up some pure Titanium White on the corner of your brush. Gently scumble soft, diagonal cloud shapes across the canvas, blending them thoroughly so they look like distant, out-of-focus wisps. -
Create depth at the bottom:
Mix a tiny amount of Burnt Umber into your blue mix to create a slightly stormier, greyer blue. Blend this into the bottom third of the canvas to suggest atmospheric depth and distance.
Step 2: Constructing the Branches
-
Sketch the layout:
Once the background is completely dry, lightly sketch the main branch structure with a pencil. Start from the bottom right corner and reach diagonally upward towards the top left, adding a secondary branch reaching in from the upper right. -
Mix the branch color:
Combine Mars Black with Burnt Umber to get a deep, warm charcoal color. You want this to be dark to contrast sharply against the pale sky. -
Paint the main limbs:
Use your medium filbert brush to paint the thickest parts of the branches. Apply the paint slightly unevenly; twists and bumps make the wood look organic and aged. -
Add fine twigs:
Switch to your small round brush. Extend the branches into thin, spindly twigs. Use a ‘shakey hand’ technique here to create natural, non-linear growth patterns rather than straight lines. -
Highlight the bark:
Mix a light grey-brown. With a mostly dry small brush, lightly drag this color along the top edges of the branches where the sunlight would hit, creating texture and form.
Muddy Petals?
If your white highlights are turning grey when painted over the pink base, let the base layer dry completely first. Acrylics are opaque, so layering wet-on-dry keeps colors crisp.
Step 3: Blooming the Flowers
-
Prepare blossom pinks:
Create three shades of pink: a dark mauve (Crimson + White), a mid-tone bubblegum (Magenta + White), and a highlight shade that is almost pure White with a speck of Magenta. -
Block in flower shapes:
Using the mid-tone pink and the filbert brush, press oval shapes onto the canvas to form general clusters of flowers attached to the twigs. Don’t worry about individual petals yet. -
Define the petals:
With the small round brush and the highlight shade, paint individual five-petal shapes over your blocked-in clusters. Leave the centers darker to create a cupped shape. -
Add soft background blooms:
Mix your pink with a lot of glazing medium or water. Paint faint, translucent flower shapes in the background areas to simulate depth of field, making them look blurry and distant. -
Detail the flower centers:
Mix a deep red-magenta. Dot the very center of the main focal flowers. Then, using yellow ochre, add tiny dots for the pollen-covered stamen tips. -
Paint the stamens:
I like to use my finest liner brush here. Use the deep magenta mix to draw ultra-fine lines connecting the yellow pollen dots to the center of the flower. -
Finish with buds:
Add small, tight teardrop shapes on the tips of the smallest twigs using the darker mauve pink to represent unopened buds.
Level Up: 3D Texture
Mix modeling paste into your white paint for the final petal highlights. Apply thick dabs with a palette knife to give the flowers real raised texture against the flat sky.
Step back and admire how the dark, rugged branches emphasize the incredible delicacy of your fresh blooms


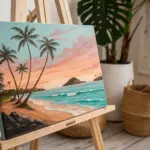
Field of Tulips in Fresh Spring Greens
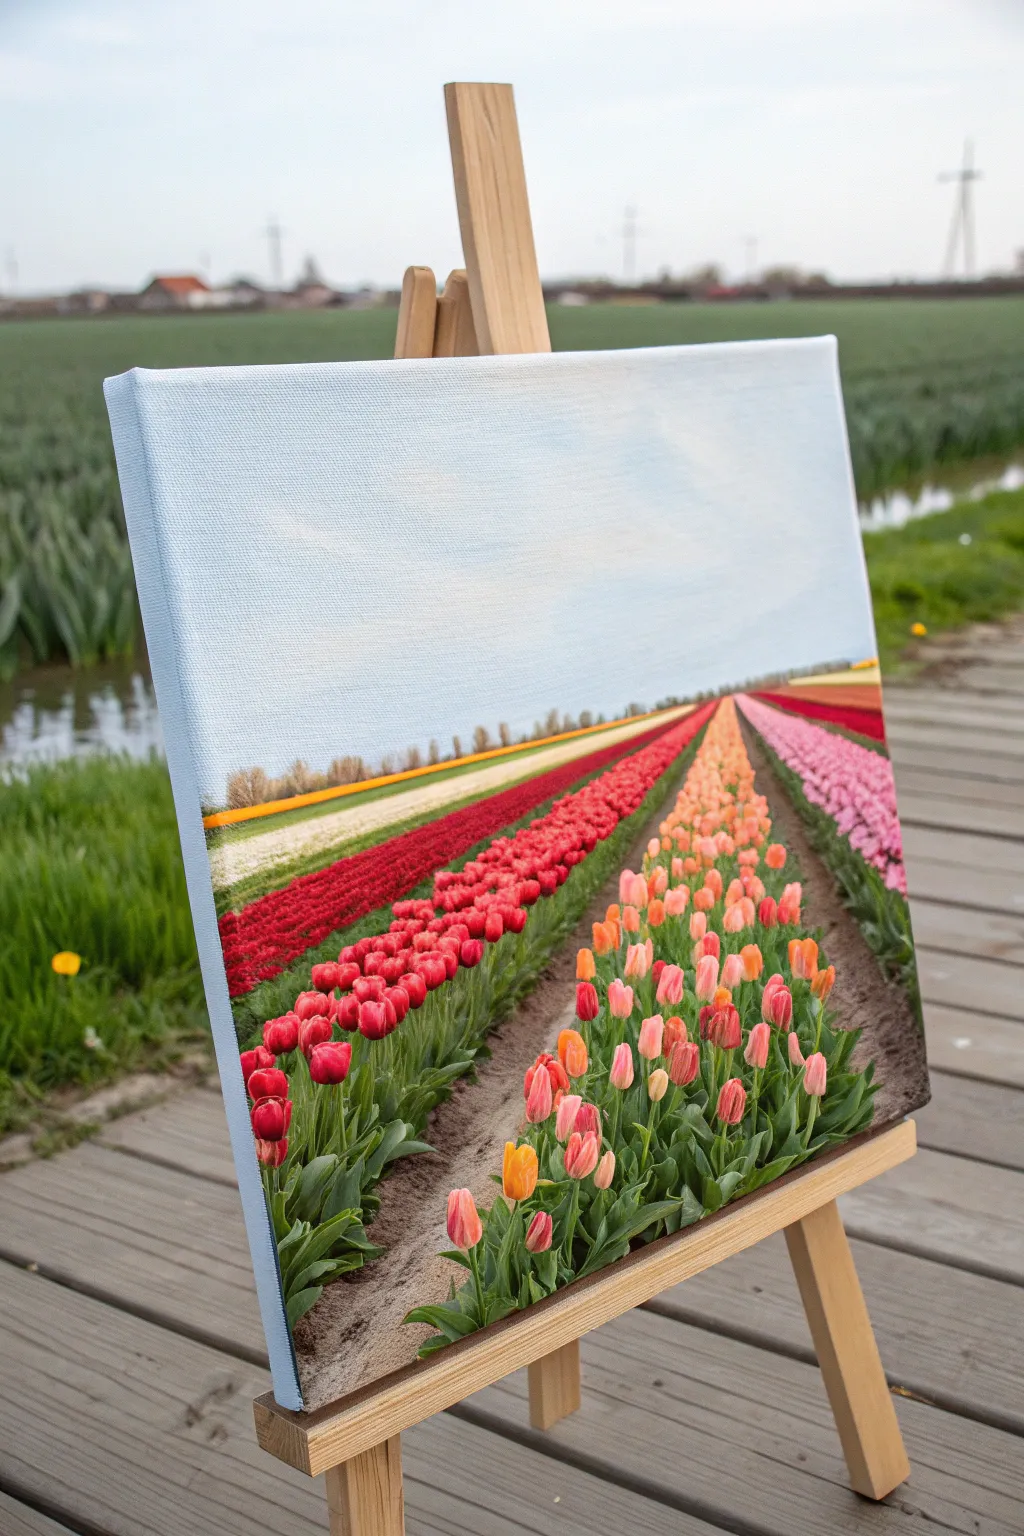
Capture the vibrant essence of spring with this stunning landscape painting that focuses on perspective and depth. By using converging lines of colorful blooms, you’ll create an endless field of tulips that pulls the viewer right into the scene.
Step-by-Step Guide
Materials
- Stretched canvas (12×16 or similar size)
- Acrylic paints (Titanium White, Phthalo Blue, Sap Green, Hookers Green, Cadmium Red, Alizarin Crimson, Cadmium Yellow, Cadmium Orange, Portrait Pink)
- Flat shader brushes (Sizes 12, 8, and 4)
- Round detail brushes (Sizes 2 and 0)
- Fan brush (optional, for sky)
- Ruler or straight edge
- Pencil
- Palette and water cup
- Paper towels
Step 1: Setting the Scene
-
Establish the horizon:
Begin by placing your canvas on your easel. Using a pencil and ruler, lightly draw a horizon line horizontally across the canvas, positioning it slightly below the vertical center (about one-third from the bottom if you want more sky, or right in the middle for balance as seen in the example). -
Draft the perspective lines:
Choose a single vanishing point on your horizon line, likely slightly to the right of center. From the bottom edge of the canvas, draw several radiating diagonal lines that all meet at that single vanishing point. These will be your rows of tulips. -
Paint the sky:
Mix Titanium White with a very small touch of Phthalo Blue. Start painting from the horizon line upward, gradually adding more blue as you reach the top edge to create an atmospheric gradient. Use sweeping horizontal strokes. -
Add soft clouds:
While the blue is still slightly tacky, use a clean or dry brush with pure white to scumble in faint, wispy clouds. Keep them subtle so they don’t distract from the flowers below.
Distance Illusion
Make flowers near the horizon muted and blurry. Only use your brightest, sharpest colors in the bottom third of the canvas to force the perspective.
Step 2: Blocking in the Landscape
-
Underpaint the ground:
Mix a muddy brown/green shade using Sap Green and a touch of Red. Fill in the ‘dirt’ paths between where your flower rows will be. This darker base will help the green stems pop later. -
Create the distant tree line:
Along the horizon line, dab in a thin strip of distant trees or bushes. Use a mix of earth tones and dull greens. Keep the details very blurry and small to indicate distance. -
Block in color bands:
Identify your color rows based on the perspective lines. Paint base stripes of color: deep red for the left, yellow/white for the middle-left, and pinks/oranges for the right. Don’t worry about individual flowers yet; just get the background color down.
Add a Human Element
Add a tiny silhouette of a windmill or a cyclist on the horizon line to give the scene a sense of immense scale and Dutch charm.
Step 3: Painting the Tulip Rows
-
Start with the furthest flowers:
Using a small number 4 flat brush, dab small dots of color near the vanishing point. At this distance, the individual flowers are indistinguishable, appearing as texture rather than distinct shapes. -
Work forward with red tulips:
On the left side, begin painting the red tulip shapes. As you move closer to the bottom of the canvas, make your brushstrokes larger and more defined. Use a U-shape stroke for the cup of the tulip. -
Add the pink and peach rows:
Move to the right side and paint the pink/peach field. Mix Titanium White with Cadmium Orange and Portrait Pink for a soft, variegated look. Alternate lighter and darker shades to show sunlight hitting different petals. -
Integrate the green foliage:
Load a size 8 flat brush with Hookers Green and a touch of yellow. Paint vertical, sword-like strokes between the flower heads. I find it helpful to paint the leaves slightly overlapping the bottom of the flowers to nest them realistically.
Step 4: Refining the Foreground
-
Detail the closest blooms:
The tulips at the very bottom edge need the most detail. Switch to your round brush. Add highlights to the tops of the petals using a lighter version of your base color (e.g., pale pink on red) and deep shadows at the base of the flower cup. -
Add definition to leaves:
For the largest foreground leaves, use two shades of green. Paint one side of the leaf lighter and the other darker to suggest a central vein and three-dimensional curling. -
Create the dirt texture:
Refine the dirt path in the immediate foreground. Dry brush some tan and light grey over your dark brown base to create the look of sandy, dry soil. -
Final highlights:
Take a tiny detail brush with pure white or pale yellow. Add the tiniest highlights on the tips of the foremost tulips where the sun hits them directly. -
Clean up edges:
Check the horizon and the edges of your canvas. If you haven’t framed it, paint the sides of the canvas with a neutral grey or continue the image wrap-around style.
Step back and admire your colorful spring landscape, ready to brighten any room


Wild Daisy Meadow With Loose Brush Dabs

Capture the breezy elegance of a summer field with this vertical canvas project featuring soaring daisies and rustling grasses. Using a blend of crisp detailing and soft, atmospheric blending, you’ll create a serene window into nature perfect for any bright room.
Detailed Instructions
Materials
- Large vertical stretched canvas (approx. 24×36 inches recommended)
- Acrylic paints: Titanium White, Ultramarine Blue, Phthalo Blue, Sap Green, Yellow Ochre, Burnt Umber, Cadmium Yellow Medium
- Large flat brush (1-2 inch) for background blocking
- Medium filbert brush for clouds and foliage
- Small round brush for stems and details
- Fine liner brush for grass tips
- Palette knife (optional for texture)
- Water container and paper towels
- Easel or flat working surface
Step 1: Sky and Atmosphere
-
Prepare the Gradient:
Begin by dampening your canvas slightly with a clean, wet brush to help the acrylics blend smoothly. On your palette, mix a generous amount of Titanium White with a tiny touch of Phthalo Blue for a very pale, airy sky color. -
Paint the Upper Sky:
Using the large flat brush, apply your pale blue mix to the top third of the canvas. Use long, horizontal strokes that crisscross slightly to avoid stiff lines. -
Fade to Horizon:
Gradually add more white to your brush as you work your way down towards the middle of the canvas. By the time you reach the horizon line (about 1/3 up from the bottom), the color should be nearly pure white or a soft misty grey to create atmospheric depth. -
Suggest Distant Hills:
Mix a hazy blue-grey using Ultramarine Blue, a dot of Burnt Umber, and plenty of White. Paint a low, uneven horizon line just below the middle mark. Keep the edges soft and blurry—details here should feel out of focus.
Paint Persistence
Make the white petals opaque by letting the first layer dry completely before adding a second. Thick, textured paint on the petals mimics real flowers.
Step 2: The Grassy Foundation
-
Block in Base Greenery:
Mix Sap Green with a little Yellow Ochre and White to create a muted, grassy olive tone. Apply this to the bottom third of the canvas, brushing vertically to mimic the upward growth of vegetation. -
Layering Shadows:
While the green is still tacky, mix a darker version using Sap Green and a touch of Burnt Umber. Stripe in darker vertical patches near the bottom corners and in between where your main flower clusters will go to add volume. -
Adding Light Grasses:
Switch to a smaller brush. Mix Yellow Ochre with White to make a straw color. Paint thin, varied strokes flicking upward from the bottom, overlapping the green base layer to simulate dried grasses catching the light.
Step 3: Tall Stalks and Stems
-
Map the Composition:
Visualize where your main daisies will live. You want one large focal flower high on the left, a few mid-sized ones on the right, and a cluster near the bottom right. Lightly sketch their positions with diluted paint if helpful. -
Paint Main Stems:
Using the small round brush and a mix of Sap Green and White, paint long, slender stems reaching up towards your flower spots. Keep the lines slightly wavering rather than ruler-straight for a natural look. -
Brown Wheat-like Stalks:
Mix Burnt Umber with Yellow Ochre. Using a fine liner or the edge of a flat brush, paint tall, thin stalks that shoot up past the flowers towards the top of the canvas. These add distinct height and elegance to the composition. -
Seed Heads on Grass:
Add texture to the tall brown stalks by dabbing small, angled strokes along the upper sections, mimicking the look of seeding wild oats or wheat.
Wobbly Stems?
To get long, straight-ish lines for stalks, thin your paint with a drop of water until it’s inky. This helps the paint flow off a liner brush without breaking.
Step 4: Daisies and Details
-
Petal Foundation:
Load your filbert brush with pure Titanium White. For the large top-left daisy, press the brush down near the center and pull outward, lifting at the end to create a tapered petal. -
Layering Petals:
Continue painting petals around the center. I like to overlap them slightly and vary the lengths so the flower doesn’t look like a perfect cartoon cutout. Apply a second coat of white on the tips for brightness if the background shows through. -
Painting the Centers:
Mix Cadmium Yellow with a tiny bit of Yellow Ochre. Dab this into the center of your daisies in a rough oval shape. Use a stippling motion (rapid dots) to create a fuzzy, pollen-rich texture. -
Shadowing the Centers:
Dip just the corner of your brush into Burnt Umber. Stipple a small shadow on the lower edge of each yellow center to give it a 3D dome shape. -
Adding Smaller Blooms:
Paint the smaller daisies in the mid-ground and foreground. For flowers facing sideways (like the one near the bottom right), paint the petals shorter on the top side to mimic perspective.
Step 5: Final Flourishes
-
Highlighting Stems:
Mix a pale mint green (White + tiny Green). Run a very thin highlight line down the sunlit side (left side) of your thickest flower stems to make them look round. -
Foreground Whites:
Add a few loose, abstract dabs of white in the very bottom foliage to suggest smaller wildflowers or Queen Anne’s Lace hidden in the deep grass. -
Final Contrast Check:
Step back from the canvas. If the flowers get lost against the sky, outline some petal edges very faintly with a diluted grey-blue mix to pop them forward.
Let your beautiful meadow dry completely before hanging it in a spot that catches the morning light


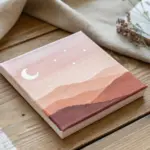
Lavender Field With Simple Stippling Texture
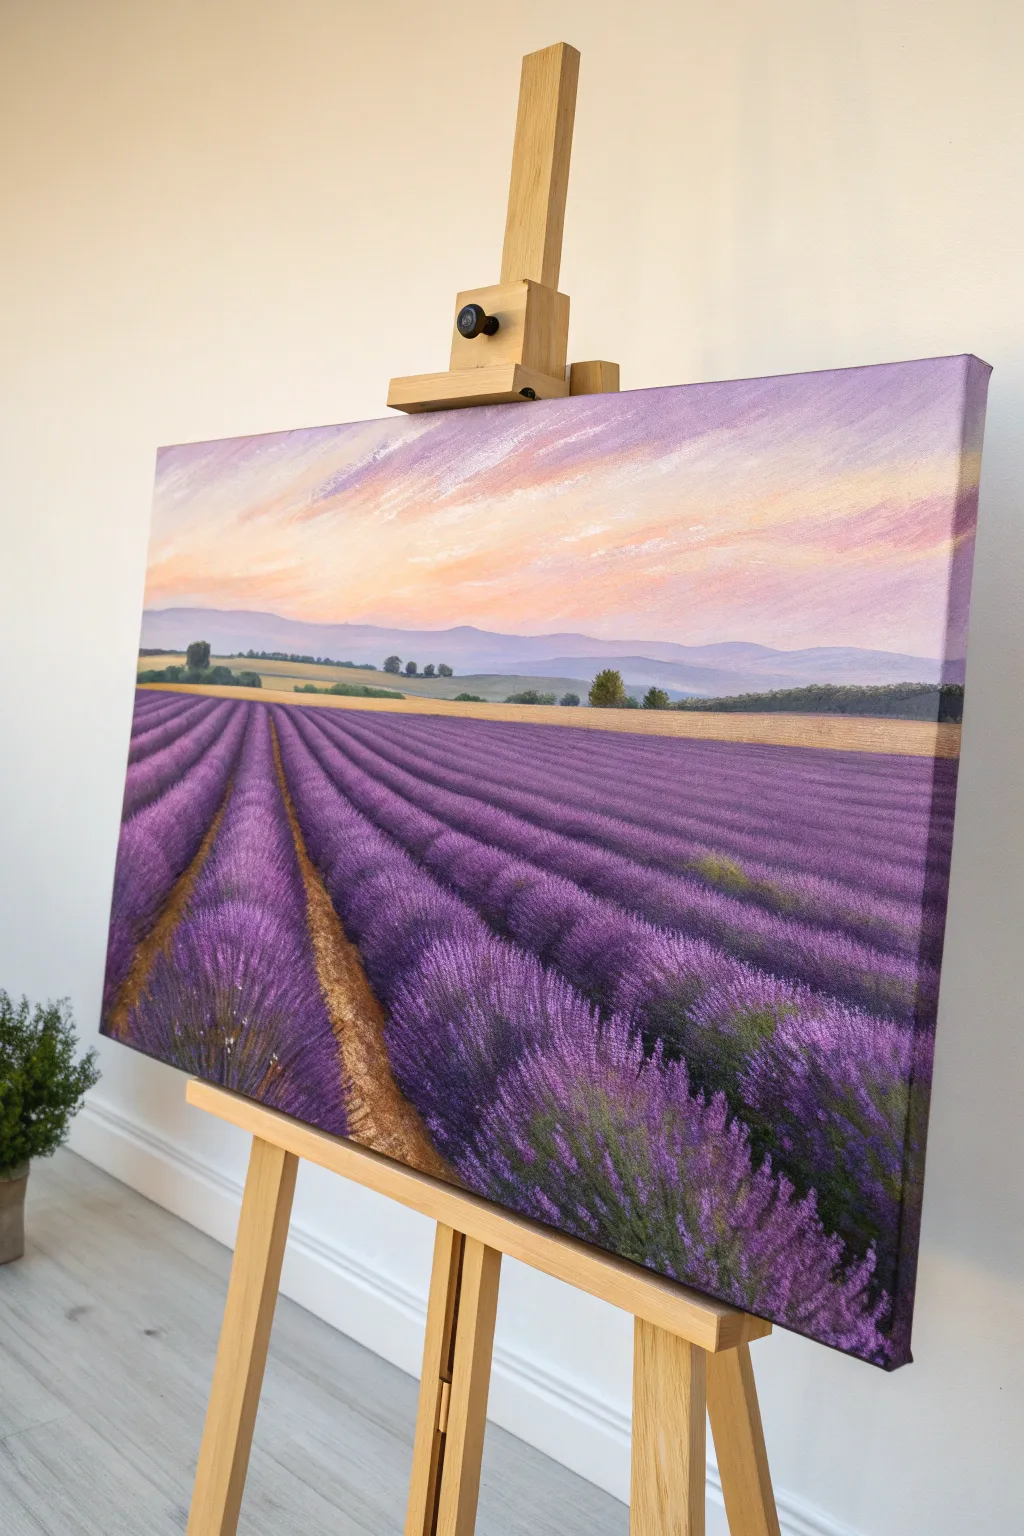
Capture the serene beauty of Provence with this sweeping landscape painting, focusing on perspective and soft light. You will build layers of vibrant purple texture to create depth while keeping the distant hills hazy and dreamlike.
Detailed Instructions
Materials
- Large rectangular canvas (e.g., 24×36 inches)
- Acrylic paints: Ultramarine Blue, Dioxazine Purple, Titanium White, Cadmium Yellow, Alizarin Crimson, Burnt Sienna, Burnt Umber, Sap Green
- Large flat brush (2-inch)
- Medium flat brush (1-inch)
- Fan brush (for texture)
- Small round brush (size 2 or 4)
- Palette knife (optional for texture)
- Cup of water and paper towels
- Easel
Step 1: Sky and Background
-
Establish the horizon:
Begin by lightly sketching a horizon line about one-third of the way down from the top of the canvas. This doesn’t need to be perfectly straight; a slight undulation suggests natural terrain. -
Paint the upper sky:
Mix Titanium White with a tiny touch of Ultramarine Blue and Alizarin Crimson to create a very pale, cool lilac. Use your large flat brush to sweep this across the top corners, using diagonal strokes that point toward the center. -
Blend the sunset glow:
While the lilac is still wet, mix Titanium White with Cadmium Yellow and a hint of Alizarin Crimson for a soft peach. Blend this from the center of the sky outwards, meeting the lilac. Use long, sweeping strokes to mimic clouds stretching across the horizon. -
Add cloud definitions:
Load a clean brush with nearly pure white and streak in thin, wispy clouds over the peach and lilac areas. Keep your touch light so the underlying colors show through slightly. -
Create distant mountains:
Mix Dioxazine Purple, Ultramarine Blue, and plenty of White for a hazy, atmospheric violet. Paint the silhouette of distant mountains along the horizon line. I find that keeping the edges slightly soft helps push them further into the distance.
Keep it Organic
Don’t make your lavender rows perfectly straight. Add slight wobbles or curves to the lines as they recede to make the field feel natural and rolling.
Step 2: Mid-Ground Landscape
-
Paint the golden fields:
Below the mountains, paint a strip of land using Yellow Ochre (or mix Yellow with a touch of Burnt Sienna) and White. This represents the harvested wheat fields sitting between the hills and the lavender. -
Add distant trees:
Using a small round brush and Sap Green mixed with a little Burnt Umber, dab in tiny, dark shapes along the ridge of the golden field. These little bumps suggest a distant tree line. -
Detail the mid-ground trees:
Paint a few distinct, slightly larger trees on the horizon line using a darker green mix. A simple rounded shape is enough; don’t worry about individual leaves.
Step 3: The Lavender Rows
-
Map out the perspective:
This is crucial: lightly sketch lines radiating from a single vanishing point near the center of the horizon. These lines will be the paths between your lavender rows, starting narrow at the top and getting much wider at the bottom. -
Base coat the soil paths:
Mix Burnt Sienna, Burnt Umber, and a little White to get a sandy earth tone. Fill in the ‘path’ wedges between your future lavender rows. Make the color lighter near the horizon and darker/richer near the bottom. -
Base coat the lavender mounds:
Mix a dark, rich purple using Dioxazine Purple and Ultramarine Blue. Fill in the lavender wedges completely. This dark underlayer provides shadow and depth for the flowers you’ll add later. -
Start the texture layering:
Once the dark base is dry, mix Dioxazine Purple with a little White. Using a fan brush or an old, splayed bristle brush, tap vertically onto the dark purple rows. Start from the bottom (foreground) to create larger textures. -
Refine the distance:
As you move up the rows toward the horizon, make your tapping marks smaller and closer together. The color should also get slightly lighter and bluer to mimic atmospheric perspective. -
Add mid-tone highlights:
Clean your brush and mix a lighter, pinker purple (Purple + White + Alizarin Crimson). Lightly stipple this on the top curves of the lavender mounds, emphasizing where the sun hits them. -
Introduce greenery:
Mix Sap Green with a touch of the purple mix to desaturate it. Using the edge of a fan brush or a small flat brush, flick upward strokes at the very bottom edge of the canvas to look like stems and leaves peeking out. -
Final bright highlights:
For the last pop of texture, mix a very pale lavender (mostly White with a touch of Purple). Stipple this sparingly on the very tops of the nearest lavender bushes in the foreground. -
Soften the edges:
Where the lavender meets the dirt paths, use a dry brush to gently feather the purple paint slightly over the brown, softening the hard line so the plants look organic.
Level Up: Impasto Pop
Mix a gel medium or modeling paste into your final highlight color. Use a palette knife to apply it for actual 3D texture on the closest flowers.
Step back and admire how the simple perspective lines pull your eye right into that calming sunset.
BRUSH GUIDE
The Right Brush for Every Stroke
From clean lines to bold texture — master brush choice, stroke control, and essential techniques.
Explore the Full Guide
Blossoming Tree Path for a Classic Spring Walk
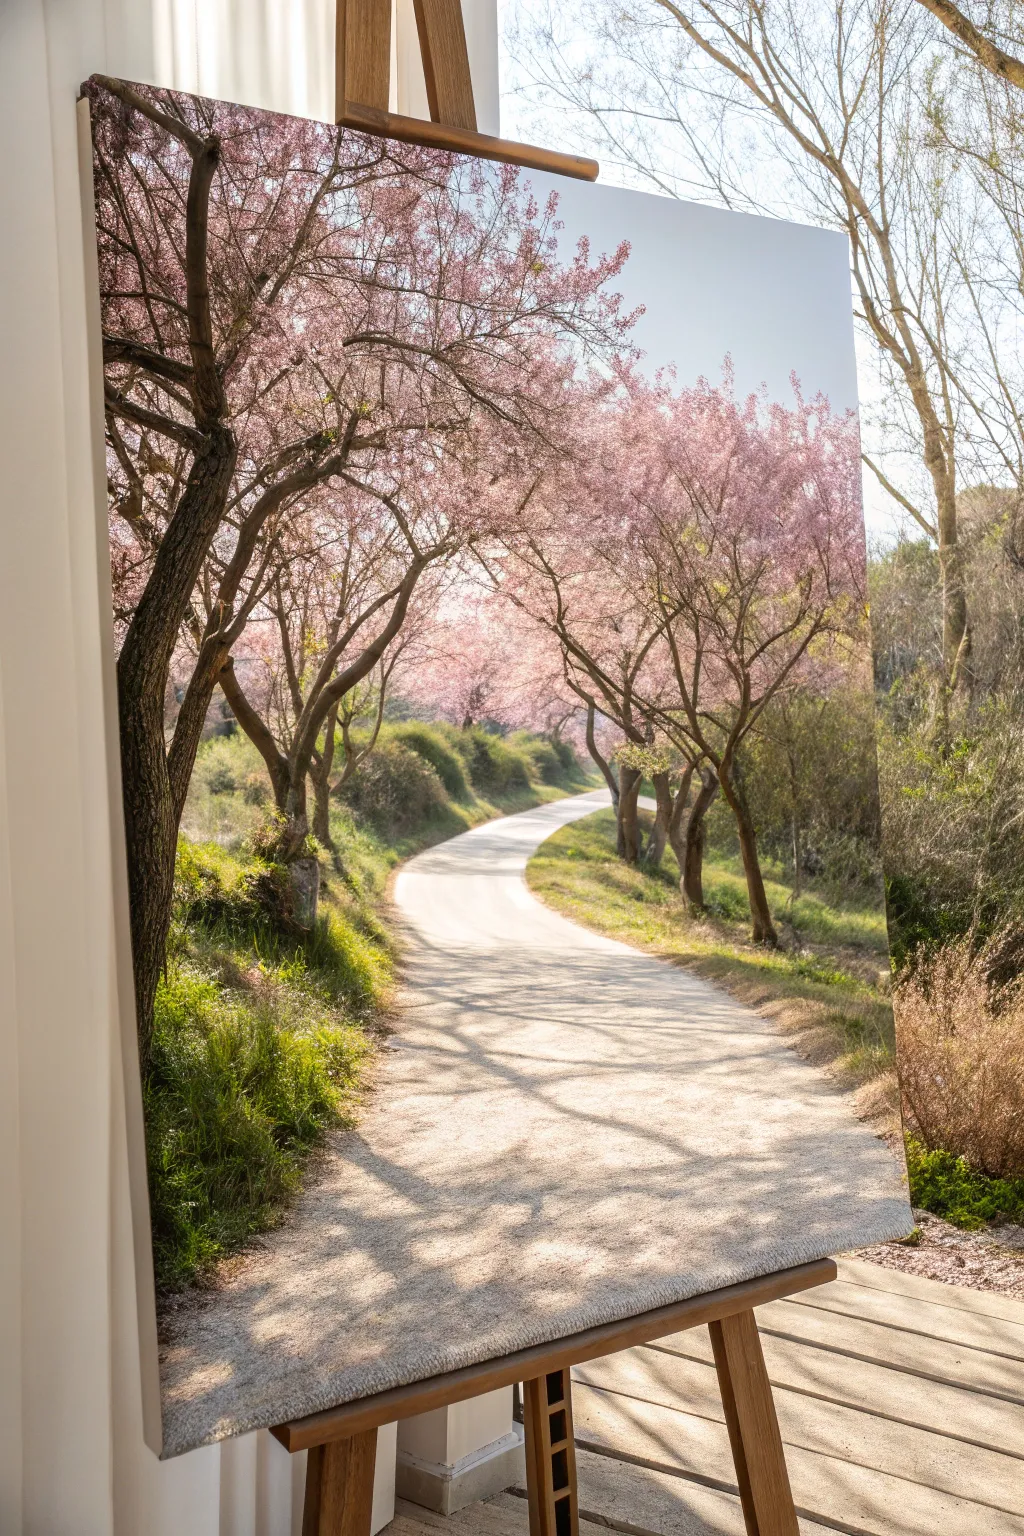

Capture the serene beauty of a spring morning with this idyllic path lined by blooming cherry trees. This tutorial guides you through creating depth with shadows and light, resulting in a peaceful scene perfect for bringing seasonal warmth indoors.
Step-by-Step
Materials
- Large stretched canvas (at least 18×24 inches)
- Acrylic paints: Titanium White, Burnt Umber, Raw Sienna, Sap Green, Ultramarine Blue, Alizarin Crimson, Cadmium Yellow
- Gesso (if canvas is unprimed)
- Brushes: Large flat wash brush (2 inch), medium filbert brush (#8), small round brush (#2), fan brush
- Palette knife
- Water container and paper towels
- Pencil for sketching
- Acrylic retarder or slow-drying medium
Step 1: Planning and Foundation
-
Prime the Surface:
Ensure your canvas is ready by applying a coat of gesso if it isn’t pre-primed. Let this dry completely to create a smooth, gripping surface for your paints. -
Draft the Path:
Lightly sketch the composition using a pencil. Start with the winding pathway; make it wider at the bottom (foreground) and significantly narrower as it curves into the distance to establish strong perspective. -
Outline the Trees:
Sketch the main tree trunks on the left and right sides. Don’t worry about every twig, just place the major vertical lines and the main overarching branches that will form the canopy. -
Paint the Sky:
Mix Titanium White with a tiny touch of Ultramarine Blue. Using your large wash brush, paint the upper portion of the canvas, fading it to almost pure white as you move down towards the horizon line to mimic atmospheric haze.
Natural Sponges
Instead of a brush, try using a natural sea sponge to dab on the foliage and blossoms. Turn the sponge frequently to avoid repetitive patterns in the leaves.
Step 2: Painting the Landscape Base
-
Base the Pathway:
Mix Titanium White with a drop of Raw Sienna and a speck of Burnt Umber to create a warm, pale beige. Fill in the pathway area with horizontal strokes, keeping the color slightly lighter in the distance. -
Block in Greenery:
Combine Sap Green with Cadmium Yellow for the sunlit grass areas along the path edges. Switch to Sap Green mixed with a little Burnt Umber for the shadowed grassy areas under the trees. -
Establish the Trunks:
Using a medium filbert brush and a mix of Burnt Umber and Ultramarine Blue (to make a deep, cool dark), paint the main tree trunks. Keep the edges slightly rough to suggest bark texture. -
Distant Foliage:
For the trees far in the background where the path disappears, use a mix of Sap Green and White. Dab this in softly; these shapes should be indistinct to push them deep into the scene.
Avoid Flat Trees
If your tree canopy looks flat, you likely covered all your dark underpainting. Go back and add deep pockets of shadow (dark purple or crimson) between blossom clusters.
Step 3: Creating the Canopy
-
Mix Blossom Colors:
Prepare three shades of pink on your palette: a deep pink (Alizarin Crimson + White), a mid-tone pink, and a very pale highlight pink (mostly White + tiny Crimson). -
Apply Dark Blossoms:
Load a fan brush or an old, splayed bristle brush with the darkest pink. Tapping gently, establish the heavy shadow areas of the cherry blossom canopy, focusing on total coverage where the branches are thickest. -
Layer Mid-Tones:
Clean your brush and switch to the mid-tone pink. Stipple this over the dark areas, leaving some of the dark color showing through to create volume within the flower clusters. -
Add Highlights:
With the palest pink, dab the top edges of the blossom clusters where the sunlight would hit. This vital step prevents the trees from looking like flat cotton candy clouds. -
Detail Branches:
Use your smallest round brush (size #2) with thinned Burnt Umber to paint fine twigs and branches weaving in and out of the pink clusters. Some branches should be hidden by flowers, others should cross in front.
Step 4: Light and Shadow
-
Mix Shadow Color:
Create a transparent glaze color for the shadows on the path. Use water or medium to thin down a mix of Ultramarine Blue and a touch of Purple or Alizarin. -
Cast Tree Shadows:
Paint horizontal shadow stripes across the pathway. I find it really helps to visualize where the tree trunks are and match the shadow angle to the light source (coming from the upper right in this scene). -
Dapple the Light:
While the shadow glaze is wet, you can lift small spots out with a clean rag, or wait for it to dry and scumble a little of the original path color back on top to create the effect of sunlight filtering through leaves. -
Enhance Trunk Texture:
Take a little Raw Sienna and White and dry-brush the right side of the main tree trunks. This highlights the bark texture catching the warm sun. -
Final Grass Details:
Use the small round brush or a palette knife edge to flick up some individual blades of grass along the path’s edge, blending the hard line between the paved road and the verge.
Step back and admire your tranquil spring landscape, ready to brighten any room.
Pastel Sunrise Over Water With Gentle Reflections
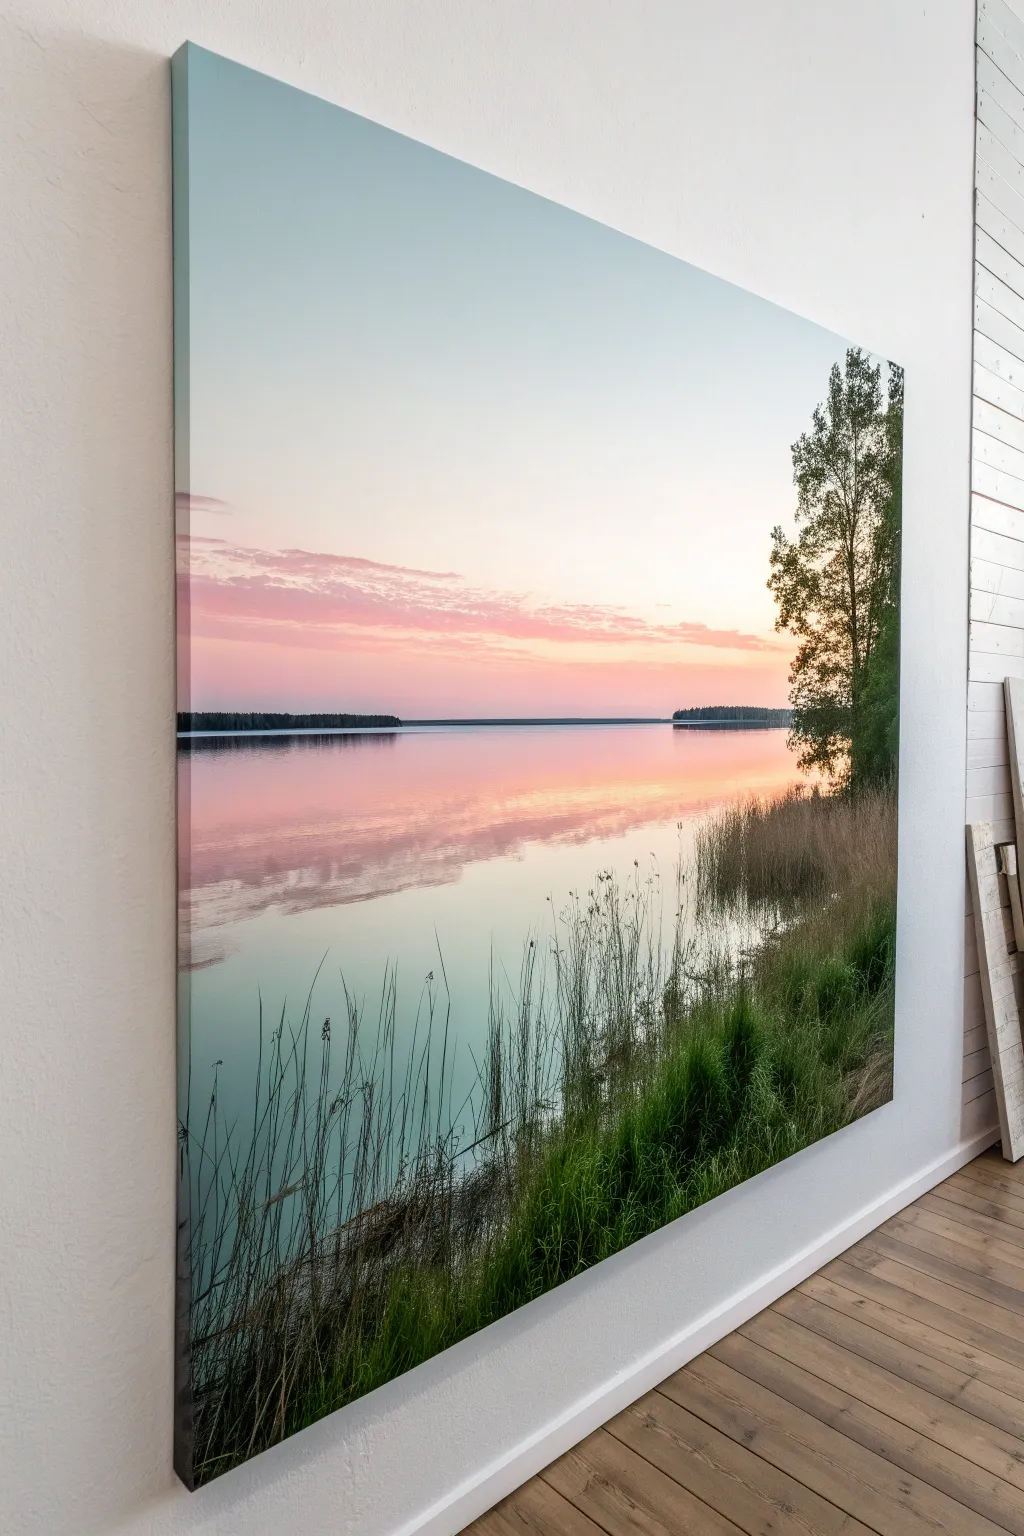
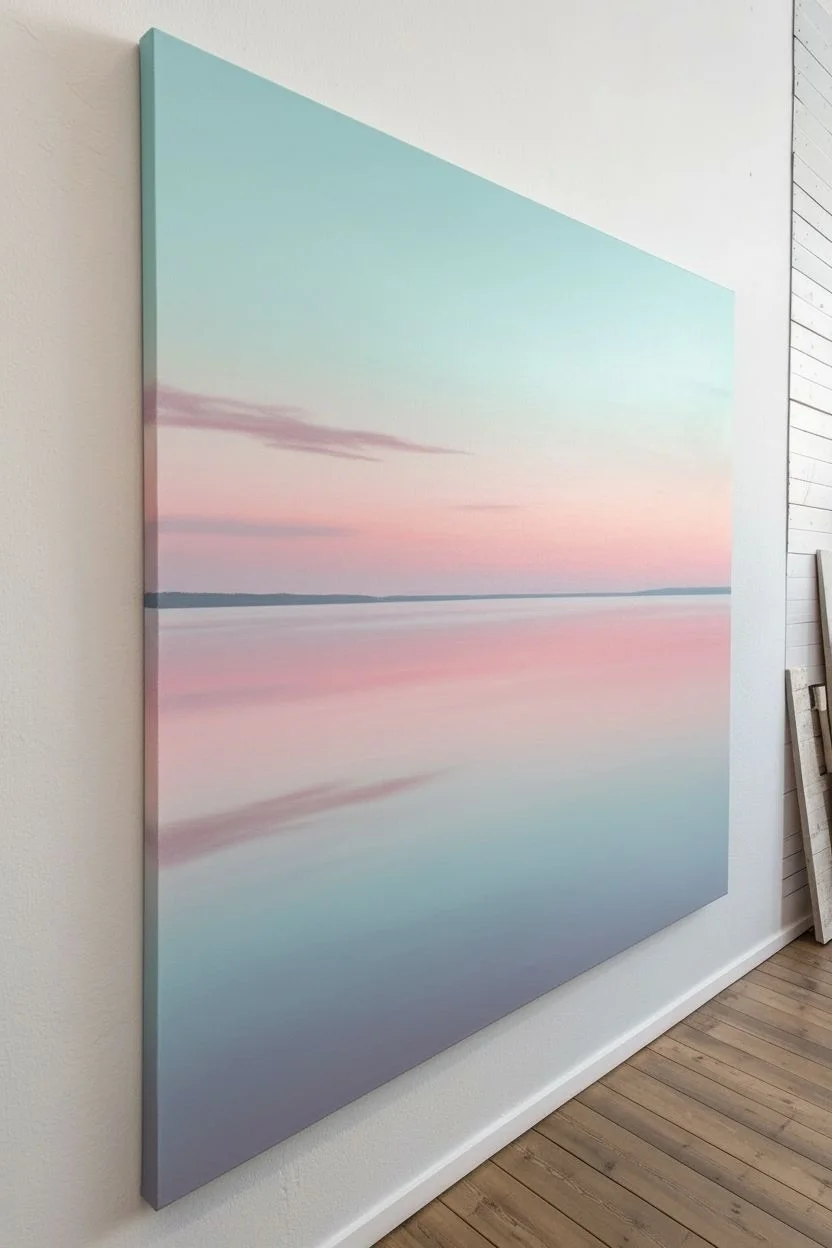
Capture the tranquil beauty of a spring morning with this large-scale acrylic landscape. Soft gradients of pink and teal create a mirror-like water effect, perfectly balanced by detailed foreground grasses.
Step-by-Step
Materials
- Large stretched canvas (at least 24×36 inches)
- Acrylic paints: titanium white, phthalo blue, turquoise deep, quinacridone magenta, cadmium yellow light, sap green, burnt umber, mars black
- Large distinct blending brush or wide flat brush (2-3 inch)
- Medium flat brush
- Small round brush
- Fan brush
- Rigger brush or liner brush
- Palette knife
- Water spray bottle
- Acrylic glazing medium
Step 1: Sky and Water Gradient
-
Prime the Surface:
Even if your canvas is pre-primed, apply a thin coat of titanium white mixed with a tiny drop of blue to create a cool, bright base. Let this dry completely to ensure your pastel colors pop later. -
Mix the Sky Colors:
Prepare three piles of paint for the sky: a pale turquoise (white + phthalo blue + turquoise), a soft pink (white + magenta + tiny touch of yellow), and a very pale lavender-blue for the upper sky. Keep them wet with a mist of water. -
Paint the Upper Sky:
Using your large blending brush, apply the pale turquoise mix to the very top third of the canvas. Use long, horizontal strokes. -
Blend the Horizon:
While the blue is wet, introduce the soft pink mix just below it, roughly where the horizon will be. Work the brushes back and forth where the colors meet to create a seamless, hazy transition. -
Create the Water Reflection:
Mirror the sky process on the bottom half of the canvas. Generally, reflections are slightly darker than the sky, so add a tiny bit more pigment to your pink and turquoise mixes. Paint the water area with horizontal strokes. -
Add Cloud Bands:
Mix a slightly darker mauve-pink. Using a medium flat brush, gently scumble in horizontal cloud bands across the pink transition area. Keep the edges soft and feathery. -
Refine the Water Surface:
To make the water look like glass, dip a clean, dry brush into glazing medium and very lightly drag it horizontally across the water area to smooth out brushstrokes.
Smooth Gradients
Work quickly when blending the large sky and water areas. If the acrylics start to drag or dry too fast, mist your canvas lightly with water to keep the paint workable for longer.
Step 2: Treeline and Reflections
-
Define the Horizon Line:
Mix Mars black with a touch of phthalo blue and burnt umber for a deep, cool dark. Use a ruler or painter’s tape to establish a perfectly straight horizon line across the middle. -
Paint the Distant Trees:
Using a small flat brush and your dark mix, tap in the distant treeline along the horizon. Keep these shapes small and vaguely vertical to suggest faraway pines. -
Add the Distant Reflection:
Immediately beneath the dark treeline, pull the wet dark paint downward into the pink water using a dry flat brush. Keep these pulls strictly vertical. -
Blur the Reflection:
Once you have the vertical pulls, very gently swipe horizontally across them with a soft, clean brush to blur the reflection into the water surface.
Add Texture Paste
Mix modeling paste into your foreground green paint before applying the closest grassy bank. This adds physical texture that catches the light and makes the reeds pop.
Step 3: Foreground Details
-
Block in the Right Tree:
On the right side, sketch the trunk and main branches of the large tree using burnt umber and a liner brush. It should reach from the mid-ground up past the top of the canvas. -
Foliage Texture:
Mix sap green with black for a deep shadow green. Use a fan brush or an old, splayed brush to tap in the leaves of the large tree. Keep the foliage dense but leave some ‘sky holes’ for airiness. -
Highlight the Tree:
Mix sap green with yellow and white. Lightly tap this lighter green onto the right-hand side of the tree clusters to simulate the morning light hitting the leaves. -
Background Reeds:
Using a thin rigger brush and a watered-down brown-grey mix, paint the shorter, denser reeds mid-depth on the right side. These should look soft and slightly out of focus. -
Foreground Grass Base:
Mix a variety of greens—some dark (sap green + black), some vibrant (sap green + yellow). Use a fan brush held vertically to create the dense grassy bank at the bottom right corner. -
Detail Tall Grasses:
Using your liner brush and ink-consistency paint (watered down slightly), paint long, sweeping individual stalks of grass rising from the bottom edge. Vary the lengths and angles. -
Add Seed Heads:
Dot the tops of some tall grasses with tiny strokes of brown or tan to create seed heads or cattails. -
Final Water Ripples:
Mix a pale pink-white. Add a few very thin, sharp horizontal lines near the foreground grasses to suggest movement where the reeds break the water’s surface.
Step back and admire how the soft colors bring a sense of calm to your entire room

PENCIL GUIDE
Understanding Pencil Grades from H to B
From first sketch to finished drawing — learn pencil grades, line control, and shading techniques.
Explore the Full Guide
Baby Bunny in a Wildflower Patch
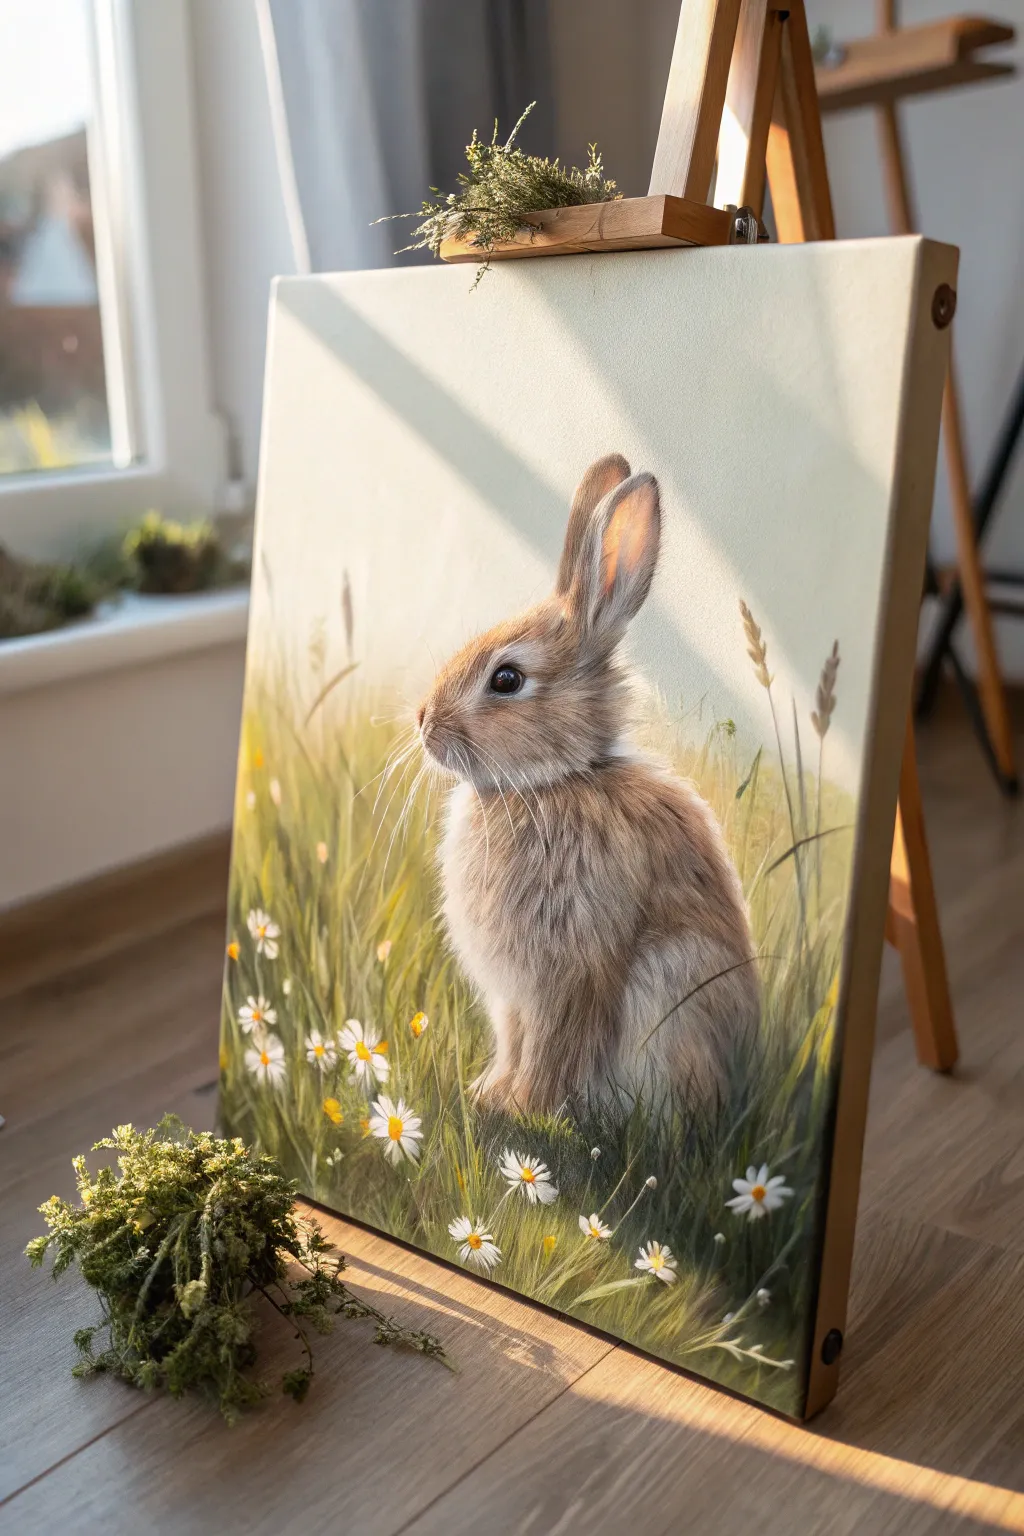
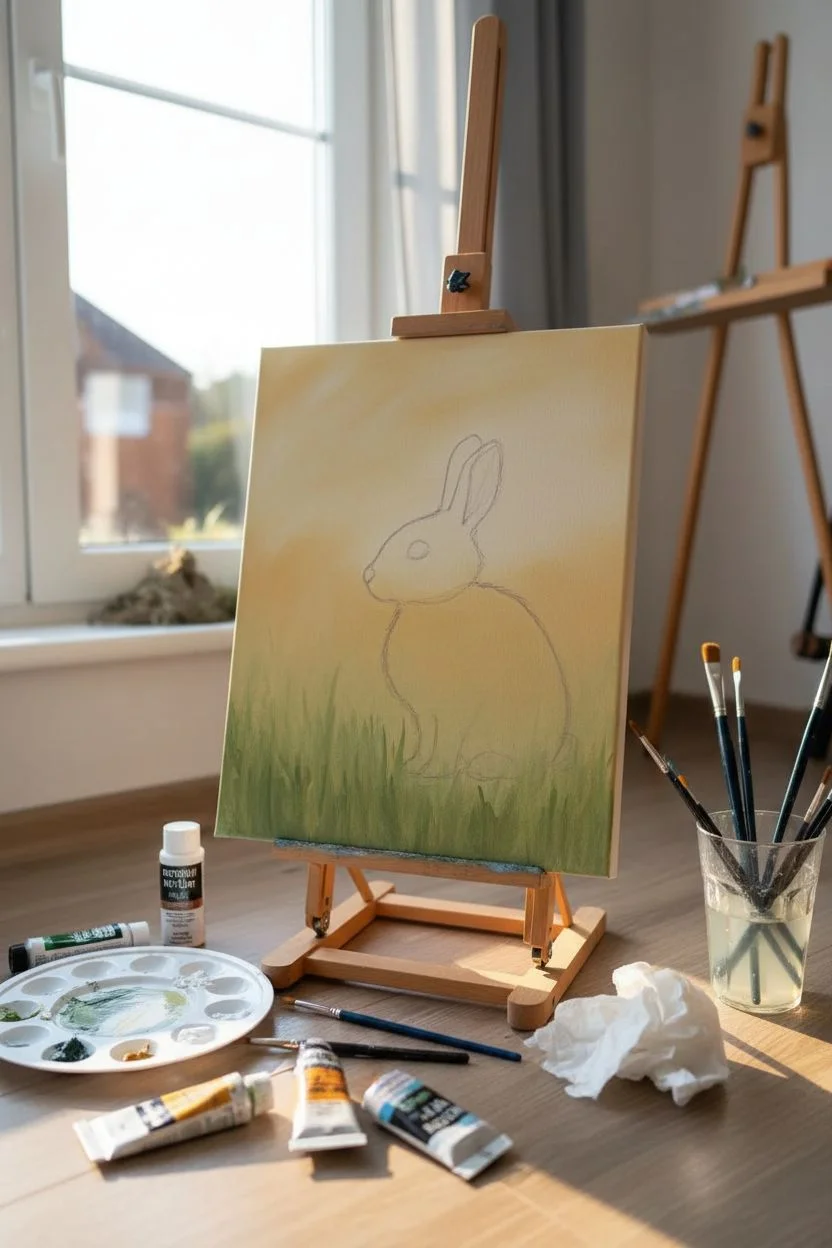
Capture the essence of spring with this heartwarming acrylic painting of a baby bunny nestled in tall grass. The soft, sun-drenched lighting and delicate wildflowers create a peaceful, pastoral scene perfect for brightening any room.
Detailed Instructions
Materials
- Stretched canvas (11×14 or similar)
- Acrylic paints: Titanium White, Burnt Umber, Yellow Ochre, Raw Sienna, Sap Green, Hooker’s Green, Cadmium Yellow
- Paintbrushes: Large flat brush (1 inch), medium filbert (size 6), small round brush (size 2), fine liner brush
- Palette and water cup
- Pencil for sketching
- Clean rag or paper towel
Step 1: Background & Blocking
-
Sketch the silhouette:
Lightly sketch the outline of the bunny using a pencil. Place the bunny slightly off-center to the right to create a balanced composition. Don’t worry about fur details yet; just focus on the main oval shape for the body and the elongated oval for the head and ears. -
Paint the sky gradient:
Mix Titanium White with a tiny touch of Yellow Ochre. Using your large flat brush, paint the upper right corner of the canvas, sweeping diagonally down toward the left. Keep this area very pale to represent bright sunlight. -
Blend the mid-ground:
While the sky paint is still wet, introduce a slightly darker mix of Yellow Ochre and a hint of Raw Sienna. Blend this into the lower left and middle sections of the background, creating a soft, out-of-focus field effect. -
Establish the grassy base:
Mix Sap Green with a little Raw Sienna. Use the medium filbert brush to block in the bottom third of the canvas. Use vertical, upward strokes to suggest the direction of swaying grass, but keep it loose and undefined for now.
Step 2: The Bunny
-
Base coat the fur:
Mix a mid-tone brown using Burnt Umber and White. Fill in the bunny’s entire silhouette with this flat color. This acts as an underpainting for the texture we will add later. -
Map shadows:
Mix pure Burnt Umber with a tiny touch of Hooker’s Green (to cool it down). Apply this shadow color to the belly, the rear leg crease, and the inner part of the ear facing away from the light. -
Map highlights:
Mix White with Raw Sienna. Apply this lighter tone to the chest, the top of the nose, and the translucent part of the tall ear where the sun hits it. This establishes the volume of the rabbit. -
Add texture with shadows:
Switch to your small round brush. Using the dark brown mixture, paint short, flicking strokes in the shadow areas to mimic deep fur layers. Follow the curve of the bunny’s body. -
Develop mid-tone fur:
Using a mix of Raw Sienna and White, add layers of fur over the main body. Keep your strokes short and directional—fur grows backward from the nose. -
Refine the face:
Use the liner brush and black (or very dark brown) to carefully paint the eye. Add a tiny white dot in the upper right quadrant of the eye for that crucial spark of life. Outline the nose and mouth softly. -
Highlight the fluff:
Load the liner brush with thin white paint. Create the finest hairs on the chest, cheeks, and ear tips. I like to flick the brush quickly here to keep the lines tapered and natural. -
Add whiskers:
With watered-down white paint and your finest liner brush, pull long, confident strokes outward from the muzzle for whiskers. Quick movements prevent shaky lines.
Furry Edges
If your bunny looks like a sticker stuck on top of the background, use a dry liner brush to feather the edges of the outline outward into the background paint.
Step 3: Foreground Flora
-
Paint distinct grass blades:
Mix Hooker’s Green with Yellow Ochre. Using the small round brush, paint sharp, defined blades of grass in the foreground overlapping the bottom of the bunny slightly to ground it in the scene. -
Add shadowy depth:
Mix Sap Green with Burnt Umber. Glaze some darker shadows at the very bottom edge of the canvas and between the grass clumps to create depth. -
Create daisy centers:
Dot small circles of Cadmium Yellow mixed with a speck of Red or Orange in the lower grass area where you want your flowers to be. -
Paint flower petals:
Using pure White on a small round brush, paint simple, tear-drop shaped petals radiating from your yellow centers. Vary the sizes and angles so the flowers look organic, not stamped. -
Add wheat stalks:
Mix Raw Sienna and White. Paint a few tall, thin stems rising above the grass layer, topped with small dashed strokes to resemble wild wheat or seed heads catching the light. -
Final sunbeams:
If desired, dry-brush a very faint glaze of Yellow Ochre and White diagonally across the top right corner towards the bunny to enhance the sunlit atmosphere.
Glowing Ears
To make the ear look translucent and sunlit, use a mix of orange and pink very thinly glazed in the center of the ear before adding the fur texture over it.
Step back and admire the gentle warmth and softness of your spring meadow scene
Ducklings by a Pond With Ripples and Reeds
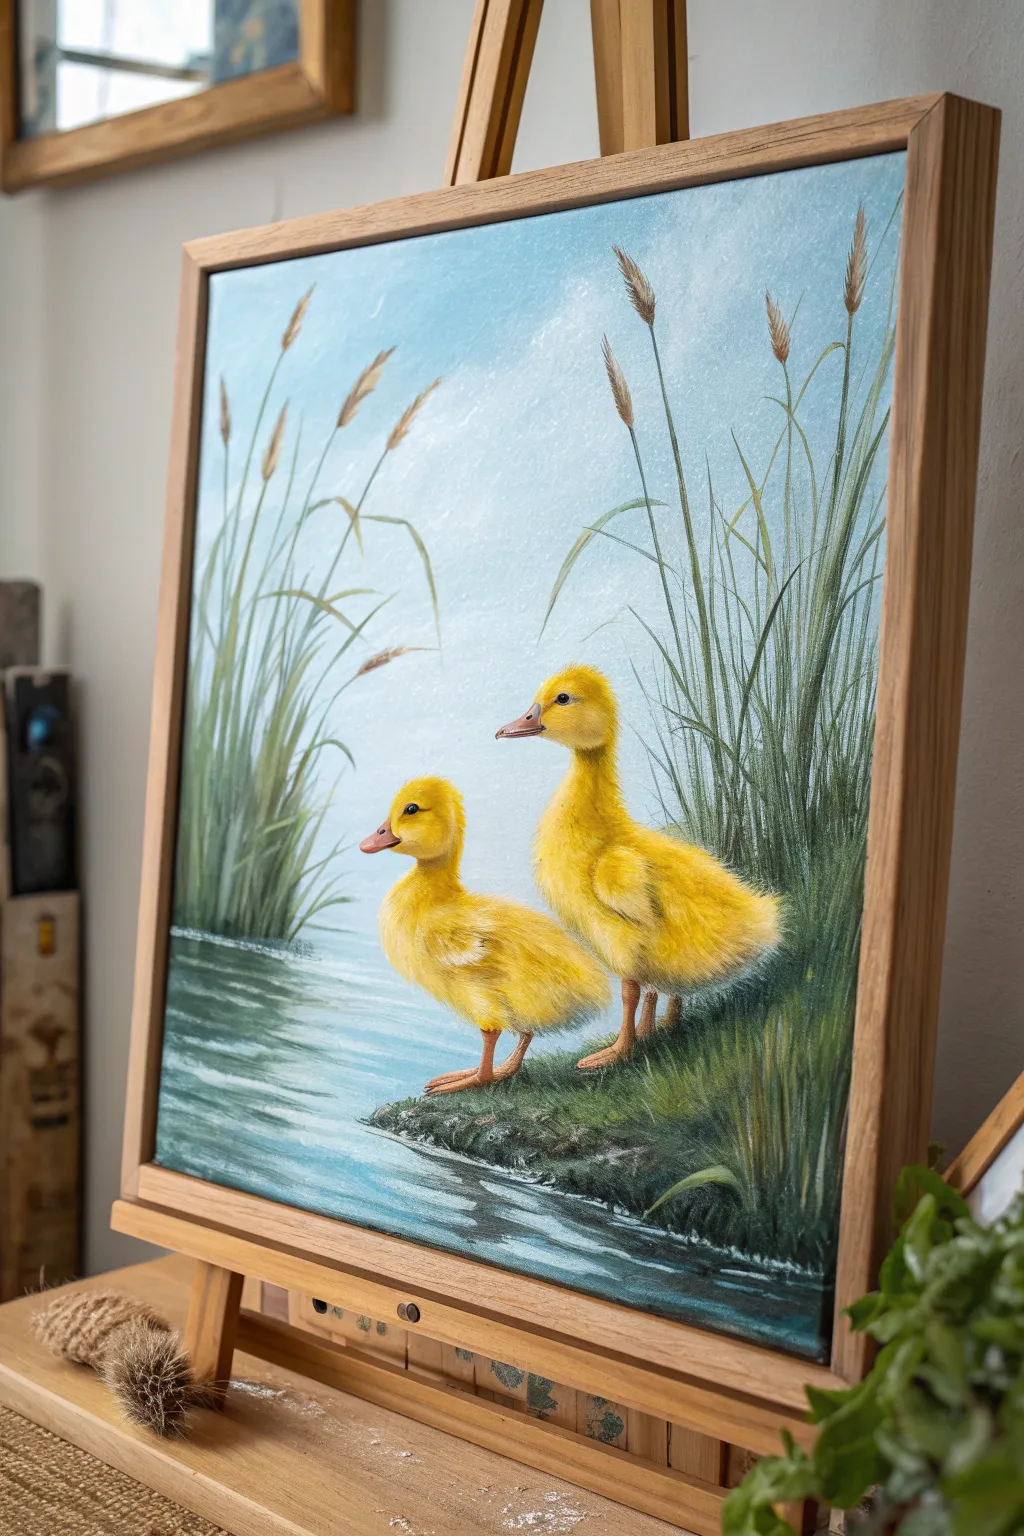

Capture the innocence of spring with this serene acrylic painting featuring two fluffy yellow ducklings resting on a grassy bank. The soft blue sky, gentle water ripples, and tall swaying reeds create a peaceful composition perfect for practicing texture and depth.
Detailed Instructions
Materials
- Canvas (square format, stretched)
- Acrylic paints (Titanium White, Cadmium Yellow, Yellow Ochre, Burnt Sienna, Burnt Umber, Sap Green, Phthalo Blue, Cerulean Blue)
- Flat shader brushes (sizes 8 and 12)
- Round brushes (sizes 2 and 4)
- Fine liner brush (size 0 or 00)
- Palette and water container
- Chalk or pastel pencil for sketching
- Paper towels
Step 1: Planning and Background
-
Sketch the composition:
Begin by lightly sketching the horizon line about a third of the way up from the bottom. Outline the two ducklings in the center-right foreground, placing one slightly behind the other. Mark vertical lines for the tall reeds behind them. -
Paint the sky gradient:
Mix Titanium White with a tiny touch of Cerulean Blue. Start at the top of the canvas and paint downwards, adding more white as you approach the horizon to create a fading, atmospheric effect. -
Create distant texture:
While the sky is still slightly tacky, dab in some very faint cloud textures using pure white and a dry brush, softening the edges so they blend seamlessly into the blue. -
Block in the water:
For the water, mix Phthalo Blue with a touch of Burnt Umber and White to get a deep, murky teal. Paint horizontal strokes below the bank line, keeping the color darker near the bottom edge.
Fixing Flat Feathers
If the ducklings look flat, deepen the darkest shadows under the wing and neck with a transparent glaze of Burnt Sienna. High contrast creates volume.
Step 2: The Grassy Bank and Reeds
-
Base coat almost greenery:
Paint the grassy bank using a mix of Sap Green and Burnt Umber. Don’t worry about individual blades yet; just establish a dark, mossy foundation where the ducks will stand. -
Paint reed stems:
Using a size 4 round brush and watered-down Sap Green mixed with a little White, paint long, confident vertical strokes for the reed stems. Vary the heights and let some curve naturally. -
Add reed heads:
Mix Yellow Ochre and Burnt Umber. Using the tip of a small flat brush, tap in the seed heads at the tops of the tallest stalks, keeping the texture fuzzy and loose. -
Detail the bank grass:
Switch to your liner brush. Use lighter greens (Sap Green + Yellow) to flick upward strokes along the bank, creating individual blades of grass that overlap the water’s edge slightly.
Step 3: Painting the Ducklings
-
Base color for ducklings:
Fill in the duckling shapes with a solid coat of Cadmium Yellow mixed with a tiny bit of White to ensure opacity. Let this layer dry completely. -
Shading the bodies:
Mix Yellow Ochre with a dot of Burnt Sienna to create a shadow tone. Apply this to the undersides of the bellies, under the wings, and beneath the necks to give them 3D form. -
Creating fluff texture:
I find a scruffy, old brush works best here. Take pure Cadmium Yellow and lighter tints (Yellow + White) and stipple or dab over the bodies to simulate soft downy feathers, blending the shadow edges. -
Highlighting the feathers:
Use a liner brush with almost pure White to add tiny, distinct hair-like strokes on the chests and tops of heads where the sunlight hits. -
Facial features:
Paint the beaks using a mix of Burnt Sienna, White, and a touch of Red. Use a dark grey (never pure black) for the nostrils and the eyes, adding a tiny white reflection dot in each eye for life. -
Feet and legs:
Paint the legs and feet with orange-brown tones. Keep the details near the grass slightly obscured to make it look like they are standing *in* the grass, not floating above it.
Level Up: Texture Gel
Mix smooth modeling paste into your yellow paint for the ducklings’ bodies. This physically builds up the surface, making the feathers look remarkably 3D.
Step 4: Reflections and Finishing Touches
-
Water ripples:
Mix Titanium White with a little sky blue. Using a flat brush turned sideways, drag thin, horizontal lines across the water surface to create ripples and movement. -
Bank reflections:
Glaze a thin layer of dark green horizontally directly beneath the grassy bank into the water to suggest a reflection of the mossy edge. -
Enhance foreground grass:
Add a few sharp, bright green grass blades in the very front corner using the liner brush to create layers of depth. -
Final highlights:
Check your lighting. Add a final touch of bright yellow-white to the tops of the ducklings’ heads and the tips of the tallest reeds to maximize the sunlit effect.
Step back and admire your charming wetland scene, ready to bring a touch of nature indoors


Butterfly Landing on a Bloom for a Focal Point
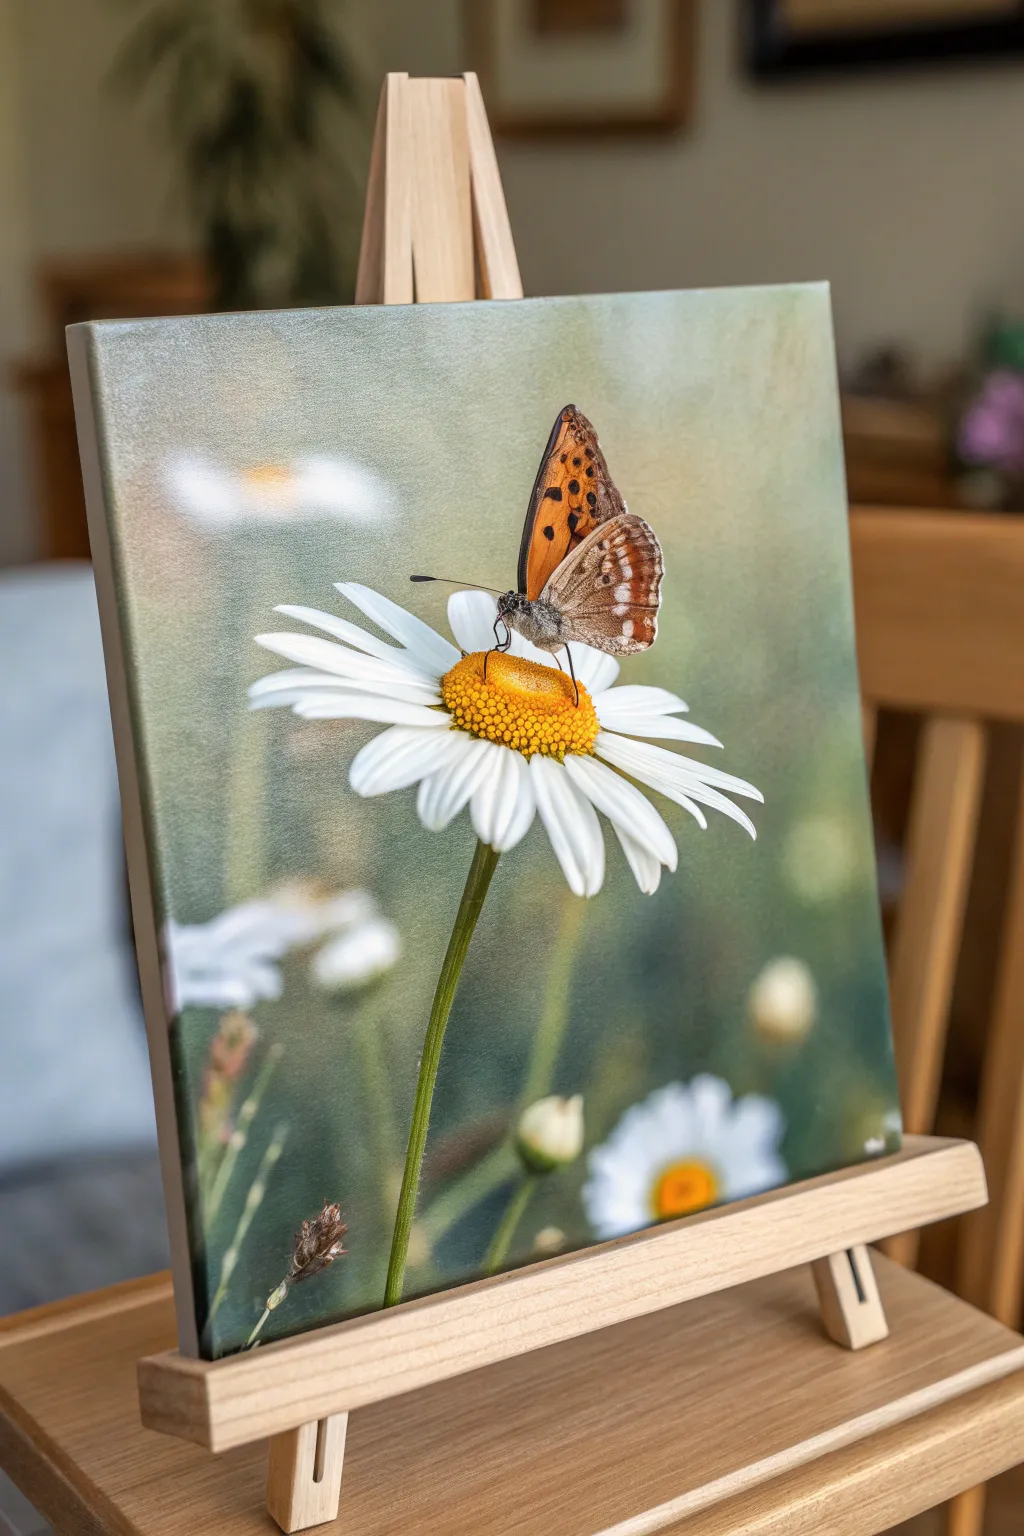
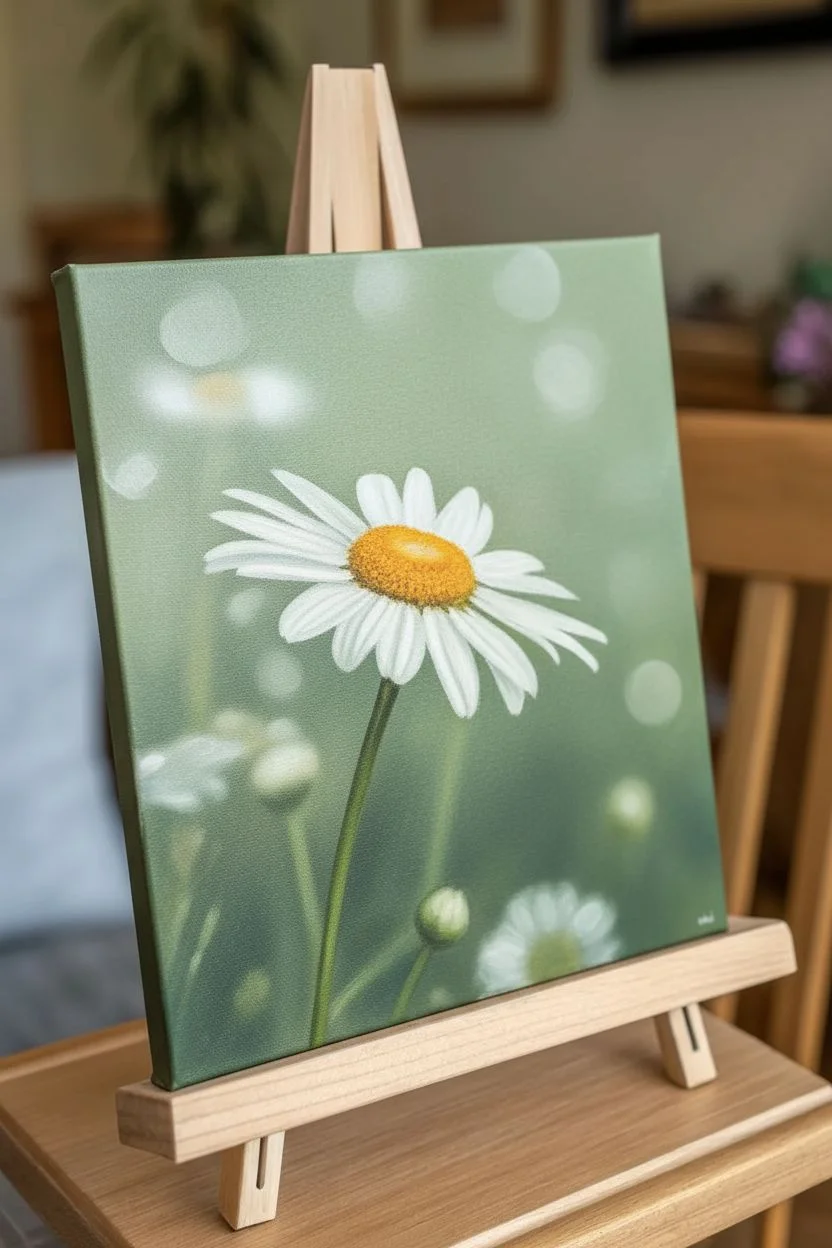
Capture the delicate moment of a butterfly resting on a pristine white daisy in this realistic acrylic painting project. The soft, blurred background contrasts beautifully with the sharp details of the insect, creating a serene focal point perfect for spring decor.
Step-by-Step
Materials
- Square painter’s canvas (12×12 or similar)
- Acrylic paints (Titanium White, Cadmium Yellow, Raw Sienna, Burnt Umber, Sap Green, Phthalo Blue, Orange, Black)
- Assorted brushes (1-inch flat, filbert, small round, fine liner)
- Palette and water cup
- Pencil for sketching
- Acrylic glazing medium (optional)
- Reference photo of a butterfly on a flower
Step 1: Setting the Scene
-
Background Wash:
Start by mixing Sap Green, a touch of Phthalo Blue, and plenty of Titanium White to create a soft, hazy sage green. Using a large flat brush, cover the entire canvas in smooth strokes. While wet, blend in small patches of slightly darker green and faint white near the bottom to suggest out-of-focus foliage. -
Creating Bokeh:
To mimic the camera’s depth of field, mix a very pale, translucent white. Use a clean, dry filbert brush to stipple soft, circular shapes in the background, representing distant flowers. Keep edges extremely soft and blended; you don’t want hard lines here. -
Sketching the Subject:
Once the background is completely dry, lightly sketch the main daisy stem, the oval center, the radiating petals, and the basic outline of the butterfly perched on top. Keep pencil lines faint so they don’t show through the white paint later. -
Stem Structure:
Mix Sap Green with a tiny bit of Burnt Umber. Paint the main stem with a round brush, tapering it slightly as it reaches the flower head. Add the small, blurred buds in the lower background using a softer, more diluted green mix.
Soft Brush Tip
To get that creamy, blurred background look without an airbrush, use a dry mop brush to gently swirl colors together while they are still wet on the canvas.
Step 2: Painting the Daisy
-
Petal Base Layer:
Using Titanium White, paint the basic shape of the daisy petals. Don’t worry about perfect opacity yet; we are just blocking in the forms. Ensure the petals curve downwards slightly to give the flower dimension. -
Shadows and Depth:
Mix a very light grey-blue using White and a speck of Black or Blue. Paint the shadowed areas underneath the petals and where they overlap. This separation is crucial for realism so the flower doesn’t look flat. -
Highlighting Petals:
Apply a second coat of pure thick Titanium White to the tips and unshadowed centers of the petals. Use a slightly smaller brush to create the texture of the veins running lengthwise down each petal. -
The Golden Center:
Fill the center oval with Cadmium Yellow. While wet, dab in Raw Sienna around the bottom edge and the side where the butterfly sits to create a rounded, dome-like form. -
Pollen Texture:
Using a small, scruffy brush or the tip of a round brush, stipple tiny dots of Burnt Umber and pure White over the yellow center. This creates the bumpy, pollen-rich texture characteristic of daisies.
Display Idea
Skip the traditional frame and display this piece on a miniature wooden table easel to enhance the charming, workshop-style aesthetic shown in the photo.
Step 3: The Butterfly Focal Point
-
Underpainting the Wings:
Block in the butterfly wings with a solid coat of orange for the upper wing and a grey-brown mix for the lower wing. Let this dry completely before adding details. -
Wing Patterns:
Using your finest liner brush and black paint, carefully draw the spots on the orange upper wing. For the lower wing, paint the intricate scalloped patterns using darker browns and creams. -
Furry Texture:
For the butterfly’s body, use a small brush to dab mixed browns and greys, creating a fuzzy texture rather than a smooth line. Add tiny highlights on the thorax to show the light hitting the ‘fur’. -
Delicate Legs:
With the liner brush and thinned black paint (ink consistency), draw the slender legs gripping the yellow flower center. Pay attention to the joints; they shouldn’t just be straight lines. -
Antennae and Proboscis:
Paint the antennae curving gently forward. Use a steady hand to add the proboscis if visible, or fine facial details. Keep these lines incredibly thin. -
Final Glazing:
I like to mix a tiny amount of glazing medium with white to add a final semi-transparent highlight to the very tips of the butterfly wings and the brightest part of the daisy petals.
Step back and admire how your detailed butterfly pops against that dreamy, soft-focus garden background
Busy Bee and Blossoms With Tiny Detail Highlights
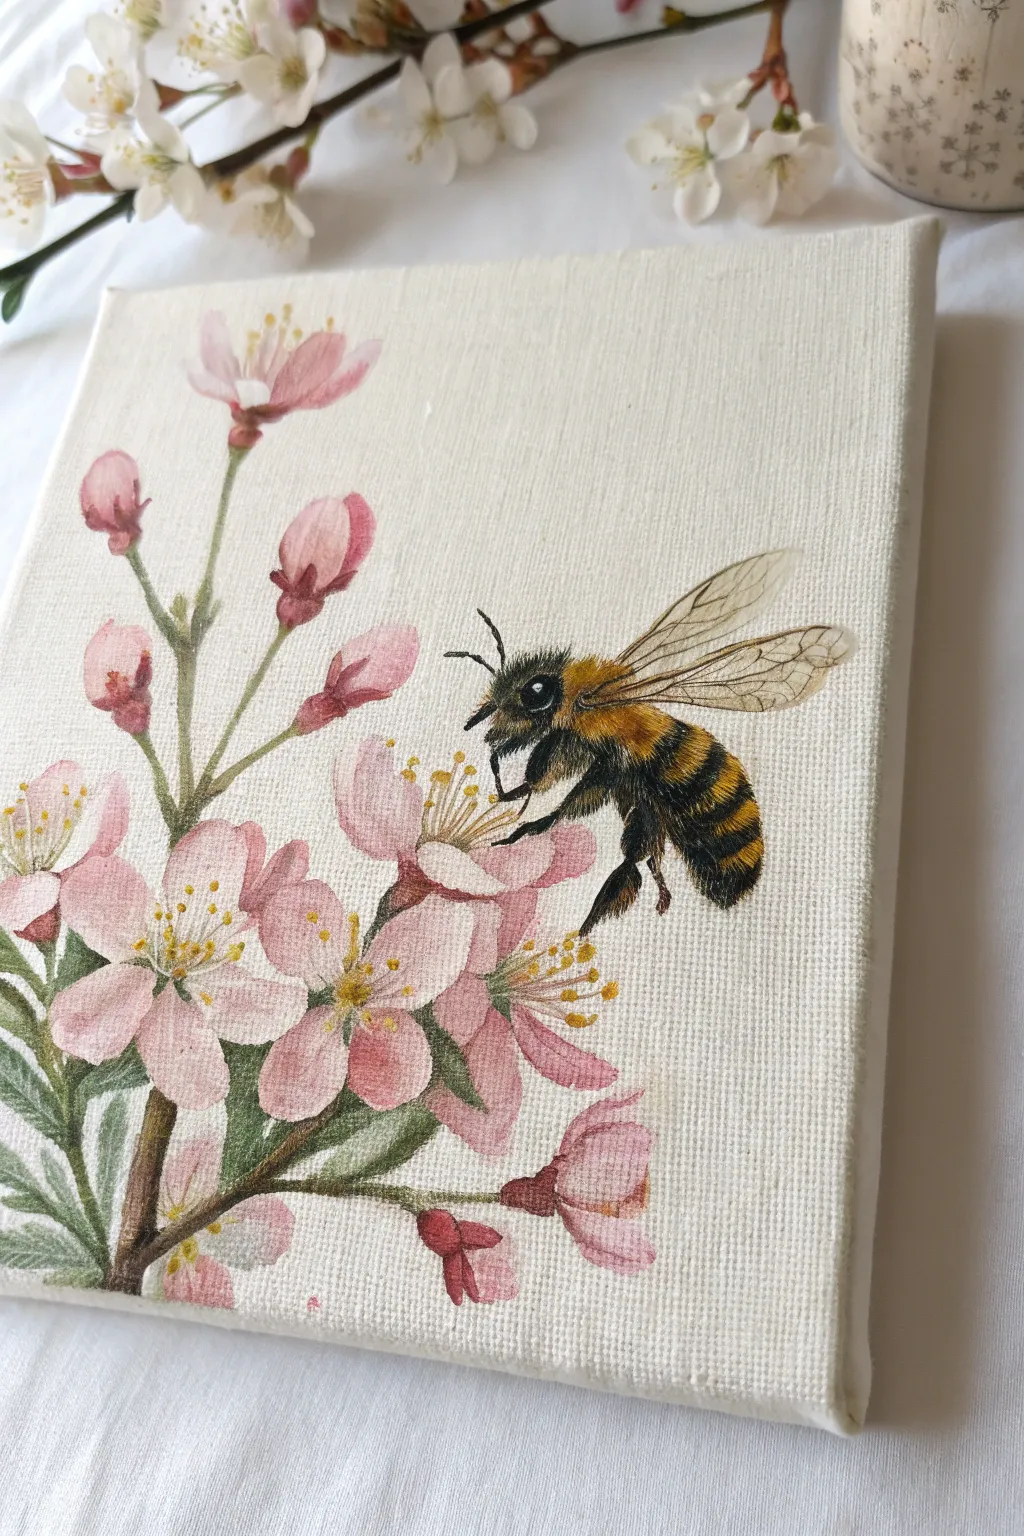
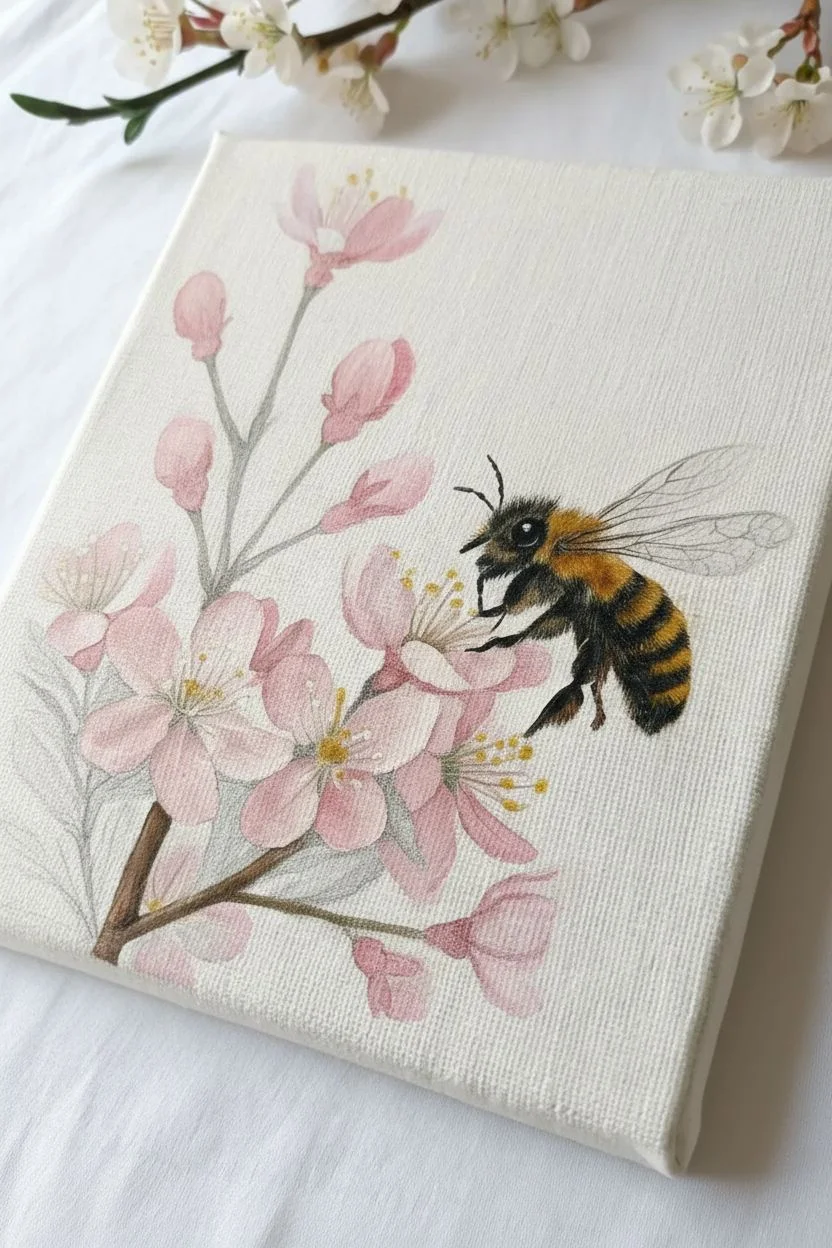
Capture the delicate fuzz of a bumblebee and the soft romance of spring blossoms in this detailed acrylic study. By contrasting loose, pale floral washes with precise, textured brushwork on the insect, you’ll create a lively scene that feels gathered straight from the garden.
How-To Guide
Materials
- Small stretched canvas (approx. 8×10 inches)
- Acrylic paints: Titanium White, Cadmium Yellow, Yellow Ochre, Burnt Umber, Mars Black, Sap Green, Alizarin Crimson, Unbleached Titanium
- Synthetic brushes: Round #4, Liner #0 or #00, Flat #6
- Palette and water cup
- Graphite pencil (HB)
- Clean rag or paper towel
Step 1: Sketching & Base Layers
-
Lightly Map the Composition:
Using your HB pencil, lightly sketch the main curved branch stemming from the bottom left corner. Position the bee to the right, hovering near the upper blossoms. Keep your lines faint so they don’t show through the pale pink petals later. -
Block in the Branch:
Mix Burnt Umber with a touch of Mars Black and a tiny bit of Sap Green for a natural bark color. Using the #4 brush, paint the main stem and smaller offshoots. Don’t worry about perfect lines; a little unevenness looks more organic. -
Paint Petal Silhouettes:
Mix a soft, pale pink using Titanium White and a very small dot of Alizarin Crimson. Paint the basic shapes of the open flowers and the tighter, darker buds. For the buds, add a slightly higher concentration of crimson to make them stand out. -
Underpaint the Bee:
While the flowers dry, block in the bee’s body. Use pure Mars Black for the head, legs, and the black stripe sections. Use Yellow Ochre for the yellow segments. This base layer doesn’t need texture yet; just get the solid color down.
Fuzzy Trouble?
If the bee’s fur looks too stiff or spiky, your paint is likely too thick. Thin the acrylic with a drop of water until it has an ink-like consistency for softer, finer lines.
Step 2: Building Floral Depth
-
Add Greenery:
Using Sap Green mixed with a little White (to make it opaque) and Yellow, paint the small leaves near the base of the stems and the sepals grasping the buds. Use a flickering motion with your brush tip to create pointy leaf ends. -
Layer Petal Translucency:
Once the pink base is dry, mix a slightly lighter shade (mostly White). Apply this to the outer edges of the petals, leaving the centers slightly darker to create a cupped, 3D effect. -
Deepen the Buds:
For the closed pink buds, mix Alizarin Crimson with a touch of Burnt Umber. Paint the bottom shadowed area of each bud where it meets the green stem, blending upward into the lighter pink. -
Add Flower Centers:
With a liner brush, dot small clusters of Yellow mixed with Ochre in the center of the open blossoms. Add tiny radiating lines of Burnt Umber around these dots to suggest stamens.
Step 3: Detailing the Bumblebee
-
Create Fur Texture (Yellow):
Switch to your smallest liner brush (#00). Mix Cadmium Yellow with a little Titanium White. Paint tiny, short hash marks over the Yellow Ochre base areas. Ensure the strokes go in the direction the fur would grow, overlapping the black sections slightly for realism. -
Create Fur Texture (Black):
Clean your brush and pick up slightly thinned Mars Black. Add tiny hair strokes to the black segments of the bee. Allow some hairs to break the silhouette of the bee, sticking out into the background to make it look fluffy. -
Paint the Legs and Antennae:
Use the liner brush and black paint to define the segmented legs. Add tiny hooks at the ends of the feet. Carefully pull out two curved lines for the antennae. -
Highlight the Eye:
The eye is crucial for life. Paint a solid black oval, then place a single, crisp dot of Titanium White near the top to serve as a reflection. -
Draft the Wings:
Mix a very transparent glaze using water and a tiny bit of Burnt Umber. Paint the oval shapes of the wings extending from the bee’s back. They should be see-through, so don’t use thick paint. -
Vein the Wings:
Using the thinnest liner brush and watery black paint, draw delicate veins on the wings. Keep the lines incredibly thin and faint; if they are too bold, the wings will look heavy.
Level Up: Pollen Heavy
Make the bee look busy by dry-brushing tiny dots of bright yellow on its back legs to simulate full pollen baskets, creating a narrative of hard work.
Step 4: Final Touches
-
Define the Petals:
Return to the flowers with a white-heavy mix. Add final crisp highlights to the very tips of the petals and the tops of the buds where the light hits. -
Enhance Stem Shadows:
Add a thin line of dark brown/black along the bottom edge of the larger branches to give them volume and weight. -
Clean Up Background:
I like to take a clean brush with some Unbleached Titanium or off-white and tidy up any edges around the bee or flowers if the painting got messy, ensuring the background canvas texture remains visible.
Step back and admire how the detailed insect contrasts beautifully with the soft, painterly botanicals you’ve created
Spring Bicycle With a Basket of Flowers
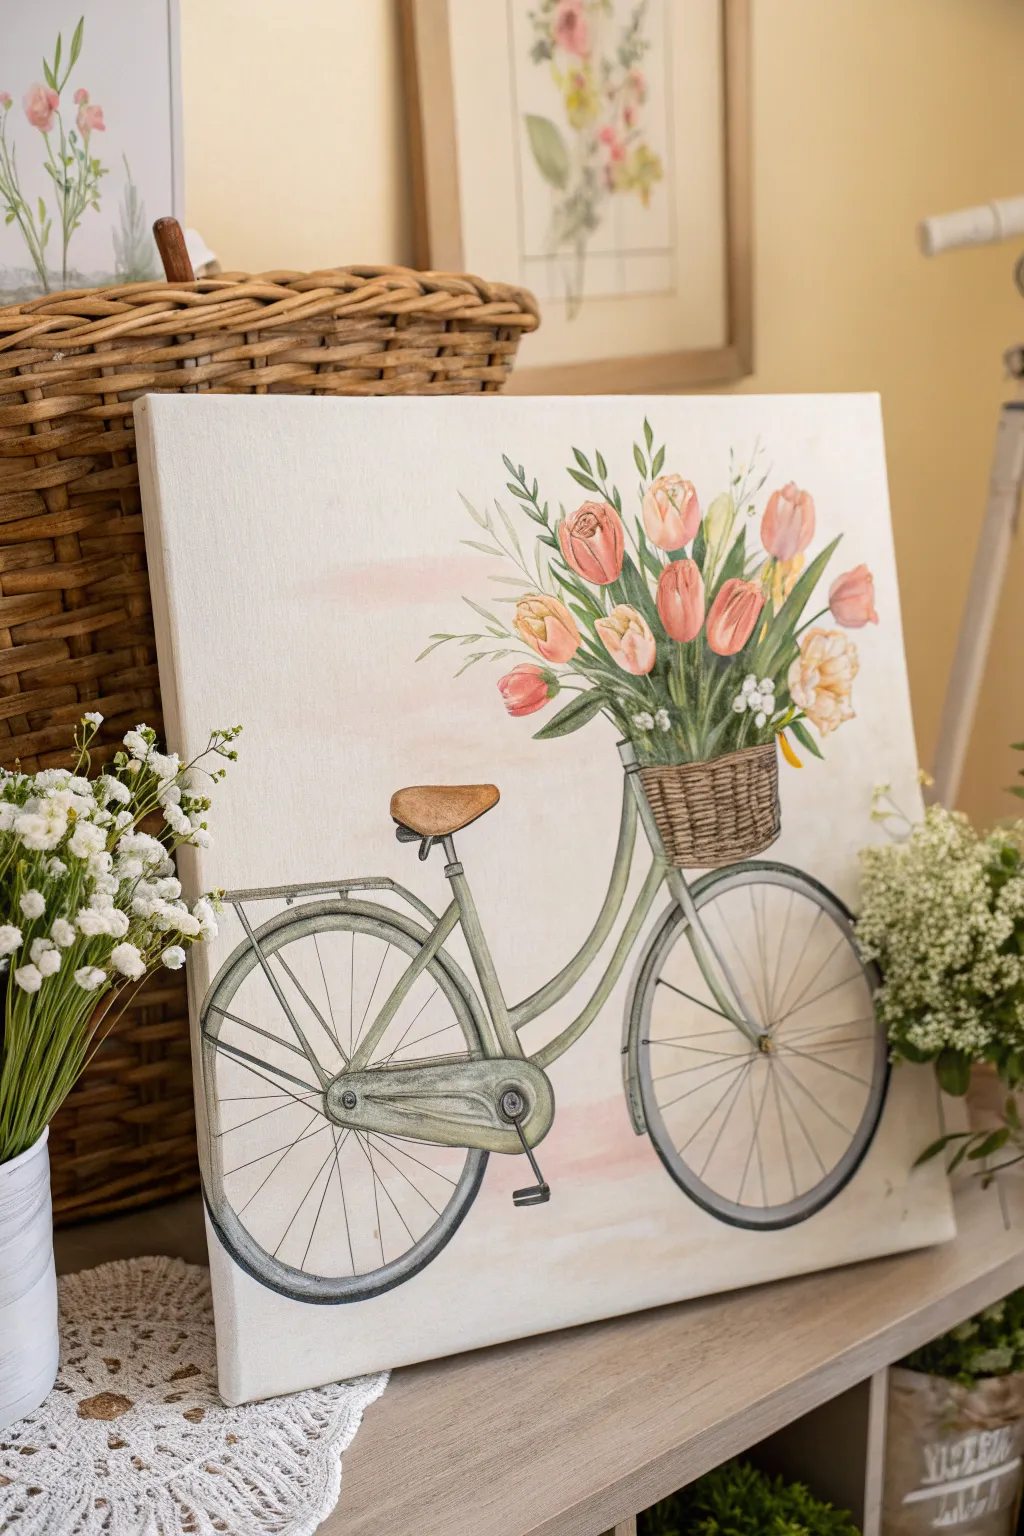
Capture the breezy essence of spring with this charming canvas painting featuring a vintage-style bicycle laden with fresh tulips. The soft, muted tones and delicate floral details create a nostalgic, cottage-core aesthetic perfect for seasonal decor.
Step-by-Step Tutorial
Materials
- Square canvas (12×12 or 16×16 inches)
- Acrylic paints: Sage green, olive green, soft pink, coral, peach, white, burnt umber, raw sienna, cream/off-white, grey
- Pencil and eraser for sketching
- Fine round brush (size 1)
- Small flat brush (size 4)
- Medium filbert brush (size 6)
- Palette and water cup
- Paper towels
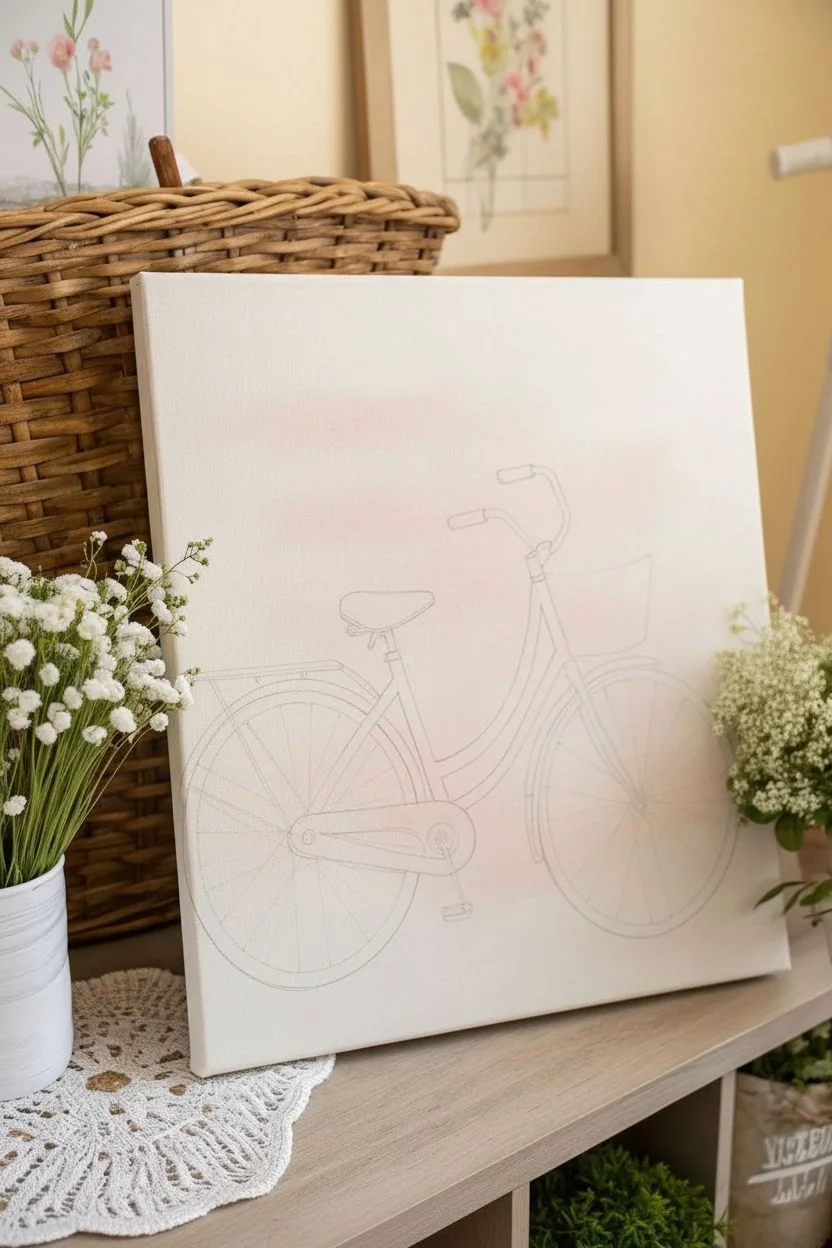
Step 1: Planning the Composition
-
Background wash:
Begin by creating a very subtle background. Mix a large amount of water with a tiny drop of pink and cream paint to create a translucent wash. Apply this loosely across the center and upper half of the canvas, letting it fade into white at the edges, creating a dreamy, misty atmosphere. -
Let it dry:
Allow the background wash to dry completely before sketching. This prevents your pencil lines from bleeding or tearing the wet canvas. -
Sketch the bicycle frame:
Using a light hand, sketch the basic geometry of the bicycle. Start with two large circles for the wheels, placed low on the canvas. Connect them with the curved frame bars, making sure the top tube dips low in that classic step-through style. -
Add details:
Sketch in the handlebars curving backward, the triangular seat, the chain guard near the back wheel, and the basket perched on the front handlebars. Keep your lines faint so they are easily covered by paint.
Steady Hand Trick
For the thin wheel spokes, try resting your pinky finger on a dry part of the canvas to stabilize your hand while painting the long, straight lines.
Step 2: Painting the Bicycle
-
Base coat for the frame:
Mix a muted sage green by combining green, a touch of white, and a tiny dot of grey. Using your small flat brush, paint the tubing of the bicycle frame. I like to keep the paint slightly thin here so the texture of the canvas shows through. -
Painting the wheels:
Switch to a grey mix for the tires. Paint a thin, even circle over your pencil lines for the wheel rims. Then, use a slightly darker grey to create the tires themselves. -
Spokes and hardware:
With your finest round brush and a watered-down grey paint, carefully draw the thin spokes radiating from the center hub to the rim. Keep a steady hand and pull the brush quickly for the straightest lines. -
Leather accents:
For the seat, mix burnt umber with a little raw sienna to create a leather tone. Paint the seat shape, adding a highlight of lighter brown on the top edge to show dimension. -
Basket texture:
Paint the basket area with a solid base of light brown. Once dry, use a darker brown on your fine brush to paint short, horizontal and vertical hatching lines to mimic a woven wicker texture.
Add Real Texture
Mix a small amount of modeling paste into your acrylic paint when creating the flower petals. This will give the blooms a raised, impasto effect.
Step 3: Blooming the Basket
-
Greenery foundation:
Using olive green, paint stems extending upwards and outwards from the basket. Add various leaf shapes—some long and slender like tulip leaves, others small and rounded for filler greenery. -
Tulip shapes:
Mix shades of coral, soft pink, and peach. Paint egg-shaped ovals for the tulip heads at the ends of your main stems. Vary the sizes and angles so some look like closed buds and others are slightly open. -
Defining the petals:
Once the base flower color is dry, take a slightly darker shade of your pink or coral and paint curved lines to define individual petals within the flower heads. Add a touch of cream to the tips for highlights. -
Filler flowers:
Dip a small brush into pure white or cream paint. Dabbing gently, add clusters of small dots or tiny petals between the tulips to represent baby’s breath or lily of the valley, adding texture to the bouquet. -
Final foliage:
Go back in with a deeper green to add shadows behind the flowers and stems near the rim of the basket, giving the arrangement volume and depth. -
Refining the bike:
Use a dark grey or black to deepen the chain guard details, the pedals, and the tiny kickstand. Ensure the kickstand is angled correctly so the bike looks grounded.
Step 4: Finishing Touches
-
Grounding shadow:
Mix a very watery grey wash. Paint a soft, horizontal shadow underneath the wheels to ground the bicycle so it doesn’t look like it’s floating in mid-air. -
Highlighting:
Add tiny flecks of pure white to the metal parts of the bike (handlebars, wheel rims) and the top of the leather seat to suggest reflected light. -
Final assessment:
Step back and look at your composition. If any pencil lines are still visible through the light paint, carefully erase them or dab a little extra paint over the top.
Now you have a delightful piece of spring art ready to brighten any wall in your home
Rain Boots and Tulips With Puddle Reflections

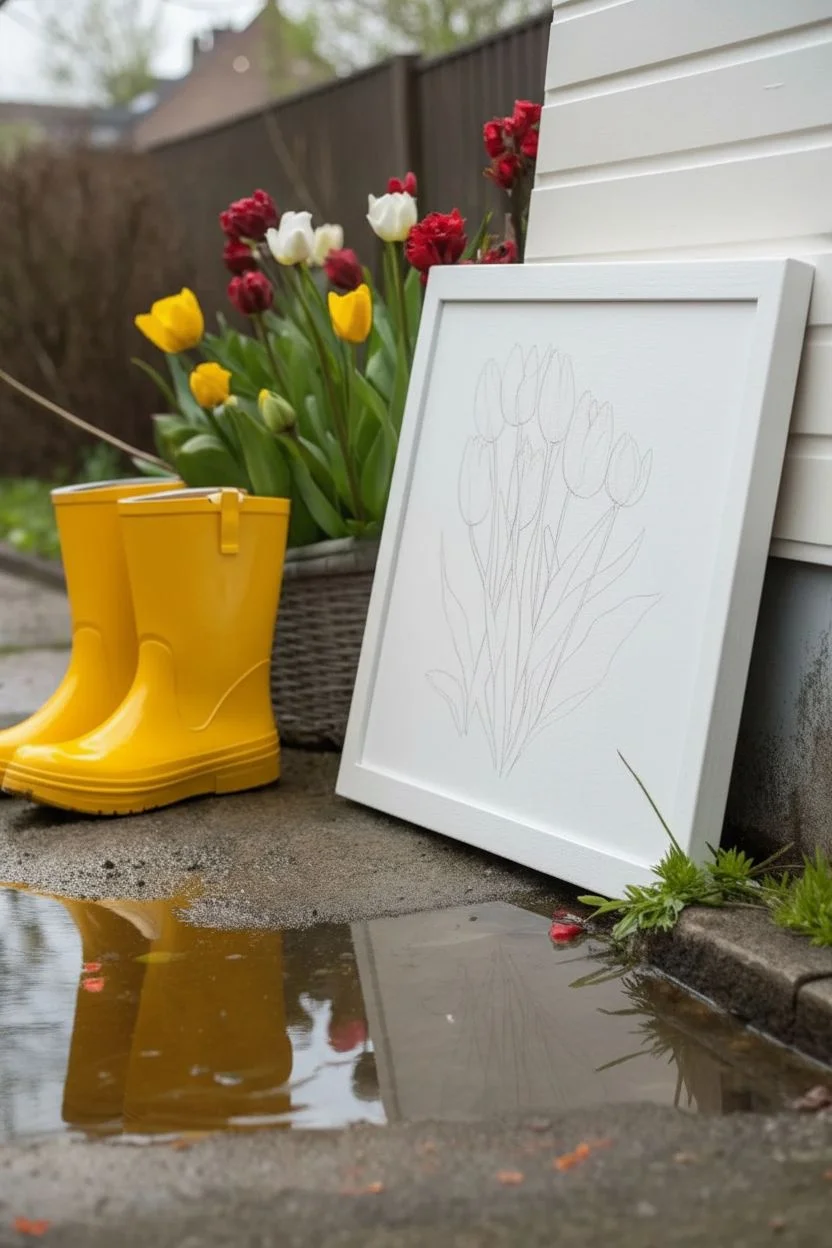
Capture the fresh vibrancy of the season with this elegant botanical study featuring red and yellow tulips. This artwork combines loose, organic stems with structured petals, creating a classic yet lively piece perfect for propping up on a porch or hanging in an entryway.
Step-by-Step
Materials
- 12×16 inch canvas or canvas panel (stretched)
- Acrylic paints (Cadmium Red, Alizarin Crimson, Cadmium Yellow Medium, Lemon Yellow, Sap Green, Hooker’s Green, Titanium White, Burnt Umber)
- Flat brush (size 6 or 8)
- Round brushes (sizes 2, 4, and 6)
- Liner brush (size 0 or 00)
- Pencil (HB) and eraser
- Palette and water cup
- Paper towels
- White wooden frame (optional, for finishing)
Step 1: Preparation & Sketching
-
Prime the Surface:
Begin by applying a fresh coat of Titanium White over your canvas if it isn’t already primed. This ensures the background remains crisp and clean, allowing the flower colors to pop. Let this dry completely before sketching. -
Plan the Composition:
Using your HB pencil, lightly sketch the layout. Start by drawing seven distinct stems radiating slightly outward from the bottom center. They shouldn’t be perfectly straight; give them a gentle curve to mimic natural growth. -
Sketch the Flower Heads:
At the top of each stem, draw simple egg shapes to represent the tulip heads. vary their heights so they don’t look like soldiers in a row. Some should be fully closed, while others can be slightly open. -
Outline the Leaves:
Sketch long, lance-shaped leaves rising from the base. Tulips have leaves that wrap around the stem, so draw them starting low and curving upward, embracing the stalks.
Step 2: Painting the Foliage
-
Base Green Layer:
Mix Sap Green with a touch of White. Using your size 6 flat brush, fill in the stems and leaves with this base color. Don’t worry about shading yet; just get the shapes filled. -
Deepen the Shadows:
Create a darker green by mixing Hooker’s Green with a tiny bit of Burnt Umber. With a size 4 round brush, paint along the one side of each stem and the underside of the curving leaves to create dimension. -
Add Highlights:
Mix Lemon Yellow into your base green mixture. Apply this lighter shade to the tips of the leaves and the side of the stems where the light source would hit, blending slightly into the wet base coat for a soft transition. -
Connect the Stems:
Ensure the connection points where the stems meet the flower heads are seamless. The green should taper gently just under the petals. I usually switch to a smaller round brush here for better control.
Paint Transparency?
If your yellow paint looks streaky or see-through, mix in a tiny, pin-head amount of Titanium White. This increases opacity without changing the yellow hue too much.
Step 3: Painting the Blooms
-
Yellow Tulip Base:
For the yellow tulips, mix Cadmium Yellow Medium with a little White. Fill in the egg shapes you sketched earlier. You want a solid, opaque layer, so apply two coats if necessary. -
Red Tulip Base:
For the red blooms, use pure Cadmium Red. Paint the main shapes, following the curve of the petals. Leave the paint slightly thinner near the top edges to suggest delicacy. -
Shadowing Yellows:
Mix a tiny amount of Red into your Yellow to make an orange tint. Paint vertical strokes from the bottom of the yellow petals upwards to show the separation between petals and the shadows at the base. -
Shadowing Reds:
Use Alizarin Crimson to add depth to the red tulips. Paint the areas where petals overlap or curve inward. This darker red gives the flower a rounded, 3D appearance. -
Adding Texture:
Tulips often have subtle striping. Using a mostly dry size 2 brush, drag very faint lines of the darker shade up through the center of the petals to mimic the flower’s texture. -
Highlights on Petals:
Mix Titanium White with a tiny dot of Lemon Yellow. Apply very thin highlights to the top edges of the petals where the sun hits them most directly.
Pro Tip: Wet Blending
Work one petal at a time while the paint is still wet. This allows you to blend the shadow color into the base color directly on the canvas for a soft, realistic gradient.
Step 4: Refinement & Details
-
Clean Up Edges:
Use a small brush with Titanium White to tidy up the background around the flowers. If you went outside the lines, painting over it with the background color is the easiest eraser. -
Deepen Contrast:
Look at the junction where the leaves cluster at the bottom. Use your darkest green mix to add deep shadows in the crevices between stems to ground the bouquet. -
Final Liner Work:
Take your liner brush with slightly watered-down dark green. Add very fine lines along the leaf edges or stems to crisp up the botanical illustration look. -
Varnish and Frame:
Once fully dry (give it at least 24 hours), apply a satin varnish to protect the acrylics. Place the canvas into a simple white wooden frame to match the clean aesthetic of the inspiration image.
This charming botanical piece brings a permanent splash of spring joy to your home decor, rain or shine
Pressed Flower Mixed Media on a Painted Spring Wash

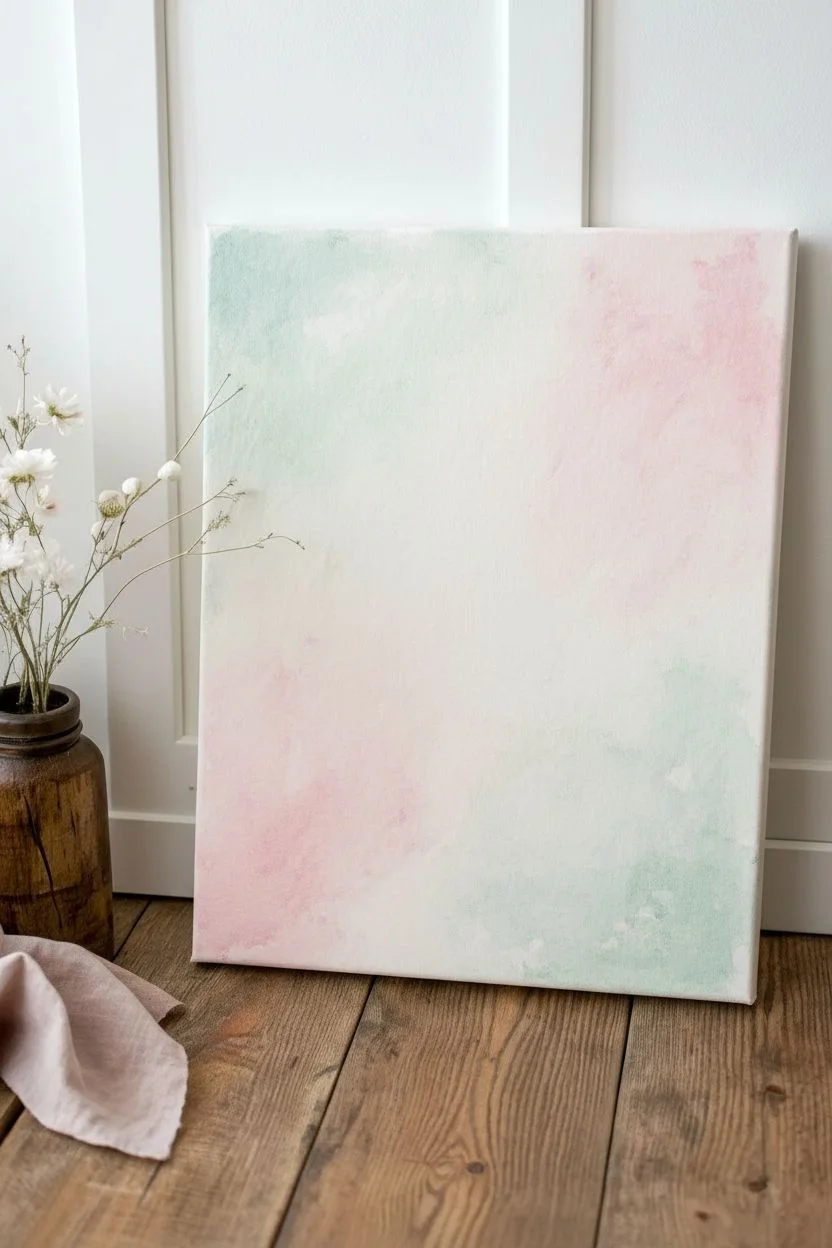
This mixed media project combines the softness of a watercolor wash with the tactile beauty of handcrafted paper florals. The result is a fresh, spring-inspired artwork that lifts off the canvas with lovely dimension and delicate pastel hues.
Step-by-Step Tutorial
Materials
- Stretched canvas (11×14 or similar)
- Acrylic paints (white, pastel pink, mint green)
- Water and mixing containers
- Wide flat paintbrush
- High-quality cardstock or watercolor paper
- Pencils and scissors
- Watercolor paints or markers for flower detailing
- Strong craft glue or hot glue gun with fine tip
- Stylus or embossing tool
- Soft foam pad or mousepad
Step 1: Preparing the Background
-
Mix your wash:
Dilute your acrylic paints heavily with water. You want a consistency similar to watercolor, creating a transparent stain rather than an opaque coat. -
Apply the first color:
Using a wide flat brush, apply the mint green wash to the top-left and bottom-right corners of the canvas. Use sweeping, irregular strokes to keep edges soft. -
Blend in the pink:
While the canvas is still slightly damp, apply the pastel pink wash to the remaining corners (top-right and bottom-left). Let the colors bleed slightly where they meet in the center. -
Create texture:
Dab the wet surface gently with a crumpled paper towel or dry cloth. This lifts some pigment and adds a clouded, worn texture to the background. Let the canvas dry completely.
Paint too opaque?
If your background wash looks too solid, wipe it back immediately with a damp sponge. You can also dry-brush a little white over the top to soften the transition.
Step 2: Crafting the Florals
-
Sketch the shapes:
On your cardstock or heavy watercolor paper, lightly sketch various flower shapes—some five-petaled blooms, some smaller buds, and diverse leaf shapes ranging from ovals to ferns. -
Cut carefully:
Use sharp scissors to cut out all your botanical elements. For the fern-like leaves, make sure to cut delicate notches along the edges. -
Add color definition:
Use watered-down acrylics or watercolor paints to stain your paper cutouts. Paint the leaves in sage greens and bluish-grays. Give the flowers soft pink, cream, or white washes. -
Detail the petals:
Once the base color is dry, use a fine brush or marker to add thin veins to the leaves and darker centers to the flowers for realism. -
Sculpt the paper:
Place your cutouts on a soft foam pad. Using a stylus or the rounded end of a paintbrush handle, press into the center of the flowers and run lines down the leaves. This curls the edges upward, creating a 3D effect.
Step 3: Assembly
-
Dry fit the arrangement:
Before gluing, lay your sculpted paper pieces onto the painted canvas to find the best composition. Aim for an oval or diamond shape centered on the canvas. -
Attach the base foliage:
Start by gluing down the larger, flatter leaves first. Apply glue only to the very base of the stems, allowing the tips of the leaves to lift off the canvas. -
Layer the blooms:
Glue the largest flowers near the center of your arrangement. Overlap them slightly over the base leaves to create depth. -
Add accent foliage:
Tuck the delicate fern shapes and thinner stems underneath and around the main flowers. I find tweezers helpful here for precise placement without disturbing the other pieces. -
Create flower centers:
For the centers of the main blooms, apply a small dot of glue and sprinkle gold glitter, small beads, or textured pollen powder. Alternatively, paint tiny stippled dots in gold or dark brown. -
Final touches:
Draw very fine, wispy stems directly onto the canvas with a fine-tip pen or thin brush to connect floating elements or add height to the bouquet.
Pro Tip: Paper grain
When curling your paper leaves, check the grain of the paper. Curling with the grain is smoother; curling against it can cause unsightly creases or cracks.
Hang your new dimensional artwork in a bright spot where the shadows can play against the gentle background colors


Have a question or want to share your own experience? I'd love to hear from you in the comments below!