If you’ve been craving diy painting ideas that actually feel doable (and still look amazing on your wall), you’re in the right headspace. I pulled together my favorite DIY-friendly projects that give you big visual payoff without needing fancy skills or a packed supply cart.
Classic Abstract Color-Block Canvas
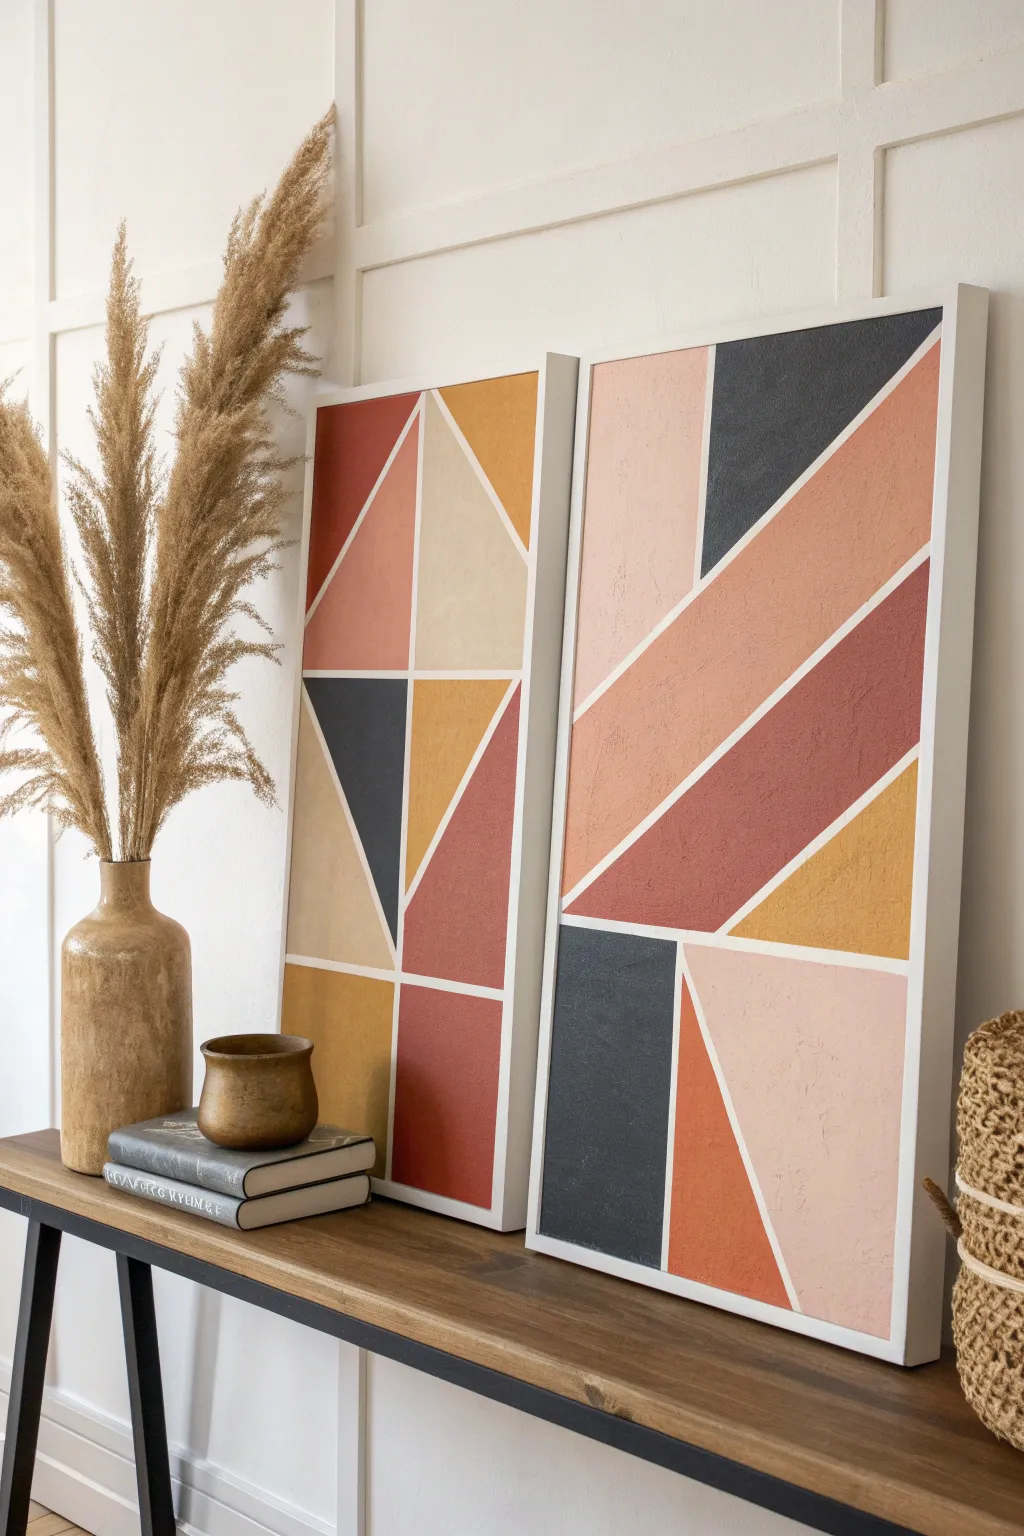
Bring mid-century modern flair to your space with this striking pair of geometric canvases. The clean lines and warm, earthy palette of terracotta, mustard, and charcoal create a sophisticated look that feels far more expensive than it actually is.
How-To Guide
Materials
- Two large framed stretched canvases (approx. 24×36 inches)
- Acrylic paints (terracotta/burnt sienna, mustard yellow, charcoal grey, blush pink, beige)
- Painter’s tape (various widths, 1/4 inch or 1/2 inch works best for the lines)
- Acrylic modeling paste or texture medium (optional, for texture)
- Palette knife
- Flat synthetic paintbrushes (1-inch and 2-inch sizes)
- Bossa wood strips or ready-made floating frames (if canvases are unframed)
- Ruler or long straight edge
- Pencil
- Top coat varnish (matte finish)
Step 1: Preparation & Design
-
Prime the surface:
If your canvases aren’t pre-primed, apply two coats of white gesso to ensure a smooth, bright base. Let the gesso dry completely between coats. -
Plan the layout:
Lightly sketch the geometric design onto both canvases using a pencil and ruler. Observe the reference image: note how the diagonal lines on both canvases seem to flow in parallel directions, creating a cohesive look across the two pieces. -
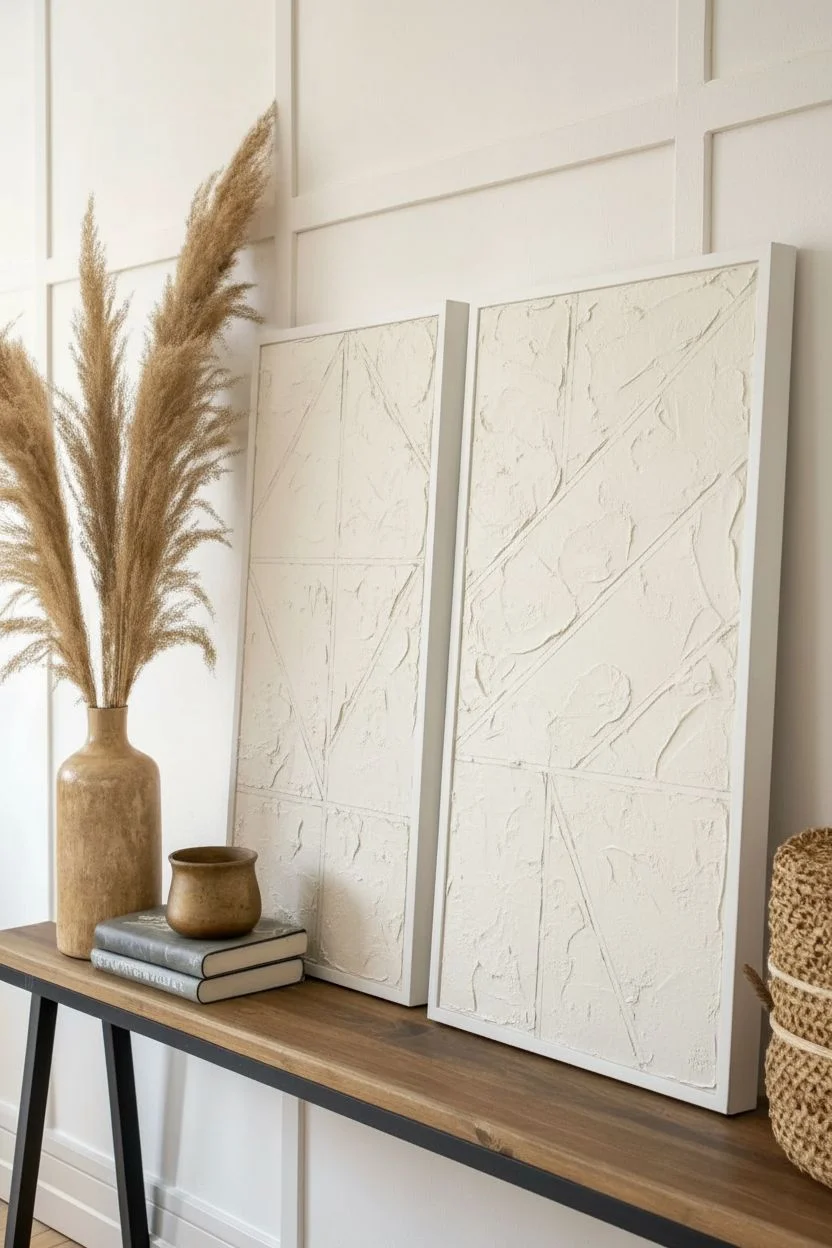
Add texture:
For that subtle, tactile finish seen in the photo, mix your white acrylic gesso with a little modeling paste. Apply a thin, uneven layer over the entire canvas using a palette knife, creating small peaks and ridges. Let this dry overnight.
Step 2: Taping & Painting
-
Apply the tape:
Once the texture layer is bone dry, apply your painter’s tape over your pencil lines. The tape represents the white negative space, so ensure it is pressed down firmly to prevent bleed-through. -
Seal the tape edges:
Here is a crucial trick: brush a very thin layer of white paint (or clear matte medium) over the edges of the tape. This seals the gap and ensures your colored lines will be razor-sharp later. -
Mix your palette:
Prepare your acrylic colors. You’ll need a deep charcoal, a warm terracotta, a muted mustard yellow, a soft blush pink, and a creamy beige. I like to mix in a tiny bit of white to the terracotta to soften it slightly. -
Paint the first blocks:
Start with the largest sections first, perhaps the terracotta diagonals. Apply the paint using a flat brush, working away from the tape edge to minimize pushing paint under it. -
Fill remaining sections:
Continue painting the other geometric sections—the charcoal triangles, yellow wedges, and pink rectangles. Apply two coats for solid, opaque coverage, letting the first coat dry to the touch before adding the second. -
Check for consistency:
Step back and look at both canvases side-by-side. Ensure the colors are balanced across the two pieces so they feel like a true pair.
Bleeding Lines?
If paint bleeds under the tape, wait for it to dry completely. Then, lay a fresh piece of tape over the colored area and repaint the line with your white base color to sharpen the edge.
Step 3: Finishing Touches
-
Remove the tape:
This is the satisfying part. Carefully peel back the painter’s tape while the final coat of paint is still slightly tacky (not fully cured) to avoid peeling up chips of dried paint. -
Touch up lines:
If any paint bled through, use a small detail brush and white paint to clean up the lines. If the texture caused bumps, you can carefully scrape excess paint away with a craft knife. -
Seal the artwork:
Once the paint is fully cured (give it at least 24 hours), apply a layer of matte varnish to protect the surface and unify the sheen of the different colors. -
Frame the pieces:
To achieve the high-end look in the photo, place your canvases into white floating frames. Secure them from the back according to the frame instructions.
Pro Tip: Texture Trick
Don’t have modeling paste? You can create a similar textured effect by mixing baking soda into your acrylic paint. Start with a 1:4 ratio of soda to paint.
Hang your new diptych together over a console table or sofa to instantly modernize your room


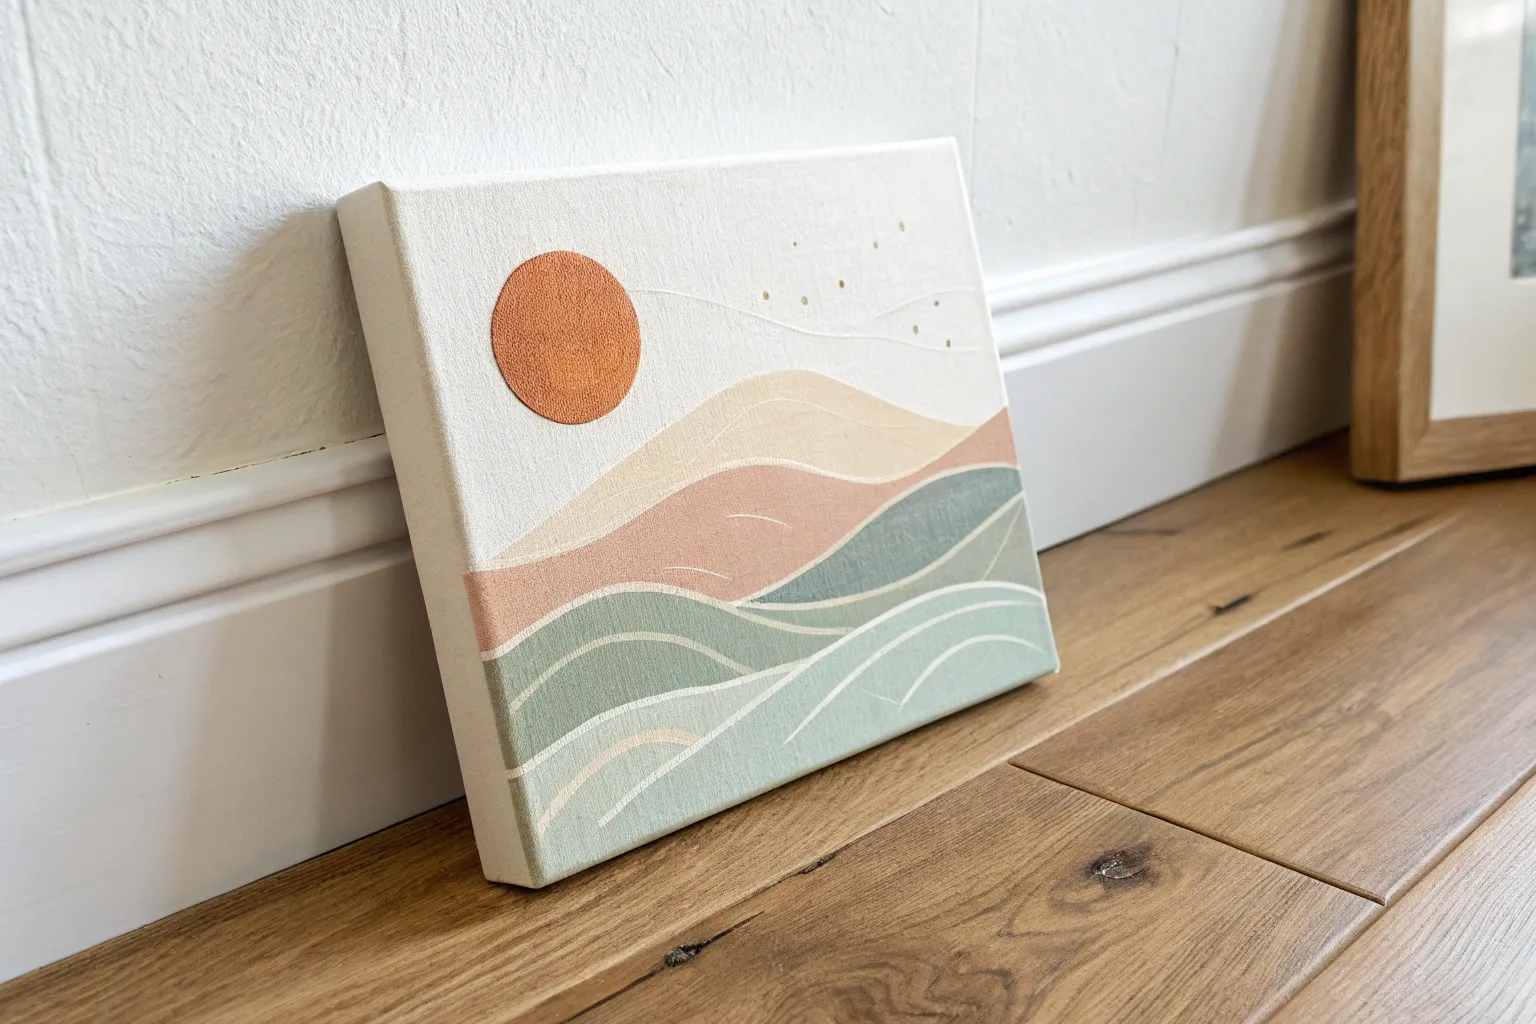
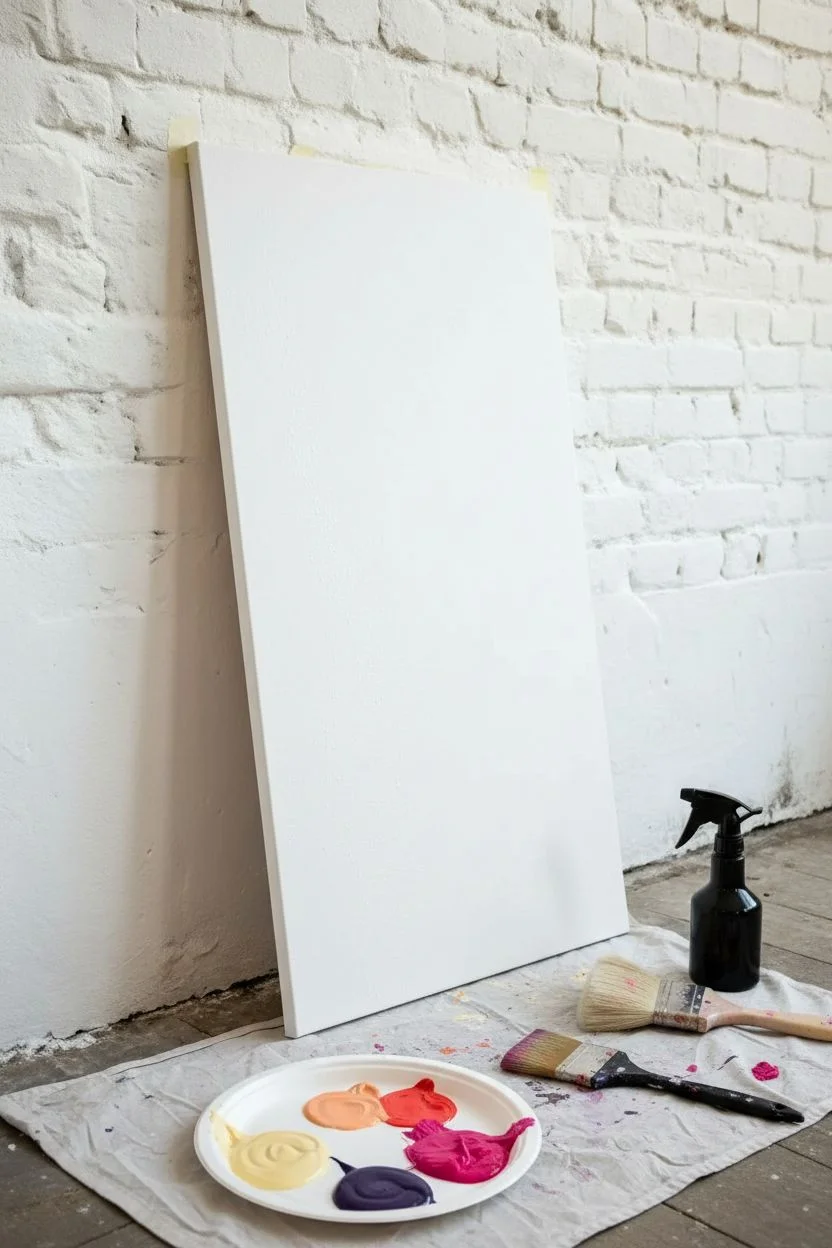
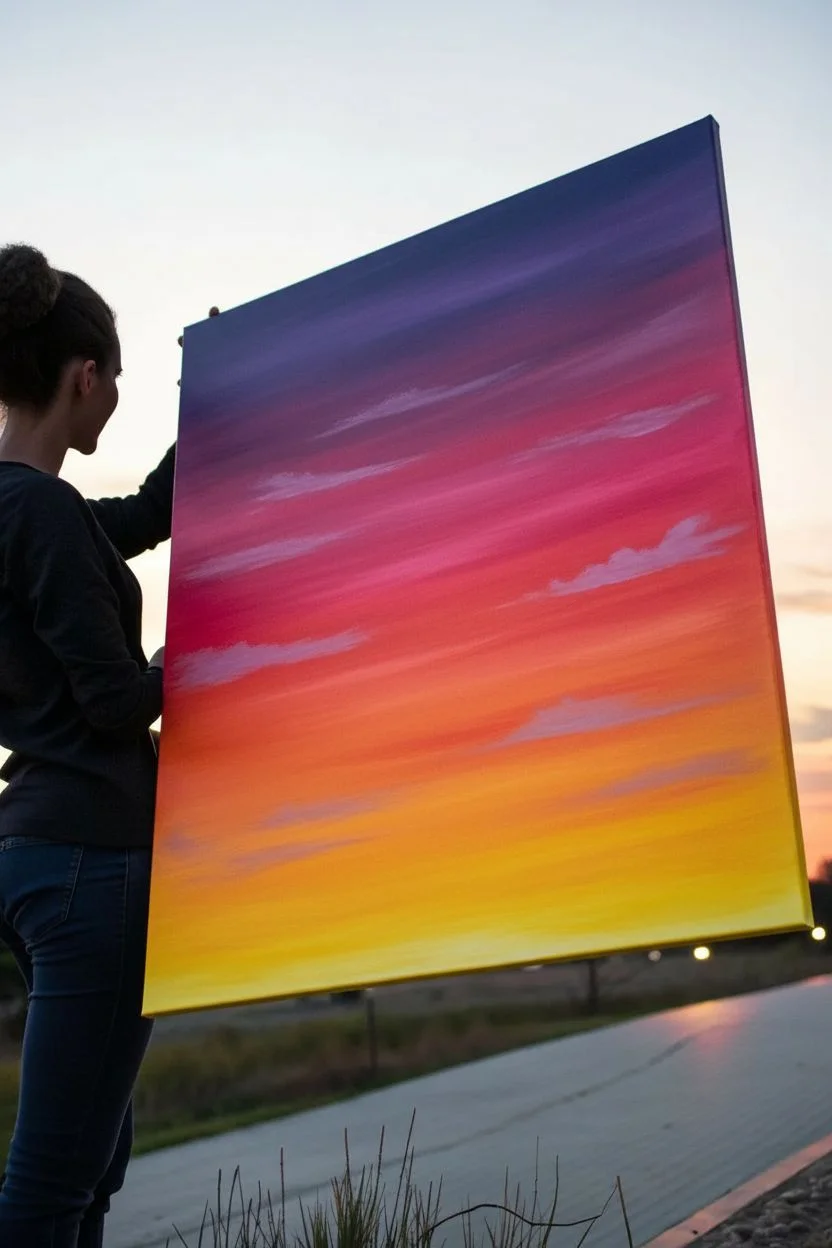
Easy Ombre Sunset Gradient Background
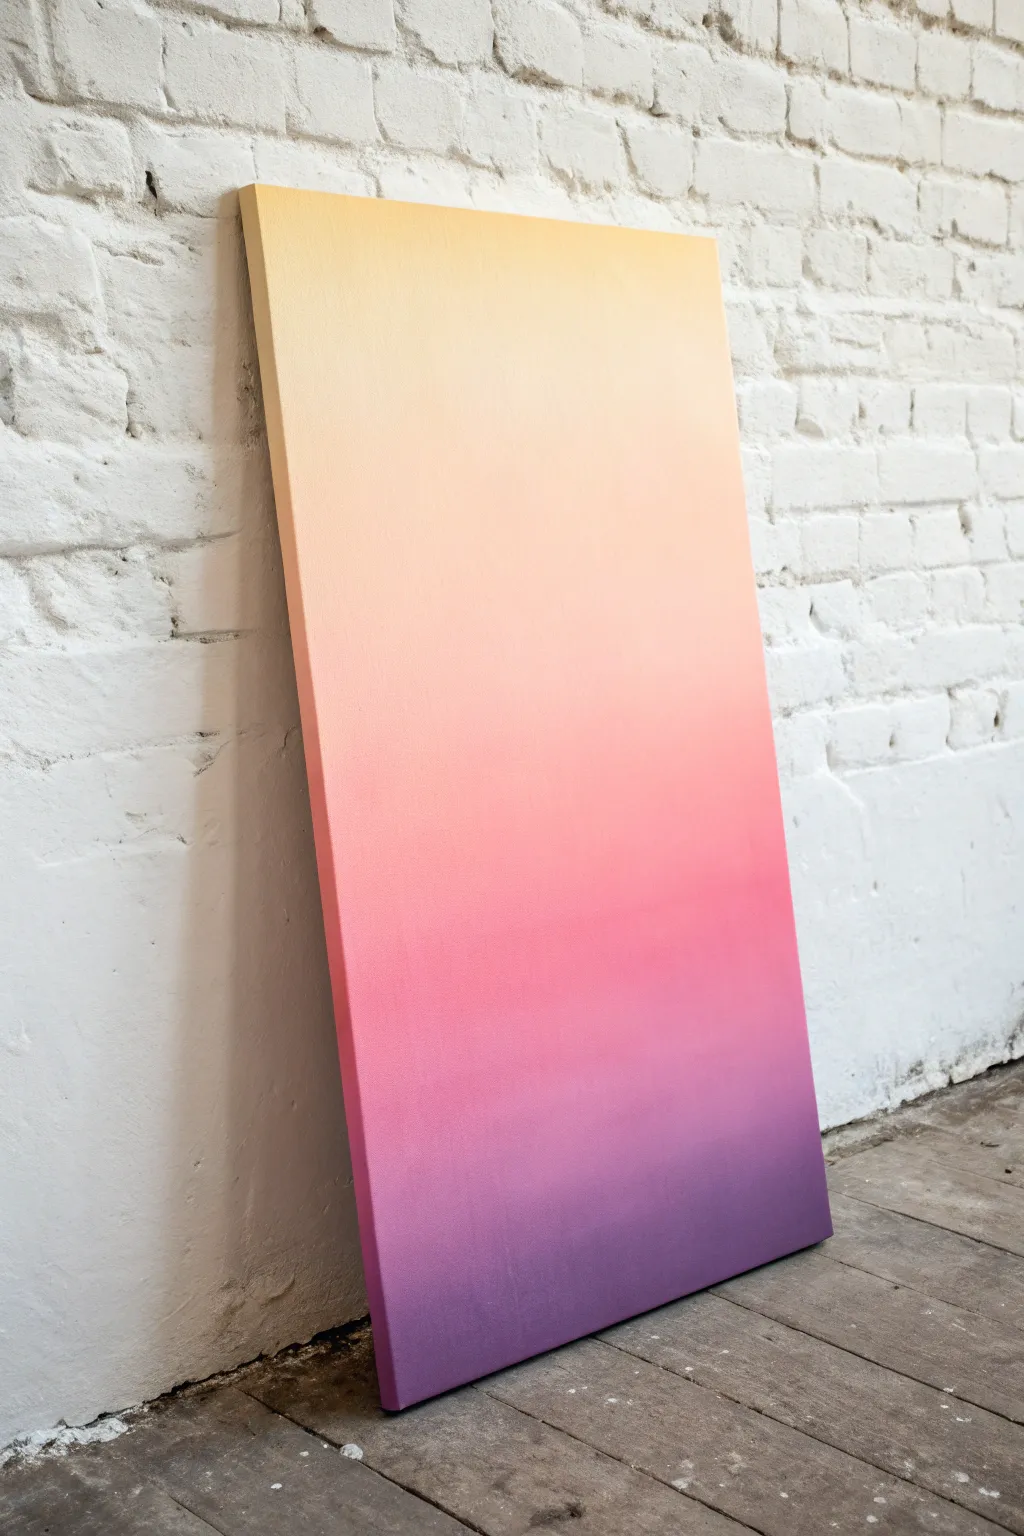
Capture the serene beauty of twilight with this large-scale gradient painting. This project transforms a simple canvas into a stunning statement piece featuring a seamless transition from warm golden yellow to deep, moody violet.
Step-by-Step Guide
Materials
- Large stretched canvas (24×36 inches or larger)
- Acrylic paints (primary yellow, white, magenta, violet, dark purple)
- Large flat paintbrush (2-3 inch width)
- Wide blending brush or soft synthetic brush
- Spray bottle with water (fine mist)
- Palette or disposable plates
- Painters tape (optional for edges)
- Drop cloth or old newspapers
Step 1: Preparation & Base Colors
-
Prepare your workspace:
Lay down a drop cloth in a well-ventilated area. If you want clean white edges, apply painter’s tape to the sides of the canvas now. -
Prime the canvas:
Even if your canvas is pre-primed, apply a coat of white acrylic paint (Titanium White) across the entire surface. This ensures your colors will pop and glide more smoothly. -
Mix your palette:
Squeeze out generous amounts of your four main colors: pale yellow (mix yellow with plenty of white), peach (yellow mixed with a dot of magenta), pink/magenta, and dark violet. You’ll need more paint than you think for blending. -
Mist the canvas:
Before applying color, lightly spritz the white base layer with water. A damp surface extends the drying time of acrylics, which is crucial for achieving that buttery smooth gradient.
Keep It Wet
Acrylics dry fast. Keep a spray bottle handy and mist the canvas lightly every few minutes to keep the paint workable for blending.
Step 2: Applying the Gradient
-
Apply the yellow top:
Start at the very top of the canvas. Load your large flat brush with the pale yellow mixture and paint broad, horizontal strokes across the top quarter. -
Add the peach section:
Clean your brush quickly or grab a second one. Apply a band of the peach color directly below the yellow, slightly overlapping the wet yellow paint. -
Initial blending (Yellow/Peach):
While both bands are still wet, use a clean, dry blending brush to gently sweep back and forth where the colors meet. Use long, horizontal strokes to blur the line. -
Apply the pink mid-tone:
Paint a band of magenta or bright pink below the peach section. This should cover the middle portion of the canvas. -
Blend the middle:
Repeat the blending process between the peach and pink sections. If the paint feels tacky or dry, give it a tiny mist of water to re-activate it. -
Lay the foundation for purple:
At the bottom third, apply your pure violet or purple paint. Make this section quite dark to anchor the artwork. -
Blend pink into purple:
Use your blending brush to marry the pink and purple sections. I prefer to brush upward slightly from the dark into the light to create a richer transition. -
Deepen the base:
For the very bottom edge, mix a tiny bit of black or dark blue into your violet to create a profound shadow color and paint the bottom 2 inches.
Add Texture
Once dry, splatter tiny white stars across the top corner or paint silhouetted black palm trees at the bottom for a tropical vibe.
Step 3: Refining the Transition
-
Assess the fade:
Step back five feet. Look for any harsh lines or patches where the canvas texture shows through too much. -
Apply a second layer (Top):
The first layer often dries semi-transparent. Repeat the yellow and peach application at the top to increase opacity. -
Re-blend the upper transition:
Carefully re-blend the yellow into the peach. A soft, dry brush is your best friend here—keep wiping it off on a rag to strip excess paint. -
Enhance the pink and purple:
Apply a second coat to the lower half. The darker colors tend to cover better, so you might just need to smooth out brushstrokes. -
Final dry blending:
With an extremely soft, dry brush, lightly whisk horizontally across the entire canvas one last time to soften the whole look. -
Paint the edges:
If you didn’t tape the sides, use the leftover paint from each section to extend the colors around the sides of the canvas for a gallery-wrap look. -
Let it cure:
Allow the painting to dry flat for at least 24 hours before hanging or leaning it against a wall.
Now you have a serene slice of sunset to bring warmth into your room


Silhouette Painting Over a Colorful Sky
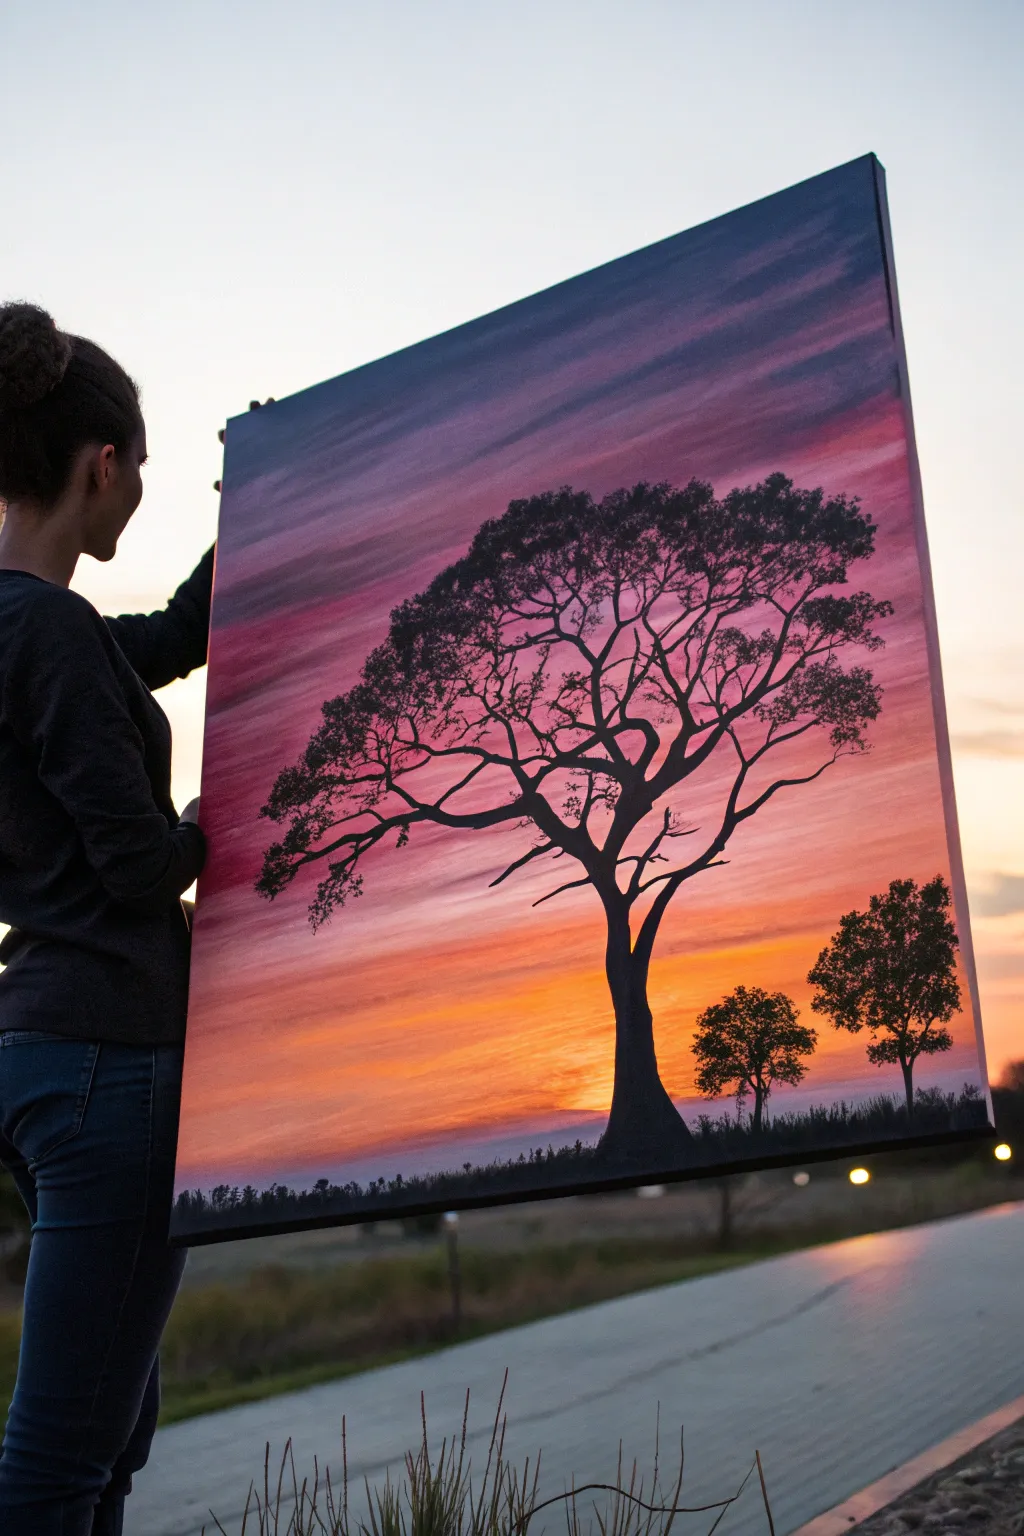
Capture the serene beauty of twilight with this striking large-scale canvas project. By blending a vibrant gradient sky behind a stark black tree silhouette, you can create a high-contrast statement piece that looks incredibly professional yet is surprisingly beginner-friendly.
Step-by-Step
Materials
- Large stretched canvas (24×36 inches or similar)
- Acrylic paints: Titanium White, Cadmium Yellow, Orange, Magenta or Alizarin Crimson, Violet/Purple, Mars Black
- Large flat paintbrush (2-3 inch) for blending
- Medium round brush
- Small liner brush or rigger brush for fine details
- Palette or paper plate
- Cup of water
- Paper towels
- Easel (optional but helpful for large canvases)
Step 1: Painting the Gradient Sky
-
Prepare the Horizon Line:
Decide where your horizon will be. For this composition, place it quite low—about 1/6th of the way up from the bottom edge. Mark this lightly with a pencil if needed, or just mentally note it. -
Start with the Lightest Color:
Load your large flat brush with Cadmium Yellow and a touch of Titanium White. Paint horizontal strokes starting just above your horizon line. The white helps the yellow be opaque and bright, simulating the glowing sun just below the horizon. -
Add Orange Tones:
Without cleaning your brush thoroughly (just wipe off excess), pick up some Orange paint. Apply this directly above the yellow section, using long, smooth horizontal strokes. -
Blend the Transition:
At the meeting point of the yellow and orange, gently sweep your brush back and forth. The paints should still be wet, allowing them to mix on the canvas creating a smooth, fiery transition. -
Introduce Pink and Magenta:
Move higher up the canvas with Magenta or Crimson. Start painting a few inches above the orange section. Work your way down to the orange, blending carefully where they meet. If the colors get muddy, wipe your brush clean before blending the seam. -
Paint the Upper Sky:
For the top third of the canvas, use your Violet or dark Purple. Apply this boldly to the top edge and blend it downwards into the magenta. This creates that deep evening twilight effect. -
Add Cloud Textures:
While the sky is still slightly tacky, mix a little purple with white to make a soft lavender. Use the corner of your brush to streak in wispy, horizontal cloud formations across the purple and pink sections to add movement to the sky. -
Let it Dry:
Allow the entire background to dry completely. This is crucial; if the sky is wet, your black silhouette paint will smear and turn muddy.
Step 2: Creating the Silhouette
-
Paint the Ground:
Using Mars Black and your medium brush, paint the strip of land at the very bottom. Make the top edge of the grass slightly uneven and organic, rather than a perfect straight line. -
Outline the Main Trunk:
Visualize where your main tree will stand. Using the medium round brush and black paint, start from the ground and pull a thick stroke upwards, slightly off-center. Taper it slightly as you go higher. -
Create the Primary Branches:
From the top of your trunk, split the tree into 3-4 main heavy branches. I like to make these wiggle and twist slightly rather than drawing straight sticks—nature is rarely perfectly straight. -
Add Secondary Branches:
Switch to a smaller brush. Branch off from your main limbs, reaching out towards the sides of the canvas. Think of the letter ‘Y’ as you split one branch into two smaller ones. -
Paint the Fine Twigs:
Using your liner brush or the very tip of a small round brush, add the delicate, thinnest twigs at the outer edges of the canopy. Use a light hand here; ink-consistency paint (black mixed with a drop of water) flows better for these fine lines. -
Fill in the Canopy Shape:
Step back and look at the overall shape. Add small clusters of tiny branches or even stippled black dots to suggest dense areas of twigs or lingering leaves, giving the tree a full, rounded silhouette against the pink sky. -
Add Distant Trees:
On the right side or background, paint smaller, simpler tree shapes. These should be much shorter than your hero tree to create a sense of depth and perspective. -
Detail the Foreground:
Finally, use your liner brush to flick tiny, upward strokes along the black horizon line. This creates the look of tall grass or weeds growing around the base of the trees.
Wet-on-Wet Blending
Work quickly on the sky! Acrylics dry fast. If the paint drags, mist the canvas lightly with water to keep the colors fluid for smoother gradients.
Add Some Sparkle
Once fully dry, flick a toothbrush loaded with watered-down white paint over the darker top section to create faint evening stars.
Hang your new artwork on a well-lit wall to let those sunset colors truly glow


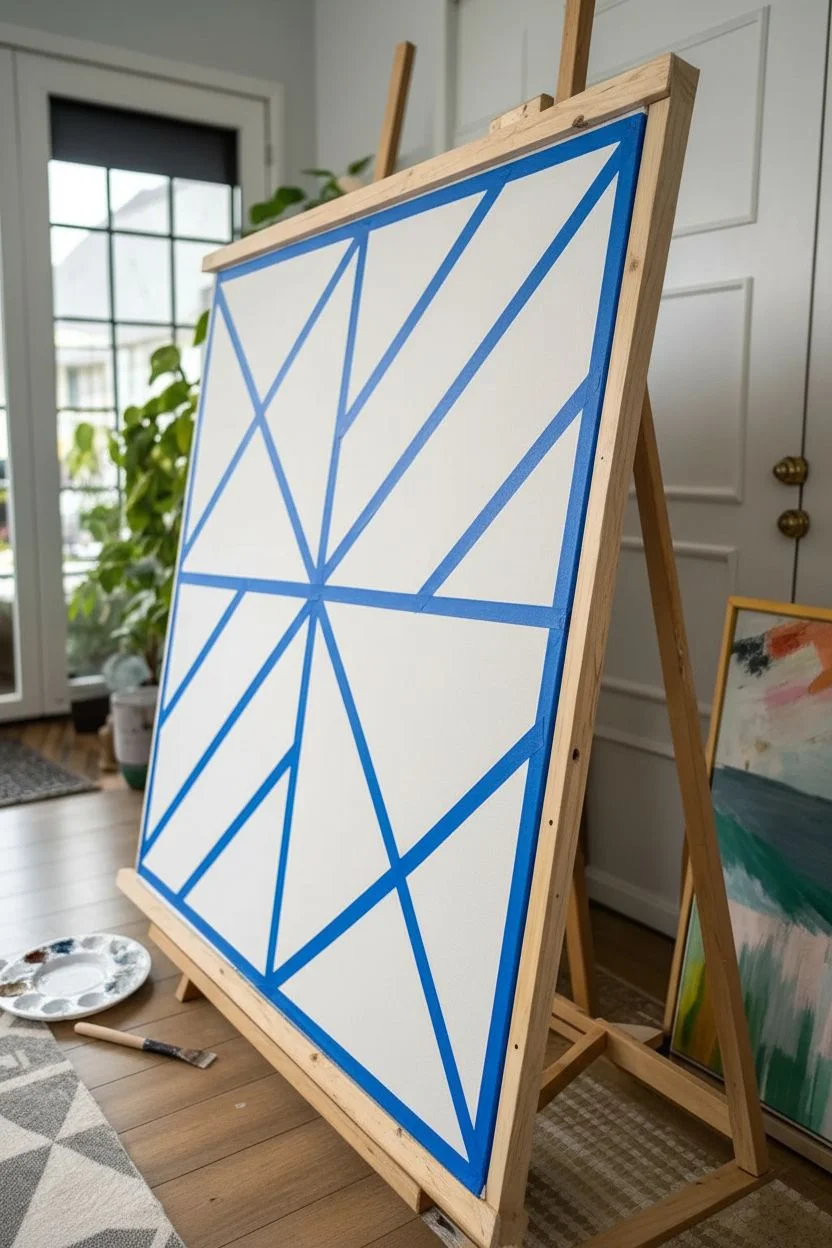
Tape-Resist Geometric Pattern Art
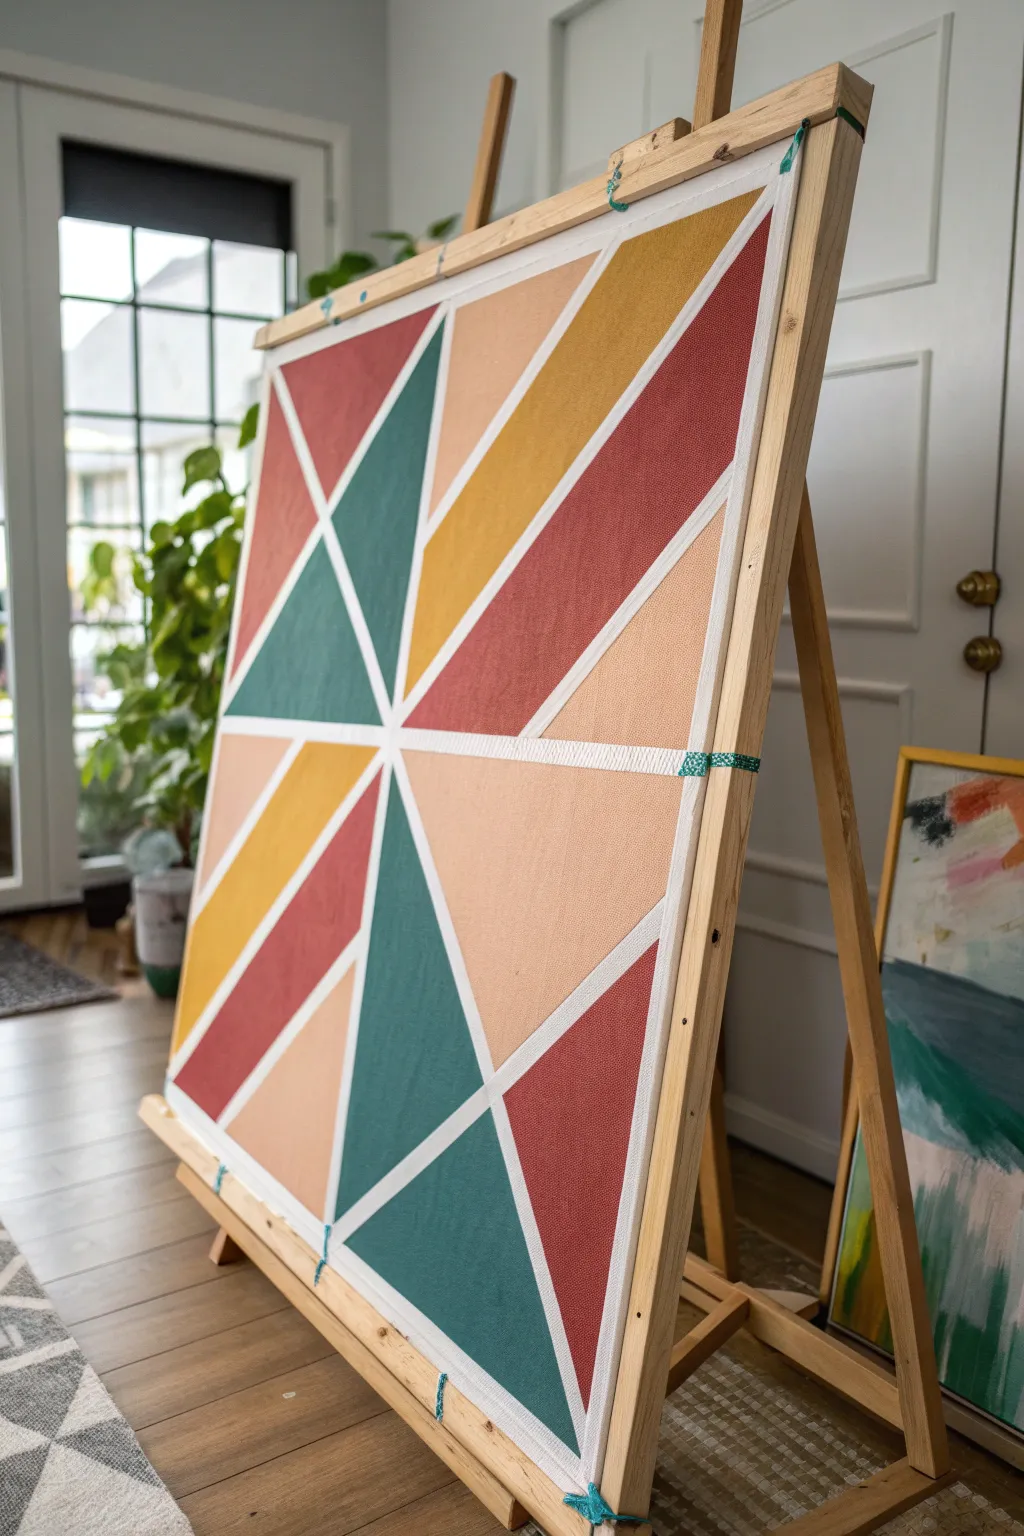
Transform a blank canvas into a stunning modern art piece with crisp lines and warm, inviting tones. This geometric tape-resist method creates a dynamic, starburst-like pattern that looks incredibly professional but is surprisingly simple to achieve.
Step-by-Step Guide
Materials
- Large square canvas (approx. 36×36 inches or similar)
- White acrylic paint (for base coat and touch-ups)
- Acrylic paints in: Teal Green, Mustard Yellow, Rusty Red, Peach/Light Salmon
- Painters tape (0.5 inch width)
- Wide flat paintbrush (2-3 inches)
- Medium flat paintbrush (1 inch)
- Credit card or burnishing tool
- Paint palette or disposable plates
- Drop cloth or easel
Step 1: Preparation & Taping
-
Prime the Surface:
Begin by painting your entire canvas with a solid coat of white acrylic paint. This ensures the background lines revealed later will be bright and clean. -
Establish the Center:
Locate the approximate center of your canvas. You don’t need to measure perfectly; a visual estimate works well for this organic geometric style. -
Create the Primary Divider:
Place a striking horizontal line of tape across the middle of the canvas to split the composition into top and bottom halves. -
Radiate the Lines:
Starting from your central point, apply long strips of painter’s tape extending outward to the edges of the canvas. Imagine a burst of light or a shattered mirror. -
Subdivide the Shapes:
Within the large triangular sections you’ve created, add diagonal tape lines to break them down into smaller triangles and quadrilaterals. -
Asymmetry is Key:
Design the layout so that one side isn’t a perfect mirror of the other. For instance, create a dense cluster of shapes in the top right and broader shapes in the bottom left. -
Secure the Seal:
Firmly run a credit card or burnishing tool along every strip of tape. This is crucial to prevent paint from bleeding underneath. -
The White Seal Trick:
Paint a thin layer of white paint *over* the edges of all your tape. This seals the tape edge with the background color, ensuring your colored lines will be razor-sharp later.
Step 2: Painting & Reveal
-
Plan Your Palette:
Squeeze out your four accent colors: Teal Green, Mustard Yellow, Rusty Red, and Peach. Keep them separate on your palette. -
Assign Colors:
Mentally map out which shapes will be which color. Try to avoid having two of the same color shapes touching each other directly. -
Apply the Teal:
Start with your darkest color. Fill in several triangles with the Teal Green, ensuring good coverage. I like to focus these on opposite corners to balance the visual weight. -
Add Warmth with Rust:
Paint selected sections with the Rusty Red. Allow the brush strokes to follow the direction of the shape for a cleaner look. -
Brighten with Mustard:
Fill in the next set of shapes with Mustard Yellow. This color often needs two coats to be fully opaque, so be patient. -
Soften with Peach:
Paint the remaining shapes with the Peach/Light Salmon hue. This lighter color acts as a neutral that ties the bolder colors together. -
Second Coat Check:
Inspect all painted areas. If potential canvas texture is showing through, apply a second coat to ensure solid, bold blocks of color. -
Wait for Dryness:
Allow the painting to dry until it is tacky but not fully cured—usually about 20-30 minutes depending on paint thickness. -
The Grand Reveal:
Slowly and carefully peel off the tape at a 45-degree angle. Pulling while the paint is slightly tacky prevents it from chipping. -
Final Touch-ups:
If any paint managed to sneak under the tape, use a tiny brush and white paint to correct the lines.
Bleeding Lines?
If edges look fuzzy, use a small angled brush and white paint to ‘cut in’ and tidy the lines. A steady hand fixes most mistakes quickly.
Add Metallic Flair
For a glam twist, mix gold leaf or metallic gold paint into one of your color sections, or paint the white divider lines gold.
Hang your new geometric statement piece in a well-lit room and enjoy the modern energy it brings to your space
BRUSH GUIDE
The Right Brush for Every Stroke
From clean lines to bold texture — master brush choice, stroke control, and essential techniques.
Explore the Full Guide
Simple Mini Canvas Series (Make Three as a Set)
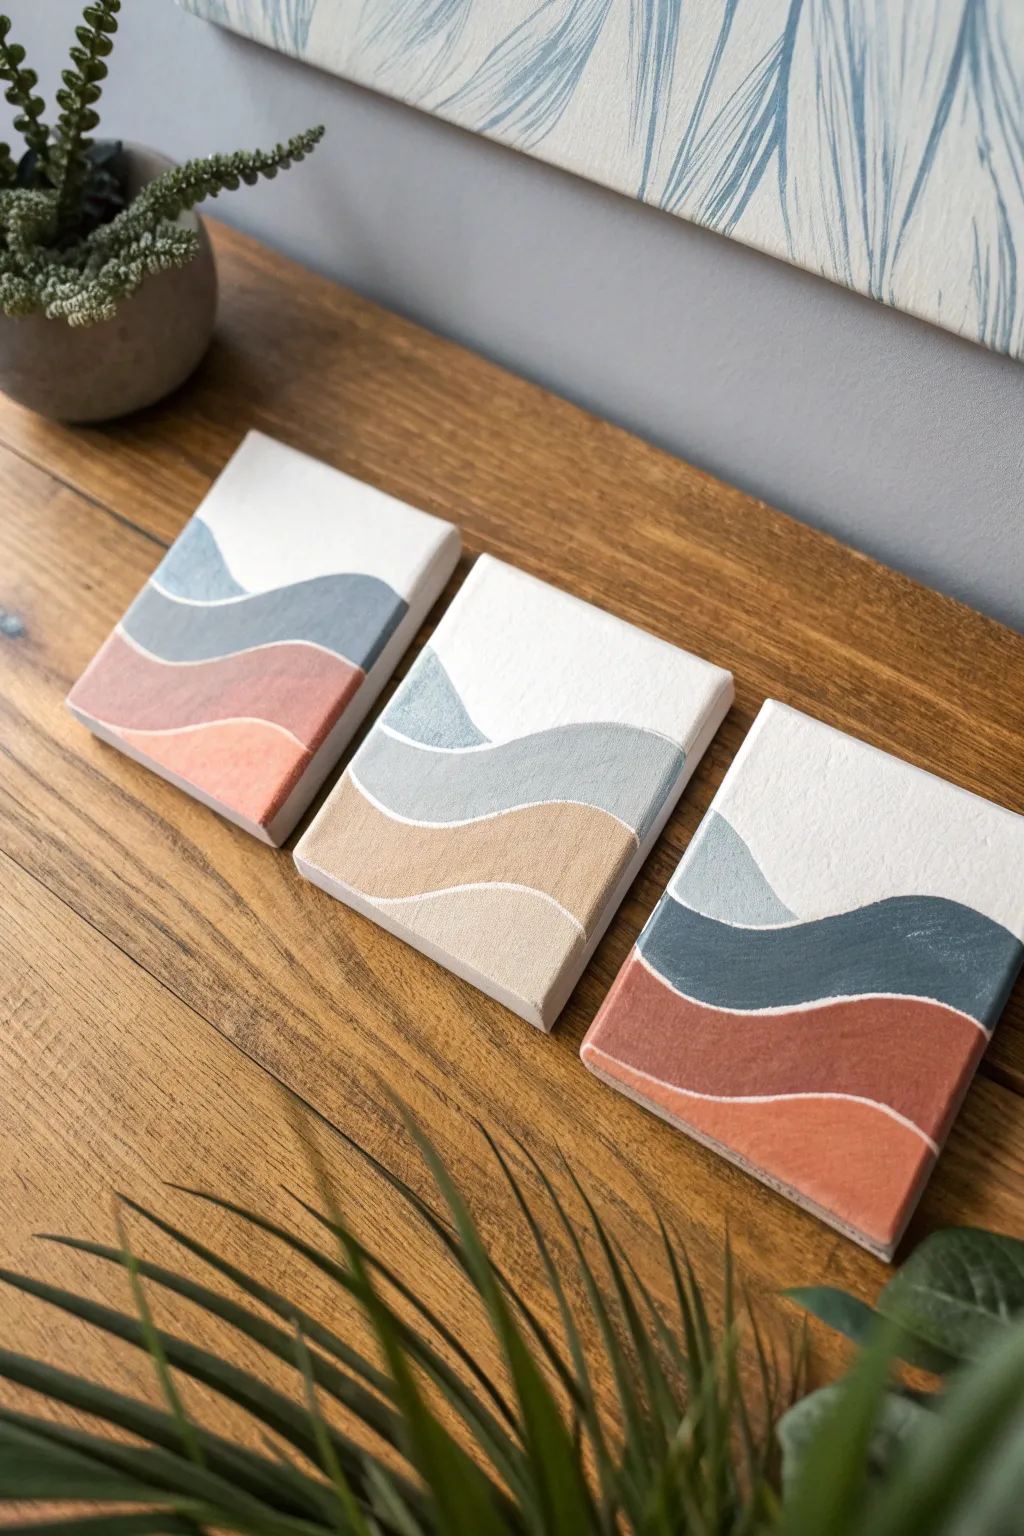
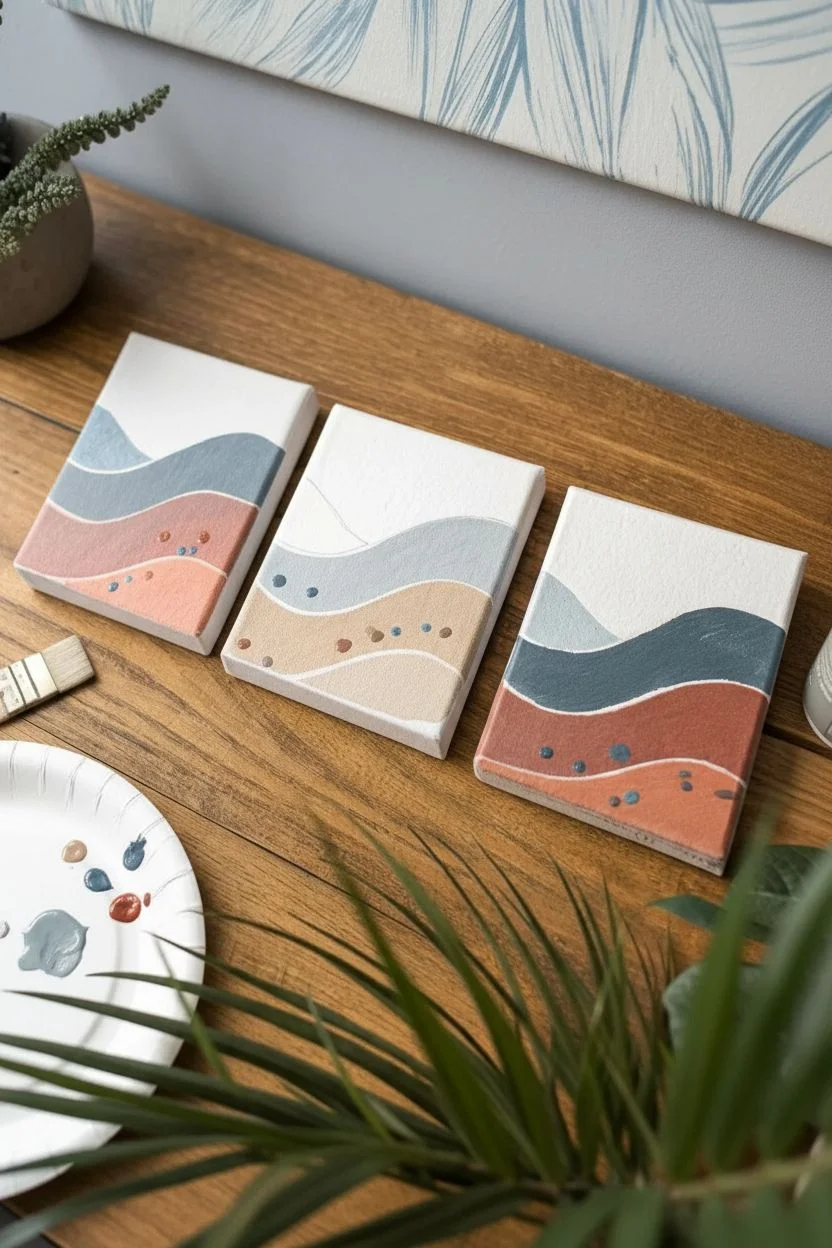
Embrace a minimalist, boho aesthetic with this set of three complementing mini canvases. Using soft earth tones and flowing wave patterns separated by crisp white lines, you can create a cohesive gallery wall moment on a small scale.
How-To Guide
Materials
- 3 mini stretched canvases (approx. 4×6 or 5×7 inches)
- Acrylic craft paints (white, slate blue, rust/terracotta, beige, sage green)
- Small flat synthetic paintbrush
- Very fine liner brush (strictly for touch-ups)
- White paint pen (medium or fine tip)
- Pencil
- Palette or paper plate
- Cup of water and paper towels
Step 1: Planning and Sketching
-
Pre-mix your palette:
Before bringing a brush to the canvas, prepare your colors. You’ll need four distinct shades: a deep slate blue, a warm rust or terracotta, a sandy beige, and a muted sage-grey. Mix white into your base colors if they seem too vibrant; you want a soft, matte earth-tone look. -
Arrange the canvases:
Lay your three mini canvases side-by-side on your workspace in the order you plan to display them. This ensures the wave patterns will visually flow or complement each other across the gap. -
Sketch the curves:
Using a pencil very lightly, draw three wavy horizontal lines across each canvas. Vary the height of the waves—some should dip low while others crest high. Leave a significant portion of the top blank for negative space. -
Plan the color block:
Decide which color goes into which ‘wave’ section. Notice in the example image how the colors rotate positions so no two canvases look identical, but they all share the same palette. I find it helpful to put a tiny dot of paint in each section as a reminder.
Unsteady Hand?
If you struggle with freehand curves, try cutting a wave shape out of cardstock to use as a stencil for your pencil sketching, or use flexible curvy masking tape.
Step 2: Painting the Color Blocks
-
Paint the bottom section:
Start with the bottom-most wave on your first canvas. Using your flat brush, fill in the shape with smooth, horizontal strokes. Don’t worry about being perfectly precise at the top edge just yet. -
Paint the sides:
Don’t forget to wrap the color around the sides of the canvas! Extending the painting to the edges gives the artwork a finished, professional look without needing a frame. -
Fill the middle and upper waves:
Rinse your brush thoroughly and move to the next color section. Paint the middle and upper waves. Leave a small gap (about 1-2mm) between the colors where the pencil lines are. -
Paint the negative space:
For the topmost section, paint it pure titanium white. Even if your canvas is already white, painting it ensures the texture and sheen match the colored sections. -
Repeat for all canvases:
Work through the other two canvases, applying your color rotation. Aim for opaque coverage; if the paint looks streaky, let it dry completely and apply a second coat.
Level Up: Texture
Mix a teaspoon of baking soda into your acrylic paints before applying. This creates a grainy, terracotta-like texture that adds incredible depth to simple shapes.
Step 3: Adding the Definition
-
Let it dry completely:
This is crucial. The paint must be 100% dry to the touch before the next step. If it’s tacky, the paint pen will drag and ruin the texture. -
Prepare the paint pen:
Shake your white paint pen well and press the nib on a scrap piece of paper until the ink flows smoothly. -
Draw the dividing lines:
Carefully trace the gaps between your color blocks with the white paint pen. The line should be consistent in thickness. If you didn’t leave a gap earlier, simply draw right over the dried paint. -
Refine the edges:
Use the paint pen to sharpen the upper edge of the top color wave where it meets the white sky, ensuring a crisp, clean curve. -
Touch ups:
If the white line looks a bit shaky, you can go back in with the original color and a very fine liner brush to neaten the edge against the white line.
Step 4: Finishing
-
Check the sides again:
Ensure the white dividing lines also wrap around the sides of the canvas to meet the back edge. -
Seal the work (optional):
If you want to protect the finish, apply a coat of matte spray varnish once the paint and pen lines are fully cured. A matte finish preserves that nice, chalky boho look.
Arrange your trio on a shelf or hang them vertically for a calm, modern accent in any room
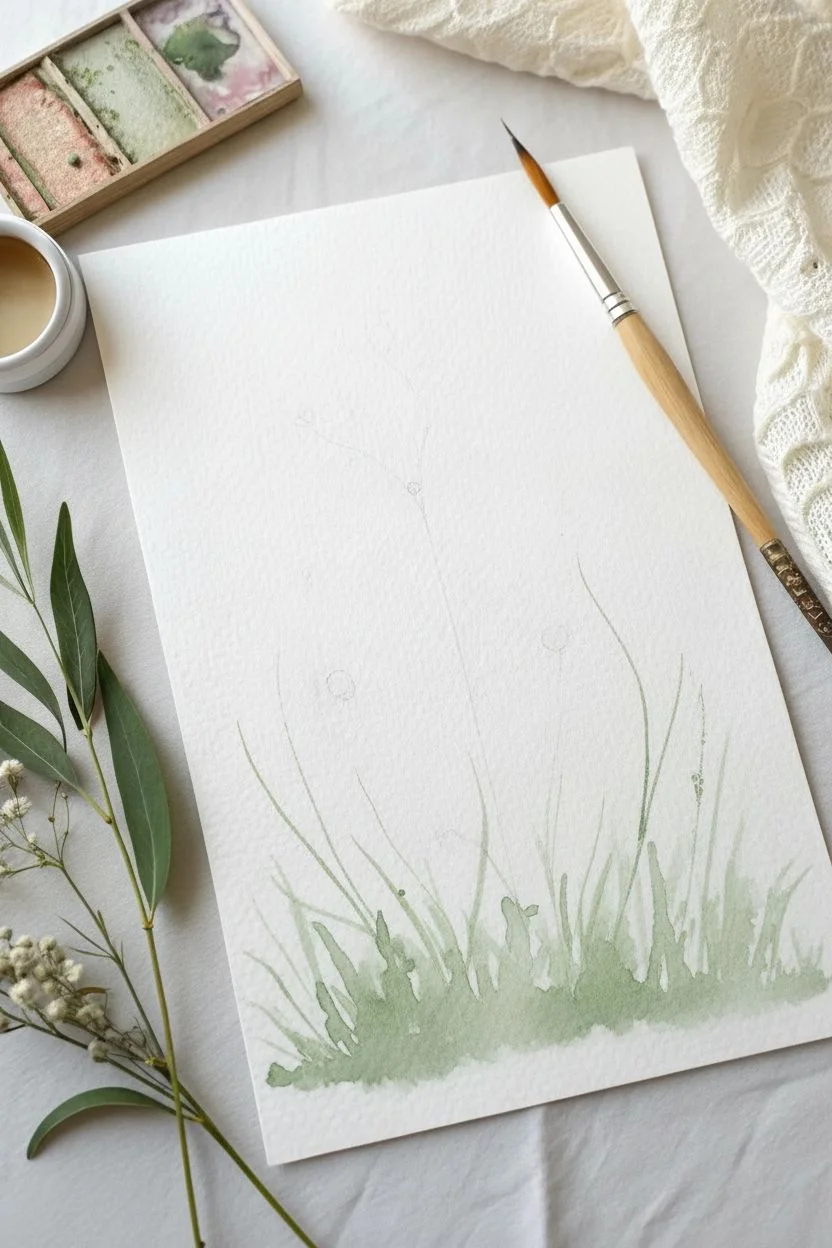
Dabbed Wildflower Field With a Limited Palette
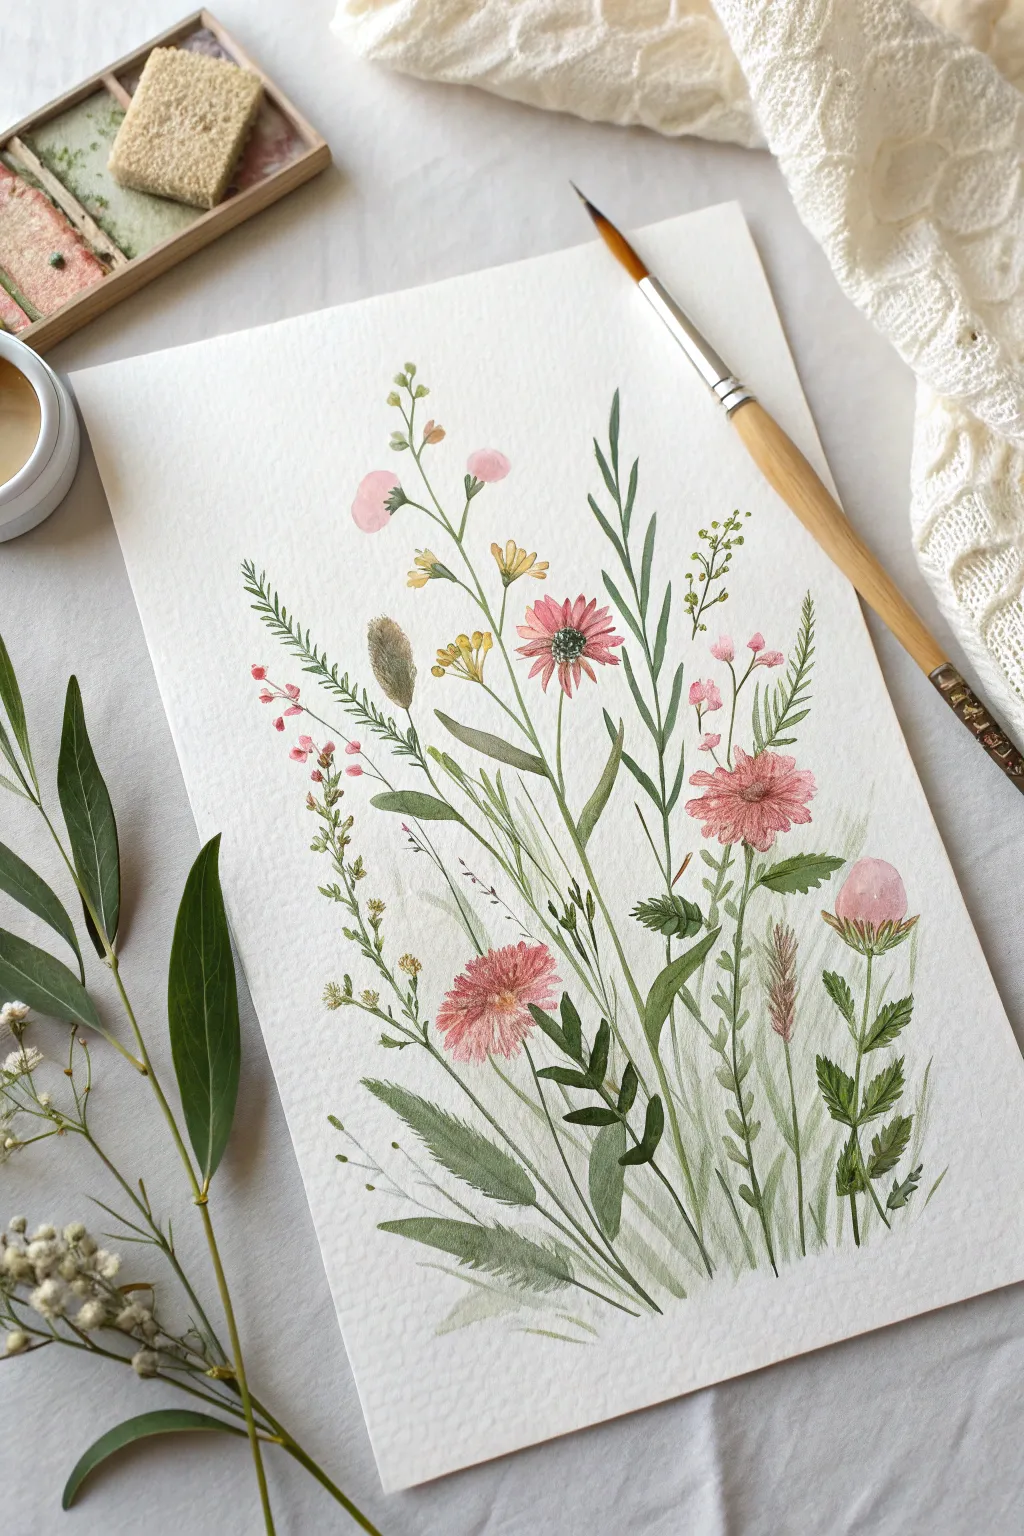
Capture the ethereal beauty of a summer meadow with this botanical watercolor study. Using fine brushwork and a soft, limited palette, you’ll build layers of translucent stems and blossoms to create a composition that feels both organic and curated.
Detailed Instructions
Materials
- Cold press watercolor paper (300 gsm recommended)
- Round watercolor brushes (Size 0 or 1 for details, Size 4 or 6 for washes)
- Watercolor paints (Sap Green, Olive Green, Alizarin Crimson, Yellow Ochre, Burnt Sienna, Payne’s Grey)
- Two jars of water
- Paper towels
- Pencil (HB or H) and kneaded eraser
- Palette or white ceramic plate
Step 1: Planning and Base Layers
-
Light Sketching:
Begin with a very faint pencil sketch to map out your composition. Draw a few sweeping vertical curves to indicate the main stems and mark small circles where the primary flower heads will sit. Keep the lines barely visible so they won’t show through the transparent paint. -
Mixing Greens:
Prepare a variety of greens on your palette. Mix Sap Green with a touch of Yellow Ochre for a warm, sunny grass color, and Sap Green with a tiny bit of Alizarin Crimson or Payne’s Grey for a deeper, shadowy foliage tone. -
Anchoring Grasses:
Load a size 4 brush with a diluted wash of your cooler green. Start at the bottom third of the paper and sweep upward with quick, flicking motions to create a bed of soft background grasses. Let the edges fade out naturally. -
Adding Texture:
While the grass layer is still slightly damp, drop in a few touches of darker green at the very bottom base. This wet-on-wet technique adds instant depth without creating harsh lines.
Step 2: Painting the Flowers
-
Pink Cosmos Petals:
Mix a watery Alizarin Crimson to get a soft pink. For the main daisy-like flowers (cosmos or coneflowers), paint the petals radiating from the center. Keep the paint fluid and let the white of the paper show through for highlights. -
Deepening the Centers:
Once the pink petals are semi-dry, use a thicker mixture of Burnt Sienna or dark red for the flower centers. Dab the tip of your brush to create a stippled texture that mimics pollen. -
Yellow Buttons:
Using Yellow Ochre, paint the small button-like flowers higher up on the stems. These are simple shapes; just dab the brush to create small clusters or singular buds. -
Budding Blooms:
For the pink buds near the top, paint small oval shapes. Add a tiny connecting green sepal loosely at the base of each pink oval while the paint is still wet to encourage a soft bleed.
Muddy Greens?
If your greens look dull, stop mixing too many colors. Clean your water jar frequently! A fresh yellow mixed with blue creates a much brighter green than reusing dirty water.
Step 3: Stems and Foliage
-
Main Stems:
Switch to your fine liner or size 0 brush. Using your mixed greens, connect the floating flower heads to the base grasses with long, confident strokes. Vary the pressure—press down for thickness and lift off for thin, delicate lines. -
Lance-Shaped Leaves:
Add longer, broader leaves near the bottom. Press the belly of a size 4 or 6 brush against the paper and drag it upwards, lifting at the end to create a tapered point. -
Fern-like Details:
For the delicate fern-like foliage on the sides, use the tip of your smallest brush. Paint a central thin stem, then add tiny, short strokes branching off symmetrically on either side. -
Adding Variety:
Intersperse different leaf shapes. Try painting some leaves that are folded or twisting by using two shades of green—one for the light-hitting side and a darker mix for the shadowed underside.
Botanical Frame
Create a vintage scientific illustration look by penciling a faint rectangular border around the flowers before painting, letting some leaves break the ‘frame’ boundary.
Step 4: Refining Details
-
Adding Seed Heads:
Mix a diluted brown-grey using Burnt Sienna and Payne’s Grey. Paint fuzzy seed heads or dried grasses by dragging a dry brush (one with very little moisture) gently over the paper texture. -
Darkening Intersections:
Go back in with your deepest green mixture. Add tiny shadows where leaves meet stems or where stems cross over one another. I find this small step instantly makes the painting look three-dimensional. -
Veining and Texture:
If you wish, use your finest brush to draw delicate veins on the largest leaves using a slightly darker green than the leaf base color. -
Splatter Effect:
Totally optional, but you can tap a wet brush filled with very diluted green or pink over the painting to add a few organic speckles, simulating pollen or a organic field atmosphere.
Allow your beautiful meadow study to dry completely before erasing any visible pencil lines.

PENCIL GUIDE
Understanding Pencil Grades from H to B
From first sketch to finished drawing — learn pencil grades, line control, and shading techniques.
Explore the Full Guide
Easy Cloud Painting With Soft Dabbing
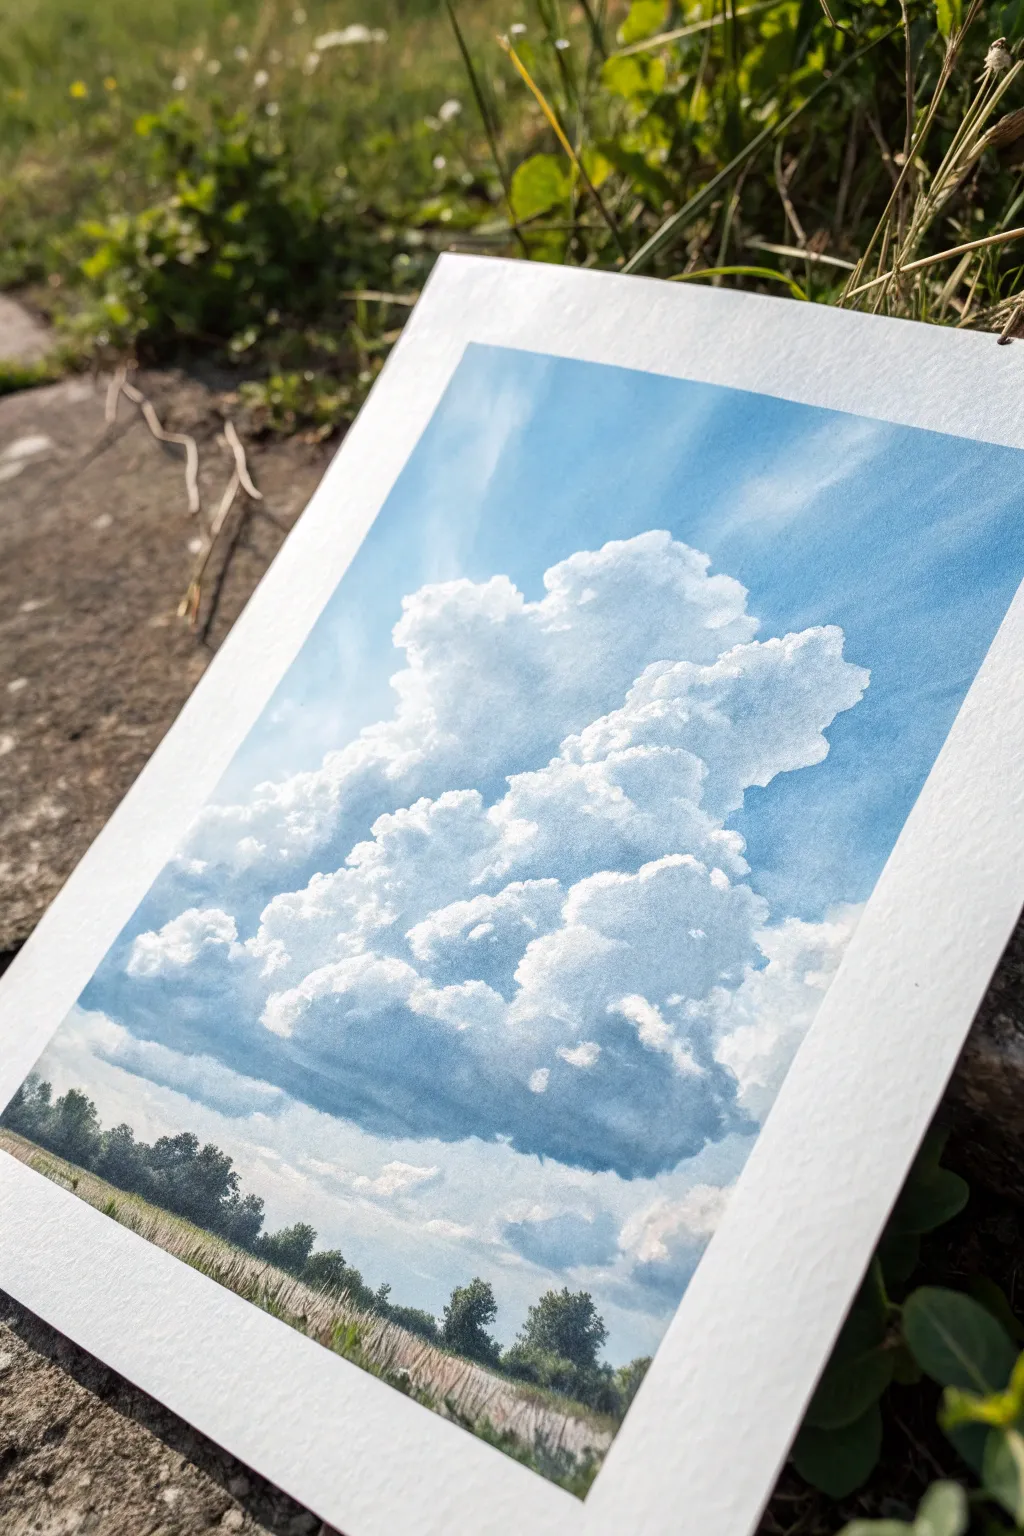
Capture the majestic volume of a summer sky with this soft dabbing technique that builds fluffy, dimensional clouds. This painting focuses on layering whites and blues to create a realistic sense of depth and atmosphere over a simple rural landscape.
Step-by-Step
Materials
- Cold press watercolor paper or heavy mixed media paper
- Painter’s tape or masking tape
- Gouache or acrylic paints (Titanium White, Cerulean Blue, Ultramarine Blue, Sap Green, Burnt Umber, Yellow Ochre)
- Round brushes (sizes 4, 8) and a small flat brush
- A clean sponge or stiff stipple brush for texture
- Mixing palette
- Cup of water and paper towels
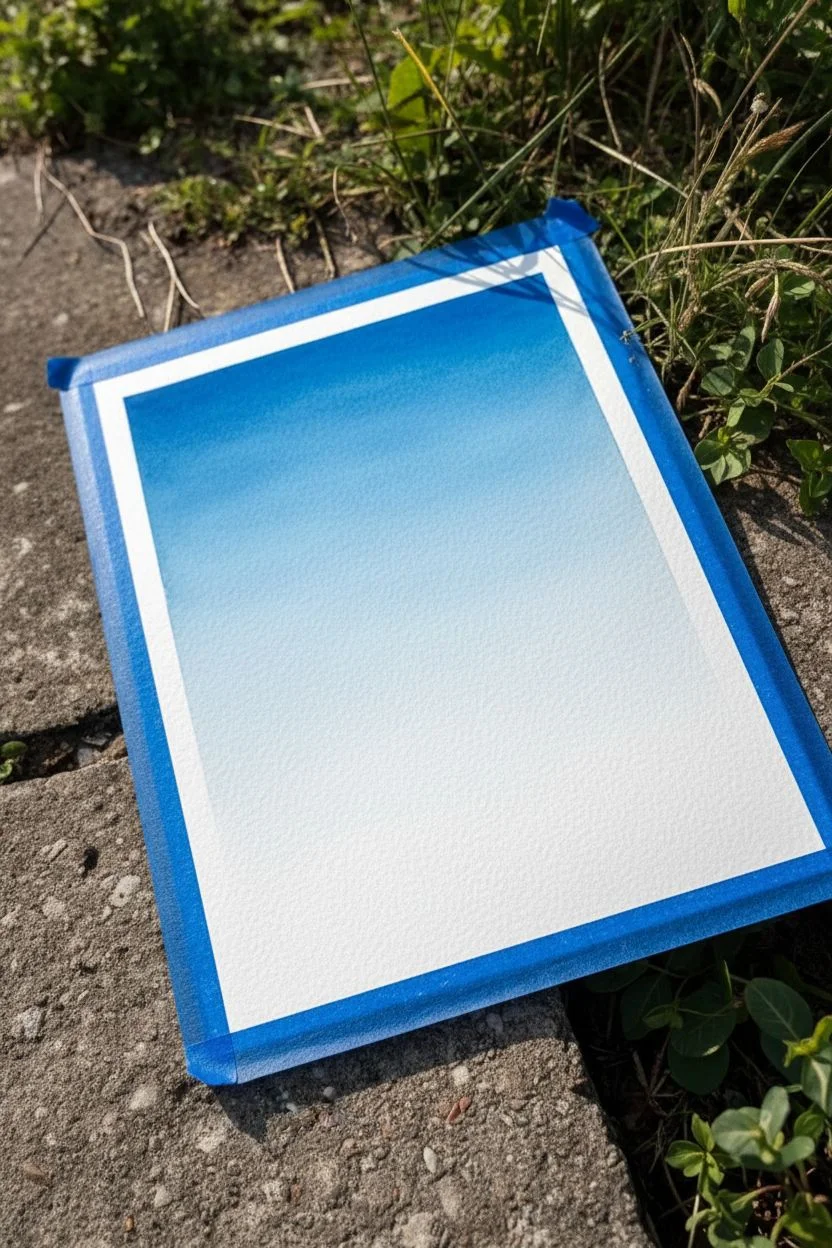
Step 1: Preparation & Sky Base
-
Tape the borders:
Secure your paper to a flat board or table using painter’s tape on all four sides. This creates that crisp white frame shown in the photo and prevents the paper from buckling when wet. -
Mix the sky gradient:
Prepare two shades of blue on your palette. Mix a bright, airy Cerulean Blue with plenty of white for the lower sky, and a deeper Ultramarine Blue for the upper corners. -
Paint the upper sky:
Using a large round brush or flat brush, apply the darker Ultramarine mix to the top of the paper. Use broad, horizontal strokes. -
Fade downwards:
While the top paint is still damp, blend in your lighter Cerulean mix as you move toward the middle of the paper. Stop about two-thirds of the way down, leaving the bottom area blank for the clouds and land.
Cloud Control
If your clouds look too flat or grey, you likely used too much water or not enough white paint. Let it dry completely, then layer thick, pure white on the top edges again.
Step 2: Forming the Cloud Structure
-
Block in the cloud shape:
With a clean brush and pure Titanium White (thick consistency, not too watery), outline the irregular, bubbly tops of your main cumulus grouping against the blue sky. -
Fill the cloud body:
Fill in the large white shape. Don’t worry about shadows yet; just establish the massive, billowing silhouette. I like to twist the brush slightly to create ragged edges rather than smooth lines. -
Create soft edges:
Before the white paint dries completely, use a slightly damp, clean brush to soften the bottom edges of the cloud, dragging the white downwards into the empty lower sky area. -
Mix a shadow color:
Create a soft grey-blue by mixing a tiny dot of Ultramarine and a speck of Burnt Umber into your white paint. It should be subtle, not dark. -
Dab in the shadows:
Apply this shadow mix to the bottom curves of the cloud puffs. Use a dabbing motion to mimic the fluffy texture. Focus these shadows on the undersides of the billows to give them weight.
Step 3: Refining & Landscape
-
Highlight the peaks:
Once the base layer is dry, come back with pure, thick Titanium White. Dab intense highlights on the very tops of the clouds where the sun hits them directly. -
Blend the mid-tones:
Use a dry brush or your finger to gently smudge the transition between the bright white tops and the shadowed bottoms, creating a seamless, puffy look. -
Paint the background horizon:
Mix a pale, hazy blue-grey and paint a faint line of distant hills just below the clouds. Keep this very light to simulate atmospheric perspective. -
Mix dark greens for trees:
Combine Sap Green with a little Burnt Umber or Ultramarine to get a deep, rich forest green. -
Stipple the tree line:
Using a small round brush or a stiff stippling brush, tap in the row of trees along the horizon. Vary the heights to make them look natural and irregular. -
Paint the foreground field:
Mix Yellow Ochre with white and a touch of green for a dried grass color. Paint the bottom strip of the paper with vertical, flickering strokes to suggest tall grass. -
Add foreground details:
Use a fine detail brush to flick a few darker brown lines into the grass for texture, and tap a few darker green bushes near the tree line. -
Reveal the frame:
Wait until the painting is 100% dry to the touch. Slowly peel away the painter’s tape at a 45-degree angle to reveal the clean, professional border.
Golden Hour Glow
For a sunset vibe, tint your white cloud highlights with a tiny amount of pale pink or orange, and glaze the blue sky with a very watery purple wash.
Now you have a serene piece of sky art ready to display or gift, capturing the peaceful feeling of a summer afternoon
Night Sky Galaxy With Splatter Stars
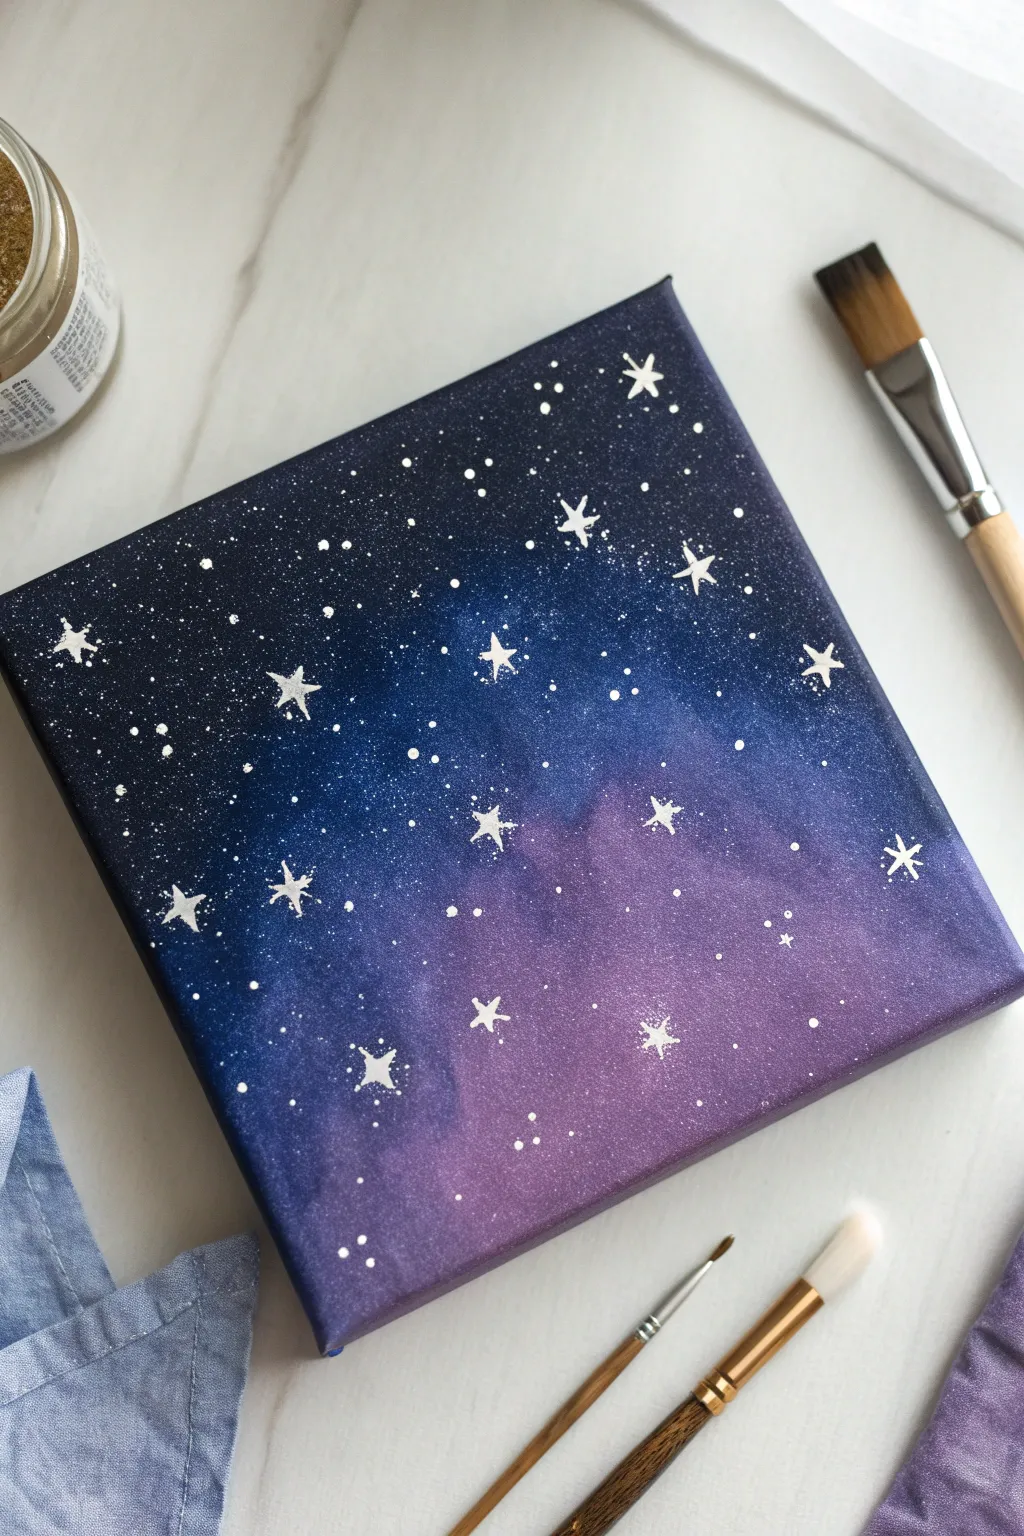
Capture the magic of a starry night with this deep, moody galaxy painting that transitions from midnight blue to soft violet. This beginner-friendly project uses simple blending techniques and satisfying splatter effects to create a cosmic masterpiece.
How-To Guide
Materials
- Small square canvas (e.g., 6×6 or 8×8 inches)
- Acrylic paints: Navy Blue, Black, Purple, Titanium White
- Flat brush (approx. 1 inch)
- Small round detail brush
- Old toothbrush or stiff fan brush (for splattering)
- Water cup and paper towels
- Palette or paper plate
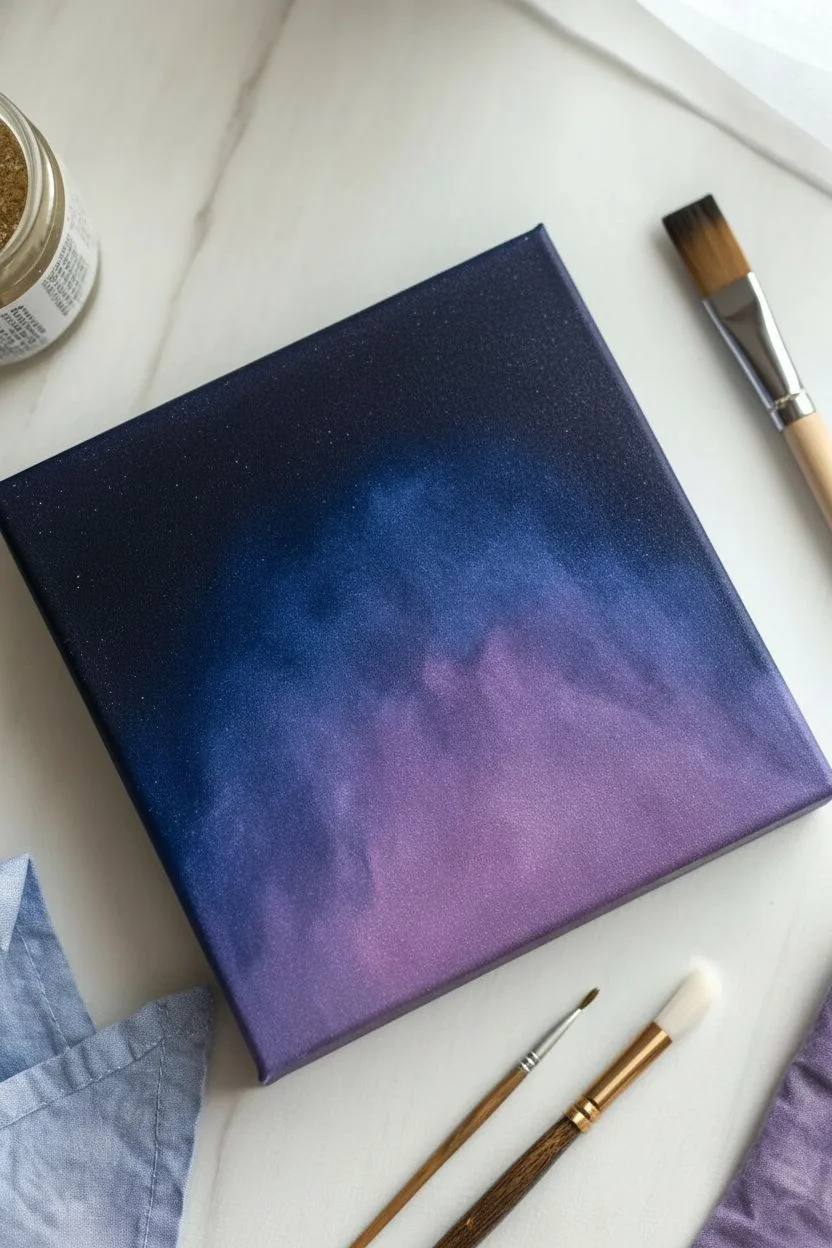
Step 1: Creating the Galaxy Base
-
Prepare the darkest corner:
Start by mixing a small amount of black into your navy blue paint to create a deep, midnight shade. Apply this color to the top-left corner of the canvas, painting in diagonal motion. -
Establish the transition zone:
Clean your flat brush slightly, but don’t rinse it fully. Pick up pure navy blue paint and apply it next to the dark corner, overlapping the wet edges to start blending them together. -
Introduce the violet:
Without cleaning the brush completely, dip into your purple acrylic. Apply this color diagonally across the center and towards the bottom right, blending it into the blue area while the paint is still wet. -
Brighten the bottom corner:
Mix a tiny touch of white into your purple to create a lighter violet shade. Paint the remaining bottom-right corner with this color. -
Smooth the gradient:
Use a clean, slightly damp flat brush to gently sweep back and forth over the transition lines between colors. I like to use very light pressure here to create that foggy, nebulous look without muddying the colors. -
Paint the edges:
Wrap your colors around the sides of the canvas, extending the blue, purple, and gradient areas to match the front for a finished professional look. -
Let it dry:
Allow the background to dry completely. This is crucial—if the background is wet, your stars will blend into the sky instead of sitting brightly on top.
Uneven Blending?
If your gradient looks choppy, wait for it to dry completely. Then apply a second thin layer of paint, using a slightly damp brush to glaze the colors together more smoothly.
Step 2: Adding the Stars
-
Prepare splatter paint:
Mix a small amount of white acrylic paint with a few drops of water. The consistency should be fluid like ink or heavy cream, but not so thin that it’s transparent. -
Create the distant stars:
Dip an old toothbrush or a stiff brush into the thinned white paint. Holding it about 6 inches above the canvas, run your thumb across the bristles to flick a fine mist of tiny dots across the dark background. -
Vary the density:
Focus more splatters on the darker blue areas to create contrast, and perhaps a faint ‘milky way’ band diagonally across the center. -
Paint prominent stars:
Switch to your smallest round detail brush and undiluted white paint. Choose random spots to manually paint slightly larger dots among the mist. -
Form the star shapes:
Select about 10-15 of your larger dots to turn into twinkling stars. Using the tip of your detail brush, gently pull short lines outward from the center dot—up, down, left, and right. -
Add diagonals:
For the largest stars, add tiny diagonal lines between the main points to create an eight-pointed glimmer, or keep them simple with four points for variety. -
Highlight the centers:
Once the star shapes are dry, add a tiny extra dot of thick white paint right in the center of the biggest stars to make them really pop against the background.
Add Metallic Flair
Mix a tiny bit of silver or gold metallic paint into your star splatter mix. It adds a subtle, magical shimmer that only reveals itself when the light hits the canvas.
Hang your new celestial artwork in a cozy spot to remind you to keep looking up.


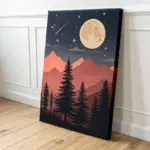
Simple Moon Painting With Subtle Texture

Capture the serene beauty of a moonlit night with this beginner-friendly acrylic painting project. The high-contrast design features a detailed, textured moon floating amidst soft clouds and twinkling stars on a deep blue canvas.
Detailed Instructions
Materials
- Square stretched canvas (approx. 10×10 or 12×12 inches)
- Acrylic paints: Navy Blue, Titanium White, Black, Grey (or mix black/white)
- Large flat brush (for background)
- Medium round brush
- Small detail brush
- Round object for tracing (like a bowl or lid) or a compass
- Pencil
- Palette or paper plate
- Cup of water and paper towels
Step 1: Setting the Scene
-
Prepare the Background:
Begin by squeezing a generous amount of navy blue acrylic paint onto your palette. Using your large flat brush, apply the paint to the entire canvas surface. Use long, horizontal strokes to ensure an even, smooth coat. -
Finish the Edges:
Don’t forget to paint the sides of the canvas with the same navy blue. This gives the artwork a professional, finished look even without a frame. -
Let it Dry:
Allow the background layer to dry completely. This is crucial so that your moon outline doesn’t mix with the blue paint. If you’re impatient like me, a hairdryer on a cool setting speeds this up.
Uneven Circle?
If your traced line feels shaky or you painted outside it, use the original navy blue paint to carefully ‘cut in’ and reshape the moon’s edge from the outside.
Step 2: Creating the Moon
-
Trace the Shape:
Position your circular object (bowl or lid) in the center or slightly off-center of the canvas. Lightly trace around it with a pencil to create a perfect circle. -
Base Coat:
Mix a light grey color (mostly white with a tiny dot of black). Fill in the circle completely with this off-white shade using a medium round brush. This acts as a primer to cover the dark blue. -
Second Layer:
Once the base is tacky or dry, apply a layer of pure Titanium White over the moon circle. This ensures the moon creates a bright, glowing contrast against the dark background. -
Mapping Craters:
While the white paint is still slightly wet, pick up a small amount of grey paint on a smaller brush. Dab irregular patches onto the moon’s surface to represent the ‘maria’ or dark plains. -
Adding Texture:
Use a dry brushing technique to blend the grey patches. Wipe most of the paint off your brush and gently drag the grey edges into the white, creating a cratered, misty texture rather than hard lines. -
Highlighting:
Add touches of pure white back on top of the lightest areas of the moon to bring back the brightness, specifically focusing on the edges to make it look spherical.
Step 3: Atmospheric Details
-
Cloud Foundation:
Mix a medium grey shade. Using a round brush, dab cloud shapes into the corners of the canvas—perhaps two clusters at the top and two at the bottom. -
Fluffing the Clouds:
Use a tapping motion rather than stroking to give the clouds a fluffy, cumulus texture. Keep the edges soft and irregular. -
Highlighting Cloud Tops:
Without cleaning your brush thoroughly, dip the tip into white paint. Tap this lighter color onto the top edges of your cloud clusters where the moonlight would naturally hit them. -
Blending Clouds:
Continue tapping to blend the white down into the grey, creating a gradient that suggests volume and depth within the clouds. -
Adding Stars:
Dip your smallest detail brush into water, then into white paint to make it fluid. Gently dot tiny stars randomly across the navy blue sky. -
Varying Star Sizes:
Make some stars slightly larger than others to create distance. Be careful not to put stars visibly ‘in front’ of the dark parts of the clouds. -
Final Inspection:
Step back from your painting to check the balance. If the moon needs more definition, you can carefully re-outline the edge with fresh white paint to crispen the circle.
Glow Up
Mix a glaze (water + tiny bit of white paint) and brush a transparent ring around the moon’s exterior to create a subtle, hazy atmospheric glow.
Enjoy the peaceful atmosphere your new lunar artwork brings to your space
Painted Botanicals Using Stencil-Like Cutouts
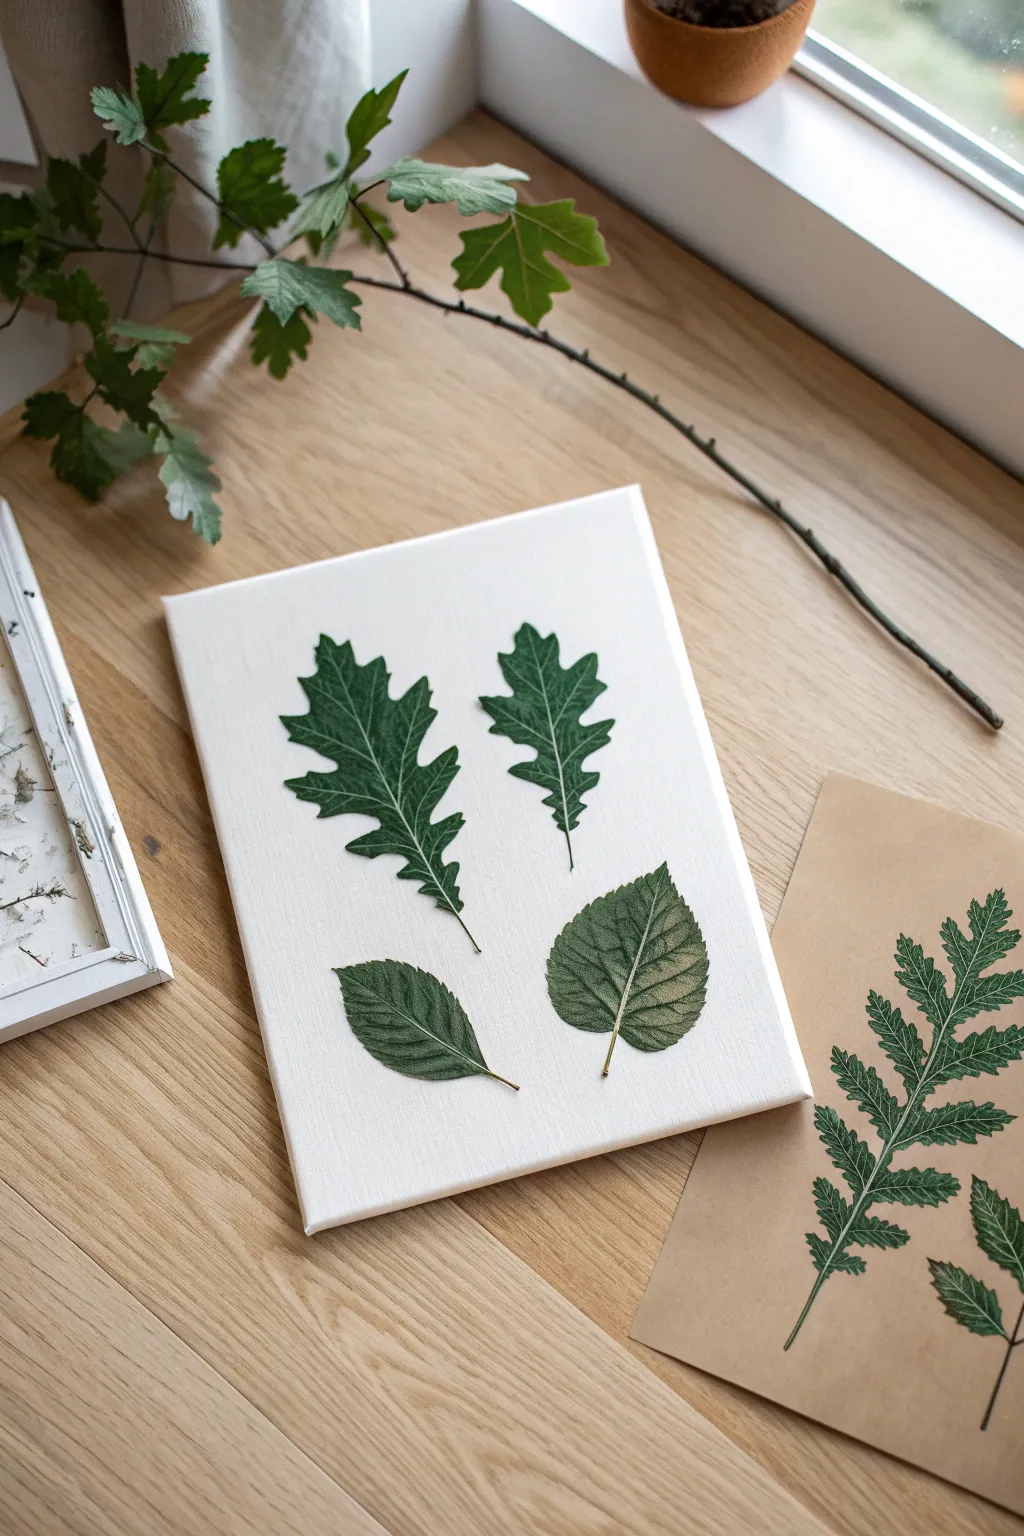
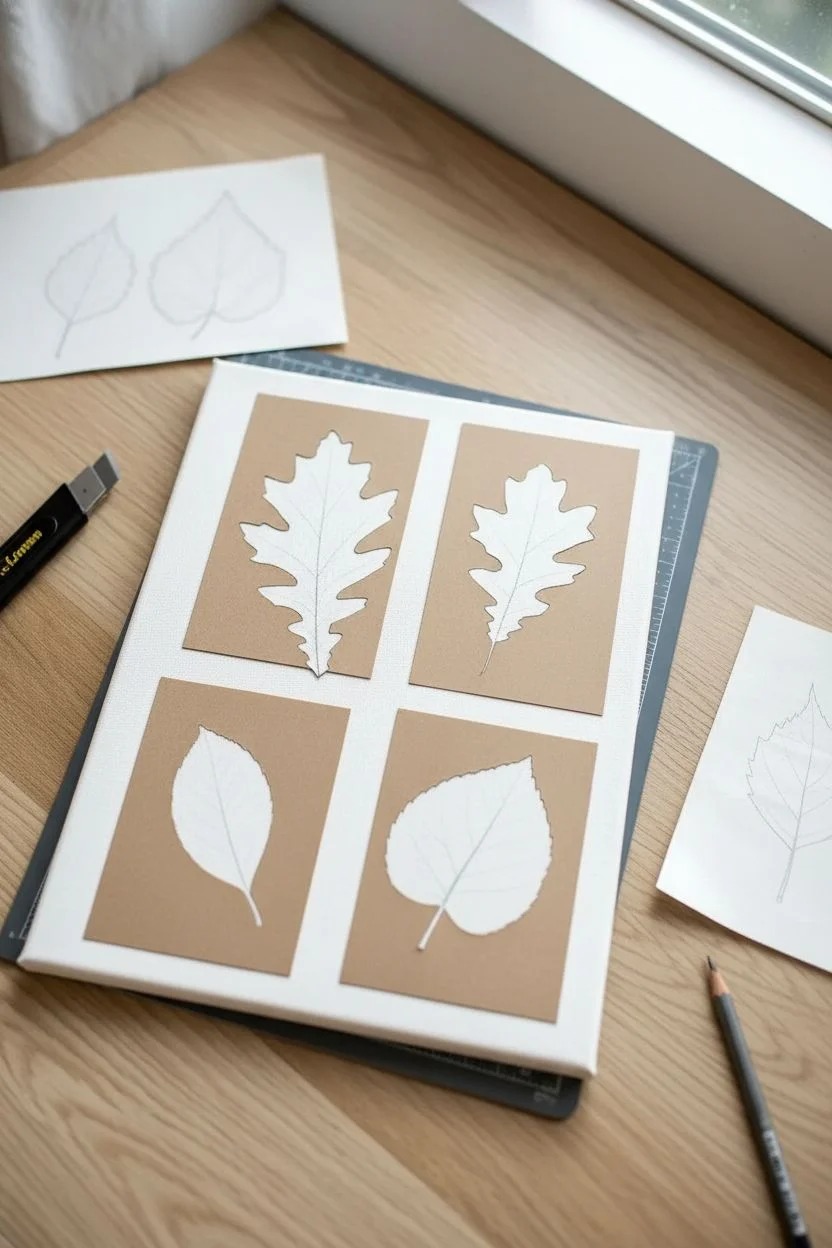
Capture the delicate beauty of pressed greenery using nothing more than paint and creative stencil techniques. This project creates a stunningly realistic botanical study that captures the fine veins and organic shapes of oak and birch leaves without needing actual preserved plants.
Step-by-Step Tutorial
Materials
- Small stretched canvas (8×10 or similar)
- Heavy body acrylic paint (Phthalo Green, Sap Green, Raw Umber, Titanium White)
- Cardstock or stiff watercolor paper
- X-Acto knife or sharp precision scissors
- Pencil
- Cutting mat
- Small flat shader brush (size 4 or 6)
- Fine liner brush (size 00 or 0)
- Repositionable spray adhesive or painter’s tape
- Matte varnish (optional)
Step 1: Creating the Stencils
-
Source Your Shapes:
Begin by finding reference images of leaves you love. For this composition, look for two distinct oak leaf shapes (for the top) and two broad, serrated shapes like birch or beech leaves (for the bottom). -
Trace and Refine:
Sketch these shapes onto your cardstock. You don’t need to be perfect, but focus on getting interesting, jagged edges for the oak leaves and a nice teardrop shape for the birch leaves. -
Cut the Negatives:
Carefully cut out the leaf shapes using an X-Acto knife on a cutting mat. For this technique, we want the *negative* space—the hole left in the paper—to act as our stencil, so keep the surrounding paper intact.
Bleeding Edges?
If paint seeps under your stencil, wait for it to dry completely. Then, use a small brush and white paint (or gesso) to carefully ‘erase’ the mistake and reshape the leaf edge.
Step 2: Painting the Base
-
Prepare the Canvas:
Ensure your stretched canvas is clean. If you want a smoother surface than the raw canvas weave, apply a coat of gesso and sand it lightly once dry. -
Mix Your Palette:
Create a deep, natural green by mixing Phthalo Green with a touch of Raw Umber. You want a dark, forest-floor shade for the base layer. -
Position the Stencils:
Arrange your cardstock stencils on the canvas. Use a light mist of repositionable spray adhesive on the back of the cardstock to hold them firmly flat against the canvas texture. -
Apply the Base Coat:
Using your flat shader brush, dab the dark green mixture into the stencil openings. Use a stippling motion rather than brushing side-to-side to prevent paint from bleeding under the paper edges. -
Remove and Dry:
Carefully lift the stencils straight up while the paint is still wet to keep the edges crisp. Let this base layer dry completely to the touch.
Pro Tip: Edges
Don’t make the green color solid. Leave the very translucent edges of the leaf slightly lighter or yellowish to mimic the way real pressed leaves fade at the perimeter.
Step 3: Adding Veins and Texture
-
Mix a Highlight Shade:
Take your original green mixture and add Sap Green and a tiny bit of Titanium White. This should be a few shades lighter than your base. -
Paint the Midribs:
Using the fine liner brush, paint the central vein (midrib) running from the stem to the tip of each leaf. Keep the line thin and tapering. -
Add Lateral Veins:
Paint the secondary veins branching out from the center. I find it helpful to look at a real leaf here; usually, the veins extend toward the pointed tips of the oak lobes. -
Create Texture:
Switch back to a slightly dry flat brush with the lighter green mix. Very gently dry-brush over the ‘fleshy’ parts of the leaf between the veins to simulate the matte texture of a dried leaf. -
Detailing the Edges:
Use the liner brush and the dark base color to touch up any fuzzy edges, sharpening the serrated points of the leaves to make them look distinct.
Step 4: Final Touches
-
Add Stems:
Mix a brownish-green using Raw Umber and Sap Green. Paint thin, realistic stems extending from the bottom of each leaf, varying the lengths slightly for visual interest. -
Highlight the Veins:
Mix an even lighter, pale green (almost white). Carefully drag the liner brush along the very tops of the main veins to give them dimension and make them pop against the dark leaf body. -
Seal the Work:
Once the painting is cured (usually 24 hours), apply a matte varnish. This unifies the sheen and protects your botanical study from dust.
Hang your new botanical artwork alongside real plants to bring a calm, natural atmosphere to your room
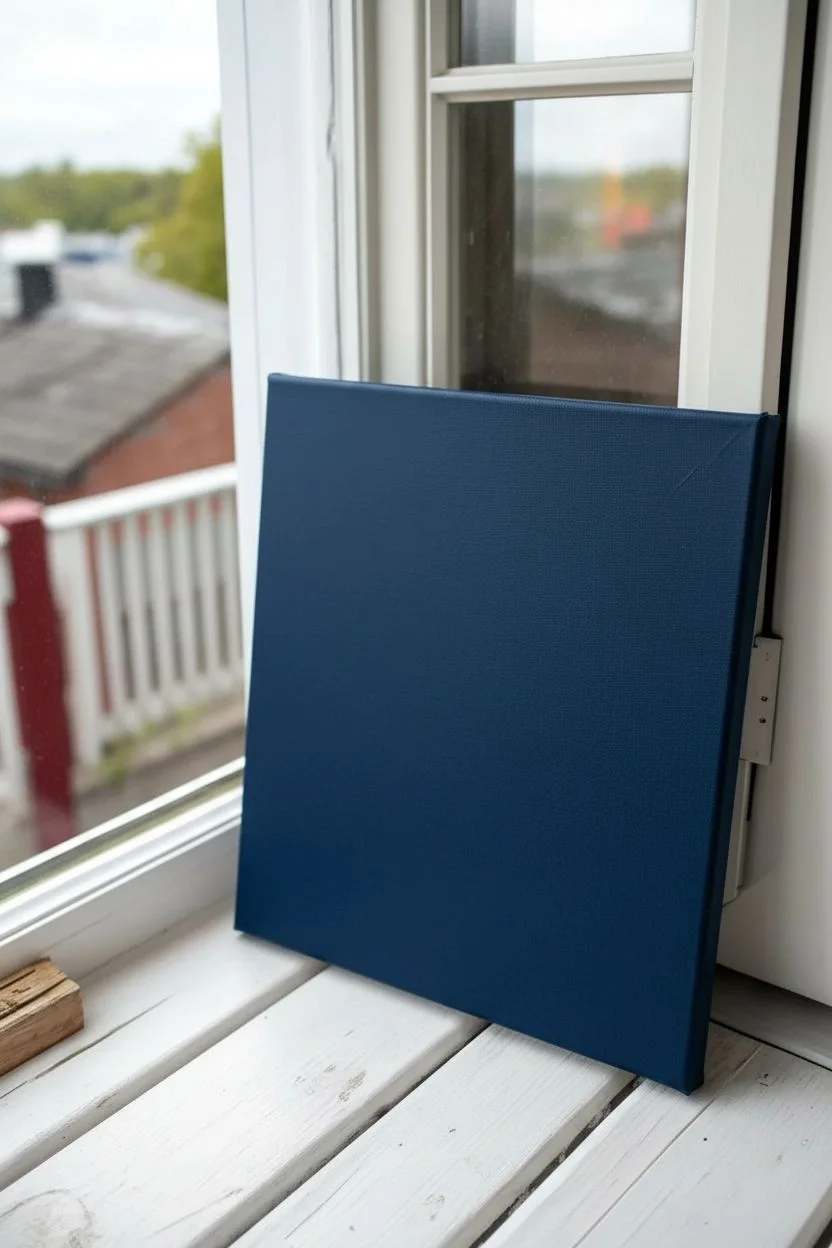
Monochrome Line-and-Shape Pattern Canvas
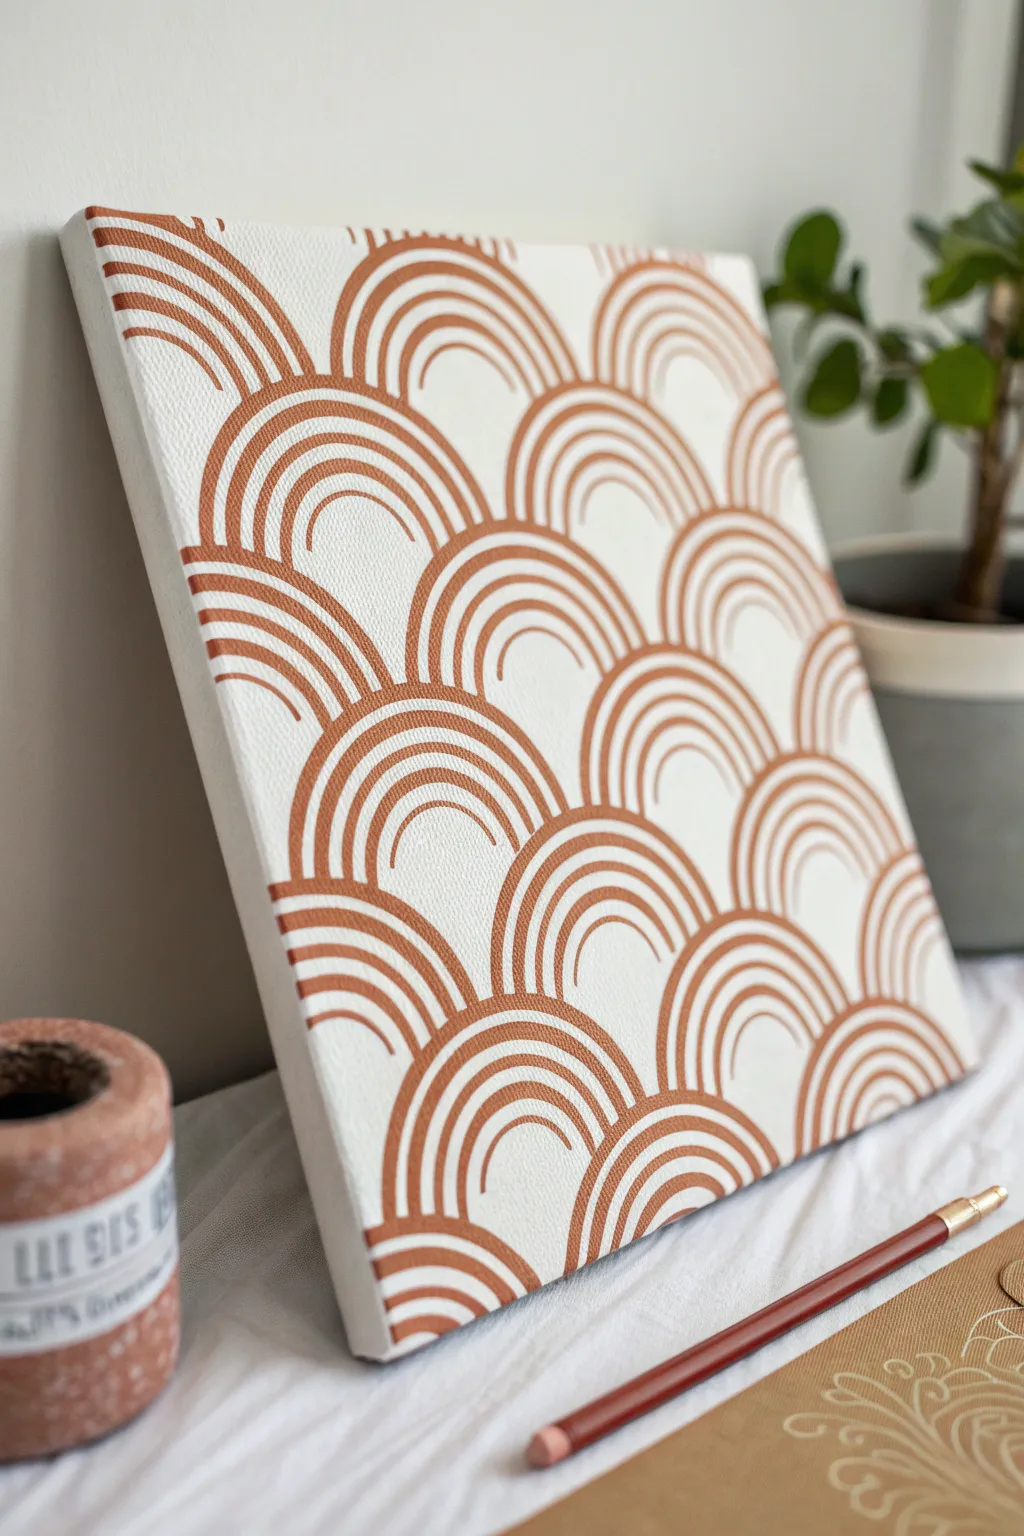
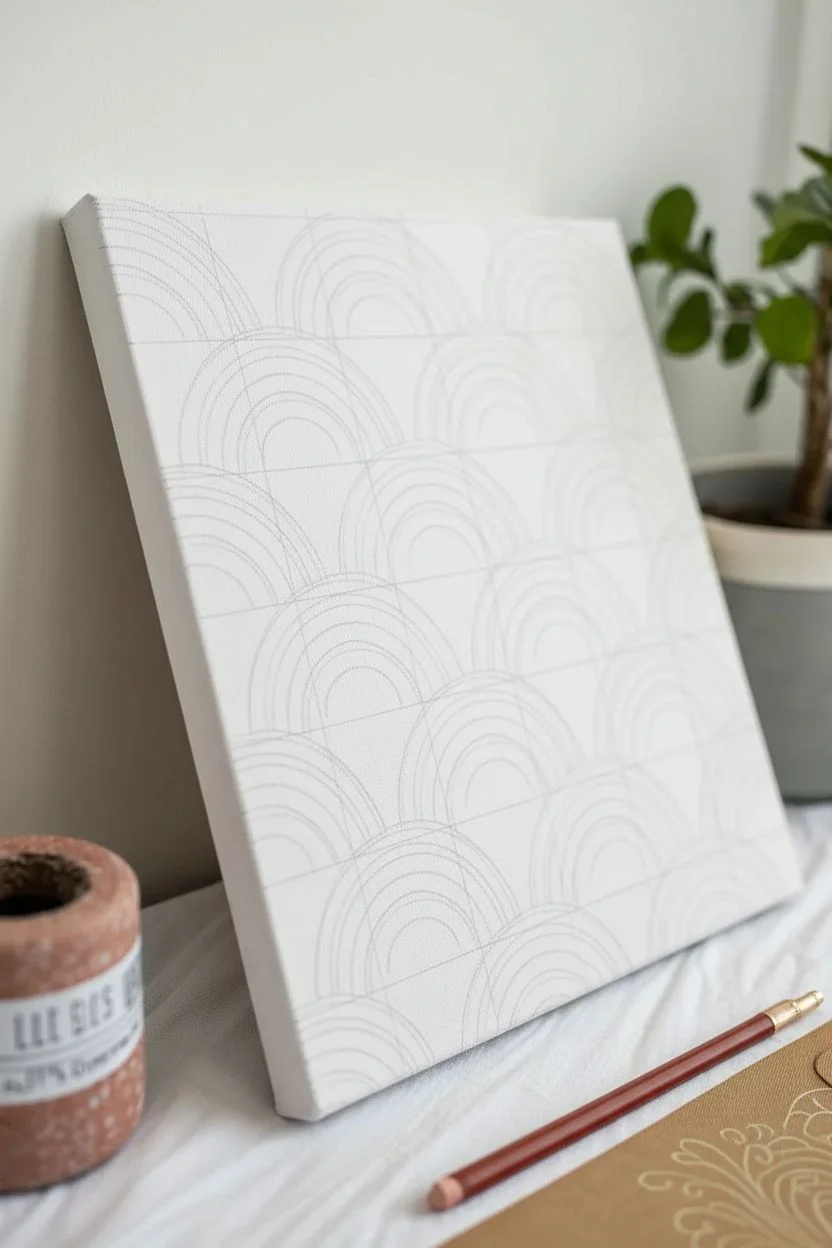
Create a stunningly simple piece of modern art with this repeating arch pattern that brings warmth and rhythm to any wall. Using just one earthy distinct color against a crisp white background, this project achieves a sophisticated, high-end look with minimal supplies.
How-To Guide
Materials
- Stretched canvas (square or rectangular)
- White acrylic paint (for base coat)
- Terracotta or rust-colored acrylic paint
- Medium flat paintbrush (approx. 1/2 inch)
- Small round paintbrush (size 2 or 4)
- Compass or round objects for tracing (cup, jar lid)
- Pencil
- Ruler
- Palette or paper plate
- Cup of water and paper towels
Step 1: Preparation & Base
-
Prime the canvas:
Even if your canvas is pre-primed, apply a fresh coat of white acrylic paint to ensure a bright, clean background. This helps the terracotta color pop later. -
Let it dry completely:
Allow the white base coat to dry fully to the touch. If the canvas texture is still very rough, you might consider a second coat for a smoother finish. -
Establish your grid:
Using a ruler and a light pencil touch, mark horizontal lines across the canvas. These will serve as the baselines for each row of arches. Space them so that each row will overlap the one below it slightly, typically repeating at half the height of your intended arches.
Smooth Curves Tip
Brace your pinky finger on a dry part of the canvas while painting. It acts as an anchor, giving you much steadier control for painting perfect curves.
Step 2: Drafting the Pattern
-
Trace the first row:
Starting at the bottom edge, use a compass or trace around a circular object (like a jar lid) to draw your first row of semi-circles. Line up the bottom of the semi-circles with your bottom grid line. -
Offset the second row:
For the row above, position the center of each new arch directly above the gap between the two arches below. This creates that classic scalloped, fish-scale effect. -
Continue upward:
Repeat this offset pattern all the way to the top of the canvas. Don’t worry if the arches run off the edges; simply draw partial arches to maintain the pattern’s continuity. -
Sketch the inner bands:
Inside each large semi-circle, lightly sketch 3 or 4 smaller concentric semi-circles. These guidelines will help you keep your painted lines evenly spaced later.
Step 3: Painting the Design
-
Prepare your paint:
Squeeze out your terracotta acrylic paint. Add a tiny drop of water to improve flow if the paint feels too thick, which helps achieve smoother curves. -
Start with the outline:
Using your small round brush, carefully paint the outermost curve of your first arch. Keep your wrist loose to maintain a fluid line. -
Fill the inner arches:
Paint the inner concentric arches following your pencil sketches. Leave a consistent gap of white space between each painted line. -
Thicken the lines:
I like to go back over the lines with a second pass to thicken them slightly. This adds visual weight and makes the color more opaque. -
Working in rows:
Complete one full horizontal row before moving to the next. This prevents you from accidentally smudging wet paint with your hand. -
Manage the intersections:
Where an arch from an upper row meets the top of an arch from the row below, ensure the lines stop cleanly. The upper arch should appear to sit ‘behind’ or neatly atop the lower ones depending on your preference, but usually, a clean separation looks best. -
Handle the edges:
For the partial arches on the sides of the canvas, paint the lines right up to the edge. You can wrap the design around the side of the canvas for a gallery-quality finish, or just stop sharply at the corner.
Add Metallic Flair
Swap the terracotta for gold leaf paint on every third arch, or trace just one thin line in each scallop with metallic copper for a subtle shimmer.
Step 4: Finishing Touches
-
Review and refine:
Once the paint is dry, look for any spotty areas where the white canvas shows through the terracotta paint. Retouch these areas with a little extra paint. -
Clean up sketches:
If any pencil marks are still visible between the painted lines, gently erase them once the paint is 100% dry to avoid smearing. -
Optional protection:
Apply a clear matte varnish spray if you want to protect the surface from dust and fading over time.
Hang your new masterpiece in a spot with good natural light to let those warm tones really shine
Paint-Pour Style Swirls for Effortless Abstracts
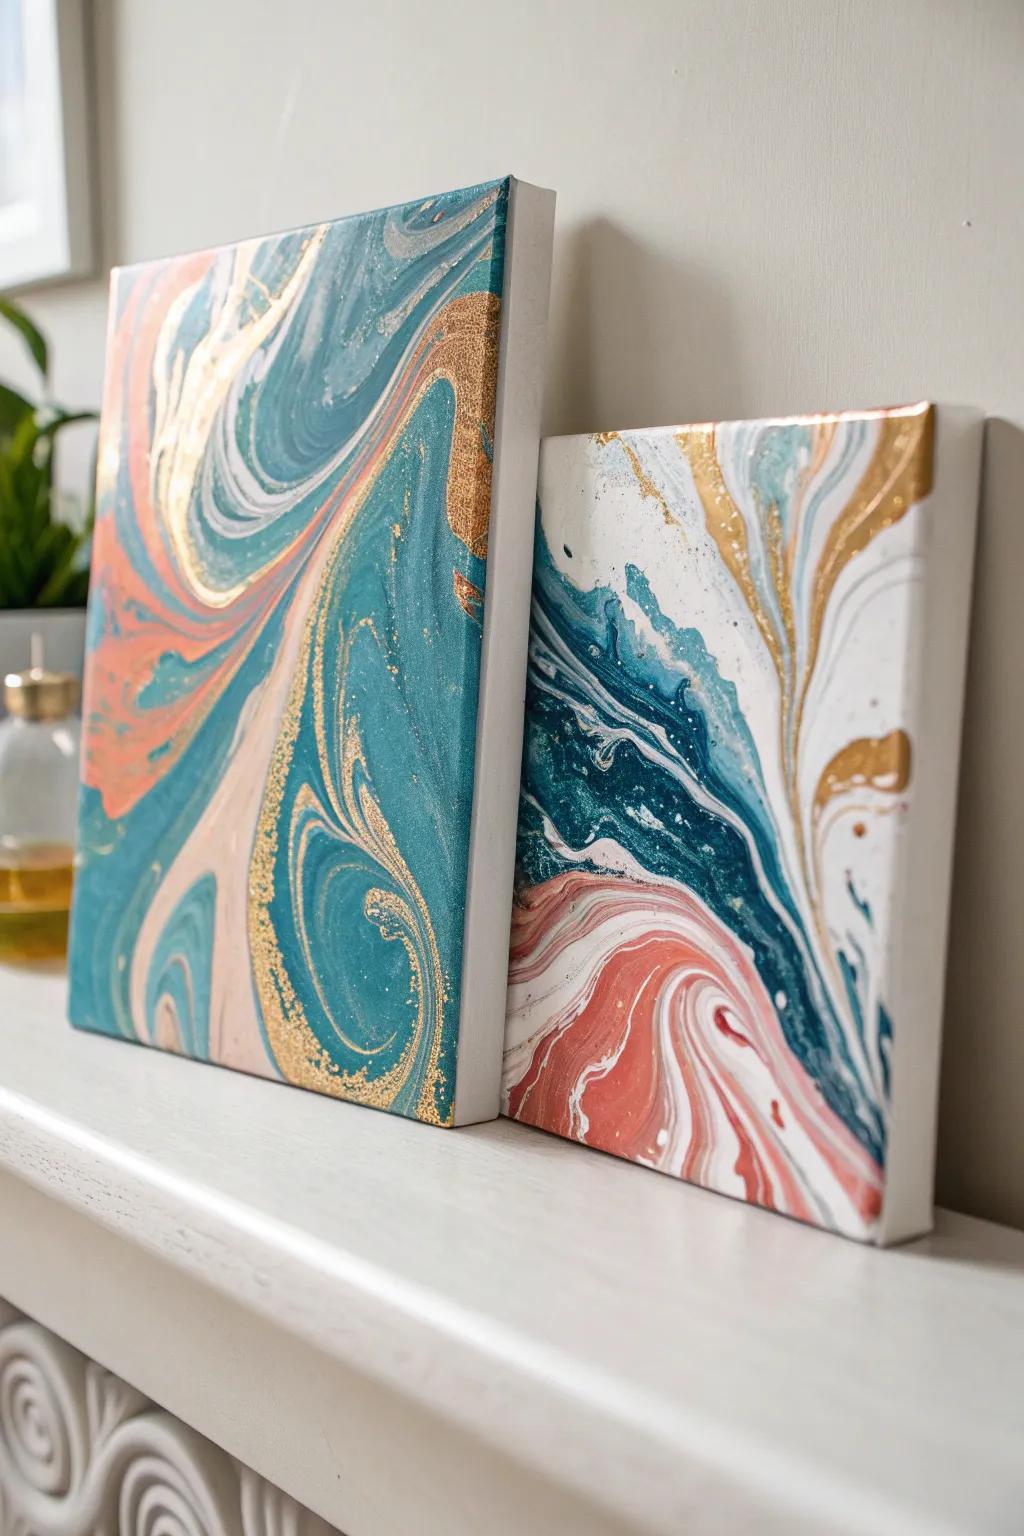
Achieve the look of high-end, fluid abstract art without complex acrylic pouring mediums by using a simple hydro-dipping technique. This method creates stunning, organic swirls of teal, coral, and gold that mimic natural marble stone.
Detailed Instructions
Materials
- Two stretched canvases (various sizes)
- Deep plastic storage tub (larger than your canvases)
- Spray paint in Teal/Turquoise
- Spray paint in Coral/Salmon
- Spray paint in White
- Spray paint in Metallic Gold
- Latex or nitrile gloves
- Drop cloth or newspapers
- Stick or skewer (for swirling)
- Water
- Clear sealant spray (gloss or matte)
Step 1: Preparation
-
Set up your workspace:
Begin by working outdoors or in a very well-ventilated area, as spray paint fumes can be strong. Lay down a drop cloth to catch any overspray or drips. -
Prepare the water bath:
Fill your large plastic tub about three-quarters full with cool tap water. -
Check water temperature:
Ensure the water is not too cold or too hot; room temperature works best to keep the paint from seizing up too quickly. -
Base coat the canvases (optional):
If your canvases aren’t primed, give them a quick coat of white spray paint and let them dry completely. This ensures no raw fabric shows through if the marble pattern has gaps.
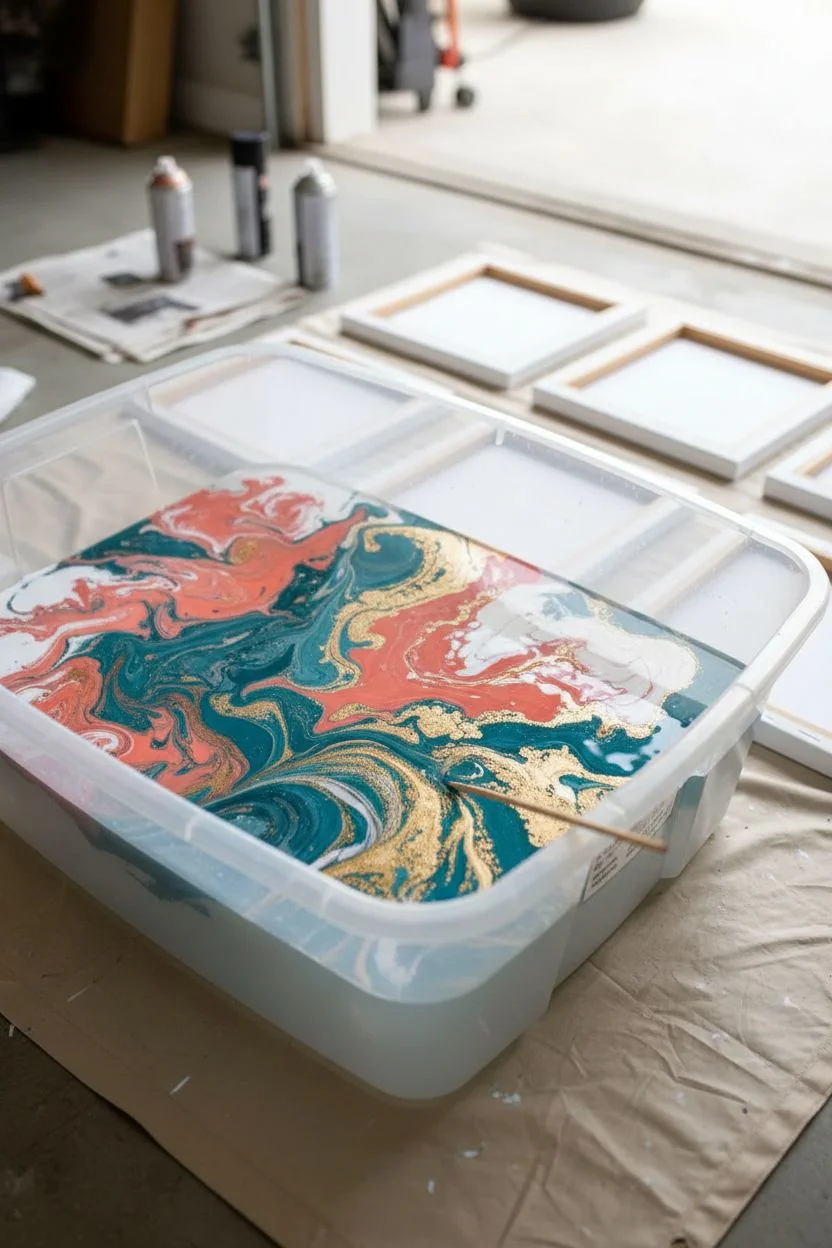
Step 2: Creating the Hydro Dip
-
Spray the first color:
Shake your white spray paint can vigorously. Hold it about 8-10 inches from the water and spray a generous amount onto the water’s surface. -
Add the secondary colors:
Immediately spray your teal and coral paints into the center of the white patch. You don’t need to be precise; random bursts work best. -
Incorporate the metallic:
Spray the metallic gold paint sparingly across the other colors. The metallic paint often reacts differently, creating beautiful veins and cells. -
Swirl the pattern:
Using your stick or skewer, very gently drag through the floating paint to marble the colors. Don’t overmix, or the colors will become muddy. -
Identify your target area:
Look for the section of the floating paint film that looks the most pleasing to you—this is where you will aim your canvas.
Paint Skinning Over?
Work faster! Spray paint forms a film on water very quickly. Have your caps off and canvas ready before you spray the first color.
Step 3: Dipping and Finishing
-
Dip the first canvas:
Wearing gloves, hold the canvas face down. Slowly and steadily lower it straight down onto the water’s surface. -
Submerge and clear:
Push the canvas completely underwater. While it is submerged, use your hand or a piece of cardboard to sweep away the remaining paint film on the surface of the water. -
Remove the canvas:
Once the surface water is clear of paint, pull the canvas back up. This prevents a second layer of paint from ruining the design you just caught. -
Inspect and tilt:
Quickly tilt the canvas to let excess water run off the edges. Inspect the design; the paint should stick instantly. -
Clean the water:
Before doing the second canvas, use a paper towel or newspaper to skim the water surface completely clean of old paint residue. -
Repeat for the second canvas:
Follow the same spraying and swirling steps for your second artwork. I like to vary the amount of gold or teal slightly to make them look like a related set rather than identical twins. -
Dry properly:
Set both canvases upright in a safe, dust-free area to dry. Allow them to dry for at least 24 hours to ensure all moisture trapped under the paint evaporates. -
Seal the artwork:
Once fully dry, apply two light coats of clear sealant spray to protect the surface and enhance the sheen of the gold paint.
Pro Tip: Metallic Veins
Hold the gold spray can slightly further away than the others. The fine mist creates delicate, realistic mineral veins rather than big blobs.
Hang your new marble masterpieces together to create a sophisticated gallery wall effect
Mixed-Media DIY Painting With Collage Paper and Paint Layers
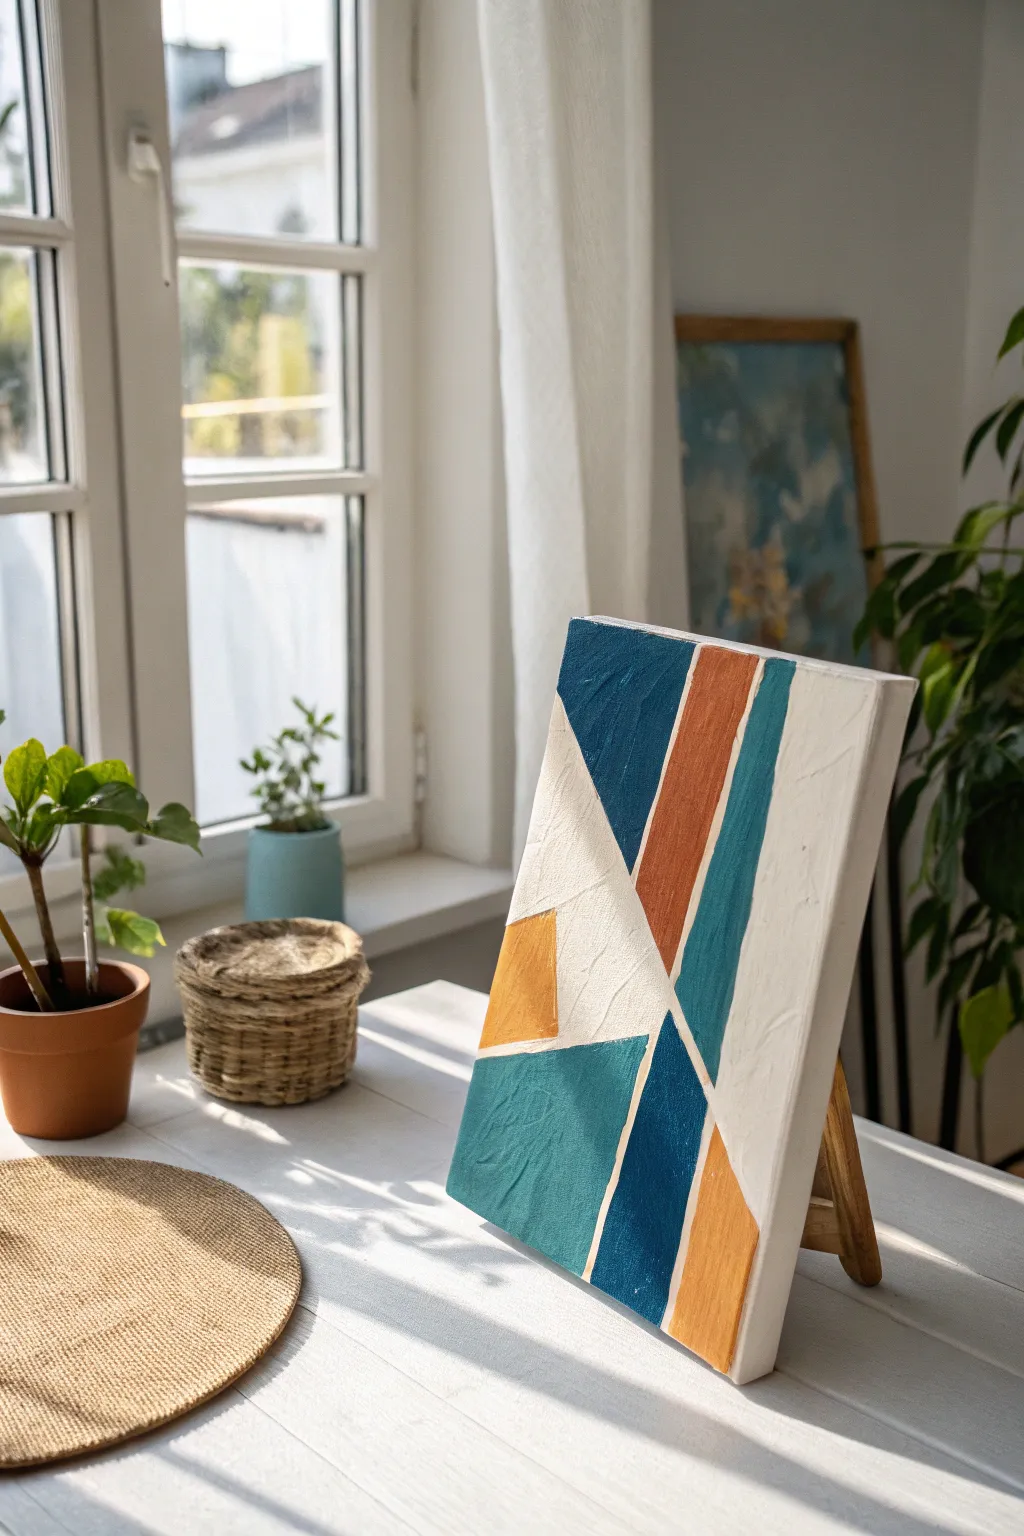
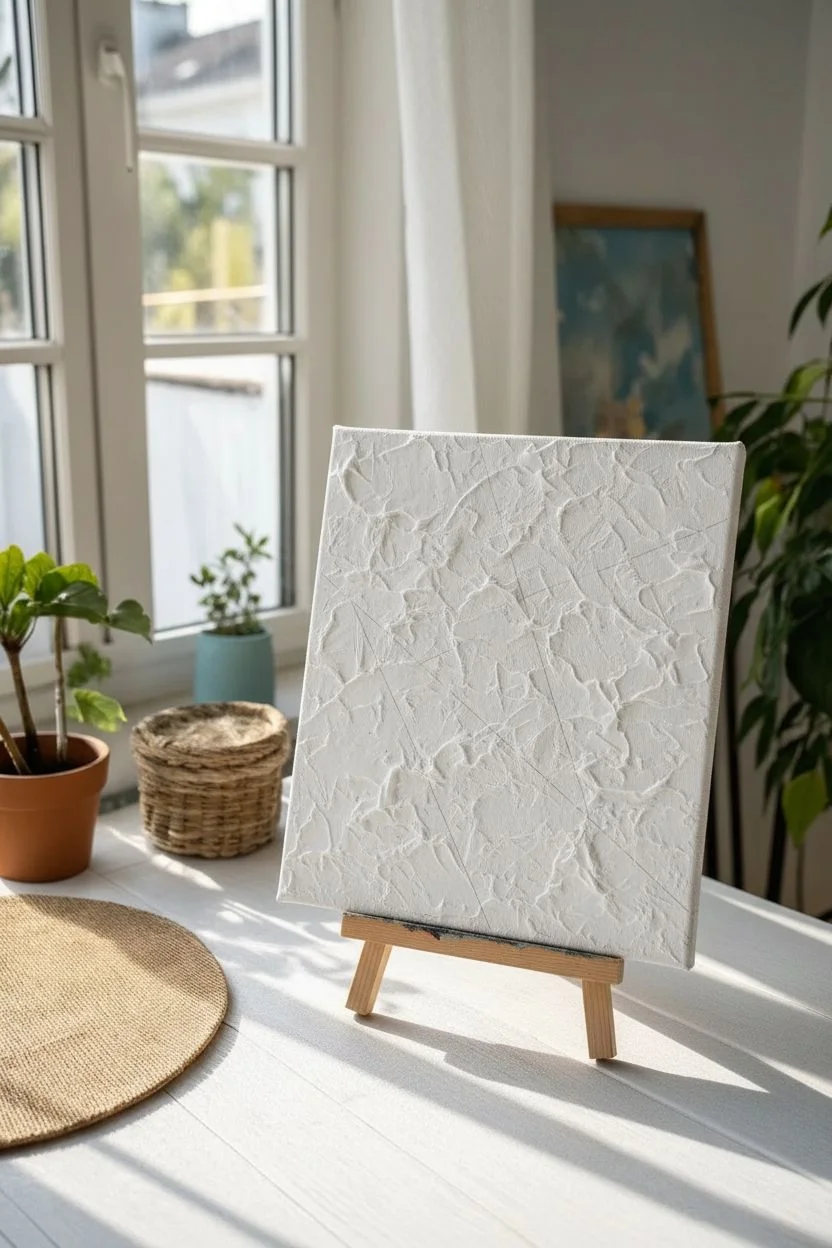
Bring the calming vibes of a seaside village into your home with this geometric abstract painting. Using simple masking techniques and acrylics on a textured base, you’ll create sharp lines and bold blocks of color that look professionally designed.
Detailed Instructions
Materials
- Small stretched canvas (approx. 8×10 or 10×12 inches)
- White texture paste or heavy body acrylic gel medium
- Palette knife
- Painter’s tape or masking tape (various widths)
- Acrylic paints: Navy blue, Teal/Turquoise, Burnt Orange/Terracotta, Mustard Yellow, White
- Flat synthetic paintbrushes (medium and small)
- Pencil
- Ruler (optional)
- Mini wooden easel (optional for display)
Step 1: Creating the Textured Base
-
Prime the surface:
Begin with a blank stretched canvas. While most come pre-primed, ensure the surface is clean and dust-free. -
Apply texture paste:
Scoop a generous amount of white texture paste or heavy gel medium onto the canvas using a palette knife. -
Spread unevenly:
Spread the paste across the entire surface. Don’t try to make it smooth; instead, use the flat side of the knife to create ridges, peaks, and subtle valleys. This underlying texture is key to the final look. -
Let it cure:
Allow the texture layer to dry completely. This can take several hours or overnight depending on thickness. I prefer to let it sit overnight to ensure the tape won’t pull up any damp paste later. -
Base coat (optional):
If you want a uniform white background, paint a coat of titanium white acrylic over the dried texture paste. This seals the texture and provides a bright base for the colors.
Step 2: Mapping the Geometry
-
Plan the layout:
Look at the composition: it relies on intersecting diagonals. Use a pencil and ruler to lightly sketch out large triangles and quadrilaterals, leaving ‘channels’ of whitespace between them. -
Mask the first shapes:
Apply painter’s tape along the pencil lines of your first few shapes. Remember, you can’t paint adjacent shapes at the same time, so pick non-touching areas first (like the top left navy triangle and the bottom right yellow section). -
Seal the tape edges:
Press the tape down firmly with your fingernail or a spoon. To get super crisp lines on a textured surface, paint a thin layer of white paint over the tape edge first to seal it.
Bleeding Lines?
If paint bleeds under the tape due to heavy texture, wait for it to dry, then firmly re-mask the line and paint over the mistake with your background white color.
Step 3: Applying Color
-
Paint the Navy section:
Mix a deep navy blue and apply it to the large top-left triangle section. Use a flat brush to work the paint into the textured crevices. -
Paint the Terracotta strip:
In the central vertical strip, apply a burnt orange or terracotta shade. Ensure the coverage is opaque. -
Add the Teal accent:
fill the long, thin vertical strip next to the orange with a teal or turquoise color. -
Remove tape and dry:
Carefully peel back the tape while the paint is still slightly tacky to avoid chipping. Let these sections dry completely. -
Mask the second distinct layer:
Once the first set of shapes is dry, apply new tape to define the remaining shapes, covering the dried painted edges where necessary to create straight lines. -
Color blocking:
Paint the bottom left section in teal. Paint the small intersecting triangle in mustard yellow. -
Final dark accents:
Add the deep navy blue to the lower right geometric shard. -
Final reveal:
Remove all remaining tape. Check for any bleed-through. If paint leaked under the tape, use a small brush and white paint to touch up the dividing lines. -
Mount and display:
Place your finished geometric study on a small wooden easel near a window to let natural light reveal the beautiful texture you created.
Pro Tip: Texture Depth
Mix a tiny drop of grey into your texture paste before applying it. When you paint the white on top later, lightly sand it back to reveal subtle shadows in the ridges.
Step back and admire how the light plays across the ridges of your modern masterpiece


Have a question or want to share your own experience? I'd love to hear from you in the comments below!