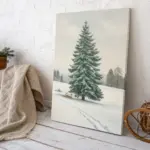
Winter scenes look fancy, but they’re secretly some of the easiest paintings to pull off because snow gives you tons of forgiving white space. Here are my go-to easy winter painting ideas that look super impressive on Pinterest without requiring fussy details.
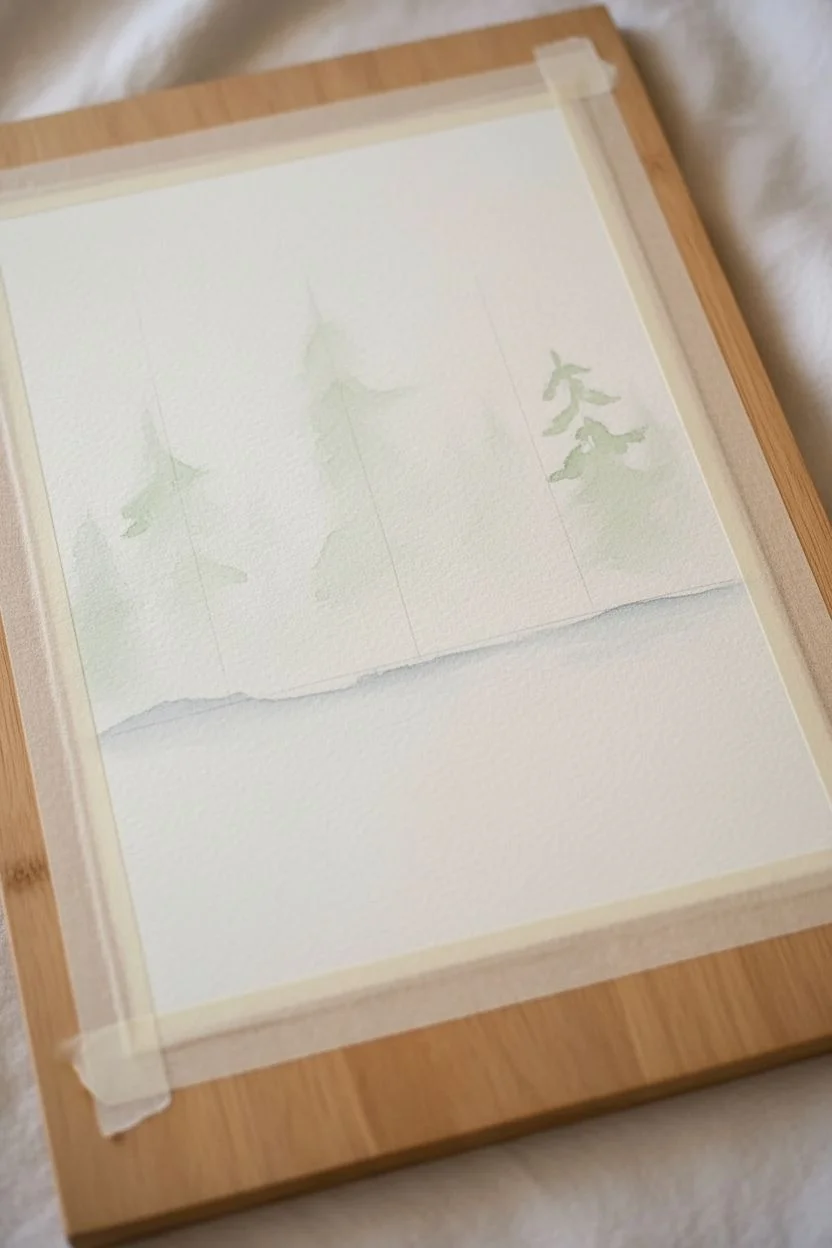
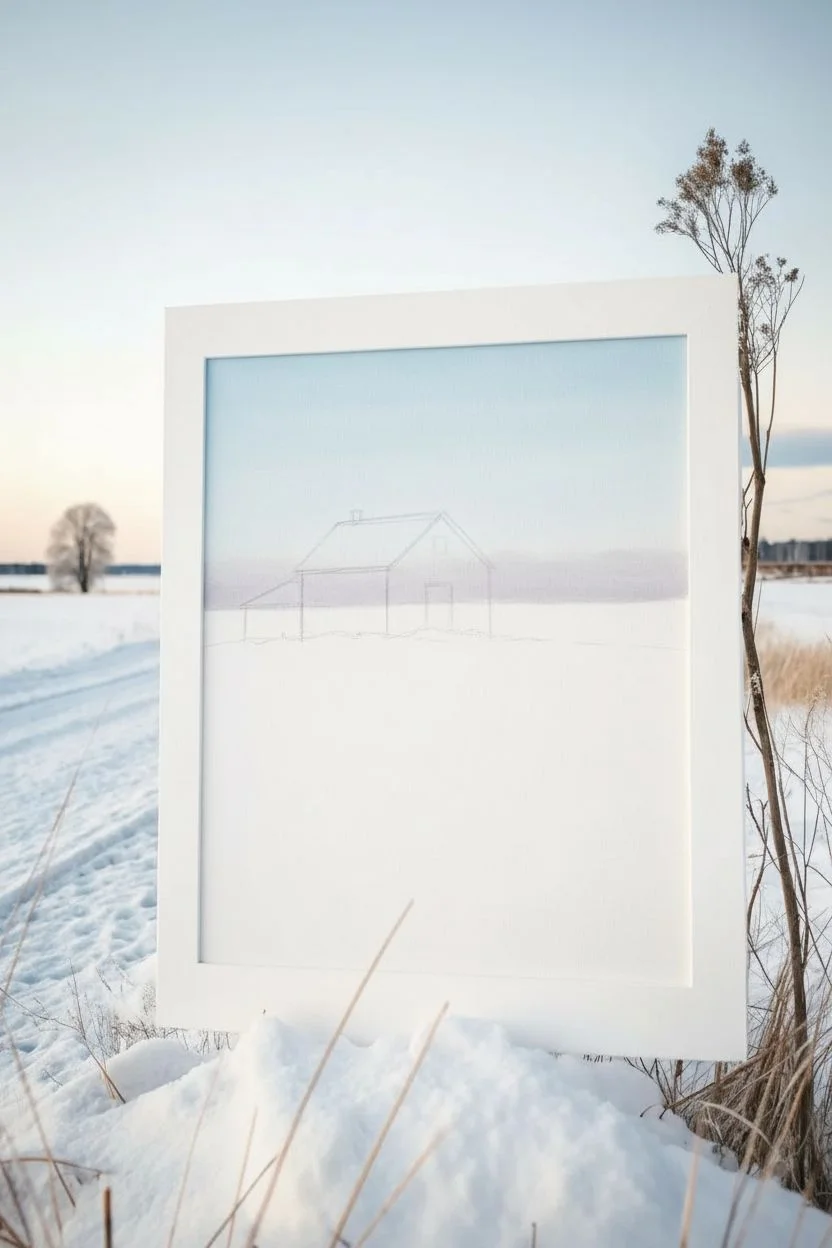
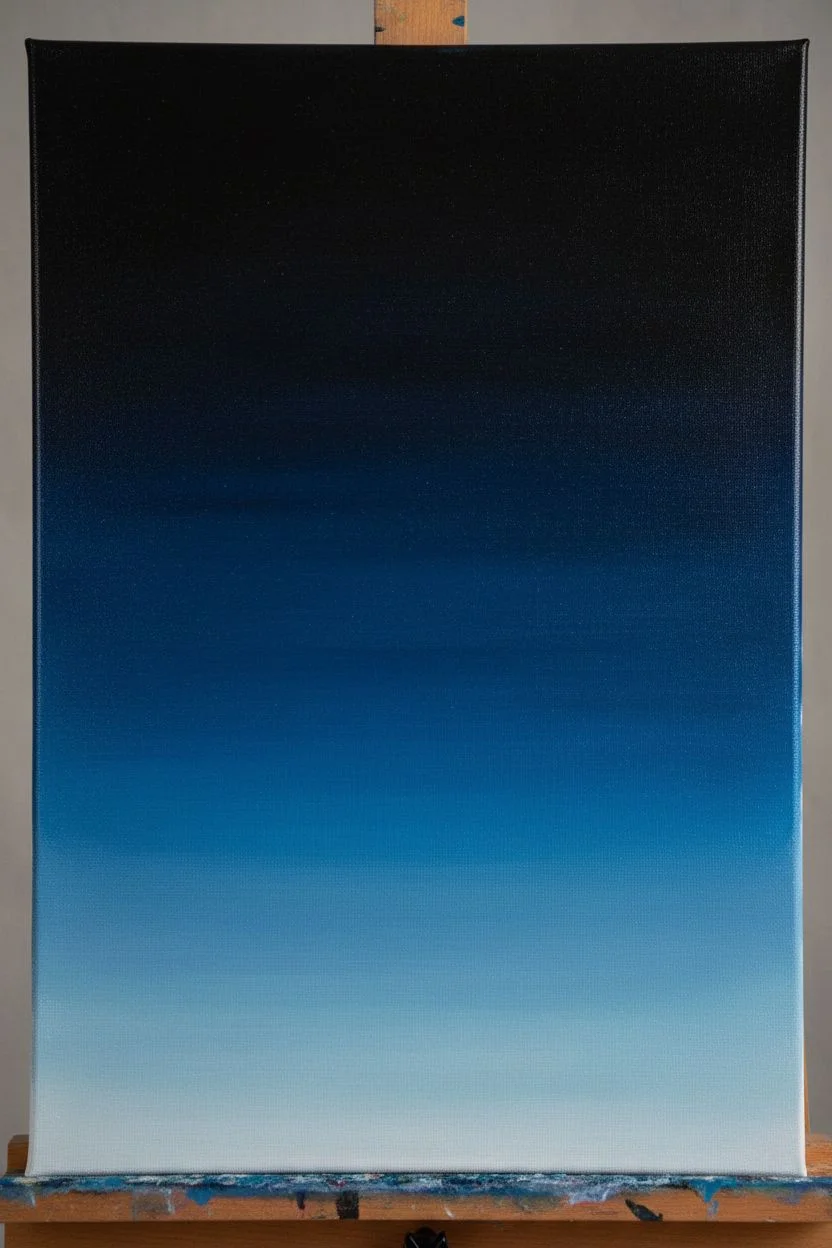
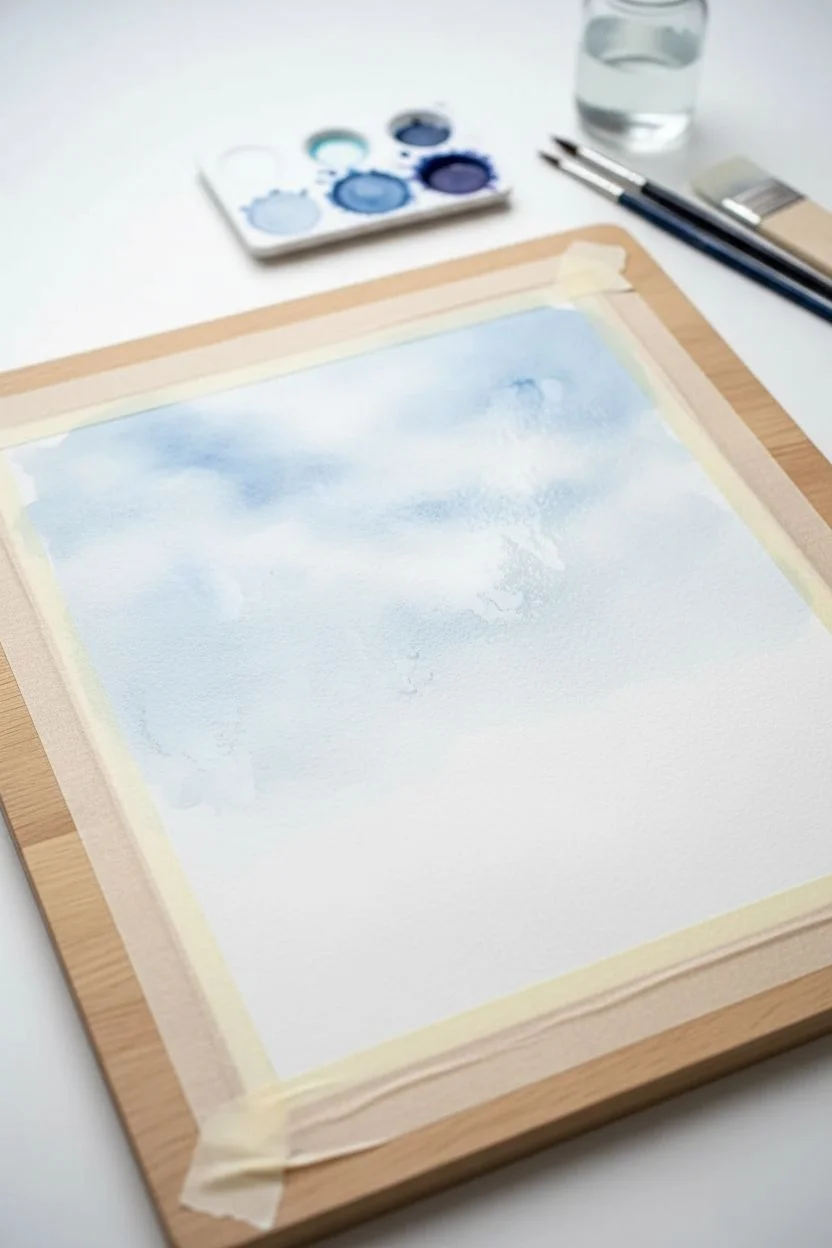
Minimalist Snowscape With a Low Horizon
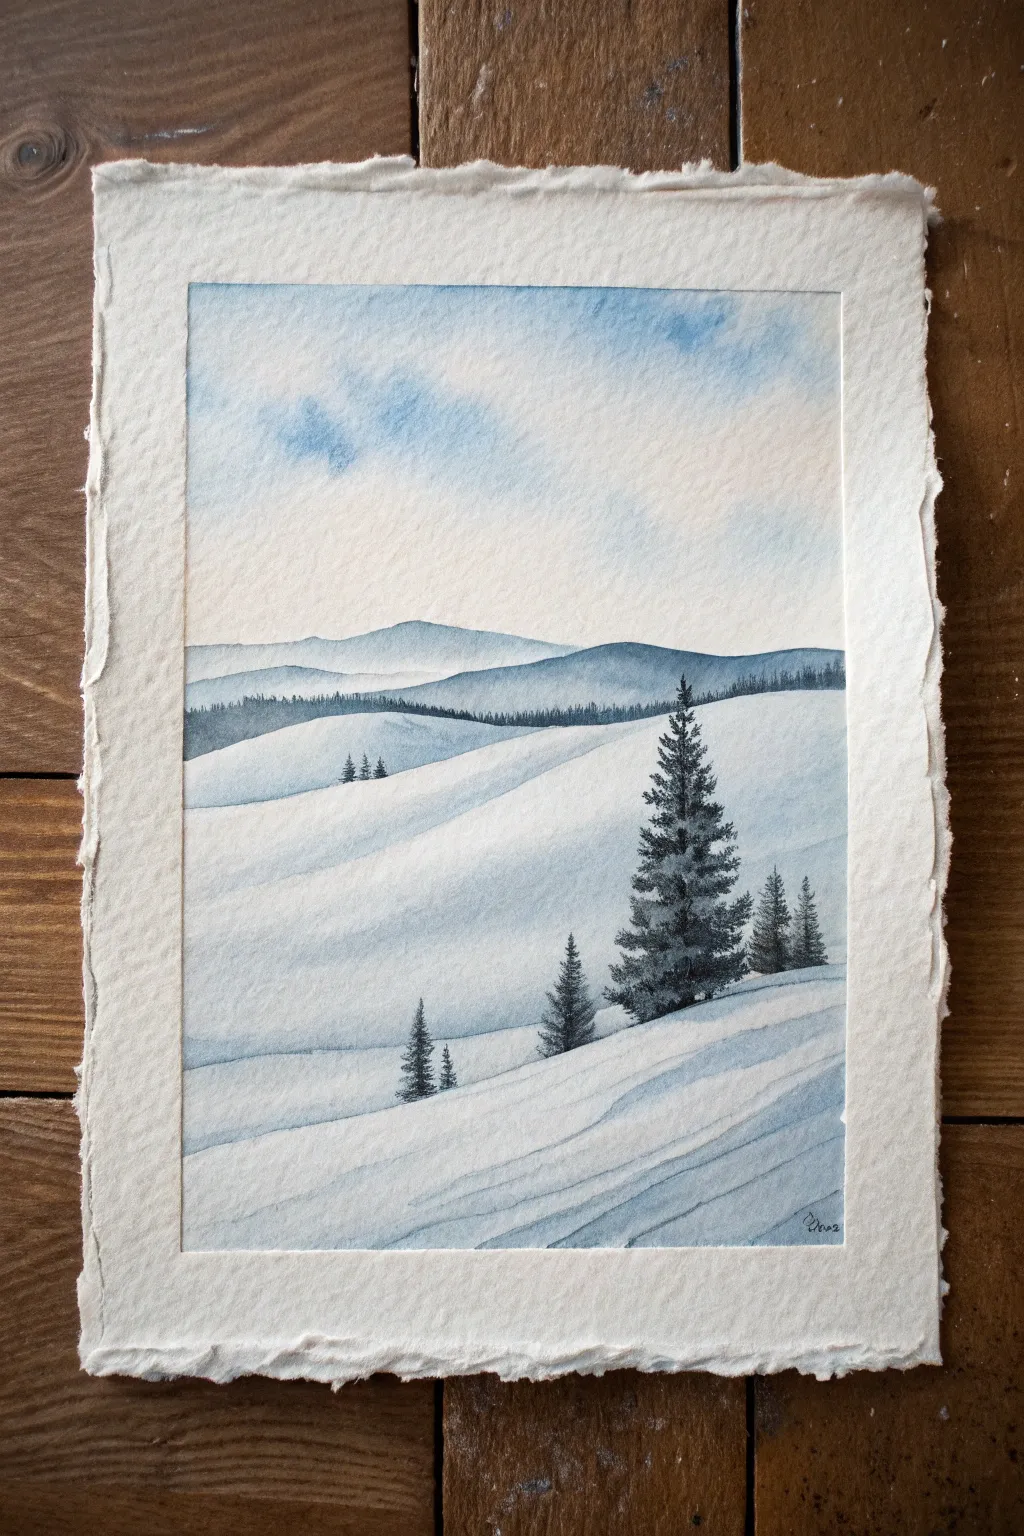
This serene watercolor landscape captures the stillness of winter using negative space to imply deep snowdrifts. With its deckled edges and soft indigo palette, it creates a sense of vast, quiet distance perfect for beginners exploring atmospheric perspective.
Step-by-Step Guide
Materials
- Cold press watercolor paper (300 gsm or heavier)
- Watercolor paints (Indigo, Payne’s Grey, Cerulean Blue)
- Round brushes (sizes 2, 6, and 10)
- Masking tape
- Pencil (HB or lighter)
- Ruler
- Two jars of water
- Paper towels
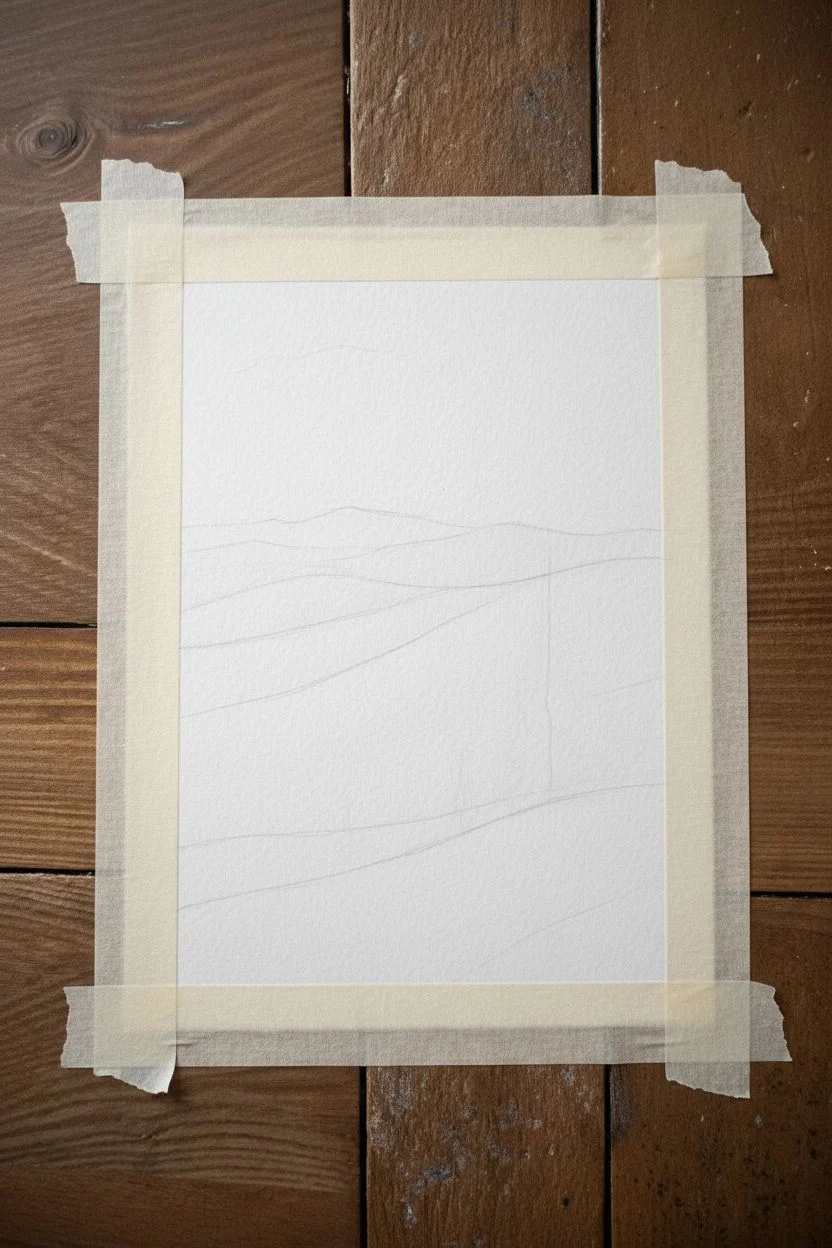
Step 1: Preparation and Sketching
-
Paper selection:
If you want the exact look from the photo, tear a sheet of heavy watercolor paper against a ruler to create soft, deckled edges. Alternatively, buy pre-deckled paper. -
Taping the border:
Measure a rectangle centered on your paper, leaving about a 1.5-inch margin all around. Tape this rectangle off securely with artist’s masking tape to create crisp, clean edges for the painting itself. -
Light sketch:
Using a very light hand, sketch the sloping lines of the snowdrifts. Start from the bottom third and create gentle, intersecting curves that guide the eye upward toward the horizon line. -
Mountain outlines:
Draw the distant mountain range near the middle of the paper. Keep these lines simple and undulating; they shouldn’t be jagged peaks, but rather worn, old mountains.
Bleeding Edges?
If paint bleeds under your tape, use a slightly damper brush (not soaking) near the edges. You can also fix small bleeds later with opaque white gouache.
Step 2: Painting the Sky and Distance
-
Wet-on-wet sky:
Pre-wet the sky area with clean water using your size 10 brush. It should glisten but not pool. -
Soft clouds:
Drop in a dilute wash of Cerulean Blue while the paper is wet, leaving plenty of white space for brightness. Soften any hard edges with a damp brush. -
First mountain layer:
Once the sky is dry, mix a watery, pale Indigo. Paint the farthest mountain ridge. The paint should be very transparent to suggest atmospheric distance. -
Second mountain layer:
After the first ridge dries, mix a slightly stronger (less watery) Indigo. Paint the next range of hills closer to the viewer. This varying value creates depth. -
Distant tree line:
While the lower edge of that second mountain range is still slightly damp, tap in tiny vertical strokes with a small brush to suggest a faraway forest sitting on the ridge.
Add Subtle Sparkle
Mix a tiny pinch of salt onto the wet shadow areas of the foreground snow. As it dries, it creates crystal-like textures that mimic frost on the ground.
Step 3: Sculpting the Snow
-
Shadow mixing:
Create a cool shadow color by mixing Indigo with a touch of Payne’s Grey and plenty of water. It should be a pale, icy blue. -
Hill shadows:
Starting with the furthest snow hill, paint the shadow side (the right side in this reference). Use a wet brush to soften the top edge of the shadow so it fades gradually into the white of the paper. -
Layering drifts:
Move downwards to the next snowdrift. Paint the shadow under the ridge line, keeping the hard edge on top and fading the color downwards. This negative painting technique makes the hill above pop out. -
Foreground texture:
For the closest snowbanks at the bottom, use slightly more pigment and create sweeping, diagonal strokes that follow the curve of the land. I like to leave small gaps of white paper here to suggest wind-blown texture.
Step 4: Adding the Evergreens
-
Tree placement:
Ensure your snow layers are completely dry before starting the trees to prevent bleeding. Locate where your main focal tree will stand on the right side. -
Main tree trunk:
Using a size 2 brush and a thick, creamy mix of Payne’s Grey, draw a very thin vertical line for the trunk of the largest tree. -
Foliage technique:
Start at the top of the trunk. Use the tip of your brush to make small, downward-slanting dabs. As you move down the tree, widen your strokes to create the conical shape. -
Building density:
Make the branches denser near the center of the tree and sparser at the tips. Leave tiny gaps within the tree so it doesn’t look like a solid block. -
Secondary trees:
Paint the smaller companion trees behind and below the main one. Use slightly more water in your mix for the ones further back to push them into the distance. -
Tiny distant trees:
Add a few extremely small, simplified tree shapes on the distant ridges to tie the scale together. -
The reveal:
Wait until the painting is bone dry. Carefully peel away the masking tape at a 45-degree angle to reveal the crisp border against the deckled paper.
Sign your name in the corner and enjoy the peaceful chill of your winter landscape


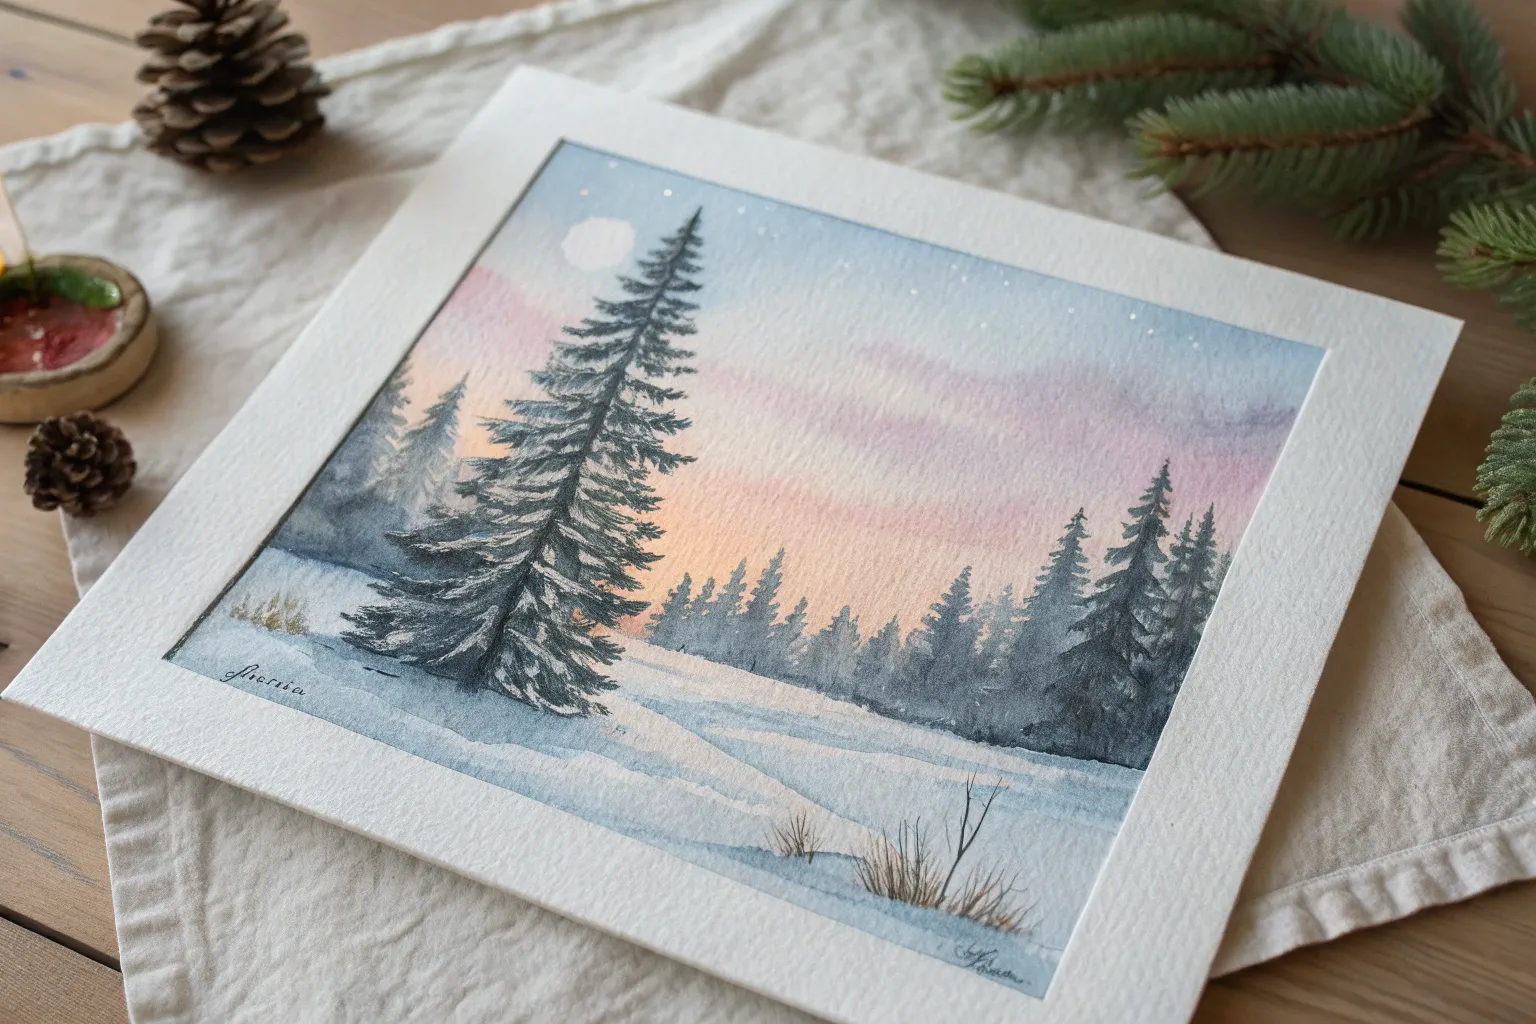
Cotton-Candy Winter Sunset Over Snow
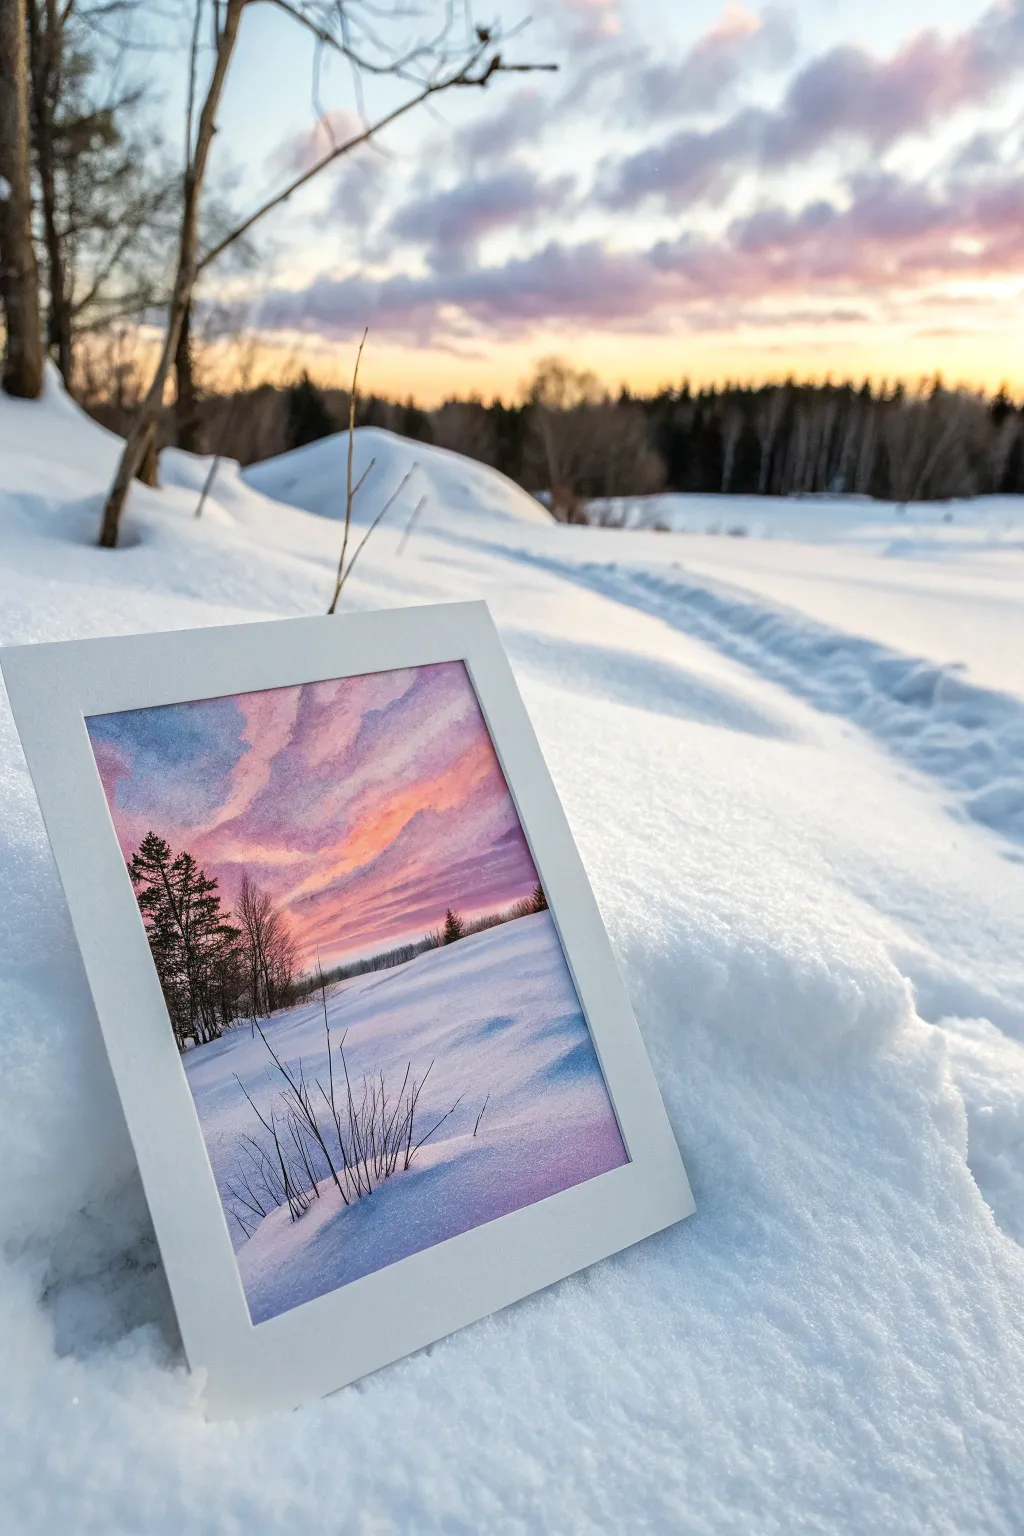
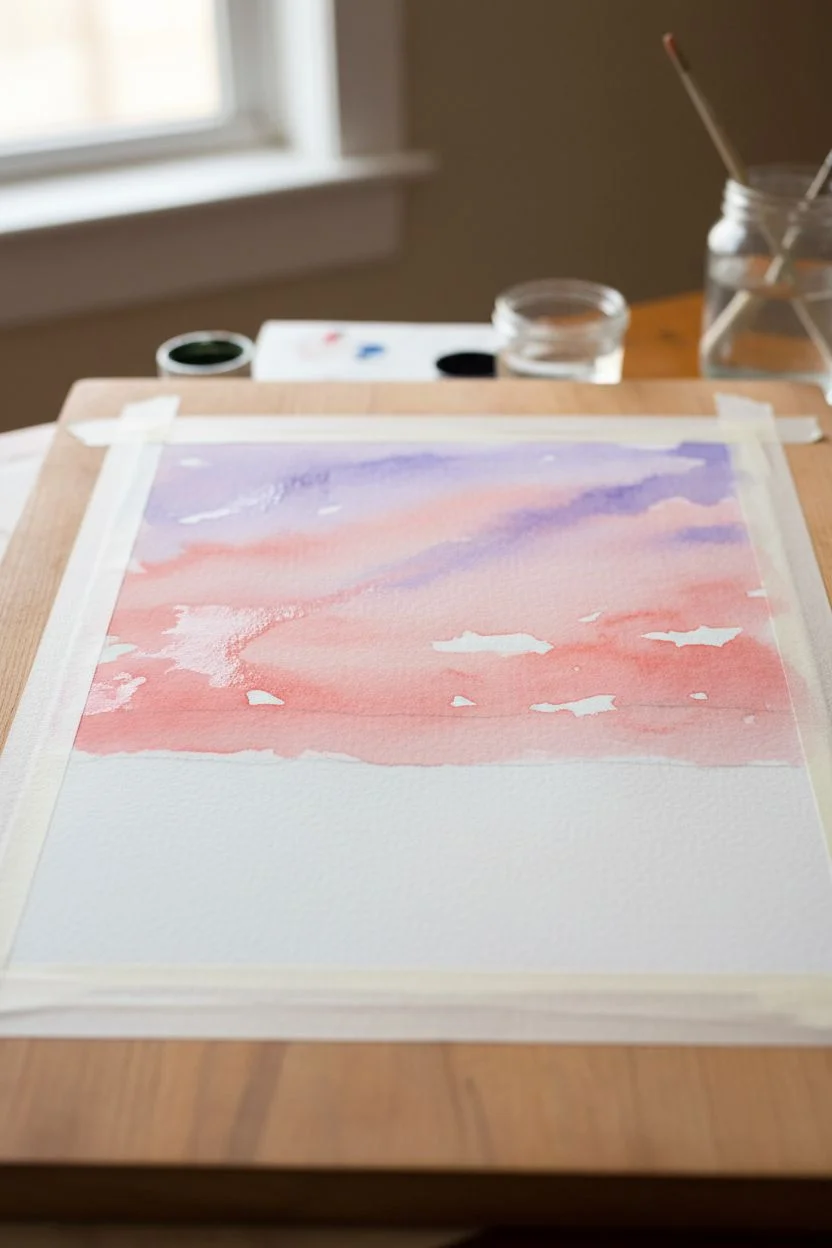
Capture the fleeting magic of a winter evening with this soft, pastel-hued watercolor painting. You will learn to layer delicate pinks and purples to create a dreamy sky that reflects beautifully onto a snowy foreground.
How-To Guide
Materials
- Cold press watercolor paper (140 lb/300 gsm)
- Watercolor paints (Alizarin Crimson, Ultramarine Blue, Cobalt Blue, Burnt Umber, Sap Green, Lemon Yellow)
- Masking fluid
- Round brushes (size 4, 8, and a small rigger or liner brush)
- Flat wash brush (1/2 inch or 3/4 inch)
- Clean water jars
- Paper towels
- Masking tape
- Board for taping down paper
Step 1: Preparation and Initial Sky Wash
-
Secure the paper:
Tape your watercolor paper down firmly to your board on all four sides. This prevents buckling and creates that crisp white border you see in the finished piece. -
Sketch the horizon:
Using a hard pencil (like an H or 2H), very lightly sketch a low horizon line about one-third of the way up the paper. Keep the line slightly uneven to represent rolling snow. -
Wet the sky:
With your large flat wash brush, apply clean water to the entire sky area above the horizon line. You want an even sheen, not puddles. -
Base sky wash:
Mix a watery wash of Alizarin Crimson with a tiny touch of Lemon Yellow to get a soft salmon pink. Brush this loosely across the middle and lower sky, leaving some white gaps for clouds. -
Add drifting clouds:
While the paper is still damp, drop in a mix of Cobalt Blue and a hint of Alizarin Crimson to create a soft violet. Apply this to the upper sky and randomly in diagonal drifts through the pink.
Step 2: Defining the Sunset and Horizon
-
Deepen the cloud shadows:
While the first layer is barely damp (not soaking), mix a stronger purple using Ultramarine Blue and Alizarin Crimson. Dab this onto the underside of the upper clouds to give them volume. -
The golden glow:
Near the horizon, where the sun has dipped, glaze a very pale yellow-orange. Be careful not to let this mix directly with wet purple paint, or it will turn muddy. -
Dry partially:
Let the sky dry completely. If the paper feels cold to the back of your hand, it’s still wet. -
Paint the distant tree line:
Mix a dark, muted purple-grey using Ultramarine, Alizarin, and a touch of Burnt Umber. With a size 8 round brush, paint a jagged strip of trees along the horizon line. -
Softening the distance:
I like to take a clean, slightly damp brush and run it along the bottom edge of that tree line immediately after painting it. This blurs the trees into the snow below.
Soften Your Edges
Snow looks best with soft transitions. If a shadow edge looks too harsh, run a clean, damp brush along the edge to feather it out before the paint dries completely.
Step 3: Snowy Foreground and Shadows
-
Wet the snow area:
With a clean brush, wet the large snow area below the tree line with clean water. -
Reflecting the sky:
Take your diluted violet (Cobalt Blue + Alizarin) and wash it over the shadowed areas of the snow, specifically in the bottom right and sweeping diagonal strokes. -
Adding texture:
While the snow wash is wet, drop slightly stronger blue into the foreground corners to create depth and focus the eye toward the center. -
Preserve the highlights:
Leave the top ridges of the snow hills pure white paper. This unpainted surface is the brightest part of your snow.
Add Winter Sparkle
For a magical touch, sprinkle a tiny pinch of salt onto the wettest blue areas of the snow. When dry, brush it off to create crystalline snowflakes.
Step 4: Final Details
-
Foreground trees:
Once the paper is bone dry, mix a strong, dark green-black using Sap Green and Alizarin Crimson (or Burnt Umber). Use a size 4 brush to paint the silhouettes of pine trees on the left side. -
Tree detailing:
Use the tip of the brush to dab delicate foliage onto the pine trees. Keep the shapes irregular and organic. -
Adding the dry stalks:
Switch to your rigger or liner brush. With a watery mix of Burnt Umber and Blue, paint thin, spindly grass stalks emerging from the snow in the immediate foreground. -
Shadows for objects:
Mix a cool blue-grey and paint faint shadows casting to the right from the base of the pine trees and the small grass stalks. -
The reveal:
Wait until the painting is 100% dry before carefully peeling off the masking tape at a 45-degree angle to reveal your clean edges.
Now you have a serene winter moment captured forever on paper.


Moonlit Night Sky With a Soft Glow
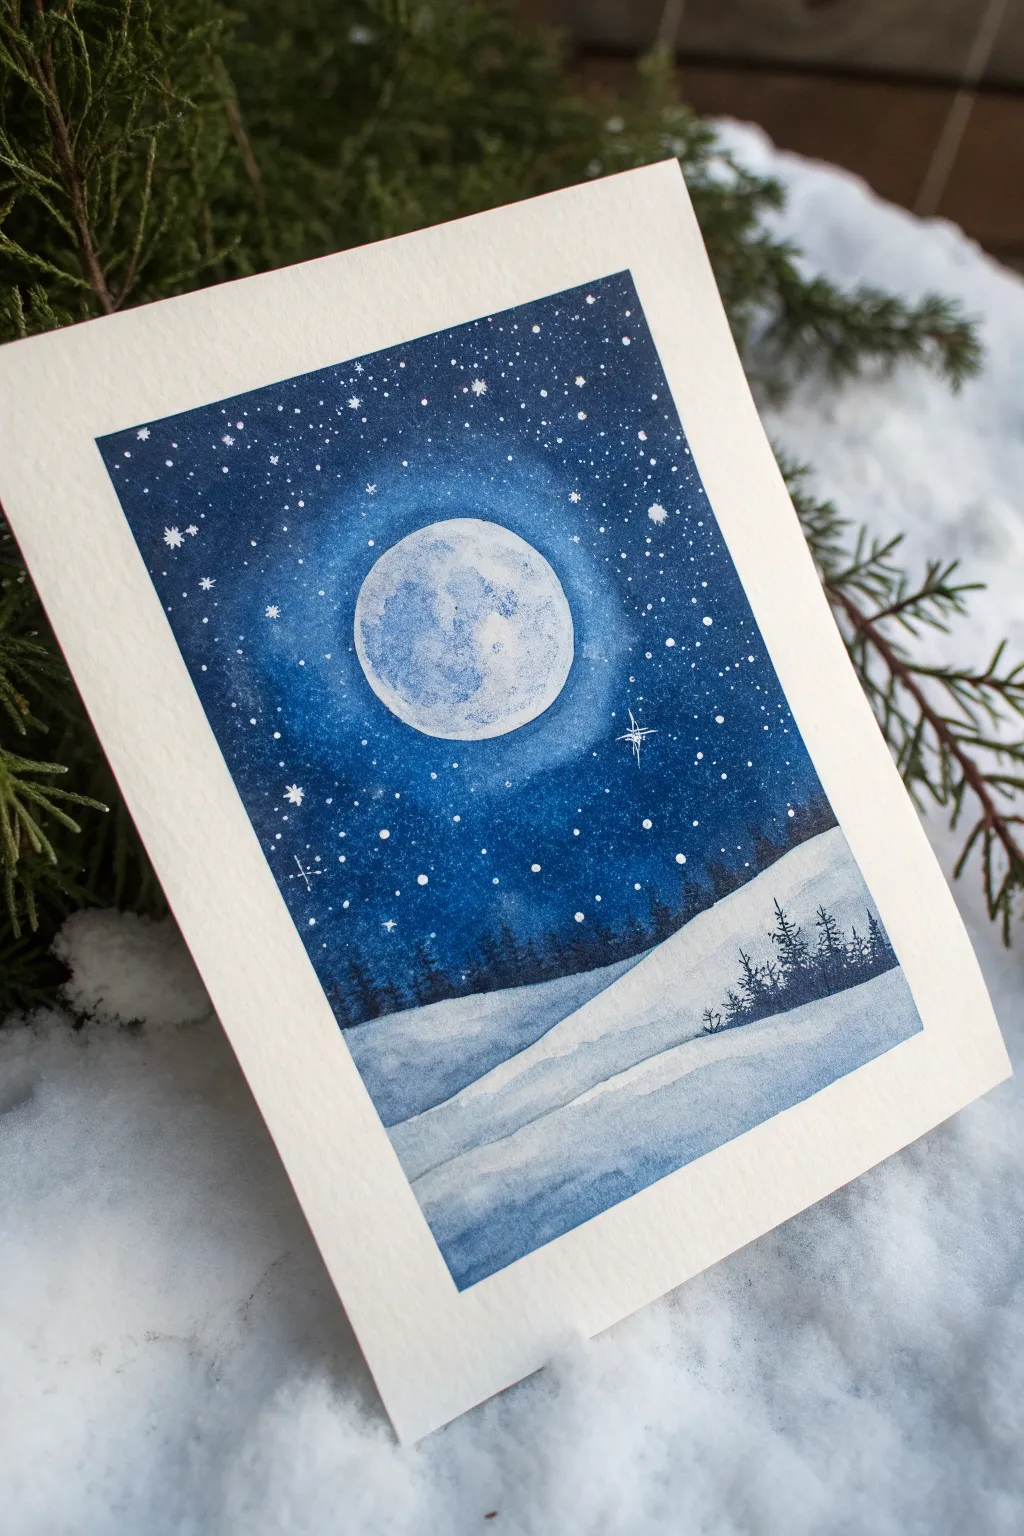
Capture the serene beauty of a crisp winter evening with this watercolor painting featuring a glowing moon and a snow-covered landscape. The contrast between the deep indigo sky and the soft, rolling snowy hills creates a peaceful, magical atmosphere.
Detailed Instructions
Materials
- Watercolor paper (cold press recommended)
- Masking tape
- Watercolor paints (Indigo, Prussian Blue, Payne’s Grey, Black)
- White opacity medium (white gouache, bleed-proof white, or white gel pen)
- Round brushes (sizes 2, 6, and 10)
- Jar or cup for tracing circles
- Pencil and eraser
- Clean water and paper towels
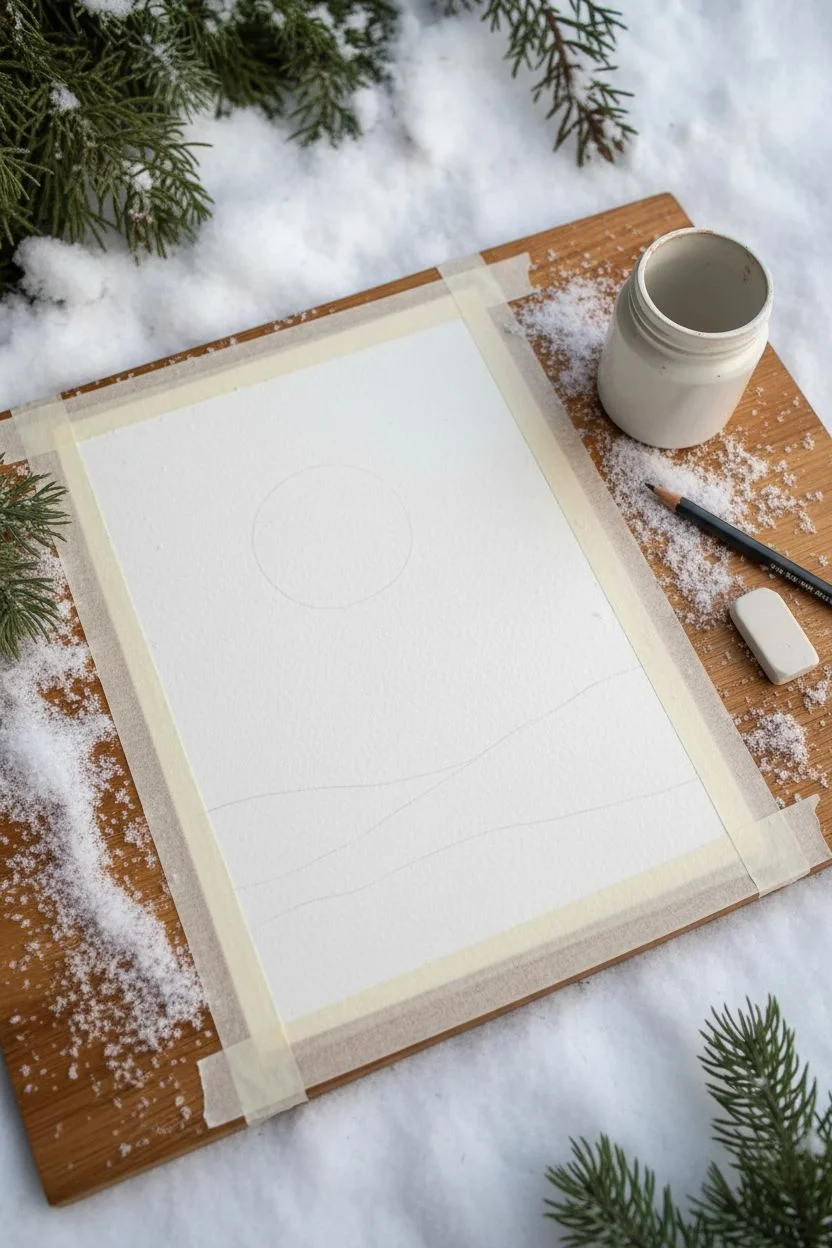
Step 1: Sketching and Masking
-
Secure the paper:
Tape down all four edges of your watercolor paper to a board or table to create a clean border and prevent buckling. -
Outline the moon:
Place a small jar or circular object in the upper center of your paper and lightly trace around it with a pencil to define your moon. -
Sketch the hills:
Draw two or three gentle, sloping lines across the bottom third of the paper to represent the snowy hills. Keep these lines faint.
Bleeding edges?
If paint seeps under your tape, use a slightly damp, stiff brush or a ‘magic eraser’ sponge to gently lift the unwanted pigment back to white
Step 2: Painting the Sky
-
Wet the sky area:
Using clean water and your largest brush, wet the entire sky area around the moon, being very careful not to get water inside the moon circle itself. -
Apply the first wash:
Drop in a light wash of Prussian Blue around the moon’s perimeter. Let the wet paper carry the pigment outwards, creating a soft, glowing halo effect. -
Deepen the sky:
While the paper is still wet, mix a concentrated Indigo or Payne’s Grey. Apply this darker color to the edges and corners of the painting, blending inward towards the moon but stopping before you cover the lighter blue halo. -
Create the gradient:
Use a clean, damp brush to smooth the transition between the deep dark corners and the lighter blue ring around the moon. The goal is a seamless gradient. -
Let it dry completely:
Allow the sky layer to dry fully. If the paper is cold to the touch, it’s still wet.
Step 3: Painting the Moon
-
Base layer for the moon:
With a diluted mixture of pale blue or grey, paint inside the moon circle. Leave some areas white to create texture and craters. -
Add lunar details:
While the moon is damp, drop in slightly darker grey spots to mimic the moon’s surface texture. Let these bloom softly.
Sparkle finish
Mix a tiny pinch of iridescent medium or glitter watercolor into your white snow paint for hills that genuinely shimmer in the light
Step 4: Snowy Landscape
-
Shadowing the hills:
Mix a very watery grey-blue. Paint along the bottom edge of your pencil lines for the hills, pulling the color downwards to create soft shadows that define the slopes. -
Soften the edges:
Quickly use a clean, wet brush to fade the bottom edge of these shadows into the white of the paper, making the snow look soft and drifted.
Step 5: Final Details
-
Paint the tree line:
Using a small brush and thick Indigo or Black paint, dab in a line of distant trees where the sky meets the snow. Keep them loose and jagged. -
Add foreground trees:
On the closer snowy hill, paint a few detailed pine trees using the very tip of your brush. Start with a vertical line and use tiny horizontal strokes for branches. -
Splatter the stars:
Cover the hills with a piece of scrap paper to protect them. Load a brush with white gouache or white ink, and tap the handle against another brush to splatter stars across the sky. -
Enhance specific stars:
Use a small brush or white gel pen to manually add a few larger stars or a ‘twinkle’ star with cross shapes for extra sparkle. -
Reveal the border:
Once everything is bone dry, slowly peel off the masking tape at a 45-degree angle to reveal your crisp white edges.
Step back and admire your peaceful winter night scene before framing it or gifting it to a friend


Silhouette Pine Trees Against a Gradient Sky
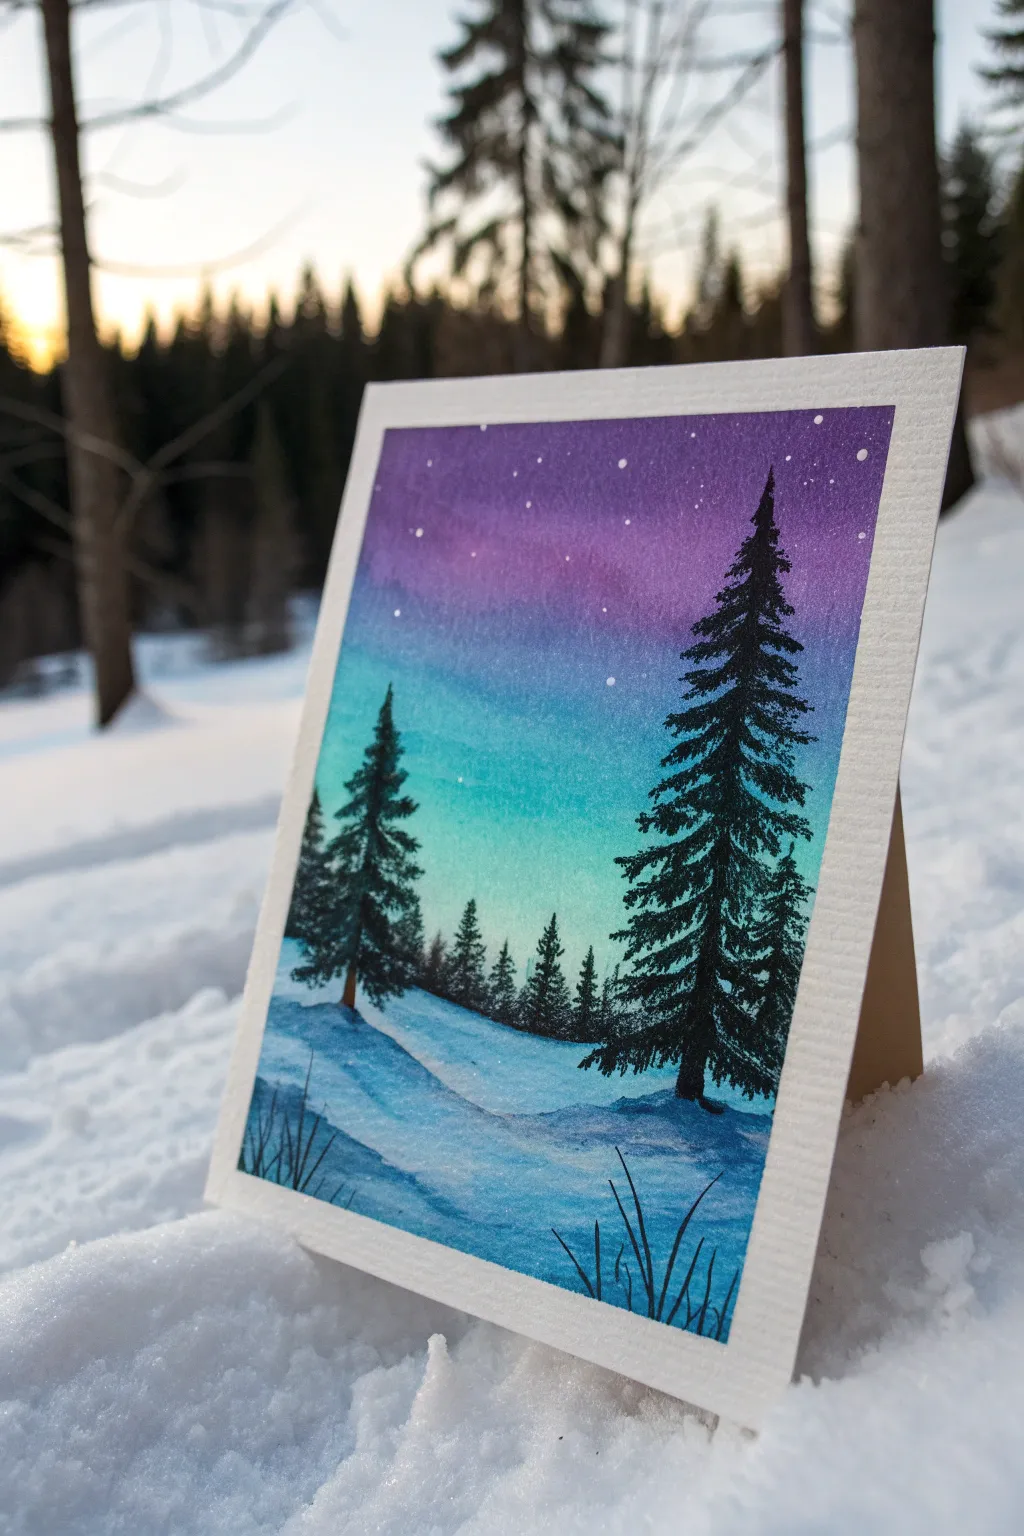
Capture the serene magic of a winter evening with this vibrant watercolor landscape. You’ll layer a stunning purple-to-teal gradient sky behind crisp black pine silhouettes to create a scene that glows with frosty atmosphere.
Step-by-Step Guide
Materials
- Cold press watercolor paper (300 gsm)
- Watercolor paints (Purple/Violet, Teal/Turquoise, Indigo, Black)
- White gouache or white acrylic paint
- Soft round brushes (size 8 and 12)
- Small detail brush (size 0 or 2)
- Old toothbrush (optional for stars)
- Artist tape (masking tape)
- Paper towels
- Two cups of water
Step 1: Setting the Scene
-
Tape it down:
Secure your watercolor paper to a board or table using artist tape on all four sides. This creates that crisp, clean white border you see in the final piece and prevents the paper from buckling when wet. -
Wet the sky area:
Visualize a horizon line about one-third of the way up from the bottom. Using a large clean brush, apply clear water to just the sky area above this imaginary line. The paper should glisten but not have puddles.
Uneven Sky?
If your sky dries with hard lines (an effect called ‘blooms’), don’t panic. Gently re-wet the entire sky area with clean water and lift color with a dry brush, or just embrace it as cloud texture.
Step 2: Painting the Gradient Sky
-
Apply the purple:
Load your brush with a rich purple or violet watercolor. Start applying it at the very top of the wet sky area, moving your brush horizontally back and forth. -
Introduce the teal:
Clean your brush and pick up a vibrant teal or turquoise color. Apply this below the purple band, letting the wet edges touch. The water on the paper will encourage them to bleed together naturally. -
Blend the transition:
If the transition looks harsh, gently run a damp (not soaking) brush along the line where the colors meet to soften the gradient. I like to tilt the board slightly to help gravity blend them. -
Fade to the horizon:
Add more water to your brush as you near the horizon line, making the teal paler and more translucent as it meets the snowy ground. Let this sky layer dry completely before moving on.
Step 3: Creating the Snowy Ground
-
Base shadow layer:
Mix a very watery, diluted blue-grey color. Paint curved, sweeping shapes at the bottom third of the paper to suggest rolling snow drifts. -
Deepen the snow:
While the snow wash is still slightly damp, drop in a slightly darker blue or indigo into the dips and valleys of your snowdrifts to create volume and depth. -
Let it dry:
Allow the entire painting to dry completely. The paper must be bone-dry for the next step, or the crisp trees will fuzz out.
Pro Tip: Depth of Field
Make distant trees look further away by adding a tiny drop of water to your black paint. The slight transparency makes them recede, while the solid black foreground trees pop forward.
Step 4: Adding the Silhouettes
-
Mix your darkest dark:
Create a thick, concentrated mixture of black watercolor. It should have the consistency of heavy cream to ensure it’s opaque against the colorful sky. -
Draw the main trunk:
Using a fine detail brush, paint a thin, straight vertical line for the trunk of the large right-hand tree. It’s okay if it’s slightly wobbly; nature isn’t perfect. -
Paint the top branches:
Starting at the very top of the trunk, make tiny, short strokes that angle downward. Keep these very narrow at the tip. -
Widen the tree:
Work your way down the trunk, making the branches progressively wider. Use a dabbing motion rather than painting individual needles to mimic the texture of fir boughs. -
Add the background forest:
Using a slightly lighter grey-black mix, paint a row of smaller, distant trees along the horizon line. These don’t need much detail, just triangular shapes with jagged edges. -
Paint the foreground tree:
Paint a second, smaller detailed tree on the left side using the concentrated black paint. Plant its base slightly lower on the paper than the distant trees to show perspective.
Step 5: Final Details
-
Add foreground grasses:
With your finest brush and black paint, flick quick, upward strokes at the very bottom corners to create dry winter grasses poking through the snow. -
Create the stars:
Dip an old toothbrush or stiff brush into white gouache mixed with a tiny bit of water. Use your thumb to flick the bristles, spraying tiny white specks across the purple and teal sky. -
Large stars:
Use your detail brush to manually place a few larger, distinct white dots in the upper purple section for brighter stars. -
The reveal:
Once absolutely everything is dry, slowly peel off the masking tape at a 45-degree angle to reveal your crisp white border.
Frame this mini masterpiece on a small stand or send it as a beautiful handmade winter greeting card
BRUSH GUIDE
The Right Brush for Every Stroke
From clean lines to bold texture — master brush choice, stroke control, and essential techniques.
Explore the Full Guide
Snow-Capped Evergreens Made With Simple Dabs
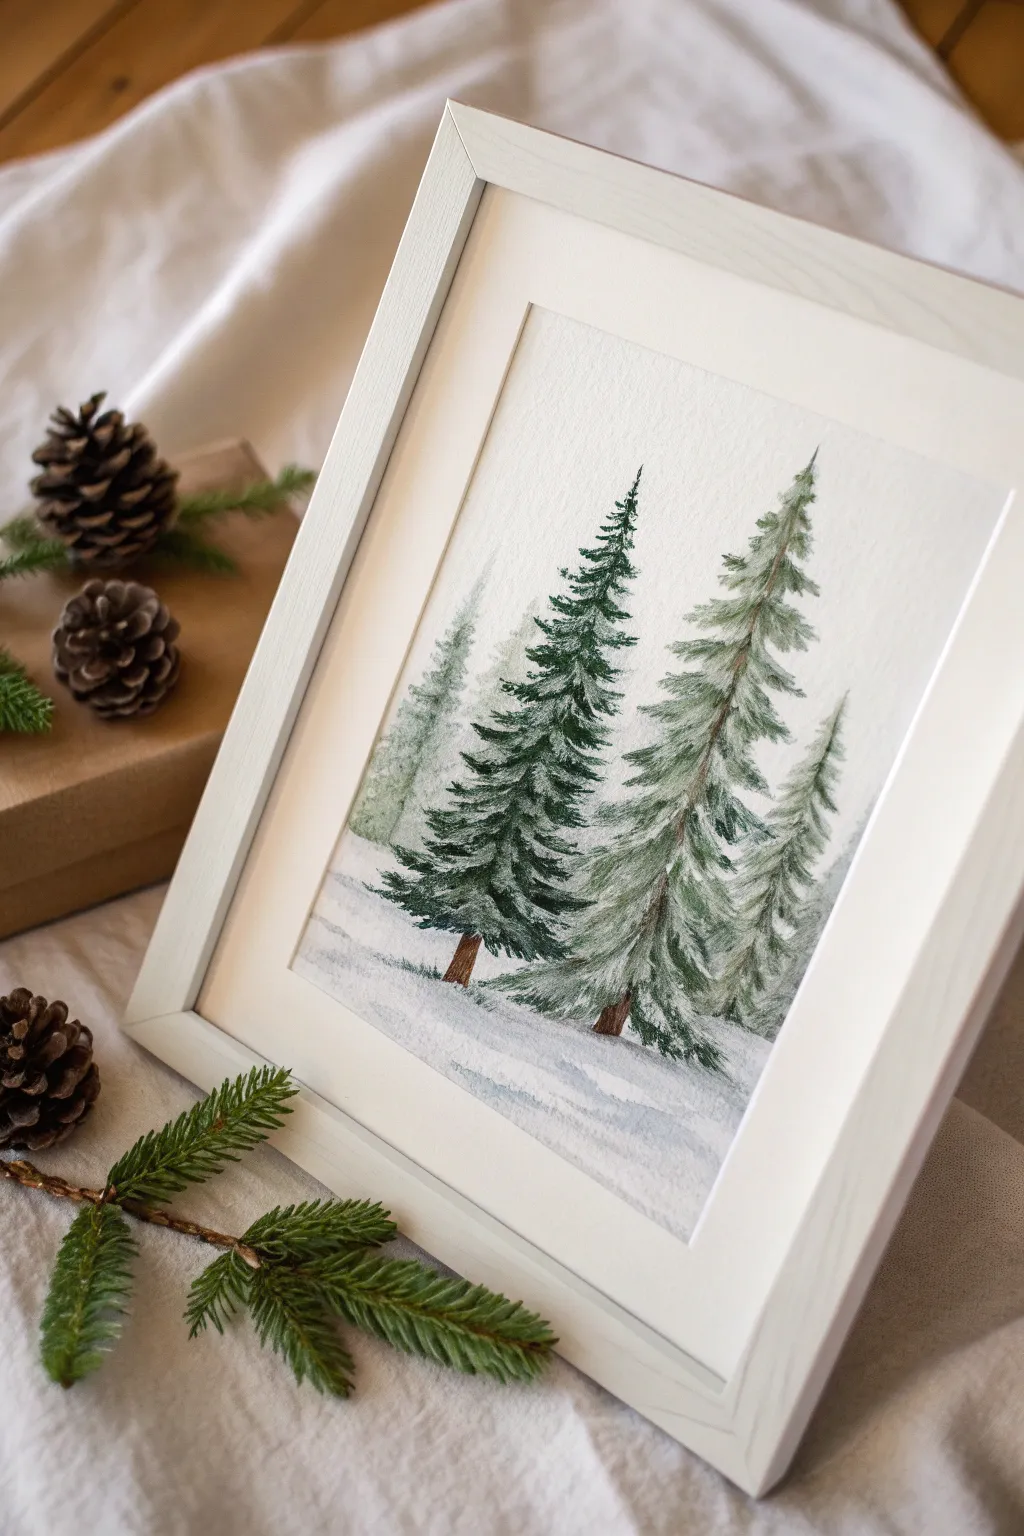
Capture the serene silence of a snowy forest with this surprisingly simple watercolor landscape featuring majestic evergreen trees dusted in fresh powder. The soft textures and layered greens create a peaceful winter scene that looks beautiful in any simple white frame.
Step-by-Step
Materials
- Cold press watercolor paper (300 gsm)
- Watercolor paints (Sap Green, Hooker’s Green, Indigo, Burnt Umber, Payne’s Gray)
- White gouache or opaque white watercolor paint
- Round watercolor brushes (sizes 2, 6, and 8)
- Two jars of water (one for clean, one for dirty)
- Paper towels
- Masking tape
- Pencil (HB or H)
Step 1: Setting the Scene
-
Prep your paper:
Tape your watercolor paper down to a hard board or table on all four sides. This prevents warping and creates a clean border later. -
Sketch the composition:
Using a light hand and an HB pencil, draw a faint horizon line about a third of the way up the paper. Sketch three vertical lines to indicate the trunks of your main trees—one distinct on the left, and two overlapping slightly on the right. -
Paint the background haze:
Mix a very watery wash of Sap Green and a touch of Payne’s Gray. Paint faint, ghost-like tree shapes in the background using a size 6 brush. Keep these edges soft and undefined to create depth. -
Let it dry completely:
Allow these background shapes to dry fully before moving on. If you paint over them while wet, the foreground trees will bleed into the background.
Loose is Better
Don’t overthink the branch shapes. Using the side of your brush rather than just the tip creates organic, unpredictable textures that look more like real nature.
Step 2: Painting the Main Trees
-
Mix your dark greens:
Create a rich, dark forest green by mixing Hooker’s Green with a drop of Indigo or Burnt Umber. You want a strong contrast against the white paper. -
Start the left tree:
Using the tip of your size 6 brush, start at the very top of the left pencil line. Use small, downward dabbing motions to create the narrow tree tip. -
Build the branches:
Working your way down the trunk, widen your strokes. flick the brush tip outwards and downwards to mimic drooping pine branches. Leave white gaps between branches—this is crucial for the snow later. -
Add the trunk base:
Near the bottom, mix Burnt Umber with a little blue to make a dark brown. Paint a small, visible section of the trunk peeking out from the bottom branches. -
Paint the right cluster:
Repeat this process for the two trees on the right. Vary the green slightly—maybe add more yellow to one or more blue to the other—so they don’t look like clones. Let the branches of these two trees overlap slightly. -
Deepen the shadows:
While the paint is still damp but not soaking, drop concentrated Indigo or dark green into the underside of the branches near the center trunk line. This adds volume.
Step 3: Adding Snow and Ground
-
Create the snowy ground:
Mix a very diluted wash of Indigo or Payne’s Gray (mostly water). Paint sweeping horizontal strokes below the trees to suggest shadows on the snow. -
Soften the edges:
Use a clean, damp brush to soften the edges of these ground shadows so they fade into the white of the paper gently. -
Prep the ‘snow’ paint:
Squeeze out some white gouache. It needs to be thick and creamy, like heavy cream, to cover the dark green paint effectively. -
Apply snow to branches:
Using your smallest brush (size 2), dab the white paint onto the top edges of your green branches. Don’t cover the green completely; just accent the tops where snow would naturally settle. -
Add texture:
For a natural look, gently dry-brush some white over the greener areas to look like frost. I like to keep the snow heaviest near the bottom of the tree. -
Final details:
Add tiny vertical white strokes on the background trees to suggest snow-covered trunks in the distance. -
Review and frame:
Once absolutely dry, peel off the tape carefully. Place your artwork in a simple white or light wood frame to complement the winter theme.
Sparkle Effect
Before the snow paint dries, sprinkle a tiny pinch of iridescent fine glitter or salt onto the wet white gouache for a magical, frosty shimmer.
Hang your new winter landscape in a cozy corner to enjoy that snowy tranquility all season long.
A Cute Snowman Built From Three Simple Shapes
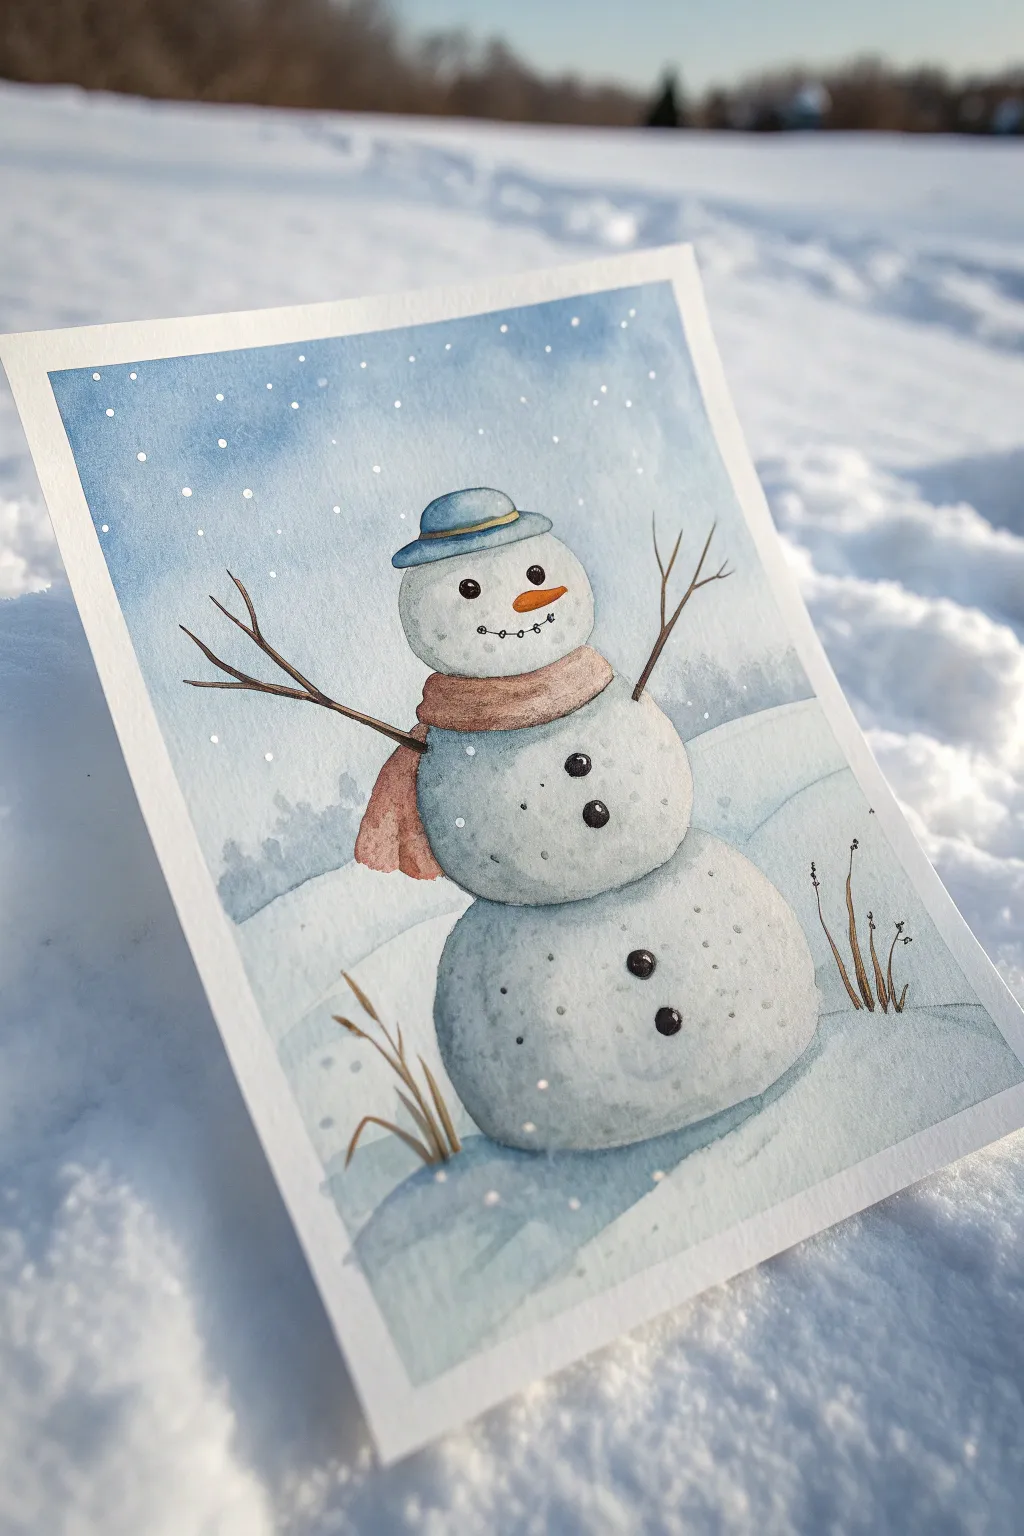
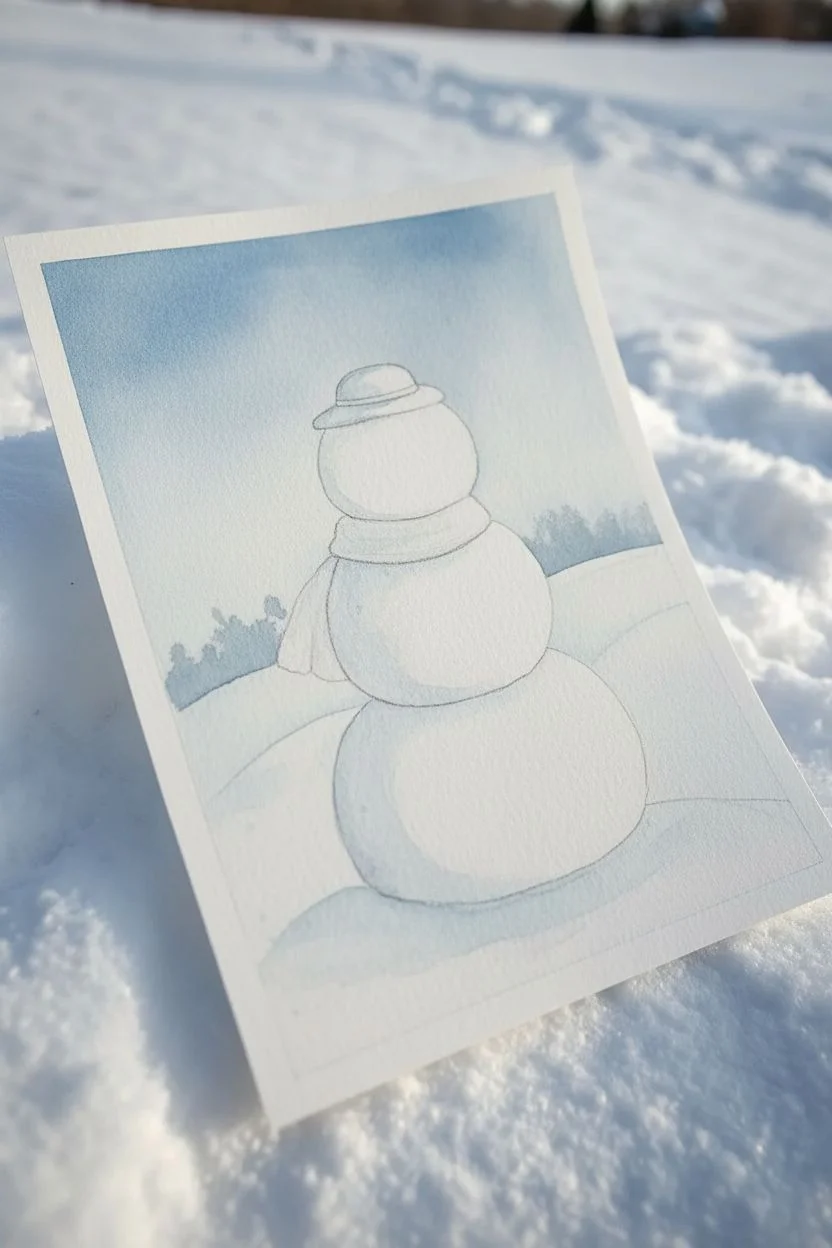
Capture the magic of a fresh snowfall with this charming watercolor illustration. Featuring a classic three-tiered snowman and soft, blurred edges, this project is perfect for creating personalized holiday cards.
How-To Guide
Materials
- Cold press watercolor paper (postcard size, approx. 4×6 or 5×7 inches)
- Watercolor paints (Indigo Blue, Burnt Sienna, Payne’s Grey, Orange)
- Round watercolor brushes (Size 2, 4, and 6)
- White gouache or white gel pen
- Masking tape
- Pencil and kneaded eraser
- Two jars of water
- Paper towels
Step 1: Sketching and Sky
-
Light Outline:
Begin by lightly sketching three stacked circles for the snowman’s body. Make the bottom circle the largest and slightly flattened, the middle circle medium-sized, and the head the smallest. Add a simple trapezoid shape for the hat on top. -
Adding Details:
Sketch thin, branching lines for the arms extending from the middle section. Draw the outline of a scarf wrapped around the neck, letting the ends drape down the left side. Don’t worry about facial features just yet. -
Defining the Horizon:
Draw a faint, curved line behind the snowman about halfway up the bottom snowball to mark where the snowy hill meets the sky. -
Wet-on-Wet Sky:
Using your largest brush, wet the entire sky area with clean water, carefully painting around the snowman and hat. While the paper is glistening, drop in watery Indigo Blue or a cool blue mix. Let the pigment bloom naturally, keeping it darker at the top and fading near the horizon. -
Soft Background Trees:
While the sky layer is still damp (but not soaking), dab a slightly thicker mix of blue-grey along the horizon line. Allow these shapes to blur into the wet paper to create the illusion of distant, misty trees.
Salt Texture Trick
While the blue shadow wash on the snowman is still wet, sprinkle a few grains of table salt on it. As it dries, the salt pushes pigment away, creating amazing frosty crystal textures.
Step 2: Painting the Snowman
-
First Shadows:
Once the sky is bone dry, mix a very diluted watery grey-blue. Paint the right side and bottom of each snowball to create form and shadow, keeping the upper left areas white for highlights. Use a clean, damp brush to soften the edges of the shadows. -
Texture Splatter:
To give the snow a textured look, load a small brush with slightly darker grey paint and tap it against your finger over the snowman. This creates tiny speckles that resemble packed snow. I find this really helps it look more realistic than flat white paper. -
Painting the Scarf:
Mix a warm reddish-brown using Burnt Sienna. Paint the scarf carefully, adding a slightly darker value in the folds where the fabric overlaps to show depth. -
The Hat:
Paint the hat with a cool, muted blue. Leave a tiny sliver of white paper or lift paint with a thirsty brush to create a highlight on the brim. Add a thin stripe of yellow or gold for the hat band. -
Stick Arms:
Using a size 2 brush and a mix of Burnt Sienna and Payne’s Grey (to make a dark brown), paint the thin, twiggy arms. Vary the pressure on your brush to make the branches look organic and tapered. -
Facial Features:
Use a detail brush to paint two small black dots for eyes and a curved line of smaller dots for the coal smile. Paint a small, triangular orange carrot nose pointing slightly to the right.
Make It 3D
Use a slightly darker shade of blue-grey right under the scarf and head to create a deep drop shadow. This separates the head from the body and makes the snowman pop off the page.
Step 3: Foreground and Finishing Touches
-
Snowy Ground:
Wet the ground area below the horizon line. Add very faint washes of cool blue to suggest undulating snow drifts, focusing the color near the bottom corners and under the snowman for a cast shadow. -
Foreground Grasses:
Using your brown mixture, paint a few wispy blades of dried grass poking out of the snow in the bottom left and right corners. Keep these loose and swift. -
Coal Buttons:
Add three irregular black buttons down the center of the snowman’s body. Leave a tiny speck of white paper in the center of each, or add white gouache later, to make them look shiny. -
Falling Snow:
Once the entire painting is completely dry, use white gouache or a gel pen to dot snowflakes all over the sky and overlapping the snowman. Vary the size of the dots for depth. -
Final Highlights:
Add tiny touches of white gouache to the top of the carrot nose, the rim of the hat, and the tops of the stick arms to show where snow has settled.
Peel off your masking tape to reveal a crisp border and enjoy your winter masterpiece

PENCIL GUIDE
Understanding Pencil Grades from H to B
From first sketch to finished drawing — learn pencil grades, line control, and shading techniques.
Explore the Full Guide
Bright Barn Pop of Color in a Snowy Field
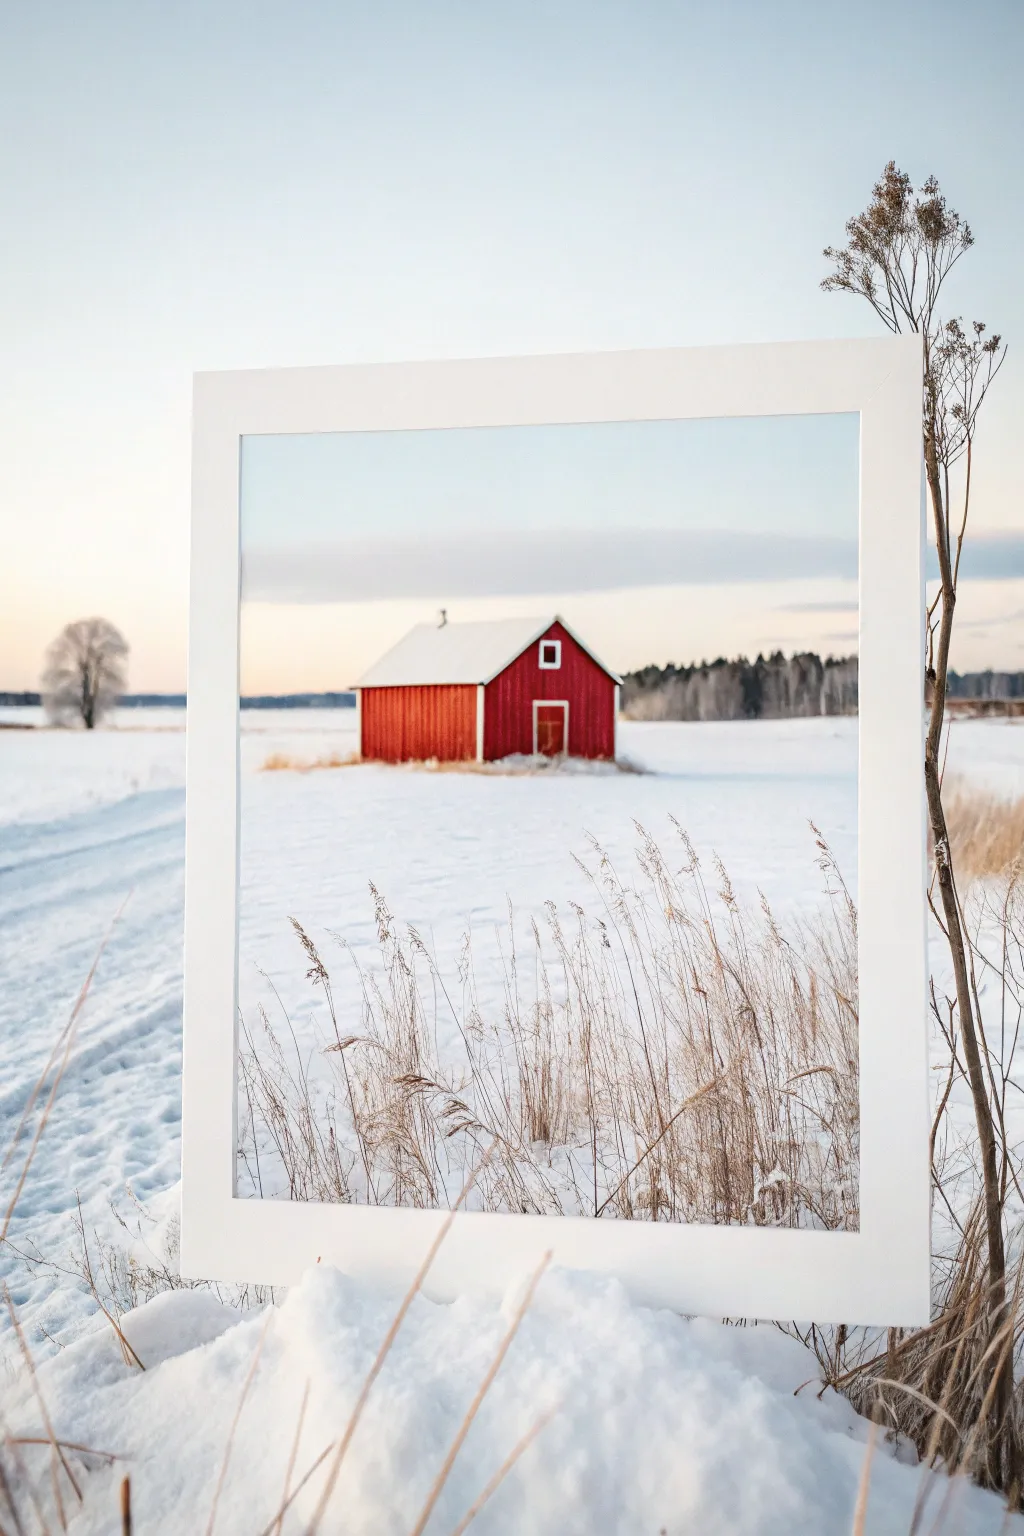
Capture the stark beauty of a winter landscape with this beginner-friendly acrylic painting featuring a vibrant red barn set against a serene white field. The clever composition places the finished canvas directly into a real snowy setting, creating a fun optical illusion where the painted grasses seem to blend with nature.
Step-by-Step Guide
Materials
- Canvas board or stretched canvas (11×14 or similar)
- Wide, white picture frame (glass removed)
- Acrylic paints: Titanium White, Mars Black, Cadmium Red, Burnt Umber, Ultramarine Blue, Yellow Ochre
- Brushes: Large flat wash brush (1 inch), medium filbert brush, small round detail brush, rigger or liner brush
- Palette and palette knife
- Water cup and paper towels
- Pencil for sketching
- Painter’s tape (optional)
Step 1: Setting the Scene
-
Establish the Horizon:
Begin by lightly sketching a horizon line about one-third of the way up the canvas. This doesn’t need to be perfectly straight; a slight undulation makes the snowy field look more natural. -
Outline the Barn:
Sketch a simple house shape for the barn in the middle ground, slightly off-center. Draw a rectangular base with a triangle on top for the roof, then add a slanted roofline extending to the left to give it perspective. -
Paint the Sky Gradient:
Mix Titanium White with a tiny touch of Ultramarine Blue. Starting at the top of the canvas, paint downwards using your large flat brush. As you near the horizon, add more white to the mix to create a fade, hinting at the pale winter light. -
Cloud Layering:
While the sky is still slightly wet, mix a very faint grey-purple using blue, a speck of red, and white. Sweep this horizontally across the lower sky to suggest distant cloud banks or fog.
Step 2: The Pop of Red
-
Block in the Snow:
For the snowy foreground, use pure Titanium White. Paint broadly with the large flat brush, using horizontal strokes. I like to mix in the tiniest drop of blue in just a few spots to create cool shadows where the snow might dip. -
Paint the Barn Walls:
Load your medium filbert brush with Cadmium Red mixed with a touch of Burnt Umber to deepen it slightly. Paint the vertical walls of the barn, using vertical strokes to simulate wood siding. -
Add the Roof:
Paint the roof using pure white. If the background sky is too light, add a tiny touch of grey to the roof edge so it stands out against the clouds. -
Details and Trim:
Switch to your small round brush. Use white paint to add the trim around the roofline, the square window near the peak, and the door frame. Fill the window center and door with a dark mix of Umber and Blue.
Uneven Paint?
If your red barn paint looks streaky or transparent, let the first coat dry completely. Red pigment is naturally translucent, so applying a second or third coat will make the color solid and vibrant.
Step 3: Distant Trees & Foreground
-
Distant Tree Line:
Mix a dark grey-green using Black, Blue, and a hint of Yellow Ochre. Using the edge of a flat brush or a small round brush, tap in a line of trees along the horizon behind the barn. Keep these blurry and indistinct to show depth. -
Solo Tree:
On the far left horizon, paint a single, faint deciduous tree using a watery grey mix. Use the tip of your brush to drag delicate branches upward. -
Foreground Grasses Base:
Creating the dried grasses is what makes this painting realistic. Mix a light tan color using White, Yellow Ochre, and Burnt Umber. Using a rigger script liner brush, flick swift, upward strokes from the bottom edge of the canvas. -
Adding Dimension to Grass:
To make the grass look dense, mix a darker brown shade. Add a second layer of thin, flicking strokes interspersed with the lighter ones. Vary the height and direction; nature is rarely perfectly straight. -
Snowy Textures:
Use a dry brush with a tiny amount of pure white to lightly skim over the bottom of the red barn walls, mimicking snow that has drifted up against the structure. -
Shadows and Tracks:
Mix a very watery blue-grey glaze. Paint definitive diagonal streaks in the snow on the left side to look like tire tracks or established paths leading into the scene.
Texture Trick
Mix a little baking soda into your white paint for the foreground snow. It creates a gritty, fluffy texture that looks incredibly realistic when applied thick with a palette knife.
Step 4: Final Presentation
-
Final Highlights:
add striking white highlights to the top seed heads of your foreground grasses to catch the imaginary light. -
Framing:
Once the painting is completely dry, place it into your wide white frame. Secure the back. -
The Photo Op:
To recreate the specific look of the reference image, take your framed painting outside on a snowy day. Prop it up in the snow so the painted horizon aligns roughly with the real horizon for a seamless illusion.
Step back and enjoy the striking contrast of your cozy red barn against the cool winter world you’ve created.
Easy Snowy Mountain Peaks in Layered Shapes
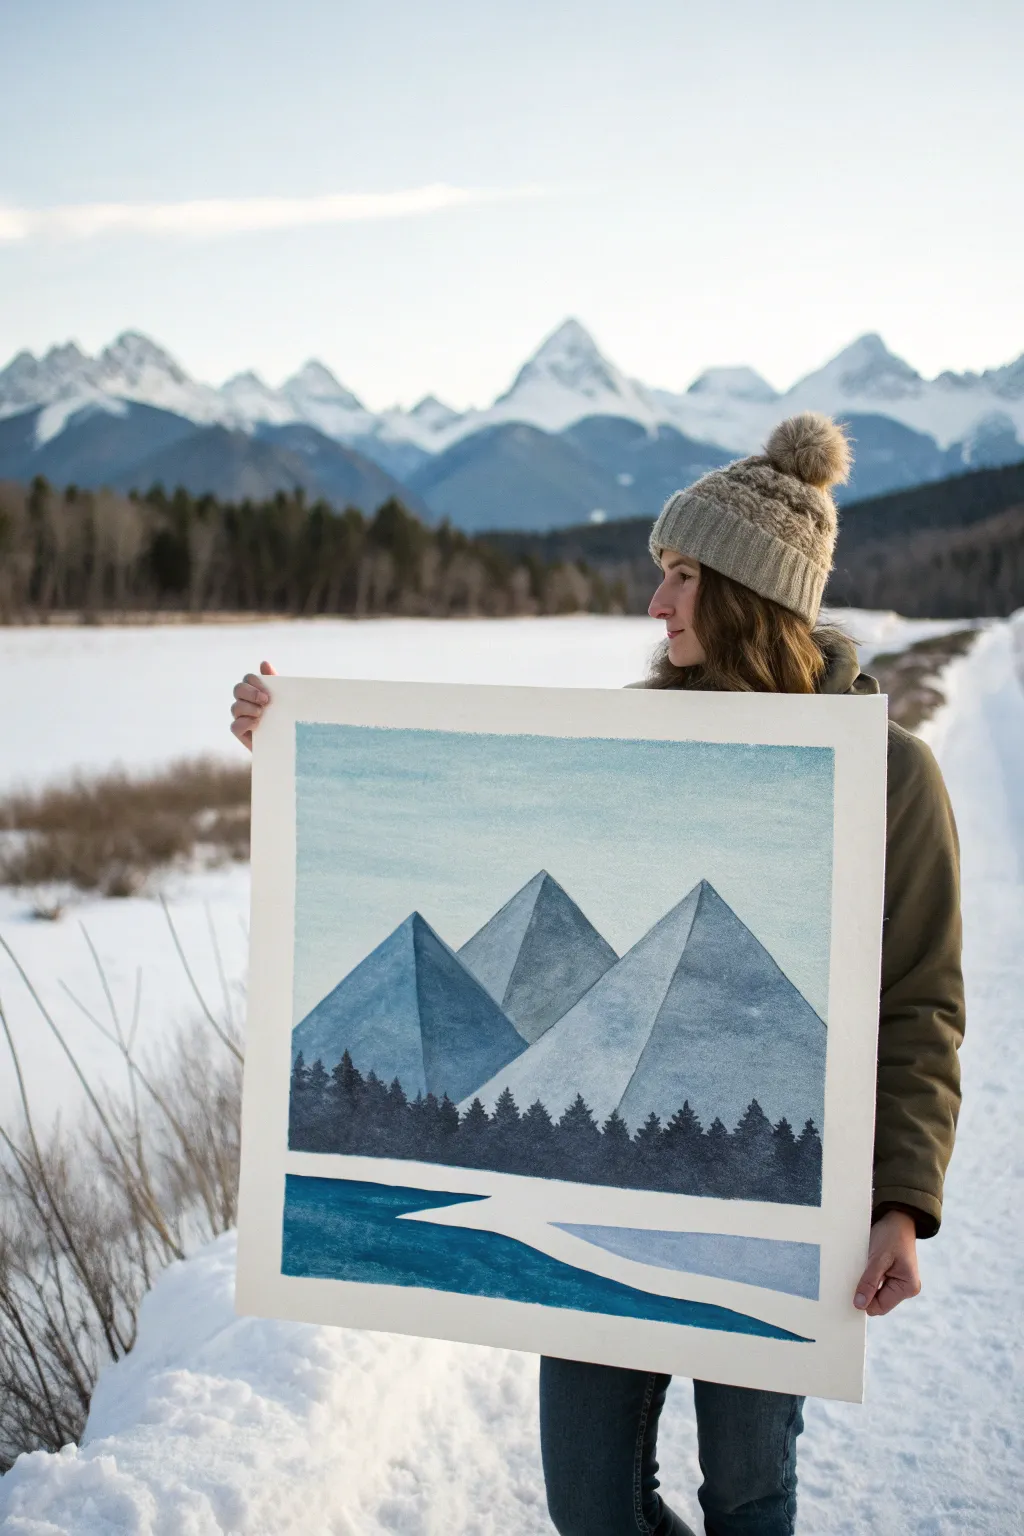
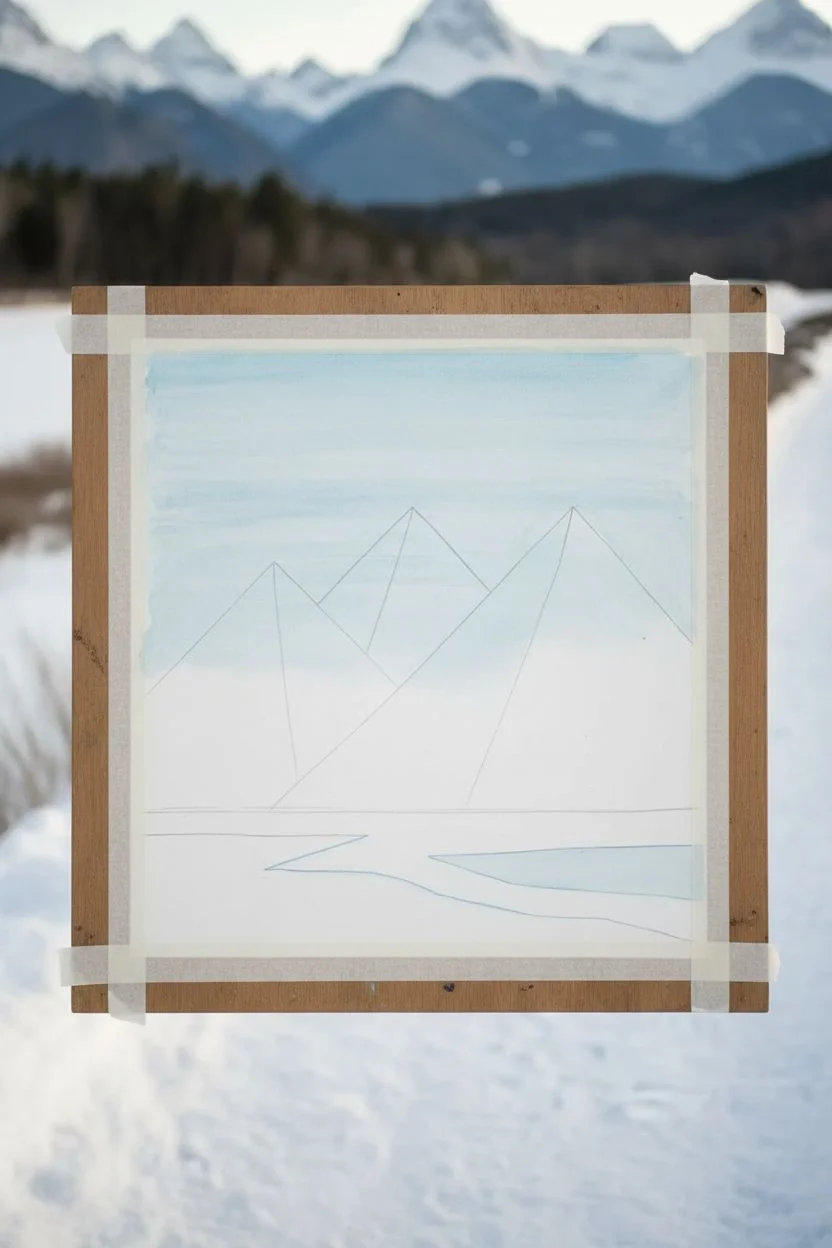
Capture the stark beauty of a mountain range using clean lines and a soothing, cool-toned palette. This project simplifies complex landscapes into layered geometric shapes, making it accessible for beginners while producing a modern, striking result.
How-To Guide
Materials
- Large square watercolor paper or heavy mixed-media board (approx 18×18 or 20×20 inches but size is flexible)
- Painter’s tape or masking tape (low tack)
- Acrylic paints: Titanium White, Phthalo Blue, Payne’s Grey, Mars Black
- Flat shader brushes (various sizes: 1-inch, 1/2-inch)
- Small round detail brush
- Ruler
- Pencil
- Palette for mixing
- Cup of water and paper towels
Step 1: Planning and Sky
-
Prep the surface:
Begin by taping down the edges of your large paper to a flat surface or drawing board. This creates a crisp white border around the final piece and prevents the paper from buckling under the paint. -
Sketch the layout:
Using your ruler and pencil, lightly draw a horizon line about one-third up from the bottom. Above this, sketch three large, overlapping triangles for your mountains. They don’t need to be perfect pyramids—vary their heights and widths slightly to keep it interesting. -
Sketch the foreground:
Below the horizon line, sketch jagged, angular shapes representing ice flows or snowy banks. Keep these lines sharp and geometric to match the mountain style. -
Mix the sky color:
On your palette, mix a very large amount of Titanium White with a tiny dot of Phthalo Blue. You want a pale, icy blue. Add a touch of water to make the paint fluid but opaque. -
Paint the background:
Fill in the entire sky area behind your pencil mountains. Use long, horizontal strokes with your largest flat brush. Don’t worry if you paint slightly over the mountain lines, as the darker mountain colors will cover it later.
Step 2: The Geometric Mountains
-
Mix mountain shades:
Create three distinct shades of blue-grey. Start with your sky mix and add more Phthalo Blue and a touch of Payne’s Grey for the lightest mountain. Make a second mix slightly darker, and a third mix darker still. -
Tape the first mountain:
I find that using tape is the secret to those crisp edges. Apply masking tape along the pencil lines of the mountain that is furthest back (usually the middle one). -
Paint the first peak:
Fill in this masked shape with your lightest mountain color. Use a flat brush and stroke away from the tape edge to prevent paint bleeding underneath. Remove the tape immediately while the paint is still wet. -
Dry completely:
Let this first shape dry fully before moving on. This is crucial—if you tape over wet paint, it will peel. -
Paint the overlapping peaks:
Repeat the taping and painting process for the left and right mountains. Use your medium and dark blue-grey mixes here. Notice how the different values create depth, making some peaks look closer than others. -
Add dimension (optional):
If you want a 3D effect like the reference, you can use a slightly lighter version of the color on one side of a triangle to mimic sunlight hitting a face.
Bleeding Lines?
If paint bleeds under your tape, wait until it is 100% dry. Then, use a small flat brush with the background color (or white) to carefully touch up and straighten the edge.
Step 3: Trees and Foreground
-
Mix the forest color:
Mix a deep, dark charcoal color using Payne’s Grey and a little Mars Black. It should be very dark, almost silhouetted, but not pure flat black. -
Stipple the treeline Base:
Using a flat brush, paint a solid horizontal band across the bottom of the mountains where they meet the ground. This is the dense undergrowth of the forest. -
Paint the tree tops:
Switch to your small round brush. Working upward from that dark band, paint tiny vertical lines and dab small, triangular shapes to create the jagged tops of pine trees. Vary heights for realism. -
Outline the icy water:
Move to the bottom third of the paper. Use your pure Titanium White to paint around the angular shapes you sketched earlier. This white space represents the snow-covered banks. -
Fill the water:
Mix a saturated, medium-dark teal using Phthalo Blue and a tiny bit of Grey. Fill in the water shapes. Ensure the edges where the water meets the white snow are sharp and clean. -
Final touches:
Once everything is bone dry, carefully peel away the border tape at a 45-degree angle to reveal your clean white frame.
Make it Sparkle
Mix a tiny pinch of silver mica powder or iridescent medium into your white paint for the snow banks. It adds a subtle, magical shimmer that only catches the light at certain angles.
Now you have a serene, modern winter landscape ready to display or gift


Winter Birch Trees With Quick Bark Marks
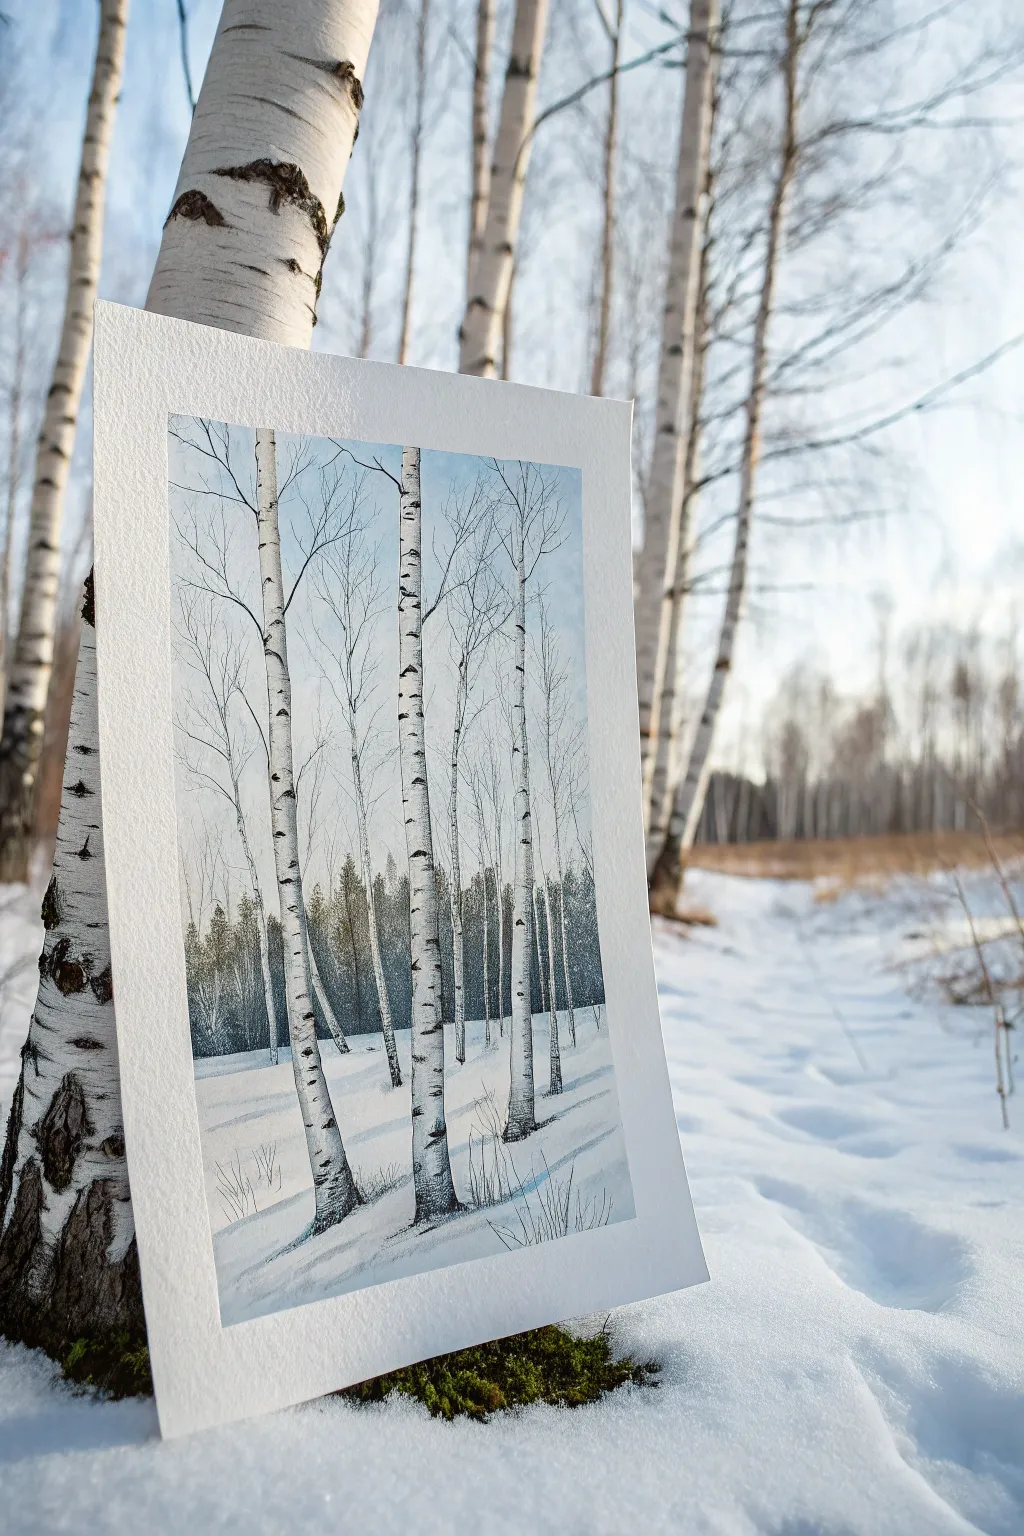
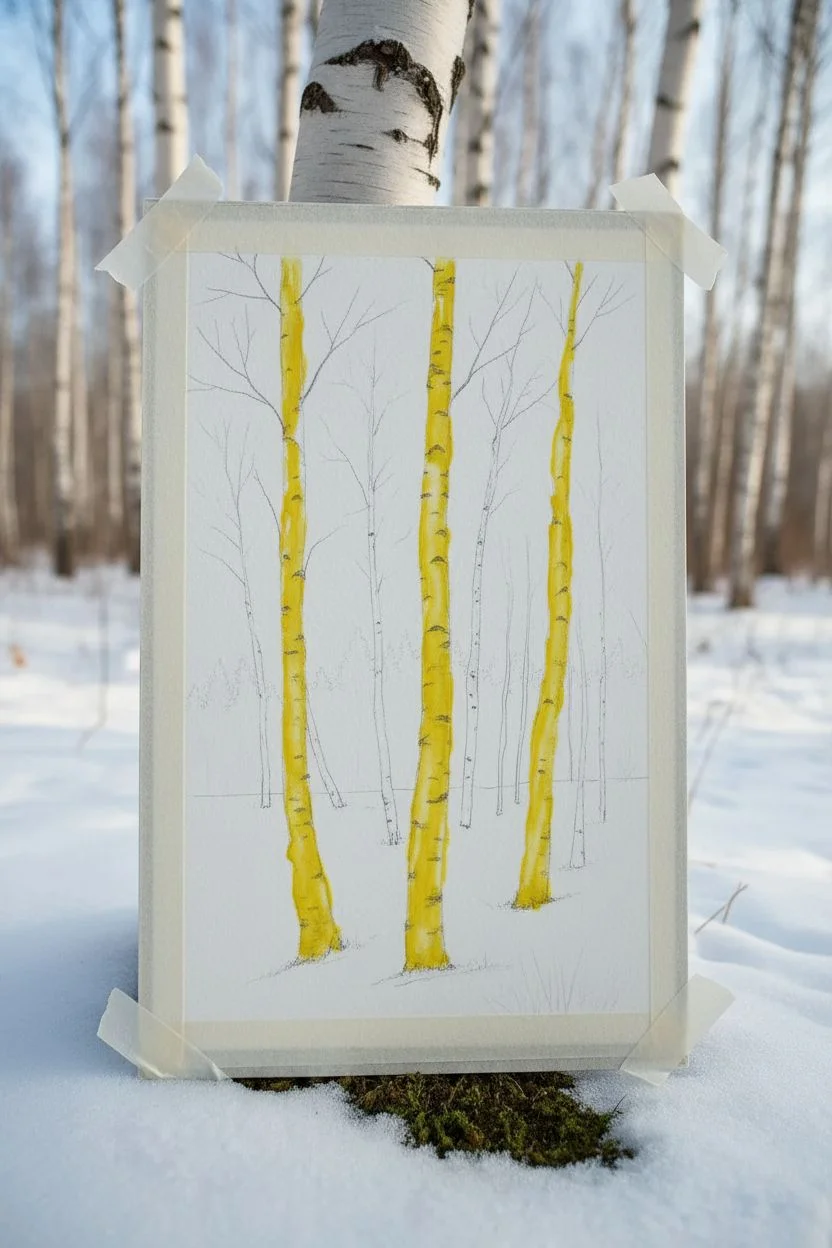
Capture the serene silence of a snowy forest with this watercolor tutorial that focuses on the distinctive textures of birch bark. By combining masking fluid with expressive dry-brush techniques, you’ll create a realistic grove of trees set against a soft winter sky.
Detailed Instructions
Materials
- Cold press watercolor paper (140lb/300gsm)
- Watercolor paints (Ultramarine Blue, Burnt Umber, Payne’s Grey, Alizarin Crimson)
- Masking fluid (drawing gum)
- Old brush or ruling pen for masking fluid
- Flat brush (3/4 inch)
- Round brushes (sizes 4 and 8)
- Rigger or liner brush for fine branches
- Paper towels
- Painting board and masking tape
- Pencil and eraser
Step 1: Preparation and Masking
-
Sketch the composition:
Lightly sketch the outlines of three main birch trunks in the foreground using an HB pencil. Vary their width slightly and ensure they aren’t perfectly straight; a subtle curve adds naturalism. Sketch a few thinner trunks further back in the distance. -
Apply masking fluid:
Using an old brush or a dedicated applicator, apply masking fluid to cover the main tree trunks entirely. Don’t forget to mask out a few major branches extending from the main trunks. Let this dry completely before touching the paper again.
Step 2: Painting the Sky and Background
-
Wet-on-wet sky:
Wet the entire sky area with clean water using your large flat brush. Prepare a dilute wash of Ultramarine Blue with a tiny touch of Burnt Umber to gray it down. Apply this wash loosely, letting it be darker at the top and fading to almost white near the horizon line. -
Create the distant forest:
While the paper is still slightly damp (but not soaking), mix a thicker, darker grey-green using Payne’s Grey and a little yellow or green. Paint a band of vertical strokes across the horizon to represent a dense silhouette of distant pine trees. -
Soften the distance:
Run a damp, clean brush along the bottom edge of this tree line to blur it into the snowy foreground, creating a misty, atmospheric transition. Allow the entire painting to dry completely.
Oops! Paper Tearing?
If masking fluid tears your paper upon removal, the paper was likely too soft or the fluid stayed on too long. Next time, remove it within 24 hours.
Step 3: Revealing and Texturing the Trees
-
Remove the mask:
Once dry, gently rub off the masking fluid with a clean finger or a rubber cement pickup tool. You should now have stark white shapes reserved for your birch trees. -
Shadow the trunks:
Mix a very watery, pale blue-grey. Paint the shadowed side of each trunk (usually the right side) to give the trees cylindrical volume, leaving the sunlit left side pure white. -
Create the signature bark:
Mix a concentrated, creamy consistency of Payne’s Grey and Burnt Umber. Take a brush with very little moisture (blot it on a towel first) and drag it horizontally across the trunks. This dry-brush technique creates the rough, papery texture of birch bark. -
Add the ‘eyes’:
Paint specific curved, dark markings—often called eyes—where branches will eventually emerge or where knots would be. Press harder with your brush to make these marks solid dark.
Level Up: Salt Texture
While the sky wash is still wet, sprinkle a pinch of table salt on the blue paint. It will create unique, snowflake-like blooms as it dries.
Step 4: Branches and Snow Details
-
Paint fine branches:
Switch to your rigger or liner brush. Using a thin, inky mix of dark brown, paint delicate branches reaching upward. Remember that birch branches tend to grow somewhat vertically rather than horizontally. -
Connect branches to trunks:
Ensure your branches connect naturally to the trunks, thickening slightly at the join points. Add plenty of tiny, wispy twigs at the very tops of the trees. -
Add snow shadows:
Mix a cool lavender-blue for the snow shadows (Ultramarine and a dot of Alizarin Crimson). Paint diagonal cast shadows stretching across the ground from the base of each tree to the right, matching the light source on the trunks. -
Detail the foreground:
Use the rigger brush to flick up a few dry grasses or dead weeds peaking through the snow at the base of the trees. Keep these sparse to maintain the stark winter feeling. -
Final assessment:
Step back and look at contrast. If the bark markings look too light, go back in with almost pure black pigment to punch up the darkest crevices.
Now you have a crisp winter woodland scene ready to frame or give as a seasonal card
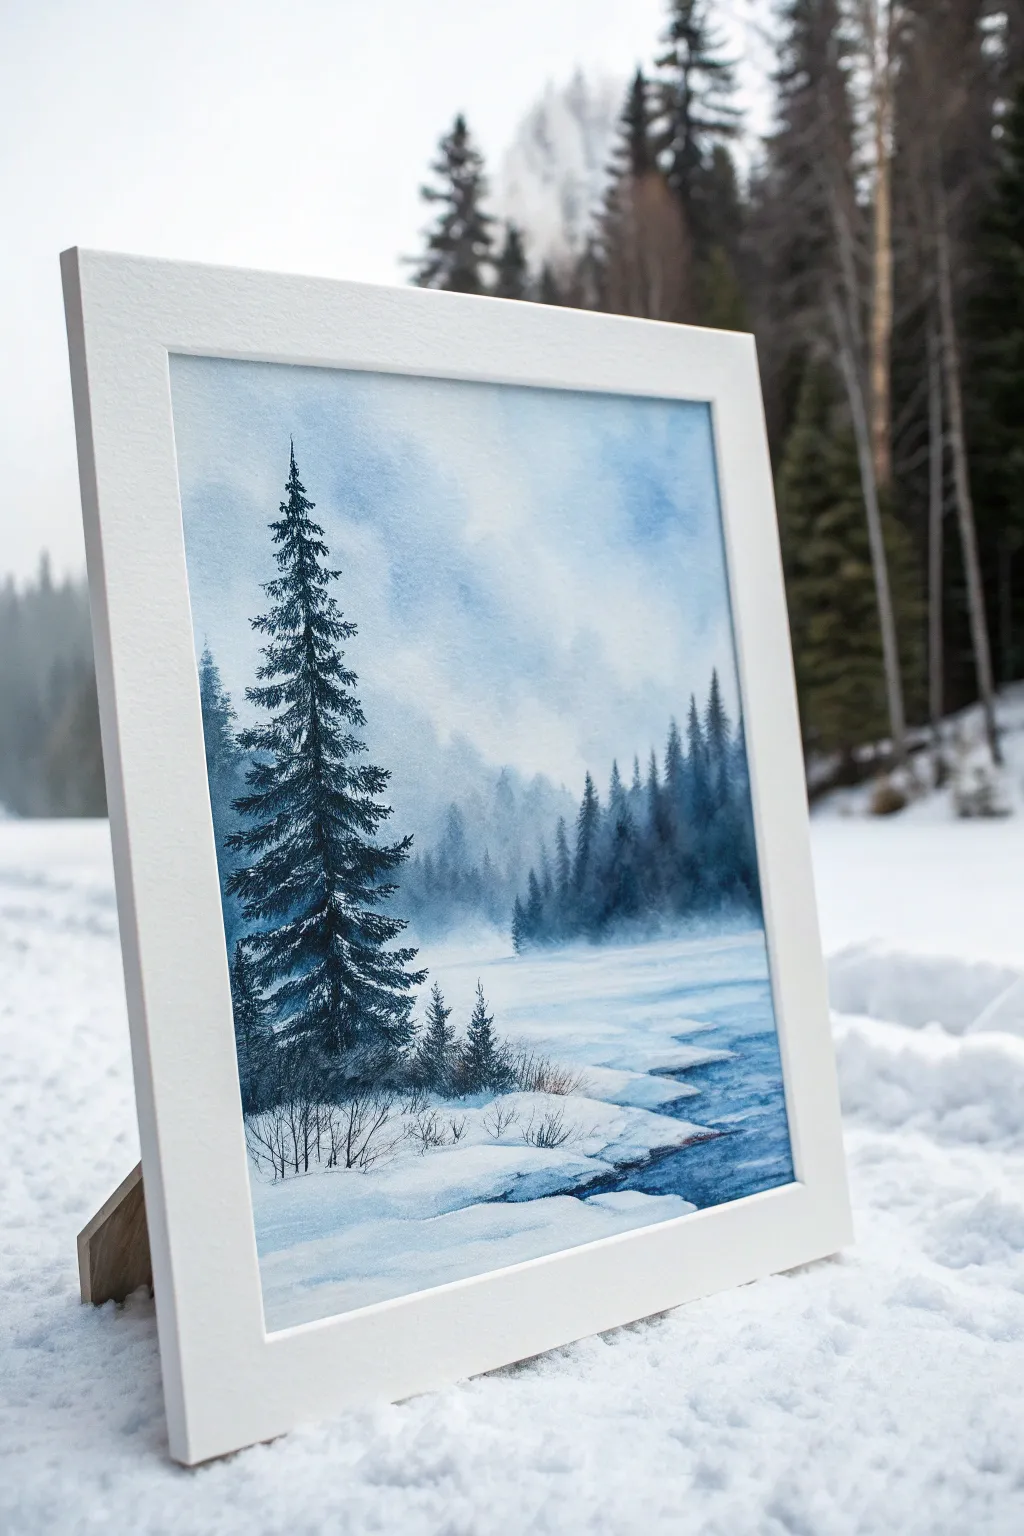
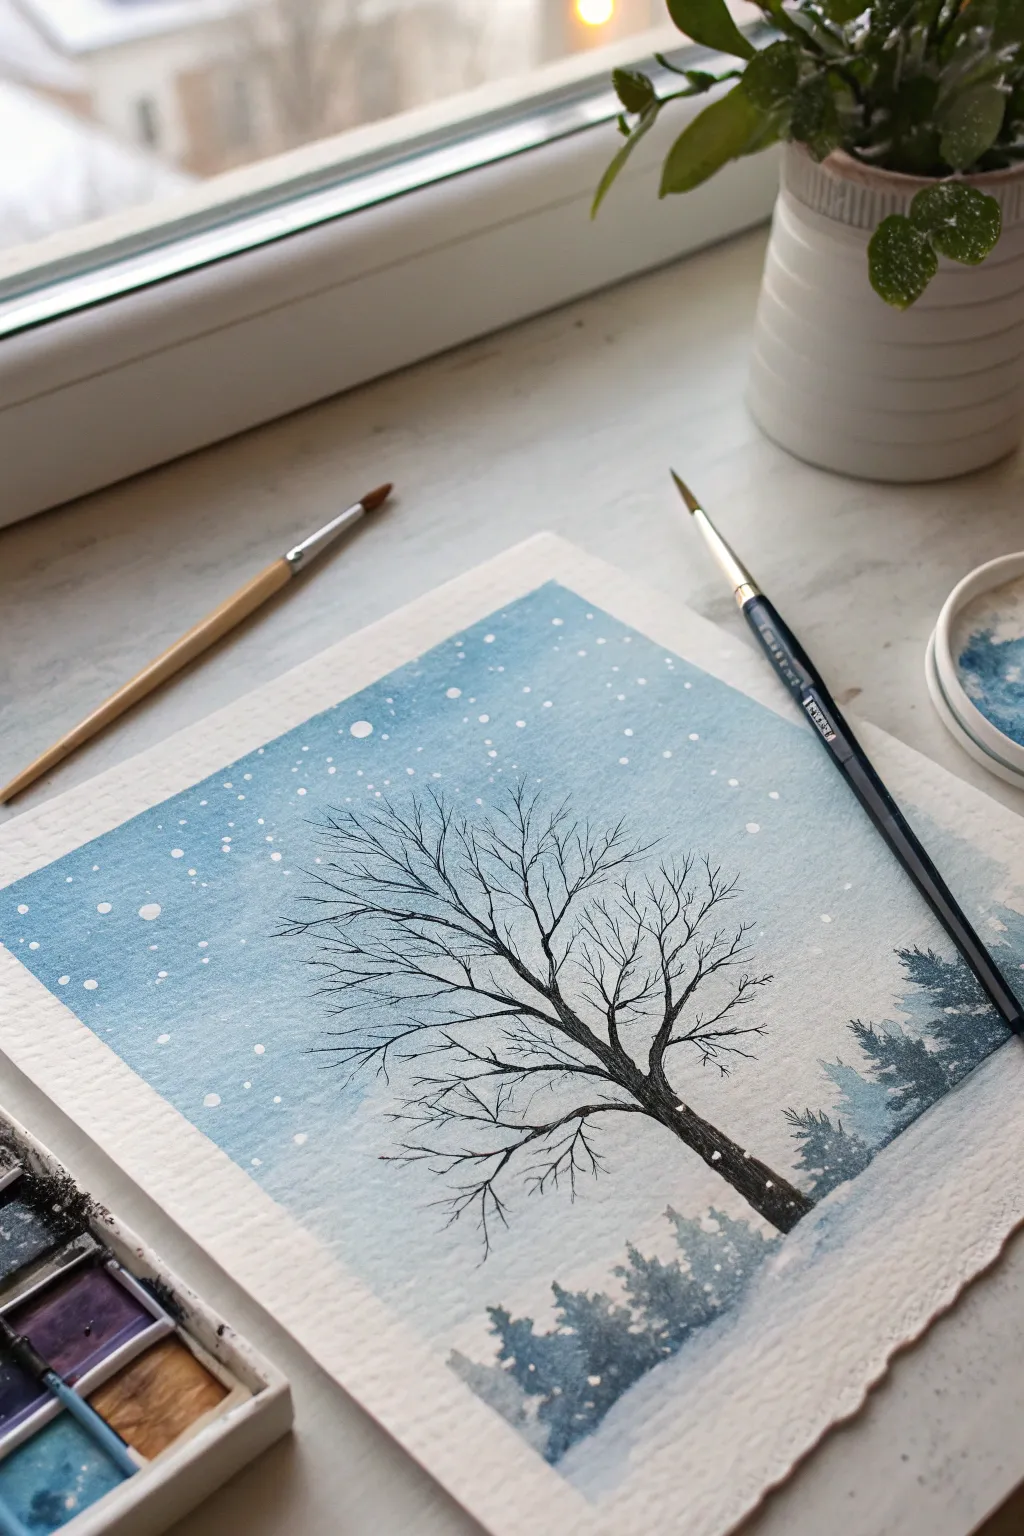
Frozen Lake With a Soft Reflection Band
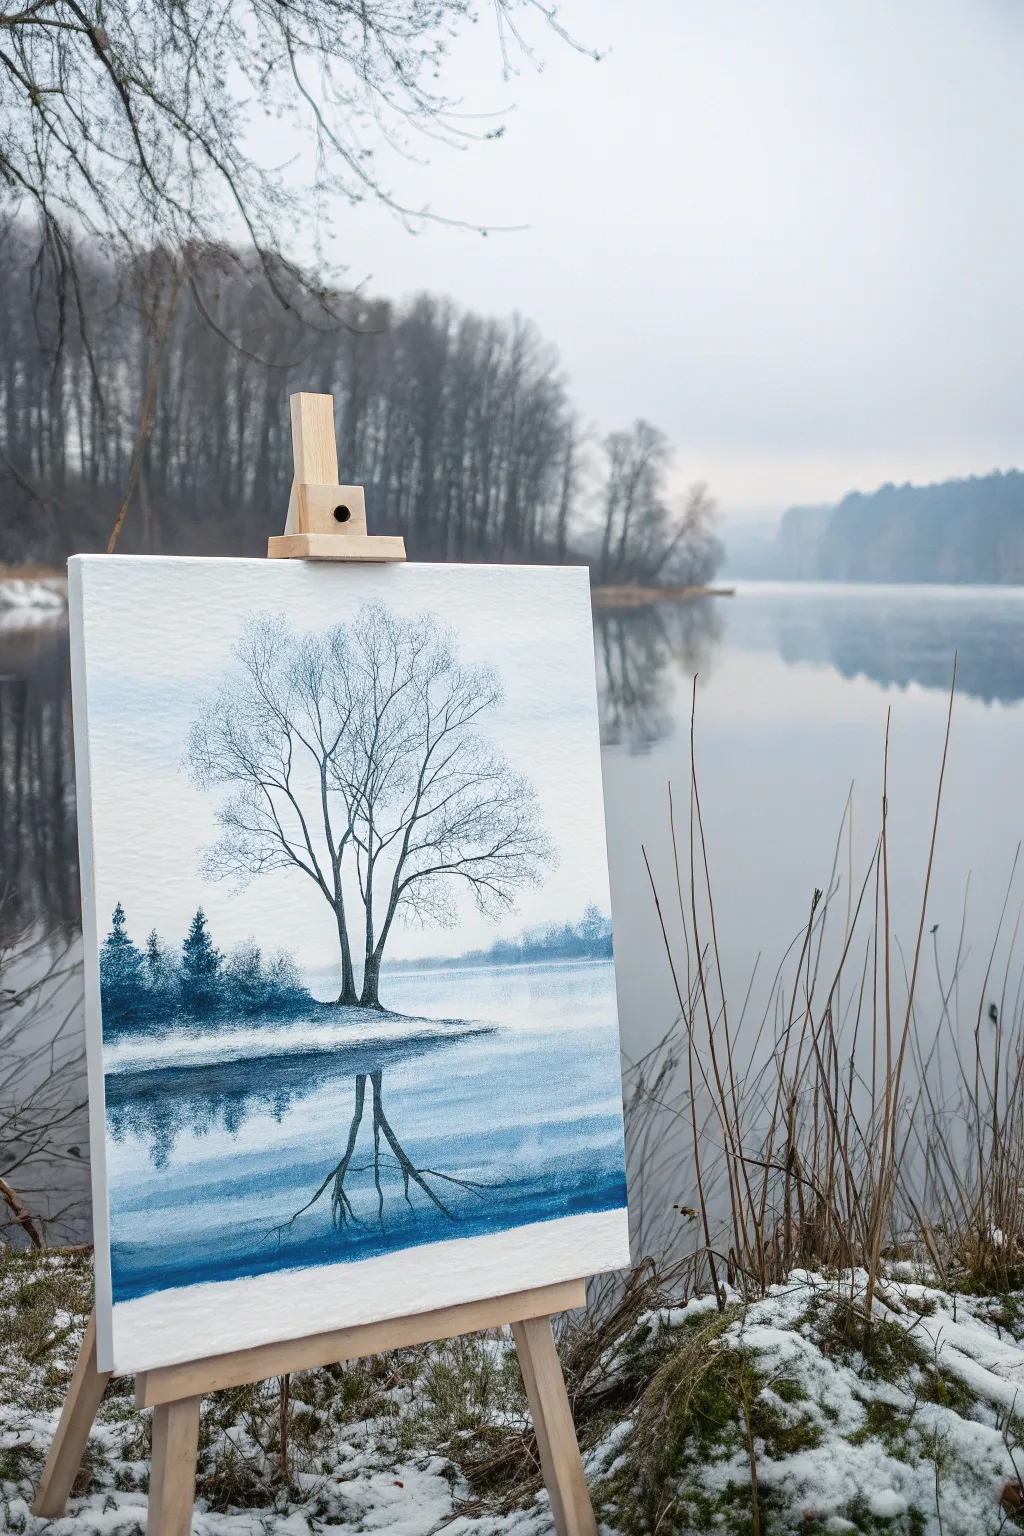
Capture the stillness of a frozen morning with this serene painting featuring a solitary tree overlooking a calm, reflective river. Using a limited palette of cool blues and greys, you will learn to create depth through soft gradients and crisp details.
Step-by-Step
Materials
- Cold pressed watercolor paper (stretched or block)
- Watercolor paints (Indigo, Payne’s Grey, Prussian Blue, Titanium White)
- Flat wash brush (1 inch)
- Round brushes (flats sizes 4 and 8)
- Fine rigger or liner brush (for branches)
- Masking tape
- Clean water and paper towels
- Pencil for sketching
- White gouache (optional highlights)
Step 1: Setting the Scene
-
Establish the horizon:
Begin by lightly sketching a horizon line about one-third of the way up from the bottom of your paper. Sketch the curved bank on the left side where the main tree will stand. -
Sketch the focal tree:
Lightly outline the dual trunks of the main tree. Don’t worry about the tiny twigs yet; just get the main structure and the general shape of the canopy captured on the paper. -
Paint the misty sky:
Wet the sky area above the horizon with clean water. Apply a very dilute wash of Prussian Blue, keeping it palest near the horizon to suggest distance and fog.
Muddy Reflections?
If your water reflections look muddy, you likely overworked the paint while it was damp. Let layers dry completely between washes, especially when glazing blue over grey.
Step 2: Background and Distant Trees
-
Create the distant forest:
While the sky is still slightly damp but not soaking, mix a watery grey-blue using Payne’s Grey. Paint the faint silhouette of the distant tree line along the horizon. -
Reflect the distance:
Immediately pull this same pale grey color downwards into the water area directly below the horizon line. Use vertical strokes to suggest a soft reflection in the water. -
Add mid-ground evergreens:
Once the background is dry, mix a slightly stronger Indigo. Paint the small evergreen trees on the left bank, dabbing the brush to create texture, but keep them looking soft and slightly receding. -
Create mid-ground reflections:
Mirror these evergreen shapes in the water directly below the bank. Keep the edges blurry to distinguish the reflection from the solid object.
Pro Tip: Card Trick
Use the edge of an old credit card to scrape into damp paint on the tree trunks. This lifts pigment and creates instant, realistic bark texture without needing a tiny brush.
Step 3: Painting the Foreground Tree
-
Paint the main trunks:
Using a size 4 round brush and a concentrated mix of Indigo and Payne’s Grey, paint the two main trunks of the tree. Ensure the base looks firmly planted in the snowy bank. -
Extend the main branches:
Switching to a smaller brush, pull branches upward and outward from the main trunks. I like to twist the brush slightly to create natural, organic kinks in the wood. -
Detail the fine twigs:
Load a rigger or liner brush with ink-like consistency paint. With a very light touch, add the intricate network of fine twigs that form the crown of the tree. These should be delicate and encompass the whole upper third of the painting.
Step 4: The Water and Reflections
-
Paint the tree reflection:
Using the same dark mix, paint the reflection of the tree trunks upside down in the water. Wiggle your brush slightly to make the reflection look like it’s on a liquid surface, rather than a perfect mirror. -
Add water ripples:
Take a flat brush and glaze horizontal bands of Prussian Blue across the water area. Leave some areas white or very pale to represent ice or still patches reflecting the sky. -
Deepen the foreground water:
Add a stronger wash of Indigo at the very bottom edge of the canvas to weigh down the composition and bring the water closer to the viewer.
Step 5: Final Winter Textures
-
Enhance the snow bank:
Add subtle shadows to the snow on the bank using a very watered-down blue-grey. Keep the top edge of the bank bright white to show snow accumulation. -
Frosty details:
You can use a tiny amount of white gouache or undiluted white watercolor to add frost to the tree trunk or highlight snow sitting on the evergreen branches. -
Final assessment:
Step back and check your values. If the main tree needs to pop more, carefully darken the trunk one last time once everything is bone dry.
Allow your peaceful winter scene to dry completely before removing the tape to reveal those crisp, professional edges
Northern Lights Over a Quiet Snow Ridge
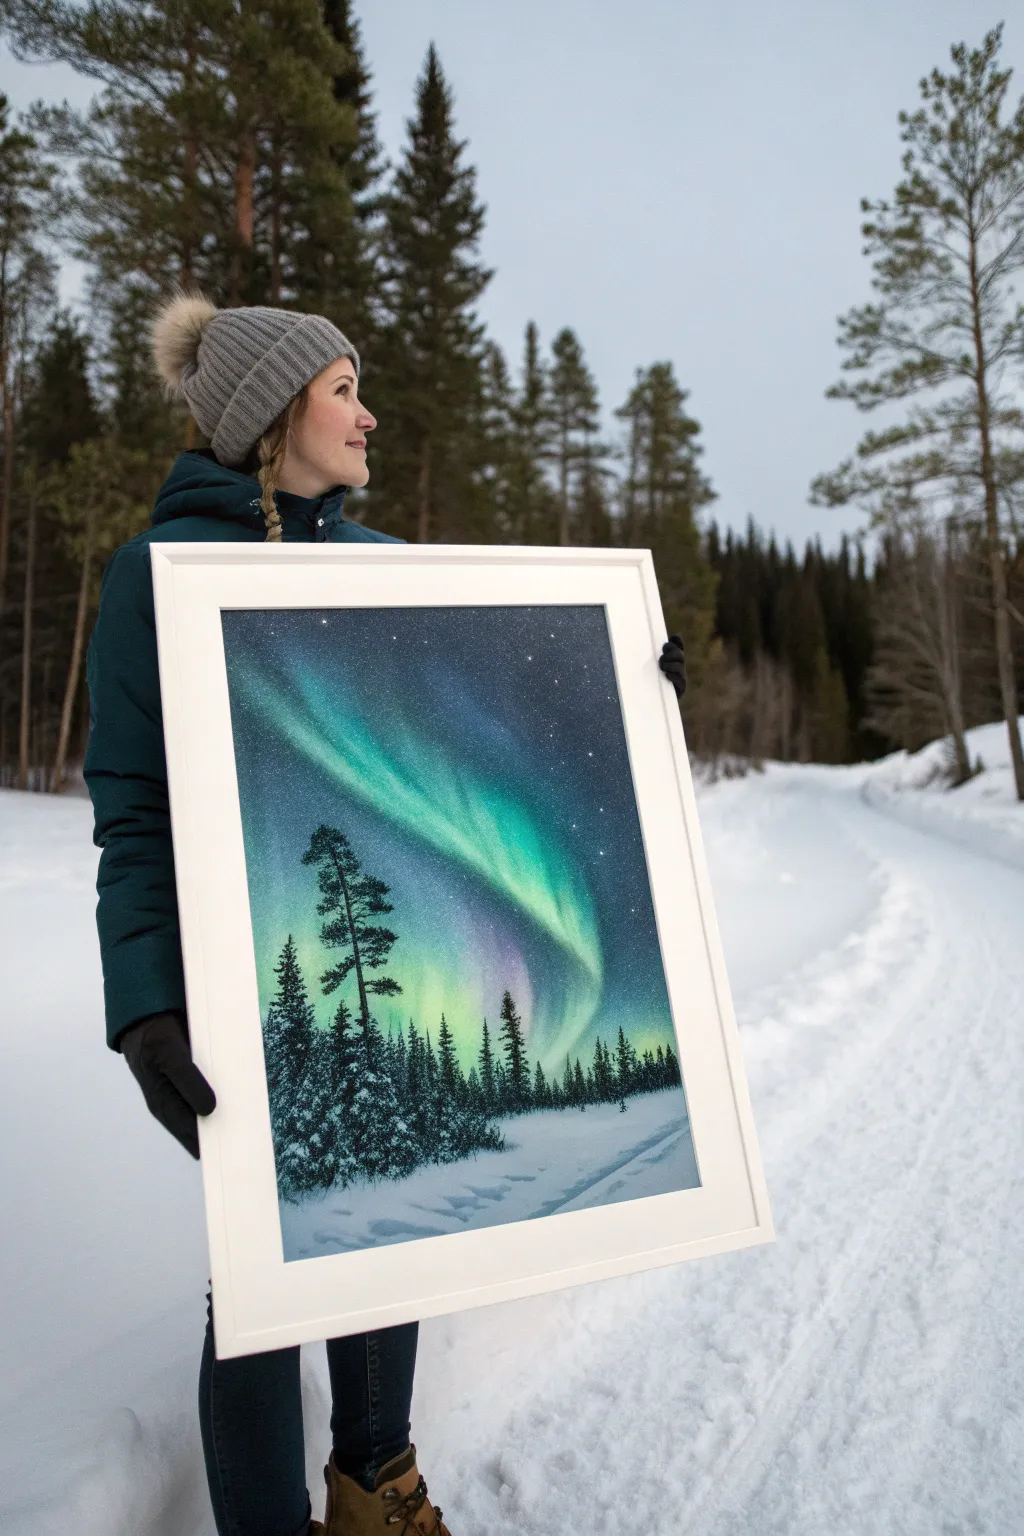
Capture the ethereal magic of the northern lights dancing over a silent, snowy forest with this atmospheric acrylic painting. The striking contrast between the deep, starry sky and the vibrant green ribbons of light makes for a breathtaking piece that surprisingly achievable for beginners.
Detailed Instructions
Materials
- Large stretched canvas (e.g., 18×24 inches or larger)
- Acrylic paints (Phthalo Blue, Ultramarine Blue, Mars Black, Titanium White, Emerald Green, Phthalo Green, Deep Violet)
- Large flat wash brush (2 inch)
- Medium flat brush
- Small round detail brush
- Fan brush (optional but helpful for trees)
- Old toothbrush (for stars)
- Palette knife
- Water cups and paper towels
- Easel or flat working surface
Step 1: Setting the Night Sky
-
Prepare the gradient:
Begin by squeezing out generous amounts of Mars Black, Ultramarine Blue, and Phthalo Blue onto your palette. You want the top of the canvas to be the deepest part of night. -
Paint the upper atmosphere:
Using your large wash brush, apply pure black mixed with a touch of Ultramarine Blue to the top third of the canvas. Use long, horizontal strokes for a smooth finish. -
Blend downward:
As you move toward the middle of the canvas, gradually mix more Phthalo Blue into your black. Keep blending the colors wet-on-wet so there are no harsh lines, creating a transition from deep space to a midnight blue. -
Create the horizon glow:
Near the bottom third (where the trees will eventually go), mix a tiny amount of Titanium White into your blue to create a lighter, hazy horizon line. Let this background layer dry completely before moving on.
Starry Night Trick
Make a few larger stars by dipping the back end of your paintbrush handle into white paint and dotting it onto the canvas. Add a tiny cross shape for a twinkle effect.
Step 2: Dancing Lights
-
Map the aurora path:
Mix a glaze using Phthalo Green, a touch of Titanium White, and a bit of water or glazing medium to make it translucent. With a clean medium flat brush, sweep a broad, curving line diagonally across the sky. -
Intensify the core:
While the glaze is still tacky, add more pigment to the center of your swooping shape. Use vertical, upward flickering strokes to mimic the way light pillars shoot up into the atmosphere. -
Add secondary colors:
To add depth, introduce a hint of Deep Violet or Magenta on the lower edge of the green ribbon. Blend it gently into the blue background for that soft, mystical glow. -
Highlight the brighest points:
For the brightest part of the aurora, mix Emerald Green with Titanium White. Apply this sparingly to the center of the ribbon where the light is strongest. -
Splatter the stars:
Dilute a small amount of Titanium White with water until it’s inky. Dip an old toothbrush into this mix and flick the bristles with your thumb to spray tiny stars across the darker parts of the sky.
Step 3: The Silent Forest
-
Establish the snow line:
Mix Titanium White with a tiny speck of Blue to create a cool shadow tone. Paint the uneven, rolling snow ridge at the bottom of the canvas. -
Begin the tree line:
Mix Mars Black with Phthalo Green for a deep, dark forest green. Using a fan brush or a flat brush turned sideways, tap in the vertical lines for the tree trunks along the ridge. -
Foliage texture:
Using the corner of your brush, tap in the pine branches. Start narrow at the top of each tree and get wider towards the base, leaving some gaps so they don’t look like solid triangles. -
Tall focal trees:
Add one or two taller, distinct trees on the left side to create a focal point. I prefer to make these a bit more detailed, showing distinct branches reaching up against the glowing sky. -
Add snow to branches:
Once the dark trees are dry, take pure Titanium White on a small round brush. Gently dab ‘snow’ onto the top edges of the branches, focusing on the side where the light would hit. -
Foreground shadows:
Paint soft, blue-grey shadows on the snowy ground extending from the base of the trees towards the viewer. -
Final highlights:
Add a few brighter white highlights to the snow ridge in the immediate foreground to suggest texture and drifts.
Add a Human Element
Paint a tiny silhouette of a cabin with a glowing yellow window at the tree line, or add small footprints in the foreground snow to tell a story.
Step back and admire your own slice of the arctic circle, perfectly captured on canvas
Snowy City Skyline With Windy Swirls
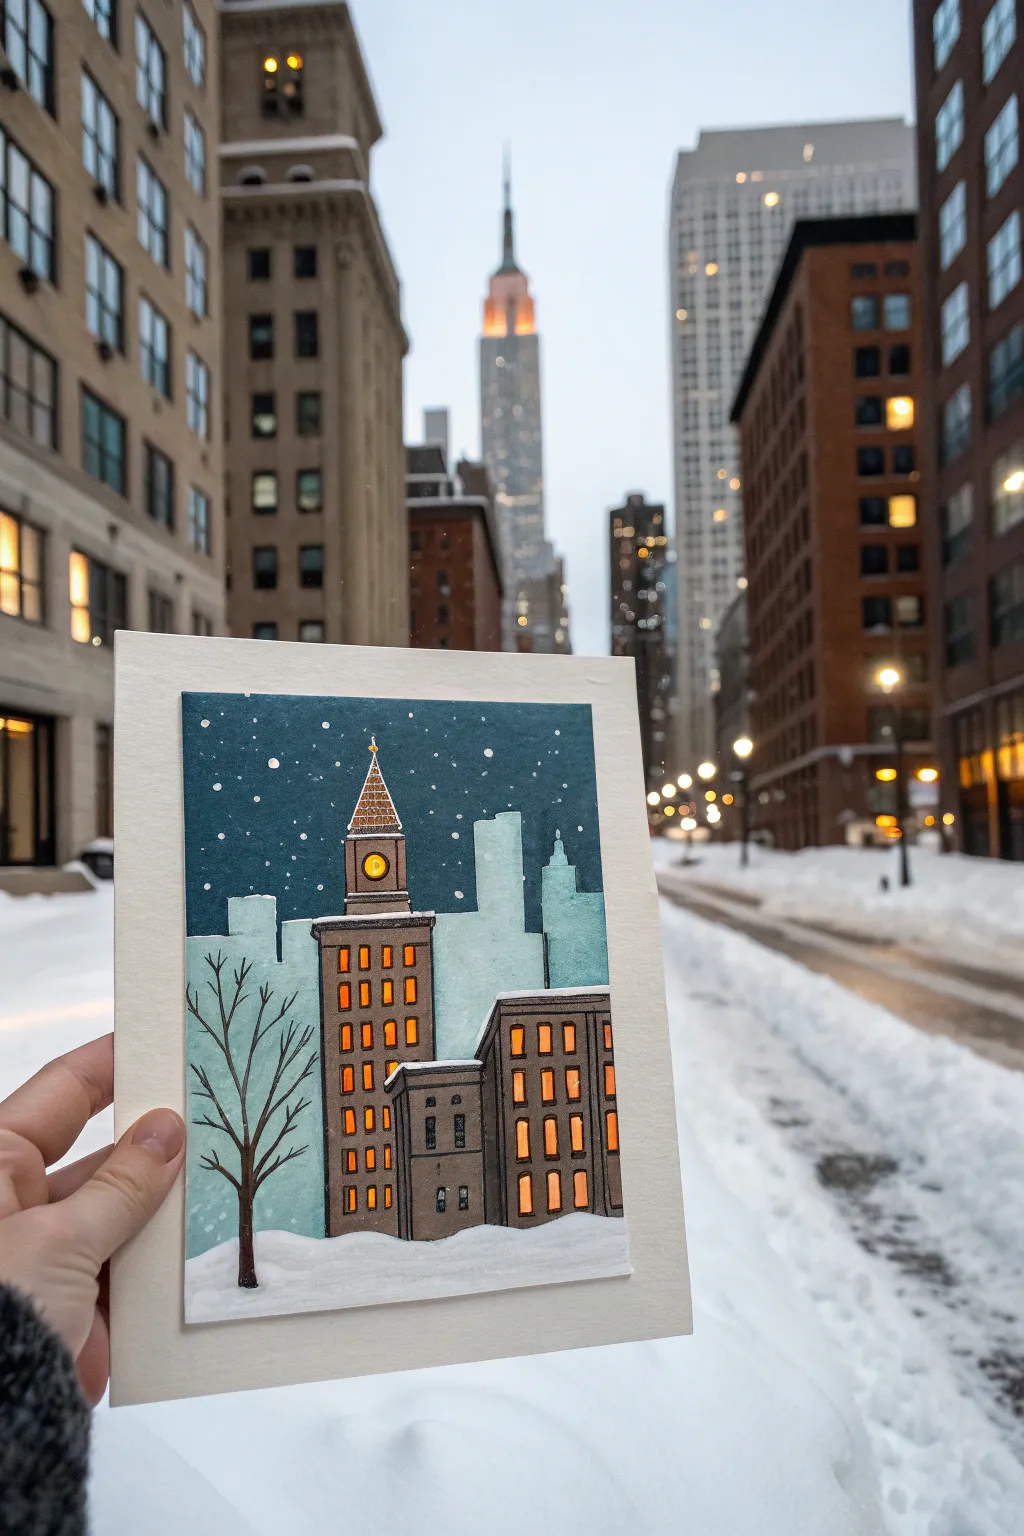
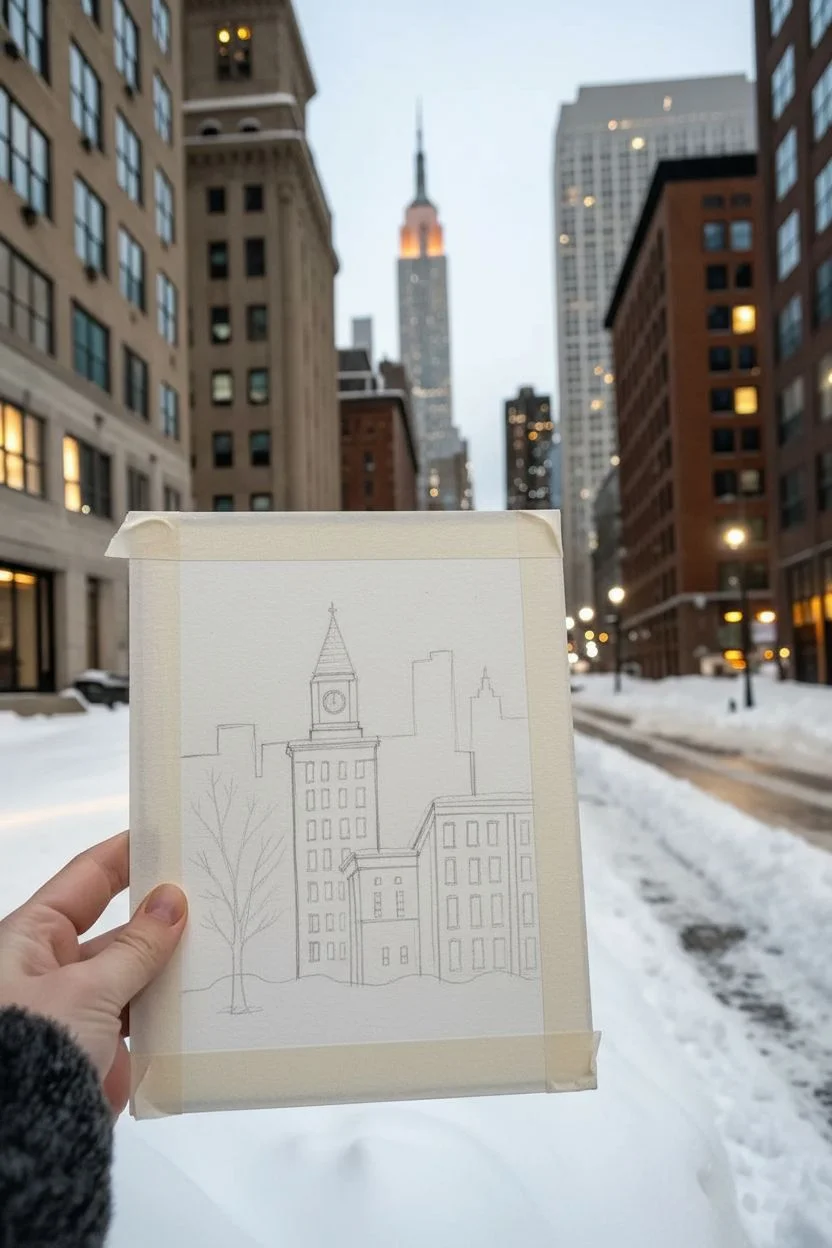
Capture the magic of a quiet winter evening with this mixed-media cityscape that looks beautifully intricate. By combining watercolor washes with bold architectural ink lines and white gel pen snow, you’ll create a cozy urban scene that glows against a snowy backdrop.
Step-by-Step
Materials
- Heavyweight watercolor paper or mixed media cardstock
- Pencil and eraser
- Watercolors (Phthalo Blue, Indigo, Burnt Sienna, Yellow Ochre)
- Black waterproof fine-liner pens (sizes 05 and 08)
- White gel pen or gouache
- Gold metallic paint or marker (optional)
- Ruler
- Paintbrushes (flat wash brush and round detail brush)
- Masking tape
Step 1: Setting the Scene
-
Prepare your canvas:
Cut your watercolor paper to a rectangle slightly smaller than your final card base. Tape the edges down to a board with masking tape to create a clean white border and prevent buckling when wet. -
Sketch the skyline:
Using a pencil and ruler, lightly sketch the outlines of your buildings. Place the tallest clock tower off-center for interest, flanked by shorter residential blocks. Don’t worry about perfect details yet; just get the basic rectangular shapes and roof lines down. -
Add background layers:
Behind your main buildings, sketch a second, simpler layer of skyscrapers. These should be taller but less detailed, representing the distant city haze. -
Position the tree:
Lightly draw the main trunk of a bare winter tree on the left side of the composition. Keep the branches reaching upward and outward, overlapping the sky area but staying mostly clear of the main clock tower.
Straight Lines Made Easy
If you struggle with unsteady hands during increased inking, place a small piece of tissue paper under your palm. It helps your hand glide smoothly while protecting the drawing from smudges.
Step 2: Painting the Backdrop
-
Paint the night sky:
Mix a deep, cool blue using Phthalo Blue and a touch of Indigo. Apply a flat wash to the sky area, carefully painting around the clock tower and the distant skyscraper shapes. Let the color get slightly lighter as it nears the horizon line. -
Wash in the distant buildings:
For the background skyscrapers, dilute your blue mix significantly with water to create a pale, icy blue-grey. Paint these shapes flatly so they visually recede into the distance. -
Color the foreground buildings:
Mix Burnt Sienna with a tiny bit of blue to create a muted brownish-grey. Paint the main foreground buildings with this wash. It doesn’t need to be perfectly even; a little texture adds character to the brickwork. -
Make the windows glow:
Using pure Yellow Ochre or a warm yellow gouache, carefully paint small rectangles for the windows. I like to paint these right over the dry building wash, or you can leave them white initially if you prefer more vibrancy. -
Let it dry completely:
This is crucial—wait until the paper is bone dry before moving to the ink stage to prevent bleeding lines.
Step 3: Inking and Details
-
Outline the architecture:
Use your 05 black fine-liner and a ruler to trace the vertical and horizontal lines of the buildings. Create clear definitions between the roof overhangs and the walls. -
Define the windows:
Outline each yellow window rectangle with the pen. To add depth, you can make the right and bottom lines of each window slightly thicker to suggest a recessed frame. -
Add the tree silhouette:
Switch to a brush pen or the thicker 08 fine-liner to fill in the tree silhouette. Start thick at the trunk and lift pressure as you move to the tips of the branches to make them taper naturally. -
Create the clock tower roof:
Draw a triangular roof with a cross-hatch pattern or small shingle details. Use a gold marker or yellow paint for the clock face to make it a focal point.
Add Dimension
Instead of glue or tape runner, mount the painted panel onto the card base using foam dimensional squares. This slight lift creates a shadow and makes the artwork feel more premium.
Step 4: Snow and Finishing Touches
-
Add snowdrifts:
At the very bottom, paint a gentle, rolling hill of white gouache or leave the paper white to represent the snowy ground. Add a very faint blue shadow line just under the buildings to ground them. -
Roof details:
Use your white gel pen or a fine brush with white gouache to add ‘snow caps’ to the flat roofs, the clock tower ledges, and the tops of the window sills. -
Falling snow:
Dot the night sky with the white gel pen. Vary the pressure to create snowflakes of different sizes, clustering a few together for a natural effect. -
Mounting the artwork:
Once fully dry, remove the tape. Cut a piece of textured off-white cardstock slightly larger than your painting and mount the artwork in the center to create a professional-looking frame.
This charming winter scene makes for a perfect holiday greeting or a framed seasonal decoration on a mantel
Monochrome Winter Landscape in Blue and White
Capture the serene silence of a snowy forest with this limited-palette watercolor study. By using only varying shades of blue and white, you’ll create a moody, atmospheric landscape that focuses entirely on tonal value and soft textures.
How-To Guide
Materials
- Cold Press watercolor paper (140lb/300gsm)
- Watercolor paints: Indigo, Prussian Blue, Titanium White (gouache or watercolor)
- Round brushes (sizes 2, 6, and 10)
- Flat brush (3/4 inch)
- Clean water jar
- Paper towels
- Masking tape
- Drawing board
Step 1: Preparation and Sky
-
Secure the paper:
Tape your watercolor paper down firmly to a drawing board on all four sides. This ensures a clean white border and prevents buckling when we apply heavy washes. -
Mix your blues:
Prepare three puddles of paint: a very watery, pale blue wash; a mid-tone denim blue; and a concentrated, dark indigo. Keep your white paint separate for later. -
Wet-on-wet sky:
Using the large flat brush, wet the entire upper two-thirds of the paper with clean water. The surface should glisten but not have standing puddles. -
Paint the atmosphere:
Drop the palest blue wash into the damp sky area. Tilt the board slightly to let the color drift naturally, creating a cloudy, uneven effect. Leave some areas nearly white to suggest hazy clouds.
Step 2: Background Forest
-
Create distant trees:
While the sky is still slightly damp (but not soaking), switch to a size 6 round brush. Load it with your mid-tone blue. -
Paint soft shapes:
Dab in loose, vertical uneven shapes along the horizon line to represent a distant tree line. Because the paper is damp, these will fuzz out slightly, creating a perfect misty effect. -
Add middle-ground pines:
Once the paper is dry to the touch, mix a slightly darker blue. Paint a cluster of distinct pine trees on the right side, just in front of the blurry background trees. Use the tip of the brush to create jagged pine bough textures. -
Soften the base:
Before the paint dries on these trees, run a clean, damp brush along their bottom edge to blur them into the snowy ground, eliminating harsh lines.
Pro Tip: Atmospheric Depth
Objects get lighter and bluer the further away they are. Keep your background trees watery and pale, and save your darkest, thickest paint only for the foreground tree on the left.
Step 3: Foreground Elements
-
Establish the snowbanks:
Use your pale blue wash to paint the shadows of the snow in the foreground. Leave the paper white for the highlighted tops of the snowbanks. -
carve the stream:
Paint the frozen stream or pathway winding from the bottom right toward the center. Use horizontal strokes with darker blue to suggest movement and icy reflections. -
The hero tree:
Load your size 2 brush with the darkest, most concentrated Indigo paint. On the left side, paint the large foreground pine tree. -
Building tree texture:
Start at the top with a fine line, then work downward with zig-zag motions. Press harder as you go down to widen the branches, leaving small gaps to minimalize heaviness. -
Add companion saplings:
Paint two or three tiny saplings near the base of the large tree using the same dark indigo mix, varying their heights for interest.
Level Up: Salt Technique
While the blue wash on the foreground snow is still wet, sprinkle a pinch of table salt on it. Let it dry completely and brush it off to create magical, crystal-like snowflake textures.
Step 4: Snowy Details
-
Create icy highlights:
Take your Titanium White (opaque watercolor or gouache). Using a fairly dry brush, scumble white paint lightly over the dark blue stream area to mimic frost and snow sitting on ice. -
Highlight the branches:
With a fine detail brush and thick white paint, carefully dab “snow” onto the tops of the hero tree’s dark branches. Don’t overdo it—just touch the upper edges. -
Paint winter weeds:
Using the very tip of your smallest brush and watery dark blue, flick quick, thin lines upward from the snowbanks to create dry winter grasses poking through the snow. -
Final assessment:
Step back. Can you distinguish the foreground from the background? If the distant trees look too sharp, you can glaze a very watery white wash over them to push them back. -
Reveal the border:
Wait until the painting is 100% bone dry. Slowly—seriously, very slowly—peel the tape away at a 45-degree angle to reveal your crisp white border.
Place your finished piece in a simple white frame to echo the snowy theme and enjoy your winter window
Paint-With-Snow Backgrounds for Playful Winter Effects
Capture the stark beauty of winter with this serene watercolor piece featuring a leafless tree against a snowy blue expanse. The contrast between the soft, atmospheric wash and sharp, dark branches creates a striking composition that feels both chilly and peaceful.
Detailed Instructions
Materials
- Cold press watercolor paper (square format)
- Watercolor paints (Indigo, Prussian Blue, Titanium White/White Gouache)
- Masking fluid (optional)
- Flat wash brush (1/2 or 3/4 inch)
- Fine detail brush (size 0 or 00, rigger brush recommended)
- Medium round brush (size 6)
- Palette for mixing
- Jar of clean water
- Paper towels
- Painter’s tape
Step 1: Preparation and Sky Wash
-
Secure the paper:
Tape down all four edges of your square watercolor paper to a board. This prevents buckling and creates a clean, crisp border when you peel it off later. -
Mix your blues:
Prepare a generous amount of a cool, icy blue wash. Mix Prussian Blue with plenty of water for transparency. In a separate well, mix a slightly deeper version of this color for later gradient effects. -
Wet the sky area:
Using your flat wash brush, apply clean water evenly across the upper two-thirds of the paper. Leave the bottom third dry to represent the snowy ground. -
Apply the gradient:
Load the flat brush with your lighter blue mix. Start at the top edge and brush horizontally back and forth, moving downwards. As you approach the bottom of the wet area, add more water to your brush to fade the color out almost to white. -
Create texture:
While the wash is still wet, you can drop in tiny amounts of clean water or grains of salt to create subtle ice-crystal textures in the sky. If you prefer the smooth look shown in the reference, let the wash settle naturally.
Step 2: Painting the Foreground Elements
-
Paint the distant tree line:
Mix a muted, blue-grey tone using Indigo and a touch of the sky blue. With your medium round brush, dab in a soft, uneven line of distant fir trees near the bottom of the sky wash. Keep these faint and blurry to suggest distance. -
Add closer evergreens to the right:
Using a stronger concentration of the same blue-grey mix, paint the clusters of pine trees on the lower right side. Use a stippling motion to mimic pine needles. -
Form the left-side foliage:
Repeat this process for the faint, snow-covered bushes or trees along the bottom left edge. Keep the paint watery here so they appear to be receding into the mist. -
Let it dry completely:
This is crucial. Before painting the main tree, the background must be bone dry to prevent bleeding. I usually use a hair dryer on a low setting to speed this up.
Brush Control Tip
For the finest twigs, hold your rigger brush near the end of the handle. This loosens your wrist and creates more organic, natural-looking lines than choking up on the fernrule.
Step 3: Detailing the Main Tree
-
Mix the trunk color:
Create a very dark, near-black mixture using Indigo and perhaps a touch of Burnt Umber if you have it, or just highly concentrated Indigo. -
Draw the main trunk:
Using a fine round brush, paint the trunk starting from the bottom right-center, extending diagonally upward towards the left. Make the base wider and taper it as you go up. -
Branch structure:
Switch to your finest detail brush or a rigger brush. Pull main branches out from the trunk. Remember that trees generally split into ‘Y’ shapes, getting thinner with every split. -
Adding fine twigs:
This step requires patience. Fill in the canopy with many tiny, interlacing twigs. Use a light touch and quick, flicking motions to get the whisper-thin lines at the ends. -
Ground the tree:
Where the trunk meets the snow, add a few horizontal strokes or slightly diluted dark paint to create a shadow and show where the tree enters the snow.
Level Up: Salt Effect
Before the sky wash dries, sprinkle coarse sea salt immediately after painting. Once dry, brush it off to create beautiful, star-like blooms that look like frosty ice crystals.
Step 4: The Magical Snowfall
-
Prepare the snow paint:
Squeeze out some white gouache or thick white watercolor. Dilute it just enough so it drips off a brush but remains opaque. -
Splatter large flakes:
Load a brush with the white paint. Hold it over the paper and tap the handle against another brush to send splatters down. Aim for varying sizes. -
Place specific snowflakes:
Use a detail brush to manually paint larger, distinct snowflakes on top of the tree branches and trunk, as if snow serves as a contrast against the dark bark. -
Enhance the ground:
Add a few very subtle washes of pale blue shadow on the white ground area to show drifts or contours in the snow. -
Final touches:
Wait for the white gauche to dry, then carefully peel off the tape to reveal your clean, crisp edges.
Step back and admire your chilly winter landscape.


Have a question or want to share your own experience? I'd love to hear from you in the comments below!