
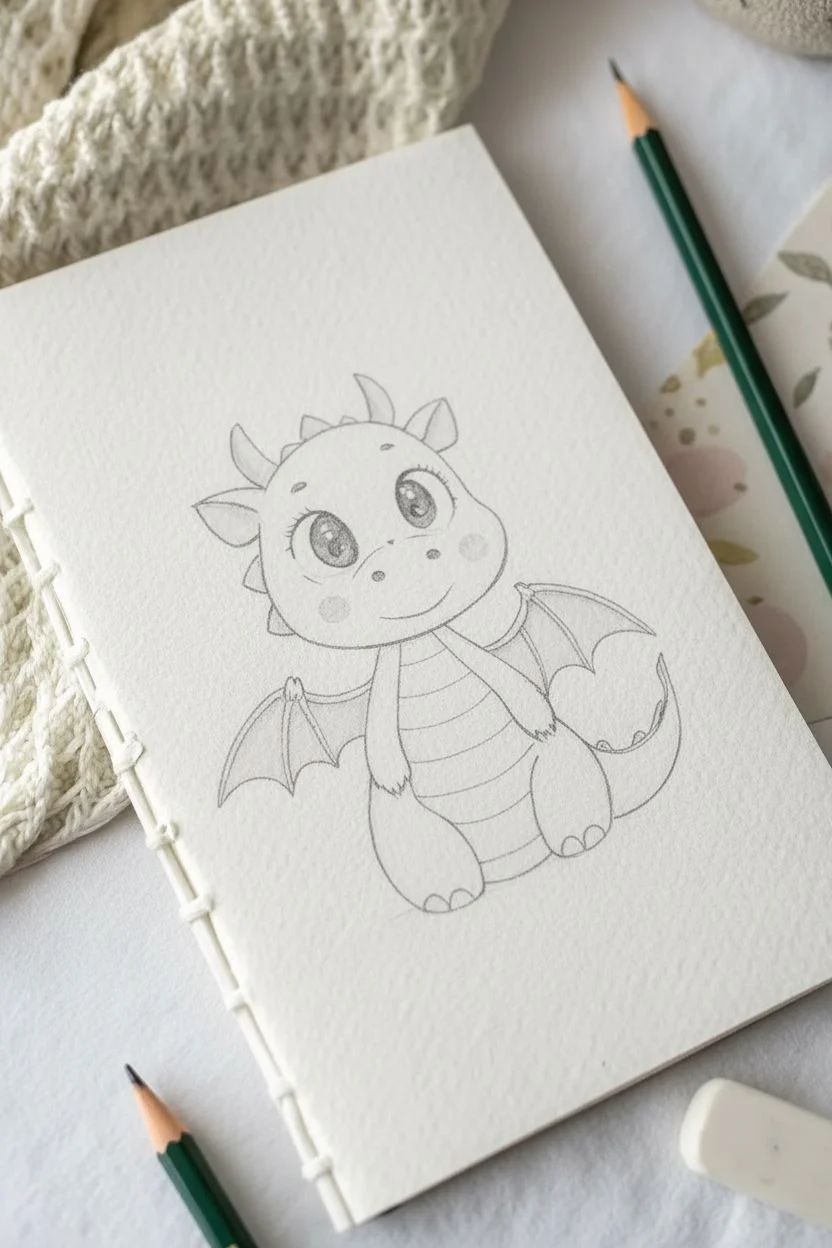
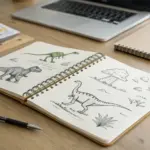
If you’ve been craving fresh dragon drawing ideas, you’re in the perfect headspace—dragons are where structure and imagination get to hang out together. I’m sharing my go-to prompts that make dragon heads and necks feel totally doable, even when you’re just sketching in your notebook.
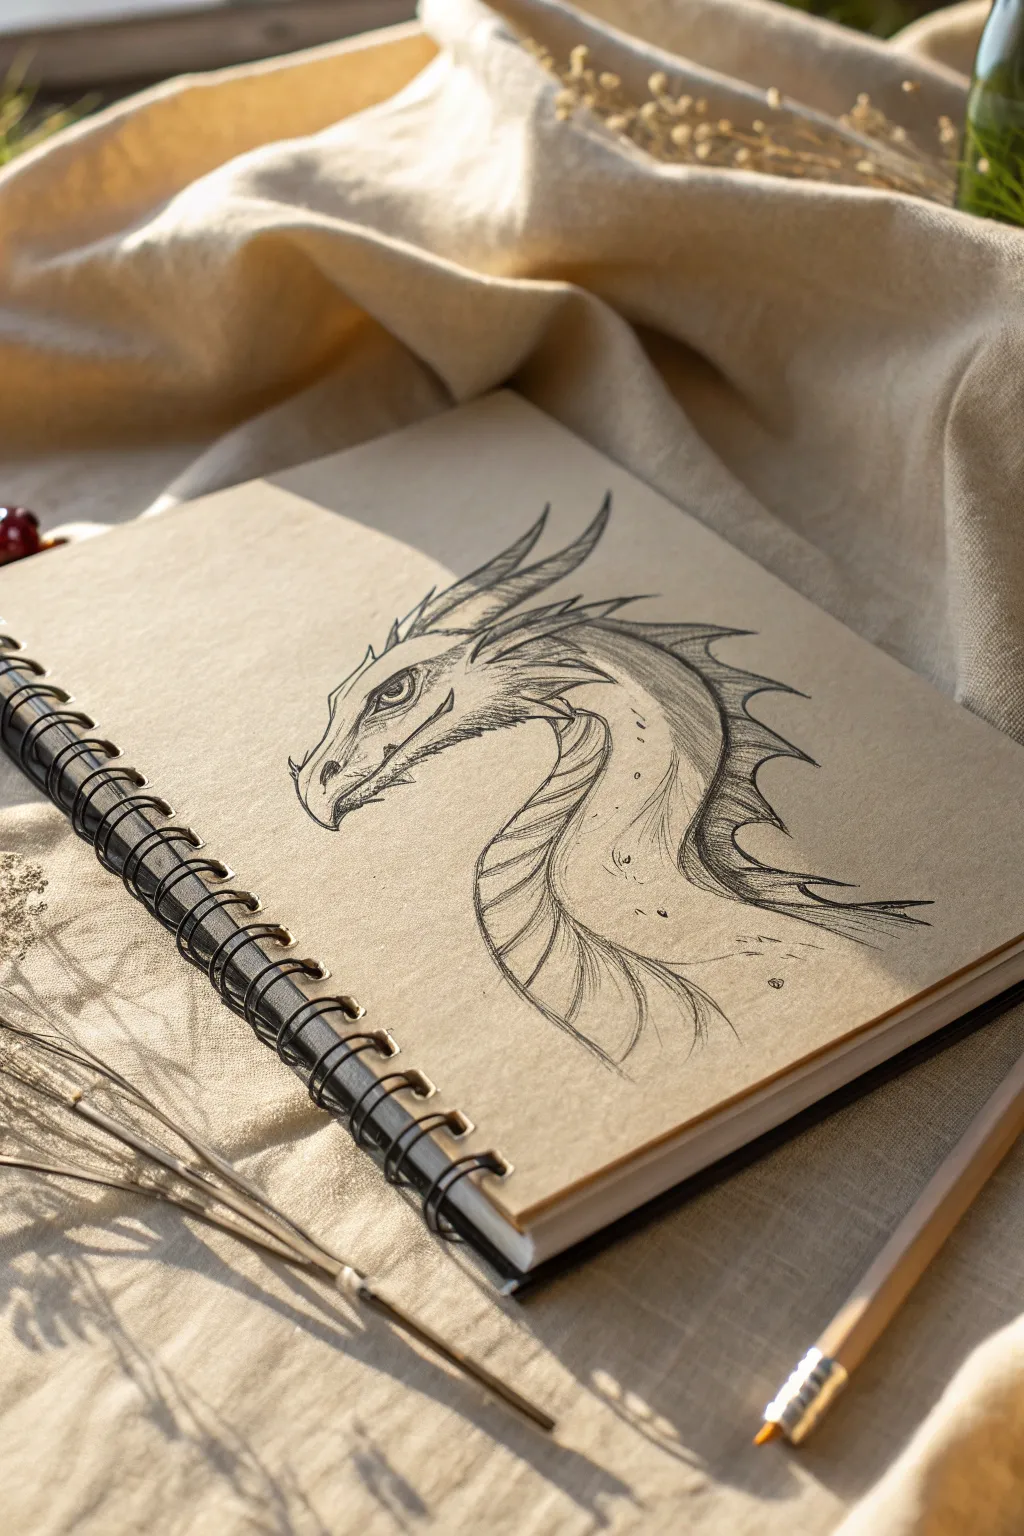
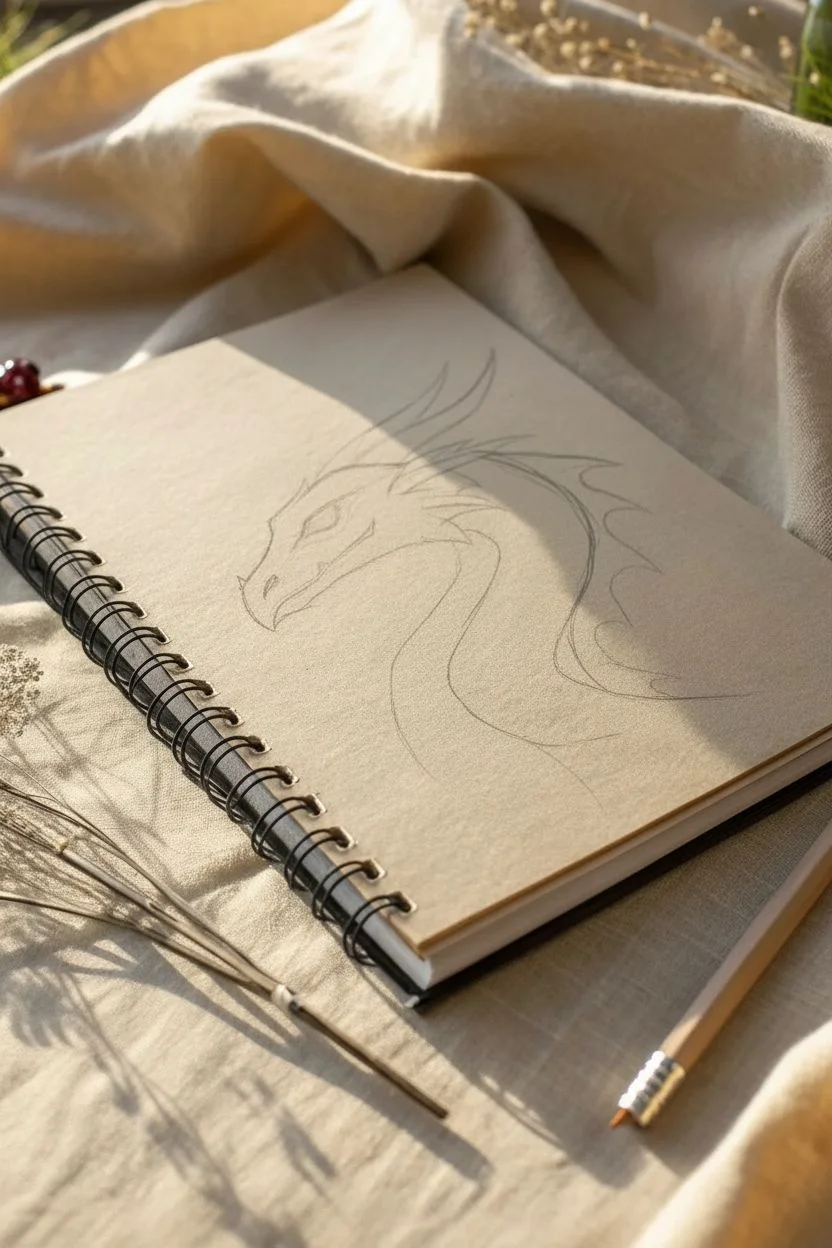
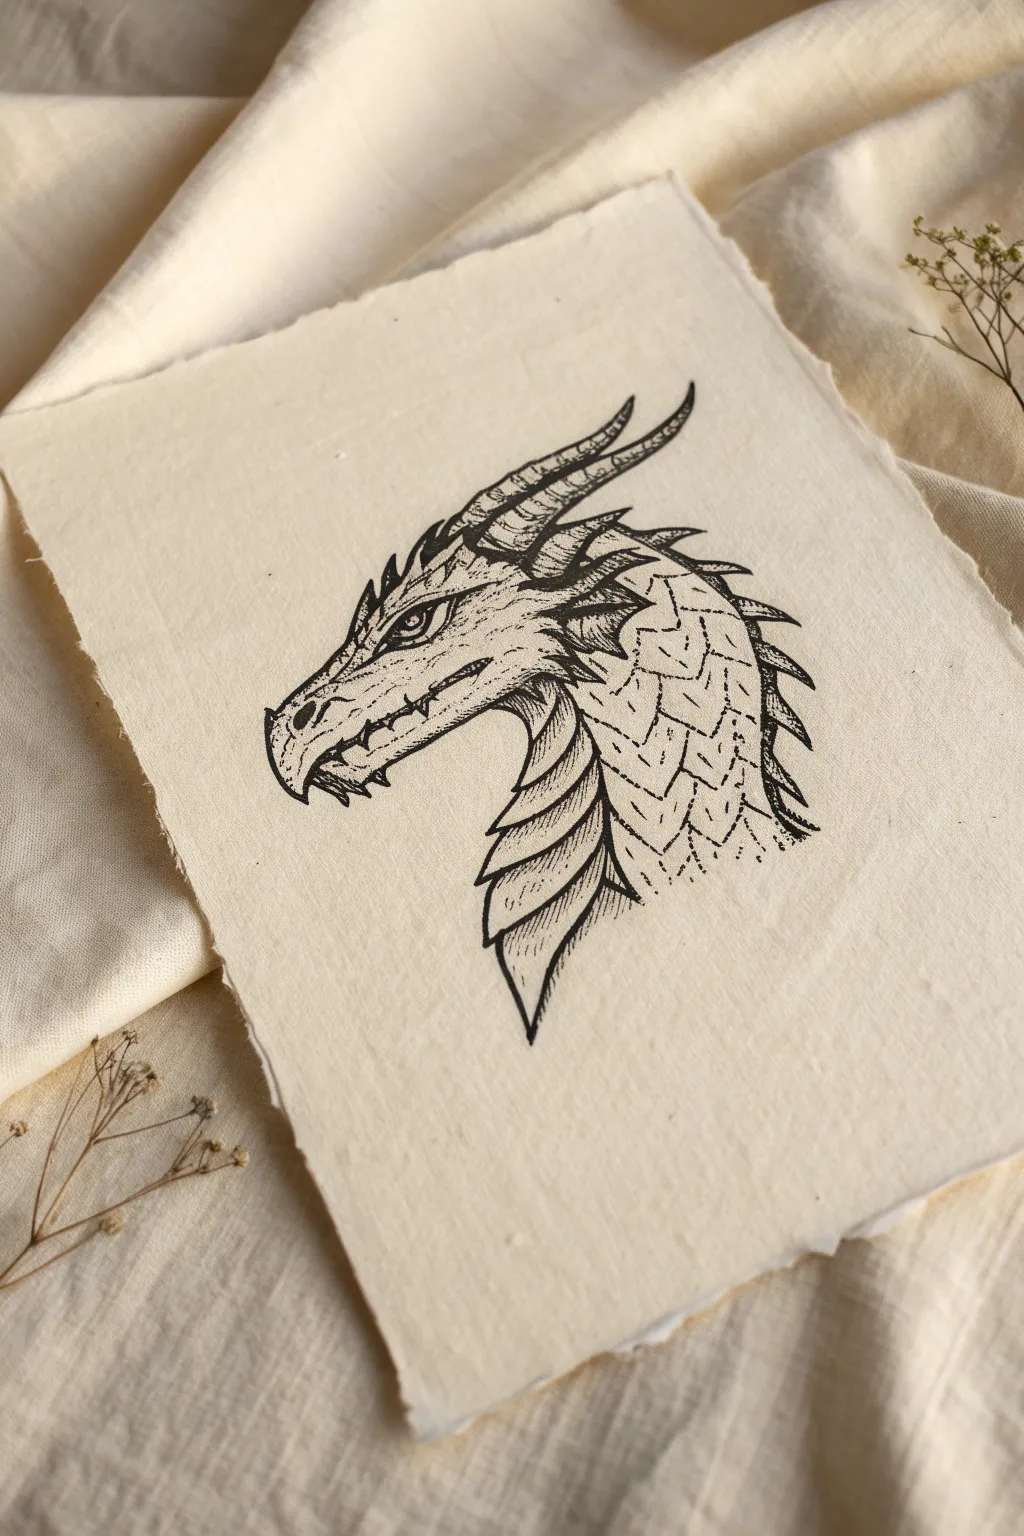
Classic Profile Dragon Head Bust
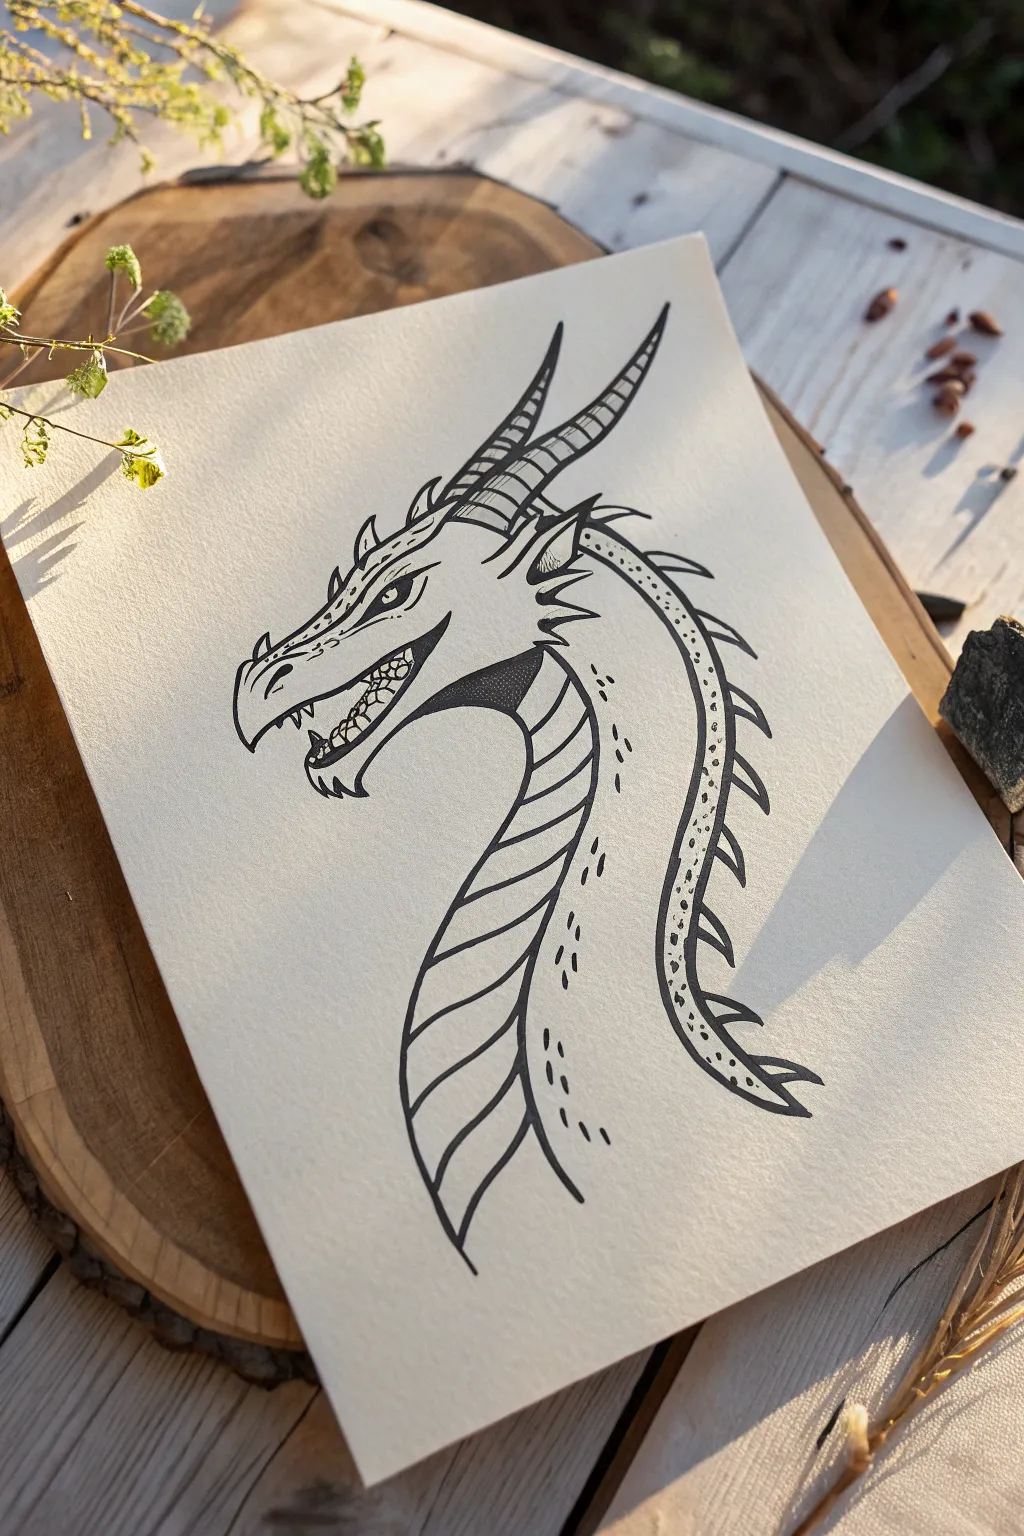
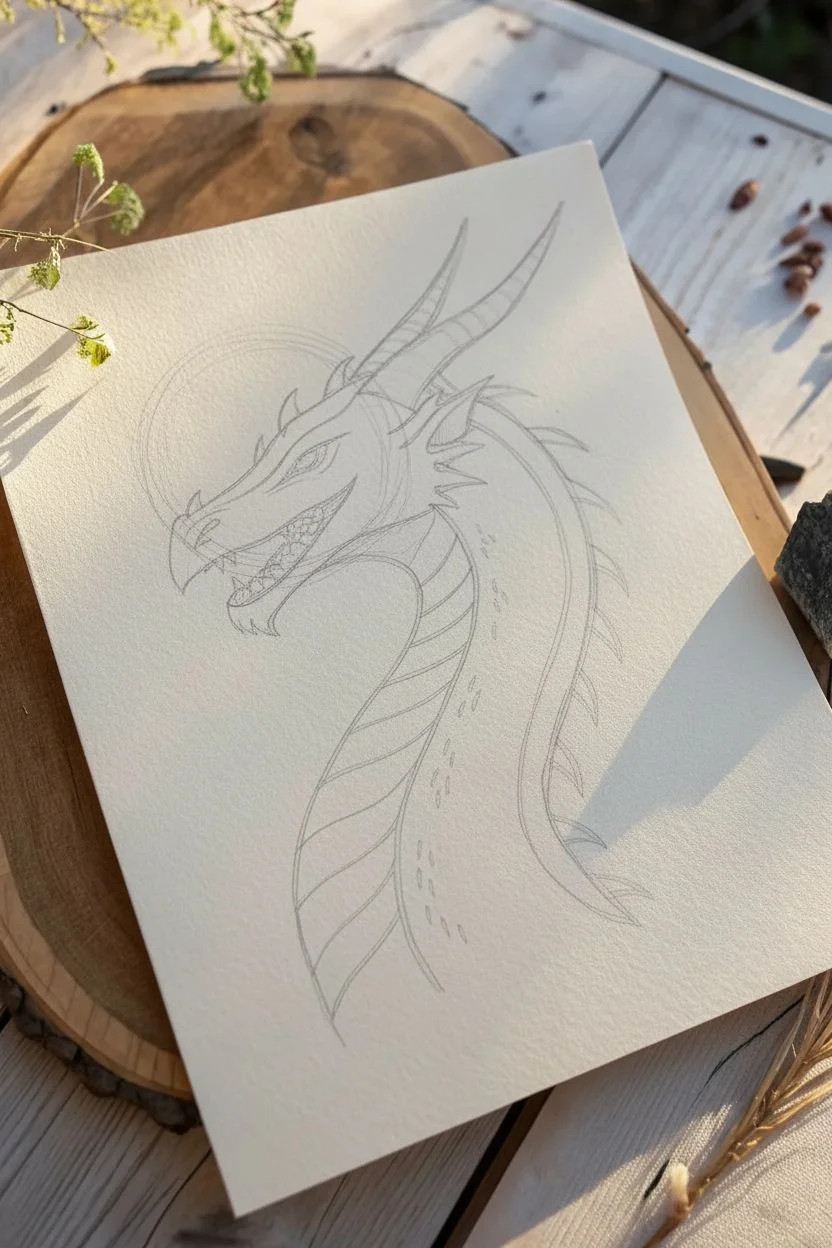
Create a striking piece of fantasy art with this tutorial for a classic dragon profile. Using crisp ink lines on textured paper, you’ll build a detailed bust featuring curved horns, jagged spines, and expressive facial features.
How-To Guide
Materials
- Cream or off-white sketchbook paper (heavyweight)
- HB pencil
- Kneaded eraser
- Fine liner pens (sizes 005, 01, and 05)
- Ruler (optional for reference guidelines)
Step 1: Penciling the Structure
-
Basic Shapes:
Start with a light HB pencil sketch. Draw a circle for the main skull and a smaller, slightly rectangular shape attached to the front for the snout. Connect these with a sweeping S-curve to form the neck. -
Jawline Definition:
Refine the jawline by drawing an angular line extending from the bottom of the skull circle to the chin. Keep the mouth slightly open to give the dragon a fierce expression. -
Horns and Spikes:
Sketch two fundamental curves sweeping backward from the top of the head for the main horns. Lightly mark the placement of the smaller spines running down the back of the neck. -
Facial Features:
Place the eye socket as a wedge shape near the top of the snout. Sketch the nostril near the tip of the snout and add the triangular teeth along the jawline.
Step 2: Inking the Details
-
Outline the Head:
Switch to your 05 fine liner for the main outlines. Trace the top of the snout, adding small bumps for texture, and follow the line up to the forehead. -
Draw the Eye:
Using the 01 pen, carefully ink the eye. Draw a sharp, heavy brow ridge above it to create a glaring look, leaving a tiny white highlight in the pupil for life. -
Mouth and Teeth:
Define the mouth with the 01 pen. Outline the sharp, triangular teeth, and add a few small, jagged lines inside the mouth corners to suggest gum texture. -
Horn Segmentation:
Ink the long horns with the 05 pen. Then, use the 01 pen to draw the curved segments or ridges along the length of the horns, giving them a ribbed appearance. -
Neck Spines:
Draw the jagged spines running down the back of the neck. Make them sharp and slightly curved, varying their size slightly as you move down.
Uneven Ink Lines?
If your hand shakes, pull the pen toward you rather than pushing it away. Keeping your wrist locked and moving from the elbow creates smoother curves.
Step 3: Texture and Shading
-
Neck Plates:
Draw the large, plate-like scales on the front of the throat. Use smooth, curved lines that follow the contour of the neck, stacking them like armor segments. -
Shadowing:
Use the 005 or 01 pen to add hatching in darker areas, particularly under the jaw and inside the open mouth. I like to keep these strokes tight and uniform for a clean look. -
Stippling details:
Add texture to the skin by placing small dots and tiny dashes along the cheek and neck with your finest pen. Concentrate them near the outlines to suggest roundness. -
Spine Texture:
Inside the spine ridge area on the back of the neck, add small circles or pebbled textures to differentiate it from the smooth neck plates. -
Final Cleanup:
Wait at least 10 minutes for the ink to dry completely. Gently erase all pencil lines with a kneaded eraser to reveal the crisp black-and-white illustration.
Scale Depth
Make the neck plates look dimensional by adding a second, thinner line just inside the bottom edge of each scale to suggest thickness.
Frame your fierce dragon sketch or scan it to use as a digital asset for your next fantasy project


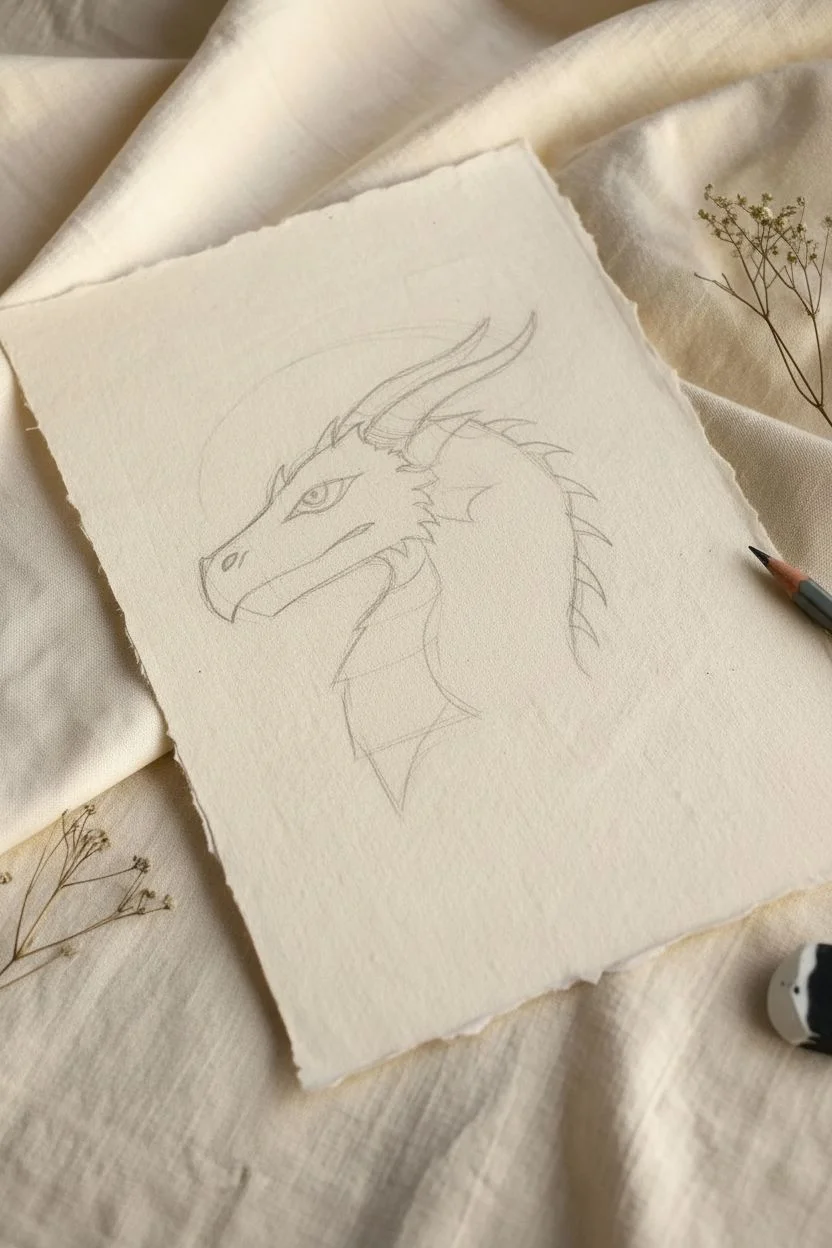
Three-Quarter Dragon Head for Instant Depth
Capture the mythical elegance of a dragon with this detailed side-profile sketch on toned paper. By focusing on overlapping scales and decisive linework, you will create a creature that feels both ancient and alive.
Step-by-Step
Materials
- Spiral-bound sketchbook with tan or kraft paper
- Fine-point black ink pen (archival ink or fineliner, 0.3mm or 0.5mm)
- H or HB graphite pencil for initial sketching
- Soft hi-polymer eraser
- White gel pen (optional for highlights)
Step 1: Laying the Foundations
-
Map the Head Shape:
Begin with a light graphite pencil to sketch an elongated oval for the main part of the head. Add a slightly tapered snout attached to the front left side, creating a wedge shape. -
Establish the Neck Flow:
Draw an S-curve sweeping down from the back of the head. This S-curve defines the majestic bend of the dragon’s neck. Lightly sketch the width of the neck, making it thickest near the shoulders and tapering slightly as it meets the jaw. -
Locate Key Features:
Mark the eye placement just above the corner of the mouth area. Sketch a rough triangular shape for the eye socket. Indicate the position of the ear or horns with faint lines sweeping back from the skull.
Flat Neck Syndrome?
If the neck looks flat, curve your belly-plate lines more deeply. Think of wrapping string around a tube—the lines must curve around the form, not just sit on top of it.
Step 2: Defining the Contours
-
Draw the Eye:
Switch to your fine ink pen. Carefully ink the eye, drawing a sharp, almond shape with a vertical slit pupil. Add a heavy upper lid to give the dragon a piercing, predatory gaze. -
Sculpt the Snout:
Trace the top ridge of the snout, adding small bumps or ridges for texture. Curve the line down to a sharp beak-like point at the nose tip. Draw the nostril as a small, darkened tear-drop shape. -
Detail the Mouth:
Draw the mouth line extending back from the beak. Give it a slight grimace or curve to suggest expression. Add a few small, jagged teeth peeking out near the front if desired, though a closed mouth looks dignified. -
Form the Jawline:
Sketch the lower jaw, connecting it from the chin back to the neck. Use short, disjointed strokes to suggest a rough, scaly texture rather than a perfectly smooth line.
Pro Tip
Don’t erase your pencil guidelines completely before inking. Leaving faint graphite marks underneath adds a raw, artistic grit that complements the sketch aesthetic.
Step 3: Horns and Spikes
-
Primary Horns:
Draw two main horns sleekly curving backward from the top of the head. I find that layering the segments of the horns like bamboo creates a realistic organic look. Outline them boldly. -
Secondary Spikes:
Add smaller spikes or frills just below the main horns and behind the jaw. These should mimic the angle of the main horns to maintain aerodynamic flow. -
Spinal Ridge:
Starting from the back of the head, draw a series of sharp, triangular spines running down the back of the neck. Vary their sizes slightly—larger near the head, smaller as they descend—to create visual interest.
Step 4: Texturing and Shading
-
Neck Underbelly:
Draw the distinctive segmented plates on the front of the neck (the throat). Use curved parallel lines that wrap around the form to emphasize the cylindrical volume of the neck. -
Adding Scales:
Scatter groups of small U-shaped scales on the cheek and upper neck. You don’t need to draw every single scale; suggesting clusters is more effective and less cluttered. -
Hatching Shadows:
Use fine hatching lines to add shadow under the jawline and beneath the neck ridges. This separation lifts the head from the neck visually. -
Texture the Skin:
Add tiny dots (stippling) and faint scratches across the face and neck to simulate leathery skin. Focus these markings around the eye socket and snout for depth. -
Final Contrast:
Go back over your main outline with slightly heavier pressure or a thicker pen to solidify the silhouette. Ensure the pupil is pitch black for intense focus.
Now you have a fierce dragon sketch ready to guard the pages of your notebook


Front-Facing Dragon Head With Symmetry Lines
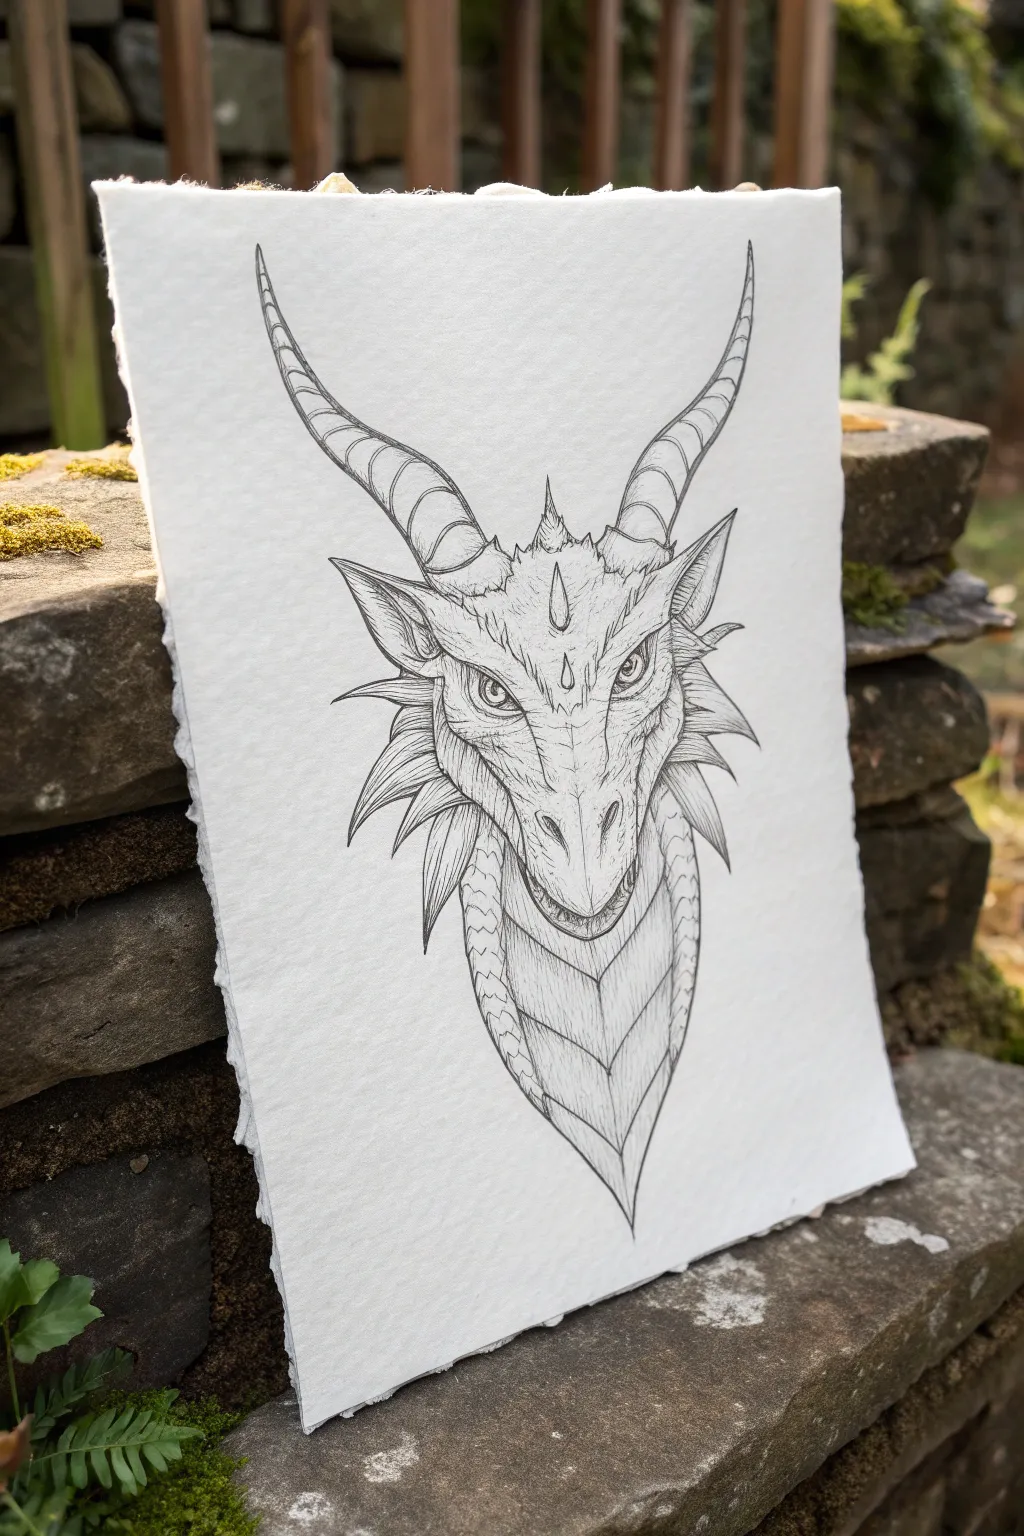
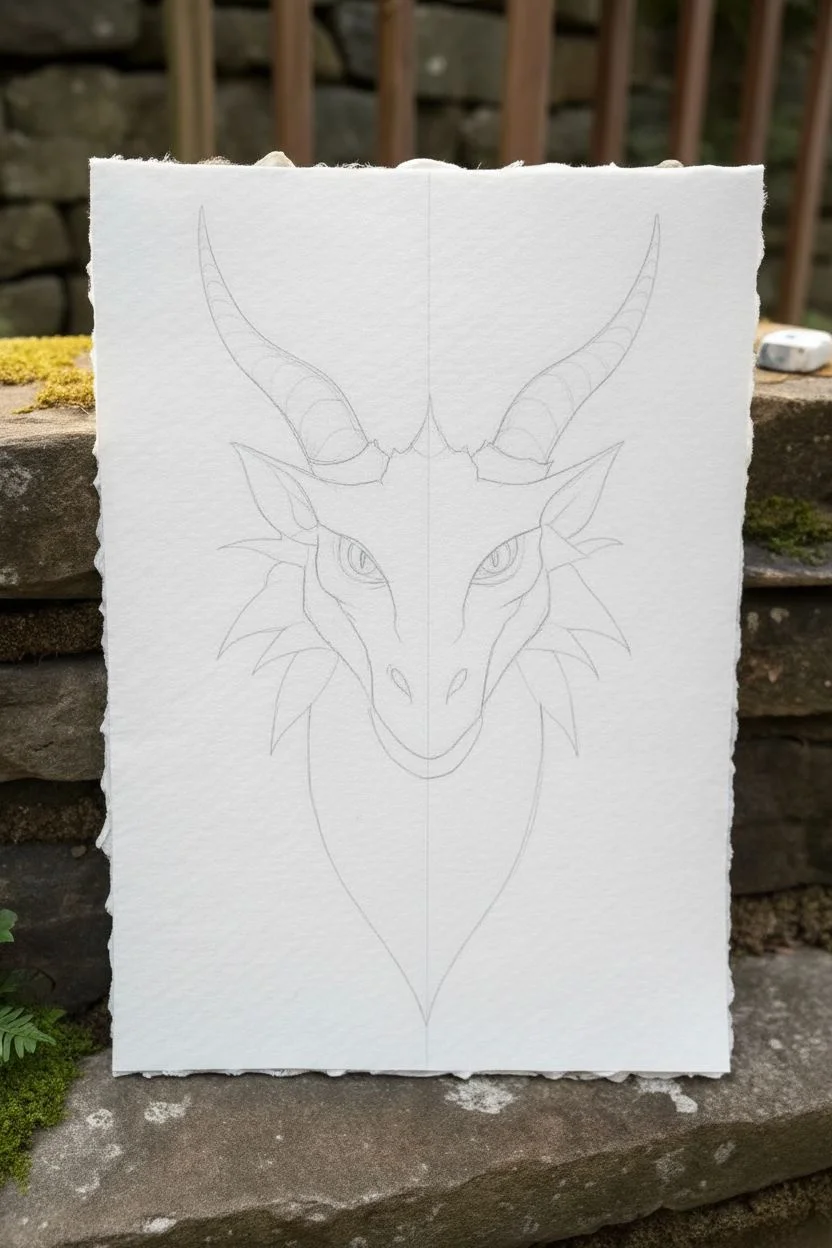
This striking front-facing dragon illustration relies on crisp linework and careful symmetry to create a sense of power and regality. The drawing uses fine hatching and varied line weights to bring depth to the scales and horns without needing color.
How-To Guide
Materials
- High-quality textured paper (approx. 300gsm, deckle edge optional)
- HB pencil for sketching
- Kneadable eraser
- Fine liner pens (sizes 0.05, 0.1, 0.3, and 0.5)
- Ruler
Step 1: Drafting the Structure
-
Establish the centerline:
Start by drawing a very light vertical line down the center of your paper using your ruler and pencil. This symmetry line is crucial for a front-facing portrait to ensure the eyes and horns are balanced. -
Block out main shapes:
Lightly sketch an inverted kite shape for the head and snout. Add two large curves extending from the top corners for the horns, and rough triangles on the sides for the cheek frills. -
Define the eyes and snout:
Place the eyes symmetrically along a horizontal guideline about halfway down the head shape. Sketch the bridge of the nose narrowing down to the nostrils. Draw the jawline, keeping it angular and sharp. -
Refine the horns and neck:
Thicken the horn guidelines into tapered, segmented shapes. Sketch the neck extending downwards, creating a V-shape at the bottom that aligns with the chin. Add the jagged outlines for the cheek spikes.
Pro Tip: Line Weight
Use thicker lines for the main silhouette and underside shadows, and the thinnest pens for surface details like scales. This variation creates instant depth.
Step 2: Inking the Outline
-
Start the main linework:
Switch to a 0.3 pen. Begin inking the primary outlines of the face, such as the snout ridge, the upper eyelids, and the jaw. Use smooth, confident strokes. -
Ink the eyes:
Carefully outline the almond-shaped eyes. Draw the vertical slit pupils in the center. I like to leave a tiny white highlight circle in each pupil to make the dragon look alive. -
Detail the horns:
Ink the outer edges of the horns. Draw the curved segments wrapping around the horns to give them volume. Ensure the segments curve with the form of the horn. -
Outline the frills:
Go over the cheek spikes and the spikes along the spine of the neck. Make the tips sharp and define the overlapping layers of the scales on the neck underside.
Level Up: Deckle Edge
To get the rustic look seen in the photo, rip your paper against a ruler edge or dampen the fold before tearing to create a soft, fibrous ‘deckle’ edge.
Step 3: Detailing and Texturing
-
Add facial scales:
Using a finer 0.1 pen, draw smaller scales around the eyes and on the snout. These don’t need to obscure the whole face; clusters of scales near the brow ridge suggest texture effectively. -
Shade the horns:
Use the 0.05 pen to add light hatching marks on the underside of each horn segment. This creates a rounded, 3D effect. -
Texturize the neck:
Draw vertical hatching lines on the large belly plates of the neck to show the curvature. Keep the lines closer together near the edges to simulate shadow. -
Define the frills:
Add striations or lines running the length of the cheek spikes with your finest pen. This makes them look rigid and bone-like rather than soft. -
Deepen contrasts:
Take your 0.5 pen and re-trace the outermost contour of the entire drawing. This heavier line weight makes the drawing pop off the page. -
Add final shadows:
Look for areas where features overlap, like under the chin or beneath the eye ridges. Add small areas of solid black or cross-hatching here to deepen the depth. -
Clean up:
Once the ink is completely dry (give it at least 15 minutes to be safe), use your kneadable eraser to gently lift all the pencil guidelines, leaving only the crisp ink art.
Now you have a fierce dragon portrait ready to guard your sketchbook or frame on the wall


Dragon Expression Sheet: Sweet to Savage
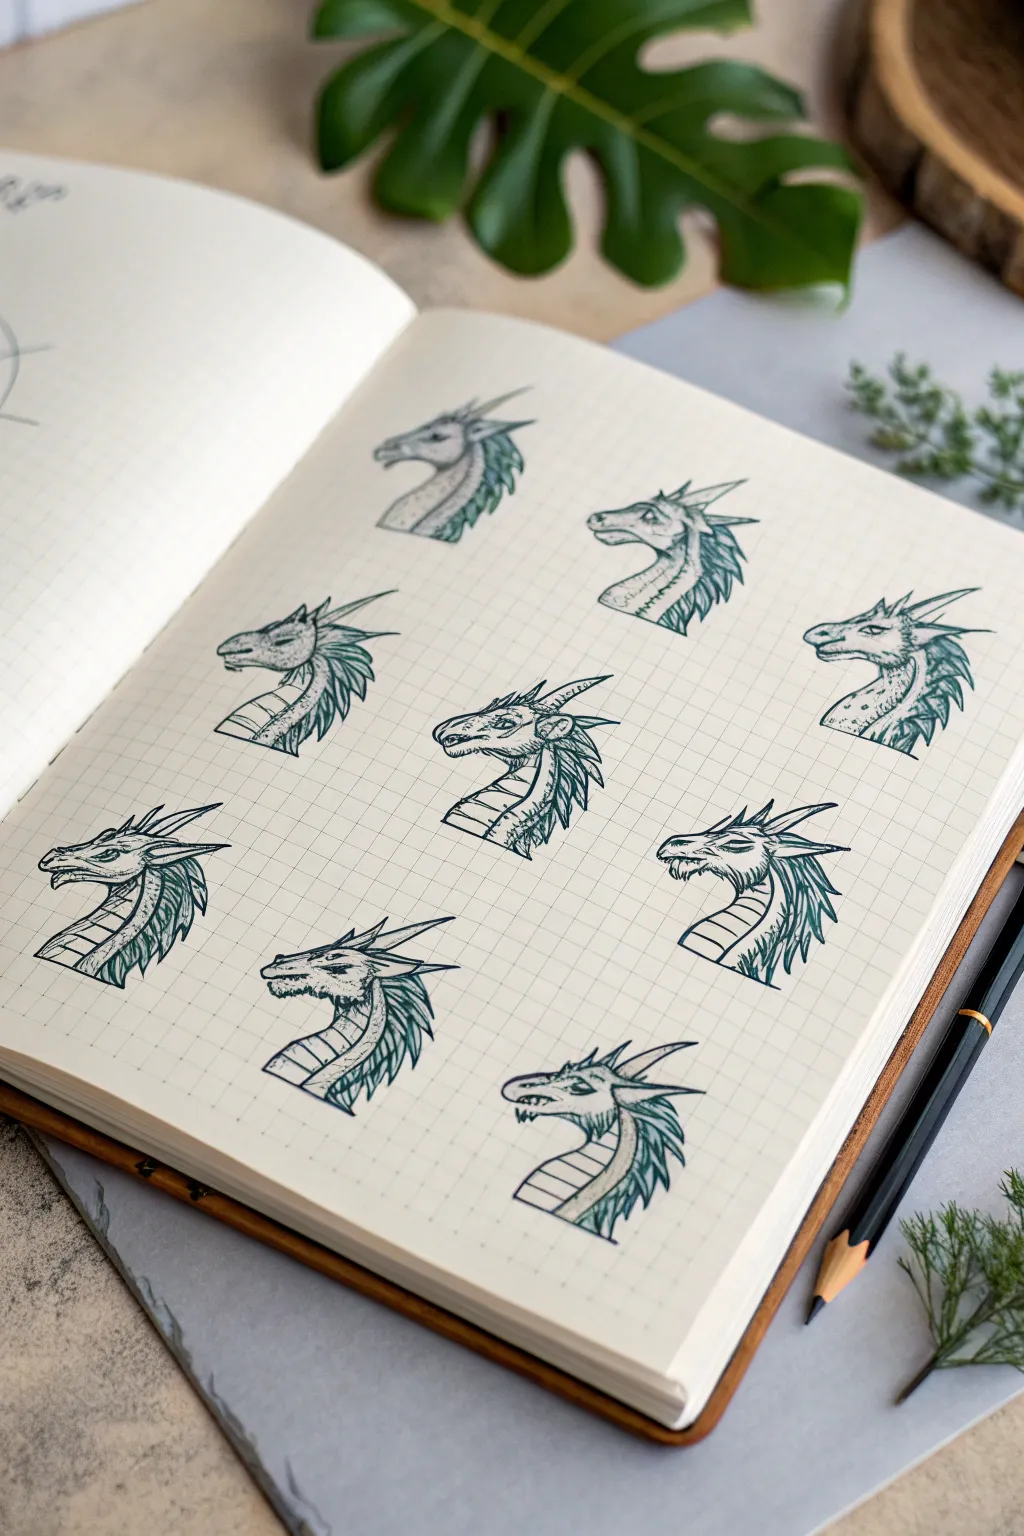

Capture the many faces of a fantasy creature with this organized character study sheet. Using a simple dot grid journal as your guide, you will sketch nine variations of a dragon head, exploring subtle shifts in emotion from gentle to fierce.
Step-by-Step
Materials
- Dot grid notebook or sketchbook
- Mechanical pencil (HB or B lead)
- Fine liner pen (black, 0.1mm – 0.3mm)
- Teal or sage green colored pencil
- Eraser (kneaded or stick)
- Ruler (optional, for spacing)
Step 1: Setting the Grid
-
Define your layout:
Open your dot grid notebook to a fresh spread. Visualize a 3×3 grid arrangement on the right-hand page. The dots will be your best friend here, helping you keep each head evenly spaced without needing to draw rigid boxes. -
Mark center points:
Lightly mark nine center points with your pencil where each dragon head will go. Leave roughly 2-3 inches of breathing room between each point so the horns and necks don’t overlap.
Step 2: Basic Structures
-
Sketch the craniums:
At each marked point, draw a rough circle for the dragon’s cranium. Keep your pencil pressure very light so these lines can be erased later. -
Add snout blocks:
Extend a boxy, rectangular shape coming off the left side of each circle to form the snout. Vary the angles slightly—some can point up, some down, and some straight ahead to create variety. -
Draw neck curves:
Sweep a curved line down from the back of the skull and another from the bottom of the jaw to form the neck. Dragon necks are serpentine, so think of an ‘S’ curve or a strong arch.
Smudge Alert?
Drawing across a grid can lead to hand smudges. Place a scrap piece of paper under your drawing hand to protect completed sketches while you work on the rest.
Step 3: Refining the Features
-
Draft the horns:
Add horns to the back of the head. I like to mix up the styles here—try long, straight spikes on one, and curved ram-like horns on another. They should flow back along the neck direction. -
Shape the frills:
Sketch the ‘mane’ or frills running down the back of the neck. Use jagged, triangular shapes for an aggressive look, or softer, leaf-like shapes for a calmer dragon. -
Detail the faces:
Place the eye socket roughly where the snout meets the cranium. Sketch the mouth line—some can be smiling slightly, others snarling with teeth exposed. Add a nostril near the tip of the snout. -
Section the underbelly:
Draw horizontal lines across the front of the neck to indicate the segmented underbelly scales. This adds great dimension and texture.
Scale Up
Try using metallic gel pens for the eyes or scales. A touch of gold or silver ink can make your dragons look magical when the light hits the page.
Step 4: Inking and Definition
-
Outline the silhouette:
Switch to your fine liner pen. Carefully trace the outer contour of your first dragon head. Use a confident, broken line for the frills to suggest hair or membrane, rather than a solid stiff line. -
Ink internal details:
Ink the eye, nostril, and mouth. For the scales and horns, use thinner or lighter strokes to differentiate texture from the main outline. -
Add texture marks:
Add small ticks, dots, and scratches on the snout and cheek areas to suggest rough lizard skin. Don’t overdo it; just a few hint lines are enough. -
Repeat for all nine:
Work your way through the grid, inking each dragon. As you go, focus on making each expression distinct—narrow the eyes for suspicion, or widen them for surprise. -
Erase pencil guides:
Wait at least five minutes for the ink to dry completely. Gently run your eraser over the whole page to remove the graphite sketches, leaving crisp black line art.
Step 5: Color and Shading
-
Apply base color:
Take your teal or sage green colored pencil. Lightly shade the frills and the top of the head scales. Leave the underbelly scales uncolored (white) for contrast. -
Deepen the shadows:
Press harder with the colored pencil in the deepest areas: under the jawline, behind the ears, and at the base of the neck frills. This creates volume. -
Highlight the horns:
Add a tiny touch of color to the base of the horns, fading out to white at the tips. This gradient effect makes them look sharp and 3D. -
Final touches:
Use the pen to add cross-hatching to the darkest shadow areas, especially under the chin, to ground the drawing.
Now you have a dynamic reference sheet filled with personality ready for your next fantasy adventure.
BRUSH GUIDE
The Right Brush for Every Stroke
From clean lines to bold texture — master brush choice, stroke control, and essential techniques.
Explore the Full Guide
Horns, Antlers, and Frill Variations
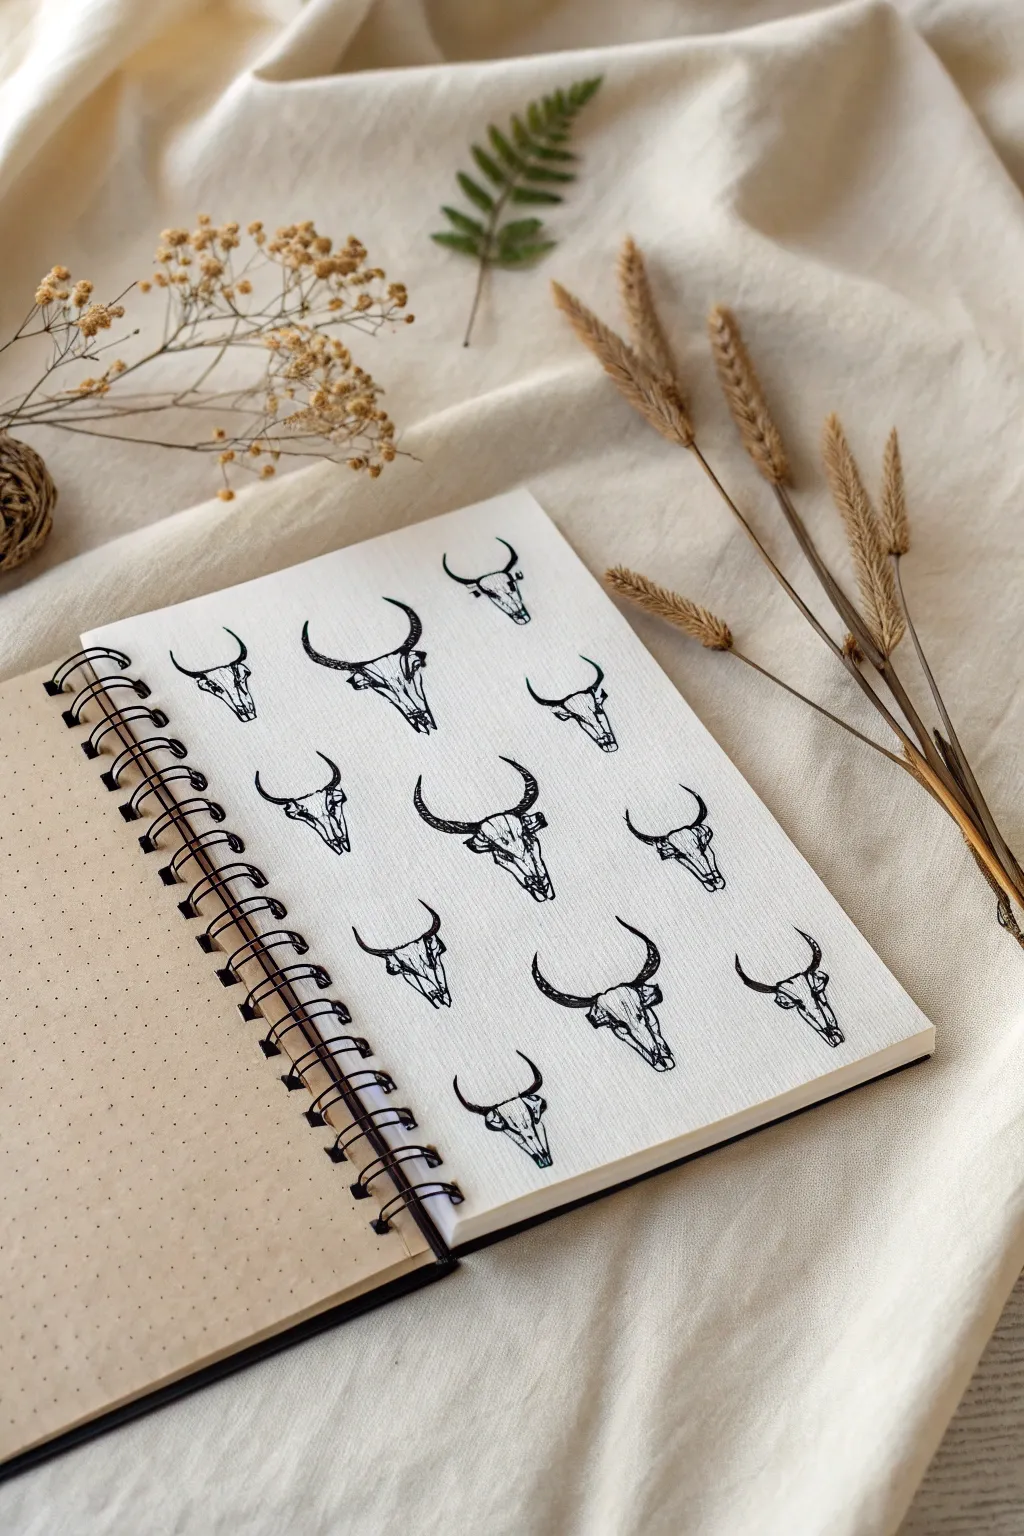
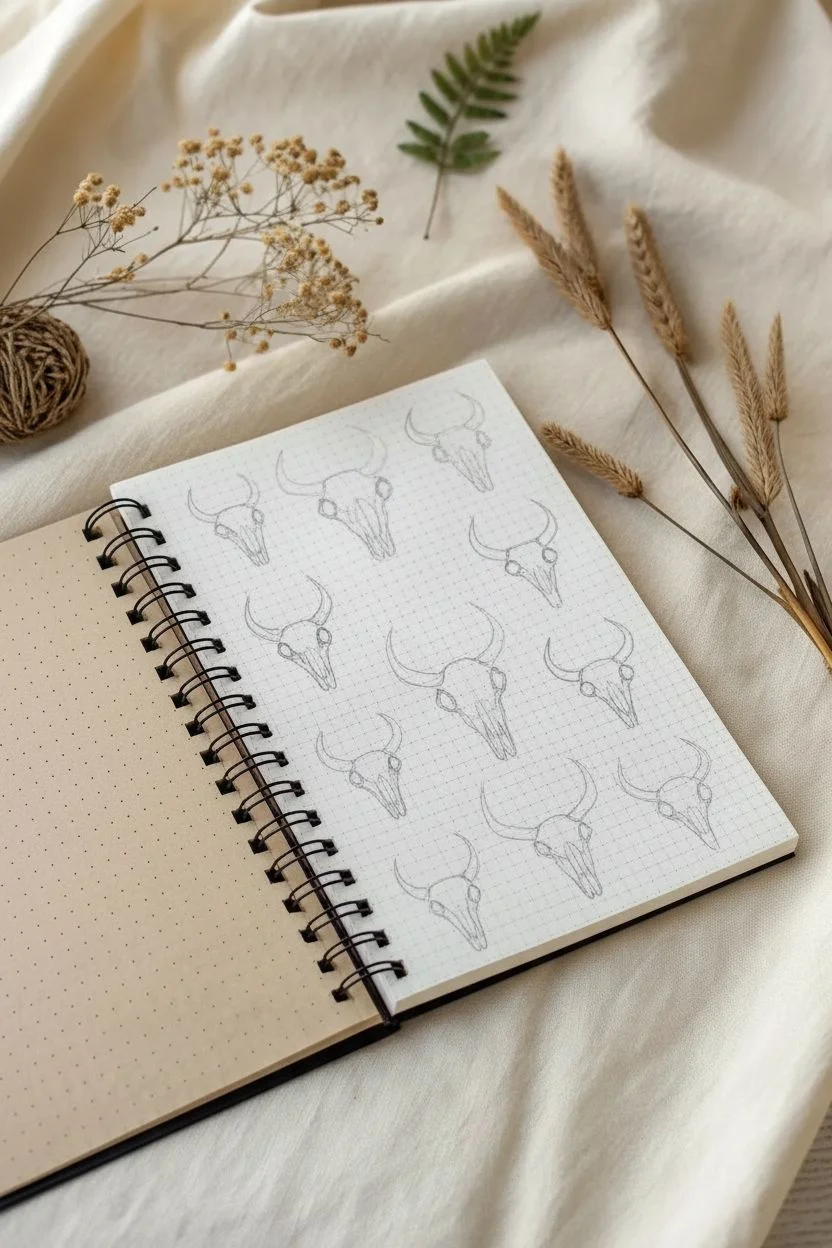
This tutorial guides you through creating a sketchbook page dedicated to studying animal skull anatomy and horn curvature. With clean ink lines and careful shading, you’ll capture the rugged texture of bone and the elegant sweep of horns.
Detailed Instructions
Materials
- Spiral-bound sketchbook with dotted or plain paper
- Fine liner pens (sizes 005, 01, and 03)
- Pencil (HB or 2H)
- Kneaded eraser
- Ruler (optional, for spacing)
Step 1: Drafting the Layout
-
Plan the grid:
Visualize a 3×4 grid on your sketchbook page. You want twelve distinct skulls evenly spaced. If you’re using dotted paper, use the dots to count out equal blocks for each skull. -
Mark the center lines:
Lightly sketch a small vertical axis line for each of the twelve positions. This ensures your skulls remain symmetrical and upright. -
Draft the basic skull shapes:
Using your pencil, draw an inverted triangle shape for each position. The top should be wider for the crown and the bottom narrower for the snout. -
Sketch the eye sockets:
Place circles or ovals on the outer edges of the upper third of your triangles. Vary the shape slightly for each one to imply different angles or species.
Step 2: Designing the Horns
-
Establish horn direction:
This is where the variety happens. For the center column, I like to draw large, sweeping horns that curve upward like a crescent moon. -
Add side variations:
For the outer columns, experiment with different shapes. Try short, stubby horns that curve inward, or thinner horns that point more vertically. -
Connect horns to skull:
Thicken the base of the horns where they meet the skull. It shouldn’t look like they are floating; draw a distinct ridge or bump at the connection point. -
Refine the bone structure:
Go back over your skull outlines. Add the nasal cavity (a teardrop shape near the bottom) and define the cheekbones under the eye sockets.
Clean Lines Pro Tip
Pull the pen towards you rather than pushing it away when drawing long curves like horns. This gives you more control and consistent line weight.
Step 3: Inking and Detailing
-
Outline the main shapes:
Switch to your 03 fine liner. Carefully trace the outer perimeter of the skulls and the main curves of the horns. Keep your hand steady for smooth arcs. -
Define the orbital cavities:
Ink the eye sockets. You can fill deep shadows with solid black, or leave them open if you prefer a more scientific illustration style. -
Add textural hatching:
Use the 01 pen for shading. Add hatching lines along the underside of the horns to give them volume and roundness. -
Create bone fissures:
Switch to the ultra-fine 005 pen. Draw tiny, jagged cracks or sutures on the forehead and nose bridge. This ‘stippling’ effect adds age and realism to the bone. -
Detail the horn growth rings:
Draw subtle, curved lines across the width of the horns, particularly near the base. These represent the natural growth ridges found on animal horns. -
Deepen the contrast:
Identify the darkest areas, such as the nasal cavity and under the cheekbones. Use cross-hatching to make these recesses recede further. -
Cleanup:
Wait at least 5-10 minutes for the ink to dry completely to avoid smudging. Gently erase all your underlying pencil guides with the kneaded eraser.
Level Up: Fantasy Twist
Turn these into dragon concepts by adding small spikes along the jawline or a frill behind the head instead of standard ears.
Your page of anatomical studies is now a beautifully detailed reference for future creature designs
Scale Texture Sampler: Face vs Neck
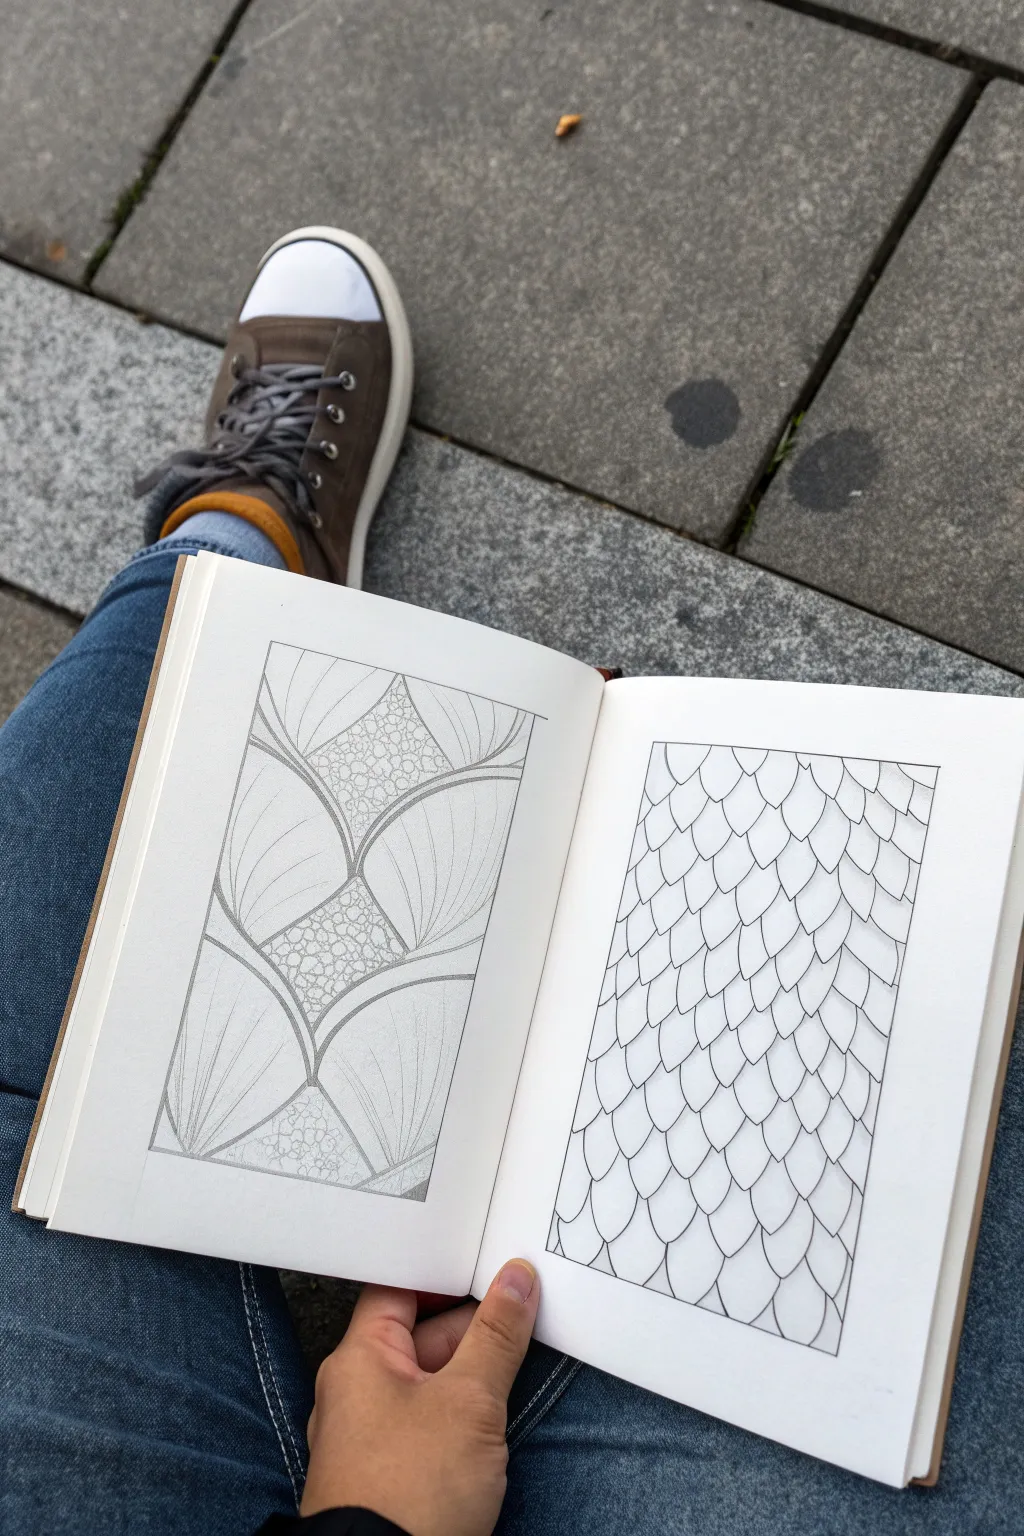
This study focuses on creating two distinct scale textures side-by-side to understand how different patterns evoke different parts of a dragon’s anatomy. One panel features large, flowing plate-like scales suitable for an underbelly or throat, while the other captures the dense, overlapping armor of a dragon’s flank or neck.
How-To Guide
Materials
- Sketchbook or drawing paper (heavyweight preferred)
- Graphite pencil (HB or 2B)
- Fine liner pen (0.3mm or 0.5mm)
- Ruler
- Eraser
- Blending stump (optional)
Step 1: Setting up the Composition
-
Define the boundaries:
Begin by drawing two identical tall vertical rectangles on your page using a ruler. These frames will contain your texture samples and keep the edges clean. -
Establish the left panel structure:
For the left panel (the large plates), lightly sketch a diamond grid or a series of diagonal intersecting lines. These will serve as the anchor points for the large, sweeping scales. -
Establish the right panel structure:
For the right panel (the tight scales), draw a faint grid of small, horizontal rows. Curve these rows slightly downward to give the impression of a cylindrical form, like a neck.
Step 2: Left Panel: The Plated Underbelly
-
Drafting the main curves:
Using your guide lines, draw large, sweeping ‘U’ shapes or scallop shells that meet at sharp points in the center. Imagine these as rigid, protective plates sliding over one another. -
Adding the inner connection:
Where the four points of your large plates meet in the center, sketch a diamond shape. This area represents the softer, flexible skin between the armored plates. -
Inking the outlines:
Go over your pencil lines with a fine liner. Use confident, smooth strokes for the long curves of the plates to emphasize their smoothness. -
Detailing the flexible skin:
Inside the central diamond shapes, draw a cluster of tiny, irregular circles or pebbles. This ‘pebbled’ texture contrasts beautifully with the smooth plates. -
Adding texture lines:
Draw very faint, radiating lines inside the large plates, starting from the center points and fanning out. These striations suggest a bone or keratin structure. -
Shading for depth:
With your pencil, lightly shade the bottom edges of the large plates where they overlap the ones below. This simple shadow creates immediate three-dimensionality.
Pro Tip: Weight Variation
Use a thicker pen for the main outline of the large plates and a much thinner pen for the internal striations. This line weight hierarchy makes the drawing easier to read.
Step 3: Right Panel: The Overlapping Armor
-
The first row:
At the very top of the right rectangle, draw a row of downward-pointing ‘V’ shapes or leaf shapes. Keep them uniform in size. -
Staggering the pattern:
Start the second row so that the point of each new scale falls directly between the two scales above it. This brick-lay pattern is crucial for realistic armor. -
Continuing the flow:
Work your way down the column. I find it helpful to slightly vary the width of the scales as I move down to prevent it from looking like a computer-generated pattern; organic imperfections look better. -
Curving the edges:
As you get close to the left and right edges of the rectangle, distort the scales slightly, making them narrower. This foreshortening trick makes the surface look curved, like a round neck. -
Clean inking:
Trace your scales with the fine liner. Be careful not to close the top of the scales; the line should stop where it tucks under the scale above it. -
Adding subtle veins:
Draw a faint central spine or a few vertical lines on just a few random scales. You don’t need to detail every single one. -
Final Cleanup:
Once the ink is completely dry, erase all your pencil guides and border lines to leave a crisp, clean study.
Level Up: Highlights
Use a white gel pen to add a tiny ‘shine’ mark on the highest point of each scale in the right panel. It makes them look wet or metallic instantly.
Now you have a reference sheet ready for your next dragon design

PENCIL GUIDE
Understanding Pencil Grades from H to B
From first sketch to finished drawing — learn pencil grades, line control, and shading techniques.
Explore the Full Guide
S-Curve Serpentine Neck Practice
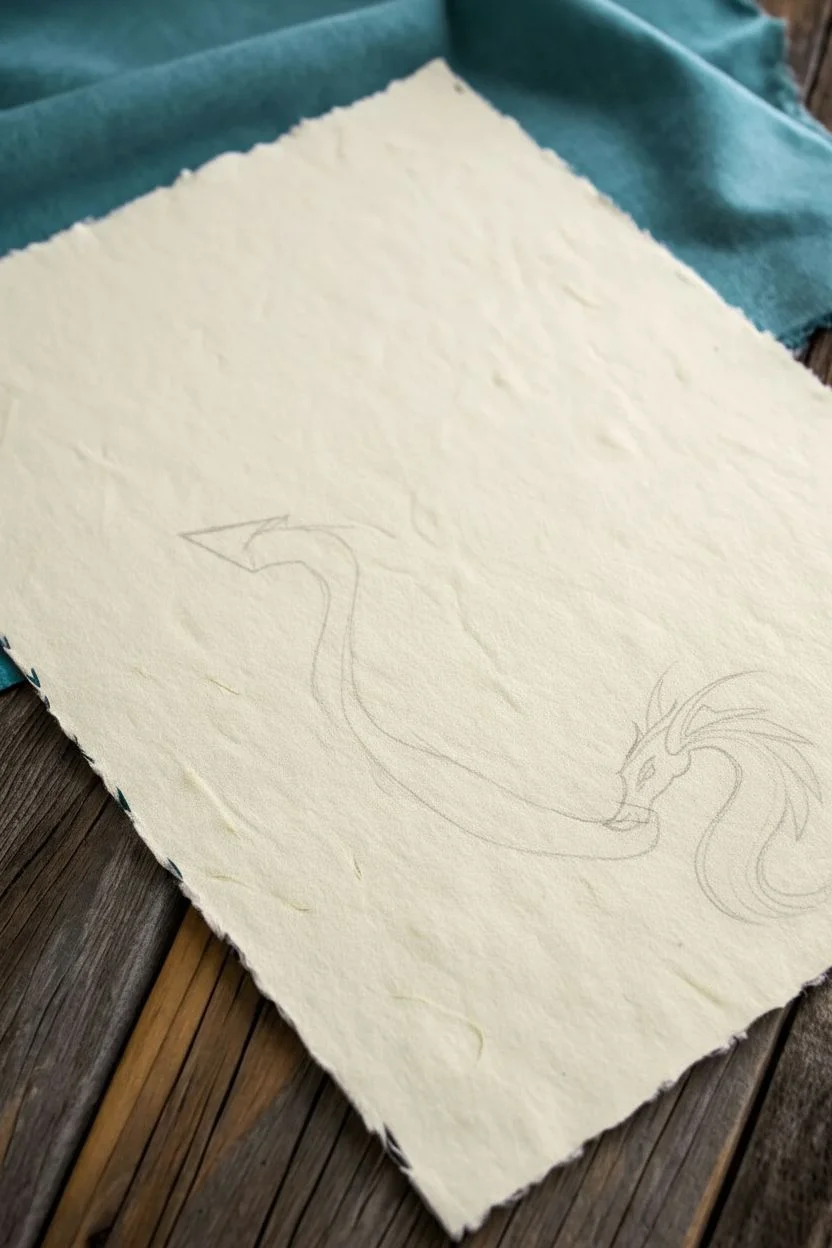
Master the flowing lines of a dragon’s neck with this elegant study on textured paper. The focus here is on creating a graceful S-curve that suggests movement and poise, rendered in a striking teal ink.
Step-by-Step Guide
Materials
- Textured handmade paper (deckled edge preferred)
- Teal or dark hunter green fine liner pen (0.3mm or 0.5mm)
- Pencil (HB or 2H)
- Kneadable eraser
- Ruler (optional for positioning)
Step 1: Planning the Curve
-
Position your paper:
Orient your textured paper vertically. Since we want plenty of negative space, plan to place your drawing in the bottom right quadrant, leaving the rest of the page open and airy. -
Sketch the guideline:
Using your pencil very lightly, draw a smooth ‘S’ shape. Start the top of the curve where the head will be and let it sweep down and to the right, hooking back up slightly at the very end. -
Block in the head:
At the top of your S-curve, sketch a simple elongated triangle shape pointing left for the snout. This doesn’t need detail yet, just the general mass. -
Refine the neck width:
Lightly draw lines parallel to your S-curve guideline to give the neck thickness. Taper it slightly; it should be thicker near the base and slightly thinner as it joins the head.
Master the Flow
Turn your paper as you draw the long S-curves. It’s much easier to pull a pen stroke towards your body than to push it away.
Step 2: Inking the Outline
-
Start with the snout:
Switch to your teal fine liner. Begin at the tip of the snout, drawing a sharp, downward-pointing nose detail. The line should curve up towards the eye area. -
Draw the eye and brow:
Place a slanted, almond-shaped eye just above the jawline. Add a heavy, angular brow ridge above it to give the dragon a focused expression. -
Define the horns:
Extend a long, swept-back horn from the top of the head. Add a second, shorter spike or ear just below it to create a layered silhouette. -
Trace the outer neck:
Carefully ink the outer boundary of the neck, following your pencil sketch. Keep your hand steady to maintain a smooth, flowing curve. -
Trace the inner neck:
Ink the inner curve of the neck. Bring this line all the way down, letting it curl up at the tail end of the S-shape to complete the form.
Step 3: Adding Details & Texture
-
Create the mane:
along the back of the neck curve, draw a series of sharp, leaf-like spikes that flow downwards. I like to make these slightly irregular in size to feel organic. -
Draw the belly scales:
Inside the neck shape, draw a single line running down the center, following the S-curve perfectly. This separates the back from the underbelly. -
Add scale segments:
On the inner side of that dividing line (the belly side), draw small curved hash marks evenly spaced. These represent the ventral plates or belly scales. -
Detail the mane flow:
add a few internal lines to the larger mane spikes you drew earlier. These lines should follow the curve of the hair/spines to suggest volume. -
Check line weight:
Go back over your main outline borders. You can thicken the outer lines slightly to make the dragon pop against the textured paper, while keeping the interior detail lines thinner. -
Erase guidelines:
Wait for the ink to become bone dry—textured paper can hold wet ink longer than smooth paper. Gently dab with your kneadable eraser to lift the pencil marks without damaging the paper surface.
Ink Bleeding?
Handmade paper is thirsty! If lines look fuzzy, switch to a smaller nib size or draw faster strokes to deposit less ink in one spot.
Now you have a mythical creature that looks like it was discovered in an ancient sketchbook
Cute Baby Dragon Head With Oversized Eyes
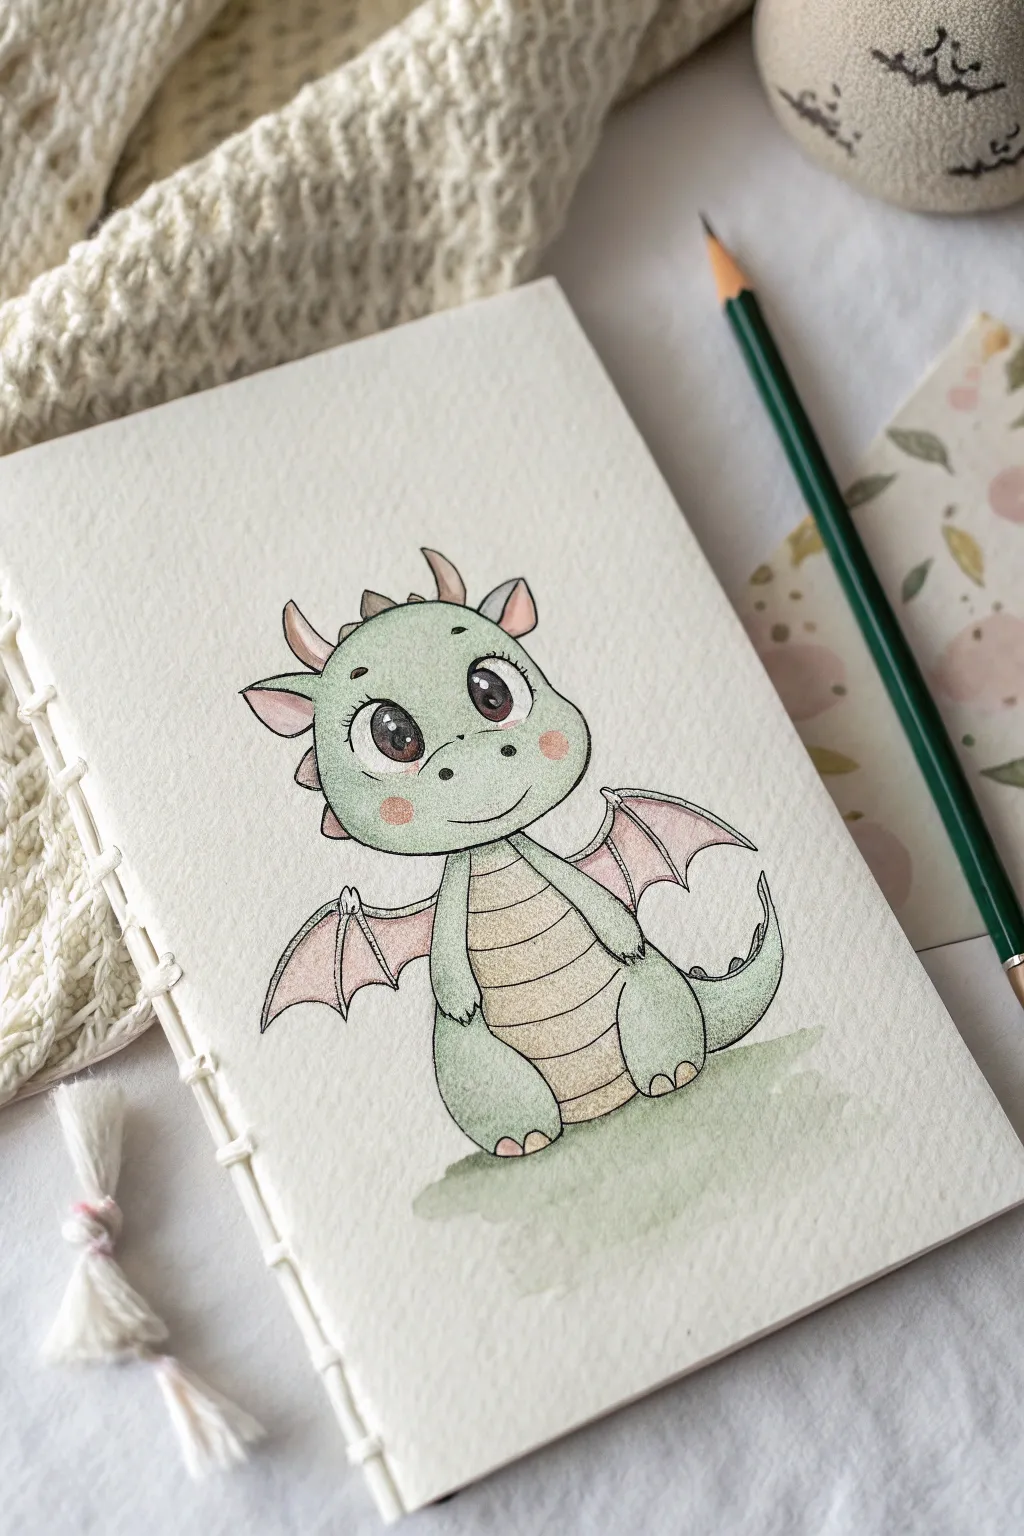
Capture the charm of mythical creatures with this adorable watercolor illustration of a baby dragon featuring oversized, expressive eyes and soft pastel tones. This project combines delicate ink linework with gentle washes of sage green and dusty rose to create a heartwarming character perfect for sketchbooks or greeting cards.
Step-by-Step Guide
Materials
- Cold Press Watercolor Paper (sketchbook or loose sheet)
- HB Pencil and Eraser
- Fine Liner Pen (Black, waterproof, size 01 or 03)
- Watercolor Paints (Sage Green, Paynes Grey, Burnt Sienna, Rose Madder)
- Round Watercolor Brushes (Size 2 and 4)
- Clean Water and Paper Towels
Step 1: Sketching the Basics
-
Map out the head shape:
Start by lightly sketching a large, slightly flattened oval for the head. It should take up almost a third of your drawing space to accommodate those big features. -
Add the body structure:
Directly beneath the head, draw a smaller, pear-shaped body. The bottom should be wider to make the dragon look like it is sitting comfortably. -
Sketch the oversized eyes:
Draw two very large ovals in the middle of the face, spacing them apart slightly. Inside, mark out the highlights (white circles) before adding the pupils to ensure you don’t accidentally color them in later. -
Refine facial features:
Add two small nostrils between the eyes and a gentle curved line for a smile. Place two rosy cheek circles just below the eyes. -
Add horns and ears:
Sketch two small triangular ears on the sides of the head. Add two small horns on top of the head and three smaller spikes running down the back of the neck. -
Draw the limbs and wings:
Sketch short, stubby arms resting against the belly and two rounded feet at the base. From the back, extend two small bat-like wings with scalloped edges. -
Detail the belly:
Draw horizontal curved lines across the stomach area to create the segmented belly texture.
Eye Sparkle Trick
Make the eyes pop by leaving two white reflections in each pupil—one large, one small. If you accidentally paint them, bring them back with a white gel pen.
Step 2: Inking the Outline
-
Trace with waterproof ink:
Using your fine liner pen, carefully trace over your pencil lines. Use a steady hand, but don’t worry if lines aren’t perfectly smooth—an organic line adds character. -
Emphasize the eyes:
When inking the eyes, make the outer rim slightly thicker. Add three delicate eyelashes to the outer corner of each eye for extra cuteness. -
Texturize the outline:
For the dragon’s skin, I like to use slightly broken or dotted lines in a few places, like the knees or elbows, to suggest softness rather than rigid plastic. -
Erase pencil marks:
Wait until the ink is completely dry—give it a few minutes—then gently erase all underlying pencil sketches.
Step 3: Painting with Watercolor
-
Paint the green skin:
Mix a watery wash of Sage Green. Paint the head, body, and limbs, carefully avoiding the eyes, belly, and wing membranes. Keep the wash light and translucent. -
Add gentle shading:
While the green is still slightly damp, dab a slightly darker concentration of green on the bottom of the feet and the edges of the face to create volume. -
Color the belly:
Mix a very diluted Burnt Sienna to get a creamy beige tone. Paint the segmented belly area, allowing it to dry slightly between segments if you want distinct lines, or wash it all at once for a softer look. -
Tint the wings and ears:
Use a diluted Rose Madder or soft pink to paint the inside of the wings and the inner ears. This adds a lovely warmth to the cool green palette. -
Define the face:
Use a slightly stronger pink mixture for the cheek circles. This gives the dragon a permanent blush. -
Paint the eyes:
Using a mix of Paynes Grey and Burnt Sienna, paint the irises. Start lighter at the bottom and get darker towards the top, leaving the white highlights completely clean. -
Ground the playful scene:
Mix a loose, watery green wash and apply it beneath the dragon to suggest a patch of grass. Let the edges fade out naturally. -
Final touches:
Once everything is dry, you can use a white gel pen to accentuate the eye highlights if they got lost, or darken the pupils with your black pen for deeper contrast.
Avoid Muddy Colors
Wait for the green skin to fully dry before painting the pink wings or beige belly. If the wet edges touch, the colors will bleed into a muddy brown mess.
Now you have a heartwarming little dragon companion ready to brighten up any page.


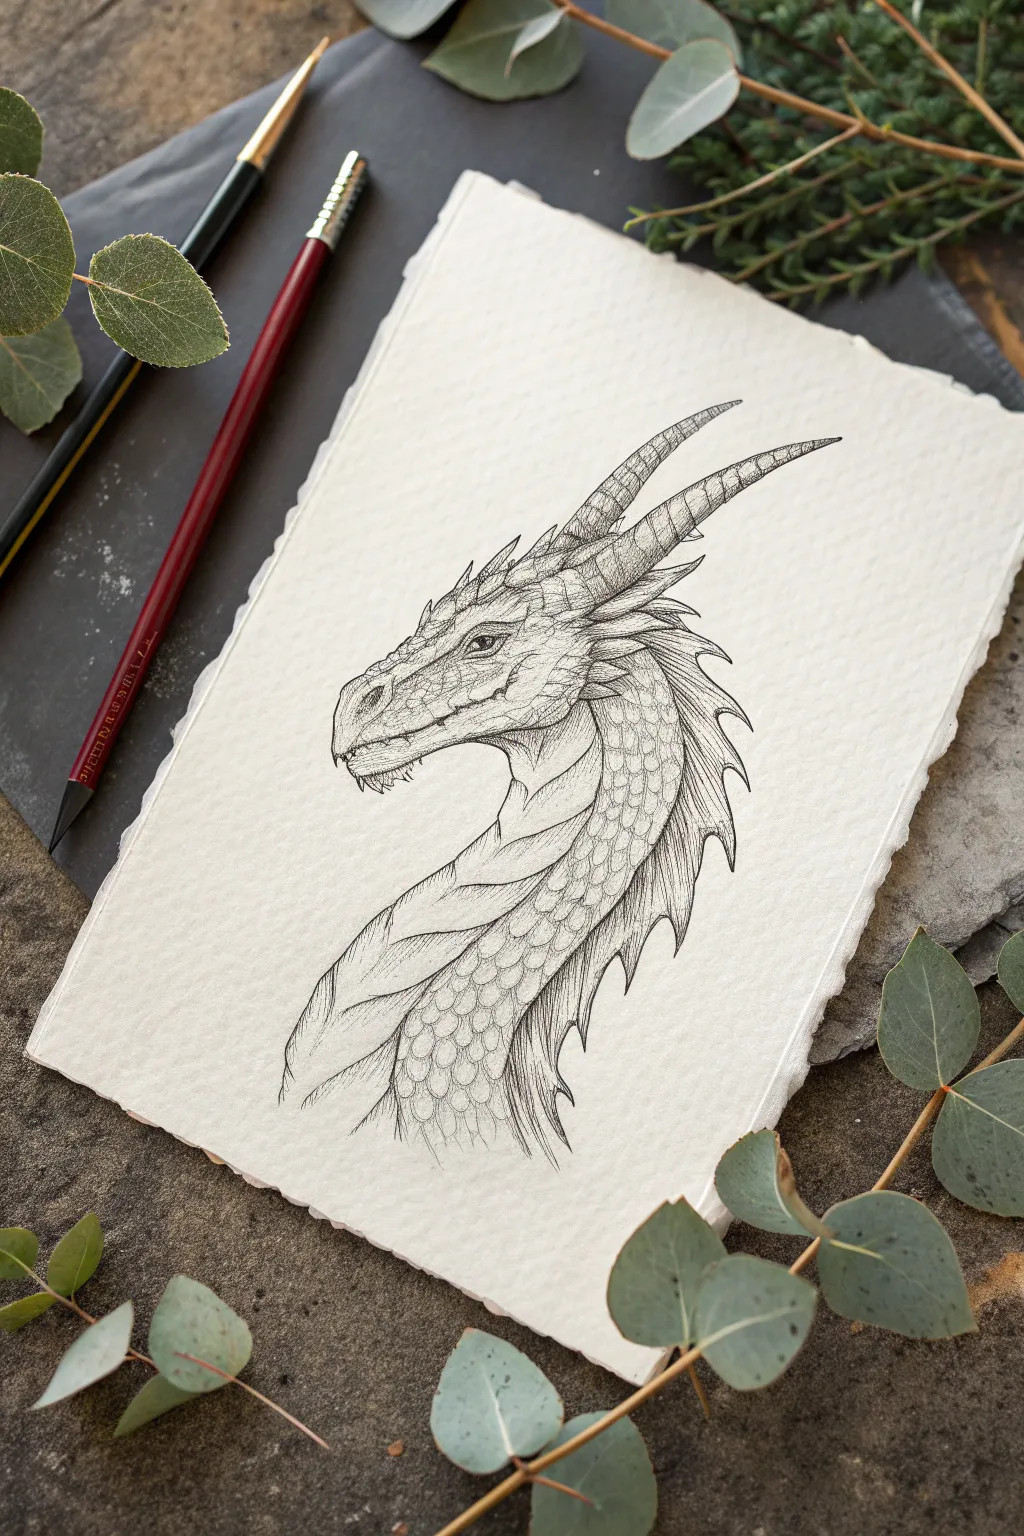
Battle-Scar Dragon With Broken Horns
Capture the fierce elegance of a dragon with this detailed ink illustration on textured paper. This project focuses on distinctive scale patterns, sharp facial features, and strong linework to create a classic fantasy profile.
Detailed Instructions
Materials
- Handmade or cold-press watercolor paper (off-white/cream)
- Fine liner pens (sizes 0.05, 0.1, 0.3, and 0.5)
- HB or 2B graphite pencil
- Kneaded eraser
- Ruler (optional for proportions)
Step 1: Planning the Profile
-
Head and Snout Shape:
Start with your HB pencil to sketch a light oval for the main head mass. extend a rectangular block forward for the snout, tapering it slightly towards the nose. Keep these lines very faint so they can be erased easily later. -
Jaw and Neck:
Draw the lower jawline, curving it sharply upward near the back of the head. Add a curved line extending downward from the back of the skull to define the neck’s arch, creating a strong, serpentine flow. -
Placing Features:
Mark the eye placement high on the head, roughly where the snout meets the skull. Sketch lightly curved guiding lines for the horns sweeping backward and the spine spikes running down the neck.
Old Paper Effect
To match the reference, tear the edges of your heavy watercolor paper instead of cutting them. This ‘deckled edge’ look mimics ancient parchment scrolls.
Step 2: Inking the Outline
-
The Eye:
Switch to a 0.1 fine liner. Draw the almond-shaped eye with a heavy upper lid and a sharp, vertical pupil. Leave a tiny white circle for a highlight to give it life. -
Snout and Mouth:
Using a 0.3 pen, trace the upper snout line, adding small bumps for nostrils. Draw the mouth line with a jagged, uneven stroke to suggest teeth and rough skin, extending it back past the eye. -
Defining the Horns:
Ink the two large horns sweeping back from the brow. I like to segment them with curved cross-lines to show growth rings. Use a 0.5 pen for the outer edges to separate them from the rest of the details. -
Neck Spikes:
Draw the row of triangular spikes running down the back of the neck. Make them slightly irregular in size and sharpness to feel organic rather than mechanical.
Level Up: Coffee Stain
Before drawing, lightly brush the paper with diluted coffee or tea and let it dry. This creates an authentic, aged background tone for your mythical beast.
Step 3: Detailing Scales and Texture
-
Underbelly Plates:
Draw large, overlapping armor plates running down the front of the throat. Use smooth, swooping lines that overlap like shingles, ending in sharp points. -
Facial Scales:
Switch to your finest 0.05 pen. Add small, clustered scales around the eye and nose. Don’t outline every scale; just suggest them with ‘U’ shapes and dots to prevent the drawing from looking too busy. -
Neck Scales:
Fill the side of the neck with larger, roughly diamond-shaped scales. Draw these with broken, scratchy lines rather than perfect geometric shapes to simulate a rugged texture. -
Cheek Details:
Add a few sharp, fin-like protrusions near the jawline and behind the eye. Use short hatching lines at the base of these fins to suggest shadow and depth.
Step 4: Shading and Finishing
-
Hatching Shadows:
Identify your light source (coming from the top left). Use diagonal hatching lines with a 0.1 pen on the underside of the jaw, the bottom of the horns, and beneath the neck spikes. -
Deepening Contrast:
Go back over the main outline (the silhouette) with a 0.5 pen to make the dragon pop off the page. Darken the corners of the mouth and the deep creases between the neck plates. -
Stippling Texture:
Add tiny dots (stippling) along the top of the snout and the prominent brow ridge. This subtle texture makes the skin look leathery and weathered. -
Clean Up:
Wait at least 15 minutes for the ink to fully cure. Gently roll a kneaded eraser over the entire drawing to lift the pencil sketch without smudging the ink.
Now you have a striking dragon portrait ready to guard your sketchbook
Fire-Breath Dragon With Smoke Shapes
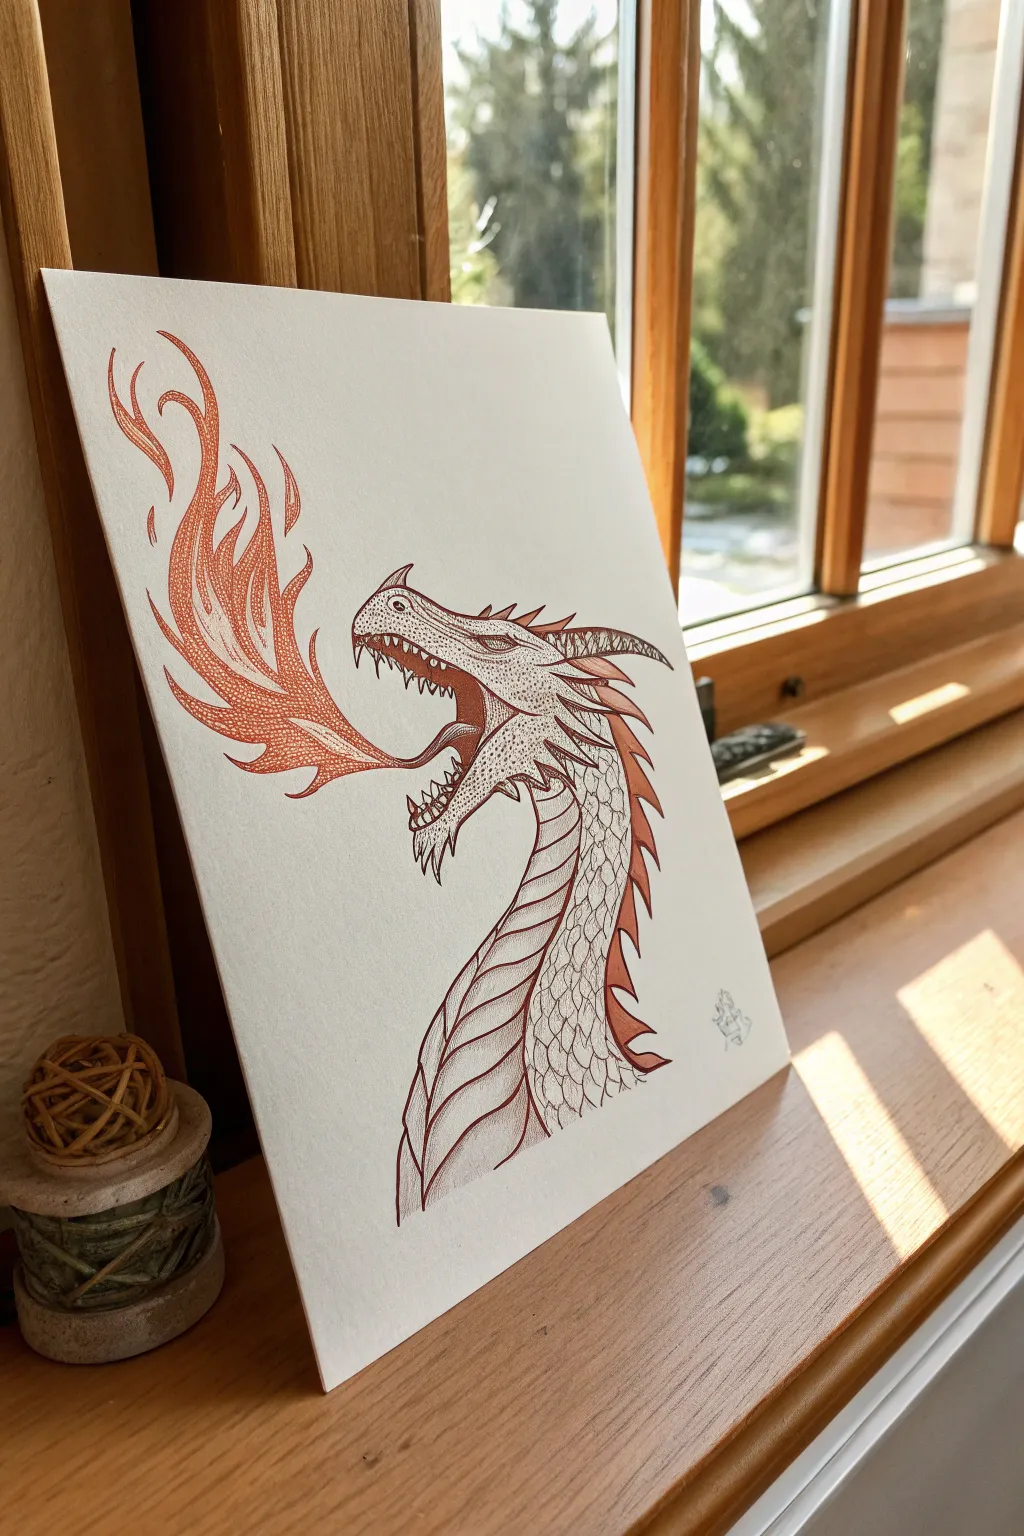
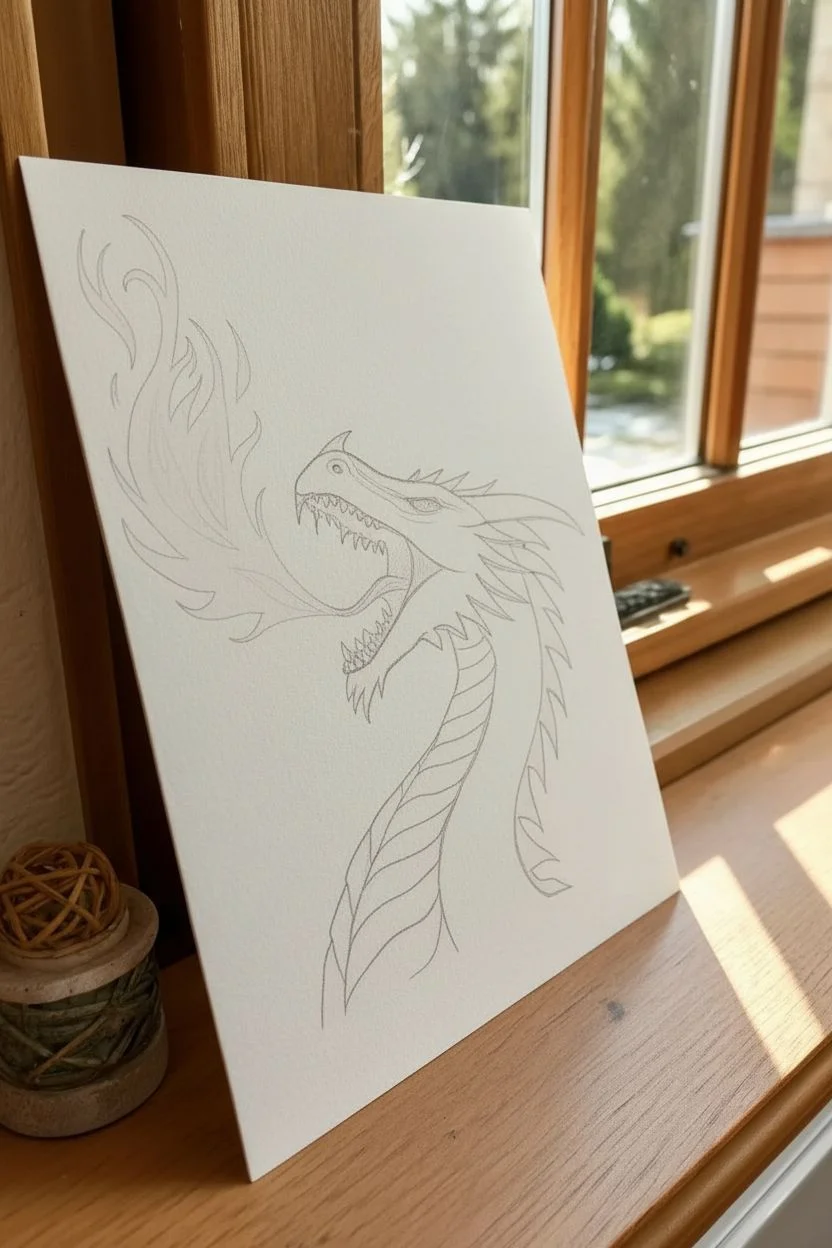
Capture the fierce elegance of a dragon breathing fire with this intricate ink illustration. By combining clean line work with meticulous stippling, you will build up depth and texture that makes the scales and flames leap off the page.
How-To Guide
Materials
- High-quality drawing paper (heavyweight, slightly textured)
- Fine liner pens (sizes 0.1, 0.3, and 0.5)
- Reddish-brown or Sepia ink pen (or fine liner)
- HB Pencil
- Soft eraser
- Ruler (optional for proportion checking)
Step 1: Drafting the Beast
-
Outline the head shape:
Begin with a light pencil sketch. Draw an elongated oval for the snout and a rounded shape for the skull, connecting them with a sleek jawline. Keep your pencil pressure very light so these lines can be erased later. -
Define the mouth:
Sketch the open mouth, ensuring the upper jaw extends slightly further than the lower jaw. Create a curved line for the tongue that lolls out, giving the dragon a dynamic, exhaling pose. -
Add facial features:
Place the eye high on the skull, sketching a sharp, angular ridge above it for the brow. Add a small nostril bump near the tip of the snout. -
Sketch the neck and horns:
Draw the S-curve of the neck flowing down from the head. Add the main backward-sweeping horn from the back of the skull and indicate the placement of the smaller spikes running down the spine. -
Outline the fire:
Draw the flames erupting from the mouth. Instead of random squiggles, draw distinct, curvy shapes that flare upward and twist, resembling stylized smoke or fluid tendrils.
Patience is Key
Stippling takes time! Don’t rush or tap too hard, or your dots will turn into tiny comets with tails. Put on a podcast and enjoy the slow, rhythmic process.
Step 2: Inking the Outlines
-
Trace the main lines:
Switch to a 0.5 reddish-brown or sepia fine liner. Carefully go over your pencil lines for the dragon’s profile, the horns, and the primary shape of the neck. Use confident, smooth strokes. -
Detail the teeth and eye:
Switch to a precise 0.1 pen. Carefully ink the sharp, jagged teeth and the intense eye pupil. I find that using the thinnest pen here prevents the small details from becoming a muddy blob. -
Ink the fire contours:
Use the 0.3 colored pen to outline the flames. Vary your line weight slightly—press a bit harder on the undersides of the flame curves to suggest volume. -
Erase pencil marks:
Wait at least 15 minutes for the ink to dry completely. Once safe, gently erase all underlying graphite sketches to reveal a clean line drawing.
Step 3: Shading with Stippling
-
Scale texture on the face:
Using your 0.1 pen, start stippling (drawing tiny dots) on the dragon’s face. Concentrate the dots heavily near the jawline and under the eye ridge to create shadow, spreading them out as you move toward highlighted areas. -
Define the neck scales:
Draw the large, plate-like scales running down the front of the neck. Instead of shading them solidly, outline them and add a few dots near the overlapping edges to show thickness. -
Texture the side of the neck:
For the area between the front plates and back spines, draw a pattern of smaller, pebble-like scales. Fill the gaps between these scales with dense stippling to make the scales themselves pop out. -
Shade the horns and spikes:
Add linear hatching or dense dots to the base of the horns and spine spikes. This grounds them to the body and gives them a rigid, bony appearance compared to the fleshier neck. -
Detail the flames:
Return to the fire breath. Use stippling inside the flame shapes, concentrating the dots at the bottom of each flame ‘tongue’ where it emerges from the mouth. This gradient effect makes the fire look hot and glowing. -
Darken the mouth interior:
To create deep contrast, use cross-hatching or very dense stippling inside the open mouth, strictly behind the teeth and tongue. This depth makes the fire look brighter by comparison. -
Final contrast check:
Look over the whole piece. If certain areas look too flat, add another layer of dots to the deepest shadows to boost the three-dimensional effect.
Ink Smearing?
If you are right-handed, work from the top-left to the bottom-right (and vice versa for lefties). This keeps your hand from resting on wet ink while you dot.
Step back and admire how thousands of tiny dots have come together to form a powerful mythical creature
Sea Dragon Head With Fins and Whiskers
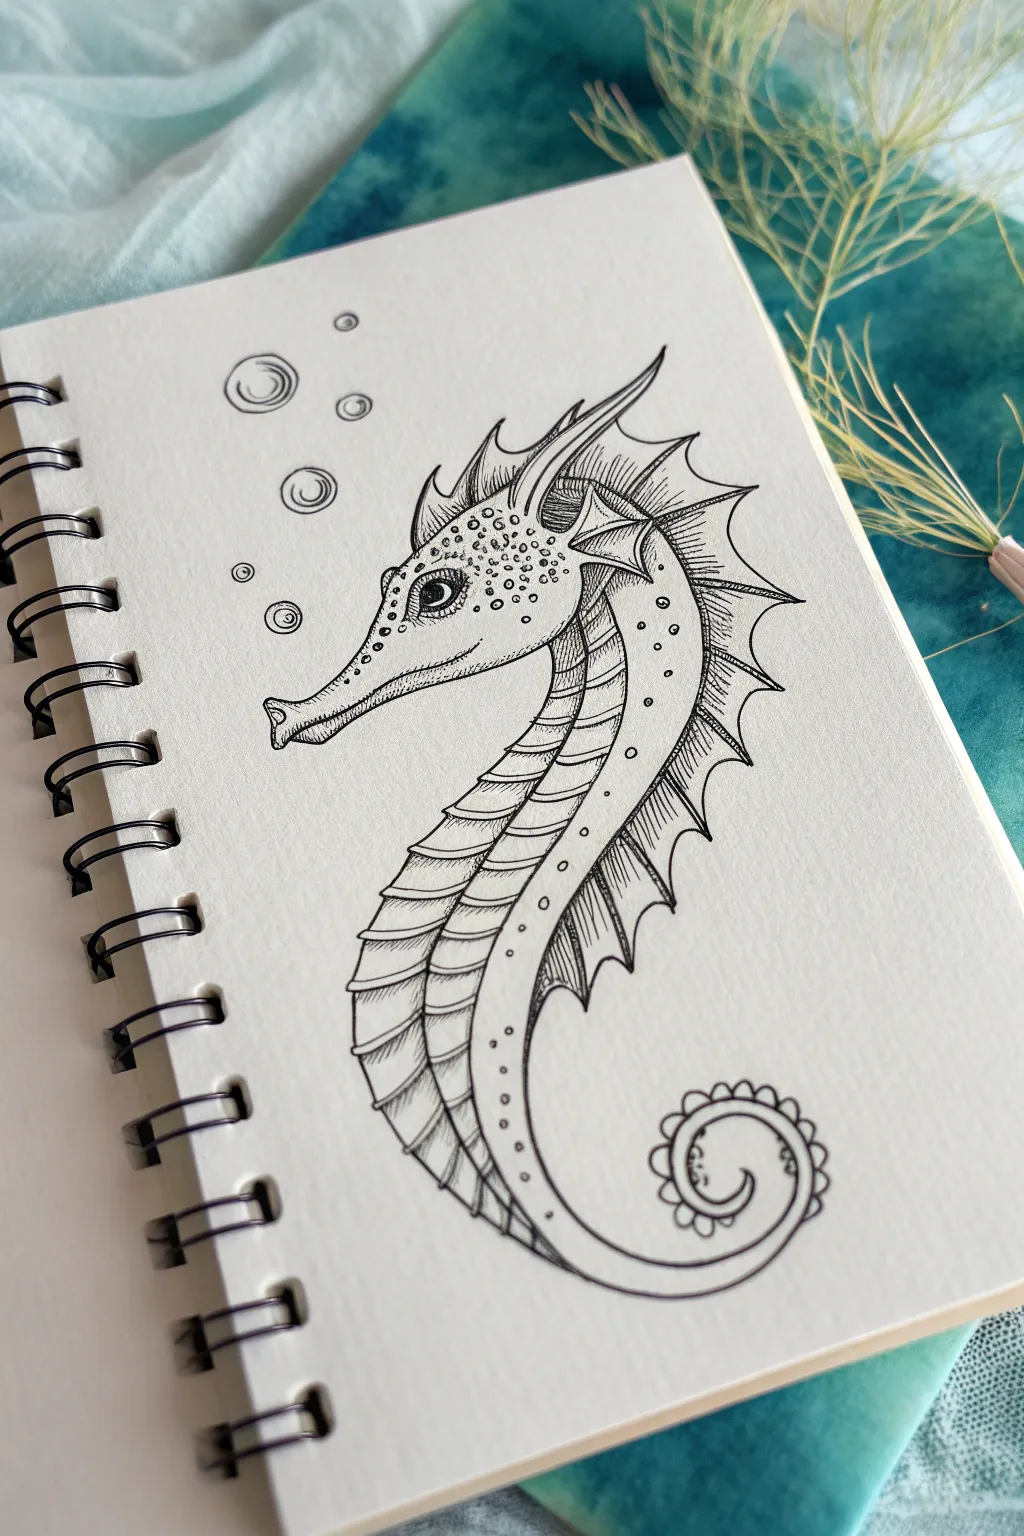
This detailed pen-and-ink illustration captures the enchanting curves of a seahorse-like sea dragon. Using fine liners and stippling techniques, you will create a textured, marine-inspired creature with a decorative spiral tail.
Detailed Instructions
Materials
- Sketchbook or drawing paper (heavyweight works best)
- Pencil (HB or H for light sketching)
- Eraser (kneaded eraser preferred)
- Fine liner pens (sizes 0.1, 0.3, and 0.5)
- White gel pen (optional for highlights)
Step 1: Sketching the Framework
-
Draft the S-curve:
Begin by drawing a large, loose ‘S’ shape in the center of your page to establish the dragon’s posture. The top curve will be the head and neck, while the bottom loop will form the curled tail. -
Shape the head:
At the top of your S-curve, sketch a slanted oval for the head. Extend a tapering snout downwards and to the left, giving it a slightly upturned tip. -
Build the body volume:
Draw contour lines parallel to your initial S-curve to create the width of the neck and belly. Taper the body gradually as it moves down towards the tail, ending in a tight spiral. -
Add fin outlines:
Sketch a spiky, flowing dorsal fin along the back of the neck and upper body. Add a smaller, fan-shaped fin near the cheek area behind where the eye will be.
Uneven Ink Flow?
If your pen skips or blots, text it on a scrap paper immediately. Keep your hand lifted slightly to prevent smudging wet ink, or place a clean sheet under your palm.
Step 2: Inking the Outline
-
Define the profile:
Using a 0.3 pen, trace the final outline of the snout and head. Pay attention to the jagged, spiky details on top of the head that suggest a crown or horns. -
Draw the main body lines:
Ink the long, curving lines of the belly and back. Divide the belly into horizontal segments by drawing curved lines across the width, resembling armor plates. -
Detail the dorsal fin:
Outline the dorsal fin with sharp, jagged points. Draw lines radiating from the body outward to the tips of the fin spines to give it structure. -
Create the decorative tail:
Ink the spiral tail carefully. Instead of a simple point, add a scalloped, flower-like decorative edge to the very tip of the curl for a whimsical touch.
Step 3: Adding Texture and Detail
-
Draw the eye:
Place a large, almond-shaped eye on the head. Ink a dark pupil, leaving a small white highlight to make it look alive, and add thickened lashes or ridges around the rim. -
Stipple the face:
Switch to your 0.1 fine liner. Add tiny dots (stippling) across the top of the head and cheeks to create texture and shading. Concentrate the dots near the edges for a rounded effect. -
Detail the belly plates:
Inside the horizontal belly segments, add vertical hatching lines on the left side of each segment. This creates a shadow effect that makes the belly look rounded rather than flat. -
Enhance the dorsal fin:
Add fine hatching lines between the spines of the back fin. I usually do this near the base of the fin to show depth and separation between the membrane and the spines. -
Decorate the body:
Draw small circles along the side of the body, following the curve of the spine. These act as decorative spots or markings on the dragon’s skin. -
Add bubbles:
Draw several circles of varying sizes floating above the snout. Add small crescent shapes inside each bubble to indicate reflection and volume. -
Final clean up:
Once the ink is completely dry, gently erase all pencil guidelines. Check your line weights; you might want to thicken the outer contour slightly with a 0.5 pen to make the drawing pop from the page.
Mastering the Curve
Turn your sketchbook as you draw the long body curves. Pulling the pen towards you rather than pushing it away often results in smoother, more confident lines.
Now you have a charming sea dragon illustration ready to be colored or left as a classic black and white study
Dragon Bust in a Frame Breaking the Border
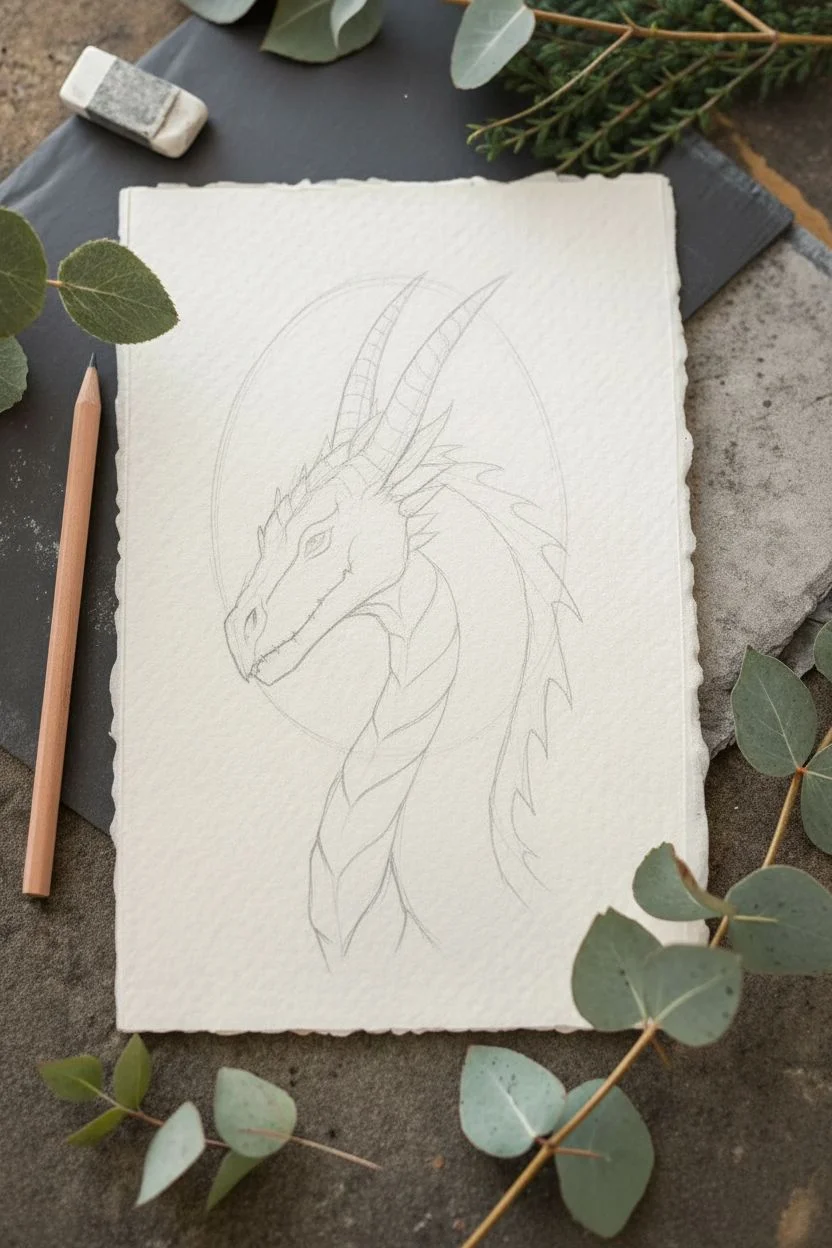
Capture the majestic essence of fantasy in this intricate black ink illustration. Using fine liners on textured deckled-edge paper, you will build up layers of scales, horns, and spines to create a believably detailed dragon bust.
How-To Guide
Materials
- Heavyweight textured paper with deckled edges (e.g., watercolor or printmaking paper)
- Hard pencil (2H or H) for initial sketching
- Soft eraser (kneaded suggested)
- Fine liner pens (sizes 0.05, 0.1, 0.3, and 0.5)
- Red pencil or colored pencil (optional, based on photo prop)
Step 1: Planning the Structure
-
Light Framework:
Begin with your hard pencil (2H) using extremely light pressure. Sketch a slanted oval for the head and a sweeping S-curve extending downwards for the neck. -
Snout and Jaw:
Refine the head shape by drawing a boxy rectangular form for the snout attached to the oval. Sketch the lower jaw slightly agape to give the dragon expression. -
Horn Placement:
Draw two long, curved guidelines extending backward from the top of the head for the main horns. Add smaller triangles along the back of the jaw and neck to mark where spines will go.
Step 2: Detailed Pencil Sketch
-
Defining Features:
Solidify the outline of the eye, placing it relatively high on the head. Sketch a deep brow ridge over it to create a fierce or focused look. -
Mapping Scales:
Lightly map out the flow of the scales. Use larger, plate-like shapes for the neck belly, and smaller, pebble-like shapes for the face and snout. -
Texturing Horns:
Draw lines ringing around the large horns to indicate their segmented growth structure. Ensure these curves follow the cylindrical form of the horn. -
Neck Spines:
Flesh out the jagged spines running down the back of the neck. Make them irregular—some sharp, some slightly curved—to look organic.
Scale Flow Direction
Make your dragon look organic by ensuring all scale patterns flow in the same direction—wrapping around form like fabric rather than sitting flat on top.
Step 3: Inking the Outlines
-
Main Outlines:
Switch to a 0.3 fine liner. Carefully trace the main silhouette of the dragon, including the jawline and the primary lines of the neck. -
Eye Detail:
Use a 0.05 or 0.1 pen for the eye. Ink the pupil and iris carefully, leaving a tiny white spot for a highlight to bring the creature to life. -
Horn Segments:
Ink the segmented rings on the horns using the 0.1 pen. Break the lines occasionally so they don’t look like perfect wire coils, which adds realism.
Smudged Ink?
If you smudge ink while erasing, stop immediately. Let it dry fully, then use a white gel pen or white gouache to carefully paint over the mistake.
Step 4: Texture and Shading
-
Facial Scales:
Using your finest pen (0.05), draw the individual scales on the snout and cheek. These should be irregular polygons, not perfect circles. -
Belly Plates:
Ink the large, overlapping plates on the front of the neck. Use slightly thicker lines (0.1) for the bottom edge of each plate to suggest thickness. -
Hatching Shadows:
I prefer to start shading under the jawline first. Use fine parallel lines (hatching) to create shadows where the head casts darkness onto the neck. -
Horn Texture:
Add vertical hatching marks along the bottom curve of the horns to make them look round and three-dimensional. -
Spine Detail:
Add striated lines flowing from the base of the neck spines outward to the tips, following the direction of growth. -
Deepening Contrast:
Take a 0.5 pen and selectively darken the deepest shadow areas—specifically right under the chin, the nostril, and the corners of the mouth. -
Stippling:
For a gritty texture, add tiny dots (stippling) on the rougher scales around the eye and nose bridge using the 0.05 pen.
Step 5: Final Touches
-
Erase Pencil:
Wait at least 15 minutes for the ink to dry completely. Gently erase all underlying pencil sketch lines with a kneaded eraser to avoid damaging the paper texture. -
Refining Edges:
Look at the drawing as a whole. If any outer lines feel too thin against the textured paper, go over them once more with the 0.3 pen to make the dragon pop.
Now step back and admire the fierce, mythical creature you have brought to life on paper
Geometric Dragon Head Using Straight Planes
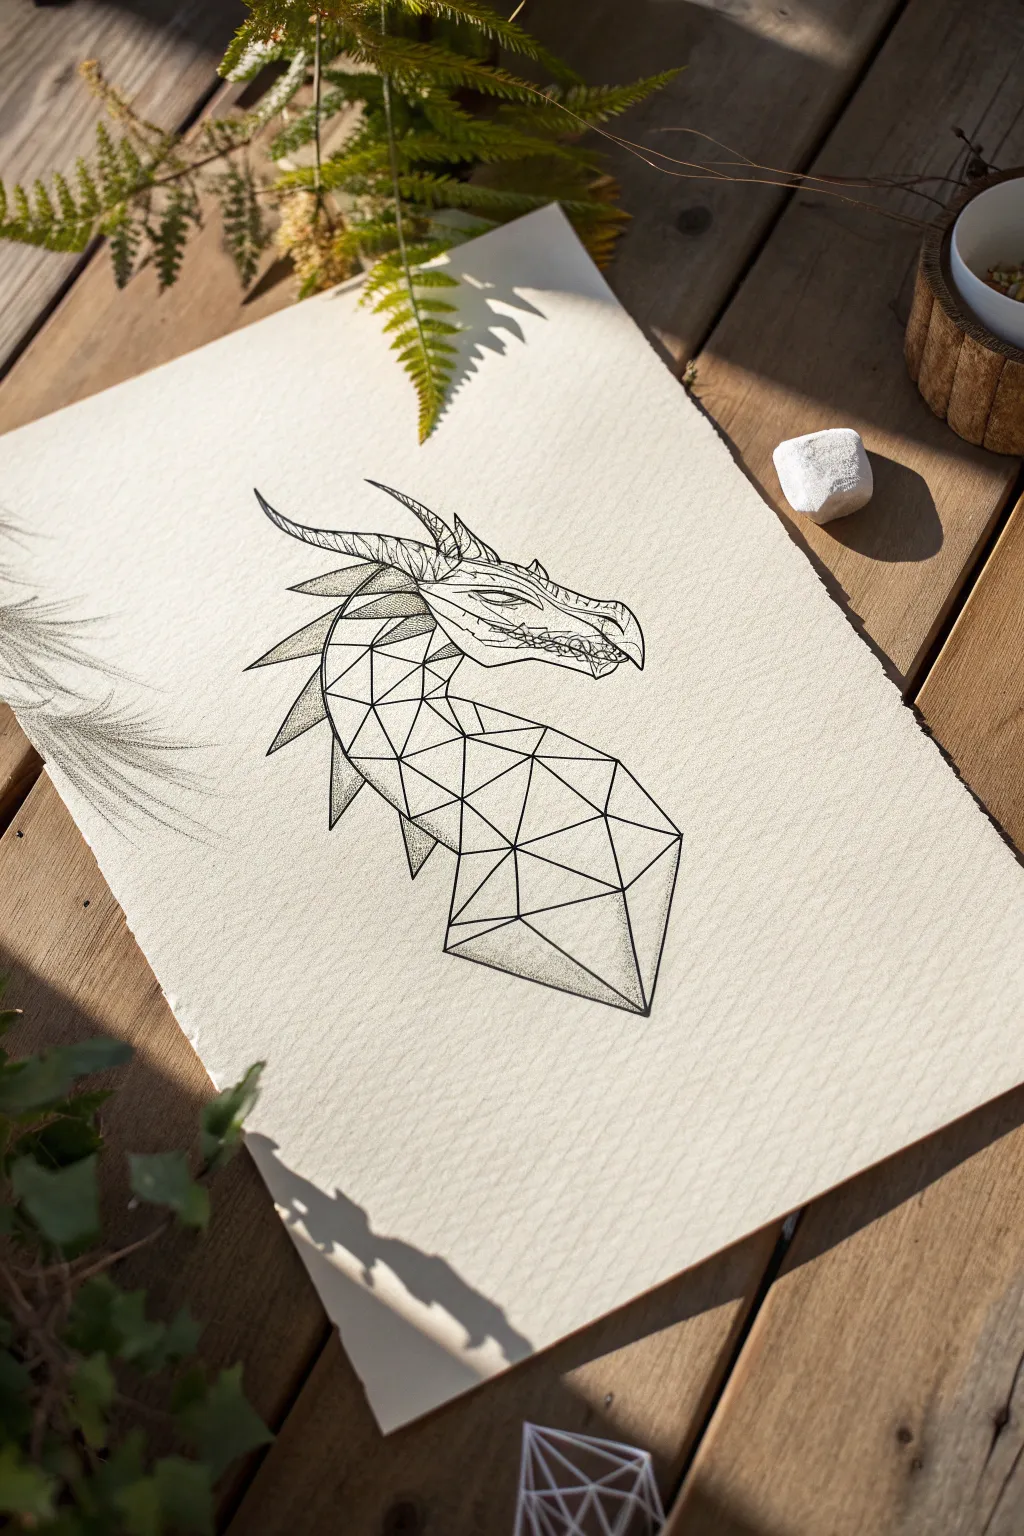
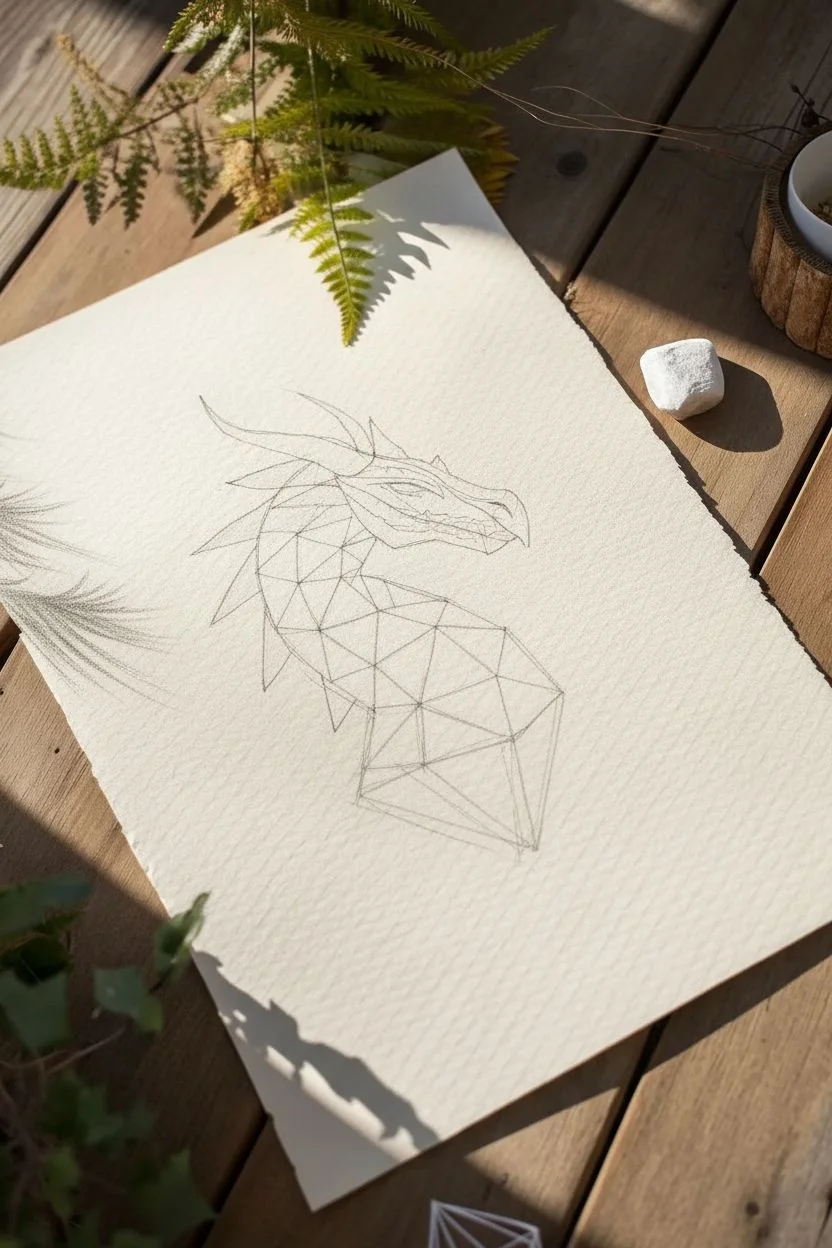
This striking drawing combines sharp, geometric planes with intricate, organic details to create a unique dragon portrait. By blending low-poly structures with fine liner textures, you’ll build a creature that feels both digital and mythical.
Detailed Instructions
Materials
- High-quality textured paper (watercolor or mixed media paper works well)
- HB pencil for sketching
- Eraser
- Fine liner pens (sizes 0.1, 0.3, and 0.5)
- Ruler
Step 1: Structural Sketching
-
Outline the head shape:
Begin with your HB pencil to lightly block out the basic silhouette of the dragon’s head. Focus on a long, sleek snout and a distinct jawline, keeping the shapes loose for now. -
Draft the geometric neck:
Sketch the neck area as a large, abstract form extending downwards. Instead of smooth curves, think in terms of large, flat facets like a carved gemstone. -
Divide into polygons:
Using a ruler, lightly draw intersecting lines within the neck shape to create a network of triangles and quadrilaterals. Vary the sizes of these shapes—smaller near the jaw and larger towards the base—to suggest curvature. -
Define the spikes:
Along the back of the neck and head, sketch out triangular outlines for the spikes. Keep the ones on the neck sharp and geometric to match the neck’s style, while the head spikes can curve slightly.
Pro Tip: Light Source Logic
Decide on a light source direction before shading the polygons. If light comes from the top right, shade the bottom-left edges of each triangle heaviest with dots.
Step 2: Inking the Geometric Form
-
Rule the neck lines:
Switch to a 0.5 fine liner. Use your ruler to trace over your pencil lines on the neck, making them crisp and deliberate. Ensure the corners where lines meet are clean and sharp. -
Add line weight:
Thicken the outer boundary lines of the geometric neck section slightly to separate the form from the background. -
Ink the geometric spikes:
Trace the spikes along the back of the neck. You can freehand these to give them a tiny bit of character, but keep the lines generally straight and angular. -
Begin dotwork shading:
Select a 0.1 fine liner. Start stippling (making tiny dots) inside specific polygons on the neck. Concentrate the dots along one edge of a polygon and fade them out toward the center to create a sense of depth and 3D form.
Step 3: Detailing the Organic Head
-
Outline the face:
Using the 0.3 pen, ink the outline of the dragon’s snout, eye ridge, and jaw. Use slightly shaky or broken lines here to simulate scales and skin texture, contrasting with the perfect lines of the neck. -
Detail the eye:
Draw the eye as a narrow, piercing slit. Add a few small wrinkles around it to give the dragon expression and age. -
Texture the scales:
With your finest 0.1 pen, add delicate hatching and small, irregular shapes along the snout and jawline. I like to keep these details concentrated near the nose and eye, leaving the cheek smoother. -
Draw the horns:
Ink the horns on top of the head with flowing, curved lines. Add small ridges or horizontal striations to make them look like organic bone or keratin. -
Blend the styles:
At the point where the head meets the geometric neck, allow the organic lines to transition into straight lines. You might add a few small, triangular scales that morph into the larger polygons.
Level Up: Metallic Accent
Use a gold or silver gel pen to trace just the interior lines of the geometric neck section. The metallic sheen will make the ‘gemstone’ structure really shine.
Step 4: Finishing Touches
-
Enhance contrast:
Go back over the darkest areas, such as the pupil, nostril, and deep crevices between scales, with your 0.5 pen to make them pop. -
Refine the stippling:
Add more dots to the shadowed planes of the geometric neck. The more contrast you create between light and dark facets, the more three-dimensional the shape will appear. -
Erase pencil guides:
Wait until the ink is completely dry—give it a few extra minutes to be safe—and then gently erase all remaining pencil marks. -
Add final texture:
If the paper texture allows, add a few very sparse dots or faint scratches in the white space around the dragon to ground it on the page.
Now you have a stunning piece that perfectly balances modern geometry with fantasy illustration
Botanical Dragon Head Made of Leaves and Vines

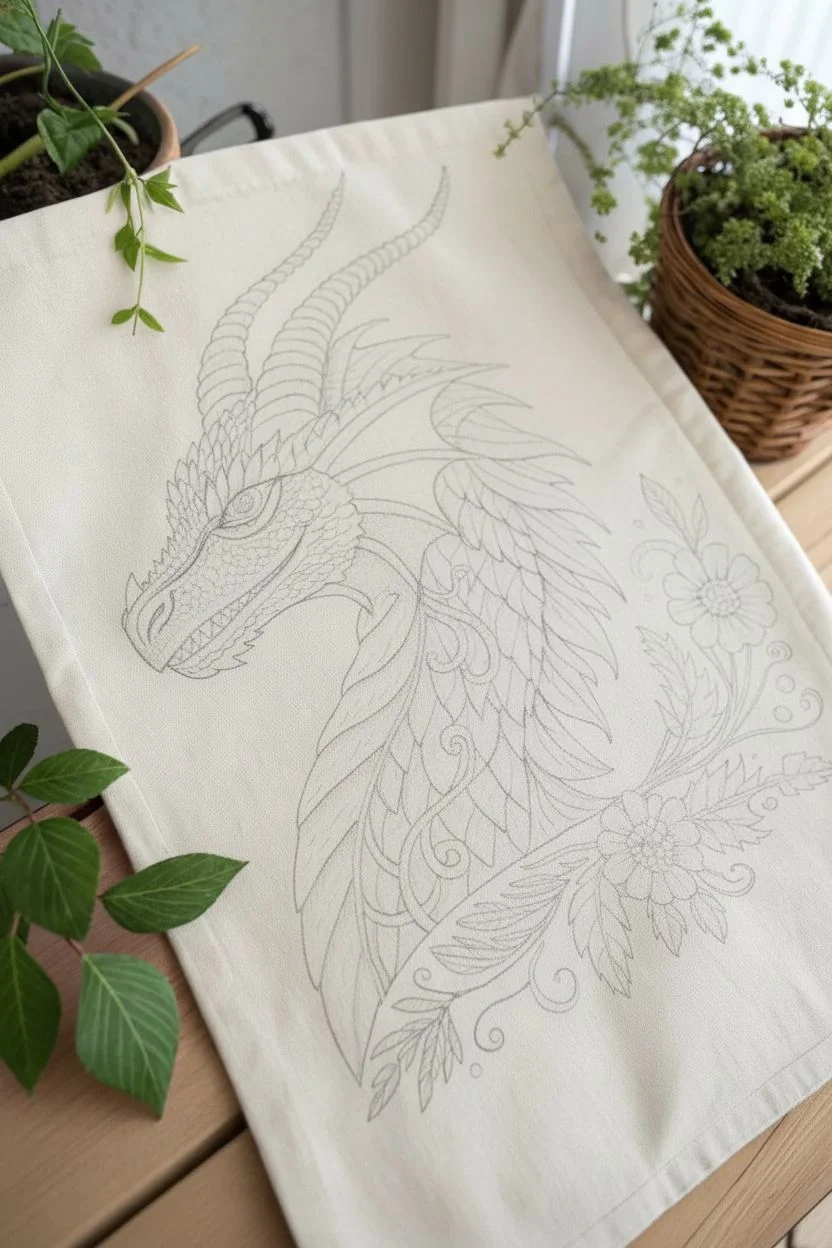
Transform a plain canvas tote into a mythical masterpiece with this leafy dragon illustration. The design combines the fierce elegance of a dragon with delicate botanical flourishes, rendered in vibrant greens and earthy oranges.
Step-by-Step Tutorial
Materials
- Plain canvas tote bag (natural or off-white)
- Fabric markers or fine tip acrylic paint pens (Greens: emerald, mint, forest; Oranges: burnt sienna, bright orange; Black for outlines)
- Pencil (HB) and eraser
- Cardboard or stiff board (to insert inside the bag)
- Iron (for heat setting)
- Clean cloth or parchment paper
Step 1: Preparation & Sketching
-
Prepare your surface:
Slip a piece of thick cardboard or a cutting board inside your tote bag. This provides a stable drawing surface and prevents ink from bleeding through to the back side of the bag. -
Rough shapes:
Using your pencil lightly, sketch the main curve of the dragon’s neck and head. Think of the neck as a graceful ‘S’ shape and the head as a tapered wedge pointing left. -
Define features:
Sketch the prominent features: the two long, ridged horns curving backward, the sharp snout, the fierce eye, and the spiky crest flowing down the back of the neck. -
Add botanical details:
At the base of the neck, sketch the floral elements. Draw a curving stem that wraps upward, ending in two simple daisy-like flowers and several serrated leaves.
Ink Bleeding?
If your markers bleed into the canvas grain, stop and apply a thin layer of clear gesso or fabric medium first. Let it dry, then draw over it for sharper lines.
Step 2: Inking the Details
-
Outline the head:
Switch to your black fine-tip fabric marker or acrylic pen. Carefully trace your pencil lines for the dragon’s profile, snout, and teeth. I like to keep my hand steady by resting my pinky on the cardboard. -
Scale texture:
Draw the scales on the face. Use smaller, tighter scales around the eye and snout, transitioning to larger, leaf-like scales as you move down the neck. -
Horn ridges:
Ink the horizontal ridges on the two main horns. Keep the lines slightly curved to show the cylindrical volume of the horns. -
Botanical linework:
Outline the flowers and leaves at the bottom. Use delicate, thinner lines for the flower petals and veins within the leaves to differentiate them from the dragon’s harder scales. -
Erase guidelines:
Allow the black ink to dry completely (wait at least 15-20 minutes to be safe), then gently erase any visible pencil marks.
Metallic Magic
Swap the orange matte ink for a metallic copper or gold fabric paint for the horns and swirling filigree to make the design shimmer in the sunlight.
Step 3: Adding Color
-
Base green tones:
Use a medium emerald green to fill in the majority of the dragon’s face and the top of the neck mane. Work in small sections to ensure even coverage. -
Throat contrast:
For the dragon’s throat and underbelly, switch to a very pale mint green or seafoam color. This lightness adds dimensionality and separates the belly from the armored scales. -
Deepening the mane:
Use a darker forest green for the spiky mane running down the back. You can add texture here by using short strokes instead of solid fill. -
Horn coloring:
Color the horns with a burnt orange or rust tone. Leave tiny slivers of uncolored canvas or use white at the very top of each ridge to create a highlight effect. -
Decorative accents:
Use a bright orange to color the swirling filigree lines that decorate the neck and the center of the flowers. This ties the horns and the botanical elements together. -
Floral coloring:
Leave the flower petals mostly the natural canvas color, but add very soft pink or peach shading near the centers. Color the leaves with a mix of olive and bright green.
Step 4: Finishing Touches
-
Stippling details:
Use your finest black pen to add stippling (tiny dots) for shading. Focus on areas under the jawline, beneath the horns, and at the base of the scales to create depth. -
Final highlights:
If you have a white paint pen, add small dots to the dragon’s eye and the glossiest parts of the scales for a wet, lifelike look. -
Heat setting:
Once the ink is fully dry (wait 24 hours ideally), place a clean cloth or parchment paper over the design. Iron on a cotton setting for 3-5 minutes to fix the pigment into the fabric.
Your mythical forest guardian is now ready to accompany you on any adventure, whether to the library or the grocery store


Have a question or want to share your own experience? I'd love to hear from you in the comments below!