If you’re craving a kitchen refresh, paint is the fastest way to shift the whole mood without ripping anything out. I’m going to walk you through my favorite kitchen paint ideas—from classic cabinet colors to artsy details that make the space feel totally custom.
Timeless Warm White Cabinets That Still Feel Inviting


Transform tired kitchen cabinetry into a beacon of classic warmth with this painting project that replicates the look of custom craftsmanship. The soft finish and aged brass accents create an inviting, lived-in feel that never goes out of style.
Step-by-Step Guide
Materials
- Cabinet-grade enamel paint (Warm White/Cream)
- High-bonding oil-based or shellac primer
- Degreaser or TSP substitute
- Sanding sponges (120 and 220 grit)
- Tack cloth
- Mini foam roller and tray
- 2-inch angled sash brush (synthetic bristle)
- Wood filler
- Painter’s tape
- Brass or antique gold cabinet hardware (cup pulls and knobs)
- Screwdriver or drill
Step 1: Preparation & Dismantling
-
Map your layout:
Before removing anything, create a simple numbered diagram of your kitchen. Label each door and drawer front on a piece of painter’s tape to ensure they go back in exactly the right spot later. -
Remove hardware and doors:
Using your drill or screwdriver, take off all cabinet doors, drawer fronts, and hinges. Remove the old pulls and knobs. Keep all screws and hardware in labeled baggies so nothing gets lost. -
Deep clean surfaces:
Scrub every inch of the wood with a degreaser or TSP substitute. Kitchen cabinets collect invisible grease that ruins paint adhesion, so don’t skimp here—scrub until the cloth comes away clean. -
Fill imperfections:
Inspect the wood for dings or old hardware holes if you plan to change the handle spacing. Press wood filler into these gaps, leaving it slightly overfilled to account for shrinkage. -
Sand for adhesion:
Once the filler is dry, scuff-sand all surfaces with 120-grit sandpaper. You aren’t trying to remove the old finish entirely, just creating a dull, toothy surface for the primer to grab onto.
Step 2: Priming the Base
-
Dust removal:
Vacuum up the sanding dust, then wipe everything down with a tack cloth. Even tiny specks of dust will show up in your final finish, so be thorough. -
Apply the primer:
Use your angled brush to hit the corners and recessed panels first, then follow up with the mini foam roller on the flat surfaces. I prefer an oil-based primer here because it blocks stain bleed-through better than water-based options. -
Sand the primer:
Let the primer cure according to the can’s instructions. Once hard, gently glide a 220-grit sanding sponge over the surface to knock down any brush strokes or texture, creating a glass-smooth base.
Brush Maintenance
Wrap your brush and roller tightly in plastic wrap or a sandwich bag between coats. This keeps the paint wet and saves you from washing them out while waiting for layers to dry.
Step 3: Painting & Finishing
-
First coat application:
Stir your warm white enamel paint gently. Start with the back of the doors to practice your technique. Brush the recessed molding first, feathering out any puddles in the corners immediately. -
Rolling the flats:
While the brushed areas are still wet, use the foam roller on the flat panels and rails. This ‘tipping off’ technique helps blend the brush marks into the rolled texture for a uniform look. -
Dry and lightly sand:
Allow the first coat to dry completely (usually 24 hours for cabinet enamels). Lightly sand with super-fine 220-grit paper and remove the dust with a fresh tack cloth. -
Second coat mastery:
Apply the second coat just like the first. Work methodically and ensure you are maintaining a wet edge to avoid lap marks. This final coat is where the rich, creamy depth really appears. -
Curing time:
This is the hardest part: wait. Cabinet paint needs several days to cure hard enough to withstand handling. Ideally, let them sit for 3-5 days before reattaching. -
Hardware installation:
Drill new holes if you are switching styles. Install your brass cup pulls on the drawers and the round knobs on the doors. The mix of shapes adds that bespoke character seen in the photo. -
Reassembly:
Using your labeled map, reattach the doors and drawers to the cabinet boxes. Adjust the hinges as needed to ensure the gaps between doors are even and straight.
Add Subtle Age
For a truly antique look, apply a very diluted brown glaze into the crevices of the door molding using a small artist’s brush, then immediately wipe the high points clean.
Enjoy the brightness and sophisticated charm your freshly painted cabinets bring to the heart of your home


Soft Greige Walls for an Easy, Cohesive Backdrop
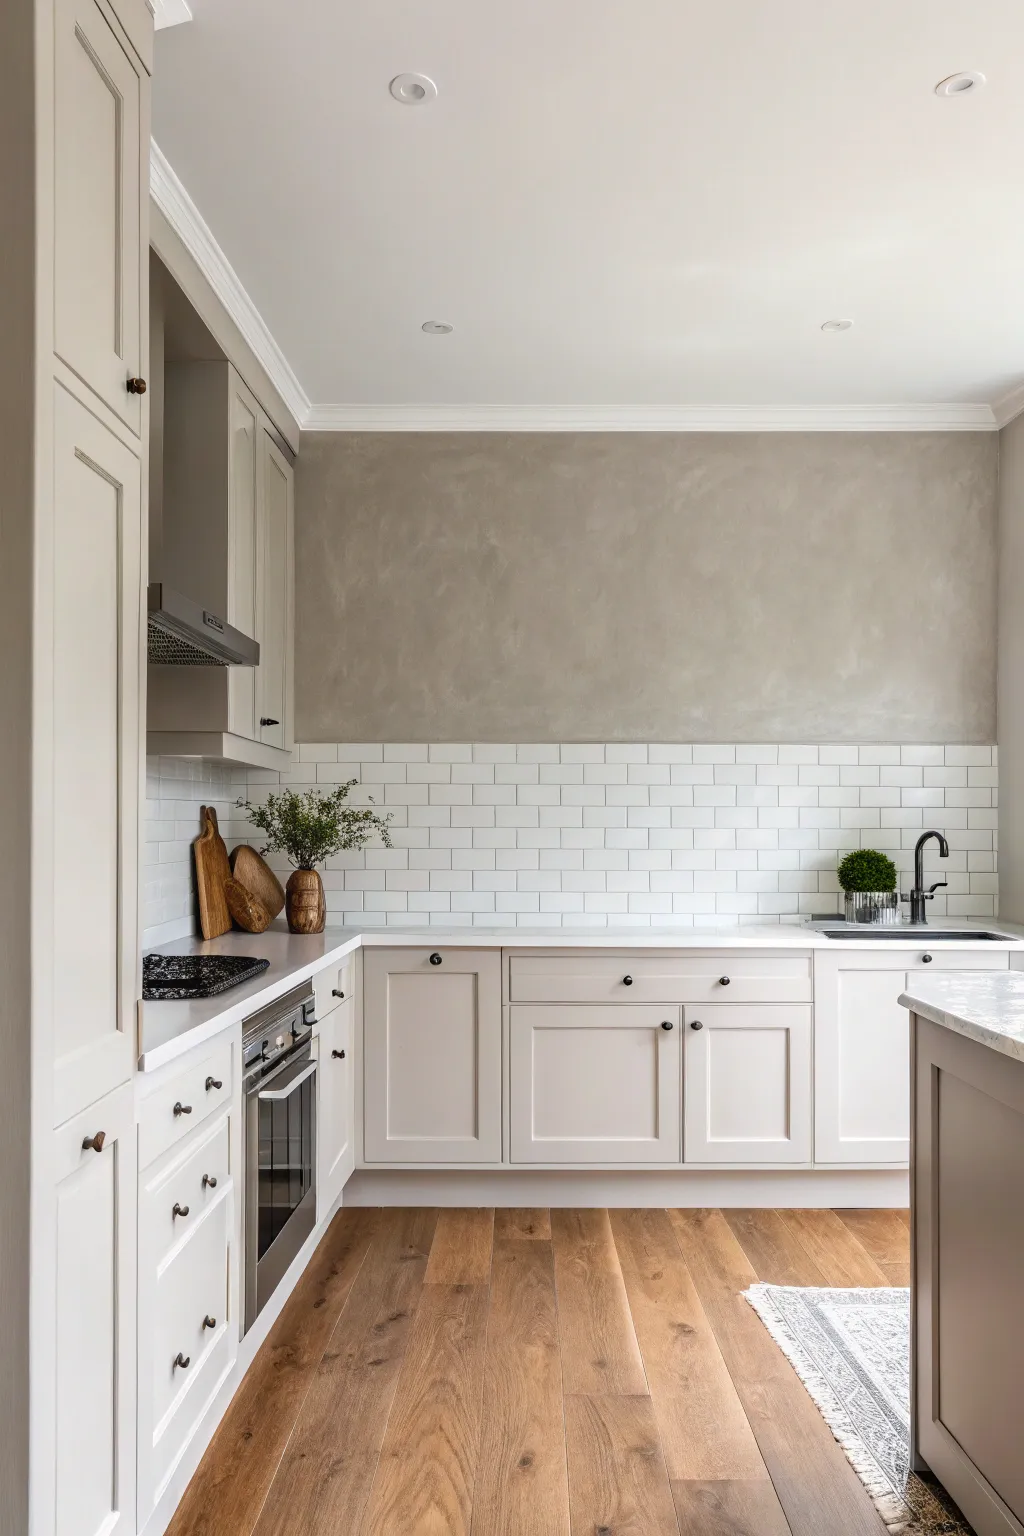
Transform your kitchen with the subtle texture and warmth of a faux limewash or Roman clay finish. This technique creates a cloudy, sophisticated backdrop that pairs perfectly with modern cabinetry and natural wood tones.
Detailed Instructions
Materials
- High-quality flat latex paint (Greige color)
- Glaze medium (clear)
- Water
- Large block brush (4-inch or 5-inch)
- Painter’s tape
- Drop cloths
- Paint tray and liners
- Mixing bucket
- Lint-free rags
- Stepladder
Step 1: Preparation
-
Clear and Protect:
Begin by removing all items from your countertops and taking down any wall-mounted decor. Lay down drop cloths to protect your beautiful wood floors and countertops from any accidental drips. -
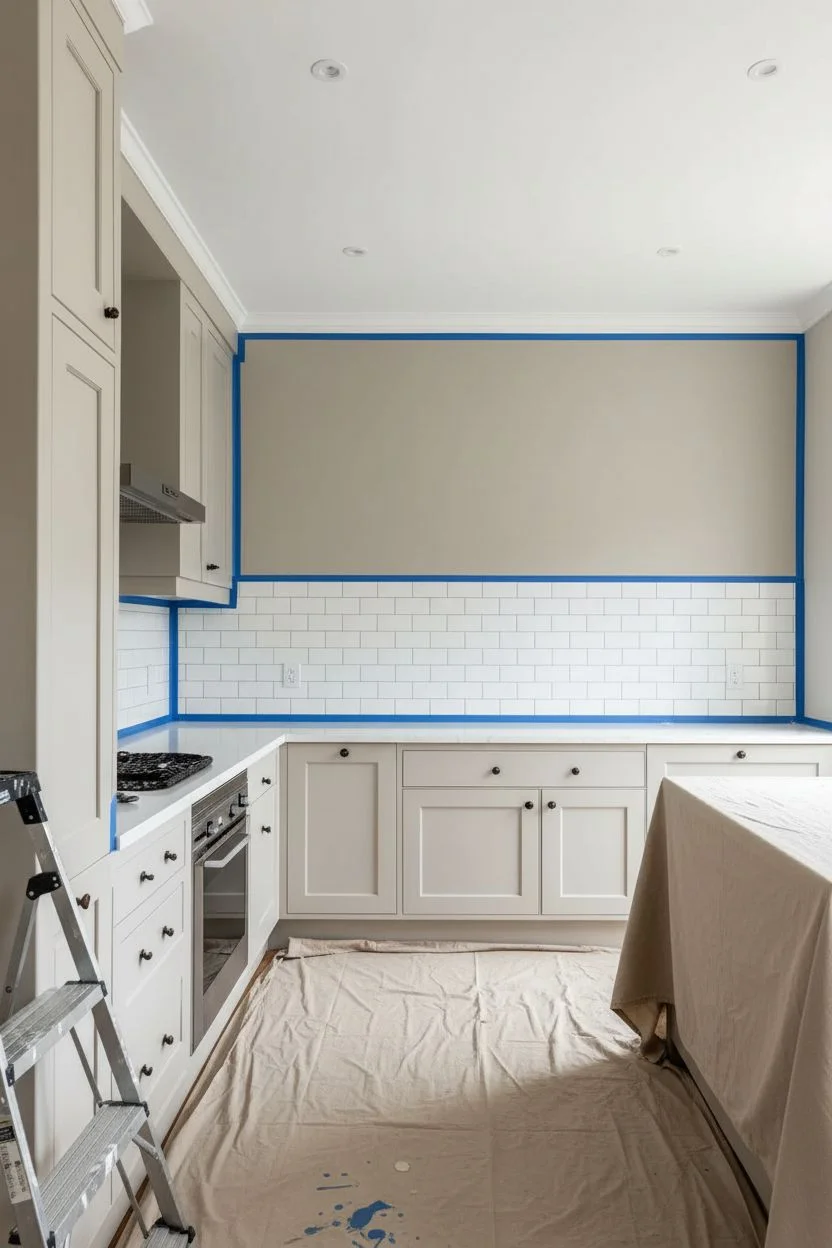
Taping Off:
Apply painter’s tape carefully along the top edge of your subway tile backsplash, the ceiling line, and around any cabinetry that touches the wall. Ensure the tape edge is firmly pressed down to prevent bleed-through. -
Surface Prep:
Wipe down the wall surface with a damp cloth to remove any kitchen grease or dust. Let it dry completely. If the walls are glossy, give them a light scuff sand to help the new paint adhere better.
Keep a Wet Edge
To avoid visible ‘seams’ in your texture, never let an edge dry completely before joining it with the next section. Work quickly and keep moving across the wall.
Step 2: Mixing the Glaze
-
Create the Mixture:
In your mixing bucket, combine your chosen greige flat paint with the clear glaze medium. A common ratio is 1 part paint to 4 parts glaze, but check your product instructions. Add a splash of water to loosen the mixture slightly. -
Test the Consistency:
The mixture should be thinner than standard paint but not as runny as water. Test a small patch on a piece of cardboard or an inconspicuous spot to ensure it moves easily without dripping excessively.
Step 3: Base Coat Application
-
Cutting In:
Using a standard brush, paint a solid base coat of the unmixed greige paint along the edges, corners, and ceiling line. This ensures no white gaps show through your textured finish. -
Rolling the Base:
Roll on a solid coat of the matte greige paint over the entire wall area. This acts as your grounding color. Allow this base coat to dry fully according to the manufacturer’s drying times.
Too Much Texture?
If an area looks too messy or brush-heavy, wait for it to dry, lightly sand it down with fine-grit paper, and apply a thin layer of the base color to reset the area.
Step 4: Creating the Texture
-
First Cloud Layer:
Dip your large block brush into the glaze mixture. Offload excess paint onto the tray—you want the brush damp, not soaking wet. -
X-Motion Technique:
Apply the glaze to the wall using a random cross-hatch or ‘X’ motion. Work in small, manageable sections (about 3×3 feet) so the edges don’t dry before you can blend them. -
Softening Edges:
While the glaze is still wet, use a clean, dry rag or a dry brush to gently feather out the edges of your ‘X’ strokes. This eliminates harsh brush marks and creates that cloudy, plastered look. -
Continuing the Pattern:
Move to the next section, overlapping slightly with the wet edge of the previous section. Keep your strokes random and varied in direction to avoid a repetitive pattern. -
Corner Work:
When you reach corners or the transition to the ceiling, use a smaller brush to dab the glaze in, maintaining the texture rather than painting a straight line. -
Letting it Dry:
Allow this first textured layer to dry completely. It might look subtle at this stage, but the depth comes with layering.
Step 5: Building Depth
-
Assess and Layer:
Once dry, stand back and look for areas that feel too flat. Apply a second layer of the glaze mixture using the same cross-hatch technique, focusing on areas that need more dimension. -
Highlighting (Optional):
For extra depth, I sometimes mix a very small amount of white into a bit of the glaze mixture and lightly brush it over specific high points to mimic the look of aged plaster catching the light. -
Final Blend:
As the second layer dries, keep a clean, dry brush handy to soften any areas that look too heavy. The goal is an organic, movement-filled surface.
Step 6: Completion
-
Remove Tape:
Carefully peel away the painter’s tape while the final layer is still slightly tacky to prevent peeling up dry paint films. -
Touch Ups:
Inspect the lines where the wall meets the tile and ceiling. Use a small artist’s brush to fix any minor bleeds or missed spots.
Enjoy the calm, organic atmosphere your new textured walls bring to your kitchen space


Classic Two-Tone Cabinets With Light Uppers and Dark Lowers

Achieve a sophisticated, modern kitchen aesthetic by combining light, airy upper cabinets with grounding, rich dark lowers. This DIY project uses contrasting paint colors and natural wood accents to create a timeless, balanced look that immediately updates any space.
Step-by-Step
Materials
- Cabinet degreaser or TSP substitute
- Medium and fine-grit sandpaper (120 and 220 grit)
- High-quality bonding primer
- White semi-gloss cabinet enamel (for uppers)
- Charcoal or soft black semi-gloss cabinet enamel (for lowers)
- Painter’s tape
- Drop cloths
- 2-inch angled sash brush
- 4-inch foam or microfiber rollers
- Screwdriver or drill
- Wood filler (if needed)
- Tack cloth
- New hardware (gold pulls and knobs)
Step 1: Preparation Phase
-
Clear and Clean:
Begin by removing all items from your cabinets and drawers. Thoroughly clean every surface with a heavy-duty degreaser or TSP substitute to remove years of cooking oils and grime, which is crucial for paint adhesion. -
Remove Hardware:
Use your screwdriver or drill to remove all doors, drawer fronts, and hardware. Label each door and its corresponding hinge with a piece of painter’s tape to ensure easy reassembly later. -
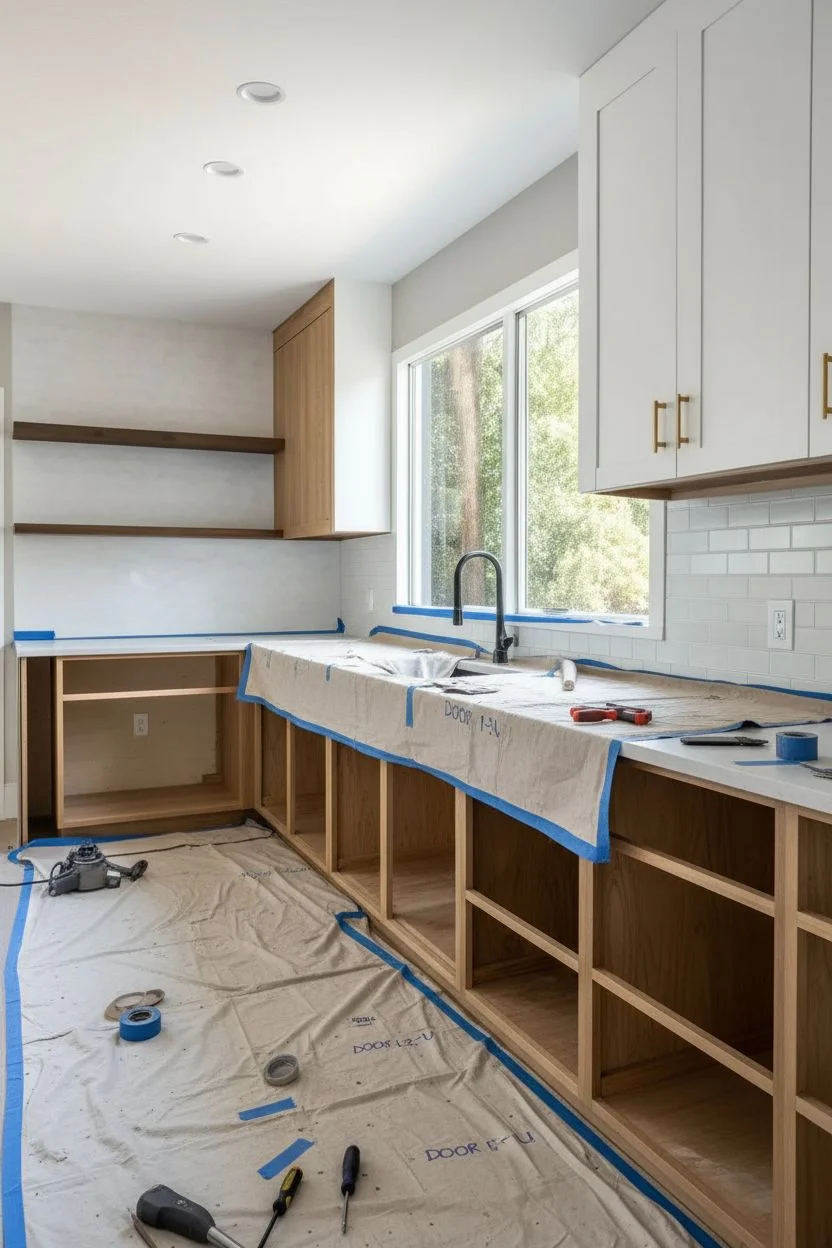
Protect the Area:
Cover your countertops, floors, and backsplash with drop cloths and use painter’s tape to protect walls and appliances. This step takes time but saves you hours of cleanup later. -
Sanding Surfaces:
Lightly sand all cabinet boxes, doors, and drawer fronts using medium-grit sandpaper (120 grit). You aren’t trying to strip the finish completely, just scuffing it up to give the primer something to grip. -
Dust Removal:
Vacuum up the sanding dust and then wipe every surface down with a tack cloth. Any remaining dust will create a bumpy finish. -
Fill Imperfections:
If you are changing hardware sizes or have visible scratches, fill old holes and dings with wood filler. Let it dry, then sand smooth with fine-grit sandpaper.
Sticky Paint?
If doors stick to frames, the paint hasn’t fully cured. Stick small felt bumpers on the corners of doors to keep them slightly separated from the frame.
Step 2: Priming and Painting Uppers
-
Apply Primer:
Apply a coat of high-quality bonding primer to all surfaces. Use an angled brush for corners and detailed areas, and a small roller for flat surfaces. Let it dry completely according to the manufacturer’s instructions. -
First Coat of White:
Start with the upper cabinets. Stir your white enamel well. Brush the recessed areas and edges of the doors first, then roll the flat panels for a smooth finish. I find working in sections helps maintain a wet edge. -
Sand Between Coats:
Once the first coat is fully dry, lightly hand-sand with 220-grit paper to knock down any raised grain or brush marks. Wipe away the dust with a tack cloth. -
Second Coat of White:
Apply the second coat of white enamel just as you did the first. Check for drips immediately, especially in the corners of panel doors.
Step 3: Painting Lowers and Finishing
-
First Coat of Dark:
Transition to your charcoal or black paint for the lower cabinets and island (if applicable). Use a fresh roller cover and brush. The darker color may require careful application to ensure full coverage without streaks. -
Evaluate Coverage:
After the first dark coat dries, inspect it carefully. Dark colors often need a third coat to achieve true depth and opacity, so don’t rush this stage. -
Apply Final Dark Coat:
Apply your final layer of dark enamel, using long, smooth strokes with the roller to minimize texture. Allow all doors and drawer fronts to cure for at least 24-48 hours before handling. -
Reassembly:
Carefully reattach the hinges and hang the doors back in their original spots, using your tape labels as a guide. -
Install New Hardware:
Install the new gold pulls and knobs. The contrast of the gold against the dark lowers and crisp white uppers is what really seals the high-end look. -
Final Touch-Ups:
Inspect your work for any nicks that happened during reinstallation. Use a small artist’s brush to touch up paint where necessary.
Pro Tip: Wood Accents
Leave a few drawers or a side panel in natural wood (or veneer them) like the image shows. Seal with clear poly for a warm, custom contrast.
Enjoy the dramatic and stylish transformation of your kitchen space


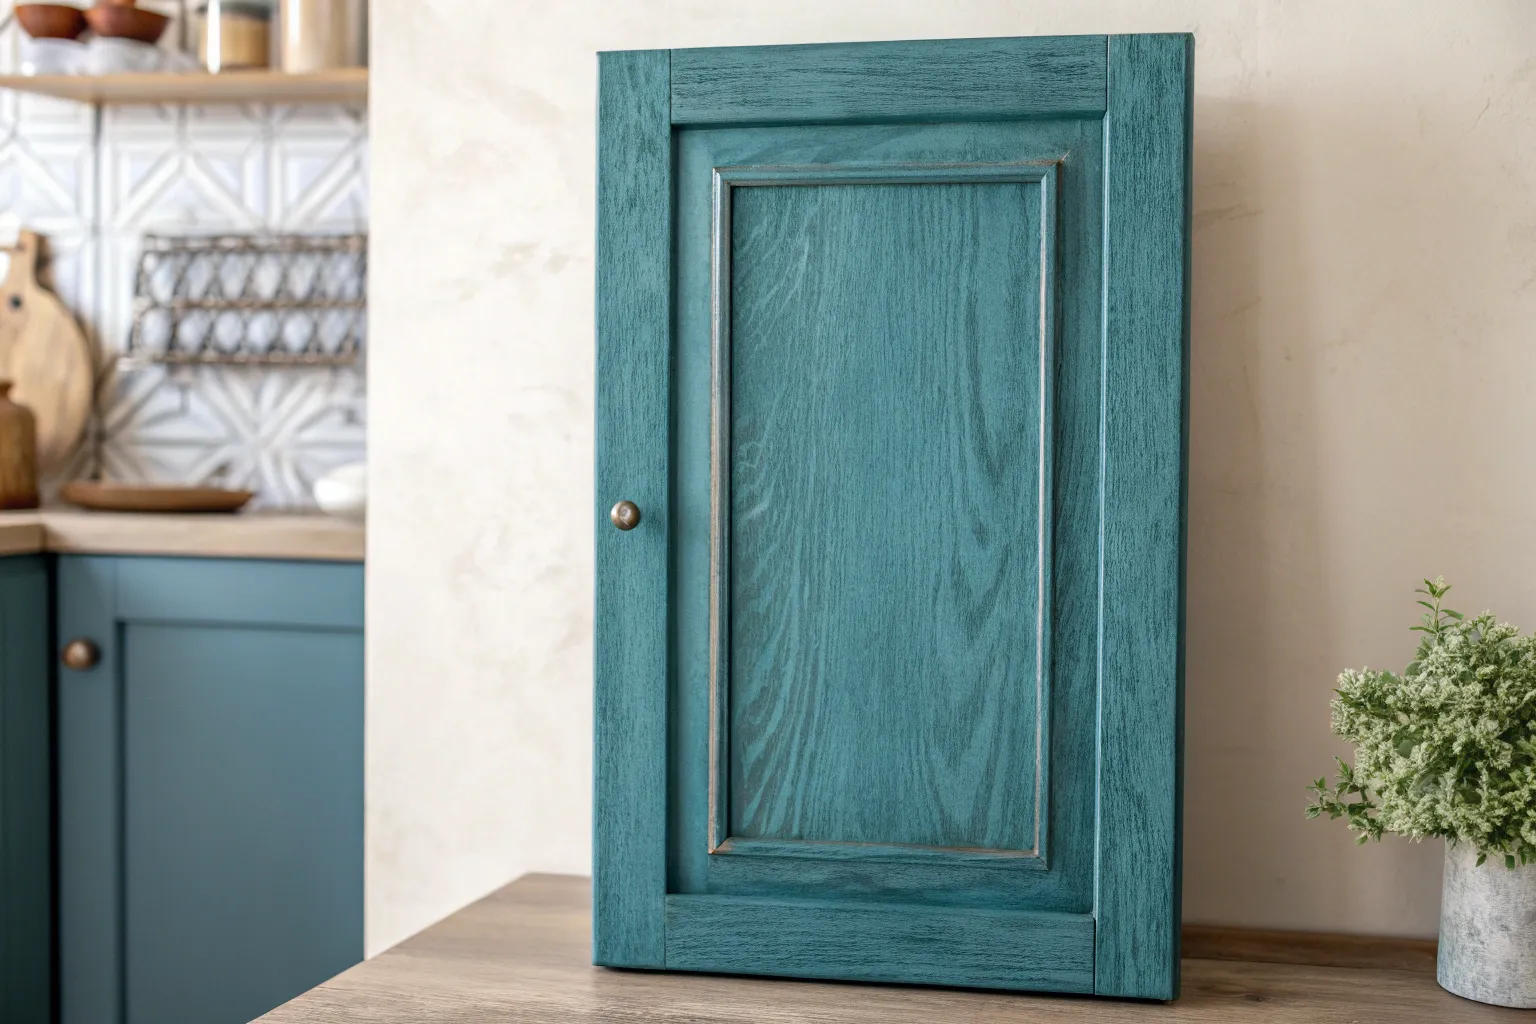
Contrasting Painted Kitchen Island as the Main Focal Point
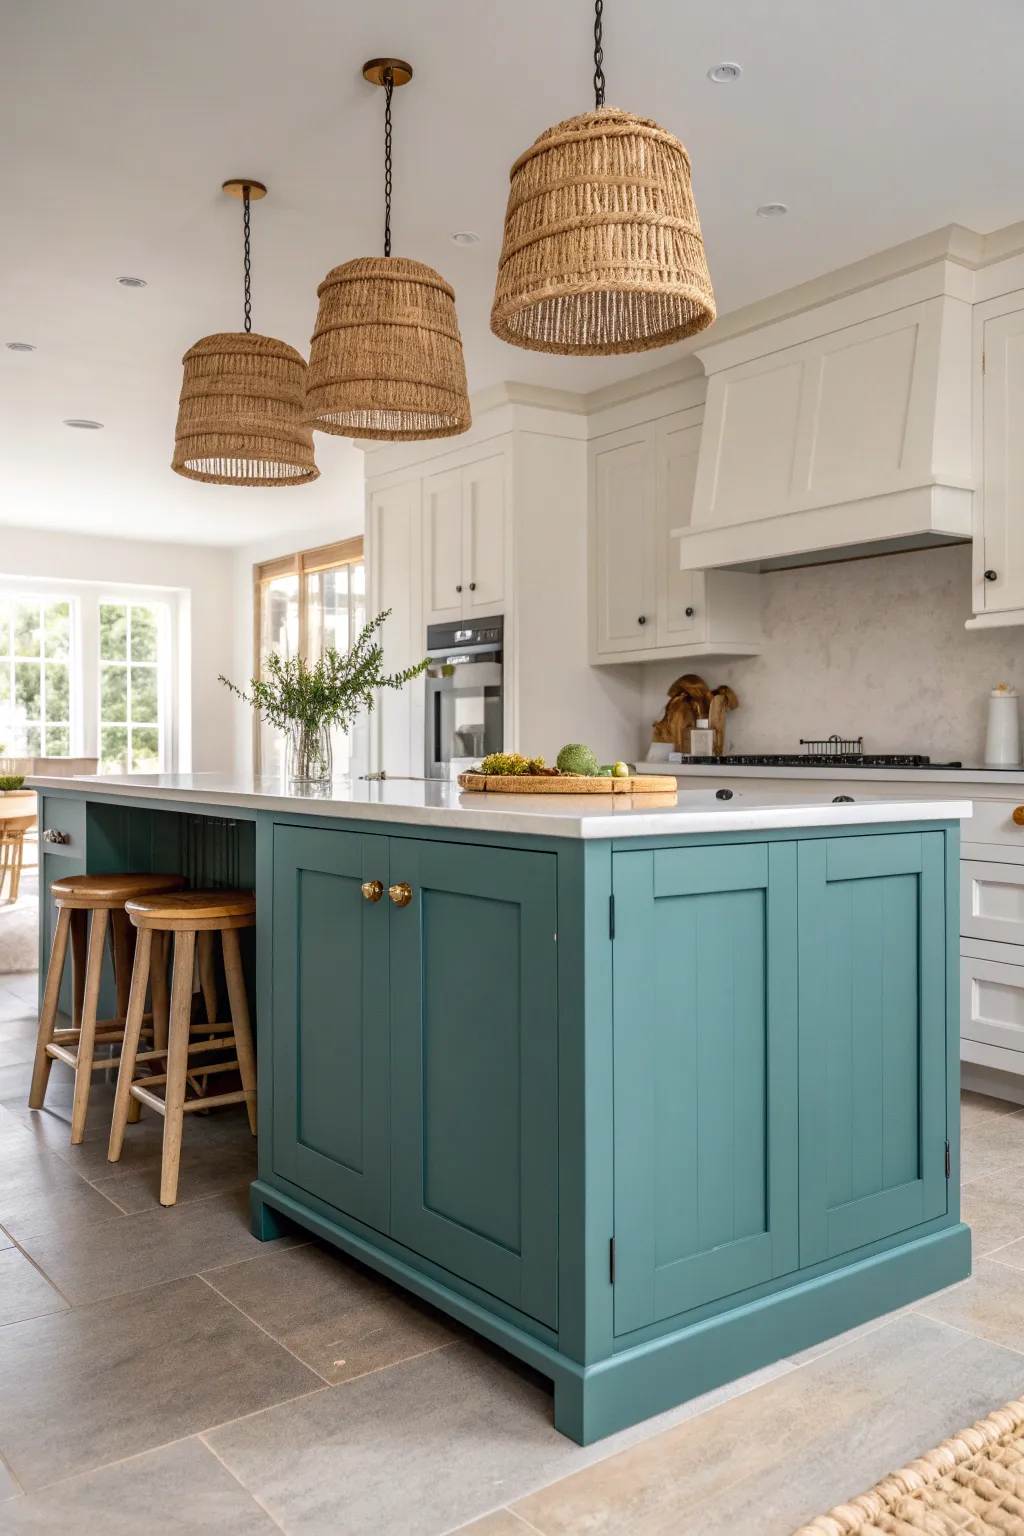
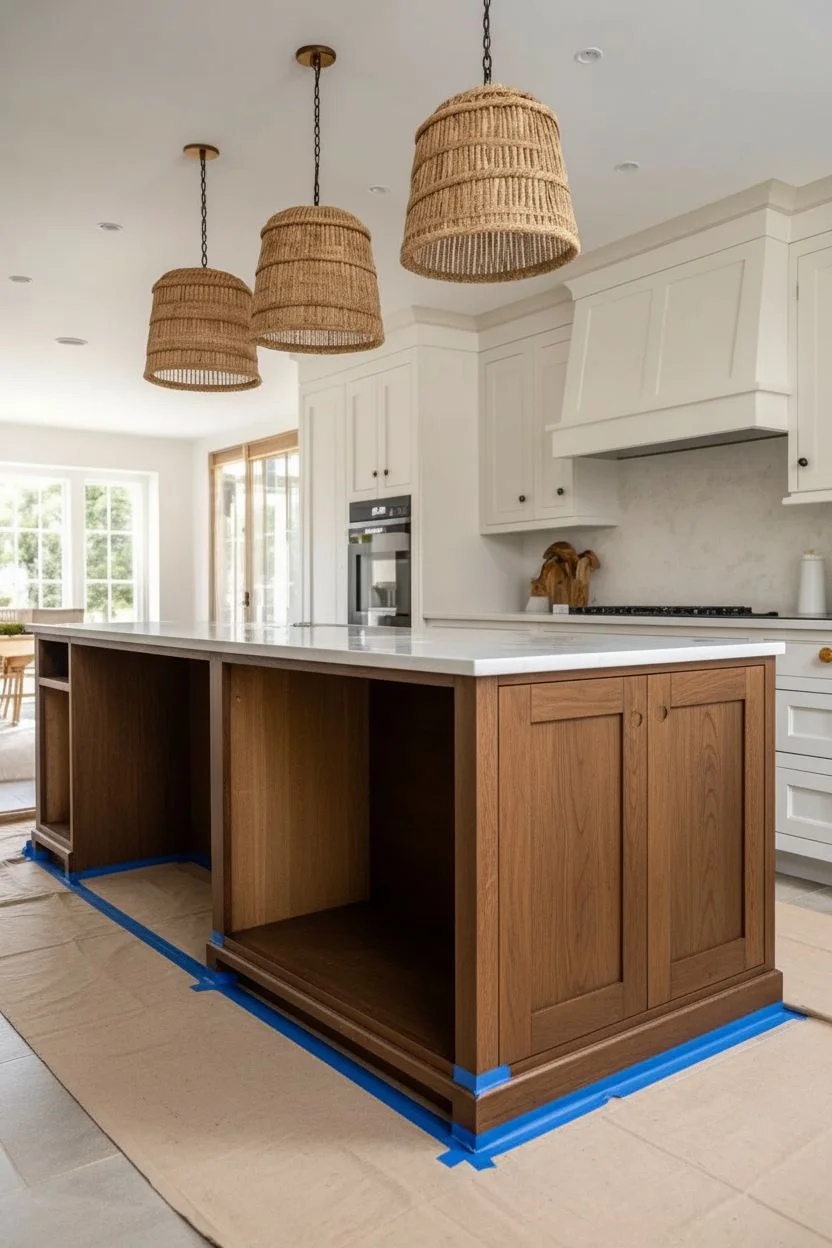
Bring sophisticated color into a neutral kitchen by transforming your island into a stunning focal point. This project achieves a smooth, professional finish in a rich teal shade that perfectly contrasts with creamy white surroundings and warm wood accents.
Detailed Instructions
Materials
- High-quality cabinet paint (satin or semi-gloss finish)
- Bonding primer (specifically for cabinetry)
- Degreaser or TSP substitute
- Sandpaper (120-grit and 220-grit)
- Tack cloth
- Liquid sandpaper/de-glosser
- High-density foam roller (4-inch)
- Angled sash brush (1.5 to 2 inch)
- Painter’s tape
- Drop cloths or rosin paper
- Screwdriver
- Wood filler (if filling hardware holes)
- Cleaning rags
Step 1: Preparation & Cleaning
-
Clear the area:
Begin by removing everything from the island countertop and emptying the drawers or cupboards inside. Remove the bar stools and place them safely out of your workspace. -
Remove hardware and doors:
Using your screwdriver, carefully take off all cabinet doors, drawer fronts, and hardware. Label each door and its corresponding hinge location with painter’s tape so reassembly is easy later. -
Deep clean surfaces:
Thoroughly scrub all surfaces to be painted with a degreaser or TSP substitute. Kitchen islands collect hidden oils and grime that will ruin paint adhesion, so be meticulous here. -
Protect the surroundings:
Lay down drop cloths or rosin paper on the floor, tucking it right up to the base of the island. Apply painter’s tape along the underside of the countertop overhang and any floor edges to protect them from wayward brush strokes.
Brush Maintenance
Wrap your brush and roller tightly in plastic wrap or a ziplock bag between coats. This keeps the paint wet so you don’t have to wash your tools until the very end.
Step 2: Sanding & Priming
-
Scuff sand:
Lightly sand all surfaces with 120-grit sandpaper. You aren’t trying to remove the old finish entirely, just creating a rough texture for the primer to grip. -
Fill imperfections:
Inspect the wood for dings or scratches. If you plan to change hardware sizes, fill the old screw holes with wood filler now. Let it dry, then sand smooth. -
Remove dust:
Vacuum up the sanding dust, then wipe every inch with a tack cloth to ensure a completely debris-free surface. -
Apply de-glosser:
For extra adhesion on glossy factory finishes, I like to wipe on a liquid sandpaper or de-glosser. Let it dry according to the bottle’s instructions. -
Prime corners first:
Use your angled brush to apply a bonding primer to corners, recessed panels, and detailed edges where a roller can’t reach. -
Roll the primer:
Use the high-density foam roller to apply primer to the flat surfaces. Work in long, smooth strokes. Allow the primer to dry completely, usually overnight for best results. -
Sand the primer:
Once dry, very lightly hand-sand the primed surface with 220-grit sandpaper to knock down any bumps. Wipe clean with a tack cloth.
Hardware Upgrade
Swap standard pulls for unlacquered brass knobs. As the brass patinates over time, it creates a living finish that looks incredible against deep teal.
Step 3: Painting & Finishing
-
Cut in with color:
Stir your teal cabinet paint thoroughly. Using the angled brush, paint the recessed areas, corners, and detailed molding first. Apply thin coats to avoid drips in the corners. -
Roll the first coat:
Immediately follow up with the foam roller on the flat panels and stiles while the brushed paint is still wet (this is ‘tipping off’ to blend the textures). -
Wait and assess:
Let the first coat dry for the manufacturer’s recommended time. Don’t rush this step or the paint remains tacky. -
Light sanding:
For a factory-smooth feel, do a quick, gentle pass with 220-grit sandpaper between coats, then wipe away the dust. -
Apply second coat:
Repeat the cutting-in and rolling process for the second coat. This deep teal color may require a third thin coat for full opacity and depth. -
Cure time:
Allow the paint to cure for at least 24-48 hours before reattaching any hardware. Cabinet paint takes longer to fully harden than wall paint. -
Reassemble:
Carefully reattach the hinges, doors, and drawer fronts using your labels as a guide. Install your gold knobs to complete the high-contrast look.
Enjoy the fresh, sophisticated energy your new island brings to the heart of your home
BRUSH GUIDE
The Right Brush for Every Stroke
From clean lines to bold texture — master brush choice, stroke control, and essential techniques.
Explore the Full Guide
Sage Green Cabinets That Work Like a New Neutral
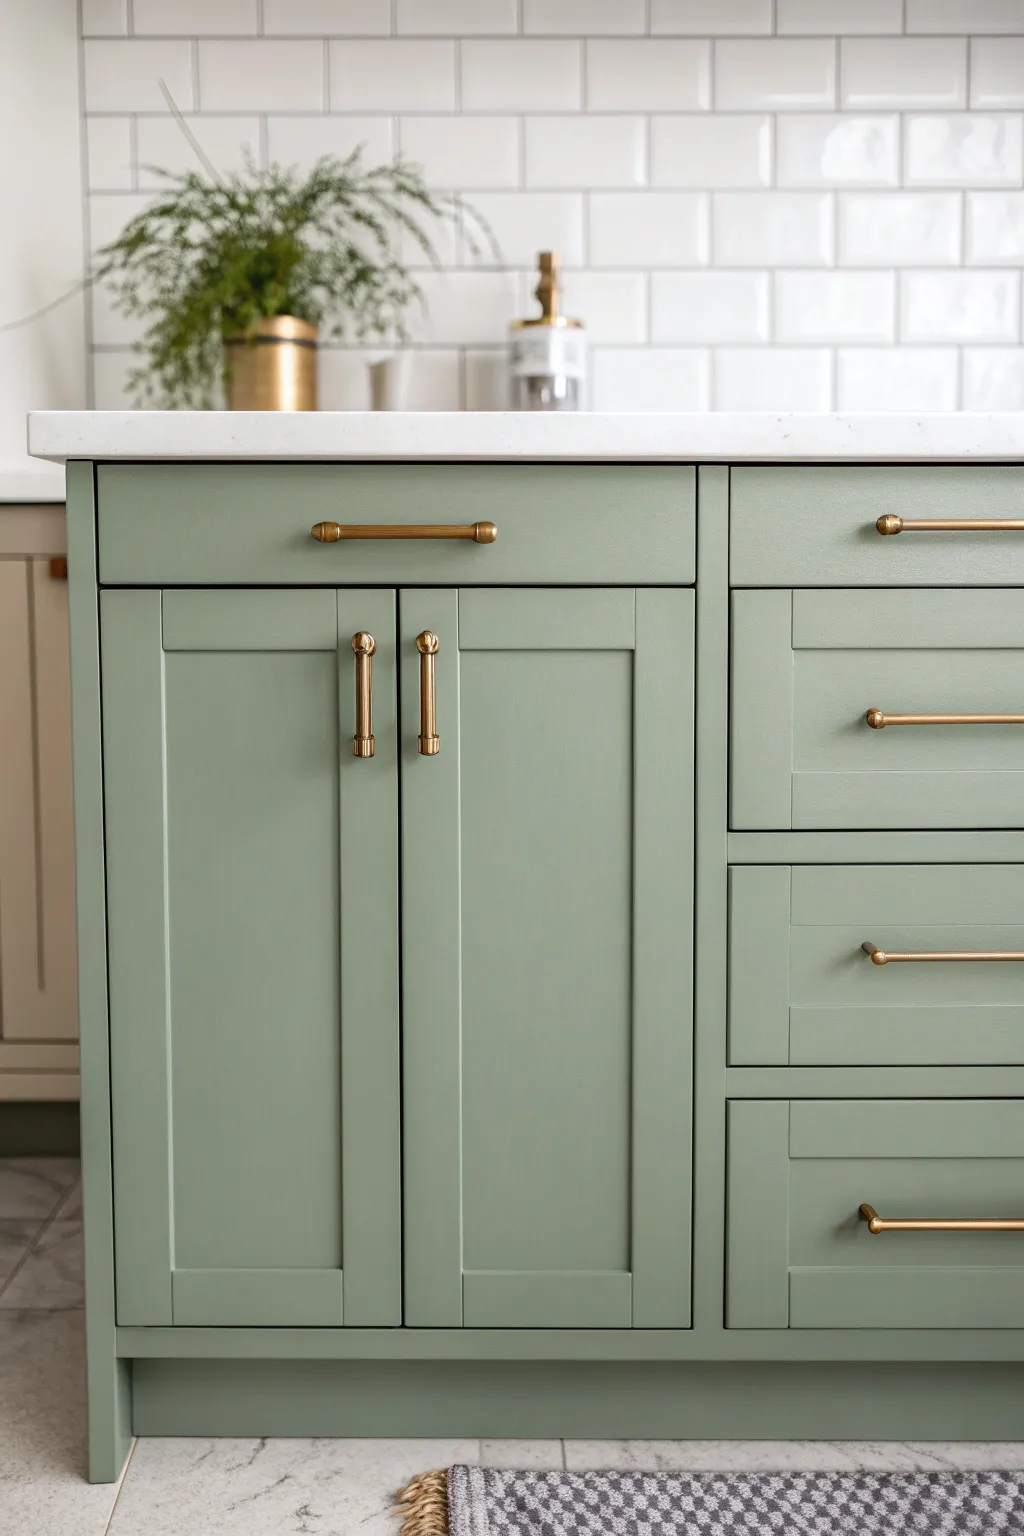
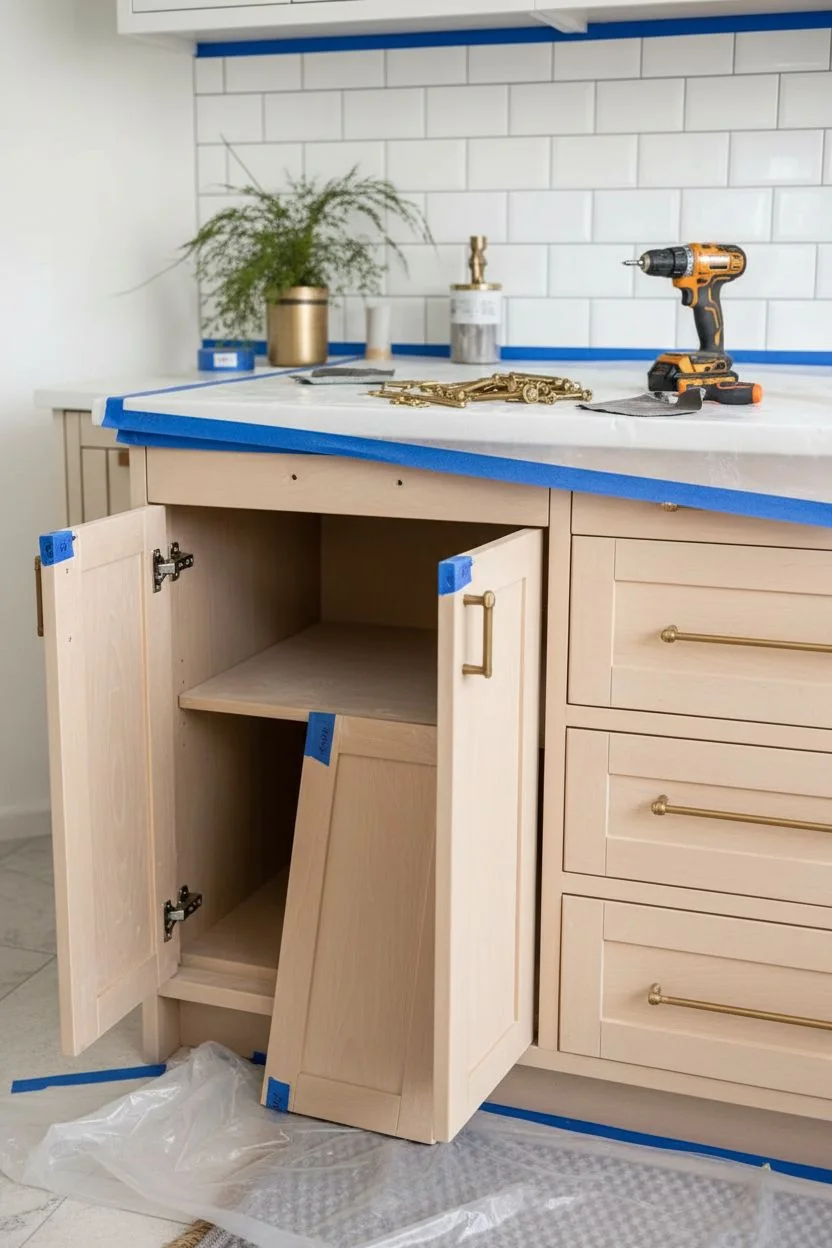
Bring a fresh, calming energy to your kitchen by transforming tired cabinets with a sophisticated coat of sage green paint. This project creates a soft, earthy finish that pairs beautifully with warm brass hardware and crisp white countertops.
Step-by-Step
Materials
- High-quality cabinet paint (satin or semi-gloss finish, sage green)
- Bonding primer
- Degreaser or TSP substitute
- Medium and fine grit sandpaper (120 and 220 grit)
- Tack cloth
- High-density foam roller
- 2-inch angled sash brush
- Screwdriver or drill
- Painter’s tape
- Drop cloths
- Wood filler (if filling old hardware holes)
- Brass cabinet pulls and knobs
Step 1: Preparation
-
Remove Hardware:
Begin by removing all cabinet doors, drawers, and hardware using your screwdriver or drill. Label each door and its corresponding hinge location with painter’s tape to ensure a perfect fit later. -
Clean Surfaces:
Scrub every inch of the cabinet boxes, doors, and drawer fronts with a degreaser or TSP substitute. This step is critical to remove cooking oils and grime that prevent paint adhesion. -
Fill Imperfections:
If you plan to change hardware sizes, fill the old screw holes with wood filler. Let it dry completely, then sand it flush. Inspect for any dings or scratches and fill those as well. -
Sand Everything:
Lightly scuff sand all surfaces with 120-grit sandpaper. You aren’t trying to strip the old finish entirely, just dulling the surface to give the primer some ‘tooth’ to grab onto. -
Remove Dust:
Vacuum up the loose sanding dust, then wipe every surface down with a tack cloth. Even tiny dust particles can ruin the smooth finish we are aiming for. -
Protect Surroundings:
Apply painter’s tape along the walls, ceiling, and floor where they meet the cabinets. Lay down drop cloths to protect your flooring and countertops.
Sticky Situation?
If doors stick after reassembly, apply a tiny dot of clear silicone bumper to the corners. Paint can add just enough thickness to cause friction on tight jams.
Step 2: Priming and Painting
-
Apply Primer:
Using the angled brush for corners and the foam roller for flat areas, apply a thin, even coat of bonding primer. Don’t worry if it looks streaky; coverage isn’t the goal here, adhesion is. -
Light Sanding:
Once the primer is fully dry (check the can for times), lightly sand with 220-grit sandpaper to smooth out any brush marks or raised grain. Wipe clean with a tack cloth again. -
First Coat of Green:
Stir your sage green paint thoroughly. Use the angled brush to cut in around the recessed panels and edges first. Keep a ‘wet edge’ to avoid lap marks. -
Roll the Flat Surfaces:
Immediately follow the brushing by rolling the flat center panels and frames with the foam roller. Roll in long, smooth strokes to create a uniform texture. -
Dry and Assess:
Allow the first coat to dry completely according to the manufacturer’s instructions. I usually let this sit overnight to be safe. Check for drips or runs and sand them out gently if found. -
Second Coat Application:
Apply the second coat just like the first: brush the details, then roll the flat areas. Two thin coats are always better than one thick one for durability and finish. -
Cure Time:
While the paint may feel dry to the touch quickly, cabinet paint needs time to cure and harden. Leave the doors and drawers open or off for at least 24-48 hours before reassembly.
Step 3: Finishing Touches
-
Reinstall Doors:
Carefully reattach the cabinet doors and slide drawers back in, referencing your labels from the beginning to match them to their original spots. -
Install New Hardware:
Measure and mark the placement for your new gold hardware. Drill fresh holes if necessary, keeping your hand steady to avoid chipping the fresh paint. -
Attach Pulls and Knobs:
Screw in the brass bar pulls and knobs. Hand-tighten them to avoid stripping the screws or damaging the cabinet surface. -
Final Clean Up:
Remove the painter’s tape slowly at a 45-degree angle to ensure a crisp line. Step back and enjoy your fresh, serene kitchen update.
Elevate the Look
For a truly bespoke feel, paint the inside of open shelving a creamy white or line the drawer bottoms with a patterned adhesive paper.
Enjoy the calm, natural vibe your new sage cabinets bring to the heart of your home
Deep Forest Green Lowers With Bright Countertops for Balance
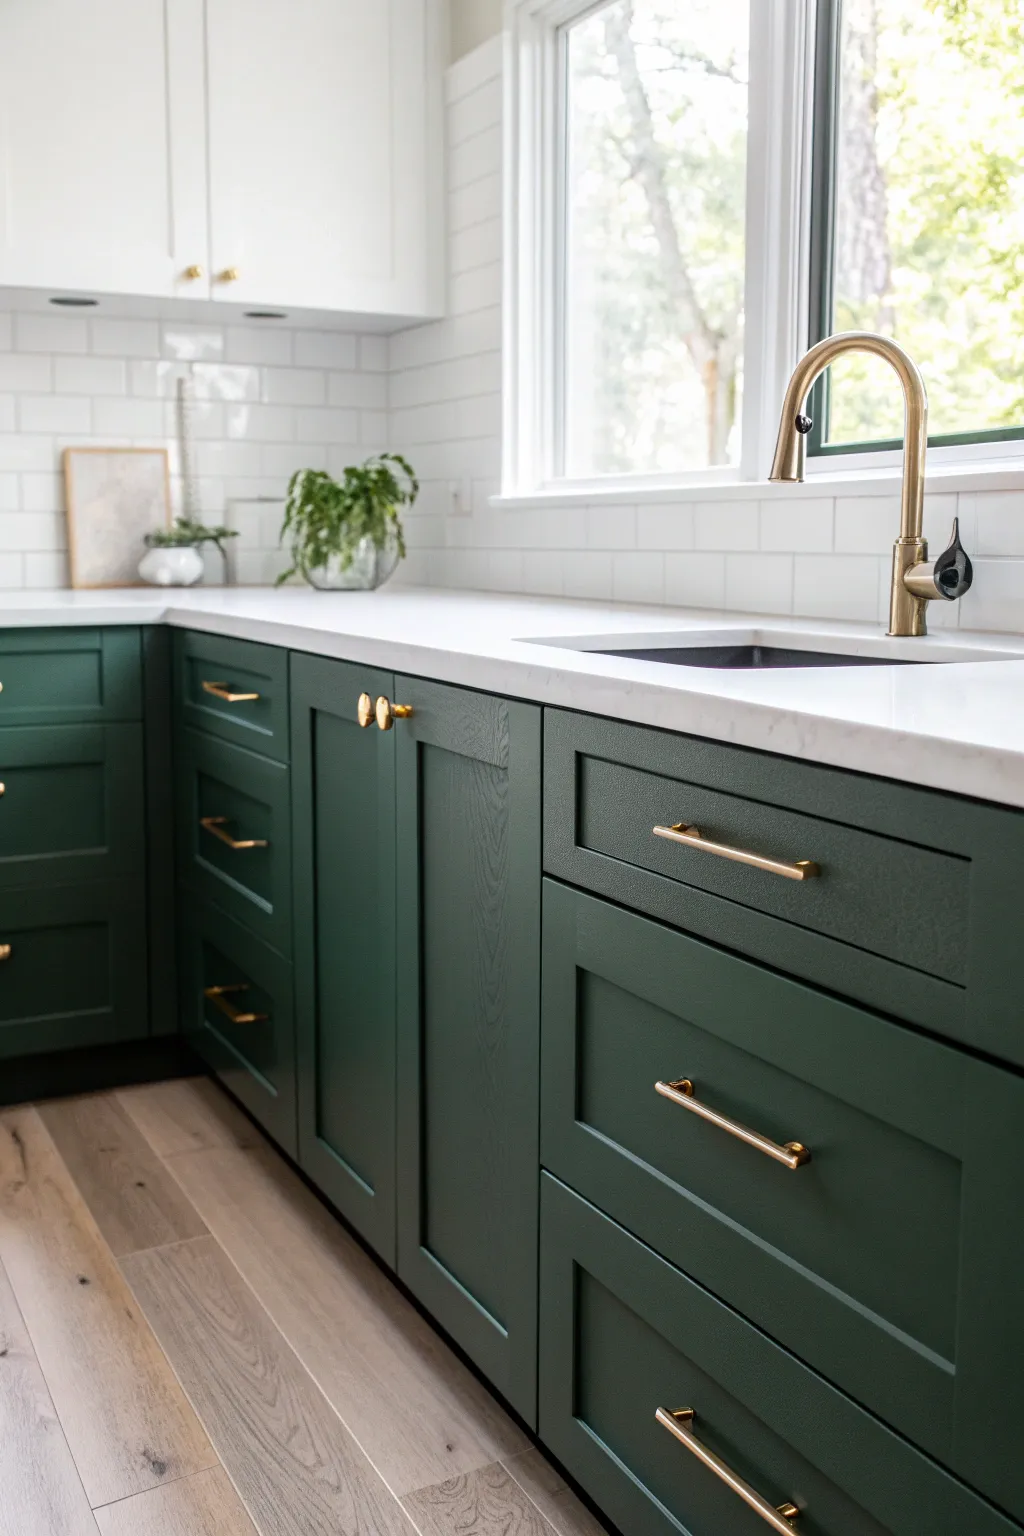
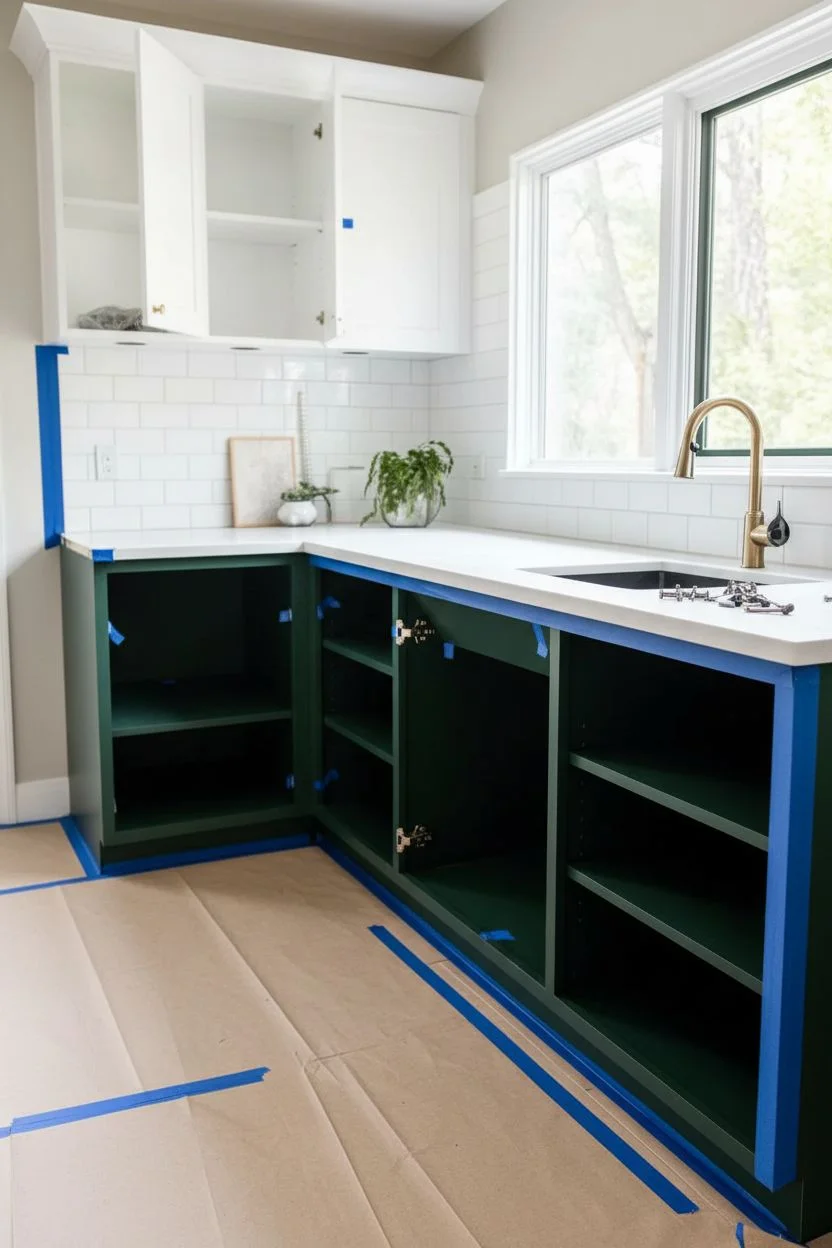
Transform a dated kitchen into a sophisticated culinary haven by painting lower cabinets in a rich, deep forest green while keeping the uppers bright and airy. This high-contrast look, paired with gold hardware and crisp white countertops, creates a grounded yet modern aesthetic that feels custom-designed.
Step-by-Step Guide
Materials
- High-quality cabinet paint (Deep Forest Green, semi-gloss or satin finish)
- High-quality cabinet paint (White, semi-gloss or satin finish for uppers)
- Bonding primer (oil-based or shellac-based recommended)
- TSP (Trisodium Phosphate) or degreaser
- Sandpaper (120 and 220 grit)
- Sanding block or orbital sander
- Tack Cloths
- Painter’s tape (delicate surface)
- High-density foam rollers (4-inch)
- Angled sash brush (2-inch, synthetic)
- Screwdriver or drill for hardware removal
- Wood filler (if filling old hardware holes)
- Drop cloths or rosin paper
- Gold drawer pulls and knobs
- Gold kitchen faucet
Step 1: Preparation & Dismantling
-
Assess and Clear:
Begin by removing everything from the cabinets and drawers. Clear the countertops completely to give yourself a clean workspace. This is the perfect time to declutter items you no longer use. -
Remove Hardware:
Using your screwdriver or drill, carefully remove all cabinet doors, drawer fronts, and existing hardware. Label each door and its corresponding opening with a piece of painter’s tape to ensure easy reassembly later. -
Protect Surfaces:
Cover your floors with rosin paper or drop cloths, taping them down securely. Use painter’s tape to protect the walls, backsplash, countertops, and appliances where they meet the cabinet frames. -
Clean Thoroughly:
Scrub all cabinet surfaces (doors, drawer fronts, and frames) with TSP or a heavy-duty degreaser. This step is critical; kitchen cabinets collect invisible oils that will ruin your paint job if not removed.
Paint Peeling?
Peeling usually means grease wasn’t fully removed or sanding was skipped. Sand the peeling area down to bare wood, clean with degreaser, re-prime, and repaint carefully.
Step 2: Sanding & Priming
-
Initial Sanding:
Scuff sand all surfaces with 120-grit sandpaper to remove the old finish’s gloss. You don’t need to strip it to bare wood, just create a dull, toothy surface for the primer to grip. -
Fill Imperfections:
If you are changing hardware sizes, fill old screw holes with wood filler. Let it dry, then sand flush. This is also the time to patch any dings or scratches in the wood. -
Dust Removal:
Vacuum up the sanding dust, then wipe every surface with a tack cloth. Any remaining dust will create a gritty texture in your finish. -
Apply Primer:
Apply a coat of bonding primer to all surfaces. Use a brush for corners and detailed moldings, and a foam roller for flat areas to minimize texture. Let the primer cure according to the manufacturer’s instructions. -
Light Sanding:
Once the primer is fully dry, inspect for drips and lightly sand with 220-grit paper to smooth out any brush strokes. Wipe clean with a fresh tack cloth.
Step 3: Painting
-
Paint Uppers First:
If painting upper cabinets white, do those first to avoid dripping light paint on your dark lowers later. Apply thin, even coats, sanding lightly between dry coats for a professional finish. -
Cut In the Lowers:
Open your deep forest green paint. Using an angled sash brush, ‘cut in’ the paint on the recessed panels, corners, and edges of the cabinet frames. I find working in small sections prevents the paint from drying too quickly. -
Roll Flat Surfaces:
Immediately follow the brush work by rolling the large flat areas of the doors and frames with a foam roller. Lay the paint off in one direction to ensure a smooth, uniform texture. -
Second Coat:
Allow the first coat to dry completely (usually 4-6 hours or overnight). Lightly sand with 220-grit paper if needed, wipe dust, and apply a second coat for full, rich opacity. Dark colors like forest green may occasionally need a third thin coat. -
Cure Time:
Let the final coat of paint cure for at least 24-48 hours before handling excessively. While it may feel dry to the touch, the paint needs time to harden against scratches.
Level Up: Inner Beauty
Line your drawers with a marble-patterned or botanical contact paper. It adds a secret pop of design every time you reach for a utensil and protects the fresh paint inside.
Step 4: Reassembly & Finishing Touches
-
Reinstall Doors:
Carefully remove the tape labels and reattach the cabinet doors and drawer fronts to their original spots. Adjust the hinges as you go to ensure everything hangs straight and level. -
Install New Hardware:
Install the new gold pulls and knobs. If you filled old holes, measure and drill new ones carefully using a hardware template for precision. -
Install Faucet:
Turn off the water supply and install the new gold faucet to match your hardware. Follow the manufacturer’s specific plumbing instructions to ensure a leak-free fit. -
Clean Up:
Remove all painter’s tape and floor protection. Polish the new hardware and wipe down the countertops to remove any stray dust. -
Style Surfaces:
Add a few green plants or warm wood cutting boards to the countertop. These elements bridge the gap between the dark green cabinets and the white surfaces, tying the whole look together.
Enjoy the dramatic and elegant transformation of your new two-tone kitchen space

PENCIL GUIDE
Understanding Pencil Grades from H to B
From first sketch to finished drawing — learn pencil grades, line control, and shading techniques.
Explore the Full Guide
Navy Cabinets That Make Metallic Hardware Shine
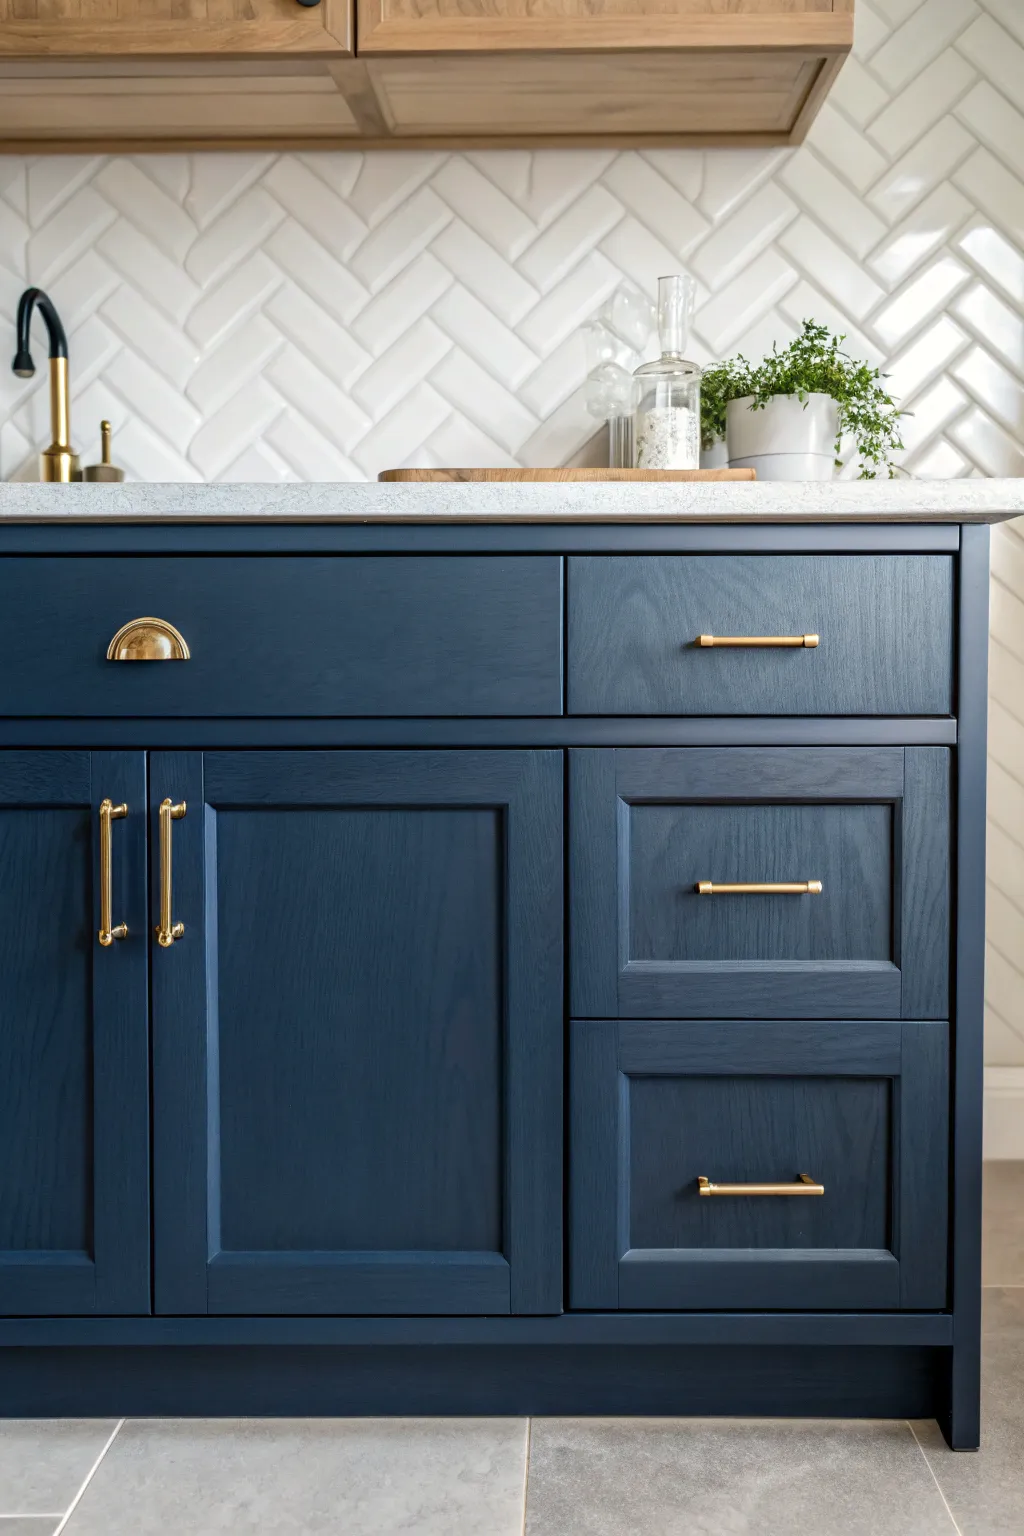
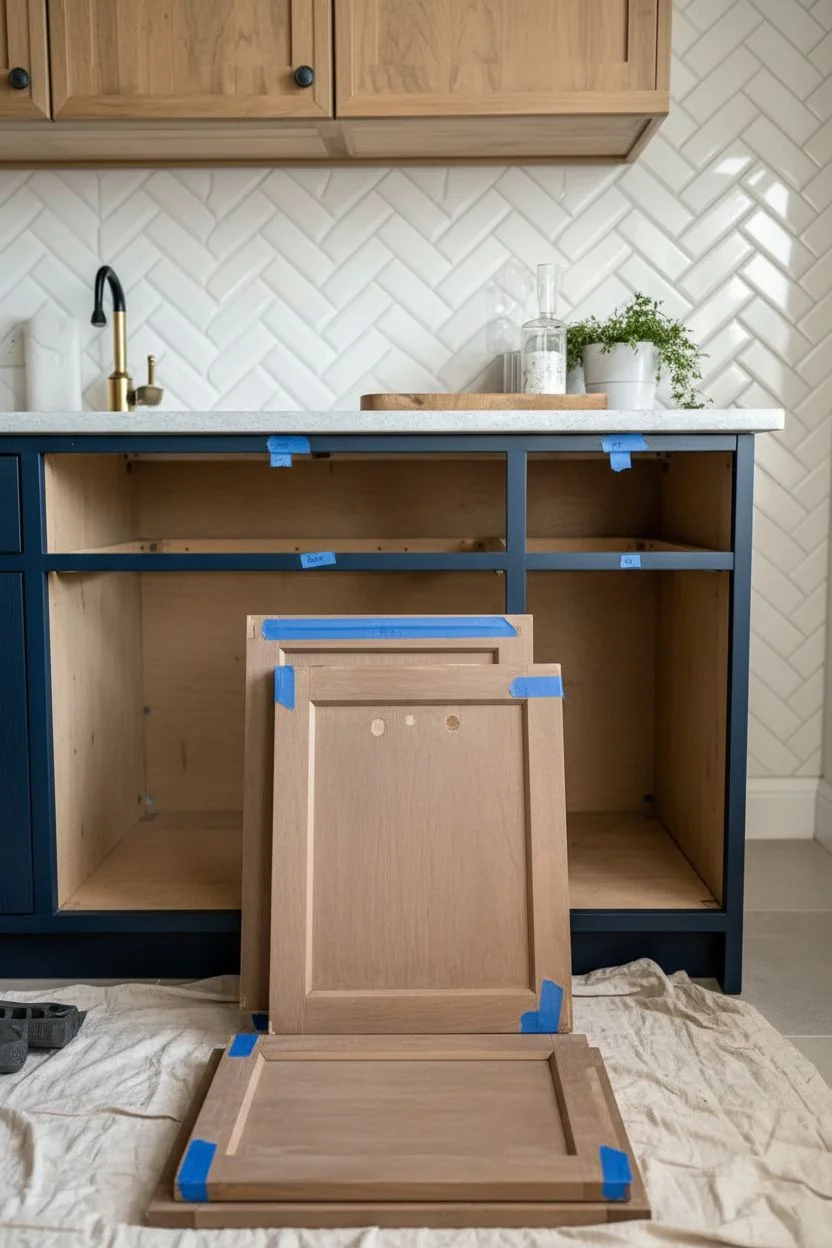
Transform tired kitchen cabinetry into a sophisticated focal point for your home with a deep navy hue that perfectly offsets gold hardware. This project creates a smooth, professional finish that highlights the wood grain texture while providing durable, everyday usability.
Step-by-Step Tutorial
Materials
- Cabinet-grade enamel paint (Navy Blue, satin/semi-gloss)
- Bonding primer
- Degreaser/Cleaner (TBS or similar)
- Sandpaper (120 and 220 grit)
- Liquid sandpaper/de-glosser
- Tack cloth
- Painter’s tape
- Mini foam roller and tray
- 2-inch angled sash brush
- Gold/Brass cabinet hardware (bin pulls, bar pulls, knobs)
- Wood filler (if filling old hardware holes)
- Drill and template for hardware
- Drop cloths
Step 1: Preparation & Cleaning
-
Remove Doors and Drawers:
Start by removing all cabinet doors, drawers, and existing hardware. Label each door and its corresponding opening with a piece of painter’s tape to ensure everything goes back in the right spot later. -
Deep Clean surfaces:
Scrub all surfaces thoroughly with a heavy-duty degreaser or TSP substitute. Kitchen cabinets accumulate invisible grease layers that will prevent paint adhesion, so don’t skip this scrub. -
Fill Old Holes:
If you are changing the hardware size or style (like switching from a knob to the bin pulls shown), fill the old holes with high-quality wood filler. Let it dry completely, usually about an hour. -
Sand for Adhesion:
Lightly sand all surfaces with 120-grit sandpaper to scuff the existing finish. You aren’t trying to remove the old finish entirely, just giving the primer something to grip. -
De-gloss and Wipe:
Wipe away sanding dust with a tack cloth. For extra insurance, apply a liquid sandpaper/de-glosser with a rag to ensure absolutely no slick spots remain.
Sticky Situation?
If doors stick to frames after drying, apply small clear bumpers to the inside corners. Paint can take up to 30 days to fully cure and harden against tackiness.
Step 2: Priming & Painting
-
Tape Off Edges:
Apply painter’s tape precisely along walls, the floor kickplate, and under the countertop edge to protect the surrounding areas from wayward brush strokes. -
Apply Primer:
Using a brush for corners and the mini roller for flat areas, apply a coat of high-quality bonding primer. Don’t worry if it looks streaky; the goal is adhesion, not full coverage. -
Sand the Primer:
Once the primer is fully dry (check the can, usually 1-2 hours), gently sand it with 220-grit sandpaper to smooth out any brush marks or raised grain. -
Cut In the Navy:
Dip your angled sash brush into the navy enamel and carefully paint the recessed panels, corners, and edges of the cabinet frames first. -
Roll the Flat Surfaces:
While the cut-in edges are still wet, use the foam roller to paint the flat panels, stiles, and rails. This maintains a ‘wet edge’ and prevents visible lap marks. -
Let Dry and Assess:
Allow the first coat to dry overnight. Dark colors like navy often look patchy after one coat, so don’t panic if coverage isn’t perfect yet. -
Apply Second Coat:
Repeat the cutting-in and rolling process for a second coat. I find that a third thin coat is sometimes necessary for very deep blues to achieve that rich, velvet-like depth. -
Cure Time:
Let the cabinets cure for at least 2-3 days before reattaching heavy doors. The paint may feel dry to the touch sooner, but it remains soft and prone to dents.
Step 3: Hardware & Styling
-
Measure Hardware Placement:
If installing new pulls, use a hardware jig/template to mark exactly where your drill holes should go. For drawers, center the template horizontally and vertically on the drawer face. -
Drill Holes:
Carefully drill through your marked spots. Place a scrap block of wood behind the drawer front while drilling to prevent the wood from blowing out on the back side. -
IInstall Metallic Accents:
Screw in the new gold bin pulls on the top drawers and bar pulls on the lower drawers/cabinets. Hand-tighten with a screwdriver rather than a drill to avoid stripping the screws or cracking the finish. -
Reassemble:
Reattach the doors and slide the drawers back in, adjusting the hinges as needed so everything hangs level and gaps are even.
Luxe Upgrade
Line the interior drawers with a patterned contact paper before reinstalling hardware. A white and grey marble pattern adds a hidden surprise when opening deeply colored cabinets.
Step back and admire how the deep blue contrast makes your metallic hardware pop, giving your kitchen an instant high-end designer feel.
Charcoal Cabinetry for a Modern, High-Contrast Look
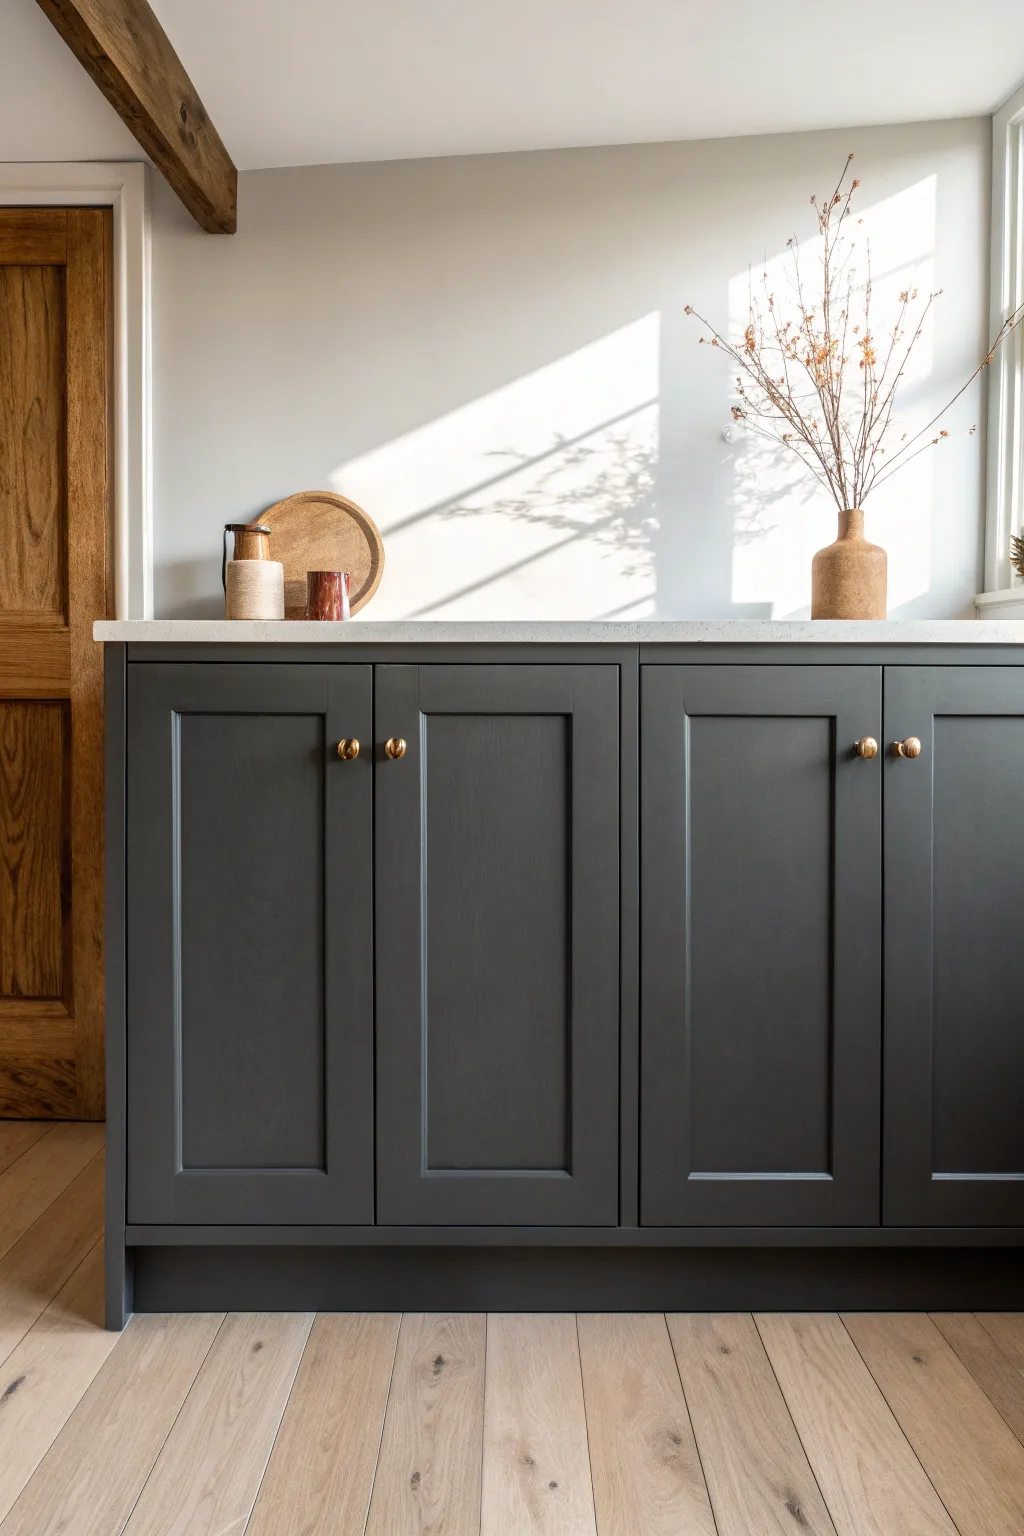
Transform standard cabinetry into a sophisticated focal point with this charcoal paint makeover. The deep, matte finish pairs beautifully with brass hardware and natural wood tones for a modern yet warm aesthetic.
How-To Guide
Materials
- High-quality cabinet paint (charcoal or dark slate)
- Bonding primer (specifically for cabinets)
- Degreaser or TSP substitute
- Sanding sponge (medium and fine grit)
- Tack cloth
- High-density foam roller
- Synthetic bristle sash brush (2-inch)
- Painter’s tape
- Brass knobs
- Drill or screwdriver
- Drop cloths
- Wood filler (if filling old hardware holes)
Step 1: Preparation
-
Remove hardware:
Start by removing all existing knobs, handles, and hinges. Label each door and its corresponding hardware location with tape to ensure easy reassembly later. -
Clean thoroughly:
Scrub every surface of the doors and cabinet frame with a tough degreaser or TSP substitute. Kitchen cabinets often have hidden grease layers that will ruin your paint adhesion if left behind. -
Fill imperfections:
If you are changing the hardware placement or see deep scratches, apply a small amount of wood filler. Let it dry completely before proceeding. -
Sand surfaces:
Use a medium-grit sanding sponge to scuff all surfaces. You aren’t trying to remove the old finish entirely, just creating a rough texture for the primer to grip. -
Remove dust:
Vacuum up the sanding dust, then wipe everything down with a tack cloth. Even a tiny speck of dust can gleam through the final coat.
Step 2: Priming
-
Tape edges:
Apply painter’s tape carefully along the walls, floor, and countertop edges where they meet the cabinetry to protect them from stray brushstrokes. -
Apply bonding primer:
Using your sash brush, cut in the primer along the recessed panels and corners first. Follow immediately with the foam roller on the flat surfaces for a smooth finish. -
First dry and sand:
Allow the primer to dry according to the manufacturer’s instructions. Once dry, lightly sand with a fine-grit sponge to knock down any raised grain or brush marks. -
Wipe clean:
Give the cabinets another pass with the tack cloth to ensure a perfectly smooth base for your color coat.
Don’t Rush the Cure
Even dry paint is soft. Treat cabinets gently for 3-4 weeks until fully cured to avoid permanent dents.
Step 3: Painting
-
Cut in color:
Stir your charcoal paint thoroughly. Begin by painting the recessed areas, corners, and edges of the doors and frames using the synthetic brush. -
Roll the flats:
While the brushed areas are still wet, use the foam roller to apply paint to the flat center panels and outer stiles. This technique, called ‘tipping off,’ helps smooth out brush marks. -
Let dry fully:
Allow the first coat to dry completely. Dark colors often require longer drying times to avoid tackiness, so patience is key here. -
Light scuff sand:
Very gently sand the first coat with a super-fine grit sponge. I find this extra step crucial for achieving that factory-finish feel. -
Apply second coat:
Repeat the cutting-in and rolling process for the second coat. Ensure full coverage, checking for any light spots peeking through the dark pigment. -
Optional third coat:
Deep charcoal tones sometimes need a thin third coat for true depth and opacity. Check your finish in natural light before deciding.
Add Interior Contrast
Paint the inside of the cabinets a soft warm wood tone or unexpected pale gray for a custom surprise when opened.
Step 4: Reassembly
-
Cure time:
Wait at least 24-48 hours before reattaching doors. Ideally, wait a few days for the paint to harden significantly to prevent chipping. -
Install hardware:
Attach your new brass knobs. The contrast against the charcoal is stunning, so handle them carefully to avoid scratching your fresh paint. -
Rehang doors:
Using your labels from the start, reattach each door to its original hinge location. Adjust the hinges as needed so the gaps between doors are even and straight. -
Final touch-ups:
Remove the painter’s tape slowly. Use a small artist’s brush to touch up any tiny spots where paint might have peeled or missed.
Enjoy the dramatic and elegant atmosphere your newly painted cabinets bring to the room


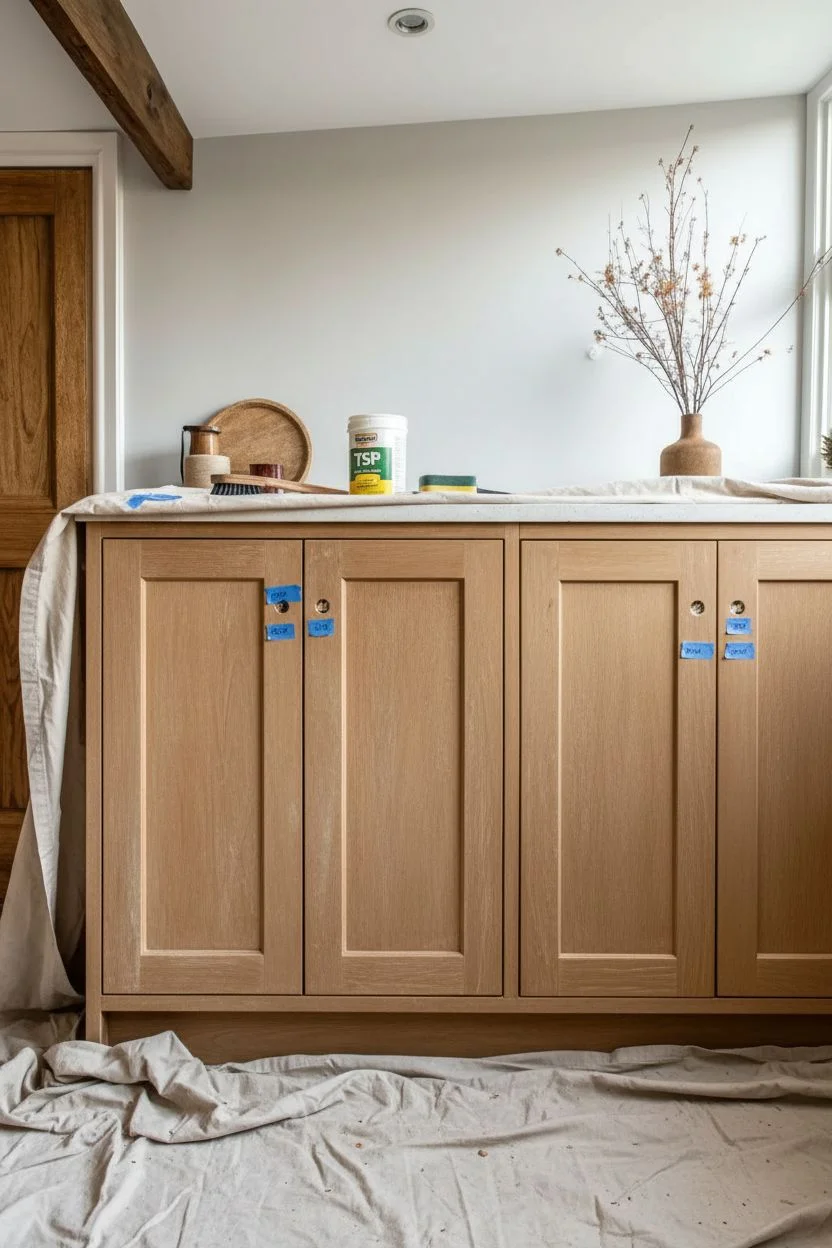
Dusty Blue Cabinets for a Soft, Classic Kitchen Palette
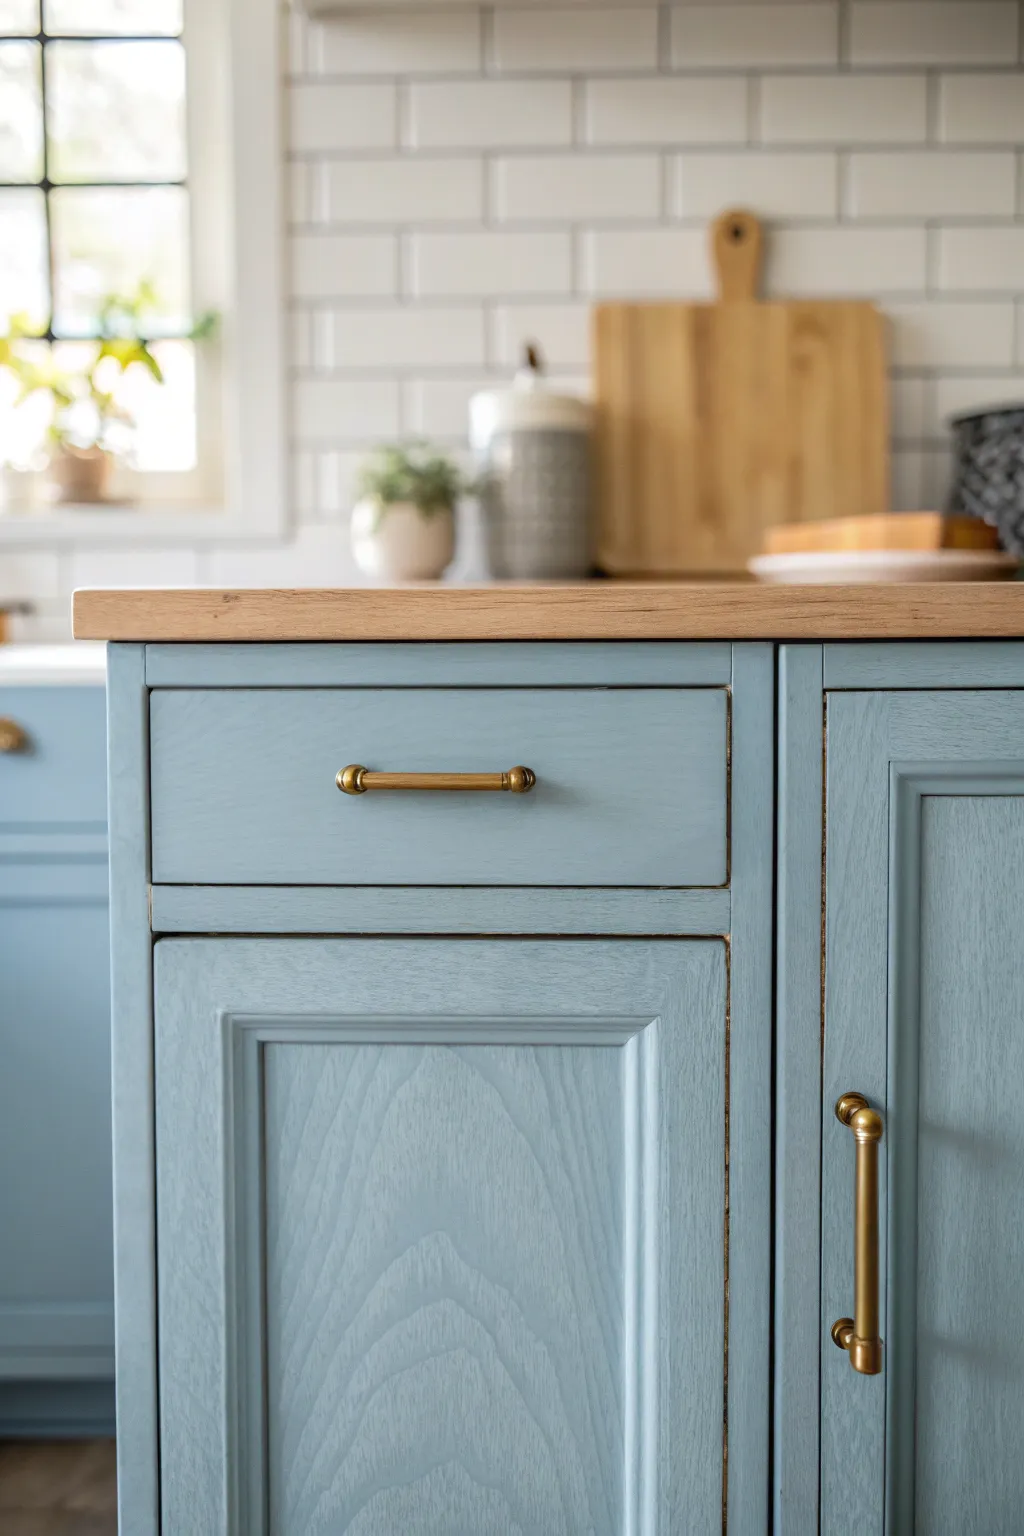
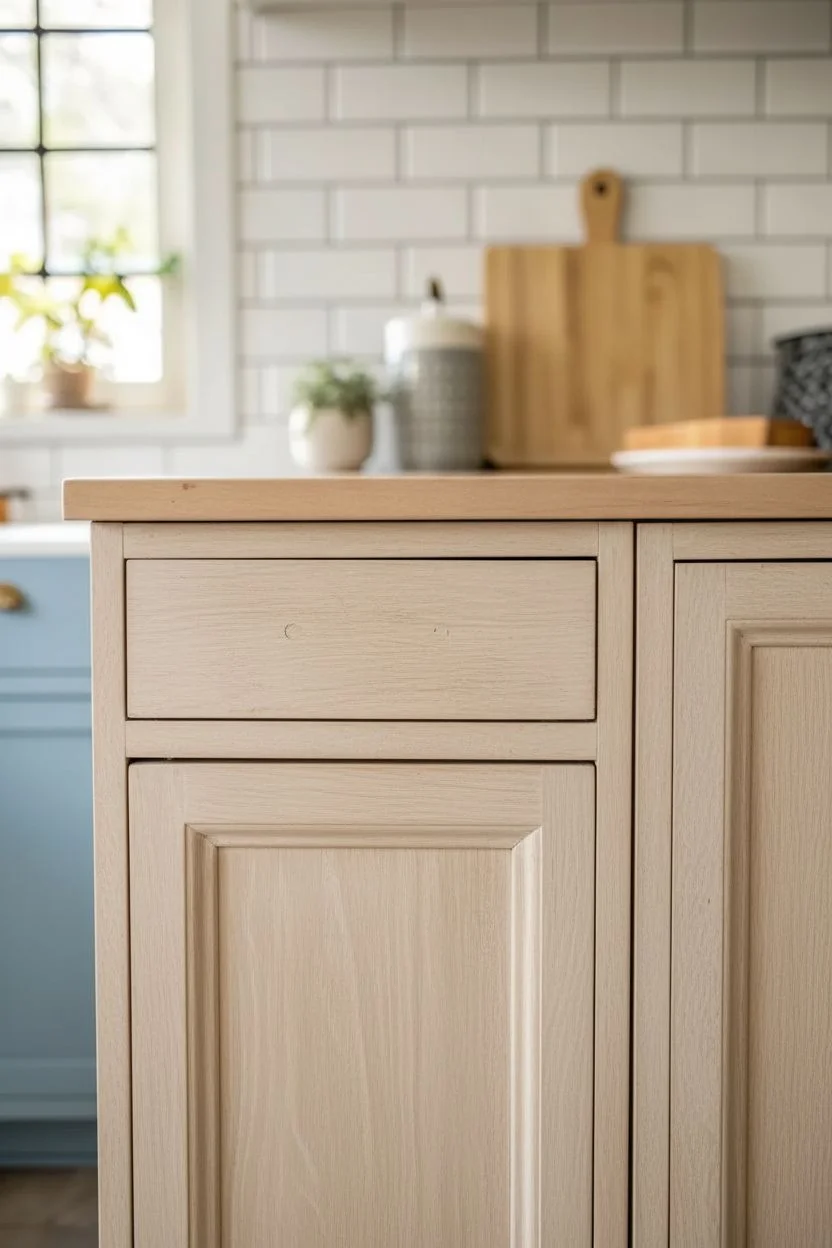
Transform your kitchen with this serene, dusty blue finish that beautifully balances modern color with classic wood texture. This technique allows the natural grain of oak cabinets to peek through, adding depth and character to an otherwise solid color palette.
Step-by-Step Tutorial
Materials
- Cabinet doors and drawers (oak or wood with prominent grain)
- Sandpaper (120 and 220 grit)
- Degreaser (TSP substitute)
- Painters tape
- High-quality bonding primer (tintable)
- Dusty blue urethane-alkyd enamel paint (satin finish)
- High-density foam roller
- Angled sash brush (2 inch)
- Brass or gold cabinet hardware
- Clean tack cloths
- Screwdriver or drill
Step 1: Preparation & Cleaning
-
Remove hardware:
Begin by removing all existing handles, knobs, and hinges from your cabinet doors and drawer fronts. Store the screws in labeled bags so you don’t lose them. -
Clean surfaces thoroughly:
Scrub every surface with a heavy-duty degreaser or TSP substitute. Kitchen cabinets accumulate invisible grease layers that will repel paint, so be extremely diligent here. -
Rinse and dry:
Wipe down the cleaned wood with a damp cloth to remove any cleaning residue, then let the wood dry completely. -
Scuff sand:
Use 120-grit sandpaper to scuff the existing finish. You aren’t trying to remove all the old varnish, just creating a rough surface for the new paint to grip. -
Remove dust:
Vacuum up the sanding dust, then wipe everything down with a tack cloth to ensure a perfectly clean surface.
Grain Game
To keep the wood grain visible, avoid ‘high-build’ primers. Use a standard bonding primer and thin coats of paint so the texture isn’t filled in.
Step 2: Priming & Painting
-
Tape off edges:
Apply painter’s tape carefully along the edges of the cabinet frame where it meets walls or the floor to ensure crisp lines. -
Prime the wood:
Apply a coat of high-bonding primer. Use a brush for the recessed corners and a foam roller for the flat surfaces. Let this dry overnight. -
Light sanding:
Once the primer is fully cured, lightly sand it with 220-grit paper to smooth out any brush strokes, then wipe with a tack cloth. -
Mix your paint:
Stir your dusty blue urethane-alkyd enamel thoroughly. This type of paint mimics the durability of oil-based paints but cleans up with water. -
First coat application:
Apply the first coat of blue paint. Start by brushing the recessed panels and corners, feathering the paint out to avoid pooling. -
Roll the flat surfaces:
Immediately follow the brush work by rolling the flat center panels and outer frames with a foam roller for a smooth finish. -
dry completely:
Allow the first coat to dry for at least 24 hours. Don’t rush this step, as humidity can affect drying times. -
Check for grain:
Inspect the finish. Since we want that wood grain texture to show through like in the photo, avoid applying the paint too thickly. -
Second coat:
Apply a second, thin coat using the same brush-then-roll technique. This ensures full color coverage without filling in the wood grain texture. -
Cure time:
Let the cabinets cure for at least 3-5 days before reinstalling doors. The paint may feel dry to the touch sooner, but it needs time to harden.
Glaze It Up
For a more antique look, apply a subtle dark wax or glaze into the crevices of the door molding after the paint cures to highlight the details.
Step 3: Assembly
-
Reattach doors:
Carefully screw the hinges back onto the cabinet frames and rehang your doors. -
Install hardware:
Attach your new brass or gold pulls. I find using a template helps ensure the handles are perfectly level and centered on every drawer. -
Final wipe down:
Give the cabinets a very gentle wipe with a microfiber cloth to remove any fingerprints from installation.
Enjoy the calm and sophisticated atmosphere your new blue cabinets bring to the heart of your home
Creamy Beige Walls to Warm Up Cool Cabinets and Tile
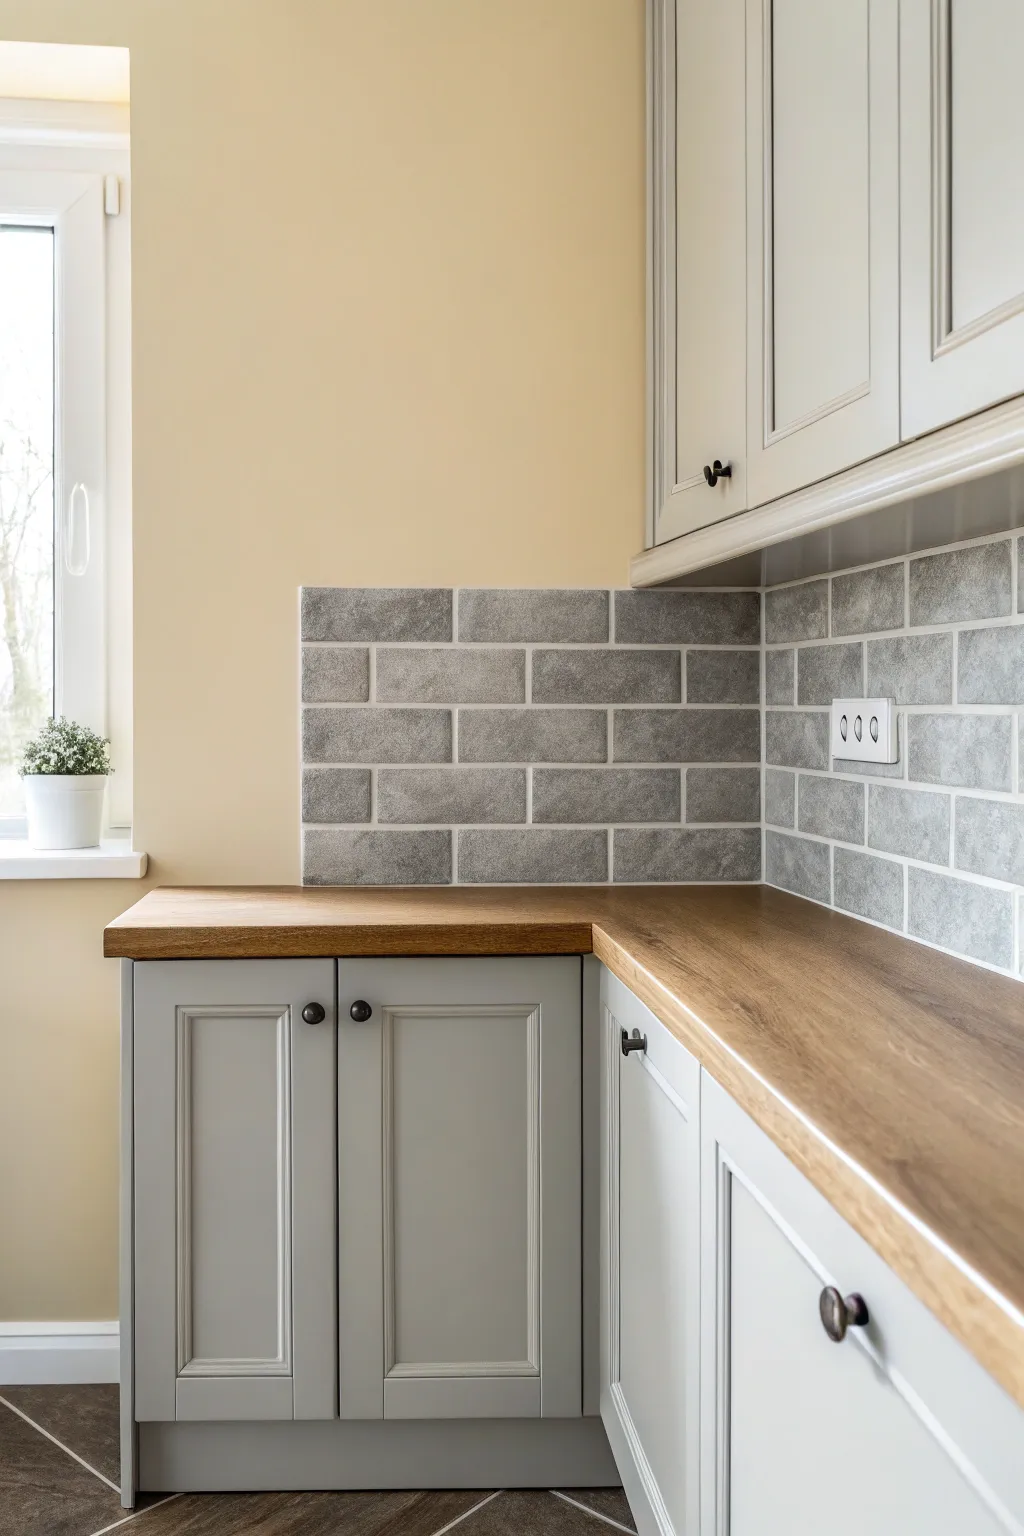
Capture the serene warmth of a modern kitchen interior with this detailed painting tutorial. You will learn to render reflective surfaces like subway tiles while balancing warm wall tones against cool grey cabinetry.
Step-by-Step Guide
Materials
- Heavyweight watercolor paper or mixed media board (approx. A4 size)
- Masking tape
- HB pencil
- Ruler
- Eraser
- Gouache or acrylic paints (Titanium White, Yellow Ochre, Burnt Sienna, Payne’s Grey, Ultramarine Blue, Raw Umber)
- Flat synthetic brushes (1/2 inch and 1/4 inch)
- Small round detail brush (size 0 or 1)
- Mixing palette
- Water container
- Paper towels
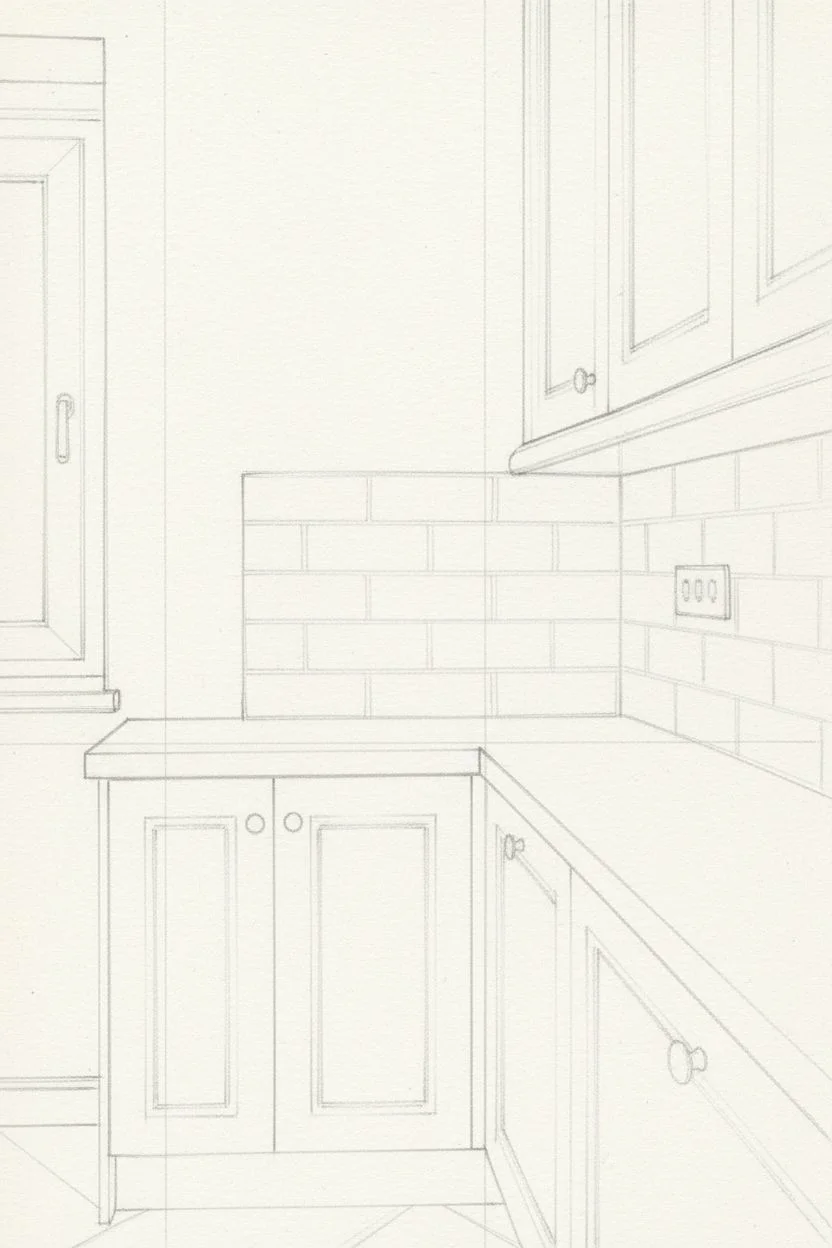
Step 1: Drafting the Composition
-
Establish the horizon line:
Begin by lightly drawing your horizon line about one-third up from the bottom of the paper. This will serve as the guide for the countertop height. -
Map out the cabinets:
Using your ruler, sketch the vertical lines for the lower cabinet unit and the upper hanging cabinet. Pay close attention to the perspective; the lines should remain vertical, but the countertop edge should angle slightly if you are implying a specific viewpoint. -
Define the backsplash area:
Draw the boundary for the tiled area between the lower and upper cabinets. Don’t draw individual tiles yet, just the rectangular shape where they will reside. -
Add architectural details:
Sketch the window frame on the left side, the cabinet door panels (shaker style), and the small circular knobs. Lightly indicate the electrical outlet on the backsplash.
Step 2: Blocking in Base Colors
-
Mix the wall color:
Combine a large amount of White with a touch of Yellow Ochre and a tiny speck of Burnt Sienna to create a creamy beige. Apply this flat wash to the wall areas, careful to cut around the cabinets and window. -
Paint the cabinets:
Mix Titanium White with a small amount of Payne’s Grey to create a soft, light grey. Paint the base layer of the lower and upper cabinets. I like to keep this layer fairly thin so the pencil lines are still faintly visible. -
Base the countertop:
Mix Yellow Ochre and Burnt Sienna with a little White effectively creating a wood tone. Paint the horizontal countertop surface. -
Backsplash grey:
Mix a slightly darker, more textured grey using Payne’s Grey and White. Fill in the backsplash rectangle completely.
Uneven Lines?
If your cabinet lines look wobbly, use a piece of cardstock or masking tape as a straight edge guide while painting. It acts like a stencil for sharp edges.
Step 3: Rendering Textures and Shadows
-
Create cabinet depth:
Using a slightly darker version of your cabinet grey, paint the recessed panels of the shaker doors. Use the ruler to keep your lines crisp. -
Add cabinet shadows:
Mix an even darker grey (add a touch of Ultramarine Blue for coolness). Apply thin shadow lines under the countertop overhang and inside the vertical groove between the cabinet doors. -
Detail the wood grain:
Using the small round brush and a mix of Burnt Sienna and Raw Umber, paint fine, wavy lines across the countertop to simulate wood grain. Vary the pressure to create thick and thin strokes. -
Grid the tiles:
With a thin mix of white paint or a white gel pen, draw the grid for the subway tiles. Create a brick pattern (running bond) by offsetting the vertical lines on alternating rows. -
Texture the tiles:
This is the fun part: take a slightly varied grey mix and dab it onto individual ’tiles’ to make them look distinctive. Leave some lighter to suggest uneven stone texture.
Pro Tip: Perspective
Make the backsplash tiles slightly narrower as they move toward the corner. This subtle compression sells the 3D perspective instantly.
Step 4: Final Details and Highlights
-
Paint the hardware:
Use pure Payne’s Grey or Black to paint the small round cabinet knobs and the window handle. Add a tiny dot of white to each knob to show a reflection. -
Window light:
Paint the window pane area white. If you want to show the exterior, keep it very high-key and washed out to suggest bright daylight pouring in. -
Adding the plant:
Paint the small pot white on the windowsill. Use small dabbing motions with green and yellow mixes to create the foliage texture. -
Highlighting edges:
Use pure white paint with your smallest brush to add a highlight line on the edge of the countertop where the light hits it. -
Outlet detail:
Paint the electrical outlet white, then add tiny grey dots for the switch details and a thin grey shadow underneath it. -
Clean up:
Erase any remaining stray pencil lines once the paint is completely bone dry. Remove the masking tape border carefully.
Step back and admire how the warm walls breathe life into the cool grey tones of your kitchen scene
Painted Range Hood for a Built-In, Custom Look
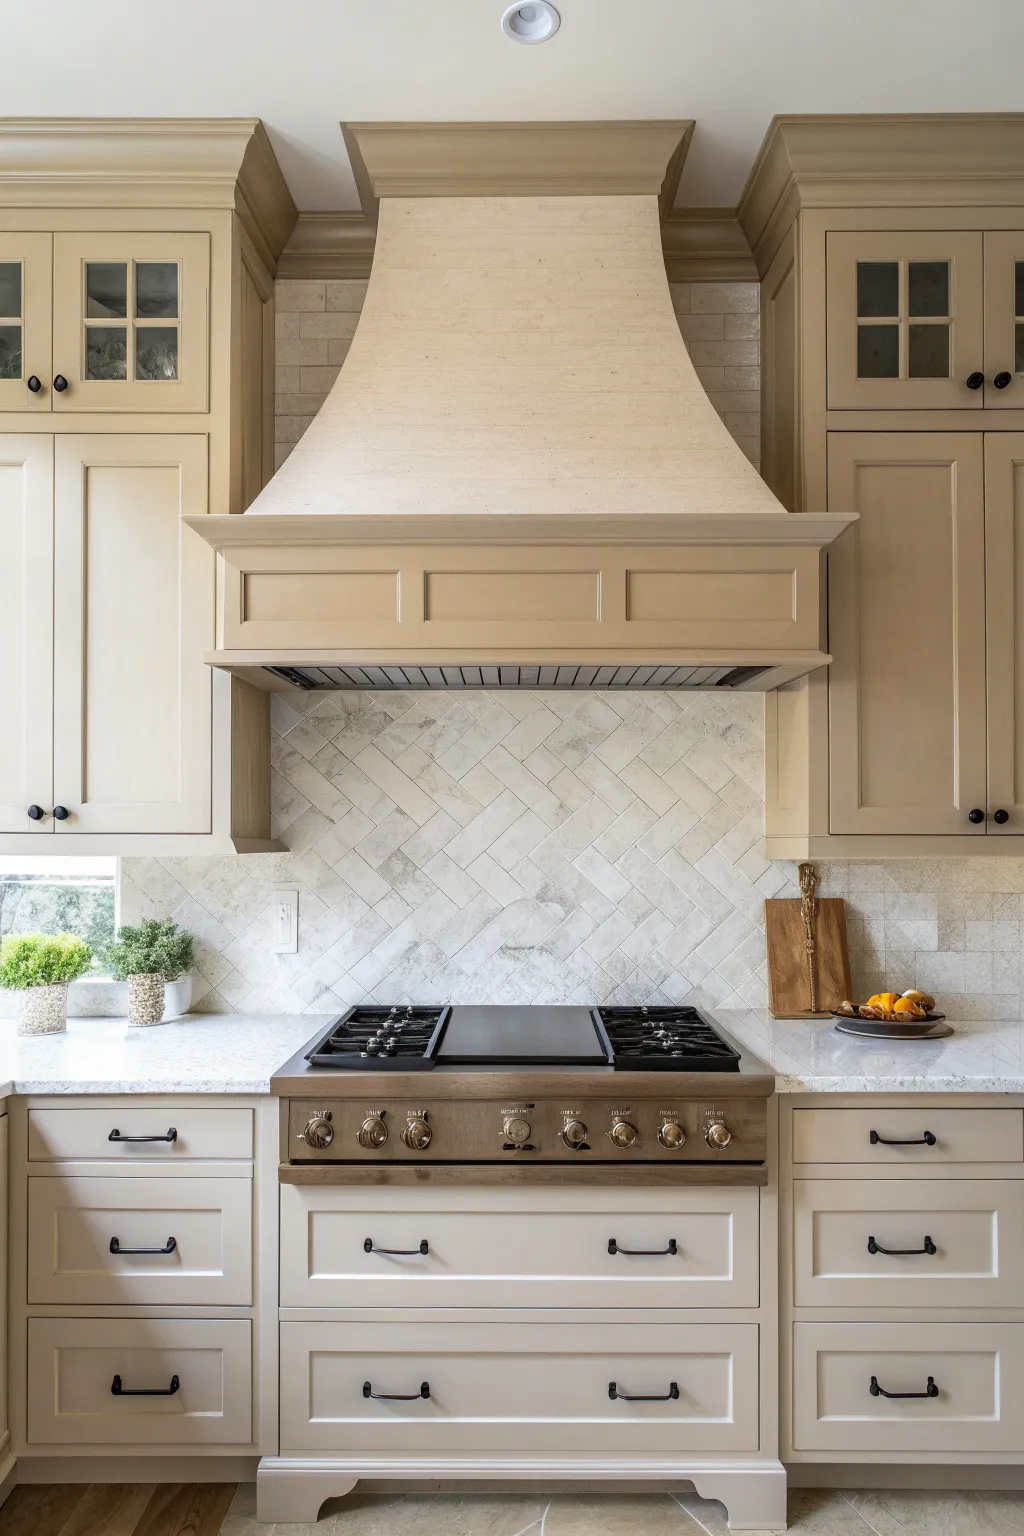
Achieve a seamless, high-end designer aesthetic in your kitchen by painting your range hood housing to perfectly match your cabinetry. This monochromatic approach creates a built-in custom look that feels architectural and sophisticated, transforming a standard appliance into a stunning focal point.
How-To Guide
Materials
- High-quality cabinet paint (satin or semi-gloss finish)
- Adhesion primer (oil-based or high-bond latex)
- Medium-grit sandpaper (120-150 grit)
- Fine-grit sandpaper (220 grit)
- Tack cloth
- Painter’s tape
- Plastic drop cloths
- Degreaser or TSP substitute
- Foam mini roller and tray
- 1.5-inch angled sash brush
- Screwdriver (for removing vent insert if possible)
- Wood filler (optional)
Step 1: Preparation & Cleaning
-
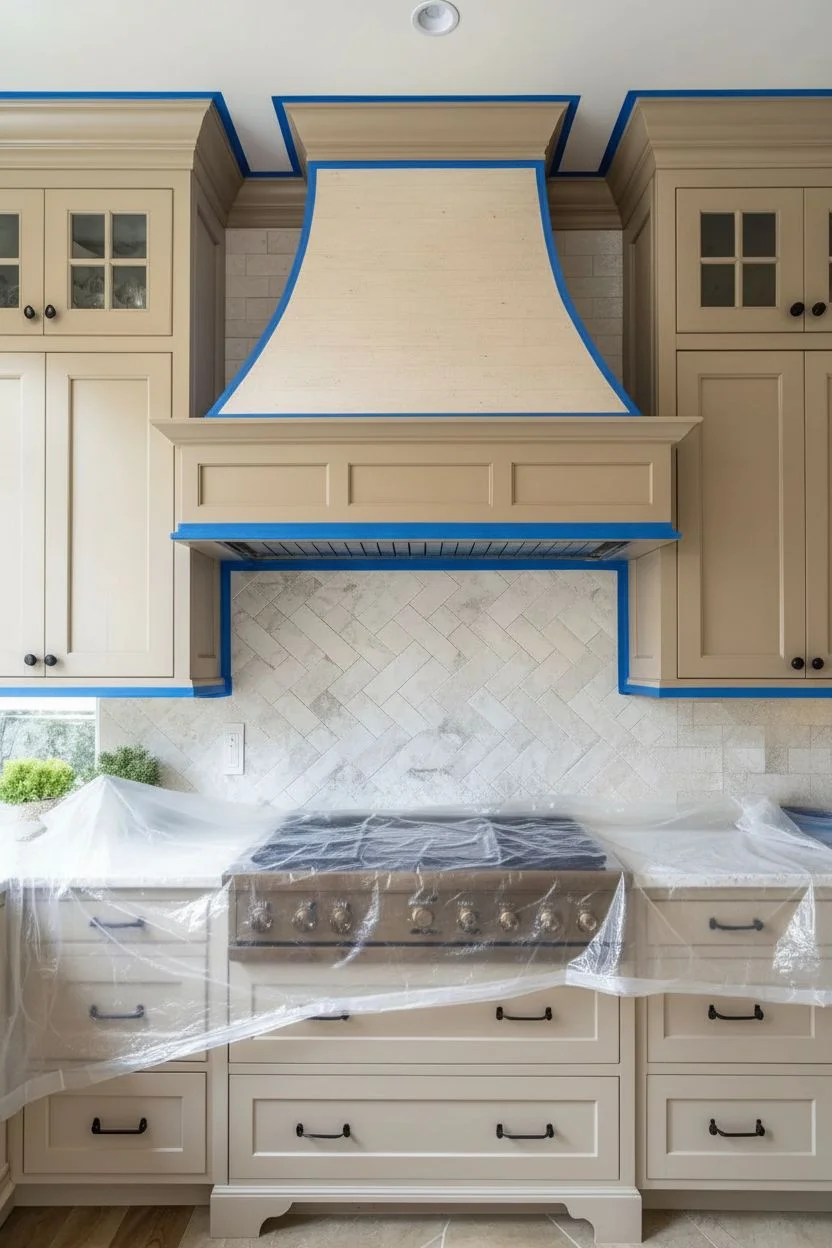
Clear the area:
Remove all items from your stovetop and surrounding counters. Cover the range, countertops, and backsplash thoroughly with plastic drop cloths to protect them from drips and dust. -
Assess the vent:
If your range hood has a removable metal vent insert or light housing, use a screwdriver to carefully detach it. This makes painting the wooden housing much easier and ensures you don’t get paint on the functional mechanics. -
Deep clean:
Since range hoods collect grease, scrub the entire surface using a degreaser or TSP substitute. Grease residue will prevent paint from sticking, so be thorough here. -
Fill imperfections:
Inspect the wood housing for any nail holes or gaps. Fill these with wood filler, let it dry completely, and then sand the filler flush with the surface.
Sticky Situation
Grease is the enemy here. If your primer beads up or separates when you apply it, there’s still oil on the surface. Stop immediately, wash again with degreaser, dry, and re-sand before trying again.
Step 2: Sanding & Priming
-
Initial light sanding:
Scuff sand the entire surface using medium-grit sandpaper (120-150 grit). You don’t need to strip it to bare wood; you just want to remove the existing sheen to give the primer some ‘tooth’ to grab onto. -
Remove dust:
Vacuum up the sanding dust, then wipe every nook and cranny with a tack cloth to ensure the surface is perfectly clean. -
Tape off edges:
Apply painter’s tape precisely along the wall, ceiling, and tile backsplash edges where the hood meets other surfaces. -
Apply primer:
Using your foam roller for flat areas and the angled brush for corners and trim details, apply a coat of adhesion primer. I usually prefer an oil-based primer for kitchen areas as it blocks stains and bonds securely, though it takes longer to dry. -
Smooth the primer:
Once the primer is fully dry (check the can instructions), legally sand it with 220-grit sandpaper to knock down any bumps. Wipe away the dust with a tack cloth again.
Texture Match
To mimic the subtle plaster look of some custom hoods, add a texture additive to your paint for the hood only, or use a limestone-based paint for a matte, stone-like finish distinct from the cabinets.
Step 3: Painting & Finishing
-
Cut in the details:
Dip your angled brush into your color-matched cabinet paint. Carefully paint the recessed corners, molding details, and edges where the roller can’t reach. -
Roll the flats:
While the brushed paint is still wet, use the foam roller to paint the large, flat vertical surfaces. Maintain a wet edge to avoid lap marks. -
Dry and assess:
Allow the first coat to dry completely. A minimum of 4-6 hours is standard for cabinet enamels, but overnight is safer to prevent tackiness. -
Sand between coats:
For that professional, factory-finish feel, lightly sand the first coat of paint with very fine sandpaper (like 320 grit or a finishing pad). This removes dust nibs and ensures the next coat is silky smooth. -
Apply second coat:
Repeat the cutting-in and rolling process for your second coat. This should provide full coverage and a rich, solid color. -
Remove tape:
Carefully peel away the painter’s tape while the final coat is still slightly tacky—don’t let it dry completely, or you might peel up the paint skin. -
Reinstall vent:
Wait at least 24-48 hours for the paint to cure enough to be touched without damage before reinstalling the metal vent insert and lights.
Step back and admire how seamlessly your new range hood blends into your kitchen design
Color-Matched Trim and Crown for Seamless Cabinet Walls
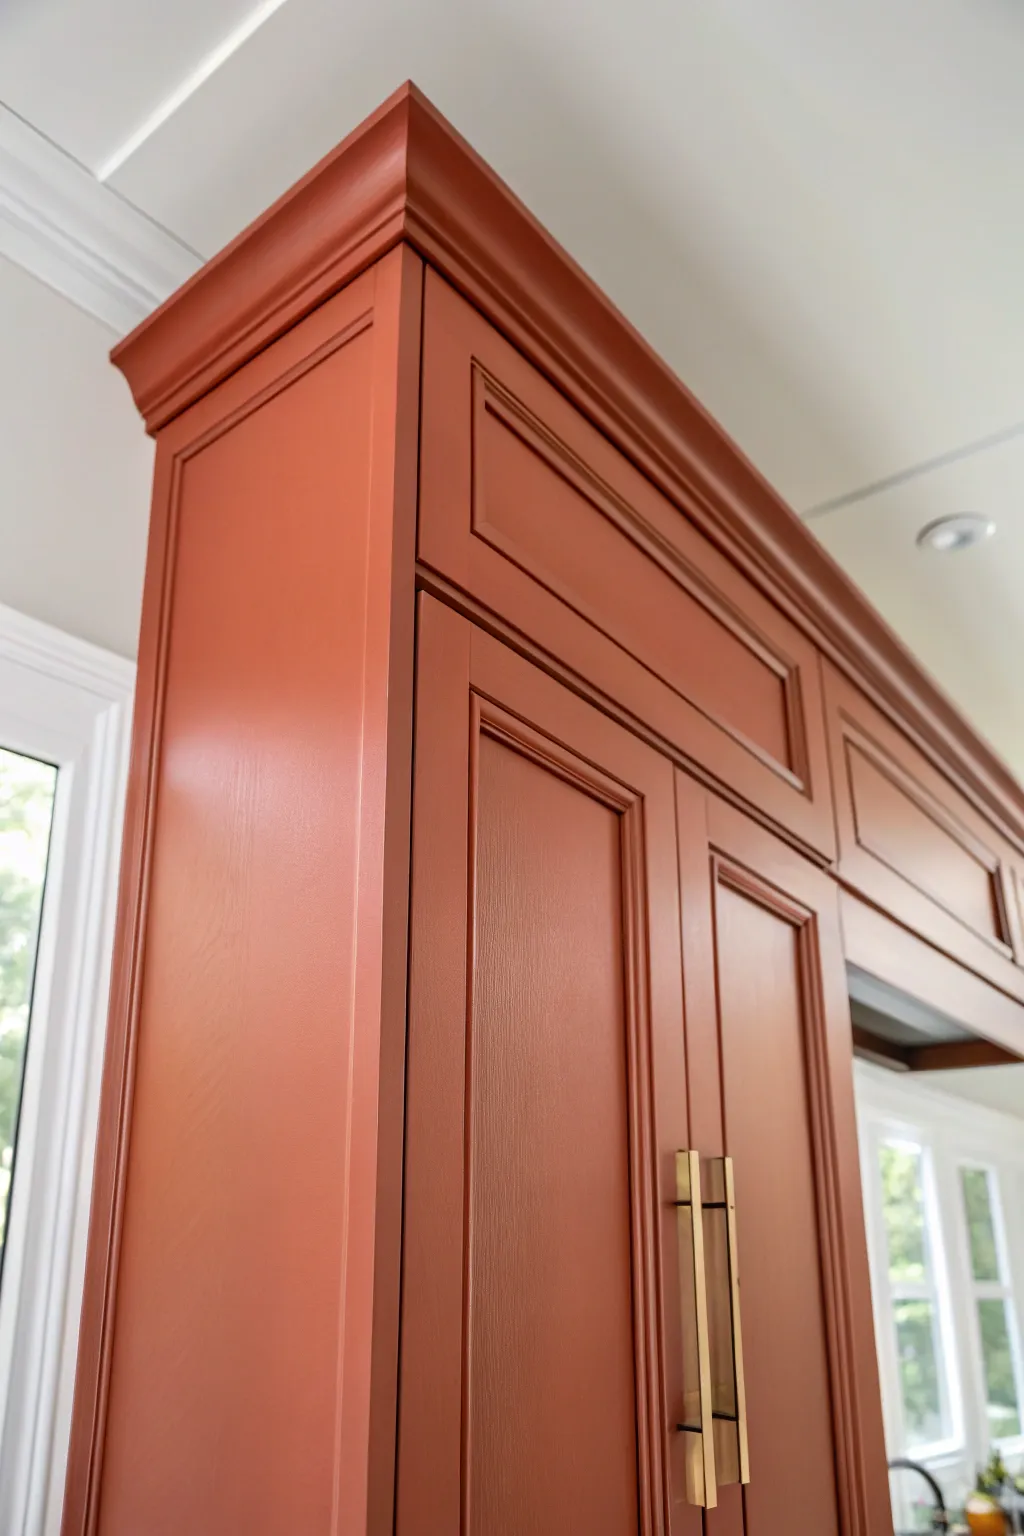
Transform standard kitchen cabinets into a high-end, custom feature by painting the cabinetry, trim, and crown molding in a unified, warm terra cotta hue. This monochromatic approach creates vertical continuity, making ceilings feel higher and the entire installation feel like bespoke furniture.
Step-by-Step Guide
Materials
- High-quality cabinet paint (Terra Cotta/Rust shade)
- Bonding primer (specifically for cabinetry)
- Degreaser or TSP substitute
- Fine-grit sandpaper (220-grit)
- Medium-grit sanding sponge
- Tack cloth
- High-density foam roller (4-inch)
- Angled sash brush (2-inch, synthetic bristle)
- Painter’s tape
- Phillips head screwdriver or drill
- Wood filler (if repairing old hardware holes)
- Acrylic caulk (paintable)
- Plastic drop cloths
Step 1: Preparation & Dismantling
-
Clear the area:
Empty the cabinets completely and remove any loose shelves. Lay down plastic drop cloths to protect your countertops and floors from dust and paint splatters. -
Remove hardware:
Using your screwdriver or drill, take off all handles, pulls, and knobs. Keep these screws in a labeled baggie so you don’t lose them. -
Remove doors:
Unscrew the hinges from the cabinet frame to remove the doors. I find it helpful to put a piece of tape on the back of each door with a number corresponding to its cabinet opening so reinstallation is frustration-free. -
Clean thoroughly:
Scrub the door fronts, frames, and crown molding with a degreaser or TSP substitute. Kitchen cabinets often have invisible grease films that will prevent paint from bonding, so be meticulous here. -
Fill imperfections:
If you are changing handle sizes or have dings, fill the holes with wood filler. Let it dry completely before moving on.
Fixing Gaps
If you see a dark crack between the molding and the ceiling, don’t just paint over it. Caulk that seam first to prevent a jagged shadow line.
Step 2: Sanding & Priming
-
Sand surfaces:
Lightly sand all surfaces—doors, frames, side panels, and the crown molding—using 220-grit sandpaper. You aren’t trying to strip the old finish, just ‘scuff’ it to give the primer something to grip. -
Remove dust:
Wipe everything down with a tack cloth to remove every speck of sanding dust. Dust is the enemy of a smooth finish. -
Caulk the seams:
Inspect the gap where the crown molding meets the cabinet box. Run a thin bead of paintable acrylic caulk along this seam and smooth it with a wet finger for that truly seamless, built-in look. -
Apply primer:
Brush primer into the recessed corners and details of the molding first, then roll the flat surfaces. Use a high-quality bonding primer designed for cabinets. -
Sand the primer:
Once the primer is fully cured, give it a very light pass with a fine sanding sponge to knock down any brush marks or raised grain.
Brush Technique
When painting the crown molding, use long, horizontal strokes across the length to mimic the wood grain direction and minimize start/stop marks.
Step 3: Painting & Finishing
-
Cut in the details:
Start with the intricate areas: the crown molding profiles and the recessed panels of the doors. Use your angled sash brush to apply the terra cotta paint smoothly, watching for drips in the corners. -
Roll the flats:
While the brushed areas are still wet (to maintain a wet edge), use the high-density foam roller to paint the flat frames and door centers. This minimizes texture and stroke marks. -
Let it dry:
Allow the first coat to dry according to the manufacturer’s instructions. Do not rush this step; tacky paint will ruin the finish. -
Sand lightly between coats:
For a professional feel, I like to run a fine sanding sponge very gently over the dried first coat before applying the second. -
Apply second coat:
Repeat the cutting-in and rolling process for the second coat. This deep, earthy color will likely need two full coats for true opacity and richness. -
Cure time:
Let the cabinets cure for at least 24 to 48 hours before reattaching hardware. Cabinet paint takes longer to harden than wall paint. -
Reassembly:
Reattach your hinges and hang the doors back in their numbered spots. Add your sleek gold pulls to complete the modern, warm aesthetic.
Enjoy the warmth and distinctive character your newly unified cabinetry brings to the kitchen space
High-Gloss Cabinet Finish to Bounce Light Around the Kitchen
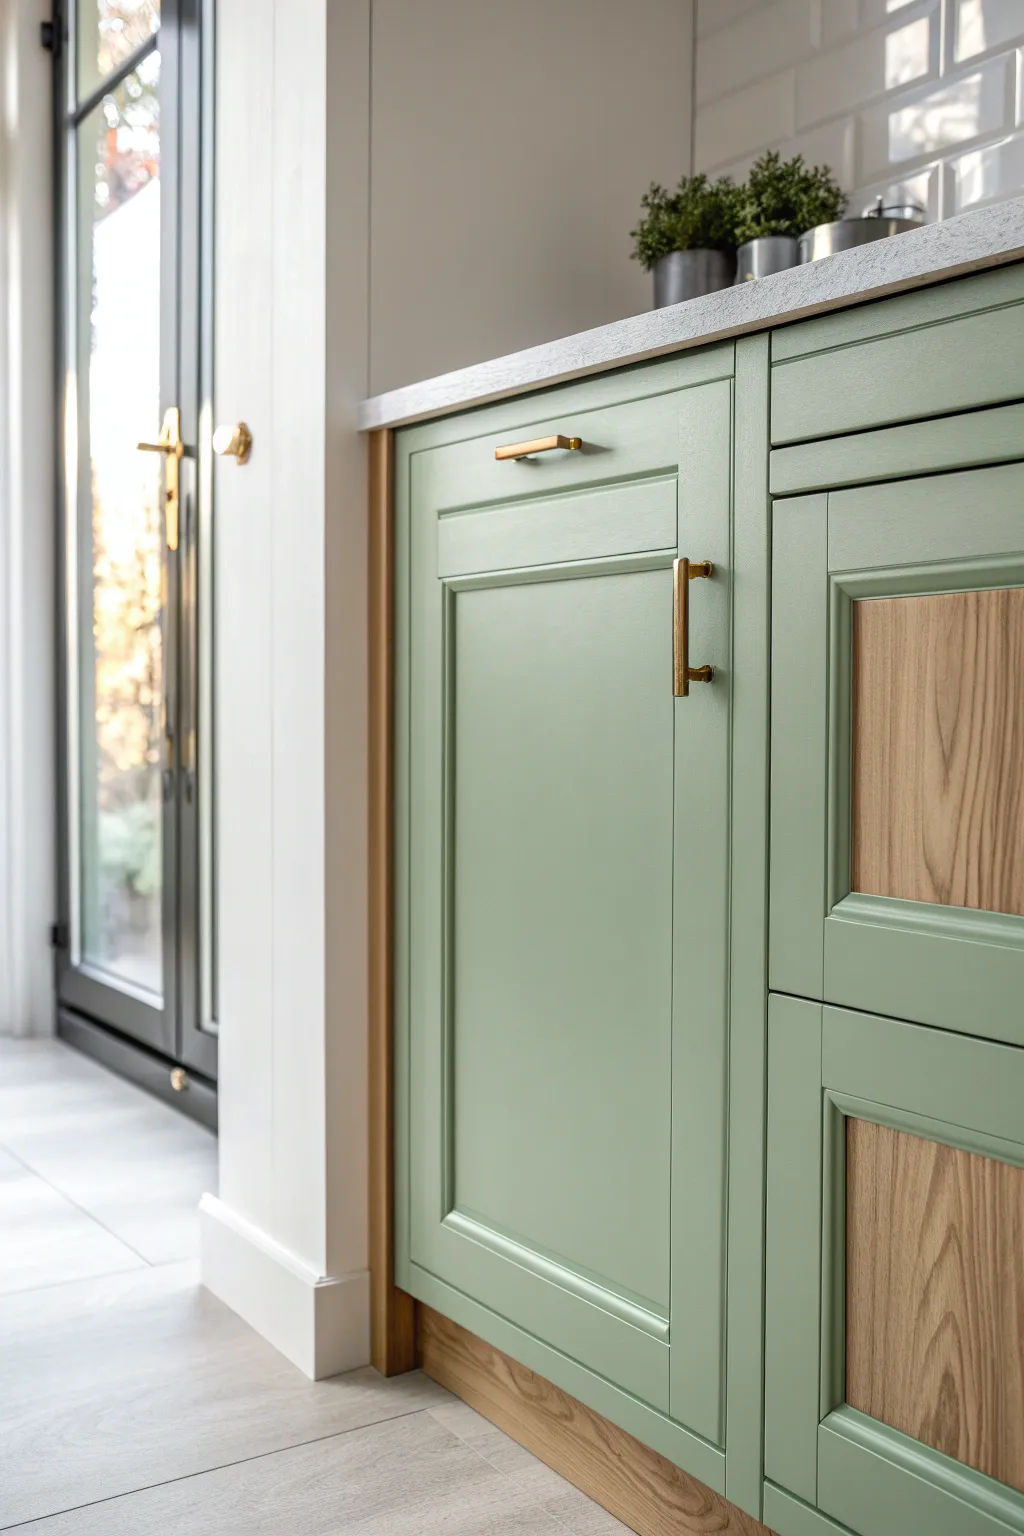
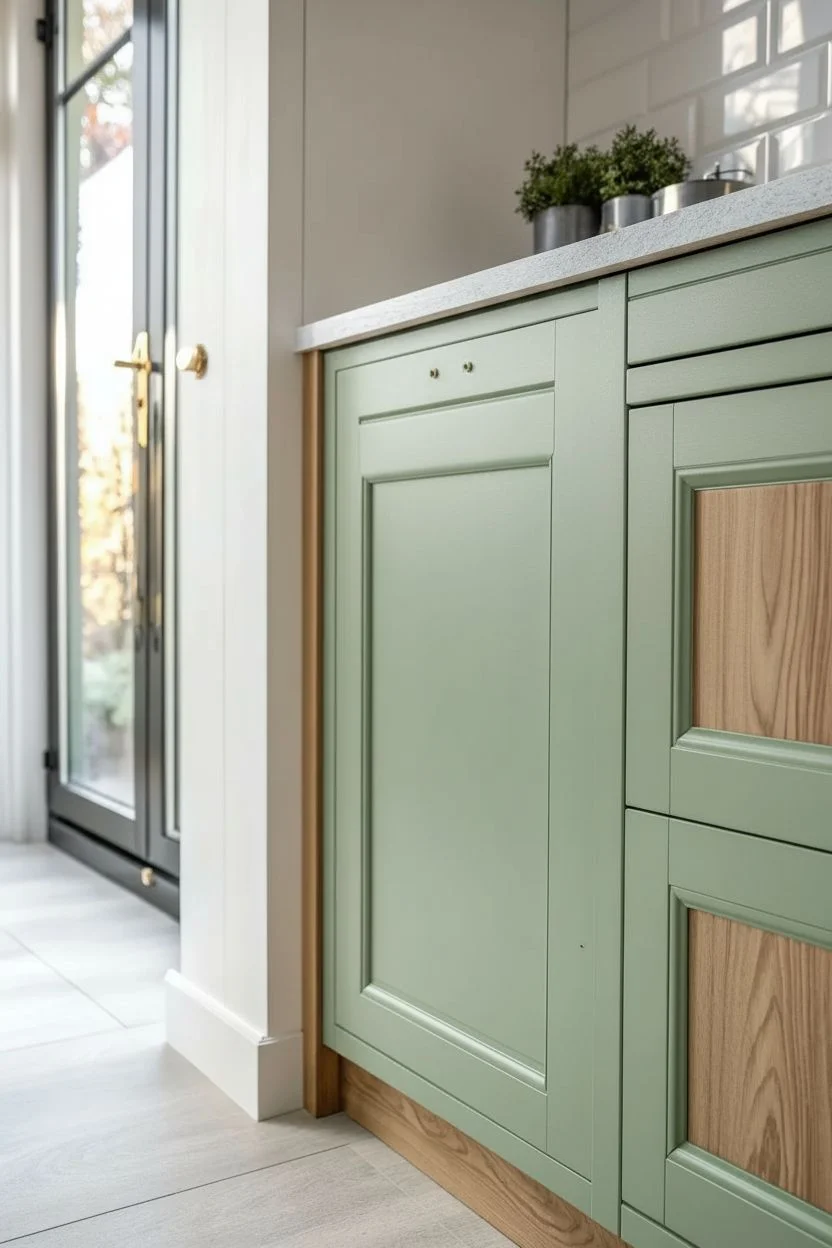
Transform dated kitchen cabinetry into a sophisticated focal point by observing this blend of solid sage paint and exposed oak grain. This project combines a smooth, durable painted finish with the warmth of natural timber inserts for a customized, high-end aesthetic.
Step-by-Step
Materials
- Cabinet doors (shaker style with central panels)
- Sage green cabinet paint (satin or eggshell finish)
- Bonding primer suitable for wood
- Clear matte polyurethane or varnish
- Wood stripper (or sander with various grits)
- Painter’s tape (high quality)
- Brass or gold cabinet pulls
- Sanding block (fine grit)
- Tack cloths
- Paint sprayer or high-density foam rollers
- High-quality synthetic angled brush
- Screwdriver or drill
Step 1: Preparation & Disassembly
-
Remove Hardware:
Begin by removing all cabinet doors from their frames using a screwdriver or drill. Take off existing handles, knobs, and hinges, placing them in labeled bags so nothing gets lost during the process. -
Clean Surfaces:
Thoroughly clean all cabinet surfaces with a degreaser or TSP alternative. This removes kitchen oils and grime that can prevent paint and varnish from adhering properly. -
Assess the Panels:
Identify which door panels will feature exposed wood. Determine if the central panel is solid wood or veneer suitable for stripping. If the panel is MDF or unappealing wood, purchase thin oak veneer sheets to apply over the center panel later.
Bleeding Lines?
If paint bleeds onto the wood panel, gently scrape it off with a damp toothpick while fresh. If dry, carefully wrap sandpaper around a stick and sand just the spot.
Step 2: Revealing the Wood Grain
-
Protect the Frames:
If you are stripping only the center panel, tape off the surrounding stiles and rails meticulously to protect them from chemical stripper run-off. -
Strip the Center Panel:
Apply a liberal coat of wood stripper to the central panels you wish to expose. Let it sit according to the manufacturer’s timeframe, then scrape away the old finish gently with a plastic scraper. -
Sand for Clarity:
Once the panel is stripped and dry, sand the wood grain starting with 120-grit and moving up to 220-grit. The goal is a raw, smooth oak surface free of old stain or varnish. -
Seal the Wood:
Apply two to three coats of clear matte polyurethane to the exposed wood panels immediately. This protects the raw wood from paint splatters in subsequent steps and seals the grain.
Add Texture
For a trendier look, replace the flat wood panel with fluted oak dowels or ribbed wood trim before sealing, adding vertical texture to the inset.
Step 3: Painting the Frames
-
Tape the Wood:
Once the clear coat is fully cured (give it 24 hours), apply painter’s tape precisely along the edges of the central wood panel. Press the edges down firmly with a credit card to prevent paint bleed. -
Scuff Sand the Frame:
Lightly sand the stiles and rails (the frame parts) of the doors and the cabinet carcass to create a key for the primer. Wipe away all dust with a tack cloth. -
Apply Primer:
Apply a high-quality bonding primer to the frames and solid doors. Use a brush for corners and a foam roller for flat areas to minimize texture. Allow this to dry completely. -
First Coat of Green:
Stir your sage green paint thoroughly. Apply the first coat using smooth, long strokes with a brush or a sprayer if available. I prefer to keep the layers thin to avoid drips collecting in the corners of the shaker profile. -
Sand Between Coats:
After the first coat dries, run a fine sanding sponge lightly over the surface. This knocks down any raised grain or dust nibs, ensuring a professional, buttery smooth finish. -
Final Paint Layer:
Apply the second (and third if necessary) coat of sage green paint. Remove the painter’s tape from the wood panels while the final coat is still slightly tacky to ensure a crisp, clean line.
Step 4: Reassembly & Styling
-
Curing Time:
Allow the doors to cure for at least a few days before hanging them back up. Paint may feel dry to the touch quickly, but it takes longer to harden fully against scratches. -
Reattach Hinges:
Screw the hinges back onto the doors and remount the doors to the cabinet frames. Adjust the hinge screws to ensure the gaps between doors are even and level. -
Install New Hardware:
Drill new holes if your new hardware centers differ from the old ones. Install the brass T-bar pulls vertically on lower cabinets and horizontally on drawers for a modern touch. -
Final Polish:
Wipe down the fronts with a soft, clean cloth to remove any fingerprints from installation. Step back and check for any tiny touch-ups needed along the tape lines.
Enjoy the calm, natural vibe your personalized cabinets bring to the heart of your home
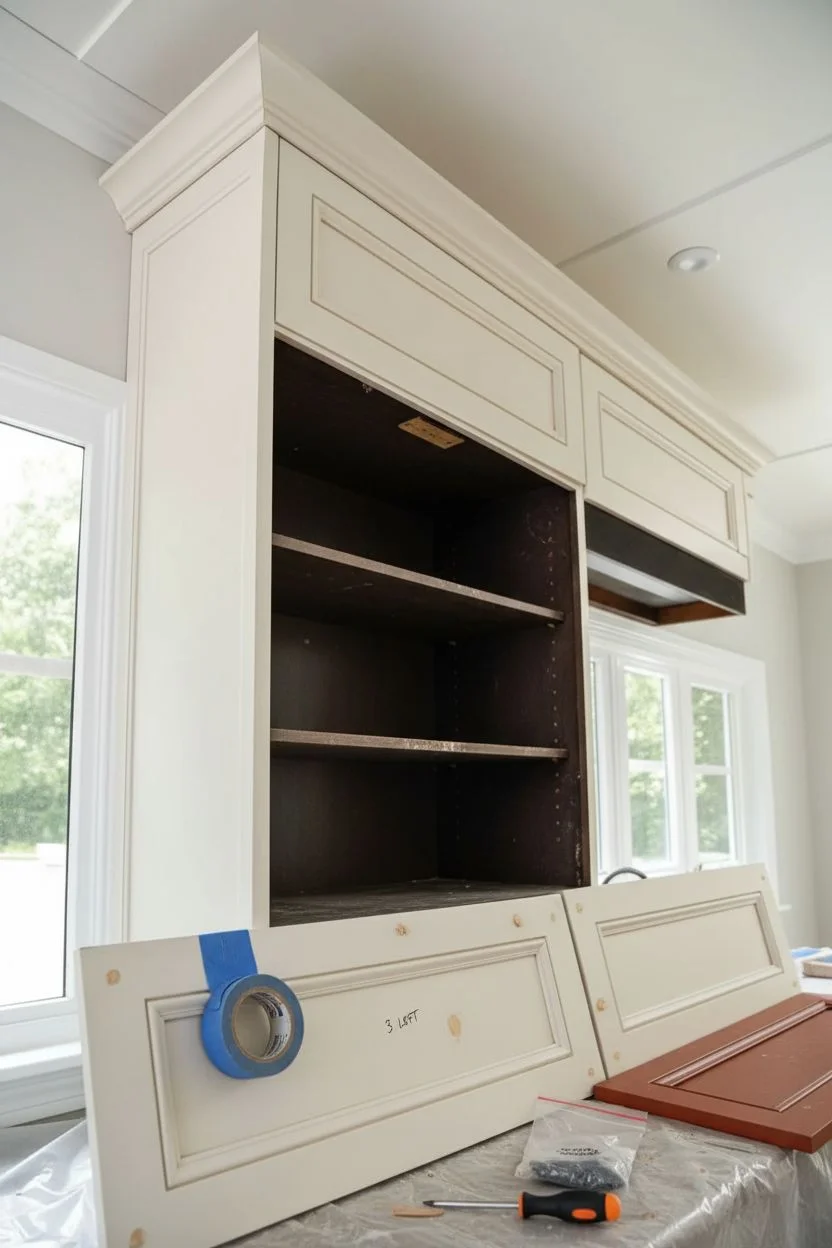
Painted Open Shelving to Tie in Decor and Dishware
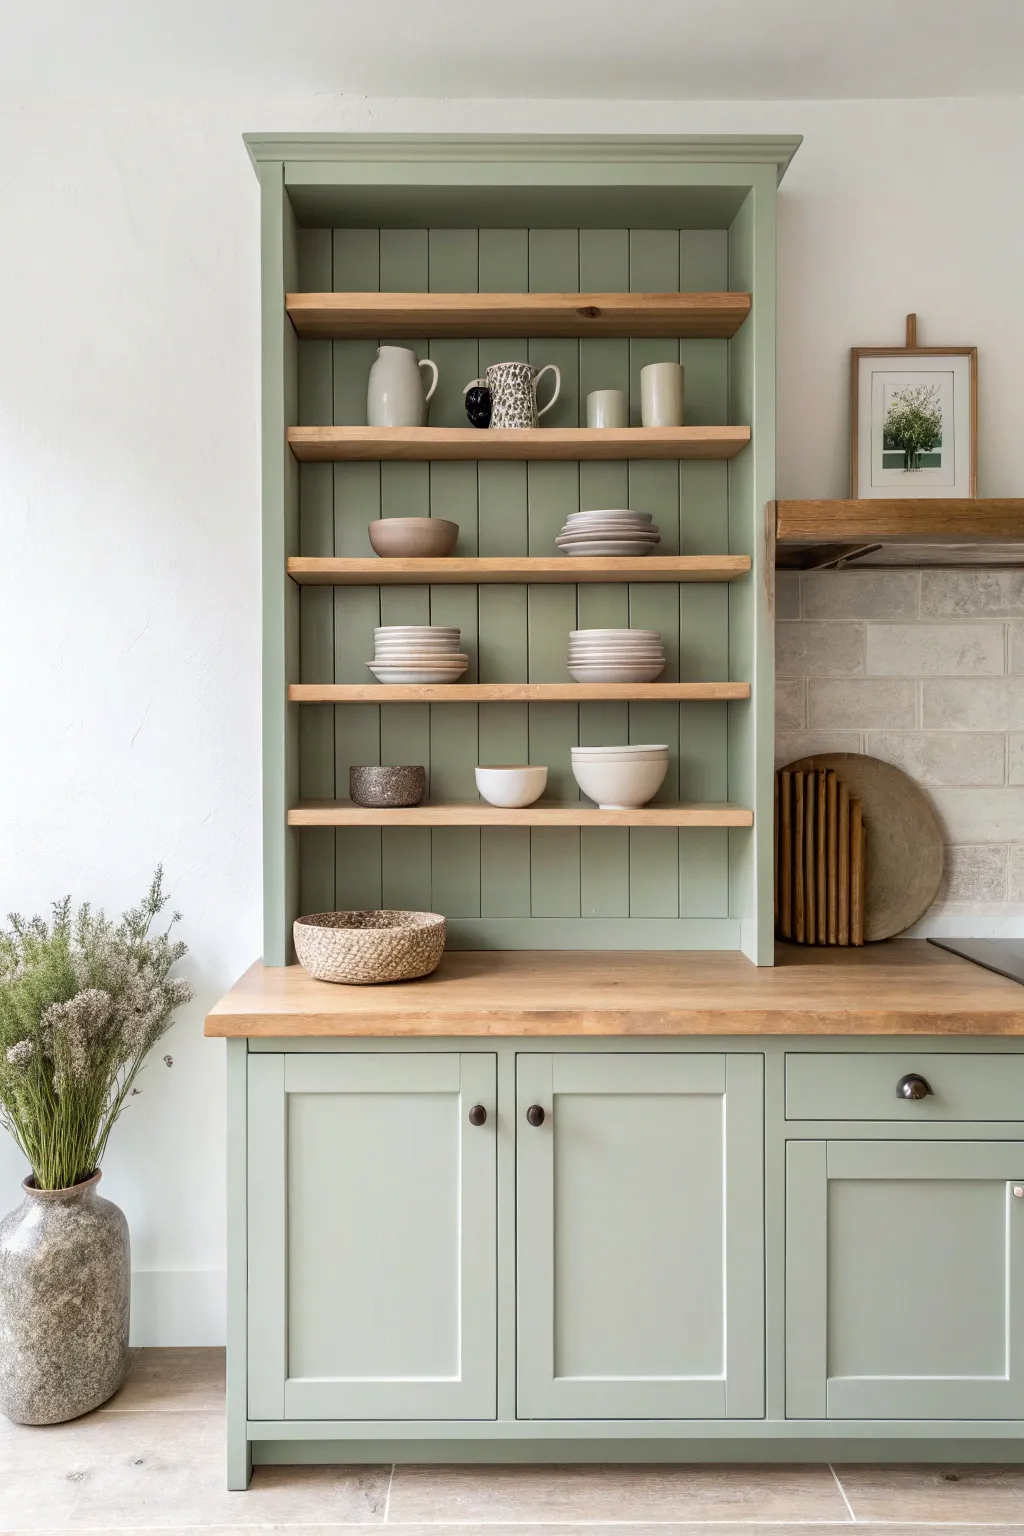
Achieve a high-end, bespoke kitchen look by building or refurbishing a hutch with this dual-tone aesthetic. This project combines the soothing appeal of sage green paint with the warmth of natural oak shelving for a piece that beautifully displays your favorite dishware.
Detailed Instructions
Materials
- Base cabinet unit (unfinished or to be refinished)
- Upper shelving unit frame (plywood or MDF)
- Tongue and groove paneling (for the backboard)
- Solid oak planks (for shelves and countertop)
- Sage green satin cabinet paint
- Clear matte polyurethane or wax
- Wood filler and sandpaper (120 and 220 grit)
- Table saw or circular saw
- Drill and screws
- Paint sprayer or high-quality foam rollers
- Angled sash brush (2 inch)
- Cabinet hardware (knobs and pulls)
- Painter’s tape and drop cloths
Step 1: Preparation & Base Construction
-
Assess your base:
Start with a sturdy base cabinet. If repurposing an old unit, remove all doors, drawers, and hardware. Clean surfaces thoroughly with a degreaser to ensure paint adhesion. -
Sand and fill:
Fill any old hardware holes or dings with wood filler. Once dry, sand the entire exterior surface with 120-grit sandpaper to scuff it up, followed by 220-grit for a smooth finish. -
Build the upper frame:
Construct the upper open shelving unit using cabinet-grade plywood for the sides and top. The width should match your base cabinet exactly to create a seamless built-in look. -
Install the back paneling:
Cut tongue and groove paneling to fit the back of your upper frame. Install these vertically to create that classic cottage texture shown in the photo, securing them with finish nails. -
Prime everything:
Apply a high-quality stain-blocking primer to the cabinet base, doors, drawer fronts, and the entire upper frame (including the back paneling). Let it cure completely according to the can’s instructions.
Step 2: The Oak Elements
-
Cut the countertop:
Measure and cut your solid oak plank to serve as the countertop. It should have a slight overhang (about 1 inch) on the front and sides of the base cabinet. -
Cut the floating shelves:
Rip your oak boards to the depth of your upper cabinet minus about half an inch for a recessed look. Cut them to length so they fit snugly inside the upper frame. -
Sand the wood:
Sand all oak pieces (countertop and shelves) extensively, working up to 220-grit or even 320-grit for an ultra-smooth, furniture-grade feel. -
Seal the oak:
Apply a clear matte polyurethane or hard wax oil to the oak. I find that a matte finish preserves the raw, organic look while protecting against kitchen spills. Apply 2-3 coats, sanding lightly between them.
Paint Pooling?
If paint pools in the tongue & groove cracks, use a dry brush to feather it out immediately. Too much paint here can crack later as wood expands.
Step 3: Painting & Assembly
-
Paint the first coat:
Using your sage green satin paint, apply the first coat to the primed cabinetry and upper frame. Use a sprayer for the doors if possible for a factory finish; otherwise, a foam roller works well for flat surfaces. -
Brush the details:
Use your angled sash brush to get into the grooves of the shaker doors and the tongue and groove back paneling. Watch for drips in these vertical grooves. -
Apply second coat:
Lightly sand the first coat with fine-grit sandpaper once dry, wipe away dust, and apply a second coat for full, rich color coverage. -
Attach the countertop:
Secure the finished oak countertop to the base cabinet by driving screws up through the cabinet’s top supports into the underside of the wood. -
Mount the upper unit:
Place the painted upper frame onto the countertop. Secure it by screwing it into wall studs and, if desired, down into the countertop from inside the frame (pre-drill to avoid splitting). -
Install shelves:
Determine your shelf spacing based on what you plan to display. Install side supports or use adjustable shelf pins, then slide your finished oak shelves into place. -
Re-hang doors and hardware:
Reattach your cabinet doors and drawers. Install your chosen hardware—antique brass or dark bronze creates a lovely contrast with the sage green.
Add Lighting
Route a channel under the bottom oak shelf to hide an LED strip. This adds warm task lighting that highlights your displayed ceramics beautifully.
Now step back and admire how the natural wood tones warm up that sophisticated green for a truly timeless kitchen focal point.
Backsplash-Led Color Picking: Paint That Pulls From Tile
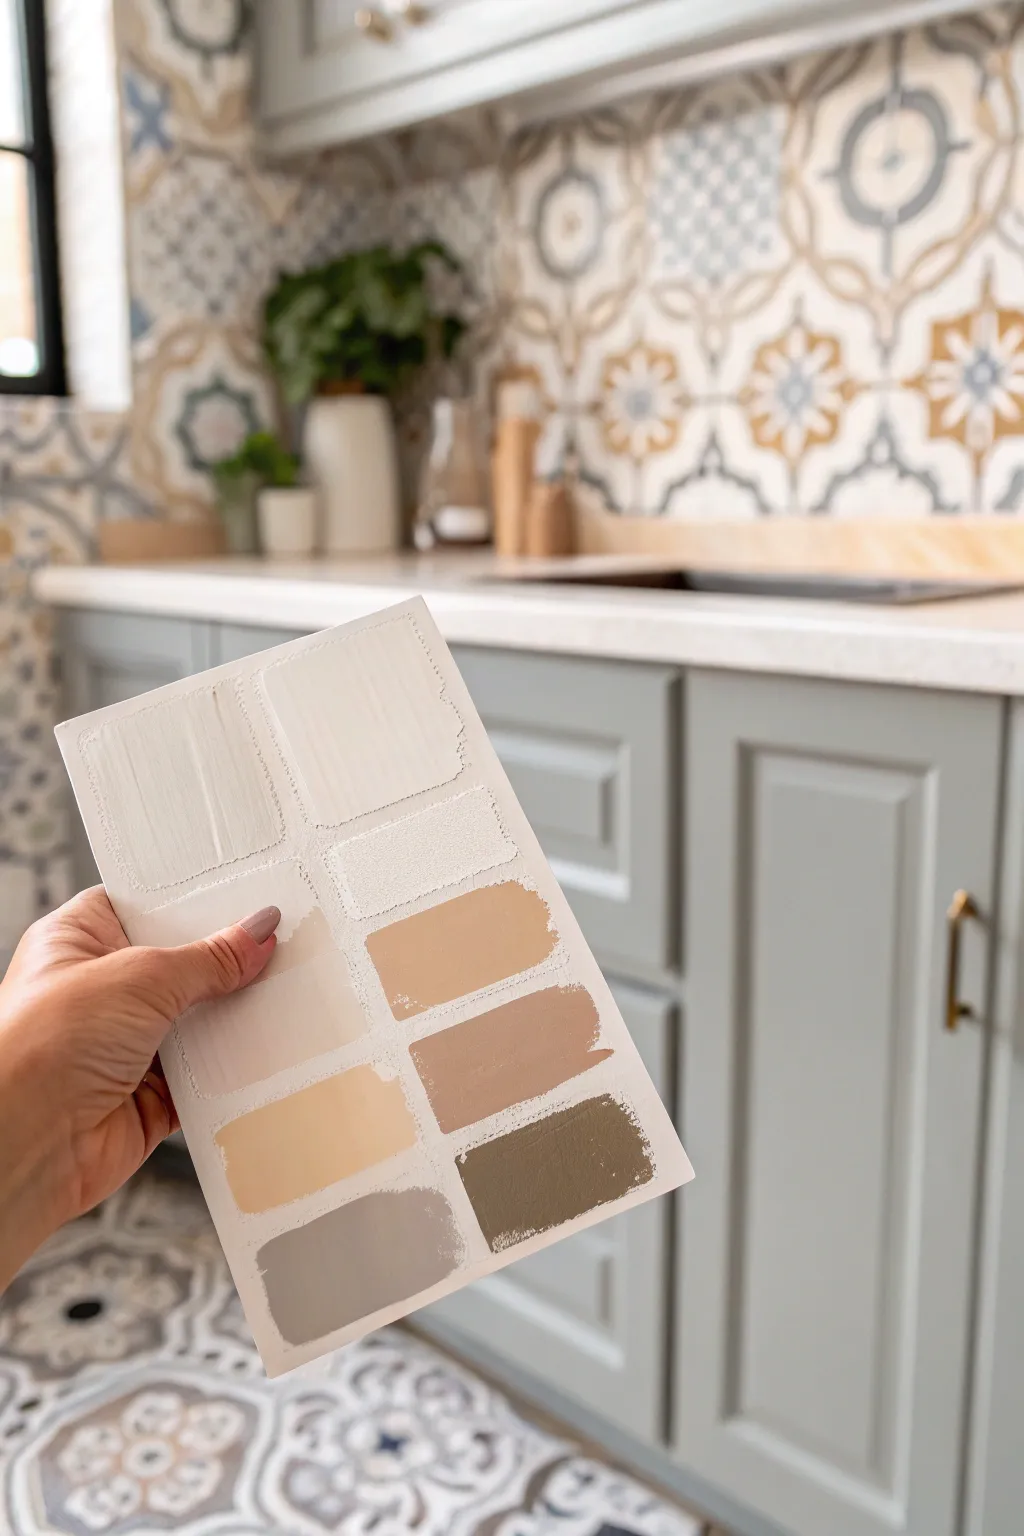
Take the guesswork out of kitchen planning by creating your own bespoke paint swatch card directly inspired by your room’s existing tiles. This simple project helps you visualize color palette options against your cabinetry and backsplash in real time.
Step-by-Step Guide
Materials
- Heavyweight cold-press watercolor paper or cardstock (approx. 5×7 inches)
- Acrylic craft paints (white, beige, ochre, grey, olive green, taupe)
- Small flat brush (size 6 or 8)
- Palette or mixing plate
- Paper towels
- Jar of water
- Pencil (optional)
- Ruler (optional)
Step 1: Preparing the Base
-
Cut the paper:
Start by cutting your heavyweight paper into a rectangular card shape that feels comfortable to hold, roughly 5 by 7 inches. -
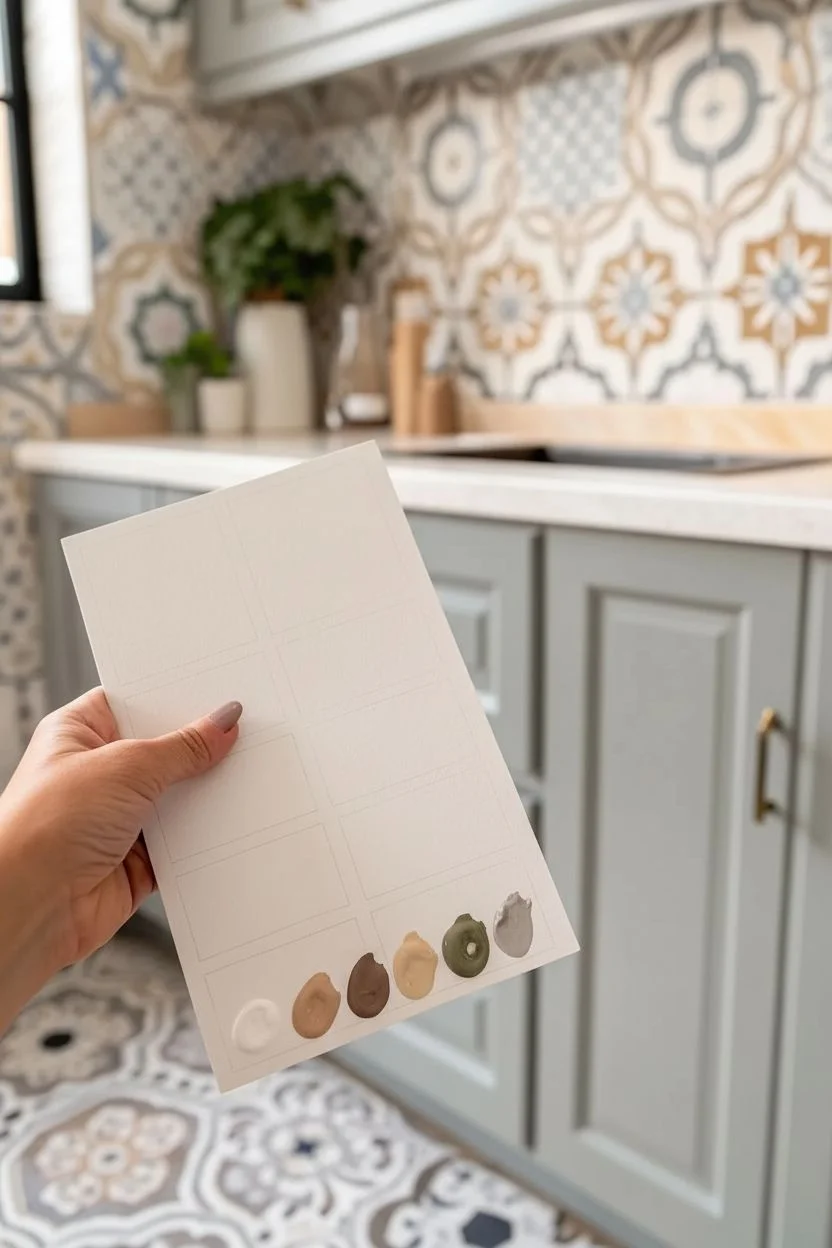
Map the layout:
Visualize a grid of six to eight rough rectangles on your card. You can lightly mark these with a pencil if you need guidance, but keeping it freehand adds charm. -
Prime the palette:
Squeeze out small amounts of your base colors: a stark white, a warm cream, a sandy beige, a deep taupe, a dusty olive, and a neutral grey.
Step 2: Painting the Swatches
-
Start with the lightest tones:
Begin at the top left corner. Load your flat brush with white paint mixed with a tiny drop of cream to create an off-white shade. -
Create texture:
Apply the paint in a rough square shape. Don’t worry about perfect edges; the visibly brushed edges mimic the texture of the tiles. -
Mix the second white:
For the adjacent square, use pure white or a slightly cooler white tone to offer a subtle contrast against the first swatch. -
Move to warm neutrals:
Clean your brush thoroughly. Mix a sandy beige color, perhaps pulling from the mortar color in your backsplash, and paint the next square below your whites. -
Add a terracotta tone:
Mix a warm, earthy ochre or light terracotta. Apply this next to the beige swatch, ensuring the paint is opaque enough to show the true color. -
Deepen the palette:
For the third row, mix a deeper taupe or mushroom color. I find adding a touch of grey to brown paint helps achieve that modern cabinet look seen in the background. -
Paint the olive accent:
Mix your olive green with a tiny bit of grey to desaturate it. Paint this swatch in the bottom right corner as a bold accent option. -
Finish with cool grey:
In the final spot (bottom left), paint a cool, medium-toned grey that mimics stone or grout lines.
Uneven Edges?
If your painted squares look too messy, use painter’s tape to frame each square before painting. Peel it off while the paint is still wet for crisp lines.
Step 3: Finishing Touches
-
Check opacity:
Once the first layer is dry to the touch, assess if any colors look streaky. Apply a second coat to the darker swatches if needed for full coverage. -
Dry completely:
Let the card sit flat until the paint is completely dry. Acrylics dry darker, so ignore the wet color. -
Add faux perforation:
Use a dry, very fine detail brush or a needle tool to scratch tiny jagged lines or dots along the edges of the painted squares to mimic a tear-off perforation effect. -
Evaluation:
Hold your finished card up against your backsplash and cabinets to see how your custom-mixed colors interact with the existing space.
Make It Real
Instead of mixing acrylics, use actual sample pots of wall paint. This turns your craft into a functional tester for your renovation project.
Now you have a handy, custom-made color reference tool to guide your kitchen styling decisions
Softly Tinted Ceiling Paint for a Cozy Kitchen Glow
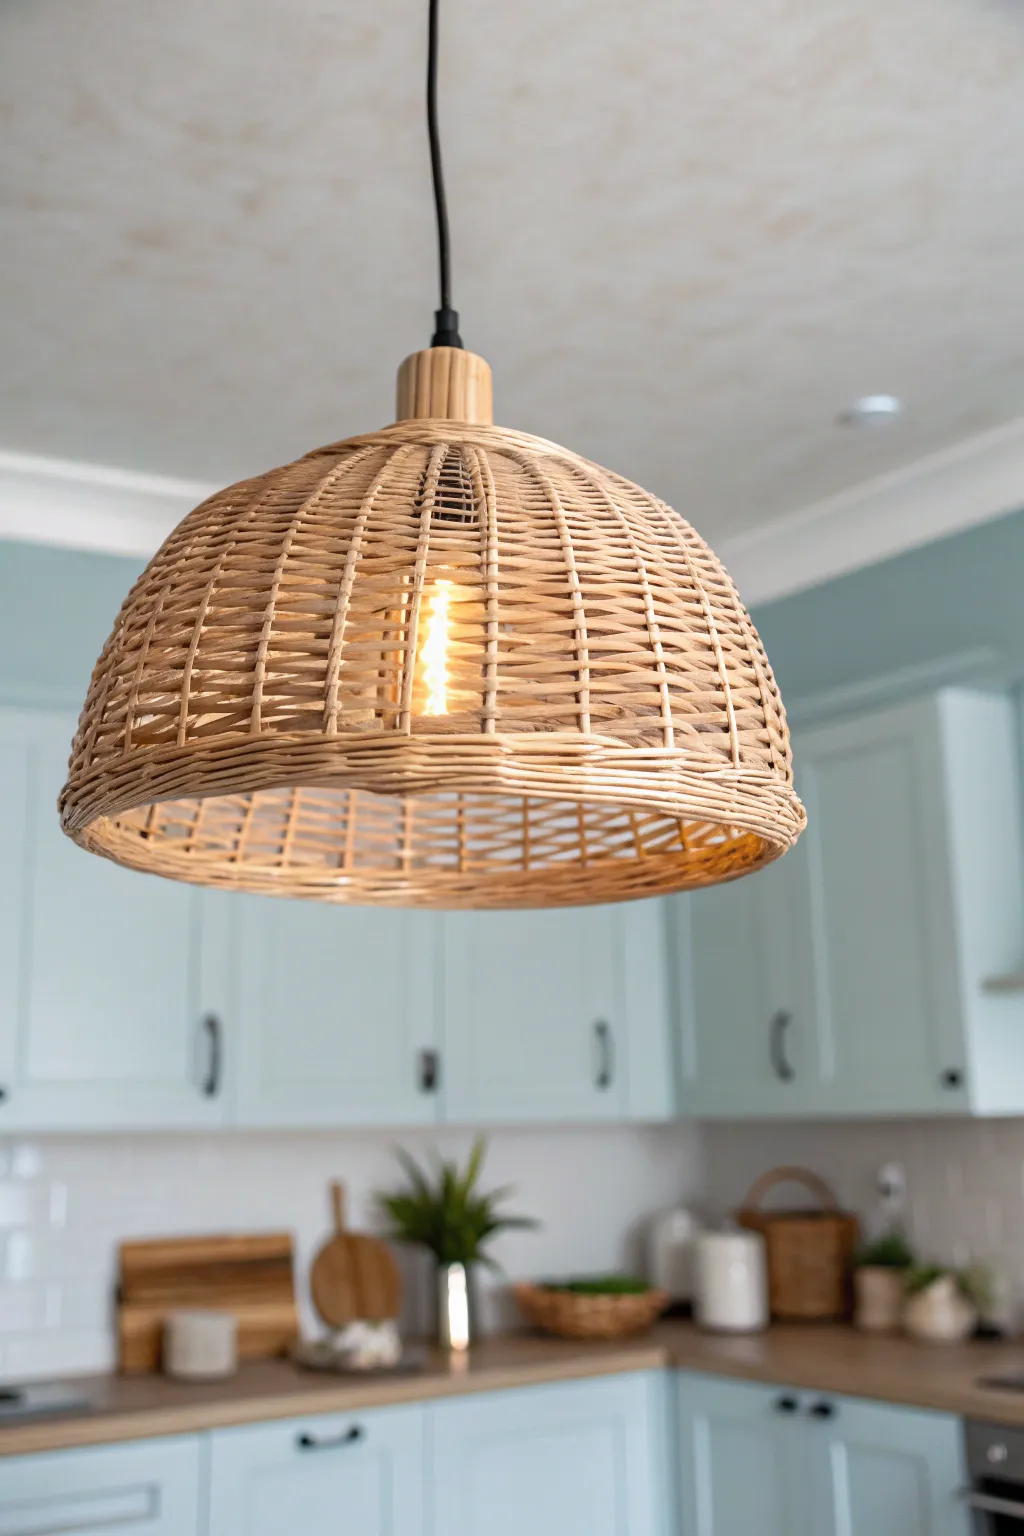
Bring earthy texture and a cozy glow to your kitchen with this handcrafted rattan pendant light. By weaving natural reeds around a dome structure, you can capture that airy, bohemian-meets-coastal vibe perfectly.
Step-by-Step
Materials
- Large wire dome lampshade frame (approx. 14-16 inches diameter)
- Round wooden cylinder block (pre-drilled for cord)
- Natural rattan reed (flat-oval profile, 5-6mm width)
- Round rattan pith (3mm, for structure)
- Soaking tub or large basin
- Water spray bottle
- Strong craft scissors or reed cutters
- Wood glue
- Quick-dry clear epoxy
- Standard pendant light cord kit (black)
- Edison bulb (warm amber tint)
- Clear matte spray sealer
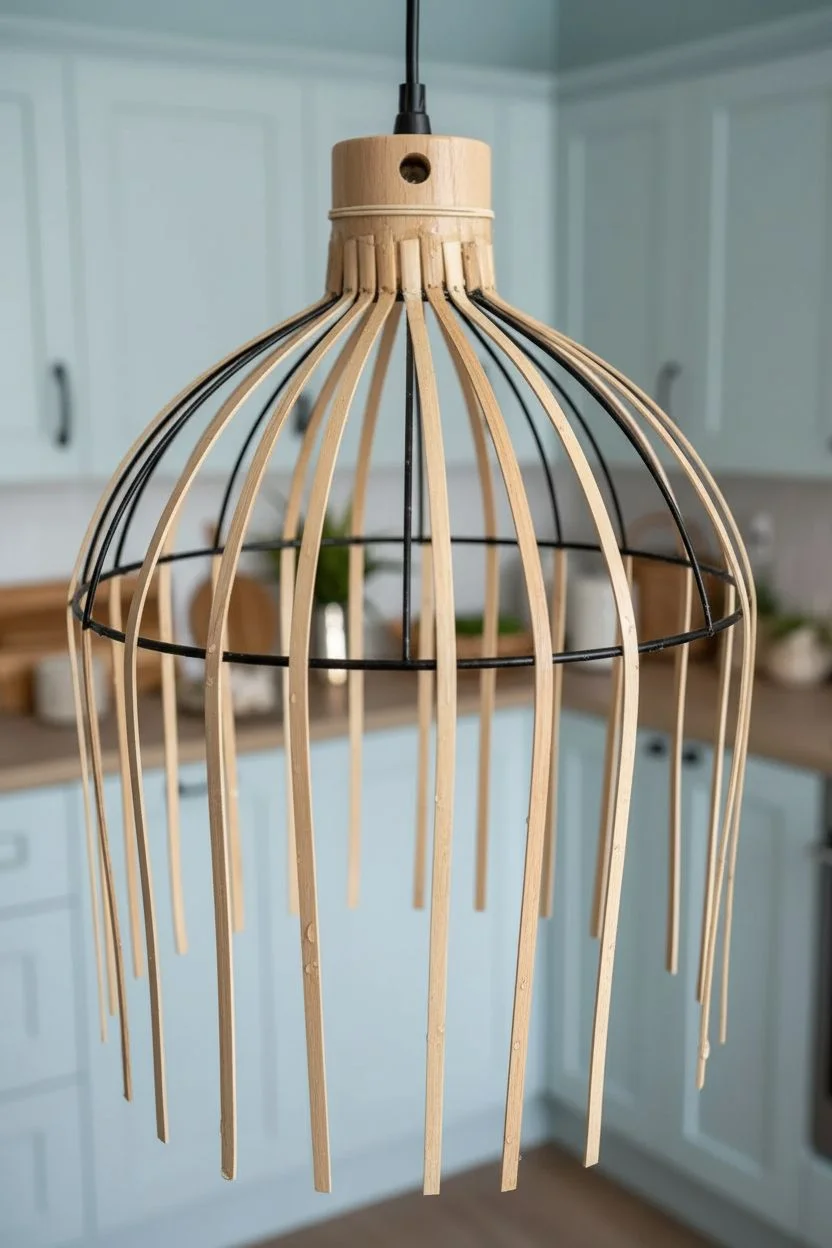
Step 1: Preparation and Framework
-
Soak the materials:
Begin by soaking your rattan reeds in warm water for about 15-20 minutes. This makes the fibers pliable and prevents them from snapping while you weave. -
Prepare the wooden mount:
Take your wooden cylinder block and ensure the central hole fits your pendant cord kit snugly. Sand the edges smooth if necessary for a clean finish. -
Attach the vertical ribs:
Cut lengths of the flat-oval reed to serve as the vertical ‘spokes.’ These should be long enough to go from the wooden mount, down the curve of the wire frame, and tuck under the bottom rim. -
Secure the spokes:
Glue the top ends of these reed spokes vertically around the wooden cylinder block. Use a strong rubber band to hold them tight against the wood while the glue sets completely. -
Align the frame:
Place the wooden block at the very top center of your wire dome frame. You may need to temporarily tie it in place with string to keep it centered while you start the structure.
Soaking Secret
Add a splash of glycerin to your soaking water. This helps the rattan retain flexibility even after it dries, preventing future cracking.
Step 2: Weaving the Shape
-
Start the top weave:
Using the thinner round pith, begin weaving horizontally around the very top where the reeds meet the wood block. Use a simple over-under pattern to lock the vertical spokes in place. -
Transition to flat reed:
Once the top neck is secure, switch to your flat-oval reed for the main body. Start weaving in a continuous spiral, going over one spoke and under the next. -
Maintain moisture:
Keep your spray bottle handy. If the glossy reed starts to feel stiff or brittle as you flourish down the frame, give it a light misting to keep it workable. -
Spacing the weave:
As the dome widens, the gap between spokes will grow. Focus on packing the horizontal rows tightly together to minimize gaps, pushing the new row up against the previous one every few inches. -
Anchor to the frame:
Every 5-6 rows, loop the weaver reed around the actual wire of the underlying frame. I find this creates necessary stability so the wicker shell doesn’t shift over time. -
Navigate the curve:
As you reach the widest part of the dome, be gentle with your tension. Pulling too tight will distort the shape inward; keep the tension relaxed to hug the wire frame naturally.
Step 3: Finishing Touches
-
Secure the bottom rim:
When you reach the bottom wire rim, wrap the weaving reed firmly around it twice to lock the weave. Trim any excess horizontal weaver material on the inside. -
Fold the spokes:
Take the excess length of the vertical spokes hanging past the rim. Bend them inward over the bottom wire frame and tuck the ends back up into the weave on the inside. -
Trim inside ends:
Once the spokes are tucked securely, trim the ends flush on the interior so there are no sharp pieces sticking out near the bulb area. -
Seal the shape:
Allow the rattan to dry completely—it will shrink and tighten slightly. Once dry, mist the entire shade with a clear matte sealer to protect the fibers from kitchen humidity. -
Install the electricals:
Thread the black pendant light cord through the wooden neck block. Secure the socket fixture inside the shade according to the kit’s instructions. -
Light it up:
Screw in a warm amber Edison bulb to enhance the golden tones of the dried reed and hang your new fixture.
Two-Tone Twist
For a subtle pattern, dip-dye the bottom third of your reeds in a diluted white or sage green dye before weaving to create an ombré effect.
Enjoy the gentle, filtered light your handmade creation casts over the room
Painted Window Frames to Create Crisp Contrast at the Sink
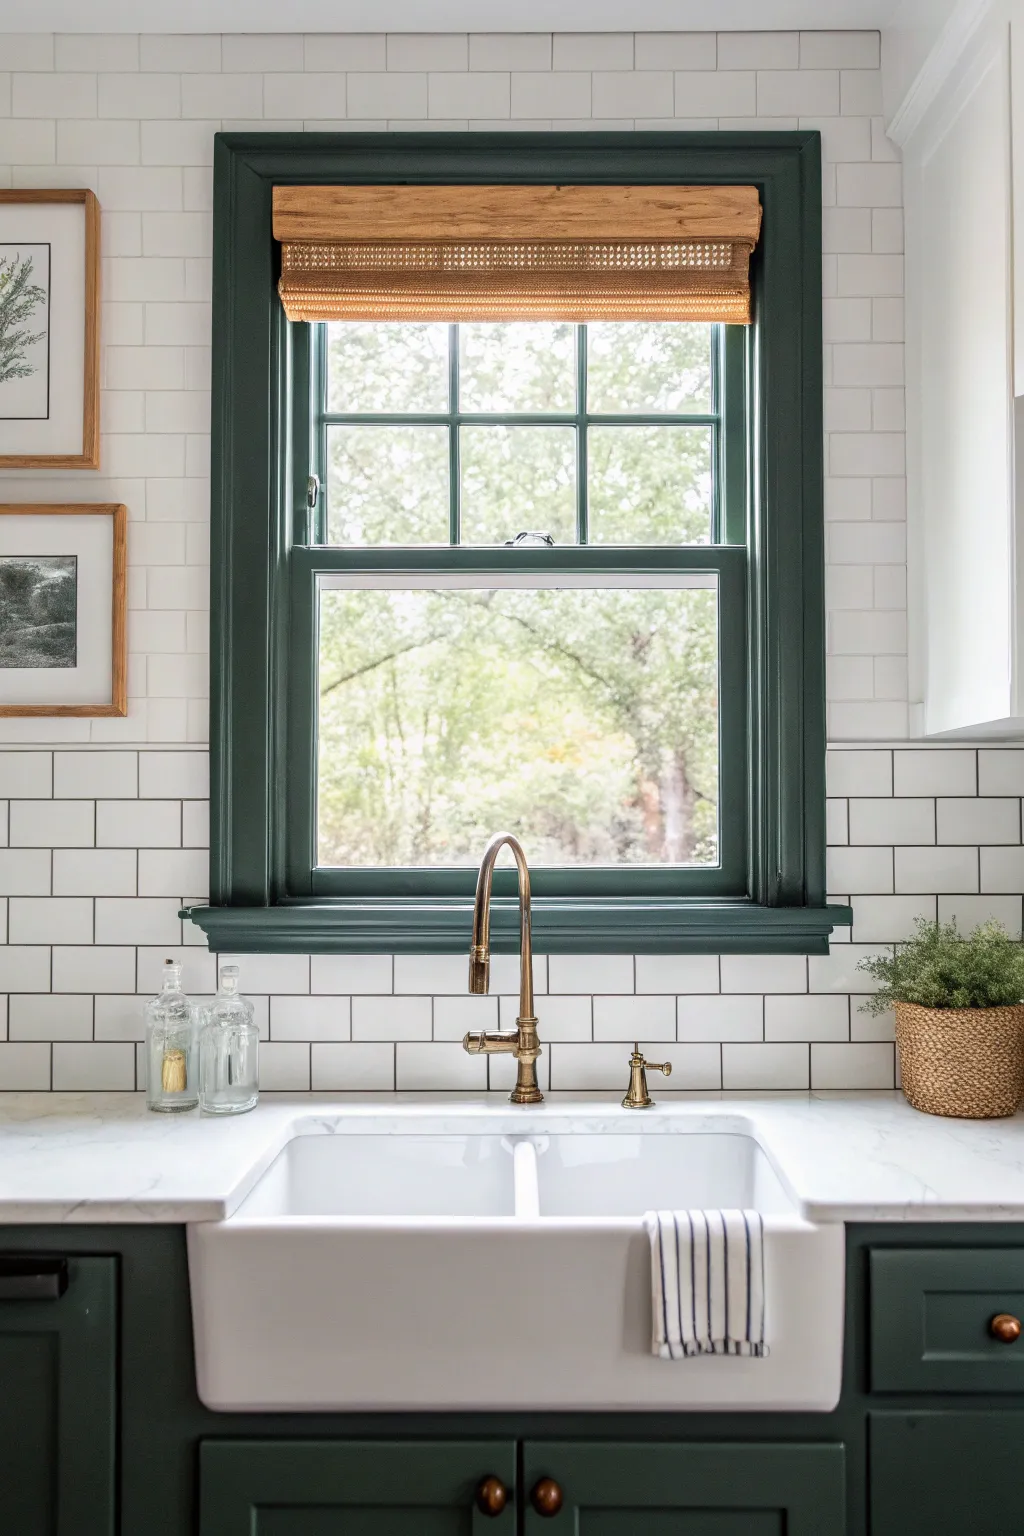
Elevate your kitchen sink view by transforming plain window trim into a stunning focal point with a coat of deep, moody green paint. This simple weekend project creates a crisp, sophisticated contrast against classic white subway tile that instantly updates the entire room.
Detailed Instructions
Materials
- High-quality interior trim paint (semi-gloss or satin finish) in deep forest green
- Stain-blocking primer (especially if painting over bare wood or dark colors)
- Painter’s tape (high-adhesion for tile, delicate for glass)
- Sanding block (120-grit and 220-grit)
- Tack cloth or microfiber rags
- Liquid deglosser (optional)
- Angled sash brush (1.5 to 2 inch)
- Small foam roller (optional for flat sections)
- Wood filler (if repairing old trim)
- Caulk and caulk gun (paintable acrylic latex)
- Drop cloth
- Screwdriver (to remove hardware)
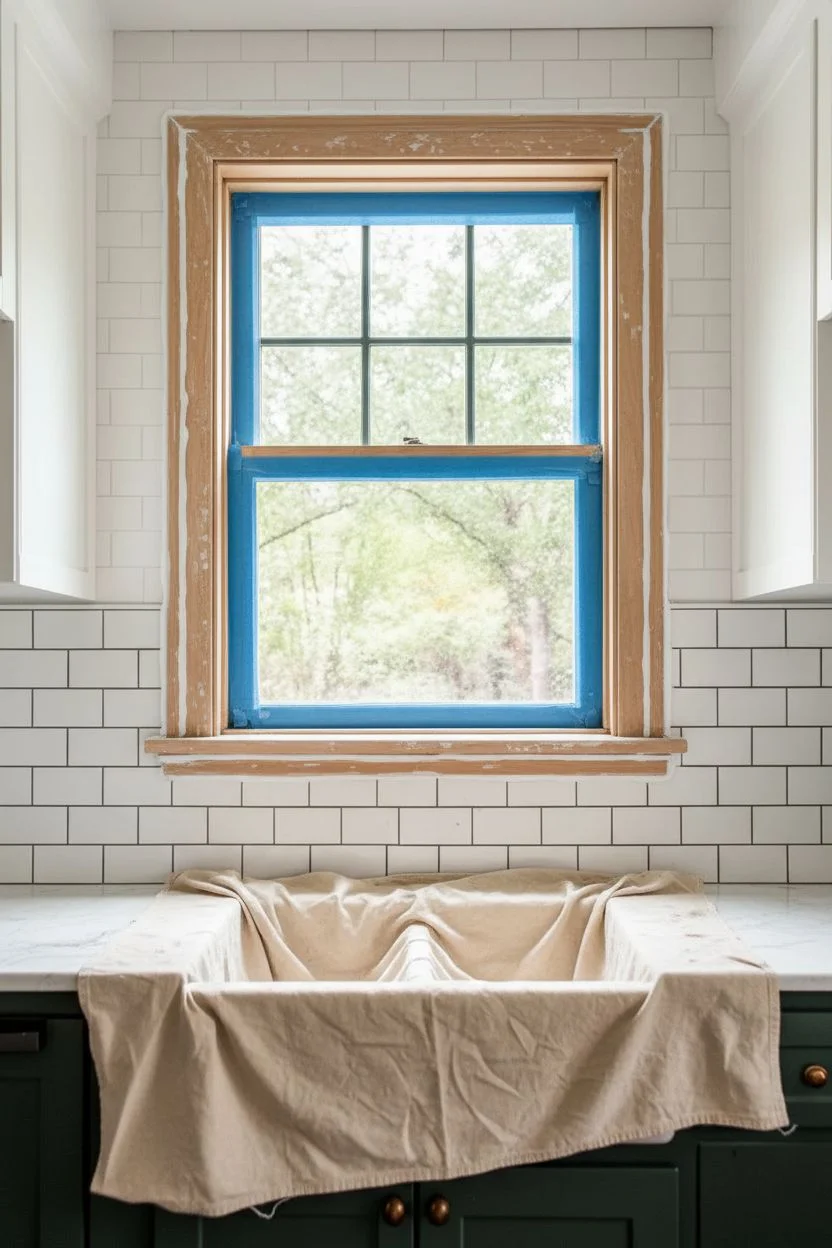
Step 1: Preparation
-
Clear the area:
Remove everything from the windowsill and surrounding countertops. Place a drop cloth over your sink and faucets to protect them from sanding dust and paint splatters. -
Clean thoroughly:
Scrub the window frame, sash, and sill with warm soapy water or a degreasing cleaner to remove kitchen grease and grime. Rinse well and let it dry completely. -
Inspect and repair:
Look for any nail holes or dents in the wood. Fill these imperfections with wood filler, slightly overfilling them to account for shrinkage. -
Sand the surface:
Once the filler is dry, sand the entire window frame with 120-grit paper to smooth out the repairs and scuff the old finish. This ‘tooth’ helps the new paint adhere properly. -
Remove dust:
Vacuum up the sanding dust, then wipe the entire surface with a tack cloth or a damp rag to ensure no particles remain. -
Caulk the gaps:
Apply a thin bead of paintable caulk where the trim meets the wall or tile to ensure a seamless look. Smooth it with a wet finger and let it cure according to the package instructions. -
Protect the glass:
Apply painter’s tape carefully to the glass panes, leaving a tiny 1/16-inch gap between the tape and the wood sash. This allows the paint to seal the glass-to-wood joint.
Sticky Situation?
If the window sticks after painting, run a thin putty knife between the sash and jamb to break the paint seal. Rub clearer candle wax on the sliding tracks for smoother operation.
Step 2: Priming and Painting
-
Apply primer:
Brush a coat of high-quality bonding primer onto the sash and trim. Use an angled brush to get into corners and muntins (the dividers between glass panes). -
Check for drips:
While priming, watch closely for pooling in the corners or drips on the vertical surfaces and smooth them out immediately. -
Light sanding:
After the primer is fully dry, I like to give it a quick pass with 220-grit sandpaper to knock down any brush strokes, then wipe it clean again. -
First coat of green:
Stir your deep green paint thoroughly. Start painting the inner sash muntins first, working from the center outward to avoid leaning into wet paint. -
Paint the frame:
Move on to the window casing and sill. Use long, smooth strokes with your angled brush, following the direction of the wood grain. -
Dry time:
Allow the first coat to dry for the time recommended on your paint can. Dark colors often require longer drying times to avoid tackiness. -
Second coat:
Apply a second coat of green to ensure rich, opaque coverage. Pay special attention to the edges near the tile to ensure a sharp line. -
Remove tape:
Carefully score the edge of the tape with a utility knife while the paint is still slightly tacky, then pull the tape away at a 45-degree angle to reveal crisp lines. -
Scrape excess:
If any paint seeped onto the glass, wait until it’s fully dry and gently scrape it off with a razor blade held flat against the glass.
Coordinate the Look
Match your lower cabinets to the window trim color for a cohesive design. Use the same satin finish on both for a custom, high-end kitchen aesthetic.
Step back and admire how this bold pop of color frames your outdoor view like a piece of art
Color Drenching One Cabinet Wall for a Bold, Gallery-Like Moment
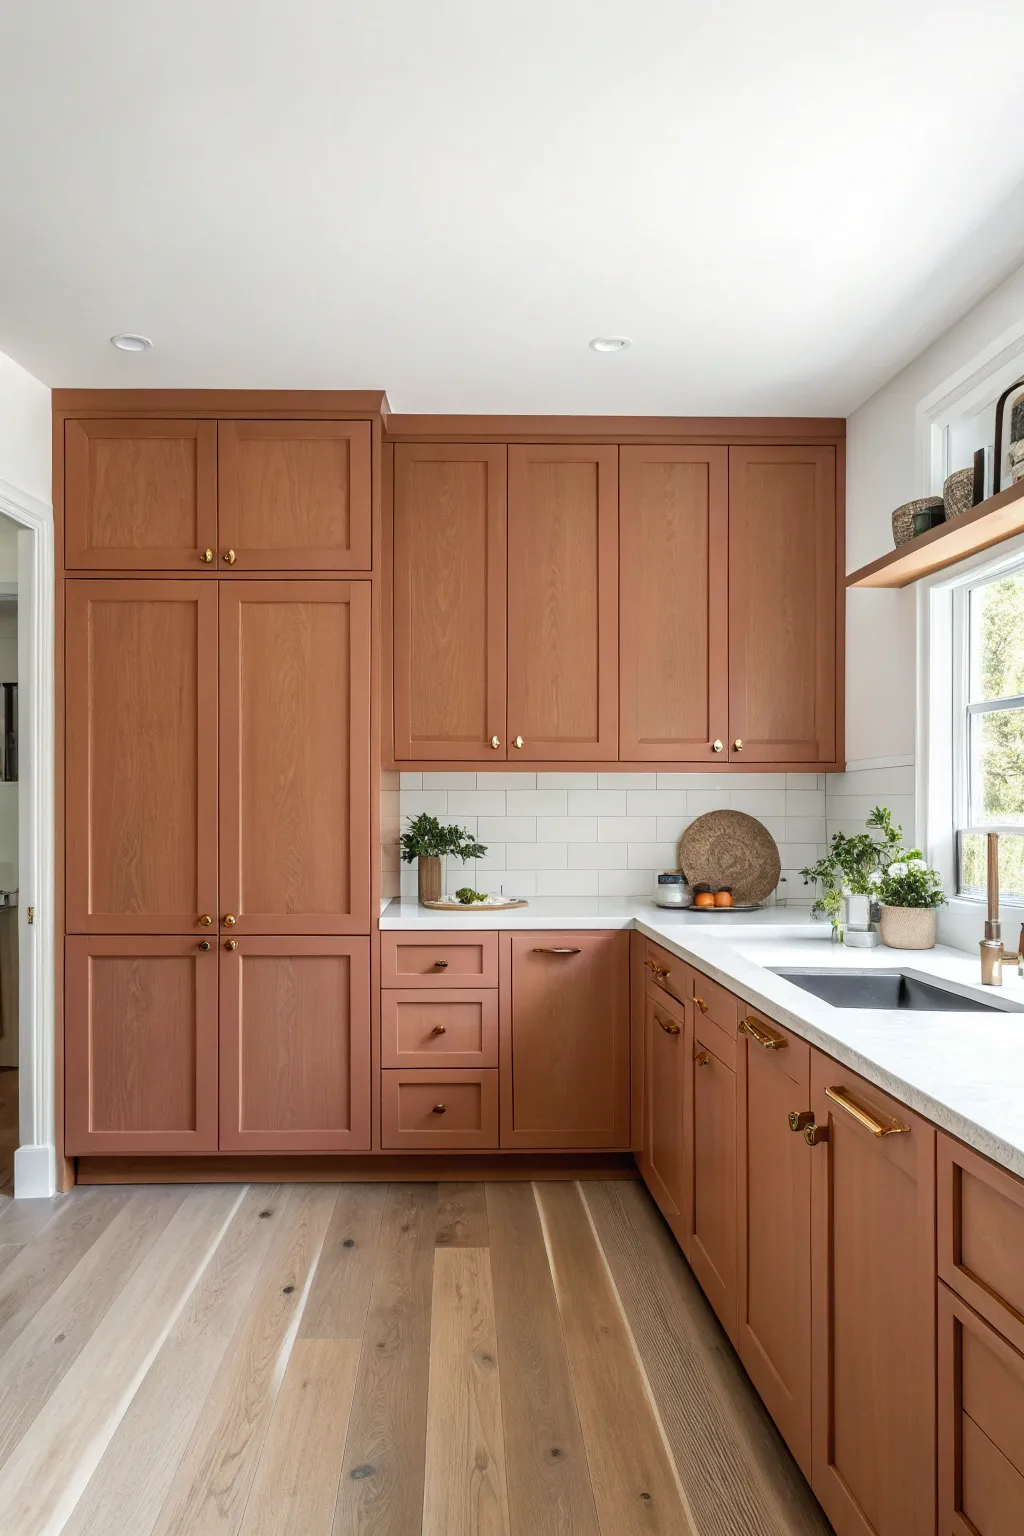
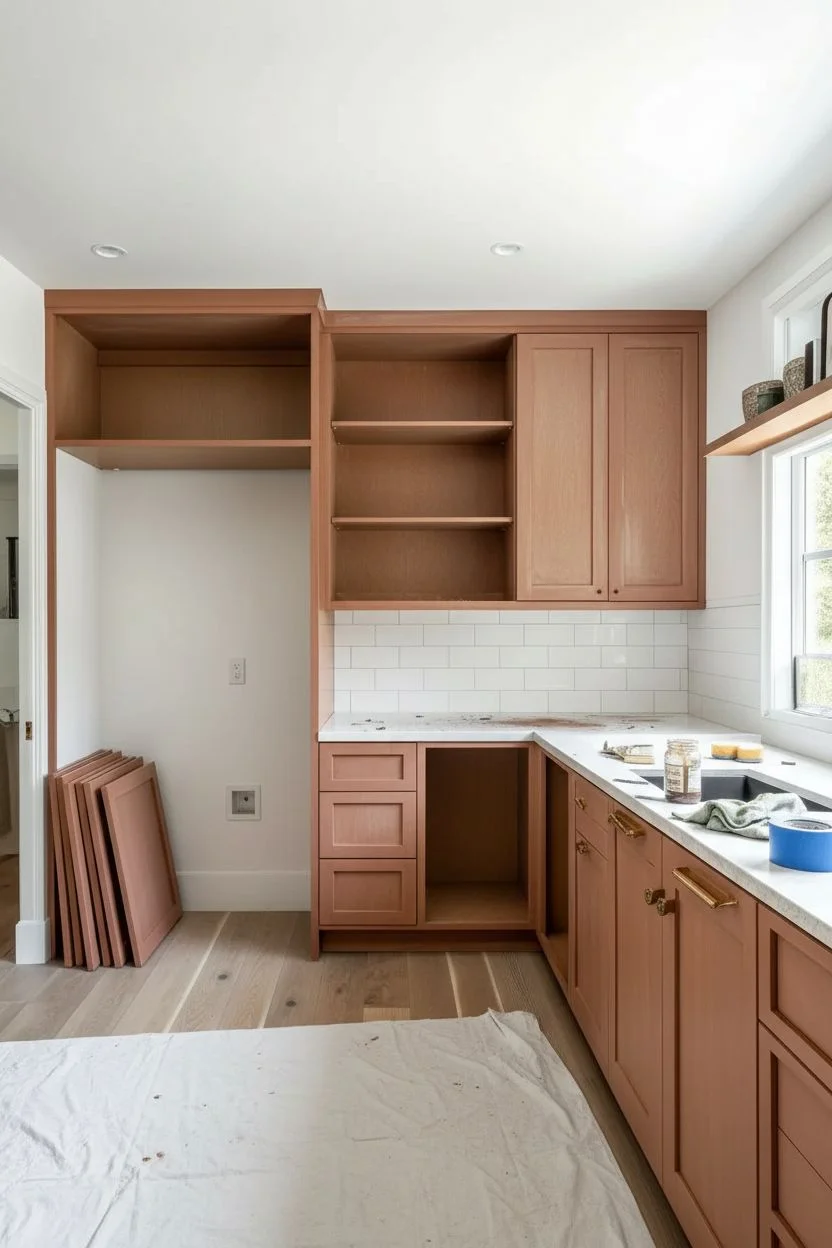
Transform a standard cabinet wall into a striking focal point with a warm, earthy terracotta hue that mimics custom millwork. This project balances the richness of baked clay tones with crisp white details, creating a sophisticated yet inviting gallery-wall effect.
Step-by-Step Tutorial
Materials
- High-quality cabinet enamel paint (terracotta/clay color)
- Bonding primer
- Degreasing cleaner (TSP substitute)
- Fine-grit sandpaper (220-grit)
- Sanding sponges
- Liquid deglosser
- Painter’s tape
- Microfiber tack cloth
- 2-inch angled sash brush
- 4-inch foam or microfiber rollers
- Drop cloths
- Screwdriver or drill
Step 1: Preparation & Dismantling
-
Remove Hardware:
Begin by removing all cabinet doors and drawer fronts. Use a screwdriver or drill to detach hinges and handles. Place all hardware in labeled bags to ensure easy reassembly later. -
Clean Surfaces:
Scrub the cabinet boxes, doors, and drawer fronts thoroughly with a degreasing cleaner. This removes cooking oils and grime that prevent paint adhesion. -
Deglossing:
Apply a liquid deglosser to all surfaces according to the manufacturer’s instructions. This step is crucial for helping the primer stick, especially on seemingly slick finishes. -
Light Sanding:
Scuff sand all surfaces using 220-grit sandpaper. You aren’t trying to remove the old finish entirely, just creating a ‘tooth’ for the new paint. Wipe away dust with a tack cloth.
Paint Peeling?
If paint is peeling after drying, it likely wasn’t cleaned or sanded enough. Sand the area heavily, clean with solvent, re-prime, and then paint again.
Step 2: Priming for Durability
-
Tape Off Areas:
Protect your walls, backsplash, and floor using painter’s tape and drop cloths. Precision here saves cleanup time later. -
Prime the Edges:
Using your angled brush, apply bonding primer to the recessed areas of the door panels and the corners of the cabinet frames. -
Roll the Flat Surfaces:
Follow up immediately with a foam or microfiber roller on the flat panels and frames to smooth out brush marks. I like to keep a wet edge to avoid lap lines. -
Dry and Sand:
Let the primer cure fully. Once dry, lightly sand with a fine-grit sponge to knock down any bumps, then wipe clean with a tack cloth.
Smoother Finish
Add a paint conditioner like Floetrol to your enamel. It slows down drying time, allowing brush and roller marks to level out and disappear.
Step 3: Painting the Terracotta Finish
-
First Coat – Details:
Open your terracotta enamel paint. Start by brushing the paint into the detailed molding, corners, and edges of the doors and frames. -
First Coat – Rolling:
Roll the larger flat surfaces while the brushed areas vary slightly wet. Use long, even strokes in one direction to create a professional finish. -
Drying Time:
Allow the first coat to dry completely according to the can’s instructions. Cabinet enamel often prompts longer drying times than wall paint, so patience is key. -
Light Sand Between Coats:
Very lightly sand the painted surface with a high-grit sponge to ensure the smoothest possible final texture. Remove all dust carefully. -
Second Coat:
Apply the second coat using the same method: brush the details first, then roll the flats. This creates that rich, saturated color drench effect. -
Inspect and Touch Up:
Once dry, check for any thin spots or drips. Apply a third light coat if necessary for full opacity, particularly on the darker areas.
Step 4: Reassembly
-
Curing Period:
Ideally, let the cabinets cure for a few days before reattaching heavy hardware. This hardens the enamel shell. -
Reattach Doors:
Carefully reinstall the hinges and hang the doors back onto the frames, ensuring they are level. -
Install Hardware:
Attach your pulls and knobs. For this look, consider brass or gold hardware to complement the warm terracotta tones.
Enjoy the warmth and character your new color-drenched kitchen brings to your home
Stenciled or Pattern-Painted Kitchen Floor for Vintage Charm
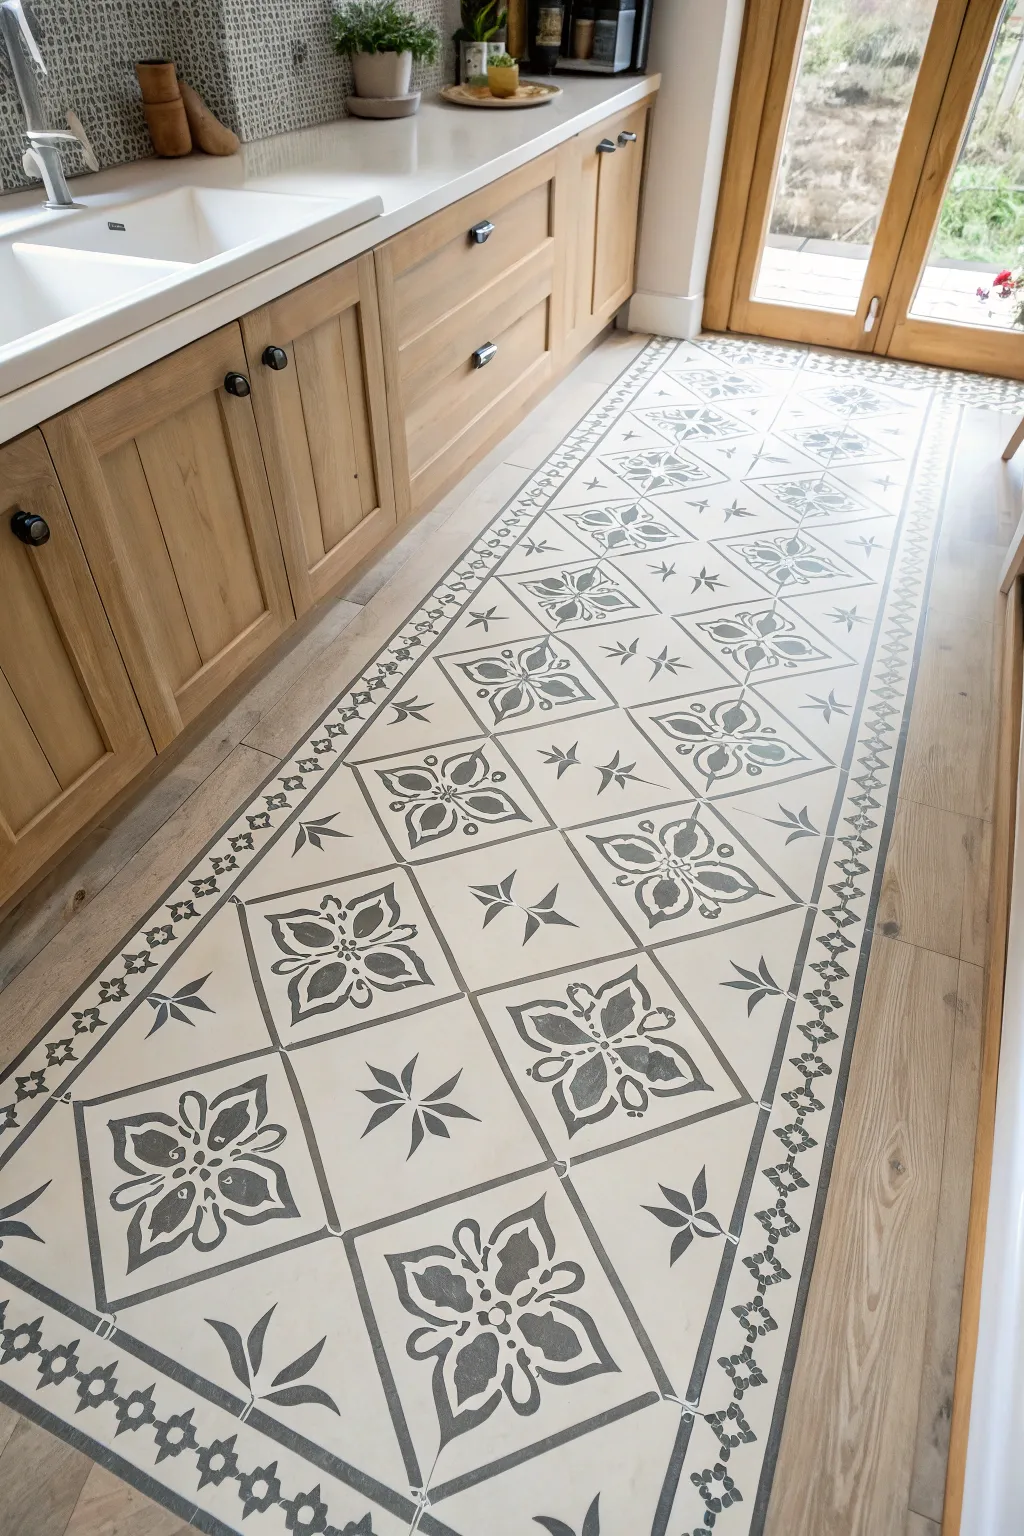
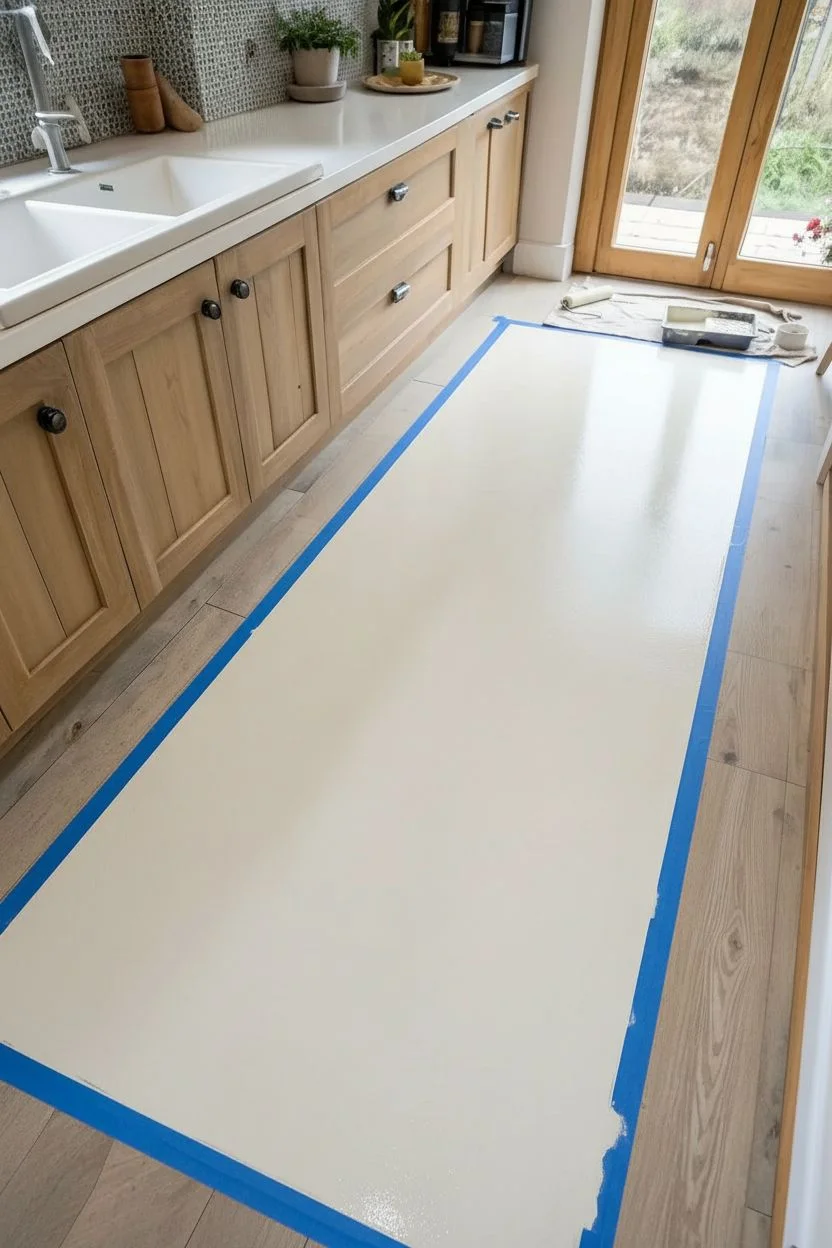
Transform a plain kitchen floor into a stunning focal point with a painted runner that mimics the look of encaustice tiles. This project uses stencils to create an intricate, vintage-inspired pattern with a crisp border, adding immediate character and warmth to your space.
Step-by-Step Guide
Materials
- High-quality floor paint (base color: Cream/Off-White)
- High-quality floor paint (pattern color: Charcoal Grey)
- Large tile stencil (square floral motif)
- Border stencil (geometric chain pattern)
- Small filler stencil (star/leaf motif)
- Painter’s tape (low tack)
- High-density foam roller
- Small stencil brushes
- Measuring tape and chalk line
- Sanding block (medium grit)
- TSP substitute cleaner
- Clear matte polyurethane floor sealer
- Paper towels
Step 1: Prep & Base Coat
-
Clean the surface:
Begin by thoroughly cleaning the floor area where your runner will go. Use a TSP substitute to remove all grease, grime, and wax, as paint won’t adhere to dirty surfaces. -
Light sanding:
Scuff sand the designated area lightly with a medium-grit sanding block. You aren’t trying to strip the floor, just creating ‘tooth’ for the paint to grip onto. -
Define the boundaries:
Measure the width of your desired runner. Use a chalk line to snap two long, parallel lines down the length of your kitchen to act as guides. Tape off the outside edges of these lines with painter’s tape. -
Apply the base color:
Roll on your cream or off-white base coat within the taped area. Use a high-quality floor paint for durability. I usually apply two thin coats rather than one thick one to ensure a smooth finish, letting it dry completely between layers.
Step 2: Stenciling the Pattern
-
Plan the layout:
Find the exact center of your painted runner. Mark this spot lightly with a pencil. This is where you will place the center of your first stencil to ensure the design is symmetrical. -
Secure the main stencil:
Position your large square tile stencil at the center mark. Secure it firmly with painter’s tape on all four sides so it doesn’t shift while you work. -
Load the roller:
Pour a small amount of charcoal grey paint onto a tray. Load your foam roller and then offload almost all the paint onto a paper towel. The roller should feel almost dry to the touch—this is critical to prevent bleed-under. -
Roll the first tile:
Gently roll over the stencil using light to medium pressure. Build up the color gradually with multiple passes rather than pressing hard, which forces paint under the stencil bridges. -
Repeat the pattern:
Lift the stencil straight up and reposition it for the next tile. Most stencils have registration marks (small cutouts) to help you align the pattern perfectly with the previous one. Continue until the main field is filled. -
Fill the gaps:
The pattern in the image alternates between a large square tile and a smaller filler motif. Once your large squares are dry, use your secondary stencil (the star/leaf design) to fill in the alternating diamond spaces created by the primary pattern.
Bleed Patrol
If paint bleeds under the stencil, don’t panic. Wait for it to dry completely, then use a small artist’s brush and your base color paint to touch up and ‘erase’ the mistakes.
Step 3: Border & Sealing
-
Tape for the border:
Once the main pattern is fully dry, measure a consistent distance from the edge of your design to create the border channel. Use painter’s tape to define two parallel lines for the border track. -
Stencil the border:
Place your geometric chain stencil between the tape lines. Using a small stencil brush or a narrow roller, apply the charcoal paint. Move the stencil along the line, aligning the pattern carefully as you go. -
Hand-paint edges:
Remove the tape. To get that crisp, finished look similar to the photo, use a small artist’s brush and your charcoal paint to paint a thin, solid line on the very outer edges of the runner, framing the entire piece. -
Final drying time:
Allow the painted design to cure for at least 24 hours. Don’t rush this step, as soft paint can smear when you apply the sealer. -
Seal for protection:
Apply 2-3 coats of clear matte polyurethane floor sealer over the entire runner area. This protects your hard work from foot traffic and spills. I like to let the final coat cure for a full 48 hours before walking on it with shoes.
Vintage Patina
For an aged, authentic look, lightly sand the dried stencil pattern in random spots before sealing. This mimics the natural wear of old encaustic tiles.
Now you have a durable, custom floor runner that adds timeless elegance to your kitchen without the cost of real tile.
Hand-Painted Kitchen Accent Mural for a One-Of-One Space
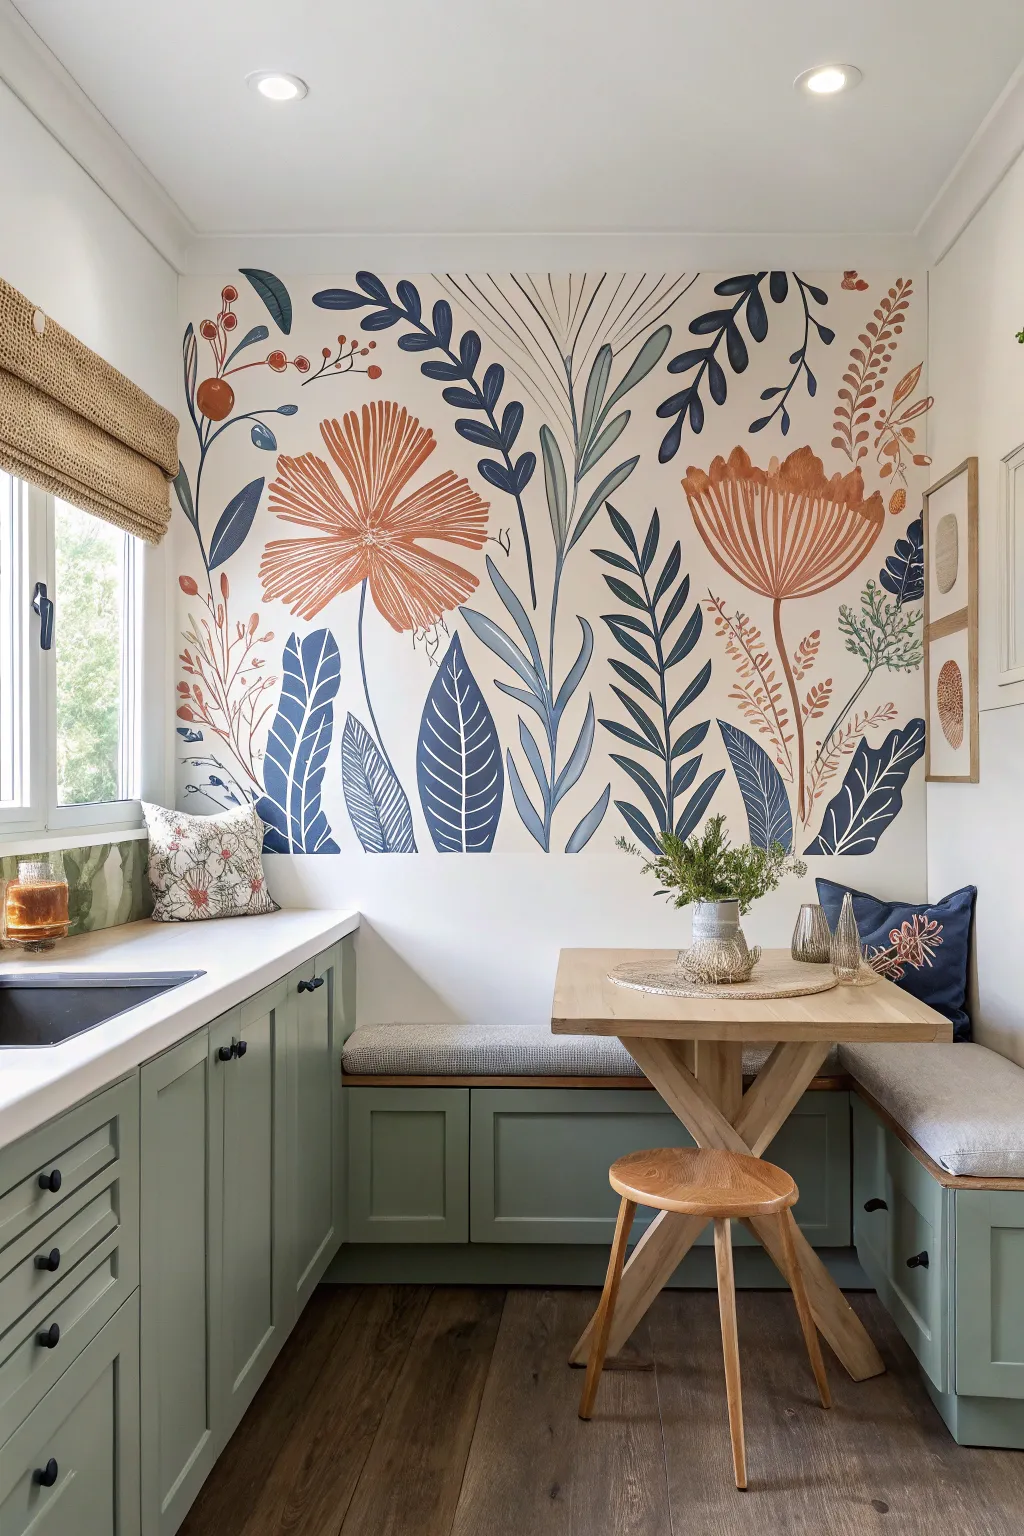
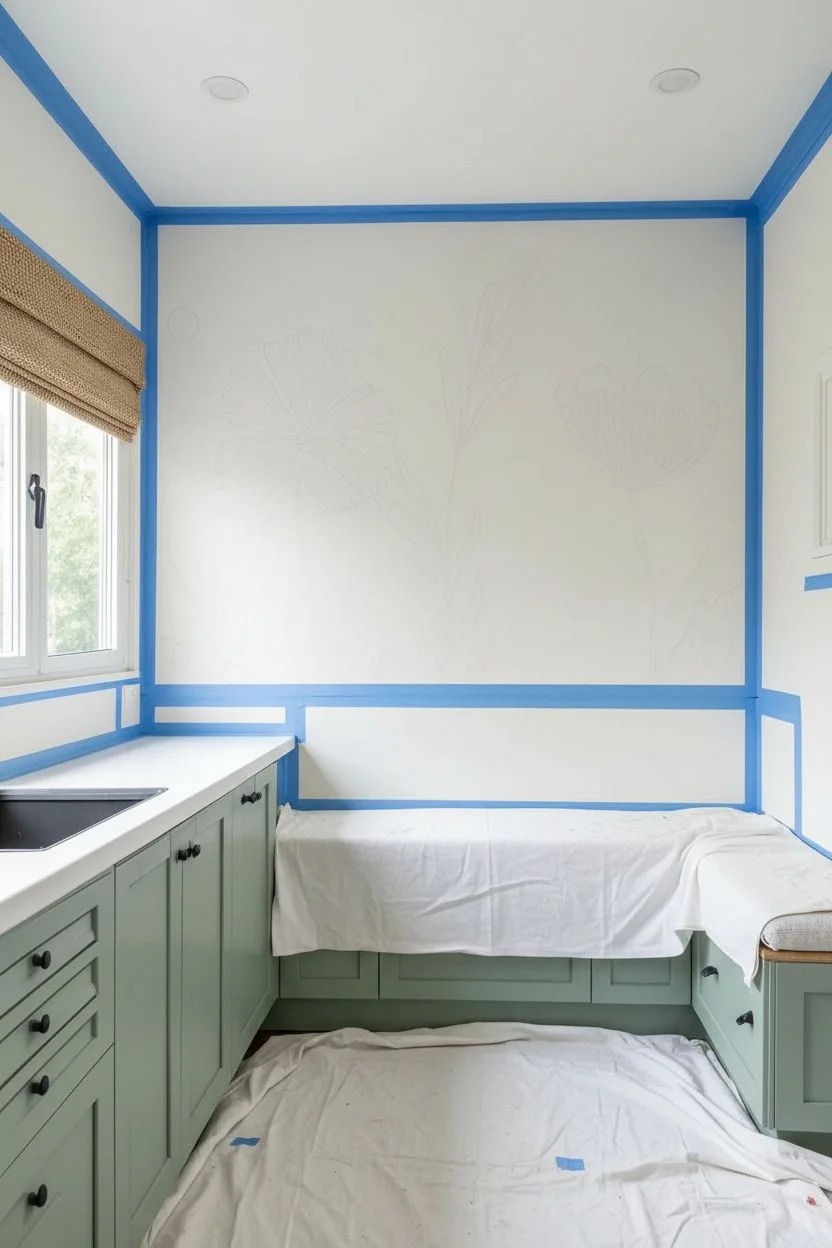
Transform a blank kitchen corner into a vibrant garden oasis with this hand-painted botanical mural idea. Featuring oversized, stylized flora in earthy terracottas and soothing blues, this project brings a custom, artistic touch that wallpaper simply can’t match.
Step-by-Step Tutorial
Materials
- Interior latex paint (eggshell or satin finish) in: off-white (base), terracotta orange, navy blue, sage green, teal, and light blue
- Assorted paintbrushes (1-inch flat brush, #4 round brush, #8 round brush, and a liner brush)
- Pencil and eraser
- Painter’s tape
- Drop cloths
- Step ladder
- Paper plates or palette
- Water cups and paper towels
- Projector (optional)
- Chalk (optional)
Step 1: Preparation & Sketching
-
Prep the canvas:
Clear the area completely. Move any furniture like the table and stools away from the wall. Tape off the ceiling line, adjacent walls, and the top of the bench seating with painter’s tape to protect trim and woodwork. Lay down drop cloths to catch any stray drips. -
Base coat application:
Ensure your wall is clean and dry. Apply two coats of your off-white base color using a roller for an even finish. Allow the first coat to dry for at least 2-4 hours before applying the second. Let the wall cure overnight for the best surface to paint on. -
Drafting the design:
Lightly sketch your large floral elements directly onto the wall using a pencil. Start with the two largest blooms—one on the left and a larger, fan-like flower on the right. If you aren’t confident freehanding, projecting the design or sketching a grid can help keep proportions in check. -
Filling the gaps:
Once the main flowers are placed, sketch the surrounding foliage. Draw tall, sweeping stems rising from the bottom center, and fill the sides with various leaf shapes—some jagged, some rounded. Aim for an organic flow where stems curve naturally towards the open spaces.
Wobbly Lines?
Steady your hand by bracing your pinky finger against the wall as you paint. If a line goes rogue, quickly wipe it with a damp paper towel before it sets, or paint over it with the base color later.
Step 2: Painting the Blooms
-
Mixing your palette:
Pour small amounts of your terracotta and orange paints onto a plate. I like to mix a tiny bit of the wall base color into these accent colors to muddy them slightly, making them feel more cohesive with the background. -
First bloom block-in:
Using a 1-inch flat brush or large filbert, paint the petals of the large left-side flower. Use long, sweeping strokes starting from the center and pulling outward to create a textured, striated look. It doesn’t need to be solid; let some brushstrokes show for that hand-painted charm. -
The fan flower:
Move to the large fan-shaped flower on the right. With the terracotta paint, outline the distinctive U-shape of the bloom. Fill in the shape with vertical strokes that mimic the fibrous texture of a seed head or thistle. -
Adding details:
Switch to a #4 round brush. Add darker orange or reddish lines inside the fan flower to define the individual segments. Paint the thin, woody stems connecting these heavy blooms to the ‘ground’ area (the bench top).
Step 3: Adding Foliage & Finishing Touches
-
Painting large leaves:
Load your medium round brush with navy blue. Paint the large, bold leaves at the base, particularly the ones flanking the center. Use significant pressure to widen the stroke at the leaf’s base and lift off as you reach the tip for a sharp point. -
Layering lighter tones:
Using sage green and teal, paint the secondary leaves and ferns. Vary your leaf shapes—paint some as simple ovals and others with jagged edges like fern fronds. Overlap is okay; just ensure the underlying paint is dry to avoid muddying the colors. -
Central stems:
Focus on the tall, thin stems in the very center. Use a light blue or grey-blue mix and a steady hand (or a liner brush) to pull these long lines upward. Add delicate, thin leaves sprouting from these central stalks. -
Detail work:
With your smallest liner brush and white or very light cream paint, add veins to the dark navy leaves. This high-contrast detail makes the flat shapes pop. Add small dots or berries in red or burnt orange near the top left for visual interest. -
Review and refine:
Step back from the wall to view the composition as a whole. Look for awkward empty spots. Fill these with small sprigs, floating petals, or extra leaves using any leftover colors on your palette. -
Clean up:
Once the paint is fully dry (give it a few hours), carefully peel away the painter’s tape at a 45-degree angle. Touch up any base coat areas if paint bled through. Move your furniture back into place to admire your work.
Add Metallic Pop
For a glamorous twist, use gold leaf or metallic gold paint for the flower centers or stamen lines. It catches the light beautifully in a sunny breakfast nook.
This custom mural creates a permanent garden view that you can enjoy rain or shine


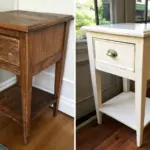
Have a question or want to share your own experience? I'd love to hear from you in the comments below!