Yarn painting is one of my favorite ways to get that juicy, touchable texture without needing a single brushstroke of paint. If you’ve got a pile of scrap yarn and a craving to make something bold, these ideas will keep your hands busy and your creativity happy.
Classic Abstract Swirl Yarn Painting
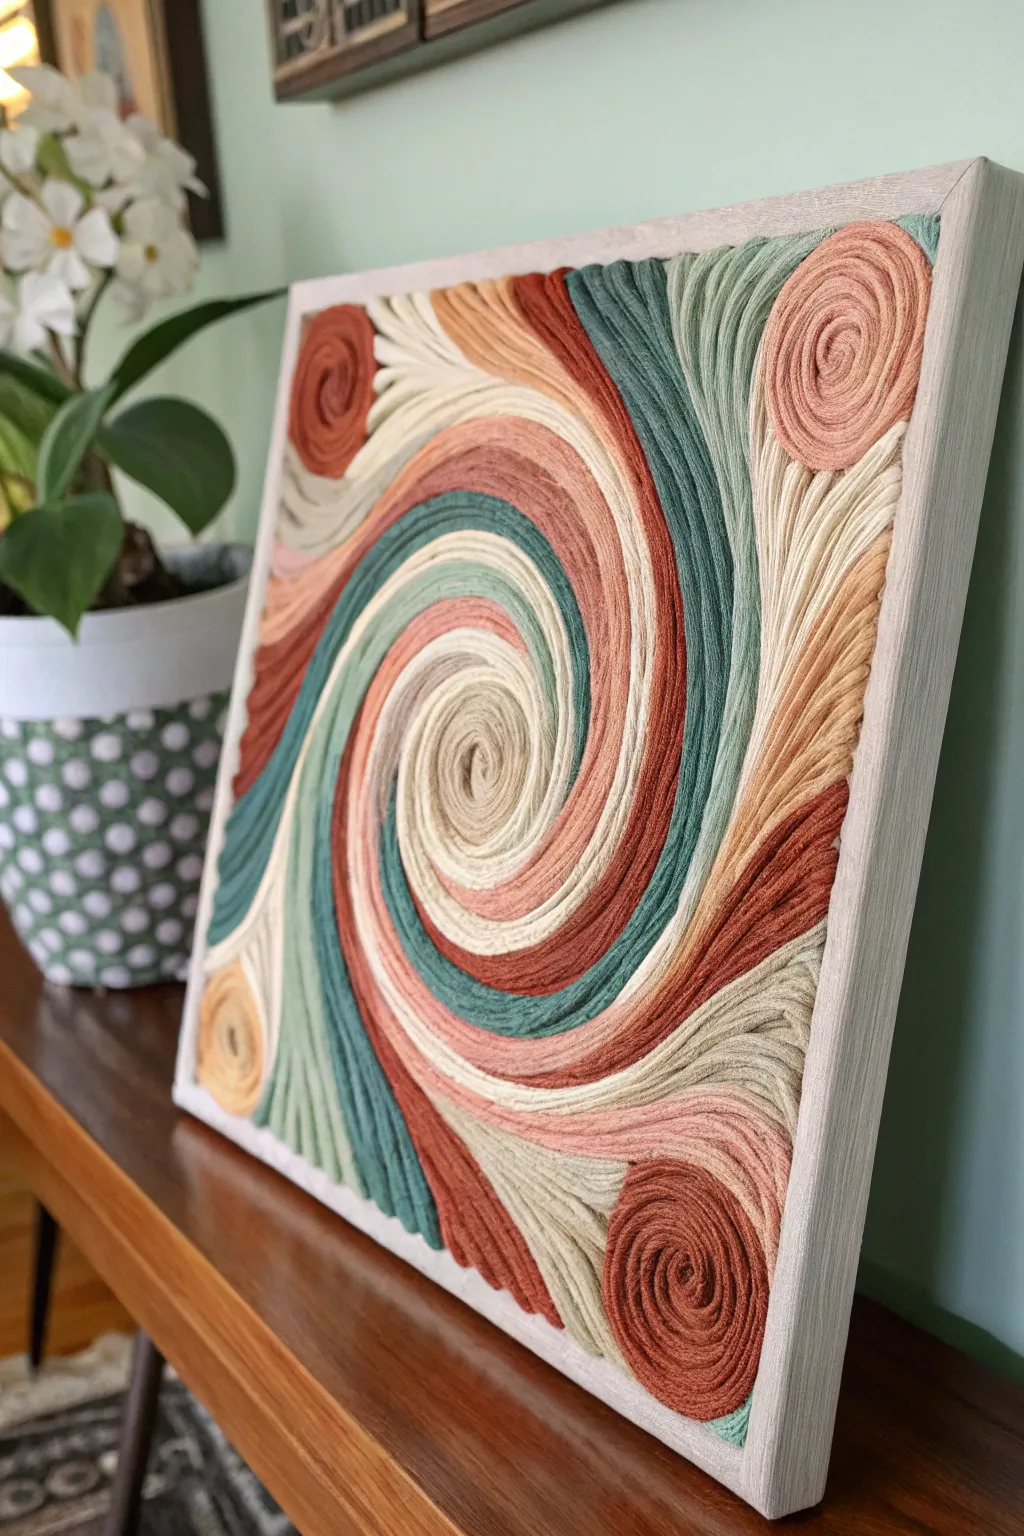
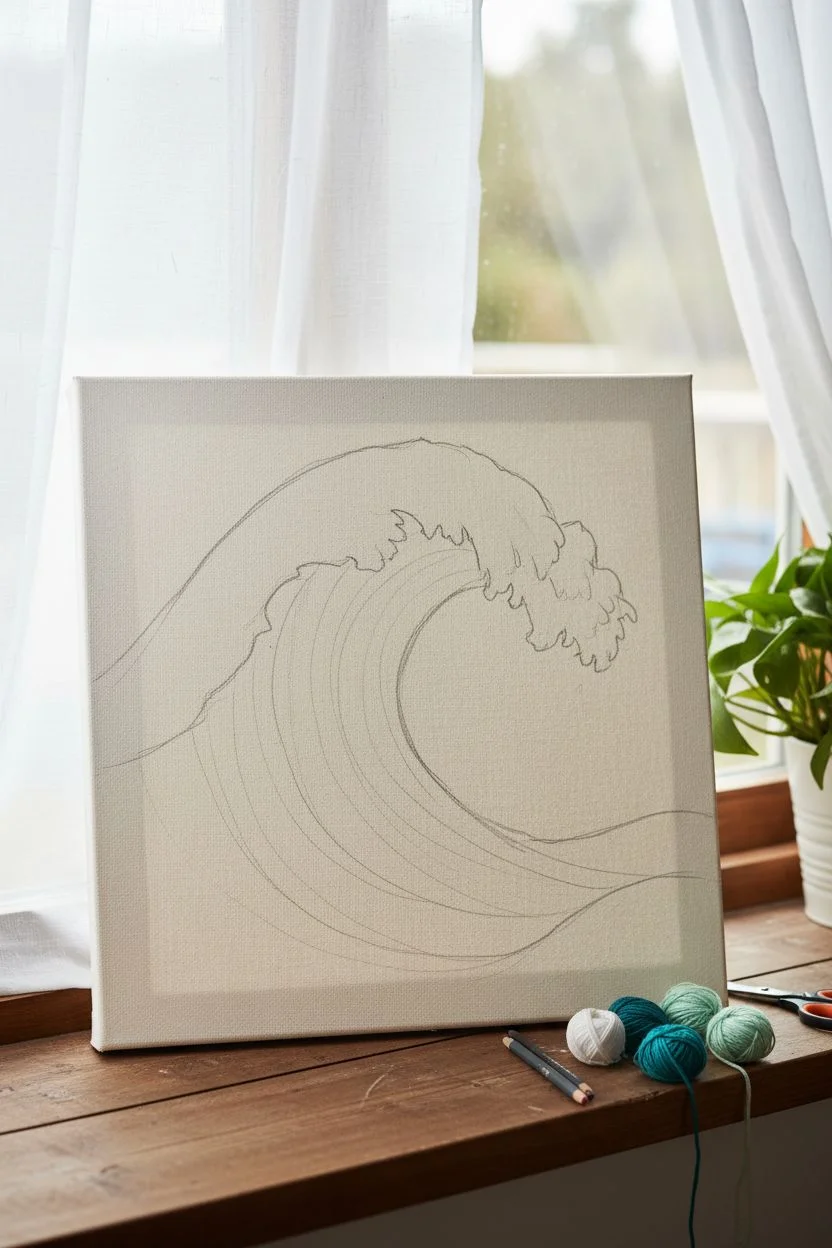
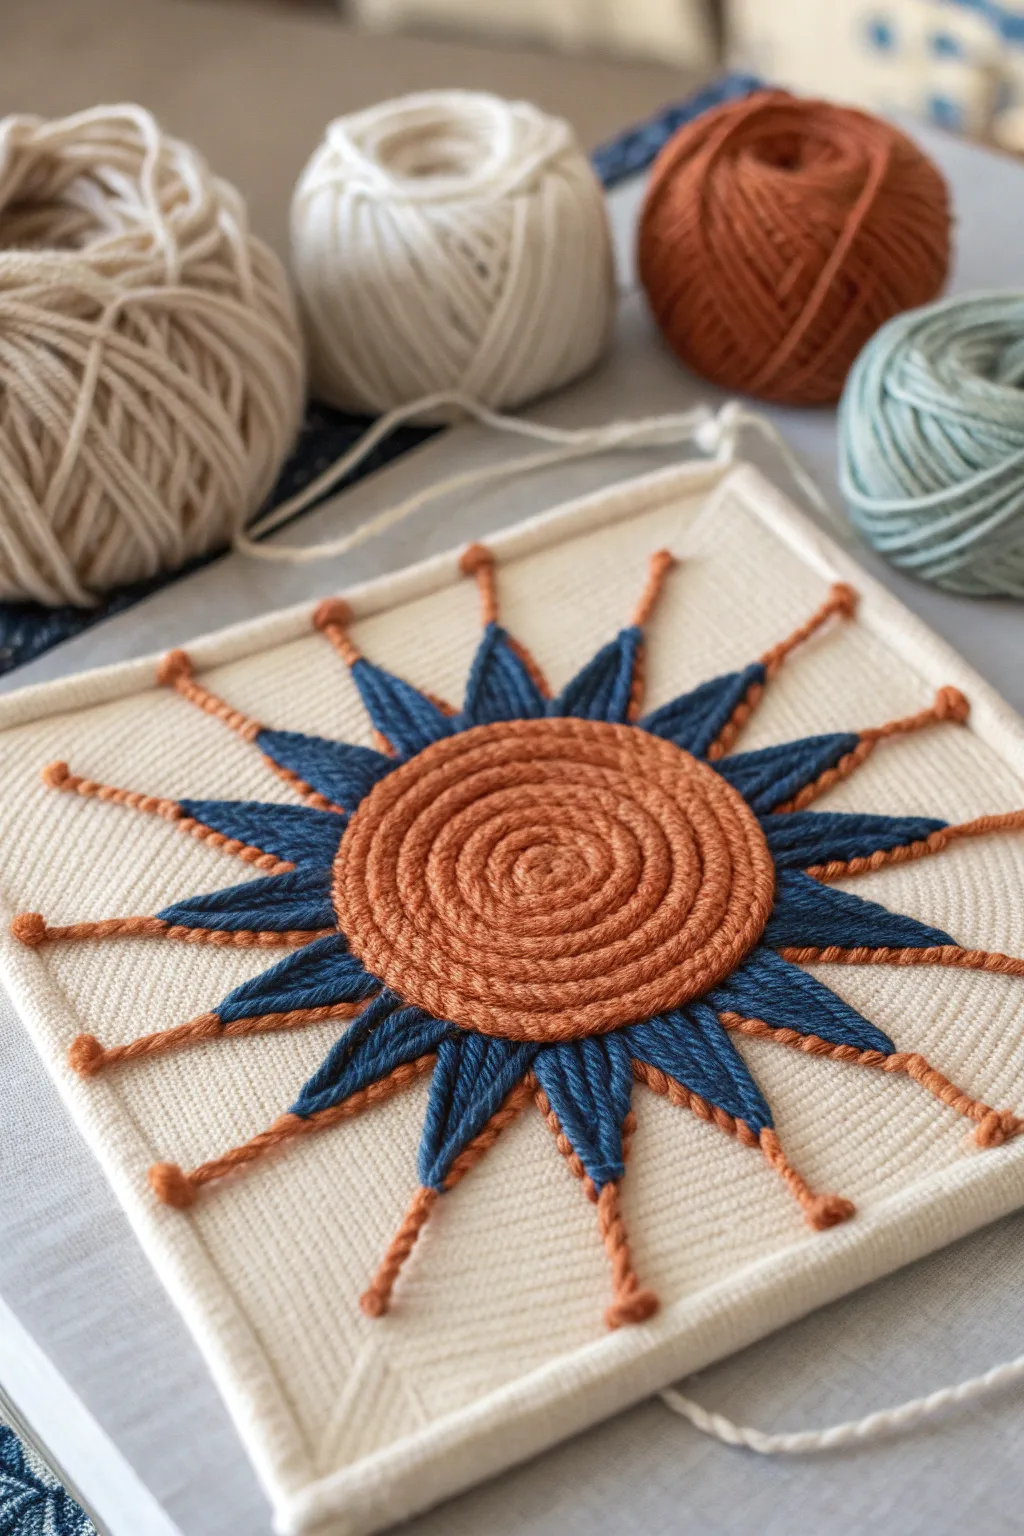
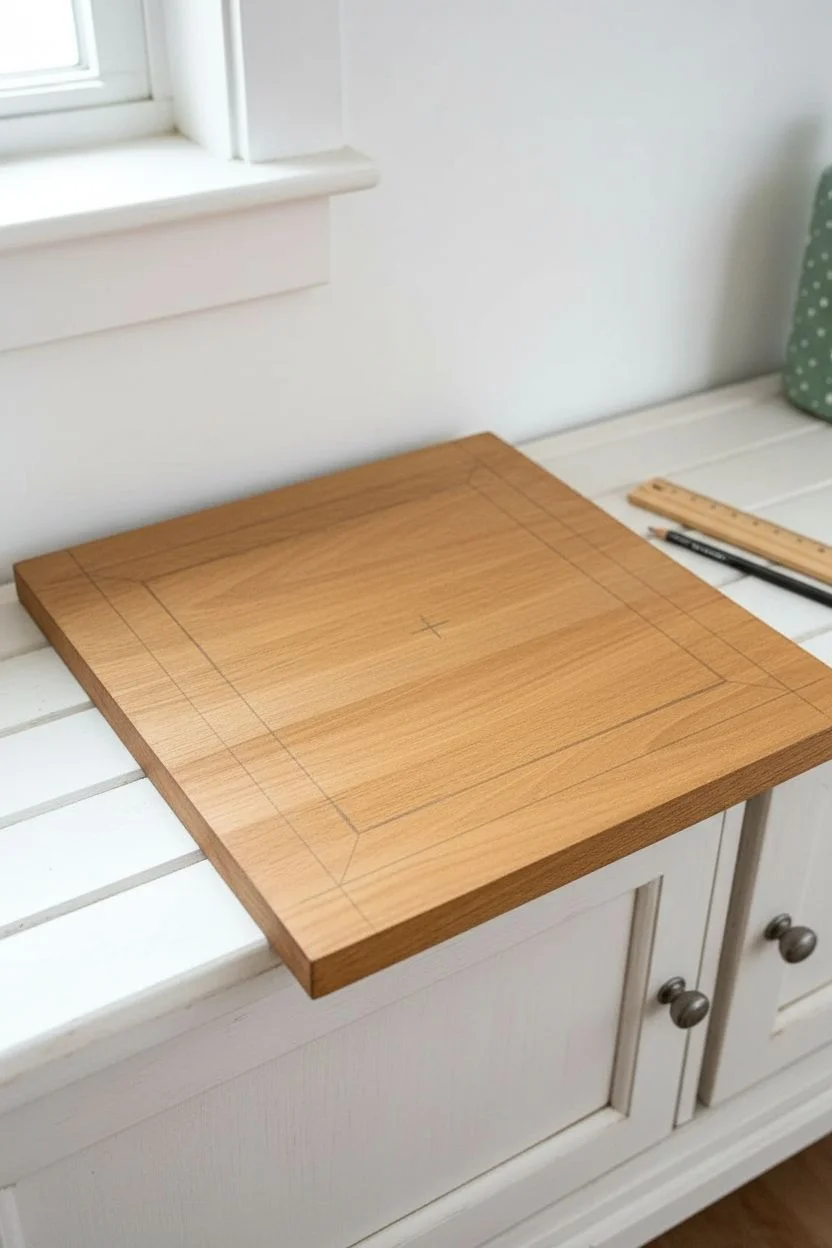
This captivating project transforms simple strands of yarn into a sophisticated, highly textured piece of abstract art. The design features a hypnotic central vortex surrounded by flowing currents and smaller eddying spirals in a soothing palette of terracotta, sage, and cream.
Step-by-Step Guide
Materials
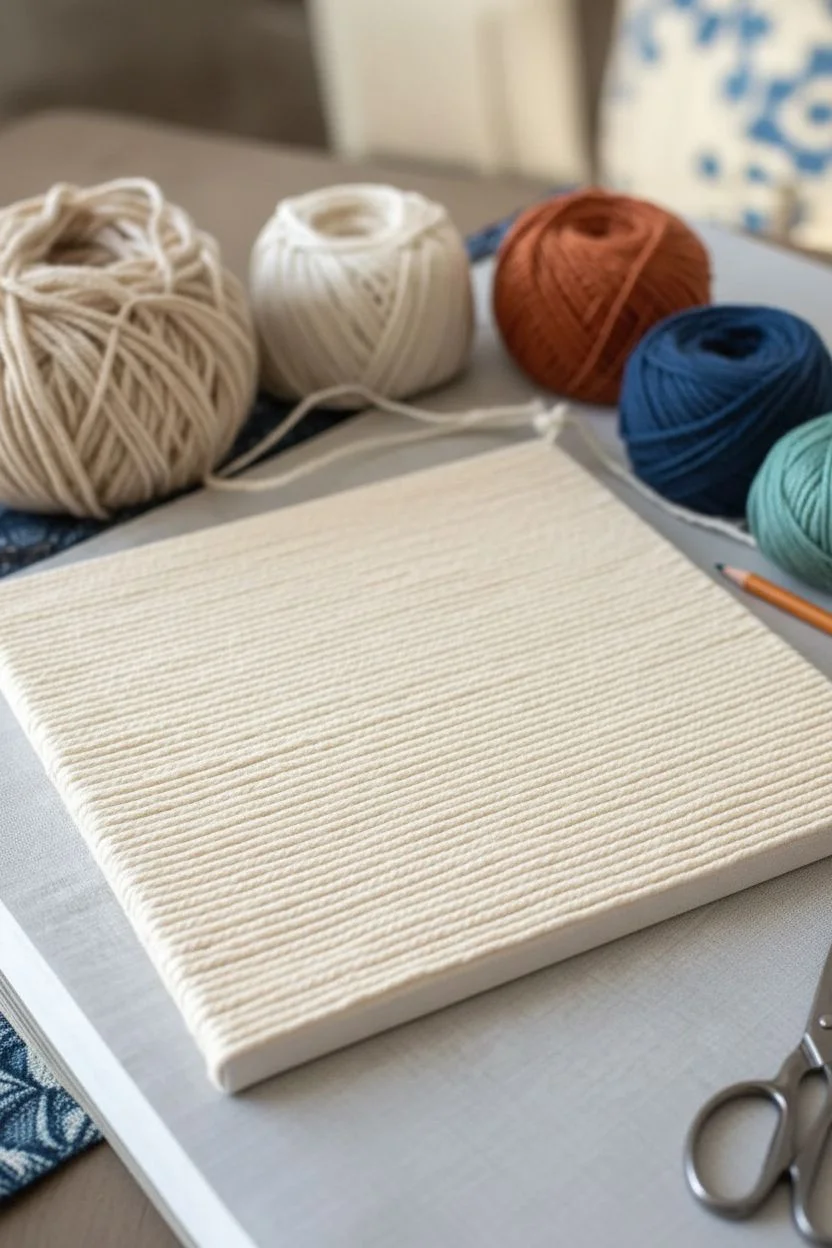
- Square canvas or wooden painting panel (approx. 12×12 inches)
- Thick cotton or acrylic yarn (worsted/aran weight) in: terracotta, sage green, teal, cream, beige, and light peach
- High-quality white craft glue (like Tacky Glue) or clear drying wood glue
- Pencil
- Scissors (small embroidery scissors work best for trimming)
- Tweezers (optional, for precise placement)
- Disposable paint brush or glue spreader
- Paper towels
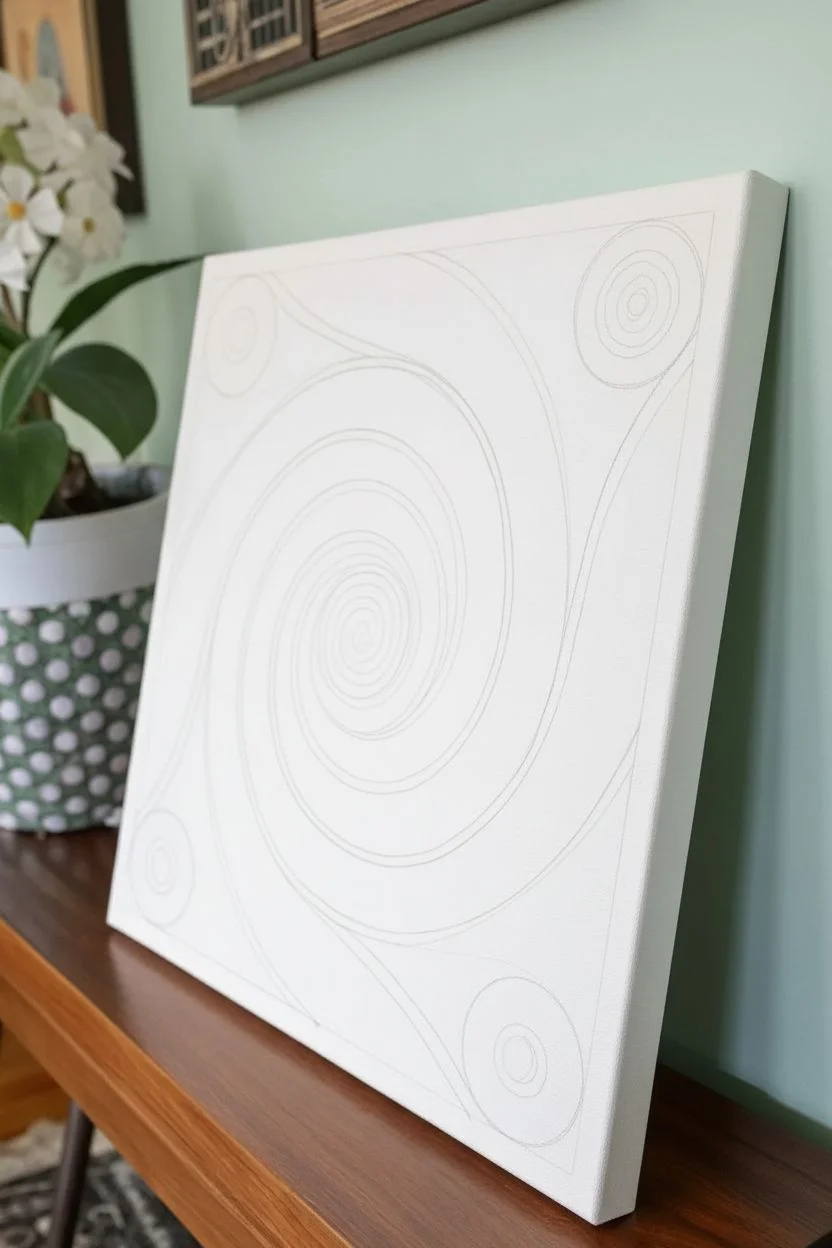
Step 1: Planning and Mapping
-
Prep the canvas:
Begin with a clean canvas or wood panel. If your canvas has a lot of texture, you might want to give it a quick coat of gesso to ensure the glue adheres smoothly, though this isn’t strictly necessary for yarn art. -
Sketch the primary spiral:
Lightly draw a large, sweeping spiral starting slightly off-center. This will be the main focal point. Don’t worry about perfect lines; these are just guides for your yarn flow. -
Add secondary spirals:
Sketch smaller circle or spiral shapes in the corners—specifically one in the top right and bottom right, and a smaller one in the bottom left. Create flowing lines that connect these spirals to the central mass, mimicking the look of flowing water or wind.
Glue Mastery
Don’t cover the whole board in glue at once. Work in 2-inch sections so the glue remains tacky. Use a brush to spread it evenly so lumps don’t seep through the yarn.
Step 2: Creating the Core Spirals
-
Center spiral start:
Select a cream or light beige yarn for the very center. Apply a generous dot of glue to the middle of your main spiral sketch. Tightly coil the end of the yarn into a tiny snail shape and press it into the glue. -
Expand the center:
Apply lines of glue following the spiral path. Continue wrapping the cream yarn around your center point until you have a circle about 1-2 inches wide. Snip the end and tuck it flush against the coil. -
Add color definition:
Switch to a terracotta or rust-colored yarn. Apply glue next to the cream section and lay down multiple rows (about 4-5 strands thick) to create a bold band of color that defines the swirl’s direction. -
Corner accents:
Repeat the tight coiling technique for the corner spirals. Use terracotta for the top right and bottom right corners, and perhaps a golden beige for the smaller bottom left accent. Work these until they are distinct, solid circles.
Step 3: Building the Flow
-
Establish directional flow:
Now, fill the space between the spirals. Choose a sage green or teal yarn. Apply glue in long, sweeping strokes that follow the curve of your central spiral, extending outward toward the edges of the canvas. -
Layering distinct bands:
Instead of mixing individual strands, place 3-6 strands of the same color side-by-side. This creates ‘ribbons’ of color that give the piece its distinct, graphic look. I like to gently push the strands together with my fingernail to close any gaps. -
Introduce contrast:
Between the green and terracotta sections, introduce bands of cream and light peach. These lighter colors act as highlights and separate the darker tones, adding depth to the swirl. -
Navigate curves:
As you lay yarn around the curves, you may notice gaps forming on the outer edges of the turn. To fix this, cut shorter, tapered pieces of yarn to fill these wedges so the overall band stays uniform in width.
Level Up: Fiber Mixing
Mix yarn weights and textures! Use a chunky wool for the bold swirls and a thinner, mercerized cotton for the detailed lines to create incredible tactile depth.
Step 4: Filling and Refining
-
Close the gaps:
Continue working outward from the center, fitting new color bands into the remaining white spaces. Ensure the yarn travels all the way to the frame edge. -
Edge management:
When a strand reaches the edge of the canvas, cut it cleanly. Applying a tiny dab of glue to the cut end prevents fraying and keeps the border sharp. -
Tighten placement:
Use tweezers or a toothpick to nudge strands into any tiny visible gaps between color sections. You want the canvas completely covered so the texture feels dense and luxurious. -
Final drying check:
Look over the piece for any loose ends or spots where the yarn is lifting. Add small dots of glue where necessary and press down firmly. -
Framing (Optional):
For a polished look, glue a floating frame around the edge, or simply paint the edges of the canvas a neutral color to finish the piece.
Hang your textured masterpiece on a wall that receives side lighting to truly show off the depth of the yarn coils


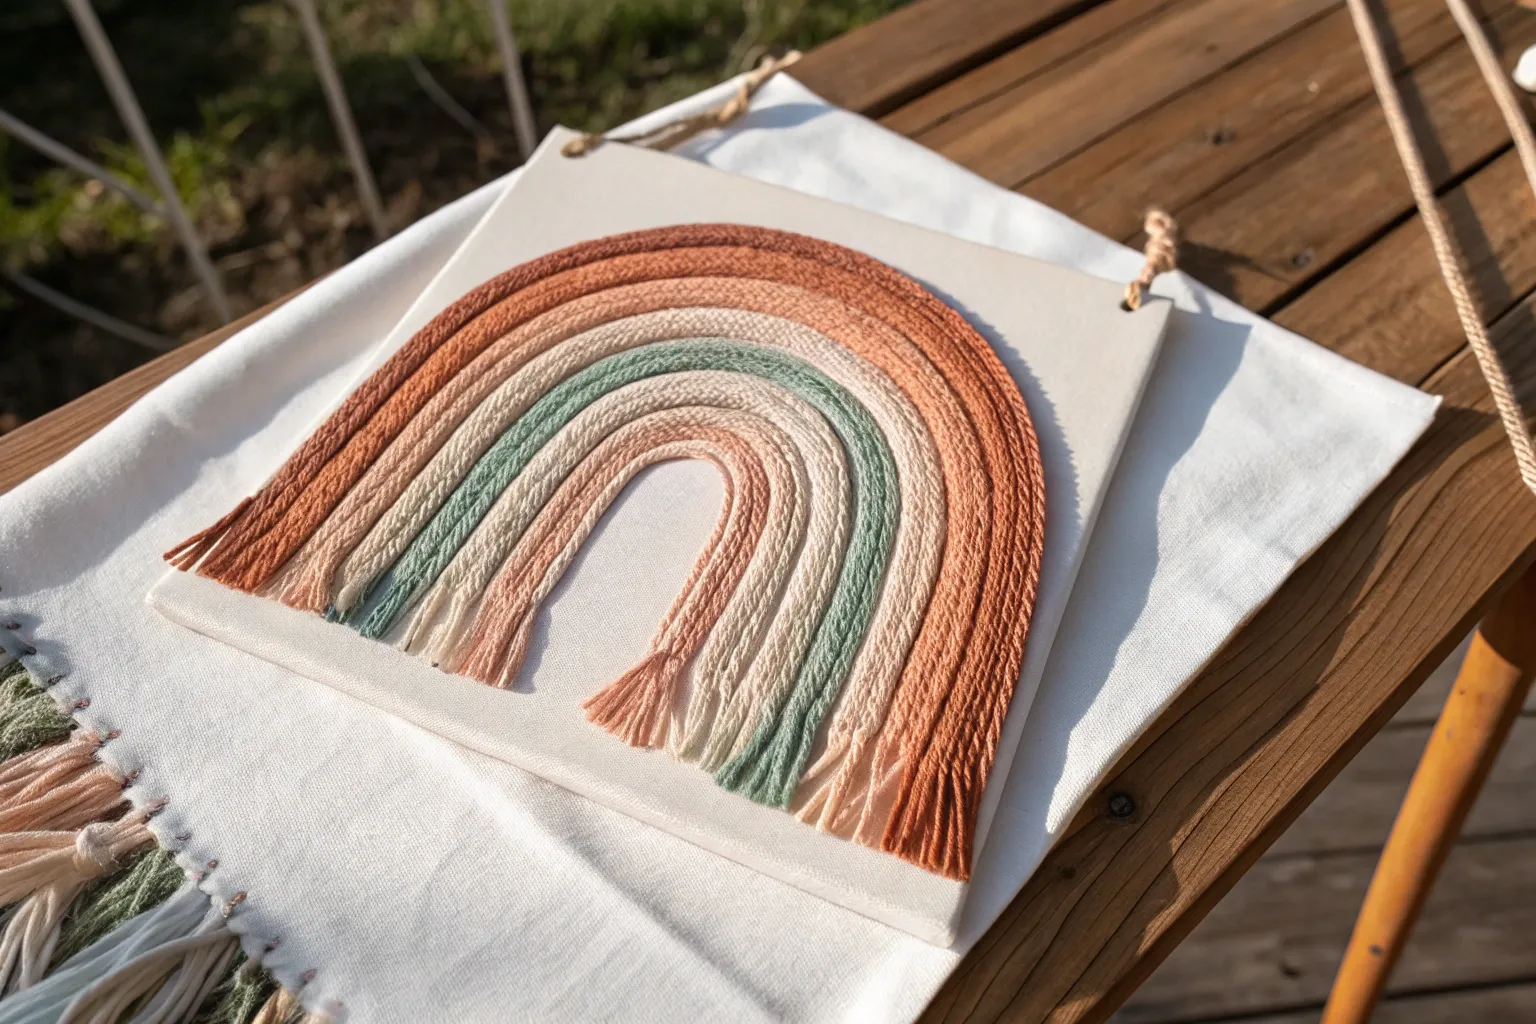
Sunset Hills Landscape in Yarn
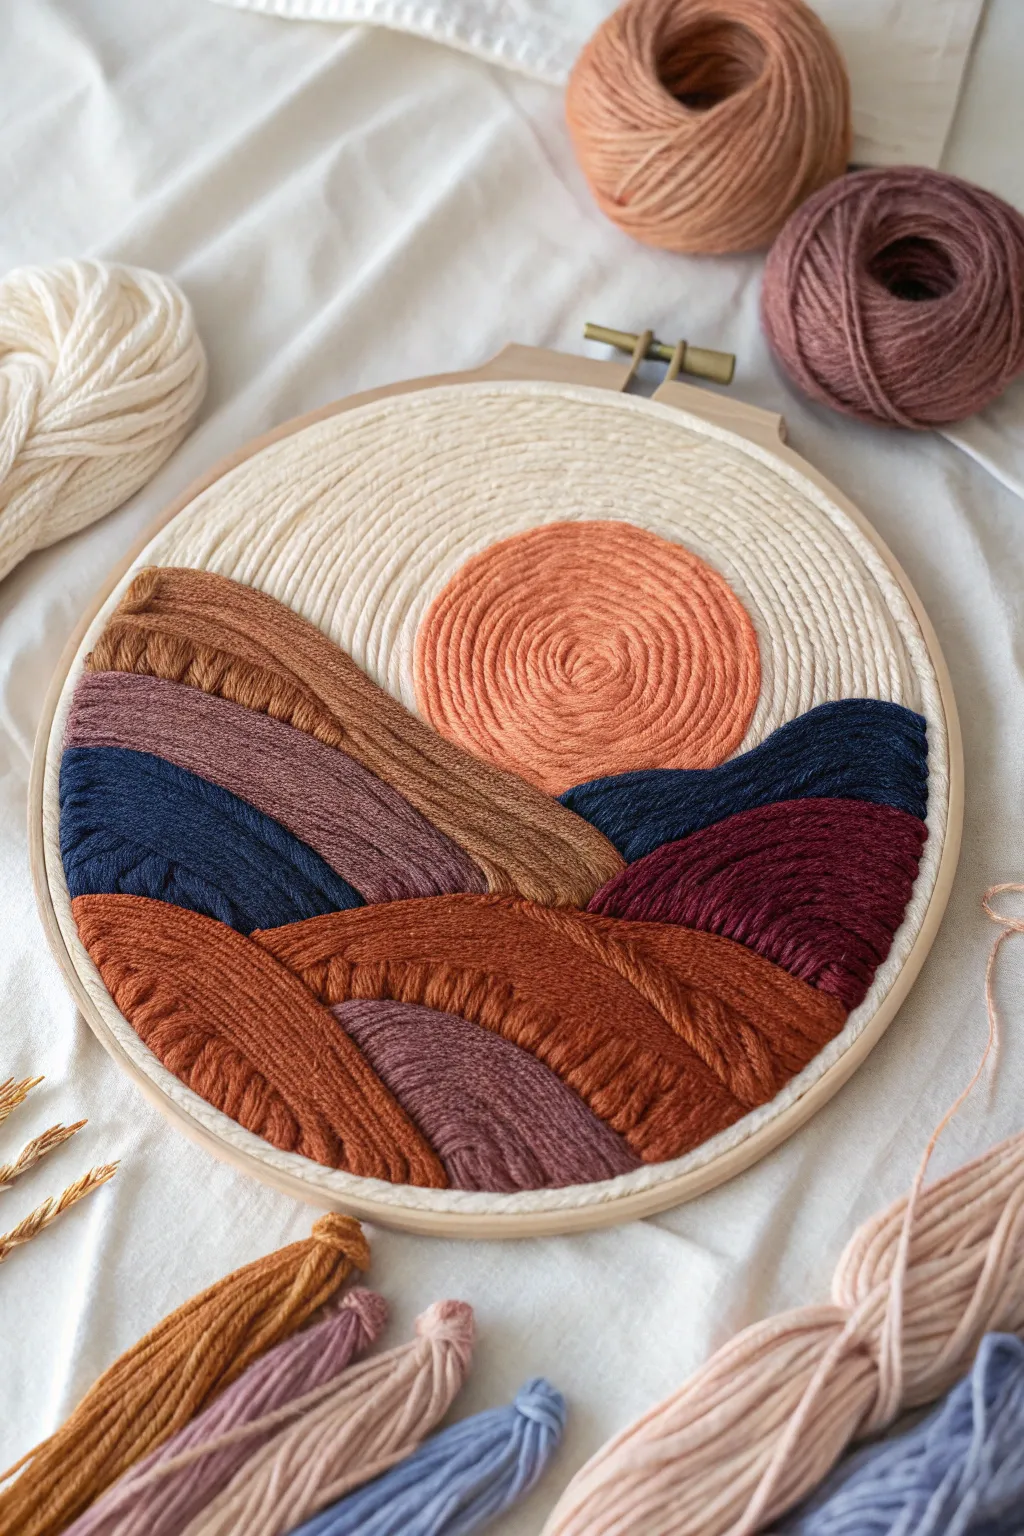
Capture the warmth of dusk with this textured yarn art featuring rolling hills and a glowing sun. The rich, earthy palette and layered yarn strands create a cozy, dimensional landscape perfect for any wall.
Step-by-Step
Materials
- Wooden embroidery hoop (8-10 inches)
- Cotton or linen fabric (cream or white)
- Chunky yarn in palette colors (deep rust, terracotta, mauve, navy blue, chocolate brown, cream)
- Fabric glue or heavy-duty craft glue
- Fabric scissors
- Pencil or disappearing ink fabric marker
- Tweezers (optional, for placement)
- Small paintbrush (for spreading glue)
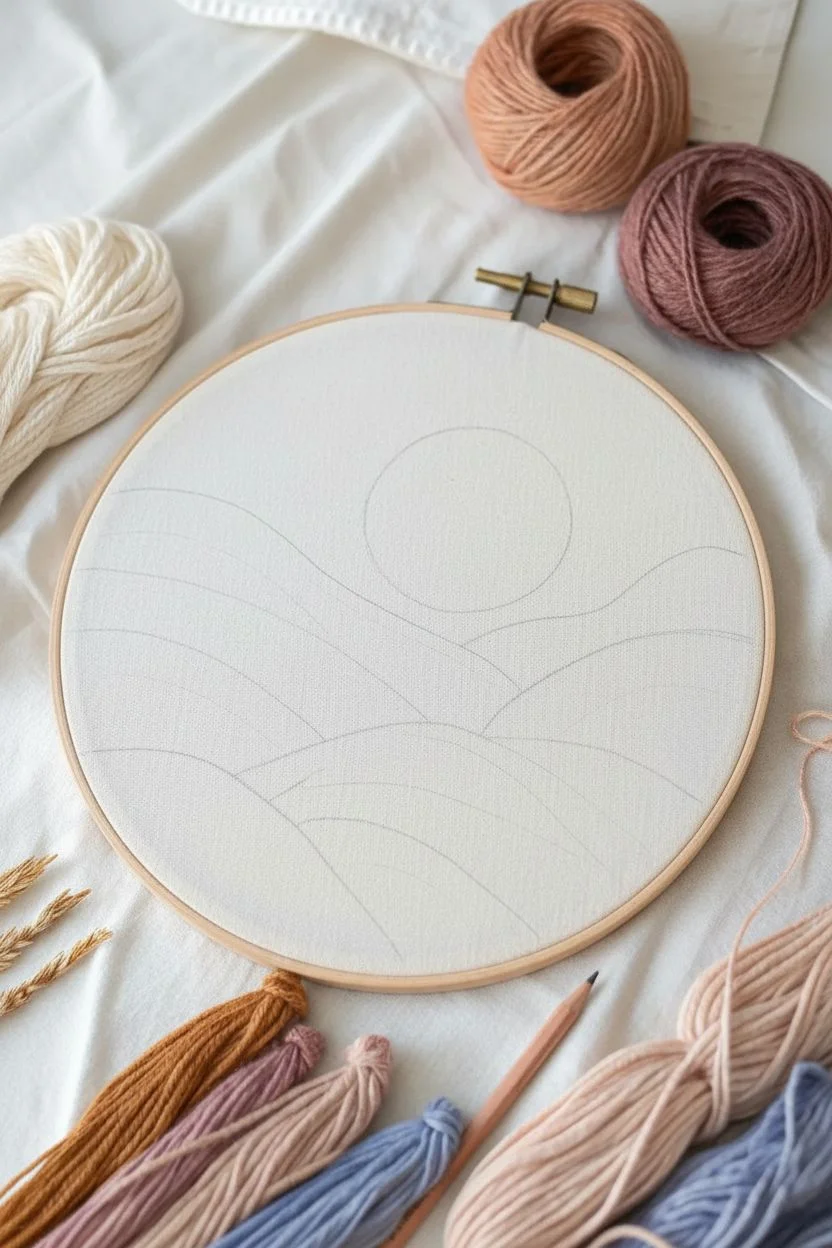
Step 1: Preparation & Sketching
-
Prep the hoop:
Begin by separating your embroidery hoop rings. Place your fabric over the inner ring, press the outer ring down, and tighten the screw. Pull the fabric taut so it feels like a drum skin. -
Sketch the horizon:
Using your pencil, draw a gentle, wavy line about one-third of the way up from the bottom to establish your first foreground hill. -
Draw the rolling hills:
sketch several more overlapping, rounded hill shapes moving upward. Create peaks and valleys that intersect naturally, leaving space at the top for the sky. -
Outline the sun:
In the center of the upper empty space, trace a circular object (like a jar lid) to create a perfect circle for the setting sun. -
Define the sky:
The remaining area above the hills and around the sun will be your sky. Your sketch acts as a map for color placement, so ensure you’re happy with the composition now.
Flow Direction Matters
Change the direction of your yarn strands for each hill (vertical, horizontal, or diagonal) to visually separate the shapes without needing outlines.
Step 2: Creating the Landscape
-
Start with the sun:
Apply a generous spiral of glue inside your sun circle. Take your orange yarn and coil it tightly starting from the very center, working outward until the circle is filled. -
Begin the sky:
Use the cream yarn for the sky. Apply glue in arched lines following the curve of the sun. Lay the yarn strands side-by-step, curving them over the sun like a rainbow to create a radiating effect. -
Fill the sky corners:
Continue adding cream yarn arcs until you reach the edges of the hoop and the tops of your highest sketched hills. Trim the ends cleanly where they meet the hill lines. -
First hill layer:
Choose a dark brown or navy for the furthest background hill. Apply glue to that specific section. Lay yarn strands horizontally or following the curve of the hill top-to-bottom. -
Add texture contrast:
For the middle hills, switch to a mauve or light brown yarn. Instead of just straight lines, try slightly twisting the yarn before gluing it down to add a braided texture. -
Define the foreground:
Select your boldest rust or terracotta color for the bottom-most hills. Glue strands in curved, sweeping motions that mimic the shape of the land. -
Manage the edges:
When a strand reaches the edge of a shape or the hoop, snip it precisely. I find using smaller, sharp embroidery scissors helps get a clean cut right against the neighboring yarn. -
Pack it tight:
As you work, gently nudge the yarn strands against each other with your fingernail or tweezers. You want to eliminate any gaps so the white fabric backing doesn’t peek through. -
Foreground details:
For the very bottom section, consider using a thicker yarn weight or doubling up strands to make the foreground pop visually.
Glue Leaking Through?
If glue seeps through the yarn, you’re using too much. Let it dry clear (it usually disappears), and use a thin paintbrush to apply a lighter layer next time.
Step 3: Finishing Touches
-
Check for gaps:
Hold the hoop up to the light to spot any tiny spaces between strands. Carefully insert small snippets of matching yarn or nudge existing rows to cover them. -
Clean up stray fibers:
Use tweezers to pluck away any fuzz or stray fibers that may have stuck to the glue surface. -
Trim the backing:
Once the glue is fully dry (give it a few hours), flip the hoop over. Trim the excess fabric close to the wood frame, or glue it down to the inside of the rim for a finished back.
Hang your textured landscape on a gallery wall or prop it on a shelf to bring a warm, handmade vibe to your room


Ocean Waves With Curved Yarn Lines
Capture the fluid motion of the ocean with this striking yarn painting that relies on directional texture rather than paint brushes. Using thick, twisted yarn creates a bold, stylized wave that practically pops off the canvas with tactile energy.
How-To Guide
Materials
- Square stretched canvas (approx. 8×8 or 10×10 inches)
- Thick worsted or bulky weight yarn in: white, dark teal, medium turquoise, and light seafoam green
- Clear-drying craft glue (like tacky glue) or a hot glue gun with fine tip
- Pencil and eraser
- Scissors with sharp tips
- Tweezers (optional, for precise placement)
- Bamboo skewer or toothpick
Step 1: Planning the Seascape
-
Draft the outlines:
Begin by lightly sketching your wave design directly onto the canvas. Draw a large, curling wave shape that dominates the center, with a smaller rolling section at the bottom right. Incorporate a distinctive ‘foam’ crest at the top of the big wave. -
Define the flow lines:
Inside the main body of the water, lightly draw curved directional lines that follow the arch of the wave. These don’t need to be perfect, but they will serve as guides for your yarn placement to ensure the ‘water’ looks like it is moving.
Glue Control
Work in small sections (1-2 inches) at a time. If you apply too much glue at once, it will dry before you can place the yarn, leading to a lumpy surface.
Step 2: Building the Whitecaps
-
Outline the foam:
Start with the white yarn. Apply a thin line of glue along the very top edge of your wave crest sketch. Gently press the white yarn along this glue line, careful not to stretch it too tight. -
Fill the crest:
Continue filling the white crest area by coiling the yarn in tight, concentric curves that mimic the rolling motion of foam. I find that using tweezers helps tuck the cut ends of the yarn underneath adjacent strands for a seamless look. -
Add secondary foam:
Move to the smaller wave section in the foreground. Create a jagged, scalloped line with white yarn to represent the breaking water, separating the dark teal bottom from the lighter sections above.
Textured Gradient
Use yarn with varying thicknesses or textures (like boucle for the foam) to create even more 3D interest and distinguish the ‘spray’ from the sleek water.
Step 3: Creating the Deep Water
-
Select the darkest shade:
Take your darkest teal yarn. This color adds depth and shadow, especially under the curl of the big wave and at the very bottom right of the canvas. -
Apply vertical glue lines:
Working in the shadowed area under the main crest, apply glue in vertical, slightly curved lines that mirror the concave shape of the wave. -
Lay the dark strands:
Press lengths of dark teal yarn onto the glue, packing them closely together so no canvas shows through. The grain of the yarn should run vertically here to suggest the height of the wave wall. -
Fill the bottom corner:
For the bottom right section (below the small foam line), lay the dark teal yarn horizontally or in a gentle downward slope to anchor the composition.
Step 4: Adding Mid-Tones and Highlights
-
Transition to turquoise:
Switch to your medium turquoise yarn. Using the same vertical-curve technique, fill in the section immediately to the left of the dark shadow. -
Introduce the lightest blue:
Use the light seafoam green yarn for the leftmost part of the wave body. This gradient—from light on the left to dark on the right—creates volume and lighting. -
Blend the colors:
If you want a smoother transition, you can alternate single strands of the medium and light colors where the sections meet. -
Curve the foreground:
Fill the remaining bottom-left section with diagonal stripes of medium turquoise and dark teal, angling them up toward the main wave to lead the eye upward.
Step 5: Refining and Sealing
-
Tuck the ends:
Go over the entire piece with a bamboo skewer or toothpick. Gently push any frayed yarn ends down or tuck them between the rows. -
Secure the perimeter:
Run a final border of glue around the very edge of the design if needed to ensure the outer strands are firmly attached to the canvas. -
Clean up:
Once the glue is fully dry (clear), use small scissors to snip away any stray fuzz or fibers that are sticking up, giving the surface a clean, polished appearance.
Step back and admire the rhythmic flow of your new fiber ocean art


Big Bold Flower Petals in Yarn
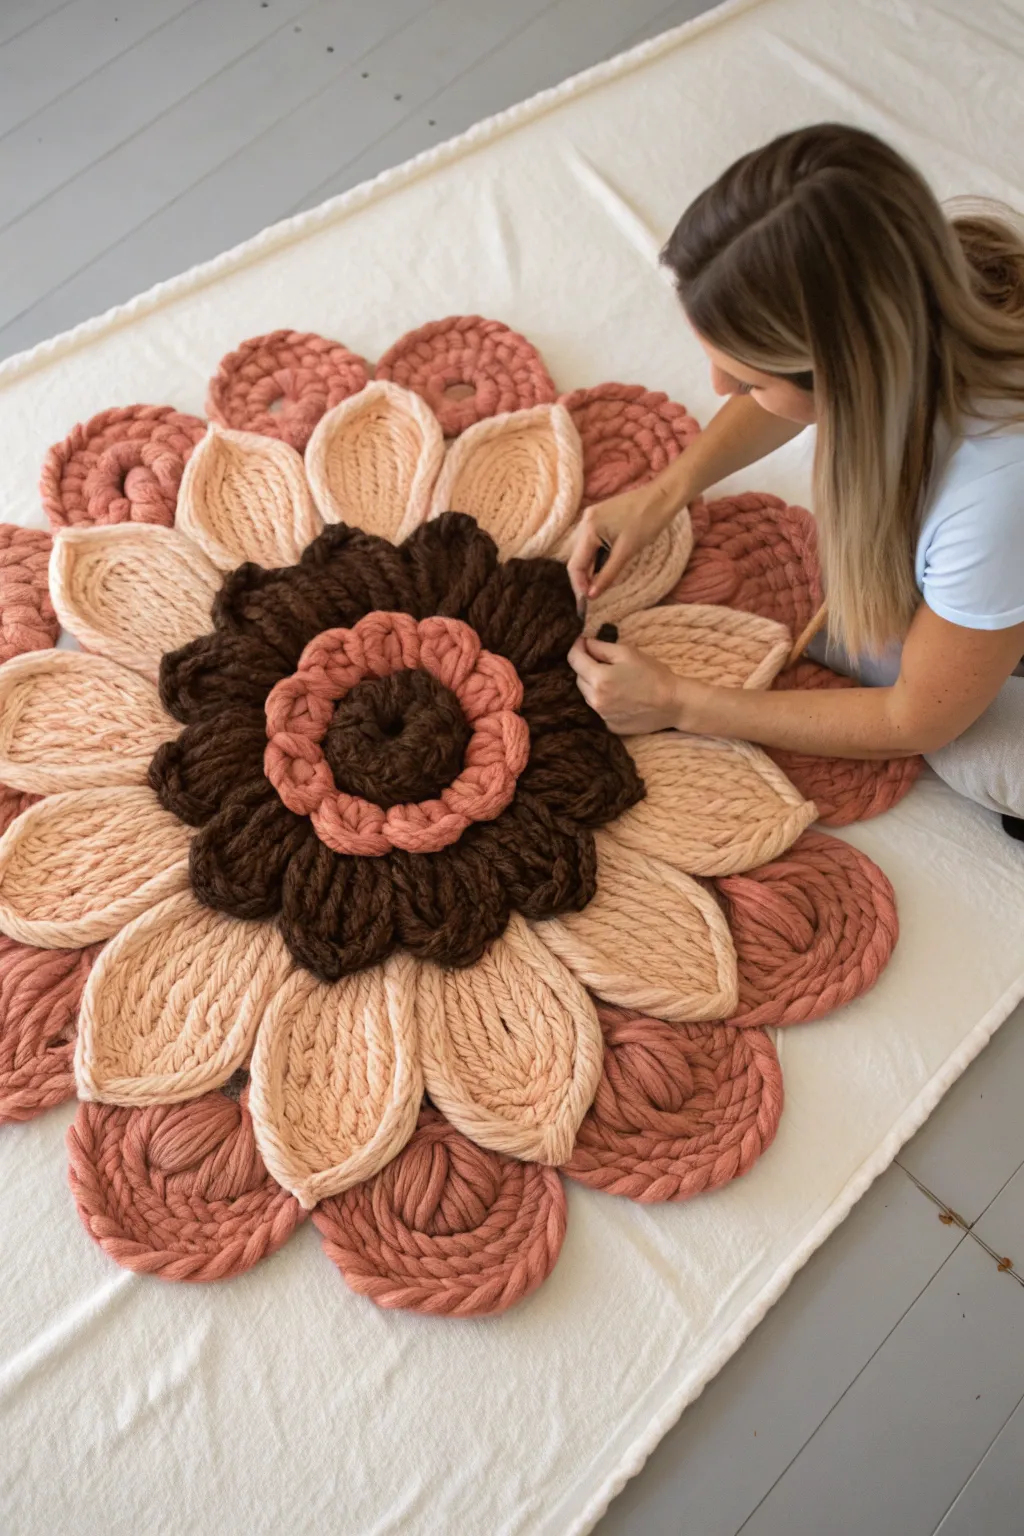
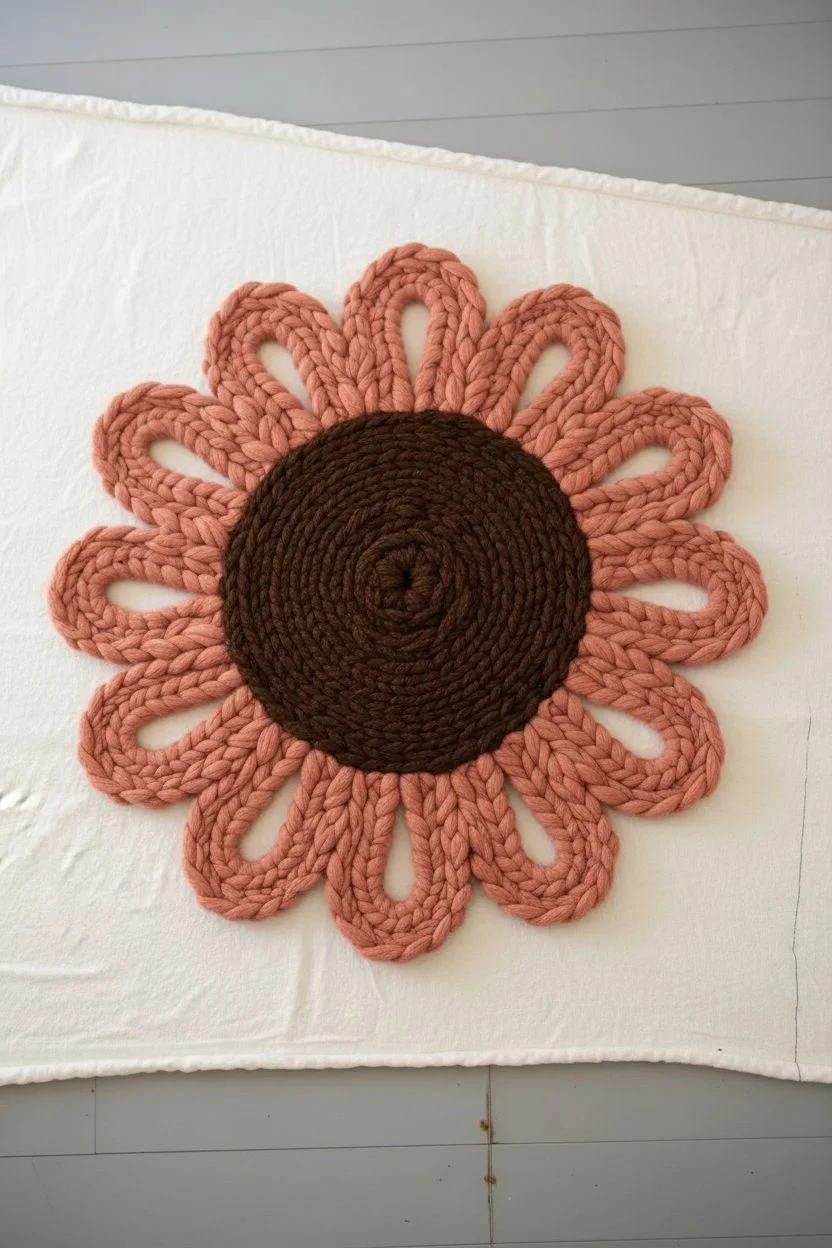
Transform your floor or wall into a blooming garden with this magnificent, oversized flower project created from chunky roving yarn. Using a simple tacking technique on a canvas backing, this piece offers huge visual impact with plush texture and comforting earth tones.
Step-by-Step
Materials
- Large piece of heavy canvas or rug backing cloth (approx. 4×4 feet)
- Super chunky wool roving or tube yarn (dark brown, rust pink, light peach/cream, dusty rose)
- Large tapestry needle
- Strong matching thread or thinner yarn for tacking
- Fabric scissors
- Fabric marker or chalk
- Hot glue gun (optional, for securing ends)
Step 1: Planning and Center
-
Prepare the Base:
Lay your backing canvas flat on a large work surface. Using your fabric marker, draw a large circle in the center, roughly 10 inches in diameter, which will be the heart of your flower. -
Start the Dark Center:
Take your darkest brown chunky yarn. Begin coiling it tightly within the center circle you just drew. -
Secure the Coil:
As you spiral the yarn outward from the very middle, use a needle and strong thread to stitch through the yarn and the canvas backing every few inches. This tacking method holds the heavy yarn in place without needing giant knitting tools. -
Create the Inner Ring:
Once the dark brown center is filled, switch to the rust pink yarn. Create a single ring of large ‘loops’ around the dark center. To do this, form a U-shape with the yarn and stitch the base of the U down, then move to the next loop.
Use Tube Yarn
For better durability, choose cotton tube yarn with fill instead of raw wool roving. It holds its shape better and won’t pill or shed if walked on.
Step 2: Forming the Petals
-
Outline the Middle layer:
Around your inner ring, you will now create the first layer of dark petals. Sketch about 8-10 petal shapes radiating from the center using your chalk. -
Fill the Dark Petals:
Using the dark brown yarn again, trace the outline of each petal shape first. Stitch it down securely. -
Fill the Centers:
Fill the inside of these dark petals by spiraling the yarn inwards or layering strips back and forth until no canvas shows through. -
The Large Cream Petals:
Now for the show-stopping light layer. Draw larger, pointed petal shapes extending outward between the gaps of the dark petals. -
Looping Technique:
Take the light peach or cream yarn. Instead of flat spirals, form long, elongated loops that mimic the grain of a flower petal. Start at the base, run the yarn to the petal tip, loop it back, and tack it down. -
Define the Petal Shape:
I find it helpful to stitch the perimeter of these light petals first to create a ‘dam’ for the inner filling, ensuring sharp, distinct edges. -
Add Texture:
Fill the interior of the cream petals with vertical lines of yarn running from the center of the flower toward the tip, tacking them down frequently to maintain the petal’s ridged texture.
Make it a Pillow
Scale this design down by 50% and stitch it onto a round cushion cover for a stunning, tactile throw pillow to match the rug.
Step 3: The Outer Ring
-
Outer Scallops:
Switch to your dusty rose yarn. Draw wide, scalloped semi-circles behind the pointed cream petals. These act as the final, bottom layer of the bloom. -
Filling the Scallops:
Fill these shapes using a concentric arc motion. Start at the outer edge of the scallop and work your way inward like a rainbow shape, stitching firmly as you go. -
Tucking Ends:
When finishing a section of yarn, cut the roving and tuck the raw end underneath a previously stitched loop. A small dab of hot glue can help secure these raw ends from fraying. -
Trim the Backing:
Once all yarn is attached, carefully cut away the excess canvas backing. Leave about an inch border, fold it under the rug, and glue or stitch it in place so it is invisible from the front. -
Final Fluff:
Gently massage the yarn petals with your hands to separate the loops and ensure the flower looks full and dimensional.
Step back and admire how this massive floral creation brings a soft, organic touch to your living space
BRUSH GUIDE
The Right Brush for Every Stroke
From clean lines to bold texture — master brush choice, stroke control, and essential techniques.
Explore the Full Guide
Minimal Mountain Range Yarn Painting
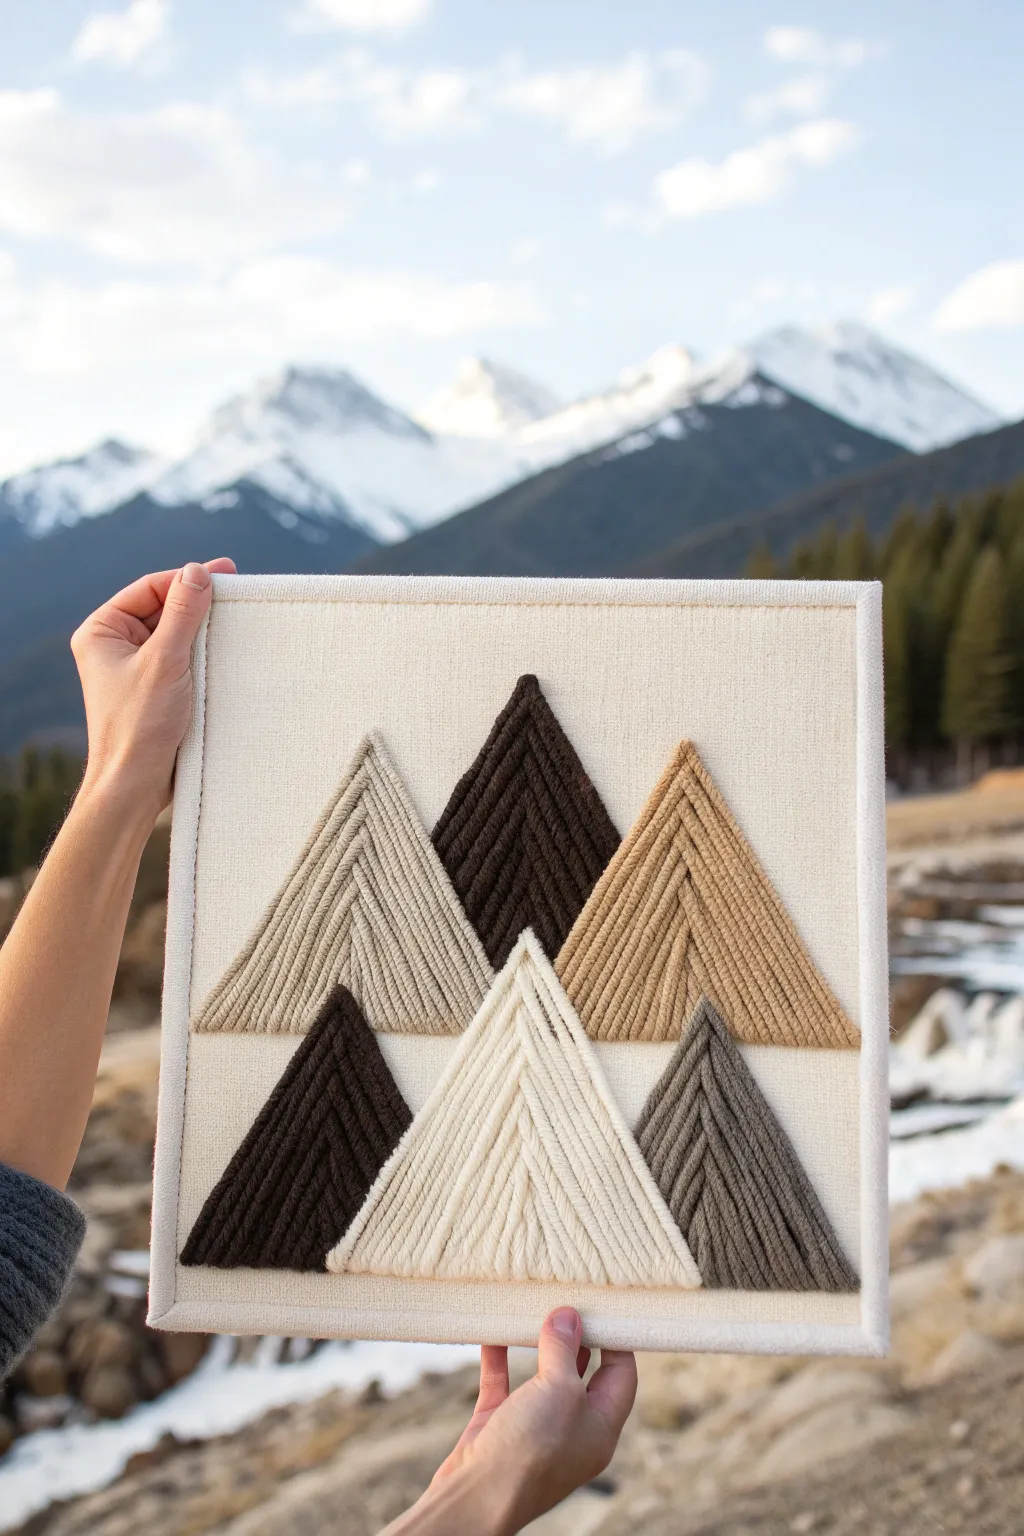
This minimal mountain range art piece combines the rustic warmth of yarn with clean, modern geometric lines. Using simple yarn strands glued in precise chevron patterns creates a textured, 3D effect that mimics peaks against a calm canvas sky.
Detailed Instructions
Materials
- Blank stretched canvas or canvas board (square)
- Worsted weight yarn in 6 colors: dark brown, chocolate, espresso, tan, beige, and cream
- Clear-drying craft glue (like Tacky Glue) or a hot glue gun with fine tip
- Fabric scissors or sharp embroidery scissors
- Ruler or straight edge
- Pencil
- Tweezers (optional but helpful)
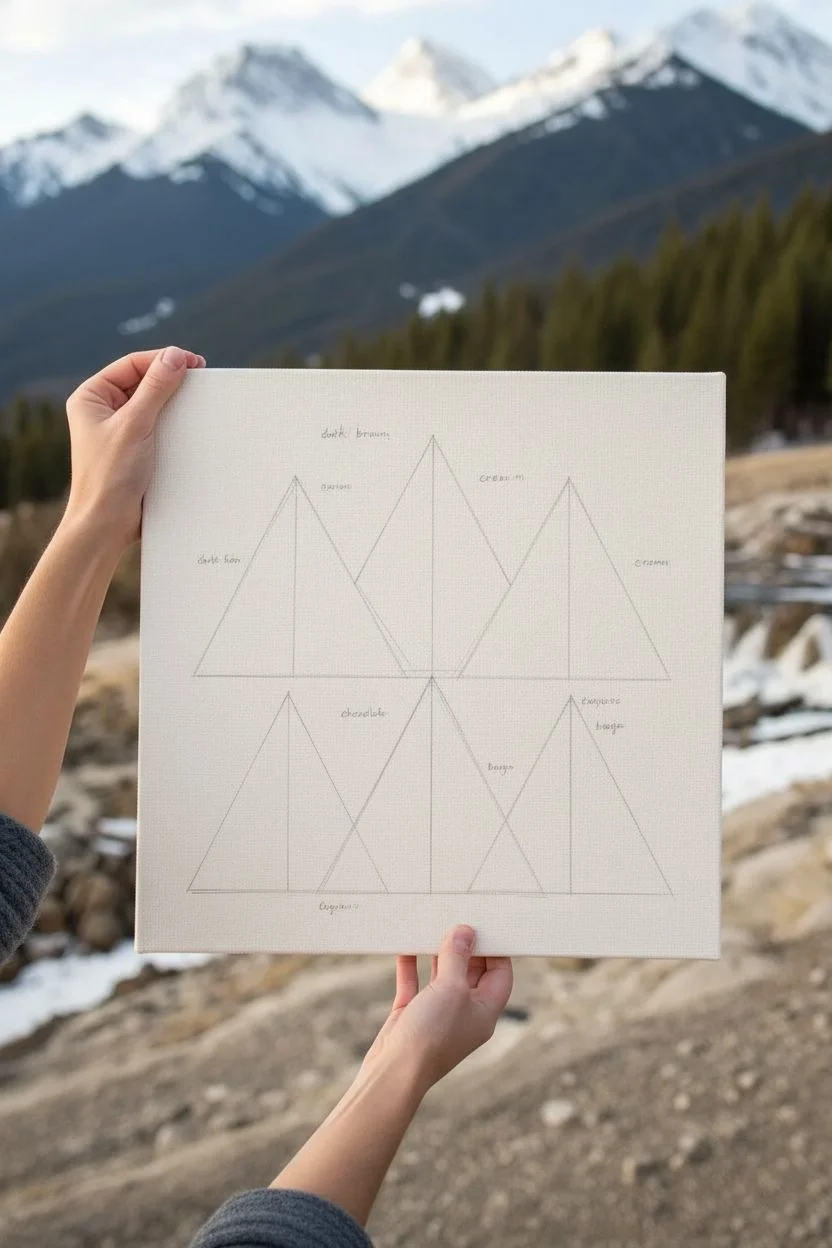
Step 1: Planning and Sketching
-
Map out the peaks:
Begin by lightly sketching your mountain triangles onto the canvas with a pencil. Draw three larger triangles in the back row and three smaller triangles staggered in the front row to create depth. -
Find the centers:
Use your ruler to draw a vertical line straight down the center of each triangle, splitting them perfectly in half. This guideline is crucial for getting that sharp chevron point. -
Color coding:
Decide on your color placement before you start gluing. The example uses darker browns for the back peaks and some front peaks, with lighter creams and tans interspersed for contrast.
Sharp Peaks Tip
For the sharpest points, cut the yarn ends at a 45-degree angle where they meet at the top. This allows them to fit together snugly without bulk.
Step 2: Creating the Peaks
-
Start the first peak:
Choose one of the back triangles to start with. Apply a thin line of glue along the left outer edge of the triangle and the right outer edge. -
Lay the outline:
Cut two strands of yarn slightly longer than the triangle sides. Press them into the glue lines, ensuring they meet perfectly at the top point. -
Fill the interior:
Working from the outside toward the center line, apply glue for the next inner layer. Cut two new strands of yarn and place them snugly against the previous strands. -
Mind the angle:
As you place strands, make sure the bottom ends are angled to align with the bottom edge of the triangle sketch. You can trim them later, but keeping them tidy helps visual alignment. -
Continue inward:
Repeat this process, row by row, moving toward that center vertical line you drew earlier. The strands should become shorter and shorter as you approach the middle. -
Close the gap:
When you reach the very center, you might need just one single vertical strand or two very thin slivers to fill the final gap without overlapping.
Gap Issues?
If you see canvas peeking through between strands, gently nudge the yarn together with a toothpick while the glue is still tacky to close the gap.
Step 3: Finishing Touches
-
Front row overlap:
Once the back row of triangles is complete and dry, move to the front row. The top points of these triangles will physically overlap the bottoms of the back row. -
Repeat the fill method:
Use the same technique: glue the outer edges first, then work inward toward the center line, ensuring the yarn colors contrast with the mountains behind them. -
Create the white peak:
For the front-center mountain, use your lightest cream yarn. This acts as a focal point and creates a lovely highlight against the darker surrounding tones. -
Trim the bottoms:
Once all glue is completely dry, use sharp scissors to trim the bottom edges of the yarn so they form a perfectly straight horizontal line. -
Frame the canvas:
To polish the look, glue a continuous strand of the cream yarn (or the same color as the canvas) around the perimeter of the canvas to create a soft, bordered finish. -
Clean up:
Inspect the piece for any visible dried glue globs or stray fibers. I usually use tweezers to pick off tiny fuzz bits for a cleaner look.
Hang your textured mountain range on a wall where the light can catch the different yarn directions for maximum effect
Cozy Cloud Texture With Fluffy Yarn
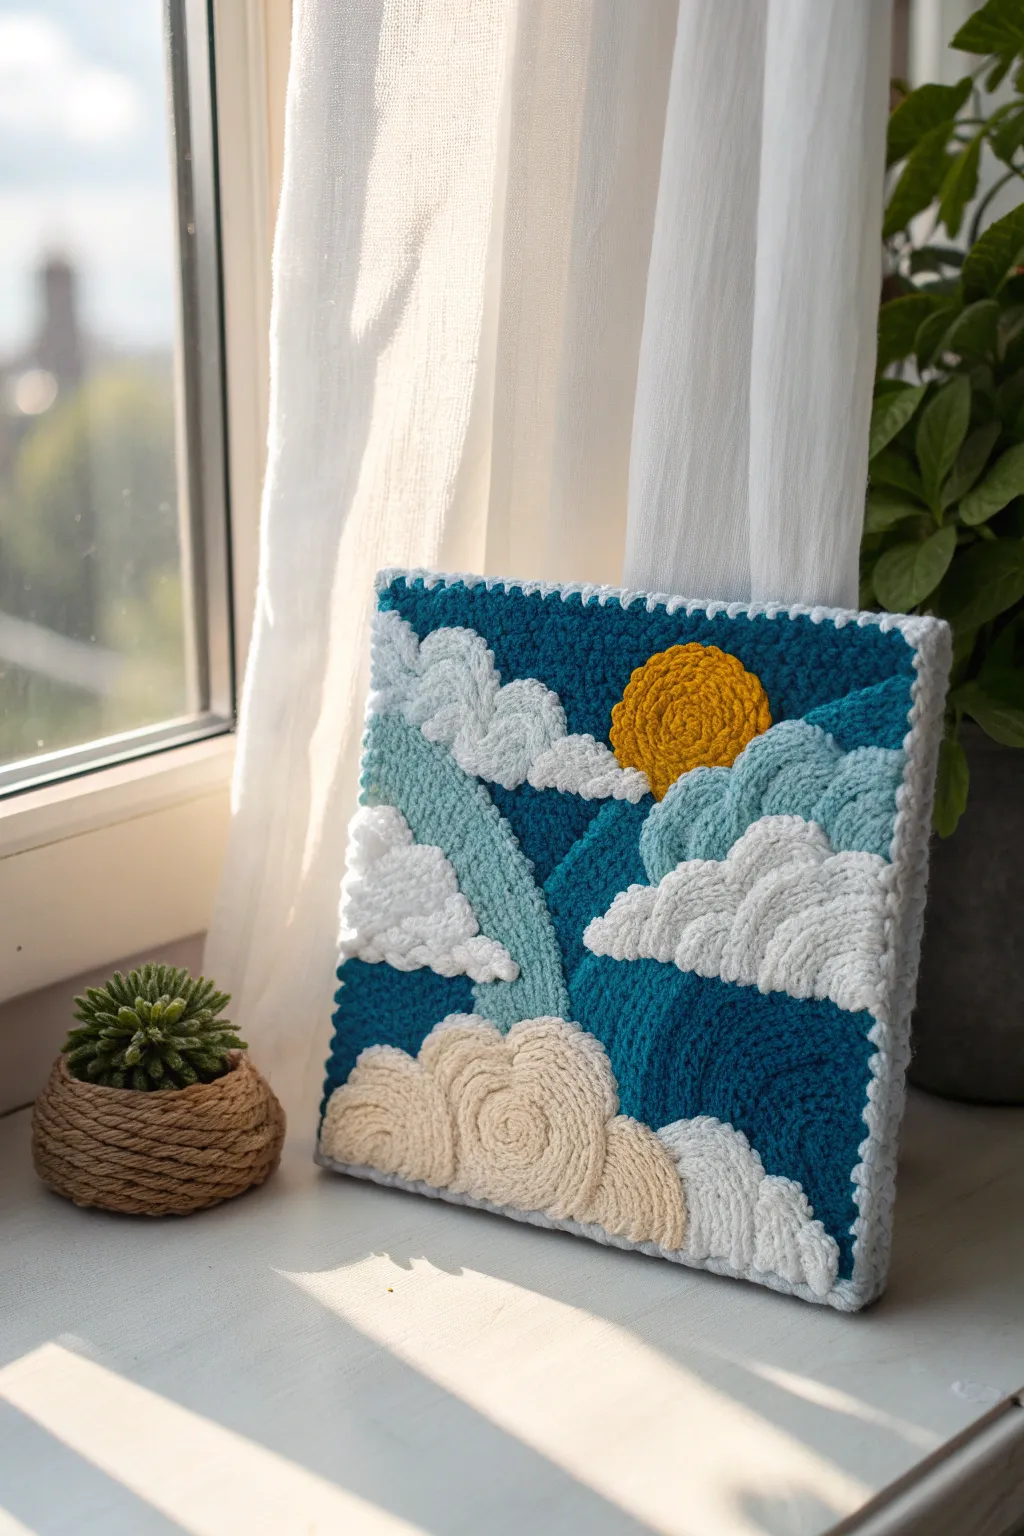
Capture the serenity of a bright, cloudy day with this textured yarn art piece. By combining chunky, velvet-style yarns with raised techniques, you’ll create a tactile landscape that feels as soft as it looks.
Step-by-Step Tutorial
Materials
- Square artist canvas (approx. 10×10 inches)
- Thick, plush chenille or velvet yarn (white, cream, teal, navy blue, light blue, mustard yellow)
- Hot glue gun and clear glue sticks
- Fabric scissors
- Pencil or disappearing fabric marker
- Optional: Crochet hook (size 5mm) for the border
- Tweezers (for precise placement)
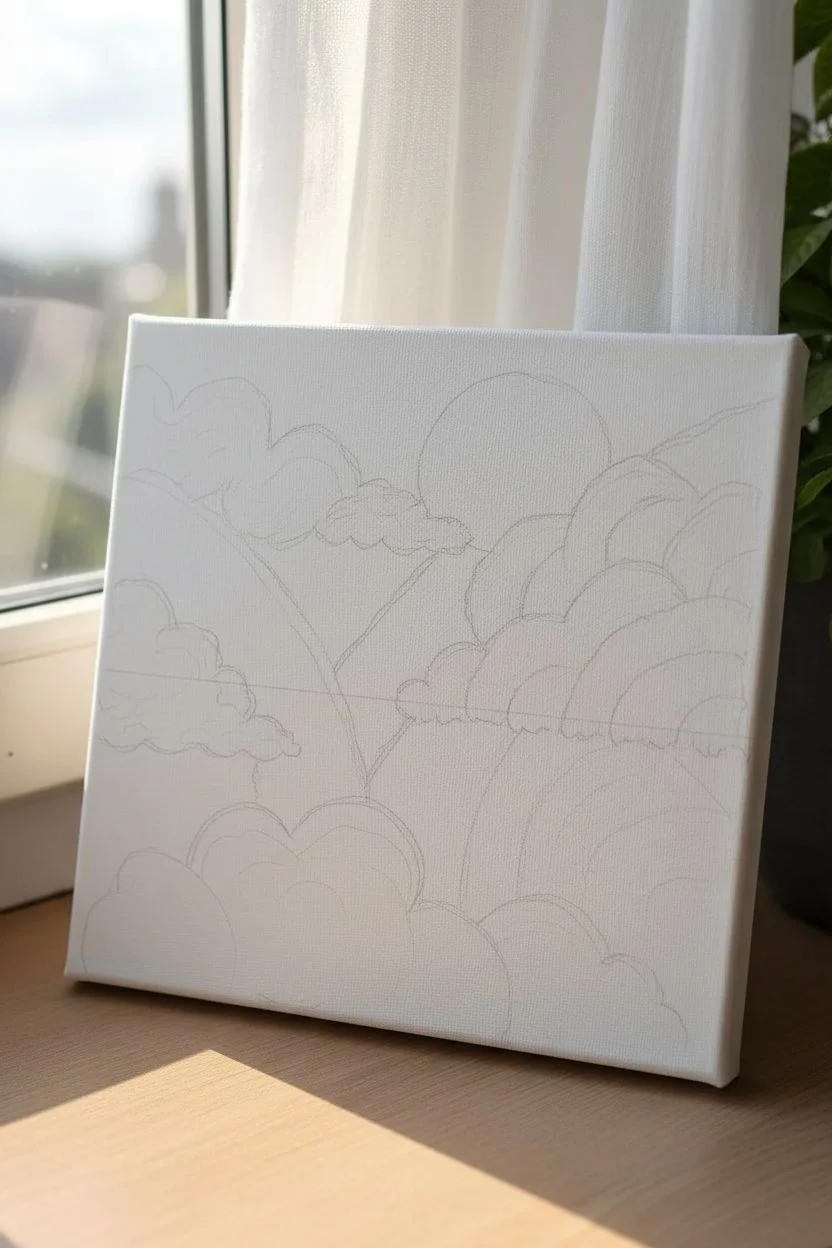
Step 1: Planning and Sketching
-
Prepare the Canvas:
Start with a clean, blank canvas. Using your pencil, lightly sketch the horizon line about two-thirds down from the top. -
Outline the Elements:
Draw jagged mountain peaks rising from the horizon on the left and right sides. Place a circle for the sun near the upper right mountain peak. -
Mark Cloud Formations:
Sketch large, billowy cloud shapes. Place a massive cluster at the bottom center and smaller, drifting clouds near the mountain peaks and in the sky. Keeping the lines light helps prevent graphite smudges on your white yarn later.
Glue Control
Work in small sections of 2-3 inches at a time. Hot glue cools rapidly, and if it hardens before you press the yarn down, create lumps.
Step 2: Creating the Sky and Mountains
-
Fill the Deep Sky:
Begin with the navy blue yarn. Apply a line of hot glue along the top edge of your mountains and around the sun circle. Press the yarn firmly into the glue. -
Coil the Sky:
Continue filling the background sky area by spiraling or layering the navy yarn back and forth until the upper background is completely covered. -
Define the Mountains:
Switch to your teal and light blue yarns. For the mountains, I find it effective to follow the slope of the peak. Glue lengths of yarn parallel to the angled mountain sides to emphasize their height. -
Add the Sun:
Using the mustard yellow yarn, apply a dot of glue in the very center of your sun circle. Coil the yarn tightly outwards in a spiral until you reach the navy blue border.
Step 3: Sculpting the Clouds
-
Base Cloud Layer:
For the flattest clouds, outline the shape with white chenille yarn and fill the center with horizontal zigzag lines or tight coils. -
Build Dimension:
To create the puffy 3D effect seen in the photo, apply a second layer of yarn directly on top of the first layer in the cloud centers. This builds physical height. -
The Bottom Cloud Bank:
Use the cream or beige yarn for the large bottom center cloud to add warmth. Instead of flat lines, create distinct spiral swirls (like cinnamon rolls) and glue them side-by-side to mimic rolling cumulus shapes. -
Highlighting:
Cut short snippets of pure white yarn. Glue these along the top edges of your beige and teal clouds to act as sunlight highlights.
Level Up: Texture Mix
Mix yarn weights! Use thinner cotton yarn for the distant mountains and ultra-thick blanket yarn for foreground clouds to exaggerate depth.
Step 4: Finishing Touches
-
Inspect for Gaps:
Look closely at the canvas for any peek-through spots. Use tweezers to insert tiny snipped pieces of matching yarn into any holes. -
Clean Up Strands:
Run a lint roller gently over the surface or pick off any wisps of hot glue spiderwebs that may have formed during the process. -
Prepare the Border:
For the edge, you can either finger-knit a long chain of white yarn or simply twist two strands of white yarn together. -
Attach the Frame:
Apply a thick bead of glue along the outer edge of the canvas. Press your purely white chain or twisted yarn along the perimeter to frame the artwork cleanly.
Hang your soft masterpiece near a window to let the natural light play off the textured layers

PENCIL GUIDE
Understanding Pencil Grades from H to B
From first sketch to finished drawing — learn pencil grades, line control, and shading techniques.
Explore the Full Guide
Easy Heart Motif Yarn Painting
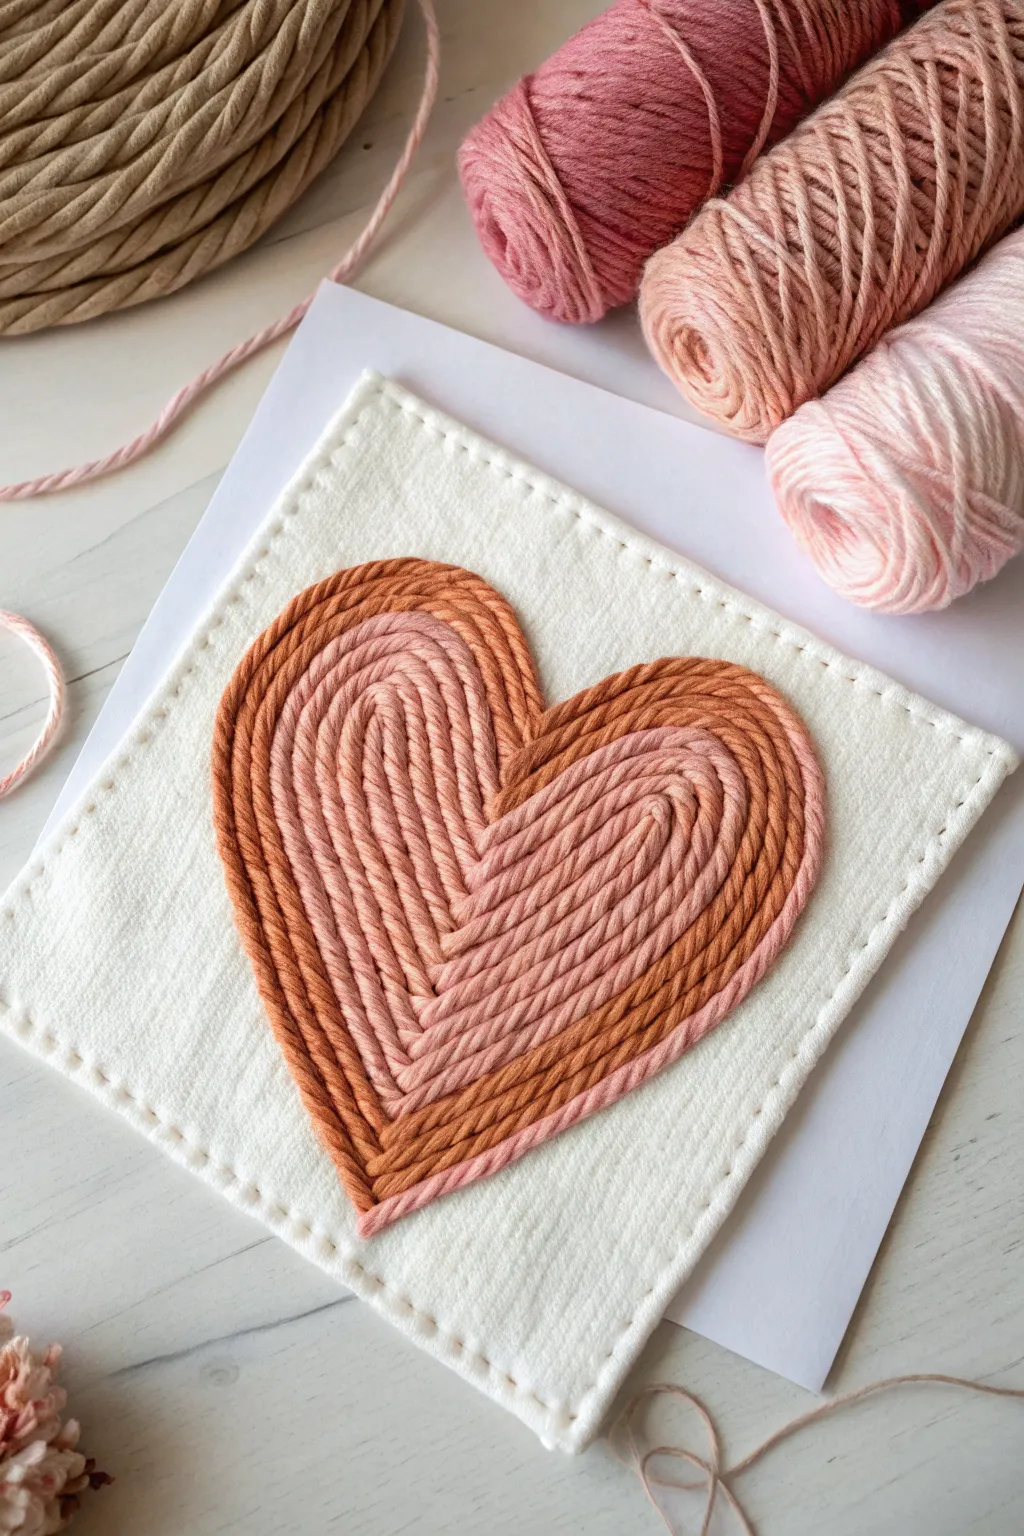
This charming, textured piece uses the technique of yarn painting to create a dimensional heart motif on a felt background. By layering strands of macrame cord in warm gradient shades, you’ll build a lovely tactile design perfect for a framed accent or greeting card.
Step-by-Step
Materials
- Thick white felt or stiff fabric backing (approx. 6×6 inches)
- Macrame cord or thick cotton yarn in three colors: dark rust, muted coral, and pale pink
- Fabric glue or strong clear craft glue
- Sharp detail scissors
- White embroidery floss or thick thread
- Large embroidery needle
- Tweezers
- Cardstock (for backing, optional)
- Pencil or disappearing ink fabric marker
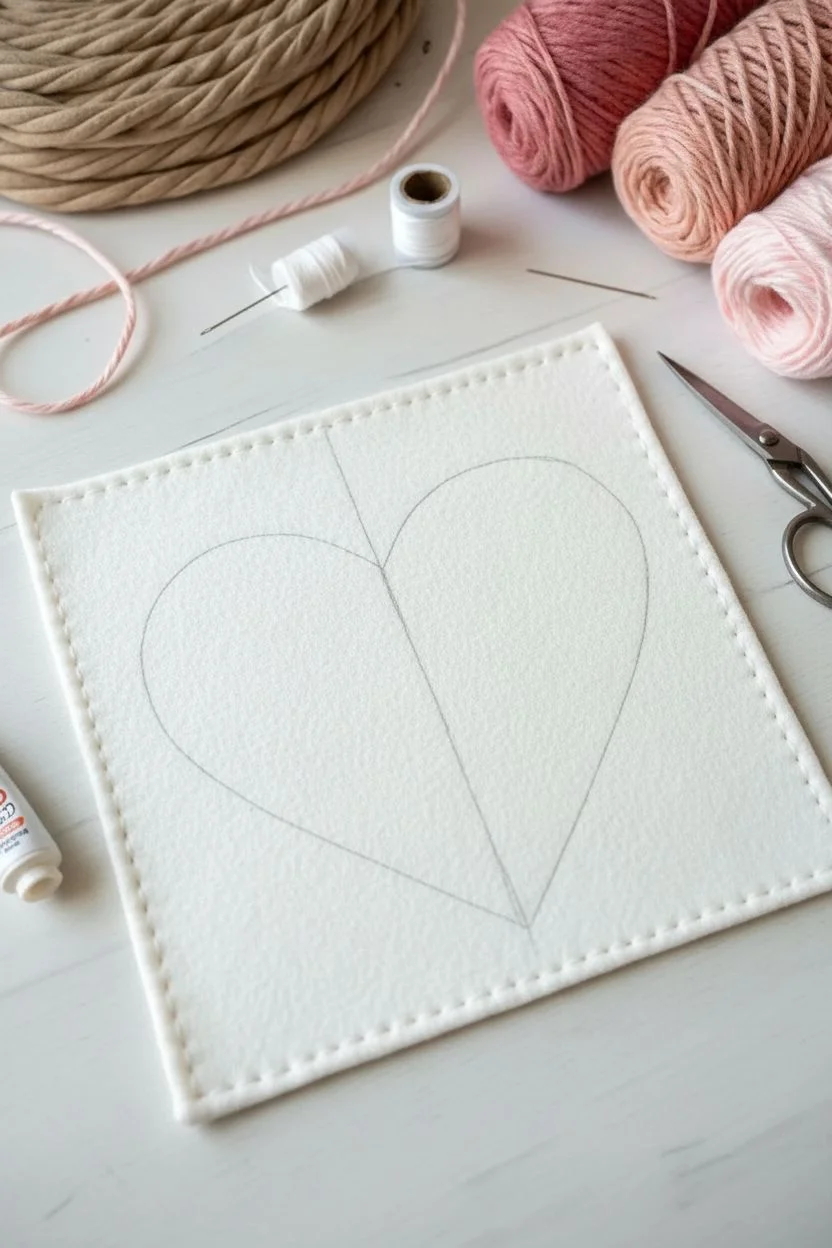
Step 1: Preparing the Base
-
Cut the foundation:
Start by cutting your white felt into a precise square. A 6×6 inch square works well for this design, but you can adjust the size based on your preference. -
Outline the heart:
Lightly sketch a large heart shape onto the center of the felt using a pencil or disappearing ink marker. This will serve as your guide for placing the cords. -
Draw center guide:
Draw a faint vertical line straight down the center of the heart, from the dip at the top to the point at the bottom. This helps keep your V-shapes symmetrical. -
Stitch the border:
Using white embroidery floss and a needle, create a decorative running stitch or blanket stitch around the entire perimeter of the felt square. This adds a finished look before you start gluing.
Keep it Tight
Use tweezers to push each new row of cord firmly against the previous one while the glue is wet. This eliminates gaps and hides the white felt background.
Step 2: Creating the Core
-
Cut the center cord:
Take your lightest pink cord. Cut a piece that is long enough to form the very center V-shape of the heart. It needs to bend at the bottom point and reach up towards the top dip. -
Glue the first V:
Apply a thin line of fabric glue along your center guide line. Fold the pink cord in half to create a sharp ‘V’ and press it into the glue, with the point of the V sitting near the bottom of your heart outline. -
Secure the top curves:
Gently curve the tops of this first cord inwards so the cut ends meet in the center dip of the heart. Glue them down firmly. This forms the tiny central heart shape.
Glue Overflow?
If glue squeezes out between cords, don’t wipe it immediately as it smears. Let it dry until tacky, then pick it off with a toothpick or needle.
Step 3: Layering the Strands
-
Measure the second layer:
Using the same light pink color, measure a new piece of cord that will wrap around the outside of your first central piece. -
Apply glue for layer two:
Run a bead of glue directly alongside the outer edge of the first cord. -
Press and shape:
Press the second cord into the glue, starting at the bottom point and working your way up both sides. Use tweezers here to keep your fingers clean and to nudge the cords tightly together. -
Switch colors:
After about 3-4 rows of the pale pink, switch to the muted coral color. Cut a length of cord, apply your glue line, and press the new color snugly against the previous pink row. -
Form the bottom point:
When gluing the bottom point of the heart, I find it helpful to pinch the cord firmly to create a sharp angle before pressing it down. This keeps the heart shape distinct rather than rounded. -
Continue the gradient:
Add 3-4 rows of the coral color, ensuring the curves at the top of the heart remain smooth and the bottom point stays sharp. -
Add the final border:
Switch to your darkest rust color for the final 2-3 outer rows. Apply the glue carefully to follow the outer sketched line of your heart.
Step 4: Finishing Touches
-
Trim ends:
Once all rows are glued, inspect the top dip of the heart where all the cord ends meet. Use sharp scissors to trim any frayed edges so they sit flush against each other. -
Clean up fuzz:
Using fine-point scissors, carefully snip away any stray fuzz or fibers that are sticking up from the surface of the cords to give it a neat appearance. -
Press flat:
Place a piece of wax paper over the heart and set a heavy book on top for about 30 minutes. This ensures the glue bonds evenly and the project lays flat. -
Mount (Optional):
If you wish to make this into a sturdy card or wall art, glue the finished felt square onto a piece of heavy cardstock or mount board.
Your textured heart art is now ready to add a cozy touch to your wall or serve as a heartfelt gift
Mandala-Style Circular Yarn Painting
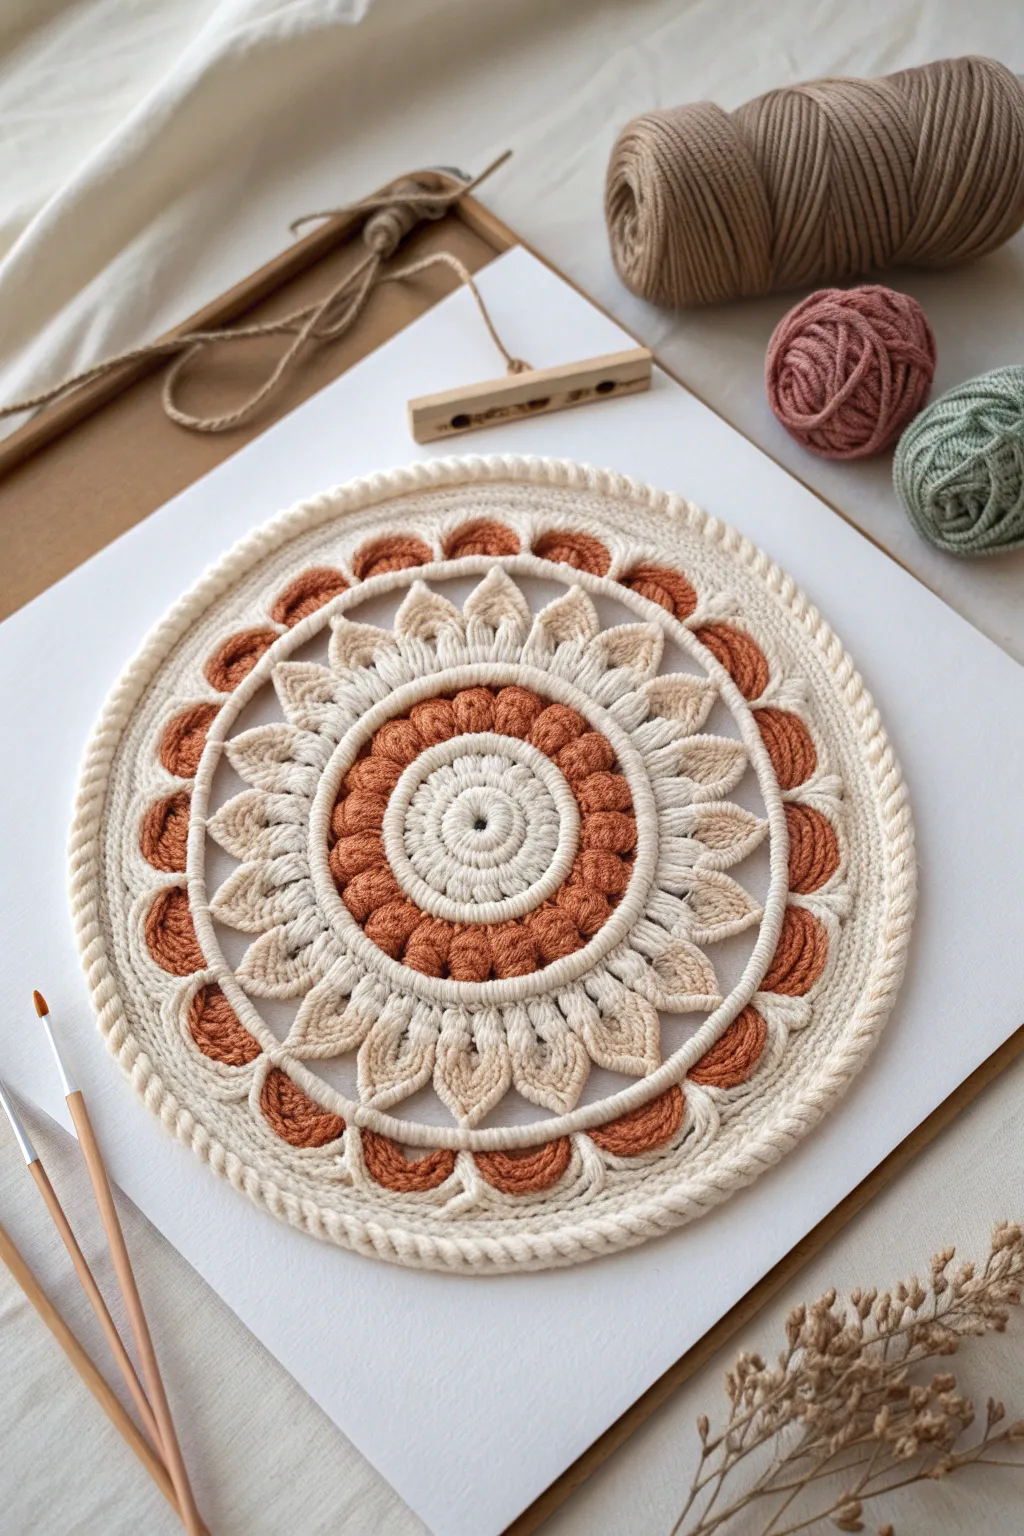
This project creates striking textile art that mimics the intricate knots of macrame without typing a single one. By carefully layering yarn strands in a radial mandala pattern, you’ll build a textured, dimensional centerpiece that brings warmth and bohemian flair to any wall.
Step-by-Step Guide
Materials
- Thick cotton macrame cord (3mm or 4mm, natural/cream)
- Medium weight yarn (terracotta/rust color)
- Finer yarn (beige or light sand)
- Sturdy white backing board (heavy cardstock, mount board, or foam core)
- Tacky glue or heavy-duty craft glue (clear drying)
- Sharp scissors
- Compass and pencil
- Tweezers (precision placement tool)
- Comb (for brushing out fringe, optional)
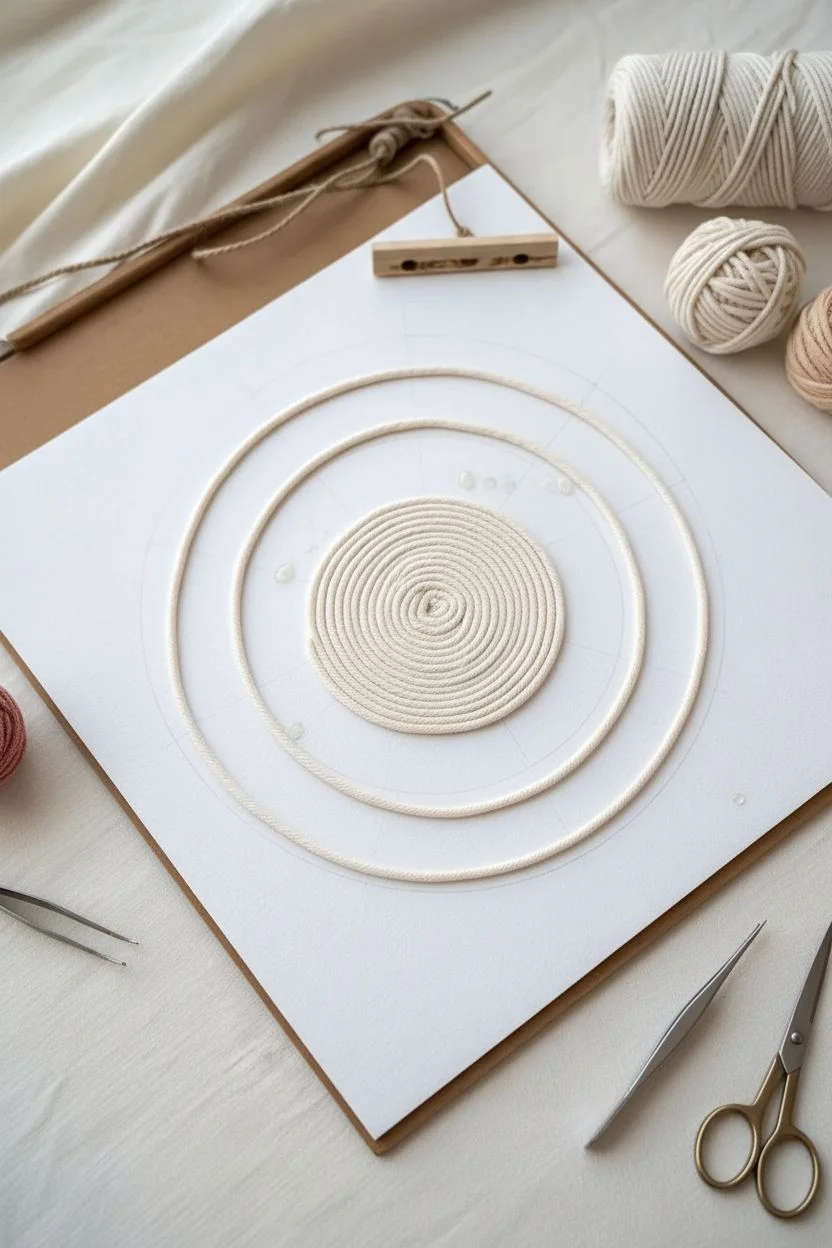
Step 1: Base Preparation
-
Cut the Base:
Start by cutting your white backing board into a perfect square or leaving it rectangular if preferred. Using a compass, draw a large circle in the center (about 8-10 inches diameter) which will mark the outer boundary, then mark several concentric circles inside to guide your different pattern zones. -
Create the Center:
Begin at the very dead center. Apply a small dot of glue and coil a piece of the cream macrame cord into a tight spiral. Continue coiling until you have a solid disc about 1.5 inches wide. -
Add the First Ring:
Switch to a slightly thinner cord or simply continue with the cream cord. Create a distinct ring around your central spiral. I find it helpful to cut individual lengths of cord for each ring rather than one continuous piece, as this keeps the circle tension-free.
Tweezer Trick
Use the back end of your tweezers or a cuticle stick to push the yarn strands firmly into the glue without getting your fingers sticky or flattening the yarn too much.
Step 2: Building the Core Patterns
-
The Puff Stitch Illusion:
Create the illusion of crochet ‘puff stitches’ using your terracotta yarn. Cut 1-inch pieces of thick yarn or bundle multiple strands of thinner yarn. Glue these short bundles radially around the center cream disc, pressing them close together so they stand up slightly for texture. -
Border the Puffs:
Enclose this terracotta ring with another clean line of the cream macrame cord. Carefully glue it down, ensuring it presses against the ends of the terracotta bundles to hide any frayed edges. -
Forming the Petals:
For the prominent petal layer, you will need to shape the yarn before gluing. Cut cream cord into equal lengths (approx. 2 inches). Pinch the ends of each piece together to form a tear-drop or leaf shape. -
Placing the Petals:
Glue these loop-shapes around your central ring. Ensure the pointed ends face outward and the rounded bases nestle against the interior circle. Use tweezers to nudge them into perfect symmetry. -
Filling the Negative Space:
If there are significant gaps between your petals, you can glue tiny snippings of beige yarn inside the petal loops to add depth, though leaving the white background visible also creates a crisp, modern look.
Step 3: Outer Details and Fringe
-
The Scalloped Ring:
Draw lightly with your pencil to mark where the scallops will sit. Take the terracotta yarn again and glue small, semi-circle arches that bridge the gap between each cream petal tip. -
Outline the Scallops:
To define the shape, run a single strand of cream cord over the top of each terracotta arch. This creates a continuous wavy line that frames the mandala. -
Create the Outer Rim:
Glue a final, thick ring of cream macrame cord around the entire design. This acts as a frame. For extra texture, you can twist two strands together before gluing to mimic a rope effect. -
Twisted Edge:
For the outermost border, verify the rope effect is consistent. If using single ply cord, manually twist it as you press it into the glue line to ensure it looks like heavy nautical rope. -
Clean Up:
Once the glue is tacky but not fully set, use your tweezers to remove any stray fibers or glue strings. If any cord ends are fraying messily, give them a tiny trim with sharp scissors for a polished finish. -
Initial Drying:
Let the piece sit flat for at least an hour. Gravity is your friend here; propping it up too soon might cause the heavier outer rope to slide out of position.
Go Multimedia
Add small wooden beads or real dried seeds into the center of the cream petals for a mixed-media texture that complements the yarn.
Step 4: Finishing Touches
-
Add Dimension:
Look at the center terracotta ‘puffs’ again. If they look too flat, simply glue a second layer of short yarn snippets directly on top of the first layer to build real 3D height. -
Final Inspection:
Check the symmetry of your cream petals. You can gently push the yarn while the glue is curing to correct any uneven spacing. -
Seal (Optional):
For longevity, especially if this will be displayed without glass, you can lightly spray the yarn with a matte fixative or even hairspray to prevent dust accumulation and fuzzing.
Once fully dry, your textured yarn mandala is ready to be framed or displayed on a mini easel as a cozy piece of decor


Sunburst Rays With Alternating Yarn Textures
Create a stunning tactile focal point with this geometric yarn painting that mimics the warmth of a rustic sunburst. By playing with yarn weights and directions, you will build a textured centerpiece featuring a spiraled copper core radiating into bold navy points and delicate accent rays.
Step-by-Step
Materials
- Small square artist canvas (8×8 or 10×10 inches)
- Thick cotton or wool yarn in cream/off-white (for background)
- Medium-weight twisted yarn in rust/copper orange
- Medium-weight yarn in navy blue
- Tacky glue or strong clear-drying craft glue
- Fine-tip glue applicator or toothpick
- Sharp fabric scissors
- Tweezers (curved tip is best)
- Pencil and ruler
- Compass (optional)
Step 1: Preparation & Background
-
Prepare the canvas:
Begin by covering your square canvas with the cream background yarn. Apply an even layer of tacky glue to the entire surface. -
Establish the base layer:
Starting from the top left corner, lay strands of critical cream yarn horizontally across the canvas. Press them close together so no canvas shows through. -
Trim the edges:
Cut the yarn ends cleanly at the canvas edge. If you prefer a wrapped look, you can wrap the yarn around to the back of the frame, but a flush cut works perfectly for this framed style. -
Dry partially:
Let this background layer dry for about 30 minutes until it’s tacky but stable enough to work on top of.
Visible Glue Globs?
If glue seeps between yarn strands, don’t wipe wet glue! It smears. Wait for it to dry completely clear, then pick off any shiny excess residue carefully with fine-point tweezers or a needle.
Step 2: The Central Spiral
-
Mark the center:
Find the exact center of your canvas and mark it lightly with a pencil or a pin. -
Start the coil:
Apply a generous dot of glue at the center mark. Take the end of your rust/copper yarn and create a tight, flat coil. I find tweezers helpful here to keep the very center tight. -
Expand the sun:
Apply glue in a spiral path outward from the center. Continue winding the copper yarn flat against the background, pressing firmly as you go. -
Finish the core:
Stop winding when the circle reaches about 3-4 inches in diameter (depending on your canvas size). Cut the yarn and tuck the end flush against the previous round with a dab of glue.
Step 3: Creating the Rays
-
Plan the rays:
Lightly mark 12 evenly spaced points around the circumference of your yarn circle to guide where the blue rays will emerge. -
Form the navy peaks:
Cut 24 short lengths of navy yarn (about 2 inches long). Take two pieces, glue them side-by-side emerging from the circle, and angle them together to meet at a sharp point. -
Fill the triangles:
Fill the inside of this V-shape with shorter lengths of navy yarn, laid vertically or following the angle of the V, until the triangle is solid and dense. -
Repeat around the circle:
Continue this process for all 12 points, ensuring the navy spikes are roughly the same size and length.
Level Up: Texture
Mix materials for the center spiral! Alternate between thick wool yarn and thin metallic embroidery floss every few rounds to create a sophisticated, shimmering core.
Step 4: Detailed Accents
-
Add the outer rays:
Cut lengths of the rust yarn to extend from the tip of each navy triangle toward the edge of the canvas. -
Knot the ends:
Tie a simple overhand knot at the very end of each rust yarn segment to create those charming little ‘pollen’ bobbles. -
Secure the extensions:
Glue these knotted strands extending directly from the tips of the blue triangles. The knot should sit freely on the canvas surface. -
Create secondary rays:
For added dimension, place shorter single strands of rust yarn between the main blue points, radiating outward from the central circle. -
Final press:
Once all yarn is placed, gently press down on the entire design with a clean book (use wax paper between them!) to ensure uneven strands adhere well while drying.
Hang your finished piece in a spot that gets angled sunlight to highlight the beautiful ridges of the yarn
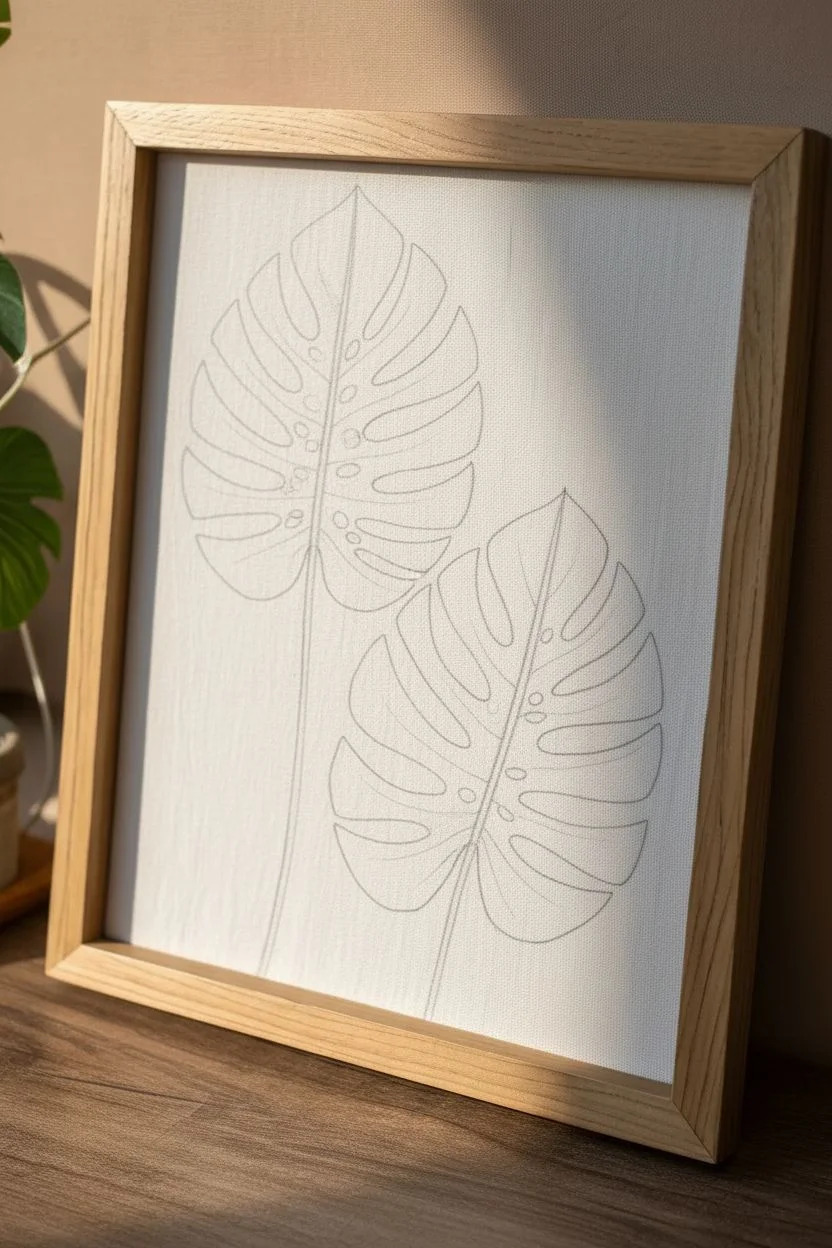
Tropical Leaf Shapes in Yarn Painting
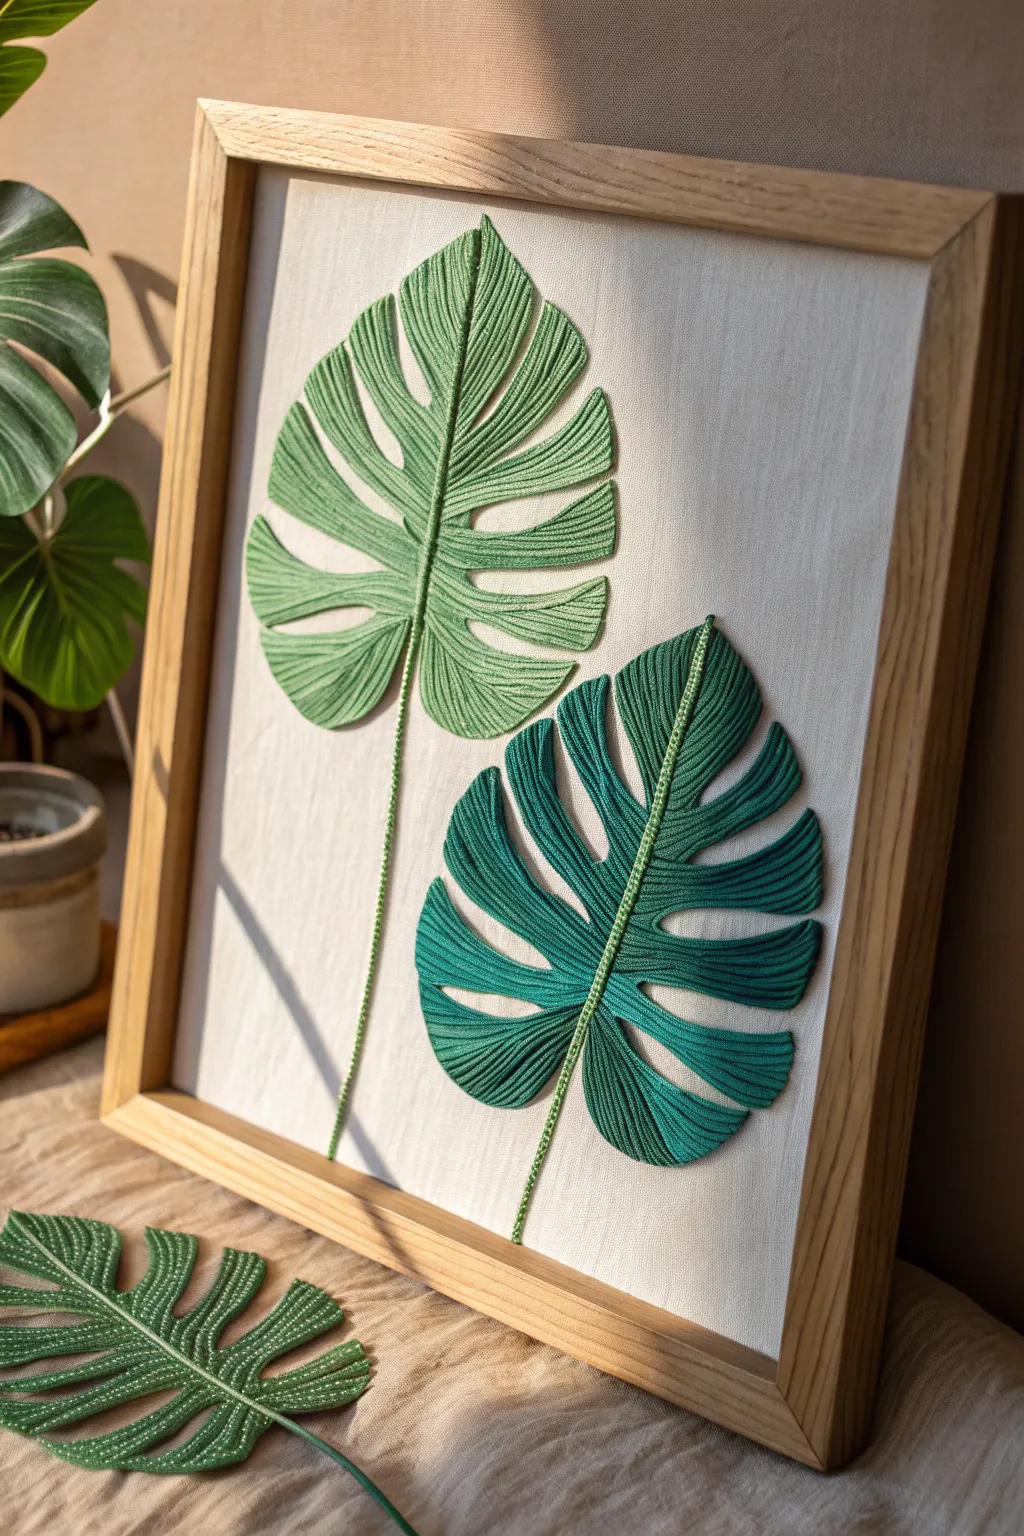
Bring the vibrancy of the jungle indoors with this tactile yarn painting project that uses layering techniques to create stunning, dimensional Monstera leaves. The finished piece features a striking interplay of light and dark threads against a neutral canvas, mimicking the natural veins of tropical foliage.
How-To Guide
Materials
- Stretched canvas or canvas board (approx. 16×20 inches)
- Light wooden float frame
- Cotton yarn in Sage Green (light)
- Cotton yarn in Teal or Emerald Green (dark)
- PVA craft glue or clear-drying tacky glue
- Fine-tip applicator bottle for glue
- Fabric scissors or sharp embroidery snips
- Tweezers
- Pencil
- Monstera leaf template (printed or hand-drawn)
Step 1: Preparation & Outline
-
Prepare the canvas:
Ensure your stretched canvas is clean and taut. If you are using a loose canvas sheet, mount it securely to a hard backing board to prevent sagging under the weight of the glue and yarn. -
Trace the design:
Lightly sketch two Monstera leaves on the canvas using a pencil. Position the left leaf slightly higher than the right one to create a balanced composition. Draw a central spine for each leaf that extends down into a stem. -
Define the sections:
Within your sketch, draw simple lines extending from the central spine to the leaf edges to mimic veins. These lines will guide your yarn placement later, ensuring the direction of the ‘painting’ looks organic.
Sticky Situation?
If glue oozes up between strands, don’t wipe it while wet! Let it dry completely clear, then use a sturdy needle or toothpick to pick off any shiny residue.
Step 2: Creating the Light Leaf
-
Outline the spine:
Start with the upper, lighter green leaf. Apply a thin line of glue down the central spine. Cut a piece of Sage Green yarn to fit and press it gently into the glue. I like to twist two strands together for the spine to give it extra definition. -
Outline the perimeter:
Run a bead of glue along the outer edge of one leaf section. Lay a single strand of Sage Green yarn along this curve to create a crisp border. This ‘dam’ will keep your filling neat. -
Begin the fill:
Apply glue to the interior of that first leaf section. Start placing lengths of yarn parallel to the veins, moving from the central spine outward toward the edge. Cut each strand perfectly to fit the space. -
Maintain flow:
Continue filling each section of the leaf. Ensure your yarn strands are packed tightly against each other so no white canvas shows through between the threads. Use tweezers to nudge them into place if they gap. -
Form the stem:
For the long stem, twist three strands of Sage Green yarn together tightly. Glue this twisted cord along your pencil line, extending from the base of the leaf down to the bottom edge of the canvas.
Step 3: Crafting the Dark Leaf
-
Establish the dark spine:
Move to the lower right leaf. Using the Teal or Emerald yarn, create the central spine just like you did for the first leaf. Consider wrapping this spine with a contrasting lighter thread for a detailed ‘vein’ effect as seen in the photo. -
Border technique:
Outline the sections of this second leaf with the dark yarn. The crisp edges are crucial here to distinguish the iconic splits (fenestrations) of the Monstera shape. -
Directional filling:
Fill the sections with the dark yarn rows. Pay close attention to the angle; the yarn should fan out slightly as it moves from the center to the wider leaf edge. -
Add texture details:
To mimic the ridge texture seen in the reference, you can overlay a second single strand of yarn on top of your filled sections periodically, creating subtle raised ‘ribs’ across the leaf surface. -
Complete the stem:
Create the twisted stem for the dark leaf, ensuring it crosses behind or beside the first leaf’s stem naturally. Glue it down firmly.
Go 3D
Make a loose leaf (like the one on the table) by gluing yarn onto parchment paper instead of canvas. Once dry, peel it off and glue just the base to the frame for a pop-out effect.
Step 4: Finishing Touches
-
Clean up:
Once the glue is fully dry (usually 24 hours), check for any stray fibers or visible glue blobs. Snip fuzzy ends carefully with your sharp embroidery scissors. -
Erase guidelines:
If any pencil marks are still visible around the edges of your yarn, gently erase them. Be careful not to snag the threads. -
Frame the art:
Place your finished canvas into the wooden float frame. Secure it from the back according to the frame’s hardware instructions.
Hang your botanical yarn painting in a sunny spot to let the textured shadows play across the surface.
Night Sky Constellations With Yarn Lines
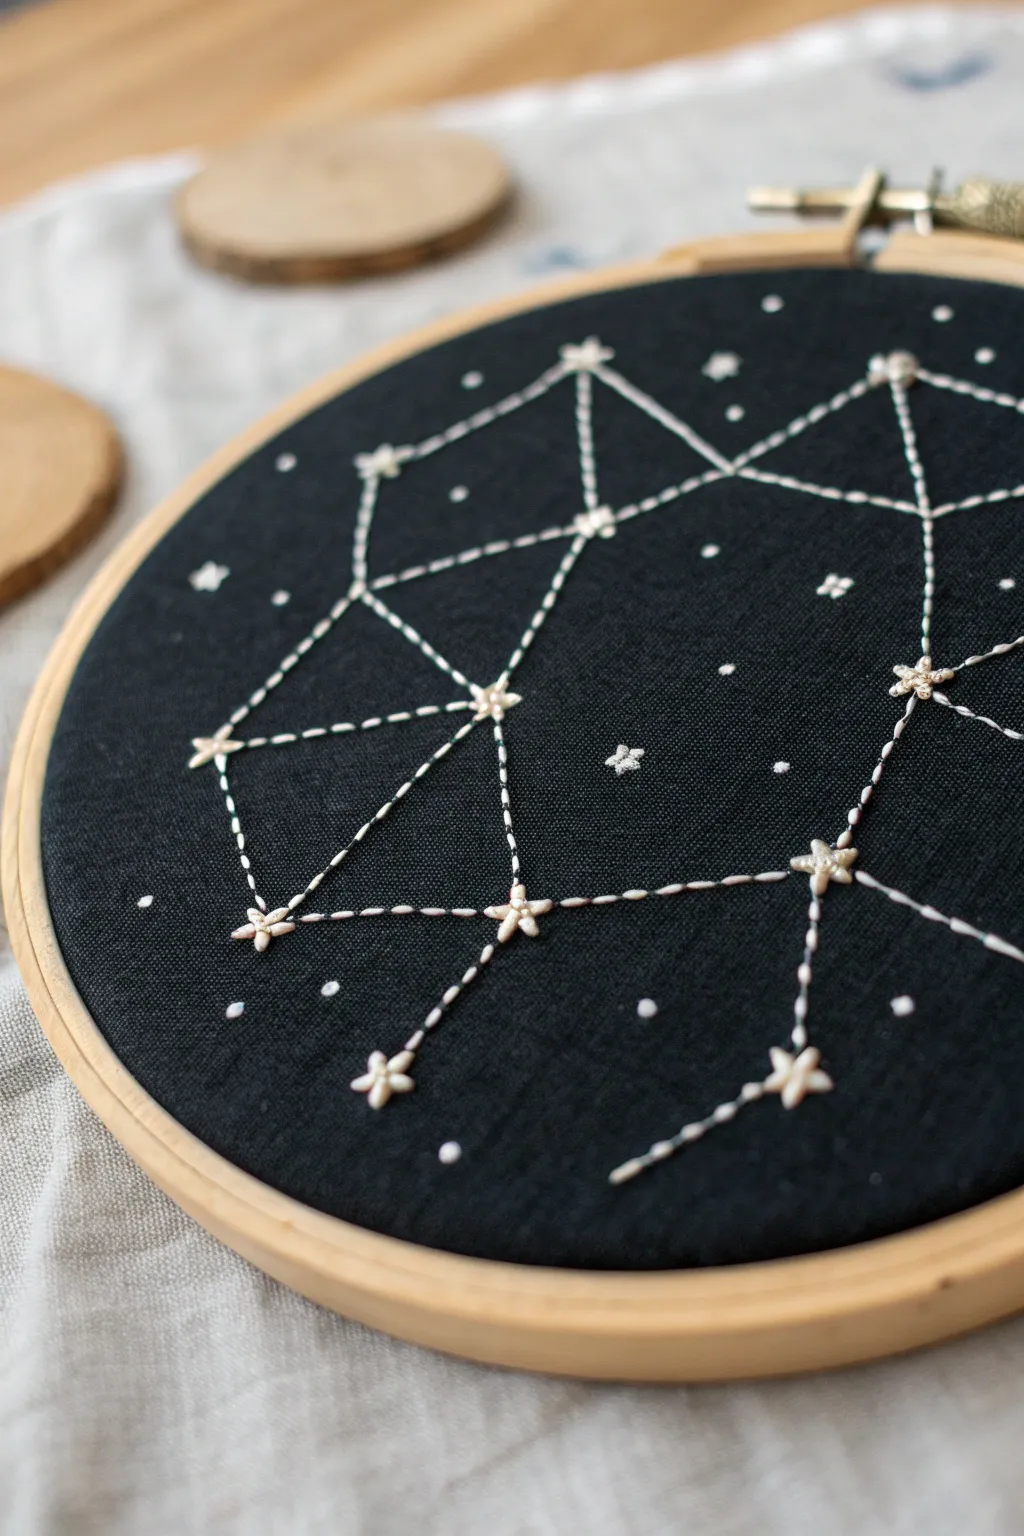
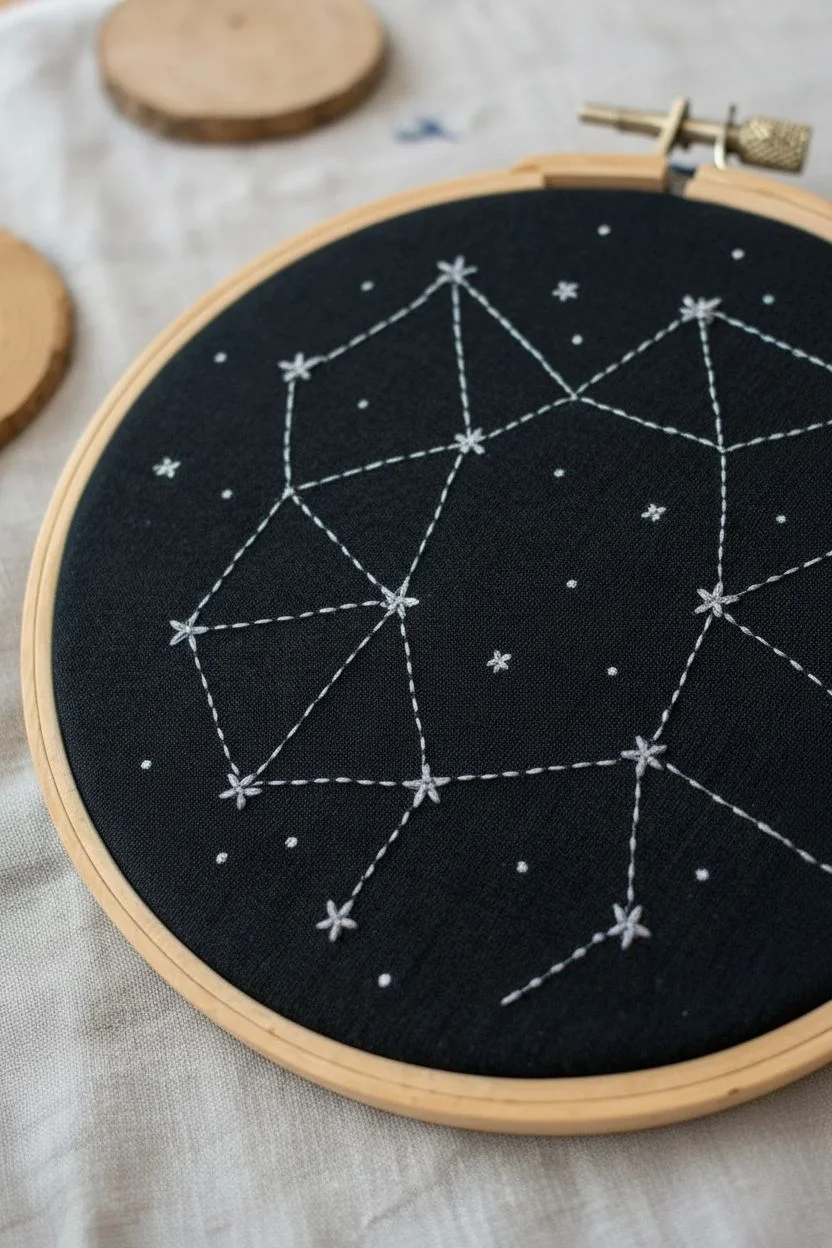
Capture the magic of a starry night with this elegant embroidery project featuring geometric constellations on a dark backdrop. The simple white thread creates a striking contrast against the fabric, resulting in a piece that feels both modern and timeless.
Step-by-Step Guide
Materials
- Wooden embroidery hoop (6 or 8 inch)
- Dark navy or black linen/cotton fabric
- White embroidery floss or thin white yarn
- Embroidery needle (size appropriate for your thread)
- White fabric pencil or tailors chalk
- Scissors
- Ruler
Step 1: Preparation & Mapping
-
Hoop the Fabric:
Begin by pressing your dark fabric to remove any wrinkles. Loosen the screw on your embroidery hoop, separate the rings, and place the fabric over the inner ring. Press the outer ring down and tighten the screw, pulling the fabric taut like a drum. -
Plan Your Stars:
Using a white fabric pencil, lightly mark the positions of your main ‘stars.’ You can create a real zodiac constellation or design an abstract geometric shape like the one shown. -
Connect the Dots:
Lightly draw straight lines connecting your marked star points using a ruler. This will serve as a guide for your stitching to ensure straight, crisp lines. -
Thread the Needle:
Cut a length of white embroidery floss (about 18 inches). I prefer using all 6 strands for a thicker, more yarn-like appearance, but you can separate them for lines if you wish. Tie a knot at the end.
Glow Up Technique
Swap standard white floss for glow-in-the-dark embroidery thread. Your constellation will charge under lights and softly illuminate when the room goes dark.
Step 2: Stitching the Stars
-
Create the First Star:
Bring your needle up through the fabric at one of your marked star points. Stitch a small ‘X’ shape. -
Finish the Star Shape:
Add a vertical stitch and a horizontal stitch over the ‘X’ to create an eight-pointed star or snowflake shape. This forms the anchor points of your constellation. -
Repeat for Main Stars:
Continue this process for every major point in your constellation design, ensuring each star is roughly the same size for uniformity. -
Secure Your Thread:
If you run low on thread, knot it securely on the back of the work before starting a fresh piece.
Fixing Puckered Fabric
If stitches pull the fabric, your tension is too high. Loosen the hoop screw slightly, tug the fabric edges to re-tighten the drum, and continue with a gentler hand.
Step 3: Connecting the Lines
-
Start the Connectors:
Bring your needle up right next to one of your stitched stars, aiming for the path of your drawn guideline. -
Stitch the Lines:
Use a simple running stitch (up and down motion) to connect the stars. Keep your stitch lengths consistent—medium length stitches often look best for that dashed-line effect. -
Maintain Tension:
Be careful not to pull the thread too tight, which can pucker the fabric. The thread should lie flat against the dark background. -
Navigate Intersections:
When lines intersect or meet at a star, try to end a stitch right at the junction point for a clean, geometric look.
Step 4: Adding Atmosphere
-
Scatter Small Stars:
To fill the empty space, add single, tiny straight stitches or French knots in random spots around the main constellation. -
French Knot Technique:
For a round star, bring the needle up, wrap the thread around the needle twice, and insert it back down close to where it came up, pulling gently until tight. -
Vary the Sizes:
Make some background stars just tiny dots and others slightly larger cross-stitches to create depth and the illusion of a distant galaxy. -
Clean Up Marks:
Once all stitching is complete, gently dab away any visible white pencil marks with a damp cloth or a piece of tape depending on your marking tool. -
Finish the Back:
Trim excess fabric around the hoop leaving about an inch. Use a running stitch around the edge of the fabric and pull tight to gather it at the back, gluing it down if desired.
Now you have a piece of the night sky framed and ready to hang on your wall
Topographic Map Contour Yarn Painting
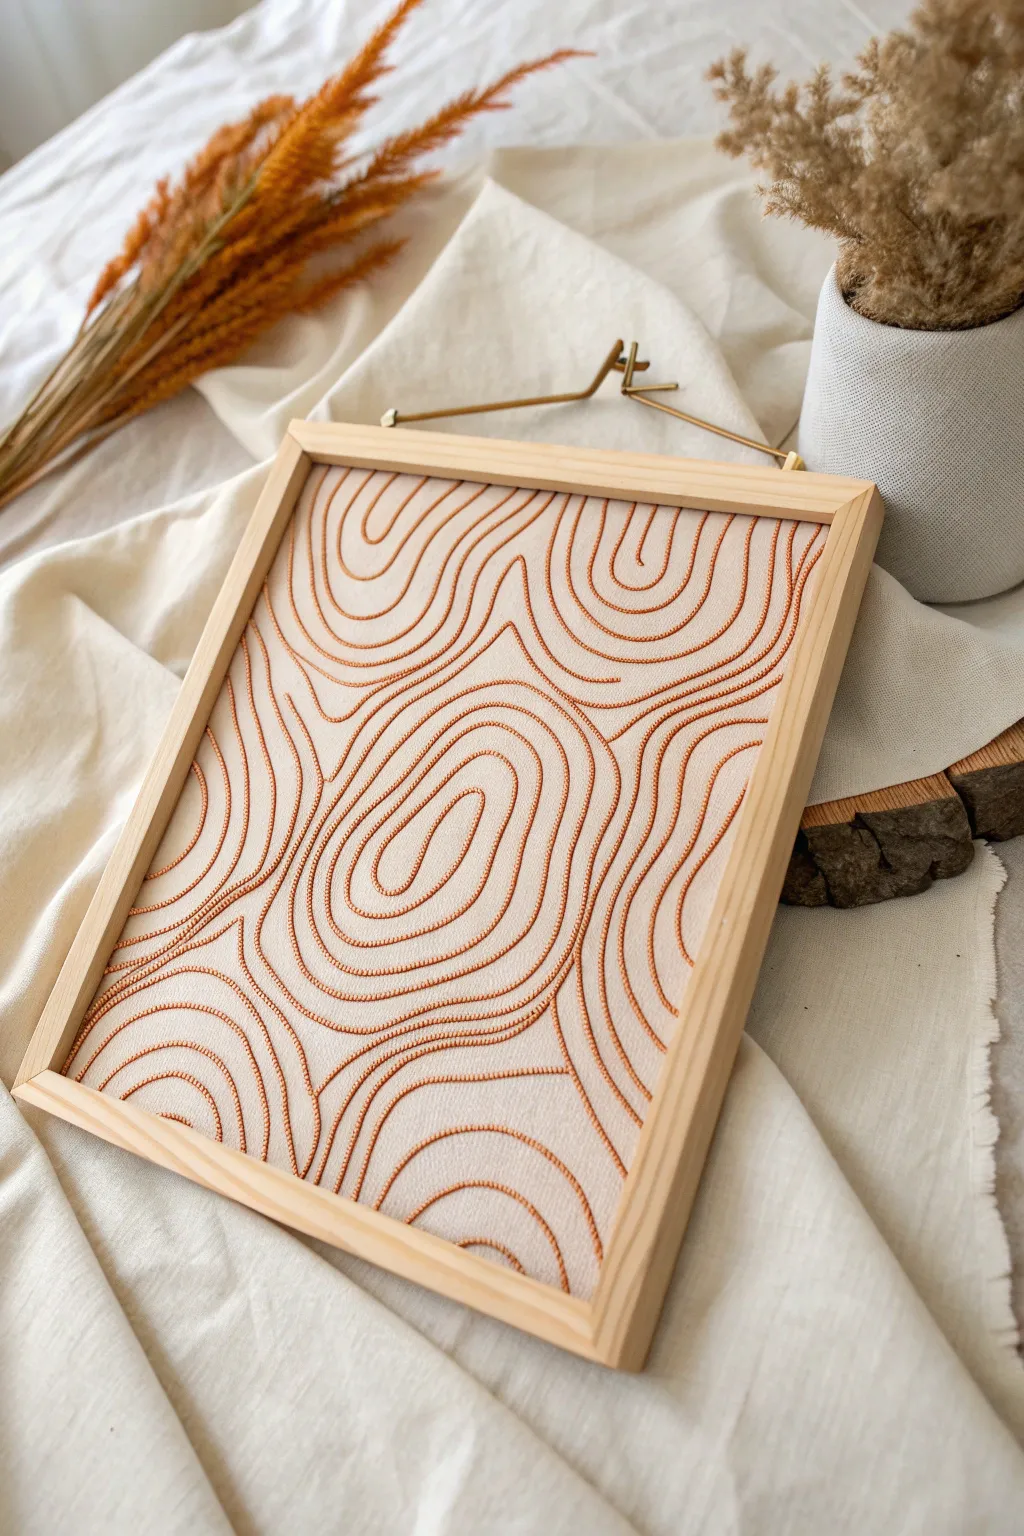
Bring the calming fluidity of topographic maps into your home with this textured yarn painting. Using simple contour lines and warm, earthy tones, you’ll create a piece that feels organic and modern.
How-To Guide
Materials
- Rectangular wooden frame (approx. 8×10 or 11×14 inches)
- Beige or cream linen fabric (a tight weave works best)
- Canvas stretcher bars (usually fit inside your chosen frame)
- Skein of copper or rust-colored yarn (worsted or bulky weight)
- Clear-drying craft glue (Tacky Glue or fabric glue)
- Fine-tip glue applicator bottle (essential for precision)
- Pencil for sketching
- Scissors
- Staple gun
- Tweezers (optional but helpful)
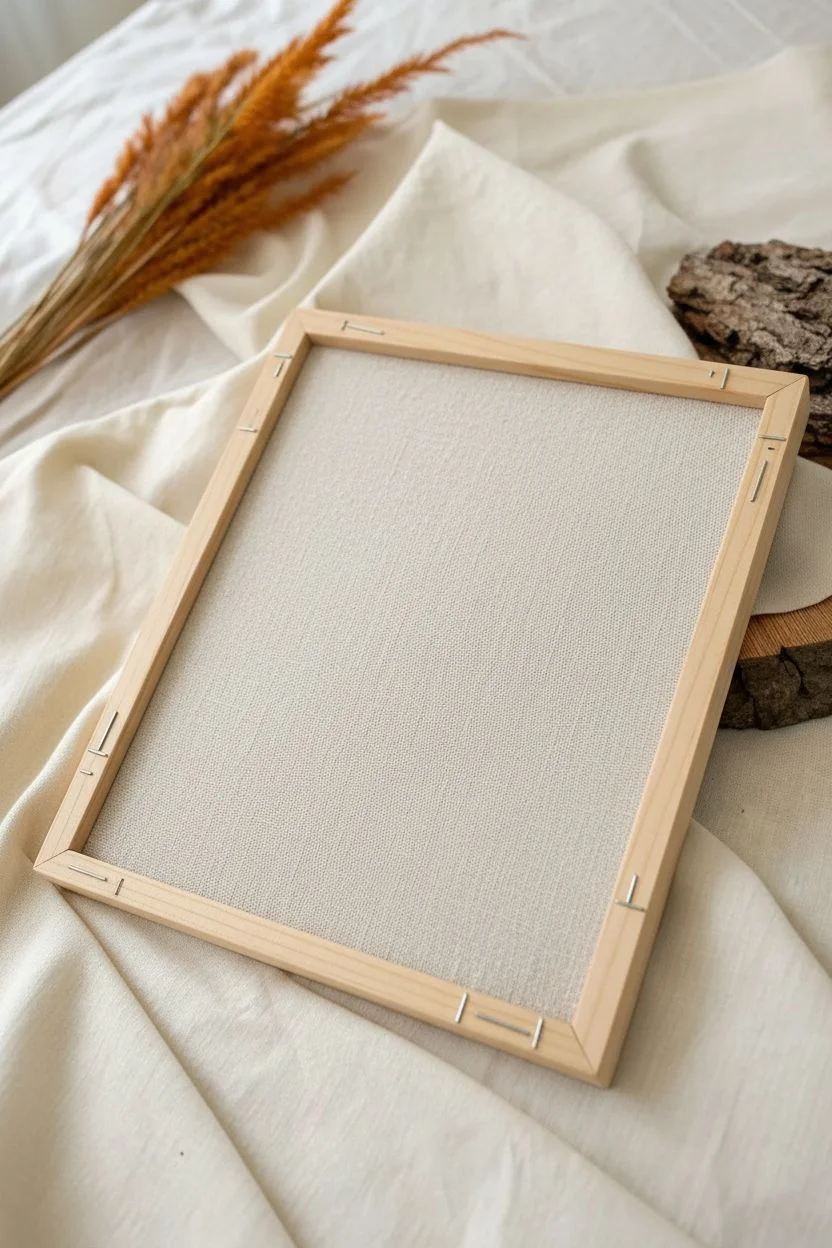
Step 1: Preparing the Canvas
-
Assemble the backing:
Begin by assembling your stretcher bars into a rectangle that will fit snugly inside your decorative wooden frame. Square up the corners to ensure a perfect fit. -
Stretch the fabric:
Cut your linen fabric so it’s about 2-3 inches larger than your stretcher frame on all sides. Lay the fabric face down and place the frame on top. -
Secure the linen:
Pull the fabric taut and staple it to the back of the stretcher bars. Start from the center of each side and work your way out to the corners, ensuring the fabric is drum-tight without warping the weave. -
Finish the corners:
Fold the corners neatly, almost like wrapping a present, and staple them flat so the frame will sit flush later. Trim any excess bulk.
Sticky Situation?
If you get glue on top of the yarn, don’t wipe it while wet! It will smudge and look shiny. Let it dry completely clear, then pick it off gently with tweezers.
Step 2: Designing the Typography
-
Analyze the pattern:
Look at reference images of topographic maps or wood grain. Notice how the lines never cross; they flow parallel to each other, creating ‘islands’ and swirls. -
Sketch the main shapes:
Lightly sketch your design onto the fabric with a pencil. Start by drawing 2-3 focal points—these are tight circular or oval swirls that anchor the composition. -
Fill the space:
Draw flowing lines that radiate out from your focal points. Let the lines bend around the centers, filling the negative space until the entire canvas is covered in a map-like pattern.
Tone on Tone
Try using a yarn color that is only a few shades darker than your fabric (like cream yarn on white linen) for a subtle, minimalist sculpture effect.
Step 3: Applying the Yarn
-
Prepare the glue:
Decant your craft glue into a fine-tip applicator bottle. This is crucial for avoiding globs and ensuring the glue line is thin enough for a single strand of yarn. -
Begin with the focal points:
Start applying glue over one of your central sketched swirls. Work in small sections—about 3-4 inches at a time—so the glue doesn’t skin over before you place the yarn. -
Lay the first strand:
Gently press the yarn onto the glue line. Do not stretch the yarn; simply lay it down. Stretching can cause it to pull back later, ruining your curves. -
Creating sharp turns:
When you reach a tight curve or loop, use tweezers or the tip of your finger to hold the yarn in place for a few seconds until the glue grabs hold. -
Cut and continue:
You don’t need to do this in one continuous strand. I prefer to cut the yarn at the edge of the frame or when starting a new distinct section to manage it better. -
Work outward:
Continue tracing your sketched lines with glue and yarn, moving from the focal points outward toward the edges of the frame. -
Maintain spacing:
Keep your yarn lines close but not touching. The negative space (the fabric showing through) is just as important as the yarn itself for creating that contour effect. -
Clean up edges:
When a line reaches the edge of the canvas, cut the yarn cleanly right at the border. You can add a tiny dab of glue to the cut end to prevent fraying. -
Final inspection:
Once all lines are filled, look for any spots where the yarn has lifted. Apply a tiny dot of glue under any loose sections and press down.
Step 4: Framing
-
Dry completely:
Let the piece sit flat for at least 4-6 hours, or overnight, to ensure the glue is fully cured. -
Insert into frame:
Place your yarn-covered canvas into the decorative wooden frame. Since the yarn adds texture, you likely won’t use glass. -
Secure the back:
Use framing points or small nails to secure the canvas inside the frame from the back side.
Hang your new textured artwork in a spot that catches side light to really emphasize the beautiful shadows of the yarn relief
Yarn Painting With Negative Space Silhouettes
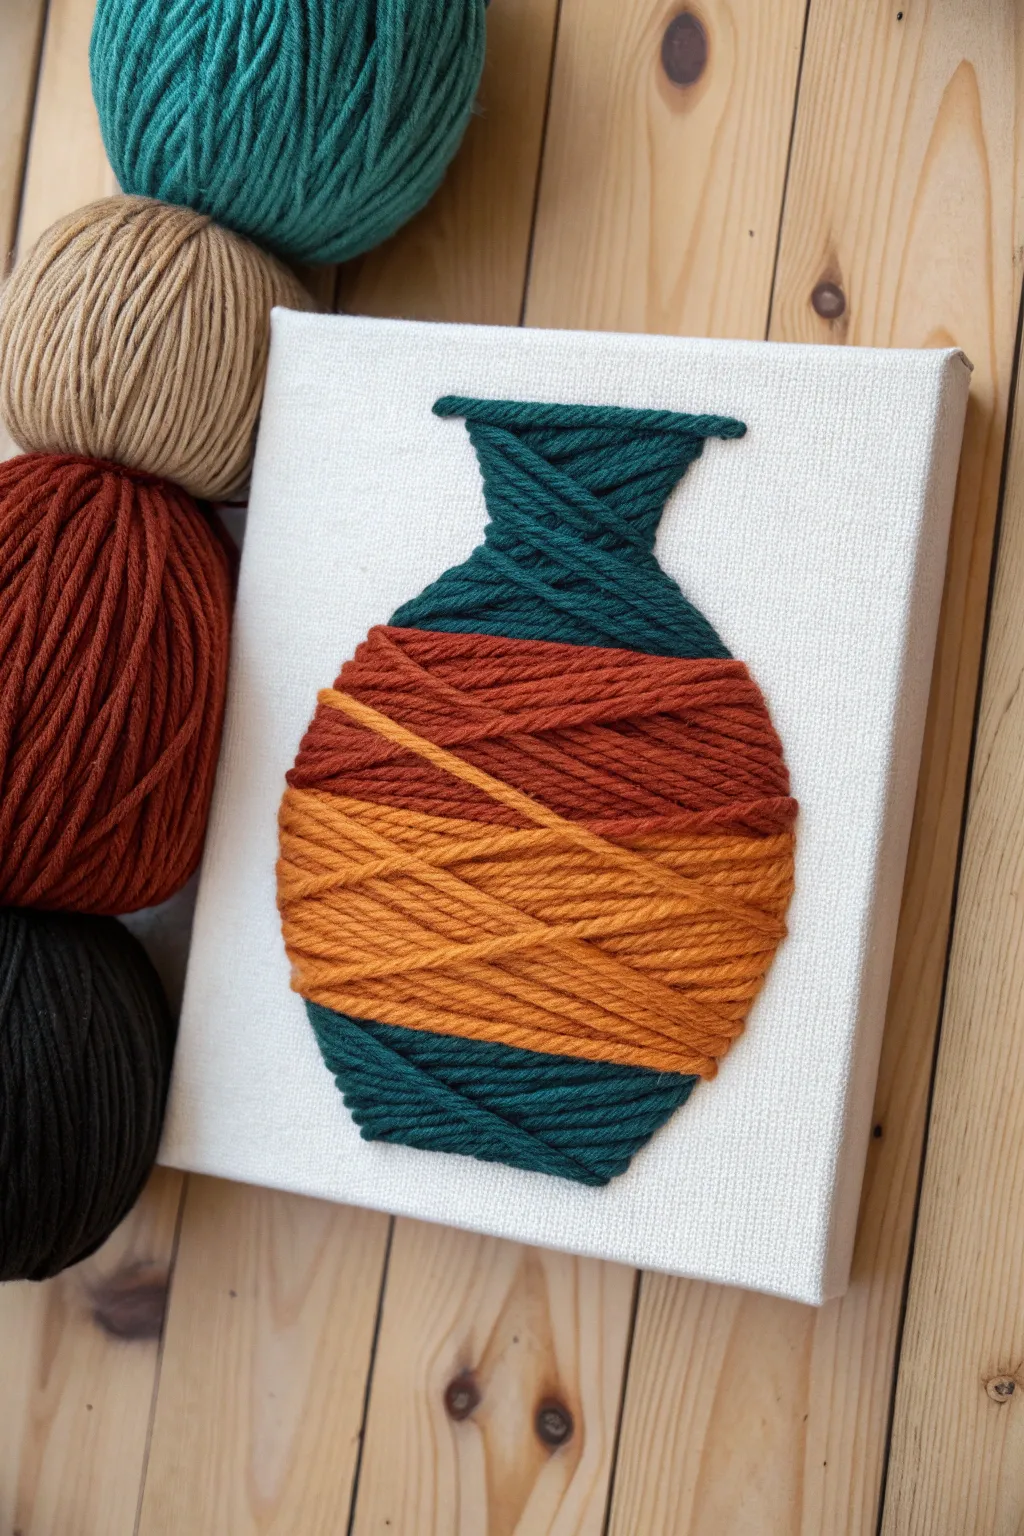
This project combines the rustic charm of thick yarn with a simple silhouette to create a textured 3D wall hanging. The result is a cozy, tactile piece of art that looks much more complicated to make than it actually is.
Step-by-Step Tutorial
Materials
- Small artist’s canvas (approx. 8×10 inches)
- Thick chunky yarn in teal, rust-red, and mustard yellow
- Pencil
- Cardstock or paper (for making a stencil)
- Scissors
- Craft glue or hot glue gun (hot glue is faster)
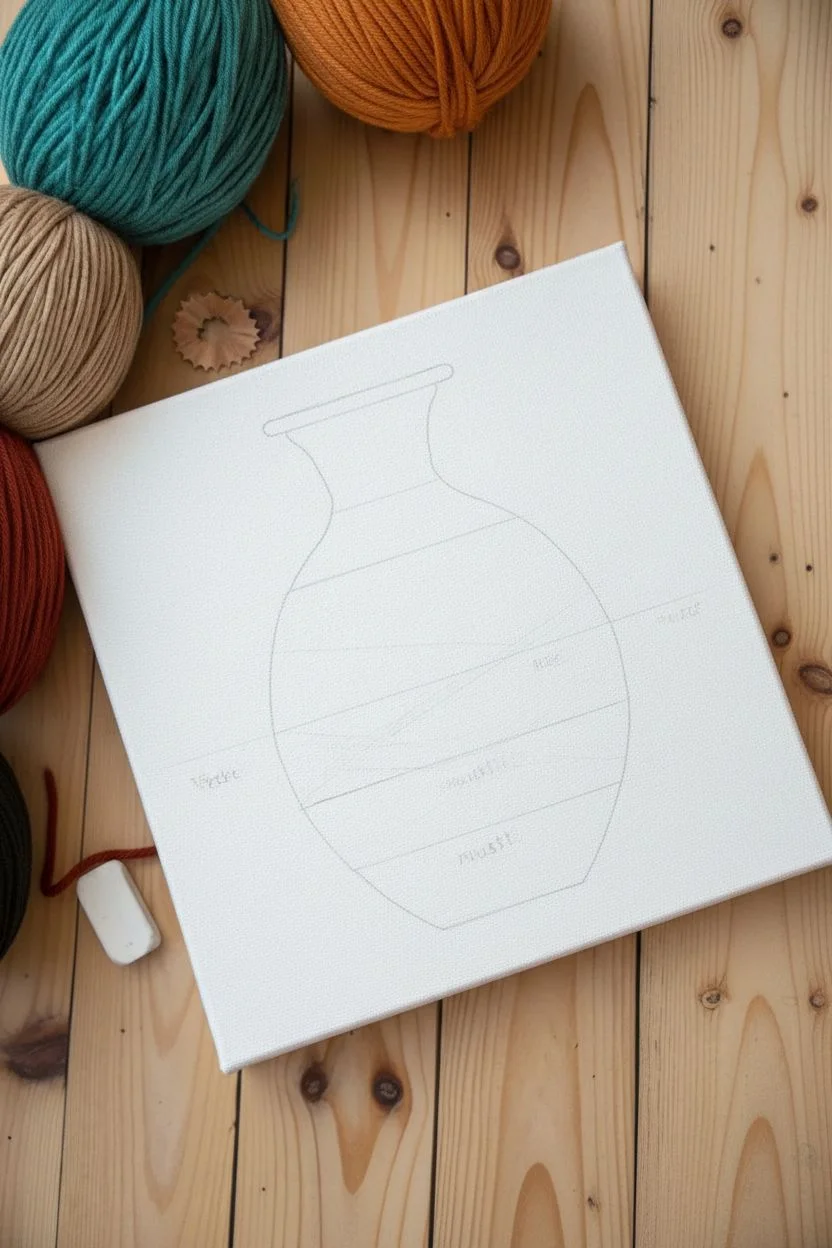
Step 1: Planning and Outline
-
Draft the vase shape:
Start by sketching a simple vase silhouette on paper or cardstock. Look for a shape with a bulbous bottom, a tapered neck, and a slightly flared rim to match the image’s style. -
Cut the stencil:
Cut out your paper vase shape using scissors. Fold the paper in half vertically before cutting if you want perfectly symmetrical sides. -
Trace onto canvas:
Center your paper template on the white canvas. Lightly trace the outline with a pencil so you have a guide for your yarn placement. -
Plan color blocks:
Using your pencil, draw faint horizontal lines across the vase shape to mark where color changes will happen. The example uses a teal base, a mustard middle, a rust upper section, and a teal neck.
Sticky Situation?
If using hot glue, you might get ‘strings’ across your canvas. Wait until the glue fully hardens, then gently rub them away with a clean cloth.
Step 2: Filling the Shape
-
Start at the base:
Apply a thin line of glue along the bottom edge of your drawn vase shape. Lay down your first strand of teal yarn horizontally, pressing it firmly into the glue. -
Build the bottom layer:
Work your way up the bottom section, gluing strands back and forth horizontally. Don’t worry about keeping the lines perfectly straight; slight angles add character. -
Trim edges carefully:
As you complete each row, snip the yarn ends so they fit neatly within your pencil outline. Aim for a clean edge that defines the silhouette. -
Switch to mustard yarn:
Once you reach your first pencil mark, switch to the mustard yellow yarn. Continue layering the strands horizontally, following the curve of the vase’s belly. -
Create overlaps:
For a more organic look, I like to let some strands slightly cross over others rather than stacking them perfectly parallel. This mimics the woven texture of a basket. -
Add the rust section:
Transition to the rust-red yarn for the upper body of the vase. Because the vase narrows here, your yarn pieces will get progressively shorter. -
Tackle the neck:
Switch back to the teal yarn for the neck. This area is tricky because it curves inward; use small dots of glue to secure the yarn ends precisely on the curved line. -
Form the rim:
Finish the top of the vase with a slightly wider horizontal strip of teal yarn to represent the lip of the vessel.
Add Dimension
Make the vase look thicker by gluing a second layer of yarn on top of the vertical center line, tapering it off towards the edges for a rounded effect.
Step 3: Refining and Finishing
-
Check the silhouette:
Step back and look at the edges of your vase. If any yarn ends are fraying too much or sticking out past the outline, give them a tiny trim with sharp scissors. -
Tuck wandering ends:
Use a toothpick or the tip of your scissors to nudge any loose yarn ends back into the glue while it’s still slightly tacky. -
Clean the canvas:
Use a white eraser to gently remove any visible pencil marks around the exterior of the vase shape.
Hang your textured masterpiece on the wall to add an instant touch of fiber art warmth to the room
Collaged Yarn Painting With Mixed Media Accents
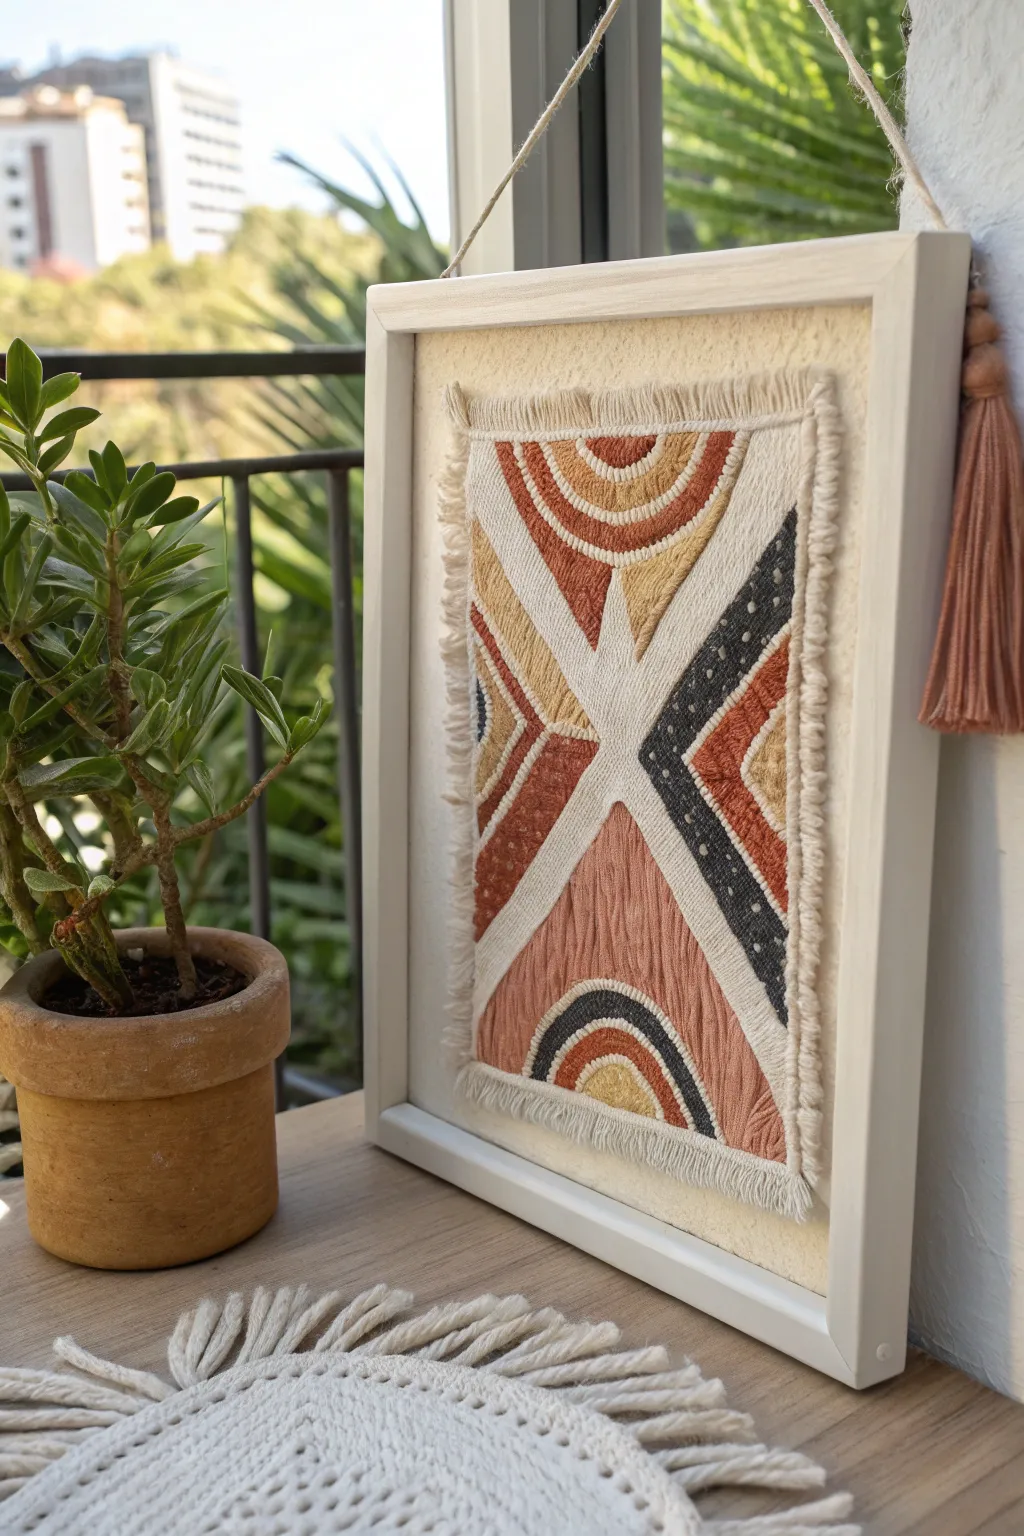
Embrace warm earth tones and geometric flair with this textured yarn artwork that mimics the cozy look of a woven tapestry. By carefully layering yarn strands in distinct sections, you can achieve a stunning, high-relief piece without ever picking up a loom or knitting needles.
How-To Guide
Materials
- Stiff backing board (cardboard or mat board), approx 8×10 inches
- Heavyweight canvas or cotton fabric (cream color)
- White or cream picture frame (shadow box preferred)
- Yarn in earthy tones: rust orange, mustard yellow, cream, dusty pink, charcoal grey
- Craft glue or tacky glue (clear drying)
- Sharp fabric scissors
- Pencil for sketching
- Tweezers (optional, for precise placement)
- Small paintbrush (for spreading glue)
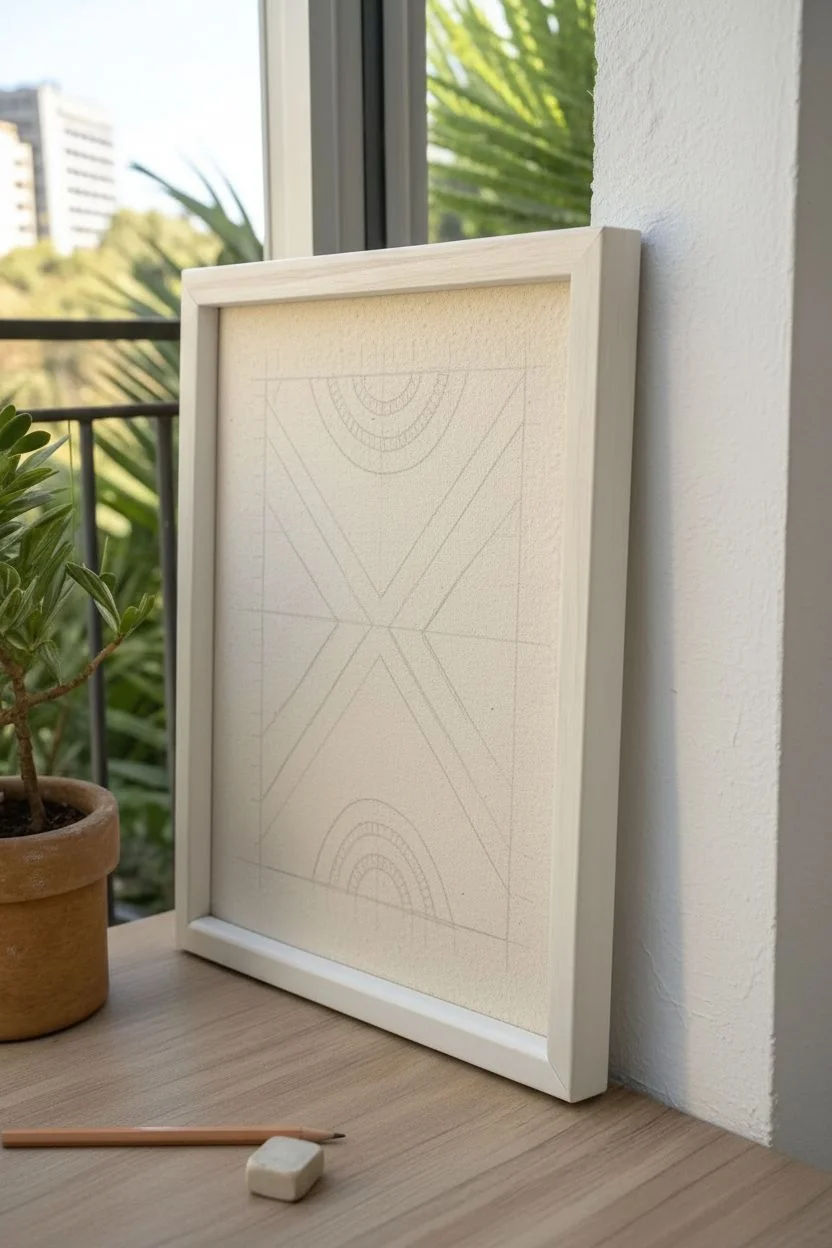
Step 1: Preparation & Sketching
-
Prepare the Base:
Cut your canvas or cotton fabric so it is about 1 inch larger on all sides than your backing board. Tightly wrap the fabric around the board and glue the edges to the back so you have a smooth, taut working surface. -
Mark the Yarn Area:
Lightly draw a rectangle in the center of your fabric-covered board. This will define the boundaries of your yarn design, leaving a nice border of the plain fabric visible around the edges. -
Sketch the Design:
Inside your rectangle, sketch the geometric pattern seen in the image. Draw a large central ‘X’ shape dividing the space into triangles. Add the curved ‘rainbow’ arches at the top and bottom, and mark out the smaller striped sections.
Sticky Situation?
If glue seeps through the yarn, don’t wipe it! It will smear and ruin the texture. Let it dry completely clear, then gently pick off any shiny residue with a needle.
Step 2: Creating the Central Cross
-
Apply Glue for the Center:
Start with the large cream-colored ‘X’ shape in the middle. Apply a generous, even layer of craft glue to this specific section using a small paintbrush. -
Lay Vertical Strands:
Cut lengths of cream yarn slightly longer than the section you are filling. Lay them vertically, side-by-side, pressing them firmly into the glue. Ensure there are no gaps between strands. -
Trim the Angles:
Once the cream section is filled, carefully trim the yarn ends to match the sharp diagonal lines of your sketched ‘X’. Precise trimming here is key to the geometric look.
Step 3: Filling the Geometric Sections
-
Fill the Side Triangles:
Move to the side triangular sections. These feature diagonal stripes. Apply glue to one small stripe area at a time (e.g., the rust orange section first). -
Directional Layering:
For the side sections, lay your yarn strands diagonally, following the angle of the central cross. Alternate colors—rust, cream, and mustard yellow—according to your pattern. -
Create the Dotted Detail:
The dark charcoal triangle on the right has small white dots. Use a dark grey yarn for the base. To create the dots, you can either glue tiny knots of white yarn on top or use a white paint pen to stipple dots onto the yarn after the glue dries. -
Fill the Bottom Triangle:
Fill the large bottom triangle with dusty pink yarn. Lay these strands vertically to contrast with the diagonal sides. I find using tweezers helps nudge these strands perfectly straight.
Tassel Time
Add a handmade tassel to the side of the frame using leftover yarn from your project. It ties the whole look together and adds movement to the rigid frame.
Step 4: Adding the Arches & Fringe
-
Create Top & Bottom Arches:
For the semi-circles at the top and bottom, curve the yarn strands as you lay them down. Apply glue in an arc shape and gently bend the yarn (rust, yellow, grey) to follow the curve. -
Add the Fringe Border:
Cut short pieces of cream yarn (about 1 inch long) to create the fringe border. Glue these perpendicular to the design’s edge, all the way around the rectangle perimeter. -
Comb and Trim Fringe:
Once the border glue is completely dry, take a fine-tooth comb or a clean spoolie brush and gently brush out the fringe yarn to make it fluffy. Trim it evenly with sharp scissors for a neat, boxy edge.
Step 5: Framing
-
Final Inspection:
Check for any loose ends or gaps where the backing shows through. Use a tiny dot of glue to secure any rogue strands. -
Mount in Frame:
Remove the glass from your frame to allow the texture to stand out, or use a deep shadow box. Place your finished board into the frame and secure the backing. -
Hang and Enjoy:
Attach a hanging cord if your frame needs one. The piece in the image uses a rustic twine hanger for an extra bohemian touch.
Hang your textured masterpiece in a sunny spot where the light can catch the different yarn directions and highlight your hard work
Raised Border Frame Made From Yarn

This stunning dimensional wall art combines the simplicity of rope with intricate geometric wrapping to create a modern bohemian masterpiece. The layered borders and spiraled center add incredible depth and texture that looks far more complex than it actually is.
Step-by-Step
Materials
- Square wooden board or plywood backing (approx. 12×12 inches)
- Thick jute or hemp rope (beige/tan color, approx. 10mm thickness)
- Thick cotton rope (white/natural color, approx. 10mm thickness)
- Medium-weight cotton yarn or macrame cord (white)
- Heavy-duty craft glue (e.g., Tacky Glue or strong wood glue)
- Hot glue gun and clear glue sticks
- Scissors
- Ruler
- Pencil
- Masking tape
Step 1: Preparing the Base
-
Clean the surface:
Ensure your wooden board is clean and dust-free. If the wood grain is very rough, give it a light sanding so the glue adheres better. -
Mark the center:
Use your ruler to find the exact center of the board. Draw a small cross mark here. -
Draw the border guidelines:
Measure inward about 1 inch from the edge on all sides and draw a square. Measure inward another inch and draw a second square. These lines will guide where your thick rope borders sit.
Step 2: Creating the Central Spiral
-
Start the coil:
Apply a dab of hot glue directly on your center mark. Take the end of your white cotton rope and press it down to anchor it. -
Wind the center:
The hot glue sets fast, so I like to switch to craft glue for the main spiral to allow for adjustments. Apply a spiral of glue around the center point. -
Create the circle:
Tightly wind the rope around the center point, pressing it flat against the board. Continue until you have a circle approximately 4-5 inches in diameter. -
Secure the end:
Cut the rope at an angle so it tapers slightly. Glue the end down securely against the side of the previous loop to make the circle look seamless.
Clean Corner Cuts
Wrap masking tape tightly around the rope exactly where you plan to cut. Slice through the tape with sharp scissors to prevent the rope from unraveling.
Step 3: Filling the Corners
-
Prep the corner yarn:
Cut several lengths of your thinner white cotton yarn or macrame cord. These need to be long enough to reach from the inner border line to the central spiral. -
Glue the first corner section:
Apply a generous layer of craft glue in one of the triangular corner spaces formed between the central circle and your inner square guideline. -
Lay the radial lines:
Starting from the corner of the square, lay yarn strands radiating outward toward the circle. The strands should touch at the corner and fan out as they reach the spiral. -
Fill the gaps:
As the fan widens, glue shorter angled pieces of yarn in between the main strands to fill any exposed wood, creating a solid textured surface. -
Repeat for all corners:
Complete this radial filling process for the remaining three corners. Let the glue dry completely before moving to the heavy borders to avoid shifting the yarn.
Two-Tone Effect
Dip-dye the ends of your white cotton rope in diluted tea or coffee before gluing to create a subtle ombré transition in the central spiral.
Step 4: Building the Raised Borders
-
Inner frame layer:
Take the thick beige jute rope. Measure and cut four pieces to frame the inner square section, mitering the corners or just butting them up tightly against each other. -
Glue the inner frame:
Use hot glue for this step for an instant hold. Glue the beige rope directly over the edges where your corner yarn ends, creating a crisp boundary. -
Middle frame layer:
Using the thick white cotton rope, creat a second border immediately outside the beige one. Press it firmly against the first rope layer so there are no gaps. -
Outer frame layer:
Finish with a final border of the thick beige jute rope along the very edge of the wooden board. -
Conceal the ends:
Check the corners of your rope frames. If any raw ends are fraying, use a tiny dot of hot glue to tuck the fibers in or wrap a small piece of matching thread around the tips. -
Clean up:
Once everything is dry, use tweezers to pull away any wispy hot glue strings that might be lingering on the surface.
Hang your textured masterpiece on the wall and enjoy the cozy, tactile warmth it adds to your room


Have a question or want to share your own experience? I'd love to hear from you in the comments below!