Sunsets are my favorite way to get huge, feel-good color on the page fast while keeping the shapes nice and simple. Here are my go-to sunset painting ideas, starting with classic gradient skies and silhouettes, then sliding into more playful, unexpected twists.
Palm Tree Silhouettes Over a Tropical Sunset
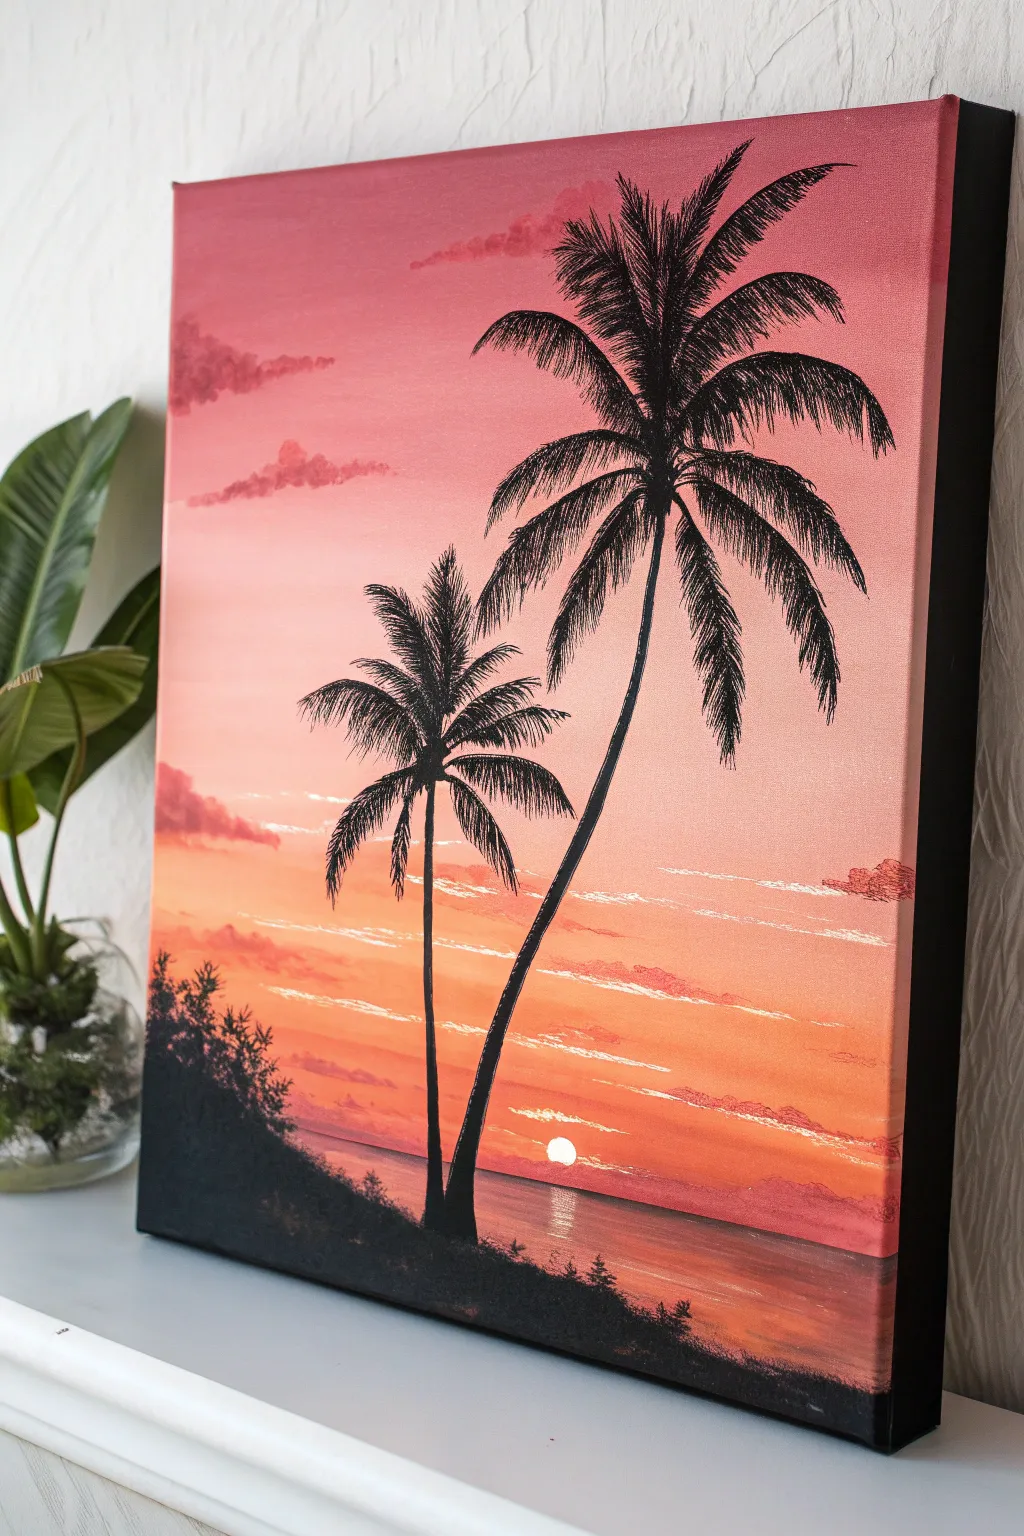
Capture the warmth of paradise with this stunning acrylic sunset painting featuring striking black palm silhouettes against a gradient sky of soft pinks and creams. This approachable project focuses on smooth blending and confident brushwork to create a serene island atmosphere.
Detailed Instructions
Materials
- Stretched canvas (e.g., 16×20 inches)
- Acrylic paints: Titanium White, Cadmium Yellow, Cadmium Orange, Alizarin Crimson, Burnt Umber, Mars Black
- Large flat wash brush (2 inch)
- Medium flat brush (3/4 inch)
- Small round detail brush (size 1 or 0)
- Liner brush
- Palette knife
- Water cup and paper towels
- Palette or paper plate
Step 1: The Gradient Sky
-
Prime the palette:
Squeeze out generous amounts of Titanium White, Alizarin Crimson, and a touch of Cadmium Orange. You want plenty of paint to ensure a smooth, wet blend on the canvas. -
Apply the top layer:
Using your large flat wash brush, mix a deep dusty rose color using Crimson and a little White. Paint the top quarter of the canvas with long, horizontal strokes. -
Blend the middle:
Gradually add more White to your mixture to lighten the pink. Continue painting downward, slightly overlapping the previous darker layer to soften the transition. -
Create the horizon glow:
Near the bottom third of the canvas (the horizon line), mix White with a tiny speck of Yellow and Orange to create a pale, creamy peach color. Blend this upward into the pinks until you have a seamless gradient. -
Paint the ocean base:
Below the horizon line, reintroduce the darker pinks and reds. Use horizontal strokes to mirror the sky colors on the water, but keep them slightly darker than the sky itself to distinguish the two.
Step 2: Clouds and Sun
-
Sketch distant clouds:
Switch to a medium flat brush. Mix a soft mauve using Crimson, a touch of Blue or Black (very little), and White. Lightly tap in wispy cloud shapes in the upper pink area. -
Texture the lower sky:
Using almost pure white with a hint of orange, use the edge of your flat brush to create thin, streaky clouds just above the horizon line. These should be very crisp and horizontal. -
Add the sun:
With a clean small round brush and pure Titanium White, paint a small half-circle perched right on the horizon line. Paint a few vertical reflection lines directly beneath it on the water. -
Glaze the water:
Allow the sun reflection to dry, then use a very watery wash of pink over the sea area to unify the reflection with the water surface.
Uneven Gradients?
If your sky blending looks streaky, your paint is likely drying too fast. Mist the canvas lightly with water or use a ‘slow-dry medium’ to keep the acrylics workable longer.
Step 3: The Silhouettes
-
Block in land:
Load your medium brush with pure Mars Black. Paint an uneven, sloping hill starting from the bottom left corner, tapering off as it reaches the center right. -
Place the trunks:
Decide where your palm trees will stand. Using the small round brush and black paint, draw two curving lines for trunks. Make the taller one lean slightly right and the shorter one lean slightly left. -
Build the frond structure:
At the top of each trunk, paint 5-7 curved lines radiating outward like a firework. These are the spines of your palm fronds. -
Paint the leaves:
Using a liner brush or the very tip of your round brush, flick short, quick strokes downward from each spine. Keep the paint fluid here; I sometimes add a drop of water to the black paint so it flows better. -
Refine the fronds:
Ensure the leaves are thicker near the center of the palm and taper to fine points at the tips. Let some fronds overlap others for a natural look.
Sharp Silhouette Tip
For the palm fronds, thin your black paint to an ink-like consistency with water. This helps the paint flow off the liner brush smoothly, creating sharp, tapering leaf tips.
Step 4: Final Details
-
Suggest foliage:
Back on the black landmass, use an old, splayed brush or a sponge to dab irregular texture along the top edge, suggesting bushes or small trees. -
Shoreline details:
Paint a very thin, straight line of black along the distant horizon where the water meets the sky, but break it up slightly so it isn’t too rigid. -
Highlight the water:
Add a few final bright white horizontal dashes in the water directly under the sun to intensify the shimmer. -
Paint the sides:
Don’t forget to paint the sides of your canvas black (or extend the image) to give it a finished, gallery-ready appearance without a frame.
Step back and admire the tranquil warmth of your tropical evening scene


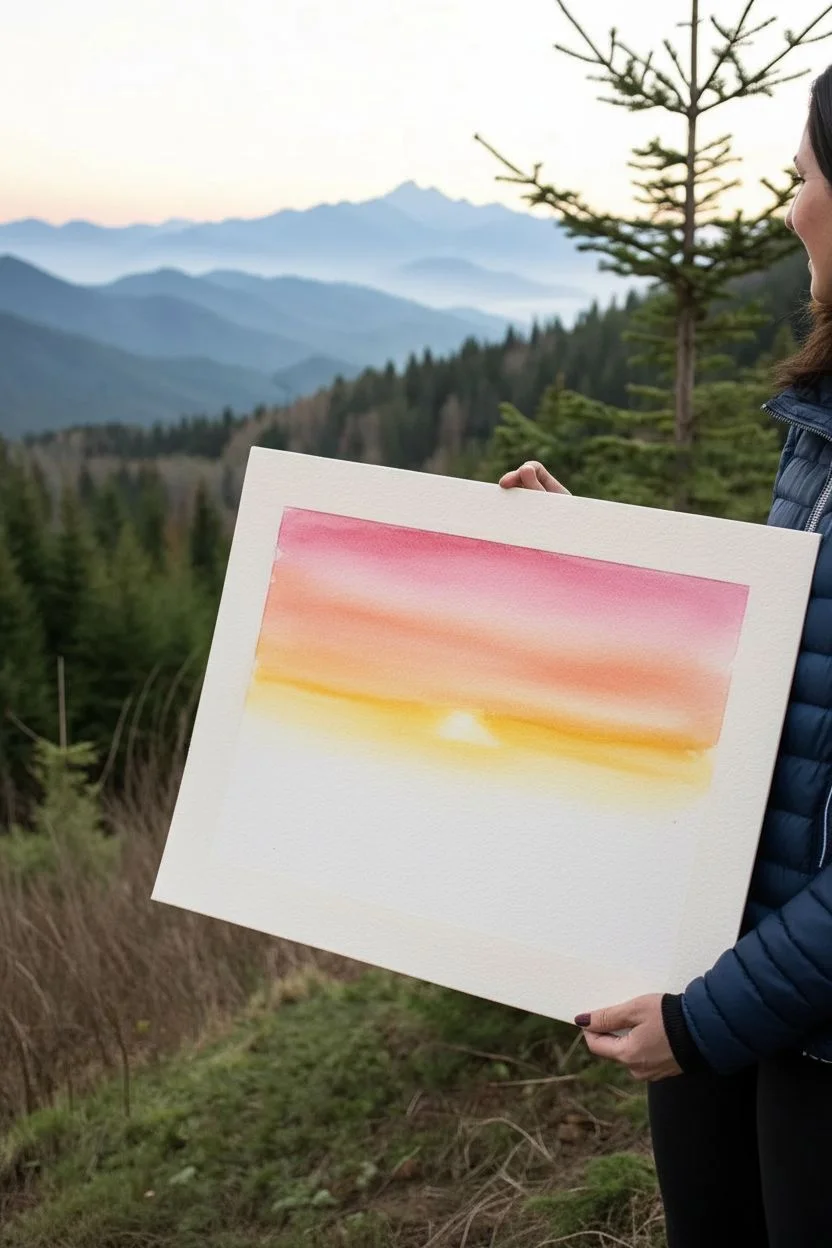
Sunset Over the Ocean With Water Reflections
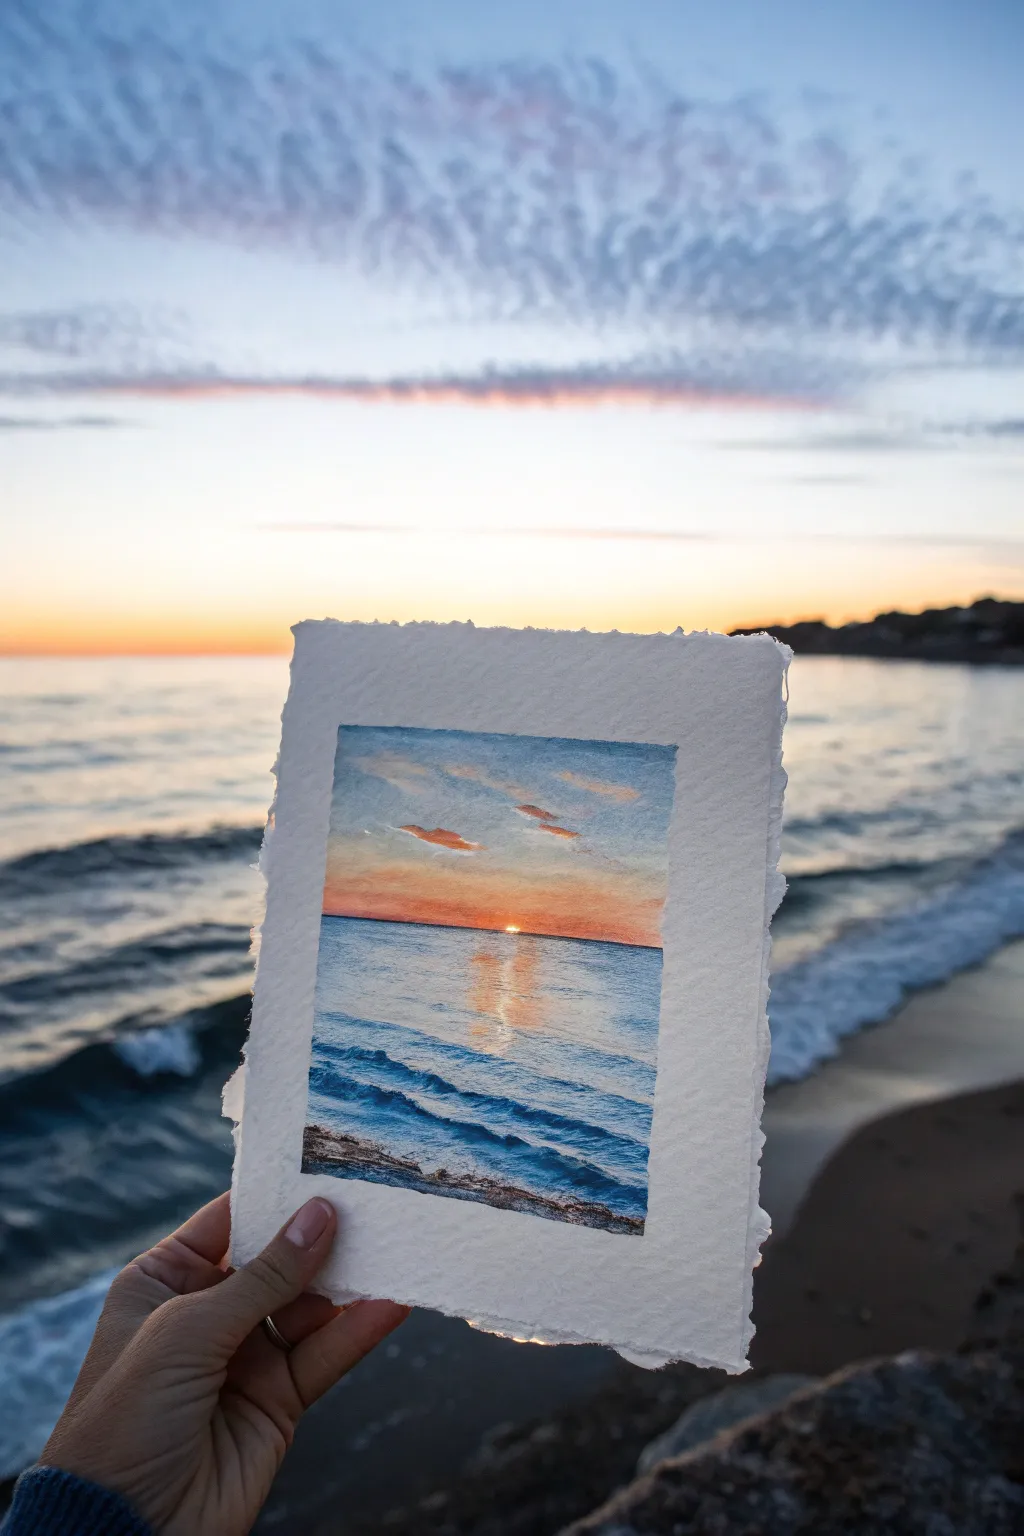
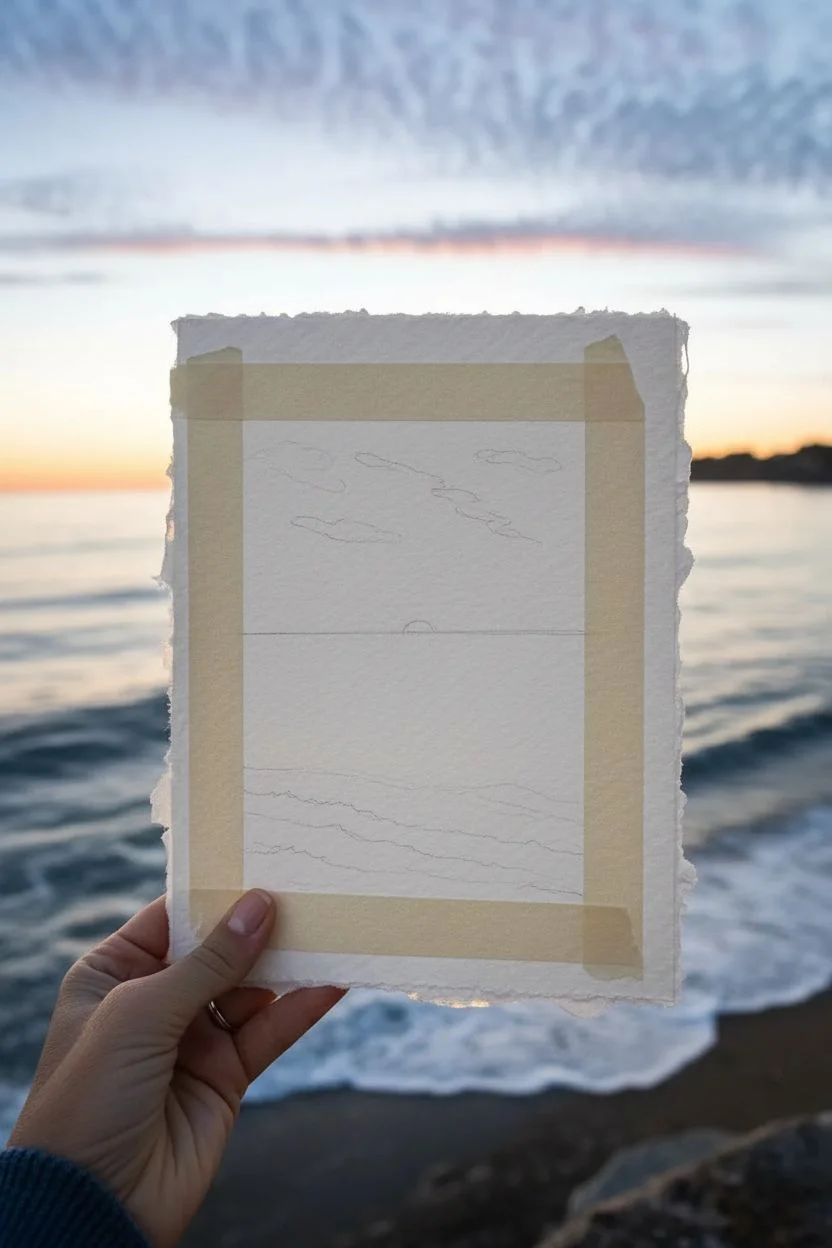
Capture the serene beauty of the sun dipping below the horizon with this compact watercolor landscape. This project focuses on blending soft gradients for the sky and using dry brush strokes to create lively, rhythmic ocean waves.
Step-by-Step
Materials
- Cold press watercolor paper (300 gsm or heavier)
- Masking tape
- Watercolor paints (Ultramarine Blue, Phthalo Blue, Alizarin Crimson, Cadmium Red, Cadmium Yellow, Burnt Sienna)
- Flat brush (3/4 inch)
- Round brushes (size 4 and 8)
- Palette for mixing
- Two jars of water
- Paper towels
- Pencil (HB)
- White gouache (optional)
Step 1: Preparation and Sketching
-
Paper Prep:
Begin by tearing your watercolor paper down to a small rectangle, roughly 5×7 inches. Creating rough, deckled edges by hand gives the piece a charming, rustic look compared to cutting with scissors. -
Tape It Down:
Board your paper using masking tape. Place the tape about an inch inward from the deckled edge to create a clean, sharp rectangular border for your actual painting area. -
Horizon Line:
Use your HB pencil to draw a faint, straight horizon line just slightly above the center of the paper. Avoid pressing too hard, as graphite can smear when wet. -
Light Sketching:
Sketch a few loose, organic shapes for the clouds above the horizon and indicate the general direction of the incoming waves in the foreground.
Step 2: Painting the Sky
-
Wet-on-Wet Sky:
With a clean flat brush, wet the entire sky area with clean water. The paper should be glistening but not forming puddles. -
Upper Sky:
Mix a watery wash of Ultramarine Blue and a tiny touch of Burnt Sienna to gray it down slightly. Apply this to the top third of the sky, letting it fade as you move down. -
Mid-Sky Transition:
Rinse your brush and pick up a pale mix of Alizarin Crimson. Blend this softly into the bottom of the blue area to create a violet transition without making green. -
Sunset Glow:
Near the horizon, introduce a warm Cadmium Yellow mixed with a bit of Cadmium Red. Paint this right up to the pencil line, ensuring the horizon stays straight. -
Cloud details:
While the sky is still damp, use a size 8 round brush to drop in slightly thicker violet-grey paint for the clouds. Soften the edges if needed, but keep the bottoms of the clouds flatter. -
The Sun:
Using a clean, damp brush or a paper towel, lift out a small semi-circle right on the horizon line to represent the setting sun. Let the sky dry completely.
Muddy Colors?
If your violet transition looks brown or grey, your blue and orange mixed too much. Let the blue layer dry completely before glazing the warm horizon colors over it.
Step 3: The Ocean and Reflection
-
Initial Ocean Wash:
Mix a light wash of Phthalo Blue and Ultramarine. Paint the water area, but leave a vertical strip in the center unpainted or very pale for the sun’s reflection. -
Warm Reflections:
In that central gap, drop in watered-down Cadmium Orange and Yellow. Let these colors bleed slightly into the surrounding blue wash. -
Defining the Horizon:
Using a stronger mix of Ultramarine Blue and Alizarin Crimson, carefully paint a thin, dark line along the horizon to separate the sea from the sky. -
Building Waves:
Once the initial wash is dry, switch to a darker blue mix. Use horizontal strokes to suggest distant waves, making the lines thinner and closer together near the horizon. -
Foreground Texture:
For the closer waves, use a drier brush with concentrated blue paint. Drag the brush quickly across the paper texture to create broken lines that resemble whitecaps and sea foam. -
Enhancing Reflection:
Add horizontal dashes of orange and yellow over the dry blue water specifically in the center column. This mimics sunlight catching the tips of the waves. -
Shoreline Contrast:
Mix a dark brown using Burnt Sienna and Ultramarine Blue. Paint the very bottom edge to suggest wet sand or rocks where the water meets the shore. -
Final Highlights:
Use a tiny dot of white gouache right at the sun’s location on the horizon for maximum brightness. You can also add thin white highlights to the crests of the foreground waves.
Sparkle Effect
To add extra magic, sprinkle a tiny pinch of salt onto the wet foreground water paint. Brush it off once dry for a texture that looks like sea foam bubbles.
Step 4: Finishing Touches
-
The Reveal:
Wait until the painting is bone dry—if it feels cool to the touch, it’s still wet. Carefully peel away the masking tape at a 45-degree angle to reveal the crisp edges. -
Flattening:
If the paper has buckled from the water, place the dry painting under a heavy book overnight to flatten it out before framing or gifting.
Now you have a stunning, perfectly framed sunset moment you can hold in your hand.


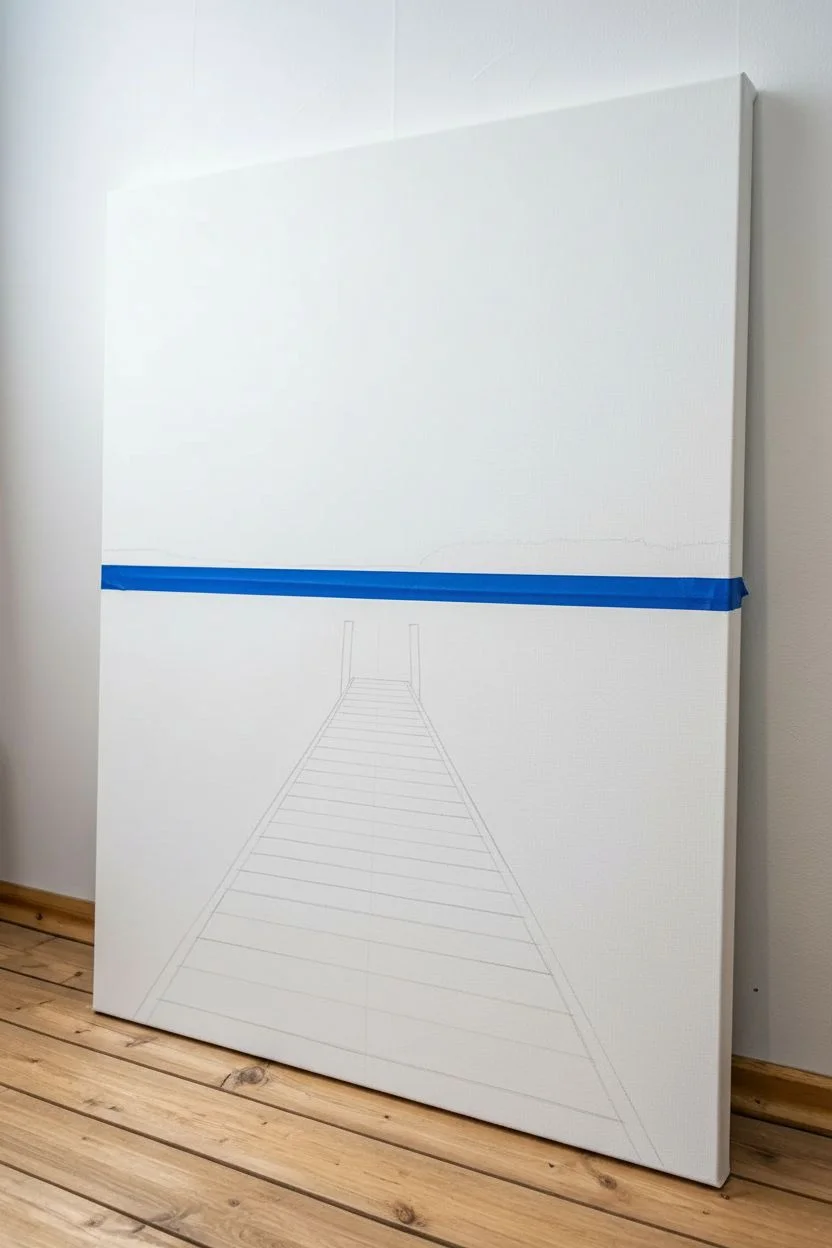
Lake Sunset With a Wooden Pier Leading In
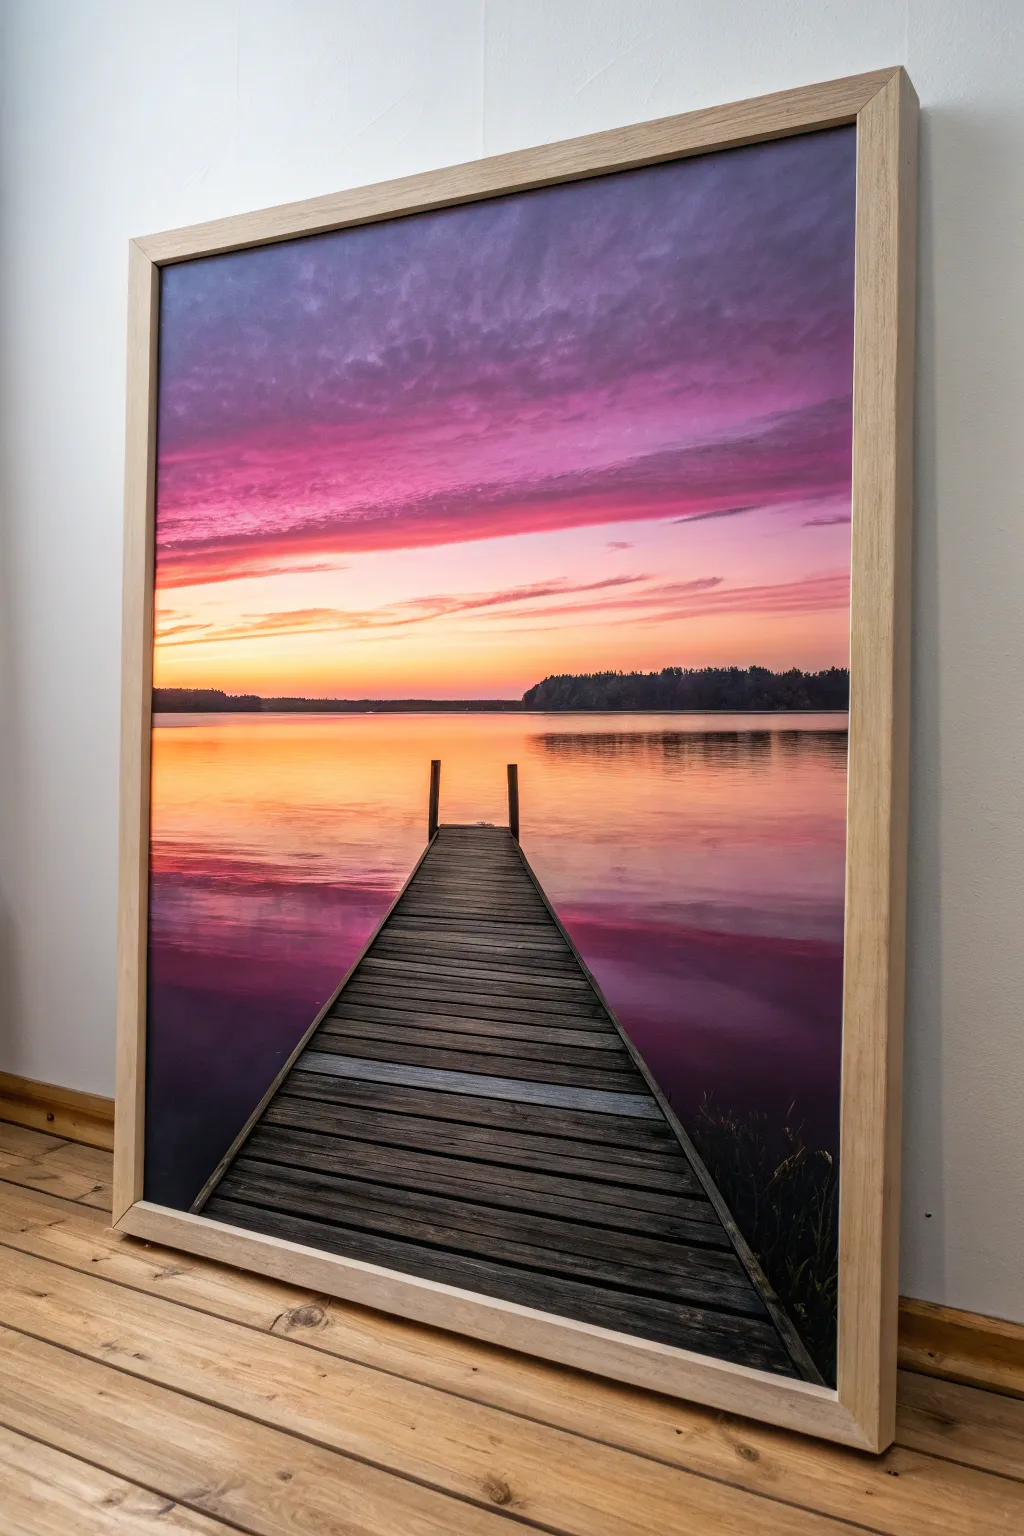
Capture the serene beauty of a lakeside twilight with this striking acrylic painting project. The composition focuses on a dramatic wooden pier leading the eye straight into a vibrant horizon of intense purples, pinks, and oranges.
Step-by-Step Tutorial
Materials
- Large stretched canvas (at least 24×36 inches recommended)
- Acrylic paints (Titanium White, Mars Black, Burnt Umber, Dioxazine Purple, Magenta, Cadmium Orange, Cadmium Yellow)
- Large flat brush (2-3 inch) for blending
- Medium flat brush (1 inch)
- Small round detail brush (size 2 or 4)
- Ruler or T-square
- Painter’s tape
- Palette knife (optional for mixing)
- Jar of water
- Paper towels
- Light wooden floating frame (optional for finishing)
Step 1: Setting the Scene
-
Establish the Horizon:
Begin by deciding where your horizon line will sit. For this composition, place strips of painter’s tape horizontally across the canvas slightly below the vertical center point to separate the sky from the water. -
Map the Pier Perspective:
Using a pencil and ruler, lightly sketch the pier. It should start very wide at the bottom center of the canvas and converge to a narrow point exactly in the middle of your horizon line to create deep perspective.
Muddy colors?
If your sunrise gradient looks brown where colors meet, wash your brush thoroughly between colors. Don’t mix purple directly into orange; use pink or red as a bridge color between them.
Step 2: Painting the Sky
-
Apply the Base Gradient:
Start at the very top with Dioxazine Purple mixed with a touch of Titanium White. As you work your way down, blend in Magenta, then transition to Cadmium Orange and finally Cadmium Yellow right above the tape line. -
Create Cloud Textures:
While the purple and magenta layers are still tacky, use a scrunched-up paper towel or a dry brush to dab in cloud shapes. Soften the edges with a clean, dry large brush using horizontal sweeping motions. -
Add Twilight Drama:
Mix a darker version of purple with a tiny bit of black. Paint subtle, streaky clouds near the top corners to frame the glowing center. I like to keep these strokes loose to mimic shifting winds. -
Remove the Tape:
Once the sky is dry to the touch, carefully peel off the painter’s tape to reveal a crisp horizon line.
Step 3: Reflecting on the Water
-
Mirror the Sky Colors:
Paint the water section using the same colors as the sky but in reverse order. Start with yellow just below the horizon line, blending into orange, magenta, and finally purple at the bottom corners. -
Add Water Movement:
While the paint is wet, use a clean horizontal stroke to drag the colors slightly side-to-side. This blurs the reflection and creates the illusion of a smooth, glassy lake surface. -
Paint the Distant Treeline:
Mix Mars Black with a little Dioxazine Purple to create a deep silhouette color. Using your medium flat brush, tap in a jagged treeline along the horizon, making the trees smaller near the center and slightly taller toward the edges. -
Add Tree Reflections:
Immediately beneath the treeline, pull some of that dark paint downwards into the water using vertical strokes, then gently glaze over it horizontally to blur it into the lake surface.
Depth Trick
Make the wooden planks progressively narrower and closer together as they move toward the horizon. This visual trick, called foreshortening, creates massive depth.
Step 4: Constructing the Pier
-
Base Coat the Wood:
Fill in the sketched pier shape with a solid coat of opaque black or very dark grey. This acts as a shadow layer between the planks. -
Painting Individual Planks:
Mix Burnt Umber with varying amounts of white and grey. Using a medium flat brush, paint horizontal slats over the black base, leaving thin black gaps between each plank to define them. -
Adding Wood Texture:
With a small detail brush and watered-down black paint, add wood grain lines, knots, and cracks to the planks. Keep the lines near the bottom of the canvas thicker and more detailed than those in the distance. -
Highlighting Edges:
Mix a light grey-brown shade. Use the edge of your flat brush to add a highlight to the front edge of each plank, simulating the dwindling light catching the wood. -
Install the Posts:
Paint two vertical posts at the far end of the pier using dark brown. Highlight the left side of each post with a touch of orange to reflect the setting sun.
Step 5: Final Touches
-
Foreground Vegetation:
In the bottom right corner, use the small detail brush to flick upwards with black paint, creating silhouetted reeds or tall grass emerging from the water. -
Varnish and Frame:
Allow the painting to cure for at least 24 hours. Apply a coat of satin varnish to protect the colors, and consider framing it in a light wood floating frame to match the natural tones of the pier.
Step back and enjoy the peaceful view you’ve created right inside your home


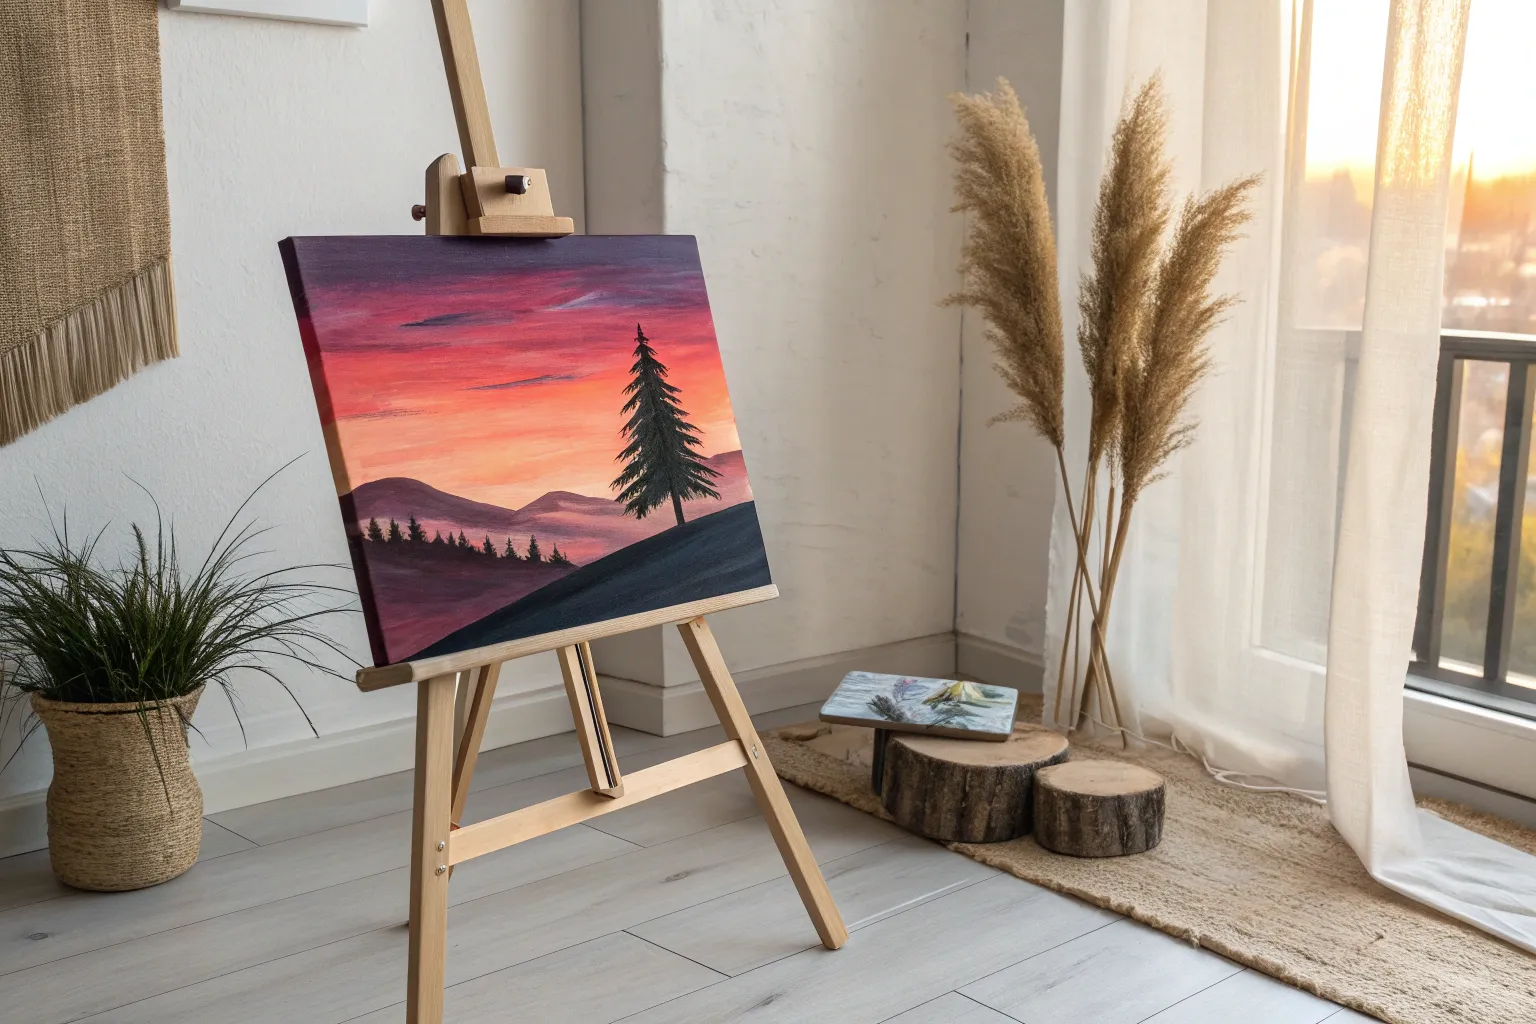
Layered Mountains at Sunset for Easy Depth
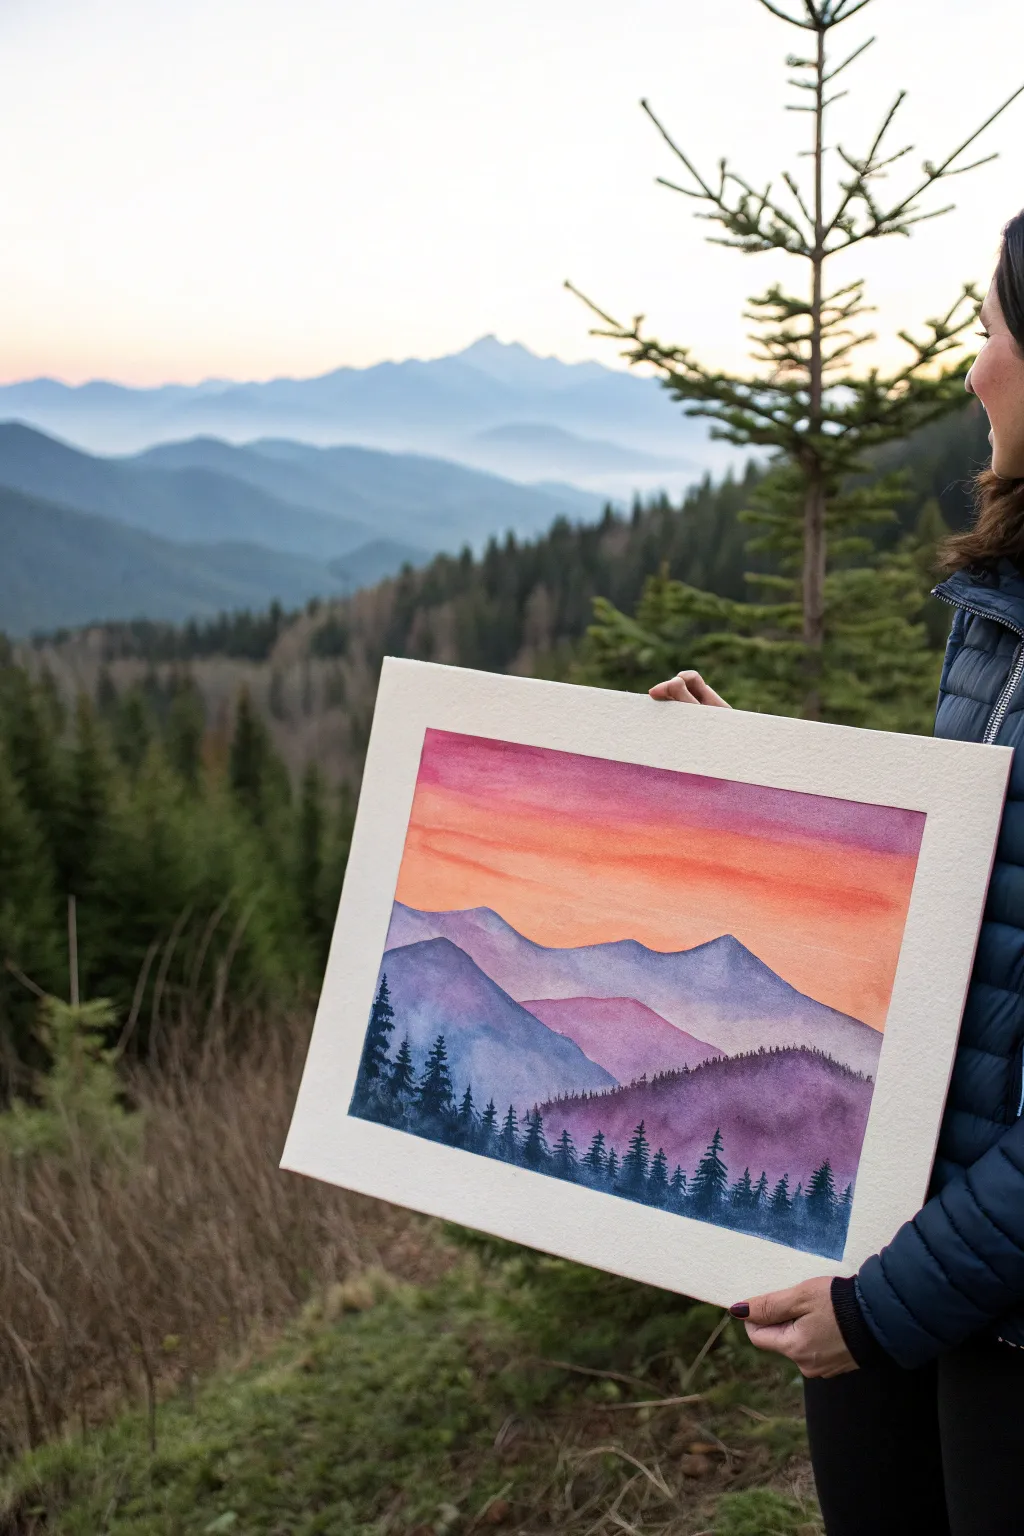
Capture the serene beauty of twilight in the mountains with this layered watercolor landscape. By mastering simple wet-on-wet gradients and sharp silhouetted details, you’ll create a sense of vast depth and vibrant atmosphere.
Detailed Instructions
Materials
- Cold press watercolor paper (140 lb/300 gsm)
- Watercolor paints (Indigo, Alizarin Crimson, Cadmium Orange, Cadmium Yellow, Cobalt Blue)
- Round watercolor brushes (size 12 for washes, size 4 for mountains, size 2 for trees)
- Board and masking tape
- Two jars of water
- Paper towels
- Palette for mixing
Step 1: Setting the Sky
-
Prepare your surface:
Tape your watercolor paper down firmly to a board on all four sides. This creates that crisp white border seen in the example and prevents the paper from buckling during the heavy washes. -
Wet the sky area:
Using your large size 12 brush and clean water, thoroughly wet the top two-thirds of your paper. The sheen should be even but not pooling. -
Apply the top gradient:
Load your brush with a mix of Alizarin Crimson and a touch of Cadmium Orange. Paint horizontal strokes across the very top, letting the color bleed downwards into the wet paper. -
Blend the sunset hues:
Clean your brush and pick up pure Cadmium Orange. Blend this just below the crimson, overlapping slightly to create a smooth transition. -
Add the horizon glow:
Rinse your brush and use a very watery Cadmium Yellow near the middle of the paper, where the mountains will eventually start. This creates the glowing light source of the setting sun. -
Let it dry mostly:
Allow the sky to dry until it is no longer shiny but feels cool to the touch. This stage is crucial mainly to prevent the mountains from bleeding into the sky.
Atmospheric Perspective Tip
Remember the golden rule of landscapes: things get paler and bluer as they get further away. Only use your darkest, most saturated Indigo paint for the closest trees at the bottom.
Step 2: Layering the Mountains
-
Mix the distant mountain color:
Create a pale wash of Cobalt Blue mixed with a tiny bit of Alizarin Crimson to make a soft lavender. It should be very diluted with water to indicate atmospheric perspective. -
Paint the furthest ridge:
Using the size 4 brush, paint a jagged mountain silhouette just below the yellow sky area. Fill in the shape underneath with the same pale wash. -
Darken the mix:
Once that first ridge is semi-dry, add a little more pigment to your lavender mix to make it slightly darker and more intense. -
Add the middle ridges:
Paint a second, overlapping mountain range lower down. Vary the peaks so they don’t mirror the first layer perfectly. -
Creating the violet layer:
Mix a stronger purple using Alizarin Crimson and Cobalt Blue (more crimson this time). Paint a third ridge that sits closer to the foreground, letting the color be richer and warmer. -
Paint the foreground mountain:
Mix Indigo with purple to get a deep, moody violet-blue. Paint the largest, closest mountain mass at the bottom, but leave the bottom edge somewhat uneven for the texture of the upcoming trees effectively.
Fixing Water Blooms
If ‘cauliflower’ blooms appear in your sky, don’t panic. Gently lift the pigment with a slightly damp brush, or embrace them as clouds. To prevent them, avoid adding water to drying paint.
Step 3: Silhouettes and Details
-
Dry completely:
Wait until the entire paper is bone dry. If the paper is damp, your crisp trees will turn into fuzzy blobs. -
Mix the darkest tone:
Prepare a concentrated mix of Indigo with very little water. It should be almost ink-like consistency for maximum opacity. -
Start the pine trees:
Switch to your size 2 detail brush. Starting from the bottom of the foreground mountain, paint vertical lines for tree trunks. -
Add cedar branches:
Using the tip of the brush, tap small, downward-sloping zig-zags on either side of the trunk lines. Keep the shapes irregular to look natural. -
Build the forest density:
Fill the bottom edge with dense trees, varying their heights significantly. Ensure some trees break the silhouette line of the purple mountain behind them to enhance the depth. -
Final reveal:
Once the trees are fully dry, carefully peel away the masking tape at a 45-degree angle to reveal your clean white borders.
Now you have a stunning mountain sunset that brings the calm of the outdoors right into your home
BRUSH GUIDE
The Right Brush for Every Stroke
From clean lines to bold texture — master brush choice, stroke control, and essential techniques.
Explore the Full Guide
City Skyline at Dusk With a Glowing Horizon
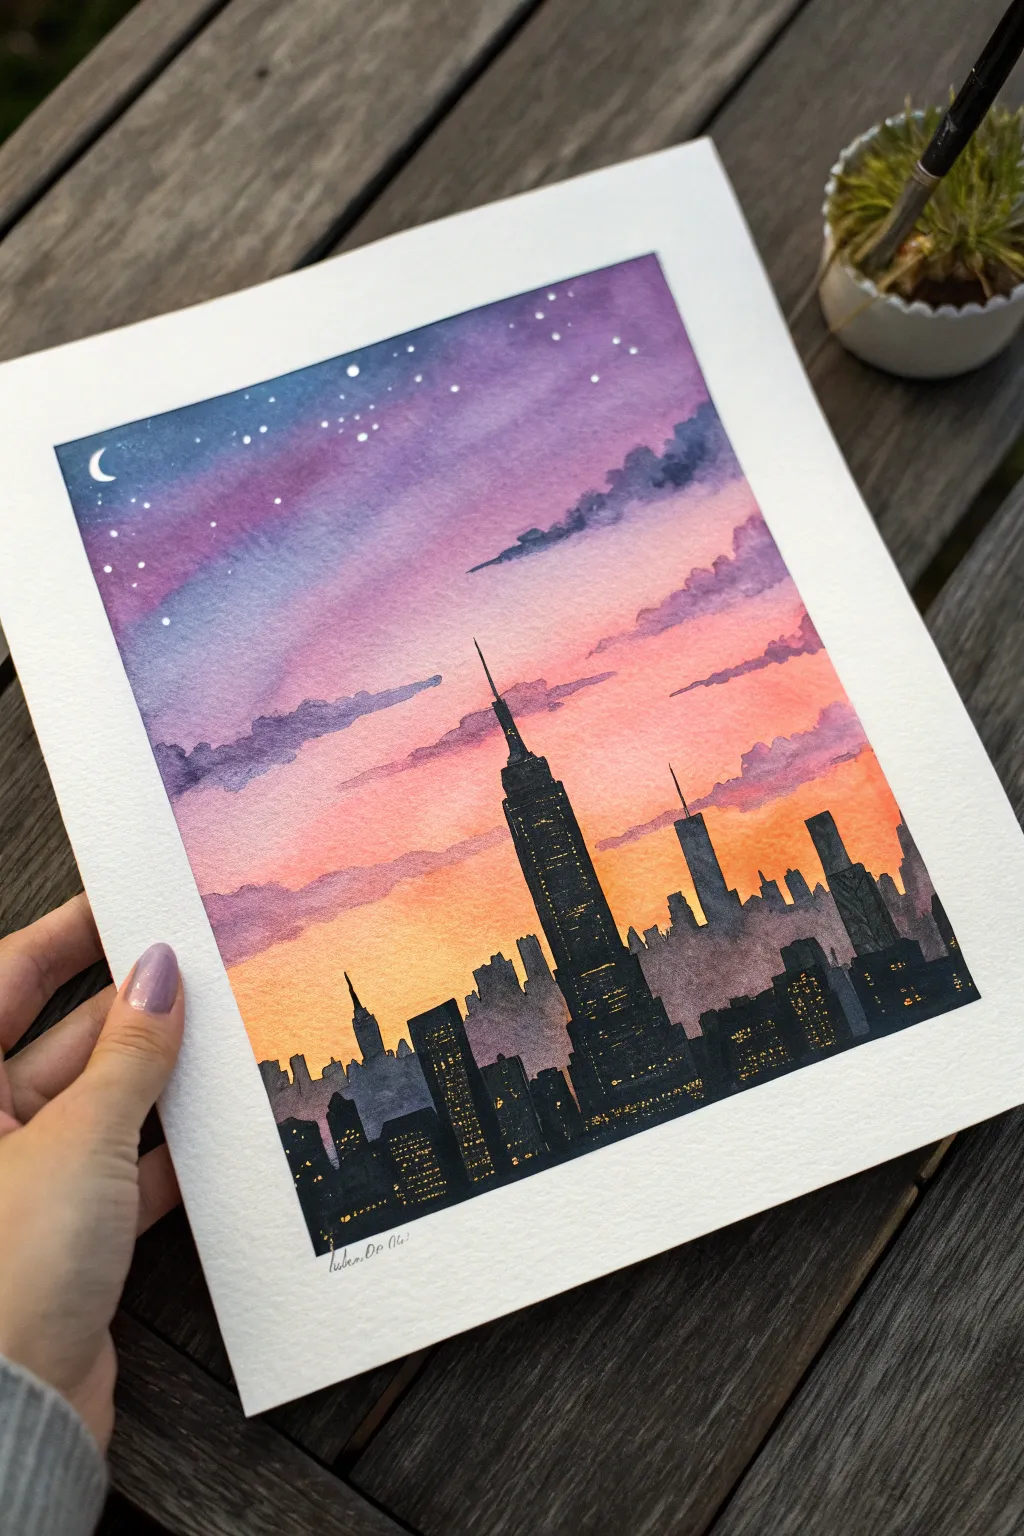
Capture the magic of twilight falling over New York City with this vibrant watercolor project. You’ll layer rich purples and blazing oranges to create a glowing sky, contrasted against the sharp, silhouetted forms of iconic skyscrapers.
Step-by-Step
Materials
- Cold-pressed watercolor paper (140lb/300gsm)
- Watercolor paints (Indigo, Purple, Alizarin Crimson, Cadmium Red, Cadmium Orange, Lemon Yellow)
- White opacity gouache or gel pen
- Round brushes (sizes 8 for wash, 2 for details)
- Masking tape
- Pencil and ruler
- Paper towels
- Water jar
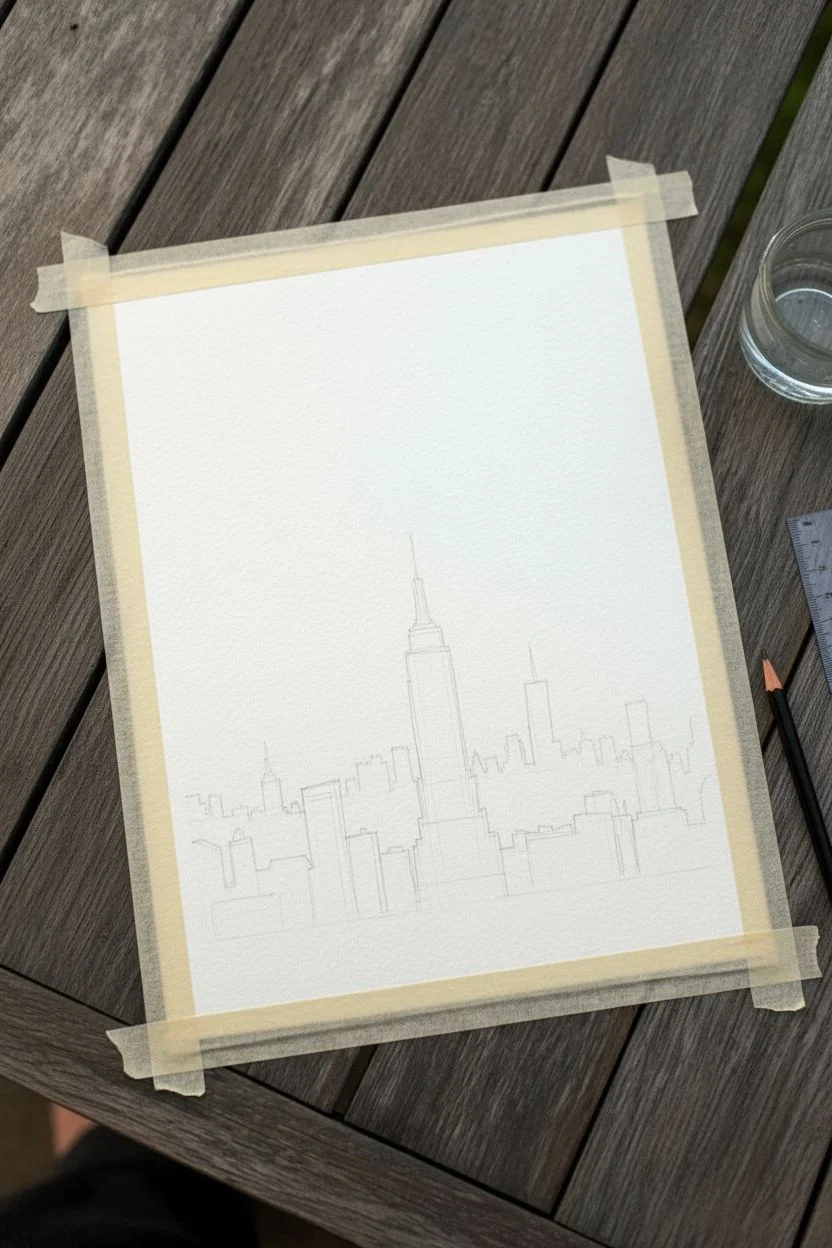
Step 1: Preparation and Sketching
-
Secure Your Paper:
Begin by taping down all four edges of your watercolor paper to a board or table with masking tape. This creates that clean, crisp white border and prevents the paper from buckling when wet. -
Draft the Horizon:
Lightly sketch the skyline at the bottom third of your paper. Focus on the main shapes: the prominent Empire State Building in the center, the slanted top of the Citigroup Center, and the blocky forms of surrounding buildings. -
Add Details:
Refine the needle-like antenna of the central skyscraper. Don’t worry about drawing every window; just get the general silhouette correct.
Step 2: Painting the Sky Gradient
-
Wet the Sky Area:
Using your large round brush and clean water, wet the entire sky area above your pencil sketch. The paper should be glistening but not forming puddles. -
Apply the Base Yellow:
Starting just above the skyline, paint a band of Lemon Yellow. Let it bleed slightly upwards. -
Transition to Orange:
While the yellow is still wet, introduce Cadmium Orange above it, blending the two softly where they meet. I like to tilt the board slightly to help gravity blend the colors. -
Introduce Warm Reds:
Move higher up the paper with a mix of Cadmium Red and Alizarin Crimson, creating a warm, rosy band. -
Create the Night Sky:
For the top section, mix Purple with a touch of Indigo for a deep twilight blue. Paint the top edge and let it gradient down into the red/pink area. -
Add Clouds:
While the sky is still damp (not soaking), dip a smaller brush into a concentrated purple-grey mix (Purple + little Indigo). Dab in horizontal cloud shapes that drift across the pink and orange sections. -
Dry Completely:
Let this layer dry completely. The paper must be bone dry before you start the buildings to keep crisp edges.
Wet-on-Wet Timing
If the paper dries too fast while blending sky colors, re-wet it very gently with a clean brush or spray bottle mist to avoid harsh lines.
Step 3: Painting the Silhouette
-
Mix the Shadow Color:
Create a very dark, saturated mix using Indigo and a touch of Black or intense Purple. It should be thick, like heavy cream. -
Outline the Main Building:
Using your size 2 detail brush, carefully paint the spire and top sections of the Empire State Building silhouette first to ensure accuracy. -
Fill the Skyscrapers:
Work your way across the horizon, filling in the building shapes with your dark mixture. Keep the edges sharp against the colorful sky. -
Vary the Darkness:
For distant buildings in the background, you can dilute your dark mix slightly with water to make them appear lighter and further away, adding depth. -
Dry Again:
Allow the black silhouette layer to dry completely before touching it again.
Starry Splatter
Instead of painting individual stars, load a stiff toothbrush with white gouache and flick the bristles for a natural galaxy spray effect.
Step 4: Final Details
-
Paint the Windows:
Using a tiny brush and yellow gouache (or a small gold gel pen), add small groups of dots to the dark buildings to represent lit windows. Cluster them randomly. -
Add the Moon:
With white gouache or a white gel pen, draw a small, crisp crescent moon in the upper left dark blue section. -
Paint the Stars:
Dot tiny points of white in the upper purple section for stars. Keep them delicate and sparse. -
The Reveal:
Once everything is 100% dry, slowly peel off the masking tape at a 45-degree angle to reveal your clean white border.
Step back and admire how the city lights sparkle against that stunning sunset gradient you created
Hot Air Balloons Floating Through a Sunset Sky
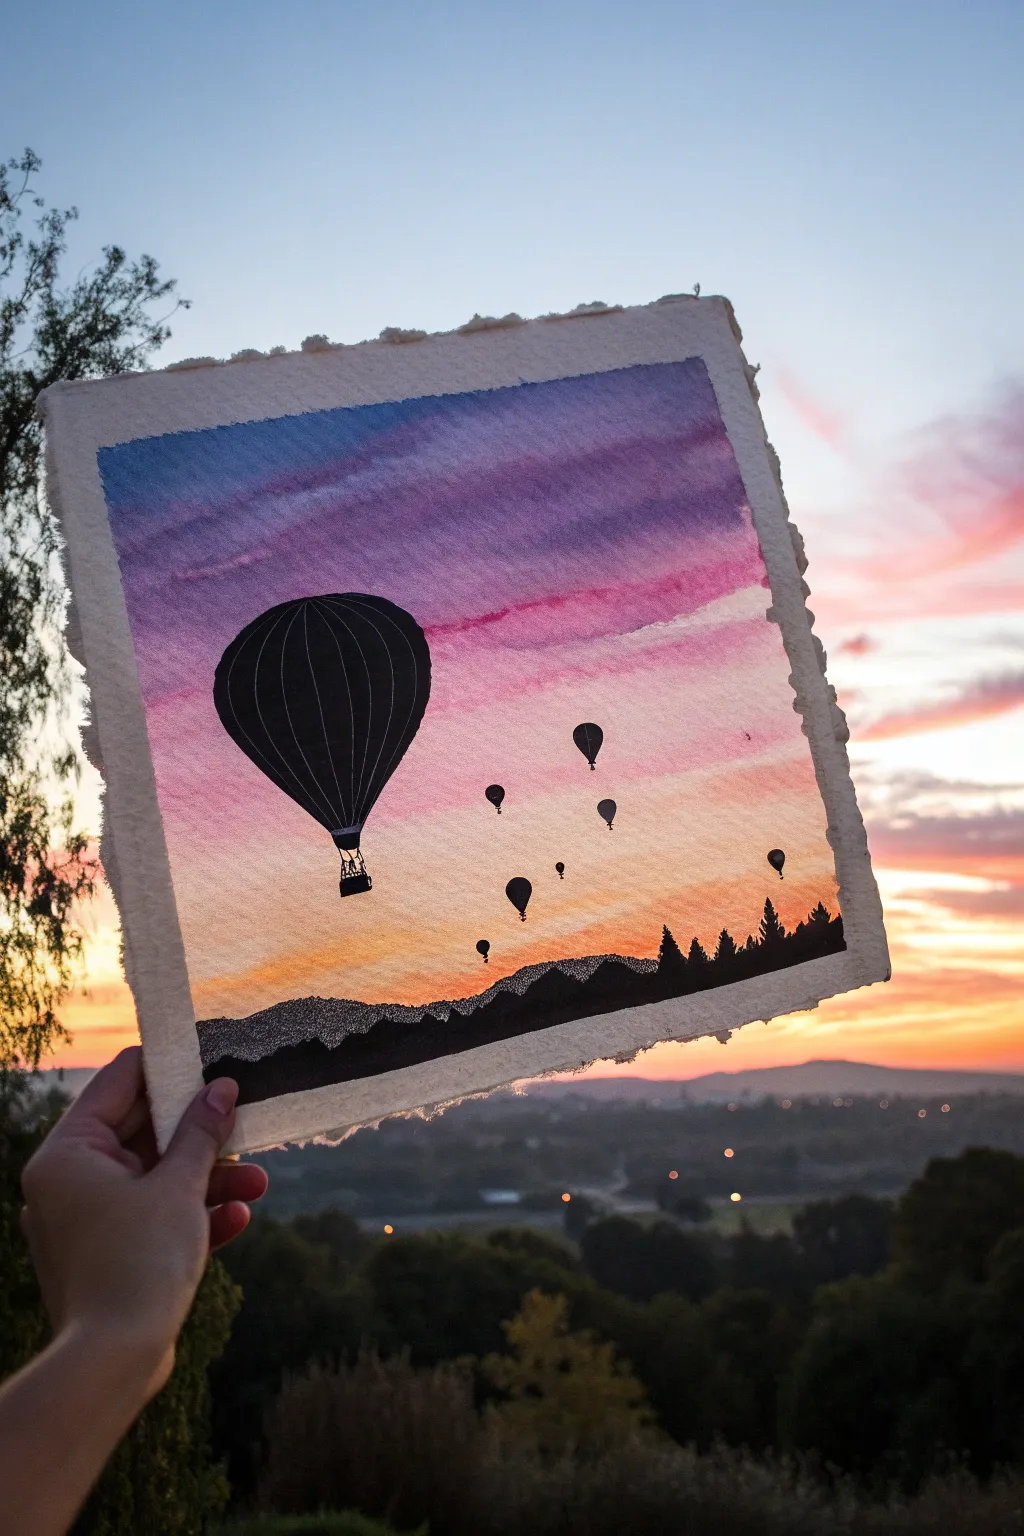
Capture the magic of flight with this stunning watercolor silhouette painting featuring hot air balloons drifting over a mountain range. The vibrant washes of pink, purple, and orange create a warm backdrop for the crisp, detailed silhouettes in the foreground.
Detailed Instructions
Materials
- Cold press watercolor paper (deckle edge optional)
- Watercolor paints (Indigo, Purple, Magenta, Orange, Yellow)
- Black gouache or black waterproof ink (for silhouettes)
- Painters tape or masking tape
- Flat wash brush (large)
- Round detail brush (size 0 or 00)
- Pencil and eraser
- Clean water jar and paper towels
Step 1: Painting the Sky Gradient
-
Tape down your paper:
Secure your watercolor paper to a board or table on all four sides. This prevents the paper from buckling when we add lots of water for the sky. -
Wet the paper:
Using your large flat brush, apply a layer of clean water across the entire sky area, stopping about an inch from the bottom where the mountains will go. The paper should be glisten, but not have puddles. -
Start with the blue-violet top:
Load your brush with a mix of Indigo and Purple. Apply broad horizontal strokes at the very top of the paper, letting the wet-on-wet technique soften the edges naturally. -
Blend into pinks:
Clean your brush slightly and pick up Magenta. Paint horizontal strokes just below the purple, allowing the colors to bleed and mix at the seam. I find that tilting the board slightly helps the colors flow downward. -
Transition to orange:
Wash your brush well. Pick up a vibrant Orange and continue the gradient downward. Ensure the transition zone between pink and orange is soft; you can use a damp, clean brush to smooth it out if needed. -
Finish with yellow warmth:
At the horizon line (just above where your mountains will be), paint a bright strip of Yellow. Let this fade into the white of the paper at the very bottom. -
Create cloud textures:
While the paint is still damp but losing its sheen, use a thirsty (damp but clean) brush to lift out slight horizontal streaks in the purple area. This creates the illusion of soft, wispy clouds. -
Dry completely:
This is crucial. Let the sky dry 100% before moving on. You can use a hair dryer on a low setting to speed this up, but ensure the paper is bone dry to the touch.
Step 2: Adding the Silhouettes
-
Sketch the layout:
Lightly sketch the outline of the large balloon on the left, smaller distant balloons, and the rolling mountain range at the bottom. Keep pencil lines very faint so they don’t show through the yellow paint. -
Paint the mountains:
Using black gouache or ink, fill in the mountain range at the bottom. Create an uneven, rolling top edge to simulate hills and trees. -
Add treeline details:
Switch to your smallest detail brush. Along the top ridge of the black mountains, dab tiny vertical spikes to look like pine trees silhouetted against the light. -
Outline the main balloon:
Carefully outline the large hot air balloon shape with your black medium. Make sure the curve is smooth and symmetrical. -
Fill and detail the balloon:
Fill in the main balloon shape solid black. Then, use the very tip of your detail brush or a white gel pen later to add vertical lines if you want texture, though solid black works perfectly for a high-contrast silhouette. -
Add the balloon basket:
Paint a small square below the balloon for the basket, connecting it with tiny, thin lines for the ropes. Keep this delicate. -
Paint distant balloons:
Scattered across the sky, paint smaller balloon shapes in varying sizes. The smaller they are, the further away they look. Remember these are just simple teardrop shapes with tiny specks for baskets. -
Final touches:
Review your treeline and balloon edges. Sharpen any fuzzy lines with the black paint. Once fully dry, peel off the tape carefully at an angle.
Pro Tip: Deckle Edges
To get the rough, torn look seen in the photo, tear your paper against a ruler before painting, or buy pre-cut deckle-edge paper. It adds a lovely rustic texture to the sunset.
Troubleshooting: Backruns
If you see ‘cauliflower’ blooms in your sky, you introduced water to drying paint. Let the layer dry completely, then glaze over the whole sky again to smooth it out.
Now you have a serene twilight scene ready to frame or gift

PENCIL GUIDE
Understanding Pencil Grades from H to B
From first sketch to finished drawing — learn pencil grades, line control, and shading techniques.
Explore the Full Guide
Tiny Bird Silhouettes Crossing the Sunset Glow
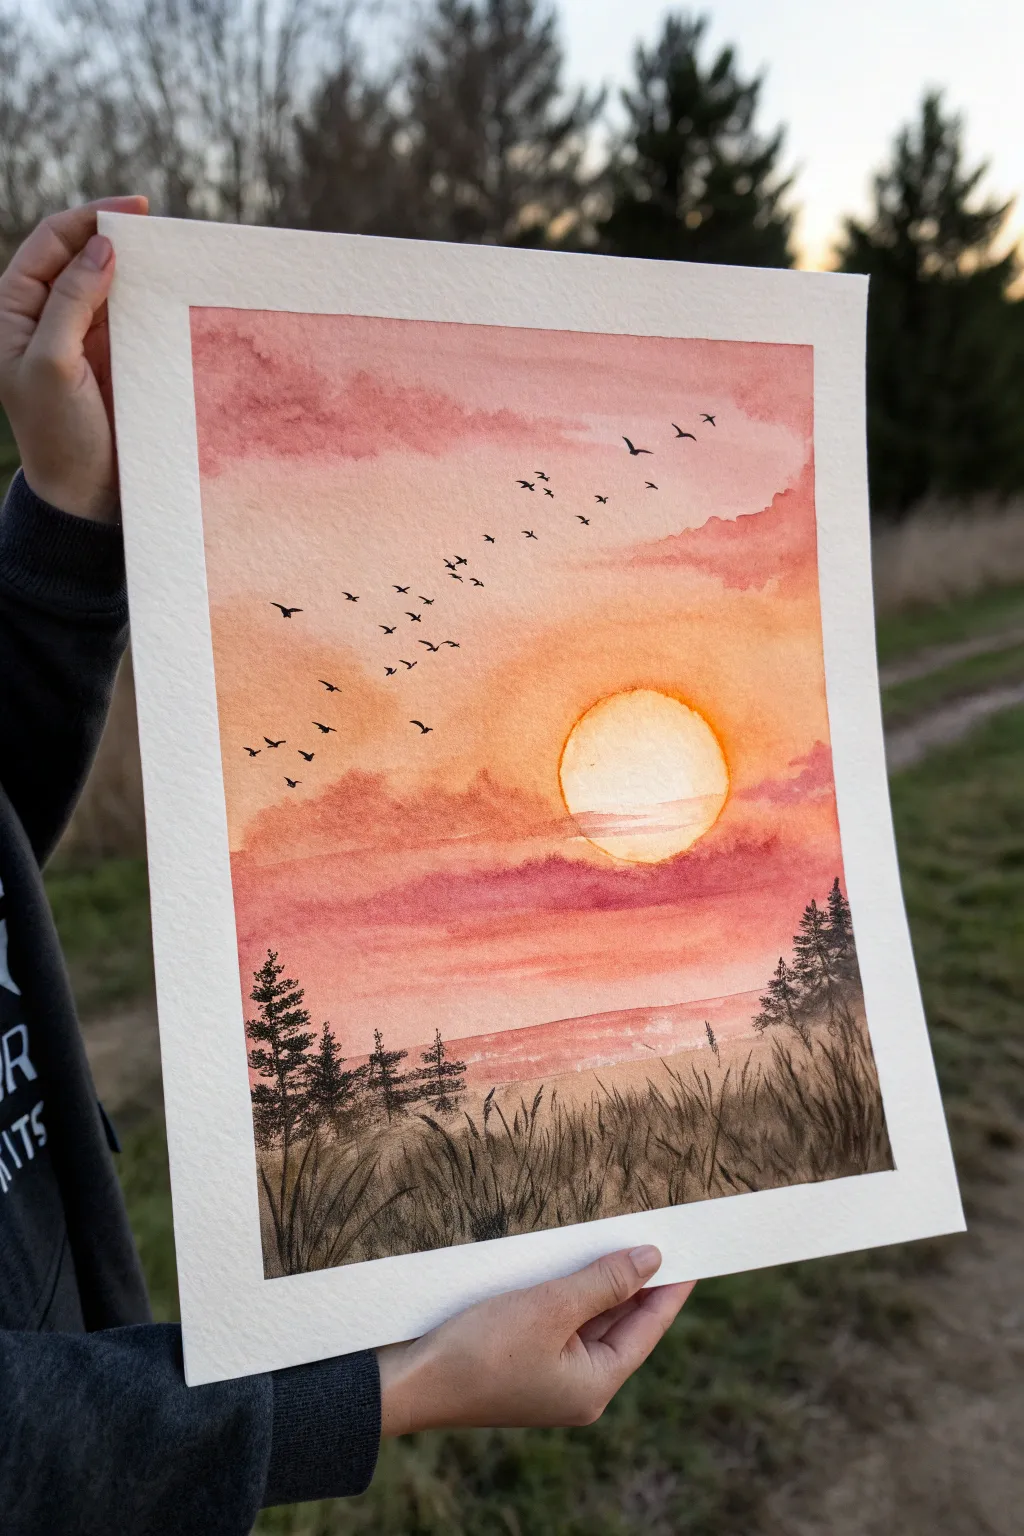
Capture the fleeting magic of twilight with this serene watercolor landscape featuring a warm, glowing sun and a flock of birds in silhouette. This project uses wet-on-wet techniques to create a soft, dreamy sky that perfectly contrasts with crisp, dark foreground details.
Step-by-Step Tutorial
Materials
- Cold press watercolor paper (140lb/300gsm)
- Painter’s tape or masking tape
- Watercolor paints: Cadmium Yellow, Alizarin Crimson, Orange, Burnt Umber, Payne’s Grey or Black
- Large flat wash brush
- Medium round brush (size 6 or 8)
- Small detail brush (size 0 or 1)
- Jar of clean water
- Paper towels
- Pencil for light sketching
Step 1: Preparing the Sky
-
Secure the paper:
Tape down all four edges of your watercolor paper to a board or table. This creates a clean white border and prevents the paper from buckling when wet. -
Sketch the sun:
Using a pencil, very lightly draw a circle for the sun slightly to the right of the center. Keep the line faint so it disappears later. -
Wet the paper:
With your large flat brush and clean water, wet the entire sky area, working around the sun circle. Try to keep the inside of the sun circle dry for now to preserve its brightness. -
Apply the glow:
Load your medium brush with a vibrant yellow. Paint around the immediate edge of the sun circle, letting the color bleed outward into the wet paper. I like to add a tiny touch of very pale yellow inside the sun circle itself, keeping it almost white. -
Build the gradient:
While the paper is still wet, mix a soft orange and apply it in a ring around the yellow glow, blending it outwards. -
Add pink clouds:
Mix a rosy pink or light crimson. While the sky is damp (not soaking wet), paint horizontal, irregular streaks across the top and bottom of the sky area to suggest soft cloud layers.
Step 2: Deepening the Atmosphere
-
Intensify the colors:
As the paper starts to lose its sheen, dab slightly stronger red-orange pigment into the cloud formations to give them volume. The paint will spread less now, creating semi-soft edges. -
Paint the horizon:
Near the bottom third of the paper, paint a wash of muted purple-pink to establish a distant horizon line. This simulates the hazy atmosphere near the ground. -
Let it dry completely:
This is crucial. Wait until the paper is bone dry and flat before moving on to the silhouettes. If you paint too soon, the sharp trees will bleed into the sky.
Blooms & Backruns
If you get water splashes (blooms) in your sky while it’s drying, don’t panic! Blot gently with a dry tissue, or let it dry and embrace the texture as ‘cloud edges’.
Step 3: Painting Silhouettes
-
Mix the silhouette color:
Create a dark, rich color using Payne’s Grey mixed with a little Burnt Umber. Avoid pure black from the tube, as it can look flat; this mixture adds depth. -
Paint the distant trees:
Using the tip of your medium round brush, dab vertical rough shapes on the left and right sides of the horizon. Keep these trees relatively small and indistinct to show distance. -
Start the foreground grass:
Switch to a smaller brush. At the very bottom of the paper, paint an uneven base of dark ground. Pull quick, upward strokes from this base to create tall blades of grass. -
Add detailed grasses:
Vary the direction and height of your grass strokes. Make some bend left and others right. Use the very tip of the brush to ensure the blades taper to a fine point at the top. -
Detail the pine trees:
On the left side, paint a few taller pine trees using a stippling motion (dabbing the brush). Start narrow at the top and widen as you go down, leaving gaps between branches for a natural look.
Sparkle Effect
Once fully dry, use a white gel pen to add tiny highlights on the tips of the grass or the tops of the birds to mimic the sun catching their edges.
Step 4: The Flight of Birds
-
Practice the birds:
Before painting on your artwork, practice painting tiny ‘V’ and ‘M’ shapes on a scrap piece of paper to get the bird shapes right. -
Plan the composition:
Visualize a diagonal line stretching from the bottom left toward the top right across the sky. This will be the flight path. -
Paint the flock:
Using your smallest detail brush (size 0 or 1) and the dark silhouette mix, paint the birds. Vary their wing positions—some gliding flat, some flapping up, some flapping down. -
Vary the sizes:
Paint the birds lower in the formation slightly larger and the ones higher up smaller to create perspective and depth. -
Final touches:
Add a few faint, smaller grasses in the mid-ground using a diluted version of your dark mix. Once everything is 100% dry, carefully peel off the tape.
Now you have a tranquil sunset scene that brings warmth to any room.
Desert Cactus Sunset With Bold Negative Shapes
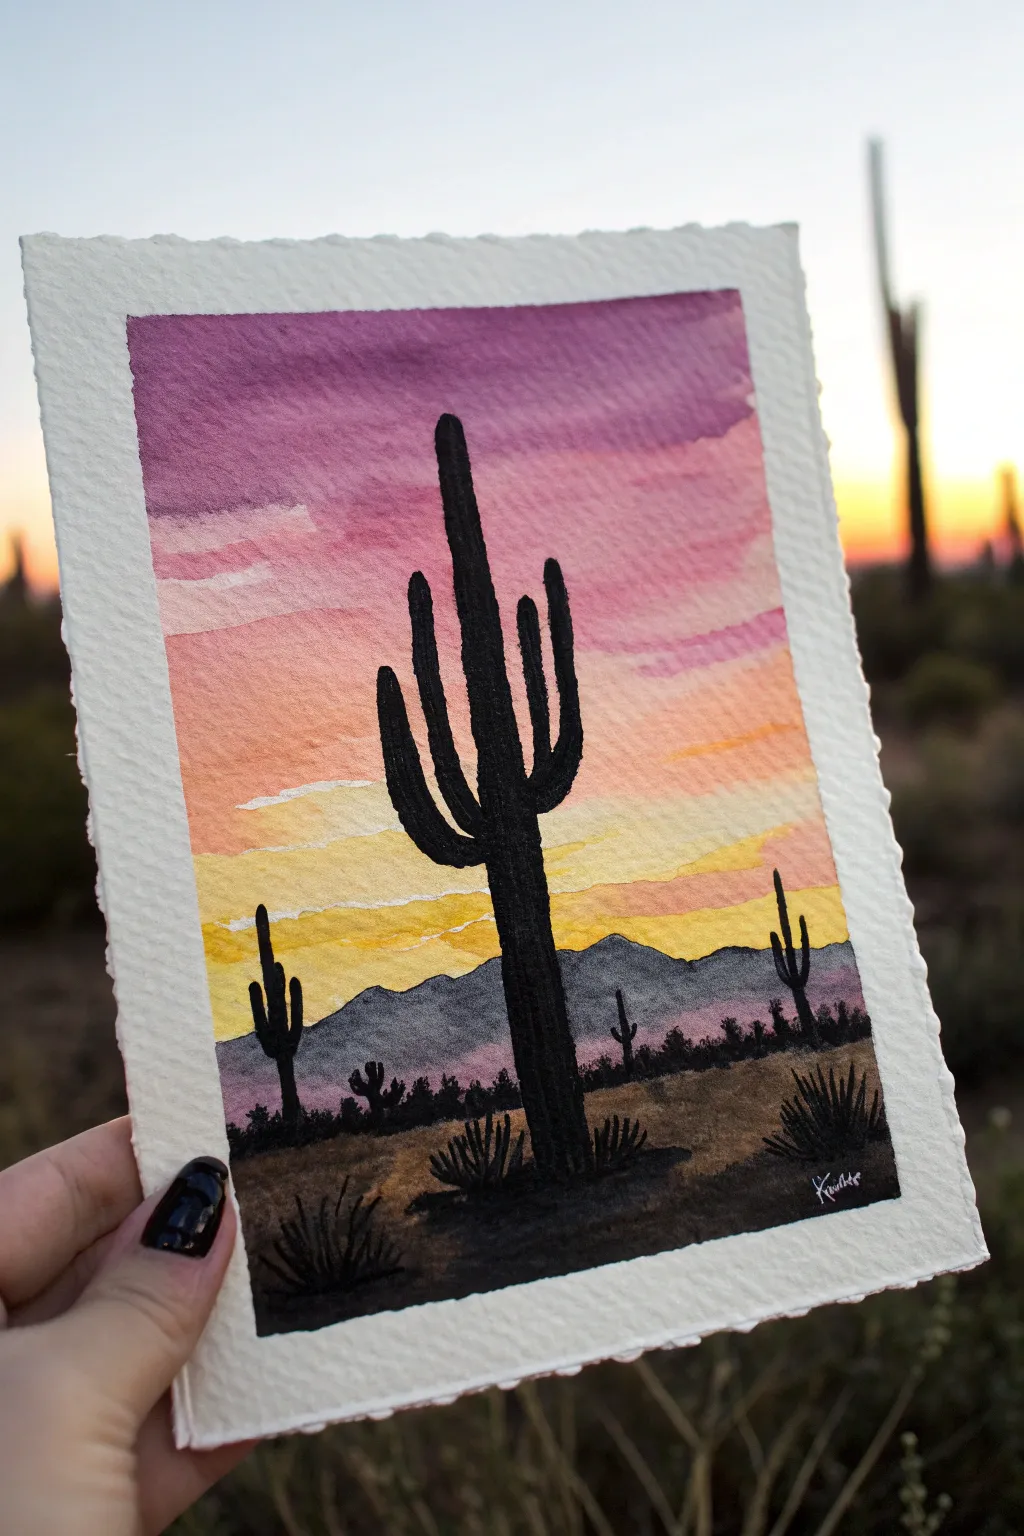
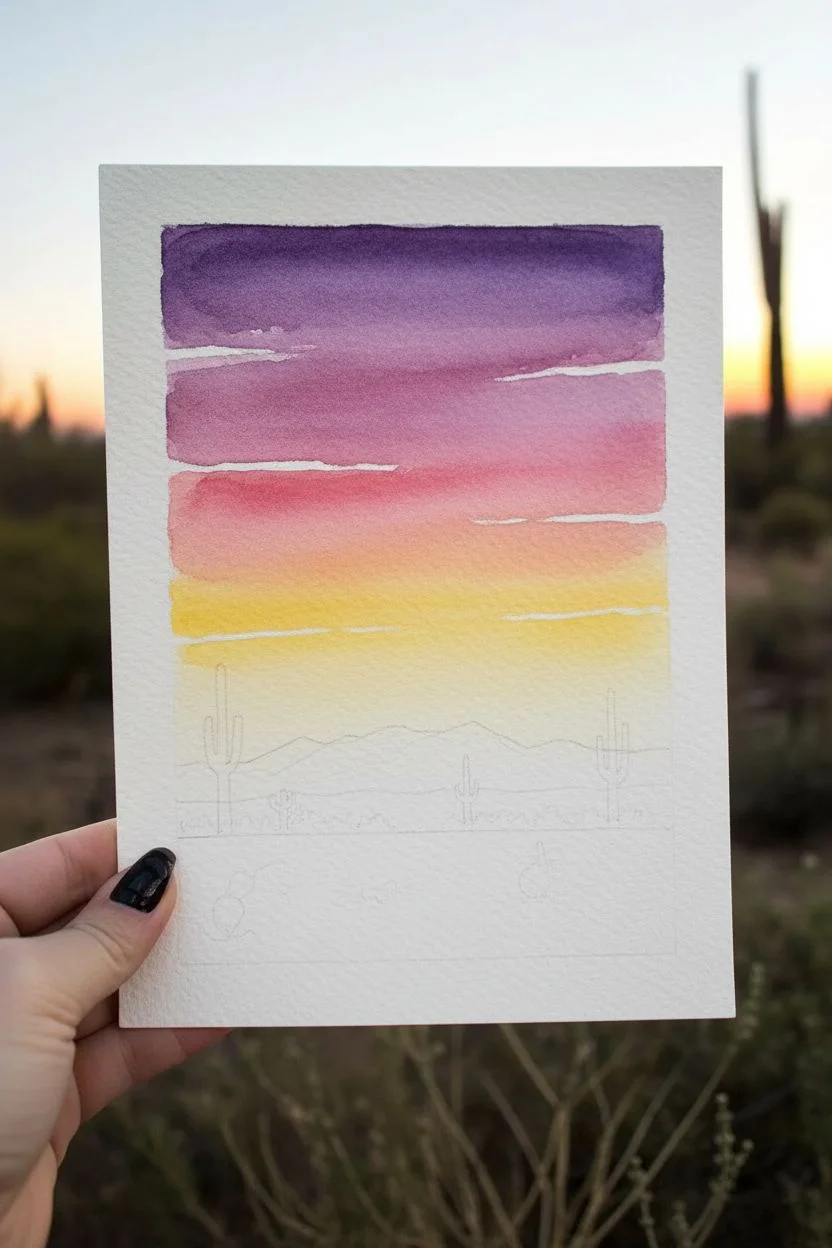
Capture the magic of an Arizona evening with this vibrant watercolor project that contrasts a glowing sunset sky against bold, stark silhouettes. Using simple wet-on-wet techniques, you’ll create a seamless gradient that perfectly frames the iconic shape of the Saguaro cactus.
Step-by-Step
Materials
- Cold press watercolor paper (deckled edge optional)
- Watercolor paints (Purple, Pink/Rose, Orange, Yellow, Black)
- Flat wash brush (3/4 or 1/2 inch)
- Round detail brushes (sizes 2 and 6)
- Masking tape or gummed tape
- Drawing board
- Pencil and eraser
- Clean water
Step 1: Setting the Sky
-
Tape it Down:
Begin by taping your watercolor paper to a board. If you have paper with nice deckled edges like in the example, tape just inside the edge or float the paper by taping the back to secure it without covering the beautiful borders. -
Light Sketching:
Lightly sketch the horizon line about a quarter of the way up the page. Draw a faint outline of the large central cactus and the distant mountain range so you know where your land elements will sit. -
Wet the Sky Area:
Using your large wash brush and clean water, thoroughly wet the paper from the top edge down to the horizon line. The paper should glisten but not have standing puddles. -
Purple Haze:
Load your brush with a deep purple watercolor. Apply this across the very top of the sky using broad horizontal strokes. Let the pigment flow naturally into the wet paper. -
Transition to Pink:
Clean your brush slightly and pick up a rose or magenta hue. Apply this directly below the purple, allowing the bottom of the purple edge to bleed into the pink. -
Warm Core:
Rinse your brush and switch to a warm orange. Paint the middle section of the sky. As you work downward, blend the orange into the bottom of the pink layer. -
Yellow Horizon:
Finish the gradient with a bright yellow right above the mountain line. Leave a few thin, unpainted white streaks horizontally through the purple and pink sections to simulate distant clouds catching the light. -
Let it Dry:
This is crucial: let the sky layer dry completely. The paper should be flat and warm to the touch before you proceed.
Cloud Control
To make the white clouds look natural, lift the paint out with a thirsty (clean but damp) brush while the sky wash is still wet.
Step 2: Mountains and Mid-ground
-
Mountain Range:
Mix a diluted black or a dark grey-purple. Using a medium round brush, paint the distant mountains. Because the paint is diluted, the sunset colors might show through slightly, giving the mountains an atmospheric haze. -
Foreground Earth:
Mix a warm brown or a muddy dark tan. Paint the ground area below the mountains, covering the bottom portion of the paper completely. -
Added Texture:
While the ground layer is still damp, dab in slightly darker brown spots to suggest uneven terrain and desert scrub. Let this layer dry.
Step 3: The Silhouettes
-
Mixing the Black:
You need a very opaque, creamy black for the silhouettes. Mix black watercolor with very little water, or use black gouache if you have it for extra opacity. -
Central Saguaro Trunk:
Using your size 6 round brush, paint the main trunk of the large cactus. Start from the ground and pull upward, tapering slightly at the rounded top. -
Adding Arms:
Paint the arms of the cactus. Saguaros have distinct ‘elbows,’ so curve the arms upward. Make sure the connections to the trunk are seamless and slightly thickened. -
Distant Friends:
Switch to a smaller brush (size 2) and paint smaller cactus silhouettes in the background on the left and right. Keep these simple and smaller to create depth. -
Texturing the Cactus:
I like to take a very fine liner brush with slightly diluted black paint and add vertical lines down the length of the main cactus to suggest ribs, though a solid silhouette works beautifully too. -
Desert Scrub:
Using the tip of your small brush, flick short, quick strokes upward along the bottom ground line. These fan-like shapes represent small bushes and floor vegetation. -
Final Touches:
Check for any light spots in your black silhouettes and fill them in. Once completely dry, sign your name in the corner with a white gel pen or opaque white paint.
Level Up: Salt Texture
Sprinkle a pinch of table salt onto the wet foreground paint while it dries. Brush it off later for a gritty, sandy sandy texture.
Frame your miniature desert escape and enjoy the warmth it brings to your space


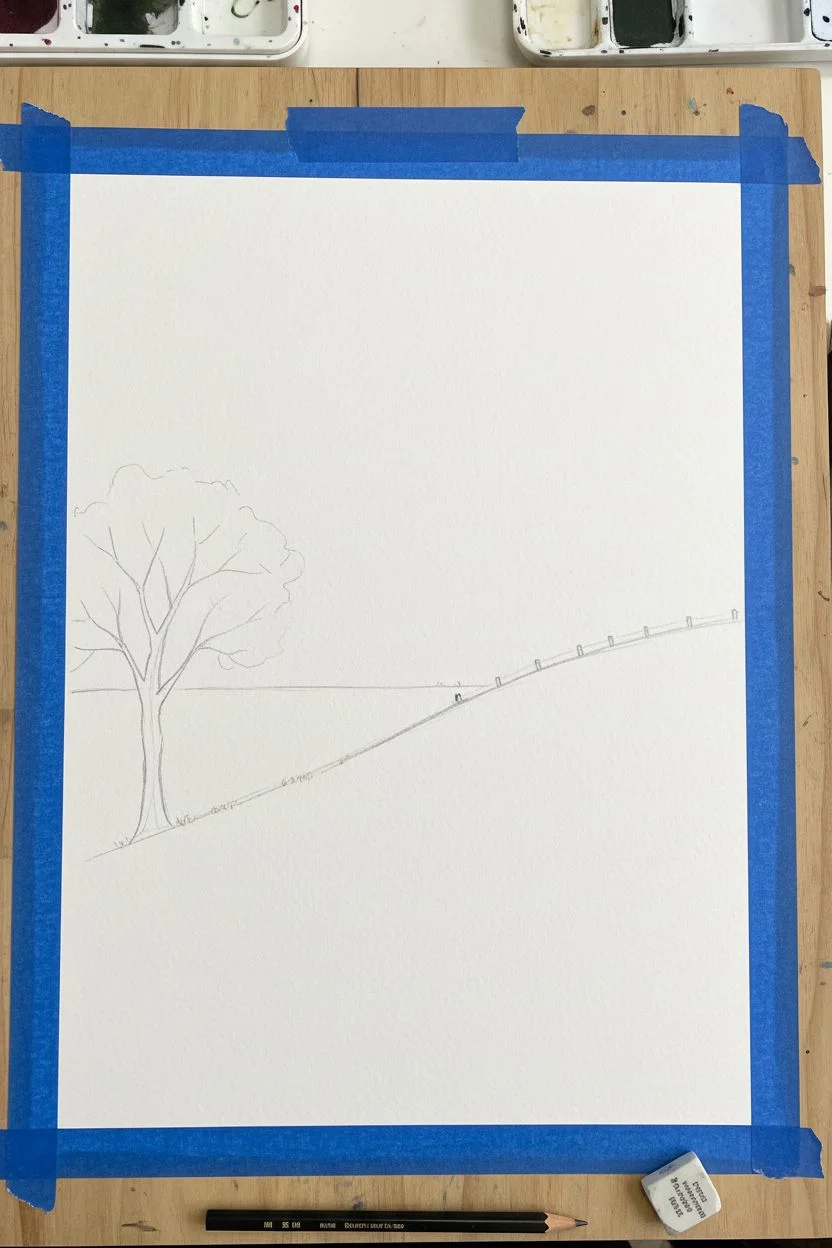
Sunset Meadow With a Fence Line Silhouette
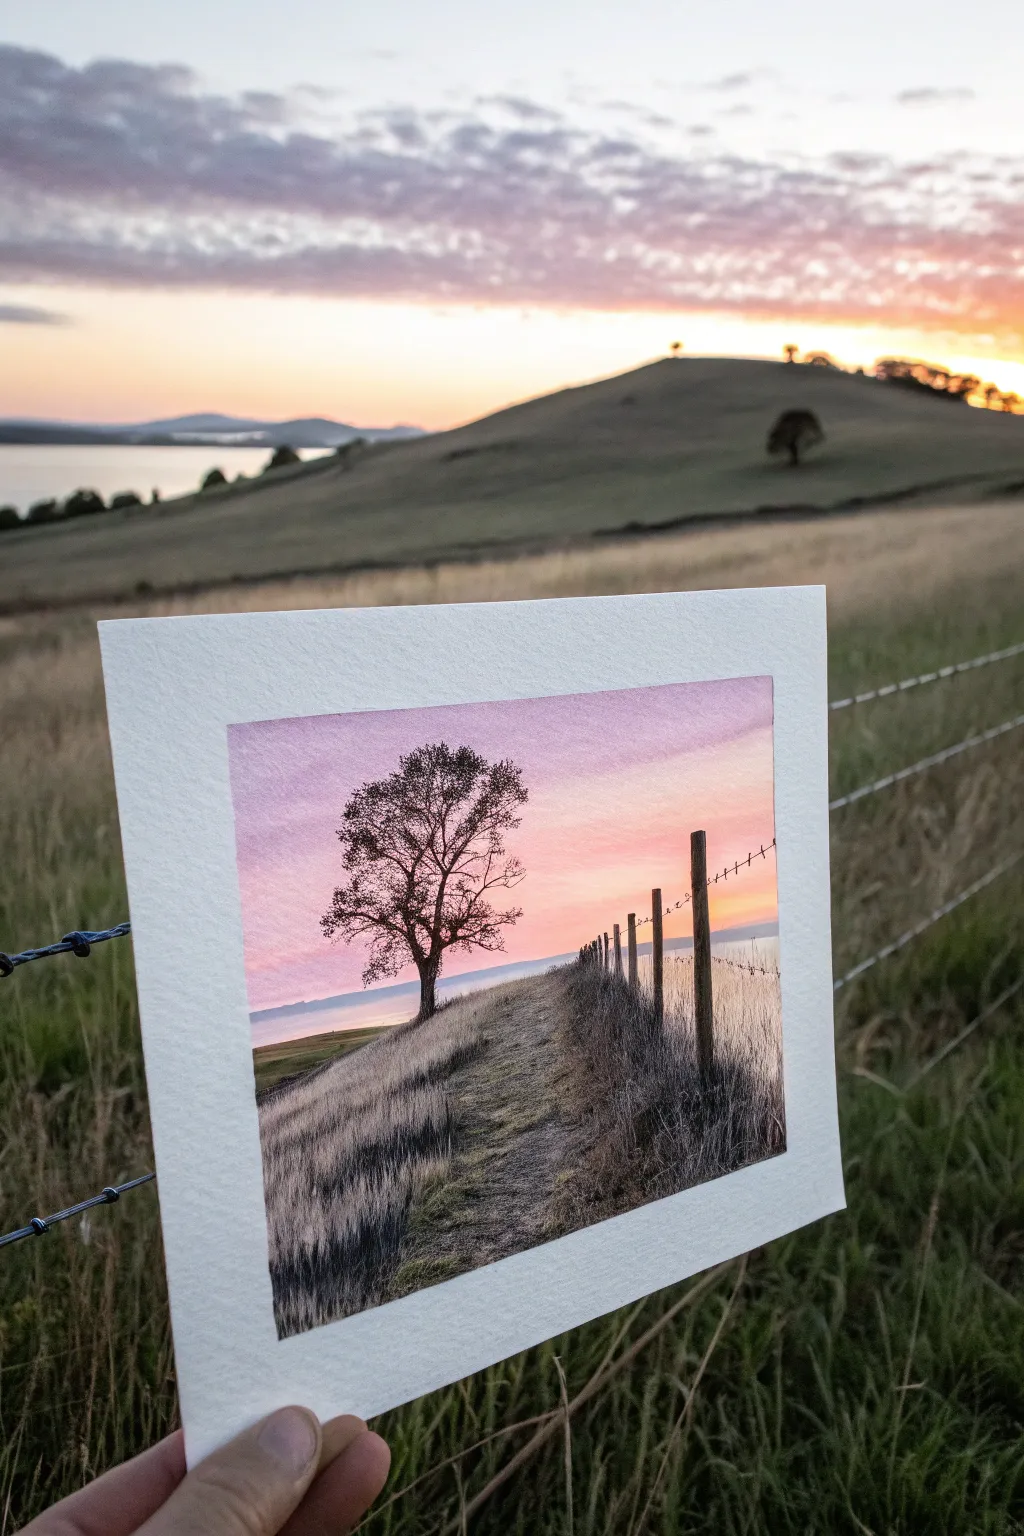
Capture the serene beauty of the golden hour with this delicate watercolor landscape, featuring a striking tree silhouette and a receding fence line. This project focuses on soft, wet-in-wet sky gradients contrasted against dry-brush textures to create a sense of depth and atmosphere.
Step-by-Step Guide
Materials
- Cold press watercolor paper (approx. 140lb/300gsm)
- Artist masking tape
- Watercolor paints (Indigo, Alizarin Crimson, Cadmium Yellow, Burnt Umber, Lamp Black)
- Round brushes (size 8 and size 12)
- Rigger or liner brush (size 1)
- Masking fluid (optional)
- Pencil (HB) and kneadable eraser
- Two jars of water
- Paper towels
- Mixing palette
Step 1: Preparation and Sketching
-
Tape the borders:
Begin by taping down all four edges of your watercolor paper to a board. Use masking tape to create a crisp white border, which acts as a natural frame for the finished piece. Ensure the tape is pressed down firmly to prevent paint seepage. -
Lightly sketch the composition:
With an HB pencil, sketch the horizon line about one-third of the way up the paper. Draw a faint diagonal line sloping from the bottom left upwards to the right for the grassy hill. -
Outline the fence and tree:
Mark the positions for the fence posts, getting smaller as they recede into the distance to create perspective. Lightly outline the main shape of the tree on the left side, focusing on the trunk and main branches without verifying details.
Pro Tip: Atmospheric Depth
Make your fence posts lighter and slightly bluer as they get smaller in the distance. This simple color shift mimics atmospheric perspective, making the background look miles away.
Step 2: Painting the Sky
-
Wet the sky area:
Using a clean size 12 brush, apply clear water to the entire sky area, stopping right at the horizon line. The paper should be glistening but not forming puddles. -
Apply the purple tones:
Mix a diluted wash of Indigo and a touch of Alizarin Crimson to make a soft mauve. Drop this color into the top left corner of the wet paper, letting it diffuse naturally. -
Blend into pinks:
Clean your brush and pick up pure Alizarin Crimson diluted with water. Blend this into the mauve area and bring it down towards the middle of the sky, keeping the wash very fluid. -
Add the sunset glow:
Near the horizon line and the right side of the sky, introduce a soft mix of Cadmium Yellow and a tiny bit of red. Let this mingle slightly with the pink above, but be careful not to mix the yellow directly with the purple to avoid muddy colors. -
Paint the distant water:
While the sky is drying but slightly damp, paint the sliver of water just below the horizon with a very pale wash of the reflected sky colors—mostly light purples and blues. Let the entire background dry completely.
Troubleshooting: Bloom Marks
If cauliflower-like ‘blooms’ appear in your sky, you likely added water to a drying damp area. Don’t fight it—turn it into a cloud by softening the hard edge with a damp, clean brush.
Step 3: The Grassy Foreground
-
Base wash for the ground:
Mix a dull, earthy tone using Burnt Umber and a touch of Indigo. Apply a light wash over the foreground hill area, leaving some streaks of white paper showing to represent light hitting the path. -
Add texture to the grass:
Once the base wash is semi-dry, use a drier brush with a darker brown mix to flick upward strokes. This dry-brush technique mimics the texture of tall, dry grass on the hillside. -
Darken the shadows:
Concentrate darker brown and black tones along the bottom left corner and the right side where the fence line sits. This grounds the painting and creates a shadow path.
Step 4: Silhouettes and Details
-
Paint the tree trunk:
Mix a strong, opaque dark color using Lamp Black and Burnt Umber. Using a size 8 brush, paint the main trunk of the tree, keeping the edges slightly rough to suggest bark. -
Detail the branches:
Switch to a rigger or liner brush. Gently pull fine lines outward from the trunk to create the delicate branch structure. I find that holding the brush loosely near the end of the handle helps create more natural, shaky organic lines. -
Stipple the leaves:
Using an old or splayed round brush with semi-dry black paint, gently stipple (dab) clumps of leaves onto the branches. Keep the foliage sparse to let the beautiful sunset sky peek through. -
Paint the fence posts:
Using the dark mix, paint the vertical fence posts along the right side. Ensure the posts in the foreground are taller and thicker, while the distant ones become mere dashes. -
Draw the wire:
With your finest brush and a very steady hand (or a fine-liner pen if you prefer), draw the thin, sagging wires connecting the fence posts. -
Final foliage touches:
Add some very sharp, dark blades of grass in the immediate foreground at the bottom of the paper to enhance the sense of depth. -
Reveal the border:
Allow the painting to dry strictly for at least 30 minutes. Carefully peel away the masking tape at a 45-degree angle to reveal the crisp white edge.
Step back and admire how a few simple silhouettes can transform a colorful gradient into a peaceful countryside evening
Pine Forest Framing a Sunset Window
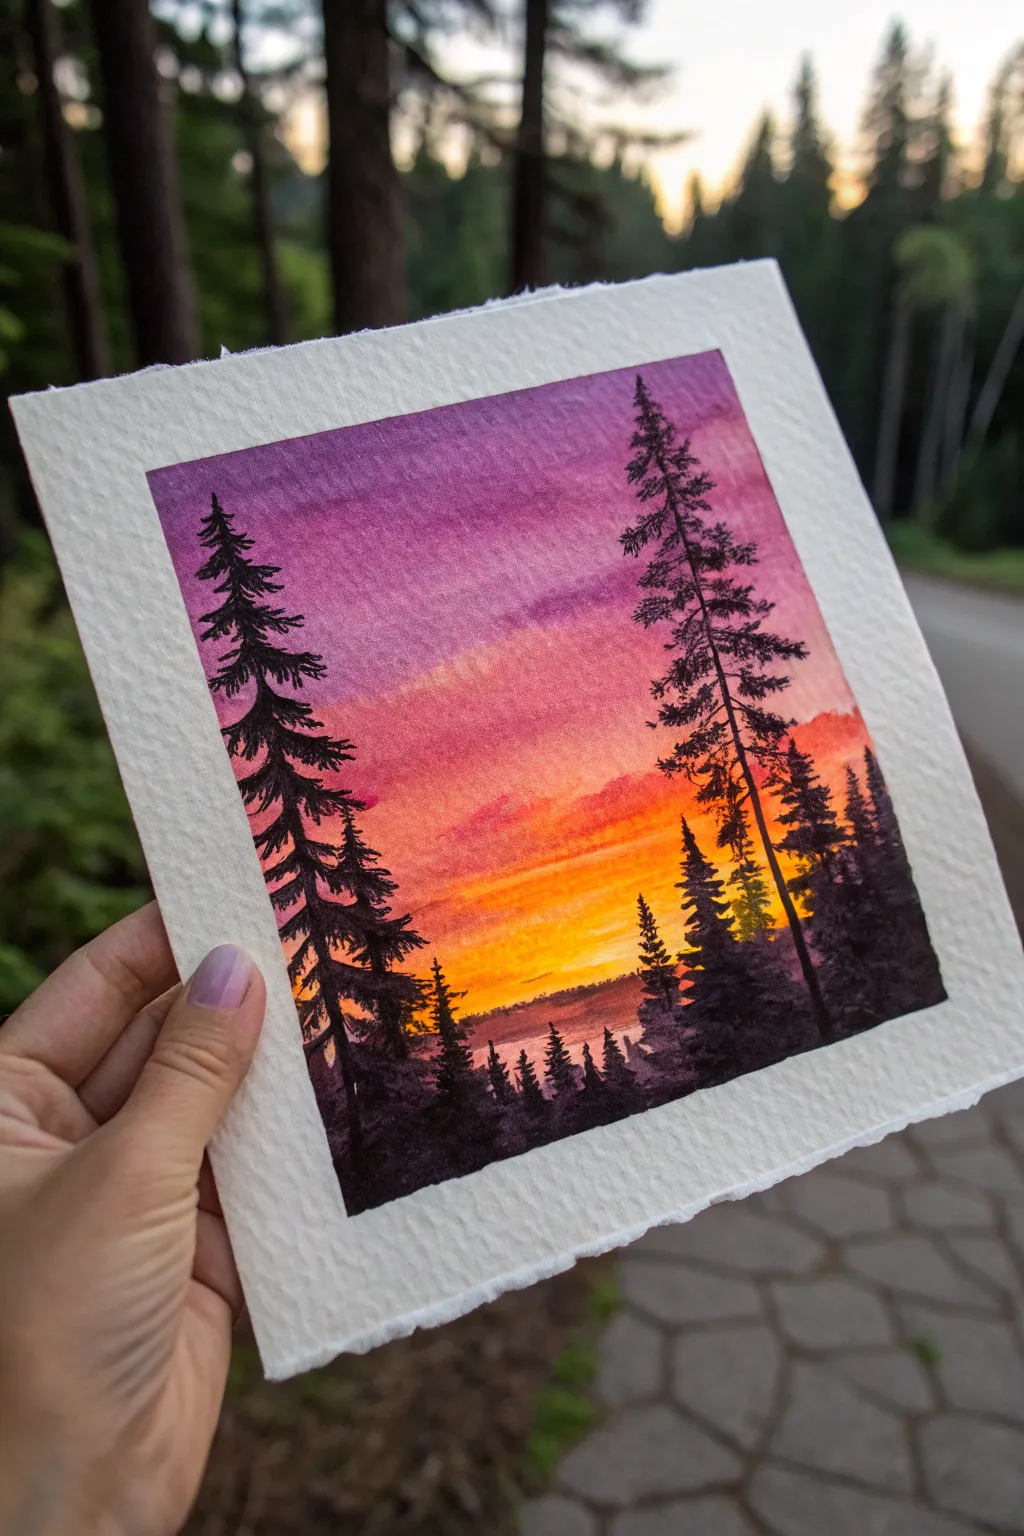
Capture the magic of twilight in the mountains with this striking watercolor tutorial. Featuring a dramatic gradient from deep violet to blazing orange, framed by silhouetted pines, this project creates a glowing ‘window’ into nature.
Detailed Instructions
Materials
- Cold-pressed watercolor paper (300gsm/140lb)
- Painter’s tape or masking tape
- Watercolor paints (Violet/Purple, Magenta/Alizarin Crimson, Orange, Cadmium Yellow, Payne’s Gray or Black)
- Flat wash brush (3/4 inch)
- Round brush (size 6 or 8)
- Fine liner or rigger brush (size 0 or 1)
- Two jars of water
- Paper towels
- Palette for mixing
Step 1: Setting the Stage
-
Tape the borders:
Begin by taping down all four edges of your watercolor paper to a rigid board. Create a clean, even border about half an inch wide; this crisp white edge will be crucial for the final ‘window’ effect. -
Pre-wet the sky:
Using your large flat brush and clean water, apply an even coat of water to the entire area inside the tape. You want the paper to be glistening wet but not forming puddles.
Step 2: Creating the Sunset Gradient
-
Apply the violet top:
Load your flat brush with a rich violet or purple mix. Apply this to the top third of the paper, using horizontal strokes. Because the paper is wet, the edges will soften naturally. -
Blend in magenta:
Clean your brush slightly, pick up a magenta or cool red, and apply it just below the violet, letting the colors bleed together where they meet. Tilt the board slightly if needed to encourage downward flow. -
Transition to orange:
Switch to a vibrant orange. Paint the middle section, carefully blending it upward into the magenta. Be careful not to let the orange touch the violet directly, or you might get muddy brown tones. -
Add the yellow glow:
For the bottom third, use your brightest yellow. Blend it into the orange above, keeping the color purest near the horizon line. I like to leave a tiny sliver of very pale yellow near the bottom for maximum brightness. -
Create cloud texture:
While the paint is still damp but losing its sheen, dab a slightly thirsty brush into the violet and magenta areas to lift out soft, streaky cloud shapes. -
Let it dry completely:
This is the hardest part—waiting! The paper must be bone dry before you start the trees. Use a hairdryer on a low setting if you are impatient, but air drying is safest.
Bleeding edges?
If paint seeped under the tape, use a white gouache or a white gel pen to touch up the borders after the painting is fully dry to reclaim that crisp edge.
Step 3: Painting the Silhouettes
-
Mix the silhouette color:
Mix a very thick, opaque dark color. Pure black can look flat, so I recommend mixing Payne’s Gray with a bit of the violet you used earlier for a deep, harmonious shadow tone. -
Draw the main trunks:
Switch to your round brush or liner brush. Paint two tall, thin vertical lines for the main tree trunks on the left and right sides. Make them slightly wobbly—nature isn’t ruler-straight. -
Start the treetops:
Using the very tip of your fine brush, dab tiny, upward-curving strokes at the apex of each tree to form the pointed tops. -
Flesh out the branches:
Moving down the trunk, paint the branches. Use a zig-zag motion, making the branches wider and heavier as you descend. Leave gaps between branches to let that beautiful sunset sky peek through. -
Add the background forest:
Paint a jagged, uneven horizon line across the bottom inch of the paper using the dark mix. Add smaller, simpler tree spikes rising from this mass to suggest a distant forest line. -
Detail the foreground:
Darken the bottom corners significantly to ground the image. Add a few more distinct, medium-sized trees in the foreground to create depth and variety in height. -
Refine the edges:
Check your branches. If they look too uniform, add distinct needles or varied tips with your smallest brush to make the silhouettes look organic and prickly. -
The reveal:
Once the black paint is completely dry, slowly peel away the masking tape at a 45-degree angle to reveal your crisp white borders.
Add some stars
Flick a tiny amount of white gouache or acrylic onto the purple section of the sky with an old toothbrush to create the first stars of the evening.
Step back and admire how the dark trees make those sunset colors truly pop
Moody Storm-Cloud Sunset With a Bright Break of Light
Capture the dramatic contrast between heavy storm clouds and the brilliant golden hour light in this moody landscape study. By layering deep indigo shadows over warm underpaintings, you will learn to create a sky that feels both threatening and hopeful.
Step-by-Step Guide
Materials
- Heavyweight watercolor paper or canvas panel (approx. A4 size)
- Acrylic paints (Indigo, Payne’s Grey, Burnt Umber, Titanium White, Cadmium Yellow, Cadmium Orange, Alizarin Crimson)
- Flat shader brushes (sizes 8 and 12)
- Small round detail brush (size 2)
- Fan brush or soft blending mop brush
- Palette knife for mixing
- Cup of water and paper towels
- Light wood frame with mat board
Step 1: Setting the Horizon and Glow
-
Establish the horizon line:
Begin by lightly sketching a low horizon line with a pencil, placing it about one-quarter of the way up from the bottom edge. Keep the line slightly uneven to represent distant rolling hills. -
Create the sun base:
Mix a bright, intense wash of Titanium White and Cadmium Yellow. Paint a horizontal strip just above the horizon line where the sun is breaking through; keep this layer wet and loose. -
Expand the warmth:
Gradually blend Cadmium Orange into the wet yellow edges, moving upward into the sky area. This creates the ‘underglow’ that will peek through the storm clouds later. -
Soften the transition:
While the paint is still workable, use a clean, damp brush to feather the top edge of the orange paint so it fades into the plain white of the paper or canvas.
Muddy Clouds?
If your greys and oranges are turning brown creates ‘mud.’ Wait for the warm underlayer to dry fully before painting the cool grey clouds over it.
Step 2: Building the Storm Clouds
-
Mix the shadow color:
Create a deep, moody grey-purple by mixing Indigo with a touch of Payne’s Grey and Alizarin Crimson. I like to keep this mix fairly thick to get good opacity. -
Paint the upper sky:
Using the large flat shader brush, apply the dark mix to the top third of the canvas. Use sweeping, diagonal strokes to suggest wind movement. -
Form the mid-clouds:
Load your brush with a slightly lighter grey (add a tiny bit of white to your dark mix) and dab irregular cloud shapes below the top dark band. Leave gaps where the orange underpainting shows through. -
Add volume highlights:
Mix a light blue-grey using Titanium White and a dash of Indigo. Apply this to the top edges of the mid-clouds to give them volume and dimension, mimicking where the upper light hits them. -
Create the burning edges:
Mix a rusty red-orange color. Carefully paint the undersides of the dark clouds that are closest to the yellow horizon strip, blending slightly upward into the grey.
Step 3: Developing the Landscape
-
Block in the distant hills:
Mix a dark, muted purple-grey for the distant hills. Paint a solid silhouette along the horizon line, overlapping the bottom of the yellow sun strip slightly. -
Paint the foreground shape:
Create a darkest dark by mixing Burnt Umber into your Indigo. Use this to fill in the foreground land area, keeping the shapes rough to suggest vegetation. -
Texture the foreground:
Switch to your small round brush. Use a tapping motion with slightly lighter green-grey paint to suggest the tops of bushes or rough grass in the immediate foreground. -
Deepen the foreground shadows:
Go back in with your darkest black-blue mix and add deep shadows at the very bottom of the painting to anchor the composition.
Metallic Magic
Mix a tiny amount of gold iridescent medium into your yellow and orange paints for the horizon line to make the sunset actually shimmer in the light.
Step 4: Final Light Refinements
-
Intensify the sun break:
Once the sky is dry, re-apply a mix of pure Titanium White and Cadmium Yellow to the brightest part of the horizon. This second layer makes the light source pop. -
Add sun rays:
Use a dry fan brush or a very lightly loaded flat brush to drag faint streaks of light yellow downward into the distant hills and upward into the clouds. -
Highlight cloud breaks:
Look for small gaps in your dark clouds. Add tiny touches of bright orange or pink to suggest light refracting through the storm. -
Final assessment:
Step back and check the contrast. If the clouds look too flat, add deeper Indigo to the shadow pockets to increase the drama. -
Framing:
Allow the painting to dry completely for at least 24 hours. Mount it behind a clean white mat board and place it in a light wood frame to complement the organic tones.
Now you have a striking piece of atmospheric art ready to bring warmth to any room on a cloudy day
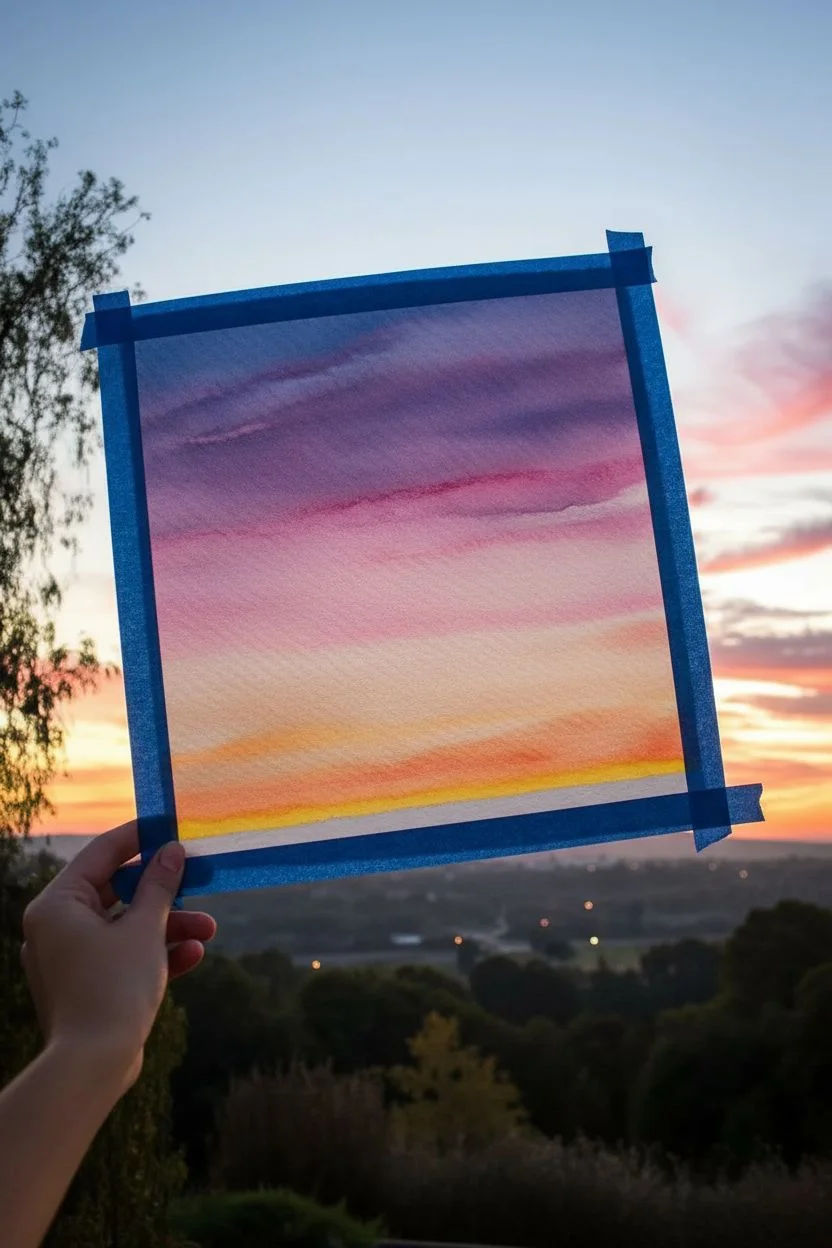
Sunset Color Study Using Only Three Colors
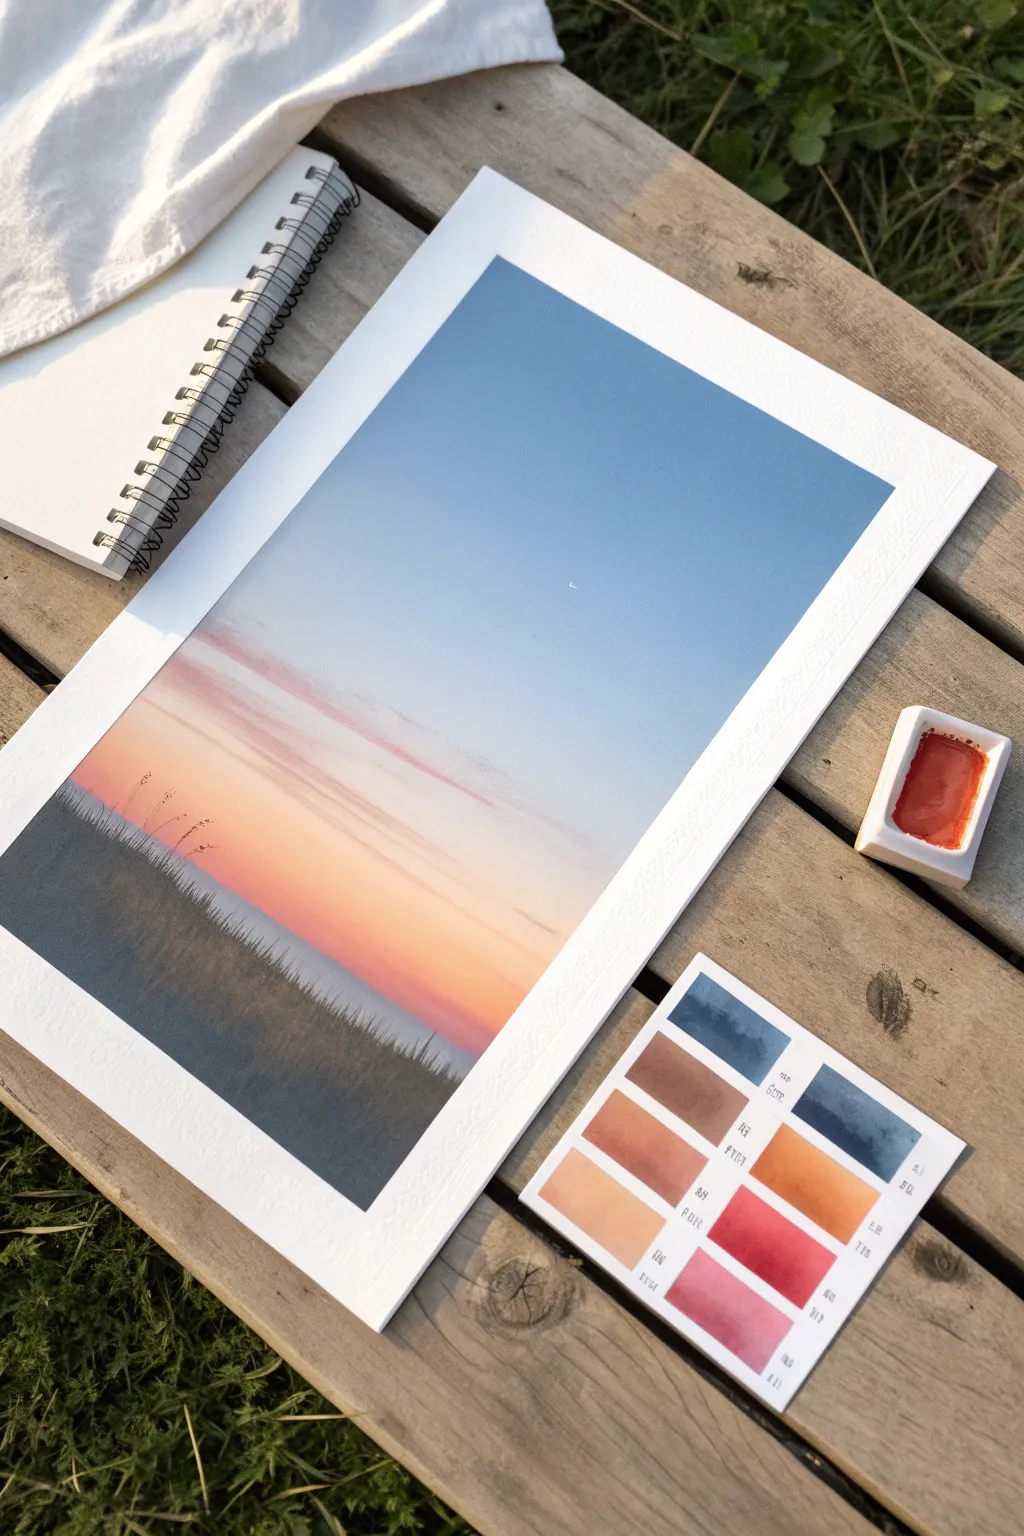
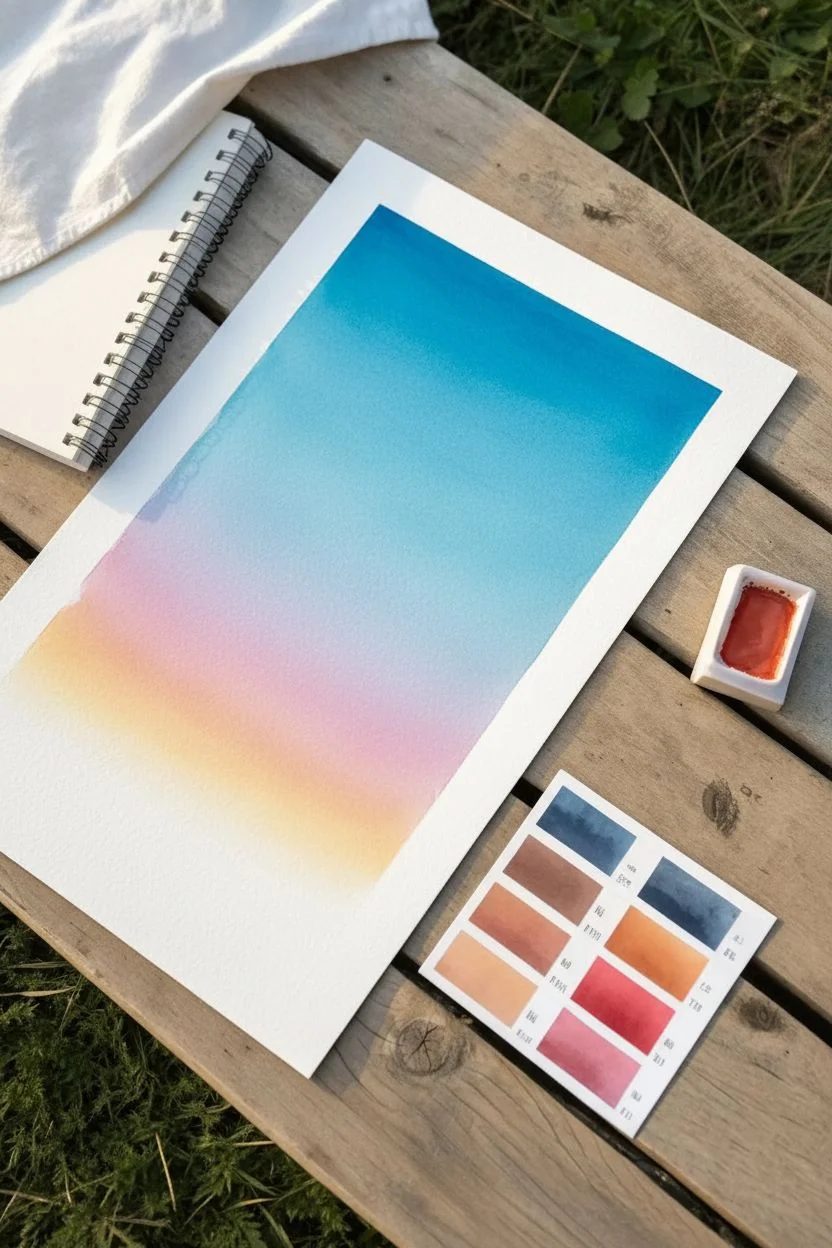
Master the art of less-is-more with this serene watercolor landscape that uses just three primary colors to create an entire spectrum of sunset hues. By focusing on smooth gradients and clean silhouettes, you’ll capture the quiet moment just as day slips into night.
Step-by-Step Tutorial
Materials
- Cold Press Watercolor Paper (block or taped down)
- Watercolor Paints (Cyan/Blue, Magenta/Red, Yellow)
- Flat Wash Brush (1/2 inch or 3/4 inch)
- Small Round Brush (Size 2 or 4)
- Detailed Liner Brush (Size 0 or 00)
- Clean Water
- Mixing Palette
- Paper Towels
- White Gouache or White Gel Pen (optional)
Step 1: Preparing the Gradient Sky
-
Mix your colors:
Before touching paper, prepare three puddles of paint on your palette: a deep cyan blue, a bright magenta, and a warm yellow. Having these ready is crucial for a smooth wet-on-wet blend. -
Pre-wet the sky area:
using your large flat brush, apply a generous coat of clean water over the entire upper two-thirds of your paper. Make sure the shine is even, not puddling. -
Apply the blue:
Load your flat brush with the cyan mix. Start at the very top edge and paint horizontally across, bringing the color down about halfway. Let the pigment fade naturally as you move lower, adding a touch of water if needed to dilute it. -
Introduce the pink:
Clean your brush thoroughly. Pick up the magenta paint and apply it right below where the blue is fading out. Gently overlap the two wet edges to create a soft violet transition zone. -
Add the yellow horizon:
Clean the brush again. Load it with yellow and apply it at the bottom of your sky area. Blend it upwards slightly into the pink to create a warm orange glow. -
Smooth the transitions:
While the paper is still damp, use a clean, slightly damp brush to gently stroke back and forth horizontally over the transition areas if any hard lines appear. Be careful not to overwork it, which can muddy the colors.
Muddy colors?
If your orange zone looks brown, you likely overlapped the blue and yellow too much. Keep a distinct pink/magenta buffer zone between them to prevent mixing complementary colors.
Step 2: painting delicate clouds
-
Lift pigment for clouds:
While the sky wash is still damp but losing its sheen (the satin stage), use a clean, thirsty brush to lift out horizontal streaks in the pink and orange sections. This creates soft, negative-space clouds. -
Add shadow accents:
Mix a tiny amount of purple using your blue and magenta. With a small round brush, paint thin, feathery streaks along the bottom edges of your lifted clouds to give them volume. Keep these marks extremely subtle. -
Total drying time:
This is the most critical step. You must let the sky dry completely bone-dry before proceeding. If the paper is cold to the touch, it’s not ready. Use a hairdryer on low heat to speed this up.
Level Up: Birds
Add scale to your sky by painting tiny, fleeting “v” shapes with your liner brush in the distance. Keep them extremely small so they don’t distract.
Step 3: The Silhouetted Foreground
-
Mix a dark chromatic black:
Instead of using black from a tube, mix your blue, magenta, and a touch of yellow together in a concentrated mix. Aim for a very dark, cool indigo or neutral grey color. -
Paint the base layer:
Using the flat brush, paint a solid block of this dark color at the very bottom of the paper, covering the bottom third. The top edge of this block doesn’t need to be perfectly straight, as it represents a field. -
Feather the grass edge:
Switch to your small round brush or liner brush. While the top edge of the dark block is wet, pull tiny, quick strokes upward to create the first layer of dense, short grass blades. -
Add tall detail stalks:
With the finest liner brush and a fully loaded mixture of the dark paint, flick quick, confident lines shooting up into the orange sky area. Vary the heights and angles to make it look natural. -
Detail the seed heads:
At the tips of a few tall stalks, dab tiny irregular dots or downward-drooping strokes to represent seed heads or wild rye. Don’t do this on every blade; pick a few focal points. -
Create depth:
Once the grass layer is dry, I sometimes add a second, slightly darker wash over just the bottom inch to ground the image and create a sense of deep shadow near the viewer’s feet.
Step 4: Finishing Touches
-
Place the moon:
Using a white gel pen or a tiny dot of white gouache on your smallest brush, paint a very fine crescent moon high in the blue section of the sky. -
Refine the edges:
If you used masking tape, peel it away carefully at a 45-degree angle away from the painting to reveal crisp, clean borders.
Step back and admire how a simple gradient can evoke such a peaceful evening atmosphere
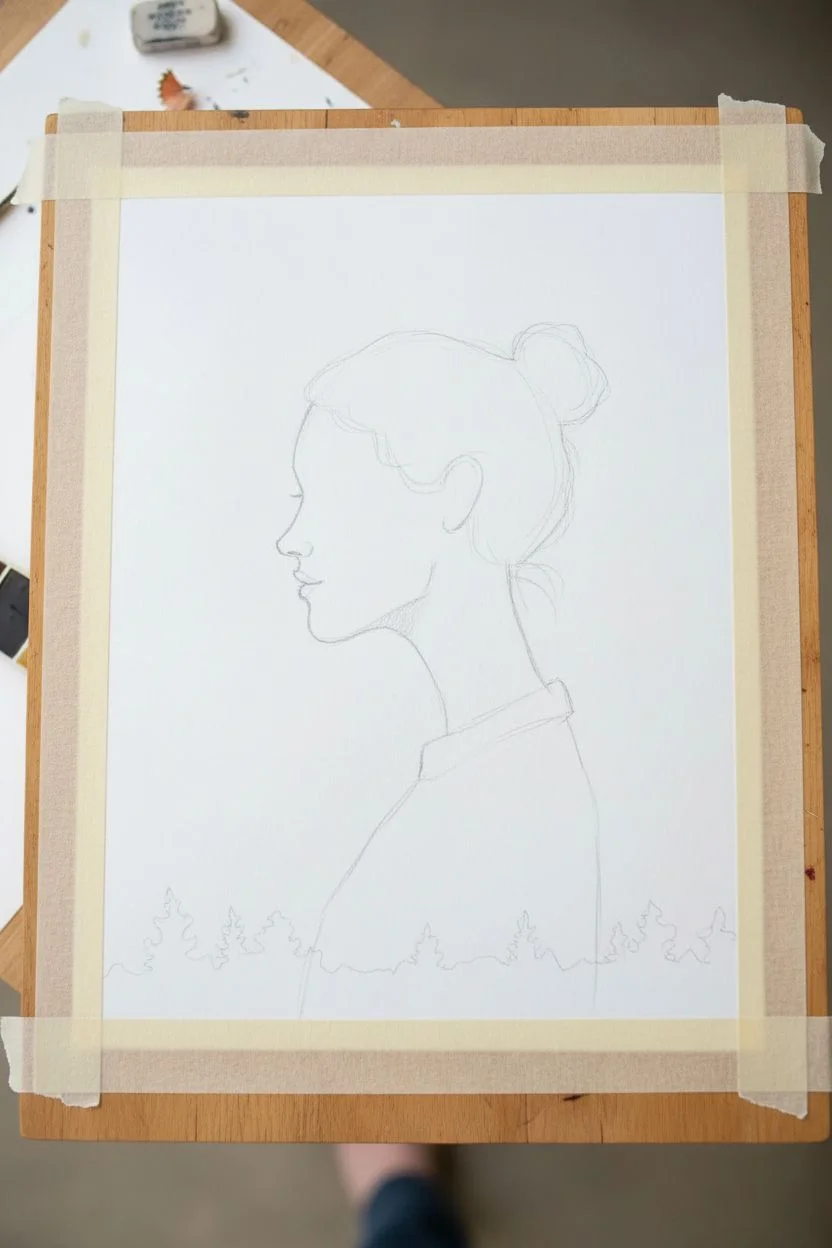
Double-Exposure Sunset Inside a Silhouette Shape
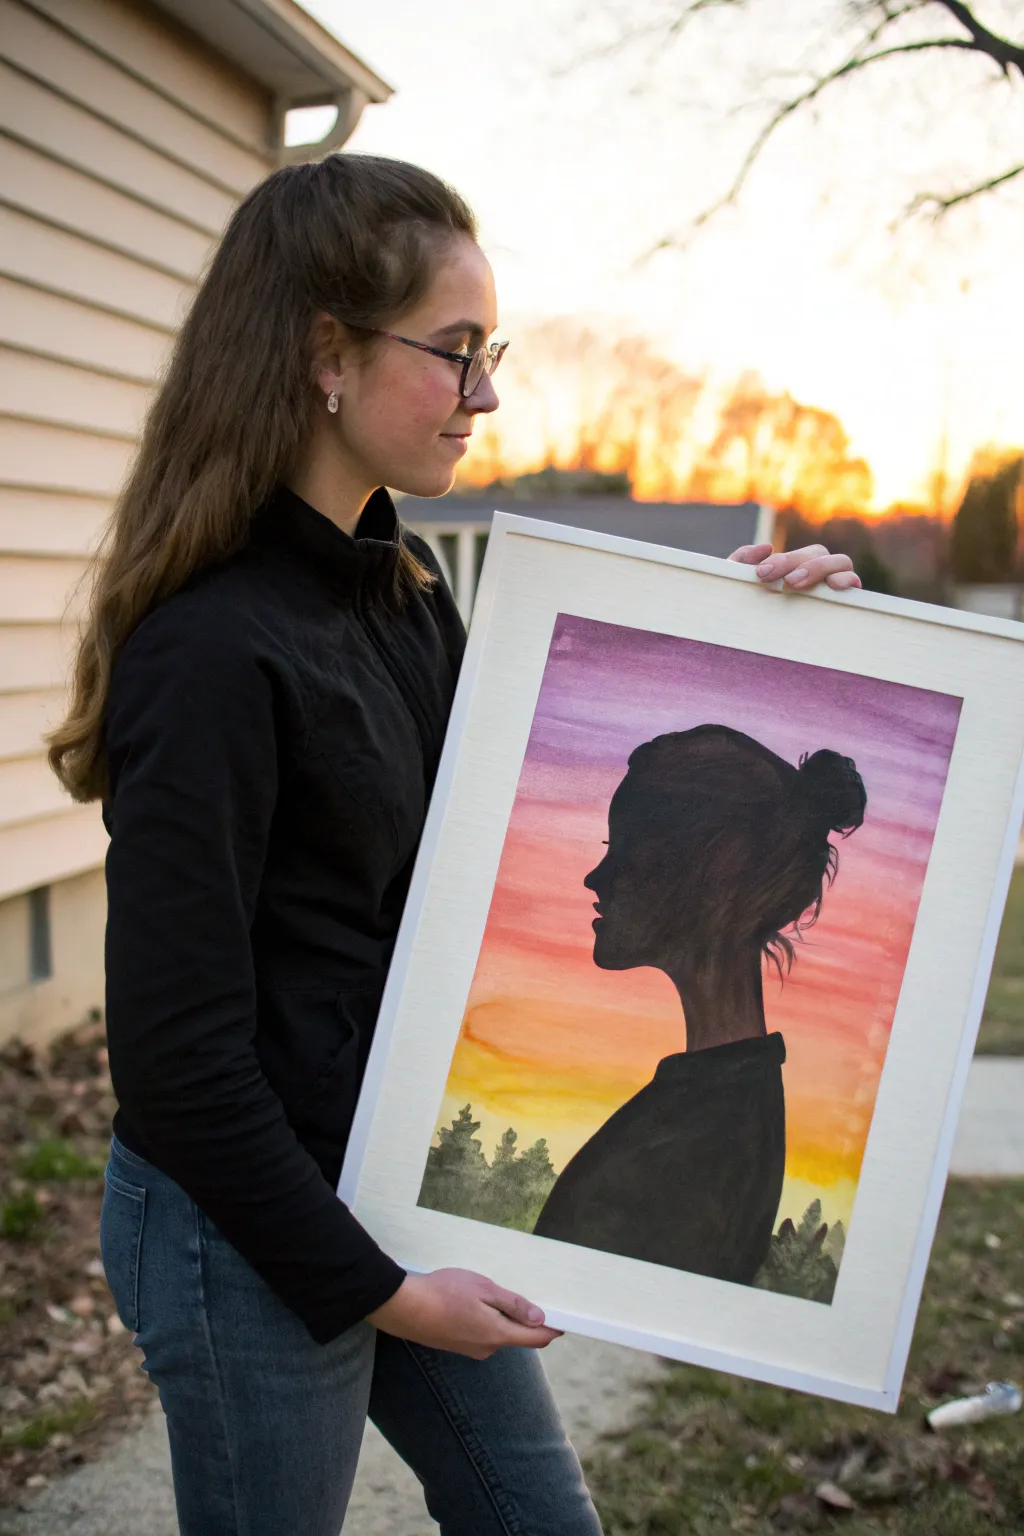
Capture the serene beauty of a setting sun with this striking watercolor silhouette project that places a dark, contemplative profile against a vibrant, blended sky. The contrast between the solid black figure and the soft, bleeding colors of the background creates a dramatic yet peaceful composition perfect for framing.
Detailed Instructions
Materials
- High-quality watercolor paper (140lb/300gsm cold press recommended)
- Watercolor paints (Purple, Magenta, Orange, Yellow)
- Black acrylic paint or black gouache
- Pencil
- Eraser
- Masking fluid (optional but helpful)
- Large flat wash brush
- Medium round brush
- Small detail brush for edges
- Artist tape
- Mixing palette
- Paper towels
- Jar of water
Step 1: Preparation & Drawing
-
Secure the paper:
Begin by taping down all four edges of your watercolor paper to a hard board or table. This creates a clean white border and prevents buckling when the paper gets wet. -
Sketch the profile:
Lightly sketch the outline of a person’s profile in the center of the paper using a pencil. Pay attention to the nose, lips, and neck curve, and add a loose bun hairstyle for a casual look. Keep the lines faint so they won’t show through lighter paint areas later. -
Add landscape elements:
At the very bottom of the paper, sketch a rough, uneven horizon line and indicate where a few evergreen trees will sit. These will ground the portrait. -
Protect the silhouette (Optional):
If you are worried about accidentally painting inside the profile, you can apply masking fluid over the entire silhouette shape now. I like to just paint carefully around the edges, but masking fluid guarantees a crisp line.
Step 2: Painting the Sunset Sky
-
Wet the background:
Using your large brush and clean water, thoroughly wet the entire area *outside* the silhouette shape. The paper should be glistening but not forming puddles. -
Start with purple:
Load your brush with a deep violet or purple. Apply horizontal strokes across the very top of the paper, letting the color bleed downwards slightly into the wet paper. -
Blend in pink:
Clean your brush and pick up a vibrant magenta or pink. Paint directly below the purple, slightly overlapping the two colors so they blend naturally on the wet surface. -
Transition to orange:
Continue moving down the page, switching to a warm orange tone. Ensure you are painting carefully around the pencil outline of the face, keeping the edges as clean as possible. -
Finish with yellow:
As you reach the lower section and the horizon line, blend a bright lemon yellow into the orange. Let this yellow fade out slightly near the very bottom where the trees will be. -
Refine the edges:
While the paint is still damp, use a smaller damp brush to tidy up the outline of the face if any paint strayed too far inside. Let the background dry completely before moving on.
Bleeding Edges?
If paint bleeds into the silhouette area, don’t panic. Gently lift the mistake with a damp paper towel immediately, or simply adjust the silhouette’s shape slightly with the black paint later to cover it.
Step 3: Creating the Silhouette
-
Fill the profile:
Once the watercolor background is bone dry, switch to black acrylic or gouache. These opaque paints provide solid coverage that watercolor usually can’t achieve. Use a medium round brush to fill in the main body of the silhouette. -
Detail the features:
Switch to your smallest detail brush to navigate the tricky curves of the nose, lips, eyelashes, and chin. Sharp, confident lines are key here to make the profile readable. -
Add hair texture:
Use the tip of your detail brush to flick tiny, wispy strokes outward from the bun and the nape of the neck. These ‘flyaways’ add realism and soften the rigid outline. -
Paint the tree line:
Using the same black paint, fill in the tree shapes at the bottom. Use a stippling motion (dabbing the brush tip) to replicate the texture of pine needles against the yellow sky. -
Final touches:
Check for any patchy areas in the black paint and apply a second coat if necessary to ensure it is completely opaque and solid. -
Reveal the border:
Wait until the black paint is fully dry, then carefully peel away the artist tape at a 45-degree angle to reveal your crisp white frame.
Make It Personal
Take a profile photo of a friend or family member against a bright window, print it out, and trace the outline onto your paper for a custom portrait silhouette.
Place your finished piece in a simple white frame to let the vibrant colors truly shine
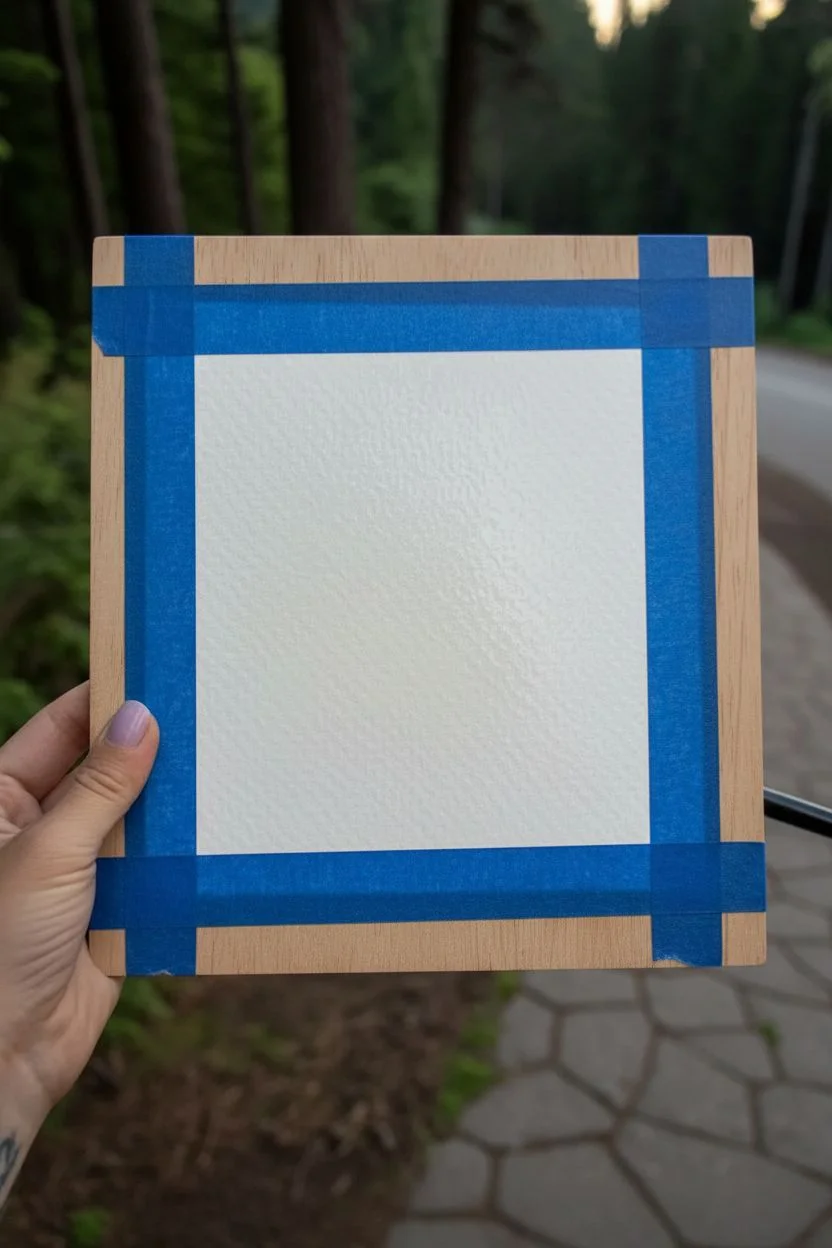
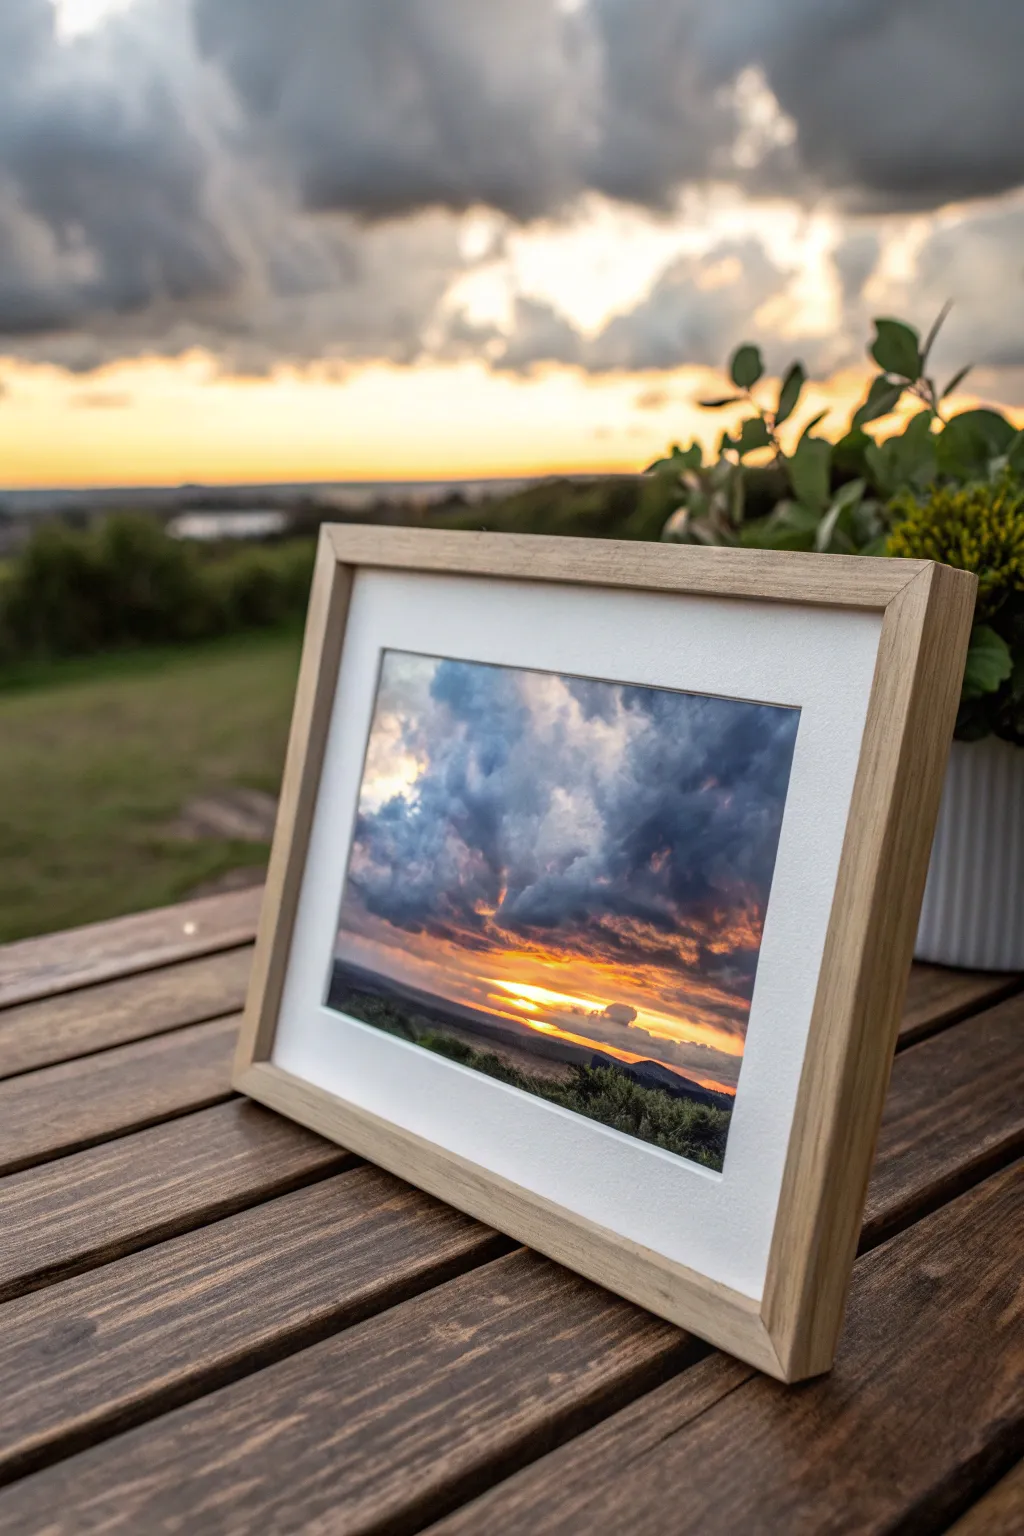
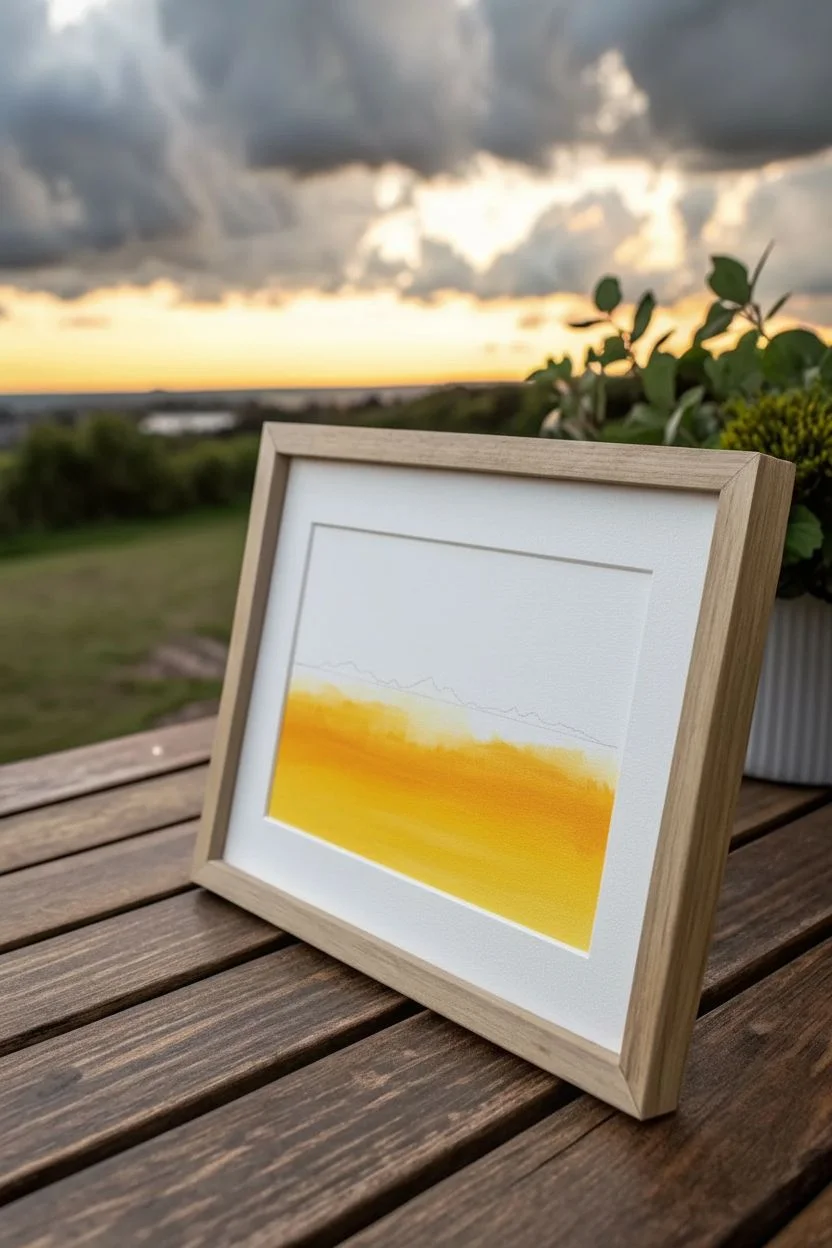
Abstract Geometric Sunset With Crisp Tape Edges
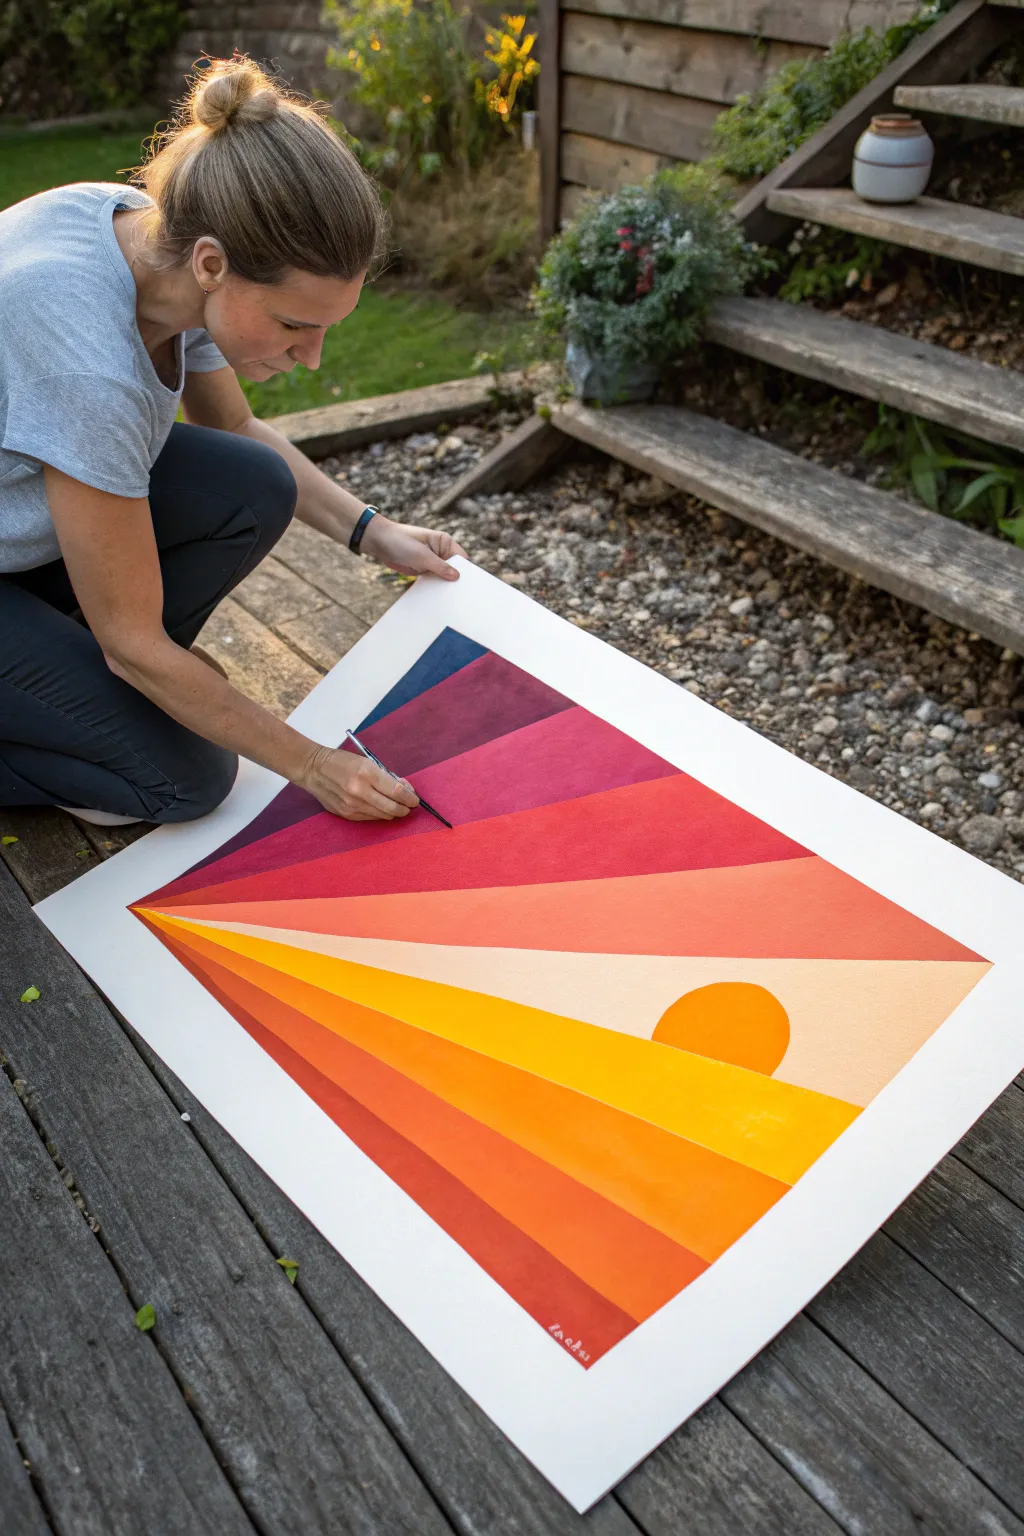
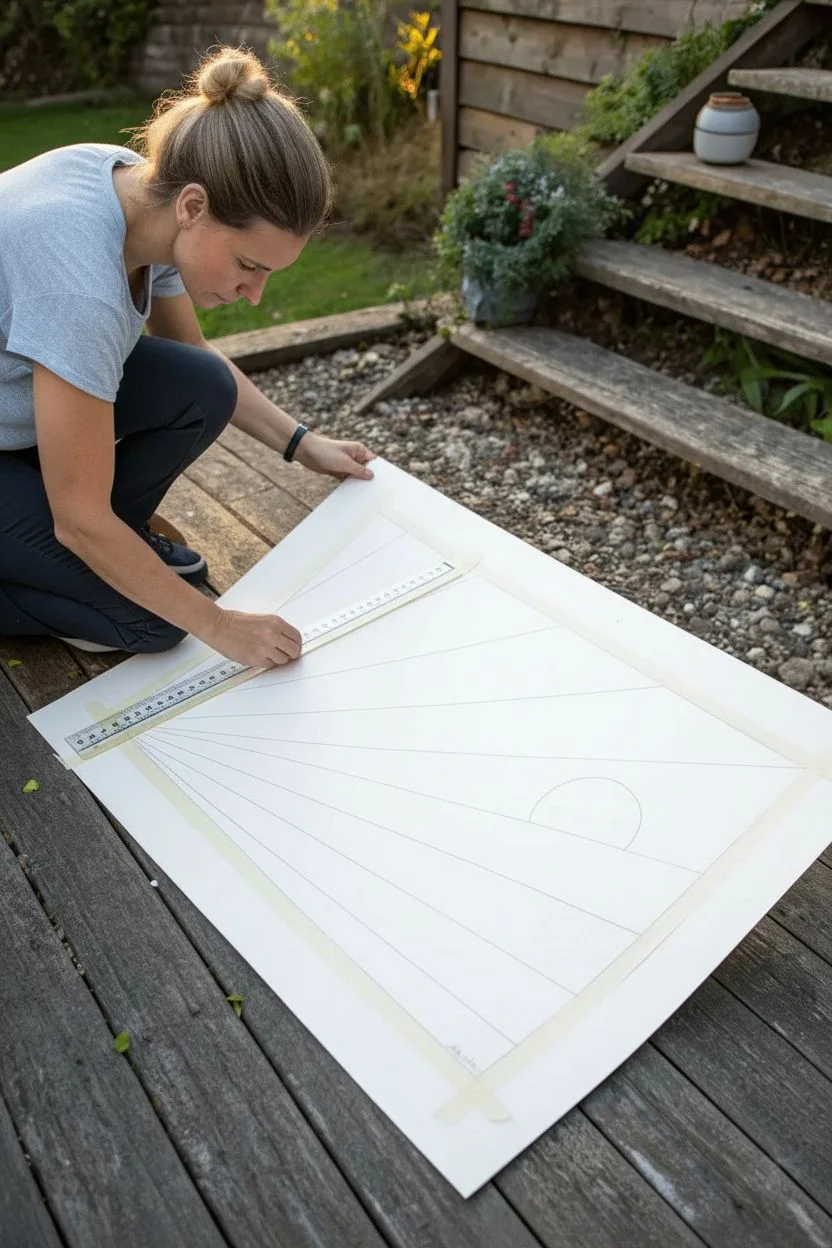
Capture the warmth of golden hour with this stunning geometric abstract painting, featuring crisp lines and vibrant gradients. By using tape to mask off distinct sections, you can create a clean, modern interpretation of a sunset that radiates energy and color.
Step-by-Step
Materials
- Large heavy-weight watercolor or mixed media paper (approx. A2 or larger)
- Artist tape or low-tack painter’s tape
- Acrylic paints (deep red, magenta, orange, yellow, cream, white, navy blue)
- Flat synthetic brushes (various sizes, 1/2 inch to 1 inch)
- Ruler or straight edge
- Pencil
- Palette for mixing
- Water cup and paper towels
Step 1: Planning and Taping
-
Define the Horizon:
Begin by deciding where your horizon line will sit. Since this is abstract, it doesn’t need to be perfectly straight or centered. Use a light pencil mark to indicate the general flow. -
Draft the Sun:
Sketch a circle for the sun using a compass or by tracing a round object like a small bowl. Place it slightly off-center for a dynamic composition. -
Map the Rays:
Using a ruler, lightly draw straight lines radiating outward from the left side of the paper across to the right. These will form the ‘rays’ of your sunset. Vary the width of these bands to create visual interest—some can be narrow slivers while others are broad sweeps of color. -
Tape Phase One:
This technique requires painting in non-adjacent sections to keep edges crisp. Tape off every *other* ray section. Press the tape down firmly, especially along the edge where paint will meet paper, to prevent bleeding. -
Seal the Edges:
For razor-sharp lines, I like to brush a very thin layer of matte medium or white paint over the tape edge first. This seals any tiny gaps so your colored paint won’t seep underneath.
Seal the Deal
Before applying color, paint a thin layer of the paper’s base color (usually white) over the tape edge. This seals voids, creating a perfect bleed-proof line.
Step 2: Painting the First Sections
-
Mix Your Gradient Palette:
Prepare your colors on the palette. You’ll need a range of warm tones: deep burgundy, bright crimson, vibrant orange, golden yellow, and pale cream. Keep a deep navy or indigo ready for the upper sky contrast. -
Paint the Upper Sky:
Start with the topmost open section. Apply your darkest color (navy or deep purple) at the left edge, blending it gradually into a lighter magenta as you move right. -
Create Smooth Transitions:
To get a smooth look within a single ray, load your brush with the next lighter color while the previous one is still wet. Blend them on the paper using horizontal strokes. -
Fill Lower Rays:
Move to the lower exposed sections. These should represent the earth or lower atmosphere, so use warm oranges, terracottas, and deep reds. Ensure the paint application is opaque and flat. -
Let it Dry completely:
Acrylics dry relatively fast, but you must be patient here. Wait until the paint is cool to the touch and totally dry before attempting to remove any tape.
Step 3: Completing the Composition
-
Remove and Re-Tape:
Gently peel back the tape at a 45-degree angle. Once revealed, tape over the *painted* sections you just finished. This protects them while you paint the remaining white gaps. Ensure the new tape aligns perfectly with your crisp paint lines. -
Paint Remaining Rays:
Fill in the newly exposed white strips. Focus on contrasting colors—if a painted section above is dark red, try making the section below it a bright orange or yellow to make the design pop. -
Paint the Sun:
If your sun circle intersects with rays, you can paint it now or layer it on top later. For a graphic look, use a solid, flat yellow-orange for the sun, making it distinct from the gradient rays around it. -
Add the Highlight Ray:
Use your palest cream or white mixed with a touch of yellow for the ray that passes directly behind or near the sun. This mimics the intensity of light at the horizon. -
Final Tape Removal:
Once the second round of painting is completely dry, slowly peel off all the tape. This is the most satisfying part, revealing the clean white gaps or perfectly abutting colors. -
Touch Ups:
Inspect your edges. if any paint bled through, use a small detail brush with a bit of opaque white (or the background color) to tidy up the lines.
Torn Paper Fix
If tape rips your paper upon removal, you likely pulled too fast or up. Always pull tape slowly, flat against itself, and away from the painted area.
Step back and admire the vibrant, structured glow of your geometric sunset.


Have a question or want to share your own experience? I'd love to hear from you in the comments below!