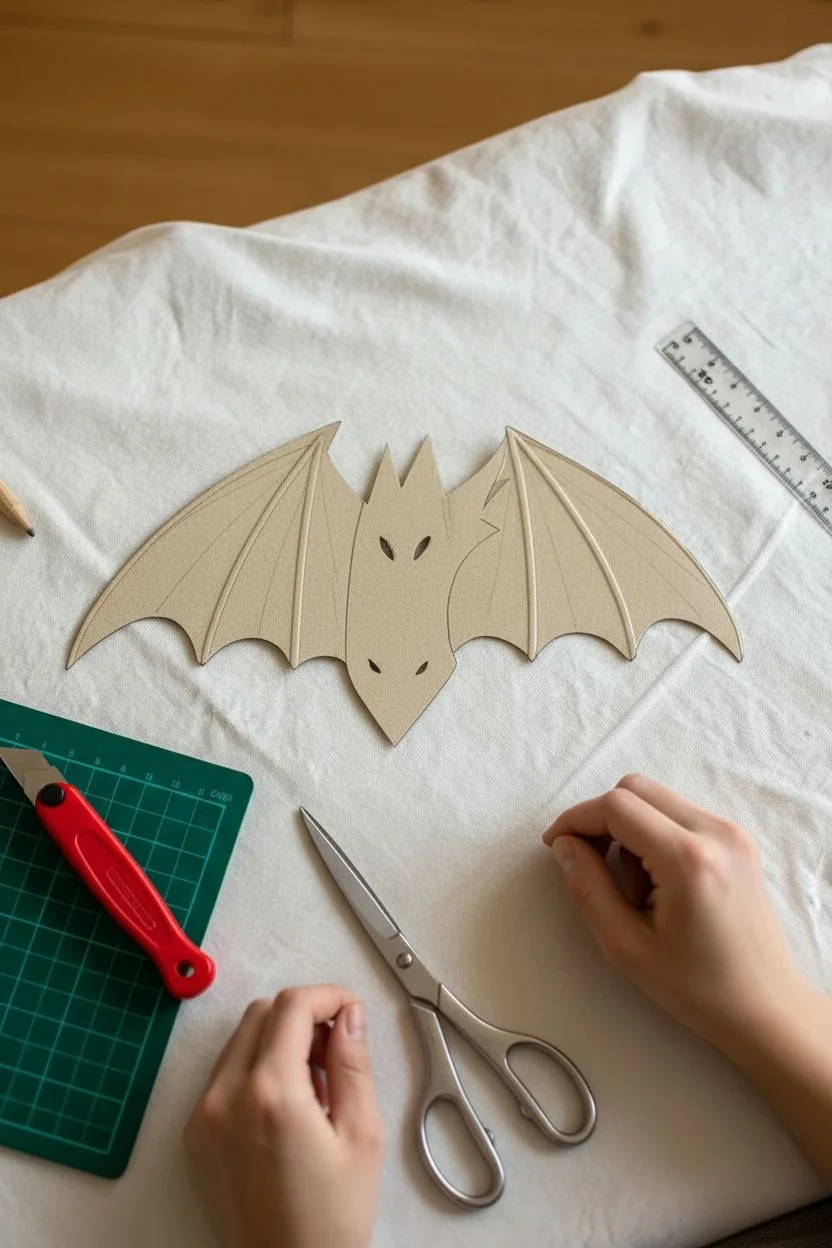
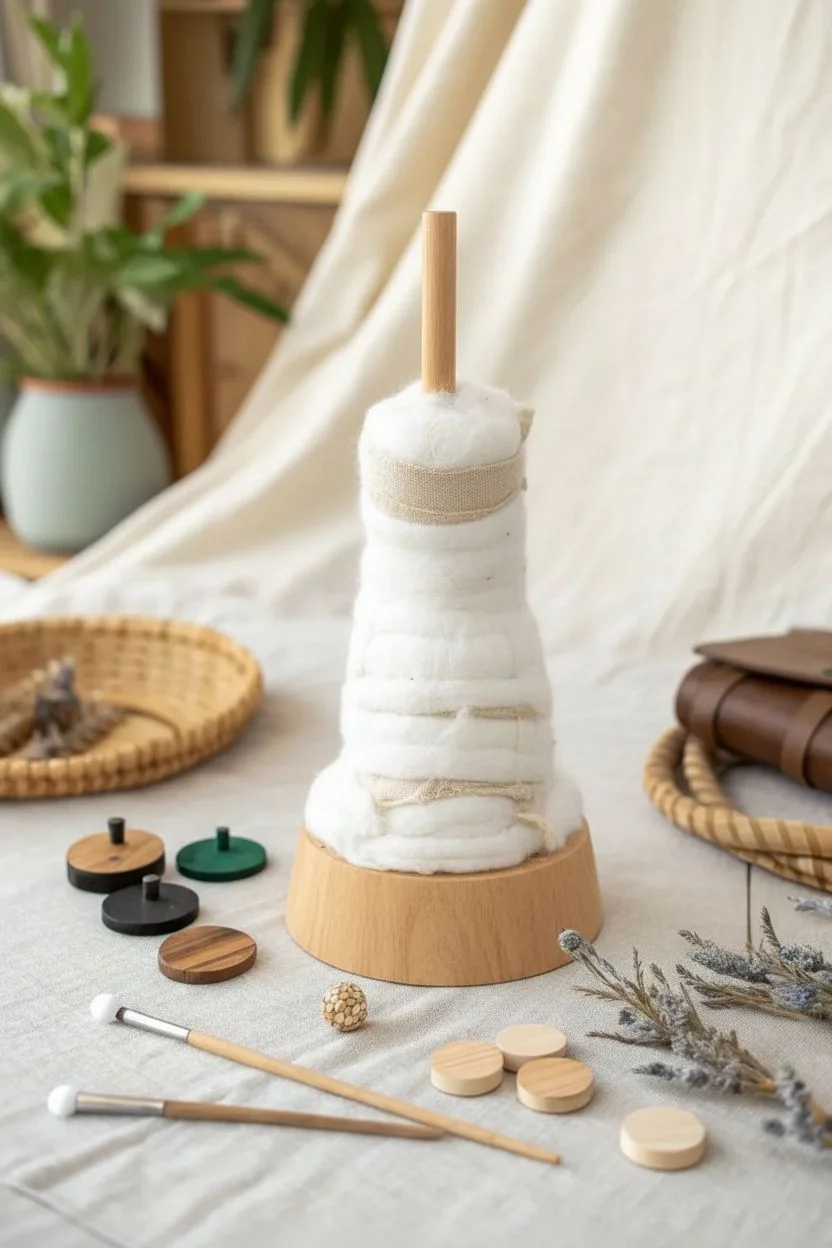
If you’re dreaming up a fierce (or super cute) dragon puppet, the real magic starts with the base—especially the head shape and that satisfying snap jaw. Here are my favorite dragon puppet base ideas to help you build a sturdy, easy-to-decorate foundation before you go wild with paint, scales, and horns.
Classic Triangular Snap-Jaw Base
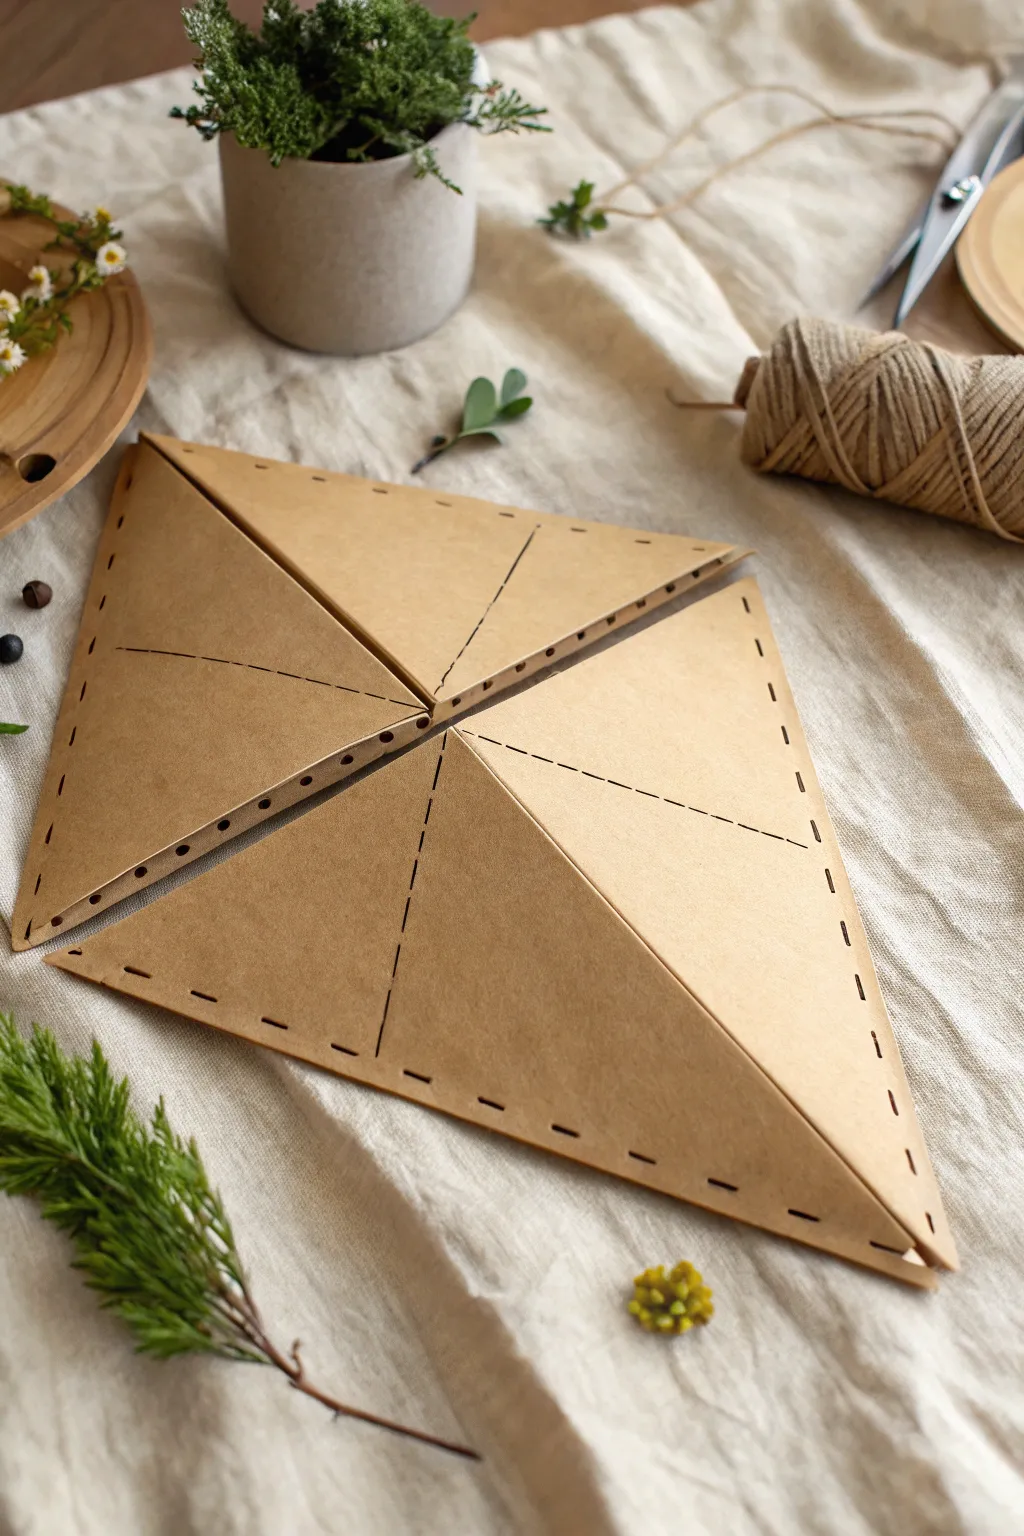
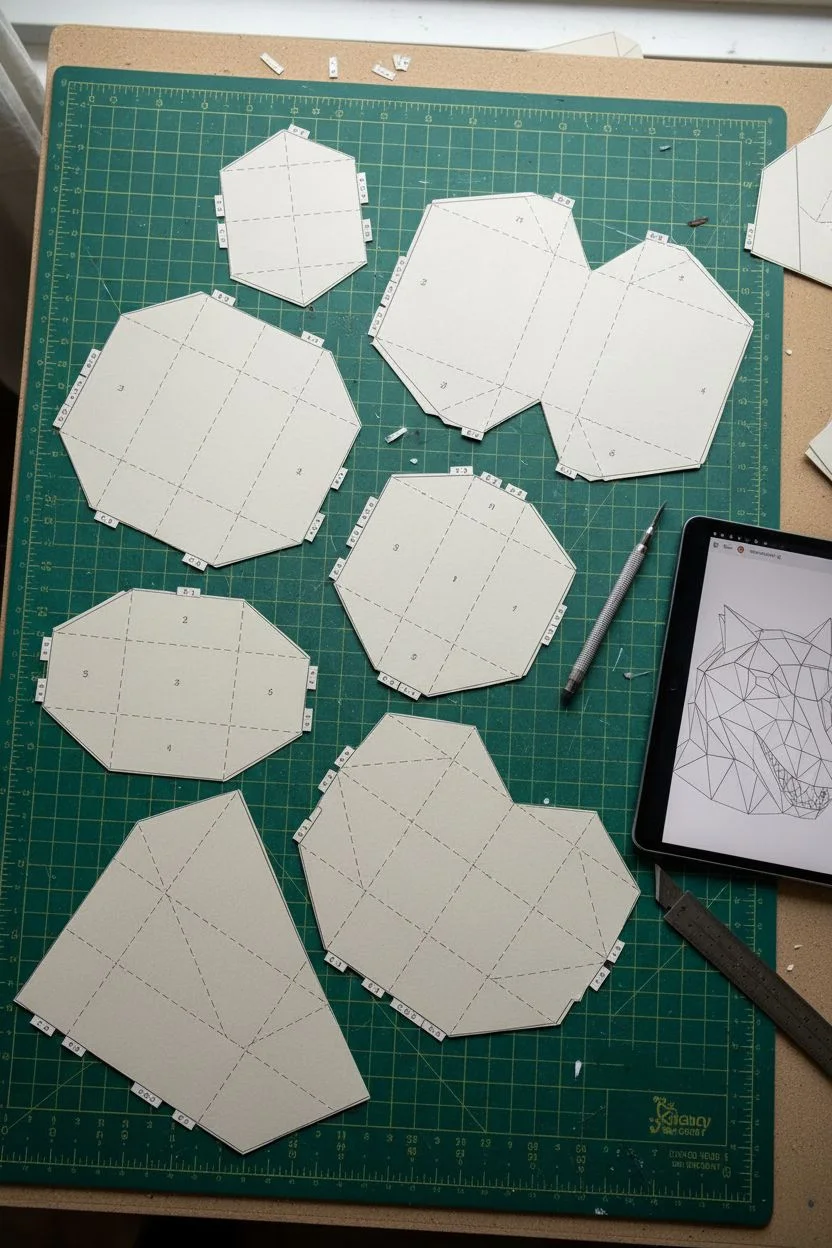
This fundamental base structure is the starting skeleton for many articulating dragon puppets, offering a sturdy yet lightweight jaw mechanism. Made from simple folded kraft cardstock, it features pre-punched holes ready for lacing or assembly, giving it a clean, geometric aesthetic before any embellishments are even added.
Step-by-Step Tutorial
Materials
- Heavyweight kraft cardstock or thin cardboard (approx. 300gsm)
- Ruler or straight edge
- Pencil
- Bone folder or scoring tool
- Awl or heavy-duty needle
- Scissors or craft knife
- Cutting mat
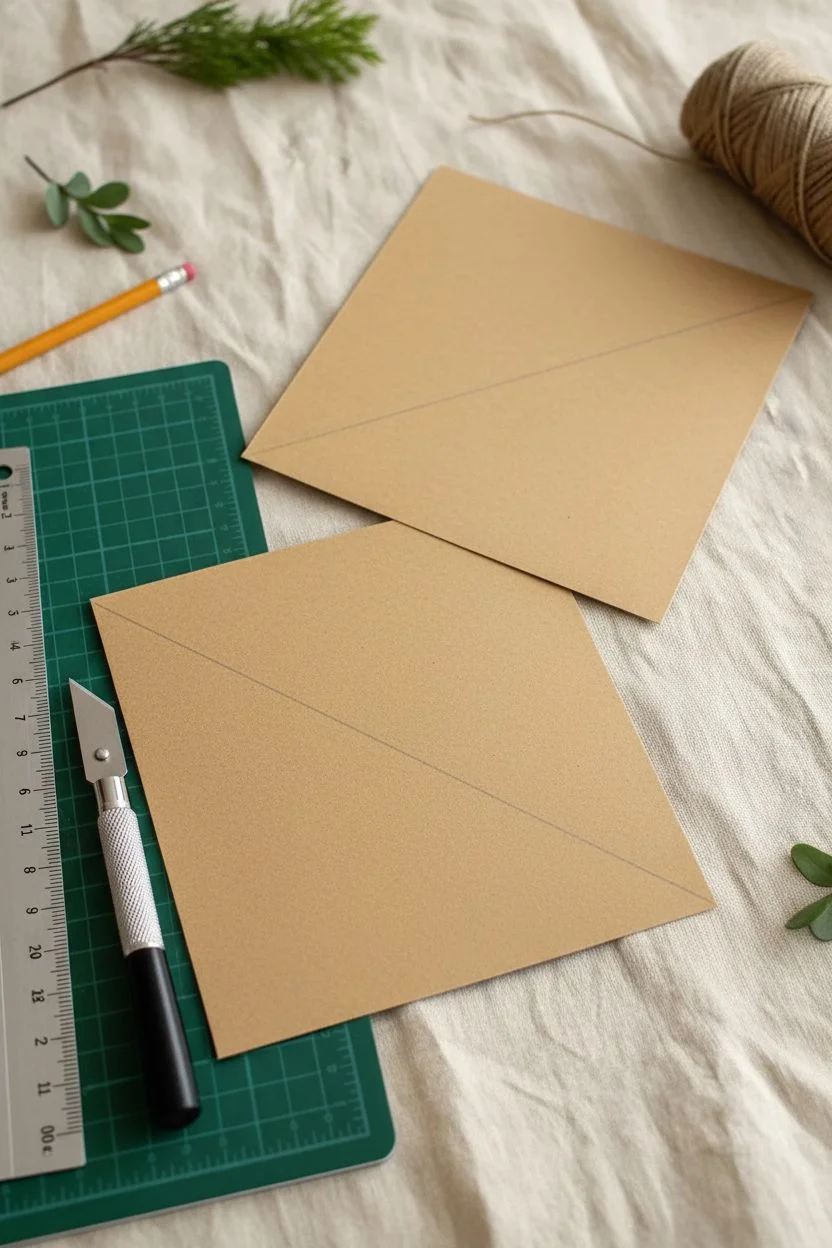
Step 1: Drafting and Cutting the Template
-
Measure your squares:
Begin by determining the size of your puppet’s jaw. For a standard hand-sized puppet, measure and mark two identical squares on your kraft cardstock, approximately 6×6 inches each. -
Cut the primary shapes:
Using your metal ruler and a craft knife on a cutting mat, carefully cut out the two square pieces. Ensure the edges are perfectly straight to guarantee the jaw aligns correctly later. -
Mark the diagonal:
On each square, use a pencil to lightly draw a diagonal line connecting opposite corners. This line will serve as the central hinge point for the folding process.
Pro Tip: Clean Scores
If you don’t have a bone folder, a dried-out ballpoint pen works perfectly for scoring kraft paper without tearing the surface fibers.
Step 2: Scoring and Folding
-
Score the center line:
Place your ruler along the diagonal pencil line you just drew. Firmly run your bone folder along this line to create a deep score. Do not cut through the paper; you just want to break the fibers to allow a clean fold. -
Create the main fold:
Fold each square in half along the scored diagonal line to create two large triangles. Use the bone folder to burnish the crease sharp and flat. -
Mark the internal crease lines:
Open the square back up. Now, visualize the paper as two triangles separated by the center fold. On each triangle, draw a line from the center of the diagonal fold (the midpoint) straight to the 90-degree corner tip. This creates the ‘pyramid’ shape. -
Score the secondary lines:
Score these new lines thoroughly. These are crucial because they allow the flat triangle to pop up into a three-dimensional form. -
Form the pyramids:
Gently fold along these new score lines. You will notice the paper naturally wants to buckle upwards to form a shallow pyramid shape. Encourage this shape by pinching the creases.
Level Up: Real Stitching
Instead of drawing lines, use a dull needle and waxed twine to actually stitch through your punched holes for an authentic, rustic texture.
Step 3: Detailing and Assembly Prep
-
Mark the stitching guide:
With the pyramids folded and flattened slightly for stability, use a ruler to mark small dots along the outer edges of the triangles. Space them evenly, about 1/4 inch apart. -
Add decorative stitch marks:
For the visual effect shown in the example, you can also mark stitching dots along the internal crease lines. This suggests a sewn construction even if you simply use glue later. -
Punch the holes:
Place the cardstock on a scrap piece of wood or a thick mat. Using an awl, pierce through every marked dot to create clean, uniform holes. Keep the tool perpendicular to the paper to prevent tearing. -
Draw faux stitching:
If you don’t intend to actually sew the pieces, use a fine-tip black marker to draw small dash lines between the holes on the internal creases, mimicking heavy thread. -
Align the jaws:
Place the two folded units together so their long folded edges touch. This mimics the mouth being closed. -
Create the hinge connection:
To join the top and bottom jaw, cut a separate strip of kraft paper or heavy tape. Attach it to the inside of the two units where the back corners meet, creating a flexible hinge. -
Final shaping:
Flex the jaws open and closed several times to break in the hinge. I like to press the side pyramids inward slightly to ensure the puppet will fit comfortably over a hand.
Now you have a fully functional geometric base ready to be transformed into a dragon, bird, or dinosaur


Thumb-and-Fingers Pocket Grip Base
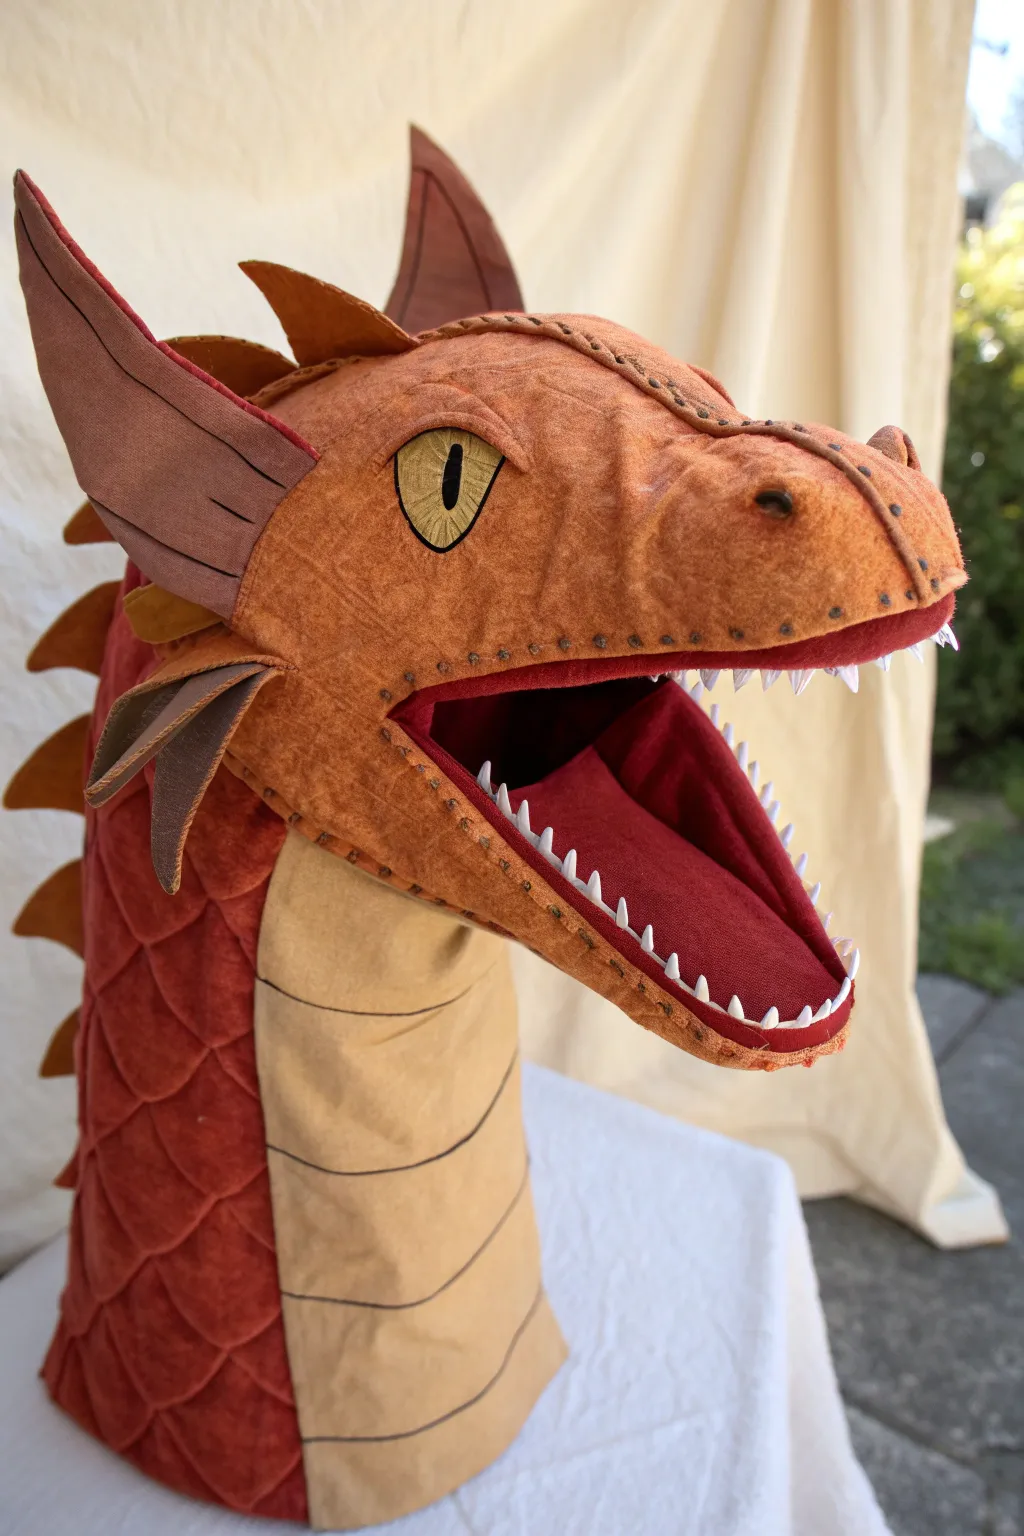
This striking dragon hand puppet combines rich textures with expressive features, creating a professional-looking character perfect for storytelling. By layering faux leather and felt over a foam base, you can achieve that realistic scaled look while keeping the puppet lightweight and flexible.
Step-by-Step Guide
Materials
- Thick upholstery foam (1/2 inch)
- Textured orange felt or faux suede (for head)
- Red velvet or velour fabric (for scales)
- Tan cotton or canvas fabric (for belly)
- White stiffened felt (for teeth)
- Yellow felt and black fabric paint (for eyes)
- Contact cement or hot glue gun
- Brown embroidery floss and needle
- Fabric marker or sharpie
- Scissors and rotary cutter
- Sewing machine (optional, can be hand-sewn)
Step 1: Constructing the Foam Base
-
pattern drafting:
Begin by sketching a side profile of the dragon head on paper; separate the upper jaw and lower jaw components slightly to allow for mouth movement, creating a ‘pac-man’ shape. -
foam cutting:
Trace your paper pattern onto the upholstery foam. You will need two side pieces for the head and a connecting strip for the top of the head to give it width. -
glue assembly:
Apply contact cement to the edges of your foam pieces. Let it become tacky, then press the edges together to form the hollow skull shape. -
mouth plate creation:
Cut a folded piece of sturdy cardstock or flexible plastic for the mouth plate. Glue foam pads on the top and bottom inside surfaces for your fingers and thumb to grip. -
attaching the mouth:
Glue the foam head structure to the outer edges of your mouth plate. Ensure the hinge moves freely so the dragon can ‘speak’ easily.
Texturing Tip
Crumple your orange faux-suede fabric tightly in your hand before gluing it down. This creates permanent creases that look like realistic reptile skin wrinkles.
Step 2: Adding the Skin and Scales
-
skinning the head:
Drape your textured orange fabric over the foam head to estimate the fit. Cut the fabric in sections—snout, cheeks, and brow—leaving a seam allowance. -
sewing the head skin:
Sew these fabric sections together. I find using an overcast stitch on the outside with brown embroidery floss adds a wonderful rustic, stitched-leather effect. -
adhering the skin:
Glue the sewn skin onto the foam base, smoothing out wrinkles as you go. Pay special attention to the nose ridges and eye sockets. -
internal mouth lining:
Cut a piece of dark red velvet to fit inside the mouth. Glue this securely to the cardstock mouth plate, ensuring it covers the foam edges. -
installing teeth:
Cut small, sharp triangles from white stiffened felt. Glue these in a row along the upper and lower jawlines, tucking the base of each tooth slightly under the outer skin fabric.
Step 3: Body and Details
-
creating body scales:
Cut many semi-circles or ‘U’ shapes from the red velvet fabric. These will be the individual scales for the neck. -
layering the scales:
Start at the bottom of the neck sleeve and glue or sew the scales in overlapping rows, working your way upward toward the head. -
belly panel:
Cut a long strip of tan canvas for the underbelly. Draw horizontal segment lines across it with a fabric marker to mimic ventral scales. -
attaching the belly:
Sew the tan belly strip to the front of the neck sleeve, merging it with the red scaled sections on the sides. -
ears and spikes:
Cut triangular shapes from stiffened felt for the ears and spine spikes. Glue the spine spikes in a row down the back of the neck. -
ear detailing:
Layer a slightly smaller piece of lighter felt inside the main ear pieces to create depth, then glue the ears to the side of the head, angling them backward. -
eye fabrication:
Cut almond shapes from yellow felt. Draw a vertical slit pupil with black fabric paint or a marker. Once dry, glue these into the eye socket areas. -
final stitching:
Add decorative heavy stitching along the jawline and brow ridges using the brown embroidery floss to emphasize the rugged, handmade aesthetic.
Floppy Jaw?
If the mouth doesn’t snap shut crisply, glue a wide elastic band across the back of the hand grip inside the puppet to help pull your fingers and thumb together.
Now you have a fierce companion ready to breathe life into your next story time performance


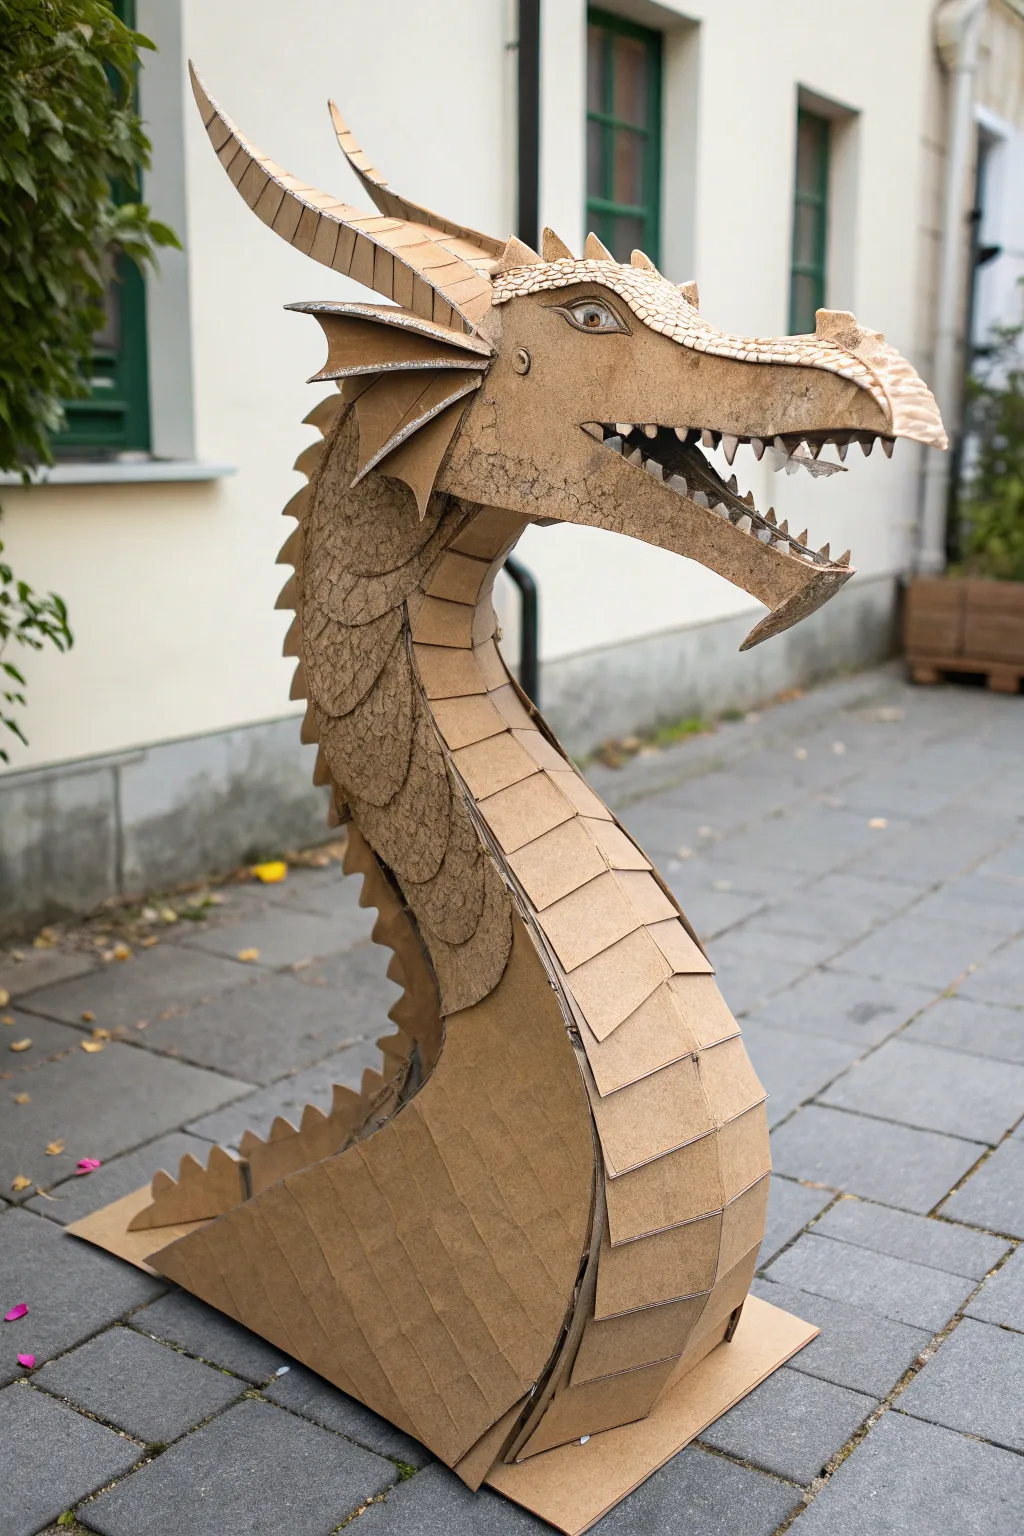
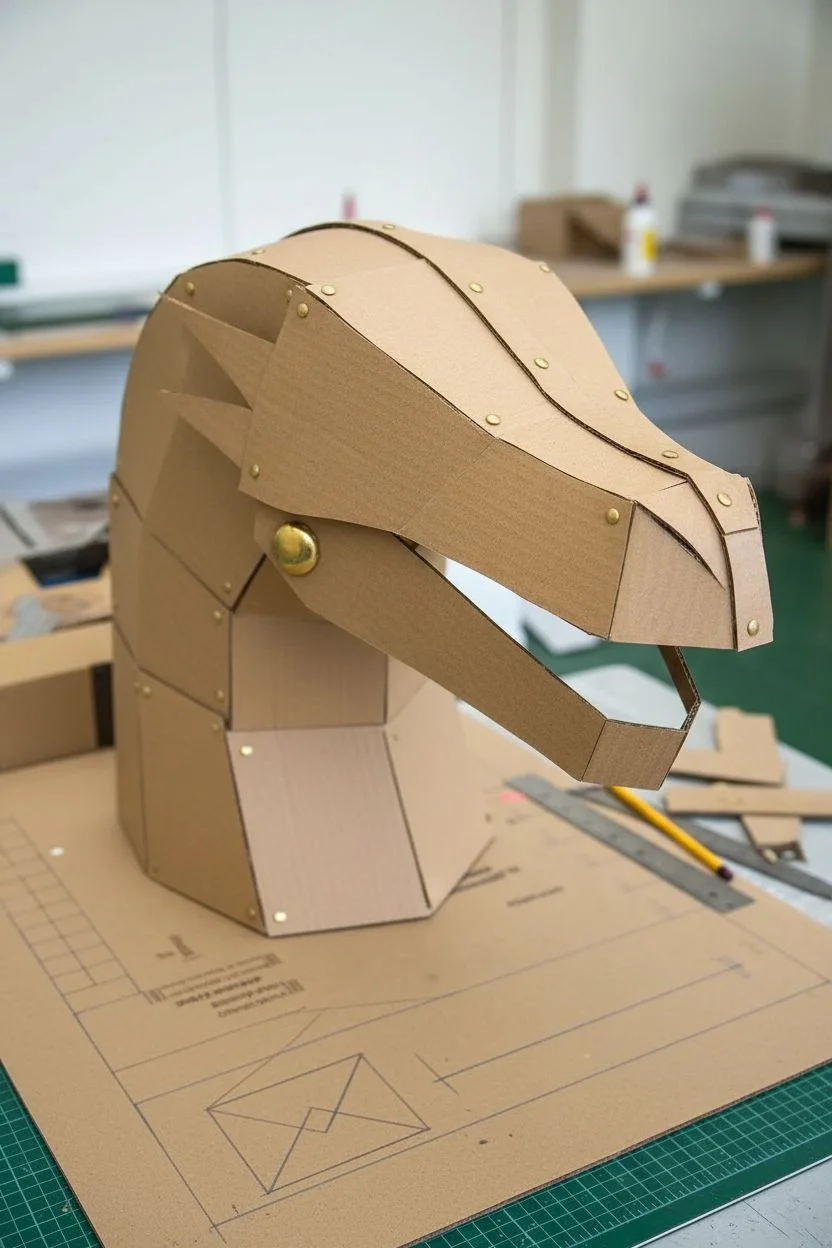
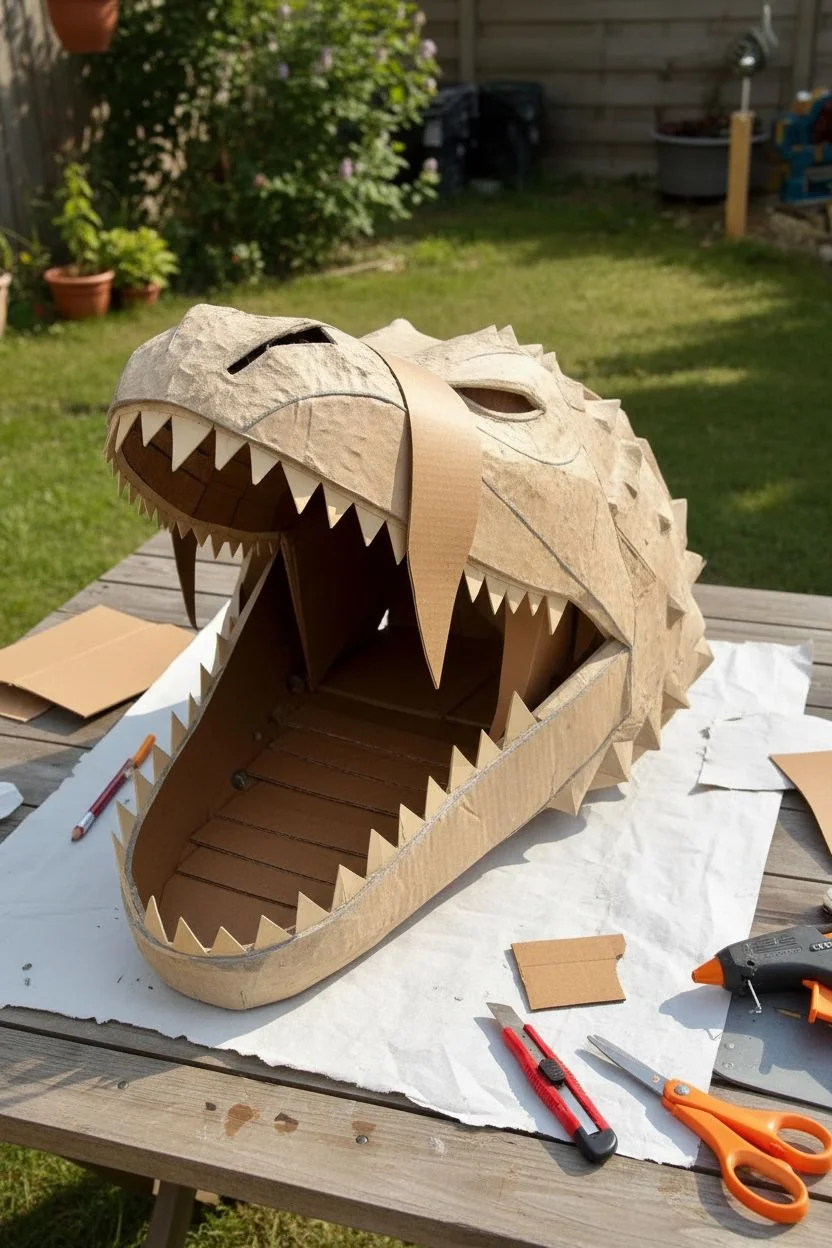
Boxy Dragon Head Shell Over the Jaw
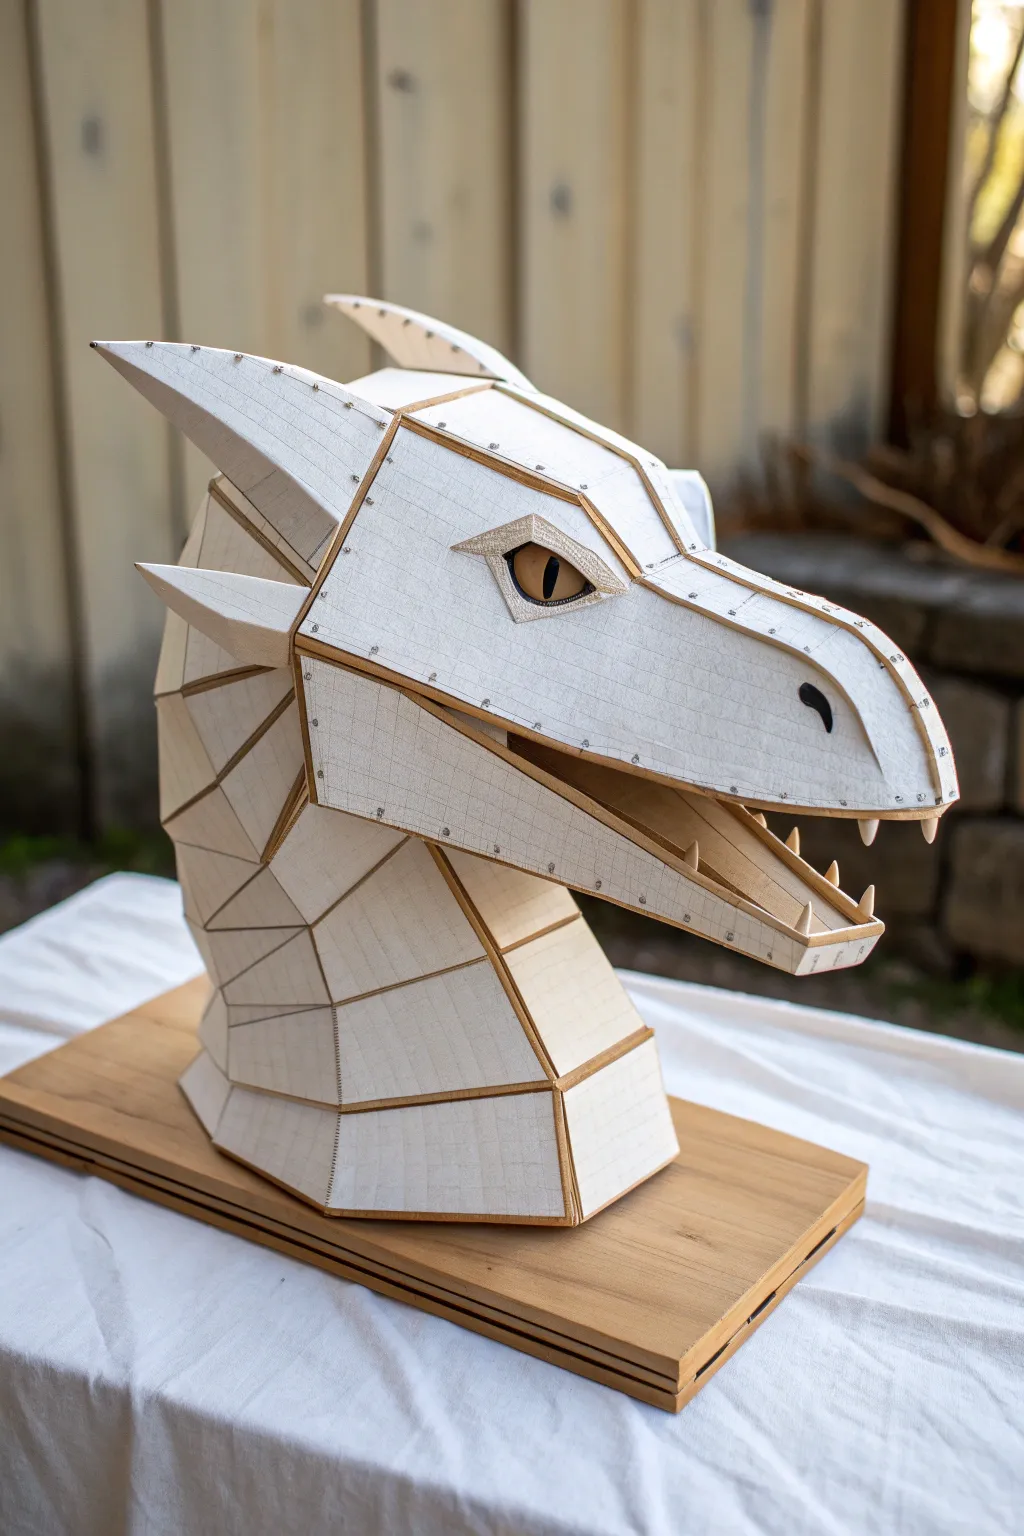
This project creates a striking, low-poly dragon head shell that serves as a sophisticated base for a puppet or a standalone sculpture. With its clean white panels and distinct brown edging, it achieves a stylized, architectural look that is both sturdy and lightweight.
Step-by-Step
Materials
- Heavyweight white cardstock or poster board (matte finish)
- Corrugated cardboard or thick kraft board (for internal structure)
- High-quality craft glue or hot glue gun with thin nozzle
- Sharp hobby knife (e.g., X-Acto) with extra blades
- Metal ruler
- Cutting mat
- Brown marker or acrylic paint (for edging)
- Small pins or micro-brad nails (optional, for decorative rivets)
- Clear plastic half-dome or glass cabochon (for the eye)
- Yellow and black acrylic paint (for the eye pupil)
- Wooden base board (for mounting)
Step 1: Designing and Cutting the Templates
-
Draft the pattern:
Begin by sketching a side profile of your dragon to determine the overall scale. Break the curve of the snout, jaw, and neck into straight, geometric planes rather than smooth curves to achieve the low-poly aesthetic. -
Create paper prototypes:
Transfer your sketch to scrap paper first. Cut out the shapes and tape them together loosely to test the fit, especially around the snout and jaw hinge area. Refining the pattern here saves good material later. -
Transfer to cardstock:
Once satisfied involving the fit, trace the final geometric panels onto your heavy white cardstock. You will need mirrored pairs for the left and right sides of the head. -
Cut the panels:
Using a sharp hobby knife and a metal ruler, cut out each polygon precisely. Keep your cuts straight and crisp, as jagged edges will ruin the clean geometric effect.
Clean Corner Pro-Tip
Score the fold lines lightly with the back of your hobby knife before bending. This crushes the paper fibers for a crisp, straight fold without tearing the surface.
Step 2: Assembling the Structure
-
Edge the panels:
Before gluing, run a brown marker or a brush with brown paint along the very edge of every cut piece. This creates the distinct outline seen in the photo that separates the white planes. -
Form the upper jaw:
Start assembling the snout. Glue the side panels of the upper jaw to the top nasal bridge piece. Use just enough glue to hold them firm without oozing out. -
Build the lower jaw:
Construct the lower mandible separately. Ensure the bottom chin piece connects angled side pieces that flare slightly outward to match the width of the upper jaw. -
Assemble the neck:
Build the neck rings starting from the head connection and working down. The neck segments should widen gradually as they reach the base to provide stability. -
Connect the sections:
Attach the upper head assembly to the neck. If you want the jaw to remain static, glue the lower jaw in an open position; otherwise, hinge it internally with fabric strips. -
Add structural backing:
For larger flat areas that feel flimsy, glue strips of corrugated cardboard on the inside (unseen) face to add rigidity without ruining the exterior finish.
Troubleshooting Gaps
If seams don’t meet perfectly, don’t force them. Fill small gaps with a sliver of cardstock, then color it with your brown edging marker to blend it into the design.
Step 3: Detailing and Mounting
-
Create the eyes:
Paint the flat side of your glass cabochon or plastic dome. Paint a vertical black slit pupil first, let it dry, then back it with gold or yellow paint. Glue this into the eye socket cutout. -
Construct the eyelids:
Cut thick, layered pieces of cardstock to frame the eye. I find that angling the upper lid sharply downward gives the dragon a more fierce, predatory expression. -
Add the horns:
Form cones or pyramids from cardstock for the horns. Glue them to the rear of the skull plate, ensuring they angle backward symmetrically. -
Install the teeth:
Cut small, sharp triangles from double-layered cardstock. Glue these to the inner edges of both the upper and lower jaws, spacing them irregularly for a natural look. -
Apply decorative rivets:
To mimic the bolted look, use a fine-tip pen to draw small dots along the brown seams, or push tiny pinheads into the cardstock at regular intervals if you have a foam core backing. -
Prepare the base:
Take your wooden base board and sand the edges smooth. You can stack two pieces of wood like in the image for a stepped plinth effect. -
Mount the head:
Apply strong adhesive to the bottom rim of the neck assembly. Press it firmly onto the wooden base and hold it until the bond is secure.
Step back and admire the fierce, geometric creature you have brought to life from flat paper


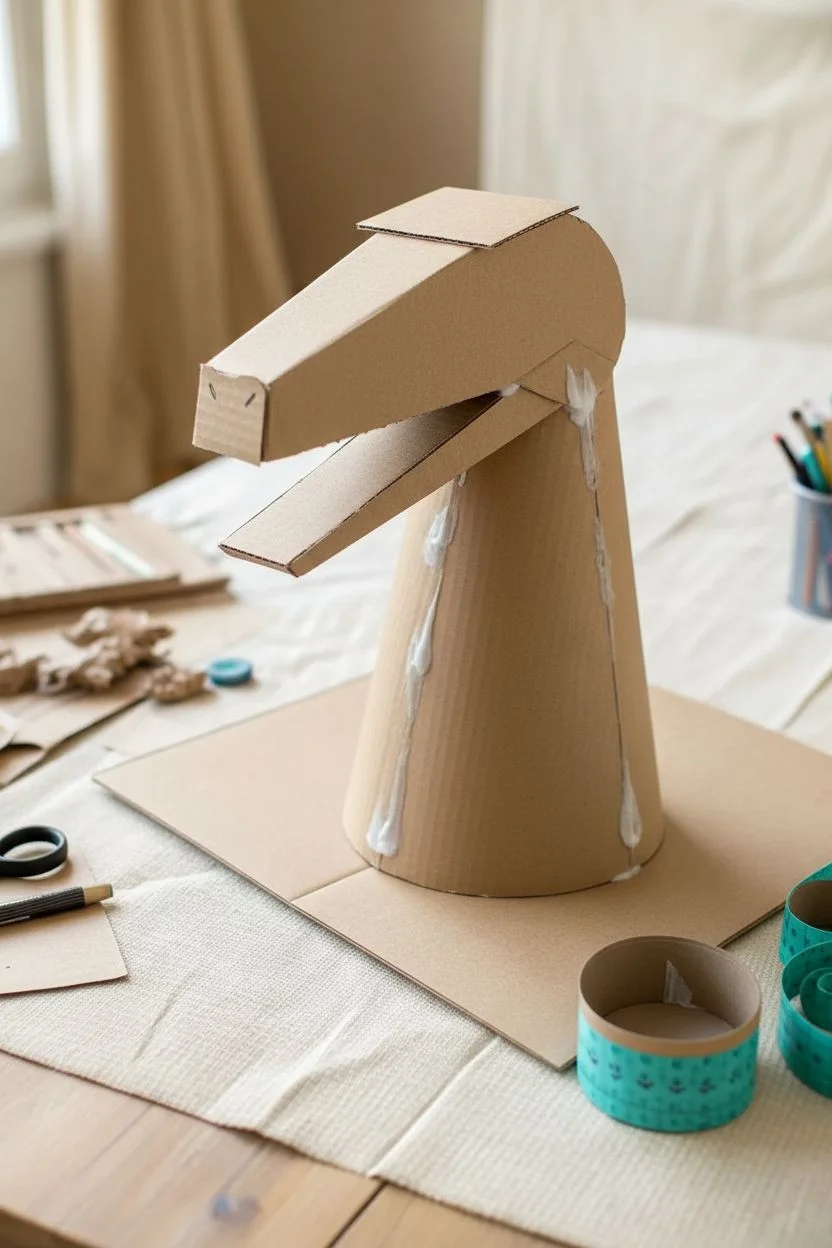
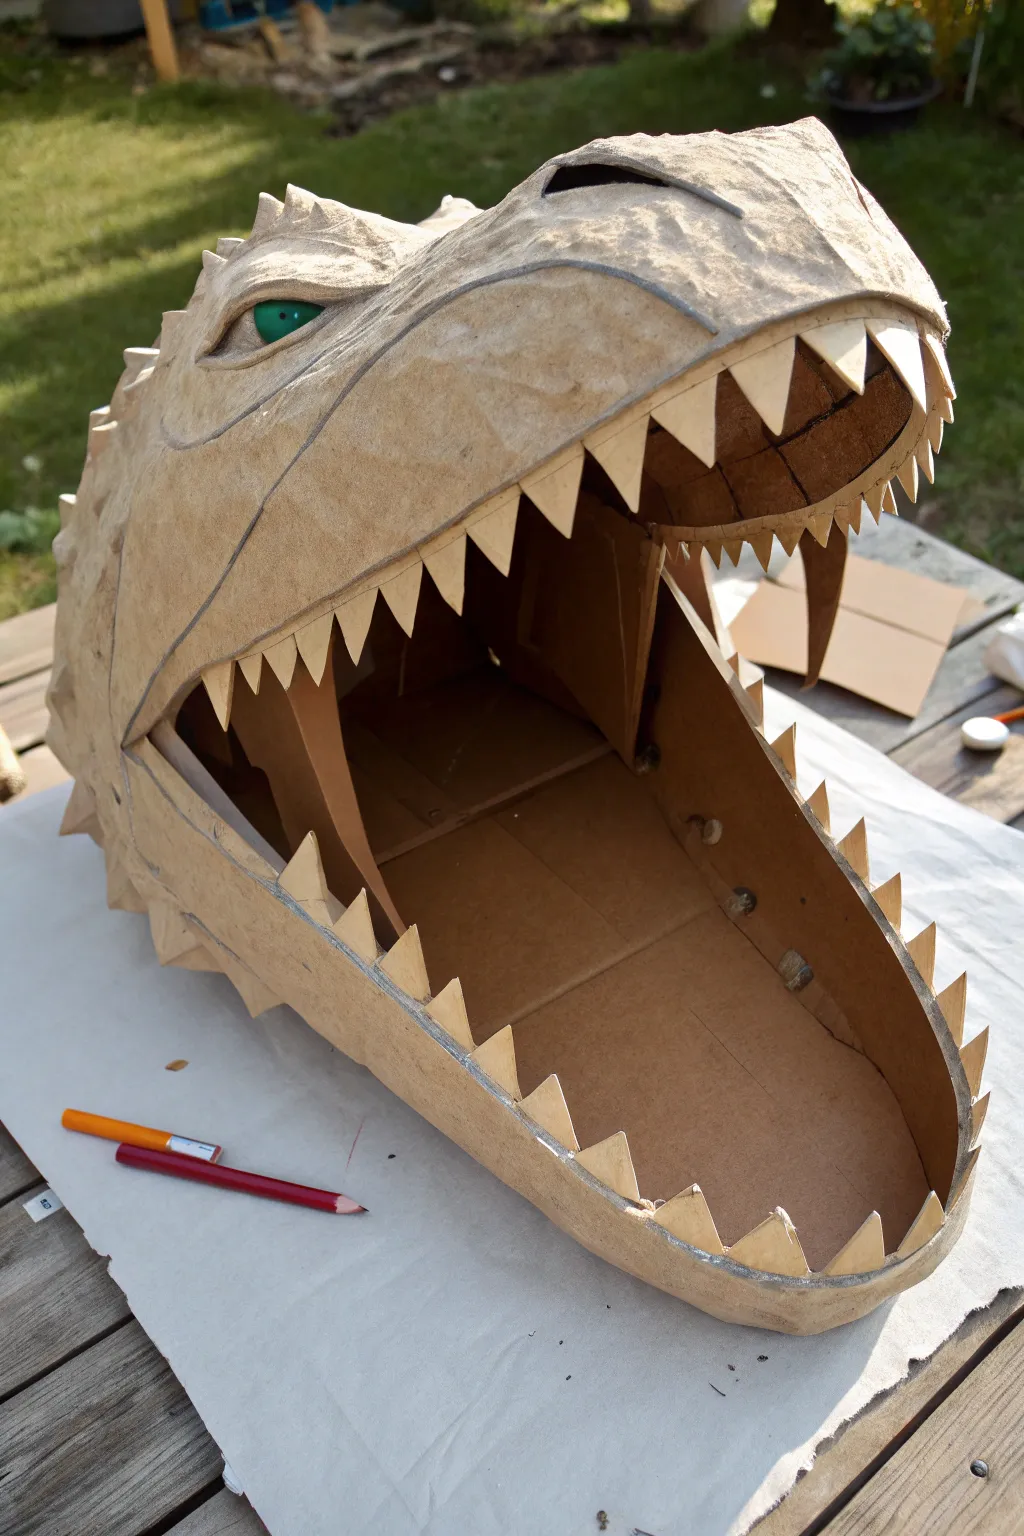
Rounded Snout Base for a Friendly Dragon
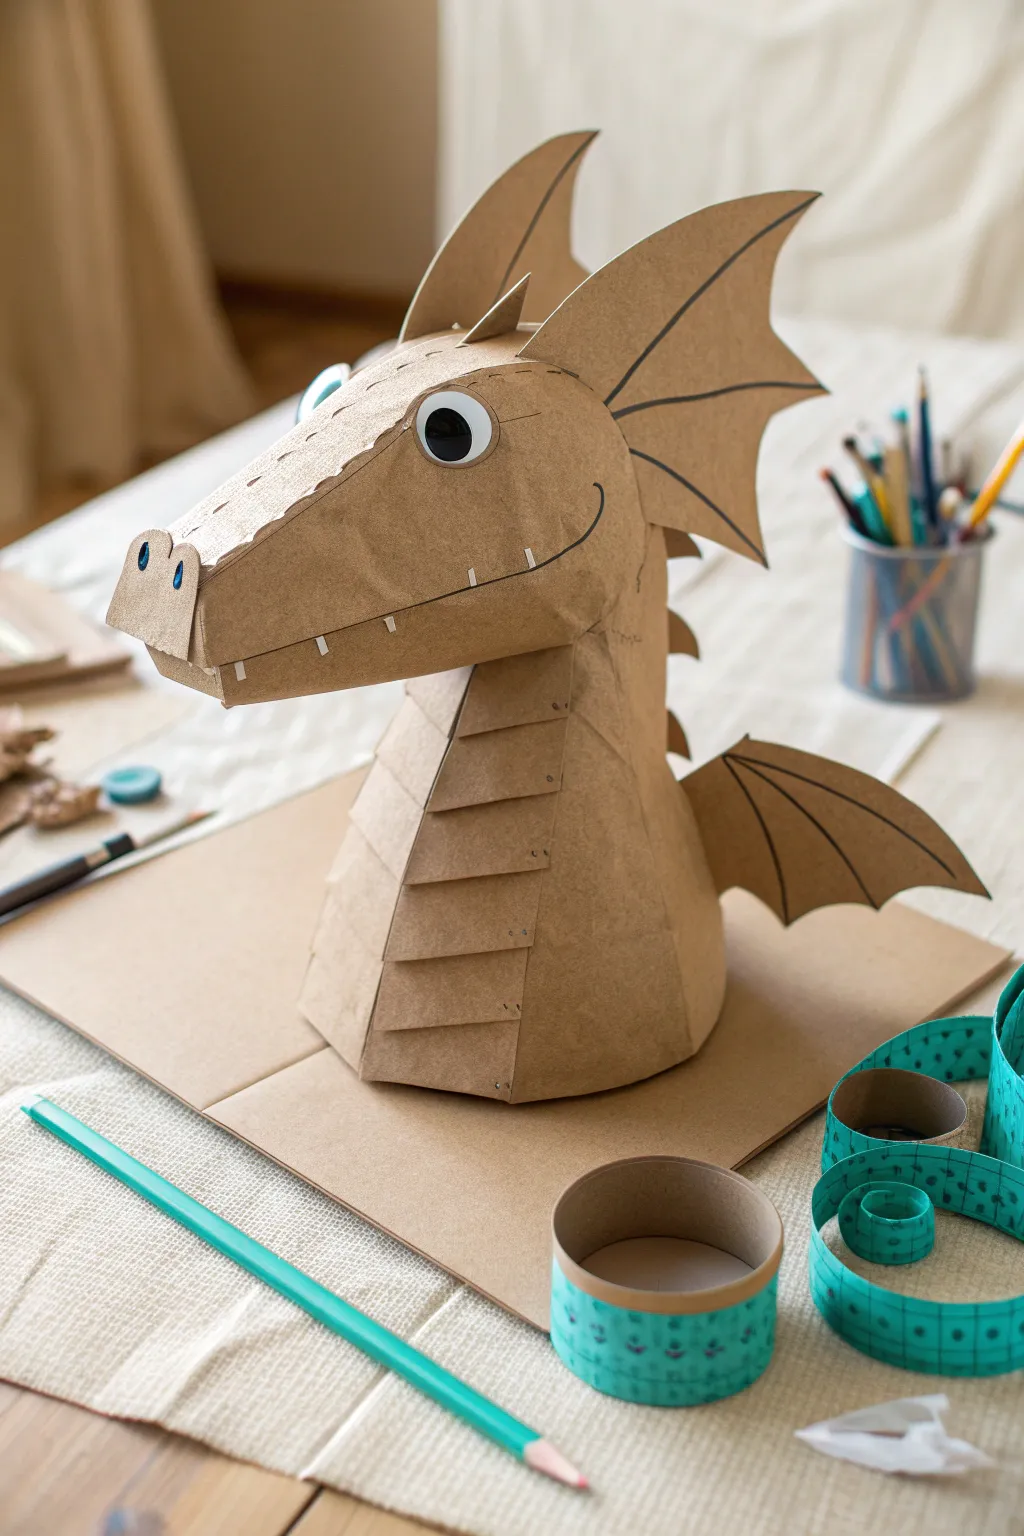
Transform humble cardboard into a delightful mythical creature with this layered dragon head project. Featuring a gently rounded snout, prominent scales, and expressive wings, this friendly dragon uses simple cut-and-paste techniques to build impressive 3D volume.
Step-by-Step Guide
Materials
- Recycled cardboard (medium thickness)
- Kraft paper or brown construction paper
- Scissors
- Craft knife
- Hot glue gun and glue sticks
- Black marker or fine-tip felt pen
- Large googly eyes (approx. 1 inch)
- Pencil for sketching
- Masking tape
- Ruler
Step 1: Constructing the Base Structure
-
Form the Neck Cylinder:
Begin by rolling a large rectangular piece of cardboard into a tapered cylinder. It should be wider at the base and slightly narrower at the top where the head will attach. Secure the seam firmly with hot glue. -
Create the Head Core:
Cut a strip of cardboard approximately 4 inches wide and 12 inches long. Bend it into an oblong loop to form the basic shape of the head; it should look like a rounded rectangle with soft corners. -
Shape the Snout:
Cut a second, slightly smaller cardboard strip. Attach this to the front of your head loop to extend the snout, angling it slightly downward to give the dragon distinctive character. -
Cap the Head:
Trace the top opening of your head shape onto a flat piece of cardboard. Cut this out and glue it on top to create a solid roof for the dragon’s skull. -
Define the Jawline:
Cut a long, curved piece of cardboard to serve as the bottom jaw. Glue this to the underside of the snout assembly, ensuring it aligns perfectly with the upper structure.
Curve Master
To get smooth curves in your cardboard without creases, run the piece over the edge of a table or roll it around a rolling pin before gluing.
Step 2: Adding Scales and Texture
-
Cut the Neck Scales:
Cut 6-8 identical trapezoid shapes from your cardboard. These will be the layered scales running down the front of the neck. -
Attach the Neck Plating:
Starting at the bottom of the neck cylinder, glue the trapezoids in an ascending overlapping pattern. Each scale should cover the top edge of the one below it, like shingles on a roof. -
Detail the Snout Ridge:
Cut a long customized strip with small triangular notches along one long edge. Glue this strip centrally along the top of the nose, curving it backwards towards the eyes. -
Draw the Nostrils:
Cut a small, boxy ‘U’ shape for the nose tip. Glue it to the very front of the snout. Use a blue or black marker to draw two oval nostrils on this piece. -
Create the Mouth Line:
Using a black marker, draw a sweeping smile line completely across the side of the snout. Add small white paper rectangles or white paint dashes along the jawline to simulate teeth.
Dragon Breath
Add streamers of red, yellow, and orange tissue paper inside the mouth area so your dragon looks like it is breathing fire when moved.
Step 3: Wings, Spikes, and Personality
-
Draft the Head Wings:
Sketch two large, spiky wing shapes on flat cardboard. These should look like dragon fins. Draw interior lines with a black marker to mimic the bone structure of the wing. -
Mount the Head Wings:
Glue these large fins to the sides of the head, positioning them just behind where the eyes will go. Angle them backward for an aerodynamic look. -
Add Dorsal Spikes:
Cut several triangular spikes. Glue them in a single file line running down the back of the dragon’s neck, opposite the chest scales. -
Create the Side Wings:
Cut two smaller wing shapes, similar in design to the head fins but closer to a bat-wing shape. Draw the interior ‘bones’ with your marker. -
Attach Side Wings:
Glue these smaller wings to the sides of the main neck cylinder, roughly halfway down. They should stick out perpendicularly to suggest the dragon’s body continues below. -
Place the Eyes:
Select two large googly eyes. Glue them prominently on the sides of the head, just above the smile line. I find that placing them slightly closer to the snout makes the expression friendlier.
Now your charming cardboard beast is ready to guard your desk or star in a puppet show
BRUSH GUIDE
The Right Brush for Every Stroke
From clean lines to bold texture — master brush choice, stroke control, and essential techniques.
Explore the Full Guide
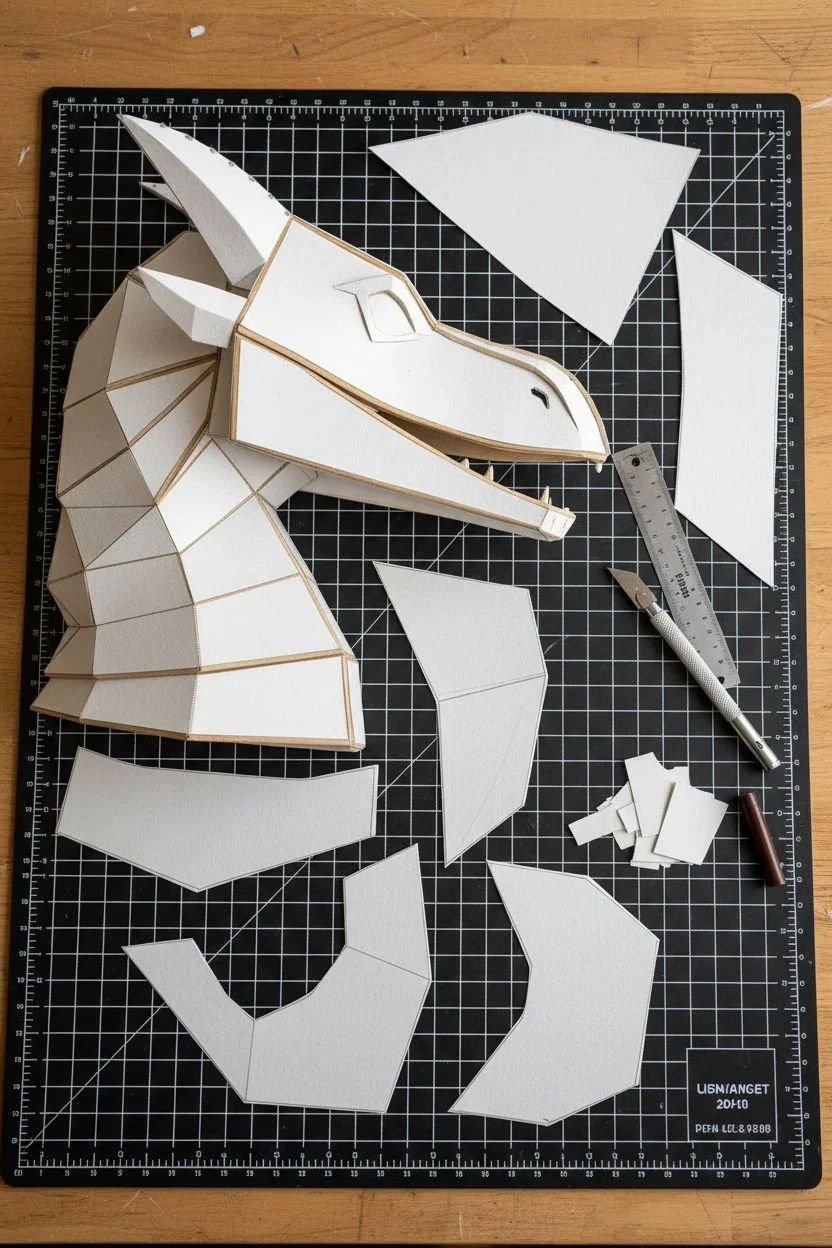
Sharp Angular Snout Base for a Fierce Dragon
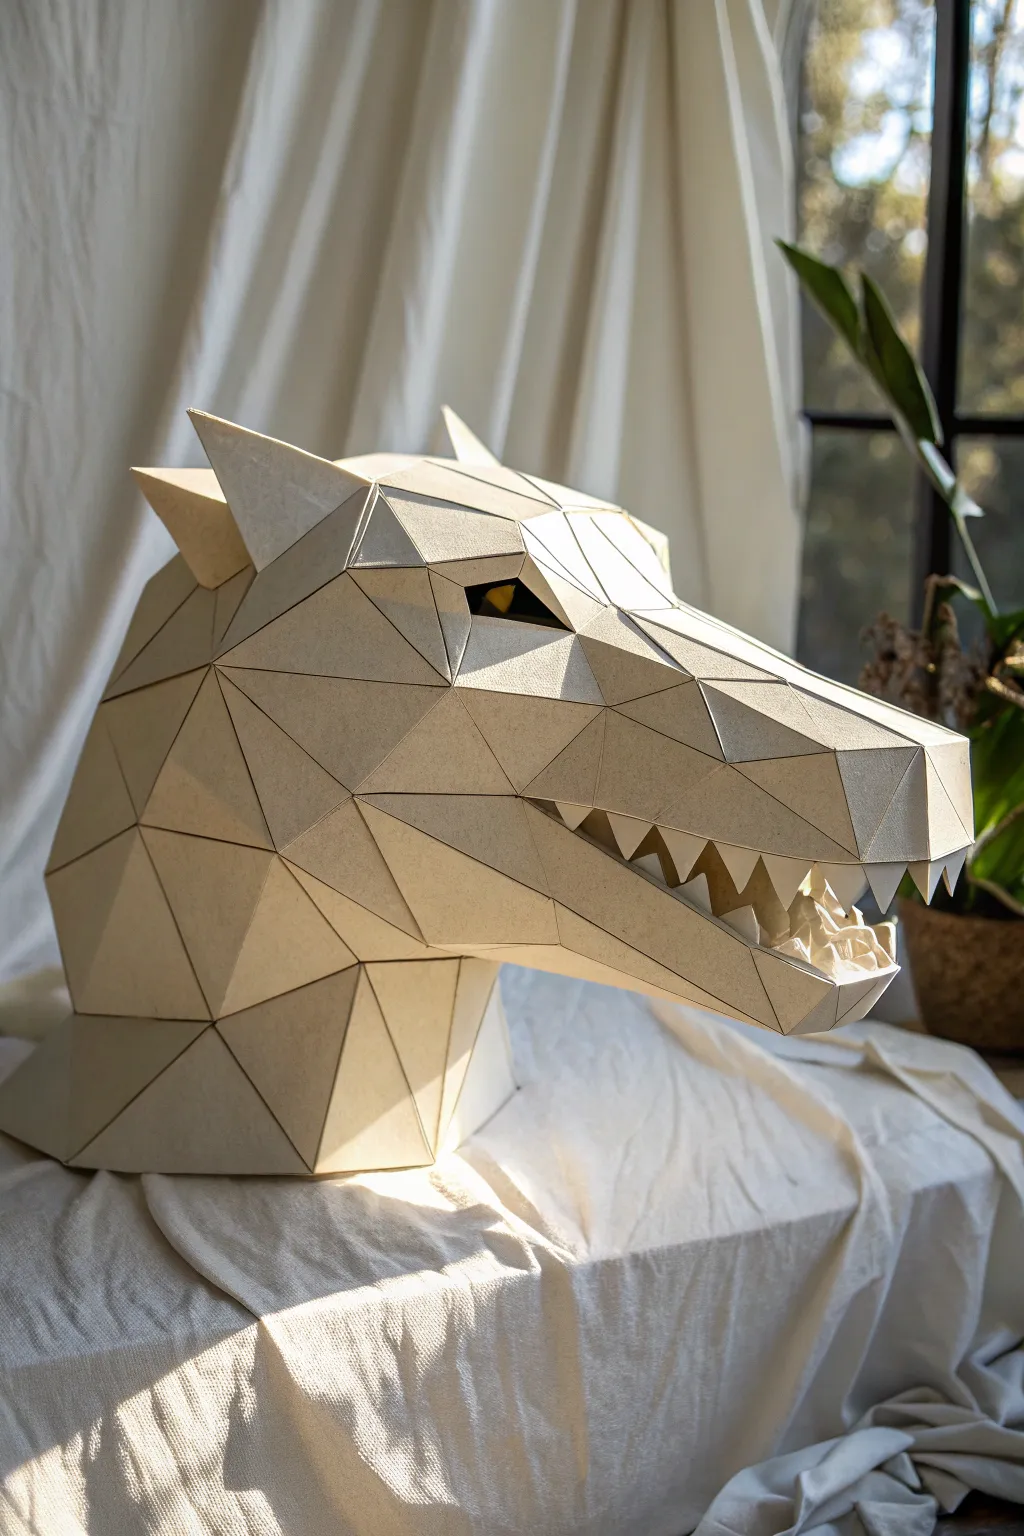
For a truly aggressive and modern dragon puppet base, this sturdy geometric design uses sharp angular facets to catch the light beautifully. The clean lines and structural integrity make it an ideal starting point for a puppet that demands presence.
Step-by-Step Tutorial
Materials
- Heavyweight cardstock or craft board (250-300gsm)
- Precision craft knife (X-Acto)
- Metal ruler
- Self-healing cutting mat
- Quick-dry tacky glue
- Bone folder or scoring tool
- Digital template (low-poly wolf or dragon head)
- Printer (or access to print shop)
- Painter’s tape or clamps (optional)
Step 1: Preparation and Cutting
-
Source the Template:
Begin by downloading a low-poly template. While this specific image resembles a wolf, the elongated snout works perfectly as a base for a dragon. Look for patterns labeled ‘papercraft trophy’ or ‘low poly mask’. -
Print on Cardstock:
Print your template directly onto your heavyweight cardstock. Standard printer paper is too flimsy for a puppet base; you need the rigidity of 250gsm+ paper to hold the angular shape. -
Score Lines First:
Before cutting anything out, use your metal ruler and the back of your craft knife (or a bone folder) to score every internal folding line. This ensures crisp, sharp edges later. -
Identify Fold Types:
Check your template’s key. Dash-dot lines usually mean a ‘mountain fold’ (points up), while dashed lines indicate a ‘valley fold’ (dips down). Mark these lightly if needed. -
Cut the Shapes:
Using a fresh blade in your craft knife, cut along the solid exterior lines of each piece. Be extremely precise here, as gaps will weaken the final structure.
Step 2: Assembly and Construction
-
Pre-fold Everything:
Go through every cut piece and reinforce the folds along your score lines. Making these bends now creates ‘muscle memory’ in the paper, making gluing much easier. -
Match the Numbers:
Most templates number the tabs and corresponding edges. Lay out your pieces on a table to visualize how the snout, cheeks, and jaw will come together. -
Start with the Nose:
I prefer to start at the very tip of the snout and work backwards. Find the smallest pieces for the nose bridge and glue the matching tabs together one by one. -
Apply Glue Sparingly:
Apply a thin layer of tacky glue to a tab. Press it firmly against its partner edge for 10-15 seconds until it sets. Too much glue will warp the paper. -
Build the Upper Jaw:
Continue attaching polygons moving backward from the nose towards the eyes. Ensure the sharp mountain folds on the top ridge remain crisp. -
Form the Lower Jaw:
Construct the lower jaw separately. This section is often U-shaped. Keep the chin angles sharp to maintain that fierce look. -
Connect the Jaws:
Join the upper and lower sections at the corner of the mouth. This is a stress point, so you might want to reinforce the inside with an extra strip of cardstock. -
Assemble the Teeth:
The teeth are usually small pyramids. Fold and glue them individually first. This takes patience, but sharp teeth are crucial for a dragon. -
Insert the Teeth:
Apply glue to the base of each tooth and insert them into the gum line of the open mouth. Use tweezers if your fingers can’t reach inside easily. -
Construct the Neck Base:
Finally, build out the neck flare. This wider base will eventually sit on your arm or stick but currently provides a stable stand for the head. -
Final Smoothing:
Once assembled, run your finger (or bone folder) firmly along all exterior creases to sharpen the geometry one last time.
Closing the Gaps
If you have tiny light gaps between seams, mix a little wood filler or thick white glue with paper dust and gently fill the crack from the outside. Sand lightly once dry.
Scale it Up
Need a giant dragon? Don’t just print on A4. Take the PDF to a copy shop and print on A3 or A2 cardstock. The assembly is the same, but the result is massive.
This angular, geometric base is now ready for paint or additional textures to become a truly mythical creature
Long-Nosed Serpentine Dragon Base
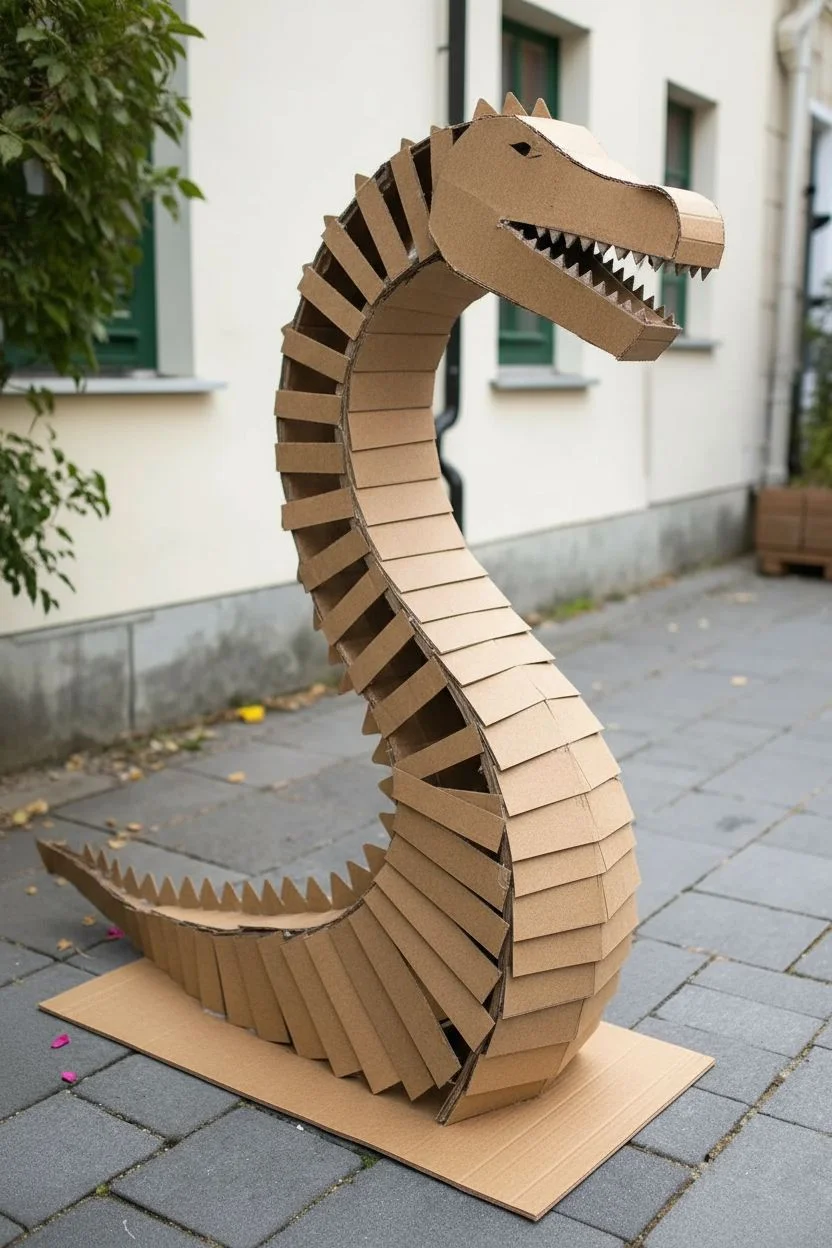
Construct an impressive, large-scale dragon puppet base using nothing but cardboard and glue. This project features a segmented, serpentine neck and an intricately detailed head with a distinct, long-nosed profile.
Step-by-Step Guide
Materials
- Corrugated cardboard sheets (varying thicknesses)
- Cardstock or thin cereal box cardboard
- Hot glue gun and plenty of glue sticks
- PVA glue (white glue)
- Masking tape
- Sharp utility knife or box cutter
- Scissors
- Acrylic paint (black, white, brown for eyes)
- Pencil and eraser for sketching
Step 1: Forming the Serpentine Neck
-
Draft the profile:
Sketch a large, curved ‘S’ shape onto a large piece of thick corrugated cardboard. This will be the central spine of the neck. The base needs to be wide and flat to support the weight, tapering slightly as it goes up. -
Cut the central spine:
Cut out two identical copies of your ‘S’ shape profile. These will form the vertical structure of the neck. -
Create internal ribs:
Cut several rectangular spacers of consistent width (about 4 inches). Glossary glue these between the two spine pieces at regular intervals to create a 3D form. The neck should now look like a ladder from the front. -
Skin the front:
Cut a long strip of flexible cardboard (make sure the corrugation runs horizontally so it bends easily). Glue this to the front curve of the neck structure, smoothing it down as you go. -
Add segmented chest plates:
Cut rectangular trapezoids from thinner cardboard. Glue these overlapping each other up the front of the neck, starting from the bottom. This creates the armored belly look seen in the reference.
Grain Direction
Always check the direction of the cardboard flutes. For curved parts like the neck skin, flutes must run parallel to the curve to bend without creasing.
Step 2: Sculpting the Head and Jaw
-
Build the skull box:
Construct a basic elongated rectangular box for the snout and a larger box for the cranium. Join them at a slight angle. -
Form the upper jaw:
Add a triangular wedge to the top of the snout to create that distinct long-nosed bridge. The cardboard should overhang the sides slightly to create an eye ridge. -
Construct the lower jaw:
Create a separate, narrower jaw piece. Attach it to the back of the skull. You can fix it in an open position with a wedge of cardboard or hinge it if you want movement. -
Cut the teeth:
Cut a jagged strip of small triangles from sturdy cardstock. Glue these strips to the inside rim of both the upper and lower jaws. -
Detail the eyes:
Cut almond-shaped pieces of cardboard for the eyes. Paint an eye design on paper or cardstock first—brown iris, black pupil, white highlight—and glue it onto the almond shape before attaching it under the brow ridge.
Step 3: Finishing Details
-
Create the horns:
Cut four long, curved triangles. Glue two edges together to create a hollow cone shape. Attach two large horns pointing back from the top of the head. -
Add the ears:
Cut fin-like shapes using corrugated cardboard. Peel away one layer of paper on these pieces to reveal the corrugation inside, adding instant texture. Glue these behind the jawline. -
Apply surfacing scales:
Tear small, irregular pieces of paper or thin cardboard. Glue them onto the side of the neck and cheeks in a layered fashion to simulate rough, organic skin texture. -
Build the dorsal spines:
Cut a series of triangular spikes. Glue them in a single row running down the back of the neck spine. -
Refine the nose bridge:
Cut small, scale-like tiles and glue them over the nose bridge and forehead area, overlapping them like roof shingles for extra detail. -
Final assembly:
Securely glue the head to the top of the neck. I usually add extra triangular supports underneath the chin connection point to ensure the heavy head doesn’t droop over time.
Wobbly Neck?
If the neck leans, add a heavy weight (like a bag of sand or rocks) inside the wide base of the structure before stealing it up to lower the center of gravity.
Step back and admire the powerful silhouette of your new dragon companion

PENCIL GUIDE
Understanding Pencil Grades from H to B
From first sketch to finished drawing — learn pencil grades, line control, and shading techniques.
Explore the Full Guide
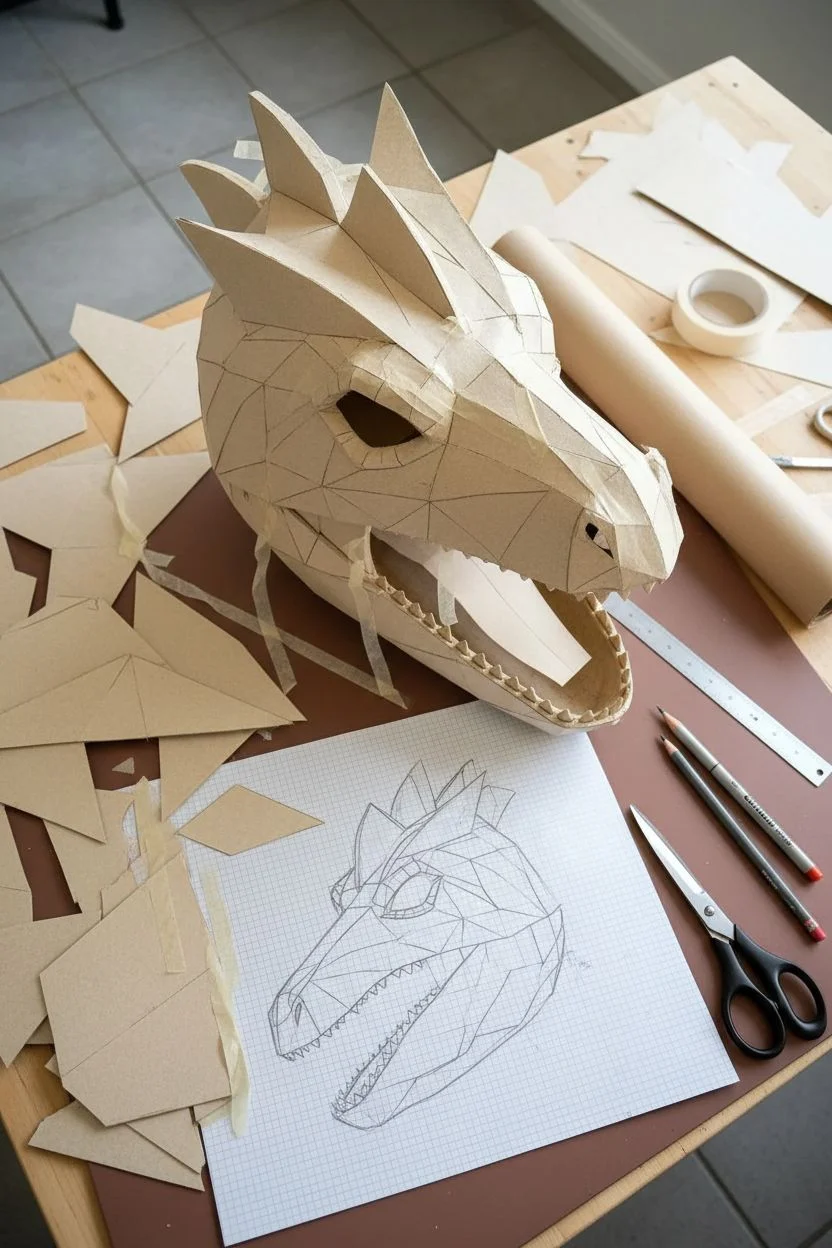
Side-Profile Printable Head Outline Base
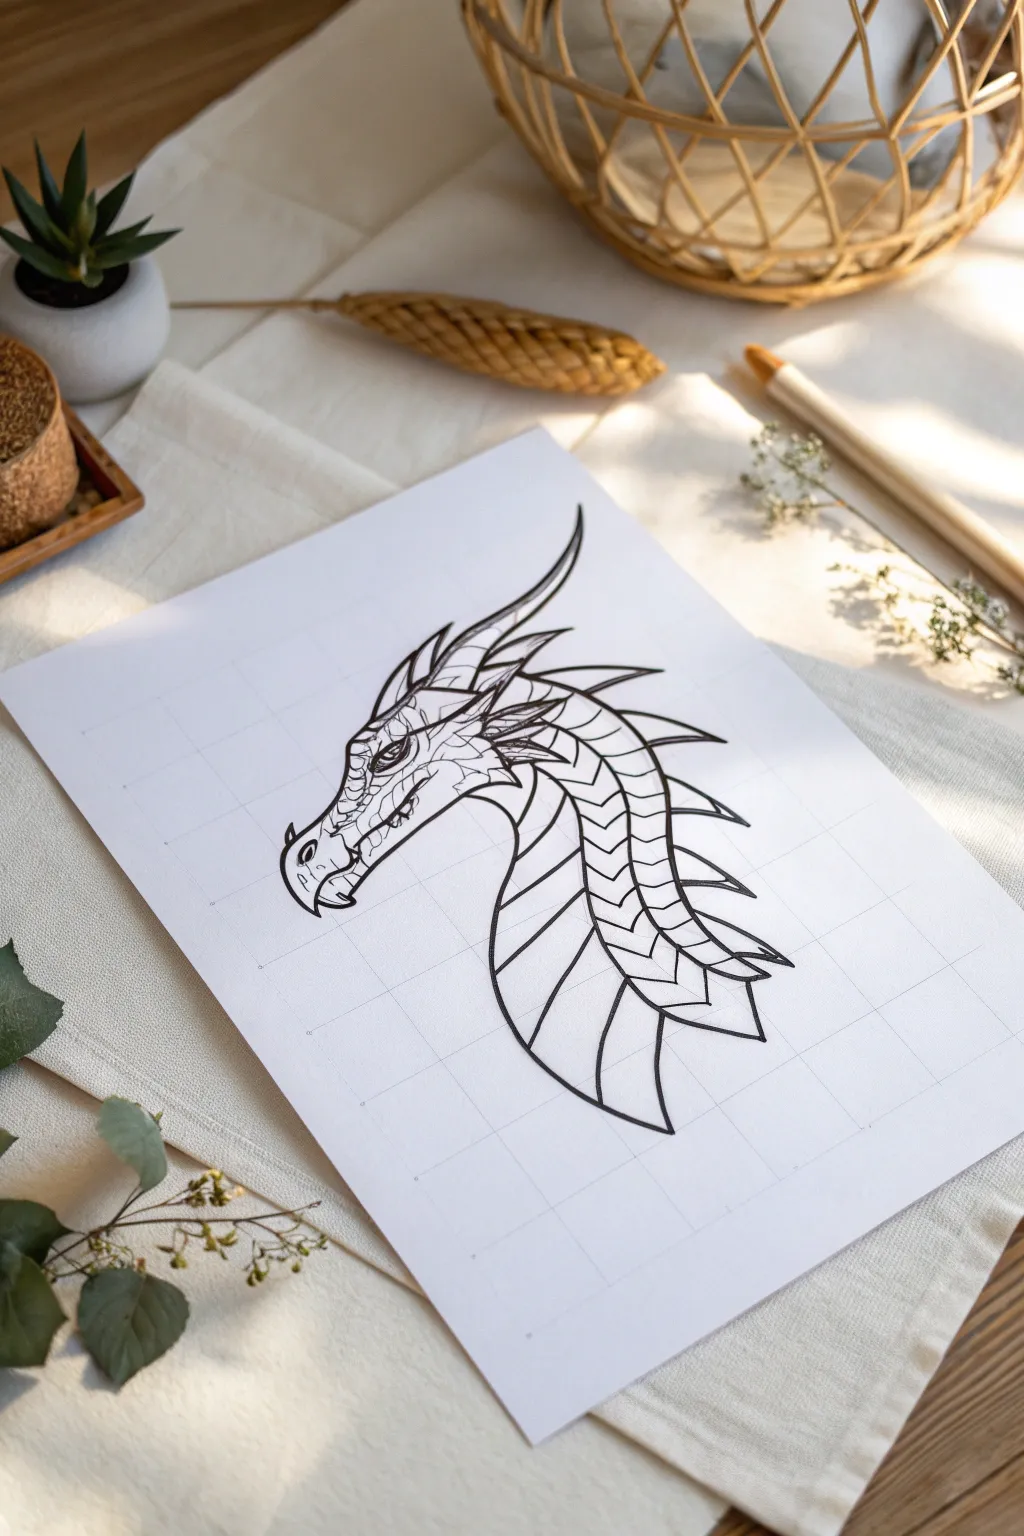
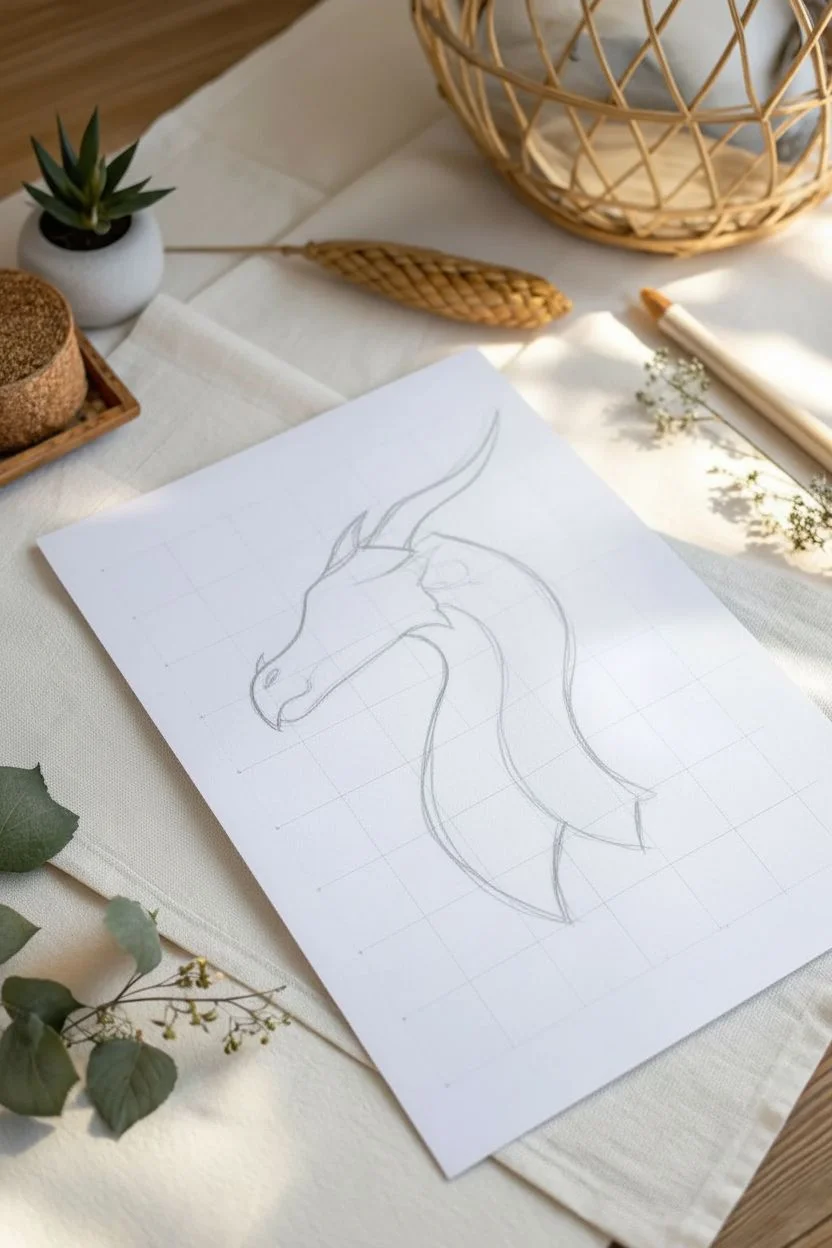
Master the art of mythical creature anatomy with this crisp, stylized dragon head profile. Using a simple grid technique and clean line work, you’ll create a professional-looking base perfect for coloring or turning into a puppet.
Step-by-Step Tutorial
Materials
- White drawing paper (heavyweight sketching paper recommended)
- H or HB drawing pencil
- Ruler
- Eraser (kneaded eraser works best)
- Black fineliner pens (0.3mm and 0.5mm sizes)
- Reference photo (optional, but helpful)
Step 1: Setting the Foundation
-
Establish the grid:
Start by lightly drawing a 4×5 grid on your paper using a ruler and pencil. The squares should be roughly 1.5 to 2 inches in size. This grid will act as your anchor to keep proportions accurate. -
Map the head shape:
Visualize the dragon’s head as a series of simple shapes. Sketch a rough triangular wedge for the snout in the center-left squares and a larger oval for the jaw and cheek area towards the center. -
Outline the neck curve:
Draw a sweeping S-curve starting from the back of the jaw oval, flowing downwards to form the neck. Mirror this curve on the back of the neck to establish thickness.
Grid Goddess
Don’t press hard when drawing your grid! Pencil grooves can catch ink later. Use a harder lead like 2H for ghost-light lines.
Step 2: Drafting the Details
-
Define the snout and jaw:
Refine the triangular wedge into a snout. Add a slight hook at the nose tip and sketch the mouth line, giving it a jagged, formidable grin. -
Position the eye:
Place the eye socket just above the corner of the mouth. Draw a sharp almond shape for the eye itself, adding a predatory slant. -
Sketch the horns:
Extending from the brow ridge, sketch two long, curved horns sweeping backward. Keep the lines fluid to suggest organic growth. -
Draft the ear and frills:
Behind the jaw, sketch a small, fin-like ear. Below the main horns, add a series of spikes or frills running down the back of the neck. -
Map the scale patterns:
Lightly sketch the scale layout. I find it easiest to draw intersecting curved lines along the neck to create a diamond or chevron pattern for the underbelly scales.
Scale Up Your Skills
Vary your line weight. Make the outer silhouette lines twice as thick as the inner scale details to make the drawing pop off the page.
Step 3: Inking and Refining
-
Begin the inking process:
Switch to your 0.5mm fineliner. Start with the main outline of the head, neck, and horns. Use confident, single strokes rather than feathery lines for a clean look. -
Detail the face scales:
Use the finer 0.3mm pen for the intricate scales around the eye and snout. Draw small, varied shapes that puzzle-piece together. -
Ink the neck armor:
Go back to the heavier pen to outline the large, armored plates running down the front of the neck. Give these lines slightly more weight to show they are sturdy protection. -
Add spine spikes:
Ink the triangular spikes running down the spine. Ensure the points are sharp and the bases curve naturally into the neck line. -
Refine the eye:
Carefully ink the eye, leaving a tiny white circle for a highlight to bring the dragon to life. Darken the pupil significantly. -
Add texture lines:
Add subtle hatching or thin lines usually near the base of the horns and under the jawline to suggest shadow and depth without fully shading.
Step 4: Final Touches
-
Let the ink set:
Allow the ink to dry completely for at least five to ten minutes. Smudging wet ink at this stage is a common tragedy we want to avoid. -
Erase the pencil guides:
Gently erase the grid lines and initial sketch marks using your kneaded eraser. Hold the paper taut to prevent wrinkling. -
Review and correct:
Check for any line gaps or areas that need a thicker outline to separate the dragon from the background. Reinforce the outer silhouette if needed.
Now you have a fierce dragon profile ready to guard your sketchbook or become a puppet base
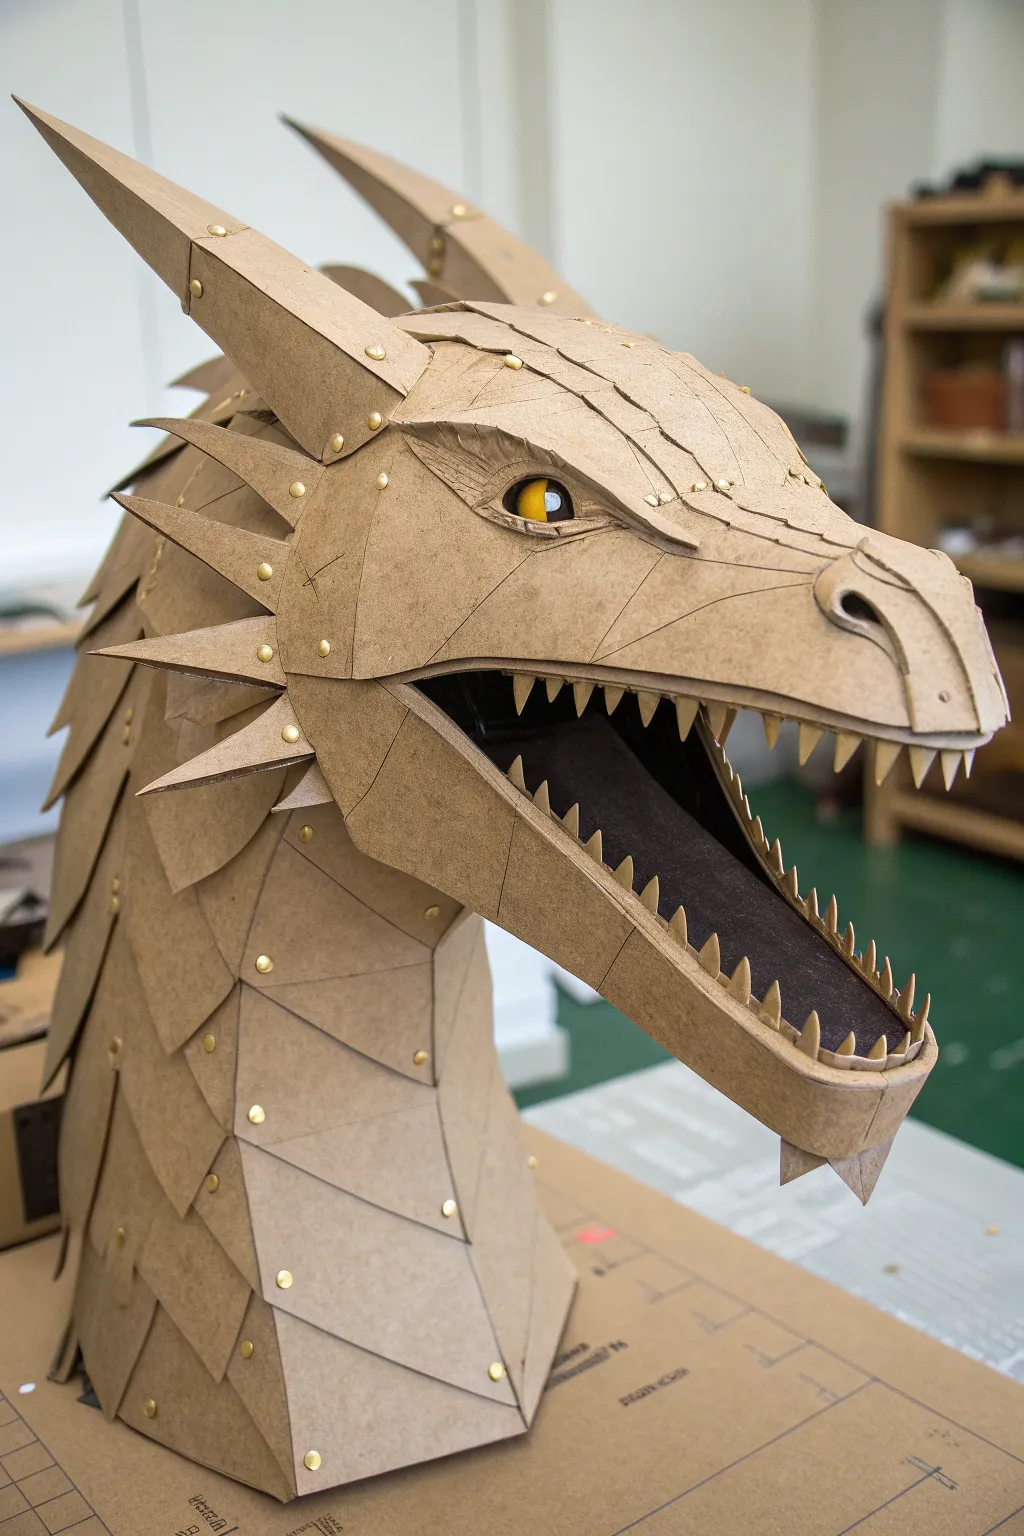
Reinforced Laminated Cardboard Jaw Base
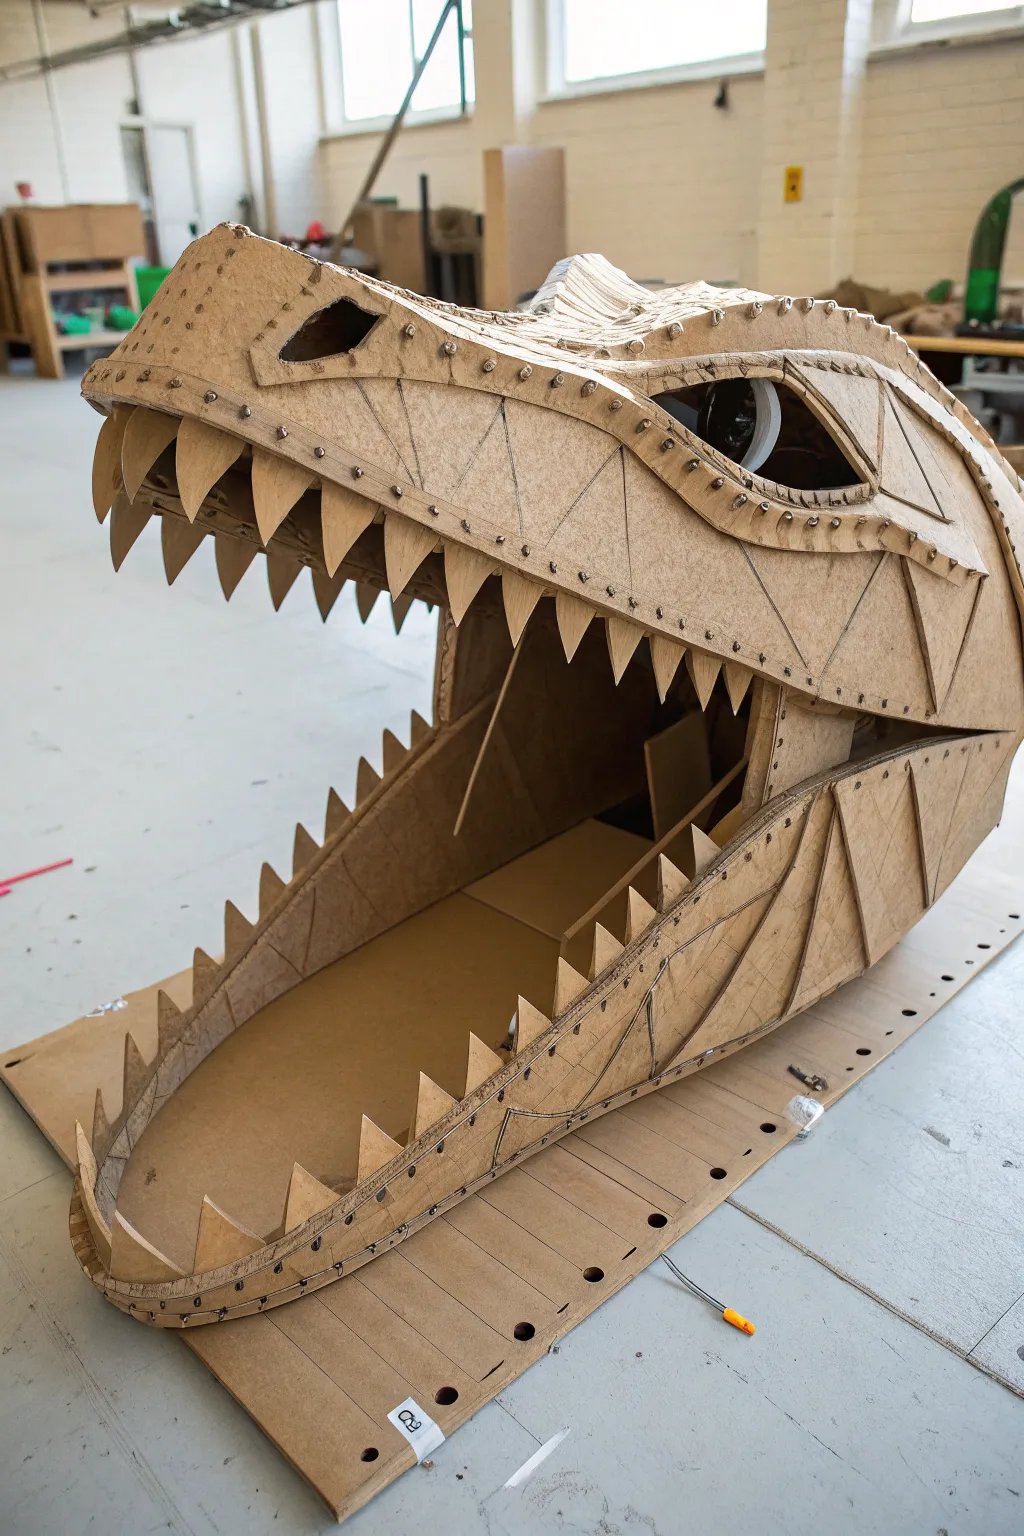
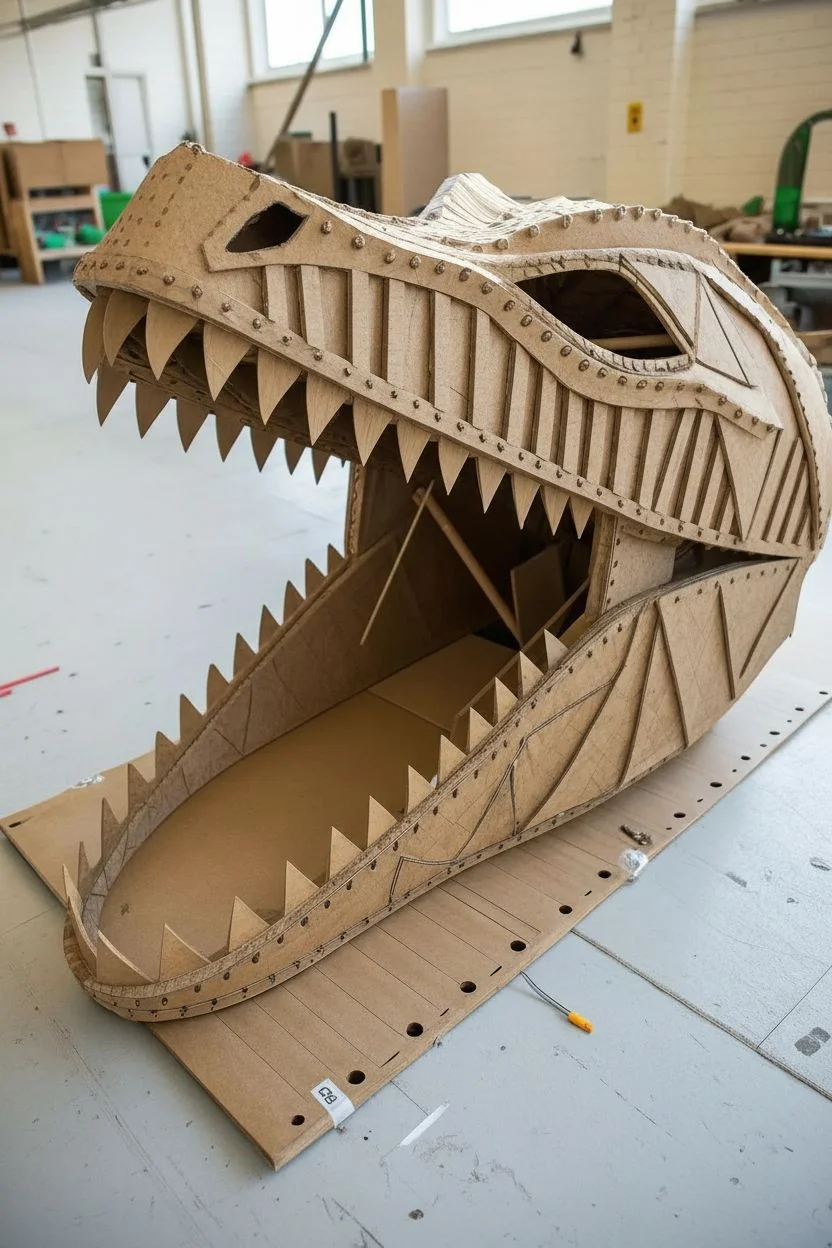
Construct a truly monumental dragon puppet base using nothing but cardboard, patience, and some clever layering techniques. This design features an impressive reinforced jaw structure and visible rugged stitching details that give it a mechanical, steam-punk aesthetic.
Step-by-Step
Materials
- High-quality sturdy cardboard (single and double wall)
- Corrugated cardboard sheets for layering
- Sharp utility knife and plenty of replacement blades
- Hot glue gun with high-temp glue sticks
- PVA glue (wood glue)
- Masking tape
- Wooden dowels or stiff wire (for internal structural support)
- Ruler and protractor
- Awl or sharp punch tool
- Heavy-duty thick thread or thin wire (for faux stitching)
- Sandpaper (medium grit)
Step 1: Structural Framework
-
Drafting the Profile:
Begin by sketching the side profile of the dragon’s skull onto a large sheet of double-wall cardboard. You will need two identical cutouts for the left and right lifting structure of the upper jaw, and two for the lower jaw. -
Creating the Jaw Hinge:
Cut out your profile shapes. Determine the pivot point where the upper and lower jaws meet. Reinforce this area with an extra layer of cardboard on the inside face to handle the stress of movement. -
Spanning the Width:
Cut several rectangular strips of cardboard to determine the width of the head. Glue these spacers between your two profile cutouts to create a 3D box framing. Ensure the snout tapers slightly inward for a better aerodynamic look. -
Reinforcing the Lower Mandible:
The lower jaw needs to be sturdy. Create a ‘floor’ for the mouth by cutting a long, tapered panel that fits between the lower jaw walls. Glue this in place, adding triangular gussets underneath for hidden support. -
Internal Struts:
I like to add thin wooden dowels or rolled cardboard tubes diagonally inside the rear of the skull cavity. This prevents the large head from warping over time.
Warped Cardboard?
If large flat areas start to warp from glue moisture, weigh them down with heavy books while drying, or laminate two grain-directions of cardboard together.
Step 2: Skinning and Armor Plating
-
Base Skinning:
Cover the open framework with large flexible sheets of single-wall cardboard. Pre-bend the cardboard by rolling it over a table edge so it curves smoothly over the skull’s dome without creasing. -
Cutting the Armor Scales:
Cut various triangular and trapezoidal shapes from standard corrugated cardboard to act as the outer armor. These should be geometric and sharp. -
Layering the Plates:
Glue these panels onto the exterior skin, leaving small 2-3mm gaps between them. This negative space creates the ‘panel line’ effect seen in the reference. -
Defining the Eye Socket:
Build up the brow ridge by layering three crescent-shaped strips of cardboard. Cut a deep, almond-shaped recess for the eye, setting the back wall of the eye socket deeply into the head. -
Adding the Faux Rivets:
Using an awl, punch evenly spaced holes along the edges of your armor plates. You can push small rolled bits of paper or cardboard into these holes, or simply punch them for visual texture.
Step 3: Dentition and Details
-
Drafting the Teeth:
Draw a variety of triangular tooth shapes. You need large anchoring teeth for the front and smaller, jagged ones for the back. Cut two identical pieces for every single tooth to create thickness. -
Assembling the Teeth:
Glue the pairs of tooth cutouts together. Once dry, sand the edges so the corrugation is hidden and the tooth looks solid and sharp. -
Mounting the Upper Teeth:
Attach the upper teeth to the ‘gum’ line of the top jaw. Angle them slightly backward/inward; this makes the dragon look more predatory and helps trap ‘prey’. -
Mounting the Lower Teeth:
Glue the lower teeth in place, ensuring they interlock or sit nicely inside the upper row when the mouth is closed. Test the fit before the glue sets fully. -
The Gum Line Ridge:
Cut long, thin strips of cardboard (about 1 inch wide). Glue these over the seam where the teeth meet the jaw to create a reinforced ‘gum’ lip. Punch rivet holes along this strip to match the armor aesthetic. -
Edge Stitching Detail:
For the final touch, thread thick twine or wire through the punched holes along the major seams (like the gum line and brow). This mimics the look of heavy leather or bolted plating.
Metallic Finish
Dry-brush metallic silver or bronze acrylic paint over the rivets and high points. It catches the cardboard texture and makes it look like beaten metal.
You now have a formidable, prehistoric structure ready for painting or puppeteering.


Lightweight Fold-and-Tab Paperboard Base
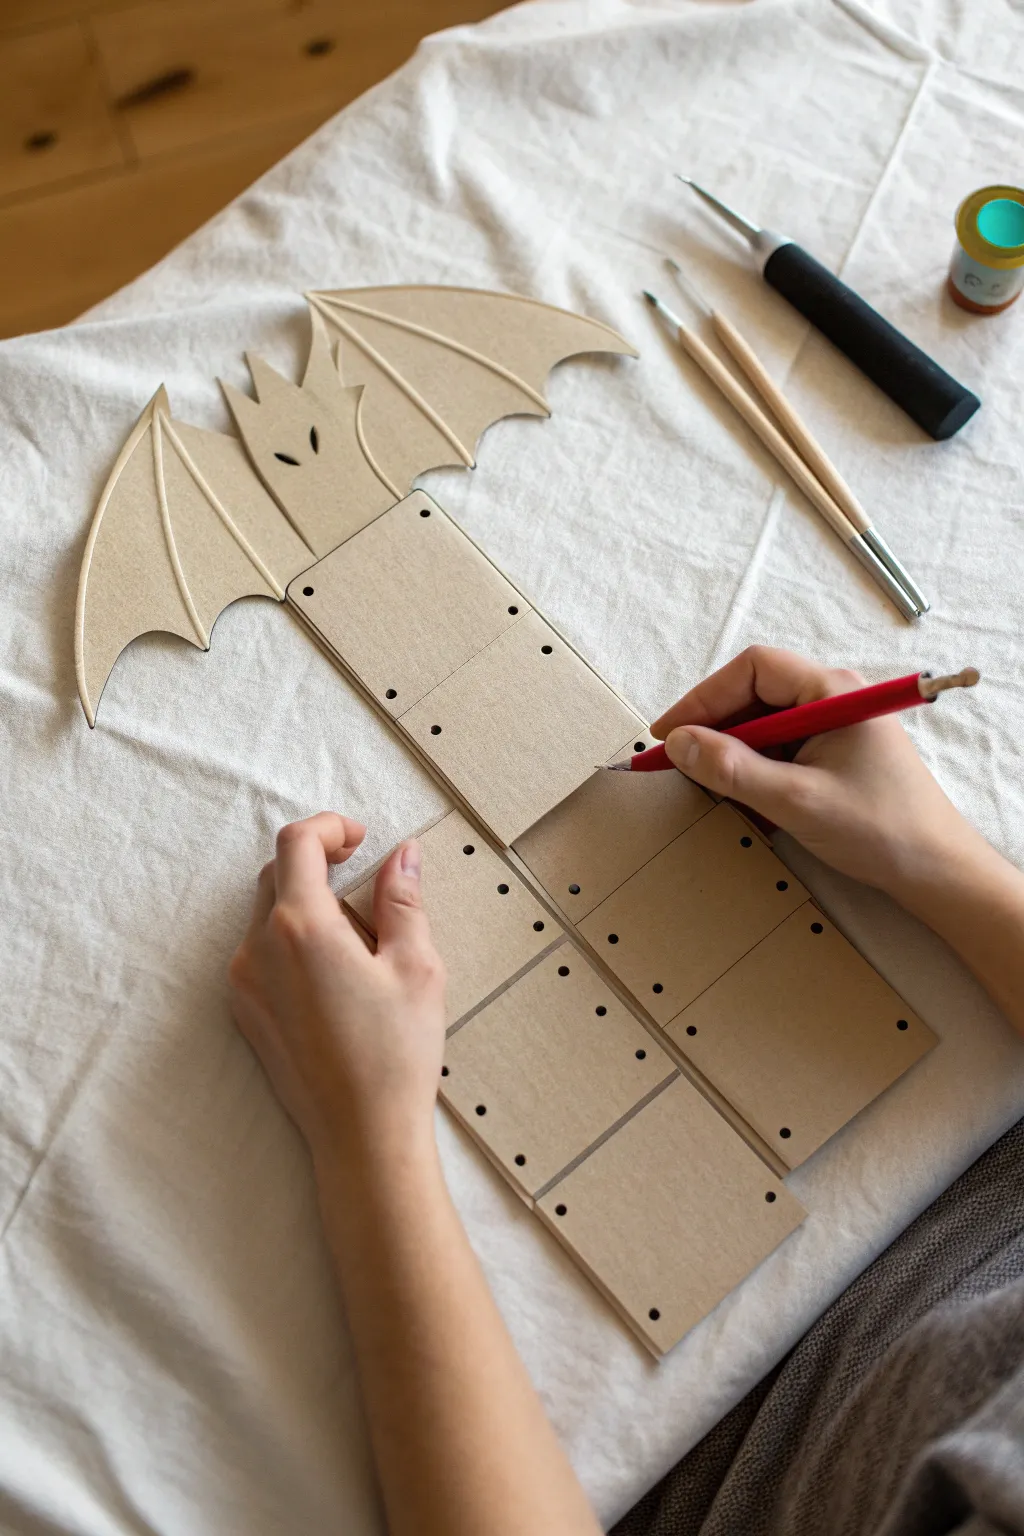
This project creates a flexible, segmented dragon puppet base using lightweight paperboard, perfect for adding your own scales and details later. The design features a stylized winged head and a jointed body that moves fluidly like a real reptile.
Step-by-Step Guide
Materials
- Lightweight paperboard (cereal box thickness or slightly heavier)
- Pencil for sketching
- Ruler
- Craft knife or scalpel used with a cutting mat
- Scissors
- Small hole punch or awl
- Red marker or pen (for marking cut lines)
Step 1: Designing the Head and Wings
-
Sketch the silhouette:
Begin by drawing the dragon’s head and wing section as a single, continuous piece on your paperboard. Start with a central vertical rectangle for the neck/head area. -
Add facial features:
Draw a jagged, crown-like top for the head to suggest horns or spikes. Sketch two simple, angled slit eyes in the center. -
Draft the wings:
Extend curved lines outward from the neck area to create bat-like wings. Make sure the points of the wings curve downward and the top edge has a nice arch. -
Detail the wings:
Draw interior lines on the wings to represent the bone structure, creating ‘fingers’ that fan out to the wing tips. -
Cut out the headpiece:
Carefully cut along your exterior outline using a craft knife or scissors. Be precise around the jagged horn area. -
Create the eye sockets:
Using the tip of your craft knife, carefully cut out the small slanted eye shapes so you can see through them.
Clean Cuts Only
Change your craft knife blade often. Paperboard dulls blades quickly, and a dull blade will tear the material rather than slicing it cleanly.
Step 2: Creating the Segmented Body
-
Measure the segments:
Determine the width of your puppet’s body. It should match the width of the neck base on your headpiece. Mark out a series of identical squares or slight rectangles. -
Cut the primary spine:
Cut a long strip of paperboard that will serve as the central column. This example uses a central strip roughly 3-4 inches wide. -
Score the hinge lines:
Measure equal distances down the strip (about every 3 inches). Lightly score these horizontal lines with your craft knife—do not cut all the way through—to create flexible folds. -
Create side panels:
Cut separate rectangular pieces that match the height of your central segments but are slightly wider. You will need two for each body segment level. -
Attach side panels:
Align these side panels next to the central strip segments. In this specific design, they are often taped on the back or connected via a backing fabric layer to allow movement, though the image focuses on the layout phase. -
Mark assembly holes:
Using a pencil, mark small dots where the segments will connect. Place four dots per segment: two near the top corners and two near the bottom corners.
Step 3: Final Assembly Prep
-
Punch the holes:
Use a small hole punch or an awl to pierce through the marked dots. These holes are essential for lacing the puppet together later. -
Refine the edges:
Check all your cut paperboard edges. If any are rough or fuzzy, smooth them down gently with fine-grit sandpaper or trim them clean. -
Emboss details:
I like to use a dull pencil or a stylus to re-trace the wing bone lines and the head details, pressing down firmly to create a debossed, 3D effect on the flat board. -
Connect the head:
Align the bottom of the head/wing piece with the top, central body segment. Mark and punch corresponding holes to link them. -
Test the folds:
Gently bend the paperboard along your scored lines to ensure the ‘spine’ of the dragon flexes easily without tearing.
Wobbly Joints?
If your scored fold lines are too stiff, run your scoring tool over them one more time, but be careful not to slice completely through the board.
You now have a sturdy, flexible base ready for paint, fabric scales, or whatever texture your dragon needs
Hinged Jaw Base With Simple Fasteners
Construct a stunningly realistic dragon trophy or puppet base using approachable materials like cardboard and brass fasteners. This project combines geometric scale-work with a clever mix of cutting and scoring techniques to create a creature that looks like it flew straight out of a fantasy epic.
Step-by-Step
Materials
- High-quality corrugated cardboard (uniform thickness)
- Brass paper fasteners (brads) – varied sizes
- Sharp craft knife or box cutter
- Self-healing cutting mat
- Pencil and eraser
- Metal ruler
- Bone folder or distinct scoring tool
- Hot glue gun and glue sticks
- Yellow ping pong ball or plastic sphere (for the eye)
- Black permanent marker or paint pen
- Dark grey or black felt (for inner mouth)
Step 1: Planning and Basic Structure
-
Draft the profile:
Begin by sketching the dragon’s side profile on a large sheet of paper or directly on a base piece of cardboard. Outline the long snout, the angular jawline, and the swept-back crest to establish the scale. -
Cut the primary skull form:
Cut two identical profile shapes for the left and right sides of the head. Cut a long rectangular strip that matches the width you want for the forehead and snout bridge; this will connect the two sides. -
Create the jaw hinge mechanism:
Before gluing the skull shut, identify the pivot point at the back of the jaw. Reinforce this area with an extra layer of cardboard inside. Punch a hole through both the upper skull and lower jaw pieces, inserting a large brass fastener to act as a simple hinge. -
Assemble the skull box:
Using hot glue, attach the central forehead strip to connect the two side profiles. Bend and curve the cardboard slightly as you glue to give the snout a rounded, organic top rather than a perfect box shape.
Loose Jaw?
If the jaw won’t stay open or feels floppy, add friction by tightening the hinge fastener or gluing a small rubber washer between the cardboard layers at the pivot point.
Step 2: Detailing the Face and Features
-
Craft the eye sockets:
Cut almond-shaped holes where the eyes will sit. Build up raised ridges around these holes using curved strips of cardboard to create distinct brow ridges that make the dragon look fierce. -
Prepare the eye:
Take your yellow plastic sphere half. Draw a vertical slit pupil using a black marker. Glue this behind the eye socket opening so it peers out from beneath the heavy brow. -
Form the nostrils:
Cut smaller arched shapes for the nostrils. Glue these onto the very tip of the snout, layering them to create depth versus just drawing them on. -
Construct the teeth:
Cut numerous small, sharp triangles from cardboard. I find it help to vary the sizes—larger for the front canines, smaller for the back. Glue these firmly along the inner ridges of the upper and lower jaw. -
Line the mouth:
Cut a strip of dark grey or black felt to fit the floor of the mouth and the roof. Glue this inside to hide the internal corrugated edges and provide a dark background that makes the teeth pop.
Step 3: Plating and Scales
-
Cut the geometric plates:
Cut dozens of trapezoidal and triangular pieces of cardboard. These will act as the armored plating. Score them down the center vertically using a bone folder to create a ridge, giving them a 3D effect. -
Layer the neck scales:
Start at the bottom of the neck and work upward. Overlap the scales like shingles on a roof. Use a brass fastener on the corners of some larger scales before gluing to simulate rivets. -
Armor the face:
Glue larger, custom-shaped plates on the cheeks and snout. Ensure the grain of the cardboard follows the contours of the face for a smoother look. -
Add the spikes:
Create sharp, cone-like spikes for the back of the head and the spinal ridge. Score and fold triangles to make them three-dimensional, then attach them along the dragon’s crest. -
Install decorative rivets:
Push brass fasteners into the corners of the facial plates and along scale edges where armor would naturally be bolted. Fold the prongs flat on the back side (or trim them if glued directly to a solid surface).
Pro Tip: Scoring Secrets
Don’t cut all the way through when scoring! Use dull side of your knife or a bone folder to dent the paper. This creates crisp, clean folds without weakening the structure.
Step 4: Final Touches
-
Refine the edges:
Inspect all exposed corrugated edges. You can cover unsightly holes with thin strips of paper or masking tape for a cleaner finish, though the raw edge also adds to the rustic aesthetic. -
Check articulation:
Gently open and close the jaw to ensure your scale placement hasn’t blocked the movement. Trim any colliding card corners if necessary.
Now you have a fierce, armored companion ready to guard your creative space
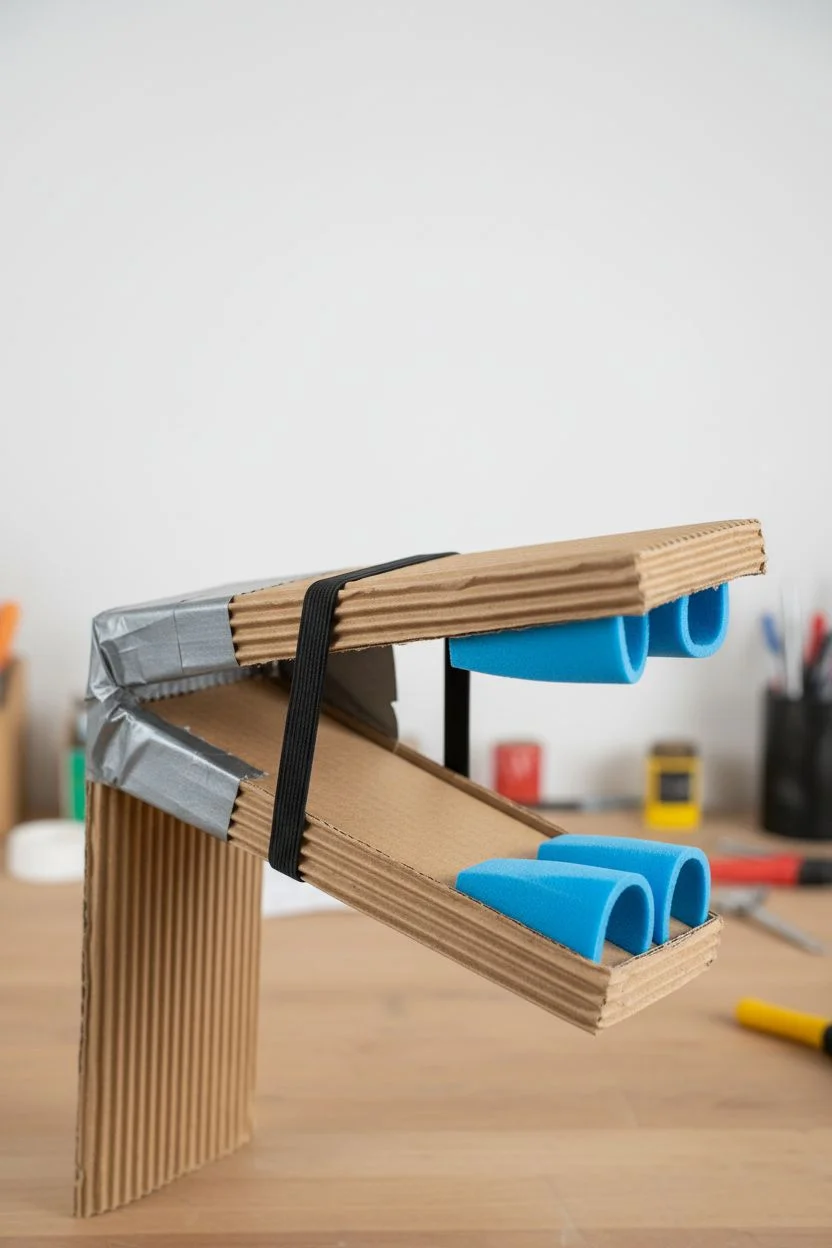
Elastic-Tension Chomp Jaw Base
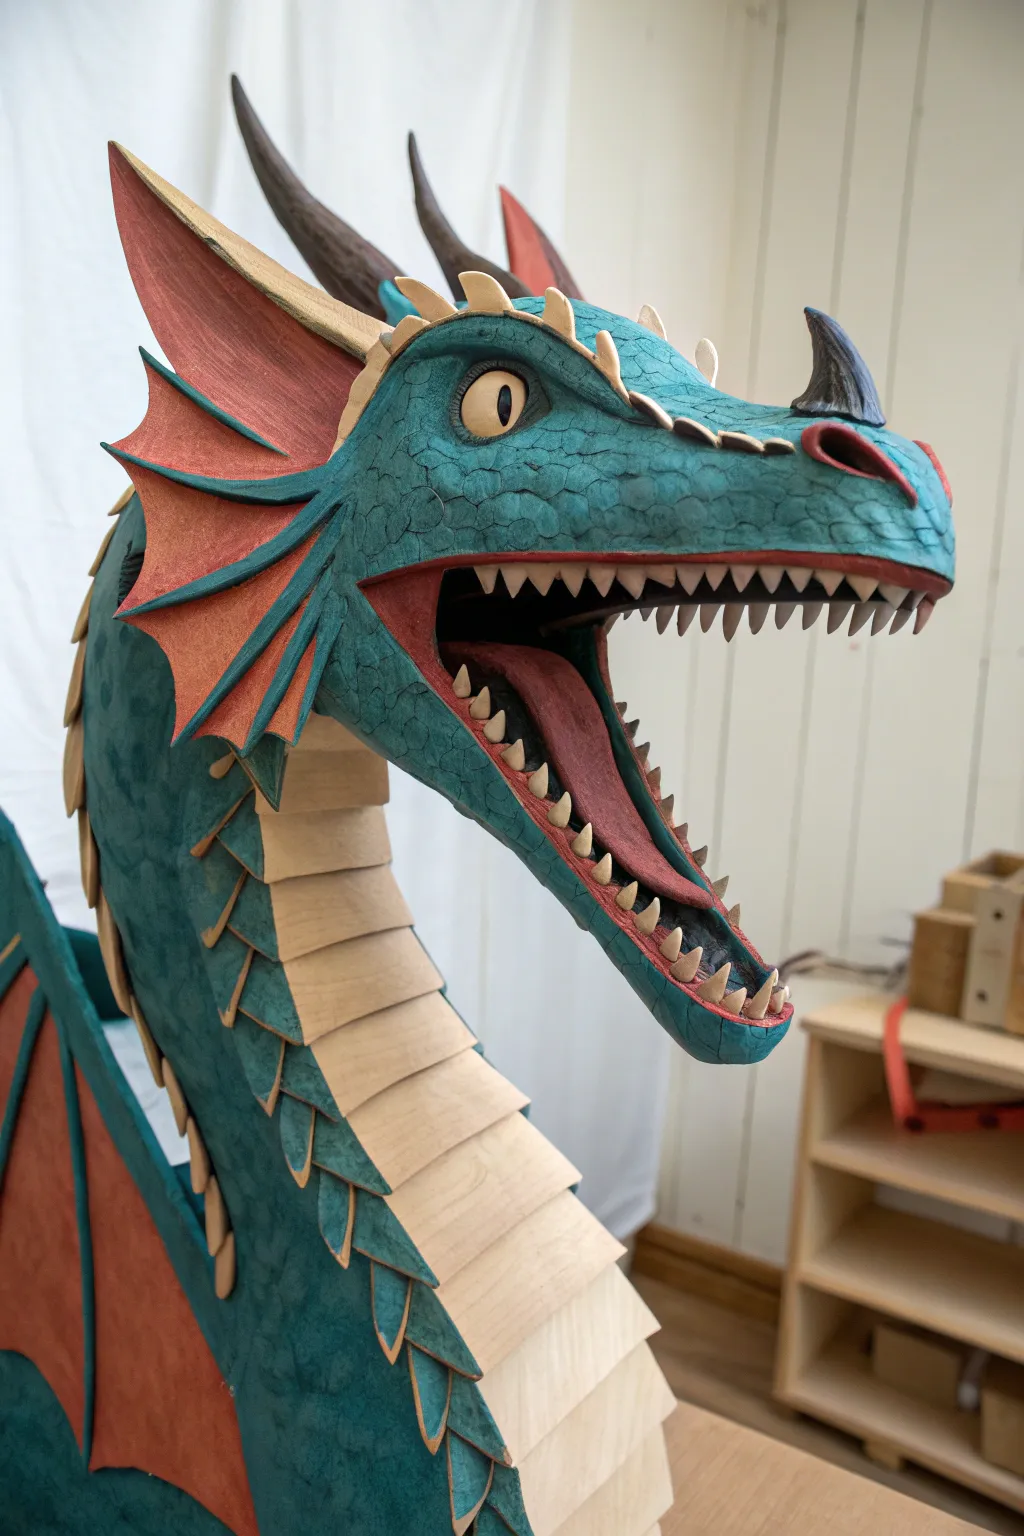
This striking dragon puppet combines a responsive articulated jaw with a stylized, layered aesthetic perfect for storytelling. The finished piece features a beautiful textured ‘scale’ effect achieved through clever painting and layering of lightweight materials.
Step-by-Step Guide
Materials
- Corrugated cardboard sheets
- EVA foam (2mm and 5mm thick)
- Craft foam sheets
- Elastic bands (heavy duty)
- Hot glue gun and glue sticks
- Acrylic paints (Teal, Sap Green, Burnt Orange, Cream, Black, Red)
- PVA glue or Mod Podge
- Tissue paper
- Scissors and X-acto knife
- Wooden dowel or PVC pipe (for neck control)
- Wire (for structural support)
Step 1: Constructing the Elastic Jaw Mechanics
-
Base Structure:
Cut two long, slightly tapered strips of corrugated cardboard for the upper and lower jaws. The upper jaw should be about 20% longer to account for the snout’s shape. -
Hinge Mechanism:
Create a hinge by connecting the back ends of the jaw pieces. You can use a duct tape hinge for flexibility, or a wire pivot point if you want more durability. Ensure the mouth can open wide without resistance. -
Adding Elastic Tension:
Attach heavy-duty elastic bands connecting the upper and lower jaw near the hinge point. The tension should be strong enough to snap the mouth shut automatically, but loose enough that your hand can force it open easily. -
Finger Grips:
Glue loops of craft foam or elastic straps inside the upper and lower jaw plates. These will act as anchors for your fingers and thumb to control the mouth movement.
Scale Texture Trick
For deeper skin cracks without tissue paper, score your EVA foam with a craft knife before heating it. The cuts will expand beautifully.
Step 2: Sculpting the Head and Neck
-
Building Volume:
Use crumpled paper or aluminium foil to bulk out the shape of the skull around your cardboard base, then tape it down securely with masking tape. -
Neck Structure:
Attach a flexible spine made of interlocking cardboard rings or a thick foam tube to the back of the head. This will form the long, serpentine neck. -
Skinning the Dragon:
Cover the entire head structure with a layer of 2mm EVA foam or thick cardstock. Heat form the foam slightly if possible to round out the sharp edges of the cardboard base. -
Creating the Belly Scales:
Cut uniform trapezoidal shapes from cream-colored cardstock or thin foam. Overlap these like shingles running all the way down the front of the neck and under the chin. -
Adding Frills and Wings:
Cut the ear frills and wing shapes from stiff cardboard. Glue 2mm foam ‘ribs’ onto them for the bony supports, then attach these firmly to the sides of the head and lower neck.
Step 3: Detailing and Texture
-
Applying Texture:
Coat the green parts of the dragon (head and neck) with a layer of crumpled tissue paper soaked in diluted PVA glue. This creates the wrinkled, leathery skin texture seen in the image. -
Layering the Face:
Cut distinct ‘eyebrow’ ridges, cheek plates, and nose bridges from 2mm foam. Glue these over your base layer to create depth and shadow. -
Teeth and Horns:
Carve small cones from high-density foam or polymer clay for the teeth. Glue them along the jawline. Create larger curved cones for the horns.
Jaw Won’t Close?
If the mouth hangs open, your elastic is too long or weak. Shorten the band or add a second one parallel to the first for more snapping power.
Step 4: Painting and Finishing
-
Base Coat:
Paint the entire head and neck (except the belly) with a dark teal acrylic paint. Paint the belly plates and horns a creamy beige, and the frills a deep burnt orange. -
Black Wash:
I find this step crucial: mix black acrylic paint with water (about 1:4 ratio) and wash it over the textured skin. Wipe it off the raised areas quickly with a rag, leaving the dark paint in the tissue paper cracks. -
Dry Brushing:
Lightly brush a brighter turquoise paint over the teal scales to make the texture pop. Do the same with a lighter cream color on the belly and horns. -
The Eyes:
Paint wooden hemispheres or plastic spoons yellow with a black slit pupil. Glue them under the heavy brow ridges for that intense glare. -
Mouth Interior:
Paint the inside of the mouth dark red or black. Cut a tongue shape from foam, paint it red, and glue it deep in the throat, curving upward slightly.
Once the paint is dry, slip your hand into the grips to bring your magnificent beast to life
Split Upper-Jaw Base for a Snarlier Bite
This impressive dragon head base features a distinct low-poly aesthetic crafted from rigid panels, giving it a chiseled, ancient look. Its primary feature is a deeply articulated split jaw design that allows for expressive, snarling movement perfect for advanced puppetry.
Step-by-Step
Materials
- Corrugated cardboard or stiff foam board
- Cardstock or heavy paper (for templates)
- Masking tape (high quality, beige)
- Paper mache strips or gummed kraft tape
- Hot glue gun and glue sticks
- PVA glue (white glue)
- Glossy black plastic half-spheres (for eyes)
- Utility knife or precision cutter
- Cutting mat
- Cardboard tube or PVC pipe (for neck mount)
- Pencil and ruler
Step 1: Conceptualizing and Template Creation
-
Design the low-poly mesh:
Begin by sketching a side profile of your dragon’s head. Break the curved organic shapes down into triangles and quadrilaterals to create a ‘low-poly’ look. It helps to draw this directly onto graph paper first to keep proportions consistent. -
Draft the jaw mechanism:
Pay special attention to the jaw hinge area. For this split-upper-jaw design, the upper snout needs a distinct separation line from the rear skull plates, allowing the mouth to open wide without distorting the head shape. -
Test with cardstock:
Transfer your flat 2D shapes onto cardstock and cut them out. Tape these flimsy pieces together temporarily to check the 3D volume. If the snout looks too narrow or the eyes too wide, adjust your paper templates now before cutting the heavier material.
Step 2: Constructing the Rigid Skull
-
Cut the base panels:
Using your finalized cardstock templates, trace the shapes onto your corrugated cardboard or foam board. Cut these out cleanly with a utility knife, keeping the edges sharp for tight seams. -
Assemble the snout:
Start by hot gluing the nose bridge and side snout panels together. Hold each piece in place until the glue cools completely to ensure the geometric angles remain sharp. I find it helpful to build the left and right sides simultaneously to maintain symmetry. -
Form the eye sockets:
CREATE a recessed area for the eyes by angling the panels inward. The socket should be deep enough that the brow ridge casts a shadow over it, enhancing the aggressive look. -
Build the lower jaw:
Construct the lower jaw as a separate bucket-like shape. Ensure the chin tapers appropriately and matches the width of the upper jaw when closed. -
Integrate the neck mount:
Secure a sturdy cardboard tube or PVC pipe vertically into the base of the skull. This will act as the handle for the puppet and the connection point for the neck later.
Hinge Alignment
If the jaw closes crookedly, check your hinge pins. Even a millimeter difference in hole placement can skew the jaw. Re-drill or move one side slightly to correct the alignment.
Step 3: Detailing and Teeth
-
Install the eyes:
Place the glossy black half-spheres into the eye sockets. Secure them from the inside with hot glue, ensuring the visible pupil area is clear of adhesive. -
Create the teeth:
Cut numerous small triangles from your board material for the teeth. Vary their sizes—larger canines for the front and smaller serrations for the back. You will need about 20-30 teeth depending on your spacing. -
Attach the dentition:
Glue the teeth to the rim of both jaws. Angle them slightly outward or irregular to give the dragon a more feral, natural appearance rather than a perfect dentist’s smile. -
Add dorsal spines:
Cut triangular fin shapes for the back of the head. Glue them along the central ridge of the skull, starting large at the back and getting smaller as they approach the brow.
Pro Tip: Eye Depth
Set the eyes deeper than you think is necessary. Deep-set eyes catch the light dramatically and make the brow look heavier and more menacing without extra sculpting.
Step 4: Refining the Surface
-
Tape the seams:
Apply strips of masking tape over every joined seam. This softens the raw corrugated edges and reinforces the bond between panels. -
Skin the structure:
Cover the entire cardboard surface with overlapping strips of masking tape or gummed kraft tape. This unifies the texture, hiding the corrugation and giving it a skin-like unevenness that takes paint beautifully later. -
Form the tongue:
Cut a long, flat strip of board for the tongue. Score it down the middle to create a subtle central groove and glue it into the floor of the lower jaw. -
Refine the eyelids:
Roll small tubes of tape or paper and glue them around the black eye spheres to create distinct upper and lower eyelids. This step is crucial for giving the dragon expression. -
Final structural check:
Open and close the jaw mechanism manually to ensure nothing rubs or catches. Reinforce the hinge point with extra glue or tape if it feels wobbly.
With the structure complete, you now have a solid foundation ready for painting or covering in fabric skin
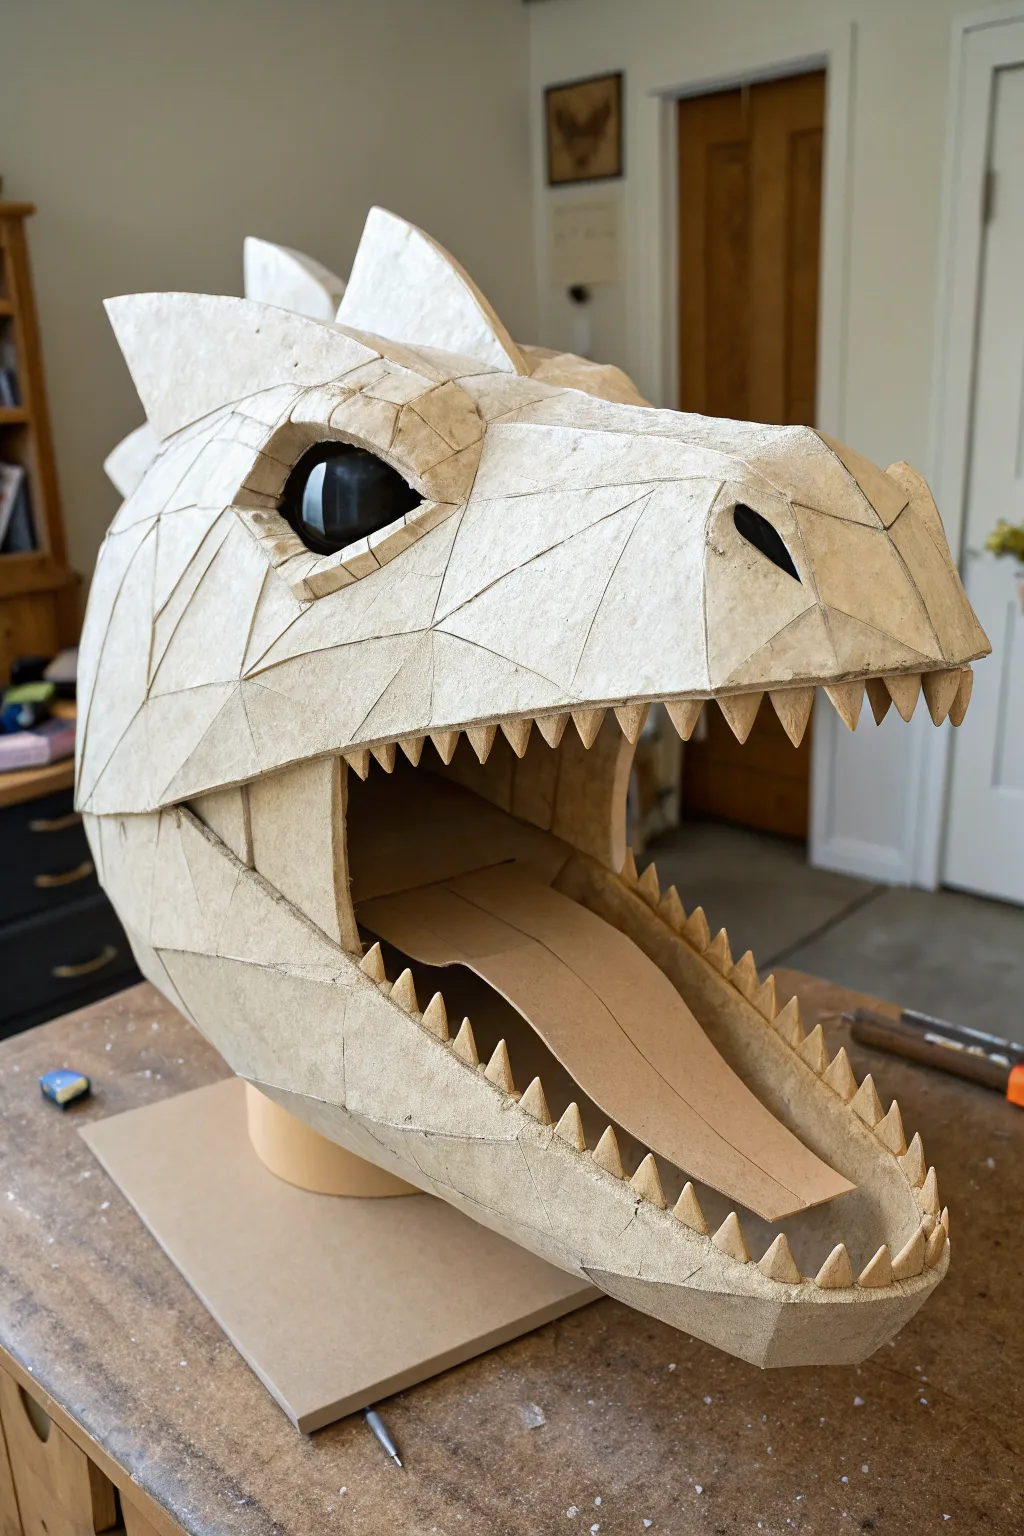
Wide-Mouth Base for Big Teeth and Tongue
This impressive dragon puppet base features a structurally reinforced wide jaw designed specifically to accommodate oversized teeth and a mobile tongue. The project uses a combination of sturdy cardboard architecture and layered paper skin to create a lightweight but durable head with a fiercely expressive open mouth.
Step-by-Step Tutorial
Materials
- Heavy-duty corrugated cardboard
- Cardstock or thin cardboard (cereal box thickness)
- Kraft paper or brown packing paper
- PVA glue (white glue) or wood glue
- Water (for diluting glue)
- Masking tape
- Utility knife or box cutter
- Scissors
- Hot glue gun and glue sticks
- Green glass craft eye or painted cabochon
- Pencil and eraser
Step 1: Constructing the Skeleton
-
Sketch the profile:
Begin by drawing the side profile of your dragon’s head onto a large sheet of thick corrugated cardboard. You need an upper jaw and a lower jaw piece; distinct curves will give it character, so mimic the sloping snout shown in the reference. -
Cut the primary plates:
Cut out two identical profile shapes for the sides of the head using a sharp utility knife. These vertical plates will define the silhouette of your dragon. -
Create the jaw spacers:
Measure the width you want for the mouth. Cut rectangular strips of cardboard to this width to serve as spacers between your two profile plates. You will need one for the roof of the mouth and one for the floor of the jaw. -
Assemble the box frame:
Hot glue the spacers between your two profile plates to create a 3D box-like structure. Reinforce the inner corners with extra hot glue to ensure the jaw doesn’t wobble. -
Form the snout arch:
Cut a long strip of flexible cardstock or lighter cardboard. Curve this over the top of the upper jaw assembly to create the rounded bridge of the nose, gluing it down to the edges of your profile plates.
Clean Cuts
Change your utility knife blade frequently. Dull blades will shred the corrugated cardboard rather than slicing it, resulting in weak edges that are harder to cover with paper.
Step 2: Skinning and Sculpting
-
Layer with kraft paper:
Tear your brown kraft paper into medium-sized strips. Create a mixture of 2 parts PVA glue to 1 part water. Dip the strips and apply them over the cardboard skeleton, smoothing out any air bubbles. -
Build up the brow ridges:
To give the dragon an angry or intense look, bunch up wads of paper soaked in glue and place them above where the eye will go. Cover these wads with a smooth strip of kraft paper to integrate them into the head. -
Add the eye:
While the paper is still slightly pliable but tacky, press your green glass eye into the socket area under the brow ridge. Use small strips of paper to create eyelids over the edges of the eye to lock it in place. -
Form the rear spikes:
Cut triangular shapes from scraps of cardboard. Glue these along the back of the head and the jawline to simulate bony protrusions or scales. -
Cover the spikes:
Apply the papier-mâché strips over the cardboard spikes, ensuring the paper seamless connections between the spike base and the main head.
Jaw Mechanics
Before skinning, add a sturdy elastic band or spring mechanism inside the back of the jaw joint. This adds tension so the mouth snaps shut automatically when you stop moving your hand.
Step 3: The Bite
-
Draft the teeth:
On a stiff piece of cardstock or thin cardboard, draw a long row of serrated, triangular teeth. Vary the sizes, making the front teeth (canines) significantly longer. -
Cut the dental strips:
Cut out these strips of teeth carefully. It helps to keep them attached in a single strip rather than cutting individual teeth, as this makes gluing them into the mouth much easier. -
Install the upper teeth:
Glue the strip of teeth to the inner rim of the upper jaw. Angle them slightly inward so they look menacing but don’t snag on the lower jaw. -
Install the lower teeth:
Repeat the process for the lower jaw. I find it helpful to close the mouth gently to check alignment before the glue fully sets. -
Define the gums:
Roll very thin tubes or ‘snakes’ of glue-soaked paper. Press these along the gum line where the cardboard teeth meet the jaw to create a fleshy transition. -
Final texture check:
Look over the entire piece. If you see visible corrugated edges on the cardboard teeth or jaw rim, cover them with small bits of masking tape or extra paper layers for a smooth finish.
Once dry, your dragon base is ready for a coat of primer and a fantastic paint job to bring those scales to life
Modular Slot System for Horns, Ears, and Spikes
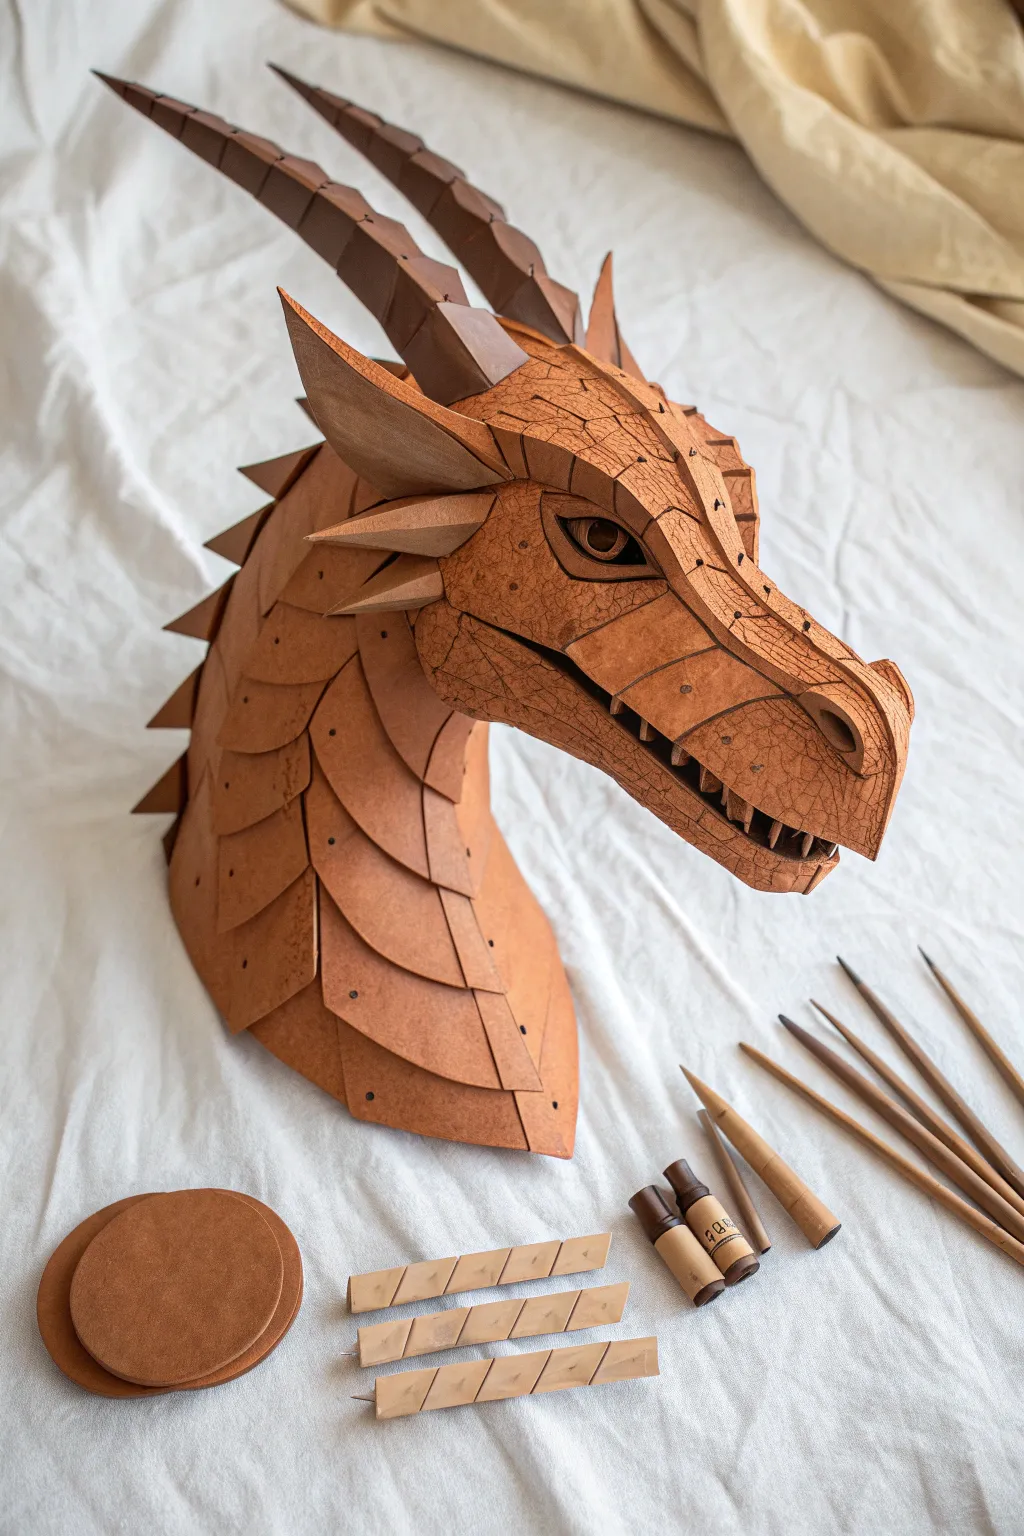
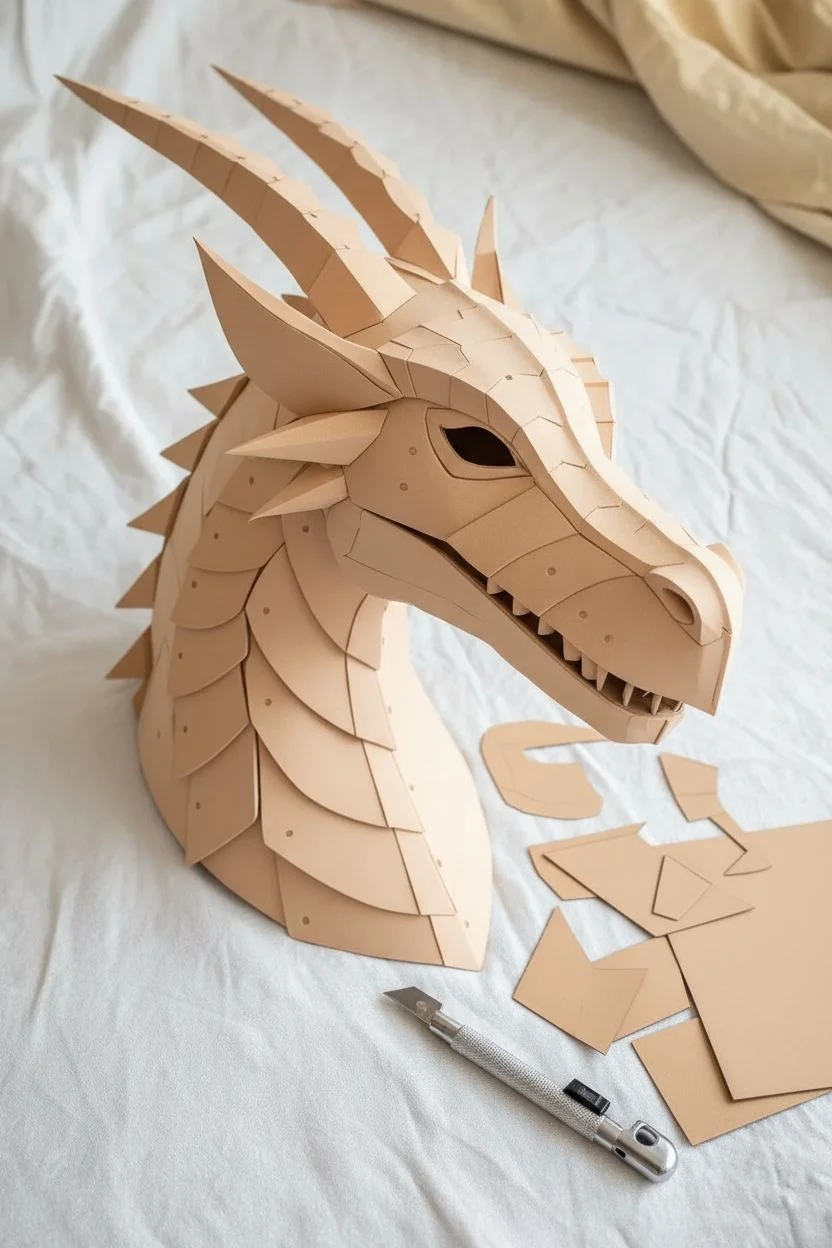
This project creates a striking dragon head puppet base featuring a cracked leather aesthetic, segmented horns, and overlapping scales. The warm terra-cotta tones and intricate facial detailing bring this fantasy creature to life using accessible crafting materials.
Step-by-Step
Materials
- High-density EVA foam (2mm, 4mm, and 6mm thickness)
- Contact cement or strong craft glue
- Heat gun
- Hobby knife with fresh blades
- Texture stamps or crumpled foil ball
- Acrylic paints (burnt sienna, raw umber, black, cream)
- Thin magnets (neodymium)
- Gloss varnish
- Dull pencil or sculpting stylus
- Leather cords (optional for rigging)
Step 1: Base Structure & Shaping
-
Template Preparation:
Begin by creating paper templates for the snout, jaw, head plates, and neck scales. Transfer these shapes onto 4mm EVA foam, maximizing your material usage. -
Basic Form Assembly:
Cut out the main head components using a sharp hobby knife. Angle your cuts at 45 degrees where seams join to create smoother transitions, especially along the snout and bridge of the nose. -
Heat Shaping:
Use a heat gun to gently warm the foam pieces until they are pliable. Curve the snout and brow ridges to give the head a rounded, organic volume rather than a boxy look. -
Initial Glue Up:
Apply contact cement to the edges of your main head pieces. Let it get tacky for about 5-10 minutes, then carefully press the seams together to form the hollow skull base.
Step 2: Detailing & Texturing
-
Creating the Crackle Texture:
Before assembling the finer details, heat individual foam sections again. While warm, press a crumpled ball of aluminum foil or a texture roller firmly into the surface to create a leathery, skin-like texture. -
Scoring Detail Lines:
With a dull pencil or stylus, draw visible crack lines and scale divisions directly into the foam. Follow the contours of the face, particularly around the eyes and nose bridge. -
Applying Neck Scales:
Cut the individual scale shapes from 2mm foam. Glue them to the neck base in overlapping rows, starting from the bottom and working upwards so top scales cover the seams of the ones below. -
Modular Magnet Points:
Embed small neodymium magnets into the skull where the horns, ears, and cheek spikes will attach. Cover these magnets with a thin layer of foam or paper so they remain hidden but functional.
Magnet Alignment
Mark magnet polarity with a marker before gluing. If a magnet flips inside the hole, use a larger magnet on the outside to pull it back into position while the glue sets.
Step 3: Horns & Accessories
-
Constructing Segmented Horns:
Cut tapering strips of 6mm foam for the horns. Glue them into triangular tubes, then slice shallow grooves around the circumference to simulate segments. -
Attaching Ear Finials:
Shape the ear and cheek spike components. Embed mating magnets into their bases, ensuring the polarity matches the points you installed on the head. -
Eye Socket Definition:
Build up the brow ridge with extra layers of thin foam. Cut a clean almond shape for the eye, setting a simple painted sphere or glass cabochon inside the socket.
Sharpen Often
Foam dulls blades remarkably fast. If the foam starts bunching or tearing instead of slicing cleanly, change your blade immediately for crisp scale edges.
Step 4: Painting & Finishing
-
Base Coating:
Seal the foam with a flexible primer or Plasti Dip. Once dry, apply a solid base coat of burnt sienna acrylic paint to cover the entire piece. -
Dark Wash Application:
Mix raw umber paint with water to create a thin wash. Brush this over the textured areas, letting it settle into the cracks and scored lines, then wipe away the excess from the raised surfaces with a rag. -
Dry Brushing Highlights:
I find using a lighter cream or pale orange color for dry brushing really makes the texture pop. Lightly dust the edges of scales, horn segments, and the nose bridge. -
Adding Pin Holed Details:
Use a heavy needle or awl to poke small decorative holes along the edges of the face plates and scales, simulating stitching or pore texture. -
Final Seal:
Protect your paint job with a matte varnish spray. For the eyes and horns, brush on a selective gloss varnish to make them look wet or polished.
Now you have a fully textured, customizable dragon base ready for your next puppetry performance
Swappable Face-Plate Base for Changing Expressions
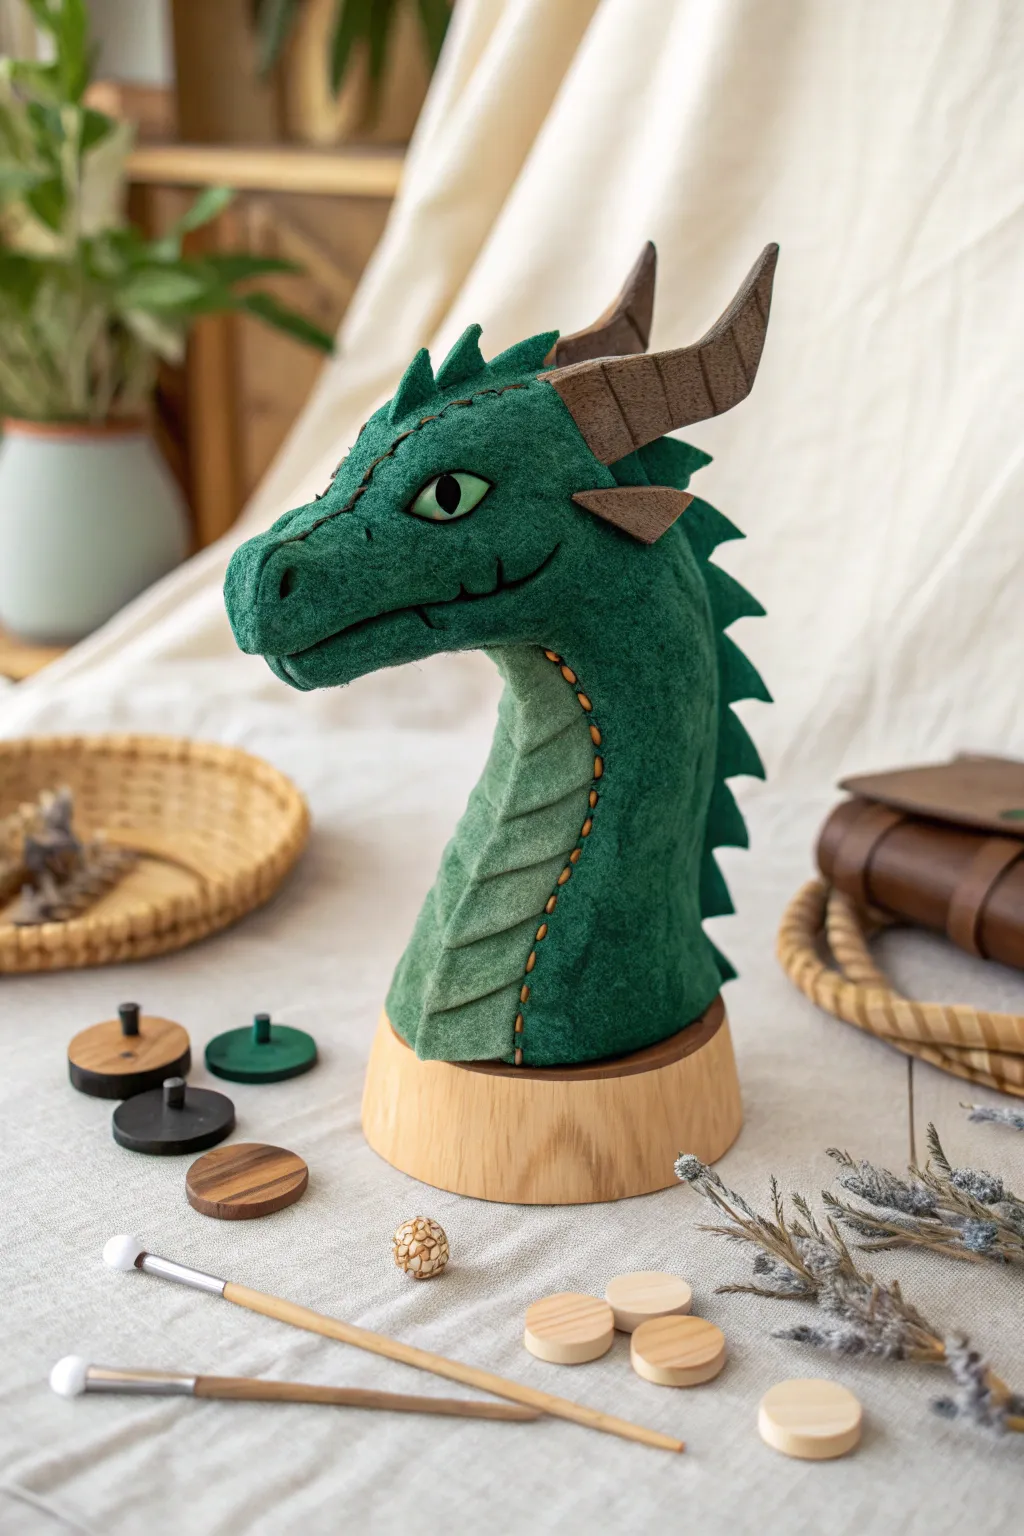
This project creates a stunning, regal dragon head mounted on a wooden base, combining the soft texture of wool felt with rustic wooden accents. The deep forest green felt and intricate stitching details give this creature a sense of ancient wisdom, perfect for a shelf display or a unique puppet base.
How-To Guide
Materials
- High-quality wool felt (forest green, lighter sage green)
- Wooden circular base (approx. 4-5 inch diameter)
- Wooden dowel or neck armature wire
- Polyester fiberfill stuffing
- Embroidery floss (dark green, black, contrasting orange/rust)
- Embroidery needles and sewing pins
- Carved wood horn set (or balsa wood to crave)
- Glass or hand-painted dragon eye cabochon (green/black slit pupil)
- Fabric glue or heavy-duty craft adhesive
- Scissors and fabric chalk
- Cardstock for templates
Step 1: Creating the Internal Structure
-
Prepare the Base:
Begin with your smooth, sanded circular wooden base. Drill a hole in the center matching the diameter of your dowel or neck support rod. Secure the rod firmly with wood glue. -
Draft the Pattern:
Sketch a profile view of the dragon’s head and neck on cardstock to use as a template. Include a long snout, a jawline, and a curved neck that flares slightly at the bottom to meet the base. -
Form the Core:
Wrap batting or scrap fabric tightly around the dowel to build up the bulk of the neck. You want a firm core that tapers up towards where the head will attach.
Wrinkle Rescue
If the felt bunches awkwardly at the neck curve, make small relief snips in the seam allowance before turning it right-side out. This helps the fabric lay flat against the stuffing.
Step 2: Sewing the Felt Skin
-
Cut the Main Fabric:
Using your templates, cut two mirrored side profile pieces from the dark forest green felt. Leave a 1/4 inch seam allowance around the edges. -
Add the Belly Scales:
Cut a strip of the lighter sage green felt for the dragon’s throat and underbelly. Create a segmented look by layering overlapping scallop shapes or stitching horizontal lines across the strip. -
Assemble the Neck:
Stitch the sage green belly strip between the two dark green neck pieces. Use a visible, decorative whip stitch with rust-colored embroidery floss to join these seams, creating that distinctive ‘stitched leather’ look seen in the reference. -
Create the Spines:
Cut a long, jagged strip of dark green felt for the dorsal spines. Insert this into the back seam of the neck pieces as you sew them together, ensuring the spikes point upward and backward.
Step 3: Sculpting the Head
-
Construct the Head Shape:
Sew the head profile pieces together, leaving the neck opening clear. Insert the spines along the top of the head as you did with the neck. -
Stuff and Sculpt:
Firmly stuff the head with polyester fiberfill. Use a chopstick to push stuffing into the snout and jaw to define the shape. Slip the head over the neck armature and blind-stitch it securely in place. -
Needle Sculpting Details:
Using a long needle and matching dark thread, pass the thread through the head from side to side to pull in the eye sockets and define the nostrils. This dimpling creates the dragon’s facial structure. -
Eye Placement:
Glue the glass eye cabochon into the recessed socket you created. Cut small eyelids from felt scraps and glue them over the top and bottom edges of the eye to create a focused, intense gaze.
Magnetic Swap Upgrade
Embed strong neodymium magnets inside the snout and brow before closing the seams. You can then sculpt alternate felt ‘expressions’ or armor plates that snap onto the face.
Step 4: Finishing Details
-
Embroider the Mouth:
Use thick black embroidery floss to stitch the mouth line. I find a backstitch works best here to create a continuous, slightly jagged smile line that extends up the cheek. -
Add Texture Stitching:
Add decorative running stitches along the brow ridge and snout using dark green thread to simulate scales and armor plating joins, giving the skin a rugged texture. -
Prepare the Horns:
Carve your wooden horns from balsa or basswood, tapering them to a point. Sand them smooth and stain them a dark walnut color to contrast with the green felt. -
Attach the Horns:
Determine the placement on the brow ridge. Carefully pierce the felt with an awl, add a dab of heavy-duty adhesive, and insert the base of the horns into the head stuffing. -
Mount to Base:
Slide the finished felt skin down the neck armature until it meets the wooden base. Use a hidden ladder stitch or fabric glue to secure the bottom edge of the felt directly to the wood.
Now you have a majestic dragon companion ready to guard your desk or workshop
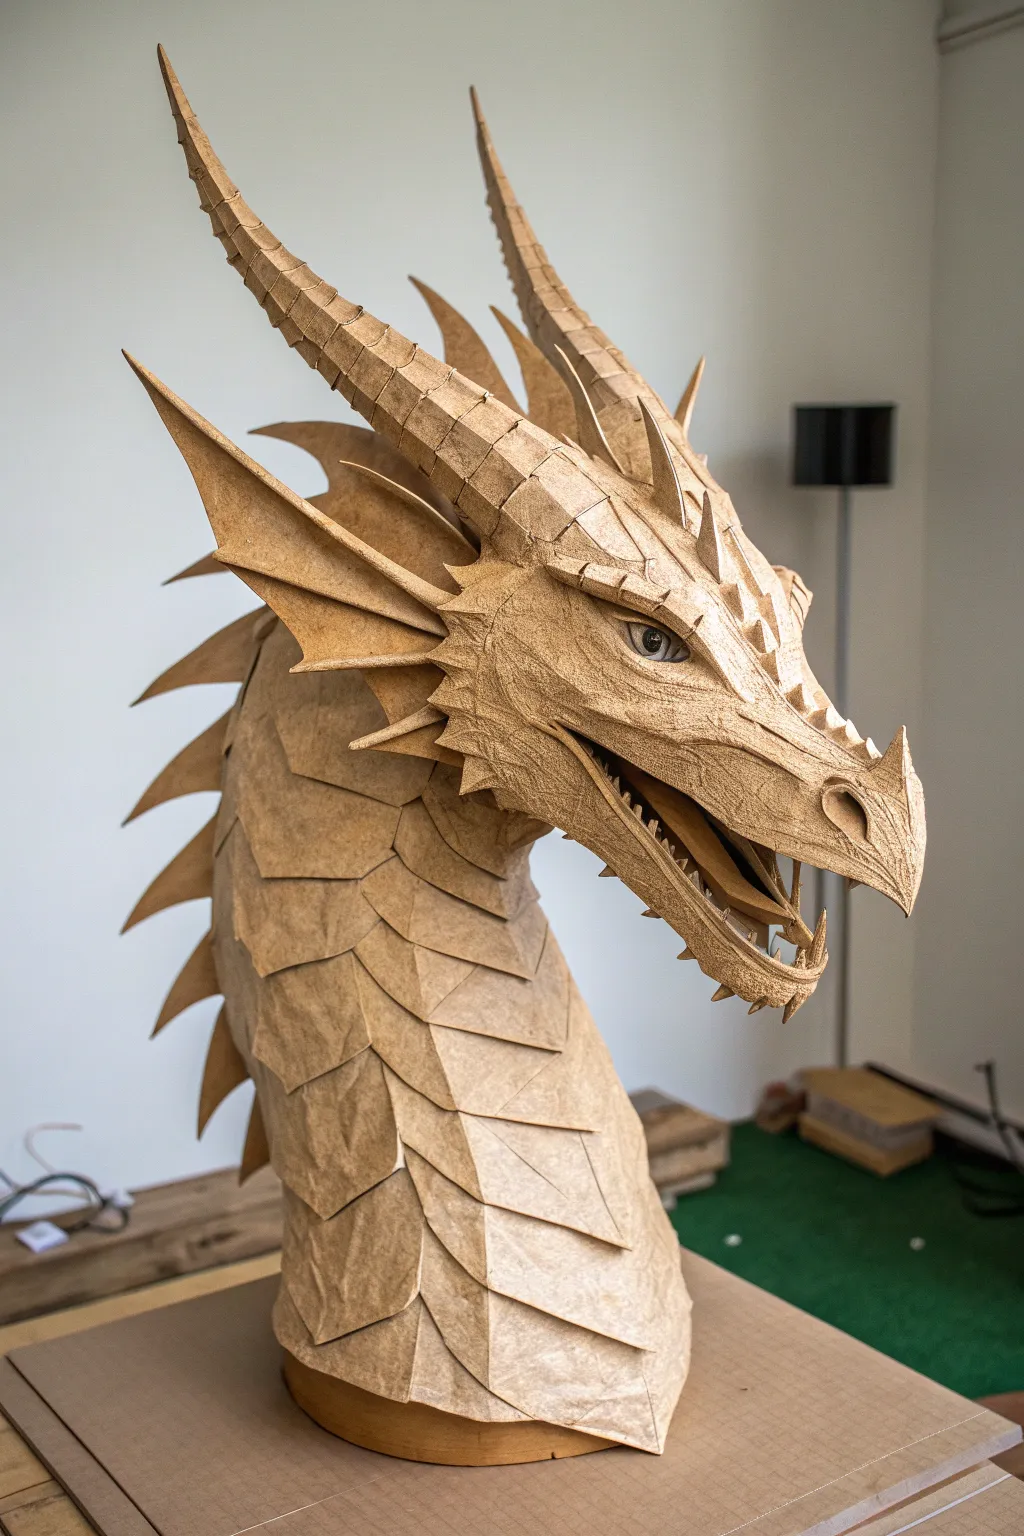
Wire-Reinforced Crest Base for Dramatic Silhouettes

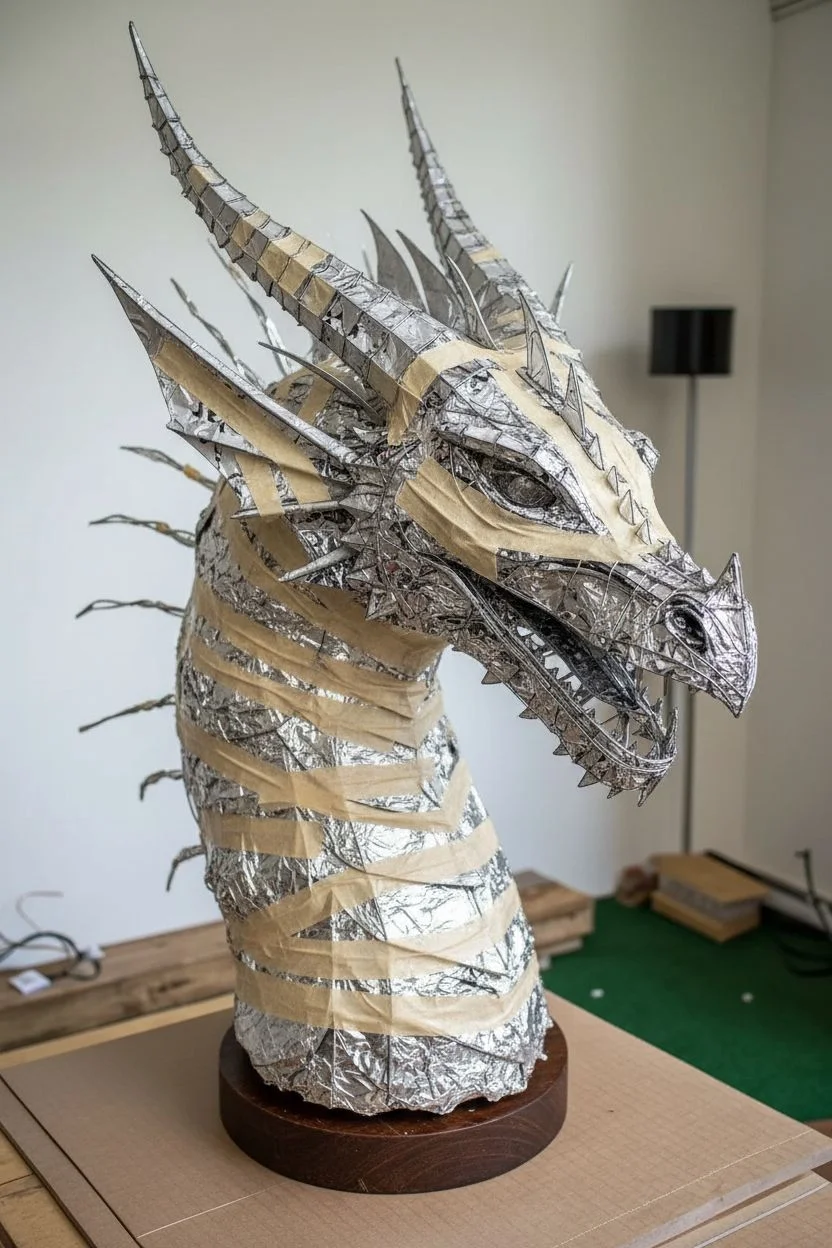
This stunning dragon head combines structural wire framing with the organic texture of layered kraft paper to create a mythical beast with impressive realism. The finish achieves a captivating balance between sharp geometric folds and lifelike, leathery skin textures.
Step-by-Step Tutorial
Materials
- Heavy-gauge armature wire (12-guage)
- Thinner binding wire (20-gauge)
- Heavyweight kraft paper (roll)
- Cardboard or cardstock sheets
- PVA glue or wood glue
- Water spray bottle
- Hot glue gun and glue sticks
- Masking tape
- Glass cabochon eye (25mm)
- Wooden base plinth
- Acrylic paints (black, dark brown)
- Sculpting tools or bone folder
Step 1: Armature Construction
-
Base Form:
Begin by twisting your heavy-gauge wire to form the central spine of the dragon, anchoring it firmly into your wooden base plinth. Create a loop for the skull shape and extend wires outward to define the length of the snout. -
Jaw Articulation:
Fashion a separate wire loop for the lower jaw. Attach this to the skull frame using thinner binding wire to act as a hinge, allowing you to adjust the mouth’s openness later. -
Horn & Crest Wireframe:
Twist long, curved lengths of wire to serve as the cores for the two main horns. Attach shorter wire spurs radiating from the back of the head to support the ear frills and neck spikes, securing everything with masking tape to prevent slipping. -
Fleshing Out:
Bull out the wire skeleton using crumbled newspaper or aluminum foil, securing it tightly with masking tape. This creates the underlying muscle volume without adding excessive weight.
Step 2: Paper Mache & Skinning
-
Base Layer:
Tear the kraft paper into strips. Dip them in a mixture of PVA glue and water, layering them over the foil form to create a solid, smooth shell. Let this dry completely until hard. -
Creating the Scales:
Cut hundreds of diamond and shield shapes from cardstock or heavy kraft paper. Fold them slightly down the center to create a ridge. I find it helps to pre-bend these in batches so you don’t lose your flow. -
Applying Neck Scales:
Starting at the base of the neck, glue the scales in overlapping rows, working your way upward. Ensure the central ridges align to suggest a spine, but allow slight irregularities for realism. -
Facial Features:
For the face, dampen larger sheets of kraft paper with a spray bottle to make them pliable. Mold these over the snout and brow, pinching the paper to form wrinkles, nostrils, and eye sockets.
Wet-Folding Trick
Using a spray bottle to slightly dampen the kraft paper before folding allows you to create sharper, more organic wrinkles that hold their shape rigidly once the paper dries.
Step 3: Detailing & Assembly
-
Horn Structure:
Wrap the long horn wires in strips of glue-soaked paper, tapering them to a point. Once dry, wrap a second layer of paper strips in a spiral pattern to create the segmented ridge texture shown in the image. -
Spike Attachment:
Cut sharp, triangular spikes from double-layered cardstock. Glue these along the back of the neck and the jawline, reinforcing the connection points with small strips of kraft paper. -
The Frills:
Construct the ear fans using thin cardstock triangles. Glue stiff wire or heavy card strips along the edges to simulate cartilage, then attach them behind the jaw. -
Installing the Eye:
Set the glass cabochon into the eye socket using hot glue. Immediately mold small, wet strips of kraft paper around the sphere to form eyelids, partially covering the eye for a reptilian glare. -
Mouth & Teeth:
Line the inside of the mouth with dark paper. creating a tongue from folded paper. Cut jagged teeth from thick cardstock and glue them securely into the gum lines.
Loose Scales?
If scales curl up too much while drying, use painter’s tape to hold them flat against the neck form. Remove the tape carefully only after the glue has fully cured.
Step 4: Finishing Touches
-
Texture Wash:
Dilute black and dark brown acrylic paint until it’s very watery. Brush this wash over the entire sculpture, letting it settle into the recesses of the scales and wrinkles. -
Dry Brushing:
Once the wash is dry, use a clean, dry brush with a tiny amount of light tan paint. Lightly whisk over the raised edges of the scales and horns to highlight the texture. -
Sealing:
Finish by sealing the sculpture with a matte spray varnish to protect the paper and unify the sheen.
Step back and admire how the simple brown paper has transformed into a creature full of life and ancient character


Have a question or want to share your own experience? I'd love to hear from you in the comments below!