When I’m painting at a party, I lean on a set of boy face paint designs that are fast, bold, and instantly recognizable from a few feet away. Here are my go-to boy face paint ideas—from quick cheek art to full-face transforms—so you can pick a look that matches the kid’s vibe and your time limit.
Classic Tiger Face
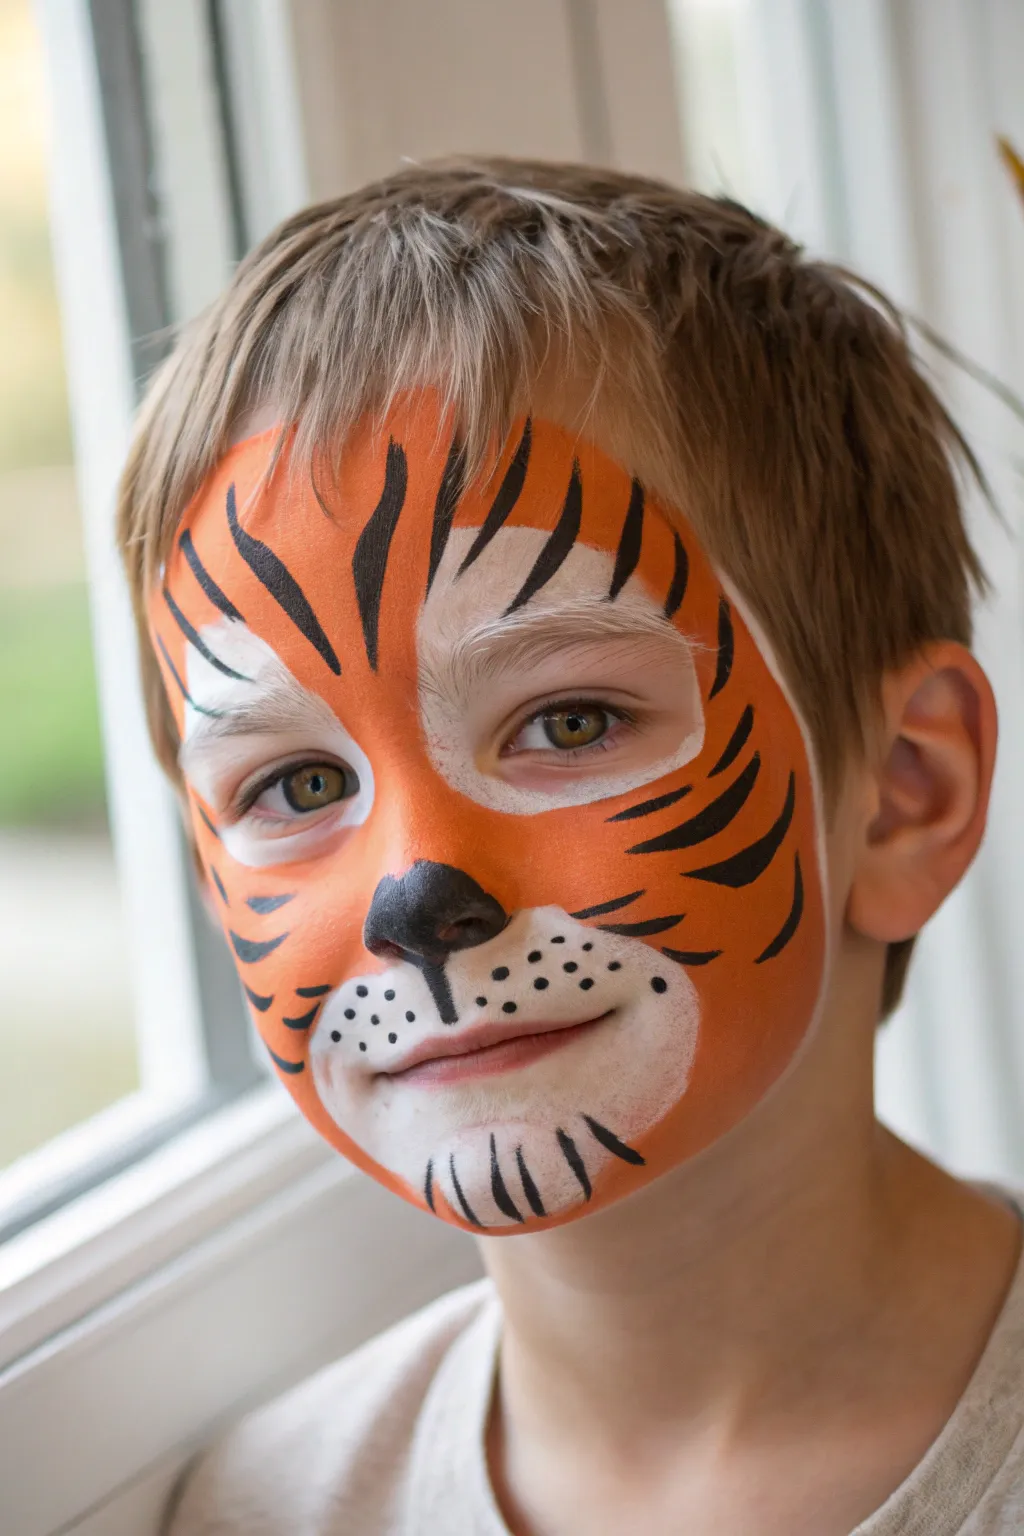
Transform little faces into roaring tigers with this timeless and bold design. It features a vibrant orange base that glows against crisp white details, tied together with dramatic black stripes for a fierce yet friendly look.
How-To Guide
Materials
- High-quality orange face paint
- High-quality white face paint
- High-quality black face paint
- Face painting sponge (high-density)
- Round brush (medium size, size 4 or 6)
- Fine liner brush (size 1 or 2)
- Cup of water
- Paper towels or spray bottle
Step 1: Laying the Foundation
-
Sponge the white highlights:
Begin by dampening your sponge and loading it with white face paint. Dab the paint gently around the mouth area to create a muzzle, and over both eyes, extending up slightly onto the forehead to mimic fluffy brows. Keep the edges soft and feathery. -
Apply the orange base:
Using a clean section of your sponge or a fresh one, load it generously with orange paint. Apply this color to the nose, cheeks, forehead, and chin, carefully blending it where it meets the white areas to create a seamless gradient. -
Refine the coverage:
Go back over the orange areas to ensure solid, opaque coverage, especially on the forehead and outer cheeks. Leave a clean gap around the eyes if the child is sensitive, but try to get close to the white highlights. -
Create the nose:
Switch to your medium round brush and load it with black paint. Paint the tip of the nose black. Instead of a simple circle, aim for a soft triangular shape that follows the natural nostrils, creating a cute animal nose. -
Draw the philtrum line:
From the center bottom of the black nose, draw a single vertical black line connecting directly to the top lip.
Step 2: Adding the Stripes
-
Start the forehead stripes:
With the medium round brush and black paint, start at the top center of the forehead. Paint a central stripe or two slightly offset, curving them inward as though they originate from the hairline. -
Add side forehead details:
Paint two to three angled stripes on each side of the forehead, starting from the hairline and tapering to a sharp point as they move toward the eyebrows. -
Paint the eye stripes:
On the outer corners of the eyes, paint curved stripes that hug the brow bone. Press down firmly to start the stroke and lift the brush as you flick outward to get a sharp, tapered tail. -
Define the cheeks:
Moving to the cheeks, paint three distinct stripes on each side. Angle them downward and inward toward the nose, varying the thickness. I find varying the pressure on the brush here really helps create that dynamic ‘tiger stripe’ shape.
Clean Lines Secret
For sharp stripe ends, practice the “press and lift” technique. Press the brush down for the thickest part of the stripe, then slowly lift while dragging to create a needle-sharp point.
Step 3: Final Details
-
Detail the chin:
On the chin, paint two small, curved stripes on either side of the center. Adding a few small vertical flicks right at the very bottom center creates a hint of fur texture. -
Add the muzzle dots:
Using your fine liner brush, add several small black dots to the white area of the muzzle on both sides of the philtrum line. This suggests whisker follicles. -
Paint the smile lines:
Extend a thin black line from the corners of the mouth slightly outward and upward to give the tiger a friendly, smiling expression. -
Highlights and white fur:
Clean your fine brush thoroughly and load it with white paint. Add tiny white strokes inside or next to the black stripes on the forehead or cheeks to add dimension and a fluffy fur effect. -
Enhance the eyes (Optional):
If the child sits still, you can add a very thin white line under the lower eyelid to make the eyes pop against the orange paint. -
Final check:
Step back and look at the symmetry. If one side looks heavier, balance it out with an extra small stripe or by thickening an existing line on the other side.
Roaring Glitter
While the orange paint is still slightly tacky, poof a little cosmetic-grade gold glitter over the cheeks and forehead. It adds a magical shimmer that catches the sunlight perfectly.
Now your fierce tiger is ready to prowl the party with confidence


Pirate Skull and Scar Combo
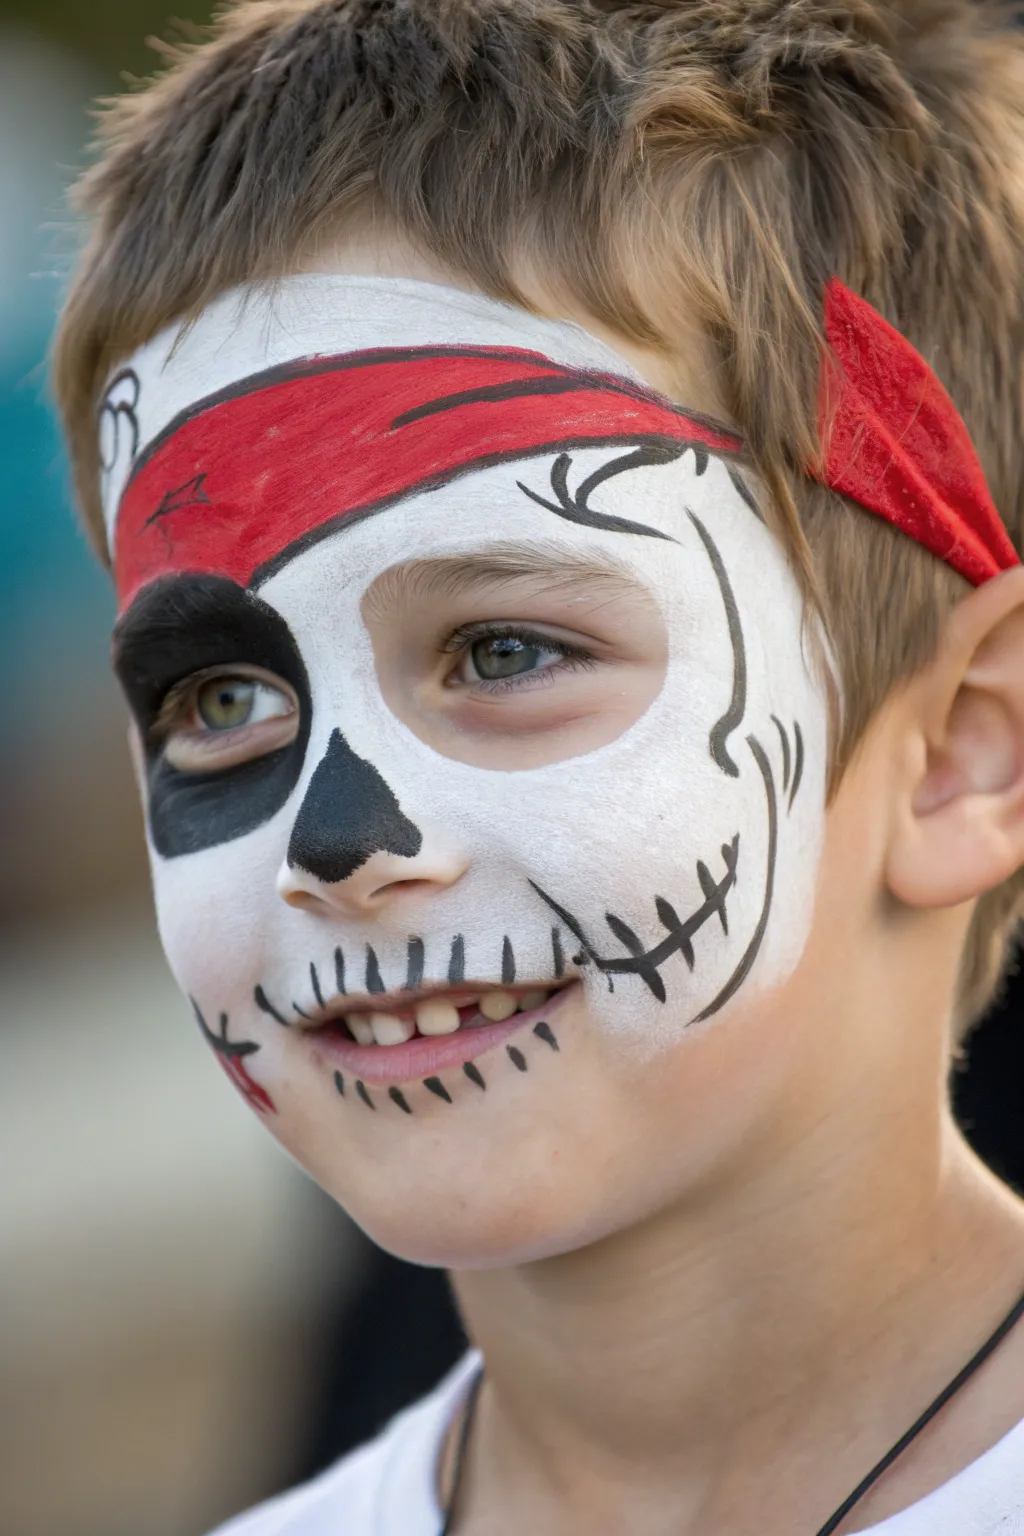
Transform a little adventurer into a swashbuckling skeleton with this striking face paint design combining classic skull features and a painted-on bandana. It’s a fantastic choice for Halloween or themed parties, blending spooky bone details with a splash of bold pirate red.
How-To Guide
Materials
- White face paint or water-activated cake
- Black face paint (liner consistency)
- Bright red face paint
- High-density face painting sponge
- Round brush (size 2 or 3 for details)
- Flat brush (small/medium for bandana)
- Bowl of clean water
- Cotton swabs for cleanup
Step 1: Setting the Scene
-
Outline the Bandana:
Start by dipping a medium flat brush into red face paint. Carefully paint a curved line across the forehead, dipping just above the eyebrows to mark the bottom edge of the pirate bandana. -
Fill the Forehead:
Using the same red paint, fill in the entire area above your initial line. Extend the red paint all the way up to the hairline and slightly down the sides of the temples. -
Add the Knot:
On the left side of the face (the child’s right), use the tip of the brush to paint a triangular or leaf-like shape extending outward from the red band to represent the tied knot of the bandana.
Fixing Smudges
If black paint bleeds into the white, wait for it to dry completely. Then, use a damp cotton swab to lift the mistake before dabbing new white paint over the top.
Step 2: Creating the Skull
-
Sponge the Base:
Load a clean sponge with white face paint, ensuring it’s not too wet to avoid streaking. Dab the white paint evenly over the rest of the face, covering the nose, cheeks, chin, and around the eyes, but stopping cleanly at the red bandana line. -
Define the Eye Socket:
Switch to a round brush and black paint. Outline a large, uneven circle around the child’s right eye (viewer’s left). It shouldn’t be a perfect circle; give it a slightly sunken, skeletal shape. -
Fill the Socket:
Fill in this entire outlined eye area with black paint. I like to keep the paint slightly thinner here so it’s comfortable on the eyelid. -
Paint the Nose Cavity:
Paint an upside-down ‘V’ or triangular shape on the tip of the nose using black paint. Add two small bumps at the bottom of the triangle to mimic nasal bone structures.
Level Up: 3D Shading
Use a light grey eyeshadow or dry powder along the edges of the white skull areas to create depth and make the bone structure pop against the skin.
Step 3: Detailed Bone Work
-
Outline the Jaw:
Using a thin round brush and black paint, draw a curved line starting from the cheekbone area, sweeping down toward the corner of the mouth to create the illusion of a hollow cheek. -
Create the Teeth:
Paint short, vertical black lines across both the upper and lower lips. Extend these lines slightly above and below the lips to make the teeth look long and skeletal. -
Connect the Roots:
At the top and bottom of each vertical tooth line, add tiny horizontal flicks or small ‘U’ shapes to suggest the roots of the teeth disappearing into the jaw. -
Cheek Stitching:
On the left cheek (wearer’s left), paint a long, jagged black line extending from the corner of the mouth toward the ear. Cross this main line with smaller perpendicular hatch marks to look like stitches or a fracture.
Step 4: Finishing Touches
-
Highlight the Bandana:
Clean your thin round brush and load it with black paint. Outline the bottom edge of the red bandana to separate it clearly from the white skull. -
Add Fabric Details:
Draw a few thin, flowing black lines inside the red bandana area and on the knot to simulate wrinkles and folds in the fabric. -
Skull Cracks:
Add fine, wiggly black lines coming from the bandana edge down onto the white forehead area to look like subtle cracks in the skull. -
Define the Temple:
Draw a curved black line near the temple on the white side to give the skull more dimension and shape. -
Add a Scar:
If desired, create a small ‘X’ or cross-stitch pattern on the chin or cheek using red paint mixed with a tiny bit of black for a fresh scar effect. -
Final Clean Up:
Check the edges of the white paint. If any spots are transparent, carefully dab a little more white on top to make the bone look solid.
Now you have a fierce little pirate ready to command the ship and collect their candy treasure


Friendly Dinosaur Snout
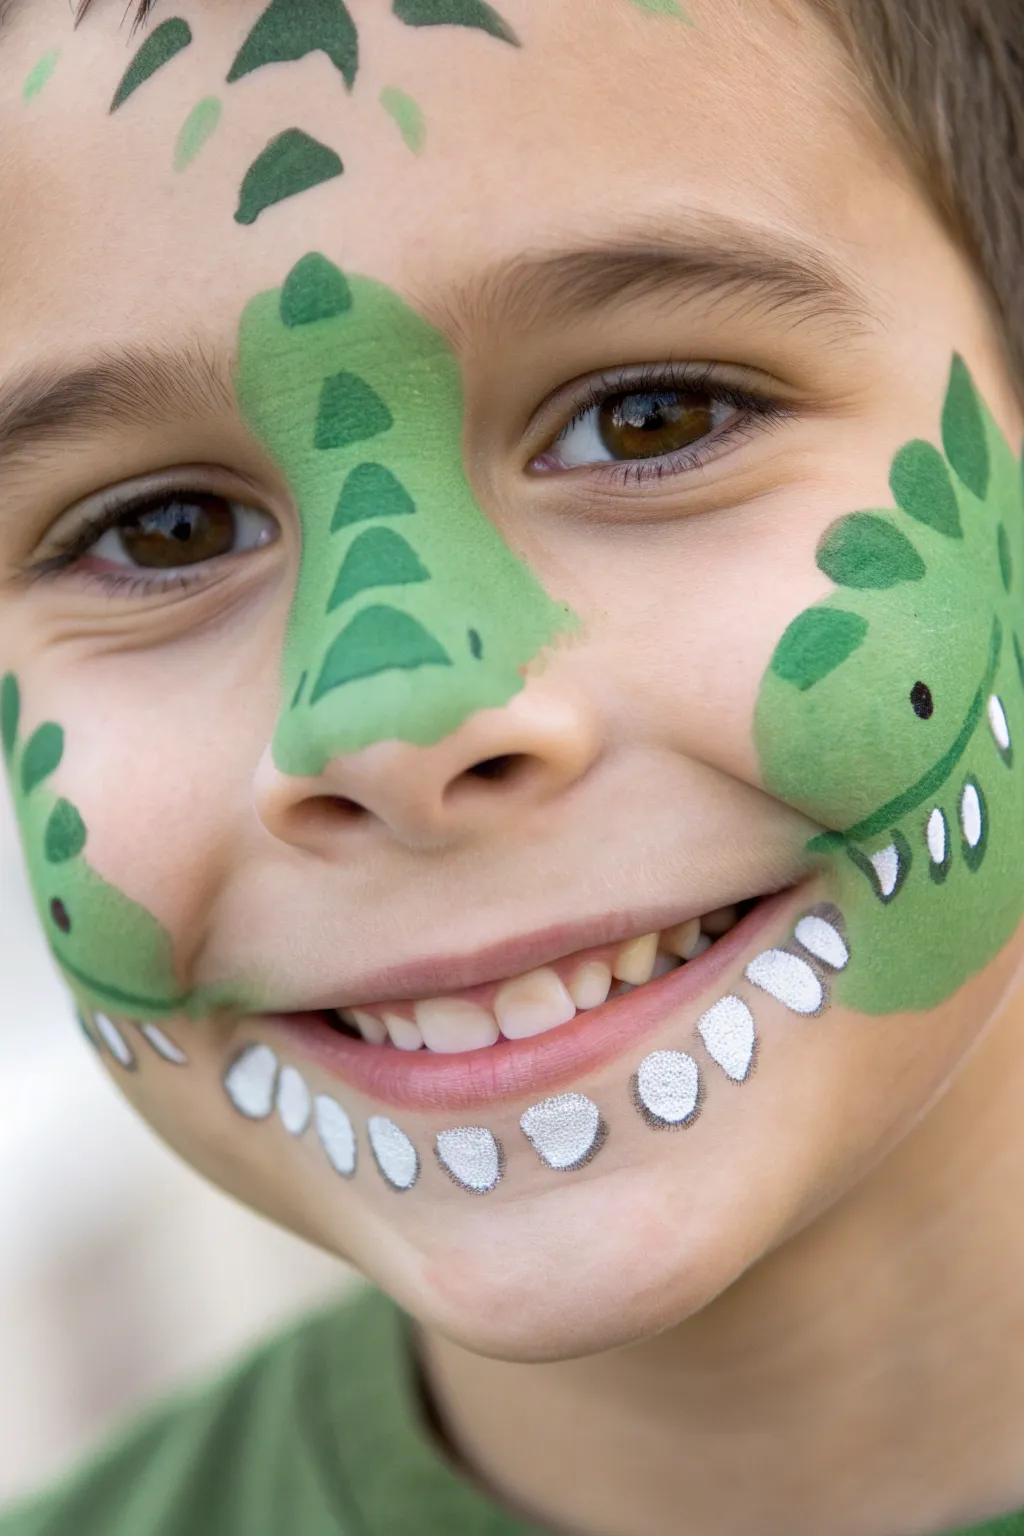
Transform your little one into a roaring reptile with this simple yet effective face paint design. By focusing on a prominent snout and toothy grin, you can create a recognizable dinosaur look without needing to cover the entire face.
Step-by-Step Guide
Materials
- Face paint set (specifically bright green, dark green, white, black, and silver/metallic)
- High-density face painting sponges
- Round brush (size 4 or 6 for outlines)
- Fine liner brush (size 1 or 2 for details)
- Cup of water
- Paper towels or wipes
Step 1: Painting the Green Base
-
Load the sponge:
Dampen your sponge slightly and load it generously with a bright, leafy green face paint. Avoid making it too watery, as you want opaque coverage. -
Create the nose bridge:
Starting between the eyebrows, dab the sponge downwards along the bridge of the nose, widening the shape as you reach the tip to create a bulbous snout. -
Shape the cheek patches:
Using the same sponge and bright green paint, create curved shapes on each cheek. On the left cheek, make a smaller curve; on the right cheek, create a larger, rounded shape that will become the dinosaur’s head. -
Blend edges:
While the paint is still slightly damp, soften the edges of your green shapes so they look nice and smooth against the skin.
Stay Steady
Rest your pinky finger on the child’s forehead or chin while painting fine lines. This anchors your hand and prevents shaky outlines.
Step 2: Adding Scales and Texture
-
Switch to dark green:
Load a medium round brush with a darker forest green color. You want a creamy consistency that flows easily. -
Paint nose scales:
On the bright green bridge of the nose, paint a vertical row of small, filled-in triangles pointing upward. These mimic the rugged ridges of a dinosaur snout. -
Add forehead details:
Above the eyebrows, paint a few scattered, abstract triangular shapes or leaves using the dark green to suggest scales on the forehead. -
Create cheek spines:
On the outer edge of the large green patch on the right cheek, paint a series of dark green triangles sticking out, like the spines on a dragon or dino’s back. -
Detail the other cheek:
Add a few small dark green teardrop shapes or spots on the smaller left cheek patch to balance the design.
Step 3: The Friendly Smile
-
Outline the mouth:
Using your round brush and dark green paint, draw a sweeping line from the corner of the child’s mouth upwards into the green cheek patches, extending their natural smile. -
Add the smile line details:
Paint small vertical ticks along this dark green mouth line to represent where the teeth will sprout from. -
Prepare the white paint:
Clean your brush thoroughly or switch to a fresh one. Load it with creamy white face paint. -
Paint the upper teeth:
Paint small, rounded triangles hanging down from the upper green cheek patches, overlapping the green slightly. -
Outline the teeth:
Once the white is dry, use a very fine liner brush with black paint to thinly outline these upper teeth for definition.
Scaly Texture
Once the base green is dry, use a stencil with a scale pattern and darker green eyeshadow or paint to dab subtle texture over the cheeks.
Step 4: Sparkle and Finish
-
Paint the lower jaw:
Using silver or metallic white paint, create a row of rounded shapes along the boy’s lower lip and chin. I find that staggering their sizes makes them look more natural. -
Outline the silver teeth:
Take your fine liner brush with black paint again and carefully outline each of the silver teeth on the lower jaw. -
Add the eye and nostril:
On the large right cheek patch, paint a small black dot for the dinosaur’s eye and a tiny curved line for a nostril. -
Final highlights:
Add tiny white dots to the dinosaur’s black eye and the dark green scales to make the design pop and look wet.
Now your prehistoric pal is ready to roar and stomp around with a smile


Zombie Grime With Cracks
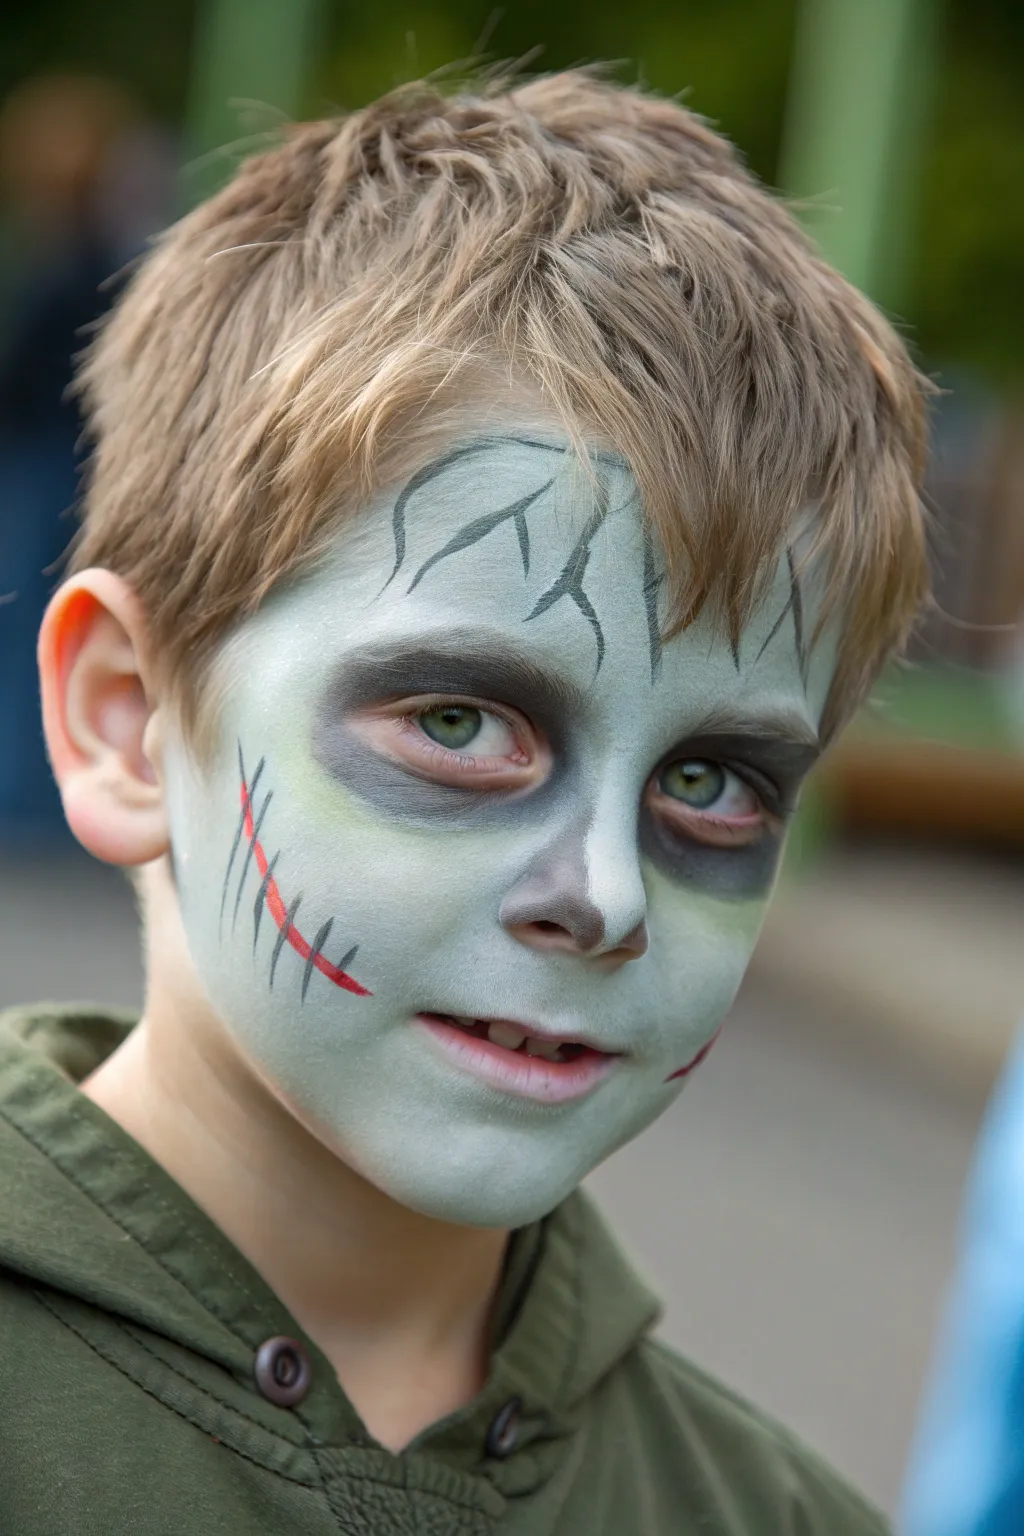
Transform a cheerful face into a spooky undead creature with this classic zombie design. The look relies on a sickly pale base, hollowed-out eyes, and jagged scar details for maximum creepiness.
How-To Guide
Materials
- High-density face paint sponge
- Pale grey face paint (water-activated)
- White face paint
- Black face paint
- Red face paint
- Round brush (size 2 or 3)
- Round brush (fine liner, size 0 or 1)
- Flat brush (small)
- Clean water cup
- Paper towels
Step 1: Setting the Base
-
Mix the Base Color:
Load your slightly damp sponge with pale grey face paint. If you only have dark grey, mix it with a generous amount of white on a palette first to achieve that bright, sickly pallor. -
Apply the Foundation:
Stipple the grey paint evenly over the entire face, avoiding the immediate eye area for now. Use a patting motion rather than dragging to get solid, streak-free coverage. -
Contour the Nose:
While the grey is still slightly workable, add a touch of white to your sponge and dab it down the bridge of the nose to create a subtle highlight. -
Hollow the Cheeks:
Using a slightly darker grey or adding a tiny dot of black to your grey sponge, lightly shade underneath the cheekbones to make the face look gaunt.
Step 2: Creating Sunken Eyes
-
Darken the Sockets:
Load a small flat brush or the corner of your sponge with black face paint. Gently dab this around the entire eye socket, creating a dark circle. -
Blend the Edges:
Before the black paint dries completely, use a clean, damp finger or sponge edge to smudge the outer rim of the black circles so they fade naturally into the grey base rather than having harsh lines. -
Add Depth:
Apply a second layer of black right along the lash line and the inner corner of the eye to make the sockets look deeper and more cavernous.
Fixing Patchy Grey
If the grey base looks streaky, your sponge was likely too wet. Let it dry completely, squeeze your sponge out thoroughly, and pat a second thin layer on top.
Step 3: Detailing the Cracks
-
Map the Forehead:
Switch to your fine liner brush (size 0 or 1) loaded with thin, inky black paint. Start at the hairline and visualize where the skin would be cracking. -
Draw Jagged Veins:
Paint squiggly, Y-shaped branching lines coming down from the forehead. Vary the pressure on your brush—push down for thicker starts and lift off for wispy, sharp ends. -
Create the Cheek Scar:
On one cheek, use a size 2 round brush with bright red paint to draw a single, slightly curved line. This will be the main wound. -
Stitch the Wound:
Once the red line is dry, take your fine liner brush with black paint and draw small perpendicular hatch marks across the red scar to look like rough stitches. -
Add Texture:
If there is any excess black paint on your brush, add a few tiny, random scratches or dots around the rest of the face for a grimy texture.
Rotting Effects
Dab a coarse stipple sponge into yellow and green face paint, then lightly texture the forehead and chin for a moldy, decaying skin effect.
Step 4: Final Touches
-
Nose Detail:
Using the black paint and a small round brush, darken the very tip and sides of the nostrils to mimic a skeletal nose cavity. -
Shade the Scars:
I like to take a tiny bit of white paint on a fine brush and add a highlight right next to the black cracks on the forehead; this gives them a 3D effect. -
Pale the Lips:
Lightly pat the grey base sponge over the lips to remove their natural pink color, making them look lifeless. -
Final Inspection:
Step back and check for any spots that need blending. If the grey base has become too transparent in spots, carefully dab a little more paint on top.
Now you have a wonderfully creepy zombie ready to roam the neighborhood for candy
BRUSH GUIDE
The Right Brush for Every Stroke
From clean lines to bold texture — master brush choice, stroke control, and essential techniques.
Explore the Full Guide
Shark Bite Cheek Illusion
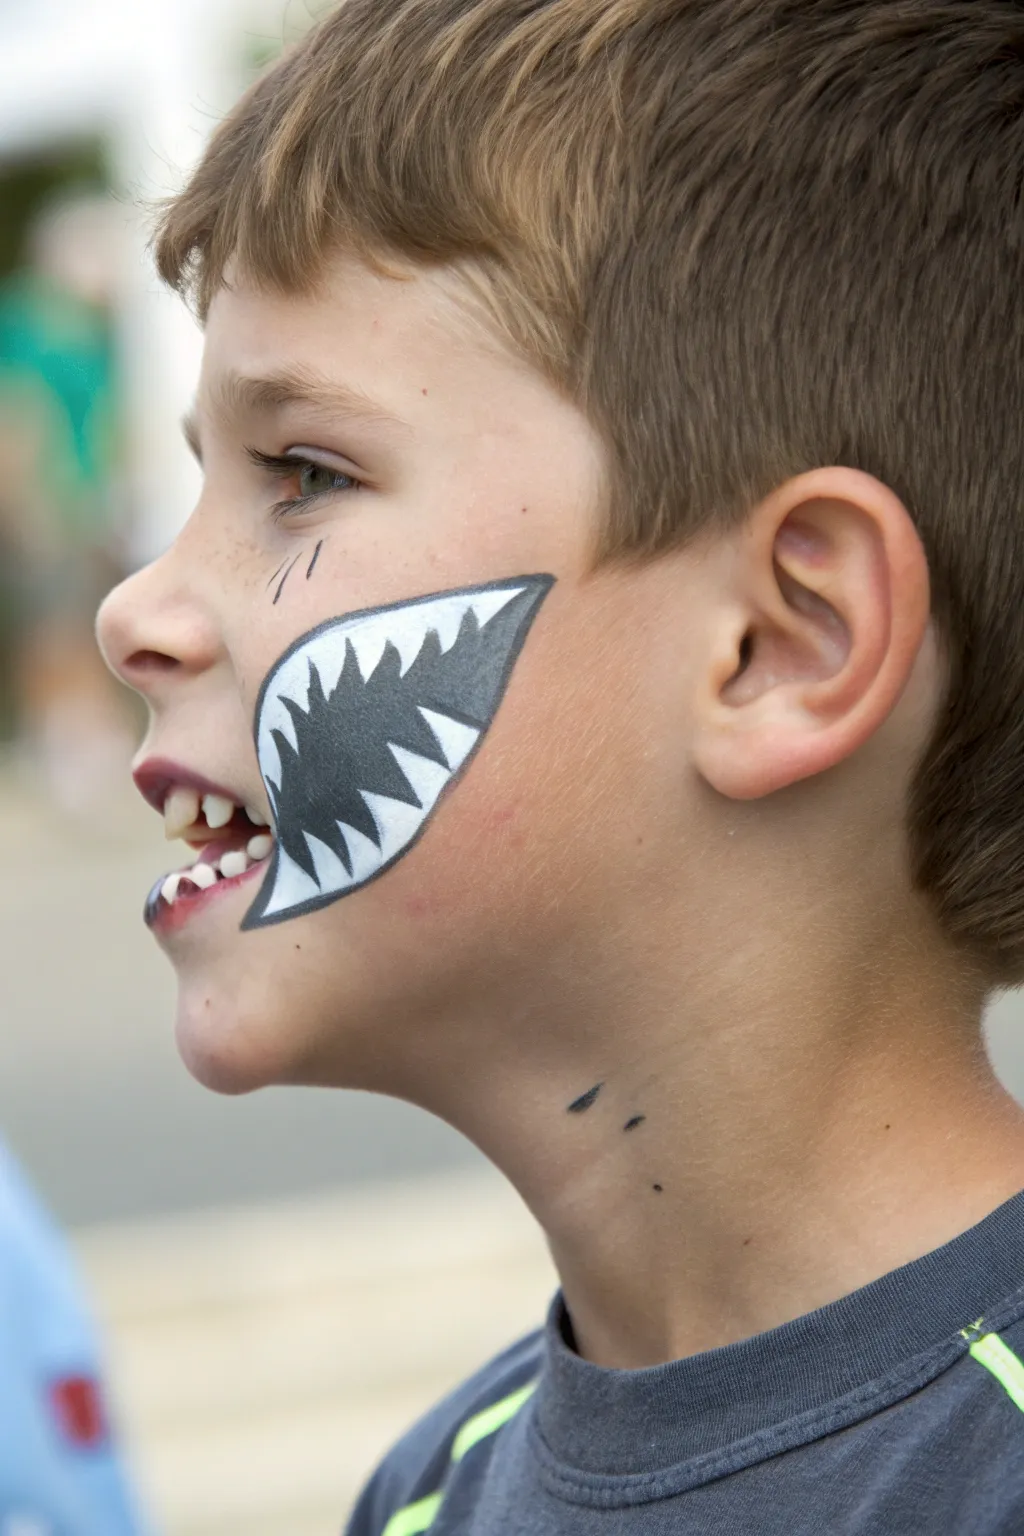
Transform a simple smile into a fearsome predator with this clever optical illusion face paint design. By extending a shark’s open jaws from the corner of the mouth, every grin becomes a chomp.
Step-by-Step Tutorial
Materials
- White face paint (water-activated preferred)
- Black face paint (water-activated preferred)
- Grey face paint (or mix black and white)
- Round brush (size 2 or 3)
- Flat brush (small to medium)
- Fine liner brush (size 0 or 1)
- Cup of clean water
- Paper towels or sponge
Step 1: Outlining the Jaws
-
Visualize the Placement:
Visualize the shape first: you want a sideways ‘V’ or triangle shape that starts at the corner of the child’s mouth and opens up towards the ear. -
Load the Brush:
Load a thin round brush with black face paint. Ensure the consistency is inky but manageable so it doesn’t drip. -
Draw the Upper Jaw Line:
Start slightly above the corner of the mouth on the cheek. Draw a curved line arching upward and back towards the earlobe. -
Draw the Lower Jaw Line:
Draw the bottom line starting slightly below the corner of the mouth, curving it downward and then up to meet the top line, forming a sharp point near the ear. -
Define the Mouth Opening:
Connect the front of the jaw lines to the actual corner of the child’s mouth, integrating their lips into the illusion.
Clean Lines
Rest your pinky finger on the child’s chin or cheek (use a dry sponge as a cushion) to steady your hand while painting detailed lines.
Step 2: Creating the Teeth
-
Switch to White:
Clean your brush thoroughly or switch to a fresh round brush loaded with opaque white paint. -
Paint the Upper Teeth:
Inside the top black line, paint a row of jagged, downward-pointing triangles. Make them sharp and slightly curved for a menacing look. -
Paint the Lower Teeth:
Repeat the process on the bottom line, painting upward-pointing triangles. Stagger them slightly so they look like they would interlock if the mouth closed. -
Fill the Teeth:
Go back and ensure each tooth is filled in solid white. You may need a second coat if the skin shows through too much.
Step 3: Filling the Void
-
Prepare Grey Paint:
Load a small flat brush or round brush with grey face paint. If you don’t have grey, mix a tiny dot of black into your white on the palette. -
Fill the Background:
Carefully paint the empty space between the upper and lower teeth with the grey paint. This represents the inside of the shark’s mouth. -
Watch the Edges:
Be very careful not to smear the white teeth while filling the grey background. I find it helps to use the very tip of the brush near the tooth edges.
Gore Factor
Add small dabs of red paint on the tips of the white teeth creates a freshly-bitten look that kids absolutely love.
Step 4: Final Details
-
Re-outline Everything:
Reload your finest liner brush with black paint. Go over the main outer jaw outlines again to make them crisp. -
Outline the Teeth:
Carefully trace the perimeter of the shark’s mouth where the grey meets the white teeth. This separation is crucial for the 3D effect. -
Add Gill Slits:
Just behind the corner of the eye, paint two or three short, curved black lines to represent gills or skin wrinkles. -
Optional Neck Detail:
For extra detail, add two or three very small scratch marks or water droplets on the neck using the tip of your liner brush.
Now ask them to open and close their mouth to see the shark take a bite
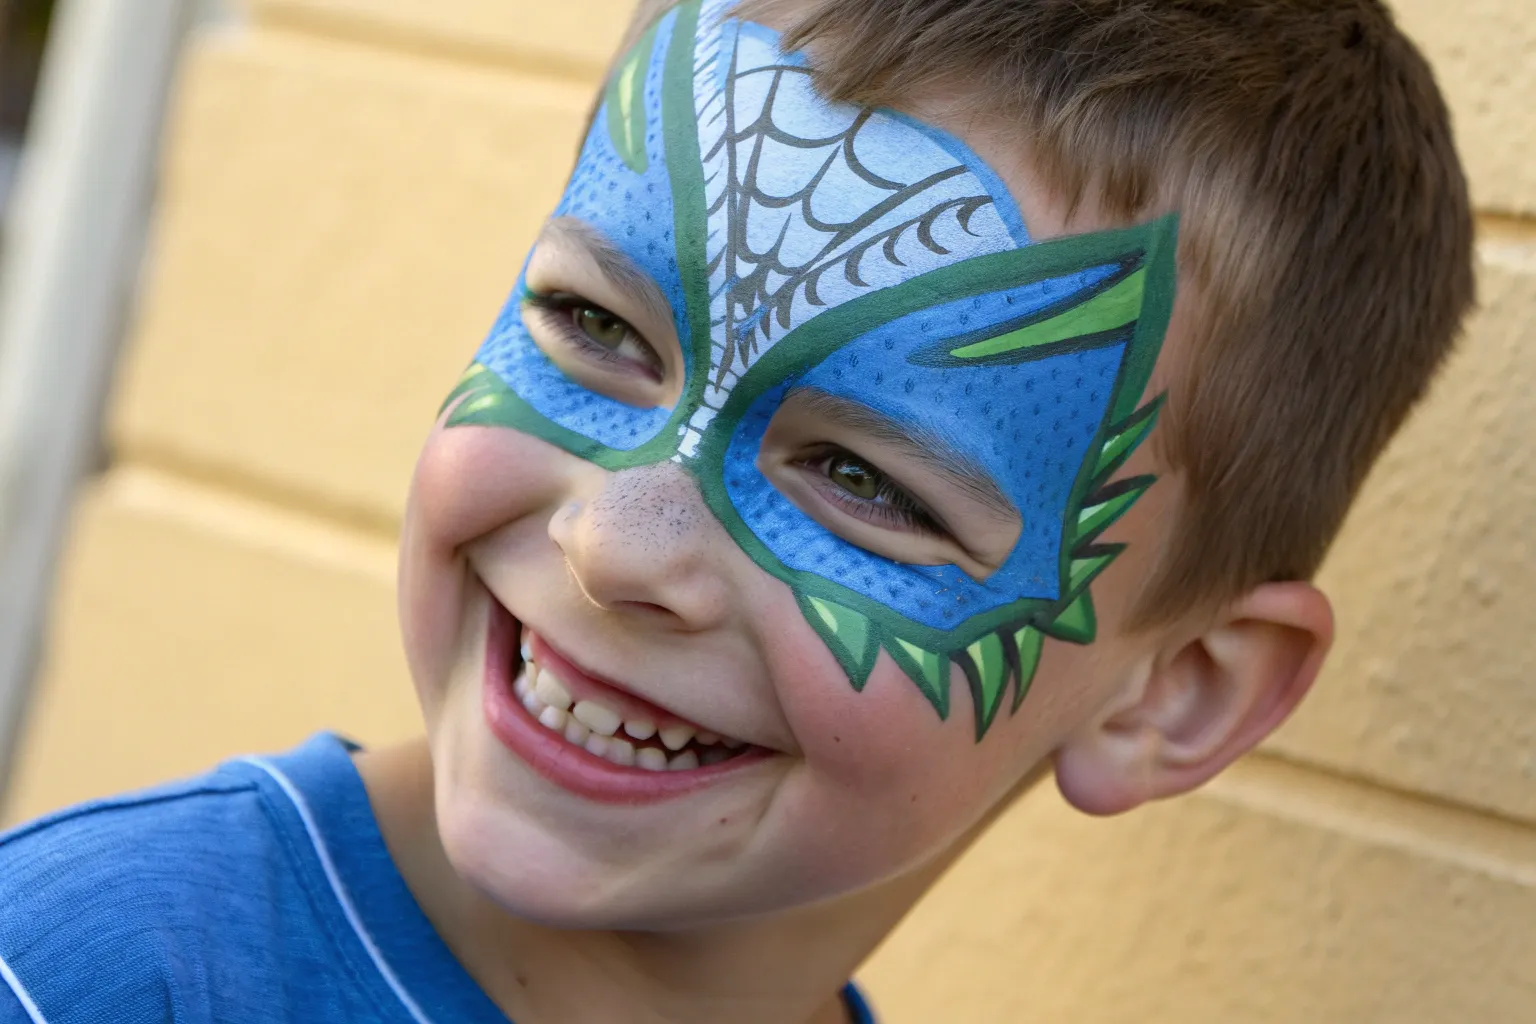
Fire-Breathing Dragon Mask
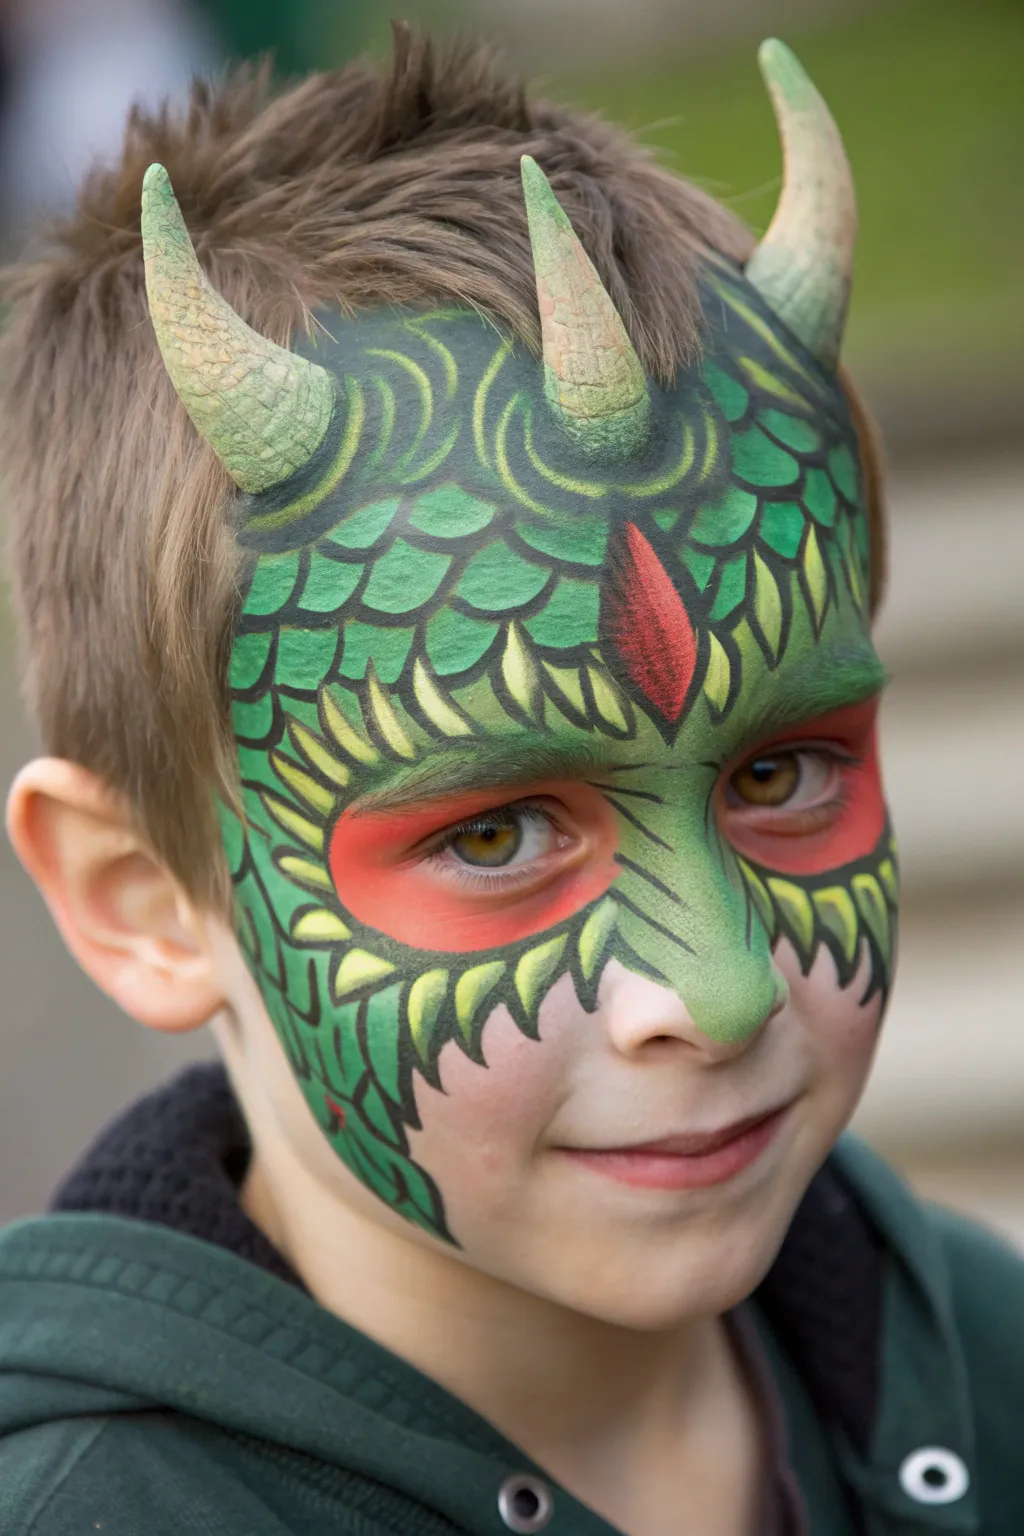

Transform yourself into a mythical beast with this striking dragon design featuring realistic 3D horns and vibrant green scales. This advanced face painting look combines prosthetic elements with detailed brushwork to create a textured, mask-like effect that is sure to roar.
Detailed Instructions
Materials
- Three small prosthetic horns (latex or foam)
- Spirit gum or skin-safe adhesive
- High-density face paint sponges
- Face paints: Dark forest green, lime green, bright yellow, bright red, black, and white
- Round brushes (sizes 2 and 4)
- Small flat brush or filbert brush
- Translucent setting powder (optional)
- Water container and spray bottle
Step 1: Prepping and Horn Application
-
Clean and test:
Begin with a clean, dry face. If you are using new adhesive, perform a small patch test on the arm first to ensure there is no allergic reaction. -
Position the horns:
Decide on placement: two horns on the outer forehead and one slightly lower in the center. Mark the spots lightly with a pale eyeliner pencil if helpful. -
Apply adhesive:
Dab a small amount of spirit gum or skin-safe adhesive onto the base of the first horn and the corresponding spot on the forehead. Wait 15–30 seconds for it to become tacky. -
Secure the horns:
Press the horn firmly against the skin and hold for a minute until secure. Repeat this process for the remaining two horns.
Horn Hack
No prosthetics? No problem. Use rolled-up tissue covered in liquid latex, or simply paint 3D-looking triangles on the forehead using shading techniques.
Step 2: Base Colors and Eyes
-
Paint the eye mask area:
Using a sponge or wide brush, paint a bright red mask shape around the eyes, focusing on the eyelids and sweeping outward toward the temples. This creates a fiery contrast. -
Lay down the green base:
Load a sponge with a blend of lime green and forest green. Pat this color over the forehead, around the horns, and down the nose and cheeks, avoiding the red eye area. -
Integrate the horns:
Paint the bottom third of the horns with the same green sponge to blend them seamlessly into the forehead -
Detail the horn texture:
Using a small brush, paint the upper parts of the horns with a sandy yellow or beige color. I like to stipple slightly here to mimic a rough, bony texture.
Step 3: Creating Scales and Definition
-
Outline the central crest:
With a thin round brush and black paint, draw a sweeping semi-circle shape originating from the center horn, creating the main forehead plate. -
Draft the scales:
Paint ‘U’ shapes across the forehead and cheeks in black. Keep the scales smaller near the eyes and larger as you move outward toward the hairline. -
Add spiky details:
Draw sharp, triangular spikes pointing downward along the cheekbones and under the eye area to frame the face aggressively. -
Highlight the center:
Paint a diamond or teardrop shape in the center of the forehead using red paint, right between the eyebrows, to act as a focal gem or scale.
Dragon Textures
For scaly skin texture without painting every line, rub a sponge over a fishnet stocking held against the skin. It creates an instant scale pattern.
Step 4: Highlights and Finishing Touches
-
Fill the spikes:
Use a small brush and bright yellow paint to fill in the triangular spikes on the cheeks. Blending a little green at the base of these spikes adds dimension. -
Highlight the scales:
Take a very fine brush with white or light yellow paint and add a small curved line to the top of each green scale U-shape. This makes them look raised and shiny. -
Deepen the shadows:
Add extra black shading at the base of the horns and under the large cheek spikes to increase the 3D effect. -
Refine the nose:
Paint the tip of the nose green and add black contour lines along the sides to reshape it into a dragon snout. -
Add lip detail:
Finish by extending the green shading slightly over the upper lip and outlining the mouth area if desired for a full-face integration.
Now you are ready to stomp through the party with your fearsome new look

PENCIL GUIDE
Understanding Pencil Grades from H to B
From first sketch to finished drawing — learn pencil grades, line control, and shading techniques.
Explore the Full Guide
Robot Half-Face With Metal Panels
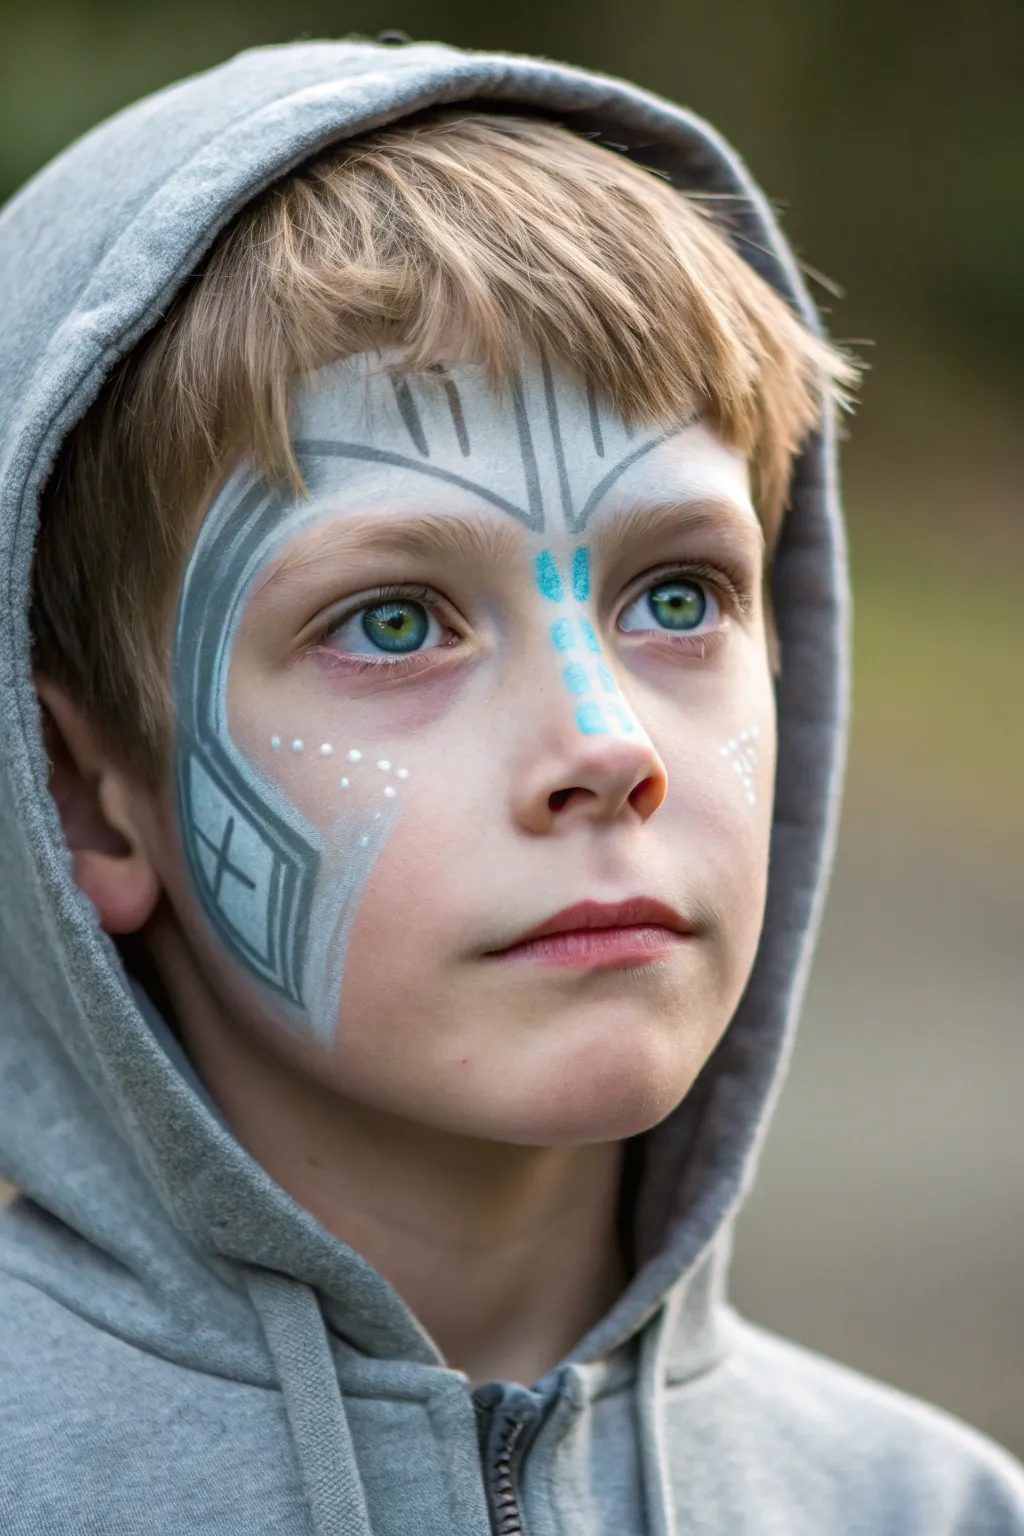
Transform half of the face into a sleek, futuristic cyborg with this striking partial-mask design. The look combines metallic silver foundations with crisp grey circuitry lines and bright teal energy nodes for a subtle yet effective robotic transformation.
Step-by-Step Tutorial
Materials
- White or Metallic Silver face paint (high-pigment, skin-safe)
- Light Grey and Dark Grey face paint
- Bright Neon Blue or Teal face paint
- Flat brush (medium size, approx 1/2 inch)
- Fine round detail brush (size 1)
- Small round brush (size 2-3)
- Sponge (optional for large areas)
- Cup of water
- Paper towels
Step 1: Laying the Metallic Foundation
-
Map the outline:
Visualize the shape first. The design sweeps down from the forehead, hugging the right temple (viewer’s left), curving under the cheekbone, and tapering off towards the jaw-line. It also extends across the bridge of the nose. -
Apply the base coat:
Load your flat brush or a damp sponge with white or metallic silver paint. Paint the large ‘C’ shape covering the forehead, temple, and cheek area. Keep the edges relatively crisp. -
Create the nose bridge:
Extend the white/silver paint down the center of the nose, stopping just above the tip. -
Add the forehead section:
Paint a connected panel above the left eyebrow (viewer’s right) to balance the asymmetry, creating a winged look across the brow line. -
Smooth the coverage:
If the first layer looks streaky, gentling pat it with a sponge or apply a second thin coat with the flat brush for an opaque, metal-plate finish.
Pro Tip: Metal Sheen
For a true robotic finish, swipe a tiny bit of pearlescent powder or dry silver eyeshadow over the dried grey lines to soften them.
Step 2: Designing the Circuitry
-
Mix your outline shade:
For the panel lines, you want a dark grey rather than stark black for a more realistic metal look. Mix black with a touch of silver or use a pre-mixed charcoal grey. -
Outline the main shape:
With your fine round detail brush, carefully trace the outer edge of your white/silver base. Keep your hand steady to create a manufactured, hard edge. -
Draw the forehead panels:
On the forehead, draw two vertical lines rising from the brow bone up into the hairline. Add smaller ticks or angles at the top to suggest mechanical seaming. -
Define the cheek plate:
On the main cheek area, draw a curved line mirroring the outer edge, creating a thick border. This separates the ‘outer casing’ from the ‘inner mechanics’. -
Add geometric details:
Inside the bottom section of the cheek plate, paint a rectangle with a cross inside it, looking like a vent or access hatch. -
Create connection lines:
Draw thin grey lines connecting the forehead section to the nose bridge, making the pieces look interlocked.
Step 3: Powering Up
-
Prepare the teal paint:
Clean your small round brush thoroughly. Load it with creamy bright teal or light blue paint. -
Paint the nose nodes:
Down the bridge of the nose, dab a series of small, rectangular dashes. These act as the central power core or data strip. -
Add subtle highlights:
I like to add tiny white dots inside the teal rectangles to make them look like glowing LEDs. -
Create cheek accents:
On the cheek opposite the main panel (the unpainted side), add a small cluster of white dots in a triangular formation to suggest subcutaneous implants. -
Scatter data points:
Add a few tiny white dots on the main silver panel, near the grey lines, to look like rivets or light indicators. -
Final clean up:
Check the edges of your grey lines. If any are too thick, you can carefully trim them back with a clean, damp brush or a Q-tip.
Troubleshooting: Shaky Lines
If your hand shakes while doing the grey outlines, rest your pinky finger gently on the child’s chin or cheek (on a dry spot!) to stabilize your brush hand.
Now step back and admire the transformation from boy to bionic hero
Sports Stripes and Team Colors
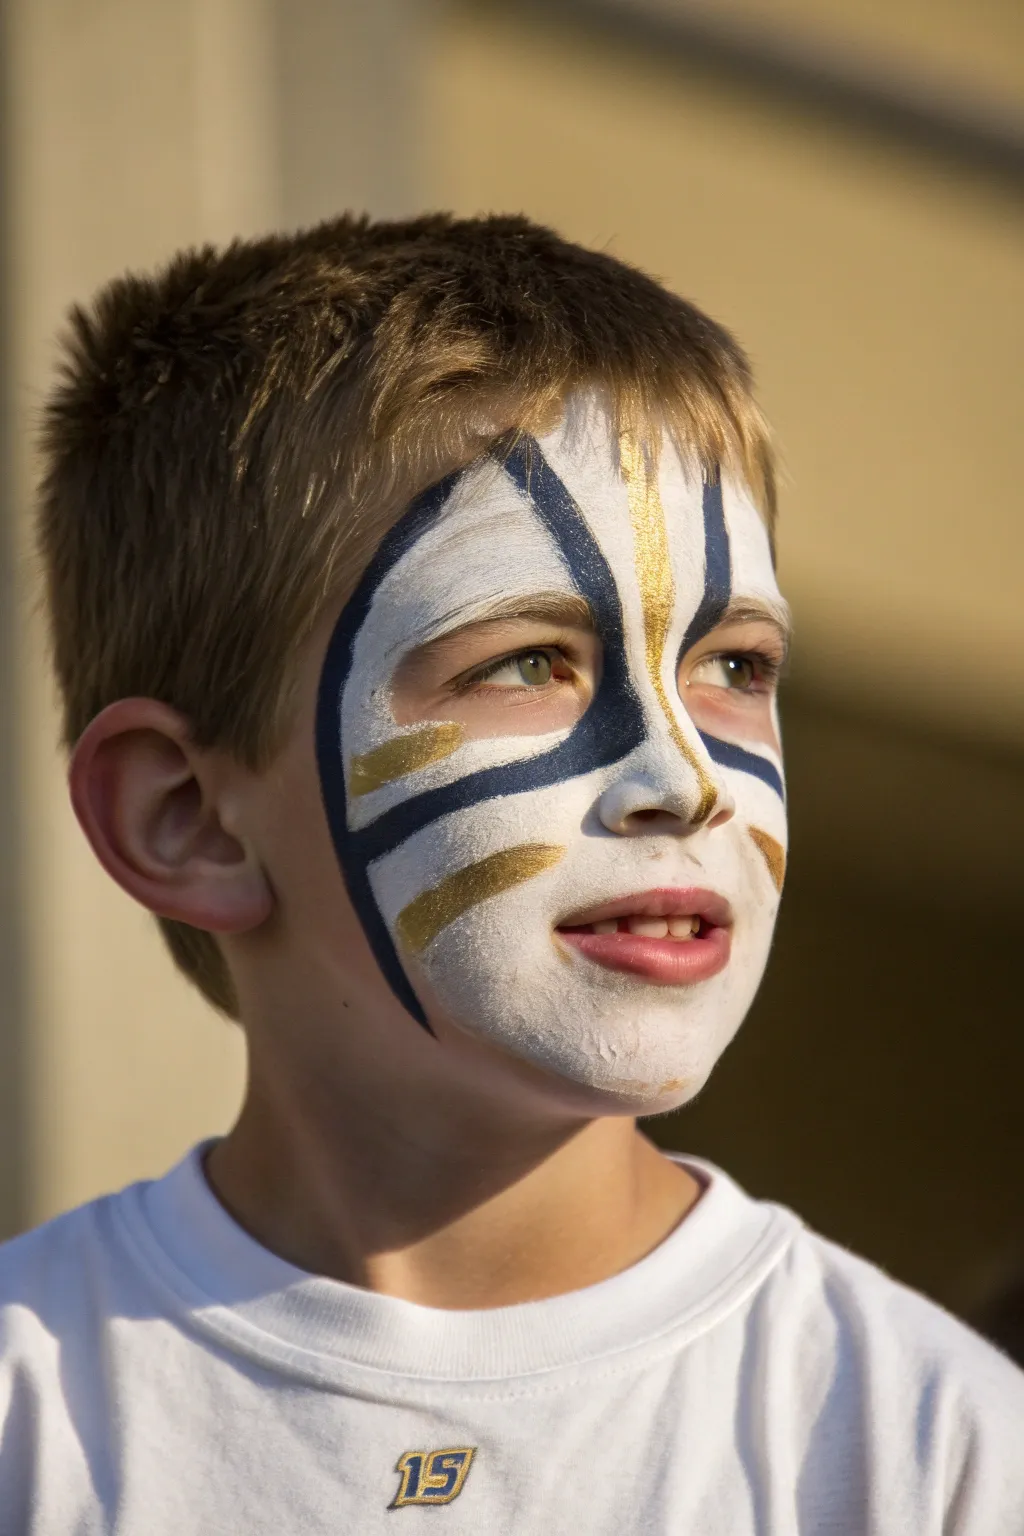
Transform into the ultimate superfan with this bold, geometric face paint design that screams team spirit. Using a striking combination of white base, navy angles, and metallic gold accents, this look balances fierce intensity with a clean, sporty style.
Detailed Instructions
Materials
- White face paint (water-activated cake or cream)
- Navy blue face paint
- Metallic gold face paint
- High-density face painting sponge
- Medium round brush (size 4 or 6)
- Small round brush (size 2 or 3) for details
- Cup of water
- Paper towels or wet wipes
Step 1: Setting the Foundation
-
Sponge prep:
Dampen your high-density sponge slightly and swirl it into the white face paint until you have a creamy consistency, avoiding excess water to prevent dripping. -
Base layer application:
Begin applying the white paint around the eyes, creating a large, mask-like shape that extends from the forehead down to the cheekbones and across the nose bridge. -
Filling the coverage:
Pat the sponge gently over the skin rather than dragging it to ensure an opaque, even coat without streaks, focusing on covering the eyebrows completely. -
Defining the edges:
Use the edge of the sponge or a clean brush to tidy up the perimeter of the white area, creating a distinct, rounded boundary on the cheeks and forehead.
Clean Lines Pro-Tip
For super-sharp edges on your stripes, load your round brush and roll the tip on a paper towel to form a perfect needle-point before touching the skin.
Step 2: Navy Geometry
-
Central nose stripe:
Load your medium round brush with navy blue paint. Start at the bridge of the nose, just between the eyes, and paint a line curving outward and upward toward the hairline. -
Mirroring the center:
Repeat this stroke on the opposite side to create a V-shape starting from the nose bridge, extending up towards the forehead. -
Cheek stripes:
From the outer corner of the eye, paint a straight, bold navy line extending horizontally toward the ear, tapering it slightly at the end. -
Jawline accents:
Add a second navy stripe below the first one on the cheek, angling it slightly downward to follow the natural contour of the jaw. -
Connecting the structure:
Thicken the lines where they meet near the nose and eyes to create strong focal points, giving the design a more aggressive, sporty look.
Fixing Smudges
If a dark color bleeds into the white, wait for it to dry completely. Then, use a damp cotton swab to lift the mistake before patting fresh white over the spot.
Step 3: The Golden Touch
-
Forehead focal point:
Rinse your brush thoroughly or switch to a clean small round brush. Load it with metallic gold paint. -
The center blaze:
Paint a vertical gold stripe directly down the center of the forehead, stopping just at the bridge of the nose. -
Nose highlights:
Continue the gold line down the ridge of the nose, letting it flare slightly at the tip for a metallic highlight. -
Cheek accents:
Place gold stripes parallel to the navy ones on the cheeks, nesting them in the white space between the blue lines. -
Sharpening the look:
I like to go back with a very fine brush and touch up any gold edges that might have blended too much with the white, keeping the colors distinct. -
Final symmetry check:
Step back and look at the face straight on; add small dabs of paint to balance the thickness of the stripes on either side.
Now your young athlete is painted up and ready to cheer their team to victory


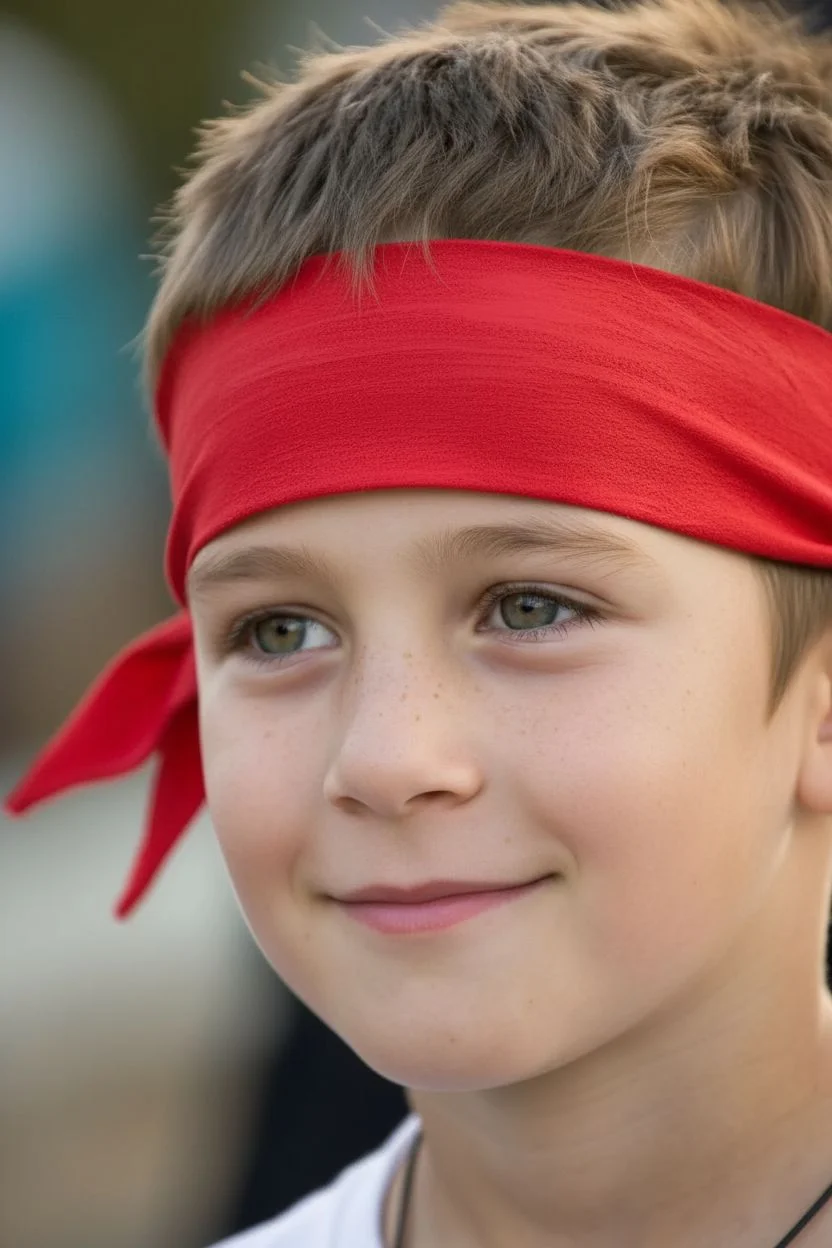
Ninja Shadow Eyes
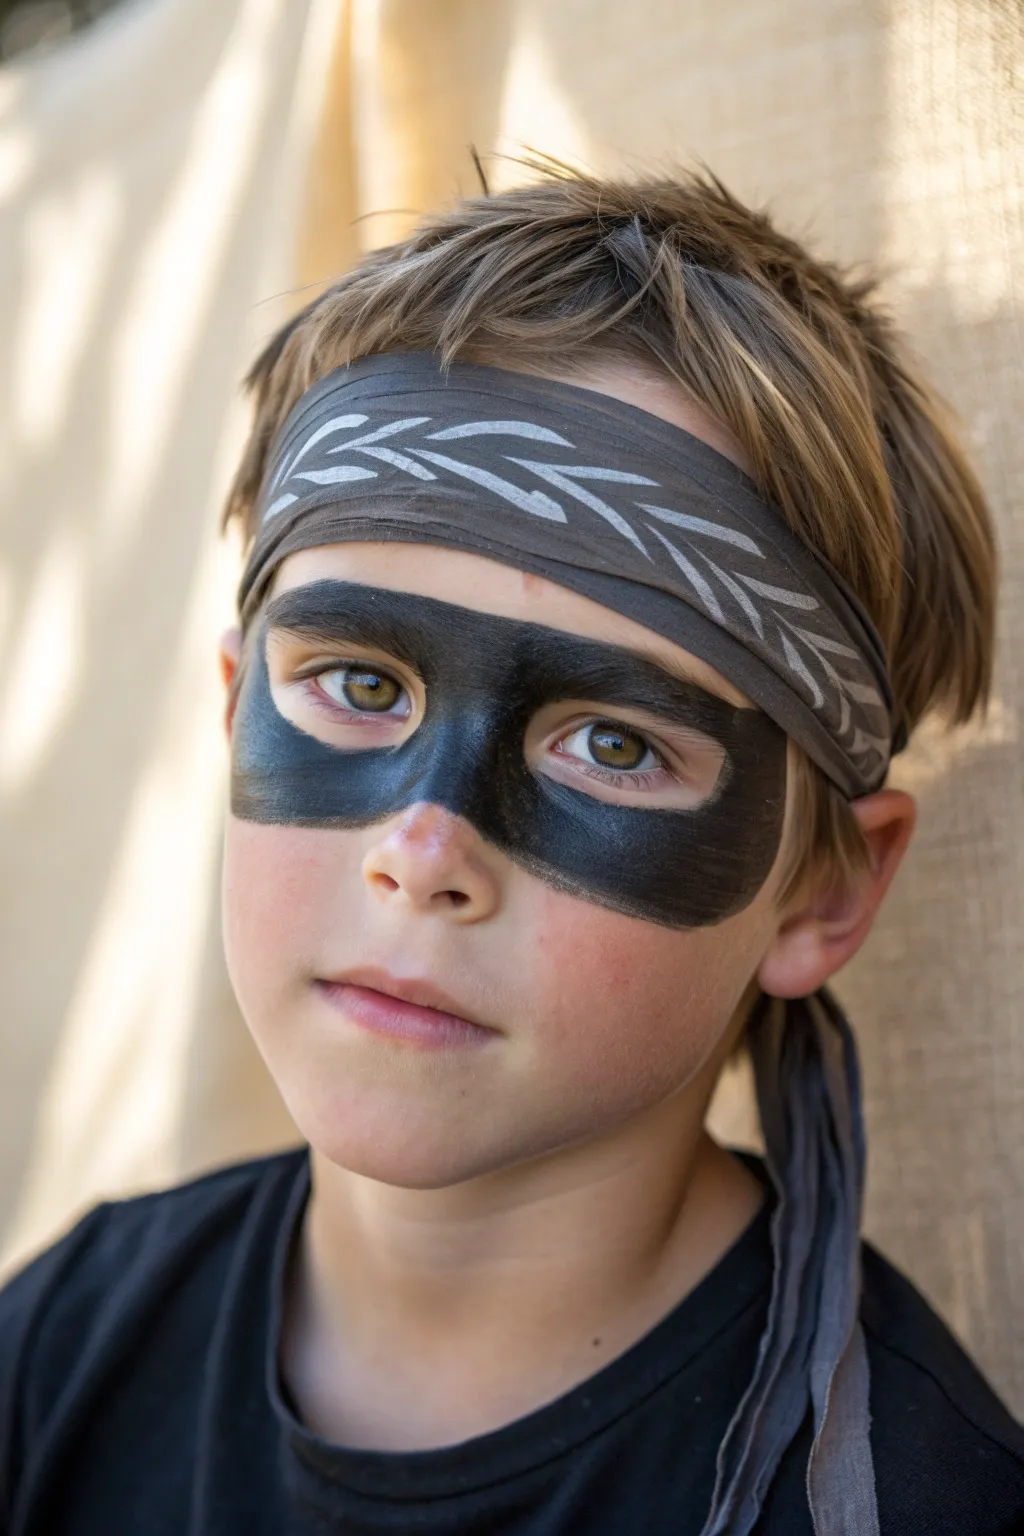
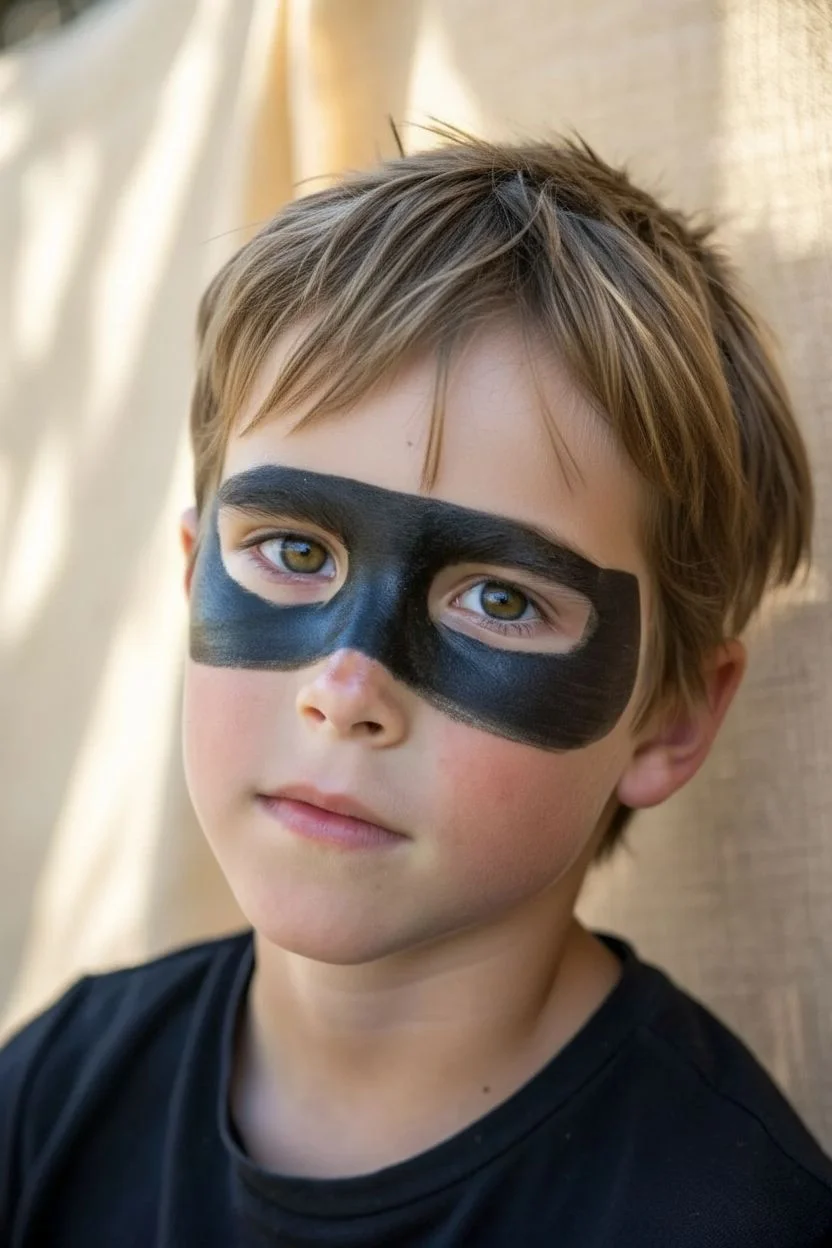
Transform into a stealthy warrior with this simple yet striking ninja mask design. The look features a bold, black eye mask painted directly onto the skin, perfectly complemented by a custom fabric headband.
How-To Guide
Materials
- Black face paint (water-activated or cream)
- Medium flat brush
- Small round brush for details
- Makeup setting spray or translucent powder
- Grey fabric strip (cotton or jersey)
- White fabric paint or silver fabric marker
- Stencil (optional for headband pattern)
- Black t-shirt to complete the look
Step 1: Painting the Eye Mask
-
Outline the shape:
Start with a clean, dry face. Using a small round brush loaded with black face paint, lightly trace the outline of the mask. The top line should run just above the eyebrows, curving gently across the forehead. -
Define the bottom edge:
Continuing with the small brush, draw the bottom edge of the mask. This line should sweep across the upper cheekbones and connect across the bridge of the nose, ensuring it sits comfortably below the eyes without getting too close to the lash line. -
Connect the sides:
Bring the top and bottom lines together at the temples. You want a rounded, organic shape rather than sharp geometric corners, so curve the line downwards to meet the cheek line. -
Fill in the mask:
Switch to a medium flat brush for better coverage. Load it well with black paint and begin filling in the outlined area. Use smooth, horizontal strokes to ensure an even application without streaks. -
Refine the edges:
Go back in with your smaller brush to sharpen up the perimeter lines. A crisp, clean edge makes the mask look professional and intentional. -
Cover the eyebrows:
Ensure the paint is thick enough over the eyebrows to hide the hair texture. I find that dabbing the paint on rather than stroking helps to saturate the hairs better. -
Handle the nose bridge:
Pay special attention to the nose area. The band should be solid and opaque across the bridge. If the paint looks thin here, let the first layer dry for a minute and add a second coat. -
Set the paint:
Once the black mask is fully dry, lightly dust it with translucent setting powder or a quick spritz of setting spray. This prevents the black pigment from smudging onto the rest of the face during play.
Step 2: Creating the Headband
-
Prepare the fabric:
Cut a strip of grey fabric long enough to wrap around the head with tails hanging down. A width of about 2-3 inches works best for this scale. -
Plan the design:
Lay the fabric flat. You will be painting a leaf-like or braided pattern. You can sketch this lightly with chalk first to get the spacing right. -
Paint the pattern:
Using white fabric paint or a silver marker, draw a series of V-shapes or leaf patterns running horizontally along the center of the headband. Keep the lines somewhat organic resembling a laurel wreath. -
Let it dry:
Allow the fabric paint to dry completely according to the manufacturer’s instructions before aiming to wear it. -
Tie it on:
Place the center of the headband on the forehead, just above the painted mask line. Tie it securely at the back of the head, letting the fabric ends drape down naturally. -
Final adjustment:
Tuck any loose hair under the band and make sure the headband sits low enough to frame the face paint without rubbing against it.
Smudge Control
If the black paint starts to crack or feel tight, mix a tiny drop of moisturizer into your water-activated paint before applying for a more flexible finish.
Level Up
Add definition to the mask by using a dark grey eyeshadow to create subtle highlights on the center of the painted area, giving it a 3D fabric look.
Now your little ninja is ready to disappear into the shadows
Monster Teeth Grin Around the Mouth
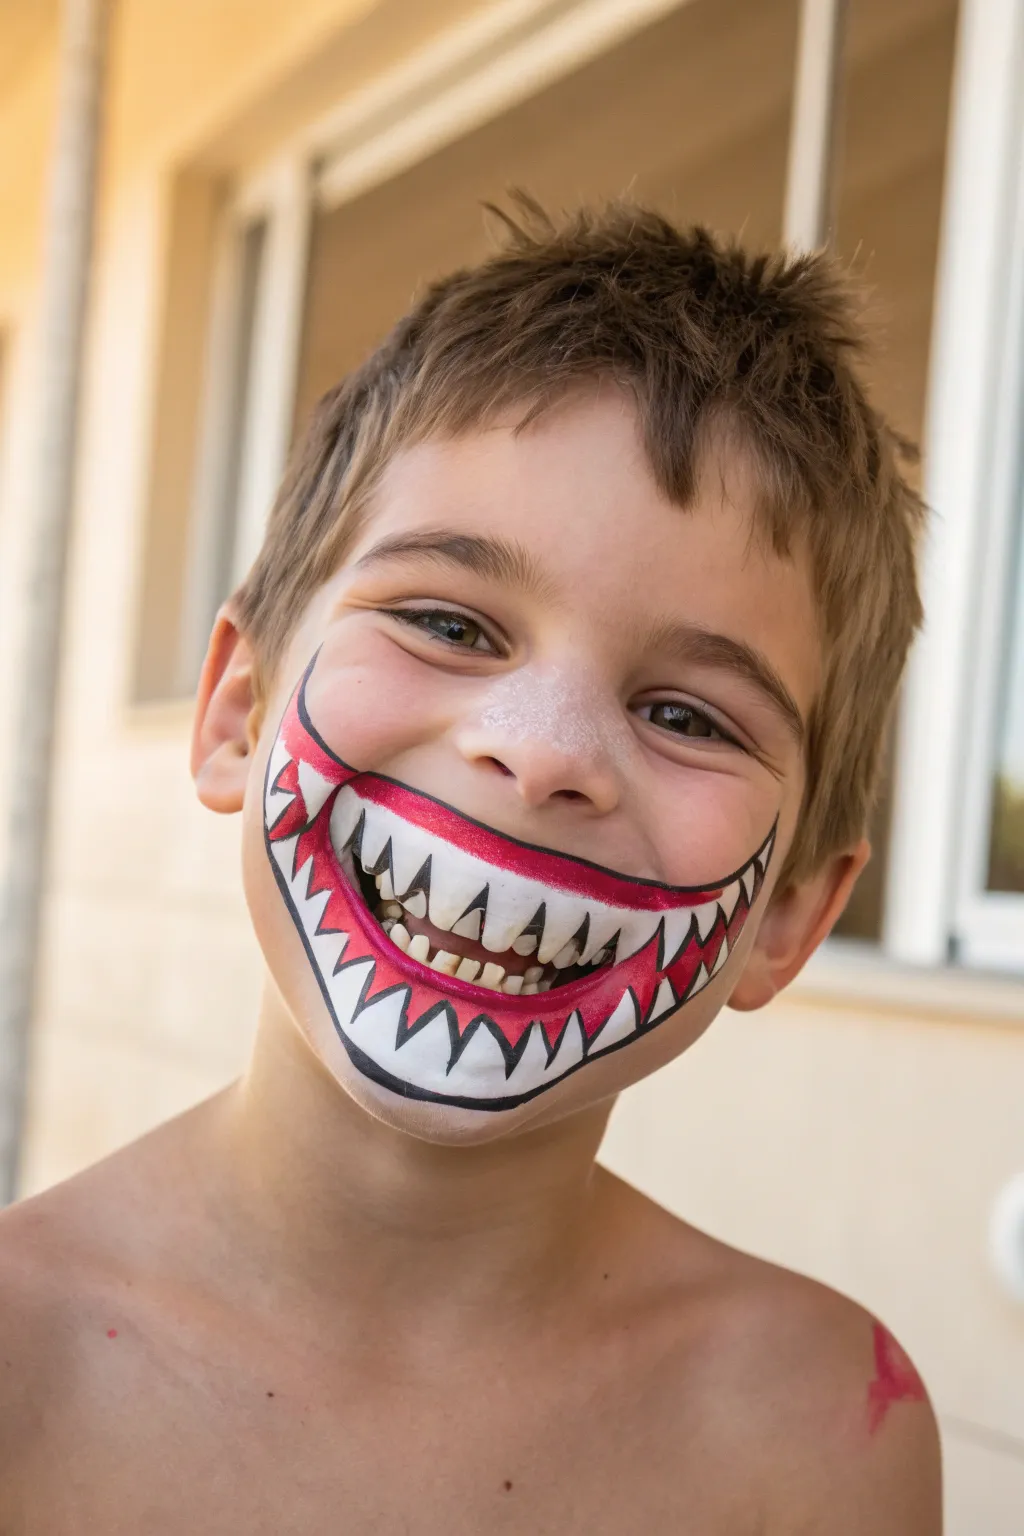
Turn a smile into a friendly fright with this oversized monster mouth design. By extending the painted smile well beyond the natural lips, you create a cartoonish, toothy illusion that moves when they talk.
Detailed Instructions
Materials
- White face paint
- Red face paint
- Black face paint
- High-density face painting sponge
- Medium round brush (size 4 or 6)
- Fine liner brush (size 1 or 2)
- Cup of water
- Paper towels
Step 1: Setting the Base Shape
-
Map the smile:
Visualize a large crescent moon shape that starts from the middle of the cheeks and curves under the chin. Using a very faint amount of black or red paint on a fine brush, sketch this outline lightly to ensure symmetry before committing. -
Fill the white base:
Dip your sponge into white face paint, ensuring it isn’t too wet to avoid streaks. Fill in the entire area inside your sketched outline, covering the lips and the skin around the mouth completely. It acts as the canvas for the teeth. -
Powder the nose:
While you have the white sponge, dab a small, diffused amount of white paint onto the nose bridge and tip for a dusty, textured creature effect.
Step 2: Creating the Teeth
-
Outline the mouth opening:
Switch to your medium round brush and load it with black paint. Paint a thin line following the natural curve of the lips but extended outwards towards the cheeks to create the ‘opening’ of the monster mouth. -
Draw the top teeth:
Using the fine liner brush and black paint, draw sharp, triangular zigzag lines pointing downward from the top edge of your white area. Make the front teeth slightly larger for perspective. -
Draw the bottom teeth:
Mirror the process on the bottom, drawing sharp triangles pointing upward. Stagger them slightly so they don’t perfectly align with the top row, making the creature look more rugged. -
Define the gum line limits:
Paint a curved black line above the top teeth and below the bottom teeth to encompass the entire design. This outer boundary defines how wide the red gums will be.
Keep it Clean
When painting the red gums, use the very tip of your brush and pull away from the white teeth. This prevents accidental red smudges on the white area.
Step 3: Adding Color and Contrast
-
Paint the red gums:
Load a medium round brush with bright red paint. Carefully fill in the space between your outer black boundary and the zigzag base of the white teeth. -
Refine the edges:
The red paint might overlap your black lines slightly. Once the red is dry, I like to go back over the black outlines with the fine liner brush to crisp up any messy edges. -
Connect the corners:
Where the top and bottom red gum lines meet at the far corners of the cheeks, sweep them into a sharp point that curls slightly upward. -
Thicken the outer line:
Use the medium brush to thicken the outermost black outline. Varying the line weight—making it thicker at the curves and thinner at the points—adds dynamic cartoon energy. -
Add detail hashes:
Add tiny little tick marks coming off the corners of the mouth or under the eye to suggest wrinkles or stretching skin. -
Final white highlights:
Clean your fine liner brush thoroughly. Dip it in white paint and add tiny highlights on the red gums to make them look wet and glossy. -
Touch up the teeth:
If the white teeth got smudged with red or black, do a final pass of solid white inside the triangles to make them pop.
Smudged Lines?
If black lines bleed into the white, wait for it to fully dry. Then, use a damp Q-tip to lift the mistake before painting clear white over the top.
Now they are ready to roar with a smile that is larger than life
Camouflage Camo Cheeks
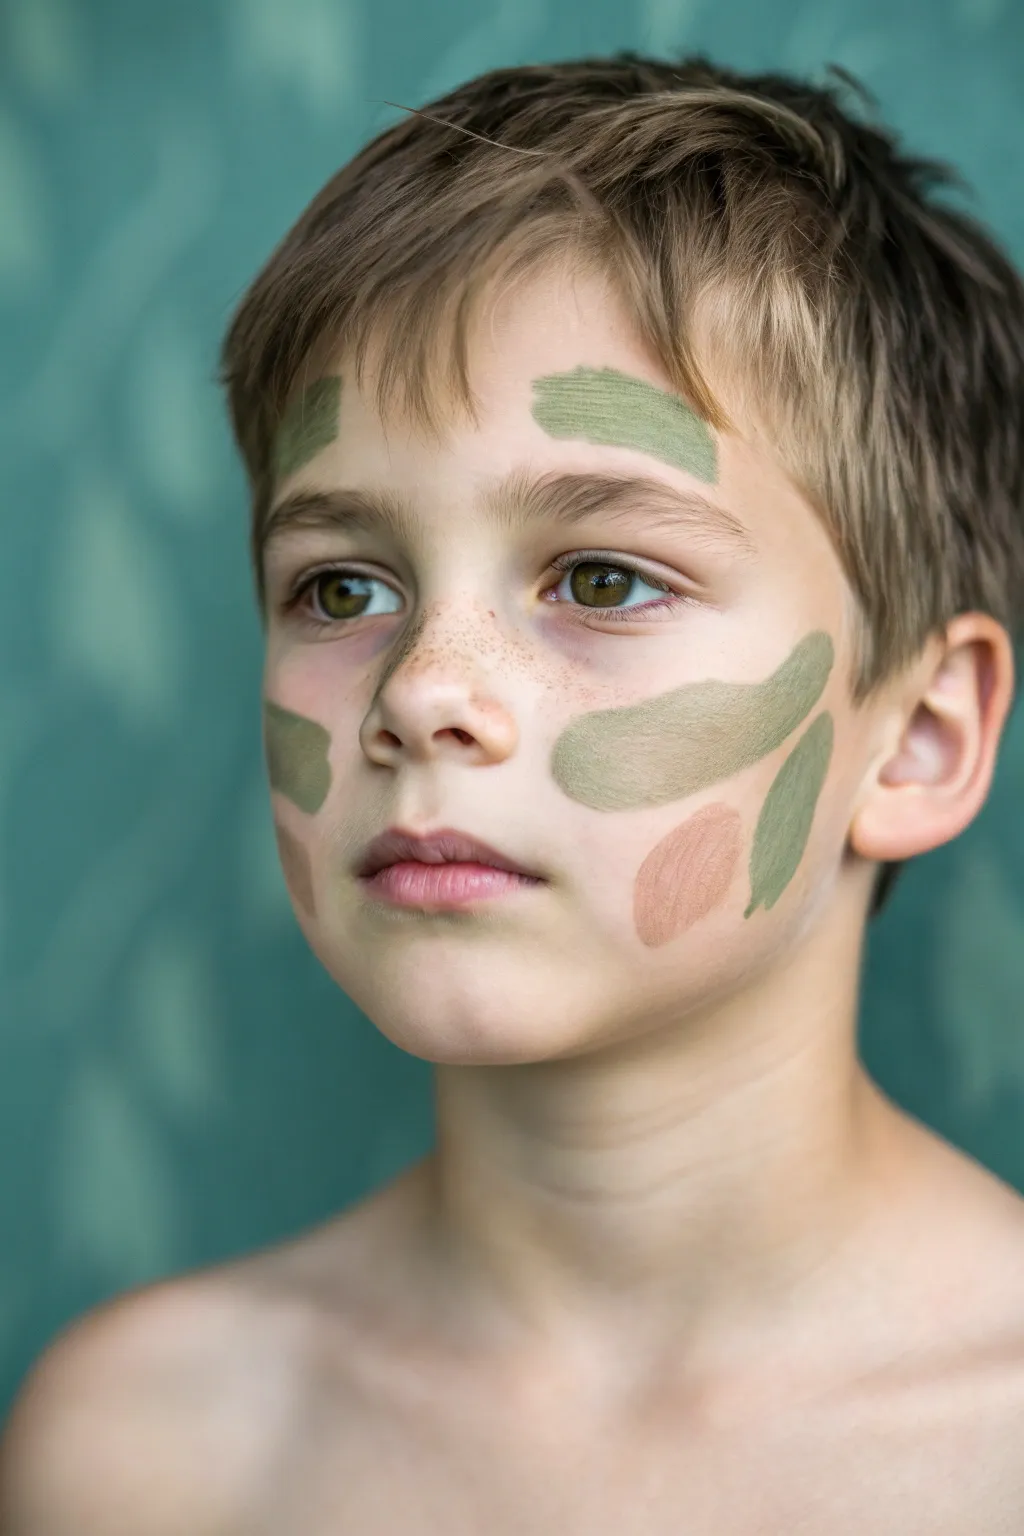
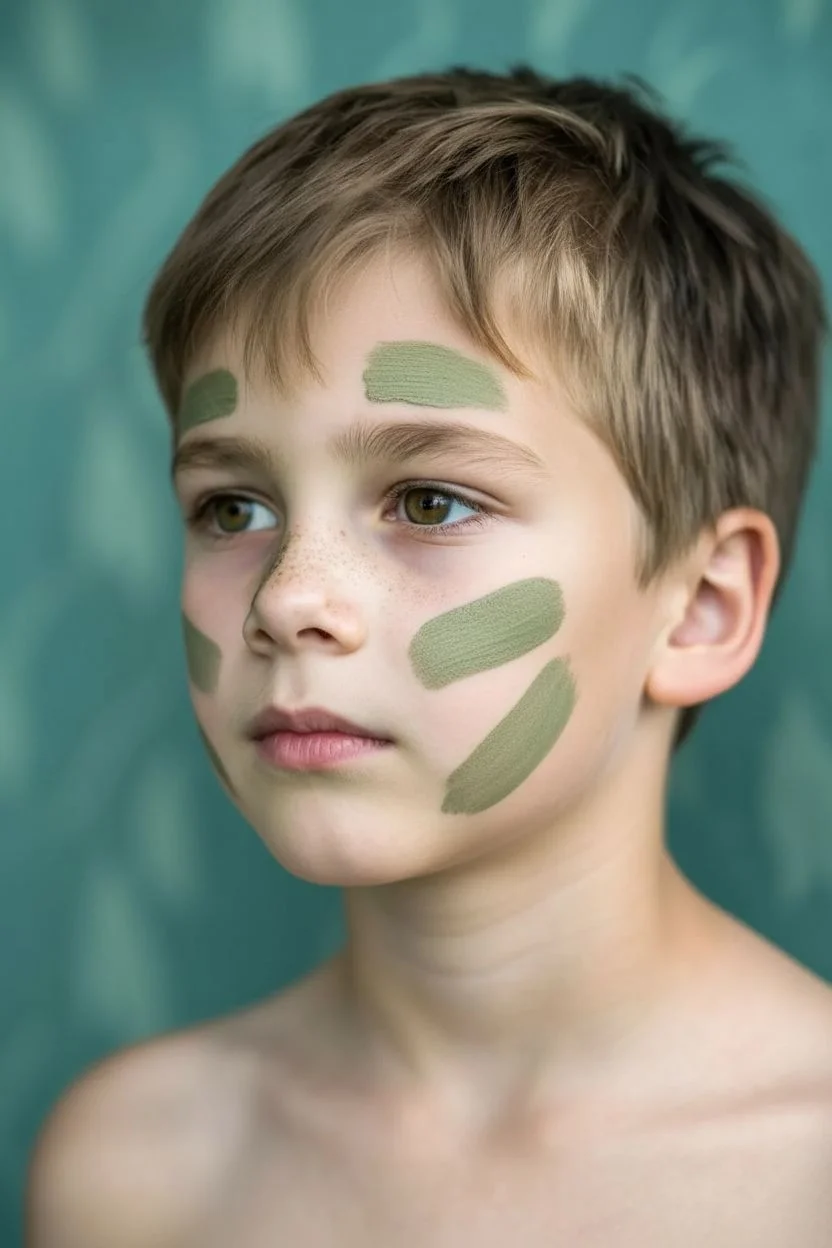
For a subtle, warrior-like take on the classic camo look, try this soft and blended approach. Instead of sharp, digital camouflage shapes, this design uses broad, organic strokes of muted greens and earthy browns to create a rugged, natural effect that blends seamlessly with the skin.
Step-by-Step Guide
Materials
- Face paint palette (must verify it includes sage green, olive green, and tan/light brown)
- Medium flat brush (approx. size 6 or 8)
- Small round sponge (optional, for blending)
- Cup of water
- Paper towels or cloth
- Setting spray (optional)
Step 1: Preparation
-
Clean canvas:
Begin with a clean, dry face. Use a gentle wipe to remove any oils or dirt from the cheeks and forehead to ensure the face paint adheres properly. -
Activate the green:
Dip your flat brush into the water and then work it into a sage green or muted olive paint. You want a creamy consistency, not too watery, so the color looks solid on the skin.
Patchy Paint?
If the green isn’t showing up opaque, your brush is likely too wet. Dab it on a paper towel to remove excess water, then work it back into the paint cake until it feels creamy like melted chocolate.
Step 2: Forehead Application
-
First forehead swatch:
Starting above the right eyebrow, press the flat side of the brush against the skin and drag it horizontally towards the center of the forehead. Create a thick, rectangular-ish shape with uneven edges. -
Second forehead accent:
Reload your brush with the same green. On the opposite side, slightly higher near the hairline, paint a smaller, similar swatch. This asymmetry is key to the natural camouflage look. -
Soften the edges:
Before the paint dries completely, you can gently tap the edges with your finger or a sponge to soften them slightly, making the paint look more like mud smudges than stickers.
Step 3: Cheek Design
-
Check density:
Ensure your brush is clean or reload it with fresh green paint if it has started to dry out. -
Left cheek upper stroke:
On the left cheekbone (the child’s left), place your brush near the ear and sweep inwards towards the nose. Curve the stroke slightly upwards as you go, tapering off as you reach the center of the cheek. -
Left cheek lower stroke:
Paint a second, diagonal stroke below the first one, angling it downwards towards the jawline. This creates movement and follows the natural contours of the face. -
Right cheek balance:
Move to the right cheek. Paint a short, stout swatch of green right on the cheekbone. It doesn’t need to match the other side perfect; in fact, I find it looks better if it doesn’t. -
Jawline accent:
Add a faint smudge of green lower down on the right jawline to balance the visual weight of the design.
Jungle Texture
Use a stipple sponge (a rough, porous sponge) dipped in dark brown to lightly tap over the green areas. This adds instant ‘dirt’ texture and makes the camo look much grittier and realistic.
Step 4: Adding Earth Tones
-
Switch colors:
Thoroughly rinse your brush until the water runs clear, then squeeze out excess moisture. Load the brush with a tan, beige, or light brown shade. -
The contour spot:
On the left cheek, find the empty space between the two green swipes you painted earlier. Press the brush down to create a rounded, organic blotch of brown here. -
Blend softly:
If the brown overlaps slightly with the green, that is perfectly fine. Let the colors mingle a little at the boundaries to enhance the rugged effect. -
Optional freckle enhancement:
If the child doesn’t have natural freckles like our model, you can take a very fine brush or a stipple sponge with dark brown paint and lightly tap a few across the bridge of the nose to tie the earthy look together.
Step 5: Finishing Touches
-
Assess the opacity:
Step back and look at the design. If any green areas look streaky, gently dab a little more paint over top to build opacity. -
Dry time:
Ask the model to keep their face relatively still for about two minutes to allow the layers to set completely without cracking. -
Set the look:
For longevity, especially if sticking around for a party, close the eyes and mist lightly with a setting spray.
Now your little soldier is ready for their backyard adventure with a look that is both cool and easy to clean up
Creepy-Cool Scorpion Side Design
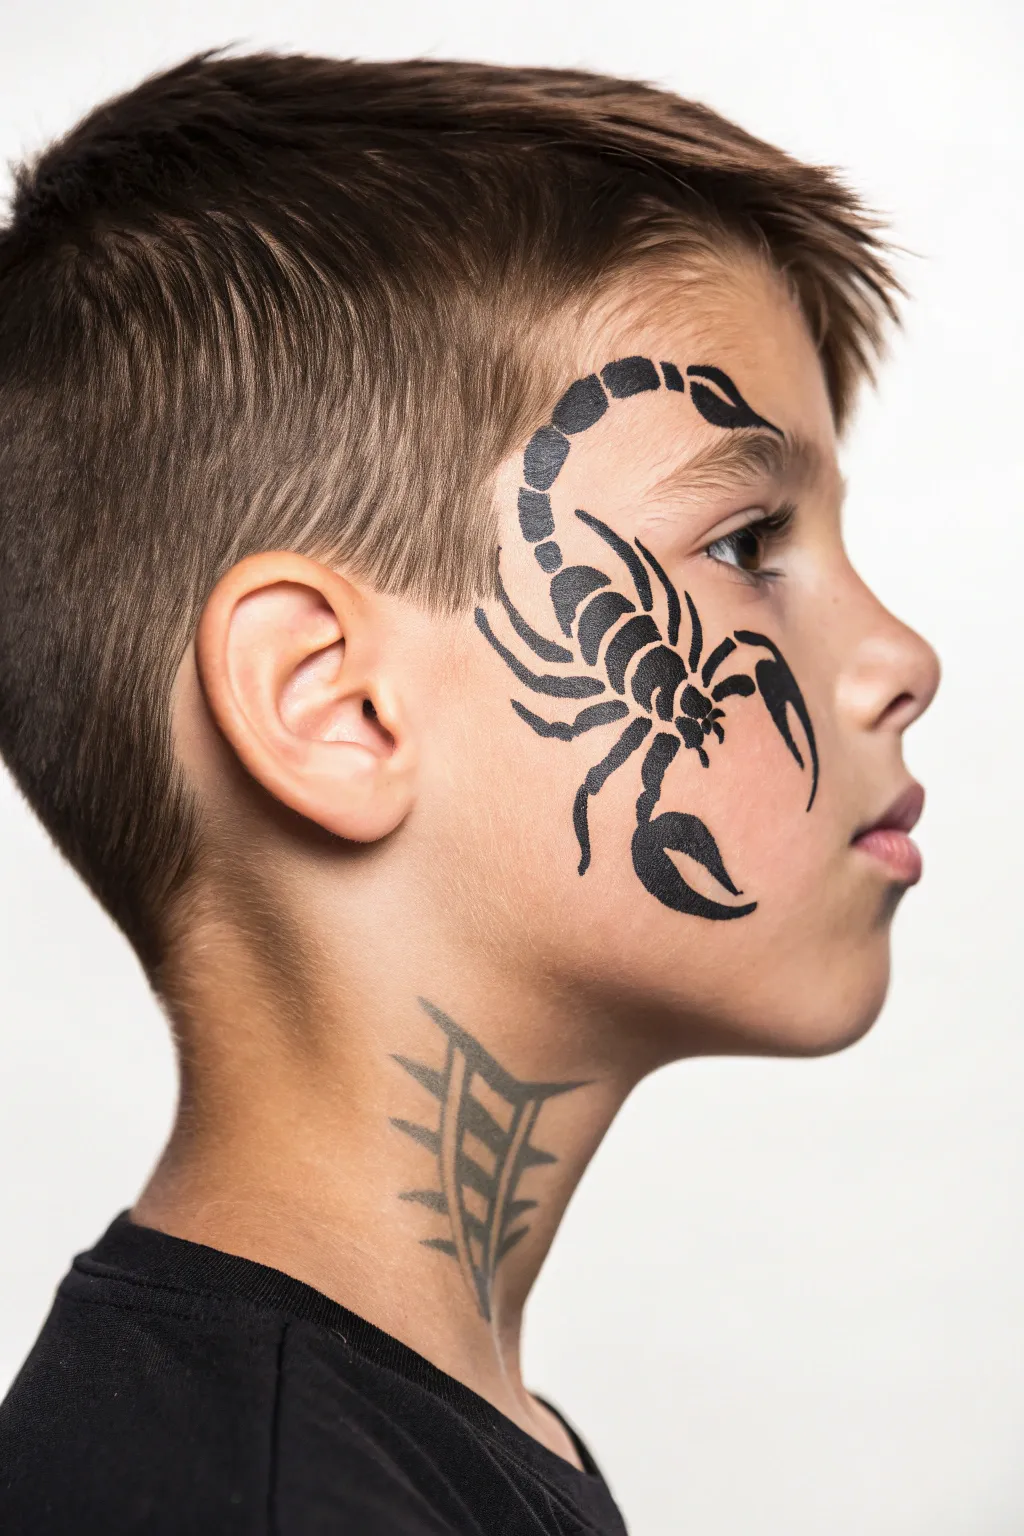

Transform a simple side profile into a striking statement with this bold black scorpion design. The artwork uses clean lines and strategic placement to make the creature look like it is climbing right up the cheek, perfect for a cool but slightly edgy costume look.
Step-by-Step
Materials
- High-quality black face paint (water-based or cake)
- Small round brush (size 2 or 3)
- Fine liner brush (size 0 or 1)
- Cup of clean water
- Paper towel or sponge nearby
- Reference image of a cartoon scorpion
- Stencil (optional, but recommended for beginners)
Step 1: Preparation and Positioning
-
Clean the canvas:
Start with a freshly washed and dried face. Ensure the area around the temple, cheekbone, and ear is free of oils or moisturizer so the paint adheres crisply. -
Visualize the placement:
Visualize the curve of the scorpion’s tail following the natural curve of the eyebrow and existing hairline. The pincers should extend towards the nose and mouth, while the tail curves up toward the forehead. -
Load your brush:
Dip your small round brush into the water and then swirl it into the black face paint. You want a creamy consistency, like melted chocolate, to ensure solid, opaque lines without dripping.
Step 2: Painting the Scorpion Body
-
Start the lower body:
Begin by painting the main body segments of the scorpion near the center of the cheekbone. Paint three to four slightly curved, oval-like shapes connected in a row, getting slightly smaller as they move upward. -
Create the tail arc:
Using the same round brush, continue the segmented pattern curving sharply upward past the temple. The segments should become almost square-like as they ascend. -
Form the stinger:
At the very top of the tail, near the hairline, paint the final curved segment ending in a sharp point. This is the stinger, so make sure the tip is distinct. -
Define the head:
Move back to the lowest body segment on the cheek. Paint a slightly larger, rounded shape here to represent the head where the legs and pincers will attach.
Sharp Line Pro Tip
For the sharpest points on the legs and stinger, lift your brush while painting the stroke. Applying less pressure at the end of the motion naturally tapers the line to a perfect point.
Step 3: Detailing the Legs and Pincers
-
Switch brushes:
Swap to your fine liner brush for sharper, thinner lines. -
Draft the back legs:
On the side of the body facing the ear, paint four thin, spindly legs. These should curve backward and vary slightly in length, looking like they are gripping the skin. -
Sketch the front arms:
Extending from the head area towards the nose, draw the two main arms. These should be thicker than the legs and curve outward. -
Add the upper pincer:
On the upper arm, paint a distinct claw shape. It should look like an incomplete oval or a crab claw, positioned right under the eye socket area. -
Add the lower pincer:
On the lower arm extending down the cheek, paint the second claw. Make this one slightly larger and more dramatic, curving inward. -
Refine the edges:
Go back over your outlines. Look for any transparent spots in the black paint and fill them in carefully to ensure a solid matte finish.
Troubleshooting Smudges
If the black paint looks streaky or grey instead of solid black, your brush has too much water. Blot it on a paper towel and reload heavily with pigment for opaque coverage.
Step 4: The Tribal Neck Accent (Optional)
-
Dilute the paint:
If you want the greyish, faded look seen on the neck in the reference, dilute your black paint with extra water to create a wash, or use a grey face paint. -
Paint the spine:
On the side of the neck, paint a central vertical line roughly two inches long. -
Add the ribs:
Paint horizontal curved lines crossing the vertical spine. These should look like a ladder or a stylized tribal pattern. -
Sharpen the tips:
Use the very tip of your brush to pull sharp points outward from the ends of the ‘ribs’ to give it a fierce, serrated look. -
Final check:
Look at the design from a slight distance. Use a damp Q-tip to clean up any smudged edges or to sharpen the point of the scorpion’s tail if needed.
Now you have a fierce creature design that looks ready to strike
Flames Brow and Cheek Boost
Ignite a sense of adventure with this dynamic flame design that bursts from the eye across the forehead and cheek. Combining sharp, graphic lines with soft blending, this look captures the movement of fire in vibrant reds and golden yellows.
How-To Guide
Materials
- High-density face paint (Red, Orange, Yellow)
- Round brush (size 4 or 5)
- Filbert brush or small sponge wedge
- Fine liner brush (size 1)
- Cup of water
- Paper towels or cloth
Step 1: Planning and Base Colors
-
Visualize the flow:
Before painting, visualize the shape. The design sweeps upwards from the inner corner of the eye, fanning out across the forehead like a crown, and trails down the cheekbone. -
Start with yellow:
Load a filbert brush or a small corner of a damp sponge with bright yellow face paint. Keep the consistency creamy but not dripping. -
Create the glowing core:
Apply the yellow over the eyelid, inner corner of the eye, and the bridge of the nose. This will be the hottest part of your flame. -
Extend the base:
Drag that yellow colour slightly under the eye and upwards onto the forehead, creating a messy, uneven edge where the orange will later act.
Muddy colors?
If your red and yellow are mixing into a brown mess, let the yellow base layer dry completely before painting red on top. Layering wet-on-wet requires a very light hand.
Step 2: Building the Heat
-
Introduce orange:
Switch to a clean filbert brush loaded with orange. Begin applying this color around the edges of your yellow patch, particularly above the eyebrow and on the outer cheekbone. -
Blend the transition:
While the paints are still tacky, use soft, short strokes to blend the orange into the yellow. You want a gradient, not a hard line. -
Shape the flame body:
Extend the orange further up the forehead and down the cheek, creating the main body of the fire shape. -
Load the red:
Now, load a #4 round brush with deep red paint. This color defines the intense outer tips of the fire.
Step 3: Defining the Flames
-
Draft the forehead spikes:
Using the red brush, press down to create the base of a flame lick on the forehead, then flick the brush upward, lifting pressure to create a sharp point. -
Create vertical rhythm:
Repeat this flicking motion across the forehead. Vary the height of each flame tip; some should reach high into the hairline, while others stay lower. -
Sweep down the cheek:
On the side of the face, create a long, sweeping flame tail that curves from the temple down towards the jawline. -
Connect the outline:
Use the red to outline the upper edge of the orange section, integrating those spikes into the main design so it looks cohesive. -
Detail the nose bridge:
Add smaller red accent flicks on the bridge of the nose, radiating outward from the inner eye corner.
Sparkle finish
Before the paint fully dries, puff a tiny bit of cosmetic-grade gold glitter onto the wet yellow areas. It adds a magical, flickering effect in the sunlight.
Step 4: Highlights and Fine Details
-
Prepare the yellow liner:
Clean your fine liner brush thoroughly and load it with opaque yellow paint. Ensure the consistency is inky for smooth lines. -
Add inner sparks:
Draw thin, sharp yellow lines inside the red flame tips on the forehead. This mimics the inner core of a flame flickering upward. -
Create radial sunbursts:
Under the eye, paint small sun-ray strokes using the yellow, pointing downwards onto the cheek. -
Define the eye:
Add a few tiny yellow flicks emerging from the inner corner of the eye, moving up towards the brow to connect the nose bridge design. -
Final check:
Step back and check for symmetry. I like to add a tiny touch of extra red to the very tips of the longest flames to make them pop.
Now you have a fierce fire design ready for action
Pixel Block Game Face
Bring the world of block-building games to life with this iconic green pixel monster design. This simple yet striking cheek art uses geometric shapes and contrasting greens to create that recognizable 8-bit look that young gamers love.
Detailed Instructions
Materials
- Light green face paint (water-activated preferred)
- Dark green face paint
- Black face paint
- Small flat brush (size 2 or 4)
- Small square-tipped shader brush (optional but helpful)
- Cup of clean water
- Paper towels for blotting
Step 1: Setting the Foundation
-
Clean the canvas:
Start with a clean, dry cheek. Use a baby wipe or a damp cloth to remove any oils or dirt, which helps the paint adhere better and last longer. -
Load the light green paint:
Dip your flat brush into the water, then work it into the light green face paint until you have a creamy consistency. You don’t want it too watery, or the squares will drip. -
Paint the first central square:
Locate the center of the cheek area where you want the design. Using the flat edge of your brush, stamp or carefully paint a single light green square. This will anchor your design. -
Add adjacent light squares:
Paint two more light green squares diagonally touching the corners of your first square to begin forming a loose checkerboard pattern. Keep the edges as straight as possible. -
Clean your brush:
Rinse your brush thoroughly in the water cup and blot it dry on a paper towel to ensure no light green pigment remains.
Step 2: Building the Pattern
-
Prepare the dark green:
Load your cleaned brush with dark green paint. Aim for the same creamy opacity as the first color so the texture looks uniform. -
Fill the gaps:
Paint dark green squares in the empty spaces next to your light green ones. I find it easiest to visualize a grid and simply fill in the missing puzzle pieces. -
Create the signature shape:
Extend the pattern by adding a dark green square slightly below the center cluster. The goal is to make an uneven, pixelated cluster rather than a perfect square block. -
Check for symmetry:
Step back slightly to ensure your squares are roughly the same size. If one looks too small, carefully dab a bit more paint on the edges to expand it. -
Let the greens dry:
Pause for a minute to let the green layers set completely. This prevents the black paint from bleeding into the green in the next steps.
Wobbly Lines?
If your squares look messy, use a flat-edged brush or a small sponge cut into a square shape. Dip it in paint and “stamp” it onto the skin for perfect uniformity.
Step 3: Adding the Darkest Details
-
Load black paint:
Clean your brush again and load it with black face paint. Be careful not to overload it; you need precise control for the darkest pixels. -
Paint the ‘face’ pixels:
Add two or three black squares interspersed within your green cluster. These represent the eyes and mouth of the pixel character. -
Position the black squares:
Place one black square near the bottom center and two diagonally above it to mimic the creature’s facial features. -
Sharpen the edges:
If any corners look rounded, use the very tip of your flat brush with a tiny amount of paint to square them off for that crisp, digital look. -
Final touch-ups:
Look for any skin showing through the paint. If you spot gaps between the squares, carefully fill them with the appropriate color to make the block solid.
Pro Tip: Long Lasting
To keep the pixel art pristine during active play, lightly dust the finished, dry design with translucent setting powder to prevent smudging.
Now your little gamer is ready to build and explore with their new digital disguise
Galaxy Explorer Visor
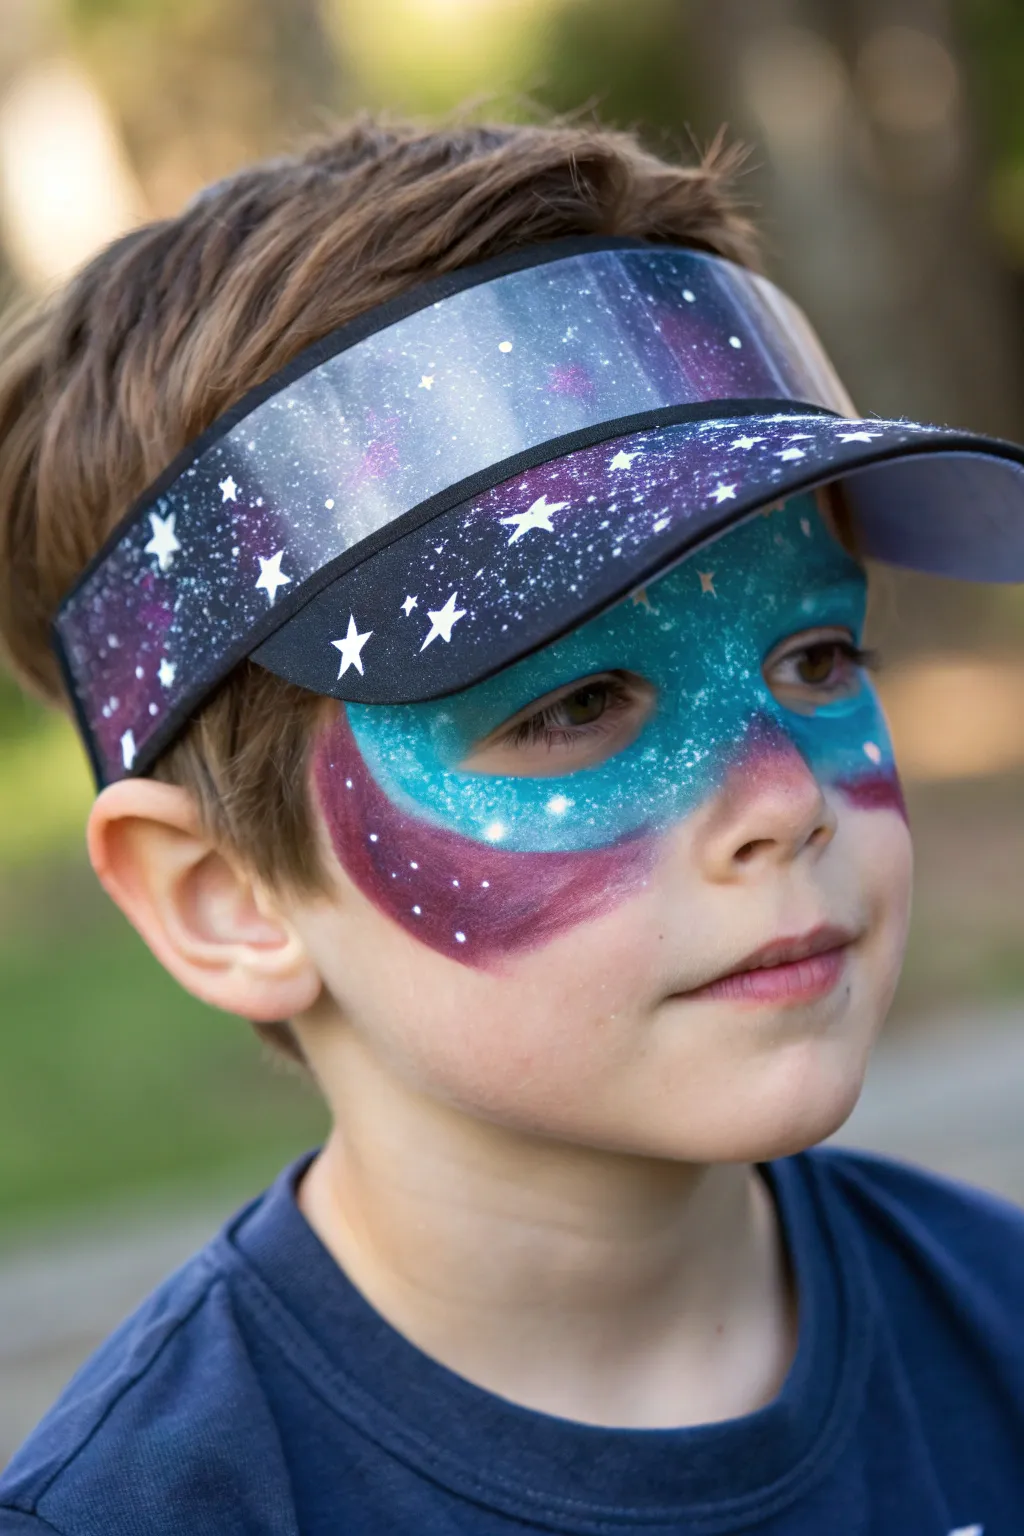
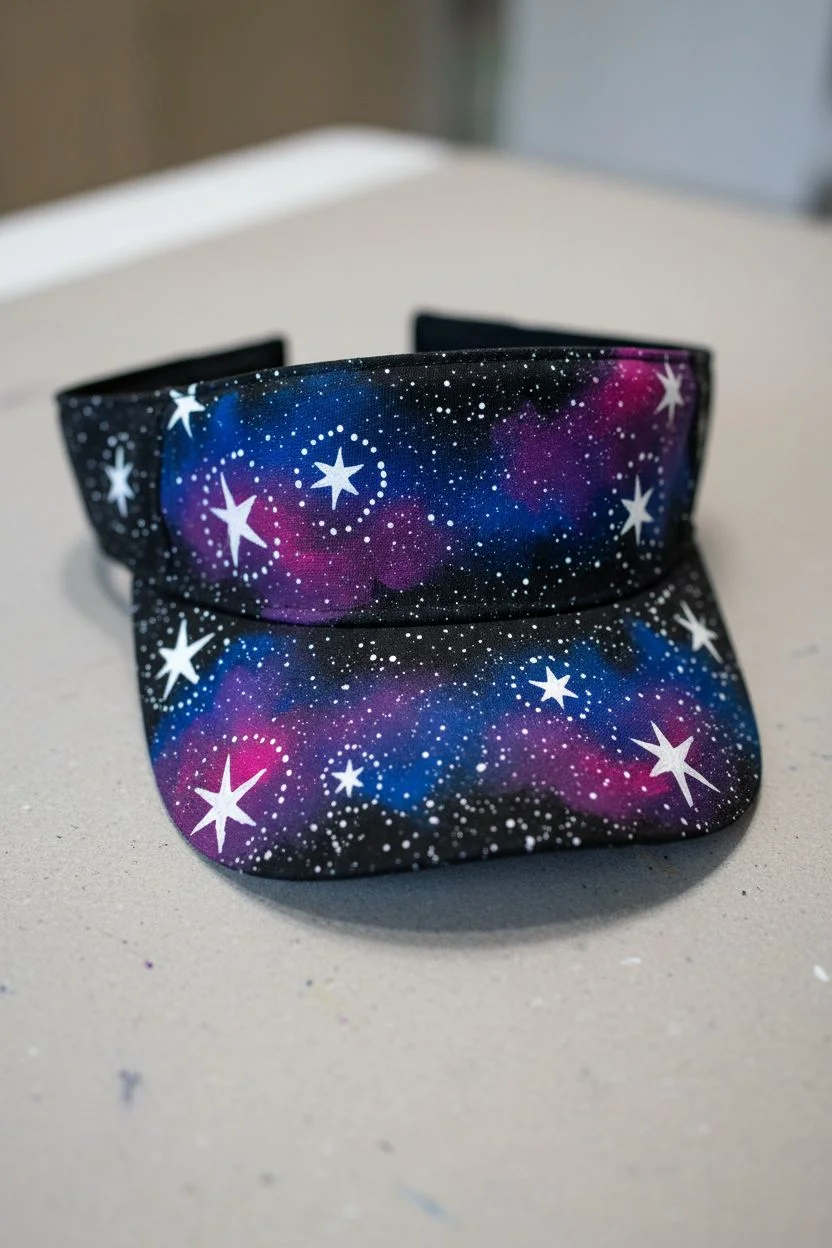
Transform a plain sun visor into a window to the cosmos and pair it with a stunning painted galaxy mask. This coordinated look combines easy fabric painting techniques with bold face art for an out-of-this-world costume.
Step-by-Step Guide
Materials
- Black fabric sun visor
- Fabric paints (black, dark blue, purple, magenta, white)
- Face paints (teal/light blue, purple/magenta, white)
- Cosmetic sponges (wedge)
- Round brushes (small and fine liner)
- Flat shader brush
- Toothbrush (for splattering)
- Cup of water and paper towels
Step 1: Painting the Visor
-
Prepare the base:
Start with a plain black visor. If your visor isn’t black, paint the entire surface with black fabric paint and let it dry completely to create a deep space background. -
Sponge on nebula clouds:
Dampen a cosmetic sponge slightly and load it with dark blue fabric paint. Lightly dab irregular patches onto the brim and headband. -
Layer the colors:
While the blue is tacky, use a fresh sponge to dab purple paint over parts of the blue and onto the black areas, blending the edges softly. -
Add highlights:
Using a very small amount of magenta or pink on a sponge, tap highlight areas into the center of your purple nebula clouds to create depth. -
Paint larger stars:
Dip a small round brush into white fabric paint. Paint distinct five-pointed stars scattered across the brim, varying their sizes for a realistic effect. -
Create star clusters:
Use a fine liner brush or a toothpick to add tiny white dots in groups around the larger stars. -
Splatter final stars:
This is the fun part: dip an old toothbrush in watered-down white paint, point it at the visor, and run your thumb across the bristles to spray a fine mist of distant stars. Let the visor dry completely.
Step 2: Creating the Galaxy Face Mask
-
Outline the mask shape:
On the face, visualize a superhero mask shape. Use a damp sponge loaded with teal or light blue face paint to block out the area around the eyes and across the bridge of the nose. -
Extend the galaxy wings:
Load a sponge with purple or magenta face paint. Sweep two curved shapes extending from the teal mask down onto the cheekbones, creating a ‘wing’ effect under the eyes. -
Blend the transition:
Where the teal meets the purple, use a clean, slightly damp sponge to gently pat the seam so the colors merge into a soft ombre gradient. -
Deepen the shadows:
I find that adding a tiny touch of black or deep blue to the outer edges of the purple swoops adds dramatic dimension to the galaxy. -
Paint the bridge stars:
Dip a fine round brush in white face paint. Paint a few four-pointed ‘sparkle’ stars on the bridge of the nose within the teal area. -
Add constellation dots:
Add small white dots scattered through the teal section, mimicking the star field on the visor. -
Highlight the cheek wings:
On the lower purple swoops, add a few tiny white dots and perhaps one larger star to balance the design. -
Coordinate the look:
Once the paint is dry, place the finished visor on the head so the fabric pattern aligns visually with the painted face mask.
Muddy Galaxy Colors?
If your sponge blending turns brown or gray, let the first color layer dry completely before adding the next. Wet-on-wet mixing can sometimes over-blend contrasting colors.
Sparkle Upgrade
While the face paint is still slightly damp, gently puff cosmetic-grade iridescent glitter over the teal section. It catches the light just like a real nebula.
Now you are ready to launch into your own space adventure with a perfectly matched headset and mask


Have a question or want to share your own experience? I'd love to hear from you in the comments below!