Painting on a black canvas feels like cheating in the best way—instant drama, instant mood, and your bright colors look like they’re practically glowing. If you want easy, beginner-friendly projects where the dark background works as built-in negative space, these ideas will keep things simple and seriously striking.
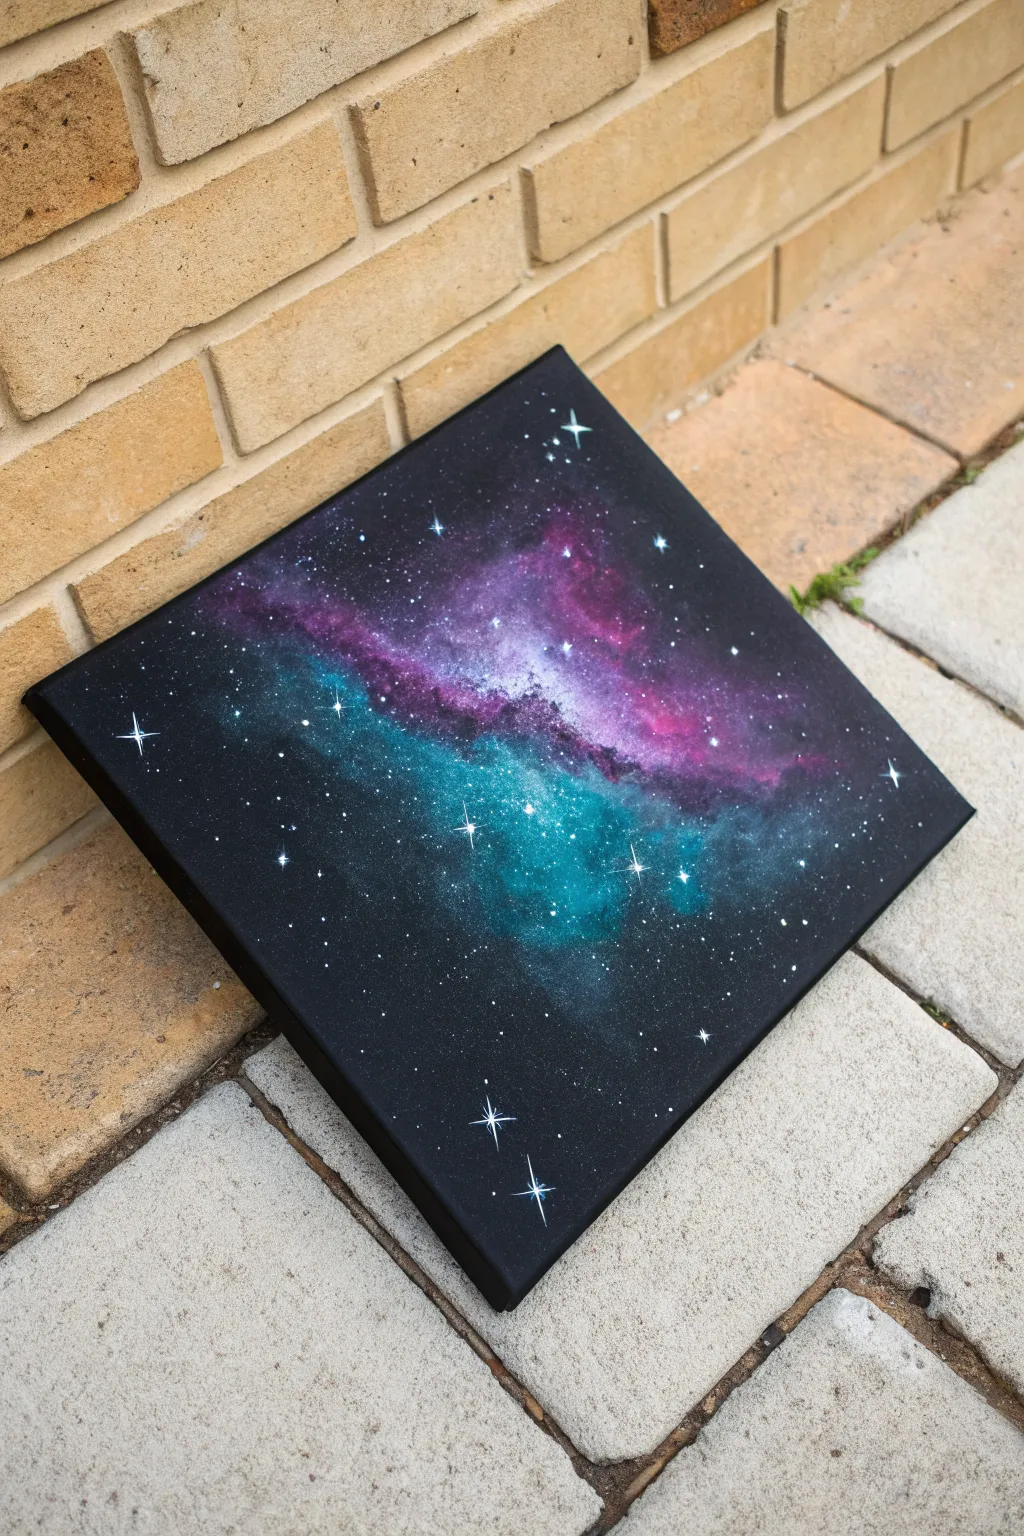
Classic Starry Night Sky
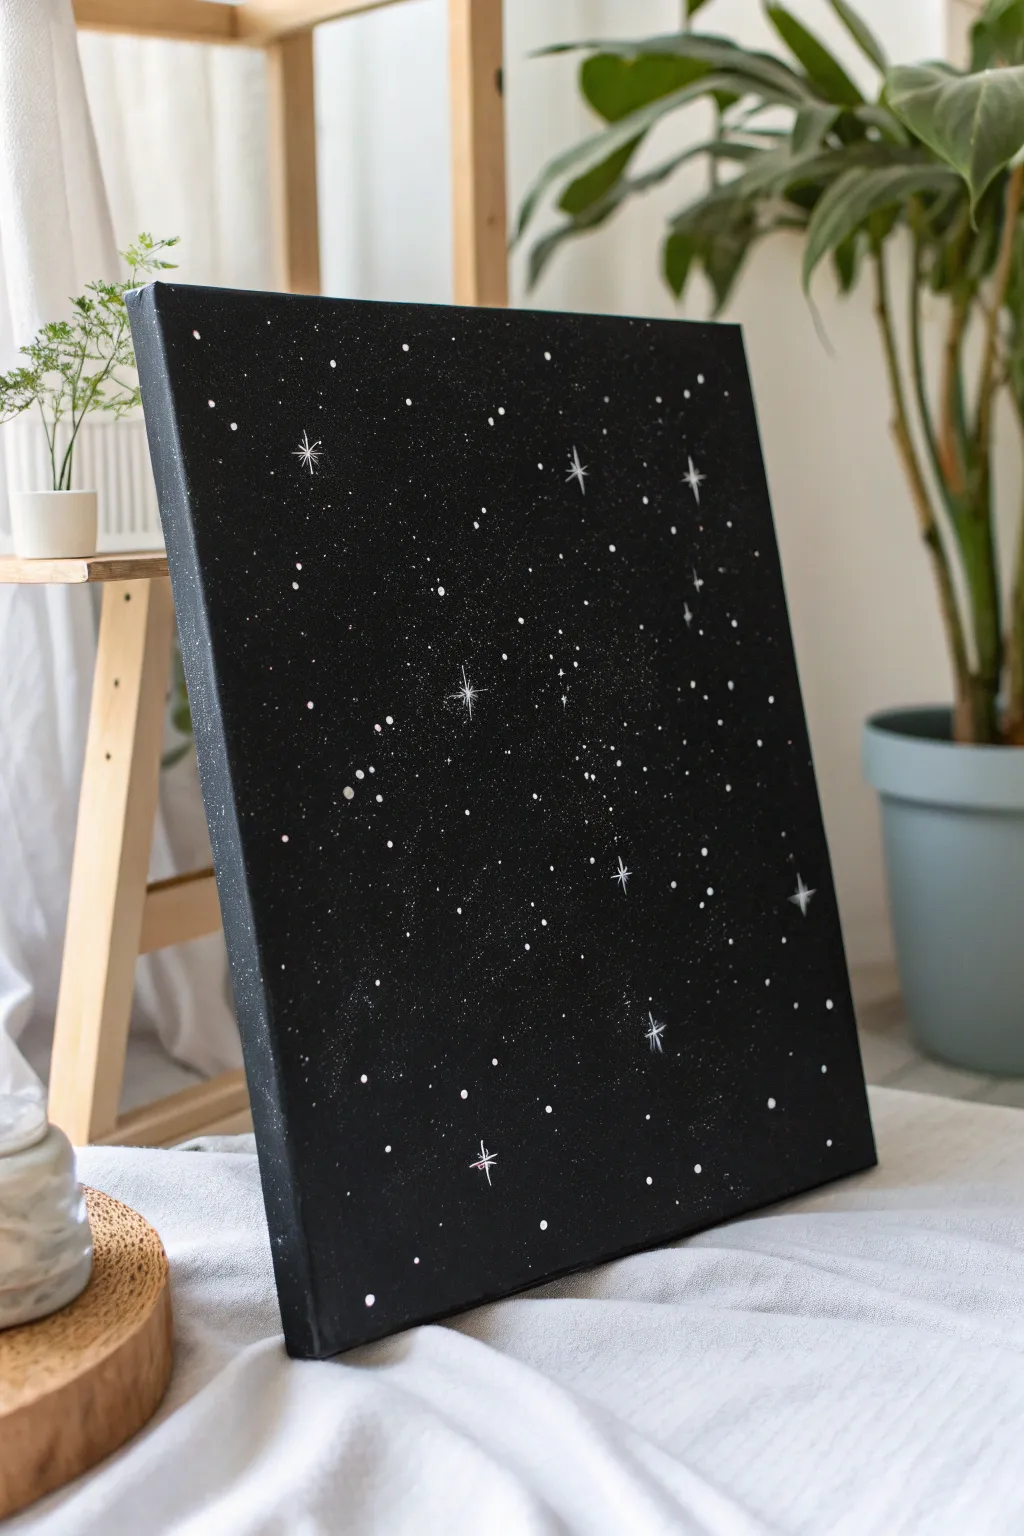
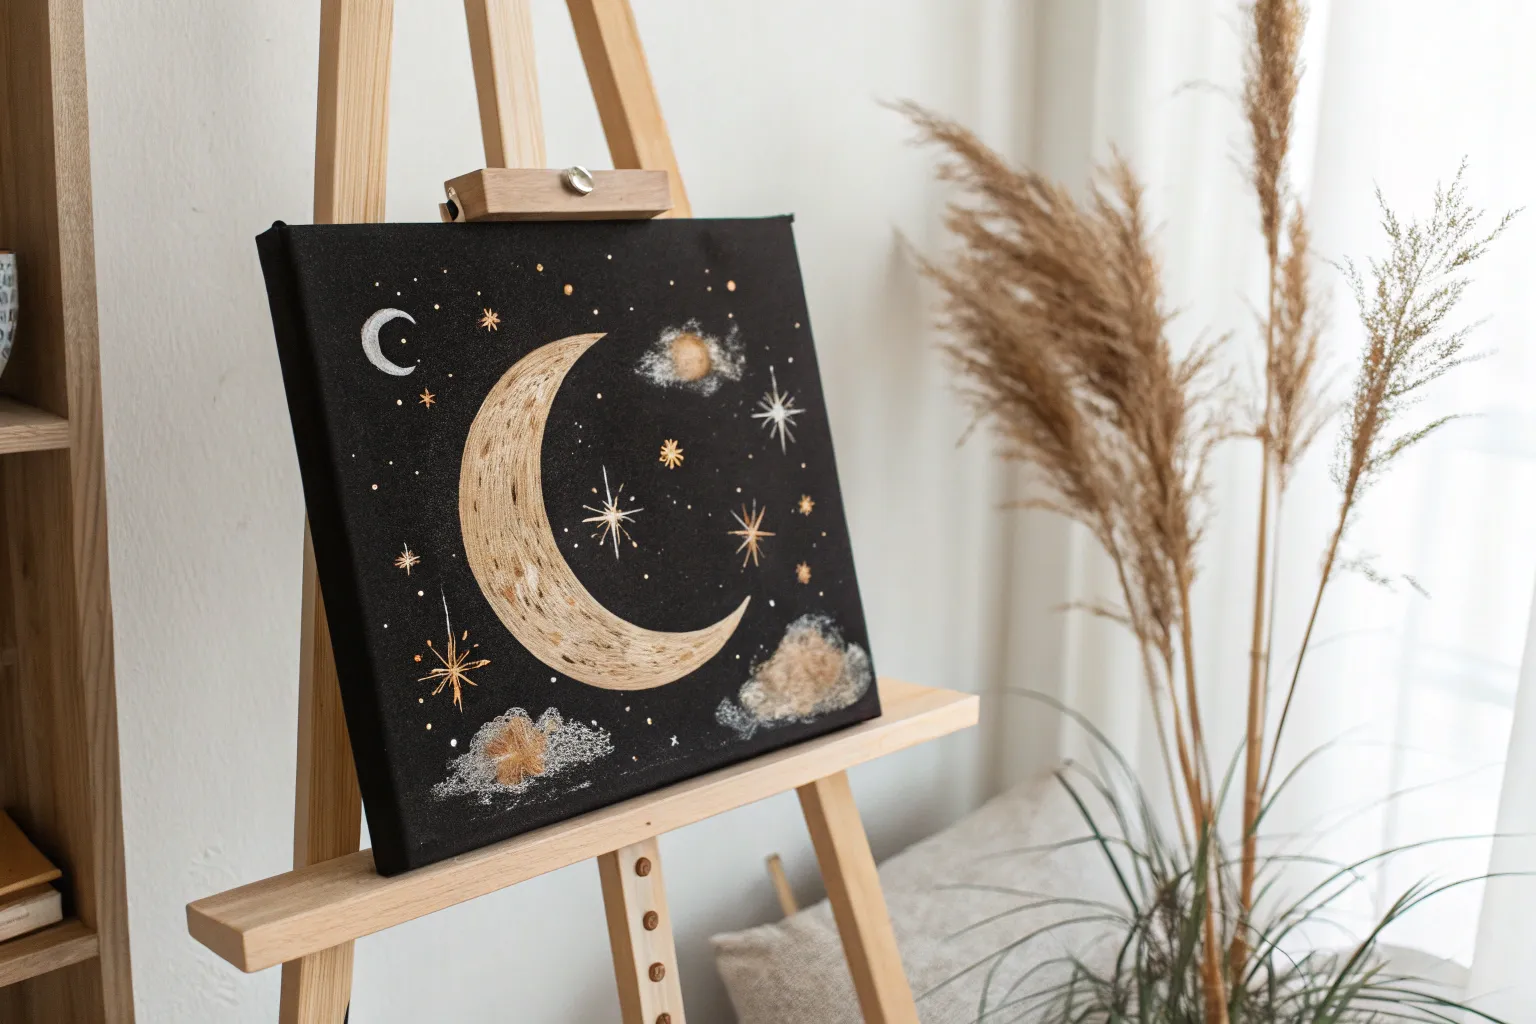
Transform a plain black canvas into a serene slice of the universe with this elegant and surprisingly simple project. By combining scattered stardust with hand-painted glimmering stars, you’ll create a sophisticated piece of decor that fits perfectly with modern interiors.
Step-by-Step Guide
Materials
- Rectangular stretched canvas (black primed, or white primed + black acrylic paint)
- Black acrylic paint (matte or satin finish)
- White acrylic paint (titanium white is best for opacity)
- Medium flat brush (for background)
- Small round detail brush (size 0 or 00)
- Old toothbrush or stiff bristle brush
- Paper plate or palette
- Water cup and paper towels
- Ruler (optional)
Step 1: Setting the Darkness
-
Prepare your canvas:
If you bought a pre-primed black canvas, wipe it down to remove any dust. If you are starting with a white canvas, this is your first step to transformation. -
Apply the base coat:
Using your medium flat brush, apply a smooth, even layer of black acrylic paint across the entire surface. Don’t forget to paint the edges and sides of the canvas for a polished, gallery-ready look. -
Ensure opacity:
Let the first coat dry completely. If you can still see canvas texture or streaks, apply a second coat of black to ensure a deep, void-like background. -
Complete drying:
Allow the black background to dry fully before moving on to the white paint. This prevents the stars from turning gray by mixing with wet base paint.
Starry Precision
To get super fine mist stars, use a toothbrush with stiffer bristles. Softer brushes create larger, blobbier splashes. Keep the brush dry before loading paint.
Step 2: Creating the Galaxy
-
Prepare the splatter paint:
Squeeze a small amount of white acrylic paint onto your palette. Mix in a few drops of water until the consistency resembles thin splashes of heavy cream or ink. It needs to be fluid but not transparent. -
Test your splatter:
Dip an old toothbrush or a stiff bristle brush into the thinned white paint. Test the splatter on a scrap piece of paper first by running your thumb across the bristles to flick the paint. -
Create the distant stars:
Hold the brush about 6-8 inches away from the black canvas. Gently flick the bristles to create a fine mist of tiny white dots across the surface. -
Add variance:
Focus the density of the spray in a diagonal drifting pattern across the canvas to mimic the Milky Way, leaving some areas sparser for balance. -
Larger individual stars:
Take your small round detail brush and dip it into un-thinned white paint. Dot random larger stars throughout the galaxy to create depth and variety amongst the fine mist.
Step 3: Painting the Twinkles
-
Plan the hero stars:
Identify about 5 to 7 spots where you want to place detailed, four-pointed ‘twinkle’ stars. I prefer to place these in the empty black spaces rather than over dense clusters. -
Paint the vertical line:
Using your finest detail brush (size 00 is ideal), paint a very thin vertical line. Start from the center and flick outward to keep the ends tapered and sharp. -
Paint the horizontal line:
Paint a matching horizontal line crossing through the center of the vertical one. Try to keep this line slightly shorter than the vertical one for a stylized look. -
Refine the center:
Add a tiny dot of white paint right where the lines intersect to make the star’s core glow the brightest. -
Add subtle rays (optional):
For the largest stars, you can add two extremely short diagonal lines at the center intersection for extra sparkle. -
Review and touch up:
Stand back and look at the composition. If a certain area looks too empty, add a few more manual dots or a tiny cross-star to balance it out.
Add Subtle Color
Before splattering white, sponge on very faint, sheer patches of deep navy or purple into the black background for a nebular deep-space effect.
Once dry, hang your personal galaxy on the wall and enjoy the calm of deep space


Simple Galaxy With Sponge Blends
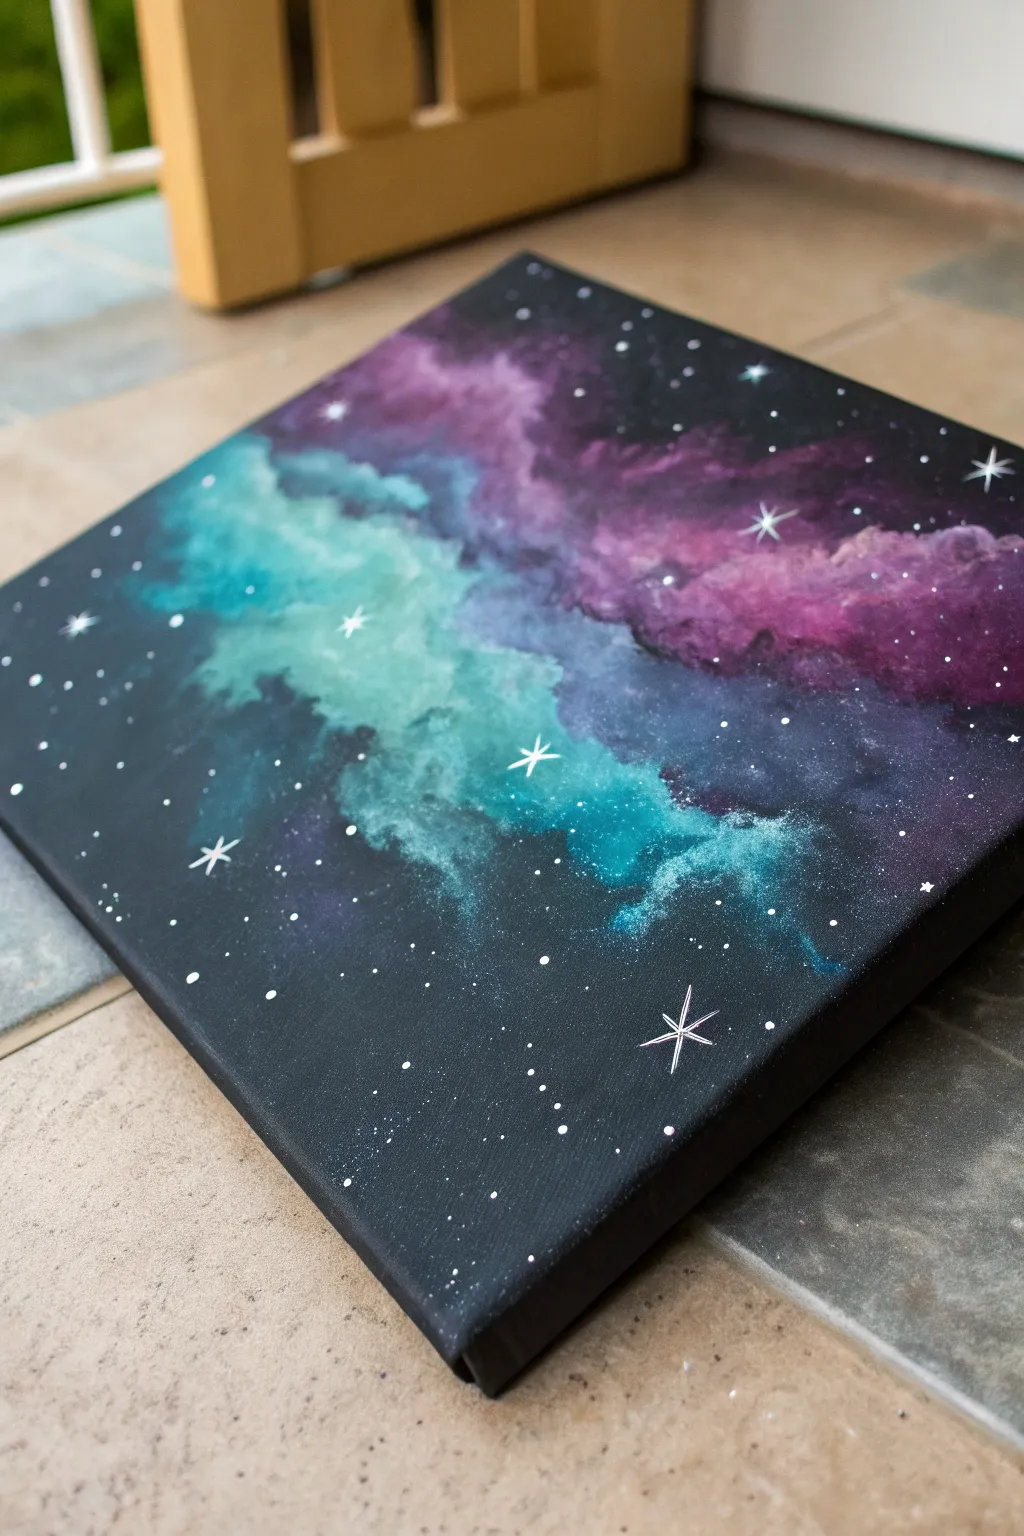
Capture the ethereal beauty of deep space with this vibrant galaxy painting on black canvas. Using simple sponge blending techniques, you will create soft, glowing nebellas in teal and magenta that pop against the dark background.
Detailed Instructions
Materials
- Square stretched canvas (black primed, or primed with black acrylic)
- Acrylic paints: Titanium White, Phthalo Turquoise (or Teal), Magenta (or Violet)
- Clean kitchen sponge or cosmetic wedge sponges
- Small round brush (size 1 or 2)
- Detail liner brush (size 0 or 00)
- Cup of water
- Paper towels or palette paper
Step 1: Setting the Background
-
Prepare the Surface:
If your canvas isn’t already black, give it a solid coat of black acrylic paint. Ensure the coverage is opaque and even, painting the sides as well for a finished look. Let this base layer dry completely before proceeding. -
Plan the Composition:
Visualize a diagonal flow across your canvas. The main galaxy cloud will drift from the top left towards the bottom right, with the two colors meeting and mingling in the center.
Hard Edges?
If your sponge marks look like stamps, your sponge is too wet or has too much paint. Dab excess onto a paper towel until the texture is almost dry before touching the canvas.
Step 2: Creating the Nebula
-
Load the Teal Sponge:
Dampen a sponge slightly and squeeze out all excess water. Dip a corner into your turquoise or teal paint. Dab it onto your palette first to remove excess paint; you want a dry-brush texture, not a wet blob. -
Apply the First Cloud:
Gently dab the teal sponge onto the canvas, starting from the left side. Create an irregular cloud shape, keeping the pressure light to let the black canvas show through the edges for a smoky effect. -
Load the Magenta Sponge:
Take a fresh piece of sponge (or a clean corner) and load it with magenta paint. Again, offload the excess paint onto your palette to ensure a soft, airy application. -
Apply the Second Cloud:
Dab the magenta paint starting from the right side, moving diagonally toward the center. Allow the cloud to be dense in the middle and fade out softly at the edges. -
Blend the Meeting Point:
Where the teal and magenta clouds meet in the center, gently dab them over each other. Don’t overwork this area—let the colors sit side-by-side or slightly overlap to create a deep, shadowy purple transitional zone. -
Add Depth with White:
Mix a tiny amount of white into your teal paint to create a lighter shade. With a clean corner of the sponge, dab this highlight into the center of the teal cloud to make it look glowing and dimensional. -
Highlight the Magenta:
Repeat the highlighting process for the magenta side. Mix a little white into the magenta and dab it sparingly into the brightest parts of the pink cloud. This creates a core ‘glow’ within the nebula. -
Soften the Edges:
If any edges look too hard or distinct, take a mostly clean, dry sponge and very gently tap over the perimeter of your clouds to blur them further into the black background.
Make it Sparkle
Mix a tiny pinch of silver glitter or iridescent medium into your white paint for the larger stars. It adds a subtle shimmer that changes as you walk past the art.
Step 3: Adding the Stars
-
Prepare the Splatter Paint:
Mix a small amount of white paint with water until it reaches an ink-like consistency. It needs to be fluid enough to splatter easily but opaque enough to show up on black. -
Create the Starfield:
Load a small brush with the watered-down white paint. Hold it over the canvas and tap the handle against another brush or your finger to spray fine speckles across the painting. Focus more splatter near the nebula clouds. -
Paint Larger Distant Stars:
Using the tip of your small round brush and pure white paint, carefully dot a few specific stars around the canvas. Make some slightly larger than the splatters to create variety in size. -
Draft the Focal Stars:
Choose 3-5 spots for your large ‘twinkle’ stars. Using a liner brush, paint a simple cross shape (+) at these points. Keep the lines very thin and delicate. -
Detail the Twinkles:
Over the cross shape into an asterisk pattern by adding a smaller ‘X’ through the center. Extend the vertical and horizontal lines slightly so they are longer than the diagonal ones. -
Refine the Points:
Use your liner brush to gently pull the tips of the main cross outward, tapering them into sharp points. This gives the stars that classic ‘lens update’ glimmer. -
Final Adjustments:
Step back and look at your composition. If the center feels empty, add one or two tiny dots of white near the meeting point of the colors to bridge the hap.
Allow the paint to fully cure before displaying your piece of the universe


Full Moon With a Soft Halo Glow
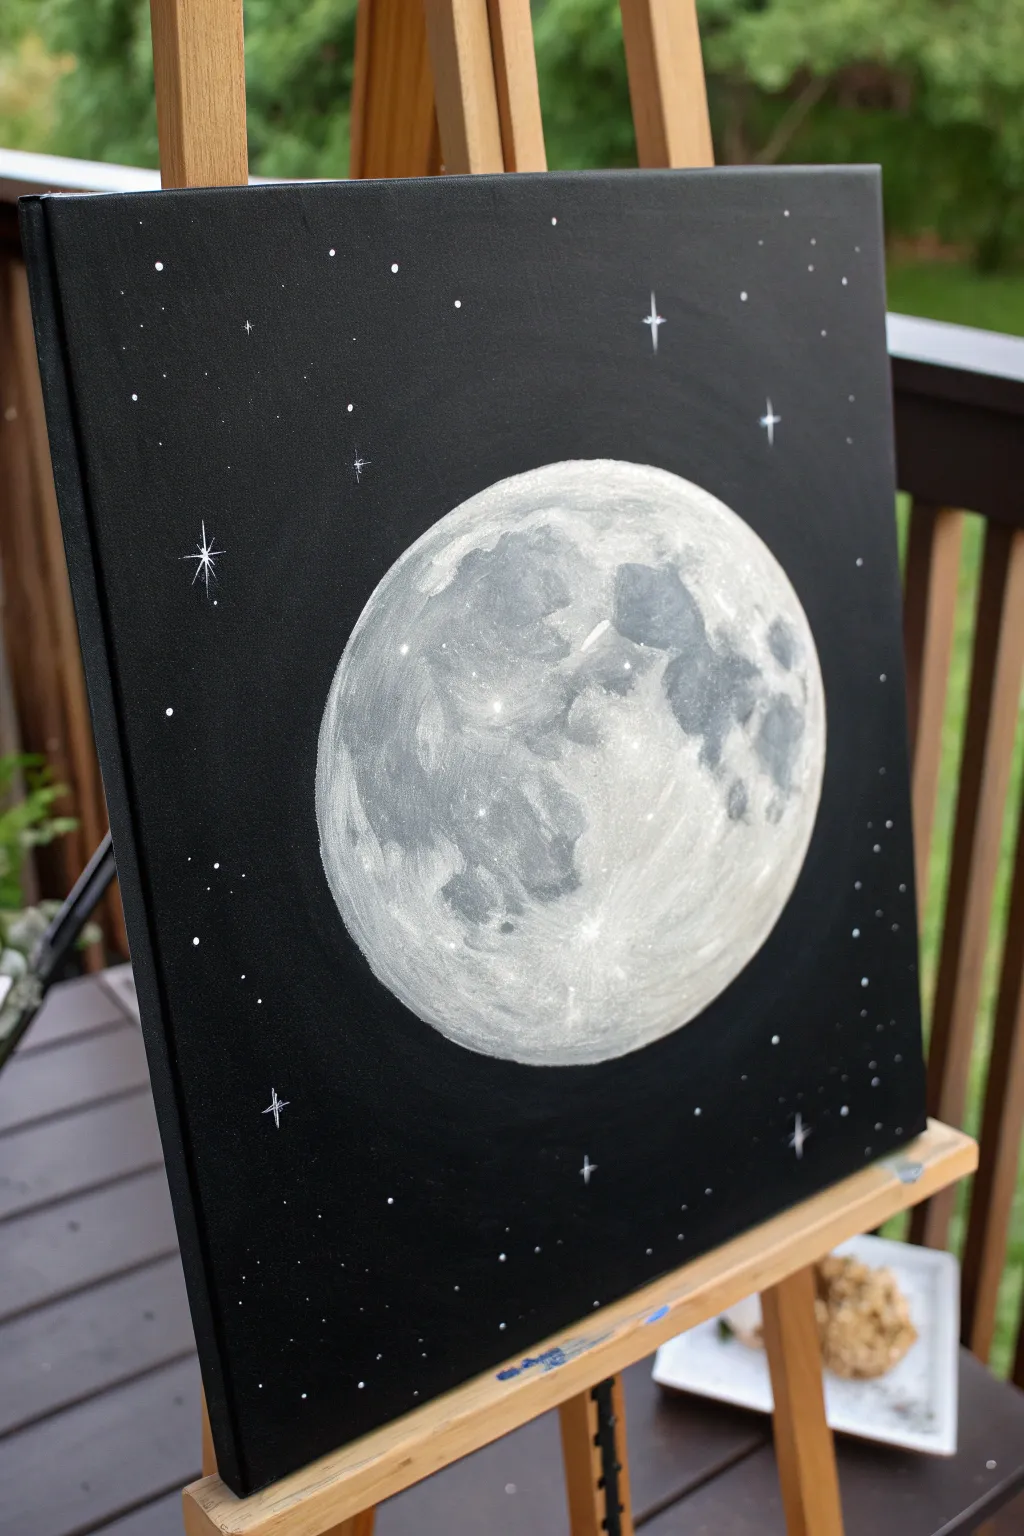
Capture the serene beauty of a moonlit night with this surprisingly simple painting technique. Using just a few shades of grey and white on a stark black background creates a stunning, high-contrast piece perfect for beginners.
Step-by-Step Tutorial
Materials
- Black stretched canvas (square format recommended)
- Acrylic paints: Titanium White, Mars Black, Neutral Grey
- Large flat brush or sponge pouncer (for the circle base)
- Small round detail brush
- Filbert brush or small flat brush
- Circular object for tracing (plate, bowl, or lid)
- White charcoal pencil or chalk
- Palette for mixing
- Water cup and paper towels
Step 1: Setting the Scene
-
Prepare the canvas:
If you aren’t using a pre-primed black canvas, start by painting a regular white canvas completely black. Use Mars Black or Lamp Black for deep coverage and let it dry completely before moving on. -
Trace the moon:
Center your circular object (like a small plate or lid) on the canvas. Lightly trace around it using a white charcoal pencil or a piece of chalk. This guideline ensures your moon is perfectly round.
Sponge Texture Trick
Use a small piece of natural sea sponge instead of a brush for the moon’s surface. Dabbing with a sponge creates instant crater-like texture that looks incredibly realistic with zero effort.
Step 2: Building the Moon’s Surface
-
Base coat:
Mix a medium grey shade using black and white paint. Using a filbert brush, fill in the entire circle with this flat grey color. Don’t worry about texture yet; just get solid coverage inside your chalk line. -
Mapping the craters:
Look at the reference image to see where the dark patches (the lunar ‘seas’) are located. Mix a darker charcoal grey and roughly dab these shapes onto the moon while the base is still slightly tacky. -
Start the texture:
Switch to a dry brush technique. Load a small amount of light grey paint onto a stiff brush and wipe most of it off on a paper towel. Gently scumble or dab this over the lighter areas of the moon to create a rough, cratered look. -
Deepen the shadows:
I like to go back in with a very dark grey (almost black) to define the deepest craters. Focus these darker spots near the edges of the grey patches you painted earlier to create depth. -
Brighten the highlights:
Mix a very pale grey, almost white. Using a dabbing motion with a small brush or even a scrunched-up piece of paper towel, apply this to the brightest parts of the moon, specifically the bottom right quadrant and the areas between the dark craters. -
Pure white accents:
Using your smallest round brush and pure Titanium White, add tiny dots and small streaks inside the lightest grey areas. This mimics the bright peaks of lunar mountains catching the sunlight. -
Create the halo effect:
To make the moon glow, mix a translucent glaze by watering down a tiny bit of white paint (or use glazing medium). Very lightly brush this along the outer edge of the moon, fading it out into the black background.
Level Up: Color Tint
Before the white accents dry, glaze a tiny drop of Phthalo Blue or Dioxazine Purple over the dark crater areas. It adds a subtle, magical coldness to the moon surface.
Step 3: Starlight and Details
-
Add distant stars:
Dip a toothbrush or stiff brush into watered-down white paint. Hold it over the canvas and flick the bristles to create a spray of tiny, distant stars. Practice on a scrap paper first to control the splatter size. -
Paint prominent stars:
Using your fine detail brush, dip into pure white paint to create larger individual stars. Place dots randomly around the sky, varying their sizes slightly for a natural look. -
Create twinkling stars:
Choose a few of your larger star dots to turn into twinkling ‘cross’ stars. Paint a very thin vertical line through the dot, followed by a shorter horizontal line intersecting it. -
Refine the edges:
If your moon’s edge got messy during the texturing phase, take a small brush with black paint and carefully clean up the outside perimeter to make it crisp again. -
Final highlights:
Step back and look at the painting from a distance. Add a final touch of pure white to the very center of the ‘twinkle’ stars to make them pop against the dark background.
Hang your lunar masterpiece in a spot where it can remind you of the peaceful night sky


Pine Tree Silhouettes Against Moonlight
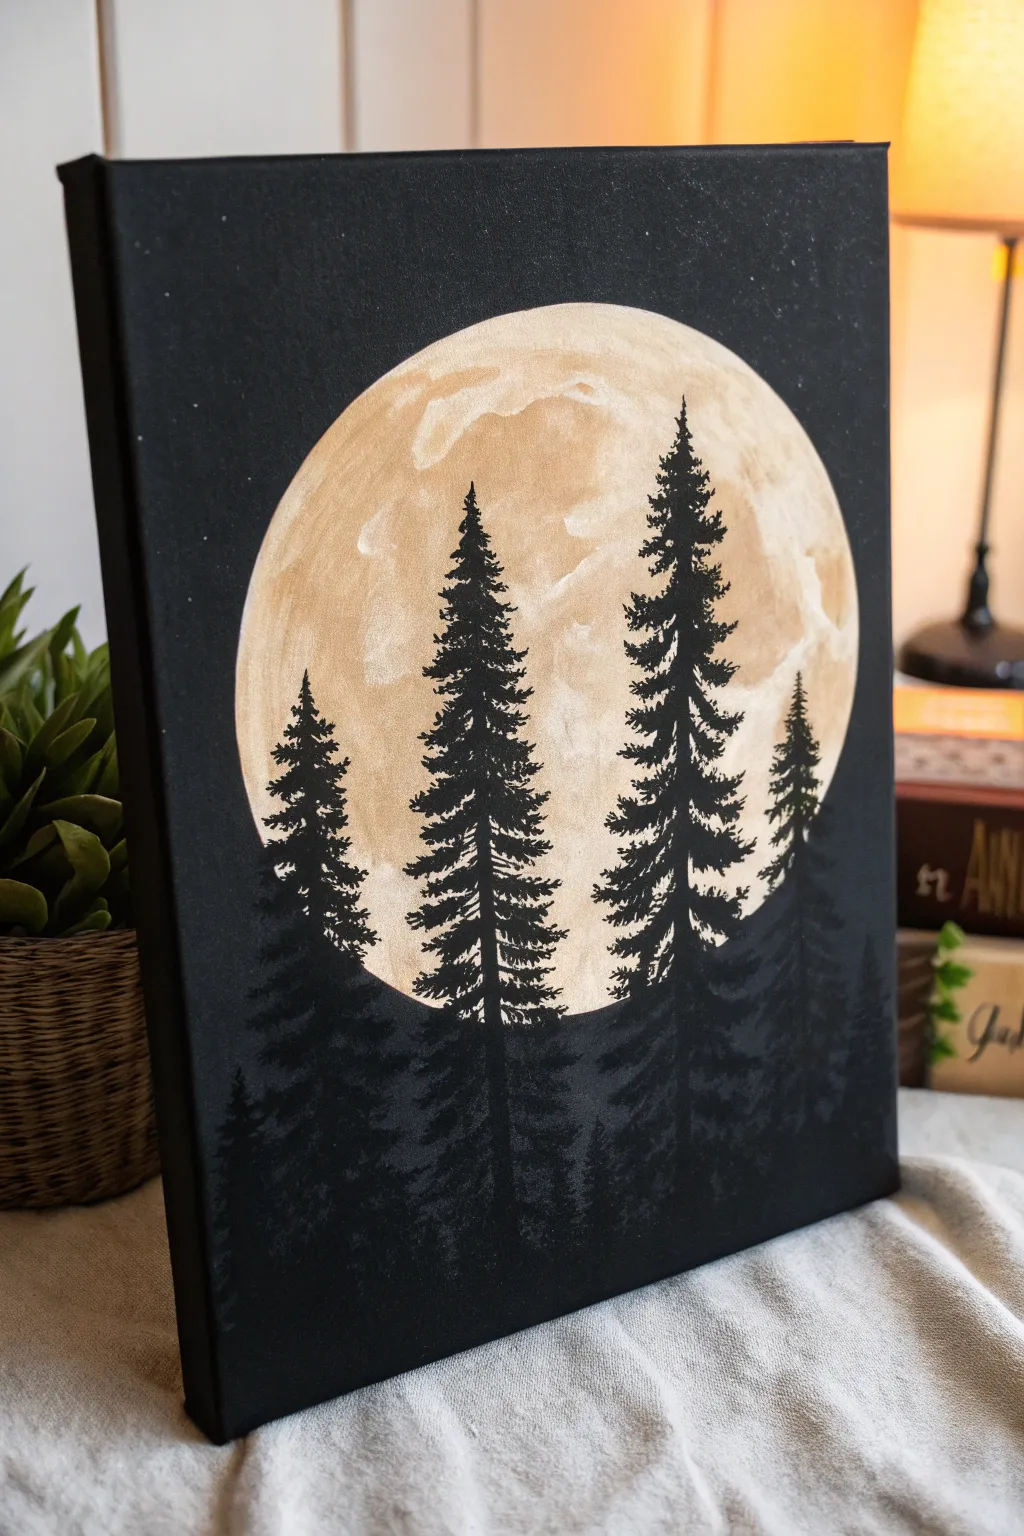
This striking project utilizes the stark contrast of a black canvas to make a glowing moon truly pop. By layering simple pine tree silhouettes over a textured lunar background, you can create a moody and atmospheric piece of art with surprising ease.
Step-by-Step Guide
Materials
- Black stretched canvas (8×10 or 11×14 inch)
- Titanium White acrylic paint
- Unbleached Titanium or heavy cream acrylic paint
- Mars Black acrylic paint
- Circular object for tracing (bowl, plate, or lid)
- White chaco liner or chalk pencil
- Flat shader brush (medium)
- Small round sponge or stipple brush
- Fine liner brush (size 0 or 00)
- Small flat or angle brush
Step 1: Setting the Scene
-
Prepare the canvas:
Start with a pre-gessoed black canvas. If you only have a white canvas, give it two solid coats of Mars Black acrylic paint and let it dry completely before proceeding. -
Trace the moon:
Position your circular object (like a bowl or plate) in the upper center of the canvas. It should be large enough to dominate the top two-thirds of the composition. -
Outline:
Lightly trace around the circular object using a white chalk pencil or chaco liner. Avoid using regular graphite pencil as it will be very difficult to see against the black.
Pro Tip: Sharp Edges
If you struggle to paint a perfect circle freehand, paint the moon first, let it dry, then place your bowl back over it as a mask while you paint the black background around it.
Step 2: Painting the Moon
-
Base coat:
Using your medium flat brush, fill in the circle with a mix of Unbleached Titanium (a beige/cream color) and a tiny touch of white. Don’t worry about making it perfectly opaque yet; some transparency adds texture. -
Add lunar texture:
While the base layer is still slightly tacky, switch to a small round sponge or a dry stipple brush. Dip it lightly into Titanium White. -
Sponge technique:
Dab the sponge gently onto a paper towel to remove excess paint, then blot it onto the moon in random patches. Focus on the upper left or lower right quadrants to suggest craters and lunar maria. -
Blend limits:
Soften the edges of your white patches by lightly tapping over them with a clean, dry brush if the sponge marks look too harsh. I find this helps the moon look spherical rather than flat. -
Clean the edge:
Once you are happy with the texture, use your small flat brush and the cream color to tidy up the outer circumference of the moon, ensuring it is a crisp, sharp circle. -
Dry completely:
Let the moon dry entirely. This is crucial because you will be painting black over it, and you don’t want the colors to muddy.
Level Up: Glow Effect
Glaze the outer rim of the moon with a very transparent layer of watered-down yellow or pale blue acrylic to give it a subtle, atmospheric halo effect.
Step 3: Creating the Silhouettes
-
Establish the ground:
Mix a small amount of Mars Black with a tiny drop of water to improve flow. Paint a low, uneven horizon line at the bottom of the canvas, covering the bottom inch or two. -
Position the trees:
Using a fine liner brush and black paint, draw vertical lines to mark the trunks of your trees. Place two tall ones directly overlapping the moon for high contrast, and shorter ones on the sides. -
Start the foliage:
Switch to a small angle brush or the tip of a small flat brush. Start at the very top of a tree trunk (the apex) and tap tiny horizontal dashes. -
Widen as you go:
Work your way down the trunk, making your tapping motions slightly wider as you descend. The shape should be triangular, narrow at the top and wide at the base. -
Create texture:
Don’t paint solid blocks; use a zigzag or tapping motion to leave gaps between the branches. Seeing the moon through the branches is what makes this realistic. -
Vary the density:
Make the trees on the outer edges (against the black background) slightly less detailed, and focus your sharpest details on the trees silhouetted against the bright moon. -
Anchor the trees:
Blend the bottom of the trees into your black foreground so they don’t look like they are floating. You can create a subtle suggestion of a second row of trees in the background using a dark grey if you want more depth. -
Add stars:
Dip an old toothbrush or stiff brush into watered-down white paint. Shield the moon and trees with a piece of paper, and flicker a fine mist of stars onto the black sky areas.
Let your painting dry completely before displaying your serene moonlit forest
BRUSH GUIDE
The Right Brush for Every Stroke
From clean lines to bold texture — master brush choice, stroke control, and essential techniques.
Explore the Full Guide
Mountain Ridge With a Neon Sunset Band
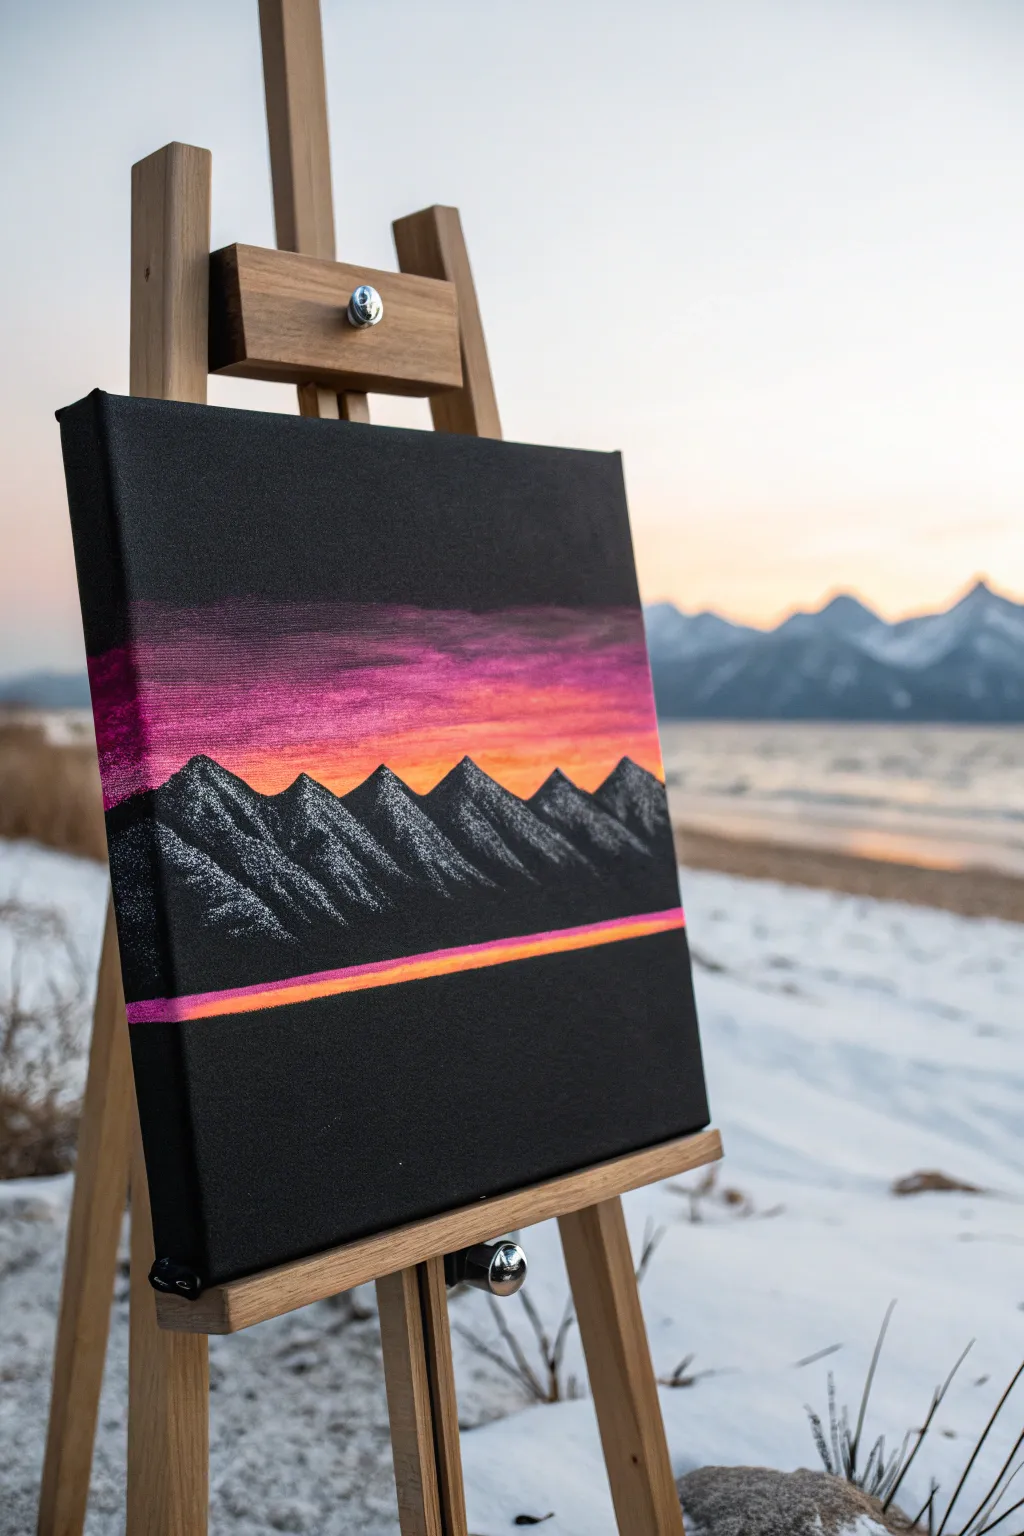
This striking landscape uses the dramatic contrast of a black canvas to make colors pop with neon intensity. The minimalist composition features a jagged mountain silhouette sandwiched between a glowing sunset sky and a matching reflection line.
Detailed Instructions
Materials
- Square stretched canvas (approx. 10×10 or 12×12 inches)
- Black gesso or black acrylic paint (matte)
- Acrylic paints: Magenta, Neon Pink, Orange, Yellow, Titanium White
- Flat shader brush (medium size)
- Small round detail brush
- Old stiff bristle brush or toothbrush (for texture)
- Painter’s tape or masking tape
- Ruler
- Palette for mixing
- Cup of water and paper towels
Step 1: Setting the Stage
-
Prime the canvas:
Even if you bought a black canvas, apply a fresh coat of matte black gesso or acrylic paint to ensure a deeply dark, uniform surface. Let this base coat dry completely before moving on. -
Establish the horizon:
Decide where your mountain range will sit. Place a strip of painter’s tape horizontally across the lower third of the canvas. This will create the sharp bottom edge for your mountains and the top edge for the reflection line. -
Create the reflection gap:
Place a second strip of tape parallel to the first one, leaving a very narrow gap—about a quarter to half an inch wide. This gap will become the neon reflection line later.
Tape Troubles?
If paint bleeds under your tape, don’t panic. Wait for it to dry completely, then use a stiff brush and black paint to ‘erase’ the bleed and sharpen the line again.
Step 2: Painting the Sky
-
Fill the sunset zone:
Using your flat brush, start painting the sky area just above where your mountains will go. Don’t worry about being messy here, as the mountains will cover the bottom edge of this sky. -
Apply the gradient base:
Lay down horizontal strokes of orange and yellow closest to the future mountain line. As you move upward, blend in magenta and neon pink. The goal is a lateral streak of color that fades into the black background at the top. -
Feather the upper edge:
For the top of the sky, use a dry brush method. Wipe most of the paint off your brush and gently drag the pinks upward into the black space, creating a textured, fading effect rather than a hard line. -
Intensify the glow:
While the paint is still slightly tacky, add a second layer of neon pink and bright orange right in the center of the band to increase opacity and vibrancy against the dark background.
Step 3: Building the Mountains
-
Draft the peaks:
Once the sky is dry, use a small round brush with black paint to outline your mountain shapes directly over the lower portion of your sunset. Aim for jagged, varied triangle shapes. -
Fill the silhouette:
Fill inside your mountain outlines with solid black paint. Paint all the way down to the top edge of your upper piece of tape. Ensure this layer is opaque so no sunset color shows through. -
Highlighting technique:
Load a small, stiff bristle brush or a dry flat brush with a tiny amount of Titanium White paint. You want the brush to be almost devoid of paint—test it on a paper towel first. -
Apply the snow:
Gently drag the brush down the right side of each mountain peak. The texture of the canvas will grab the paint, creating the look of broken snow on rocky slopes. Keep the left sides of the mountains pure black for shadow. -
Vary the pressure:
Apply slightly more pressure at the very peaks for brighter white caps, and use a feather-light touch as you move down the slopes to let the black show through.
Level Up: Starry Night
Flick a toothbrush dipped in watered-down white paint over the upper black section to create a field of distant stars, adding depth to the empty space above the sunset.
Step 4: The Final Stripe
-
Paint the reflection:
Identify that narrow gap between your two pieces of tape. Paint this strip using the same gradient colors as your sky: pink on the left, blending into orange and yellow on the right. -
Peel the reveal:
Wait for the paint to be dry to the touch but not fully cured. Carefully peel away both strips of tape. You should now have a sharp horizon line under the mountains and a crisp, glowing bar of color below it. -
Touch ups:
If the tape pulled up any black paint or left a ragged edge, use your small detail brush and black paint to tidy up the lines. -
Paint the edges:
To give the piece a finished, gallery-style look without a frame, paint the sides of the canvas black to match the background.
Step back and admire how the colors seem to vibrate against the dark void you created
City Skyline Silhouette With Window Lights
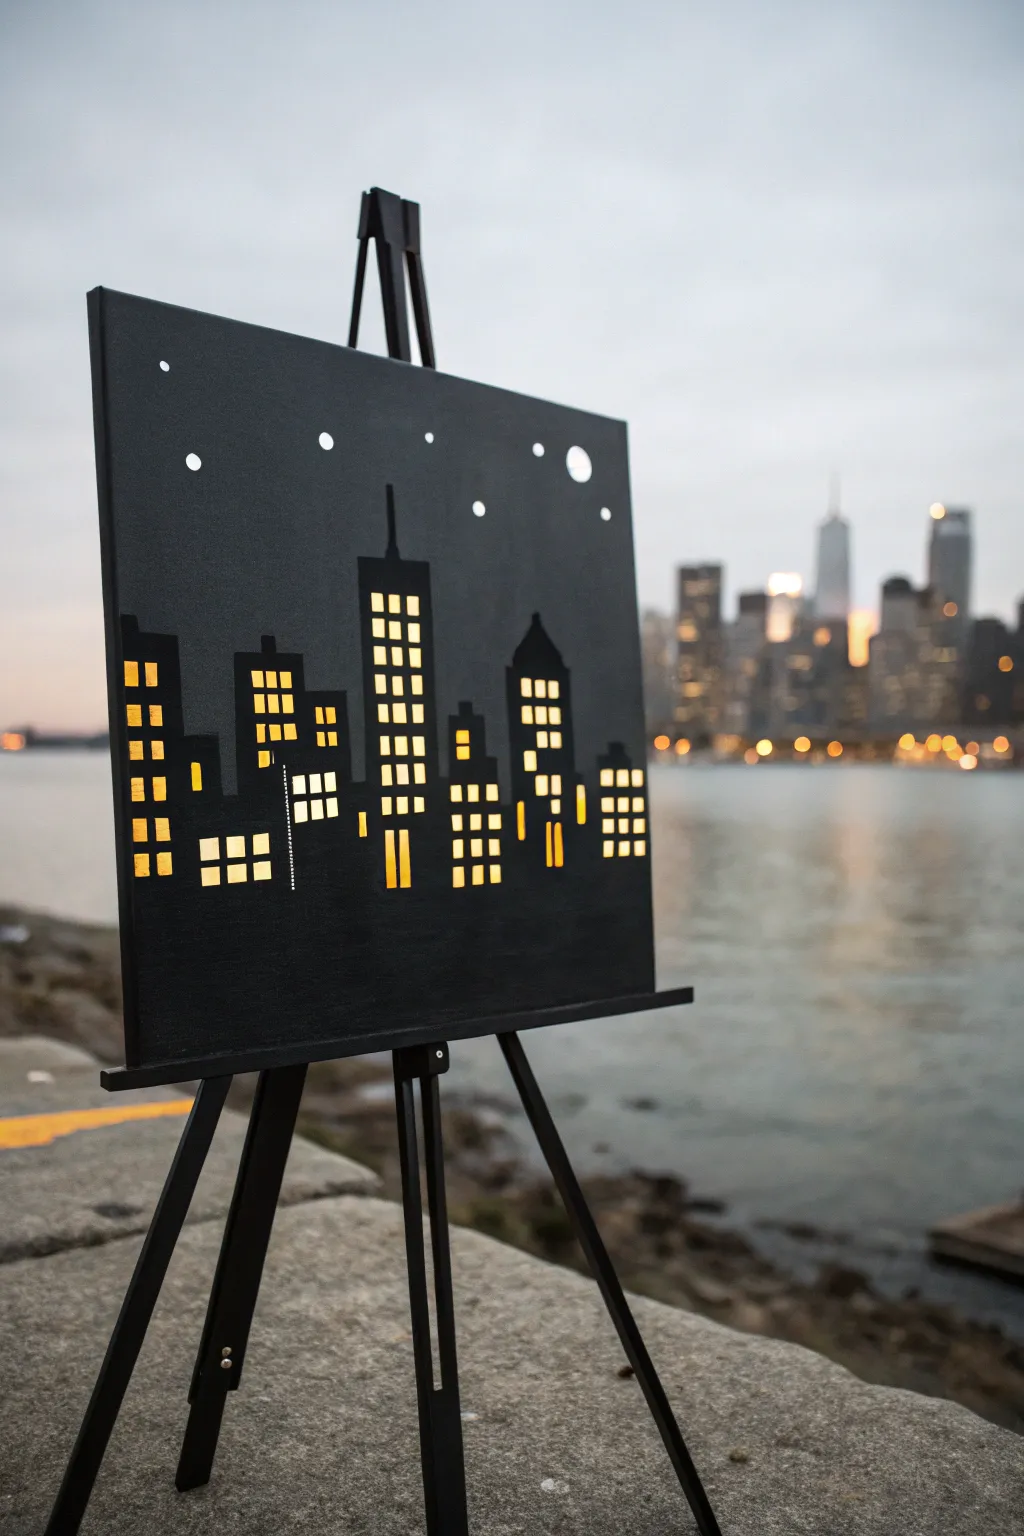
Transform a plain black canvas into a bustling metropolis illuminated against the night sky. This clever mixed-media project uses a simple cutout technique backed by warm light to bring your cityscape to life without intricate brushwork.
Step-by-Step Guide
Materials
- Stretched canvas (black primed or painted black)
- Craft knife (X-Acto)
- Self-healing cutting mat
- Yellow vellum, tissue paper, or translucent yellow plastic
- Tape or craft glue
- White or yellow acrylic paint (optional, for stars)
- Small round brush or stylus tool
- Ruler
- Pencil or white charcoal pencil
- Battery-operated LED fairy lights or a small puck light
Step 1: Designing the City
-
Prepare the canvas:
If you couldn’t find a pre-primed black canvas, coat a standard white canvas with two layers of matte black acrylic paint. Let it dry completely for at least an hour. -
Flip and sketch:
Turn the canvas over so you are looking at the back (the unfinished side). This is where we will do all our drawing to keep the front clean. -
Draft the skyline:
Using a pencil and a ruler, draw the outlines of various building shapes. Vary the heights and widths—include tall skyscrapers with antennas, shorter stepped buildings, and distinctive roof shapes. -
Add window grids:
Inside your building outlines, draw grids of small squares or rectangles. These will become the light sources. Don’t worry about being perfectly uniform; a little irregularity adds character. -
Mark the stars:
Above the skyline, mark several small circles or dots where you want the stars and moon to be.
Sharp Blades Only
Canvas fabric is tough and fibrous. Change your X-Acto blade frequently—dull blades will drag and fray the threads rather than slicing them cleanly.
Step 2: Cutting and Lighting
-
Set up your cutting station:
Place the canvas face down on a clean surface. Note that since you are cutting through the fabric, you need a very sharp blade. A self-healing mat underneath the canvas frame can help if you are pressing hard, though often the tension of the canvas is enough. -
Cut the windows:
Carefully use your craft knife to slice out the window squares you drew. Use a gentle sawing motion if the canvas is thick. Remove the small squares of fabric. -
Refine the edges:
If the canvas threads fray around your cuts, trim them carefully with small scissors or your knife to keep the window lines sharp. -
Cut the celestial bodies:
Use the tip of your knife to gently poke or cut small holes for the stars. For a larger moon, carefully cut out a circle. -
Prepare the backing:
Cut strips of yellow vellum or tissue paper that are slightly larger than your building clusters. -
Attach the diffuser:
On the back of the canvas, tape or glue the yellow paper over the window holes. This filters the light and gives it that warm, golden glow. -
Add painted details:
Flip the canvas to the front. If you want brighter stars that reflect light rather than transmit it, use a small brush to dot white paint near the top. -
Position the light:
Secure a small battery-operated puck light or a bundle of fairy lights to the back wooden frame of the canvas using tape. -
Test the glow:
Turn on the light source and dim the room lights to ensure your windows are glowing evenly. The yellow paper should diffuse the harsh LED light into a soft window pane effect.
Flickering Effect
Use battery-operated tea lights with a ‘flicker’ mode behind the canvas. It makes the city look alive, as if activity is happening inside the buildings.
Place your easel near a window or lamp to enjoy the silhouette by day, and switch on the backlight at night for a magical city view

PENCIL GUIDE
Understanding Pencil Grades from H to B
From first sketch to finished drawing — learn pencil grades, line control, and shading techniques.
Explore the Full Guide
Glowing Fireflies in a Jar
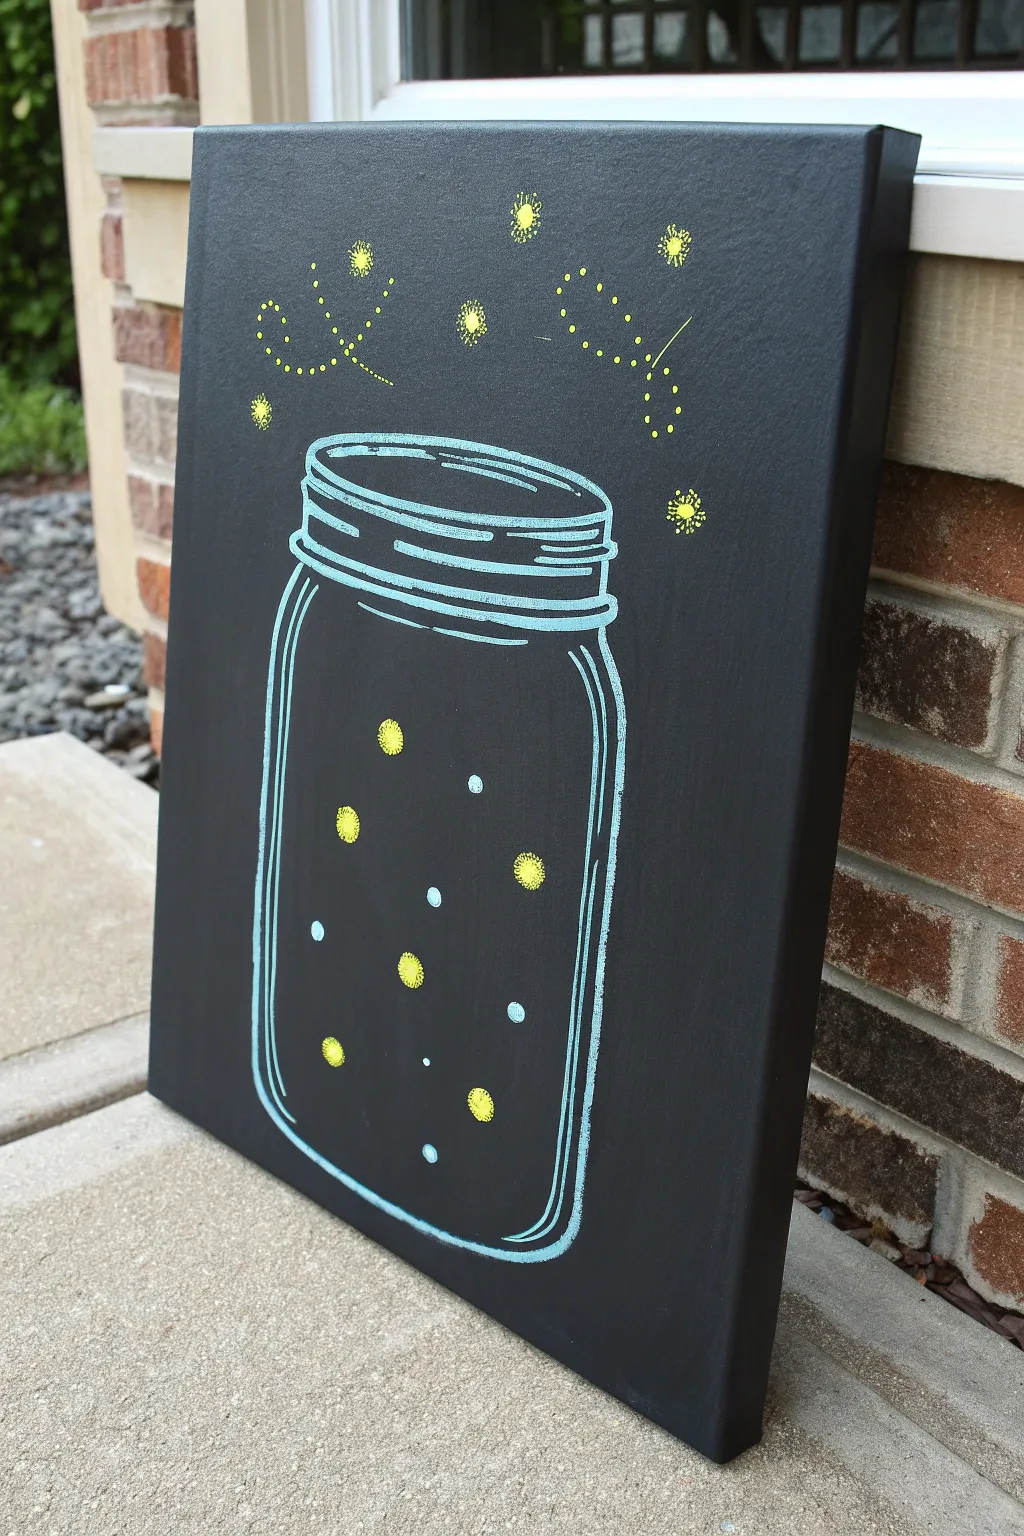
Capture the magic of summer evenings with this delightful chalkboard-style painting. Using a black canvas as your base creates an instant nighttime backdrop that makes the neon fireflies pop with luminescent charm.
How-To Guide
Materials
- Rectangular stretched canvas (e.g., 11×14 or 16×20 inches)
- Black acrylic paint
- Large flat brush or foam brush
- Chalkola markers or fine-tip paint pens in Light Blue, White, and Neon Yellow
- Yellow acrylic paint (optional, for brighter glow)
- Small round brush (size 2 or 4)
- Pencil
- Ruler
- Cup or round object (for tracing, optional)
Step 1: Setting the Night Scene
-
Prepare the Base:
Begin by painting your entire white canvas with a solid coat of black acrylic paint. Ensure you cover the sides for a finished look without needing a frame. -
Second Coat:
Once the first layer is touch-dry, apply a second coat of black to ensure full opacity. No white canvas texture should peek through. -
Dry completely:
Let the canvas dry fully for at least an hour. Drawing on wet paint will clog your markers, so patience is key here.
Step 2: Drafting the Jar
-
Sketch the Lid:
Using a regular pencil, lightly sketch an oval near the top third of the canvas. This will be the opening of your jar. -
Add Dimension:
Draw a slightly larger oval around the first one to create the rim, then two parallel curved lines beneath it for the screw-top effect. -
Form the Body:
Below the lid, draw two long, vertical lines that curve inward slightly at the bottom, connecting them with a gentle curve to form the base of the jar. -
Outline in Blue:
Using your light blue paint pen or chalk marker, trace over your pencil lines. Don’t worry about perfect straightness; a shaky line looks more like hand-drawn illustration. -
Add Glass Reflections:
Draw a few curved accent lines on the shoulders and sides of the jar to suggest the reflection of glass. Keep these lines broken rather than continuous. -
The Rim Detail:
Thicken the lines of the jar’s mouth and screwbands. I like to double up the lines here to make the glass look thick and sturdy.
Chalky Charm
For a true chalkboard look, lightly rub piece of white chalk sideways over the black background, then wipe it off with a dry tissue before you start drawing.
Step 3: Creating the Glow
-
Paint the Bodies:
Dip a small round brush into yellow acrylic paint or use a yellow paint marker. Dab small circles randomly inside the jar. -
Stagger Sizes:
Make some dots larger and some smaller to create depth, as if some fireflies are closer to the glass than others. -
Add Escaping Bugs:
Place 4-5 yellow dots floating above the open jar lid, showing the fireflies flying free into the night. -
Create the Halos:
Once the yellow centers are dry, take your yellow marker and draw tiny, spiky lines radiating outward from the larger ‘escaping’ fireflies to simulate a glowing buzz. -
Background Glow:
Add smaller, softer yellow dots or tiny blue dots in the background inside the jar to fill empty space. -
Flight Trails:
Using the yellow marker, draw dashed or dotted lines trailing behind the flying fireflies to show their movement path. -
Curved Paths:
Loop the flight trails around each other slightly for a playful, energetic feel.
Marker Won’t Flow?
If paint pens skip or drag, the canvas texture is likely too rough. Prime the pen tip on a scrap piece of paper or cardboard often to keep the ink flowing smoothly.
Step 4: Final Highlights
-
White Accents:
Use a white paint pen to add extremely thin highlights to the blue jar outline, specifically on the curves where light would hit. -
Touch-ups:
Step back and assess your composition. If the black background looks uneven, carefully touch it up with a small brush around your design.
Hang your luminous artwork in a hallway or bedroom to enjoy a little summer sparkle all year round
Easy Dandelion Puff With Floating Seeds
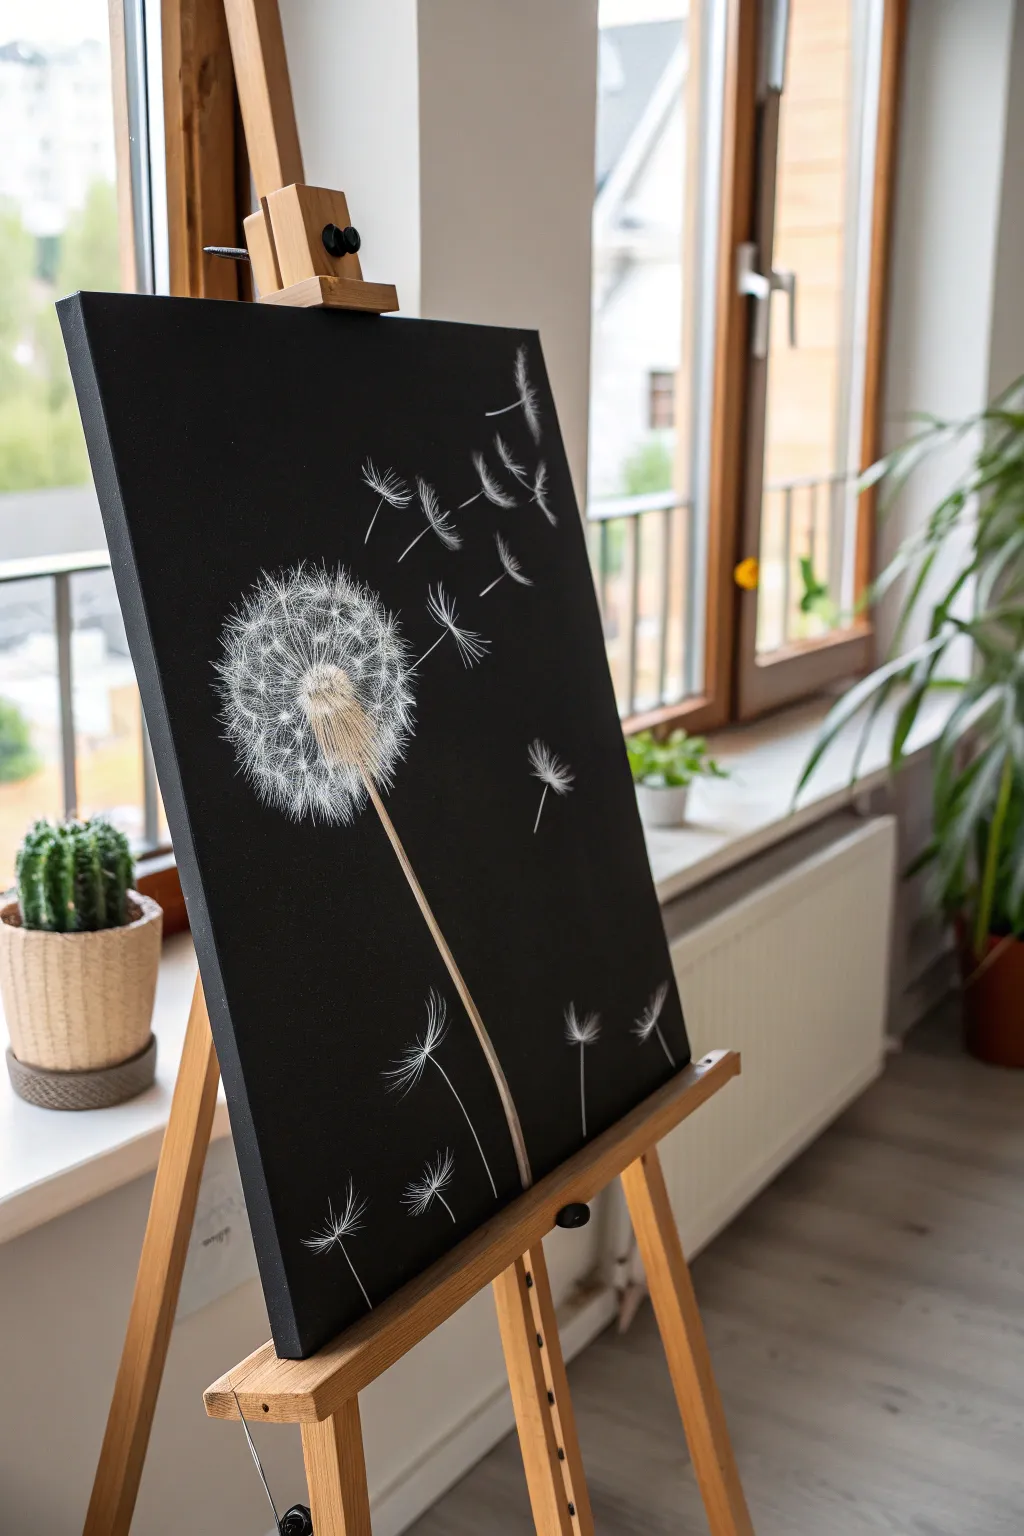
Capture the delicate beauty of a dandelion releasing its seeds into the breeze with this striking black canvas project. Using simple brush strokes and high-contrast white acrylics, you’ll create a minimalist yet detailed piece that fits perfectly in modern decor.
Detailed Instructions
Materials
- Stretched canvas (black primed, any size)
- Acrylic paint: Titanium White
- Acrylic paint: Raw Sienna or Beige (for the stem)
- Round detail brushes (sizes 0 and 1)
- Fine liner brush (size 00 or 000)
- Small flat brush
- Cup of water
- Palette or paper plate
- Chalk or white charcoal pencil (optional for sketching)
Step 1: Preparation & Stem
-
Prepare the canvas:
If your canvas isn’t already black, paint it entirely with black acrylic paint. Use broad strokes for even coverage and let it dry completely before starting the design. -
Map out the placement:
Visualize where the main flower head will sit. It looks best slightly off-center to the left. You can lightly mark the center point with chalk or a white charcoal pencil if you need a guide. -
Mix the stem color:
On your palette, mix a small amount of white with Raw Sienna to create a light beige-tan color. It should be opaque enough to show up against the black background. -
Paint the stem:
Using a small flat brush or a round brush, paint a straight line extending from the bottom center-left area up toward your marked flower center. Keep the line thin and steady. -
Add the receptacle:
At the top of the stem, create a small, oval-shaped bulb where the seeds will attach. Use the same beige mix, perhaps darkening it slightly at the base for a touch of dimension.
Paint Too Thick?
If your fine lines look chunky, thin your acrylic paint with a tiny drop of water or flow medium. The paint should have an inky consistency to glide smoothly off the liner brush.
Step 2: Creating the Puff
-
Start the center structure:
Switch to your fine liner brush and pure Titanium White paint. From the beige bulb, paint very fine, short lines radiating outward in a spherical shape to establish the core of the flower head. -
Paint the inner seeds:
Create the dense inner circle of the puff by painting many tiny starburst shapes or clusters of small dashes. This area should look brighter and more concentrated than the outer edges. -
Extend the filaments:
Using the liner brush with thinned white paint (add a drop of water for flow), draw long, delicate lines radiating from the center outward to create the full sphere of the dandelion. -
Add the pappus details:
At the end of each long filament line, paint a small V-shape or tiny intricate branching lines. This mimics the feathery ‘parachute’ part of the seed. -
Layer for density:
Go back over the sphere, adding more radiating lines and feathery tips. I find it helpful to overlap them slightly to make the puff look three-dimensional and fluffy. -
Soften the edges:
Ensure the outer edge of the circle isn’t too perfect. Vary the length of the filaments slightly so the perimeter looks organic and airy.
Make It Sparkle
Once the white paint is fully dry, gently brush a clear glitter glaze or metallic silver paint over the center of the puff and seed tips for a magical, shimmering effect.
Step 3: Drifting Seeds
-
Plan the wind direction:
Decide where your seeds are blowing. In the reference image, they drift forcefully toward the top right, with a few settling near the bottom. -
Paint the seed bodies:
For the flying seeds, paint a tiny white dash or dot representing the seed itself. Orient them so they align with the direction of the wind. -
Add the stems:
Draw single, fine lines extending from the seed bodies. Curve them slightly to show movement, as if they are bending in the breeze. -
Create the parachute tops:
At the top of each floating stem, paint the feathery pappus. Use flicking motions with your smallest brush to create a U-shaped fan of tiny hairs. -
Vary the sizes:
Make the seeds closer to the flower slightly larger and the ones further away (top right corner) smaller to suggest distance and depth. -
Add bottom seeds:
Don’t forget the few seeds drifting near the bottom of the canvas. Paint these vertically or slightly tilted, looking closer to the viewer with distinct filament details. -
Final highlights:
Take a step back and look at the whole piece. Use pure white to add extra brightness to the center of the main puff and the tips of the floating seeds to make them pop.
Hang your new artwork near a window or in a well-lit spot where the contrast can truly shine


One-Stroke Wildflowers That Pop
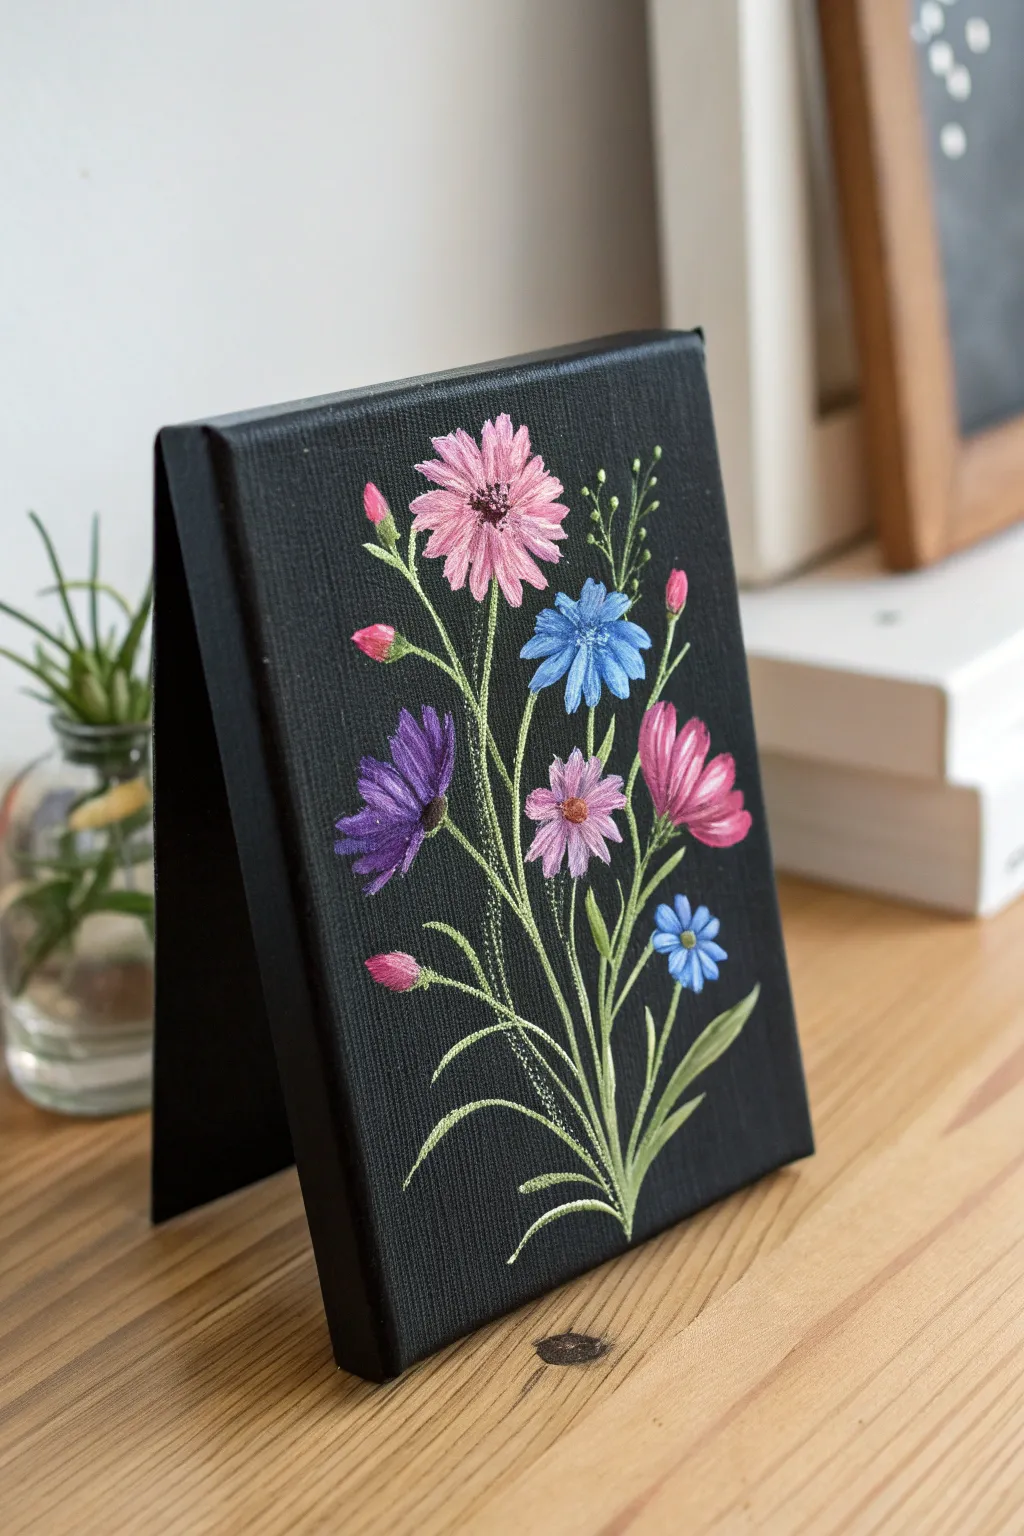
Transform a simple black canvas into a vibrant botanical display using bold hues and easy strokes. The stark background makes these delicate pink, purple, and blue wildflowers truly leap off the surface, creating an elegant piece of decor.
Step-by-Step
Materials
- Small black stretched canvas (e.g., 5×7 or 8×10 inch)
- Acrylic paints: Titanium White, Magenta or Pink, Violet, Sky Blue, Phthalo Blue, Sap Green, Yellow Ochre
- Round brushes (sizes 2 and 4)
- Small liner brush (size 0 or 00)
- Palette or paper plate
- Cup of water
- Paper towels
Step 1: Painting the Stems and Foliage
-
Mix your greens:
Start by mixing Sap Green with a tiny touch of Titanium White to create a soft, visible green against the black. I like to keep a darker version of the green on the palette for shadows later. -
Map the main shape:
Using your size 2 round brush, paint a central gathering point at the bottom center of the canvas. Pull 4-5 long, slightly curved main stems upward, fanning them out like a bouquet. -
Add side branches:
From the main stems, pull smaller, shorter stems branching off to the sides. These will hold the leaves and smaller buds. -
Paint lance-shaped leaves:
Switch to a liner brush for precision. Paint long, slender leaves emerging from the base and along the lower stems. Use a ‘press and lift’ motion: press down to widen the stroke and lift up to taper it to a sharp point. -
Add textural details:
Using a very pale green or white mix, add tiny, almost scratchy highlights along one side of the stems to give them dimension and light.
Step 2: Creating the Blooms
-
Start the main pink flower:
Mix Magenta with White to get a bright bubblegum pink. Near the top center, paint a daisy-like shape. Use the brush tip to pull petals outward from a center point, keeping the edges slightly ragged for a natural look. -
Add the purple coneflower:
On the left side, paint a purple flower head facing sideways. Use Violet mixed with White. Paint the petals drooping slightly downward from a central point, mimicking a coneflower shape. -
Paint the blue cornflowers:
Mix Sky Blue with White. Create two blue flowers—one larger near the right center and a tiny one lower down. These petals should be shorter and somewhat triangular or trumpet-shaped. -
Insert the smaller filler flowers:
Using a lighter pink or lilac shade, paint a small, simple 5-petal flower in the middle of the arrangement and a half-open bud on the far right. -
Create buds:
With the pink mix, dot small, tear-drop shaped buds at the tips of the thinnest upper stems on the left side. Add tiny green sepals at their base where they connect to the stem.
Chalky Colors?
If acrylics dry dull on the black canvas, apply a second coat to the petals once dry. A touch of gloss varnish at the very end restores vibrance.
Step 3: Detailing and Refining
-
Highlight the petals:
Mix a very light version of each flower color (almost white). Carefully add thin strokes down the center or tips of the petals to create separation and catch the light. -
Paint flower centers:
For the pink and purple flowers, dab a mix of Dark Brown (or Violet + Green) and Black into the centers. For the blue flowers, use just a tiny dark dot. -
Add pollen texture:
Dip the tip of your smallest brush or a toothpick into Yellow Ochre or White. Stipple tiny dots onto the dark centers of the main flowers to look like pollen. -
Paint wispy accents:
Using the liner brush and watery light green paint, add very fine, hair-like sprigs and tiny dots near the top right to act as filler greenery or baby’s breath. -
Final touch-ups:
Step back and look at the composition. If any stems look disconnected from their flowers, gently connect them with the liner brush and the dark green mix.
Metallic Magic
Swap the white paint for metallic gold when mixing highlights. This gives the wildflowers a luxurious, shimmering finish against the dark background.
Allow your painting to dry completely before displaying this strikingly modern floral piece on a desk or shelf
Bold Tulips With a Double-Loaded Brush
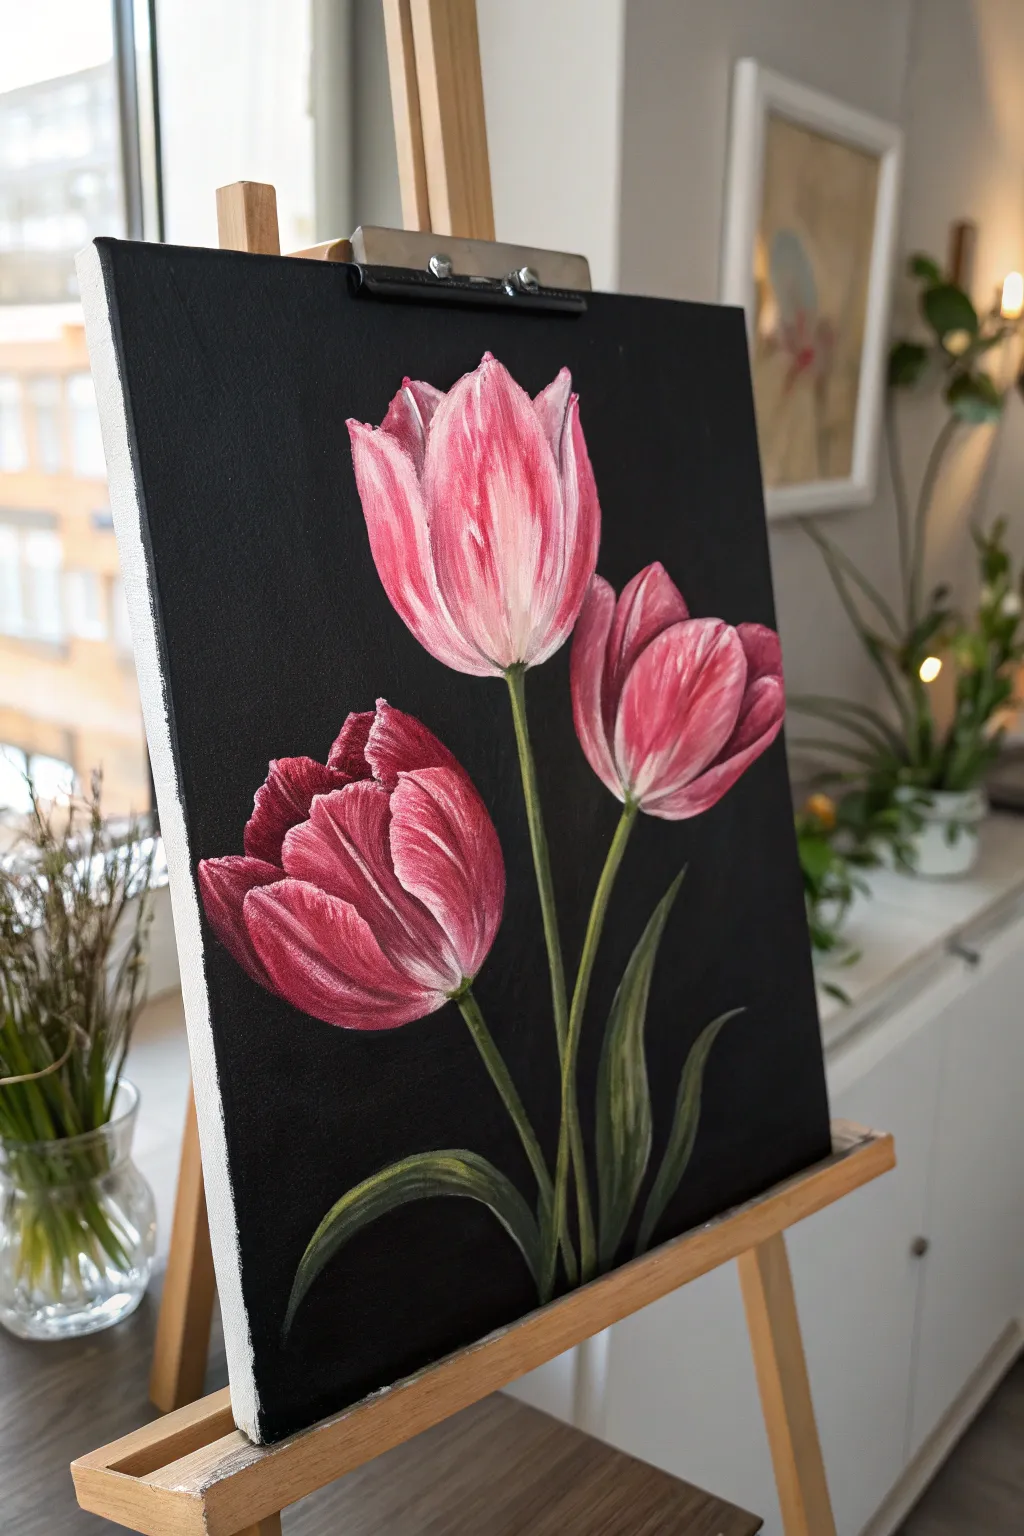
Contrast is the star of the show in this floral painting, where vibrant pink tulips pop dramatically against a deep black background. By using a double-loading technique, you can create organic, streaky petals that look impressively realistic with surprisingly few strokes.
How-To Guide
Materials
- Stretched canvas (11×14 or similar)
- Black acrylic paint (or pre-primed black canvas)
- Acrylic paints: Magenta/Deep Pink, Titanium White, Sap Green, Olive Green
- Large flat brush (for background)
- Medium filbert brush (for petals)
- Small round brush (for stems and details)
- Palette paper or plate
- Water cup and paper towels
Step 1: Preparation and Background
-
Prepare the canvas:
If your canvas is white, use a large flat brush to cover the entire surface with black acrylic paint. Apply two coats if necessary to ensure it is completely opaque and velvety. -
Let it cure:
Allow the black background to dry completely. This is crucial because working wet-on-wet with pink over black will result in muddy colors. A hairdryer can speed this up. -
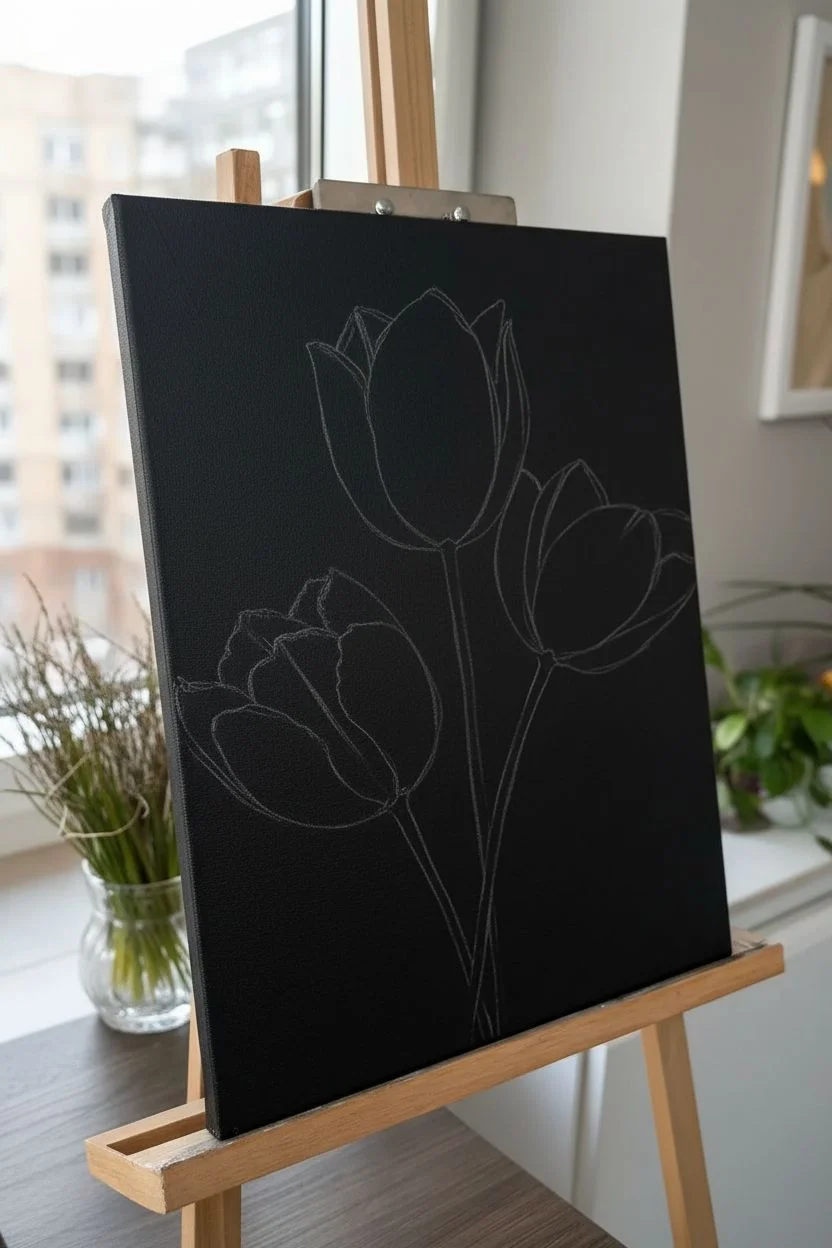
Lightly sketch placement:
Using a piece of chalk or a white charcoal pencil, very faintly sketch three ovals where your flower heads will go. Place one high in the center, and two slightly lower on either side.
Step 2: Painting the Petals
-
Prepare your palette:
Squeeze out a generous amount of Magenta and Titanium White next to each other on your palette ensuring they don’t mix yet. -
Load the brush:
Dip one corner of your medium filbert brush into the Magenta and the other corner into the White. Stroke the brush back and forth on the palette a few times to slightly blend the middle while keeping the sides distinct. -
Form the center tulip: back petals:
Start with the top-center flower. Place your brush at the top tip of a petal, white side facing the outside edge. Press and pull downward in a curved stroke to create the back petals first. -
Form the center tulip: front petals:
Reload your brush the same way. Now, create the front petals by starting slightly lower and curving inward, hugging the back petals. The white paint should create natural highlights on the edges. -
Repeat for the side tulips:
Move to the left and right flowers. Vary the angles slightly so they aren’t identical soldiers; maybe tilt the right one outward a bit more. -
Add deep shadows:
While the paint is still slightly workable, take a tiny bit of pure Magenta on a small brush and deepen the shadows at the very base of the flower cups where the petals overlap. -
Refine the highlights:
If some petals look too dark, wait for them to dry to the touch, then dry-brush a tiny amount of pure white on the intricate upper edges to make them pop.
Muddy Colors?
Work quickly! If you over-blend the pink and white on the canvas, they turn into a flat bubblegum color. Let the streaks happen naturally and stop.
Step 3: Stems and Foliage
-
Mix your greens:
Combine Sap Green with a touch of white to create a medium green. Keep some darker Olive Green aside for shadows. -
Paint the main stems:
Using the small round brush and your medium green mix, paint thin stems extending from the bottom of each flower head all the way to the bottom edge of the canvas. Keep your hand loose for a natural curve. -
Start the leaves:
Switch back to the filbert brush. Double-load it with Olive Green and the lighter green mix you made. -
Sweep in the foliage:
Start at the base of the stems and sweep upward and outward. Press down to widen the leaf, then lift up as you reach the tip to create a sharp point. -
Layer the leaves:
Add a few more leaves overlapping the stems, particularly at the bottom. Vary the height, making some short and broad, and others long and slender. -
Highlight the greens:
I like to add a tiny touch of white to my green mix and add thin highlights along the sun-facing edge of the stems and the tips of the leaves.
Add Dew Drops
Use a detail brush to add tiny white dots and small curved shadow lines on a petal or two to mimic fresh morning dew.
Step 4: Finishing Touches
-
Assess the contrast:
Step back and look at your painting. If any black canvas is showing through the pink petals unintentionally, touch it up with a second layer of paint. -
Clean up edges:
If you accidentally got pink on the background, use a small brush with black paint to “erase” the mistake and sharpen the petal edges.
Now step back and admire how those bright petals glow against the dark background
White Daisies With Simple Shadow Petals
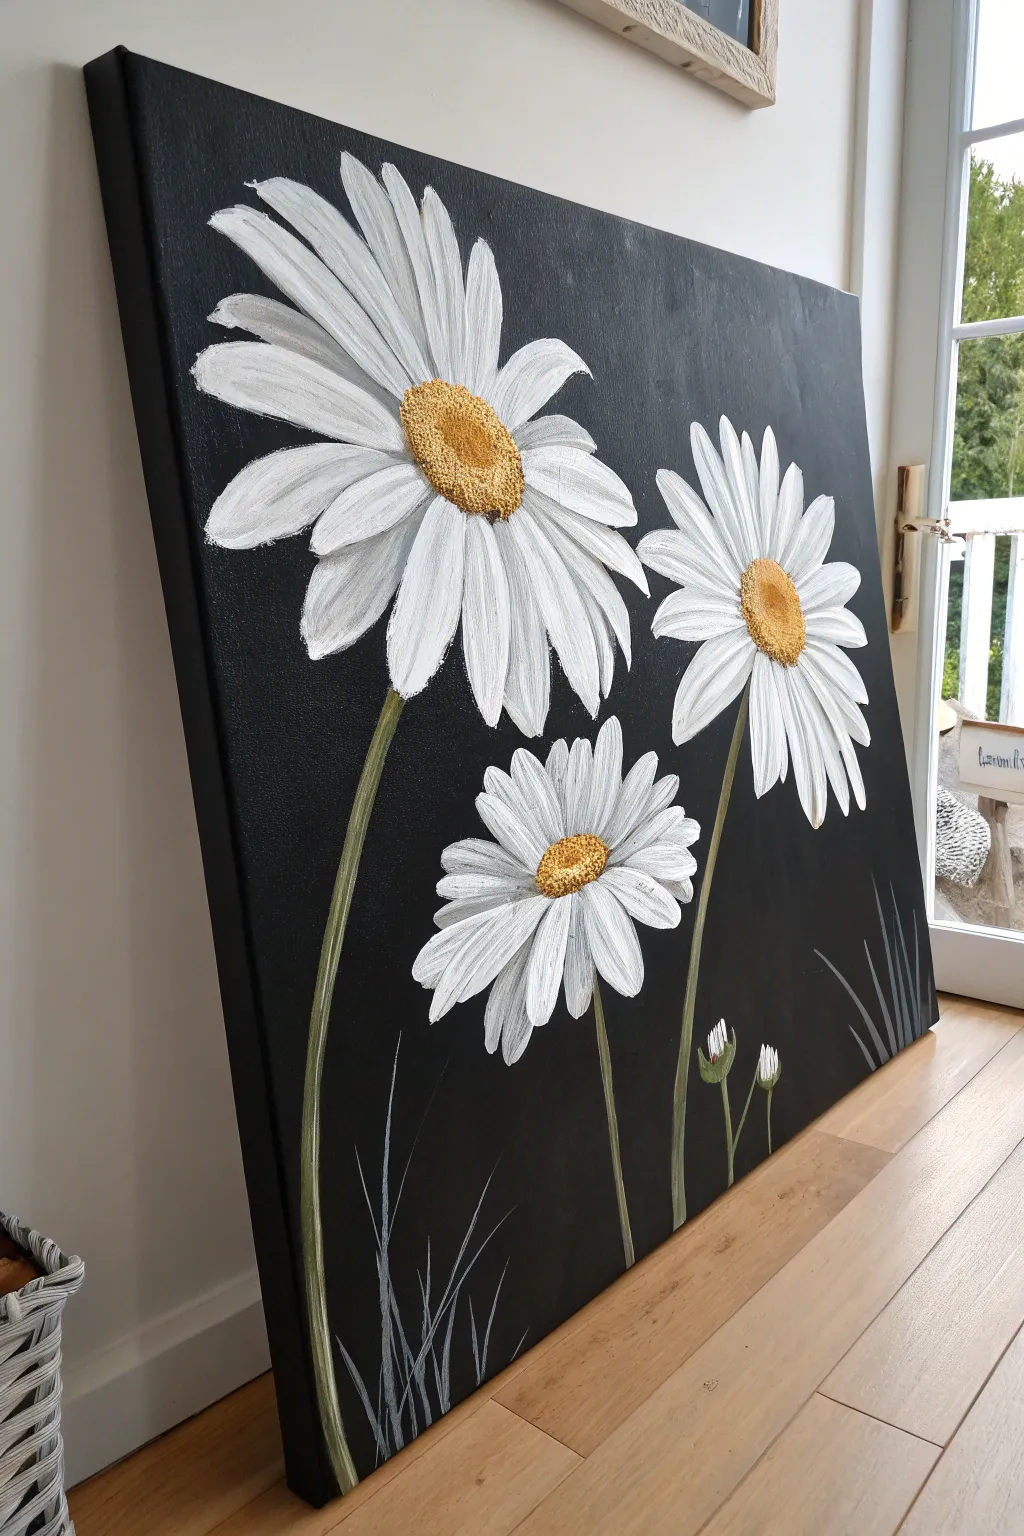
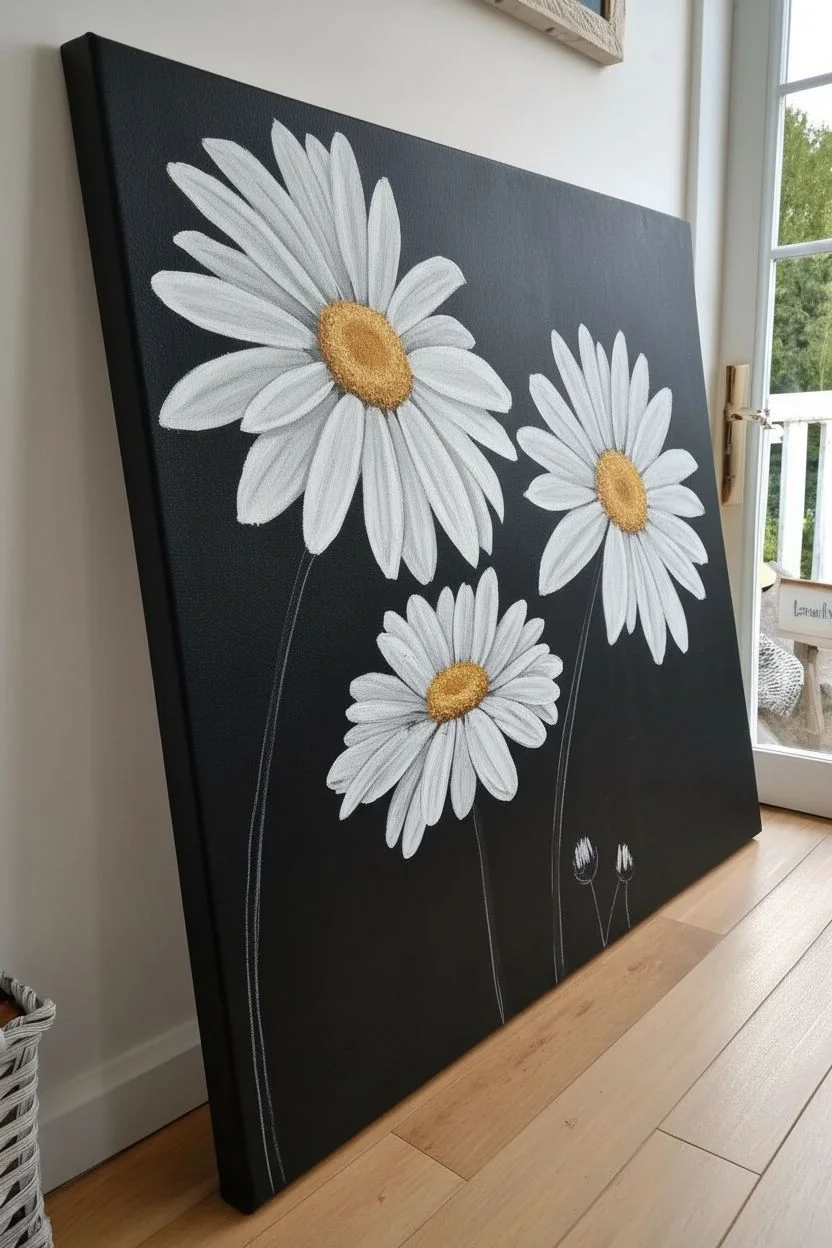
Create a striking piece of wall art with this bold contrast of bright white daisies against a deep black background. The textured yellow centers add a delightful tactile element that brings the flowers to life.
Step-by-Step Tutorial
Materials
- Large stretched canvas (square or rectangular)
- Black acrylic paint (matte or satin finish)
- Titanium white acrylic paint
- Yellow ochre and cadmium yellow acrylic paint
- Raw sienna or burnt umber acrylic paint (for shading)
- Green oxide and olive green acrylic paint
- Thick texture paste or heavy body gel medium
- Large flat brush (for background)
- Filbert brushes (various sizes)
- Round detail brush
- Palette knife
- Chalk or white charcoal pencil
Step 1: Setting the Stage
-
Prime the Background:
Begin by painting your entire canvas with black acrylic paint. Use a large flat brush and long, even strokes to ensure full coverage. Make sure to paint the sides of the canvas as well for a professional finish. -
Second Coat:
Once the first layer is completely dry to the touch, apply a second coat of black paint if necessary to ensure a solid, opaque background without any white canvas showing through. -
Sketch the Layout:
Using a piece of chalk or a white charcoal pencil, lightly sketch the placement of your three main flower heads. Draw simple ovals for the centers and loose lines to indicate the direction of the petals. Mark the positions for the two smaller buds near the bottom right.
Clean Edges Trick
If you struggle with shaky hands when painting long stems, rest your pinky finger on a dry part of the canvas to stabilize your hand as you pull the brush downward.
Step 2: Creating Texture
-
Mix the Texture:
Mix your yellow ochre and cadmium yellow paints with a texture paste or heavy body gel medium. You want a thick, frosting-like consistency that will hold its shape. -
Apply the Centers:
Use a palette knife or a stiff bristle brush to dab this thick yellow mixture into the center ovals you sketched. Don’t smooth it out; stipple it to create a rough, bumpy texture that mimics real pollen. -
Depth and Shadow:
While the texture paste is still wet, gently dab a tiny bit of raw sienna or burnt umber into the lower edge of each yellow center to create a natural shadow.
Step 3: Painting the Petals
-
Base Petal Shape:
Load a medium filbert brush with titanium white. Starting near the yellow center, pull the brush outward to create the petal shapes. Press down at the start and lift up as you reach the tip to create a tapered end. -
Layering Petals:
Paint the petals that appear to be ‘behind’ first. I find that slightly watering down the white paint for this first layer helps create a smoother base for the brighter highlights later. -
Adding Dimension:
Mix a tiny touch of grey (a dot of black into white) and paint subtle streaks along the sides or bottoms of the petals to distinguish them from one another. -
Top Layer Highlights:
Once the base petals are dry, apply a second layer of pure, thick titanium white to the top petals. Focus on the tips and the highest points to make them pop against the dark background.
Add a Little Sparkle
For a glamorous touch, sprinkle a tiny pinch of gold glitter or mix iridescent medium into the wet yellow texture paste on the flower centers before it dries.
Step 4: Stems and Foliage
-
Stem Base:
Mix olive green with a little white. Using a round brush, draw long, flowing lines from the flower heads down to the bottom of the canvas. Keep the pressure steady but light. -
Painting Buds:
For the small buds at the bottom right, paint small green almond shapes, then add slivers of white peeking out from the top to show the unbloomed petals. -
Grass Accents:
Using a liner brush or the edge of a flat brush, flick upward strokes of grey-green or muted white at the very bottom of the canvas to suggest tall grass blades. -
Final Touches:
Review your painting. If any black background was accidentally covered heavily, touch it up carefully. Ensure the yellow centers have cured completely before handling or hanging.
Hang your new masterpiece in a well-lit area to let the textured centers catch the light and create natural dimension
Minimal Branch With Metallic Leaves
Transform a stark black canvas into a piece of opulent decor with this striking metallic branch study. The contrast between the matte charcoal background and the textured, shimmering leaves creates a sophisticated look that captures light from every angle.
Detailed Instructions
Materials
- Large stretched canvas (18×24 or 24×36 inches suggested)
- Matte black acrylic paint or gesso
- Wide flat paintbrush (for the background)
- White colored pencil or chalk (for sketching)
- Round paintbrush (size 2 or 4)
- Liner brush (size 0 or 00)
- Metallic gold acrylic paint
- Metallic bronze or copper acrylic paint
- Gold leaf adhesive (size)
- Imitation gold leaf sheets or flakes
- Soft, fluffy dry brush (for leaf application)
- Varnish (gloss or satin)
Step 1: Setting the Stage
-
Prepare the canvas:
Begin by applying a generous coat of matte black acrylic paint or black gesso to your entire canvas. Ensure you paint the sides for a professional finish. -
Ensure opacity:
Once the first layer is dry, hold it up to the light to check for thin spots. Apply a second coat if necessary to achieve a solid, velvety black background. -
Sketch the structure:
Using a white colored pencil or a piece of chalk, lightly sketch the main trunk line starting from the bottom right corner, curving gently upward toward the top left. -
Add secondary lines:
Sketch smaller offshoot branches stemming from the main trunk. Keep the lines elongated and graceful to maintain the minimalist feel.
Foil Preservation Tip
When working with gold leaf, turn off any fans and close windows. The sheets are incredibly light and will blow away with even the slightest breeze.
Step 2: Painting the Skeleton
-
Base coat the branches:
Mix a small amount of gold metallic paint with a tiny drop of water to improve flow. Use your round brush to paint over your sketched trunk lines. -
Refine the tips:
Switch to your liner brush for the delicate ends of the branches. Lift pressure as you reach the end of a stroke to create tapering, needle-thin points. -
Build texture:
While the gold paint is still slightly tacky, dab a little bronze paint randomly along the thicker parts of the trunk to create dimension and a bark-like illusion.
Make It 3D
Mix flexible modeling paste with your black base coat to create a raised texture on the canvas before painting, giving the background a stone-like feel.
Step 3: Creating the Leaves
-
Outline leaf shapes:
With the white pencil, lightly mark where your leaves will sit. Aim for alternating patterns along the branches rather than perfect symmetry. -
Apply adhesive:
Paint the leaf shapes carefully using the gold leaf adhesive (size) and a designated craft brush. Be precise, as the foil will stick exactly where the glue is. -
Wait for tackiness:
Wait for the adhesive to turn clear and tacky. This usually takes 15-20 minutes depending on the brand, but don’t rush this step or the glue will smear. -
Apply gold leaf:
Press the gold leaf sheets over the sticky leaf shapes. Don’t worry if it looks messy at this stage; just ensure the adhesive is fully covered. -
Brush away excess:
Using a soft, dry brush, gently sweep away the loose gold leaf. The crisp shape of your painted leaves will emerge from under the foil. -
Add painted details:
If you prefer a painted look over foil or want variation, use the bronze paint to fill in some leaf shapes directly. I like to leave visible brushstrokes here to mimic leaf veins. -
Connect the stems:
Use the liner brush and gold paint to connect each leaf base to the main branch with a tiny, thin stem.
Step 4: Final Touches
-
Clean up sketch lines:
Once everything is completely dry, use a slightly damp cloth to wipe away any visible white pencil or chalk marks. -
Add highlights:
Mix a bright gold with a touch of white (or use a pearl medium) and add tiny highlights to the upper curve of the main branches to simulate light hitting the form. -
Seal the art:
Protect the metal leaf from tarnishing by applying a coat of gloss or satin varnish over the entire painting. This will also deepen the black background.
Hang your shimmering botanical art in a spot with good natural light and enjoy the golden glow
Three Cute Cacti With Bright Edge Highlights
Contrast is key in this striking painting where vibrant greens pop against a deep black background. You’ll create three distinct desert plants, using light green gradients and metallic gold dots to make them shine.
Step-by-Step Tutorial
Materials
- Small black stretched canvas (e.g., 8×10 or 10×12 inches)
- Acrylic paints: Black (for touch-ups), Dark Phthalo Green, Light Permanent Green, White, Yellow Ochre, Gold Metallic
- Flat shader brushes (medium and small)
- Fine liner brush (size 0 or 00)
- Pencil for sketching
- Water cup and palette
Step 1: Planning and Base Coats
-
Arrange the composition:
Start by lightly sketching the outlines of your three cacti directly onto the black canvas. Place a tall Saguaro-style cactus in the center, a round barrel cactus in the lower left, and a spiky succulent in the lower right. -
Mix your base green:
On your palette, mix a mid-tone green using your Dark Phthalo Green and a touch of Light Permanent Green. This will be the foundational color for the two smooth cacti. -
Block in the tall cactus:
Using a flat shader brush, paint the main body and the small arm of the center cactus. Use vertical strokes to mimic the direction of growth. Don’t worry about perfect coverage yet; a little streakiness adds texture. -
Block in the barrel cactus:
Paint the round shape on the left with the same green mixture. Paint in curved vertical bands to suggest the roundness of the plant. -
Base the spiky succulent:
For the bottom right plant, mix a slightly darker, cooler green by adding a tiny dot of black or blue to your green mix. Paint triangular leaf shapes radiating outward from a central point.
Step 2: Adding Dimension and Details
-
Highlight the tall cactus:
Mix a lighter green by adding White and Yellow to your base green. Using a smaller flat brush, paint vertical stripes down the center cactus to create ‘ribs’. Leave the darker base color showing between these stripes for shadow. -
Define the barrel cactus ribs:
Apply the same light green mix to the round cactus on the left. Paint curved lines following the form of the ball, leaving dark gaps between them to create deep grooves. -
Detail the succulent leaves:
Switch to your fine liner brush. With a very light mint green (green plus lots of white), paint thin lines down the center of each spiky leaf and outline the edges to make them sharp. -
Create the cactus flower:
On top of the round barrel cactus, dab a small oval of Yellow Ochre mixed with a touch of White to create the fuzzy flower base. -
Refine the gradients:
If the transition between your light highlights and dark base feels too harsh, use a slightly damp, clean brush to gently feather the edges while the paint is still tacky.
Paint opacity issues?
If the green looks too transparent on the black canvas, don’t keep piling wet paint. Let the first layer dry completely, then apply a second coat for true vibrancy.
Step 3: The ‘Bright Edge’ Finish
-
Prepare the gold accents:
Squeeze out a small amount of Metallic Gold paint. Verify it flows well; if it’s too thick, add a single drop of water. -
Dot the tall cactus:
Dip the handle end of a small brush or a dotting tool into the gold paint. Dot evenly spaced ‘spines’ along the outer edges of the tall cactus and along the vertical rib lines. -
Top the flower:
Add tiny gold dots onto the yellow flower patch on the barrel cactus to give it a pollen-filled texture. -
Change tools for the barrel cactus:
Switch back to your fine liner brush and white paint. Instead of dots, paint tiny dashed lines or small ‘x’ shapes running down the highlighted ribs of the round cactus to simulate spines. -
Highlight the spiky tips:
Use the liner brush and pure white paint to add a sharp thorn to the very tip of each leaf on the bottom-right succulent. -
Clean up the background:
Check your black background for any accidental green smudges. Cover these with a coat of black paint to ensure the negative space remains deep and matte.
Pro Tip: Dot Consistency
Reload your dotting tool or brush handle after every 2-3 dots. This ensures your gold spines stay uniform in size rather than fading out as you go down the line.
Allow the paint to fully cure before displaying your desert trio on a mini easel or shelf
Neon Butterfly With an Outer Glow Outline
This striking canvas piece combines the elegance of a classic monarch butterfly with a modern pop-art twist. Using a stark black background allows the electric blue and hot pink hues to vibrate off the surface, creating a bold statement piece for any room.
Step-by-Step Guide
Materials
- Black stretched canvas (square or rectangular)
- White chalk or a white charcoal pencil
- Acrylic paints: Bright Cyan/Turquoise, Hot Pink/Magenta, Lime Green, White, Black
- Medium flat brush (for filling)
- Small round brush (size 0 or 1 for details)
- Fine liner brush (for outlining)
- Palette or paper plate
- Cup of water and paper towels
Step 1: Planning & Sketching
-
Prepare the workspace:
Ensure your canvas is clean and dust-free. If your canvas isn’t pre-primed black, paint the entire surface with black acrylic paint and let it dry completely before starting. -
Establish the centerline:
Using your white chalk or charcoal pencil, lightly draw a vertical line (slightly tilted is fine) in the center of the canvas to guide the body’s placement. This helps keep the symmetry in check. -
Sketch the body:
Draw the thorax (middle section) and abdomen (long tail section) along your centerline. Make them distinct segments, similar to a caterpillar shape. -
Outline the wings:
Sketch the large upper forewings first. They should be roughly triangular with rounded edges. Then, draw the lower hindwings, which are more rounded and teardrop-shaped. Don’t worry about perfection; butterfly wings are organic shapes.
Step 2: Color Blocking
-
Create a white base:
Because you are painting neon colors on black, they won’t show up well directly. Use your medium flat brush to paint the inside of the wing shapes solid white first. Let this layer dry completely. -
Paint the blue sections:
Once the white underpainting is dry, apply your Bright Cyan paint. Cover the entire left side (both top and bottom wings) and the bottom-right wing. You may need two coats for full opacity. -
Paint the pink accent:
Fill the top-right wing with Hot Pink. This sharp contrast is the key feature of this specific design, giving it that unique split personality look. -
Fill the body:
Paint the segmented body in the center with Lime Green. Use a small round brush to stay within the lines, ensuring the green pops against the dark background.
Uneven Coverage?
Neon paints can be notoriously transparent. If the blue or pink looks streaky, let it dry fully and apply a second (or even third) thin coat rather than globbing on thick paint.
Step 3: Defining the Details
-
Draft the veins:
Lightly sketch the vein patterns over the dried color with your chalk. Start from the body and radiate lines outward toward the wing edges, connecting them with curved lines to create ‘panes’ of color. -
Paint thick outlines:
Using black paint and a small round brush, go over your chalk lines to create the thick black veins. Also, thicken the black border around the outer edges of the wings. -
Add grey highlights:
Mix a tiny bit of white into your black to make a dark charcoal grey. Use a fine liner brush to outline the outer edge of the black wing borders. This subtle ‘glow’ effect separates the butterfly from the background. -
Detail the body:
Use the black liner brush to add thin horizontal stripes across the green body to emphasize the segments.
Add Some Sparkle
For the finishing dots on the wing edges, try using a metallic silver paint or even dimensional puffy paint. This adds actual texture and catches the light beautifully.
Step 4: Finishing Touches
-
Add wing spots:
Dip the handle end of a paintbrush into white paint to create perfect dots. Stamp these along the outer black margins of the wings. Feel free to mix some pink or blue dots in with the white ones for variety. -
Paint the antennae:
Use your finest liner brush and thinned grey or white paint to sweep two delicate antennae extending from the top of the head. -
Clean up:
Once everything is fully dry, use a damp cloth or a clean brush with a little water to gently wipe away any visible chalk sketch lines. -
Seal (Optional):
If you want to protect the vibrancy of the neon colors, apply a coat of gloss varnish over the entire canvas.
Hang your luminous creation in a well-lit spot to truly let those contrasting colors shine
High-Contrast Bubbles With Iridescent Streaks
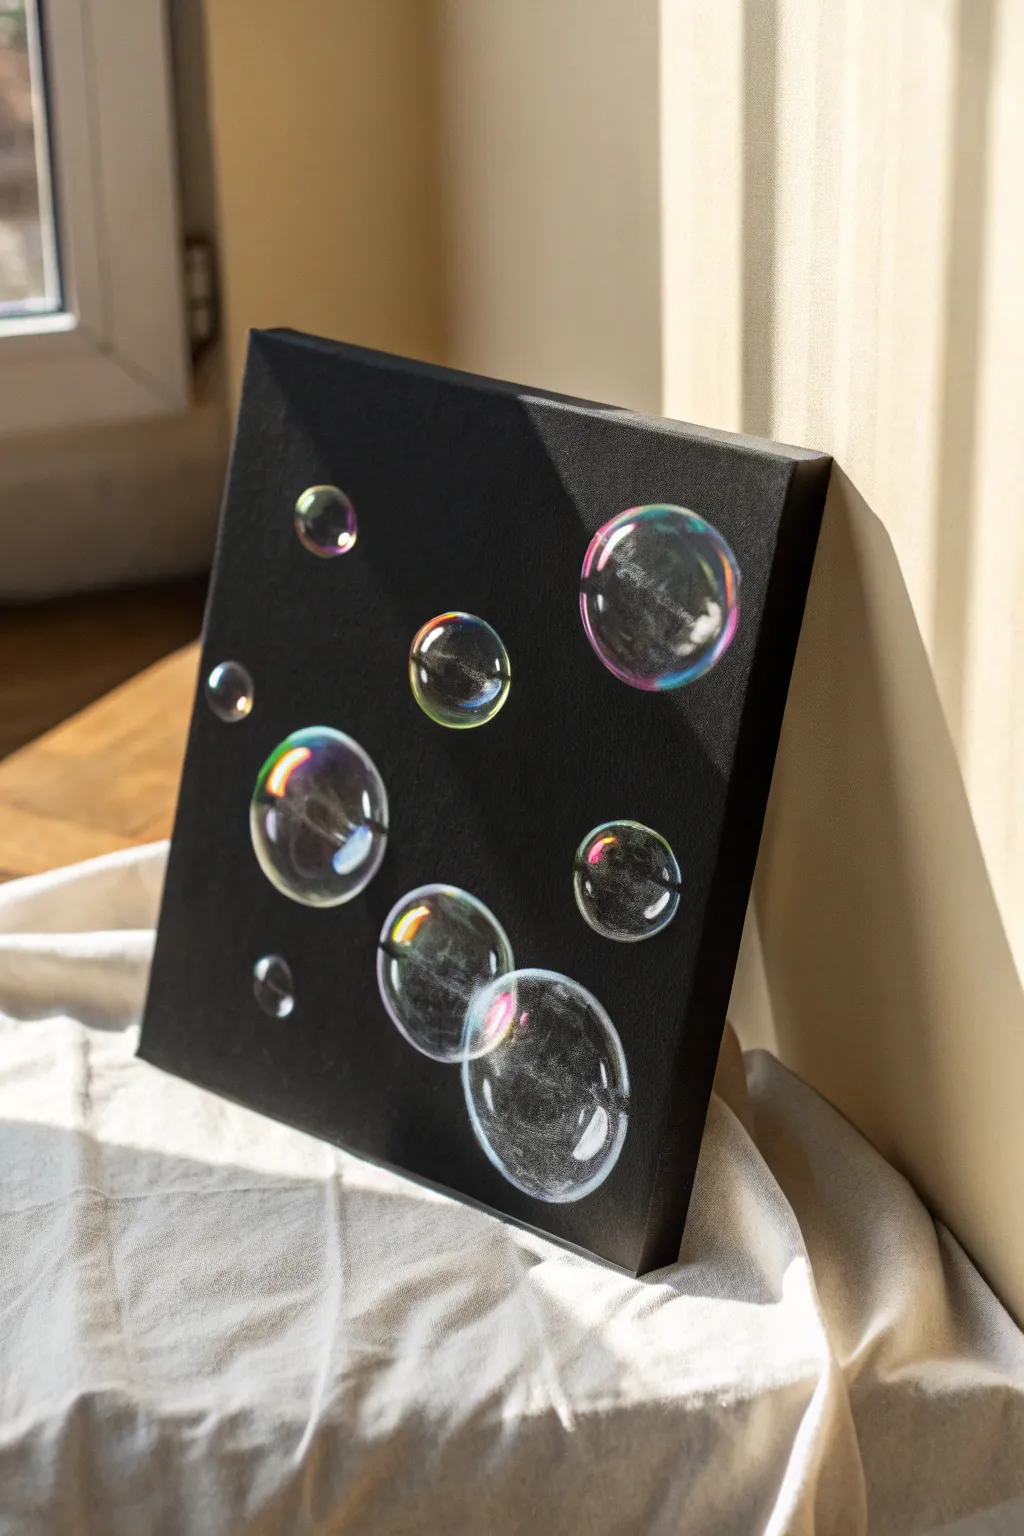
Capture the delicate, fleeting beauty of soap bubbles against a dramatic dark background with this high-contrast painting project. The sharp black canvas makes the iridescent colors pop, creating a mesmerizing 3D effect that looks far more complex than it actually is.
Step-by-Step Tutorial
Materials
- Square stretched canvas (black primed, or white canvas painted black)
- Acrylic paints: Titanium White, Cyan (or Phthalo Blue), Magenta (or Quinacridone Magenta), Lemon Yellow
- Soft synthetic brushes: Round #2 or #4, Detail liner #0 or #00, Small filbert brush
- Something circular to trace (cups, lids, tape rolls of various sizes)
- White colored pencil or chalk pencil
- Mixing palette
- Water cup and paper towels
Step 1: Preparation & Sketching
-
Prep the surface:
If you aren’t using a pre-primed black canvas, coat your white canvas with two layers of black acrylic paint. Let it dry completely between coats to ensure a smooth, opaque matte finish. -
Plan composition:
Gather your circular objects. Arrange them on the dry canvas to find a pleasing layout. Aim for a mix of large, medium, and small bubbles, allowing one or two pairs to overlap slightly for depth. -
Trace the outlines:
Using a white chalk pencil or colored pencil, very lightly trace around your objects. Keep the pressure minimal; you want a faint guide that will disappear under the paint, not a harsh white ring. -
Refine the circles:
bubbles aren’t always perfect circles, but for this style, they look best when fairly precise. Fix any wobbly areas of your tracing by hand to ensure smooth curvature.
Fixing Wobbly Lines
If your circle edges look shaky, don’t panic! Use a flat brush with black paint to ‘cut back’ into the shape from the outside, carving out a perfect curve again.
Step 2: Painting the Iridescence
-
Mix transparent colors:
On your palette, prepare small puddles of Cyan, Magenta, and Yellow. You want these to be somewhat translucent, so thin them slightly with water or a glazing medium if they are heavy body paints. -
Apply the first color streaks:
Start with the Magenta. Using your small round brush, paint thin, curved strokes along sections of the bubble’s inner edge. Don’t outline the whole circle; just pick 2-3 shorter arcs along the perimeter. -
Add the Cyan tones:
Clean your brush and pick up the Cyan. Paint curved strokes on the opposite side of the bubble from the magenta areas. Let some strokes slightly overlap the magenta to create purple transitions. -
Highlight with Yellow:
Add small touches of Yellow near the Cyan areas. I find this creates a lovely green shift where they meet. Keep these strokes sheer and wispy. -
Soften the edges:
While the paint is still slightly damp, use a clean, slightly moist brush to feather the inner edges of your colored strokes towards the center of the bubble. The outer edge should remain sharp against the black.
Step 3: Creating Glassy Reflections
-
Prepare the White:
Load your detail liner brush with Titanium White. This needs to be opaque, so don’t dilute it too much, but ensure it flows smoothly from the bristles. -
Paint the main reflections:
Look at the reference image or a real bubble. The strongest light source usually creates a distorted window-pane shape or a bright curved shine. Paint these stark white shapes on the upper right or upper left of every bubble (keep the light source consistent). -
Add the bottom glow:
Paint a thinner, sharper crescent of white along the bottom edge of the bubble, opposite your main highlight. This represents light refracting through the sphere. -
Dry brush textures:
Wipe most of the white paint off a small filbert brush until it’s almost dry. Gently scuff some cloudy white textures in the middle of the large bubbles to simulate the soap film’s surface swirling. -
Enhance overlaps:
If you have overlapping bubbles, ensure the outlines of the ‘front’ bubble cross over the ‘back’ bubble cleanly. You might need to brighten the line where they intersect to separate them visually. -
Add tiny floats:
Use your smallest brush to add a few tiny, distant bubbles in the empty black spaces. These can just be simple white rings with a tiny dot of color. -
Final crisping:
Step back and look at the contrast. If any black areas got muddy, carefully touch up the background with fresh black paint to sharpen the outer edges of the bubbles one last time.
Splatter Magic
For extra magic, dip a toothbrush in diluted white paint and flick tiny stars across the background before you start the bubbles for a cosmic space effect.
Hang your new masterpiece in a spot with good lighting to watch those faux reflections really shine
Diamond Frame Galaxy Using Painter’s Tape
Learn how to paint a mesmerizing galaxy that seems to glow against a deep black background. This tutorial guides you through creating ethereal nebulae in shades of magenta and teal, complete with sparkling stars.
Step-by-Step
Materials
- Square stretched canvas (black primed, or painted black)
- Acrylic paints: Black, Titanium White, Magenta/Purple, Teal/Turquoise
- Sponges (kitchen sponge cut into pieces or sea sponge)
- Small round paintbrushes (sizes 0 and 1)
- Old toothbrush (optional for stars)
- Palette or paper plate
- Cup of water
- Paper towels
Step 1: Setting the Scene
-
Prepare the canvas:
If your canvas isn’t already black, cover the entire surface with black acrylic paint and let it dry completely. A second coat ensures a solid, opaque background. -
Plan your nebula:
Visualize a diagonal flow for your galaxy cloud, running roughly from the top left to the bottom right. This diagonal composition creates dynamic movement.
Step 2: Creating the Nebulae
-
Start with white sponging:
Dip a small piece of sponge into a tiny amount of white paint. Dab most of it off onto a paper towel until the sponge is almost dry. -
Lay the cloudy foundation:
Gently dab the dry sponge onto the canvas in a diagonal cloud shape. Keep this layer very faint and misty; you are just marking where the brightest colors will go. -
Sponge on the magenta:
Take a fresh piece of sponge and load it with magenta or purple paint. Dab it over the upper portion of your white misty area, blending it softly into the black edges. -
Add the teal section:
Using another clean sponge piece, apply teal paint to the lower section of your cloud formation. Allow the teal and purple to meet in the middle. -
Blend the transition:
Where the teal and purple meet, lightly dab the sponge to overlap them slightly. This creates a natural gradient rather than a hard line. -
Intensify the glow:
Mix a tiny bit of white with your magenta and teal paints separately to create lighter tints. Sponge these lighter colors into the very center of the colored clouds to make them look like they are glowing from within. -
Re-establish deep shadows:
If your sponging got too wide or messy, dip a sponge in black paint and carefully dab around the edges of the galaxy to shape it back down and add depth.
Dry Sponge is Key
Always dab excess paint onto a paper towel before sponging the canvas. Too much wet paint creates blobs instead of a soft, misty nebula texture.
Step 3: Painting the Stars
-
Create distant stars:
Dilute a small amount of white paint with water until it has an inky consistency. Dip an old toothbrush or stiff brush into this mix. -
Technique check:
Test the splatter on a piece of paper first. Run your thumb over the bristles to flick tiny droplets of paint. -
Splatter the canvas:
Gently flick the white paint over the galaxy. Focus more density on the diagonal cloud area and fewer stars in the dark corners. -
Paint prominent star centers:
Use your smallest round brush (size 0) to dot several larger white stars directly onto the canvas in random spots. -
Add vertical rays:
For the ‘shimmer’ stars, paint a thin vertical line extending up and down from a center white dot. Taper the ends so they are sharp. -
Add horizontal rays:
Paint a shorter horizontal line crossing through the center dot. This creates the classic four-point star shape. -
Final highlights:
Add a tiny extra dot of pure white in the very center of your four-point stars to make them shine brightest.
Add Hidden Depth
Mix a tiny amount of glitter medium into your teal and purple paints for a galaxy that actually sparkles when the light hits it.
Hang your new celestial masterpiece on a wall where it can catch the light and inspire you to keep creating
Gold-on-Black Mandala Dot Pattern

Transform a plain black canvas into a mesmerizing focal point with this elegant gold-on-black mandala. By combining traditional dotting techniques with delicate brushwork, you’ll create a radiating design that looks far more complex than it actually is.
Step-by-Step Guide
Materials
- Square stretched canvas (black primed, or painted black)
- Metallic gold acrylic paint (high opacity)
- White slate pencil or chalk pencil
- Compass
- Ruler
- Fine liner brush (size 00 or 000)
- Dotting tools (various sizes)
- Acrylic sealer (optional)
- Damp cloth (for mistakes)
Step 1: Preparation & Grid
-
Base coat:
If your canvas isn’t already black, apply two smooth coats of matte black acrylic paint. Let it dry completely between layers to ensure a solid, opaque background. -
Find the center:
Use your ruler to draw faint diagonal lines from corner to corner with a chalk pencil. Where they cross is your exact center point. -
Draw guide circles:
Using a compass, draw a series of concentric circles radiating from the center. Space them out where you want your major petal layers and dot rings to sit. Keep these lines very light so they are easy to remove later. -
Segment the grid:
Divide your circle like a pie. Mark 16 equal sections radiating from the center to help keep your petals symmetrical.
Smudged the gold?
Don’t panic or wipe it wet! Let the gold mistake dry completely, then paint over it with a tiny bit of your black background paint to act as an eraser.
Step 2: The Central Core
-
Paint the central flower:
Load your fine liner brush with gold paint. In the very center, paint a small, eight-petaled flower shape. I like to keep the paint consistency slightly fluid here for sharper points. -
Add inner details:
Within the central circle area, add delicate freehand filigree lines or swirls around your starting flower to fill the negative space with texture. -
Create the first border:
Paint a solid ring around this central design. Use small dots to outline the inner edge of this ring for added detail. -
Apply the large dots:
Using a medium-sized dotting tool, place a ring of prominent gold dots just outside the central border. Try to space them evenly, using your grid lines as a guide.
Step 3: Petals & Flourishes
-
Outline the main petals:
Using your liner brush, paint the outline of large, leaf-shaped petals. Each petal point should align with a grid line. -
Stipple the interiors:
Don’t fill the petals solidly. Instead, use a very small dotting tool or the tip of a toothpick to fill the inside of each petal with tiny, dense stippling marks. This creates a beautiful texture contrast. -
Add the petal spines:
Paint a thin, curved line down the center of each leaf petal to give it dimension and divide the stippled texture. -
Create the secondary layer:
In the V-shape gaps between the main petals, paint a second, slightly smaller set of petals. Repeat the outlining and stippling technique for a cohesive look. -
Emphasize with dots:
Between the tips of the petals and on the outer edges, add single medium-sized dots to bridge the design elements.
Pro Tip: Consistency
Add a drop of flow medium or water to your gold paint for the liner work. It ensures creates crisp, sharp points on your petals instead of jagged, dry-brush edges.
Step 4: Outer Radiance
-
Outer dot chains:
Using a ‘walking the dots’ technique, create swooping chains of dots that connect the outer petal tips. Start with a larger dot and gradually decrease pressure to make smaller dots as you curve the line. -
Extend the rays:
Paint straight lines of diminishing dots extending outward from the petal tips toward the canvas edges, creating a sunburst effect. -
Fill the gaps:
Look for any large empty black spaces near the outer perimeter. Add small single dots or tiny clusters to balance the composition without overcrowding it. -
Clean up:
Once the gold paint is fully dry (give it at least an hour), gently wipe away your chalk guidelines with a slightly damp cloth or a cotton swab.
Hang your stunning black and gold mandala in a spot with good lighting to catch the metallic shimmer
Palette-Knife Abstract Color Smears
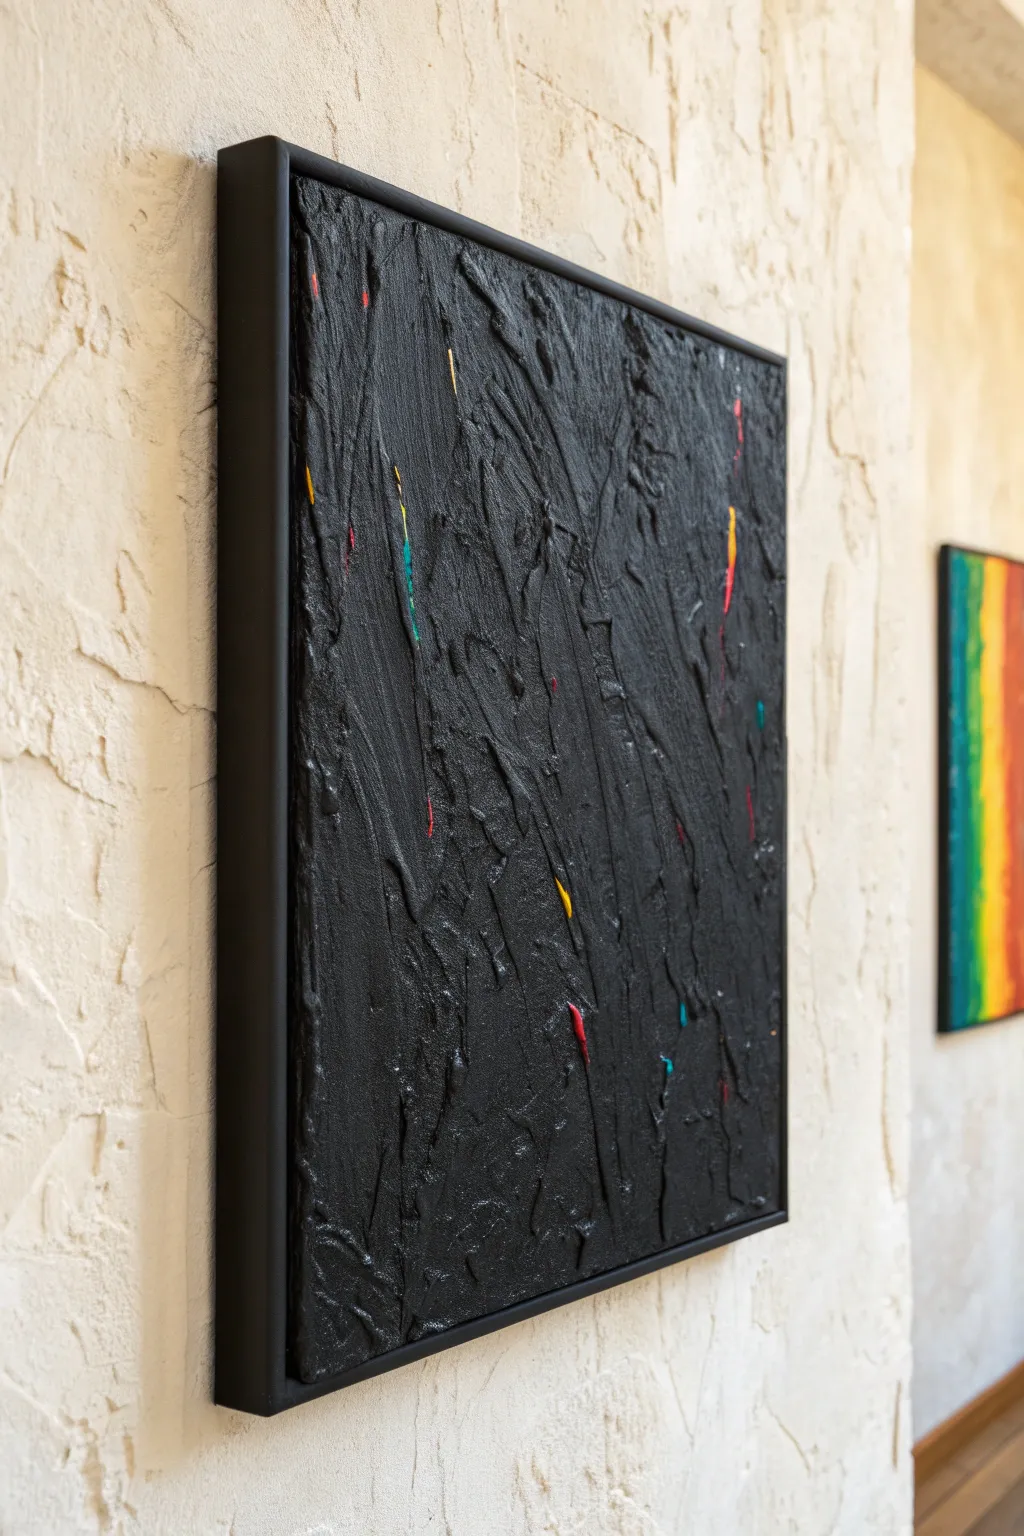
This striking artwork uses heavy texture to transform a simple black canvas into a sophisticated statement piece. By layering deep black impasto strokes with tiny, strategic pops of hidden color, you create a sense of depth and mystery that shifts beautifully as you move around the room.
Step-by-Step Tutorial
Materials
- Stretched canvas (square format, e.g., 20×20 inches)
- Heavy body black acrylic paint (or black gesso)
- Modeling paste or texture gel
- Various acrylic paint colors (cyan, magenta, yellow)
- Small palette knives (one narrow, one wide)
- Wide flat paintbrush (2-3 inch)
- Palette or mixing plate
- Black float frame (optional)
Step 1: Texturing the Base
-
Prep the mix:
Begin by scooping a generous amount of modeling paste onto your palette. Mix in a substantial amount of black heavy body acrylic paint. -
Check consistency:
Stir the mixture until the color is a solid, deep charcoal or jet black. You want a consistency similar to frosting—thick enough to hold a peak but spreadable. -
Initial application:
Load your wide palette knife or spatula with the black texture paste and apply it to the canvas. -
Create vertical movement:
Spread the paste primarily in vertical motions. Don’t smooth it out perfectly; you want ridges, valleys, and rough patches to remain. -
Add directional variety:
While keeping the general flow vertical, slightly angle your knife left and right occasionally. This creates the jagged, organic look seen in the reference image. -
Build the edges:
Ensure the texture extends all the way to the edges of the canvas, wrapping slightly around the sides if you aren’t planning to frame it. -
Let it cure:
Allow this thick base layer to dry completely. Since modeling paste is dense, this might take 24–48 hours depending on humidity.
Step 2: Injecting Color
-
Prepare accent colors:
Squeeze out tiny dots of your bright colors—cyan, magenta, and yellow—onto your palette. Keep them pure; you don’t need to mix them. -
Select a narrow tool:
Use a very small, narrow palette knife or even the edge of an old credit card for this delicate step. -
Apply the first streak:
Pick up a tiny amount of color (e.g., yellow) on the tip of your tool. Find a ridge in the dried black texture. -
The drag technique:
Gently drag the colored tool alongside a raised black ridge. Use very light pressure so the color just catches the edge without overwhelming the black. -
Distribute sparingly:
Add 3-5 small streaks of this first color scattered randomly across the canvas. Avoid placing them in a grid or pattern. -
Switch colors:
Wipe your tool clean and switch to cyan. Repeat the dragging process, placing these near—but not directly on top of—the previous marks. -
Layering the red:
Finish with tiny accents of red or magenta. I find that placing warmer colors near the center draws the eye effectively. -
Final black touch-up:
If any color streak feels too bold or wide, take a little fresh black paint on a small brush and trim the edges to thin it out.
Pro Tip: Tint Control
Mix a tiny drop of dark blue into your black base. It creates a ‘cold black’ that makes the warm yellow and red accents vibrate more intensely.
Step 3: Refining and Finish
-
Check the finish:
Once the color streaks are dry, evaluate the sheen. The reference art has a slight sheen on the texture. -
Varnish for unity:
Brush on a coat of satin or semi-gloss varnish. This deepens the black and makes the texture pop under lighting. -
Framing:
For the professional gallery look shown in the image, install the canvas into a black float frame, leaving a small gap between the canvas edge and the frame.
Troubleshooting: Cracking?
If your thick texture paste cracks while drying, don’t panic. Mix a thinner black wash (paint + water) and brush it into the cracks for a darker, aged effect.
Hang your new textured masterpiece where the light can catch those peaks and reveal the hidden colors
Fluid Pour With Black and Metallic Swirls
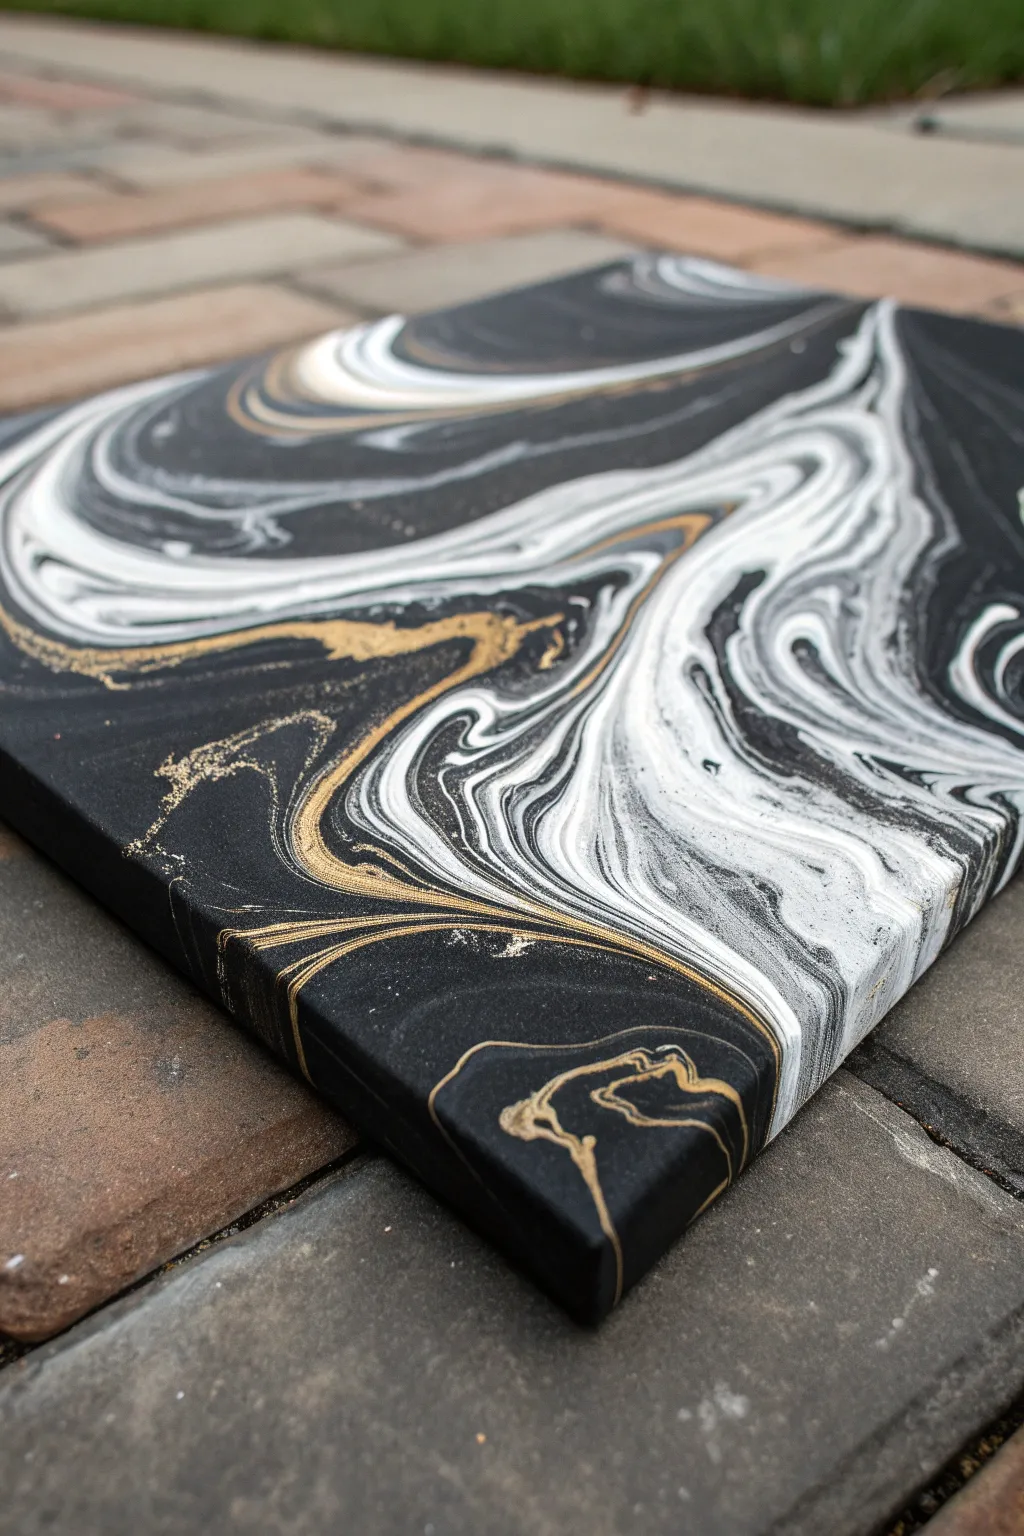
This striking fluid art piece combines the deep elegance of black with crisp white ribbons and shimmering gold accents. The result is a high-contrast, marble-like effect that looks incredibly sophisticated but is surprisingly simple to achieve using the dirty pour technique.
Detailed Instructions
Materials
- Stretched canvas (any size, though 8×10 or 11×14 is manageable)
- Black acrylic paint
- White acrylic paint
- Gold metallic acrylic paint
- Pouring medium (like Liquitex or Floetrol)
- Silicone oil (optional, for cells)
- Plastic cups (one per color + one large pour cup)
- Craft sticks for stirring
- Push pins (for lifting the canvas)
- Plastic drop cloth or garbage bag
- Gloves
Step 1: Preparation and Mixing
-
Prep the workspace:
Cover your entire working area with a plastic drop cloth or large garbage bag, as this process can get messy. Ensure your surface is perfectly level so the paint doesn’t slide off uncontrollably. -
Elevate the canvas:
Insert push pins firmly into the four corners on the back of your canvas wood frame. This lifts the canvas off the table, allowing paint to drip freely over the edges without sticking to your work surface. -
Mix the black base:
In one cup, mix your black acrylic paint with the pouring medium. Aim for a 1:1 ratio, though this depends on your paint brand. You want a consistency similar to warm honey—it should flow off the stick in a continuous stream without breaking. -
Mix the accent colors:
Repeat the mixing process in separate cups for the white and gold paints. Since metallic paints are often heavier, test the consistency carefully to ensure they match the fluidity of the black and white. -
Add silicone (optional):
If you want the bubbly ‘cell’ effects seen in some fluid art, add just 1-2 drops of silicone oil into the black and gold cups. Stir only two or three times; over-stirring can break the oil down too noticeably.
Step 2: The Pour
-
Layer the dirty pour cup:
Take your empty ‘pour cup.’ Start by pouring a generous amount of black into the bottom. This will ensure your background is dark. -
Add floating layers:
Gently pour a layer of white on top of the black, followed by a layer of gold. Tilt the cup slightly as you pour down the side so the colors sit on top of each other rather than mixing directly into mud. -
Continue layering:
Repeat the layering process—black, white, gold—until your cup is nearly full or contains enough paint to cover your specific canvas size. I find ending with a little black on top helps start the flow smoothly. -
The flip (or direct pour):
You can either place the canvas face down on the cup and flip them together, or simply pour the contents of the cup onto the center of the canvas in a slow, circular motion. -
Empty the cup:
If pouring directly, keep pouring until the cup is empty, letting the paint puddle in the center of the canvas. You should see distinct rings of black, white, and gold starting to form.
Muddy Colors?
If your colors are turning grey instead of staying distinct, you likely over-stirred the pour cup or tilted too aggressively. Layer gently and tilt slowly.
Step 3: Tilting and Shaping
-
Initial tilt:
Gently lift the canvas and start tilting it slowly. Move the puddle of paint toward one corner, but bring it back toward the center before it goes completely over the edge. This stretches the design first. -
Cover the corners:
Systematically tilt the canvas toward each corner. Watch the black and gold swirls stretch and interact. Allow the excess paint to flow over the sides; this is crucial for getting that wrapped gallery look. -
Check the edges:
Once the surface is covered, use your finger to tap any bare spots on the corners or sides with the paint drippings from your table. This ensures the sides look just as polished as the front. -
Torch for bubbles:
If you have a kitchen torch or heat gun, quickly pass it over the surface (keeping it moving constantly). This pops air bubbles and can bring up small cells if you used silicone, creating interesting details. -
Final drying:
Place the canvas back down on a level surface to dry. It needs to stay untouched for at least 24 to 48 hours. The paint will self-level as it dries, leaving a smooth, glass-like finish.
Add Sparkle
Sprinkle ultra-fine gold glitter into the wet black paint lines immediately after pouring. It adds texture and catches light beautifully once dry.
Once fully cured, you can seal your metallic masterpiece with a glossy varnish to make that gold really pop


Have a question or want to share your own experience? I'd love to hear from you in the comments below!