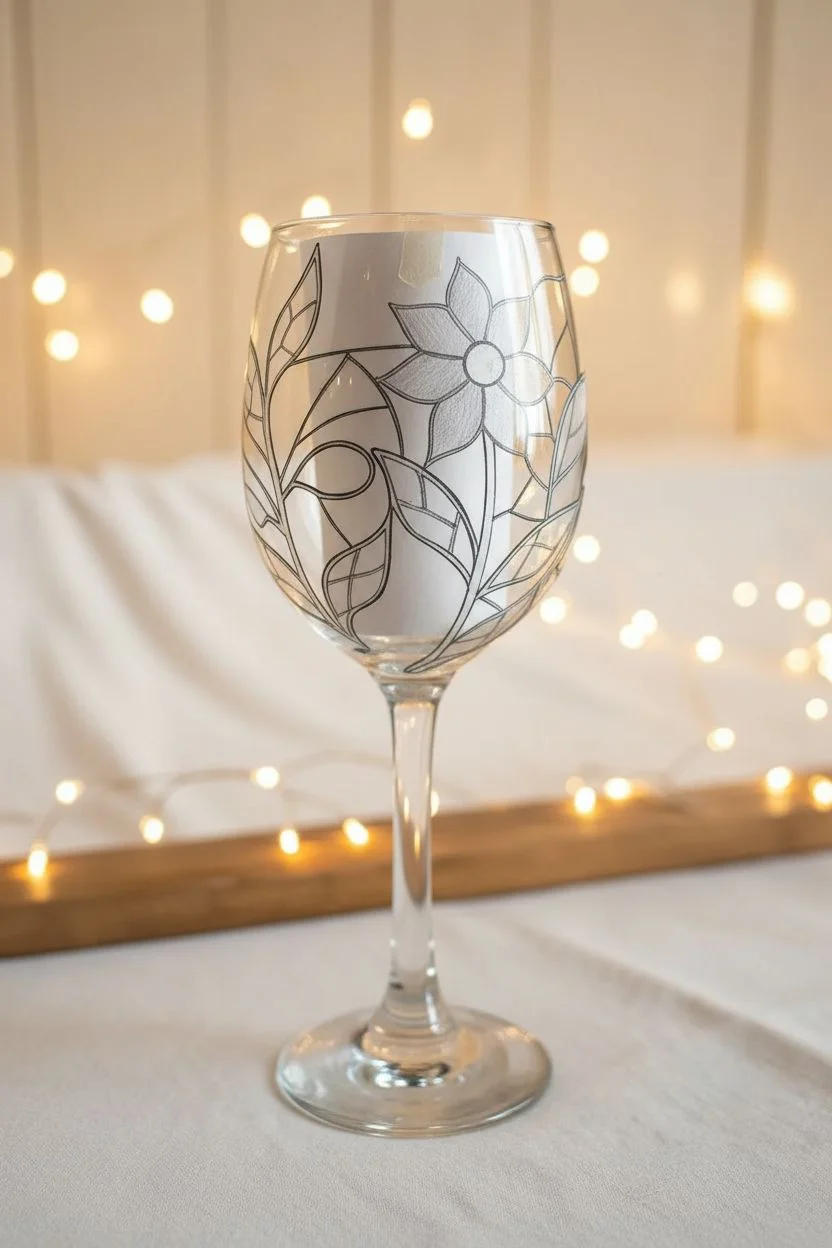
There’s something extra satisfying about turning a plain wine glass into a little piece of usable art with just a few simple marks. These beginner-friendly wine glass painting ideas are all about easy shapes, repeatable patterns, and that “I can totally do this” kind of confidence.
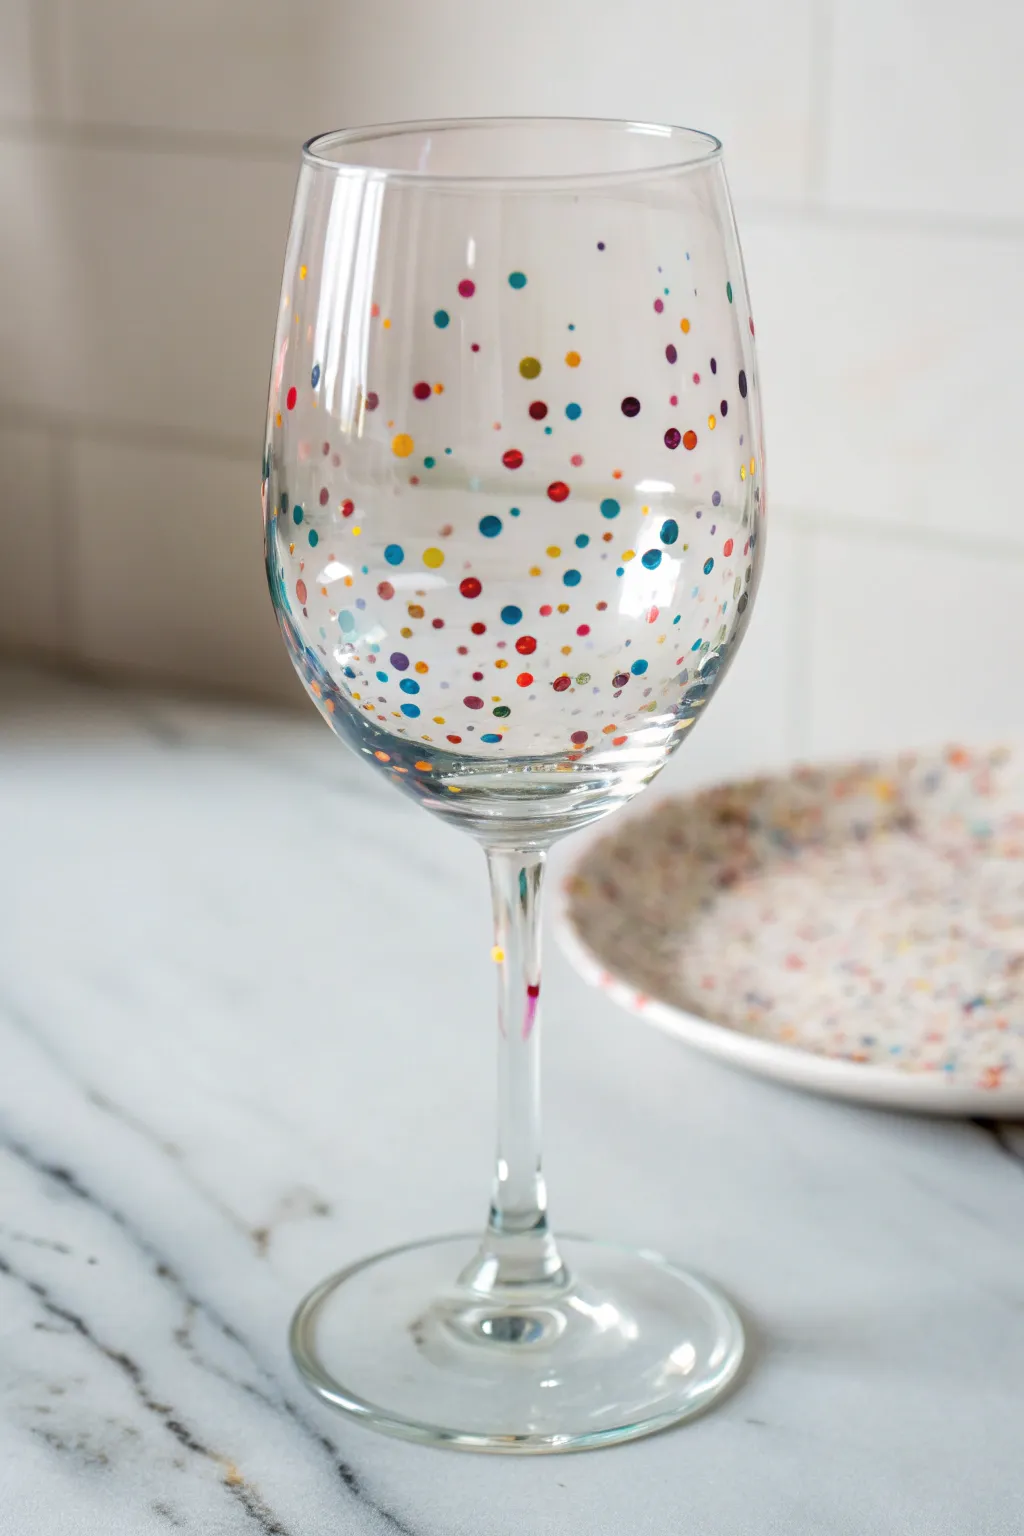
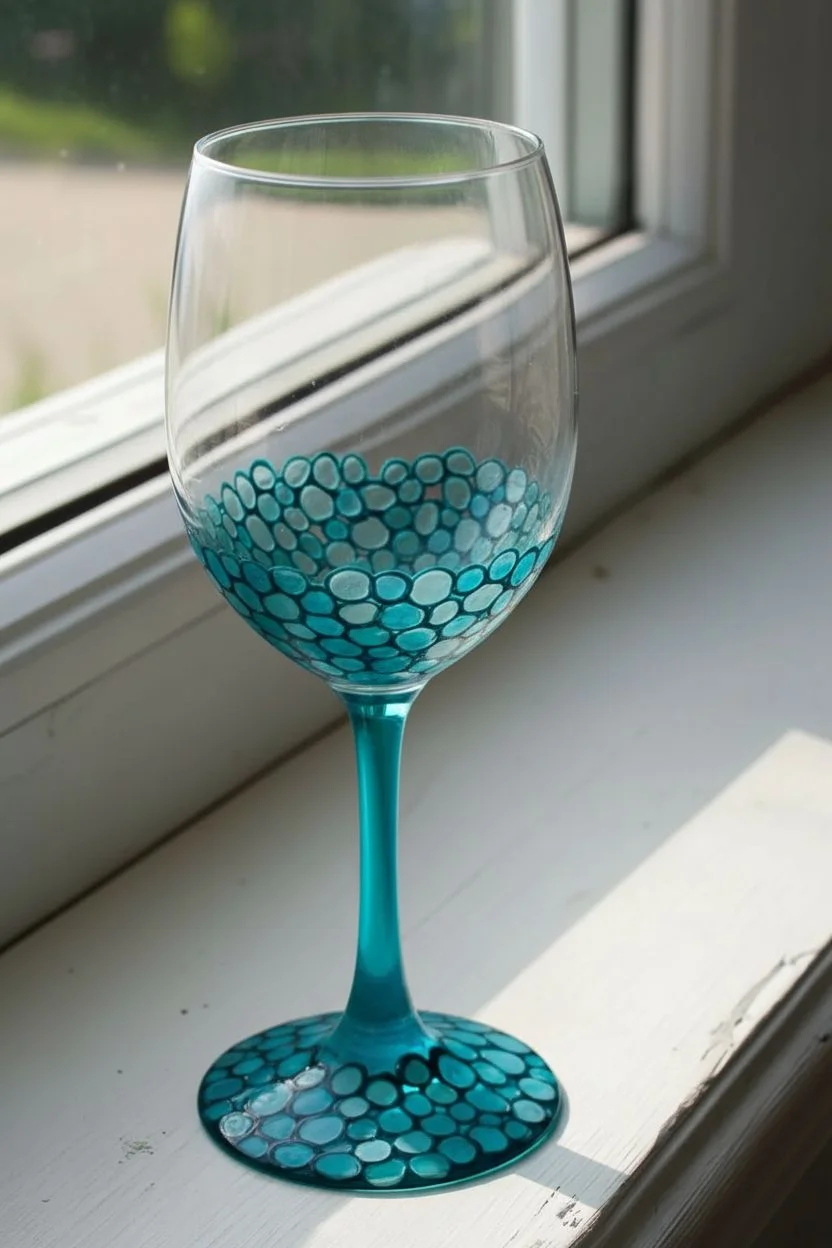
Classic Polka Dot Wine Glass Painting With Q-Tip Dabs
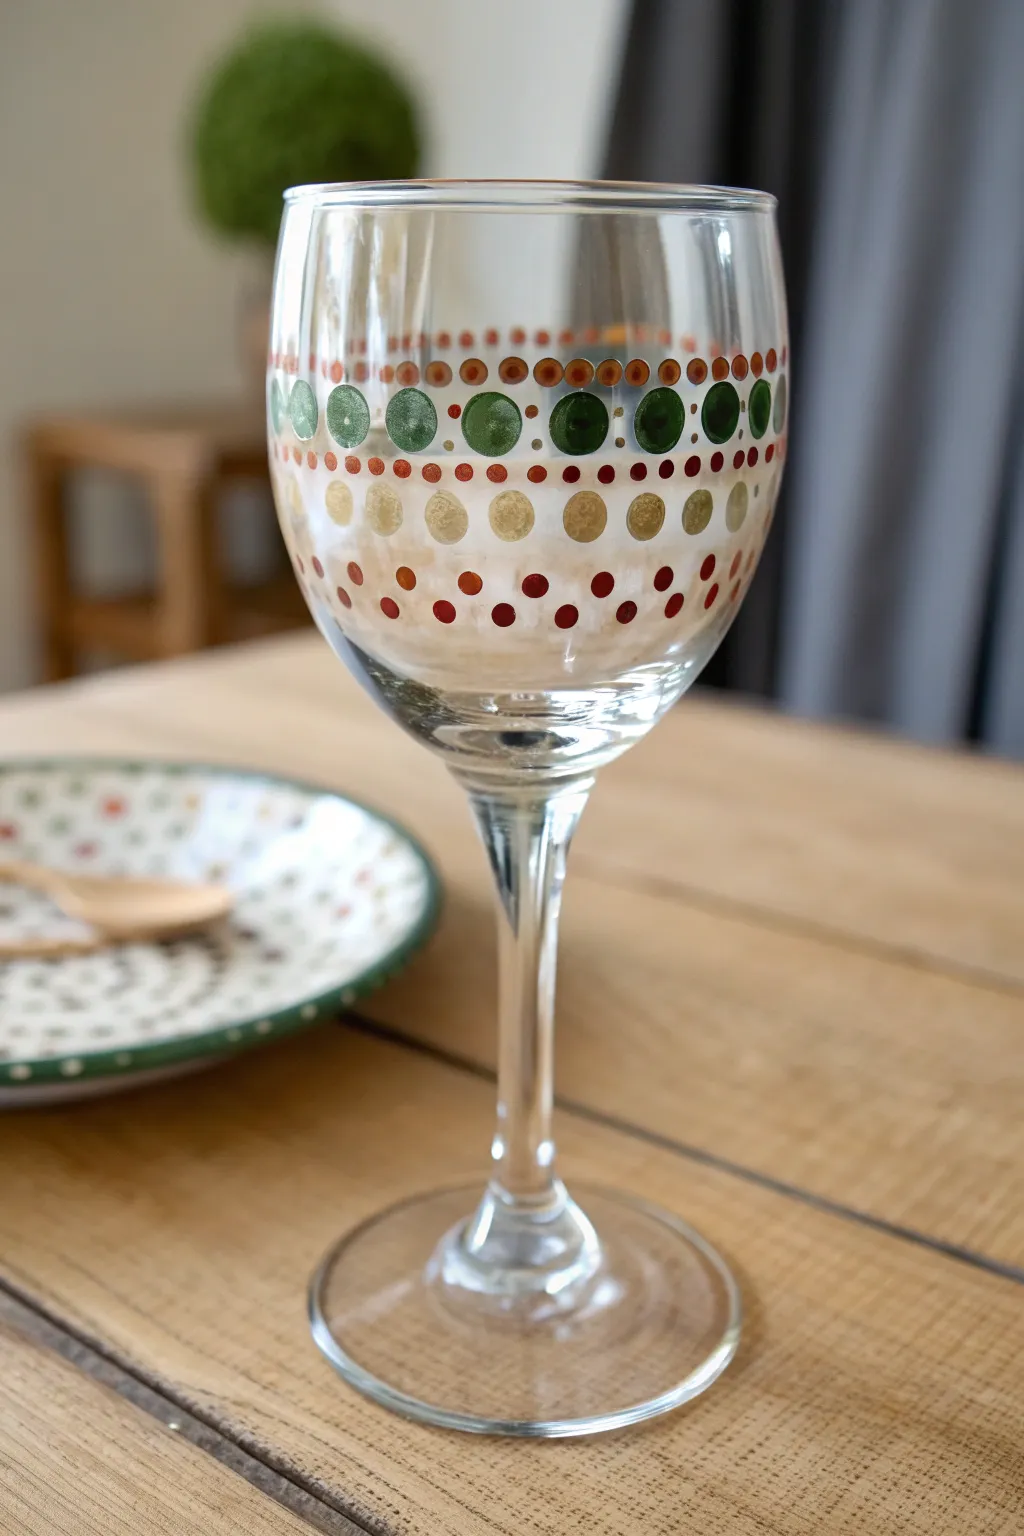
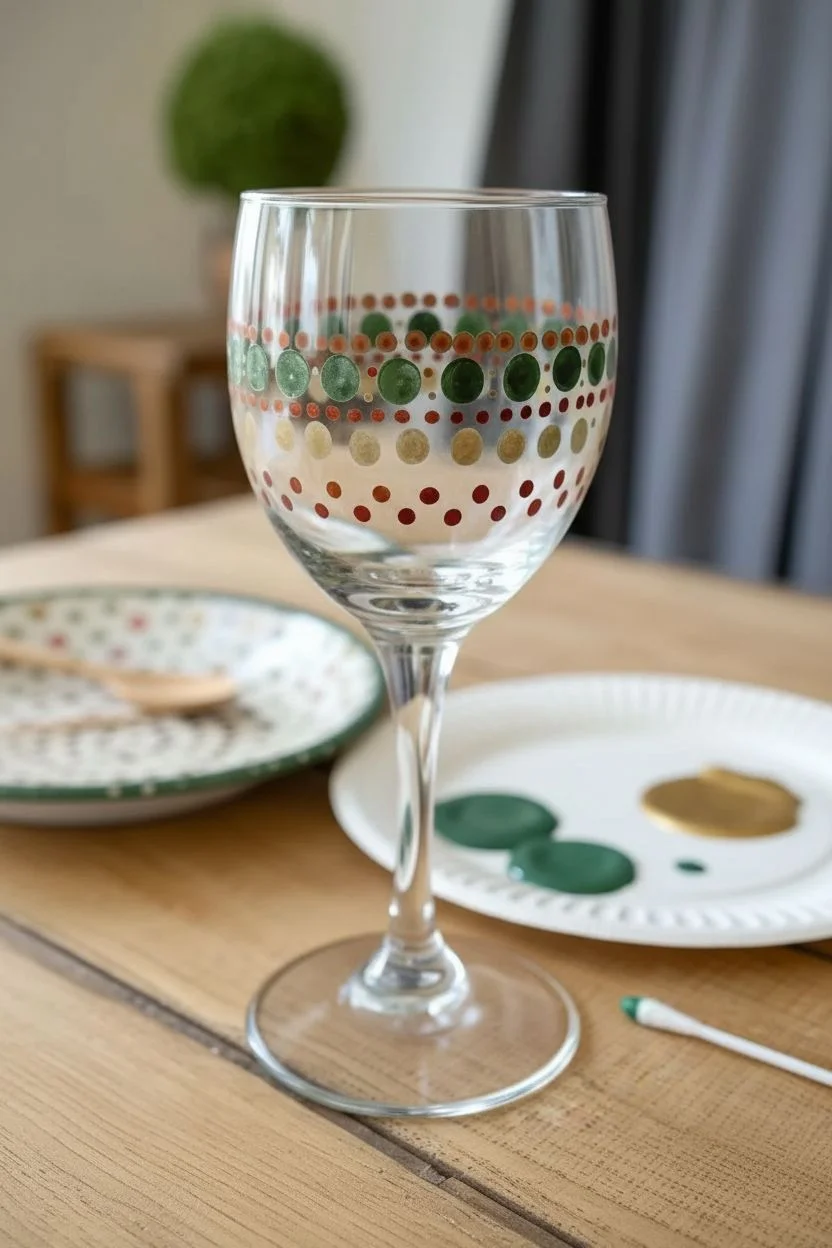
This sophisticated yet accessible project uses Q-tips and dotting tools to create precise rows of alternating colors and sizes, resulting in a cohesive, earthy pattern. The combination of forest greens, muted golds, and deep reds gives the classic polka dot technique a warm, vintage feel that looks beautiful on any table.
Detailed Instructions
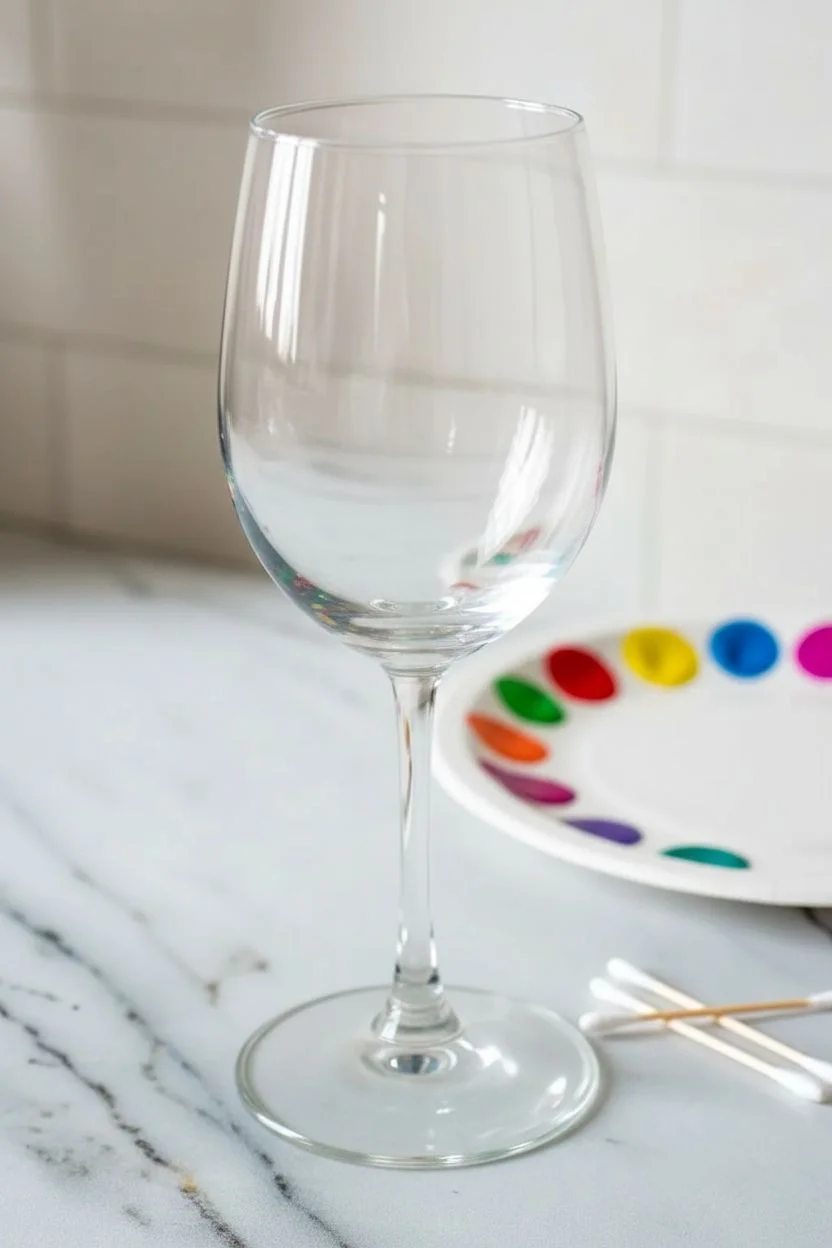
Materials
- Clear wine glass (cleaned with rubbing alcohol)
- Enamel glass craft paints (Forest Green, Metallic Gold, Deep Red/Burgundy, Burnt Orange)
- Q-tips (cotton swabs)
- Rubbing alcohol
- Cotton pads or paper towels
- Paper plate or palette
- Damp cloth (for mistakes)
- Medium-sized dotting tool or pencil eraser (optional, for larger dots)
- Oven (for curing)
Step 1: Preparation and Base Rows
-
Clean surface:
Begin by thoroughly wiping down the outside of your wine glass with rubbing alcohol and a cotton pad. This step removes oils and fingerprints, ensuring the paint adheres properly. -
Prepare palette:
Squeeze dime-sized amounts of Forest Green, Metallic Gold, Deep Red, and Burnt Orange onto your paper plate or palette. Keep them spaced apart so they don’t accidentally mix. -
Start the center row:
Load a clean Q-tip or a medium-sized dotting tool with Forest Green paint. Locate the vertical center of the bowl of the glass as your starting point. -
Paint large green dots:
Apply large, evenly spaced green dots in a horizontal ring around the glass. Try to keep about a half-inch of space between each dot. I find turning the glass slowly with my non-painting hand helps keep the line straight. -
Add gold accents:
Using a fresh Q-tip, dip into the Metallic Gold paint. Place a gold dot directly in the center of the spaces between your green dots, creating an alternating pattern for this main row.
Uneven Dot Sizes?
If your Q-tip gets too saturated and makes inconsistent dots, swap it for a fresh one immediately. You can also lightly dab excess paint onto paper before touching the glass.
Step 2: Creating the Borders
-
Top border row:
Dip a Q-tip into the Burnt Orange paint. Create a ring of smaller dots just above your main green-and-gold row. These should be aligned so that each orange dot sits directly above a gap in the row below. -
Lower border row:
Repeat this process below the main row using the same Burnt Orange paint. Try to mirror the spacing of the top row to maintain symmetry. -
Second lower row:
Switch to Metallic Gold again. Create a new ring of medium-sized dots below the orange row you just finished. These should be slightly larger than the orange dots but smaller than the main green ones. -
Third lower row:
Using the Deep Red paint and a Q-tip with a smaller amount of paint (or a smaller dotting tool), create a ring of small dots below the gold row. -
Bottom accent row:
Finish the bottom section with one final row of Deep Red dots, spaced slightly wider apart than the previous row, tapering the design downward.
Step 3: Top Section and Finishing Touches
-
Upper detail row:
Move back to the top of the glass, above your first orange row. Create a row of medium-sized dots using the Metallic Gold paint. -
Final top rim:
For the highest row shown in the design, dip a Q-tip or small tool into the Deep Red paint. Place these dots closely together for a defined upper border. -
Inspect and clean:
Check your design for any smudges or uneven dots. Use a damp Q-tip to carefully wipe away and redo any specific dots while the paint is still wet. -
Dry time:
Allow the glass to air dry completely for at least 1 hour, or up to 24 hours depending on your specific paint instructions. -
Curing process:
Place the glass in a cool oven. Turn the heat to 350°F (or the temperature specified on your paint bottle) and bake for 30 minutes. Turn the oven off and let the glass cool completely inside before removing.
Custom Color Schemes
Swap the earth tones for pastels (mint, pink, lavender) for a spring look, or use white, silver, and icy blue for a winter-themed set.
Once cured, your beautiful custom glassware is ready to be hand-washed and used for your next gathering


Tiny Heart Scatter Wine Glass Painting
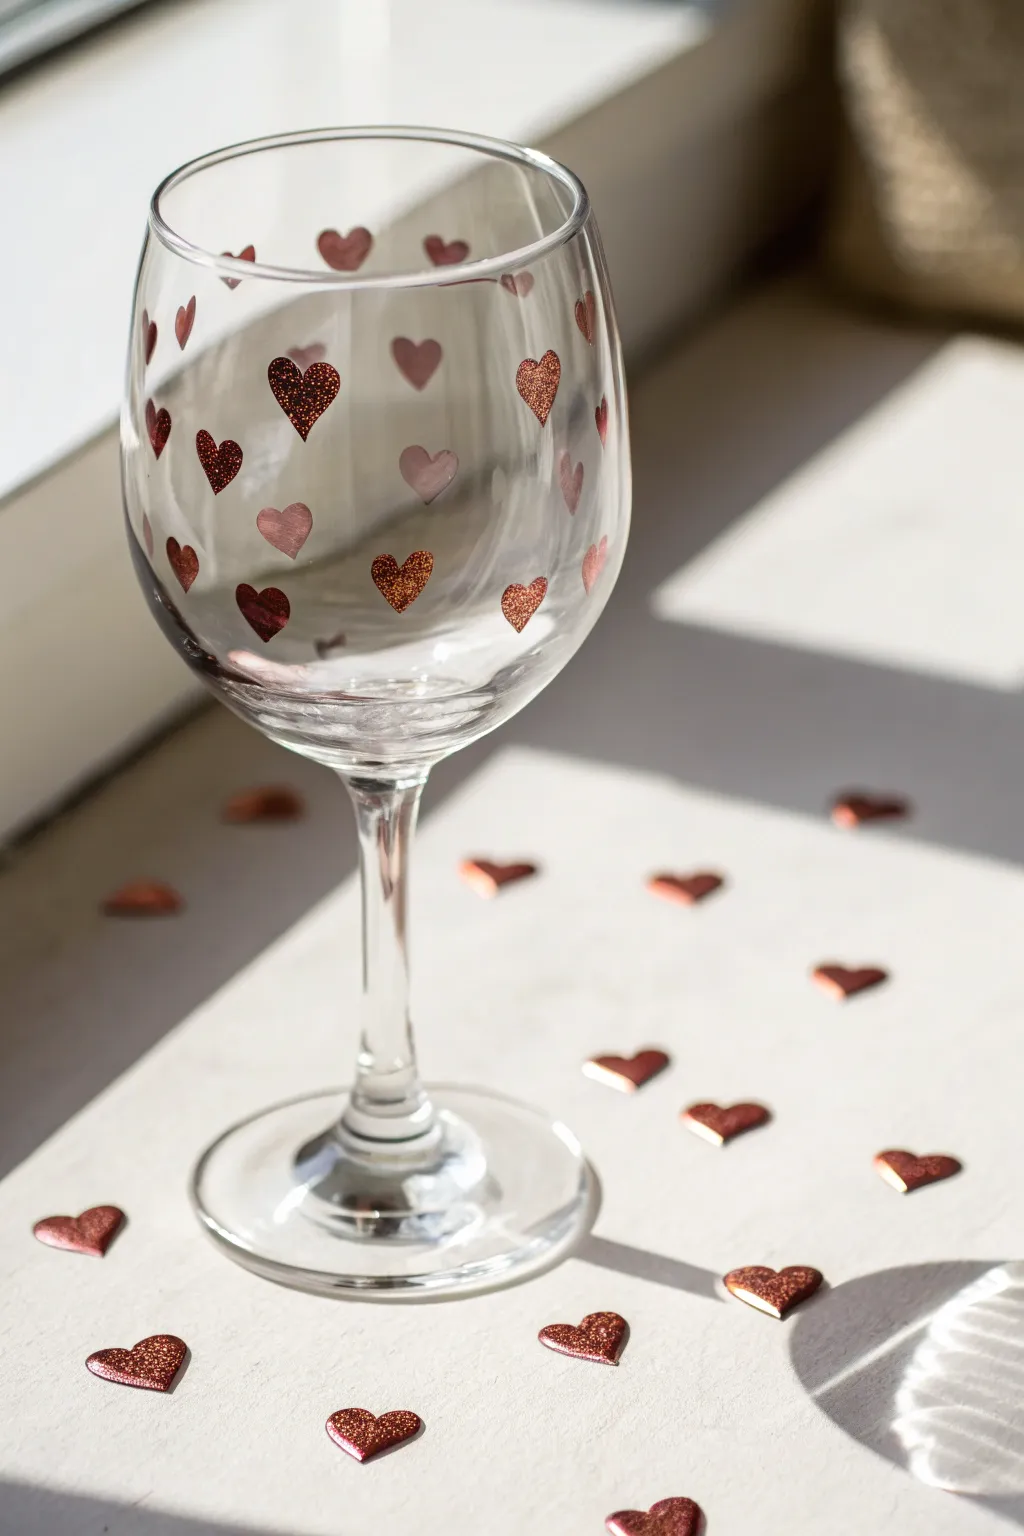
Transform a plain stemmed glass into a romantic vessel with this delicate scattering of copper-red hearts. The design combines matte shapes and glittering accents for a sophisticated dimensional look that is surprisingly easy to achieve.
Step-by-Step Guide
Materials
- Clear stemmed wine glass
- Rubbing alcohol
- Cotton pads or paper towels
- Glass paint (burnt orange or copper shade)
- Glass paint (fine glitter topcoat, gold or copper)
- Small round paintbrush (size 0 or 1)
- Fine-point paintbrush (size 000 or spotter)
- Palette or small dish
- Cotton swabs (for cleanup)
- Oven (for curing, if paint requires)
Step 1: Preparation
-
Clean and Degrease:
Before you even touch a paintbrush, thoroughly wipe down the entire surface of your glass with rubbing alcohol. This removes unseen oils or fingerprints that prevent paint from sticking properly. -
Air Dry:
Let the alcohol evaporate completely for a minute or two. Avoid touching the glass bowl with your bare hands after this point; try to hold it by the stem or base. -
Prepare Your Palette:
Squeeze a small dime-sized amount of your base copper or burnt orange glass paint onto your palette.
Uneven Hearts?
Don’t stress over symmetry. If a heart looks lopsided, turn it into a slightly larger heart, or use a toothpick to scratch away paint and reshape whilst wet.
Step 2: Painting the Base Hearts
-
Start the Scatter:
Dip your small round brush into the base color. Working on one side of the glass first, paint a small heart shape by pressing the brush down twice in a ‘V’ formation. -
Vary the Placement:
Paint a second heart a few inches away. Don’t worry about perfect rows; the charm comes from a random, floating arrangement. -
Rotate and Repeat:
Turn the glass slightly and continue adding hearts. Aim for about 1-2 inches of space between each motif to keep the design airy. -
Create Depth:
For visuals that pop, paint some hearts slightly larger and others tiny. I find this variety makes the finished glass look more professional. -
Check Coverage:
If the first coat looks streaky or translucent, let it dry for about 20 minutes before gently dabbing on a second thin layer of color. -
Let Base Dry:
Allow these base hearts to dry completely according to your paint manufacturer’s instructions—usually at least an hour.
Step 3: Adding the Glitter Accent
-
Prep the Glitter:
Dispense a small amount of your glitter glass paint. If it’s too thick, you can thin it slightly with the medium recommended by the brand. -
Select Certain Hearts:
You don’t need to glitter every single heart. Choose about half of them to accent, creating a nice textual contrast. -
Apply Glitter Coat:
Using your finest brush, carefully paint over the chosen base hearts with the glitter medium. Keep the edges neat. -
Add Lone Sparkles:
For extra whimsy, paint a few hearts purely with the glitter paint (no base color) in the empty spaces between the solid hearts. -
Clean Up Edges:
If any paint went outside the lines, dip a cotton swab in rubbing alcohol and gently wipe away the mistake while the paint is wet.
Match Your Table
Try using metallic silver or rose gold paint instead of copper for a cooler tone, or mix red and white glass paint for varying shades of soft pink hearts.
Step 4: Finishing Touches
-
Rim Inspection:
Ensure no paint is within 1 inch of the rim where lips will touch. This is important for safety and longevity of the design. -
Final Dry:
Let the glass sit undisturbed for at least 24 hours to allow the paint to fully cure on the surface. -
Baking the Glass:
Place your glass in a cool oven. Turn the heat to 350°F (or your paint’s specified temp) and bake for 30 minutes. Turn the oven off and let the glass cool inside completely.
Enjoy your beautiful new custom glassware at your next dinner party or give it as a heartfelt gift


Bold Striped Wine Glass Painting With Tape Guides
Achieve a sophisticated look with surprisingly simple techniques using this bold striped design. The combination of crisp black lines, warm metallic copper, and soft beige creates a modern aesthetic perfect for dinner parties or gifts.
Step-by-Step Tutorial
Materials
- Wine glass (white wine style preferred for straighter sides)
- Rubbing alcohol and cotton pads
- Painter’s tape or dedicated masking tape (various widths)
- Enamel glass paints (Black, Metallic Copper, Cream/Beige)
- Flat shader paintbrushes (small and medium sizes)
- Small craft knife (optional, for trimming tape)
- Baking sheet and oven (for curing)
Step 1: Preparation and Taping
-
Clean surface:
Begin by thoroughly wiping down the entire exterior of the wine glass with rubbing alcohol and a cotton pad. This removes oils and fingerprints that could prevent the paint from adhering properly. -
Initial tape placement:
Starting near the top rim (leaving about an inch for lip space), wrap a strip of painter’s tape horizontally around the glass bowl. Ensure the ends meet perfectly to keep the line straight. -
Create spacing:
Apply subsequent strips of tape below the first one. Vary the distance between tape strips to create stripes of different widths, mimicking the pattern in the photo. -
Design variation:
For the very thin pinstripes seen in the design, you can place two pieces of tape very close together, leaving just a sliver of glass exposed. -
Seal edges:
Once your taping design covers the bowl, press down firmly on all tape edges with your fingernail or a credit card to prevent paint bleed-under. -
Base prep:
Repeat the taping process on the foot of the glass, creating concentric circles or simple stripes that mirror the bowl’s design.
Tape Sealing Trick
For ultra-crisp lines, paint a thin layer of clear medium over the tape edges first. This seals the gap so colors won’t bleed under.
Step 2: Painting
-
Apply copper base:
Identify the widest stripes in your pattern. Use a flat brush to apply the metallic copper enamel paint here. I prefer to dab or stipple the metallic paint slightly rather than dragging it, which helps maintain a rich texture. -
Add black accents:
Fill in the thinner spacer stripes with the black enamel paint. Use a smaller brush for these areas to avoid accidentally brushing onto the tape of adjacent colors if they are wet. -
Paint cream stripes:
Apply the cream or beige paint to the remaining exposed glass bands. This neutral tone balances the high contrast between the black and copper. -
Repeat on base:
Paint the exposed rings on the foot of the glass using the same color palette to ensure the design feels cohesive from top to bottom. -
Fix imperfections:
Check for any spots that look translucent. Metallic paints often need a second coat, but wait roughly 20-30 minutes for the first coat to be tacky before reapplying.
Step 3: Finishing Touches
-
Remove tape:
Carefully peel off the tape while the paint is still slightly wet (usually about 30-45 minutes after painting). Pulling the tape away at a 45-degree angle helps ensure a crisp line. -
Clean lines:
If any paint bled under the tape, use a toothpick or a cotton swab dipped in rubbing alcohol to gently scrape or wipe away the excess while it’s still fresh. -
Dry time:
Allow the glass to air dry completely for at least 24 hours (or follow the specific instructions on your paint bottle). -
Bake to cure:
Place the glass on a baking sheet in a cold oven. Turn the oven to 350°F (175°C) and bake for 30 minutes. Turn the oven off and let the glass cool completely inside the oven to set the paint permanently.
Level Up: Texture
Mix a tiny amount of glitter into the copper paint for extra sparkle, or use a matte varnish on the beige stripes for contrast.
Raise your newly designed glass for a toast to your creativity and patience


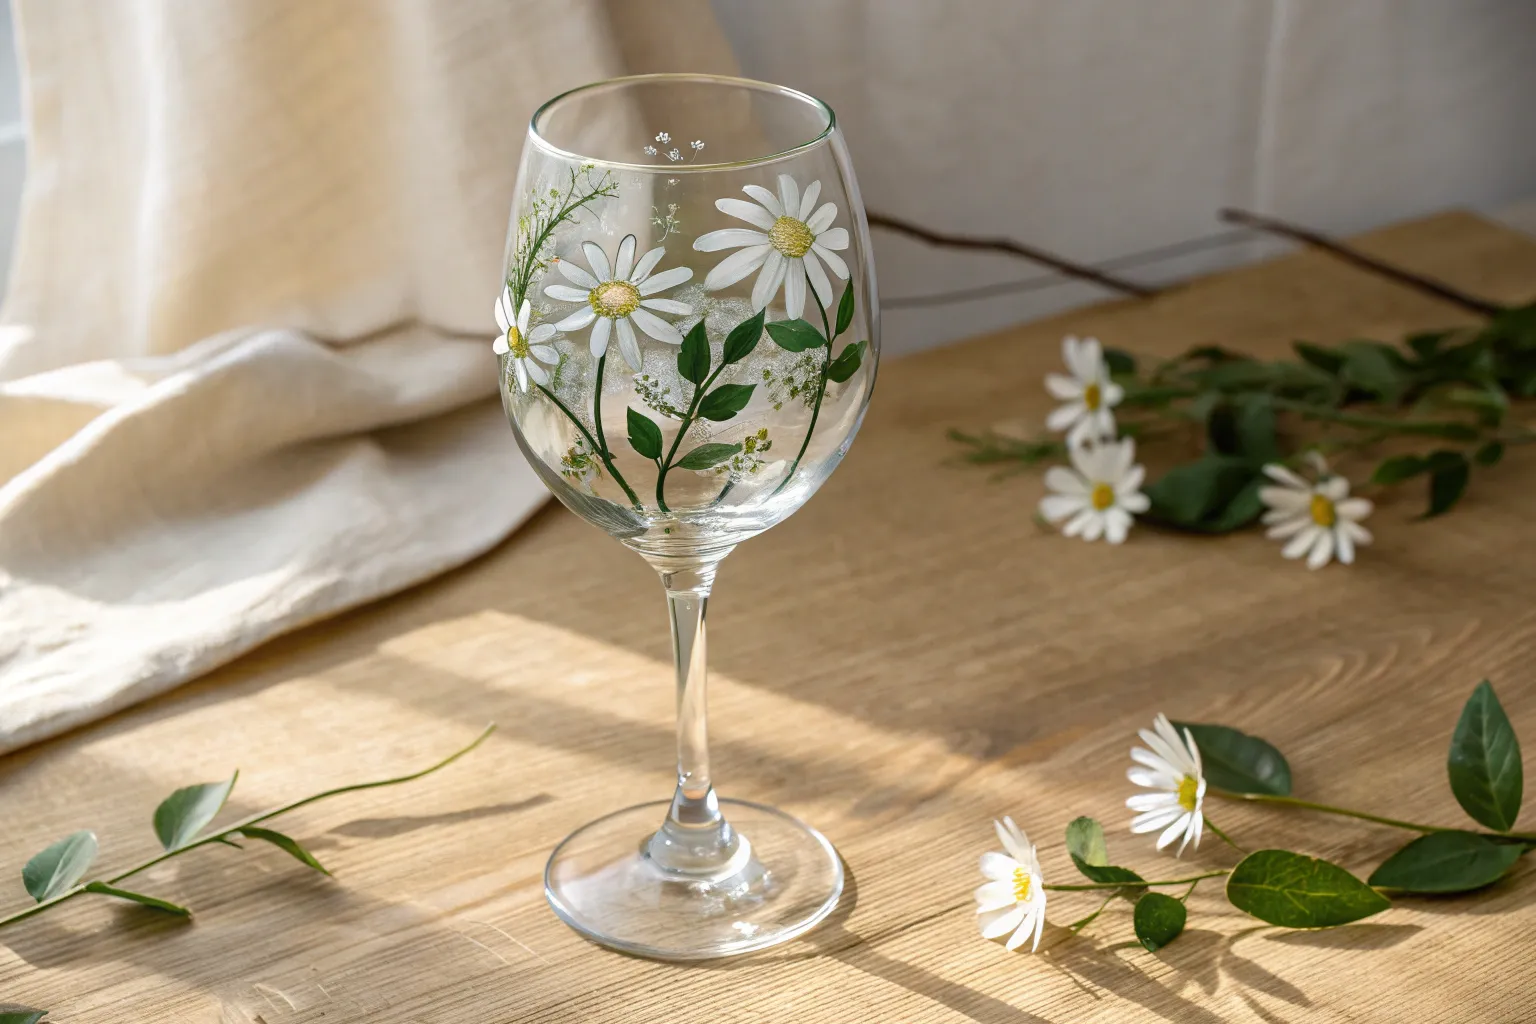
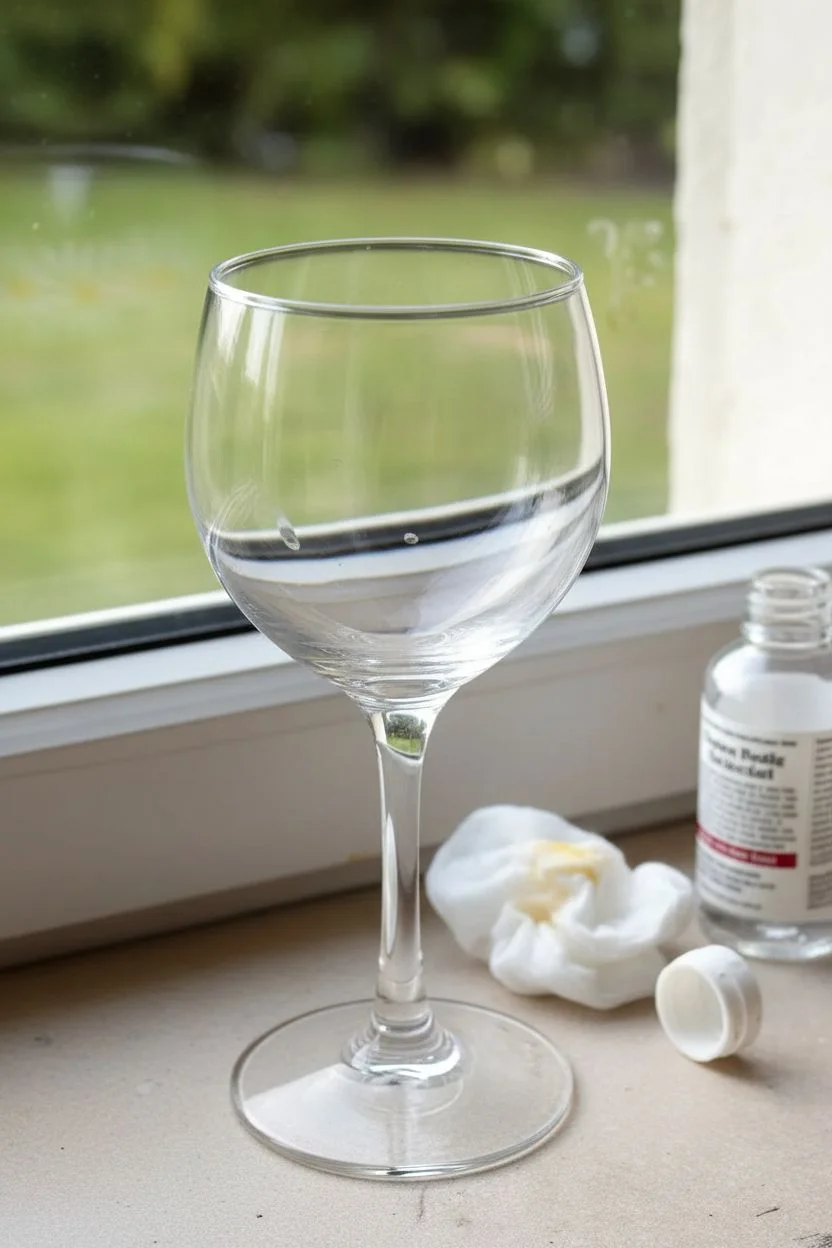
Easy Daisy Wine Glass Painting Around the Bowl
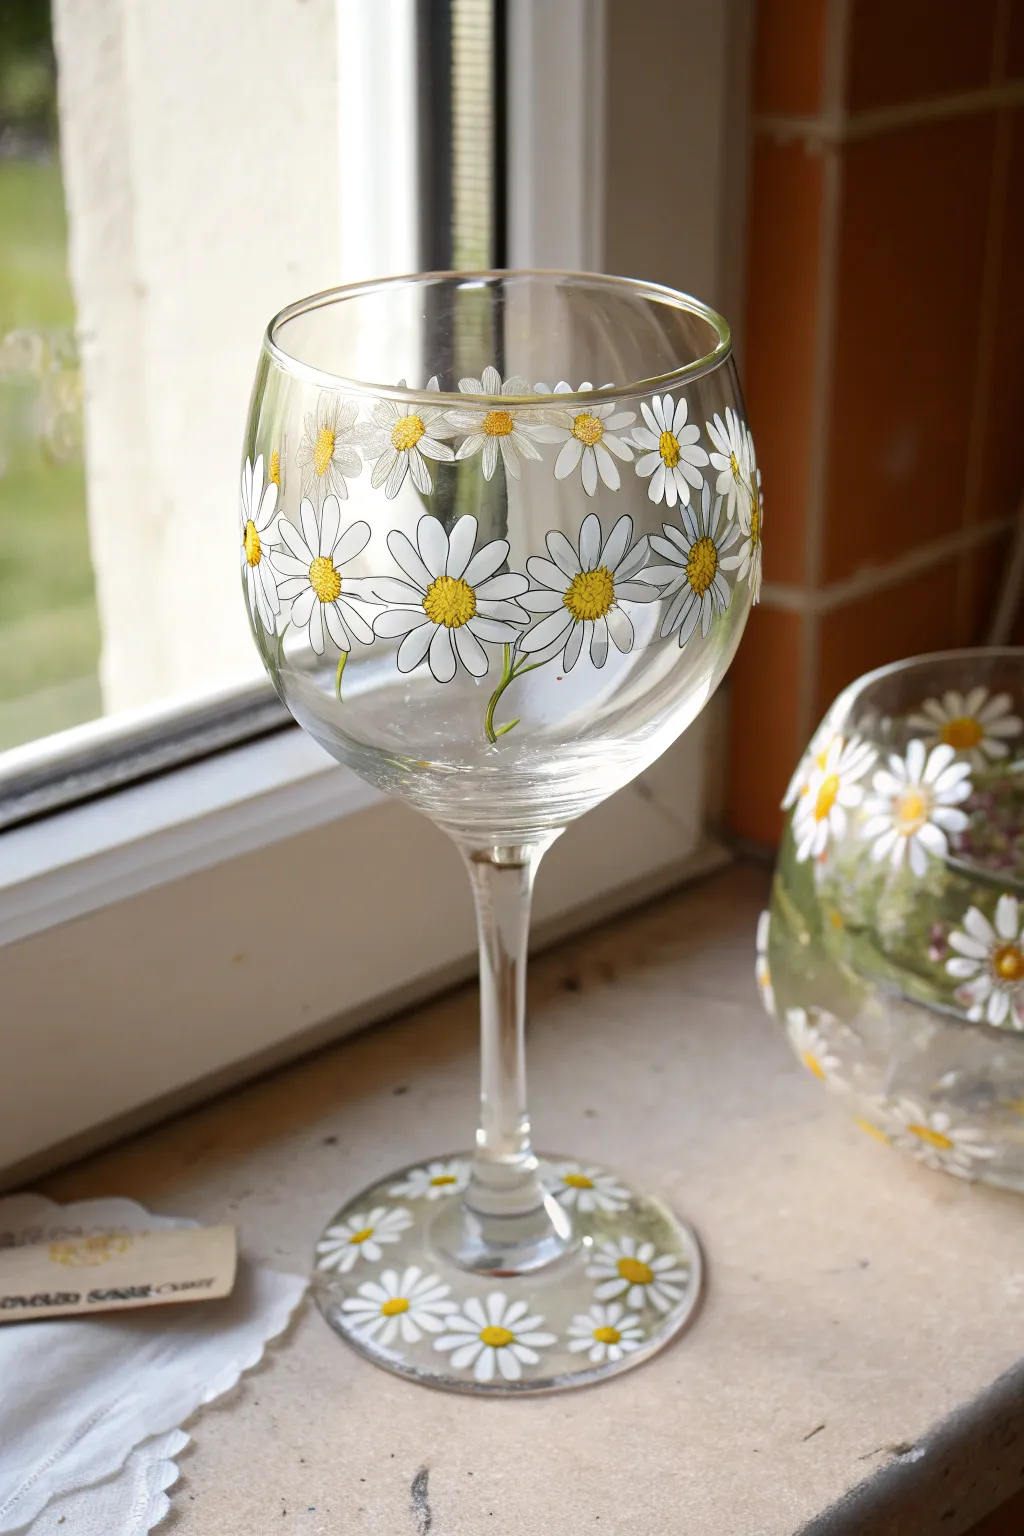
Transform a simple wine glass into a cheerful field of flowers with this classic daisy pattern. The design features a charming ring of large white daisies hugging the bowl and a matching miniature garden along the base, perfect for beginners looking for a striking result.
Step-by-Step Guide
Materials
- Clear stemmed wine glass
- Rubbing alcohol
- Cotton pads
- Enamel glass craft paint (Opaque White)
- Enamel glass craft paint (Bright Yellow)
- Enamel glass craft paint (Leaf Green – optional for stems)
- Small round paintbrushes (sizes #2 and #4)
- Fine liner brush (size #0 or #00)
- Palette or small plate
- Cotton swabs (for cleanup)
- Oven (for curing)
Step 1: Preparation
-
Clean the Surface:
Before you even open a paint bottle, thoroughly wash the wine glass with warm soapy water and dry it completely. -
Degrease the Glass:
Wipe down the exterior of the bowl and the top of the base with rubbing alcohol on a cotton pad. This removes any lingering fingerprints or oils that could prevent the paint from adhering properly.
Fixing Smudges
Mistake happen! If you smudge a wet petal, dampen a cotton swab with a tiny bit of rubbing alcohol and wipe the error away cleanly. Dry the spot before repainting.
Step 2: Painting the Daisy Centers
-
Plan the Layout:
Visualize a horizontal ring around the widest part of the glass bowl. You can use a piece of masking tape as a temporary guide if you’re worried about keeping your line straight. -
Paint the Centers:
Dip your #4 round brush into the yellow enamel paint. Create diverse centers by dotting circles around the bowl. Vary the sizes slightly—some large, some medium—to create a natural, organic look. -
Wait for Tac-Dry:
Allow these yellow centers to dry for about 10-15 minutes. They don’t need to be fully cured, but they shouldn’t be wet enough to smear into the white petals we’ll add next.
Add a Buzz
Make your garden lively by painting a tiny bumblebee or ladybug resting on one of the petals. A simple black oval with wings can add huge charm.
Step 3: Creating the Petals
-
Load the Brush:
Load a #2 round brush generously with opaque white enamel. You want enough paint to get smooth coverage but not so much that it drips. -
Paint the Top Petals:
Starting from the outer edge of a yellow center, press the brush down and stroke inward toward the middle. Lift the brush as you reach the yellow dot to create a tapered petal shape. -
Complete the Circle:
Continue painting petals all around the yellow center until you have a full flower. Don’t worry if they aren’t perfectly symmetrical; real flowers are delightfully imperfect. -
Overlap the Flowers:
As you move to the next flower, allow the white petals of adjacent daisies to slightly overlap or touch. This creates the illusion of a full bouquet rather than isolated stickers. -
Check for Opacity:
I usually hold the glass up to the light at this stage. If the white looks too streaky or transparent, let it dry for 20 minutes and apply a second coat of petals right over the first.
Step 4: Adding Details and the Base
-
Outline the Petals:
For that crisp, illustrated look seen in the photo, use your fine liner brush and a very small amount of black or dark grey enamel. Outline each white petal with a thin, delicate line. -
Texture the Centers:
Using the same fine liner brush, add tiny stippling dots inside the yellow centers using a darker yellow or light brown paint to give the flower heads texture and depth. -
Add Green Stems:
If painting stems like the ones shown, use a thin brush with green paint to draw short, curved lines dangling from a few of the lower flowers. -
Decorate the Base:
Repeat the flower process on the foot of the wine glass. Paint smaller yellow dots scattered across the flat surface of the base. -
Finish the Base Flowers:
Use the smaller #2 brush or the liner brush to add tiny white petals to these base flowers, creating a ‘meadow’ effect for the glass to rest on.
Step 5: Curing
-
Air Dry First:
Let the glass sit undisturbed for at least 1 hour, or up to 24 hours depending on your paint brand’s specific instructions. -
Bake to Set:
Place the glass in a cool oven. Turn the heat to 350°F (175°C) and bake for 30 minutes. Turn the oven off and let the glass cool down completely inside the oven before removing.
Now you have a refreshing piece of glassware ready for your next summer drink or garden party
BRUSH GUIDE
The Right Brush for Every Stroke
From clean lines to bold texture — master brush choice, stroke control, and essential techniques.
Explore the Full Guide
Simple Sunflower Wine Glass Painting With Chunky Petals
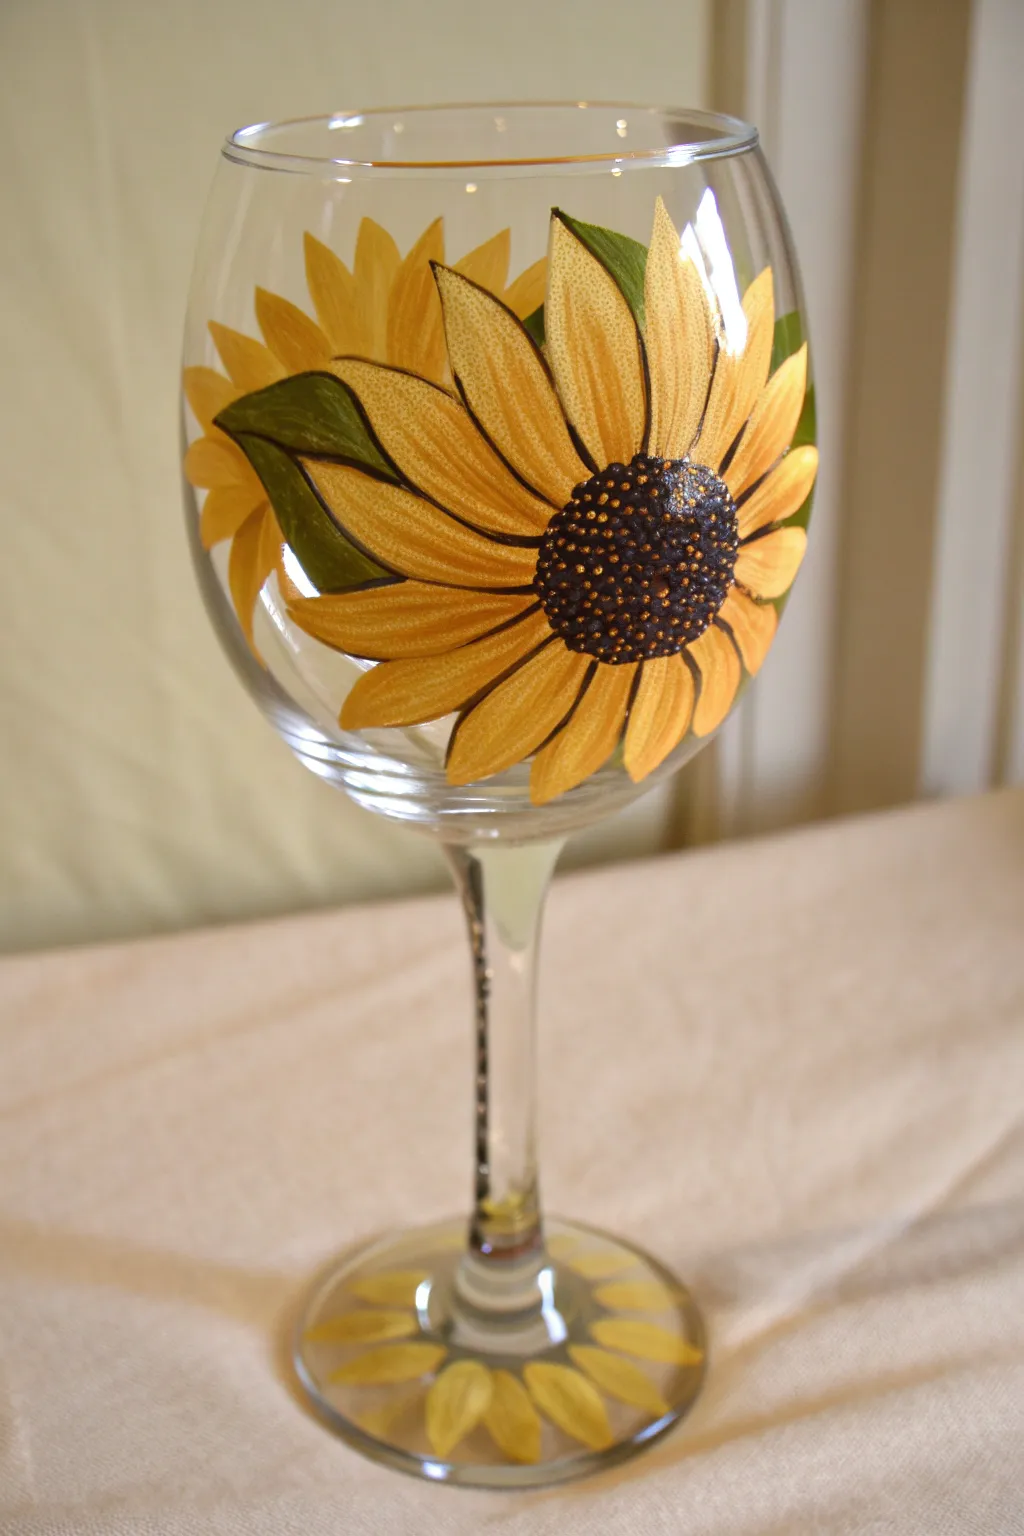
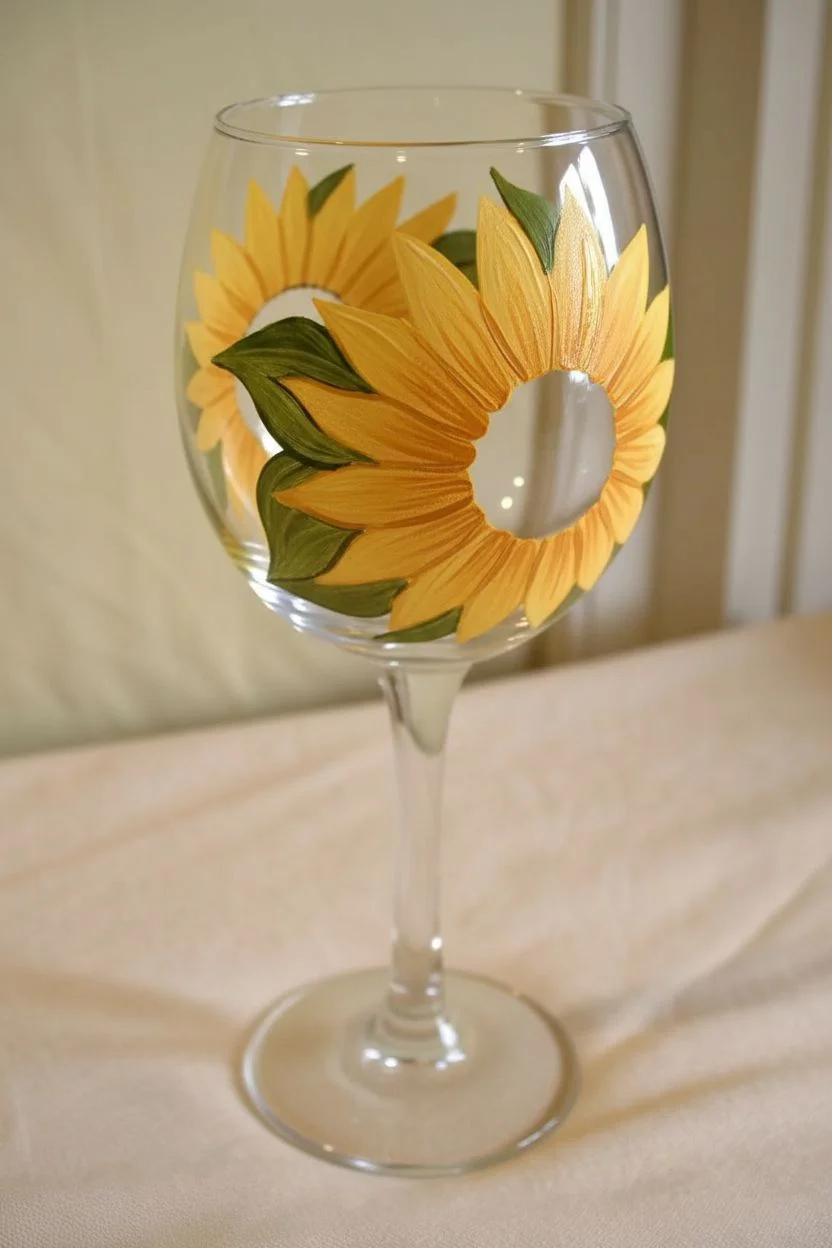
Brighten up your stemware collection with this bold and cheerful design that features large, wrap-around sunflowers. The chunky petal style makes this an approachable project for beginners, creating a hand-painted look that feels rustic and warm.
How-To Guide
Materials
- Wine glass (white wine shape preferred)
- Rubbing alcohol
- Cotton pads or paper towel
- Enamel glass paints (Yellow, ochre/dark yellow, green, dark brown, black, white)
- Round paintbrush (medium size, approx #4 or #6)
- Fine liner paintbrush (size #0 or #1)
- Dotting tool or toothpick
- Oven for curing (optional, depending on paint brand)
Step 1: Preparation and Petals
-
Clean the surface:
Before dipping your brush, wipe the entire surface of the glass with rubbing alcohol on a cotton pad. This removes oils and fingerprints that prevent paint adhesion. -
Block in the first petals:
Using your medium round brush loaded with bright yellow, press down near the bowl’s midpoint and pull outward to create a broad, teardrop-shaped petal. Paint 5-7 of these in a radial pattern, leaving a large empty circle in the center. -
Layer the second row:
Mix a tiny bit of white into your yellow to lighten it slightly. Paint a second layer of petals in the gaps behind the first set, making the flower look full and lush. -
Add secondary sunflowers:
Rotate the glass and repeat the process to create 2-3 colorful blooms around the bowl. It is okay if they overlap slightly or run off the top edge. -
Paint the leaves:
Tuck large, pointed green leaves in the negative spaces between the flowers. Use a flowing stroke that tapers to a point, following the curve of the glass.
Paint Slipping?
If the paint streaks or pulls away, your glass might be too cold or oily. Rewipe with alcohol and let the glass come to room temperature.
Step 2: Details and Definition
-
Create the heavy centers:
Fill the empty center circles with a dark brown paint. Don’t worry about texture yet; just get a solid base coat down and let it dry to the touch. -
Outline the petals:
I find that definition is key here, so use a fine liner brush with dark brown or diluted black to loosely outline each yellow petal. This separates them visually and adds that illustrative style. -
Shade the petals:
Using a slightly darker yellow or ochre, paint small streaks at the base of each petal (where it meets the brown center) to create depth and shadow. -
Outline the leaves:
Using the same fine liner and dark paint, outline your green leaves. Add a central vein line down the middle of each leaf for realism. -
Texture the centers:
Dip a dotting tool or the non-brush end of your paintbrush into black paint. Stipple dots densely around the outer edge of the brown center. -
Add lighter seeds:
Wipe your tool and switch to a light yellow or gold paint. Add tiny dots in the very middle of the flower center to mimic pollen and seeds catching the light.
Step 3: Finishing the Stem
-
Decorate the base:
Don’t forget the bottom! Paint a ring of simple yellow petals radiating outward on the foot of the glass to mirror the main design. -
Detail the base:
Once the base petals are dry, give them the same quick outline treatment as the main flowers to keep the style consistent. -
Clean up stray marks:
If you made any mistakes or smudges, use a wet cotton swab or toothpick to scrape away the excess paint before it fully cures. -
Cure the paint:
Follow the instructions on your specific bottle of enamel paint. Most require air drying for 21 days or baking in a cool oven that heats to 350°F for 30 minutes to become dishwasher safe.
Add Some Sparkle
While the paint works wet, sprinkle ultra-fine gold glitter onto the brown centers for a shimmering finish perfect for evening use.
Enjoy sipping your favorite vintage from your own hand-painted floral masterpiece
Leafy Vine Wrap Wine Glass Painting
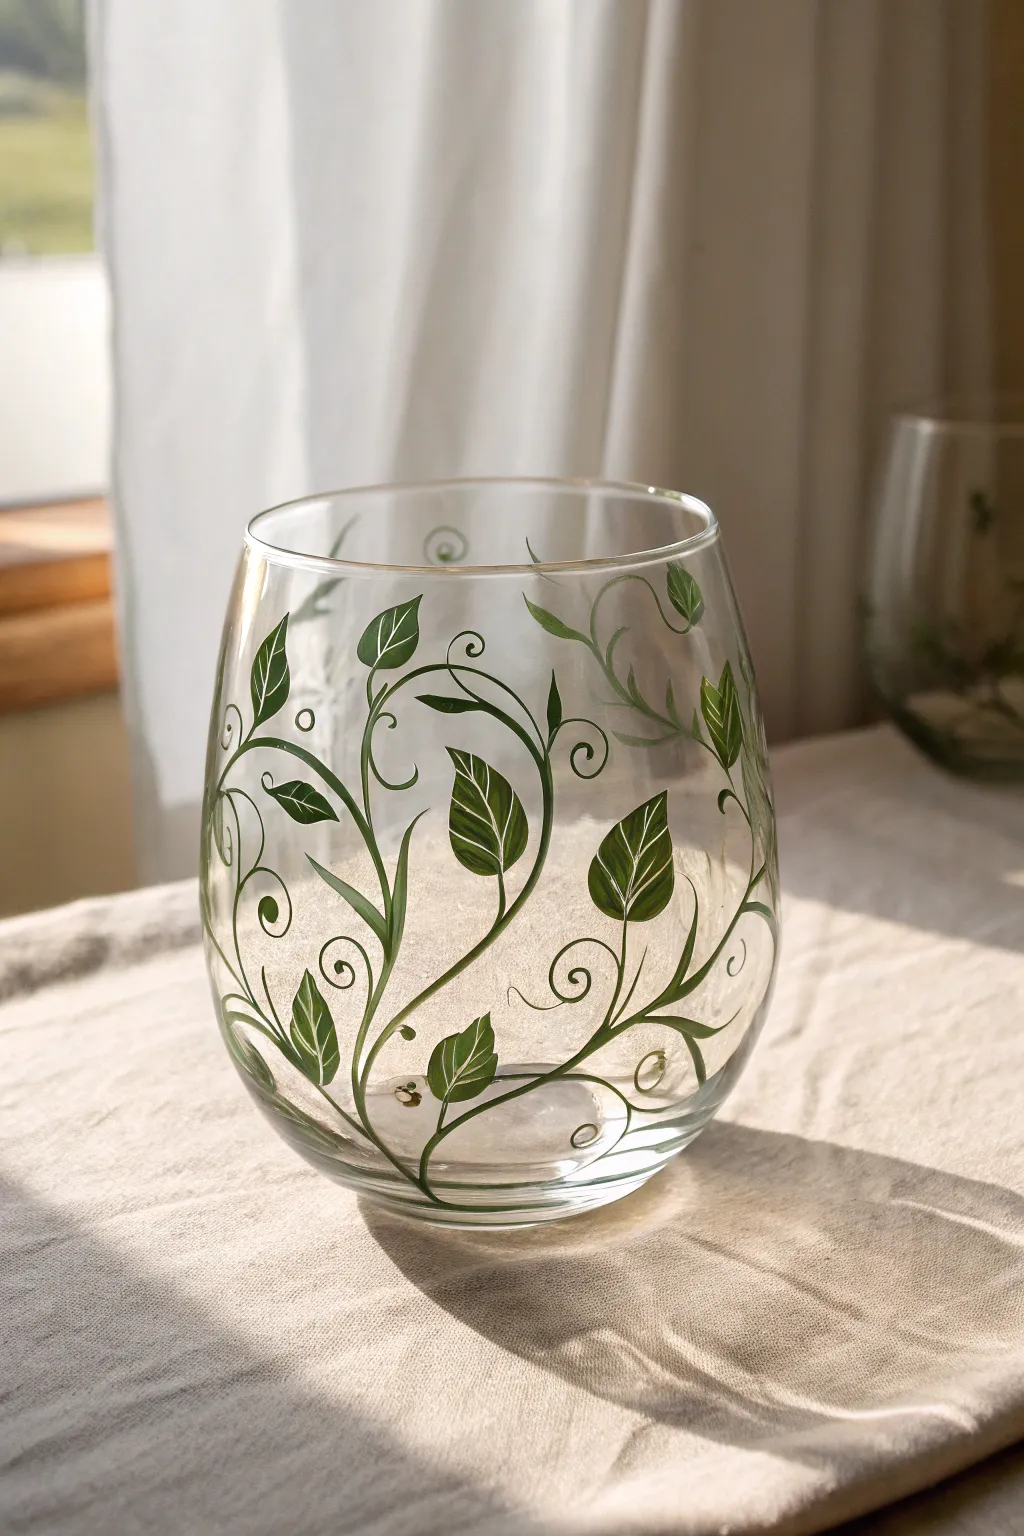
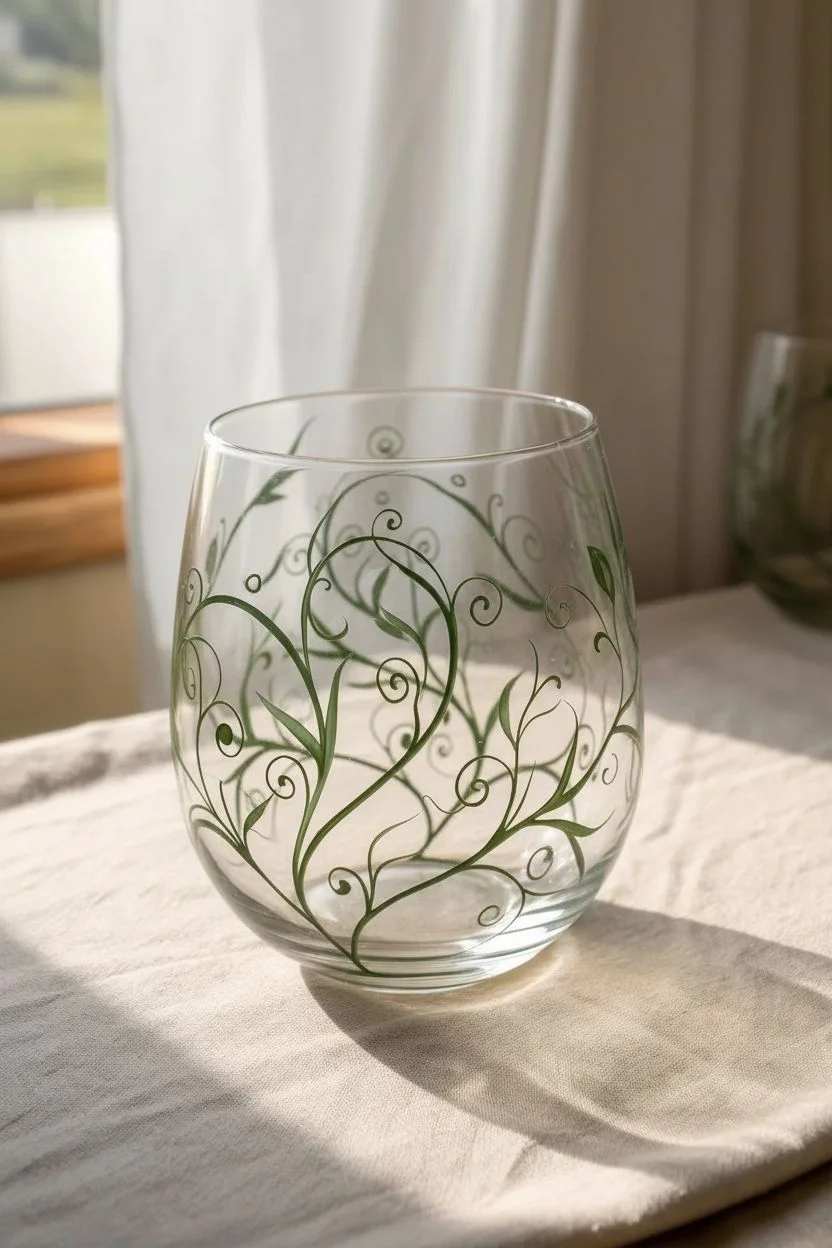
Transform a simple stemless wine glass into a botanical beauty with this elegant vine design. The swirling patterns and two-toned leaves create a natural, organic look that feels sophisticated yet is surprisingly achievable for beginners.
Step-by-Step Tutorial
Materials
- Stemless wine glass (washed and dried)
- Rubbing alcohol
- Cotton rounds or paper towel
- Glass enamel paint (Dark Green, Light Green/Lime, White)
- Round paint brush (size 2 or 4)
- Fine liner brush (size 0 or 00)
- Palette for mixing
- Q-tips (for cleanups)
Step 1: Preparation and Vine Structure
-
Clean the surface:
Before you even touch a brush to the glass, wipe the entire exterior surface with rubbing alcohol and a cotton pad. This removes invisible oils from your fingers that can prevent the paint from adhering properly. -
Load your liner brush:
Squeeze a small amount of Dark Green enamel paint onto your palette. Using your fine liner brush (size 0 or 00), thin the paint slightly with a tiny drop of water if it feels too thick, aiming for an inky consistency that flows smoothly. -
Paint the main stems:
Start near the bottom of the glass. Using light pressure, drag your liner brush upward in long, sweeping ‘S’ curves. Don’t worry about being perfectly straight; organic wiggles look more natural. -
Intertwine the vines:
Create 3-4 main vines that travel up the sides of the glass. Allow some to cross over each other and wrap around the curvature of the glass. -
Add curly tendrils:
At the ends of your main stems or branching off the sides, paint delicate spirals using the very tip of your liner brush. These decorative curls add whimsy to the design.
Uneven Coverage?
If your white veins look transparent, don’t overwork wet paint. Let the first thin layer dry completely, then go over the line a second time for bright, opaque pop.
Step 2: Adding the Leaves
-
Switch brushes:
Pick up your round brush (size 2 or 4). This shape is perfect for creating leaves because you can press down to widen the stroke and lift up to create a point. -
Paint the dark leaf base:
Load the round brush with Dark Green. Choose spot on a vine, press the belly of the brush against the glass, and pull outward, lifting as you go to form a sharp tip. -
Vary direction and size:
Continue adding dark green leaves along the vines. I like to group them in pairs or alternate them along the stem to keep the composition balanced but not rigid. -
Create two-tone leaves:
Without cleaning your brush thoroughly, dip the tip into the Light Green paint. Paint a second stroke right next to a dark one to create a leaf that naturally blends from dark to light. -
Fill the empty spaces:
Look for gaps in your design. Add smaller, single-stroke leaves using just the Light Green paint to create depth and variety in foliage color. -
Dry partially:
Let the green base coats dry for about 15-20 minutes. The paint should be tacky or dry to the touch before you add the fine details.
Pro Tip: Leaf Shape
Practice the ‘press and lift’ motion on paper first. The harder you press the round brush, the wider the leaf base; lifting quickly creates that perfect pointy tip.
Step 3: Detailing and Curing
-
Prepare the highlight color:
Squeeze a small dot of White glass paint onto your palette. You will need your fine liner brush again for this step. -
Paint the central veins:
carefully drag a thin white line through the center of your largest leaves. This instantly gives them dimension and structure. -
Add diagonal veins:
branching off the central white vein, add tiny, feather-light diagonal strokes. Keep these lines very thin so they don’t overpower the green. -
Highlight the tendrils:
If any of your dark green stems or curls look too heavy, use the white paint to add a thin highlight line along one edge. This makes the vines look round and glossy. -
Clean up edges:
Dip a Q-tip in rubbing alcohol to wipe away any smudges or sharpen edges of leaves that became too blobby. -
Cure the glass:
Follow the instructions on your specific paint bottle. Most glass enamels require 21 days of air drying or a baking method (usually 350°F / 176°C for 30 minutes) to become dishwasher safe.
Now you have a stunning piece of functional art ready for your next dinner party

PENCIL GUIDE
Understanding Pencil Grades from H to B
From first sketch to finished drawing — learn pencil grades, line control, and shading techniques.
Explore the Full Guide
Citrus Slice Wine Glass Painting in Repeating Rows
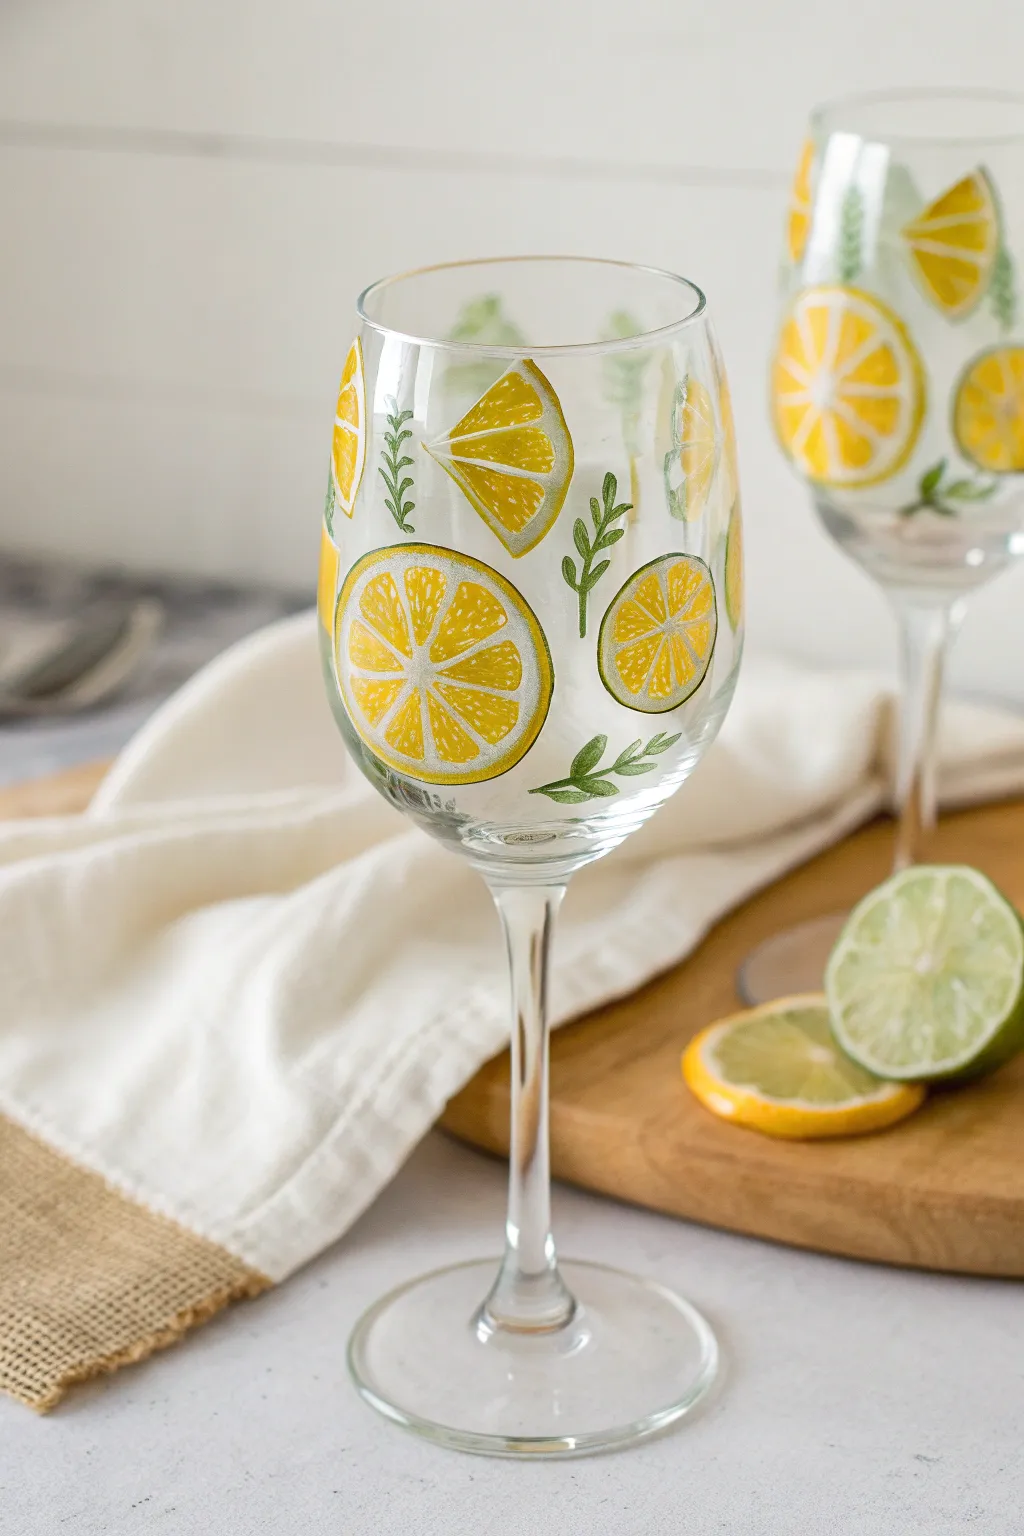
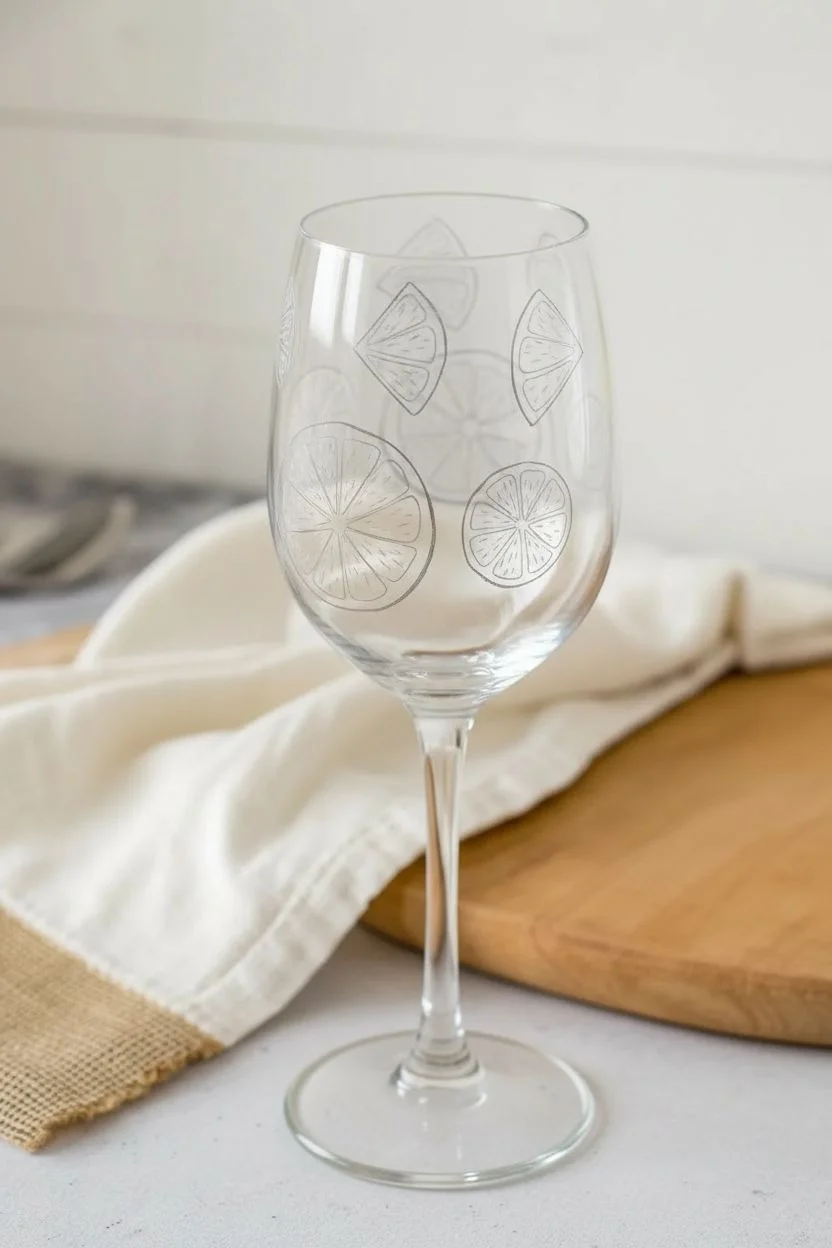
Brighten up your table setting with these cheerful, summery wine glasses featuring hand-painted citrus slices and delicate greenery. This translucent, layered painting style mimics the juicy texture of real fruit, making your refreshing drinks look even more inviting.
How-To Guide
Materials
- Clear wine glasses
- Rubbing alcohol
- Cotton pads or paper towels
- Enamel glass craft paint (Yellow, White, Green)
- Small flat shader brush
- Fine liner brush (size 0 or 00)
- Palette or small plate
- Oven for curing (optional, depending on paint brand)
Step 1: Preparation and Planning
-
Clean the surface:
Before you begin, thoroughly wipe down the exterior of your wine glass with rubbing alcohol and a cotton pad. This removes any oils or fingerprints that could prevent the paint from adhering properly. -
Plan the layout:
Visualize a repeating pattern of round slices and triangular wedges. To keep the design balanced, imagine placing them in staggered rows, leaving enough negative space for the greenery later.
Slice Translucency
For a realistic juicy look, mix a tiny drop of clear glazing medium into your yellow paint. This makes the segments semi-transparent like real fruit
Step 2: Painting the Citrus Slices
-
Paint the yellow circles:
Dip your flat shader brush into the yellow enamel paint. Paint several solid yellow circles scattered around the glass for the full lemon slices. They don’t need to be perfect circles; a slightly organic shape looks more natural. -
Add wedge shapes:
Using the same yellow paint, add triangular wedge shapes in the empty spaces between your circles. These represent cut lemon wedges seen from the side. -
Let the base layer dry:
Allow this yellow base layer to dry completely. Enamel paints can be tacky, so I usually give this step at least an hour to ensure the next layers don’t lift the yellow paint. -
Prepare the white paint:
Put a small amount of white enamel paint on your palette. You want a creamy consistency that flows well from a liner brush. -
Outline the rind:
With your fine liner brush and white paint, carefully outline the outer edge of each yellow shape. This creates the pith layer of the lemon peel. -
Create the segments:
Inside the yellow circles, paint thin white lines radiating from the center like a bicycle wheel to create the fruit segments. For the wedges, draw a couple of lines fanning out from the point of the triangle. -
Add outer contour:
Clean your liner brush and pick up a tiny bit of dark green or a mix of yellow and tiny bit of green. Outline the very outer edge of the white rind you just painted to give the peel definition.
Uneven Lines?
If your white rind lines are shaky, wait for them to dry, then gently scrape away the excess with a toothpick to clean up the edges without ruining the base
Step 3: Adding Texture and Details
-
Stipple the fruit flesh:
Once the white lines are dry, mix a slightly lighter shade of yellow. Use the tip of your liner brush to gently tap or stipple tiny dots inside the yellow segments. This mimics the juicy texture of citrus pulp. -
Highlight the peel:
Add tiny, short dashed lines of darker yellow or orange on the outer yellow skin of the wedges to give the peel a textured, zest-like appearance.
Step 4: Painting the Greenery
-
Paint the stems:
Load your liner brush with green enamel paint. In the open spaces between the lemons, paint simple, thin vertical or slightly curved lines to serve as stems. -
Add the leaves:
Using short, quick strokes, add small leaves branching off the stems. Press down slightly at the start of the stroke and lift up as you pull away to create a tapered leaf shape. -
Vary the foliage:
Make some sprigs look like rosemary with tiny needle-like strokes, and others like broad leaves for variety.
Step 5: Curing
-
Final drying time:
Allow the finished glass to dry for at least 24 hours before handling extensively. -
Bake to set:
Follow the instructions on your specific paint bottle for curing. Most require placing the glass in a cool oven, heating it to 350°F, baking for 30 minutes, and letting it cool down inside the oven.
Once cured, these glasses are ready to be the star of your next summer brunch or dinner party
Watermelon Wedge Wine Glass Painting
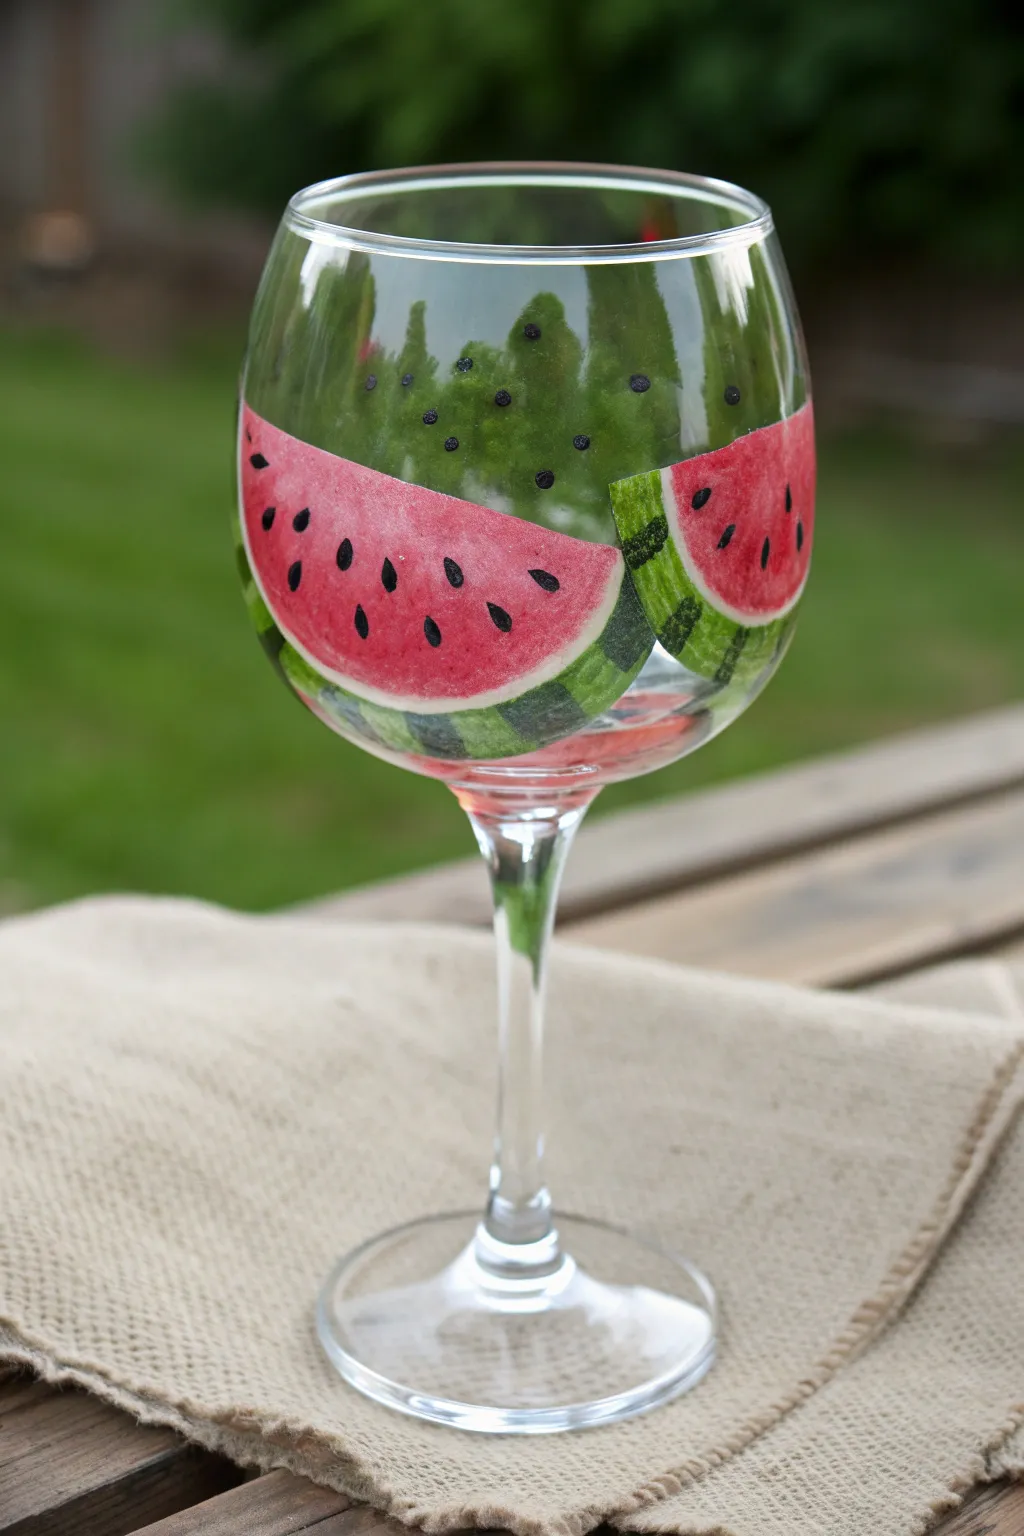
Cheers to summer vibes with this juicy watermelon design that wraps around your glass. The bright pink fruit and detailed rind create a refreshing look that’s perfect for warm-weather sipping.
Step-by-Step Tutorial
Materials
- Clear stemmed wine glass
- Rubbing alcohol
- Cotton rounds or paper towels
- Enamel glass paints (Deep Pink, Light Pink, Dark Green, Lime Green, White, Black)
- Flat shader brush (medium size)
- Small liner brush or detail brush
- Small round brush
- Paint palette or paper plate
- Paper towels
- Cup of water
- Oven (for curing)
Step 1: Preparation and Base Shapes
-
Clean surface:
Before you even open the paint, wipe the entire surface of the glass with rubbing alcohol on a cotton round. This removes fingerprints and oils that prevent paint from sticking. -
Plan your placement:
Visualize two or three large watermelon wedges wrapping around the bowl of the glass. You want them to curve naturally with the glass shape. -
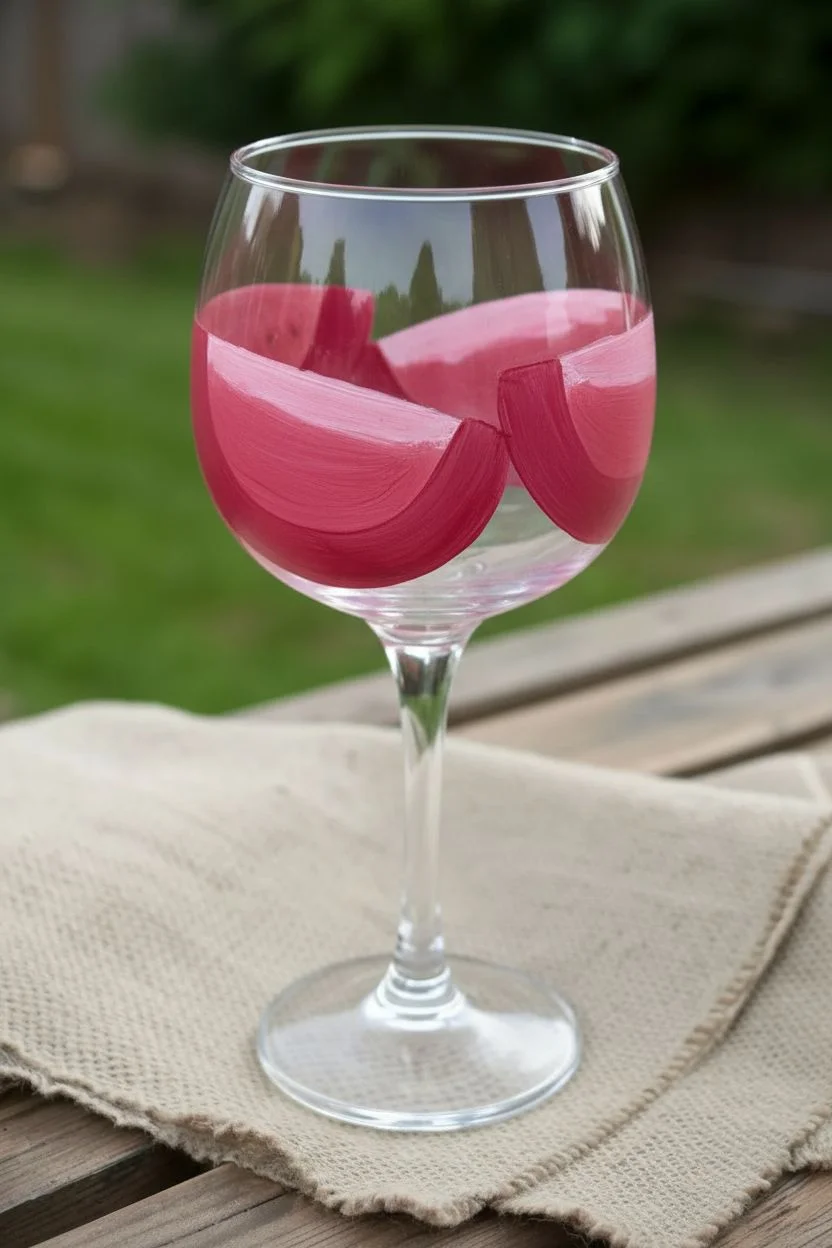
Paint the fruit flesh:
Load your flat brush with Deep Pink. Paint a large semi-circle or crescent shape for the main part of the watermelon slice. Don’t worry about the rind yet. -
Add dimension:
While the pink is still wet, pick up a tiny bit of Light Pink on the corner of your brush. Sweep it near the top center of the slice to create a subtle highlight. -
Paint additional slices:
Repeat the pink crescent shapes around the glass. Leave about a half-inch of space between the pink edge and where the bottom of the rind will be. -
Let it tack up:
Allow these pink shapes to dry for about 10-15 minutes. They don’t need to be fully cured, but they shouldn’t be wet enough to smear.
Uneven Rind Fix
If your green rind line looks shaky, let it dry fully. Then, use a toothpick to gently scratch the paint into a straight line before baking.
Step 2: Adding the Rind
-
Create the pith:
Using a clean flat brush and White paint, create a curved line nestled right against the bottom curve of your pink shape. This is the white pith layer. -
Blend the transition:
If the pink is dry, the white will stand out sharply. If you prefer a softer look, slightly dampen your brush to blur the line where the pink meets the white. -
Paint the outer skin:
Beneath the white line, paint a thick curved band using Lime Green. This should be the same width as the white line or slightly thicker. -
Add rind stripes:
Switch to your small round brush and Dark Green paint. Paint short, vertical stripes or squiggles over the Lime Green band to mimic the watermelon’s striped skin pattern. -
Paint the background rind:
For a dimensional effect, use the Dark Green to paint the ‘back’ of the watermelon wedge on the reverse side of the glass, so it looks like a full slice cut from the fruit. -
Dry completely:
Let all layers dry for at least an hour before moving on to the final details to prevent muddying the colors.
Step 3: Seeds and Finishing Touches
-
Prepare the seeds:
Using your smallest liner brush, dip the tip into Black enamel paint. You want enough paint to create a small droplet. -
Place the seeds:
Press the tip of the brush onto the pink area and slightly drag it downwards to create a teardrop shape. Scatter these randomly across the fruit. -
Vary the direction:
Make sure the pointed ends of the seeds generally point toward the center of the imaginary watermelon for a realistic look. -
Add background seeds:
Looking through the glass to the ‘back’ green rind you painted earlier? Paint a few black seeds directly on the green area on the inside of the glass to add depth. -
Clean up edges:
Dip a Q-tip or a toothpick in rubbing alcohol to carefully scrape away any smudges or jagged edges on your rind or fruit. -
First cure phase:
Let the glass sit undisturbed for 24 hours (or follow your specific paint bottle’s instructions for air drying time). -
Bake to set:
Place the glass in a cool oven. Set the temperature to 350°F (176°C) and bake for 30 minutes. Turn the oven off and let the glass cool down completely inside the oven.
Mixing Greens
Don’t have lime green? Mix your dark green with a generous amount of yellow and a touch of white to get that perfect bright rind hue.
Enjoy sipping from your custom creation at your next outdoor gathering


Dotted Pineapple Wine Glass Painting
Bring a splash of summer to your drinkware with this cheerful pineapple design. Using simple dots and bold shapes, you can transform a plain wine glass into a fun, tropical statement piece perfect for patio sipping.
Detailed Instructions
Materials
- Clear wine glass
- Rubbing alcohol
- Cotton pads or paper towels
- Enamel glass craft paint (Yellow, Dark Yellow/Orange, Green, White)
- Small flat paintbrush
- Fine detail paintbrush or liner brush
- Round foam pouncer or a large paint dabber (approx. 1 inch)
- Q-tips or a pencil eraser (for dots)
- Palette or small plate
- Oven (for curing, if paint requires)
Step 1: Preparation
-
Clean the glass:
Begin by thoroughly cleaning the surface of your wine glass. Wipe the area where you’ll be painting with rubbing alcohol on a cotton pad to remove any oils or fingerprints tailored to ensure the paint adheres properly. -
Dry completely:
Let the alcohol evaporate completely before you start applying any paint. A clean, bone-dry surface is the secret to a long-lasting finish.
Tape Hack
For a perfectly crisp oval shape, cut an oval out of contact paper or masking tape and use the negative space as a stencil on the glass.
Step 2: Creating the Pineapple Body
-
Mix your base yellow:
Pour a generous amount of bright yellow enamel paint onto your palette. If the yellow seems too transparent, mix in a tiny touch of white to increase opacity without losing the vibrancy. -
Paint the oval base:
Using a medium flat brush, paint a large, upright oval shape in the center of the glass bowl. This doesn’t have to be geometrically perfect; a slightly organic shape looks more natural. -
Let the first coat dry:
Allow this yellow layer to dry to the touch tailored to the manufacturer’s instructions. Glass paint can be slippery, so you want the base somewhat set before adding more. -
Apply a second coat:
I usually find that yellows need a second coat for full coverage. Apply another layer of yellow over the oval to ensure the color is solid and bright. -
Prepare the dots:
While the yellow base dries completely, prepare a darker yellow or orange-yellow shade on your palette for the pineapple’s texture. -
Add the texture dots:
Dip the end of a Q-tip, a pencil eraser, or the handle end of a paintbrush into the darker yellow paint. Press dots firmly onto the dry yellow oval in a semi-regular grid pattern to mimic the pineapple’s skin.
Step 3: Adding the Crown
-
Start the leaves:
Switch to your green enamel paint. Using a small liner brush or a pointed round brush, start painting the leaves sprouting from the top of the yellow oval. -
Shape the fronds:
Paint the center leaves standing straight up, tapering them to a sharp point. Add curved leaves on either side that fan out slightly, creating a classic crown shape. -
Fill in the green:
Ideally, fill in the leaf shapes completely with green paint. If the paint looks streaky, let it dry briefly and add a second coat for a lush, deep green look. -
Wait for drying:
It is crucial to let the green paint dry completely before adding the final details to prevent the colors from muddming together.
Gold Glam
Swap the white detail lines on the leaves for metallic gold paint, and add tiny gold accents between the pineapple dots for a luxe version.
Step 4: Detailing and Curing
-
Add leaf highlights:
Dip a very fine detail brush into white enamel paint. Carefully paint thin, curved lines along the spine or edges of each green leaf to give them definition and a pop of brightness. -
Clean up edges:
If painting outside the lines occurred, use a damp Q-tip or a toothpick to gently scrape away excess paint while it is still somewhat fresh. -
Initial cure:
Allow the finished painted glass to sit and air-dry for at least 24 hours (or as specified by your paint brand) before handling it extensively. -
Bake to set:
To make the glass top-rack dishwasher safe, place the glass in a cool oven. Turn the heat to 350°F (176°C) and bake for 30 minutes. Turn the oven off and let the glass cool down completely inside the oven to prevent cracking.
Enjoy your refreshing new glassware at your next summer gathering
Stippled Cactus Wine Glass Painting
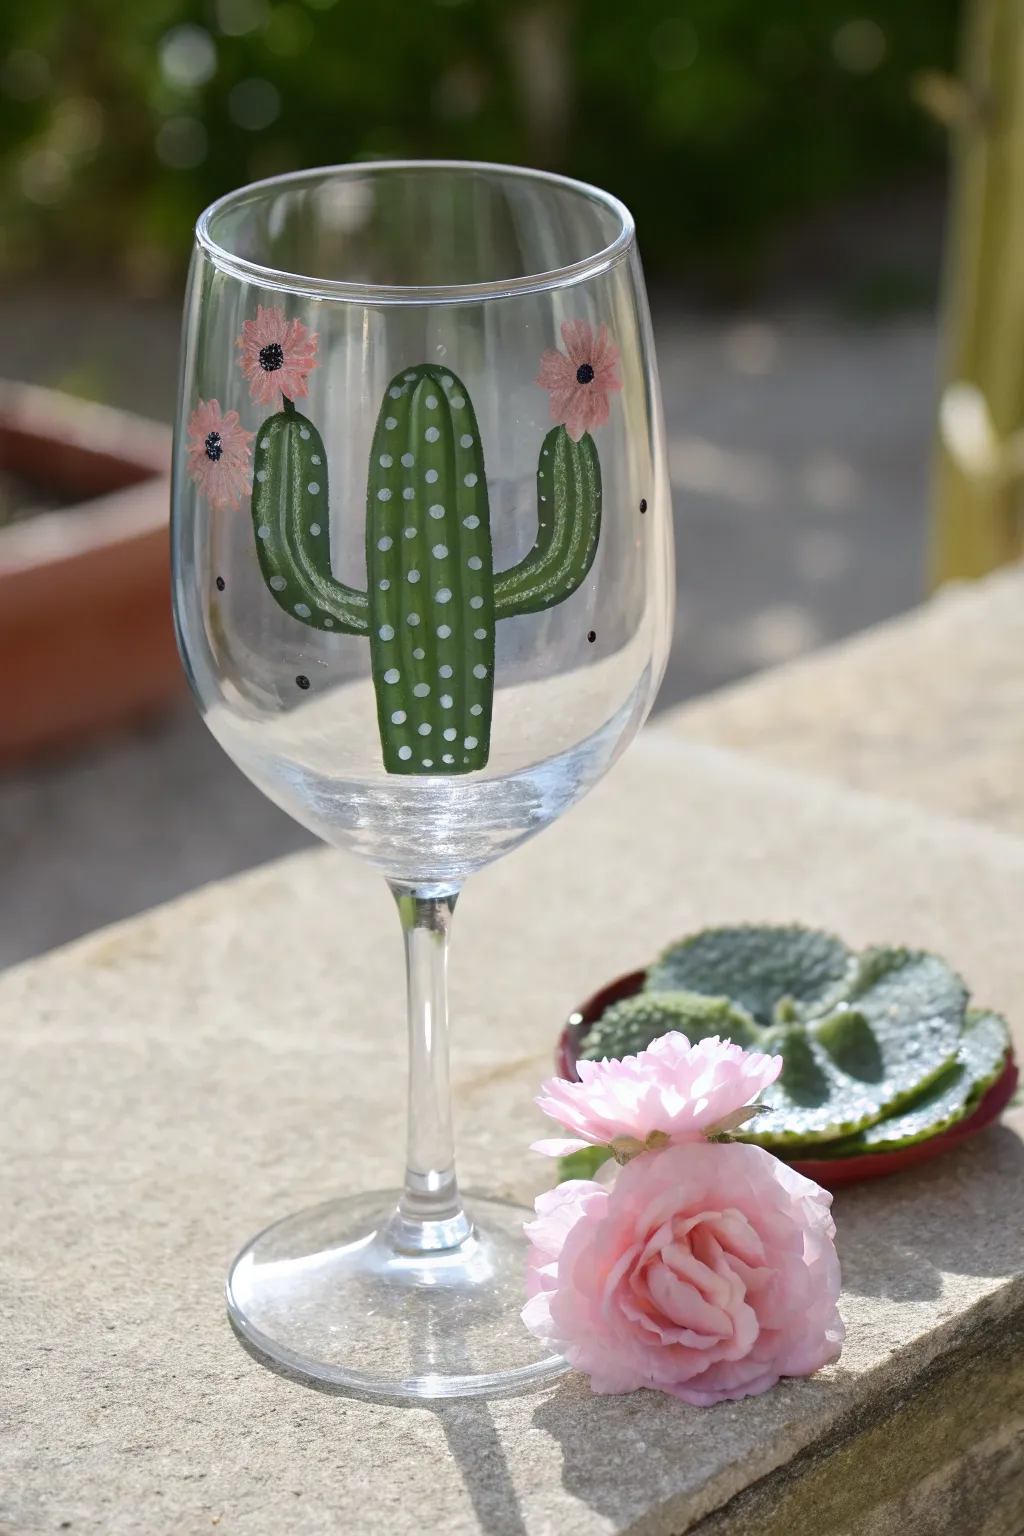
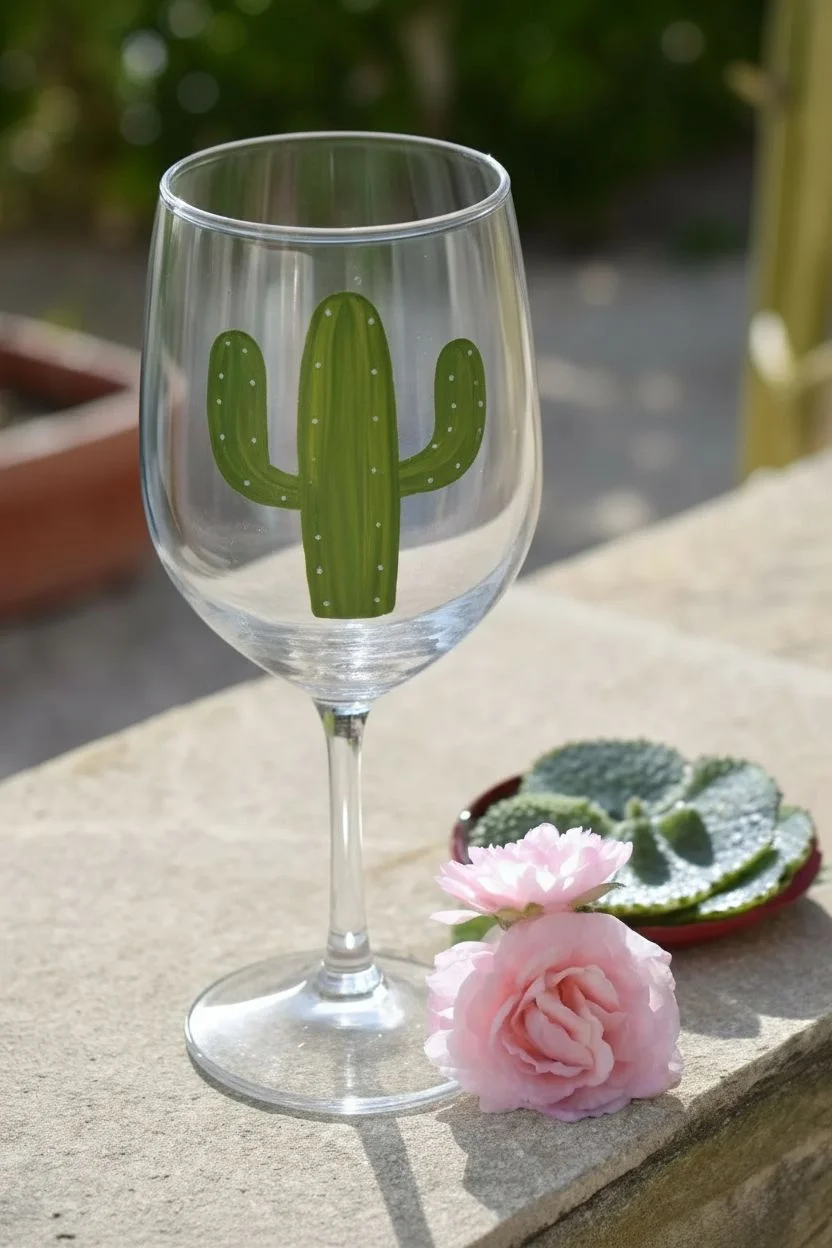
Transform a plain glass into a trendy piece of drinkware with this charming cactus design. Using simple shapes and a clever dotting technique, you’ll create a stylized succulent complete with sweet pink blooms that’s perfect for summer sipping.
Step-by-Step Guide
Materials
- Clear wine glass
- Rubbing alcohol
- Cotton pads or paper towels
- Enamel glass craft paint (Olive Green, White, Light Pink, Black)
- Medium flat brush (approx. size 6 or 8)
- Small round detail brush (size 0 or 1)
- Dotting tool or toothpick
- Palette or small tray
- Oven (optional, for curing)
Step 1: Preparation & Base Coat
-
Clean the surface:
Before you unscrew any paint caps, thoroughly wipe the exterior of your wine glass with rubbing alcohol and a cotton pad. This step removes oils and fingerprints that could prevent the paint from adhering properly. -
Outline the main body:
Load your medium flat brush with Olive Green enamel paint. Start about an inch up from the bottom of the bowl and paint a vertical, rectangular shape with a rounded top. This will be the main trunk of your cactus. -
Add the left arm:
While the paint is wet or slightly tacky, paint a curved L-shape coming off the left side of the trunk. Make it curve upward, ending slightly lower than the main trunk. Keep the width consistent with the trunk. -
Add the right arm:
Repeat the previous process on the right side to create a second arm. Try to make this one symmetrical to the first, creating the classic saguaro shape. -
Assess opacity:
Glass paint can be translucent. If your green looks streaky, let this first layer dry completely (about 20-30 minutes), and then apply a second coat of Olive Green directly over the first to make the color solid and bold.
Pro Tip: Better Dots
If you don’t have a dotting tool, use the head of a sewing pin or the flat end of a wooden skewer. Reload with fresh paint every 2-3 dots for uniform size.
Step 2: Adding Details & Flowers
-
Start the spines:
Once your green base is completely dry to the touch, dip a mechanical dotting tool or the blunt end of a small paintbrush into white paint. You want a decent amount of paint on the tool. -
Create the vertical lines:
Carefully stamp rows of white dots down the length of the cactus trunk. I find it easiest to start with the center vertical row to establish spacing, then add parallel rows on either side. -
Detail the arms:
Continue the dotting pattern onto the curved arms. Follow the curve of the green shape with your dots to give the cactus some visual dimension. -
Paint the flowers:
Clean your small round brush or switch to a new one. Dip it into Light Pink paint and dab rough, circular shapes onto the very tips of the cactus arms and trunk. Don’t worry about being perfect; imperfect edges look more like petals. -
Add flower centers:
Let the pink paint dry briefly. Using the very tip of your smallest brush or a toothpick, add a small cluster of black dots in the center of each pink flower to mimic pollen or seeds. -
Scatter background texture:
To fill empty space and balance the design, use a toothpick dipped in black paint to add tiny, sparse dots randomly around the cactus. These should be much smaller than the white spines.
Step 3: Finishing Touches
-
Check for cleanup:
Look closely at your glass. If you smudged any paint or have a wonky edge, use a damp cotton swab or a toothpick to gently scrape or wipe away the mistake before it cures fully. -
Wait for cure time:
Let the glass sit undisturbed for at, usually 21 days for air curing. This is crucial for durability. -
Bake to set (Optional):
If your paint brand allows for oven curing, place the glass in a *cold* oven. Set the temp to 350°F (175°C) and bake for 30 minutes. Turn off the oven and let the glass cool completely inside before removing.
Level Up: Succulent Set
Make a set of 4 glasses, painting a different cactus shape on each one: a round barrel cactus, a prickly pear, and an aloe vera plant alongside this one.
Once fully cured, your custom glassware is ready to be filled with your favorite beverage and enjoyed in the sunshine
Beginner Ombre Wine Glass Painting From Base Up
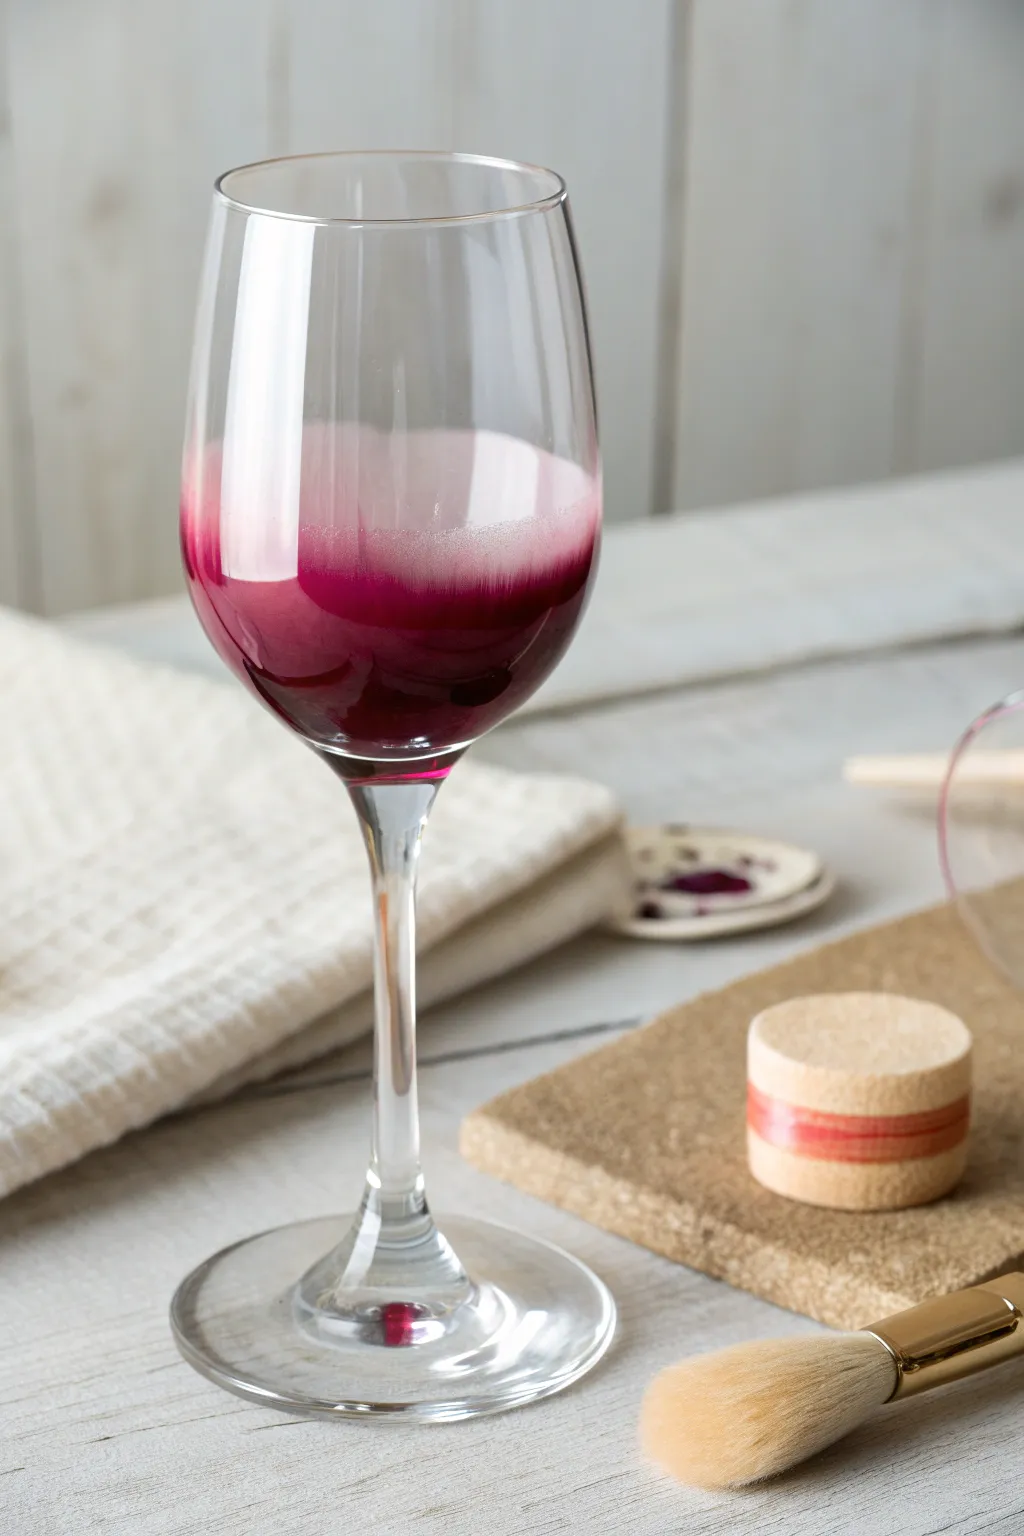
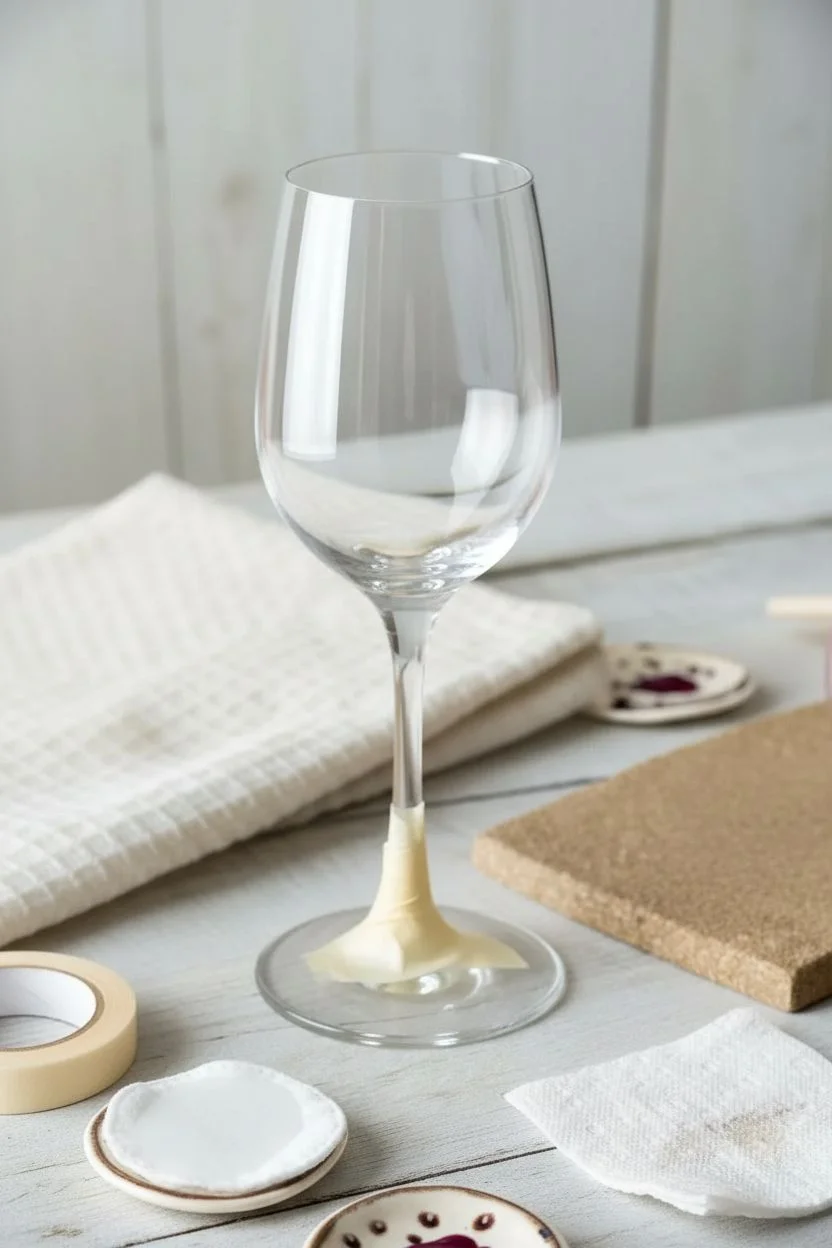
Achieve a sophisticated, velvety gradient on your wine glasses with this simple ombre technique. This project creates a stunning deep red base that fades gently into a frosted mist, perfect for adding a touch of elegance to your table setting.
Detailed Instructions
Materials
- Wine glass (thoroughly cleaned)
- Rubbing alcohol
- Cotton pads
- Enamel glass paint (deep cranberry or burgundy)
- Enamel glass paint (frost white or clear medium)
- Makeup styling wedges or small sea sponge
- Paper plate or palette
- Painter’s tape (optional)
- Oven for curing (if required by paint)
Step 1: Preparation
-
Clean the surface:
Before you begin painting, it is crucial to remove any oils or fingerprints from the glass. Wipe the entire outer surface of the wine glass bowl with rubbing alcohol using a cotton pad. -
Dry completely:
Allow the alcohol to evaporate completely for a few moments so you have a pristine, dry surface for the paint to adhere to. -
Protect the stem:
If you are worried about getting paint on the stem, wrap a small piece of painter’s tape right where the stem meets the bowl to keep a clean line.
Sponge texture too rough?
If the paint looks too bubbly, your sponge is overloaded. Dab it heavily on paper first, or wait for the paint to tack up slightly and pat it down again gently.
Step 2: Creating the Ombre Base
-
Load the sponge:
Squeeze a generous amount of the deep cranberry enamel paint onto your paper plate. Take a makeup wedge sponge and dab the flat end into the paint. -
Offload excess paint:
Tap the sponge up and down on a clean part of the plate several times. I like to do this until the texture of the sponge print looks bubbly and light rather than a heavy blob. -
Start at the bottom:
Begin dabbing the paint onto the absolute bottom of the bowl, where it meets the stem. Apply this layer quite heavily to create an opaque foundation. -
Work upwards:
Slowly work your way up the curve of the glass, maintaining a steady dabbing motion. As you move higher, use less pressure to deposit less paint. -
Creating the fade:
Stop adding fresh paint to your sponge. Use the remaining residue on the sponge to continue tapping upwards towards the middle of the glass, letting the color naturally become thinner and more translucent.
Step 3: Refining the Gradient
-
Add the frost layer:
While the red paint is still slightly tacky, dab a clean sponge wedge into a very small amount of frost or clear medium paint. -
Blend the transition:
Tap this lighter medium lightly over the upper edge of your red section. This helps blur the line where the color ends and the clear glass begins. -
Soften the texture:
Go back over the main red area with a light tapping motion to smooth out any heavy ridge lines from the sponge, ensuring a soft, misty texture. -
Check for consistency:
Hold the glass up to a light source. Look for any unintended transparent spots in the bottom section and dab more red paint there if needed to solidify the base. -
Clean the rim:
Ensure no stray paint creates a hard line too high up the glass. If you went too high, simply wipe the excess away with a damp cloth or cotton swab to maintain ample clear space near the rim.
Pro Tip: Seamless Fades
Use a cosmetic wedge sponge rather than a crafting sponge. The pores are much smaller, which creates that ultra-smooth, airbrushed mist effect shown in the photo.
Step 4: Curing and Finishing
-
Remove tape:
If you used painter’s tape on the stem, carefully peel it away now while the paint is still wet to avoid pulling up any dried chips later. -
Initial dry time:
Let the glass sit undisturbed for at least one hour until the paint is dry to the touch. -
Full cure time:
Follow the specific instructions on your enamel paint bottle. Most require air drying for 21 days or baking in a cool oven. -
Baking method (optional):
If baking, place the glass in a cold oven, heat to 350°F (175°C), bake for 30 minutes, then turn the oven off and let the glass cool completely inside before removing.
Once fully cured, your elegant new stemware is ready to be filled with your favorite vintage and admired by guests
Confetti Speckle Wine Glass Painting
Bring the party to your table with this vibrant and playful design that mimics falling confetti. This technique uses a simple stippling method to create rising bubbles of color that condense towards the bottom of the bowl, perfect for festive occasions or brightening up a weeknight dinner.
How-To Guide
Materials
- Clear wine glass
- Rubbing alcohol
- Cotton rounds or paper towels
- Multi-surface acrylic enamel paints (red, orange, yellow, bright green, teal, blue, purple, magenta)
- Q-tips (cotton swabs)
- Toothpicks or a dotting tool (small size)
- Paper plate or palette
- Oven (for baking/curing)
Step 1: Preparation
-
Clean surface:
Begin by thoroughly cleaning your wine glass with warm soapy water to remove any dust or sticker residue. -
Degrease glass:
Once dried, wipe the entire outer surface of the glass with rubbing alcohol on a cotton round. This removes oils from your fingers that prevents paint adhesion. -
Avoid touching:
From this point on, try to hold the glass by the stem or rim only, avoiding the main bowl area where you will be painting. -
Prepare palette:
Squeeze a dime-sized amount of each paint color onto your paper plate. You want a full rainbow spectrum: red, orange, yellow, green, teal, blue, purple, and pink.
Oops! Smudged a dot?
Don’t panic! While the paint is still wet, use a damp Q-tip or a toothpick to carefully wipe the mistake away. Let that spot dry for a moment before repainting.
Step 2: Painting the Base Layer
-
Start at the bottom:
This design is heaviest at the bottom of the bowl. Dip a Q-tip into your first color (let’s say teal) and press it gently onto the glass near the stem. -
Vary pressures:
Dot randomly around the base of the bowl. Create slightly different sized dots by varying how hard you press the Q-tip. -
Switch colors:
Using a fresh Q-tip for each shade, repeat the process with your blue and purple paints, concentrating them strictly on the lower third of the glass bowl. -
Add warmth:
Introduce your warm tones—red, orange, and yellow—interspersed among the cool tones at the bottom to start building that confetti look. -
Density check:
Pause and look at the bottom of the bowl. It should look crowded with dots, but not completely solid; leave small gaps of clear glass showing through.
Step 3: Creating the Gradient
-
Move upward:
Start placing dots further up the side of the glass. As you move higher, ensure the space between the dots increases significantly. -
Lighten the load:
About halfway up the glass, stop using the Q-tips. The large dots should remain mostly at the bottom to anchor the design. -
Switch to toothpicks:
Dip the blunt end of a toothpick (or a small dotting tool) into your paints to create much smaller speckles. -
Fill the gaps:
Go back to the bottom, dense section and add these tiny toothpick dots in the empty spaces to create depth and texture. -
Scatter upwards:
Continue using the toothpick to place tiny dots rising up toward the rim. At the top third of the glass, placing just one or two rogue dots creates a floaty, airy effect. -
Check the rim:
Ensure you leave at least an inch of clear space right at the rim where your lips will touch. -
Stem detail:
I like to add just one or two stray dots of paint on the upper stem, as if a piece of confetti fell down, to tie the look together.
Glittery Upgrade
Mix a tiny amount of glitter medium into your translucent paints, or overlay a few dots with metallic gold paint for a sparkling champagne effect.
Step 4: Curing
-
Dry time:
Let the glass sit undisturbed for at least one hour until the paint is dry to the touch, though 24 hours is safer for durability. -
Cold oven start:
Place your glass on a baking sheet inside a cold oven. Do not preheat, as the sudden temperature change can crack the glass. -
Bake settings:
Turn the oven to 350°F (175°C). Once it reaches temperature, set a timer for 30 minutes. -
Cool down:
Turn the oven off and open the door slightly, but leave the glass inside until the oven is completely cool.
Now you have a festive, custom glass ready for your next celebration
Frosted Branch Wine Glass Painting With Dry Brushing
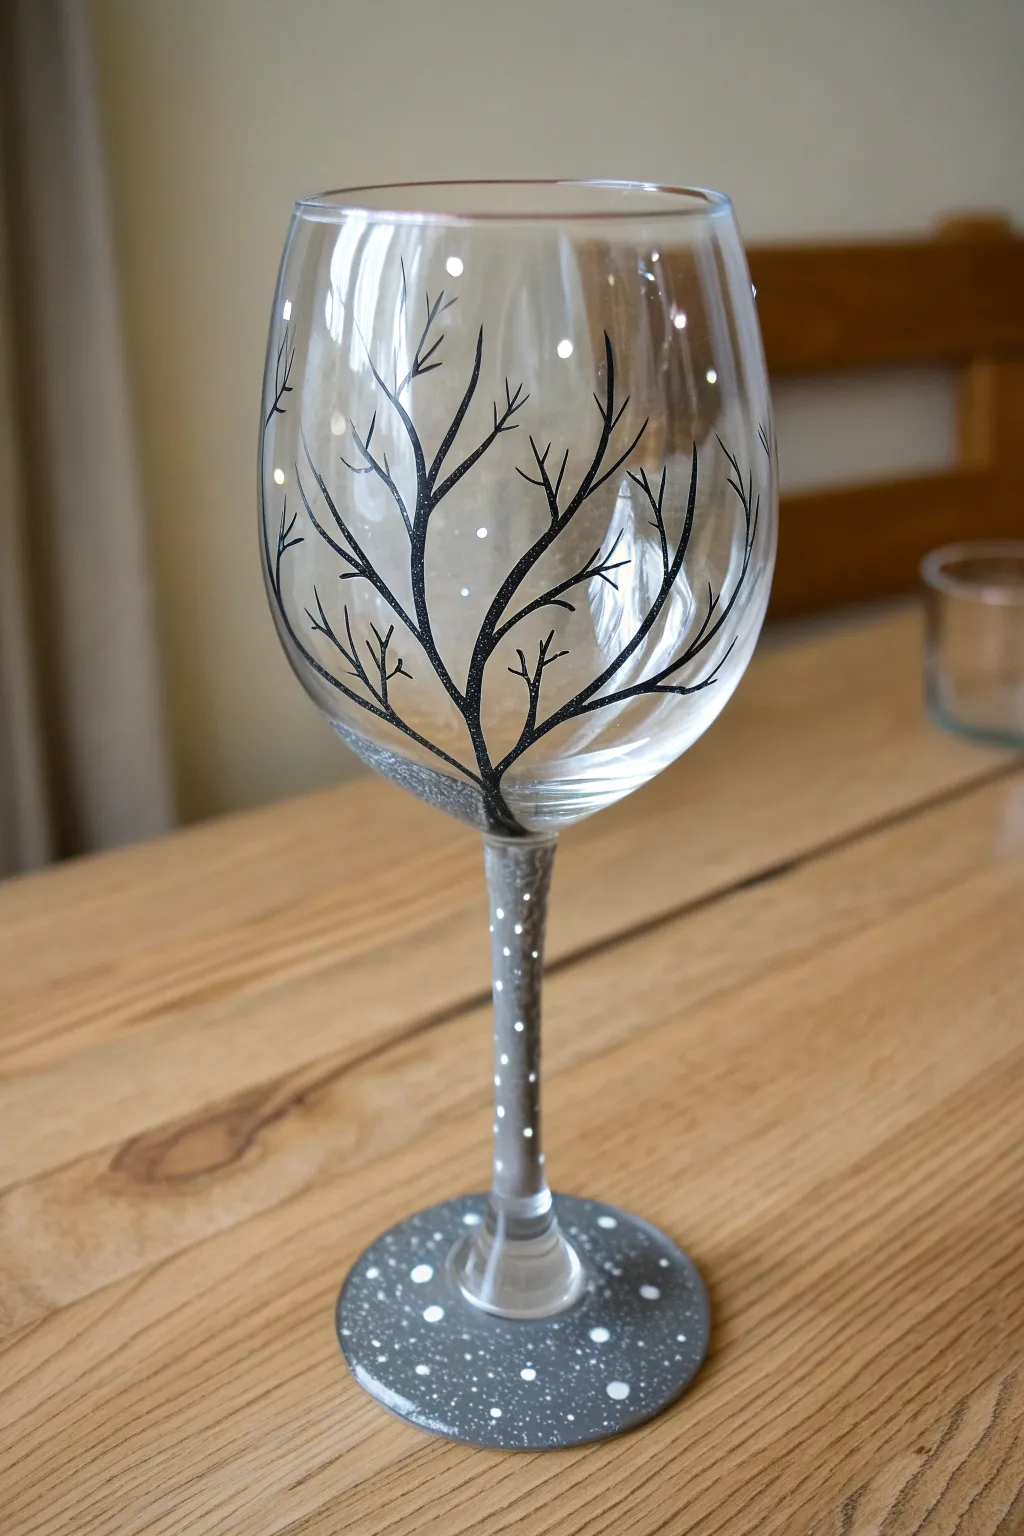
Transform a plain wine glass into a chilly winter scene featuring stark black bare branches rising from a speckled snowy base. This beginner-friendly project uses gray textures and simple line work to create an elegant, frosted aesthetic perfect for holiday gifts.
Step-by-Step
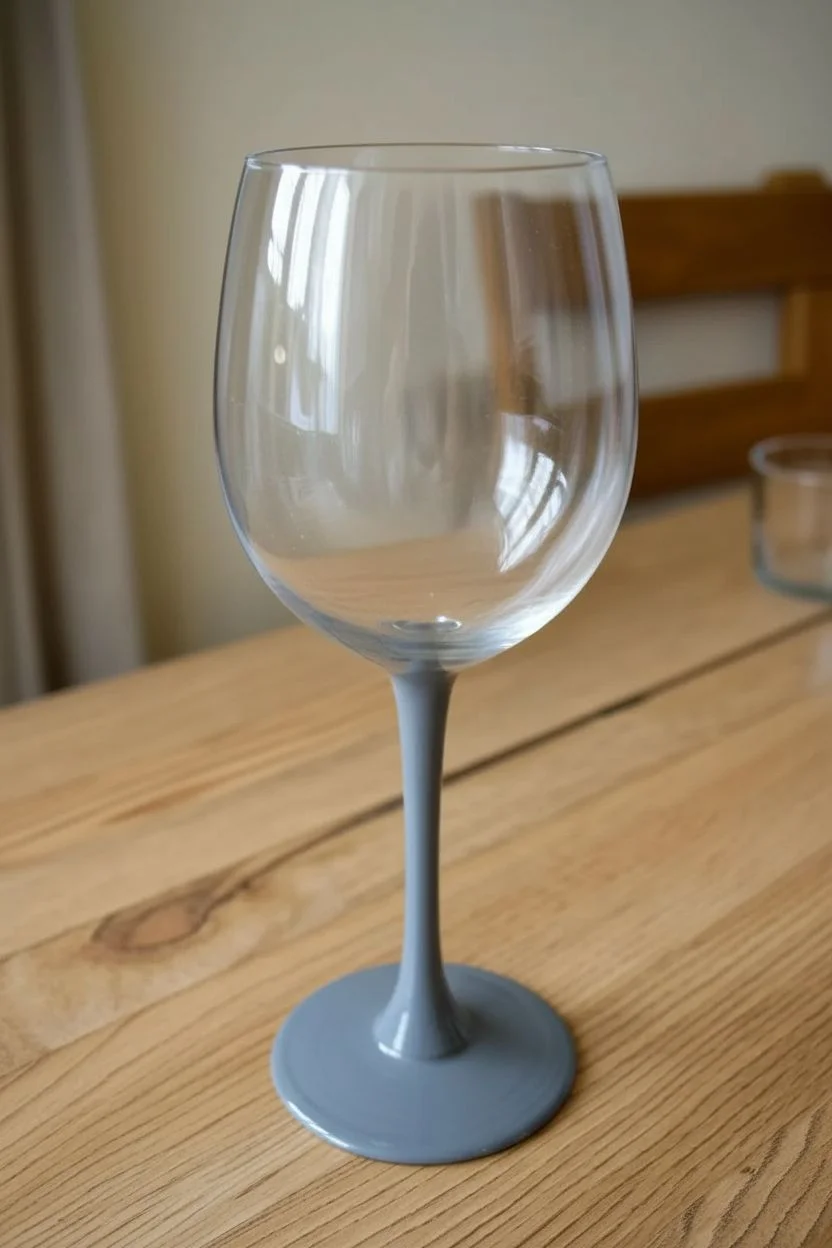
Materials
- Clear wine glass
- Rubbing alcohol
- Cotton pads
- Multi-surface acrylic paint (Black)
- Multi-surface acrylic paint (Gray/Silver)
- Multi-surface acrylic paint (White)
- Fine liner brush (size 0 or 00)
- Medium flat brush
- Toothbrush or splatter tool
- Palette or paper plate
- Q-tips (for cleanup)
Step 1: Preparation & Base Coat
-
Clean the glass:
Before you start painting, it’s crucial to remove any oils or fingerprints. Wipe the entire outer surface of the wine glass with rubbing alcohol on a cotton pad and let it air dry completely. -
Paint the base:
Using your flat brush, apply a coat of gray paint to the entire circular foot of the wine glass. Ensure smooth, even coverage. -
Paint the stem:
Continue the gray paint up the stem of the glass. I like to stop just as the stem flares out into the bowl, creating a natural transition point. -
Second coat:
Acrylics on glass can be streaky. Once the first gray layer is dry to the touch (usually 15-20 minutes), apply a second coat to the base and stem for full opacity.
Step 2: Creating the Snowy Texture
-
Prepare the splatter:
Squeeze a small amount of white paint onto your palette. If it’s very thick, add a drop of water to thin it slightly—you want a consistency like heavy cream. -
Splatter the base:
Dip an old toothbrush into the thinned white paint. point the bristles toward the gray base and stem, then run your thumb across the bristles to flick tiny specks of ‘snow’ onto the painted areas. -
Add larger snowflakes:
For variety, dip the handle end of a paintbrush into the white paint and gently dot a few larger snowflakes onto the base and halfway up the stem. -
Let it cure:
Allow the snowy base and stem to dry completely. This prevents you from smudging your work while handling the bowl in the next phase.
Paint Slipping?
If your brush slips and leaves paint where you don’t want it, don’t panic. Use a damp Q-tip or a toothpick to gently scrape away mistakes while the paint is still wet.
Step 3: Painting the Branches
-
Load the liner brush:
Switch to your fine liner brush and load it with black multi-surface paint. Roll the brush tip in the paint to keep the bristles together for sharp lines. -
Start the main trunk:
Starting from the bottom of the bowl (where the stem meets the glass), paint a slightly thicker line curving upward. This acts as your main tree trunk. -
Add primary branches:
Extend a few long, sweeping lines upward and outward from the main trunk. Let them curve naturally to follow the shape of the glass. -
Create smaller twigs:
From your primary branches, paint shorter, finer lines branching off. Vary the angles to make the tree look organic and wild. -
Fill the gaps:
Walk around the glass and add a second or third tree silhouette if you want coverage on all sides, or keep it to a single motif on the front.
Add Sparkle
While the white snow dots are still wet, sprinkle a tiny pinch of ultra-fine iridescent glitter over the base. It will catch the light beautifully like real fresh snow.
Step 4: Adding the Frost Effect
-
Dry brush technique:
Take a clean, dry flat brush and dip just the very tip into a tiny amount of gray or silver paint. Wipe almost all of the paint off onto a paper towel until the brush leaves faint, scratchy marks. -
Frost the bottom:
Gently sweep this dry brush near the bottom of the bowl, right where the black trunk begins. This creates a foggy, frosted transition from the stem to the clear glass. -
Highlight the branches:
Using the same dry brush with barely any paint, lightly graze the tops of a few black branches to give them an icy, shimmering highlight. -
Final drying:
Let the glass sit undisturbed for at least 24 hours (or follow your specific paint’s curing instructions) before baking or washing it.
Once cured, fill your new glass with your favorite vintage and enjoy the wintry atmosphere
Boho Dot Mandala Wine Glass Painting at the Base
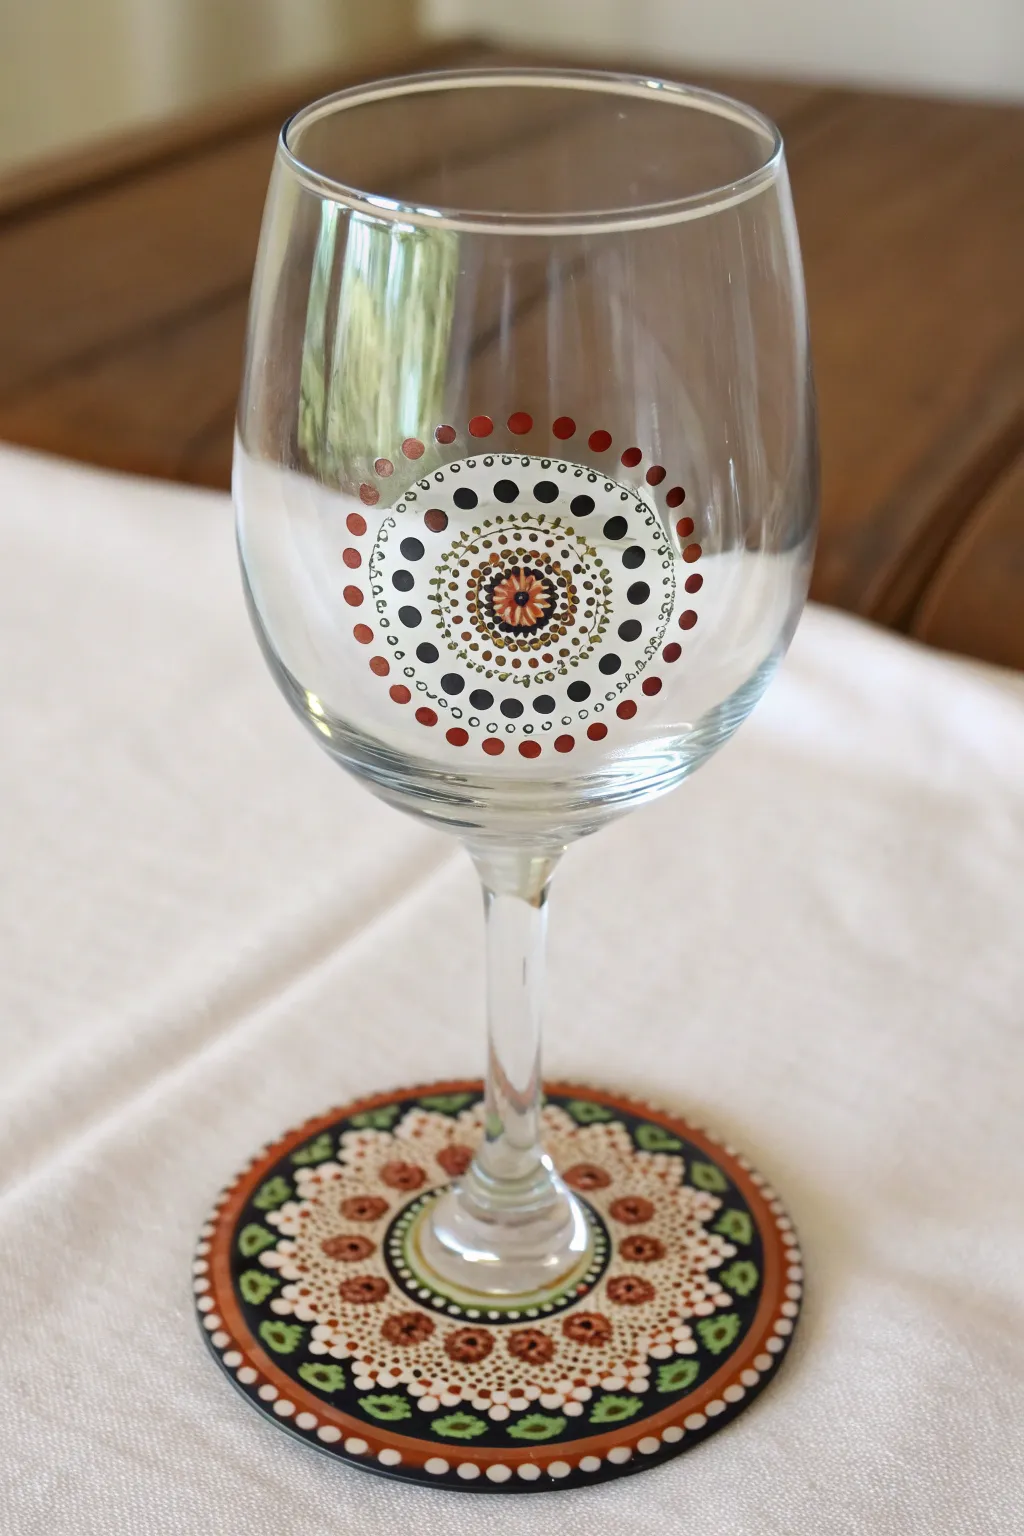

Transform a plain wine glass into a bohemian masterpiece featuring intricate mandala patterns. This project combines delicate dotting on the bowl with a boldly patterned base for a stunning, cohesive look.
Detailed Instructions
Materials
- Clear wine glass
- Rubbing alcohol
- Cotton pads
- Multi-surface acrylic enamel craft paints (terra cotta, white, black, sage green, gold)
- Set of dotting tools (various sizes)
- Fine-tip detail brush
- Q-tips (for cleanup)
- Palette or paper plate
- Oven (for curing)
Step 1: Painting the Glass Bowl
-
Clean surface:
Before you begin painting, thoroughly wipe down the outside of the wine glass bowl with rubbing alcohol and a cotton pad to remove any oils or fingerprints. -
Start the center:
Using a medium-sized dotting tool, place a central terra cotta dot on the side of the glass bowl where you want the mandala to sit. -
Create the flower center:
With a fine brush or small tool, pull small strokes of white and terra cotta outward from the center dot to create a tiny sunburst or flower effect. -
Add first ring:
Dip a small tool in gold or dark yellow paint and create a tight ring of tiny dots around your central flower. -
Expand with contrast:
Switch to black paint and a slightly larger tool. Create a ring of dots spaced further apart, leaving room for the next layer. -
Connect the dots:
Use your smallest tool with white paint to add tiny filler dots between the black ones, adding delicate detail to the negative space. -
Outer ring design:
Create the final large ring using terra cotta paint and a medium-large tool. Space these dots evenly around the entire design to frame the mandala. -
Let it dry:
Allow the paint on the bowl to dry completely before handling the glass too much for the next phase.
Step 2: Patterning the Base
-
Prep the base:
Clean the top surface of the glass base with alcohol, just as you did the bowl. -
Define the rim:
Paint a solid black band around the outer edge of the base using your brush, then add a thinner terra cotta ring directly inside it. -
Create the inner border:
Paint a small ring around the stem’s connection point using black, outlining it with white. -
Main base pattern:
In the wide space between your outer rim and inner stem ring, paint small, alternating petal shapes using sage green and black. -
Fill with dots:
Fill the interior of the base design with a field of tiny white dots, creating a ‘lace’ effect background. -
Add focal points:
Overlay larger terra cotta dots on top of the white field, spacing them symmetrically around the circle. -
Refine the edge:
Go back to your outer black rim and add a final row of tiny white dots on top of the black paint for high contrast. -
Final cure:
Once fully dry (wait at least 24 hours), place the glass in a cool oven. Heat to 350°F, bake for 30 minutes, and let it cool inside the oven to cure the paint.
Don’t rush the layers
If you are layering dots on top of other painted sections (like on the base), ensure the bottom layer is 100% dry or the paints will smear together.
Try a gradient effect
For the outer ring of dots on the bowl, mix a little white into your terra cotta paint for every few dots to create an ombre fade around the circle.
Now you have a beautifully custom piece of glassware ready for your next gathering or to give as a gift
Tape-Resist Geometric Wine Glass Painting
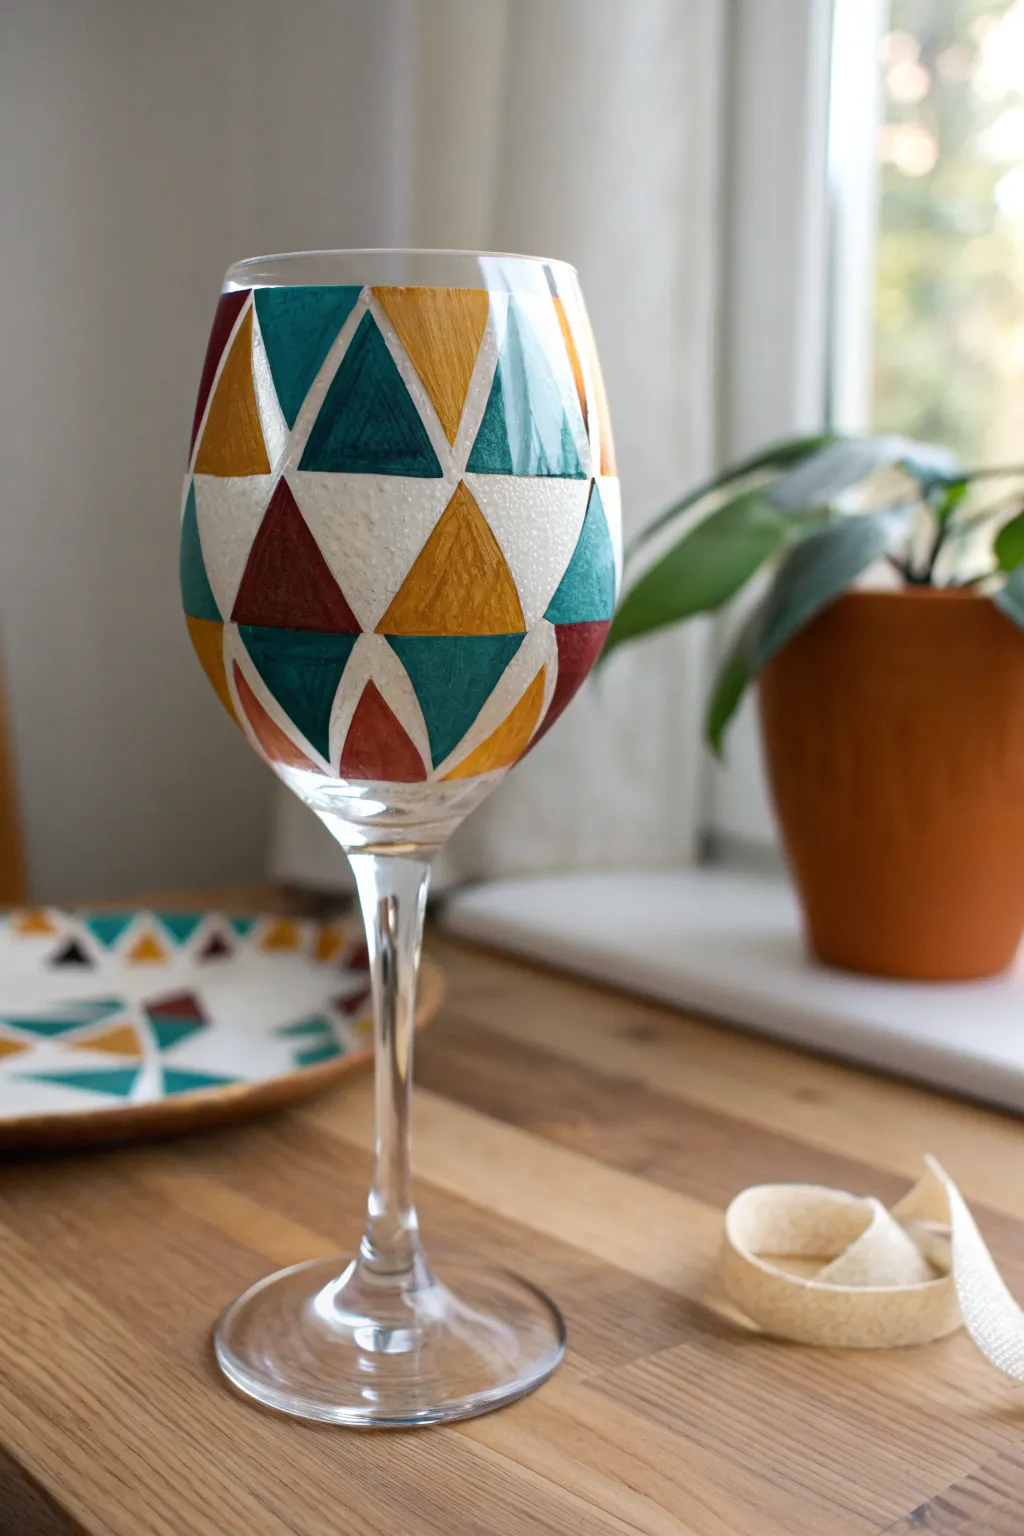
Transform a plain stemmed wine glass into a modern art piece featuring a striking mosaic of colors. This tape-resist technique creates crisp, clean lines between bold triangles of teal, mustard, rust, and white for a sophisticated geometric look.
Step-by-Step
Materials
- Clear wine glass (stemmed)
- Rubbing alcohol
- Cotton pads or paper towel
- Thin painter’s tape or graphic art tape (1/8 inch width recommended)
- Enamel craft paints for glass (Teal, Mustard Yellow, Rust/Red-Brown, White)
- Small flat synthetic paintbrushes
- Palette or small dish
- Scissors
Step 1: Preparation and Design
-
Clean surface:
Before you begin, wipe down the entire exterior of the wine glass bowl with rubbing alcohol and a cotton pad. This removes oils and fingerprints, ensuring the paint adheres properly. -
Avoid the rim:
Decide on your paintable area. For safety and comfort when drinking, leave the top inch of the glass near the rim completely unpainted and free of tape. -
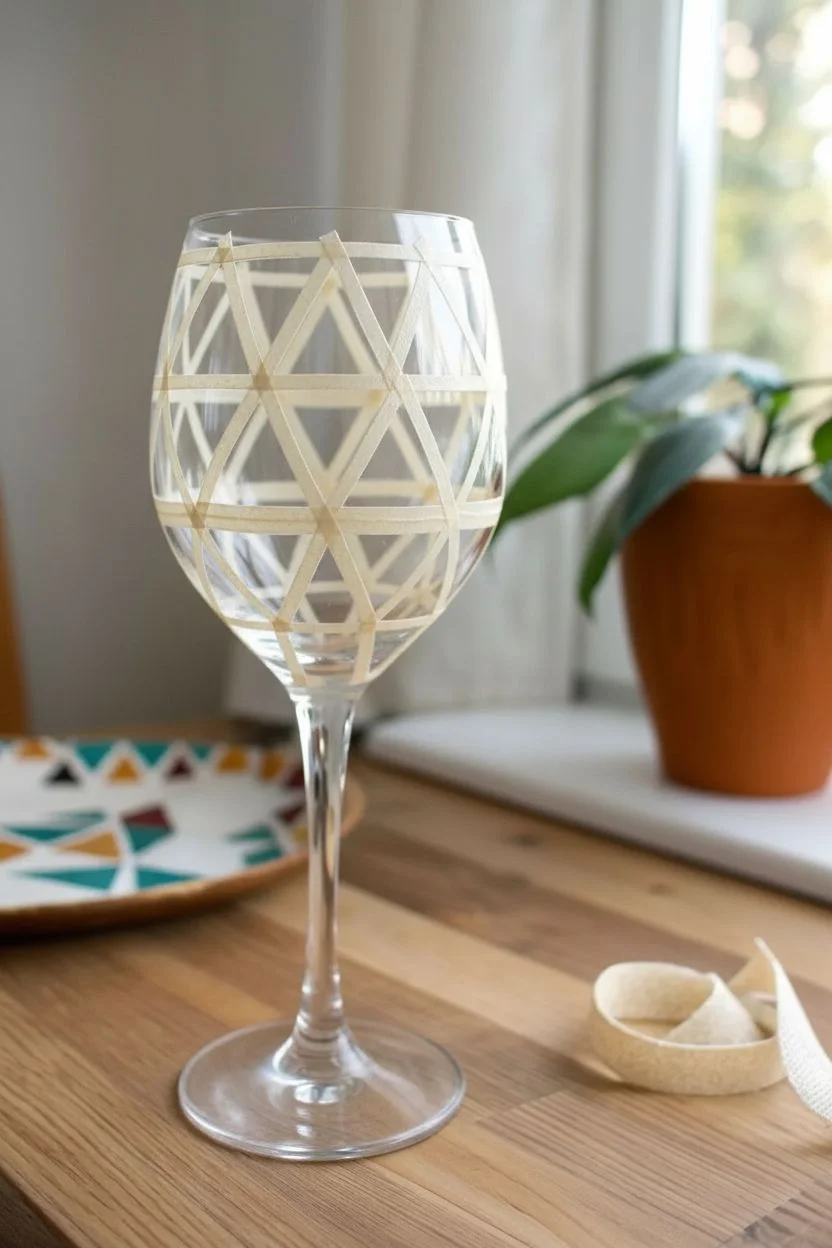
Create the grid:
Begin taping your design by placing diagonal strips of thin graphic art tape across the glass bowl. Start with long lines that crisscross to form large X shapes. -
Form triangles:
Continue adding diagonal tape strips intersecting your first lines to break the spaces down into smaller triangles. Aim for a mix of sizes, but keep the shapes distinctly triangular. -
Secure the edges:
Once your pattern is laid out, firmly run your fingernail or a credit card edge over every strip of tape. This burnishing step is crucial to prevent paint from bleeding under the adhesive.
Seal the Tape Edges
For ultra-crisp lines, paint a thin layer of clear medium or white paint over the tape edges first. This seals the tape so any bleed is invisible before adding color.
Step 2: Painting the Mosaic
-
First color application:
Pour a small amount of teal enamel paint onto your palette. Using a small flat brush, fill in scattered triangles around the glass, spacing them out so no two teal shapes touch. -
Apply second hue:
Clean your brush thoroughly and switch to the mustard yellow paint. Fill in another set of random triangles, painting smoothly from the tape inward to avoid pushing paint under the edges. -
Add warmth:
Introduce the rust or reddish-brown color to the remaining empty spaces. Be strategic with placement to balance the warm tones against the cool teal. -
Incorporate white:
Use white enamel for specific accent triangles. In the example shown, white is used somewhat sparingly or textured (stippled) to add visual interest and brightness. -
Opacity check:
Glass paint can be translucent. If the first coat looks streaky or too sheer, let it dry for about 20 minutes (or per manufacturer instructions) and apply a second coat for solid, opaque color. -
Clean up drips:
Inspect the glass for any accidental smudges on the stem or the clear rim area. Wipe these away immediately with a damp paper towel or a cotton swab dipped in alcohol.
Step 3: Finishing Touches
-
Remove tape (timing is key):
Carefully peel off the tape while the paint is still slightly tacky—usually about 30 to 60 minutes after the final coat. Don’t wait until it is fully cured, or the paint might chip. -
Peel technique:
Pull the tape slowly at a 45-degree angle away from the painted areas. If you see any paint lifting, gently press it back down and use a craft knife to score the edge before peeling. -
Fix imperfections:
If any paint bled under the tape, use a toothpick or a craft knife to gently scrape away the excess once the paint is dry to the touch, refining those distinct gaps. -
Curing process:
Follow the specific curing instructions on your paint bottle. Most glass enamels require either air-curing for 21 days or baking in a cool oven that is heated to 350°F (176°C) for 30 minutes to become dishwasher safe.
Metallic Accent Upgrade
Swap the white paint for metallic gold or copper. The shimmer adds an elegant, high-end finish that catches the light beautifully during dinner parties.
Now you have a stunning, custom-designed glass ready for your next dinner party or as a thoughtful gift
Faux Stained-Glass Wine Glass Painting With Outlined Shapes
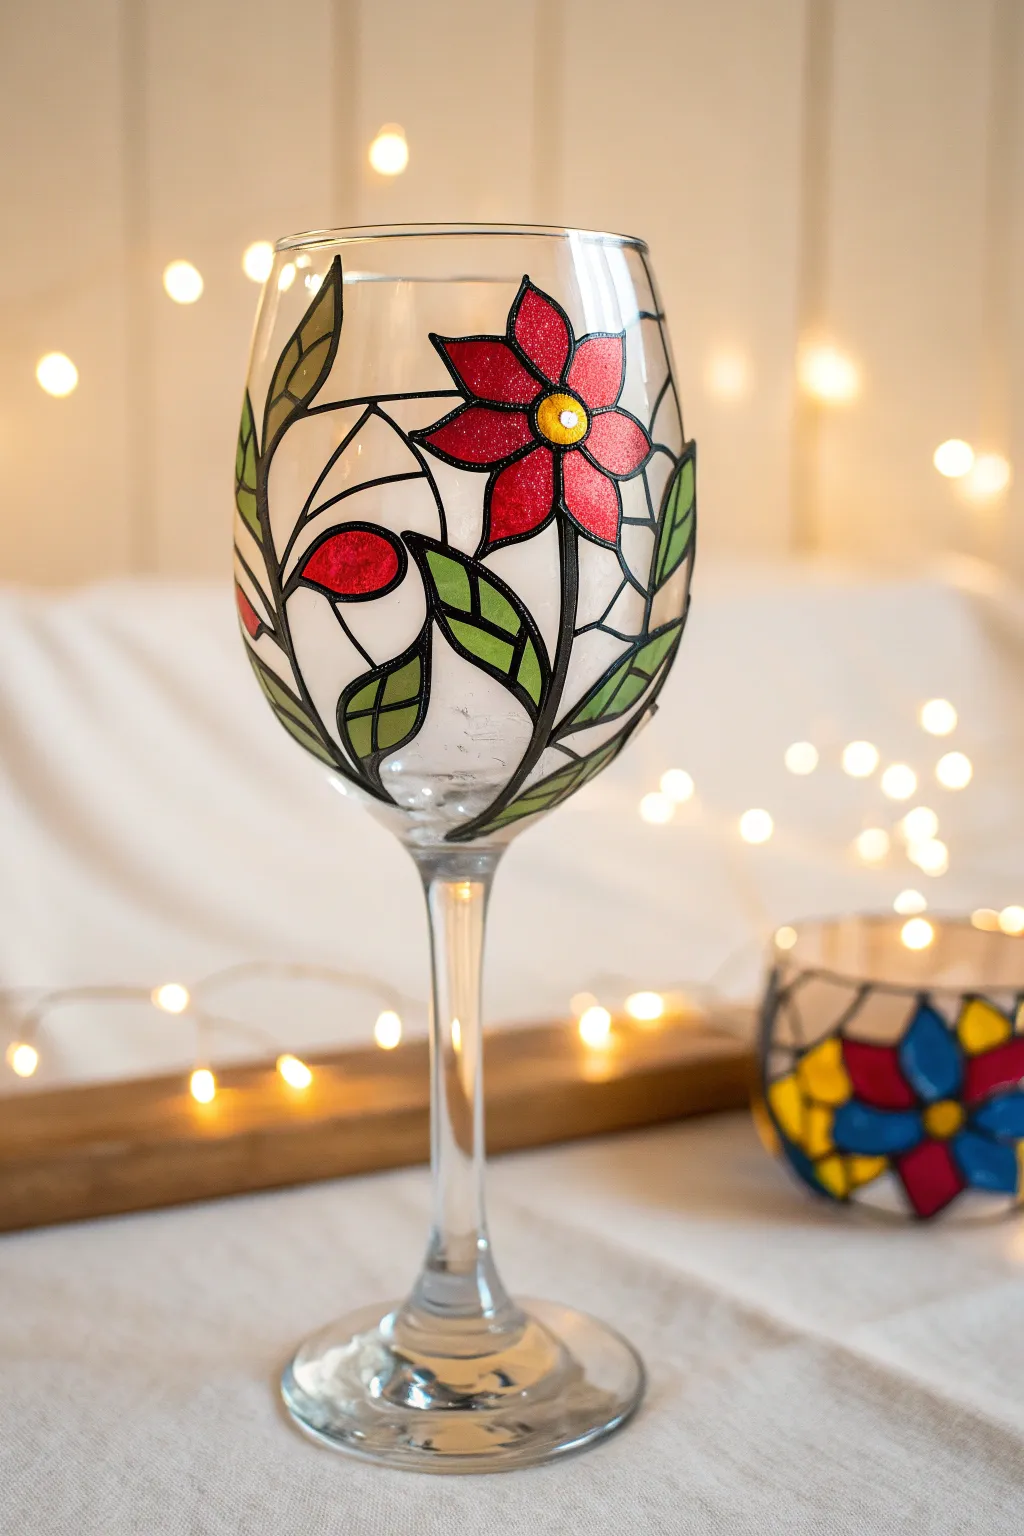
Transform a plain wine glass into a luminous piece of art that mimics the classic look of stained glass. Using lead-effect outliners and translucent glass paints, you’ll create a vibrant floral design that glows beautifully under soft lighting.
How-To Guide
Materials
- Clear wine glass
- Rubbing alcohol and cotton pads
- Black liquid lead outliner (or stained glass relief paste)
- Solvent-based or water-based glass paints (Red, Green, Yellow)
- Fine round paintbrush (size 0 or 1)
- Sketch paper and pencil for drafting
- Tape (painter’s or masking tape)
- Paper towels
- Cotton swabs for cleanup
Step 1: Preparation & Planning
-
Clean surface:
Begin by thoroughly cleaning your wine glass with rubbing alcohol and a cotton pad. This removes invisible oils and fingerprints which can prevent the paint from adhering properly. -
Draft the pattern:
On a piece of paper, sketch your floral design. Draw a large five-petaled flower for the focal point and surround it with flowing stems and leaf shapes. Ensure the size fits the bowl of your glass. -
Insert the guide:
Cut your sketch out roughly and roll it up carefully. Insert it inside the wine glass and tape it against the glass wall so the design faces outward. This will act as your tracing guide.
Shake vs. Stir
Stir your glass paints gently with a stick rather than shaking the bottle. Shaking introduces air bubbles that ruin the smooth, clear stained-glass finish.
Step 2: Creating the “Lead” Outline
-
Test the outliner:
Before touching the glass, squeeze a small amount of black liquid lead onto a paper towel to ensure the nozzle is clear and the flow is smooth, not sputtering. -
Trace the flower center:
Holding the glass steady (cradling it in a towel helps prevent rolling), gently squeeze the tube to trace the small center circle of your main flower. -
Outline the petals:
Continue tracing the five pointed petals of the flower. Try to keep an even pressure on the tube to maintain a consistent line width, lifting the nozzle slightly off the surface as you drag it. -
Add stems and leaves:
Work your way outward from the flower, drawing the curved lines for stems and the pointed leaf shapes. Connect these lines to create a cohesive ‘web’ effect typical of stained glass. -
Close the shapes:
Ensure every shape—every petal and leaf—is a completely closed loop. Any gaps in the black outline will allow the colored paint to leak out later. -
Clean up errors:
If you make a mistake, don’t panic. Use a cotton swab to wipe away the wet outliner immediately, or wait for it to dry and scrape it off with a craft knife. -
Let outlines cure:
Allow the black outlines to dry completely. This usually takes at least 1-2 hours depending on the brand, but I prefer letting it sit overnight to ensure it’s rock hard.
Step 3: Painting the Glass
-
Prepare the red paint:
Dip your fine brush into the red glass paint. You want a generous amount on the brush, more like dropping paint into the area than brushing it on. -
Fill the petals:
Touch the brush to the glass inside a petal outline. Gently push the paint toward the black ‘lead’ lines without painting over them. The fluid paint should level itself out. -
Paint the leaves:
Switch to green paint (cleaning your brush thoroughly or using a fresh one). Fill in the leaf sections using the same flooding technique to get a smooth, translucent finish. -
Detail the center:
Carefully dab yellow paint into the small center circle of the flower. This bright pop of color draws the eye and completes the floral look. -
Check for pinholes:
Hold the glass up to a light source. If you see tiny pinholes where the paint didn’t cover, dab a tiny bit more wet paint into those spots to seal them. -
Dry horizontally:
To prevent drips, prop the glass horizontally while the paint is wet, if possible, or keep it upright and rotate it occasionally during the first 20 minutes of drying. -
Final cure:
Follow the manufacturer’s instructions for the final cure. Some paints require 21 days of air drying, while others need to be baked in a home oven to become dishwasher safe.
Uneven Lines?
If your outliner lines look shaky or vary in thickness, try resting your wrist on a book or stable object raised to the height of the glass for better support.
Place a tealight inside your finished glass to see your artwork glow with brilliant color
Sponged Galaxy Wine Glass Painting
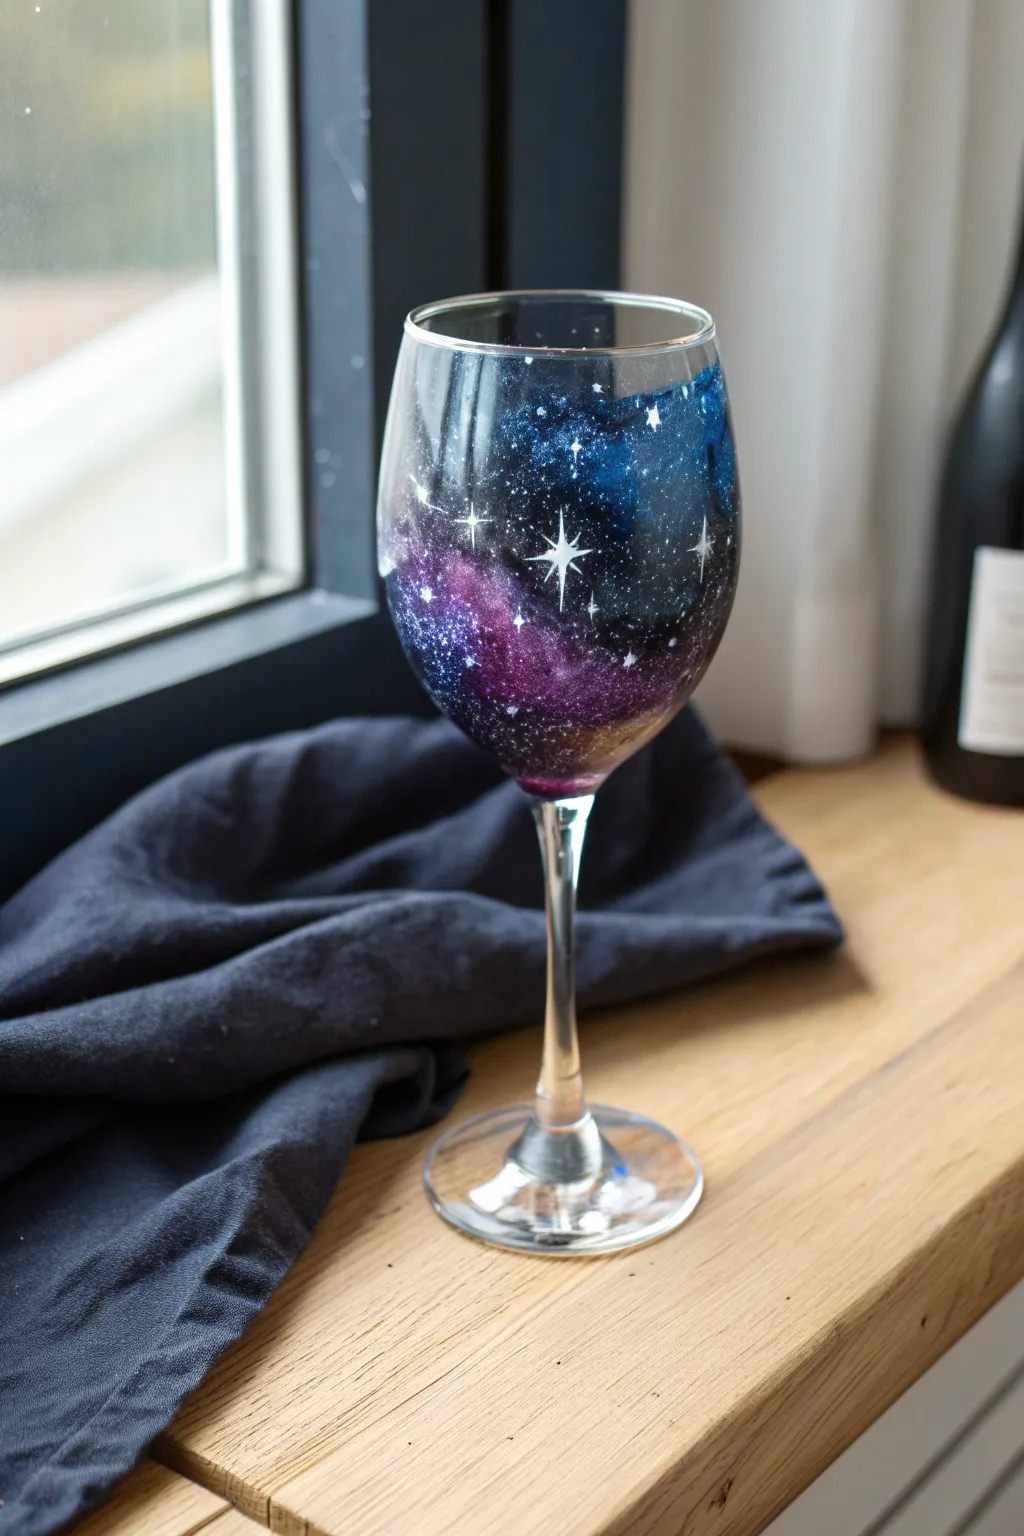
Transform a plain wine glass into a mesmerizing piece of the cosmos with this stunning galaxy design. Using simple sponge painting techniques, you’ll blend deep blues, vibrant purples, and starry whites to create a dreamy night sky that sparkles in the light.
Step-by-Step Guide
Materials
- Glass wine glass (stemmed or stemless)
- Rubbing alcohol and cotton pads
- Enamel acrylic craft paint (Black, Navy Blue, Purple, Turquoise, White)
- Makeup sponges or small craft sponges
- Small piece of foil or a paint palette
- Old toothbrush (optional for splattering)
- Fine detail paintbrush (size 0 or 00)
- Toothpicks
- Gloss varnish or sealant (optional, specifically for glass paint)
Step 1: Preparation & Base Application
-
Clean surface:
Before you paint a single stroke, wipe down the entire outside bowl of the wine glass with rubbing alcohol and a cotton pad. This removes oily fingerprints that could prevent the paint from sticking. -
Dispense paint:
Squeeze a nickel-sized amount of black, navy blue, purple, and turquoise paint onto your foil or palette. Keep them slightly separated for now, but ready for mixing. -
Sponge the black:
Dip a corner of your makeup sponge into the black paint. Dab off the excess onto the foil so the sponge is loaded but not dripping. -
Create the void:
Lightly dab the black paint onto the glass in sporadic patches. Focus on the areas you want to be the deepest space, leaving gaps of clear glass for the colors to shine through. -
Add deep blue:
While the black is still slightly tacky, switch to a fresh corner of the sponge (or a new sponge) and pick up the navy blue. -
Blend the darkness:
Dab the navy blue over the edges of the black patches and into some of the clear glass areas, creating a seamless transition from the void into the color.
Step 2: Building the Galaxy
-
Layer the purple:
Using a clean sponge section, tap purple paint into the remaining clear spaces and slightly over the navy blue edges. The varying pressure of your sponge allows colors to mix right on the glass for an organic nebulae look. -
Highlight with turquoise:
Add small, concentrated touches of turquoise or teal in the center of the purple or blue clouds to create glowing hotspots within your galaxy. -
Second pass:
Let the first layer dry for about 15-20 minutes. If the glass looks too transparent, repeat the sponge process lightly to build opacity. I find that two thin layers usually give a richer depth than one heavy one. -
Dry completely:
Allow the background colors to dry fully before moving on to the stars. This usually takes about an hour, depending on the thickness of your paint.
Sponge Control
Don’t press too hard with the sponge. Light, rapid tapping motions create a textured, airy look. Pressing too hard creates solid blocks of color that look less like clouds.
Step 3: Adding the Stars
-
Prepare the stars:
Place a small amount of white enamel paint on your palette. If it’s very thick, create a tiny puddle and use a toothpick to thin it with just a drop of water. -
Splatter texture:
Dip the bristles of an old toothbrush into the white paint. Hold the brush a few inches from the glass and flick the bristles with your thumb to spray a fine mist of tiny distant stars. -
Dab distinct stars:
Dip the tip of a toothpick into the white paint and gently touch it to the glass to create brighter, more distinct stars of varying sizes. -
Paint a shining star:
Select a spot for your main ‘north star.’ Using your finest detail brush, paint a small white cross. -
Refine the shine:
Lengthen the vertical line of the cross slightly more than the horizontal one. Gently curve the inner corners inward to give it that classic twinkle shape. -
Add tiny flares:
Paint a few smaller, simple cross-shaped stars elsewhere on the glass to balance the composition, but keep them smaller than your main focal star. -
Curing:
Follow the instructions on your specific paint bottle for curing. Most enamel paints require 21 days of air drying or a specific baking method in the oven to become dishwasher safe.
Glitter Galaxy
Mix a tiny amount of silver metallic paint or fine glitter medium into your blue and purple layers for a subtle shimmer that sparkles when you pour white wine.
Enjoy your beautiful cosmic creation that makes every glass of wine feel like a celebration of the universe
Under-the-Sea Wine Glass Painting With Bubbles and Seaweed
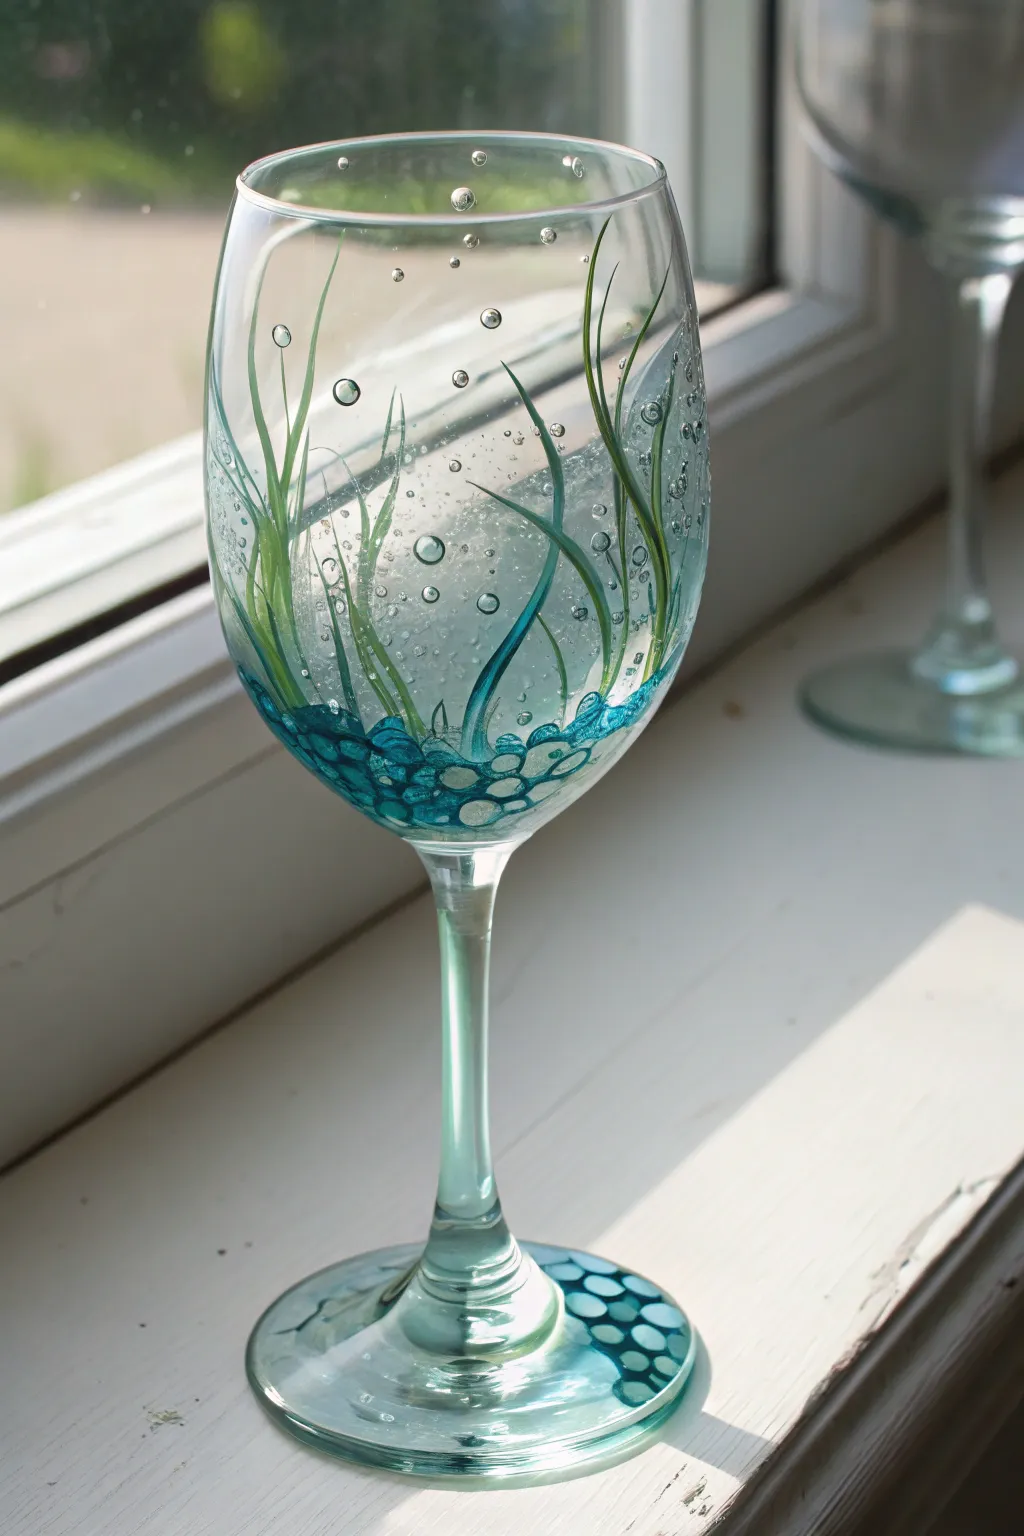
Transform a standard wine glass into an enchanting underwater scene with this delicate painting project. Using simple glass paints, you’ll create swaying seaweed tendrils and dimensional faux bubbles that catch the light beautifully.
Detailed Instructions
Materials
- Clear wine glass
- Rubbing alcohol
- Cotton pads
- Glass paint (transparent turquoise/teal)
- Glass paint (opaque or semi-transparent olive green)
- Glass paint (lighter lime green)
- Glass paint outliner/relief paste (clear or pearlescent)
- Detail brush (size 0 or 00 liner)
- Small round brush (size 2)
- Palette or small dish
- Paper towels
Step 1: Preparation & Base
-
Clean the surface:
Begin by thoroughly wiping down the entire outer surface of the wine glass with rubbing alcohol on a cotton pad. This removes oils and fingerprints, ensuring your paint adheres perfectly. -
Mix your ocean tones:
On your palette, prepare your teal or turquoise color. If it’s too opaque, mix in a little clear glass medium or use a transparent glass paint to keep that watery effect. -
Paint the bottom stones:
Using your small round brush, dab irregular circles at the very bottom of the glass bowl. Cluster them closely together to resemble sea glass or pebbles resting on the ocean floor. -
Extend to the stem:
Continue this pattern down the stem, painting a solid wash of teal that transitions into distinct circular pebble shapes on the foot of the glass. -
Create the pebble outlines:
Once the teal blobs are tacky but not fully dry, use a darker shade of teal or a very fine liner brush to outline the ‘stones’ at the bottom of the bowl for definition.
Paint Slipping?
Glass is slippery! If paint runs, let it thickens slightly on the palette for 5 mins before applying. Avoid overloading the brush.
Step 2: Foliage & Texture
-
Start the main stalks:
Load your liner brush with olive green paint. Starting from the pebble base, pull long, wavy lines upward. Vary the pressure: press down slightly at the base and lift off as you reach the top to create a tapered point. -
Add lighter tendrils:
Switch to your lighter lime green shade. Paint thinner, wispy strands of grass interspersed between the darker ones. Having two shades creates depth and makes the seaweed look like it’s drifting. -
Curve the tips:
Ensure the tips of your grass curve slightly to the left or right, rather than pointing straight up, to mimic the movement of water. -
Leaf details:
For the wider ‘kelp’ leaves, paint a broader stroke that twists slightly. You can achieve this by rolling the brush between your fingers as you pull the stroke upward. -
Dry the foliage:
Let these green layers dry completely before moving on to the bubbles, as you don’t want to smudge the fine lines.
Step 3: Bubbles & Finishing
-
Paint the large bubbles:
Using the handle end of a paintbrush or a dotting tool, dip into clear or pearlescent relief paste. Dot various sizes of bubbles around the seaweed. -
Add tiny fizz:
Switch back to your smallest liner brush. create tiny clusters of micro-bubbles near the tips of the seaweed and rising from the pebble bed. -
Highlighting bubbles:
To make the bubbles look 3D, add a minute dot of white paint to the upper left corner of your larger bubble circles once the clear paste is dry. This ‘catchlight’ makes them pop. -
Accent the base:
Return to the foot of the glass. Add a few green strokes or dots among the teal pebbles to tie the design together. -
Final drying time:
Allow the glass to dry for at least 24 hours in a dust-free area. -
Curing the paint:
Follow the manufacturer’s instructions for your specific glass paint. This often involves baking the glass in a cool oven that heats up to 325°F (160°C) for about 30-40 minutes to make it dishwasher safe.
Add Sparkle
Sprinkle ultra-fine iridescent glitter onto the wet ‘pebble’ paint at the base for a magical, shimmering sea-floor effect.
Enjoy your beautiful new hand-painted underwater glass at your next dinner party
Goldfish Swim-Around Wine Glass Painting
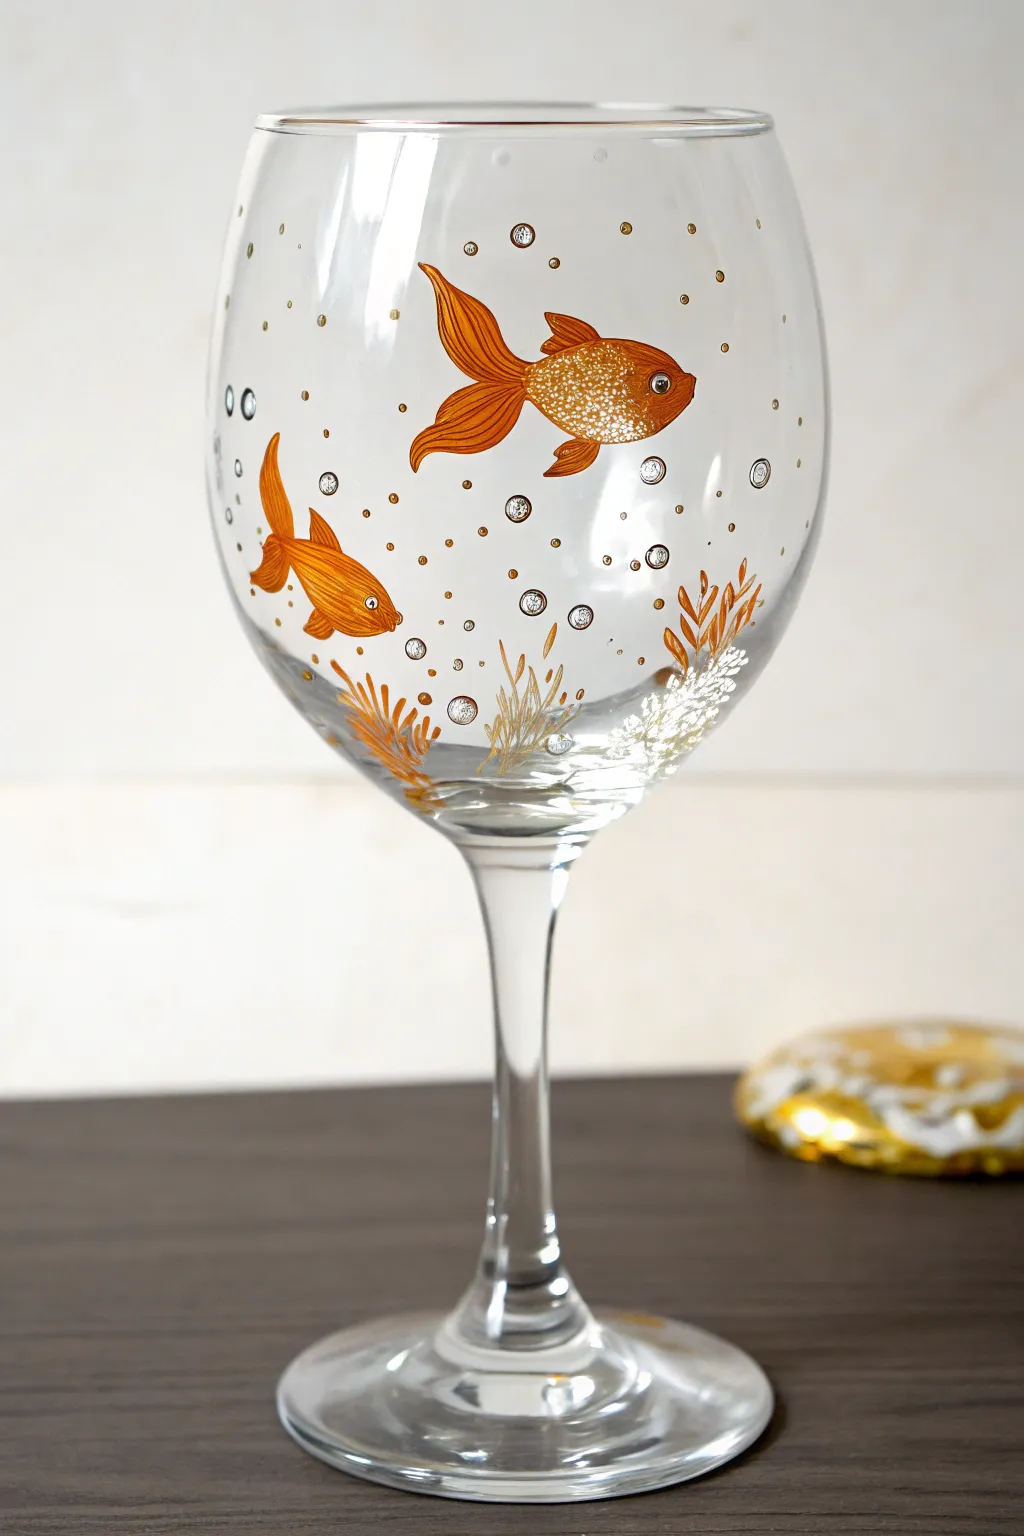
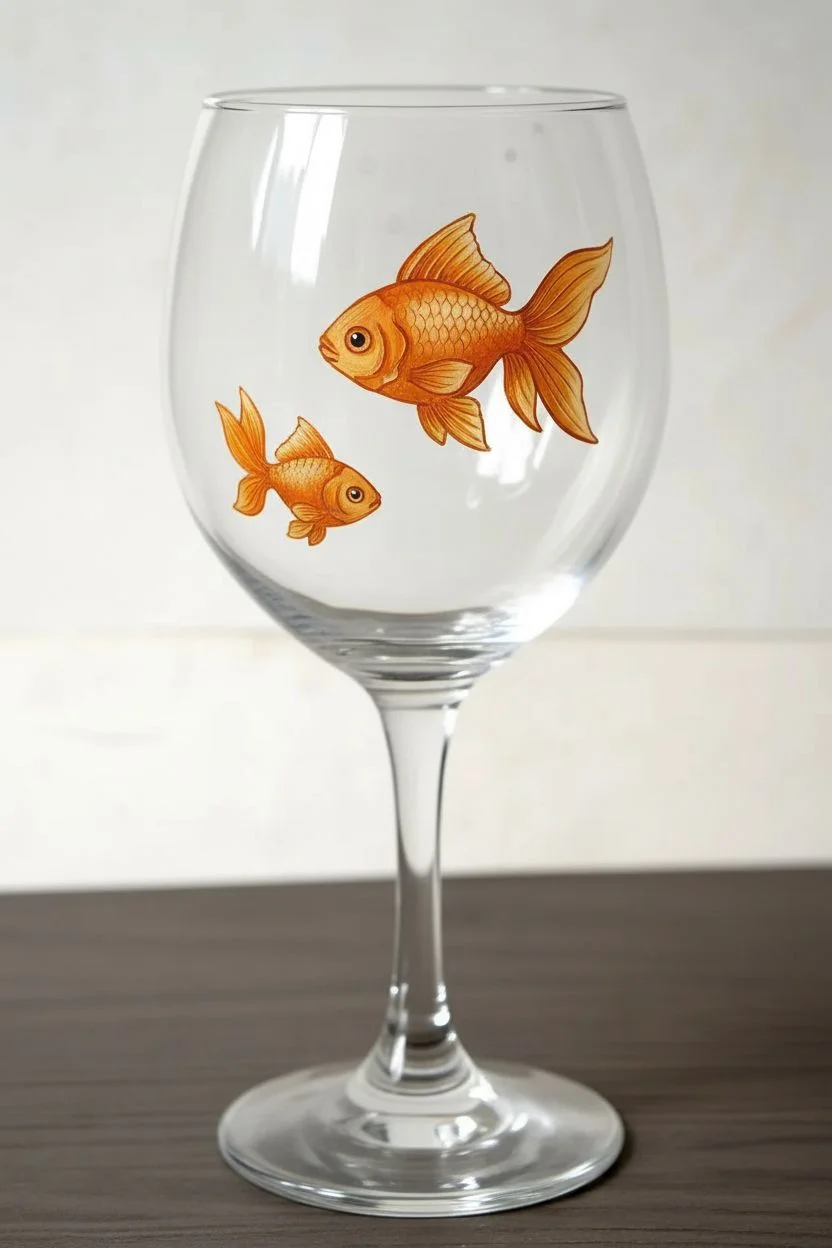
Transform a plain wine glass into a dazzling aquarium with this elegant goldfish design. Using translucent glass paints and delicate brushwork, you’ll create shimmering fish and bubbles that seem to float right on the surface.
How-To Guide
Materials
- Large wine glass (clean and grease-free)
- Rubbing alcohol and cotton pads
- Glass paint (Orange, Gold, White, Silver)
- Fine liner brush (size 0 or 00)
- Small round brush (size 1)
- Dotting tool or toothpick
- Paper towels
- Palette or small dish
- Oven (for baking instructions, if applicable to your paint brand)
Step 1: Preparation & Base Fish
-
Prepare the surface:
Begin by thoroughly wiping down your wine glass with rubbing alcohol and a cotton pad. This removes any fingerprints or oils that could prevent the paint from adhering properly. -
Outline the large fish:
Using a fine liner brush and the orange glass paint, carefully paint the outline of the larger goldfish near the top half of the glass. Create an oval shape for the body and sweeping, curved lines for the flowing tail and fins. -
Outline the small fish:
Repeat the previous step for the smaller goldfish, positioning it lower and to the left of the large one. Ensure it’s facing diagonally upwards to create a sense of movement. -
Fill the bodies:
Switch to your small round brush. Mix a tiny bit of gold paint into your orange to create a shimmering hue, then fill in the bodies of both fish. Work somewhat quickly to smooth out brushstrokes before the paint gets tacky. -
Initial drying:
Allow this base layer to dry for about 15-20 minutes. It doesn’t need to be fully cured, but it should be dry enough that adding details won’t smear the base color.
Paint Slipping?
If paint beads up or slips right off the glass, your surface is likely oily. Clean the spot again with alcohol and let dry completely before repainting.
Step 2: Adding Details & Scales
-
Paint the fins:
With the liner brush and pure orange paint, fill in the fin and tail areas. Use long, sweeping strokes that follow the curve of the fins to simulate texture. -
Add scale texture:
Once the body paint is dry to touch, use your finest brush or a toothpick. Dip it in white paint and add tiny, stippled dots across the upper back and center of the fish bodies creating a scale effect. I like to cluster them denser near the top and sparser near the belly. -
Define the eyes:
Paint a small white circle for the eye on each fish. Once that dries, add a tiny dot of black or dark silver in the center for the pupil. -
Highlighting fins:
Mix a little gold with orange and add thin streaks along the ridges of the fins and tails. This adds dimension and makes them catch the light beautifully.
Make it Sparkle
Sprinkle ultra-fine glitter onto wet paint on the fish tails or coral for a magical shimmer that catches candlelight beautifully during dinner.
Step 3: Underwater Atmosphere
-
Create large bubbles:
Dip a dotting tool or the handle end of a brush into silver or pearl white paint. Press firmly to create larger circles scattered around the fish. Let the center of the dot remain slightly transparent if possible for a bubble effect. -
Outline bubbles:
Use your fine liner brush with black or dark grey paint to ring the larger bubbles very thinly. Add a tiny white highlight dot inside to make them look spherical and wet. -
Add tiny bubbles:
Using the smallest tip of a dotting tool or a toothpick, sprinkle tiny gold dots throughout the scene, focusing on the space between the fish and rising from the bottom. -
Paint sea grass:
Near the bottom stem of the glass, use gold and orange paint to create whispy sea grass. Use quick, upward flicking motions with your liner brush to keep the lines organic and thin. -
Add coral accents:
Intersperse white branch-like coral shapes among the gold grass at the base. Gently dab the paint to give it a rougher, coral-like texture compared to the smooth grass. -
Final cure:
Refer to your specific paint brand’s instructions for curing. This often involves letting the glass air dry for 24 hours, then baking it in a cool oven that heats up to 350°F (176°C) for 30 minutes to set the design permanently.
Enjoy your beautiful new glassware at your next dinner party or display it as a piece of art
Stem-Integrated Wine Glass Painting (Turn the Stem Into the Design)
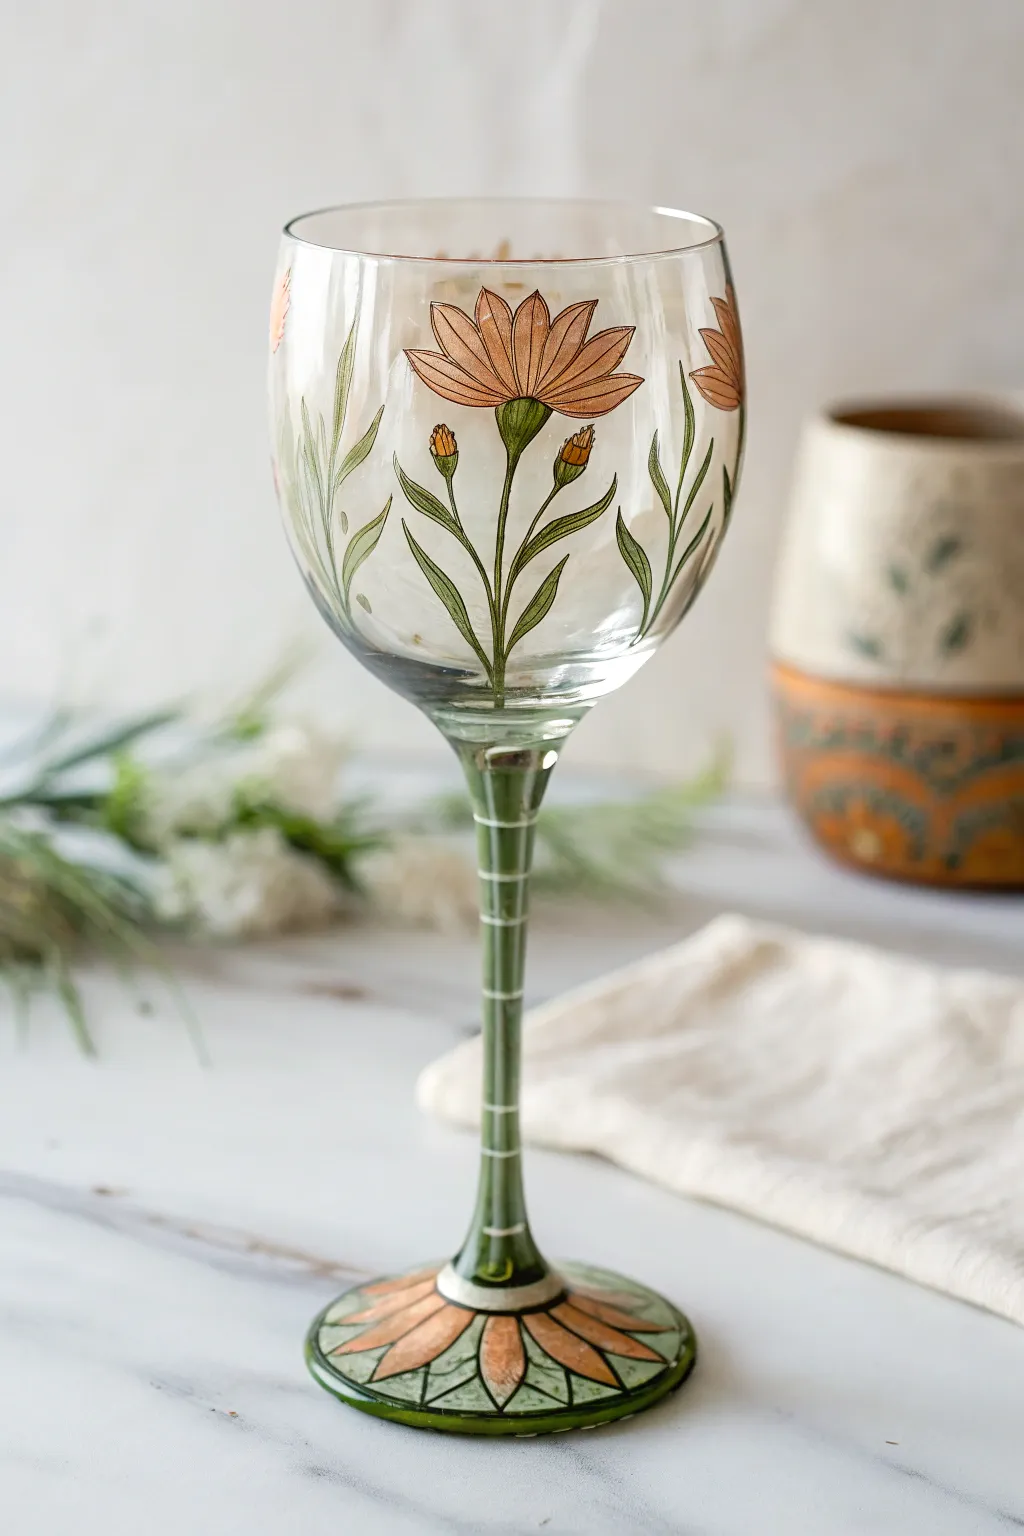
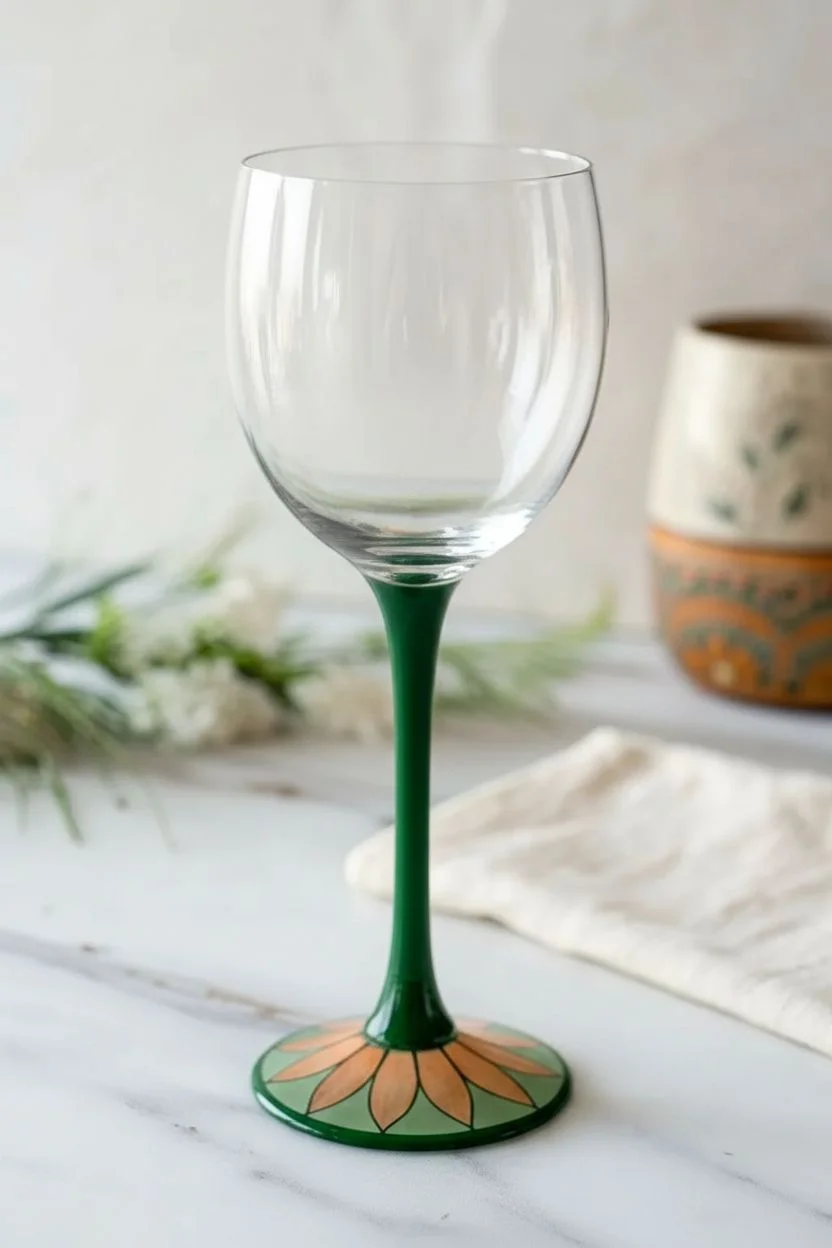
Transform a standard wine glass into a blooming flower by turning the stem itself into the main stalk of the plant. This elegant design features translucent petals on the bowl and a decorative, patterned base that grounds the entire piece in nature-inspired beauty.
Step-by-Step Tutorial
Materials
- Clear, long-stemmed wine glass
- Rubbing alcohol and cotton pads
- Enamel glass paints (Forest Green, White, Peach/Orange, Yellow-Ochre)
- Fine liner brush (size 0 or 00)
- Small flat brush or filbert brush
- Glass paint outline medium or black/dark brown liner paint
- Masking tape (thin width)
- Palette for mixing
Step 1: Preparation and Base Pattern
-
Clean the Surface:
Before laying down a single stroke, thoroughly wipe down the entire glass with rubbing alcohol on a cotton pad to remove oils and fingerprints. Handle the glass by the rim or using a clean cloth from this point on. -
Paint the Base Petals:
Start at the very bottom foot of the glass. Mix your peach/orange enamel and use the flat brush to paint large, petal shapes radiating outward from the center stem connection. Leave small gaps between them for the outline later. -
Fill the Green Zones:
Paint the remaining pie-slice sections on the foot with your forest green paint. I like to keep this layer fairly thin and translucent to mimic stained glass. -
Create the Stem:
Using the flat brush, paint the entire vertical stem with a solid coat of forest green, extending it slightly up onto the very bottom of the bowl to create the flower’s receptacle.
Fixing Smudges
Make a mistake? Don’t wipe it! Wet paint will smear. Wait for the mistake to dry completely, then gently scrape it off with a craft knife or toothpick.
Step 2: Painting the Main Floral Design
-
Draft the Stems:
Switch to your fine liner brush loaded with green. From the top of the painted stem, draw three to four main lines branching upward onto the bowl. These will hold your buds and main flower. -
Add Leaves:
Along these new branches, paint long, slender leaves. Use a ‘press and lift’ motion: press the brush down to widen the leaf at the base, then lift while dragging to create a sharp point. -
Paint the Main Bloom:
Choose a prominent branch for the main flower. Using the peach paint, stroke outward to create six to eight petals. Keep the paint somewhat sheer so light can pass through. -
Add Flower Buds:
On the shorter branches, paint small teardrop shapes in yellow-ochre or peach to represent closed buds waiting to open. -
Detail the Buds:
Add tiny green sepals (the leafy cupped part) at the base of each flower bud using your liner brush, connecting them seamlessly to the green stems. -
Initial Drying Time:
Let these colored layers dry for about one hour (or according to your specific paint instructions) before attempting any outline work to prevent smearing.
Step 3: Outlining and Refining
-
Outline the Bloom:
Using your darkest outline paint and the finest brush (00), carefully trace the edges of the peach petals on the bowl. A shaky hand actually adds organic realism here. -
Detail the Leaves:
Add a central vein line to your green leaves and outline the stems on the bowl to make them pop against the clear glass. -
Define the Base:
Return to the foot of the glass. Outline the peach petals and green sections you painted earlier. Add a scalloped or webbed line design over the green sections for extra detail. -
Tape the Stem Stripes:
Once the green stem is completely dry to the touch, cut very thin strips of masking tape (or use 1/8 inch graphic tape) and wrap them horizontally around the stem at even intervals. -
Paint White Rings:
Paint white enamel over the gaps between the tape. Alternatively, if you have a steady hand, freehand thin horizontal white rings up the length of the green stem. -
Remove Tape and Cure:
If you used tape, peel it off carefully while the white paint is still slightly wet to ensure crisp lines. Allow the entire glass to cure for the full time recommended by the manufacturer, usually 21 days for air-drying or a bake cycle in the oven.
Add Golden Highlights
For a luxury look, replace the dark outline paint with gold metallic relief paste. It adds texture and catches the candlelight beautifully during dinner.
Now you have a stunning, hand-painted glass perfectly suited for a garden party or a quiet evening in


Have a question or want to share your own experience? I'd love to hear from you in the comments below!