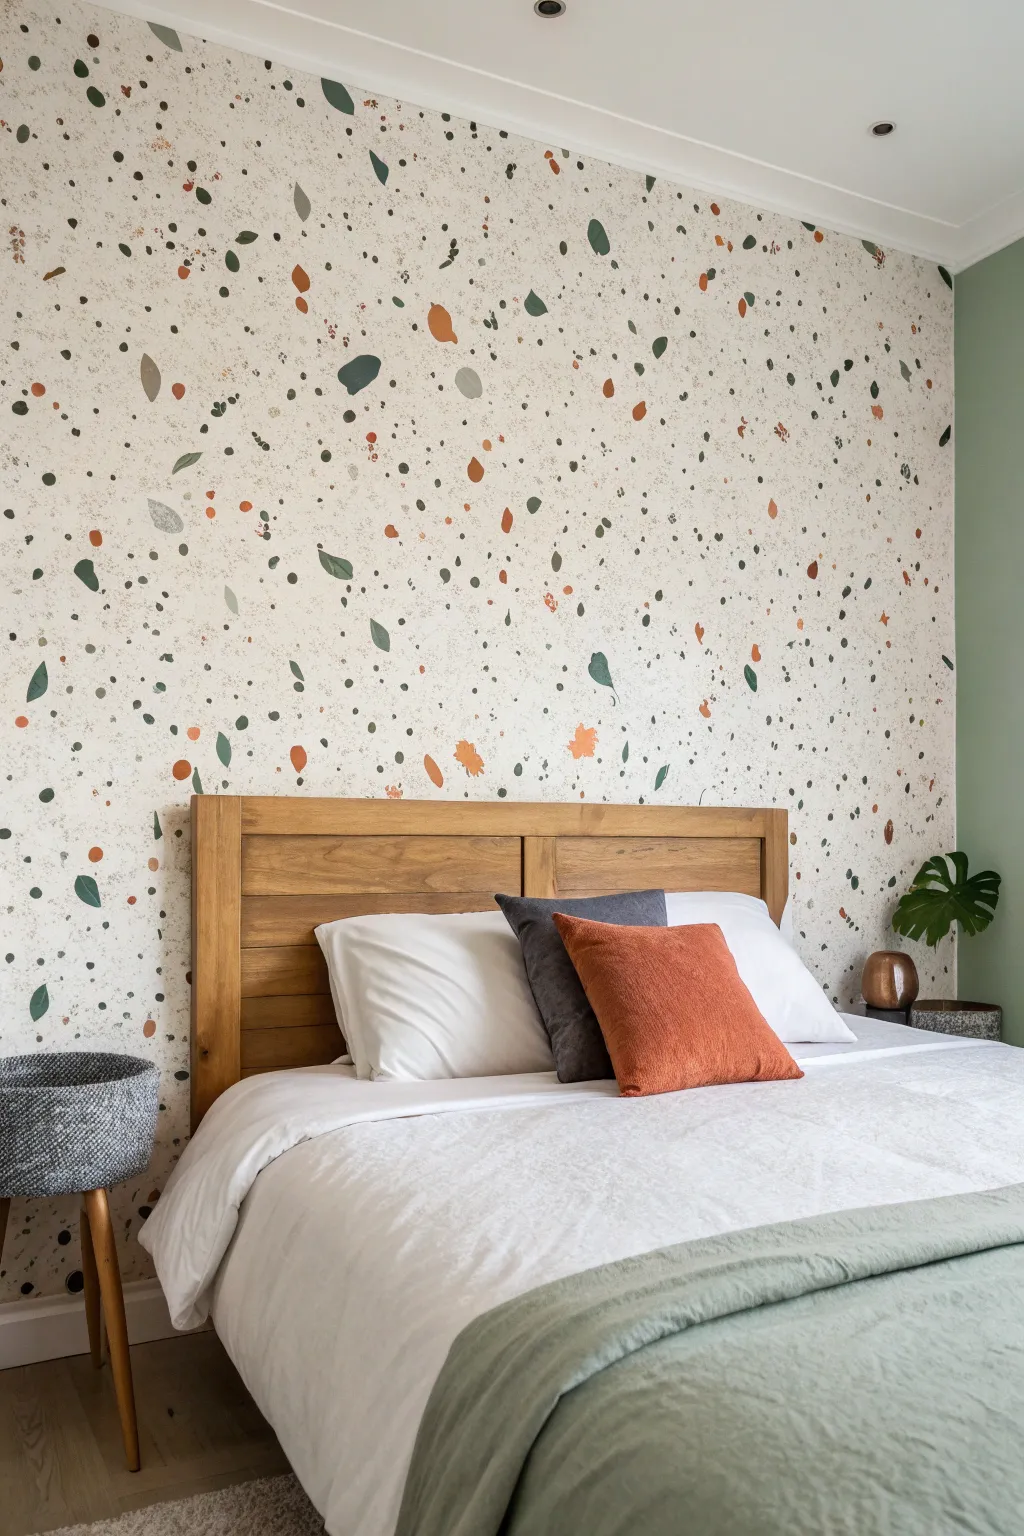
Your bedroom paint can do so much more than “make the walls a color”—it can shape the whole vibe of your sleep space in one weekend. Here are my favorite bedroom painting ideas (from classic to artsy) that make the room feel intentional, cozy, and totally you.
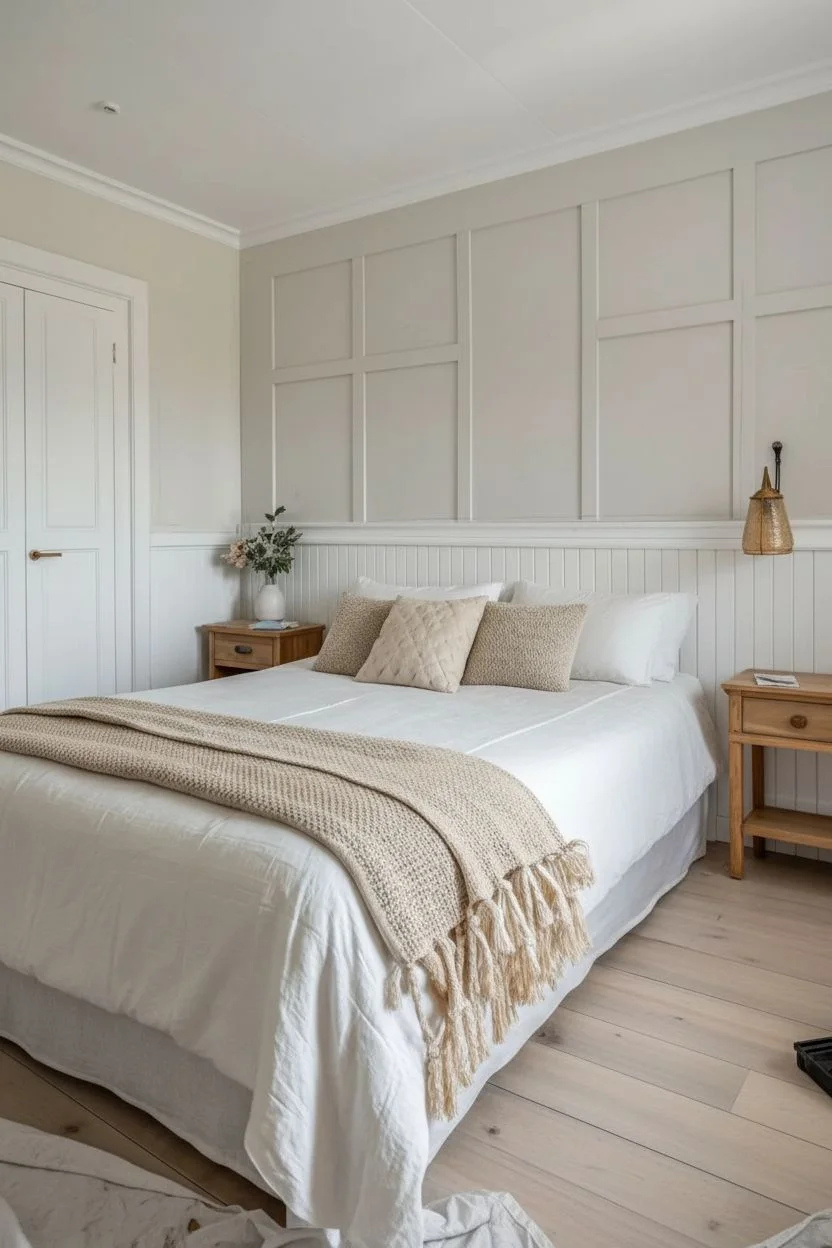
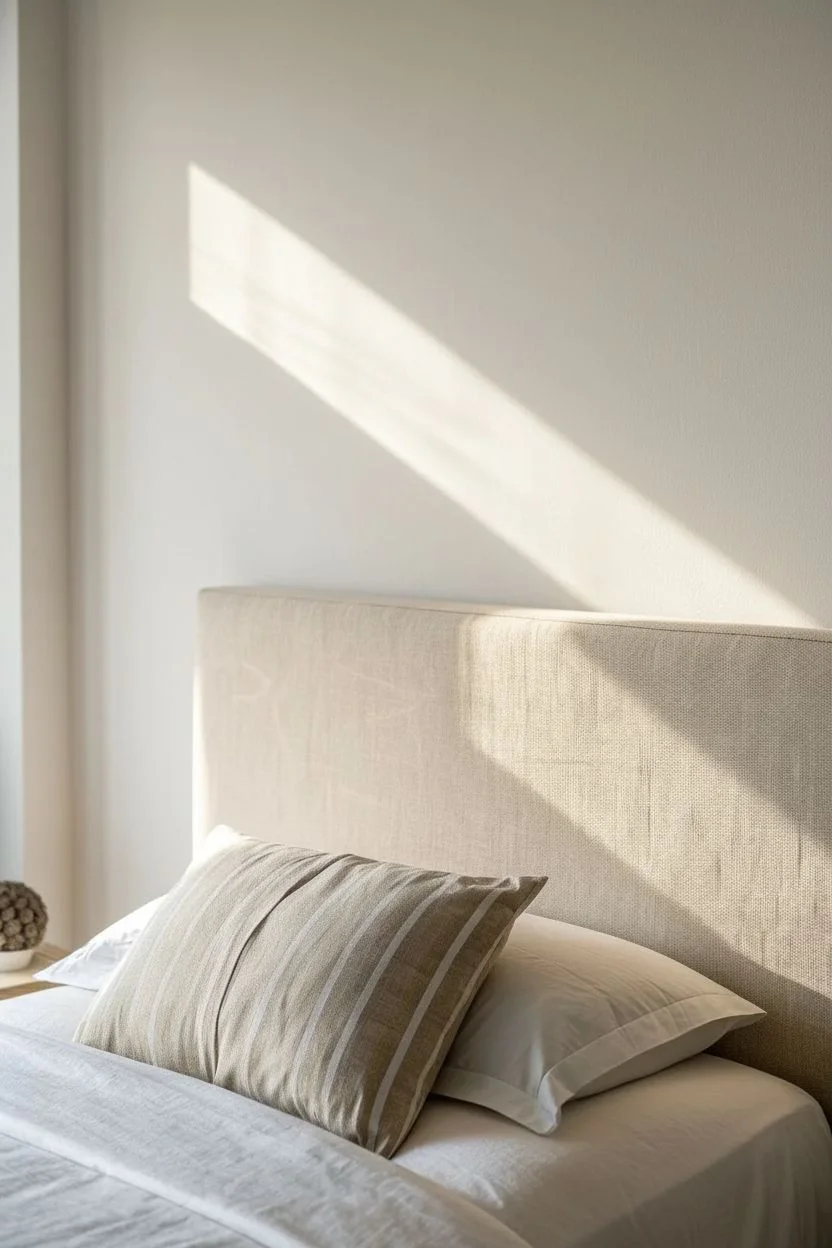
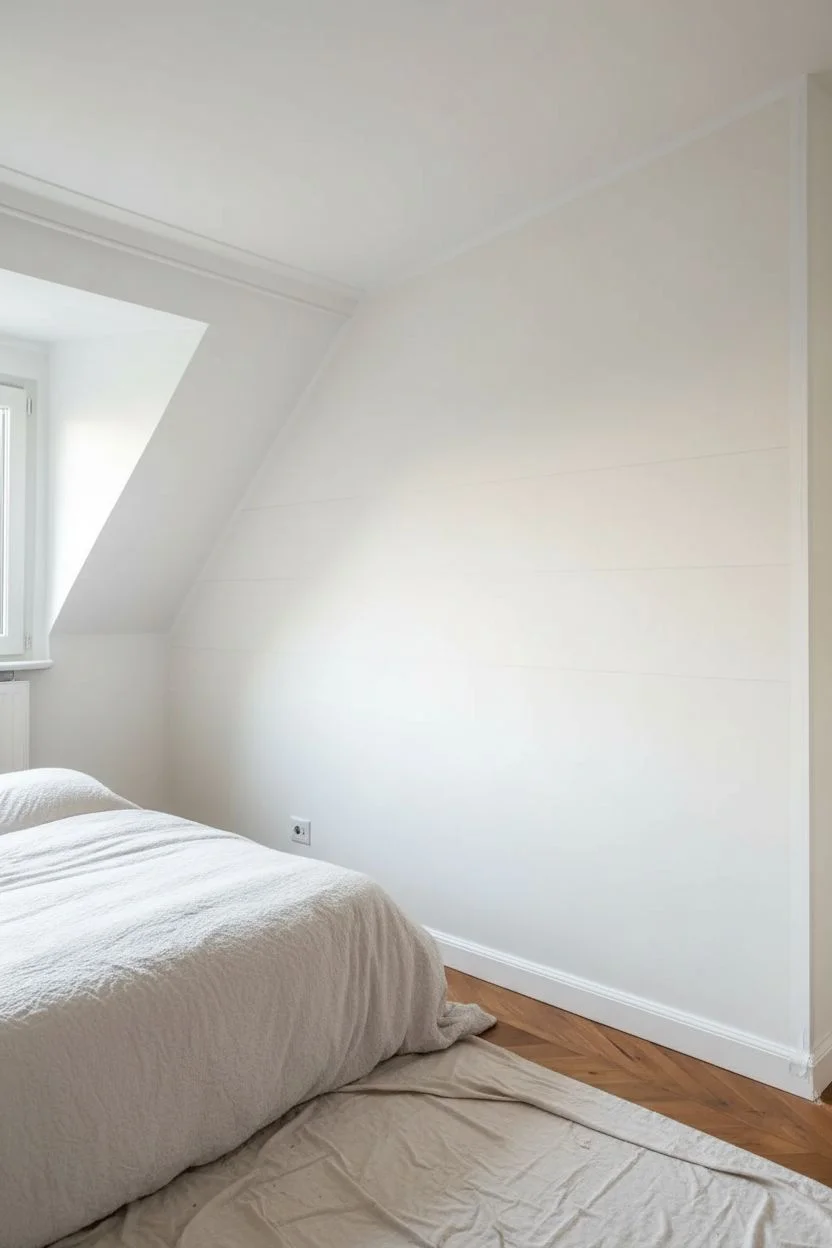
Soft Neutral Sanctuary Walls
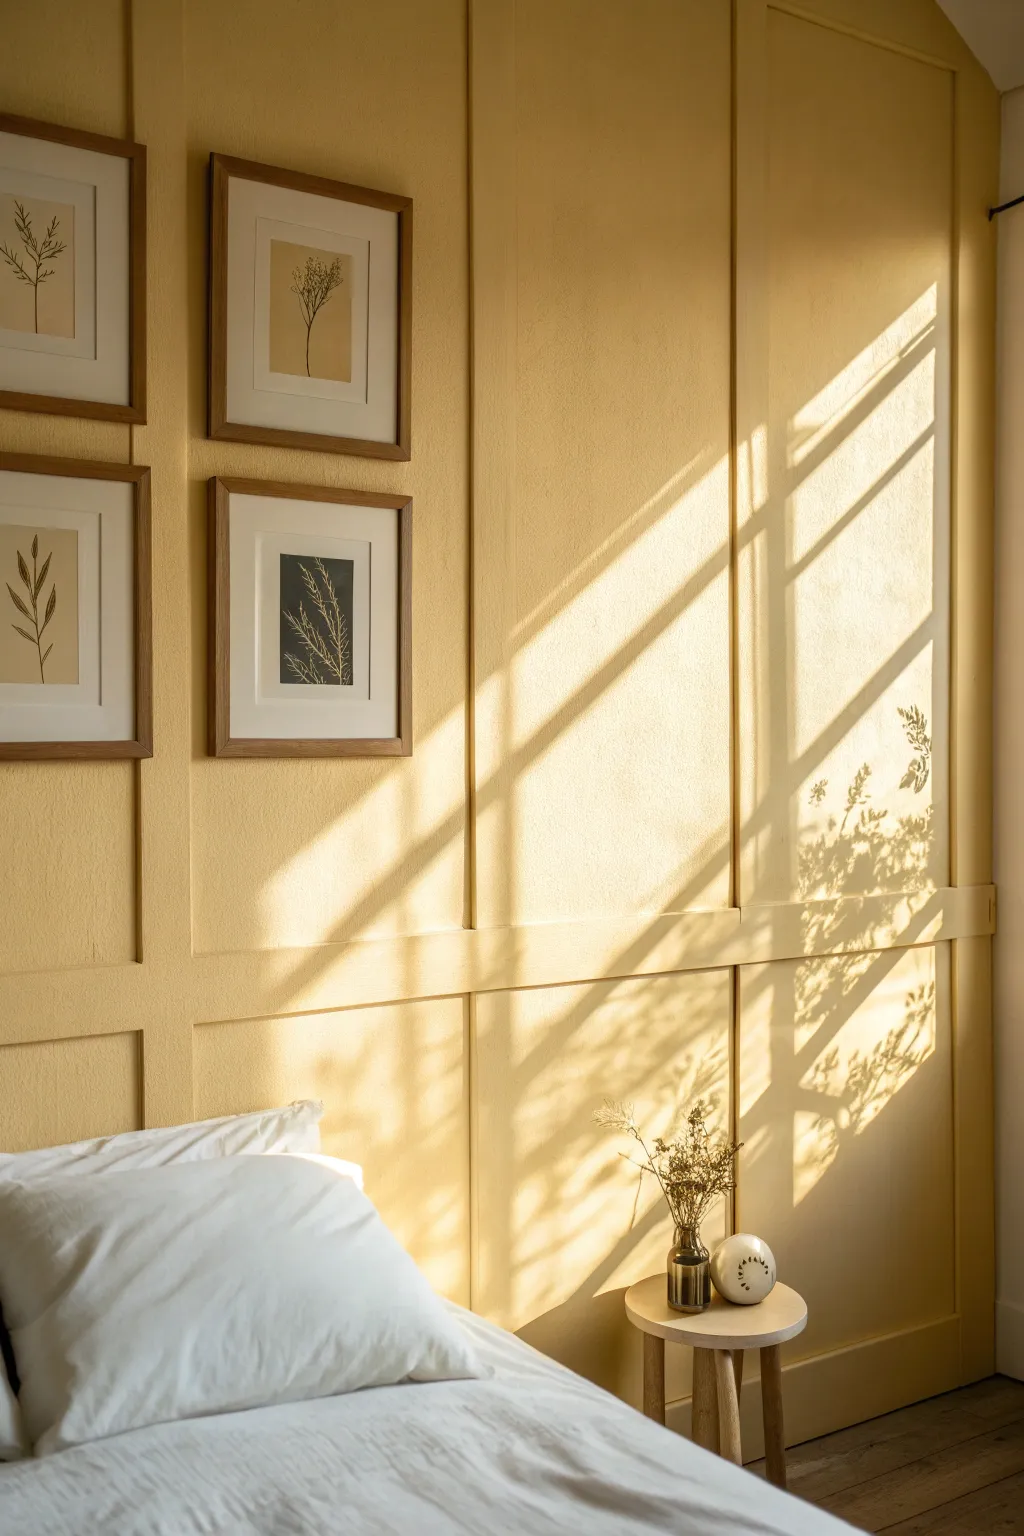
Transform a plain bedroom wall into a warm, structural focal point using this classic board and batten technique. By combining simple wood trim with a rich, buttery yellow hue, you can add architectural depth and create a cozy, sun-soaked atmosphere.
Step-by-Step
Materials
- 1×3 MDF or Poplar boards (for vertical battens)
- 1×4 MDF or Poplar boards (for top rail)
- Construction adhesive (e.g., Liquid Nails)
- Brad nailer and 2-inch brad nails
- Bubble level or laser level
- Measuring tape
- Spackle or wood filler
- Paintable caulk and caulk gun
- Sandpaper (120 and 220 grit)
- Primer (if using raw wood)
- Interior latex paint (Satin or Eggshell finish)
- Paint roller (medium nap) and angled sash brush
- Drop cloths and painter’s tape
- Four botanical art prints and wooden frames
Step 1: Planning and Layout
-
Measure and Calculate:
Begin by measuring the total width of your wall. Decide on the spacing for your vertical battens; in the image, the spacing appears generous, likely around 16 to 20 inches apart. Divide your wall width by the desired number of ‘bays’ to determine exact placement so the design looks symmetrical. -
Mark the Studs:
Use a stud finder to locate and mark the studs along the wall. While you can attach battens to drywall with adhesive, nailing into studs provides the most secure hold, especially for the horizontal top rail. -
Determine Height:
Decide on the height of your grid. The photo shows a full-wall treatment, but notice the horizontal rail about one-third up from the floor. Mark a level line for this lower horizontal rail, usually matching window sill height or about 32-36 inches from the floor.
Step 2: Installing the Trim
-
Install Horizontal Rails:
Install the horizontal 1×4 board first. Apply construction adhesive to the back, place it along your marked level line, and secure it with the brad nailer. If you are doing a full ceiling-height grid, you can install a top rail near the ceiling now as well. -
Cut Vertical Battens:
Measure the distance from your baseboard to the bottom of the horizontal rail. Cut your 1×3 boards to fit these lower sections. Then, measure from the top of the horizontal rail to the ceiling (or top rail) for the upper vertical sections. -
Attach Vertical Battens:
Apply adhesive to the back of a vertical batten. Place it on the wall at your calculated interval marks. Use a level to ensure it is perfectly plumb before nailing it in place. Repeat this process across the entire wall for both the lower and upper sections. -
Check Alignment:
It is crucial to ensure the upper vertical batten aligns perfectly with the lower one. I like to use a straight edge or a long level to bridge the horizontal rail and check that the top and bottom pieces form a straight vertical line.
Gaps at the Wall?
Walls are rarely perfectly straight. If your board has a gap behind it, don’t force it flat. Nail it securely, and use caulk to fill the gap for a visually seamless finish.
Step 3: Prep for Painting
-
Fill Nail Holes:
Go over every board and fill the small brad nail holes with spackle or wood filler. Leave it slightly ‘proud’ (raised) above the surface to allow for sanding. -
Caulk the Seams:
Run a thin bead of paintable caulk along every edge where the wood meets the drywall and where the boards meet each other. Smooth the bead with a wet finger or a caulking tool for a seamless transition. This step is the secret to making the woodwork look built-in. -
Sand Smooth:
Once the filler is dry, sand the nail holes flat with 120-grit sandpaper. Lightly scuff the face of any pre-primed boards to help the paint adhere. Follow up with a quick pass of 220-grit for a professional smoothness. -
Wipe Down:
Remove all sanding dust with a tack cloth or a damp rag. Dust is the enemy of a smooth paint finish, so be thorough here.
Visual Balance Trick
For the most pleasing layout, ensure the bays at the far left and far right ends of the wall are the same width, even if the center bays are slightly different.
Step 4: Painting and Styling
-
Cut In Edges:
Using your angled sash brush, paint the corners, the edges of the trim, and the areas where the roller won’t reach. Use a warm, yellow-ochre or butter-yellow shade akin to ‘Farrow & Ball Sudbury Yellow’ or similar. -
Roll the Walls:
Use a roller to paint the flat drywall sections between the battens. Then, carefully roll the faces of the battens. Using a roller on the trim helps match the texture of the drywall for a unified look. -
Apply Second Coat:
Allow the first coat to dry completely according to the can’s instructions. Apply a second coat to ensure rich, opaque color coverage, paying special attention to the caulk lines. -
Hang the Artwork:
Once fully cured, center your botanical prints within the grid panels. The image shows them placed in the upper left quadrant. Measure to center them precisely between the vertical battens for a tailored appearance.
Step back and enjoy the warm, architectural depth the new color and texture bring to your sanctuary


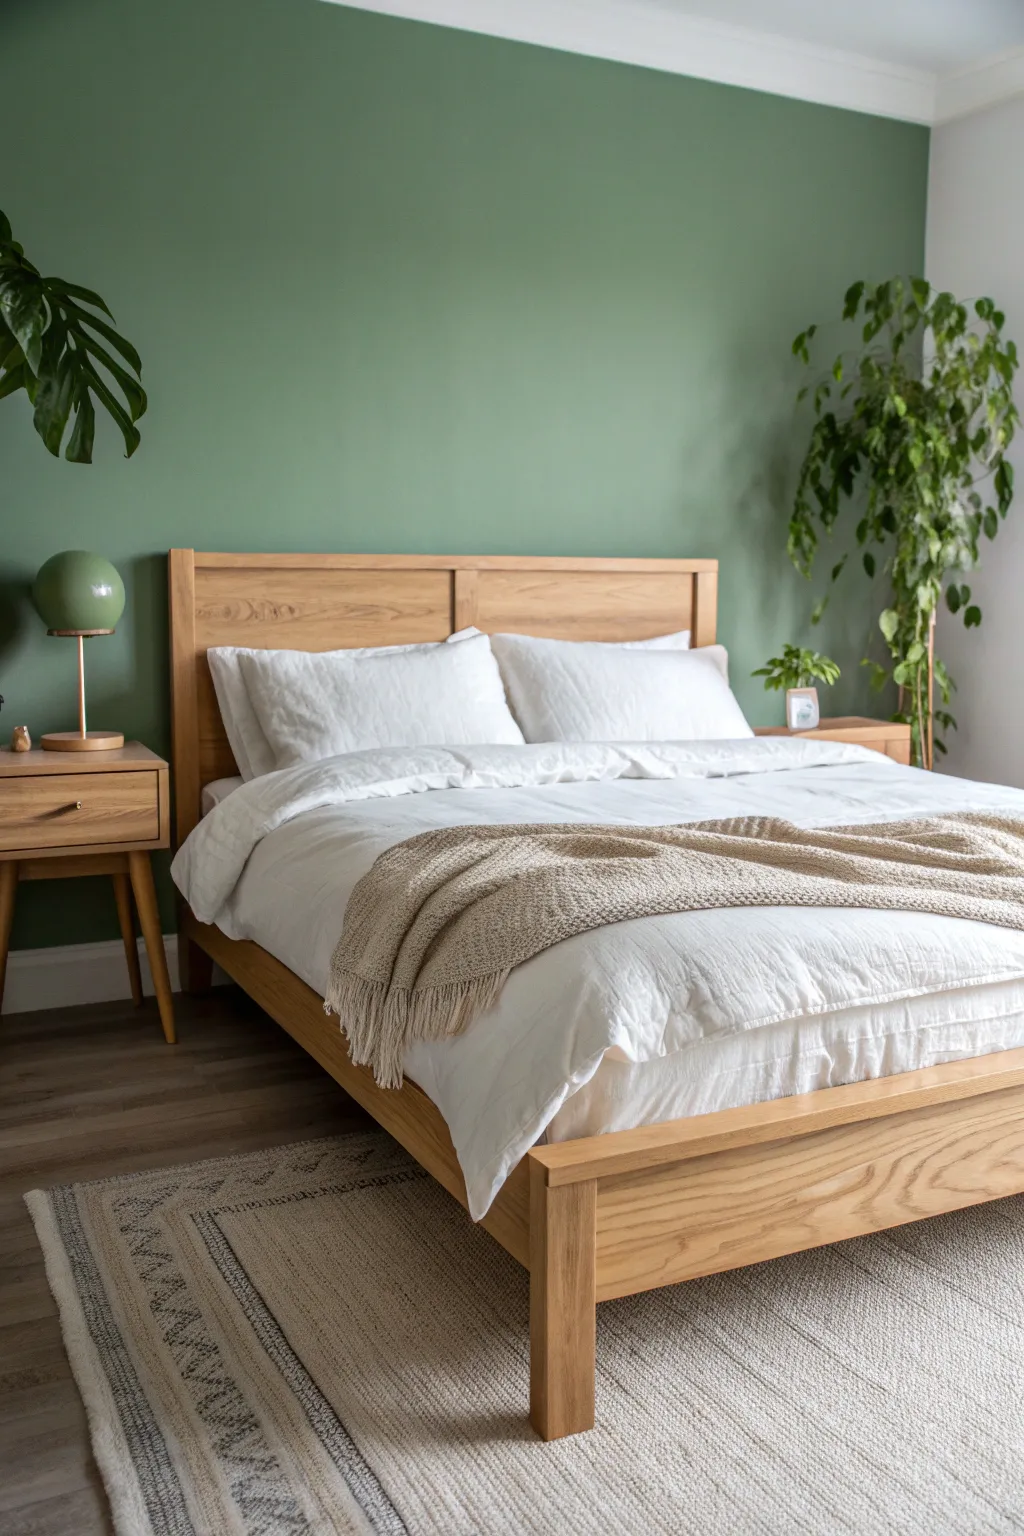
Classic Accent Wall Behind the Bed
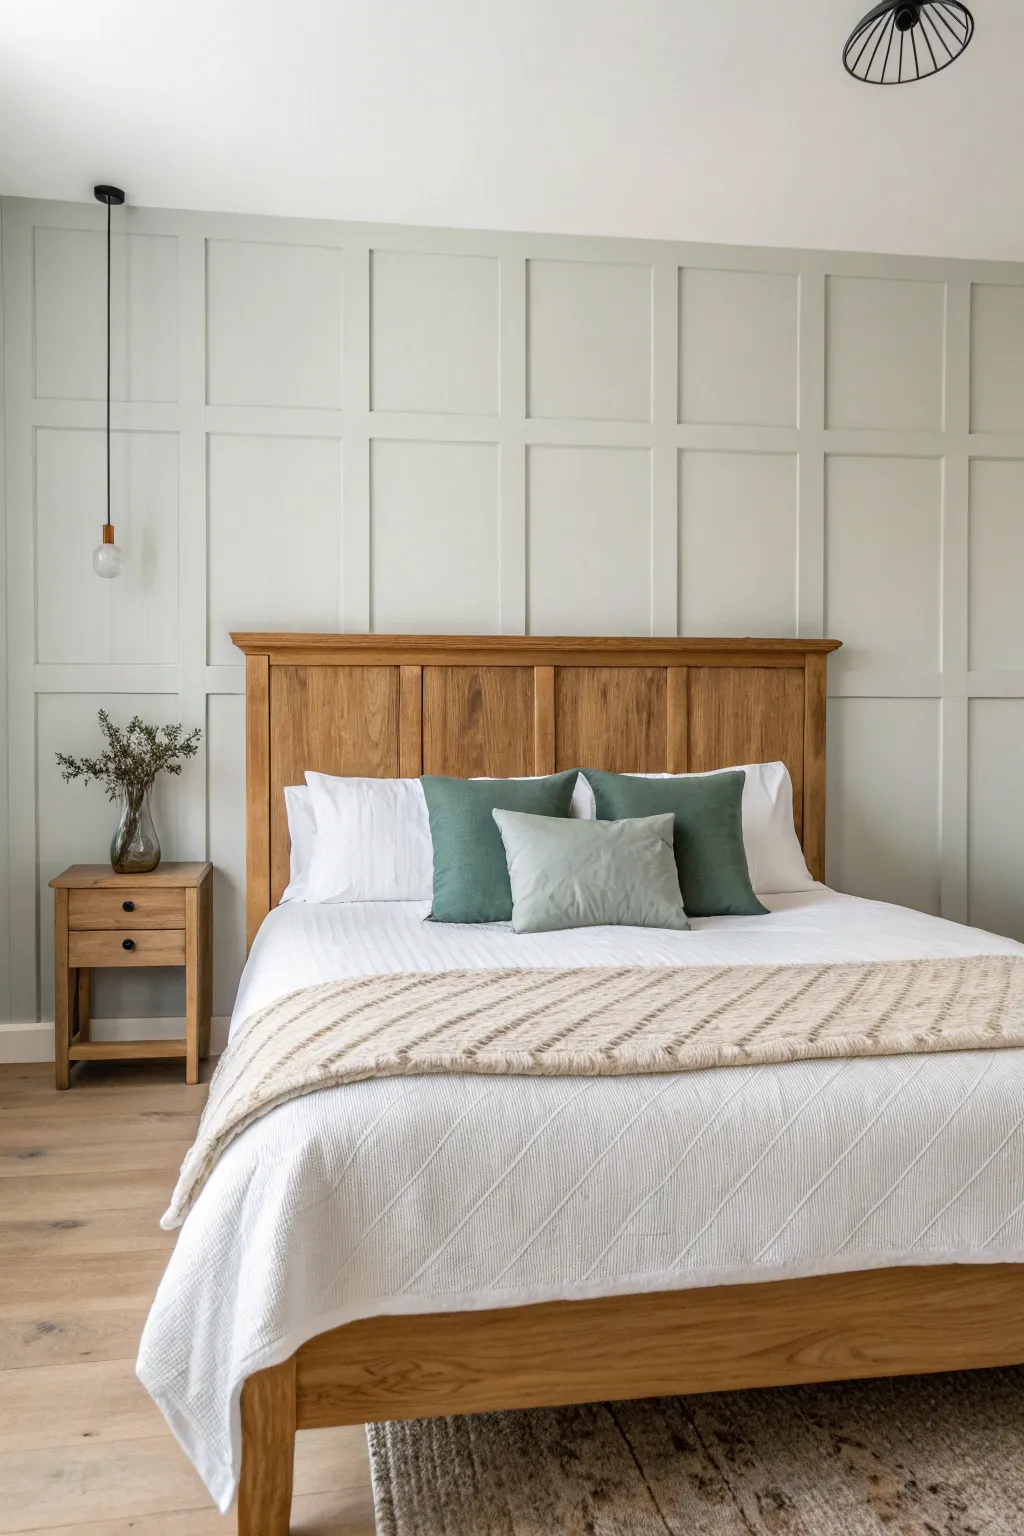
Transform a plain bedroom wall into a sophisticated focal point with a floor-to-ceiling grid paneling design. This architectural feature adds depth and character while maintaining a clean, modern aesthetic with a single, muted sage-green hue.
How-To Guide
Materials
- MDF or pine battens (2-3 inches wide)
- Construction adhesive (e.g., Liquid Nails)
- Wood filler
- Caulk and caulk gun
- Primer
- Interior paint (sage/grey-green, matte or eggshell finish)
- Laser level (or spirit level)
- Measuring tape
- Chop saw or hand saw
- Fine-grit sandpaper (120 and 220 grit)
- Paint roller (medium nap) and sash brush
- Brad nailer (or hammer and finish nails)
- Pencil
- Painter’s tape
Step 1: Planning and Layout
-
Measure the wall:
Start by measuring the exact height and width of your feature wall. Note locations of outlets or switches. -
Determine grid spacing:
Decide on the size of your squares. For a balanced look like the photo, aim for relatively large squares (approx 20-24 inches). Divide your total width by your desired number of columns to get exact spacing. -
Mark vertical lines:
Using a pencil and a long level (or laser level), mark the positions for your vertical battens on the wall. Ensure the spacing is even from left to right. -
Mark horizontal lines:
Mark the horizontal lines to create the grid. It’s often visually pleasing to start from the ceiling down to ensure full squares at the top.
Spacer Block Hack
Cut a scrap piece of wood to the exact height of your grid squares. Use this as a physical guide to place horizontal battens without measuring every time.
Step 2: Installation
-
Install the frame:
Attach the border pieces first—ceiling, floor (above skirting if keeping it), and side walls. Apply construction adhesive to the back and secure with brad nails. -
Place vertical battens:
Cut your vertical strips to size. adhere and nail them over your marked vertical lines. Use your level constantly to ensure they remain perfectly plumb. -
Measure horizontal inserts:
Measure the distance between each vertical batten individually. Walls are rarely perfectly straight, so cut each horizontal piece to fit its specific slot. -
Attach horizontal pieces:
Install the horizontal pieces using adhesive and nails. I find using a spacer block helps keep the spacing consistent without measuring every single time.
Visible Gaps?
If gaps appear between battens and the wall due to uneven drywall, don’t force the wood. Use extra caulk to fill the void, creating a smooth visual transition.
Step 3: Finishing and Painting
-
Fill nail holes:
Use wood filler to cover all nail holes and any joints where the horizontal pieces meet the vertical ones. Overfill slightly as it shrinks when drying. -
Caulk the edges:
Run a bead of caulk along every edge where the wood meets the wall to eliminate gaps. Smooth it with a wet finger or a caulk tool for a seamless look. -
Sand smooth:
Once the filler is dry, sand everything smooth with 120-grit paper. Wipe away dust with a tack cloth. -
Prime the wood:
If using raw MDF or wood, apply a coat of primer to the battens. This ensures the final paint sheen is uniform across both the wall and the wood. -
Paint edges:
Using a sash brush, paint the corners and edges of the grid first. This ‘cutting in’ step is tedious but crucial for good coverage. -
Roll the main areas:
Use a roller for the flat faces of the battens and the wall sections inside the squares. Apply two coats for a rich, solid finish.
Step 4: Styling
-
Replace hardware:
Reinstall any outlet covers or switch plates. If you painted over them, consider replacing them with new ones that complement the wall color. -
Add lighting (optional):
If your design included a pendant light like the photo, install the hook or fixture now, ensuring it hangs comfortably beside where the bed will go.
Step back and admire how this simple grid adds architectural depth and calm elegance to your sleeping space


Two-Tone Walls With a Dipped Line
Bring sophisticated character to your bedroom with this classic tongue-and-groove wainscoting project. The calming sage green lower half grounds the space while the crisp white upper wall keeps the room feeling airy and bright.
Step-by-Step Guide
Materials
- Tongue-and-groove MDF or wood cladding boards
- Horizontal wooden batten (for top rail)
- Small wooden trim (optional, for under rail)
- Construction adhesive (e.g., Gripfill or No More Nails)
- Decorator’s caulk and caulk gun
- Wood filler
- Sanding block (120 grit)
- Primer (if using bare wood)
- Sage green eggshell or satin wood paint
- Clean white emulsion paint
- Spirit level
- Tape measure
- Handsaw or jigsaw
- Hammer and panel pins (optional)
- Paintbrush (2-inch synthetic)
- Mini foam roller and tray
- Masking tape
Step 1: Preparation and Planning
-
Measure your height:
Decide on the height of your paneling. A good rule of thumb is roughly one-third to half the wall height; in the photo, it sits just below the window sill, creating a natural line that integrates the window into the design. -
Mark the level line:
Use a spirit level and pencil to draw a faint horizontal line around the room at your chosen height. This guide ensures your paneling stays perfectly level even if the floor is uneven. -
Remove skirting (optional):
For the cleanest finish, carefully pry off existing skirting boards. You can reinstall them over the paneling later, or simply sit the paneling on top of the existing skirting if it has a flat top edge. -
Cut the boards:
Measure and cut your tongue-and-groove boards to length. If your floor is uneven, you may need to scribe the bottom of the boards, but usually, the skirting board will hide small gaps at the floor.
Uneven Walls?
If your walls are very bowed, battens fixed horizontally to the wall first can provide a flat framework to attach your paneling to, rather than gluing directly to plaster.
Step 2: Installing the Paneling
-
Apply adhesive:
Apply a zigzag of construction adhesive to the back of your first board. I find it helpful to start in a corner to ensure a straight vertical reference point. -
Secure the first board:
Press the board firmly against the wall, checking it with a spirit level to ensure it is perfectly vertical. If you need extra hold while the glue sets, tap in a few panel pins through the tongue part of the board. -
Continue the run:
Apply adhesive to the next board, slot its groove into the previous board’s tongue, and press flat against the wall. Continue this process along the wall. -
Negotiate corners:
When you reach a corner, you will likely need to rip-cut the final board lengthwise to fit. Measure the remaining gap at the top, middle, and bottom to account for any wall wonkiness.
Two-Tone Tip
Paint the radiator to match! If a radiator sits on your paneled wall, paint it in the same green metal paint or eggshell to make it blend in seamlessly.
Step 3: Adding the Top Rail
-
Measure the rail:
Measure the total length of the paneled wall to cut your horizontal top rail batten. If your wall is longer than your timber, join two pieces with a diagonal scarf joint for a seamless look. -
Install the rail:
Apply adhesive to the back of the rail and sit it on top of the vertical paneling boards. Use panel pins to secure it into the wall studs if possible for a sturdy shelf-like finish. -
Add decorative trim:
If you want the exact look from the photo, glue a small piece of molding or trim directly underneath the top rail to add a subtle architectural detail.
Step 4: Finishing and Painting
-
Fill and sand:
Fill any nail holes or visible joints with wood filler. Once dry, sand the filler and any rough edges smooth with your 120-grit sanding block. -
Caulk the seams:
Run a thin bead of decorator’s caulk along the top of the rail where it meets the wall, and in internal corners. Smooth it with a wet finger for a seamless transition. -
Prime the wood:
If your MDF or wood is unprimed, apply a coat of wood primer. This seals the surface and ensures your topcoat color will be rich and true. -
Paint the upper wall:
Paint the wall above the rail in a crisp clean white first. Don’t worry if you get a little white paint on the top rail, as you will cover it later. -
Tape the edge:
Once the white paint is completely dry, apply low-tack masking tape to the wall strictly along the top edge of the wooden rail to protect your white paint. -
Cut in the color:
Using a 2-inch angled brush, ‘cut in’ your sage green paint along the edges, corners, and in between the grooves of the paneling. -
Roll the flat surfaces:
Use a mini foam roller to apply the green paint to the flat faces of the boards. This eliminates brush marks and gives a smooth, professional finish. -
Apply second coat:
Allow the first coat to dry according to the tin’s instructions, then apply a second coat for full opacity and depth of color. Remove the tape while the final coat is still slightly wet for a razor-sharp line.
Step back and admire how this simple architectural addition has completely transformed the calm and coziness of your room


Calm Blue Bedroom Color Story
Transform a plain bedroom into a serene retreat with this dual-texture feature wall project. By combining vertical beadboard wainscoting with a geometric board and batten grid above, all painted in a unified dusty blue, you create depth and architectural interest that feels both classic and contemporary.
Step-by-Step
Materials
- Dusty blue satin or eggshell interior paint (e.g., Farrow & Ball ‘Light Blue’ or similar)
- White semi-gloss trim paint
- MDF or wood lattice strips (approx. 2 inches wide)
- Beadboard paneling sheets or tongue-and-groove planks
- Chair rail molding
- Construction adhesive (e.g., Liquid Nails)
- Brad nailer and 1.5-inch brad nails
- Wood filler
- Paintable caulk and caulk gun
- Fine-grit sandpaper (220 grit) and sanding block
- Level (4-foot or laser level recommended)
- Tape measure and pencil
- Circular saw or miter saw
- Paint roller (microfiber nap)
- Angled sash brush (2-inch)
- Painter’s tape
- Drop cloths
Step 1: Setting the Lower Foundation
-
Prep the workspace:
Clear the room of furniture closest to the wall and lay down drop cloths to protect your flooring. Remove any existing baseboards on the feature wall using a pry bar, being careful not to damage the drywall if you plan to reuse them. -
Measure and cut beadboard:
Determine your desired wainscoting height—around 32 to 36 inches is standard. Measure the width of your wall. Cut your beadboard sheets to this height using a circular saw guided by a straight edge. -
Install the beadboard:
Apply construction adhesive to the back of the beadboard panels. Press them onto the lower portion of the wall, ensuring they are level. Secure them with your brad nailer, shooting nails into the studs where possible and along the edges. -
Add the chair rail:
Measure the full width of the wall and cut your chair rail molding to fit. Position it directly on top of the beadboard edge to cap it off. Use a level to ensure it is perfectly horizontal before nailing it into the wall studs.
Gap Troubleshooting
If your horizontal battens have small gaps where they meet vertical ones, don’t panic. Use wood filler for rigid gaps and caulk for flexible corners. Sand smooth before painting for an invisible joint.
Step 2: Creating the Upper Grid
-
Plan the grid layout:
Measure the wall space above the chair rail. Decide on the number of vertical sections you want; odd numbers often look best. Calculate the spacing so the ‘squares’ formed by horizontal battens will be roughly uniform. -
Install vertical battens:
Cut your MDF or wood strips to fit vertically between the chair rail and the ceiling (or crown molding). Apply adhesive to the back of each strip, position them according to your calculated spacing, check for plumb with your level, and nail them in place. -
Install horizontal battens:
Measure the horizontal distance between your vertical strips carefully, as walls aren’t always perfectly straight. Cut smaller pieces of molding to fit snugly between the verticals to create the grid effect shown. Level each piece and nail it securely.
Step 3: Finishing and Painting
-
Fill and sand holes:
Go over every nail hole with a dab of wood filler. I find it helpful to slightly overfill the hole, as the filler shrinks when drying. Once dry, sand the spots flush with the wood using 220-grit sandpaper. -
Caulk the seams:
Run a thin bead of paintable caulk along every edge where the wood meets the wall, where wood meets wood, and along the beadboard seams. Smooth the bead with a damp finger or a caulk tool for a seamless look. -
Tape and prime:
Apply painter’s tape to the adjacent walls and ceiling. If using raw wood or MDF, apply a coat of primer to the new woodwork to ensure the paint adheres evenly and doesn’t soak in too much. -
Cut in the edges:
Using your angled sash brush and the dusty blue paint, carefully paint all the corners, the detailed grooves of the beadboard, and along the edges of the battens where a roller can’t reach. -
Roll the first coat:
Use a microfiber roller to paint the flat wall sections and the faces of the battens. Work in W-shaped motions to distribute the paint evenly. Let this coat dry for at least 4 hours. -
Apply the second coat:
Assess the coverage. A second coat is usually necessary for that rich, velvety finish seen in the photo. Repeat the cutting-in and rolling process. Remove the painter’s tape while the paint is still slightly tacky to prevent peeling. -
Reinstall baseboards:
Once the wall is fully dry, reinstall your baseboards at the bottom of the beadboard. Touch up nail holes with a final dab of filler and paint.
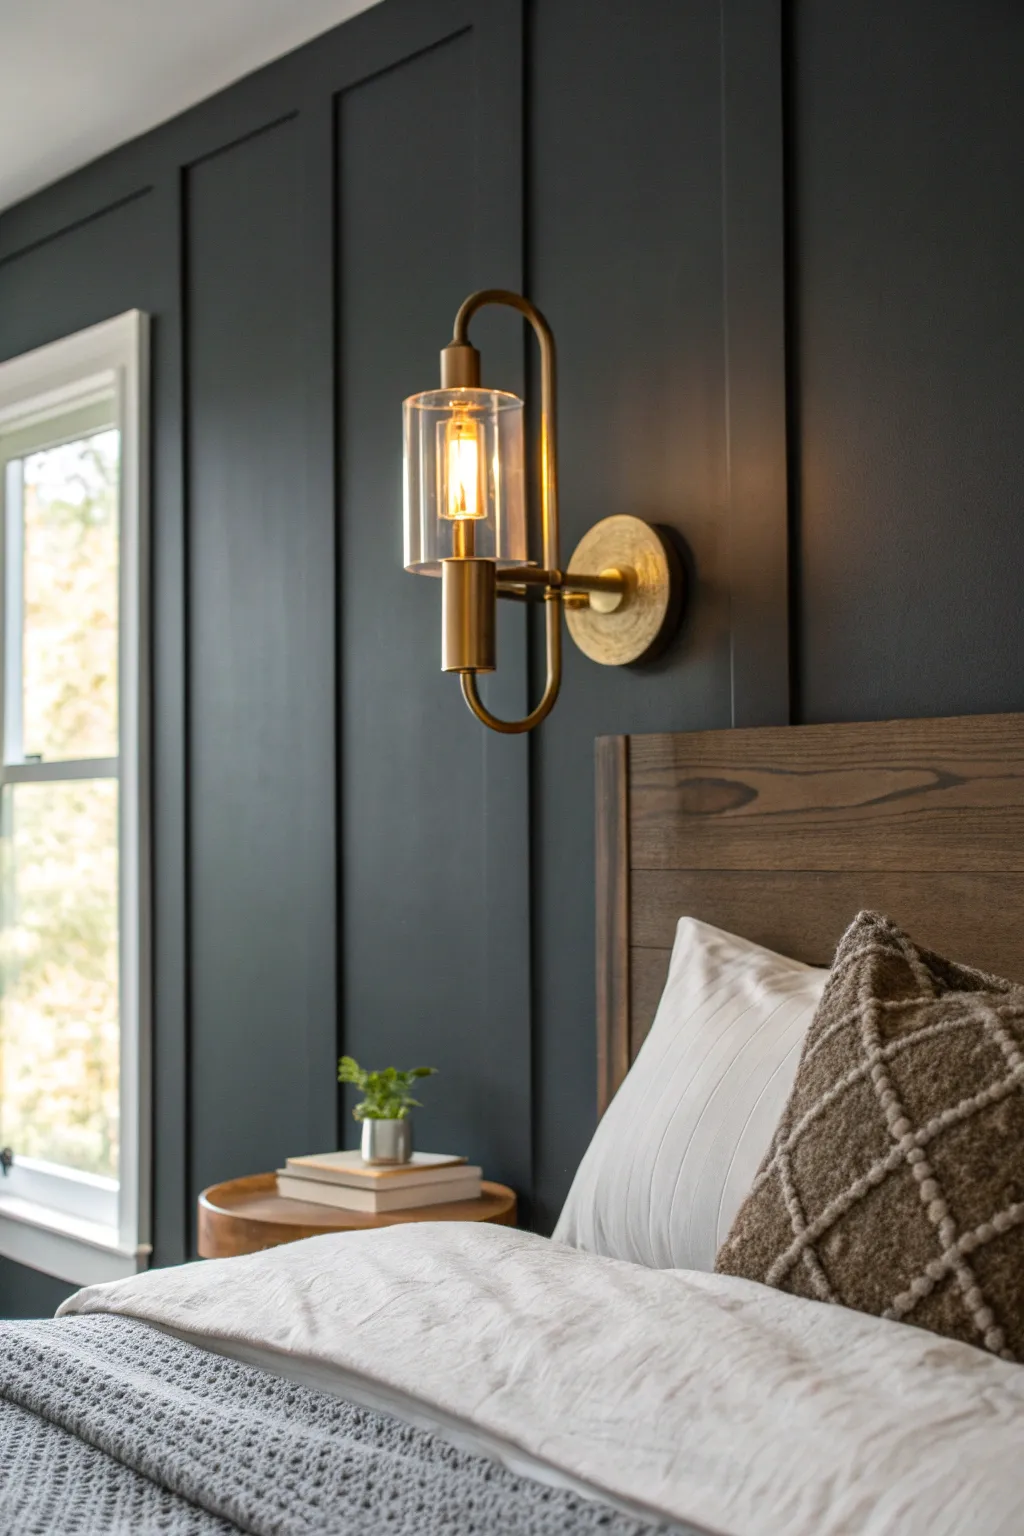
Level Up: Sconce Integration
Plan for lighting before you start. If adding a wall sconce like the one shown, run wiring behind the drywall first and cut a mounting block into your grid layout so the fixture sits flush.
Step back and admire the calm, sophisticated atmosphere your new feature wall brings to the room
BRUSH GUIDE
The Right Brush for Every Stroke
From clean lines to bold texture — master brush choice, stroke control, and essential techniques.
Explore the Full Guide
Botanical Green for a Restful Retreat
Transform your bedroom into a calming sanctuary with a simple yet impactful accent wall in a soft, botanical green. This project focuses on achieving a smooth, matte finish that pairs perfectly with natural wood tones and crisp white linens.
Step-by-Step Guide
Materials
- High-quality interior latex paint (Botanical/Sage Green, matte or eggshell finish)
- White ceiling paint (flat finish) if refreshing the trim
- Painter’s tape (1.5 or 2 inch width)
- Drop cloths or plastic sheeting
- Spackling paste and putty knife
- Sandpaper (120 and 220 grit) or sanding sponge
- Mild detergent or TSP substitute
- Angled sash brush (2.5 inch) for cutting in
- Paint roller frame and extension pole
- Microfiber roller covers (3/8 inch nap for smooth walls)
- Paint tray and liners
- Screwdriver (for removing outlet covers)
- Damp rags
Step 1: Preparation
-
Clear the space:
Begin by moving the bed and nightstands away from the wall you intend to paint. If possible, move smaller furniture out of the room entirely to give yourself ample working space. -
Protect surfaces:
Lay down drop cloths to cover the flooring completely. Secure the edges with tape if you are worried about them shifting under your feet while you work. -
Remove hardware:
Use your screwdriver to take off any electrical outlet covers or switch plates on the wall. Store the screws in a ziplock bag taped to the back of the plates so nothing gets lost. -
Inspect and repair:
Examine the wall closely for nail holes or dings. Fill these imperfections with a small amount of spackling paste, smoothing it out with a putty knife. -
Sand smooth:
Once the spackle is dry, sand the patched areas flush with the wall surface using fine-grit sandpaper. I like to run my hand over the spot to ensure I can’t feel any ridges. -
Clean the wall:
Wipe the entire wall down with a mild detergent solution or TSP substitute to remove dust, oils, and cobwebs. A clean surface ensures the best paint adhesion.
Uneven Coverage?
If the green looks patchy after drying, your roller might have been too dry. Ensure fully saturated strokes and always wait for the previous coat to fully cure before fixing.
Step 2: Taping and Cutting In
-
Tape edges:
Apply painter’s tape along the baseboards, ceiling line, and adjacent walls. Press the edge of the tape down firmly with a putty knife or your fingernail to prevent bleed-through. -
Mix the paint:
Open your can of botanical green paint and stir it thoroughly with a stick. Pour a small amount into a handheld cup or cut bucket for easier handling on the ladder. -
Cut in the perimeter:
Dip your angled brush about an inch into the paint. Carefully paint a 2-to-3-inch border along the ceiling line, corners, and baseboards where the roller won’t reach. -
Feather the edges:
As you paint the border, feather the wet edge out slightly toward the center of the wall. This prevents a hard ridge of paint from forming that might show through the rolled layer.
Level Up: Texture
For an organic feel, use a limewash or chalk-finish paint instead of standard latex. This adds subtle movement and depth that mimics natural stone or plaster surfaces.
Step 3: Rolling the Wall
-
Load the roller:
Pour paint into the tray. Dip your roller cover in and roll it back and forth on the ridges of the tray until it is evenly saturated but not dripping. -
Apply the first coat:
Start near one corner and roll the paint onto the wall in a ‘W’ or ‘V’ pattern. Fill in the shape without lifting the roller, working in sections about 3 feet wide. -
Maintain a wet edge:
Move to the next section immediately, overlapping slighting with the wet edge of the previous section. This blending technique helps avoid lap marks. -
Wait for drying:
Allow the first coat to dry completely according to the manufacturer’s instructions. This usually takes 2 to 4 hours. Don’t rush this, as painting over tacky paint can pull it up. -
Apply second coat:
Check for any thin spots. Apply a second coat using the same technique: cutting in the edges first, then rolling the main surface for a rich, opaque color. -
Remove tape:
remove the painter’s tape while the paint is still slightly damp to the touch—about an hour after the final coat. Pull the tape slowly at a 45-degree angle away from the painted area. -
Final touches:
Once fully cured, replace the outlet covers and move your furniture back into place. Style with light wood tones and plants to complete the botanical look.
Enjoy the peaceful atmosphere your new accent wall brings to the room
Warm Taupe With Rosy Undertones
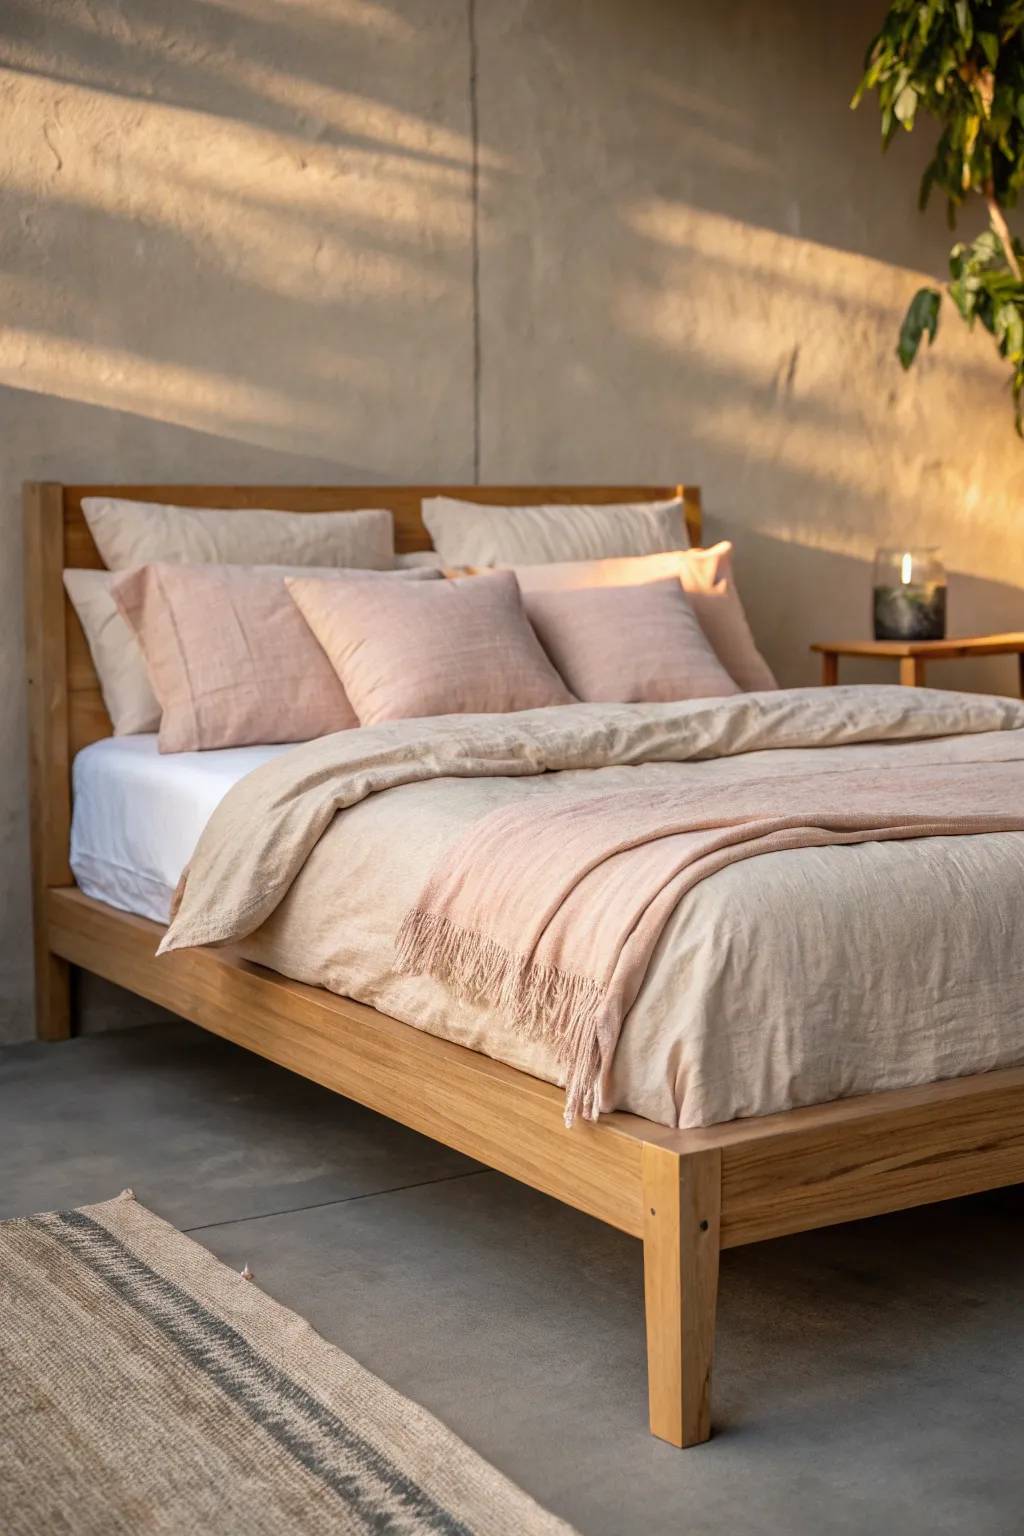
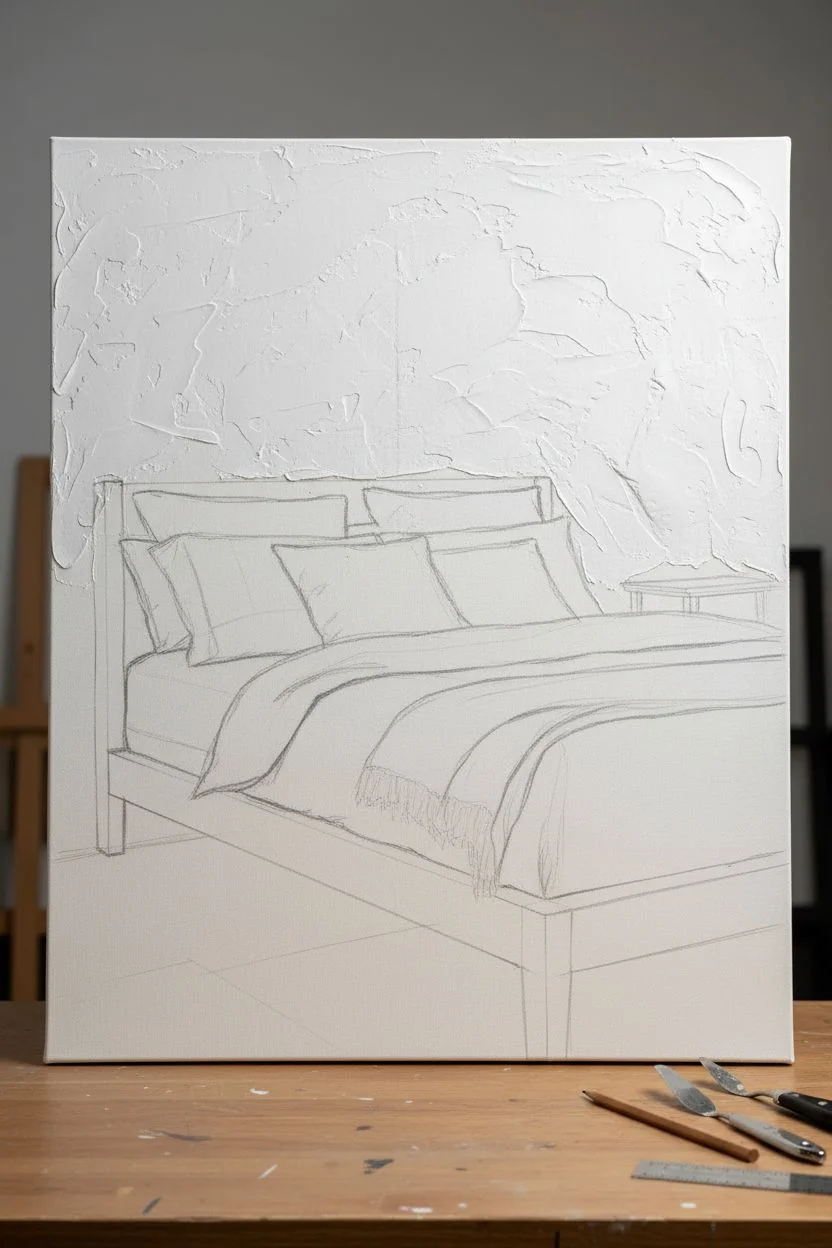
Capture the serene warmth of a sunlit bedroom with this textured acrylic painting project. You will focus on recreating the interplay of soft shadows and rosy fabrics against a plastered taupe wall.
Step-by-Step Tutorial
Materials
- Canvas (16×20 or similar size)
- Acrylic paints (Titanium White, Burnt Umber, Yellow Ochre, Alizarin Crimson, Raw Sienna, Black)
- Modeling paste or texture gel
- Various flat brushes (sizes 4, 8, 12)
- Small round detail brush (size 2)
- Palette knife
- Water cup and paper towels
- Pencil for sketching
- Ruler
Step 1: Planning and Texture
-
Sketch the layout:
Begin by lightly sketching the main shapes using your pencil and ruler. Draw the horizontal line of the bed frame about a third of the way up the canvas and add the vertical headboard lines to establish the perspective. -
Outline the soft elements:
Sketch the fluffy shapes of the pillows and the draped duvet. Keep these lines loose and organic to contrast with the structured wooden frame. -
Add wall texture:
To mimic the rough, plastered look of the wall in the photo, apply a thin, uneven layer of modeling paste to the wall area using your palette knife. -
Let it cure:
Allow the texture paste to dry completely before painting. This usually takes a few hours, but it creates that crucial depth for the light to catch later.
Too Much Pink?
If your taupe wall looks too pink, add a tiny amount of yellow ochre or sap green to neutralize the red tones and bring it back to a warm neutral.
Step 2: The Wall and Lighting
-
Mix the base wall color:
Create the signature warm taupe by mixing Titanium White, a touch of Burnt Umber, key amounts of Yellow Ochre, and a tiny dot of Alizarin Crimson to give it that rosy undertone. -
Paint the wall background:
Cover the entire wall area with your taupe mix. Don’t worry about being perfectly smooth; let the brushstrokes interact with the texture paste you applied earlier. -
Create the shadow gradients:
Mix a slightly darker version of your wall color by adding more Burnt Umber. Glaze the upper right corner and the area behind the plant to suggest depth and dimness. -
Paint the sunbeams:
Mix Titanium White with a hint of Yellow Ochre. Using a dry brush technique, drag this lighter color diagonally across the wall to simulate the strong sunlight filtering through blinds.
Soft Fabic Tip
To make the linen bedding look extra soft, blend your highlight and shadow colors while the paint is still wet on the canvas (wet-on-wet technique).
Step 3: The Bed and Linens
-
Paint the wooden frame:
Mix Raw Sienna and Yellow Ochre for the light wood tone. Paint the headboard and bed frame using a flat brush, following the grain of the wood. -
Deepen the wood shadows:
Add a little Burnt Umber to your wood mix and paint the shadowed side of the legs and the area under the mattress to ground the furniture. -
Base coat the bedding:
For the sheets and duvet, mix Titanium White with a very small amount of Burnt Umber for a creamy off-white tone. Paint the main bedding shapes. -
Mix the pillow pinks:
Creating the dusty rose color is my favorite part; mix Titanium White, Alizarin Crimson, and a tiny bit of Burnt Umber to desaturate the pink. Paint the accent pillows. -
Add fabric folds:
Using a slightly darker shade of your bedding colors, paint soft, curved lines to represent the wrinkles and folds in the linen. Soften these edges with a damp brush so they aren’t too harsh. -
Detail the throw blanket:
Use the pink mixture again for the throw blanket at the foot of the bed. Use small, vertical strokes at the edge to simulate the fringe texture.
Step 4: Finishing Touches
-
Paint the floor:
Mix a cool grey using Black and White. Paint the floor area, ensuring horizontal brushstrokes to create a flat surface perspective. -
Add the rug:
Paint the rug using a beige tone (White + tiny bit of Raw Sienna). While wet, drag a little grey through it to suggest the woven texture shown in the reference. -
Leafy green accents:
In the top corner, use Burnt Umber and Yellow Ochre (optionally a bit of premade Sap Green if you have it) to dab in the leaves of the hanging plant. -
Final highlights:
Take pure Titanium White on your smallest brush and add the brightest highlights where the sun hits the top of the pillows and the edge of the bed frame.
Step back and admire the cozy atmosphere you’ve captured on canvas

PENCIL GUIDE
Understanding Pencil Grades from H to B
From first sketch to finished drawing — learn pencil grades, line control, and shading techniques.
Explore the Full Guide
Moody Charcoal Cocoon
Transform a plain bedroom into a cozy, sophisticated retreat with this DIY board and batten feature wall painted in a deep, moody charcoal. The architectural detail adds depth and shadows, turning a simple coat of paint into a high-end design statement.
Step-by-Step Guide
Materials
- 1×3 inch MDF or primed pine boards
- 1×4 inch MDF or primed pine boards (for top rail)
- Construction adhesive (e.g., Liquid Nails)
- Brad nailer and 2-inch brad nails
- Wood filler or spackling paste
- Paintable caulk and caulk gun
- Fine-grit sandpaper (220 grit) or sanding block
- High-quality painter’s tape
- Primer (tinted gray recommended)
- Interior paint in ‘Charcoal’ or ‘Iron Ore’ (satin or eggshell finish)
- Paint roller with 3/8-inch nap microfiber cover
- 2-inch angled sash brush
- Level (4-foot or longer recommended)
- Measuring tape
- Stud finder
Step 1: Planning and Preparation
-
Measure the wall:
Begin by measuring the full width and height of your feature wall. Sketch a quick diagram to determine your spacing. -
Calculate batten spacing:
Decide on the distance between your vertical battens; typically, 16 to 24 inches looks best. Adjust the spacing so that the gaps on the far left and far right ends are equal, ensuring a symmetrical look. -
Clear and prep the surface:
Remove any existing baseboards if you plan to replace them with a matching board, or simply plan to rest your battens on top of the existing baseboard. Lightly sand the wall if it has a glossy finish to help the new paint adhere.
Uneven Wall Woes?
If your wall bows and causes gaps behind the battens, don’t force the wood. Nail it securely where you can, and use extra caulk to fill the gaps behind the board for a seamless look.
Step 2: Installing the Woodwork
-
Mark the studs:
Use a stud finder to locate and mark the studs along the wall. While you can glue battens anywhere, nailing into studs provides the most secure hold for horizontal rails. -
Install the top horizontal rail:
Install a 1×4 board horizontally near the ceiling or at your desired height if doing a partial wall. Use a level to ensure it is perfectly straight, then secure it with construction adhesive and brad nails. -
Install the vertical battens:
Cut your 1×3 boards to fit vertically between the baseboard and the top rail. Apply construction adhesive to the back of the first board. -
Level and secure:
Place the first vertical batten on your mark. Use your long level to ensure it is perfectly plumb before nailing it into place. Repeat this process for all vertical boards. -
Check spacing frequently:
As you work across the wall, measure the distance between boards periodically to ensure your spacing hasn’t drifted.
Liquid Gold
Add warmth to the dark wall by installing brass sconces directly on the battens. Drill your wire hole before attaching the batten to the wall to hide the wiring easily.
Step 3: Finishing and Seams
-
Fill nail holes:
Apply a small amount of wood filler to every nail hole. Overfill slightly, as the filler shrinks when drying. -
Sand smooth:
Once the filler is dry, sand it flush with the wood surface using 220-grit sandpaper. Run your hand over it to ensure it feels invisible. -
Caulk the seams:
Run a bead of paintable caulk along every edge where the wood meets the wall, and where boards meet each other. This step is crucial for making the wall look like one seamless unit rather than wood stuck to drywall. -
Smooth the caulk:
I prefer to use a damp finger or a lint-free rag to smooth the caulk bead immediately after applying it, ensuring there are no ridges.
Step 4: Painting the Mood
-
Prime the wall:
Apply a coat of primer over the wood and the drywall. If you are using a very dark charcoal color, ask the paint store to tint your primer gray to minimize the number of topcoats needed. -
Cut in edges:
Using your angled sash brush and the dark charcoal paint, cut in around the ceiling, baseboards, and corners. Also brush paint into the corners of the battens where the roller might miss. -
Roll the first coat:
Use a roller to paint the flat wall sections and the faces of the battens. Work in ‘W’ shapes to distribute paint evenly. -
Check for drips:
Inspect the vertical boards for drips that may pool on the sides or near the caulk lines and smooth them out with your brush before they dry. -
Apply second coat:
After the manufacturer’s recommended drying time, apply a second coat for full, rich coverage. Dark colors often need this second layer to achieve true depth without streakiness.
Step back and admire how the dark color and structured lines create a sophisticated sanctuary perfect for deep rest
Deep Navy for a Night-Sky Feel
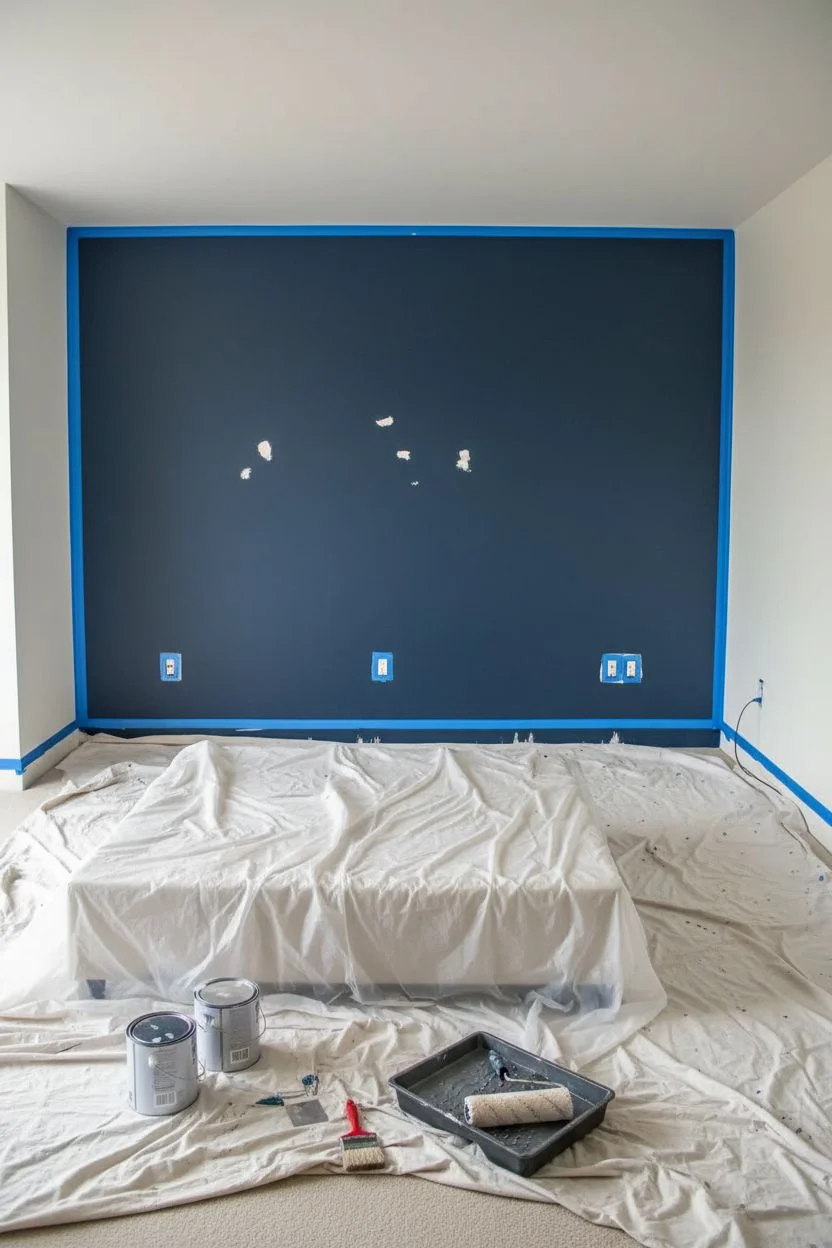
Transform your bedroom into a serene sanctuary with this bold, deep navy accent wall that mimics the calming depth of a night sky. This high-contrast design pairs perfectly with neutral furnishings, creating a sophisticated backdrop that feels both cozy and luxurious.
How-To Guide
Materials
- Deep navy interior latex paint (matte or eggshell finish)
- White ceiling paint (flat finish) if needed for touch-ups
- Painter’s tape (high-quality)
- Drop cloths or plastic sheeting
- Screwdriver (for removing outlet covers)
- Spackle and putty knife
- Sandpaper (fine grit)
- Microfiber cloth
- Angled sash brush (2.5 inch)
- Paint roller frame and extension pole
- Microfiber roller covers (3/8 inch nap)
- Paint tray and liners
- Ladder
Step 1: Preparation
-
Clear the area:
Begin by moving the bed, nightstands, and any other furniture away from the wall you intend to paint. If possible, move them to the center of the room or out completely to give yourself ample workspace. -
Remove hardware:
Using a screwdriver, take off any outlet covers, switch plates, and remove the existing sconces if they are hardwired. If you have wall art hooks or nails, pull those out now. -
Address imperfections:
Inspect the wall for nail holes or dings. Fill these with a small amount of spackle using your putty knife. Let it dry completely. -
Sand and clean:
Once the spackle is dry, lightly sand those spots until they are flush with the wall. Follow up by wiping down the entire wall with a damp microfiber cloth to remove dust and dirt, ensuring a clean surface for adhesion. -
Protect the perimeter:
Apply painter’s tape along the baseboards, the ceiling line, and the adjacent walls. Press the tape edge down firmly with your finger or a putty knife to prevent paint bleed. -
Cover the floor:
Lay down drop cloths to protect your carpet or flooring. Ensure they are pushed right up against the baseboards.
Step 2: Cutting In
-
Mix the paint:
Open your can of deep navy paint and stir it thoroughly. Pour a small amount into a manageable container or the paint tray. -
Start at the top:
Dip your angled sash brush about halfway into the paint. Start cutting in along the ceiling line. Move confidently but carefully, keeping a wet edge. -
Work the corners:
Paint the corners where the accent wall meets the adjacent walls. I find it helpful to feather the paint slightly outward so the roller can blend it easily later. -
Detail baseboards and outlets:
Continue cutting in around the baseboards and carefully around any outlet sockets. Creating a frame of paint around the wall’s perimeter is the goal here.
Patchy Darkness?
Deep colors like navy have less titanium dioxide (white pigment), making coverage harder. If it still looks uneven after two coats, a third thin coat is often standard for dark hues.
Step 3: Rolling the Wall
-
Load the roller:
Pour more paint into the tray. Load your roller cover fully, rolling it back and forth on the ramp until the nap is saturated but not dripping. -
Apply the first coat:
Start rolling from the top corner, working in W or M patterns. Use the extension pole to reach the top without constantly moving the ladder. -
Maintain a wet edge:
Work across the wall in 3-foot sections. Overlap your previous strokes while the paint is still wet to avoid roller marks. -
Let it dry:
Allow the first coat to dry according to the manufacturer’s instructions. Dark colors often look patchy after one coat, so don’t panic. -
Apply second coat:
Repeat the rolling process for a second coat to achieve that rich, opaque navy finish. This step is crucial for deep colors to ensure true depth. -
Remove tape:
While the second coat is still slightly tacky (not fully cured), carefully peel off the painter’s tape at a 45-degree angle to ensure a crisp line.
Pro Tip: Use Tinted Primer
Ask the paint store to mix a grey-tinted primer for you. Using a grey base coat instead of white helps deep blue topcoats cover much faster and achieve a truer color with fewer layers.
Step 4: Finishing and Styling
-
Reinstall hardware:
Once the paint is fully dry (usually 24 hours for full cure), screw the outlet covers back on and reinstall your sconces. -
Position the bed:
Move your bed back into position against the new navy backdrop. Center it perfectly between your lighting fixtures. -
Style the bedding:
Layer your bed with crisp white sheets and a textural beige throw blanket to contrast beautifully against the dark wall, just like the inspiration image.
Step back and admire how this single wall change completely redefines the atmosphere of your room


Paint the Ceiling as the Fifth Wall
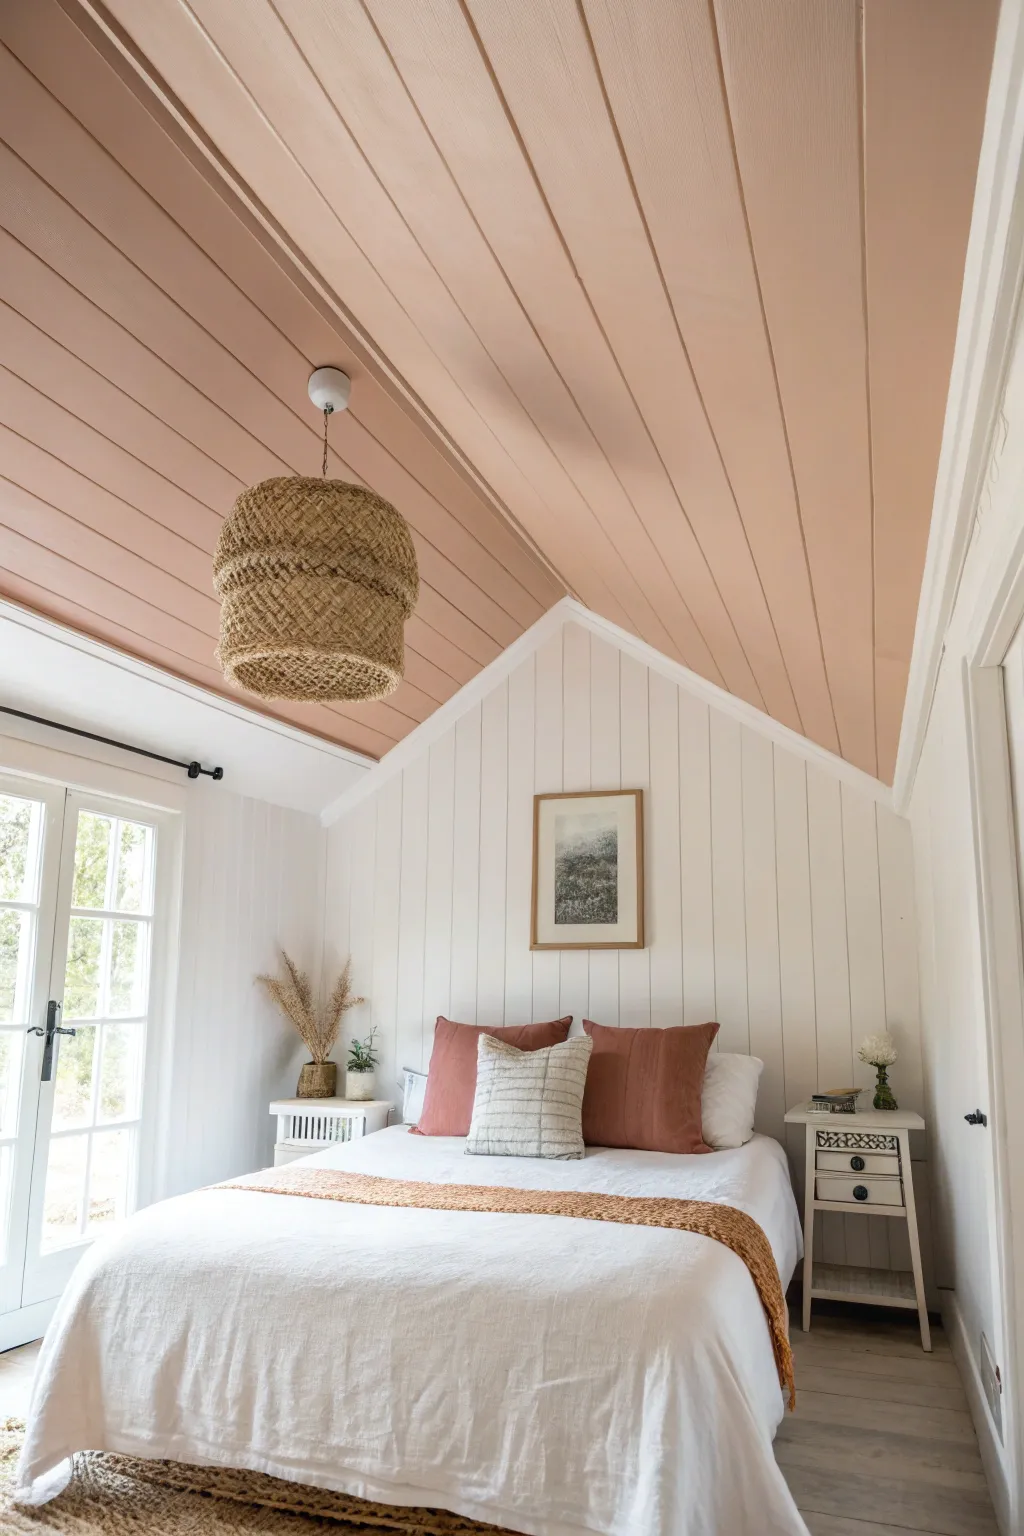
Transform a standard bedroom by turning your ceiling into a focal point with a warm, dusty pink hue against crisp white walls. This refreshing take on the ‘fifth wall’ concept adds height and coziness to vaulted spaces without overwhelming the room.
Step-by-Step Guide
Materials
- High-quality interior latex paint (Dusty Pink/Peach shade, creating a matte or eggshell finish)
- White semi-gloss or satin trim paint
- Angled sash brush (2.5 inch)
- Roller frame and extension pole
- Medium nap roller covers (3/8 inch or 1/2 inch for paneling grooves)
- Painter’s tape (delicate surface)
- Drop cloths
- Ladder
- Sanding sponge (fine grit)
- Mild detergent or TSP substitute
- Caulk and caulk gun (optional, for gaps)
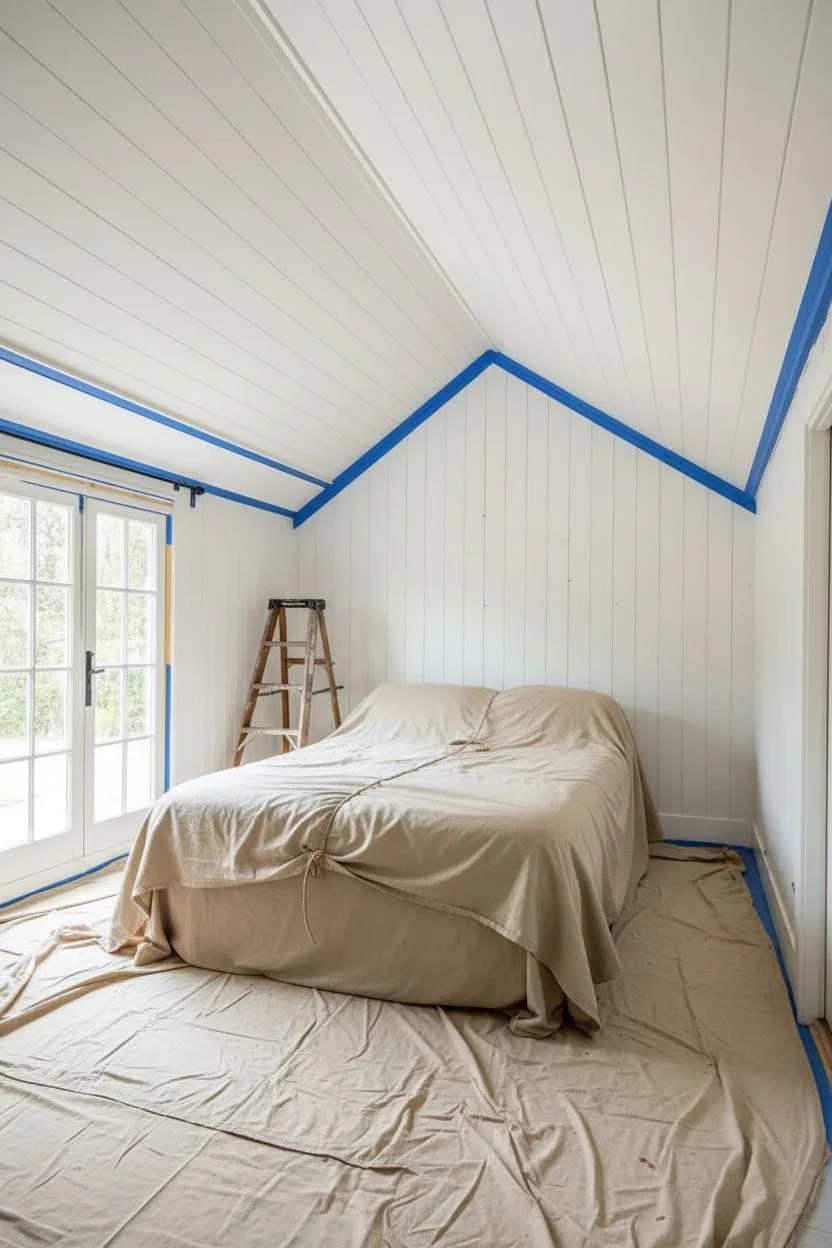
Step 1: Preparation
-
Clear the space:
Remove all furniture from the room, or move large items like the bed to the center and cover completely with drop cloths to protect from overhead drips. -
Clean the surfaces:
Wipe down the ceiling planks and wall paneling with a mild detergent or TSP substitute to remove dust and oils, ensuring better paint adhesion. -
Address imperfections:
Inspect the shiplap for any large gaps or nail holes. Fill holes with wood filler and run a bead of caulk along any large separation lines if you want a seamless look. -
Sand lightly:
Once dry, use a fine-grit sanding sponge to lightly scuff the existing finish on both the ceiling and walls. This is crucial for durability. -
Tape carefully:
Apply painter’s tape along the tops of the walls where they meet the ceiling angle. I like to press the tape edge firmly with a putty knife to prevent bleed-under.
Step 2: Painting the Ceiling
-
Cut in the edges:
Using your angled sash brush and the pink paint, carefully cut in along the perimeter of the ceiling and around any light fixture bases. -
Brush the grooves:
Before rolling, run your brush inside the deep V-grooves of the ceiling paneling. A roller often misses these crevices, so pre-filling them ensures solid coverage. -
Roll the first coat:
Attach the roller to an extension pole. Load it with pink paint and roll in the direction of the planks, smoothing out the brush marks you just made in the grooves. -
Let it dry:
Allow the first coat to dry completely according to the manufacturer’s instructions, usually 2-4 hours. -
Apply the second coat:
Repeat the cutting and rolling process for a rich, true color. The second coat provides that finished, professional depth.
Groove Master
If the panel grooves are very deep, use a thick brush to shove paint into them first, then immediately roll over the flat surface to level the texture.
Step 3: Refreshing the Walls
-
Tape the ceiling line:
Once the pink ceiling is fully cured (give it at least 24 hours), apply delicate surface tape to the pink edge to protect your new work. -
Cut in the white:
Use the white paint to cut in the corners of the walls, around windows, and along the baseboards. -
Paint the wall panels:
Roll the vertical wall paneling with the white paint. Focus on long, vertical strokes to match the wood grain. -
Check groove coverage:
Just like the ceiling, double-check that the white paint has fully coated the vertical grooves; use a brush for touch-ups if the roller bridged over them. -
Final coat:
Apply a second coat of white for a crisp, clean finish that contrasts beautifully with the warm ceiling.
Material Match
Enhance the natural vibe by swapping plastic switch plates for wooden ones painted to match the white walls, making them disappear.
Step 4: Finishing Up
-
Remove tape:
Pull off the painter’s tape while the paint is still slightly tacky to ensure a sharp, clean line between the pink and white. -
Reinstall fixtures:
Once everything is dry, re-hang your pendant light fixture or adjust the canopy to sit flush against the newly painted ceiling. -
Style the room:
Bring furniture back in, choosing bedding and pillows in terracotta or rust tones to echo the ceiling color without matching it perfectly.
Step back and enjoy the warm glow your new ceiling casts over the entire room
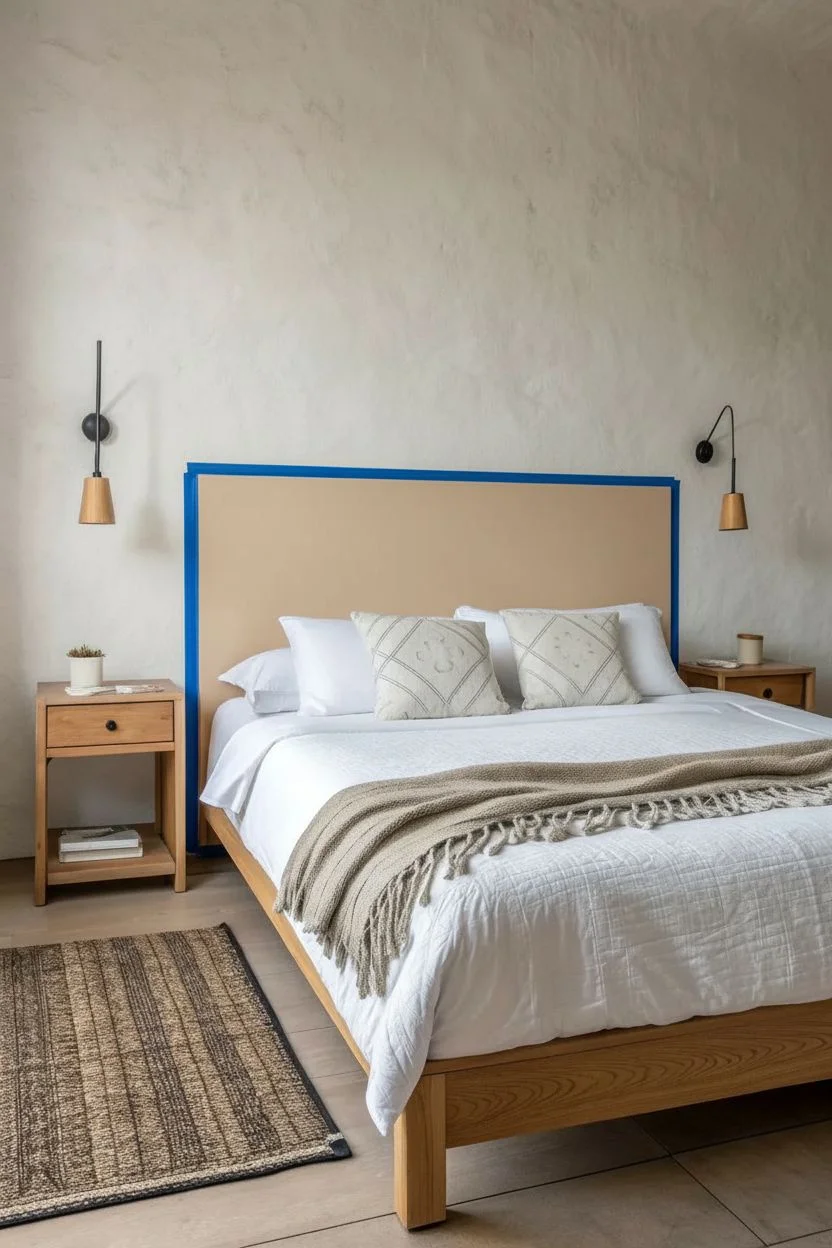
Painted Headboard Arch
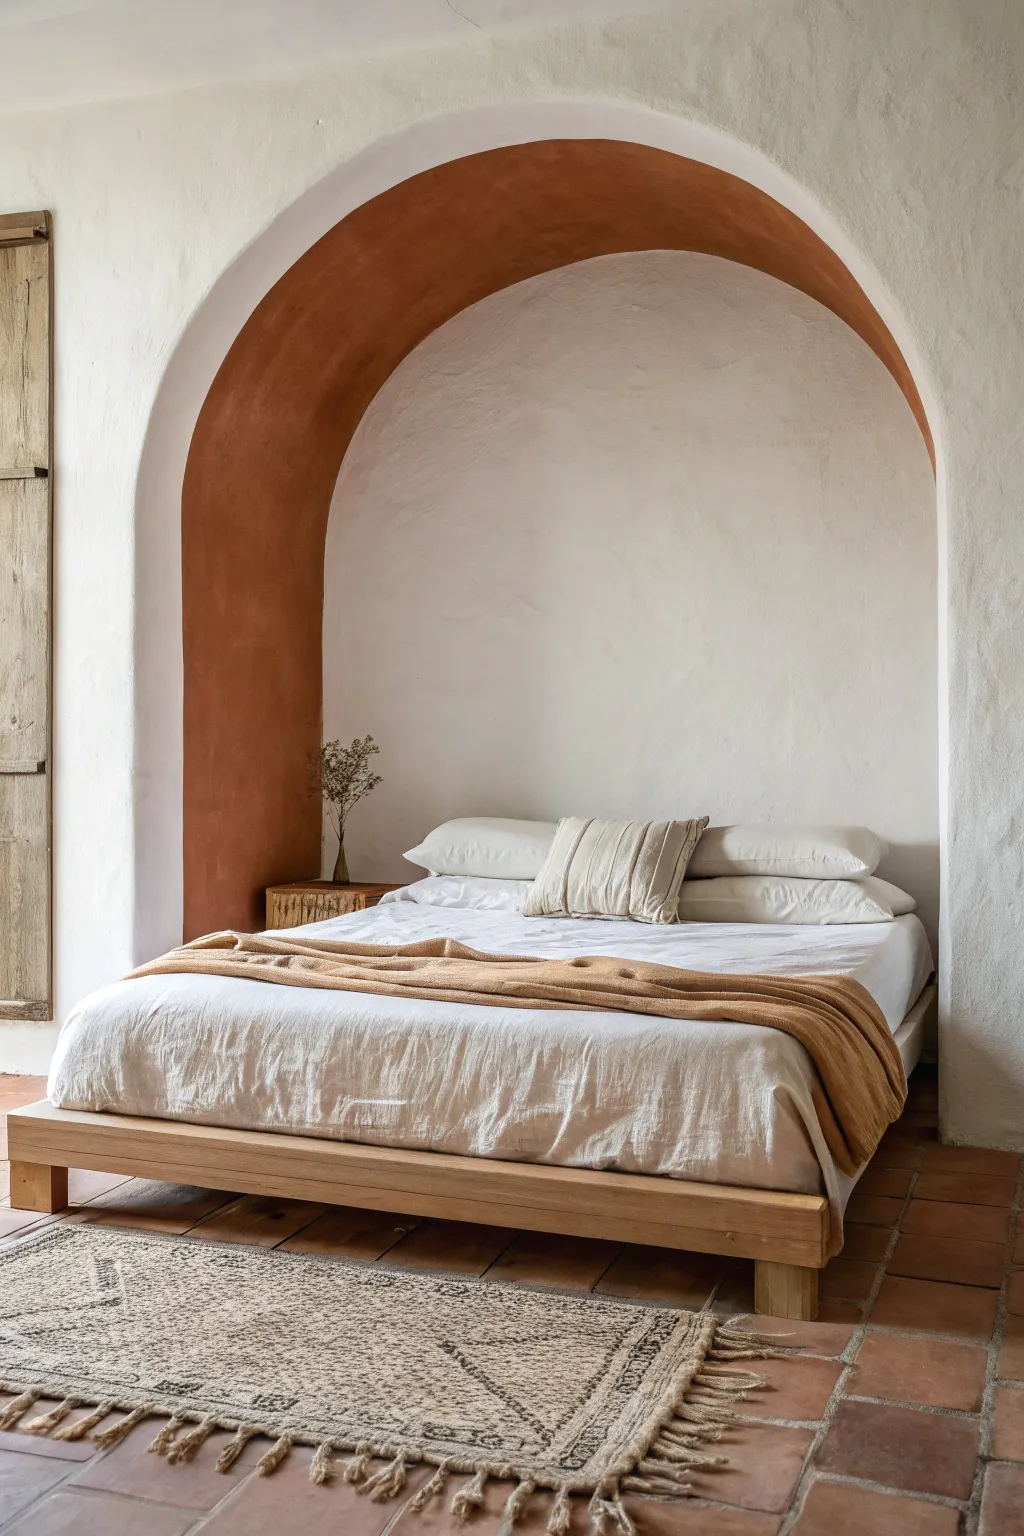
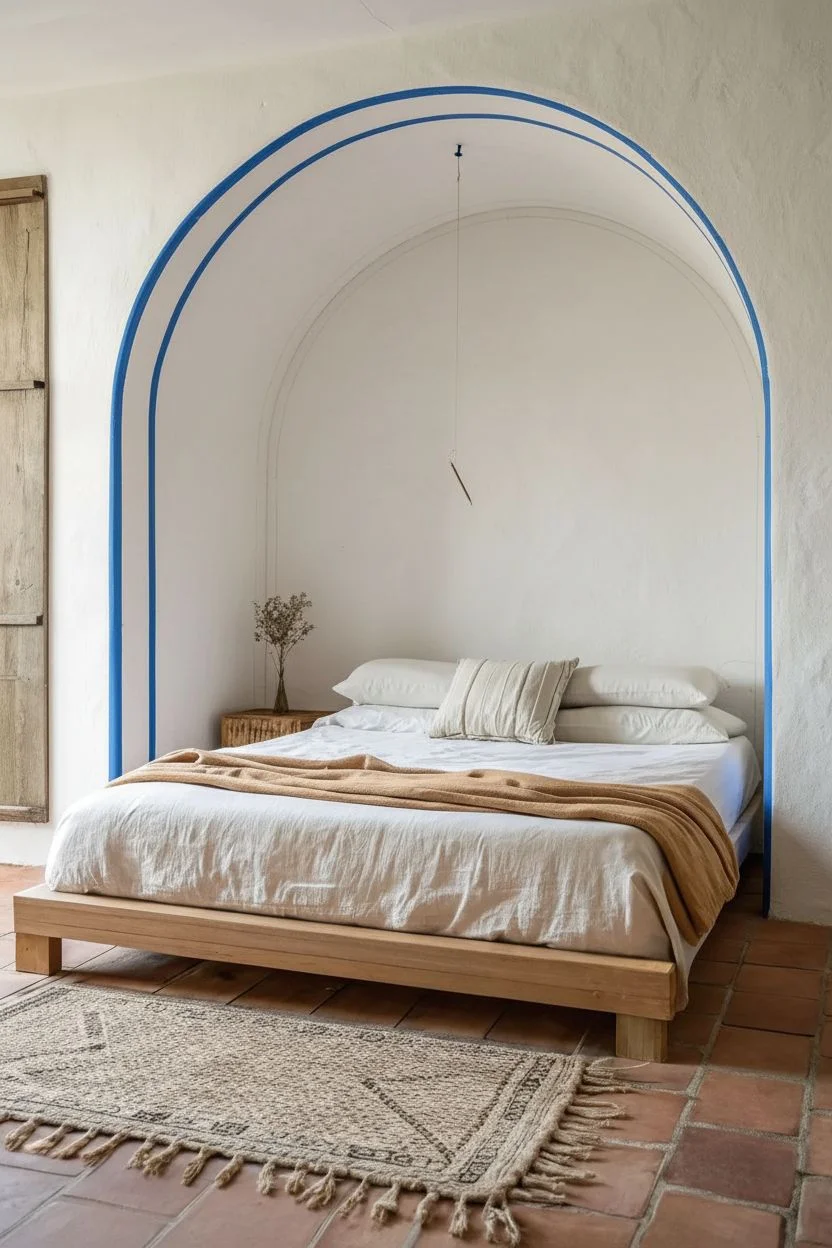
Transform a plain bedroom alcove or flat wall into a stunning architectural feature with this painted arch technique. The rich, earthy terracotta tone creates immediate warmth and frames your bed with Mediterranean elegance.
Step-by-Step Tutorial
Materials
- Terracotta or rust-colored interior wall paint (matte finish)
- White interior wall paint (to match existing walls)
- Pencil
- Tape measure
- String and push pin (for drawing the arch)
- Angled sash brush (2-2.5 inch)
- Small roller with extension pole
- Painter’s tape
- Drop cloth
- Sanding sponge (fine grit)
- Damp cloth
Step 1: Preparation & Mapping
-
Clean the canvas:
Start by moving furniture away from the wall. If you have an existing niche like the photo, wipe down the interior surfaces with a damp cloth to remove dust. If working on a flat wall to create a trompe l’oeil effect, clean the entire area thoroughly. -
Light sanding:
Run a fine-grit sanding sponge over the area you intend to paint. This scuffs the surface slightly, helping the new paint adhere better. Wipe away any dust afterward. -
Define the arch width:
Measure the width of your bed or intended area. For a true niche, measure the opening. Mark the center point at the very top where the peak of the arch will be, and then mark the straight vertical sides. -
Draw the curve:
If you are painting a flat wall to look like an alcove, tie a string to a pencil. Pin the other end of the string at the center point of your desired arch width. Pull the string taut and trace a semi-circle to create a perfect arch top. -
Tape the boundaries:
Currently, the example shows the color painted on the *interior* face of the arch. Apply painter’s tape carefully along the outer front edge of the wall where the niche meets the main room. Press the edges down firmly to prevent bleed-through.
Step 2: Painting the Color Block
-
Cut in the edges:
Open your terracotta paint. Dip the angled sash brush and carefully paint along the taped edge, creating a crisp line. If you are painting a flat wall arch, use a steady hand to cut in the curved line you drew. -
Paint the corners:
Use your brush to get into the interior corners where the arch curve meets the back wall. Apply paint generously but smooth it out to avoid drips. -
Roll the main area:
Switch to your small roller. Load it with terracotta paint and fill in the rest of the arch’s interior surface—the curved ceiling and the side walls. Work in smooth, overlapping W-motions. -
Let it dry:
Allow the first coat to dry completely, usually about 2-4 hours. It might look patchy at this stage, but don’t worry. -
Apply second coat:
Repeat the cutting-in and rolling process for a second coat. This deep, earthy color often needs two or even three coats to achieve that solid, velvety depth seen in the photo. -
Remove tape:
While the final coat is still slightly tacky (not fully cured), verify your lines and then slowly peel off the painter’s tape at a 45-degree angle. This prevents the dried paint from cracking off with the tape.
Crisp Line Secret
Paint over your tape edge with the existing wall color (white) first. This seals the tape so any bleed is invisible, leaving a perfect line.
Step 3: Refining the Contrast
-
Assess the white walls:
The beauty of this look comes from the stark contrast between the rust arch and the white surroundings. Check if the white paint outside the arch needs a touch-up. -
Touch up edges:
If any terracotta paint seeped under the tape, wait for it to dry fully. Then, use a small artist’s brush and your white wall paint to carefully cover the mistake. -
Soften the texture:
The inspiration image has a slightly plastered, organic feel. If your walls are too smooth, you can simulate this by dabbing the wet paint slightly with a dry brush or sponge during the final coat to add subtle texture. -
Style the space:
Once fully dry (give it 24 hours), move your bed back into position. Center it perfectly under the arch to maximize the framing effect. -
Add minimal decor:
Place a simple wooden nightstand and perhaps a dried botanical arrangement nearby. The goal is to let the bold paint color be the main artwork.
Texture Twist
Mix a paint additive like sand or joint compound into your terracotta paint for a true Mediterranean plaster look and feel.
Step back and admire how a single structural color change completely redefined the room’s atmosphere
Rectangular Headboard Block With Crisp Edges
Create the warm, grounded look of a massive solid oak headboard directly on your wall without the heavy lifting or carpentry skills. This painting technique uses clever masking and subtle texture layering to mimic the grain and presence of natural timber.
How-To Guide
Materials
- Painter’s tape (high-quality, gentle release)
- Measuring tape
- Pencil
- Level (laser or bubble)
- Base coat paint (warm beige/light tan latex)
- Glaze medium (acrylic or latex)
- Paint colors (raw umber, burnt sienna, dark oak)
- Wide bristle brush (chip brush)
- Wood graining tool (optional but helpful)
- Soft rag or cheesecloth
- Small artist brush
- Clear matte sealer (water-based)
Step 1: Preparation & Layout
-
Measure and Mark:
Determine the desired height and width of your headboard. For a queen bed like the one shown, aim for approximately 64 inches wide and 48 inches high from the floor. Use a measuring tape to find the center of your wall and mark the outer boundaries lightly with a pencil. -
Establish the Perimeter:
Using a long level, draw faint, straight lines connecting your marks to create a perfect rectangle. This crisp geometric shape is crucial for the modern block effect. -
Tape the Edges:
Apply painter’s tape along the *outside* edge of your pencil lines. Run your finger or a putty knife firmly along the tape edge to ensure a tight seal that prevents paint bleed.
Bleeding Lines?
If paint bleeds under the tape, wait for it to dry fully. Then, re-tape the painted area and lightly brush the original wall color over the bleed to erase it perfectly.
Step 2: Base Coat Application
-
Apply the Base Layer:
Roll or brush on your base coat paint within the taped area. This color represents the lightest tone of the wood, so a creamy biscuit or light tan works best. -
Ensure Solid Coverage:
The base needs to be opaque. If the wall color shows through after the first coat, let it dry completely and apply a second coat. A smooth, solid block of color is your canvas. -
Dry Completely:
Wait for the base coat to cure fully—usually at least 4-6 hours. If the base is tacky, the subsequent glaze layers won’t glide properly.
Step 3: Creating the Wood Grain
-
Mix the Glaze:
In a mixing container, combine your clear glaze medium with your darker wood-tone paint (dark oak or walnut) in a 4:1 ratio. The mixture should be translucent, not solid. -
Apply the Glaze Strip:
Working in horizontal sections about 12 inches high, brush the glaze mixture across the width of the rectangle. Don’t worry about perfect smoothness; slight streakiness adds to the realism. -
Drag the Grain:
While the glaze is wet, drag a dry wide-bristle brush horizontally through the paint in long, continuous strokes from left to right. This creates the primary linear grain pattern. -
Add Knot Details:
To mimic the natural imperfections seen in real oak, wiggle your brush slightly or press firmly in random spots to create darker pools of glaze that resemble knots or dense grain. -
Soften the Look:
If the brush marks look too harsh, lightly tap them with a cheesecloth or dry rag to blur the lines slightly. Real wood has a softness to it. -
Continue Downward:
Repeat the glazing and dragging process for the remaining sections, working your way down to the floor. Ensure the horizontal strokes align so it looks like continuous planks or a solid slab. -
Detail the Edges:
Use a small artist brush to carefully darken the very edges of the rectangle with a slightly more concentrated glaze mix. This creates a subtle shadow effect, making the ‘board’ pop off the wall.
Pro Tip: Plank Effect
To make it look like joined planks, draw horizontal pencil lines every 8-10 inches before glazing. Leave a tiny 1mm gap in glaze at these lines to mimic seams.
Step 4: Finishing Touches
-
Remove Tape:
Here I prefer to pull the tape while the final glaze layer is still slightly tacky, not bone dry. Pull the tape away from the painted area at a 45-degree angle to reveal that crisp, sharp edge. -
Touch Up:
Check your perimeter. If any glaze bled under the tape, use a small brush and your original wall color to clean up the line once everything is dry. -
Seal the Work:
Once the faux wood effect is fully cured (give it 24 hours), apply a coat of clear matte sealer. This removes any glossy sheen from the glaze and protects your artwork from pillow friction.
Step back and admire how this painted illusion adds warmth and architectural interest to your bedroom
Soft Vertical Stripes to Lift a Low Ceiling
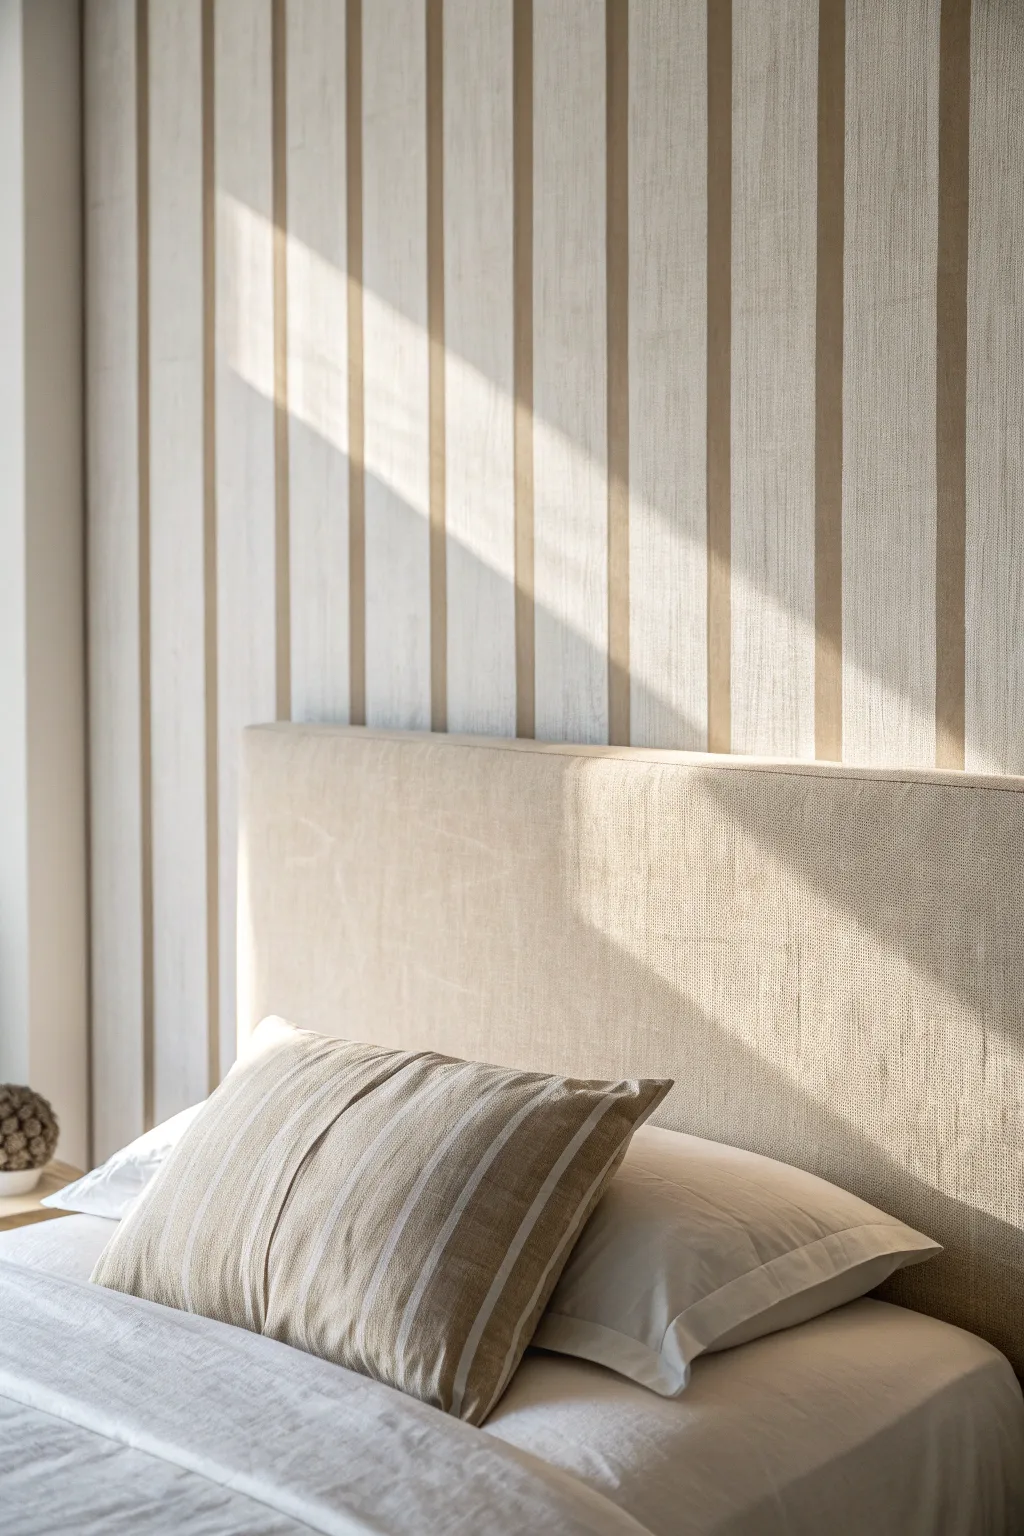
Elevate your space and visually raise a low ceiling with these sophisticated, soft vertical stripes. This technique uses subtle tonal shifts and texture to create a peaceful, airy atmosphere rather than a bold geometric statement.
Step-by-Step
Materials
- High-quality painter’s tape (1.5 or 2 inch width)
- Matte latex paint (Base color: Soft Cream)
- Matte latex paint (Stripe color: Warm Taupe/Beige)
- Laser level (highly recommended) or spirit level
- Pencil
- Tape measure
- Paint roller with microfiber sleeve (3/8 inch nap)
- Small trim roller or angled sash brush
- Putty knife or credit card
- Clean damp cloth
- Drop cloths
Step 1: Preparation and Base Coat
-
Clear and Clean:
Begin by removing all furniture from the wall area and covering your floors with drop cloths. Wipe the walls down with a damp cloth to remove any dust or oils that could prevent paint adhesion. -
Apply the Base Colour:
Roll on your lighter base color (the soft cream) over the entire wall. This color will act as the space between your darker stripes. I prefer doing two thorough coats to ensure a rich, consistent background, allowing at least 4 hours of drying time between coats. -
Dry Completely:
Allow the base coat to cure fully, preferably overnight. This is crucial because applying tape to fresh paint can peel it right off, ruining your hard work before you’ve barely begun.
Bleeding Lines?
If you get bleed-under, let it dry fully. Then, place a new piece of tape precisely over the stripe edge and touch up with the base wall color for a perfect fix.
Step 2: Measuring and Taping
-
Calculate Stripe Width:
Measure the total width of your wall. Decide on a stripe width—5 to 7 inches usually looks elegant. Divide your wall width by the stripe width to see if you end up with a partial stripe; adjust slightly if needed so the pattern ends symmetrically. -
Mark the Wall:
Starting from one corner, use your tape measure and pencil to make small tick marks along the wall at your determined intervals. Do this at eye level and near the baseboard to help guide your lines. -
Set Your Lines with a Laser:
Set up a laser level to project a vertical plumb line through your first set of marks. This tool is a lifesaver for keeping lines perfectly straight over uneven floors or ceilings. -
Apply the Tape:
Apply the painter’s tape along the laser line. Remember to place the tape on the *outside* of the area you intend to paint as the stripe. Place a small piece of tape inside the ‘save’ zones (the base color areas) as a visual reminder of which stripes not to paint. -
Seal the Edges:
Once all stripes are taped, run a putty knife or a clean credit card firmly along the edges of the tape. This pressure activates the adhesive and creates a tight seal against the wall texture. -
The ‘Bleed-Proof’ Trick:
To guarantee crisp lines, lightly brush a small amount of your *base color* over the edge of the tape that faces the stripe area. This seals any tiny gaps with the base paint, so if anything bleeds under, it matches the wall perfectly.
Add Texture
For a linen-like effect, drag a dry, stiff-bristle brush vertically through the wet stripe paint. This creates subtle vertical streaks resembling fabric.
Step 3: Painting the Stripes
-
Prepare the Contrast Color:
Pour your darker taupe/beige paint into a tray. If you want an even softer, more translucent look like in the image, you can mix in a small amount of glazing liquid, though pure matte paint works beautifully for a solid look. -
Roll the Stripes:
Using a small trim roller, apply the stripe color between the tape lines. Use a vertical motion, rolling from top to bottom, to maintain the vertical orientation of the texture. -
Feather the Edges:
Be careful not to overload the roller, which can cause thick ridges against the tape. Feather the paint out slightly so it’s even across the stripe width. -
Cut in Top and Bottom:
Use your angled sash brush to carefully paint the very top (ceiling line) and bottom (baseboard line) of each stripe where the roller can’t reach. -
Assess Coverage:
Wait for the paint to dry to the touch (usually about an hour). If the color looks too sheer or uneven, apply a second thin coat using the same vertical rolling technique.
Step 4: The Reveal
-
Remove Tape Early:
The golden rule of striping: remove the tape while the final coat is still slightly tacky, not bone dry. This prevents the paint skin from bridging over the tape and tearing when pulled. -
Pull at an Angle:
Slowly peel the tape away from the painted stripe at a 45-degree angle. Pull gently and steadily to ensure a clean, razor-sharp edge. -
Touch Up:
Inspect your lines. If any paint managed to sneak under the tape, wait for it to dry completely, then use a tiny artist’s brush and your base color to erase the mistake.
Enjoy the newfound height and calm elegance these subtle stripes bring to your bedroom retreat
Playful Cabana Stripes for a Guest Bedroom
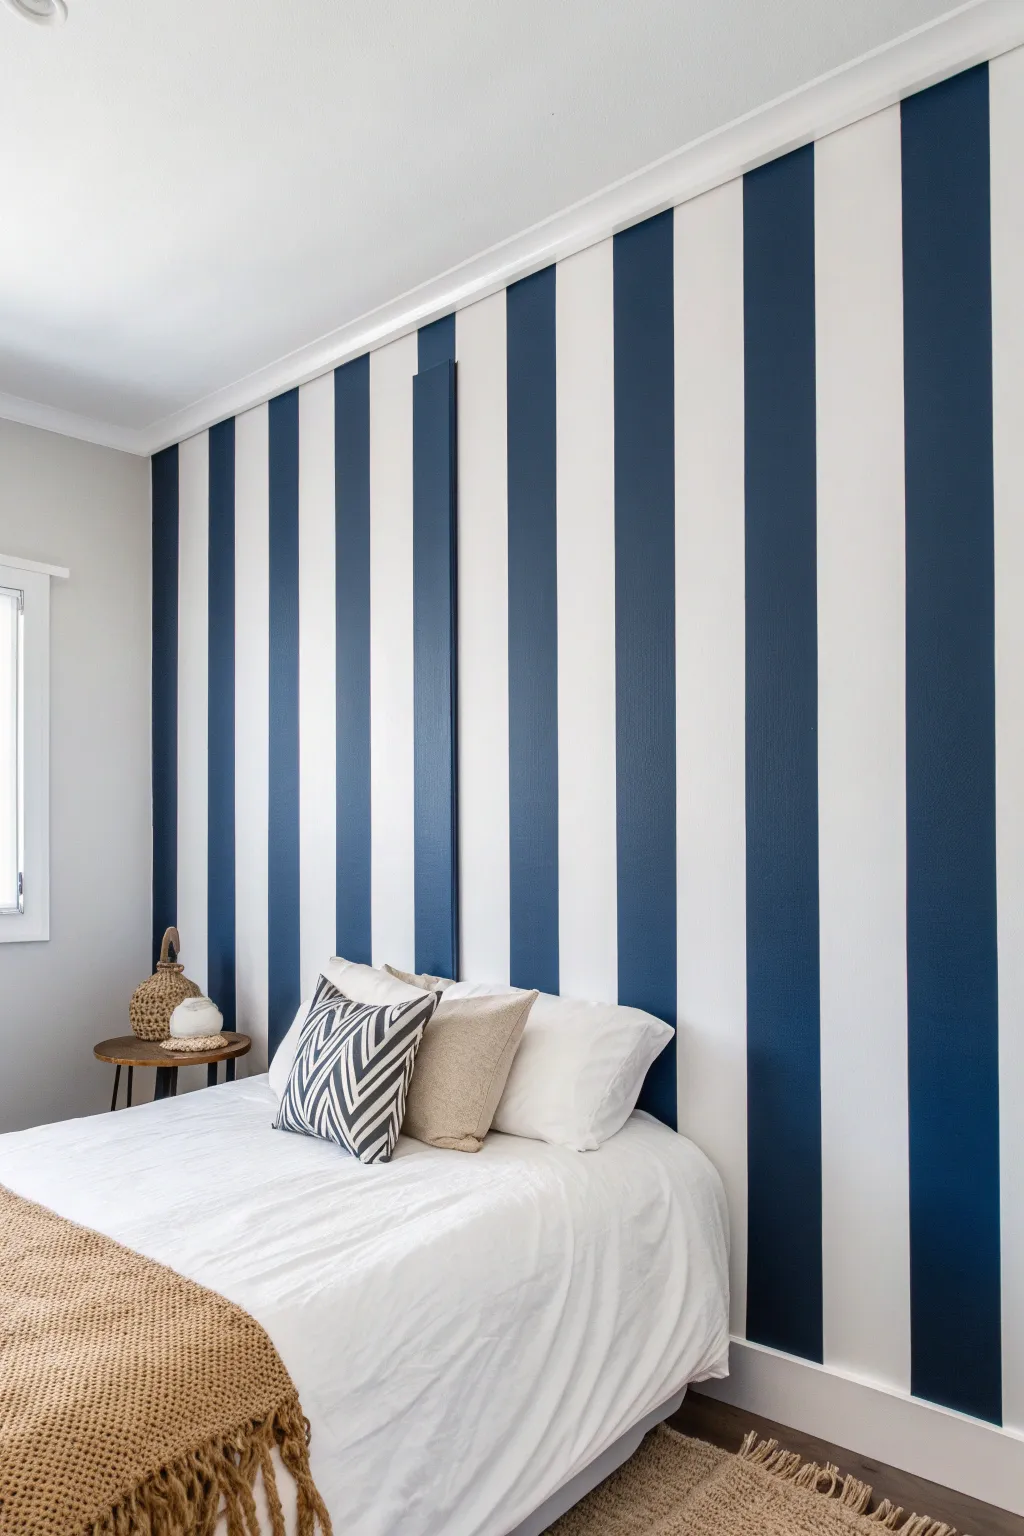
Transform a plain guest bedroom into a coastal retreat with these crisp, high-impact vertical stripes. This project creates a classic focal point using bold navy blue and bright white paint for a look that feels both preppy and relaxing.
How-To Guide
Materials
- Interior latex wall paint (Bright White)
- Interior latex wall paint (Navy Blue)
- Painter’s tape (high quality, 1.5 – 2 inch width)
- Laser level or long spirit level
- Tape measure
- Pencil
- Paint rollers (9-inch for large areas)
- Small foam roller or angle sash brush
- Paint tray and liners
- Drop cloths
- Putty knife or credit card
Step 1: Preparation & Base Coat
-
Clear the room:
Begin by moving furniture away from the wall you intend to paint. If possible, move the bed completely out of the room to give yourself ample working space for the ladder and roller extension pole. -
Prep the surface:
Patch any nail holes or imperfections with spackle. Once dry, sand these spots smooth and wipe the wall down with a damp cloth to remove dust and oils, ensuring the tape will stick perfectly later. -
Paint the base color:
Roll on two coats of your base color—usually the lighter shade, so in this case, the bright white. Allow the paint to cure for at least 24 to 48 hours. This is crucial; if the base paint isn’t fully cured, the tape might peel it off.
Seal Prior to Painting
Painting a thin layer of your base (white) color over the tape edge before applying the navy seals the tape. This creates an impenetrable barrier for perfectly crisp lines.
Step 2: Measuring & Marking
-
Determine stripe width:
Measure the total width of your wall. Divide this number by an odd number (like 7, 9, or 11) to determine your stripe width. An odd number ensures you start and end with the same color stripe in the corners, which looks more professional. -
Mark vertical guides:
Using a tape measure, make small pencil marks along the top of the wall near the ceiling at your determined intervals. Repeat this process along the bottom of the wall near the baseboard. -
Draw the lines:
Connect your top and bottom marks using a long spirit level or a laser level. Draw a very faint vertical pencil line from floor to ceiling for every stripe transition.
Add Wood Texture
Instead of just paint, use vertical 1×6 MDF boards for the colored stripes. Paint them navy before installing for a truly dimensional, paneled ‘board and batten’ effect.
Step 3: Taping the Stripes
-
Apply painter’s tape:
Apply the tape along your pencil lines. Crucially, you must place the tape on the *outside* of the area you intend to paint blue. This means the tape will cover the parts that remain white. -
Mark the ‘No Paint’ zones:
It can get confusing once the wall is full of blue tape. Place a small piece of tape or a sticky note inside the stripes that need to remain white to prevent accidental painting. -
Seal the tape edges:
Run a putty knife or an old credit card firmly along the edge of the tape to press it down flat. This prevents paint from bleeding underneath. -
The sealing secret:
For razor-sharp lines, I always lightly brush a small amount of the *base coat color* (white) over the edge of the tape that will face the blue stripe. This seals any tiny gaps with white paint so the blue sits perfectly on top.
Step 4: Painting the Navy
-
Cut in the edges:
Using an angled brush, carefully paint the navy blue along the ceiling line and baseboard within the designated stripe areas. -
Roll the first coat:
Use a roller to fill in the vertical stripes with navy blue paint. Use a ‘W’ motion to distribute paint evenly, but be careful not to roll too aggressively over the tape edges. -
Apply the second coat:
Once the first coat is dry to the touch (usually 2-4 hours), apply a second coat of navy blue to ensure a deep, rich opacity without streakiness.
Step 5: The Reveal
-
Remove tape promptly:
Don’t wait for the paint to fully dry. Peel the tape off while the second coat is still slightly tacky—pulling slowly at a 45-degree angle away from the painted edge. -
Touch up:
Inspect your lines. If any blue bled through, use a tiny artist’s brush and your white paint to carefully correct the error once everything is dry. -
Style the room:
Once fully dry, move your furniture back in. The vertical lines will naturally draw the eye upward, making the ceiling feel higher.
Enjoy the dramatic, nautical flair your new accent wall brings to the space
Geometric Color Blocking With Angles
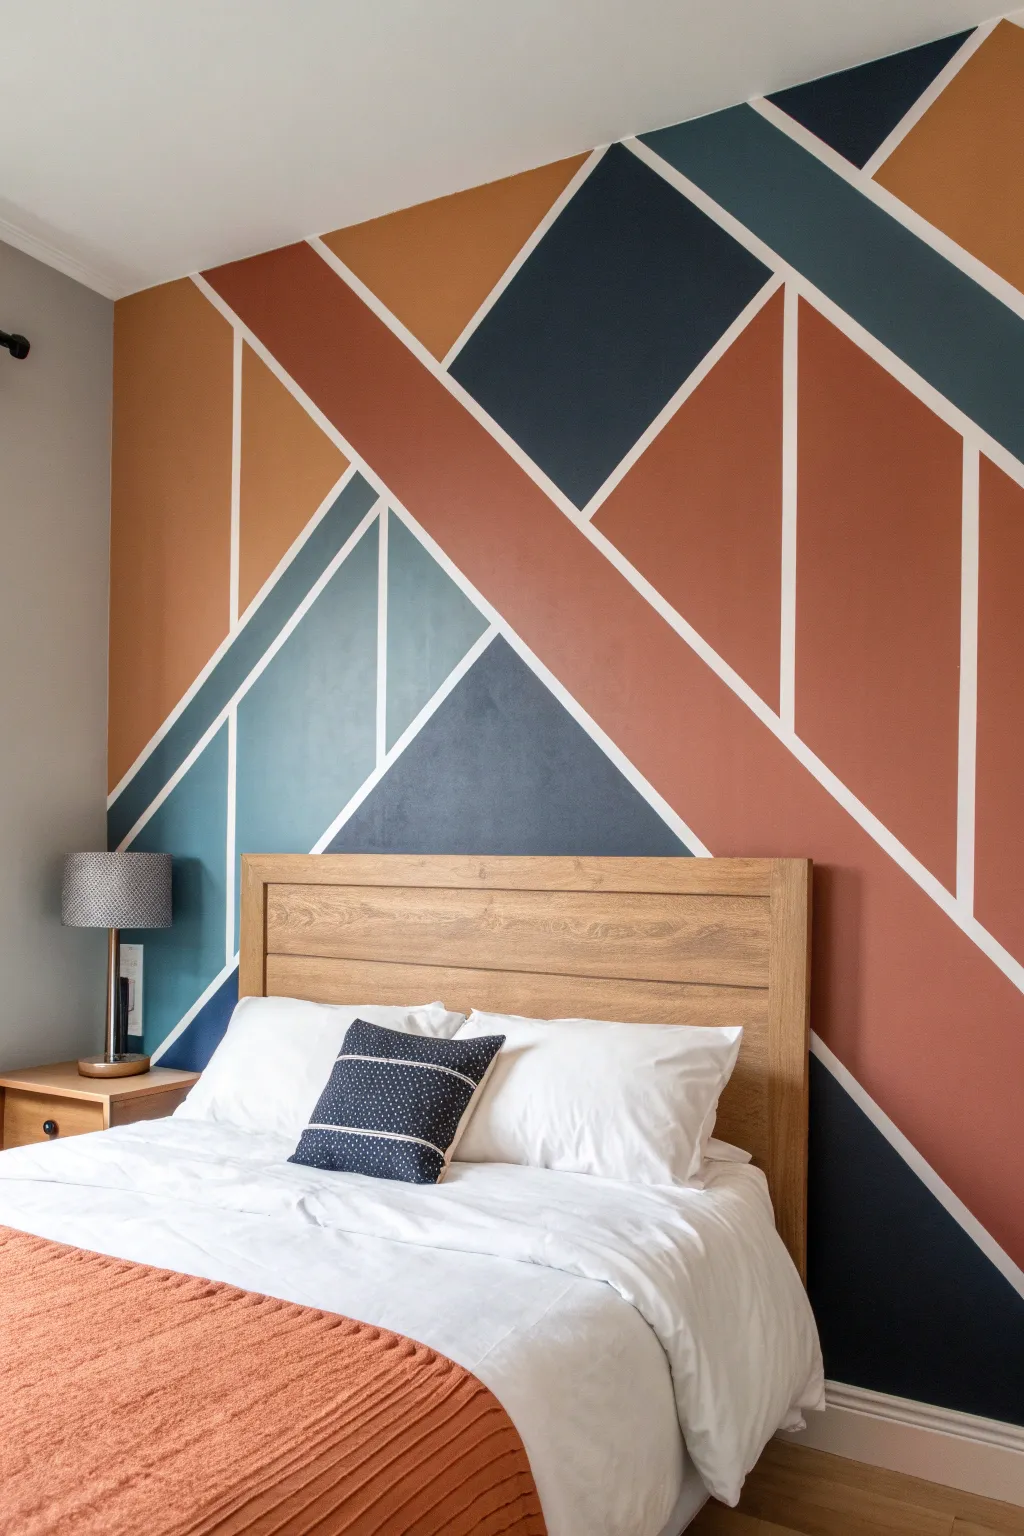
Transform a plain bedroom wall into a stunning focal point with this bold geometric design featuring intersecting angles and a warm, earthy color palette. The crisp white lines create a sophisticated structure that separates deep navy, terracotta, and soft teal blocks for a modern, artistic look.
Step-by-Step Guide
Materials
- Interior latex paint (Eggshell or Satin finish): Dark Navy/Teal
- Interior latex paint: Terracotta/Burnt Orange
- Interior latex paint: Mustard/Ochre
- Interior latex paint: Light/Grey Teal
- Painter’s tape (high quality, delicate surface optional)
- Laser level or long straight edge/level
- Pencil
- Paint rollers (mini rollers work best for small sections)
- Small angled sash brush (1.5 – 2 inch)
- Drop cloth
- Paint tray and liners
- White base wall paint (for touch-ups and sealing)
Step 1: Planning and Preparation
-
Prep the surface:
Begin by ensuring your wall is clean, smooth, and painted with your desired base color. White is used here as the separating line color, so if your wall isn’t already white, roll a fresh coat of white paint over the entire surface and let it cure for at least 24-48 hours. -
Clear the area:
Move furniture away from the wall, specifically the bed and headboard, to give yourself ample working space. Lay down a drop cloth to protect your flooring. -
Sketch the layout:
Lightly sketch your design on paper first. The key feature of this design is a large diagonal ‘stripe’ running from top-left to bottom-right, intersected by vertical lines. Visualize where these major lines will sit on your actual wall.
Step 2: Taping the Design
-
Establish the main diagonal:
Using a long straight edge or a laser level locked to a diagonal angle, apply your first strip of painter’s tape. This primary line should start high on the left side and slope down toward the right, anchoring the entire composition. -
Create parallel channels:
Place a second strip of tape parallel to your first line to create the thick terracotta band shown in the center. The distance between these tape lines determines the width of that central color block. -
Add vertical divisions:
Use a level to apply vertical strips of tape. Notice how the vertical lines in the image stop abruptly when they hit a diagonal line; this creates the interesting trapezoid and triangle shapes. -
Fill in the angles:
Continue taping off the remaining sections, creating a mix of large and small triangles. Step back frequently to ensure the balance feels right—you want a mix of large blocks (like the right-side terracotta) and smaller detailed areas (like the left-side blues). -
Seal the tape edges:
This is the most crucial step for crisp lines. Take your base wall color (white) and lightly brush it over the edges of the tape. This seals any gaps; if paint bleeds, it will be white-on-white, keeping your colored lines razor-sharp later.
Bleed-Through Blues?
If paint bleeds under the tape, don’t panic. Let it dry fully. Place a new piece of tape specifically over the colored part, then touch up the white line with a small artist brush.
Step 3: Painting the Color Blocks
-
Map your colors:
To avoid mistakes, stick a tiny piece of tape or make a light pencil mark in each section indicating which color goes where. This prevents accidentally painting two adjacent shapes the same color. -
Start with the edges:
Using your angled sash brush to cut in the edges of your first color block. Be careful not to get paint on the tape that borders a section meant for a different color. -
Roll the first color:
Use a mini roller to fill in the rest of the shape. I personally prefer mini rollers for geometric walls because they offer better control in tight corners than standard rollers. -
Apply the remaining colors:
Work through your paint colors one by one. Rinse your brush and roller thoroughly between colors, or use separate sleeves/brushes for the terracotta, navy, and teal to speed up the process. -
Apply a second coat:
Once the first coat is dry to the touch (usually 1-2 hours), apply a second coat to ensure rich, opaque coverage, especially for the dark navy and deep terracotta sections.
Metallic Accent Lines
Instead of leaving the taped lines white, go over them with a thin gold or copper leafing pen after the paint dries to add a glamorous, high-end metallic border to your shapes.
Step 4: The Reveal
-
Remove the tape:
Do not wait for the paint to fully cure. Carefully peel off the painter’s tape while the second coat is still slightly tacky. Pull the tape slowly at a 45-degree angle away from the painted edge. -
Check for imperfections:
Inspect your white lines. If any paint managed to bleed through, wait for it to dry completely, then use a tiny artist’s brush and your white base paint to touch up the line. -
Let it cure:
Allow the wall to dry completely for at least 24 hours before moving your headboard back into place to prevent scuffing the fresh design.
Step back and admire how a few lines and bold colors completely redefined the energy of your room
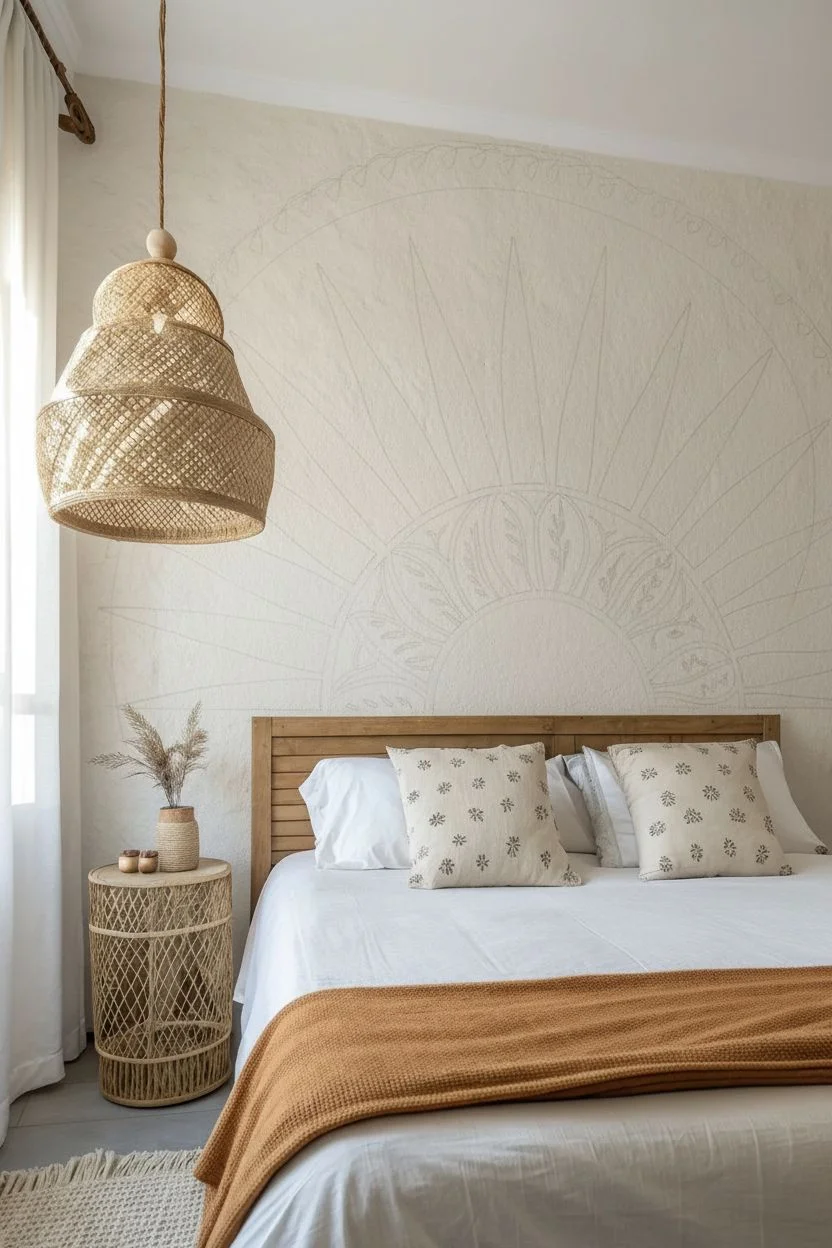
Oversized Circle or Half-Sun Focal Point
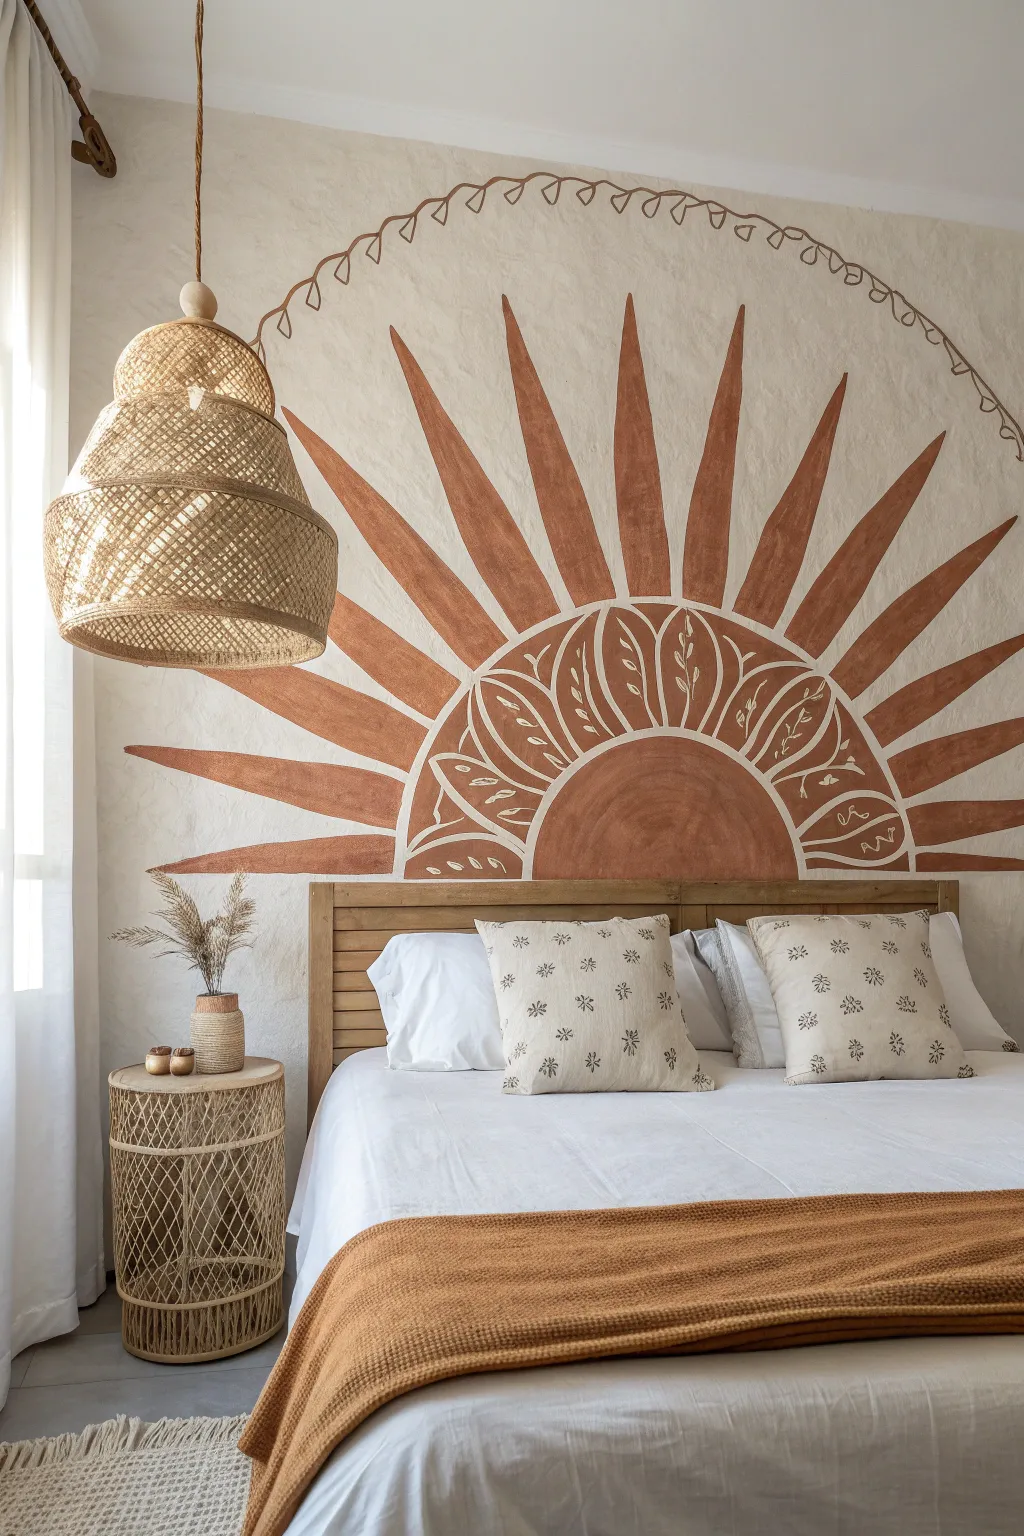
Transform your bedroom into a warm, bohemian sanctuary with this radiant half-sun mural. Featuring earthy terracotta tones and delicate botanical line work, this large-scale focal point adds instant coziness and artistic flair above your headboard.
How-To Guide
Materials
- Interior latex wall paint (terracotta or rust orange)
- White or cream paint pen (medium tip) or small round brush with white acrylic paint
- Pencil
- String/twine (non-stretchy)
- Painter’s tape or thumb tack
- Measuring tape
- 2-inch angled sash brush (for cutting in edges)
- 4-inch mini foam roller and tray
- Drop cloth
- Level (optional)
- Eraser
Step 1: Planning and Sketching
-
Find your center:
Measure the width of your headboard to find the exact center point on the wall just above where your mattress sits. Mark this spot lightly with a pencil; this will be the anchor for your sun. -
Create a compass:
Tie a piece of non-stretchy string to a pencil. Measure out the length for the inner sun circle—about 18-24 inches depending on your bed size—and secure the other end of the string to your center mark using a thumb tack or strong tape. -
Draw the core:
Keeping the string taut, draw a large semi-circle arching upwards from the base line. This forms the solid core of the sun. -
Sketch the pattern band:
Lengthen your string by about 8-10 inches. From the same center anchor point, draw a second, larger semi-circle parallel to the first one. This new band will house your botanical details later. -
Draft the rays:
Freehand sketch the iconic sun rays radiating outward. Start with the central vertical ray to keep things symmetrical, then add rays to the left and right. I find it helpful to vary the width slightly, making them wider at the base and tapering to a soft point, for that organic, hand-painted look. -
Add the decorative arch:
Using your string compass one last time, extended to reach just beyond the tips of your longest rays, lightly trace a faint guide line. Sketch the wavy, scalloped line that connects the ray tips, giving the mural a framed finish.
Step 2: Painting the Base
-
Outline the shapes:
Using your 2-inch angled brush and the terracotta paint, carefully cut in the edges of your pencil sketch. Paint the outline of the inner semi-circle, the pattern band, and the perimeter of each sun ray. -
Fill the core:
Use the mini foam roller to fill in the large central semi-circle. Apply two thin coats for even coverage, letting the paint dry to the touch between layers. -
Fill the band and rays:
Continue using your brush or roller to fill in the secondary band and the individual sun rays. Don’t worry if the edges aren’t laser-sharp; a little wobble adds to the rustic charm. -
Paint the decorative line:
Using a small artist brush, trace over your scalloped wavy line sketch at the very top. Keep this line relatively thin and dainty compared to the bold rays. -
Let it cure:
Allow the entire terracotta base to dry completely, ideally overnight. The white details need a fully dry surface to prevent smudging or mixing colors.
Wobbly Lines?
If your ray edges look too messy, don’t panic. Use an angled artist brush with your original wall color to ‘erase’ and refine the terracotta edges from the outside in.
Step 3: Adding Details
-
Section the band:
Working within the second semi-circle band you painted, use a white paint pen to draw curved vertical dividers. Space them out to create ‘petals’ or sections around the sun’s core. -
Draw botanical stems:
Inside each divided section, draw a central curved line representing a stem. Alternate the direction of the curve slightly for visual interest. -
Add leaves:
Draw small, simple leaf shapes branching off each white stem. Keep your strokes loose and fluid. -
Create the outer scallops:
Along the uppermost wavy line you painted earlier, use the white paint pen to add tiny loops or scallops hanging from the terracotta line, mimicing a delicate lace trim. -
Clean up:
Once all paint is dry, gently erase any visible pencil marks that weren’t covered by paint. Step back and admire your handiwork.
Add Texture
Mix a textured additive or a bit of baking soda into your terracotta paint for a plaster-like, old-world fresco finish before applying it to the wall.
Now you have a stunning, sun-drenched feature wall that anchors your bedroom with warmth and creativity
Ombre Fade From Cozy Dark to Airy Light
Capture the warmth of a setting sun right in your bedroom with this stunning blended ombre wall. By merging a deep, earthy rust tone at the base into a soft, creamy peach at the ceiling, you create a cozy yet airy illusion that draws the eye upward.
Detailed Instructions
Materials
- High-quality latex interior paint (Dark Rust/Terracotta)
- High-quality latex interior paint (Medium Peach/Coral)
- High-quality latex interior paint (Light Cream/Off-White)
- 3 large paint trays
- 3 paint rollers (medium nap)
- Painter’s tape
- Drop cloths
- Large blending brush (dry bristles)
- Spray bottle with water
- Mixing bucket (optional for custom mid-tones)
- Ladder or sturdy step stool
Step 1: Preparation & Mapping
-
Prep the surface:
Clear the area against the wall completely. Lay down drop cloths to protect your beautiful herringbone floors and tape off the skirting boards, ceiling line, and adjoining walls with painter’s tape. Remove any outlet covers. -
Prime if necessary:
If the current wall color is dark or high-gloss, apply a coat of white primer to ensure your ombre colors pop truly and adhere well. -
Mark your zones:
Lightly mark the wall with a pencil to divide it into three horizontal sections. The bottom third will be your darkest rust, the middle is for the peach transition, and the top is for the lightest cream.
Step 2: Applying the Base Colors
-
Paint the top section:
Pour your lightest cream paint into a tray.Using a roller, paint the top section of the wall, bringing the paint slightly lower than your pencil mark. Keep the edge wet; don’t let it dry completely. -
Paint the bottom section:
Using a fresh roller and tray, apply the darkest terracotta color to the bottom third of the wall. Paint upwards, stopping just below the middle section, but ensuring good coverage near the skirting boards. -
Apply the middle tone:
With a third roller, apply the medium peach color in the center band. Leave a gap of about 4-6 inches between this middle color and the top/bottom colors for now.
Fixing Patchiness
If blending looks muddy or gray, stop! Let the paint dry fully, then re-apply fresh bands of pure color and blend again. Don’t overwork wet paint.
Step 3: The Blending Process
-
Create the first transition:
Starting with the gap between the dark bottom and the middle peach, apply fresh paint of both colors right next to each other so they touch. -
Mix wet-on-wet:
While both paints are still wet, use a clean, dry blending brush to criss-cross over the line where the colors meet. I find that working in ‘X’ motions helps break up the hard line best. -
Mist for workability:
If the paint feels tacking or sticky, lightly spritz the wall with your water spray bottle. This keeps the latex open longer, allowing for a smoother gradient. -
Blend the upper transition:
Move to the gap between the middle peach and the top cream. Repeat the process: dampen the edges with fresh paint, then use your brush to blur the line. -
Check from a distance:
Step back frequently to look at the wall as a whole. You are looking for harsh horizontal stripes. If you see one, go back in with a slightly damp brush to feather it out. -
Smooth the texture:
Once the X-strokes have blended the colors, use a very light, dry roller to vertically sweep over the blended areas to mimic the texture of the res of the wall.
Metallic Magic
Mix a clear glaze with a hint of gold mica powder and roll it over the transition area for a shimmering ‘golden hour’ sunset effect.
Step 4: Refinement & Finish
-
Let it dry:
Allow the first layer to dry completely. Ombre walls often look patchy while wet, so don’t panic if it isn’t perfect yet. -
Assess depth:
If the dark bottom isn’t opaque enough, apply a second coat to the solid bottom area, carefully feathering it upward into the blended zone again. -
Final touch-ups:
Use a small brush to fix any areas near the tape where the blending might be uneven. Ensure the gradient looks smooth from floor to ceiling. -
Remove tape:
Slowly peel off the painter’s tape while the final touch-ups are still slightly tacky to prevent peeling the paint skin. -
Clean up:
Replace your outlet covers and move your furniture back into place, enjoying the new warmth of the room.
Step back and admire the serene, sunset-like atmosphere you’ve brought permanently into your home.
Hand-Painted Minimal Line Mural Above the Bed
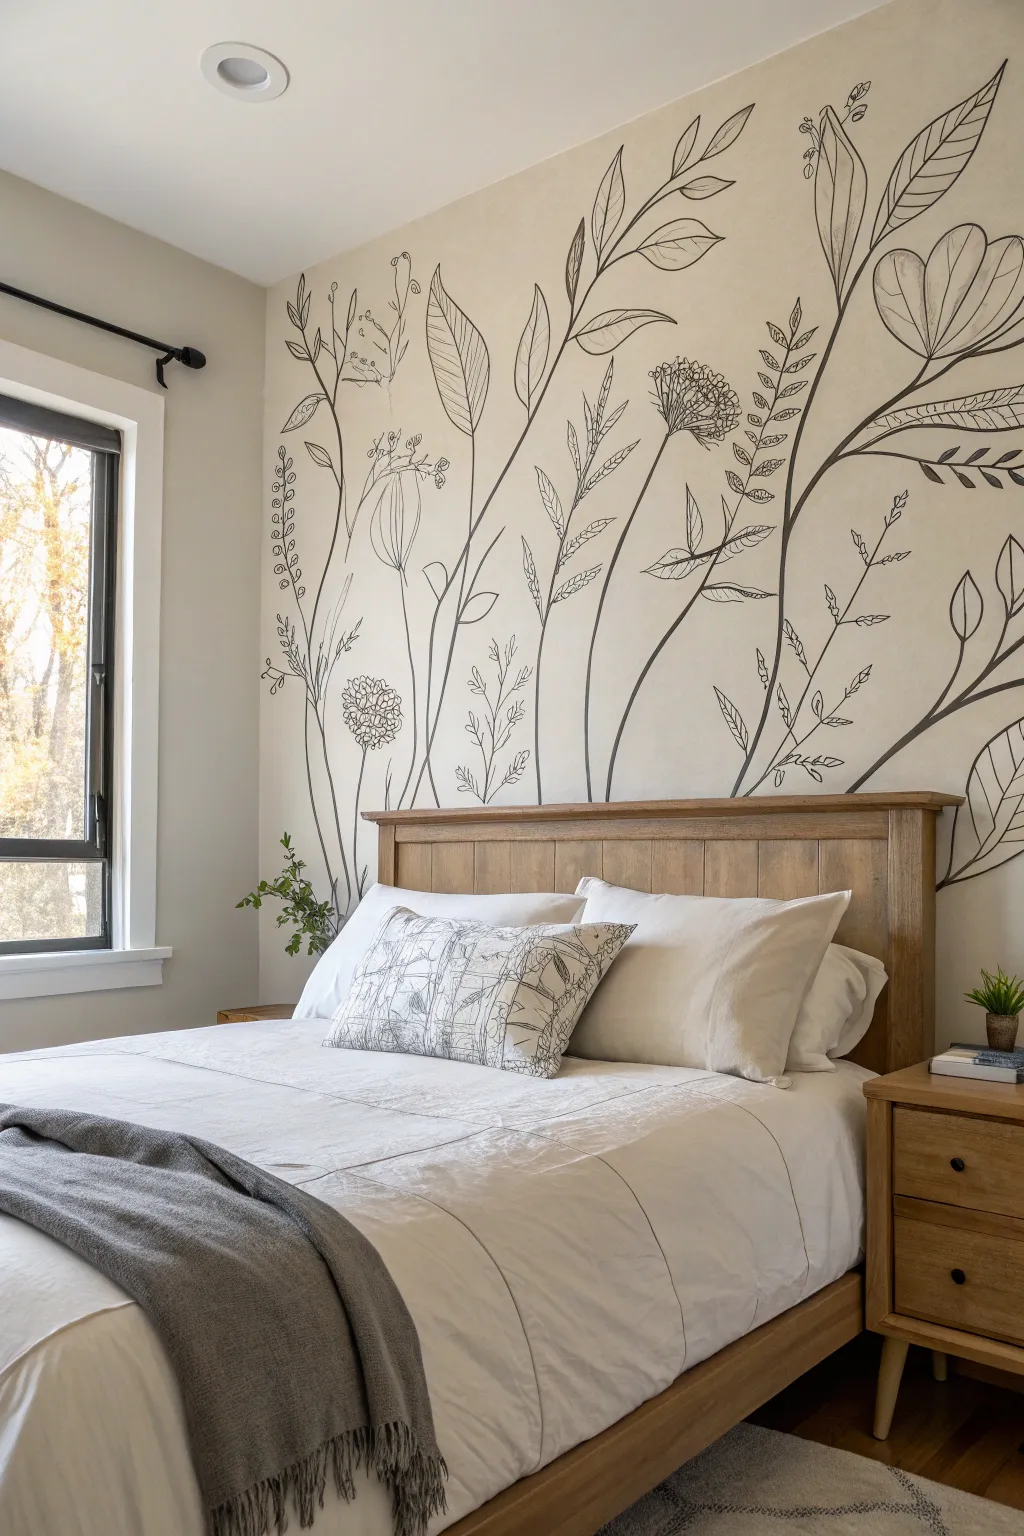
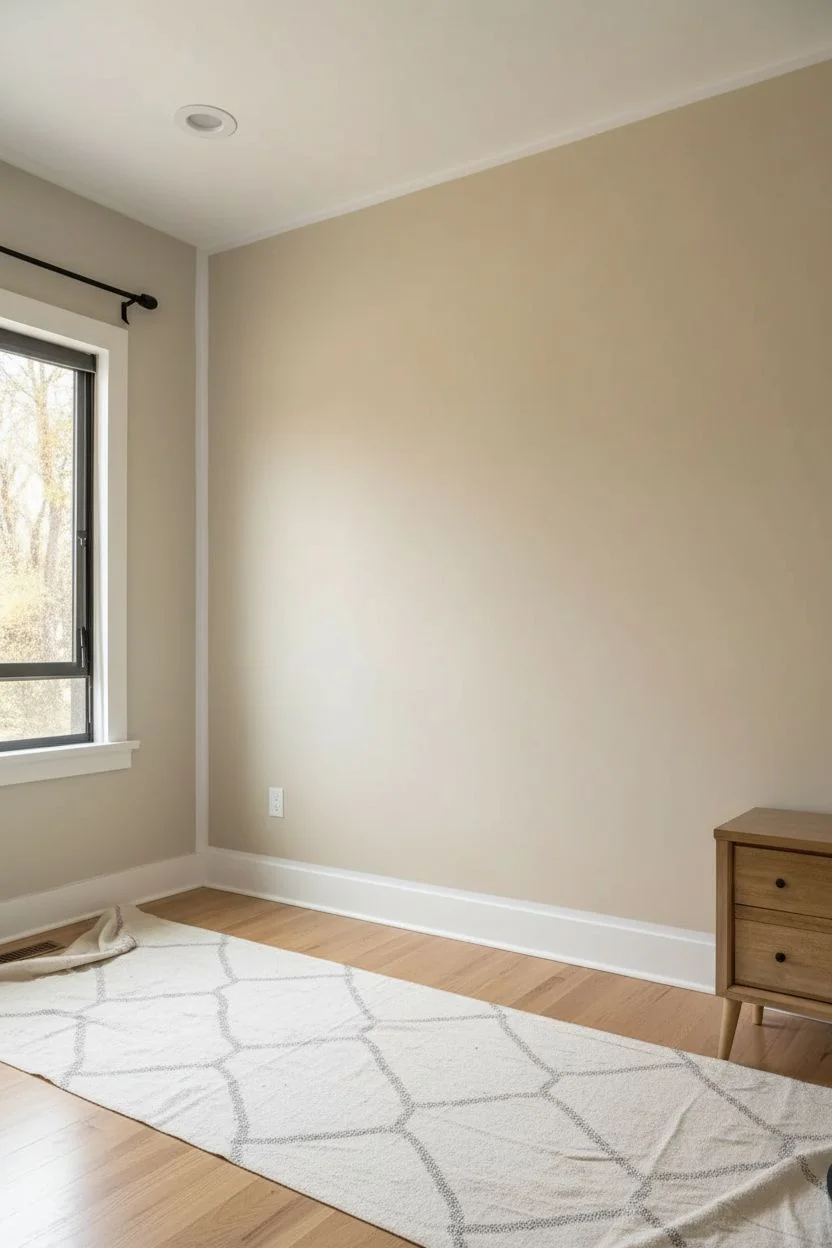
Transform your bedroom into a serene garden sanctuary with this oversized line-art mural. The stark black organic shapes against a warm beige background create a modern yet restful focal point that feels both sophisticated and handcrafted.
Step-by-Step Guide
Materials
- Interior latex paint (matte finish, warm beige/cream)
- Black acrylic paint or high-quality black interior latex paint
- Pencil (HB or 2B)
- Large eraser
- Overhead projector (optional)
- Small round paintbrushes (sizes 2, 4, and 6)
- Liner brush (size 0 or 1)
- Painter’s tape
- Drop cloths
- Step ladder
- Mixing cup or small palette
Step 1: Preparation & Background
-
Clear and prep the space:
Begin by moving the bed away from the wall to give yourself ample working room. Lay down drop cloths to protect your flooring and tape off the baseboards and ceiling edge with painter’s tape. -
Apply the base color:
Roll on two coats of your chosen warm beige or cream interior paint. Allow the wall to dry completely—usually at least 4-6 hours, but overnight is safer—before attempting any sketch work. -
Select your botanical references:
Gather inspiration images of wildflowers, ferns, and tall grasses. Look for distinct silhouettes like seed pods, long bladed leaves, and simple petal structures. -
Plan the composition:
Sketch a rough layout on paper first. The key to this look is varying height; ensure some stems reach nearly to the ceiling while others stay lower to create a natural, uncalculated rhythm.
Clean Up Smudges
If you drip black paint or smudge a line, don’t wipe it! Let it dry completely, lightly sand the bump, and touch it up with your background wall color.
Step 2: Sketching the Design
-
Transfer the stems:
Using a light pencil technique, start drawing the main stems starting from behind where the headboard will sit. Curve them gently outward and upward, avoiding perfectly straight lines to maintain an organic feel. -
Add leave shapes:
Sketch in the large leaves. Keep the shapes simple—elongated ovals and pointed lance shapes work best. Don’t worry about internal veins yet; focus on the outer silhouette. -
Detail the flowers and seed heads:
Draw the floral elements at the tips of your stems. For the ‘dandelion’ style puffs, lightly sketch a circle as a guide. For the larger blooms, draw loose, overlapping petals. -
Step back and assess:
Frequently step back to the far side of the room. This helps you spot empty areas that need filling or places where the design looks too crowded. Erase and adjust as needed.
Step 3: Painting the Lines
-
Prepare your black paint:
Pour a small amount of black paint into a cup. If using acrylics, I sometimes add a tiny drop of water to improve flow, making long strokes smoother. -
Outline the main stems:
Using a size 4 or 6 round brush, carefully trace your pencil lines on the thickest stems. Keep your hand steady and pull the brush towards you for better control. -
Paint the leaf outlines:
Switching to a size 4 brush, outline your leaves. Vary your pressure: press down slightly for thicker lines on the curves and lift up for thinner, tapered tips. -
Add internal details:
Use a finer brush (size 2) to add the central veins to the leaves. These don’t need to connect perfectly; broken lines often look more artistic and sketchy. -
Tackle the intricate florals:
For the seed heads and complex flowers, switch to your smallest liner brush. Use stippling (small dots) or short, quick flicks to mimic the texture of pollen or petals. -
Refine the line weight:
Go back over areas where lines intersect. thickening the ‘V’ shape where a leaf meets a stem adds visual weight and realism to the botanical structure. -
Erase guide lines:
Wait at least 24 hours for the paint to fully cure. Once dry, gently erase any visible pencil marks with a clean, white eraser to avoid smudges.
Use a Projector
Not confident drawing freehand? Project a floral clipart image onto the wall and simply trace the shadows with your pencil for perfect proportions.
Enjoy the peaceful atmosphere your new custom wall art brings to the room
Speckled Terrazzo-Style Confetti Accent Wall

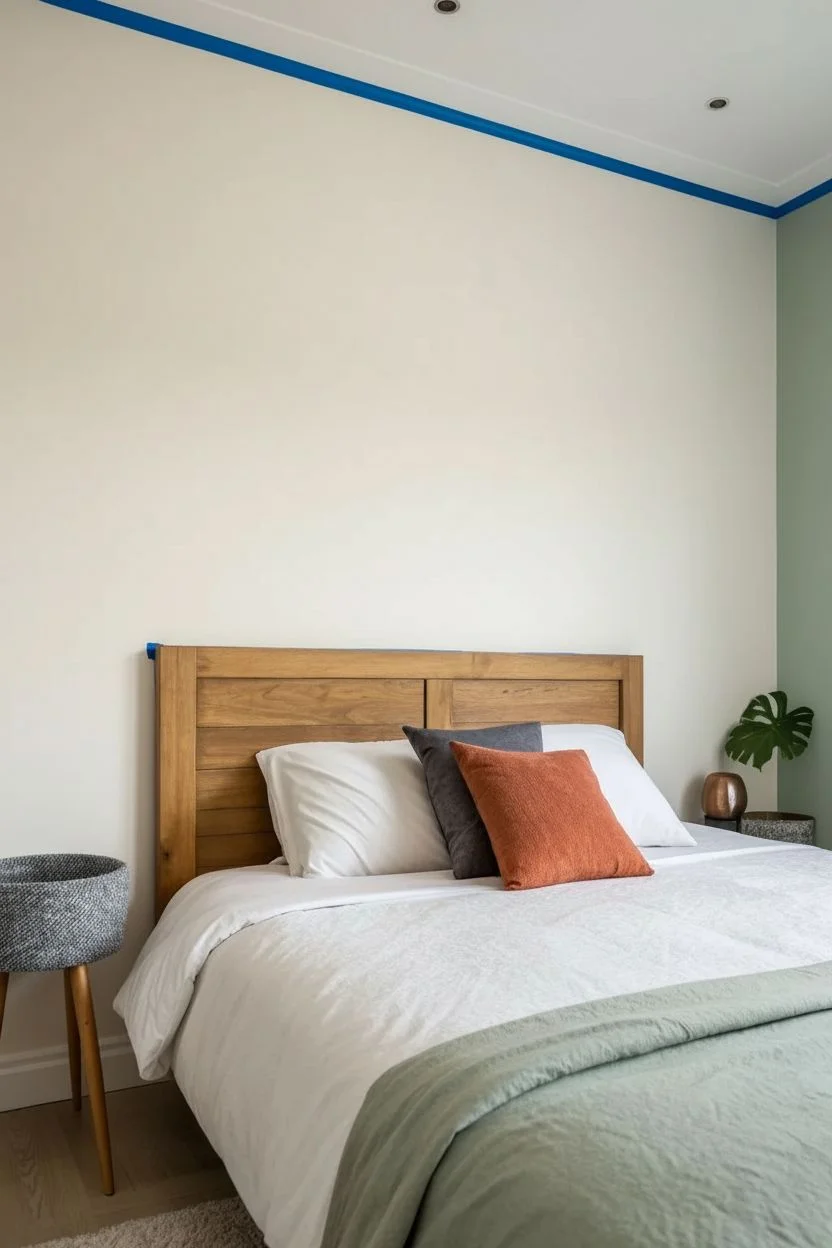
Transform a plain wall into a playful, chic focal point with this DIY terrazzo-style finish. The organic, scattered shapes and earthy tones mimic the look of expensive stone or designer wallpaper, but all you need is paint and patience to achieve this high-end effect.
Detailed Instructions
Materials
- Base wall paint (creamy off-white/eggshell)
- Painter’s tape
- Drop cloths
- Small artist brushes (round and flat tips, sizes 4-8)
- Sample pots of paint (Terracotta, Sage Green, Charcoal Grey, Tan/Beige)
- Clean rags or sponge
- Old toothbrush (optional for micro-speckles)
- Cardboard palette or paper plates
- Pencil (optional)
Step 1: Preparation & Base Coat
-
Clear and cover:
Begin by moving furniture away from the wall you intend to paint. Lay down drop cloths to protect your flooring from potential splatters, as this technique can get a little messy. -
Tape the edges:
Apply painter’s tape along the ceiling line, baseboards, and adjoining walls to ensure crisp, clean edges for your accent wall. -
Apply the base color:
Roll on two coats of your creamy off-white base color. Allow the first coat to dry completely before applying the second to ensure solid coverage. Let this cure for at least 4-6 hours before starting the detail work.
Natural Variation is Key
Avoid making shapes too uniform. Twist your brush while painting to create inconsistent, jagged edges that look more like crushed rock and less like polka dots.
Step 2: Painting the Large Shapes
-
Plan your palette:
Pour small amounts of your accent colors (terracotta, sage, charcoal, tan) onto your cardboard palette. Keep a cup of water handy for rinsing brushes between distinct color applications. -
Start with primary shapes:
Select your medium-sized round brush and dip it into the terracotta paint. Paint irregular, organic shapes scattered randomly across the wall. Think of these as flattened pebbles—some round, some oval, some slightly angular. -
Add the greenery:
Switch to your sage green paint. Fill in the empty spaces with similar organic shapes, perhaps introducing some slightly elongated, leaf-like forms to mimic natural stone fragments. I like to step back every few minutes to ensure the distribution feels balanced, not clustered. -
Depth with charcoal:
Using the charcoal grey, add smaller, darker accents. These should be fewer in number than the lighter colors to act as grounding points without overwhelming the design. -
Layering the tan tones:
Finally, add the tan or beige shapes. These can overlap slightly with dry shapes of other colors to create depth, but try to keep most distinct.
Drips and Splatters
If the toothbrush flick creates a drip, don’t wipe it! Let it dry, then paint over it with a bit of your base wall color, or turn the drip into a larger stone shape.
Step 3: Adding the Confetti Details
-
Create medium speckles:
Switch to a smaller brush. Using all your colors, dab small dots and tiny dashes in the negative spaces between the larger shapes. This begins to build the ‘terrazzo’ aggregate look. -
The toothbrush flick:
For the tiniest micro-speckles, dip an old toothbrush into slightly watered-down charcoal paint. hold it near the wall and run your thumb across the bristles to flick a fine mist of paint onto the surface. -
Repeat with other tones:
Clean the toothbrush and repeat the flicking process with the terracotta and sage paints. This fine mist fills the background and makes the wall look like genuine composite material rather than just a pattern. -
Refine the edges:
Inspect your larger shapes. If any look too perfect or circular, use a small brush to roughen the edges slightly, making them look more like chipped stone. -
Wait and watch:
Allow the paint to dry. Acrylic wall paints can darken slightly as they dry, so wait for the final color check before deciding if you need more density. -
Fill the gaps:
Step back to the other side of the room. If you spot any large ‘blank’ areas that draw the eye uncomfortably, go back in and add a cluster of small specks or a single medium shape to balance it out. -
Clean up:
Once the paint is dry to the touch, carefully peel away the painter’s tape at a 45-degree angle to reveal your crisp edges.
Enjoy the rhythmic process of creating this pattern and the stunning, custom art piece you’ll have on your wall


Have a question or want to share your own experience? I'd love to hear from you in the comments below!