
Halloween is basically a permission slip to draw all the spooky-cute things your heart wants—no pressure, just play. Here are my favorite Triggered-By-October sketch prompts, starting with the classics and sliding into the delightfully weird.
Jack-o’-Lantern Faces With Totally Different Moods
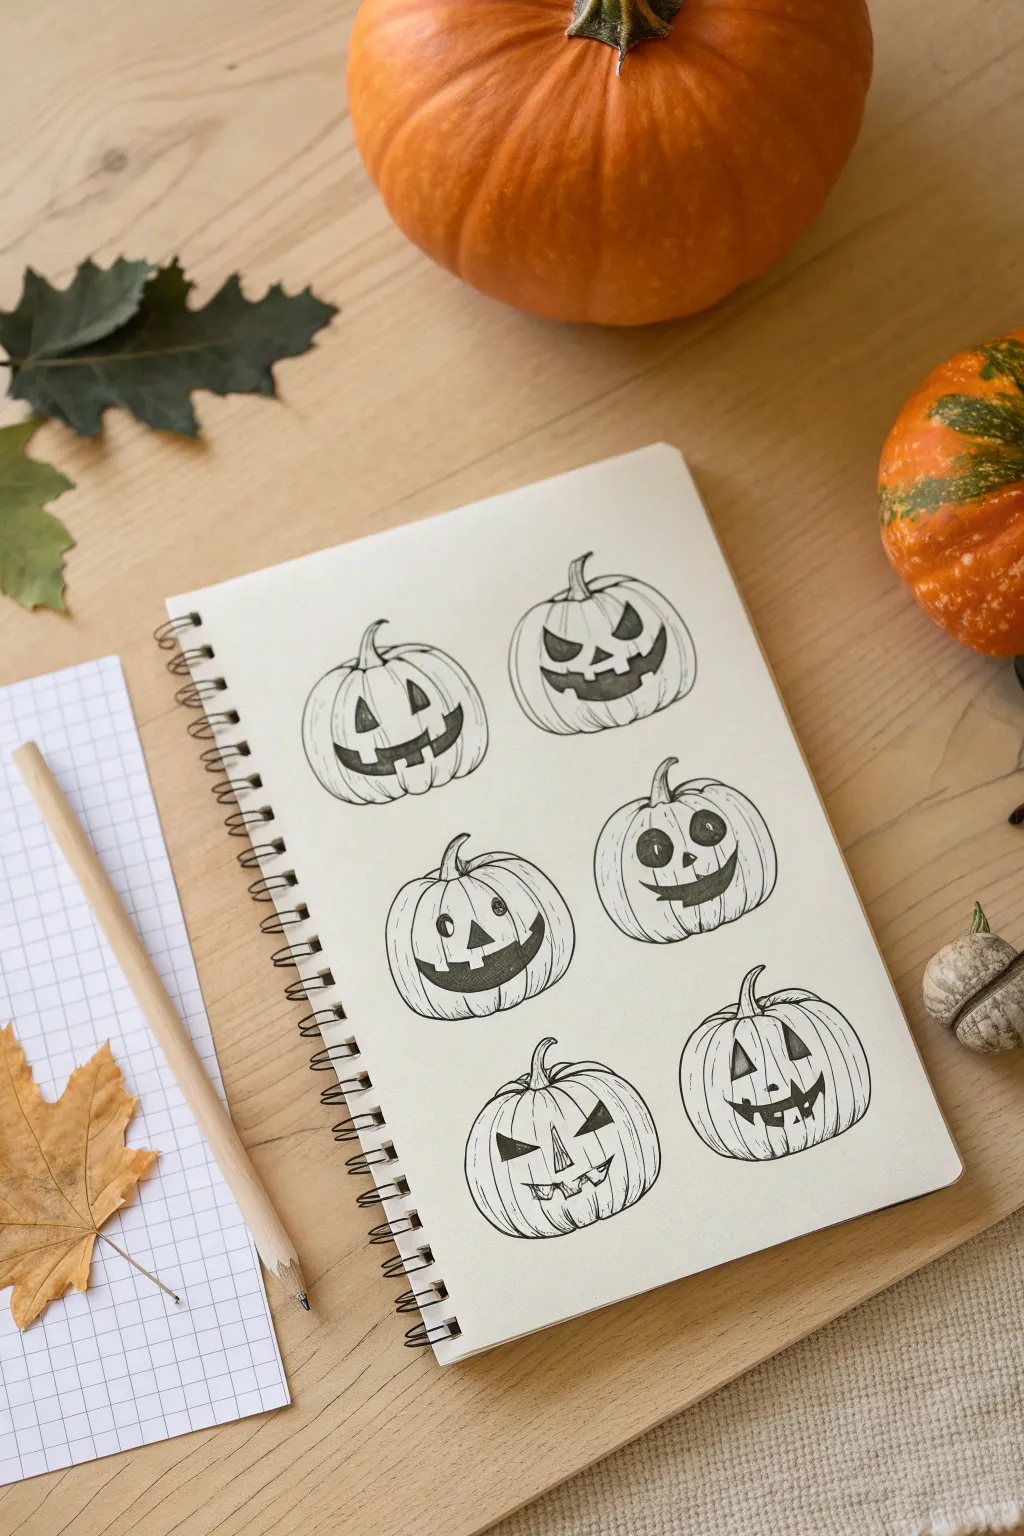
Capture the spirit of Halloween with this study of six distinct Jack-o’-Lantern personalities. This sketchbook page exercise explores how subtle changes in eye shape and mouth curvature can completely transform a pumpkin’s expression from spooky to silly.
How-To Guide
Materials
- Sketchbook with smooth, off-white paper
- Pencil (HB or 2B for initial sketching)
- Fine-liner pen (0.3mm or 0.5mm black)
- Eraser
- Soft blending stump (optional)
- Reference photo of pumpkins (optional)
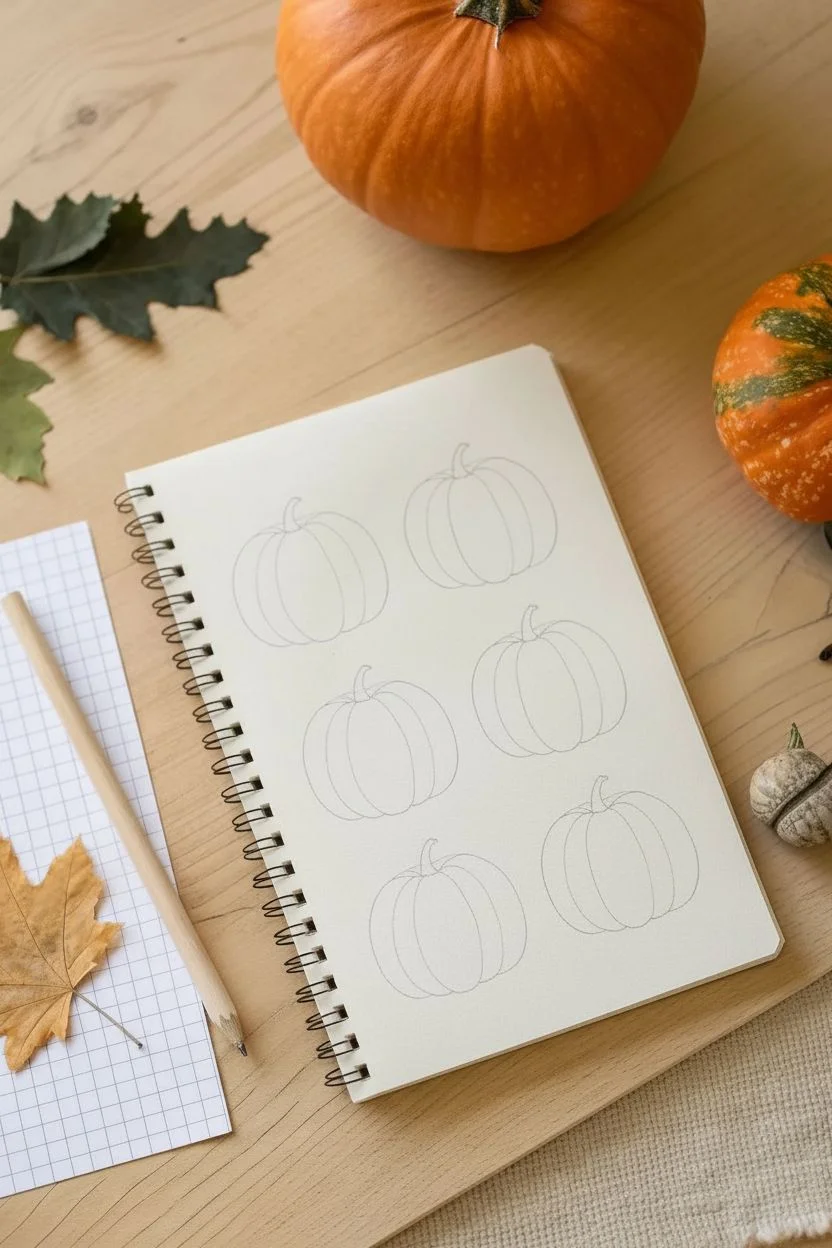
Step 1: Setting the Composition
-
Plan the layout:
Visualize six evenly spaced zones on your sketchbook page: two columns and three rows. I like to lightly mark the centers of where each pumpkin will sit to ensure they aren’t crowded together. -
Draft the basic shapes:
Using your pencil with a very light hand, draw six ovals or flattened circles. Vary the shapes slightly—make some wider and squat, others a bit taller—to give each pumpkin unique character. -
Add the segments based on perspective:
Sketch the vertical ribs (ridges) of the pumpkins. Start with a central curve for the middle rib, then add C-shaped curves radiating outward on either side. Remember that the outer ribs should appear thinner due to perspective.
Step 2: Designing the Personalities
-
Sketch the Classic Jack (Top Left):
For the first face, draw triangular eyes and a small triangular nose. Sketch a wide, grinning mouth with three square teeth—one top, two bottom. -
Create the Menacing Grin (Top Right):
Draw angled, aggressive eyebrows that slant downward toward the center. Add half-moon eyes beneath them and a jagged, wavy mouth filled with sharp teeth. -
Draw the Goofy face (Middle Left):
This pumpkin needs rounder, softer features. Draw large circular eyes with visible pupils looking sideways. Give it a wide, open-mouthed grin with a single large tooth at the bottom. -
Draft the Friendly face (Middle Right):
Draw two large, round eyes with pupils looking slightly up. Add a simple, curved smile that tapers at the ends, making it look cheerful but slightly mischievous. -
Sketch the Zig-Zag Scare (Bottom Left):
Create triangular eyes that are quite narrow. Draw a mouth that is a single, continuous zig-zag line, stitched shut or grimacing, rather than an open cavity. -
Add the Traditional Spook (Bottom Right):
Go for classic triangle eyes again, but taller. Add a wide mouth that droops slightly at the corners before curling up, giving it a slightly unsettling, classic Halloween vibe.
Uneven Ink Lines?
Don’t panic! Wobbly lines actually make pumpkins look more realistic and organic. Embrace the imperfections as natural texture.
Step 3: Inking and Definition
-
Outline the pumpkin bodies:
Switch to your fine-liner pen. Trace over your pencil lines for the pumpkin ribs. Use broken or slightly wavering lines rather than perfect curves to mimic organic pumpkin skin. -
Add the stems:
Ink the stems at the top of each fruit. Give them a twisted, cut-off look, adding small lines inside the stem shape to suggest fibrous texture. -
Ink the facial features:
Carefully outline the eyes, noses, and mouths you sketched earlier. Keep your hand steady here to maintain the specific expressions you designed. -
Fill in the darks:
Using the fine-liner or a slightly thicker marker, color inside the mouths, noses, and eyes. This high contrast creates the ‘carved’ illusion. -
Add depth lines:
Draw very fine, short hatching lines at the bottom of the pumpkin segments and near the stem. This subtle shading gives the pumpkins volume and weight.
Add a Glow Effect
Use a yellow or orange colored pencil to lightly shade around the eyes and mouth openings to make it look like there’s a candle inside.
Step 4: Finishing Touches
-
Erase guidelines:
Wait until the ink is completely dry (give it a full minute) to avoid smudging. Gently erase all the underlying pencil sketches. -
Refine the texture:
Look at your drawing as a whole. If any pumpkin looks too flat, add a few more vertical texture lines following the curve of the ribs. -
Add cast shadows (optional):
If you want to ground them, add a tiny bit of pencil shading underneath each pumpkin to show they are sitting on a surface.
You now have a playful reference sheet of pumpkin faces ready for the season


Cute Ghosts With Props (And Big Personality)
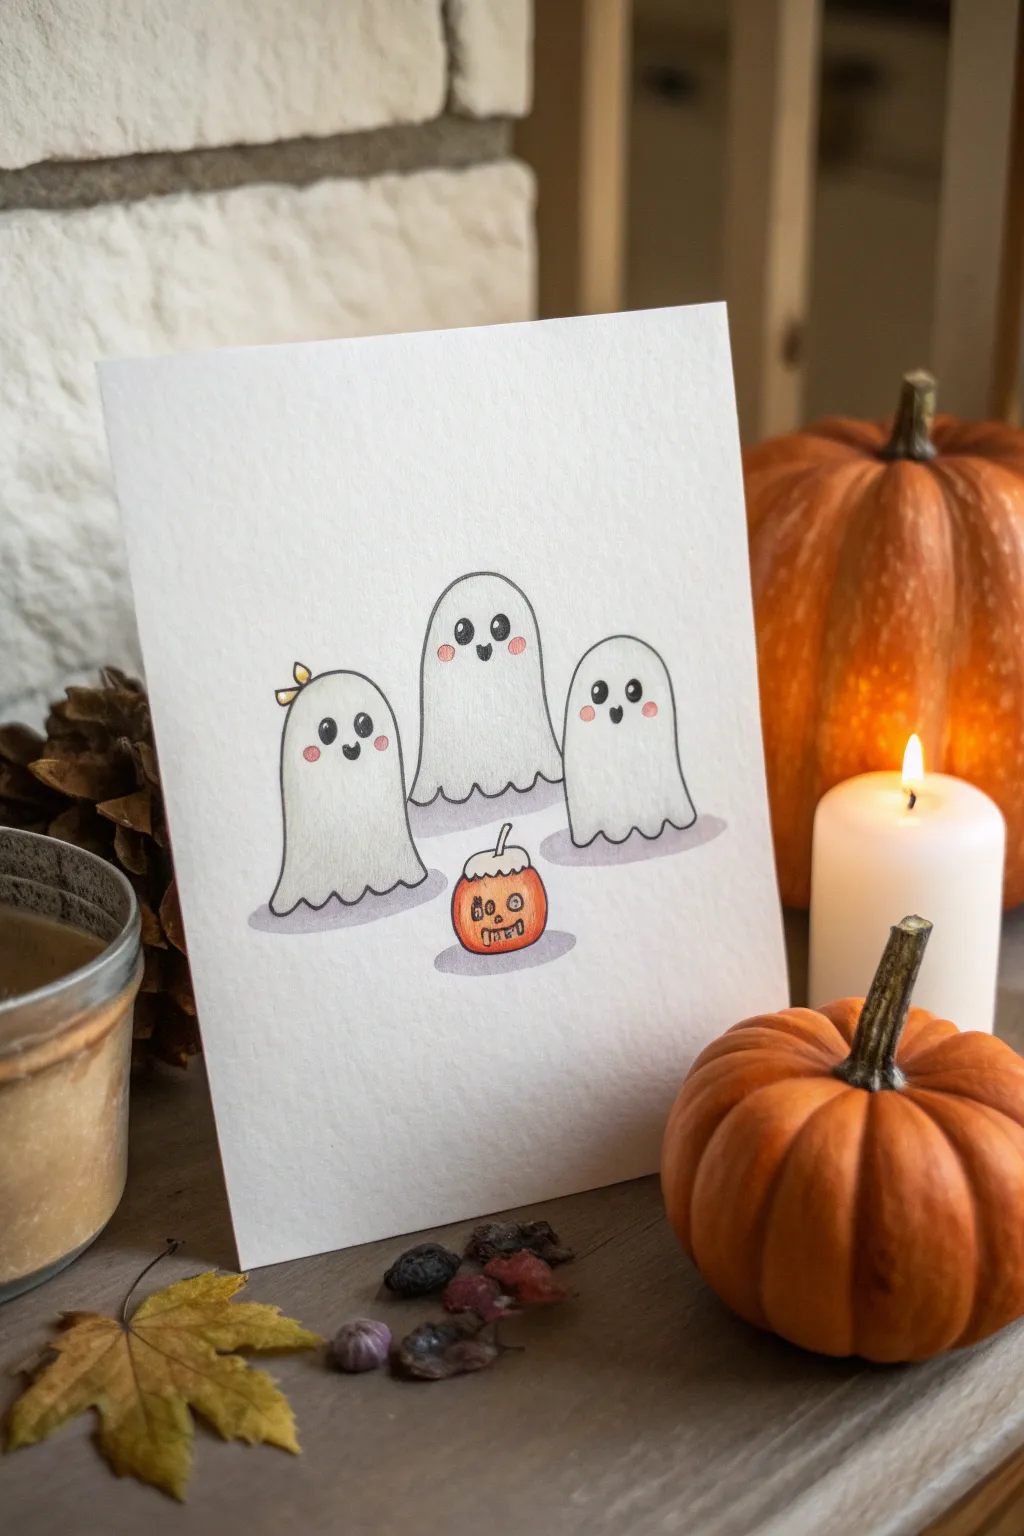
Capture the sweeter side of spookiness with this adorable illustration of three ghost friends admiring a tiny jack-o’-lantern. Using simple linework and soft shading, you’ll create a heartwarming scene perfect for a greeting card or festive art print.
Step-by-Step Guide
Materials
- Thick drawing paper or cardstock (cold press watercolor paper adds nice texture)
- Fine liner pen (black, waterproof, size 03 or 05)
- Colored pencils (cool gray, orange, yellow, pink, brown, and light blue)
- Pencil and eraser for sketching
- Paper blending stump or cotton swab (optional)
Step 1: Planning the Composition
-
Rough ghost placement:
Start by lightly sketching three dome shapes with your pencil. Place one taller ghost in the center back, and two slightly shorter ghosts flanking it in the foreground to create depth. -
Define the bottoms:
Connect the sides of your domes with wavy, scalloped lines to create the ruffled bottom edge of the ghostly sheets. Make the center ghost’s hem sit slightly higher up on the page than the front two. -
Sketch the pumpkin prop:
Draw a small, slightly flattened circle centered in front of the middle ghost. Add a tiny stem on top. -
Add a bow detail:
On the left ghost, sketch a small, slanted bow on the upper left side of its head for a touch of personality.
Step 2: Refining Features
-
Ghost faces:
Draw wide-set eyes using oval shapes for all three ghosts. Add tiny, U-shaped mouths between the eyes. For the center and right ghosts, place the mouth slightly higher to look like an open smile. -
Pumpkin details:
Give the pumpkin a face with simple triangle eyes and a toothy grin. Draw vertical curved lines to indicate the pumpkin’s ribs. -
Inking the outlines:
Go over your pencil lines with a waterproof fine liner pen. Keep your hand steady but allow for slight organic wobbles in the fabric folds. -
Erase guidelines:
Wait a moment for the ink to dry completely, then gently erase all the underlying pencil sketches.
Uneven Shading?
If pencil strokes look scratchy, use tiny circular motions rather than back-and-forth lines. Layer color slowly—it’s easier to add more gray than to erase it.
Step 3: Adding Color & Shadow
-
Ghostly shading:
Using a cool gray colored pencil, very lightly shade the bottom third of each ghost. Use small circular motions to build up color near the scalloped hem. -
Creating volume:
Extend the gray shading slightly up the sides of the ghosts to make them look rounded. I find that leaving the center of the bodies pure white maximizes the glow effect. -
Blushing cheeks:
Take a pink pencil and draw small, soft circles on the cheeks of each ghost, just below their eyes. -
Coloring the pumpkin:
Fill in the pumpkin with a vibrant orange pencil. Press harder near the edges and bottom to create a feeling of roundness. -
Stem and face details:
Color the stem brown. Use a yellow pencil to fill the eyes and mouth of the jack-o’-lantern so it looks lit from within. -
Accessories:
Color the bow on the left ghost with yellow, adding a tiny bit of orange or brown in the center knot for shadow.
Make It Sparkle
Once finished, use a white gel pen to add tiny reflection dots to the ghosts’ eyes. You can also draw small floating stars or sparkles around them in yellow.
Step 4: Ground & Shadows
-
Casting shadows:
Use a darker gray or a muted violet pencil to draw oval shadows on the ground directly beneath each figure. -
Softening the edge:
Use a light touch to fade these cast shadows out at the edges so they don’t look like solid holes. -
Final blending:
If your shading looks too sketch-like, use a paper blending stump or clean cotton swab to smooth out the pencil strokes on the ghosts’ bodies.
Now you have a charming ghost squad ready to haunt your home with cuteness


Bats in Silhouette Against a Bold Moon
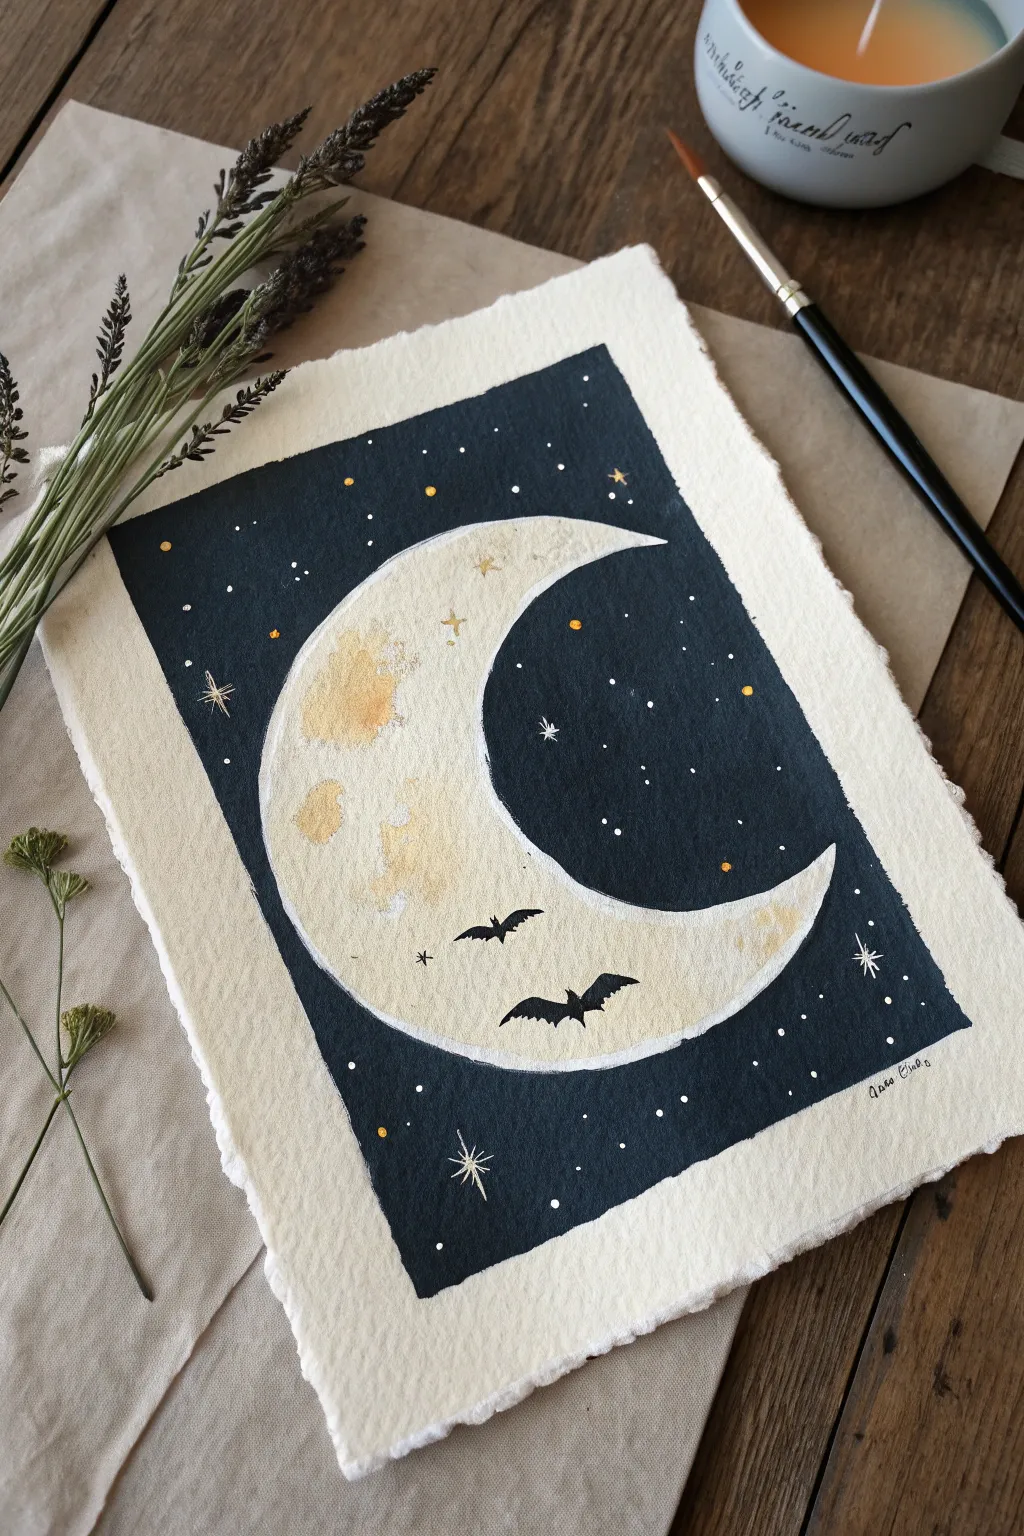
Capture the eerie beauty of Halloween night with this striking contrast illustration. Using opaque paints on textured paper creates a moody, magical atmosphere where delicate bats dance across a glowing crescent moon.
Detailed Instructions
Materials
- Heavyweight watercolor paper (preferably with deckled edges)
- Pencil (HB or lighter)
- Kneaded eraser
- Navy blue or indigo gouache paint
- Yellow ochre watercolor or gouache
- Burnt sienna watercolor or gouache
- White gouache
- Black ink or gouache
- Round brushes (sizes 2, 4, and a tiny detail brush)
- Clean water cups
- Paper towel
- Ruler (optional)
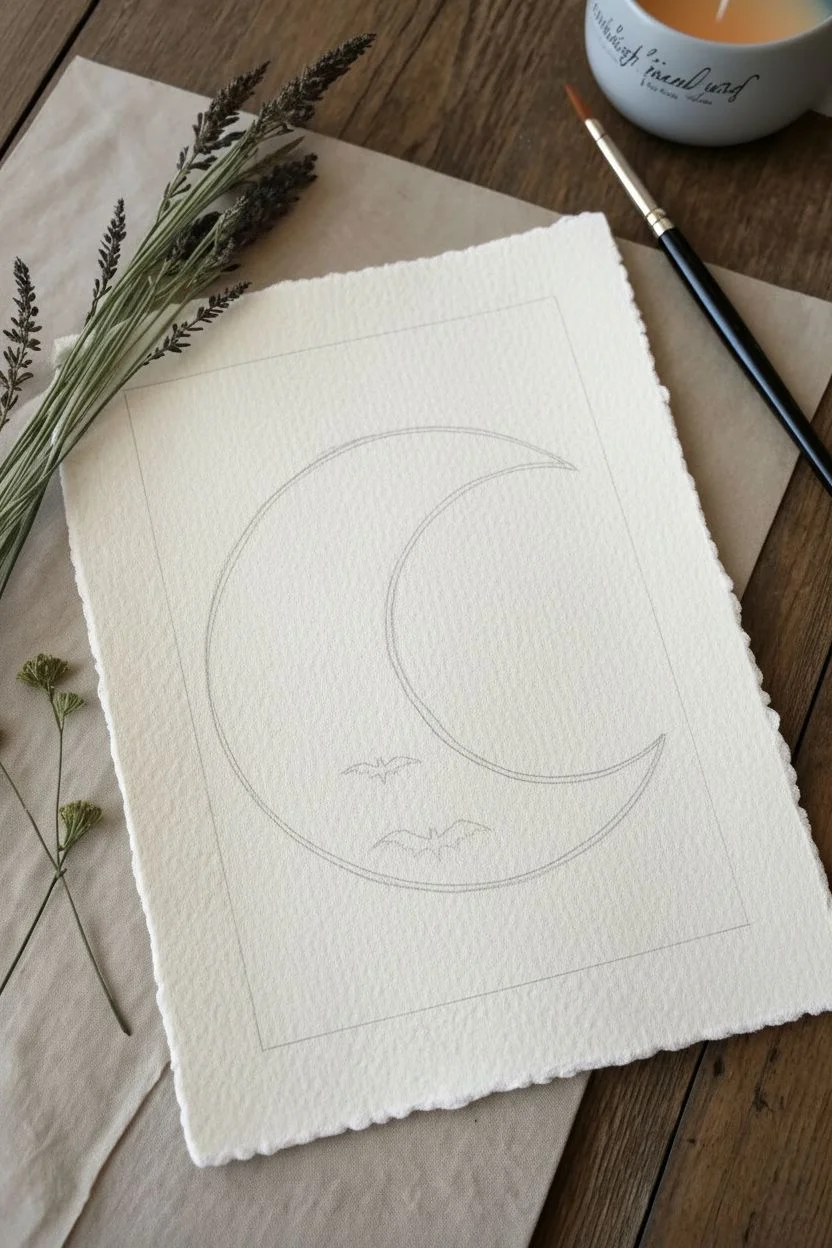
Step 1: Planning and Sketching
-
Define the Frame:
Begin by deciding the size of your painting area. Instead of taping down the edges, freehand a rectangle in the center of your paper to keep that organic, handmade look, leaving a generous border of raw paper visible. -
Sketch the Moon:
Draw a large crescent moon shape dominating the center of your rectangle. Keep the curve smooth and the points sharp. Don’t worry if it’s not perfect circles; a slightly stylized shape adds character. -
Position the Bats:
Lightly sketch two small bat silhouettes flying across the lower half of the moon. Place them so they overlap the moon’s surface rather than the dark background to ensure high contrast.
Step 2: Painting the Sky
-
Prepare the Dark Mix:
Mix a deep, rich navy blue or indigo gouache. You want a creamy consistency that is opaque enough to cover the paper but fluid enough to spread evenly. -
Cut in the Edges:
Using a size 4 round brush, carefully paint the dark sky area. Start by outlining the moon shape precisely—this is ‘cutting in.’ Keep your hand steady to maintain the moon’s crisp edge. -
Fill the Background:
Fill in the rest of the rectangular background with your dark blue mix. Work fairly quickly to avoid streak marks, but don’t rush the edges. I find it helps to rotate the paper to get the best angle for the straight outer edges. -
Dry Completely:
Let this dark background layer dry fully. Gouache can reactivate if you touch it while wet, so patience is key here.
Gouache Tip
If your dark background looks streaky after drying, don’t panic. Apply a second thin coat of the navy paint in the opposite direction for a velvet-smooth finish.
Step 3: Creating the Moon
-
Base Layer:
Dilute some yellow ochre very heavily with water to create a pale, creamy wash. Paint the entire surface of the moon with this translucent layer. -
Add Texture:
While the base is still slightly damp, drop in tiny touches of stronger yellow ochre and a hint of burnt sienna. Allow these colors to bloom slightly to mimic craters and lunar shadows. -
Refine the Surface:
Once the initial wash is dry, use a damp brush to gently lift pigment or dab on a thicker cream color in random patches to create that classic dry, cratered moon texture.
Make It Sparkle
Mix a tiny amount of metallic gold watercolor or ink into your yellow star accents for a subtle shimmer that catches the light when viewed from an angle.
Step 4: Details and Stars
-
Paint the Bats:
Switch to your smallest detail brush and black ink or gouache. Carefully fill in the bat silhouettes you sketched earlier, ensuring their wings are sharp and defined against the pale moon. -
Add Large Stars:
Using white gouache, paint a few four-pointed stars in the dark sky. Make the vertical line longer than the horizontal line for a twinkling effect. Add a tiny dot of yellow to the center of larger stars. -
Create the Starfield:
Dip your small brush in white gouache and dot tiny stars throughout the blue background. Vary the sizes—some should be microscopic pinpricks, others slightly larger dots. -
Golden Accents:
To warm up the sky, add a few tiny dots of yellow ochre among the white stars. This subtle addition ties the sky back to the color of the moon. -
Final Highlights:
Add a microscopic touch of white ink or paint to the tips of the larger stars to make them really shine.
Once dry, display your celestial scene in a floating frame to show off the beautiful paper texture


Witch Hats With Texture, Buckles, and Creases
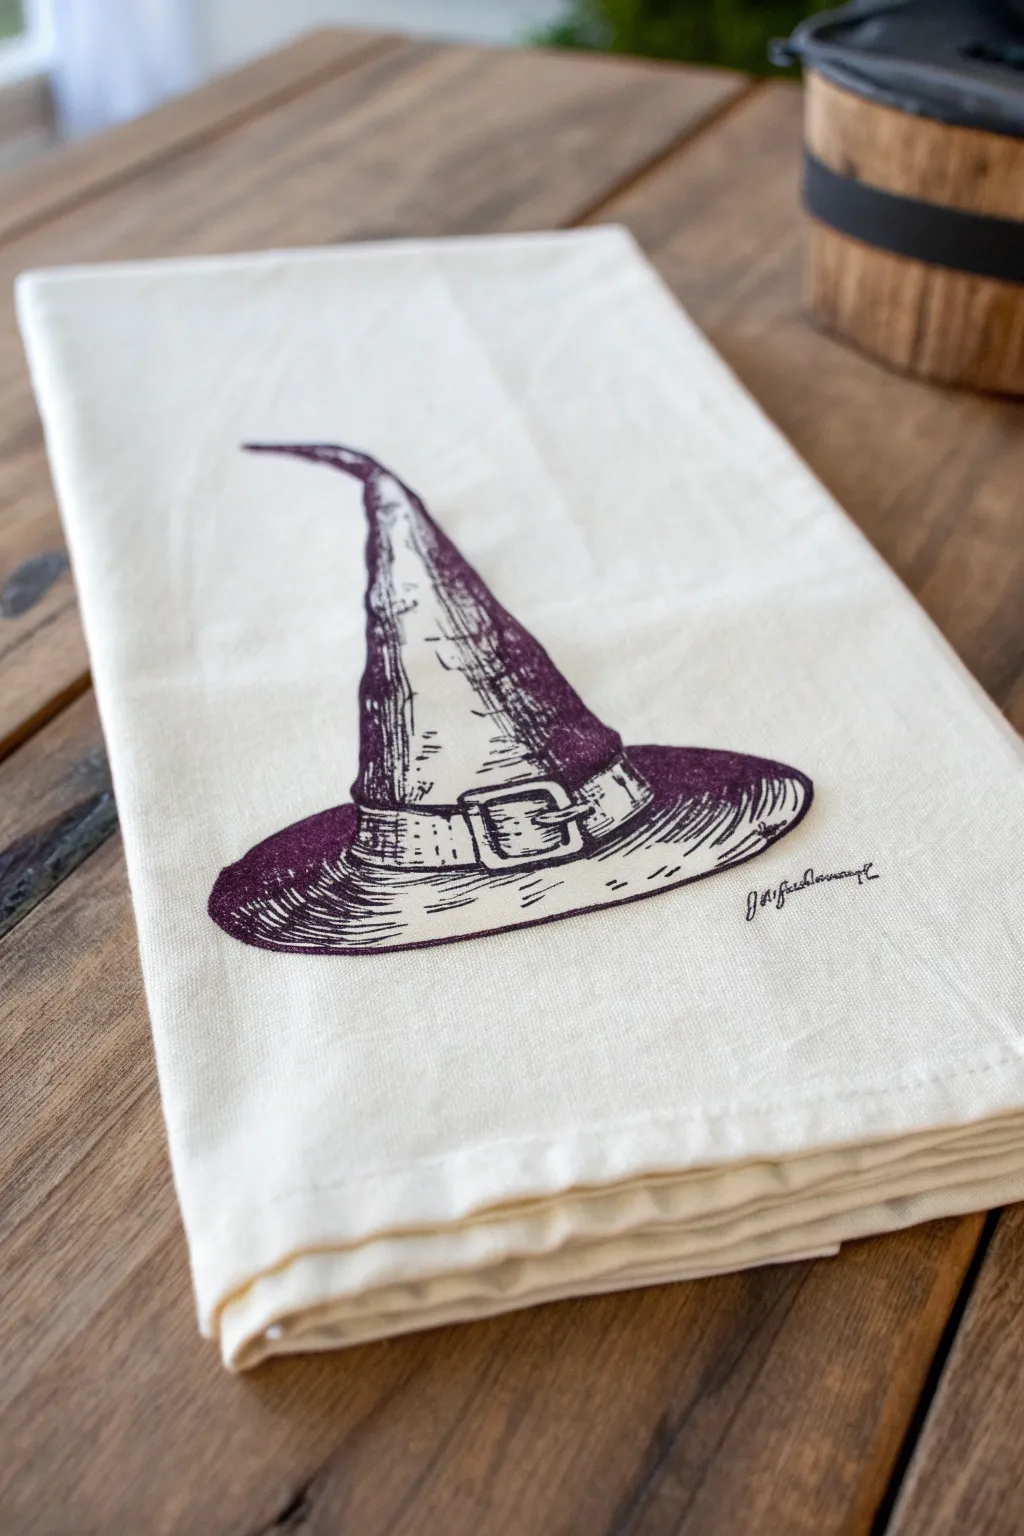
This rustic, hand-sketched design captures the whimsical charm of a witch’s hat with heavy emphasis on texture and age. The deep purple ink on cream fabric gives a vintage, screen-printed feel that works perfectly for Halloween kitchen decor.
How-To Guide
Materials
- Cream or off-white cotton flour sack tea towel
- Fabric transfer paper or pencil (for initial sketch)
- Fine-point fabric marker in dark plum or deep violet
- Medium-point fabric marker in the same plum color
- Iron and ironing board
- Piece of cardboard (to place inside the towel)
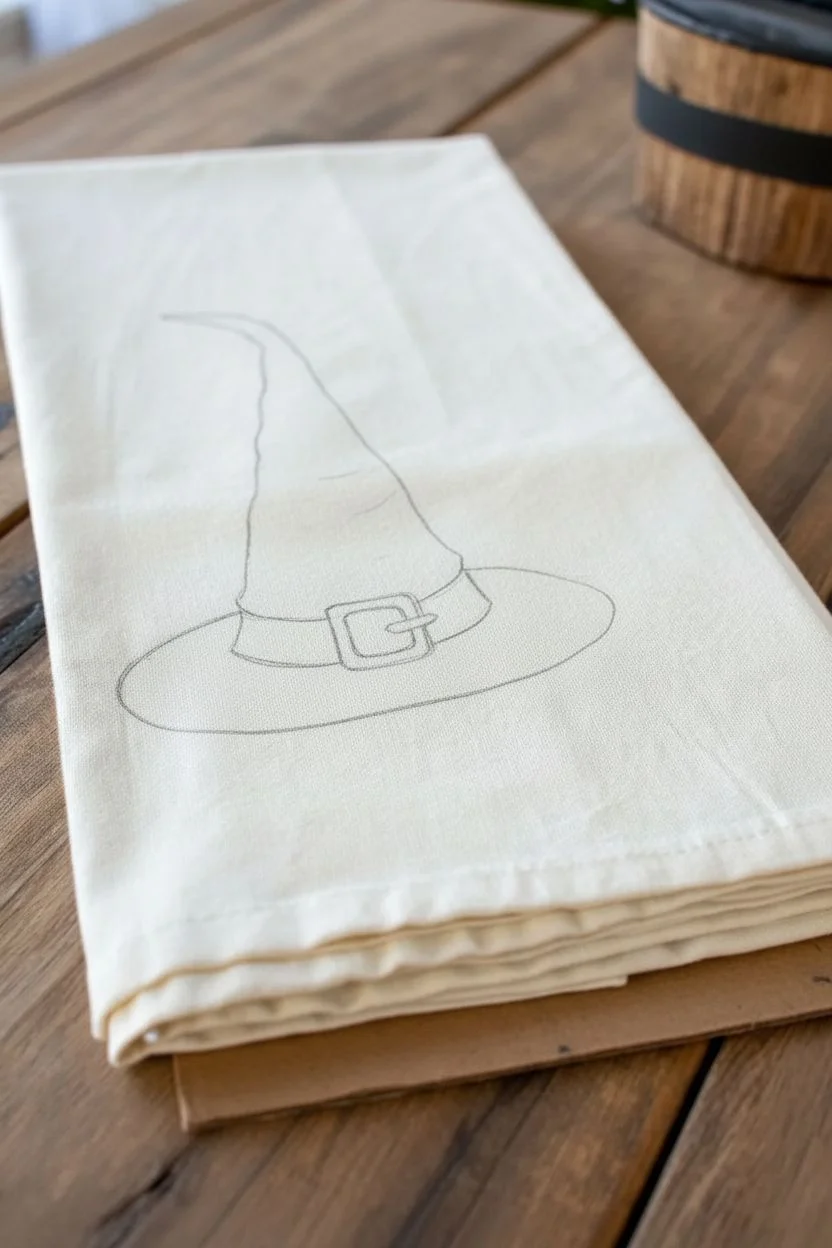
Step 1: Preparation & Outline
-
Prepare the fabric:
Begin by washing and drying your tea towel to remove any sizing, then iron it flat to ensure a smooth drawing surface. -
Protect your surface:
Slide a piece of cardboard underneath the area where you plan to draw. This is crucial to prevent the ink from bleeding through to the other side of the towel or onto your table. -
Draft the basic shape:
Using a pencil very lightly, sketch the outline of the hat. Start with a wide, flattened oval for the brim. -
Add the cone:
Draft the cone shape rising from the center of the brim, but instead of a straight triangle, give it a slight curve to the left, curling the very tip downward like a hook. -
Sketch the buckle band:
Draw a band just above the brim. I like to make this band look slightly loose by curving the lines downward. -
Detail the buckle:
Add a square buckle slightly off-center on the band, drawing the prong resting on the frame.
Hatching Pro Tip
Don’t press hard with the marker. Use quick, light flicks of the wrist when hatching. This feathers the ends of the lines, making the shading look smoother.
Step 2: Inking the Details
-
Start the main outline:
Switch to your medium-point fabric marker. Trace over your pencil lines for the outer brim and the main cone shape, using a slightly shaky or broken line to create an illustrative, vintage texture. -
Define the buckle:
Ink the buckle and the band. Make the lines of the band slightly thicker to differentiate the leather texture from the hat fabric. -
Add vertical creases:
Draw long, vertical lines running up the length of the cone. These shouldn’t be straight; waver them to simulate wrinkles in fabric. -
Create horizontal breaks:
Intersect your vertical lines with small, horizontal hatch marks. This cross-hatching technique builds the illusion of rough, woven fabric.
Step 3: Shading & Texture
-
Switch to fine details:
Grab your fine-point marker for the shading work. This prevents the drawing from becoming a dark blob. -
Shadow the cone right:
Apply dense, vertical hatching lines heavily on the right side of the cone to create a cylindrical 3D form. -
Deepen the brim shadow:
On the left side of the brim, use tight, close-together lines to color it almost completely deep purple, leaving just small slivers of cream showing through for texture. -
Highlight the curve:
Leave the center-left area of the cone mostly empty or with very sparse lines. This negative space acts as a highlight where the light hits the hat. -
Texture the brim underside:
On the right side of the brim, use curved horizontal lines that follow the shape of the oval to show the brim’s curve. -
Add loose scribbles:
Go back over the darkest areas and add a few loose, scribbly lines to enhance that ‘hand-sketched’ aesthetic. -
Initial your work:
Sign your name or initials near the bottom right of the hat using a flowing, cursive script. -
Set the ink:
Follow the instructions on your fabric marker packaging. Usually, this involves letting it dry for 24 hours and then heat-setting with a hot iron (no steam) to make it washable.
Vintage Dye Look
Want an aged look? Before drawing, soak the tea towel in strong black tea for 10 minutes, rinse, and dry. This turns the bright white fabric into an antique parchment color.
Once heat-set, your spooky tea towel is ready to haunt your kitchen or serve as a thoughtful seasonal gift
BRUSH GUIDE
The Right Brush for Every Stroke
From clean lines to bold texture — master brush choice, stroke control, and essential techniques.
Explore the Full Guide
Spiderweb Corners for Instant Halloween Vibes
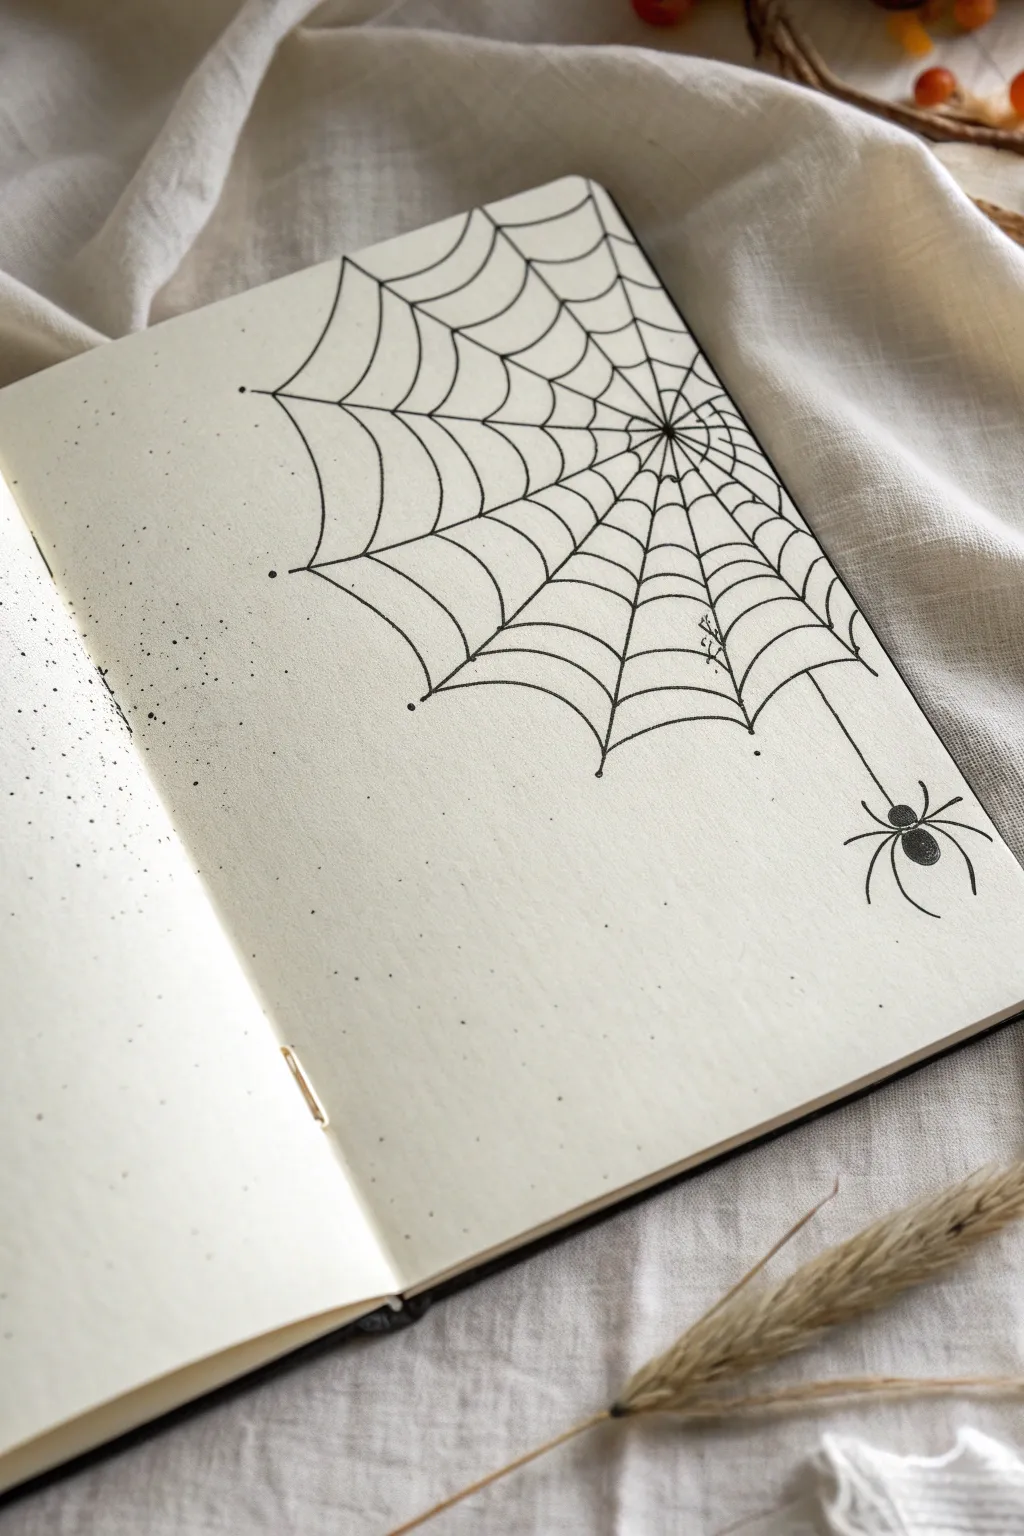
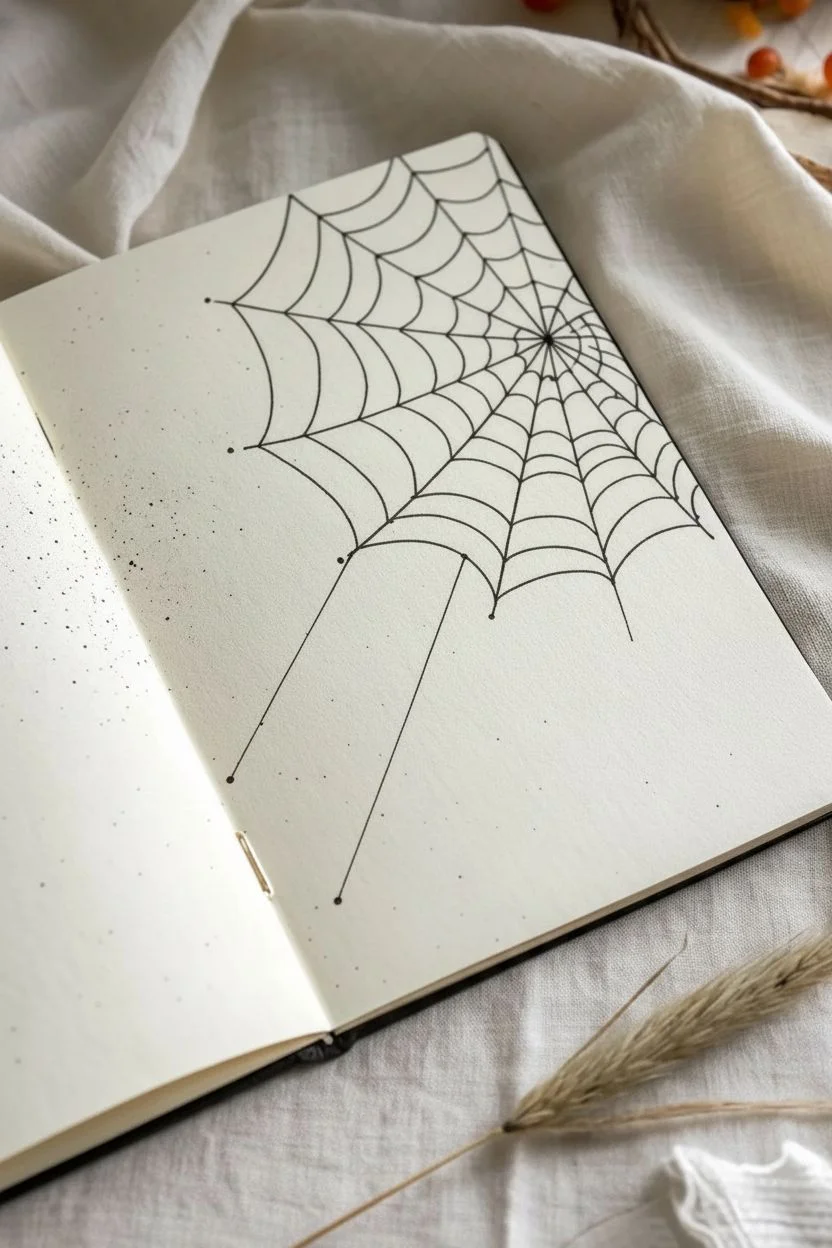
Transform a blank journal page into a spooky scene with this deceptively simple ink drawing. The clean lines of the web contrasted with delicate ink splatters create a minimalist yet striking Halloween aesthetic perfect for bullet journals.
Step-by-Step Guide
Materials
- Dotted or plain journal/sketchbook
- Fine liner pen (01 or 03 nib size)
- Thicker drawing pen (05 or 08 nib size)
- Pencil and eraser
- Scrap paper (for testing splatters)
Step 1: Setting the Structure
-
Mark the center point:
Begin by deciding where your web will anchor. In this design, place a small pencil dot roughly one-third of the way down the page and about an inch or two away from the gutter (the center fold). -
Draw the main radial lines:
Using your fine liner, draw straight lines radiating outward from your center point. Imagine these as the spokes of a wheel.Extend them all the way to the top and right edges of the page, varying the angles slightly so they aren’t perfectly symmetrical. -
Extend lines to the left:
Draw longer radial lines extending toward the bottom left. These should be longer than the others to create that sweeping, asymmetrical look shown in the reference. -
Add anchor dots:
At the very end of the floating lines (the ones that don’t touch the paper edge), draw tiny black dots. This gives the web a finished, deliberate appearance.
Curve Control
Keep your wrist loose when drawing the scalloped web lines. If you try to control the pen too tightly, the lines will look rigid rather than like draped silk.
Step 2: Weaving the Web
-
Start the inner spiral:
Starting very close to the center point, draw the first row of webbing. Connect two radial lines with a small, concave curve (curving inward toward the center). -
Continue the curves:
Work your way around the center point, connecting each spoke with these small U-shaped curves. I find it easiest to rotate the notebook as I go to keep my hand position consistent. -
Build outward:
Move a little further out and start a second row of curves. Try not to make the spacing perfectly even; a little natural variation makes the web look more organic and creepy. -
Widen the gaps:
As you move toward the outer edges of the web, increase the distance between your rows of webbing. The curves should also get wider and slightly flatter as they get further from the center. -
Add a flaw:
For extra realism, create a small ‘broken’ section. In one of the middle gaps, draw a tiny, dangling, tangled line instead of a perfect curve, like a bug got caught or the wind tore it. -
Finish the outer edge:
Complete the web by adding the final, widest curves connecting the ends of your longest radial lines.
Step 3: The Spider & Details
-
Draw the drop line:
Choose a point on the lower right section of the web. Draw a straight vertical line hanging down about two inches. -
Create the spider body:
At the end of the line, draw two shapes with your thicker pen: a small circle for the head/thorax and a larger, slightly elongated oval for the abdomen underneath it. Fill them in solid black. -
Add the legs:
Switch back to the fine liner for delicate legs. Draw four legs on each side of the body. The front two should curve slightly forward, while the back two trail behind. -
Refine the leg joints:
Make sure the legs have a distinct ‘bend’ or joint in the middle. The tips should be sharp and delicate. -
Add texture with stippling:
To create the atmospheric background, use your fine pen to tap tiny dots randomly around the web. Concentrate more dots near the left edge of the page and fade them out as they get closer to the web. -
Create flicked splatters:
For the faint, random specks, take your pen and very gently flick the tip against the edge of a ruler or another pen over the paper. Test this on scrap paper first to control the spray. -
Erase pencil guides:
Wait at least five minutes to ensure the ink is absolutely bone dry, then gently erase your initial center point mark.
Smudge Alert
If you’re left-handed, work from right to left across the web to avoid dragging your hand through wet ink. Or place a clean sheet of paper heavily under your hand.
Now you have a wonderfully creepy corner piece ready to host your daily to-do list or sinister thoughts
Adorable Spiders That Don’t Feel Too Creepy
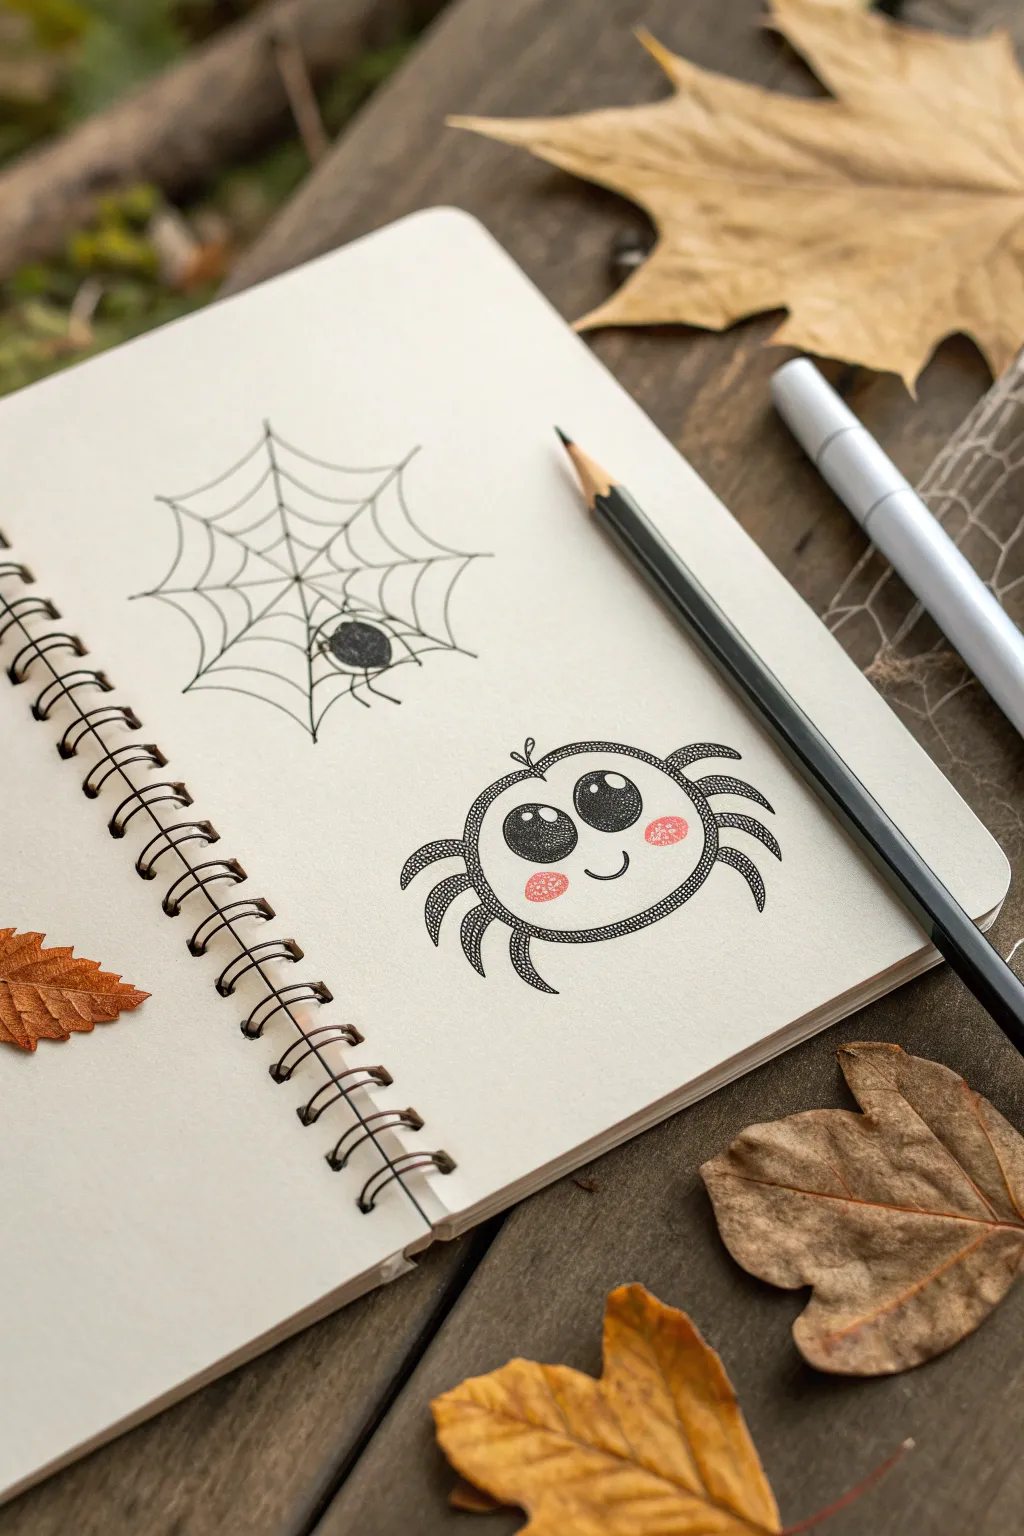
Embrace the sweeter side of spookiness with this adorable pair of drawings featuring a classic hanging spider and a larger, kawaii-style friend. Perfect for autumn journaling, this project relies on simple shapes and bold outlines to create a friendly Halloween vibe.
Step-by-Step Tutorial
Materials
- Spiral-bound sketchbook with smooth paper
- Fine liner pen (black, roughly 0.5mm)
- Pencil (HB or similar for initial sketching)
- Eraser
- Pink colored pencil or pastel
Step 1: Drawing the Classic Web
-
Outline the main spokes:
Start near the top left of your page. Draw a central point and lightly sketch 6-8 straight lines radiating outward like the spokes of a wheel. -
Connect the spokes:
Starting near the center, draw curved, scalloped lines connecting each spoke. Continue adding these connecting lines in expanding circles until you reach the outer edges of your spokes. -
Add the hanging thread:
Choose a spot on the web and draw a single straight line dropping down. This will be the silk thread for your little spider. -
Draw the spider body:
At the end of the thread, draw a filled-in black oval for the spider’s body. It should be small and simple. -
Add tiny legs:
Draw four small, curved L-shaped legs coming off each side of the oval body to complete the silhouette.
Step 2: Creating the Kawaii Spider
-
Sketch the body shape:
Further down the page, lightly pencil a wide, slightly flattened oval. Imagine a squashed pumpkin shape. -
Draw the big eyes:
Inside the oval, draw two large circles near the top center. They should be close together but not touching. -
Ink the eye details:
Inside the large eye circles, draw two smaller circles for highlights (one large, one tiny) in the upper corners. Fill in the rest of the eye with solid black ink. -
Add the smile:
Draw a small, simple ‘u’ shape directly between and below the eyes for a happy mouth. -
Outline the body:
Go over your exterior pencil oval with your ink pen. I like to double up this line or use slight scribbles to give it a fuzzy, textured look rather than a perfect geometric line. -
Add the legs:
Draw four legs on each side. Start with the top legs curving upward, and the lower legs curving downward. Use a segmented style by drawing short, pill-shaped sections for each leg part. -
Texture the legs:
Similar to the body, you can add tiny hatching or stippling lines on the legs to suggest a little bit of fuzziness. -
Draw the top tuft:
Add a tiny little cowlick or tuft of hair on the very top center of the spider’s head using two small loops. -
Apply blush:
Take your pink pencil and gently shade small oval cheeks right under the eyes. This gives it that signature kawaii character. -
Final cleanup:
Once the ink is completely dry, gently erase any visible pencil sketch marks to keep the page looking crisp.
Fuzzy Texture Tip
Instead of a solid single line for the body, try lifting your pen repeatedly to create a ‘broken’ line. This makes the spider look naturally fuzzy.
Level Up: Seasonal Twist
Give your spider a costume! Draw a tiny witch hat on its head or have it holding a small candy corn in one of its front legs.
Now you have a charming duo of arachnids to decorate your sketchbook pages for the season

PENCIL GUIDE
Understanding Pencil Grades from H to B
From first sketch to finished drawing — learn pencil grades, line control, and shading techniques.
Explore the Full Guide
Skull Sketches: Simple, Stylized, or Slightly Realistic
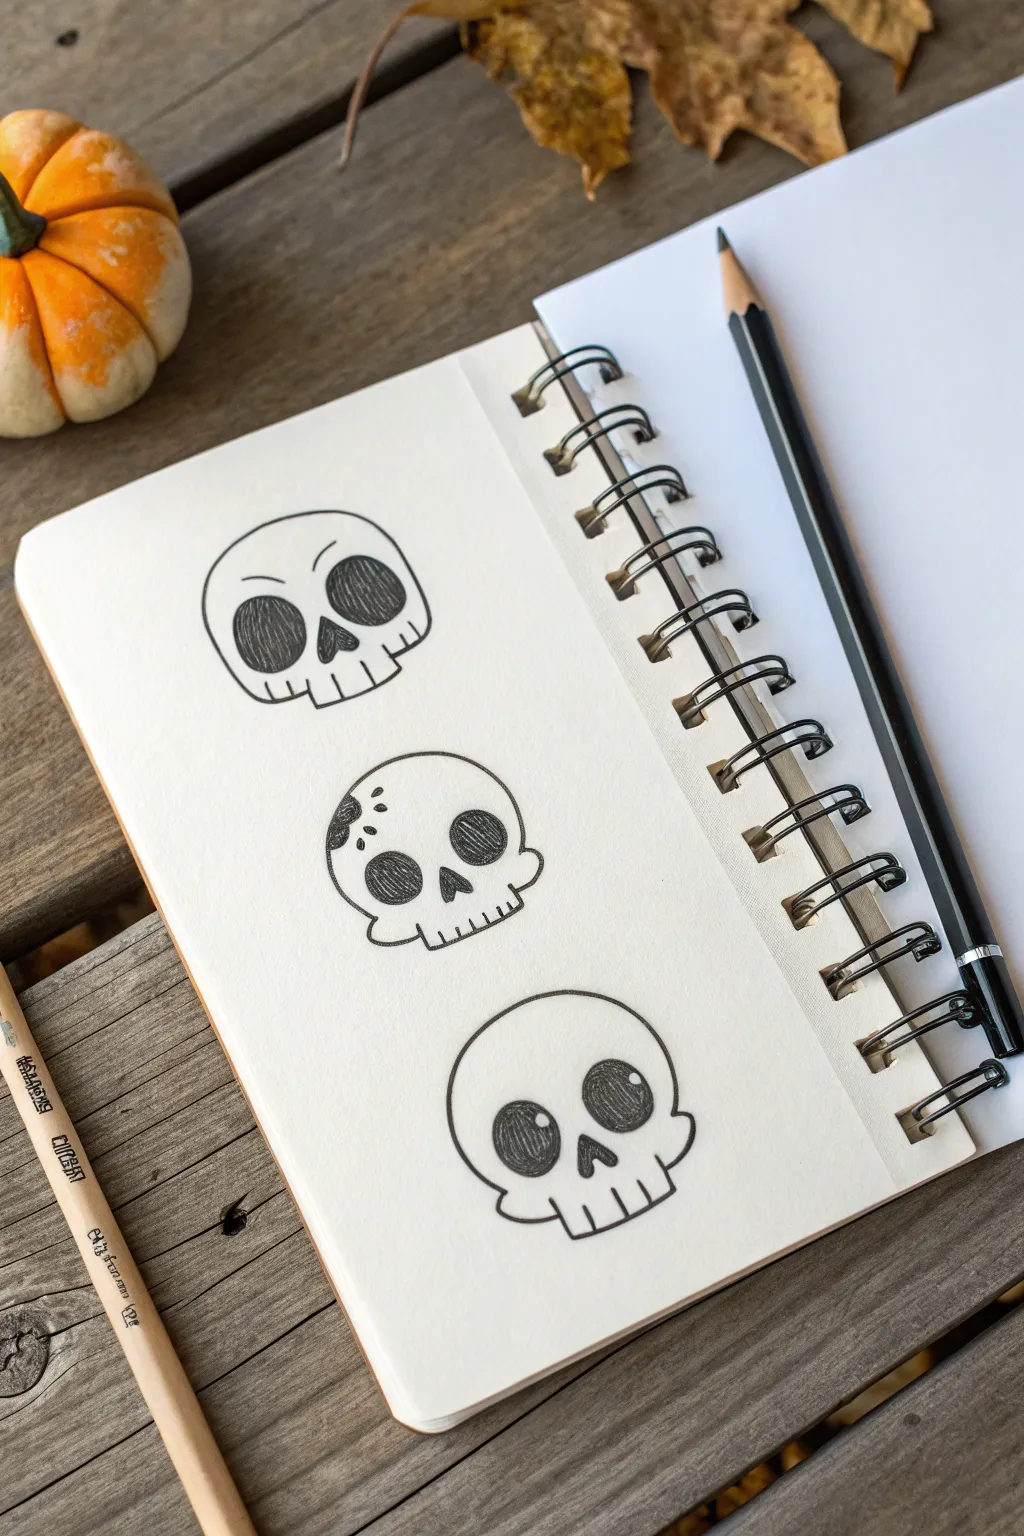
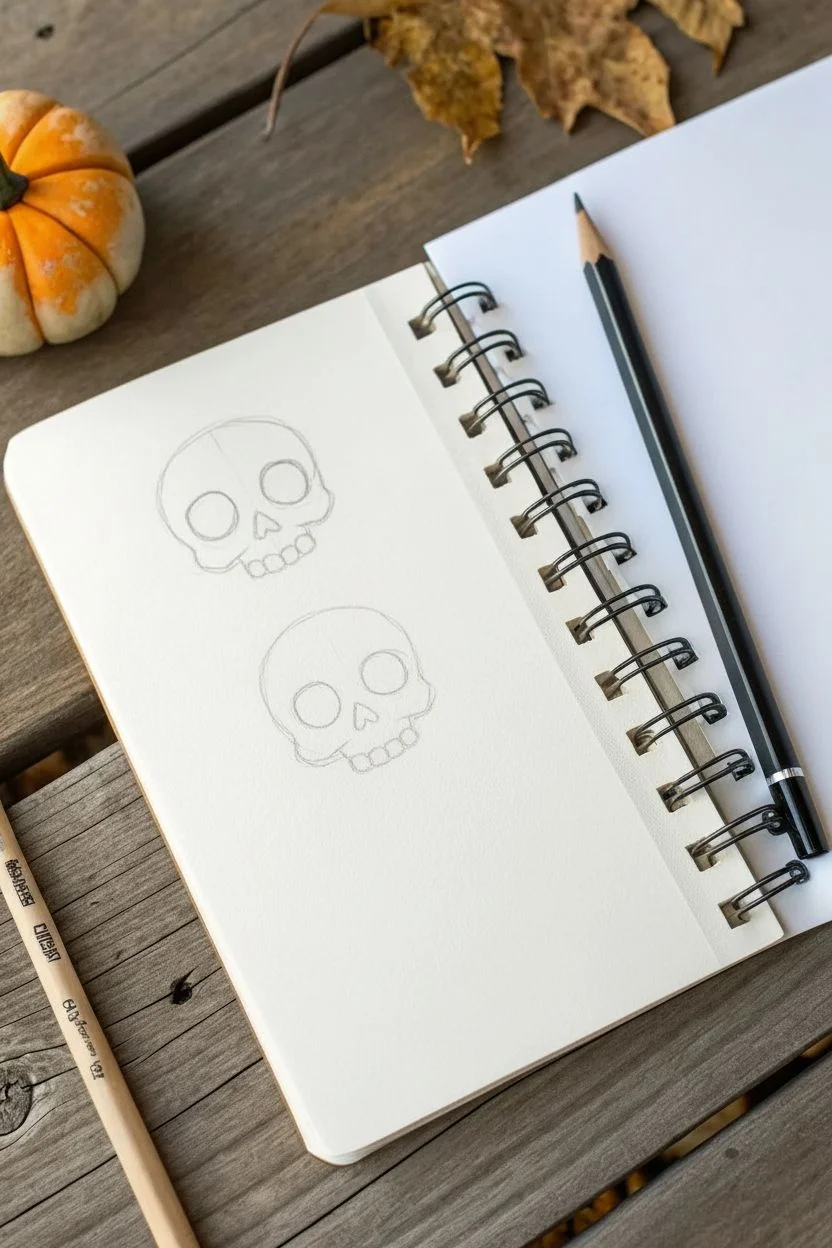
Practice your spooky sketching skills with this trio of distinct skull styles, ranging from serious to cute. These simple, bold line drawings are perfect for filling up a sketchbook page or adding a touch of Halloween flair to your journals.
Step-by-Step Guide
Materials
- Sketchbook or drawing paper
- Pencil (HB or 2B for initial sketching)
- Black drawing pen (fineliner or gel pen)
- Eraser
Step 1: The Determined Skull (Top)
-
Outline the Cranium:
Start by drawing a rounded dome shape for the top of the head. Don’t close the circle at the bottom yet; instead, let the sides dip inward slightly where the temples would be. -
Add Cheekbones and Jaw:
Below the temple dip, flare the line out slightly to create cheekbones, then curve down and inward to form a wide U-shape for the jaw. -
Draw Eye Sockets:
Draw two large, somewhat D-shaped ovals in the upper center. Angle them slightly downward towards the nose to give a menacing look. -
Add the Nose:
Between the eyes, sketch an upside-down heart shape or a triangle with notched sides for the nasal cavity. -
Sketch the Teeth:
Draw a horizontal line across the jaw area. Add small vertical lines along this main line to define the teeth, curving the outer ones specifically to match the jaw’s contour. -
Detail and Ink:
Trace over your pencil lines with your black pen. Fill in the eye sockets and nose cavity completely black, leaving small white streaks if you want a textured shading effect. Add two small curved lines above the eyes for angry eyebrows.
Step 2: The Weathered Skull (Middle)
-
Base Shape:
Draw a similar cranium shape to the first skull, but make the jaw section slightly narrower and boxier. -
Add Features:
Place two circular eyes lower on the face than before. Add a small, simple triangle for the nose. -
Create Damage:
On the left side of the forehead, draw an irregular, wobbly shape to represent a hole or fracture. Add a few small dots or smaller circles nearby to suggest pitting or decay. -
Teeth and Cracks:
Draw a simple grid-like pattern for the teeth, keeping them blocky. Add a tiny crack line extending from the jaw upward. -
Inking the Damage:
When inking, fill in the large fracture hole with scribbled shading rather than solid black to show texture. Shade the eye sockets and nose solid black.
Uneven Eyes?
Don’t stress about perfect symmetry. Slight differences in eye shape or size actually give skulls more character and make them look hand-drawn rather than stamped.
Step 3: The Friendly Skull (Bottom)
-
Round the Shape:
For this cute version, make the main head shape much rounder, almost like a squashed circle or a bun. -
Oversized Eyes:
Draw two very large, perfectly round circles for the eye sockets. They should take up a significant portion of the face. -
Tiny Nose and Jaw:
Draw a small, soft upside-down heart for the nose. Keep the jaw area excessively short and stubby to enhance the cute proportions. -
Cute Teeth:
Instead of a full set of teeth, just draw three or four simple U-shapes or vertical lines at the bottom. Less detail makes it look friendlier. -
Highlight the Eyes:
This is the crucial step: when filling the black eyes, serve two small white circles in the upper right corners of the sockets. These ‘catchlights’ make the skull look alive and cute. -
Final Clean Up:
Once the ink is fully dry, gently erase all underlying pencil sketches to leave crisp, clean lines.
Shading Tip
Instead of filling spaces with solid black ink immediately, use tight cross-hatching or scribbles first. This builds texture and prevents ink from bleeding through the paper.
Now you have a page of personality-filled skulls ready to haunt your next art project
Skeleton Characters Doing Something Wholesome
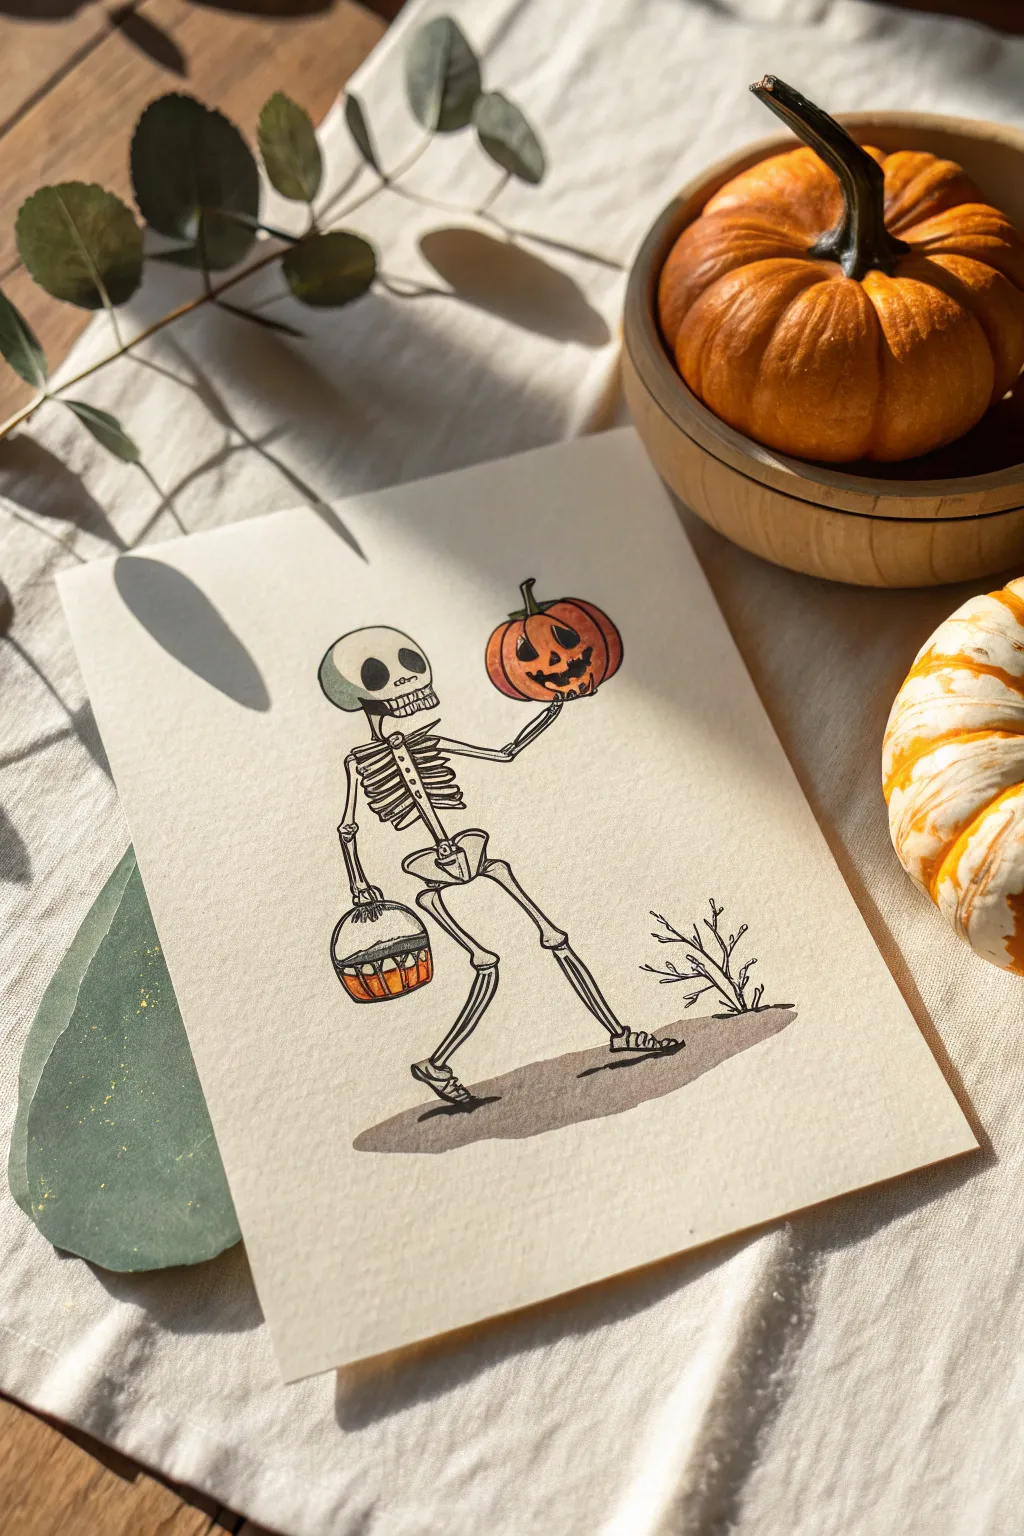
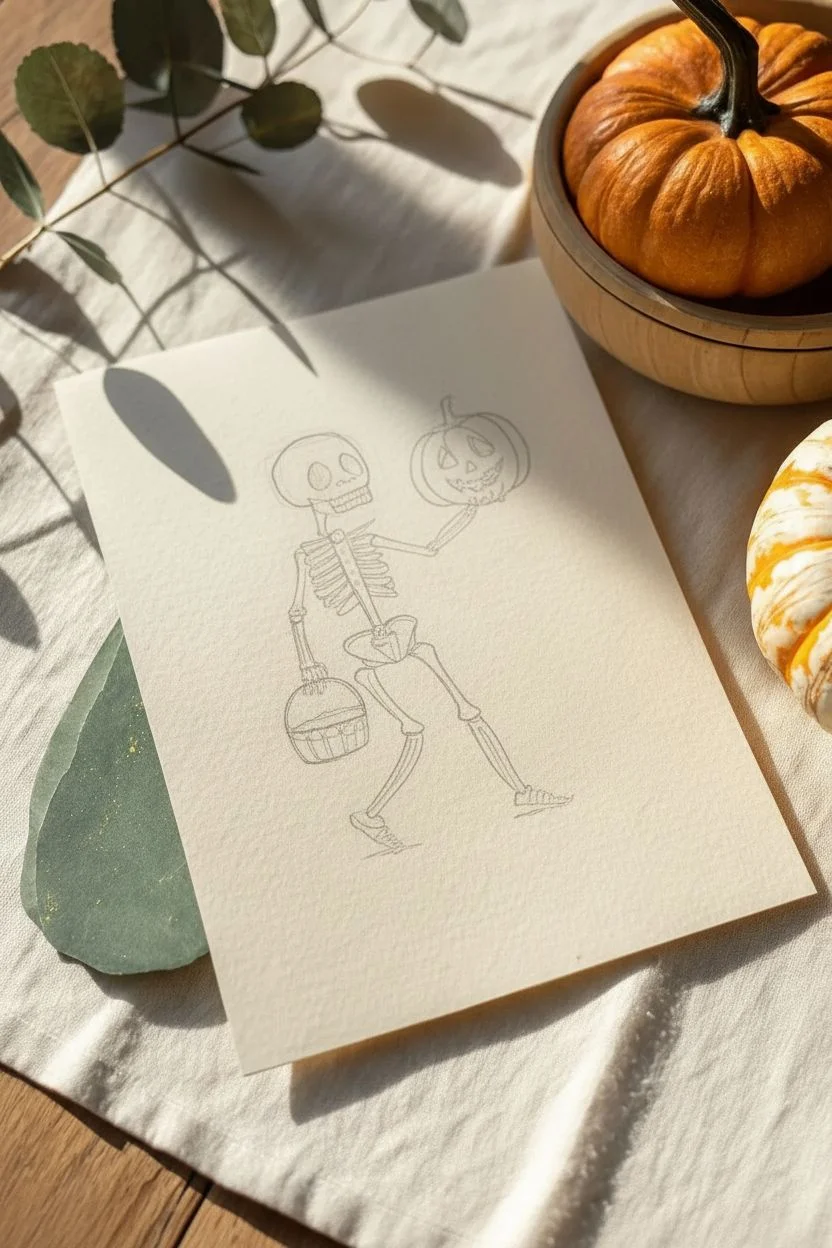
Capture the playful side of Halloween with this charming illustration of a skeleton embarking on a trick-or-treat adventure. Using fine liners for crisp detail and soft watercolor washes for warmth, this piece balances spooky subject matter with a wholesome, folk-art vibe.
Step-by-Step
Materials
- Hot press watercolor paper or smooth mixed media paper
- HB Drawing pencil
- Kneaded eraser
- Fine line waterproof ink pens (sizes 005, 01, and 05)
- Watercolor paints (Orange, Brown, Burnt Umber)
- Small round watercolor brush (size 2 or 4)
- Water cup and paper towel
Step 1: Drafting the Skeleton Structure
-
Head and torso placement:
Begin lightly in pencil by drawing a rounded skull shape slightly towards the left side of your paper. Leave plenty of room below for the legs. Below the skull, sketch a simple vertical line for the spine and a small trapezoid shape for the ribcage. -
Adding the limbs:
Sketch the arms and legs using stick-figure guidelines first to get the pose right. Position the left arm reaching down and the right arm bent upward as if holding something. Draw the legs in a mid-stride position, with the front leg bent at the knee and the back leg pushing off the ground. -
Fleshing out the bones:
Thicken your stick figure lines to create bone shapes. Add small bumps for joints at the knees and elbows. Draw the pelvis as a butterfly shape at the base of the spine. -
Sketching the accessories:
Place a round pumpkin shape in the skeleton’s right hand (the raised one). In the lower left hand, sketch a simple bucket shape with a curved handle. -
Refining the face:
Add two large, dark ovals for eye sockets and an upside-down heart shape for the nose cavity. Sketch a toothy grin using a horizontal line with small vertical dividers.
Pro Tip: Loose Lines
Don’t try to make your ink lines perfectly straight. A slightly shaky or ‘wobbly’ hand adds a nervous, vintage energy that fits the spooky skeleton theme perfectly.
Step 2: Inking the Details
-
Outlining the skull:
Switch to your 05 fine liner for the main outlines. Trace over your pencil sketch of the skull, but keep the line weight relatively consistent. -
Defining the ribcage and spine:
Carefully ink the individual ribs. Instead of drawing a solid block, draw horizontal, slightly curved bands attached to the central spine. Leave space between them to show the skeletal structure. -
Inking the limbs:
Outline the arm and leg bones. Use the 01 pen here for slightly finer control. Don’t forget to draw the small individual bones of the fingers grasping the pumpkin. -
Adding texture to the pumpkin:
Ink the pumpkin’s outline and add the jack-o’-lantern face features. Draw curved vertical lines downwards from the stem to show the pumpkin’s ridges. -
Detailing the basket:
Ink the bucket and handle. Add a rim around the top edge and simple cross-hatching or vertical lines on the side for texture. -
Environmental details:
To ground the character, draw a loose, uneven horizon line beneath the feet. Add a small, scraggly bush or twig decoration to the right side using jagged, thin lines. -
Erasing pencil marks:
Wait until the ink is completely dry to the touch, then gently use your kneaded eraser to lift all visible pencil guidelines.
Level Up: Metallic Pop
Once the watercolor is dry, use a gold gel pen or metallic watercolor paint to add tiny highlights to the pumpkin stem or the buckle of the skeleton’s belt/pelvis area.
Step 3: Adding Color
-
Painting the pumpkin:
Mix a vibrant orange watercolor. Carefully fill in the pumpkin in the skeleton’s hand. I find adding a tiny touch of brown to the orange helps the pumpkin look more organic and less like plastic. -
Coloring the candy bucket:
Use the same orange mix to paint the interior contents of the bucket. You can use a diluted brown or grey for the bucket itself, or leave it white for high contrast. -
Shadowing the bones:
Prepare a very watery, pale grey or cool brown wash. Apply this subtly to the right side of the skull and bones to create a sense of volume and dimension. Keep this extremely light—you want the bones to read as white. -
Grounding shadow:
Mix a translucent brown or grey wash. Paint an oval-shaped cast shadow on the ground beneath the skeleton’s feet, stretching slightly to the right to match the light source. -
Skull shading detail:
Add a slightly darker grey wash to the left side of the skull (the back of the head) to differentiate it from the face. -
Final touches:
Once the paint is dry, use your finest 005 pen to add tiny stippling or hatching marks in the darkest shadow areas, like inside the ribcage or under the bucket handle.
Now you have a playfully spooky skeleton character ready to walk right off the page


Haunted House Silhouette With Glowing Windows
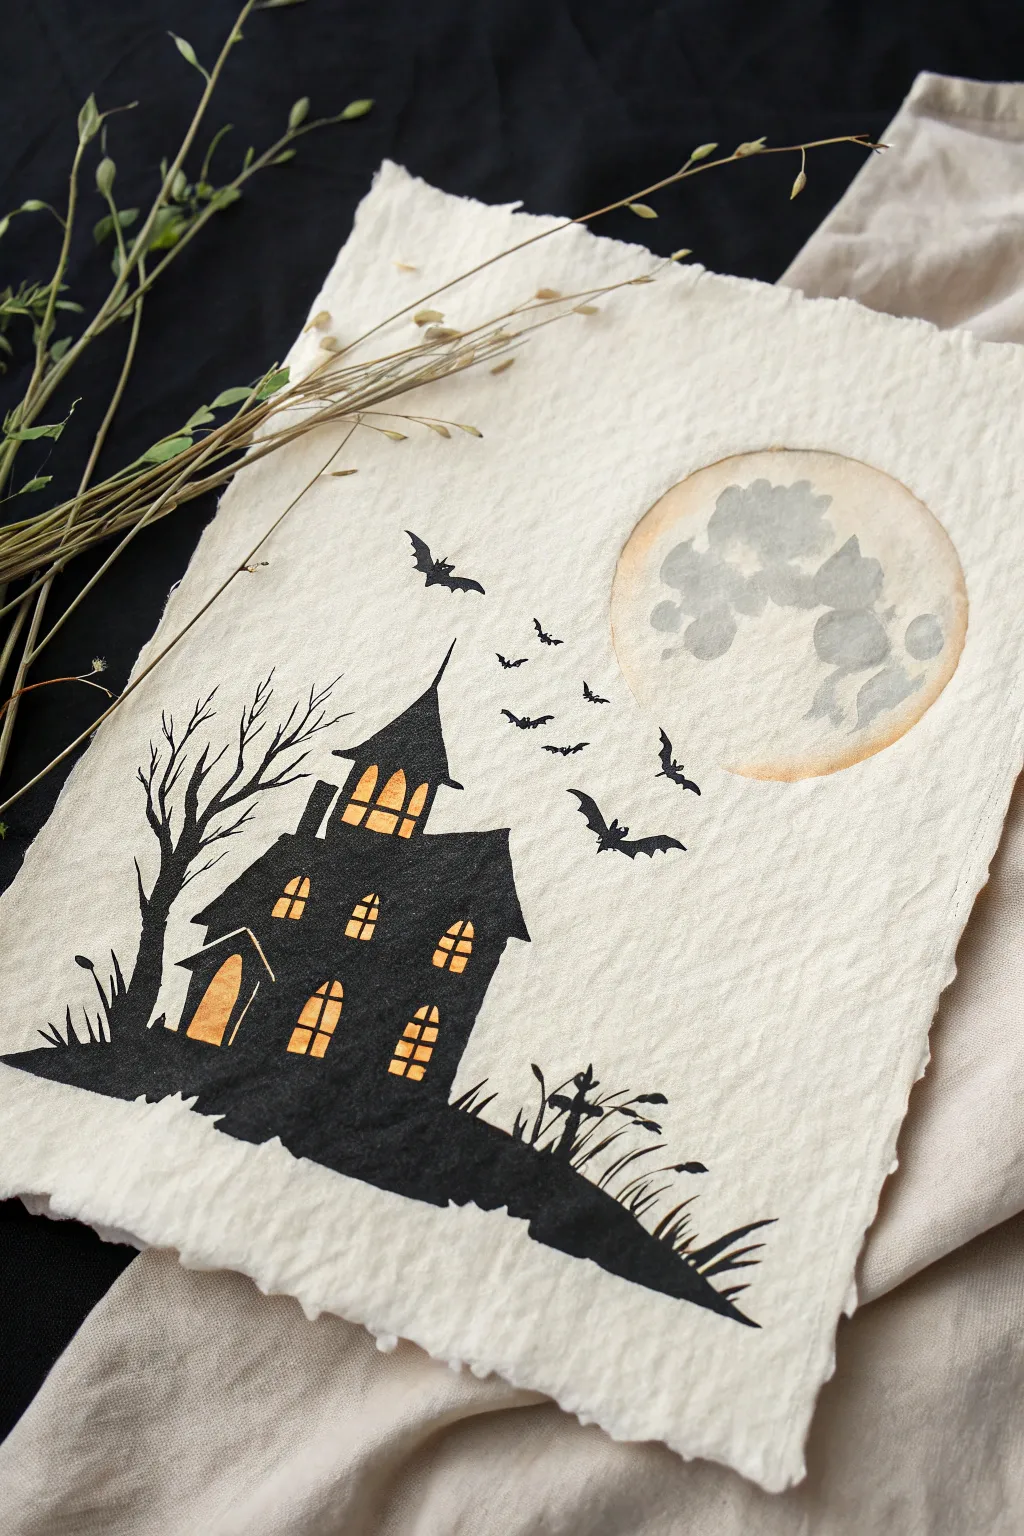
Capture the spooky essence of Halloween with this striking mixed-media silhouette. Using the stark contrast of black ink against textured deckle-edge paper, you’ll create a mysterious hilltop mansion illuminated by warm, glowing windows.
How-To Guide
Materials
- Heavyweight deckle-edge watercolor or cotton rag paper
- Black waterproof fine liner pens (0.3mm and 0.5mm)
- Black India ink or acrylic gouache
- Small flat brush and fine detail brush
- Watercolor paints (Yellow Ochre, Burnt Sienna, Payne’s Grey, light blue)
- Pencil and eraser
- Masking fluid (optional)
- Clean water and palette
Step 1: Setting the Scene: The Glowing Moon
-
Outline the moon:
Start by lightly sketching a large circle in the upper right quadrant of your textured paper using a pencil. It doesn’t need to be perfectly round; a slight organic shape adds character. -
Paint the moon’s glow:
Mix a very dilute wash of Yellow Ochre with a touch of Burnt Sienna. Wet the area inside your circle with clean water first, then drop in the pigment around the edges, letting it bleed inward for a soft, glowing rim. -
Add lunar texture:
While the moon is still damp but not soaking, mix a watery grey using Payne’s Grey and a hint of blue. Dab this onto the center of the moon to create craters and shadows. Let the natural texture of the paper break up the paint.
Crisp Window Panes
Struggling to keep the yellow paint out of the black frames? Use liquid frisket (masking fluid) on the yellow windows. Let it dry, paint the black house over it, then rub it off to reveal the light.
Step 2: Drafting the Haunted Silhouette
-
Sketch the hill:
Once the moon area is dry, use your pencil to sketch a rolling, uneven hill at the bottom of the page that slopes upward from right to left. -
Outline the house structure:
Draw the main body of the house on top of the hill. Include a central section with a pointy roof, a smaller side annex, and a tall, crooked turret. Keep the lines jagged and slightly askew for a spooky feel. -
Define the windows:
Sketch arched windows throughout the house. Make sure to draw the muntins (the grid bars) inside the windows now so you don’t paint over them later. -
Add landscape details:
Roughly pencil in a gnarled, leafless tree on the left side and some tall, spindly grass blades and a crooked cross near the bottom right.
Aged Paper Effect
To enhance the antique, spooky look, lightly brush the outer deckled edges of your paper with leftover weak tea or diluted brown watercolor to create a vintage vignette border.
Step 3: Bringing the Light
-
Base layer for windows:
Using a small detail brush, paint the interior of the window shapes with a bright yellow-orange watercolor mix. You can go slightly darker near the edges of the panes to suggest depth. -
Intensify the glow:
For a ‘lit from within’ look, add a tiny dot of more concentrated orange or light brown at the bottom of each window pane. Allow this stage to dry completely before touching the black ink.
Step 4: Inking the Silhouette
-
Outline delicate areas:
Switch to your fine liner pen. Carefully outline the window frames, preserving the yellow interiors. Trace the delicate branches of the tree and the grass blades. -
Fill the silhouette:
Using black India ink or acrylic gouache and a flat brush, fill in the main shape of the house and the ground. Be careful around the windows—slow down here to ensure crisp edges. -
Refine the tree:
Use your finest brush or the pen to thicken the tree trunk where it meets the ground, tapering out into thin, spindly twigs that reach toward the sky. -
Add the grave marker:
Paint the small cross silhouette on the right side of the hill, ensuring it merges seamlessly with the black ground.
Step 5: Batty Details
-
Sketch flight paths:
Visualize a curved line swooping from the house up toward the moon. Lightly mark positions for 5-7 bats along this path. -
Ink the bats:
Draw the bats using the fine liner or small brush. Vary their sizes—larger ones closer to the house, smaller ones near the moon—to create a sense of distance and movement. -
Final touches:
Check your black areas for any patchiness and add a second coat of ink if needed for a solid, opaque silhouette. Erase any remaining stray pencil lines once everything is bone dry.
Display your haunted masterpiece in a floating frame to show off those beautiful rough edges
Graveyard Mini Scene With Tombstones and Mist
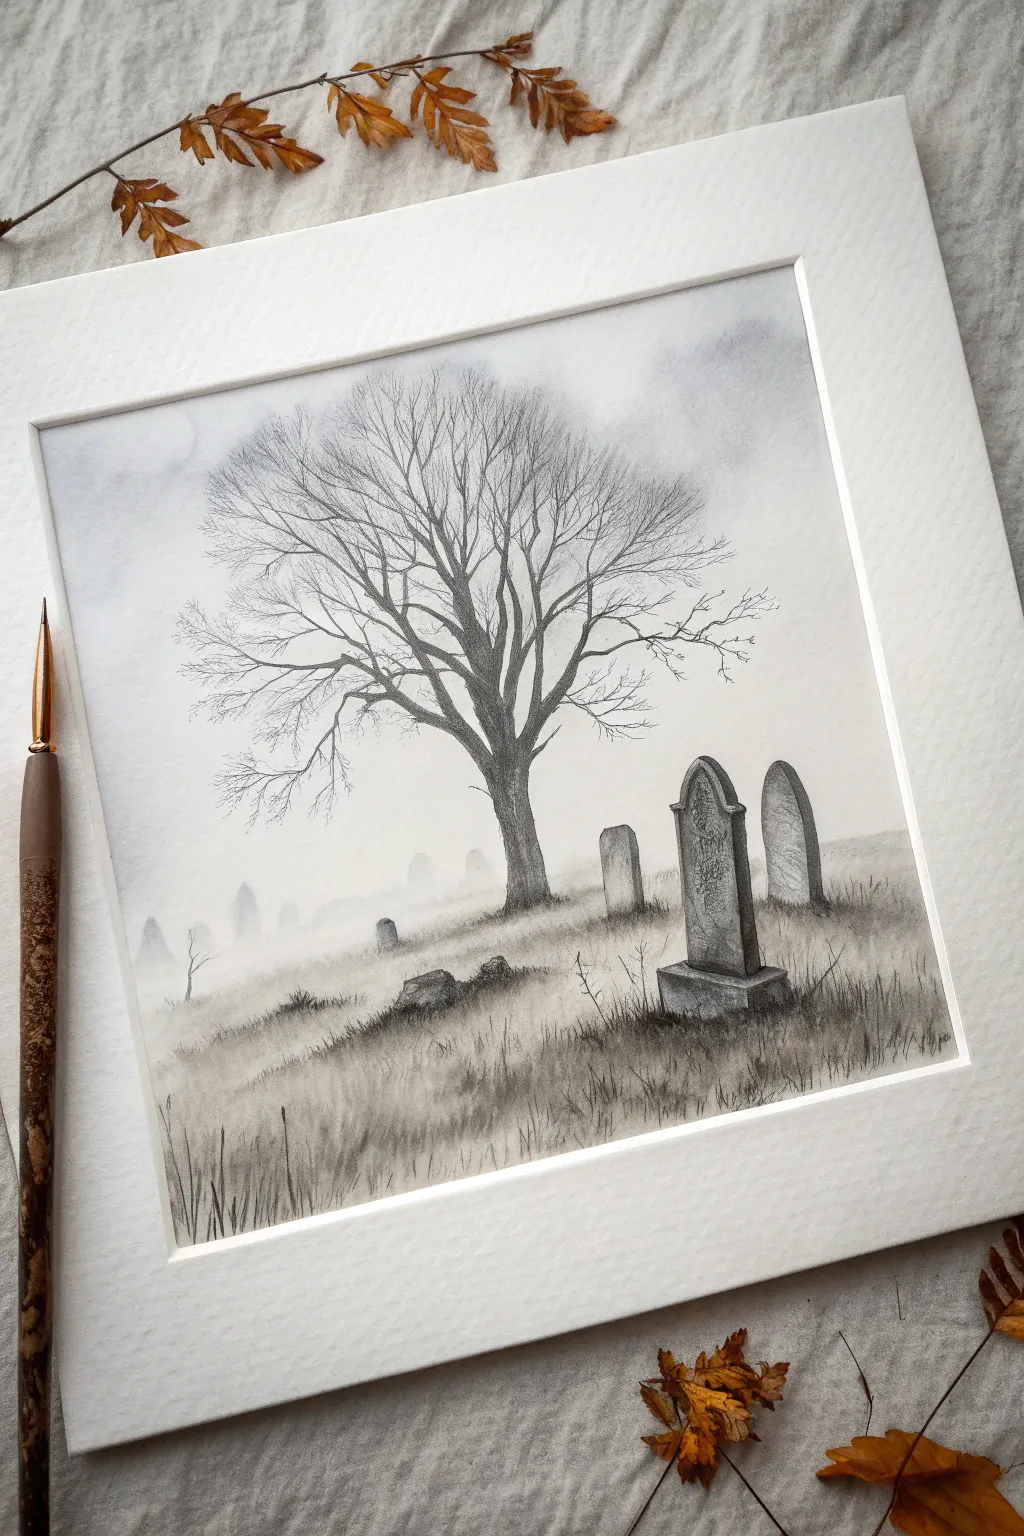
Capture the eerie silence of a foggy autumn morning with this delicate pencil and watercolor wash illustration. By combining soft atmospheric perspective with fine graphite details, you’ll create a hauntingly beautiful scene perfect for the Halloween season.
Step-by-Step Guide
Materials
- Hot press watercolor paper (smooth texture)
- Graphite pencils (4H, HB, 2B, 4B)
- Watercolor paint (Payne’s Grey or Black)
- Small round watercolor brush (size 2 or 4)
- Clean water and palette
- Paper towel
- Blending stump (tortillon)
- Fine liner pen (light grey or sepia, optional)
- Kneaded eraser
Step 1: Setting the Scene
-
Horizon line:
Begin by lightly sketching a sloping horizon line about one-third of the way up from the bottom of your paper using a harder pencil like a 4H. Keep the line uneven to mimic natural terrain. -
Misty background wash:
Dilute a tiny amount of Payne’s Grey watercolor with plenty of water to create a very faint, tea-stain consistency. Apply this as a wash across the upper two-thirds for the sky, letting it pool unevenly to suggest drifting clouds. -
Distant shapes:
While the wash is still slightly damp, drop in faint, blurry shapes along the horizon line using a slightly more concentrated grey wash. These soft blobs will serve as distant, fog-obscured tombstones later. -
Foreground foundation:
Apply a slightly darker, graduated wash starting from the bottom corners and fading upward toward the horizon line. This grounds the image and establishes the grassy hill.
Smudged Skies?
Graphite smears easily on textured paper. Place a clean sheet of scrap paper under your drawing hand to protect the delicate misty sky while you work on the foreground details.
Step 2: The Lonely Tree
-
Trunk structure:
Once the paper is completely bone-dry, switch to an HB pencil. Sketch the trunk of the large central tree, placing it slightly off-center. Make the base wider and taper it as it reaches upward. -
Branching out:
Extend main branches from the trunk, ensuring they twist and bend organically rather than looking like straight pipes. I tend to make them separate into ‘V’ shapes repeatedly. -
Fine twigs:
Using a sharp 2B pencil, add the delicate network of fine twigs at the ends of the branches. Keep your hand loose and let the lines be squiggly and unpredictable. The tips should fade into nothingness. -
Tree texture:
Add texture to the bark using vertical hatching strokes with the 2B pencil. Concentrate the shading on the right side of the trunk to suggest a light source coming from the left.
Step 3: Tombstones & Grass
-
Sketching the stones:
Draw the main foreground tombstones using the HB pencil. Create a variation of shapes—rounded tops, pointed arches, and slanted rectangles. Use perspective to give them depth, showing the side planes. -
Shading the stone:
With a 4B pencil, shade the side planes of the tombstones darkly. For the front faces, use a lighter touch and add scribbles or illegible text to mimic weathered inscriptions. -
Grounding the objects:
Darken the area immediately underneath the tree and the tombstones. This contact shadow is crucial for making them feel planted in the earth rather than floating. -
Distant details:
Return to those faint watercolor blobs in the mist. Lightly define their edges with a 4H pencil, keeping them much lighter than the foreground objects to maintain atmospheric depth. -
Base grass texture:
Use the side of your HB pencil to create soft, sweeping shading across the hill in the foreground. Use a blending stump to smooth this out, creating a foggy, soft-focus ground.
Pro Tip: Atmospheric Depth
Make foreground objects darker and sharper, while keeping background objects lighter and blurrier. This ‘atmospheric perspective’ is the secret to creating a convincing foggy effect.
Step 4: Final Atmosphere
-
Individual blades:
Take your sharpest 2B or 4B pencil and flick quick, upward strokes in the immediate foreground to create distinct blades of wild grass. -
Cluster the growth:
Cluster these grass strokes around the base of the tombstones and the tree trunk. This helps integrate the objects into the landscape. -
Enhancing the mist:
Use a kneaded eraser to lift out small clouds of graphite from the mid-ground. This negative drawing technique brings the ‘mist’ back into the lower parts of the scene. -
Final contrast check:
Step back and assess your values. Darken the deepest shadows on the closest tombstone and the tree bark to maximize contrast against the pale, misty background.
Frame your spooky little landscape in a wide white mat to emphasize the delicate grey tones.
Candy Haul: Trick-or-Treat Bucket Overflowing

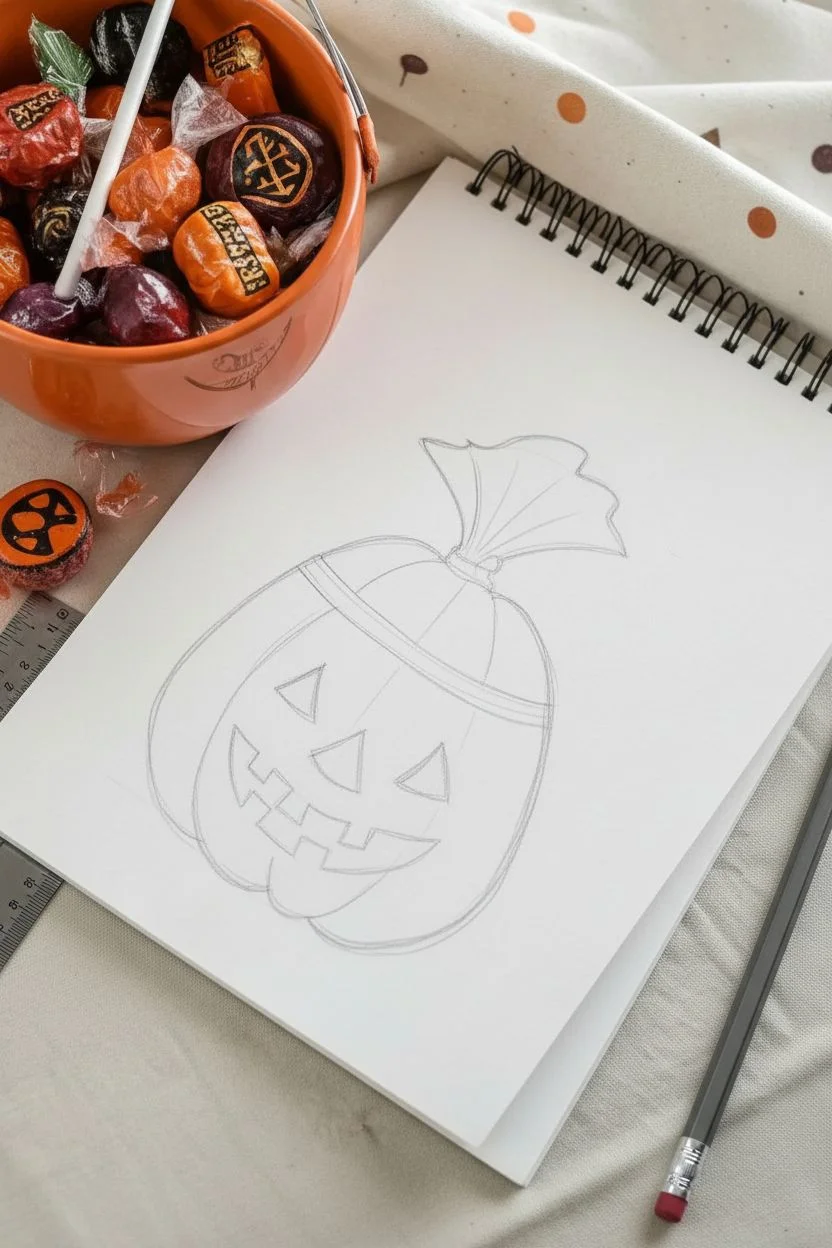
Capture the essence of trick-or-treating with this charming ink illustration of a classic pumpkin loot bag. This drawing features crisp linework and traditional hatching techniques to bring a festive, dimensional feel to your Halloween sketchbook.
Step-by-Step Tutorial
Materials
- Spiral-bound sketchbook with smooth paper
- Fine liner pen (size 0.3 or 0.5)
- Thicker marker or brush pen (for bold outlines)
- Pencil (HB or 2B)
- Soft eraser
- Ruler (optional)
Step 1: Penciling the Structure
-
Rough out the main shape:
Begin by lightly sketching a large, slightly squashed oval shape in the center of your page. This will act as the body of the pumpkin bag. -
Add the gathered top:
Draw a horizontal band slightly above the middle of the oval to represent the drawstring or tie. Above this band, sketch a fan-like shape flaring upwards to create the gathered fabric opening. -
Define the face guide:
Lightly mark a central vertical line and a horizontal curve across the lower third of the oval to help place the facial features symmetrically later. -
Sketch the face details:
Using your guidelines, draw two triangles for eyes and a smaller triangle for the nose. Sketch a wide, jagged grin with two square teeth on the bottom and one on top. -
Refine the bag’s volume:
Draw curved vertical lines running from the top band down to the bottom of the bag. These lines mimic the ribs of a pumpkin and give the bag a round, three-dimensional look.
Ink Smearing?
If your hand smudges the ink, place a scrap piece of paper under your drawing hand as a guard while you work across the page.
Step 2: Inking the Features
-
Outline the face:
Switch to your fine liner pen. Carefully trace over the eyes, nose, and mouth. I like to fill these shapes in with a diagonal hatching pattern immediately to distinguish them, or you can opt for solid black. -
Draw the gathered fabric:
Ink the top part of the bag. Use loose, jerky lines for the top edge to simulate crinkled plastic or fabric. Add vertical lines coming down from the top edge toward the tie to show folds. -
Detail the tie section:
Ink the horizontal band that cinches the bag. Add two bold lines for the band itself and small crease marks where the bag bulges out below it. -
Ink the main body:
Trace the outer silhouette of the pumpkin body. Don’t make the line perfectly smooth; a little wobble adds character to the fabric texture. -
Add the pumpkin ribs:
Go over your pencil lines for the ribs. Break these lines occasionally rather than drawing them solid from top to bottom, which helps the drawing look more organic.
Step 3: Shading and Texture
-
Hatch the sides:
Using your fine liner, add cross-hatching (crisscrossed lines) to the left and right sides of the bag. This creates shadows and makes the bag look rounder. -
Shade the bottom:
Add curved hatching lines at the very bottom of the bag to ground it and suggest weight. -
Darken the features:
If you chose to use hatching for the eyes and mouth, go over them with a second layer of lines in the opposite direction to make them significantly darker than the shading on the bag. -
Thicken the perimeter:
Take a slightly thicker marker or press harder with your pen to go over the very outer edge of the entire drawing. A bold silhouette makes the illustration pop off the page. -
Add movement lines:
Draw a few quick, short strokes around the bag’s exterior—specifically near the bottom left—to suggest motion or a surface beneath it. -
Clean up:
Wait at least five minutes for the ink to dry completely. Gently erase all your underlying pencil sketches to reveal the clean crisp art.
Variation Tip
Try using stippling (lots of tiny dots) instead of hatching for the shadowed areas to give the bag a different, softer texture.
Now you have a classic Halloween icon ready to decorate your seasonal spreads
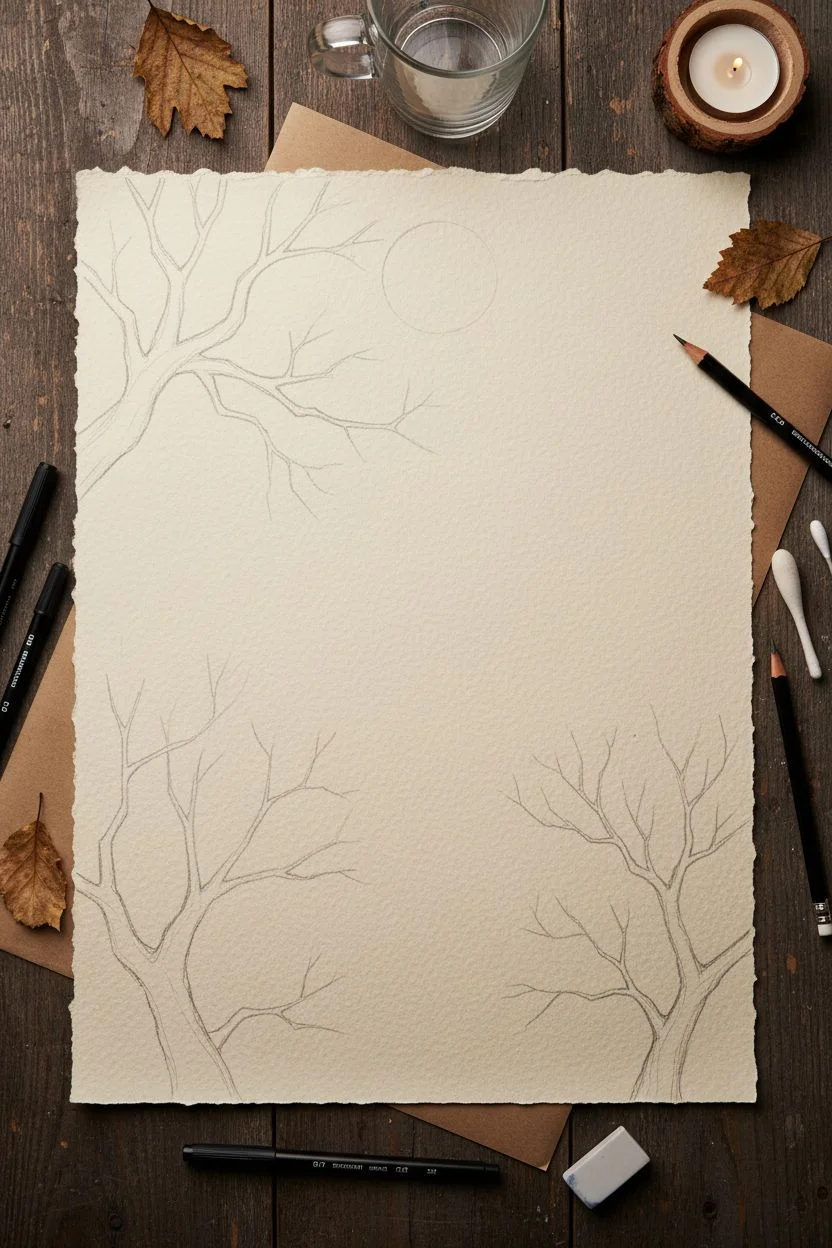
Spooky Tree Branches Framing a Halloween Scene
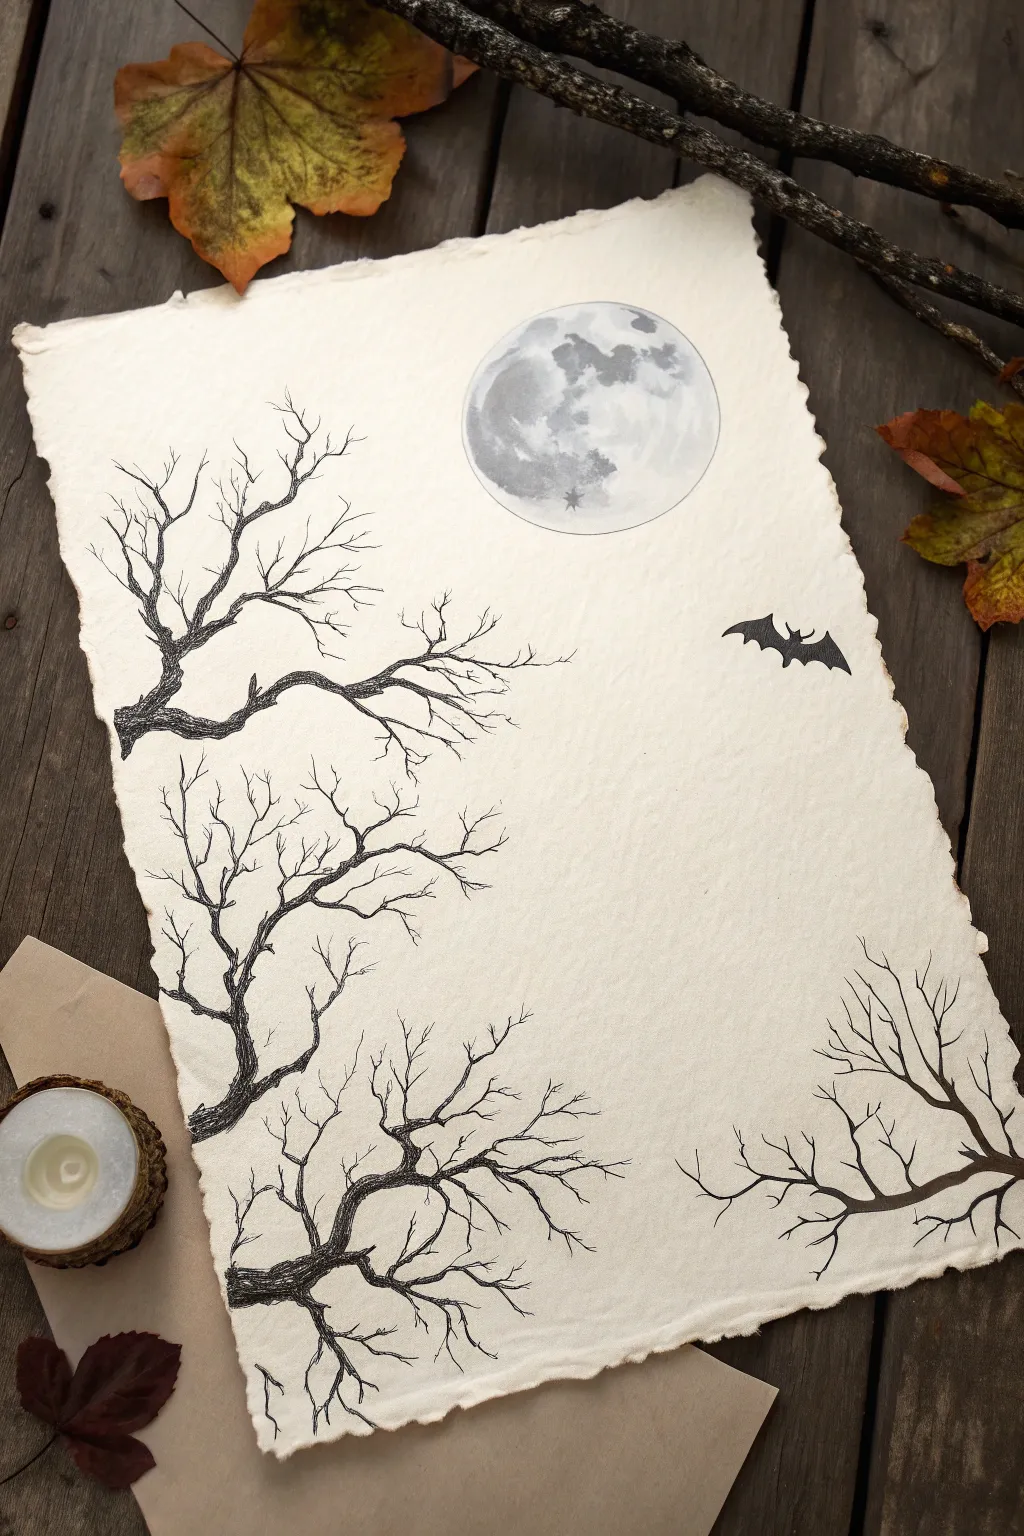
Capture the eerie silence of a Halloween night with this minimalist ink drawing on textured paper. The stark black branches framing a soft gray moon create a hauntingly beautiful composition perfect for seasonal decor or greeting cards.
Detailed Instructions
Materials
- Heavyweight textured paper (watercolor or handmade cotton rag)
- Black fine liner pens (sizes 0.1, 0.3, and 0.5)
- Graphite pencil (HB or 2B) and eraser
- Blending stump or cotton swab
- Ruler (optional)
- Reference image of bare tree branches
Step 1: Setting the Scene
-
Prepare the paper:
Begin with a sheet of high-quality, textured paper. If your paper doesn’t already have deckled edges, you can gently tear the edges against a ruler or by hand to create that rustic, old-world parchment look. -
Map out the moon:
Decide on the placement for your full moon, ideally in the upper center or slightly off-center. Lightly trace a circle using a glass or a compass. keep this line very faint as it’s just a guide. -
Sketch the branch flow:
Using your pencil, lightly sketch the main skeletal structure of the trees. Position the largest branches coming in from the left side and the bottom right corner to frame the open negative space in the center.
Make it gnarly
For spookier trees, add ‘knots’ or elbows where branches change direction. Drawing a small circle or bump at the joint makes the limb look old and twisted.
Step 2: Drawing the Moon
-
Create the craters:
Inside your circle, lightly sketch irregular shapes to represent the lunar seas (maria). Look at a reference photo of the moon to get the placement of the major dark spots roughly correct. -
Shade the moon:
Use the side of your pencil to gently shade the darker areas. I like to keep the graphite application uneven to mimic the moon’s cratered surface. -
Blend for texture:
Take a blending stump or a cotton swab and gently rub the graphite shading. Smudge the edges of the dark spots so they fade softly into the white areas, creating a misty, atmospheric glow. -
Define the rim:
Strengthen the outline of the moon extremely lightly with the pencil, but ensure it remains a thin, delicate line so the moon doesn’t look like a sticker.
Coffee stain finish
Before drawing, lightly stain your paper with watered-down coffee and let it dry. This adds an aged, parchment effect that enhances the Halloween vibe.
Step 3: Inking the Trees
-
Outline the main trunks:
Switch to your 0.5 fine liner pen. Trace over your pencil guides for the thickest parts of the branches. Make the lines slightly jagged and uneven to suggest rough bark texture. -
Add detail to the bark:
Using the 0.3 pen, add texture lines running along the length of the branches. Short, broken strokes work best here to create a gnarled, twisted appearance. -
Draw secondary branches:
Extend smaller branches outward from the main trunks using the 0.3 pen. Remember that branches generally get thinner the further they grow from the trunk. -
Add the finest twigs:
Switch to your 0.1 fine liner. Draw the tiny, delicate twigs at the very ends of the branches. Let your hand shake slightly or move quickly to create natural, erratic growth patterns. -
Create intersecting lines:
Don’t be afraid to let branches cross over one another. This adds depth and complexity to the silhouette. -
Review the composition:
Step back and look at the density. If the tree area looks too sparse, add a few more mid-sized branches to fill the gaps, ensuring they still point generally inward.
Step 4: Final Details
-
Add the bat:
In the open space on the right side, between the moon and the lower branches, sketch a small bat silhouette in pencil first. -
Fill the bat silhouette:
Ink the outline with your 0.3 pen and fill it in completely solid black. Ensure the wing points are sharp and defined. -
Clean up:
Wait at least 10-15 minutes for the ink to dry completely. Once dry, gently erase any visible pencil lines from the tree sketches, being careful not to smudge the graphite moon.
Frame your spooky masterpiece or use it as a hauntingly elegant invitation for your Halloween party
Monster Mash Character Sheet (Your Own Little Cast)
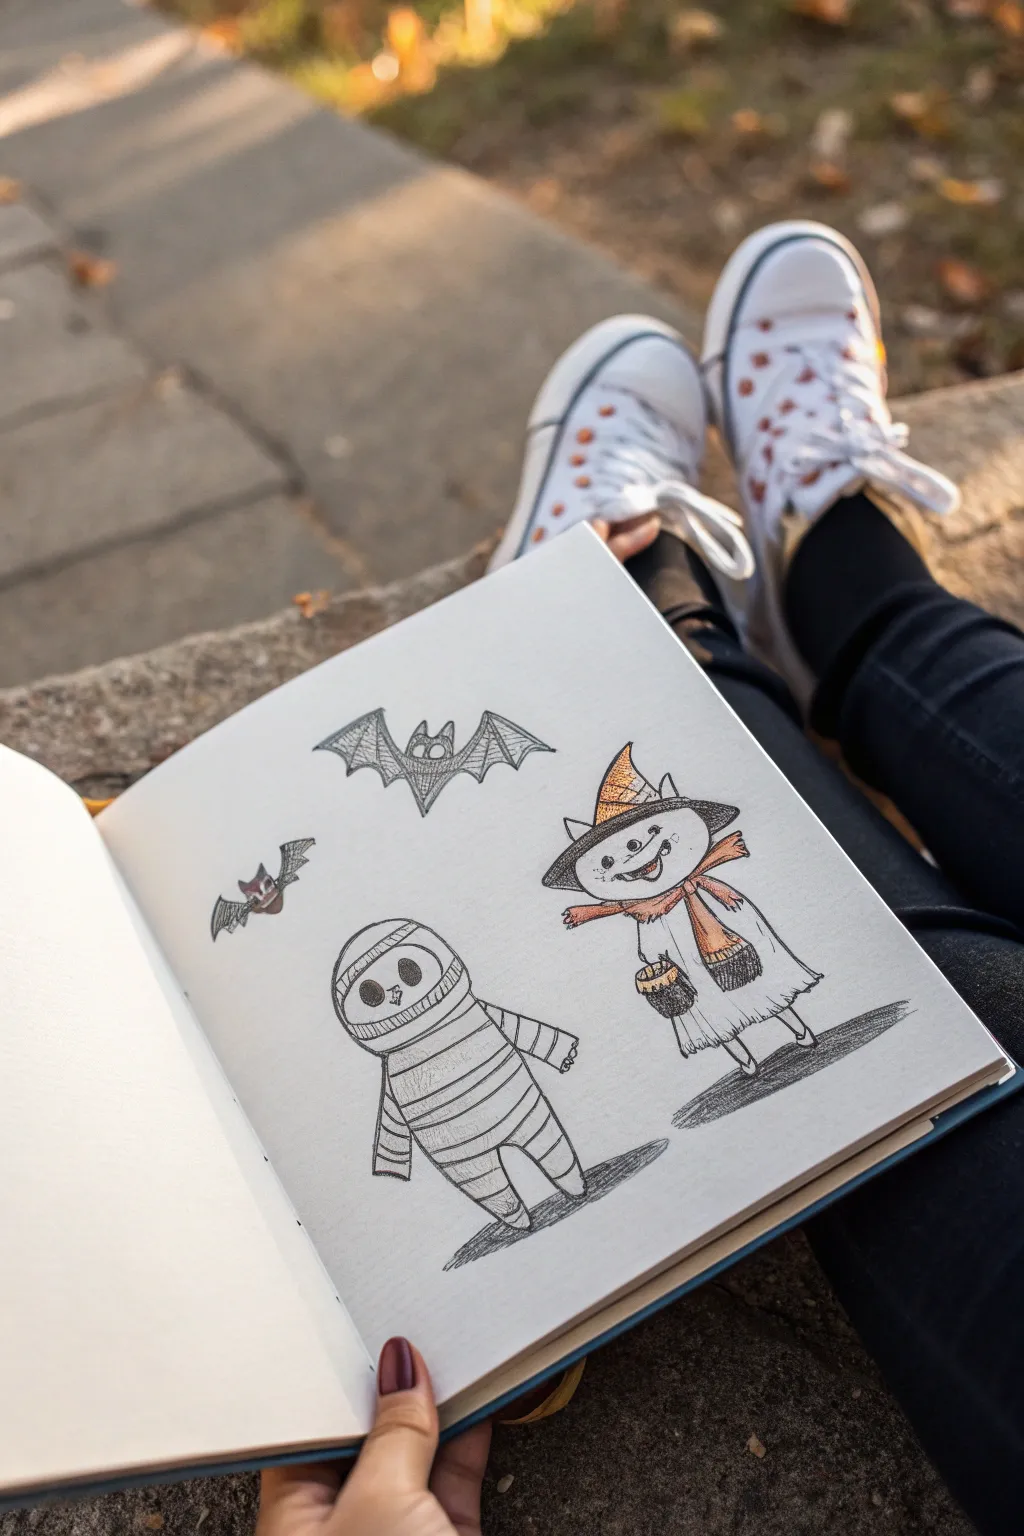
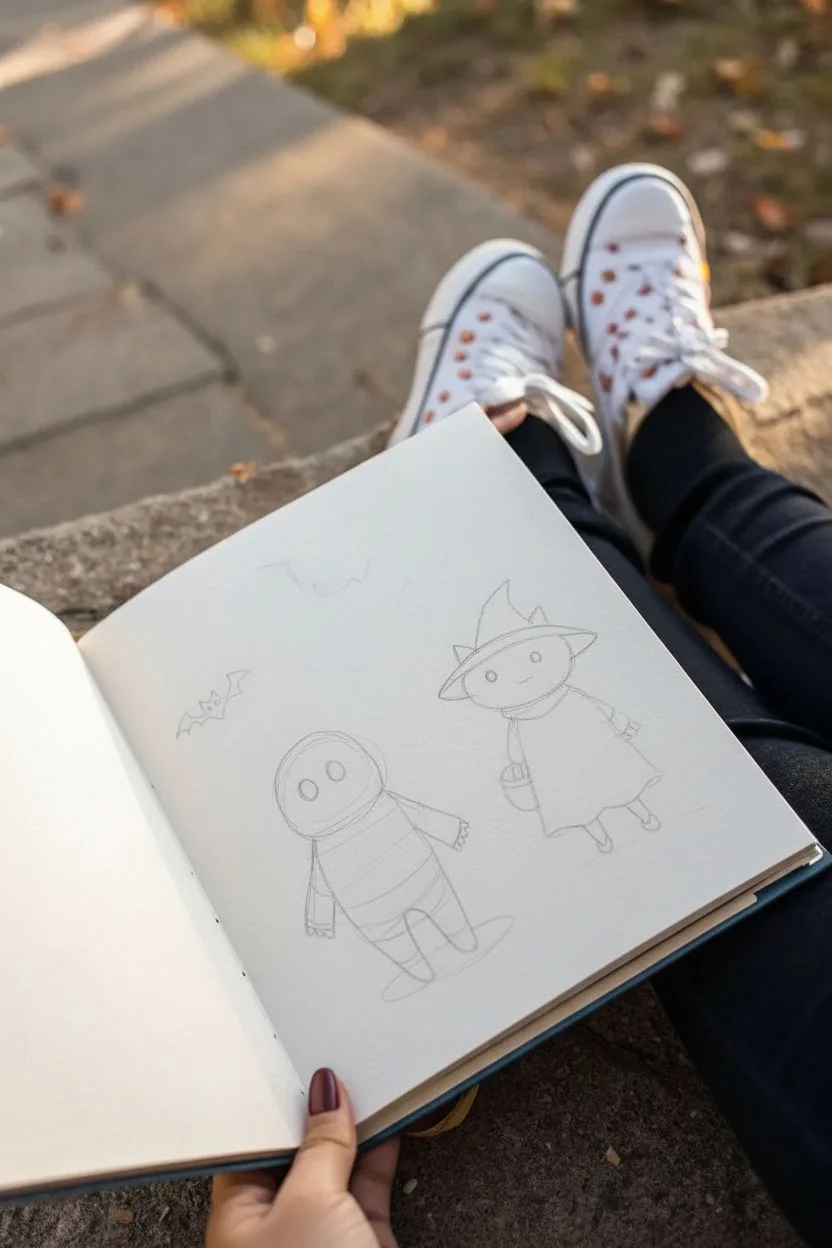
Capture the spooky season with this adorable character sheet featuring a chubby mummy, a friendly scarecrow-witch, and fluttery bats. This sketch relies on simple shapes and gentle linework with just a pop of orange to bring the characters to life.
Step-by-Step
Materials
- Sketchbook or heavyweight drawing paper
- HB or 2B graphite pencil
- Eraser
- Fine liner pen (0.3mm or 0.5mm, black)
- Ballpoint pen (black, for shading)
- Orange colored pencil or pastel pencil
- White gel pen (optional for highlights)
Step 1: Drafting the Shapes
-
Map out the positions:
Start lightly with your pencil. Draw a rounded bean shape on the lower left for the mummy and a slightly taller, rough triangle shape on the right for the scarecrow figure. -
Define the mummy’s form:
Refine the mummy’s body into a singular, pill-like oval. Add stubby legs at the bottom and two short arms sticking out slightly from the sides. -
Structure the scarecrow-witch:
Give the right-hand figure a large, round head. Top it with a oversized, crumpled witch hat. Draw a simple dress or robe shape flowing down from the neck. -
Position the bats:
Sketch a small ‘M’ shape in the upper center and a smaller one to the left to mark where the bats will fly.
Loose Lines
Don’t try to make perfect, unbroken lines. A slightly shaky or ‘hairy’ line quality adds to the charming, hand-drawn spooky aesthetic.
Step 2: Inking the Mummy
-
Outline the body:
Switch to your fine liner. Trace the outer edge of the mummy, keeping the line somewhat loose to suggest fabric texture. -
Create the face gap:
Draw an oval near the top of the head for the face opening. Inside, draw two simple, round black eyes. -
Wrap the bandages:
Draw horizontal, slightly curved lines across the entire body to mimic bandages. Don’t make them perfectly parallel; let them convey the roundness of the body. -
Add shading:
Using a ballpoint pen or light hatching strokes with the fine liner, shade the sides of the mummy and under the arms to create volume.
Step 3: Detailing the Scarecrow-Witch
-
Draw the face features:
Ink a wide, stitched smile and two button eyes. Add a little triangle nose. -
Ink the outfit:
Outline the hat, making the brim look floppy. Draw a scarf wrapped around the neck with tails hanging down. -
Add the pumpkin bucket:
Draw a small pumpkin basket in the character’s hand. Use short, scratchy strokes for the dress hem to make it look tattered. -
Texture the clothing:
Add vertical lines on the hat and dress for texture. I like to use very light strokes here to keep the drawing looking airy.
Add Sparkle
Use a white gel pen to add tiny dots to the characters’ eyes or highlights on the pumpkin bucket to make the drawing pop.
Step 4: Finishing Touches
-
Ink the bats:
Go over your bat sketches. Give them scalloped wings and tiny ears. Use cross-hatching to fill in their bodies, making the center bat darker than the one on the left. -
Clean up:
Once the ink is completely dry, gently erase all your underlying pencil sketches. -
Add color accents:
Take your orange colored pencil. Color the band of the witch’s hat, the scarf, and the pumpkin bucket. Use a light hand for a vintage, desaturated look. -
Ground the characters:
Using the side of your pencil or ballpoint pen, sketch a quick, scribbly shadow underneath both main characters so they aren’t floating in space.
Now you have a charming page of Halloween doodles ready to celebrate the season
Halloween Doodle Flash Sheet for Fast Pinterest-Style Practice
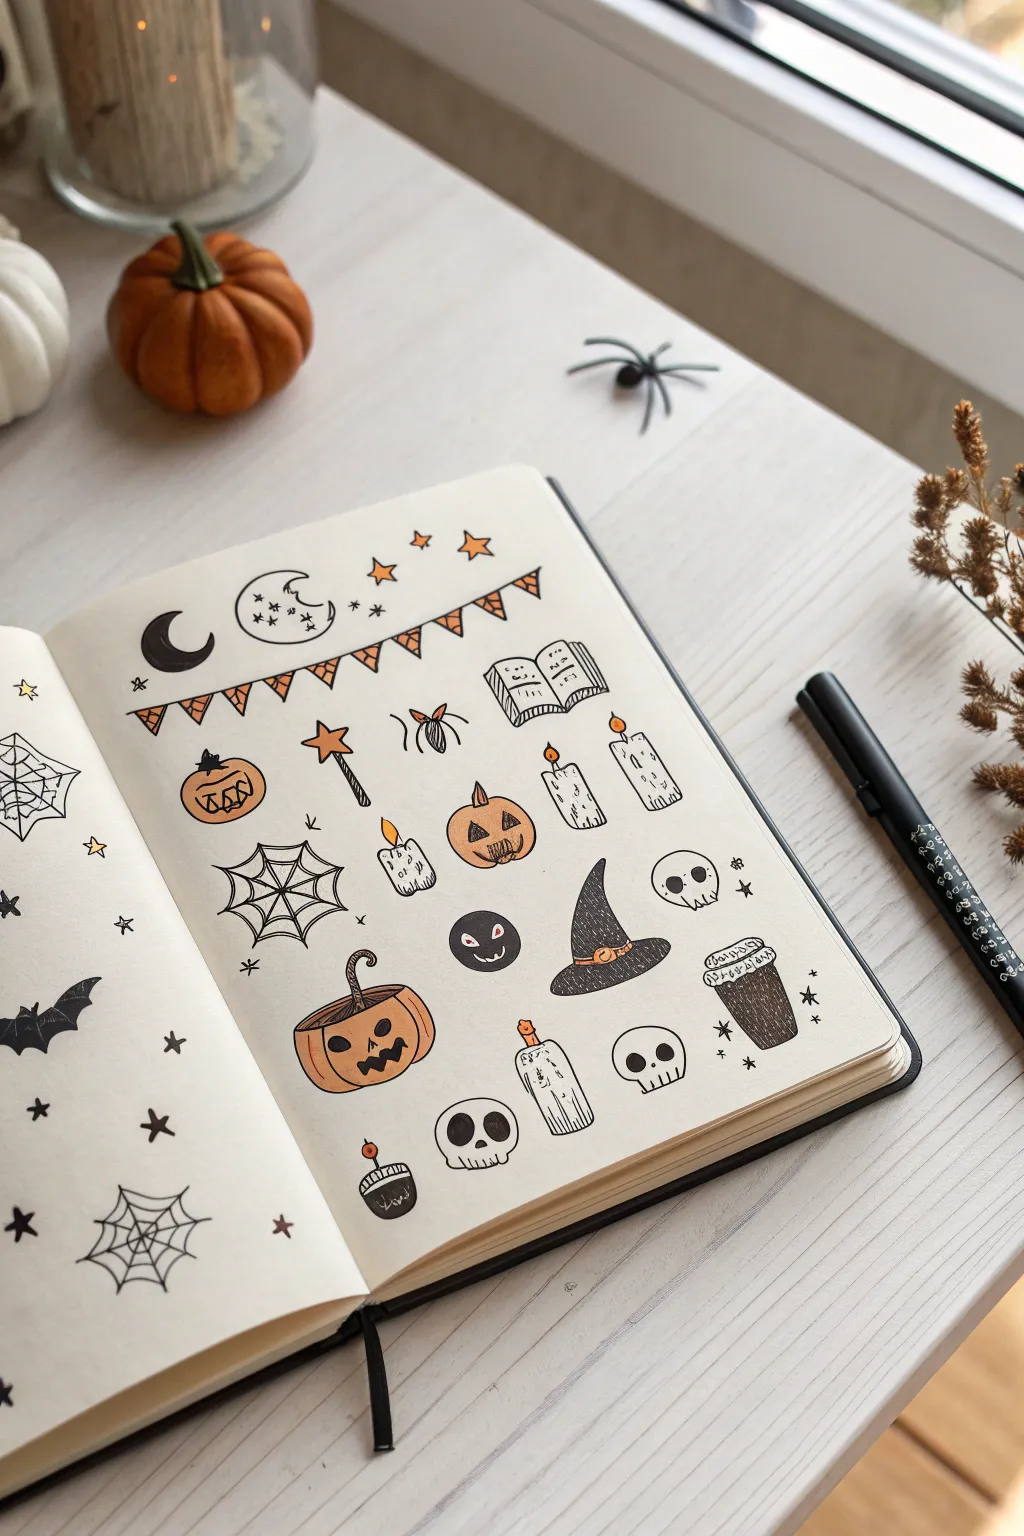
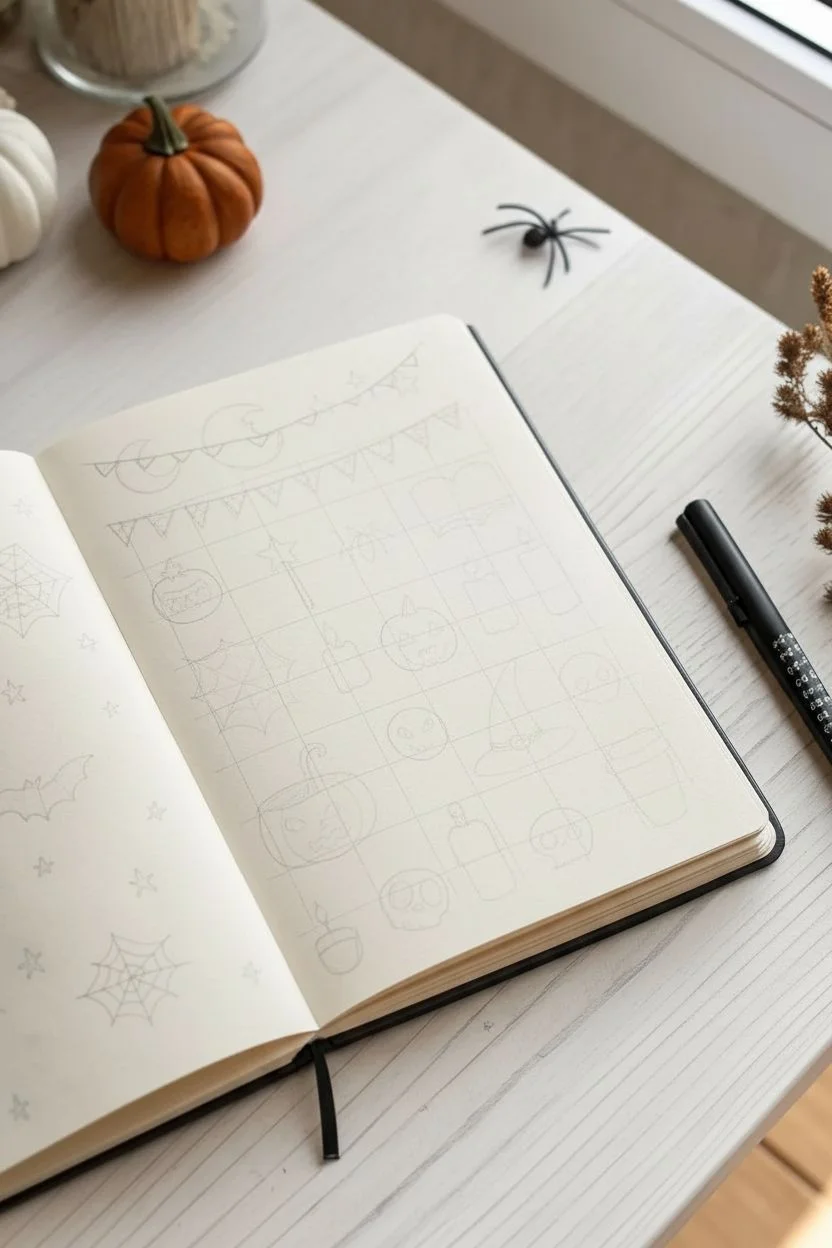
Fill a sketchbook page with charmingly eerie doodles perfect for the Halloween season. This flash sheet style combines simple line work with pops of orange and black to create a cohesive, festive aesthetic.
How-To Guide
Materials
- Sketchbook or bullet journal (heavyweight paper preferred)
- Fine liner pen (black, 0.3mm or 0.5mm)
- Thicker marker or brush pen (black)
- Orange marker or colored cancy
- Pencil and eraser
Step 1: Planning and Layout
-
Lightly Pencil the Grid:
Start by visualizing your page as a grid of invisible squares. Use a pencil to lightly sketch small circles or squares where each doodle will go to ensure they are spaced evenly and don’t feel cluttered. -
Establish the Top Border:
At the very top, sketch a wavy line for a bunting banner. Draw small triangles hanging from the line, leaving space above it for celestial elements.
Ink Smudging?
Place a scrap piece of paper under your drawing hand. This acts as a shield, preventing oils from your skin from touching the paper and stopping your hand from dragging wet ink.
Step 2: Drawing the Outlines
-
Inking the Banner:
Using your fine liner, go over the pencil lines for the bunting. Inside about half of the triangles, draw a simple jack-o’-lantern face or a small star. -
Celestial Elements:
Above the banner, draw a solid black crescent moon on the left. In the center, draw a larger, open crescent moon with a sleeping face profile and fill the inside with tiny stars and dots. -
Adding Stars:
Scatter a few five-pointed stars around the moons to balance the top section. -
Pumpkin Parade:
Draw three distinct pumpkins throughout the page. Make one round and squat, one slightly taller, and one like a bucket with a handle. Give them all different expressions—one classic grin, one silly smile, and one spooky grimace. -
Webs and Spiders:
Sketch a classic radial spiderweb in the middle-left area. Near the top right, draw a small spider with long, spindly legs hanging down. -
Witchy Accessories:
Draw a witch’s hat with a crumpled peak and a wide brim in the center right. Nearby, add a magic wand topped with a star. -
Spooky Objects:
Fill in gaps with an open spellbook, a few melting candles of different heights, and a potion bottle or coffee cup with a sleeve. -
Skulls and Critters:
Add a few simple skull shapes. For variety, make some jawless and others with teeth. Don’t forget a small bat silhouette with pointed wings on the left page.
Add Dimension
Use a light grey marker to add simple shadows underneath each doodle or along the right side of objects. This lifts the drawings off the page instantly.
Step 3: Inking and Coloring
-
Solid Black Fills:
Switch to your thicker marker. Completely fill in the first crescent moon, the bat, the witch’s hat (leaving a stripe for the band), the coffee cup sleeve, and the center of the small round monster face. -
Refining Line Weights:
Go back over your main outlines with the fine liner. I find that slightly thickening the outer contour of objects like the pumpkins makes them pop more against the page. -
Adding Orange Accents:
Take your orange marker or pencil. Color in the pumpkins completely. Add orange stripes to the bunting triangles and color the star on the wand. -
Flame and Glow:
Use the orange to add little teardrop shapes for flames on top of the candles and the magic wand. -
Hat Details:
Color the band on the witch’s hat orange to tie the color palette together. -
Texture Details:
Use the fine liner to add tiny vertical lines on the candles for wax drips, stitching lines on the hat, and wood grain texture on the broomstick or wand handle. -
Final Fillers:
Look for empty white spaces. Fill them with tiny black stars, asterisks, or small dots to make the composition feel dense and finished. -
Erase and Clean:
Once the ink is totally dry, gently erase any remaining pencil guidelines to leave a crisp, clean finish.
Now you have a festive reference page ready for the spooky season


Have a question or want to share your own experience? I'd love to hear from you in the comments below!