If you’re craving scary pumpkin inspiration that goes beyond the basic grin, I’ve got you. These ideas blend carving, painting, and a few delightfully creepy details so your pumpkin feels like a tiny horror artwork on your steps.
Classic Menacing Jack-o’-Lantern Face
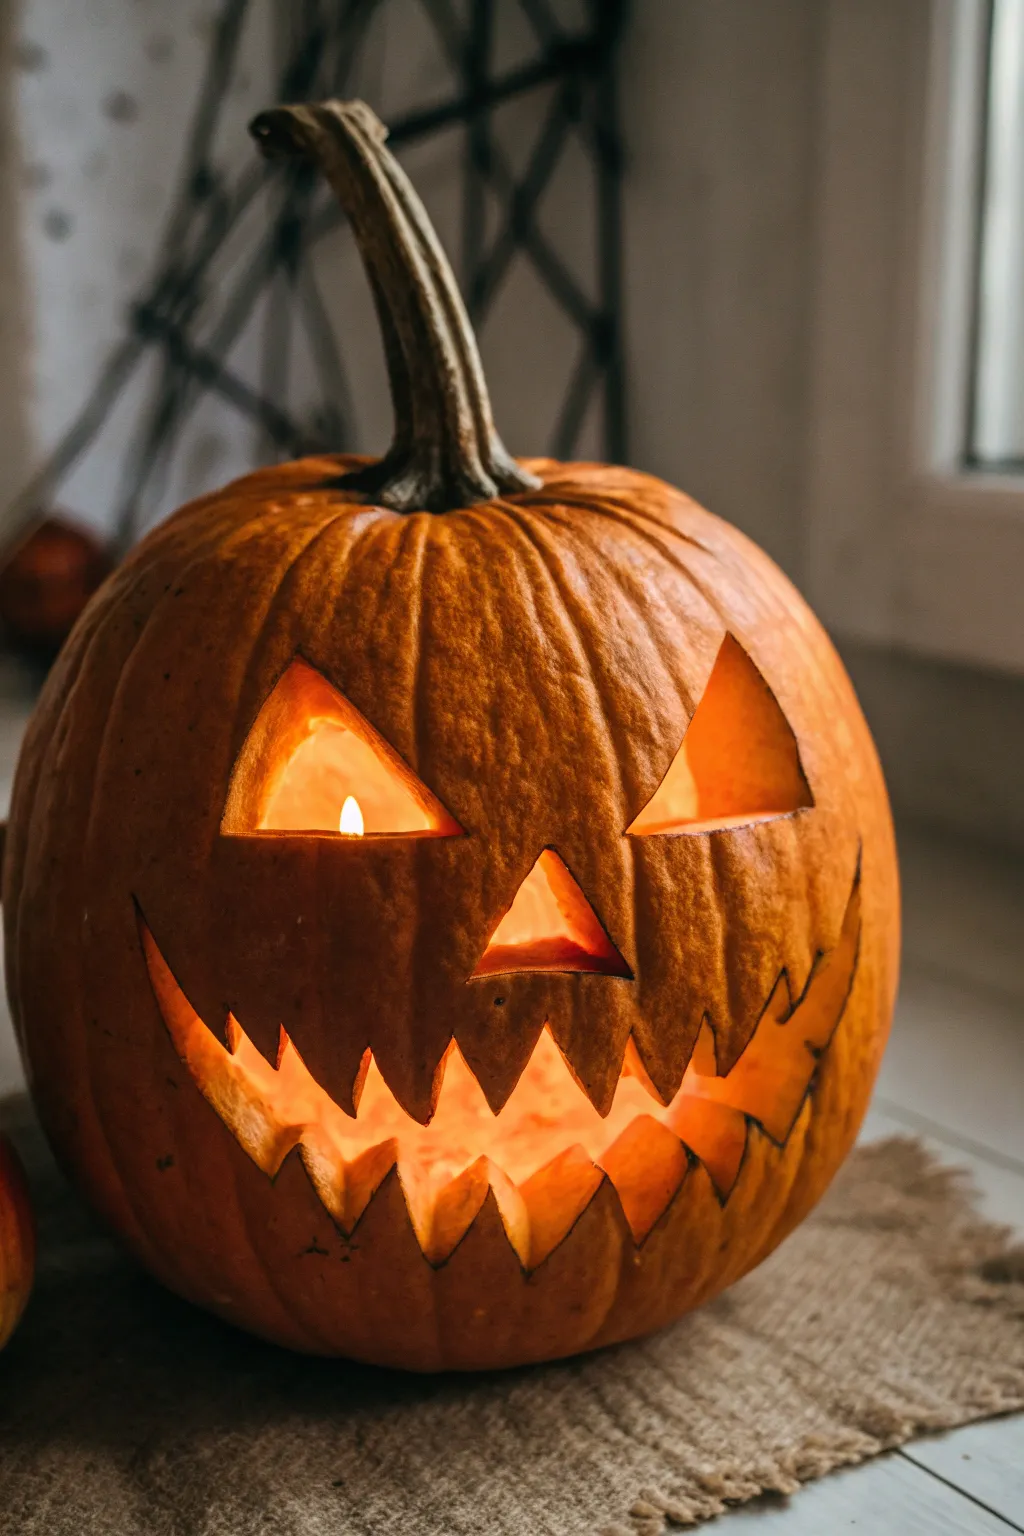
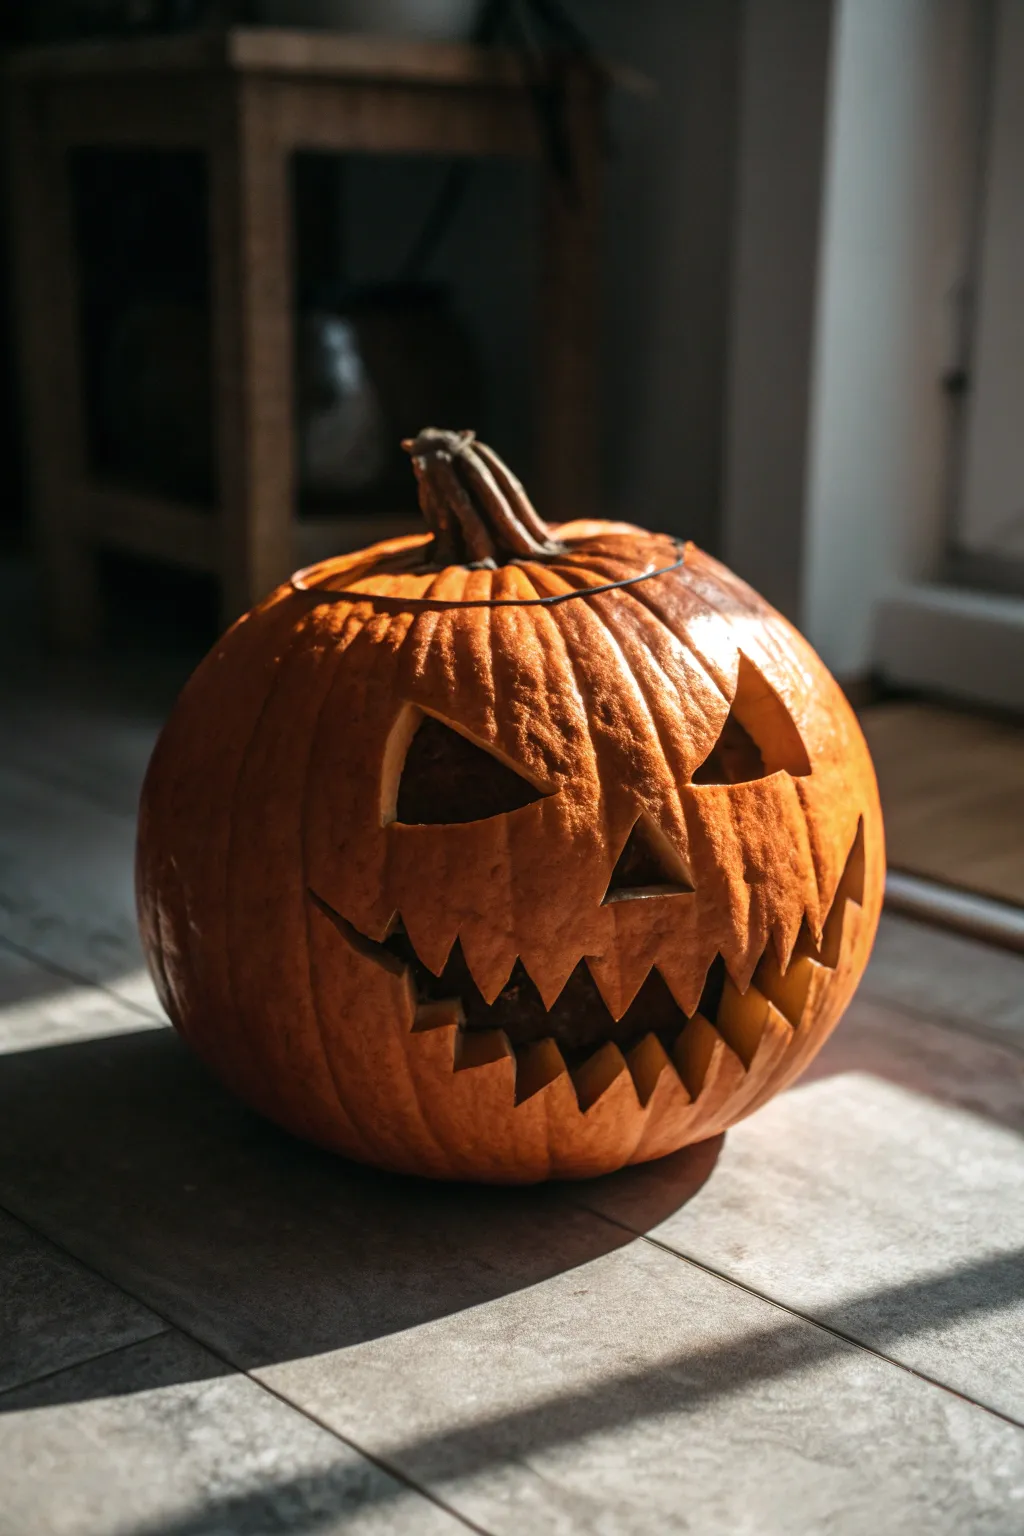
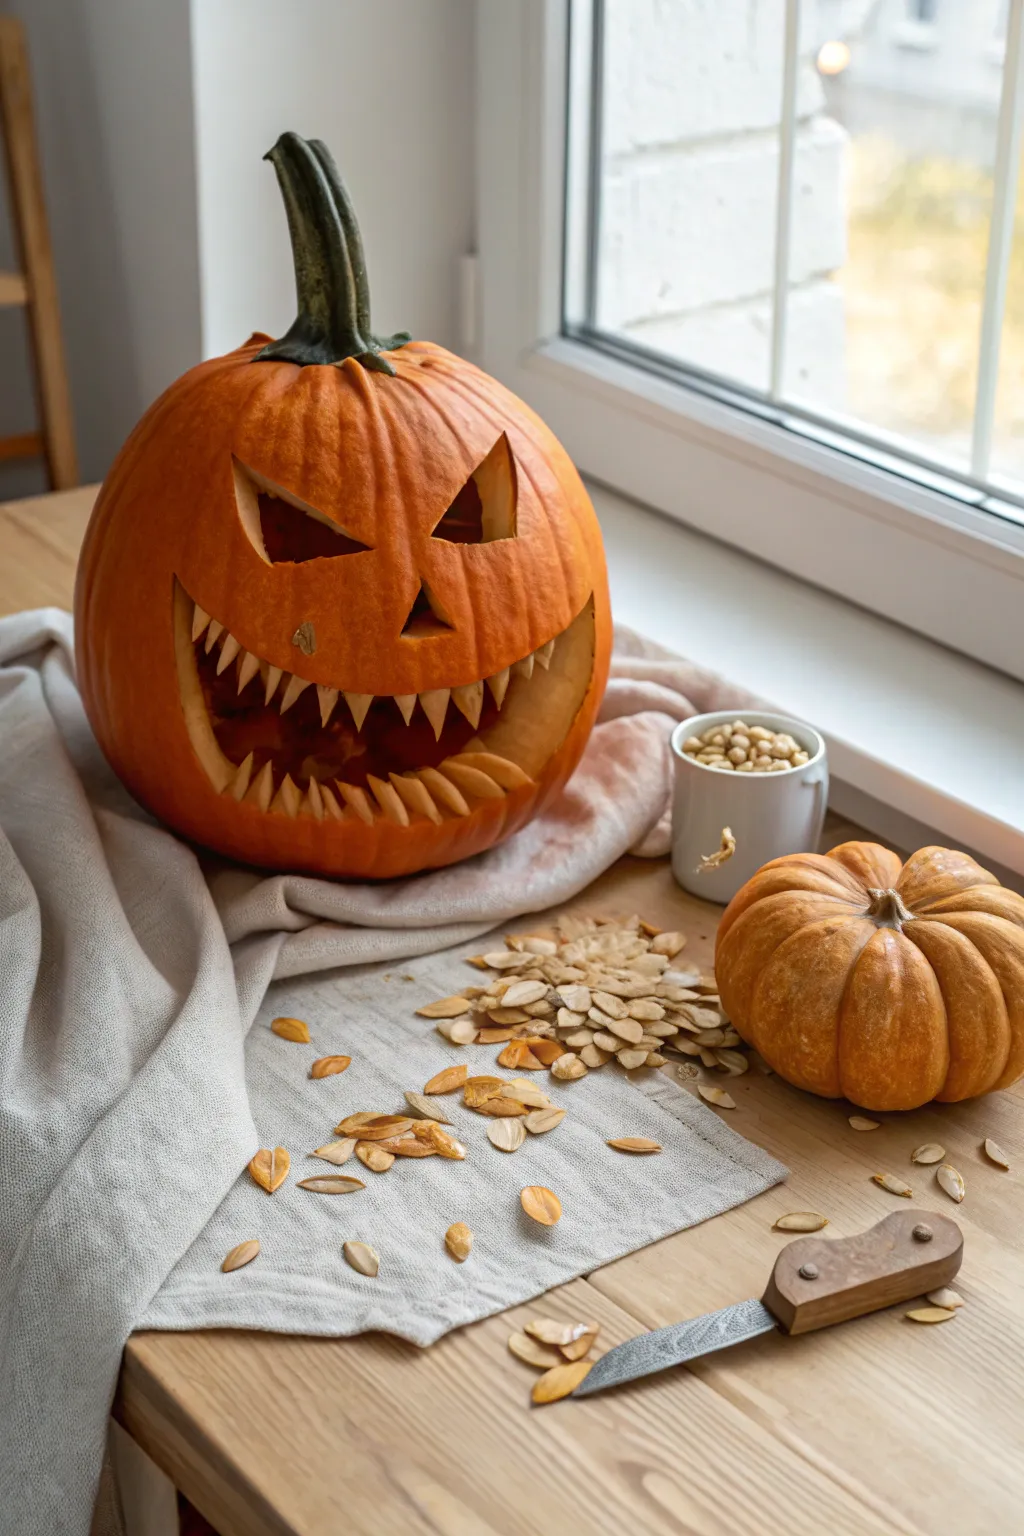
This project captures the quintessential spirit of Halloween with a menacing yet classic jagged grin and glowing triangular eyes. The sharp angles and wide, toothy mouth create a spooky silhouette that instantly transforms any porch into a haunted haven.
Step-by-Step Guide
Materials
- Medium to large perfectly round pumpkin
- Serrated pumpkin carving saw or knife
- Large metal serving spoon or fleshing tool
- Washable marker or poker tool suitable for stencils
- Tealight candles (real or LED Battery-Operated)
- Newspaper or disposable table cover
- Bowl for seeds and guts
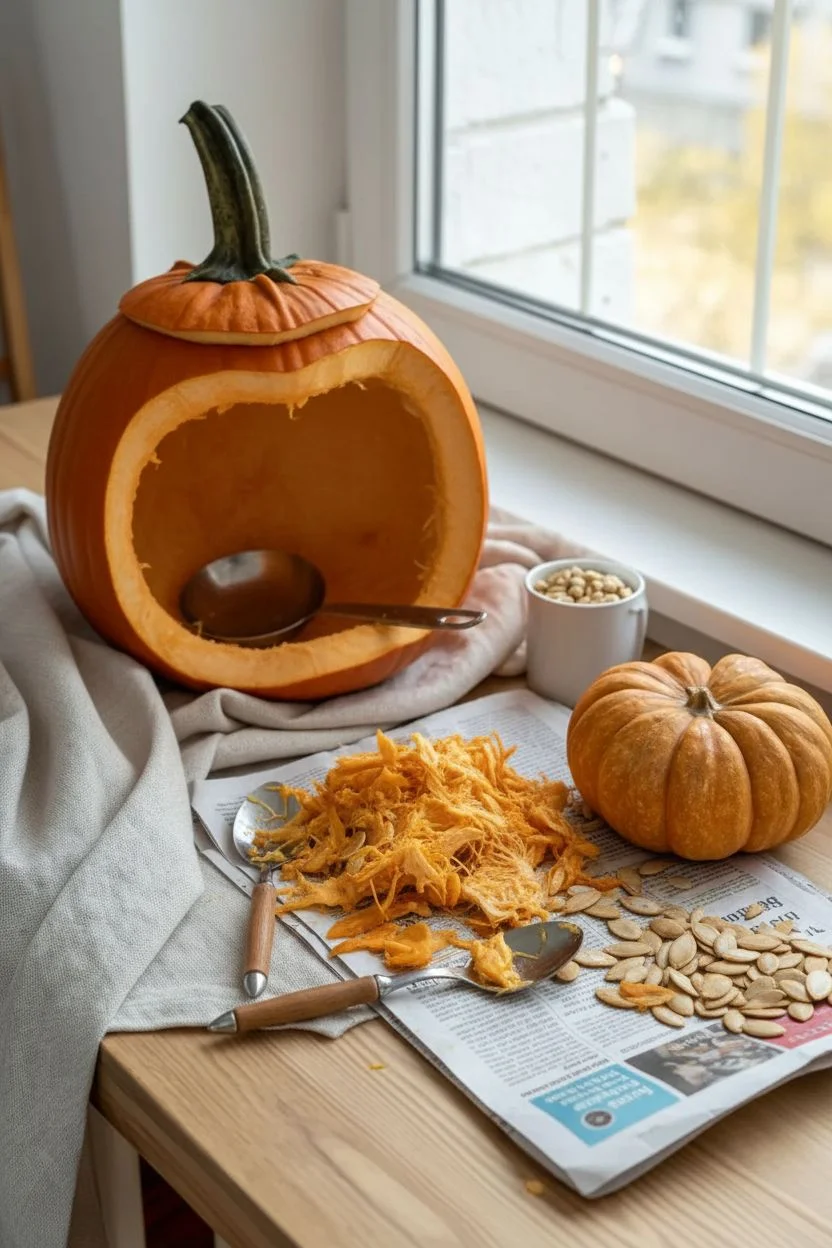
Step 1: Preparation & Cleaning
-
Set up your workspace:
Cover your sturdy work surface with newspaper or a disposable plastic tablecloth to catch the inevitable mess. Get your bowl ready for the pumpkin innards nearby. -
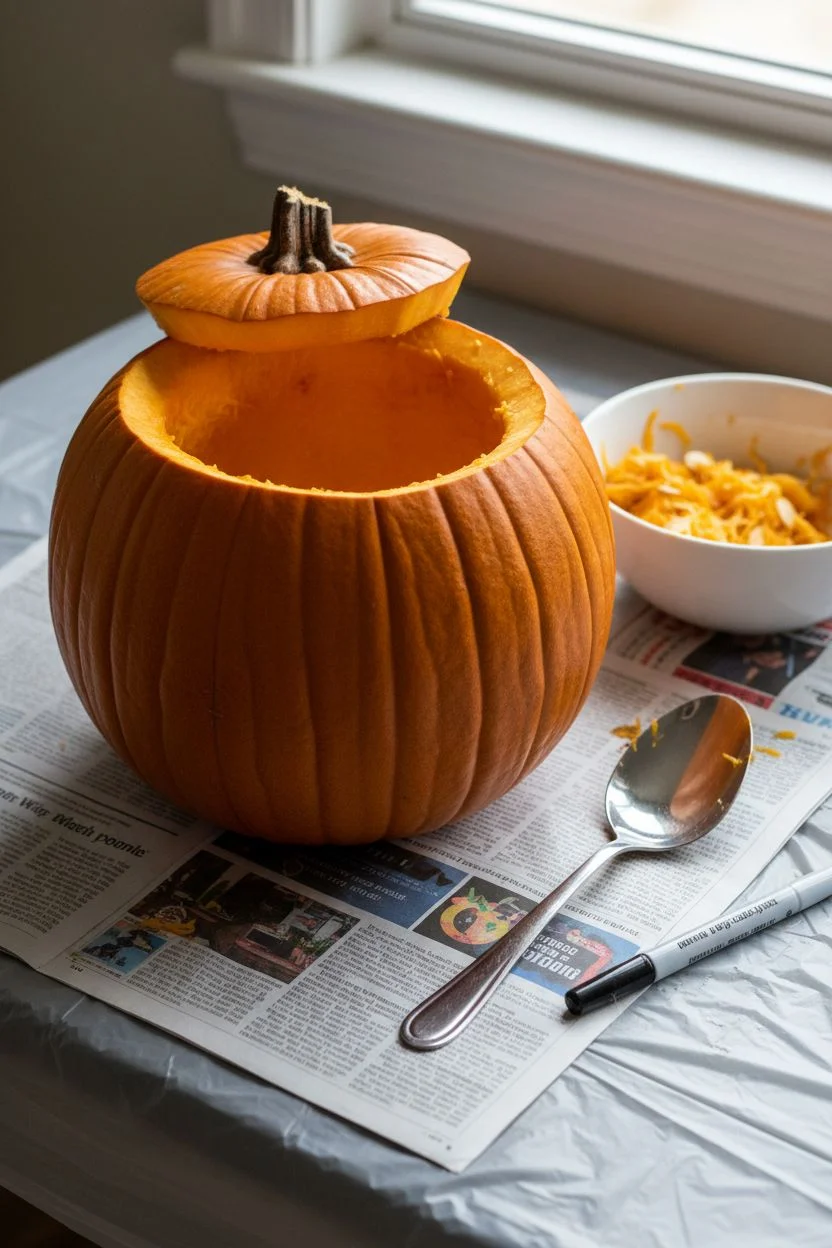
Open the lid:
Using your serrated knife, cut a circle around the stem at the top of the pumpkin. Angle your knife inward toward the center of the pumpkin as you cut; this creates a ledge so the lid won’t fall inside later. -
Remove the top:
Gently pry the lid off by the stem. Use your knife to slice off the fibrous strands hanging from the bottom of the lid so it is clean. -
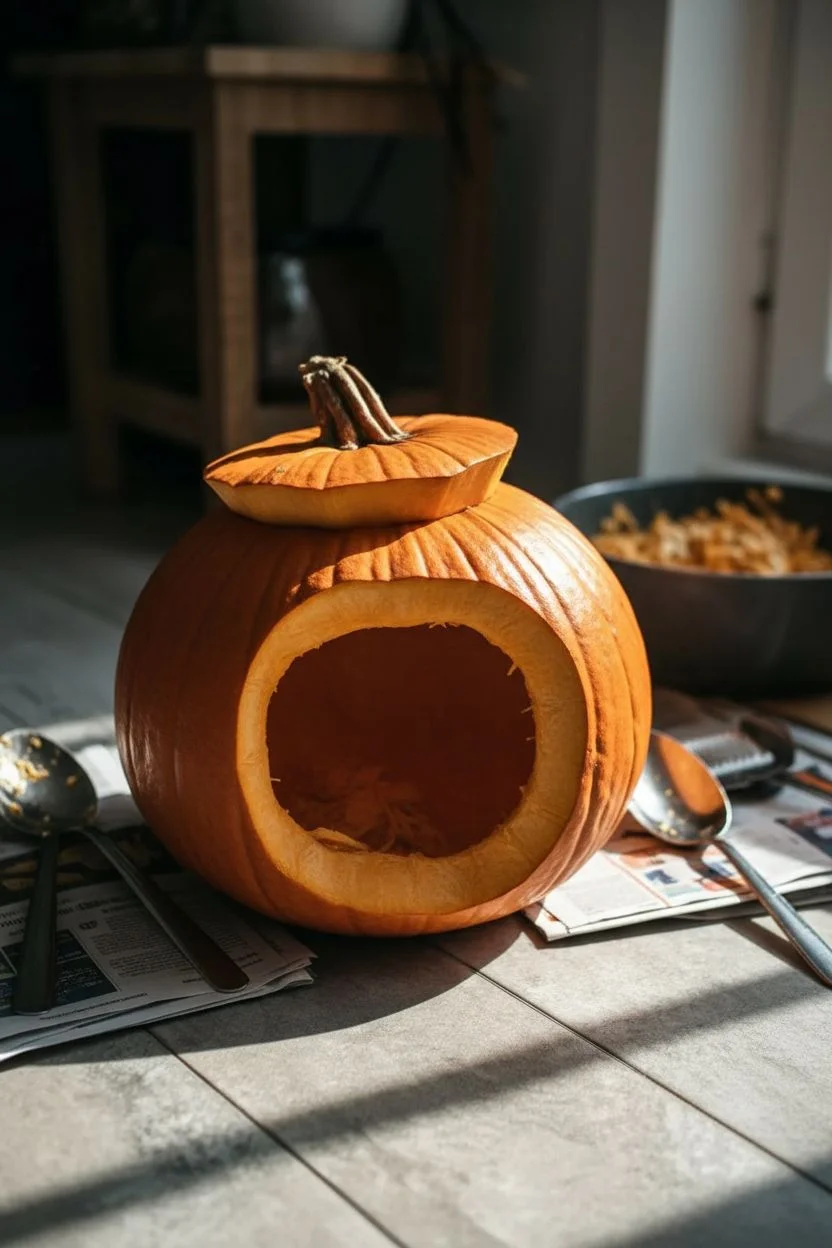
Scoop the insides:
Use your large metal spoon or fleshing tool to scrape the interior walls. Remove all seeds and stringy pulp. I like to scrape the wall where the face will be a bit thinner (about 1 inch thick) to make carving easier.
Broken Tooth Fix
If a tooth snaps off while carving, don’t panic. Use a sturdy toothpick to pin the broken piece back into place. Push it deep into the flesh so it’s invisible from the outside.
Step 2: Drafting the Face
-
Plan the eyes:
Using a washable marker, draw two large, equilateral triangles for the eyes about a third of the way down the pumpkin face. Angle them slightly inward to create a meaner, glaring expression. -
Position the nose:
Draw a smaller triangle centered below the eyes for the nose. Keep it proportional to the eyes but distinctly smaller. -
Sketch the mouth shape:
Lightly outline a wide, crescent-shaped smile that stretches almost as wide as the pumpkin’s face. The ends should curve upward significantly toward the ears. -
Add the teeth:
Inside your mouth outline, draw sharp, jagged triangles pointing up from the bottom lip and down from the top lip. Ensure the teeth interlock slightly visually but leave gaps for the light to shine through.
Cinnamon Scent Hack
Make your jack-o’-lantern smell amazing by sprinkling cinnamon or pumpkin spice on the inside of the lid. The heat from the candle will warm the spice and act as a diffuser.
Step 3: Carving the Features
-
Carve the eyes:
Hold your serrated saw perpendicular to the pumpkin surface. carefully saw along the lines of the eye triangles using a gentle up-and-down motion. Push the cut pieces out from the inside. -
Cut the nose:
Repeat the sawing process for the small nose triangle. Take your time on the corners to keep them sharp and crisp. -
Carve the center of the mouth:
Start carving the mouth from the center, working your way outward. Cut out the larger gaps between the teeth first to release tension in the pumpkin wall. -
Detail the teeth:
Carefully saw along the jagged lines of the teeth. Use short, controlled strokes. Be extra gentle with the tips of the teeth so they don’t snap off. -
Remove mouth sections:
Push the cut-out sections of the mouth gently into the pumpkin or pull them out, whichever offers less resistance. Clean up any hanging strands.
Step 4: Finishing Touches
-
Clean the edges:
Check all your cutouts. If there are jagged bits of pumpkin flesh visible in the holes, shave them off carefully with a small knife to ensure clean lines. -
Preserve the pumpkin:
Rub a thin layer of petroleum jelly on the cut edges of the face. This helps seal in moisture and prevents the shriveled look that happens after a day or two. -
Place the light:
Place one or two tea lights inside the bottom of the pumpkin. If using real candles, ensure they are stable. For a brighter glow like the photo, use two candles. -
Light it up:
Light the candles and place the lid back on top, matching the notch you cut earlier so it sits flush.
Step back and dim the lights to verify your spooky masterpiece glows with just the right amount of menace


Jagged Grin With Extra-Deep Cut Shadows
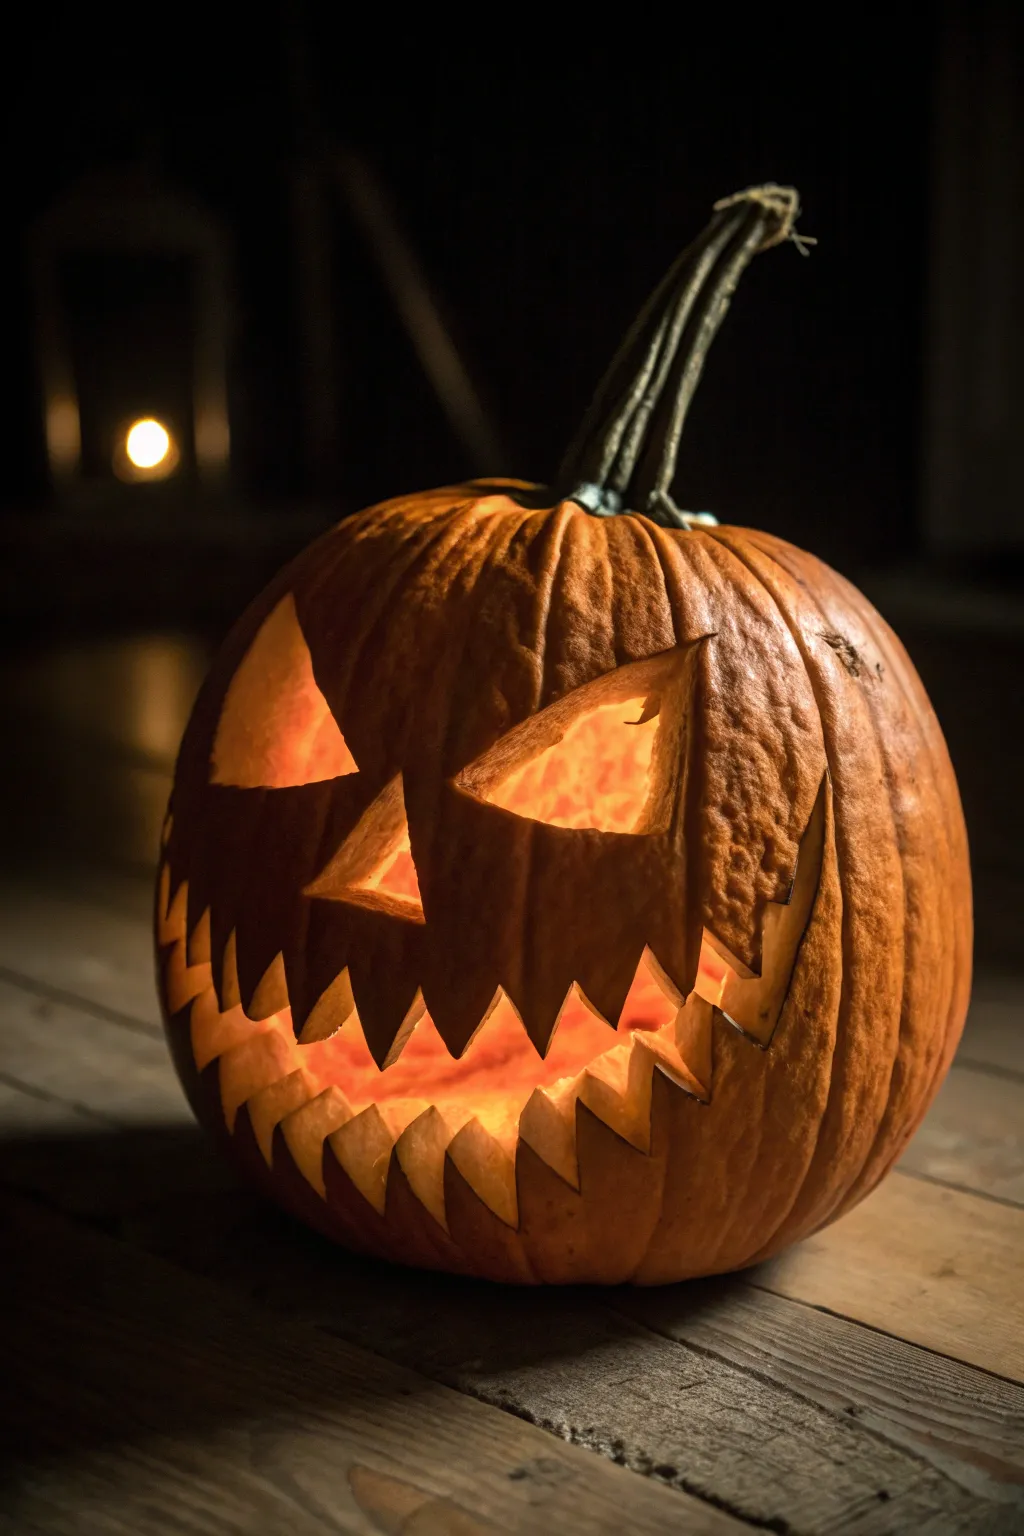

Embrace the spookier side of Halloween with this intensely angular Jack-o’-lantern design featuring exaggerated, sharp teeth. By cutting deeply into the pumpkin’s flesh and widening the mouth, you create dramatic shadows that flicker menacingly in candlelight.
Step-by-Step Tutorial
Materials
- Large, round pumpkin with a sturdy stem
- Serrated pumpkin carving knife (saw)
- Small paring knife for detail work
- Large metal spoon or clay loop tool
- Water-soluble marker or grease pencil
- Large bowl for seeds
- LED candle or tealight
Step 1: Preparation and Gutting
-
Select your canvas:
Choose a pumpkin that is slightly taller than it is wide to accommodate the long vertical cuts of the mouth. Inspect the skin to ensure it’s free of major blemishes on the front face. -
Open the top:
Using your serrated knife, cut a circle around the stem. Angle the knife inward towards the center of the pumpkin as you cut; this creates a ledge so the lid won’t fall inside later. -
Remove the lid:
Gently pry the lid off by the stem. If it sticks, run your knife around the cut one more time to sever any connecting fibers. -
Scoop the interior:
Use a large metal spoon or a scraping tool to remove all seeds and stringy pulp. I find scraping the interior wall where the face will be until it’s about 1 inch thick makes carving much easier.
Step 2: Drafting the Face
-
Plan the eyes:
With your marker, draw two sharp triangles for eyes. Instead of standard triangles, angle the inner corners sharply downward towards the nose area to create an angry, furrowed brow look. -
Map the nose:
Draw a small, simple triangle for the nose sitting just below the inner corners of the eyes. Keep it relatively small to leave maximum room for the massive mouth. -
Outline the mouth limits:
Mark the outer corners of the mouth very high up on the cheeks—almost parallel with the nose. This height is crucial for that menacing, ear-to-ear grin effect. -
Draw the jagged teeth:
Sketch a zigzag pattern connecting the corners. Make the ‘teeth’ triangles long and sharp, varying their sizes so they don’t look too uniform. Ensure the bottom jaw mirrors the top with deep valleys between teeth.
Angle Your Blade
When cutting the teeth, angle your knife slightly toward the center of the opening. This ‘undercut’ hides the thick rind and makes the teeth looks sharper and more defined.
Step 3: The Carving Process
-
Carve the eyes first:
Starting with the eyes keeps the pumpkin structurally sound while you work. Insert your serrated saw perpendicular to the deeper skin and use a gentle sawing motion to follow your lines. -
Push out eye pieces:
Once the shape is fully cut, push the piece gently from the inside out to avoid tearing the skin. -
Cut the nose:
Carefully saw out the small nose triangle. Because this shape is small, use short strokes and take your time turning the corners. -
Start the mouth center:
Begin carving the mouth at the center teeth. Support the pumpkin wall with your free hand inside the gourd to prevent the delicate tooth tips from snapping. -
Work outward:
Continue carving the sharp zigzags toward the cheeks. As you cut the deep ‘V’ shapes between teeth, ensure your cuts intersect cleanly at the points so the waste pieces come out easily. -
Refine the edges:
Once the main mouth pieces are removed, use a small paring knife to carefully shave away any hanging pumpkin fibers or rough jagged bits of flesh from the tooth outlines.
Broken A Tooth?
If a sharp tooth snaps off during carving, don’t panic. Use a sturdy toothpick inserted into the flesh to pin the broken piece back in place. It will hold perfectly once displayed.
Step 4: Creating Depth
-
Bevel the inner cuts:
To maximize shadow and light, go back over the inside edges of the mouth. Slice a small amount of the inner flesh away at a 45-degree angle, widening the opening slightly on the inside. -
Clean the skin:
Wipe away any remaining marker lines with a damp paper towel or rubbing alcohol. -
Preserve the cut edges:
Rub a thin layer of petroleum jelly on the cut surfaces. This seals in moisture and prevents the thin teeth from shriveling up too quickly. -
Light it up:
Place your light source inside. For this design, a brighter light works best to punch through the narrow eye slits and cast those dramatic tooth shadows.
Set your finished creation on the porch and watch the flickering light bring that wicked grin to life


Needle Teeth Made From Toothpicks
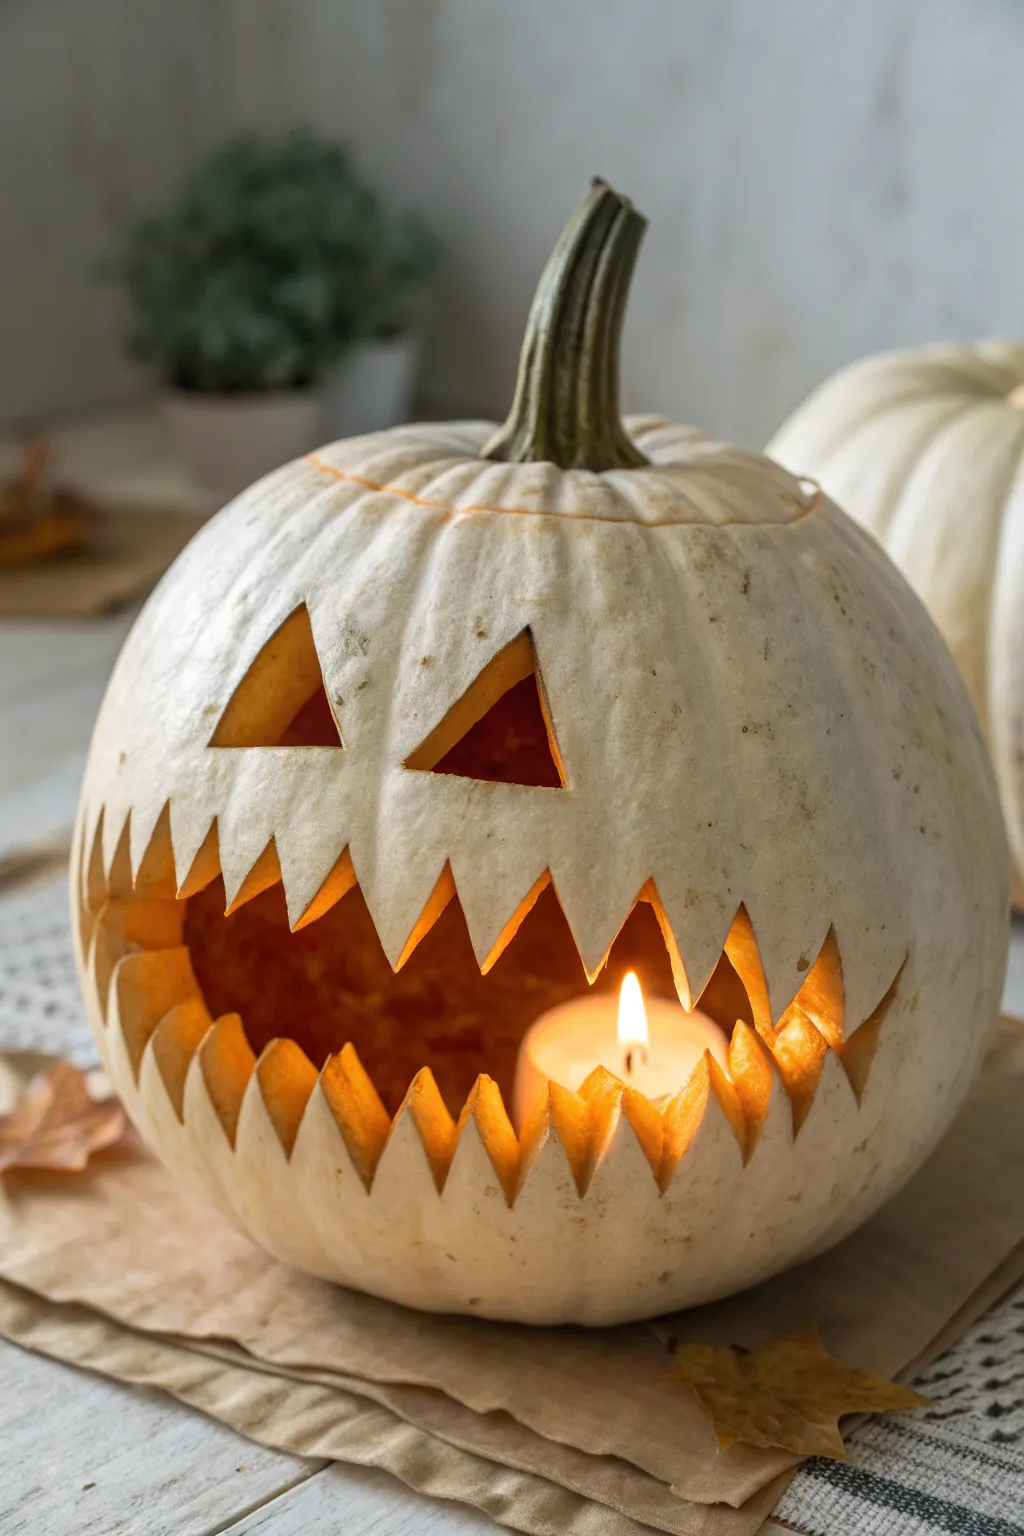
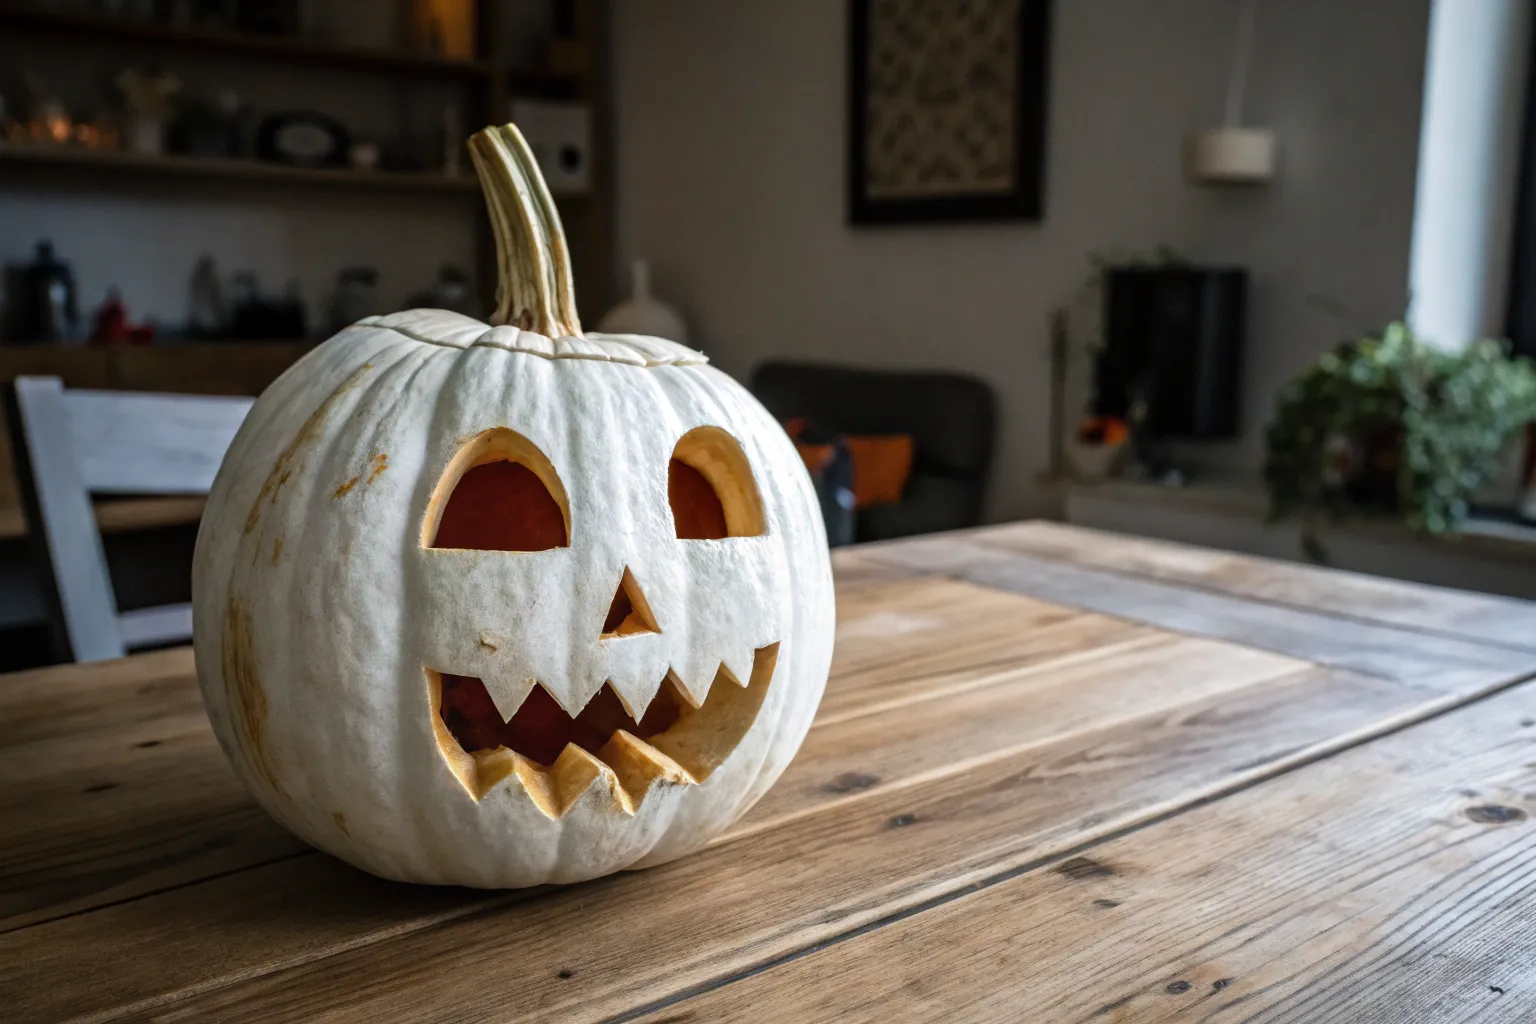
Deviate from the traditional orange this season with a striking white pumpkin that glows with ethereal charm. This project features a classic jagged grin and sharp triangular eyes, carved into pale skin for a spookier, more skeletal effect.
Detailed Instructions
Materials
- White pumpkin (Lumina or Casper variety)
- Serrated pumpkin carving saw (fine-tooth)
- Poker tool or awl
- Large metal spoon or pumpkin scraper
- Masking tape
- Washable marker or pencil
- Tea light candle (real or LED)
- Bowl for seeds/pulp
- Paper towels
Step 1: Preparation & Cleaning
-
Select the canvas:
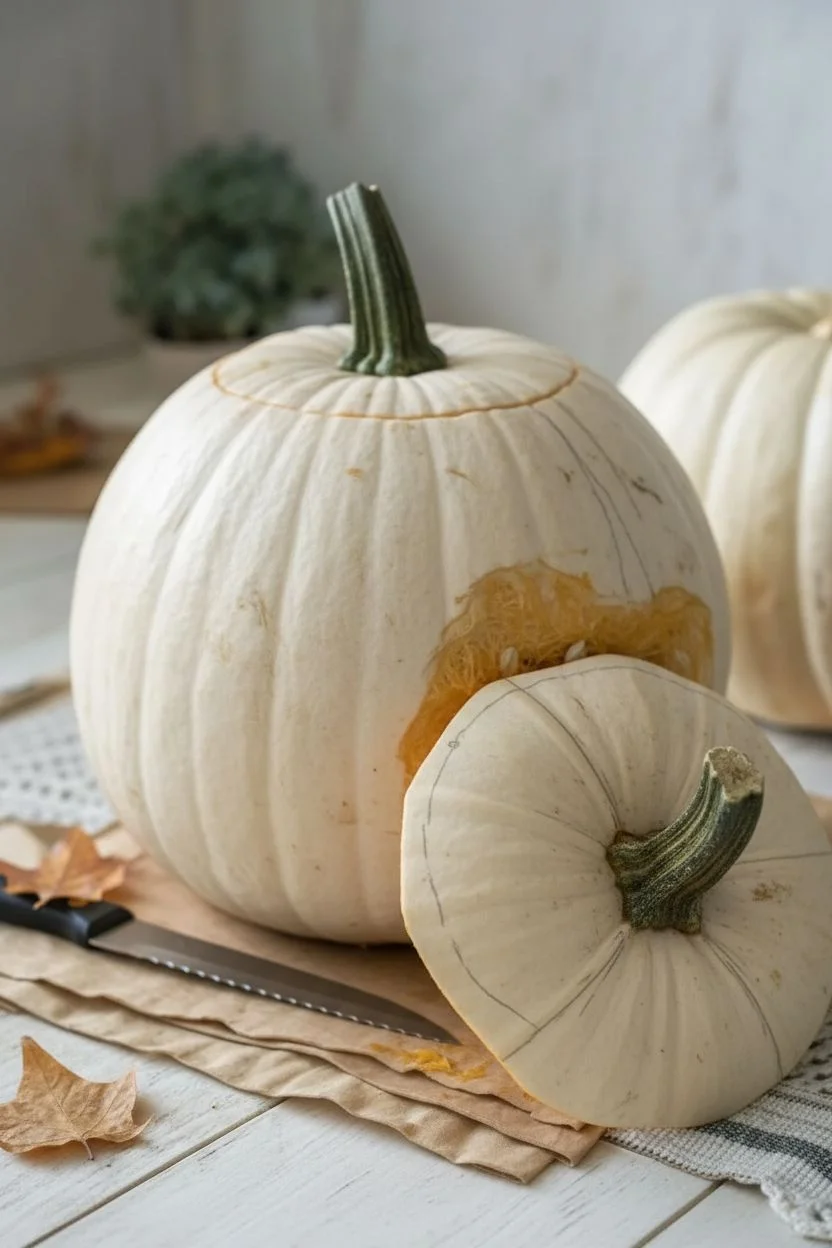
Choose a white pumpkin that sits flat and has a relatively smooth side for the face. Look for a stem that is sturdy and dark green for contrast. -
Wipe it down:
Clean the exterior of the pumpkin with a damp paper towel to remove any dirt or field dust, ensuring the white skin is bright and ready for marking. -
Draft the lid:
Using a pencil, draw a circle around the stem, about 2-3 inches out. Add a small notch or ‘key’ shape to the back of the circle so you can easily realign the lid later. -
Cut the cap:
Insert your serrated saw at a 45-degree angle inward (towards the center) along your drawn line. This angled cut prevents the lid from falling inside as the pumpkin shrinks. -
Gut the interior:
Remove the lid and trim off the seeds hanging from it. Use your large spoon or scraper to hollow out the inside. I find it really helpful to scrape the wall behind the future face area a bit thinner—about 1 inch thick—to make carving easier.
Clean Cuts Only
White pumpkins show mistakes more than orange ones. If you slip, don’t worry—use a bit of white toothpaste or flour mixed with water to patch small nicks in the skin.
Step 2: Designing the Face
-
Draft the eyes:
Sketch two sharp, isosceles triangles for the eyes. Place them fairly high up on the pumpkin to leave room for the massive mouth. -
Sketch the mouth outline:
Draw a wide, crescent-shaped smile that wraps visibly around the sides of the pumpkin. The wider the mouth, the scarier the effect. -
Detail the teeth:
Inside your mouth outline, draw sharp zigzag lines for the teeth. Make the points long and needle-like, mimicking the look of shark teeth. Ensure the top and bottom rows interlock visually but leave gaps for light.
Step 3: Carving the Features
-
Transfer the design:
Use your poker tool or awl to prick small holes along every line of your design, spacing them about 1/8 inch apart. This transfer method is often cleaner than carving through paper. -
Carve the eyes:
Start with the eyes since they are smaller and higher up. Insert the small serrated saw and cut with a gentle up-and-down sawing motion. Remove the cut pieces by pushing them gently from the inside out. -
Start the mouth center:
For the complex mouth, I prefer to start in the middle and work outward. Carefully saw along the jagged tooth lines. -
Navigate the corners:
When you reach the sharp points of the teeth, remove the saw and re-insert it at the new angle rather than trying to turn the blade while it’s in the pumpkin, which can snap the delicate tips. -
Clear section by section:
Don’t try to remove the entire mouth piece at once. Cut small sections of the negative space between the teeth and remove them individually to reduce tension on the fragile tooth points. -
Refine the edges:
Once the main pieces are out, go back with a small detailing tool or paring knife to clean up any fibrous strands or ragged bits of skin on the teeth edges.
Make It Glow
For a cooler, ghostly vibe, use a blue or purple LED light inside instead of a traditional yellow flame. It reacts beautifully with the pale skin.
Step 4: Final Touches
-
Clean the surface:
Wipe away remaining marker lines or poker holes with a damp cloth. -
Preserve the cut:
Rub a thin layer of petroleum jelly on the cut edges of the teeth and eyes. This helps seal in moisture and prevents the white flesh from shriveling and turning brown too quickly. -
Light it up:
Place a tea light candle inside. If using a real flame, ensure the lid has a small vent hole (chimney) or leave the lid slightly askew for airflow.
Set your luminescent creation on the porch to greet trick-or-treaters with a chilling skeletal grin


Sideways Pumpkin Face Using the Stem as a Nose
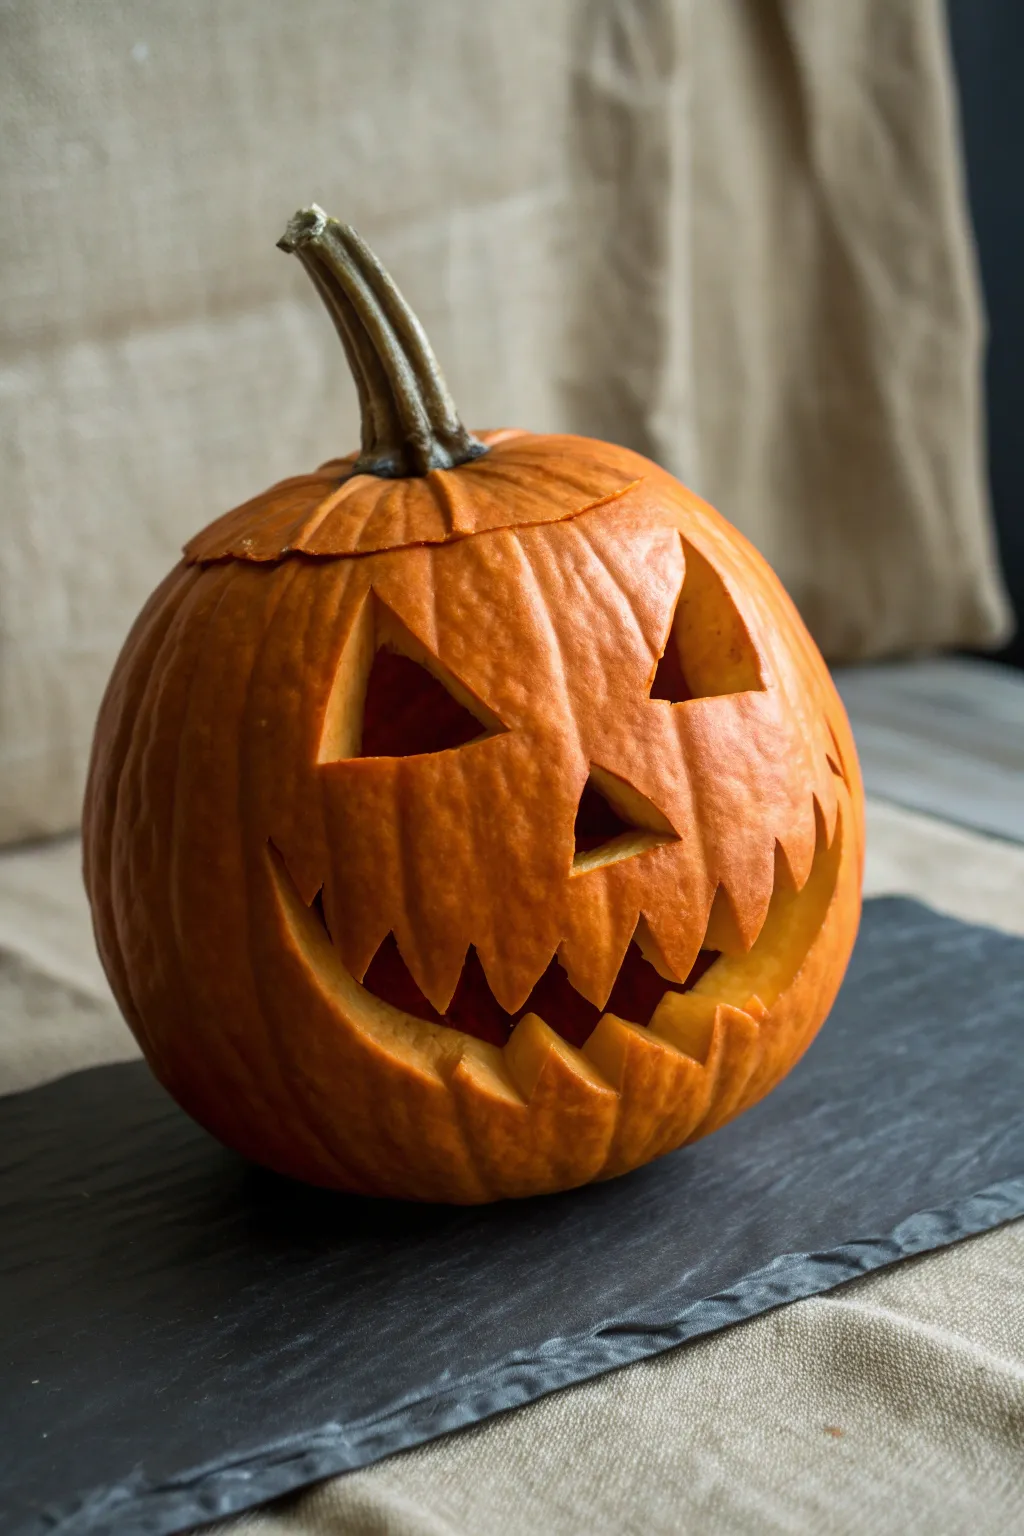
This project features a timeless, sinister Jack-o’-lantern expression with sharp, triangular features and a wide, jagged grin. The clean lines and deep cuts create dramatic shadows, making it a perfect centerpiece for your spooky porch display.
Step-by-Step Guide
Materials
- Medium to large round pumpkin
- Serrated pumpkin carving knife (saw)
- Small paring knife
- Large metal spoon or specialized scraping tool
- Dry-erase marker or washable pen (red or black)
- Bowl for seeds/guts
- Newspaper or drop cloth
- LED votive light or candle
Step 1: Preparation and Cleaning
-
Select your canvas:
Choose a pumpkin with a relatively flat side and a strong, sturdy stem. Ensure it sits stably on a flat surface without wobbling too much. -
Map the lid:
Around the top stem, use your marker to draw a circle for the lid. Include a small ‘notch’ or triangular divert in your line; this acts as a key so you can easily fit the lid back on the correct way later. -
Cut the cap:
Using your serrated carving saw, cut along the line you just drew. Angle the blade inward towards the center of the pumpkin rather than straight down to create a ledge that prevents the lid from falling inside. -
Remove the top:
Gently pry the lid off by the stem. Use a knife to slice off the fibrous strands hanging from the bottom of the lid so it is clean. -
Gut the pumpkin:
Reach in with your hand to pull out the bulk of the seeds and stringy pulp. Transfer these to your waste bowl. -
Scrape the walls:
Use your large metal spoon or scraping tool to thin the inner walls, specifically on the side where you plan to carve the face. I aim for a wall thickness of about one inch to make carving easier.
Fixing a Broken Tooth
If a tooth snaps off, don’t panic! Use a sturdy toothpick inserted vertically to pin the broken piece back onto the gum line. It will hold perfectly.
Step 2: Designing the Face
-
Draft the eyes:
With your washable marker, draw two sharp, right-angled triangles for eyes. Place them high on the pumpkin face, angling the inner corners downward to create an angry, menacing brow line. -
Place the nose:
Draw a smaller triangle for the nose slightly below the eyes centered in the middle. Orient this triangle creating a classic ‘arrowhead’ shape. -
Sketch the grin:
Draw a wide mouth that stretches almost as wide as the eyes. Instead of a smooth curve, sketch a series of sharp, jagged teeth along both the top and bottom jawlines, ensuring the corners curl upward into a sinister smile.
Step 3: Carving the Features
-
Start with the eyes:
Insert your serrated saw perpendicular to the pumpkin skin. Use a gentle sawing motion to cut along your marker lines for the eyes. -
Pop out the pieces:
Once the eye shapes are fully cut, push the pieces gently fro the inside of the pumpkin to pop them out cleanly. -
Carve the nose:
Repeat the sawing process for the small nose triangle. Take your time here, as the corners are tight. -
Tackle the mouth:
Begin carving the mouth. I find it easiest to start at the center and carve outward toward the cheeks. -
Navigate the teeth:
Carefully saw up and down for each tooth. When changing direction at the sharp points of the teeth, remove the saw and re-insert it at the new angle rather than turning the blade while it’s in the flesh. -
Remove mouth sections:
Cut the mouth out in smaller sections rather than trying to remove the entire long strip at once. This prevents the delicate teeth from snapping off. -
Clean the edges:
Use your small paring knife to carefully trim away any ragged bits of pumpkin flesh or skin along the cut edges for a polished look.
Make it Spooky
Sprinkle cinnamon or pumpkin spice on the inside of the lid. When the candle heats up, your jack-o’-lantern will smell like a fresh pie.
Step 4: Finishing Touches
-
Wipe it down:
Use a damp paper towel or sponge to wipe away any remaining marker lines on the pumpkin’s surface. -
Preserve the pumpkin:
Rub a thin layer of petroleum jelly on all cut edges. This helps lock in moisture and keeps the pumpkin from shriveling too quickly. -
Light it up:
Place your LED light inside, replace the lid using your registration notch, and admire the menacing glow.
Enjoy the eerie atmosphere this classic carved design brings to your Halloween decoration setup
BRUSH GUIDE
The Right Brush for Every Stroke
From clean lines to bold texture — master brush choice, stroke control, and essential techniques.
Explore the Full Guide
Split-Mouth Pumpkin With a Cutout Tongue
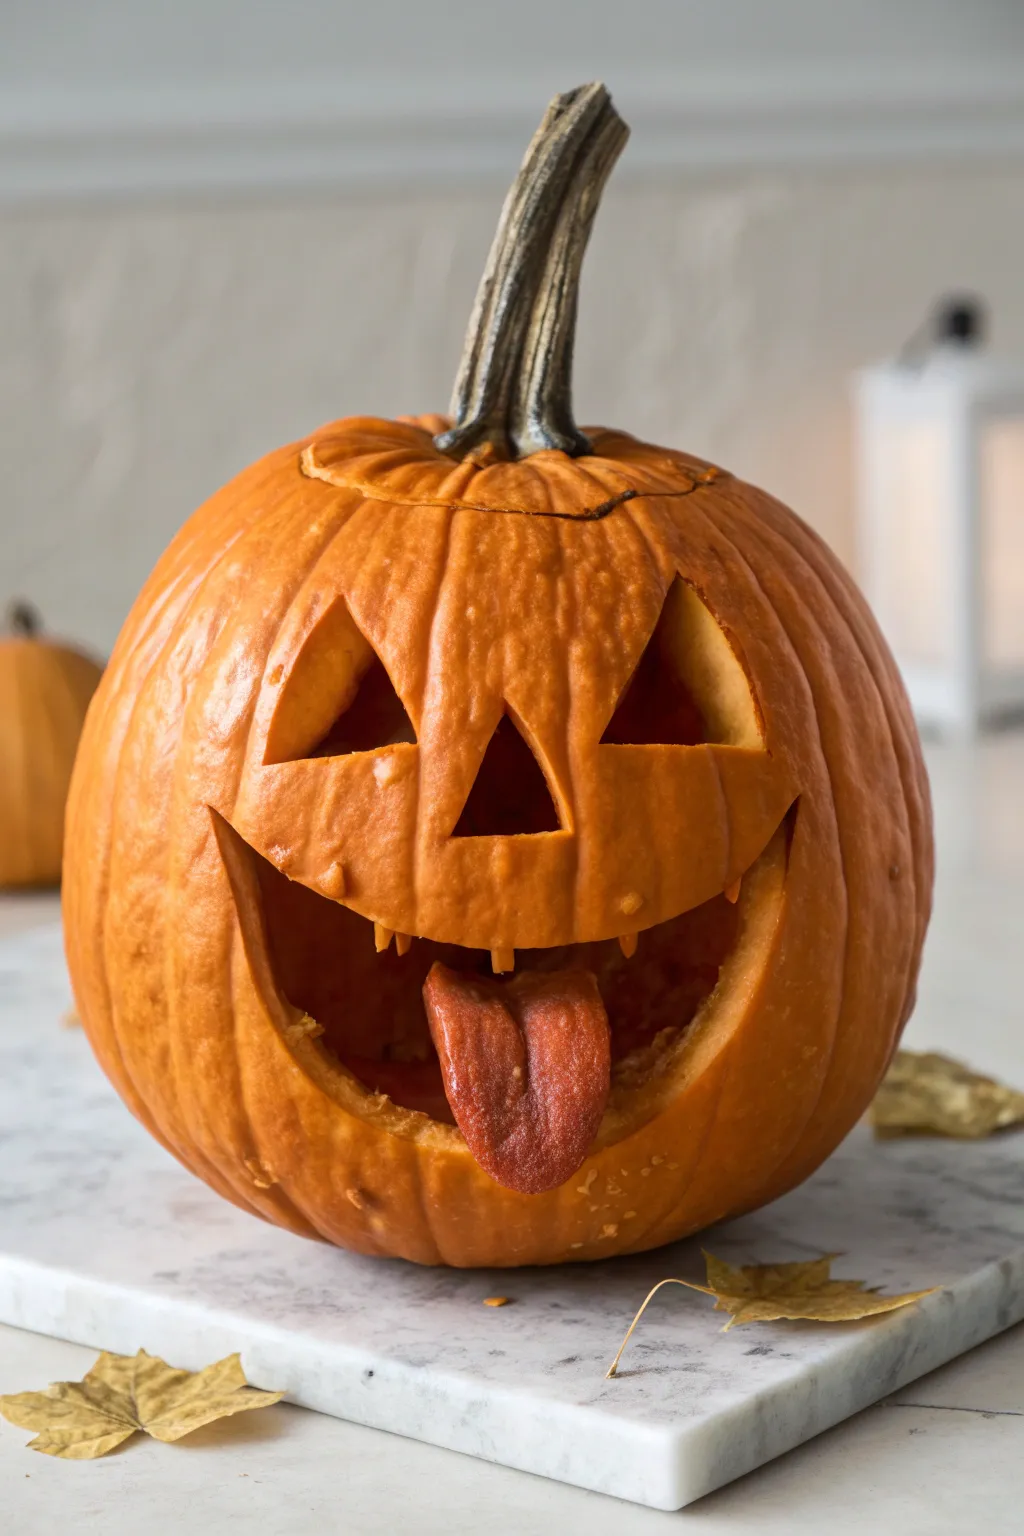
Give your Halloween decor a playful yet eerie twist with this expressive jack-o’-lantern featuring a wide, split grin and a realistically textured tongue. This project uses the pumpkin’s own discarded shell to create a 3D element that adds hilarious personality to your porch.
Step-by-Step Tutorial
Materials
- Medium to large orange pumpkin
- Serrated pumpkin carving saw or knife
- Large metal spoon or dedicated scraping tool
- Water-soluble marker or pencil
- Small paring knife
- Toothpicks
- Bowl for seeds/guts
Step 1: Preparation & Mapping
-
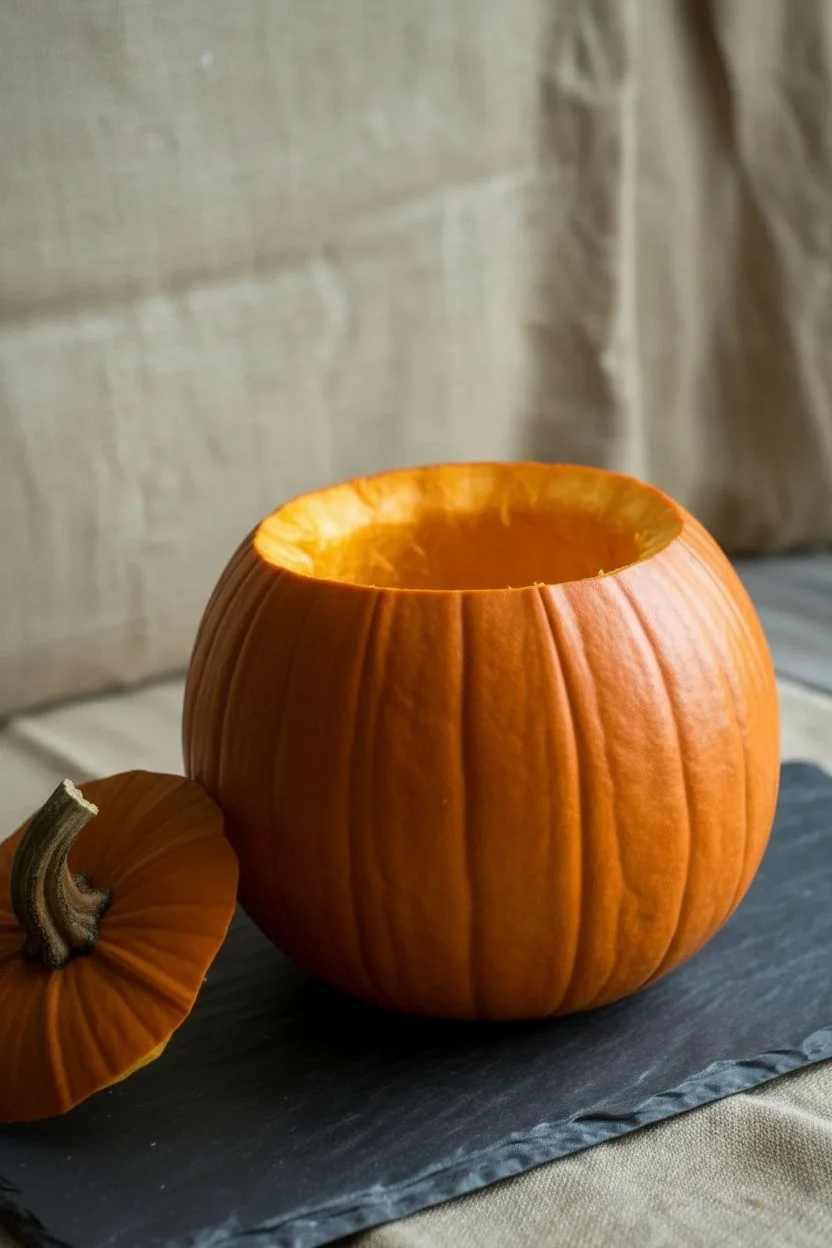
Open the lid:
Cut a circular opening around the stem at the top of the pumpkin. Angle your knife slightly inward as you cut so the lid sits firmly on top later without falling in. -
Clean the interior:
Remove the lid and use a large metal spoon or scraper to hollow out the inside. Is scraping the least fun part? Maybe, but you need to get the walls relatively smooth and clean, leaving them about an inch thick. -
Sketch the face:
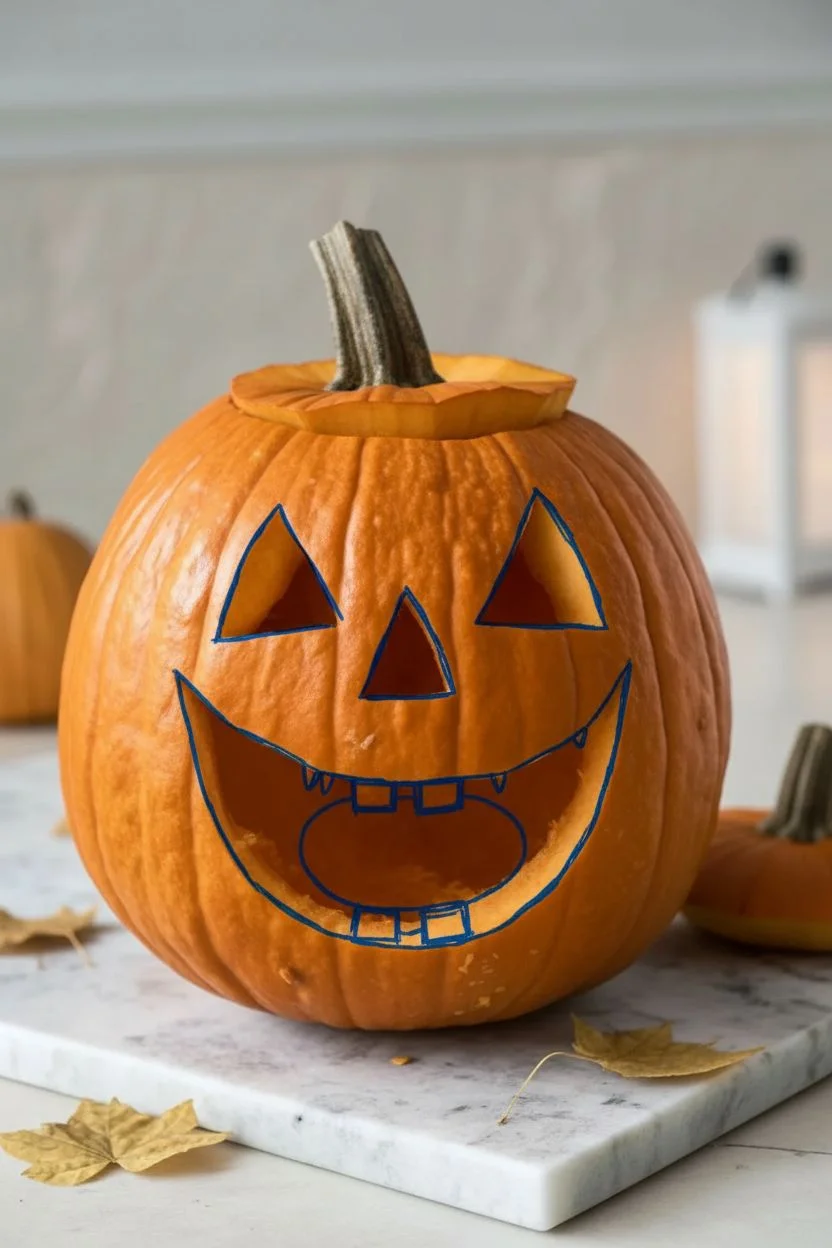
With a water-soluble marker, draw two distinct triangles for eyes and a smaller triangle for the nose. Then, sketch a wide, U-shaped smile that extends far up the cheeks. -
Draft the tongue zone:
Draw the mouth outline carefully. Instead of a simple open mouth, sketch a split design where the top and bottom teeth will sit, leaving a large open space in the center for the tongue to emerge.
Stay Fresh Longer
Rub a thin layer of petroleum jelly on all cut surfaces, including the custom tongue. This seals in moisture and prevents the edges from shriveling up too quickly.
Step 2: Carving the Features
-
Cut the eyes and nose:
Using a serrated saw or knife, carefully cut out the triangular eye and nose shapes following your marker lines. Punch these pieces out and discard them. -
Separate the mouth section:
Begin cutting the large mouth opening. Unlike traditional carvings, you want to preserve a large chunk of the pumpkin flesh from the mouth area—do not chop it into tiny bits as you remove it. -
Save the scrap:
Push the large mouth cutout piece from the inside out to remove it intact. Set this piece aside immediately; this will become your tongue. -
Refine the edges:
Go back over the edges of the mouth opening with a small knife to clean up any ragged bits of flesh or skin. -
Carve the teeth:
Using a small paring knife, carefully whittle away the outer orange skin along the gum line to create small, rectangular buck teeth at the top of the mouth opening. You don’t need to cut all the way through; just revealing the lighter flesh works well.
Step 3: Crafting the Tongue
-
Shape the tongue base:
Take the large scrap piece you saved from the mouth. I like to flip it skin-side down and use the inner flesh side as the visible part of the tongue for a raw, meaty texture. -
Round the tip:
Use your knife to round off one end of the scrap piece into a classic U-shaped tongue tip. Taper the sides slightly so it looks natural. -
Add texture:
Score a shallow line down the center of the tongue using the tip of your knife to create the centerline. You can lightly scrape the surface to enhance the fibrous texture. -
Skin adjustments:
If the scrap is too thick, slice off some of the orange skin from the back (the underside) of the tongue to make it lighter and easier to mount.
Glow Up
Place a red LED light inside instead of a white candle. The red glow will backlight the texture of the tongue, making it look even more fleshy and grotesque.
Step 4: Assembly
-
Position the tongue:
Place the tongue inside the mouth opening, letting it drape over the bottom lip. The rounded tip should hang down casually. -
Secure with toothpicks:
Insert two or three toothpicks into the back base of the tongue piece. Push the other ends of the toothpicks firmly into the floor of the pumpkin’s mouth interior to lock it in place. -
Final check:
Wipe away any remaining marker lines with a damp cloth. Place the lid back on top to complete the look.
Now you have a hilariously expressive pumpkin that is ready to greet trick-or-treaters
Pumpkin Guts “Vomit” Spill
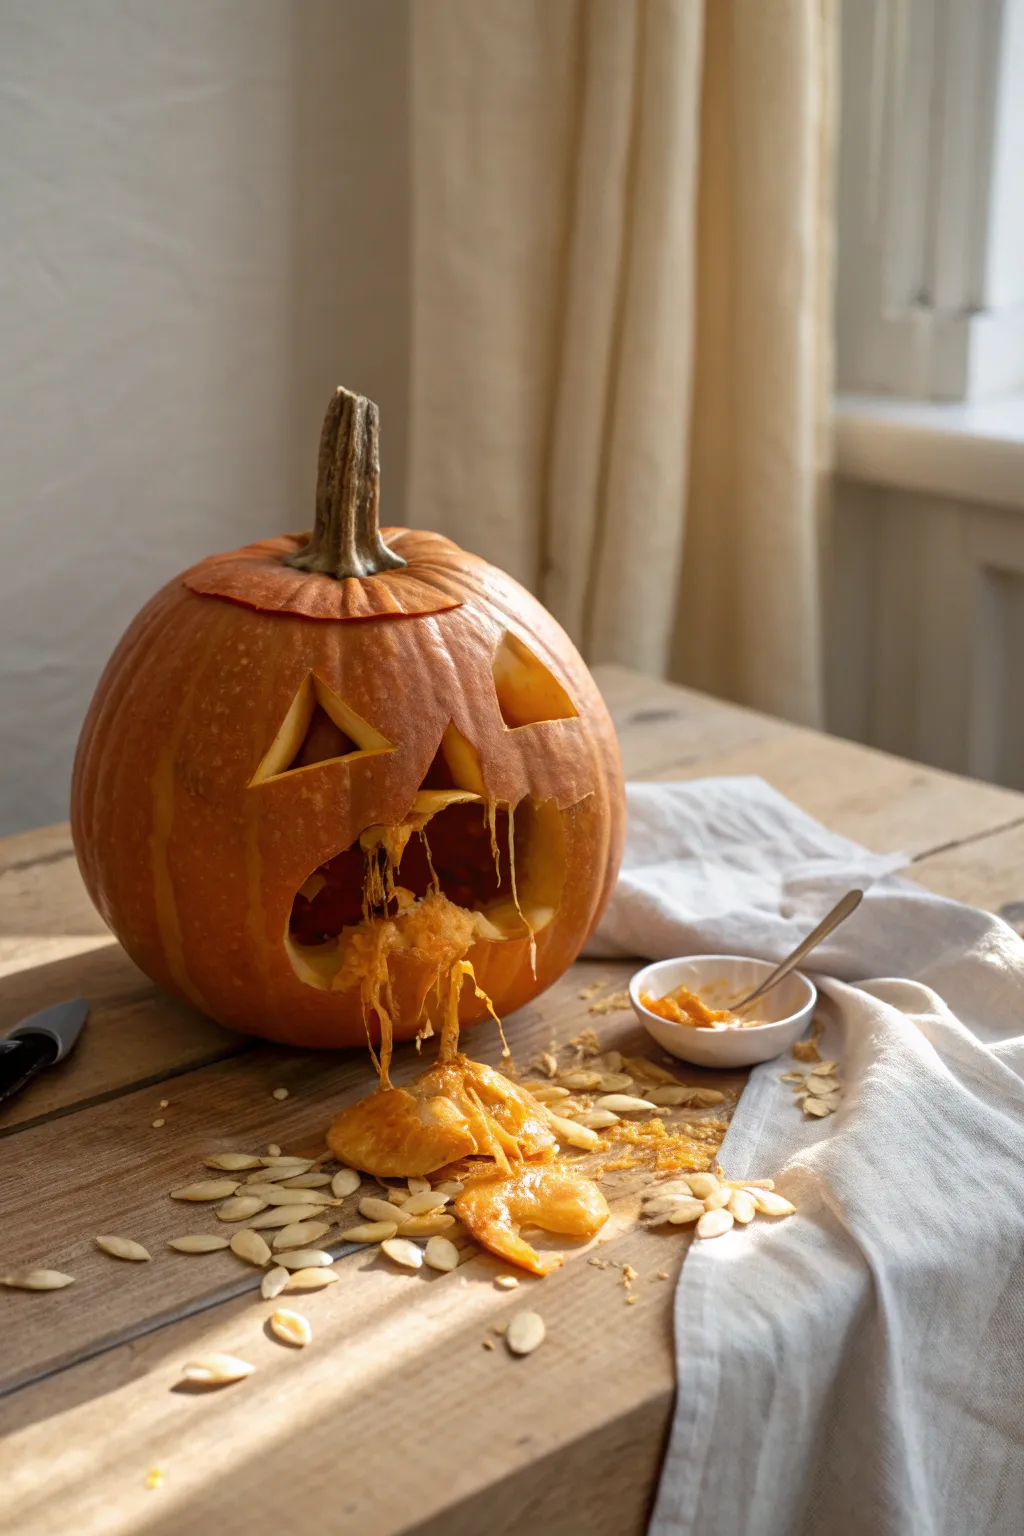
Add a touch of gross-out humor to your Halloween decor with this classic puking pumpkin design. By utilizing the natural stringy mess of the pumpkin’s insides, you can create a centerpiece that is equal parts spooky and hilarious.
How-To Guide
Materials
- Medium to large orange pumpkin
- Carving knife or pumpkin saw
- Large metal spoon or scoop
- Small paring knife
- Bowl for discarded seeds
- Newspaper or drop cloth
- Market or pencil for sketching
- Tea light or LED candle (optional)
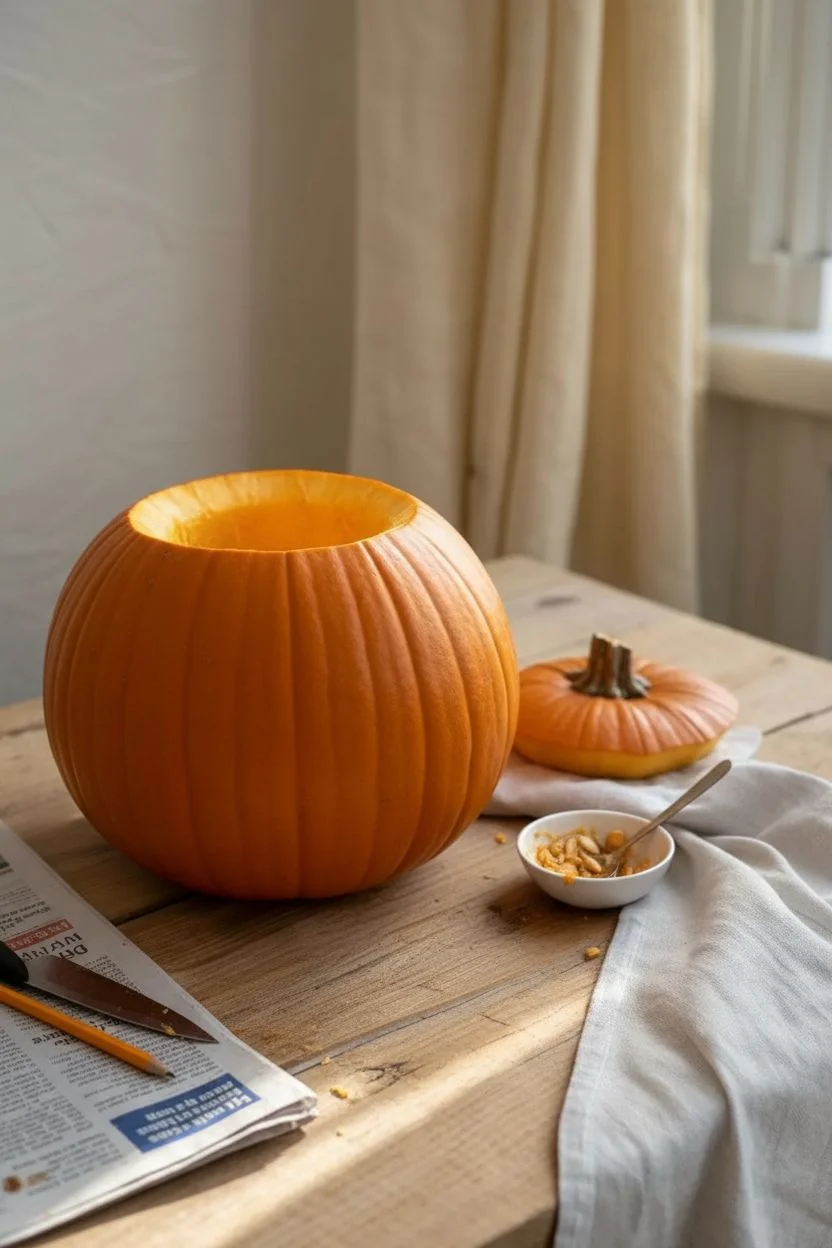
Step 1: Preparation and Opening
-
Clean surface:
Begin by wiping down the exterior of your pumpkin with a damp cloth to remove any dirt or field debris. Dry it completely to ensure your marker lines will stick. -
Map the lid:
Around the stem, draw a circle or hexagon shape for your lid. I like to include a small notch in the design so it’s easy to realign the lid later. -
Cut the top:
Using your carving knife, cut along your lid lines. Angle the knife inward toward the center of the pumpkin to create a ledge that prevents the lid from falling inside. -
Initial scoop:
Remove the lid and trim off the fibrous bottom of it. Reach in with your spoon and remove about half of the seeds and pulp. You need to leave plenty of guts behind for the effect later, so don’t clean it completely.
Stuck Guts?
If the pulp strings keep breaking, try mixing a little petroleum jelly or clear slime with the seeds to create a stickier, gooier consistency that holds together better.
Step 2: Carving the Face
-
Sketch the eyes:
Draw two simple triangles for the eyes on the upper third of the pumpkin’s face. Keep them somewhat widely spaced for a dazed expression. -
Sketch the nose:
Draw a smaller triangle between and slightly below the eyes for the nose. -
Draw the mouth:
Sketch a large, wide, open mouth. An oval or kidney bean shape works best here to look like a gaping maw. -
Carve the features:
Carefully cut out the eye and nose triangles first. Use your finger to push the cut pieces inward, then pull them out through the top opening. -
Carve the mouth:
Cut along your mouth outline. This is the most critical cut, so take your time to ensure the edges are clean.
Level Up: Green Slime
Mix a drop of green food coloring into the pulp pile or add cooked spaghetti dyed green for a more cartoonish, colorful vomit effect.
Step 3: Creating the Spill
-
Loosen the insides:
Use your scraping tool to loosen the remaining pulp and seeds from the inner walls, but do not remove them from the pumpkin yet. -
Drag the guts:
Reach through the mouth opening (or push from the inside) and grab a handful of the stringy pulp and seeds. Drag them out through the mouth. -
Arrange the flow:
Drape the prominent strings of pulp so they hang from the bottom lip of the carving. Let gravity help you create a natural-looking spill. -
Create the pile:
Scoop more seeds and globs of pulp onto the surface directly in front of the mouth. Pile it up slightly so it looks like a fresh puddle. -
Connect the flow:
Ensure there is a visual connection between the guts inside the mouth and the pile on the table. You want a continuous line of strings bridging the gap. -
Scatter seeds:
Take a handful of loose seeds and scatter them wider around the main pile to add realistic texture and messiness to the scene.
Step 4: Final Touches
-
Clean the face:
Wipe away any remaining marker lines on the pumpkin’s skin with a damp paper towel. -
Adjustment:
Step back and look at the composition. If the spill looks too thin, pull more guts from the inside cavity to bulk it up. -
Lighting (Optional):
If you want to light it, place a tea light deep inside the back of the pumpkin. Be careful not to burn the hanging pulp near the front. -
Replace lid:
Place the lid back on top, aligning your notch, to complete the pumpkin’s silhouette.
Now you have a delightfully disgusting decoration that captures the spirit of the season

PENCIL GUIDE
Understanding Pencil Grades from H to B
From first sketch to finished drawing — learn pencil grades, line control, and shading techniques.
Explore the Full Guide
Stitched-Up Scar Pumpkin Face
This project captures the essence of Halloween with a classic, menacing face featuring sharp, angular features and a wide, toothy grin. By focusing on creating deep, clean cuts and jagged teeth, you’ll achieve a shadow-casting masterpiece that looks great both lit and unlit.
Step-by-Step Guide
Materials
- Medium to large well-rounded pumpkin
- Serrated pumpkin carving saw or drywall saw
- Carving scoop or large metal spoon
- Poker tool or awl
- Washable marker or grease pencil
- Newspaper or drop cloth
- Large bowl for seeds
- Tea light or LED candle
Step 1: Preparation & Gutting
-
Set the Stage:
Lay down your newspaper or drop cloth on a sturdy table or, if you prefer, sitting on the floor like I sometimes do for better leverage. -
Create the Lid:
Using your serrated saw, cut a circular lid around the pumpkin’s stem. Angle the knife inward at 45 degrees so the lid sits on a ledge and won’t fall inside later. -
Scoop the Interior:
Remove the lid and trim off the hanging pulp. Then, dive in with your scoop or spoon to scrape out all the seeds and strings. The cleaner the inside wall, the easier the carving will be. -
Thin the Face Wall:
Focus your scraping on the side where you plan to carve the face. Try to thin the pumpkin wall to about one inch thick here, which makes cutting intricate teeth much smoother.
Broken Tooth Fix
If a tooth snaps off while carving, don’t panic. Use a sturdy toothpick inserted halfway into the broken piece and halfway into the gum line to pin it invisibly back in place.
Step 2: Drafting the Face
-
Outline the Eyes:
With your washable marker, draw two large right-angled triangles for eyes. Position them high on the pumpkin, angling their inner corners downward toward where the nose will be for an ‘angry’ brow line. -
Place the Nose:
Draw a smaller triangle for the nose centered beneath the eyes. It should be relatively small compared to the eyes to keep the focus on the mouth. -
Draft the Upper Lip:
Sketch a wide smile line starting low on one side and curving upward. Instead of a smooth line, draw jagged ‘V’ shapes to mark where the top teeth will be. -
Draft the Lower Lip:
Complete the mouth by drawing the bottom jawline. Ensure the bottom jagged teeth interlock roughly with the top ones, creating a zipper-like, menacing grin.
Step 3: Carving the Features
-
Initial Eye Cuts:
Starting with the eyes keeps the pumpkin structure stable. Insert your serrated saw perpendicular to the pumpkin surface and use a sawing motion to cut out the first eye triangle. -
Pop Out the Pieces:
Once the shape is fully cut, gently push the eye piece from the inside out to remove it cleanly without tearing the skin. -
Carve the Nose:
Carefully cut the small nose triangle. Since this is a smaller shape, use shorter sawing strokes to maintain control. -
Start the Mouth:
Begin carving the mouth at the center of the upper lip. Work your way outward toward the cheeks, following your jagged marker lines carefully. -
Define the Teeth:
When cutting the sharp points of the teeth, I find it best to cut past the corner slightly and come back from the other direction to meet the cut, ensuring a crisp point rather than trying to turn the saw. -
Clear Canals:
Remove the distinct sections of the mouth cutout as you go. Don’t try to remove the entire mouth strip in one giant piece; it is likely to break.
Level Up: Scar Tissue
To add a ‘stitched’ look, carve a shallow line extending from the mouth corner. Use lengths of bailing wire poked through the skin across the cut to look like metal staples.
Step 4: Refining & Lighting
-
Cleanup:
Go back over your cuts with a smaller knife to clean up any ‘fuzz’ or hanging bits of pumpkin flesh from the corners of the eyes and teeth. -
Wipe Down:
Use a damp paper towel to wipe away any remaining marker lines on the pumpkin’s surface. -
Preserve:
Rub a thin layer of petroleum jelly along the cut edges. This helps seal in moisture and prevents the shriveling that happens so quickly after carving. -
Lighting Check:
Place your candle inside, dim the lights, and check for any obstructions. If the light isn’t casting strong shadows, you may need to scrape the inside wall behind the face a bit thinner.
Set your finished jack-o’-lantern on the porch and watch the shadows dance
Bleeding Cuts With Painted Drips
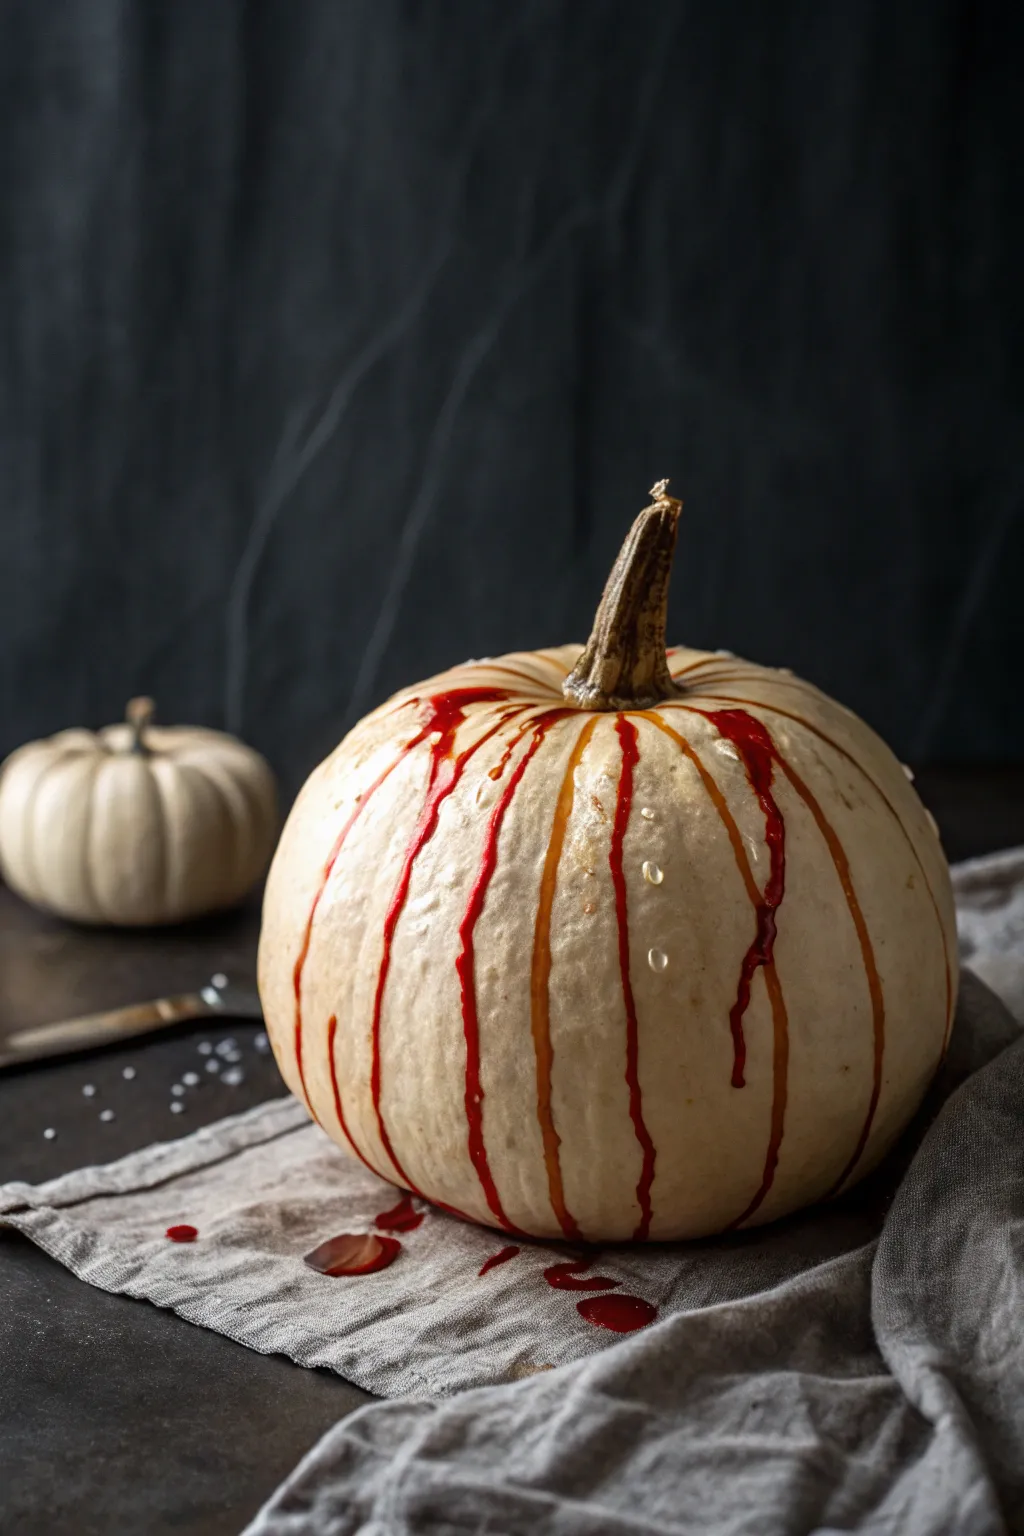
Transform a pristine white pumpkin into a spooky, elegant centerpiece with cascading crimson drips that mimic fresh blood. This project relies on the natural grooves of the gourd to guide your painting for a realistically creepy effect.
Step-by-Step Tutorial
Materials
- Medium-sized white pumpkin (Lumina or Casper variety)
- Red acrylic paint (crimson or deep red)
- Clear gloss medium or corn syrup (to add shine/viscosity)
- Small mixing bowl
- Spoon or dropper
- Small paintbrush
- Water
- Paper towels or drop cloth
Step 1: Preparation
-
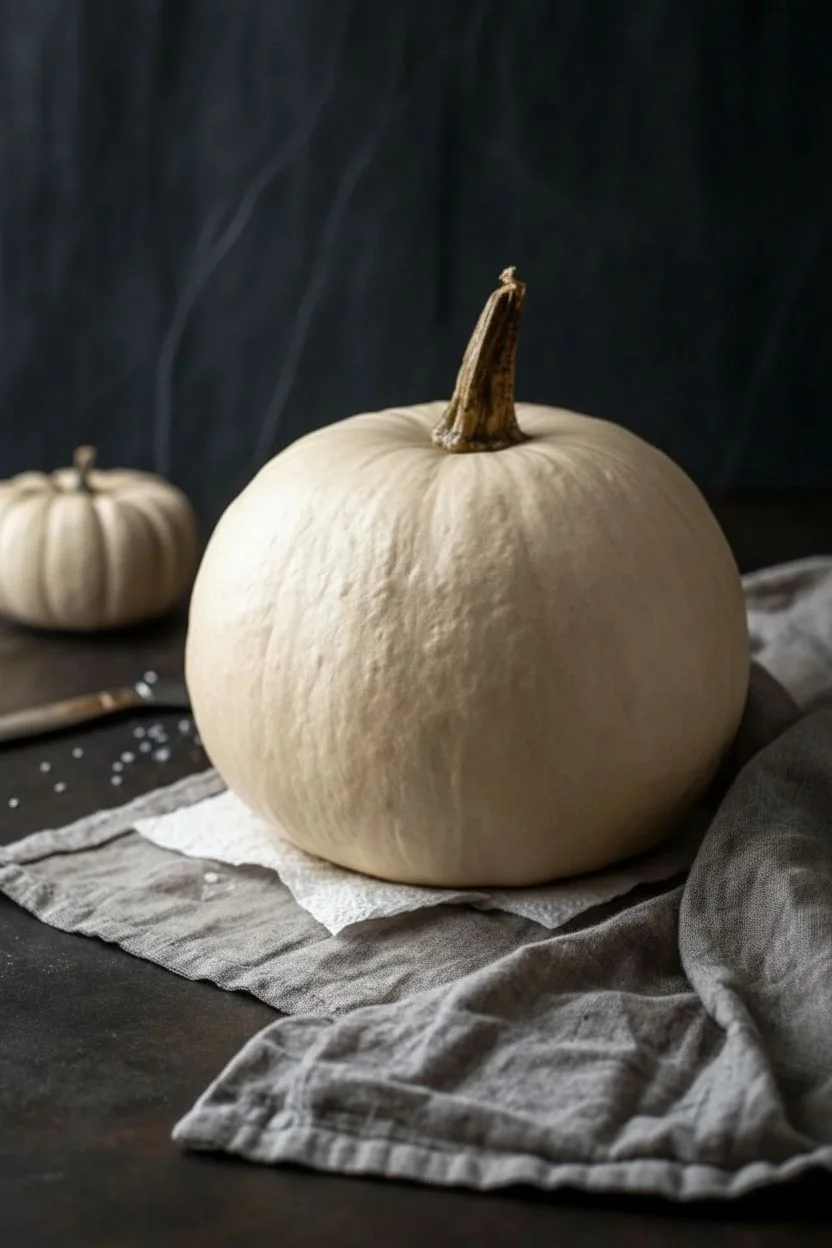
Clean surface:
Begin by wiping down your white pumpkin with a slightly damp cloth to remove any dirt or field dust. -
Dry thoroughly:
Ensure the pumpkin skin is completely dry before applying any paint, as moisture will prevent the drip mixture from adhering properly. -
Set the scene:
Place your pumpkin on a surface covered with paper towels or a drop cloth, as this project involves intentional dripping that can get messy.
Paint Too Runny?
If your drips are rush to the bottom too fast, your mix is too thin. Add more acrylic paint to thicken it back up so it moves like molasses.
Step 2: Creating the Mixture
-
Paint selection:
Choose a deep red acrylic paint; avoid bright cherry reds if you want a more menacing, realistic look. -
Mix base:
In your small bowl, squeeze out a generous amount of the red paint. -
Add viscosity:
Mix in a small amount of clear gloss medium. If you don’t have gloss medium, I find a little corn syrup works wonders here to create a sticky texture that stays shiny when dry. -
Test consistency:
Add water drop by drop until the mixture is fluid enough to run, but thick enough that it won’t streak down instantly like water. -
Color adjustment:
If the red looks too flat, you can mix in a tiny pinhead-sized drop of blue or brown to deepen the ‘blood’ color.
Step 3: Applying the Drips
-
Load the tool:
Dip your spoon or a dropper into your red paint mixture, picking up a moderate amount. -
Identify grooves:
Locate the natural vertical ribs or grooves running from the stem down the side of the pumpkin. -
Start at the top:
Place the tip of your tool right at the base of the stem, at the very top of a groove. -
Release the drip:
Gently release a small pool of paint and let gravity take over, watching it travel down the groove. -
Guide the flow:
If the paint gets stuck or stops too high up, use your small paintbrush to gently encourage it downward without flattening the drip. -
Vary the lengths:
Repeat this process around the pumpkin, but use different amounts of paint so some drips go all the way to the bottom while others stop midway. -
Stem detail:
Dab a little bit of the mixture around the immediate base of the stem to make it look like the source of the bleeding. -
Adding droplets:
Dip a stiff brush in the mixture and flick it gently near the existing lines to create random splatter spots for added realism.
Make it Glisten
Once the red paint is fully dry, carefully brush a layer of high-gloss varnish strictly over the red lines to keep them looking permanently wet.
Step 4: Finishing Touches
-
Check density:
Step back and look at the pumpkin; if the red looks too transparent, carefully layer a second drip over the first one once it’s tacky. -
Bottom pooling:
Allow a few drips to pool slightly at the base of the pumpkin on the cloth for a ‘fresh’ look. -
Drying time:
Do not touch the pumpkin for several hours. Because the paint is applied thickly to create the drip volume, it will take much longer to dry than a standard coat.
Place your bleeding pumpkin on a dark placemat or rustic cloth to enhance the stark contrast of the white skin and red design


Eyeball Socket Pumpkin With Painted Eyes
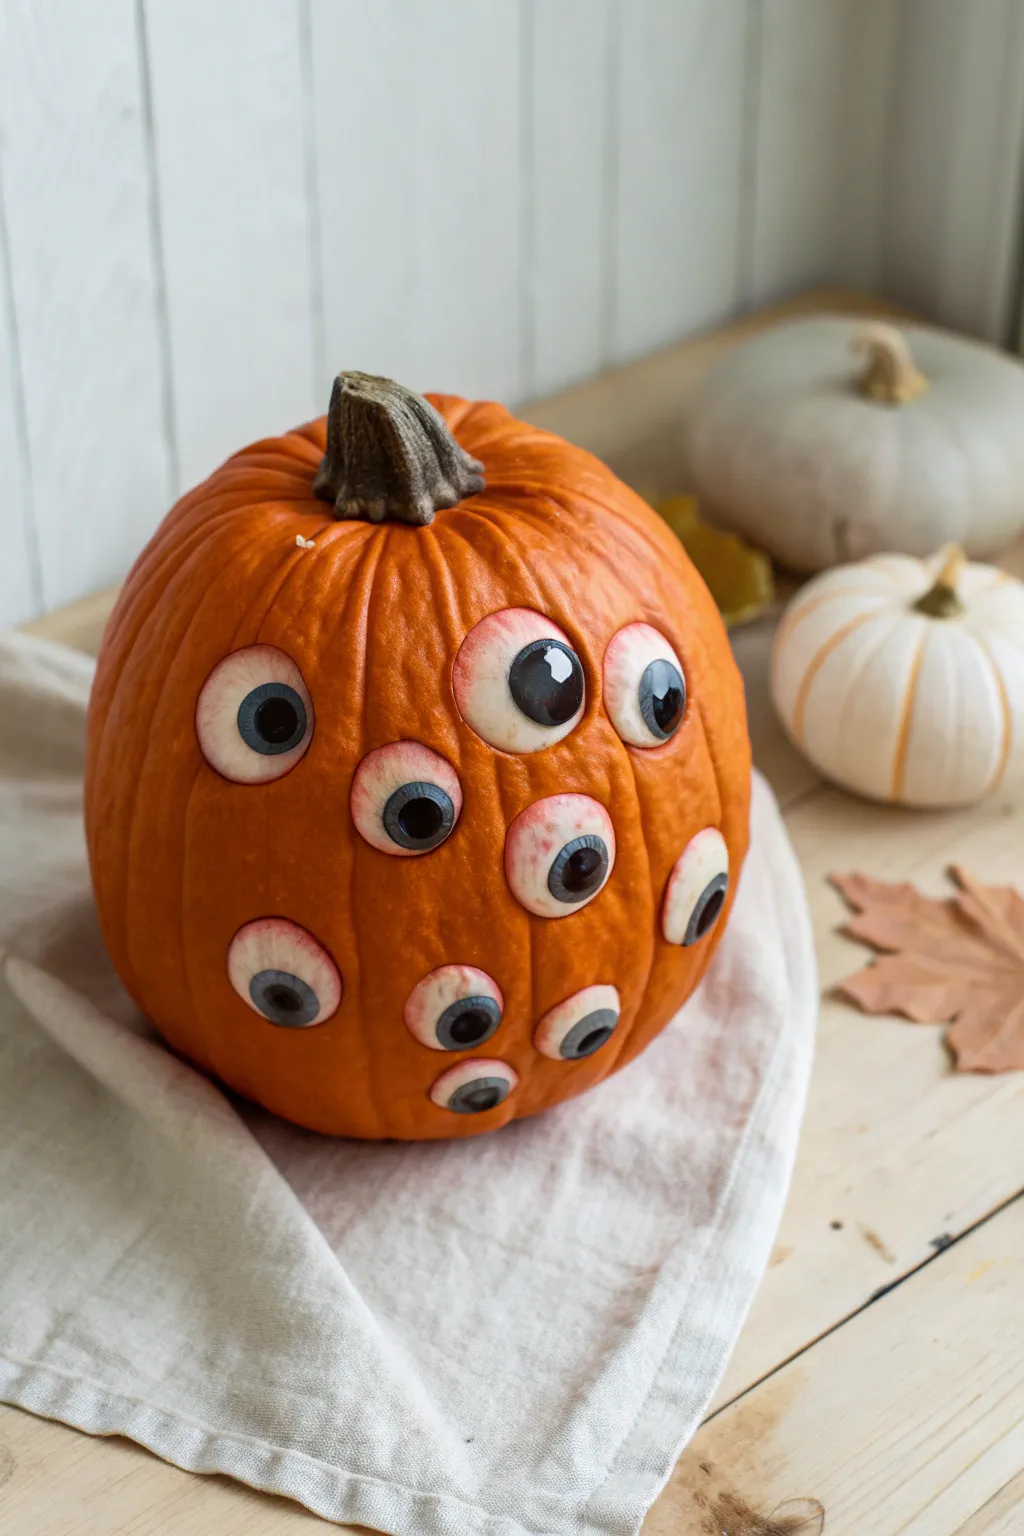
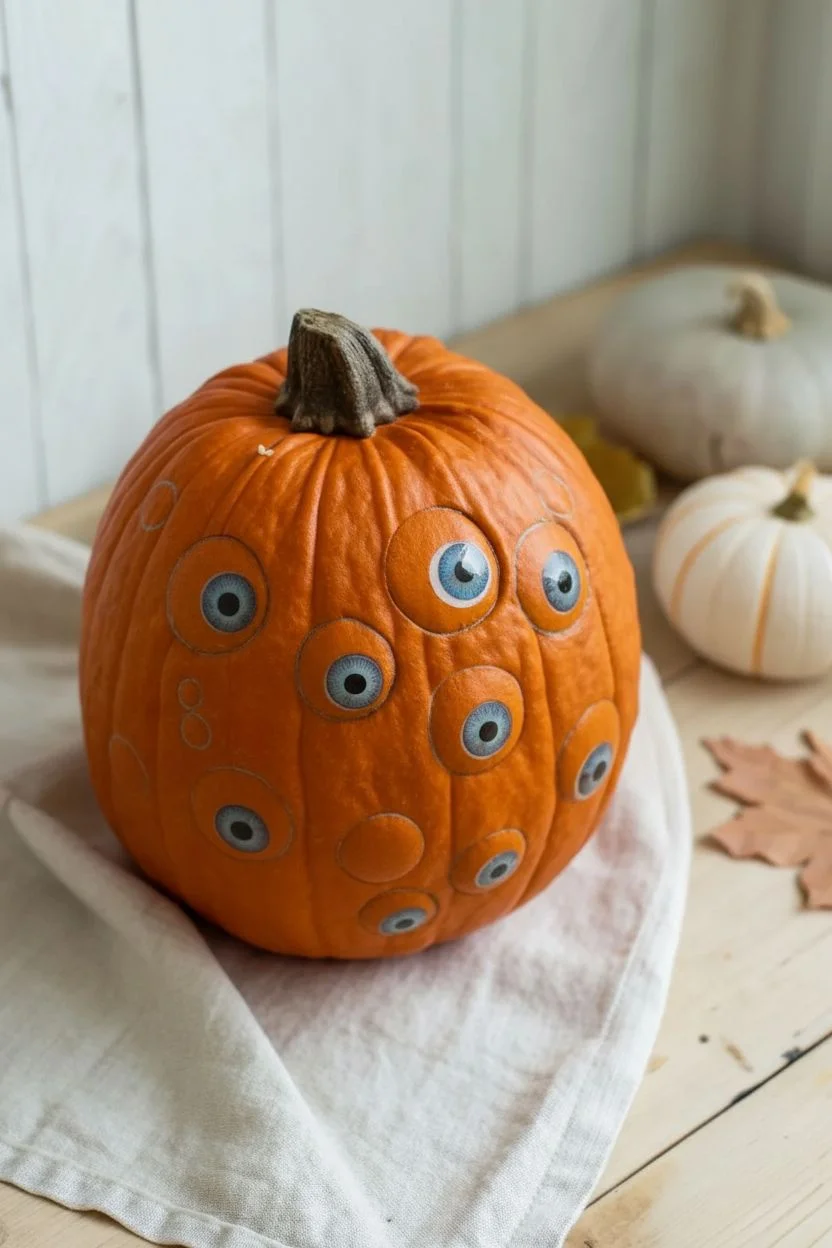
Transform an ordinary pumpkin into an unsettling creature straight out of a monster movie with this eyeball socket technique. By carving shallow recesses into the rind, the realistic eyes appear to be growing naturally, or unnaturally, from the pumpkin’s flesh.
Step-by-Step
Materials
- Medium orange pumpkin (real or synthetic foam)
- Realistic doll eyes or acrylic fake eyeballs (various sizes)
- Small Melon baller or loop sculpting tool
- Carving knife or X-ACTO knife
- Red acrylic paint
- Fine tip paintbrush
- Glazing medium (optional)
- Pencil or dry-erase marker
- Clear dry craft glue or hot glue gun (if using a foam pumpkin)
Step 1: Planning the Gaze
-
Clean surface:
Begin by wiping down your pumpkin with a damp cloth to remove any dirt or residue. A clean surface helps your guide marks show up clearly and prevents tools from slipping. -
Map the eyes:
Take your collection of realistic eyeballs and hold them against the pumpkin to find the best arrangement. You want a scattered, random look rather than a symmetrical pattern. -
Trace outlines with care:
Once you like a position, hold the eye firmly in place and trace around it with a pencil or dry-erase marker. Do this for every single eye you plan to insert. -
Check the spacing:
Step back and look at your markings. Ensure there is enough orange rind between the circles so the pumpkin maintains its structural integrity and doesn’t crack.
Step 2: Carving the Sockets
-
Score the rind:
Using your X-ACTO knife or sharp carving tool, carefully cut along the traced circular lines. You only want to cut through the tough outer skin, not deep into the flesh yet. -
Remove the skin:
Peel away the circle of orange skin you just cut to reveal the lighter flesh underneath. This gives your melon baller a clean place to start working. -
Scoop the crater:
Take your melon baller or loop tool and gently scoop out the flesh inside the circle. I usually twist the tool in a circular motion to keep the shape round. -
Test the fit:
Frequently press the eyeball into the new socket to check the depth. The goal is for the eye to nestle halfway in, so the pumpkin flesh hugs it like an eyelid. -
Refine the edges:
If the eye is tight, carefully shave away small slivers of the socket wall. A snug fit is crucial so friction holds the eye in place without needing excessive glue.
Eyes Won’t Stay In?
If the socket is too large and the eye falls out, wrap a thick rubber band or a layer of masking tape around the back of the eyeball to increase its diameter for a tighter fit.
Step 3: Adding Gore & Assembly
-
Mix the wash:
Dilute a small drop of red acrylic paint with water or glazing medium. You want a translucent, watery consistency rather than opaque paint. -
Apply irritation:
Using a fine brush, paint this red wash inside the socket and slightly onto the orange rim. This creates an inflamed, sore look where the skin meets the eye. -
Detailing veins:
With a barely damp brush and slightly thicker red paint, drag tiny squiggles outward from the socket onto the pumpkin skin to mimic broken capillaries. -
Secure the eyes:
If using a real pumpkin, the moisture and snug fit might hold the eyes alone. If they feel loose, add a dab of super glue or strong craft adhesive to the back of the eye. -
Final press:
Push each eye firmly into its designated socket. Rotate them slightly so the pupils look in different, chaotic directions for maximum creepiness.
Pro Tip: Make it Wet
For an extra gross factor, brush a layer of high-gloss varnish or clear corn syrup over the exposed pumpkin flesh around the eye to make the tissue look permanently moist and fresh.
Set your many-eyed creation on the porch to intently watch every trick-or-treater that walks by
Cracked Skull Illusion on a Pumpkin
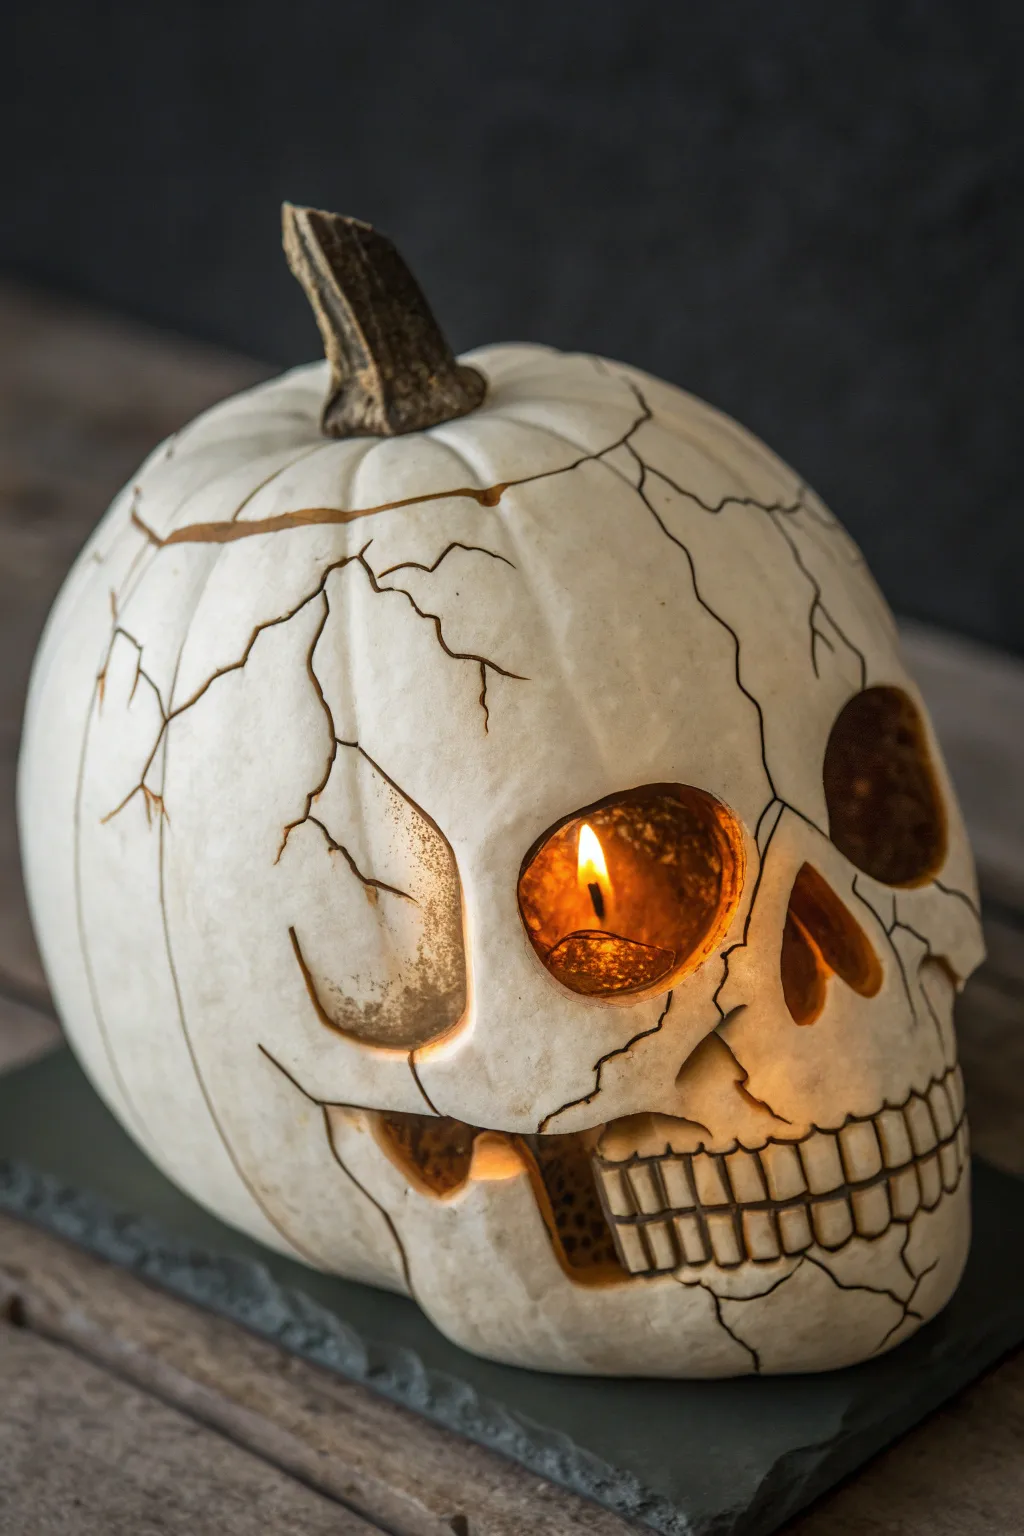
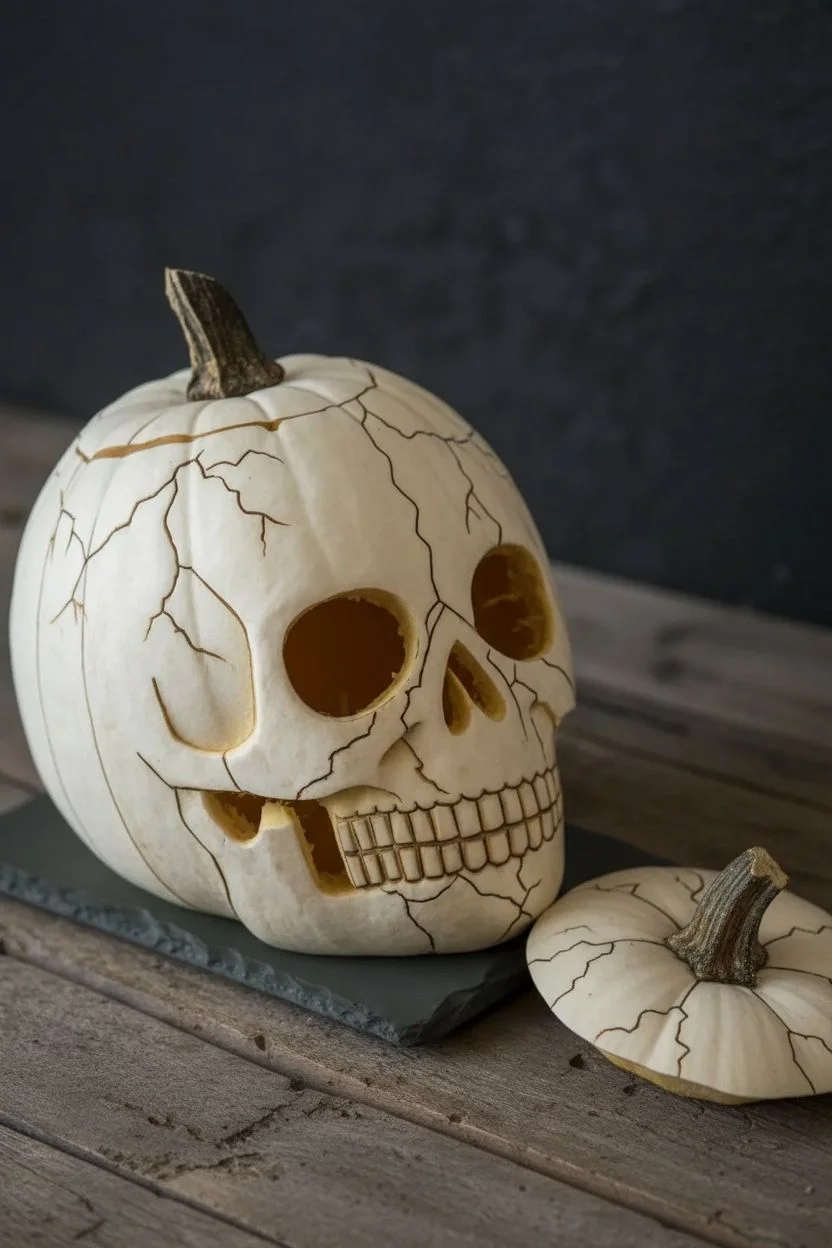
Transform a simple white pumpkin into an eerie, ancient relic with this sophisticated carving project. By combining traditional carving with shallow etching techniques, you’ll create a haunting skull that seems to be breaking through the pumpkin’s own skin.
Detailed Instructions
Materials
- Medium to large white pumpkin (real or high-quality foam)
- Small serrated pumpkin saw
- Linoleum cutter or clay loop tool
- Fine-point permanent marker
- Access to a printed skull reference photo
- X-Acto knife or craft scalpel
- Potter’s needle tool or awl
- Brown acrylic paint (diluted)
- Small paintbrush
- Tea tree oil (if using a real pumpkin)
- LED votive or candle
Step 1: Preparation and Mapping
-
Select the face:
Choose the smoothest side of your white pumpkin. If it has a natural flat spot or slight indentation, use this for the eye socket area to enhance the 3D effect. -
Clean the interior:
Cut a lid at the top (or bottom, which I prefer for structural integrity) and scoop out the insides thoroughly until the walls are about one inch thick. -
Sketch the skull profile:
Using a fine-point marker, lightly sketch the profile of a skull. Focus on the large eye socket, the triangular nose cavity, and the grin of teeth along the bottom curve. -
Plan the cracks:
Draw jagged, lightning-bolt style lines radiating from the skull features across the rest of the pumpkin. These will become the ‘cracks’ in the bone.
Step 2: Carving the Features
-
Cut the eye socket:
Use your serrated saw to cut out the right eye socket completely. Clean up the edges with your X-Acto knife to make the curve smooth. -
Carve the nose:
Carefully cut out the triangular nose cavity. Remember that on a skull, this is an inverted heart shape or two tear drops joined together. -
Define the cheekbone:
Instead of cutting all the way through for the left eye area, use a linoleum cutter or clay loop tool to shave off just the pumpkin skin. This creates a shaded, sunken effect without a full hole. -
Sculpt the teeth area:
Shave away a rectangular strip of skin where the mouth will be. Don’t cut through the pumpkin wall yet; just reveal the flesh underneath.
Depth Trick
Make the ‘skin’ edges of the shaved areas slightly irregular. A perfect line looks fake; a jagged edge looks like fractured bone.
Step 3: Detailing and Texturing
-
Trace the teeth:
Within the shaved mouth rectangle, use your needle tool to deeply score the outlines of individual teeth. -
define the teeth gaps:
Use the X-Acto knife to cut small wedges between the teeth to define them. Create a deeper gap between the upper and lower row of teeth. -
Etch the crack lines:
Retrace your marker lines for the cracks using the X-Acto knife. Cut in at a slight V-angle to create a groove, but do not slice all the way through into the pumpkin gut. -
Widen major fissures:
For the larger cracks near the top, go back over the V-groove with a wider tool to make them look like significant structural breaks in the ‘bone’. -
Add surface noise:
Take a rough scouring pad or sandpaper and gently buff the skin around the carving. This takes away the pumpkin’s natural shine and makes it look more like matte bone.
Bone Finish
For a foam pumpkin, lightly dry-brush cream or beige paint over the white surface before carving to add realistic bone texture.
Step 4: Antiquing and Lighting
-
Mix an aging wash:
Dilute a small drop of brown acrylic paint with water until it is very runny and translucent. -
Apply the wash:
Brush this dirty water mixture into the etched cracks, around the teeth, and into the shaved eye socket area. -
Wipe back:
Immediately wipe the surface with a paper towel. The brown pigment will stay trapped in the cracks and crevices, creating instant shadow and age. -
Preserve the edges:
If using a real pumpkin, rub a little Vaseline or tea tree oil on the cut edges to prevent shriveling too quickly. -
Light it up:
Place your candle inside. Position it so the flame is visible directly through the open eye socket for that menacing glow.
Now step back and watch as the flickering candlelight brings your ancient skull to life in the shadows
Stacked Pumpkin Totem of Creepy Faces
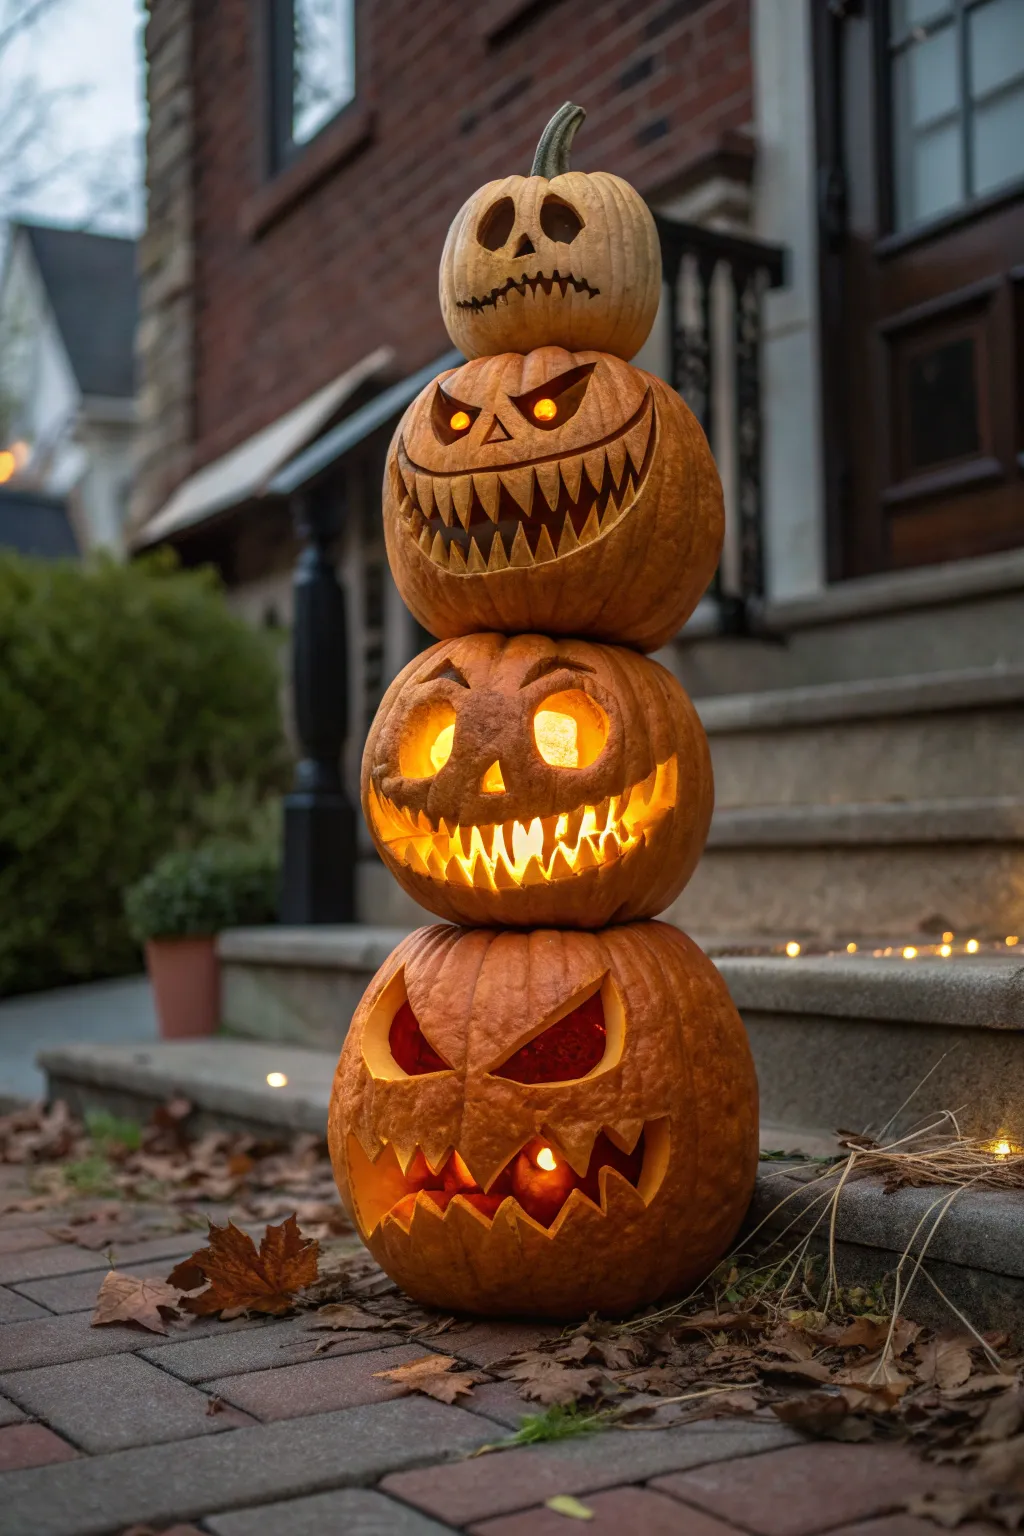
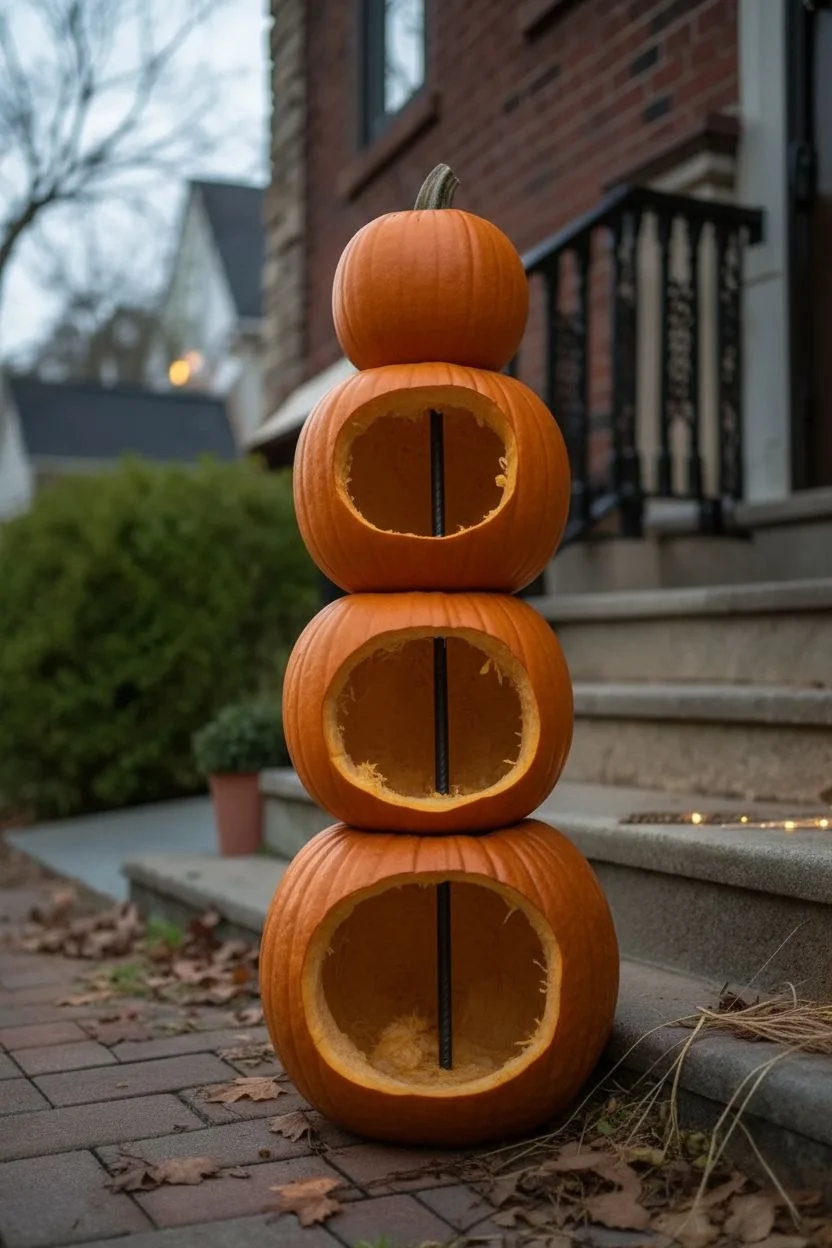
Elevate your porch decor, literally, with this towering stack of four jack-o’-lanterns, each bearing a unique and menacing expression. The vertical arrangement creates an imposing silhouette against your front door, featuring faces that range from classic spooky to downright aggressive.
Step-by-Step Tutorial
Materials
- 4 Pumpkins of graduating sizes (large base to small top)
- Bonsai saw or keyhole saw
- Carving knives (serrated and precision)
- Large metal spoon or pumpkin scraper
- sturdy wooden dowel or metal rebar (approx. 4-5 feet)
- Drill with a large spade bit (matching dowel diameter)
- Dry-erase marker or grease pencil
- LED puck lights or battery-operated string lights
- Hammer or mallet
- Newspaper or drop cloth
Step 1: Planning the Structure
-
Select your pumpkins:
Choose four pumpkins that decrease in size. The base pumpkin needs to be wide and sturdy to support the weight, while the top one should be the smallest and lightest. Ideally, look for pumpkins with flatter bottoms for better stacking stability. -
Prepare the stems:
For the bottom three pumpkins, cut the stems off completely flush with the pumpkin top. This creates a flat surface for the next pumpkin to sit on. Leave the stem intact only on the smallest, topmost pumpkin. -
Gut the pumpkins:
Cut access holes in the bottoms of the pumpkins rather than the tops. This preserves the structural integrity of the ‘roof’ of each pumpkin where the weight rests. Scoop out all seeds and pulp thoroughly with your metal spoon. -
Arrange the stack:
Do a dry run by stacking the uncarved pumpkins to check for balance. If any wobble significantly, you may need to shave down the bottom surface slightly to level them out.
Preservation Pro-Tip
Spray the cut edges and interior with a diluted bleach solution (1 tsp bleach per gallon water) or coat cut edges with petroleum jelly to prevent shriveling.
Step 2: Carving the Faces
-
Draft the bottom face:
On the largest pumpkin, use a dry-erase marker to sketch a wide, aggressive face. Draw low-set, angled triangular eyes and a broad mouth with large, separated teeth at the bottom jaw to suggest a heavy, menacing grimace. -
Carve the base features:
Using a sturdy serrated saw, cut out the features of the bottom pumpkin. For the eyes, I like to angle the blade inward slightly to let more light cast shadows. -
Design the second tier:
On the second largest pumpkin, sketch a classic but wild expression. Give it wide, circular eyes with pupils (leave a piece of pumpkin skin) and a very wide, toothy grin that stretches across the face. -
Execute the second carving:
Carefully crave the second face. Be gentle with the thin strips of pumpkin between the teeth; a precision knife works best here to avoid snapping them. -
Create the third tier:
For the third pumpkin, draw a face that looks mischievous. Use slanted triangular eyes and a mouth filled with sharp, needle-like teeth. This creates a visual bridge between the classic face below and the skull-like one above. -
Carve the third tier:
Cut out the third face. Since this pumpkin is smaller, use finer tools. Ensure the teeth are sharp and distinct. -
Detail the top tier:
For the smallest pumpkin, sketch a skull-like nose and hollow, round eyes. Draw a zig-zag mouth that looks like stitches rather than an open grin. -
Finalize the carving:
Carve the top pumpkin. This one is lighter, so you can hold it in your lap for better control on the small details.
Step 3: Assembly and Lighting
-
Drill the guide holes:
Using your drill and spade bit, drill a hole through the exact center of the top and bottom of the bottom three pumpkins. For the top pumpkin, drill only through the bottom, stopping before you hit the stem. -
Place the anchor:
Decide where your totem will stand (it’s heavy to move later!). If on soil, hammer your rebar or dowel partially into the ground. If on a porch, use a heavy planter base or simply rely on the weight of the pumpkins threaded on the dowel. -
Thread the base:
Slide the largest pumpkin onto the dowel/rod. Place your LED light inside on the ground or floor. -
Stack the middle layers:
Slide the second and third pumpkins onto the rod. Before placing each one, ensure you’ve placed a light source inside the pumpkin below it, or thread a string of lights up through the enter holes alongside the dowel. -
Cap the totem:
Place the final, smallest pumpkin on top of the rod. Adjust the rotation of the pumpkins so the faces are slightly staggered or aligned, depending on your preference. -
Final wipe down:
Use a damp cloth to wipe away any remaining marker lines or pumpkin debris from the exterior skin.
Fixing the Wobble
If pumpkins won’t sit flat on each other, use small shims made from leftover pumpkin rind scraps to level them out invisibly between the layers.
Step back and admire how your new vertical masterpiece transforms the entryway with its towering, glowing presence
Imprisoned Mini Pumpkin Behind Carved Bars
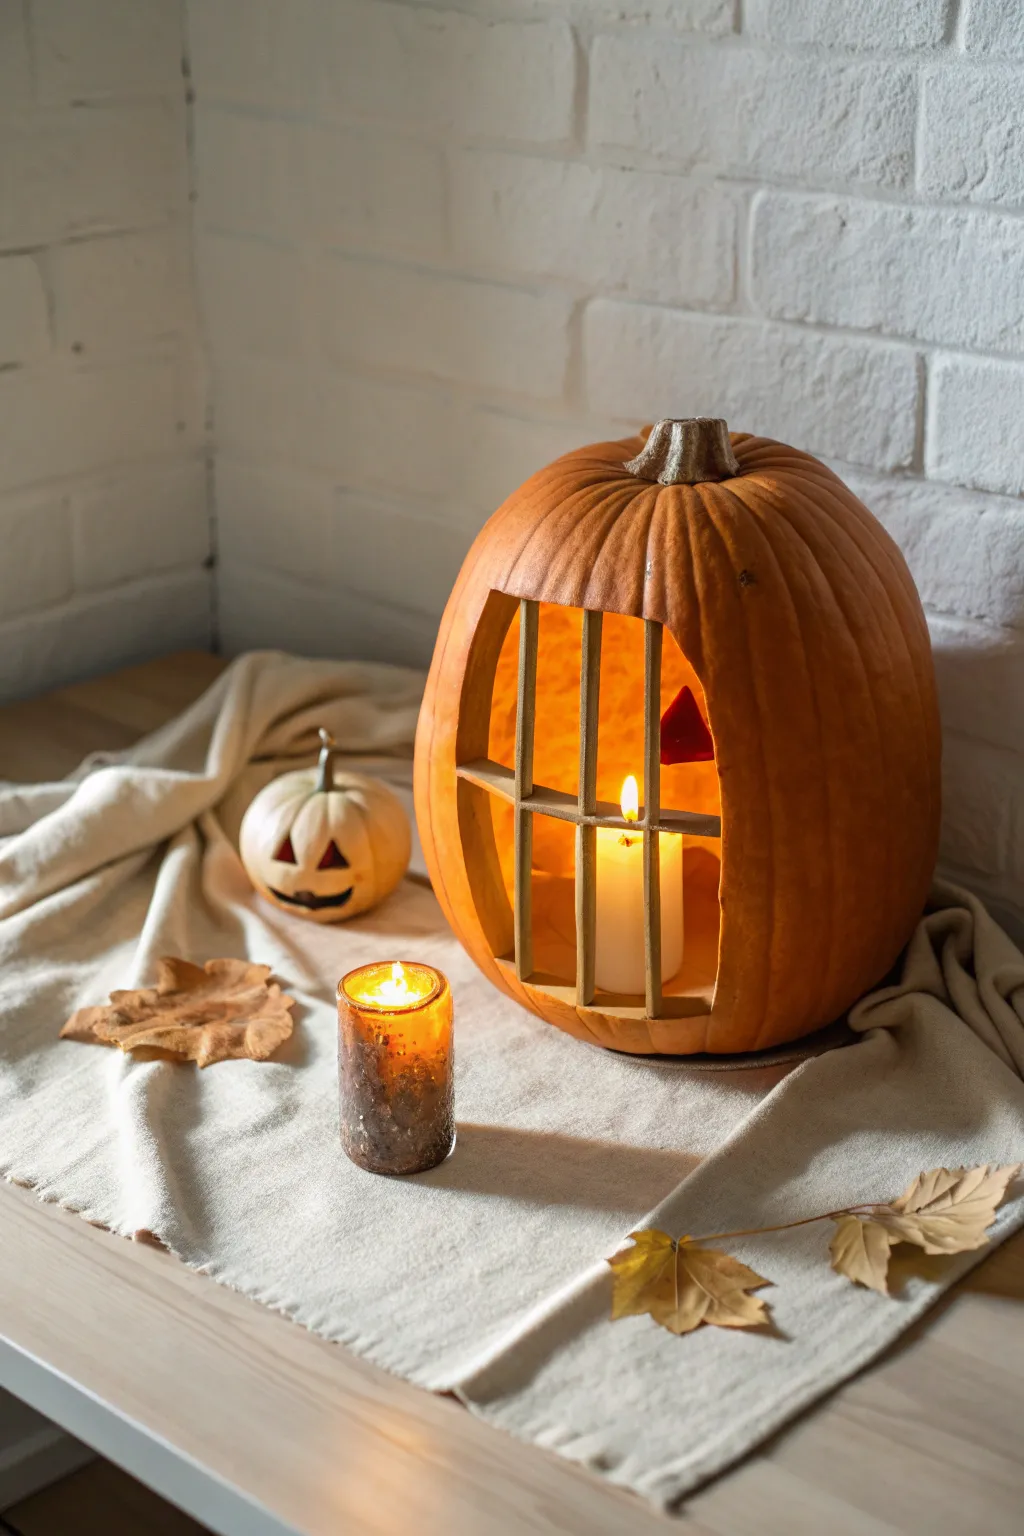
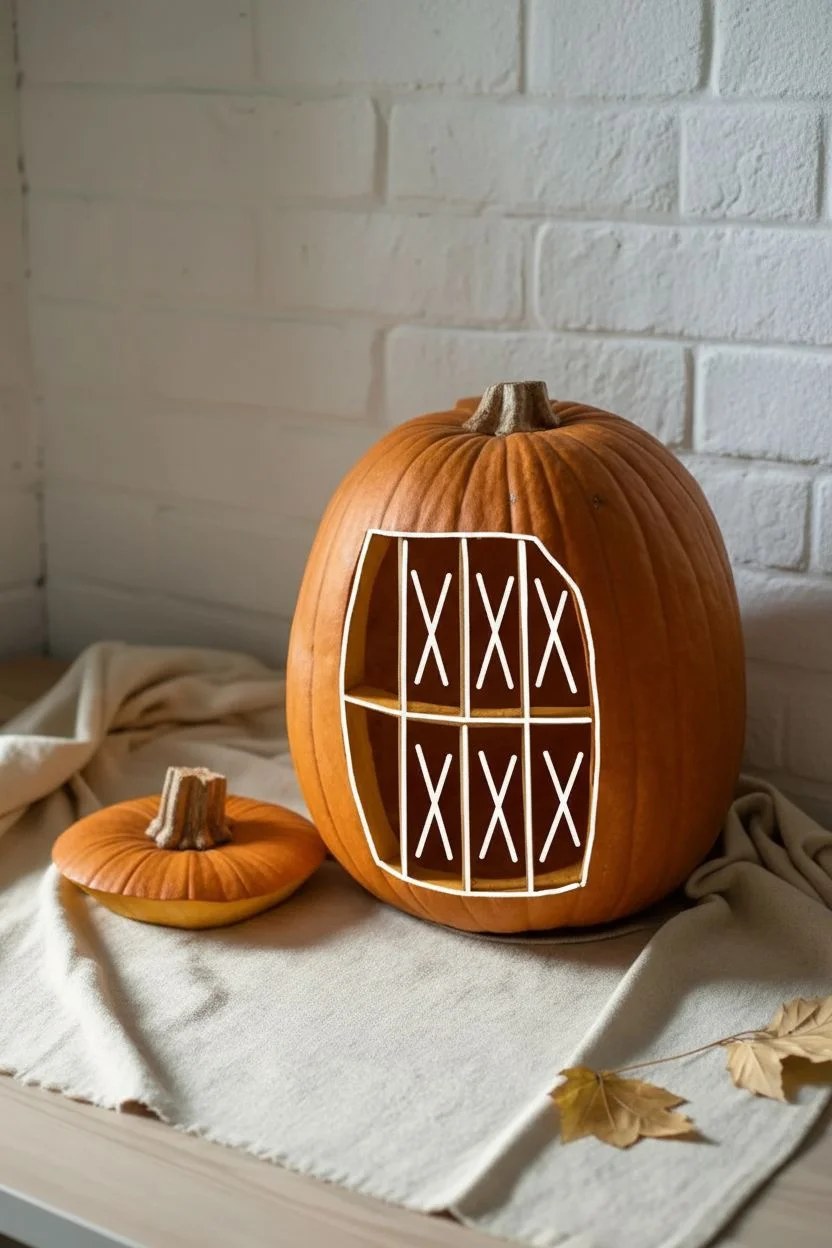
Transform a standard pumpkin into a glowing prison cell with this clever carving project that uses negative space to create bars. The scene is completed with a tiny, sinister accomplice waiting on the outside, creating a fun narrative display for your porch.
Step-by-Step
Materials
- Large, tall orange pumpkin (slight oblong shape works best)
- Small white ‘Baby Boo’ pumpkin
- Pumpkin carving kit (saw, scoop, poker tool)
- Sharp paring knife
- Dry erase marker or washable felt pen
- Large spoon or ladle
- Two pillar candles (white)
- Glass votive holder (optional, for side accent)
- Lighter or long matches
- Newsprint or drop cloth
Step 1: Preparing the Cell Block
-
Open the lid:
Begin by cutting a circle around the stem of the large orange pumpkin. Angle your knife inward at 45 degrees so the lid sits like a cork and won’t fall through later. -
Scoop the interior:
Remove the lid and use your scraping scoop or a large heavy spoon to clean out all seeds and stringy pulp. I like to scrape the interior wall where the bars will be until it’s about 1 inch thick, making the carving easier. -
Draft the window:
On the best-looking side of the pumpkin, draw a large rectangle with rounded corners using your dry erase marker. This will be the main prison window frame. -
Plan the bars:
Inside that rectangle, sketch out your vertical bars. Draw three evenly spaced vertical bars, ensuring they are at least 0.75-1 inch thick so they don’t snap. -
Add the crossbar:
Draw a single horizontal bar intersecting the vertical ones about halfway down. This adds structural stability and completes the jail cell look. -
Double-check spacing:
Look over your grid. You should have defined open spaces (windows) between the solid grid lines. Mark the spaces you need to remove with an ‘X’ to avoid accidental cuts.
Broken Bars?
If a bar snaps during carving, don’t panic. Insert a toothpick into the broken ends and rejoin the pieces like a dowel. The break will be nearly invisible in the dark.
Step 2: Carving the Bars
-
Cut the first window pane:
Starting with the top left section marked with an ‘X’, insert your small pumpkin saw. Use a steady up-and-down motion to cut out the negative space. -
Remove the piece:
Gently push the cut block from the inside out to pop it free. If it sticks, re-trace your corners with the knife rather than forcing it. -
Continue the pattern:
Repeat this process for the remaining window panes. Work slowly around the intersection points of the bars as these are the most fragile areas. -
Clean the edges:
Once all holes are cut, use a sharp paring knife to carefully trim any ragged pumpkin flesh from the bars to make them look uniform and smooth. -
Wipe it down:
Use a damp paper towel to wipe away any remaining marker lines from the orange skin.
Level Up: The Prisoner
Place a second carved mini pumpkin INSIDE the jail cell peering out through the bars to create a true ‘imprisoned’ pumpkin scene.
Step 3: The Accomplice
-
Prep the mini pumpkin:
Take your small white pumpkin and carefully cut a small circle around the stem. These stems can be brittle, so handle gently. -
Clean the mini interior:
Use a teaspoon or a small melon baller to scoop out the seeds. Since it’s small, you don’t need to scrape the walls too thin. -
Carve the face:
Use your smallest detail saw or an X-Acto knife to crave triangular eyes and a simple cheeky grin. Keep it simple as the surface area is tiny.
Step 4: Setting the Scene
-
Place the main candle:
Insert a white pillar candle into the large orange pumpkin. Ensure it sits flat on the bottom; if not, carve a small indentation in the pumpkin floor to level it. -
Arrange the display:
Set the large pumpkin on your display surface. Position the small white pumpkin to the left, slightly forward, as if keeping watch. -
Add atmosphere:
Place a second candle in a textured glass holder (like the amber one in the photo) near the front center for extra ambient light. -
Light it up:
Using a long match or lighter, carefully light the candle inside the jail cell first, then the exterior candles.
Now you have a brilliantly lit scene that tells a spooky story right on your doorstep
Cannibal Pumpkin Eating a Smaller Pumpkin
Create a delightfully sinister centerpiece with this deeply carved, sharp-toothed jack-o’-lantern design. The jagged, multi-layered teeth and angular eyes give it a predatory grin that looks fantastic illuminated by candlelight.
Detailed Instructions
Materials
- Large, round orange pumpkin
- Smaller decorative pumpkin (optional, for display)
- Serrated carving knife or pumpkin saw
- Small paring knife
- Large metal spoon or scooping tool
- Dry erase marker or grease pencil
- Bowl for seeds
- Tea lights or LED pumpkin lights
- Newspaper or drop cloth
Step 1: Preparation & Gutting
-
Clean and clear:
Begin by wiping down the exterior of your large pumpkin to remove any dirt or debris. Lay down your newspaper or drop cloth to catch the mess. -
Open the lid:
Cut a circle or hexagon around the stem at the top. Angle your knife inward toward the center of the pumpkin so the lid sits on a ledge and won’t fall inside later. -
Remove the innards:
Using your large metal spoon, scrape out the seeds and stringy pulp. I like to be thorough here—scrape the inner walls until they are smooth and about one inch thick to make carving easier. -
Save the seeds:
Separate the seeds from the pulp and set them aside in a bowl if you plan to roast them later, or discard the pulp entirely.
Tooth Tactics
Make the teeth much longer than you think they need to be. Pumpkin flesh shrinks as it dries, so extra length ensures they remain scary rather than looking like nubs after a day.
Step 2: Drafting the Face
-
Sketch the eyes:
Using a dry erase marker, draw two sharp, triangular eyes angling downward toward the nose. Add a smaller, fierce triangle for the nose. -
Outline the mouth:
Draw a wide, crescent-shaped grin that stretches far across the face. Make the top line curve upward slightly at the corners to create a menacing sneer. -
Plan the teeth:
Instead of drawing individual teeth yet, sketch the negative space—the gaps between the teeth. This design relies on long, needle-like teeth, so plan for deep V-shapes.
Step 3: Carving the Features
-
Carve the eyes:
Start with the eyes. Use your serrated saw to cut along the lines, using a gentle sawing motion. Push the cut pieces out from the inside. -
Carve the nose:
Cut out the small triangle nose. Clean up any hanging pumpkin strings from the corners using the small paring knife. -
Cut the mouth opening:
This is the crucial step. Do not cut out the teeth individually yet. First, cut the entire mouth shape out as a single block to open up the canvas, or cut a thin line defining the separation between upper and lower jaw if you want maximum control. -
Define the upper teeth:
Using the small paring knife or a fine saw, carefully carve upward triangles into the top rim of the mouth to form sharp fangs. -
Create the lower teeth:
Repeat the process on the bottom rim, carving downwards. Vary the size of the teeth—make some longer and curved for a more organic, monstrous look. -
Refine the points:
Go back over each tooth tip. Shave away tiny slivers of pumpkin skin to make the points needle-sharp. This detail makes the face significantly scarier. -
Clean the edges:
Wipe away any marker lines with a damp cloth. Use the paring knife to trim any jagged flesh from the inside of the cutouts so the light shines through cleanly.
Cannibal Effect
To match the ‘cannibal’ theme perfectly, carve a very wide mouth and wedge a tiny gourd or pumpkin specifically inside the jaws, securing it with toothpicks.
Step 4: The Final Scene
-
Preserve the pumpkin:
Rub a little petroleum jelly or vegetable oil on the cut edges of the teeth and eyes. This helps prevent them from shriveling up too quickly. -
Arrange the seeds:
Scatter a handful of the dried or roasted pumpkin seeds on the table surface leading out of the mouth for a messy, gluttonous effect. -
Position the small pumpkin:
Place the smaller decorative pumpkin nearby to complete the composition, suggesting it might be the next snack. -
Light it up:
Place your light source inside the pumpkin and replace the lid. Dim the room lights to see the terrifying silhouette of those sharp teeth.
Enjoy the spookiness of your sharp-toothed creation as it guards your windowsill this Halloween
3D Hand Pushing Out From Inside the Pumpkin
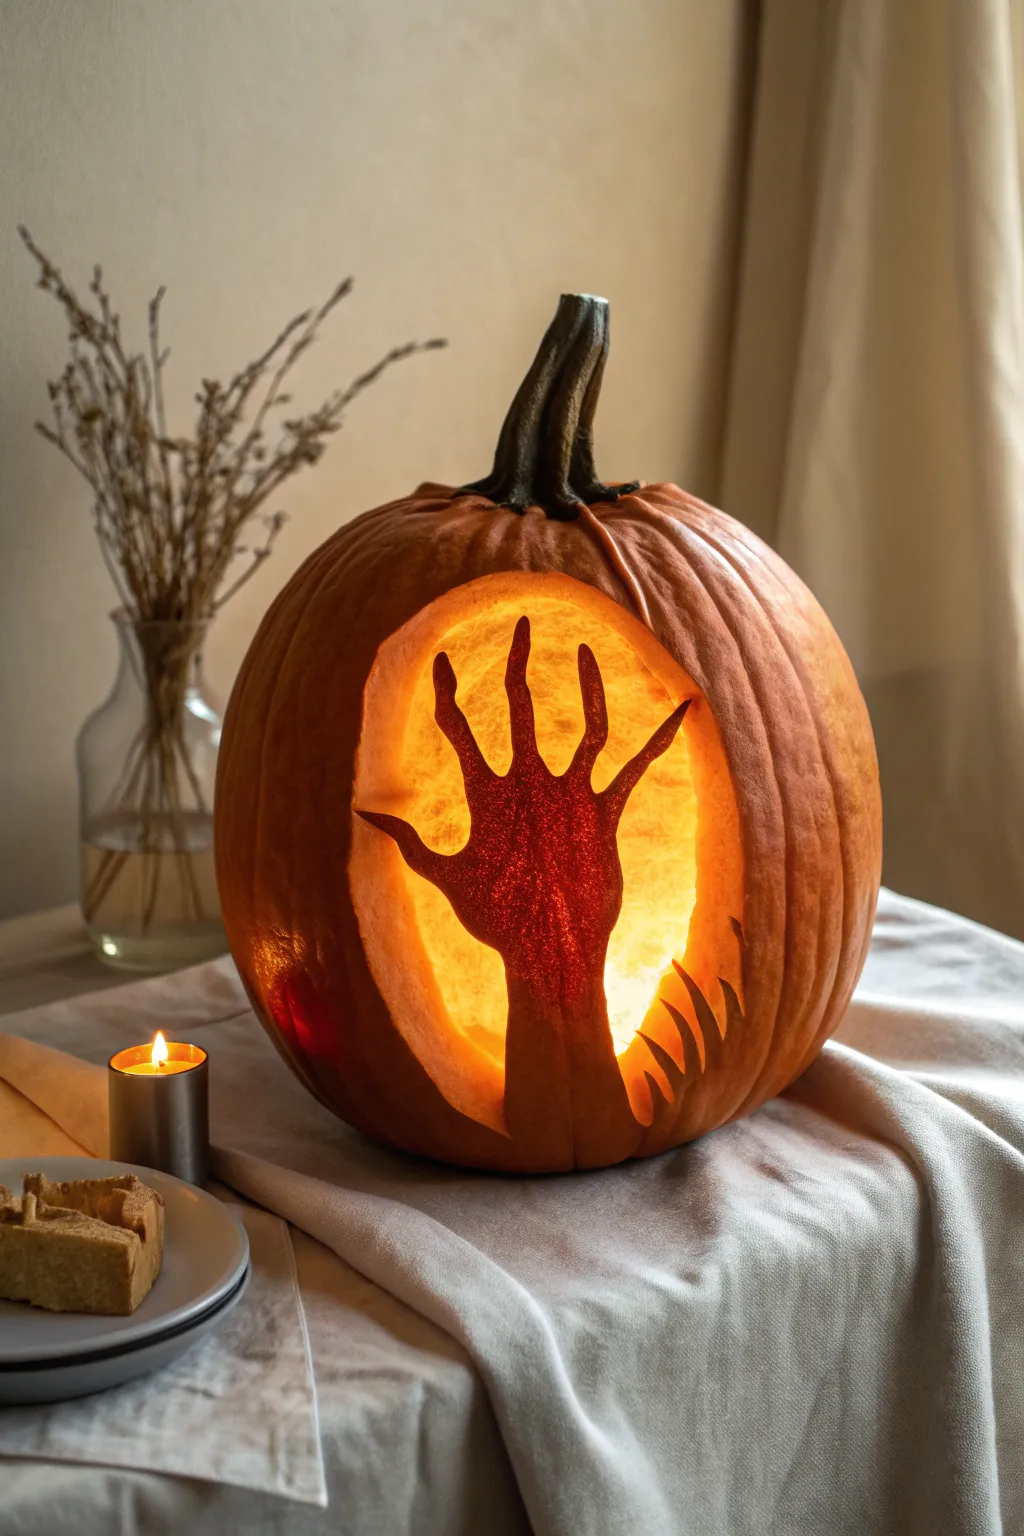
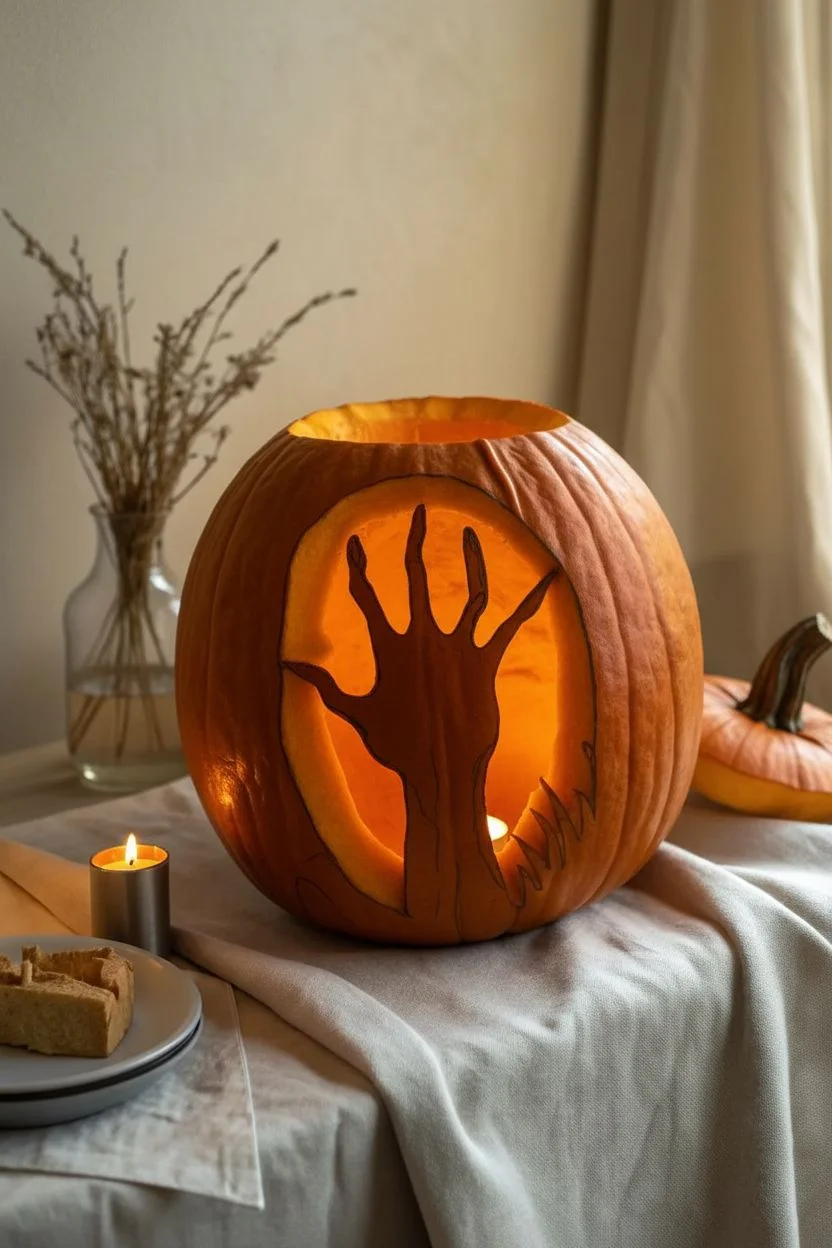
Create a spine-chilling illusion with this advanced pumpkin carving technique that makes it look like a trapped spirit is pushing its hand through the pumpkin’s flesh. By shaving layers rather than cutting all the way through, you achieve a haunting, warm glow that reveals the skeletal details of the hand.
Step-by-Step Tutorial
Materials
- Large, smooth pumpkin
- Pumpkin carving kit (saw, scoop)
- Linoleum cutters or clay loop tools (crucial for shading)
- Dry erase marker or grease pencil
- Printed hand silhouette template (optional)
- X-Acto knife
- LED candle or bright pumpkin light
- Petroleum jelly
- Push pin
Step 1: Preparation & Outline
-
Clean and Gut:
Cut a lid in the top of your pumpkin and remove all the seeds and strings. Scrape the inner wall where you plan to carve until it is approximately 1 inch thick; this ensures the light will shine through the shaved sections properly. -
Plan the Oval:
Using a dry erase marker, sketch a large oval shape on the flattest face of the pumpkin. This will be the ‘window’ where the hand appears. -
Sketch the Hand:
Inside your oval, draw a spooky, outstretched hand. You want the fingers splayed wide and reaching upward. If you aren’t confident drawing freehand, tape a printed silhouette to the pumpkin and use a push pin to poke holes along the outline, transferring the design onto the skin. -
Define the Boundary:
Use an X-Acto knife or a fine carving tool to lightly score the outline of the large oval and the outline of the hand itself. Do not cut all the way through; just break the skin to define your zones.
Depth Check
Turn off room lights and put a flashlight inside the pumpkin frequently while scraping. It’s the only way to accurately judge the shading depth.
Step 2: Shaving & Sculpting
-
Remove the Background Skin:
Start by peeling away the orange pumpkin skin inside the oval but *outside* of the hand shape. You want to expose the lighter flesh underneath. A wide loop tool works best for this initial skin removal. -
Deepen the Background:
Continue shaving down the background area around the hand. You need to go deeper here than anywhere else to let the most light through, creating that bright glow that silhouettes the hand. -
Refine the Hand Shape:
Now, carefully shave the skin off the hand itself, but keep this layer very thin. You want the hand to remain darker than the background, so leave more flesh thickness here. -
Add Texture to the Hand:
Use a small clay loop tool to gently scrape texture onto the hand. I like to scratch vertical lines along the fingers to mimic tendons and wrinkled skin. These subtle variations in thickness will show up as shadows when lit. -
Contour the Fingers:
Carve slightly deeper right next to the finger edges on the background side. This high contrast makes the fingers pop and look 3D. -
Create the Second Hand:
Looking at the reference, there is a second partial hand or claws emerging at the bottom right. Sketch this smaller detail and repeat the process: remove the skin, but keep the flesh thicker than the background.
Color Pop
For an even creepier effect, use a red or green LED light inside, or layer red tissue paper behind the hand area on the inside wall.
Step 3: Lighting & Detailing
-
Test the Light:
Place your light inside the pumpkin in a dark room. This step is critical. Check which areas are too dark. -
Adjust Thickness:
If the background isn’t glowing brightly enough, scrape more flesh away from the inside of the pumpkin wall (behind the design) or carefully shave more off the front. -
Add Highlights:
To make knuckles or fingernails shine brighter, shave those tiny specific spots almost paper-thin. This creates ‘highlights’ of light. -
Smooth the Edges:
Use a scrubbing pad or the back of a spoon to smooth out tool marks in the background area if you want a uniform glow, or leave them rough for a chaotic energy. -
Preserve the Work:
Once you are happy with the sculpt, rub a thin layer of petroleum jelly over all exposed flesh. This locks in moisture and prevents the delicate hand from shriveling too quickly.
Light up your creation and watch as the trapped hand eerily glows from within the pumpkin wall
Pinhole Carving for a Swarming Shadow Pattern
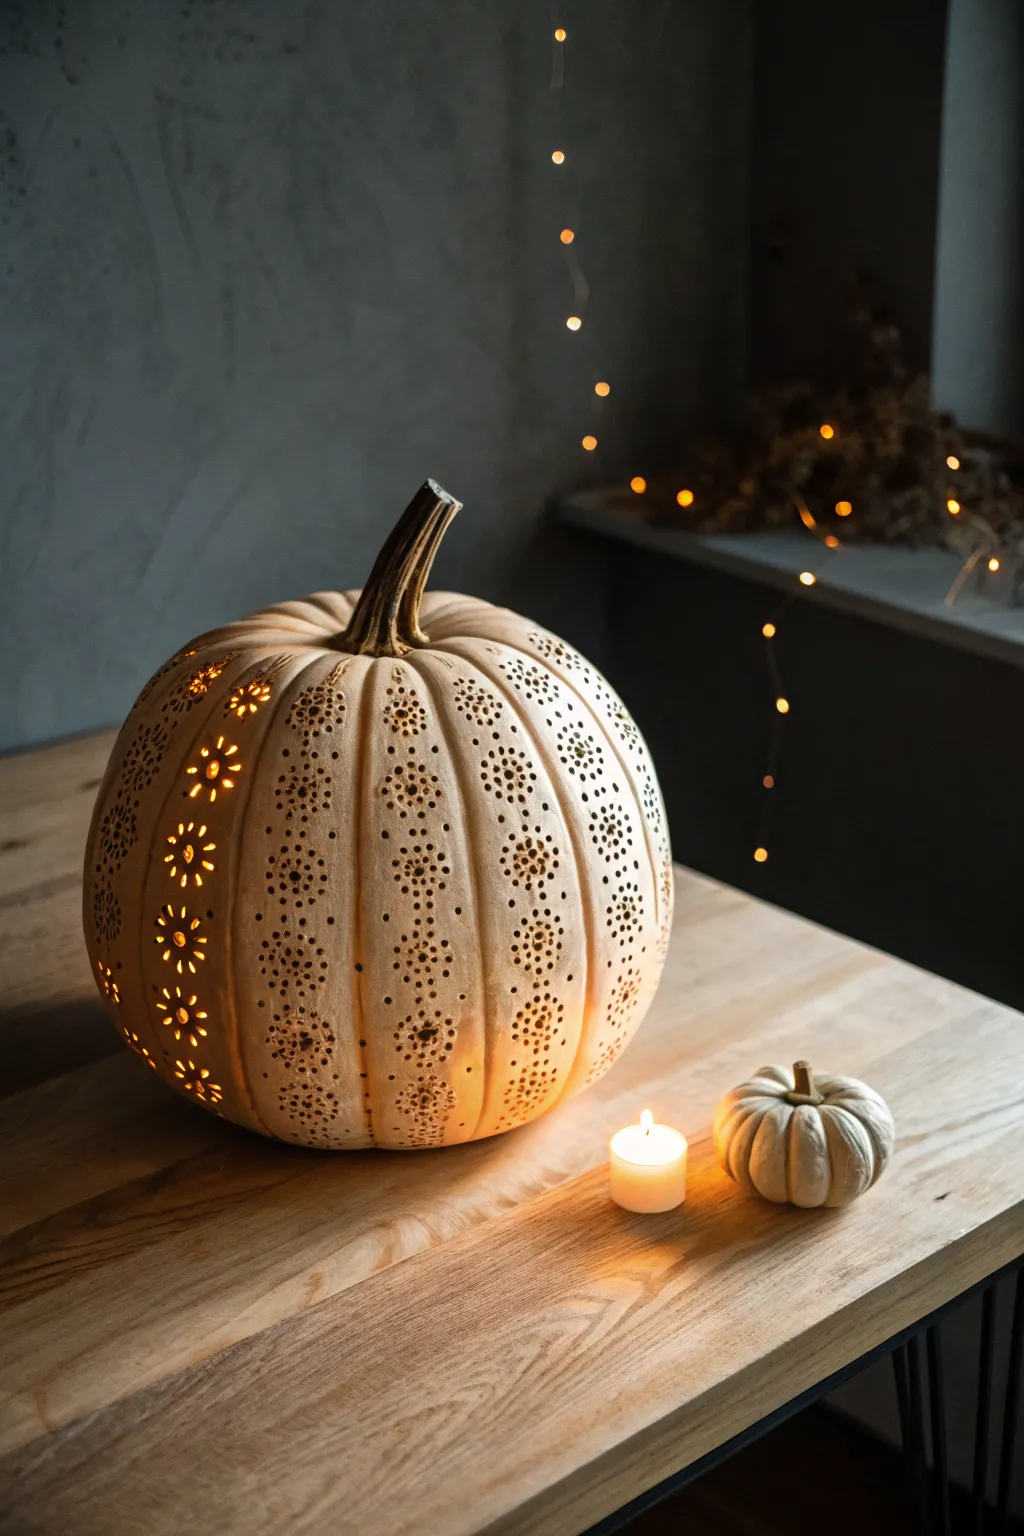

Transform a pale pumpkin into a glowing masterpiece of light and shadow using a simple drill. The intricate clusters of tiny holes mimic delicate lace or swarming fireflies, creating an elegant centerpiece that feels more magical than scary.
Detailed Instructions
Materials
- Medium-sized white pumpkin (real or faux)
- Power drill
- Drill bits (various sizes: 1/8″, 3/16″, 1/4″)
- Masking tape or painter’s tape
- Fine-point washable marker or pencil
- Pumpkin carving saw or serrated knife
- Large metal spoon or scraping tool
- Sandpaper (fine grit)
- Battery-operated LED candle or string lights
Step 1: Preparation and Planning
-
Prepare the workspace:
Set up a steady work surface covered with newspaper or a plastic drop cloth, as drilling creates quite a bit of pumpkin debris. -
Open the pumpkin:
Cut a circle around the stem at the top of the pumpkin using your serrated knife. Angle the knife inward slightly so the lid won’t fall through later. -
Scoop out the interior:
Thoroughly remove all seeds and stringy pulp. I find that scraping the inner walls until they are about 1 inch thick makes drilling easier and lets more light shine through. -
Wipe down the surface:
Clean the exterior skin with a damp cloth to remove any dirt or residue, ensuring a clean slate for your design work.
Clean Exit Holes
If the drill leaves messy hanging bits on the inside, let the pumpkin dry out for an hour. The bits will shrivel and can be easily rubbed off with a dry scouring pad.
Step 2: Designing the Pattern
-
Map out the ribs:
Identify the natural vertical ribs of the pumpkin. These vertical sections will serve as the guides for your recurring pattern. -
Mark vertical zones:
Using thin strips of masking tape, mark off alternating vertical ribs. You will leave some ribs plain to create negative space and focus attention on the drilled sections. -
Sketch the flowers:
On the exposed ribs, use your washable marker to draw small circles where the center of your ‘flower’ bursts will be. Space them evenly from top to bottom. -
Add detail dots:
around your center circles, mark spots for the petals. Then, add random scattering dots between the flower clusters to create that ‘swarming’ texture.
Step 3: Drilling the Design
-
Start with the centers:
Insert a medium-sized drill bit (around 3/16″) into your drill. Carefully drill straight into the center marks of each flower shape. -
Create the petals:
Switch to a slightly smaller bit. Drill the holes surrounding the center hole to form the petals. Keep the drill perpendicular to the pumpkin surface to prevent slipping. -
Drill the background texture:
Using the smallest bit (1/8″), drill the scattered dots filling the space between the flowers. Vary the density; more holes near the center of the panel and fewer toward the edges creates a nice fade effect. -
Clean up the edges:
Once all holes are drilled, inspect the pumpkin. Use the small drill bit or a toothpick to clear out any pumpkin globs stuck inside the holes. -
Refine the surface:
If drilling created rough raised edges on the pumpkin skin, gently sand them down with fine-grit sandpaper for a polished, ceramic-like finish. -
Clean the interior again:
Reach inside and scrape away any new debris that was pushed through during drilling. This ensures nothing blocks your light source.
Try a Constellation
Instead of abstract flowers, print out a star map. Tape it to the pumpkin and drill through the stars to project actual constellations like the Big Dipper or Orion.
Step 4: Illumination
-
Remove marker lines:
Wipe the outside of the pumpkin with a damp cloth one last time to remove any remaining guide marks from your sketch. -
Insert the light:
Place a battery-operated LED pillar candle or a bundle of battery-operated string lights inside. String lights often provide a brighter, more distributed glow for this specific design. -
Replace the lid:
Set the pumpkin top back in place, ensuring the airflow notch (if using a real candle) is aligned, though LEDs are safer for this enclosed design.
Dim the lights and watch your intricate pinhole patterns cast a mesmerizing dance of shadows across the room


Have a question or want to share your own experience? I'd love to hear from you in the comments below!