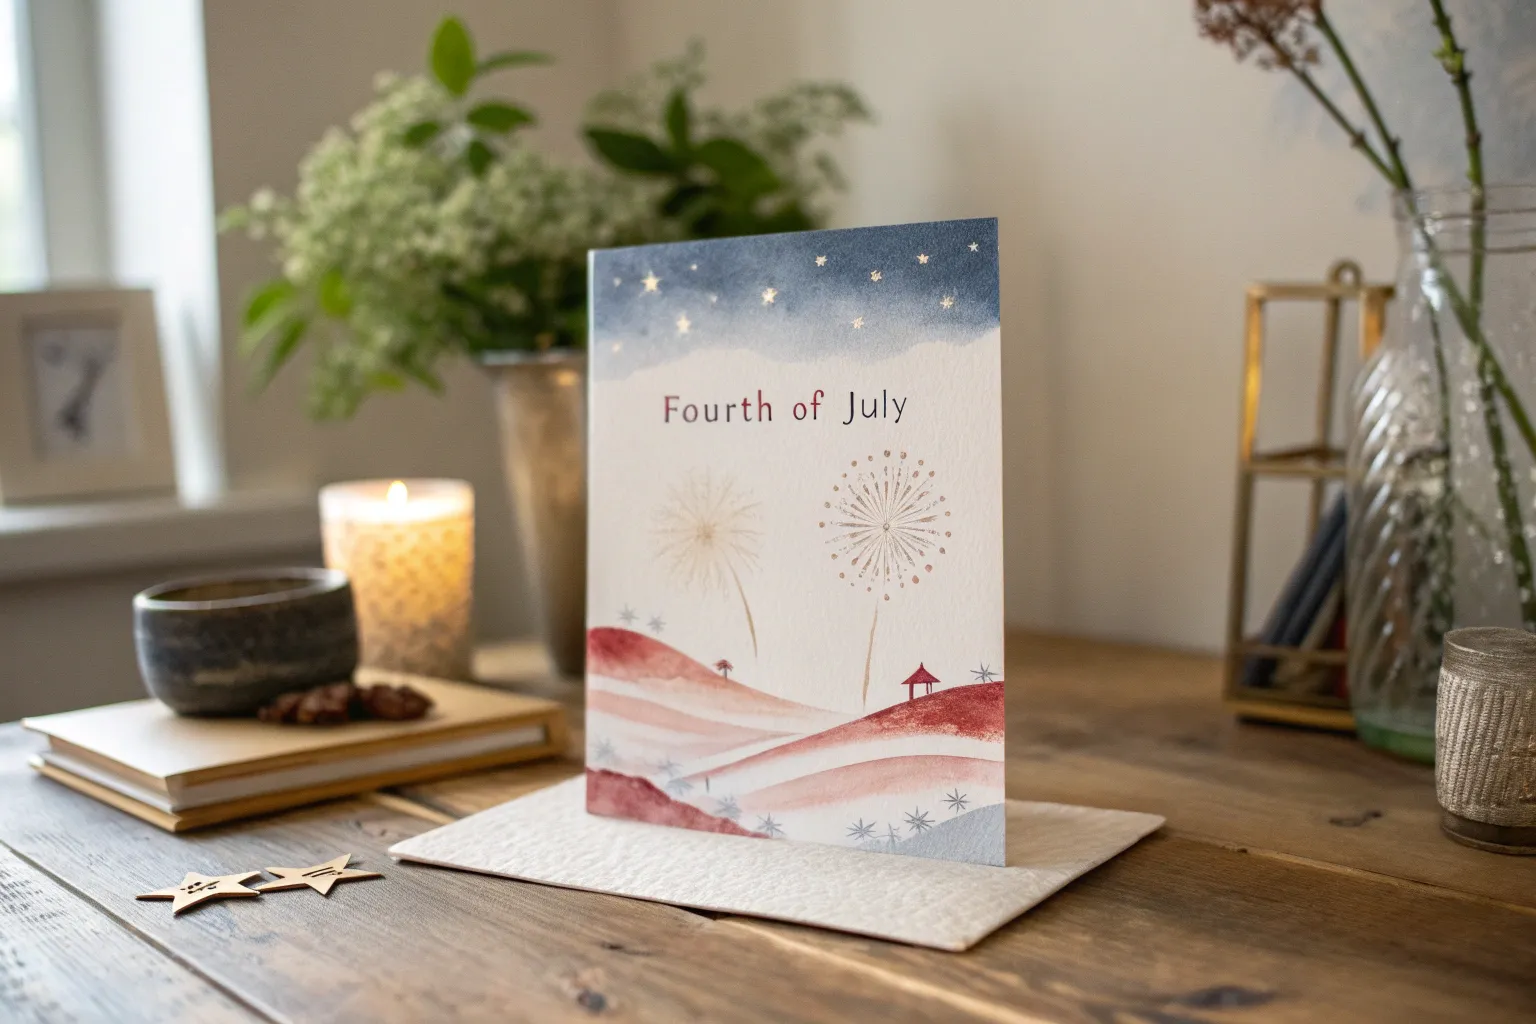
If you’re craving 4th of July painting ideas, I’ve got you—think big, bold fireworks, classic flags, and that instantly festive red, white, and blue palette. These are the kinds of projects I love setting up in the studio because they’re easy to start, super satisfying, and you can make them as simple or detailed as you want.
Fireworks Burst Over a Night Sky
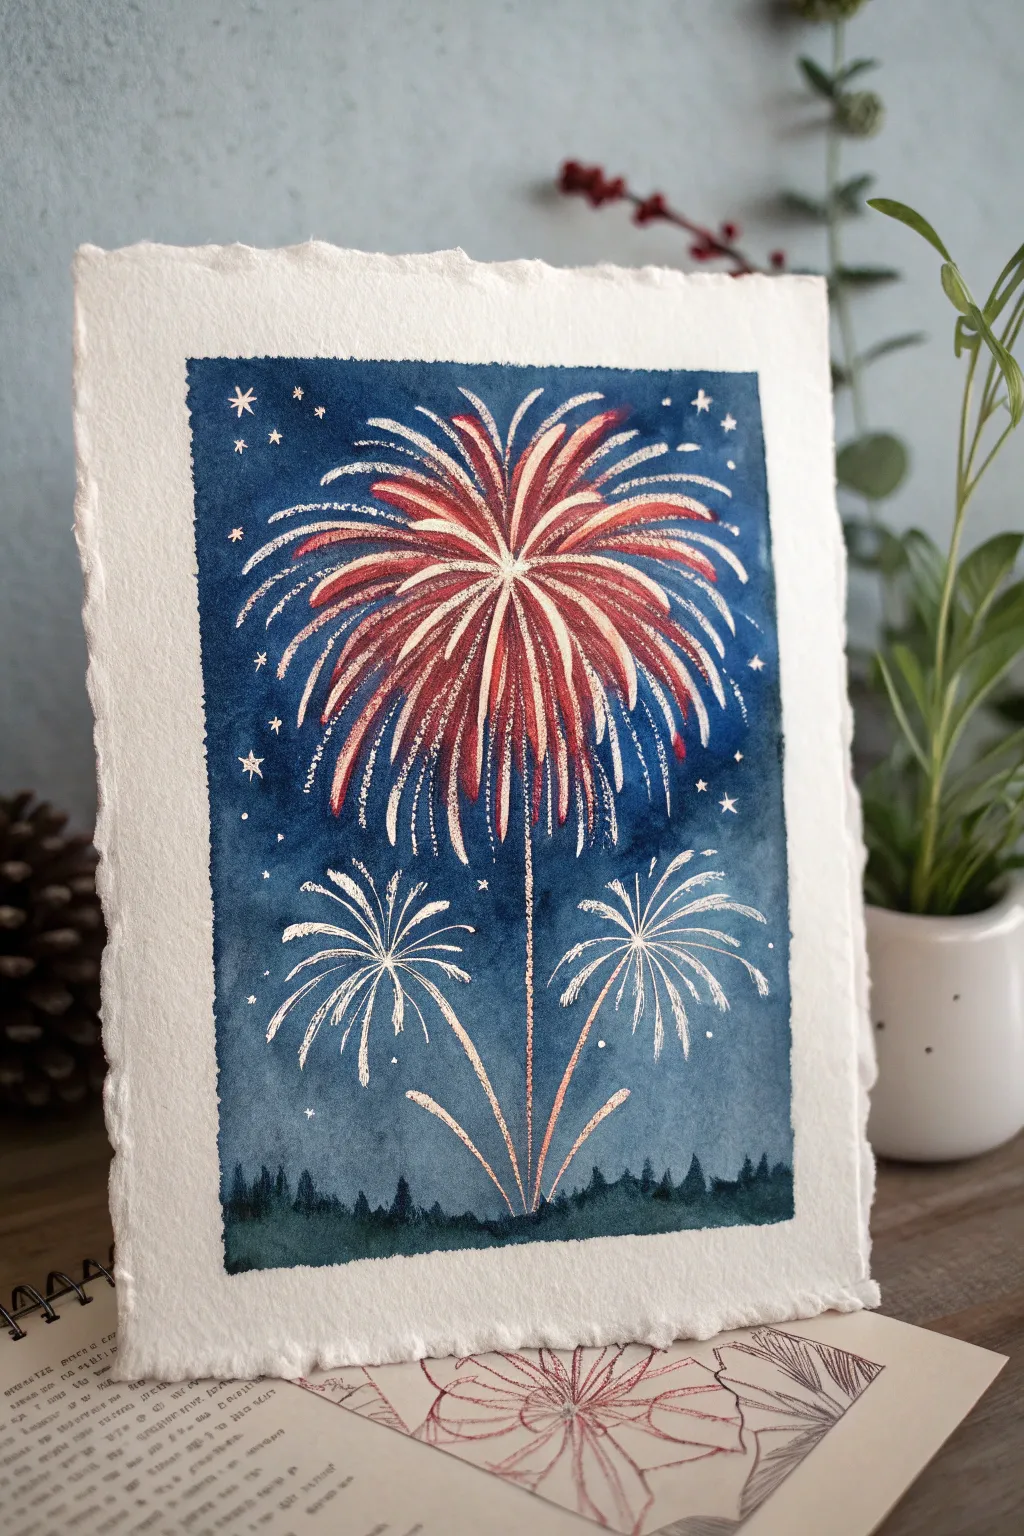
Capture the magic of a Fourth of July celebration with this elegant watercolor and metallic ink painting. The stark contrast between the deep indigo sky and the shimmering bursts creates a festive yet sophisticated piece of art.
How-To Guide
Materials
- Cold press watercolor paper (deckled edge preferred)
- Masking tape
- Watercolor paints (Indigo, Prussian Blue, Payne’s Gray, Forest Green)
- Metallic watercolor or gouache (Gold and/or Copper)
- White gouache or white gel pen
- Red watercolor or gouache
- Round brushes (sizes 2, 6, and a fine liner brush)
- Jar of clean water
- Paper towels
- Palette for mixing
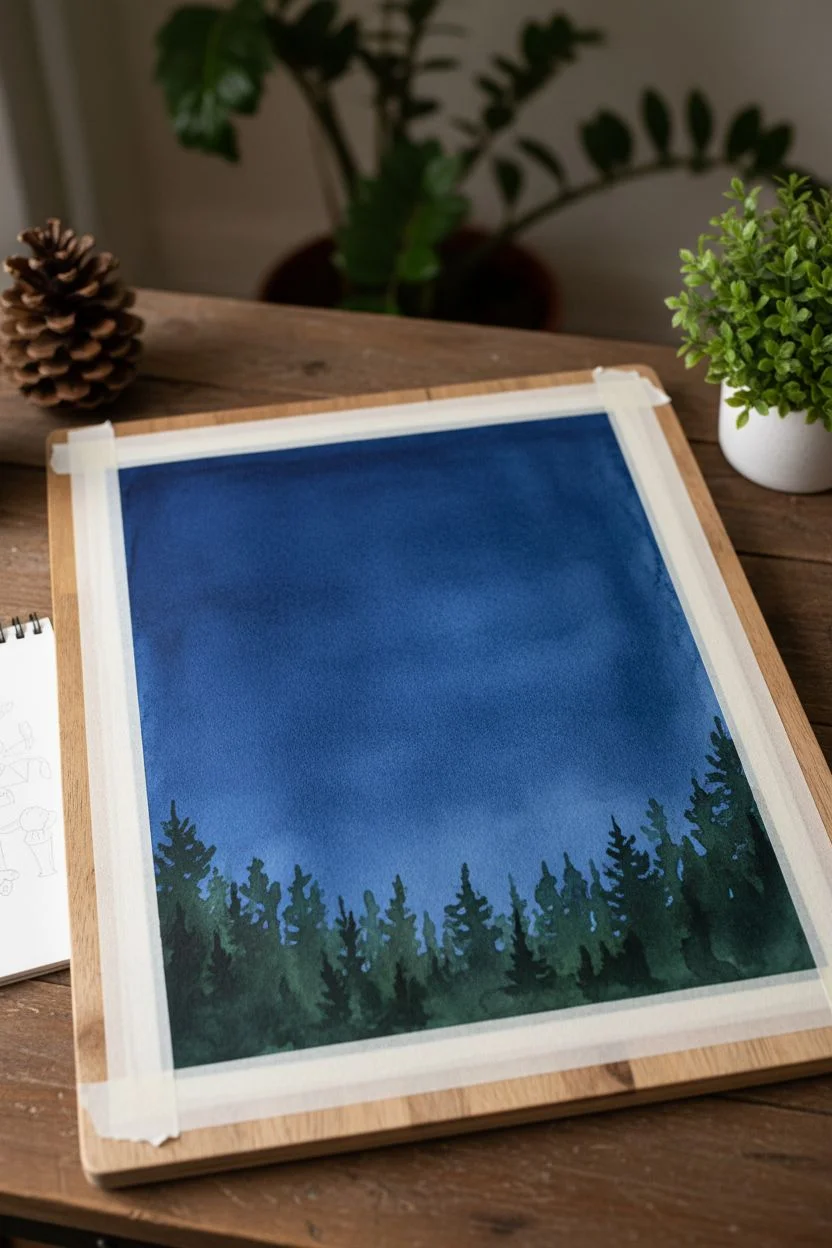
Step 1: Setting the Scene
-
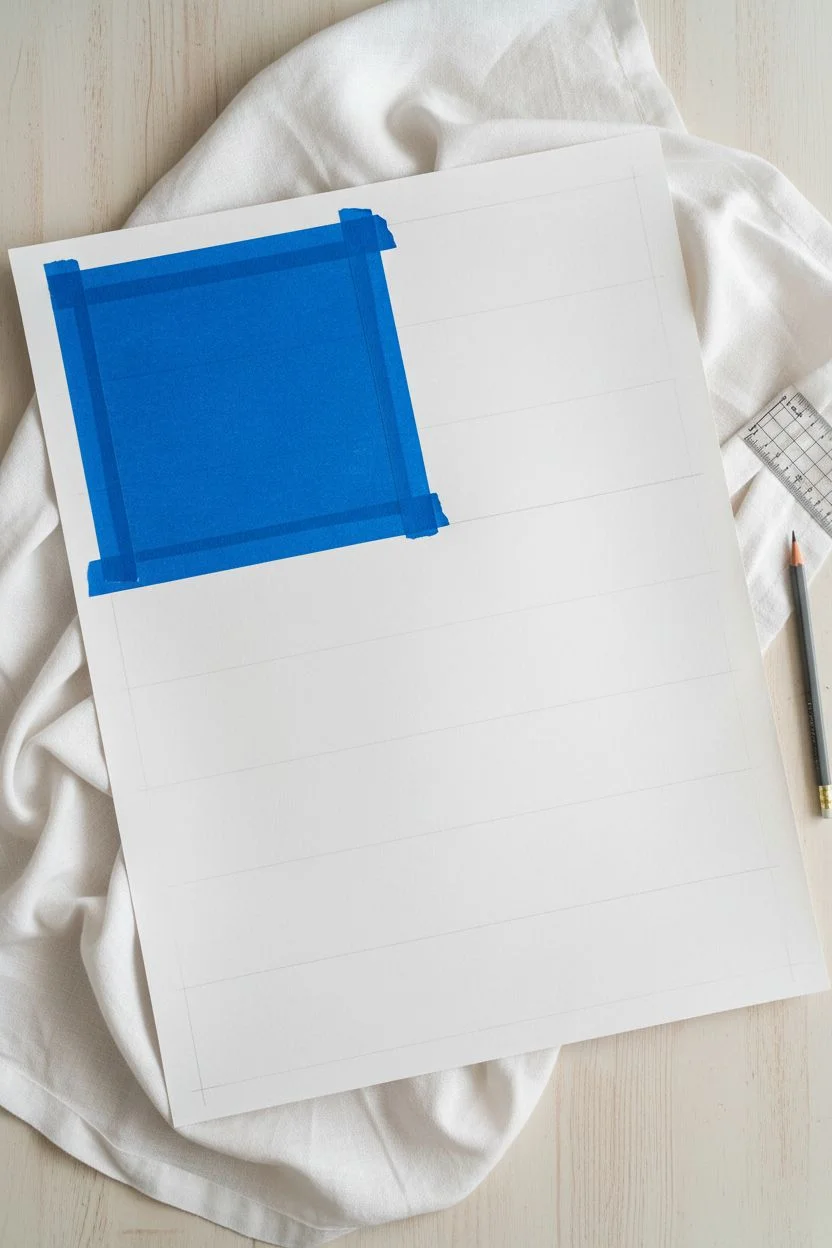
Prep the paper:
Begin by taping down your watercolor paper to a board. If you are using deckled edge paper like the example, leave a generous border of white space around the edges by taping inside the paper’s perimeter to create a clean, sharp rectangle in the center. -
Mix the night sky:
Create a deep, rich night sky color on your palette. I generally mix Indigo with a touch of Payne’s Gray to get that midnight darkness. You want a heavy pigment load here so the background isn’t too pale. -
Paint the background wash:
Using a size 6 brush, apply the dark blue wash to the entire taped-off rectangle. Start from the top and work your way down. Don’t worry about leaving space for the fireworks yet; we will paint those opaquely on top. -
Create the horizon:
While the bottom of the sky is still slightly damp, drop in a mix of Forest Green and Indigo along the bottom edge to suggest a dark, shadowy forest line. Use the tip of your brush to pull up tiny, uneven vertical strokes to mimic pine tree silhouettes. -
Allow to dry:
Let this background layer dry completely. It must be bone dry before you add the fireworks, or the lines will bleed into the blue.
Clean Lines
For the sharpest firework trails, ensure your paint has an ink-like consistency—not too watery, but fluid enough to flow off a liner brush smoothly.
Step 2: The Main Explosion
-
Establish the center:
Locate the center point for your main firework in the upper middle of the sky. Using white gouache or opaque white watercolor on a fine liner brush, make a small dot to mark the core. -
Paint the white core rays:
From that center dot, flick your brush outwards to create thin, radiating white lines. Keep your wrist loose. These should be short near the center, like the heart of the explosion. -
Add the red burst:
Switch to a vibrant red gouache or thick watercolor. Paint longer curved strokes exploding outward from the center, overlapping the white slightly. Vary the lengths to make the burst feel organic. -
Layer in metallic details:
Load your fine brush with metallic gold or copper paint. Add thin, shimmering rays interspersed among the red and white strokes. This element catches the light beautifully. -
Extend the trails:
Add a few longer, thinner white or metallic lines curving downward at the edges of the burst, simulating gravity pulling the sparks down.
Step 3: Secondary Fireworks and Details
-
Position the smaller bursts:
Identify two spots lower down on either side of the main firework stem. These will be your smaller, secondary explosions. -
Paint the metallic starbursts:
Using primarily your metallic gold or copper paint, create two smaller starburst shapes. Use simple, straight, and slightly curved lines radiating from a central point. -
Add vertical stems:
With a steady hand and your liner brush, paint a very thin vertical line straight up from the tree line to the center of each explosion. Use the metallic paint for a magical trail effect. -
Highlight the secondary bursts:
Add tiny touches of white gouache to the tips of the metallic starbursts to make them pop against the dark background. -
Sprinkle the stars:
Using your white gouache or a white gel pen, dot tiny stars throughout the dark blue sky. Vary the pressure to create different sized dots. -
Draw star gleams:
Select a few of the larger white dots and carefully draw tiny crosses through them to create twinkling four-pointed stars. -
Reveal the border:
Once the painting is 100% dry, very slowly and carefully peel away the masking tape at a 45-degree angle to reveal the crisp edges and the beautiful deckled paper border.
Sparkle finish
Mix a tiny pinch of dry mica powder into your wet blue background wash for a subtle, all-over shimmer that mimics a humid summer night sky.
Frame this sparkling night scene in a floating frame to show off those beautiful paper edges


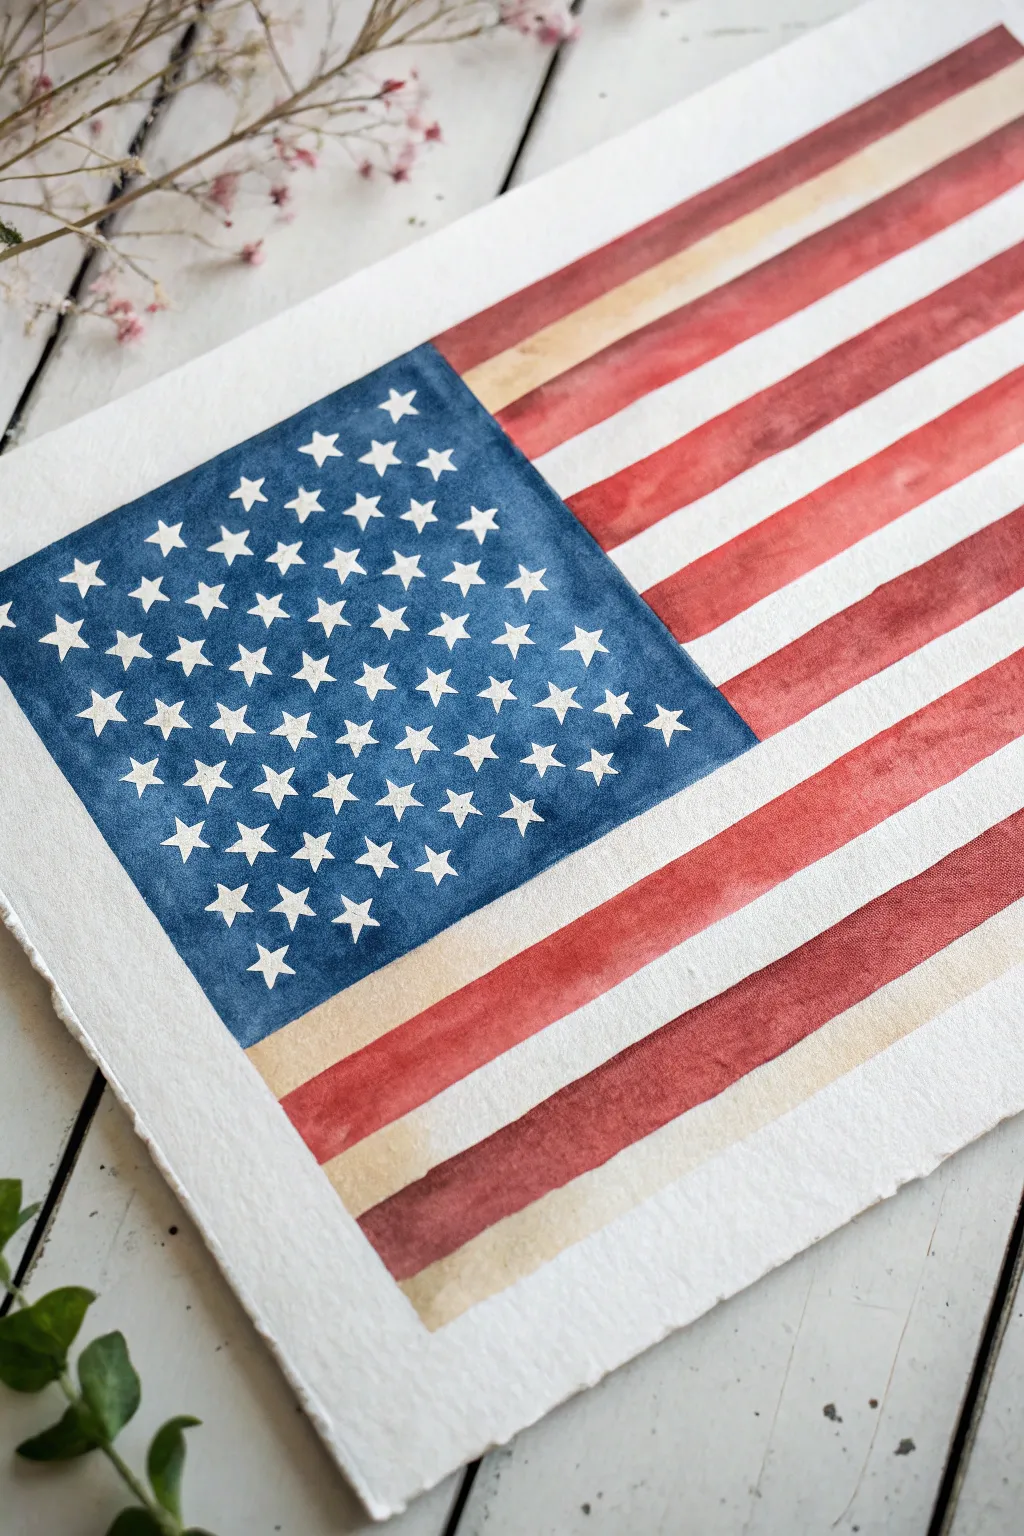
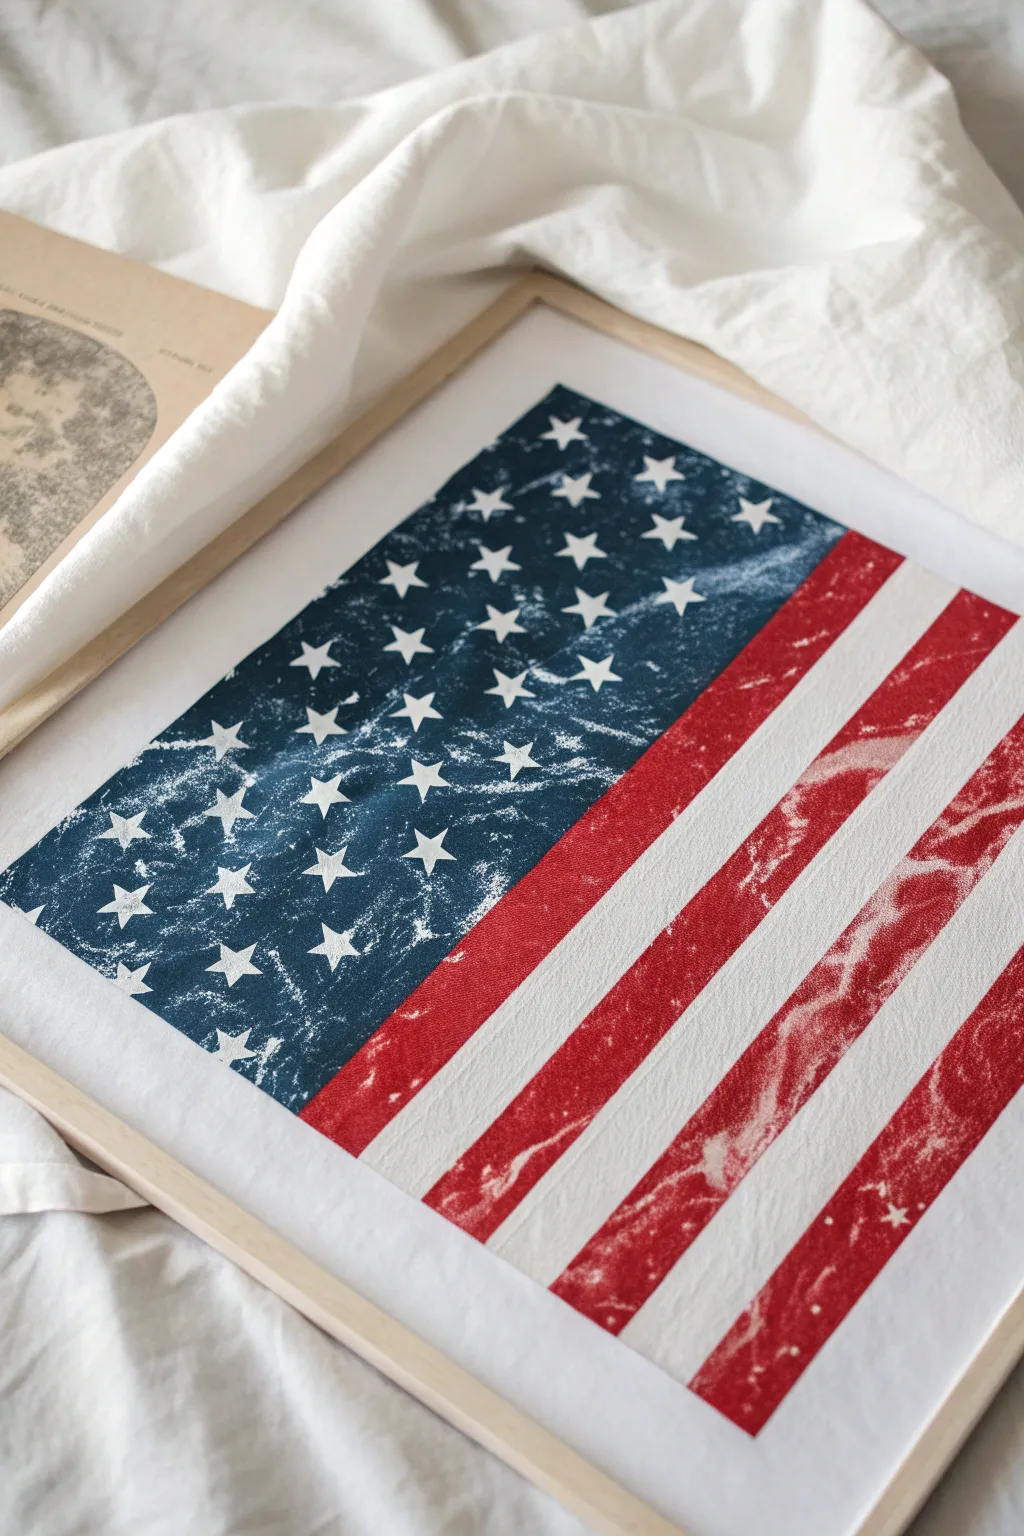
Waving Stars-and-Stripes Flag Study
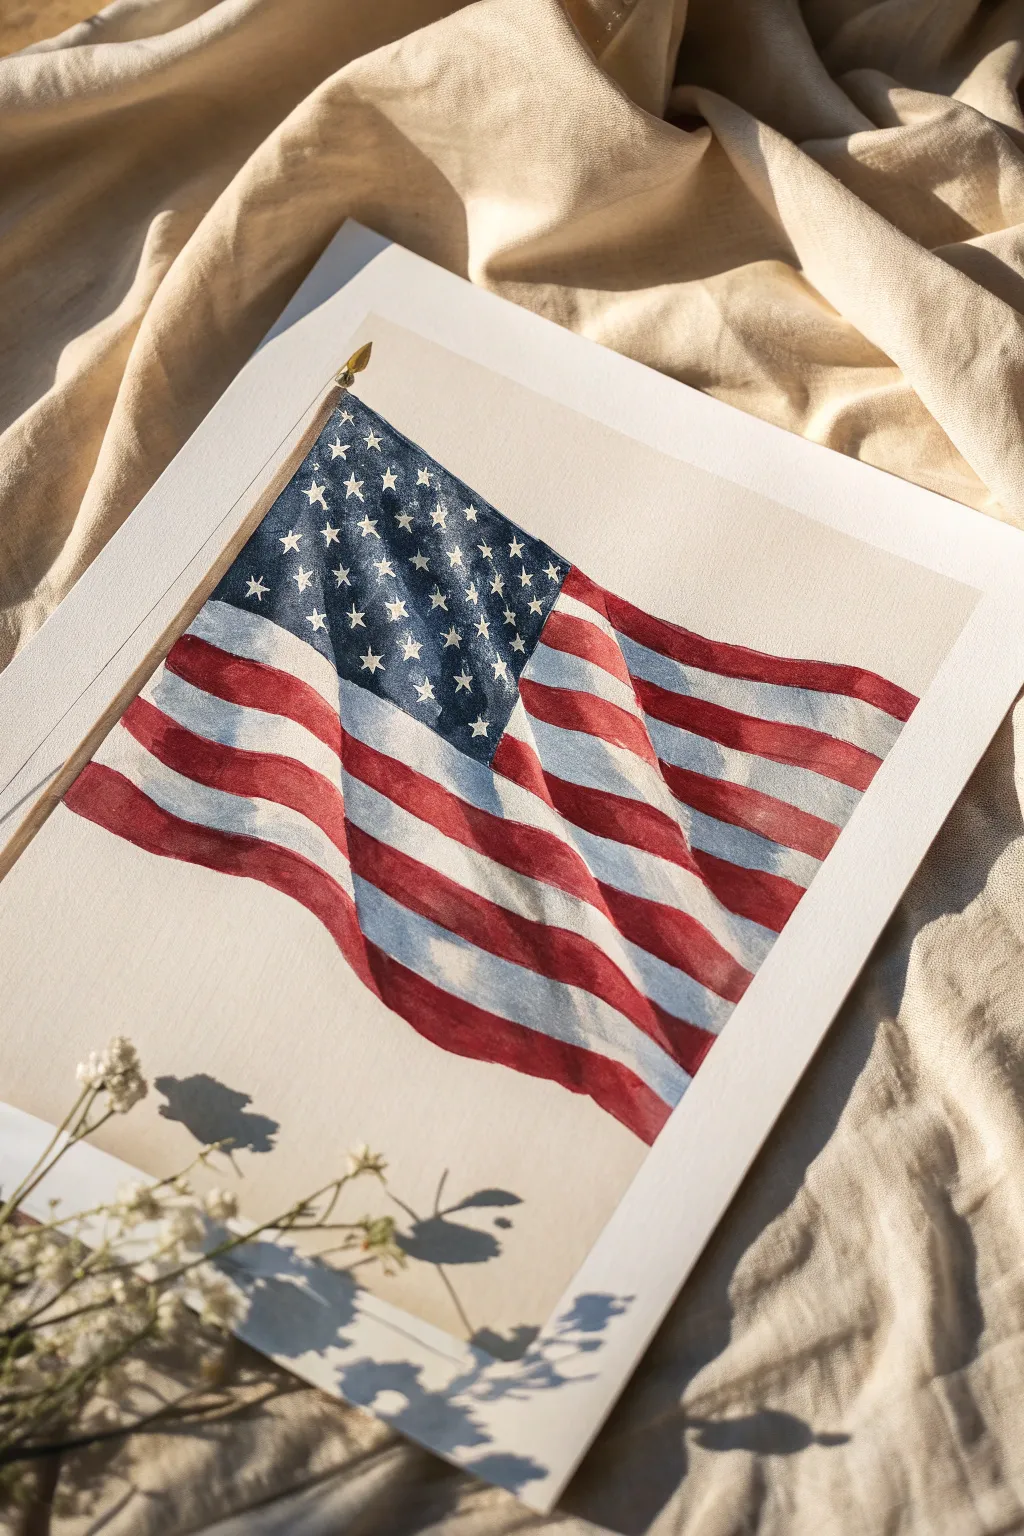

Capture the graceful motion of the Stars and Stripes with this detailed watercolor study. By focusing on deep shadows and flowing folds, you’ll create a flag that looks like it’s truly fluttering in a summer breeze rather than lying flat.
Detailed Instructions
Materials
- Cold press watercolor paper (140lb/300gsm)
- Watercolor paints (Alizarin Crimson, Cadmium Red, Ultramarine Blue, Indigo, Burnt Sienna, Yellow Ochre)
- Round brushes (sizes 2, 6, and 10)
- Masking fluid or white gouache
- Pencil (HB) and kneaded eraser
- Ruler
- Paper towels
- Two jars of water
Step 1: Sketching the Skeleton
-
Draw the flagpole:
Start by lightly sketching a diagonal line on the left side of your paper for the flagpole. Add a small decorative finial at the top. This anchors your composition and gives the flag a point of origin. -
Outline the flag shape:
Sketch the perimeter of the flag. Instead of a perfect rectangle, curve the top and bottom lines to mimic a waving motion. Let the right edge flutter inward, creating an organic, non-rigid shape. -
Map the folds:
Lightly draw curved lines across the flag’s surface to indicate where the fabric buckles and deepens. Think of these as hills and valleys; these guidelines are crucial for placing your shadows later. -
Mark the canton and stripes:
Block in the union (the blue rectangle) in the upper left corner, following the wave of your fabric. Then, sketch the seven red and six white stripes. Let the lines curve with your ‘hills and valleys’ rather than using a straight ruler.
Keep it Moving
Don’t outline the stripes with a pen or distinct dark paint line. Let the contrast between the red and white create the edge. This keeps the fabric looking soft and pliable.
Step 2: The Blue Canton & Stars
-
Mask the stars:
Apply small dots or star shapes of masking fluid where your fifty stars will go. If you don’t have masking fluid, you can skip this and paint around them, or use opaque white gouache at the very end. -
Mix your blues:
Create a deep, rich navy by mixing Ultramarine Blue with a touch of Indigo and a tiny bit of Alizarin Crimson to warm it up. You want a color that feels historical, not electric. -
Paint the blue field:
Wash the blue mix over the canton area. While it’s wet, drop in more Indigo into the ‘valleys’ of the folds to create instant depth. Let the highlight areas remain slightly lighter. -
Remove masking:
Once the blue paint is bone dry, gently rub off the masking fluid to reveal the crisp white paper underneath.
Bleeding Colors?
If red bleeds into white, dab it immediately with a clean, dry paper towel. If it stains, wait for it to dry, then lift the color gently with a stiff, damp brush before repainting.
Step 3: Painting the Stripes
-
Mix your reds:
Prepare two puddles of red. One should be a bright Cadmium Red for the illuminated parts of the stripes, and the second should be mixed with a little Alizarin Crimson and Burnt Sienna for the shadowed folds. -
Paint the first red stripe:
Start at the top. Use the brighter red on the ‘hills’ of the fabric wave. As you move into a recessed fold, switch to your darker red mix. Blending these wet-on-wet creates a seamless 3D illusion. -
Continue the pattern:
Skip every other stripe (leaving them white for now) and paint the remaining red stripes. Skipping helps prevent wet red paint from bleeding into the white areas. -
Shadow the white stripes:
The white stripes aren’t purely white. Mix a very watery grey-blue using Ultramarine and a touch of Burnt Sienna. Glaze this shadow color into the folds of the white stripes so they match the lighting of the red ones.
Step 4: Building Depth and Detail
-
Deepen the darkest folds:
Once the first layers are dry, go back with a concentrated mix of Indigo and Alizarin Crimson. Paint thin, hard-edged shadows in the deepest crevices of the fabric to punch up the contrast. -
Paint the pole:
Use Yellow Ochre mixed with a little brown for the wooden flagpole. Add a darker strip along one side to show roundness, and paint the finial with pure Yellow Ochre for a gold look. -
Refine the stars:
If strict realism is your goal, you can tidy up the star shapes with a small brush and white gouache. If they look too stark, glaze a tiny bit of the blue shadow mix over the stars that sit in the deep folds. -
Soften edges:
Check your shadows. If a fold looks too sharp where it should be gradual, wet a clean brush and gently scrub the edge to soften the transition. -
Final assessment:
Stand back and look at the overall flow. If the flag feels too flat, add another light glaze of cool grey over the entire shadowed half of the waves to unify the lighting.
Now you have a patriotic piece that captures both history and movement


Silhouette Skyline With a Fireworks Finale
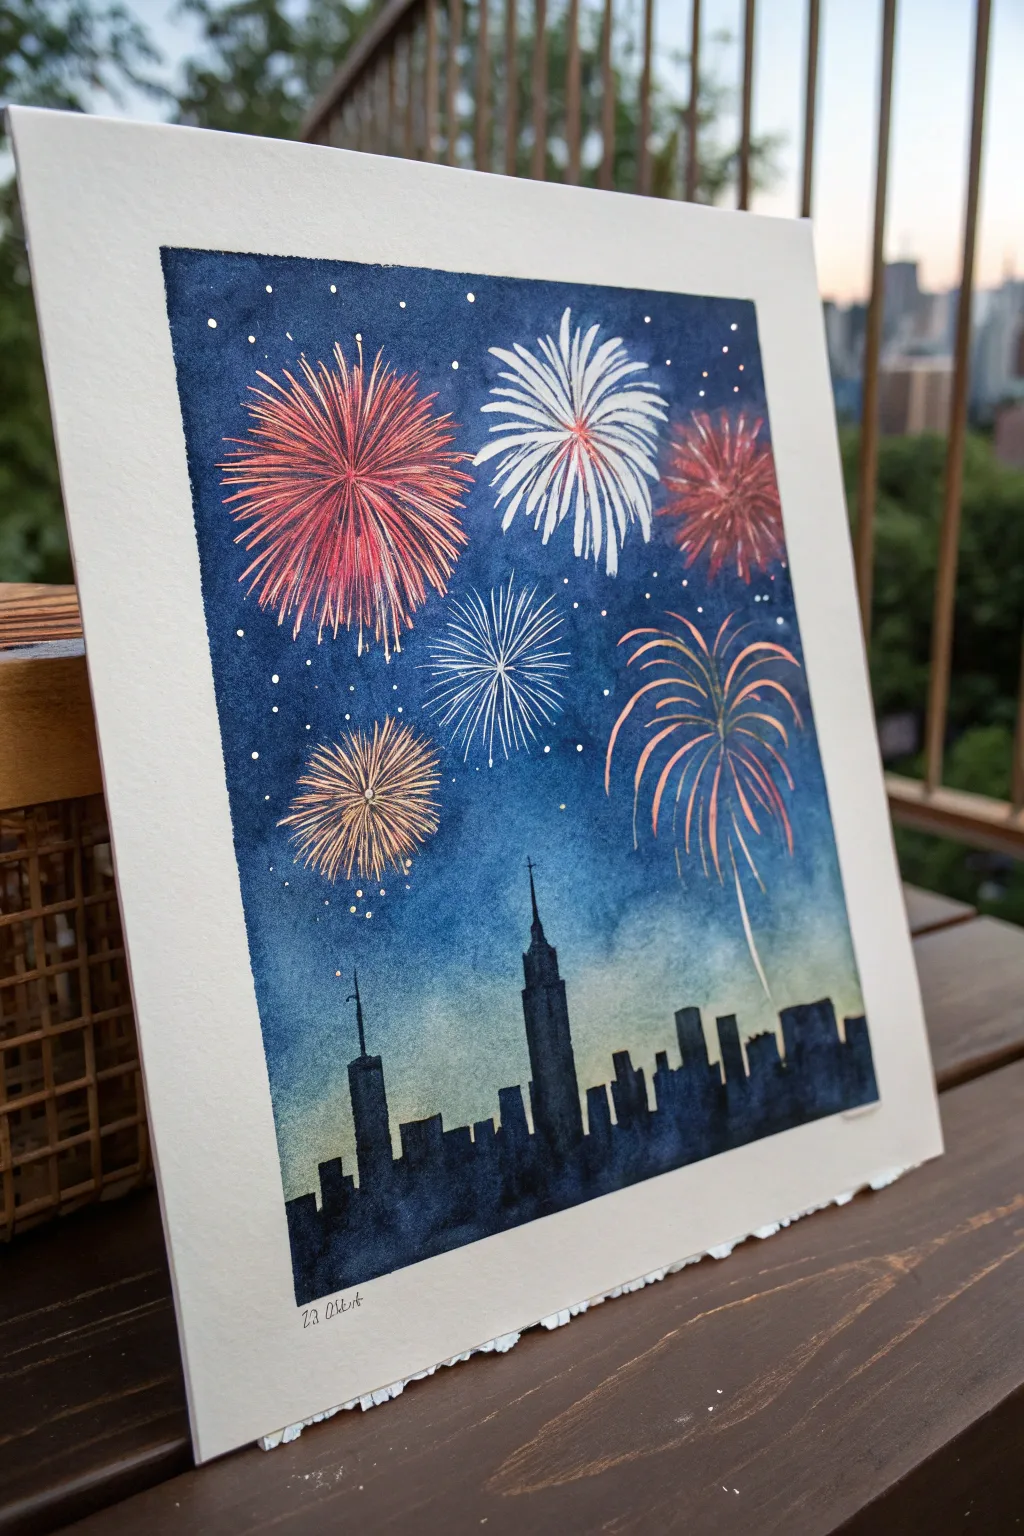
Capture the magic of a festive evening with this moody and vibrant watercolor painting featuring a recognizable city silhouette under a bursting sky. The contrast between the dark indigo wash and the bright, metallic fireworks creates a stunning depth that feels like looking out a high-rise window.
Detailed Instructions
Materials
- Cold press watercolor paper (block or taped down)
- Watercolor paints (Indigo, Payne’s Gray, Prussian Blue, Yellow Ochre, Burnt Sienna)
- Metallic watercolor paints or gel pens (Gold, Copper, Silver, White)
- Fine liner or masking fluid (optional for stars)
- Flat wash brush (large)
- Round brushes (sizes 2, 4, and 8)
- Fine detail brush (size 0 or 00)
- Pencil and eraser
- Paper towels and water jars
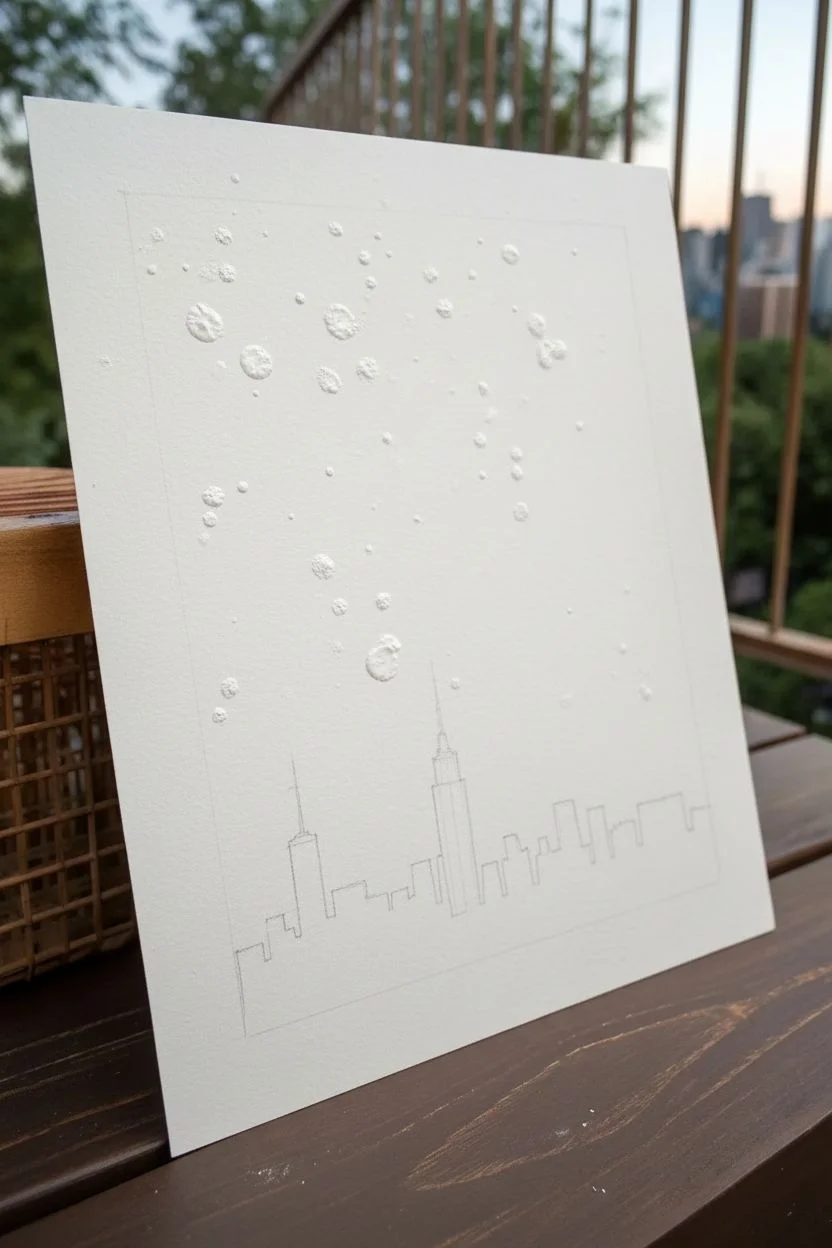
Step 1: Planning the Skyline
-
Light Sketching:
Begin by lightly sketching the horizon line about one-quarter of the way up from the bottom of your paper. Don’t press too hard, as you want the pencil lines to disappear under the paint later. -
Building Blocks:
Block in the shapes of the buildings. Since this is a silhouette, focus on the outer recognizability. Include iconic shapes like the needle of the Empire State Building or the angular top of One World Trade Center to give the city character. -
Masking (Optional):
If you plan to have very bright white fireworks or stars, apply small dots or lines of masking fluid in the sky area now. Let this dry completely before touching it with paint.
Sparkle Factor
If you don’t have metallic watercolors, use metallic gel pens or glitter glue applied very thinly over dry paint for that shimmering pyrotechnic effect.
Step 2: Creating the Atmosphere
-
Wet-on-Wet Gradient:
Pre-wet the entire sky area with clean water, stopping right at the edge of your building sketch lines. The paper should be glisten, but not hold puddles. -
The Sunset Glow:
While the paper is wet, drop a very diluted mix of Yellow Ochre and a touch of Burnt Sienna just above the building line to create a faint, hazy city glow. -
Deepening the Sky:
Starting from the very top edge, load your large flat brush with a rich Indigo or Prussian Blue. Paint downwards, letting the color naturally diffuse and lighten as it meets the yellowish glow near the horizon. -
Adding Texture:
While the blue wash is still damp, you can drop in slightly concentrated dots of Payne’s Gray or deep purple in the upper corners to create a vignette effect. Allow the background to dry completely—this is crucial before moving on.
Muddy Haze?
If the blue sky bleeds too much into the yellow horizon glow and turns green, let it dry, then glaze over the bottom with a thicker, opaque layer of dark blue.
Step 3: The Silhouette
-
Mixing Shadow Tones:
Mix a very dark, opaque color for the buildings. I prefer mixing Indigo with Burnt Umber rather than using straight black, as it gives a richer, more dimensional shadow. -
Painting the City:
Using a size 4 or 8 round brush, fill in the building shapes. Carefully cut in around the edges of the spires to keep them sharp. -
Varying Heights:
Ensure there is variety in the roof lines; add small rectangular bumps for water towers or vents to make the silhouette look realistic and not too blocky. -
Grounding the Scene:
Make sure the bottom edge of the paper is filled solidly with this dark mix to ground the entire composition.
Step 4: The Fireworks Finale
-
Burst Structures:
Switch to your metallic paints or white gel pens. Start with the largest firework bursts first. Paint a small center point, then pull curved strokes outward. -
Layering Colors:
For the red burst, use a metallic red or copper. Make the lines fine near the center and slightly thicker as they flare out. Add a second layer of shorter strokes in the middle for density. -
The Chrysanthemum Shape:
For the large white/silver firework, use curved strokes that droop slightly at the ends, mimicking gravity pulling the sparks down. -
Palm Tree Bursts:
Create the palm-tree style firework on the right using fewer, thicker strokes that arc dramatically downward, using a gold or bronze metallic paint. -
Secondary Sparks:
Fill the empty spaces with smaller starbursts (simple crossing lines) or ‘dandelion’ puffs using a fine detail brush. -
Stars and Debris:
Use a white gel pen or opaque white gouache to dot small stars in the darkest parts of the sky. Add tiny dots around the main fireworks to represent drifting sparks. -
Final Touches:
Once everything is dry, erase any visible pencil marks near the horizon and sign your piece in the bottom margin.
Now you have a dazzling cityscape that captures the excitement of holiday celebrations without the noise


Vintage-Inspired Firecracker Poster Painting
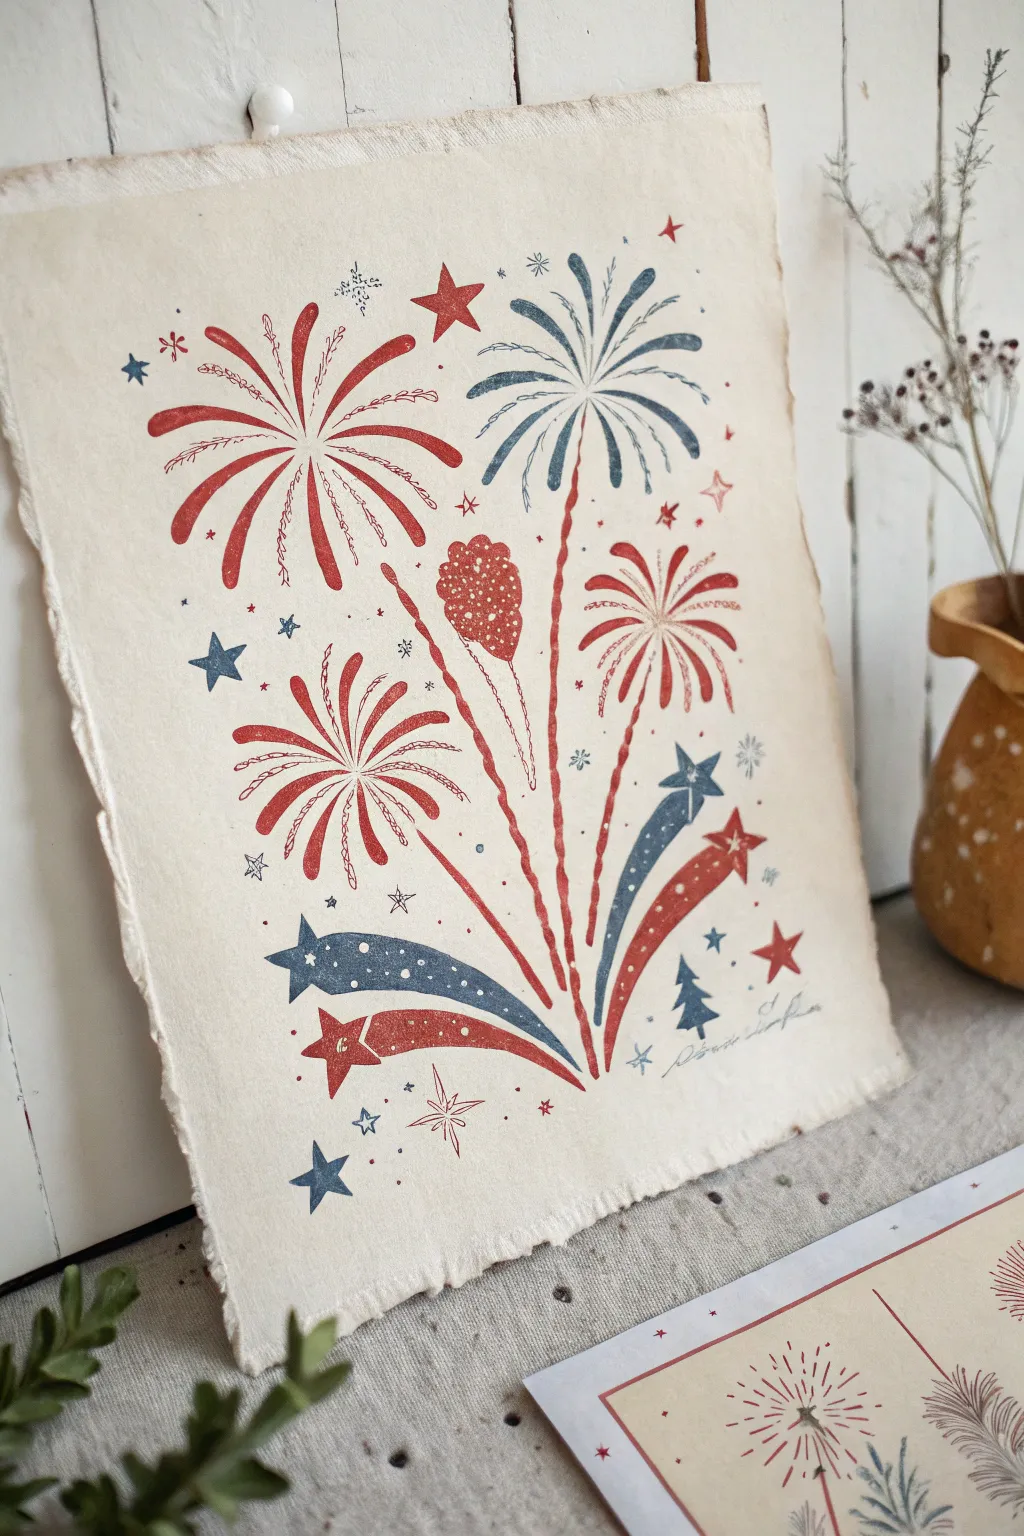
Capture the nostalgic charm of a bygone era with this vintage-inspired firework poster. Using simple red and blue hues on textured paper creates a delightful folk art aesthetic that feels both festive and timeless.
Step-by-Step Guide
Materials
- Heavyweight cold-press watercolor paper or handmade cotton rag paper (cream/off-white)
- Acrylic gouache paints (Deep Red, Navy Blue, Royal Blue)
- Fine liner brushes (sizes 0 and 00)
- Round watercolor brush (size 2)
- Pencil for sketching
- Kneaded eraser
- Deckle edge ruler or tearing tool (optional)
- Palette for mixing
Step 1: Preparing the Canvas
-
Creating the edge:
Begin by tearing the edges of your watercolor paper to create a soft, deckled look. You can do this by folding the paper and running a wet brush along the crease before carefully pulling it apart, or simply use a deckle edge ruler if you have one. -
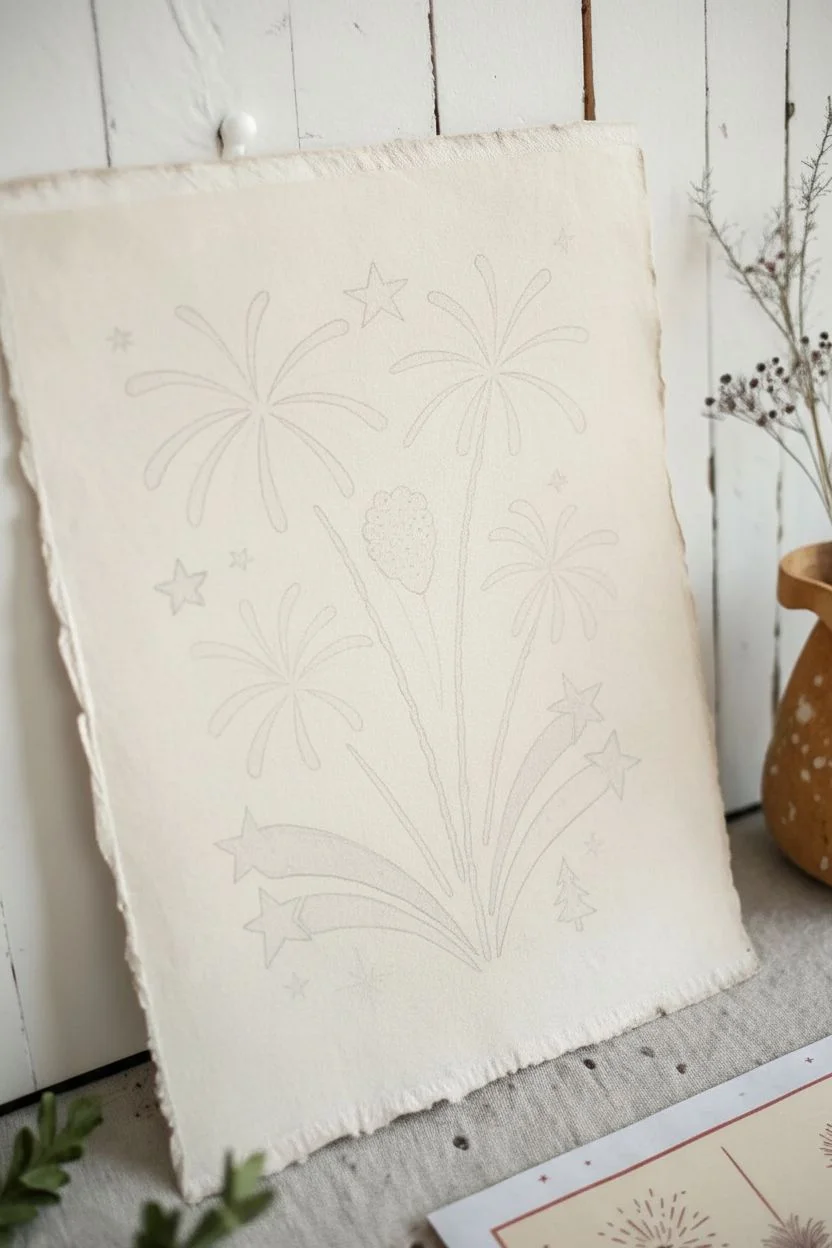
Planning the layout:
With a light pencil, sketch the main firework ‘bursts’. Imagine three main taller explosions and two lower, swooping comets at the bottom. Keep your lines very faint so they do not show through the paint later. -
Sketching the stems:
Draw long, slightly curved stems rising from the bottom center point, fanning out like a bouquet. These stems will anchor your explosions.
Vintage Texture Tip
To mimic the printed look, lightly sand the dried painting with fine-grit sandpaper. This buffs away some pigment for a worn, aged effect.
Step 2: Painting the Main Bursts
-
The top left burst:
Load your round brush with deep red gouache. Paint the thick, curved petals of the top-left firework first. Start from the center and flick outward to get a tapered end. Leave space between the strokes. -
Adding fine details:
Switch to your size 0 liner brush. Between the thick red petals, paint delicate, spindly lines with small dots or ‘sparks’ at the ends to give the flower an exploding effect. -
The blue palm burst:
Moving to the top right, use a mix of navy and royal blue. Create a palm-tree style burst with curved strokes that droop downwards slightly at the tips. The strokes should be looser and more separated than the red flower. -
The central red accents:
Paint the smaller, lower-right red firework similarly to the first, but smaller. Then, directly in the center, paint the textured oval red shape, dabbing the brush to create a stippled, sparkling texture rather than a solid block of color.
Tea Staining
Soak your paper in strong black tea and let it dry before painting. This creates an authentic antique parchment background color.
Step 3: Painting the Swoops and Stars
-
The grand finale swoops:
Using your thickest brush, paint the large, swooping comet tails at the bottom. Alternate between red and navy blue. Make the heads of the comets (the star shapes) crisp and sharp, trailing off into curved tails towards the center. -
Adding white speckles:
Once the comet tails are dry, use a tiny dot of white paint or a white gel pen to add speckles inside the blue swoops, mimicking a starry night or fizzing sparks. -
Connecting the stems:
Use the red paint and a liner brush to trace over your pencil lines for the stems. I find that making these lines slightly broken or uneven adds to the hand-pressed, vintage character. -
Scattering the stars:
Fill the empty negative spaces with various small stars. Paint simple five-point stars in blue and red, varying the sizes. Add tiny asterisks and single dots for distant sparkles. -
The blue tree accent:
Near the bottom right corner, paint a small, simple silhouette of a pine tree in blue to ground the composition and give it scale.
Step 4: Finishing Touches
-
Adding texture:
If your painting looks too flat, use a very dry brush with a lighter shade of your main colors to lightly scuff over the painted areas. This faux-distressing mimics a vintage print. -
Final assessment:
Step back and check the balance. Paint a few extra tiny dots or ‘dust’ around the major explosions to make the whole piece feel energetic and lively. -
Erase guidelines:
Once the paint is completely bone dry, gently use your kneaded eraser to lift any remaining pencil marks that are visible around the edges of the paint.
Hang your patriotic masterpiece using simple wooden clips or frame it without glass to let the paper texture shine
BRUSH GUIDE
The Right Brush for Every Stroke
From clean lines to bold texture — master brush choice, stroke control, and essential techniques.
Explore the Full Guide
Parade Boots and Bunting Banner Illustration
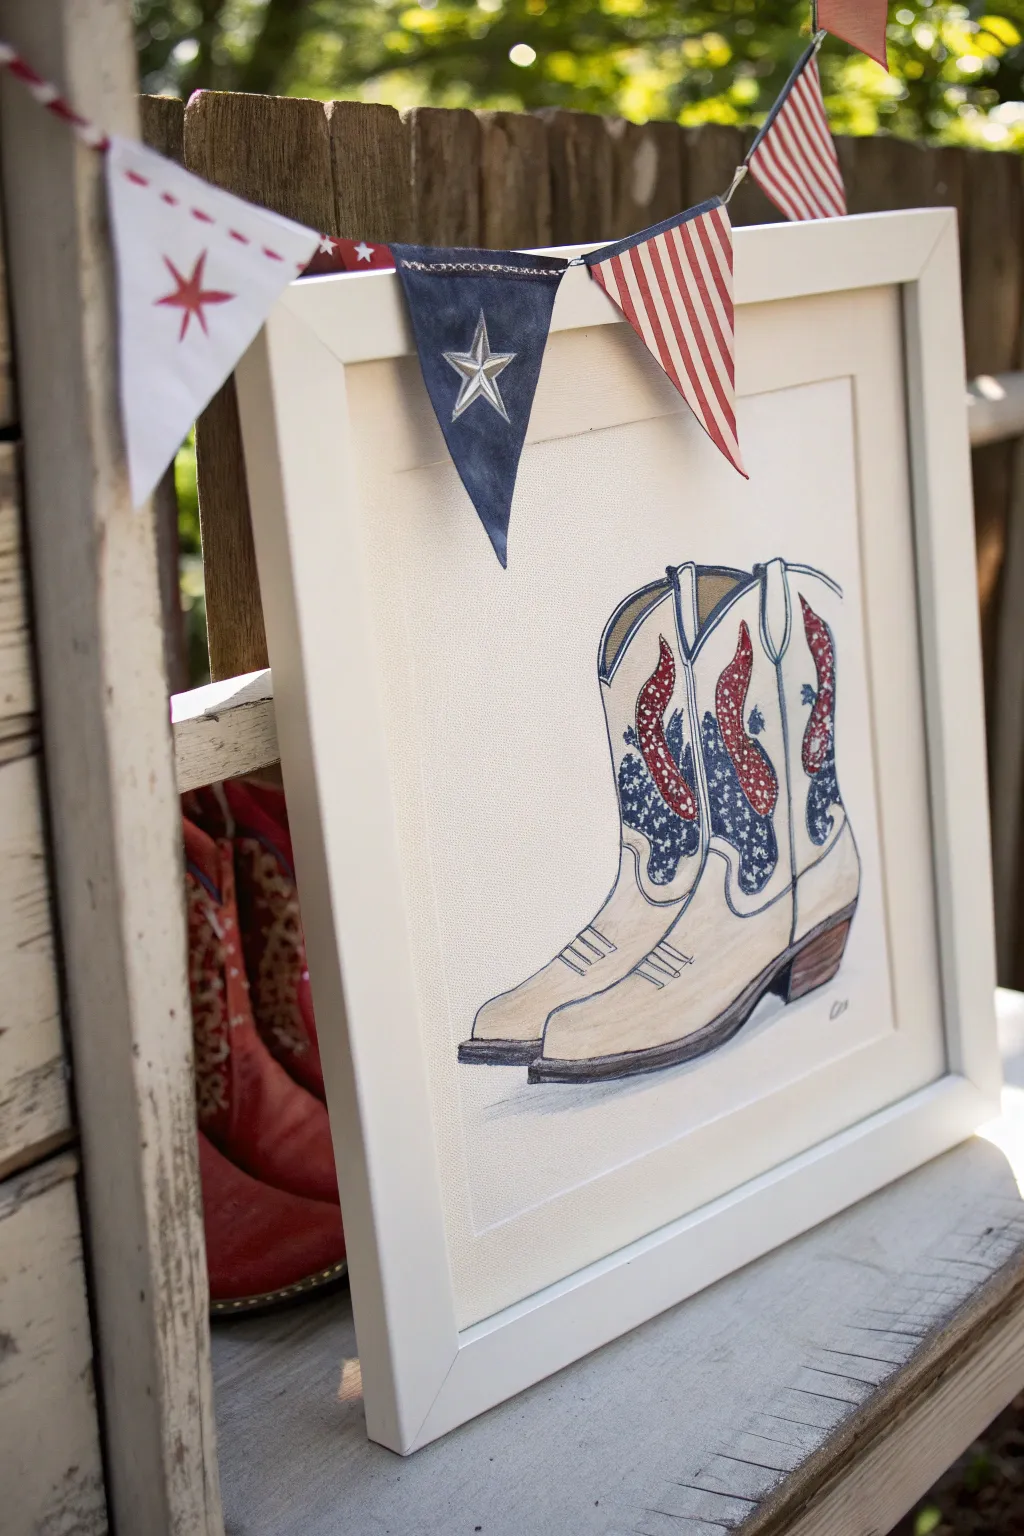
Capture the spirit of an Independence Day parade with this charming mixed-media project featuring watercolor cowboy boots and a real fabric bunting. This unique piece combines traditional illustration with dimensional crafting, resulting in festive décor that literally pops out of the frame.
Step-by-Step
Materials
- Hot press watercolor paper (smooth texture)
- Pencil and eraser
- Fine liner pens (black, water-resistant)
- Watercolor paints (cream, burnt umber, navy blue, crimson red)
- Paintbrushes (fine round and medium round)
- White or cream square shadow box frame (approx. 10×10 inches)
- Canvas fabric scraps (natural, blue, red striped)
- Blue fabric paint or marker
- Silver paint pen or white gel pen
- Red baker’s twine
- Fabric glue or hot glue gun
- Scissors
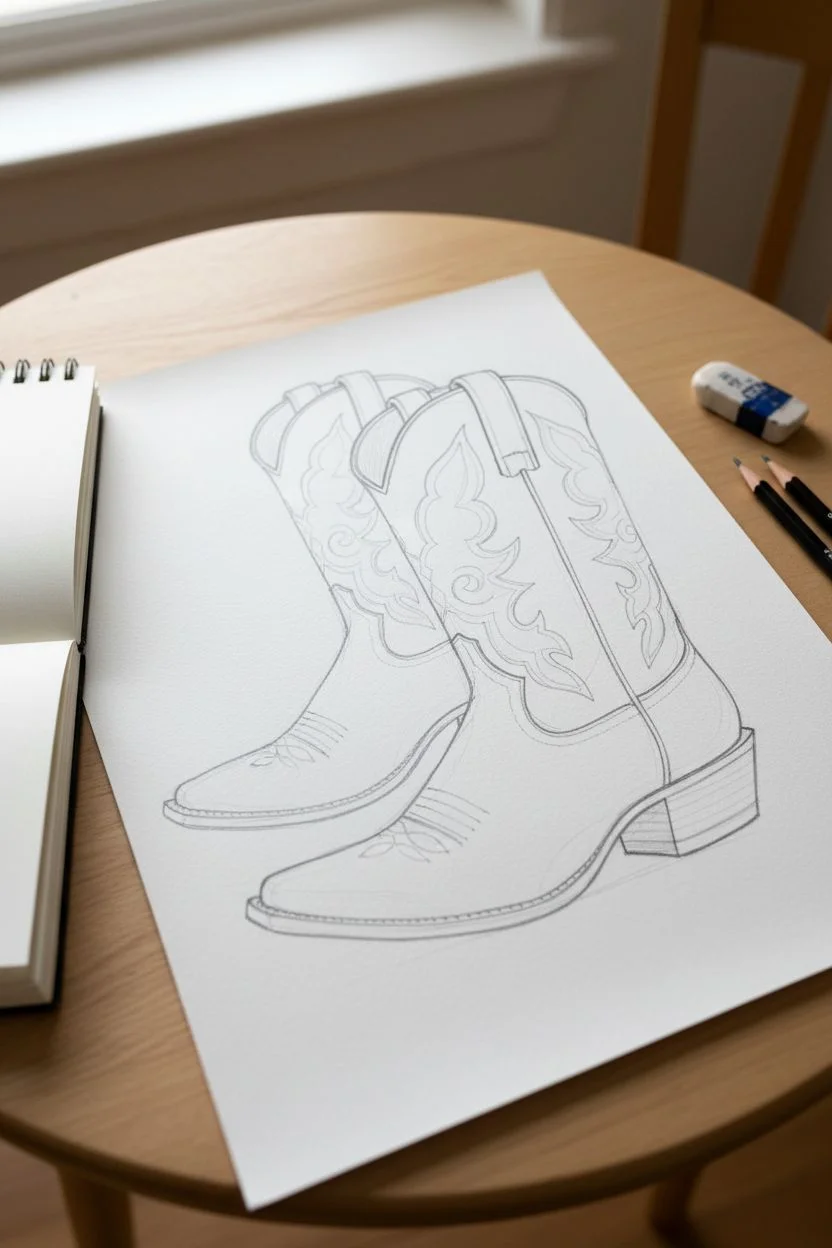
Step 1: Sketching the Boots
-
Establish the shapes:
Begin by lightly sketching two tall boot shapes in the center of your paper. Position the front boot slightly lower to create depth, angling both toes toward the left. -
Refine the outline:
Add characteristic cowboy boot details, such as the curved top edge (the scallop), the pull straps on the sides, and the slightly distinct heel block. -
Add decorative curves:
Draw the flame-like or scrollwork stitching patterns on the boot shafts. This is where the flag pattern will go, so make the shapes large enough to fill with detail. -
Detail the vamp:
Sketch the stitching lines across the instep (the top of the foot) and add the welt line that separates the sole from the leather upper.
Canvas Texture Trick
To mimic the texture shown in the photo, use cold press paper or lightly dab your wet paint with a paper towel to create a rough, fabric-like finish on the boots.
Step 2: Painting the Artwork
-
Ink the lines:
Go over your pencil sketch with a water-resistant black fine liner. Use a steady hand for the main outlines, but feel free to tackle the stitching details with shorter, sketchier strokes for a rustic look. -
Apply the base wash:
Mix a very watery cream or pale beige watercolor wash. Paint the main leather body of the boots, leaving the decorative scroll shapes unpainted for now. -
Paint the flag details:
Once the cream layer is dry, fill the decorative scroll shapes. Paint the top half of the scroll with crimson red dots or texture, and the bottom half with navy blue. -
Add the stars:
After the blue paint dries completely, use a white gel pen or fine white paint to add small star clusters over the blue sections. -
Darken the soles:
Paint the heels and soles using burnt umber mixed with a touch of black. Create a shadow underneath the boots with a diluted grey-blue wash to ground the illustration. -
Add leather shading:
I find that adding a second, slightly darker layer of cream/tan along the edges of the boots helps round out the form and makes them look less flat.
Bunting Won’t Hang Right?
If the fabric triangles are stiff and sticking out, lightly dampen them with water and reshape them with your fingers. Let them dry in position for a natural drape.
Step 3: Creating the Bunting
-
Cut the flags:
Cut five small triangles out of your fabric scraps. You will need plain natural canvas for the white flags, blue canvas for the star flag, and red striped fabric (or painted red stripes) for the others. -
Decorate the white flags:
On the plain canvas triangles, use a red marker or paint to draw a simple starburst or asterisk in the center, adding dashed stitching lines along the top edge. -
Finish the blue flags:
For the blue triangle, draw a five-pointed star in the center using a silver paint pen or white fabric paint. Outline the star thinly for better visibility. -
String the banner:
Cut a length of red baker’s twine slightly longer than the width of your frame. -
Attach the flags:
Space the fabric triangles evenly along the twine. Fold the top edge of each triangle over the twine and secure it on the back side with a dab of fabric glue.
Step 4: Final Assembly
-
Frame the art:
Place your dry boot painting into the shadow box frame. Ensure the glass is clean on both sides before closing the backing. -
Drape the bunting:
Position the mini bunting across the top front face of the frame. Let it dip slightly in the center for a relaxed, natural look. -
Secure the twine:
Tape or glue the ends of the baker’s twine to the top corners or the back of the frame so the bunting hangs securely over the glass.
Hang your finished shadow box on the porch or display it on a mantel to welcome guests with a touch of classic Americana style
Easy Watercolor Resist Flag
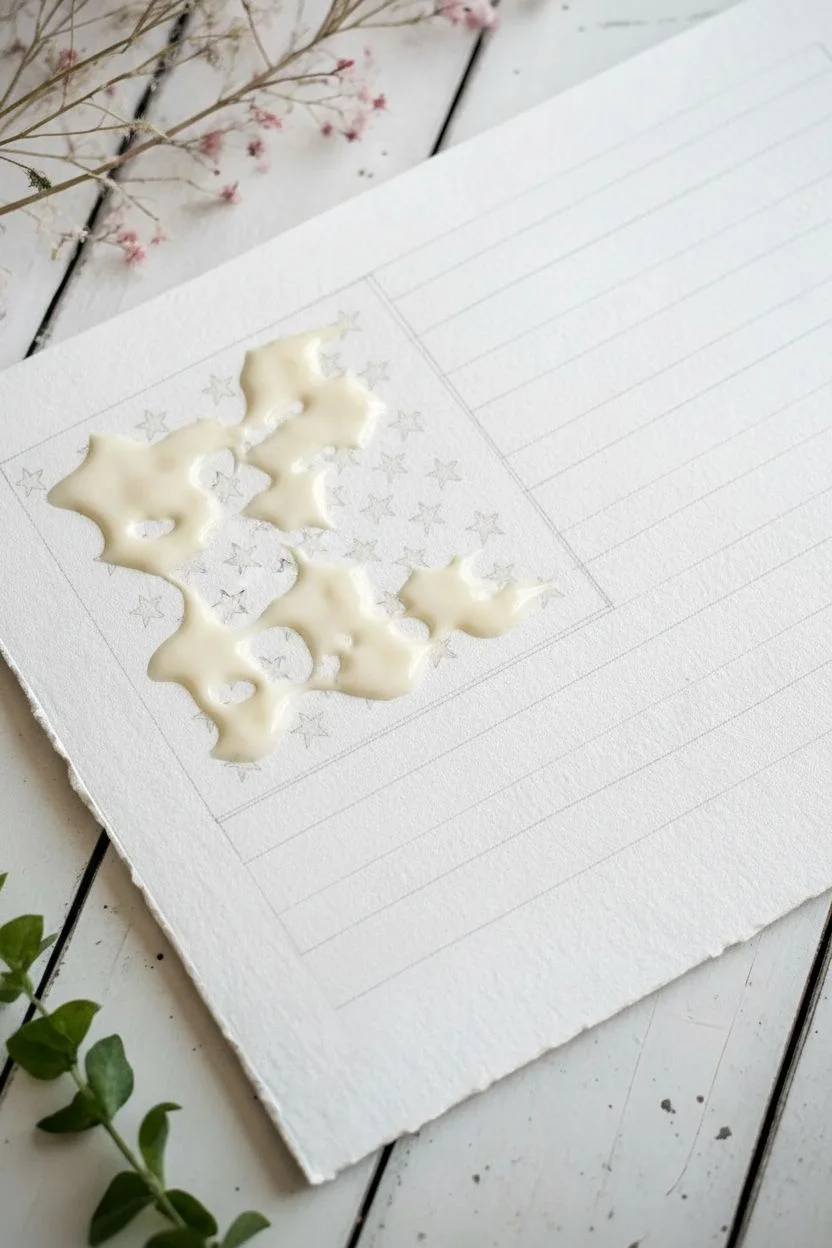
Capture the spirit of Americana with this lovely, textured watercolor flag that uses a simple resist technique to keep the stars crisp and bright. The porous paper and loose washes give it a charming, slightly aged look perfect for patriotic décor.
Step-by-Step
Materials
- Cold press watercolor paper (deckled edge preferred)
- White masking fluid or white wax crayon
- Pointed round paintbrush (size 4 or 6)
- Flat wash brush (1/2 inch or 3/4 inch)
- Watercolor paints: Indigo Blue, Alizarin Crimson, and Yellow Ochre
- Masking tape or painter’s tape
- Rubber cement pickup tool (optional)
- Pencil and ruler
- Two jars of water
- Paper towels
Step 1: Planning and Resisting
-
Prepare your paper:
Start with a high-quality sheet of cold press watercolor paper. If yours doesn’t have a deckled edge, you can gently tear the edges against a ruler to create that soft, handmade look. -
Sketch the layout:
Lightly use a pencil and ruler to mark out the rectangular union (the blue corner) and the thirteen stripes using very faint lines. Don’t press too hard, as you want the graphite to disappear under the paint. -
Mark the star positions:
Inside the union rectangle, lightly mark small dots where the centers of your 50 stars will go. Remember the alternating pattern: rows of six stars alternating with rows of five. -
Apply the resist:
Using a fine-point applicator or a very small brush dipped in white masking fluid, carefully draw a five-pointed star over each pencil dot. If you don’t have fluid, drawing firmlessly with a sharpened white wax crayon works too. -
Let it cure:
It is crucial to let the masking fluid dry completely. It should turn transparent or slightly yellow and feel rubbery to the touch before you proceed to any painting.
Pro Tip: Vintage Vibes
To make the flag look truly antique, mix a tiny bit of coffee or strong tea into your ‘white’ stripe wash instead of just using plain water or yellow ochre paint.
Step 2: Painting the Blue Union
-
Mix your blue:
Create a deep, patriotic blue by mixing Indigo Blue with a tiny touch of water. You want the pigment to be rich and saturated. -
Paint the background:
Using your round brush, load it with blue paint and wash over the entire union rectangle, painting right over your masked stars. The fluid will protect the paper underneath. -
Add texture:
While the blue paint is still wet, drop in a slightly more concentrated indigo or even a touch of black in the corners to create depth and a vintage vignette effect. -
Let the blue dry:
Wait for the blue section to be completely bone-dry. If you paint the red stripes too soon, the red will bleed into the blue.
Step 3: Painting the Stripes
-
Mix the red:
Mix Alizarin Crimson with a little water. For a vintage feel, dirty the red slightly with a tiny drop of brown or the blue you just used. -
Paint the red stripes:
Using the flat wash brush, paint every other stripe red, starting with the very top stripe. I like to do this freehand to keep the edges slightly organic, rather than perfectly taped off. -
Add stripe variation:
Allow the paint to pool slightly at the ends or edges of the stripes to mimic the texture of fabric or aging. -
Mix the white stripe tone:
Mix a very watery wash of Yellow Ochre. This will be used for the ‘white’ stripes to give them an antique, tea-stained appearance rather than stark white. -
Paint the light stripes:
Once the red stripes are mostly dry (to prevent major bleeding), gently wash the Yellow Ochre mix into the remaining stripes. -
Dry completely:
Let the entire painting sit until the paper is flat and cool to the touch.
Trouble: Tearing Paper?
If the paper rips when removing the masking fluid, you pulled too fast or the paper was still damp. Always pull the mask gently at a low angle away from the artwork.
Step 4: The Final Reveal
-
Test for dryness:
Touch the masking fluid gently. If the paper feels cool or damp at all nearby, wait longer. Removing masking fluid from damp paper will tear the surface. -
Remove the masking fluid:
Gently rub the dried masking fluid with a clean finger or a rubber cement pickup tool to peel it away, revealing the crisp white stars underneath. -
Clean up edges:
If any pencil lines are still visible around the stars or stripes, gently erase them with a kneaded eraser. -
Flatten the artwork:
If your paper has buckled from the water, place the finished painting under a heavy book overnight to smooth it out.
Now you have a timeless piece of patriotic art ready to be framed or displayed on a mantle.

PENCIL GUIDE
Understanding Pencil Grades from H to B
From first sketch to finished drawing — learn pencil grades, line control, and shading techniques.
Explore the Full Guide
Salt-and-Glue Raised Fireworks Painting
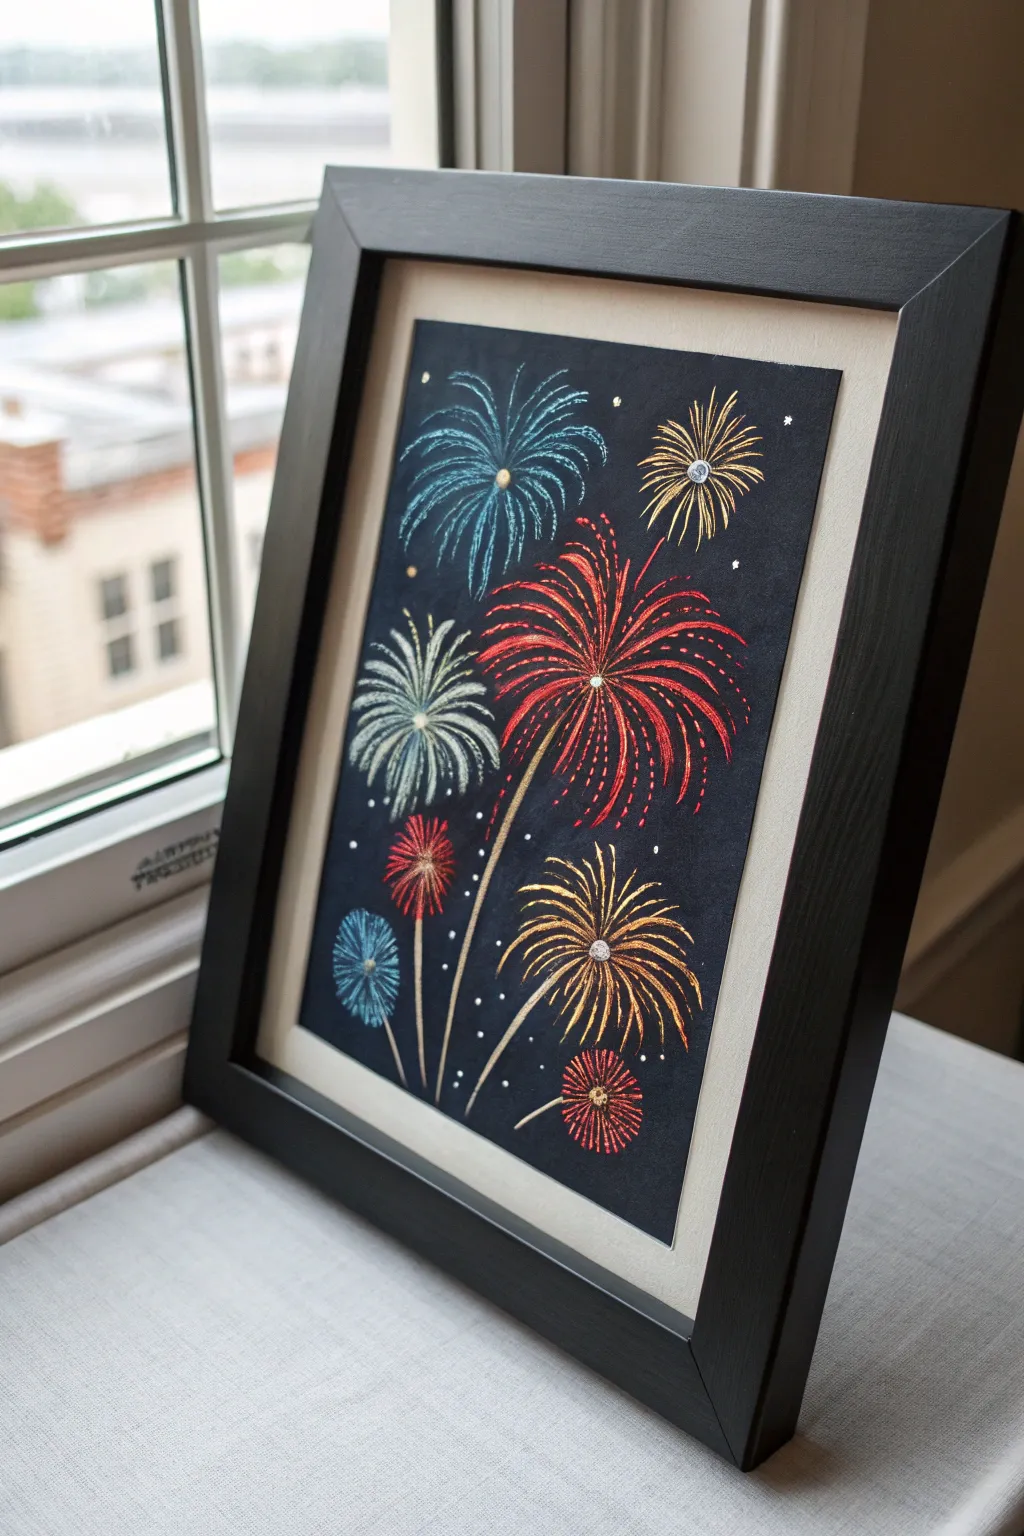
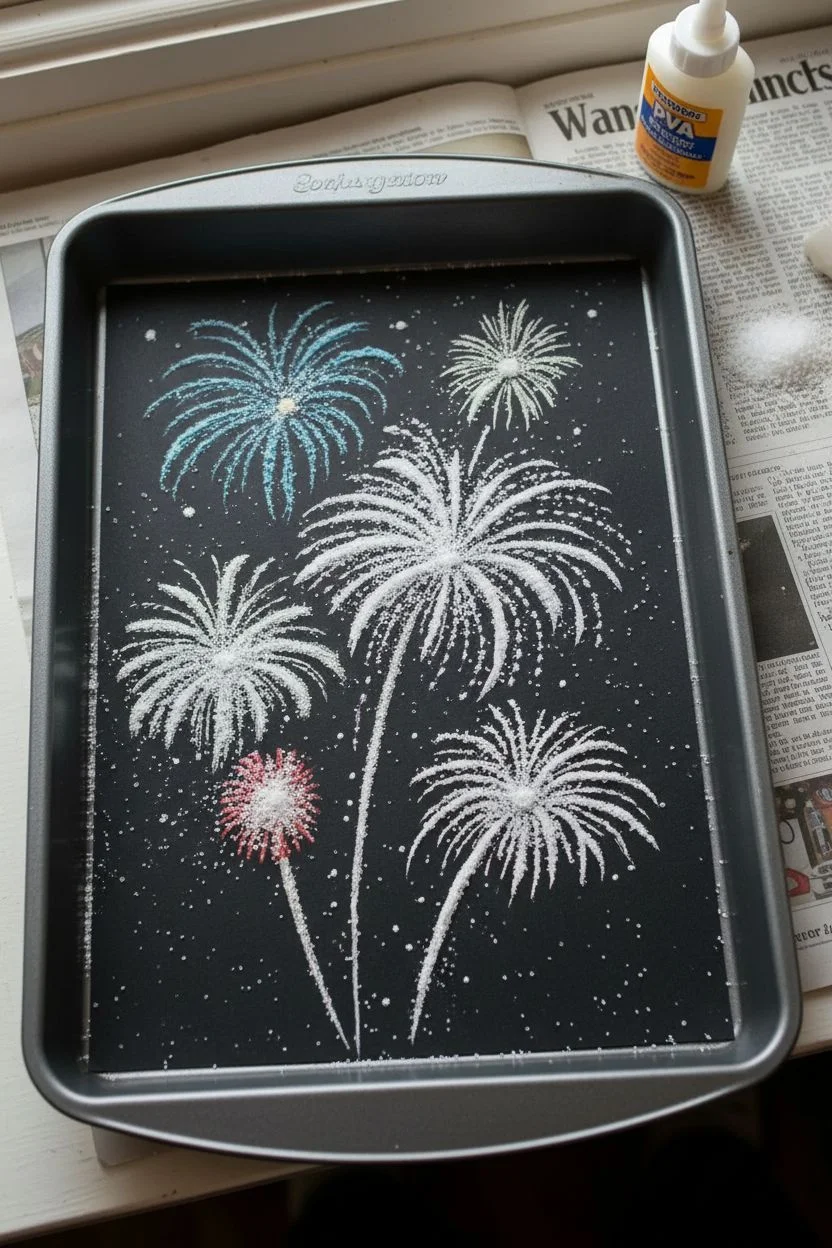
Capture the explosive magic of Independence Day with this textured art project that pops right off the page. Using simple household ingredients like salt and glue, specifically raised lines create a shimmering, 3D effect against a stark black background.
Step-by-Step Tutorial
Materials
- Black cardstock or heavy construction paper
- White PVA school glue (in a bottle with a fine tip nozzle)
- Table salt (fine grain works best)
- Watercolor paints or liquid food coloring
- Fine paintbrush
- Small cup of water
- Tray or baking sheet (to catch salt)
- Pencil (optional)
- Small rhinestone gems (optional)
Step 1: Planning and Drawing
-
Prepare your workspace:
Lay down newspaper or a plastic tablecloth, as this project can get a little messy with loose salt. Place your black cardstock onto a baking sheet or tray to catch the excess salt later. -
Sketch the design (optional):
If you want precise placement, lightly sketch your fireworks using a pencil. Draw a mix of large starbursts, smaller spheres, and trailing willow shapes. If you feel confident, you can skip this and draw directly with glue. -
Apply the glue lines:
Using your white school glue, trace over your pencil lines or freehand your fireworks. Squeeze the bottle gently to create consistent, raised lines. Avoid making the lines too thick, or they might pool and spread. -
Create variety:
Draw different types of fireworks. For some, start from a center point and draw curved lines radiating outward. For others, make shorter, dash-like strokes to simulate sparkles. -
Add trailing tails:
Don’t forget the stems! Draw a few long, curved lines extending from the bottom of the page up toward the bursts to represent the rocket trails.
Control the flow
If your glue bottle’s opening is too wide, pour glue into a fine-tip squeeze bottle or use a toothpick to drag glue into thin, delicate lines.
Step 2: Salting and Coloring
-
Coat with salt:
While the glue is still wet, generously pour table salt over the entire design. Ensure every bit of white glue is completely covered in a mound of salt. -
Shake off excess:
Wait about 10–15 seconds for the salt to adhere, then lift the paper and gently shake the loose salt onto your tray. You should be left with a crystallized, snowy-white design. -
Prepare your paints:
Wet your watercolor paints so they are very liquid and vibrant. If using food coloring, dilute it slightly with a drop of water in a small cup. -
Begin painting the salt:
Dip your brush into the paint and gently touch the tip to the salt-covered glue. You don’t need to brush it; simply tap the salt, and watch the color wick and run along the line like magic. -
Blend colors:
I like to alternate colors on the same firework burst. Touch a red brush to the center and a blue brush to the tips, allowing them to meet and blend in the middle for a gradient effect. -
Detail the small sparks:
Use a contrasting color, like yellow or gold, for the smaller starbursts or dot accents floating around the main fireworks. -
Add metallic touches:
If you have metallic watercolors, add touches of gold or silver to give it that authentic pyrotechnic shimmer. -
Let it dry completely:
Allow the painting to dry undisturbed on a flat surface. This can take several hours or overnight depending on how much glue was used. -
Final embellishments:
Once fully dry, glue a small rhinestone gem into the center of the largest fireworks for extra sparkle. This mimics the bright flash point of the explosion.
Color not spreading?
If the paint sits on top instead of absorbing, your brush is too dry. Add more water to your paint so it’s fluid enough to travel through the salt crystals.
Frame your sparkling masterpiece behind glass to protect the textured surface and display it proudly
Straw Blow-Painted Firework Bursts
Capture the magic of Independence Day with this delicate, vintage-inspired firework illustration on handmade paper. This project uses fine lines and scattered stars to create a festive yet elegant piece of art perfect for holiday decor.
Detailed Instructions
Materials
- Thick, handmade cotton rag paper (deckle edge recommended)
- Fine liner pens (Red and Blue, approx. 0.3mm or 0.5mm)
- Liquid watercolor or ink (Red and Blue)
- Small round paintbrush (size 0 or 2)
- Standard drinking straw (cut in half)
- Pencil and eraser
- Palette or small dish for ink
Step 1: Preparation & Sketching
-
Paper Selection:
Choose a high-quality, textured paper. The rough surface of cotton rag paper adds a beautiful, rustic charm that complements the ink work perfectly. -
Mark the Center:
Lightly mark a tiny dot in the center of your paper with a pencil. This will serve as the origin point for your firework explosion. -
Drafting Guidelines:
Visualize a circle around your center point. You don’t need to draw the full circle, but keep this imaginary boundary in mind to help maintain a balanced shape for the burst.
Ink Blotches?
If a blown ink drop creates a puddle instead of a streak, quickly dab it with the corner of a paper towel to lift the excess, then turn the blot into a drawn star.
Step 2: Creating the Burst
-
Starting with Red Ink:
Dip your fine brush into red liquid watercolor or ink. Alternatively, you can use a red fineliner pen for more control. -
First Radiating Lines:
Draw long, curved lines radiating outward from the center point. Apply more pressure near the center and flick your wrist outward to taper the line into a point. -
Adding Variation:
Vary the length and curve of your red lines. Some should be short and tight near the center, while others stretch further out, creating a dynamic sense of movement. -
Introduce Blue Accents:
Switch to your blue ink or pen. Intersperse blue curved lines between the red ones. I like to keep the blue lines slightly fewer in number to let the red dominate the warmth of the explosion. -
Drawing the Inner Core:
Add very fine, short strokes near the absolute center using your thinnest pen tip. This density creates a glowing core for the firework.
Step 3: The Straw Technique
-
Prepare for Blowing:
Place a small drop of wet ink (red or blue) at the end of one of your drawn lines. -
Blow the Ink:
Position your straw directly over the wet drop and blow sharply outward. This pushes the ink into an organic, unpredictable sprawl that mimics the trailing smoke of a firework. -
Repeat Selectively:
Repeat this on 3-5 random strands. Don’t overdo it; you want a mix of controlled drawn lines and loose, blown ink effects. -
Check Density:
Step back and look at the composition. If there are large empty gaps in the radial pattern, fill them with thin, wispy pen lines.
Pro Tip: Texture
Work with the grain of the paper. On rough handmade paper, light, broken lines often look better than solid heavy markers, adding to the vintage aesthetic.
Step 4: Details & Embellishment
-
Adding Stars:
Using your red pen, draw small five-pointed stars scattered around the outer edges of the burst. -
Blue Star Accents:
Add corresponding blue stars, perhaps slightly smaller than the red ones, to balance the color distribution. -
Stippling Effects:
Create a ‘glitter’ effect by adding tiny dots. Cluster them densest near the center origin point and scatter them more loosely as you move toward the paper’s edge. -
Outer Atmosphere:
Add a few stray dots and tiny stars quite far from the main burst. This negative space makes the explosion feel expansive. -
Final Inspection:
Check for any smudges. If using watercolor, ensure all thick droplets are fully dry before handling the paper.
Display your patriotic artwork on a mantle or tablescape to add a handcrafted touch to your celebration


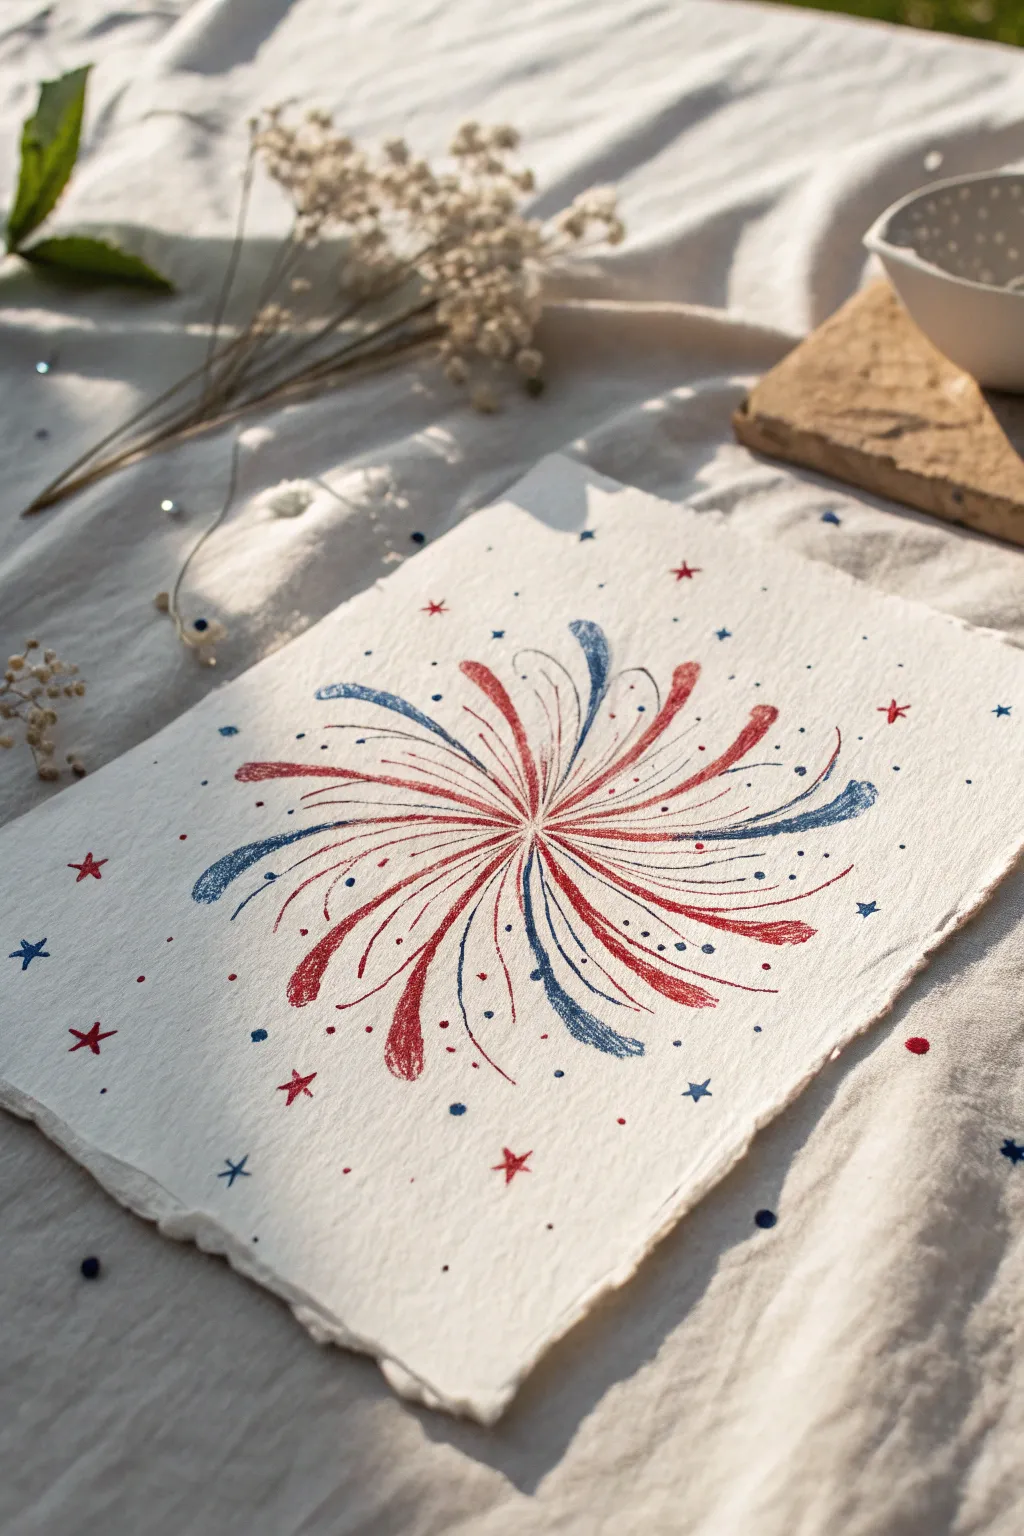
Spin-Painted Starburst in Patriotic Colors
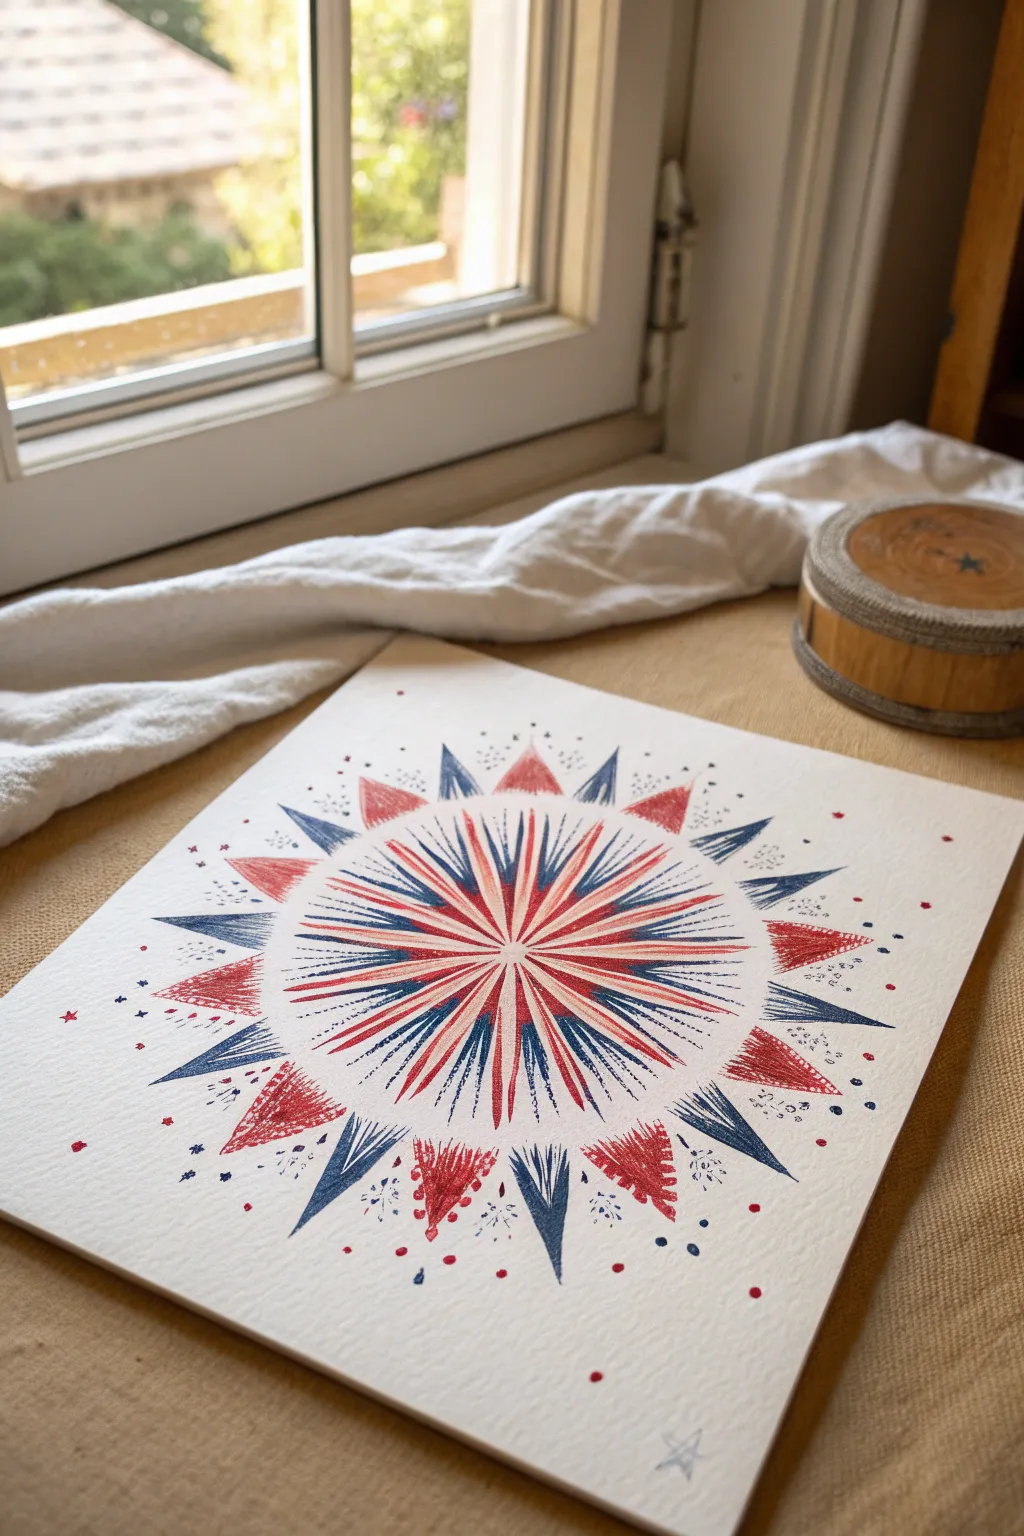
Bring a touch of folk art charm to your Fourth of July decor with this intricate, starburst-inspired illustration. Using simple radial symmetry and classic red and blue hues, this project creates a striking visual that looks beautifully festive on a mantelpiece.
Step-by-Step Tutorial
Materials
- Heavyweight textured art paper (watercolor or mixed media paper)
- Ruler
- Compass
- Pencil (HB or lighter)
- Eraser
- Fine-point markers or pigment pens (Red and Blue)
- Brush pens or colored pencils (Red and Blue)
- Small star stamps (optional)
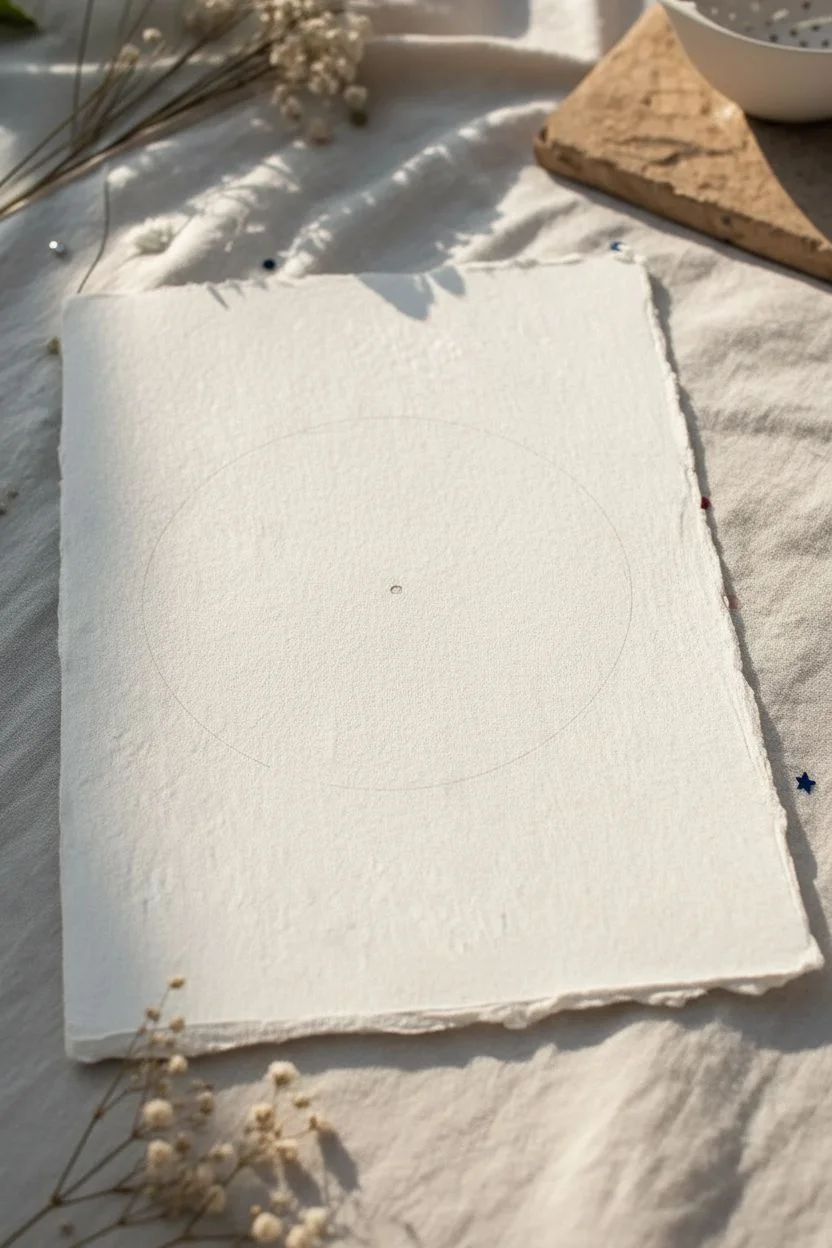
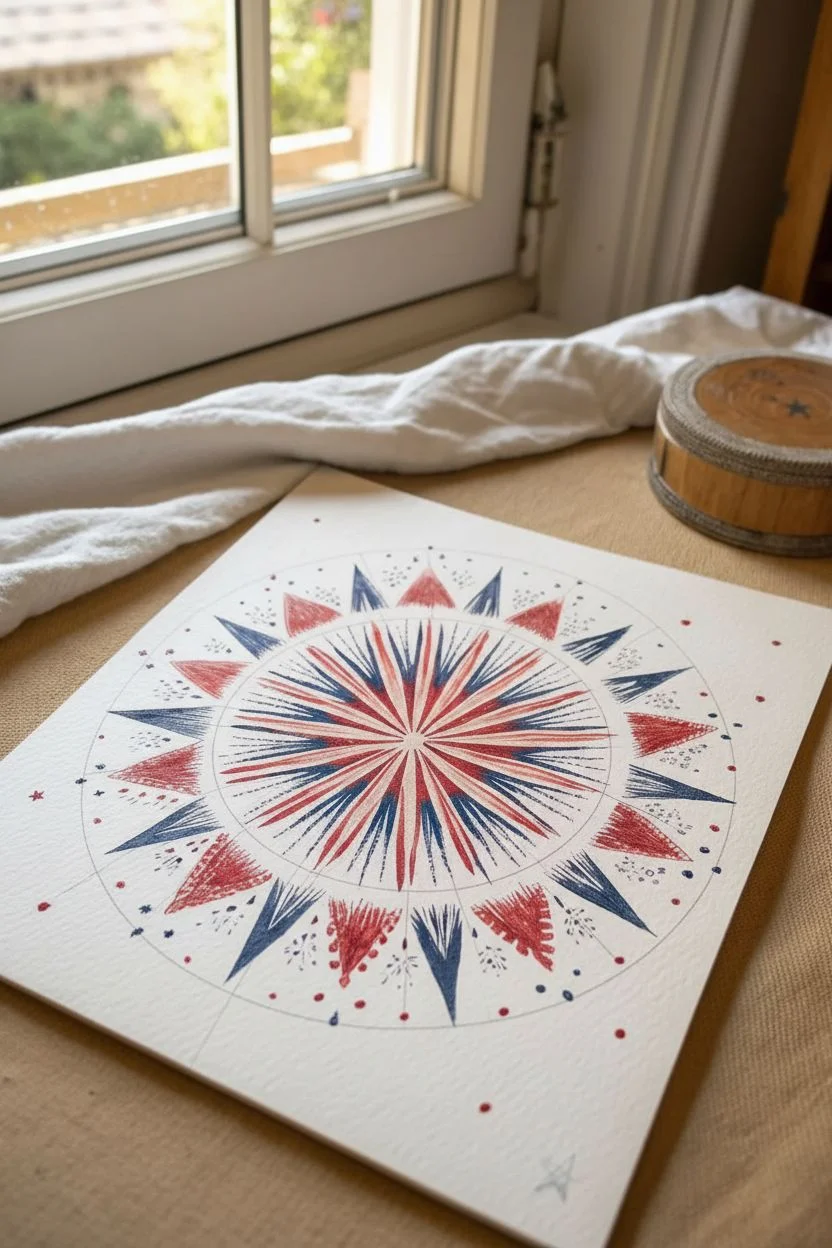
Step 1: Setting the Framework
-
Find the center:
Begin by placing your paper on a flat surface. Use a ruler to lightly mark the exact center point of your sheet with a pencil. -
Draw guide circles:
Using your compass, draw three concentric circles expanding from the center point. The first should be small (about 1 inch diameter), the second medium (about 4 inches), and the third large (about 7 inches) to define the outer tips of the starburst. -
Create radial lines:
Lightly sketch 16 evenly spaced straight lines radiating from the center point all the way to the outer circle, dividing the circle like a pizza.
Uneven Spacing?
If your radial lines look uneven, lightly sketch a ‘clock face’ first (12, 3, 6, 9) and fill in the gaps to keep symmetry in check.
Step 2: Building the Core
-
Sketch the inner flower:
In the central zone, sketch elongated teardrop or petal shapes along every radial line. These should extend from the center outward toward the medium circle boundary. -
First ink application:
Switch to your blue fine-point pen. Carefully outline and fill alternating petals with thin, scratchy lines to create a textured look, skipping every other one. -
Add red accents:
Fill the remaining alternate petals with your red pen, using the same hatching technique. This creates the vibrant, two-tone core of the design. -
Extend the rays:
Draw thin, straight lines extending from the tips of these petals outward, alternating colors to match the petal base.
Step 3: Creating the Outer Burst
-
Outline outer triangles:
Between the tips of the inner petals, sketch larger triangular spikes that reach out to your largest guide circle. These form the ‘sun rays’ of the starburst. -
Apply texture to blue spikes:
Using your blue brush pen or marker, fill in the blue spikes. Instead of solid coloring, use rapid, outward-flicking strokes to give edges a rough, energetic appearance. -
Fill red spikes:
Repeat the process for the red spikes. I find that leaving small gaps of white space within the color adds to the vintage, hand-stamped aesthetic. -
Layering details:
Go back over the center of the design with a finer pen to sharpen the convergence point where all the lines meet.
Vintage Wash
Brush a very diluted layer of tea or coffee over the paper before starting to give the entire piece an aged, parchment-like antique glow.
Step 4: Adding Festive Touches
-
Scattered dots:
Around the perimeter of the starburst, use your pens to dot small clusters of red and blue spots. Vary the size of the dots for a more organic feel. -
Tiny stars:
Draw tiny five-point stars or asterisks randomly near the tips of the spikes. If you have a small star stamp, you can use that for uniformity. -
Clean up:
Once the ink is completely dry—give it a few minutes to avoid smudging—gently erase all your pencil guide circles and radial lines. -
Final inspection:
Look for any uneven areas in your hatching. If a spike looks too light, add a few more rapid ink strokes to build up the density.
Place your finished piece near a window to let the natural light highlight the texture of the ink
Marble-Rolled Abstract Flag Texture
Create a stunningly textured American flag that balances modern abstraction with classic patriotism. By using a rolling technique, you’ll achieve a distressed, weathered look that makes the deep blues and reds pop against crisp white paper.
How-To Guide
Materials
- Heavyweight watercolor paper or mixed media paper (16×20 inches recommended)
- Acrylic paint (Deep Navy Blue, Deep Red)
- White acrylic paint or specialized stamping ink
- Brayer or foam paint roller
- Bubble wrap or crinkled plastic wrap
- Tape (painter’s tape or masking tape)
- Star-shaped stamps or star stencil
- Small foam pouncer or stencil brush
- Wooden dowel or rolling pin (for the marbling technique)
- Palette or paper plate
- Ruler and pencil
- Wooden frame (optional)
Step 1: Preparing the Canvas
-
Measure the layout:
Start by lightly marking out your flag design on the paper with a pencil and ruler. You want to define the blue canton (the rectangle for stars) in the top left corner first. -
Mark the stripes:
Measure and faintly mark horizontal lines for the stripes. While a traditional flag has 13 stripes, for this artistic interpretation, fewer, wider stripes often read better visually. -
Mask the blue field:
Use painter’s tape to block off the area surrounding the blue rectangle. This ensures your blue paint stays perfectly confined to the canton area.
Clean Lines Pro-Tip
Before painting over your tape, seal the edges by painting a thin layer of white acrylic first. This blocks gaps so the red and blue lines stay razor-sharp.
Step 2: Creating the Blue Canton
-
Prepare the texture tool:
Wrap a sheet of bubble wrap or crinkled plastic wrap around a rolling pin or brayer. Secure it with a small piece of tape on the handle or side so it doesn’t slip. -
Load the paint:
Squeeze a generous amount of Navy Blue acrylic paint onto your palette. Roll your textured tool through the paint until the bubble wrap is evenly coated but not dripping. -
Roll the texture:
Roll the tool over the masked-off blue area. Apply medium pressure to transfer the paint, creating a speckled, organic texture rather than a solid block of color. -
Add depth:
For a richer look, I like to reload the roller slightly and go over the area a second time in a different direction to layer the texture. -
Dry and peel:
Allow the blue area to dry completely to the touch, which usually takes about 20 minutes. Carefully peel away the tape to reveal sharp edges.
Level Up: Vintage Tea Stain
Brush weak tea or coffee over the white paper areas before painting. This warms the paper tone and makes the finished flag look authentically antique.
Step 3: Applying the Stripes
-
Mask the white stripes:
Place strips of painter’s tape over the areas that you want to remain white. Press the edges of the tape down firmly to prevent paint bleed. -
Protect the blue:
Place a piece of paper or fresh tape over your dried blue canton to protect it from stray red paint while you work on the stripes. -
Texture the red:
Using a clean brayer wrapped in fresh bubble wrap (or washed and dried), load it up with Deep Red acrylic paint. -
Roll the stripes:
Roll the red paint over the exposed stripe areas. The texture should look distressed and uneven, similar to the blue section. -
Reveal the pattern:
Once the red paint is mostly dry, slowly peel back all the tape. You should now have crisp white paper stripes alternating with textured red ones.
Step 4: Adding Stars and Details
-
Plan star placement:
If using a stencil, position it over the dry blue field. If stamping, lightly mark small dots with a pencil where the center of each star should go to keep them aligned. -
Apply the stars:
Dip a foam pouncer or stencil brush into white paint. Dab off excess paint onto a paper towel until the brush is almost dry—this prevents seepage. -
Stamp or stencil:
Press the white paint through the stencil or apply your stamp. A slightly faded or incomplete impression actually adds to the vintage aesthetic. -
Final touches:
Inspect the edges. If there are any jagged lines where the tape was, use a fine brush with white paint to clean them up, or leave them for a rustic feel. -
Frame it:
Once the artwork is fully cured, place it into a light wood frame to complement the airy, textured style of the piece.
Hang your textured masterpiece in a well-lit spot to let those marbled details really shine across the room
Mixed-Media Sampler Grid of 4th of July Icons
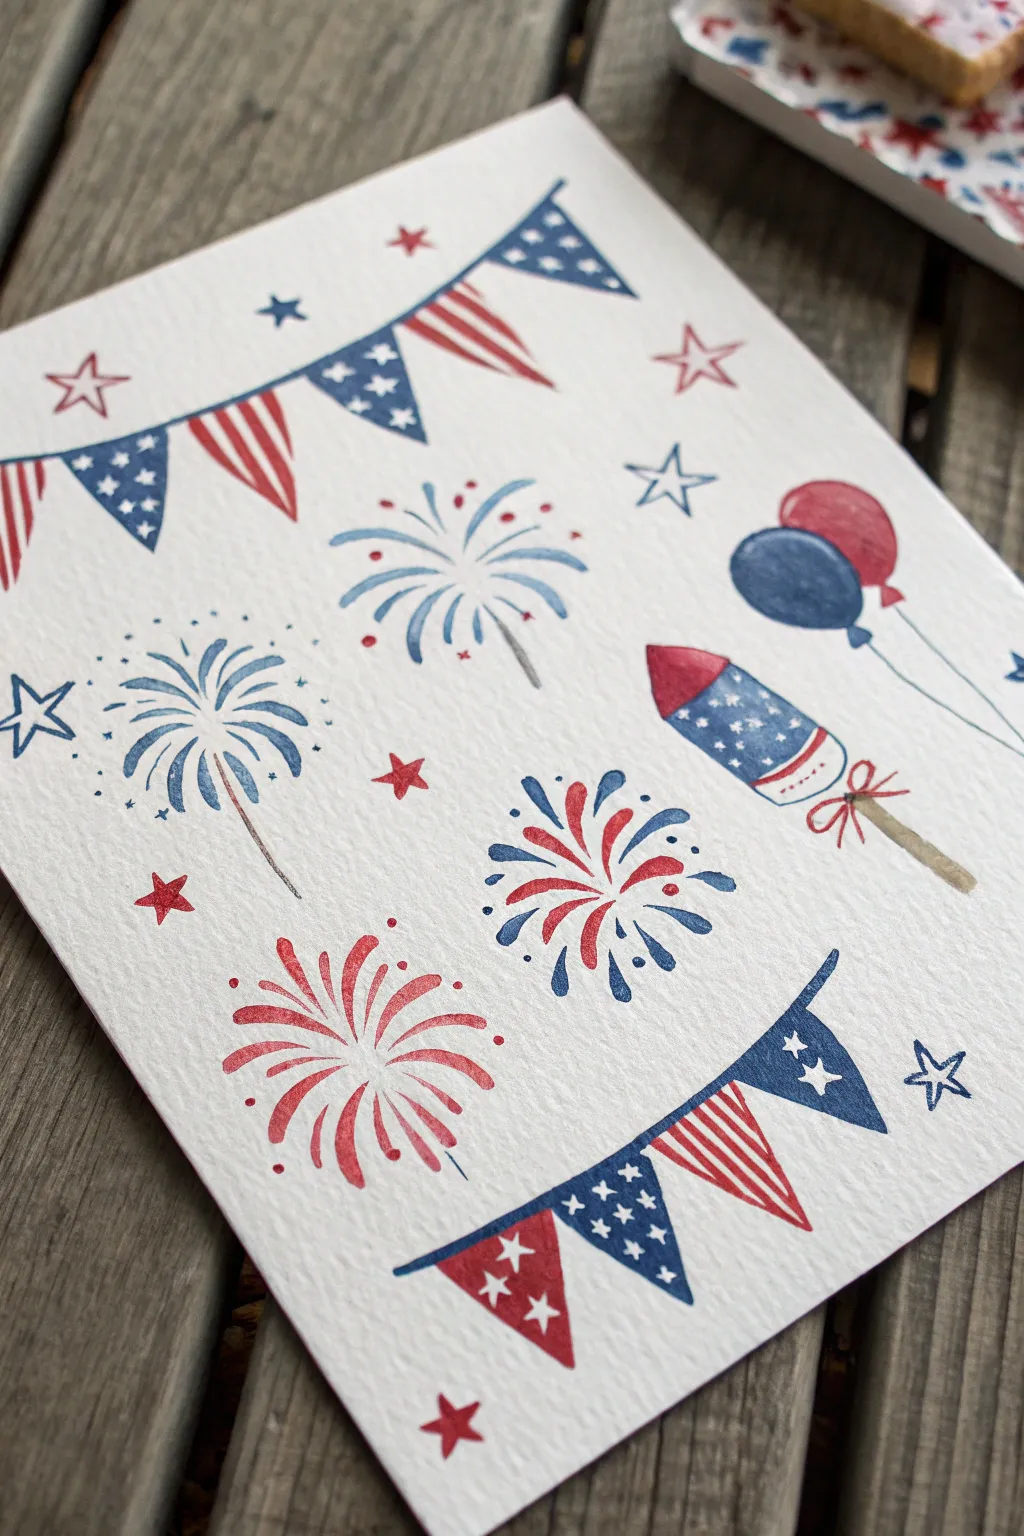
Celebrate Independence Day with this charming collection of watercolor icons, featuring festive bunting, bursting fireworks, and summer treats. The detailed yet simple illustrations are painted on textured paper, giving the piece a classic, handcrafted feel perfect for greeting cards or party invitations.
Detailed Instructions
Materials
- Cold press watercolor paper (140lb/300gsm)
- Watercolor paints (Alizarin Crimson, Ultramarine Blue, Hooker’s Green Dark for mixtures)
- Round watercolor brushes (Size 2 and 4)
- Pencil (HB or H)
- Kneaded eraser
- Ruler
- Jar of water
- Paper towels
Step 1: Sketching the Layout
-
Plan the bunting curves:
Using your pencil lightly, draw a gentle swooping curve across the top third of your paper and an inverted scoop curve across the bottom third. These will be the guidelines for your flag bunting. -
Sketch the triangular flags:
Along both curved lines, sketch small adjacent triangles. Aim for about 4-5 flags per bunting string. Make sure the points hang downwards. -
Position the central icons:
In the middle space between the buntings, lightly sketch the placement of your main elements. Place a large firework burst on the left, a central red and blue burst, and a red burst lower down. -
Add detail elements:
Sketch the rocket on the right side, tilted slightly upward. Above it, draw two overlapping oval balloons with strings. Scatter small stars of various sizes—some outlined, some solid—throughout the negative space to balance the composition.
Step 2: Painting the Bunting
-
Outline the top string:
Load your size 2 brush with diluted Ultramarine Blue and carefully trace the curved line holding the top flags. -
Paint the blue flags:
Alternating every other flag, fill the triangles with blue paint. While wet, lift small dots of pigment with a thirst brush or dry tissue to create white stars, or paint around tiny white star shapes if you have a steady hand. -
Paint the red stripes:
For the remaining flags, use Alizarin Crimson to paint thin vertical stripes. Leave thin strips of white paper showing between the red lines. -
Repeat for bottom bunting:
Follow the same pattern for the bottom bunting, but perhaps switch the order of the blue star flags and red stripe flags for variety. Let this section dry completely.
Clean Edges Pro-Tip
For the tiny white stars on the blue flags and rocket, use a white gel pen after the paint dries instead of trying to paint around them. It’s much easier and cleaner!
Step 3: Creating the Fireworks & Stars
-
Paint the blue firework:
For the left-side burst, use watery blue paint. Start from a central point (imaginary or lightly marked) and paint curved strokes flicking outward like flower petals. Add small dots at the end of some strokes. -
Paint the mixed burst:
For the central firework, alternate between short thick strokes of red and blue. I find it helpful to paint all the blue strokes first, rinse the brush, and then fit the red strokes in between. -
Paint the red burst:
Create the lower firework using only red strokes. Make these slightly thicker at the center and tapering out to fine points. -
Add stems:
With a very diluted gray (mix blue and a touch of orange/brown), paint extremely thin, faint lines extending downward from the center of the blue and red fireworks. -
Fill the stars:
Paint the scattered stars. Outline some with a fine blue line, leaving the center white. Fill others completely with solid red or blue.
Level Up: Sparkle
Once dry, add touches of clear glitter glue or metallic silver watercolor to the fireworks and star centers for a festive shimmer that catches the light.
Step 4: Detailing the Rocket & Balloons
-
Paint the balloons:
Paint the top balloon red and the slightly overlapping lower one blue. Leave a tiny sliver of white paper unpainted on the upper curve of each balloon to represent a highlight. -
Add balloon strings:
Use the very fine tip of your size 2 brush and watery blue paint to draw wavering lines trailing down from the balloons. -
Color the rocket body:
Paint the nose cone of the rocket red. Paint the main body blue, leaving tiny white specks for stars (or use white gouache later). Leave a white stripe below the blue, then a thin red stripe at the base. -
Finish with the stick:
Paint the wooden stick using a light brown mix. Add a tiny red bow where the stick creates a junction with the rocket. -
Erase guidelines:
Once you are absolutely certain the paper is bone dry, gently erase any visible pencil marks to clean up the illustration.
Now you have a festive, hand-painted sampler perfect for celebrating the holiday.


Have a question or want to share your own experience? I'd love to hear from you in the comments below!