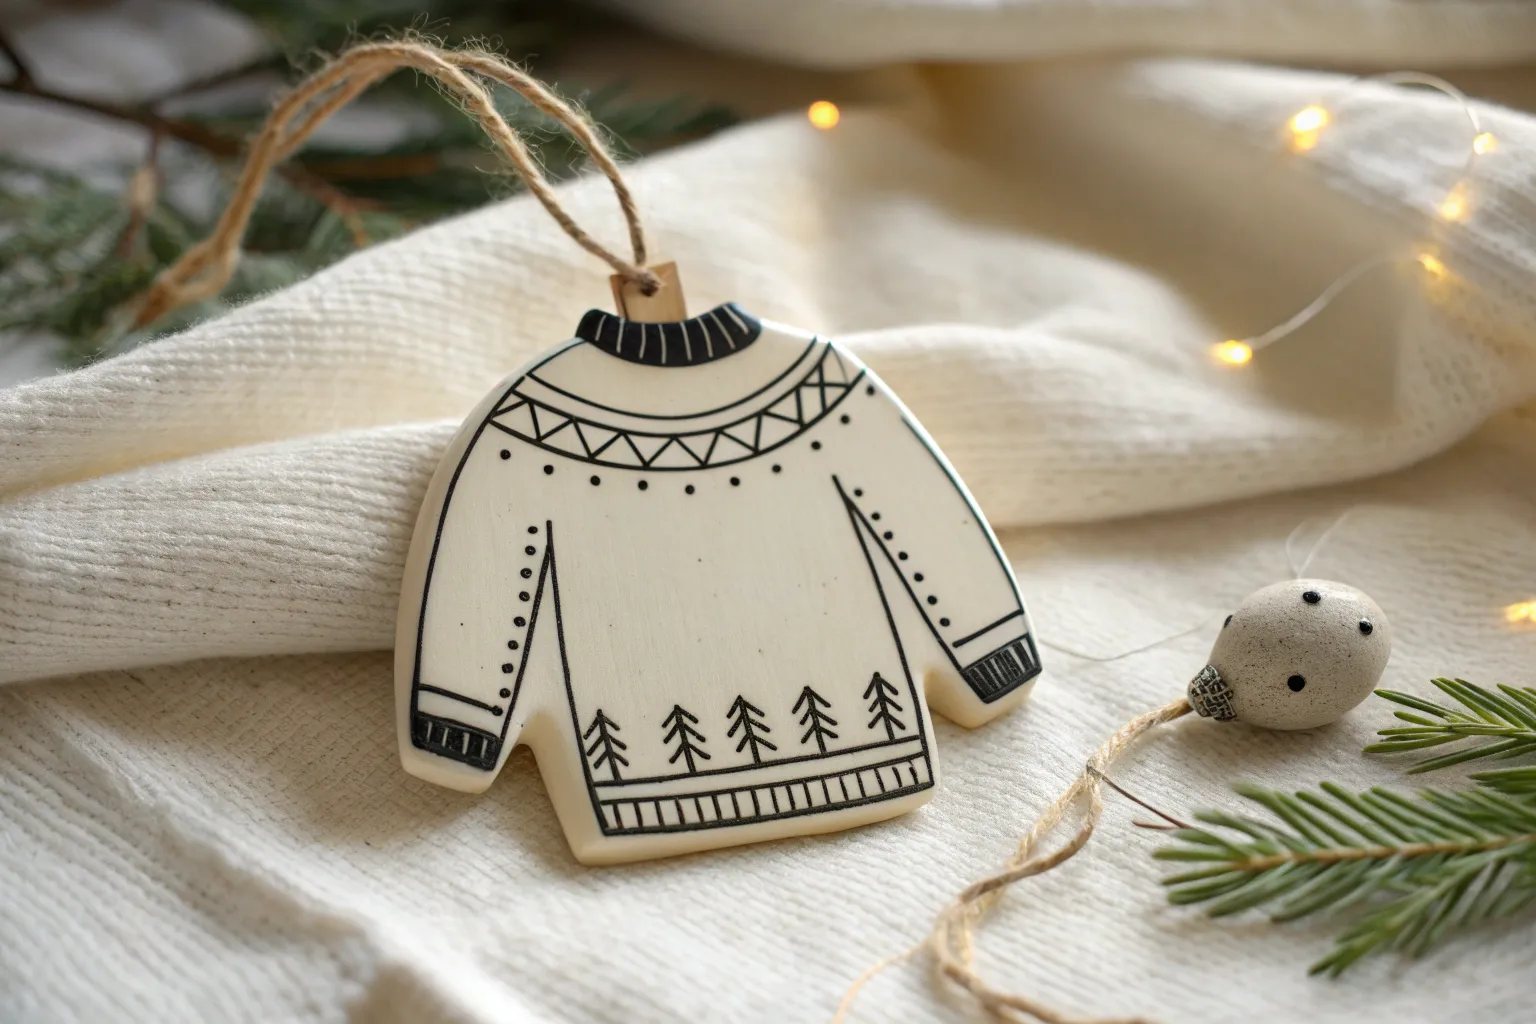
If you’ve ever wanted to draw an ugly sweater that’s delightfully loud and totally unbothered by good taste, you’re in the right headspace. Here are my favorite ugly sweater drawing ideas—from classic knit motifs to “what even is happening” levels of festive chaos.
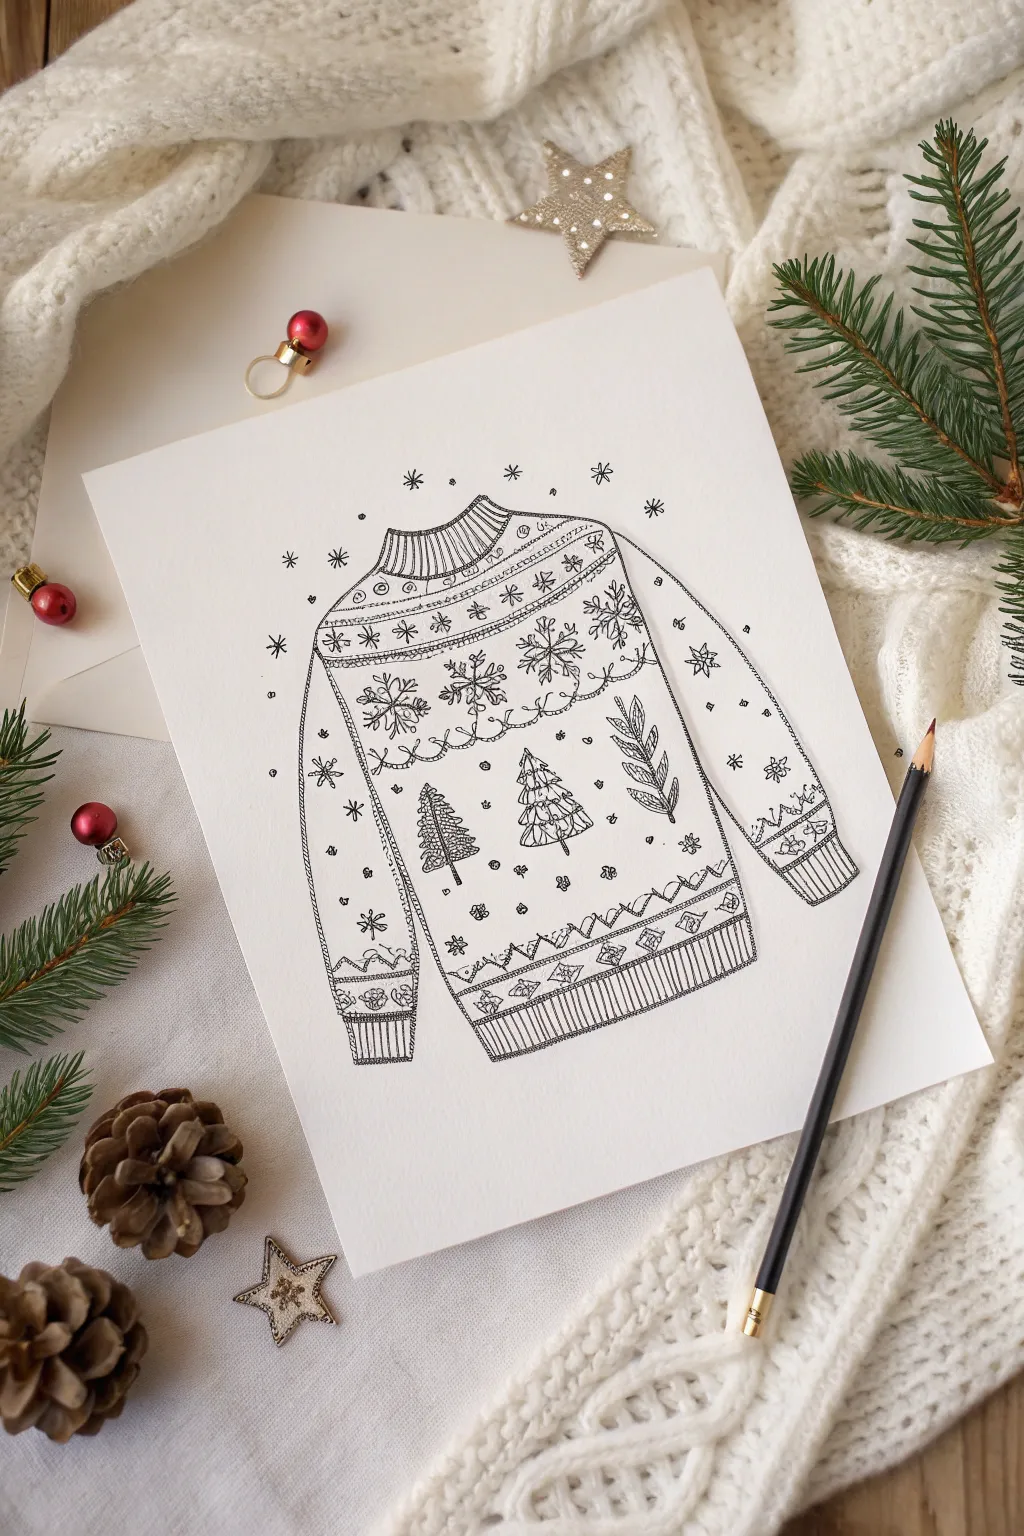
Classic Reindeer Center Panel Sweater
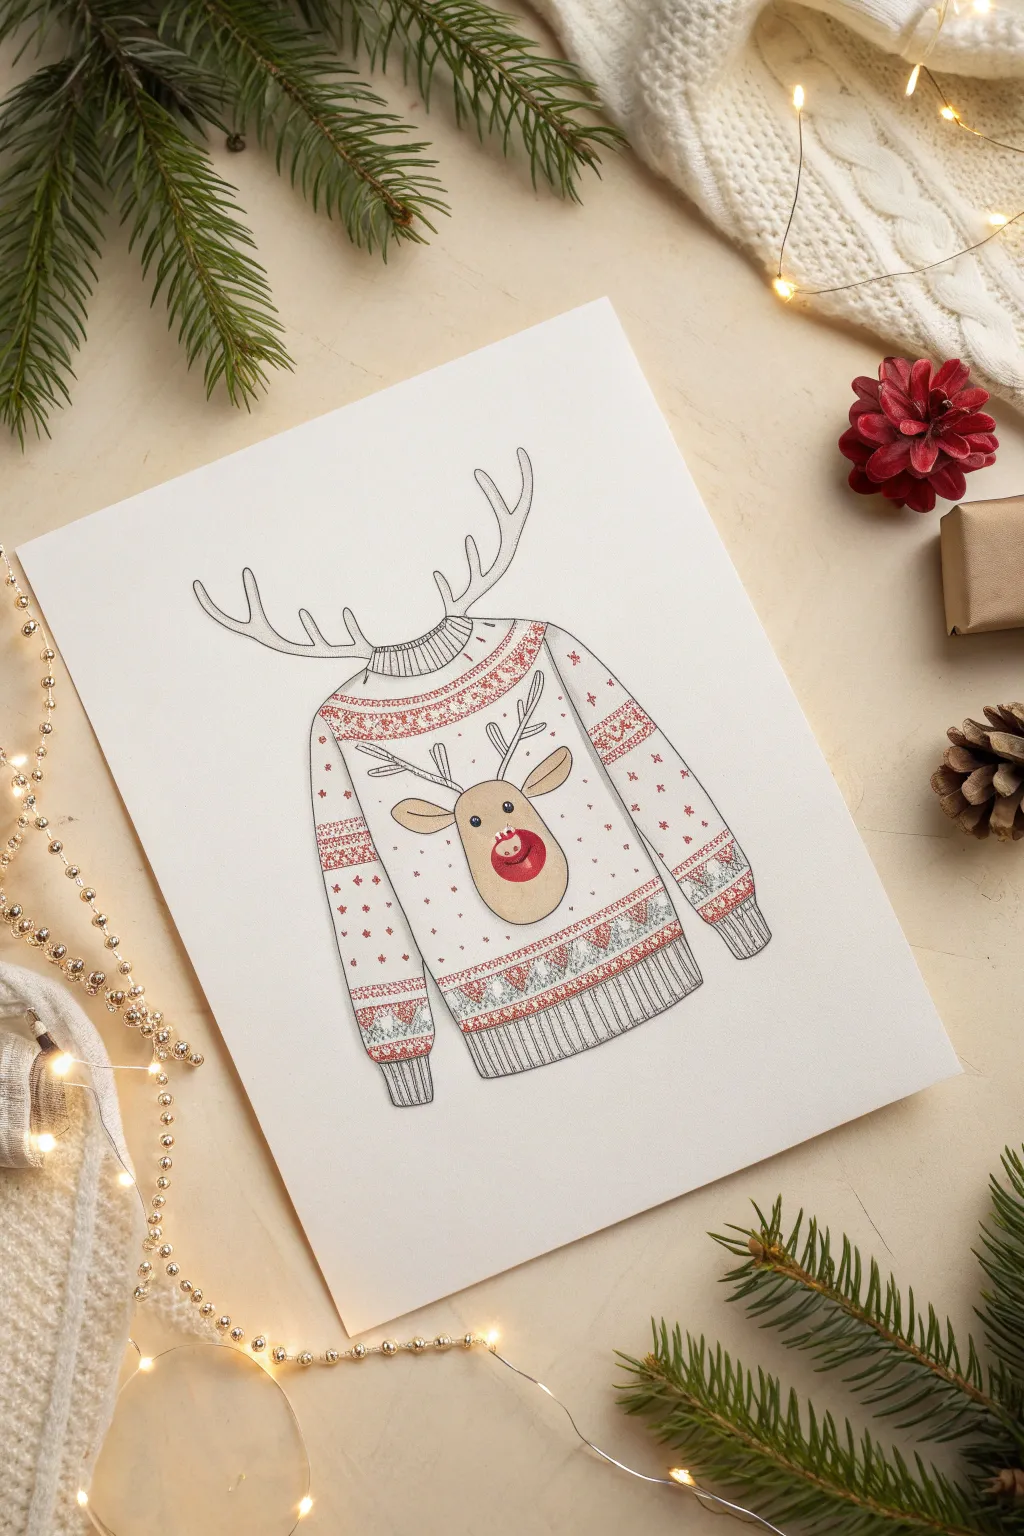
Capture the charm of the holiday season with this playful drawing that features a classic Christmas sweater design topped with negative-space antlers. The finished piece combines precise fineliner work with soft colored pencil accents for a cozy, festive look.
How-To Guide
Materials
- Heavyweight white drawing paper or cardstock (A4 or A5)
- HB graphite pencil
- Kneaded eraser
- Fine liner pens (0.3mm and 0.5mm, black)
- Colored pencils (red, beige/tan, light grey)
- Ruler (optional)
- Blending stump (optional)
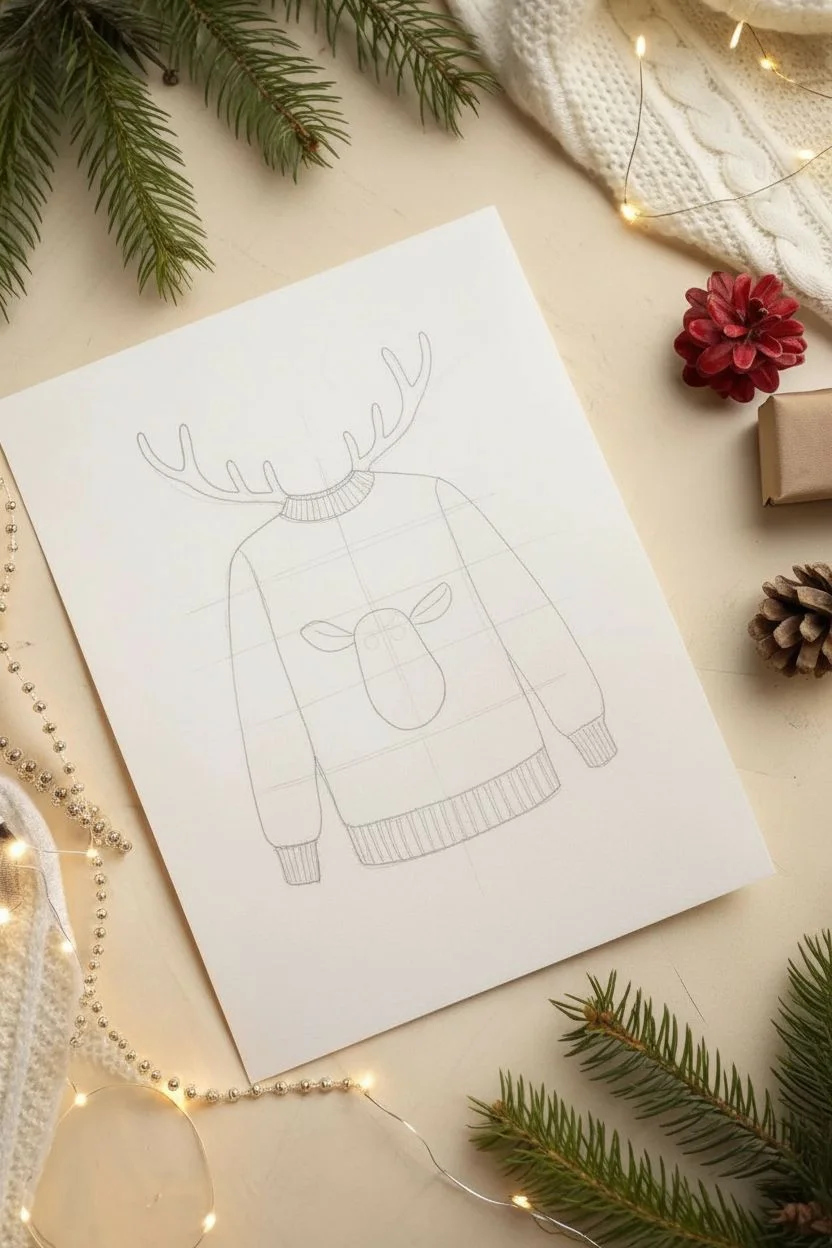
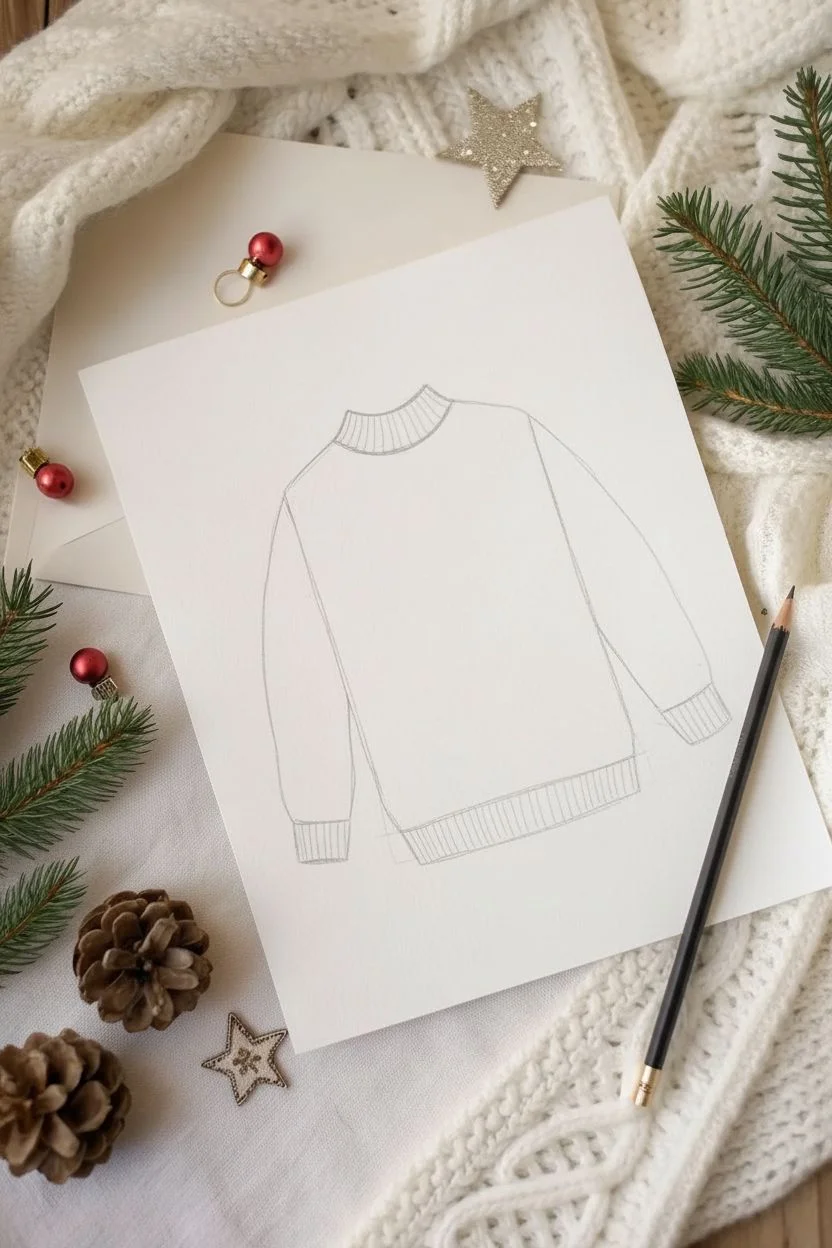
Step 1: Sketching the Outline
-
Establish the sweater shape:
Start by lightly sketching the main body of the sweater with your HB pencil. Draw a rounded rectangle for the torso, slightly tapering in at the waist, and add the sleeves extending outwards and downwards. -
Add the collar and cuffs:
Sketch a ribbed crew neck collar at the top center. Add similar ribbed cuffs on the ends of both sleeves and a wide ribbed band at the bottom hem. -
Draft the antlers:
Instead of drawing a head, draw large reindeer antlers emerging directly from the collar opening. Sketch two main branches curving outward, with smaller points branching off. -
Center the reindeer face:
In the middle of the chest area, lightly outline an oval shape for the reindeer’s face. Add two smaller ears poking out from the top sides of this oval. -
Sketch the pattern bands:
Using light horizontal guidelines, divide the sweater into sections. Create bands across the chest and upper arms where the intricate Fair Isle patterns will go, ensuring the lines curve slightly to suggest the volume of the fabric.
Step 2: Inking the Details
-
Outline the main forms:
Switch to your 0.5mm fineliner. Carefully trace the external outline of the sweater, the antlers, and the reindeer’s main face shape. -
Detail the ribbing:
Use the 0.3mm fineliner to draw vertical lines within the collar, cuffs, and hem to create a ribbed texture. I like to keep these lines slightly imperfect to mimic knitwear. -
Draw the reindeer features:
Ink two small circles for eyes wide apart, a large oval nose, and a curved mouth. Inside the nose, draw a smaller oval for a highlight before filling the rest in. -
Create the sweater patterns:
Fill the horizontal bands with festive motifs using the 0.3mm pen. Draw rows of small x-shapes, zig-zags, and tiny triangles. -
Add scattered motifs:
In the empty white space of the sweater body (around the reindeer face), draw small scattered stars or snowflakes to fill the voids. -
Erase pencil lines:
Wait a few moments for the ink to dry completely, then gently gently remove all underlying graphite sketches with your kneaded eraser.
Ink Smudging?
If your fineliner smudges under the eraser, switch to a pigment-based liner like a Micron, or let the ink cure for at least 15 minutes before erasing.
Step 3: Adding Color and Texture
-
Color the nose:
Use a bright red colored pencil to fill in the reindeer’s nose, pressing firmly for a vibrant pop of color. -
Shade the reindeer face:
Lightly shade the reindeer’s face and ears with a beige or tan pencil. Apply slightly more pressure around the edges to give it a bit of dimension. -
Accent the patterns:
Take the red pencil again and carefully color specific rows of the knit pattern—like the zig-zags or the small crosses—leaving other rows white for contrast. -
Shadow the ribbing:
Use a light grey colored pencil to add faint shading to the ribbed areas (collar, cuffs, hem). Shade just the bottom or sides of these sections to create depth. -
Enhance the antlers:
Add very subtle grey shading to the bottom edges of the antlers sticking out of the neck to give them a sense of roundness without fully coloring them. -
Final touches:
Review your drawing. If you want the sweater to look softer, use a blending stump to smooth out the colored pencil on the reindeer’s face.
Pattern Precision
Don’t measure every tiny pattern perfectly. Small irregularities in the spacing of the ‘knitted’ X’s and zig-zags make the fabric texture look more realistic and handmade.
Now you have a charming, festive illustration perfect for a custom holiday card


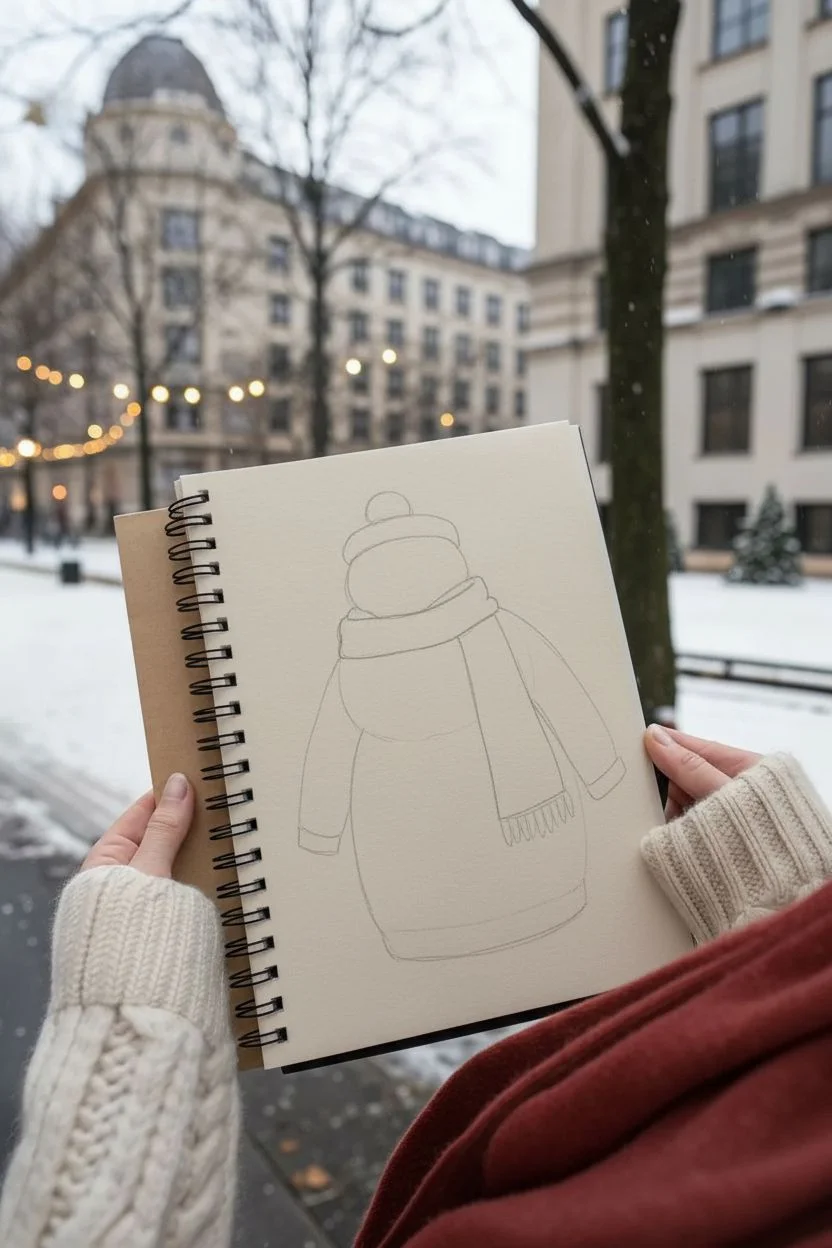
Giant Snowman Belly Sweater
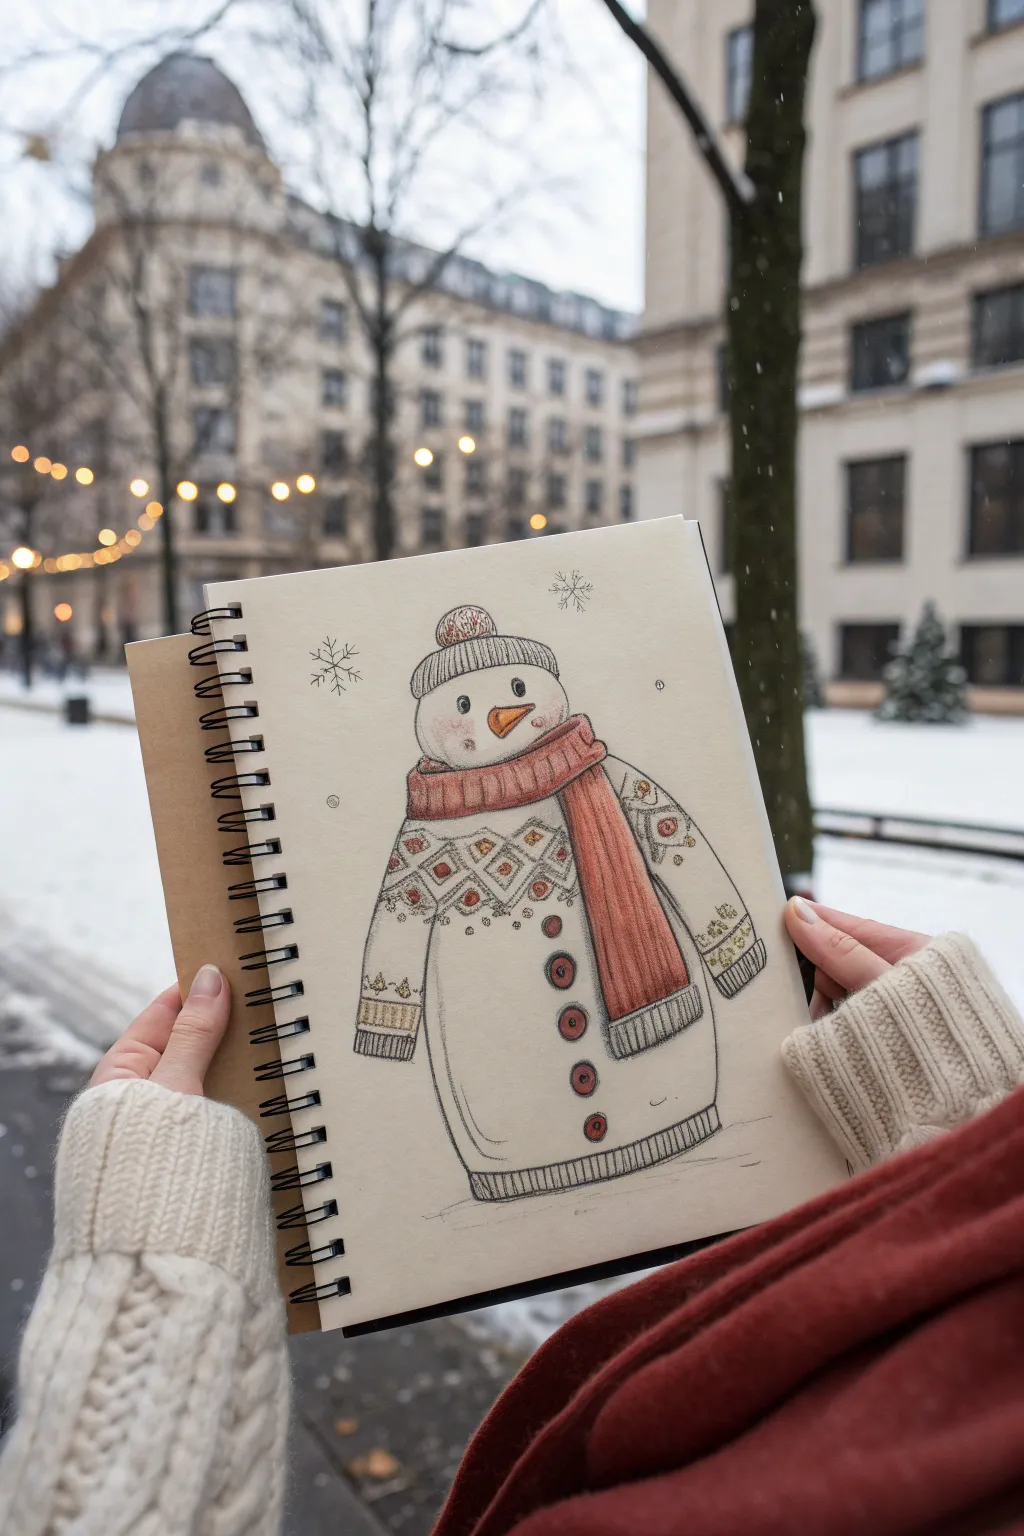
This whimsical drawing imagines a snowman whose entire body is wrapped in the cozy textures of a Fair Isle sweater. With delicate line work and soft shading, it captures the perfect blend of winter chill and knitted warmth.
Step-by-Step Guide
Materials
- A spiral-bound sketchbook with off-white or cream paper
- Pencil (HB for sketching)
- Fine liner pens (Black, 0.3mm and 0.5mm)
- Colored pencils (Warm grey, muted red, burnt orange, yellow ochre)
- Eraser
- White gel pen (optional for highlights)
Step 1: Basic Structure
-
Draw the head shape:
Start by lightly sketching a rounded oval for the snowman’s head near the top center of your page. -
Outline the body:
Below the head, sketch a large, elongated loaf shape that mimics the drape of an oversized sweater. Make sure the bottom is slightly wider than the top. -
Add the beanie base:
Sit a curved rectangle directly on top of the head for the hat’s rim, followed by a smaller semi-circle on top for the crown. -
Position the scarf:
Draw a thick, curved band wrapping around the snowman’s neck area. Let one long end drape vertically down the right side of the body.
Step 2: Adding the Details
-
Sketch the facial features:
Place two small dots for eyes and a triangular carrot nose pointing slightly to the left. Add a tiny smile line. -
Create the sweater sleeves:
Draw simple arm shapes extending from the sides, ending in ribbed cuffs. These shouldn’t look like sticks, but like stuffed sweater sleeves. -
Draft the Fair Isle pattern:
Lightly pencil a horizontal band across the chest area. Inside this band, sketch geometric diamonds and small circles to create the classic knit pattern. -
Add buttons and pom-pom:
Draw four distinct round buttons down the center front of the body. Top the hat with a fluffy pom-pom circle. -
Ribbing details:
Sketch vertical lines at the bottom hem of the sweater body, the sleeve cuffs, and the hat rim to indicate a ribbed knit texture.
Uneven Patterns?
Don’t fret if your geometric shapes aren’t perfect. Knitted sweaters naturally distort, so slightly wobbly diamonds actually make the fabric look more realistic and cozy.
Step 3: Inking and Coloring
-
Outline the main shapes:
Use your 0.5mm fine liner to trace over your main pencil lines. Keep the lines slightly loose and sketchy to maintain a hand-drawn feel. -
Detail the drawing:
Switch to a 0.3mm fine liner for the delicate sweater patterns, the ribbing lines, and the snowflake decorations in the background. -
Erase pencil marks:
Wait for the ink to dry completely, then gently erase all visible graphite foundations. -
Color the scarf:
Using the muted red pencil, shade the scarf. Apply more pressure in the folds to create shadow and depth. -
Fill the pattern:
Color your chest pattern using the muted red and burnt orange pencils. I like to leave small specks of paper showing through to simulate texture. -
Shade the whites:
Use a warm grey pencil to shade the edges of the snowman’s head and the sweater body to give it a rounded, 3D form. -
Final touches:
Color the nose orange and the buttons a deep red. Add faint grey shading under the snowman to ground him on the page.
Texture Pop
Use a white gel pen to add tiny ‘V’ shapes over the colored sections of the scarf and hat. This simple trick mimics individual knit stitches instantly.
Step back and admire your cozy, illustrated winter companion


Tangled Christmas Lights Wrapped Sweater

This clever DIY project takes a plain white sweatshirt and transforms it into a meta-fashion statement by hand-drawing a classic “ugly sweater” design directly onto the fabric. The result is a charmingly sketched, minimalist holiday top that mimics embroidery or knitting stitches with simple ink lines.
Step-by-Step Tutorial
Materials
- White crewneck sweatshirt (cotton blend works best)
- Fabric markers (fine tip in black, red, and jagged green)
- Pencil for sketching
- Cardboard insert for inside the shirt
- Ruler
- Iron (for setting the ink)
Step 1: Preparation and Outline
-
Secure the canvas:
Before you start any drawing, slide a piece of cardboard inside the sweatshirt. This prevents the ink from bleeding through to the back and gives you a smooth, taut surface to work on. -
Sketch the sweater shape:
Using a pencil very lightly, draw the outline of a sweater in the center of the chest. It doesn’t need to match the sweatshirt’s actual seams; draw a stylized version with a rounded collar, cuffs, and waistband. -
Ink the main contours:
Go over your pencil outline with a fine-tip black fabric marker. Keep your hand steady but allow for a slight sketch-like quality to the line—it adds to the hand-drawn charm. -
Add the ribbing details:
Draw vertical stripes inside the collar, cuffs, and bottom waistband area using black ink. This mimics the ribbed texture of a real knit sweater.
Ink Control Pro-Tip
Does your fabric have a heavy texture? Stretch the fabric slightly with clips on your cardboard insert. This flattens the grain and helps the marker nib glide smoothly without skipping.
Step 2: Designing the Patterns
-
Create horizontal guides:
Lightly sketch horizontal lines across the body and sleeves of your drawn sweater. These will serve as baselines for your different pattern rows. -
Draw the zig-zag row:
Near the top chest area, draw a continuous zig-zag line in green ink. Add small circles in the valleys of the zig-zags with red ink to look like decorative texture. -
Add the leafy vine:
Below the zig-zags, draw a straight horizontal green line. Add small, leaf-like dashes coming off it at angles to create a festive vine or garland effect. -
Create the cross-stitch diamonds:
In the next section down, use green ink to draw a row of intersecting diagonal lines, forming a lattice of diamond shapes. -
Detail the diamonds:
Inside or between the diamond intersections, add tiny red dots. This small detail helps simulate the look of a knit pattern. -
Draw the snowflake or star row:
Create a row of simple asterisks or star shapes using green ink. Connect them with a faint horizontal line if desired.
Level Up: Tech & Texture
Glue tiny red craft pom-poms onto the red dots for 3D texture, or stitch real fairy lights (battery pack in pocket) behind the drawing so the “knitted” lights actually glow.
Step 3: The Forest & Finishing Touches
-
Pencil the tree placements:
On the bottom half of the sweater, mark out where your stylized pine trees will go. Stagger their heights slightly for visual interest. -
Draw the tree trunks:
Using black ink, draw vertical lines for the trunks, adding small squiggly branches coming off the sides. -
Top the trees:
Draw triangular tops on your trees. Alternate colors here: make some triangles solid red and others green with vertical hatch marks. -
Fill the ribbing with color:
Go back to the collar, cuffs, and waistband. Carefully fill in the spaces between the black ribbing lines with red ink to make the trim pop. -
Incorporate sleeve details:
Don’t forget the sleeves of your drawn sweater. Carry the same pattern bands (zig-zags, vines, and dots) onto the arm sections of the illustration. -
Erase guidelines:
Once the ink is completely dry (give it at least 30 minutes), gently erase any visible pencil marks. -
Heat set the design:
To make your artwork permanent and washable, iron the design according to the fabric marker instructions (usually on medium heat with a cloth barrier).
Now you have a cozy, artistic take on holiday wear that is as fun to make as it is to wear


Holiday Doodle Collage Sweater
Embrace the cozy vibes of winter with this charming pen-and-ink illustration of a patterned holiday sweater. Using simple lines and repetitive motifs, you’ll build up texture that mimics the look of a classic knitted jumper without needing any yarn.
How-To Guide
Materials
- Heavyweight drawing paper or cardstock (white or cream)
- Fine liner pen (black, 0.3mm or 0.5mm)
- Pencil (HB for sketching)
- Eraser
- Ruler (optional)
Step 1: Sketching the Outline
-
Map out the shape:
Start by lightly sketching the main body of the sweater with your pencil. Draw a large, slightly tapered rectangle for the torso. -
Add the sleeves:
Attach two long, slender rectangles extending downwards from the top corners of the torso. Angle them slightly outward as if the sweater is laying flat with arms relaxed. -
Define the neckline:
Draw a curved scoop at the top center for the neck opening. Add a thicker band around this curve to represent the ribbed collar. -
Mark the cuffs and hem:
Sketch horizontal bands at the bottom of the torso and at the end of both sleeves to create the ribbed cuffs and hemline.
Step 2: Creating the Ribbed Texture
-
Ink the outlines:
Using your fine liner pen, trace over your final pencil outline. Keep your hand steady but don’t worry if the lines aren’t machine-perfect; a little wobble adds character. -
Detail the collar:
Draw vertical lines inside the collar band, spacing them closely together to mimic knit ribbing. -
Detail the cuffs and hem:
Repeat the vertical line technique on the wrist cuffs and the bottom hem of the sweater. I find adding a double horizontal line above the ribbing helps separate it from the main knitting.
Pattern Variety
Look at real sweaters for inspiration! Mixing heavy solids (like trees) with light line work (like snowflakes) creates the best visual balance.
Step 3: Designing the Patterns
-
Create horizontal zones:
Lightly use your pencil to divide the main body of the sweater into horizontal sections. These will act as guides for where each pattern row will go. -
Draw the snowflake yoke:
In the top section across the chest, draw a row of medium-sized snowflakes. Use simple intersecting lines with small ‘V’ shapes at the ends. -
Add geometric dividers:
Separate your pattern rows with thin bands of geometric shapes. Zig-zags, small triangles, or simple dashed lines work perfectly to mimic fair isle stitching. -
Illustrate the pine trees:
In the large middle section, draw stylized pine trees. Start with a vertical line for the trunk, then add layered triangles or scribbled loops moving downward to create the branches. -
Fill in with filler motifs:
Scatter small dots, tiny stars, or little ‘x’ shapes in the empty white spaces around the trees and snowflakes. This creates the dense, speckled look of a knit fabric. -
Add nature elements:
On the right side or sleeves, sketch a simple leaf or fern frond to break up the symmetry. Use a central stem with small leaves branching off.
Smudged Ink?
If you smear the ink while erasing, you can fix it by turning the smudge into a shadow or adding more ‘confetti’ dots around the area to hide it.
Step 4: Finishing Touches
-
Decorate the sleeves:
Carry a few of the patterns from the body onto the sleeves. A snowflake near the shoulder and a geometric band near the cuff balances the design. -
Add ‘stitches’:
If any area looks too empty, draw tiny vertical dashes or small circles to suggest the texture of yarn stitches. -
Erase guidelines:
Wait until the ink is completely dry—give it a few minutes to be safe—then gently erase all your pencil sketches and guidelines. -
Final whimsical details:
Draw a few loose stars and snowflakes floating in the space outside the sweater to give the illustration a magical, wintery atmosphere.
Now you have a cozy piece of art ready to frame or turn into a holiday greeting card
BRUSH GUIDE
The Right Brush for Every Stroke
From clean lines to bold texture — master brush choice, stroke control, and essential techniques.
Explore the Full Guide
Fair Isle Animal Mashup Sweater
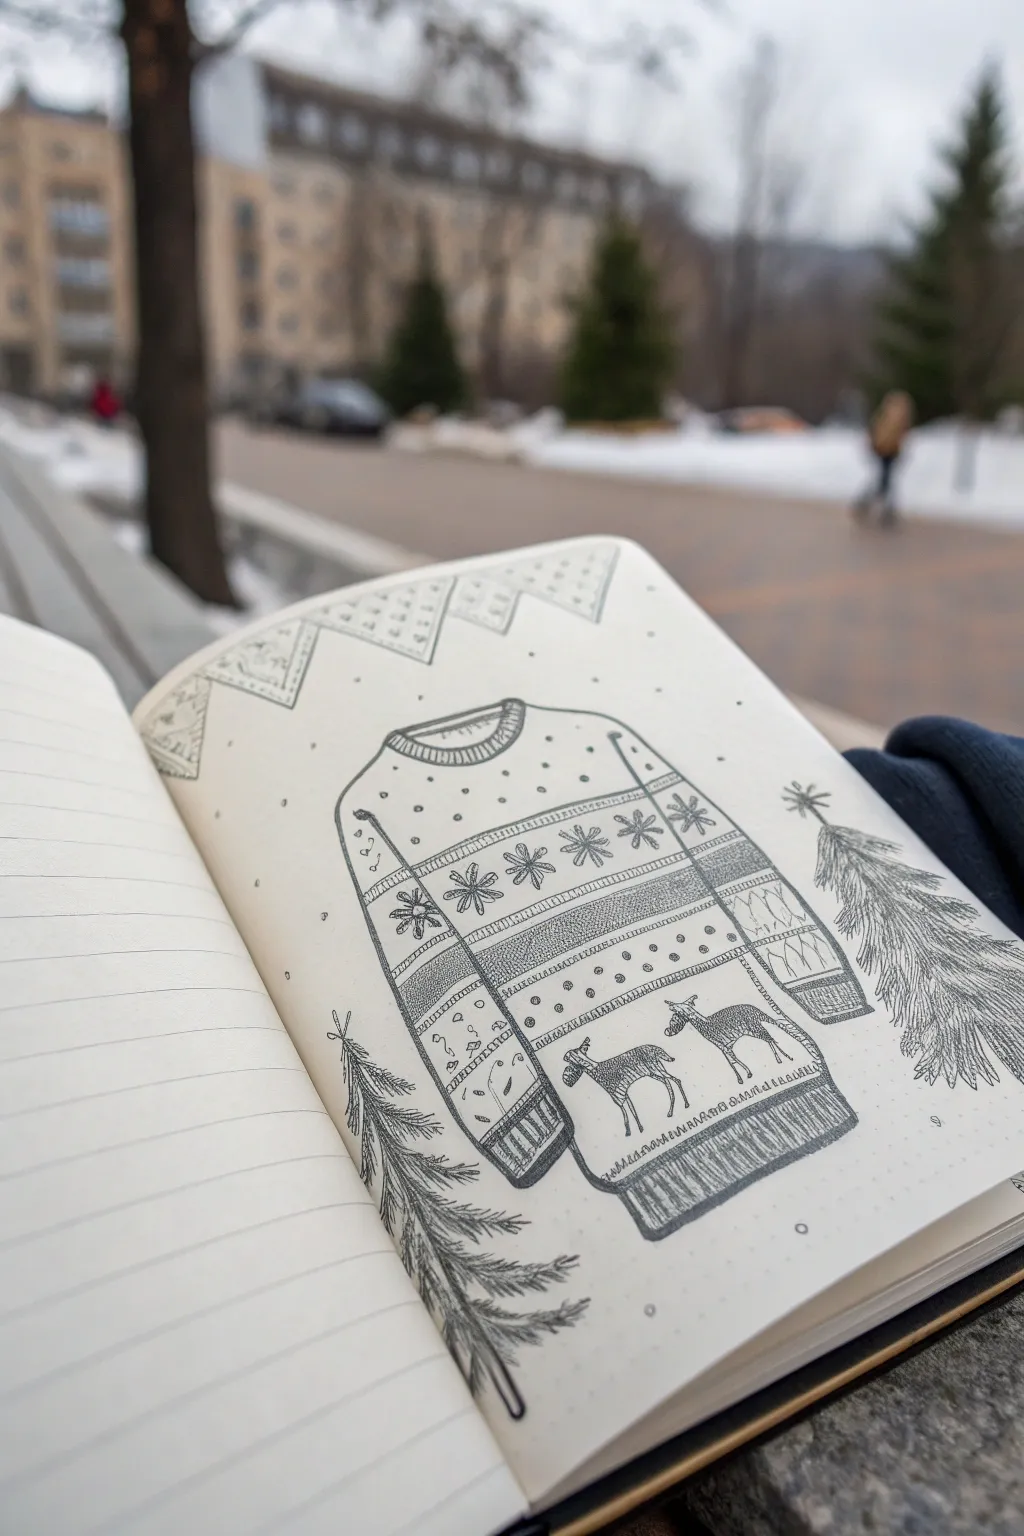
Capture the cozy charm of winter with this detailed ink illustration of a classic Fair Isle sweater. Using fine liners on dotted or plain journal paper, you’ll build up intricate patterns row by row to create a festive and textured look that pops right off the page.
Step-by-Step
Materials
- Dotted or blank journal (cream or white paper)
- HB Pencil
- Kneadable eraser
- Fine liner pens (sizes 0.1mm, 0.3mm, and 0.5mm)
- Ruler (optional, but helpful for bands)
Step 1: Drafting the Outline
-
Shape the torso:
Begin with your pencil by lightly sketching the main body of the sweater. Draw a large, slightly boxy rectangle with rounded shoulders to establish the relaxed fit of a cozy knit. -
Add the collar:
Sketch a ribbed crew neck at the top center. Draw a curved line for the back of the neck and a deeper curve for the front to give it a 3D perspective. -
Form the sleeves:
Extend the sleeves outwards from the shoulders. Keep the lines slightly curved to suggest soft fabric, ending with ribbed cuffs at the wrists. -
Mark the pattern bands:
Using light horizontal lines, divide the torso and sleeves into several distinct bands. These guidelines will define where your different patterns—like snowflakes, stripes, and animals—will go later. -
Refine the perimeter:
Go over your outer pencil lines to firm up the silhouette, ensuring the bottom hem is curved slightly downward to match the perspective of the collar.
Step 2: Inking the Details
-
Main outline ink:
Switch to a 0.5mm fine liner. Carefully trace the external silhouette of the sweater, including the collar, cuffs, and bottom hem. Don’t worry if the line isn’t perfectly straight; a little wobble adds to the hand-knit feel. -
Ribbing texture:
Use a 0.1mm or 0.3mm pen to draw vertical lines inside the collar, cuffs, and bottom hem. Keep them close together to simulate the ribbed texture of the knitting. -
Top section dots:
In the yoke area (the top section below the collar), draw scattered small dots or tiny circles. This creates a speckled wool effect typically found in traditional sweater designs. -
Snowflake band:
In the first major band across the chest, draw a row of six-pointed snowflakes. Start with a simple cross, add a horizontal line, and put small ‘v’ shapes at the tips. -
Textured stripe:
For the band directly below the snowflakes, use stippling (lots of tiny dots) or very dense hatching to create a darker, textured shading bar. This adds contrast to the design. -
Simple shapes band:
Beneath the textured stripe, draw a row of simple geometric shapes, like small beads or circles spaced evenly apart. -
The animal motif:
In the largest band near the bottom, sketch the outlines of two donkeys or deer facing right. Keep the legs spindly and the bodies simple stylistic blocks. -
Filling the animals:
Fill the animals using vertical hatching lines. This technique mimics the vertical stitching of a knit sweater rather than realistic fur. -
Sleeve continuation:
Replicate the chest patterns onto the sleeves. Make sure the stripes on the sleeves align horizontally with the stripes on the body so the garment looks constructed correctly. -
Geometric borders:
Use your finest pen (0.1mm) to add tiny borders between your main bands—zig-zags or tiny loops work best to separate the patterns clearly.
Ink Smudges?
If you smudge wet ink, turn it into a ‘mistake feature.’ Draw a few more random dots around it and call it a heavy flurry of snow.
Step 3: Background & Final Touches
-
Corner bunting:
In the top left corner of your page, draw a hanging bunting banner with patterned triangular flags to frame the composition. -
Evergreen accents:
Draw sketch-style pine trees on the right and bottom left. Use quick, jagged strokes that fan downward to create the needles. -
Atmospheric specks:
Sprinkle tiny dots and small open circles around the sweater and trees to represent falling snow. -
Erase guidelines:
Wait for about 5-10 minutes to ensure the ink is completely set. Then, gently erase all underlying pencil sketch marks. -
Final shading:
Add a few final hatching lines at the armpits and sides of the sweater to give the drawing volume and roundness.
Pattern Consistency
Count the squares on your dot grid paper to keep your geometric bands even. This acts like a real knitting chart.
Now you have a charming winter illustration perfect for your journal or a holiday card
3D Pompom and Tassel Illusion Sweater
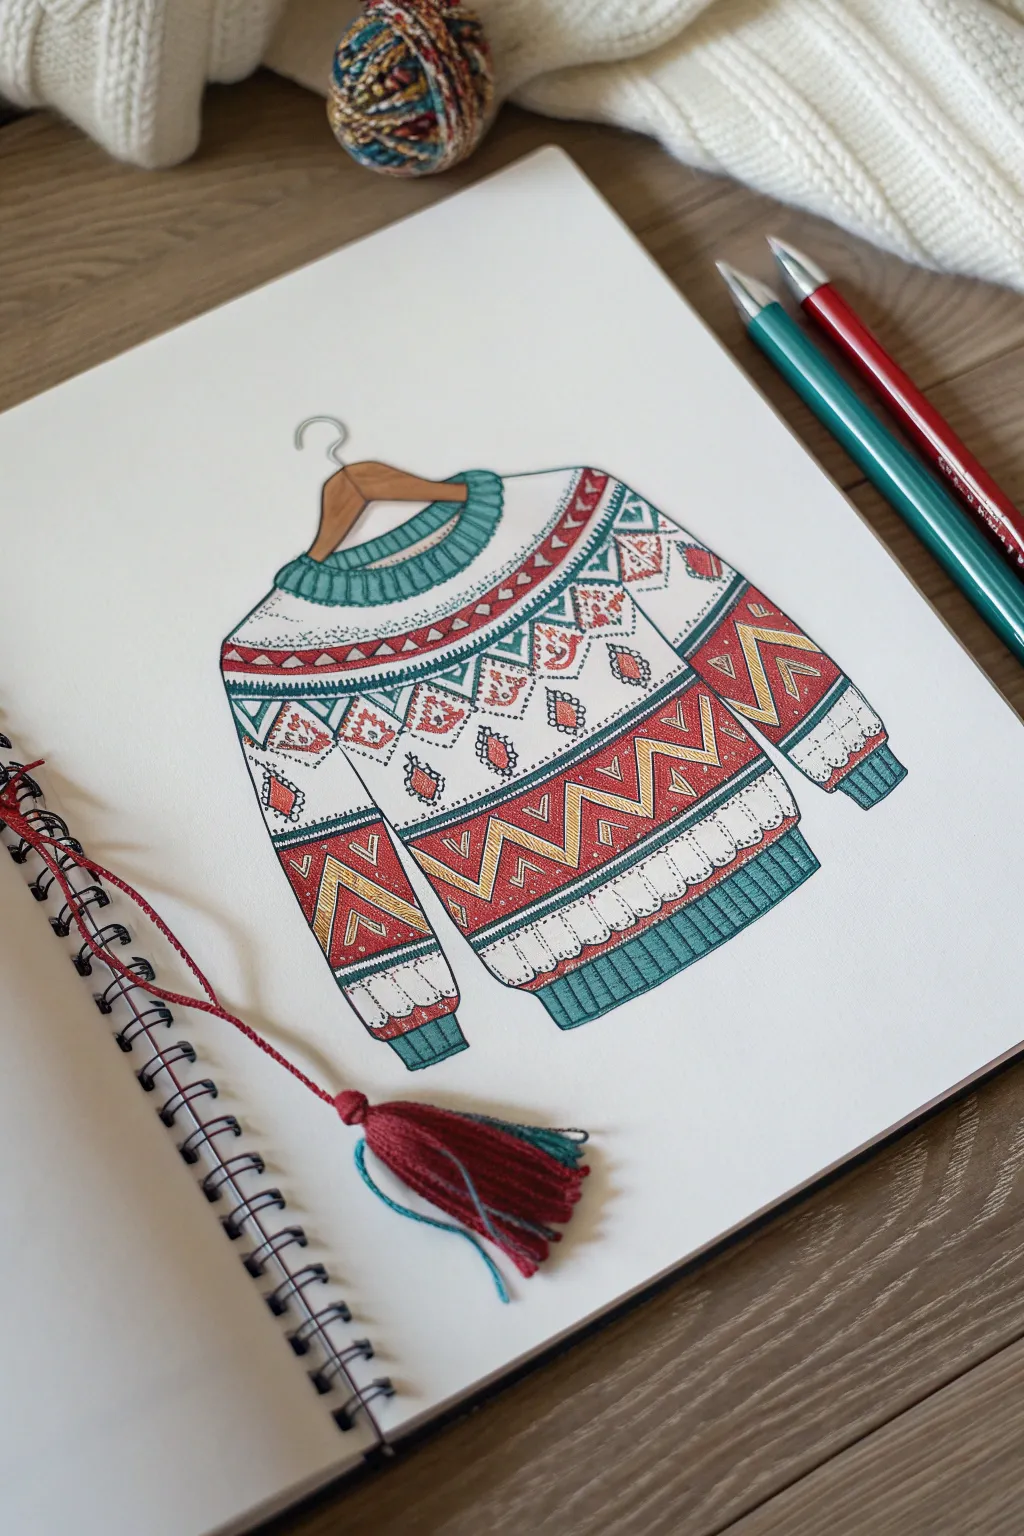
Capture the cozy charm of knitwear with this detailed illustration of a classic patterned sweater. Using fine liners and colored pencils, you’ll create a vibrant, textured drawing that feels warm enough to wear.
Step-by-Step Guide
Materials
- Sketchbook or drawing paper (heavyweight preferred)
- HB or 2B pencil for sketching
- Eraser
- Fine liner pens (0.1, 0.3, and 0.5mm sizes, black)
- Colored pencils (teal, deep red, mustard yellow, warm brown)
- White gel pen for highlights
- Ruler (optional)
Step 1: Basic Shape and Outline
-
Sketch the Hanger:
Begin by lightly sketching a simple wire hook and a wooden triangle shape for the hanger at the top center of your page. -
Outline the Neckline:
Draw a curved neckline just below the hanger, making sure it dips slightly in the front to show the collar’s ribbed texture. -
Draw the Bodice Properties:
Map out the main body of the sweater. Keep the lines slightly loose and curved to mimic fabric drape rather than stiff cardboard. -
Add Sleeve Structures:
Extend the sleeves outward from the shoulders. Taper them slightly towards the cuffs to give the garment distinct form. -
Define Ribbed Cuffs and Hem:
Draw rectangular bands at the bottom of the sleeves and the main body to serve as the ribbed cuffs and hemline.
Uneven Patterns?
If your geometric bands look crooked, lightly draw curved guidelines that follow the sweater’s drape before adding the pattern details.
Step 2: Pattern Design
-
Plan the Horizontal Bands:
Using light pencil strokes, divide the sweater body and sleeves into several horizontal sections where different patterns will go. -
Sketch the Main zig-zags:
In the widest central band, sketch a large chevron or zig-zag pattern. Repeat similar, smaller zig-zags on the sleeves to match. -
Add Geometric Details:
Fill the narrower bands with small triangles, diamonds, and dots. Don’t worry about perfect symmetry; hand-drawn imperfections add charm. -
Ink the Outlines:
Go over your main pencil lines with a 0.5mm fine liner. Use a 0.3mm pen for the intricate pattern details inside the bands. -
Clean Up:
Once the ink is completely dry, gently erase all underlying pencil sketches to reveal a crisp line drawing.
Level Up: Real Tassel
Punch a tiny hole at the bottom hem and thread a real miniature yarn tassel through it for a fun, mixed-media 3D element.
Step 3: Color and Texture
-
Color the Collar and Cuffs:
Start with your teal colored pencil. Fill in the neckline, cuffs, and bottom hem using vertical strokes to simulate ribbing. -
Fill Red Sections:
Use the deep red pencil to color the background of the central zig-zag band and alternating pattern strips on the shoulders. -
Apply Mustard Accents:
Fill in the zig-zag stripes and small diamond shapes with mustard yellow to create a warm contrast against the red and teal. -
Shade the Wood:
Color the wooden part of the hanger with warm brown, pressing harder on the edges to create a rounded, 3D effect. -
Add Knit Texture:
With a 0.1mm fine liner, add tiny ticks or stippling over the colored areas to suggest the fuzzy texture of wool. -
Highlight with Gel Pen:
Use a white gel pen to add small dots or lines over the darkest patterns, mimicking the highlight on chunky yarn stitches.
Now you have a charming sweater illustration that captures the cozy spirit of the season

PENCIL GUIDE
Understanding Pencil Grades from H to B
From first sketch to finished drawing — learn pencil grades, line control, and shading techniques.
Explore the Full Guide
Ugly Sweater Character Portrait (The Sweater Is a Face)

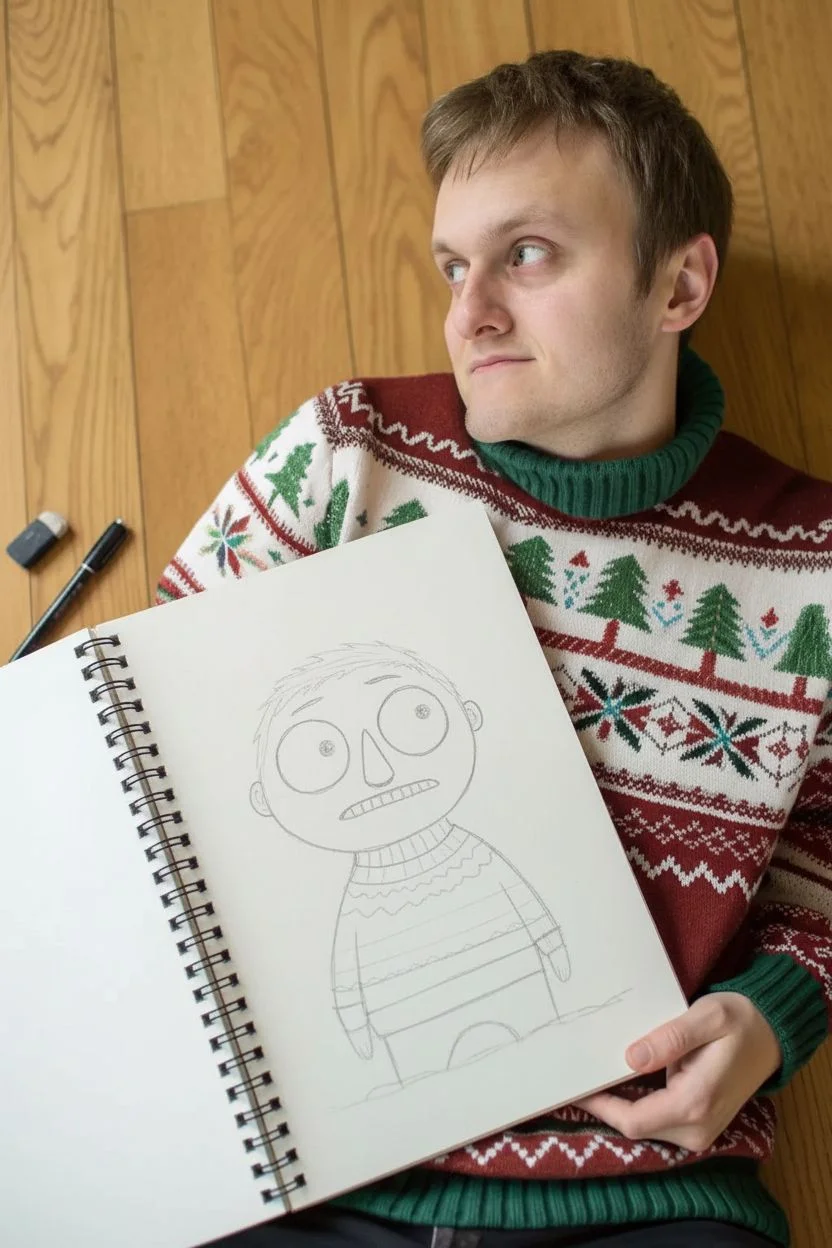
Capture the true essence of holiday awkwardness by drawing a cartoon character wearing a simplified version of your own festive knitwear. This colored pencil illustration exudes charm with its wide-eyed expression and vibrant pattern matching.
Step-by-Step Tutorial
Materials
- Spiral-bound sketchbook (heavyweight paper recommended)
- Graphite pencil (HB or 2B)
- Fine liner pen (black, waterproof)
- Colored pencils (red, green, beige, brown)
- Eraser
- Your favorite ugly Christmas sweater for reference
Step 1: Sketching the Character Framework
-
Outline the head shape:
Begin by lightly sketching a large, slightly flattened oval for the head. It should be oversized relative to the body to achieve that classic cartoon proportion. -
Position the facial features:
Sketch two large circles for eyes in the upper half of the face. Leave plenty of space between them for a goofy look. -
Add the nose and mouth:
Draw a rounded triangle shape for the nose right between the eyes. Below that, sketch a flat-topped oval for a grimacing mouth. -
Draft the body and sweater:
Extend a small neck downwards, then curve out into rounded shoulders. Draw the torso as a bell shape that flattens at the bottom, mimicking the bulk of a thick sweater. -
Map out the pattern:
Lightly draw horizontal guidelines across the sweater torso. These will serve as boundaries for your festive stripes and patterns later.
Step 2: Inking and Details
-
Ink the main outlines:
Using your fine liner, go over the pencil lines for the head and body. Use a steady hand, but don’t worry if the lines aren’t perfectly smooth—a little jitter adds character. -
Detail the face:
Draw tiny pupils in the center of the large eye circles. Inside the mouth shape, draw a grid to represent clenched teeth. -
Create the hair:
Add short, jagged strokes along the top of the head for hair. Keep it messy and textured. -
Draw the sweater motifs:
Fill in the horizontal bands on the sweater. Use simple symbols like zig-zags within one band, small Christmas trees or snowflakes in another, and rows of hearts or dots. -
Clean up:
Once the ink is completely dry, gently erase all underlying pencil sketch lines to keep the drawing crisp.
Pattern Simplification
Don’t try to copy every single stitch of your real sweater. Pick 2-3 distinctive bands or motifs and simplify them into geometric shapes for the drawing.
Step 3: Adding Color and Depth
-
Color the skin:
Use a pale beige or peach colored pencil to lightly shade the face and hands. Apply slightly more pressure on the cheeks for a rosy, flushed look. -
Fill in the nose:
Color the nose a solid bright red or orange to make it a focal point. -
Color the hair:
Use a brown pencil for the hair. I find that layering strokes in the direction of hair growth makes it look more natural. -
Apply the sweater base colors:
Color the ribbed collar and the pants in a solid green. Use a bright red for the thick stripes on the sweater. -
Detail the patterns:
Carefully color the small icons in the sweater bands. Alternate red and green for the zig-zags and hearts to maintain that festive palette. -
Add a shadow:
Draw a thin, squiggly line near the feet and lightly shade under the character to ground them in space. -
Extra personality:
Draw a tiny floating snowflake or star above the character’s head for a final whimsical touch.
Add Subtle Texture
Use the side of your colored pencil to create a rougher, grainier texture on the sweater areas. This mimics the cozy look of knit fabric.
Now you have a charming, slightly anxious cartoon twin to share the holiday spirit with
Mini Sweater Grid for Mix-and-Match Ideas
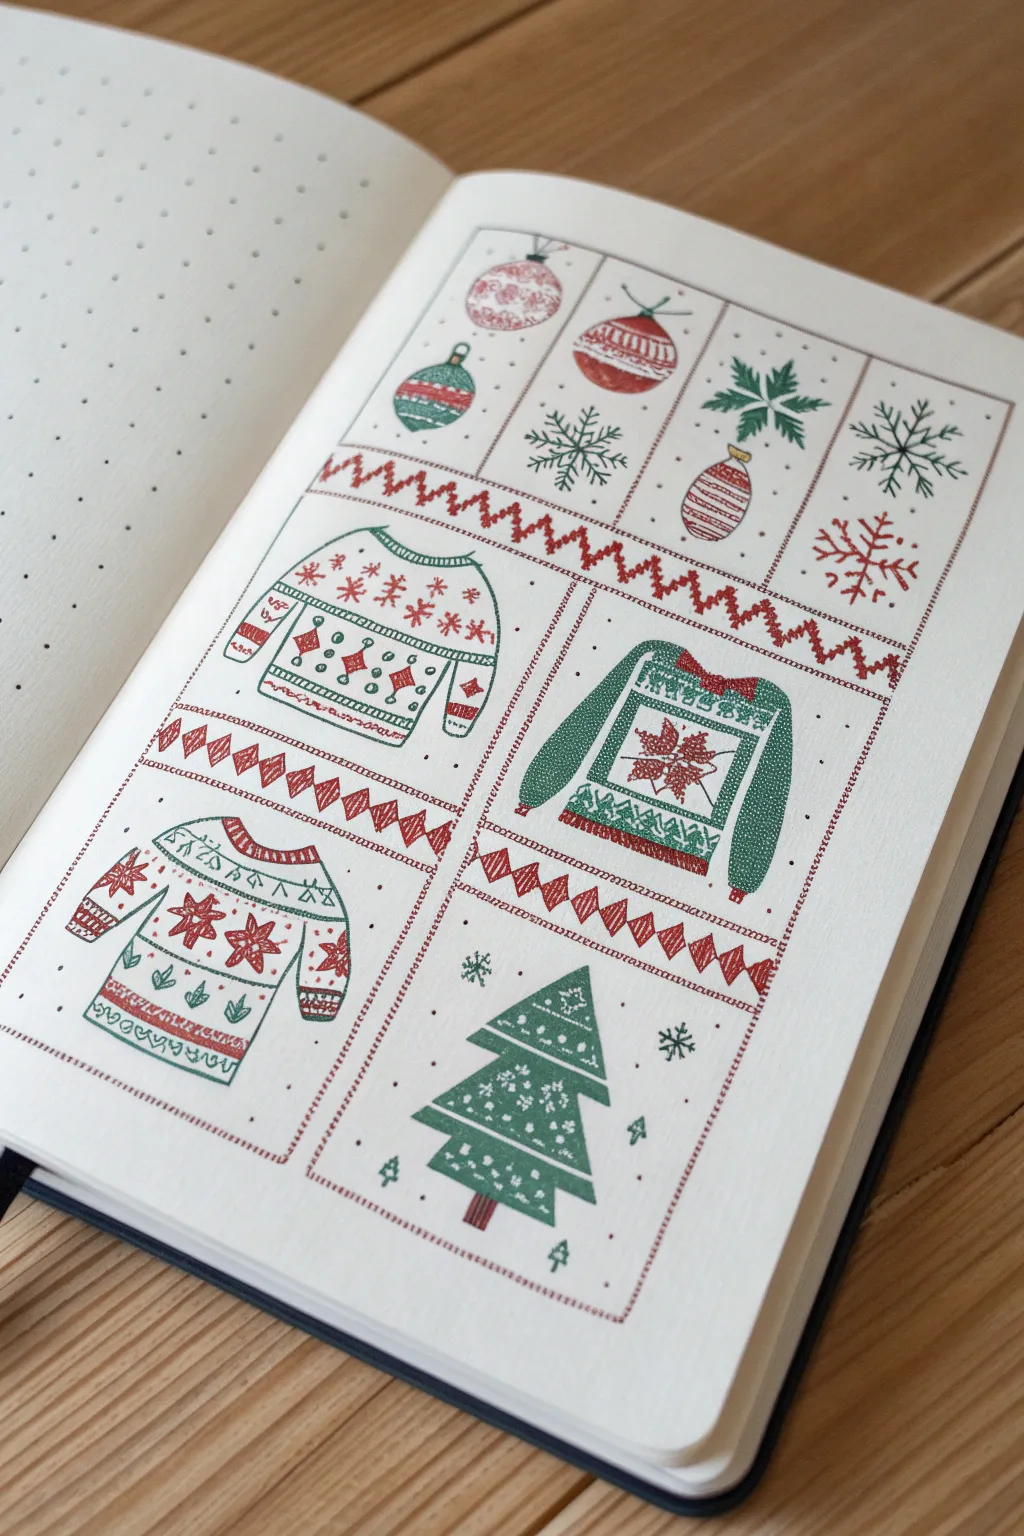
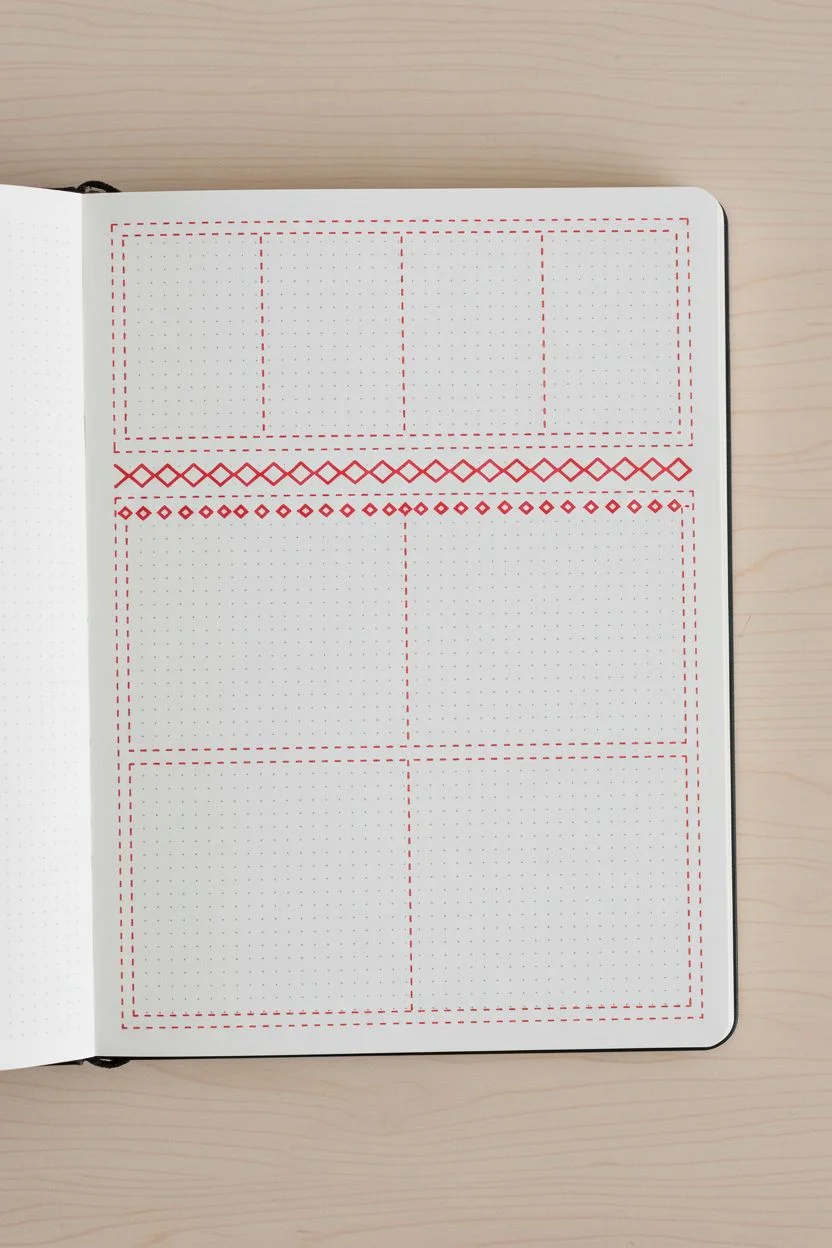
This charming bullet journal layout breaks down holiday motifs into a clean, easy-to-draw grid featuring stylized ugly sweaters, ornaments, and a classic Christmas tree. Using a simple red and green palette on dot grid paper creates a cohesive, festive look perfect for practicing seasonal doodles.
Detailed Instructions
Materials
- Dot grid notebook (A5 size recommended)
- Fine liner pen (Black, 0.3mm or 0.5mm)
- Gel pens or fineliners (Christmas Red)
- Gel pens or fineliners (Forest Green)
- Ruler
- Pencil and eraser for sketching
Step 1: Setting Up the Grid
-
Define the boundaries:
Start by using your pencil and ruler to map out the main rectangular frame of the page. Leave a comfortable margin of about 1 inch from the page edges. -
Create the top section:
Draw a horizontal line about one-quarter of the way down from the top of your frame. Divide this upper section into four equal vertical columns for the ornament doodles. -
Section the sweater area:
Divide the remaining large lower section into four equal quadrants. Draw a vertical line down the center and a horizontal line across the middle. This creates four larger boxes for your sweaters and tree. -
Ink the structural lines:
Go over your main grid lines with a red fine liner. To mimic the stitched look shown in the image, draw these as dotted lines rather than solid strokes. Use the dots on your paper as a guide for spacing. -
Add decorative borders:
Between the top ornament row and the sweater grid, draw two parallel red dotted lines. I like to fill the space between them with a bold red zigzag pattern to separate the sections distinctly. -
Separate the sweater rows:
Repeat the decorative border process for the horizontal line separating the top two sweaters from the bottom row. Draw a chain of red diamonds inside this double-dotted line instead of a zigzag for variety.
Grid Master Tip
Count the dots on your paper before starting! If your page is 26 dots wide, mark the halfway point at 13 dots to ensure your sweater quadrants are perfectly equal.
Step 2: Doodling the Ornaments
-
Sketch the baubles:
In the top four small boxes, lightly pencil in your shapes. From left to right: a round bauble, a teardrop ornament, a striped round ornament, and a snowflake. -
Add details to first ornaments:
Ink the first round bauble with horizontal bands of green and red squiggles. For the second teardrop shape, use alternating horizontal stripes of solid color and zigzags. -
Finish the top row:
Draw the third ornament with vertical curved stripes. Fill the final box with a large, eight-pointed snowflake in green, adding smaller red stars around it to fill the space.
Step 3: Illustrating the Sweaters
-
Outline the sweater shapes:
In the top-left, top-right, and bottom-left large boxes, draw the outline of a sweater. Use a simple ‘T’ shape with curved sleeves and a crew neck. Don’t worry about perfect symmetry; the hand-drawn look adds charm. -
Design the first sweater:
For the top-left sweater, draw horizontal bands across the chest. Fill the center band with green diamond shapes and red dots. Add red snowflake asterisks above the band and striped cuffs on the sleeves. -
Create the heavy knit look:
In the top-right box, color the body of the sweater solid green, leaving a large white square in the center. Inside the white square, draw a large red poinsettia flower. Add red accents to the collar and hem. -
Pattern the third sweater:
For the bottom-left sweater, focus on Nordic patterns. Draw a row of large red stars across the chest. Add small green leaf sprigs below them and finish with a decorative red and green hemline.
Smudge Prevention
Red ink takes longer to dry than you think. Work from the top-left corner to the bottom-right (if right-handed) to avoid dragging your hand through wet lines.
Step 4: Completing the Layout
-
Draw the Christmas tree:
In the final bottom-right box, draw a stylized pine tree composed of three stacked triangles, getting wider at the bottom. Add a small brown or red trunk. -
Decorate the tree:
Fill the green tree sections with white detailing (using a white gel pen or by leaving negative space) or simply stipple darker green dots for texture. Add a tiny red star on top. -
Fill empty spaces:
Look for empty white space around the sweaters and tree. Draw tiny red dots, small green asterisks, and little pine trees to make the composition feel full and busy. -
Erase guidelines:
Once the ink is completely dry, gently erase all your initial pencil sketches to reveal the clean, festive grid.
Enjoy flipping through your journal and seeing this cozy collection of holiday knits


Have a question or want to share your own experience? I'd love to hear from you in the comments below!