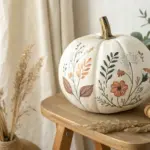
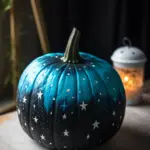
When I’m brainstorming gourd painting ideas, I always start by turning the gourd in my hands and letting its curves suggest the design. The magic is in those wonky bumps and long necks—shape-driven designs look like they were meant to live on dried gourds.
Sunflower Blooms and Twisting Vines
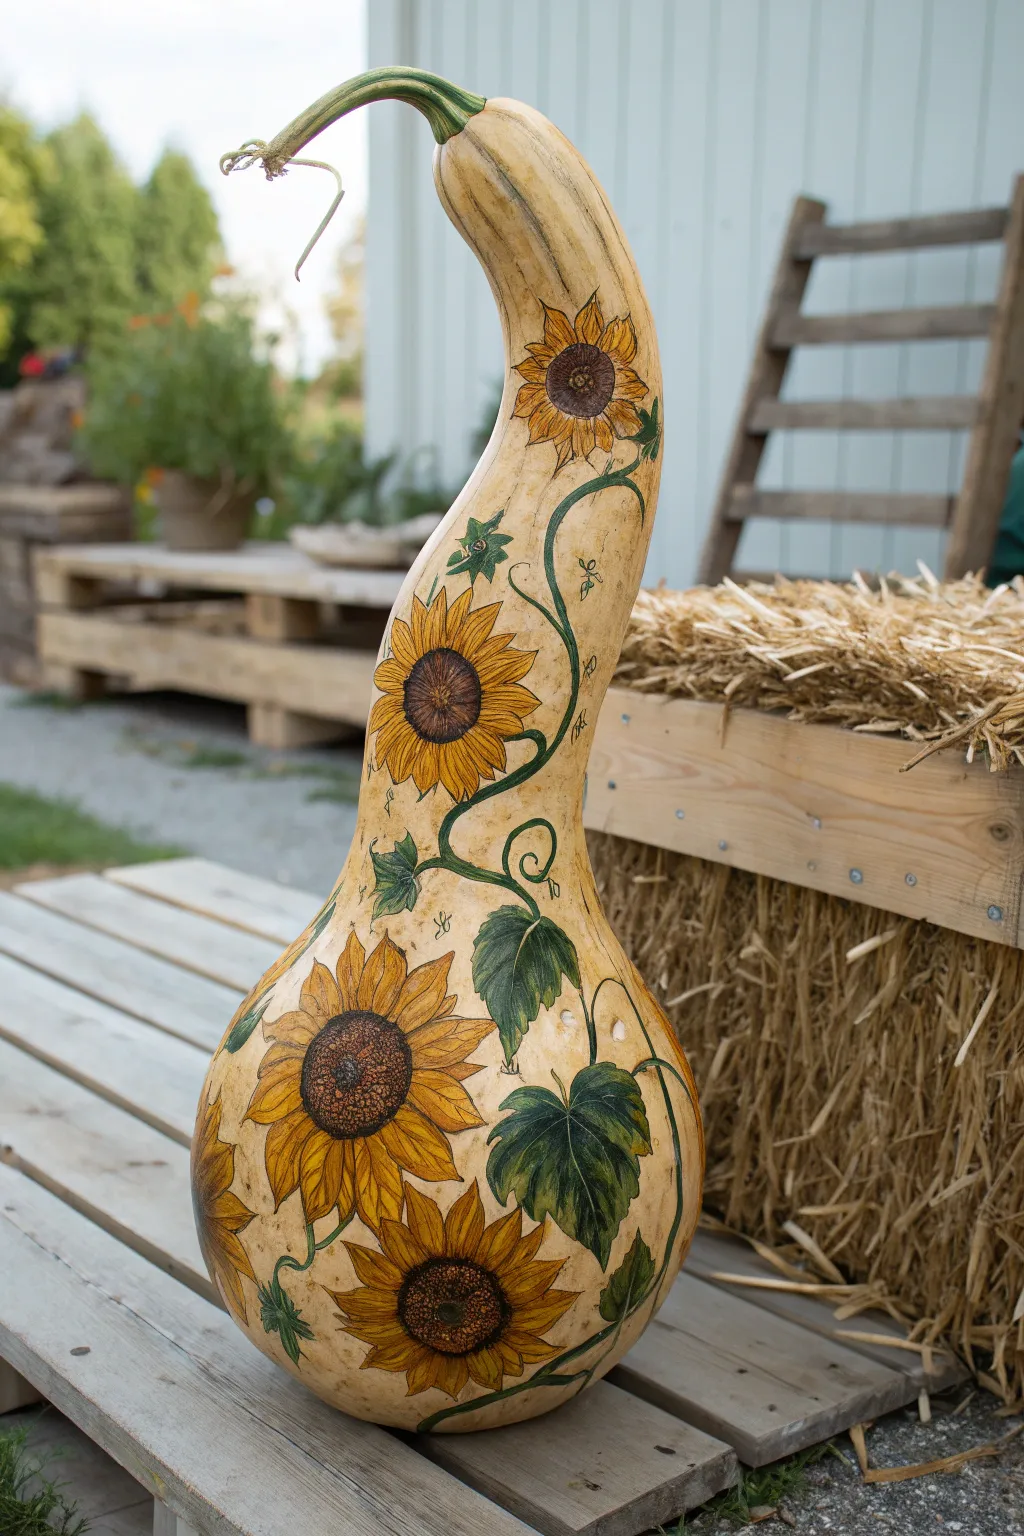
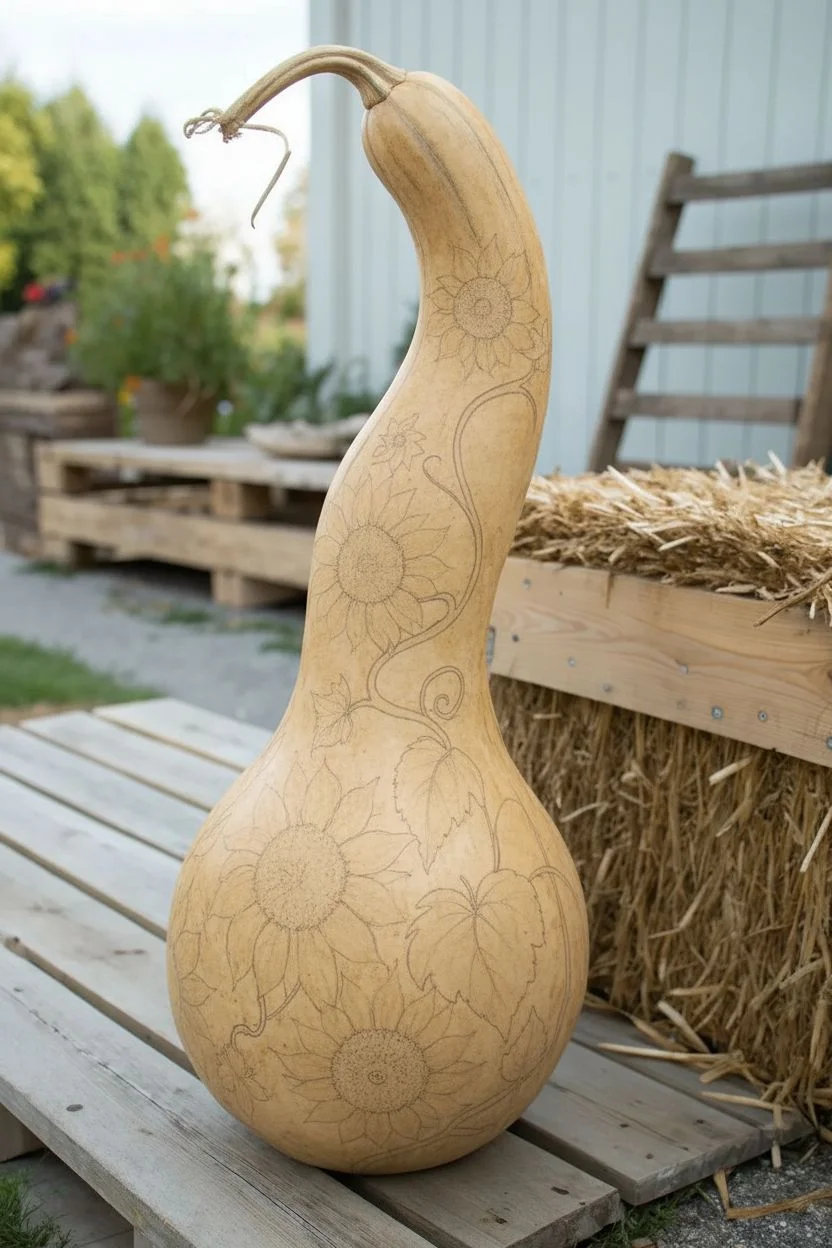
Transform a simple dried gourd into a vertical masterpiece featuring cheerful sunflowers climbing a winding green vine. This project celebrates the natural imperfections of the gourd’s shape, using its curves to guide the organic flow of petals and leaves.
Step-by-Step Guide
Materials
- Large dried gourd (clean and prepped)
- Pencil and eraser
- Gesso or acrylic primer (optional)
- Acrylic paints (Yellow Ochre, Cadmium Yellow, Burnt Sienna, Burnt Umber, Sap Green, Hooker’s Green, Titanium White)
- Fine liner brushes (size 0 and 00)
- Small flat or filbert brushes (size 2 or 4)
- Fine-point permanent marker or archival ink pen (brown or black)
- Matte or satin spray varnish
- Palette for mixing
Step 1: Preparation and Sketching
-
Surface Prep:
Ensure your dried gourd is completely clean. Scrub away any mold or dirt with a scouring pad and warm soapy water, then let it dry thoroughly. If the surface is very rough, lightly sand it smooth with fine-grit sandpaper. -
Base Tone:
This design works beautifully on the natural tan skin of the gourd. However, if your gourd has heavy blemishes, you can apply a wash of diluted Titanium White or a cream acrylic to create a uniform canvas while keeping that natural look. -
Mapping the Vine:
Using a pencil, lightly sketch a main vine line that starts at the wider base and winds its way up the neck. Let the curve of the gourd dictate the path; it should feel like it’s growing naturally. -
Placing the Blooms:
Sketch three main sunflowers along the vine. Place the largest bloom at the bottom for visual weight, a medium one in the middle, and a slightly smaller one near the top neck curve. Add a fourth partial bloom peeking around the side of the base. -
Adding Foliage:
Draw large, heart-shaped leaves extending from the vine near the base, and smaller, jagged leaves higher up. Sketch in curly tendrils branching off near the empty spaces.
Step 2: Painting the Sunflowers
-
petal Underpainting:
Fill in the petal shapes with a base coat of Yellow Ochre. Don’t worry about shading yet; just get a solid layer of color down to block out the shapes. -
Brightening the Petals:
Once the base is dry, mix Cadmium Yellow with a touch of Titanium White. Paint the outer tips and centers of the petals, leaving the Yellow Ochre visible near the flower center and in the shadows where petals overlap. -
Flower Centers:
Paint the round centers with Burnt Sienna. While the paint is still wet, stipple (dab repeatedly) a little Burnt Umber around the outer ring of the center to create depth and texture. -
Detailing the Centers:
For the very middle of the flower center, create a lighter brown mix and stipple a small circle. This creates that classic dimensional sunflower seed head look.
Pro Tip: Steady Hands
When painting the long vines or doing fine ink work, rest your pinky finger on a dry part of the gourd to stabilize your hand. This acts as a pivot point for smoother curves.
Step 3: Leaves and Vines
-
Green Base Coat:
Use Sap Green to fill in the main vine and the leaf shapes. Use a flat brush for the broader leaf areas and a liner brush for the thin vine sections. -
Leaf Shadows:
Mix a small amount of Burnt Umber into your Hooker’s Green to create a dark shadow tone. Paint the veins of the leaves and the underside of the vine where it would naturally be shaded. -
Highlighting Foliage:
Mix a little Yellow Ochre or White into your Sap Green. Lightly brush this onto the tops of the leaves and the high points of the vine to make them pop against the gourd background. -
Curly Tendrils:
Using your thinnest liner brush and thinned green paint, carefully trace over your pencil sketches for the curly tendrils. Keep your hand loose to ensure the lines look fluid rather than stiff.
Level Up: 3D Texture
Mix a texture medium or modeling paste into the brown paint for the flower centers. Dab it on thickly to create actual raised bumps that mimic real seeds.
Step 4: Inking and Finishing
-
Outlining:
This step brings the illustration style to life. Using a fine-point permanent marker or an archival ink pen, carefully outline the petals, leaves, and vines. I prefer breaking the line occasionally rather than making it solid, which feels more organic. -
Adding Veins and Texture:
Use the pen to draw the fine veins inside the leaves and add small hatching lines on the petals near the center to suggest texture and shadow. -
Seed Details:
Dot the center of the sunflowers with the pen to simulate individual seeds. Concentrate the dots more densely around the outer edge of the center circle. -
Cleanup:
Once the ink is fully dry, gently erase any visible pencil lines that weren’t covered by paint or ink. -
Sealing:
Take the gourd to a well-ventilated area and spray it with two light coats of matte or satin varnish. This protects the acrylic and ink from fading and seals the gourd’s surface.
Display your botanical artwork on a porch or mantle to bring a permanent touch of summer harvest indoors


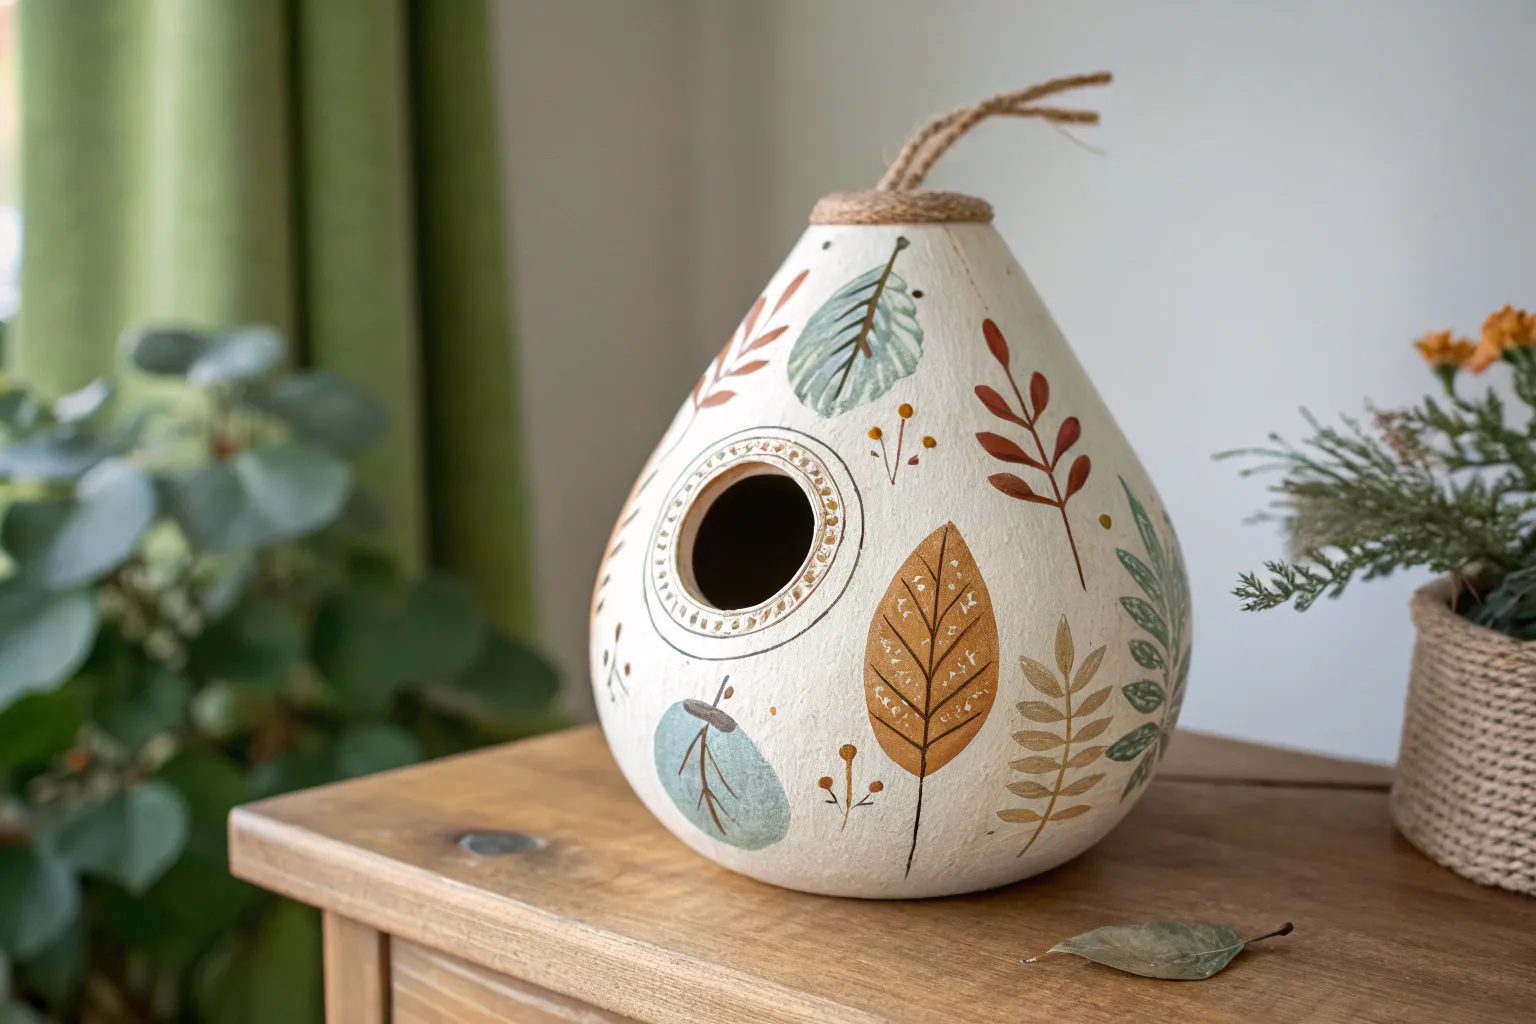
Painted Gourd Birdhouse With a Door Cutout
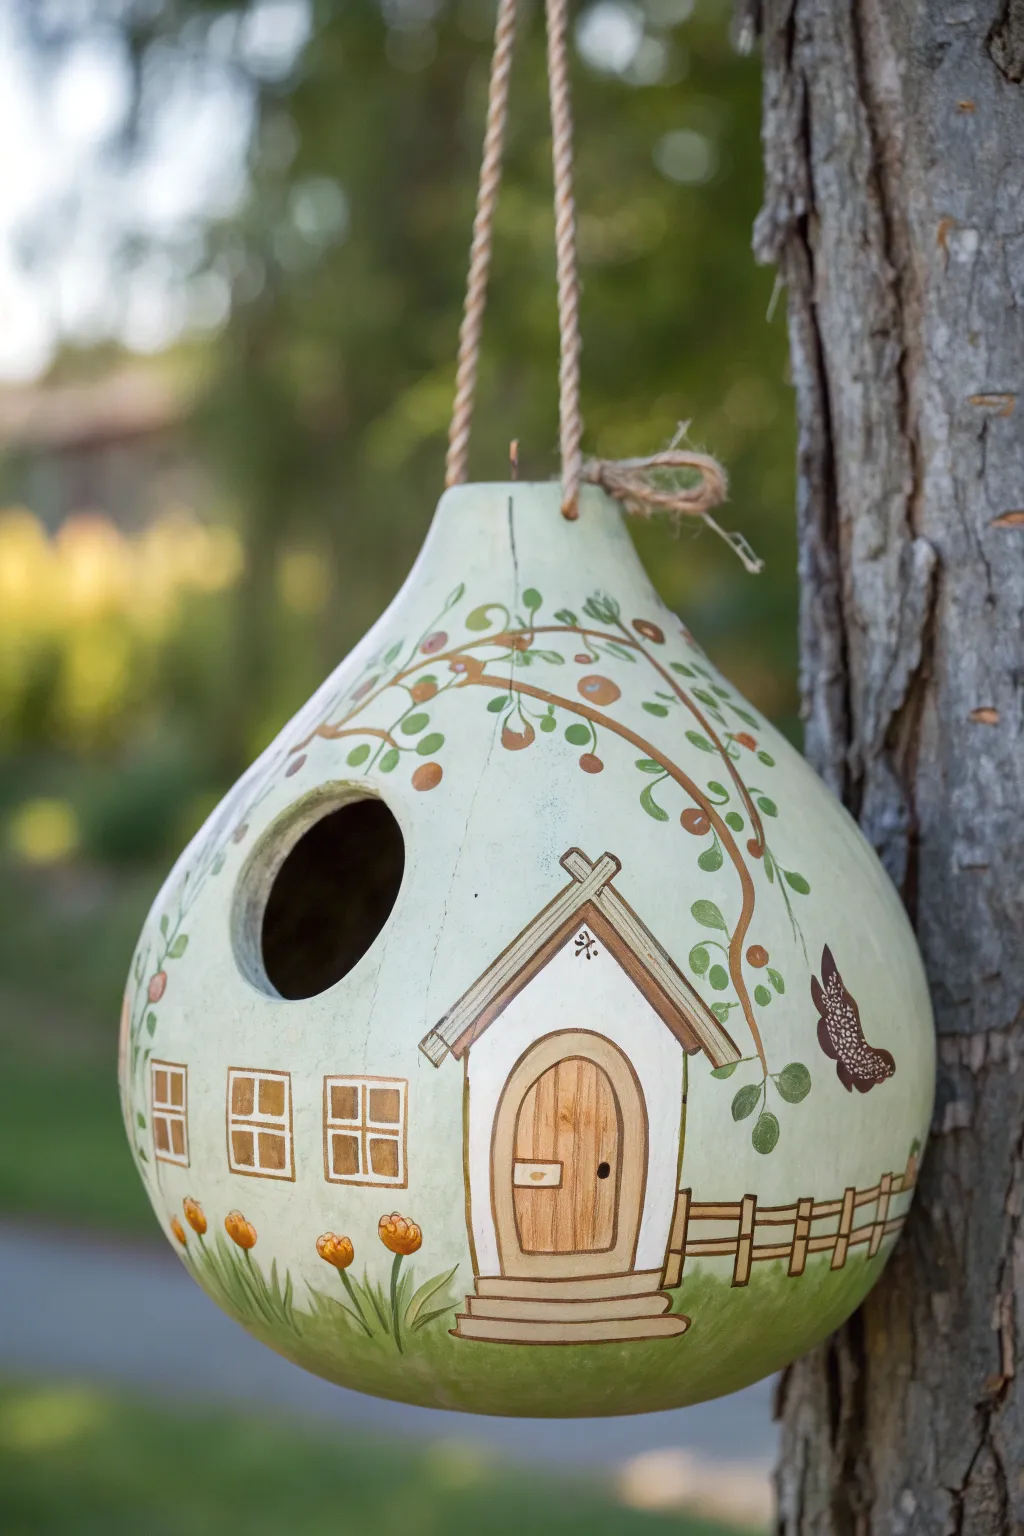
Transform a simple dried gourd into this whimsical, homey birdhouse featuring delicate painted vines and tiny architectural details. The soft celadon background creates a peaceful canvas for a charming cottage scene complete with faux windows and a welcoming wooden door.
Step-by-Step Guide
Materials
- Dried, cleaned bottle gourd
- Drill with 1.5-inch hole saw bit
- Sandpaper (medium and fine grit)
- Acrylic craft paints (Light Celadon/Sage Green, White, Cream, Dark Brown, Tan, Burnt Sienna, Leaf Green)
- Pencil for sketching
- Small drill bit (for hanging holes)
- Jute twine or rope
- Assorted paintbrushes (1-inch flat, fine liner, small angle brush)
- Outdoor varnish or polyurethane sealer (satin or matte finish)
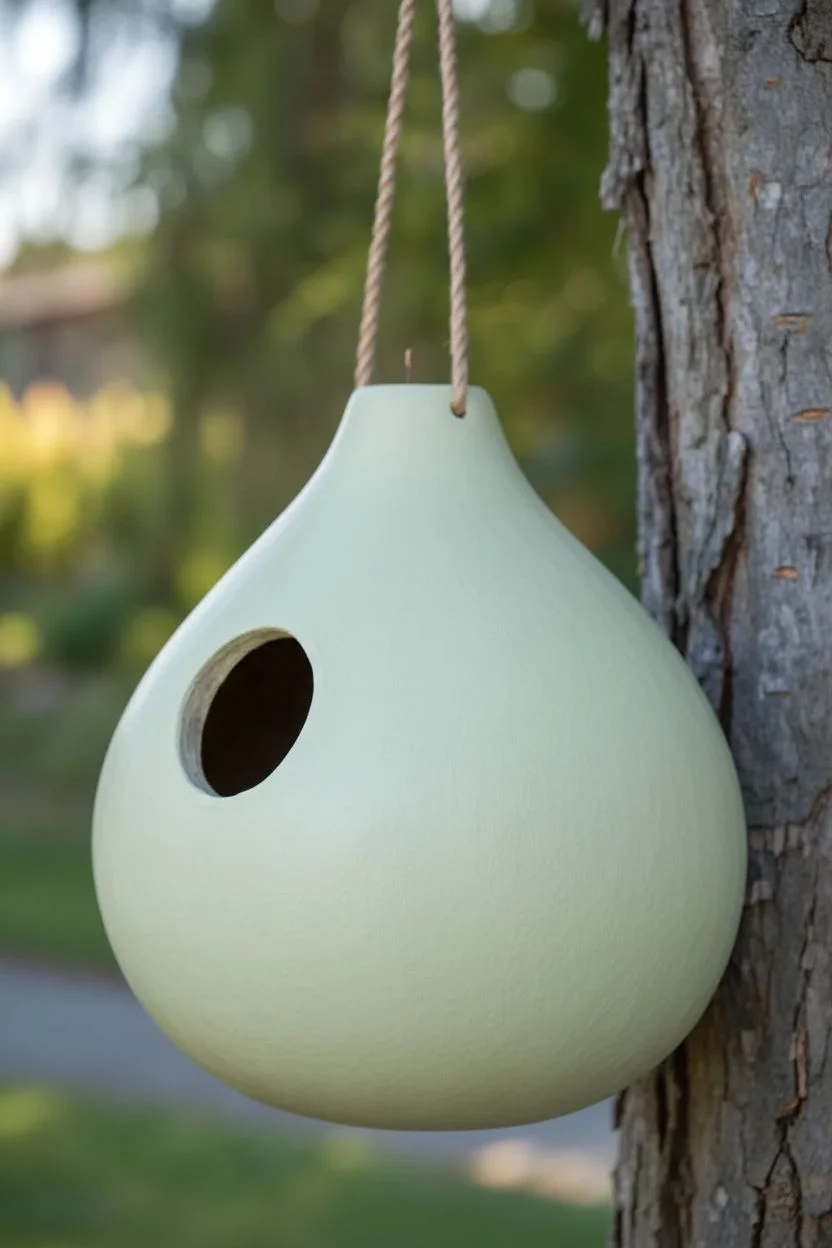
Step 1: Preparation & Base Coat
-
Cut the Entrance:
Begin by determining the best side of your gourd for the front. Use your drill with a 1.5-inch hole saw bit to carefully cut the main entrance hole about midway up the bulbous part. -
Clean the Interior:
Once the hole is cut, scrape out any loose dried seeds and pulp from inside using a spoon or a bent wire tool. Shake it out thoroughly until clean. -
Drill Hanging Holes:
At the very top of the gourd’s neck, drill two small holes opposite each other. These will be used later for threading the jute hanger. -
Smooth the Surface:
Sand the entire exterior of the gourd lightly to remove any bumps or mold stains. Pay extra attention to the rim of the entrance hole, sanding it smooth so it’s safe for birds. -
Apply Base Color:
Paint the entire exterior with a light celadon or pale sage green acrylic paint. This may take two or three coats to get full, opaque coverage; let each coat dry completely before adding the next.
Paint Slipping?
If acrylic paint beads up or slips on the gourd surface, the skin might be too waxy. Lightly sand the area again or prime with a specific bonding primer before repainting.
Step 2: Painting the Cottage Details
-
Sketch the Design:
Using a pencil, lightly draw your design directly onto the dry base coat. Sketch a small house facade below and to the right of the entrance hole, several square windows to the left, and a picket fence wrapping around the bottom. -
Block in the Whites:
Fill in the shape of the little cottage entrance with white paint. Paint the interior of the window squares with a cream or off-white color to distinguish them from the main house structure. -
Create the Wooden Door:
Inside the white cottage shape, paint a rounded arch for the door using a tan or light brown color. Once dry, use a fine liner brush and darker brown paint to add vertical wood grain lines. -
Add Door Details:
Paint a small horizontal rectangle for a mail slot and a tiny dot for the doorknob. Outline the door arch in dark brown to give it definition against the white wall. -
Paint the Roof and Trim:
Use a small angle brush and dark brown paint to create the peaked roof lines above the door. Add cross-hatching or a small geometric motif in the peak for extra charm. -
Define the Windows:
Outline your cream window squares with thick lines of tan or light brown to create window frames. Add a cross in the center of each to act as muntins (window pane dividers).
Step 3: Finishing Touches & Assembly
-
Paint the Fence:
Along the lower curve of the gourd, paint vertical posts and horizontal rails for a picket fence using brown paint. Keep the lines somewhat organic to match the rustic feel. -
Add Greenery and Flowers:
Mix a grass green color and paint uneven ground cover along the very bottom. Paint simple orange tulip shapes popping up from the grass, adding stem lines connecting them to the ground. -
Create the Vines:
Using your thinnest liner brush and brown paint, draw winding vine branches that start from the sides and drape over the top area of the gourd. Let them curve naturally around the main entrance hole. -
Add Leaves and Berries:
Dip a small round brush in leaf green and press it gently against the vine branches to create leaves. Add small terracotta or orange dots scattered among the leaves to represent berries or buds. -
Paint the Butterfly:
If you have empty space on the right side, paint a simple butterfly silhouette in dark brown with small white dot details on the wings. -
Seal the Artwork:
Once all paint is thoroughly dry (I prefer to wait overnight just to be safe), apply two to three, thin coats of outdoor varnish or polyurethane. This protects the art from weather and UV rays. -
Attach the Hanger:
Cut a length of sturdy jute twine. Thread one end through one top hole and knot it securely on the inside. Repeat with the other end in the opposite hole to create a hanger loop.
Pro Tip: Depth
Add a tiny drop of water to your brown paint when lining the wood grain on the door. The slightly translucent paint creates a more realistic, stained-wood effect.
Hang your finished masterpiece from a sturdy branch and wait for your first feathered tenants to move in


Cute Owl Faces That Fit the Gourd’s Curve
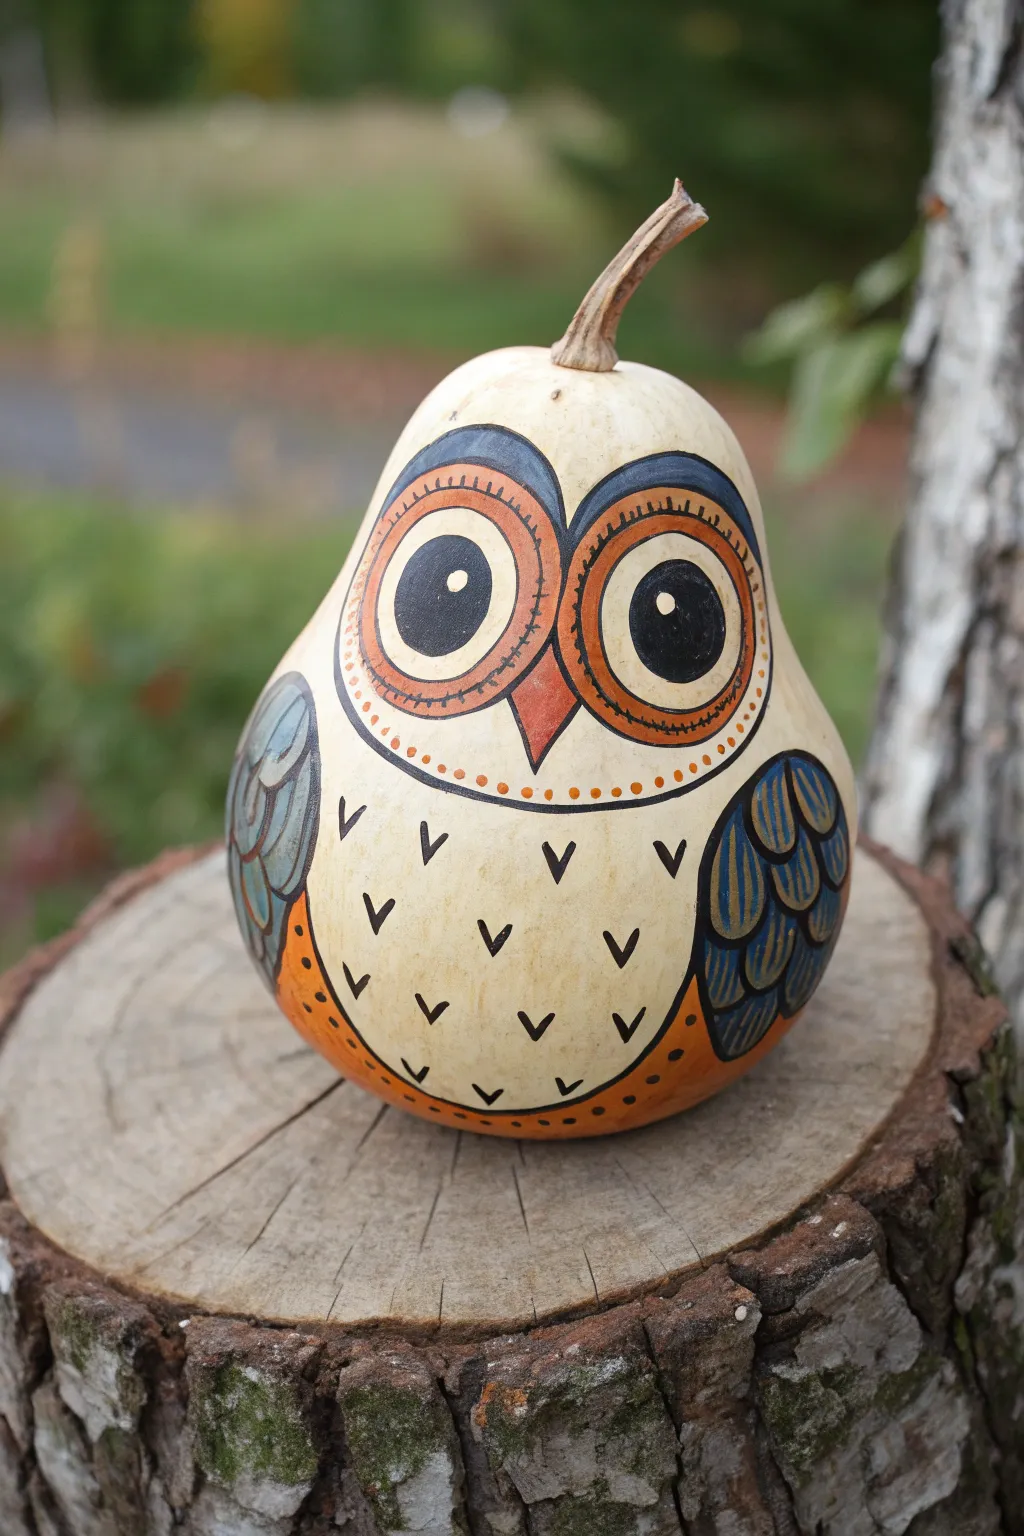
Transform a simple pear-shaped gourd into a charming woodland creature with bold, graphic lines and a warm autumnal palette. This project uses the natural curve of the gourd to accentuate the owl’s large, expressive eyes and round belly.
Step-by-Step Tutorial
Materials
- Dried pear-shaped gourd (cleaned and primed white/cream)
- Acrylic paints (black, white, burnt orange, navy blue, light blue)
- Pencil and eraser
- Fine liner brush (size 0 or 00)
- Flat shader brush (size 4 or 6)
- Round brush (size 2)
- Matte or satin varnish sealant
- Palette for mixing
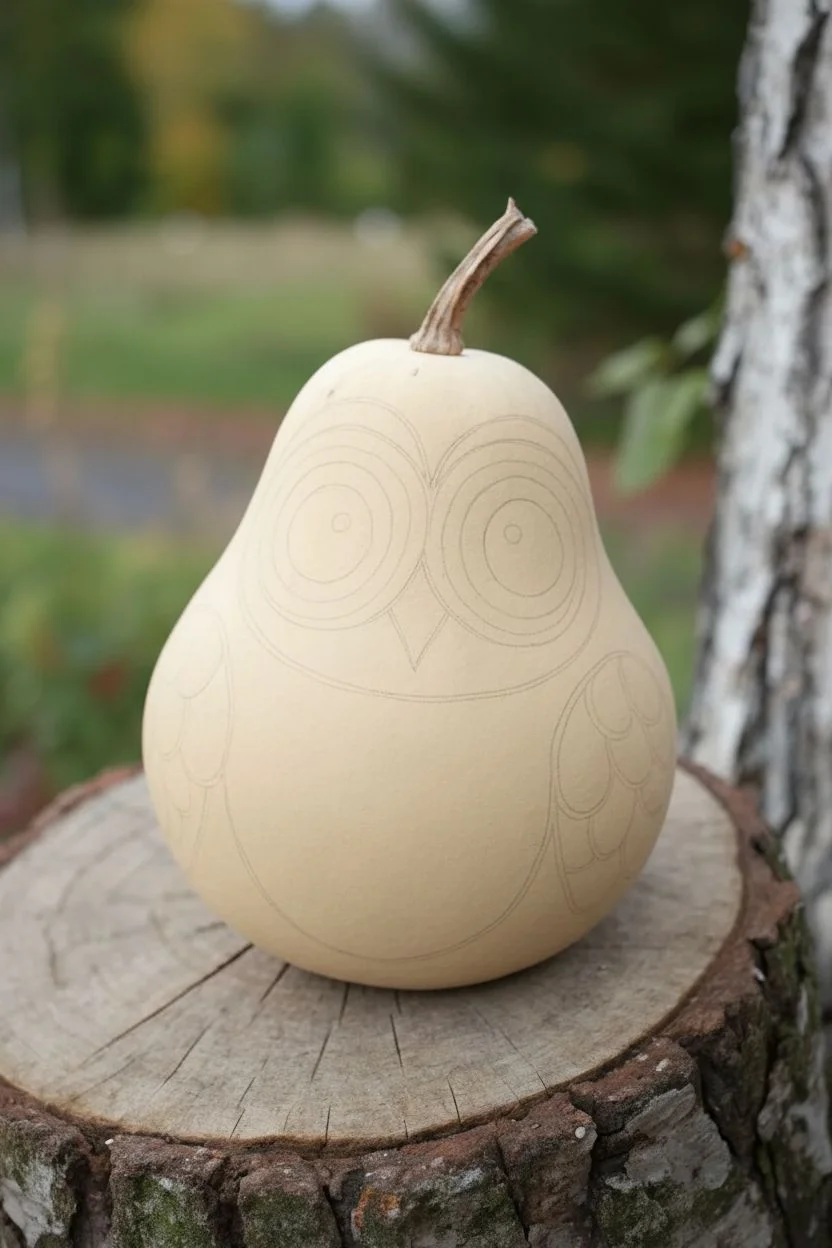
Step 1: Planning and Sketching
-
Prepare the surface:
Ensure your gourd is fully dried, cleaned of any mold, and primed with a coat or two of warm cream or off-white acrylic paint to create a uniform base. -
Map out the eyes:
Using a pencil, draw two large, touching circles on the upper, narrower part of the gourd. These will form the main spectacle shapes for the eyes. -
Sketch the inner details:
Draw concentric circles inside the large eye shapes. You need a large outer ring, a slightly smaller inner ring for the iris, and a central circle for the pupil. Add a small ‘V’ shape between the eyes for the beak. -
Outline the body features:
Lightly sketch curved wing shapes on both sides of the gourd’s ‘hips’. Draw a sweeping curve connecting the bottom of the wings to define the owl’s underbelly.
Steady Hand Pro Tip
Struggling with the long curved lines around the eyes? Rest your pinky finger on the dry surface of the gourd to stabilize your hand while painting the fine details.
Step 2: Blocking in Color
-
Paint the eyes:
Fill the large pupil circles with solid black acrylic. Leave a tiny white dot in the upper right of each pupil for a highlight or add it later if you paint over it. -
Add the eye rings:
Paint the band surrounding the black pupil with a warm burnt orange. Let this dry completely. -
Create the eyebrows:
Above the orange rings, paint the upper eyelids or ‘brows’ with a muted navy blue, curving them to follow the top of the eye circles. -
Paint the beak:
Fill in the triangular beak shape with the same burnt orange used for the eyes. -
Fill the wings:
Paint the wing block on the left with a light blue-grey and the wing block on the right with the navy blue. It’s okay if it looks flat mainly; we will add details later. -
Paint the base:
Fill the area beneath the belly curve and under the wings with burnt orange to ground the figure.
Step 3: Detailing and Line Work
-
Outline the eyes:
Using your finest liner brush and black paint (or a black paint pen for stability), carefully outline the main eye circles and the inner iris rings. -
Add decorative ticks:
Paint small, evenly spaced tick marks around the orange ring of the eyes to simulate texture. -
Outline the face mask:
Draw a unified outline around both eyes and the beak, creating a heart-like facial disc characteristic of owls. Add a dotted line of orange just inside the bottom curve of this shape. -
Texture the belly:
On the cream-colored chest area, paint small, floating ‘V’ shapes in black black to represent chest feathers. Stagger them irregularly for a natural look. -
Define the blue wing:
On the right (navy) wing, use thin black lines to draw overlapping ‘U’ shapes, outlining individual feathers. Add light blue highlights inside these shapes. -
Define the grey wing:
Repeat the feather outlining process on the left (light blue) wing using black paint. -
Detail the orange base:
Add small black dots along the bottom orange section of the gourd to mirror the detailing near the eyes. -
Seal the artwork:
Once all paint is perfectly dry—I usually wait overnight to be safe—apply a coat of matte or satin varnish to protect the paint and give it a finished sheen.
Make It 3D
Glue small pieces of felt or leather over the painted wing areas for a mixed-media texture, or attach real twigs to the side as perch-style ‘arms’.
Place your finished owl on a mantle or sturdy branch to watch over your home


Black Cat Gourds With Bright Eyes
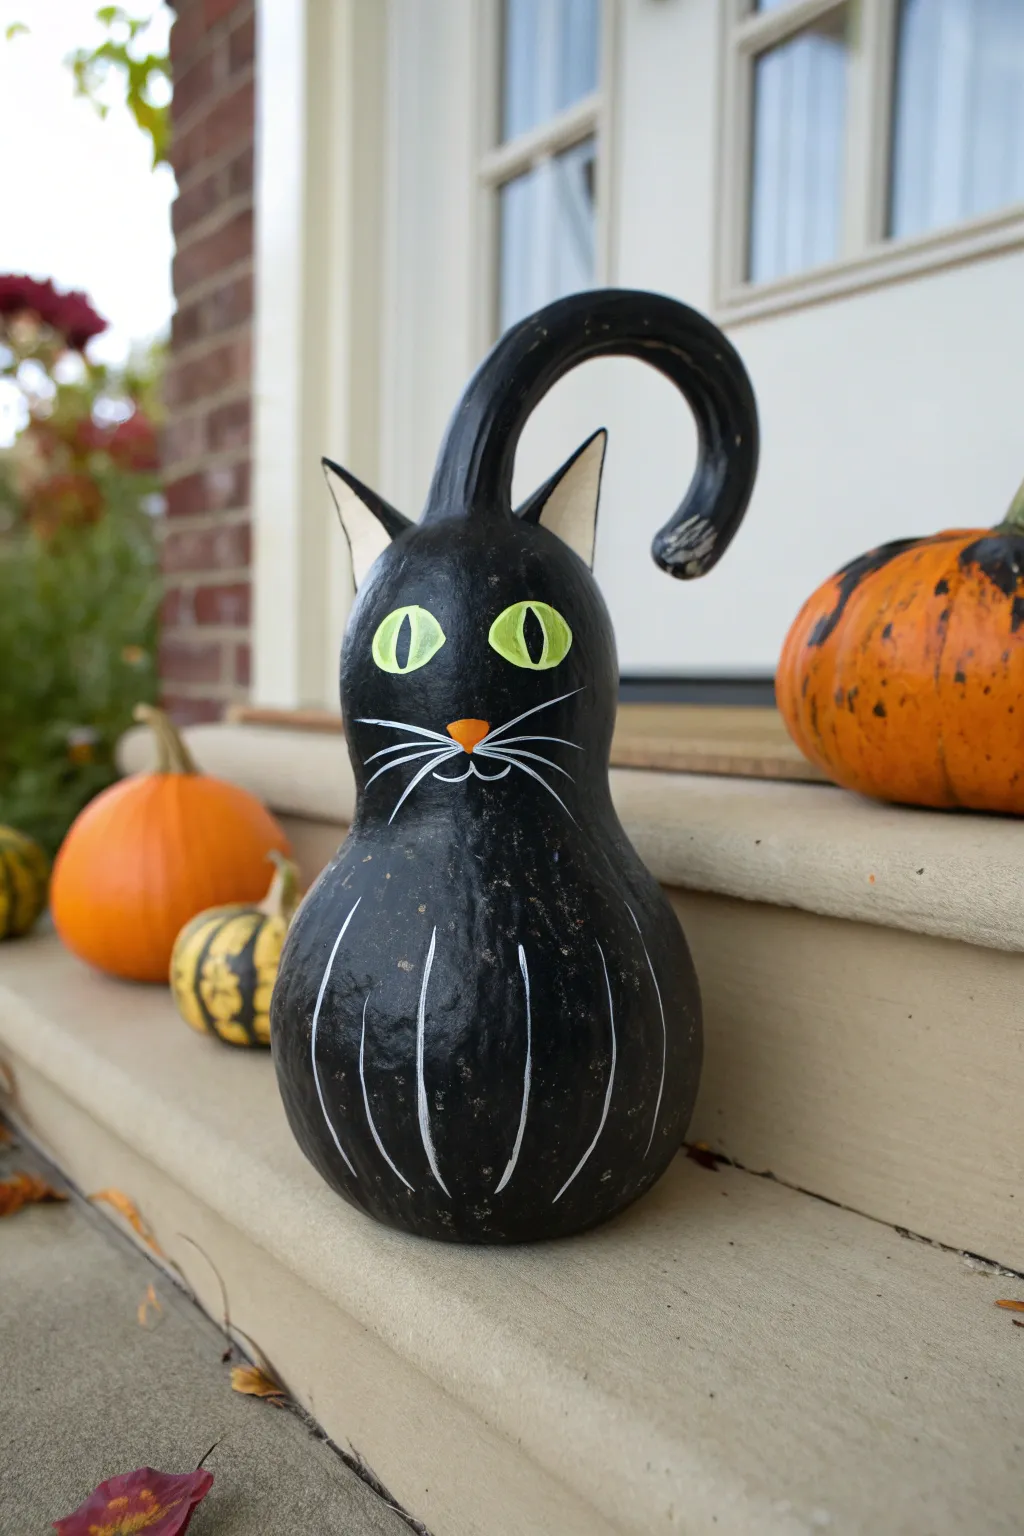
Transform a uniquely shaped gourd into a charming feline friend perfect for greeting trick-or-treaters. This project relies on the natural curve of a gooseneck gourd to create an expressive tail, paired with striking green eyes for a spooky yet sweet look.
Step-by-Step Tutorial
Materials
- Dried gooseneck gourd (also known as swan gourd)
- Black acrylic craft paint (matte or satin)
- White acrylic craft paint
- Lime green acrylic craft paint
- Orange acrylic craft paint
- Flat paintbrush (medium size)
- Small round detail brush
- Fine liner brush
- Pencil
- Clear spray sealant (optional, for outdoor use)
- Damp cloth
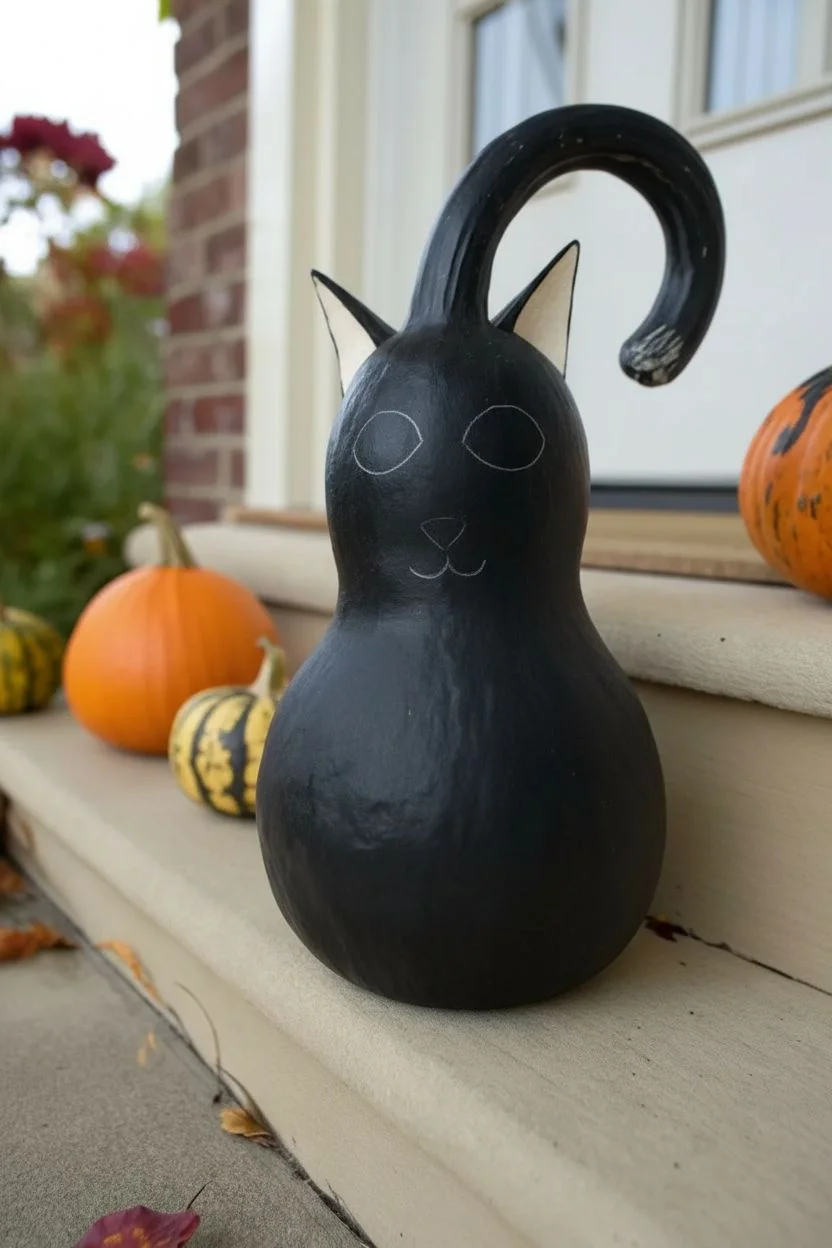
Step 1: Preparation & Base Coat
-
Clean the gourd:
Before painting, ensure your dried gourd is free of dust and dirt by wiping it down with a damp cloth. Let it dry completely so the paint adheres properly. -
Map out the features:
Lightly sketch the outline of the ears, eyes, and nose directly onto the gourd with a pencil. The bulbous bottom will be the body, the middle section is the head, and the long curved neck serves as the tail. -
Apply the black base:
Using your medium flat brush, paint the entire gourd black, carefully painting around the areas you pencil-marked for the ears and eyes. This saves you from having to paint many layers of light colors over black later. -
Cover the stem:
Ensure you paint all the way up the curved neck, which acts as the tail. Leave just the very tip of the stem unpainted or lightly distressed for a rustic touch. -
Let it dry:
Allow the first coat of black paint to dry fully. If the gourd’s natural color shows through, apply a second coat for solid, opaque coverage.
Choosing the Purrfect Gourd
Look for a ‘goose neck’ or ‘swan’ gourd specifically. The more dramatic the curve of the neck, the more animated and expressive the cat’s tail will look.
Step 2: Painting the Face
-
Fill the ears:
Paint the triangular ear shapes you reserved with white acrylic paint. You may need two coats to get a crisp, bright white against the dark background. -
Paint the eyes:
Fill in the eye ovals with a bright lime green paint. The shape should be slightly almond-like to give that classic cat appearance. -
Outline the ears:
Once the white ear paint is dry, use your small round brush and black paint to crisply define the edges, sharpening the triangular points. -
Add pupils:
Using the small detail brush, paint a vertical black slit in the center of each green eye. I find steadying my hand against the gourd helps make these lines straight. -
Create the nose:
Paint a small, inverted triangle in orange right between and slightly below the eyes for the nose.
Step 3: Fine Details & Finish
-
Paint the whiskers:
Load a fine liner brush with thinned white paint. Starting from the nose area, pull three long, sweeping lines outward on each cheek to create whiskers. -
Add the mouth:
With the same liner brush, paint two small curves coming down from the bottom of the orange nose to form the mouth. -
Create body stripes:
To give the cat definition, paint widely spaced, thin vertical white lines on the lower bulb of the gourd. These curved lines suggest the cat’s haunches and posture. -
Highlight the tail:
If desired, dry brush a tiny bit of white or grey near the very tip of the curved tail to highlight the texture of the stem. -
Refine the eyes:
For a spark of life, add a tiny white dot to the upper corner of each pupil as a catchlight. -
Erase mistakes:
If any lines went astray, simply touch them up with your black base paint once the other colors are dry. -
Seal the artwork:
If this kitty will be sitting on a porch, spray the entire finished piece with a clear UV-resistant sealant to protect it from the elements.
Shaky Whiskers?
If painting thin lines is difficult, use a white paint pen or a permanent chalk marker instead for the whiskers and body stripes. It offers much better control.
Place your new feline beside your pumpkins to add a touch of handcrafted magic to your autumn display
BRUSH GUIDE
The Right Brush for Every Stroke
From clean lines to bold texture — master brush choice, stroke control, and essential techniques.
Explore the Full Guide
Witch-Themed Gourds With Hats and Hair Details
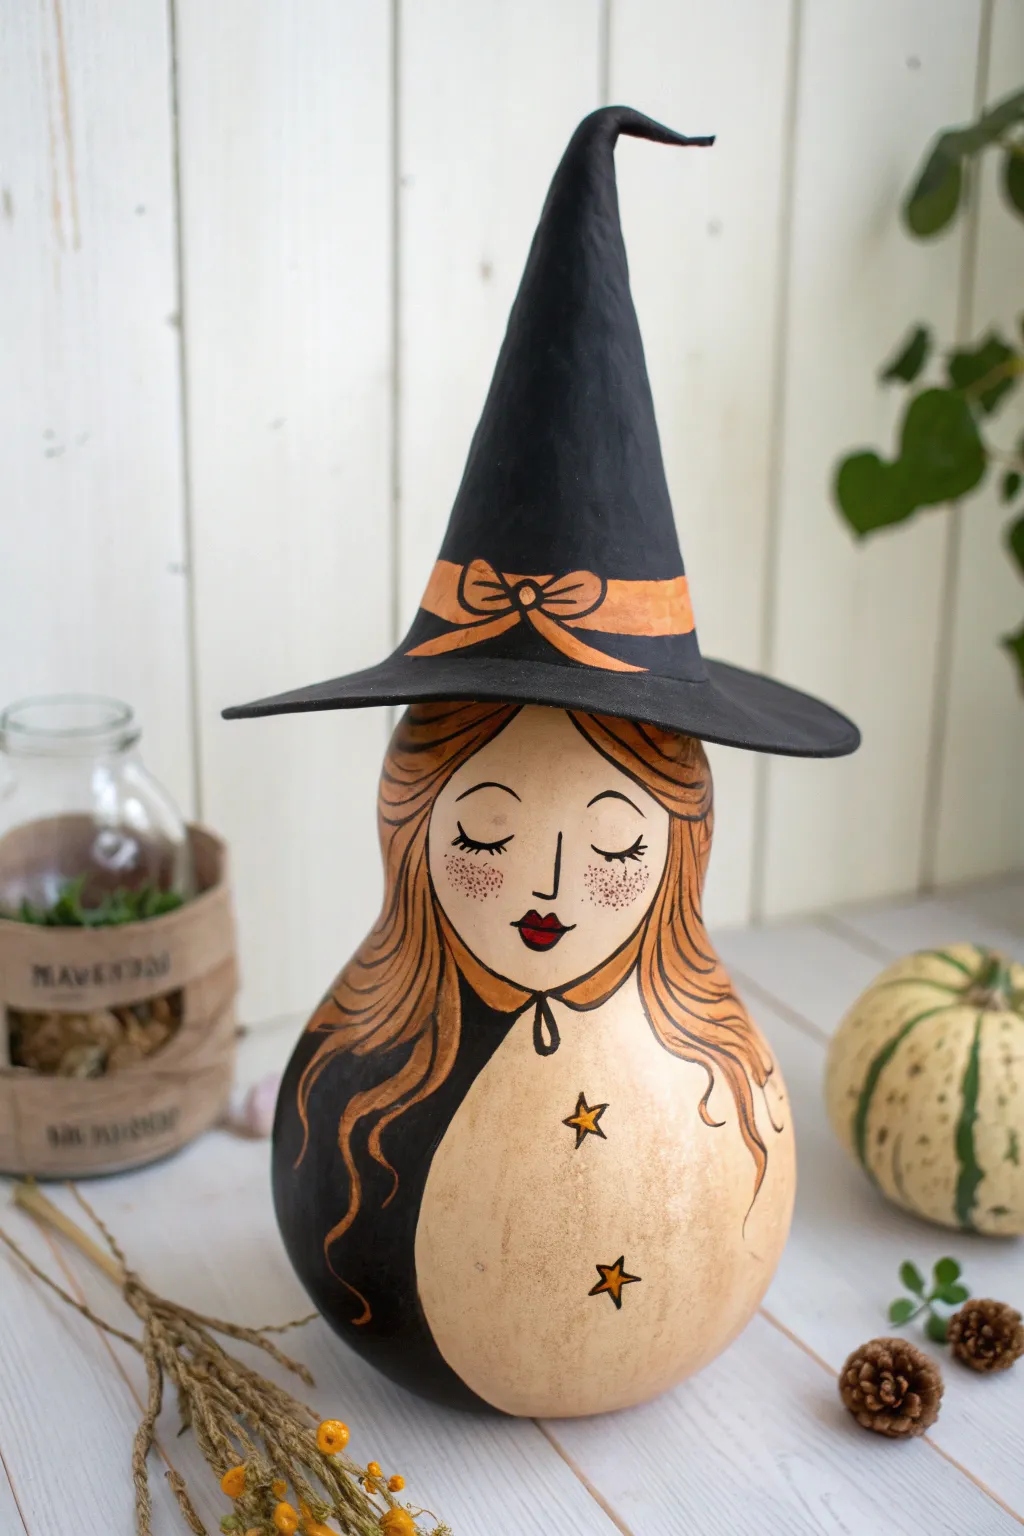
Transform a dried gourd into an enchanting witch character, featuring serene closed eyes, flowing auburn locks, and a dimensional hat topper. This mixed-media project combines painting with papercraft to create a stunning piece of rustic autumn decor.
Detailed Instructions
Materials
- Large dried bottle gourd (cleaned and prepped)
- Acrylic paints: Flesh tone, light copper/orange, black, white, gold, dark red
- Air-dry clay or stiff black paper/felt (for the hat)
- Pencil and eraser
- Fine-point black permanent marker or liner brush
- Various paintbrushes: Flat brush, fine detail brush, liner brush
- Orange ribbon or fabric strip
- Matte sealant spray or varnish
- Paper towels and water cup
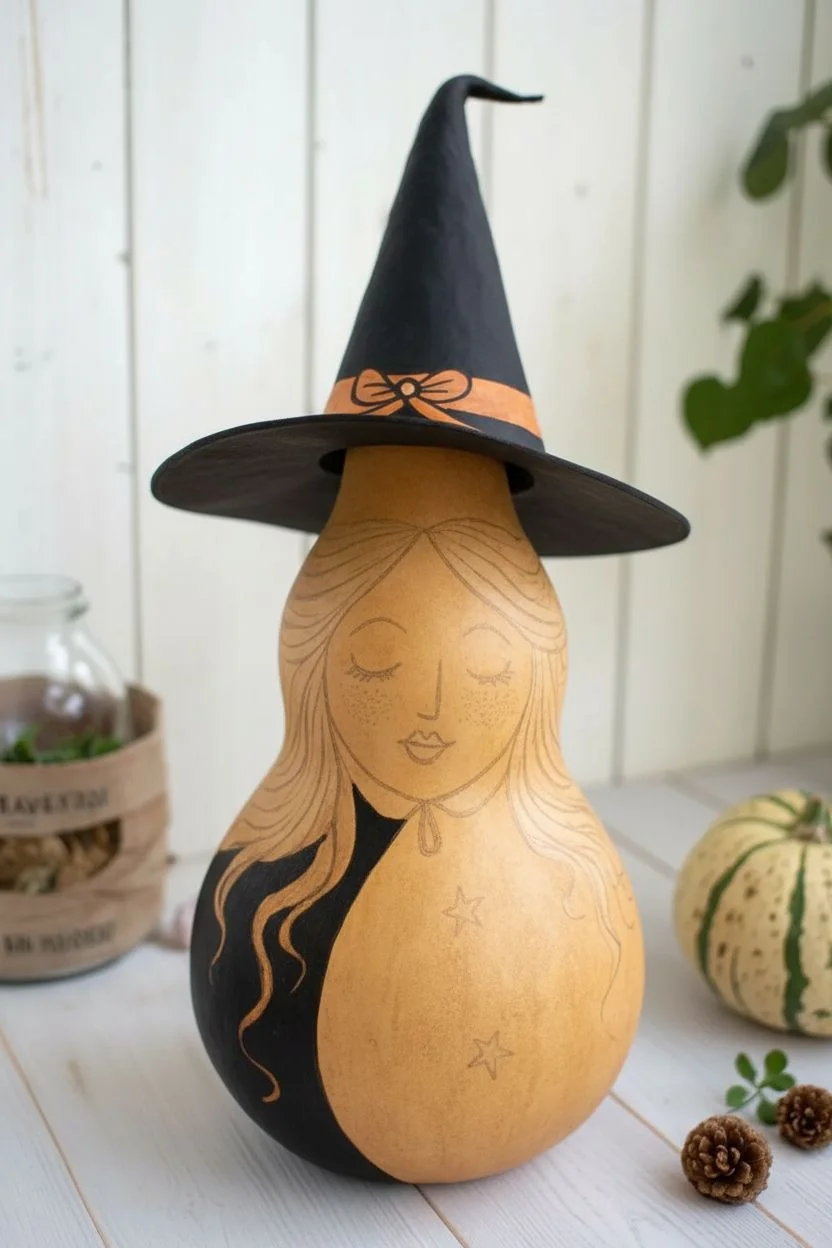
Step 1: Gourd Preparation & Sketching
-
Clean the surface:
Ensure your gourd is thoroughly cleaned and dried. Lightly sand any rough bumps if you prefer a smoother canvas for the face, though some texture adds to the rustic charm. -
Map out the design:
Using a light pencil, sketch the outline of the face in the center of the gourd’s bulbous bottom section. Draw two curved lines for the hair parting and the jawline. -
Sketch the features:
Lightly draw two downward-curving arcs for the closed eyes, small nose lines, and a small heart-shaped mouth. Don’t press too hard to avoid denting the gourd skin.
Smooth Sealing
Before painting, seal the raw gourd with a clear wood sealer. This prevents the porous skin from soaking up your paint, meaning you’ll need fewer coats for full coverage.
Step 2: Painting the Base Layers
-
Apply the skin tone:
Basing the face area with a flesh-toned acrylic paint. You may need two coats to ensure the natural gourd color doesn’t show through too strongly. Let this dry completely. -
Block in the hair:
Paint the hair area surrounding the face with a light copper or orange hue. Extend this color down the sides and slightly towards the back, leaving the very bottom natural if desired. -
Paint the clothing:
Below the chin line, paint the left side of the gourd body black to represent a cloak or dress. Leave the center chest area unpainted (natural gourd color) or paint it a soft cream tone.
3D Texture Trick
Make the hat permanent! Instead of paper, use black polymer clay to sculpt the hat directly onto the stem, then bake the whole gourd at a low temp (200°F) to set it.
Step 3: Adding Facial Details
-
Outline the features:
Using a very fine liner brush and black paint (or a specialized paint marker), carefully trace over your pencil lines for the eyes, lashes, and nose. Keep your hand steady and use light pressure. -
Paint the lips:
Fill in the mouth with a dark red or burgundy color. Add a tiny white highlight dot on the lower lip to give it a gloss effect. -
Add freckles and blush:
Mix a slightly darker, watered-down orange-brown and gently stipple freckles across the cheeks and nose using the tip of a stiff brush. You can smudge a little pink paint for a blush effect underneath. -
Refine the hair:
Mix a darker brown shade and use your liner brush to paint individual flowing strands through the copper hair section. I find that starting from the part and sweeping downward creates the most natural movement. -
Outline the face and hair:
Go over the border between the face, hair, and background with a bold black line to give the artwork a crisp, illustrative style.
Step 4: Clothing & Magical Elements
-
Detail the cloak:
Where the black cloak meets the neck, paint a small collar shape. Add a simple tie string detail in the center. -
Create stars:
On the lighter open area of the chest/stomach, paint small five-pointed stars. Once the base color dries, outline them in steady black lines. -
Add gold accents:
Fill the centers of the stars with metallic gold paint for a touch of magic that catches the light.
Step 5: Creating the Witch Hat
-
Form the cone:
Ideally, use air-dry clay to sculpt a cone shape directly onto the gourd’s neck, extending it into a bent, whimsical point. Alternatively, form a cone from stiff black cardstock or felt. -
Make the brim:
Cut a circle from cardstock or roll a flat disk of clay for the brim. Attach this securely to the bottom of your cone marked for the hat. -
Paint the hat black:
If using clay or non-black material, paint the entire hat structure matte black. Let it dry completely. -
Paint the hat ribbon:
Paint a band of orange around the base of the cone. Add a simple bow outline in black or dark brown over the orange band for definition. -
Final Assembly:
Glue the finished hat securely onto the top of the gourd stem. Seal the entire painted surface with a matte spray varnish to protect your work.
Place your mystical witch gourd on a mantle or tablescape to invoke a cozy creative spirit this season
Fantasy Character Gourds Inspired by the Shape
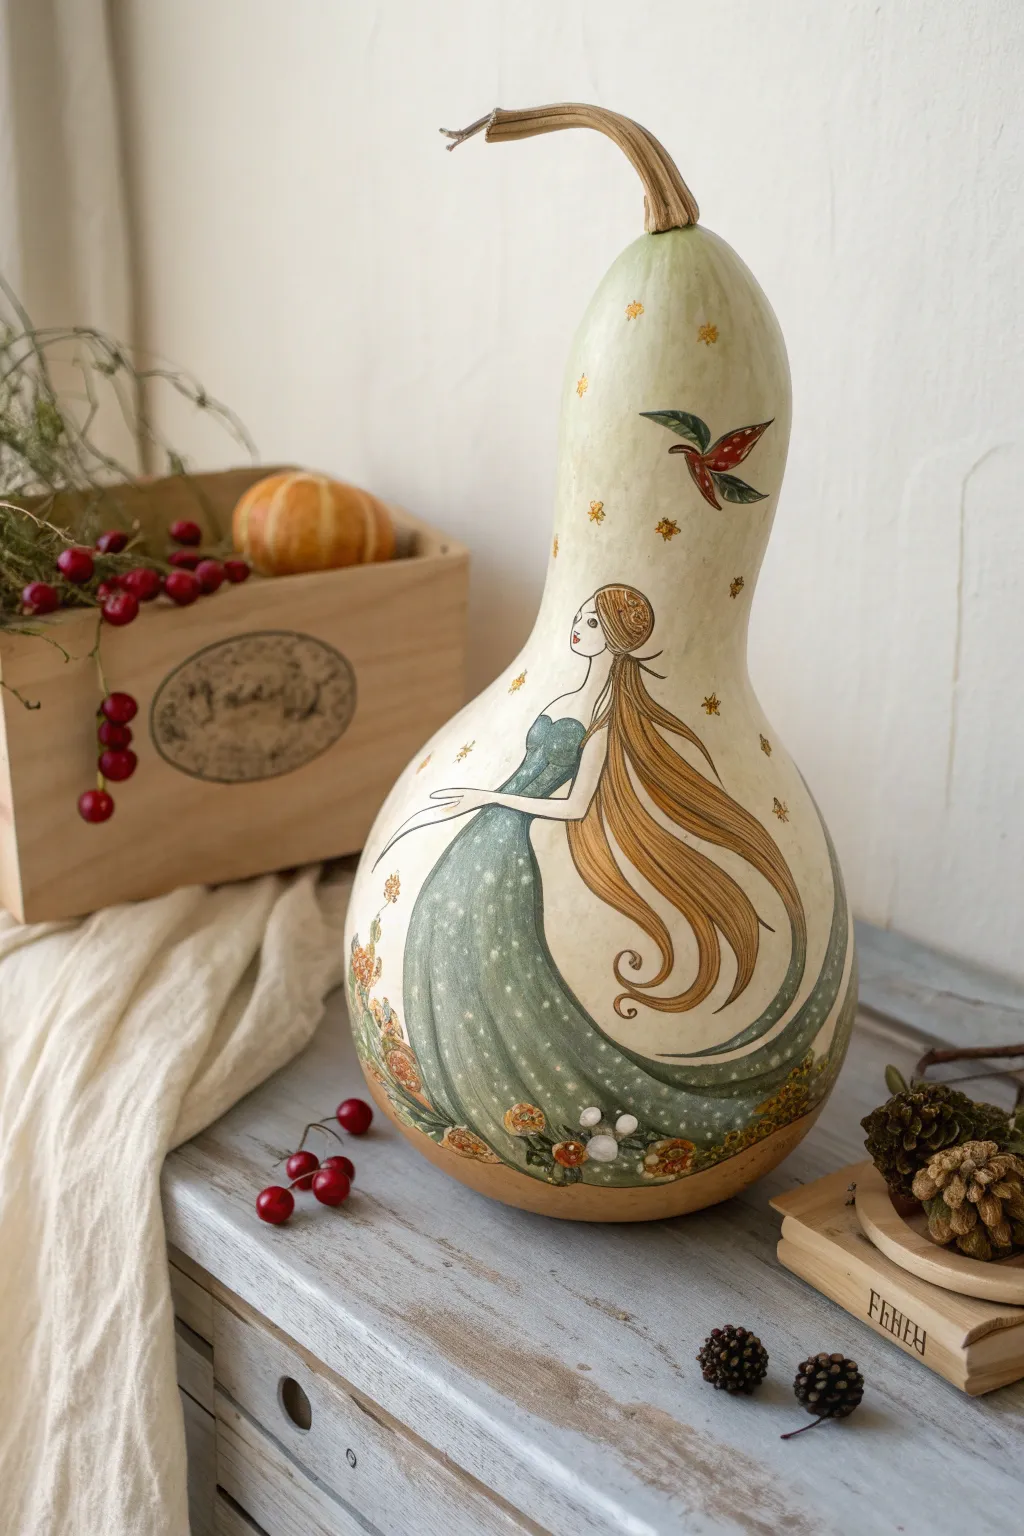
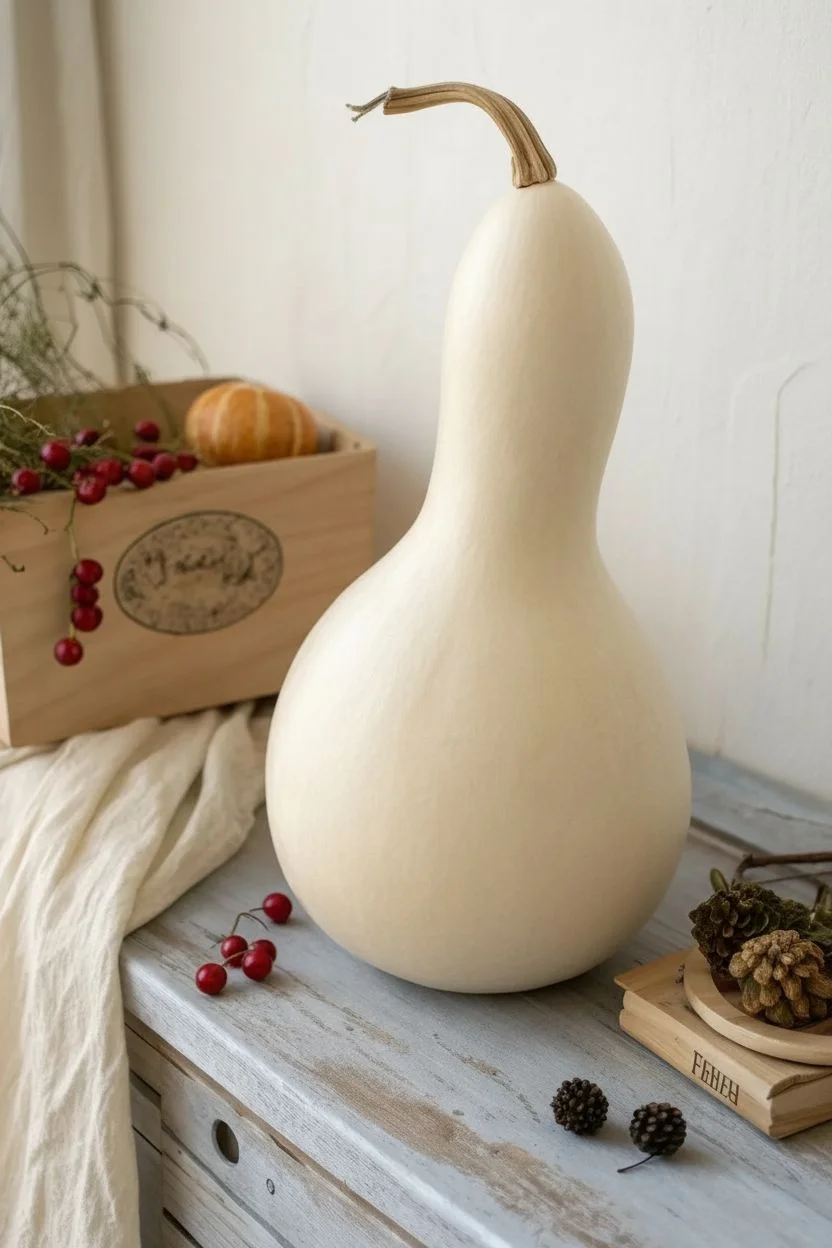
Transform a simple bottle gourd into an enchanting work of art featuring a graceful forest maiden with impossibly long, flowing hair. This intermediate project utilizes the gourd’s natural curves to emphasize the sweep of the character’s gown and tresses.
Step-by-Step Guide
Materials
- Large dried bottle gourd (cleaned and smooth)
- Gesso or white acrylic primer
- Fine grit sandpaper (220-400 grit)
- Pencil and eraser
- Acrylic paints (pale cream, sage green, teal, gold, dark brown, red)
- Fine detail brushes (sizes 0, 00, 1)
- Flat shader brush (size 4 or 6)
- Gold leaf pen or fine gold metallic paint
- Matte or satin varnish
Step 1: Preparation and Base Coat
-
Clean the surface:
Ensure your dried gourd is free of mold and dirt. Lightly sand the entire surface with fine-grit sandpaper to create a smooth, accepting texture for the paint. -
Prime the gourd:
Apply a coat of gesso or white primer. Since the intricate design requires a clean background, a smooth, opaque white base is crucial. Let this dry completely. -
Apply the background color:
Mix a very pale cream or off-white acrylic. Paint the entire gourd with this shade to create a warm, vintage parchment look. You may need two coats for full coverage.
Uneven Surface?
If your gourd has bumps that ruin the face profile, start sanding early. Use wood filler for deep pits, let dry, and sand flush before priming.
Step 2: Sketching the Figure
-
Map out the composition:
Hold the gourd and find the most pleasing ‘front’ face. Using a pencil, lightly sketch the small upper body of the maiden on the neck of the gourd, just where it begins to widen. -
Use the shape:
Draw the dress skirt expanding dramatically downward to cover the bulbous bottom of the gourd. This is where the natural form does the heavy lifting for you. -
Sketch the hair:
Draw the hair flowing from her head, down her back, and swirling around the side of the gourd, intertwining with the dress. The hair lines should be long and fluid.
Add Texture
Instead of just painting the bottom flowers, glue dried pressed flowers or small beads to the hem of the dress for a 3D mixed-media effect.
Step 3: Painting the Maiden
-
Paint the skin:
Using a very fine brush, fill in the face, neck, and arms with a pale skin tone. Keep the features simple—a tiny red lip and a single dark eye looking backward. -
Fill the dress base:
Mix a muted teal-green. Paint the bodice and the sweeping skirt. Don’t worry about the sparkles yet; just get a solid, smooth layer of color down. -
Paint the hair:
Using a golden-brown ochre shade, fill in the hair shape. Use long, continuous strokes with a liner brush to mimic strands rather than blocking it in solidly.
Step 4: Details and Embellishments
-
Outline the figure:
Once dry, use your finest brush (00) and watered-down dark brown or black paint to outline the profile, arms, and hair. Keep the lines incredibly thin and delicate. -
Add hair definition:
Go back into the hair with a slightly darker brown to add individual strands and depth to the flowing mass. -
Create the starry dress:
Dip a toothpick or a stylus tool into white paint. Dot the teal skirt gently to create a starry, ethereal pattern that gets denser near the bottom hem. -
Paint the bottom florals:
Along the very bottom edge where the dress meets the gourd base, stipple in small abstract flowers using orange, yellow, and red to ground the figure. -
Add the bird:
Paint a small, stylized red bird flying just above the maiden’s hair on the upper neck of the gourd.
Step 5: Final Touches
-
Gilding accents:
Use a gold leaf pen or metallic paint to draw small six-pointed stars scattered across the cream background space. Add gold highlights to her hair and the flower centers. -
Preserve the stem:
Leave the natural dried stem unpainted for a rustic touch, or lightly dry-brush it with a bit of gold to tie it into the design. -
Seal the artwork:
Once fully cured (wait at least 24 hours), apply two coats of clear matte or satin varnish to protect the delicate line work from dust and handling.
Place your finished gourd on a mantel or low shelf where the sweeping curves of the art can be admired from all angles


Have a question or want to share your own experience? I'd love to hear from you in the comments below!